
ORNL/SPR-2014/696
The Weatherization Assistant
User’s Manual (Version 8.9)
Michael B. Gettings
Mini Malhotra
Mark P. Ternes
January 2015
Approved for public release.
Distribution is unlimited.

DOCUMENT AVAILABILITY
Reports produced after January 1, 1996, are generally available free via US Department of Energy
(DOE) SciTech Connect.
Website http://www.osti.gov/scitech/
Reports produced before January 1, 1996, may be purchased by members of the public from the
following source:
National Technical Information Service
5285 Port Royal Road
Springfield, VA 22161
Telephone 703-605-6000 (1-800-553-6847)
TDD 703-487-4639
Fax 703-605-6900
E-mail info@ntis.gov
Website http://www.ntis.gov/help/ordermethods.aspx
Reports are available to DOE employees, DOE contractors, Energy Technology
Data Exchange
representatives, and International Nuclear Information System representa
tives from the following
source:
Office of Scientific and Technical Information
PO Box 62
Oak Ridge, TN 37831
Telephone 865-576-8401
Fax 865-576-5728
Website http://www.osti.gov/contact.html
This report was prepared as an account of work sponsored by an
agency of the United States Government. Neither the United States
Government nor
any agency thereof, nor any of their employees,
makes any warranty, express or implied, or assumes any legal liability
or responsibility for the accuracy, completeness, or usefulness of any
information, apparatus, product, or process disclosed, or represen
ts
that its use would not infringe privately owned rights. Reference herein
to any specific commercial product, process, or service by trade name,
trademark, manufacturer, or otherwise, does not necessarily constitute
or imply its endorsement, recommendati
on, or favoring by the United
States Government or any agency thereof. The views and opinions of
authors expressed herein do not necessarily state or reflect those of
the United States Government or any agency thereof.
ORNL/SPR-2014/696
Energy and Transportation Science Division
THE WEATHERIZATION ASSISTANT
USER’S MANUAL (VERSION 8.9)
Michael B. Gettings
Mini Malhotra
Mark P. Ternes
Date Published: January 2015
Prepared by
OAK RIDGE NATIONAL LABORATORY
Oak Ridge, Tennessee 37831-6283
managed by
UT-BATTELLE, LLC
for the
US DEPARTMENT OF ENERGY
under contract DE-AC05-00OR22725

The Weatherization Assistant User’s Manual (Version 8.9) iii
How to Use This User’s Manual
How to Use This User’s Manual
This manual is intended to be a training manual for new users of the
Weatherization Assistant and as a reference manual for experienced users.
New users should read Chapters 1–4 to familiarize themselves with the
Weatherization Assistant and its basic operation. Chapter 1 presents an overview
of all the features and capabilities offered by the Weatherization Assistant.
Chapters 2 and 3 step new users through the process of installing the
Weatherization Assistant and setting up the software for the first time. Chapter 4
presents a quick-start tutorial on how to enter a new client and initiate an energy
audit for this client, which is the primary purpose of the Weatherization Assistant.
Once new users have installed the software and understand the basic steps needed
to run an audit, they will then need to read other chapters of the user’s manual to
learn about the details of performing an audit. Helpful information on how to
navigate through the Weatherization Assistant’s multiple forms and enter
information into its data fields is presented in Chapter 5. The quick-start tutorial in
Chapter 4 will emphasize the need for a new user to make sure accurate
information is entered into the Setup and Supply Libraries before running an actual
audit on a home for the first time; therefore, a new user will need to read Chapters
14 and 15, which discuss these libraries. A new user will also need to read
Chapters 8–11, which discuss the details of how to enter information into the
audits, and Chapter 12, which discusses the output report generated from running
an audit that provides details concerning the recommended weatherization
measures.
Experienced users can use the manual as a reference guide to obtain information on
operational details of features and details of every data input field found in the
Weatherization Assistant. Five Chapters (Chapters 8–12) discuss the details
associated with the audits themselves. Separate chapters are provided for all the
remaining key elements of the Weatherization Assistant: Agency, Clients, Work
Orders, Setup Library, Supply Library, Preferences, and Data Link. A final chapter
(Chapter 18) provides details on several features that have input fields found on
multiple forms within the Weatherization Assistant. Although the input fields
themselves are described as appropriate in the chapters in which they are
encountered, an overall discussion of each feature is presented in Chapter 18.

iv The Weatherization Assistant User’s Manual (Version 8.9)
How to Use This User’s Manual

The Weatherization Assistant User’s Manual (Version 8.9) v
Table of Contents
Table of Contents
How to Use This User’s Manual .................................................................................................... iii
List of Figures ................................................................................................................................ ix
Acronyms ..................................................................................................................................... xix
Chapter 1. Overview of the Weatherization Assistant ................................................................. 1-1
1.1 Overview of NEAT and MHEA ...................................................................................... 1-2
1.2 Software Overview .......................................................................................................... 1-4
1.3 Program Overview ........................................................................................................... 1-5
1.4 Optional Features ............................................................................................................. 1-8
Chapter 2. Installation and Start-up ............................................................................................. 2-1
2.1 Hardware and Software Requirements ............................................................................ 2-1
2.2 Obtaining the Weatherization Assistant Software ........................................................... 2-1
2.3 Installing the Weatherization Assistant ........................................................................... 2-3
2.4 Network Installation......................................................................................................... 2-6
2.5 Obtaining and Installing the GIS Files............................................................................. 2-7
2.6 Obtaining Manuals for the Weatherization Assistant ...................................................... 2-8
2.7 Accessing Web-Based Training for the Weatherization Assistant .................................. 2-9
2.8 Starting the Weatherization Assistant ............................................................................ 2-10
2.9 The User Log On Form .................................................................................................. 2-11
Chapter 3. Setting Up the Weatherization Assistant .................................................................... 3-1
3.1 Initial Start-up of the Weatherization Assistant ............................................................... 3-1
3.2 Program Setup .................................................................................................................. 3-2
3.3 Importing Information from a Previous Version ............................................................. 3-8
Chapter 4. Quick-Start Tutorial ................................................................................................... 4-1
4.1 Creating a New Client ...................................................................................................... 4-1
4.2 Starting a New Audit ....................................................................................................... 4-4
4.3 Running a New Audit ...................................................................................................... 4-8
Chapter 5. Navigation and Data Entry ......................................................................................... 5-1
5.1 Form and Record Navigation ........................................................................................... 5-1
5.2 Entering Data into the Weatherization Assistant ............................................................. 5-3
5.3 Navigating Between Controls .......................................................................................... 5-5
5.4 The Escape Key ............................................................................................................... 5-6
5.5 Required Versus Optional Textboxes and Drop-down Lists ........................................... 5-7
5.6 Field Defaults ................................................................................................................... 5-7
5.7 Field Range Checking ...................................................................................................... 5-8
5.8 Data Sheet and Form Views of Records .......................................................................... 5-9

vi The Weatherization Assistant User’s Manual (Version 8.9)
Table of Contents
5.9 Copying and Pasting Data .............................................................................................. 5-12
5.10 Deleting Data ............................................................................................................... 5-14
5.11 Entry Errors .................................................................................................................. 5-15
5.12 The Report Block ......................................................................................................... 5-16
5.13 Getting Help ................................................................................................................. 5-18
5.14 The References Button ................................................................................................. 5-19
Chapter 6. Agency ....................................................................................................................... 6-1
6.1 Agency Information ......................................................................................................... 6-1
6.2 Contacts (Agency) ........................................................................................................... 6-4
6.3 Cost Centers ..................................................................................................................... 6-8
6.4 Surveys (Agency)........................................................................................................... 6-13
6.5 Clients ............................................................................................................................ 6-15
6.6 Audits (Agency) ............................................................................................................. 6-17
6.7 Work Orders (Agency) .................................................................................................. 6-19
6.8 Libraries ......................................................................................................................... 6-21
6.9 Status History ................................................................................................................. 6-22
Chapter 7. Clients......................................................................................................................... 7-1
7.1 Client Information ............................................................................................................ 7-2
7.2 Status (Clients) ................................................................................................................. 7-9
7.3 Energy Index .................................................................................................................. 7-11
7.4 Contacts (Client) ............................................................................................................ 7-14
7.5 Audits (Client) ............................................................................................................... 7-17
7.6 Work Orders (Client) ..................................................................................................... 7-20
7.7 Surveys (Client) ............................................................................................................. 7-24
7.8 Photos (Client) ............................................................................................................... 7-27
Chapter 8. NEAT and MHEA Introduction ................................................................................. 8-1
8.1 Starting a New Audit and Accessing Previous Audits..................................................... 8-1
8.2 Audit Information ............................................................................................................ 8-2
Chapter 9. NEAT Building Description....................................................................................... 9-1
9.1 Shell – Walls .................................................................................................................... 9-2
9.2 Shell − Windows .............................................................................................................. 9-7
9.3 Shell − Doors ................................................................................................................. 9-14
9.4 Shell − Unfinished Attics ............................................................................................... 9-19
9.5 Shell − Finished Attics ................................................................................................... 9-24
9.6 Shell – Foundations........................................................................................................ 9-26
9.7 Heating − General Description Data .............................................................................. 9-34
9.8 Required Heating System Details Sub-Form ................................................................. 9-39
9.9 Cooling ........................................................................................................................... 9-54

The Weatherization Assistant User’s Manual (Version 8.9) vii
Table of Contents
Chapter 10. MHEA Building Description ................................................................................. 10-1
10.1 Shell − Walls ................................................................................................................ 10-2
10.2 Shell − Windows .......................................................................................................... 10-5
10.3 Shell − Doors ............................................................................................................. 10-13
10.4 Shell − Ceiling ........................................................................................................... 10-16
10.5 Shell − Floor .............................................................................................................. 10-20
10.6 Addition ..................................................................................................................... 10-26
10.7 Heating – Primary, Secondary, and Replacement ..................................................... 10-37
10.8 Cooling – Primary, Secondary, and Replacement ..................................................... 10-43
Chapter 11. NEAT and MHEA Common Elements .................................................................. 11-1
11.1 Status (Audit) ............................................................................................................... 11-1
11.2 Ducts/Infiltration – Air and Duct Leakages ................................................................. 11-3
11.3 Duct/Infiltration – Optional Forms ............................................................................ 11-18
11.4 Base Loads – Water Heating...................................................................................... 11-24
11.5 Base Loads – Refrigerators ........................................................................................ 11-29
11.6 Base Loads – Lighting Systems ................................................................................. 11-35
11.7 Health and Safety ....................................................................................................... 11-38
11.8 Itemized Costs ............................................................................................................ 11-41
11.9 Utility Bills................................................................................................................. 11-49
11.10 Photos (Audit) .......................................................................................................... 11-53
11.11 Measures (Audit) ..................................................................................................... 11-54
11.12 Optional Heating System Details ............................................................................. 11-59
11.13 Optional Water Heater Details ................................................................................. 11-63
Chapter 12. NEAT and MHEA Results ..................................................................................... 12-1
12.1 Running an Audit and Viewing the Results ................................................................. 12-1
12.2 Recommended Measures Report ................................................................................. 12-2
Chapter 13. Work Orders ........................................................................................................... 13-1
13.1 Work Order Information .............................................................................................. 13-2
13.2 Status (Work Order) ..................................................................................................... 13-7
13.3 Measures (Work Order) ............................................................................................... 13-9
13.4 Photos (Work Order).................................................................................................. 13-24
Chapter 14. Setup Library .......................................................................................................... 14-1
14.1 Setup Library Information ........................................................................................... 14-2
14.2 Key Parameters ............................................................................................................ 14-5
14.3 Fuel Costs................................................................................................................... 14-21
14.4 Fuel Price Indices ....................................................................................................... 14-24
14.5 Library Measures ....................................................................................................... 14-26
14.6 User Defined Measures .............................................................................................. 14-31
14.7 NEAT Insulation Types ............................................................................................. 14-42

viii The Weatherization Assistant User’s Manual (Version 8.9)
Table of Contents
Chapter 15. Supply Library........................................................................................................ 15-1
15.1 General Information Form ........................................................................................... 15-2
15.2 Materials/Labor Forms................................................................................................. 15-5
15.3 Energy Details Sub-Form .......................................................................................... 15-10
Chapter 16. Preferences ............................................................................................................. 16-1
16.1 General ......................................................................................................................... 16-1
16.2 Range Check and Default Values ................................................................................ 16-4
16.3 Report Sections ............................................................................................................ 16-5
16.4 Features ........................................................................................................................ 16-7
Chapter 17. Data Link ................................................................................................................ 17-1
17.1 Currently Linked Backend Data File ........................................................................... 17-3
17.2 Currently Linked Reporting File .................................................................................. 17-6
17.3 Data Transfer – Import/Export With Another MSAccess Database ............................ 17-7
17.4 Data Transfer – Import/Export Indirectly with Text Files ......................................... 17-15
17.5 Selecting Client Records ............................................................................................ 17-24
Chapter 18. Auxiliary Features .................................................................................................. 18-1
18.1 Digital Photos............................................................................................................... 18-1
18.2 Geographic Information System (GIS) ........................................................................ 18-6
18.3 Status Tracking .......................................................................................................... 18-10
18.4 E-Mailing from Within Weatherization Assistant ..................................................... 18-15
Appendix A. NEAT Weatherization Measures ...................................................................... A-1
Appendix B. MHEA Weatherization Measures ..................................................................... B-1
Appendix C. Reports .............................................................................................................. C-1
Appendix D. Development of Customized Reports ............................................................... D-1
Appendix E. Window Leakiness ............................................................................................. E-1

The Weatherization Assistant User’s Manual (Version 8.9) ix
List of Figures
List of Figures
Figure Page
1.1. Design of the Weatherization Assistant. .......................................................................... 1-1
1.2. The Weatherization Assistant’s Main Menu.................................................................... 1-6
2.1. Welcome screen. .............................................................................................................. 2-4
2.2. Disclaimer Statement screen. ........................................................................................... 2-4
2.3. Destination Folder screen for a “New Installation.” ........................................................ 2-5
2.4. Destination Folder screen for an “Update.” ..................................................................... 2-5
2.5. Start Installation screen. ................................................................................................... 2-6
2.6. Finish screen. ................................................................................................................... 2-6
2.7. The Weatherization Assistant’s icon for Version 8.9. ..................................................... 2-6
2.8. The Installation ID form. ............................................................................................... 2-10
2.9. The Weatherization Assistant’s Main Menu.................................................................. 2-12
2.10. The Weatherization Assistant Log On form. ................................................................. 2-12
3.1. The Weatherization Assistant’s Main Menu.................................................................... 3-2
3.2. The Agency Information form under the Main Menu’s “Agency” button. ..................... 3-3
3.3. The Contacts form under the Main Menu’s “Agency” button. ........................................ 3-4
3.4. The General Information form under the Main Menu’s “Supply Library” button. ......... 3-5
3.5. The Setup Library Information form under the Main Menu’s “Setup Library”
button. .............................................................................................................................. 3-6
3.6. The Data Link form (Version 8.6). .................................................................................. 3-8
3.7. The Data Link form (Version 8.9). .................................................................................. 3-9
3.8. A blank Transfer CLIENTS Between Databases form. ................................................. 3-10
3.9. An example of the Transfer CLIENTS Between Databases form with client
entries. ............................................................................................................................ 3-10
3.10. The Pick External Database for Import/Export form. .................................................... 3-11
3.11. The Client Information form under the Main Menu’s “Clients” button. ....................... 3-13
4.1. The Weatherization Assistant’s Main Menu.................................................................... 4-1
4.2. The Client Information form under the Main Menu’s “Clients” button. ......................... 4-2
4.3. The Contacts form under the Main Menu’s “Clients” button. ......................................... 4-3
4.4. The Audits form under the Main Menu’s “Clients” button. ............................................ 4-5

x The Weatherization Assistant User’s Manual (Version 8.9)
List of Figures
4.5. The Audit Information form under the Main Menu’s “NEAT” button. .......................... 4-5
4.6. The Audit Information form under the Main Menu’s “MHEA” button. ......................... 4-6
5.1. The Audit record navigation block found on the Audit Information form under the
Main Menu’s “NEAT Audit” and “MHEA Audit” buttons............................................. 5-1
5.2. The Clients form under the Main Menu’s “Agency” button. .......................................... 5-3
5.3. Two textboxes, one requiring a numeric entry. ............................................................... 5-3
5.4. A drop-down list with its item list visible. ....................................................................... 5-4
5.5. Two checkboxes, the top one being selected and with a “Yes” response. ....................... 5-5
5.6. Two textboxes, the first is a required field and the second is not. ................................... 5-7
5.7. A status bar showing the reasonable range and default value for the Number of
Conditioned Stories field. ................................................................................................ 5-8
5.8. Error indicating that a numeric entry is outside the acceptable range. ............................ 5-8
5.9. Warning indicating that a numeric entry is outside the reasonable range. ...................... 5-9
5.10. The Report block from the Client Information form. .................................................... 5-16
5.11. The Access report toolbar. ............................................................................................. 5-16
5.12. The “References to Setup Library:” window. ................................................................ 5-20
6.1. The Agency Information form under the Main Menu’s “Agency” button. ..................... 6-2
6.2. The Contacts form under the Main Menu’s “Agency” button. ........................................ 6-5
6.3. The User Group and Password sub-form. ........................................................................ 6-8
6.4. Cost Centers form under the Main Menu’s “Agency” button. ........................................ 6-9
6.5. The Show Fund Transactions (or Cost Center Funds) sub-form. .................................. 6-11
6.6. The Work Order Costs table under the Agency/Cost Centers tab. ................................ 6-12
6.7. The Surveys form under the Main Menu’s “Agency” button. ....................................... 6-13
6.8. The Clients form under the Main Menu’s “Agency” button. ........................................ 6-15
6.9. The Audits form under the Main Menu’s “Agency” button. ......................................... 6-17
6.10. The Work Orders form under the Main Menu’s “Agency” button. ............................... 6-19
6.11. The Libraries form under the Main Menu’s “Agency” button. ..................................... 6-21
6.12. The Status History form under the Main Menu’s “Agency” button. ............................. 6-23
7.1. The Client Information form under the Main Menu’s “Clients” button. ......................... 7-2
7.2. The Status form under the Main Menu’s “Clients” button. ........................................... 7-10
7.3. The Energy Index form under the Main Menu’s “Clients” button. ............................... 7-12

The Weatherization Assistant User’s Manual (Version 8.9) xi
List of Figures
7.4. The Contacts form under the Main Menu’s “Clients” button. ....................................... 7-15
7.5. The Audits form under the Main Menu’s “Clients” button. ............................................... 7-18
7.6. The Work Orders form under the Main Menu’s “Clients” button. ................................ 7-21
7.7. The Surveys form under the Main Menu’s “Clients” button. ........................................ 7-24
7.8. The Photos form under the Main Menu’s “Clients” button. .......................................... 7-27
8.1. The Audit Information form under the Main Menu’s “NEAT” button. .......................... 8-3
8.2. The Audit Information form under the Main Menu’s “MHEA” button. ......................... 8-3
8.3. Dimensions associated with a manufactured home. ........................................................ 8-8
9.1. The Walls form under the Main Menu’s “NEAT” button. .............................................. 9-2
9.2. The Windows form under the Main Menu’s “NEAT” button. ........................................ 9-7
9.3. Basic types of windows. .................................................................................................. 9-9
9.4. The Doors form under the Main Menu’s “NEAT” button. ............................................ 9-15
9.5. The Unfinished Attics form under the Main Menu’s “NEAT” button. ......................... 9-19
9.6. The Finished Attics form under the Main Menu’s “NEAT” button. ............................. 9-25
9.7. Components of a finished attic. ..................................................................................... 9-25
9.8. The Foundations form under the Main Menu’s “NEAT” button. .................................. 9-27
9.9. The Heating form under the Main Menu’s “NEAT” button. ......................................... 9-34
9.10. The Uninsulated Supply Ducts for Heating System sub-form. ...................................... 9-38
9.11. The Gas Furnace Details sub-form under the Main Menu’s “NEAT” button. .............. 9-40
9.12. The Oil/Kerosene Furnace/Boiler Details sub-form under the Main Menu’s
“NEAT” button. ............................................................................................................. 9-47
9.13. The Electric Resistance Heating System Details sub-form under the Main Menu’s
“NEAT” button. ............................................................................................................. 9-48
9.14. The Heat Pump Details sub-form under the Main Menu’s “NEAT” button. ................ 9-51
9.15. The Space Heater Details sub-form under the Main Menu’s “NEAT” button. ............. 9-53
9.16. The Cooling form under the Main Menu’s “NEAT” button.......................................... 9-55
10.1. The Shell − Walls form under the Main Menu’s “MHEA” button................................ 10-2
10.2. Carport/Porch Roof Dimensions .................................................................................... 10-4
10.3. The Shell − Windows form under the Main Menu’s “MHEA” button.......................... 10-6
10.4. Basic types of windows. ................................................................................................ 10-8
10.5. The Shell − Doors form under the Main Menu’s “NEAT” button. ............................. 10-13

xii The Weatherization Assistant User’s Manual (Version 8.9)
List of Figures
10.6. The Shell − Ceiling form under the Main Menu’s “NEAT” button. ........................... 10-16
10.7. Typical Manufactured Home Roof Configuration. ...................................................... 10-17
10.8. Mobile Home Cathedral Ceiling with Step Wall. ........................................................ 10-19
10.9. The Shell − Floor form under the Main Menu’s “NEAT” button. .............................. 10-20
10.10. Section of a Typical Mobile Home Floor. ................................................................... 10-21
10.11. Lengthwise and Widthwise Floor Joists. ..................................................................... 10-22
10.12. Batt/Blanket Insulation Location. ................................................................................ 10-23
10.13. Typical Mobile Home Belly Configurations. .............................................................. 10-24
10.14. Addition of a Mobile Home. ........................................................................................ 10-26
10.15. The Addition − Walls form under the Main Menu’s “MHEA” button........................ 10-27
10.16. The Addition − Windows form under the Main Menu’s “MHEA” button.................. 10-30
10.17. The Addition − Doors form under the Main Menu’s “MHEA” button. ...................... 10-31
10.18. The Addition − Ceiling form under the Main Menu’s “MHEA” button. .................... 10-32
10.19. The Addition – Floor form under the Main Menu’s “MHEA” button. ....................... 10-34
10.20. Dimensions of Mobile Home Addition........................................................................ 10-35
10.21. Batt/Blanket Insulation Location. ................................................................................ 10-35
10.22. The Primary Heating System form under the Main Menu’s “MHEA” button. ........... 10-37
10.23. The Secondary Heating System form under the Main Menu’s “MHEA” button. ....... 10-38
10.24. The Replacement Heating System form under the Main Menu’s “MHEA” button. ... 10-38
10.25. The Primary Cooling System form under the Main Menu’s “MHEA” button. ........... 10-44
10.26. The Secondary Cooling System form under the Main Menu’s “MHEA” button. ....... 10-44
10.27. The Replacement Cooling System form under the Main Menu’s “MHEA” button. ... 10-45
11.1. The Status form under the Main Menu’s “NEAT” button. ............................................ 11-2
11.2. The Air and Duct Leakages form under the Main Menu’s “NEAT” button. ................ 11-4
11.3. The Whole House Blower Door Measurements for Air Leakage sub-form. ................. 11-6
11.4. The Whole House Blower Door Measurements for Duct Leakage sub-form. .............. 11-9
11.5. The Blower Door Subtraction Measurements for Duct Leakage sub-form. ................ 11-11
11.6. The Duct Blower (Photo courtesy of The Energy Conservatory). ............................... 11-13
11.7. The Duct Blower Measurements for Duct Leakage sub-form. .................................... 11-14
11.8. The Pressure Pan Measurements for Duct Leakage sub-form (MHEA only). ............ 11-17

The Weatherization Assistant User’s Manual (Version 8.9) xiii
List of Figures
11.9. The Optional Blower Door and Zonal Pressures form under the Main Menu’s
“NEAT” button. ........................................................................................................... 11-19
11.10. The Zonal Pressures sub-form. .................................................................................... 11-20
11.11. The Pressure Pans sub-form......................................................................................... 11-21
11.12. The Optional Pressure Balance form under the Main Menu’s “NEAT” button. ......... 11-22
11.13. The Optional Pressure Pans form. ............................................................................... 11-23
11.14. The Water Heating form under the Main Menu’s “NEAT” button. ............................ 11-24
11.15. The Refrigerator form under the Main Menu’s “NEAT” button. ................................ 11-29
11.16. The Lighting Systems form under the Main Menu’s “NEAT” button. ....................... 11-36
11.17. The Health & Safety - Whole House form under the Main Menu’s “NEAT”
button. .......................................................................................................................... 11-38
11.18. The Health & Safety - Equipment form under the Main Menu’s “NEAT” button...... 11-39
11.19. The Worst Case Draft Test for Heating System(s) sub-form. ..................................... 11-40
11.20. The Health & Safety – Building Shell form under the Main Menu’s “NEAT”
button. .......................................................................................................................... 11-40
11.21. Two checkboxes, one indicating a hazard. .................................................................. 11-41
11.22. The Itemized Costs form under the Main Menu’s “NEAT” button............................. 11-43
11.23. The Itemized Costs form under the Main Menu’s “NEAT” button............................. 11-43
11.24. The Itemized Costs form under the Main Menu’s “NEAT” button............................. 11-48
11.25. Data sheet view of the Itemized Costs form. ............................................................... 11-48
11.26. The Utility Bills form under the Main Menu’s “NEAT” button. ................................ 11-50
11.27. The Photos form under the Main Menu’s “NEAT” button.......................................... 11-54
11.28. The Measures form under the Main Menu’s “NEAT” button. .................................... 11-55
11.29. The Create Work Order sub-form ................................................................................ 11-58
11.30. The Create Work Order window .................................................................................. 11-58
11.31. The Optional Heating System Details buttons on the Heating form of the Main
Menu’s “NEAT” button (above) and Heating [Primary] form of the Main Menu’s
“MHEA” button (below).............................................................................................. 11-59
11.32. The Operational Tests for Heating System sub-form. ................................................. 11-61
11.33. The Vent Tests for Heating System sub-form. ............................................................ 11-61
11.34. The Other Components for Heating System sub-form. ............................................... 11-62
11.35. The Other Boiler Components for Heating System sub-form (NEAT only). .............. 11-62

xiv The Weatherization Assistant User’s Manual (Version 8.9)
List of Figures
11.36. The Inspections for Heating System sub-form. ........................................................... 11-62
11.37. The Thermostat Details for Heating System sub-form. ............................................... 11-62
11.38. The Optional Water Heater Details buttons. ................................................................ 11-63
11.39. The Operational Tests for Water Heater sub-form. ..................................................... 11-64
11.40. The Vent Tests for Water Heater sub-form. ................................................................ 11-64
11.41. The Inspections for Water Heater sub-form. ............................................................... 11-64
12.1. The Introductory section of the Recommended Measures report. ................................. 12-2
12.2. The Annual Energy and Cost Savings section of the Recommended Measures
report. ............................................................................................................................. 12-3
12.3. The Energy Saving Measure Economics section of the Recommended Measures
report. ............................................................................................................................. 12-5
13.1. The Work Order Information form under the Main Menu’s “Work Orders” button..... 13-2
13.2. The Status form under the Work Order main Menu Item. ............................................. 13-7
13.3. The Measures form under the Main Menu’s “Work Orders” button (form view)......... 13-9
13.4. Message when copying a measure from Library Measures to a work order. .............. 13-12
13.5. The “Materials Detail” sub-form displayed by selecting the “Show Audit Material
Detail” button on the Work Order Measures form. ..................................................... 13-14
13.6. The Energy Savings for Measure: <Measure Name> sub-form. ................................. 13-16
13.7. The Materials/Labor Details sub-form (form view). ................................................... 13-18
13.8. The Materials/Labor Details sub-form (data sheet view). ........................................... 13-18
13.9. The Measures form under the Main Menu’s “Work Orders” button (data sheet
view). ........................................................................................................................... 13-23
13.10. The Photos form under the Main Menu’s “Work Orders” button. .............................. 13-24
14.1. The Setup Library Information form under the Main Menu’s “Setup Library”
button. ............................................................................................................................ 14-2
14.2. The NEAT Key Parameters – Economics form under the Main Menu’s “Setup
Library” button............................................................................................................... 14-6
14.3. The NEAT Key Parameters – Set Points form under the Main Menu’s “Setup
Library” button............................................................................................................... 14-7
14.4. The NEAT Key Parameters – Insulation form under the Main Menu’s “Setup
Library” button............................................................................................................... 14-8
14.5. The NEAT Key Parameters – Equipment form under the Main Menu’s “Setup
Library” button............................................................................................................... 14-9

The Weatherization Assistant User’s Manual (Version 8.9) xv
List of Figures
14.6. The NEAT Key Parameters – Windows form under the Main Menu’s “Setup
Library” button............................................................................................................. 14-11
14.7. The MHEA Key Parameters – Economics form under the Main Menu’s “Setup
Library” button............................................................................................................. 14-13
14.8. The MHEA Key Parameters – Set Points form under the Main Menu’s “Setup
Library” button............................................................................................................. 14-13
14.9. The MHEA Key Parameters – Insulation form under the Main Menu’s “Setup
Library” button............................................................................................................. 14-15
14.10. The MHEA Key Parameters – Heat Transfer form under the Main Menu’s “Setup
Library” button............................................................................................................. 14-16
14.11. The MHEA Key Parameters – Doors form under the Main Menu’s “Setup
Library” button............................................................................................................. 14-19
14.12. The MHEA Key Parameters – Windows form under the Main Menu’s “Setup
Library” button............................................................................................................. 14-19
14.13. The MHEA Key Parameters – Base Loads form under the Main Menu’s “Setup
Library” button............................................................................................................. 14-20
14.14. The Fuel Costs form under the Main Menu’s “Setup Library” button. ....................... 14-21
14.15. The Fuel Price Indices form under the Main Menu’s “Setup Library” button. ........... 14-25
14.16. The Library Measures form under the Main Menu’s “Setup Library” button ............. 14-26
14.17. The Unit Costs of Measure sub-form for the Attic Insulation R-30 measure. ............. 14-29
14.18. The User Defined Measures form under the Main Menu’s “Setup Library” button
(with energy savings, Materials/Labor Details sub-form in form view) ..................... 14-32
14.19. The User Defined Measures form under the Main Menu’s “Setup Library” button
(Health and Safety measure, Materials/Labor sub-form in data sheet view) ............... 14-32
14.20. The User Defined Measures form (data sheet view, All Measures) (left-most
columns) ....................................................................................................................... 14-33
14.21. The All User Measures Cost sub-form ........................................................................ 14-38
14.22. The Materials/Labor Details sub-form (form view) .................................................... 14-39
14.23. The Materials/Labor Details sub-form (data sheet view) ............................................ 14-40
14.24. NEAT Insulation Types ............................................................................................... 14-43
15.1. The General Information form under the Main Menu’s “Supply Library” button ........ 15-2
15.2. A typical form under Main Menu’s “Supply Library” button (form view) ................... 15-5
15.3. The Construction Materials/Hardware Materials form (data sheet view) ..................... 15-6
15.4. Inventory control block .................................................................................................. 15-8

xvi The Weatherization Assistant User’s Manual (Version 8.9)
List of Figures
15.5. Inventory Purchase/Removal Summary ........................................................................ 15-8
15.6. Inventory Used Summary .............................................................................................. 15-8
15.7. The additional entries on the Hot Water Equipment and Refrigerator forms. ............. 15-10
15.8. The Energy Details sub-form for Replacement Cooling Equipment ........................... 15-11
15.9. The Energy Details sub-form for Replacement Doors ................................................ 15-12
15.10. The Energy Details sub-form for Replacement Heating Equipment ........................... 15-13
15.11. The Energy Details sub-form for Replacement Hot Water Equipment ....................... 15-14
15.12. The Energy Details sub-form for Insulation ................................................................ 15-14
15.13. The Energy Details sub-form for Replacement Lamps ............................................... 15-15
15.14. The Energy Details sub-form for Replacement Refrigerators ..................................... 15-16
15.15. The Energy Details sub-form for Replacement Windows ........................................... 15-17
16.1. The General form under the Main Menu’s “Preferences” button. ................................. 16-2
16.2. Report displaying optional logo and header text ........................................................... 16-4
16.3. Range Check and Default Values form under the Main Menu’s “Preferences”
button. ............................................................................................................................ 16-5
16.4. The Report Sections form under the Main Menu’s “Preferences” button. .................... 16-6
16.5. The Features form under the Main Menu’s “Preferences” button. ................................ 16-7
16.6. Photo Folder field for third party photo browser ........................................................... 16-8
16.7. Program Error History form......................................................................................... 16-10
17.1. The Data Link form ....................................................................................................... 17-1
17.2. The “Currently Linked Backend Database” block. ........................................................ 17-3
17.3. The Compact and Repair window.................................................................................. 17-4
17.4. The Pick Database to Link window. .............................................................................. 17-5
17.5. Import/Export via MSAccess Database (Transfer CLIENTS between databases) –
Check-in/Check-out feature activated (two clients selected for import). ...................... 17-7
17.6. The Pick External Database for Import/Export window. ............................................... 17-9
17.7. The WARNING: Overwrite with older data? window. ............................................... 17-12
17.8. The Transfer between databases form (via Text Files) ................................................ 17-16
17.9. Browse window for selecting files to import via text files. ......................................... 17-17
17.10. Example “CSV” file for heating system records. ........................................................ 17-18
17.11. Exporting Clients (via text files). ................................................................................. 17-21

The Weatherization Assistant User’s Manual (Version 8.9) xvii
List of Figures
17.12. The Client Selector form (GIS feature on) .................................................................. 17-25
17.13. The Sort/Filter menu window. ..................................................................................... 17-26
18.1. Tab for pathname method of photo storage. .................................................................. 18-1
18.2. Pathname photo browser. ............................................................................................... 18-2
18.3. Controls on Information tab for third party photo browser. .......................................... 18-3
18.4. Third party photo browser navigation window. ............................................................. 18-4
18.5. Editor of third party photo browser. .............................................................................. 18-5
18.6. GIS Map for Single Client Location. ............................................................................. 18-7
18.7. GIS Map for Client Selection. ....................................................................................... 18-9
18.8. The Status Editor sub-form. ......................................................................................... 18-13
18.9. E-mail specification form for reporting error message. ............................................... 18-15
18.10. E-mail Setup form. ....................................................................................................... 18-17

xviii The Weatherization Assistant User’s Manual (Version 8.9)
List of Figures

The Weatherization Assistant User’s Manual (Version 8.9) xix
Acronyms
Acronyms
AFUE annual fuel utilization efficiency
ASHRAE American Society of Heating, Refrigerating, and Air- Conditioning
Engineers
Btu British thermal unit
COP coefficient of performance
csv comma separated values (file format)
DOE Department of Energy
GIS Geographic Information System
GUI graphical user interface
HDD heating degree days
HSPF heating seasonal performance factor
MB megabytes
MHEA Manufactured Home Energy Audit
MMBtu million British thermal units
NEAT National Energy Audit Tool
NFRC National Fenestration Rating Council
NOAA National Oceanic and Atmospheric Administration
RAM random access memory
SHGC solar heat gain coefficient
SIR savings-to-investment ratio
SP2 service pack 2 (Microsoft)
UPW uniform present worth

xx The Weatherization Assistant User’s Manual (Version 8.9)
Acronyms

The Weatherization Assistant User’s Manual (Version 8.9) 1-1
Chapter 1: Overview of the Weatherization Assistant
Chapter 1. Overview of the Weatherization Assistant
The Weatherization Assistant is a Windows-based energy audit software tool that
was developed by Oak Ridge National Laboratory (ORNL) to help states and their
local weatherization agencies implement the U.S. Department of Energy (DOE)
Weatherization Assistance Program. It applies engineering and economic
calculations to assist states and agencies select energy efficient retrofit measures
that meet government criteria for cost-effectiveness and that can be installed in
homes of low-income families enrolled in the Program. The Weatherization
Assistant can be used to select and rank measures for individual houses, or to
establish a priority list of weatherization measures for nearly identical housing
types.
The Weatherization Assistant is actually an umbrella program for two individual
energy audits or measure selection programs (see Figure 1.1): the National Energy
Audit Tool (NEAT) and the Manufactured Home Energy Audit (MHEA). NEAT is
designed specifically for site-built single-family homes, although it can be used
with some limitations for small multifamily residences. MHEA is designed
specifically for manufactured (or mobile) homes. The unique construction
characteristics of mobile homes require evaluating and installing measures
specifically for such homes in order to obtain effective weatherization with high
energy and dollar savings.
Figure 1.1. Design of the Weatherization Assistant.
In addition to serving as the umbrella program for NEAT and MHEA, the
Weatherization Assistant provides optional features that are useful in implementing
and administering weatherization programs. These optional features include
recording an extensive amount of agency-related contact information and client
Weatherization Assistant
Optional Administrative Features
(Member Programs)
NEAT
Site-Built Homes
MHEA
Manufactured Housing

1-2 The Weatherization Assistant User’s Manual (Version 8.9)
Chapter 1: Overview of the Weatherization Assistant
intake data, developing work orders, recording diagnostic measurements and health
and safety issues, storing digital photos and documents, using an internal map to
locate or select clients, tracking the status of clients and jobs, tracking available
funds and total expenditures, tracking inventory, and generating summary and
analysis reports.
Installation of the Weatherization Assistant provides users with both of the
measure selection programs as well as the optional administrative features.
Installation procedures are provided in Chapter 2, Installation and Start-up.
1.1 Overview of NEAT and MHEA
NEAT was developed by ORNL. It was formally introduced in the summer of
1993 and has been modified and upgraded many times since. MHEA, on the other
hand, was originally developed by the National Renewable Energy Laboratory
(NREL). ORNL converted this original version of MHEA to a Windows-based
program, packaged it with NEAT under the Weatherization Assistant umbrella,
and now maintains and supports the software.
NEAT and MHEA evaluate each home individually after taking into account local
weather conditions, weatherization measure costs, fuel costs, and specific
construction details of the home. After describing envelope components, heating
and cooling systems, and base load equipment (e.g., refrigerators, water heaters,
lighting), NEAT and MHEA produce a prioritized list of cost-effective
weatherization measures customized for the dwelling being evaluated. The output
includes estimates of the dollar value for the projected energy savings, savings-to-
investment ratios (SIRs), installation costs, a list of the quantities of the major
materials necessary to perform the recommended weatherization retrofits, and
design heating and cooling loads needed to size any replacement equipment.
MHEA stands apart from other building energy analysis tools in many ways. Input
and calculations incorporated into the software address constructions unique to
mobile homes such as bellied floors and bowstring roofs. The retrofit measures
evaluated by MHEA are all applicable to mobile homes.
NEAT and MHEA follow eight steps to select the energy efficiency measures for a
particular home that meet a designated level of cost-effectiveness (i.e., measures
that have an SIR greater than a specified value):

The Weatherization Assistant User’s Manual (Version 8.9) 1-3
Chapter 1: Overview of the Weatherization Assistant
1. NEAT and MHEA guide the user through the process of entering data on the
home that describe the characteristics of the home, its mechanical systems, and
other energy-related information. NEAT and MHEA also allow health and
safety deficiencies and repair items to be noted. Both audits use blower door
measurements, duct leakage measurements, and steady-state efficiency
measurements of space-heating equipment, if available. Data may be collected
in the field using data input forms and transferred to NEAT or MHEA later in
the office, or data may be entered directly into NEAT or MHEA using a
portable computer while auditing the home.
2. NEAT and MHEA use engineering calculations and weather data from over 200
weather cities in the continental United States and bordering provinces of
Canada to compute the annual heat loss and heat gain of the home, and the
annual space-heating and space-cooling energy consumption required to keep
the home at a specific thermostat set-point. Both audits calculate heat loss and
heat gain on a monthly basis using a variable-base degree-day method and ten-
year average weather data for the selected city. They also consider the amount
of solar energy absorbed by a home and the typical amount of heat generated
inside a home by people and their refrigerators, water heater, other appliances,
and lights. NEAT and MHEA estimate the heat gain and loss due to duct
leakage if specified. NEAT and MHEA assume a home is maintained at average
conditions regardless of specific occupants because efficiency measures
typically remain after occupants move, and this follows the intent of the
Weatherization Assistance Program that finances energy efficiency measures
that generate savings over the life of the measures.
3. NEAT and MHEA compute the energy consumption of selected base load uses
(water heating, refrigerators, and lighting in need of retrofit) if desired.
Refrigerator and water heater descriptions use an extensive database of
manufacturers and models, which eliminates the need to input detailed
equipment descriptions by the user.
4. NEAT checks the applicability of 38 building envelope, space-heating and
space-cooling system, and base load energy efficiency measures to the specific
home being audited, while MHEA checks the applicability of 32 measures.
These measures include air and duct leakage reduction, envelope insulation,
window replacements and other treatments, space-heating and space-cooling
equipment replacement and tune-up, replacement refrigerators, water heater

1-4 The Weatherization Assistant User’s Manual (Version 8.9)
Chapter 1: Overview of the Weatherization Assistant
tank and pipe insulation, replacement lighting, and more. Both audits then
calculate an energy savings and discounted SIR for each applicable measure
applied individually to the home. User-defined energy efficiency measures can
also be entered and evaluated. The SIRs are calculated using fuel costs and
installation costs representative of the home and agency as input by the user, as
well as measure lifetimes appropriate for each measure.
5. NEAT and MHEA evaluate the interaction between efficiency measures (e.g.,
since insulation reduces the amount of energy needed for space heating, it also
reduces the energy savings from a space-heating system replacement).
Beginning with the measure with the highest SIR, NEAT and MHEA apply
each energy efficiency measure to the home and then compute a new SIR for
the remaining measures, taking into account savings gained by preceding
measures.
6. NEAT and MHEA identify a final list of recommended energy efficiency
measures by selecting those with an SIR greater than the cut-off value selected
by the user once interactions between measures have been accounted for.
7. NEAT and MHEA generate a report of recommended energy efficiency
measures that identifies, both individually and cumulatively, the energy
savings, installation cost, and SIR of the recommended measures. The report
also identifies those health, safety, and repair items selected by the user that
need to be performed. In addition, an essential materials list is developed, and
design heating and cooling loads needed to size replacement equipment are
provided.
8. NEAT and MHEA can adjust their estimated energy savings based on actual
utility consumption data and develop a second list of recommend energy
efficiency measures if the user desires.
1.2 Software Overview
The Weatherization Assistant utilizes a commercially produced database software,
Microsoft Access, to provide a user interface for data input and to store the
information you provide and the results of running the program. The analysis
engines (NEAT and MHEA) are written in the programming language “C.” The
Microsoft Access portions of the program are linked to the analysis engines by

The Weatherization Assistant User’s Manual (Version 8.9) 1-5
Chapter 1: Overview of the Weatherization Assistant
C++ and Visual Basic programs. However, the Weatherization Assistant requires
no software associated with any of these languages or applications for normal use.
The Weatherization Assistant features a Windows graphical user interface. Data
input is provided to the program through Microsoft Access forms, which can be
used in either “form” view (data are displayed on forms that are filled in) or “data
sheet” view (as would be seen in a spreadsheet application).
The Weatherization Assistant stores all of its input and output information in a
single database file (often called the “mdb database file” or just the “mdb file”
because the file’s extension is “.mdb”). Within this file, information is stored in
linked tables, each table composed of as many “records” as is required to store the
information required. For example, when you enter information on a new client by
filling in data on a form, you are adding a new record to the client table.
Information is retrieved simply by requesting to view different records in the
database. You may already be familiar with the concept of tables, records, and
forms if you have used other software products based on Microsoft Access.
With data stored in Access tables, persons experienced in Access can retrieve the
information and import it to other Access applications without having to re-enter
data. In addition, the Weatherization Assistant can produce and read comma
separate value (csv) files containing data, which provides an additional mechanism
for data transfer between computer applications. This data transfer capability
provides the potential for collecting or storing all weatherization program data into
state-wide or nationwide databases that could then be used in program evaluation
or lead to better implementation processes.
1.3 Program Overview
The Weatherization Assistant divides its tasks into several main activities. These
activities are accessed using buttons found on the initial form, called the Main
Menu, which appears when opening the program (see Figure 1.2). Throughout this
manual, these main activities are referenced by the names given to these buttons as
seen on this Main Menu.

1-6 The Weatherization Assistant User’s Manual (Version 8.9)
Chapter 1: Overview of the Weatherization Assistant
Figure 1.2. The Weatherization Assistant’s Main Menu.
Forms under the Main Menu’s “Agency” button (see Chapter 6, Agency) allow you
to enter information about your agency, your staff and their functions, and the
contractors and suppliers used by your agency. You can list the sources of funding
available for your work with balances of funds available in each, and you can also
see and navigate to all the clients, audits, work orders, setup libraries, and supply
libraries that are associated with your agency.
Forms under the Main Menu’s “Clients” button allow you to enter information
about the clients that your agency serves. The Weatherization Assistant keeps a
listing of your clients separate from the descriptions of the homes of those clients.
Minimal information is required to identify a client, but there is a considerable
amount of optional data that you can enter if you desire. You must supply at least
the minimal data on a client before you can continue and perform an audit on the
client’s home or continue entering data for other clients. Under the Main Menu’s
“Clients” button, you can also see and navigate to all the audits and work orders
that are associated with that client. A detailed discussion of data entered under the
Main Menu’s “Clients” button is given in Chapter 7, Clients.

The Weatherization Assistant User’s Manual (Version 8.9) 1-7
Chapter 1: Overview of the Weatherization Assistant
Forms under the Main Menu’s “Site Built (NEAT)” and “Mobile Home (MHEA)”
buttons allow you to describe a client’s home and enter other audit information
once a client has been entered into the Weatherization Assistant. It is this home
description that allows the Weatherization Assistant to make retrofit
recommendations for improving the energy efficiency of the home. After all the
house information has been entered and the audit has been run, you can view and
print the audit recommendations, as well as prepare for the optional step of
initiating work orders to install the recommendations. Data entered under the Main
Menu’s “NEAT” and “MHEA” buttons are fully described in Chapters 8–12.
Forms under the Main Menu’s “Work Orders” button provide an optional feature
that allows you to develop work orders needed for weatherization measures to be
installed in a home. Work orders may be automatically generated by the execution
of either NEAT or MHEA, developed manually (e.g., if the measures to be
installed were recommended based on a predefined priority list rather than running
NEAT or MHEA), or created by a combination of the two. The level of detail
included in the work orders is determined by the user. Material descriptions and
associated costs pre-entered in the Supply Library can be used to make the
development of the work orders easier, faster, and more consistent. The use of
work orders combined with the use of the Weatherization Assistant’s optional
inventory feature can help you track and maintain inventory. A detailed description
of the optional work order feature is provided in Chapter 13, Work Orders.
Forms under the Main Menu’s “Setup Library” button allow you to set up the
Weatherization Assistant to reflect conditions in your agency. The parameters
entered in the Setup Library affect the recommendations of the audits, although
they are not a part of the individual home descriptions. Parameters that are entered
in the Setup Library include fuel costs; identification of the weatherization
measures predefined in NEAT and MHEA that your agency performs; material and
labor costs associated with these weatherization measures; and values of selected
key parameters associated with materials, equipment, thermostat set-points, etc.
The Setup Library also allows you to enter your own weatherization measures and
insulation materials as alternatives to those already programmed into NEAT and
MHEA. Detailed discussions of the forms under the Main Menu’s “Setup Library”
button are provided in Chapter 14, Setup Library.
Forms under the Main Menu’s “Supply Library” button allow you to identify or
select materials and enter details on each material such as cost, R-value for

1-8 The Weatherization Assistant User’s Manual (Version 8.9)
Chapter 1: Overview of the Weatherization Assistant
insulation materials, etc. Entering materials into the Supply Library is most useful
when you are going to develop work orders, as described under the Main Menu’s
“Work Orders” button. In this case, having a library of materials to choose from
makes it easier to create a work order. If you are not going to use the work order
feature, then the only materials that you may want to enter in the Supply Library
are new refrigerators and water heaters that you use to replace existing units (if you
perform these measures). The forms under the Main Menu’s “Supply Library”
button are discussed in Chapter 15, Supply Library.
Forms under the Main Menu’s “Preferences” button allow you to choose various
options affecting the appearance of the Weatherization Assistant or the operation
of its interface. These options do not affect the calculations or the
recommendations of NEAT or MHEA themselves. These options include the
appearance of headers that are printed on the first page of all reports, the values
used to perform range checks on every numerical data input field, and the ability to
turn on or off optional features in the Weatherization Assistant. All of the options
that can be controlled under the Main Menu’s “Preferences” button are discussed
in Chapter 16, Preferences.
Forms under the Main Menu’s “Data Link” button allow you to transfer data with
other users of the Weatherization Assistant or even with other database or analysis
programs. The Data Link feature also allows you to choose which database you are
connected to, although most users will only use the one database provided as part
of the initial installation of the Weatherization Assistant. Note that on the Main
Menu, the database file to which you are currently connected is displayed. In
Figure 1.2, this file is “wa8-9.mdb” which is located in the folder “C:\Program
Data\Weatherization Assistant 8-9.” The use of the Data Link feature is presented
in Chapter 17, Data Link.
1.4 Optional Features
The optional features in the Weatherization Assistant were incorporated into the
program in such a way as to allow you to use the measure selection programs
(NEAT and MHEA) almost as stand-alone programs, if you are not interested in
using the optional features. This is why most of the optional features are accessed
from their own tabs under the various Main Menu buttons (with the exception of
work orders, which has its own Main Menu button and was described previously),
and why there are separate buttons on the Main Menu of the program to take you

The Weatherization Assistant User’s Manual (Version 8.9) 1-9
Chapter 1: Overview of the Weatherization Assistant
directly to either NEAT or MHEA. In addition, the optional features are, for the
most part, independent of one another. This allows you to pick and choose which
optional features to use in a phased approach.
The Weatherization Assistant allows an extensive amount of diagnostic
measurements and health and safety issues to be recorded within the NEAT and
MHEA audits. NEAT and MHEA do not use most of these measurements and
observations directly in their calculations. However, by recording these
measurements and observations within the Weatherization Assistant, they become
a permanent part of the electronic record for a house. Also, repairs can be
automatically recommended to fix any identified health and safety issues if you set
the Weatherization Assistant up to do so. Chapter 11, NEAT and MHEA Common
Elements, discusses how to record diagnostic measurements and health and safety
issues.
The Weatherization Assistant provides the capability of linking digital photos
taken at any stage of the weatherization process or digital scans of additional
documents to a client, audit, and/or work order. This can be useful to more clearly
identify weatherization or repair items that need to be performed, or to document
pre-existing conditions that will not be addressed during weatherization. This
capability is discussed in Section 18.1, Digital Photos.
A Geographic Information System (GIS) can be installed with the Weatherization
Assistant that allows mapping of a single client’s location or any group of clients at
once. This allows auditors, weatherization crews, inspectors, and others to find the
location of a client’s home, and could assist in scheduling efforts or in creating
summary reports by geographic location. The GIS is described in Section 18.2,
Geographic Information System (GIS).
A relatively extensive client status tracking system is incorporated in the
Weatherization Assistant. This system allows an agency to track the overall status
of a client as well the client’s application, audit, work orders, inspections, and
payments if desired. Section 18.3, Status Tracking, discusses how to use this
system.
Although the Weatherization Assistant already provides many data fields under the
Main Menu’s “Agency” and “Clients” buttons for entering a wide range of
information on clients and their houses, agencies and states often collect even more

1-10 The Weatherization Assistant User’s Manual (Version 8.9)
Chapter 1: Overview of the Weatherization Assistant
information. The Weatherization Assistant provides the capability of including this
additional information in its database. User-generated survey or data forms can be
developed under the Main Menu’s “Agency” button (see Section 6.4, Surveys
(Agency)), with the responses or data for each individual client stored and retrieved
in reports under the Main Menu’s “Clients” button (see Section 7.7, Surveys
(Client)).
The Weatherization Assistant provides a tool to assist weatherization staff in
tracking available funding provided that the work order feature is used. You can
create cost centers (funding sources) and record the receiving of funds under the
Main Menu’s “Agency” button (see Section 6.3, Cost Centers). The funding
balances of each of the cost centers will then be automatically updated as work
orders are completed and actual costs are recorded under the Main Menu’s “Work
Orders” button (see Section 13.3, Measures (Work Order)).
The Weatherization Assistant provides predefined reports that summarize and
analyze the information you have entered. Different reports are available and
accessed under each of the Main Menu buttons. The primary report used in the
Weatherization Assistant is the Recommended Measures report that summarizes
the recommendations of a NEAT and MHEA audit (see Chapter 12, NEAT and
MHEA Results). Many other reports are available. For example, reports are also
available that document the data and information you entered into each NEAT or
MHEA audit, list the cost of measures you entered in the Supply Library,
summarize the work performed on a house, or identify all the houses weatherized
between selected dates along with their final costs. If you are an experienced user
of Microsoft Access, you can even develop your own reports as outlined in
Appendix D, Development of Customized Reports.

The Weatherization Assistant User’s Manual (Version 8.9) 2-1
Chapter 2: Installation and Start-up
Chapter 2. Installation and Start-up
The Weatherization Assistant includes the two measure selection programs, NEAT
for site-built homes and MHEA for mobile homes, as well as an umbrella of
optional features addressing other tasks performed by agency personnel as part of
the weatherization process. The instructions provided in this chapter will install all
of these tools onto your computer. Instructions are also provided in this chapter on
how to install the separate files needed to use the Weatherization Assistant’s GIS
to map the location of client homes, how to obtain the Weatherization Assistant
User’s Manual, and how to start the program.
2.1 Hardware and Software Requirements
The Weatherization Assistant must be installed on a Windows-based personal
computer that has at least 100 megabytes (MB) of free random-access memory
(RAM). The installation will require at least 150 MB of available hard disk space.
Your graphic card and monitor should be able to produce a display with a
minimum resolution of 1024×768 pixels in order to allow the Weatherization
Assistant’s windows to be seen without scrolling.
The Weatherization Assistant needs only a Windows operating system (NT4.0,
Win2000, XP, Vista, Windows 7 or Windows 8), which normally comes with the
purchase of a computer. NT4.0 and Win2000 must have at least the service pack 2
(SP2) upgrades installed in order to ensure proper operation of the Weatherization
Assistant. The upgrades are available through Microsoft, typically by using their
Windows Update feature.
The Weatherization Assistant uses your existing Windows printer setup to both
display and print results and reports. Thus, even though you may not have a printer
physically attached to your computer, you must have an acceptable printer driver
loaded and selected as the default in order to display the results. Output produced
by the Weatherization Assistant is stored in its database file and displayed in rich-
text format from within the program.
2.2 Obtaining the Weatherization Assistant Software
The Weatherization Assistant software is copyrighted and cannot be altered in any
way beyond the bounds set within the program. The latest version of the

2-2 The Weatherization Assistant User’s Manual (Version 8.9)
Chapter 2: Installation and Start-up
Weatherization Assistant is Version 8.9.0.5. All releases of Version 8.9 of the
Weatherization Assistant are designated by four digits (i.e., 8.9.x.x), where the
third digit indicates the update number and the fourth digit indicates the
maintenance number.
The installation file for the latest release of Version 8.9 of the Weatherization
Assistant (WA 8-9-0-5.exe) can be downloaded over the Internet from either the
Weatherization Assistance Program Technical Assistance Center (WAPTAC) or
ORNL web sites:
• http://waptac.org/Energy-Audits/Weatherization-Assistant.aspx
and then select
the “Weatherization Assistant 8.9” hyperlink, or
• http://eber.ed.ornl.gov/pub/weatherization and then select the “Weatherization
Assistant 8.9” folder.
Right click your mouse on the “WA 8.9.0.5” hyperlink on the WAPTAC site or the
“WA 8-9-0-5.exe” file from the ORNL site. Select “Save target as…” from the
menu displayed. You will be presented with a “Save As” window asking where on
your computer you wish to save the “WA 8-9-0-5.exe” file. Choose an existing or
new location (folder) on your computer to save the file in. You might select your
“Desktop” to allow easy access. You are encouraged to leave the “File name” as
the default automatically entered in this field (i.e., “WA 8-9-0-5.exe”). Once the
folder has been selected or created, select the “Save” button to begin the download,
which may take several minutes if you are not using a high-speed Internet
connection. After completion of the download, you may exit your Internet browser
or download the GIS files and/or the manuals for the Weatherization Assistant (see
Section 2.5, Obtaining and Installing the GIS Files).
The “WA 8-9-0-5.exe” file will not be needed for normal operation once it has
been executed to install the Weatherization Assistant. However, you would need
the file if you ever needed to re-install the program. Thus, it is recommended that
you eventually save the file in a safe location, possibly in the folder created during
installation (e.g., “C:\Program Files\Weatherization Assistant 8-9” or “C:\Program
Data\Weatherization Assistant 8-9”).

The Weatherization Assistant User’s Manual (Version 8.9) 2-3
Chapter 2: Installation and Start-up
2.3 Installing the Weatherization Assistant
If your computer is configured to allow only certain users, normally a system
administrator, to install software, then this user will have to be contacted in order
to install the Weatherization Assistant. If you should attempt installation under
such circumstances without proper authorization, you will receive messages
indicating either the need for “administrative privileges” or that you do not have
“write access” to certain locations on your computer.
If this is the first installation of the Weatherization Assistant program on your
computer or you are upgrading from a previous version other than Version 8.9,
then the Weatherization Assistant’s installation procedure will automatically install
Version 8.9 as a “new installation.” A “new installation” will install Version 8.9 of
the Weatherization Assistant in its own folder on your computer (the default folder
is “C:\Program Files\Weatherization Assistant 8-9” for a computer with an XP
operating system or “C:\ProgramData\Weatherization Assistant 8-9” for a
computer with a later operating system), provide you with a unique icon on your
desktop with which to start Version 8.9 of the program, and give you a database
file to store all your agency, client, audit, and other information. If earlier versions
were previously installed, they will remain on your computer and will be fully
functional.
If a previous release of Version 8.9 is already installed on your computer, then it is
recommended that you install the latest release of Version 8.9 as an “update,”
although you have the option to install the latest release as a “new installation” if
desired. Installation of the latest release of Version 8.9 as an “update” will install
the latest release in the same folder as your previous release of Version 8.9, use the
same desktop icon to start the Weatherization Assistant, and use the same database
file as the previous release of Version 8.9. All the information entered in your
previous release of Version 8.9 on your agency, clients, and audits and in your
Setup and Supply Libraries will remain unchanged.
1
1
A change in only the fourth digit of the latest release indicates a change in the program that should not affect the
program’s output or recommendations (e.g., a new report was added). However, if the third digit in the latest release
is different than your previous release, then a modification has been made to the program that could affect the
program’s output (e.g., savings or cost of a measure). Therefore, once the latest release is installed, rerunning an
audit that was previously run under the previous release could result in changes in the Recommended Measures
Report (e.g., a different list of recommended measures; different energy savings, costs, and/or SIR for a
recommended measure). Once the latest release is installed, the Recommended Measures Report generated under the

2-4 The Weatherization Assistant User’s Manual (Version 8.9)
Chapter 2: Installation and Start-up
Before installing Version 8.9 of the Weatherization Assistant on your computer,
close all Windows programs that are running. Then, to initiate the installation
process, use Windows Explorer or My Computer to locate the “WA 8-9-0-5.exe”
file that you downloaded to your computer and then double click on it. If the “WA
8-9-0-5.exe” file was downloaded to your desktop, simply double clicking on the
file’s icon on your desktop will initiate the process.
A welcome screen for the Weatherization Assistant Install program appears (see
Figure 2.1). Select “Next,” and then select “I Agree” after reading the Disclaimer
Statement (see Figure 2.2).
Figure 2.1. Welcome screen.
Figure 2.2. Disclaimer Statement screen.
The Destination Folder screen that appears identifies if a previous Version 8.9 was
found on your computer and where the new release of Version 8.9 will be installed
(see Figure 2.3 and Figure 2.4). It is recommended that you install the new release
in the folder selected by the installer: “C:\Program Files\Weatherization Assistant
8-9” or “C:\ProgramData\Weatherization Assistant 8-9” for a “new installation,” or
the folder where the previous release of Version 8.9 is installed in the case of an
“update.” However, the installation routine does allow you to select another folder
if you desire. If you do choose a folder other than the default, make sure it is
previous release can be viewed without rerunning the audit by selecting the Recommended Measures report in the
Report block in the lower right corner of the NEAT or MHEA Audit Information forms. If you want to rerun the
audit using the latest release but keep the recommendations generated under the previous release, you should make a
copy of the audit and then run the audit on the copied version (do not run the audit on the original version of the
audit because this will write over the recommendations generated under the previous release).

The Weatherization Assistant User’s Manual (Version 8.9) 2-5
Chapter 2: Installation and Start-up
different from the folder of any other existing version of Weatherization Assistant.
This will ensure that any building descriptions entered with a previous version will
remain undisturbed.
Figure 2.3. Destination Folder screen for a
“New Installation.”
Figure 2.4. Destination Folder screen for an
“Update.”
Once the destination folder has been selected, click “Next” to obtain the Start
Installation screen (see Figure 2.5). This screen confirms the release of Version 8.9
that will be installed. Click “Next” to start the installation of the actual
Weatherization Assistant files.
The installation may take a minute or two. During the installation, several progress
screens will appear that display the installation status. If the installation was
successful, a final screen appears stating that the latest release was installed
successfully (see Figure 2.6). Select “Finish” to complete the installation and exit
the install program.

2-6 The Weatherization Assistant User’s Manual (Version 8.9)
Chapter 2: Installation and Start-up
Figure 2.5. Start Installation screen.
Figure 2.6. Finish screen.
If a “New Installation” was performed, the installation
process will have placed a new icon on your desktop
(see Figure 2.7). This icon will be called “WA 8.9” if
no previous versions of Version 8.9 were on your
computer and “WA 8.9.x.x” if there was. To run
Version 8.9 of the Weatherization Assistant, just double
click on this new icon. However, you should consult
Chapter 3, Setting Up the Weatherization Assistant, to
properly set up the program before proceeding with its
use.
If an “Update” was performed, the installation process will have linked the icon
used to run the previous release to the latest release. As before, just double click on
this same icon to run the latest release of Version 8.9.
2.4 Network Installation
If you are installing the Weatherization Assistant on a network, you need to:
• Install the Weatherization Assistant on each of the client computers. The
program will then be run individually from each client computer.
Figure 2.7. The
Weatherization Assistant’s
icon for Version 8.9.

The Weatherization Assistant User’s Manual (Version 8.9) 2-7
Chapter 2: Installation and Start-up
• Copy one of the “wa8-9.mdb” files from a client computer to a shared folder on
the network computer. Make sure that the shared folder has READ, WRITE,
and CREATE permissions for all users, and that the “wa8-9.mdb” file in the
shared folder has READ and WRITE permissions. The “mdb” files may be
renamed, in order to prevent the confusion resulting from files of the same
name, as long as each retains the “mdb” extension.
• Run the Weatherization Assistant on each client computer and use the Data
Link feature on the Main Menu to link each client computer to the shared “wa8-
9.mdb” file on the network computer (see Section 17.1, Currently Linked
Backend Data File).
An alternate method of sharing information among multiple computers is to use the
Import/Export feature of the program. See Section 17.3, Data Transfer –
Import/Export with Another MSAccess Database, for more details.
2.5 Obtaining and Installing the GIS Files
The GIS feature in Version 8.9 of the Weatherization Assistant allows the location
of client homes to be mapped (see Section 18.2, Geographic Information System
(GIS)). Before this optional feature can be used, you must first download and then
unzip two files that are available only over the Internet (due to copyright
restrictions) from the same two web sites used to obtain the program files for the
Weatherization Assistant:
• http://waptac.org/Energy-Audits/Weatherization-Assistant.aspx
and then
select the “GIS Mapping" hyperlink, or
• http://eber.ed.ornl.gov/pub/weatherization
and then select the “GIS Files"
folder.
Download the “base.zip” file and the zip file for your state (i.e., “xx.zip” where xx
is the two letter abbreviation for your state) following the same steps used to
download the latest release of the Weatherization Assistant (see Section 2.2,
Obtaining the Weatherization Assistant Software). These downloads may take
several minutes if you are not using a high-speed Internet connection.

2-8 The Weatherization Assistant User’s Manual (Version 8.9)
Chapter 2: Installation and Start-up
After downloading the two files to your computer, right click on each zip file and
choose “Extract All…” Select the destination for the extracted files to be the GIS
folder under the location where you installed the Weatherization Assistant (e.g.,
“C:\Program Files\Weatherization Assistant 8-9\gis” or “C:\Program
Data\Weatherization Assistant 8-9\gis”). After each file has been unzipped, the zip
files are no longer needed and can be deleted. The GIS files are used under a
license agreement and cannot be duplicated or further distributed.
After both zip files have been unzipped, turn the GIS feature on within the
Weatherization Assistant by selecting the “Preferences” button from the
Weatherization Assistant’s Main Menu, click on the Features tab, check the box
next to Feature 3, “Enable geographic information system (mapping),” and then
click on the “Restart” button. See Sections 16.4, Features, and 18.2, Geographic
Information System (GIS), for more details.
2.6 Obtaining Manuals for the Weatherization Assistant
Two manuals are available for the Weatherization Assistant:
• The Weatherization Assistant Users Manual (Version 8.9) – (This manual)
The primary manual describing Version 8.9 of the Weatherization Assistant,
including detailed descriptions of NEAT, MHEA, and all the associated
administrative features offered in Version 8.9. This manual is provided in PDF
format.
• The National Energy Audit (NEAT) Engineering Manual (Version 7) –
This engineering manual delineates the algorithms and assumptions used by
NEAT in arriving at its measure recommendations based on the user’s input of
the building characteristics. This manual was published in September 2003 and,
thus, does not include changes made in the Weatherization Assistant since that
time. This manual is provided in PDF format. An update to the manual is
forthcoming. No equivalent manual for MHEA is currently available.
Both manuals can be downloaded over the Internet from the same two web sites
used to obtain the program files for the latest release of the Weatherization
Assistant:

The Weatherization Assistant User’s Manual (Version 8.9) 2-9
Chapter 2: Installation and Start-up
• http://www.waptac.org/Weatherization-Assistant/Weatherization-Assistant-
Manuals.aspx, or
• http://eber.ed.ornl.gov/pub/weatherization and then select the “Manuals” folder.
Selecting the files for the manuals from the WAPTAC or ORNL web sites will
either:
• Automatically open the files with the PDF software because the software is
already installed on your computer. In this case, you may use that software’s
“Print” button to immediately print the manuals, or you may use that software’s
“Save” button to save the files to a folder on your computer for later viewing
and printing.
• Cause your Internet browser to display the same “Save As” window as seen
when downloading the program files for the latest release of the Weatherization
Assistant, because the PDF software is not installed on your computer. In this
case, you may download the manuals following the same steps used to
download the latest release of the Weatherization Assistant (see Section 2.2,
Obtaining the Weatherization Assistant Software). However, you will not be
able to view or print the manuals until you install the PDF software or a PDF
viewer on your computer.
In both cases, it may take several minutes to open or download the files if you are
not using a high-speed Internet connection. It is recommended that you download
or save the manuals in the same folder or a subfolder where you installed the
Weatherization Assistant (e.g., “C:\Program Files\Weatherization Assistant 8-9” or
“C:\ProgramData\Weatherization Assistant 8-9”).
2.7 Accessing Web-Based Training for the Weatherization Assistant
A web-based training course on the Weatherization Assistant has been developed
and made available over the Internet. The course covers all of the information
presented in three days of on-site training provided to new users of the
Weatherization Assistant. Also provided is a module that presents information on
the optional advanced features of the program. To access the training, go to:
http://www.weatherizationassistanttraining.org
.

2-10 The Weatherization Assistant User’s Manual (Version 8.9)
Chapter 2: Installation and Start-up
The first time you visit the website, select the “REGISTER” hyperlink near the
bottom of the page. This will lead you through a registration process. Once
registered, use the LOGIN hyperlink to visit the training site as often as needed.
There is no charge associated with use of this site.
2.8 Starting the Weatherization Assistant
Click on the Weatherization Assistant icon displayed on your desktop to start the
program. Any other means of attempting to open the program will likely fail. The
icon has specific instructions regarding the opening of the Weatherization
Assistant that are needed for its successful operation.
The first time you start the
Weatherization Assistant
after installation, you will be
asked to enter an “Installation
ID” (see Figure 2.8). The
entry requested is a brief
name (up to 10 characters)
identifying this specific
installation of the software. If
this will likely be the only
installation of the
Weatherization Assistant in
your agency, this entry is not
vital and may be something
such as the acronym of your
agency. However, if you plan
to have multiple installations of the Weatherization Assistant on different
computers within your agency and you plan to share data between them, the
Installation ID should uniquely identify this specific installation. For example, you
might enter “Inst 1,” or the initials or last name of the person who is responsible
for this specific computer.
The Installation ID is appended to new records (such as setup or supply libraries)
when they are created (see Sections 14.1, Setup Library Information, and 15.1,
General Information Form). For example, if the Installation ID you entered was
Figure 2.8. The Installation ID form.

The Weatherization Assistant User’s Manual (Version 8.9) 2-11
Chapter 2: Installation and Start-up
“Smith,” and you copied the library “Your Setup Library,” then the copy of the
Setup Library would be named “Your Setup Library [Smith].” If necessary for
uniqueness, an integer will also be appended. If the Installation ID field on the
Installation ID form is left blank, a default installation ID consisting of the time the
record was created will be assigned. For example, under these circumstances, the
copied setup library would be named “Your Setup Library [09:51:13].” Of course,
you are free to rename the record, as long as the name remains unique.
The Installation ID is also used by default when exporting from an installation
using text files in order to identify which computer the files are from (see Section
17.4, Data Transfer – Import/Export Indirectly with Text Files).
You can change the Installation ID at any time by selecting the “Preferences”
button on the Weatherization Assistant’s Main Menu (see Section 16.1, General).
After you have entered the Installation ID, select the “Done” button. If during
installation you chose to install the Weatherization Assistant in a folder on your
computer other than the default folder, the Weatherization Assistant may tell you
that it must connect to the “back-end database.” Click on the “OK” button to
continue. You will then be asked to confirm that the linking was successful. A
similar process will then be performed to link to a reporting module.
The Weatherization Assistant will now take you briefly to an introductory banner
screen that indicates the version number and release date. Subsequent start-ups of
the Weatherization Assistant will also take you directly to this introductory screen.
This screen will automatically disappear once the program has fully loaded and be
replaced by the Main Menu for the Weatherization Assistant (see Figure 2.9). It is
from this Main Menu that you will access all of the functions included in the
Weatherization Assistant. An overview of the Main Menu is provided in Section
1.3, Program Overview.
2.9 The User Log On Form
If you institute use of the User Logon feature of the Weatherization Assistant, you
will be presented with the Weatherization Assistant Log On form each time you
start the program (see Figure 2.10). This feature requires users of the program to be
registered and have passwords assigned before they can access the program. A list
of currently registered users is displayed by clicking on the downward pointing
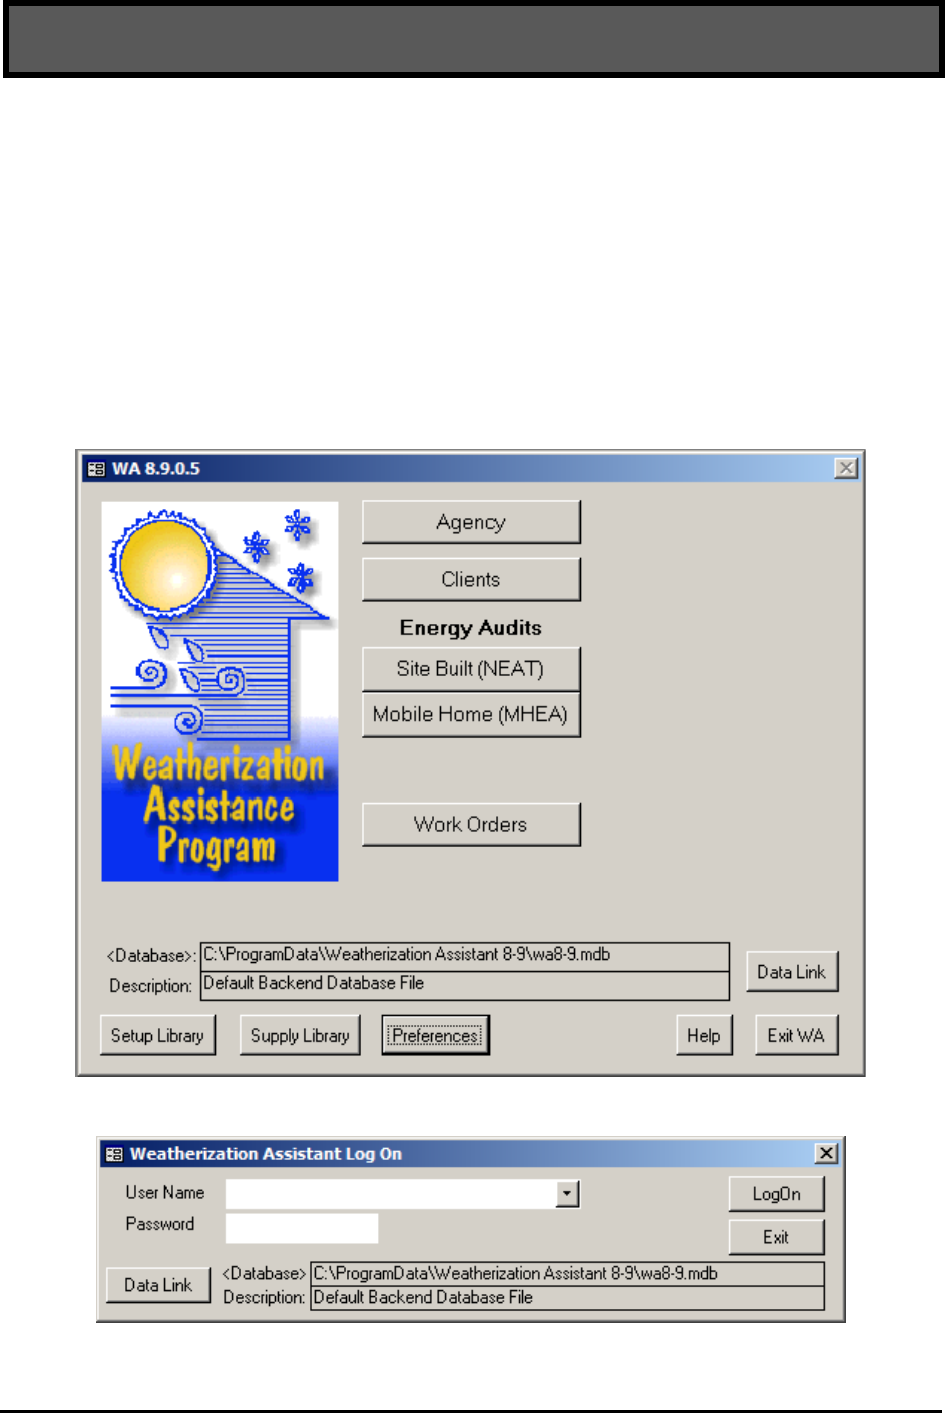
2-12 The Weatherization Assistant User’s Manual (Version 8.9)
Chapter 2: Installation and Start-up
arrow in the “User Name” drop-down list. The following is displayed for each
registered user: the User Name, the Full Name of the user, and the user’s Group
(indicating privileges), Agency, and State (of agency). Choose a user from the list
and enter the password for that user. Only after successfully logging on will the
Weatherization Assistant’s Main Menu (see Figure 2.9) become available. See
Feature 4, “Enable user logons with user names and passwords from the Agency/
Contacts tab” in Section 16.4, Features, and “Change Logon Group and Password”
in Section 6.2, Contacts (Agency), for more information on the use of the User
Logon feature.
Figure 2.9. The Weatherization Assistant’s Main Menu.
Figure 2.10. The Weatherization Assistant Log On form.

The Weatherization Assistant User’s Manual (Version 8.9) 3-1
Chapter 3: Setting Up the Weatherization Assistant
Chapter 3. Setting Up the Weatherization Assistant
A new installation of Weatherization Assistant requires the program to be properly
set up for your specific agency before it can be used to select cost-effective
weatherization measures for homes. This involves the simple, administrative tasks
of initializing your agency information and renaming the default Setup and Supply
Libraries to better identify them to yourself. It also involves the important steps of
tailoring the Setup Library and, to a lesser extent, the Supply Library to represent
your local costs, conditions, etc. These latter steps cannot be ignored.
If your installation of Version 8.9 is an upgrade from an earlier Version 8 of the
Weatherization Assistant (e.g., Version 8.6), you can set up your new installation
by importing agency information and the Setup and Supply Libraries from the
previous version, as outlined in Section 3.3, Importing Information from a
Previous Version. Otherwise, you must follow the steps outlined in Section 3.2,
Program Setup, to set up the Weatherization Assistant manually. You must decide
which method you will use before implementing it because confusion may result if
both approaches are used.
This chapter assumes that you are familiar with navigation and data entry
techniques common to programs using a Windows user interface. If you are not,
you should consult Chapter 5, Navigation and Data Entry, to learn how to navigate
through the Weatherization Assistant’s multiple forms and enter information into
its data fields.
3.1 Initial Start-up of the Weatherization Assistant
Click on the Weatherization Assistant icon displayed on your desktop to start the
program. The first time you start the Weatherization Assistant after a new
installation, an Installation ID form will be displayed (see Figure 2.8). If this is the
first time the Weatherization Assistant has been started since it was installed,
follow the steps presented in Section 2.8, Starting the Weatherization Assistant, to
correctly set up the Installation ID.

3-2 The Weatherization Assistant User’s Manual (Version 8.9)
Chapter 3: Setting Up the Weatherization Assistant
Figure 3.1. The Weatherization Assistant’s Main Menu.
3.2 Program Setup
Initializing Your Agency Information
Select the “Agency” button from the Weatherization Assistant’s Main Menu (see
Figure 3.1) to display the Agency Information form (see Figure 3.2). Change the
Agency Name from “Your Agency” to the actual name of your agency (the full
name or perhaps an acronym) and the State from “US” to your state using the drop-
down list. If the Weatherization Assistant is installed on multiple computers within
your agency, you should make the Agency Names unique, perhaps by entering a
dash (“-”) followed by the Installation ID that you used in Section 3.1, Initial Start-
up of the Weatherization Assistant, after the name of your agency. Although not
absolutely necessary, you should select the Agency Type from the options in the
drop-down list that best matches your agency. Make sure the checkbox in front of
“Default agency to associate with new Client, Work Order…” is checked. Delete

The Weatherization Assistant User’s Manual (Version 8.9) 3-3
Chapter 3: Setting Up the Weatherization Assistant
the “Agency comment” from the Comment field. Section 6.1, Agency Information,
should be reviewed for more information on these steps.
Figure 3.2. The Agency Information form under the Main Menu’s “Agency” button.
Although optional, you may wish to enter one or more “Contacts” for your agency.
Select the Contacts tab under the Main Menu’s “Agency” button to display the
Contacts form (see Figure 3.3). Enter your name in the Contact Name field.
Following this entry, make sure that the Name Detail field correctly identifies your
First, MI (if you entered it), and Last names. Enter an abbreviated name, possibly
your initials, first, or last name, in the User Name field and make sure the Active
checkbox is checked. Enter your agency name in the Company field. If any of the
checkboxes at the left center of the form apply to you, select them. An agency
contact designated as an “Auditor” can be assigned responsibility for audits (see
“Auditor” in Section 8.2, Audit Information).
If you want to use the Weatherization Assistant’s User Logon feature to restrict
who can open the software, select the “Change LogOn Group and Password”
button. Select the “Admin” User Group and enter and confirm a password. Leave
the “Confirm Old Password” field blank. Select the “Apply New Password” button
(see Feature 4 in Section 16.4, Features for additional details).

3-4 The Weatherization Assistant User’s Manual (Version 8.9)
Chapter 3: Setting Up the Weatherization Assistant
You may enter additional agency contacts now or at a later time by selecting the
“New” button in the Agency Contact record navigation block in the lower left
corner of the form. Enter the new contact’s Contact Name and User Name, and
make sure the Active checkbox is checked. Enter the Company Name for the
contact and any additional information related to the contact. For instance, if the
contact was associated with a material supplier, the Company field would be the
name of the company that supplies the material and the Supplier checkbox would
be checked.
Figure 3.3. The Contacts form under the Main Menu’s “Agency” button.
Section 6.2, Contacts (Agency), should be consulted for more information on these
steps. When finished, click on the X-box in the upper right corner of the “Agency”
window to return to the Weatherization Assistant’s Main Menu.
Naming Your Supply Library
Select the “Supply Library” button from the Weatherization Assistant’s Main
Menu (see Figure 3.1) to display the Supply Library’s General Information form
(see Figure 3.4). Rename the Supply Name from “Your Supply Library” to
something more recognizable to you. It is recommended that you simply replace
the “Your” with the acronym of your agency. If you have more than one
installation of the software within your agency, it is also recommended that you

The Weatherization Assistant User’s Manual (Version 8.9) 3-5
Chapter 3: Setting Up the Weatherization Assistant
use the Installation ID in the name, perhaps by adding a dash (“-”) followed by the
Installation ID. The name of your agency and your state, as entered previously,
will be correctly listed in the Agency and State fields, respectively. Refer to
Section 15.1, General Information (for the Supply Library) for more information
on these steps. When finished, click on the X-box in the upper right corner of the
“Supply” window to return to the Weatherization Assistant’s Main Menu.
Figure 3.4. The General Information form under the Main Menu’s “Supply Library”
button.
Naming Your Setup Library
Select the “Setup Library” button from the Weatherization Assistant’s Main Menu
(see Figure 3.1) to display the Setup Library Information form (see Figure 3.5).
Rename the Library Name from “Your Setup Library” to something more
recognizable to you. It is recommended that you simply replace the “Your” with
the acronym of your agency. If you have more than one installation of the software
within your agency, it is also recommended that you use the Installation ID in the
name, perhaps by adding a dash (“-”) followed by the Installation ID. The name of
your agency, state, and supply library as entered previously will be correctly listed

3-6 The Weatherization Assistant User’s Manual (Version 8.9)
Chapter 3: Setting Up the Weatherization Assistant
in the Agency, State, and Supply Library fields, respectively. Refer to Section
14.1, Setup Library Information, for more information on these steps.
Figure 3.5. The Setup Library Information form under the Main Menu’s “Setup Library”
button.
When finished, click on the X-box in the upper right corner of the “Setup Library”
window to return to the Weatherization Assistant’s Main Menu.
Populating the Setup and Supply Libraries
Before entering a client and running an audit, data specific to your agency must be
entered into the Setup Library, such as your actual fuel costs, your actual costs for
installing measures, and identifying which measures your agency can perform.
Information needs to be entered into the Supply Library only if you replace
refrigerators or water heaters, or if you will be using detailed material information
in the optional work order feature.
If this is your first use of the Weatherization Assistant, it may take up to a week to
compile the required information and then a day to enter it into the Weatherization
Assistant. If you used a previous version of the Weatherization Assistant (e.g.,
Version 8.6.0.4), it may take less than a day for you to manually reenter the data

The Weatherization Assistant User’s Manual (Version 8.9) 3-7
Chapter 3: Setting Up the Weatherization Assistant
from the previous version into Version 8.9, although now might be a good time to
take an extra day to update the information. If you were using a previous version of
the Weatherization Assistant, you can easily print out all the measure costs you had
entered in the Setup Library. Select the “Setup Library” button from the
Weatherization Assistant’s Main Menu (see Figure 3.1) in the previous version to
display the Setup Library Information form (see Figure 3.5). Choose the Library
Measure Costs report using the drop-down list in the Report block in the lower
right corner of the Setup Library Information form, and then select the “Print”
button in the Report block. Before using this previous measure cost data, it might
be a good time to take an extra day to update the information.
To enter the information into Version 8.9, select the “Setup Library” button from
the Weatherization Assistant’s Main Menu in this version (see Figure 3.1) to
display the Setup Library Information form (see Figure 3.5). Use the tabs shown in
the “Setup Library” window to enter data specific to your agency. The Fuel Costs
tab (to enter current fuel costs) and the Library Measures tab (to select the
measures your agency installs and enter the costs for these measures in the units
specified) are of greatest importance. Under the Fuel Costs tab, rename the Fuel
Cost Table Name from “Default Costs” to something more recognizable to you,
perhaps indicating when or from where the costs were obtained. You may also
want to look at the Key Parameters tab to see if any of these items need to be
altered. You will need to refer to Chapter 14, Setup Library, for details concerning
the information stored in the setup library and how to change it. Exit the Setup
Library by clicking on the X-box in the upper right corner of the “Setup Library”
window to return to the Weatherization Assistant’s Main Menu.
From the Weatherization Assistant’s Main Menu (see Figure 3.1), select the
“Supply Library” button to display the General Information form (see Figure 3.4).
If you are planning to replace refrigerators or install new water heaters as part of
your weatherization program, you may want to enter the replacement models you
will use by selecting the Refrigerators or Hot Water Equipment tabs, respectively
(see “Additional Entries on the Hot Water Equipment and Refrigerator Forms” in
Section 15.2, Materials/Labor Forms, for more details). Exit the Supply Library by
clicking on the X-box in the upper right corner of the “Supply” window to return to
the Weatherization Assistant’s Main Menu.

3-8 The Weatherization Assistant User’s Manual (Version 8.9)
Chapter 3: Setting Up the Weatherization Assistant
3.3 Importing Information from a Previous Version
If you used a previous version (Version 8.2 or later) of the Weatherization
Assistant, you can set up a new installation of Version 8.9 by importing your
agency information, Setup and Supply Library information, as well as client and
audit data from the previous version. (Importing from Version 7.4 is not possible.)
This approach may reduce the time needed to reenter agency information and
Setup and Supply Library data. However, an upgrade from Version 8.2 or later to
Version 8.9 signifies changes in the database structure (e.g., added fields), default
parameters, etc. Therefore, importing the Setup and Supply Libraries, clients,
and/or audits may require some additional data entry or modification before they
can be used in Version 8.9. Results (e.g., recommendations) obtained from
different versions may also differ. See the end of this section for further details.
To begin, start your previous
version (e.g., Version 8.6) of the
Weatherization Assistant to
display the Weatherization
Assistant’s Main Menu (similar
to Figure 3.1), and then select
the “Data Link” button to
display the Data Link form (see
Figure 3.6). Write down the path
name of the database you are
currently connected to and have
been using, as shown in the Path
field under “Currently Linked
BACKEND DATABASE.” The
path name will end with a
“.mdb.” You can click into the
Path field and use the keyboard navigation buttons to see the entire path name if
needed. Alternatively, you can highlight the entire path name and use traditional
Windows procedures (e.g., press the [Ctrl-C] key combination) to copy the name
into your computer’s memory for pasting later. Exit this previous version of the
Weatherization Assistant when you are done.
Start Version 8.9 of the Weatherization Assistant using the icon displayed on your
desktop. If this is the first time you have started Version 8.9 following installation,
Figure 3.6. The Data Link form (Version 8.6).

The Weatherization Assistant User’s Manual (Version 8.9) 3-9
Chapter 3: Setting Up the Weatherization Assistant
follow the steps presented in Section 2.8, Starting the Weatherization Assistant, to
correctly set up the Installation ID.
Select the “Data Link” button on the Weatherization Assistant’s Main Menu (see
Figure 3.1) to display the Data Link form in Version 8.9 (see Figure 3.7).
Figure 3.7. The Data Link form (Version 8.9).
Select “With another MSAccess Database” from the “Import/Export Data” drop-
down list at the bottom of the form then click on the “Go” button to display a blank
Transfer CLIENTS Between Databases form (see Figure 3.8).
If you copied the path name of your existing database into your computer’s
memory, you can click in the textbox beneath “External Database Path” then paste
the path name into the textbox by pressing the [Ctrl-V] key combination. Pressing
the Enter key on your keyboard will then display the clients in this database in the
display window under “External Database Path” (see Figure 3.9).

3-10 The Weatherization Assistant User’s Manual (Version 8.9)
Chapter 3: Setting Up the Weatherization Assistant
Figure 3.8. A blank Transfer CLIENTS Between Databases form.
Figure 3.9. An example of the Transfer CLIENTS Between Databases form with client
entries.

The Weatherization Assistant User’s Manual (Version 8.9) 3-11
Chapter 3: Setting Up the Weatherization Assistant
Otherwise, select the
“Browse” button to display
the Pick External Database
for Import/Export form (see
Figure 3.10). The default
location first displayed on
this form will either be the
last location you visited
using the form or the
location where you installed
Version 8.9. Use typical
Windows navigation
techniques to find the
database that you were using
in the previous version (refer
to the path name you wrote
down previously). Once you
have found the database,
click on the name of the database so that it is highlighted and its name appears in
the “File name” field, and then select the “Save” button. You will be brought back
to the “Transfer CLIENTS between databases” form (see Figure 3.9), where the
path name for the database you were using in the previous version is displayed to
the left of the “Browse” button and the clients entered in this database are shown in
the display window under “External Database Path.”
Information transferred between databases is grouped by clients. You specify what
clients you want transferred and all the data associated with these clients is
transferred. This includes all of the information entered under the “Client,”
“Energy Audits” (NEAT or MHEA), and “Work Orders” Main Menu buttons as
well as the reports generated when running the audits or forming the work orders
for these clients. If you so indicate, the transfer will also include the agency
information and the Setup and Supply Libraries associated with these clients. See
Chapters 6 through 15 for descriptions of the information contained in each of
these categories.
If you want to transfer one or more clients from a previous version to Version 8.9
to create a contiguous Version 8.9 database, highlight the clients to be transferred
by clicking on their Client IDs on the right side of the “Transfer CLIENTS
Figure 3.10. The Pick External Database for
Import/Export form.

3-12 The Weatherization Assistant User’s Manual (Version 8.9)
Chapter 3: Setting Up the Weatherization Assistant
between databases” form. More than one client can be highlighted by holding
down the [Ctrl] or [Alt] keys. If you are only interested in transferring agency and
library information, highlight just one of your clients who accesses these libraries
and is assigned to the agency of interest so that this information will be included in
the transfer. You can delete this client from Version 8.9 once the transfer has
occurred, while retaining the library and agency information. If you have multiple
libraries you wish to transfer to Version 8.9, select multiple clients, each accessing
a different library you wish to transfer.
Make sure that the “Include Agency and Library Records” checkbox is checked.
Then, select the “Import <--” button to start the data transfer process. This may
take several minutes depending on how many clients you highlighted. When the
data transfer process is completed, the “Status” bar at the bottom right of the form
will disappear and the client(s) that you transferred will be listed on the left side of
the “Transfer CLIENTS between databases” form under “Local Database Path.”
Select the “Exit” button to close the “Transfer CLIENTS between databases” form
and return you to the Data Link form, and select the “Exit” button again to close
the Data Link form and return you to the Weatherization Assistant’s Main Menu.
Select the “Agency” button on the Weatherization Assistant’s Main Menu (see
Figure 3.1) to display the Agency Information form (see Figure 3.2). If the name
shown in the Agency Name field is not the name of the agency that you used in the
previous version, use the drop-down list in the Agency record navigation block in
the lower left corner of the Agency Information form to call up the agency with the
name that you were using. Make sure the checkbox in front of “Default agency to
associate with new Client, Work Order, ...” is checked. You should examine the
Agency Information forms for any other agencies that may exist in your Version
8.9 database (e.g., “Your Agency”) to ensure that this checkbox is not selected.
Verify that the number in parentheses on the Clients tab is the number of clients
that you wanted to transfer from the previous version. When finished, click on the
X-box in the upper right corner of the “Agency” window to return to the
Weatherization Assistant’s Main Menu.
If you transferred one or more clients only to transfer their associated library
and/or agency information from the previous version to Version 8.9, you may wish
to delete these clients from the Version 8.9 database so that they do not exist in
more than one database. Deleting these clients will not delete the libraries imported

The Weatherization Assistant User’s Manual (Version 8.9) 3-13
Chapter 3: Setting Up the Weatherization Assistant
with them. Select the “Clients” button on the Weatherization Assistant’s Main
Menu (see Figure 3.1) to display the Client Information form (see Figure 3.11). If
the name shown in the Client ID field near the top of the form is not one of the
clients to be deleted, use one of the drop-down lists in the Client record navigation
block in the lower left corner of the Client Information form to call up a client to
be deleted. Once a correct client is shown in the Client ID field, select the “Del”
button in the Client record navigation block. A warning box will appear that says
“This will cause CASCADING DELETES to occur in all tables associated with
this Client record.” Click “OK .” Repeat this process for any additional clients you
used simply to transfer agency and/or library information. When finished, click on
the X-box in the upper right corner of the “Client” window to return to the
Weatherization Assistant’s Main Menu.
Figure 3.11. The Client Information form under the Main Menu’s “Clients” button.
The methods outlined in this section have described how to import your previous
version’s Setup Library into Version 8.9. However, there are database structure
differences between your former version’s Setup Library and Version 8.9’s library.
For instance, Version 8.9 adds two new weatherization measures to NEAT, the
Door Replacement measure and the White Roof Coating measure. You will need to
decide whether these measures should be evaluated and, if so, what their costs

3-14 The Weatherization Assistant User’s Manual (Version 8.9)
Chapter 3: Setting Up the Weatherization Assistant
should be. Also, now might be a good time to review and update all of the
information in the Setup Library, especially the fuel and measure costs.
If your import was from a version prior to 8.6, none of the user-defined NEAT
insulation types from the previous version will be transferred since the formats are
different. Therefore, you must enter these insulation types manually into Version
8.9 by selecting the “Setup Library” button from the Weatherization Assistant’s
Main Menu (see Figure 3.1) and then selecting the NEAT Insulation Types tab.
See Section 14.7, NEAT Insulation Types, for more information. You must also
enter the costs associated with these insulation types by selecting the Library
Measures tab.
If you transferred one or more clients from a previous version to Version 8.9 to
form a contiguous Version 8.9 database, you must check all the audit-related forms
in Version 8.9 before rerunning these audits to make sure all the fields are filled in.
Refer to the “Weatherization Assistant Update History” document that can be
downloaded over the Internet from the same two web sites used to obtain the
program files for the latest release of the Weatherization Assistant to help identify
these fields:
• http://waptac.org/Energy-Audits/Weatherization-Assistant.aspx
then select the
“Update History” hyper link or
• http://eber.ed.ornl.gov/pub/weatherization/Update%20History.pdf
In addition, rerunning an audit under Version 8.9 that was run under a previous
version could result in changes in the Recommended Measures report (e.g., a
different list of recommended measures; different energy savings, costs, and/or
SIR for a recommended measure). Once the clients and audits have been
transferred to Version 8.9, the Recommended Measures report generated for an
audit under the previous version can still be viewed without rerunning the audit by
selecting the Recommended Measures report in the Report block in the lower right
corner of the NEAT or MHEA Audit Information forms. If you rerun the audit
using Version 8.9, a new Recommended Measures report will be created and the
previous report created under the previous version will be lost. Therefore, if you
want to rerun the audit using Version 8.9 but keep the recommendations generated
under the previous version, you should make a copy of the audit and then run the
copied version using Version 8.9.

The Weatherization Assistant User’s Manual (Version 8.9) 4-1
Chapter 4: Quick-Start Tutorial
Chapter 4. Quick-Start Tutorial
This chapter provides a quick overview of the basic steps needed to run an audit on
a client home, which is the primary purpose of the Weatherization Assistant. These
steps include entering a new client, initiating an energy audit for this client, and
obtaining and understanding a recommendations report. Being familiar with these
basic steps will allow you to start using the Weatherization Assistant. You will also
be prepared to read other chapters of the user’s manual to learn about the details of
performing an audit and using other features of the program.
This chapter assumes that you are familiar with navigation and data entry
techniques common to programs using a Windows user interface. If you are not,
you should consult Chapter 5, Navigation and Data Entry, to learn how to navigate
through the Weatherization Assistant’s multiple forms and enter information into
its data fields.
4.1 Creating a New Client
Before entering audit data for a
client’s home, you must first set up
the client in the Weatherization
Assistant and enter information
related to the client. Select the
“Clients” button from the
Weatherization Assistant’s Main
Menu (see Figure 4.1) to display
the Client Information form (see
Figure 4.2).
If you have entered information
previously for a client or have
imported clients, the form will
likely be filled in with information
for one of these previously defined
clients. Do not type over any information for an existing client. Click on the
“New” button in the Client record navigation block in the lower left corner of the
Client Information form to provide you with a blank Client Information form. If
this is your first definition of a client for this installation of the Weatherization
Figure 4.1. The Weatherization Assistant’s Main
Menu.

4-2 The Weatherization Assistant User’s Manual (Version 8.9)
Chapter 4: Quick-Start Tutorial
Assistant, selecting the “Clients” button from the Main Menu will take you to a
blank Client Information form with default Client ID of “Client (1).”
Figure 4.2. The Client Information form under the Main Menu’s “Clients” button.
Change the default entry in the Client ID field that the Weatherization Assistant
automatically created for this new client (i.e., “Client (xx)”) to an ID your agency
uses for the client, typically a job number. Make sure the name of your agency is
listed in the Agency field. If not, select your agency using the drop-down list in the
Agency field.
Although not required, you will want to assign a setup library to the client if you
plan to use the work order feature (see Chapter 18, Work Orders). If you have only
one setup library associated with your agency, then this setup library will be
automatically selected in the Setup Library field. If you have more than one setup
library associated with your agency, the Setup Library field will be blank, although
you can select the correct setup library to use for this client by using the drop-down
list. Select the correct Dwelling Type for the house using the drop-down list.
Although not absolutely necessary, you should enter the number of occupants in
this client’s house in the Number of Occupants field because NEAT and MHEA
will use this number of occupants instead of a default number of 2 in its calculation

The Weatherization Assistant User’s Manual (Version 8.9) 4-3
Chapter 4: Quick-Start Tutorial
of internal loads. Enter any other information you desire for your new client in the
other fields on this form. More detailed information is provided in Section 7.1,
Client Information.
While still under the Main Menu’s “Clients” button, select the Contacts tab to
display the Contacts form (see Figure 4.3). Enter the client’s name in the Full
Name field. This should be the name of the person who applied for weatherization
services. Make sure that the “Name Detail” fields correctly identify the “First,”
“MI” (if entered), and “Last” names. Check the Primary Applicant checkbox.
Ensure that the Contact Type is “Applicant/Person of Record.” If not, use the drop-
down list in the Contact Type field to select this entry. Enter any other information
you desire for the client using the fields on this form. If you had entered address
information for the client on the Client Information form, you can use the “Copy
Client Addr” button to copy this address to the Contacts form.
Additional client contacts may be entered by choosing the “New” button in the
Client Contact record navigation block. However, only one contact per client
should be declared a Primary Applicant with Contact Type of “Applicant/Person of
Record.” Choose any other appropriate Contact Type for subsequent contacts (e.g.,
“Other Contact for Applicant”).
For more information on how to use the Contacts form and enter additional
contacts, see Section 7.4, Contacts (Client).
Figure 4.3. The Contacts form under the Main Menu’s “Clients” button.

4-4 The Weatherization Assistant User’s Manual (Version 8.9)
Chapter 4: Quick-Start Tutorial
When finished, you can immediately start an audit for the client that you just
entered by selecting the Audits tab. Alternatively, you can click on the X-box in
the upper right corner of the “Client” window to return to the Weatherization
Assistant’s Main Menu and start an audit at a later time. Section 4.2, Starting a
New Audit, discusses how to start an audit.
4.2 Starting a New Audit
Once you have created a client in the Weatherization Assistant, you can describe
the client’s home in either audit program (NEAT or MHEA), which will then allow
you to run the audit to develop a set of recommended energy measures. You can
start a new audit either by selecting the “Clients” button from the Weatherization
Assistant’s Main Menu (see Figure 4.1), or by selecting either the “Site Built
(NEAT)” or “Mobile Home (MHEA)” buttons. Starting an audit from the “Client”
window automatically enters the correct Client ID in the audit, which eliminates a
common error, so this approach is recommended and described first.
If you just created a client as discussed in Section 4.1, Creating a New Client, and
are still on either the Contacts form or Client Information form under the Main
Menu’s “Clients” button (see Figure 4.2 or Figure 4.3), you can start an audit for
the client that you just entered by selecting the Audits tab to display the Audits
form (see Figure 4.4). Otherwise, select the “Clients” button from the
Weatherization Assistant’s Main Menu (see Figure 4.1) to bring you to the Client
Information form (see Figure 4.2), use the Client record navigation block in the
lower left corner of the form to select the client that you want to create an audit for,
and then select the Audits tab to display the Audits form (see Figure 4.4).
From the Audits form, select either the “Create New Site Built (NEAT) Audit” or
“Create New Mobile Home (MHEA) Audit” button depending on which audit is
applicable for the client’s house. The buttons are on the bottom right on the form.
This will bring you to the Audit Information form under the Main Menu’s “NEAT”
or “MHEA” button (see Figure 4.5 and Figure 4.6, respectively).

The Weatherization Assistant User’s Manual (Version 8.9) 4-5
Chapter 4: Quick-Start Tutorial
Figure 4.4. The Audits form under the Main Menu’s “Clients” button.
Figure 4.5. The Audit Information form under the Main Menu’s “NEAT” button.

4-6 The Weatherization Assistant User’s Manual (Version 8.9)
Chapter 4: Quick-Start Tutorial
Figure 4.6. The Audit Information form under the Main Menu’s “MHEA” button.
The Client ID, Agency Name, and Agency State fields will already be filled in
using information you previously entered for the client. Change the Audit Name
from the default name created for this new audit (e.g., “Audit (xx)”) to a name
conforming to the naming convention for the clients and audits you have
developed. It is recommended that you use the Client ID in the Audit Name. For
example, for a client named “John Smith” with a Client ID of “11_348," you might
enter “11_348 Audit 1” as the Audit Name, signifying that this is the first (and
probably only) audit you are creating for this client. Some may wish to include the
client’s last name in the Audit Name, such as “Smith Audit 1.” However, if you
have more than one client with last name “Smith”, you may find locating the
correct audit by the Audit Name difficult. Others have been known to use an Audit
Name referencing the client’s street address. This can become somewhat unwieldy.
Although not required, you may select the auditor to be assigned to this audit using
the drop-down list in the Auditor field. If you selected yourself as an “Auditor”
(see “Initializing Your Agency Information” in Section 3.2, Program Setup), you
will be listed in the drop-down list, as will any other agency contacts declared as
auditors.
Select the setup, fuel cost, and supply libraries to be assigned to this audit using the
drop-down lists in the Setup Library, Fuel Cost Library, and Supply Library fields,

The Weatherization Assistant User’s Manual (Version 8.9) 4-7
Chapter 4: Quick-Start Tutorial
respectively. If you have not created more than one setup, fuel cost, or supply
libraries for your agency, these entries will automatically be selected for you. The
supply and setup libraries will be those that you named when you initially set up
the Weatherization Assistant (see Section 3.2, Program Setup). The fuel cost
library is a sub-library found in the setup library. You should have updated this
fuel cost library and renamed it as part of the process of updating and populating
the setup library (see Section 3.2, Program Setup). Select a city close to the client’s
home that has similar weather using the drop-down list in the Weather File field.
Finally, enter audit data on the house in the remaining fields on the Audit
Information form. Refer to Chapter 8, NEAT and MHEA Introduction, for more
details.
At this point you may exit the “NEAT Audit” or “MHEA Audit” window and
return later to enter the remaining house audit data, or you can enter all house data
now under other tabs on the NEAT or MHEA audit forms (e.g., Shell, Heating,
Cooling, Ducts/Infiltration, Baseloads, and Itemized Costs), as described in
Chapters 9–11. In either case, when you are finished, click on the X-box in the
upper right corner of the “NEAT Audit” or “MHEA Audit” window to return to
the “Client” window, then click on the X-box in the upper right corner of the
“Client” window to return to the Weatherization Assistant’s Main Menu. One
method of returning to the audit is somewhat the reverse of the above process used
to exit the audit; that is, select the “Client” button from the Weatherization
Assistant’s Main Menu (see Figure 4.1) to bring you to the Client Information
form (see Figure 4.2), use the Client record navigation block in the lower left
corner of the form to select the client that you want to return to, select the Audits
tab to display the Audits form (see Figure 4.4), and then double click on the name
of the audit in the Audit Name column of the table that you want to return to.
The alternative method of starting a new audit for a client already entered under
the Main Menu’s “Client” button is to select either the “Site Built (NEAT)” or
“Mobile Home (MHEA)” buttons from the Weatherization Assistant’s Main Menu
(see Figure 4.1), depending on which audit is applicable for the client’s house. This
will display the Audit Information form under the “NEAT Audit” or “MHEA
Audit” window (see Figure 4.5 and Figure 4.6, respectively). This form will likely
be filled in with information for a previously entered audit. Do not type over
any information for an existing audit.

4-8 The Weatherization Assistant User’s Manual (Version 8.9)
Chapter 4: Quick-Start Tutorial
Click on the “New” button in the Audit record navigation block in the lower left
corner of the Audit Information form to obtain a new, essentially blank audit form.
Select the client that this audit is being started for using the drop-down list in the
Client ID field near the top of the form. The client information must have been
previously entered as outlined in Section 4.1, Creating a New Client. Select “OK”
if a warning box appears that says “This will assign the Audit to a new Client
record.” The Agency Name and Agency State fields will be automatically filled in
using the information you previously entered for the client. At this point, follow
the same procedures outlined above for the other method of starting a new audit to
fill in the information on the Audit Information form, starting with changing the
Audit Name from the default name created for this new audit (e.g., “Audit (xx)”) to
a name conforming to the naming convention for the clients and audits you have
developed.
As with the other approach of starting a new audit, you may exit the “NEAT
Audit” or “MHEA Audit” window and return later to enter the remaining house
audit data, or you can enter all house data now under the other tabs on the NEAT
or MHEA audit forms, as described in Chapters 9–11. In either case, when you are
finished, click on the X-box in the upper right corner of the “NEAT Audit” or
“MHEA Audit” window to return to the Weatherization Assistant’s Main Menu.
To return to the audit, select either the “Site Built (NEAT)” or “Mobile Home
(MHEA)” buttons from the Weatherization Assistant’s Main Menu (see Figure 4.1)
to bring you to the NEAT or MHEA Audit Information form (see Figure 4.5 and
Figure 4.6, respectively), and then use the Audit record navigation block in the
lower left corner of the form to select the audit that you want to return to.
4.3 Running a New Audit
When you are finished entering all the audit data for a house, you can run the audit
by selecting the “Run Audit” button found in the upper right corner of each form
under the “NEAT Audit” or “MHEA Audit” window. When you run an audit, a
Recommended Measures report will automatically be displayed. The report lists all
the cost-effective weatherization measures recommended for the house along with
the estimated energy and cost savings, installation costs, and savings-to-investment
ratios for the recommended measures. The report also provides other information
such as the primary material quantities needed to perform each recommended
measure, the total space-heating and space-cooling energy consumption estimated
for the house, and the design heating and cooling loads for the house. The

The Weatherization Assistant User’s Manual (Version 8.9) 4-9
Chapter 4: Quick-Start Tutorial
Recommended Measures report is described in detail in Chapter 12, NEAT and
MHEA Results.
The Recommended Measures report can be printed by clicking on the printer
symbol in the menu bar located at the top of the report. Or, use the [Ctrl-P] key
combination to call up your printer driver’s form to further control the printing
process. When finished reviewing the report, use the “Close” button in the menu
bar located at the top of the report to exit the report and return to the audit.

4-10 The Weatherization Assistant User’s Manual (Version 8.9)
Chapter 4: Quick-Start Tutorial
The Weatherization Assistant User’s Manual (Version 8.9) 5-1
Chapter 5: Navigation and Data Entry
Chapter 5. Navigation and Data Entry
The Weatherization Assistant uses a graphic user interface (GUI) provided by
Microsoft’s Access XP (2003). The Weatherization Assistant uses all the standard
Access forms, controls, and the concept of records contained in this software.
Thus, if you are familiar with Access, you are probably already proficient with the
mechanics of entering data into the Weatherization Assistant. Otherwise, this
chapter will supply you with the basics needed for this task.
5.1 Form and Record Navigation
Data entry and display in the Weatherization Assistant uses forms. Each form
contains information related to a specific topic, such as the Client Information form
as found under the Main Menu’s “Clients” button or the Heating form, as found
under the Main Menu’s “NEAT” and “MHEA” buttons. You navigate to the
different forms found in the Weatherization Assistant using the tabs found under
each of the Main Menu’s buttons. In some cases, forms and/or sub-forms are
accessed through buttons found on other forms.
The term "record" refers to the information contained on a specific form. The terms
"record" and "form" are often used interchangeably, although you should keep the
somewhat subtle difference in definitions in mind. To navigate to a record you are
interested in on a given form, you can use the controls in the record navigation
block located in the lower left corner of the form. The type of record you can find
using the record navigation block is indicated in the upper left border of the block.
For example, in Figure 5.1, audit records can be found using the Audit record
navigation block that is located on the Audit Information form under the Main
Menu’s “NEAT” and “MHEA” buttons. There are three types of controls on record
navigation blocks you can use:
Figure 5.1. The Audit record navigation block found on the Audit Information form under
the Main Menu’s “NEAT Audit” and “MHEA Audit” buttons.

5-2 The Weatherization Assistant User’s Manual (Version 8.9)
Chapter 5: Navigation and Data Entry
• Drop-down Lists − The drop-down lists included in most of the record
navigation blocks include listings of all available records arranged in
alphanumeric order “by” various identifying fields. For example, in Figure 5.1,
you can find a specific audit record by searching by the audit name, client
name, client ID, or alternate client ID. Clicking your mouse on any item listed
in one of the drop-down lists will position you to that record (i.e., will display
that audit’s records on the form).
• Navigation buttons − Records are stored in alphabetical order by one of the
identifying fields (e.g., Audit Name or Client Name) and then numbered
sequentially. You can use the navigation buttons at the bottom of the record
navigation block to move to a particular record number by entering the
appropriate number, using the first or last record buttons ( or ,
respectively), or using the next or previous record buttons ( or ,
respectively). The total number of records currently stored is shown in the data
field following the word “of.”
• Other control buttons − Finally, remaining buttons in the record navigation
block allow you to create, copy, or delete records. Use the “New” button to
create a new blank record, the “Copy” button to copy the currently accessed
record, and the “Del” button to delete the currently accessed record.
You can also locate and move to a desired client, audit, or work order record by
accessing the Clients, Audits, or Work Orders forms found under the Main Menu’s
“Agency” and “Clients” buttons (see Figure 5.2). These display-only forms are
meant just for navigation. They provide a relatively condensed view of all records
of the type selected by displaying the available records in a spreadsheet format or
data sheet view. Information in these forms cannot be altered, as indicated by the
information being shaded. To navigate to a desired client, audit, or work order
record, double click on the desired entry under the Client ID, Audit Name, or Work
Order Name columns, or any column with a header that is in angle brackets (< >).
See Section 5.8, Data Sheet and Form Views of Records, for more information on
how to use these navigation data sheet views.
The bookmarks feature is enabled when the Weatherization Assistant is first
installed (see Feature 9 in Section 16.4, Features). If you select the “Agency,”
“Client,” “Audit,” “Work Order,” “Setup Library,” or “Supply Library” buttons on
the Main Menu with this feature enabled, the Weatherization Assistant will

The Weatherization Assistant User’s Manual (Version 8.9) 5-3
Chapter 5: Navigation and Data Entry
Figure 5.2. The Clients form under the Main Menu’s “Agency” button.
automatically return you to the same record you were last working on when you
exited that record type to return to the Main Menu.
Data for a record are stored in your computer’s temporary memory rather than to
the Weatherization Assistant’s database file that resides on a hard drive when you
start filling in data on a blank form or modify data on an existing form. When you
exit that form or navigate to a new record, the record you were working on gets
saved to the Weatherization Assistant’s database file, which typically resides on
your hard drive or the hard drive of a network computer. There are a number of
completeness and relational integrity checks performed by the Weatherization
Assistant when the record is being saved. This is why you may get warning and
error messages when you try to leave a form or navigate to a new record (see
Section 5.11, Entry Errors).
5.2 Entering Data into the Weatherization Assistant
Forms contain three types of controls (or
fields) that accept input from the user:
textboxes, drop-down lists, and checkboxes.
Textboxes (see Figure 5.3) allow you to
type in entries from the keyboard and are
Figure 5.3. Two textboxes, one requiring
a numeric entry.

5-4 The Weatherization Assistant User’s Manual (Version 8.9)
Chapter 5: Navigation and Data Entry
not restricted to any pre-selected set of responses. However, they often must satisfy
certain conditions to be acceptable. For example, a field expecting a number
cannot contain an alphabetic character.
Drop-down lists (see Figure 5.4) look like textboxes
except that they have a square with a downward
pointing arrow to the right of the field. Entries into
these controls are restricted to one of several predefined
responses.
The drop-down list entries can be selected in one of
three ways:
• Left click on the box with the arrow, and then click on the desired response
from the item list that appears.
• Once you have navigated to the control, press the [Alt-↑] key combination to
display the item list, use the [↑] and [↓] keys to highlight the desired response.
• Whenever the entire field is selected (i.e., the entry is in reverse video), you
may begin to type in one of the acceptable responses. As soon as the characters
you type uniquely match one of the acceptable responses, the remainder of the
field will be automatically filled in.
In all of the cases above, navigating from a drop-down list to a new control (e.g.,
pressing either the [Enter] or [Tab] keys) completes the selection. You will not be
allowed to exit a drop-down list unless an acceptable response has been provided,
or you press the [Esc] key to back out of your changes (see Section 5.4, The
Escape Key).
Some drop-down boxes do not require the entry to be one of the predefined
responses. The exceptions are the fields for the Existing Refrigerator and Water
Heater Manufacturer and Model under the Audit Base Loads tab as well as the
fields designating the location of zonal pressure and pressure pan readings under
the Ducts and Infiltration tab of the audits. These fields are a combination of a
drop-down list and a textbox, which lets you select an entry from the drop-down
list as well as allows you to type in entries from the keyboard. However, you will
obtain the data from the database of refrigerators and water heaters only if your
Figure 5.4. A drop-down
list with its item list visible.

The Weatherization Assistant User’s Manual (Version 8.9) 5-5
Chapter 5: Navigation and Data Entry
entry exactly matches one that is in the database. See “Manufacturer and Model” in
Section 11.4, Base Loads – Water Heating, and Section 11.5, Base Loads –
Refrigerators.
A green shaded drop-down list indicates that the selection is being made from a
library of entries, normally from your Supply Library. In such circumstances, the
information provided in the item list includes not only what will appear in the
drop-down list, but most often additional data associated with each item.
When the characters in a textbox or drop-down list are highlighted (displayed in
reverse video), the control is said to be in overwrite mode. Any characters that are
highlighted in a control will be replaced by keystrokes you enter. Any number of
characters can be highlighted by left clicking the mouse while dragging it across
those you wish highlighted.
To switch to insert mode, position the mouse pointer to a location within the
textbox or drop-down list and left click. This will allow you to insert characters
between existing ones. While in insert mode within a textbox or drop-down list, the
[←], [→], [Home], [End], [Backspace], and [Delete] keys retain their traditional
functions of positioning the cursor within the field. Single character highlighting
(replacing only individual characters) can be obtained by pressing the [Insert] key
on your keyboard.
The checkbox (see Figure 5.5) is a small white box in
which a check mark may or may not be visible. If a
check is visible, it implies a response of “Yes” to the
question or statement associated with the box. You
may change the response in a checkbox either by left
clicking the mouse on the box or pressing the [Space]
key whenever the box has been selected (indicated by a dotted rectangle around the
control name).
5.3 Navigating Between Controls
You can use either the mouse or keyboard to navigate among the controls on
forms. You will typically use a mixture of both methods. The mouse is most
intuitive for navigating between forms, menus, and tabs, but you may find the
keyboard [Tab] key or other keys to be quite handy for navigating on forms. This
Figure 5.5. Two checkboxes,
the top one being selected
and with a “Yes” response.

5-6 The Weatherization Assistant User’s Manual (Version 8.9)
Chapter 5: Navigation and Data Entry
may be especially true during lots of data entry when constantly moving between
the mouse and keyboard can be tedious. Experiment and see what methods are
most comfortable for you.
You can point and click the left mouse button on the textbox or drop-down list you
want to edit or the checkbox you want to select. Accessing a textbox or drop-down
list in this manner will automatically put you into the insert mode within the
control, with a vertical line indicating where the next keyboard character will be
inserted.
You can use the [Tab] key and the [Shift-Tab] key combination to cycle through
the controls in forward or reverse order, respectively. These keys will place you in
overwrite mode within a textbox or drop-down list, highlighting its entire contents.
In most cases, the [Enter] key will act in the same manner as the [Tab] key. One
exception is when positioned in a comment field. Here, the [Enter] key is reserved
for moving the cursor to a new line within the comment. The [↑] and [↓] keys will
work the same as the [Shift-Tab] key combination and [Tab] key, respectively,
unless you are in the insert mode within a field, during which the keys will be
inoperative.
5.4 The Escape Key
The [Esc] key is a useful way to back out of your changes. It is similar to an
"undo" command. If you have made changes to a textbox or drop-down list but
have not yet left the control, pressing the [Esc] key restores the value that was in
the control prior to your change. Pressing the [Esc] key twice consecutively (or
only once if you are not in a control) will back out of all changes you have made to
all the controls on a form since you entered it. This can be particularly useful if, for
some reason, entries you have made on a form produce an error in the input that
will not allow you to exit the form. Sometimes identifying the error is difficult and
you are, therefore, prevented from continuing data entry. Pressing the [Esc] key
twice will place the form back to its original state, which was acceptable input.
You will lose the data entered on the form but will be able to continue data entry.
Once you leave a form and navigate to another form, the changes in the former
form are saved and cannot be reversed. Thus, if you have doubts whether many
changes you will make to a record are desired, you might consider making a copy
of the record prior to initiating the changes.

The Weatherization Assistant User’s Manual (Version 8.9) 5-7
Chapter 5: Navigation and Data Entry
5.5 Required Versus Optional Textboxes and Drop-down Lists
Required textboxes and drop-down lists
have a single solid black border around
the entry (see Figure 5.6). If you try to
exit a form with a required textbox or
drop-down list blank, you will be
reminded to complete all required
textboxes and drop-down lists, and the
cursor will be positioned to the first required textbox or drop-down list that is
missing an entry. If you decide NOT to save the record, you can use the [Esc] key
to cancel your changes.
Textboxes and drop-down lists without the solid line border are not necessary for
the Weatherization Assistant to execute or to allow saving the information on the
form. However, the data may be necessary for clarity, record keeping
requirements, or simply identification purposes.
In the remainder of this user’s manual, the description of required entries will end
with “Required” to clearly indicate that they are mandatory and must have an
appropriate value entered in them before you can proceed. Other, non-required
entries will be identified by descriptions that end with “Optional” to indicate that
they may be left blank.
5.6 Field Defaults
Many of the numeric fields in the Weatherization Assistant, especially those under
the Main Menu’s “NEAT” and “MHEA” buttons, have a default value associated
with them. This default value is displayed in the lower left corner of the screen in
the status bar when you enter a field. A short description of the field is provided in
the status bar followed by a set of square brackets (see Figure 5.7). If a default
value has been assigned to this field, it will be displayed in this set of brackets as
“Default xx (TAB on blank field to accept).” If you leave a required numeric field
using the [Enter] or [Tab] keys without having entered a value, the default value
will be automatically entered. You can edit the default values that have been
assigned to the numeric fields by selecting the Range Check and Default Values
tab under the Main Menu’s “Preferences” button (see Section 16.2, Range Check
and Default Values). Some numeric fields have default values that are computed
Figure 5.6. Two textboxes, the first is a
required field and the second is not.

5-8 The Weatherization Assistant User’s Manual (Version 8.9)
Chapter 5: Navigation and Data Entry
from other values you have already entered. An example is the Steady State
Efficiency field on NEAT’s Heating form. Computed defaults override values
entered under Preferences, though either may be replaced by your own entry.
Figure 5.7. A status bar showing the reasonable range and default
value for the Number of Conditioned Stories field.
5.7 Field Range Checking
Numeric fields have range checks applied as soon as you exit the field. There are
two ranges that are checked: the acceptable range and the reasonable range.
The acceptable range
determines if a number
entered is acceptable to
the analysis engine. For
example, it makes sure
that all window
dimensions are positive
numbers. All numeric
entries must fall within
the acceptable range set for each field. If you enter a number outside the acceptable
range for a field, you will get an error message (see Figure 5.8). You will then have
to select the “OK” button to go back to the form to change the data entered in that
field, or to use the [Esc] key to back out of the latest entry and change the entry
back to its previous acceptable value (perhaps a blank field). You will not be
allowed to continue entering data in any other field until you change the entry to an
acceptable value. The acceptable ranges cannot be changed by the user.
The reasonable range checks to see if the number entered falls within a range of
values that might be reasonable for the field in question. For example, for window
dimensions, the reasonable range may be between 4 and 90 inches. The minimum
and maximum values are displayed in the status bar in the lower left corner of the
screen when you enter the field (see Figure 5.7). If you enter a value outside the
reasonable range, you will get a warning message stating that the value is above or
below the reasonable maximum or minimum value, respectively (See Figure 5.9).
You can override the message to enter the value desired by selecting the “OK”
Figure 5.8. Error indicating that a numeric entry is outside the
acceptable range.

The Weatherization Assistant User’s Manual (Version 8.9) 5-9
Chapter 5: Navigation and Data Entry
button. Just be sure to check the
accuracy of the value you entered
if you choose to override the
warning message. Otherwise, you
will need to select the “Cancel”
button to return to the field to
correct the number entered. You
can edit the reasonable minimum
and maximum values that have
been assigned to the individual
numeric fields by selecting the
Range Check and Default Values
tab under the Main Menu’s “Preferences” button (see Section 16.2, Range Check
and Default Values).
5.8 Data Sheet and Form Views of Records
The Weatherization Assistant provides you with the ability to display different
views of your records on many of the forms, so you can select the view that best
suits your needs. Multiple views are available more often for the forms found
under the Main Menu’s “NEAT” and “MHEA” buttons, although they are also
available for some of the forms found under the Main Menu’s “Agency,” “Client,”
“Work Order,” “Setup Library,” and “Supply Library” buttons. There are three
basic views supported, two of which allow you to edit the data displayed or enter
new data in a new record:
• Form View − The form view is the most common view, allowing you to see
and edit all of the information for a particular record, or enter new data into a
blank record. The controls on the form are usually arranged or grouped in ways
that will contribute to your understanding of the information requested. In those
instances when a form has sub-forms, it is normally only in the form view that
all of the sub-form information can also be viewed.
• Navigation Data Sheet View − This view displays a listing of all records of a
particular type in a spreadsheet format (see Figure 5.2). The columns in the
spreadsheet represent the information entered for a given control. Data
displayed in the navigation data sheet view cannot be altered. This view is used
primarily to provide a summary of records and to allow you to navigate to the
Figure 5.9. Warning indicating that a numeric
entry is outside the reasonable range.

5-10 The Weatherization Assistant User’s Manual (Version 8.9)
Chapter 5: Navigation and Data Entry
record you choose. If the number of records is large, you may have to scroll
vertically to see all the records. This view is distinguished from the editable
data sheet view described below by noticing that the information presented in
the navigation data sheet view are all shaded. See Section 5.1, Form and
Record Navigation, for additional relevant discussion.
• Editable Data Sheet View − Like the navigation data sheet view, the editable
data sheet view displays a listing of all records of a particular type in a
spreadsheet format, with the columns in the spreadsheet representing the
information entered for a given control. However, data displayed in the editable
data sheet view can be edited, and data for new records can be entered. If the
number of records is large, you may have to scroll vertically to see all the
records. Typically, the number of controls or columns is too wide to fit on one
screen, so you must also scroll horizontally to view all of the available controls.
In some instances, all of the controls found on a form will not be displayed in
the editable data sheet view.
The forms accessed by the Clients, Audits, or Work Orders tabs under the Main
Menu’s “Agency” and “Clients” buttons are set up to be displayed in the
navigation data sheet view. These forms cannot be displayed in any of the other
two views.
The form view is the default view for all other forms in the Weatherization
Assistant. The editable data sheet view is also available for most of these other
forms (and some sub-forms). These include the Contacts and Cost Centers tabs
under the Main Menu’s “Agency” button, the Contacts tab under the Main Menu’s
“Clients” button, the Measures tab under the Main Menu’s “Work Orders” button,
and many of the tabs under the Main Menu’s “NEAT” and “MHEA” buttons.
Before you use the editable data sheet view exclusively, you should view records
in both the form view and the editable data sheet view until you become familiar
with the contents of each record type.
It is often helpful to temporarily switch from form view to editable data sheet view
to see all of your records for a given type. To switch from form view to editable
data sheet view, right click anywhere on the form but not inside a control. A
rectangular "Subform Datasheet" pop-up window will appear. Left click on the
rectangular window and the view will change to the data sheet view. To change
back to form view, position your cursor on the record you are interested in seeing

The Weatherization Assistant User’s Manual (Version 8.9) 5-11
Chapter 5: Navigation and Data Entry
in form view, then right click your mouse. The same "Subform Datasheet" window
will appear. Left click on the rectangular window and you will be taken to the form
view for that particular record.
The editable data sheet view also allows you to easily change all the entries in a
given control. For example, if you wanted to change the Frame Type of all
windows in a NEAT audit, place the Windows form under NEAT’s Shell tab into
the data sheet view, locate the Frame Type column, and then simply type in the
first letter of the desired frame type in the drop-down list as you use the down
arrow key to travel down the column. This allows the automatic fill feature of the
drop-down list to complete the entry. Instead of entering the first letter of the
desired frame type, you could change the entry in the first record (or make sure it is
correct) and then use the [Ctrl-‘] (control-apostrophe) key combination in
subsequent records to copy the contents of the control from the previous record
(which, in the data sheet view, is the field immediately above) into the current
record.
The data sheet view is also handy for sorting the list of records shown. Click your
mouse on the title header of the column of data that you want to sort the records by
to display the entire column in reverse video. Then select either the “A-Z” or “Z-
A” buttons on the main application tool bar at the top of the application’s window
to sort the records in alphabetical or reverse alphabetical order, respectively. You
can sort the records using multiple columns by selecting multiple adjacent columns
in the data sheet. Just click and drag in the column header to select multiple
columns. The sort order is determined by the position of the selected columns,
from left to right. The ordering of columns can be changed by highlighting a
column(s) then clicking and dragging the column to a new position. Several of the
left most columns cannot be re-ordered because they are considered to be
identifying information for the records. Column widths can be adjusted by
dragging the column header borders. All column width and position settings affect
only the current data sheet view. When you close the form, the original column
widths and order will be restored.
A few specialized data sheet views will not allow sorting by multiple columns. In
these data sheets, selecting an entire column of data will turn the “A-Z” and “Z-A”
buttons grey, making them un-accessible. Instead, place your cursor in any single
record of the type you wish to sort on. Then select either the “A-Z” or “Z-A”
buttons.
5-12 The Weatherization Assistant User’s Manual (Version 8.9)
Chapter 5: Navigation and Data Entry
You may also “filter” the records when displayed in the editable data sheet view.
Filtering forces the display of only those records that have a specified value for a
given data item. For example, if one of the columns displayed the city in which the
clients dwelt, you could choose to display only records for clients who lived in one
specified city. To do so, click your mouse on any city entry of the particular city
you are interested in, and then click on the filter button ( ) at the top of the
window. Your display will then include only those clients from the city selected.
Be careful when using filtering. If you forget that your display of records is
filtered, you may wonder what happened to some records you would otherwise
expect to see in the display. To cancel filtering, select the remove filter button ( ).
5.9 Copying and Pasting Data
Data records are normally copied while in the form view using the “Copy” button
in the record navigation blocks (see Section 5.1, Form and Record Navigation).
When this technique is used to create a copy of a record, you will be placed
immediately into the form view for the new record. Most often, records have a data
field that must be unique among all of the records of the specific type (e.g., the
Client ID or the Audit Name). Whenever the “Copy” button is used to copy such a
record, the copy process will provide you with a default entry for this data field
that is unique (a significant advantage compared to the method of copying records
while in the editable data sheet view describe below). In addition, your cursor will
be positioned at this data field, with the field in reverse video, allowing you to
immediately change the default entry to a value or name that makes more sense to
you.
The process of copying a record while in the editable data sheet view is different.
You must first select the record you wish to copy by clicking the record selection
box at the very left of the record you wish to copy. This will display the entire row
of data in reverse video. Copy the information in this record to a temporary
location (referred to as the “clipboard” in most computer applications) by either
entering the [Ctrl-C] key combination, selecting the “Copy” button (displayed as
two small overlapping sheets of paper) from the toolbar at the top of the
application window, or selecting the Edit/Copy menu items from the menu bar at
the top of the application window. Select the blank record row by clinking the
record selection box with the asterisk (“*”) in it. This will place the entire blank
record row into reverse video. Finally, paste the copied record into the blank record
by either entering the [Ctrl-V] key combination, selecting the “Paste” button

The Weatherization Assistant User’s Manual (Version 8.9) 5-13
Chapter 5: Navigation and Data Entry
(displayed as a clipboard with a small sheet of paper) from the toolbar at the top of
the application, or selecting the Edit/Paste menu items from the menu bar at the top
of the application window. This method of copying records does not provide you
with default unique entries for those fields that must be unique. Therefore,
immediately after pasting the copied record into the blank record row, you must
provide a new unique entry yourself before proceeding.
Data presented in the data sheet view or any similar tabular format within the
Weatherization Assistant can be copied and then pasted into an equivalent data
range within the Weatherization Assistant. For example, you might want to copy
the fuel prices from one setup library to another. To do this, go into the Fuel Costs
tab of the setup library that you want to copy the fuel costs from. Click your mouse
on the Unit Cost column header so that the entire column becomes displayed in
reverse video. Use one of the techniques described above to copy this data to your
computer’s clipboard. Then, go to the Fuel Costs tab in the setup library that you
want to paste the costs into. Select the Unit Cost column as before, and use one of
the techniques described above to paste the copied data into this column. The
existing fuel costs will be replaced with those that you copied. Care must be taken
to always copy and paste the same amount and type of data.
Data presented in the data sheet view or any similar tabular format within the
Weatherization Assistant can also be copied and then pasted into another Windows
application. For example, the fuel costs copied above could also be pasted into
Microsoft Excel. After copying the desired fuel costs, open the Excel application
and position your cursor in the cell where you want the upper left corner of the
data to be located. A single paste instruction will paste all of the copied data into
the spreadsheet. You may need to adjust column widths to properly display the
data, after which you can print the data from Excel.
The data entered in a single control or field can be copied and pasted, but make
sure both controls or fields are the exact same type. To select the data to be copied,
click and drag the mouse over the contents of the control or field, or use the [Tab]
key to enter the field. Either way, the contents of the control or field will become
highlighted and selected. Alternatively, if the control or field has only one word in
it, you can simply double click on the control or field to highlight and select it.
Then, use the copy and paste techniques described above to complete the process.

5-14 The Weatherization Assistant User’s Manual (Version 8.9)
Chapter 5: Navigation and Data Entry
You can also use the [Ctrl-‘] (control-apostrophe) key combination when you are
in a control or field to copy the contents of the same control or field from the
previous record. This is particularly useful in the data sheet view when you want to
make a copy of the field directly above the current field in the same data sheet
column. See Section 5.8, Data Sheet and Form Views of Records, for more details.
5.10 Deleting Data
Once you have become familiar with all the techniques of selecting data described
in the Section 5.9, Copying and Pasting Data, deleting data becomes relatively
simple. To delete data in a single control, select the data you wish to delete and
then either press the [Delete] key on your keyboard, select the “Cut” button
(displayed as a pair of scissors) from the toolbar, or select the Edit/Cut menu items
from the menu bar. Any deletion of data from a drop-down list must be replaced by
another selection available from the drop-down list.
To delete an entire record while in form view, use the “Del” button in the record
navigation block. This will delete the entire record currently accessed and of the
type indicated by the navigation block. After hitting the “Del” button, the
Weatherization Assistant will prompt you to make sure you really intend to delete
the current record. When you delete a record, you also automatically delete all of
the unique records that fall under it (called cascading deletes). For example,
deleting a client record deletes all audits, work orders, and reports associated with
that client, but it would not delete the setup and supply libraries associated with the
client. A special case occurs in deleting setup or supply libraries. The
Weatherization Assistant will not allow you to delete any library that is referenced
by any agency, client, audit, or work order. You first have to reassign any of these
references to another library before you can successfully delete it (see Section
5.14, The References Button).
To delete an entire record while in the editable data sheet view, click on the record
selection box on the left of the record you wish to delete to display the entire row
of data in reverse video. Then, use one of the three techniques described above to
delete the data.
You can use the editable data sheet view to delete multiple records. Use the sorting
feature of this view to make those records you wish to delete appear together.
Select multiple records by moving the cursor to the record selector on the left side

The Weatherization Assistant User’s Manual (Version 8.9) 5-15
Chapter 5: Navigation and Data Entry
of the data sheet for the first record you wish to delete (the cursor will change to a
right arrow), and then clicking and dragging the mouse across the record selectors
until the records you want to delete are all highlighted. Press the [Delete] key, or
use one of the other deletion methods described above. The Weatherization
Assistant will ask you if you are sure you want to delete the number of records
selected.
The Water Heating and Refrigerators forms found under the Main Menu’s
“NEAT” and “MHEA” buttons do not have a record navigation box in the form
view and do not have an editable data sheet view available. If you have entered
data on these forms and later wish to delete it, select the “Del” button at the lower
left of the form. After confirming your intent to delete the record, the form will be
blanked out. Choosing the “New” button, also in the lower left corner of the form,
will not delete the entries on the form, but simply place your cursor in the
Manufacturer field, preparatory to your selecting a different record from the
database.
5.11 Entry Errors
The Weatherization Assistant may detect a data input error once the entry has been
made or after you have selected the “Run Audit” button to run an audit. The error
messages provided can be fairly descriptive, allowing you to clearly identify the
problem. For drop-down lists, the most common error message is “The text you
entered isn’t an item in the list,” indicating that you did not select one of the pre-
designated items from the drop-down list. Another possible data entry error
message is “The value you entered isn’t valid for this field.” This would most
likely occur because you accidentally input an alphabetic character rather than a
numeric entry.
Occasionally, you may not completely understand the entire error message.
However, the message may refer to a “table” that is causing the problem. The
name of the table will lie in single quotes and will be the name that appears after
“tbl.” For example, an error message that refers to “tblAgency” is indicating a
problem with a data entry in the Agency table. The table names generally coincide
with the names found on the various tabs used within the Weatherization Assistant.
Therefore, if you are fairly familiar with the Weatherization Assistant, you may be
able to identify the form within the Weatherization Assistant that is creating the
problem. For example, “tblAgency” refers to a problem with the Agency table that

5-16 The Weatherization Assistant User’s Manual (Version 8.9)
Chapter 5: Navigation and Data Entry
is associated with the Agency Information form found under the Main Menu’s
“Agency” button. In such instances, locate the form, examine the entries, and try to
determine which entry does not conform to the requirements given in this manual.
5.12 The Report Block
A Report block (see Figure 5.10)
appears in the lower right corner on
the Information tabs under most of
the Main Menu buttons: Agency,
Clients, NEAT and MHEA Energy
Audits, Work Orders, Setup and
Supply Libraries.
The “Select Report” drop-down list in each Report block provides you with a list
of all the reports available to you for the program segment you are currently
accessing. Examples of all the standard reports provided with the Weatherization
Assistant are shown in Appendix C, Reports. If you are familiar with Microsoft
Access, you may be able to develop your own customized reports and add them to
the report list following the procedures outlined in Appendix D, Development of
Customized Reports. Choose the report you want to access using the standard
mechanics for drop-down lists (see Section 5.2, Entering Data into the
Weatherization Assistant).
The “Preview” button in the
Report block displays the
selected report as it would
appear if printed. A standard
Access toolbar will appear at
the top of this display (see
Figure 5.11). Three buttons on the toolbar allow you to display varying numbers of
pages of the report. Each button looks like a single dark colored rectangle with
light colored pages in it. A single page indicates viewing one page at a time, two
pages side by side allows you to view two pages at one time, and the button with
four small pages allows you to choose from an additional six predefined layouts.
Depending on the resolution you have chosen for your graphics, many of these
displays will not have large enough text to read. Clicking the mouse while
positioning your cursor at a location on the display will enlarge the view about that
Figure 5.10. The Report block from the Client
Information form.
Figure 5.11. The Access report toolbar.

The Weatherization Assistant User’s Manual (Version 8.9) 5-17
Chapter 5: Navigation and Data Entry
point. You may also use the Zoom drop-down box, seen with “Fit” selected in
Figure 5.11, to select a magnification.
Also on the toolbar is a print button, normally at the extreme left of the toolbar.
Select this button to print the report using your default printer. You may also use
the [Ctrl-P] key combination to display the Windows Print screen and print the
report from there. This form allows you to select other printers you may have
installed, choose which pages to print, and allows you to use other print options as
well. If you have the PDF software, one of the printers available will be the PDF
generator. Selecting this will save the report as a PDF file that can be distributed
via most electronic media.
The right-most button on the toolbar is the “Output to Notepad” button. Select this
button to export the report to a pure ASCII text file and display it in Notepad (a
Windows application). From there, the file may be saved to any location on your
computer with any file name you wish. It may also be edited as any other text file,
attached to e-mails, etc.
Close the report display using the “Close” button on the toolbar. The standard
Windows closure X-box in the upper right of the display may also be used for this
purpose, but care must be taken to select the closure X-box associated with the
report display, since other windows may also be open at the same time with their
own closure X-boxes.
The “Print” button on the Report block acts the same as the “Preview” button
except it automatically presents you with the Windows Print screen in addition to
displaying the report.
The “Snapshot File” button on the Report block also displays the report, but only
after creating a snapshot file and indicating the location where the snapshot file
was placed on your computer (e.g., “Snapshot output file created: C:\Program
Data\Weatherization Assistant 8-9\output\NAuOut-01.snp”). The filename is a
default name that you may change using standard Windows procedures. A
“Snapshot” file is a file formatted specifically for the “Snapshot” computer
application. If you do not have this software on your computer, this option may not
be of much use to you.

5-18 The Weatherization Assistant User’s Manual (Version 8.9)
Chapter 5: Navigation and Data Entry
5.13 Getting Help
You can get help anywhere within the Weatherization Assistant by pressing the
[F1] key. The help material will usually be specific to the current control (textbox,
drop-down list, or checkbox) that you are on. If help material for that specific
control is not available, the Weatherization Assistant will display help material for
a more general topic associated with the specific form that you are on.
The right pane of the help window will display the title of the help material in bold
letters at the top with the help material underneath. The left pane of the window
will contain one of three displays, depending on the tab chosen for the pane. The
Contents tab displays a listing of all help topics available in the Weatherization
Assistant. You can choose topics by browsing through the expandable Contents
tree. Just double click on a topic in the tree to reveal any sub-topics associated with
the main topic. The Index tab allows you to find topics by keywords, arranged in
alphabetical order. If more than one help topic matches the word chosen, a sub-
window will appear allowing you to choose which of the topics you want to view.
You can also use the Search feature to search for a particular topic. Type a word in
the field supplied and the Weatherization Assistant will search for all occurrences
of that word in the help material.
Hypertext items (i.e., highlighted help text that you see in a different color) are
found in some of the help material that provide you with more information on that
topic or word. Move the mouse cursor to the highlighted word(s) and press the left
mouse key to see this additional information.
The tabs to select these alternate help features may be hidden by selecting the
“Hide” button at the top of the window. If you have viewed multiple topics during
a single help session, you can use the “Back” button to go back to previous topics.
The “Print” button allows you to print the material currently displayed. The
“Options” button provides some additional options that may be of use.
Exit the help form and return to the main program by clicking on the X-box in the
upper right corner. A blank “Weatherization Assistant 8-9 Help” window may
persist. Use that window’s X-Box to completely exit the help application.

The Weatherization Assistant User’s Manual (Version 8.9) 5-19
Chapter 5: Navigation and Data Entry
5.14 The References Button
“References” buttons exist on several forms in the Weatherization Assistant: the
Contacts and Cost Centers tabs under the Main Menu’s “Agency” button; beneath
the banner line in the “Setup Library” window and under the Fuel Costs tab, both
under the Main Menu’s “Setup Library” button; and beneath the banner line in the
“Supply” window under the Main Menu’s “Supply Library” button. When selected
from any of these locations, you are presented with a navigation data sheet
window, each row listing a separate reference to the record accessed on the parent
form (see Figure 5.12). The location of each reference is identified by the record
type and the name you assigned the record. Some entries list multiple record types
with the names of the records in successive columns in the table for the entry to
further help you locate the reference.
The entries may be sorted or filtered (see Section 5.8, Data Sheet and Form View
of Records). Entries can be hidden from view by using the same process described
in Section 5.10, Deleting Data. From this form, however, no records are actually
deleted. They will reappear the next time the window is opened. You can navigate
directly to any record displayed by placing your cursor in the cell containing the
name of the record you wish to access and double clicking your mouse.
The “Clear the References Listed Above” button at the lower left corner of the
window will clear the reference being accessed from all of the records in the table.
Be careful in using this feature. For example, if you clear the references to a setup
library, any audits that had referenced the setup library will no longer run, though
the audits and their recommendations will remain. However, you will no longer
know what setup library was used in making the recommendations. Once this
operation is performed, there is no way to undo it without going into each
individual record and making the assignment manually. You may selectively clear
references by hiding records you do not wish to be involved in the operation from
the table before selecting the “Clear the References Listed Above” button.
You may wish to change the references in the records listed in the table to another
reference of similar type. The drop-down list at the middle of the bottom of the
window contains possible alternate references available for this reassignment. For
example, you can change the auditor assigned to a group of audits. Thus, in
viewing the references to a specific agency contact, the drop-down list will contain
all agency contacts. Make your selection from the drop-down list and click on the

5-20 The Weatherization Assistant User’s Manual (Version 8.9)
Chapter 5: Navigation and Data Entry
“Change the References Listed Above to this new value” button. A selective
reassignment may be accomplished by first hiding or filtering out from the table
the records you do not wish to be reassigned.
Figure 5.12. The “References to Setup Library:” window.

The Weatherization Assistant User’s Manual (Version 8.9) 6-1
Chapter 6: Agency
Chapter 6. Agency
The Agency is the highest level record type within the Weatherization Assistant.
Thus, all other records (Clients, Audits, Work Orders, etc.) must be associated with
an Agency level record. Information related to your agency is organized under the
Main Menu’s “Agency” button (see Figure 3.1).
The minimum agency information necessary to operate the Weatherization
Assistant is already supplied by the program at installation; namely, an Agency
Name and State. As discussed in Section 3.2, Program Setup, you should edit this
information to tailor it to your agency unless you are setting up a new installation
of the Weatherization Assistant by importing agency information from previous
versions (see the introductory discussion associated with Chapter 3, Setting Up the
Weatherization Assistant). You should also provide additional information about
your agency as needed before substantial use of the Weatherization Assistant.
The remainder of this chapter is divided into sections describing the data and
display items entered on each of the forms seen under the Main Menu’s “Agency”
button: Agency Information, Contacts, Cost Centers, Surveys, Clients, Audits,
Work Orders, Libraries, and Status History. All but the first and last of the tabs
associated with these forms have a number in parentheses following the tab name.
These numbers indicate the number of records entered for each particular form for
the agency currently selected. For example, in Figure 6.1, there are 12 client
records and 7 audit records entered for the Demonstration Agency.
6.1 Agency Information
The Agency Information form (see Figure 6.1) allows you to enter general
information about your agency. It also allows you to view and navigate to other
agencies in your database, and to access agency level reports. Below are brief
descriptions of the individual data items and controls found on the Agency
Information form:
• Agency Name – Enter the name of the agency being described. The entry is one
of only two required data items on the Agency Information form. The entry
may be up to 80 characters in length. The name must be unique. Required.

6-2 The Weatherization Assistant User’s Manual (Version 8.9)
Chapter 6: Agency
Figure 6.1. The Agency Information form under the Main Menu’s “Agency” button.
• State – Select the state in which the agency is located from the entries in the
drop-down list. Required.
• Agency Type – Select the entry that best describes what type of agency this is.
The choices are Local Community Action Agency, Tribal Organization, Unit of
Local Government, or Other. Optional.
• Federal Grant # – Enter the Federal Grant Number under which the agency
performs Weatherization Assistance Program work, as seen on the DOE
Program Application Forms. Optional.
• EIN – Enter the Federal Employer Identification Number assigned by the U.S.
Internal Revenue Service to this agency, as entered on the Financial Status
Reports of the DOE Program Application Form. Optional.
• Other ID Num – Enter any additional identification descriptor (numbers and/or
letters) for this agency which may be of use to you or your state. The entry must
be 50 characters or less. Optional.
• Comment – You may enter comments directly in the Comment field on the
form, or you may enter them in the Comment Editor by selecting the
“Comment” button to the left of the field. The Comment Editor is similar to

The Weatherization Assistant User’s Manual (Version 8.9) 6-3
Chapter 6: Agency
Window’s Notepad and may be used to enter extended comments. The total
comment may have up to 65,000 characters. Text from other sources may be
copied and pasted into the Comment Editor’s window. The Agency Comment is
not displayed anywhere else in the Weatherization Assistant or in any of its
predefined reports. However, you may wish to include the comment in a user-
designed report (see Appendix D, Development of Customized Reports).
Optional.
• Address, City, State, and Zip Code – Enter the complete mailing address for
the agency. Optional.
• Phone and Fax Numbers – Enter a primary phone and fax number that others
should use to contact the agency. Numbers for individuals within the agency
may be separately recorded under the Contacts tab as, discussed in Section 6.2,
Contacts (Agency). Optional.
• E-Mail – Enter an e-mail address that others should use to contact the agency.
The Weatherization Assistant has the ability to e-mail client records from
within the program. Setting up this feature will require you to enter this or
another agency e-mail address (see Section 18.4, E-Mailing from Within
Weatherization Assistant). Optional.
• Web Page URL – If the agency has a web site, enter its URL in this field.
Optional.
• Default Agency – If selected, this checkbox indicates that the agency being
described on the remainder of the form will be automatically associated with
any new Client, Work Order, Setup Library, and Supply Library records
created. Only one agency can be selected as the “Default Agency.” Thus,
selecting this checkbox for this agency will automatically uncheck it for any
other agency.
• Agency Record Navigation Block – The Agency record navigation block is
used to find and navigate to agency records for other agencies that have been
entered, copy or delete the currently accessed agency, or create a new agency.
These would not be a common activities because normally an agency has only
one agency record. See Section 5.1, Form and Record Navigation, for
information on using the Weatherization Assistant’s record navigation blocks.

6-4 The Weatherization Assistant User’s Manual (Version 8.9)
Chapter 6: Agency
• Report Block – The Report block provides you with access to all reports
available under the Main Menu’s “Agency” button. See Appendix C, Reports,
for examples of these reports. The following reports are currently available:
Quarterly Program Report (the unit production portion of the DOE Quarterly
Program Report), Scheduled Audits (for NEAT and MHEA), Open Work
Orders, and Economic Summary by Client, Client Surveys (Blank), and Work
Order Totals by Category. See Section 5.12, The Report Block, for information
on the mechanics of using the Weatherization Assistant’s Report blocks.
Appendix D, Development of Customized Reports, describes a method to create
reports tailored to your needs and to list the reports in the Report block.
• Select Clients – If reports selected in the Report block require the selection of
specific clients to be included in the report, the forms accessed from the “Select
Clients” button are used to make this selection. Currently, none of the
predefined reports at the Agency level require such a selection, although a
customized report that you develop might. Transfer of client data between
computers using text files requires this same client selection process. See
Section 17.5, Selecting Client Records, for information on how to use the Select
Clients feature.
If the Weatherization Assistant’s Geographic Information System (GIS) feature
has been turned on, you can select a group of clients using the forms accessed
from the “Select Clients” button and display their locations on a map. Refer to
Section 17.5, Selecting Client Records, as well as Section 18.2, Geographic
Information System (GIS), for additional information on this mapping option.
6.2 Contacts (Agency)
The Contacts form under the Main Menu’s “Agency” button (see Figure 6.2)
allows you to enter information on any person associated with the currently
selected agency, including auditors, contractors, crew members, and suppliers. You
can enter as many contacts as needed. If you have enabled the User Logon or
Check-in/Check-out features (see Features 4 and 10 in Section 16.4, Features), you
will have to enter users of the Weatherization Assistant. If you want to track work
orders by contractor or add suppliers to your supply libraries, then you will have to
enter these contacts as well. The Contacts form may be viewed and edited in the
data sheet view, which provides a summary of all contacts already entered for the
agency or allows quick changes to multiple entries. Below are descriptions of the

The Weatherization Assistant User’s Manual (Version 8.9) 6-5
Chapter 6: Agency
individual data items and controls found on the Contacts form under the Main
Menu’s “Agency” button:
Figure 6.2. The Contacts form under the Main Menu’s “Agency” button.
• Contact Name – Enter the name of the contact. You may enter the name with
the given name first and the surname last, or with the surname first followed by
a comma and then any given names. After you have entered the name and
moved to another control, the Weatherization Assistant will automatically fill in
the uneditable Name Detail fields (i.e., First, MI, and Last) to show you how the
program sees the name that you have entered. If you are basically trying to enter
the name of a company (e.g., a supplier of materials), you should enter the
name of your primary contact within that company and then provide entries for
the User Name and Company fields. Suppliers and contractors listed in drop-
down lists in other parts of the Weatherization Assistant are identified by these
User Name and Company fields rather than the Contact Name for a person
within the company. The name must be unique. Required.
• User Name – Enter a short User Name (initials perhaps) that can be used to
identify the contact. In some lists and reports, space does not permit displaying
the full Contact Name, so the list or report will use the User Name to identify
the contact instead. Be sure to use short User Names to make forms and reports

6-6 The Weatherization Assistant User’s Manual (Version 8.9)
Chapter 6: Agency
more readable. If the User Logon feature is enabled (see Feature 4 in Section
16.4, Features), a valid User Name and password will be required to use the
Weatherization Assistant. The name must be unique. Required.
• Active – This checkbox indicates if the contact is currently active with the
weatherization program. Only contacts who are active will appear in
appropriate drop-down lists throughout the program. See also the description
for the Auditor, Contractor, Crew, and Supplier checkboxes provided below.
• References – Selecting this button displays the “References to Agency
Contact” window, which lists all references to the contact currently being
accessed. See Section 5.14, The References Button, for more information on the
use of this feature.
• Company – Enter the company for whom the contact person works. Drop-
down lists of contractors and suppliers used elsewhere in the Weatherization
Assistant will identify the contact by the Company entry, as well as the User
Name and/or Contact Name. Required.
• Auditor, Contractor, Crew, and Supplier – These checkboxes indicate
whether the contact person holds any of the positions indicated. Contacts who
are Auditors will be included in the drop-down list for the Auditor field on the
Audit Information form under the Main Menu’s “NEAT” and “MHEA” buttons
(see Section 8.2, Audit Information). Contractors and Crews may be assigned to
Work Orders (see Sections 13.1, Work Order Information, 14.5, Library
Measures, and 14.6, User Defined Measures) and Suppliers may be listed as
sources of inventoried items in the Supply Library (see Section 15.2,
Materials/Labor Forms). These listings will occur only if a particular contact is
declared as “Active” as described above.
• EIN – Enter the Federal Employer Identification Number of the company with
whom the contact is associated, as assigned by the U.S. Internal Revenue
Service. Optional.
• Title – Enter any title that may help describe the contact, such as “manager,”
“appliance manager,” “crew chief,” or “monitor.” This title will not appear in
lists of contacts used throughout the Weatherization Assistant. Optional.

The Weatherization Assistant User’s Manual (Version 8.9) 6-7
Chapter 6: Agency
• Address, Unit Number, City, State, and Zip Code – Enter the complete
mailing address for the contact. Optional.
• Work, Cell, Pager, Fax, and Home Phone – Enter any of the indicated phone
numbers for the contact. Optional.
• E-Mail – Enter an e-mail address for the contact. The Weatherization Assistant
has the ability to e-mail client records from within the program. Entering an e-
mail address on the Contacts form will automatically enter this contact and their
e-mail address in the Address Book of this feature (see Section 18.4, E-Mailing
from Within Weatherization Assistant). Optional.
• Web Page – If available, enter the URL for this contact’s web site. This could
be particularly useful, for example, if the contact is a supplier whose web site
contains a catalogue of available items. The web site may be accessed directly
from the Contacts form by clicking your mouse on the address. Optional.
• Comment – You may enter comments directly in the Comment field on the
form, or you may enter them in the Comment Editor by selecting the
“Comment” button to the left of the field. The Comment Editor is similar to
Window’s Notepad and may be used to enter extended comments. The total
comment may have up to 65,000 characters. Text from other sources may be
copied and pasted into the Comment Editor’s window. Comments entered on
the Contacts form are not displayed anywhere else in the Weatherization
Assistant or in any of its predefined reports. However, you may wish to include
the comment in a user-designed report. Optional.
• Change LogOn Group and Password − If the User Logon feature is enabled
(see Feature 4 in Section 16.4, Features), only contacts who have been entered
under the Contacts form on the Main Menu’s “Agency” button and assigned
LogOn passwords will be able to open the Weatherization Assistant. In
addition, only contacts who have been entered under the Contacts form and
assigned a password can be identified as making a change to one of the
Weatherization Assistant’s status categories (see Section 18.3, Status Tracking).
Select the “Change LogOn Group and Password” button to obtain the User
Group and Password sub-form to input the required password information (see
Figure 6.3). Assign the contact to a User Group, either User or Admin. Contacts

6-8 The Weatherization Assistant User’s Manual (Version 8.9)
Chapter 6: Agency
who are Users will be able to create new
records and edit existing ones, but will
not be allowed to delete client, audit, or
work order records. In addition, a User
cannot change the settings on the
Features tab found under the Main
Menu’s “Preferences” button. Contacts
who are assigned to the Admin group
have full capabilities, including deletion
of all records. If the contact does not
currently have a password, you only need to enter a new password in the New
Password and Confirm New Password fields. Otherwise, enter the contact’s
existing password in the Confirm Old Password field before entering a new
password in the other two fields. Select the “Apply New Password” button
when you are finished to complete the process. If the User Logon feature is not
turned on, there are no restrictions enforced in the Weatherization Assistant and
every user is considered to be in the Admin User Group.
• Agency Contact Record Navigation Block – The Agency Contact record
navigation block is used to find and navigate to existing agency contacts, copy
or delete the currently accessed contact, or create a new contact. See Section
5.1, Form and Record Navigation, for information on using the Weatherization
Assistant’s record navigation blocks.
6.3 Cost Centers
The Weatherization Assistant gives you the option of assigning the cost for each
individual weatherization measure that is recommended and/or installed to a
different cost center or funding source (see Sections 11.11, Measures (Audit); 13.3,
Measures (Work Order); and 14.5, Library Measures, for more details). If you use
this option, the Weatherization Assistant will track expenditures by cost center and
provide you with summaries. If you enter the funding received or allocated to each
cost center, the Weatherization Assistant will also provide you with summaries of
the balance of funds remaining for each cost center. The Cost Centers form under
the Main Menu’s “Agency” button (see Figure 6.4) is used to set up these cost
centers, enter the funding received for each cost center, and view summaries of
expenditures and balances. Below are descriptions of the individual data items and
controls found on the Cost Centers form under the Main Menu’s “Agency” button:
Figure 6.3. The User Group and
Password sub-form.

The Weatherization Assistant User’s Manual (Version 8.9) 6-9
Chapter 6: Agency
Figure 6.4. Cost Centers form under the Main Menu’s “Agency” button.
• Cost Center Name – Enter the name of the cost center that you are setting up.
Usually this name identifies the source providing the funds for this cost center
(e.g., the DOE Weatherization Program, LIHEAP, PVE, utility program, etc.).
The name must be unique. Required.
• Active – This checkbox indicates whether the cost center is currently available
to fund work. If the cost center is active, then it will appear in the drop-down
lists found elsewhere in the Weatherization Assistant which assign
recommended or installed measures to cost centers. If the cost center is not
active, then it will not appear in these drop-down lists.
• References – Selecting this button displays the “References to Agency Cost
Center” window, which lists all references to the cost center currently being
accessed. The entries will include all instances where a measure whose cost has
been assigned to the cost center has been recommended by an audit, any work
order that includes the measure, as well as all measures whose costs have been
pre-assigned to the cost center in a setup library (see Section 14.5, Library
Measures). See Section 5.14, The References Button, for more information on
the use of the References feature.

6-10 The Weatherization Assistant User’s Manual (Version 8.9)
Chapter 6: Agency
• Cost Center Type – Indicate the type of funding source for this cost center.
The options are DOE, Other funds included in grant budget, or Other funds not
included in grant budget. Optional.
• Program Year − Enter the program year for which the funding and/or
expenditures in this cost center are being tracked. If you want to track the same
cost center by individual program years, you will need to set up a separate cost
center for each year. For example, if you want to track DOE Weatherization
Assistance Program funds over the 2008 and 2009 program years, you might
create a cost center called “DOE 2008” and another called “DOE 2009.” The
entry does not allow a range of years to be entered. If such is your need, you
might enter the beginning year in this field, then the expected span in the
Comment field. Optional.
• Description – Enter any additional description you may need to identify this
cost center. Optional.
• Comment − You may enter comments directly in the Comment field on the
form, or you may enter them in the Comment Editor by selecting the
“Comment” button to the left of the field. The Comment Editor is similar to
Window’s Notepad and may be used to enter extended comments. The total
comment may have up to 65,000 characters. Text from other sources may be
copied and pasted into the Comment Editor’s window. Comments entered on
the Cost Centers form are not displayed anywhere else in the Weatherization
Assistant or in any of its predefined reports. However, you may wish to include
the comment in a user-designed report. Optional.
• Cost Center Financial Summary Table − These fields are displayed on the
Cost Center form in a table format. They summarize the income and
expenditures for the cost center being referenced. The numbers in the “Actual”
column are those debits or credits that have been declared as “Cleared” under
the “Show Fund Transactions” button (see below) or that are listed as “Actual”
expenditures on a work order (see “The Materials/Labor Details Sub-Form” in
Section 13.3, Measures (Work Order), for details). The numbers in the
“Expected” column include those in the “Actual” column as well as debits or
credits that have been entered into the Transactions form but have not yet been
“Cleared” and “Estimated” costs from active work orders that have not yet been
declared “Actual.” Uneditable.

The Weatherization Assistant User’s Manual (Version 8.9) 6-11
Chapter 6: Agency
The first three rows in the summary table show totals based on entries made
under the “Show Fund Transactions” button (see below). The “Total Funds In”
row lists the total funding received by or allocated to the cost center. The “Total
Non Work Order Costs” row lists the total costs charged to the cost center that
are not related to or accounted for in any work order. For example, these costs
may be for overhead, administration, or training. The Total Available Funds
row is simply the difference between the Total Funds In row and the total Non
Work Order Costs row.
The Total Work Order Costs row lists the total costs from all work orders that
have not been canceled. The individual entries that make up these totals may be
viewed under the “Show Work Order Costs” button (see below). The Balance
row displays the balance for the cost center (i.e., the difference between the
Total Available Funds row and the Total Work Order Costs row).
• Show Fund Transactions − The individual entries that comprise the Total
Funds In and the Total Non Work Order Costs in the cost center financial
summary table are entered, edited, and displayed in the sub-form accessed by
selecting the “Show Fund Transactions” button (see Figure 6.5). Enter the date
of the transaction in the first column and a description of the transaction in the
second column. Credits (allocations or income to the cost center) are entered in
the third column while non-work order related debits (costs) are entered in the
fourth column. Anticipated credits and debits may be entered. They will only
affect totals under the “Expected” column on the financial summary table until
the Cleared checkbox has been selected. Enter any comment associated with the
transaction. Double clicking on the Comment field will bring up the Comment
Editor permitting entry of extended length comments, if necessary. This sub-
form cannot be viewed in the standard form view.
Figure 6.5. The Show Fund Transactions (or Cost Center Funds) sub-form.

6-12 The Weatherization Assistant User’s Manual (Version 8.9)
Chapter 6: Agency
• Show Work Order Costs − An itemized listing of work order costs that
comprise the Total Work Order Costs in the financial summary table are
displayed in the sub-form accessed by selecting the “Show Work Order Costs”
button (see Figure 6.6). This sub-form is “READ ONLY.” No entries can be
edited.
Figure 6.6. The Work Order Costs table under the Agency/Cost Centers tab.
Shown in their respective columns of entries are the Client ID of the client for
whom the work is being performed, the specific work order under which the
cost was incurred, the measure within the work order whose cost is being listed
preceded by the order number of the measure within the work order, the
estimated cost for the measure, and the actual cost for the measure if one has
been entered. The “ActCost” entries on this sub-form are included in both the
“Actual” and “Expected” entries of the financial summary table, whereas the
“EstCost” costs are included in only the “Expected” totals of the financial
summary table.
Modifications to the entries displayed in the sub-form can only be made in the
respective work orders that generated the costs. The headers for the Client,
Work Order, and Measure columns are in angle brackets (<>). This implies that
the actual client, work order, or measure may be accessed directly by double
clicking on the record’s entry in the form. If this technique of editing any of
these records is used, it is highly recommended that you exit the record after
making the modifications and return to the Work Order Measure Costs sub-
form before navigating to other forms. Having too many inter-related forms
open at the same time in the Weatherization Assistant can confuse the software
and result in abnormal behavior and warnings.

The Weatherization Assistant User’s Manual (Version 8.9) 6-13
Chapter 6: Agency
• Cost Center Record Navigation Block – The Cost Center record navigation
block is used to find and navigate to existing cost centers, copy or delete the
currently accessed cost center, or create a new cost center. See Section 5.1,
Form and Record Navigation, for information on using the Weatherization
Assistant’s record navigation blocks.
6.4 Surveys (Agency)
The Surveys form (see Figure 6.7) under the Main Menu’s “Agency” button is
used to define custom surveys for your agency to collect additional information on
your clients or their households. The surveys themselves are filled out for
individual clients under the Main Menu’s “Clients” button as described in Section
Figure 6.7. The Surveys form under the Main Menu’s “Agency” button.
7.7, Surveys (Client). You can create any number of surveys. Surveys do not need
to be limited to questions asked of the client. They could also be used to document
other information related to the clients collected by the agency, such as income or
other eligibility criteria. Below are descriptions of the individual data items and
controls found on the Surveys form under the Main Menu’s “Agency” button:
• Survey Name – Enter the name for the survey. The Survey Name will be used
to identify the survey to be completed later under the Main Menu’s “Clients”
button. The name must be unique. Required.

6-14 The Weatherization Assistant User’s Manual (Version 8.9)
Chapter 6: Agency
• Active – Use this checkbox to indicate whether the survey is considered
“Active.” Only active surveys will be listed for selection in the drop-down lists
under the Main Menu’s “Clients” button.
• Comment – You may enter comments that apply to the entire survey directly in
the Comment field on the form, or you may enter them in the Comment Editor
by selecting the “Comment” button to the left of the field. The Comment Editor
is similar to Window’s Notepad and may be used to enter extended comments.
The total comment may have up to 65,000 characters. Text from other sources
may be copied and pasted into the Comment Editor’s window. Comments
entered on the Cost Centers form are not displayed anywhere else in the
Weatherization Assistant or in any of its predefined reports. However, you may
wish to include the comment in a user-designed report (see Appendix D,
Development of Customized Reports). Optional.
• Survey Definition Record Navigation Block – The Survey Definition record
navigation block is used to find and navigate to existing surveys, copy or delete
the currently accessed survey, or create a new survey. See Section 5.1, Form
and Record Navigation, for information on using the Weatherization Assistant’s
record navigation blocks.
The Survey Question Definitions sub-form is used to define the questions to be
included in the survey. A new question may be initiated by positioning the cursor
at the first blank record or by selecting the new record button ( ). Be careful to
distinguish between the new record button associated with the Survey Question
Definitions sub-form and the new record button in the Survey Definition record
navigation block. The latter would initiate a whole new survey, not a new question
within the existing survey. The entries in the sub-form are copy/paste friendly from
both the Weatherization Assistant program and other text or word processing
software. The multiple columns of the sub-form may be copied to a spreadsheet,
such as Microsoft Excel, for printing. You can create a blank survey by not
entering any questions. The survey can then be associated with any client when
you want to create a totally unique set of questions specific to that client. Below
are descriptions of the individual data items and controls found on the Survey
Question Definitions sub-form:
• Group – You can assign each question to a group if desired. This may be
desirable for organizational or presentation purposes. You could also use the

The Weatherization Assistant User’s Manual (Version 8.9) 6-15
Chapter 6: Agency
Group designation to sort the questions on the sub-form using standard data
sheet view sorting techniques. The entry is limited to 50 characters. Optional.
• Order # – Establish the order the questions will appear on the Client Surveys
report by assigning order numbers (see Section 7.1, Client Information).
Optional.
• Question – Enter the actual question to be asked of the client or completed by
agency staff. Each question may be 255 characters or less. Optional.
6.5 Clients
The Clients form under the Main Menu’s “Agency” button (see Figure 6.8) shows
all client records associated with the current agency in a navigation data sheet
view. The form is used primarily to navigate to individual client records, although
it can also be used to create new blank client records. The shading of the records
displayed on this form is the visual indicator that this form is used for navigation
Figure 6.8. The Clients form under the Main Menu’s “Agency” button.
Columns not displayed in this figure include the Numerical ClientID, AgencyName,
AgencyState, and Alt. Client ID.

6-16 The Weatherization Assistant User’s Manual (Version 8.9)
Chapter 6: Agency
rather than data entry. You can double click with your mouse on the entries under
the column headings in angle brackets (<>) to navigate to the associated record.
Like any data sheet, the order that the client records are displayed can be changed
by highlighting a column and pressing one of the sort buttons in the tool bar. Some
of the columns in the form may be collapsed (not shown) by default. You can
double click the mouse near the borders of some of the columns in the header to
have them expanded. You can also collapse columns that you do not want to see by
dragging their widths to zero. You may need to use the vertical and horizontal
scroll bars to display all the records and columns, respectively. Below are
descriptions of the individual data items and controls found on the Clients form
under the Main Menu’s “Agency” button:
• Client ID, Agency Name (not shown), Agency State (not shown), Client
Name, and Alt. Client ID (not shown) − These entries are those given on the
Client Information form under the Main Menu’s “Clients” button for each of
the clients listed (see Section 7.1, Client Information).
• Numerical ClientID (not shown) − When a new client is created, the
Weatherization Assistant automatically assigns a unique number to this client
for internal software purposes. This field displays what this number is for each
client. See Feature 6 in Section 16.4, Features, for more information.
• Last Edited – This field shows the date (and time, if the column is expanded)
of the last change made to this client record while on the forms under the Main
Menu’s “Clients” button.
• Status – This field gives the latest client status for each client as set on the
Status form under the Main Menu’s “Clients” button for the client. See Section
7.2, Status (Clients), for more information.
• Date – This field provides the date that the latest status was set.
• Checked Out To, Last Checked Out, and Last Check In − If the Check-
in/Check-out client records feature is turned on (see Feature 10 in Section 16.4,
Features), the Weatherization Assistant tracks who checked a client out and
when the client was checked out and checked back in. These fields provide this
information for each client if applicable.

The Weatherization Assistant User’s Manual (Version 8.9) 6-17
Chapter 6: Agency
• Refresh List – The “Refresh List” button can be used to update the information
displayed on the Clients form to reflect any changes since the last time this
form was opened.
• Create New Client Record for this Agency – You may use this button to
create a new client. Selecting the button will take you to the Client Information
form under the Main Menu’s “Clients” button (see Section 7.1, Client
Information), where descriptive data for the new client can be entered. When
you exit the Client Information form, you will be returned to the Client form
under the Main Menu’s “Agency” button. A row with the new client should
already be added; if not, use the “Refresh List” button on the form.
6.6 Audits (Agency)
The Audits form under the Main Menu’s “Agency” button (see Figure 6.9) shows
all audit records associated with the current agency in a navigation data sheet view.
The form is used primarily to navigate to individual audit records. The shading of
the records displayed on this form is the visual indicator that this form is used for
navigation rather than data entry. You can double click with your mouse on the
Figure 6.9. The Audits form under the Main Menu’s “Agency” button.
Columns not displayed in this figure include the numerical ClientID, numerical JobID,
agency name, and agency state.
entries under the column headings in angle brackets (<>) to navigate to the
associated record. Like any data sheet, the order that the audit records are
displayed can be changed by highlighting a column and pressing one of the sort

6-18 The Weatherization Assistant User’s Manual (Version 8.9)
Chapter 6: Agency
buttons in the tool bar. Some of the columns in the form may be collapsed (not
shown) by default. You can double click the mouse near the borders of some of the
columns in the header to have them expanded. You can collapse columns that you
do not want to see by dragging their widths to zero. You may need to use the
vertical and horizontal scroll bars to display all the records and columns,
respectively.
Normally, there is only one audit record for each client. However, the
Weatherization Assistant does allow you to create and execute more than one audit
per client. This might be useful if you desire to see the effect of some modification
in the building description on the recommendations of the audit. You might also
want to update or correct an existing audit without losing the original description.
If you have created and run more than one audit per client, you should ensure that
only one set of active work orders exists for the client. Otherwise, confusion and
double accounting of costs are likely to occur. Below are descriptions of the
individual data items and controls found on the Audits form under the Main
Menu’s “Agency” button:
• Client ID, Client Name, Alt. Client ID, Audit Name, Type, Agency Name
(not shown), and Agency State (not shown) − These entries are those given
on the Audit Information form under the Main Menu’s “NEAT” and “MHEA”
buttons for each of the audits listed (see Section 8.2, Audit Information).
• Last Edited – This field shows the date (and time, if the column is expanded)
of the last change made to this audit record while in the forms under the Main
Menu’s “NEAT” or “MHEA” buttons.
• Status – This field gives the latest audit status for each audit as set on the Status
form under the Main Menu’s “NEAT” and “MHEA” buttons for the audit. See
Section 11.1, Status (Audit), for more information.
• Date – This field provides the date that the latest status was set.
• Numerical ClientID and JobID (not shown) − When a new client and a new
audit are created, the Weatherization Assistant automatically assigns a unique
number to each of these for internal software purposes. These fields display
what these numbers are for each audit. See Feature 6 in Section 16.4, Features,
for more information.

The Weatherization Assistant User’s Manual (Version 8.9) 6-19
Chapter 6: Agency
• Refresh List – The “Refresh List” button can be used to update the information
displayed on the Audits form to reflect any changes since the last time this form
was opened.
6.7 Work Orders (Agency)
The Work Orders form under the Main Menu’s “Agency” button (see Figure 6.10)
shows all work order records associated with the current agency in a navigation
data sheet view. The form is used primarily to navigate to individual work order
Figure 6.10. The Work Orders form under the Main Menu’s “Agency” button.
Columns not displayed in this figure include the numerical ClientID, numerical
WorkOrderID, agency name, and agency state.
records. The shading of the records displayed on this form is the visual indicator
that this form is used for navigation rather than data entry. You can double click
with your mouse on the entries under the column headings in angle brackets (<>)
to navigate to the associated record. Like any data sheet, the order that the work
order records are displayed can be changed by highlighting a column and pressing
one of the sort buttons in the tool bar. Some of the columns in the form may be
collapsed (not shown) by default. You can double click the mouse near the borders
of some of the columns in the header to have them expanded. You can collapse
columns that you do not want to see by dragging their widths to zero. You may
need to use the vertical and horizontal scroll bars to display all the records and
columns, respectively.
More than one work order per client may be displayed on this form if more than
one contractor is assigned work for a client. The work orders may have been

6-20 The Weatherization Assistant User’s Manual (Version 8.9)
Chapter 6: Agency
generated automatically from the Measures form under the Main Menu’s “NEAT”
and “MHEA” buttons (see Section 11.11, Measures (Audit)) or manually under the
Main Menu’s “Work Orders” button (see Section 13.1, Work Order Information).
Below are descriptions of the individual data items and controls found on the Work
Orders form under the Main Menu’s “Agency” button:
• Client ID, Work Order, Agency Name (not shown), and Agency State (not
shown) − These entries are those given on the Work Order Information form
under the Main Menu’s “Work Orders” button for each of the work orders listed
(see Section 13.1, Work Order Information).
• Numerical ClientID (not shown) and WorkOrderID (not shown) − When a
new client and a new work order are created, the Weatherization Assistant
automatically assigns a unique number to each of these for internal software
purposes. These fields display what these numbers are for each work order. See
Section 16.4, Features, for more information.
• Contractor – This field shows the contractor assigned to this work order. This
entry may be blank if a contractor has not been assigned. Contractors are
defined on the Contacts tab under the Main Menu’s “Agency” button as
described in Section 6.2, Contacts (Agency), and assigned to each measure
either by default in the Setup Library (see Section 14.5, Library Measures),
when a work order is initiated from the Measure form under the Main Menu’s
“NEAT” and “MHEA” buttons (see Section 11.11, Measures (Audit)), or under
the Main Menu’s “Work Orders” button itself (see Section 13.1, Work Order
Information).
• Last Edited – This field shows the date (and time, if the column is expanded)
of the last change made to this work order record while on the forms under the
Main Menu’s “Work Orders” button, or the date the work order was generated
from the Measures form of the Main Menu’s “NEAT” and “MHEA” buttons if
no modifications have been made.
• Status, Inspect Status, and Pay Status – There are three status categories for a
work order: a general status, an inspection status, and a payment status. Each
status category has its own column in the Work Orders form. These fields give
the latest status of each category for each work order. These statuses are
changed on the Status form under the Main Menu’s “Work Orders” button for

The Weatherization Assistant User’s Manual (Version 8.9) 6-21
Chapter 6: Agency
each individual work order. See Section 13.2, Status (Work Order), for more
information.
• Dates – These fields provide the date that the latest status was set for each of
the three work order status categories.
• Refresh List – The “Refresh List” button can be used to update the information
displayed on the Work Orders form to reflect any changes since the last time
this form was opened.
6.8 Libraries
The Libraries form under the Main Menu’s “Agency” button (see Figure 6.11)
shows all the setup libraries and supply libraries associated with the current agency
in a navigation data sheet view. The form is used primarily for reference and to
navigate to individual libraries. The shading of the records displayed on this form
is the visual indicator that this form is used for navigation rather than data entry.
You can double click with your mouse on a specific library of interest to directly
access that library. Like any data sheet, the order that the libraries are shown can
be changed by highlighting a column and pressing one of the sort buttons in the
tool bar. Below are descriptions of the individual data items and controls found on
the Libraries form under the Main Menu’s “Agency” button:
Figure 6.11. The Libraries form under the Main Menu’s “Agency” button.

6-22 The Weatherization Assistant User’s Manual (Version 8.9)
Chapter 6: Agency
• Library Name, Description, and Comment − These entries are those given to
each library under the Main Menu’s “Setup Library” or “Supply Library”
buttons (see Sections 14.1, Setup Library Information, and 15.1,General
Information Form, respectively).
• Created On, By (not shown) – These entries give the date (and time if the
column is expanded) and who was logged on when the library was created. The
second entry requires use of the User Logon feature (see Feature 4 in Section
16.4, Features, for more information).
• Last Edited, By – These entries give the date the library was last modified and
who was logged on when the modification was made. This second entry
requires use of the User Logon feature (see Feature 4 in Section 16.4, Features,
for more information).
• Refresh List − The “Refresh List” button can be used to update the information
displayed on the Libraries form to reflect any changes since the last time this
form was opened.
6.9 Status History
The Status History form under the Main
Menu’s “Agency” button lists the current
status settings and the entire history of
status changes for all status categories
(types) for all clients belonging to the
current agency (see Figure 6.12). You may
need to use the vertical scroll bar to see all
the status settings. The status categories
used in the Weatherization Assistant are
shown in Table 6.1.
The Status History form is used to review the history of status changes rather than
to edit individual records in the history. Changes in status are made under the
Status forms of the respective “Client,” “NEAT” or “MHEA,” and “Work Orders”
Main Menu buttons. See Sections 7.2, Status (Clients); 11.1, Status (Audit); and
13.2, Status (Work Order), for more details. Section 18.3, Status Tracking,
provides a full discussion of the status tracking feature in the Weatherization
Table 6.1. Status categories tracked
under the Status History form
Client Level
Client (General)
Client Application
Audit Level
NEAT Audit
MHEA Audit
Work Order
Level
Work Order (General)
Work Order Inspection
Work Order Payment

The Weatherization Assistant User’s Manual (Version 8.9) 6-23
Chapter 6: Agency
Assistant, including a display of all of the status categories and the possible
settings for each. You can double click your mouse on the entries under the column
headings in angle brackets (<>) to navigate to the associated record.
Figure 6.12. The Status History form under the Main Menu’s “Agency” button.
The Weatherization Assistant retains a record of all status settings and changes. If
you make a mistake in setting a status, correcting it will still leave the old setting in
the history. Even though you cannot edit status records from the Status History
form, you can delete entire status records using the form (see the discussion of
deleting records in a data sheet view in Section 5.10, Deleting Data). Thus, the
form is a good location to detect mistaken entries and delete them.
Combining the use of the filter and sort features in the Status History form can
produce a useful display (see the discussion of filtering and sorting in Section 5.8,
Data Sheet and Form Views of Records). If you filter the entries by a specific
client and then sort the entries by date, you will display a chronological listing of
all status entries associated with a specific client. A similar display can also be
produced by selecting the “Overall Client Status History” button on the Status
form under the Main Menu’s “Clients” button and sorting the records by date as
discussed in Section 7.2, Status (Clients).
Below are descriptions of the individual data items and controls found on the
Status History form.

6-24 The Weatherization Assistant User’s Manual (Version 8.9)
Chapter 6: Agency
• Client ID − This entry is the Client ID given on the Client Information form
under the Main Menu’s “Clients” button (see Section 7.1, Client Information).
• Record Name − This field identifies the Client ID, Audit Name, or Work Order
associated with the status setting.
• Status Type − This field identifies the status category associated with this
status setting. These categories are listed in Table 6.1.
• Date − This field displays the date that the status setting became effective.
• Status − This field displays the status setting. The possible settings for each
status category are listed in Section 18.3, Status Tracking.
• Changed On − This field displays the date that the status setting was changed.
• By − This field displays the User Name of the person who changed the status
setting. The names are restricted to those that have been entered on the Contacts
form under the Main Menu’s “Agency” button and have a password assigned as
discussed in Section 6.2, Contacts (Agency). A User Name of “Admin” implies
that a specific person was not identified as making the change.
• Comment (not shown) − Any comment that has been appended to this status
setting will be shown in this field.
• Refresh List − The “Refresh List” button can be used to update the information
displayed on the Status form to reflect any status changes that may have been
made since the last time this form was opened.

The Weatherization Assistant User’s Manual (Version 8.9) 7-1
Chapter 7: Clients
Chapter 7. Clients
Because audits and work orders are assigned to clients, setting up and entering
information on clients is an essential task in the Weatherization Assistant.
Information related to clients is organized under the Main Menu’s “Clients” button
of the Weatherization Assistant (see Figure 3.1).
The minimal information required for a specific client is a Client ID, the name of
the agency handling the client, and the type of dwelling. However, you may store
additional client information in case you are using the Weatherization Assistant as
the main repository of client data.
The first task in using the Weatherization Assistant for a new client is to enter
identifying information about the client under the Main Menu’s “Clients” button.
The most common and direct way to start a new client record is to select the
“Clients” button on the Weatherization Assistant’s Main Menu and then select the
“New” button from the Client record navigation block on the Client Information
form (see Figure 7.1). You can also start a new client by selecting the “Agency”
button from the Weatherization Assistant’s Main Menu, selecting the Clients tab,
and then clicking on the “Create New Client Record for this Agency” button (see
Section 6.5, Clients).
You may access the record for any existing client by selecting the “Clients” button
from the Weatherization Assistant’s Main Menu and then using one of the Client
record navigation block drop-down lists to locate and select the desired client.
Although this is the more direct method, you can also access an existing client by
selecting the “Agency” button from the Weatherization Assistant’s Main Menu,
selecting the Clients tab, and then double clicking your mouse on the Client ID
corresponding to the client of interest (see Section 6.5, Clients).
The remainder of this chapter is divided into sections describing the data and
display items entered on each of the forms seen under the Main Menu’s “Client”
button: Client Information, Status, Energy Index, Contacts, Audits, Work Orders,
Surveys, and Photos (if the photo browser tab method for attaching photos to
records has been activated under the Main Menu’s “Preferences” button as
described under Feature 1 in Section 16.4, Features). All but the first three tabs
associated with these forms have a number in parentheses following the tab name.
These numbers indicate the number of records entered for each particular form for

7-2 The Weatherization Assistant User’s Manual (Version 8.9)
Chapter 7: Clients
the client currently selected. For example, in Figure 7.1, there are two contact
records and one audit record entered for client 05_348.
7.1 Client Information
The Client Information form (see Figure 7.1) under the Main Menu’s “Clients”
button allows you to enter general information on a specific client and the client’s
dwelling. It also allows you to view and navigate to other clients in your database,
and to access client level reports.
Figure 7.1. The Client Information form under the Main Menu’s “Clients” button.
Both options for linking photos to the client are shown (Photos tab and Photo Folder field
with accompanying “Browse” and “View” buttons) even though only one can be selected
and displayed at one time.
All of the data on the Client Information form are optional except the Client ID,
Agency, and Dwelling Type. However, optional data may still be used elsewhere
in the Weatherization Assistant or in reports that you generate. For example, if the
number of occupants is entered, NEAT and MHEA will use this value rather than a
default value to determine the amount of internal loads. As another example, the
majority of information in the Dwelling and Occupants blocks of data are used to
generate the Unit Production portion of the DOE Quarterly Report, accessed from

The Weatherization Assistant User’s Manual (Version 8.9) 7-3
Chapter 7: Clients
the Report block under the Main Menu’s “Agency” button (see Section 6.1,
Agency Information).
Below are descriptions of the individual data items and controls found on the
Client Information form. The data items and controls included in the Dwelling and
Occupant blocks are described at the end, as are the data items and controls related
to mapping, photographs, and checking out clients.
• Client ID – The Client ID is designed to be the key parameter identifying this
client to you and to the computer. The Client ID is one of several fields you will
use to locate and identify a specific client. Therefore, the Client ID must be
unique. Typically, the Client ID should be the job number that agencies assign
to their clients. Although the Client ID could be the name of the client, the
names of the client and other contacts associated with the client should be
entered under the Contacts form as discussed in Section 7.4, Contacts (Client).
The entry may be up to 50 characters in length, although report footers can only
report the first 20 characters. Required.
• Alt. Client ID – The Alternate Client ID field allows you to assign a second
identifying parameter to each client if your agency or state has multiple means
of identifying a client. The Alternate Client ID can be used to locate and
identify a specific client. The entry may be up to 50 characters in length,
although report footers can only report the first 20 characters. Optional.
• Agency – This field is used to select the agency associated with this client. A
new client will automatically be assigned to the agency selected as the default
agency under the Main Menu’s “Agency” button (see Section 6.1, Agency
Information), although any agency defined under the Main Menu’s “Agency”
button can be selected using the drop-down list. If the agency a client is
assigned to is changed after audits and/or work orders have been created for this
client, then information in the audits and/or work orders (e.g., Setup, Fuel Cost,
and Supply Libraries) will have to be re-entered to retain consistency with the
new agency assignment. Required.
• State − The State field that is to the right of the Agency field and shaded will be
automatically filled in once the agency the client is assigned to is selected. This
is the state associated with the selected agency as entered under the Main
Menu’s “Agency” button (see Section 6.1, Agency Information).

7-4 The Weatherization Assistant User’s Manual (Version 8.9)
Chapter 7: Clients
• Setup Library − The setup library to be associated with this client can be
selected using the drop-down list. The setup libraries that will be listed in the
drop-down list are those that have been created for the agency selected in the
Agency field. The setup library needs to be selected using the Setup Library
field only if work orders will be created without running a NEAT or MHEA
audit so that user-defined measures entered in the setup library can be accessed
from under the Main Menu’s “Work Orders” button. The setup library that will
be used in running NEAT or MHEA will be selected on the NEAT or MHEA
Audit Information form (see Section 8.2, Audit Information). However, if you
select a setup library on the Client Information form for this client, then the
selected setup library will automatically be selected on the Audit Information
form when an audit for this client is created (although you can change this
selection on the Audit Information form if desired). Optional.
• Address, Unit Number, City, State, and Zip Code – Enter the address of the
client’s dwelling to be weatherized. If you are using the Weatherization
Assistant’s Geographic Information System (GIS) feature, the GIS will use this
address to plot the location of the dwelling as explained in Section 18.2,
Geographic Information System (GIS). The address may or may not be the same
as any address you supply for contacts associated with the client as discussed in
Section 7.4, Contacts (Client). Optional.
• County and Other Geographic Identifier – These fields can be used to
identify the county the client’s dwelling resides in or to locate the dwelling by
some other geographic identifier (e.g., congressional district). The entries may
be 20 characters or less. Optional.
• Comment – You may enter comments directly in the Comment field on the
form, or you may enter them in the Comment Editor by selecting the
“Comment” button to the left of the field. The Comment Editor is similar to
Window’s Notepad and may be used to enter extended comments. The total
comment may have up to 65,000 characters. Text from other sources may be
copied and pasted into the Comment Editor’s window. Any comment that is
entered is displayed in a variety of reports, including the Client Information
Report and the NEAT/MHEA Data Collection Form (Client Specific) available
from under the Main Menu’s “Clients” button (see the Report Block below) and
the Input Report available from under the Main Menu’s “NEAT” and “MHEA”
buttons (see Section 8.2, Audit Information). You may also wish to include the

The Weatherization Assistant User’s Manual (Version 8.9) 7-5
Chapter 7: Clients
comment in a user-designed report (see Appendix D, Development of
Customized Reports). Optional.
• Cumulative Cost and SIR – These two fields are filled in only if a work order
has been created for the client and actual costs (rather than estimated costs) for
weatherization measures have been entered into the work order. These fields
show the actual cost of all measures performed on the client’s dwelling and the
savings-to-investment ratio (SIR) for these measures calculated using the actual
costs and savings. See the discussion under “The Materials/Labor Details Sub-
Form” in Section 13.3, Measures (Work Order), for more details. Uneditable.
• Client Record Navigation Block – The Client record navigation block is used
to find and navigate to existing client records in your database, copy or delete
the currently accessed client, or to create a new client. See Section 5.1, Form
and Record Navigation, for information on using the Weatherization Assistant’s
record navigation blocks.
The default installation of the Weatherization Assistant turns on the “Use only
the latest bookmarked Agency in the find record drop-down boxes” feature in
Preferences (see Feature 9 in Section 16.4, Features). With this feature turned
on, the drop-down lists in the Client record navigation block will display only
the clients associated with the agency last visited using the Main Menu’s
“Agency” button. Normally, this will be your agency, so the drop-down lists
will display only your agency’s clients. If you have more than one agency
defined in your database and you want the drop-down lists to display clients
from all defined agencies, turn this feature off.
• Report Block – The Report block provides you with access to all reports
available under the Main Menu’s “Clients” button. The following reports are
currently available: Client Completion Report, Client Information Report,
Client Information Form, NEAT/MHEA Data Collection Form (blank or client
specific), and Client Surveys. See Appendix C, Reports, for examples of these
reports. The reports display information already gathered and entered into the
Weatherization Assistant while the forms are blank forms to be used to gather
information. The NEAT and MHEA Data Collection Forms may be printed
with general client information pre-entered or completely blank. See Section
5.12, The Report Block, for information on the mechanics of using the
Weatherization Assistant’s Report blocks. Appendix D, Development of

7-6 The Weatherization Assistant User’s Manual (Version 8.9)
Chapter 7: Clients
Customized Reports, describes a method to create reports tailored to your needs
and to list the reports in the Report block.
Dwelling Data Block
The data items included in the Dwelling data block are intended to be used
primarily to complete the Unit Production portion of the DOE Quarterly Program
Report (see “Report Block” in Section 6.1, Agency Information). Definitions of the
items should be consistent with this report, DOE guidance, and/or 10 CFR Part
440. All of the data entries are optional except for the Dwelling Type. Below are
brief descriptions of the individual data items found in the Dwelling data block on
the Client Information form:
• Type – Use the drop-down list to select the type of dwelling this client lives in.
The choices are Site Built, Mobile Home, Duplex, Triplex, Fourplex,
Multifamily (5 or more units per building), Shelter, and Other. The selection is
used only in populating the Quarterly Program Report and does not restrict your
assigning either the NEAT or MHEA audit to the client, though the two should
be consistent. Required.
• Ownership – Indicate whether the client owns or rents the dwelling. If you
select “Other,” you may want to specify details in the Comment field. Optional.
• Primary Heating Fuel – Choose the fuel that is used to provide the most space
heating in the dwelling using the drop-down list. The choices are None, Natural
Gas, Oil, Electricity, Propane, Wood, Coal, Kerosene, and Other. If you select
“Other,” you may want to specify details in the Comment field. Optional.
• Secondary Heating Fuel − If more than one fuel is used to provide space
heating to the dwelling, choose the next most used fuel using the drop-down
list. The choices are the same as for the primary heating fuel. Optional.
• High Energy Use – Select this checkbox if the client/dwelling is considered to
be a high energy user, defined as “a low-income household whose residential
energy expenditures exceed the median level of residential expenditures for all
low-income households in the state.” Optional.

The Weatherization Assistant User’s Manual (Version 8.9) 7-7
Chapter 7: Clients
• High Energy Burden − Select this checkbox if the client’s energy costs are a
high burden for them. A client with a high energy burden is defined as “a low-
income household whose residential energy expenditures divided by the annual
income of that household (energy burden) exceeds the median level of energy
burden for all low-income households in the state.” Optional.
• Previously Weatherized – Select this checkbox if the dwelling was previously
weatherized as defined for the DOE Quarterly Program Report. Optional.
• Low Cost/No Cost – Select this checkbox if the work performed on the
dwelling may be considered to be low cost or no cost as defined for the DOE
Quarterly Program Report (typically a dwelling in which a maximum of $50
materials were expended). Optional.
• Year Built – Enter an estimate of the year the dwelling was built. Optional.
• Account #1 and #2 − These fields are provided so that utility account numbers
for the client can be entered. If both fields will be used, you should establish a
consistent approach within your agency or state as to which fields are used for
which accounts. For example, electric utility account numbers may always be
entered in the Account #1 field, and natural gas, propane, fuel oil, etc. account
numbers are always entered in the Account #2 field. A comment entry may also
help clarify the type of account number entered in each field. Optional.
Occupants Data Block
The data items included in the Occupants data block are intended to be used
primarily to complete the Unit Production portion of the DOE Quarterly Program
Report. Definitions of the items should be consistent with this report, DOE
guidance, and/or 10 CFR Part 440. All of the data entries are optional. Below are
brief descriptions of the individual data items found in the Occupants data block on
the Client Information form:
• Occupants – Enter the total number of occupants living in the dwelling.
Although optional, this entry is used in NEAT and MHEA to determine the
internal loads of the dwelling, estimate water usage, and modify the minimum
leakage rate for the dwelling. A default number of occupants is used in NEAT
and MHEA if no entry is made. Optional.

7-8 The Weatherization Assistant User’s Manual (Version 8.9)
Chapter 7: Clients
• Elderly − Enter the number of elderly people who live in the dwelling, defined
as those 60 years of age or older. Optional.
• Disabled − Enter the number of disabled people who live in the dwelling, as
defined in 10 CFR Part 40. Optional.
• Native American − Enter the number of occupants living in the dwelling who
are members of a Native American Tribe. Optional.
• Children − Enter the number of children who live in the dwelling, defined as
being 19 years of age or younger, or as defined by your state. Optional.
• Primary Language − Select the primary language spoken by the occupants of
the dwelling using the drop-down list. The choices are English, Spanish, Other
European Language, Asian Language, and Other. If you select “Other,” you
may want to specify details in the Comment field. Optional.
Graphic Information System Data Items
If you are using the Graphic Information System (GIS), two uneditable fields
(Latitude and Longitude) and a “Map” button will be present on the Client
Information form just below the Comment field. If the address entered on the
Client Information form for the client is recognized by the Weatherization
Assistant, the Latitude and Longitude fields will display the indicated data and the
“Map” button will take you to a map showing this location. See Section 18.2,
Geographic Information System (GIS), for more details.
Photograph Data Items
If you have chosen to use the third party photo browser method for attaching
photos to records under the Main Menu’s “Preferences” button (see Feature 2 in
Section 16.4, Features), a Photo Folder field, “Browse” button, and “View” button
will be present on the Client Information form below the Comment field. Use the
“Browse” button to select a folder on your computer in which you have stored
digital photos for this specific client. Once selected, the location of this folder will
be displayed in the Photo Folder field. Select the “View” button to obtain a photo
browser in which you may view and edit these photos. The Weatherization
Assistant provides the option of attaching photos not only to clients, but also to
The Weatherization Assistant User’s Manual (Version 8.9) 7-9
Chapter 7: Clients
audits and work orders as well. Therefore, you should develop a consistent policy
regarding where and how you store reference to your photos. See Section 18.1,
Digital Photos, for more information on viewing and editing photos.
Client Check Out Data Items
If you have chosen to use the Check-in/Check-out feature of the Weatherization
Assistant (see Feature 10 in Section 16.4, Features, and Section 17.3, Data
Transfer – Import/Export With Another MSAccess Database), a Checked Out To
field, “Check In” button, and “Check Out” button will be present on the Client
Information form below the Comment field. If the client you are currently
referencing has been checked out, the User Name of the user who checked out the
record will appear in the “Checked Out To” drop-down list’s field.
You may initialize the checking out of a client or change the user assigned to the
check-out by using either the “Check Out” button or the “Checked Out To” drop-
down list. You may choose any user to be recorded as the user having checked out
the client using the drop-down list. If you use the “Check Out” button, you may
only check the client out to the current user who is logged on, presumably yourself.
Once a client has been checked out, you may check the client back in by selecting
the “Check In” button, regardless of who had previously checked the client out. If
there are multiple users who may check records in and out, you will need to
coordinate this practice.
7.2 Status (Clients)
The Status form under the Main Menu’s
“Clients” button (see Figure 7.2) allows you to
view the current status settings associated with
the client being accessed for all of the status
categories used in the Weatherization
Assistant. The status categories used in the
Weatherization Assistant and that appear in
the left column of the Status form are shown
in Table 7.1. The current status will be shown
for only those categories for which a status
has been set or for which a setting is possible. You may need to use the vertical
scroll bar to see all the status settings, especially if multiple work orders exist
Table 7.1. The status categories used
in the Weatherization Assistant
Client Level
Client (General)
Application
Audit Level Audit (NEAT or MHEA)
Work Order
Level
Work Order (General)
Work Order Inspection
Work Order Payment

7-10 The Weatherization Assistant User’s Manual (Version 8.9)
Chapter 7: Clients
because three status categories (general, inspection, and payment) are tracked
separately for each work order. Below are brief descriptions of the individual data
items and controls found on the Status form. The entries on the main Status form
cannot be edited. You must use the “Edit” button on the form to change the current
status for the client.
Figure 7.2. The Status form under the Main Menu’s “Clients” button.
• <Status Category and Record Name> – The left most column of the form
displays the status category (see Table 7.1). If the status category is an audit
level or work order level category, the name of the audit or work order is also
displayed.
• Current Status − This field displays the current status setting for the given
status category. The possible settings for each category are listed in Section
18.3, Status Tracking.
• Completed − An “X” will be displayed in this field when the current status
setting signifies completion or closure of the activity associated with the status
category. Settings that represent completion are indicated by an asterisk (*) in
Section 18.3, Status Tracking.

The Weatherization Assistant User’s Manual (Version 8.9) 7-11
Chapter 7: Clients
• Date − This field displays the date that the current status became effective.
• Changed − This field displays the date that the current status was last changed.
• By − This field displays the User Name of the person who changed the status.
The names are restricted to those that have been entered on the Contacts form
under the Main Menu’s “Agency” button and have a password assigned as
discussed in Section 6.2, Contacts (Agency). A User Name of “Admin” implies
that a specific person was not identified as making the change.
• Comment − Any comment that has been appended to this current status setting
will be shown in this field.
• Edit − Status settings are changed by selecting the “Edit” button in the row of
the status category you wish to change. Use of the Status Editor form that
appears is explained in Section 18.3, Status Tracking.
• History − Select the “H” button to see a history of all settings for a specific
status category for the current client. The Status History form that appears is the
same in appearance as that discussed in Section 6.9, Status History.
• Refresh List − The “Refresh” button can be used to update the information
displayed on the Status form to reflect any status changes that may have been
made since the last time this form was opened.
• Overall Client Status History − Select the “Overall Client Status History”
button to display a listing of all status entries for all status categories associated
with the current client. The Status History form that appears is the same in
appearance as that discussed in Section 6.9, Status History. You can use of the
sort feature (see Section 5.8, Data Sheet and Form Views of Records) while
viewing this form to arrange the status settings in a desired order (e.g.,
chronologically).
7.3 Energy Index
The Energy Index form (see Figure 7.3) is used to compute an overall energy index
for the client’s dwelling in units of Btu per heating degree day per square foot.
Note that the energy index may be significantly affected by the life styles of the
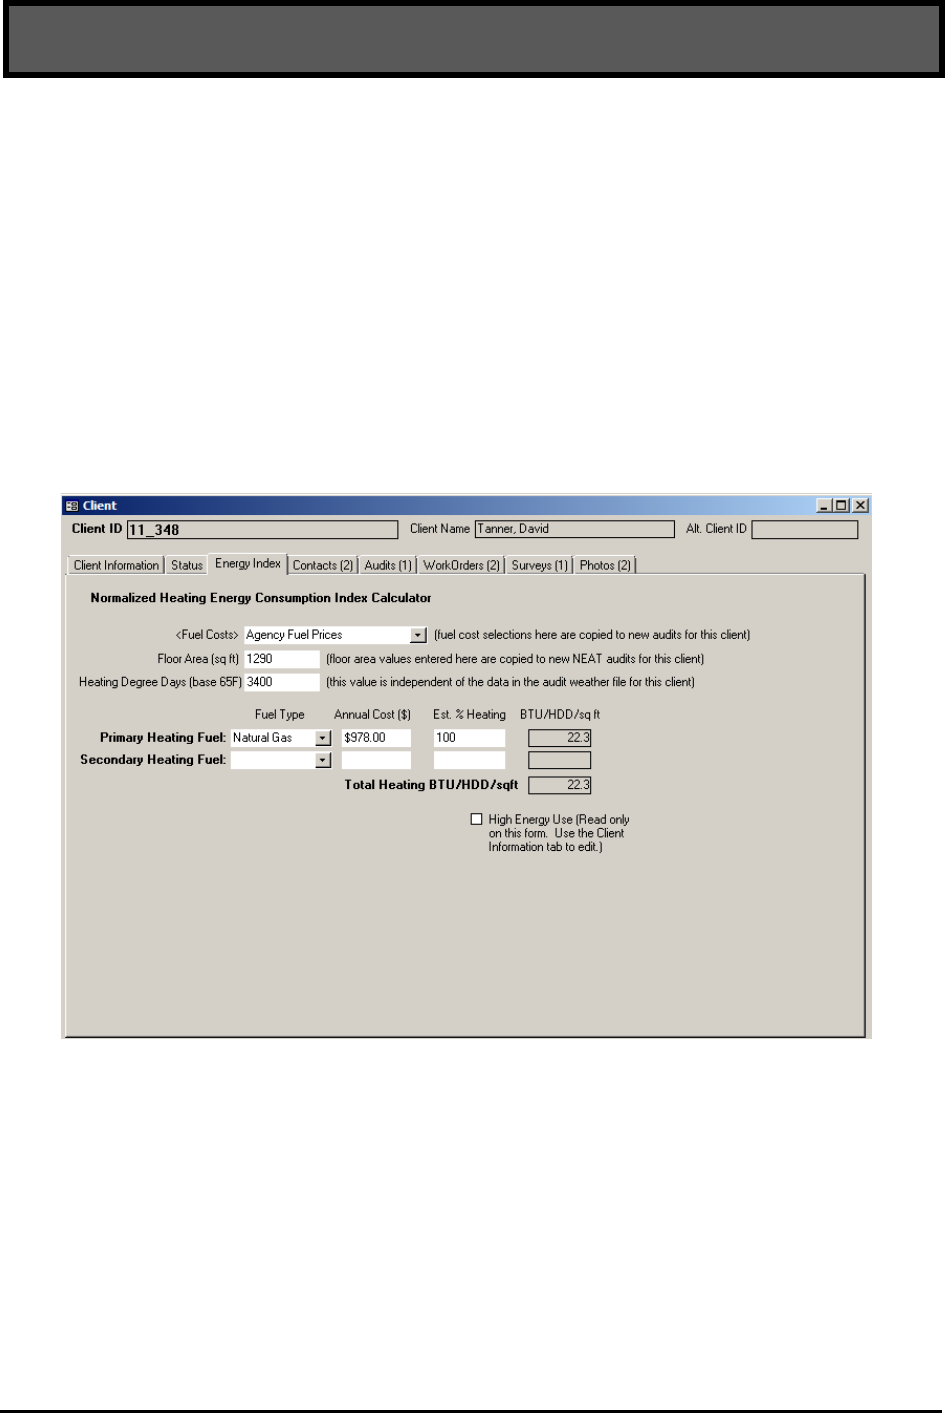
7-12 The Weatherization Assistant User’s Manual (Version 8.9)
Chapter 7: Clients
occupants, regardless of the dwelling’s construction characteristics, because it is
based on actual energy consumption. The energy index is typically used to
determine how energy efficient the client’s dwelling currently is and the potential
to save energy in the client’s dwelling from weatherization. The index can be used
to compare or rank dwellings according to the potential energy savings that could
be achieved from weatherization. The energy index calculated by the
Weatherization Assistant is of most use in heating climates because the index is
based on heating degree days. The energy index calculated on this form is
independent of the detailed energy calculations and energy consumption estimates
made under NEAT or MHEA. Use of the Energy Index form is totally optional.
Figure 7.3. The Energy Index form under the Main Menu’s “Clients” button.
Below are descriptions of the individual data items and controls found on the
Energy Index form. All entries except those for the secondary fuel type are
required for the Weatherization Assistant to calculate an energy index. You may,
however, enter partial data and then return at a later time to complete the data
entry.
• Fuel Costs – In order to translate the Annual Cost of energy entered in dollars
(see below) into units of energy consumption, the Weatherization Assistant

The Weatherization Assistant User’s Manual (Version 8.9) 7-13
Chapter 7: Clients
needs to know the fuel prices paid by the client. Use this drop-down list to
select the Fuel Cost table that contains the fuel prices appropriate for this client.
The fuel costs tables that will appear in the drop-down list are those that have
been entered in any setup library associated with the agency that the client has
been assigned to (see Section 14.3, Fuel Costs). If you have only one Setup
Library with a single fuel cost table, this will be a trivial choice.
If you select a fuel cost table on the Energy Index form, then the selected fuel
cost table will automatically be selected on the NEAT or MHEA Audit
Information form (see Section 8.2, Audit Information) when an audit for this
client is created (although you can change this selection on the Audit
Information form if desired). If you do change the table on the Audit
Information form, remember that the fuel costs used in the audit calculations
may be different from those used to calculate the energy index.
• Floor Area – Enter the conditioned floor area of the client’s dwelling in units
of square feet. This is the floor area of the living space, not the foot print area.
For example, a two-story home with a floor area of 1200 sq. ft. per story would
have a total floor area of 2400 sq. ft. If you enter a floor area on the Energy
Index form, then this floor area will automatically be entered on the NEAT
Audit Information form (see Section 8.2, Audit Information) when an audit for
this client is created (although you can change this entry on the Audit
Information form if desired).
• Heating Degree Days – Enter the number of annual Heating Degree Days
(HDDs) at base 65ºF for the location of the dwelling. The annual HDDs entered
should correspond to the same time period as the annual energy costs entered
below in order for the energy index to be most accurate. In addition, values
entered for different clients should come from a consistent source. However, if
the HDDs for this time period are not available, then average values over long
time periods may be used. Such values may be available through the National
Oceanic and Atmospheric Administration (NOAA) or The American Society of
Heating, Refrigeration, and Air Conditioning Engineers (ASHRAE).
The next three fields exist for both a primary and a secondary heating fuel. Enter
information into the fields for the secondary heating fuel only if more than one fuel
is used to supply space heating to the dwelling (e.g., if an electric space heater is

7-14 The Weatherization Assistant User’s Manual (Version 8.9)
Chapter 7: Clients
used to heat a bedroom while the remainder of the house is heated by a gas
furnace).
• Fuel Type – Select the fuel type that is being described as providing the space
heat. The choices are None, Natural Gas, Oil, Electricity, Propane, Wood, Coal,
Kerosene, and Other.
• Annual Cost – Enter the annual fuel bill for the fuel specified. Typically, this is
the sum of 12 recent and consecutive monthly fuel bills.
• Est % Heating − Enter an estimate of the portion of the Annual Cost for this
fuel that was spent for space heating, as opposed to water heating, cooking, etc.
A default value will be entered automatically based on the Fuel Type selected,
but you should modify this value if you do not think it is representative of the
actual conditions in the dwelling.
• BTU/HDD/sqft – Once all of the information described above has been
entered, the Weatherization Assistant computes and displays an energy index
for the primary and secondary fuels as well as a combined energy index for
both fuels. This latter value is the energy index for the home (i.e., a measure of
the home’s energy efficiency).
• High Energy Use – This read-only checkbox is automatically filled out
depending on your entry on the Client Information tab for this same data item
(see Section 7.1, Client Information). Although DOE’s definition of this
parameter is not directly linked to the energy index for a home, consistent use
of the energy index and designation of homes as high energy users should
reveal some correlation between these two data items.
7.4 Contacts (Client)
The Contacts form under the Main Menu’s “Clients” button (see Figure 7.4) allows
you to enter information on people associated with the currently selected client.
You can enter as many contacts as needed. The person requesting weatherization
assistance should be one contact that is entered and will often be the only contact
entered. Other contacts that may be entered for some clients include responsible
relatives of elderly individuals who should be consulted, owners of rental units, or
perhaps a utility representative from whom billing data will be obtained.

The Weatherization Assistant User’s Manual (Version 8.9) 7-15
Chapter 7: Clients
Multifamily buildings may have a superintendent or maintenance person assigned
to the building who could be a valuable contact. The Contacts form may be viewed
and edited in the data sheet view, which provides a summary of all contacts already
entered for the client or allows quick changes to multiple entries. Client contacts
are reported on the Client Completion Report, the Client Information Report, and
the Client Survey Report, all of which are accessible from the Report block of the
Client Information form (see Section 7.1, Client Information). Below are
descriptions of the individual data items and controls found on the Contacts form
under the Main Menu’s “Clients” button:
Figure 7.4. The Contacts form under the Main Menu’s “Clients” button.
• Full Name – Enter the name of the contact. You may enter the name with the
given name first and the surname last, or with the surname first followed by a
comma and then any given names. After you have entered the name and moved
to another control, the Weatherization Assistant will automatically fill in the
uneditable Name Detail fields (i.e., First, MI, and Last) to show you how the
program sees the name that you have entered. If you are trying to enter the
name of a company (e.g., a supplier of materials), you should enter the name of
your primary contact within that company and then provide entries for the User
Name and Company fields. The name must be unique. Required.

7-16 The Weatherization Assistant User’s Manual (Version 8.9)
Chapter 7: Clients
• Primary Applicant – Use this checkbox to indicate if the contact being entered
is the name of the person who applied for weatherization. If checked, this
person’s name will also appear in the uneditable Client Name field, which is
shown above the tabs on the “Client” window when this particular client is
accessed. Reports will also display this individual as the client. Only one
contact can be declared as the Primary Applicant for each client. Designating a
contact as the Primary Applicant will automatically uncheck the checkbox for
any other contact who had previously been declared as the Primary Applicant
for this client. Changing the contact designated as the Primary Applicant is not
recommended when other windows displaying this information are open.
• Contact Type – Select from the drop-down list the Contact Type that best
applies to the contact. The choices are Applicant/Person of Record, Non-
Applicant/Person of Record, Other Contact for Applicant, Landlord/Owner,
Superintendent, Maintenance Staff, and Other. The entry will default to
“Applicant/Person of Record” when a new contact record is initiated. Normally,
if the Primary Applicant checkbox is checked for this contact, then the Contact
Type is “Applicant/Person of Record.” The “Non-Applicant/Person of Record”
is intended for use in multifamily buildings to designate an occupant of a unit
who can have weatherization work performed on their unit only because the
required fraction of other units in the building qualify. Optional.
• Company Name – If applicable, enter the company associated with the contact.
Remember that the contacts being entered here are for a specific client, not for
your agency in general. Thus, companies you use as suppliers or contractors
would likely be more appropriately entered on the Contacts form under the
Main Menu’s “Agency” button as discussed in Section 6.2, Contacts (Agency),
unless this company supplied a specific need for this client alone. Optional.
• Title – If applicable, enter a title associated with the client. This entry could
alternately be used to enter a position or relation of the contact to a primary
applicant. Optional.
• Address, Unit Number, City, State, and Zip Code – Enter the complete
mailing address of the contact. If the address is the same as the address entered
for the dwelling on the Client Information form (see Section 7.1, Client
Information), you can use the “Copy Client Addr” button to copy this address
from the Client Information form to the Contacts form. Optional.

The Weatherization Assistant User’s Manual (Version 8.9) 7-17
Chapter 7: Clients
• Copy Client Addr − If the address entered for the dwelling on the Client
Information form (see Section 7.1, Client Information) is the same as the
address for the client, you can use the “Copy Client Addr” button to copy the
address information from the Client Information form to the Contacts form.
• Work, Cell, Pager, Fax, and Home Phone – Enter any of the indicated phone
numbers for the contact. Optional.
• E-Mail – Enter an e-mail address for the contact. Only e-mail addresses of
contacts listed under the Main Menu’s “Agency” button will be entered
automatically in the Address Book of the e-mail feature of the Weatherization
Assistant. See Section 18.4, E-Mailing from Within Weatherization Assistant,
for more information. Optional.
• Comment – You may enter comments directly in the Comment field on the
form, or you may enter them in the Comment Editor by selecting the
“Comment” button to the left of the field. The Comment Editor is similar to
Window’s Notepad and may be used to enter extended comments. The total
comment may have up to 65,000 characters. Text from other sources may be
copied and pasted into the Comment Editor’s window. Comments entered on
the Contacts form are not displayed anywhere else in the Weatherization
Assistant or in any of its predefined reports. However, you may wish to include
the comment in a user-designed report (see Appendix D, Development of
Customized Reports). Optional.
• Client Contact Record Navigation Block – The Client Contact record
navigation block is used to find and navigate to existing client contacts, copy or
delete the currently accessed contact, or create a new contact. Only contacts
associated with the current client will appear in the drop-down list. See Section
5.1, Form and Record Navigation, for information on using the Weatherization
Assistant’s record navigation blocks.
7.5 Audits (Client)
The Audits form (see Figure 7.5) under the Main Menu’s “Clients” button shows
all the audit records associated with the current client in a navigation data sheet
view. This form is similar to the Audits form found under the Main Menu’s
“Agency” button as discussed in Section 6.6, Audits (Agency). The form is used
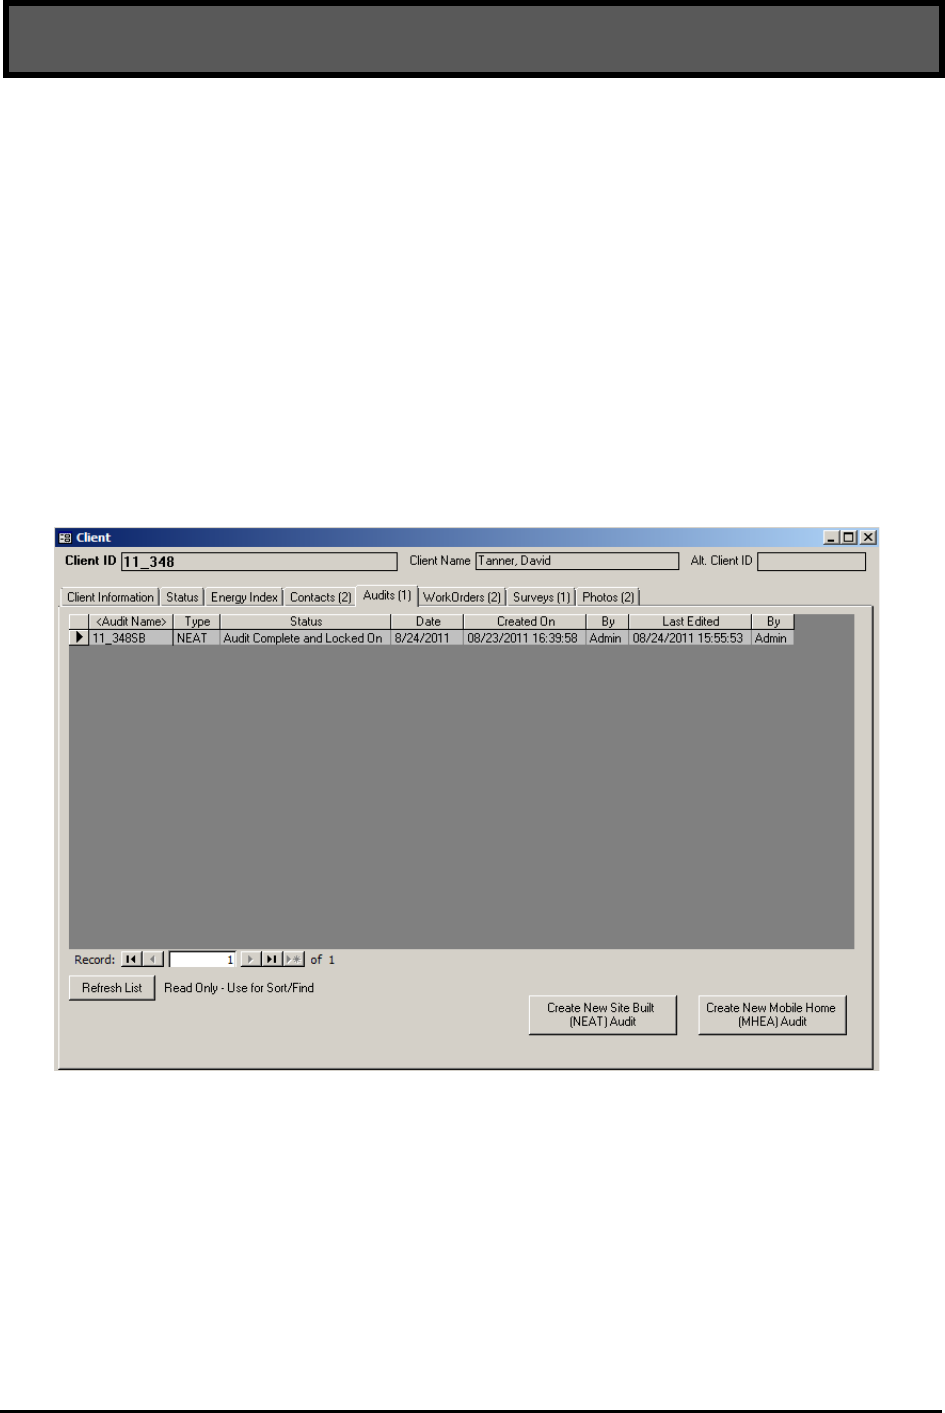
7-18 The Weatherization Assistant User’s Manual (Version 8.9)
Chapter 7: Clients
primarily to navigate to individual audit records. The shading of the records
displayed on this form is the visual indicator that this form is used for navigation
rather than data entry. You can double click with your mouse on the entries under
the column headings in angle brackets (<>) to navigate to the associated record.
Like any data sheet, the order that the audit records are displayed can be changed
by highlighting a column and pressing one of the sort buttons in the tool bar. Some
of the columns in the form may be collapsed (not shown) by default. You can
double click the mouse near the borders of some of the columns in the header to
have them expanded. You can collapse columns that you do not want to see by
dragging their widths to zero. You may need to use the horizontal scroll bar to
display all the columns.
Figure 7.5. The Audits form under the Main Menu’s “Clients” button.
Columns not displayed in this figure include the ClientID and numerical JobID.
Normally, there is only one audit record for each client. However, the
Weatherization Assistant does allow you to create and execute more than one audit
per client. This might be useful if you desire to see the effect of some modification
in the building description on the recommendations of the audit. You might also
want to update or correct an existing audit without losing the original description.
If you have run more than one audit per client, you should ensure that only one set

The Weatherization Assistant User’s Manual (Version 8.9) 7-19
Chapter 7: Clients
of active work orders exists for the client. Otherwise, confusion and double
accounting of costs are likely to occur. Below are brief descriptions of the
individual data items and controls found on the Audits form under the Main
Menu’s “Clients” button:
• Audit Name and Type − These entries are those given on the Audit
Information form under the Main Menu’s “NEAT” and “MHEA” buttons for
each of the audits listed (see Section 8.2, Audit Information).
• Numerical JobID (not shown) − When a new audit is created, the
Weatherization Assistant automatically assigns a unique number to the audit for
internal software purposes. This field displays what this number is for each
audit. See Feature 6 in Section 16.4, Features, for more information.
• ClientID (not shown) – The Client ID associated with each audit is also
available on this form but not normally displayed since the same information is
available immediately above the form (see Figure 7.5).
• Status – This field gives the latest audit status for each audit as set on the Status
form under the Main Menu’s “NEAT” or “MHEA” buttons. See Section 11.1,
Status (Audit), and Section 18.3, Status Tracking, for more information.
• Date – This field provides the date that the latest status was set.
• Created On – This field gives the date (and time if the entry is expanded) that
the audit was originally created, either by using the “Create New…Audit”
buttons on this form, copying an existing audit, or selecting the “New” button
on the Audit Information form.
• By – If the User Logon feature was enabled (see Feature 4 in Section 16.4,
Features) when an audit was created or last edited, these columns will give the
user that was logged on at that time.
• Last Edited – This field shows the date (and time, if the column is expanded)
of the last change made to this audit record on forms under the Main Menu’s
“NEAT” and “MHEA” buttons.

7-20 The Weatherization Assistant User’s Manual (Version 8.9)
Chapter 7: Clients
• Refresh List – The “Refresh List” button can be used to update the information
displayed on the Audits form to reflect any changes since the last time this form
was opened.
• Create New Site Built (NEAT) Audit and Create New Mobile Home
(MHEA) Audit – You can select these buttons if you wish to initiate a new
NEAT or MHEA audit for the current client. The Weatherization Assistant will
create a new audit record, display the appropriate Audit Information form, and
provide an initial default Audit Name. The Client ID, Agency Name, and
Agency State fields on the form for the new audit will also be automatically
entered based on the information entered for the current client and the agency
assigned to that client. If no other entries are made on this new Audit
Information form, you may immediately exit the form without adding any
further information and the audit will be recorded for future reference but with
blank status. If you enter any other information on the newly created audit form,
the Weatherization Assistant will begin examining for required data entries and
not allow you to exit the form until the required data entries have been made (or
you have erased the other information by entering two consecutive [Esc] keys).
See Sections 4.2, Starting a New Audit, and 8.2, Audit Information, for details.
7.6 Work Orders (Client)
The Work Orders form (see Figure 7.6) under the Main Menu’s “Clients” button
shows all work order records associated with the current client in a navigation data
sheet view. This form is similar to the Work Orders form found under the Main
Menu’s “Agency” button as discussed in Section 6.7, Work Orders (Agency). The
form is used primarily to navigate to individual work order records. The shading of
the records displayed on this form is the visual indicator that this form is used for
navigation rather than data entry. You can double click with your mouse on the
entries under the column headings in angle brackets (<>) to navigate to the
associated record. Like any data sheet, the order that the work order records are
displayed can be changed by highlighting a column and pressing one of the sort
buttons in the tool bar. Some of the columns in the form may be collapsed (not
shown) by default. You can double click the mouse near the borders of some of the
columns in the header to have them expanded. You can collapse columns that you
do not want to see by dragging their widths to zero. You may need to use the
horizontal scroll bar to display all the columns.

The Weatherization Assistant User’s Manual (Version 8.9) 7-21
Chapter 7: Clients
More than one work order for a client will be displayed on this form if you have
divided the work on a client’s home into more than one work order, normally
because more than one contractor is assigned the work. The work orders may have
been generated automatically from the Measures form under the Main Menu’s
“NEAT” and “MHEA” buttons (see Section 11.11, Measures (Audit)) or manually
from the Main Menu’s “Work Orders” button (see Section 13.1, Work Order
Information). Below are brief descriptions of the individual data items and controls
found on the Work Orders form under the Main Menu’s “Clients” button:
• Work Order Name − This entry is the name associated with the work order as
prescribed on the Work Order Information form of the Main Menu’s “Work
Orders” button when it was first generated (see Section 13.1, Work Order
Information).
• Numerical WorkOrderID (not shown) − When a new work order is created,
the Weatherization Assistant automatically assigns a unique number to the work
Figure 7.6. The Work Orders form under the Main Menu’s “Clients” button.
Columns not displayed in this figure include the ClientID and numerical JobID.
Note: The form has been displayed wrapped since scrolling would normally
be necessary to see all columns.

7-22 The Weatherization Assistant User’s Manual (Version 8.9)
Chapter 7: Clients
order for internal software purposes. This field displays what this number is for
each work order. See Feature 6 in Section 16.4, Features, for more information.
• ClientID (not shown) – The Client ID associated with each work order is also
available on this form but not normally displayed since the same information is
available immediately above the form (see Figure 7.6).
• Status, Inspect Status, and Pay Status – There are three status categories for a
work order: a general status, an inspection status, and a payment status. Each
status category has its own column in the Work Orders form. These fields give
the latest status of each category for each work order. These statuses are
changed on the Status form under the Main Menu’s “Work Orders” button for
each individual work order. See Section 13.2, Status (Work Order), and Section
18.3, Status Tracking, for more information.
• Status Dates – These fields provide the date that the latest status was set for
each of the three work order status categories.
• ActCost – If any actual costs have been entered for the measures listed on a
work order, then the total of these costs will be displayed in this column. See
“The Materials/Labor Details Sub-Form” in Section 13.3, Measures (Work
Order), for more information. This entry may not be of much significance until
the work order status has been declared “Completed” as discussed in Section
13.2, Status (Work Order).
• ActSave (not shown) – This field displays the total actual life cycle savings
(over the life of the measures) for all measures listed on a work order that have
energy savings associated with them. The actual savings reflects the
“Actual/Estimated Adjustment Factors” imposed on the savings for each
measure as discussed in Section 13.3, Measures (Work Order). This field is not
shown (collapsed) by default because it may not be of interest on the work
order level. To view the column, double click your mouse while positioned just
to the right of the line between the ActCost and ActSIR column headers.
• ActSIR – If energy savings are associated with any of the measures listed on a
work order and actual costs for these measures have been entered, then the
ActSIR field will display the corresponding actual savings-to-investment ratio
(SIR) for the work order as a whole. The value is the ratio of the ActSave to the

The Weatherization Assistant User’s Manual (Version 8.9) 7-23
Chapter 7: Clients
ActCost entries above. This entry may not be of much significance until the
work order status has been declared “Completed” and all actual costs have been
entered as discussed in Section 13.2, Status (Work Order).
• Created On – This field gives the date (and time if the entry is expanded) that
the work order was originally created, either from having run a NEAT or
MHEA audit, copying an existing work order, or selecting the “New” button on
the Work Order Information form.
• By – If the User Logon feature was enabled (see Feature 4 in Section 16.4,
Features) when a work order was created or last edited, these columns will give
the user that was logged on at that time.
• Last Edited – This field shows the date (and time, if the column is expanded)
of the last change made to this work order record on the forms under the Main
Menu’s “Work Orders” button or, if no modifications have been made, the date
the work order was generated from the Measures form of the Main Menu’s
“NEAT” or “MHEA” buttons.
• Refresh List – The “Refresh List” button can be used to update the information
displayed on the Work Orders form to reflect any changes since the last time
this form was opened.
• Create New Work Order – Selecting this button will take you directly to the
Work Order Information form under the Main Menu’s “Work Orders” button
(see Section 13.1, Work Order Information) and initiate a new work order for
the current client. The Weatherization Assistant will provide an initial default
Work Order name. The Client ID, Agency Name, and Agency State fields on
the new work order will also be automatically entered based on the information
entered for the current client and the agency assigned to that client. If a NEAT
or MHEA audit has been entered for the client, the name of the audit will also
be automatically entered. However, this entry may be altered if more than one
audit has been performed for the client, or the entry may be deleted if the
measures to be assigned to this work order come from some source other than a
NEAT or MHEA audit, such as in the case of a priority list.
• Savings – This field displays the sum of the ActSave column (i.e., the
cumulative actual life cycle savings for all measures for all work orders for the

7-24 The Weatherization Assistant User’s Manual (Version 8.9)
Chapter 7: Clients
client). If accurately tracked, this entry would eventually equal an estimate of
the total life time dollar savings of all work performed for a client. Uneditable.
• Cumulative CLIENT Actual Cost – This field displays the sum of the
ActCost column (i.e., the cumulative actual cost for all work orders for the
client). If accurately tracked, this entry would eventually equal the total actual
costs of all work performed for a client. Uneditable.
• Cumulative CLIENT Actual SIR – This field displays the actual SIR for all
work performed for the client from all work orders displayed on the Work
Orders form based on the entries in the ActSIR column. This entry may not be
of much significance until the work order statuses for all work orders associated
with the client have been declared “Completed” and all actual costs have been
entered, as discussed in Section 13.2, Status (Work Order). Uneditable.
7.7 Surveys (Client)
The Surveys form (see Figure 7.7) under the Main Menu’s “Clients” button is used
to fill out the surveys you have previously developed under the Main Menu’s
“Agency” button (see Section 6.4, Surveys (Agency)) allowing you to collect
Figure 7.7. The Surveys form under the Main Menu’s “Clients” button.

The Weatherization Assistant User’s Manual (Version 8.9) 7-25
Chapter 7: Clients
additional information on your current client or his/her household. The predefined
surveys you select for this client can be altered on this form without changing the
originals. You may fill out multiple surveys for the same client. If you have
predefined a blank survey, it can be selected for any client, then modified to create
a unique survey specific to that client.
Below are descriptions of the individual data items and controls found on the
Surveys form under the Main Menu’s “Clients” button. Entries in the Survey
Questions sub-form will be discussed afterwards.
• Survey Name – Once you have selected a survey from your predefined surveys
(see the following control description), this field will contain the survey name
given at the time of the survey’s definition. You are free to change the name
here without affecting the name of the original survey. The name should be
unique amongst the survey names for a given client. Required.
• Which Survey to Create, Create New Survey – To select a predefined survey
for the current client, use the “which Survey to Create” drop-down list to select
the survey and then select the “Create New Survey” button to actually create
and display the survey for your current client. The name of the survey will
appear in the Survey Name field at the top of the form. Be careful. The
Weatherization Assistant allows you to create more than one copy of the same
survey for the same client, which can possibly create confusion.
• Survey Record Navigation Block – The Survey record navigation block is
used to find and navigate to existing surveys that you have created and filled in
for the current client, and to delete unwanted copies of surveys using the “Del”
button. See Section 5.1, Form and Record Navigation, for information on using
the Weatherization Assistant’s record navigation blocks.
• Comment – You may enter comments pertinent to the entire survey directly in
the Comment field on the form, or you may enter them in the Comment Editor
by selecting the “Comment” button to the left of the field. The Comment Editor
is similar to Window’s Notepad and may be used to enter extended comments.
The total comment may have up to 65,000 characters. Text from other sources
may be copied and pasted into the Comment Editor’s window. Any comment
that is entered is displayed on the Client Surveys report accessed from the
Client Information form (see Section 7.1, Client Information). Optional.

7-26 The Weatherization Assistant User’s Manual (Version 8.9)
Chapter 7: Clients
The Survey Questions sub-form is used to answer the questions listed in a
predefined survey or alter a survey by adding, deleting, or modifying questions
contained in it. Altering a survey on this form will not affect the surveys defined
under the Main Menu’s “Agency” button. You could develop a predefined survey
under the Main Menu’s “Agency” button that has no questions in it, recall this
blank survey for the current client, and then develop a survey specific for the
current client by adding whatever questions you like. A new question may be
initiated by positioning the cursor at the first blank record or by selecting the new
record button ( ).The entries in the sub-form are copy/paste friendly from both
the Weatherization Assistant program and other text or word processing software.
The multiple columns of the sub-form may be copied to a spreadsheet, such as
Microsoft Excel, for printing. All surveys created for the current client can be
printed from the Client Information form under the Main Menu’s “Clients” button
using the Report block (see Section 7.1, Client Information). Below are brief
descriptions of the individual data items and controls found on the Survey
Questions sub-form:
• Group – If not entered on the predefined survey, you can assign each question
to a group if desired on this form. Any existing Group entry may be modified.
Assigning groups may be desirable for organizational or presentation purposes.
You could also use the Group designation to sort the questions on the sub-form
using standard data sheet view sorting techniques. The entry is limited to 50
characters. Optional.
• # – If not entered on the predefined survey, you can establish the order the
questions will appear on the Client Surveys report by assigning order numbers
on this form (see “Report Block” in Section 7.1, Client Information). Any
existing assignments may be modified. Optional.
• Question – If not entered on the predefined survey, you can enter the actual
question to be asked of the client or completed by agency staff on this form.
Any existing question may be modified to be specific to the current client. Each
question may be 255 characters or less. Optional.
• Reply – Individual question replies are entered as text entries in the Reply
column and are limited to 50 characters or less. Number replies are seen as text
and cannot be used in arithmetic operations. Optional.

The Weatherization Assistant User’s Manual (Version 8.9) 7-27
Chapter 7: Clients
• Comment – You can enter any comments associated with each question or
answer directly in the Comment field on the form, or you may enter them in the
Comment Editor by double clicking on the Comment field. Text from other
sources may be copied and pasted into the Comment Editor’s window. The
comments appear on the Client Surveys report printed from the Client
Information form under the Main Menu’s “Clients” button using the Report
block (see Section 7.1, Client Information). Optional.
7.8 Photos (Client)
If you have selected the “Use photo browser tab…” checkbox from the Features
tab under the Main Menu’s “Preferences” button (see Feature 1 in Section 16.4,
Features), the Photos tab will appear under the Main Menu’s “Clients” button.
This feature allows you to access the Photos form (see Figure 7.8). From this form,
you may select, view, and edit digital photos for the current client. See Section
18.1, Digital Photos, for more information on this feature. The ability to reference
digital photos also exists under the Main Menu’s “NEAT,” “MHEA,” and “Work
Orders” buttons. Therefore, you should develop a consistent policy regarding
where you reference your photos.
Figure 7.8. The Photos form under the Main Menu’s “Clients” button.

7-28 The Weatherization Assistant User’s Manual (Version 8.9)
Chapter 7: Clients

The Weatherization Assistant User’s Manual (Version 8.9) 8-1
Chapter 8: NEAT and MHEA Introduction
Chapter 8. NEAT and MHEA Introduction
The primary purpose of the Weatherization Assistant is to make energy efficiency
measure recommendations applicable to specific homes. This purpose is fulfilled
by gathering audit information on each dwelling and entering this information into
the program. This descriptive information is organized under either the
Weatherization Assistant’s Main Menu’s “Site Built (NEAT)” button for site-built,
single-family homes or the Main Menu’s “Mobile Home (MHEA)” button for
mobile homes (see Figure 3.1). This manual refers to information, forms, tabs, etc.,
accessed under these two buttons as being in the “NEAT Audit window” or
“MHEA Audit window” or, simply, being “NEAT’s” or “MHEA’s.”
The discussion of the data entry and display items found under these two Main
Menu buttons is presented in five separate chapters. This chapter discusses the
information entered on the Audit Information form found in both the “NEAT
Audit” and “MHEA Audit” windows. The Audit Information forms for NEAT and
MHEA are discussed together because most of the information entered on these
forms is the same. Chapter 9, NEAT Building Description, discusses the data
entered under NEAT’s Shell, Heating, and Cooling forms to describe a site-built
house, while Chapter 10, MHEA Building Description, discusses the data entered
under MHEA’s Shell, Addition, Heating, and Cooling forms to describe a mobile
home. The NEAT forms are discussed separately from the MHEA forms because
the descriptive data for a site-built home differs from the data for a mobile home.
Chapter 11, NEAT and MHEA Common Elements, discusses forms that are
common to both NEAT and MHEA. These include the Status, Ducts/Infiltration,
Base Loads (Water Heating, Refrigerators, and Lighting Systems), Health &
Safety, Itemized Costs, Utility Bills, Photos, and Measures forms, as well as some
optional sub-forms found on the Heating and Water Heating forms. Finally, the
Recommended Measures report, typically displayed immediately after running a
NEAT or MHEA audit, is discussed in Chapter 12, NEAT and MHEA Results.
8.1 Starting a New Audit and Accessing Previous Audits
Once a client has been entered into the Weatherization Assistant, audit information
on the client’s dwelling can be entered into the program and the audit can be run to
obtain a list of recommended weatherization measures. The recommended way to
start a new audit record for a client is to select the “Clients” button on the
Weatherization Assistant’s Main Menu (see Figure 3.1), select the client for which

8-2 The Weatherization Assistant User’s Manual (Version 8.9)
Chapter 8: NEAT and MHEA Introduction
the audit is to be performed, select the Audit tab, and then click on either the
“Create New Site Built (NEAT) Audit” or “Create New Mobile Home (MHEA)
Audit” button, whichever is appropriate for this specific dwelling. Alternatively,
you may initiate a new audit for a previously entered client by entering either the
“NEAT Audit” or “MHEA Audit” window from the Main Menu, then selecting the
“New” button from the Audit record navigation block on the Audit Information
form. You will then have to choose the correct client from the form’s “Client ID”
drop-down list. Either method will leave you on the Audit Information form for
NEAT or MHEA with the audit correctly assigned to the client of your choice.
These approaches are discussed in more detail in Sections 4.2, Starting a New
Audit; 7.5, Audits (Client); and 8.2, Audit Information.
You may access any existing audit by selecting the appropriate “NEAT Audit” or
“MHEA Audit” button from the Main Menu and then using one of the drop-down
lists in the Audit record navigation block to locate and select the desired audit.
Although this is the more direct method, you can also access an existing audit by
selecting the “Clients” button from the Weatherization Assistant’s Main Menu,
navigating to the client of interest using the Client record navigation block,
selecting the Audits tab, and then double clicking your mouse on the Audit Name
corresponding to the audit of interest as discussed in Section 7.5, Audits (Client).
Similarly, you can access an existing audit from the Main Menu’s “Agency” button
as discussed in Section 6.6, Audits (Agency).
8.2 Audit Information
The Audit Information forms under the Main Menu’s “NEAT Audit” and “MHEA
Audit” buttons (see Figure 8.1 and Figure 8.2, respectively) are used to enter
overall audit information about the house and to identify the libraries the audit will
reference for non-house specific data. They also allow you to view and navigate to
other audits in your database, and to access audit level reports. Below are
descriptions of the individual data items and controls found on the Audit
Information forms. Most apply to both NEAT and MHEA. Those fields that are
unique to NEAT or MHEA are described separately.
• Audit Name – The Audit Name is designed to be the key parameter identifying
this audit to you and to the computer. Therefore, the Audit Name must be
unique. Some convention should be adopted to supply each audit with a unique

The Weatherization Assistant User’s Manual (Version 8.9) 8-3
Chapter 8: NEAT and MHEA Introduction
Figure 8.1. The Audit Information form under the Main Menu’s “NEAT” button
2
.
Figure 8.2. The Audit Information form under the Main Menu’s “MHEA” button
2
.
2
Both options for linking photos to the audit are shown (the Photos tab and the Photo Folder field with
accompanying “Browse” and “View” buttons) even though only one can be selected and displayed at one time.

8-4 The Weatherization Assistant User’s Manual (Version 8.9)
Chapter 8: NEAT and MHEA Introduction
Audit Name. When an audit is initially created, NEAT and MHEA will
automatically give the new audit a unique name in the form of “Audit (#).” You
should replace this default name with a name of your choosing. The name of the
audit might contain or somehow reference the Client ID because the Client ID
must be unique for each client. Use of the occupant’s name rather than the
Client ID is not recommended because it does not ensure uniqueness, especially
if only last names are used. Most clients will usually have only one audit
associated with it; however, the possibility of creating and running multiple
audits for a client should be considered. Required.
• Client ID – This field will display the Client ID of the client for whom the
audit is being performed. If the audit was initiated using the “Create New Site
Built (NEAT) Audit” or “Create New Mobile Home (MHEA) Audit” buttons
on the Audits form of the Main Menu’s “Clients” button as discussed in Section
7.5, Audits (Client), then this field will automatically be filled in with that
client’s Client ID. If the audit was initiated using the “New” button in the Audit
record navigation block, then the Client ID will remain the same as the Client
ID on the Audit Information form prior to requesting the new audit. In this case,
you will have to use the drop-down list associated with the Client ID field to
choose the correct client from those entered in the database. When you do
attempt to change the client, you will get a warning because changing the client
associated with an existing audit is usually not a normal operation except for
when a new audit is being created. NEAT and MHEA simply do not know that
this is a new audit. Required.
• Agency Name and Agency State – These fields display the name of the agency
that this client is assigned to and the state of this agency. The fields will be
automatically filled in based on the information entered on the Client
Information form (see Section 7.1, Client Information) for the client identified
in the Client ID field. Changing the Client ID will immediately update the
Agency Name and Agency State, if needed. Uneditable.
• Auditor – This field displays the User Name of the auditor who is assigned to
or responsible for this audit. Use the drop-down list associated with this field to
select the auditor. The list will contain only those contacts declared as auditors
on the Contacts form under the Main Menu’s “Agency” button corresponding to
the agency responsible for the client as discussed in Section 6.2, Contacts
(Agency). Optional.

The Weatherization Assistant User’s Manual (Version 8.9) 8-5
Chapter 8: NEAT and MHEA Introduction
• Comment – You may enter comments pertinent to the audit directly in the
Comment field on the form, or you may enter them in the Comment Editor by
selecting the “Comment” button to the left of the field. The Comment Editor is
similar to Window’s Notepad and may be used to enter extended comments.
The total comment may have up to 65,000 characters. Text from other sources
may be copied and pasted into the Comment Editor’s window. Any comment
that is entered is displayed on the Recommended Measures report and the Input
Report available from the Report block as described below. You may also wish
to include the comment in a user-designed report (see Appendix D,
Development of Customized Reports). Optional.
• Photo Folder, Browse, and View − If you have chosen to use the third party
photo browser method for attaching photos to records under the Main Menu’s
“Preferences” button (see Feature 2 in Section 16.4, Features), a “Photo
Folder” field, “Browse” button, and “View” button will be present on the Audit
Information form below the Libraries and Other Options data block. Use the
“Browse” button to select a folder on your computer in which you have stored
digital photos for this specific client. Once selected, the location of this folder
will be displayed in the Photo Folder field. Select the “View” button to obtain a
photo browser in which you may view and edit these photos. The
Weatherization Assistant provides the option of attaching photos not only to
audits, but also to clients and work orders as well. Therefore, you should
develop a consistent policy regarding where and how you store reference to
your photos. See Section 18.1, Digital Photos, for more information on viewing
and editing photos.
Libraries and Other Options Data Block
The first four entries in the Libraries and Other Options data block tell NEAT and
MHEA what libraries to reference for non-house specific data when running the
audit.
• Setup Library – Select the setup library to be associated with this audit using
the drop-down list. If you selected a setup library on the Client Information
form for this client (see Section 7.1, Client Information), then the selected setup
library will automatically be entered in the Setup Library field, although you
can change this selection using the drop-down list if desired. The Setup Library
contains measure costs, candidate measure information, fuel costs, and other

8-6 The Weatherization Assistant User’s Manual (Version 8.9)
Chapter 8: NEAT and MHEA Introduction
key parameters that will be used by NEAT and MHEA when the audit is run.
The setup libraries that will be listed in the drop-down list are those that have
been created for the agency identified in the Agency Name field. If there is only
one setup library associated with the agency chosen for the audit, the setup
library will automatically be entered into the field. See Chapter 14, Setup
Library, for more information on how to create setup libraries and the need to
update the Setup Library to reflect your local costs and weatherization
approaches. Required.
• Fuel Cost Library – Select the fuel cost library to be associated with this audit
using the drop-down list. The fuel cost library contains the fuel costs to be used
by the audit in calculating the dollar value of energy savings. If you have more
than one utility supplying a particular fuel in your agency’s service territory,
you may need to have more than one fuel cost library. Fuel cost libraries are a
subset of data contained in a setup library. Therefore, the fuel cost libraries that
will be listed in the drop-down list are only those that have been created in the
setup library identified in the Setup Library field. If you change the setup
library to be used by the audit, entry in the Fuel Cost Library field will be
automatically deleted, indicating the need to choose another entry from the new
setup library. If the assigned setup library has only one fuel cost library, that
library will automatically be assigned. See Section 14.3, Fuel Costs, for more
details. Required.
• Supply Library – Select the supply library to be associated with this audit
using the drop-down list. Although the supply library is used primarily with
work orders, the audit uses entries in the supply library for replacement
refrigerators and water heaters. See “Additional Entries on the Hot Water
Equipment and Refrigerator Forms” in Section 15.2, Materials/Labor Forms,
for more details on how to populate the supply library with the replacement
refrigerators and hot water heaters that you use. Unless an unusual situation
arises, an agency will have only a single supply library. If this is the case, this
supply library will be entered automatically. Required.
• Weather File – The audit must be told what climatic data to use in estimating
the energy consumptions for the dwelling. Select one of the approximately 220
weather cities provided in NEAT and MHEA using the drop-down list. The
cities are listed in alphabetical order, first by state, then by city. You may wish

The Weatherization Assistant User’s Manual (Version 8.9) 8-7
Chapter 8: NEAT and MHEA Introduction
to consider not only those cities in your state, but also cities near you in states
that border your own. Required.
• Billing Adjustment – NEAT and MHEA will adjust their energy savings
estimates and develop a second set of recommended weatherization measures
based on the actual pre-weatherization energy consumption of the house if the
Billing Adjustment checkbox is selected and pre-retrofit utility billing data have
been entered on the Utility Bills form (see Section 11.9, Utility Bills). Both
unadjusted and adjusted results will be reported in the Recommended Measures
report. See Chapter 12, NEAT and MHEA Results, for more details.
NEAT Specific Entries
• Conditioned Stories – Enter the number of conditioned stories. The value is
used to determine an approximate distance between the lowest and highest
points at which air infiltration can enter and exit the house. Therefore, include a
finished attic if the space is heated or cooled, and a basement if it is heated or
cooled and a significant portion of its wall area is above-grade (e.g., a walk-out
basement). You may enter a decimal (e.g., 1.5) for a finished attic, split level, or
half story upstairs, although this degree of accuracy is normally not necessary.
Required.
• Floor Area – Enter the approximate floor area of the house that is heated or
cooled in units of square feet. This is the floor area of the living space, not the
foot print area. For example, a two-story home with a floor area of 1200 sq. ft.
per story would have a total floor area of 2400 sq. ft. If you entered a floor area
on the Energy Index form under the Main Menu’s “Clients” button (see Section
7.3, Energy Index), then this floor area will automatically be entered in the
Floor Area field, although you can change this entry if desired. Required.
• Impute Cooling – This checkbox, which appears in the Libraries and Other
Options data block, is intended to accommodate audits in extremely southern
climates where neither heating nor cooling equipment is present in the house.
The feature is designed to allow installation of measures that could add to the
occupants’ comfort even though energy cannot be saved. If the checkbox is
selected, NEAT will “impute” a cooling energy use assuming that an air
conditioner with an SEER as specified in the Key Parameters/Equipment form

8-8 The Weatherization Assistant User’s Manual (Version 8.9)
Chapter 8: NEAT and MHEA Introduction
under the Main Menu’s “Setup Library” button (see Section 14.2, Key
Parameters) is present in the house.
MHEA Specific Entries
• Length – Enter the length of the home in units of feet (see Figure 8.3). The
home length is the length of the living space. Do not include the length of the
towing tongue that extends out from one end of the manufactured home.
Required.
• Width – Enter the width of the home in units of feet (see Figure 8.3). Required.
• Exterior Wall Height – Enter the height of the exterior wall of the home in
units of feet as measured from the floor to the ceiling inside the home (see
Figure 8.3). Make this measurement in any portion of the house that does not
have a raised or cathedral ceiling. Required.
Figure 8.3. Dimensions associated with a manufactured home.
• Wind Shielding – Select the option that best describes how well the
manufactured home is shielded from the wind. The options are Well Shielded,
Normal Shielding, or Exposed. A correction factor is included in the infiltration
calculation for the relative amount of external wind shielding. A well-shielded
home may be surrounded by thick vegetation, in a small valley that seldom
experiences windy conditions, or closely surrounded by other homes and
buildings. A normally shielded home may be one that is found in a typical

The Weatherization Assistant User’s Manual (Version 8.9) 8-9
Chapter 8: NEAT and MHEA Introduction
manufactured home housing park where there are surrounding homes and some
surrounding vegetation. An exposed home has no surrounding vegetation or
buildings to protect it from the wind. Required.
• Home Leakiness – Select the option that best describes the air leakage rate of
the home prior to your weatherization work. The options are Tight, Medium,
and Loose. Leakage rates in units of cfm at 50 Pa associated with these
selections are set in the Key Parameters/Heat Transfer form under the Main
Menu’s “Setup Library” button (see Section 14.2, Key Parameters). These
values will be used as the existing air leakage rate for the home before
weatherization if actual values are not entered on the Ducts/Infiltration form
(see Section 11.2, Ducts/Infiltration – Air and Duct Leakages). Required.
• Outdoor Water Heater Closet – Select this checkbox to indicate that the
water heater is located in an unconditioned closet with an exterior access. If an
outdoor closet exists, MHEA will assume a “30 × 30” inch water heater closet
in its calculations of wall, floor, and ceiling areas.
Other Controls
• Audit Record Navigation Block – The Audit record navigation block is used
to find and navigate to existing audits in your database, copy or delete the
currently accessed audit, or create a new audit. See Section 5.1, Form and
Record Navigation, for information on using the Weatherization Assistant’s
record navigation blocks.
The default installation of the Weatherization Assistant turns on the “Use only
the latest bookmarked Agency in the find record drop-down boxes” feature in
Preferences (see Feature 9 in Section 16.4, Features). With this feature turned
on, the drop-down lists in the Audit record navigation block will display only
the audits associated with the agency last visited using the Main Menu’s
“Agency” button. Normally, this will be your agency, so the drop-down lists
will display only your agency’s audits. If you have more than one agency
defined in your database and you want the drop-down lists to display audits
from all defined agencies, turn this feature off.
• Report Block – The Report block provides you with access to all reports
available under the Main Menu’s “NEAT” and “MHEA” buttons. The

8-10 The Weatherization Assistant User’s Manual (Version 8.9)
Chapter 8: NEAT and MHEA Introduction
following reports are currently available: Recommended Measures, Input
Report, Heating System Summary, Pressure Diagnostics Report/Form, and
Health & Safety Summary. See Appendix C, Reports, for examples of these
reports. The Recommended Measures report provides information on the
weatherization measures recommended by NEAT or MHEA for a house and is
available only after an audit has been run. The Input Report provides a listing of
all the building description data entered in the audit as well as a summary of the
data entered on the client. The Heating System Summary report provides a
listing of just the heating system information entered in the audit while the
Pressure Diagnostics Report/Form lists just the air leakage and other pressure
diagnostic measurements that were entered in the audit. Finally, the Health &
Safety Summary report displays issues associated with health and safety and
any instances that were identified on any of the audit forms. See Section 5.12,
The Report Block, for information on the mechanics of using the
Weatherization Assistant’s Report blocks. Appendix D, Development of
Customized Reports, describes a method to create reports tailored to your needs
and to list the reports in the Report block.
• Economics Summary Block – Once an audit has been run, the following three
fields in the Economics Summary block of data will summarize the audit
recommendations: Measures Recommended, Total Initial Cost, and Cumulative
SIR. The Measures Recommended field identifies the number of measures
recommended. The Total Initial Cost field provides the total cost for the
recommended measures as estimated by NEAT or MHEA (as opposed to actual
costs, which may be entered in the Weatherization Assistant as part of a work
order). The Cumulative SIR field provides the savings-to-investment ratio (SIR)
estimated by NEAT or MHEA for all the measures recommended for the house.
If the audit has not yet been run, the Measures Recommended field will be “0”
and the other two fields will be blank. Uneditable.
• Run Audit Block – After entering all the audit data for a house using the other
forms under the Main Menu’s “NEAT” or “MHEA” buttons, you can select the
“Run Audit” button to have NEAT or MHEA perform its calculations and
recommend weatherization measures for the house. The Run Audit data block
contains two uneditable fields that show when the audit was last run (i.e., the
“Last Run On” date and time). If the audit has not yet been run, the date field
will display “Not Run.” The Run Audit data block is provided on all the forms
under the “NEAT Audit” and “MHEA Audit” windows. Thus, an audit can be

The Weatherization Assistant User’s Manual (Version 8.9) 8-11
Chapter 8: NEAT and MHEA Introduction
run from any of these forms once you have decided that the audit input is
complete.
An audit may be run any number of times. However, rerunning an audit will
cause the recommendations from the previous run to be overwritten. If you wish
to rerun an audit but save the recommendations from the previous run, use the
“Copy” button in the Audit record navigation block to copy the audit. Give the
copied audit a new Audit Name (possibly a variant of the original name), make
any modifications to the audit desired, and then select the “Run Audit” button
to produce a new set of recommendations.

8-12 The Weatherization Assistant User’s Manual (Version 8.9)
Chapter 8: NEAT and MHEA Introduction

The Weatherization Assistant User’s Manual (Version 8.9) 9-1
Chapter 9: NEAT Building Description
Chapter 9. NEAT Building Description
This chapter discusses the information entered on the building description forms
under the Main Menu’s “NEAT” button that is needed to describe site-built, single-
family houses and that is unique as compared to mobile homes. Prior to entering
information on the forms described in this chapter, you must have already entered
information about the client whose house is being audited (see Section 7.1, Client
Information), chosen to run a NEAT audit for this client, and entered required
information on the Audit Information form for this audit (see Section 8.2, Audit
Information).
The Shell tab contains information related to Walls, Windows, Doors, Unfinished
Attics, Finished Attics, and Foundations of the home. Although unrealistic, only
one wall description need be entered under the Shell tab in order to satisfy the
minimum requirements of the program. This allows describing single units of a
small multifamily building where no heat is lost to the outside through some of the
envelop components.
The Heating and Cooling forms allow descriptions of the home’s HVAC
equipment. NEAT requires at least one heating system, but cooling systems are
optional. The entries on these forms are also discussed in this chapter.
Chapter 11, NEAT and MHEA Common Elements, discusses the remaining forms
under the Main Menu’s “NEAT” button, those common to both NEAT and
MHEA. These include the Status, Ducts/Infiltration, Base Loads (Water Heating,
Refrigerators, and Lighting Systems), Health & Safety (Whole House, Equipment,
and Building Shell), Itemized Costs, Utility Bills, Photos, and Measures forms, as
well as some optional sub-forms found on the Heating and Water Heating forms.
Of these forms, only the Ducts/Infiltration form is required.
On many of the tabs and sub-tabs under the Main Menu’s “NEAT” button,
numbers in parentheses are displayed. These numbers indicate the number of
descriptions, or records, that have been entered for that particular component type.
For example, a tab titled “Walls (4)” indicates that four wall descriptions have thus
far been entered for the house currently being viewed.
Finally, the Recommended Measures report that is typically displayed immediately
after running a NEAT audit is discussed in Chapter 12, NEAT and MHEA Results.

9-2 The Weatherization Assistant User’s Manual (Version 8.9)
Chapter 9: NEAT Building Description
9.1 Shell – Walls
Before you can run NEAT to produce weatherization recommendations, you must
enter data for at least one exterior wall (as well as one heating system) using the
Walls form (see Figure 9.1) under the Main Menu’s “NEAT” button. However,
you will normally describe at least one exterior wall for each of the four cardinal
directions. Walls with different orientations differ in their heat transfer
characteristics because of the different amounts of sunlight that fall on them. This
is particularly important for the windows that may lie on the walls. Walls that
differ in their construction or insulation level should also be described separately
because the cost of insulating the wall and the energy savings from insulating the
wall will differ. In order to describe all of the exterior walls of a house most
efficiently, you may combine multi-storied walls that have the same orientation
and construction. A maximum of 18 wall descriptions may be entered.
Figure 9.1. The Walls form under the Main Menu’s “NEAT” button.
Below are descriptions of the individual data items and controls found on the Walls
form. All items on the Walls form are required except the Additional Cost and
Comment fields.

The Weatherization Assistant User’s Manual (Version 8.9) 9-3
Chapter 9: NEAT Building Description
• Wall Code – The Wall Code identifies wall sections to you and the
Weatherization Assistant. The wall codes must be unique for all wall
descriptions within a given audit. NEAT automatically provides a default entry
for all new walls that are created in the form of “WL#” where the “#” is an
integer insuring uniqueness of the wall code. You may choose to enter your
own wall code to include characters that indicate the orientation, exposure, or
some other characteristics of the wall section. The wall code may have up to 20
characters, although space restrictions in many reports suggest a lesser number
of characters should be used (perhaps 3 to 5) to preserve readability. Entries are
not case-sensitive. The wall code allows NEAT to subtract the correct window
and door areas entered in the Windows and Doors forms (see Sections 9.2,
Shell − Windows, and 9.3, Shell − Doors, respectively) from the corresponding
wall area. NEAT will also use the wall codes in output reports and work orders
to identifying which walls should receive recommended insulation. The wall
codes may also be helpful when labeling your drawing of the house’s floor
plan. Required.
• Wall Type – Enter the type of load-bearing structure for this wall. The choices
are Balloon Frame, Platform Frame, Masonry or Stone, Concrete Block, Adobe,
and Other. NEAT does not differentiate between a balloon frame and platform
frame structure. This distinction is for the benefit of you and the insulation
subcontractor. The thermal characteristics of the Other wall type can be defined
in the Setup Library (see Section 14.2, Key Parameters). The Wall Type
selected may affect the measures considered. See “Added Insulation Type”
below. Required.
• Stud Size − If the Wall Type selected is Balloon Frame or Platform Frame, the
Stud Size field will appear. Enter the stud size used in framing this wall section.
The choices are 2×2, 2×3, 2×4, 2×6, and 2×8. The material cost for insulating
frame walls with loose fill insulation will be adjusted to reflect the available
space in the wall cavity as determined by the stud size and any existing
insulation. Conditionally Required.
• Exterior Type – Select the type of siding installed on the exterior surface of the
wall. The choices are Wood, Metal or Vinyl, Stucco, Brick or Stone, None, and
Other. The thermal characteristics of the Other exterior siding type can be
defined in the Setup Library (see Section 14.2, Key Parameters). Required.

9-4 The Weatherization Assistant User’s Manual (Version 8.9)
Chapter 9: NEAT Building Description
• Exposed To – Enter what the wall is exposed to on the outside of the wall. The
choices are Outside (Ambient) if the wall is exposed to the outside air, Buffered
Space if the wall is exposed to an unconditioned but enclosed space such as a
garage or porch, and Attic Space if the wall is exposed to an unconditioned
attic. A wall adjacent to an unconditioned attic may be described on the Walls
form or as a Kneewall on the Finished Attics form (see Section 9.5, Shell −
Finished Attics). Required.
• Orientation – Enter the closest cardinal compass direction that the wall
component faces. The choices are North, South, East, and West. Required.
• Gross Area – Enter the gross area of the wall in square feet. This is the total
area, including the windows and doors in that wall section (NEAT will
automatically subtract out the area of any windows and doors assigned to the
wall section in its calculations). Values to the nearest ten square feet are
normally sufficient, although a decimal point can be used. Inaccuracy in this
entry will mostly affect the estimated quantity of wall insulation needed should
wall insulation be recommended. Required.
• Measure # – The Measure Number field allows individual wall segments to be
combined into groups. For each group, an SIR to insulate all the wall segments
in that group will be calculated, and one recommendation for insulating all the
wall segments in that group will be given. Enter the same measure number to all
walls you wish to be grouped together. Measure numbers must be used in
consecutive order, starting with 1. For example, a measure number of 3 cannot
be entered until measure numbers 1 and 2 have been used. Walls having an
Added Insulation Type of None or an Added Insulation Type selected that is not
appropriate for the wall will be automatically dropped from a group (see Added
Insulation Type below). Required.
You will likely want to obtain a single SIR for insulating all the walls in a
house if all the walls have the same construction. In this case, enter a measure
number of 1 for all the wall segments. Reasons for giving some walls a different
measure number might be because they have different existing insulation levels,
different wall or exterior types, or different exposures, all of which can impact
installation costs and potential savings. However, walls with these differences
might still be grouped together if you wanted to determine if insulating all the
walls in a house as one retrofit measure was cost-effective.

The Weatherization Assistant User’s Manual (Version 8.9) 9-5
Chapter 9: NEAT Building Description
• Existing Insulation Type – Select the type of existing insulation installed in
the wall segment. The choices are None, Blown Cellulose, Blown Fiberglass,
Rockwool, Fiberglass Batts, Polystyrene Board, and Other. If the Wall Type is
Balloon or Platform Frame, NEAT assumes that the Polystyrene Board and
Other insulation types are installed over the wall studs rather than between the
studs as is assumed for the remaining insulation types. If both cavity insulation
and exterior sheathing insulation are present, enter the type that has the greatest
R-value (you should also note this in the Comment field described below). If
loose fill insulation exists in the wall cavity, NEAT will not consider adding
any additional loose fill insulation. Required.
• Existing Insulation R Value − If the Existing Insulation Type is an entry other
than None, then the Existing Insulation R Value field will appear. Enter the R-
value of the existing insulation found in this wall segment. The default R-values
displayed in the status bar located in the lower left corner of the Weatherization
Assistant window assume a 3 ½ inch cavity and a standard R-value/inch for the
insulation type indicated by the user. If both cavity insulation and exterior
sheathing insulation are present, their total R-value should be entered in this
field. Required.
• Added Insulation Type – Select the type of insulation you would install in this
wall segment if NEAT recommends wall insulation. The choices are None,
Blown Cellulose, and any wall insulation types that you have entered on the
NEAT Insulation Types form under the Setup Library (see Section 14.7, NEAT
Insulation Types). Select None if conditions prohibit insulating this particular
wall segment (you should note what the conditions are in the Comment field
described below). NEAT will not recommend wall insulation if the Added
Insulation Type is a loose fill insulation and (1) the Existing Insulation Type is
also a loose fill insulation; (2) the Wall Type is Masonry or Stone, Concrete
Block, or Adobe; (3) and the air space in the cavity is less than 1.5 inches.
NEAT considers a wall insulation material to be loose fill if the “Units” for the
material on the NEAT Insulation Types form have been chosen as “R/in.”
Required.
• Additional Cost – Enter any additional cost associated with insulating this
specific wall segment in units of dollars. This would be a cost that is not
normally associated with the wall insulation measure and, therefore, is not
accounted for in the measure costs entered on the Library Measures form under

9-6 The Weatherization Assistant User’s Manual (Version 8.9)
Chapter 9: NEAT Building Description
the Setup Library (see Section 14.5, Library Measures). The cost is the total
additional cost to insulate this specific wall segment; it is not a cost per square
foot of wall area. The amount entered will be added to the normal cost
computed from the wall area and the cost per square foot specified on the
Library Measures form in the Setup Library. A blank entry indicates no
additional cost. If a cost is entered, you should briefly explain the reason for
this additional cost in the Comment field described below. Optional.
• Comment – You may enter comments pertinent to the wall segment directly in
the Comment field on the form, or you may enter them in the Comment Editor
by selecting the “Comment” button to the left of the field. The Comment Editor
is similar to Window’s Notepad and may be used to enter extended comments.
The total comment may have up to 65,000 characters. Text from other sources
may be copied and pasted into the Comment Editor’s window. Any comment
that is entered is displayed on the Recommended Measures report and the Input
Report available from the Audit Information form (see Section 8.2, Audit
Information). In addition, any comment that is entered can be imported into any
specific work order (see Section 13.1, Work Order Information). Thus, you may
wish to enter comments related to any observation that might affect the
installation of needed measures or repair work. Optional.
• Windows on this Wall – Selecting this button will take you to a data sheet
view of the Windows form (see Section 9.2, Shell − Windows) that displays
only those windows installed in the wall you are currently accessing. You may
use this form to enter the windows installed in this wall segment and to make
modifications to any window that you have already entered. The form is the
same as that described for the main Windows form except that a form view is
not available and you cannot run NEAT from this view. Users may want to
enter windows using this button rather than the main Windows form because
they find it easier to enter the windows installed on a wall at the same time the
wall is described rather than after all wall segments have been entered.
However, special care must be taken to keep the Window Codes entered unique
since the codes already entered but for windows on other walls will not be
visible from this form.
• Doors on this Wall – Selecting this button will take you to a data sheet view of
the Doors form (see Section 9.3, Shell − Doors) that displays only those doors
installed in the wall you are currently accessing. You may use this form to enter

The Weatherization Assistant User’s Manual (Version 8.9) 9-7
Chapter 9: NEAT Building Description
the doors installed in this wall segment and to make modifications to any door
that you have already entered. The form is the same as that described for the
main Doors form except that a form view is not available and you cannot run
NEAT from this view. Users may want to enter doors using this button rather
than the main Doors form because they find it easier to enter the doors installed
on a wall at the same time the wall is described rather than after all wall
segments have been entered. However, special care must be taken to keep the
Door Codes entered unique since the codes already entered but for doors on
other walls will not be visible from this form.
• Wall Record Navigation Block – The Wall record navigation block is used to
find and navigate to existing wall descriptions for the audit being edited, copy
or delete the currently accessed wall description, or create a new wall
description for the audit. See Section 5.1, Form and Record Navigation, for
information on using the Weatherization Assistant’s record navigation blocks.
9.2 Shell − Windows
The Windows form (see Figure 9.2) under the Main Menu’s “NEAT” button is
used to enter information on all the windows installed in the house.
Figure 9.2. The Windows form under the Main Menu’s “NEAT” button.
A total of 24 window descriptions (i.e., Window Codes) may be entered. Multiple
windows installed on the same wall segment and with the same characteristics may

9-8 The Weatherization Assistant User’s Manual (Version 8.9)
Chapter 9: NEAT Building Description
be entered as a single window description by indicating the number of windows
having this description. If the 24 window records are not enough to describe all the
windows, you will have to enter windows with characteristics that are close to
others under one common window description. Avoid combining the areas of two
or more windows into one so that just one window needs to be entered. Window
treatments are generally priced in NEAT either per window unit or window area.
Combining two or more window areas into one large area can lead to errors in
estimating the cost of the window treatments depending on the pricing scheme
used.
Below are descriptions of the individual data items and controls found on the
Windows form.
• Window Code – The Window Code identifies window descriptions to you and
the Weatherization Assistant. If more than one window has the same
description, you may enter the description once and indicate the number of
windows with this description using the Number field described below. The
window codes must be unique for all window descriptions within a given audit.
NEAT automatically provides a default entry for all new windows that are
created in the form of “WD#” where the “#” is an integer insuring uniqueness
of the window code. You may choose to enter your own window code to
include characters that indicate the orientation or some other characteristics of
the window. The window code may have up to 20 characters, although space
restrictions in many reports suggest a lesser number of characters should be
used (perhaps 3 to 5) to preserve readability. Entries are not case-sensitive.
NEAT will use the window codes in output reports and work orders to identify
which windows should receive weatherization measures. The window codes
may also be helpful when labeling your drawing of the house’s floor plan.
Required.
• Window Type − Select what basic type of window this is. The choices are
Jalousie, Awning, Slider, Fixed, Door Window, Sliding Glass Door, and
Skylight. These choices are shown in Figure 9.3 and described below. NEAT
does not use the window type in any of its calculations. This entry is provided
for your benefit, so that you can clearly identify and recall the type of window
being described. In addition, you can better determine the correct entry for the
Leakiness field described below if you know the window type. Optional.

The Weatherization Assistant User’s Manual (Version 8.9) 9-9
Chapter 9: NEAT Building Description
Figure 9.3. Basic types of windows.

9-10 The Weatherization Assistant User’s Manual (Version 8.9)
Chapter 9: NEAT Building Description
Jalousie windows are constructed of multiple horizontal panes of glass (about
2–6 inches wide) that open at the same angle when a crank near the bottom of
the window is turned. Jalousie windows are always single pane. When closed,
large gaps between the glass panes often exist, which results in high infiltration
rates through the window.
Awning windows are constructed of 1–3 glass sashes that are hinged at the top,
bottom, or side of the sashes. When the window is opened (often by turning a
crank), the sashes angle out from the home’s exterior. The sashes either angle
down, up, or to the side depending on where the sashes are hinged to the
window frame. An awning window with a single sash of glass is often called a
casement window if it is hinged on the side or a hopper window if it is hinged
on the bottom.
Slider windows usually have two sashes of glass. One or both sashes can slide
past the other either horizontally or vertically when the window is opened.
Fixed windows are sealed in the window frame and cannot be opened.
Door windows are usually sealed in the window frame of a door and cannot be
opened, although sometimes they are made to be opened.
Sliding Glass Doors are large windows that extend from the floor to almost the
ceiling. You may use this selection to describe picture windows even though
they are fixed and cannot be opened.
Skylights are glass or plastic windows in the ceiling.
• Frame Type – Select the window frame and sash construction materials. The
choices are Wood or Vinyl, Metal, and Improved Metal (i.e., metal frame with a
thermal break). Required.
• Glazing Type – Select the glazing type depending on the number of panes and
type of glass in the primary window and the characteristics of any storm
window that may cover the primary window. The choices are Single Pane,
Single with Wood Storm, Single with Metal Storm, Single with Bad Storm,
Double Pane, and Double Pane Low-e. NEAT treats a Single with Bad Storm
window as a single pane window without a storm. The Single with Bad Storm

The Weatherization Assistant User’s Manual (Version 8.9) 9-11
Chapter 9: NEAT Building Description
glazing type is provided for your use in conveying additional information.
Required.
• Interior Shading − Select the interior window coverings that are present
which, when closed, prevent sunlight from entering the home and also slightly
increase the insulating value of the window. The options are Drapes, Blinds or
Shades, Drapes with Blinds or Shades, and None. NEAT does not use this
information in any of its calculations at this time. Optional.
• Exterior Shading – Enter the approximate percentage of window area that is
shaded by trees, overhangs, or other exterior barriers when sunlight could
otherwise strike the window. Do not enter the % sign with the number. As
guidance, consider that a window directly under a roof eave may have 20% of
its area shaded and windows completely covered by a large porch may be
shaded 100% of the time. For houses in heating climates and/or when space-
heating energy consumption is the primary concern, determine the percentage
of shading that occurs during the winter. For example, deciduous trees lose their
leaves in the winter, so their shading during that season may be minimal. NEAT
already accounts for the effect of a window’s orientation on the sunlight
striking it, unless an unusual house configuration causes additional shading,
e.g., a window opening into a small interior courtyard being shaded by other
walls surrounding the courtyard. Required.
• Leakiness – Provide an estimate of how leaky the window is. The choices are
Very Tight, Tight, Medium, Loose, and Very Loose. Typical selections by
window type are listed below. Degrade the leakiness one level if 2 to 9 sq. in. of
glass is missing in the window and two levels if 9 to 25 sq. in. of glass is
missing. Specify the window to be Very Loose if more than 25 sq. in. of glass is
missing in the window. Upgrade the leakiness one level if a storm window in
average or better condition is installed. Additional guidance is provided in
Appendix E, Window Leakiness. Required.
Jalousie window – The leakiness of a jalousie window is typically Loose.
Awning window − The leakiness of an awning window that has a single sash of
glass and a latching/locking mechanism that seals the window by forcing the
sash against the frame and any installed weather stripping is typically Tight.
Such a window is often called a casement window if it is hinged on the side or a

9-12 The Weatherization Assistant User’s Manual (Version 8.9)
Chapter 9: NEAT Building Description
hopper window if it is hinged on the bottom. The leakiness of an awning
window with 2 or 3 sashes of glass or without a latching/locking mechanism is
typically Medium.
Slider window and sliding glass door − The leakiness of a vertical slider
window is typically Medium if it is older and Tight if it is newer. The leakiness
of a horizontal slider window or sliding glass door is typically Medium.
Fixed window, door window, and skylight – The leakiness of a fixed window,
door window, or skylight is typically Very Tight.
• Width and Height – Enter the width and height of the window (including the
window frame) in units of inches. Accuracy to the nearest inch is usually
satisfactory. NEAT will use these dimensions together with the number of
windows being described by this Window Code (see Number below) to
estimate the total window area, and it will subtract this total area from the
appropriate wall area based on the Wall Code (see below). Required.
• Wall Code – Enter the Wall Code of the exterior wall on which the window is
installed. The acceptable Wall Codes are determined by your input on the Walls
form (see Section 9.1, Shell – Walls) and will be displayed in the drop-down list
associated with the field. Thus, you must enter a wall description before
attempting to describe any windows that may lie on that wall. Specifying the
Wall Code for each window allows NEAT to subtract the window area from the
appropriate gross wall area. Required.
• Number – Enter the number of windows that can be described by the entries on
this form. If the number of windows is greater than one, then this indicates that
more than one window lies on the indicated wall because one of the data entry
items making up the window description is the Wall Code. Be aware that the
number in parentheses on the Windows tab (see Figure 9.2) is the number of
window descriptions, not necessarily the total number of windows. Required.
• Retrofit Options – Select one of the approaches for retrofitting the window.
The options are Evaluate All, Weatherize, Replace, Replace with LowE, Add
Storm, and Evaluate None. Evaluate All allows NEAT to determine if it is cost-
effective to weatherize, replace, or install a storm window on the window. If
more than one of these retrofits is cost-effective, NEAT will select the most

The Weatherization Assistant User’s Manual (Version 8.9) 9-13
Chapter 9: NEAT Building Description
cost-effective measure. If none of the measures are cost-effective, no measure
will be recommended. Choosing Weatherize (weatherizing the window using
caulk, weather stripping, incidental repairs, etc.), Replace or Replace with
LowE (replacing the window, often because it is damaged beyond repair), or
Add Storm (adding an exterior storm window to a window that currently does
not have a storm window) indicates your decision to perform the selected
retrofit measure regardless of its cost-effectiveness and to not perform the other
three measures. These selections tell NEAT to make the selected retrofit a
mandatory measure. NEAT will recommend the measure regardless of its cost-
effectiveness and will not evaluate the other three options. However, NEAT
will estimate the energy savings and SIR for the measure. If the SIR for the
measure is less than your accepted minimum value, you will need to reconsider
your selection or consider the measure a repair. Evaluate None prevents NEAT
from evaluating the cost-effectiveness of weatherizing, replacing, or installing a
storm window on the window, which effectively turns off all retrofits for this
window. Reasons for selecting any option other than Evaluate All for this
window description would be an appropriate entry in the Comment field
described below. The thermal characteristics of replacement windows and
storm windows are specified in the Key Parameters/Windows form under the
Main Menu’s “Setup Library” button (see Section 14.2, Key Parameters) and
may be altered if the user sees a need to do so. Required.
• Include in SIR − If the Retrofit Option selected is Weatherize, Replace,
Replace with LowE, or Add Storm, an Include in SIR checkbox will appear on
the form. This checkbox allows you to indicate that you wish to have the
selected measure included in the calculation of the whole house (package) SIR
for this audit. Measures not included in the whole house SIR are normally
related to health and safety. Current Weatherization Program policy dictates
that window replacement cannot be considered a health and safety measure.
Check the guidance for your program in deciding when you can mandate a
window treatment and if it can be excluded from the SIR calculation. An
alternate reason for excluding a measure from the whole house SIR is if it is
funded outside of the Weatherization Assistance Program. Whether a measure
is or is not included in the whole house SIR is indicated by its location in the
list of measures produced for the Recommended Measures Report (see Chapter
12, NEAT and MHEA Results).

9-14 The Weatherization Assistant User’s Manual (Version 8.9)
Chapter 9: NEAT Building Description
• Additional Cost − If the Retrofit Option selected is any option other than
Evaluate None, then Additional Cost fields will appear separately for
Weatherization, Replacement, Low E, and Storm windows. Enter any additional
cost associated with performing these retrofits on the window being described
that is in addition to the cost that NEAT will automatically calculate using the
cost information you entered in the Library Measures form of the Setup Library
(see Section 14.5, Library Measures). For example, these might include the cost
for removing any security bars before replacement or storm windows can be
installed. The cost to be entered is a cost per window, not a total cost for all the
windows indicated in the Number field. The reason for this extra cost would be
an appropriate entry in the Comment field described below. Optional.
• Comment – You may enter comments pertinent to the window directly in the
Comment field on the form, or you may enter them in the Comment Editor by
selecting the “Comment” button to the left of the field. The Comment Editor is
similar to Window’s Notepad and may be used to enter extended comments.
The total comment may have up to 65,000 characters. Text from other sources
may be copied and pasted into the Comment Editor’s window. Any comment
that is entered is displayed on the Recommended Measures report and the Input
Report available from the Audit Information form (see Section 8.2, Audit
Information). In addition, any comment that is entered can be imported into any
specific work order (see Section 13.1, Work Order Information). Thus, you may
wish to enter comments related to any observation that might affect the
installation of needed measures or repair work. Optional.
• Window Record Navigation Block – The Window record navigation block is
used to find and navigate to existing window descriptions for the audit being
edited, copy or delete the currently accessed window description, or create a
new window description for the audit. See Section 5.1, Form and Record
Navigation, for information on using the Weatherization Assistant’s record
navigation blocks.
9.3 Shell − Doors
The Doors form (see Figure 9.4) under the Main Menu’s “NEAT” button is used to
enter information on all the doors installed in the house. A total of 10 door
descriptions (i.e., Door Codes) may be entered. Multiple doors installed on the
same wall segment and with the same characteristics may be entered as a single
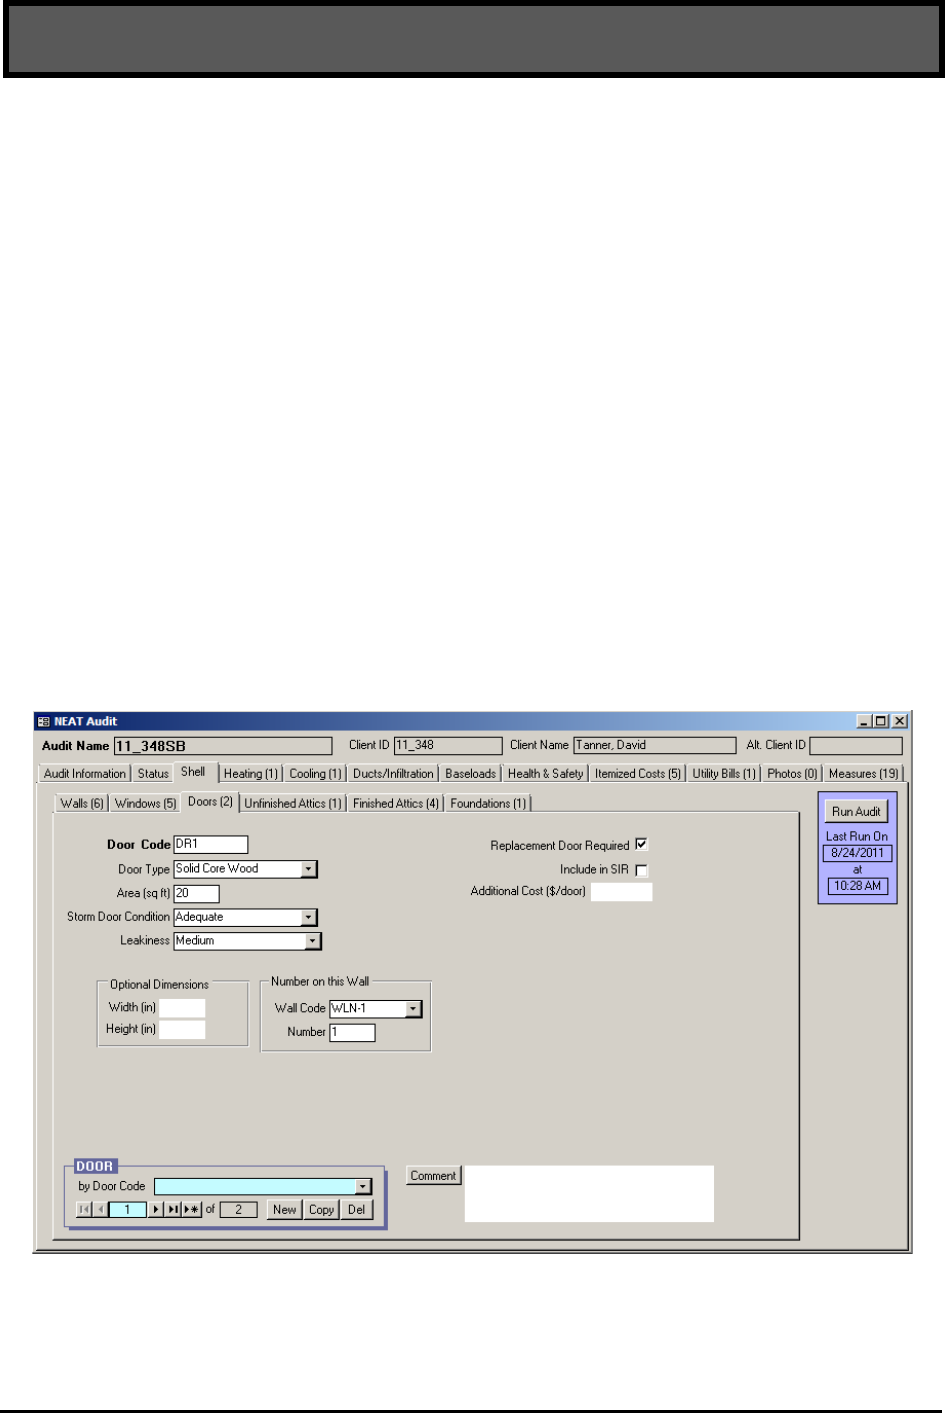
The Weatherization Assistant User’s Manual (Version 8.9) 9-15
Chapter 9: NEAT Building Description
door description by indicating the number of doors having this description. If the
10 door records are not enough to describe all the doors, you will have to enter
doors with characteristics that are close to others under one common door
description.
Installation of a storm door or replacement of the primary door would seldom be
cost-effective based solely on heat conduction savings. NEAT will attempt to
account for air leakage reduction accomplished by replacing a primary exterior
door, which can allow the measure to be cost-effective. Care must be taken not to
over-estimate the leakiness of the existing door (see “Leakiness” below).
Alternatively, replacing or weatherizing a door may be considered as part of the
air-leakage reduction work performed on the house and the associated cost
included as part of the Infiltration Reduction Cost (see Section 11.2, Ducts/
Infiltration – Air and Duct Leakages). In such cases, the Door Replacement
measure can be turned off (see Section 14.5, Library Measures) or the leakage of
the existing door declared as Tight, reflecting the replacement or weatherized door.
Figure 9.4. The Doors form under the Main Menu’s “NEAT” button.

9-16 The Weatherization Assistant User’s Manual (Version 8.9)
Chapter 9: NEAT Building Description
Below are descriptions of the individual data items and controls found on the
Doors form.
• Door Code – The Door Code identifies door descriptions to you and the
Weatherization Assistant. If more than one door has the same description, you
may enter the description once and indicate the number of doors with this
description using the Number field described below. The door codes must be
unique for all door descriptions within a given audit. NEAT automatically
provides a default entry for all new doors that are created in the form of “DR#”
where the “#” is an integer insuring uniqueness of the door code. You may
choose to enter your own door code to include characters that indicate the
orientation or some other characteristics of the door. The door code may have
up to 20 characters, although space restrictions in many reports suggest a lesser
number of characters should be used (perhaps 3 to 5) to preserve readability.
Entries are not case-sensitive. NEAT will use the door codes in output reports.
The door codes may also be helpful when labeling your drawing of the house’s
floor plan. Required.
• Door Type – Select what type of door this is. The choices are Hollow Core
Wood, Solid Core Wood, Insulated Steel, Single Pane Sliding Glass, and
Double Pane Sliding Glass. For a door with glazing, you will usually enter the
door on the Doors form and the glazing on the Windows Form (see Section 9.2,
Shell − Windows), although in some cases you may want to enter it just as a
door or a window depending on which has the greatest fraction of area.
Required.
• Area − Enter the area of the door in units of square feet (accuracy to the nearest
square foot is usually satisfactory). NEAT will compute the total door area for
the door type being described using this door area and the number of doors
meeting this description (see Number below) and subtract this total area from
the appropriate wall area based on the Wall Code (see below). Required.
• Storm Door Condition – Select the condition of any storm door installed on
this door. The choices are Adequate, Deteriorated, and None. NEAT treats
Deteriorated the same as None. The distinction allows you to convey added
information. Required.

The Weatherization Assistant User’s Manual (Version 8.9) 9-17
Chapter 9: NEAT Building Description
• Leakiness – Provide an estimate of how leaky the door is. The choices are
Tight, Medium, and Loose. Typical characteristics of these three categories of
leakiness are listed below. Required.
Tight doors will have the door and frame squared, no warping, functioning
weather stripping in good condition around the door, a good seal at the
threshold, no holes or structural damage, and latches that keep the door securely
shut. If windows exist in the door, they will be fixed and well sealed.
Doors with medium leakiness will have some characteristics of loose doors, but
retain substantial integrity. However, they would likely benefit from air sealing
efforts.
Loose doors will exhibit many, if not most, of the following problems: door
and/or frame out of square, warping, weather stripping missing or severely
damaged, no seal at the threshold, holes or significant structural damage, and
latches that do not keep the door securely shut.
• Width and Height – If a replacement door or storm door installation is needed,
you can use these two fields to enter the width and height of the door opening in
units of inches. The dimensions are not used in any NEAT calculations. They
are for your reference only. Therefore, the fields may be left blank.
Alternatively, you could enter the dimensions in the Comment field. Optional.
• Wall Code – Enter the Wall Code for the exterior wall on which the door is
installed. The acceptable Wall Codes are determined by your input on the Walls
form (see Section 9.1, Shell – Walls) and will be displayed in the drop-down list
associated with the field. Thus, you must enter a wall description before
attempting to describe any doors that may lie on that wall. Specifying the Wall
Code for each door allows NEAT to subtract the door area from the appropriate
gross wall area. Required.
• Number – Enter the number of doors that can be described by the entries on
this form. If the number of doors is greater than one, then this indicates that
more than one door lies on the indicated wall because one of the data entry
items making up the door description is the Wall Code. Be aware that the
number in parentheses on the Doors tab (see Figure 9.4) is the number of door
descriptions, not necessarily the total number of doors. Required.

9-18 The Weatherization Assistant User’s Manual (Version 8.9)
Chapter 9: NEAT Building Description
• Replacement Door Required – Selecting this checkbox indicates your
decision to replace the door(s) described regardless of the cost-effectiveness,
that is, making the measure mandatory. If the SIR of the measure is less than
your accepted minimum value, you will have to reconsider requiring the door
be replaced or consider its replacement a repair, if your program permits, or as
part of your infiltration reduction efforts. If unchecked, NEAT will recommend
this measure only if it is cost-effective.
• Include in SIR − If the Replacement Door Required checkbox is selected, an
Include in SIR checkbox will appear on the form. This checkbox allows you to
indicate whether you wish to have the door replacement included in the
calculation of the whole house (package) SIR for this audit. Measures not
included in the whole house SIR are normally related to health and safety.
Check the guidance for your program in deciding when you can mandate a door
replacement and if it can be excluded from the SIR calculation. An alternate
reason for excluding a measure from the whole house SIR is if the measure is
being funded outside of the Weatherization Assistance Program. Whether a
measure is or is not included in the whole house SIR is indicated by its location
in the list of measures produced for the Recommended Measures Report (see
Chapter 12, NEAT and MHEA Results).
• Additional Cost − Enter any additional cost associated with replacing the
door(s) being described that is in addition to the cost that NEAT will
automatically calculate using the cost information you entered in the Library
Measures form of the Setup Library (see Section 14.5, Library Measures). For
example, an unforeseen cost to repair or modify the door frame. The cost to be
entered is a cost per door, not a total cost for all the doors indicated in the
Number field. The reason for this extra cost would be an appropriate entry in
the Comment field described below. Optional.
• Comment – You may enter comments pertinent to the door directly in the
Comment field on the form, or you may enter them in the Comment Editor by
selecting the “Comment” button to the left of the field. The Comment Editor is
similar to Window’s Notepad and may be used to enter extended comments.
The total comment may have up to 65,000 characters. Text from other sources
may be copied and pasted into the Comment Editor’s window. Any comment
that is entered is displayed on the Recommended Measures report and the Input
Report available from the Audit Information form (see Section 8.2, Audit
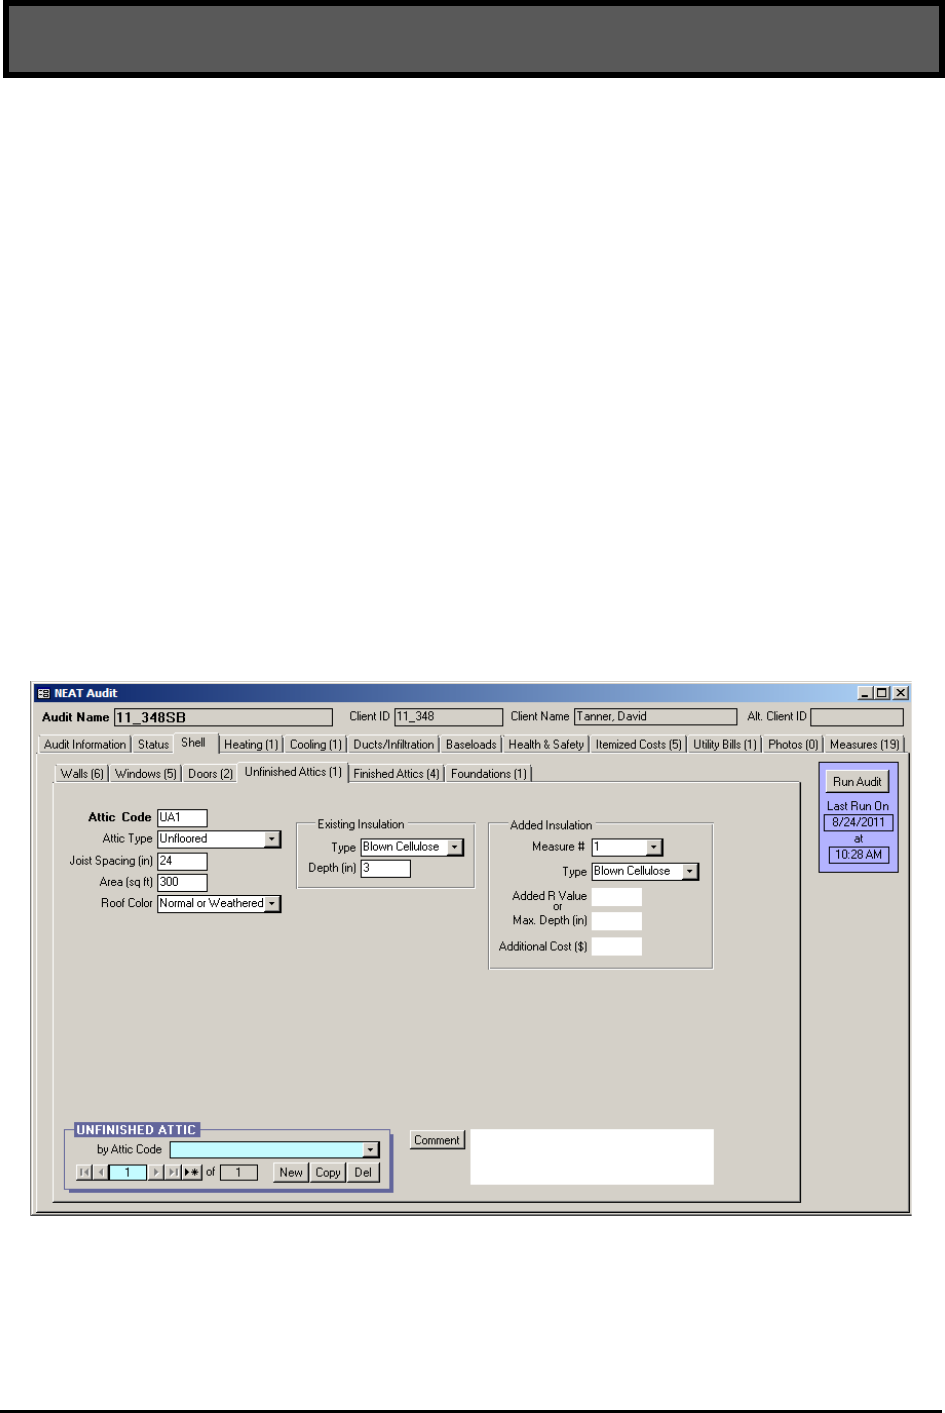
The Weatherization Assistant User’s Manual (Version 8.9) 9-19
Chapter 9: NEAT Building Description
Information). In addition, any comment that is entered can be imported into any
specific work order (see Section 13.1, Work Order Information). Thus, you may
wish to enter comments related to any observation that might affect the
installation of needed measures or repair work. Optional.
• Door Record Navigation Block – The Door record navigation block is used to
find and navigate to existing door descriptions for the audit being edited, copy
or delete the currently accessed door description, or create a new door
description for the audit. See Section 5.1, Form and Record Navigation, for
information on using the Weatherization Assistant’s record navigation blocks.
9.4 Shell − Unfinished Attics
The Unfinished Attics form (see Figure 9.5) under the Main Menu’s “NEAT”
button is used to enter information on unfinished attics in the house (i.e., attic areas
that are not conditioned).
Figure 9.5. The Unfinished Attics form under the Main Menu’s “NEAT” button.
A total of seven unfinished attic areas can be described in NEAT. Many houses
will require only one unfinished attic description, but homes with separate

9-20 The Weatherization Assistant User’s Manual (Version 8.9)
Chapter 9: NEAT Building Description
unfinished attic areas may require two or more unfinished attic descriptions,
especially if the attic areas differ in their characteristics. This occurs especially in
homes that have had additions built onto them, where the attics in the additions
differ in characteristics from the attic in the original home. Use the Finished Attics
form (see Section 9.5, Shell − Finished Attics) to describe attic areas that are
included in the conditioned area of the home.
Below are descriptions of the individual data items and controls found on the
Unfinished Attics form.
• Attic Code – The Attic Code identifies attic components to you and the
Weatherization Assistant. The attic codes must be unique for all attic
descriptions within a given audit. This includes the attic codes entered on the
Unfinished Attics form as well as those entered on the Finished Attics form.
NEAT automatically provides a default entry for all new attic areas that are
created in the form of “A#” where the “#” is an integer insuring uniqueness of
the attic code. You may choose to enter your own attic code to include
characters that indicate location or some other characteristics of the attic. The
attic code may have up to 20 characters, although space restrictions in many
reports suggest a lesser number of characters should be used (perhaps 3 to 5) to
preserve readability. Entries are not case-sensitive. NEAT will use the attic
codes in output reports and work orders to identifying which attic areas should
receive weatherization measures. The attic codes may also be helpful when
labeling your drawing of the house’s floor plan. Required.
• Attic Type – Select what type of attic this is. The choices are Unfloored,
Floored, and Cathedral or Flat. NEAT does not treat Unfloored and Floored
attics differently. However, if the attic has a floor (e.g., plywood installed over
the attic joists so that items may be stored in the attic), you will likely need to
enter the restriction on the total depth of insulation that can be installed in the
Max. Depth field (see below). You may also need to enter an additional cost for
insulating this attic area because of this obstruction in the Additional Cost field
(see below). A Cathedral or Flat attic is any attic area where the roof and
interior ceiling surfaces are parallel. Required.
• Joist Spacing – Enter the spacing between the attic joists in units of inches.
NEAT does not use this number in any of its calculations. This number is for

The Weatherization Assistant User’s Manual (Version 8.9) 9-21
Chapter 9: NEAT Building Description
your reference only. For example, it may be important to an insulation
contractor installing batt insulation in the attic. Required.
• Area – For a Floored or Unfloored attic area, enter the area of the attic floor
that borders a conditioned space in units of square feet. For a Cathedral or Flat
attic area, enter the actual area of the sloped ceiling in units of square feet.
Required.
• Roof Color – Enter the color of the roof. The two choices are “White,
Reflective or Shaded” and “Normal or Weathered”. A White or Reflective roof
appears white or shiny metallic, is clean, and has little or no discoloration due
to weathering. Roofs completely shaded by trees in the summer should be
categorized as white or reflective roof regardless of their finish. The majority of
roofs will be classified as Normal or Weathered. Roof surfaces designated as
White or Reflective will not be considered when evaluating the White Roof
Coating measure. Required.
• Existing Insulation Type – Select the type of existing insulation installed in
the attic area. The choices are None, Blown Cellulose, Blown Fiberglass,
Rockwool, Fiberglass Batts, and Other. NEAT assumes that the R-value per
inch of insulation for the Other insulation type is 3.09 h-ft
2
-F/Btu-in. If more
than one type of attic insulation is present, enter the type that has the greatest R-
value (you should also note this in the Comment field described below).
Required.
• Existing Insulation Depth – If the Existing Insulation Type is an entry other
than None, then the Existing Insulation Depth field will appear. Enter the
average depth of the existing insulation found in this attic segment, in units of
inches. You can ignore compression or different depths of insulation around
eaves. If more than one type of attic insulation is present, their total depth
should be entered in this field. Required.
• Measure # – If the Added Insulation Type field is an entry other than None,
then the Measure # field will appear. The Measure Number field allows
individual attic segments to be combined into groups. For each group, an SIR to
insulate all the attic segments in that group will be calculated, and one
recommendation for insulating the attic segments in that group will be given.
Enter the same measure number to all attics you wish to be grouped together.

9-22 The Weatherization Assistant User’s Manual (Version 8.9)
Chapter 9: NEAT Building Description
Measure numbers must be used in consecutive order, starting with 1. For
example, a measure number of 3 cannot be entered until measure numbers 1
and 2 have been used. Required.
You will likely want to obtain a single SIR and recommendation for insulating
all the attics in a house if all the attics have the same construction. In this case,
enter a measure number of 1 for all the attic segments. Reasons for giving some
attics a different measure number might be because they have different existing
insulation levels or depth restrictions, which impacts potential savings and
installation costs. In this case, each attic will receive the insulation
recommendation that is most cost-effective in light of its existing condition.
• Added Insulation Type – Select the type of insulation you would install in this
attic segment if NEAT recommends attic insulation. The choices are None,
Blown Cellulose, Blown Fiberglass, and any attic insulation name(s) that you
have entered on the NEAT Insulation Types form under the Setup Library (see
Section 14.7, NEAT Insulation Types). Select None if conditions prohibit
insulating this particular attic segment (you should note what the conditions are
in the Comment field described below). Unless entries are present in either the
Added R Value or Max. Depth fields described below, NEAT will evaluate the
cost-effectiveness of installing standard levels of insulation (R-11, R-19, R-30,
R-38, and R-49) for the type chosen over the existing insulation and
recommend the most cost-effective level, if any. Required.
• Added R Value – If the Added Insulation Type field is an entry other than
None, then the Added R Value field will appear. If you want NEAT to evaluate
only a specific R-value of added attic insulation, enter the R-value in this field.
If the field is left blank, NEAT will determine the most cost-effective level of
insulation for you from its standard levels (R-11, R-19, R-30, R-38, and R-49).
If you enter an R-value in this field, all the standard levels of insulation will be
ignored. In addition, the installation of the specified level of insulation will be
considered mandatory and will be listed on the Recommended Measures report
whether or not it is cost-effective. If it is not cost-effective, it would be wise to
run NEAT again with a different R-value or with this field left blank to allow
NEAT to choose a cost-effective level of insulation to add, if one exists. This
entry might be used if you want to test adding a specific amount of insulation to
that presently installed in the attic so that the total R-value of insulation in the

The Weatherization Assistant User’s Manual (Version 8.9) 9-23
Chapter 9: NEAT Building Description
attic (existing plus added) would be equal to a value specified by your state for
new construction. Optional.
• Max. Depth – If the Added Insulation Type field is an entry other than None,
then the Max. Depth field will appear. If there is a restriction to the total depth
of insulation that can exist in an attic, enter the total depth (depth of any
existing insulation plus the space for any additional insulation) in this field in
units of inches. You should leave this field blank if no restriction exists or the
restriction is greater than 15 in. (NEAT assumes unlimited insulation may be
added if the restriction is greater than 15 in.). It is expected that the insulation
depth might be restricted at the eaves, so this restriction does not need to be
entered. For floored attics, this depth will usually be the height of the attic floor
joists (usually 3.5 or 5.5 in.). If you enter a maximum depth restriction for a
particular attic segment, NEAT will evaluate adding not only the standard
levels of insulation (R-11, R-19, R-30, R-38, and R-49) that still fit into the
available space, but also the level of insulation that exactly fills the available
space. NEAT determines the cost for installing an amount of insulation that
exactly fills the available space by interpolating between costs for installing the
standard levels of insulation as entered in the Setup Library (see Section 14.5,
Library Measures). Optional.
• Additional Cost – If the Added Insulation Type field is an entry other than
None, then the Additional Cost field will appear. Enter any additional cost
associated with insulating this specific attic segment in units of dollars. This
would be a cost that is not normally associated with insulating an attic and,
therefore, is not accounted for in the measure costs entered on the Library
Measures form under the Setup Library (see Section 14.5, Library Measures).
For instance, enter the additional costs associated with cutting an opening into
the attic or for insulating beneath an attic floor. The cost is the total additional
cost to insulate this specific attic segment; it is not a cost per square foot of attic
area. The amount entered will be added to the normal cost computed from the
attic area and the cost per square foot specified on the Library Measures form in
the Setup Library. A blank entry indicates no additional cost. If a cost is
entered, you should briefly explain the reason for this additional cost in the
Comment field described below. Optional.
• Comment – You may enter comments pertinent to the attic segment directly in
the Comment field on the form, or you may enter them in the Comment Editor

9-24 The Weatherization Assistant User’s Manual (Version 8.9)
Chapter 9: NEAT Building Description
by selecting the “Comment” button to the left of the field. The Comment Editor
is similar to Window’s Notepad and may be used to enter extended comments.
The total comment may have up to 65,000 characters. Text from other sources
may be copied and pasted into the Comment Editor’s window. Any comment
that is entered is displayed on the Recommended Measures report and the Input
Report available from the Audit Information form (see Section 8.2, Audit
Information). In addition, any comment that is entered can be imported into any
specific work order (see Section 13.1, Work Order Information). Thus, you may
wish to enter comments related to any observation that might affect the
installation of needed measures or repair work. Optional.
• Unfinished Attic Record Navigation Block – The Unfinished Attic record
navigation block is used to find and navigate to existing unfinished attic
descriptions for the audit being edited, copy or delete the currently accessed
unfinished attic description, or create a new unfinished attic description for the
audit. See Section 5.1, Form and Record Navigation, for information on using
the Weatherization Assistant’s record navigation blocks.
9.5 Shell − Finished Attics
The Finished Attics form (see Figure 9.6) under the Main Menu’s “NEAT” button
is used to enter information on finished attics in the house (i.e., attic areas that are
included in the conditioned area of the home). Four types of finished attic
components can be described in NEAT: outer ceiling joist, collar beam, knee wall,
and roof rafter (see Figure 9.7 and the Attic Area Type field described below).
You may enter into NEAT as many as 16 finished attic components in any
combination of the four types. Use the Unfinished Attics form (see Section 9.4,
Shell − Unfinished Attics) to describe attic areas that are not conditioned.
Most of the entries on the Finished Attics form are the same as those for the
Unfinished Attics form. Therefore, refer to Section 9.4, Shell − Unfinished Attics,
for descriptions of most of the individual data items and controls. Fields that are
new or need additional explanation are discussed below.

The Weatherization Assistant User’s Manual (Version 8.9) 9-25
Chapter 9: NEAT Building Description
Figure 9.6. The Finished Attics form under the Main Menu’s “NEAT” button.
• Attic Area Type – Select what type of
finished attic area this is. The choices as shown
in Figure 9.7 are Outer Ceiling Joist, Collar
Beam, Kneewall, and Roof Rafter. Required.
• Attic Floor Type – If the Attic Area Type is
Outer Ceiling Joist or Collar Beam, the Attic
Floor Type field will appear. This field is
analogous to the Attic Type field on the
Unfinished Attics form, although the only
options are Unfloored and Floored. The
Cathedral or Flat option is not provided
because NEAT assumes that only finished attic areas of type Roof Rafter will
have this construction. The Attic Floor Type field is not shown when the Attic
Area Type is Kneewall or Roof Rafter because these component types do not
have floors. Required.
• Measure # − The Measure # field will not appear if the Attic Area Type is
Kneewall because NEAT always evaluates the insulation of a knee wall
Figure 9.7. Components of a
finished attic.

9-26 The Weatherization Assistant User’s Manual (Version 8.9)
Chapter 9: NEAT Building Description
separately. Be careful in grouping finished attic sections because an insulation
depth restriction entered for one section will be applied to all sections grouped
together. Required.
• Added Insulation Type − The options for Added Insulation Type for knee
walls differ from those for other finished or unfinished attic types. They are
None, Fiberglass Batts, and any knee wall insulation type(s) that you have
entered on the NEAT Insulation Types form under the Setup Library (see
Section 14.7, NEAT Insulation Types).
• Added R Value and Max. Depth − The Added R Value and Max. Depth fields
will not appear if the Attic Area Type is Kneewall because these fields do not
pertain to knee walls. The R-value of insulation added to knee walls is the value
specified on the NEAT Insulation Types form under the Setup Library (see
Section 14.7, NEAT Insulation Types) for insulations of type “Knee Wall.”
• Finished Attic Record Navigation Block – The Finished Attic record
navigation block is used to find and navigate to existing finished attic
descriptions for the audit being edited, copy or delete the currently accessed
finished attic description, or create a new finished attic description for the audit.
See Section 5.1, Form and Record Navigation, for information on using the
Weatherization Assistant’s record navigation blocks.
9.6 Shell – Foundations
The Foundations form (see Figure 9.8) under the Main Menu’s “NEAT” button is
used to describe the foundations of the dwelling, including basements, crawl
spaces, slab-on-grade foundations, and floors exposed to the outside air.
Foundations can be insulated by insulating the floor, sill box, and/or wall of the
foundation depending on what type of foundation it is, the intended use of any
foundation space, and what areas of the foundation are currently insulated. For
basements and crawlspaces, NEAT will never recommend both floor insulation
and sill and/or wall insulation for the same foundation
Below are descriptions of the individual data items and controls found on the
Foundations form.

The Weatherization Assistant User’s Manual (Version 8.9) 9-27
Chapter 9: NEAT Building Description
Figure 9.8. The Foundations form under the Main Menu’s “NEAT” button.
• Foundation Code – The Foundation Code identifies foundation spaces to you
and the Weatherization Assistant. The foundation codes must be unique for all
foundation space descriptions within a given audit. NEAT automatically
provides a default entry for all new foundations that are created in the form of
“F#” where the “#” is an integer insuring uniqueness of the foundation code.
You may choose to enter your own foundation code to include characters that
indicate the type of foundation or some other characteristics of the foundation
space. The foundation code may have up to 20 characters, although space
restrictions in many reports suggest a lesser number of characters should be
used (perhaps 3 to 5) to preserve readability. Entries are not case-sensitive.
NEAT will use the foundation codes in output reports and work orders to
identifying which foundation spaces should receive recommended insulation.
The foundation codes may also be helpful when labeling your drawing of the
house’s floor plan, particularly if there are more than one foundation spaces.
Required.

9-28 The Weatherization Assistant User’s Manual (Version 8.9)
Chapter 9: NEAT Building Description
• Foundation Type – Select what type of foundation space this is. The choices
are Conditioned, Non Conditioned, Vented Non Conditioned, Unintentionally
Conditioned, Uninsulated Slab, Insulated Slab, and Exposed Floor. The first
four choices are used to describe basements, crawlspaces, and any other type of
enclosed foundation space. Conditioned means that the space is purposefully
heated (or more rarely cooled) by a heating or cooling system to maintain a
temperature at or near the rest of the dwelling. For example, a basement heated
by supply registers or radiators in the space would be conditioned, as would a
basement heated continuously by a space heater. Unintentionally Heated means
that there is a heat source in the space that adds heat unintentionally to the space
so that the temperature of the space is maintained above the outside temperature
or ground temperature. For example, a basement that is heated because a
furnace or water heater is located in the basement or because uninsulated
ductwork runs through the basement would be unintentionally heated. Non
Conditioned means that there are no sources of heat in the space other than
conduction through walls, floors, and perhaps insulated ductwork. Vented Non
Conditioned means that there are no sources of heat in the space other than
conduction through walls, floors and perhaps uninsulated ductwork, and the
space is vented directly to the outdoors. For example, a crawlspace with
foundation vents would be Vented Non Conditioned. An Exposed Floor is used
to describe a floor that is exposed directly to the outside air. For example, a
second-story floor overhang would be an Exposed Floor, as would the floor of a
house built on stilts or using pier and beam construction such that ambient air
can freely flow beneath the house. Required.
NEAT assumes that all Conditioned, Unintentionally Conditioned, Non
Conditioned, and Vented Non Conditioned foundations (i.e., basements and
crawl spaces) are enclosed by walls with thermal characteristics of concrete
block walls. Walls built with other cementitious materials, including solid
concrete walls, likely have similar thermal characteristics to block walls.
All of the data fields shown in Figure 9.8 are not needed if the Foundation Type
is Uninsulated Slab, Insulated Slab, or Exposed Floor. If the Foundation Type is
changed while editing an existing foundation from a type that does not require
certain fields to one that requires these same fields, a warning will appear if you
attempt to leave the Foundations form before entering the required data. You
will not be permitted to leave the form until the missing entries are entered.

The Weatherization Assistant User’s Manual (Version 8.9) 9-29
Chapter 9: NEAT Building Description
• Measure # – The Measure Number field allows individual foundation spaces to
be combined into groups. For each group, an SIR to insulate all the foundation
spaces in that group will be calculated, and one recommendation for insulating
all the foundation spaces in that group will be given. Enter the same measure
number to all foundation spaces you wish to be grouped together. Measure
numbers must be used in consecutive order, starting with 1. For example, a
measure number of 3 cannot be entered until measure numbers 1 and 2 have
been used. Required.
You should usually give each foundation space a different measure number
unless they are basically identical and you select the same insulation strategies
(i.e., the same Added Insulation Types). The cost-effectiveness of insulating a
foundation will vary depending on the type of foundation, existing insulation
levels and locations, and the retrofit approach.
• Comment – You may enter comments pertinent to the foundation space
directly in the Comment field on the form, or you may enter them in the
Comment Editor by selecting the “Comment” button to the left of the field. The
Comment Editor is similar to Window’s Notepad and may be used to enter
extended comments. The total comment may have up to 65,000 characters. Text
from other sources may be copied and pasted into the Comment Editor’s
window. Any comment that is entered is displayed on the Recommended
Measures report and the Input Report available from the Audit Information
form (see Section 8.2, Audit Information). In addition, any comment that is
entered can be imported into any specific work order (see Section 13.1, Work
Order Information). Thus, you may wish to enter comments related to any
observation that might affect the installation of needed measures or repair work.
Optional.
• Foundation Record Navigation Block – The Foundation record navigation
block is used to find and navigate to existing foundation descriptions for the
audit being edited, copy or delete the currently accessed foundation description,
or create a new foundation description for the audit. See Section 5.1, Form and
Record Navigation, for information on using the Weatherization Assistant’s
record navigation blocks.

9-30 The Weatherization Assistant User’s Manual (Version 8.9)
Chapter 9: NEAT Building Description
Floor Data Block
The data items included in the Floor data block are intended to describe the floor of
the house that separates the conditioned space inside the house from the foundation
space, the outside, or the ground. For enclosed foundations, some people think of
this floor as being the ceiling of the foundation space. All of the data items
described below will be shown if the Foundation Type is Conditioned, Non
Conditioned, Vented Non Conditioned, Unintentionally Conditioned, or Exposed
Floor. If the Foundation Type is Uninsulated Slab or Insulated Slab, only the Area
field will appear. For these foundation types, the Existing Insulation R Value field
is not needed because NEAT knows that there is no insulation present if the
Foundation Type is Uninsulated Slab and assumes a standard R-value for the
insulation if the Foundation Type is Insulated Slab. The other two fields are not
needed because NEAT does not currently evaluate an insulation retrofit for slabs.
• Area – For enclosed foundation spaces, enter the area of the floor directly
above the foundation space you are describing in units of square feet. For slab-
on-grade foundations, enter the area of the slab floor in the living space. For
exposed floors, enter the area of the floor that is directly exposed to the outside.
Required.
• Existing Insulation R Value – Enter the R-value of the existing insulation
installed in the floor being described. Required.
• Added Insulation Type − Select the type of insulation you would install under
this floor if NEAT recommends floor insulation. The choices are None,
Fiberglass Batts, and any floor insulation type(s) that you have entered on the
NEAT Insulation Types form under the Setup Library (see Section 14.7, NEAT
Insulation Types). Select None if conditions prohibit insulating this particular
floor (you should note what the conditions are in the Comment field described
above). For any entry other than None, NEAT will evaluate the cost-
effectiveness of installing standard levels of insulation (R-11, R-19, R-30, and
R-38) for the insulation type chosen. However, the depth of any existing
insulation plus the added insulation must fit within the joist depth, as specified
by the Floor Joist Size, entered under the Sill data block. NEAT will
recommend the most cost-effective level, if any. Required.

The Weatherization Assistant User’s Manual (Version 8.9) 9-31
Chapter 9: NEAT Building Description
• Additional Cost – Enter any additional cost associated with insulating the floor
of the foundation being described in units of dollars. This would be a cost that
is not normally associated with insulating the floor and, therefore, is not
accounted for in the measure costs entered on the Library Measures form under
the Setup Library (see Section 14.5, Library Measures). For instance, enter the
additional labor and material costs associated with freeze protecting water
pipes. The cost is the total additional cost to insulate the floor; it is not a cost
per square foot of floor area. The amount entered will be added to the normal
cost computed from the floor area and the cost per square foot specified on the
Library Measures form in the Setup Library. A blank entry indicates no
additional cost. If a cost is entered, you should briefly explain the reason for
this additional cost in the Comment field described above. Optional.
Sill Data Block
The data items included in the Sill data block are intended to describe the sill
portion of an enclosing foundation wall or the sill associated with an exposed floor.
All of the data items described below will be shown if the Foundation Type is
Conditioned, Non Conditioned, Vented Non Conditioned, Unintentionally
Conditioned, or Exposed Floor. If the Foundation Type is Uninsulated Slab or
Insulated Slab, none of the fields in the Sill data block will appear because these
foundation types do not have a sill.
• Floor Joist Size − Enter the size of the floor joist (i.e., the band or rim joist) in
units of inches. The levels of insulation that will be evaluated for addition to a
floor are restricted to those that allow the total of existing and added insulation
to fit within this joist depth. Required.
• Perimeter to Insulate – Enter the length of the sill perimeter (i.e., the band or
rim joist) that is exposed to the outdoor air and is uninsulated in units of feet.
This entry is used with the Floor Joist Size to determine the sill area that could
be insulated. Required.
• Added Insulation Type − Select the type of insulation you would install in this
sill if NEAT recommends sill (i.e., band or rim joist) insulation. The choices are
None, Fiberglass Batts, and any sill insulation type(s) that you have entered on
the NEAT Insulation Types form under the Setup Library (see Section 14.7,
NEAT Insulation Types). Select None if conditions prohibit insulating this sill

9-32 The Weatherization Assistant User’s Manual (Version 8.9)
Chapter 9: NEAT Building Description
(you should note what the conditions are in the Comment field described
above). Regardless of your entry, NEAT will not evaluate sill insulation if the
Foundation Type is Vented Non Conditioned, Uninsulated Slab, Insulated Slab,
or Exposed Floor. For any entry other than None, NEAT will evaluate the cost-
effectiveness of installing the R-value specified on the NEAT Insulation Types
form under the Setup Library for the insulation type chosen. Required.
• Additional Cost − Enter any additional cost associated with insulating the sill
of the foundation being described in units of dollars. This would be a cost that
is not normally associated with insulating a sill and, therefore, is not accounted
for in the measure costs entered on the Library Measures form under the Setup
Library (see Section 14.5, Library Measures). The cost is the total additional
cost to insulate the sill; it is not a cost per square foot of sill area. The amount
entered will be added to the normal cost computed from the sill area and the
cost per square foot specified on the Library Measures form in the Setup
Library. A blank entry indicates no additional cost. If a cost is entered, you
should briefly explain the reason for this additional cost in the Comment field
described above. Optional.
Foundation Wall Data Block
The data items included in the Foundation Wall data block are intended primarily
to describe the walls that enclose the foundation. All of the data items described
below will be shown if the Foundation Type is Conditioned, Non Conditioned,
Vented Non Conditioned, or Unintentionally Conditioned. If the Foundation Type
is Uninsulated Slab, Insulated Slab, or Exposed Floor, only the Perimeter field will
appear because these foundation types are not enclosed by walls.
• Height − Enter the height of the wall enclosing the foundation space (i.e., the
basement or crawlspace wall) in units of feet. Enter an average height if the
height of the wall is not uniform. If the wall height entered is less than two feet,
NEAT will not evaluate the installation of floor, sill, or foundation wall
insulation for the space because of access concerns. Required.
• Height Exposed − Enter the percentage of the Height field that is exposed to
the outside air (i.e., is above grade). Do not enter the % sign with the number.
Enter an average percentage if the exposure is not uniform. Required.

The Weatherization Assistant User’s Manual (Version 8.9) 9-33
Chapter 9: NEAT Building Description
• Perimeter – Enter the length of the floor perimeter that borders the outdoors or
ground in units of feet. Do not include the perimeter that borders another
foundation space. The value is used with the Height and Height Exposed fields
to determine the foundation wall area that borders the outside and ground. The
default is the perimeter of a square with area given in the Area field. The value
must be greater than zero. Required.
• Existing Insulation R-Value – Enter the R-value of the existing insulation
currently installed on the foundation walls. NEAT assumes this coverage is
uniform. If only part of the wall is insulated, enter an area weighted average R-
value, or enter just the uninsulated length of the wall in the Perimeter field and
enter zero in this field. Required.
• Added Insulation Type − Select the type of insulation you would install on the
foundation wall if NEAT recommends foundation wall insulation. The choices
are None, Rigid Foam Board, and any floor insulation type(s) that you have
entered on the NEAT Insulation Types form under the Setup Library (see
Section 14.7, NEAT Insulation Types). Select None if conditions prohibit
insulating this particular floor (you should note what the conditions are in the
Comment field described above). For any entry other than None, NEAT will
evaluate the cost-effectiveness of installing the R-value specified on the NEAT
Insulation Types form under the Setup Library for the insulation type chosen.
Required.
• Additional Cost – Enter any additional cost associated with insulating the walls
of the foundation being described in units of dollars. This would be a cost that
is not normally associated with the Foundation Wall Insulation measure and,
therefore, is not accounted for in the measure costs entered on the Library
Measures form under the Setup Library (see Section 14.5, Library Measures).
The cost is the total additional cost to insulate the foundation wall; it is not a
cost per square foot of foundation wall area. The amount entered will be added
to the normal cost computed from the foundation wall area and the cost per
square foot specified on the Library Measures form in the Setup Library. A
blank entry indicates no additional cost. If a cost is entered, you should briefly
explain the reason for this additional cost in the Comment field described
above. Optional.

9-34 The Weatherization Assistant User’s Manual (Version 8.9)
Chapter 9: NEAT Building Description
9.7 Heating − General Description Data
The Heating form (see Figure 9.9) under the Main Menu’s “NEAT” button is used
to describe the heating systems installed in the dwelling. NEAT allows the
definition of a primary heating system and as many secondary systems as are
required to describe all of the heat sources in a home. The primary system is the
system that supplies the majority of the heat to the home and on which NEAT will
consider installing energy efficiency measures. You should enter information and
describe the primary system first before creating additional records to describe
secondary systems.
Figure 9.9. The Heating form under the Main Menu’s “NEAT” button.
You may encounter homes where even the primary heating system is inoperative.
Do not attempt to describe these systems to NEAT by entering a value of 0 for
either the Steady-State Efficiency or Heat Supplied (see the corresponding field
descriptions in the discussions that follow). Rather, describe the existing heating
equipment as supplying the amount of heat (Heat Supplied) as it was intended to
supply and an efficiency that is typical, but at the lowest end of the possible range,
for equipment of its type. Then, follow your state’s recommendations regarding
repair, tune-up, or replacement of the equipment, which may involve issues of
cost-justifying a replacement or replacement as a health and safety measure.

The Weatherization Assistant User’s Manual (Version 8.9) 9-35
Chapter 9: NEAT Building Description
Alternatively, if you know that the inoperative system is going to be replaced, you
could describe the replacement as the existing system on the heating forms.
The Heating form is divided into four sections: a general description of the heating
system at the top of the form, a Required Heating System Details sub-form in the
middle of the form, buttons for entry of Optional Heating System Details below the
sub-form, and a Heating System record navigation block and Comment field at the
very bottom of the form. Always enter information on the general description of
the system first because the data fields in the sub-form change depending on the
selections made in the Equipment Type and Fuel fields. The Optional Heating
System Details buttons can be used to document an extensive number of heating
system measurements and observations made while auditing a dwelling, though
their entry does not affect the recommendations of the audit.
Descriptions of the individual data items and controls found in the general
description portion of the Heating form are provided below, along with
descriptions of the Heating System record navigation block and Comment field.
The Required Heating System Details sub-form is discussed in Section 9.8,
Required Heating System Details Sub-Form, and the optional information that can
be entered using the Optional Heating System Details buttons is described in
Section 11.12, Optional Heating System Details.
• System Code – The System Code identifies heating systems to you and the
Weatherization Assistant. The system codes must be unique for all heating
system descriptions within a given audit. NEAT automatically provides a
default entry for all new heating systems that are created in the form of “HS#”
where the “#” is an integer insuring uniqueness of the system code. You may
choose to enter your own system code to include characters that indicate some
characteristics of the heating system. The system code may have up to 20
characters, although space restrictions in many reports suggest a lesser number
of characters should be used (perhaps 3 to 5) to preserve readability. Entries are
not case-sensitive. NEAT will use the system codes in output reports and work
orders to identifying which heating systems should receive recommended
energy efficiency measures. The system codes may also be helpful when
labeling your drawing of the house’s floor plan, particularly if there are more
than one heating system. Required.

9-36 The Weatherization Assistant User’s Manual (Version 8.9)
Chapter 9: NEAT Building Description
• Equipment Type – Select what type of heating system this is. The choices are
Gravity Furnace, Forced Air Furnace, Steam Boiler, Hot Water Boiler, Fixed
Electric Resistance, Portable Electric Resistance, Heat Pump, Vented Space
Heater, Unvented Space Heater, and Other. Required.
• Fuel – Select the type of fuel used by the heating system. The choices are
Natural Gas, Oil, Electricity, Propane, Wood, Coal, Kerosene, and Other. You
can set the heat content and price for the Other fuel type on the Fuel Costs tab
of the Setup Library (see Section 14.3, Fuel Costs). Required.
• Location − Select the location of the heating system. The choices are Heated
Space, Unconditioned Space, and Unintentionally Heated Space. A Heated
Space is purposefully heated by a heating system to maintain a desired
temperature, usually utilizing a thermostat to control the space temperature. For
example, a basement heated by supply registers or radiators in the space would
be heated, as would a basement heated continuously by a space heater. An
Unintentionally Heated Space is partially heated by a heat source in the space
that adds heat unintentionally to the space. For example, a basement that is
heated because a furnace, boiler, or water heater are located in the basement or
because uninsulated ductwork runs through the basement would be
unintentionally heated. An Unconditioned Space is not heated because there are
no sources of heat in the space other than conduction through walls, floors, and
perhaps insulated ductwork. The choice will affect the savings attributed to vent
dampers. Required.
• Heat Supplied – Enter an estimate of the percent of the floor area that is heated
by the heating system being described. Do not enter the % sign with the
number. The sum of the percentages for all heating system described must be
100 or less. Required.
• Primary System – Use this checkbox to identify that this is the primary heating
system installed in the dwelling. The primary system supplies the majority of
heat for the dwelling and is the system to which heating retrofits will apply. If
this checkbox is left unchecked, NEAT will assume that the heating system is a
secondary system unless it is the only heating system described. Checking the
checkbox for any heating system will automatically uncheck the checkbox for
any other system you may have previously indicated as being the primary
system. It is best if the first heating system you describe is the Primary system.

The Weatherization Assistant User’s Manual (Version 8.9) 9-37
Chapter 9: NEAT Building Description
• Manufacturer and Model – Enter the name of the manufacturer and the model
number of the existing heating system. This information may be needed for
reference to establish an appropriate replacement. Optional.
• Eliminate with Primary System Replacement – This checkbox will appear if
the Primary System checkbox is not checked (i.e., if this is a secondary heating
system). Use this checkbox to identify that this secondary heating system is to
be permanently turned off or removed from the dwelling if the primary system
is replaced. NEAT will assign the percent of the floor area that was heated by
this secondary heating system to the replacement primary system (i.e., NEAT
will assume that any heat formerly supplied by this secondary system will be
supplied by the new primary system following its installation).
• Comment – You may enter comments pertinent to the heating system directly
in the Comment field on the form, or you may enter them in the Comment
Editor by selecting the “Comment” button to the left of the field. The Comment
Editor is similar to Window’s Notepad and may be used to enter extended
comments. The total comment may have up to 65,000 characters. Text from
other sources may be copied and pasted into the Comment Editor’s window.
Any comment that is entered is displayed on the Recommended Measures
report and the Input Report available from the Audit Information form (see
Section 8.2, Audit Information). In addition, any comment that is entered can be
imported into any specific work order (see Section 13.1, Work Order
Information). Thus, you may wish to enter comments related to any observation
that might affect the installation of needed measures or repair work. Heating
system comments may include observations of equipment conditions, reasons
for selecting specific retrofit options, or references to health and safety items.
Optional.
• Heating System Record Navigation Block – The Heating System record
navigation block is used to find and navigate to existing heating system
descriptions for the audit being edited, copy or delete the currently accessed
heating system description, or create a new heating system description for the
audit. See Section 5.1, Form and Record Navigation, for information on using
the Weatherization Assistant’s record navigation blocks.

9-38 The Weatherization Assistant User’s Manual (Version 8.9)
Chapter 9: NEAT Building Description
Uninsulated Supply Ducts
The “Uninsulated Supply Ducts” button will
appear only when the Equipment Type is
Gravity Furnace, Forced Air Furnace, Heat
Pump or Other, and the Primary System
checkbox is checked. Also, if the Duct
Insulation measure has been turned off in
the Library Measures form of the Main
Menu’s “Setup Library” button (see 14.5,
Library Measures), this button will not appear. NEAT assumes that all other
equipment types and all secondary systems do not have a forced air distribution
system. Selecting the “Uninsulated Supply Ducts” button causes the Uninsulated
Supply Ducts sub-form to appear (see Figure 9.10). This form is used to enter
information on uninsulated supply ducts that are located outside the conditioned
space of the dwelling. Insulated ducts, ducts located within the conditioned space
of the dwelling, and return ducts should not be entered. NEAT will use this
information to evaluate the cost-effectiveness of supply duct insulation. Duct
leakage characteristics can be entered on the Ducts/Infiltration form described in
Section 11.2, Ducts/Infiltration – Air and Duct Leakages.
Duct systems in homes are often comprised of ducts of different types and of
varying sizes. At this time, up to three uninsulated supply duct sections located
outside the conditioned space can be described. If the three duct sections are not
enough to describe all the different ducts, you will have to enter duct sections with
characteristics that are close to others under one common duct section description.
For example, you may have to describe ducts with 6 in. and 8 in. diameters
together, entering 7 in. as their average diameter. Although the quantity of
insulation and the total cost for insulating the ducts might be somewhat affected by
having to describe ducts with different characteristics together, the cost-
effectiveness of insulating the ducts will most likely not be significantly affected.
Below are descriptions of the individual data items and controls found on the
Uninsulated Supply Ducts sub-form.
• Location – Select the location of the uninsulated ducts to be described. The
choices are Attic or Subspace. For an Attic location, NEAT assumes that an
attic environment surrounds the ducts. For a Subspace location, NEAT assumes
Figure 9.10. The Uninsulated Supply
Ducts for Heating System sub-form.

The Weatherization Assistant User’s Manual (Version 8.9) 9-39
Chapter 9: NEAT Building Description
that the ducts are located in the largest unintentionally heated foundation space
that you have described on the Foundations forms (see Section 9.6, Shell –
Foundations). If there is no unintentionally heated foundation space, then
NEAT will assume that the ducts are located in an unconditioned space. If
uninsulated ducts exist in both the Attic and Subspaces, choose the location that
has the greatest uninsulated duct surface area. Required.
• Type − Select what type of duct this is. The choices are Round or Rectangular.
Required.
• Length – Enter the length of the uninsulated supply duct in units of feet.
Required.
• Width, Height, and Diameter – The Width and Height fields will appear if the
Type is Rectangular, and the Diameter field will appear if the Type is Round.
Enter these dimensions for the uninsulated duct in units of inches. NEAT will
use these dimensions together with the Length to determine the surface area of
the uninsulated duct in computing the savings and insulation quantity for the
Duct Insulation measure. If duct sections with different characteristics need to
be combined together because only three duct sections can be described on the
Uninsulated Supply Ducts form, then usually ducts with different widths and
heights or with different diameters will need to be described together. In this
case, enter average values. Required.
9.8 Required Heating System Details Sub-Form
The Required Heating System Details sub-form found on the Heating form (see
Section 9.7, Heating − General Description Data) is used to describe details for
the heating system being described. The data fields in the sub-form change
depending on the selections made in the Equipment Type and Fuel fields on the
general heating system portion of the Heating form. There are five possible sub-
forms (see Table
9.1). Each sub-form will be discussed separately. However, the
three sub-forms for fuel types other than Electricity are similar. Therefore, a
complete description of the fields on the Gas Furnace Details sub-form will be
given first, then only the fields that differ from these discussed for the other two
sub-forms corresponding to the fuel types other than Electricity.

9-40 The Weatherization Assistant User’s Manual (Version 8.9)
Chapter 9: NEAT Building Description
Table 9.1. Selection of Equipment Type and Fuel to display different Required Heating
System Details sub-form
EQUIPMENT TYPE
FUEL
Natural Gas,
Propane, Wood,
Coal, or Other
Oil, Kerosene Electricity
Gravity Furnace,
Forced Air Furnace,
Steam Boiler or Hot
Water Boiler
Gas Furnace Details
Sub-Form
Oil, Kerosene
Furnace/Boiler
Details Sub-Form
Electric Resistance
Heating System
Details Sub-Form
Vented Space Heater,
Unvented Space Heater,
or Other
Space Heater Details Sub-Form
Fixed Electric
Resistance or Portable
Electric Resistance
- N/A -
Heat Pump
- N/A -
Heat Pump Details
Sub-Form
Gas Furnace Details Sub-Form
If the selected equipment type is Gravity Furnace, Forced Air Furnace, Steam
Boiler or Hot Water Boiler, and the selected fuel is Natural Gas, Propane, Wood,
Coal or Other, the Gas Furnace Details sub-form is presented (see Figure 9.11).
Below are descriptions of the individual data items and controls found on the Gas
Furnace Details sub-form.
Figure 9.11. The Gas Furnace Details sub-form under the Main Menu’s “NEAT” button.

The Weatherization Assistant User’s Manual (Version 8.9) 9-41
Chapter 9: NEAT Building Description
• Input Units and Input Rating – The input rating of the heating system is used
only with the output capacity to calculate a default steady-state efficiency for
the heating system. If the steady-state efficiency of the heating system will be
measured by performing a flue-gas analysis or if the steady-state efficiency will
be obtained by some other means, then there is no need to enter the input rating.
In this case, choose “No Input” in the Input Units field, in which case the Input
Rating field will be hidden. If you want to enter the input rating, first select the
energy units for the input rating in the Input Units field. The choices for the
Input Units field are No Input, kBtu per Hour, Gallons per Hour, Lbs per Hour,
and Cubic Centimeters per Minute. Then enter the actual value of the input
rating in the Input Rating field. The input rating can be measured or taken
directly from the nameplate of the heating system. Optional.
• Output Capacity – Enter the output capacity of the heating system in units of
kBtu/h. The output capacity is usually obtained directly from the nameplate of
the heating system or from an inspection of nozzle sizes, etc. If this information
is not available, the output capacity can be approximated or, in rare cases,
measured. Required.
• Steady-State Efficiency – Enter the steady-state efficiency of the heating
system in units of percent (do not enter the % sign with the number). This
parameter should be as accurate as possible because it affects not only the
savings calculated for heating system weatherization measures but also the
savings of most envelope measures. There are online and published sources of
heating equipment efficiencies by manufacturer and model. However, these
efficiencies are for new units installed and tuned properly or may have been
determined under different conditions. Thus, the values may differ significantly
from those for the unit as it is actually operating. Therefore, if possible, the
steady-state efficiency should be measured by performing a flue-gas analysis. If
no other information on the steady-state efficiency is available, NEAT will
compute a default value for you if you have entered values for the Input Units,
Input Rating, and Output Capacity fields, described above (see Section 5.6,
Field Defaults). Beware of replacing a heating system based on anything but a
measured efficiency. Required.
• Condition – Describe the current condition of the heating system by selecting
either Good, Fair, or Poor (but working). The condition is used to estimate the

9-42 The Weatherization Assistant User’s Manual (Version 8.9)
Chapter 9: NEAT Building Description
efficiency increase resulting from a tune-up. The poorer the condition, the
greater will be the estimated efficiency increase. Required.
• Programmable Thermostat – Use this checkbox to indicate whether the
existing thermostat is a programmable model that allows automatic setback of
the heating set-point. The number of degrees assumed for the setback is entered
in the Setup Library (see Section 14.2, Key Parameters). The presence of an
existing programmable thermostat will prevent the Setback (Smart) Thermostat
retrofit measure from being evaluated and recommended for this house. This
checkbox should also be checked to indicate that the occupants would not
benefit from a programmable thermostat because they already manually set
their thermostat back in winter, do not want a programmable thermostat, and/or
would not be able to use a programmable thermostat. In these cases, the reason
for checking the checkbox should be noted in the Comment field described
below.
• Automatic Vent Damper - Present – Use this checkbox to indicate that the
heating system flue is equipped with an automatic vent damper. The presence of
an existing automatic vent damper will prevent an automatic vent damper
retrofit measure from being evaluated and recommended for this heating
system.
• Automatic Vent Damper - Evaluate – This checkbox will appear only if the
Automatic Vent Damper - Present checkbox is not checked. Use this checkbox
to indicate that the installation of an automatic vent damper should be evaluated
and recommended if it is found to be cost-effective. In some areas, local codes
prohibit their use. If not selected, NEAT will not evaluate installing an
automatic vent damper.
• Automatic Vent Damper - Flue Diameter – This field will appear only if the
Automatic Vent Damper - Evaluate checkbox is checked. If installation of an
automatic vent damper is recommended, this entry records the diameter in
inches required for installation. This information might also be recorded in the
Comment field to assist the contractor in obtaining the correct size and allowing
it to be imported into a work order (see Comment in Section 13.1, Work Order
Information). Conditionally Required.

The Weatherization Assistant User’s Manual (Version 8.9) 9-43
Chapter 9: NEAT Building Description
• IID and Pilot Light – Use these checkboxes to indicate whether the heating
system uses an intermittent ignition device (IID) or pilot light to ignite the main
burner of the heating system (an IID consists of an electric igniter that
eliminates the need for a standing pilot light). Only one of the two checkboxes
can be checked at the same time. If you checked a box but want to change your
selection, uncheck the current selection before selecting the other checkbox.
The presence of an existing IID will prevent an IID from being evaluated and
recommended for this heating system.
• On in Summer – This checkbox is visible only if the Pilot Light checkbox has
been selected. Use this checkbox to indicate that the pilot light on the heating
system is left on (i.e., remains lit) throughout the summer, which increases the
energy savings calculated for the IID retrofit measure.
• Power Burner – Use this checkbox to indicate that the heating system is
equipped with a power burner. Power burners use blowers to better mix the fuel
and combustion air, and are normally found on oil or coal furnaces that have
been converted to burn natural gas.
The Replacement System data block will appear on the right side of the Required
Heating System Details sub-form if the heating system being described is the
primary heating system. The Replacement System data block will not appear for
existing systems where the Fuel has been selected as Wood, Coal, or Other, since
the replacement system options described below are not considered for these types
of systems. Individual data items and controls presented in this data block allow
you to enter information associated with tune-up and replacement retrofit measures
for this primary system. Below are descriptions of the individual data items and
controls found in the Replacement System data block.
• Options – Select one of six choices regarding tune-up or replacement of the
primary heating unit, as listed below. Required.
1. Evaluate All. NEAT will evaluate both heating system replacement
(standard and high efficiency) and system tune-up and recommend the most
cost-effective option, if any. Replacement system efficiencies and costs for
both standard and high efficiency replacements will be requested in
subsequent fields.

9-44 The Weatherization Assistant User’s Manual (Version 8.9)
Chapter 9: NEAT Building Description
2. Tune-up Performed – Evaluate Replacements Only. A tune-up of the system
has already been performed. The System Efficiency given on the form is the
efficiency of the tuned up system. NEAT will not evaluate the system Tune-
up measure. Replacement system efficiencies and costs for both standard
and high efficiency replacements will be requested in subsequent fields.
3. Tune-up Mandatory. Inspection of the heating system has indicated that a
system tune-up is all that is necessary. NEAT will evaluate and recommend
the system Tune-up measure, regardless of its cost-effectiveness. The tuned
up system will then be used in evaluating other measures not considered
mandatory. No system replacement will be considered.
4. Standard Efficiency Replacement Mandatory. NEAT will consider
replacement of the existing heating system with a standard efficiency system
as mandatory. This may be the result of an unsafe yet unrepairable existing
system. NEAT will evaluate and recommend the replacement regardless of
its cost-effectiveness. The replacement system efficiency and cost for the
standard unit will be requested in subsequent fields. The efficiency of the
replacement system will be used in evaluating other measures not considered
mandatory. No system tune-up or high efficiency replacement will be
considered.
5. High Efficiency Replacement Mandatory. NEAT will consider replacement
of the existing heating system with a high efficiency system as mandatory.
This may be the result of an unsafe yet unrepairable existing system. NEAT
will evaluate and recommend the replacement regardless of its cost-
effectiveness. The replacement system efficiency and cost for the high
efficiency unit will be requested in subsequent fields. The efficiency of the
replacement system will be used in evaluating other measures not considered
mandatory. No system tune-up or standard efficiency replacement will be
considered.
6. Don’t Replace – Evaluate Tune-up Only. No system replacement (either
standard or high efficiency) will be considered. The tune-up measure,
however, will still be considered and recommended if cost-effective.
7. Evaluate None. No system replacement or tune-up will be considered.

The Weatherization Assistant User’s Manual (Version 8.9) 9-45
Chapter 9: NEAT Building Description
The Replacement System Options setting can help you direct NEAT in its
evaluation process related to the heating systems in two ways not necessarily
obvious from the field descriptions. NEAT was originally designed to compare the
cost-effectiveness of replacing the existing system with either a standard efficiency
heating system or a high efficiency system. However, if you are not interested in
this comparison and only want to evaluate the cost-effectiveness of either the
standard efficiency or high efficiency systems, choose “Evaluate All” or “Tuneup
Performed - Evaluate Replacements Only” for the Options, then enter a large total
cost (see Labor and Material Cost field descriptions below) for the replacement
system you do not want to be recommended. Since the system with the large cost
will never be cost-effective, you have essentially eliminated the comparison of the
two different replacements.
The selection of “Tuneup Performed - Evaluate Replacements Only” for the
Replacement System Options was intended to indicate that a heating system had
been tuned up during an initial visit to a home and that the measure should not be
evaluated further by the audit. However, if inspection of the heating system
indicates that a tune-up most likely can’t be performed successfully, yet
replacement of the system still needs to be cost justified, this same setting can also
be used to direct NEAT to not evaluate the Tune-up measure under these
circumstances.
In both of the instances described above, the inputs being used to direct NEAT are
not being used in the original manner they were intended. Thus, these techniques
should only be implemented with proper authorization and should be documented
appropriately (e.g., using the Comments).
• Fuel – If the System Retrofit Option selected is Evaluate All, Tune-up
Performed – Evaluate Replacements Only, Standard Efficiency Replacement
Mandatory, or High Efficiency Replacement Mandatory, a “Fuel” drop-down
list will appear on the form. Select the type of fuel used by the replacement
heating system. The choices are Natural Gas, Oil, Electricity, Propane, Wood,
Coal, Kerosene, and Other. You can set the heat content and price for the Other
fuel type on the Fuel Costs tab of the Setup Library (see Section 14.3, Fuel
Costs). Conditionally Required.
• Include in SIR – If the System Retrofit Option selected is Tuneup Mandatory,
Standard Efficiency Replacement Mandatory, or High Efficiency Replacement

9-46 The Weatherization Assistant User’s Manual (Version 8.9)
Chapter 9: NEAT Building Description
Mandatory, an Include in SIR checkbox will appear on the form. This checkbox
allows you to indicate that you wish to have the selected measure included in
the calculation of the whole house (package) SIR for this audit. Measures not
included in the whole house SIR are normally related to health and safety.
Check the guidance for your program in deciding when you can mandate an
HVAC measure and if it can be excluded from the SIR calculation. Even if the
measure can be considered related to health and safety, if it is shown to be cost-
effective, you may choose to still include it in the whole house SIR by selecting
this checkbox. By doing so, it will not be seen as a health and safety measure,
thus preserving funds dedicated for other such measures. An alternate reason
for excluding a measure from the whole house SIR is if it is funded outside of
the Weatherization Assistance Program. Whether a measure is or is not
included in the whole house SIR is indicated by its location in the list of
measures produced for the Recommended Measures Report (see Chapter 12,
NEAT and MHEA Results).
• System AFUE – Enter the AFUE (Annual Fuel Utilization Efficiency) for the
replacement unit. The AFUE will most often be given on the unit label or in the
unit specifications. Entries will be required for either or both the standard and
high efficiency units, depending on the choice made for System Retrofit
Options. Conditionally Required.
• Labor and Material Costs – Enter the Labor and Material costs associated
with replacing the primary heating system. Entries will be displayed for either
or both the standard and high efficiency units, depending on the choice made
for System Retrofit Options. NEAT adds the labor and equipment costs in
computing the SIR and reporting costs. Thus, the total cost (labor plus
equipment) may be entered in either field, with $0.00 entered for the other of
the two fields, with no adverse consequences. Do not enter $0.00 in both Labor
and Material Cost fields for either replacement unit. Conditionally Required.
Oil/Kerosene Furnace/Boiler Details Sub-Form
If the selected equipment type is Gravity Furnace, Forced Air Furnace, Steam
Boiler or Hot Water Boiler, and the selected fuel is Oil or Kerosene, the
Oil/Kerosene Furnace/Boiler Details sub-form is presented (see Figure 9.12).

The Weatherization Assistant User’s Manual (Version 8.9) 9-47
Chapter 9: NEAT Building Description
Figure 9.12. The Oil/Kerosene Furnace/Boiler Details sub-form under the
Main Menu’s “NEAT” button.
This sub-form is nearly identical with the Gas Furnace Details sub-form except
that the Pilot Light/IID and Power Burner entries (see Figure 9.11) are replaced by
the Retention Head entries (see Figure 9.12 above and descriptions below). See the
discussion under “Gas Furnace Details Sub-Form” above for descriptions of the
other entry fields.
• Retention Head Present – Indicate whether the primary heating system is
equipped with a Retention Head Oil Burner. This device provides higher
combustion efficiency by mixing the oil and air more vigorously.
• Retention Head Recommended – Indicate whether the installation of a
retention head burner would be recommended if found cost-effective. If
selected, NEAT will recommend installation only if found cost-effective. If not
selected, the measure will not be considered. This checkbox will be visible only
if you have indicated that a retention head burner does not already exist.
The Replacement System data block of the Oil/Kerosene Furnace/Boiler Details
sub-form is identical to that described previously for the Gas Furnace Details sub-
form and the response of NEAT to its entries is the same.
Electric Resistance Heating System Details Sub-Form
If the selected equipment type is other than Heat Pump and the selected fuel is
Electricity, the Electric Resistance Heating System Details sub-form is presented
(see Figure 9.13). Electrical equipment is assumed 100% efficient, although
distribution losses may be described by the data associated with the Uninsulated
Supply Ducts fields (see Section 9.7, Heating − General Description Data) and the
Ducts and Infiltration form (see Section 11.2 ). Electric furnaces do require entry
of an Output Capacity.

9-48 The Weatherization Assistant User’s Manual (Version 8.9)
Chapter 9: NEAT Building Description
Figure 9.13. The Electric Resistance Heating System Details sub-form under the Main
Menu’s “NEAT” button.
• Output Units and Output Capacity – Select the energy units for the output
capacity in the Output Units field. The choices are kW and kBtu per hour. Enter
the output capacity of the heating system in the units selected in the Output
Units field. The output capacity is usually obtained directly from the nameplate
of the heating system. If this information is not available, the output capacity
can be approximated or, in rare cases, measured. Required.
The Replacement System data block will appear on the right side of the Required
Heating System Details sub-form if the heating system being described is the
primary heating system. Individual data items and controls presented in this data
block allow you to enter information associated with the replacement of this
primary system. The entries do not allow evaluation of replacing electric heating
equipment with a fossil-fueled system.
Any time NEAT recommends installation of a heat pump, any existing cooling
equipment that has been described (see Section 9.9, Cooling) will be assumed
replaced by the heat pump, with characteristics on the cooling side as specified in
the Setup Library (see “Equipment” in Section 14.2, Key Parameters). If no
existing cooling equipment has been specified, NEAT will include only heating
savings in its estimates of total savings and SIR for the heat pump installation as
well as for other measures being evaluated.
Below are descriptions of the individual data items and controls found in the
Replacement System data block on the Electric Resistance Heating System Details
sub-form.
• Options – Select one of four choices regarding replacement of the primary
heating unit. Required.

The Weatherization Assistant User’s Manual (Version 8.9) 9-49
Chapter 9: NEAT Building Description
1. Evaluate Replacement with Heat Pump. NEAT will evaluate replacing the
existing heating system, and any existing cooling equipment, with a heat
pump and recommend the replacement only if it is cost-effective. See
assumptions associated with installation of a heat pump in the introductory
paragraph to the Replacement System data block, above. Replacement
system efficiency and cost will be requested in subsequent fields.
2. Replacement with Heat Pump Mandatory. NEAT will consider replacing the
existing heating system with a heat pump as mandatory. However, if existing
cooling equipment has been described (see Section 9.9, Cooling), the
replacement of the first cooling unit must also be declared mandatory in
order for the heat pump replacement to be treated as mandatory. See
additional assumptions associated with installation of a heat pump in the
introductory paragraph to the Replacement System data block, above.
Mandatory replacement of a heating system may be the result of an unsafe
yet unrepairable existing system. NEAT will recommend the replacement
regardless of its cost-effectiveness. The replacement system efficiency and
cost will be requested in subsequent fields. The efficiency of the
replacement system will be used in evaluating other measures not considered
mandatory.
3. Replacement with Electric Resistance System Mandatory. NEAT will
consider replacing the existing heating system with an electric resistance
system as mandatory. Mandatory replacement of a heating system may be
the result of an unsafe yet unrepairable existing system. NEAT will evaluate
and recommend the replacement regardless of its cost-effectiveness. The
replacement system cost for the electric resistance unit will be requested in
subsequent fields. The efficiency of the replacement system will be used in
evaluating other measures not considered mandatory.
4. Don’t Replace – Evaluate None. No system retrofit option will be
considered.
• Include in SIR – If the System Retrofit Option selected is Replacement with
Heat Pump Mandatory or Replacement with Electric Resistance System
Mandatory, an Include in SIR checkbox will appear on the form. This checkbox
allows you to indicate that you wish to have the selected measure included in
the calculation of the whole house (package) SIR for this audit. Measures not

9-50 The Weatherization Assistant User’s Manual (Version 8.9)
Chapter 9: NEAT Building Description
included in the whole house SIR are normally related to health and safety.
Check the guidance for your program in deciding when you can mandate an
HVAC measure and if it can be excluded from the SIR calculation. Even if the
measure can be considered related to health and safety, if it is shown to be cost-
effective, you may choose to still include it in the whole house SIR by selecting
this checkbox. By doing so, it will not be seen as a health and safety measure,
thus preserving funds dedicated for other such measures. An alternate reason
for excluding a measure from the whole house SIR is if it is funded outside of
the Weatherization Assistance Program. Whether a measure is or is not
included in the whole house SIR is indicated by its location in the list of
measures produced for the Recommended Measures Report (see Chapter 12,
NEAT and MHEA Results).
• HSPF – If the System Retrofit Option selected is Evaluate Replacement with
Heat Pump or Replacement with Heat Pump Mandatory, an HSPF field will
appear on the form. Enter the HSPF (Heating System Performance Factor) for
the replacement unit. The HSPF will most often be given on the unit label or in
the unit specifications. Conditionally Required.
• Labor and Material Costs – Enter the Labor and Material costs associated
with replacing the primary heating system. NEAT adds the labor and equipment
costs in computing the SIR and reporting costs. Thus, the total cost (labor plus
equipment) may be entered in either field, with $0.00 entered for the other of
the two fields, with no adverse consequences. Do not enter $0.00 in both Labor
and Material Cost fields. Required.
Heat Pump Details Sub-Form
If the selected Equipment Type is Heat Pump, the Heat Pump Details sub-form is
presented (see Figure 9.14). Below are descriptions of the individual data items
and controls found on the Heat Pump Details sub-form.

The Weatherization Assistant User’s Manual (Version 8.9) 9-51
Chapter 9: NEAT Building Description
Figure 9.14. The Heat Pump Details sub-form under the Main Menu’s “NEAT” button.
• HSPF – Provide an estimate of the heating seasonal performance factor (HSPF)
of the existing system. Newer systems are required to display the HSPF rating
on the unit. There are online and published sources of heat pump efficiencies by
manufacturer and model. If no estimate is available, you may leave the field
blank and proceed to the Year Manufactured field (see entry below). All of
these sources represent the system efficiency for a new unit operating correctly.
Conditionally required.
• Year Manufactured – Enter the approximate year the unit was manufactured
or purchased new. Use the full year (e.g., “1986,” not “‘96”). This entry is
hidden if a value has been provided in the HSPF field above. Otherwise the year
is used to estimate the HSPF. Conditionally required.
The Replacement System data block will appear on the right side of the Required
Heating System Details sub-form if the heating system being described is the
primary heating system. Individual data items and controls presented in this data
block allow you to enter information associated with the replacement of this
primary system. The entries do not allow evaluation of replacing electric heating
equipment with a fossil-fueled system.
Any time NEAT recommends installation of a heat pump, any existing cooling
equipment that has been described (see Section 9.9, Cooling) will be assumed
replaced by the heat pump, with characteristics on the cooling side as specified in
the Setup Library (see “Equipment” in Section 14.2, Key Parameters). If no
existing cooling equipment has been specified, NEAT will include only heating
savings in its estimates of total savings and SIR for the replacement as well as for
other measures being evaluated.
Below are descriptions of the individual data items and controls found on the Heat
Pump Details sub-form.
• Options – Select one of three choices regarding replacement of the primary
heating unit. Required.
1. Evaluate Replacement with Heat Pump. NEAT will evaluate replacing the
existing heating system, and any existing cooling equipment, with a heat

9-52 The Weatherization Assistant User’s Manual (Version 8.9)
Chapter 9: NEAT Building Description
pump and recommend the replacement only if it is cost-effective. See
assumptions associated with installation of a heat pump in the introductory
paragraph to the Replacement System data block, above. Replacement
system efficiency and cost will be requested in subsequent fields.
2. Replacement with Heat Pump Mandatory. NEAT will consider replacing the
existing heating system with a heat pump as mandatory. However, if existing
cooling equipment has been described (see Section 9.9, Cooling), the
replacement of the first cooling unit must also be declared mandatory in
order for the heat pump replacement to be treated as mandatory. See
additional assumptions associated with installation of a heat pump in the
introductory paragraph to the Replacement System data block, above.
Mandatory replacement of a heating system may be the result of an unsafe
yet unrepairable existing system. NEAT will recommend the replacement
regardless of its cost-effectiveness. The replacement system efficiency and
cost will be requested in subsequent fields. The efficiency of the
replacement system will be used in evaluating other measures not considered
mandatory.
3. Don’t Replace – Evaluate None. No system replacement will be considered.
• Include in SIR – If the System Retrofit Option selected is Replacement with
Heat Pump Mandatory, an Include in SIR checkbox will appear on the form.
This checkbox allows you to indicate that you wish to have the selected
measure included in the calculation of the whole house (package) SIR for this
audit. Measures not included in the whole house SIR are normally related to
health and safety. Check the guidance for your program in deciding when you
can mandate an HVAC measure and if it can be excluded from the SIR
calculation. Even if the measure can be considered related to health and safety,
if it is shown to be cost-effective, you may choose to still include it in the whole
house SIR by selecting this checkbox. By doing so, it will not be seen as a
health and safety measure, thus preserving funds dedicated for other such
measures. An alternate reason for excluding a measure from the whole house
SIR is if it is funded outside of the Weatherization Assistance Program.
Whether a measure is or is not included in the whole house SIR is indicated by
its location in the list of measures produced for the Recommended Measures
Report (see Chapter 12, NEAT and MHEA Results).

The Weatherization Assistant User’s Manual (Version 8.9) 9-53
Chapter 9: NEAT Building Description
• (Replacement System) HSPF – If the System Retrofit Option selected is
Evaluate Replacement with Heat Pump or Replacement with Heat Pump
Mandatory, an HSPF field will appear on the form. Enter the HSPF (Heating
System Performance Factor) for the replacement unit. The HSPF will most
often be given on the unit label or in the unit specifications. Required.
• Labor and Material Costs – Enter the Labor and Material costs associated
with replacing the primary heating system. NEAT adds the labor and equipment
costs in computing the SIR and reporting costs. Thus, the total cost (labor plus
equipment) may be entered in either field, with $0.00 entered for the other of
the two fields, with no adverse consequences. Do not enter $0.00 in both Labor
and Material Cost fields for the replacement unit. Required.
Space Heater Details Sub-Form
If the selected equipment type is Unvented Space Heater, Vented Space Heater or
Other, and the selected fuel is any type other than Electricity, the Space Heater
Details sub-form is presented (see Figure 9.15).
Figure 9.15. The Space Heater Details sub-form under the Main Menu’s “NEAT” button.
This sub-form is identical with the Gas Furnace Details sub-form except that the
entries related to the pilot light, IID, and power burner have been eliminated as
well as those related to high efficiency replacements. Discussion of the entry fields
given under the Gas Furnace Details sub-form section should be referred to for the
space heater equipment types along with the additional information below.
If the selected equipment type is Unvented Space Heater, it would be assumed that
the Steady State Efficiency entered would be essentially 100% (the “%” sign is not
entered), the only exception possibly being a wall-mounted unit where heat may be
lost through the wall. For a unit with 100% efficiency, the Input Rating is the same

9-54 The Weatherization Assistant User’s Manual (Version 8.9)
Chapter 9: NEAT Building Description
as the Output Capacity (if expressed in the same units) and only the latter value
needs to be entered. Also, for an unvented space heater, the Vent Damper entries
are not applicable and would be left unchecked.
The Replacement System data block will appear on the right side of the Space
Heater Details sub-form if the heating system being described is the primary
heating system and the selected fuel is Natural Gas, Propane or Oil. Individual data
items and controls presented in this data block are the same as described under the
Gas Furnace Details sub-form except no entries related to the high efficiency
replacement unit will appear. Only a standard efficiency replacement is assumed
available.
In Version 8.9 of the Weatherization Assistant, the Tune-up measure has been
eliminated for space heaters. However, the possible selections under the
“Replacement Systems Options” drop-down list do not reflect this change. Any
selection directing NEAT to evaluate the Tune-up measure for a space heater will
be ignored.
9.9 Cooling
The Cooling form (see Figure 9.16) under the Main Menu’s “NEAT” button is
used to describe the cooling systems installed in the dwelling. NEAT allows the
definition of up to five cooling systems in a home. Below are the descriptions of
the individual data items and controls found on the Cooling form.

The Weatherization Assistant User’s Manual (Version 8.9) 9-55
Chapter 9: NEAT Building Description
Figure 9.16. The Cooling form under the Main Menu’s “NEAT” button.
• AC Code – The AC Code identifies cooling systems installed in the house to
you and the Weatherization Assistant. The AC code must be unique for all
cooling system descriptions within a given audit. NEAT automatically provides
a default entry for all new cooling systems that are created in the form of
“AC#” where the “#” is an integer insuring uniqueness of the AC code. You
may choose to enter your own AC code to include characters that indicate the
location, type, or some other characteristics of the cooling system. The AC code
may have up to 20 characters, although space restrictions in many reports
suggest a lesser number of characters should be used (perhaps 3 to 5) to
preserve readability. Entries are not case-sensitive. NEAT will use the AC
codes in output reports and work orders to identify which cooling system
should receive recommended retrofit measures. The AC codes may also be
helpful when labeling your drawing of the house’s floor plan in case there are
more than one unit (e.g., multiple window air conditioners). Required.
• Equipment Type – Select what type of cooling system this is. The choices are
Central Air Conditioner, Window or Room Air Conditioner, Heat Pump, and
Evaporative Cooler. If Evaporative Cooler has been selected, the subsequent
fields requesting system performance characteristics (i.e., Capacity, SEER, and
Year Manufactured) will be automatically hidden. Required.

9-56 The Weatherization Assistant User’s Manual (Version 8.9)
Chapter 9: NEAT Building Description
• Manufacturer and Model – Enter the manufacturer and model of the existing
air-conditioning unit if needed for reference, possibly in establishing an
appropriate replacement. See also description of Capacity below. Optional.
• Floor Area Cooled – Enter an estimate of the floor area that is cooled by the
cooling system being described in square feet. The sum of all areas cooled by
primary and secondary equipment should be less than or equal to the floor area
of the house entered on the Audit Information form under the Main Menu’s
“NEAT” button. NEAT uses this information to calculate the cooling energy
consumption as well as the savings from cooling system retrofit measures.
Required.
• Capacity − Enter the output capacity of the unit in kBtu/h. The value is often
printed on the nameplate of the air conditioner. For central systems and heat
pumps, the value may be given in tons of cooling, where 1 ton equals 12
kBtu/h. Sometimes the model number will contain a value divisible by 6, since
cooling equipment is normally sold with capacities that are integral multiples of
½ ton (e.g., a model xxx30xxx is likely a 30 kBtu/h or 2-1/2 ton system).
Otherwise enter an estimate. Required.
• SEER – Enter the efficiency of the cooling system in units of SEER (Seasonal
Energy Efficiency Ratio). Usually, SEER is used in rating central air
conditioners and heat pumps. Window air conditioners are rated in EER
(Energy Efficiency Ratio). SEER is annual average efficiency of a cooling unit,
while EER is a measure of efficiency averaged over several hours of constant
operating condition. Both have units of Btu/watt-hour. An exact conversion
between EER and SEER is not possible since they are measured at different
operating conditions. An approximate conversion may be obtained using the
following formulae:
SEER = (1.2 × EER) – 0.7 (if the unit’s fan runs only when conditioning is
required).
SEER = (0.9 × EER) + 0.1 (if the fan runs continuously while the unit is in
use).

The Weatherization Assistant User’s Manual (Version 8.9) 9-57
Chapter 9: NEAT Building Description
If an SEER cannot be estimated, leave the field blank and press [Enter] while
accessing the field. NEAT will display the Year Purchased field, allowing an
alternate entry. Conditionally required.
• Year Manufactured – Enter the approximate year the unit was purchased new.
Use the full year (e.g., “1986,” not “‘96”). The purchase year is used to estimate
the SEER, if it is not provided. This entry is hidden if a value has been provided
in the SEER field. Conditionally required.
NEAT will evaluate replacing a central system with another central system and a
window unit with another window unit. Costs associated with these replacements
are specified in the Library Measures form of the Setup Library (see Section 14.5,
Library Measures), with the replacement efficiencies as indicated in the Key
Parameters/Equipment form under the Main Menu’s “Setup Library” button (see
Section 14.2, Key Parameters).
If your description of the heating equipment (see Sections 9.7, Heating − General
Description Data, and 9.8, Required Heating System Details Sub-Form) allows for
installation of a heat pump (i.e., the existing primary heating is supplied by a heat
pump or electric resistance), NEAT will evaluate replacing the heating system and
all cooling equipment by the single heat pump and recommend this if cost-
effective and more so than replacing each individual air conditioner.
The Required Retrofits data block in the middle of the Cooling form allows you to
specify that system replacement or tune-up should be considered mandatory. Only
one of the two selections can be chosen for each cooling equipment description.
Selection of one when the other is checked will automatically eliminate the initial
selection.
• Replacement Required – Select this checkbox if you have determined that the
existing air conditioner being described must be replaced. NEAT will
recommend the replacement regardless of its cost-effectiveness. In order for
your selection of “Replacement with Heat Pump Mandatory” (see “Options”
under the Electric Resistance Heating System or Heat Pump Details sub-forms
in Section 9.8, Required Heating System Details Sub-Form) to be effective, this
checkbox must be selected for the first cooling equipment description.

9-58 The Weatherization Assistant User’s Manual (Version 8.9)
Chapter 9: NEAT Building Description
• Tune-up Mandatory – Select this checkbox if inspection of the existing air
conditioner indicates that a system tune-up is all that is necessary. NEAT will
evaluate and recommend the system tune-up, regardless of its cost-
effectiveness. The tuned up system will then be used in evaluating other
measures not considered mandatory. No system replacement will be considered.
• Include in SIR – If either the Replacement Required or Tune-up Mandatory
checkboxes have been selected, an Include in SIR checkbox will appear on the
form. This checkbox allows you to indicate that you wish to have the selected
measure included in the calculation of the whole house (package) SIR for this
audit. Measures not included in the whole house SIR are normally related to
health and safety. Check the guidance for your program in deciding when you
can mandate an HVAC measure and if it can be excluded from the SIR
calculation. Even if the measure can be considered related to health and safety,
if it is shown to be cost-effective, you may choose to still include it in the whole
house SIR by selecting this checkbox. By doing so, it will not be seen as a
health and safety measure, thus preserving funds dedicated for other such
measures. An alternate reason for excluding a measure from the whole house
SIR is if it is funded outside of the Weatherization Assistance Program.
Whether a measure is or is not included in the whole house SIR is indicated by
its location in the list of measures produced for the Recommended Measures
Report (see Chapter 12, NEAT and MHEA Results).
• Comment – You may enter comments pertinent to the cooling system directly
in the Comment field on the form, or you may enter them in the Comment
Editor by selecting the “Comment” button to the left of the field. The Comment
Editor is similar to Window’s Notepad and may be used to enter extended
comments. The total comment may have up to 65,000 characters. Text from
other sources may be copied and pasted into the Comment Editor’s window.
Any comment that is entered is displayed on the Recommended Measures
report and the Input Report available from the Audit Information form (see
Section 8.2, Audit Information). In addition, any comment that is entered can be
imported into any specific work order (see Section 13.1, Work Order
Information). Thus, you may wish to enter comments related to any observation
that might affect the installation of needed measures or repair work. Cooling
system comments may include observations of equipment conditions, reasons
for selecting specific retrofit options, or the need for specific maintenance (e.g.,
low refrigerant charge or dirty coils). Optional.

The Weatherization Assistant User’s Manual (Version 8.9) 9-59
Chapter 9: NEAT Building Description
• Cooling System Record Navigation Block – The Cooling System record
navigation block is used to find and navigate to existing cooling system
descriptions, copy or delete the currently accessed cooling system description,
or create a new cooling system description for the audit. See Section 5.1, Form
and Record Navigation for information on using the Weatherization Assistant’s
record navigation blocks.

9-60 The Weatherization Assistant User’s Manual (Version 8.9)
Chapter 9: NEAT Building Description

The Weatherization Assistant User’s Manual (Version 8.9) 10-1
Chapter 10: MHEA Building Description
Chapter 10. MHEA Building Description
This chapter discusses the information entered on the building description forms
under the Main Menu’s “MHEA” button that is needed to describe manufactured
homes and that is unique to this building type, as opposed to site-built, single-
family houses. Prior to entering information on the forms described in this chapter,
you must have already created the client whose house is being audited (see Section
7.1, Client Information), chosen to run a MHEA audit for this client, and entered
required information on the Audit Information form for this audit (see Section 8.2,
Audit Information).
The Shell tab contains information related to the Walls, Windows, Doors, Ceiling,
and the Floor of the manufactured home. At least one form under each of these
categories must be entered.
The Addition tab allows the description of an addition to the mobile home and has
the same catagories of components as the Shell tab—that is, Walls, Windows,
Doors, Ceiling, and Floor. All entries under this tab may be left blank, but if entry
is begun on any one of the Walls, Ceiling, or Floor forms, all three of these forms
must be completed. The Windows and Doors forms under the Addition tab are
optional.
The Heating (Primary, Secondary, and Replacement), and Cooling (Primary,
Secondary, and Replacement) forms allow descriptions of the home’s HVAC
equipment. The Primary Heating form must be filled out for each home, but the
remaining forms under these two tabs are optional. The entries on the above forms
are discussed in this chapter.
Chapter 11, NEAT and MHEA Common Elements, discusses the remaining forms
under the Main Menu’s “MHEA” button, those common to both NEAT and
MHEA. These include the Status, Ducts/Infiltration, Base Loads (Water Heating,
Refrigerators, and Lighting Systems), Health & Safety (Whole House, Equipment,
and Building Shell), Itemized Costs, Utility Bills, Photos, and Measures forms, as
well as some optional sub-forms found on the Heating and Water Heating forms.
Of these forms, only the Ducts/Infiltration form is required.
On many of the tabs and sub-tabs under the Main Menu’s “MHEA” button,
numbers in parentheses are displayed. These numbers indicate the number of

10-2 The Weatherization Assistant User’s Manual (Version 8.9)
Chapter 10: MHEA Building Description
descriptions, or records, that have been entered for that particular component type.
Some of the component types in MHEA can have only a single record described,
for example, Walls. Thus the number indicated for walls will never be greater than
1. See the individual descriptions below for additional information regarding the
number of records possible for each component type.
Finally, the Recommended Measures report that is typically displayed immediately
after running a MHEA audit is discussed in Chapter 12, NEAT and MHEA Results.
10.1 Shell − Walls
Unlike NEAT, MHEA uses only one form to describe the characteristics of the
walls (see Figure 10.1). MHEA assumes that the house is rectangular in shape with
wood-frame construction, and the walls facing different orientations have identical
construction characteristics.
Below are brief descriptions of the individual data items and controls found on the
Walls form. All items on the Walls form are required except the Uninsulatable
Wall Area, Additional Cost, and Comment fields.
Figure 10.1. The Shell − Walls form under the Main Menu’s “MHEA” button.

The Weatherization Assistant User’s Manual (Version 8.9) 10-3
Chapter 10: MHEA Building Description
• Wall Stud Size – Select the stud size used in framing the walls. The choices are
2×2, 2×3, 2×4, and 2×6. MHEA uses this information to calculate the wall R-
value and the volume of wall cavity available for added insulation. Required.
• Orientation of Long Wall – Select the closest cardinal compass direction that
one of the long walls of the home faces. The choices are North, South, East, and
West. For this entry, MHEA considers North the same as South and East the
same as West, but you might adopt a convention such as entering the
orientation of the front wall as the long wall. MHEA uses this information to
calculate solar loads on the home. Required.
• Wall Ventilation – Indicate whether the walls are vented or not vented. The
walls of the mobile home may be intentionally ventilated to remove
accumulated moisture by having corrugated metal siding open at the bottom to
provide space for air to flow between the exterior and interior wall materials.
Small holes in the siding at the bottom and top of the exterior wall surface may
be visible, allowing the air to circulate. MHEA degrades the wall R-value for
ventilated walls. Required.
• Existing Insulation Type and Thickness – MHEA assumes that exterior walls
of the mobile home may have Batt/Blanket, Loose Fill, or Foam Core
insulation. Enter the thickness of existing insulation type in inches. Enter 0 for
insulation types that do not exist. MHEA uses this information to calculate the
wall R-value and the volume of wall cavity available for additional insulation.
You may view, and, if necessary, adjust the Rs/Inch MHEA assigns to these
existing insulation types from the Key Parameters/Insulation form in MHEA’s
Setup Library (see Section 14.2, Key Parameters). A default value of 3.5 inches
exists. Required.
• Carport/Porch Roof Length, Width and Orientation – A carport/ porch roof
is a shelter with no walls that extends out from one wall of the mobile home
(see Figure 10.2). Often, this shelter is used to park a car or shade an outdoor
sitting area. Enter the length and width of this carport/porch roof in feet. The
length is the dimension parallel to the mobile home. Enter 0 for the length and
width if no carport/porch roof exists.

10-4 The Weatherization Assistant User’s Manual (Version 8.9)
Chapter 10: MHEA Building Description
If the length or width of the
carport/porch roof is greater
than 0, the Orientation field
appears. Enter the orientation of
the wall to which the
carport/porch is attached.
MHEA allows description of
only one carport or porch. For
more than one carport or porch
attached to the home, describe
the one that provides the most
shading to the walls. Thus, if
you have to choose, you should
first consider omitting the description of porch attached to the north wall of the
home. The carport/porch description can also be used to describe extensive
shading of a wall due to trees or shrubs. Enter pseudo dimensions sufficient to
represent the desired degree of shading and orientation of the shaded wall.
Required.
• Uninsulatable Wall Area – Enter the gross area of the wall in square feet that
is not accessible for insulating. MHEA already accounts for wall studs and
framing around windows and doors. An example of uninsulatable wall is a wall
segment between an attached unconditioned space and the home. Note: Wall
area associated with a conditioned addition to the home that is described under
the Addition tab is automatically excluded. Optional.
• Additional Cost – Enter any additional cost associated with insulating the walls
in units of dollars. This would be a cost that is not normally associated with
insulating the walls and, therefore, is not accounted for in the measure costs
entered on the Library Measures form under the Setup Library (see Section
14.5, Library Measures). The cost is the total additional cost to insulate the
walls; it is not a cost per square foot of wall area. The amount entered will be
added to the normal cost computed from the wall area and the cost per square
foot specified on the Library Measures form in the Setup Library. A blank entry
indicates no additional cost. If a cost is entered, you should briefly explain the
reason for this additional cost in the Comment field described below. Optional.
Figure 10.2. Carport/Porch Roof Dimensions.

The Weatherization Assistant User’s Manual (Version 8.9) 10-5
Chapter 10: MHEA Building Description
• Comment – You may enter comments pertinent to the walls directly in the
Comment field on the form, or you may enter them in the Comment Editor by
selecting the “Comment” button to the left of the field. The Comment Editor is
similar to Window’s Notepad and may be used to enter extended comments.
The total comment may have up to 65,000 characters. Text from other sources
may be copied and pasted into the Comment Editor’s window. Any comment
that is entered is displayed on the Recommended Measures report and the Input
Report available from the Audit Information form (see Section 8.2, Audit
Information). In addition, any comment that is entered can be imported into any
specific work order (see Section 13.1, Work Order Information). Thus, you may
wish to enter comments related to any observation that might affect the
installation of needed measures or repair work. Optional.
• New/Del – Since there can be only one Wall record in MHEA, the “New”
button will not initiate a new blank Walls form. Instead, it takes you back to the
first field on the existing form, the Wall Stud Size field, while not changing any
existing entries. The “Del” button will erase all entries on the Walls form. You
will receive a warning of the deletion only if the form had been previously
filled in prior to your entering the form.
10.2 Shell − Windows
The Windows form (see Figure 10.3) under MHEA’s Shell tab is used to enter
information on all the windows installed in the house. A total of 24 window
descriptions (i.e., Window Codes) may be entered. Multiple windows with the
same characteristics facing any orientation may be entered as a single window
description by indicating the number of windows facing different orientations
having this description. However, similar windows considered for different retrofit
measures should be described separately. If the 24 window records are not enough
to describe all the windows, you will have to enter windows with characteristics
that are close to others under one common window description. Avoid combining
the areas of two or more windows into one so that just one window needs to be
entered. Window treatments in MHEA are priced either per window unit, by
window area, or per united inch. Combining two or more window areas into one
large area can lead to errors in estimating the cost of the window treatments
regardless of pricing scheme used. The thermal characteristics of existing and
replacement windows, with or without storms, are specified in the Key

10-6 The Weatherization Assistant User’s Manual (Version 8.9)
Chapter 10: MHEA Building Description
Parameters/Windows form under the Main Menu’s “Setup Library” button (see
Section 14.2, Key Parameters).
Below are brief descriptions of the individual data items and controls found on the
Windows form. All items on the Windows form are required except the Frame
Type, Additional Cost and Comment fields.
Figure 10.3. The Shell − Windows form under the Main Menu’s “MHEA” button.
• Window Code – The Window Code identifies window descriptions to you and
the Weatherization Assistant. If more than one window has the same
description, you may enter the description once and indicate the number of
windows with this description using the Number Facing field described below.
The window codes must be unique for all window descriptions within a given
audit. MHEA automatically provides a default entry for all new windows that
are created in the form of “WD#” where the “#” is an integer insuring
uniqueness of the window code. You may choose to enter your own window
code to include characters that indicate some characteristics of the window. The
window code may have up to 20 characters, although space restrictions in many
reports suggest a lesser number of characters should be used (perhaps 3 to 5) to
preserve readability. Entries are not case-sensitive. MHEA will use the window
codes in output reports and work orders to identify which windows should

The Weatherization Assistant User’s Manual (Version 8.9) 10-7
Chapter 10: MHEA Building Description
receive weatherization measures. The window codes may also be helpful when
labeling your drawing of the house’s floor plan. Required.
• Window Type − Select what basic type of window this is. The choices are
Jalousie, Awning, Slider, Fixed, Door Window, Sliding Glass Door, and
Skylight. These choices are shown in Figure 10.4 and described below. MHEA
does not use the window type in any of its calculations, except to exclude those
of type “Sliding Glass Door” and “Door Window” from being considered for
replacement. Otherwise, this entry is provided for your benefit, so that you can
clearly identify and recall the type of window being described. In addition, you
can better determine the correct entry for the Leakiness field described below if
you know the window type. Required.
Jalousie windows are constructed of multiple horizontal panes of glass (about
2–6 inches wide) that open at the same angle when a crank near the bottom of
the window is turned. Jalousie windows are always single pane. When closed,
large gaps between the glass panes often exist, which results in high infiltration
rates through the window.
Awning windows are constructed of 1–3 glass sashes that are hinged at the top,
bottom, or side of the sashes. When the window is opened (often by turning a
crank), the sashes angle out from the home exterior. The sashes either angle
down, up, or to the side depending on where the sashes are hinged to the
window frame. An awning window with a single sash of glass is often called a
casement window if it is hinged on the side or a hopper window if it is hinged
on the bottom.
Slider windows usually have two sashes of glass. One or both sashes can slide
past the other either horizontally or vertically when the window is opened.
Fixed windows are sealed in the window frame and cannot be opened.
Door windows are usually sealed in the window frame of a door and cannot be
opened, although sometimes they are made to be opened.
Sliding Glass Doors are large windows that extend from the floor to almost the
ceiling. You may use this selection to describe picture windows even though
they are fixed and cannot be opened.

10-8 The Weatherization Assistant User’s Manual (Version 8.9)
Chapter 10: MHEA Building Description
Figure 10.4. Basic types of windows.

The Weatherization Assistant User’s Manual (Version 8.9) 10-9
Chapter 10: MHEA Building Description
Skylights are glass or plastic windows in the ceiling.
• Frame Type – Select the window frame and sash construction materials. The
choices are Wood or Vinyl, Metal, and Improved Metal (i.e., metal frame with a
thermal break). MHEA does not use this information at this time and assumes
all window frames in the mobile home to be improved metal. This assumption
is reflected in the U-values assigned to windows in the Setup Library and can
be altered by the user if desired (see Section 14.2, Key Parameters). Optional.
• Glazing Type – Select the glazing type depending on the number of panes of
glass in the primary window and the characteristics of any storm window that
may cover the primary window. The choices are Single Pane, Single with Glass
Storm, Single with Plastic Storm, Double Pane, Double with Glass Storm, and
Double with Plastic Storm. Required.
• Interior Shading − Select the interior window coverings that are present
which, when closed, prevent sunlight from entering the home and also slightly
increase the insulating value of the window. The options are Drapes, Blinds or
Shades, Drapes with Blinds or Shades, and None. Drapes are heavy curtains
that hang in loose folds over the window. Decorative drapes that don’t block
much sun should be ignored. Blinds or shades are lightweight window
coverings that hang flat over the window and include Venetian blinds, mini-
shades, and roller shades. Select drapes with shades if the occupant has both
drapes and blinds/shades on the window. Required.
• Exterior Shading – Select the type of exterior window shading present outside
the window and which reduces the sunlight striking the window. The choices
are Awning, Carport or Porch, Low-e Film, Sunscreen, and None. An awning is
a device that is mounted above a window and extends out from the exterior of
the home. It is usually constructed of aluminum, fiberglass, or fabric. A
carport/porch roof is a shelter that has no walls and extends out from one wall
of the manufactured home. Often, the home occupant will park a car under this
shelter or use it to shade an outdoor sitting area. A low-e film is a reflective film
applied to the exterior surface of glass window panes by the window
manufacturer. A sun screen is a mesh screen that is installed or hung on the
exterior side of a window. You may need to estimate the effect of other objects
that consistently shade a window using one of the entries provided. For
example, an object that reduces the amount of sunlight striking a window by

10-10 The Weatherization Assistant User’s Manual (Version 8.9)
Chapter 10: MHEA Building Description
50% might be described as an Awning. If the window is shaded most of the
time, you could use the Carport or Porch entry. Required.
• Leakiness – Provide an estimate of how leaky the window is. The choices are
Very Tight, Tight, Medium, Loose, and Very Loose. Typical selections by
window type are listed below. Degrade the leakiness one level if 2 to 9 sq. in. of
glass is missing in the window and two levels if 9 to 25 sq. in. of glass is
missing. Specify the window to be Very Loose if more than 25 sq. in. of glass is
missing in the window. Upgrade the leakiness one level if a storm window in
average or better condition is installed. Additional guidance is provided in
Appendix E, Window Leakiness. Required.
Jalousie window – The leakiness of a jalousie window is typically Loose.
Awning window − The leakiness of an awning window that has a single sash of
glass and a latching/locking mechanism that seals the window by forcing the
sash against the frame and any installed weather stripping is typically Tight.
Such a window is often called a casement window if it is hinged on the side or a
hopper window if it is hinged on the bottom. The leakiness of an awning
window with 2 or 3 sashes of glass or without a latching/locking mechanism is
typically Medium.
Slider window and sliding glass door − The leakiness of a vertical slider
window is typically Medium if it is older and Tight if it is newer. The leakiness
of a horizontal slider window or sliding glass door is typically Medium.
Fixed window, door window, and skylight – The leakiness of a fixed window,
door window, or skylight is typically Very Tight.
• Width and Height – Enter the width and height of the window (including the
window frame) in units of inches (accuracy to the nearest inch is usually
satisfactory). MHEA will use these dimensions together with the number of
windows being described by this Window Code (see Number Facing below) to
estimate the total window area facing different orientations, and it will subtract
this total area from the appropriate wall area based on the wall orientation.
Required.

The Weatherization Assistant User’s Manual (Version 8.9) 10-11
Chapter 10: MHEA Building Description
• Number Facing North, South, East, and West – Enter the number of
windows with this window description facing closest cardinal directions.
Required.
• Retrofit Options – Select one of the approaches for retrofitting the window.
The options are Evaluate All, Weatherize, Replace, Add Glass Storm, Add
Plastic Storm, and Evaluate None. Evaluate All allows MHEA to determine if it
is cost-effective to weatherize, replace, or install a glass or plastic storm
window on the windows. If more than one of these retrofits is cost-effective,
MHEA will select the best measure. If none of the measures are cost-effective,
then no measure will be recommended. Choosing Weatherize (weatherizing the
window using caulk, weather stripping, incidental repairs, etc.), Replace
(replacing the window, often because it is damaged beyond repair), or Add
Glass Storm or Plastic Storm (adding a glass or a plastic storm window to a
window that currently does not have a storm window) indicates your decision to
perform the selected retrofit measure regardless of its cost-effectiveness and to
not perform the other two measures. These selections tell MHEA to make the
selected retrofit a mandatory measure. MHEA will recommend the measure
regardless of its cost-effectiveness and will not evaluate the other two options.
However, MHEA will estimate the energy savings and SIR for the measure. If
the SIR for the measure is less than your accepted minimum value, you will
need to reconsider your selection or consider the measure a repair. Evaluate
None prevents MHEA from evaluating the cost-effectiveness of weatherizing,
replacing, or installing a glass or a plastic storm window on the window, which
effectively turns off all retrofits for this window. Reasons for selecting any
option other than Evaluate All for this window description would be an
appropriate entry in the Comment field described below. Required.
• Include in SIR − If the Retrofit Option selected is Weatherize, Replace, Add
Glass Storm, or Add Plastic Storm, an Include in SIR checkbox will appear on
the form. This checkbox allows you to indicate that you wish to have the
selected measure included in the calculation of the whole house (package) SIR
for this audit. Measures not included in the whole house SIR are normally
related to health and safety. Current Weatherization Program policy dictates
that window replacement cannot be considered a health and safety measure.
Check the guidance for your program in deciding when you can mandate a
window treatment and if it can be excluded from the SIR calculation. An
alternate reason for excluding a measure from the whole house SIR is if it is

10-12 The Weatherization Assistant User’s Manual (Version 8.9)
Chapter 10: MHEA Building Description
funded outside of the Weatherization Assistance Program. Whether a measure
is or is not included in the whole house SIR is indicated by its location in the
list of measures produced for the Recommended Measures Report (see Chapter
12, NEAT and MHEA Results).
• Additional Cost − If the Retrofit Option selected is any option other than
Evaluate None, then Additional Cost fields will appear separately for
Weatherization, Replacement, Glass Storm and Plastic Storm windows. Enter
any additional cost associated with performing these retrofits on the window
being described that is in addition to the cost that MHEA will automatically
calculate using the cost information you entered in the Library Measures form
of the Setup Library (see Section 14.5, Library Measures). For example, these
might include the cost for removing any security bars before replacement or
storm windows can be installed. The cost to be entered is a cost per window,
not a total cost for all the windows indicated in the Number field. The reason
for this extra cost would be an appropriate entry in the Comment field described
below. Optional.
• Comment – You may enter comments pertinent to the window directly in the
Comment field on the form, or you may enter them in the Comment Editor by
selecting the “Comment” button to the left of the field. The Comment Editor is
similar to Window’s Notepad and may be used to enter extended comments.
The total comment may have up to 65,000 characters. Text from other sources
may be copied and pasted into the Comment Editor’s window. Any comment
that is entered is displayed on the Recommended Measures report and the Input
Report available from the Audit Information form (see Section 8.2, Audit
Information). In addition, any comment that is entered can be imported into any
specific work order (see Section 13.1, Work Order Information). Thus, you may
wish to enter comments related to any observation that might affect the
installation of needed measures or repair work. Optional.
• Window Record Navigation Block – The Window record navigation block is
used to find and navigate to existing window descriptions for the audit being
edited, copy or delete the currently accessed window description, or create a
new window description for the audit. See Section 5.1, Form and Record
Navigation for information on using the Weatherization Assistant’s record
navigation blocks.

The Weatherization Assistant User’s Manual (Version 8.9) 10-13
Chapter 10: MHEA Building Description
10.3 Shell − Doors
The Doors form (see Figure 10.5) under the Main Menu’s “MHEA” button is used
to enter information on all the doors installed in the house. A total of 10 door
descriptions (i.e., Door Codes) may be entered. Multiple doors with the same
characteristics facing any orientation may be entered as a single door description
by indicating the number of doors facing different orientations having this
description. However, similar doors considered for different retrofit measures
should be described separately. If the 10 door records are not enough to describe
all the doors, you will have to enter doors with characteristics that are close to
others under one common door description.
Below are brief descriptions of the individual data items and controls found on the
Doors form. All items on the Doors form are required except the Additional Cost
and Comment fields.
Figure 10.5. The Shell − Doors form under the Main Menu’s “NEAT” button.
• Door Code – The Door Code identifies door descriptions to you and the
Weatherization Assistant. If more than one door has the same description, you
may enter the description once and indicate the number of doors with this
description using the Number Facing field described below. The door codes

10-14 The Weatherization Assistant User’s Manual (Version 8.9)
Chapter 10: MHEA Building Description
must be unique for all door descriptions within a given audit. MHEA
automatically provides a default entry for all new doors that are created in the
form of “DR#” where the “#” is an integer insuring uniqueness of the door
code. You may choose to enter your own door code to include characters that
indicate the orientation or some other characteristics of the door. The door code
may have up to 20 characters, although space restrictions in many reports
suggest a lesser number of characters should be used (perhaps 3 to 5) to
preserve readability. Entries are not case-sensitive. MHEA will use the door
codes in output reports. The door codes may also be helpful when labeling your
drawing of the house’s floor plan. Required.
• Door Type – Select what type of door this is. The choices are Hollow Core
Wood, Solid Core Wood, Standard Manufactured Home Door, and Insulated
Steel. The U-value assumed for each of these types is specified in the Key
Parameters/Doors form under the Main Menu’s “Setup Library” button (see
Section 14.2, Key Parameters). Required.
• Storm Door Present – Select this checkbox to indicate if any storm door is
installed on this door. If this field is unchecked, MHEA will evaluate installing
a storm door as one of the retrofit measure, if this measure is selected on the
Library Measures form of the Main Menu’s “Setup Library” button (see Section
14.5, Library Measures).
• Width and Height – Enter the width and height of the door opening in units of
inches. Required.
• Number Facing North, South, East, and West – Enter the number of exterior
doors with this door description facing the closest cardinal directions. Required.
• Replacement Door Required – Select this checkbox to indicate that door
replacement is required (often because it is in poor condition and beyond
repair). MHEA will make this a mandatory measure and recommend it
regardless of its cost-effectiveness. If the SIR of the measure is less than your
accepted minimum value, you will have to reconsider requiring the door be
replaced or consider its replacement a repair. If unchecked, MHEA will
recommend this measure only if it is cost-effective. The U-value assumed for
any replaced door is specified in the Key Parameters/Doors form under the
Main Menu’s “Setup Library” button (see Section 14.2, Key Parameters).

The Weatherization Assistant User’s Manual (Version 8.9) 10-15
Chapter 10: MHEA Building Description
• Include in SIR − If the Replacement Door Required checkbox is selected, an
Include in SIR checkbox will appear on the form. This checkbox allows you to
indicate whether you wish to have the door replacement included in the
calculation of the whole house (package) SIR for this audit. Measures not
included in the whole house SIR are normally related to health and safety.
Check the guidance for your program in deciding when you can mandate a door
replacement and if it can be excluded from the SIR calculation. An alternate
reason for excluding a measure from the whole house SIR is if the measure is
being funded outside of the Weatherization Assistance Program. Whether a
measure is or is not included in the whole house SIR is indicated by its location
in the list of measures produced for the Recommended Measures Report (see
Chapter 12, NEAT and MHEA Results).
• Additional Cost − Enter any additional cost associated with door replacement
that is in addition to the cost that MHEA will automatically calculate using the
cost information you entered in the Library Measures form of the Setup Library
(see Section 14.5, Library Measures). The cost to be entered is a cost per door,
not a total cost for all the doors indicated in the Number field. The reason for
this extra cost would be an appropriate entry in the Comment field described
below. Optional.
• Comment – You may enter comments pertinent to the door directly in the
Comment field on the form, or you may enter them in the Comment Editor by
selecting the “Comment” button to the left of the field. The Comment Editor is
similar to Window’s Notepad and may be used to enter extended comments.
The total comment may have up to 65,000 characters. Text from other sources
may be copied and pasted into the Comment Editor’s window. Any comment
that is entered is displayed on the Recommended Measures report and the Input
Report available from the Audit Information form (see Section 8.2, Audit
Information). In addition, any comment that is entered can be imported into any
specific work order (see Section 13.1, Work Order Information). Thus, you may
wish to enter comments related to any observation that might affect the
installation of needed measures or repair work. Optional.
• Door Record Navigation Block – The Door record navigation block is used to
find and navigate to existing door descriptions for the audit being edited, copy
or delete the currently accessed door description, or create a new door

10-16 The Weatherization Assistant User’s Manual (Version 8.9)
Chapter 10: MHEA Building Description
description for the audit. See Section 5.1, Form and Record Navigation, for
information on using the Weatherization Assistant’s record navigation blocks.
10.4 Shell − Ceiling
The Ceiling form (see Figure 10.6) under the Main Menu’s “MHEA” button is
used to enter information on roof/ceiling in the house. Unlike NEAT, only one
roof/ceiling segment can be described in MHEA.
Below are brief descriptions of the individual data items and controls found on the
Ceiling form. All items on the Ceiling form are required except the Existing
Insulation, Additional Cost and Comment fields.
Figure 10.6. The Shell − Ceiling form under the Main Menu’s “NEAT” button.
• Roof Type – Select what type of roof this is. The choices are Flat, Bowstring,
and Pitched. These are the typical roof configurations found in mobile homes
(see Figure 10.7). The characteristics of these roof types and how MHEA treats
them are described below.

The Weatherization Assistant User’s Manual (Version 8.9) 10-17
Chapter 10: MHEA Building Description
• Flat roofs have an interior surface (ceiling) and an exterior surface (roof)
attached directly to either side of the wood framing, similar to wall
construction.
Figure 10.7. Typical Manufactured Home Roof Configuration.
• Bowstring roofs have a lightweight exterior roofing material (usually
aluminum) that is stretched over the roof frame structure. The roof has a slight
curve with the highest point in the middle of the home width. MHEA uses the
home width and the height of the roof you specify to calculate the volume of a
bowstring roof section.
• Pitched roofs are sloped to a higher peak point. When viewing the home width
from the outdoors, the roof line creates a triangle. Pitched roofs are also often
shingled, unlike flat and bowstring roofs. MHEA uses the width of the home
and the height of added insulation you provide to calculate the volume of added
insulation for the roof insulation measures.
NOTE: In some cases, there will be a second roof constructed over the original
manufactured home roof. Enter construction information describing the original
manufactured home roof since it is under this roof that insulation may be added.
Enter the roof color of the second exterior roof. Required.
• Roof Color – Enter the color of the roof. The two choices are “White,
Reflective or Shaded” and “Normal or Weathered”. A White or Reflective roof
appears white or shiny metallic, is clean, and has little or no discoloration due
to weathering. Roofs completely shaded by trees in the summer should be
categorized as white or reflective regardless of their finish. The majority of
roofs will be classified as Normal or Weathered. Roof surfaces designated as
White or Reflective will not be considered when evaluating the White Coat
Roof measure. Required.

10-18 The Weatherization Assistant User’s Manual (Version 8.9)
Chapter 10: MHEA Building Description
• Joist Size – If the roof type selected is Flat, a Joist Size field will appear on the
form. The choices are 2×4, 2×6, and 2×8. MHEA uses this information to
calculate the volume of roof cavity available for adding insulation.
Conditionally required.
• Height of Roof at Center – If the roof type selected is Bowstring, a Height of
Roof at Center field will appear on the form. Enter the maximum height in
inches of the roof above the ceiling, disregarding any existing insulation.
MHEA uses this information to determine the available space for additional
insulation. This field is not provided if a flat or pitched roof is selected.
Conditionally required.
• Insulation to Add at Center – If the roof type selected is Pitched, an Insulation
to Add at Center field will appear on the form. Enter the thickness of added
insulation in inches you want MHEA to evaluate. The pitch of the roof may be
such that filling the roof cavity would not be cost-effective in your climate,
whereas a lesser level would. Local standard practice or experience with the
predictions of MHEA will help establish the most appropriate levels to use.
MHEA will not consider adding more than 12 inches of insulation. Enter 0 if
you do not want MHEA to evaluate any roof insulation measures. Conditionally
required.
• Existing Insulation Type and Thickness – MHEA assumes that the roof of the
mobile home may have Batt/Blanket, Loose Fill, or Foam Core insulation.
Enter the thickness of existing insulation by type in inches measured at the
center of the roof/ceiling section. Enter 0 or leave the field blank for insulation
types that do not exist. MHEA uses this information to calculate the roof/ceiling
R-value and also to calculate the volume in the roof/ceiling cavity for flat and
bowstring roofs that is available for additional insulation. You can ignore
compression or different depths of insulation across the roof/ceiling. You may
view, and, if necessary, adjust the Rs/Inch MHEA assigns to these existing
insulation types from the Key Parameters/Insulation form in MHEA’s Setup
Library (see Section 14.2, Key Parameters). Optional.
• Cathedral Ceiling – A Cathedral ceiling is a sloped or vaulted ceiling where
the ceiling and roof planes are parallel. Enter the percent of floor area that is
under a cathedral ceiling. Enter 0 if no segment of the mobile home floor has a
cathedral ceiling. Required.

The Weatherization Assistant User’s Manual (Version 8.9) 10-19
Chapter 10: MHEA Building Description
• Step Wall
Orientation – If the
roof type selected is
flat or pitched and
the percent of
cathedral ceiling is
greater than 0, the
Step Wall
Orientation field will
appear. Some
manufactured home
ceilings slope up to the top of a short wall. This short wall then steps vertically
down to the average home height (see Figure 10.8). Select the closest cardinal
direction that the step wall faces. The choices are North, South, East, West, and
No Step Wall. Enter No Step Wall if a step wall does not exist. Optional.
• Additional Cost – Enter any additional cost associated with insulating this
roof/ceiling cavity in dollars. This would be a cost that is not normally
associated with insulating the roof and, therefore, is not accounted for in the
measure costs entered on the Library Measures form under the Setup Library
(see Section 14.5, Library Measures). For instance, enter the additional costs
associated with cutting an opening into the roof to access the cavity. The cost is
the total additional cost to insulate the entire cavity; it is not a cost per square
foot of attic area. The amount entered will be added to the normal cost
computed from the attic characteristics and costs specified on the Library
Measures form in the Setup Library. A blank entry indicates no additional cost.
If a cost is entered, you should briefly explain the reason for this additional cost
in the Comment field described below. Optional.
• Comment – You may enter comments pertinent to the roof/ceiling section
directly in the Comment field on the form, or you may enter them in the
Comment Editor by selecting the “Comment” button to the left of the field. The
Comment Editor is similar to Window’s Notepad and may be used to enter
extended comments. The total comment may have up to 65,000 characters. Text
from other sources may be copied and pasted into the Comment Editor’s
window. Any comment that is entered is displayed on the Recommended
Measures report and the Input Report available from the Audit Information
form (see Section 8.2, Audit Information). In addition, any comment that is
Figure 10.8. Mobile Home Cathedral Ceiling with Step Wall.

10-20 The Weatherization Assistant User’s Manual (Version 8.9)
Chapter 10: MHEA Building Description
entered can be imported into any specific work order (see Section 13.1, Work
Order Information). Thus, you may wish to enter comments related to any
observation that might affect the installation of needed measures or repair work.
Optional.
• New/Del – Since there can be only one Ceiling record in MHEA, the “New”
button will not initiate a new blank Ceiling form. Instead, it takes you back to
the first field on the existing form, the Roof Type field, while not changing any
existing entries. The “Del” button will erase all entries on the Ceiling form. You
will receive a warning of the deletion only if the form had been previously
filled in prior to your entering the form.
10.5 Shell − Floor
The Floor form (see Figure 10.9) under the Shell tab of the Main Menu’s “MHEA”
button is used to describe the floor of a mobile home.
Figure 10.9. The Shell − Floor form under the Main Menu’s “NEAT” button.

The Weatherization Assistant User’s Manual (Version 8.9) 10-21
Chapter 10: MHEA Building Description
The Floor form is divided into four sections: a general description, floor wing
description, floor belly description, and the Comment and Additional Cost fields.
The floor of a mobile home is constructed of floor joists spanning across the length
or width of the mobile home. The floor is supported on a pair of I-beams spanning
across the length of the mobile home. The floor wing is the part of the floor outside
the supports, and the floor belly is the part between the supports. The floor wing
and belly sections are protected from outside elements including water, wind, and
rodents using a wrap attached to the underside of floor joists, and may contain
insulation.
Figure 10.10 illustrates a section of the floor of a typical mobile home. The mobile
home may also have skirting installed around the perimeter of the floor.
Figure 10.10. Section of a Typical Mobile Home Floor.
Below are descriptions of the individual data items and controls found on the Floor
form. All items are required except the Comment and Additional Cost fields.
• Floor Joist Direction – The floor joist is the wood framing that supports the
interior floor. Select the direction the floor joists are installed. The choices are
Lengthwise and Widthwise. Lengthwise floor joists are installed parallel to the
long dimension (length) of the home. Widthwise floor joists are installed
parallel to the short dimension (width) of the home (see Figure 10.11). The
floor joist direction is needed to calculate the volume of the belly section and
the R-value of the floor. It also indicates if the central air supply duct is located

10-22 The Weatherization Assistant User’s Manual (Version 8.9)
Chapter 10: MHEA Building Description
between the joists (for lengthwise floor joists) or below the joists (for widthwise
floor joists). Required.
• Skirt Present – Select this checkbox to
indicate that a skirt exists around the exterior of
the home. The skirt must be solid and intact,
not simply a decorative lattice. Research has
shown that skirting only protects the mobile
home belly from exposure to the wind. If
skirting exists, MHEA adjusts the R-value of
the floor to account for the absence of wind.
• Floor Joist Size [Wing and Belly] –Select the
dimensions of the floor joists. The choices are
2×4, 2×6, and 2×8. Sometimes, the floor joist
size is different in the wing section than in the
belly section. MHEA needs this information to
calculate the floor R-value and the volume of
the floor/belly section. Required.
• Loose Insulation Thickness [Wing and Belly]
– Enter the amount of existing loose-fill
insulation in inches for both wing and belly
sections. Occasionally, the insulation existing
in the wing section is different than that in the belly section. Enter 0 if
insulation does not exist. MHEA uses this information to calculate the R-value
and the volume of the wing and belly sections available for additional
insulation. Required.
Figure 10.11. Lengthwise and
Widthwise Floor Joists.

The Weatherization Assistant User’s Manual (Version 8.9) 10-23
Chapter 10: MHEA Building Description
• Batt/Blanket Insulation Location
[Wing and Belly] – Indicate where the
batt/blanket insulation is located in the
wing and belly sections. The choices are
Attached to Flooring, Between Joists,
Attached Under Joists, Draped Below
Joists (only belly section), and None.
Figure 10.12 shows the four
configurations. Attached to Flooring
refers to the case when the batt/blanket
insulation is attached to the underside of
the flooring. Between Joists refers to the
case when the insulation lies between
but at the bottom of the joists, leaving
the potential for an air space between the
top of the insulation and the flooring.
Attached to Joist refers to the case when
the insulation is attached to the
underside of the floor joists. Insulation
in the belly section that is draped below
the underside of the floor joists (attached
only around the perimeter of the belly section) is described as Draped Below
Floor Joist. Enter None if batt/blanket insulation does not exist in the wing and
belly sections.
• Batt/Blanket Thickness [Wing and Belly] – Enter the amount of existing
batt/blanket insulation in inches for both wing and belly sections. Occasionally,
the insulation existing in the wing section is different than that in the belly
section. Enter 0 if insulation does not exist. MHEA uses this information to
calculate the R-value and the volume of the wing and belly sections available
for additional insulation. Required.
Figure 10.12. Batt/Blanket Insulation
Location.

10-24 The Weatherization Assistant User’s Manual (Version 8.9)
Chapter 10: MHEA Building Description
• Belly Cavity Configuration [Belly] –
The belly cavity is the deep section that
runs across the length of the home and
usually houses the main supply air duct.
Select the configuration of the belly
cavity. The choices are Square,
Rounded, and Flat. Figure 10.13 shows
the three configurations. A square cavity
configuration has vertical sides and a
horizontal base. Usually, the main iron
support beams act as the vertical sides.
For a rounded belly cavity configuration,
the belly wrap is draped in the middle
portion of the home. Usually, the wrap is
draped between the main iron support
beams of the home. A flat belly cavity
configuration is one in which there is no
center belly section lower than the belly wing section. This type of belly is often
found on homes where the main air supply duct is located between lengthwise
floor joists or where the main supply air duct is located in the roof section.
Required
• Condition of Belly –Enter the condition of the existing belly wrap. The choices
are Good, Average, and Poor. A belly wrap in good condition does not have any
tears, holes, or other openings and is tightly attached around its entire perimeter.
An average belly wrap condition has some small tears, holes, or other openings
in the belly wrap or may not be well attached at its perimeter. A belly wrap with
large tears, holes, or other openings or which is not well attached at its
perimeter is in poor condition. MHEA uses this information to adjust the R-
value of the floor and the effectiveness of sealing any ducts lying within the
belly. If the belly is in other than Good condition and you want MHEA to
evaluate floor insulation, you should include the cost associated with repairing
the belly as an Additional Cost on this form or as a repair item on the Itemized
Costs form (see Sections 11.8, Itemized Costs, and 14.6, User Defined
Measures). Required.
• Maximum Depth of Belly Cavity [Belly] – Enter the maximum depth of the
belly in inches as measured from the underside of the flooring to the lowest part
Figure 10.13. Typical Mobile Home
Belly Configurations.

The Weatherization Assistant User’s Manual (Version 8.9) 10-25
Chapter 10: MHEA Building Description
of the belly, disregarding any existing insulation. MHEA uses this information
to calculate the volume of the belly section available for additional insulation.
Required.
• Additional Cost – Enter any additional cost associated with insulating the floor
in units of dollars. This would be a cost that is not normally associated with
insulating the floor and, therefore, is not accounted for in the measure costs
entered on the Library Measures form under the Setup Library (see Section
14.5, Library Measures). For instance, enter the additional labor and material
costs associated with repairing the belly wrap. The cost is the total additional
cost to insulate the floor; it is not a cost per square foot of floor area. The
amount entered will be added to the normal cost computed from the floor
characteristics and costs specified on the Library Measures form in the Setup
Library. A blank entry indicates no additional cost. If a cost is entered, you
should briefly explain the reason for this additional cost in the Comment field
described below. Optional.
• Comment – You may enter comments pertinent to floor directly in the
Comment field on the form, or you may enter them in the Comment Editor by
selecting the “Comment” button to the left of the field. The Comment Editor is
similar to Window’s Notepad and may be used to enter extended comments.
The total comment may have up to 65,000 characters. Text from other sources
may be copied and pasted into the Comment Editor’s window. Any comment
that is entered is displayed on the Recommended Measures report and the Input
Report available from the Audit Information form (see Section 8.2, Audit
Information). In addition, any comment that is entered can be imported into any
specific work order (see Section 13.1, Work Order Information). Thus, you may
wish to enter comments related to any observation that might affect the
installation of needed measures or repair work. Optional.
• New/Del – Since there can be only one Floor record in MHEA, the “New”
button will not initiate a new blank Floor form. Instead, it takes you back to the
first field on the existing form, the Floor Joist Direction field, while not
changing any existing entries. The “Del” button will erase all entries on the
Floor form. You will receive a warning of the deletion only if the form had
been previously filled in prior to your entering the form.

10-26 The Weatherization Assistant User’s Manual (Version 8.9)
Chapter 10: MHEA Building Description
10.6 Addition
An addition to a mobile home is
defined as any add-on structure that is
attached to the mobile home through a
shared wall and is conditioned by the
mobile home heating and cooling
systems (see Figure 10.14). If the
addition is separated from the mobile
home (e.g., by closing the door to an
entrance vestibule), it should not be
included in the energy audit. MHEA
assumes that the addition is
rectangular in shape and has wood-
frame construction.
The characteristics of the envelope of an addition are described on the Walls,
Windows, Doors, Ceiling, and Floor forms under the Addition tab of the Main
Menu’s “MHEA” button. You may access these forms in any order. However, it is
recommended that you complete the forms in a logical order so that you do not
overlook any components of the addition. If there is no addition, you do not need
to access the addition forms. However, if entry is begun on any one of the Walls,
Ceiling, or Floor forms, all three of these forms must be completed.
The Windows and Doors forms and many items on other forms are analogous to
the forms and items on the forms under the Shell tab for the mobile home proper.
Addition − Walls
The Walls form (see Figure 10.15) under the Addition tab of the Main Menu’s
“MHEA” button is used to describe the exterior walls of the addition. MHEA
assumes that the three exposed walls of the addition have identical construction
characteristics, and therefore, uses only one form to describe them.
Figure 10.14. Addition of a Mobile Home.

The Weatherization Assistant User’s Manual (Version 8.9) 10-27
Chapter 10: MHEA Building Description
Figure 10.15. The Addition − Walls form under the Main Menu’s “MHEA” button.
Below are brief descriptions of the individual data items and controls found on the
Walls form. All items on the Walls form are required except the Additional Cost
and Comment fields.
• Wall Stud Size – Select the stud size used in framing the walls. The choices are
2×2, 2×3, 2×4, and 2×6. MHEA uses this information to calculate the wall R-
value and the volume of wall cavity available for added insulation. Required.
• Addition Orientation – Select the closest cardinal compass direction that the
addition of the mobile home faces. It is the orientation of the wall of the mobile
home to which the addition is attached. The choices are North, South, East, and
West. MHEA uses this information to calculate solar loads on the addition.
Required.
• Wall Ventilation – Indicate whether the walls are vented or not vented. The
walls of the mobile home addition may be intentionally ventilated to remove
accumulated moisture by having corrugated metal siding open at the bottom to
provide space for air to flow between the exterior and interior wall materials.
Small holes in the siding at the bottom and top of the exterior wall surface may

10-28 The Weatherization Assistant User’s Manual (Version 8.9)
Chapter 10: MHEA Building Description
be visible, allowing the air to circulate. MHEA degrades the wall R-value for
ventilated walls. Required.
• Existing Insulation Type and Thickness – MHEA assumes that exterior walls
of the mobile home addition may have Batt/Blanket, Loose Fill, or Foam Core
insulation. Enter the thickness of existing insulation type in inches. Enter 0 for
insulation types that do not exist. MHEA uses this information to calculate the
wall R-value and the volume of wall cavity available for additional insulation.
You may view, and, if necessary, adjust the Rs/Inch MHEA assigns to these
existing insulation types from the Key Parameters/Insulation form in MHEA’s
Setup Library (see Section 14.2, Key Parameters). A default value of 3.5 inches
exists. Required.
• Wall Configuration – Select the wall configuration of the mobile home
addition. The choices are Maximum Wall Height at Interior Wall, Maximum
Wall Height at Center of Addition, and All Addition Walls the Same Height.
Select Maximum Wall Height at Interior Wall if the roof of the addition slopes
down from the shared wall of the mobile home and the addition to the opposite
exterior wall of the addition. Select Maximum Wall Height at Center of
Addition if the roof peaks along the center of the addition and slopes down
towards the two exterior walls that are perpendicular to the mobile home.
Finally, select All Addition Walls the Same Height if the addition has a flat
roof. Required.
• Interior Wall Max. and Min. Height – Enter the height in feet of the addition
walls as seen from the addition’s conditioned space. If the walls are of varying
height, enter the maximum and minimum wall heights. If the walls are all the
same height, enter the same value in both the maximum and minimum height
fields. Required.
• Additional Cost – Enter any additional cost associated with insulating the walls
of the addition, in units of dollars. This would be a cost that is not normally
associated with insulating the walls of an addition to a mobile home and,
therefore, is not accounted for in the measure costs entered on the Library
Measures form under the Setup Library (see Section 14.5, Library Measures).
The cost is the total additional cost to insulate the walls; it is not a cost per
square foot of wall area. The amount entered will be added to the normal cost
computed from the wall area and the cost per square foot specified on the

The Weatherization Assistant User’s Manual (Version 8.9) 10-29
Chapter 10: MHEA Building Description
Library Measures form in the Setup Library. A blank entry indicates no
additional cost. If a cost is entered, you should briefly explain the reason for
this additional cost in the Comment field described below. Optional.
• Comment – You may enter comments pertinent to walls directly in the
Comment field on the form, or you may enter them in the Comment Editor by
selecting the “Comment” button to the left of the field. The Comment Editor is
similar to Window’s Notepad and may be used to enter extended comments.
The total comment may have up to 65,000 characters. Text from other sources
may be copied and pasted into the Comment Editor’s window. Any comment
that is entered is displayed on the Recommended Measures report and the Input
Report available from the Audit Information form (see Section 8.2, Audit
Information). In addition, any comment that is entered can be imported into any
specific work order (see Section 13.1, Work Order Information). Thus, you may
wish to enter comments related to any observation that might affect the
installation of needed measures or repair work. Optional.
• New/Del – Since there can be only one Wall record in MHEA, the “New”
button will not initiate a new blank Walls form. Instead, it takes you back to the
first field on the existing form, the Wall Stud Size field, while not changing any
existing entries. The “Del” button will erase all entries on the Walls form. You
will receive a warning of the deletion only if the form had been previously
filled in prior to your entering the form.
Addition – Windows
The Windows form (see Figure 10.16) under the Addition tab of the Main Menu’s
“MHEA” button is used to enter information on all the windows installed in the
mobile home addition. This form is analogous to the Windows form under the
Shell tab of the Main Menu’s “MHEA” button. See Section 10.2, Shell − Windows
for descriptions of the individual data items and controls found on the Windows
form.

10-30 The Weatherization Assistant User’s Manual (Version 8.9)
Chapter 10: MHEA Building Description
Figure 10.16. The Addition − Windows form under the Main Menu’s “MHEA” button.
Addition – Doors
The Doors form (see Figure 10.17) under the Addition tab of the Main Menu’s
“MHEA” button is used to enter information on all the doors installed in the
mobile home addition. This form is analogous to the Doors form under the Shell
tab of the Main Menu’s “MHEA” button. See Section 10.3, Shell − Doors, for
descriptions of the individual data items and controls found on the Doors form.
The Replacement Door Required and the Include in SIR checkboxes, which appear
on the Doors form under the Shell tab, do not appear on the Doors form under the
Addition tab.
NOTE: Do not describe the doors installed on the shared wall between the mobile
home and the addition.

The Weatherization Assistant User’s Manual (Version 8.9) 10-31
Chapter 10: MHEA Building Description
Figure 10.17. The Addition − Doors form under the Main Menu’s “MHEA” button.
Addition − Ceiling
The Ceiling form (see Figure 10.18) under the Addition tab of the Main Menu’s
“MHEA” button is used to enter information on the ceiling of the mobile home
addition.
• Joist Size – Enter the joist size of the roof of the mobile home addition. The
choices are 2×4, 2×6, and 2×8. MHEA uses this information to calculate the
volume of roof cavity available for adding roof insulation. Required.
• Roof Color – Enter the color of the roof of the mobile home addition. The two
choices are “White, Reflective or Shaded” and “Normal or Weathered”. A
White or Reflective roof appears white or shiny metallic, is clean, and has little
or no discoloration due to weathering. Roofs completely shaded by trees in the
summer should be categorized as white or reflective regardless of their finish.
The majority of roofs will be classified as Normal or Weathered. Roof surfaces
designated as White or Reflective will not be considered when evaluating the
White Coat Roof measure. Required.

10-32 The Weatherization Assistant User’s Manual (Version 8.9)
Chapter 10: MHEA Building Description
• Existing Insulation Type and Thickness – MHEA assumes that the roof of the
mobile home addition may have Batt/Blanket, Loose Fill, or Foam Core
insulation. Enter the thickness of existing insulation by type in inches measured
at the center of the roof/ceiling section. Enter 0 or leave the field blank for other
insulation types that do not exist. MHEA uses this information to calculate the
roof/ceiling R-value and also to calculate the volume in the roof/ceiling cavity
that is available for additional insulation. You can ignore compression or
different depths of insulation across the roof/ceiling. You may view, and, if
necessary, adjust the Rs/Inch MHEA assigns to these existing insulation types
from the Key Parameters/Insulation form in MHEA’s Setup Library (see
Section 14.2, Key Parameters). Optional.
Figure 10.18. The Addition − Ceiling form under the Main Menu’s “MHEA” button.
• Additional Cost – Enter any additional cost associated with insulating this
roof/ceiling cavity in dollars. This would be a cost that is not normally
associated with insulating the roof/ceiling of an addition to a mobile home and,
therefore, is not accounted for in the measure costs entered on the Library
Measures form under the Setup Library (see Section 14.5, Library Measures).
For instance, enter the additional costs associated with cutting an opening into
the roof to access the cavity. The cost is the total additional cost to insulate the

The Weatherization Assistant User’s Manual (Version 8.9) 10-33
Chapter 10: MHEA Building Description
entire cavity; it is not a cost per square foot of attic area. The amount entered
will be added to the normal cost computed from the attic characteristics and
costs specified on the Library Measures form in the Setup Library. A blank
entry indicates no additional cost. If a cost is entered, you should briefly explain
the reason for this additional cost in the Comment field described below.
Optional.
• Comment – You may enter comments pertinent to the roof/ceiling section
directly in the Comment field on the form, or you may enter them in the
Comment Editor by selecting the “Comment” button to the left of the field. The
Comment Editor is similar to Window’s Notepad and may be used to enter
extended comments. The total comment may have up to 65,000 characters. Text
from other sources may be copied and pasted into the Comment Editor’s
window. Any comment that is entered is displayed on the Recommended
Measures report and the Input Report available from the Audit Information
form (see Section 8.2, Audit Information). In addition, any comment that is
entered can be imported into any specific work order (see Section 13.1, Work
Order Information). Thus, you may wish to enter comments related to any
observation that might affect the installation of needed measures or repair work.
Optional.
• New/Del – Since there can be only one Ceiling record in MHEA, the “New”
button will not initiate a new blank Ceiling form. Instead, it takes you back to
the first field on the existing form, the Joist Size field, while not changing any
existing entries. The “Del” button will erase all entries on the Ceiling form. You
will receive a warning of the deletion only if the form had been previously
filled in prior to your entering the form.
Addition − Floor
The Floor form (see Figure 10.19) under the Addition tab of Main Menu’s
“MHEA” button is used to describe the floor of the mobile home addition,
including crawl space, slab-on-grade foundations, and floors exposed to the outside
air. The floor can be retrofitted by adding insulation depending on the floor type
and space available for adding insulation. Below are descriptions of the individual
data items and controls found on the Floor form. All items are required except the
Comment field.

10-34 The Weatherization Assistant User’s Manual (Version 8.9)
Chapter 10: MHEA Building Description
• Floor Type – Select the type of floor for the mobile home addition. The choices
are Crawl Space, Slab-on-Grade, and Exposed Floor. The choice affects the
heat conduction seen through the floor. All of the data fields shown in Figure
10.19 are not needed if the Floor Type is Slab-on-Grade. Required.
• Floor Joist Size –The Floor Joist Size field appears when the floor type is other
than Slab-on-Grade. Select the dimensions of floor joists in inches. The choices
are 2×4, 2×6, and 2×8. MHEA uses this information to calculate the floor R-
value and the volume of the addition floor section. Required.
Figure 10.19. The Addition – Floor form under the Main Menu’s “MHEA” button.
• Floor Length and Width – Enter the dimensions of the addition floor in feet.
The floor length is the dimension parallel to the wall shared with the mobile
home and the floor width is the dimension perpendicular to the wall (see Figure
10.20). MHEA recognizes an addition to the mobile home only when floor
dimensions are entered. Required.

The Weatherization Assistant User’s Manual (Version 8.9) 10-35
Chapter 10: MHEA Building Description
• Batt/Blanket Location – The
Batt/Blanket Location field appears
when the floor type is other than
Slab-on-Grade. Indicate where the
batt/blanket insulation is located in
the addition floor. The choices are
Attached to Flooring, Between
Joists, Attached Under Joists, and
None. Figure 10.21shows the three
configurations. Attached to Flooring
refers to the case when the
batt/blanket insulation is attached to
the underside of the flooring.
Between Joists refers to the case
when the insulation lies between but
at the bottom of the joists, leaving
the potential for an air space
between the top of the insulation
and the flooring. Attached to Joist
refers to the case when the
insulation is attached to the
underside of the floor joists. Enter
None if batt/blanket insulation does
not exist in the addition floor.
Required.
• Existing Insulation Type and
Thickness – The Existing
Insulation fields appear when the
floor type is other than Slab-on-
Grade. MHEA assumes that the mobile home addition floor, if not a slab-on-
grade, may have Batt/Blanket or Loose Fill insulation. Enter the thickness of
existing insulation by type in inches. Enter 0 for any insulation type that does
not exist. MHEA uses this information to calculate the addition floor R-value
and the volume of addition floor cavity available for additional insulation. You
may view, and, if necessary, adjust the Rs/Inch MHEA assigns to these existing
insulation types from the Key Parameters/Insulation form in MHEA’s Setup
Library (see Section 14.2, Key Parameters). Required.
Figure 10.20. Dimensions of Mobile Home
Addition.
Figure 10.21. Batt/Blanket Insulation
Location.

10-36 The Weatherization Assistant User’s Manual (Version 8.9)
Chapter 10: MHEA Building Description
• Depth Available for Added Insulation – The Depth Available for Added
Insulation fields appear when the floor type is other than Slab-on-Grade. Enter
the depth of space available for additional insulation in the addition floor
section in inches. MHEA uses this information to evaluate insulation measures
for the addition floor. Required.
• Comment – You may enter comments pertinent to the addition floor directly in
the Comment field on the form, or you may enter them in the Comment Editor
by selecting the “Comment” button to the left of the field. The Comment Editor
is similar to Window’s Notepad and may be used to enter extended comments.
The total comment may have up to 65,000 characters. Text from other sources
may be copied and pasted into the Comment Editor’s window. Any comment
that is entered is displayed on the Recommended Measures report and the Input
Report available from the Audit Information form (see Section 8.2, Audit
Information). In addition, any comment that is entered can be imported into any
specific work order (see Section 13.1, Work Order Information). Thus, you may
wish to enter comments related to any observation that might affect the
installation of needed measures or repair work. Optional.
• New/Del – Since there can be only one addition Floor record in MHEA, the
“New” button will not initiate a new blank Floor form. Instead, it takes you
back to the first field on the existing form, the Floor Type field, while not
changing any existing entries. The “Del” button will erase all entries on the
Floor form. You will receive a warning of the deletion only if the form had
been previously filled in prior to your entering the form.

The Weatherization Assistant User’s Manual (Version 8.9) 10-37
Chapter 10: MHEA Building Description
10.7 Heating – Primary, Secondary, and Replacement
The Primary and Secondary forms (see Figure 10.22 and 10.23) under the Heating
tab of the Main Menu’s “MHEA” button are used to describe the heating systems
installed in the mobile home. MHEA allows the definition of a primary and a
secondary heating system in a home. The primary system is the system that
supplies the majority of the heat to the home and on which MHEA will consider
installing energy efficiency measures. You must describe an existing primary
heating system before MHEA will execute. The Replacement form (see Figure
10.24) is used to describe the equipment you want MHEA to evaluate for the
primary heating system replacement as a possible retrofit measure. MHEA will
properly evaluate the effects of fuel switching as part of the Replace Heating
System measure. You should enter information and describe the primary system
first before describing the secondary system and/or the replacement system. If the
primary system supplies all of the heat for the home, leave the Secondary form
blank. If no replacement is to be considered, leave the Replacement form blank.
Figure 10.22. The Primary Heating System form under the Main Menu’s “MHEA” button.
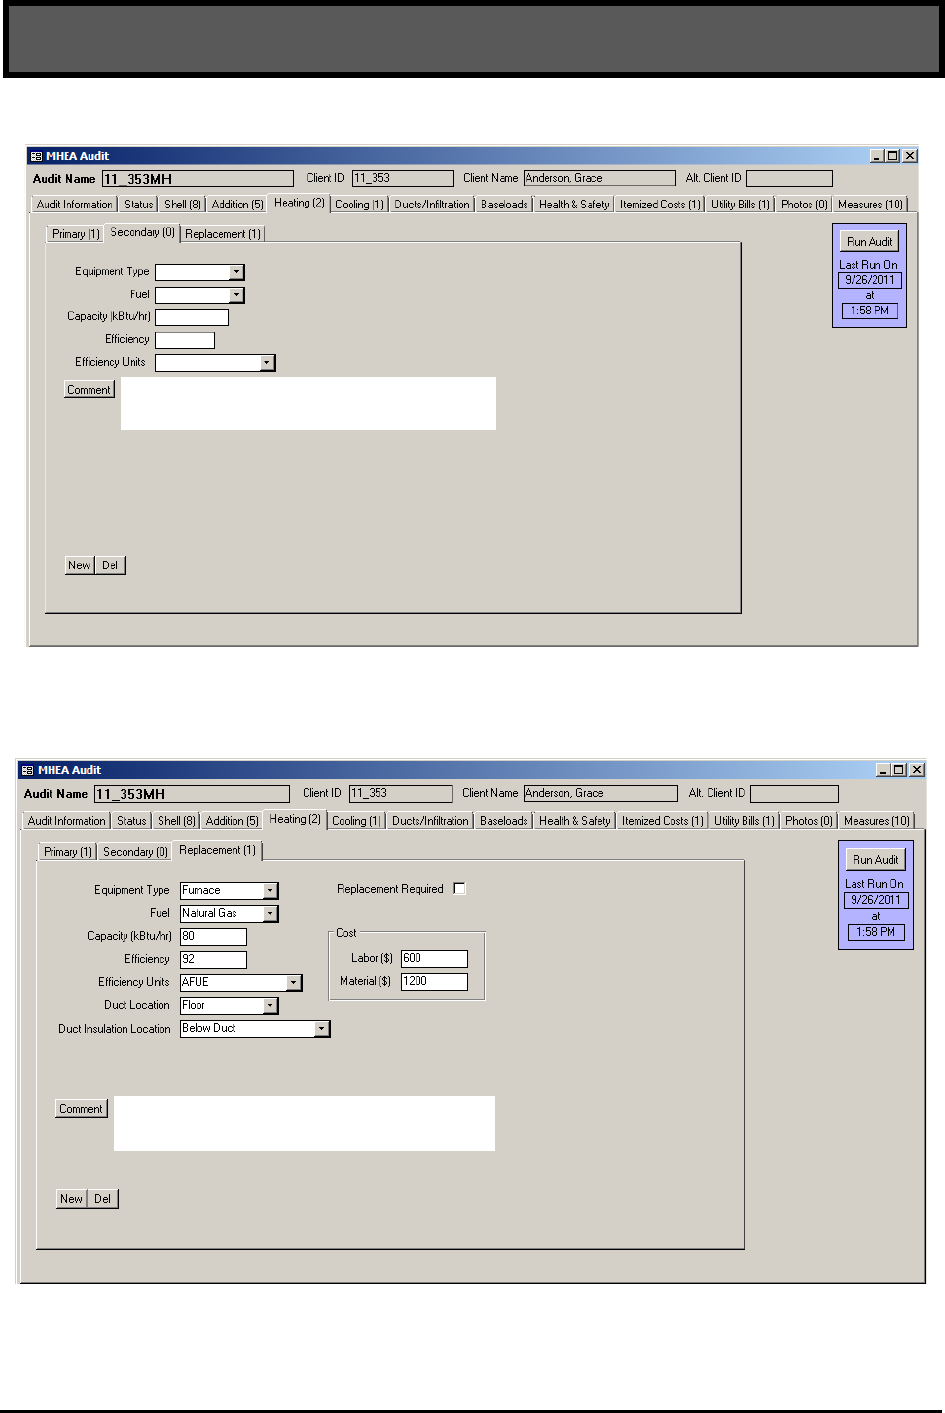
10-38 The Weatherization Assistant User’s Manual (Version 8.9)
Chapter 10: MHEA Building Description
Figure 10.23. The Secondary Heating System form under the Main Menu’s “MHEA”
button.
Figure 10.24. The Replacement Heating System form under the Main Menu’s “MHEA”
button.

The Weatherization Assistant User’s Manual (Version 8.9) 10-39
Chapter 10: MHEA Building Description
You may encounter homes where even the primary heating system is inoperative.
Do not attempt to describe these systems to MHEA by entering a value of 0 for
either the Efficiency or Heat Supplied (see the corresponding field descriptions in
the discussions that follow). Rather, describe the existing heating equipment as
supplying the amount of heat (Heat Supplied) as it was intended to supply and an
efficiency that is typical, but at the lowest end of the possible range, for equipment
of its type. Then, follow your state’s recommendations regarding repair, tune-up,
or replacement of the equipment, which may involve issues of cost-justifying a
replacement or replacement as a health and safety measure. Alternatively, if you
know that the inoperative system is going to be replaced, you could describe the
replacement as the existing system on the heating forms.
Below are the descriptions of the individual data items and controls found in the
Primary, Secondary and Replacement forms. All items on these forms are required
except the Comment field. Items that appear on more than one form are analogous.
Items that are not common on all three forms are indicated by specifying the name
of the applicable form(s) in brackets.
• Equipment Type – Select what type of heating system this is. The choices are
Furnace, Heat Pump, Space Heater, and None.
Heating and cooling sides of a heat pump are treated as separate components
requiring descriptions under both the Heating and Cooling tabs. For correct
modeling of replacing the existing primary heating and cooling systems with a
heat pump, the replacement for both the heating and cooling sides of the
existing units must be specified as heat pumps and the total cost of the
replacement split between the Heating Replacement and Cooling Replacement
descriptions. To have the replacement seen as cost-effective, this split in cost
should be adjusted in order to show an SIR for replacement of both the heating
and cooling components as cost-effective. See Appendix B.16, Replace Heating
System. Required.
• Fuel – Select the type of fuel used by the heating system. The choices are
Natural Gas, Oil, Electricity, Propane, Wood, Coal, Kerosene, and Other. You
can set the heat content and price for all fuel types, including the Other fuel
type, on the Fuel Costs tab of the Setup Library (see Section 14.3, Fuel Costs).
Required.

10-40 The Weatherization Assistant User’s Manual (Version 8.9)
Chapter 10: MHEA Building Description
• Capacity – Enter the rated input capacity in kBtu/h for natural gas, electric,
propane, oil, and kerosene furnaces and space heaters. Enter the rated output
capacity in kBtu/h for heat pumps. The capacity can often be obtained directly
from the nameplate of the heating system or from an inspection of nozzle sizes,
etc. If this information is not available, the output capacity can be approximated
or, in rare cases, measured. The capacity for coal and wood systems is not
required. NOTE: If MHEA determines that the capacity of the equipment is
insufficient to meet the home’s load, the annual energy consumption predicted
by the program for the house will be reduced, also reducing the savings that
might be predicted for individual measures. If this has occurred for any
individual execution of MHEA, it will be noted under the Special Notes on the
Recommended Measures Report. See Special Notes in Section 12.2,
Recommended Measures Report. Conditionally required.
• Efficiency and Efficiency Units – Enter the efficiency of the heating system in
the Efficiency Units selected. The choices for Efficiency Units are Steady State,
AFUE, HSPF, and COP. Steady State and AFUE (Annual Fuel Utilization
Efficiency) entries apply to furnaces and space heaters and are expressed as
percentages typically ranging from 50% to 100%. Steady state efficiency is an
instantaneous measure of efficiency while AFUE is an annual average
efficiency, which is often displayed on the unit label or in the unit
specifications. An electric furnace or unvented space heater is 100% efficient as
long as it is located in the living space of the manufactured home. COP
(Coefficient of Performance) and HSPF (Heating Seasonal performance factor)
are used in rating heat pump equipment. COP is an instantaneous measure of
efficiency while HSPF is annual average efficiency. Newer systems are
required to display the HSPF rating on the unit. Older systems may list a COP
value. COP entries are pure numbers with typical values between 1.5 and 4.0.
HSPF values are also pure numbers with typical values between 5.0 and 10.0.
This parameter should be as accurate as possible because it affects not only the
savings calculated for heating system weatherization measures but also the
savings of most envelope measures. There are online and published sources of
heating equipment efficiencies by manufacturer and model. However, these
efficiencies are for new units installed and tuned properly or may have been
determined under different conditions. For fossil-fueled heating systems, if
possible the steady-state efficiency should be measured by performing a flue-
gas analysis. Required.

The Weatherization Assistant User’s Manual (Version 8.9) 10-41
Chapter 10: MHEA Building Description
• Duct Location [Primary and Replacement] – Select the location of the main
supply air duct for the heating system. The choices are Floor, Ceiling, and
None. Usually, mobile homes have a single duct that runs along the center of
the home, or two ducts, each running along the length of the home and
connected by a cross-over duct. Indicate if the main supply duct is located
under the floor or above the ceiling. In some cases, no main supply air duct
exists. Enter None, if the supply air duct has been disconnected from the central
heating system and there are no plans to reconnect it. Required.
• Duct Insulation Location [Primary and Replacement] – Select the location
of insulation, if any, associated with the main supply air duct. The choices are
Above Duct, Blow Duct, Around Duct or Ductboard, and No Insulation.
Insulation may be located only on the top of the duct, only on the bottom of the
duct, or wrapped completely around the duct. Ductboard is a rigid insulation
used to either insulate ducts or to create a plenum that is used as a duct. Select
the appropriate choice if duct is insulated or None if the duct is uninsulated.
Required.
• Heat Supplied [Primary] – Enter the percent of the floor area that is heated by
the primary heating system. Do not enter the % sign with the number. Required.
• Programmable Thermostat [Primary] – Use this checkbox to indicate
whether the existing thermostat is a programmable model that allows automatic
setback of the heating set-point. The number of degrees assumed for the setback
is entered in the Setup Library (see Section 14.2, Key Parameters). The
presence of an existing programmable thermostat will prevent a Setback
Thermostat retrofit measure from being evaluated and recommended for this
house. This checkbox should also be checked to indicate that the occupants
would not benefit from a programmable thermostat because they already
manually set their thermostat back in winter, do not want a programmable
thermostat, and/or would not be able to use a programmable thermostat. In
these cases, the reason for checking the checkbox should be noted in the
Comment field described below.
• Tune-up Mandatory [Primary] – Use this checkbox to indicate that a system
tune-up is all that is necessary based on the inspection of the heating system.
MHEA will evaluate and recommend the system tune-up, regardless of its cost-

10-42 The Weatherization Assistant User’s Manual (Version 8.9)
Chapter 10: MHEA Building Description
effectiveness. The tuned up system will then be used in evaluating other
measures not considered mandatory. No system replacement will be considered.
• Replacement Required [Replacement] – Use this checkbox to indicate that a
system replacement is necessary based on the inspection of existing heating
system. This may be the result of an unsafe yet unrepairable existing system.
Make sure that the Tune-up Mandatory checkbox on the Primary Heating form
is unchecked. MHEA will evaluate and recommend system replacement,
regardless of its cost-effectiveness. The replacement system will then be used in
evaluating other measures not considered mandatory. No primary heating
system tune-up will be considered.
• Include in SIR [Primary and Replacement] – If the Tune-up Mandatory
[Primary] checkbox or the Replacement Required [Replacement] checkbox is
selected, the Include in SIR checkbox will appear on the form. This checkbox
allows you to indicate that you wish to have the selected measure included in
the calculation of the whole house (package) SIR for this audit. Measures not
included in the whole house SIR are normally related to health and safety.
Check the guidance for your program in deciding when you can mandate an
HVAC measure and if it can be excluded from the SIR calculation. Even if the
measure can be considered related to health and safety, if it is shown to be cost-
effective, you may choose to still include it in the whole house SIR by selecting
this checkbox. By doing so, it will not be seen as a health and safety measure,
thus preserving funds dedicated for other such measures. An alternate reason
for excluding a measure from the whole house SIR is if it is funded outside of
the Weatherization Assistance Program. Whether a measure is or is not
included in the whole house SIR is indicated by its location in the list of
measures produced for the Recommended Measures Report (see Chapter 12,
NEAT and MHEA Results).
• Labor and Material Costs [Replacement] – Enter the Labor and Material cost
associated with replacing the primary heating system. MHEA adds the labor
and equipment costs in computing the SIR and reporting costs. Thus, the total
cost (labor plus equipment) may be entered in either field, with $0.00 entered
for the other of the two fields, with no adverse consequences. Do not enter
$0.00 in both Labor and Material Cost fields for either replacement unit.
Required.

The Weatherization Assistant User’s Manual (Version 8.9) 10-43
Chapter 10: MHEA Building Description
• Comment – You may enter comments pertinent to the heating system directly
in the Comment field on the form, or you may enter them in the Comment
Editor by selecting the “Comment” button to the left of the field. The Comment
Editor is similar to Window’s Notepad and may be used to enter extended
comments. The total comment may have up to 65,000 characters. Text from
other sources may be copied and pasted into the Comment Editor’s window.
Any comment that is entered is displayed on the Recommended Measures
report and the Input Report available from the Audit Information form (see
Section 8.2, Audit Information). In addition, any comment that is entered can be
imported into any specific work order (see Section 13.1, Work Order
Information). Thus, you may wish to enter comments related to any observation
that might affect the installation of needed measures or repair work. Heating
system comments may include observations of equipment conditions, reasons
for selecting specific retrofit options, or references to health and safety items.
Optional.
• Optional Heating System Detail Buttons [Primary] – Buttons at the bottom
of the Primary Heating form can be used to document an extensive number of
heating system measurements and observations made while auditing a dwelling.
These buttons are described in Section 11.12, Optional Heating System Details.
• New/Del –The “New” button will take you back to the first field on the existing
form, the Equipment Type field, while not changing any existing entries. The
“Del” button will erase all entries on the Primary Heating form. You will
receive a warning of the deletion only if the form had been previously filled in
prior to your entering the form.
10.8 Cooling – Primary, Secondary, and Replacement
The Primary and Secondary forms (see Figure 10.25 and 10.26) under the Cooling
tab of the Main Menu’s “MHEA” button are used to describe the cooling systems
installed in the mobile home. MHEA allows the definition of a primary and a
secondary cooling system in a home. The primary system is the system that
supplies the majority of the cooling to the home and on which MHEA will
consider installing energy efficiency measures. The Replacement form (see Figure
10.27) is used to describe the equipment you want MHEA to evaluate for the
primary cooling system replacement as a possible retrofit measure. You should

10-44 The Weatherization Assistant User’s Manual (Version 8.9)
Chapter 10: MHEA Building Description
Figure 10.25. The Primary Cooling System form under the Main Menu’s “MHEA” button.
Figure 10.26. The Secondary Cooling System form under the Main Menu’s “MHEA”
button.

The Weatherization Assistant User’s Manual (Version 8.9) 10-45
Chapter 10: MHEA Building Description
Figure 10.27. The Replacement Cooling System form under the Main Menu’s “MHEA”
button.
enter information and describe the primary system first before describing the
secondary system and/or the replacement system.
Below are descriptions of the individual data items and controls found in the
Primary, Secondary and Replacement forms. All items on these forms are required
except the Comment field. Items that appear on more than one form are analogous.
Items that are not common on all three forms are indicated by specifying the name
of the applicable form(s) in brackets.
• Equipment Type – Select what type of cooling system this is. The choices are
Central Air Conditioner, Window or Room Air Conditioner, Heat Pump,
Evaporative Cooler, or None. If Evaporative Cooler or None has been selected,
fields not needed will be automatically hidden.
Heating and cooling sides of a heat pump are treated as separate components
requiring descriptions under both the Heating and Cooling tabs. For correct
modeling of replacing the existing primary heating and cooling systems with a
heat pump, the replacement for both the heating and cooling sides of the
existing units must be specified as heat pumps and the total cost of the

10-46 The Weatherization Assistant User’s Manual (Version 8.9)
Chapter 10: MHEA Building Description
replacement split between the Heating Replacement and Cooling Replacement
descriptions. To have the replacement seen as cost-effective, this split in cost
should be adjusted in order to show an SIR for replacement of both the heating
and cooling components as cost-effective. See B.20, Replace DX Cooling .
Required.
• Capacity − Enter the cooling capacity of the unit in kBtu/h. The value is often
printed on the nameplate of the air conditioner. For central systems and heat
pumps, the value may be given in tons of cooling, where 1 ton equals 12
kBtu/h. Sometimes the model number will contain a value divisible by 6, since
cooling equipment is normally sold with capacities that are integral multiples of
½ ton (e.g., a model xxx30xxx is likely a 30 kBtu/h or 2-1/2 ton system). If no
capacity is available, enter an estimate. NOTE: If MHEA determines that the
capacity of the equipment is insufficient to meet the home’s load, the annual
energy consumption predicted by the program for the house will be reduced,
also reducing the savings that might be predicted for individual measures. If this
has occurred for any individual execution of MHEA, it will be noted under the
Special Notes on the Recommended Measures Report. See Special Notes in
Section 12.2, Recommended Measures Report. Required.
• Efficiency and Efficiency Units – Enter the efficiency of the cooling system in
the Efficiency Units selected. The choices for Efficiency Units are EER, SEER,
and COP. EER (Energy Efficiency Ratio) is used in rating window air
conditioners. SEER (Seasonal Energy Efficiency Ratio) and COP (Coefficient
of Performance) are used in rating central air conditioners and heat pumps. COP
is an instantaneous measure of efficiency. EER is a measure of efficiency
averaged over several hours of constant operating condition, while SEER is
annual average efficiency. COP is unitless, while EER and SEER have units of
Btu/watt-hour. Newer systems are required to display the EER or SEER rating
on the unit. Older systems may list a COP value. COP has typical values
between 1.5 and 4.0. EER and SEER have typical values between 5.0 and 20.0.
Enter the SEER, if it is given on the nameplate. Required.
• Duct Location [Primary and Replacement] – If Central Air Conditioner or
Heat Pump has been selected for Equipment Type, the Duct Location field will
appear. Select the location of the main supply air duct for the cooling system.
The choices are Floor, Ceiling, and None. Usually, mobile homes have a single
duct that runs along the center of the home, or two ducts, each running along

The Weatherization Assistant User’s Manual (Version 8.9) 10-47
Chapter 10: MHEA Building Description
the length of the home and connected by a cross-over duct. Indicate if the main
supply duct is located under the floor or above the ceiling. In some cases, no
main supply air duct exists. Enter None, if the supply air duct has been
disconnected from the central heating system and there are no plans to
reconnect it. Conditionally required.
• Duct Insulation Location [Primary and Replacement] – If Central Air
Conditioner or Heat Pump has been selected for Equipment Type, the Duct
Insulation Location field will appear. Enter the location of insulation, if any,
associated with the main supply air duct. The choices are Above Duct, Below
Duct, Around Duct or Ductboard, and No Insulation. Insulation may be located
only on the top of the duct, only on the bottom of the duct, or wrapped
completely around the duct. Ductboard is a rigid insulation used to either
insulate ducts or to create a plenum that is used as a duct. Select appropriate
choice if duct is insulated or None if duct is uninsulated. The entry will be
available only if the Duct Location is other than None. Conditonally Required.
• Floor Area Cooled [Primary and Secondary] – Enter an estimate of the
percent of the floor area that is cooled by the cooling system being described.
Do not enter the % sign with the number. The sum of all areas cooled by
primary and secondary equipment should be less than or equal to 100%.
Required.
• Tune-up Mandatory [Primary] – Use this checkbox to indicate that a system
tune-up is all that is necessary based on the inspection of the cooling system.
MHEA will evaluate and recommend the system tune-up, regardless of its cost-
effectiveness. The tuned up system will then be used in evaluating other
measures not considered mandatory. No system replacement will be considered.
• Replacement Required [Replacement] – Use this checkbox to indicate that a
system replacement is necessary based on the inspection of existing cooling
system. Make sure that the Tune-up Mandatory checkbox on the Primary
Cooling form is unchecked. MHEA will evaluate and recommend system
replacement, regardless of its cost-effectiveness. The replacement system will
then be used in evaluating other measures not considered mandatory. No
primary cooling system tune-up will be considered.

10-48 The Weatherization Assistant User’s Manual (Version 8.9)
Chapter 10: MHEA Building Description
• Include in SIR [Primary and Replacement] – If Tune-up Mandatory
[Primary] or Replacement Required [Replacement] is selected, an Include in
SIR checkbox will appear on the form. This checkbox allows you to indicate
that you wish to have the selected measure included in the calculation of the
whole house (package) SIR for this audit. Measures not included in the whole
house SIR are normally related to health and safety. Check the guidance for
your program in deciding when you can mandate an HVAC measure and if it
can be excluded from the SIR calculation. Even if the measure can be
considered related to health and safety, if it is shown to be cost-effective, you
may choose to still include it in the whole house SIR by selecting this
checkbox. By doing so, it will not be seen as a health and safety measure, thus
preserving funds dedicated for other such measures. An alternate reason for
excluding a measure from the whole house SIR is if it is funded outside of the
Weatherization Assistance Program. Whether a measure is or is not included in
the whole house SIR is indicated by its location in the list of measures produced
for the Recommended Measures Report (see Chapter 12, NEAT and MHEA
Results).
• Labor and Material Costs [Replacement] – Enter the Labor and Material cost
associated with replacing the primary cooling system. MHEA adds the labor
and equipment costs in computing the SIR and reporting costs. Thus, the total
cost (labor plus equipment) may be entered in either field, with $0.00 entered
for the other of the two fields, with no adverse consequences. Do not enter
$0.00 in both Labor and Material Cost fields for either replacement unit.
Required.
• Comment – You may enter comments pertinent to the cooling system directly
in the Comment field on the form, or you may enter them in the Comment
Editor by selecting the “Comment” button to the left of the field. The Comment
Editor is similar to Window’s Notepad and may be used to enter extended
comments. The total comment may have up to 65,000 characters. Text from
other sources may be copied and pasted into the Comment Editor’s window.
Any comment that is entered is displayed on the Recommended Measures
report and the Input Report available from the Audit Information form (see
Section 8.2, Audit Information). In addition, any comment that is entered can be
imported into any specific work order (see Section 13.1, Work Order
Information). Thus, you may wish to enter comments related to any observation
that might affect the installation of needed measures or repair work. Cooling

The Weatherization Assistant User’s Manual (Version 8.9) 10-49
Chapter 10: MHEA Building Description
system comments may include observations of equipment conditions, reasons
for selecting specific retrofit options, or references to health and safety items.
Optional.
• New/Del –The “New” button will take you back to the first field on the existing
form, the Equipment Type field, while not changing any existing entries. The
“Del” button will erase all entries on the Primary Heating form. You will
receive a warning of the deletion only if the form had been previously filled in
prior to your entering the form.

10-50 The Weatherization Assistant User’s Manual (Version 8.9)
Chapter 10: MHEA Building Description

The Weatherization Assistant User’s Manual (Version 8.9) 11-1
Chapter 11: NEAT and MHEA Common Elements
Chapter 11. NEAT and MHEA Common Elements
Chapter 9, NEAT Building Description, and Chapter 10, MHEA Building
Description, of this manual addressed entry of building description data specific to
NEAT and MHEA, respectively. The Weatherization Assistant contains additional
building and audit description data that is common to both site-built and mobile
homes. This chapter describes the information entered on the forms found under
Main Menu’s “NEAT Audit” and “MHEA Audit” buttons which is common to
both building types. This includes the Status, Ducts/Infiltration, Base Loads (Water
Heating, Refrigerators, and Lighting Systems), Health & Safety, Itemized Costs,
Utility Bills, Photos, and Measures forms, as well as the optional sub-forms found
on the Heating and Water Heating forms.
The only form of these that must be visited is the Ducts/Infiltration form. Entries
under the Baseloads tab may generate recommendations for base load measures
modeled by NEAT and MHEA. The Health & Safety and Itemized Costs forms
can be used to create recommendations to remediate health and safety issues, enter
repair activities and administrative costs, or define energy saving measures not
evaluated by NEAT or MHEA. The Utility Bills tab can store data from utility
bills, which can be used to adjust the audits’ recommendations based on actual
consumption. The Status and Photos tabs are associated with optional features that
do not affect the recommendations of the audits. The Measures tab is the starting
point from which the optional work order feature of the program can be employed
(see Chapter 13, Work Orders).
11.1 Status (Audit)
The Status form under the “NEAT Audit” and “MHEA Audit” windows (see
Figure 11.1) allows you to view the status associated with the current audit. The
setting and tracking of statuses is an optional feature in the Weatherization
Assistant. See Section 18.3, Status Tracking, for more detailed information on this
feature.
Below are descriptions of the individual data items and controls found on the
Status form.
The entries on the main Status form cannot be edited. You must use
the “Edit” button on the form to change the current status for the audit.

11-2 The Weatherization Assistant User’s Manual (Version 8.9)
Chapter 11: NEAT and MHEA Common Elements
• Audit (<Record Name>) – The left most column of the form displays the
status category (i.e., Audit) followed by the name of the audit for which the
status is being reported.
Figure 11.1. The Status form under the Main Menu’s “NEAT” button.
• Current Status − This field displays the current status setting for the audit. The
possible settings for audits are listed in Section 18.3, Status Tracking.
• Completed − An “X” will be displayed in this field when the current status
setting signifies completion or closure of the activity associated with the status
category. Settings that represent completion are indicated by an asterisk (*) (see
Table 18.1, Status Categories and Settings).
• Date − This field displays the date that the current status became effective.
• Changed − This field displays the date that the current status was last changed.
• By − This field displays the User Name of the person who changed the status.
The names are restricted to those that have been entered on the Contacts form
under the Main Menu’s “Agency” button and have a password assigned as

The Weatherization Assistant User’s Manual (Version 8.9) 11-3
Chapter 11: NEAT and MHEA Common Elements
discussed in Section 6.2, Contacts (Agency). A User Name of “Admin” implies
that a specific person was not identified as making the change.
• Comment − Any comment that has been appended to this current status setting
will be shown in this field.
• Edit − Status settings for the current audit are changed by selecting the “Edit”
button. Use of the Status Editor form that appears is explained in Section 18.3,
Status Tracking.
• History − Select the “H” button to see a history of all settings for the current
audit. The Status History form that appears is the same in appearance as that
discussed in Section 6.9, Status History.
11.2 Ducts/Infiltration – Air and Duct Leakages
Both NEAT and MHEA provide means to evaluate the effectiveness of infiltration
reduction work and duct sealing. However, the programs do not direct this work.
They assume that available procedures of locating and repairing air leaks are being
used. Air leakage reductions from specific weatherization activities cannot be
predicted accurately with calculations. What information you provide regarding
infiltration and ducts will depend on what measurements you are accustomed to
taking during an audit.
Blower doors depressurize (or pressurize) a house to some pressure differential
(measured in Pascal, Pa) with respect to the outside. They can then measure the
cubic feet per minute (CFM) of air passing through leaks in the house at that
pressure differential. Since the pressure differential is greater than under normal
circumstances, the air leaks are exaggerated above what they would be normally,
allow easier detection. A duct blower works in a similar manner as the blower
door, except that it pressurizes only the ducts in the house with respect to the
remainder of the house and outdoors. Similarly, it will provide the CFM leaking
from the ducts at this pressure differential.
The appearance of the Air and Duct Leakages form changes depending on whether
you wish the Weatherization Assistant to evaluate duct sealing and, if so, which
method is to be used. However, some entries and features appear regardless of your
choice. Below are descriptions of these individual data items and controls. Others,

11-4 The Weatherization Assistant User’s Manual (Version 8.9)
Chapter 11: NEAT and MHEA Common Elements
which are unique to the choice of duct sealing method, will be described separately
with the discussion of the specific method. See Figure 11.2 for the positioning of
these items on the form.
Figure 11.2. The Air and Duct Leakages form under the Main Menu’s “NEAT” button.
• Evaluate Duct Sealing – Select this checkbox if you wish to evaluate duct
sealing and duct leakage measurements are available. If this checkbox is
unchecked, only the air sealing of the building envelope is evaluated using two
sets of air leakage measurements – before and after weatherization. If this
checkbox is selected, you will be required to provide additional air leakage or
duct leakage data before and after duct sealing.
• Duct Leakage Method – If the Evaluate Duct Sealing checkbox is selected, the
Duct Leakage Method field will be presented. Select a desired method for duct
leakage measurements. The choices are Whole House Blower Door
Measurements, Blower Door Subtraction Measurements, Duct Blower
Measurements, and Pressure Pan Measurements. The Pressure Pan
Measurements option is available only in MHEA. NEAT and MHEA assume
that the duct sealing efforts are performed prior to any whole house air

The Weatherization Assistant User’s Manual (Version 8.9) 11-5
Chapter 11: NEAT and MHEA Common Elements
infiltration reduction work having been performed. The entries required for
each of these methods are described below in sections specific to the method
chosen.
• Cost of Infiltration Reduction – If the Evaluate Duct Sealing checkbox is left
unchecked, you may enter the cost in dollars associated with reducing the
infiltration from the pre-weatherization value to an actual or target post-
weatherization level. NEAT and MHEA use this information to calculate the
SIR for the infiltration reduction measures. If the cost of infiltration reduction is
not provided, the SIR for infiltration reduction will not be computed or reported
on the Recommendation Measure Report. If the Evaluate Duct Sealing
checkbox is checked and a Duct Leakage Method is selected, you must enter
the costs associated with reducing the infiltration from the post-duct sealing
value (before other weatherization measures are implemented) to the target
post-weatherization level in dollars. Conditionally Required.
• Cost of Duct Sealing – If the Evaluate Duct Sealing checkbox is checked and a
Duct Leakage Method is selected, a field for entering the cost of duct sealing
will be displayed. You must enter the costs associated with duct sealing in
dollars to reduce duct leakage from pre-duct sealing value to post-duct sealing
value (before other weatherization measures are implemented). NEAT and
MHEA use this information in computing the SIR for the Seal Ducts measure.
Required.
• Comment – You may enter comments pertinent to the air and duct leakages
directly in the Comment field on the form, or you may enter them in the
Comment Editor by selecting the “Comment” button to the left of the field. The
Comment Editor is similar to Window’s Notepad and may be used to enter
extended comments. The total comment may have up to 65,000 characters. Text
from other sources may be copied and pasted into the Comment Editor’s
window. Any comment that is entered is displayed on the Recommended
Measures report and the Input Report available from the Audit Information
form (see Section 8.2, Audit Information). In addition, any comment that is
entered can be imported into any specific work order (see Section 13.1, Work
Order Information). Thus, you may wish to enter comments related to any
observation that might affect the installation of needed measures or repair work.
If leakage sites are located during the initial blower door setup, you could

11-6 The Weatherization Assistant User’s Manual (Version 8.9)
Chapter 11: NEAT and MHEA Common Elements
include comments to identify to the crew or contractor where these sites are.
Optional.
• Refresh Tightness Limit – NEAT and MHEA use building data entered on the
Audit Information form under the “NEAT Audit” and “MHEA Audit” windows
to calculate the building tightness limit (BTL) and report that on the Air and
Duct Leakages form as “The minimum recommended CFM at 50 Pa is: <BTL>
CFM.” You may use this value as the minimum limit for target post
weatherization air leakage rate to ensure that the building is not over-tight after
weatherization. If you alter the building data on the Audit Information form,
you may select the “Refresh Tightness Limit” button on this form to update the
building tightness limit reported on this form. If you have an alternate method
of computing a building tightness limit or if ASHRAE 62.2 is being used, this
limit may be considered irrelevant.
The Air and Duct Leakages form has four different sub-forms—one if you do not
wish to evaluate duct sealing and three that evaluate duct sealing using three
different methods. MHEA has an additional sub-form for a fourth duct sealing
method available only for mobile homes. Each sub-form and its associated inputs
will be discussed separately below.
Whole House Blower Door Measurements for Air Leakage Sub-Form
If the duct leakage measurements are
unavailable, the Evaluate Duct Sealing
checkbox should be left unchecked. The
sub-form, then presented, includes the
Whole House Blower Door
Measurements data block consisting of
two sets of data fields for entering air
leakage data before and after
weatherization (see Figure 11.3).
• Before Weatherization (Existing) Air Leakage Rate and House Pressure
Difference – If pre-weatherization blower door measurements are available,
enter the measured air leakage rate in units of CFM (cubic feet per minute) and
the corresponding house pressure difference in units of Pa (Pascal). The air
leakage rate is normally measured at a pressure differential of 50 Pa, if such can
Figure 11.3. The Whole House Blower
Door Measurements for Air Leakage sub-
form.

The Weatherization Assistant User’s Manual (Version 8.9) 11-7
Chapter 11: NEAT and MHEA Common Elements
be reached. Leave the fields blank if blower door measurements are
unavailable. NEAT and MHEA will use this information only to estimate
energy savings from air sealing. The entries will not impact the energy saving
estimates for other measures. The default for House Pressure Difference is 50
Pa. Optional.
• After Weatherization (Target or Actual) Air Leakage Rate and House
Pressure Difference – Enter the post-weatherization air leakage rate in units of
CFM (cubic feet per minute) and the corresponding house pressure difference in
units of Pa (Pascal). If you are entering data before performing any work on a
house, and your audit procedure has established a “target” post-weatherization
air leakage rate, enter the value here. If the target air leakage information is in
air changes per hour (ACH) at natural conditions, an approximate conversion
may be accomplished by multiplying the ACH by one-third of the volume of
the house to obtain air leakage rate in CFM at 50 Pa (CFM50). If no target
value is available and no pre-retrofit air leakage data has been entered,
established default values may be entered (e.g., 2500 CFM at 50 PA). If no air
sealing work is deemed necessary and no other weatherization measure is likely
to reduce air leakage, enter the pre-weatherization blower door measurements in
the post-weatherization data fields. If a post-weatherization blower door test is
eventually conducted, you may re-run the audit using these blower door
measurements to verify the previous results or maintain a record of actual air
leakage reduction and energy savings accomplished. The values entered for
post-weatherization leakage rate can affect the savings of other measures,
particularly HVAC measures. The default for House Pressure Difference is 50
Pa. Required.
Entry of target or default values for the post-weatherization leakage data is
required to allow the Weatherization Assistant to make logical recommendations
for the other measures it considers. Estimates of these savings will be more
accurate if they are based on the air leakage characteristics of the house after
infiltration reduction is accomplished, rather than before.
If only the required post-weatherization leakage data is provided, NEAT and
MHEA will not produce any measure listing for infiltration reduction on the
Recommended Measures report (see Section 12.2, Recommended Measures
Report). If both pre- and post-weatherization leakage data is entered, the programs
will produce an entry in this report indicating the savings for infiltration reduction.

11-8 The Weatherization Assistant User’s Manual (Version 8.9)
Chapter 11: NEAT and MHEA Common Elements
If, in addition, a cost for the infiltration reduction has been entered on the Whole
House Blower Door Measurements sub-form, the Recommended Measures report
will display an estimated SIR for the measure. If you routinely provide entries for
all of the air leakage data and the SIRs for infiltration reduction shown in the
Recommended Measures report are consistently less than the minimum acceptable
value (normally 1.0), then you should review your procedure for determining the
targets used, the costs being assumed, or your infiltration reduction procedure.
Common Entries on the Duct Leakage Sub-Forms – Duct Operating
Pressures
All of the duct leakage measurement methods require entries for duct operating
pressures. These entries will be described below and not repeated for each
individual method. See Figure 11.4 to view the Duct Operating Pressures data
block.
• Before Duct Sealing Supply and Return Duct Operating Pressures – Enter
the pre-weatherization (i.e., pre-duct sealing) supply and return duct operating
pressures with respect to the space surrounding the ducts, in units of Pascal,
measured during normal conditions with the air handler fan on. These
measurements can be taken by inserting pressure probes through small holes
drilled in the supply plenum (near the air handler) and the return plenum. The
holes should be repaired afterwards. Required.
• After Duct Sealing Supply and Return Duct Operating Pressures – Enter
the post-duct sealing supply and return duct operating pressures with respect to
space surrounding the ducts, in units of Pascal, measured during normal
conditions with the air handler fan on. These measurements can be taken by
inserting pressure probes through small holes drilled in the supply plenum (near
the air handler) and the return plenum. The holes should be repaired afterwards.
Required.
Whole House Blower Door Measurements for Duct Leakage Sub-Forms
Under this duct leakage measurement method, whole house blower door
measurements are taken before and after duct sealing to estimate the duct leakage
reduction. For the method to provide this estimate, duct sealing must be
accomplished first, followed by the remainder of the weatherization efforts,

The Weatherization Assistant User’s Manual (Version 8.9) 11-9
Chapter 11: NEAT and MHEA Common Elements
including infiltration reduction. The entries required are from readings you would
normally take to estimate the whole house infiltration. These readings are simply
taken before any duct leakage or infiltration reduction work has been performed,
then after duct sealing is accomplished - but before any other weatherization
efforts, then a third time after all of the weatherization work has been performed,
including infiltration reduction. For all readings, the registers and grills of the duct
system should remain open, thus making the ducts as much a part of the
conditioned space as possible.
This sub-form (see Figure 11.4) includes a Whole House Blower Door
Measurements data block consisting of the three sets of data fields requiring air
leakage data and the Duct Operating Pressure data block, discussed under
“Common Entries on the Duct Leakage Sub-Forms – Duct Operating Pressures,”
above. All data items on this sub-form are required.
Figure 11.4. The Whole House Blower Door Measurements for Duct Leakage sub-form.
• Before Weatherization (Existing) Air Leakage Rate and House pressure
Difference – Enter the pre-weatherization blower door measurements including
the measured air leakage rate in units of CFM (cubic feet per minute) and the
corresponding house pressure difference in units of Pa (Pascal). The air leakage
rate is normally measured at a pressure differential of 50 Pa, if such can be
reached. NEAT and MHEA use this information with the measurements
conducted after duct sealing and before other weatherization to estimate energy
savings from duct sealing. The default for House Pressure Difference is 50 Pa.
Required.
• After Duct Sealing and Before Other Weatherization (Target or Actual)
Air Leakage Rate and House pressure Difference – Enter the post-duct
sealing air leakage rate in units of CFM (cubic feet per minute) and the
corresponding house pressure difference in units of Pa (Pascal). If you are

11-10 The Weatherization Assistant User’s Manual (Version 8.9)
Chapter 11: NEAT and MHEA Common Elements
entering data before duct sealing efforts have actually been performed, enter
“target” post-duct sealing air leakage data your audit procedure has established
for the house being audited. NEAT and MHEA use this information with the
measurements conducted before weatherization to estimate energy savings from
duct sealing. The default for House Pressure Difference is 50 Pa. Required.
• After Weatherization (Target or Actual) Air Leakage Rate and House
Pressure Difference – Enter the post-weatherization air leakage rate in units of
CFM (cubic feet per minute) and the corresponding house pressure difference in
units of Pa (Pascal). If you are entering data before weatherizing the house,
enter an established “target” post-weatherization air leakage rate. If the target
air leakage information is in air changes per hour (ACH) at natural conditions,
an approximate conversion may be accomplished by multiplying the ACH by
one-third of the volume of the house to obtain air leakage rate in CFM at 50 Pa
(CFM50). If no target value is available, established default values may be
entered (e.g., 2500 CFM at 50 PA). Make sure the target or default values
indicate the same or less air leakage than the post-duct sealing values. If no air
sealing work is deemed necessary and no other weatherization measure is likely
to reduce air leakage, enter the post-duct sealing blower door measurements in
the post-weatherization data fields. If a post-weatherization blower door test is
eventually conducted, you may re-run the audit using these blower door
measurements to verify the previous results or maintain a record of actual air
leakage reduction and energy savings accomplished. NEAT and MHEA use this
information with the measurements conducted after duct sealing and before
other weatherization efforts to estimate energy savings from air sealing. The
values entered for post-weatherization leakage rate can affect the savings of
other measures, particularly HVAC measures. The default for House Pressure
Difference is 50 Pa. Required.
Blower Door Subtraction Measurements for Duct Leakage Sub-Form
Under this duct leakage measurement method, two sets of whole house blower
door measurements are taken, both before and after duct sealing. The first set of
measurements is taken with the registers and grills of the duct system open,
making the ducts as much a part of the conditioned space as possible. The second
set of measurements is taken with all supply registers and return grills covered with
cardboard, plastic, tape, etc., to have the duct system sealed off from the rest of the
house. These measurements allow the program to subtract the house leakage from

The Weatherization Assistant User’s Manual (Version 8.9) 11-11
Chapter 11: NEAT and MHEA Common Elements
the house-plus-duct leakage, thus isolating the duct leakage. One additional
reading is recorded while the duct system is sealed off – the duct-to-house pressure
difference, allowing a determination of the duct leakage to the house. This method
of determining duct leakage is not useful if this duct-to-house pressure difference
is less than 20 Pa, indicating large duct leakage to the house. This is commonly
true in homes that use building cavities for a significant part of the ductwork.
This sub-form includes a Whole House Blower Door Measurements data block and
a Duct Operating Pressure data block, discussed under “Common Entries on the
Duct Leakage Sub-Forms – Duct Operating Pressures,” above (see Figure 11.5).
Figure 11.5. The Blower Door Subtraction Measurements for Duct Leakage sub-form.
• Before Weatherization (Existing) Air Leakage Rate and House Pressure
Difference, With Registers/Grills Open – Enter the pre-weatherization air
leakage rate in units of CFM (cubic feet per minute) and the corresponding
house pressure difference in units of Pa (Pascal) with the registers and grills
open. The air leakage rate is normally measured at a pressure differential of 50
Pa, if such can be reached. The default for House Pressure Difference is 50 Pa.
Required.
• Before Weatherization (Existing) Air Leakage Rate, House Pressure
Difference, and Duct-to-House Pressure Difference, With Registers/Grills
Sealed – Enter the pre-weatherization air leakage rate in units of CFM (cubic
feet per minute) and the corresponding house pressure difference with respect to
the outside and the duct-to-house pressure difference in units of Pa (Pascal), all
with the registers and grills sealed off. The air leakage rate is normally
measured at a pressure differential of 50 Pa, if such can be reached. The duct-
to-house pressure difference can be measured by inserting a pressure probe

11-12 The Weatherization Assistant User’s Manual (Version 8.9)
Chapter 11: NEAT and MHEA Common Elements
through a small hole drilled in either the supply plenum (near the air handler) or
the return plenum, or by punching a small hole through the temporary covering
over a supply register or return grill. The default for House Pressure Difference
is 50 Pa. Required.
• After Duct Sealing and Before Other Weatherization (Target or Actual)
Air Leakage Rate and House Pressure Difference, With Registers/Grills
Open – Enter the post-duct sealing air leakage rate in units of CFM (cubic feet
per minute) and the corresponding house pressure difference in units of Pa
(Pascal), with the registers and grills open. The air leakage rate is normally
measured at a pressure differential of 50 Pa, if such can be reached. The input
form indicates possible use of "Target" values for these inputs. If your audit
procedure has established such targets, they may be entered. However, due to
the unique nature of duct leakage in homes, availability of such values is less
likely. The default for House Pressure Difference is 50 Pa. Required.
• After Duct Sealing and Before Other Weatherization (Target or Actual)
Air Leakage Rate, House Pressure Difference, and Duct to House Pressure
Difference, With Registers/Grills Sealed – Enter the post-duct sealing air
leakage rate in units of CFM (cubic feet per minute) and the corresponding
house pressure difference and duct-to-house pressure difference in units of Pa
(Pascal), all with the registers and grills sealed off. The duct-to-house pressure
difference can be measured by inserting a pressure probe through a small hole
drilled in either the supply plenum (near the air handler) or the return plenum,
or punching a small hole through the temporary covering over a supply register
or return grill. The input form indicates possible use of "Target" values for these
inputs. If your audit procedure has established such targets, they may be
entered. However, due to the unique nature of duct leakage in homes,
availability of such values is less likely. The default for House Pressure
Difference is 50 Pa. Required.
• After Weatherization (Target or Actual) Air Leakage Rate and House
Pressure Difference, With Registers/Grills Open – Enter the post-
weatherization air leakage rate in units of CFM (cubic feet per minute) and the
corresponding house pressure difference in units of Pa (Pascal). If you are
entering data before weatherizing the house, enter an established “target” post-
weatherization air leakage rate. If the target air leakage information is in air
changes per hour (ACH) at natural conditions, an approximate conversion may

The Weatherization Assistant User’s Manual (Version 8.9) 11-13
Chapter 11: NEAT and MHEA Common Elements
be accomplished by multiplying the ACH by one-third of the volume of the
house to obtain air leakage rate in CFM at 50 Pa (CFM50). If no target value is
available, established default values may be entered (e.g., 2500 CFM at 50 PA).
Make sure the target or default values indicate the same or less air leakage than
the post-duct sealing values. If no air sealing work is deemed necessary and no
other weatherization measure is likely to reduce air leakage, enter the post-duct
sealing blower door measurements in the post-weatherization data fields. If a
post-weatherization blower door test is eventually conducted, you may re-run
the audit using these blower door measurements to verify the previous results or
maintain a record of actual air leakage reduction and energy savings
accomplished. NEAT and MHEA use this information with the measurements
conducted after duct sealing and before other weatherization efforts to estimate
energy savings from air sealing. The values entered for post-weatherization
leakage rate can affect the savings of other measures, particularly HVAC
measures. The default for House Pressure Difference is 50 Pa. Required.
Duct Blower Measurements for Duct Leakage Sub-Form
Under this duct leakage measurement method, a
duct blower (see Figure 11.6) and a blower door are
used. A duct blower pressurizes the duct system,
which is sealed off (by taping the registers and
grills) from the remainder of the house. The
measured CFM through the duct blower is then
equal to the total air leakage from the ducts to both
the outside and interior of the house. To obtain
leakage to only the outside, the blower door is used
to pressurize the entire house to the same pressure,
with respect to the outside, as the ducts. With no
pressure differential between the house and the
ducts, any leakage recorded by the duct blower
must then be to the outside. The leakage will be at
whatever duct/outside pressure differential is
established by the duct blower. This technique of
determining duct leakage is more accurate than the
other means, but also the most time-consuming.
Figure 11.6. The Duct Blower
(Photo courtesy of The Energy
Conservatory).

11-14 The Weatherization Assistant User’s Manual (Version 8.9)
Chapter 11: NEAT and MHEA Common Elements
This sub-form includes a Whole House Blower Door Measurements data block, a
Duct Operating Pressure data block, and a Duct Blower Measurements data block
(see Figure 11.7). The Whole House Blower Door Measurements data block is the
same as used for evaluation of air leakage without consideration of duct leakage,
discussed earlier in this chapter. Entries for the Duct Operating Pressure data block
are the same as for all other duct leakage measurement methods and will not be
described here. They are discussed under “Common Entries on the Duct Leakage
Sub-Forms – Duct Operating Pressures,” earlier in this chapter.
Figure 11.7. The Duct Blower Measurements for Duct Leakage sub-form.
• Before Weatherization (Existing) Air Leakage Rate and House Pressure
Difference – If pre-weatherization blower door measurements are available,
enter the measured air leakage rate in units of CFM (cubic feet per minute) and
the corresponding house pressure difference in units of Pa (Pascal). The air
leakage rate is normally measured at a pressure differential of 50 Pa, if such can
be reached. Leave the fields blank if blower door measurements are
unavailable. NEAT and MHEA will use this information only to estimate
energy savings from air sealing. The entries do not impact the energy saving
estimates for other measures. The default for House Pressure Difference is 50
Pa. Optional.
• After Weatherization (Target or Actual) Air Leakage Rate and House
Pressure Difference – Enter the post-weatherization air leakage rate in units of
CFM (cubic feet per minute) and the corresponding house pressure difference in
units of Pa (Pascal). If you are entering data before performing any work on a
house, and your audit procedure has established a “target” post-weatherization
air leakage rate, enter the value here. If the target air leakage information is in
air changes per hour (ACH) at natural conditions, an approximate conversion

The Weatherization Assistant User’s Manual (Version 8.9) 11-15
Chapter 11: NEAT and MHEA Common Elements
may be accomplished by multiplying the ACH by one-third of the volume of
the house to obtain air leakage rate in CFM at 50 Pa (CFM50). If no target
value is available and no pre-retrofit air leakage data has been entered,
established default values may be entered (e.g., 2500 CFM at 50 PA). If no air
sealing work is deemed necessary and no other weatherization measure is likely
to reduce air leakage, enter the pre-weatherization blower door measurements in
the post-weatherization data fields. If a post-weatherization blower door test is
eventually conducted, you may re-run the audit using these blower door
measurements to verify the previous results or maintain a record of actual air
leakage reduction and energy savings accomplished. The values entered for
post-weatherization leakage rate can affect the savings of other measures,
particularly HVAC measures. The default for House Pressure Difference is 50
Pa. Required.
• Before Duct Sealing Total Fan Flow and Duct Pressure – These
measurements are taken before duct sealing with the registers and grills
temporarily sealed off (taped) from the rest of the house and the duct blower
pressurizing the ducts with respect to the house and outside. Enter the duct
blower fan flow rate in CFM and the corresponding ducts-to-house pressure
difference in Pascal. You might want to open a window during the
measurement to ensure that there is no pressure differential between the house
and the outside. Required.
• Before Duct Sealing Outside Fan Flow, Duct Pressure, and House Pressure
WRT Outside – These measurements are taken before duct sealing with the
registers and grills temporarily sealed off (taped) from the rest of the house, the
duct blower pressurizing the ducts, and the blower door pressurizing the house
such that the house-to-outdoor pressure difference is maintained at the same
level as the ducts-to-outdoor pressure difference. Enter the duct blower fan flow
rate in CFM and the ducts-to-outdoor and house-to-outdoor pressure differences
in Pascal. Note, for accurate determination of the duct leakage, the house-to-
outdoor pressure difference should be the same as, or as close as possible to, the
ducts-to-outdoor pressure difference. Required.
• After Duct Sealing Total Fan Flow and Duct Pressure – These
measurements are taken after duct sealing with the registers and grills
temporarily sealed off (taped) from the rest of the house, and the duct blower
pressurizing the ducts with respect to the house and outside. Enter the duct

11-16 The Weatherization Assistant User’s Manual (Version 8.9)
Chapter 11: NEAT and MHEA Common Elements
blower fan flow rate in CFM and the corresponding ducts-to-house pressure
difference in Pascal. You might want to open a window during the
measurement to ensure that there is no pressure differential between the house
and the outside. Required.
• After Duct Sealing Outside Fan Flow, Duct Pressure, and House Pressure
WRT Outside – These measurements are taken after duct sealing with the
registers and grills temporarily sealed off (taped) from the rest of the house, the
duct blower pressurizing the ducts, and the blower door pressurizing the house
such that the house-to-outdoor pressure difference is maintained at the same
level as the ducts-to-outdoor pressure difference. Enter the duct blower fan flow
rate in CFM, and the ducts-to-outdoor and house-to-outdoor pressure
differences in Pascal. Note, for accurate determination of the duct leakage, the
house-to-outdoor pressure difference should be the same as, or as close as
possible to, the ducts-to-outdoor pressure difference. Required.
Pressure Pan Measurements for Duct Leakage Sub-Form (For MHEA Only)
A correspondence has been found to exist between the sum of pressure pan
measurements from all of the supply registers in a manufactured home and the duct
leakage to the outside. The pressure pan measurements, that is, the duct-to-house
pressure difference at each supply register, are taken with the blower door
depressurizing the house to 50 Pascal and a pressure pan attached to a manometer.
No pressure difference indicates that the supply duct leading to the register is at the
same pressure as the house and that little or no leaks to the outside exist in that
branch of the ducts. The sum of these measurements from all supply registers
corresponds to the total leakage of the ducts to the outside. This method of
estimating duct leakage is normally appropriate only for manufactured homes.
This sub-form includes a Whole House Blower Door Measurements data block, a
Duct Operating Pressure data block, and a Pressure Pan Measurements data block
(see Figure 11.8). The Whole House Blower Door Measurements data block is the
same as used for evaluation of air leakage without consideration of duct leakage,
discussed earlier in this chapter. Entries for the Duct Operating Pressure data block
are the same as for all other duct leakage measurement methods and will not be
described here. They are discussed under “Common Entries on the Duct Leakage
Sub-Forms – Duct Operating Pressures,” earlier in this chapter.

The Weatherization Assistant User’s Manual (Version 8.9) 11-17
Chapter 11: NEAT and MHEA Common Elements
Figure 11.8. The Pressure Pan Measurements for Duct Leakage sub-form (MHEA only).
• Before Weatherization (Existing), Air Leakage Rate and House Pressure
Difference – If pre-weatherization blower door measurements are available,
enter the measured air leakage rate in units of CFM (cubic feet per minute) and
the corresponding house pressure difference in units of Pa (Pascal). The air
leakage rate is normally measured at a pressure differential of 50 Pa, if such can
be reached. Leave the fields blank if blower door measurements are
unavailable. NEAT and MHEA will use this information only to estimate
energy savings from air sealing. The entries do not impact the energy saving
estimates for other measures. The default for House Pressure Difference is 50
Pa. Optional.
• After Weatherization (Target or Actual), Air Leakage Rate and House
Pressure Difference – Enter the post-weatherization air leakage rate in units of
CFM (cubic feet per minute) and the corresponding house pressure difference in
units of Pa (Pascal). If you are entering data before performing any work on a
house, and your audit procedure has established a “target” post-weatherization
air leakage rate, enter the value here. If the target air leakage information is in
air changes per hour (ACH) at natural conditions, an approximate conversion
may be accomplished by multiplying the ACH by one-third of the volume of
the house to obtain air leakage rate in CFM at 50 Pa (CFM50). If no target
value is available and no pre-retrofit air leakage data has been entered,
established default values may be entered (e.g., 2500 CFM at 50 PA). If no air
sealing work is deemed necessary and no other weatherization measure is likely
to reduce air leakage, enter the pre-weatherization blower door measurements in
the post-weatherization data fields. If a post-weatherization blower door test is
eventually conducted, you may re-run the audit using these blower door
measurements to verify the previous results or maintain a record of actual air
leakage reduction and energy savings accomplished. The values entered for

11-18 The Weatherization Assistant User’s Manual (Version 8.9)
Chapter 11: NEAT and MHEA Common Elements
post-weatherization leakage rate can affect the savings of other measures,
particularly HVAC measures. The default for House Pressure Difference is 50
Pa. Required.
• Before Duct Sealing Sum of Pressure Pan Measurements – Enter the pre-
duct sealing sum of the pressure differentials between the supply duct registers
and the house with the house depressurized to 50 Pa with respect to the outside.
Required.
• After Duct Sealing Sum of Pressure Pan Measurements – Enter the post-
duct sealing sum of the pressure differentials between the supply duct registers
and the house with the house depressurized to 50 Pa with respect to the outside.
Required.
11.3 Duct/Infiltration – Optional Forms
The Weatherization Assistant has an optional capability of documenting additional
air and duct leakage measurements that may be taken during the audit for
diagnostic purposes. These measurements are entered on three optional forms
under the Ducts/Infiltration tab in the “NEAT Audit” and “MHEA Audit”
windows: the Optional Blower Door and Zonal Pressures form, the Optional
Pressure Balance form, and the Optional Pressure Pans form. Below are the
descriptions of the procedures for obtaining the measurements and recording them
on these forms.
Optional Blower Door and Zonal Pressures
Multiple blower door tests may be conducted during an audit, perhaps to assess the
effects of weatherization measures (e.g., high density blown insulation installation)
on the air and duct leakage rate, during different stages of weatherization, or during
an inspection. The Optional Blower Door and Zonal Pressures form (see Figure
11.9) allows recording any additional blower door measurements as well as zonal
pressure and/or pressure pan readings taken during the blower door tests. Multiple
records of data may be entered accommodating any number of sets of readings.
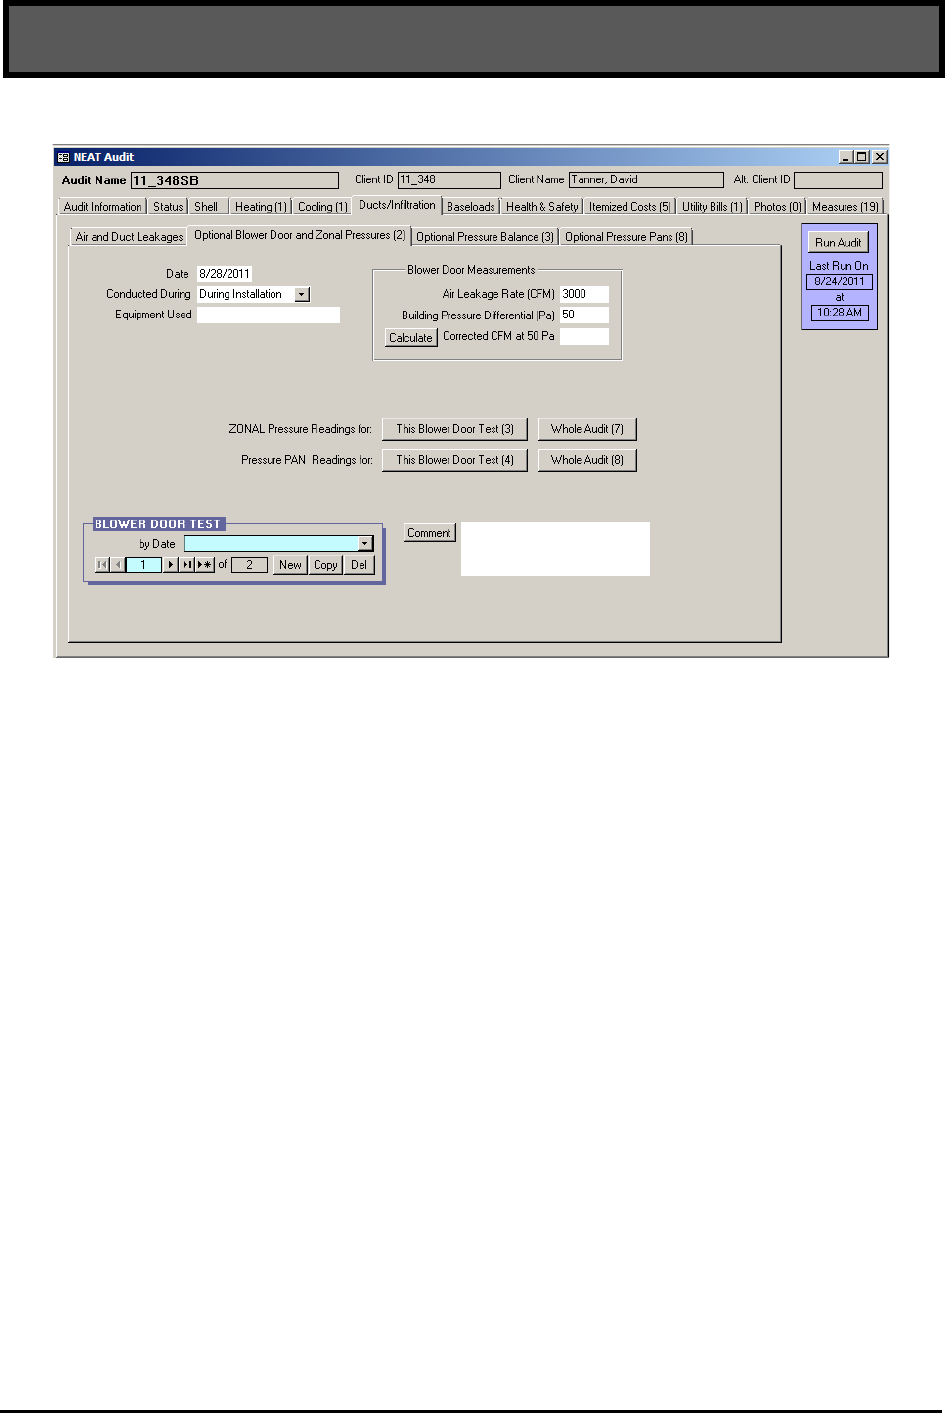
The Weatherization Assistant User’s Manual (Version 8.9) 11-19
Chapter 11: NEAT and MHEA Common Elements
Figure 11.9. The Optional Blower Door and Zonal Pressures form under the
Main Menu’s “NEAT” button.
Enter when the blower door test was conducted in the Date field. The default date
will be the current date. Entering the Date and any other field on the form will
preserve the record, allowing all other fields to be optional. Select the occasion
when the test was conducted using the Conducted During drop-down list. The
choices are Audit, Pre-Installation, During Installation, Post-Installation,
Inspection, and Other. Enter the name of the equipment used for taking the
measurements in the Equipment Used field. Enter the blower door measurements
including the Air Leakage Rate in CFM and the corresponding Building Pressure
Differential with respect to outside in Pascal. If the pressure differential is other
than 50 Pascal (which occurs in dwellings with high air leakage where 50 Pa house
pressure cannot be reached), use the “Calculate” button to have the audit provide
the equivalent air leakage rate at 50 Pa in the Corrected CFM at 50 Pa field. Use
the Blower Door Test record navigation block to access additional blower door
tests or create new ones. Enter any comments pertaining to the current blower door
test in the Comment field.
If Audit has been selected in the Conducted During drop-down list, you will be
asked on exiting the form if you wish to overwrite any existing Pre-retrofit blower
door measurements entered on the Air and Duct Leakages form – the values used

11-20 The Weatherization Assistant User’s Manual (Version 8.9)
Chapter 11: NEAT and MHEA Common Elements
by the audits in computing energy savings from infiltration reduction efforts – with
the leakage rates just entered. Choose “OK” to copy the data to the Air and Duct
Leakages form or “Cancel” to reject the offer. Data on the Optional Blower Door
and Zonal Pressures sub-form will be unaffected, regardless of your choice.
Zonal pressures are pressure differences between the living zone of the house
where the blower door is installed and other zones of the house, such as attics,
basements, attached garages, etc. Zonal pressure readings taken during blower door
tests may help identify the possible location of leakage sites, locate where the
functioning air barrier is, or identify potential health and safety problems
associated with a combustion appliance.
Zonal pressure readings can be recorded for a specific blower door setup using the
“This Blower Door Test” button displayed on the form next to the ZONAL
Pressure Readings for: text. Selecting this button will display the Zonal Pressures -
<Date> - <Conducted During> sub-form (see Figure 11.10). If you are revisiting
this form, your entries from the Date and Conducted During fields on the parent
form will be displayed following the “Zonal Pressures” header. On this form you
may enter the name of the zone using the Location drop-down list or by typing a
new location if it is not listed. Enter the corresponding pressure differential in
Pascal in the Pressure field. Select the Ducts Present checkbox if any ducts are
present in the zone. You may enter any comments pertaining to each entry in the
Comment field.
Figure 11.10. The Zonal Pressures sub-form.
Zonal pressure readings recorded for all zones from all blower door setups can be
viewed and altered using the “Whole Audit” button displayed next to the “This
Blower Door Test” button. Selecting this button will take you to the Zonal

The Weatherization Assistant User’s Manual (Version 8.9) 11-21
Chapter 11: NEAT and MHEA Common Elements
Pressures – <Audit> sub-form, which is similar to Zonal Pressures sub-form
accessed using the “This Blower Door Test” button, except for an additional
Blower Door Test column that lists the Date and Conducted During information
you have entered for each blower door setup. The <Audit> indicated in the header
is the Audit Name designated on the Audit Information Form.
The “This Blower Door Test” button and the “Whole Audit” button associated
with the Pressure PAN Readings for: text on the Optional Blower Door and Zonal
Pressure tab (see Figure 11.9) behave in the same manner as the analogous buttons
associated with the zonal pressure readings, described above. They allow you to
view and alter either pressure pan readings for the specific blower door setup
currently being viewed on the form (see Figure 11.11) or pressure pan readings
recorded for all blower door setups. If revisiting the sub-form for “This Blower
Door Test,” the readings from the current blower door setup, your entries from the
Date and Conducted During fields on the parent form will be displayed following
the “Pressure Pans” header. If viewing readings for the “Whole Audit,” the sub-
form will have an additional Blower Door Test column listing the Date and
Conducted During information you have entered for each blower door setup. For a
discussion on the use of pressure pans and the information entered on the Pressure
Pans sub-form, see the section, “Optional Pressure Pans,” which follows.
Figure 11.11. The Pressure Pans sub-form.

11-22 The Weatherization Assistant User’s Manual (Version 8.9)
Chapter 11: NEAT and MHEA Common Elements
Optional Pressure Balance
Pressure Balance measurements help identify factors within the building envelope
that may increase infiltration. When the air handler of a central forced air furnace
or air conditioner is on, it supplies conditioned air to rooms throughout a house.
The supplied air is intended to be returned to the furnace or air conditioner through
the return registers. If supply air is blocked from reaching a return, pressure
differences can be created between the space and the location of the return
register(s). This can hinder the supply air from being delivered to the space as well
as create a negative pressure in the remainder of the house, increasing infiltration.
The Optional Pressure Balance form (see Figure 11.12 ) allows you to record
pressure differences between various rooms of the house and the space where the
return registers exist. The measurements are taken with the air handler operating.
The measurements do not involve the use of a blower door.
Enter the name of the space using the Location drop-down list or by typing a new
location if it is not listed. Enter the pressure differential in Pascal measured
between the room and the location where the return registers exist before, after, or
both before and after any pressure balancing efforts (such as undercutting a door)
in the Initial and Final pressure fields. You may enter comments pertaining to each
entry in the Comment field.
Figure 11.12. The Optional Pressure Balance form under the Main Menu’s
“NEAT” button.

The Weatherization Assistant User’s Manual (Version 8.9) 11-23
Chapter 11: NEAT and MHEA Common Elements
Optional Pressure Pans
Pressure pan readings are pressure differences between the house and the supply or
return registers measured during a blower door test by attaching a digital
manometer to a pressure pan that fits snugly over the register. Pressure pan
readings may help identify the possible location of duct leakage. No pressure
difference indicates that the duct leading to the register is at the same pressure as
the house and that little or no leaks to the outside exist in that branch of the ducts.
Pressure pan readings can be recorded on the Optional Pressure Pans form (see
Figure 11.13) under the Ducts/Infiltration tab in the “NEAT Audit” and MHEA
Audit” windows.
Enter an optional Register # to uniquely identify the register, possibly referenced in
a drawing. Enter the location of the register using the Location drop-down list or
by typing a new location if it is not listed. Identify the register as Supply or Return
using the Register Type drop-down list. Enter the pressure differential in Pascal
between the register and the home before, after, or both before and after any duct
sealing efforts in the Initial Pressure and Final Pressure fields. NEAT and MHEA
audits do not use this information in any calculation. This form is to assist you in
identifying duct leakage and potential locations for duct sealing. You may enter
comments pertaining to each entry in the Comment field.
Figure 11.13. The Optional Pressure Pans form.

11-24 The Weatherization Assistant User’s Manual (Version 8.9)
Chapter 11: NEAT and MHEA Common Elements
11.4 Base Loads – Water Heating
The Water Heating form (see Figure 11.14) under the Baseloads tab in the “NEAT
Audit” and “MHEA Audit” windows is used to enter information necessary to
evaluate four water heating measures: tank insulation, pipe insulation, low-flow
showerheads, and water heater replacement. Only those data entry fields necessary
to evaluate the water heating measures you have turned on in the Library Measures
form (see Section 14.5, Library Measures) of the Setup Library associated with the
audit will appear on the form. If none of the four water heating measures are to be
evaluated for a specific audit, the Water Heating form need not be accessed.
If water heater replacement is to be evaluated, the existing water heater or its
equivalent must be found in the database provided by the program. Both NEAT
and MHEA will evaluate replacing an existing unit with a unit using a different
fuel. However, if this is to be considered, the replacement costs should include
whatever cost is involved in making the fuel for the replacement unit available
(e.g., piping the natural gas to the location of the replacement unit).
Figure 11.14. The Water Heating form under the Main Menu’s “NEAT” button.
The Water Heating form is divided into four sections: the “Existing Equipment”
description, the “Shower Heads” section, both on the left of the form, the

The Weatherization Assistant User’s Manual (Version 8.9) 11-25
Chapter 11: NEAT and MHEA Common Elements
“Replacement” equipment description on the right of the form, and the Comment
field, water heater record creation buttons and buttons for the entry of Optional
Water Heater Details at the bottom of the form. Always enter information on the
general description of the existing water heater first. The Optional Water Heater
Details buttons can be used to document an extensive number of water heater
measurements and observations made while auditing a dwelling.
Below are descriptions of the individual data items and controls found on the
Water Heating form. The optional information that can be entered using the
Optional Water Heater Details buttons is described in Section 11.13, Optional
Water Heater Details.
Existing Equipment Data Block
• Manufacturer and Model – Enter the existing water heater’s manufacturer and
model number. You may select the manufacturer and model number from the
database using the drop-down lists or type them in if they are not listed.
However, if you are evaluating water heater replacement, you must select the
manufacturer and model of the unit or its equivalent from the database in order
for the audit to provide the efficiency data necessary to evaluate the
replacement. Selecting a manufacturer from the “Manufacturer” drop-down list
first will restrict the listings in the “Model” drop-down list to those models of
that manufacturer and make the selection of model easier. Otherwise, the Model
list will include all models from all manufacturers. Conditionally required.
• Fuel Type – Select the type of fuel used by the water heater. The choices are
Natural Gas, Electricity, and Propane. If the manufacturer and model have been
selected from the database, this field will be entered automatically. Required.
• Location – Select the location of the existing water heater from the drop-down
list. The choices are Heated Space, Unconditioned Space, and Unintentionally
Heated Space. A Heated Space is purposely heated to the living space
temperature, possibly under thermostat control or using a space heater. A
basement may be considered a heated space if maintained at the living space
temperature. An Unintentionally Heated Space is partially heated by a heat
source in the space that adds heat unintentionally. For example, a basement
without heating registers, but having a furnace, boiler, water heater, or
uninsulated ductwork would be unintentionally heated. An Unconditioned

11-26 The Weatherization Assistant User’s Manual (Version 8.9)
Chapter 11: NEAT and MHEA Common Elements
Space is not heated because there are no sources of heat in the space other than
conduction through walls, floors, and perhaps insulated ductwork. The choice
will affect the savings of the water heating measures. Required.
• Size – Enter the capacity of the water heater in gallons. If the manufacturer and
model have been selected from the database, this field will be entered
automatically. If you are evaluating water heater replacement and the capacity
of the replacement unit differs substantially from the capacity of the existing
unit, you will receive a warning. Required for replacement.
• Water Heater Wrap Present –Use this checkbox to indicate if water heater
tank insulation already exists. If the Water Heater Tank Insulation measure has
been turned off in the Library Measures form of the Main Menu’s “Setup
Library” button (see Section 14.5, Library Measures), this checkbox will not
appear.
• Water Heater Pipe Insulation Present – Use this checkbox to indicate if pipe
insulation exists on at least the first five feet of pipe exiting the water heater. If
the Water Heater Pipe Insulation measure has been turned off in the Library
Measures form of the Main Menu’s “Setup Library” button (see Section 14.5,
Library Measures), this checkbox will not appear.
• Rated Input and Input Units – Enter the rated input of the water heater in
units selected. The choice for input units are kBtu and kW. If the manufacturer
and model have been selected from the database, this field will be entered
automatically. Required for replacement.
• Energy Factor and Recovery Efficiency – These fields display the Energy
Factor and Recovery Efficiency of the water heater if the manufacturer and
model have been selected from the database. These fields are not displayed if
the Water Heater Replacement measure has been turned off on the Library
Measure form of the Main Menu’s “Setup Library” button (see Section 14.5,
Library Measures). Uneditable.
• Original Tank Insulation R-value, Thickness, and Type – If the Water
Heater Wrap Present checkbox is left unchecked, the Original Tank Insulation
fields for entering the R-value, thickness, and type of tank insulation are
displayed. Enter either the R-value or both the type and thickness of tank

The Weatherization Assistant User’s Manual (Version 8.9) 11-27
Chapter 11: NEAT and MHEA Common Elements
insulation. If you enter the R-value, the Type and Thickness fields disappear. If
you enter the thickness, the R-value field disappears. Select the insulation type
using the drop-down menu. The choices are Fiberglass and Polyurethane. You
may remove the access plate or examine the relief valve penetration to view the
insulation and determine its characteristics. Conditionally required.
Shower Heads Data Block
If the Low-flow Showerheads measure has been turned off in the Library Measures
form of the Main Menu’s “Setup Library” button (see Section 14.5, Library
Measures), this data block will not appear. The entries are optional unless the
Showerheads measure is to be evaluated.
• Number of Shower Heads – Enter the number of showerheads used in the
house for which replacement with low-flow models needs to be evaluated.
• Shower Use – Enter the total time the showerheads are in use in minutes per
day for which replacement with low-flow models needs to be evaluated.
Combine the times for all showerheads being considered for replacement.
• Average GPM – Enter the average flow rate in gallons per minute of all
showerheads being considered for replacement. You can determine this easily
using a container of known volume and a stop watch.
Replacement Data Block
Most of the data items in the Replacement data block are uneditable. They are
automatically filled in after you select a replacement water heater from the “Pick
from Library” drop-down list. The fields are analogous to those described in the
Existing Equipment data block except they apply to the replacement unit. See the
discussions of these fields in the material above. The three additional fields are
discussed below. If the Water Heater Replacement measure has been turned off in
the Library Measures form of the Main Menu’s “Setup Library” button (see
Section 14.5, Library Measures), this data block will not appear.
• Pick from Library – Select the replacement water heater using the drop-down
list. The listed items are those you have entered in the Supply Library (see
“Additional Entries on the Hot Water Equipment and Refrigerator Forms” in

11-28 The Weatherization Assistant User’s Manual (Version 8.9)
Chapter 11: NEAT and MHEA Common Elements
Section 15.2, Materials/Labor Forms). If you do not have any replacement
water heaters in the Supply Library being accessed by this audit, you will
receive a notice giving you brief instructions on how to add these records.
• Installation Cost – If you have entered unit costs for your replacement water
heaters in the Supply Library, these costs will be copied into this field when a
unit is selected for use. You may alter this cost here if the unit cost changed.
Also, if the unit cost entered in the Supply Library does not include the labor
cost associated with installation, you would add it to this value, unless you
choose to enter this cost in the Additional Cost field. Required for replacement.
• Additional Cost – Enter any additional cost associated with installation of the
water heater not included in the value entered above. This may include labor
costs, delivery changes, or the cost of disposing of the old unit. Optional.
• Replacement Required – Use this checkbox to indicate that a water heater
replacement is necessary based on the inspection of existing unit. This may be
the result of an unsafe yet un-repairable existing system. NEAT and MHEA
will evaluate and recommend system replacement, regardless of its cost-
effectiveness.
• Include in SIR – If the Replacement Required checkbox is selected, the
Include in SIR checkbox will appear on the form. This checkbox allows you to
indicate that you wish to have the Water Heater Replacement measure included
in the calculation of the whole house (package) SIR for this audit. Measures not
included in the whole house SIR are normally related to health and safety.
Check the guidance for your program in deciding when you can mandate a
water heater be replaced and if the replacement can be excluded from the SIR
calculation. Even if the replacement is related to health and safety, if the
measure is shown to be cost-effective, you may choose to still include it in the
whole house SIR by selecting this checkbox. By doing so, it will not be seen as
a health and safety measure, thus preserving funds dedicated for such measures.
Another reason you may not want a measure included in the whole-house SIR
calculation is if it is being funded outside of the Weatherization Assistance
Program. Whether a measure is or is not included in the whole house SIR is
indication by its location in the list of measures produced for the Recommended
Measures Report (see Chapter 12, NEAT and MHEA Results).

The Weatherization Assistant User’s Manual (Version 8.9) 11-29
Chapter 11: NEAT and MHEA Common Elements
• Comment – You may enter comments pertinent to the water heating system or
associated retrofit measures directly in the Comment field on the form, or you
may enter them in the Comment Editor by selecting the “Comment” button to
the left of the field. The Comment Editor is similar to Window’s Notepad and
may be used to enter extended comments. The total comment may have up to
65,000 characters. Text from other sources may be copied and pasted into the
Comment Editor’s window. Any comment that is entered is displayed on the
Recommended Measures report and the Input Report available from the Audit
Information form (see Section 8.2, Audit Information). In addition, any
comment that is entered can be imported into any specific work order (see
Section 13.1, Work Order Information). Thus, you may wish to enter comments
related to any observation thaat might affect the installation of needed measures
or repair work. Optional.
11.5 Base Loads – Refrigerators
The Refrigerator form (see Figure 11.15) under the Baseloads tab in the “NEAT
Audit” and “MHEA Audit” windows is used to enter information necessary to
evaluate the Refrigerator Replacement measure. If this measure is not to be
evaluated for a specific audit, the Refrigerator form need not be accessed.
Figure 11.15. The Refrigerator form under the Main Menu’s “NEAT” button.

11-30 The Weatherization Assistant User’s Manual (Version 8.9)
Chapter 11: NEAT and MHEA Common Elements
The Refrigerator form is divided into four data blocks: the Existing Equipment
description and energy Consumption information for the existing refrigerator on
the left of the form, the description of the Replacement unit on the right, and the
comment field and record creation/deletion buttons at the bottom of the form.
Below are descriptions of the individual data items and controls found on the
refrigerator form.
Existing Equipment Data Block
• Manufacturer and Model – Enter the existing refrigerator’s manufacturer and
model number. You may select the manufacturer and model from the database
using the drop-down lists or type them in if they are not listed. Selecting a
manufacturer from the “Manufacturer” drop-down list first will restrict the
listings in the “Model” drop-down list to those models of that manufacturer and
make the selection of model easier. Otherwise, the Model list will include all
models from all manufacturers. If you select the manufacturer and model of the
unit from the database, the general characteristics of the unit and the energy
consumption data will be entered automatically. Optional.
• Style – Select the style of the existing unit from the drop-down list. The choices
are Top Freezer, Bottom Freezer, Side by Side, Single Door, Single Door
w/Freezer, and Other. If the manufacturer and model are selected from the
database, this information will be entered automatically. Optional.
• Defrost – Select the defrost characteristics of the existing unit from the drop-
down list. The choices are Automatic, Manual, Partial Automatic, and Other. If
the manufacturer and model are selected from the database, this information
will be entered automatically. Optional.
• Size - Enter the size of the existing unit in cubit feet. If the size of the existing
and replacement units are not within 20%, the programs will produce a warning
indicating a possible size problem related to the replacement. Optional.
• Location – Select the location of the existing refrigerator from the drop-down
list. The choices are Heated Space, Unconditioned Space, and Unintentionally
Heated Space. A Heated Space is purposely heated to the living space
temperature, possibly under thermostat control or using a space heater. A
basement may be considered a heated space if maintained at the living space

The Weatherization Assistant User’s Manual (Version 8.9) 11-31
Chapter 11: NEAT and MHEA Common Elements
temperature. An Unintentionally Heated Space is partially heated by a heat
source in the space that adds heat unintentionally. For example, a basement
without heating registers, but having a furnace, boiler, water heater, or
uninsulated ductwork would be unintentionally heated. An Unconditioned
Space is not heated because there are no sources of heat in the space other than
conduction through walls, floors, and perhaps insulated ductwork. The choice
will affect the savings of the water heating measures. Required.
• Height, Width, Depth [Available Space Dimensions] – Enter the dimensions
of the available space in inches, where the existing refrigerator is installed. If
entered, NEAT and MHEA use this information along with the dimensions of
the replacement unit to determine if the replacement unit could fit in the
available space and produce a warning if the replacement unit is oversized.
Optional.
Consumption Data Block
The Consumption data block accommodates entries required to estimate the
existing unit’s current annual consumption. This data can be obtained either by
selecting a unit from the database, reading the energy guide label of the unit, or
metering the energy consumption of the refrigerator.
If the consumption is to be estimated from an energy guide label or from values in
the database, the following three entries will be used.
• kWh/Yr – Enter the annual energy consumption listed on the energy guide
label for the existing unit, if one exists. If the manufacturer and model are
selected from the database, this data will be entered automatically. However,
you may change the value obtained from the database on this form. The entry is
not required if you are using metered consumption data. Conditionally required.
• Age – Select the age of the existing unit from the drop-down list. The choices
are Less than 5 years, 5 to 9 years, 10 to 14 years, and 15 or more years. If the
manufacturer and model are selected from the database, this information will be
entered automatically. The age in the database is based on the first year the
model was sold. If you know that the existing model is newer than that
indicated from the database, change the entry. The entry is not required if you
are using metered consumption data. Conditionally required.

11-32 The Weatherization Assistant User’s Manual (Version 8.9)
Chapter 11: NEAT and MHEA Common Elements
• Door Seal Condition – Select the entry that best describes the current condition
of the existing refrigerator’s door seals. The choices are Good, Fair – Some
Wear, and Poor – Gaps Visible. The entry is not required if you are using
metered consumption data. Conditionally required.
If you use metering to determine the consumption of the existing refrigerator, enter
data into the “Metered Consumption” portion of the Consumption data block.
• Metering Minutes – If you are using metered consumption data, enter the time
period in minutes for which you metered the existing refrigerator. Metering
should be performed for at least 180 minutes (3 hours). You should attempt to
prevent refrigerator door openings during the metering period. This entry is not
required if the kWh/yr field has been used to provide the consumption data.
Conditionally required.
• Meter Reading – Enter the metered consumption in kWh for the period
specified by the Metering Minutes. This entry is not required if the kWh/yr field
has been used to provide the consumption data. Conditionally required.
• Manual Defrost – Use this checkbox to indicate that the existing unit has
manual defrost. This entry is used for metered consumption only.
• Includes Defrost Cycle – Use this checkbox to indicate if the metered
consumption entered above included a defrost cycle. This can be determined if
you observe a peak in either the metered consumption or the monitored
refrigerator interior temperature which is several times higher than the
surrounding peaks. Estimation of annual refrigerator consumption from metered
data is less accurate if the metering period includes a defrost cycle.
• Adjusted Consumption – This field displays the adjusted annual energy
consumption in kWh/yr, based on the location, age, door seal condition, and the
presence of defrost cycle during metering. Uneditable.
• Refresh – Select this button to display or update the adjusted consumption after
you have entered or changed the data for the existing refrigerator.

The Weatherization Assistant User’s Manual (Version 8.9) 11-33
Chapter 11: NEAT and MHEA Common Elements
Replacement Data Block
The Replacement data block is displayed on the right side of the Refrigerator form.
Individual data items and controls presented in this data block allow you to enter
information on the replacement refrigerator. For most of the data items in this data
block, you may either type the information on this form or recall the data entered
on the Refrigerator form of the Main Menu’s “Supply Library” button (see
“Additional Entries on the Hot Water Equipment and Refrigerator Forms” in
Section 15.2, Materials/Labor Forms). If the Refrigerator Replacement measure
has been turned off in the Library Measures form of the Main Menu’s “Setup
Library” button (see Section 14.5, Library Measures), this data block will not
appear.
• Pick from Library – Use this drop-down box to select a replacement unit from
your library of refrigerators. If this field is used, the entry must match a unit
listed in your library. If you do not have any replacement refrigerators in the
Supply Library being accessed by this audit, you will receive a notice giving
you brief instructions on how to add these records. Optional.
• Manufacturer and Model – Enter the manufacturer and model number of the
replacement refrigerator. If the unit is selected from the library, this information
will be entered automatically. Optional.
• Style – Select the style of the replacement unit from the drop-down list. The
choices are Top Freezer, Bottom Freezer, Side by Side, Single Door, Single
Door w/Freezer, and Other. If the unit is selected from the library, this
information will be entered automatically. Optional.
• Defrost – Select the defrost characteristics of the replacement unit from the
drop-down list. The choices are Automatic, Manual, Partial Automatic, and
Other. If the unit is selected from the library, this information will be entered
automatically. Optional.
• kWh/Yr – Enter the annual energy consumption in kWh/Yr for the replacement
refrigerator. You may find this information from the energy guide label of the
replacement unit. If the unit is selected from the library and the energy details
were already provided in the library, this information will be entered
automatically. Required.

11-34 The Weatherization Assistant User’s Manual (Version 8.9)
Chapter 11: NEAT and MHEA Common Elements
• Size - Enter the size of the replacement unit in cubit feet. If the size of the
existing and replacement units are not within 20%, the programs will produce a
warning indicating a possible size problem related to the replacement. Optional.
• Height, Width, Depth, Size [Replacement Unit] – Enter the dimensions of the
replacement unit. If entered, NEAT and MHEA use this information along with
the dimensions of the available space, if entered in the Existing Equipment data
block, to determine if the replacement unit could fit in the available space.
NEAT and MHEA will produce a warning if the replacement unit is oversized.
If the unit is selected from the library and the dimensions were already provided
in the library, this information will be entered automatically. Optional.
• Installation Cost – Enter the installation cost of the replacement refrigerator
including the labor cost. If the unit was selected from the library and you have
entered unit costs for your replacement refrigerator in the Supply Library, these
costs will be copied into this field when a unit is selected for use. You may alter
this cost here if the unit cost changed. Also, if the unit cost entered in the
Supply Library does not include the labor cost associated with installation, you
would add it to this value, unless you choose to enter this cost in the Additional
Cost field. Required for replacement.
• Additional Cost – Enter any additional cost associated with replacing the
refrigerator not included in the value entered above. This may include labor
costs, delivery changes, or the cost of disposing of the old unit. Optional.
• Adjusted Consumption – This field displays an adjusted annual energy
consumption for the replacement unit in kWh/yr, based on the number of
occupants specified on the Client Information form of the Client main Menu
item (see Section 7.1, Client Information). The adjusted consumption will be
higher than the value entered/displayed in the kWh/yr field above, if the number
of occupants is larger increasing the frequency of opening the refrigerator door.
Uneditable.
• Annual Savings – This field displays the annual energy savings in kWh/yr,
which is the difference between the adjusted consumption of the existing and
replacement refrigerators. NEAT and MHEA use this value to determine the
SIR of the Refrigerator Replacement measure if the refrigerator is located in a
Heated Space. If the refrigerator is outside the heated space, additional

The Weatherization Assistant User’s Manual (Version 8.9) 11-35
Chapter 11: NEAT and MHEA Common Elements
temperature dependency adjustments will be made when computing the SIR
which cannot be performed until the audit is run. Uneditable.
• Comments – You may enter comments pertinent to the refrigerator
replacement directly in the Comment field on the form, or you may enter them
in the Comment Editor by selecting the “Comment” button to the left of the
field. The Comment Editor is similar to Window’s Notepad and may be used to
enter extended comments. The total comment may have up to 65,000
characters. Text from other sources may be copied and pasted into the
Comment Editor’s window. Any comment that is entered is displayed on the
Recommended Measures report and the Input Report available from the Audit
Information form (see Section 8.2, Audit Information). In addition, any
comment that is entered can be imported into any specific work order (see
Section 13.1, Work Order Information). Thus, you may wish to enter comments
related to any observation that might affect the installation of needed measures
or repair work. Optional.
11.6 Base Loads – Lighting Systems
The Lighting Systems form (see Figure 11.16) under the Baseloads tab in the
“NEAT Audit” and “MHEA Audit” windows is used to describe the existing
lighting systems for which you want to evaluate the replacement measure. If this
measure is not to be evaluated for a specific audit, the Lighting Systems form need
not be accessed. If the Lighting Retrofits measure has been turned off in the
Library Measures form of the Main Menu’s “Setup Library” button (see Section
14.5, Library Measures), this form will not be accessible.
Below are descriptions of the individual data items and controls found on the
Lighting Systems form.
• Light Code – The Light Code identifies the lighting systems to you and the
Weatherization Assistant. The light codes within a given audit must be unique
for lighting systems that are dissimilar in terms of lamp type, size, or use, or
which are retrofitted differently. NEAT automatically provides a default entry
for all new lighting systems that are created in the form of “LT#” where the “#”
is an integer insuring uniqueness of the light code. You may choose to enter
your own light code to include characters that indicate the room, location, or
any other lighting system characteristics. The light code may have up to 20

11-36 The Weatherization Assistant User’s Manual (Version 8.9)
Chapter 11: NEAT and MHEA Common Elements
characters, although space restrictions in many reports suggest a lesser number
of characters should be used (perhaps 3 to 5) to preserve readability. Entries are
not case-sensitive. NEAT and MHEA will also use the light codes in output
reports and work orders to identifying which lamps should be replaced. The
light codes may also be helpful when labeling your drawing of the house’s floor
plan. Required.
Figure 11.16. The Lighting Systems form under the Main Menu’s “NEAT” button.
• Room – Select the name of the room where the lamps being described are
located. The choices are Kitchen, Family Room, Living Room, Recreation
Room, Dining Room, Bedroom, Bathroom, Utility Room, and Other. This
information may be needed for reference to locate the lamps considered for
replacement. Optional.
• Location – Select the location of the lighting in the room from the drop-down
list. The choices are Ceiling, Floor, Table, Wall, and Other. This information
may be needed for reference to locate the lamps considered for replacement.
Optional.
• Lamp Type – Select the type of existing incandescent lamp from the drop-
down list. The choices are Standard, Flood, and Other. NEAT and MHEA use
this information along with the Size to provide the default wattage and cost for

The Weatherization Assistant User’s Manual (Version 8.9) 11-37
Chapter 11: NEAT and MHEA Common Elements
the replacement CFL. This information is reported in the Materials section of
the Recommended Measures report (see Section 12.2, Recommended Measures
Report) to indicate which replacement CFL type would be required. Required.
• Quantity – Enter the number of lamps represented by this record which are
candidates for CFL replacement. Required.
• Size – Enter the size of the existing incandescent lamp in watts. NEAT and
MHEA use this information along with the lamp type to provide a default
wattage for the replacement CFL and to calculate energy savings from the
replacement measure. Required.
• Use – Enter the average time period, in hours per day, the lamp is normally on.
The value must be 24 or less. This value has a significant effect on the savings
from lamp replacement. You should target the replacement measure to lamps
with substantial on-times. Required.
• CFL Size [Replacement CFL] – Enter the size of the replacement CFL in
watts. NEAT and MHEA use the standard replacement wattage closest to your
entry. The default for this field is the wattage of the CFL with approximately
the same light output as the existing incandescent lamp characterized by the
Size. Required.
• Additional Cost [Replacement CFL] – Enter any added cost, in dollars per
lamp, not normally associated with installation of a CFL and not included in the
standard material costs. Replacing a fixture’s harp to allow the CFL to fit, or
other size modification, are examples. Optional.
• Lighting System Record Navigation Block – The Lighting System record
navigation block is used to find and navigate to existing lighting system
descriptions for the audit being edited, copy or delete the currently accessed
lighting system description, or create a new lighting system description for the
audit. See Section 5.1, Form and Record Navigation, for information on using
the Weatherization Assistant’s record navigation blocks.
• Comments – You may enter comments pertinent to the lighting system directly
in the Comment field on the form, or you may enter them in the Comment
Editor by selecting the “Comment” button to the left of the field. The Comment

11-38 The Weatherization Assistant User’s Manual (Version 8.9)
Chapter 11: NEAT and MHEA Common Elements
Editor is similar to Window’s Notepad and may be used to enter extended
comments. The total comment may have up to 65,000 characters. Text from
other sources may be copied and pasted into the Comment Editor’s window.
Any comment that is entered is displayed on the Recommended Measures
report and the Input Report available from the Audit Information form (see
Section 8.2, Audit Information). In addition, any comment that is entered can be
imported into any specific work order (see Section 13.1, Work Order
Information). Thus, you may wish to enter comments related to any observation
that might affect the installation of measures. Optional.
11.7 Health and Safety
The forms under the Health & Safety tab in the “NEAT Audit” and “MHEA
Audit” windows, which include the Whole House, Equipment, and Building Shell
forms (see Figure 11.17 to 11.20), can be used to enter information about the
health and safety related observations in the house. Items on these forms, and on
the optional sub-forms under the Heating and Water Heating forms (see Sections
11.12, Optional Heating System Details, and 11.13, Optional Water Heater
Details), help identify potential health and safety hazards. Each form also provides
the opportunity to record extended comments. Below are descriptions of these
forms as well as the handling of health and safety hazards in the Weatherization
Assistant.
Figure 11.17. The Health & Safety - Whole House form under the
Main Menu’s “NEAT” button.

The Weatherization Assistant User’s Manual (Version 8.9) 11-39
Chapter 11: NEAT and MHEA Common Elements
Whole House
The Whole House form (see Figure 11.17) can be used to identify the need for
smoke detectors and carbon monoxide monitors and to record the carbon monoxide
concentrations in various rooms of the house. The carbon monoxide concentration
should be recorded for rooms having combustion-based space heating or water
heating, a kitchen having a gas/propane cook stove, and the living area.
Equipment
The Equipment form (see Figure 11.18) can be used to identify health and safety
issues related to equipment in the house. Worst case condition draft measurements
may be recorded for any combustion-based heating systems described under the
Heating tabs of NEAT and MHEA and any water heaters (see Figure 11.19).
Improper venting is a concern for wood stoves, fireplaces, clothes dryers, and
exhaust fans. Wood stoves and fireplaces may also have inadequate combustion air
and bathroom or kitchen exhaust fans may be missing or not operational.
Individual burner and oven carbon monoxide measurements can be recorded for a
gas cook stove and a gas leak associated with the gas stove may also be identified.
The existence of an air-to-air heat exchanger may be indicated.
Figure 11.18. The Health & Safety - Equipment form under the Main Menu’s
“NEAT” button.

11-40 The Weatherization Assistant User’s Manual (Version 8.9)
Chapter 11: NEAT and MHEA Common Elements
Figure 11.19. The Worst Case Draft Test for Heating System(s) sub-form.
Building Shell
The Building Shell form (see Figure 11.20) can be used to identify health and
safety issues in the attics, walls, and basement/crawlspaces of the house. The
health and safety issues that can be identified include wiring problems, water leaks,
Figure 11.20. The Health & Safety – Building Shell form under the Main Menu’s
“NEAT” button.

The Weatherization Assistant User’s Manual (Version 8.9) 11-41
Chapter 11: NEAT and MHEA Common Elements
plumbing leaks, moisture/mold problems, the presence of lead-based paint in walls,
asbestos in vermiculite attic insulation or wall siding, and recessed lighting, as well
as problems associated with the ventilation and the chimney/flue, and the need of a
vapor barrier in the basement. All areas can also be described as having Other
Problems, which could be explained in the comments.
Handling of Health and Safety Hazards
Most of the checkboxes on the forms under the Health &
Safety tab and on the optional details sub-forms under the
Heating and Water Heating forms, when checked, show a red
border around them (see Figure 11.21) indicating potential
hazards. All such hazards are reported under both the Heating
System and the Health & Safety Summary Reports for the
audit. For each potential health and safety hazard, remedial
measures are predefined under the User Defined Measures
form of the Setup Library (see Section 14.6, User Defined Measures).
If you have selected Feature 11, “Automatically generate itemized cost records for
health and safety problems,” on the Features form of the Main Menu’s
“Preferences” button (see Section 16.4, Features), when checking/unchecking a
checkbox indicating a potential hazard, you will be asked if you wish to
ADD/ERASE an associated health and safety measure to/from the Itemized Costs
form under the “NEAT Audit” or “MHEA Audit” windows (see Section 11.8,
Itemized Costs). In the same request to ADD a measure, you will be notified if the
cost of the measure has not been initialized, indicated by a default cost of $999.
You may use the button with three periods, , to the right of the checkbox on the
form, to go to the User Defined Measures form under the Main Menu’s “Setup
Library” button (see Section 14.6, User Defined Measures), which addresses the
specific health and safety item and allows you to initialize the cost. Thus, this
feature allows you to automatically generate health and safety measures to
supplement your recommended energy measures list.
11.8 Itemized Costs
The primary use of the Itemized Costs form under the “NEAT Audit” and “MHEA
Audit” windows is to describe costs you encounter during weatherization, such as
travel, administrative, or repair costs, or the costs of health and safety measures.
Figure 11.21. Two
checkboxes, one
indicating a hazard.

11-42 The Weatherization Assistant User’s Manual (Version 8.9)
Chapter 11: NEAT and MHEA Common Elements
The form was later expanded to include an ability to describe energy saving
measures defined by the user and not addressed under the Library Measures tab of
the Main Menu’s “Setup Library” button (see Section 14.5, Library Measures).
However, in such cases, since the measure is being defined by you, the user, you
must determine and enter the associated annual energy savings. Once fully defined
on the Itemized Costs form, a user-defined measure that saves energy is treated by
NEAT and MHEA the same as the library measures.
Itemized cost records may be created in three ways. First, you may define
measures by supplying entries to each individual data field on a blank Itemized
Costs form in the specific audit you are currently referencing. Second, NEAT and
MHEA provide you with a mechanism to predefine measures that you commonly
encounter by defining them in the Setup Library, then copying them into any audit
to which they apply. NEAT and MHEA also allow you to copy from a library of
predefined standard health and safety measures that is a part of all setup libraries
(see Section 14.6, User Defined Measures). Third, if you have selected Feature 11,
“Automatically generate itemized cost records for health and safety problems” on
the Features form of the Main Menu’s “Preferences” button (see Section 16.4,
Features), any health and safety issues you have identified on the Health & Safety
forms or under the Heating and Water Heating forms will create itemized cost
records to remediate the hazards (see “Handling of Health and Safety Hazards” in
Section 11.7, Health and Safety).
Entering a User-Defined Measure for an Individual Audit
Below are descriptions of the individual data items and controls found on the
Itemized Costs form as you would enter them individually for a specific audit. See
Figure 11.22 for an example of a simple cost measure and Figure 11.23 for an
example of a user-defined measure having energy savings. See the following
section, “Copying a Predefined Measure from the Setup Library,” for the
alternative means of providing these entries. See Section 12.2, Recommended
Measures Report, for references to this report in the field descriptions below.
• Measure Name – Enter a brief description of the measure. This description will
be displayed in the “Recommended Measure” column of the Recommended
Measures report.

The Weatherization Assistant User’s Manual (Version 8.9) 11-43
Chapter 11: NEAT and MHEA Common Elements
Figure 11.22. The Itemized Costs form under the Main Menu’s “NEAT” button.
A simple cost.
Figure 11.23. The Itemized Costs form under the Main Menu’s “NEAT” button.
A user-defined measure with energy savings.

11-44 The Weatherization Assistant User’s Manual (Version 8.9)
Chapter 11: NEAT and MHEA Common Elements
• Cost – Enter the total cost of the measure in dollars. The cost will be displayed
in the “Measure Cost” column under the Energy Saving Measure Economics
section of the Recommended Measures report. Required.
• Include in SIR – This checkbox allows you to indicate that you wish to have
the measure included in the calculation of the whole house (package) SIR for
this audit. Measures not included in the whole house SIR are normally related
to health and safety. An alternate reason for excluding a measure from the
whole house SIR is if it is funded outside of the Weatherization Assistance
Program. Whether a measure is or is not included in the whole house SIR is
indicated by its location in the list of measures produced for the Recommended
Measures Report (see Chapter 12, NEAT and MHEA Results). You must select
this checkbox in order to have the form present you with the fields necessary to
define a measure having energy savings.
• Material – If you enter a material associated with the measure, this material
will be displayed under the Materials section of the Recommended Measures
Report. Optional.
• Annual Energy Savings and Units – If the Include in SIR checkbox is
checked, the Annual Energy Savings and Units fields appear. If you are
describing an energy saving measure, enter an estimate of the annual energy
savings in the units selected in the adjacent drop-down list. The choices for
units are kWh, MBtu or Therms. You may need to use standard conversion
factors to arrive at savings in these units. This information is used in calculating
the measure's SIR. Required for an energy saving measure.
• Life – If annual energy savings is entered, the Life field will appear. Enter the
lifetime of the measure/materials associated with the measure in years. Industry
standards have been established for many materials. Required for an energy
saving measure.
• Fuel Saved – If annual energy savings is entered, the Fuel Saved field will
appear. Select the type of fuel saved by the user-defined measure. The choices
are Primary Heating Fuel, Water Heating Fuel, Natural Gas, Oil, Electricity,
Propane, Wood, Coal, Kerosene, and Other. Required for an energy saving
measure.

The Weatherization Assistant User’s Manual (Version 8.9) 11-45
Chapter 11: NEAT and MHEA Common Elements
• Comment – You may enter comments pertinent to the measure directly in the
Comment field on the form, or you may enter them in the Comment Editor by
selecting the “Comment” button to the left of the field. The Comment Editor is
similar to Window’s Notepad and may be used to enter extended comments.
The total comment may have up to 65,000 characters. Text from other sources
may be copied and pasted into the Comment Editor’s window. Any comment
that is entered is displayed on the Recommended Measures report and the Input
Report available from the Audit Information form (see Section 8.2, Audit
Information). In addition, any comment that is entered can be imported into any
specific work order (see Section 13.1, Work Order Information). Thus, you may
wish to enter comments related to any observation that might affect the
installation of needed measures or repair work. Optional.
• Itemized Cost Record Navigation Block – The Itemized Cost record
navigation block is used to find and navigate to existing measure descriptions,
copy or delete the currently accessed description, or create a new measure
description for the audit. See Section 5.1, Form and Record Navigation, for
information on using the Weatherization Assistant’s record navigation blocks.
Copying a Predefined Measure from the Setup Library
If you have predefined measures in your Setup Library (see Section 14.6,User
Defined Measures), the Itemized Costs form allows you to simply copy any of
these measures into an audit whenever they apply. All of the fields on the Itemized
Costs form will be entered automatically with the data provided by the measure
definition in the Setup Library. If any data existed in the form’s fields prior to the
selection, it will be overwritten. Most often, no further data entry will be necessary.
There are major differences between a measure defined by supplying individual
entries on the Itemized Costs form and one copied from the Setup Library. The
former can have only one material associated with it, the one entered in the
Material field on the form. However, a measure defined in the Setup Library can
have multiple material/labor components, each with its own individual cost
associated with it (see Section 14.6,User Defined Measures). In this latter case,
only the component designated by the user in the Setup Library (presumably the
major component) will be displayed in the Material field, followed by a plus sign
in parentheses, (+), (see Figure 11.23) indicating that there is more to the material
description of the measure than this single entry. The Cost field, however, will

11-46 The Weatherization Assistant User’s Manual (Version 8.9)
Chapter 11: NEAT and MHEA Common Elements
display the total cost of the measure, comprised of the sum of the individual
component costs defined in the Setup Library. If after copying a measure from the
Setup Library into an audit, the Cost field displays “$999”, it is an indication that
you have not initialized the cost of the measure in the Setup Library.
You may review the complete description of a user-defined measure in the Setup
Library by clicking on the small button with three periods in it,
, located just to
the right of the uneditable display of the measure name on the Itemized Costs form.
This button takes you to the actual Setup Library entry. Be aware that any changes
to the measure made at this point will change the measure description for all future
references. If you do access the measure in the Setup Library, use the X-box in the
upper right corner of the “Setup Library” window to close the Setup Library and
return to the Itemized Costs form.
Although the display of a measure copied from the Setup Library will show only
one component on the Itemized Costs form of the audit, the complete description
with all of its individual components will be available in any work order created
from the audit. Any modifications to the measure can be made at that time. See
Section 13.3, Measures (Work Order). If you have chosen to copy a predefined
measure from the Setup Library into an audit and you do not want this detailed
material costing to be forwarded to the work orders, click on the “Clear Reference
to User Defined Measure” button. You are then free to alter any of the entries
displayed on the audit’s Itemized Cost form for this item. The changes will not
affect the measure definition in the Setup Library. Only the single Material and
Cost visible on the Itemized Cost form will be associated with the measure and be
forwarded to the work orders. WARNING: Modifying the information on the
Itemized Costs form for a user-defined measure generated by copying an item from
your Setup Library without first clearing the reference to the predefined measure
will cause inconsistencies in data reported in the NEAT or MHEA Recommended
Measures report and that reported in the work orders.
The following summarizes the information regarding copying a predefined
measure from the Setup Library as it relates to the specific data items and controls
on the Itemized Costs form.
• Copy from User Defined Measure – If you wish to include a measure you
have previously described on the User Defined Measures form under the Main
Menu’s “Setup Library” button into an audit, select it from the “Copy from

The Weatherization Assistant User’s Manual (Version 8.9) 11-47
Chapter 11: NEAT and MHEA Common Elements
User Defined Measure” drop-down list. The drop-down list includes all
measures you have described on the User Defined Measures form in the Setup
Library accessed by the audit.
• Copy from Library Health and Safety Measures – If you wish to include a
measure from the library of health and safety measures into an audit, select it
from the “Copy from Library Health and Safety Measure” drop-down list. The
drop-down list includes fifty health and safety measures that come as part of the
program. Although all setup libraries contain these same health and safety
measures, the costs for the measures will be taken from the specific Setup
Library accessed by the audit.
• Referenced User Defined Measure – If you have selected a measure from the
Setup Library using either option above, this field will display the measure
name as given in the library. If the measure was selected from the “Copy from
Library Health and Safety Measures” drop-down list, the text “Health & Safety
Item #” appears in red in the uneditable field below this field, where # is a
unique number pre-assigned to each measure of the library of health and safety
measures. See Figure 11.24. Uneditable.
• Clear Reference to User Defined Measure – If a user-defined measure has
been copied from the Setup Library, this button can be used to remove the
reference of the measure in the audit from the user-defined measure defined in
the Setup Library. The detailed material/labor detail associated with the
measure in the Setup Library will no longer be available to any work order that
might be created from the audit. Only the information on the Itemized Costs
form remains as defining the measure. However, that information can be altered
without causing a discrepancy between data seen in the Recommended
Measures report and work orders generated from the audit.
The Itemized Costs form can be viewed and edited in the data sheet view (see
Figure 11.25). The data sheet view provides a summary of all measures entered on
this form and allows quick changes to multiple entries. However, care must be
taken if any changes are made from this view, as it may not be obvious which
measures have been copied from the Setup Library.

11-48 The Weatherization Assistant User’s Manual (Version 8.9)
Chapter 11: NEAT and MHEA Common Elements
Figure 11.24. The Itemized Costs form under the Main Menu’s “NEAT” button.
A measure copied from Library Health and Safety Measures.
Figure 11.25. Data sheet view of the Itemized Costs form.
Columns not displayed include “Fuel Saved,” “Health & Safety Item #,” and “Comment.”

The Weatherization Assistant User’s Manual (Version 8.9) 11-49
Chapter 11: NEAT and MHEA Common Elements
11.9 Utility Bills
The Weatherization Assistant has an optional feature of storing utility billing data
for the homes you weatherize and using that data to adjust energy savings
estimates from the measures. The Utility Bills form under the “NEAT Audit” and
“MHEA Audit” windows (see Figure 11.26) can be used to enter four sets of
energy use data: pre-retrofit heating, pre-retrofit cooling, post-retrofit heating, and
post-retrofit cooling energy use. NEAT and MHEA will compare their
consumption predictions with the pre-retrofit billing data (see “Heating and
Cooling Energy Consumption Comparisons” Section 12.2, Recommended
Measures Report). If the Billing Adjustment checkbox has been selected in the
Audit Information form (see “Billing Adjustment” in Section 8.2, Audit
Information), NEAT and MHEA will adjust their energy savings estimates and
develop a second set of recommended weatherization measures based on the actual
pre-weatherization energy consumption of the house. Post-retrofit billing data may
also be entered and stored with the other data for a house but is not used or
displayed by the programs. Computer software exists which can use both pre- and
post-weatherization billing data to derive actual energy savings estimates, possibly
useful in program evaluations.
The billing data feature works best with metered fuels, such as natural gas and
electric. Bulk fuels, such as propane or fuel oil, which are delivered in bulk and
stored in tanks at the house, are less appropriate. Unless deliveries are relatively
frequent and approximately the same amount of fuel remains in the tank at the time
of each delivery, use of billing data for these fuels can lead to substantial
inaccuracy.
Below are descriptions of the individual data items and controls found on the
Utility Bills form under the “NEAT Audit” and “MHEA Audit” windows.
• Type – Select the predominant energy end use, either Heating or Cooling, for
which the billing data is entered. NOTE: Billing data may include both heating
and cooling energy use when the same fuel is used for both end uses, such as in
a house with electric heating and cooling or a heat pump. In these cases, you are
advised to not use this feature unless you can successfully separate heating and
cooling end uses prior to entering the data. The billing data may also include
non-heating or non-cooling end uses, such as for cooking or water heating. In

11-50 The Weatherization Assistant User’s Manual (Version 8.9)
Chapter 11: NEAT and MHEA Common Elements
these cases, you will have to enter an estimate of this base load in a subsequent
field. Required.
Figure 11.26. The Utility Bills form under the Main Menu’s “NEAT” button.
• Period – Select whether the data being entered pertains to a Pre-Retrofit or
Post-Retrofit period. Only pre-retrofit data will be used for measure savings
adjustments. Required.
• Units – Select the units of energy use data, either Therms or kWh, depending
on the fuel source for the data being entered. Normally cooling data will be in
kilowatt-hours of electricity and heating data in either therms or kilowatt-hours.
The utility may document natural gas consumption in therms, mcf (thousand
cubic feet), or ccf (hundred cubic feet). Mcf and ccf can be converted to therms
by multiplying by a value obtained from the local gas utility. Because heat
content of natural gas varies according to composition, ask the utility for the
number of therms contained in a mcf or ccf delivered to homes in the area. This
value (in therms per ccf) should be entered in the Setup Library (see Section
14.3, Fuel Costs). Most natural gas contains approximately ten therms per mcf

The Weatherization Assistant User’s Manual (Version 8.9) 11-51
Chapter 11: NEAT and MHEA Common Elements
and one therm per ccf of natural gas. Other fuels may require additional
conversion, such as gallons of propane or oil. However, note the warning at the
beginning of this section regarding recording bulk fuel consumption. Required.
• Days in First Period – Enter the number of days included in the first billing
period. Subsequent periods are assumed to be contiguous, thus allowing
determination of their lengths. Required.
• Degree Days Base Temperature – The Utility Bills Data Entry screens
provide an option for entering heating degree days (HDDs) and cooling degree
days (CDDs) for natural gas and electricity billing data, respectively. The
degree-day information will not affect any adjustments to the measure savings.
It simply allows you to compare degree-days used by NEAT and MHEA with
those from the actual billing periods. Heating and cooling degree days are
available from local utilities, state energy offices or the U.S. Department of
Commerce National Weather Service, Asheville, NC.
If degree-day information is to be entered, base temperatures for these HDD or
CDD values are required. Assume a base temperature of 65 ºF for HDDs and 78
ºF for CDDs, unless different base temperatures are listed on the utility bills.
Optional.
• Base Load – Enter an estimate of the average base load consumption per month
in the units chosen in “Units” above. The period consumptions entered likely
result from not only heating or cooling, but also from use of appliances, such as
stoves, water heaters, or refrigerators. The Weatherization Assistant needs to
separate this “base load” consumption from the heating and cooling
consumption. This entry is an estimate of this base load consumption for an
average 30-day month.
To estimate the base load for the heating fuel in homes with fossil fueled
heating systems, select a billing period when the heating equipment did not
operate, most likely during the summer. This period should be one of normal
household occupancy – no long term visitors or household vacations. If the
billing period chosen is significantly more or less than 30 days, you should
adjust the consumption by the ratio of 30 over the number of days in the period.
This consumption in the units selected in the Units field is an estimate of the
heating fuel base load.

11-52 The Weatherization Assistant User’s Manual (Version 8.9)
Chapter 11: NEAT and MHEA Common Elements
To estimate the base load for a fuel with Type “Cooling,” select a billing period
with normal household occupancy having no or minimal electric heating or air-
conditioning consumption, most likely during fall or spring. Make any
adjustment for the period length, as described above. This adjusted kilowatt-
hours consumed is the base load.
During the audit runs, NEAT and MHEA will adjust the base load entries to
correspond to each of the billing periods, regardless of their duration. You may
wish to leave this field blank until after entering the actual billing data for the
periods. If possible, the programs will compute default values for the base loads
that reflect the period data entered. Optional.
• Comments – You may enter comments pertinent to each set of billing data
directly in the Comment field on the form, or you may enter them in the
Comment Editor by selecting the “Comment” button to the left of the field. The
Comment Editor is similar to Window’s Notepad and may be used to enter
extended comments. The total comment may have up to 65,000 characters. Text
from other sources may be copied and pasted into the Comment Editor’s
window. Any comment that is entered is displayed on the Recommended
Measures report and the Input Report available from the Audit Information
form (see Section 8.2, Audit Information). Optional.
Billing Periods
If you wish to enter billing data, ask the client for up to 12 months of utility bills. If
the client has discarded these bills, he or she may request consumption records
from the local utility. Or, the client may sign a release that grants you authority to
directly obtain the data. The billing periods entered must be consecutive. They may
extend from one year into the next, but must span one year or less. Thus, no two
periods can include any of the same days of the year in two years. The number of
periods entered must be 12 or less. Examples of entries are twelve consecutive
monthly readings, one annual consumption, or any number of consecutive periods,
12 or less, spanning less than a year. The following data are required for each
billing period within a set. They appear on the right side of the input screen in a
tabular format.
The data need not be entered row by row, but, instead, could be entered column by
column. For example, if the meter is read on the 15
th
of every month, you may

The Weatherization Assistant User’s Manual (Version 8.9) 11-53
Chapter 11: NEAT and MHEA Common Elements
wish to travel down the month column entering 1, 2, 3, 4…, then moving to the
Day column entering 15 in each entry, using the down arrow key to travel from on
field in a column to the next.
• # – Enter consecutive integers for the entry numbers, beginning with 1.
Required.
• Month – Enter the number of the month in which the meter reading
corresponding to the billing period was taken (i.e., 1 for January, 2 for
February, etc.). Required.
• Day – Enter the day of month on which the meter reading corresponding to the
billing period was taken. Required.
• Usage – Enter the energy consumption during the billing period. The units are
those selected in the Units field to the left. Required.
• Degree Days – Enter the number of heating or cooling degree-days (depending
on the “Type” selected) corresponding to the period. Optional.
11.10 Photos (Audit)
If you have selected the “Use photo browser tab…” checkbox from the Features
tab under the Main Menu’s “Preferences” button (see Feataure 1 in Section 16.4,
Features), the Photos tab will appear under the “NEAT Audit” and “MHEA Audit”
windows. This feature allows you to access the Photos form (see Figure 11.27).
From this form, you may select, view, and edit digital photos for the current audit.
See Section 18.1, Digital Photos, for more information on this feature. The ability
to reference digital photos also exists under the Client and Main Menu’s “Work
Orders” buttons. Therefore, you should develop a consistent policy regarding
where you reference your photos.

11-54 The Weatherization Assistant User’s Manual (Version 8.9)
Chapter 11: NEAT and MHEA Common Elements
Figure 11.27. The Photos form under the Main Menu’s “NEAT” button.
11.11 Measures (Audit)
The Weatherization Assistant has an optional feature of creating work orders based
on the results from running NEAT or MHEA. An alternate use of the work order
feature is to modify the recommendations generated by NEAT and MHEA to
reflect actual work performed with associated actual costs or to add as much detail
to the measure descriptions as desired (see Chapter 13, Work Orders). The
Measures form (see Figure 11.28) under the “NEAT Audit” and “MHEA Audit”
windows is the starting point for implementing these capabilities.
Following execution of either NEAT or MHEA, the Measures form will list all
measure recommendations, similar to the listing in the Recommended Measures
report (see Section 12.2, Recommended Measures Report) except in a different
format. Any corresponding data items will have the same values in both.
Below are the descriptions of the individual data items and controls found on the
Measures form. The uneditable fields reflect the data and assumptions used by the
audits in generating the recommendations.

The Weatherization Assistant User’s Manual (Version 8.9) 11-55
Chapter 11: NEAT and MHEA Common Elements
Figure 11.28. The Measures form under the Main Menu’s “NEAT” button.
• # – This field displays the order in which measures appear on the
Recommended Measures report. Uneditable.
• Measure Name – This field displays the name of the measure as given under
the Library Measures tab of the Main Menu’s “Setup Library” button (see
Section 14.5, Library Measures) or on the Itemized Costs form for the audit
(see Section 11.8, Itemized Costs). Uneditable.
• Components – This field displays the component names associated with the
measure. These are primarily the Codes you have assigned to records during
entry of the building description in either NEAT or MHEA. For example a Wall
Code, “WL1.” Uneditable.
• WO? – The header name is short for “Include in Work Order?” Select this
checkbox for each measure you want transferred to a work order. Measures not
selected will not be sent to a work order. You may wish not to send a specific
measure to a work order if a work order already exists which includes the
measure or if you do not want to consider certain recommended measures.

11-56 The Weatherization Assistant User’s Manual (Version 8.9)
Chapter 11: NEAT and MHEA Common Elements
• Contractor –This field allows you to assign each measure to a contractor. The
selection will determine how many work orders are created from the measure
list. All measures assigned the same contractor will be included in the same
work order. The choices displayed in the drop-down list will be all agency
contacts defined as Contractor or Crew (see Section 6.2, Contacts (Agency)).
The entry is optional. All measures with an unassigned Contractor that are
selected for transfer to a work order will be assigned to the same work order
with the contractor undesignated. If you have assigned a Default Contractor to a
particular measure in the Setup Library (see “Default Contractor/Crew” under
“The General Task Description” in Section 14.6, User Defined Measures) and
that measure is recommended, the default contractor will automatically be
entered for you. However, you may still change the selection if you desire.
Optional.
• Cost Center – If you are tracking costs that are incurred by different funding
sources or programs, assign the cost of implementing this particular measure to
the appropriate Cost Center. The choices available in the drop-down list will be
those you have defined under the Cost Center tab on the Main Menu’s
“Agency” button for your agency (see 6.3, Cost Centers). If the entry is left un-
assigned, work orders can still be developed, but total costs over multiple audits
will not be tracked. The costs assigned to the various cost centers are not the
estimated costs displayed on this Measures tab. They are the actual costs
declared in the work orders themselves (see “Quantity (Actual)” and “Unit Cost
(Actual)” under “The Materials/Labor Details Sub-Form” in Section 13.3,
Measures (Work Order)). If you have assigned a Default Cost Center to a
particular measure in the Setup Library (see “Default Cost Center” under “The
General Task Description” in Section 14.6, User Defined Measures) and that
measure is recommended, the default cost center will automatically be entered
for you. However, you may still change the selection if you desire. Optional.
• <Est
. Cost> – This field displays the estimated cost used by the audits to make
their initial recommendations, which may not be the same as actual costs
following implementation of the measures, as referred to above. The angle
brackets surrounding the header name are to remind you that the values
displayed in the column could be the sum of individual component costs and
that the breakdown of the total may be viewed by using the “Costs” buttons to
the right of the entries. Uneditable.

The Weatherization Assistant User’s Manual (Version 8.9) 11-57
Chapter 11: NEAT and MHEA Common Elements
• Est. SIR – This field displays the estimated SIR used by the audits to make
their initial recommendations, which may not be the same as actual SIRs seen
following implementation of the measures. Uneditable.
• Costs (button) – Selecting this button will display the Unit Costs for Measure
sub-form, which shows a breakdown of the costs for the standard audit
measures. The entries of the sub-form are uneditable. For measures copied to
the audit from the Setup Library (see Section 11.8, Itemized Costs), this sub-
form will include as many costing components as were defined in the Setup
Library (see “The Materials/Labor Details Sub-Form” in Section 14.6, User
Defined Measures).
• Select All, UnSelect All, Invert Select (buttons) – The “Select All,”
“UnSelect All,” and “Invert Select” buttons allow you to accept all of the
recommended measures, reject (unselect) all, or invert the current selection
under WO?.
• Include Details for Materials – Select this checkbox if you wish to transfer the
material details, including the estimated costs, associated with the selected
measures to the work orders. This will ensure that the estimated costs in the
work orders match those used by the audit, as seen in the detail displayed by
selecting the “Costs” buttons on the form. You may choose to leave the
checkbox unchecked and create work orders with no predefined cost data
associated with the measures. This may be chosen in order to enter costing of
the measures in the work orders, perhaps expected to have greater detail than
available from the estimated costs used by the audits. However, the cost data
used by the audits will still be available to you in the work orders and you may
still transfer these costs to the work orders, measure by measure, if desired.
• Create Work Order(s) – Select this button when you are ready to create the
work orders based on the information provided on the Measures form. If you
have previously created work orders from this specific audit, the Create Work
Order sub-form (see Figure 11.29) will be displayed asking your preference
among three options:

11-58 The Weatherization Assistant User’s Manual (Version 8.9)
Chapter 11: NEAT and MHEA Common Elements
1. SAVE the previously
existing work orders and
create new ones. NOTE,
this could lead to duplicate
measures in multiple work
orders.
2. REPLACE the previously
generated work orders with
new ones, or
3. CANCEL the request to
create work orders.
Any work orders not created from this audit will be unaffected by the request to
create work orders from the Measures form of this audit. Thus, if you used the
Work Orders form under the Main Menu’s “Clients” button to create work
orders for a client, then ran an audit for the same client and asked to create work
orders based on the audit recommendations, the two sets of work orders will
exist for the same client. This is intended to address situations where agencies
may implement some measures outside an audit (such as from a priority list),
but use the audit for recommendations on other measures.
The program will next
display a window (see
Figure 11.30) indicating
how many work orders
were created as a result
of your selections on the
Measures form. This
should correspond to the
number of unique
contractors, including
undesignated, you indicated on the form. Selecting the “OK” button will take
you to the Main Menu’s “Work Orders” button for the first work order. Having
created work orders from the audit recommendations, you are prepared to make
any modifications to them before printing out the actual work orders. See
Chapter 13, Work Orders, for additional information.
Figure 11.29. The Create Work Order sub-form.
Figure 11.30. The Create Work Order window.

The Weatherization Assistant User’s Manual (Version 8.9) 11-59
Chapter 11: NEAT and MHEA Common Elements
11.12 Optional Heating System Details
The Optional Heating System Details buttons on the Heating form under the Main
Menu’s “NEAT” button and Heating [Primary] form under the Main Menu’s
“MHEA” button (see Figure 11.31) can be used to document an extensive number
of heating system measurements and observations made while auditing a dwelling.
The measurements and observations are entered on the sub-forms accessed from
these buttons. Some of these data items help to identify potential health and safety
hazards. You must complete the description of the current heating system before
accessing these optional sub-forms. Not all buttons will be applicable to the
heating system you describe on the Heating form. No attempt is made in this
manual to describe correct procedures for obtaining the measurements or
performing the inspections. You should refer to literature on standard HVAC
practices or consult with a qualified HVAC contractor. Other than the indication of
potential health and safety issues, the information entered on the sub-forms is only
for documentation, and not used anywhere else in the Weatherization Assistant.
Below are brief descriptions of the Optional Heating System Details buttons found
on the Heating forms. Each form allows entry of an extended comment if
necessary. Each form must be closed before any other form can be accessed. Close
the forms using the customary Windows X box in the upper right corner.
Figure 11.31. The Optional Heating System Details buttons on the Heating
form of the Main Menu’s “NEAT” button (above) and Heating [Primary] form
of the Main Menu’s “MHEA” button (below).
Operational Tests
Selecting the “Operational Tests” button displays the Operational Tests for Heating
System sub-form (see Figure 11.32), which allows recording information about the
operation of the heating system. Three groups of measurements can be recorded:
flue gas analysis, carbon monoxide measurements, and the heat rise across the heat
exchanger. For each item in these groups, pre-retrofit (i.e., during the “Audit”) and
post-retrofit (i.e., during the “Inspection”) measurements can be recorded. On

11-60 The Weatherization Assistant User’s Manual (Version 8.9)
Chapter 11: NEAT and MHEA Common Elements
exiting the form, either the pre-retrofit or post-retrofit Steady State Efficiency entry
can replace the steady state efficiency previously entered on the Heating form if
you indicate so by choosing “Yes” on the screen that appears when you exit either
of the two fields. Optional.
Vent Tests
Selecting the “Vent Tests” button displays the Venting Tests for Heating System
sub-form (see Figure 11.33), which allows recording information about the
characteristics of the flue and damper as well as pre- and post-retrofit draft
measurements on the flue associated with the heating system. Any potential safety
hazard due to venting related problems may also be noted. See the description
under Section 11.7, Health and Safety, on how the Weatherization Assistance
handles health and safety hazards. Optional.
Furnace Components
Selecting the “Furnace Components” button displays the Other Components for
Heating System sub-form (see Figure 11.34), which allows recording information
about the characteristics for various furnace components including the fan limit
controls, burner and pilot, blower and belts, accessories (humidifier, air cleaner,
and air conditioner coil), and air filter. In general, the type, size/dimensions,
operation settings, and physical condition can be recorded here. The potential
safety hazard due to malfunctioning fan limit control may also be noted. See the
description under Section 11.7, Health and Safety, on how the Weatherization
Assistance handles health and safety hazards. Optional.
Boiler Components
The “Boiler Components” button is available only on the Heating form under the
Main Menu’s “NEAT” button. Selecting this button displays the Other Boiler
Components for Heating System sub-form (see Figure 11.35), which allows
recording information about the components of the boiler, boiler type, its overall
condition, and the condition of the expansion tank and drain valve. Additional
information can be entered describing the associated controls and convectors. The
presence of asbestos associated with the boiler constitutes a potential hazard and
may also be noted. See the description under Section 11.7, Health and Safety, on
how the Weatherization Assistance handles health and safety hazards. Optional.

The Weatherization Assistant User’s Manual (Version 8.9) 11-61
Chapter 11: NEAT and MHEA Common Elements
Inspections
Selecting the “Inspections” button displays the Inspections for Heating System
sub-form (see Figure 11.36), which allows recording information about additional
items not addressed otherwise. The checkboxes, if selected, indicate potential
safety hazards associated with the heating system. See the description under
Section 11.7, Health and Safety, on how the Weatherization Assistance handles
health and safety hazards. Optional.
Thermostat
Selecting the “Thermostat” button displays the Thermostat Details for Heating
System sub-form (see Figure 11.37), which allows recording information about the
characteristics associated with the thermostat used by the heating system including
its type, set-points, and anticipator settings. Optional.
Figure 11.32. The Operational Tests for
Heating System sub-form.
Figure 11.33. The Vent Tests for Heating
System sub-form.

11-62 The Weatherization Assistant User’s Manual (Version 8.9)
Chapter 11: NEAT and MHEA Common Elements
Figure 11.34. The Other Components for
Heating System sub-form.
Figure 11.35. The Other Boiler Components
for Heating System sub-form (NEAT only).
Figure 11.36. The Inspections for Heating
System sub-form.
Figure 11.37. The Thermostat Details for
Heating System sub-form.

The Weatherization Assistant User’s Manual (Version 8.9) 11-63
Chapter 11: NEAT and MHEA Common Elements
11.13 Optional Water Heater Details
The Optional Water Heater
Details buttons on the Water
Heating form under the Main
Menu’s “NEAT Audit” or
“MHEA Audit” buttons (see
Figure 11.38) can be used to document an extensive number of water heater
measurements and observations made while auditing a dwelling. The
measurements and observations are entered on the sub-forms accessed from these
buttons. Some of these data items help to identify potential health and safety
hazards. You must complete the description of the water heater before accessing
these optional sub-forms. Not all buttons will be applicable to the water heater you
describe on the Water Heating form. No attempt is made in this manual to describe
correct procedures for obtaining the measurements or performing the inspections.
You should refer to literature on standard practices or consult with a qualified
contractor. The information entered on the sub-forms is only for documentation
and not used anywhere else in the Weatherization Assistant.
Below are brief descriptions of the Optional Water Heater Details buttons found on
the Water Heating form. Each form allows entry of an extended comment if
necessary. Each sub-form must be closed before any other sub-form can be
accessed. Close the forms using the customary Windows X box in the upper right
corner.
Operational Tests
Selecting the “Operational Tests” button displays the Operational Tests for Water
Heater sub-form (see Figure 11.39), which allows recording information about the
operation of the water heater. Two groups of measurements can be recorded: flue
gas analysis and carbon monoxide measurements. For each item in these groups,
pre-retrofit (i.e., during the “Audit”) and post-retrofit (i.e., during the “Inspection”)
measurements can be recorded. Optional.
Vent Tests
Selecting the “Vent Tests” button displays the Venting Tests for Water Heater sub-
form (see Figure 11.40), which allows recording information about the
Figure 11.38. The Optional Water Heater Details
buttons.

11-64 The Weatherization Assistant User’s Manual (Version 8.9)
Chapter 11: NEAT and MHEA Common Elements
characteristics of the flue and damper as well as pre- and post-retrofit draft
measurements on the flue associated with the water heater. Any potential safety
hazard due to venting related problems may also be noted. See the description
under Section 11.7, Health and Safety, on how the Weatherization Assistance
handles health and safety hazards. Optional.
Figure 11.39. The Operational Tests for
Water Heater sub-form.
Figure 11.40. The Vent Tests for Water
Heater sub-form.
Inspections
Selecting the “Inspections” button displays
the Inspections for Water Heater sub-form
(see Figure 11.41), which allows recording
information about additional items not
addressed otherwise. The checkboxes, if
selected, indicate potential safety hazards
associated with the heating system. See the
description under Section 11.7, Health and
Safety, on how the Weatherization
Assistance handles health and safety
hazards. Optional.
Figure 11.41. The Inspections for Water
Heater sub-form.

The Weatherization Assistant User’s Manual (Version 8.9) 12-1
Chapter 12: NEAT and MHEA Results
Chapter 12. NEAT and MHEA Results
This chapter describes how to have NEAT and MHEA perform the computations
necessary to produce the measure recommendations. The chapter also describes the
Recommended Measures report, the primary location for displaying data related to
these recommendations and the specific audit from which they were derived.
Additional reports are available from the Audit Information tab’s Report block. For
brief discussions on these other reports, see “Report Block” in Section 8.2, Audit
Information. See Appendix C, Reports, for examples of all the reports available in
the Weatherization Assistant. For the mechanics involved in viewing and printing
reports, see Section 5.12, The Report Block.
12.1 Running an Audit and Viewing the Results
After entering all the audit data for a house on the forms under the Main Menu’s
“NEAT Audit” or “MHEA Audit” buttons, select the “Run Audit” button found on
the upper right corner of each form to run the audit. The Weatherization Assistant
will examine your input to see that all necessary information is available. Although
the programs perform checks on each form's content every time you exit a form,
they do not know until you request execution whether all the forms with required
information have been visited. If a required form has not been entered, a warning
box will appear, indicating the form that contains the required data and its need of
being visited. Running a NEAT audit requires that at least the information on the
Audit Information, Shell-Walls, Heating, and Ducts/Infiltration forms be provided.
Running a MHEA audit requires that the information on the Audit Information, all
Shell components, Heating – Primary, and Ducts/Infiltration forms be provided.
Provided all necessary data is available, selecting the “Run Audit” button will
change your mouse pointer to its “Busy” form while the calculations are being
performed. You will also see the word "Calculating" in the status bar at the bottom
of the window. Wait for the operations to be completed before attempting further
interaction with the Weatherization Assistant.
Depending on your settings in Preferences (see “Run Control” under Section 16.1,
General), either the Measures form under the Main Menu’s “NEAT Audit” or
“MHEA Audit” buttons or the Recommended Measures report will be displayed in
a separate window. The "Last Run On field” below the “Run Audit” button will
also be updated with the current time stamp. If you are not presented with the

12-2 The Weatherization Assistant User’s Manual (Version 8.9)
Chapter 12: NEAT and MHEA Results
Recommended Measures report after execution, you may view it using the Report
block under the Audit Information form. See Section 5.12, The Report Block, for
information about viewing the report.
12.2 Recommended Measures Report
The information available on the Recommended Measures report is divided into
sections. By default, all sections are displayed. You may choose which sections are
displayed using the Report Sections form under the Main Menu’s “Preferences”
button (see Section 16.3, Report Sections). All sections of the Recommended
Measures report will be discussed individually below with descriptions of the data
each displays.
The Introductory Section
Regardless of your settings under Preferences, the report will always include an
introductory section identifying at least your Agency, the Client ID, Audit Name,
the Weather File used, and the Setup Library Name associated with the audit – all
information provided on the Audit Information tab (see Section 8.2, Audit
Information). If you made entries in the Comment or Auditor fields on this form,
they will also be displayed here. Figure 12.1 is an example introductory section of
the Recommended Measures report for a MHEA audit.
Figure 12.1. The Introductory section of the Recommended Measures report.

The Weatherization Assistant User’s Manual (Version 8.9) 12-3
Chapter 12: NEAT and MHEA Results
If you provided a client name under the Contacts tab of the Main Menu’s “Clients”
button (see Section 7.4, Contacts (Client)), it will be displayed in this introductory
section. Other fields in the section give the date of the audit and the version of the
Weatherization Assistant that created the recommendations. The RunID and
AuditID fields uniquely identify where the recommendations on the report came
from. All audits (i.e., complete building descriptions) have unique Audit IDs. If an
audit is copied, it will be assigned a different Audit ID from its parent audit.
However, a given audit may be executed any number of times using the “Run
Audit” button. Each time an audit is executed, even though it retains the same
Audit ID number, it will be given a different Run ID number.
Annual Energy and Cost Savings
The Annual Energy and Cost Savings section of the Recommended Measures
report lists the individual measure recommendations generated by NEAT or
MHEA that reflect the input you provided and displays the savings data associated
with each (see Figure 12.2). Each recommendation is identified by its name, as
given on the Library Measures form under the Main Menu’s “Setup Library”
button (see Section 14.5, Library Measures). If the audit producing the report
included a user-defined measure with energy savings that is seen as cost-effective,
it will appear in the list with the name you gave the measure on the Itemized Costs
form (see Section 11.8, Itemized Costs). MHEA may append to a measure name
additional information associated with the measure. For example, the Lighting
retrofit will display what room the auditor indicated the lights were in and how
many lights met that particular description (e.g., “[Dining][4]”). Activities having
no savings, such as health and safety measures or repair costs, will not appear in
this section of the report.
Figure 12.2. The Annual Energy and Cost Savings section of the Recommended Measures
report.

12-4 The Weatherization Assistant User’s Manual (Version 8.9)
Chapter 12: NEAT and MHEA Results
The order of measures in the list will be as follows:
1. Those measures assumed to be cost-effective outside of NEAT and MHEA, that
is, infiltration reduction and duct sealing. These measures will appear on the
report only if sufficient information has been given in the audit to determine
their energy savings (see Section 11.2, Ducts/Infiltration – Air and Duct
Leakages).
2. Measures declared mandatory (such as the replacement of an unsafe furnace)
that are to be included in determining the single SIR for all work performed on
the home (the “package” SIR). These could include measures you may have
indicated as having already been performed (such as a heating system tune-up).
3. Measures not declared mandatory whose recommendation depends on their
cost-effectiveness, after all interactions with other measures have been
considered. These measures will be listed in order of their cost-effectiveness (as
determined by their Measure SIR, displayed in the succeeding report section).
Only measures with SIR equal to or greater than the cut-off value selected in
Key Parameters of the Setup Library (see Section 14.2, Key Parameters),
normally 1.0, will be displayed.
4. Measures declared mandatory but which are not to be included in determining
the package SIR, normally either health and safety measures, if they have
energy savings, or measures not funded by the Weatherization Assistance
Program.
Following the measure name, but in a separate column, the component codes of
those components to which the measure is to be applied will appear. For example,
one recommendation might be to install "Wall Insulation" on walls "WL1,"
"WL2," "WL3," and "WL4." See the building description inputs discussed in
Chapters 9 and 10 for information on component codes.
For each measure recommended, the annual energy and dollar savings associated
with the measure are given. These savings parameters will be divided into four
categories, Heating, Cooling, Base Load, and Total for each measure. The heating
energy savings is always given in MMBtu (million Btu), while the energy savings
for cooling and base load measures (hot water measures, refrigerator replacement,
and lighting retrofits) will be in kWh. The savings from any user-defined measures

The Weatherization Assistant User’s Manual (Version 8.9) 12-5
Chapter 12: NEAT and MHEA Results
with energy savings will appear in the Base Load column with energy savings
given in kWh, regardless of the fuel they may save. A total energy savings in
MMBtu is given in the last column of this report section. This entry may not be of
use, particularly if it is a total of contributions in differing units (i.e., MMBtu and
kWh).
Energy Saving Measure Economics
The Energy Saving Measure Economics section of the Recommended Measures
report gives individual and cumulative economic parameters for the recommended
measures (see Figure 12.3). All of the measures displayed in the Annual Energy
and Cost Savings section of the report will appear in this section. However, in
addition, this report section will also list activities having no savings, such as
health and safety measures and repair costs. The listing will contain the same
measures as seen on the Measures tab of the audit from which the report was
created (see Section 11.11, Measures (Audit)).
Figure 12.3. The Energy Saving Measure Economics section of the Recommended
Measures report.
For each measure, the following data is listed in this report section:
• Index (#) – A consecutive line number, possibly used when referencing the
measures of the report. The indices could differ from those in the previous
section due to the addition of activities having no energy savings. However,
they will be the same as those in the audit’s Measures tab.

12-6 The Weatherization Assistant User’s Manual (Version 8.9)
Chapter 12: NEAT and MHEA Results
• Recommended Measure – The Measure name, as described in the previous
section. The measure names of any itemized costs or health and safety entries
will be the same as seen on the Itemized Costs tab of the audit that produced the
report. See Section 11.8, Itemized Costs.
• Components – The Component codes, as described in the previous report
section.
• Measure Savings – The total dollar savings per year. The value will be the sum
of the three dollar savings amounts for each measure, as displayed in the
previous section.
• Measure Cost – The dollar cost to install the measure. For library measures,
this cost will be computed from cost data contained in the setup library together
with the applicable building description data you entered during the audit,
including any Additional Costs you specified. For itemized costs or health and
safety measures, the measure costs will be taken from the measure descriptions
on the Itemized Costs tab of the audit.
• Measure SIR – The Savings-to-Investment Ratio (SIR) for each individual
recommended energy conservation measure (computed over the measure's
lifetime).
Values in columns under the “Cumulative” designation are such that a value in a
given row represents the parameter value that accounts for the measure on that row
and all measures in the rows above it.
• Cumulative Cost ($) – The cumulative cost of the recommended measures. If
all measures listed in the Recommended Measures report are installed in a
home, the cumulative cost displayed on the last row of the listing will be an
estimate of the total cost of weatherizing the home.
• Cumulative Savings($/yr) (MHEA Only) – The cumulative dollar savings of
the recommended measures. If all measures listed in the Recommended
Measures report are installed in a home, the cumulative savings displayed on
the last row of the listing will be an estimate of the total annual dollar savings
for the home owner.

The Weatherization Assistant User’s Manual (Version 8.9) 12-7
Chapter 12: NEAT and MHEA Results
• Cumulative SIR – The cumulative SIR of the recommended measures. If all
measures listed in the Recommended Measures report are installed in a home,
the last non-zero cumulative SIR displayed will be the SIR for all of the work
performed on the home – referred to in some documents as the “package” SIR.
The “0.0” values often seen at the bottom of this column indicate that the
measures in such rows are considered health and safety measures that,
according to Weatherization Program policy, do not have to be included in the
package SIR.
The order of measures in the listing will be the same as in the previous report
section but with the addition of those measures having no energy savings (e.g.,
itemized costs and health and safety measures). These added measures are
displayed with “0” savings and “0.0” SIR values. They fall into two categories:
those that are required to affect the “package” SIR (the SIR for all work performed
on the home) and those that are not required to affect this parameter.
Within the Weatherization Assistance Program, health and safety measures are
permitted to be excluded from affecting the package SIR. Measures not funded by
the Program might also be included in this category. All other costs, including
repair costs and any administrative costs, should be accounted for in determining
the package SIR. The Energy Saving Measure Economics section treats these two
categories of measures differently in order to report a package SIR that reflects
these policies. Which of the two categories a measure falls into is determined by
your selection in the Include in SIR checkbox associated with the measure on the
Itemized Costs form where the measure was defined (see Section 11.8, Itemized
Costs). If you indicated that a measure should not be included in the package SIR,
the measure will be listed at the end of the recommended measure list such that its
cost does not affect the entry representing the package SIR (see the description of
the Cumulative SIR parameter, above). Its cost will still be added to the cumulative
cost so that the last Cumulative Cost entry represents all work performed on a
home. If, on the other hand, you have requested that a cost be included in the SIR,
the measure will be listed at the top of the measure list and its effect felt in both the
cumulative cost and cumulative SIR values further down the listing.
Materials
This report section lists the major materials and their quantities necessary to install
the recommended measures reported in the Energy Saving Measure Economics

12-8 The Weatherization Assistant User’s Manual (Version 8.9)
Chapter 12: NEAT and MHEA Results
report section. Some material descriptions include a material type as well as a
name. For example, the material "Wall Insulation" may have type, "Blown
Cellulose." In NEAT, if a heating system replacement has been recommended, the
corresponding line in the Materials section will give estimates of the pre-retrofit
and range of post-retrofit sizes for the equipment. Minor materials, such as
fasteners and other hardware, are not listed.
Pre/Post Retrofit Energy and Loads (NEAT)
NEAT provides estimates of annual loads and energy consumption for both heating
and cooling, before and after installing the recommended measures. The loads
represent the energy addition or extraction the heating and cooling equipment must
deliver over an entire year to keep the conditioned spaces at the specified set-point
temperature. The energy is the consumption of the equipment in meeting these
loads. The loads and energy differ essentially by a factor of the seasonal efficiency
of the equipment. Both the loads and consumption for heating and cooling have
units of MMBtu (million Btu) per year.
Also provided are estimates of the peak rate of heating and cooling energy that the
equipment must deliver. The "Heat loss/gain" values are these peak rates prior to
application of duct loss factors and the "Output required" the peaks with the duct
loss factors applied. The units for the Heat loss/gain values are kBtu/h for both the
heating and cooling entries. For the Output required values, the units are kBtu/h for
heating and ton for cooling. One ton of cooling is equivalent to 12 kBtu/h. The
Output required values are more often referred to as the “size” of the equipment
(see “Approximate Component Contributions to Peak HEATING and COOLING
Loads (Equipment Sizing)” below).
Pre/Post Retrofit Energy Consumption (MHEA)
MHEA’s Recommended Measures report displays a Pre/Post Retrofit Energy
Consumption section, which provides estimates of annual energy consumption for
heating, cooling, and base loads before and after installing the recommended
measures. The units for the Heating entries are MMBtu (million Btu) and kWh for
the Cooling and Base Load entries. The values given for the Base Loads reflect
only the appliances described on the Baseloads tab of the audit description (see
Sections 11.4 through 11.6).

The Weatherization Assistant User’s Manual (Version 8.9) 12-9
Chapter 12: NEAT and MHEA Results
Billing Data Adjusted Results
Pre-retrofit utility billing data you enter into either NEAT or MHEA (see Section
11.9, Utility Bills) allows these programs to show you a comparison of their energy
consumption predictions and this billing data (see “Heating and Cooling Energy
Consumption Comparisons” below). Then, if you desire, the programs will adjust
their measure recommendations and savings to reflect the data.
Results in three of the above sections (Annual Energy and Cost Savings, Energy
Saving Measure Economics, and the Materials) are altered whenever you enter this
billing data and request that the results be adjusted accordingly – by using the
Include Billing Adjustment checkbox on the General Information form (see
Section 8.2, Audit Information). If so requested, NEAT and MHEA will then
generate these same three sections except with adjusted values. You may choose to
have the report include both the unadjusted and the adjusted sections, or, to avoid
confusion, only the adjusted if you have made the decision to weatherize according
to billing adjusted recommendations (see Section 16.3, Report Sections).
Note, however, the Weatherization Assistant was designed to make its
recommendations based on average weather and occupancy characteristics rather
than the specific life styles of the occupants. If adjustment is requested, the
recommendations will then be specific to the life styles of the occupants during the
period in which the billing data were gathered.
Heating and Cooling Energy Consumption Comparisons
The Heating and Cooling Energy Comparison reports allow you to see a
comparison of the annual consumptions predicted by the Weatherization Assistant
and the billed consumptions you enter on the Utility Bills form in either NEAT or
MHEA. These report sections are available only if the corresponding heating
and/or cooling billing data have been previously entered.
The predicted values are based on the building description you have entered and
assumptions used in estimating measure savings. They correspond to the same time
intervals for which the billing data were taken, allowing a one-to-one comparison.
They will be displayed side-by-side with actual values taken from the billing data.
If you have entered the value on the Ducts/Infiltration form, NEAT will use the
pre-retrofit air leakage data in computing the predicted consumptions. Otherwise,

12-10 The Weatherization Assistant User’s Manual (Version 8.9)
Chapter 12: NEAT and MHEA Results
NEAT will use the post-retrofit air leakage data. In MHEA, if no pre-retrofit air
leakage data is available, the program will use the rate corresponding to your
selection for Home Leakiness on the Audit Information form.
Also displayed side-by side will be the heating or cooling degree-days assumed by
the programs in their computations as well as those you entered with the billing
data (if available). Both will be based on the base temperature you indicated during
entry of the billing data. Comparison of predicted and actual consumptions and
degree-day totals should assist you in determining whether to use the adjusted
recommendations based on the billing data entered. Percent differences of the
totals of these two quantities are displayed to further aid in the decision. Note,
however, NEAT and MHEA were designed to make their recommendations based
on average weather and occupancy characteristics rather than the specific life
styles of the occupants. Thus, the programs should not be expected to reproduce
the billing data with great accuracy.
Approximate Component Contributions to Peak HEATING and COOLING
Loads (Equipment Sizing)
The size of a home's heating equipment should correspond to the peak heat loss of
the house, normally expressed in thousand Btu per hour (kBtu/h). Peak heat gain,
including solar, can also be expressed in kBtu/h or in tons (each ton being equal to
12 kBtu/h). NEAT estimates these sizes both before and after weatherization using
the building description information you provide and formulas taken with
permission from tables published by the Air Conditioning Contractors of America
(ACCA) in their Seventh Edition (1986) of Manual J, Load Calculation for
Residential Winter and Summer Air Conditioning. MHEA’s peak heating load
estimates are not based on published values. The program uses the same building
component characteristics used in estimating the annual heating consumption and
recommended measure savings. MHEA does not provide peak cooling load
estimates.
You should verify NEAT and MHEA’s sizing estimates with the results of an
actual equipment sizing procedure for the types of building components common
in your area before regularly using them to guide the purchase of new replacement
equipment. The sizing estimates calculated by NEAT may differ from those of
other techniques designed specifically to size equipment in several ways:

The Weatherization Assistant User’s Manual (Version 8.9) 12-11
Chapter 12: NEAT and MHEA Results
1. the range of building components available in NEAT may not be as extensive as
the range in other equipment sizing techniques;
2. NEAT performs the estimate on the building as a whole, not by zones or even
room by room;
3. generic duct-loss factors are used in NEAT, whereas other techniques may use
unique duct loss factors for each zone; and
4. the methods of computing specific component contributions may have changed
since NEAT’s component contributions were developed.
MHEA’s assumptions of building component characteristics may also vary from
those used in techniques specifically designed to size HVAC equipment.
The Approximate Component Contributions to Peak Heating/Cooling Load
sections of the Recommended Measures report will list each building component's
contribution to the total design heat loss or gain, in units of Btu/h. Also listed for
each component is a size parameter (e.g., area, volume, or a number). You can
compare these individual component contributions with those from other sizing
procedures for an indication of variations in the procedures.
NEAT and MHEA convert the total building heat loss/gain to a required
heating/cooling system output by multiplying the former by a duct-loss factor. The
programs do not have sufficient information to accurately predict this factor.
Standard sizing techniques recommend computing the building heat loss/gain
zone-by-zone, then assigning a specific duct-loss factor for the duct supplying air
to each zone.
NEAT assumes no duct loss if the heating system is either a space heater or a
portable electric resistance heater. Otherwise, it uses a factor of 1.15, assuming that
either exposed duct has been insulated by the weatherization of the house or the
duct is not in an unconditioned space. Pre-retrofit duct-loss factors of 1.20 are
assigned to systems having more than ten feet of uninsulated duct in an
unconditioned space. MHEA’s duct-loss factors range from 1.0 to 1.20 depending
on the winter design temperature and whether or not the ducts are insulated.

12-12 The Weatherization Assistant User’s Manual (Version 8.9)
Chapter 12: NEAT and MHEA Results
These duct-loss factors may be inappropriate for hot water or steam boilers, which
may have lower or higher heat loss through their pipes than forced-air systems
have through ducts. You may be able to assign a more accurate duct-loss (or "pipe
loss") factor based upon your examination of a home after weatherization.
For example, a hydronic heating system with insulated pipes or a forced-air system
with insulated ducts may merit a lower "duct-loss" factor. A steam system with
uninsulated pipes may merit a higher "duct-loss" factor. You can estimate the
heating system output required by multiplying this factor by the building heat loss
reported on the Sizing report.
If a heating system replacement is recommended, NEAT's material list (see the
section “Materials” above) will give both a pre- and a post-retrofit equipment size.
The pre-retrofit size reported is taken from your input of Capacity on the Heating
Systems form, not NEAT’s sizing estimate. You may wish to compare your
entered value with the estimate reported here in the Component Contributions
section. The minimum post-retrofit equipment size reported in the Materials List is
NEAT’s estimate as described in this section.
Special Notes
This report section displays notes generated internally by the audit as it executes.
They should be reviewed to see if any may alter your retrofit decisions. It is in this
report section that MHEA will indicate its determination that the HVAC capacities
you have entered for the equipment are insufficient to heat or cool a home. See the
Capacity field descriptions for MHEA’s Heating and Cooling equipment in
Sections 10.7 and 10.8 . The note will have the form, “Pre/Post-weatherization
heating/cooling load may not be met in all months,” then give you the number of
the months (e.g., “12, 1,” indicating December and January). This situation can
affect the savings and recommendations of measures.
Comments
The Comments section contains all comments you may have entered during the
building description input. Each is associated with both a component type and the
specific component code you chose for the component, if applicable.

The Weatherization Assistant User’s Manual (Version 8.9) 12-13
Chapter 12: NEAT and MHEA Results
Retrofit Measures Not Considered
This report section lists all of the library measures that have chosen to not be
considered in the audit having produced the report, as taken from the Library
Measures tab of the Setup Library accessed by the audit (see the Active field
description in Section 14.5, Library Measures).

12-14 The Weatherization Assistant User’s Manual (Version 8.9)
Chapter 12: NEAT and MHEA Results

The Weatherization Assistant User’s Manual (Version 8.9) 13-1
Chapter 13: Work Orders
Chapter 13. Work Orders
The Weatherization Assistant’s optional Work Order feature allows you to prepare
detailed listings of tasks to be performed as part of the weatherization of a house.
A work order can include as much material and costing detail as you wish to
specify. You may create as many work orders for a client as is necessary. Tasks
assigned to work orders can be developed from the NEAT or MHEA audits or a
listing of measures you have previously defined in the Setup Library (as perhaps
from a priority list), or be described individually on the work order itself. The
status of individual work orders can be tracked. Work orders also allow you to
track inventory and costs by cost center (funding source). An alternate use of the
work order feature is to document, to any detail desired, exactly what was done to
a client’s home.
Before you can create a work order, you must first have a client defined under the
Main Menu’s “Clients” button on whose dwelling the work is to be performed (see
Chapter 7, Clients). You may initiate a new work order in any of three ways:
1. If you have already run an audit for a client, select the “Create Work Order(s)”
button on the Measures form in either the “NEAT Audit” or “MHEA Audit”
windows (see Section 11.11, Measures (Audit)) – This will automatically assign
the work order(s) to the Client for whom the audit was run and populate them
with the measure recommendations from the audit. If you have assigned
contractors to the measures on the Measures form, separate work orders will be
created for each contractor with the contractor information included in each.
2. Select the “Create New Work Order…” button on the Work Orders form under
the Main Menu’s “Clients” button (see Section 7.6, Work Orders (Client)) –
This will automatically assign a new work order to the current client, but have
no measures associated with it.
3. Use the new record button ( ) or “Copy” button on the Work Order
Information form under the Main Menu’s “Work Orders” button – This will
initiate a new work order and assign it, by default, to the same client assigned to
the work order displayed when the new record button was selected. This default
assignment can be easily changed using the “Client ID” drop-down list on the
form.

13-2 The Weatherization Assistant User’s Manual (Version 8.9)
Chapter 13: Work Orders
The remainder of this chapter is divided into sections describing the data and
display items entered on each of the forms seen under the Main Menu’s “Work
Orders” button: Work Order Information, Status, Measures, and Photos (if the
photo browser tab method for attaching photos to records has been activated in the
Main Menu’s “Preferences” button as described in Section 16.4, Features). See
Appendix C, Reports, for an example of an actual work order generated from
information entered under Main Menu’s “Work Orders” button.
13.1 Work Order Information
The Work Order Information form under the Main Menu’s “Work Orders” button
(see Figure 13.1) is used to enter general information about the work order, to
identify the client and contractor, and to specify a supply library from which
inventoried items can be selected. It also allows you to view and navigate to other
work orders in your database and access work order reports for viewing and
printing, including the actual work orders.
Figure 13.1. The Work Order Information form under the Main Menu’s “Work Orders”
button.

The Weatherization Assistant User’s Manual (Version 8.9) 13-3
Chapter 13: Work Orders
Below are brief descriptions of the individual data items and controls found on the
Work Order Information form:
• Work Order – This field contains a unique name to identify the current work
order. You may develop your own naming convention or use the default names.
If the work order is initiated from under the Main Menu’s “Clients,” “NEAT
Audit,” or “MHEA Audit” buttons, the default work order name will have the
form “WO/<Client ID>/<Contractor ID>/#.” The <Client ID> is the Client ID
entered on the Client Information form of the Main Menu’s “Clients” button.
The <Contractor ID> is the User Name, if entered and designated as a
Contractor or Crew, on the Contacts form of the Main Menu’s “Agency”
button. The “#” is an integer assigned to ensure uniqueness of the name, since
there may be multiple work orders for the same client and assigned to the same
contractor. If the work order is initiated from this, the Work Order Information
form, the default work order name will be simply “Work Order (#),” where the
# is an integer insuring uniqueness of the name. In such cases, it is advised that
you replace this name with a more descriptive name. The Work Order name is
printed on the work order. Required.
• Client ID – This field identifies the Client for whom the work is being
performed. The entry will likely be supplied for you as the program anticipates
the assignment. If incorrect, use the drop-down list to select the correct Client.
Client and Client Contact information are printed on the work order. Required.
• Agency/State – These fields will automatically be set to correspond to the
agency performing the work for the client identified in the Client ID field
above. Changing the Client ID will immediately update the Agency Name and
State, if need be. Agency Information will be printed on the work order.
Uneditable.
• Audit Name – If the work order was initiated by selecting the “Create Work
Order(s)” button on the Measures form in either the “NEAT Audit” or “MHEA
Audit” windows (see Section 11.11, Measures (Audit)), this field will display
the name of the audit from which the work order was generated. Otherwise the
field will be blank. If an audit name is displayed, the audit may be accessed
simply by double clicking on the name. The drop-down list will show any
audits assigned to the client identified in the Client ID field above. Note that it
would be an unusual occurrence to change the audit to which a work order was

13-4 The Weatherization Assistant User’s Manual (Version 8.9)
Chapter 13: Work Orders
associated or even to have more than one audit associated with a given client. If
supplied, the Audit Name will be printed on the work order. Optional.
• Supply Library – This field identifies the Supply Library (see Chapter 15,
Supply Library) containing the inventory of materials from which any materials
used by the work order may be taken. In addition, if you have specified costs
for materials in the Supply Library, reference to these materials in the work
order will automatically use these costs. Only supply libraries associated with
the agency specified in the Agency field on the form will be visible in the drop-
down list, though most agencies would likely have only one supply library. If
the work order was created from an audit or copied from an existing work
order, this field will be set initially to the same supply library assigned to the
record from which the work order was created. Required.
• Contractor/Crew – The Contractor/Crew field identifies the contractor
assigned to perform the work described by the work order. Only those Contacts
defined as Contractors or Crew for the Agency indicated in the Agency field on
the Work Order Information form will be displayed in the drop-down list. If the
work order was initiated from the Measures form in either the “NEAT Audit” or
“MHEA Audit” windows, the entry will comply with your settings on that
form. If the Contractor/Crew is specified, the Contractor Company, Address,
and Contractor Contact Name as well as phone numbers and e-mail address will
be printed on the Work Order. Optional.
• Work Order Type – Choose the type that best describes this work order. The
choices are Weatherization, Re-Weatherization, Emergency Repair or
Replacement, Response to Client Request, and Other. The Work Order Type is
printed on the work order, if available. Optional.
• Comment – You may enter comments pertinent to the entire work order
directly in the Comment field on the form, or you may enter them in the
Comment Editor by selecting the “Comment” button to the left of the field. The
Comment Editor is similar to Window’s Notepad and may be used to enter
extended comments. Text from other sources may be copied and pasted into the
Comment Editor’s window. Unique to the comment fields on any form within
the “Work Order” window is the ability to import comments from the audit you
have specified in the Audit Name field above by selecting the “Use an Audit
Comment” drop-down list displayed at the bottom of the Comment Editor. This

The Weatherization Assistant User’s Manual (Version 8.9) 13-5
Chapter 13: Work Orders
drop-down list includes references to all comments entered on all forms of the
audit. You can import multiple comments by selecting items one-by-one. The
total comment may have up to 65,000 characters. Any comment that is entered
in this comment field will be displayed in the header section of the work order.
Optional.
• Work Order Economic Summary Block – This block displays three fields:
1. The Number of Active Measures assigned to the work order. A work order
description under the “Work Order” window may contain more measures
than have been declared “Active.” Measures are declared “Active” under the
Measures tab on the form corresponding to each individual measure (see
“Active” in Section 13.3, Measures (Work Order)). Only active measures
are printed in the work order. Note that a single measure may be composed
of many components (see “The Materials/Labor Details Sub-Form” in
Section 13.3). When a measure is indicated as not being active, all of its
components are excluded from the work order when it is printed.
Uneditable.
2. The Cumulative Estimated Cost of all active measures assigned to the work
order. This value is the sum of the “Estimated” costs for all active measures,
as displayed on the individual measure forms. See “Estimated/Actual Cost
and SIR” in Section 13.3. Uneditable.
3. The Cumulative Actual Cost of all active measures assigned to the work
order. This value is the sum of the “Actual” costs for all active measures, as
displayed on the individual measure forms. See “Estimated/Actual Cost and
SIR” in Section 13.3. A measure for which an active cost has been declared
will still have an estimated cost as well. Both costs will contribute to the
appropriate cumulative cost displayed in this block. Uneditable.
• Work Order Record Navigation Block – The Work Order record navigation
block is used to find and navigate to existing work orders, copy or delete the
currently accessed work order, or create a new work order. See Section 5.1,
Form and Record Navigation, for information on using the Weatherization
Assistant’s record navigation blocks. If you use the “Copy” button to copy the
current work order, the program will ask you if you wish to copy all of the
measures as well. A “Yes” response will copy the measures and all associated

13-6 The Weatherization Assistant User’s Manual (Version 8.9)
Chapter 13: Work Orders
data (e.g., costs and quantities). A “No” response will copy only the
information on the Work Order Information form. Whether you use the “New”
or “Copy” button, the resulting work order will be assigned a default Work
Order name that you can modify.
The default installation of the Weatherization Assistant turns on the “Use only
the latest bookmarked Agency in the find record drop-down boxes” feature in
Preferences (see Feature 9 in Section 16.4, Features). With this feature turned
on, the drop-down lists in the Work Order record navigation block will display
only the work orders associated with the agency last visited using the Main
Menu’s “Agency” button. Normally, this will be your agency, so the drop-down
lists will display only your agency’s work orders. If you have more than one
agency defined in your database and you want the drop-down lists to display
work orders from all defined agencies, turn this feature off.
• Report Block – The Report block provides you with access to all reports
available under the Main Menu’s “Work Orders” button. See Appendix C,
Reports, for examples of these reports. The following reports are currently
available:
1. “Work Order” – The standard work order containing estimated costs for
the measures.
2. “Work Order (Bid Form)” – The work order with costs unspecified, to
solicit bids from the contractor on the costs for the measures).
3. “Work Order (Bid Form with Only Client ID)” – The same as the Bid
Form above except using only the Client ID to identify the client in order
to protect the privacy of the client.
See Section 5.12, The Report Block, for information on the mechanics of
using the Weatherization Assistant’s Report blocks. Appendix D,
Development of Customized Reports, describes a method to create reports
tailored to your needs and to list the reports in the Report block.

The Weatherization Assistant User’s Manual (Version 8.9) 13-7
Chapter 13: Work Orders
Photographic Data Items
If you have chosen to use the third party photo browser method for attaching
photos to records under the Main Menu’s “Preferences” button (see Section 16.4,
Features), a Photo Folder field, “Browse” button, and “View” button will be
present on the Work Order Information form below the Comment field. Use the
“Browse” button to select a folder on your computer in which you have stored
digital photos for this specific work order. Once selected, the location of this folder
will be displayed in the Photo Folder field. Select the “View” button to obtain a
photo browser in which you may view and edit these photos. The Weatherization
Assistant provides the option of attaching photos not only to work orders, but also
to audits and clients as well. Therefore, you should develop a consistent policy
regarding where and how you store reference to your photos. See Section 18.1,
Digital Photos, for more information on viewing and editing photos.
13.2 Status (Work Order)
The setting and tracking of statuses is an optional feature of the Weatherization
Assistant. The Status form under the Main Menu’s “Work Orders” button (see
Figure 13.2) allows you to view the current status settings associated with the
current work order for three work order status categories: General, Inspection, and
Payment. The current status will be shown for only those categories for which a
status has been set or for which a setting is possible. Below are brief descriptions
of the individual data items and controls found on the Status form.
Figure 13.2. The Status form under the Work Order main Menu Item.

13-8 The Weatherization Assistant User’s Manual (Version 8.9)
Chapter 13: Work Orders
• WO/<Record Name>/<Work Order Status Category> – The left most
column of the form displays the work order status category and the name of the
work order for which the status is being reported.
• Current Status − This field displays the current status setting for the given
work order status category. The possible settings for each work order category
are listed in Section 18.3, Status Tracking.
• Completed − An “X” will be displayed in this field when the current status
setting signifies completion or closure of the activity associated with the work
order status category. Settings that represent completion are indicated by an
asterisk (*) in Section 18.3, Status Tracking.
• Date − This field displays the date that the current status became effective.
• Changed − This field displays the date that the current status was last changed.
• By − This field displays the User Name of the person who changed the status.
The names are restricted to those that have been entered on the Contacts form
under the Main Menu’s “Agency” button and have a password assigned, as
discussed in Section 6.2, Contacts (Agency). A User Name of “Admin” implies
that a specific person was not identified as making the change.
• Comment − Any comment that has been appended to this current status setting
will be shown in this field.
• Edit − Status settings are changed by selecting the “Edit” button in the row of
the work order category you wish to change. Use of the Status Editor form that
appears is explained in Section 18.3, Status Tracking. The status of a work
order may also be changed on the Status tab of the Main Menu’s “Client”
button (see Section 7.2 Status (Clients)).
• History − Select the “H” button to see a history of all settings for a specific
work order status category for the current work order. The Status History form
that appears is the same in appearance as that discussed in Section 6.9, Status
History.

The Weatherization Assistant User’s Manual (Version 8.9) 13-9
Chapter 13: Work Orders
• Overall Work Order Status History − Select the “Overall Work Order Status
History” button to display a listing of all status entries for all work order
categories associated with the current work order. The Status History form that
appears is the same in appearance as that discussed in Section 6.9, Status
History. You can use of the sort feature (see Section 5.8, Data Sheet and Form
Views of Records) while viewing this form to arrange the status settings in a
desired order (e.g., chronologically).
13.3 Measures (Work Order)
The Measures form under the Main Menu’s “Work Orders” button (see Figure
13.3) is used to develop detailed task descriptions for weatherization measures to
be installed in a home. If a work order is initiated by executing a NEAT or MHEA
audit, this form will automatically have records corresponding to the recommended
measures that you have selected on the Measures form in either the “NEAT Audit”
or “MHEA Audit” windows (see Section 11.11, Measures (Audit)). If a work order
is initiated from the Work Orders form of the Main Menu’s “Clients” button or the
Work Order Information form of the Main Menu’s “Work Orders” button, the
Measures form will have no measure records.
Figure 13.3. The Measures form under the Main Menu’s “Work Orders”
button (form view).

13-10 The Weatherization Assistant User’s Manual (Version 8.9)
Chapter 13: Work Orders
The Measures form is divided into three sections: a general description of
measures at the top of the form, a Materials/Labor Details sub-form in the middle
of the form, and the Measures record navigation block, three buttons for accessing
details, and a measure summary block at the bottom of the form. Always enter
information on the general description of the measure first before describing
materials and labor components on the Materials/Labor Details sub-form. The
Materials/Labor Details sub-form may contain multiple records associated with the
current measure. This sub-form will be described under its own topic, as will the
sub-form accessed by selecting the “Show Audit Economic Details” button. Below
are descriptions of the individual data items and controls found in the Measures
form.
• Order # – Enter an integer to prescribe the order in which you want the
measures to be listed in the Measures record navigation block (see “Measures
Record Navigation Block” below) and in the work order (see “Report Block” in
Section 13.1, Work Order Information). All measures not assigned unique order
numbers will be listed first in random order in the work order. Optional.
• Active – Use this checkbox to include the measure in the work order. If
unchecked, it is recommended you include a comment indicating the reason for
not including the measure in the work order.
• Measure Type – Select the type for the measure using the drop-down list. The
choices are Base Loads, Building Insulation, Client Education, Doors and
Windows, General Heat Waste and Air Infiltration, General Repairs, Health and
Safety, HVAC Systems, and Other. A measure generated by a NEAT or MHEA
audit, which corresponds to a library measure, will automatically be assigned
the measure type as prescribed on the Library Measures form of the Main
Menu’s “Setup Library” button (see “Measure Type” in Section 14.5, Library
Measures). The measure type does not appear on any report. However, it can be
used to sort the measure list when the Measures form is viewed in the data sheet
view. Optional.
• Measure Name – Enter the name of the measure to identify it in the work
order. Any measure generated by a NEAT or MHEA audit (i.e., corresponding
to a library measure, an itemized cost, or a health and safety measure) will
automatically be assigned the measure name listed on the Measures form of the

The Weatherization Assistant User’s Manual (Version 8.9) 13-11
Chapter 13: Work Orders
Main Menu’s “NEAT Audit” or “MHEA Audit” buttons (see “Measure Name”
in Section 11.11, Measures (Audit)). Required.
• Components – List the identifying name or code of all the building
components to which the measure will be applied. A library measure generated
by a NEAT or MHEA audit will automatically be assigned the component
codes entered on the respective forms under the Main Menu’s “NEAT Audit”
or “MHEA Audit” buttons. (See the building description inputs discussed in
Chapters 9 and 10 for information on component codes.) The component codes
can also be entered here under the Work Orders Measures form without
reference to an audit. They may indicate some characteristic of the components
or correspond to codes used on a sketch of the house, which could be scanned
and attached electronically to the work order (see Section 13.4, Photos (Work
Order)). For these codes to be of use to the contractor or crew performing the
weatherization, their correlation to the floor plan of the house must somehow be
conveyed. The list of component codes may have up to 255 characters, although
the space restrictions in work orders suggest a lesser limit in the number of
characters (perhaps 15 to 30) to preserve readability. Optional.
• Cost Center – If you want to track the costs incurred by different funding
sources or programs, select the cost center (funding source) from the drop-down
list to which the actual cost of the measure will be charged. The drop-down list
will display the cost centers defined under the Cost Centers form of the Main
Menu’s “Agency” button (see Section 6.3, Cost Centers) for the agency
identified on the Work Order Information form. A measure generated by a
NEAT or MHEA audit will automatically be assigned a cost center if you have
assigned a default cost center for the measure on the Library Measures or User
Defined Measures forms of the Main Menu’s “Setup Library” button (see
“Default Cost Center” in Sections 14.5, Library Measures, and 14.6, User
Defined Measures) or a cost center for the measure on the Measures form of the
Main Menu’s “NEAT Audit” or “MHEA Audit” buttons (see “Cost Center” in
Section 11.11, Measures (Audit)). However, you may alter the cost center on
this form using the drop-down list. Optional.
• Copy from Library Measures –If you want to include a measure from the
library measures without running a NEAT or MHEA audit, select the “New”
button on the Measures record navigation block (see “Measures Record
Navigation Block” below). The “Copy from Library Measures” drop-down list

13-12 The Weatherization Assistant User’s Manual (Version 8.9)
Chapter 13: Work Orders
will appear on the top right of the Measures form. The drop-down list will
include the 45 library measures for NEAT or the 49 library measures for
MHEA listed on the Library Measures form of the Main Menu’s “Setup
Library” button (see Section 14.5, Library Measures). You can select a desired
measure using the drop-down list.
NOTE: If you include a measure from the library measures that has multiple
material descriptions (such as Building
Insulation (except Fill Ceiling Cavity),
Replace AC, and Lighting Retrofits in
NEAT, and Replace DX Cooling
Equipment and Lighting Retrofits in
MHEA), you will receive a message (see
Figure 13.4) indicating that more than
three material detail records (i.e.,
material, labor, and other) were added.
Delete the extra records in the sub-form that you do not intend to use for this
measure.
• Copy from User Defined Measures – If you want to include a measure from
the user-defined measures without running a NEAT or MHEA audit, select the
“New” button on the Measures record navigation block (see “Measures Record
Navigation Block” below). The “Copy from User Defined Measure” drop-down
list will appear on the top right of the Measures form. The drop-down list will
include those library health and safety measures and the user-defined measures
you have described on the User Defined Measures form of the setup library
assigned to the client on the Client Information form and for which you have
also selected the Active checkbox and the Available for Use in NEAT or
MHEA checkboxes on that form (see Section 7.1, Client Information, and
Section 14.6, User Defined Measures). Select the desired measure using the
drop-down list.
• Comment – You may enter comments pertinent to the measure directly in the
Comment field on the form, or you may enter them in the Comment Editor by
selecting the “Comment” button to the left of the field. The Comment Editor is
similar to Window’s Notepad and may be used to enter extended comments.
Text from other sources may be copied and pasted into the Comment Editor’s
window. Unique to the comment fields on any form within the “Work Order”
Figure 13.4. Message when copying a
measure from Library Measures to a
work order.

The Weatherization Assistant User’s Manual (Version 8.9) 13-13
Chapter 13: Work Orders
window is the ability to import comments from the audit you have specified in
the Audit Name field above by selecting the “Use an Audit Comment” drop-
down list displayed at the bottom of the Comment Editor. This drop-down list
includes references to all comments entered on all forms of the audit. You can
import multiple comments by selecting items one-by-one. The total comment
may have up to 65,000 characters. Any comment that is entered in this
comment field will be displayed in the work order immediately under the
measure name. Optional.
• Actual/Estimated Adjustment Factor (%) – Enter an adjustment factor, in
percent, if you discover that the actual energy savings from the measure would
likely be different from the estimated energy savings calculated by NEAT or
MHEA. For example, if you discover that only 80% of the wall area of your
initial input can actually be insulated, you would expect that the actual energy
savings from the wall insulation measure might be approximately 80% of the
initial energy saving estimate calculated by NEAT or MHEA. In this case, you
would enter 80 in the Actual/Estimated Adjustment Factor field. Such an
adjustment would also likely be desired in your conversion of estimated costs to
actual costs on the Materials/Labor Details sub-form for the measure (see
Quantity / Unit Cost (Actual) entries under “The Materials/Labor Details Sub-
Form” below).
• Measures Record Navigation Block – The Measures record navigation block
is used to find and navigate to existing measure descriptions, copy or delete the
currently accessed measure description, or create a new measure description for
the work order being created. See Section 5.1, Form and Record Navigation,
for information on using the Weatherization Assistant’s record navigation
blocks. If you choose the “New” button, you will be presented with a blank
Measures form displaying the “Copy from Library Measures” and “Copy from
User Defined Measures” drop-down boxes (see descriptions of these fields
above).
• Estimated/Actual Cost and SIR – This block of data, located in the lower
right corner of the Measures form, summarizes the total Estimated and Actual
Costs and SIRs for the measure. Estimated Costs are those initially coming
from whatever source generated the measure, such as the execution of either
NEAT or MHEA, although even these may be altered under the
Materials/Labor Details sub-form (see below). Actual costs are assigned
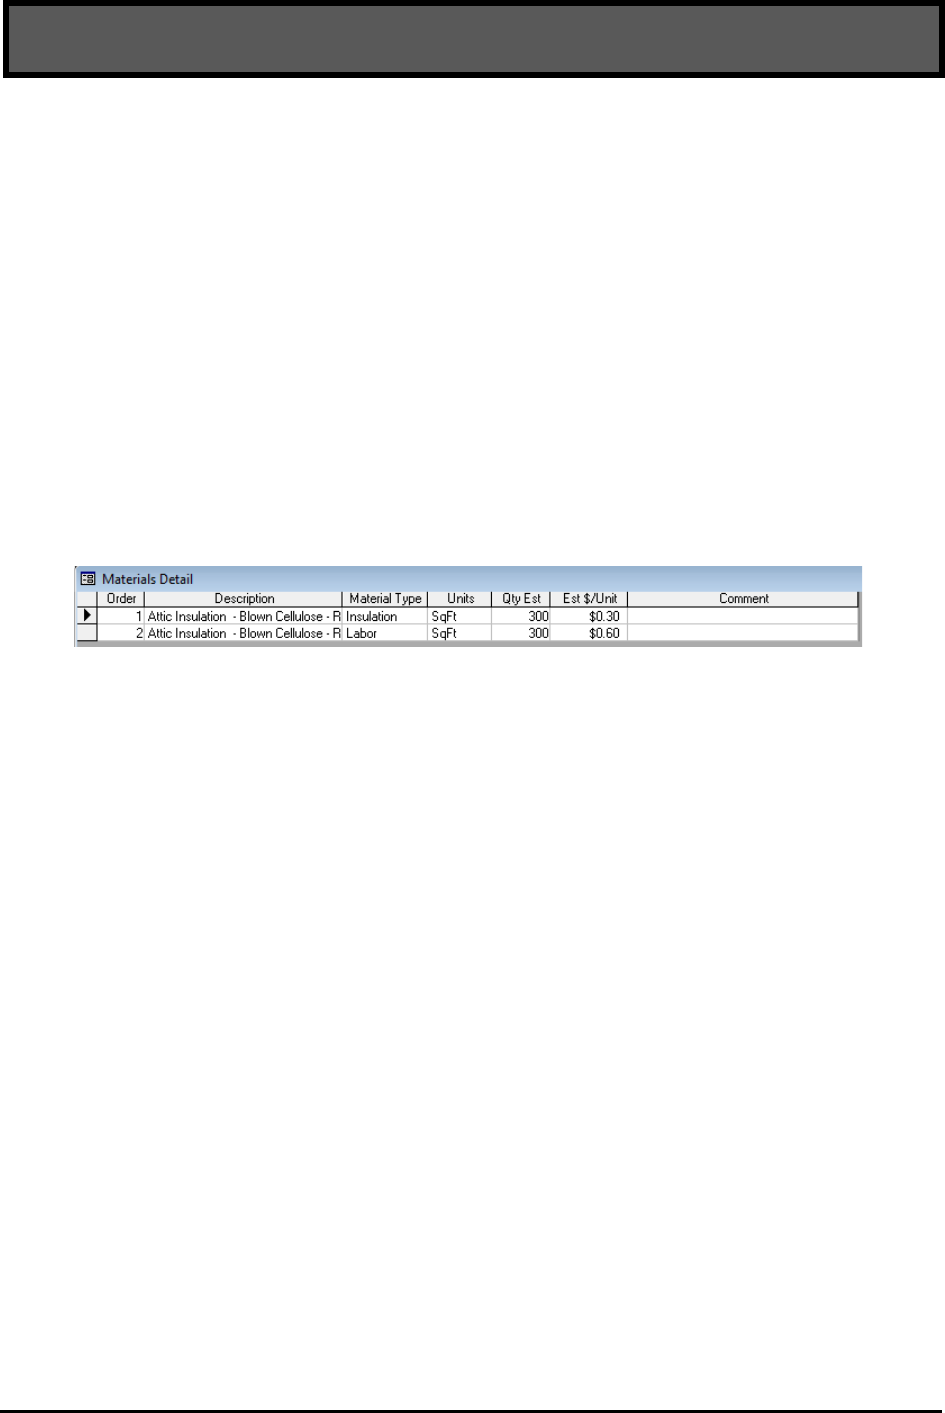
13-14 The Weatherization Assistant User’s Manual (Version 8.9)
Chapter 13: Work Orders
whenever you declare them under the Materials/Labor Details sub-form. Care
must be taken in interpreting these “Actual” parameters. If you have only
declared part of the costing components as “Actual” under the Materials/Labor
Details sub-form (see below), this cost may not reflect the total cost of
implementing the measure. The SIR will display “0.0” for measures without
energy savings associated with them.
• Show/Hide Audit Material Detail – If a measure was generated by a NEAT or
MHEA audit, selection of this button will display the costing components used
by the audit (see Figure 13.5), as specified in the Setup Library (see “Costs” in
Section 14.5, Library Measures, or “The Materials/Labor Details Sub-Form” in
Section 14.6, User Defined Measures).
These audit cost components are designed to be approximate costs used by the
audits in estimating the cost-effectiveness of the measures for determining the
recommendations. However, they may not be as detailed or as precise as you
may wish for the purposes of generating work orders for the measures.
Nevertheless, you may still wish to refer back to them. If, in initially forming
the work orders from audit recommendations, you chose to “Include Details for
Materials” (see Section 11.11, Measures (Audit)), these costing components
will have already been transferred to the work order. This would make what
you view by selecting the “Show Audit Material Detail” button the same as
what is displayed in the Materials/Labor Details sub-form, particularly if the
latter is viewed in data sheet view. However, if you did not choose to transfer
these components or you have since altered the detail in the sub-form, this
button still allows you to refer back to what the audits used for costing
components in making their recommendations. If the measure was generated by
some other means than the audits, no entries will be seen when selecting this
button.
It is recommended that prior to selecting the “Show Audit Material Detail”
button you maximize the window the Weatherization Assistant program uses.
Figure 13.5. The “Materials Detail” sub-form displayed by selecting the “Show Audit
Material Detail” button on the Work Order Measures form.

The Weatherization Assistant User’s Manual (Version 8.9) 13-15
Chapter 13: Work Orders
Otherwise, the sub-window used to display this added data may fall outside the
program window, making it hidden.
Once the “Show Audit Material Detail” button has been selected, the name of
the button will change to “Hide Audit Material Detail.” It is recommended that
when you no longer require viewing the audit material detail and prior to
navigating to another measure, you close the sub-window by selecting the
“Hide Audit Material Detail” button instead of using the traditional Windows X
box in the upper right corner of the sub-window. This allows the naming of the
button to remain synchronized with the display.
• Create Materials Using Audit Detail – This button is used to transfer the audit
material detail for the measure being accessed (viewed using the “Show Audit
Material Detail” button) to the work order. This would not be necessary if,
when generating the work order from the Measures form under the Main
Menu’s “NEAT Audit” or “MHEA Audit” buttons, you chose “Include Details
for Materials” (see Section 11.11, Measures (Audit). The detail would have
already been transferred. However, if this was not your choice and you now
wish to transfer the information, this button will accomplish the action. Even if
you initially chose to transfer the audit data but have since altered it using the
Materials/Labor Detail sub-form, you may still go back to the original audit
data using this button. However, you will be warned that this transfer will
overwrite the existing data for this measure. If the measure was not generated
from running either the NEAT or MHEA audits, selecting this button will
indicate “No material detail records to add.”
• Show Audit Economic Details – Selecting this button will display the Energy
Savings for Measure: <Measure Name> sub-form (see Figure 13.6) that allows
you to view the energy and economic details about the measure as calculated by
NEAT or MHEA. The values for the annual energy and dollar savings and the
savings-to-investment ratio (SIR) will be the same as those seen in the
Recommended Measures report (see Section 12.2, Recommended Measures
Report). If the measure was not produced by running an audit, most of the
entries will be zero. The values displayed on this sub-form will be described in
the following section, “The Energy Savings for Measure Sub-Form.”

13-16 The Weatherization Assistant User’s Manual (Version 8.9)
Chapter 13: Work Orders
The Energy Savings for Measure Sub-Form
• Energy Savings – This set of fields shows the annual heating energy savings in
units of MMBtu, annual cooling energy savings in units of kWh, and annual
base load energy savings in units of kWh estimated by NEAT or MHEA for the
measure. The total savings displayed in MMBtu converts the cooling and base
load savings from kWh to MMBtu, then adds their sum to the heating savings,
already in MMBtu. Uneditable.
• Economics Savings – This set of fields shows the heating, cooling, and base
load energy cost savings in units of dollars estimated by NEAT or MHEA for
the measure in the first year. Uneditable.
• Lifetime of Measure – This field displays the life of measure, in years, used by
NEAT or MHEA. These values are taken from the Library Measures form
under the Main Menu’s “Setup Library” button. Uneditable.
• Present Worth of Life Cycle Savings – This field displays the energy savings
of the measure in the first year multiplied by the lifetime of the measure,
adjusted to account for the fact that future dollar savings are not worth as much
as current dollars (i.e., “discounted”). The value also attempts to adjust for
forecasted changes in fuel costs. Uneditable.
• Actual/Estimated Adjustment Factor (%) – This is the only editable field on
the Energy Savings for Measure sub-form. It is identical to the entry of the
same name that appears on the Measures form (see above). Changing the value
here will automatically change the value displayed on the Measures form. Since
this parameter only affects the “Actual” savings and SIR, changing it on this
Figure 13.6. The Energy Savings for Measure: <Measure Name> sub-form.

The Weatherization Assistant User’s Manual (Version 8.9) 13-17
Chapter 13: Work Orders
sub-form will not affect any other entries on the form. It is included here to
allow you to make some conclusion about actual energy savings while viewing
the savings estimated by the audits. Windows of the program can be arranged
such that both this window and the parent Measures form are both visible, in
which case you will be able to see the effect of the “Actual/ Estimated
Adjustment Factor (%)” on the Actual SIR viewed on this latter form. Optional.
• Initial Cost – This field displays the cost of the measure, in dollars, used by
NEAT or MHEA. Uneditable.
• Savings to Investment Ratio (SIR) – This field displays the SIR of the
measure computed by NEAT or MHEA, which is the ratio of the present worth
of life cycle savings and the cost of implementing the measure, both displayed
on this sub-form immediately above this field. Uneditable.
The Materials/Labor Details Sub-Form
The Materials/Labor Details sub-form (see Figure 13.7) is used to describe
individual materials and labor components for a measure. You may enter as much
information as you feel necessary to sufficiently describe implementation of each
measure. There must be at least one material/labor record described for a measure
in order to have the measure printed on the work order.
A measure generated by a NEAT or MHEA audit will have this information
entered automatically, if you have so chosen (see “Include Details for Materials” in
Section 11.11, Measures (Audit)). The library measures have three cost
components: material, labor, and other, as specified in the Setup Library (see
“Costs” in Section 14.5, Library Measures). The user-defined measures and library
of health and safety measures may have as many cost components as you feel
necessary (see “The Materials/ Labor Details Sub-Form” in Section 14.6, User
Defined Measures). This detail is the same data viewed by selecting the “Show
Audit Material Detail” button described above, as well as under the “Costs” button
for the measure on the Measures form of the audit that generated the work order.
The Materials/Labor Details sub-form is also where you indicate use of materials
from your Supply Library (see Chapter 15, Supply Library) which then get
subtracted from your inventory once the material costs have been declared
“Actual.”

13-18 The Weatherization Assistant User’s Manual (Version 8.9)
Chapter 13: Work Orders
The Materials/Labor Details sub-form can also be viewed in data sheet view (see
Figure 13.8 below and Section 5.8, Data Sheet and Form Views of Records).
Although both views allow full data entry capabilities, the form view is likely
easier to understand since the controls have their standard appearance and do not
need to be cast in a spreadsheet format. Therefore, this view will be assumed in the
following descriptions. However, the alternate data sheet view still offers the added
ability to quickly see all components of the measure detail at once, not possible in
the form view.
Below are descriptions of the individual data items and controls found on the
Materials/Labor Details form.
• Order # – An integer entry that prescribes the order in which the costing
components of the measure will be listed on the work order. Any components
not given an order number will be listed first on the work order, but all those
without a number will have random order amongst themselves. Optional.
Figure 13.7. The Materials/Labor Details sub-form (form view).
Figure 13.8. The Materials/Labor Details sub-form (data sheet view).
Note: The form has been displayed wrapped since scrolling would
normally be necessary to see all columns.

The Weatherization Assistant User’s Manual (Version 8.9) 13-19
Chapter 13: Work Orders
• Type – If you are using the Supply Library (see Chapter 15, Supply Library) to
store information about materials you use in your weatherization activities and
possibly taking advantage of the Weatherization Assistant’s inventory feature,
select the category under which the material is listed in the library. With the
exception of “Unspecified,” these selections correspond to the material
categories in the Supply Library. The choices are as follows.
Cooling Equipment Labor
Construction Materials/Hardware Lighting
Doors Miscellaneous Supplies
Health and Safety Items Refrigerators
Heating Equipment Windows
Hot Water Equipment Other
Insulation Unspecified
The entry is used to narrow your search for the material when using the “Copy
Supply” drop-down list at the upper right corner of the sub-form. If you do not
plan to locate this material detail component in your Supply Library, this entry
may be left blank or designated as “Unspecified.” If the measure to which this
detail belongs originated from a NEAT or MHEA audit recommendation, this
entry will automatically be assigned. Optional (unless locating the material in
your Supply Library).
• Components – This field is normally visible only in the form view of the
Materials/Labor Details sub-form. It must not be confused with the Components
field in the general description portion of the Measures form. Figure 13.3
displays both of these fields. The Components field on the Materials/Labor
Details sub-form is never pre-populated and it is not displayed on the work
order. You may use it for a note regarding the material, but it will be visible
only within the Weatherization Assistant.
• Description – Enter a brief description of the component detail of the measure.
If the “Copy Supply” drop-down list was used to select the material, this field
will be automatically entered. In such cases, you may change the description,
but it may complicate your ability to identify the item as one tracked in your
inventory. The entry will also be automatically filled in if the material entry
stems from an audit recommendation. However, this does not link the entry to
an item in your Supply Library. You must still use the “Copy Supply” drop-

13-20 The Weatherization Assistant User’s Manual (Version 8.9)
Chapter 13: Work Orders
down list if you wish to associate the material with one in that library. The entry
may be 80 characters or less. Required.
• Units – Enter the units to be associated with the Estimated and Actual Quantity
fields on the sub-form. You may enter a unit not in the drop-down list (e.g.,
“gallon”). WARNING: If the detail entry was copied from the Supply Library
using the “Copy Supply” drop-down list, do not change the Units entry that is
automatically entered. The inventory kept in the Supply Library will expect the
Quantity and Unit Cost entries on the sub-form to be in these original units.
Required.
• Copy Supply – This entry is used in conjunction with the Type entry on the
sub-form to locate a specific material from your Supply Library. Selecting the
material using this drop-down list will automatically fill in most of the
remaining fields on the sub-form, provided you have specified the analogous
entries in the Supply Library. Locating a material in the Supply Library is
essential if you are using the inventory feature of the program for the specific
material being described. Optional.
• Comment – You may enter comments pertinent to the current material/labor
component directly in the Comment field on the form, or you may enter them in
the Comment Editor by selecting the “Comment” button to the left of the field.
If in data sheet view, double clicking on the field will display the Comment
Editor. The Comment Editor is similar to Window’s Notepad and may be used
to enter extended comments. Text from other sources may be copied and pasted
into the Comment Editor’s window. Unique to the comment fields on any form
within the “Work Order” window is the ability to import comments from the
audit you have specified in the Audit Name field on the Work Order
Information form by selecting the “Use an Audit Comment” drop-down list
displayed at the bottom of the Comment Editor. This drop-down list includes
references to all comments entered on all forms of the audit. You can import
multiple comments by selecting items one-by-one. The total comment may have
up to 65,000 characters. However, the field on the work order that will display
this comment is only about 20 characters in width. The Weatherization
Assistant will wrap the comment on the report, but excessively long comments
become awkward to display. Any comment that is entered in this comment field
will be displayed in the work order immediately under the material description.
Optional.

The Weatherization Assistant User’s Manual (Version 8.9) 13-21
Chapter 13: Work Orders
If the measure being viewed is a library measure or a user-defined measure, and
you had entered comments for any component detail while defining the measure
in the Setup Library, those comments will be automatically copied to this form
provided the request was made to carry along the component detail when
generating the work order (see “Include Details for Materials” in Section 11.11,
Measures (Audit), or “Create Materials Using Audit Detail” in Section 13.3,
Measures (Work Order)).
• Quantity (Estimated) – This is an estimate of the quantity of the material
needed to install this component of the measure, in the units specified in the
Units field. If this specific Materials/Labor Details entry originated from an
audit recommendation, this field will initially be the quantity specified in the
recommendation. However, you may alter this value if a new, more accurate
estimate becomes available. You may always review the value from the audit
recommendation by selecting the “Show Audit Material Detail” button.
Although the entry is optional with regard to form completeness checks, if left
blank, no value will appear in the Work Order report. You may enter the
Estimated Quantity without entering the associated Unit Cost. However, unless
both the Estimated Quantity and Estimated Unit Cost are entered, no Estimated
Total will be computed or displayed. Optional.
• Unit Cost (Estimated) – This is an estimate of the cost per unit (as given in the
Units field) of the material used in installing this component of the measure. If
this specific Materials/Labor Details entry originated from an audit
recommendation, this field will initially be the unit cost used to calculate cost
and SIR of the recommendation. However, you may alter this value if a new,
more accurate unit cost estimate becomes available. You may always review
the value from the audit recommendation by selecting the “Show Audit
Material Detail” button. Although the entry is optional with regard to form
completeness checks, if left blank, no value will appear in the Work Order
report. You may enter an Estimated Unit Cost without an associated Estimated
Quantity. However, unless both the Estimated Quantity and Estimated Unit
Cost are entered, no Estimated Total will be computed or displayed. Optional.
• Total (Estimated) – This field is the product of the Estimated Quantity and the
Estimated Unit Cost entries described above. If either of these values is
changed, this total will automatically change (you may need to access the field
for this update to occur). This total estimated cost will be reported in the work

13-22 The Weatherization Assistant User’s Manual (Version 8.9)
Chapter 13: Work Orders
order as an indication to the contractor of your estimate of the cost for this
particular component of the measure’s installation. The sum of the Total
Estimated costs from all components of a measure is displayed in the Estimated
Cost field in the lower right corner of the Measures form (see “Estimated/
Actual Cost and SIR” earlier in this section). Uneditable.
• Quantity (Actual) – This field allows you to record an actual quantity of
material used in installing this component of the measure, in the units specified
in the Units field. This value may not be available until after the work has
actually been performed. A blank field on the Work Order report for this
quantity allows the contractor to record it such that it can be reported back to
the agency. However, if entered prior to the Work Order report being printed,
the value will appear on the report in this field instead. If the Actual Quantity
and Actual Unit Cost are found to be the same as the estimated values, clicking
on the “Copy” button will automatically copy the estimated values to the Actual
fields. If the material has been selected from your Supply Library, it is only
after the quantity of the material has been declared “Actual” that the quantity
will be subtracted from your inventory tracked in that Supply Library (see
“Used (button)” in Section 15.2, Materials/Labor Forms, and the Copy Supply
field described above). You may enter the Actual Quantity without entering the
associated Unit Cost. However, unless both the Actual Quantity and Actual
Unit Cost are entered, no Actual Total will be computed or displayed. Optional.
• Unit Cost (Actual) – This field allows you to record an Actual Unit Cost of the
material used in installing this component of the measure, in the units specified
in the Units field. This value may not be available until after the work has
actually been performed. A blank field on the Work Order report for this
quantity allows the contractor to record it such that it can be reported back to
the agency. However, if entered prior to the Work Order report being printed,
the value will appear on the report in this field instead. If the Actual Quantity
and Actual Unit Cost are found to be the same as the estimated values, clicking
on the “Copy” button will automatically copy the estimated values to the actual
fields. You may enter the Actual Unit Cost without entering the associated
Quantity. This may be useful if a Unit Cost for the material has been set by a
contract, but the Actual Quantity is left for the contractor to determine at the
time the work is performed. However, unless both the Actual Quantity and
Actual Unit Cost are entered, no Actual Total will be computed. Optional.

The Weatherization Assistant User’s Manual (Version 8.9) 13-23
Chapter 13: Work Orders
• Total (Actual) – This field is the product of the Actual Quantity and the Actual
Unit Cost entries described above. If either of these values is changed, this total
will automatically change (you may need to access the field for this update to
occur). The entries necessary for the program to compute this value may not be
available until after the work has been performed. However, if available at the
time the Work Order report is printed, the value will appear on the report. The
sum of the Total Actual costs from all components of a measure is displayed in
the Actual Cost field in the lower right corner of the Measures form (see
“Estimated/ Actual Cost and SIR” earlier in this section). Uneditable.
You may also view all tasks within the work order in data sheet view (see Section
5.8, Data Sheet and Form Views of Records, and Figure 13.9, below). Although
you can make changes while in this view, it is not recommended as standard
practice since the form has more information associated with it than can be
displayed from this view (in particular the information within the Materials/ Labor
Details sub-form).
Figure 13.9. The Measures form under the Main Menu’s “Work Orders” button (data
sheet view).
Note: “Cost Center” and “Comment” fields not displayed.

13-24 The Weatherization Assistant User’s Manual (Version 8.9)
Chapter 13: Work Orders
13.4 Photos (Work Order)
If you have selected the “Use photo browser tab…” checkbox from the Features
tab under the Main Menu’s “Preferences” button (see Feature 1 in Section 16.4,
Features), the Photos tab will appear under the Main Menu’s “Work Orders”
button. This feature allows you to access the Photos form (see Figure 13.10). From
this form, you may select, view, and edit digital photos for the current work order.
See Section 18.1, Digital Photos, for more information on this feature. The ability
to reference digital photos also exists under the Main Menu’s “Clients,” “NEAT,”
and “MHEA” buttons. Therefore, you should develop a consistent policy regarding
where you reference your photos.
Figure 13.10. The Photos form under the Main Menu’s “Work Orders” button.

The Weatherization Assistant User’s Manual (Version 8.9) 14-1
Chapter 14: Setup Library
Chapter 14. Setup Library
NEAT and MHEA require more than a home’s description in order to select energy
efficiency measures for a dwelling. Using the Setup Library, you customize the
programs to your area by supplying fuel costs, material costs, and additional key
parameters. These values are not expected to change house-by-house. The Setup
Library is also where you have the opportunity to tell the programs which
measures to consider. This is most often decided with input from the state. You
may also define those tasks regularly performed as part of your weatherization
work that are not otherwise addressed by the programs. If you know energy
savings associated with any of these tasks, you may define user-defined measures,
which NEAT and MHEA will treat exactly as they do the predefined library
measures. The Setup Library is also where you may designate the characteristics of
insulation types not already available in NEAT.
As many setup library records as needed may be defined, each with its individual
set of material costs, settings, etc. For example, you may have more than one
contractor who has bid on work you perform. Thus, you would need a separate
Setup Library to contain the costs associated with each contractor. In addition,
each Setup Library itself can have multiple sets of fuel costs (see Section 14.3,
Fuel Costs) to accommodate the possibility of different utility service areas. See
“Setup Library Record Navigation Block” below for a discussion on how to create
additional setup libraries. Only one Setup Library can be associated with each
audit.
The remainder of this chapter is divided into sections describing the data entered
on each of the tabs seen under the Main Menu’s “Setup Library” button: Setup
Library Information, Key Parameters, Fuel Costs, Fuel Price Indices, Library
Measures, User Defined Measures, and NEAT Insulation Types. Data under the
Setup Library Information, Fuel Costs, and Fuel Price Indices tabs are used by both
NEAT and MHEA. Under the Key Parameters, Library Measures, and User
Defined Measures tabs, you designate which of the programs’ data you wish to
view using the “View” drop-down list in the lower left corner of the form. For the
latter of these tabs, you also have the choices to look at “All User-Defined
Measures” or only the “Health & Safety” measures defined in the Weatherization
Assistant (see Section 14.6, User Defined Measures).

14-2 The Weatherization Assistant User’s Manual (Version 8.9)
Chapter 14: Setup Library
14.1 Setup Library Information
The Setup Library Information form (see Figure 14.1) under the Main Menu’s
“Setup Library” button identifies the Setup Library being displayed and the
Agency to which the Setup Library is assigned. Individual entry items on the form
are discussed below:
Figure 14.1. The Setup Library Information form under the Main Menu’s
“Setup Library” button.
• References – Selecting this button, located just below the banner line of the
“Setup Library” window, displays the “References to Setup Library” window,
which lists all references to the Setup Library currently being accessed. See
Section 5.14, The References Button, for more information on the use of this
feature.
• Library Name – Enter in this field a name by which the specific Setup Library
can be identified. If you have more than one Setup Library in your agency, the
Library Name may contain some reference to how this library differs from any
other. However, a complete description of the library should be saved for the
Description or the Comment fields. A default name will be supplied when a
new Setup Library is created. The name will use your installation’s ID (see
Section 3.1, Initial Start-up of the Weatherization Assistant), if available.

The Weatherization Assistant User’s Manual (Version 8.9) 14-3
Chapter 14: Setup Library
Otherwise the default name will contain the time the library was created.
Entries may be 50 characters or less. Required.
• Agency – This field identifies the agency to which the Setup Library is
associated. Since the only way to create a new Setup Library is to copy an
existing one (see “Setup Library Record Navigation Block” below) or import
one with a client (see both topics on “Importing Clients” in Sections 17.3, Data
Transfer – Import/Export With Another MSAccess Database, and 17.4, Data
Transfer – Import/Export Indirectly with Text Files), this entry will always be at
least initially filled in for you. The field is more for identification purposes,
possibly on a state level, identifying the agency within the state using the set of
parameters in the library. WARNING: The program allows you to change the
Agency assignment of a Setup Library. However, doing so when existing audits
use the library will hide the link between the audits and the library. Therefore,
re-assigning the agency assignment of a Setup Library is not recommended
unless the library has just been created, insuring no other references to it exist.
Required.
• State – This field displays the state associated with the Agency entered in the
previous field. Uneditable.
• Supply Library – This entry indicates what Supply Library is associated with
the Setup Library. The Supply Library is where your inventory of materials and
supplies exists. The Setup Library uses this designation to permit you to include
materials from your inventory in defining user-defined measures. If these
materials are so chosen, actual implementation of the user-defined measure will
automatically update your inventory within the specified Supply Library. (See
Section 14.6, User Defined Measures). The Supply Library entry will most
often be automatically entered for you whenever a new Setup Library is created
or when associated with an imported client (see both topics on “Importing
Clients” in Sections 17.3, Data Transfer – Import/Export With Another
MSAccess Database, and 17.4, Data Transfer – Import/Export Indirectly with
Text Files). WARNING: Changing the Supply Library assigned to a Setup
Library can cause confusion, unless the library has just been created. Even
though the material assignments used in existing work orders will remain
unchanged, the Supply Library and Setup Library designations in Audits and
Work Orders may become inconsistent and make it difficult to distinguish
where inventoried materials are being drawn from. Required.

14-4 The Weatherization Assistant User’s Manual (Version 8.9)
Chapter 14: Setup Library
• Description – You may use this field to briefly describe the intended use of the
Setup Library, particularly if you use more than one Setup Library in your
agency. If you have multiple contracts for work with different costs, this field
would be ideal to record the contractor’s name, the geographic area in which
they work, etc. The entry may be 255 characters or less. Optional.
• Comment – You may enter comments pertinent to the Setup Library directly in
the Comment field on the form, or you may enter them in the Comment Editor
by selecting the “Comment” button to the left of the field. The Comment Editor
is similar to Window’s Notepad and may be used to enter extended comments.
The total comment may have up to 65,000 characters. Text from other sources
may be copied and pasted into the Comment Editor’s window. Any comment
that is entered is displayed on the Library Measure Costs and User Defined
Measure Costs reports (see “Report Block” below). Optional.
• Setup Library Record Navigation Block – The Setup Library record
navigation block is used to find and navigate to setup libraries, delete existing
libraries, or create a new library by copying an existing one. See Section 5.1,
Form and Record Navigation, for information on using the Weatherization
Assistant’s record navigation blocks.
By default, the drop-down list will display only the setup libraries associated
with your agency, since it is likely that your agency has been “bookmarked” by
being the last agency visited using the Main Menu’s “Agency” button. If you
have more than one agency defined in your database (as might be the case for a
state’s installation) and you want the drop-down list to display setup libraries
from all defined agencies, uncheck the “Use only the last bookmarked Agency
in the find record drop down boxes,” Feature 9 from the Preferences/Features
tab (see the indicated topic in Section 16.4, Features).
For the Setup Library record navigation block, the “New” button does not
create a blank setup library. Instead it creates a setup library which is a copy of
the library that came with the program, originally named “Your Setup Library,”
prior to you having made any changes to it (see “Naming Your Setup Library”
in Section 3.2, Program Setup). If you wish to create a setup library having
modifications to one you are already using, access it using the record navigation
block, use the “Copy” button, and make the changes you wish in the resulting

The Weatherization Assistant User’s Manual (Version 8.9) 14-5
Chapter 14: Setup Library
copy. Do not use the “New” button for this, since the new setup library will not
have any of your current data in it.
• Report Block – The Report block provides you with access to all reports
available under the Main Menu’s “Setup Library” button. The following reports
are currently available: Library Measure Costs and User Defined Measure
Costs. See Appendix C, Reports, for examples of these reports. The Library
Measure Costs report will display the costs for all of the library measures (see
“Costs” in Section 14.5, Library Measures). For each measure, all three cost
components (material, labor, and other) will be displayed. For insulation
measures having multiple insulation types for each application, these three
components will be given for each material. The entries are divided by Measure
Type and Measure Name. The User Defined Measure Costs report displays the
costs for all of the measures you have defined under the User Defined Measures
tab of the setup library as well as all of the library health and safety measures
contained in the Weatherization Assistant (see Section 14.6, User Defined
Measures). User-defined measures may have as many materials or components
to their costing scheme as you wish. All of these components will be listed in
the report for these measures. See Section 5.12, The Report Block, for the
mechanics of using the Weatherization Assistant’s Report blocks. Appendix D,
Development of Customized Reports, describes a method to create reports
tailored to your needs and to list the reports in the Report block.
14.2 Key Parameters
The forms under the Key Parameters tab in the “Setup Library” window provide
you with the flexibility of modifying some of NEAT’s and MHEA’s inputs and
assumptions. If you have information about the parameters included on these forms
that is more appropriate for your agency than the existing values, you may enter
them by replacing the existing values. Caution should be exercised in altering
parameters. The Weatherization Assistant attempts to recommend measures for
houses with typical occupancy characteristics. No effort should be made to adjust
parameters to coincide with the lifestyles of individual occupants unless possibly
for health and safety considerations of a specific occupant. (If this is done, make
sure to alter a copy of your standard setup library so that other audits won’t be
affected by the change.)

14-6 The Weatherization Assistant User’s Manual (Version 8.9)
Chapter 14: Setup Library
Key parameters for both NEAT and MHEA are accessible under the same Key
Parameters tab. Choose which set of parameters you view by using the “View”
drop-down list in the lower left corner of the Key Parameters form. The name of
the program (either “NEAT” or “MHEA”) will appear just above the “View” drop-
down list indicating which set is currently being displayed.
The key parameters for both programs are subdivided into categories, such as
“Economics” or “Insulation,” each under a separate sub-form. These parameters
will be discussed below in order of the program, then category.
Site Built (NEAT) Key Parameters
Economics
• Real discount rate – The rate at which dollars saved in the future are
discounted to a worth in current dollars. DOE supplies this rate each year and
has specified that it must be changed no less than every five years. This
parameter is updated with each release of the Weatherization Assistant.
• Minimum acceptable SIR – The savings to investment ratio (SIR) for an
individual measure below which the measure will not be recommended. A
minimum SIR of 1.0 has been specified by DOE.
Figure 14.2. The NEAT Key Parameters – Economics form under the
Main Menu’s “Setup Library” button.

The Weatherization Assistant User’s Manual (Version 8.9) 14-7
Chapter 14: Setup Library
Set Points
• Heating and Cooling setpoints for daytime and nighttime (F) – The assumed
thermostat set-points in the house being audited. NEAT has been designed to
make recommendations based on typical occupancy. The set-point values
should not be altered to reflect any unusual lifestyles of the occupants.
• Night setback (F) – The number of degrees Fahrenheit below the normal
heating nighttime set-point that an automatic set-back thermostat decreases the
heating set-point during the night.
Figure 14.3. The NEAT Key Parameters – Set Points form under the Main
Menu’s “Setup Library” button.
Insulation
• Average annual outside film coefficient (Btu/h-ft
2
-F) – The winter/summer
average film coefficient assumed for exterior surfaces.
• Uninsulated R-Value for "Other" Wall Type (h-ft
2
-F/Btu) – The R-value
associated with an uninsulated wall given Wall Type “Other” on NEAT’s Walls
form.

14-8 The Weatherization Assistant User’s Manual (Version 8.9)
Chapter 14: Setup Library
• R-Value for “Other” exterior siding type (h-ft
2
-F/Btu) – The R-value
associated with the Exterior Type (siding) “Other” on NEAT’s Walls form.
• R-Value per inch for “Other” existing ceiling insulation type (h-ft
2
-F/Btu-
in) – This value is not used in the program. The parameter entry was left in the
key parameters by mistake. The value used is 3.09 h-ft
2
-F/Btu-in.
• Added duct insulation R-value (h-ft
2
-F/Btu) – The R-value assumed added to
the supply ducts by the Duct Insulation measure.
• Water heater wrap added R value (h-ft
2
-F/Btu) – The insulation R-value
used to wrap water heaters in the Water Heater Tank Insulation measure.
• Base value of free heat from internals (Btu/h) – The heat from lights and
appliances that is released into a home. NEAT adds to this base amount the heat
generated by as many as two adults (276 Btu/h per adult) and one child (224
Btu/h) for every occupant above two in number.
Figure 14.4. The NEAT Key Parameters – Insulation form under the Main
Menu’s “Setup Library” button.

The Weatherization Assistant User’s Manual (Version 8.9) 14-9
Chapter 14: Setup Library
Equipment
• Window A/C replacement SEER – The SEER (seasonal energy efficiency
ratio) of the replacement window air conditioner.
• Central A/C replacement SEER – The SEER of the replacement central air
conditioner.
• Heat pump replacement SEER (cooling) – The SEER of the replacement heat
pump when operating in cooling mode.
Figure 14.5. The NEAT Key Parameters – Equipment form under the Main
Menu’s “Setup Library” button.
• SEER used to impute cooling savings – The SEER of an air-conditioning unit
that would most likely be installed in the home sometime in the future. This
data item controls NEAT's optional feature of computing cooling savings for
measures in a home without air-conditioning and little heating needs, as might
be found in the extreme South. No cooling energy is actually saved in such a
home. However, most measures that would save cooling energy in a home with
air-conditioning can make living conditions more comfortable during the
summer in homes without air-conditioning. Thus, you may "impute" a savings

14-10 The Weatherization Assistant User’s Manual (Version 8.9)
Chapter 14: Setup Library
in these homes in order to install measures to increase the comfort. The homes
may install air-conditioning in the future, thus eventually allowing this imputed
savings to occur. The feature is activated from NEAT’s Audit Information form
(see “Impute Cooling” in Section 8.2, Audit Information).
• Low flow shower head flow rate (gal/min) – The flow rate in gallons per
minute of replacement shower heads used in your program.
• Refrigerator defrost cycle energy (kWh) – The electrical energy in kWh
assumed consumed by the existing refrigerator’s defrost cycle. The value is
used to adjust the metered consumption of the refrigerator if the user indicates
that the metering period included a defrost cycle.
Windows
• Replacement Window U-value (Btu/h-ft
2
-F) – The U-value assumed for the
replacement window. Unless changed by the user, the value represents a typical
double pane, wood or vinyl frame window.
• Replacement Window Solar Heat Gain Coefficient – The solar heat gain
coefficient (SHGC) assumed for the replacement window. Unless changed by
the user, the value represents a typical double pane, wood or vinyl frame
window.
• Replacement Low-e Window U-value (Btu/h-ft
2
-F) – The U-value assumed
for the replacement low-e window. Unless changed by the user, the value
represents a typical double pane, low-e, wood or vinyl frame window.
• Replacement Low-e Window Solar Heat Gain Coefficient – The solar heat
gain coefficient (SHGC) assumed for the replacement low-e window. Unless
changed by the user, the value represents a typical double pane, low-e, wood or
vinyl frame window.
• Retrofit Storm Window Emittance – The emittance assumed for the Storm
Windows retrofit measure. Unless changed by the user, the value represents a
typical single pane wood frame glass storm window. If your agency installs
low-e storm windows, this value should be changed to reflect the low-e storm’s
manufacturer’s specifications.

The Weatherization Assistant User’s Manual (Version 8.9) 14-11
Chapter 14: Setup Library
• Retrofit Storm Window Solar Heat Gain Coefficient – The solar heat gain
coefficient (SHGC) assumed for the Storm Windows retrofit measure. Unless
changed by the user, the value represents a typical single pane wood frame
glass storm window. If your agency installs low-e storm windows, this value
should be changed to reflect the low-e storm’s manufacturer’s specifications.
• Retrofit Window Film Surface Emittance – The surface emittance assumed
for the Window Film retrofit measure. There is a wide range of reported
window film characteristics. If your agency installs window films, this value
should be changed to reflect the window film’s manufacturer’s specifications.
• Retrofit Window Film Solar Heat Gain Coefficient (including frame) – The
solar heat gain coefficient (SHGC) assumed for the retrofit window film
measure. There is a wide range of reported window film characteristics. If your
agency installs window films, this value should be changed to reflect the
window film’s manufacturer’s specifications.
Figure 14.6. The NEAT Key Parameters – Windows form under the Main Menu’s
“Setup Library” button.

14-12 The Weatherization Assistant User’s Manual (Version 8.9)
Chapter 14: Setup Library
Mobile Home (MHEA) Key Parameters
Economics
• MHEA Real Discount Rate – The rate at which dollars saved in the future are
discounted to a worth in current dollars. DOE supplies this rate each year and
has specified that it must be changed no less than every five years. This
parameter is updated with each release of the Weatherization Assistant.
• MHEA Minimum Acceptable SIR – The savings to investment ratio (SIR) for
an individual measure below which the measure will not be recommended. A
minimum SIR of 1.0 has been specified by DOE.
• Spending limit for package of measures ($) – The average per dwelling
expenditure of financial assistance allowed under the Weatherization Assistance
Program as prescribed in the annual program guidance. If this limit is exceeded
for an specific dwelling, a warning will be printed under the “Special Notes”
section of the Recommended Measures Report (see Section 12.2, Recommended
Measures Report).
Set Points
• MHEA Heating and Cooling Setpoints for daytime and nighttime (F) – The
assumed thermostat set-points in the house being audited. MHEA has been
designed to make recommendations based on typical occupancy. The set-point
values should not be altered to reflect any unusual lifestyles of the occupants.
• Thermostat setback amount (F) – The number of degrees Fahrenheit below
the normal heating nighttime set-point that an automatic set-back thermostat
decreases the heating set-point during the night.
• Length of night thermostat setback (Hours) – The number of hours each day
that a set-back thermostat, if one exists, affects the thermostat set-point.

The Weatherization Assistant User’s Manual (Version 8.9) 14-13
Chapter 14: Setup Library
Figure 14.7. The MHEA Key Parameters – Economics form under the Main
Menu’s “Setup Library” button.
Figure 14.8. The MHEA Key Parameters – Set Points form under the Main
Menu’s “Setup Library” button.

14-14 The Weatherization Assistant User’s Manual (Version 8.9)
Chapter 14: Setup Library
Insulation
• Bag size for loose cellulose and fiberglass insulation (lb) – The weight of the
bags of cellulose and fiberglass insulation purchased to perform the insulation
retrofits. These values are used with the Installed Density entries above to
determine the number of bags of insulation necessary to perform the associated
insulation retrofits.
• Density of added loose cellulose and fiberglass insulation (lb/ft
3
) – The
anticipated density of cellulose and fiberglass insulation to be installed. These
values are used with the Bag Size entries that follow to determine the number of
bags of insulation necessary to perform the associated insulation retrofits.
• Interior wall R-value: Summer, Winter (h-ft
2
-F/Btu) – The R-value of the
interior wall components, excluding insulation, for the summer and winter
seasons. The wall components may simply include the interior wall material
and the surface resistance of the air. Refer to literature related to approximating
R-values of building components for further detail.
• Interior ceiling R-value: Summer, Winter (h-ft
2
-F/Btu) – The R-value of the
interior ceiling components, excluding insulation, for the summer and winter
seasons. The ceiling components may simply include the ceiling material and
the surface resistance of the air. Refer to literature related to approximating R-
values of building components for further detail.
• Interior floor R-value: Summer, Winter (h-ft
2
-F/Btu) – The R-value of the
interior floor components, excluding insulation, for the summer and winter
seasons. The floor components may simply include the flooring material, floor
covering, and the surface resistance of the air. Refer to literature related to
approximating R-values of building components for further detail.
• Outside wall R-value: Summer, Winter (h-ft
2
-F/Btu) – The R-value of the
outside wall components for the summer and winter seasons. The wall
components may simply include the exterior wall material and the surface
resistance of the air. Refer to literature related to approximating R-values of
building components for further detail.

The Weatherization Assistant User’s Manual (Version 8.9) 14-15
Chapter 14: Setup Library
• Existing Batt/Blanket, Loose, Rigid, Foamcore insulation R-value per inch
(h-ft
2
-F/Btu-in) – The R-value per inch for the insulation to be used in MHEA
energy calculations. This value is used to evaluate the insulating effect of
existing insulation described on the input forms as well as the insulating effect
of new insulation added during weatherization. Note that rigid insulation is
typically found in the roof section and that foamcore insulation is typically
found in the wall sections of the manufactured home.
Figure 14.9. The MHEA Key Parameters – Insulation form under the Main
Menu’s “Setup Library” button.
Heat Transfer
• Home leakiness—Tight, Medium, and Loose (cfm) – The pre-retrofit blower
door readings in CFM at 50 Pa pressure differential which are associated with
the selection of Home Leakiness on the Audit Information form of the MHEA
audit (see “Home Leakiness” in Section 8.2, Audit Information). The values are
used if none are entered for “Before Weatherization (Existing) Air Leakage
Rate and House Pressure” on the Air and Duct Leakages form of the audit (see
Section 11.2, Ducts and Infiltration – Air and Duct Leakages).

14-16 The Weatherization Assistant User’s Manual (Version 8.9)
Chapter 14: Setup Library
• Free heat from interior sources: Day, Night (Btu/h) – The heat released into
a home from activities taking place within the home, including cooking, hot
water use, appliance use, and lighting. MHEA assumes daytime hours of 8:00
AM through 8:00 PM with the remaining hours considered to be during the
nighttime.
• Duct-sealing and Duct insulation distribution loss reduction (%) – These
parameters are no longer used in the program. Duct leakage measurements are
taken from the forms used to evaluate duct sealing efforts (see Section 11.2,
Ducts and Infiltration – Air and Duct Leakages).
• Evaporative cooler actual saturating efficiency (%) – The saturating
efficiency of the evaporative cooler. Refer to manufacturer’s literature or
literature describing evaporative cooler operation for actual saturating
efficiency values.
• Saturating efficiency for evaporative tune-up (%) – The saturating efficiency
after a tune-up has been performed on an evaporative cooler.
Figure 14.10. The MHEA Key Parameters – Heat Transfer form under the Main
Menu’s “Setup Library” button.

The Weatherization Assistant User’s Manual (Version 8.9) 14-17
Chapter 14: Setup Library
• Saturating efficiency for evaporative replacement (%) – The saturating
efficiency of a replacement evaporative cooler. The manufacturer’s literature
should help indicate the new evaporative cooler saturating efficiency.
• Cooling system fan power (Watts) – The fan power of the cooling system fan.
This value is used in the equipment cooling capacity and equipment energy
consumption calculations.
Doors
• Door U-value: wood with solid core, wood with hollow core, standard
manufactured home door (Btu/h-ft
2
-F) – The U-value for each type of door.
These values are used to evaluate the insulating effect of the existing doors
described on the input screens. Note that MHEA assumes a standard
manufactured home door has a solid core and a vinyl or fiberglass skin.
• U-value of replacement door (Btu/h-ft
2
-F) – The U-value for a replacement
manufactured home door. This value is used to evaluate the insulating effect of
the replacement doors.
Windows
• Window U-value: Winter, Summer; single pane, double pane (Btu/h-ft
2
-F)
– Enter the U-value of single and double pane windows with no storm windows
for the summer and winter seasons. Refer to manufacturer’s literature or
literature related to approximating window U-values for further detail.
• Window U-value with glass storm: Winter, Summer; single pane, double
pane (Btu/h-ft
2
-F) – The U-value of single and double pane windows with a
glass storm for the summer and winter seasons. Refer to manufacturer’s
literature or literature related to approximating window U-values for further
detail.
• Window U-value with plastic storm: Winter, Summer; single pane, double
pane (Btu/h-ft
2
-F) – The U-value of single and double pane windows with a
plastic storm for the summer and winter seasons. Refer to manufacturer’s
literature or literature related to approximating window U-values for further
detail.

14-18 The Weatherization Assistant User’s Manual (Version 8.9)
Chapter 14: Setup Library
• Skylight U-value: Winter, Summer; single pane, double pane (Btu/h-ft
2
-F)
– The U-value of single and double pane skylights with no storms for the
summer and winter seasons. Refer to manufacturer’s literature or literature
related to approximating skylight U-values for further detail.
• Skylight U-value with glass storm: Winter, Summer; single pane, double
pane (Btu/h-ft
2
-F) – The U-value of single and double pane skylights with a
glass storm for the summer and winter seasons. Refer to manufacturer’s
literature or literature related to approximating skylight U-values for further
detail.
• Skylight U-value with plastic storm: Winter, Summer; single pane, double
pane (Btu/h-ft
2
-F) – The U-value of the skylights with a plastic storm for the
summer and winter seasons. Refer to manufacturer’s literature or literature
related to approximating skylight U-values for further detail.
• Window shading R-value: drapes, blinds or shades, drapes and shades (h-
ft
2
-F/Btu) – The R-value of the interior window covering. Refer to
manufacturer’s literature or literature related to approximating R-values of
interior window shading devices for further detail.
• Sun screen solar transmittance reduction: Winter, Summer (%) – The
percent reduction of solar transmittance in the winter and summer due to an
exterior window sun screen. The solar transmittance is the fraction of solar
energy that travels through the window into the living space of the
manufactured home. Refer to manufacturer’s literature or literature related to
sun screen solar transmittance for further detail.
• Ratio of awning depth to window height – The ratio of the exterior window
awning depth to the height of the window (depth/height). The depth of the
awning is the distance the awning extends from the exterior of the
manufactured home. This value is used to calculate the shading effect of the
awning on the window.

The Weatherization Assistant User’s Manual (Version 8.9) 14-19
Chapter 14: Setup Library
Figure 14.11. The MHEA Key Parameters – Doors form under the Main Menu’s
“Setup Library” button.
Figure 14.12. The MHEA Key Parameters – Windows form under the Main
Menu’s “Setup Library” button.

14-20 The Weatherization Assistant User’s Manual (Version 8.9)
Chapter 14: Setup Library
Base Loads
• MHEA Low-flow shower head flow rate (gal/min) – The flow rate in gallons
per minute of replacement shower heads used in your program.
• MHEA Water heater wrap added R-value (h-ft
2
-F/Btu) – The R-value of
insulation used to wrap water heaters in the Water Heater Tank Insulation
measure.
• MHEA Refrigerator defrost cycle energy (kWh) – The electrical energy in
kWh assumed consumed by the existing refrigerator’s defrost cycle. The value
is used to adjust the metered consumption of the refrigerator if the user
indicates that the metering period included a defrost cycle.
Figure 14.13. The MHEA Key Parameters – Base Loads form under the Main Menu’s
“Setup Library” button.

The Weatherization Assistant User’s Manual (Version 8.9) 14-21
Chapter 14: Setup Library
14.3 Fuel Costs
The Fuel Costs form (see Figure 14.14) under the Main Menu’s “Setup Library”
button is used to record the average fuel prices in your agency’s area. The prices
will be used in any NEAT or MHEA audit that specifies use of the Setup Library
and the Fuel Cost Library within a Setup Library (see “Libraries and Other Options
Data Block” under Section 8.2, Audit Information). Since fuel costs vary widely
throughout the United States, the values in the “Default Costs” Fuel Cost Library,
installed with the program, will likely not reflect costs in your location and should
be changed (see “Populating the Setup and Supply Libraries” in Section 3.2,
Program Setup, and the “Unit Cost” field description below). Check the costs of
fuels in your area at least once a year and update the costs, if necessary. Fuel costs
should be typical—avoid high or low short-term values.
Figure 14.14. The Fuel Costs form under the Main Menu’s “Setup Library” button.
You may have multiple fuel cost libraries in any given setup library, but each must
contain prices for all fuels. Thus, if your area is served by two different natural gas
companies and two different electric companies, in order to account for all

14-22 The Weatherization Assistant User’s Manual (Version 8.9)
Chapter 14: Setup Library
possibilities of service from these four companies, you would need four different
fuel cost libraries. As the number of service companies increases, the number of
fuel cost libraries needed to cover all possibilities can become unmanageable.
Under these circumstances, it is recommended that you attempt to average prices
for a given fuel from providers whose prices do not differ significantly. Some
states have decided to use state-wide average fuel costs in order to ensure equity
among all of its clients.
Below are descriptions of the individual data items and controls found under the
Fuel Costs form and the associated Fuel Costs Table.
• Fuel Cost Table Name – Use the Fuel Cost Table Name to identify the
applicability of this particular set of fuel prices, particularly if you have
multiple sets. The Name may be 80 characters or less.
• References – Selecting this button will display the “References to Fuel Cost
Table” window, which lists all the references to the current fuel cost table. You
may clear the references to the current fuel cost table or change the references
to any other fuel cost table you have already created under the currently
accessed setup library. See Section 5.14, The References Button, for more
information on the use of this feature.
• Fuel Cost Record Navigation Block – The Fuel Cost record navigation block
is used to find and navigate to existing fuel cost tables under the currently
accessed setup library, copy or delete the current fuel cost table, or create a new
fuel cost table. See Section 5.1, Form and Record Navigation, for information
on using the Weatherization Assistant’s record navigation blocks.
• Comment – You may enter comments pertinent to the current fuel cost table
directly in the Comment field on the form, or you may enter them in the
Comment Editor by selecting the “Comment” button to the left of the field. The
Comment Editor is similar to Window’s Notepad and may be used to enter
extended comments. The total comment may have up to 65,000 characters. Text
from other sources may be copied and pasted into the Comment Editor’s
window. If you have multiple fuel cost tables, use this Comment field to
describe how this fuel cost table differs from the others. Optional.

The Weatherization Assistant User’s Manual (Version 8.9) 14-23
Chapter 14: Setup Library
The Fuel Cost Table
• Fuel Type – This column lists all fuel types considered in the Weatherization
Assistant. These include: Natural Gas, Oil, Electricity, Propane, Wood, Coal,
Kerosene, and Other. You may use “Other” by providing the unit cost and heat
content of a fuel not listed. Uneditable.
• In Units of – This field shows the unit in which the fuel cost is specified for
different fuel types. These include: Mcf (1,000 cubic feet) for natural gas,
gallons for #2 oil, kWh for electricity, gallons for propane, cords for wood, tons
for coal, and gallons for kerosene, and MMBtu (million British thermal units)
for other. Uneditable.
• Unit Cost – The fuel price in dollars per unit of fuel given in the previous
column. If you obtain information regarding fuel prices from a fuel bill or
communication with a utility company, you may not be able to immediately
obtain the appropriate values for use in the Weatherization Assistant. First, note
carefully the units that are given for the prices from any source. If they do not
match the units required by the Weatherization Assistant, as given in the “In
Units of” field, you will have to convert the values. The most common need for
conversion is seen in the prices given for natural gas. The Weatherization
Assistant requires the natural gas price to be in $/Mcf (dollars per thousand
cubic feet of gas). Use the following conversions if the natural gas price is
given in different units:
Multiply $/MBtu by 1.025 to obtain the cost in units of $/Mcf.
Multiply $/therm by 10.25 to obtain the cost in units of $/Mcf.
Multiply $/ccf by 10 to obtain the cost in units of $/Mcf.
Particularly if you take a fuel price from a utility bill, you may have to account
for fixed charges. The prices required by the Weatherization Assistant must
exclude any fixed charges, such as a $2.00 per month fee for bill processing.
However, if the fee is charged per unit of consumption, such as a delivery cost
for propane in dollars per gallon, then this cost should be included in the price
used in the Weatherization Assistant.
You may experience situations where the price per unit depends on the total
amount consumed each month, sometimes referred to as “tiered” rates. The fuel

14-24 The Weatherization Assistant User’s Manual (Version 8.9)
Chapter 14: Setup Library
price to be used in the Weatherization Assistant should be the price per unit
from the highest tier normally encountered by your clients. Or, you may find
seasonal rates where the price per unit is different during the winter versus the
summer. If the fuel for which you encounter this situation is used predominately
during one of the seasons, use the price for that season. If you feel that the fuel
is used almost equally during both seasons, take an average of the prices.
• Heat Content –The number of MMBtu (million British thermal units) derived
from burning one unit of the fuel. If you have information providing more
accurate heat contents than listed for the fuels you commonly encounter, enter
these values here. Some natural gas companies post the heat content of their gas
on their bills or would certainly be able to give you an average if contacted.
They do vary, but normally not more than a few percent.
14.4 Fuel Price Indices
The Fuel Price Indices form (see Figure 14.15) under the Main Menu’s “Setup
Library” button specifies the fuel price indices, which are used to adjust the dollar
savings of measures to account for anticipated changes in fuel prices over their life.
Those distributed with the program and viewed under this tab are national average
indices, published annually by the Department of Commerce, for the year closest
to program’s release (2011 for Version 8.9.0.5). Weatherization Program rules
require these indices to be updated at least every five years. Thus, unless your
release of the program is more than five years old, you do not need to make any
changes in these entries.
• Fuel Type – This column lists all fuel types considered in the Weatherization
Assistant. These include: Natural Gas, Oil, Electricity, Propane, Wood, Coal,
Kerosene, and Other. The “Other” fuel type corresponds to the “Other” fuel
type found under the Fuel Costs form and can be used for a fuel not otherwise
listed. Uneditable.
• Year – This column displays the year beyond the current year for which the
Price Index corresponds. Uneditable.

The Weatherization Assistant User’s Manual (Version 8.9) 14-25
Chapter 14: Setup Library
Figure 14.15. The Fuel Price Indices form under the Main Menu’s “Setup Library” button.
• Price Index – This column displays the projected Fuel Price Indices, as taken
from the Department of Commerce publication. Those distributed with the
Weatherization Assistant are national average indices, even though the
Department of Commerce also publishes separate indices for the four U.S.
census regions.
• UPW Factor – The Uniform Present Worth (UPW) factor is computed from
the Fuel Price Indices, described above, and the “Real discount rate,” entered on
the Key Parameters/Economics form. The values give the factor by which the
first year’s dollar savings of a measure is to be multiplied to obtain its
“discounted” lifetime dollar savings. The discounted lifetime dollar savings of a
measure is the value which, when divided by the cost of installing the measure,
gives the savings-to-investment ratio (SIR) reported by NEAT and MHEA.
Uneditable.

14-26 The Weatherization Assistant User’s Manual (Version 8.9)
Chapter 14: Setup Library
14.5 Library Measures
The Library Measures form (see Figure 14.16) is used to enter information about
the measures you want NEAT and MHEA to consider while evaluating an audit.
The “Library” measures are those which have been programmed into NEAT and
MHEA, as opposed to any user-defined measures you may have generated (see
Section 14.6, User Defined Measures). Both NEAT and MHEA measures are
accessed under the same Library Measures tab in the “Setup Library” window. Use
the “View” drop-down list at the lower left of the form to choose which program’s
measures you wish to display.
Figure 14.16. The Library Measures form under the Main Menu’s “Setup Library” button.
Below are descriptions of the individual data items and controls found on the
Library Measures form.
• Measure Type – This field displays the type of measure assigned to the NEAT
and MHEA library measures. Examples are “Building Insulation” and “HVAC
Systems.” The measure type does not appear on any report. However, if a work

The Weatherization Assistant User’s Manual (Version 8.9) 14-27
Chapter 14: Setup Library
order is initiated from a NEAT or MHEA audit, the measure types for the
transferred library measures are displayed on the Measures form under the Main
Menu’s “Work Orders” button (see “Measure Type” in Section 13.3, Measures
(Work Order)), where they can be used to sort the measure list when the
Measures form is viewed in the data sheet view. Uneditable.
• Measure Name – This is the name the library measure will be identified by in
all locations throughout the program, including audits, work orders, and all
reports that might be printed. Note that the measure names of similar measures
may differ in NEAT versus MHEA. Uneditable.
• Active – Selection of this checkbox indicates your desire that the program
consider this measure when forming its recommendations. Even if selected
here, however, a measure will not be recommended unless it is cost-effective or
is a measure that has been declared mandatory and is so designated within a
specific audit. The “Select All,” “UnSelect All,” and “Invert Select” buttons at
the bottom of the form allow you to make all of the measures active, deactivate
(unselect) all measures, or invert the selection currently seen from the
checkboxes.
• Default Contractor – The Weatherization Assistant gives you the optional
feature of designating the contractor who will install each measure. Measures
recommended for the same dwelling but assigned different contractors will be
automatically added to different work orders, if the work order feature has been
implemented (see Chapter 13, Work Orders). The “Default Contractor” drop-
down list allows you to assign a default contractor for each measure. This
assignment can be changed either when the measure is recommended (see
“Contractor” in Section 11.11, Measures (Audit)) or when assigned to a specific
work order (see “Contractor/Crew” in Section 13.1, Work Order Information).
Thus an entry here does not commit you to retain the assignment, but simply
may reduce your effort making such assignments later.
The choices available from the drop-down list will include only those agency
contacts declared as “Contractors” or “Crew” under the Contacts tab of the
Main Menu’s “Agency” button for the agency associated with this Setup
Library (see Section 6.2, Contacts (Agency)). Optional.

14-28 The Weatherization Assistant User’s Manual (Version 8.9)
Chapter 14: Setup Library
• Default Cost Center – The Weatherization Assistant gives you the option to
attribute costs incurred in installing measures to different Cost Centers or
funding sources. With this, and additional information, the program can provide
you with a record of income and expenditures by cost center (see Section 6.3,
Cost Centers). The “Default Cost Center” drop-down list allows you to assign a
default cost center for each measure. This assignment can be changed either
when the measure is recommended (see “Cost Center” in Section 11.11,
Measures (Audit)) or when assigned to a specific work order (see “Cost Center”
in 13.3, Measures (Work Order)). Thus an entry here does not commit you to
retain the assignment, but may reduce your effort making such assignments
later.
The choices available from the drop-down list will include only those entries
made under the Cost Center tab of the Main Menu’s “Agency” button for the
agency associated with this Setup Library (see Section 6.3, Cost Centers). Cost
Center assignments need to be made only if you are tracking funds within the
Weatherization Assistant. Optional.
• Life – NEAT and MHEA allow you to change the “Life” of each measure. The
lifetimes in the programs as shipped reflect industry standards and will likely be
sufficient for your use. However, if you have documented cause to alter them,
you may do so on this form. For some measures, the life may depend on the
specific material being used in your program. Note that lifetimes for “Lighting
retrofits” are in thousands of hours burn time for the replacement compact
fluorescent, not years. Required.
• Costs – Each measure listed on the Library Measures form has a “Costs” button
on the right side of the form. Selecting this button for a measure will take you to
the Unit Costs of Measure sub-form (see Figure 14.17), where the cost
components for implementing the measure can be entered. The exceptions are
the measures for replacing heating systems, cooling systems (only in MHEA),
water heaters, and refrigerators. These measures require their costs to be entered
on the audit forms. NEAT and MHEA use these costs for evaluating the cost-
effectiveness of measures. These costs can be transferred to work orders.
However, they may not represent the actual cost or detail cost breakup you may
wish to have for the work orders. Therefore, they may be adjusted in the work
orders (see “Estimated/Actual Costs and SIR” in Section 13.3, Measures (Work
Order)).

The Weatherization Assistant User’s Manual (Version 8.9) 14-29
Chapter 14: Setup Library
On this form, the cost components for a measure are restricted to three entries:
Material (or Insulation), Labor, and Other. Most of the insulation measures,
cooling system, and lighting retrofit measures have multiple materials that may
be used in installing the measure. In such instances, each material will have its
own set of Material, Labor, and Other cost components.
Figure 14.17. The Unit Costs of Measure sub-form for the Attic Insulation R-30
measure.
Only the Unit$ and the Comment fields are editable. Enter into the Unit$
column the dollar cost per “Unit” for installing the material. Separate entries
may be made for the dollar cost per unit to purchase the material and the dollar
cost per unit for labor to install the material. Both NEAT and MHEA simply
add these two quantities together (they always have the same “Units” associated
with them) in determining the cost of installing the measure.
The third component to the cost for each material, “Other,” will likely have
different units than the material and labor components. Entry in this column
may be handled differently in NEAT versus MHEA and may not be appropriate
for many measures in NEAT. For example, an “Other” cost for an attic
insulation measure in NEAT has units of “Each Attic,” implying that this dollar
cost will be added to the cost of insulating each individual attic segment, not to
the total cost for insulating all of the attics in an entire dwelling. Only in the
case of a home having a single attic segment qualifying for insulation would the
entry have the likely intended purpose of a setup cost for equipment necessary
to install the insulation. MHEA does not have the option to describe multiple
attic segments for the mobile home, so doesn’t suffer from this problem. The
“Other” cost column in NEAT is more appropriately used for measures such as
window treatments where you have an option to cost the measure per window
(“Each”) or per square foot of window area. Paying close attention to the
“Units” of the “Other” cost component will assist you in deciding when it is
appropriate to use this entry for any specific measure.

14-30 The Weatherization Assistant User’s Manual (Version 8.9)
Chapter 14: Setup Library
The entries in the Unit$ column are required, though they are permitted to be
zero, as long as no material has zero cost per unit for all three components. The
total cost for a measure will be the sum of the costs from the three components,
using the quantities in the units indicated from the specific audit being
evaluated.
The Comment field is a standard comment field capable of storing 65,000
characters or less, even though only a few of these would be visible in this data
sheet view. However, by double clicking your mouse on a particular Comment
field, the Comment Editor window will open allowing better entry and viewing
of longer comments. The comments entered here for each component of a
measure cost will be copied to the component costs displayed for each measure
seen using the “Costs” button on the Measures form under the Main Menu’s
“NEAT Audit” or “MHEA Audit” buttons if the measure gets recommended
(see Section 11.11, Measures (Audit)). Also, the comment will be available on
any work order that includes the measure using the material (see “Show/Hide
Audit Material Detail” and “Create Materials Using Audit Detail” in Section
13.3, Measures (Work Order)).
• Record Navigation Bars – Both the Unit Costs of Measure sub-form and the
Library Measures form have abbreviated record navigation bars near the lower
left of the forms, allowing you to move to a desired entry. However, both of
these forms will have a vertical scroll bar at the right of the entries (if
necessary) allowing you to access any of its entries without having to use these
navigation bars. The Unit Costs of Measure sub-form for most measures is of
sufficient size such that all components associated with the measure will fit into
the Costs sub-form window, eliminating the need for the scroll bar. In most
cases, it will be easier to use your mouse or arrow keys on your keyboard to
select a desired entry.
• All Library Measure Costs – Selecting the “All Library Measure Costs”
button at the lower right of the Library Measures form presents you with a form
view of all measures’ costing components in a single window. In the standard
setup of Version 8.9, there are a total of 332 costing components. However, this
number will increase if you define additional NEAT insulation types (see
Section 14.7, NEAT Insulation Types). Vertical scrolling will be necessary to
see all of these components. This format may not be the most favorable for
editing the costs. However, one key advantage of the form is that it allows you

The Weatherization Assistant User’s Manual (Version 8.9) 14-31
Chapter 14: Setup Library
to quickly copy the cost table or any portion of the table to another location for
printing or electronic mailing purposes (see Section 5.9, Copying and Pasting
Data).
14.6 User Defined Measures
The User Defined Measures form under the Main Menu’s “Setup Library” button
(see Figure 14.18) can be used to predefine weatherization activities that are not
addressed within the library measures but commonly encountered during an audit.
Defining these measures on this form allows you to copy them to any audit as an
itemized cost (see Section 11.8, Itemized Costs) or to a work order (see “Copy
from User-Defined Measures” in Section 13.3, Measures (Work Order)).
Also accessible from this form is a library of 50 predefined health and safety
measures (see Figure 14.19). These measures are not actually “user-defined”
because they come with the program. Their names cannot be altered by the user
and they cannot be deleted since these are measures associated with specific health
and safety hazards which may be observed during an audit (see “Handling of
Health and Safety Issues” under Section 11.7, Health and Safety).
Activities that you define (those other than the library health and safety measures)
may or may not have energy savings associated with them. Those without energy
savings are referred to as “itemized costs.” They may be repair costs,
administrative costs, etc. Those for which you have assigned energy savings will
be considered exactly as any of the library measures defined in the program.
They will be ranked by SIR and recommended only if their SIR meets the
established criteria. Additional input is required for this type of user-defined
measure, as described below.
The User Defined Measures form is divided into three sections: the general task
description on the top of the form, a Materials/Labor Details sub-form in the
middle, and the Measures record navigation block, the Measure Comment field,
the “View” drop-down list and the “All User Measures Costs” button at the very
bottom of the form. The Materials/Labor Details sub-form is multi-component,
allowing any number of material or labor components to be associated with each
user-defined measure.

14-32 The Weatherization Assistant User’s Manual (Version 8.9)
Chapter 14: Setup Library
Figure 14.18. The User Defined Measures form under the Main Menu’s “Setup Library”
button (with energy savings, Materials/Labor Details sub-form in form view).
Figure 14.19. The User Defined Measures form under the Main Menu’s “Setup Library”
button (Health and Safety measure, Materials/Labor sub-form in data sheet view).

The Weatherization Assistant User’s Manual (Version 8.9) 14-33
Chapter 14: Setup Library
The general task description area can be viewed in form view or data sheet view
(Section 5.8, Data Sheet and Form Views of Records). The data sheet view (see
Figure 14.20) allows you to see more of the records at one time, possibly making it
easier to locate a particular record. However, the detail involved in each make it
normally more feasible to make changes while in the form view. The measures
displayed will be those of type selected from the “View” drop-down list.
Figure 14.20. The User Defined Measures form (data sheet view, All Measures) (left-most
columns).
The General Description
Below are descriptions of the individual data items and controls found in the
general task description portion of the User Defined Measures form. Discussion of
the Materials/Labor Details sub-form and the controls at the bottom of the form
will follow. The item descriptions below are phrased as if you were entering a new
user-defined measure. For any measure previously defined, the program will
display those entries made at the time the measure was defined or previously
modified.

14-34 The Weatherization Assistant User’s Manual (Version 8.9)
Chapter 14: Setup Library
• Measure # – If you want to prescribe the order in which the user-defined
measures will be displayed in the “Measures” drop-down list on the form or
when the form is displayed in data sheet view, assign a number to the measure
by entering a unique integer in this field. The library health and safety measures
have pre-assigned measure numbers from 101 through 150. You may change,
reuse, or delete pre-assigned or new measure numbers in this field in any
desired manner. However, this is not recommended for the health and safety
measures. All measures with no number assigned will be listed first but in a
random order amongst themselves. If a measure number is changed, you must
exit the currently accessed form in order to see the measures in the altered
order. When in data sheet view, the ordering of the measures may be
temporarily changed using the Sort feature (see Section 5.8, Data Sheet and
Form Views of Records), but this ordering will be lost once a setup library has
been exited. Optional.
• Active – If selected, this checkbox makes the current measure accessible to
either NEAT or MHEA audits (see “Copying a Predefined Measure from the
Setup Library” in Section 11.8, Itemized Costs) and work orders (see “Copy
from User Defined Measures” in Section 13.3, Measures (Work Order)). If the
current measure is a library health and safety measure with this checkbox
selected, the measure can be automatically added to the Itemized Costs form of
a NEAT or MHEA audit if the potential health and safety hazard is identified
on the Health & Safety forms or under the Heating and Water Heating forms of
the audits (see “Handling of Health and Safety Issues” under Section 11.7,
Health and Safety). If this checkbox is unchecked, it would be wise to include a
comment indicating the reason for excluding the measure.
• Include in SIR – Use this checkbox to indicate if you wish the cost of this
measure to be included in the cumulative SIR on the Recommended Measures
report (see Section 12.2, Recommended Measures Report). If checked, the
measure will appear at the top of the recommended measure list and will be
included in the cumulative cost and SIR for the job. If unchecked, the measure
is placed at the end of the measure list after a final cumulative SIR has been
displayed. In this case, the cost is added to the cumulative cost but not used to
compute the cumulative SIR. You must check this checkbox for all user-defined
measures having energy savings associated with them.

The Weatherization Assistant User’s Manual (Version 8.9) 14-35
Chapter 14: Setup Library
• Measure Type – Select the measure type category from the drop-down list. The
choices are Base Loads, Building Insulation, Client Education, Doors and
Windows, General Heat Waste and Air Infiltration, General Repairs, Health and
Safety, HVAC Systems, and Other. This information does not appear on any
report. However, if entered, it can be used to sort measures by measure type on
this form or on the Measures form of the Main Menu’s “Work Orders” button
(see Section 13.3, Measures (Work Order)). Optional.
• Measure Name – If you want to define a measure other than a library health
and safety measure, enter a unique name for the measure in this field. A
measure is identified by the measure name elsewhere in the program. The
library health and safety measures already have the measure name assigned.
Their names cannot be changed. If you attempt to, you will receive a message
that the program can’t save the record. If you are accessing one of the library
health and safety measures, an uneditable field displaying the pre-assigned
measure number and the text “H&S Code” in red will appear to the right of the
Measure Name field. Required.
• Default Contractor/Crew – If you wish to pre-assign a measure to a specific
contractor or crew, enter this indication here. The choices in the drop-down list
for this field will be those entries on the Contacts tab under the Main Menu’s
“Agency” button which have been designated as either “Contractor” or “Crew”
(see Section 6.2, Contacts (Agency)). This information will be carried with the
measure anytime it is copied to an audit, although it may then be changed.
Anytime a measure is copied to a work order, it will automatically be assigned
the Contractor or Crew affiliated with that work order. Optional.
• Default Cost Center – If you are tracking costs that are incurred by different
funding sources or programs, the Cost Center is that source of funding to which
the actual cost of implementing the measure will be charged. Cost centers are
defined under the Cost Centers tab of the Main Menu’s “Agency” button for
your agency (see Section 6.3, Cost Centers). The cost center entered here will
be carried with the measure anytime the measure is copied to an audit or work
order, although it may be changed in either of these locations. Optional.
• Energy Savings – Indicate in this drop-down list whether you have an estimate
of annual energy savings to associate with the user-defined measure being
described. Otherwise, the record is viewed as an itemized cost without energy

14-36 The Weatherization Assistant User’s Manual (Version 8.9)
Chapter 14: Setup Library
savings. Your selection here determines whether additional fields will be
displayed below this one in which information necessary to define an energy
efficiency measure is to be entered. NOTE: In order to have energy information
associated with a user-defined measure transferred to a work order, the measure
must have been implemented into either the NEAT or MHEA audit that was
then used to create the work order.
• Units – If Estimated is selected in the “Energy Savings” drop-down list, the
“Units” drop-down list appears. Select the units of the annual energy savings to
be assigned to the measure. The choices are kWh, MBtu (million Btu), and
Therms. Required.
• Amount – If Estimated is selected in the “Energy Savings” drop-down list, the
Amount field appears. Enter the numeric value of the amount of annual energy
to be saved in the units indicated in the “Units” drop-down list. Required.
• Fuel Saved – If Estimated is selected in the “Energy Savings” drop-down list,
the “Fuel Saved” drop-down list appears. Select the type of fuel to be saved.
The choices are Primary Heating Fuel, Water Heating Fuel, Natural Gas, Oil,
Electricity, Propane, Wood, Coal, Kerosene, and Other. If Primary Heating Fuel
or Water Heating Fuel is selected, the type of fuel saved will be set the same as
the fuel specified for the primary heating system or water heater, respectively,
in the audit into which the measure is copied. Required.
• Life – If Estimated is selected for the “Energy Savings” drop-down list, the Life
field appears. Enter the expected life of the measure being defined in years.
Required.
• Available for Use In Site Built and Mobile Home – Select either or both of
these checkboxes to indicate the applicability of the measure to the building
type(s), Site Built and/or Mobile Home. Your selection will determine which
user-defined measures will appear in the “Copy from User Defined Measures”
drop-down lists on the Itemized Costs forms under the “NEAT Audit” or
“MHEA Audit” windows (see Section 11.8, Itemized Costs).
• Measure Comment – You may enter comments pertinent to the current
measure directly in the Comment field on the form, or you may enter them in
the Comment Editor by selecting the “Measure Comment” button to the left of

The Weatherization Assistant User’s Manual (Version 8.9) 14-37
Chapter 14: Setup Library
the field. The Comment Editor is similar to Window’s Notepad and may be
used to enter extended comments. The total comment may have up to 65,000
characters. Text from other sources may be copied and pasted into the
Comment Editor’s window. The comment that is entered will be imported with
the measure to any audit in which you choose to use the measure. The comment
will then be displayed on that audit’s Recommended Measures report and the
Input Report, available from the Audit Information form (see Section 8.2, Audit
Information). If a work order is created from the audit, the comment will be
carried with the measure to the work order. Or, the measure may be imported
directly to a work order, carrying the comment with. Either way a measure with
a comment becomes part of a work order, it will then be displayed in the Work
Order report which can be printed from the Work Order Information form (see
Section 13.1, Work Order Information). Optional.
• Measures Record Navigation Block – The Measures record navigation block
is used to find and navigate to existing measure descriptions for the setup
library being edited, copy or delete the currently accessed measure description,
or create a new measure description for the setup library. See Section 5.1, Form
and Record Navigation, for information on using the Weatherization Assistant’s
record navigation blocks. The Measures record navigation block on the User
Defined Measures form differs somewhat from other navigation blocks.
Although the “by Description” drop-down list will contain all user-defined and
health and safety measures in the setup library being accessed, the arrow
buttons and numeric values displayed in the block pertain only the category of
measures selected in the “View” drop-down list described below.
• View – Use this drop-down list to indicate which group of measures you wish
to be displayed when viewing the User Defined Measures form in the data sheet
view. The choices are Site Built (NEAT) Measures, Mobile Home (MHEA)
Measures, Health & Safety, and All User Defined Measures. Selecting Site
Built (NEAT) Measures or Mobile Home (MHEA) Measures will restrict the
display to those user-defined measures that you have defined and selected using
the Available for Use In checkboxes. Selecting Health & Safety will restrict the
display to the fifty library health and safety measures. Selecting All User
Defined Measures will display all measures that you have defined and the
library health and safety measures, irrespective of them being selected or not
selected for NEAT and MHEA.

14-38 The Weatherization Assistant User’s Manual (Version 8.9)
Chapter 14: Setup Library
• All User Measure Costs – Selecting this button will display the Cost Detail for
All User Defined Measures sub-form in data sheet view (see Figure 14.21).
This form lists all costs associated with all of the user-defined measures having
cost components assigned, as well as the library health and safety measures.
The columns displayed include: NEAT, MHEA, #, Measure Name, Material
Description, Type, Units, <first material/labor component indicator>, Unit $
and Comment. The first four columns correspond to the fields of the general
description area of the User Defined Measures form. The remaining six fields
correspond to the fields of the Materials/Labor Details sub-form (see below).
Since each measure may have multiple material/labor components, the first
material/labor components associated with a measure is indicated by a right
pointing arrow (-->) in the column to the left of the Unit$ column. On this sub-
form, NEAT, MHEA, #, Unit $ and Comment columns are editable.
Figure 14.21. The All User Measures Cost sub-form.
The Materials/Labor Details Sub-Form
The Materials/Labor Details sub-form is used to enter information about all
material/labor components needed to install a measure. The sub-form may be
viewed in either form view (see Figure 14.22) or data sheet view (see Figure
14.23) (see Section 5.8, Data Sheet and Form Views of Records). Both views have
the same capabilities for entering data, except that the form view displays only one
material/labor component at a time while the data sheet view displays all
material/labor components defined under a measure. Thus, the form view uses a
record navigation block to allow access to all material/labor components.
A measure may have as many cost components in its details as necessary but
should normally have at least one. A user-defined measure with no detail may be

The Weatherization Assistant User’s Manual (Version 8.9) 14-39
Chapter 14: Setup Library
copied into and audit, but it would have to have a cost assigned at that time and
have its reference to the user-defined measure in the setup library cleared (see
“Clear Reference to User Defined Measure” in Section 11.8, Itemized Costs). If
copied to a work order, a cost would also have to be designated at that time. Health
and safety measures should have at least one cost component or an error message
will be produced if the program attempts to automatically use the measure as a
result of a hazard noted in an audit (see “Handling of Health and Safety Issues” in
Section 11.7, Health and Safety).
When a user-defined measure is copied from a setup library into a work order (see
“Copy from User Defined Measures” in Section 13.3, Measures (Work Orders)),
all cost components given in the Materials/Labor Details sub-form are carried
along with the measure and will appear in the work order’s Material/Labor Details
sub-form. However, when a user-defined measure with multiple cost components
is copied to an audit, only one of those components can be displayed on the audit’s
Itemized Costs form (see “Copying a Predefined Measure from the Setup Library”
in Section 11.8, Itemized Costs, and the Order # field below). However, the
measure will retain reference to the entire detail unless “Clear Reference to User
Defined Measure” is chosen in the audit, in which case only the component visible
on the audit’s Itemized cost form is retained. However, the cost assigned will still
be the total cost of all the former cost components.
Below are descriptions of individual data items and controls found on the
Materials/Labor Details sub-form of the setup library’s User Defined Measures
form.
Figure 14.22. The Materials/Labor Details sub-form (form view).

14-40 The Weatherization Assistant User’s Manual (Version 8.9)
Chapter 14: Setup Library
Figure 14.23. The Materials/Labor Details sub-form (data sheet view).
• Order # – Enter an integer that prescribes the order in which the costing
components of the measure will be listed on a work order when the measure is
implemented (see “Order #” in Section 13.3, Measures (Work Order)). Any
component not assigned an order number will be listed first in the work order,
but all those without a number will have random order amongst themselves.
If the measure being described here in the Setup Library is copied to an audit
(see Section 11.8, Itemized Costs) and it has more than one Material/Labor
Detail component, only one of these components can be displayed in the audit’s
Material field on the Itemized Costs form, even though all will get carried along
with the measure. The audit will choose the detail component with Order # of
“1” then add “(+)” after the detail name in the audit indicating additional detail
is associated with the measure. The exception to this convention is if the user-
defined measure has a cost component with Order # of “1” whose Description
(see below) is “Equipment.” This is seen as a nondescript detail whose
inclusion on the audit form would not be of benefit. For such a measure, the
Material field on the audit’s Itemized Cost form is left blank. Optional.
• Type – If you are using the Supply Library to store information about materials
you use in your weatherization activities and track inventory, select the
category using the drop-down list under which the material/labor is listed in that
library. The choices are the thirteen material/labor categories in the Supply
Library (see Chapter 15, Supply Library) and Unspecified (see Figure 14.23).
The entry is used to narrow your search for the material when using the “Copy
Supply” drop-down list on the sub-form. If you do not plan to locate this
material/labor component in your Supply Library, this entry may be left blank
or designated as “Unspecified.” Conditionally Required.

The Weatherization Assistant User’s Manual (Version 8.9) 14-41
Chapter 14: Setup Library
• Copy Supply – This entry is used in conjunction with the Type field, described
above, to locate a specific material/labor component in the Supply Library (see
Chapter 15, Supply Library). Selecting the material using this drop-down list
will automatically fill in most of the remaining fields on the sub-form, provided
you have specified the analogous entries in the Supply Library. Copying a
material/labor component from the Supply Library is essential if you want to
track its inventory. The library health and safety measures have pre-entered
materials, but none that reference a Supply Library. If you wish to have these
measures reference Supply Library materials, make that association here.
Optional.
• Description – Enter a brief description of the material/labor component. If the
material/labor component has been copied from the Supply Library, this field
will be entered automatically. In such cases, you may change the description,
but it may complicate your ability to identify the component as one tracked in
your inventory. The library health and safety measures have predefined material
descriptions, though you may change them here. The entry may be 80
characters or less. Required.
• Qty (Quantity) – Enter the quantity of the material/labor component needed to
install the measure, in the units selected in the “Units” drop-down list,
described below. This data is copied to a work order or carried through an audit
to a work order if the measure becomes part of a work order. However, you
may alter the quantity in the work order if a new, more accurate estimate
becomes available. When you create a new user-defined measure from the
Measures record navigation block a default value of “1.00” will automatically
be entered. Alter this value as needed. Required.
• Units – Select the units in which the Quantity (above) and cost, $/Unit (below),
of the material/labor component are specified, using the drop-down list. The
choices are Each, Hour, Bag, Roll, SqFt, Linear Foot, Inch, Pound, Case, Box,
and United Inch. You may also enter a unit of your own choosing that is not in
the drop-down list. The program will retain this new unit as part of the
component description where ever the user-defined measure is used. If the
material/labor component has been copied from the Supply Library, this field
will be entered automatically. If this is the case, do not change the Units entry
provided. The inventory kept in the Supply Library will expect the Quantity and
$/Unit entries for the component to be in these original units. Required.

14-42 The Weatherization Assistant User’s Manual (Version 8.9)
Chapter 14: Setup Library
• $/Unit – Enter the cost of the material/labor component, in dollars per unit
selected in the Units field, described above, needed to install the measure. If the
material/labor component is copied from the Supply Library, this information
will be entered automatically. A library health and safety measure will initially
have material and labor costs of $900.00 and $99.00, respectively, indicating
that the user has not provided costs for the measure (see Figure 14.23).
Required.
• Material Comment – You may enter comments pertinent to the current
material/labor component directly in the Comment field on the form, or you
may enter them in the Comment Editor by selecting the “Comment” button to
the left of the field. If in data sheet view, double clicking on the field will
display the Comment Editor. The Comment Editor is similar to Window’s
Notepad and may be used to enter extended comments. Text from other sources
may be copied and pasted into the Comment Editor’s window. The total
comment may have up to 65,000 characters. However, the field on the work
order which will display this comment is only about 20 characters in width. The
Weatherization Assistant will wrap the comment on the report, but excessively
long comments become awkward to display. A comment that is entered in this
comment field will be displayed in any work order that includes the user-
defined measure containing the material/labor component. Optional.
• Material or Labor Record Navigation Block – If viewed in form view, the
Material or Labor record navigation block is used to find and navigate to
existing material/labor component descriptions for a measure, copy or delete the
currently accessed material/labor component descriptions, or create a new
material/labor component description for a measure. See Section 5.1, Form and
Record Navigation, for information on using the Weatherization Assistant’s
record navigation blocks.
14.7 NEAT Insulation Types
The Added Insulation Type fields on the Walls, Unfinished Attics, Finished Attics
and Foundations forms in the NEAT building description allow specification of the
type of insulation to be considered when insulating these components (see the
“Added Insulation Type” topics for these shell components in Chapter 9, NEAT
Building Description. The NEAT Insulation Types form in the Setup Library

The Weatherization Assistant User’s Manual (Version 8.9) 14-43
Chapter 14: Setup Library
allows you to define additional insulation types for each of these components to
meet local needs (see Figure 14.24).
Figure 14.24. NEAT Insulation Types.
When the Weatherization Assistant is initially installed, the added insulation types
available for each of the shell components are displayed in greyed, outlined fields
on the NEAT Insulation Types form. The names cannot be changed. Below these
insulation type names are blank, editable fields into which you may enter the
names of additional insulation types of your choosing. Once entered, these names
will appear in the Library Measures Costs sections of the Setup Library (see
“Costs” in Section 14.5, Library Measures), in the building description forms of
audits accessing the Setup Library, and in any reports that recommend a measure
using these materials.
To the right of these material names are numeric fields giving the R-values per
inch or total R-Value of the material you are defining. The R-values have
dimensions h-ft
2
-F/Btu. Typical values corresponding to various insulation types
may be found in building manufacturers’ data sheets or in ASHRAE’s (American
Society of Heating, Refrigerating, and Air-Conditioning Engineers) Handbook of

14-44 The Weatherization Assistant User’s Manual (Version 8.9)
Chapter 14: Setup Library
Fundamentals. Entries in these fields permit your defined insulation types to have
the physical characteristics needed by the NEAT audit that you desire. Required
for named insulation types.
As indicated above, any insulation type added on the NEAT Insulation Types form
will automatically add the type to the appropriate Library Measures Costs form. By
default, the Unit$ field for the insulation type on this form will be assigned a cost
of “9999.00” with the Comment of “Not considered unless cost is specified.” Thus,
in order for the program to seriously consider use of an insulation type you add, a
reasonable cost must be entered on Library Measures Costs form corresponding to
the envelope component using the insulation. For example, if you add “Spray
Foam” as a Sill insulation type, you must access the “Costs” button for NEAT’s
measure 7, “Sillbox insulation,” under the Library Measures form in the Setup
Library and enter a reasonable cost for installing sill insulation using this insulation
type.

The Weatherization Assistant User’s Manual (Version 8.9) 15-1
Chapter 15: Supply Library
Chapter 15. Supply Library
The Supply Library provides you with an optional ability to record material
properties and labor rates related to your weatherization work. If you use the
inventory feature of the Weatherization Assistant, the Supply Library becomes the
mechanism for tracking your inventory. It provides you with a means of recording
material purchases, tracking use of the materials through the work orders, and
tallying up your total remaining items. Energy-related information that can be
stored in the Supply Library includes thermal properties, equipment efficiencies,
physical dimensions, lifetimes, etc. The Supply Library is accessed from the Main
Menu’s “Supply Library” button. (see Figure 3.1).
Items in the Supply Library are accessed from audits, work orders, and setup
libraries. The NEAT and MHEA audits use the Supply Library as a repository for
replacement refrigerators and water heaters (see Sections 11.4, Base Loads – Water
Heat, and 11.5, Base Loads – Refrigerators), the data possibly coming from a visit
to a home building supply store. Items from the Supply Library may be referenced
directly from the setup library forms when specifying the materials/labor
components needed for installing user-defined measures (see “Copy Supply” under
“The Materials/Labor Details Sub-Form” in Section 14.6, User Defined Measures).
Items from the Supply Library may also be referenced directly from the work order
forms when specifying the materials/labor components needed in generating
detailed work orders (see “Copy Supply” under “The Materials/Labor Details Sub-
Form” in Section 13.3, Measures (Work Order)).
NOTE: Referencing materials from the Supply Library is optional for running the
audits and/or creating the work orders except when considering the Water Heater
Replacement measure under the NEAT or MHEA audits. See “Additional Entries
on the Hot Water Equipment and Refrigerator Forms” in Section 15.2,
Materials/Labor Forms, for the exception related to water heater replacement.
You will likely need only one supply library, though any number of supply
libraries may be defined for an agency. More than one supply library might be used
if materials are stored in multiple locations and you wish to track the inventory at
these locations separately. However, you would need to be continually aware of
this situation and know when a given library should be referenced. Considering the
Supply Library as an inventory of items may help you determine if more than one
library is necessary and how many should be used. All supply libraries associated

15-2 The Weatherization Assistant User’s Manual (Version 8.9)
Chapter 15: Supply Library
with the current agency are listed under the Libraries form under the Main Menu’s
“Agency” button (see Section 6.8, Libraries).
This chapter describes all the data items and controls found under the Main Menu’s
“Supply Library” button. The Supply Library consists of 14 forms that include
General Information, Cooling Equipment, Construction Materials/Hardware,
Doors, Health and Safety Items, Heating Equipment, Hot Water Equipment,
Insulation, Labor, Lighting, Miscellaneous Supplies, Refrigerators, Windows, and
Other. All forms except the General Information form represent materials/labor
categories, which contain similar data items and controls. This chapter will discuss
the General Information form first. Then, in a separate section, the data items and
controls on the materials/labor forms are described, noting any exceptions to the
commonality of the forms. Finally, the entries on the Energy Details sub-forms are
discussed individually, since they differ for the different material categories.
15.1 General Information Form
The entry items and controls on the General Information tab (see Figure 15.1) of
the Main Menu’s “Supply Library” button are described below.
Figure 15.1. The General Information form under the Main Menu’s “Supply
Library” button.
• References – Selecting this button, located just below the banner line of the
“Supply Library” window, displays the “References to Supply Library”

The Weatherization Assistant User’s Manual (Version 8.9) 15-3
Chapter 15: Supply Library
window, which lists all references to the Supply Library currently being
accessed. See Section 5.14, The References Button, for more information on the
use of this feature.
• Supply Name – Enter a name that will identify this particular Supply Library
throughout the program. Most often, an agency will have only one supply
library. If more than one is created, the name may contain an abbreviated
indication as to why one differs from another. Save any lengthier explanations
for the Description and Comment fields. A default name will be supplied when
a new supply library is created. The name will use your installation’s ID (see
Section 3.1, Initial Start-up of the Weatherization Assistant), if available.
Otherwise the default name will contain the time the library was created. The
entry may be 50 characters or less. Required.
• Agency – This field identifies the agency to which the Supply Library is
associated. Since the only way to create a new supply library is to copy an
existing one or import one with a client (see “Importing Clients” in Sections
17.3, Data Transfer – Import/Export With Another MSAccess Database, and
17.4, Data Transfer – Import/Export Indirectly with Text Files), this entry will
always be at least initially filled in for you. The field is more for identification
purposes, possibly on a state level, identifying the agency within the state using
the materials in the library. Required.
WARNING: The program allows you to change the agency assignment of a
supply library. However, doing so when existing setup libraries, audits, or work
orders use the Supply Library will likely cause confusion. Therefore, re-
assigning the agency assignment of a supply library is not recommended unless
the library has just been created, insuring no other references to it exist.
• State – This field displays the state associated with the agency entered in the
previous field. Uneditable.
• Description – You may use this field to briefly describe the intended use of the
Supply Library, particularly if you use more than one supply library in your
agency. The entry may be 255 characters or less. Optional.
• Comment – You may enter comments directly in the Comment field on the
form, or you may enter them in the Comment Editor by selecting the

15-4 The Weatherization Assistant User’s Manual (Version 8.9)
Chapter 15: Supply Library
“Comment” button to the left of the field. The Comment Editor is similar to
Window’s Notepad and may be used to enter extended comments. The total
comment may have up to 65,000 characters. Text from other sources may be
copied and pasted into the Comment Editor’s window. Comments entered on
this General Information form are not displayed anywhere else in the
Weatherization Assistant or in any of its predefined reports. However, you may
wish to enter a comment that provides helpful information about the Setup
Library. The comment could then be included in a user-designed report (see
Appendix D, Development of Customized Reports). Optional.
• Supply Record Navigation Block – The Supply record navigation block is
used to find and navigate to supply libraries, or copy or delete existing libraries.
See Section 5.1, Form and Record Navigation, for information on using the
Weatherization Assistant’s record navigation blocks. The drop-down lists will
display only the supply libraries associated with the agency currently selected
(“bookmarked”) on the Agency Information tab under the Main Menu’s
“Agency” button. Normally the agency selected on this tab is your agency, so
the drop-down lists will display only your agency’s supply libraries. If you have
more than one agency defined in your database and you want the drop-down
lists to display supply libraries from all defined agencies, uncheck the “Use
only the last bookmarked Agency in the find record drop down boxes,” Feature
9 from the Preferences/Features tab (see the indicated topic in Section 16.4,
Features).
• Report Block – The Report block provides you with access to the Supply
Library Summary report. See Appendix C, Reports, for an example of this
report. The report lists the Category, Description, and Manufacturer of each
item in the Supply Library for which you have indicated at least one purchase
(see “Inventory Data Block” in Section 15.2, Materials/Labor Forms). For each
of these items, the report also lists the number purchased, the number
designated as actually having been used (see “Quantity (Actual)” under “The
Materials/Labor Details Sub-Form” in Section 13.3, Measures (Work Order)),
and the number yet available to be used. See Section 5.12, The Report Block,
for the mechanics of using the Weatherization Assistant’s Report blocks.

The Weatherization Assistant User’s Manual (Version 8.9) 15-5
Chapter 15: Supply Library
15.2 Materials/Labor Forms
The following entry items and controls are common to all materials/labor forms in
the Supply Library. Exceptions are noted in square brackets following the field or
control name. All these forms may be viewed and edited in either form or data
sheet view (see Section 5.8, Data Sheet and Form Views of Records). See Figures
15.2 and 15.3 for examples. The items displayed in these figures are only examples
and most likely will not represent materials you would actually need in your supply
library. The information on the Energy Details sub-form is not available in data
sheet view for some of the category’s forms. Nevertheless, the data sheet view
offers a convenient way of reviewing the materials in your library, especially if it
grows large. Records in the view may also be copied and pasted either between
Weatherization Assistant databases or from the program to a spreadsheet
application. Additional entries that are not common are given in “Additional
Entries on the Hot Water Equipment and Refrigerator Forms” in Section 15.2,
Materials/Labor Forms.
Figure 15.2. A typical form under Main Menu’s “Supply Library” button (form view).

15-6 The Weatherization Assistant User’s Manual (Version 8.9)
Chapter 15: Supply Library
Figure 15.3. The Construction Materials/Hardware Materials form (data sheet view).
3
General Description Data
• Description – Enter a description of the item or labor category. Entries may be
80 characters or less. Required.
• Manufacturer [except Labor] – Enter the name of the manufacturer of the
item. Your inventory may contain multiple entries for the same item but
manufactured by different companies, though their descriptions must still be
unique. Entry may be 50 characters or less. Optional.
• Model [except Labor] – Enter the model of the item being described. Your
inventory may have multiple entries of a specific item type but of varying
models, though their descriptions must still be unique. Thus, you may
alternatively decide to include model information in the Description. Entries
may be 50 characters or less. Optional.
• Supplier [except Labor] – Choose the Supplier of the material being
described. Choices in the drop-down list will be those agency contacts declared
as “Supplier” on the Contacts tab under the Main Menu’s “Agency” button. See
Section 6.2, Contacts (Agency). Optional.
• Units – Enter the units by which the item is costed. The choices provided are
Each, Hour, Bag, Roll, SqFt, Linear Foot, Inch, Pound, Case, Box, and United
Inch. You may also enter a unit of your own choosing that is not in the drop-
down list. The program will retain this new unit as part of the item description
3
Above is an example for one category of material. The Comment field is not displayed

The Weatherization Assistant User’s Manual (Version 8.9) 15-7
Chapter 15: Supply Library
where ever the material is used. The units for analogous materials used in the
audits, as prescribed in the Setup Library, and those in the Supply Library do
not need to be the same. However, if you are using the inventory feature for the
material, you would need to manually convert the quantity required when
translating the audit recommendation to a task in a work order. If this is
undesirable, care should be taken to set the Units here to be the same as those
used in the audits. Required.
• $/Unit – Enter the cost of the item in the Units entered in the previous field.
Both the Units and the $/Unit will be copied to any use of the item in the Work
Orders. Required.
• Comment – Supply material comments may be entered directly in the comment
field on the form. Or, select the “Comment” button to the left of the field, which
will take you to the Comment Editor. This text editor is similar to Window’s
Notepad and may be used to edit extended comments. The total comment may
have up to 65,000 characters. Text from other sources may be copied and pasted
into the Comment Editor’s window. Supply material Comments are carried with
the material whenever the material is used in a user-defined measure or work
order. You may also wish to include the comment in a user-designed report (see
Appendix D, Development of Customized Reports) Optional.
• Supply Item Record Navigation Block – The supply item record navigation
block, located at the bottom left of each material category tab, is used to find,
access, copy, delete, or initiate new materials under the category being
referenced. See Section 5.1, Form and Record Navigation, for information on
using the Weatherization Assistant’s record navigation blocks. The listings of
items in a given category may be ordered by their Description, Manufacturer, or
Supplier in the drop-down lists of the navigation block.
Inventory Data Block [Except Labor]
The following data items and buttons fall under the Inventory data block
positioned in the lower right corner of all material category forms except Labor
(see Figure 15.4).

15-8 The Weatherization Assistant User’s Manual (Version 8.9)
Chapter 15: Supply Library
• Purchased (data item) – This value displays the
accumulated number of the item you have indicated as
having been purchased. Uneditable.
• Purchased (button) – This button takes you to a data
sheet displaying all your entries documenting purchases
or removal of the item currently being accessed.
Figure 15.5. Inventory Purchase/Removal Summary.
Enter the date of purchase or removal, the number of items (in the units
displayed on the parent form) purchased or removed, and any comment that you
may wish to associate with the entry. Only entries “Cleared” will actually affect
the inventory. Uncleared entries may be anticipatory, rather than actual. The
current date is the default, though this may be changed. Items “Removed” are in
addition to those that will automatically be removed by use in work orders (see
“Used (button)” below). Entire records may be deleted from the table by
selecting the entire row of data and pressing your [Delete] key (see Section
5.10, Deleting Data).
• Used (data item) – This value displays the total number of the items that have
been used in work orders. See “Used (button)” below. Uneditable.
• Used (button) – The “Used” button takes you to a data sheet displaying all
instances in which the specific item being referenced has been used in work
orders.
Figure 15.6. Inventory Used Summary.
Figure 15.4. Inventory
control block.

The Weatherization Assistant User’s Manual (Version 8.9) 15-9
Chapter 15: Supply Library
Only those materials declared as being “Actual” in their use will be included in
the table (see “Quantity (Actual)” under “The Materials/Labor Details Sub-
Form” of Section 13.3, Measures (Work Order)). The table displays the Client
ID, the Alternate Client ID, the Work Order in which the item was used, the
status of the work order and when this status was last changed, the material
number within the measure on the work order (if entered), the specific measure
in the work order in which the item is used, the quantity used by the specific
work order entry, and any comment you entered on the work order related to
this item’s use. See “The Materials/Labor Details Sub-Form” referenced above
for more information on most of these data items. Note that the headers for
“Client,” Work Order,” and “Measure” in the table are within angle brackets (<
>), indicating that double clicking your mouse in any entry in these columns
will take you to the specific record indicated by the entry. This provides a quick
method of reminding yourself of any use of an item. The items within the table
may appear to be editable, but attempts to change them will fail. Changes must
be made in the actual record from which the data originated.
• Available – This field displays the difference between the number of items
“Purchased” and those “Used”, as given in the fields immediately above.
Uneditable.
Additional Entries on the Hot Water Equipment and Refrigerator Forms
The supply library’s listings for Hot Water Equipment and Refrigerators have an
additional purpose in the Weatherization Assistant beyond listing materials for use
in the work orders. They are the only categories of materials in the library which
have data that may be copied to an audit and used in the audit calculations in
determining the cost-effectiveness of measures (i.e., the water heater and
refrigerator replacement measures). Although information about a replacement
refrigerator may be entered directly into NEAT’s and MHEA’s audit input forms
(see Section 11.5, Base Loads – Refrigerators), data on replacement water heaters
must be entered in the program’s Supply Library in order for the audits to consider
replacing a water heater (see Section 11.4, Base Loads – Water Heating).
In addition to the fields described in Section 15.2, Materials/Labor Forms, the Hot
Water Equipment and Refrigerator forms have two drop-down lists. These drop-
down lists access the Weatherization Assistant’s database of almost 8,000 water

15-10 The Weatherization Assistant User’s Manual (Version 8.9)
Chapter 15: Supply Library
heaters and 34,000 refrigerators. The green shading of the drop-down list is an
indication that you are accessing an entire database.
• Pick Manuf. and Model – Select the
manufacturer and model from the drop-down
lists. Choosing a Manufacturer first will
restrict the listings in the “Model” drop-down
list to those models of that manufacturer.
Otherwise, the Model list will include all
models from all manufacturers. If you don’t
find a model by first choosing the
manufacturer, you might attempt to leave the Manufacturer field blank and
search for the model without specifying the manufacturer. Some manufactures
may be listed in more than one way in the “Pick Manufacturer” drop-down list.
Selecting a model from the databases automatically fills in all required data on
both the main form and the Energy Details form (see “Hot Water Equipment”
and “Refrigerator” in Section 15.3, Energy Details) except for the Description
on the main form, which you must provide. Choosing from the database is
optional. However, if not chosen from the database and you plan to use the
listing in the NEAT or MHEA appliance replacement measures, all required
data on both the main form and Energy Details form must then be manually
supplied.
15.3 Energy Details Sub-Form
The Energy Details sub-form allows you to record energy-related data for each
entry under certain material categories of the Supply Library: Cooling Equipment,
Doors, Heating Equipment, Hot Water Equipment, Insulation, Lighting,
Refrigerator, and Windows. The Energy Details sub-form can be accessed by
selecting the “Energy Details” button on the forms corresponding to these material
categories of the Main Menu’s “Supply Library” button. The fields under the
Energy Details sub-form depend on the specific category of material being
accessed. On the Hot Water Equipment and Refrigerators forms, the fields under
Energy Details are required to provide sufficient information for use in the NEAT
and MHEA audits. For other material categories, the fields under Energy Details
sub-form are optional and the data provided is for documentation purposes only,
Figure 15.7. The additional entries
on the Hot Water Equipment and
Refrigerator forms.

The Weatherization Assistant User’s Manual (Version 8.9) 15-11
Chapter 15: Supply Library
having no bearing on the material properties assumed by the NEAT and MHEA
audits.
Below are brief descriptions of the individual data items and controls found on the
Energy Details sub-forms for each material category under the Main Menu’s
“Supply Library” button. Energy Details are available only from the form view.
Cooling Equipment
• Equipment Type – Select what type of cooling equipment is being described.
The choices are the same as in the audits: Central Air Conditioner, Window or
Room Air Conditioner, Heat Pump, and Evaporative Cooler. Optional.
• Efficiency Units, Efficiency – If you want to enter the efficiency of the unit,
first select the units for efficiency input. The choices are EER, SEER and COP.
EER ratings are commonly found on window or room air-conditioning units
while SEER ratings are more common on central systems. COP ratings are
rarely found. Optional.
• Capacity – Enter the output capacity of the unit in kBtu/h. The value is often
printed on the nameplate of the air conditioner. Central systems have their
capacity rated in “tons.” One ton is approximately 12 kBtu/h. Optional.
• Life (yr) – Enter the life of the unit in years. If you are in doubt regarding what
lifetime to use for a material and a similar material is used in one of NEAT’s or
MHEA’s standard library measures (see “Life” in Section 14.5, Library
Measures), you may use these values. Optional.
Figure 15.8. The Energy Details sub-form for Replacement Cooling Equipment.

15-12 The Weatherization Assistant User’s Manual (Version 8.9)
Chapter 15: Supply Library
Doors
• Rated U Value – Enter the Rated U Value
of the door, likely included on a label
attached to the door when new. Optional.
• Life – Enter the life of the door in years.
Most doors could be assumed to have a life
of 20 years. Optional.
Heating Equipment
• Equipment Type –The choices for Equipment Type are Furnace, Heat Pump,
and Space Heater. If you need to be more specific regarding the type (e.g.,
vented versus un-vented space heater), you may do so using either the
Description or Comment fields for the item. Optional.
• Fuel Type – Select the type of fuel used by the heating system. The choices are
Natural Gas, Oil, Electricity, Propane, Wood, Coal, Kerosene, and Other. The
“Other” fuel type should correspond to what you have defined this fuel to be in
your agency’s Setup Library (see Section 14.3, Fuel Costs). Optional.
• Efficiency Units, Efficiency – If you want to enter the efficiency of the system,
first select the units for efficiency input. The choices are Steady State, AFUE,
HSPF, and COP. Steady State and AFUE ratings apply to fossil fueled or
electric resistance systems while HSPF (and less commonly COP) are used to
rate the efficiencies of heat pumps. Optional.
• Capacity – Enter the output capacity of the heating system in units of kBtu/h.
The output capacity is usually obtained directly from the nameplate of the
heating system or from an inspection of nozzle sizes, etc. If this information is
not available, the output capacity can be approximated or, in rare cases,
measured. Optional.
• Life (yr) – Enter the life of the unit in years. If you are in doubt regarding what
lifetime to use for a material and a similar material is used in one of NEAT’s or
MHEA’s standard library measures (see “Life” in Section 14.5, Library
Measures), you may use these values. Optional.
Figure 15.9. The Energy Details
sub-form for Replacement Doors.

The Weatherization Assistant User’s Manual (Version 8.9) 15-13
Chapter 15: Supply Library
Figure 15.10. The Energy Details sub-form for Replacement Heating Equipment.
Hot Water Equipment
If you are considering the Water Heater Replacement measure in the NEAT or
MHEA audit, you are required to enter information about your replacement units in
the Energy Details sub-form. If you have chosen a unit from the database of water
heaters, the information on the Energy Details sub-form for the unit will
automatically be entered (see “Additional Entries on the Hot Water Equipment and
Refrigerator Forms” in Section 15.2, Materials/Labor Forms). Otherwise, enter the
indicated information.
• Fuel Type – Select the type of fuel used by the equipment. The choices are
Natural Gas, Electricity and Propane. Required.
• Capacity – Enter the capacity of the water heater in gallon. Required.
• Input Units, Input – First select the unit for the Input rating. The choices are
kBtu or kW. Then, enter the Input rating of the water heater. Required.
• Energy Factor, Recovery Efficiency – The Energy Factor and Recovery
Efficiency are ratings of a water heater’s efficiency and are required for
estimating the savings of replacing the existing water heater. They are available
in the database of water heaters or from your local distributor. Required.
• Life – Enter the life of water heater in years. The standard life used for water
heaters is 15 years. Required.

15-14 The Weatherization Assistant User’s Manual (Version 8.9)
Chapter 15: Supply Library
Figure 15.11. The Energy Details sub-form for Replacement Hot Water Equipment.
Insulation
• Insulation Type – Select the insulation type from the available choices: Batts
or rolls (unfaced), Batts or rolls (faced), Loose (blown or pumped), and Rigid.
Specify the material (e.g., fiberglass) in the Description field. Optional.
• R-value, R Value Units – Enter the R-value of the insulation either as “R-value
(overall)” or “R-value per inch of thickness.” Select the corresponding R-value
units from these two choices. Optional.
• Installed Density – If the Insulation Type is “Loose,” you will be asked for the
Installed Density” in “lb/cuft.” Optional.
• Bag Size – If the Insulation Type is “Loose,” you will be asked for the bag size
in pounds (lb). Optional.
• Suitable for – Use the checkboxes to indicate what applications the insulation
will be used for. Select all applicable choices: Attics, Walls, Sill Boxes, and
Foundations. Optional.
Figure 15.12. The Energy Details sub-form for Insulation.

The Weatherization Assistant User’s Manual (Version 8.9) 15-15
Chapter 15: Supply Library
Lighting
Enter information that describes each replacement lamp in your inventory.
• Lamp Type –Enter the replacement lamp type. The choices are Compact Spiral
(a-lamp replacement), Spiral, Globe (decorative), Chandelier (decorative),
Circline screw in, and Other. Optional.
• Life – Enter the estimated life of the lamp in hours. Optional.
• Lumens – Enter the light output in lumens. Optional.
• Watts – Enter the wattage of the lamp. Optional.
• Color Temp. – Enter the color temperature of the lamp in Kelvin (K).
Optional.
• Three-way, Dimmable – Use the checkboxes to indicate whether the bulb is
three way and/or dimmable. Optional.
Figure 15.13. The Energy Details sub-form for Replacement Lamps.
Refrigerators
If you are considering the Refrigerator Replacement measure in the NEAT or
MHEA audit, you may enter information about your replacement units in the
Energy Details sub-form. If you have chosen a unit from the database of
refrigerators, the information on the Energy Details sub-form for the unit will be
entered automatically (see “Additional Entries on the Hot Water Equipment and
Refrigerator Forms” in Section 15.2, Materials/Labor Forms). Otherwise, enter the
indicated information.

15-16 The Weatherization Assistant User’s Manual (Version 8.9)
Chapter 15: Supply Library
Figure 15.14. The Energy Details sub-form for Replacement Refrigerators.
• Capacity – Enter capacity of the replacement unit in cuft. NEAT and MHEA
compare this capacity (if specified here) with the capacity of the existing unit, if
specified on the Refrigerator form under the audits, and produce a warning if
the entries are not within 20%, indicating a possible size problem related to the
replacement (see “Capacity” in Section 11.5, Base Loads – Refrigerators).
Optional.
• kWh per Year – Enter an estimate of the annual energy consumed by the unit
in kWh/Year, possibly from its energy guide label. Optional.
• Life – Enter the expected life of the unit. The standard life used for water
heaters is 15 years. Optional.
• Height, Width, Depth – Enter the dimensions of the refrigerator in inches.
NEAT or MHEA compare these dimensions (if specified here) with the
available space dimensions of the existing unit, if specified on the Refrigerator
form under the audits, and produce a warning if the entries indicate a possible
size problem related to the replacement. (see “Height, Width, Depth” in Section
11.5, Base Loads – Refrigerators). Optional.
• Style – Select the style of the unit. The choices are Top Freezer, Bottom
Freezer, Side by Side, Single Door, Single Door with Freezer, and Other.
Optional.
• Defrost – Select the defrost type for the replacement unit. The choices are
Automatic, Manual, Partial Automatic, and Other. Optional.
• Model Year – Enter the year when the specific model was first sold. If
unknown, the entry may be estimated or left blank. Optional.

The Weatherization Assistant User’s Manual (Version 8.9) 15-17
Chapter 15: Supply Library
• Years Made – Enter the number of years the model was available. If unknown,
the entry may be estimated or left blank. Optional.
Windows
Enter data that describes the replacement windows you have in your inventory.
Most of the information requested can be found on the new window’s label. Many
manufacturers have adopted the National Fenestration Rating Council’s (NFRC)
labeling, which includes the information, though the leakage coefficient is optional
for manufacturers to report.
• Rated U Value – Enter the U-Value of the window (Btu/hr-ft
2
-F), a measure of
the heat conduction property of the window.
• Rated SHGC – The SHGC (solar heat gain coefficient) measures how well the
window blocks heat from the sun. Values are between 0.0 and 0.87.
• Rated Leakage Coefficient – Enter the rated infiltration in cfm/ft
2
, which is
NFRC’s air leakage parameter in cubic feet per minute of air per square foot of
window area at 75 Pa.
• Life – Enter the life of the window. A standard glass window may be normally
assigned a life of 20 years.
If you have standard window sizes in your inventory, make separate entries in the
Supply Library for each standard size, indicating the size in the Description field of
the main form for the Windows.
Figure 15.15. The Energy Details sub-form for Replacement Windows.

15-18 The Weatherization Assistant User’s Manual (Version 8.9)
Chapter 15: Supply Library

The Weatherization Assistant User’s Manual (Version 8.9) 16-1
Chapter 16: Preferences
Chapter 16. Preferences
Forms under the Main Menu’s “Preferences” button (see Figure 3.1) allow you to
choose various options available in the Weatherization Assistant which modify the
appearance and operation of the interface to the program. These options do not
affect the audits or influence the recommendations from the audits.
If you are using the Weatherization Assistant on a network, it will be important for
you to understand the difference between the locations where your data are stored
and where the settings for these preferences reside. Normal use of a network for
the program is to have each terminal linked to a database on the network server,
where all of the data you and others enter into the program are stored (see the
introductory remarks in Chapter 17, Data Link). Thus, all users linked to the
server’s database file share the same information. However, the settings for the
Preferences are stored locally at each terminal, regardless of where you store your
other data. Thus, you may see a difference in behavior of the program from one
terminal to the next, despite being linked to the same database. In Access
terminology, your data are stored in the “backend” (or “mdb”) file, while the
settings for the Preferences are stored in the “frontend” (or “mde”) file.
This chapter describes all the data entry and display items on the four forms found
under the Main Menu’s “Preferences” button: General, Range Check and Default
values, Report Sections, and Features. Each form is discussed individually in the
sections below.
16.1 General
The General form (see Figure 16.1) under the Main Menu’s “Preferences” button
allows you to make settings for some in-depth run analyses, which may assist
developers investigate any apparent unusual behavior in the program, as well as
allow the user to designate images and text to appear at the top of reports that the
program generates. Below are brief descriptions of the settings and controls found
on the General form.
• Installation ID – This field allows you to specify (or change) the Installation
ID, which was previously requested on the Installation ID form displayed when
the Weatherization Assistant was started the first time following its installation.
The Installation ID can be used to identify one installation of the

16-2 The Weatherization Assistant User’s Manual (Version 8.9)
Chapter 16: Preferences
Weatherization Assistant from another, possibly in the same office or agency.
See Section 2.8, Starting the Weatherization Assistant, for information on the
use of Installation ID in the Weatherization Assistant. Optional.
Figure 16.1. The General form under the Main Menu’s “Preferences” button.
• Restart – The “Restart” button should be selected whenever changes are made
on the form to ensure that the options selected take effect during the current
session of program use. Following the button’s selection, you will be taken to
the Main Menu.
Run Control Block
The Run Control block provides three checkboxes controlling reports that may be
automatically displayed upon executing an audit. If none of the checkboxes are
selected, no obvious change, other than the final disappearance of the <busy>
cursor, will be seen on your computer screen following execution.

The Weatherization Assistant User’s Manual (Version 8.9) 16-3
Chapter 16: Preferences
• Automatically open the output summary report after each audit analysis –
This checkbox controls whether the Recommended Measures report is
displayed after execution (see “Report Block” in Section 8.2, Audit
Information). The report displays information related to the audit
recommendations for the house being analyzed. See Appendix C, Reports, for a
sample of this report. The default setting for this checkbox is checked.
• View the run messages from the audit analysis after each Run – If this
checkbox is selected, the program will display run messages produced during
the execution of an audit. This display requires that your computer has access to
Microsoft WordPad, which is normally part of your Windows installation. Use
the normal Windows close button to exit the message display. The program will
also write these additional diagnostic messages to a file named
“last_neat_run.txt” or “last_mhea_run.txt,” depending on which audit was last
executed, and save the file in the folder created during installation (e.g.,
“C:\Program Files\Weatherization Assistant 8-9” or “C:\ProgramData\
Weatherization Assistant 8-9”). Note: Unless you rename these message files,
they will be overwritten each time you execute an audit of the same type,
NEAT or MHEA. These diagnostics data would likely be useful to program
developers in determining causes for unusual behavior of the program. The files
may be viewed with any text editor. The default setting for this checkbox is
unchecked, suitable for normal execution of the program.
• Audit analysis engine debugging – If selected, this checkbox will add to the
above diagnostic messages output detailing the calculations performed by the
audits. The display requires access to Microsoft WordPad. The output can be
lengthy and is not designed to be of significant use to normal users. However, it
may assist support personnel in identifying problems that might be occurring.
Use the normal Windows close button to exit the display. The information is
saved to your computer, may be viewed at any time using a text editor, and is
overwritten each time an audit of the same type is executed. The default setting
for this checkbox is unchecked, suitable for normal execution of the program.
Main Menu/Report Header Logos and Labels Block
Fields in this block allow you to customize report headers and add your own logo
to the Main Menu display. Below are discussions of the data items and controls
found in the Main Menu/Report Header Logos and Labels block.

16-4 The Weatherization Assistant User’s Manual (Version 8.9)
Chapter 16: Preferences
• Browse – Use the Left and Right “Browse” buttons to locate and choose logos
to be displayed on the upper left and right, respectively, of your reports and the
Weatherization Assistant’s Main Menu. Selection of the buttons takes you to
normal Windows browse displays where you can select any file in most graphic
formats (e.g., jpg, bmp, etc.) to be used as logos. The graphics you use may
have to be correctly sized using other graphics applications. The field under
each browse button displays the path and file name of the graphic file you have
chosen. The boxes below the path name fields display the actual graphics that
have been selected. For a Weatherization Program agency, it is customary to
retain the Program logo on the left.
• Report Label – Enter the text you wish to have displayed in report headers into
the Label fields provided. Provision is made for Left, Right and Center text.
Note, however, that no attempt is made to truncate or create multiple lines of
header from this text. Thus, if text is entered for all three positions and the text
is too lengthy, it has the possibility of overlapping. Figure 16.2 shows an
example of a report header with left and right logos and text entered for all three
positions. Notice that the text almost overlaps. If you have multiple installations
of the Weatherization Assistant in your agency, you may wish to coordinate
these settings.
Figure 16.2. Report displaying optional logo and header text.
16.2 Range Check and Default Values
To assist you in properly entering data, the Weatherization Assistant provides you
with default values and range checks for many of the numeric input parameters
(See Sections 5.6, Field Defaults, and 5.7, Field Range Checking). Though values
for these defaults and ranges are set during installation of the program, you may
alter these values on the Range Check and Default Values form (see Figure 16.3)
under the Main Menu’s “Preferences” button.

The Weatherization Assistant User’s Manual (Version 8.9) 16-5
Chapter 16: Preferences
On this form, each parameter is listed by the Main Menu window (“Form”) and
form (“Location”) on which it lies. Designated columns allow you to adjust the
"Min," "Max," and "Default" values to meet your needs. No other fields on this
form are editable and no records can be added or deleted. If a field on this form is
left blank, no default will be available or no range checking will occur for that
particular parameter. Also, any default computed by either of the audits overrides
the default entered on this form. The Range Check and Default Values form must
be exited before any changes made during a visit to the form will take effect.
Figure 16.3. Range Check and Default Values form under the Main Menu’s “Preferences”
button.
16.3 Report Sections
Two of the reports available from the NEAT and MHEA audits are the
Recommended Measures and the Input Report (see “Report Block” in Section 8.2,
Audit Information). Both of these reports have multiple sections (see Appendix C,
Reports). The Report Sections form (see Figure 16.4) under the Main Menu’s
“Preferences” button allows you to select which sections of these reports are
displayed and/or printed. Below are brief descriptions of the settings and controls
found on the Report Sections form.

16-6 The Weatherization Assistant User’s Manual (Version 8.9)
Chapter 16: Preferences
• Which Report – This drop-down list displays the names of the reports for
which the settings can be edited. The list includes: NEAT Recommended
Measures, NEAT Input Report, MHEA Recommended Measures, and MHEA
Input Report.
• Sections to Hide or Make Visible Block – This block displays the Section
Names of the report selected in the “Which Report” drop-down list, and allows
you to select the sections you wish to be displayed on the report. Select the
checkboxes under Visible to indicate your preference. The default setting for all
sections is Checked.
• Select All, UnSelect All, Invert Select (buttons) – The “Select All,”
“UnSelect All,” and “Invert Select” buttons allow you to select all listed
sections, unselect all, or invert the selection currently set from the checkboxes.
Figure 16.4. The Report Sections form under the Main Menu’s “Preferences” button.

The Weatherization Assistant User’s Manual (Version 8.9) 16-7
Chapter 16: Preferences
16.4 Features
The Features form (see Figure 16.5) under the Main Menu’s “Preferences” button
is used for setting preferences regarding many features of the Weatherization
Assistant. You can activate these features by selecting the corresponding
checkboxes. The feature selections are independent of one another, except for the
two related to Digital Photo Options. Below are brief descriptions of the settings
and controls found on the Features form.
Figure 16.5. The Features form under the Main Menu’s “Preferences” button.
• Restart – The “Restart” button should be selected whenever changes are made
on the form to ensure that the options selected take effect during the current
session of program use. Following the button’s selection, you will be taken to
the Main Menu.
• (1) Use photo browser tab for attaching individual image file pathnames to
records – The Weatherization Assistant allows storage of digital images
associated with your weatherization work. These photos can be stored, viewed,
and edited on your computer using one of two methods. The method selected by
this first checkbox allows you to store the location on your computer of each

16-8 The Weatherization Assistant User’s Manual (Version 8.9)
Chapter 16: Preferences
individual photo image file. Thus, photos accessible from any location in the
Weatherization Assistant need not be in any particular location. Choice of this
method will add a tab to any Main Menu window to which photos can be
attached. This is the photo feature initially selected. See Section 18.1, Digital
Photos, for more information on the use of the photo browsers.
• (2) Use third party photo browser for attaching a single directory of image
files to records – This second method of storing, viewing, and editing photos
requires you to assign a location on your computer where all photo files
associated with a given record for each Main Menu window of the program
(e.g., Audits, Work Orders, etc.) will be stored. Thus, all photos associated with
a given work order must be stored together and all those for the audit of a client
in another (or the same if so chosen). If this method is selected, the
Weatherization Assistant will display a Photo Folder field on the Information
forms of the appropriate Main Menu windows asking for this location. Use the
“Browse” button to find and select the location, then the “View” button to view
the photos stored in that location. See Section 18.1, Digital Photos, for more
information on the photo browsers.
Figure 16.6. Photo Folder field for third party photo browser.
• (3) Enable geographic information system (mapping) – This checkbox turns
on the Geographic Information System (GIS), which allows you to map the
locations of clients’ dwellings (see Section 18.2, Geographic Information
System (GIS)). Using this feature requires downloading additional files and an
installation. If the feature is selected without having performed this installation,
you will receive a message upon restarting the program that the installation has
not been performed and that the feature is subsequently turned off until
installation is complete. If the required installation for the feature has been
performed, selecting this feature will place a “Map” button on the Client
Information form (see “Geographic Information System Data Items” in Section
7.1, Client Information) and under the “Select Clients” button of the Agency
Information form (see “Select Clients” in Section 6.1, Agency Information).
• (4) Enable user logons with user names and passwords from the Agency/
Contacts tab – This feature allows regulation of the users for a specific

The Weatherization Assistant User’s Manual (Version 8.9) 16-9
Chapter 16: Preferences
installation of the program. If activated, users must logon with a User Name and
Password to enter the program. See “Change LogOn Group and Password” in
Section 6.2, Contacts (Agency), for additional details on this feature. If this
feature is selected, the user will receive a “User Logon Notice” window with
the warning: “Turning on the logon feature will require you to select a user
name and enter a password using records entered on the Agency/Contact tab the
next time the program starts. Be sure you have a record entered on that tab with
your user name and an assigned password before turning on this feature.” The
form will then allow you to either continue or cancel the selection of the
feature. If the feature is activated without the requisite user name and password
available, you will be locked out of using the Weatherization Assistant.
• (5) Enable short codes for the definition and selection of measures,
materials, etc. – This feature was never fully implemented into the
Weatherization Assistant. The selection here will make no difference in the
operation of the program.
• (6) Enable display of internal Access long integer record IDs – Whenever a
record (such as a client, audit, or work order) is created, Access assigns the
record a random integer ID number unique to the record. This ID number will
not change, even if you change the other information related to the record or
export the record to another computer. Under normal operation of the program,
this Access ID number is of little use. Thus, the default mode is to not have
them displayed. However, they can be used to uniquely identify a record,
regardless of its location. Program analysts who may use other Microsoft
products to debug or otherwise analyze the execution of the program with
relation to a particular record may require the ID. Whenever a record is copied,
the new record is given a different, unique, integer record ID.
• (7) Enable the logging of program errors – Although many possible
conditions that would cause the Weatherization Assistant to not function
properly have been anticipated and addressed by provided warnings or
messages to the user, some likely remain unaddressed. Under such
circumstances the user will receive an Access or System error message, which
the user is not expected to understand. If this feature is turned on, these “un-
handled” errors will be logged giving more detailed information regarding the
condition of the program at the time the error occurred (see Figure 16.7). This
information, together with the user’s description of what operation was being

16-10 The Weatherization Assistant User’s Manual (Version 8.9)
Chapter 16: Preferences
performed when the error occurred and possibly the database being used at the
time of the error, is normally sufficient to allow developers of the program to
determine the cause of the problem.
Figure 16.7. Program Error History form.
• Show History of Program Errors – Selecting this button to the right of this
feature’s description will display an Error History form showing the latest error
(if any) that has occurred with all of the information the software can provide
related to it. Note that the “Error Message” window will likely have a vertical
scroll bar associated with it. The abbreviated navigation block at the bottom left
of the form can be used to access additional error entries, if they exist. The “Do
a VBA Reference Check” button on this form initiates an installation test,
which might be of use to program developers in diagnosing irregular operation
of a specific installation. You may view the error records in data sheet view (see

The Weatherization Assistant User’s Manual (Version 8.9) 16-11
Chapter 16: Preferences
Section 5.8, Data Sheet and Form Views of Records), from which you may
delete any records no longer desired (see Section 5.10, Deleting Data). It is
likely good policy to keep the error messages recorded to a minimum so that if
an error that causes considerable disruption in your operations occurs, it can be
easily recognized in the error history. If an error that you need assistance to
resolve occurs and this feature is not activated, turn it on and then try to
reproduce the error. If you have set up the e-mail feature of the Weatherization
Assistant (see Section 18.4, E-Mailing from Within Weatherization Assistant),
you may click on the “Email this Error Message” button to quickly e-mail the
error message to program support personnel.
• (8) Enable bookmarks (automatically return to the last record edited) –
This feature keeps track of the last record you visited under each of the Main
Menu buttons (e.g., “Agency,” Client,” “Energy Audits,” etc.), and displays that
same record the next time that button is selected. Otherwise, the program will
present the first record in its list of records of that type. This order may not be
obvious and more likely will require you to access the desired record via the
record navigation block. This same order will be initiated for all record types if
the “Clear Bookmarks” button is selected. The default setting for this feature is
checked.
• (9) Use only the latest bookmarked Agency in the find record drop-down
boxes –This feature will restrict the records displayed in the record navigation
blocks (see Section 5.1, Form and Record Navigation) on the Information
forms under the “Clients,” “Energy Audits,” and “Work Orders” Main Menu
buttons to those belonging to the agency last visited via the Main Menu’s
“Agency” button. If this feature has not been selected, the record navigation
drop-down lists will display records associated with all agencies in the database
you are currently linked to. For most agencies using the program, this feature
will have no effect, since their agency will be the only one in the database.
However, for a state director with clients from all of the state’s agencies
imported into a common database, lists of clients, audits, work orders, etc.
would likely be long, making locating a specific record difficult. With this
feature activated, the director may view only records from a specific agency at
any given time. The feature is initially activated with the agency present at
installation bookmarked.

16-12 The Weatherization Assistant User’s Manual (Version 8.9)
Chapter 16: Preferences
• (10) Enable the check-in/check-out feature for client records – This feature
is used by the Client Export routines (see both topics on “Exporting Clients” in
Sections 17.3, Data Transfer – Import/Export With Another MSAccess
Database, and 17.4, Data Transfer – Import/Export Indirectly with Text Files)
of the Weatherization Assistant. It is used in conjunction with the User Logon
feature (Feature 4, described above). If activated, the program tracks which
clients have been exported and who was logged on when each was exported.
The feature may be of use if you routinely pass client information between
computers. A client record that is “checked out” will show what user checked
the record out on the Client Information form for that specific client (see
“Checked Out To” in Section 7.1, Client Information) as well as on the forms
associated with the Import/Export feature, referenced above.
When this feature is activated, you will receive a notice from the program that
the User Logon feature will also be activated. See the warning stated relating to
this feature. If you are not prepared to have the User Logons feature activated,
be sure to deactivate it before proceeding.
• (11) Automatically generate Itemized cost records for health and safety
problems – This feature automatically adds a library health and safety measure
to the Itemized Costs forms of an audit corresponding to each health and safety
problem identified on the Health & Safety forms, the Optional Details for
Heating Systems sub-forms, and the Optional Details for Water Heater sub-
forms of the audit. After running the audit, these measures are listed on the
Recommended Measures report. See “Handling of Health and Safety Issues” in
Section 11.7, Health and Safety, for more information on this feature.
• (12) Show the In Stock column when copying items from a supply library
(slow for large databases) – If you are using the inventory feature of the
Weatherization Assistant, you will be using the “Copy Supply” drop-down list
to locate items in the Supply Library and indicate their use in work orders (see
“Copy Supply” under “The Materials/Labor Details Sub-Form” in Section 13.3,
Measures (Work Orders)). One of the columns in this drop-down list is the “In
Stock” column. To obtain this number, the Weatherization Assistant searches
through its database for all the instances that the material has been used. This
search can require considerable time for large databases. This feature allows
you to turn off this computation, thus speeding up the presentation of this drop-
down list, but at the expense of eliminating the “In Stock” column.

The Weatherization Assistant User’s Manual (Version 8.9) 17-1
Chapter 17: Data Link
Chapter 17. Data Link
The facilities under the Main Menu’s “Data Link” button allow you to group client
information (such as for different program years), quickly link to various database
files, and share information on individual clients or groups of clients with others.
Figure 17.1. The Data Link form.
All user-supplied data and audit results in the Weatherization Assistant are stored
in a file on the computer. The file is a Microsoft Access database file, termed the
“backend” file in Access terminology. Files on your computer are designated by a
name and an extension with the two separated by a period (e.g., “wa8-9.mdb”).
This is, in fact, the default name of the file in which data in Version 8.9 of the
Weatherization Assistant will be stored, the “mdb” standing for “Microsoft
database.” You may have as many database files as you feel necessary with
whatever names you choose, as long as their extensions are “mdb.” You may wish
to have a separate database file for each program year. A state may have a different
database file for each agency within their state. The Data Link feature of the
Weatherization Assistant allows you to quickly “link” to various database files.

17-2 The Weatherization Assistant User’s Manual (Version 8.9)
Chapter 17: Data Link
When linked to a specific database file, the program views only the client
information contained in the file, thus allowing you to more easily locate records.
Understanding the concept of the database file allows you to perform some
relatively simple operations outside of the Weatherization Assistant using standard
Windows capabilities. Although means within the program may accomplish the
same objectives, those with knowledge of Windows may prefer to use its features
instead. For example, database files may be copied using Windows, though the
files’ names must remain unique. If, immediately after installing the
Weatherization Assistant, the original “mdb” file (e.g., “wa8-9.mdb”) is copied,
this original file may be saved as an empty database file for future use. If you plan
to keep separate database files for each program year, you might name the copied
database file after the year whose data it will contain (e.g., “wa8-9 PY2011.mdb”),
then link to this database file (see Section 17.1, Currently Linked Backend Data
File) for use during that year. When you are ready to begin the 2012 program year,
make another copy of the original, empty database file and name it after the new
program year (e.g., “wa8-9 PY2012.mdb”), link to it, and begin using it. Thus, you
are provided with separate files, each with all the data applicable to a specific
program year. You may think of other reasons to have multiple database files with
names you choose to indicate specific characteristics.
In addition to allowing you to link to various database files, the facilities on the
Data Link form also provide means to share information with others. Although this
could be accomplished by simply sending an entire database file, an “mdb” file,
this may not be the best method under some situations. The added features on the
Data Link form provide you with two independent methods of sending others all or
portions of the contents of database files. These features might be used to move
client data from a laptop used in the field to the central agency computer in the
office or to upload data periodically to the state agency. You may select specific
clients to include in your data transmission, you may send them in a “compressed”
and “encrypted” format, or you may send them in a format more appropriate for
use by other software applications. Files created by these alternate approaches will
have different “extensions” than the “mdb” files, but they still contain similar
information.
Report formats that are available in the Weatherization Assistant are stored in
another file, waReport.mde. The program must also link to this file before you may
utilize these reports. With the ability in Version 8 to have multiple reporting

The Weatherization Assistant User’s Manual (Version 8.9) 17-3
Chapter 17: Data Link
modules (see Appendix D, Development of Customized Reports), you may need to
select between various reporting modules. The Data Link facility allows you to
perform this operation.
The following sections discuss in more detail the facilities available on the Main
Menu’s “Data Link” button of the Weatherization Assistant. The discussion is
subdivided into topics whose related data input fall within separate blocks on the
Data Link form.
17.1 Currently Linked Backend Data File
As discussed above, you may have multiple database files in which your client
information is stored, perhaps dividing the data into different program years or as
coming from different sources. This facility under the “Currently Linked Backend
Database” block allows you to quickly access any of these databases. The fields
and controls under this block are discussed separately.
Figure 17.2. The “Currently Linked Backend Database” block.
• Path – This field displays the path (location in your computer) and name of the
database file you are currently linked to. Thus, any data viewed anywhere
within the Weatherization Assistant will come from this file. If the path
designation is long, you may need to use the [Home] or [End] keys to be able to
view the entire entry. Uneditable.
• Size – This field reports the size of the database file displayed in the Path field,
in Megabytes (Mb). This may be important to note if you intend to send your
entire database file via means that may have restrictions on the size of files that

17-4 The Weatherization Assistant User’s Manual (Version 8.9)
Chapter 17: Data Link
can be transmitted or stored. Also, the time required to send files by e-mail will
likely depend on the size. Uneditable.
• Description – This field provides you with a means of identifying the
characteristics or contents of the database file designated in the Path field. If the
file was sent to you, it may reveal identifying information to you regarding the
file. Optional.
• Repair and Compact – With extended use, a database file may become
disjoint or even damaged. The “Repair and Compact” button examines the
database file identified in the Path field and attempts to repair any damaged
segments, then compact the file into its most efficient form. If selected, the
operation will notify you that it “requires exclusive use of the backend
database.” Thus, “If the currently linked backend [database] is shared on a
network, be sure everyone has exited the program...”, or are not linked to the
database. You are then given the opportunity to continue or cancel the
operation. It is a good idea to execute the Repair and Compact operation
periodically to ensure your database remains free of errors. If you should have
an abnormal termination of the program, such as due to a power failure, it
would be particularly advisable to execute it. Note, under such circumstances,
some of the most recent data may be lost, but the remaining data would be
intact and in proper format for future use.
Figure 17.3. The Compact and Repair window.

The Weatherization Assistant User’s Manual (Version 8.9) 17-5
Chapter 17: Data Link
• To switch to a different backend database file, pick the new file then press
the link button [drop-down list and “Browse” and “Link” buttons] – A history
of database files you have accessed using this drop-down list is kept by the
program. These files are displayed in this drop-down list. Selecting the database
file from the list will automatically place the database path and file name into
the drop-down list’s field. If the file no longer exists, you will be notified in a
message. Otherwise, you may then immediately select the “Link” button to link
to the specific database file.
Selecting the box containing three periods just to the right of this drop-down
list, , produces a datasheet view of all the entries that appear in the drop-
down list. The form allows you to delete any entries no longer of use or no
longer in existence (see Section 5.10, Deleting Data).
You may also use the associated “Browse” button to locate files you want to
link to. Selecting the “Browse” button will take you to the “Pick Database to
Link” window, a standard Windows Operating System browse window (see
Figure 17.4).
Figure 17.4. The Pick Database to Link window.

17-6 The Weatherization Assistant User’s Manual (Version 8.9)
Chapter 17: Data Link
The default location when entering this window will be the location from which
you last chose a database using this window. If you have not yet used the
“Browse” button, this location will be the folder where you installed the
Weatherization Assistant, typically C:\ProgramData\Weatherization Assistant
8-9. However, you may navigate to anywhere on your computer or any network
to which you are attached. Locate the database file you wish to link to. Select
the file by either double clicking on it or single clicking on it and choosing the
“Open” button in the lower right corner of the window. Doing either will take
you back to the Data Link form with the database path and file name entered
into the drop-down list’s field in the block. Then, select the “Link” button to
link to the database file.
Whenever the “Link” button is selected, you will be shown a progress bar in a
dialog box that monitors the progress of the linking operation. When completed,
the message “Data Link was successful” should appear. Select the “OK” button
in this window. A similar linking process will then be performed for the
Reporting module associated with the database, which will indicate that
“Reporting Data Link was successful” when completed. Again, select “OK.”
Following a successful linking operation, one of two courses will be taken by
the program. If you do not use the User Logon feature (see Feature 4, “User
logons with user names and passwords from the Agency/Contacts tab” in
Section 16.4, Features), the program will take you to the Main Menu with the
newly linked database file information now visible in the <Database> and
Description fields (see Figure 2.9). If you do use the User Logon feature, you
will instead be taken to the Weatherization Assistant’s Log On form (see
Section 3.1, Initial Start-up of the Weatherization Assistant) where you will
have to logon as a user of this specific database. In either case, you are now
ready to access all the information in the database just linked to.
17.2 Currently Linked Reporting File
This data block acts the same as the “Currently Linked Backend Database” block
discussed above except that it links only to a Reporting file. Under most
circumstances, linking to a report file will be accomplished for you, either on
installation of the program or as you change database files (see Section 17.1,
Currently Linked Backend Data File). However, Version 8 of the Weatherization
Assistant allows for multiple reporting modules (see Appendix D, Development of

The Weatherization Assistant User’s Manual (Version 8.9) 17-7
Chapter 17: Data Link
Customized Reports). This data block allows you to choose which reporting
module will be used in the current session of running the program.
17.3 Data Transfer – Import/Export with Another MSAccess Database
The Weatherization Assistant provides you with two methods of sharing data with
others. The method is selected using the drop-down list in the “Import/Export
Data” block at the bottom of the Data Link form (see Figure 17.1). The transfer
“With another MS Access Database” method is most applicable to sending
portions of your database or even single client records. The method creates files
either in the same format as your entire database (i.e., “mdb” files), or compressed
and encrypted “wdz” files, where the designations relate to the “extensions” given
to the file names of the files created. Whereas you may directly link to “mdb” files,
the “wdz” files must be “imported” before their information can be accessed.
However, the latter files are smaller and their information is “encrypted” such that
only those with the Weatherization Assistant software can view their contents.
Figure 17.5. Import/Export via MSAccess Database (Transfer CLIENTS between
databases) – Check-in/Check-out feature activated (two clients selected for import).
Choosing this method from the drop-down list, then selecting the “Go” button to
the right, will present you with the “Transfer CLIENTS between databases” form,

17-8 The Weatherization Assistant User’s Manual (Version 8.9)
Chapter 17: Data Link
displayed in Figure 17.5, though initially there will be no entries in the panel on the
right. The figure has been produced with the Check-in/Check-out feature activated.
This adds the “Checked Out To” columns in each of the form’s two panels and the
“Check IN/OUT” buttons, which would not be present without this feature
activated (see Feature 10, “Enable the check-in/check-out feature for client
records” in Section 16.4, Features).
In the left panel of this form you will see a list of clients in the database you are
currently accessing (linked to). The database path and file name are displayed in
the "Local Database Path" box at the top of this half of the form as well as a
reminder of what version of the program created these entries. Additional columns
of data may be seen by using the horizontal scroll bar at the bottom of each panel.
The data columns available are
Client ID
Alt. Client ID
Work Status / Date
Last Edited / By
City / Zip
Last Imported
Contact Name
Agency Name / State
Last Exported
Importing Clients (from another MS Access database)
The following discussions that describe specific data items or controls found on the
“Transfer CLIENTS between databases” form, as they pertain to importing clients
from MS Access database files, are bulleted. Those applying to the process in
general lie outside any bullets.
• External Database Path [drop-down list and “Browse” button] – To import
clients to your database from another MS Access database, you must first locate
the database file containing the clients you wish to import. If you have imported
or exported clients previously, the database files you used will be displayed in
the “External Database Path” drop-down list at the top of the right half of the
“Transfer CLIENTS between databases” form. You may select one of these
previously accessed files to use again on this occasion. Otherwise, select the
“Browse” button to the right of this drop-down list. This will take you to the
“Pick External Database for Import/Export” window, a standard Windows
Operating System browse window, an example of which is shown in Figure
17.6.

The Weatherization Assistant User’s Manual (Version 8.9) 17-9
Chapter 17: Data Link
Figure 17.6. The Pick External Database for Import/Export window.
Use standard Windows techniques to locate the “mdb” or “wdz” file that
contains the desired clients to be imported. The default location when entering
this window will be the location from which you last chose a database. If you
have not yet used the “Browse” button, this location will be the folder where
you installed the Weatherization Assistant, typically C:\ProgramData\
Weatherization Assistant 8-9. The drop-down list near the top of the form will
present you with a list of “Previous Locations” accessed from the form. Other
locations accessible to your computer can be located using the left panel,
possibly requiring use of its associated vertical scroll bar. Once a location is
selected, the contents of the folder will appear in the right panel. Clicking your
mouse on the desired file from this listing will transfer the file name to the “File
name” field near the bottom of the window. Select the “Save” button to accept
this file as the one containing the desired clients, or “Cancel” to abort the search
without having selected a file. Either will return you to the “Transfer CLIENTS
between databases” form.

17-10 The Weatherization Assistant User’s Manual (Version 8.9)
Chapter 17: Data Link
The right half of the "Transfer CLIENTS between databases" form will now
contain a listing of clients in the selected database from which you are going to
import (see Figure 17.5 for an example). Note the display under the "Version" title
indicates the version of the database whose clients are being displayed. Only
clients from databases produced by versions of the Weatherization Assistant
having version numbers beginning with “8” can be imported. The data in prior
versions (Versions 7 and below) have data structures significantly different,
making their conversion impractical.
Select the clients to be imported by clicking on rows containing their information
in the listing on the right of the screen, and using the other standard Windows item
selection procedures. For example, you can select multiple clients lying adjacent to
each other by clicking on the first or last, then holding down the [Shift] key while
using the [Up Arrow] or [Down Arrow] keys to select others. Holding down the
[Ctrl] key while clicking on clients will allow you to select multiple clients that are
not adjacent to each other. To assist in the selection process, you may sort the
listings by any of the client identifying criteria, using the “Sort list of clients by”
drop-down list at the lower left of the form. The sort may be performed in
“Ascending” or “Descending” order, depending on the selection made in the
checkboxes under “Order” to the right of the drop-down list. The sorting will sort
clients on both halves of the form. Selected clients’ entries will appear in reverse
video. In the example used here, Figure 17.5, two clients have been selected.
• Advanced Select – An alternate method of selecting the clients to import uses
the “Advanced Select” button beneath the panel on the right of the form.
Selecting this button takes you to the “Client Selector” window. This window is
the primary means of selecting clients in the second method of transferring data.
See Section 17.5, Selecting Client Records, for more information on this
feature.
• Include Agency and Library Records – Before actually performing the
import, you must decide whether you want the library and agency information
associated with the clients to be imported as well. If you do, make sure the
checkbox under “Include Agency and Library Records” between the two panels
is checked. If selected, the import will copy the setup and supply libraries used
by the clients and their audits to your computer. If it is your intent to be able
and run the audits associated with the clients being imported and replicate the
results originally obtained, this will be necessary. However, if you import many

The Weatherization Assistant User’s Manual (Version 8.9) 17-11
Chapter 17: Data Link
clients from the same source, there is a greater possibility of conflicting records
and/or overwriting libraries in the database receiving the import with this option
chosen.
• Assign Imported Clients to – If the “Include Agency and Library Records”
checkbox is not selected, no libraries will be transferred with the import. Also,
you will have to tell the Weatherization Assistant what agency already in your
database you wish to assign the records to during the import by using the
“Assign Imported Clients to” drop-down list near the bottom left of the form.
Displayed in this list will be all the agencies existing in the database you are
currently linked to. In many cases, your agency may be the only one listed.
• WDZ Password – One final consideration that may need to be addressed prior
to actually performing the import procedure regards the possible use of
password protection on “wdz” files. If you are importing clients from a “wdz”
file that originated from an export that used a password, that password would
have to have been conveyed to you in order to allow you to import the clients.
To accomplish this, choose the “WDZ Password” button near the top of the
right half of the “Transfer CLIENTS between databases” window (see Figure
17.5). The “WDZ/ZIP Password” window will appear. In the field, “ZIP
Password for Import and Export” in the window, type the password given you,
paying attention to punctuation and capitalization. Close the window and
proceed with the importing process. The Weatherization Assistant will leave
this password set until you change it. So, unless the password is expected to be
used in repeated importing and exporting sessions, make sure to return to this
form and delete the password.
• Import – Once you have completed the selection of clients and any other
necessary settings, click on the left pointing arrow, “Import,” which lies
between the two halves of the form. The clients will be copied over into the
database file you are currently linked to and the Client IDs and associated
information will appear on the left half of the form. A status bar in the middle
near the bottom of the form will monitor the progress of the operation,
indicating each record as it is transferred.
During the importing process, there is the potential that a record being imported is
seen as already existing in the database you are currently linked to, that is, the
database into which the records are being imported. If this occurs, the program will

17-12 The Weatherization Assistant User’s Manual (Version 8.9)
Chapter 17: Data Link
display a window titled “WARNING: Overwrite with older data?” An example of
this window is given in Figure 17.7.
Figure 17.7. The WARNING: Overwrite with older data? window.
In this example, the Weatherization Assistant sees a supply library being imported
as the same as one already existing in the database. For all records except agency
records, two records are considered to be the same if they have the same Access
long integer ID number. You can choose to have the program display these
numbers on the applicable forms (see Feature 6 in Section 16.4, Features). In the
warning, this ID number is displayed in square brackets following the
identification of the record type. The example warning is indicating that the supply
library being imported, “in the Source,” is older than the supply library considered
identical in the “Target,” or in the database you are currently linked to and into
which you are importing the record. This is confirmed by displaying the dates and
times the source and target records were last edited.
The warning window gives you three options to resolve the situation. The first,
“Keep only new data and discard the old,” prevents the imported record from
replacing the corresponding record in your database. This is a relatively safe choice
in that you do not change any parameters in your database that may have been or
will be used in your weatherization work. However, it does not ensure that you will
be able to replicate the results associated with the imported client or even examine
the parameters contained in the offending record associated with the client. The

The Weatherization Assistant User’s Manual (Version 8.9) 17-13
Chapter 17: Data Link
second choice, “Keep only the old data (careful),” will result in overwriting the
record in your database. This would normally be seen as unwanted, since any
audits, work orders, etc., that had references to the record would now likely see
different data. Thus, the “careful” appended to the choice description. The last
choice, “Cancel,” cancels the import of the client that resulted in the conflict, but
proceeds with attempting to import any additional clients you may have designated
as part of this particular importing session.
Exporting Clients (via database files)
Exporting is the reverse process to importing, described above. You can export any
set of clients in the database you are currently linked to and place them in either
another existing database or have a new database created just for the clients you
wish to export. However, if exporting to an existing database, the database must
have been formed using the same version of the Weatherization Assistant. No
backward compatibility has been provided. To export clients to a database file
(“wdz” or “mdb”), enter the “Transfer CLIENTS between databases” form by
choosing “With another MSAccess Database” in the “Import/Export Data” block
on the Data Link form and selecting the “Go” button (see Figures 17.1 and 17.5).
• External Database Path –Your first task will be to designate to the
Weatherization Assistant the name and location of the file you wish to have the
clients’ data transferred to. If you have exported clients previously, the files to
which your exports were sent will be displayed in the “External Database Path”
drop-down list at the top of the right half of the “Transfer CLIENTS between
databases” form. You may select one of these previously accessed files to use
again. Any clients you export to the file on this occasion will be added to the
clients previously sent to the file.
• Browse – If the file you wish to use for exporting is not in the “External
Database Path” drop-down list, or you wish to create a new database file to
export clients to, select the “Browse” button to the right of the “External
Database Path” drop-down list. This will take you to the “Pick External
Database for Import/Export” window, a standard Windows Operating System
browse window (see Figure 17.6 for an example). If you plan to export clients
to a database file that already exists but did not find in the “External Database
Path” drop-down list, follow the directions in the paragraph below Figure 17.6

17-14 The Weatherization Assistant User’s Manual (Version 8.9)
Chapter 17: Data Link
to locate and select the file. When finished, you will be taken back to the
“Transfer CLIENTS between databases” form.
If you are creating a new database file, use the portion of these same directions
below Figure 17.6 to designate the location on your computer where you wish
to have the new file placed. One option might be your “Desktop.” Enter the
name you wish assigned to this new database in the "File name" field at the
bottom of the window. Then choose the type of database file you wish to create,
either a standard "mdb" database file or a zipped "wdz" file, using the "Save as
type:" drop-down list at the bottom of the form. Either “.wdz” or “.mdb” will be
appended to the file name you entered in the File name field, depending on your
choice. The "wdz" files are compressed to about one tenth the size of the
standard file. They are also automatically encrypted to allow safe transport of
confidential client information over public media. Next, click on the “Save”
button to indicate your selection is complete. If the database file did not exist
previously, you will receive a notice stating this and that the program is
“Creating a database file so you can copy jobs to that database.” You will then
be taken back to the “Transfer CLIENTS between databases” form.
Choose the clients you wish to export from those currently in your database, listed
on the left of the "Transfer CLIENTS between databases" form. Multiple client
selections may be accomplished using standard Windows selection techniques (i.e.,
the [Shift] and [Up/Down Arrow] or [Ctrl] [Mouse Click] key combinations), as
described above in the discussion on importing clients. When your client selection
is complete, click on the right pointing arrow to initiate the export procedure. The
status bar at the lower left of the form will monitor the progress of the operation.
This process may be repeated to export additional clients, until all the desired
clients have been exported to the specified database. The exported client
information will now appear on the right panel of the form.
• Email – If you have setup the e-mail feature of the Weatherization Assistant
(see Section 18.4, E-Mailing from Within Weatherization Assistant), you may
click on the “Email” button to initiate sending the database file as an attachment
to an e-mail. The file name may be automatically entered into the Attach Files
field on the form. If not, you may copy and paste the database path and file
name from the External Database Path field into the Attach Files field using
standard techniques (see Section 5.9, Copying and Pasting Data). You will
need to enter the e-mail address of the recipient and any Subject and Text you

The Weatherization Assistant User’s Manual (Version 8.9) 17-15
Chapter 17: Data Link
wish to include in the mailing. Then click on the “Send Email” button to send
your e-mail. If this e-mailing feature has not been set up within the
Weatherization Assistant, simply use your standard e-mail application,
attaching the database file just created. Be aware that if you chose to export the
clients to an “mdb” file, the file size may prohibit attachment to an e-mail.
• Check IN/OUT – If you have activated the Check-in/Check-out feature of the
Weatherization Assistant (see Feature 10 in Section 16.4, Features), you can
use the “Check IN” and “Check OUT” buttons that appear on the form to
change the status of any client record appearing on either the left (Local
Database) or right (External Database) halves of the “Transfer CLIENTS
between databases” form. Simply select the desired client as you would for
importing or exporting, then click on the appropriate button. If you choose the
“Check OUT” button, the client record will be “Checked Out To” the current
logged-on user. Checking in a client deletes the entry in this field, although the
date in the Last Check Out field, wherever it is displayed, will remain. Any
status change made on this form will also appear on the Client Information form
(see Section 7.1, Client Information) as well as any time the Client Selector
form is viewed (see Section 17.5, Selecting Client Records, and the “Select
Client” button description in Section 6.1, Agency Information).
17.4 Data Transfer – Import/Export Indirectly with Text Files
The Weatherization Assistant provides you with a second method of sharing data.
The transfer “Indirectly with text files” method is most applicable to sending large
quantities of data. It also gives the user greater control over individual data items
within the client file. The method uses data formatted in “csv” (comma separated
value) files which, if you choose, can be compressed into a single “zip” file for any
given exporting session. These files are text files that could be read with any text
editor, though the arrangement of data would be difficult to use directly. As text
files in this specific format, other computer applications could be made to accept
the data and integrate the information with other data.
Access this mode of data transfer by choosing “Indirectly with text files” in the
“Import/Export Data” drop-down list under the Main Menu’s “Data Link” button,
then selecting the “Go” button to the right. You will be presented with a “Transfer
between databases with intermediate CSV/ZIP files” form, designed specifically

17-16 The Weatherization Assistant User’s Manual (Version 8.9)
Chapter 17: Data Link
for transferring data using text files (see Figure 17.8). The form has three data
blocks: “Import,” “Export,” and “Progress Messages.” Each will be addressed
separately below. For brevity, this form will hereafter be referred to simply as the
“Transfer between databases…” form.
Figure 17.8. The Transfer between databases form (via Text Files).
Importing Clients (via text files)
The “Import” block on the “Transfer between databases…” form is shown in
Figure 17.8, above. The block on the form is used specifically to import data in the
“csv” format, whether from individual “csv” files or combined and compressed

The Weatherization Assistant User’s Manual (Version 8.9) 17-17
Chapter 17: Data Link
into “zip” files. Discussions of specific data items or controls found on the
“Transfer between databases…” form, as they pertain to importing clients from
text files, are bulleted. Those applying to the process in general lie outside any
bullets.
• Pick the file(s) to import – In order to import information, you must first “Pick
the files(s) to import.” Although you could type in the path and name of a file
into this field directly, most often you will use the “Browse” button to the right
of this field in making the file selection. The button presents you with the “Pick
Import File(s)” window, a standard Windows Operating System browse
window. Figure 17.9. displays an example of the window you will see.
Figure 17.9. Browse window for selecting files to import via text files.
Use standard Windows techniques to locate the folder where the file or files you
wish to import are stored. Most of the time you will be looking for files with
extension “zip.” The two “zip” files seen in the figure above are just such files,
having been created using the Weatherization Assistant’s client export via text
files feature (see “Exporting Clients (via text files)” in the following topic).

17-18 The Weatherization Assistant User’s Manual (Version 8.9)
Chapter 17: Data Link
Follow the directions in the paragraph below Figure 17.6 to locate and select
the “zip” file from which you wish to import, using the “Open” button to
conclude your choice. Only one file of type “zip” can be imported at a time.
Though possibly used less often, the program can import individual or groups
of records of information using separate “csv” files. All of the data related to
any given client is composed of many individual records of data, each related to
a different area of information (e.g., address, contacts, wall descriptions,
heating systems, etc.). If, on exporting information (see the following topic), the
user has chosen to export record-by-record instead of by entire client, individual
“csv” files will be created for each record type (see Figure 17.10) instead of a
single “zip” file containing all records for a given client. Thus, on import, you
could choose to import only data corresponding to specific record types.
Adding to the flexibility, each “csv” file may contain information of the same
type but for multiple clients. Thus, for example, you could choose to import
only all of the billing data records for a group of clients in a single import.
Thus, the potential exists for a utility to be able to provide client billing data in
the “csv” format, which could then be directly imported to the Weatherization
Assistant. The Browse window may be used to select single or multiple “csv”
files for importing (using the standard Windows [Shift][Arrow] and
[Control][Mouse Click] techniques). Doing so will transfer multiple file names
into the “File name” field.
Figure 17.10. Example “CSV” file for heating system records.
Clicking on the “Open” button completes the file selection and returns you to
the “Transfer between databases…” form with the file’s path and name
automatically transferred to the “Pick the file(s) to import” field. If more than

The Weatherization Assistant User’s Manual (Version 8.9) 17-19
Chapter 17: Data Link
one file has been chosen in the file selection process (“csv” files only), the field
will indicate “Multiple Files Selected.”
• Operation – You must next choose what the importing process should do if
client information for the any specific client you are importing already exists in
the database you are currently linked to. The choice is made using the
“Operation” drop-down list. The choices are, “Replace any existing records
(delete+write),” “Update existing records (no delete),” and “Just show list of
clients (test only-no write).” In making your choice, you need to think of
individual records of client information and the data items or fields within the
records. For example, a wall record within the NEAT audit for a client contains
fields describing the wall’s existing insulation type, its orientation, etc. If a
given record of specific information already exists for the same client for which
the importing process is being performed, selecting “Replace…” will replace
the entire record with the same record from the imported file. If “Update…” is
selected, existing records are updated field-by-field, preserving any fields in the
existing record that don’t have information for matching fields in the record
being imported.
Choose “Just show list of clients (test only, no write)” in the “Operation” drop-
down list if you wish to have the program perform a “dry run” of the importing
process without actually writing any information to the database you are
currently linked to. This will show you, in the Progress Messages window at the
bottom of the form, the list of records that would be imported, without actually
performing the import (i.e., altering your existing database information). At the
end of the messages produced in any import process, including an import using
the “test only” option, a list of Clients for whom records are included in the
import will be shown. This could be useful to review prior to actually
performing the import, which will alter your database.
• Speed Up Import – Importing information related to the peak heating and
cooling loads (see “Approximate Component Contributions to Peak HEATING
and COOLING loads (Equipment Sizing)” in Section 12.2, Recommended
Measures Report) has been found to be time consuming when importing data
for many clients. If this information is not required and your import is already
large, selecting the Speed Up Import checkbox will shorten the time required to
accomplish the import.

17-20 The Weatherization Assistant User’s Manual (Version 8.9)
Chapter 17: Data Link
• Convert Setup Libraries – The Convert Setup Libraries checkbox is designed
for importing records of Setup Libraries from different versions. The feature
will convert any Version 8 setup library to one compatible with Version 8.9.0.5
(e.g., Version 8.3.3.11 or 8.6.0.4). No means of data conversion from versions
prior to Version 8 are yet available.
• Assign Imported Clients to – If you are importing a client that was exported
without agency information (see “Exporting Clients (via text files)” in the next
section), use the “Assign Imported Clients to” drop-down list to assign an
agency to the client. The drop-down list will display those agencies in the
database you are currently linked to. If you attempt to import such a client
without providing this assignment, the Progress Message associated with the
import will indicate “Import Failed” and no information will be added to your
database.
If you import a client with agency information, this field may be left blank and
the agency information associated with the imported client will be added to
your database, if it doesn’t already exist. If you designate a different agency in
this field than is assigned to the client(s) to be imported, you will receive a
warning window allowing you to “Assign Clients to: <the agency designated>”
or “Keep original agency assignments.” Make your selection, then click on
“OK” to exit the window
• Do Import – When all of the specifications for the import have been
established, select the “Do Import” button to actually initiate the import
process.
• Progress Messages – In the white space below the “Progress Messages”
header, record-by-record progress of the importing process will be displayed.
This may be too detailed for most users to be concerned with. However, at the
end of the process, the message will indicate the success or failure of the import
as well as the clients for which information was imported. If a failure should
occur, the messages will indicate exactly what record caused the failure. This
would allow an analyst to examine a specific location in the file being imported
to determine the potential cause of the failure. With the increased information
collected with Version 8, importing data can be relatively slow. It may be wise
to copy the files to be used in the import to a local drive on your computer, if
necessary, before initiating the process. Be patient and wait for the <busy>

The Weatherization Assistant User’s Manual (Version 8.9) 17-21
Chapter 17: Data Link
cursor to disappear and the Progress Message to report the outcome of the
process.
• View Last Import/Export Progress Messages – The Weatherization Assistant
saves the text of the Progress Messages from the last import and export sessions
in files on your computer. These files may be displayed by selecting the “View
Last Import Progress Messages” and “View Last Export Progress Messages”
buttons, respectively.
• Exit – Use the “Exit” button to return to the Main Menu’s Data Link form
whenever you have completed your import session.
Exporting Clients (via text files)
The “Export” block on the “Transfer between databases…” form is shown in
Figure 17.11, below. It is used to export information to text files in the “csv”
format, either as individual “csv” files or combined into “zip” files.
Figure 17.11. Exporting Clients (via text files).
• Pick the type records to export – To export information, you must first pick
the type of export to be performed. The program allows you to export three
types of information, “Client records (WITH/WITHOUT agency and library
records),” “Error History (all runtime errors),” and “Database Dump (all tables,
all clients).” The two “Client records” options allow you to choose whether to
include data related to the exported clients’ agencies and library records. The
“Error History” export creates a single “csv” formatted file of the run-time error
messages. These are the same error messages reported under the Main Menu’s

17-22 The Weatherization Assistant User’s Manual (Version 8.9)
Chapter 17: Data Link
“Preferences” button (see Feature 7, “Enable the logging of program errors” in
Section 16.4, Features). The “Database Dump” option does the same as the
“Client records (WITH their agency and library records)” option, except that it
performs the process for all client records in the database you are currently
linked to. This may be used by local agencies who report regularly to the state.
• Select Client Records to Export – If the type of export was chosen as one of
the “Client records ” options, you must tell the exporting process which clients
in your current database you wish to have exported. Do this by clicking on the
“Select Client Records to Export” button. Doing so will present you with a
Client Selector form. This form has applicability elsewhere in the program as
well, specifically if any user-generated reports require selection of clients (see
“Select Clients” in Section 6.1, Agency Information). For an explanation in the
use of the Client Selector form, see Section 17.5, Selecting Client Records.
• Pick the path for export file(s) – You must next tell the exporting procedure
where to place the files it will create. You may enter a path directly into the
“Pick the path for export file(s)” field. If you have performed an export
previously, the field will use the location used in that export as a default.
Otherwise, use the “Browse” button to the right of this field to designate the
path. The button takes you to a standard Windows directory tree from which to
select the path. Use the tree to locate the desired folder, highlighting the folder
when found. Then click on “OK.” The path will automatically be transferred to
the Select Client Records to Export field in the Export block of the “Transfer
between databases…” form. If, in the next step, you do not choose to create a
single “zip” file from your export, you may wish to select an empty folder,
previously created outside the Weatherization Assistant, at this step to prevent
the numerous “csv” files created from becoming confused with other files,
possibly from another export procedure. If you have chosen to perform a
Database Dump, it would be wise to export to a local drive on your computer to
speed the process.
• Zip the exported files – Indicate with the “ZIP the exported files” checkbox
whether you wish to create a single “zip” file containing all of the individual
“csv” files as a result of the export. If the checkbox is not selected, individual
“csv” files will be created, each containing data for a different record type, over
multiple clients if you chose more than one client under the Client Selector
form (see Figure 17.10). Note that “zip” files are customarily about a tenth the

The Weatherization Assistant User’s Manual (Version 8.9) 17-23
Chapter 17: Data Link
size of their corresponding unzipped files, making even the single “csv” file
created by exporting the Error History a considerably smaller “zip” file.
• ZIP Password for Import and Export – The “ZIP Password for Import and
Export” field gives users an optional added control over the security of
information in the files created. All “zip” files created with the export process
in the Weatherization Assistant have their information “encrypted,” preventing
non-users of the program from viewing their contents. However, the encryption
is standard with the program, allowing any user to import the information and
view it. If you wish to further restrict the accessibility of the information in the
files, enter a password in this field when exporting the data. That password will
then be required by any person importing the data in order to successfully
accomplish the import. WARNING: If you assign a password and it is
forgotten, the information in the exported files will no longer be retrievable by
any means.
• ZIP File Name Prefix / Include Date Stamp in Prefix – If a single “zip” file
will be created by the export, the next two entry items simply give you
flexibility in specifying the name of the file that will be created. The standard
default name for a Client Export “zip” file is “waClient-##.zip” or
“waClientNoLib-##.zip” depending on whether you have or have not chosen to
include the agency and library records with the export. For a Database Dump
“zip” file, the default name is “waDump-##.zip”; and for an Error History “zip”
file, “waErrors-##.zip.” In all three cases, the “##” represents a two digit integer
insuring uniqueness of the file. The integer will be selected automatically based
on other existing files in the location to which the file is to be exported. To add
greater specificity you may enter characters in the “ZIP File Name Prefix” field.
If entered, these characters will be added as a prefix to the default name.
Similarly, if the “Include Data Stamp in Prefix” checkbox is selected, a date
will be used as part of a prefix in the file name. The date format will be “yyyy-
mm-dd-dow,” for example, “Prefix2005-09-30-Fri-waClient-01.zip.”
• Do Export – When all of the specifications for the export have been
established, select the “Do Export” button to initiate the export process.
• Progress Messages – In the white space below the “Progress Messages”
header, record-by-record progress of the exporting process will be displayed.
This may be too detailed for most users to be concerned with. However, at the

17-24 The Weatherization Assistant User’s Manual (Version 8.9)
Chapter 17: Data Link
end of the process, the message will indicate the success or failure of the export
as well as confirm the exported “zip” file name (if a “zip” file was created) and
that the process is “done.” If a failure should occur, the messages will indicate
exactly what record caused the failure. This would allow an analyst to more
likely determine the potential cause of the failure. With the increased
information collected with Version 8, exporting can be relatively slow. It would
be wise to export the file(s) to a local drive on your computer. Be patient and
wait for the <busy> cursor to disappear and the Progress Message to report the
outcome of the process.
• Email – If you have setup the e-mail feature of the Weatherization Assistant
(see Section 18.4, E-Mailing from Within Weatherization Assistant), you may
click on the “Email” button to initiate sending the file(s) created by the export
as an attachment to an e-mail. If a single “zip” file was created by the export,
the file name will be automatically entered into the Attach Files field on the
form. You will need to enter the e-mail address of the recipient and any Subject
and Text you wish to include in the mailing. Then click on the “Send Email”
button to send your e-mail.
• View Last Import/Export Progress Messages – The Weatherization Assistant
saves the text of the Progress Messages from the last import and export sessions
in files on your computer. These files may be displayed by selecting the “View
Last Import Progress Messages” and “View Last Export Progress Messages”
buttons, respectively.
• Exit – Use the “Exit” button to return to the main Main Menu’s Data Link form
whenever you have completed your export session.
17.5 Selecting Client Records
The Client Selector form (see Figure 17.12) is used anytime there is a need to
select specific clients from your entire list of clients in a database. This occurs
when specifying which clients’ data are to be exported to a text file or included in a
user-defined report (see “Select Clients” in Section 6.1, Agency Information).

The Weatherization Assistant User’s Manual (Version 8.9) 17-25
Chapter 17: Data Link
Figure 17.12. The Client Selector form (GIS feature on).
The form displays a list of the Client IDs for all clients in your database on the left
side of the form along with a column of checkboxes denoted as “Selected.” To
select clients, click on the checkboxes next to the clients you wish to have included
in the selection. To assist in identifying the clients, the form will also display
additional information for each client, as chosen by the user in the “Fields to
Display” window. Use the standard Windows selection technique of the
[Ctrl][Mouse-Click] combination to select which client information fields you wish
displayed. If you select a significant number of fields, you may need to use a
horizontal scroll bar, which will appear at the bottom right of the listing, to view
some of the fields.

17-26 The Weatherization Assistant User’s Manual (Version 8.9)
Chapter 17: Data Link
The form allows sorting and filtering of the
entries. Once you have chosen the client
information fields to be displayed, you may right
click your mouse in any client’s cell in the
column of information you wish to sort by. You
will receive the Sort/Filter menu window seen in
Figure 17.13. Select either “Sort Ascending” or
“Sort Descending”. The records displayed will be
sorted in alpha-numeric order according to the
data item chosen.
You may also “filter” the records to be displayed. For example, if one of the fields
you chose to have displayed included the City and clients in your database lived in
various cities, position your cursor in a cell under the City column containing the
name of the city on which you wish to filter the entries. Right click your mouse to
obtain the Sort/Filter menu window. Select “Filter by Selection.” Your display will
then include only those clients from the city chosen. You could also select your
filtering criteria by entering the text by which you wish to filter into the Filter For
field in the Sort/Filter menu window. However, the entry must match a data item
exactly or you will filter out all of the entries. The entry in this field might best be
obtained by copying an existing data item and pasting it into this field.
Selecting “Filter Excluding Selection” will eliminate all entries matching the
chosen data item, the opposite of filtering by the selection. Be careful when using
filtering. If you forget that your display of records is filtered, you may wonder
what happened to some records you would otherwise expect to see in the display.
To cancel filtering, select “Remove Filter/Sort” in the Sort/Filter menu window.
Descriptions of the functions for other controls on the form are given below.
• Select All / UnSelect All / Invert Select – Buttons on the Client Selector form
allow alternate methods of selecting clients. The “Select All” button will select
all of the clients displayed. You could then individually uncheck the
checkboxes of those clients you do not want selected. The “UnSelect All”
button will eliminate all previously selected clients, allowing you to begin the
selection process again. The “Invert Select” button will cause all of the
Figure 17.13. The Sort/Filter menu
window.

The Weatherization Assistant User’s Manual (Version 8.9) 17-27
Chapter 17: Data Link
currently selected clients to become un-selected and all of the un-selected
clients to be selected.
• Other selection methods – If you use the Check-in/Check-out feature of the
Weatherization Assistant (see “Check-in/Check-out client records” Feature 10
in Section 16.4, Features) or have exported or imported specific client records,
as described elsewhere in this chapter, the client selection methods under the
“Other selection methods” drop-down list may also be useful. The selections
from the list are
Checked out to Me
Edited since last Import
Edited since last Check out
Edited since last Export
Edited since last Check in
The choices on the left in the list above apply only if you are using the Check-
in/Check-out feature. The first category will display only those client records
currently checked out by you, the current user logged on. The next two choices
will display all records that have been altered since they were last checked out
or in, regardless of who performed the check-out or check-in. This can be
useful, not only in selecting client records, but also in identifying records that
you personally have checked out or those that have been altered since having
been checked out, possibly an undesirable situation. The choices on the right in
the table look for all clients that have been exported or imported.
• Mapit / Map All / UnMap All / Invert Map – If you have implemented the
Geographic Information System (GIS) feature (see Section 18.2, Geographic
Information System (GIS), and Feature 3 in Section 16.4, Features) of the
Weatherization Assistant, an additional column will appear in the list of clients
and several buttons will be added to the form. The “Mapit” column of
checkboxes allows you to select which clients you wish to have mapped. This is
a separate selection process from that using the “Selected” checkboxes. The
three buttons, “Map All,” “UnMap All,” and “Invert Map” have the analogous
effect on the mapping selection as do the three corresponding buttons described
above for the actual client selection process. Having made the selection of
clients to map, clicking on the “Map” button will display a map with the
locations of the clients’ homes indicated with stick pins. This may be useful, for
example, in deciding what homes are in the same vicinity for establishing a visit
schedule. However, there are also capabilities within the mapping routine to

17-28 The Weatherization Assistant User’s Manual (Version 8.9)
Chapter 17: Data Link
“select” homes on the map for the actual client selection process (see the GIS
reference given above). Having made the selection using the map will
automatically check the “Selected” checkboxes on the Client Selector form
corresponding to the homes selected on the map.
• Refresh Client List - Use the “Refresh Client List” button if the Client Selector
form has remained open while other program activities have been performed
which might change the listing of clients included on the form.
• Map – If you have enabled the Geographic Information System (GIS) feature
(see Section 18.2, Geographic Information System (GIS), and Feature 3 in
Section 16.4, Features), clicking on of the “Map” button, which will appear on
the form, will use your selection of clients under the “Mapit” column to display
a map with the indicated clients’ residences located with stick pins. If you have
not checked any clients under the “Mapit” column or if none that you have
selected have addresses that can be located by the GIS feature, you will be
given an error window stating, “ERROR! There are no Clients that can be
displayed on the map.”
• Okay – Clicking on the “Okay” button will return you to whatever feature you
were using when you accessed the Client Selector form with the clients
indicated under the “Selected” column as having been selected.
The Weatherization Assistant User’s Manual (Version 8.9) 18-1
Chapter 18: Auxiliary Features
Chapter 18. Auxiliary Features
The Weatherization Assistant has several additional features whose use is optional
and which do not affect the recommendations in any way. However, they may
assist you in the administration of your program. They have been referred to earlier
in the manual, but never fully described. These features include the ability to
associate digital photos to specific Weatherization Assistant records, map the
locations of your clients, track the status of your work with your clients, and use a
directory internal to the program to send e-mails.
18.1 Digital Photos
Weatherization Assistant allows you to organize digital photographs related to
your weatherization work. Photos may be saved at several levels, as associated
with the Client, an Audit, or a specific Work Order. Read Sections 7.8, Photos
(Client); 11.10, Photos (Audit); and 13.4, Photos (Work Order), for additional
information.
There are two methods of photo storage and editing supported in the
Weatherization Assistant: the pathname method and the third party photo browser.
Use the Features tab under Preferences (see Items 1 and 2 in Section 16.4,
Features) to choose which method is displayed on your forms. Both methods
assume that you know how to use a digital camera to take pictures and that you
know how to move those pictures as JPG (jpeg) files to folders on your computer.
The Weatherization Assistant also gives you tools for cropping, rotating, adjusting,
and annotating each of your photographs. Your annotations are actually stored in
the JPG file header thus preserving your notes if the JPG files are moved.
With networked installations you can store all the digital JPG files in shared
folders with each client computer accessing the same images. However, note that
in order to have each client computer access these photos, each must have assigned
the same drive letter to the shared folder on the network server such that the
pathnames stored refer to the correct location.
Pathname Method of Photo Storage
The first method uses a photo tab displayed on the
Client, Audit, and Work Order forms to access the
Figure 18.1. Tab for pathname
method of photo storage.

18-2 The Weatherization Assistant User’s Manual (Version 8.9)
Chapter 18: Auxiliary Features
photo feature (see Figure 18.1). When selected, you will be presented with the
pathname photo browser form. The form is the same regardless of which of the
three Main Menu windows access it. The form accessed for a work order is shown
in Figure 18.2.
Photos are added to the collection by using the “Add Link” button in the center of
the two panes on the form. The button will take you to a standard Windows browse
window designed for selecting files. This window is used in the same manner as it
Figure 18.2. Pathname photo browser.
is to choose files to be imported (see “Importing Clients (via text files)” in Section
17.4, Data Transfer – Import/Export Indirectly with Text Files), except now you
will be looking for the JPG files you downloaded from your digital camera. If you
are familiar with Windows Explorer, you may also use the standard drag and drop
procedure between this application and the Weatherization Assistant’s photo
browser to add photos to a collection. Simply drop the photo files into the left pane
in Weatherization Assistant’s photo browser window. The full pathname for each
JPG file is stored in the database and associated with each photo. This way, the
JPG files can be stored in whatever folders make sense for your installation. For

The Weatherization Assistant User’s Manual (Version 8.9) 18-3
Chapter 18: Auxiliary Features
example, you might want each auditor to have their own shared folder for storing
their photographs or place all your digital photos in a single shared folder.
Each photo added to your collection will display a thumbnail in the browse pane
(see Figure 18.2). Clicking on any of these thumbnails will select it and display the
path to the photo file in the Path field below the browse pane. You may also assign
a category to the photo using the “Category” drop-down list. Choices are Existing
Conditions, Health and Safety Condition, Work Completed, Drawings and
Documents, and Other. A photo is deleted from your collection by selecting the
“Del Link” button. The actual JPG file is not deleted, only the application’s link to
the file, thus deleting the thumbnail and accessibility to the file.
Highlighting a photo’s thumbnail in the browse pane and pressing the “Edit”
button or double clicking on a thumbnail will open the photo in the editor pane on
the right portion of the form. When the photo is opened in the editor, you can crop,
rotate, adjust brightness and contrast, add text or lines, and add comments of any
length using the controls below the image. Most of these processes are self-
evident. However, to add text to your photo, enter the text in the field to the right
of the “A” button below the photo, select the color of the text (white or black) with
the buttons just below the text, press the “A” button, locate the cross-hair cursor at
the point in the photo you want the upper left corner of the text to appear, and click
your mouse. Pressing the “Save” button saves your edits to the file indicated in the
Path field at the lower left of the window. If you want to preserve your original
photo, change this path and/or file name before saving any of your changes. You
may need to use the [End] key on your keyboard while in this field to see the file
name at the end of the entry.
Third Party Photo Browser
The second method of photo
storage and editing available
in the Weatherization
Assistant uses a licensed
program (IrfanView),
referred to as the “third party photo browser” under the Main Menu’s
“Preferences” button (see Feature 2 in Section 16.4, Features). The method
assumes that you will be storing all of the JPG photo files for each client, audit,
and work order in specified folders (perhaps sub-folders under a photos folder on a
Figure 18.3. Controls on Information tab for third party
photo browser.

18-4 The Weatherization Assistant User’s Manual (Version 8.9)
Chapter 18: Auxiliary Features
shared network drive or in sub-folders under the Weatherization Assistant’s
“photos” folder). With this method, only the path name to the folder is associated
with the record. The Photo Folder field on the Information tabs of the Client,
NEAT and MHEA Audit, and Work Order windows contains the path name to the
folder containing the JPG files (see Figure 18.3). Once you enter the path, either
manually or using the “Browse” button, it will remain with the record unless you
change it. Select the “View” button to start IrfanView. A window showing
thumbnails of all the files in that folder will be displayed (see Figure 18.4). If
chosen to be viewed, a directory tree will also appear displaying the location of the
folder currently being accessed. Double clicking on any thumbnail will take you to
the photo editor.
Figure 18.4. Third party photo browser navigation window.

The Weatherization Assistant User’s Manual (Version 8.9) 18-5
Chapter 18: Auxiliary Features
The editor for the third party photo browser contains numerous tools to crop,
rotate, adjust, and annotate the JPG files (see Figure 18.5). It is a full featured
photo editor whose capabilities are beyond the scope of this manual to totally
describe. It is suggested that you experiment with the editor using a photo of no
value or a copy of a photo, though you could simply choose to not save your
changes. Use the “IPTC info” button under the Image/Information menu option in
the editor to add detailed comments related to each photo. Save your changes to the
photo using the File/Save or Save as menu item. Exit the editor using the [Esc] key
or the standard Windows X-box in the upper right corner of the editor.
Figure 18.5. Editor of third party photo browser.

18-6 The Weatherization Assistant User’s Manual (Version 8.9)
Chapter 18: Auxiliary Features
18.2 Geographic Information System (GIS)
An optional feature of the Weatherization Assistant Version 8 is geographical
encoding of each client location performed by the Graphic Information System
(GIS). The feature allows you to map the location of a single client or a group of
clients. It may also be used to select clients to include in a user-defined report or to
select client data to export.
The Geographic Information System requires download of two additional files
(from the same Weatherization Assistance Program sponsored site on which the
main program is posted) and an installation procedure. The first file you will need
to download, “base.zip,” is common to all states. Choose the second based on your
state of residence (e.g., “tn.zip” for Tennessee). You may download and install
files for more than one state if needed. Both the “base.zip” and the state specific
file are “zip” files requiring “unzipping.” Most recent versions of Windows will
include a routine to do this. Once downloaded to a location on your computer, right
click on the zip file and choose “Extract All.” You will be presented with a request
for a location on your computer where the files are to be placed once unzipped.
Select the “GIS” folder under the location where you installed the Weatherization
Assistant, normally, “C:\Program Files\Weatherization Assistant 8-9\GIS.” Unzip
both the base.zip and your state specific file into this location. Make sure that all
individual files are in this same location, not in any sub-folders of this location.
Sometimes the unzipping routine will place the state specific files in a separate
folder named after the abbreviation for the state. If this occurs, use Windows
Explorer, or some other file handling application, to move them to the GIS folder.
Make sure to turn the feature on in Preferences the next time you start the
Weatherization Assistant program (see Feature 3, “Enable geographic information
system (mapping)” in Section 16.4, Features). After successful installation of the
feature, the "zip" files are no longer needed. All files associated with the GIS
feature are used under a license agreement and cannot be duplicated or further
distributed.
Once installed and activated, the GIS “Map” button will appear in two locations
within the program: the Client Information form (see Section 7.1, Client
Information) and the Client Selector form (see Section 17.5, Selecting Client
Records), the latter accessible from the Agency Information tab and the Main
Menu’s “Data Link” button. Use of the feature, as accessed from these two

The Weatherization Assistant User’s Manual (Version 8.9) 18-7
Chapter 18: Auxiliary Features
locations, differs as do some of the controls on the resulting form. When accessed
from the Client Information tab, the primary use is to locate a single client. Thus,
only one location will be indicated on the map. When accessed from the Client
Selector form, the purpose is to select a group of clients from all those in your
database. Thus, many locations may be displayed on a single map. The two
different applications will be discussed separately below.
Client Location
When the “Map” button on the Client Information form of the Main Menu’s
“Clients” button (see the discussion of the “Map” button in Section 7.1, Client
Information) is selected for a client having an address understood by GIS, a map
with the location indicated is displayed (see Figure 18.6).
Figure 18.6. GIS Map for Single Client Location.
Note that the address of the location is automatically entered in the “Address to
Find” field with the location’s Latitude and Longitude also indicated. Attached to

18-8 The Weatherization Assistant User’s Manual (Version 8.9)
Chapter 18: Auxiliary Features
the pin denoting the location is the Client ID. A feature of the Client Location GIS
map is that if you find the location to be different from the originally displayed
location, you may click on the pin and drag it to its correct location. This will not
change the address, but will update the coordinates of the location, which preserves
your change for future references via the GIS mapping. On exiting the map, you
will be asked to confirm your desire to preserve this change.
Most of the useful features associated with this use of GIS are accessed by right
clicking your mouse on the map. Doing so will produce a menu from which you
may zoom in or out, return to the previous scale (“Unzoom”), have the location
displayed on a map of the entire state or country, enter a different address to locate,
or print the map. An alternative method of zooming in is to outline a rectangular
sub-area of the map by holding down your left mouse button while moving your
mouse across the map. When you release the mouse button, the area outlined will
then fill the window.
Client Selection
The second use for the GIS feature is to select clients based on their location using
the Client Selector form, although the form may also be used to simply view the
locations of a group of clients without actually selecting them (see Section 17.5,
Selecting Client Records). The Client Selector form, containing a “Map” button, is
accessible from the “Select Clients” button located on the Agency Information
form (see “Select Clients” in Section 6.1, Agency Information) or from the “Select
Client Records to Export” button on the “Transfer between databases with
intermediate CSV/ZIP files” form under the Main Menu’s “Data Link” button (see
“Exporting Clients (via text files)” in Section 17.4, Data Transfer – Import/Export
Indirectly with Text Files). The Client Selector form may also be involved in
generating user-defined reports (see Appendix D, Development of Customized
Reports).
The map displayed when initiated in this mode will likely have multiple locations
denoted by pins (see Figure 18.7). Note that the pins are of two different colors,
red and green. The map was initiated from a Client Selector form in which some
clients may have already been selected. The map indicates this by having the
selected clients’ locations designated with the green pins. Un-selected clients have
red pins.

The Weatherization Assistant User’s Manual (Version 8.9) 18-9
Chapter 18: Auxiliary Features
One of the uses of the GIS map initiated from the Client Selector form is to give
you an alternative method of selecting clients. You may change a client from being
un-selected to selected, or vice versa, by simply clicking on the pin. If all the
locations within a specific area are to have their selection status changed, activate
the Selects checkbox at the top middle of the window, place your mouse at a
corner of a rectangle used to enclose the clients of interest, and drag your mouse to
the opposite corner of the rectangle. All clients within the rectangle you have
outlined will have their selection status reversed.
Figure 18.7. GIS Map for Client Selection.
Any changes made in the selection status of clients made from the map will be
automatically transferred back to the client selector form from which the map was
initiated.

18-10 The Weatherization Assistant User’s Manual (Version 8.9)
Chapter 18: Auxiliary Features
When you click your mouse on a specific client’s pin, that client’s ID will appear
in the Client ID field. Double clicking on this field will then take you to the Client
Information form (see Section 7.1, Client Information) for that client.
As with the map used to locate a single client, the client selector mode of the GIS
map has additional features accessible by right clicking your mouse on the map.
The menu then displayed allows you to zoom in or out, return to the previous scale
(“Unzoom”), have the location displayed on a map of the entire state or country,
enter a different address to locate, or print the map. An alternative method of
zooming in is available. Activate the Zooms checkbox at the top middle of the
window. Then, outline a rectangular sub-area of the map by holding down your left
mouse button while moving your mouse across the map. When you release the
mouse button, the area outlined will then fill the window.
18.3 Status Tracking
Status tracking is an optional feature that allows you to track the status of Clients,
Audits, and Work Orders. The status categories for these three record types and
their available settings are listed in Table 18.1. Settings of these statuses are
normally performed from the Status tab in each of the three corresponding Main
Menu windows. However, the Status tab under the Main Menu’s “Clients” button
allows you to view and edit the settings for all of the status categories associated
with the current client. See Sections 7.2, Status (Clients); 11.1, Status (Audit); and
13.2, Status (Work Order), for discussions on the Status tab. See Section 6.9,
Status History for information on reviewing the history of all status settings. Status
settings are changed using the Status Editor sub-form (see Figure 18.8), which is
accessed by selecting the “Edit” button in the row of the setting category you wish
to change on the Status tab. All status settings for a given client are displayed in
that client’s Client Completion Report (see Appendix C, Reports).
Below are brief descriptions of the individual data items and controls found on the
Status Editor sub-form.
• Status of – This field reminds you of the status category (type) you are about to
change. Uneditable.
• For Client ID, Alt Client ID – These fields display the client identification
parameters. Uneditable.

The Weatherization Assistant User’s Manual (Version 8.9) 18-11
Chapter 18: Auxiliary Features
Table 18.1. Status categories and settings
Main Menu Window
Status Categories
Settings
4
Client Level
Client (General)
Active On
Work Done, File Closed/Locked On*
No Work Done, File Closed/Locked On*
File Locked On
Delayed On
Other
Application
Received On
Eligibility Verified On
Approved On*
Referred On*
Denied On*
Delayed On
Other
Audit Level
Audit (NEAT or
MHEA)
Site Visit Scheduled For
Site Visit Completed On
Billing Data Collected On
Recommendations Generated On
Audit Complete and Locked On*
Walk Away by Auditor On*
Delayed On
Denied On
Other
4
Statuses tagged with an asterisk (*) are considered to represent completion.

18-12 The Weatherization Assistant User’s Manual (Version 8.9)
Chapter 18: Auxiliary Features
Table 18.1. Status categories and settings (cont.)
Main Menu Window
Status Categories
Settings
4
Work Order Level
Work Order (General)
Work Order Created from Audit On
Work Order Details Completed On
Work Order Approved On
Work Order Issued On
Work Scheduled to Start On
Work Started On
Work Completed On*
Client Signed Off On*
Work Refused by Client On*
Work Order Canceled On*
Work Order Modified On
Rework Completed On*
Delayed On
Other
Work Order Inspection
Scheduled For
Passed On*
Failed On
Not Required*
Delayed On
Other
Work Order Payment
Invoice Received On
Invoice Approved On
Invoice Paid On*
Not Required*
Delayed On
Other

The Weatherization Assistant User’s Manual (Version 8.9) 18-13
Chapter 18: Auxiliary Features
Figure 18.8. The Status Editor sub-form.
• Client ID/Audit Name/Work Order – This field displays the record name
(either the Client ID, Audit Name or Work Order) for which you are about to
change the status setting. Uneditable.
• Current Status – The Current Status field will indicate the existing status, if
one exists. If this is the first time you have accessed this status category, the
field will be blank. Use the “Current Status” drop-down list to change the status
to the appropriate setting (i.e., one of those listed in the Table 18.1).
• Date – Following the designation of each current status are two dates, a
reference to an agency contact or user, and a comment. Click on the “Date”
drop-down list arrow to be presented with a calendar to select the date on which
the status became effective. The current date will be circled in red on the
calendar. Use the left and right arrow boxes at the top of the calendar to display
other months, if necessary. Click on the date you wish to select, and it will
automatically be entered in the Date field. If you save the status change without
entering a date in the Date field, it will automatically be assigned the current
date.
• Changed On – Perform the same steps as above to set the “Changed On” date.
However, this may not be necessary since this date will be set to the current
date if left blank, which is likely what you would have entered.

18-14 The Weatherization Assistant User’s Manual (Version 8.9)
Chapter 18: Auxiliary Features
• By – Use the “By” drop-down list to select who is making this change, likely
yourself. The names that will appear are those you have entered in the Contacts
tab under the Main Menu’s “Agency” button. If left blank, this field will be
automatically set to the agency contact who has logged on for this specific use
of the program, if you are using the Logon Feature (see Feature 4, “Enable user
logons with user name and passwords from the Agency/Contacts tab” in Section
16.4, Features). Otherwise, it will be set to “admin,” indicating that if the
Logon Feature is not being used, all users are assumed to have administrative
privileges.
• Clear the Current Status – Use this button to clear the current status setting
being viewed in the form. Selecting the button will send you back to the status
form from which the “Edit” button had been selected with the row of the status
category cleared, though the row with the status category designated will
remain. It is anticipated that at some future time, the current status for the status
category will be revisited and an entry made. Clearing a current status setting
only effects the “Current Status” entry. It does not affect the “Status History”
listing. The two sets of statuses are separate. Status history records must be
deleted from a Status History form, often accessed using the “H” buttons just to
the right of the “Edit” buttons used to access the Status Editor (see the
references at the beginning of this section).
• Comment – Comments related to the Status may be entered directly in the
comment field on the form. Or, select the “Comment” button to the left of the
field, which will take you to the Comment Editor. This text editor is similar to
Window’s Notepad and may be used to edit extended comments. The total
comment may have up to 65,000 characters. Text from other sources may be
copied and pasted into the Comment Editor’s window. The Comment is
displayed only on the Client Status form and in the Client Completion Report
(see Appendix C, Reports). Optional.
• OK, Cancel – When satisfied with your entries, select the “OK” button to save
the changes or select the “Cancel” button to exit without saving your changes to
the status category. You will be returned to the Status tab form.

The Weatherization Assistant User’s Manual (Version 8.9) 18-15
Chapter 18: Auxiliary Features
18.4 E-Mailing from Within Weatherization Assistant
The Weatherization Assistant allows you to send e-mails directly from within the
program using an address book of e-mail addresses generated from the Contacts
tab under the Main Menu’s “Agency” button. Messages and/or attachments may be
automatically linked to an e-mail when initiated using the “E-mail this Error
Message” button located on the Error History form (see Feature 7, “Enable the
logging of program errors” in Section 16.4, Features) or the “E-mail” button on
either of the transfer between databases forms used to export client information
(see discussions on “Exporting Clients” in Sections 17.3, Data Transfer –
Import/Export With Another MSAccess Database, and 17.4, Data Transfer –
Import/Export Indirectly with Text Files).
For example, Figure 18.9 shows the form displayed having selected the “Email this
Error Message” button on the Error History form.
Figure 18.9. E-mail specification form for reporting error message.

18-16 The Weatherization Assistant User’s Manual (Version 8.9)
Chapter 18: Auxiliary Features
• Address Book and To – The form is shown with the “Address Book” drop-
down list displaying a sample list of e-mail addresses that were entered under
the Agency Contacts tab. Selecting one of the entries in this drop-down list will
automatically transfer the address to the “To” field. Or, you may type an
address directly into the field.
• From – The From field is automatically filled in as the “From Address” entered
in the E-mail Account Setup form accessed by selecting the “Setup” button (see
Figure 18.10 below). Or, you may type an address directly into the field.
• Subject and Message – In this example, the Subject and Message fields are
automatically filled in, reflecting the entry in the Error History from which the
e-mail was initiated. You may alter and add to the message to give any
additional information.
• Attach Files – If the e-mail had been initiated from one of the Export forms
having created a single file with the exported information, the file path would
have been automatically entered in the “Attached Files” field. Otherwise, use
the “Browse” button to locate and select files to attach.
• Send Email – Once completed with the e-mail specification, click the “Send
Email” button to send the message and attached file(s).
• Progress – The Progress field will notify you of the progress in sending the e-
mail. If attachments are large, it may take some time to complete the process.
The field will indicate to you how much (how many bytes of data) of the
transmission has been sent and how large (total bytes) the total transmission is.
Uneditable.
• Activity Log – The “Activity Log” will contain any messages from the e-mail
server, more than likely the connection status and any problems that might be
encountered. The messages could be used by a system administrator to debug
any problem with e-mail transmissions that might occur. Uneditable.
• Setup – In order to use the e-mail feature, you must have an e-mail account on
a server somewhere. The Setup for the e-mailing capability in the
Weatherization Assistant need be performed only once, though it may be

The Weatherization Assistant User’s Manual (Version 8.9) 18-17
Chapter 18: Auxiliary Features
altered at any time. The form presented upon selecting the “Setup” button is
shown in Figure 18.10.
Contact your system administrator for the information required to successfully
initiate your e-mail account according to local procedures. The administrator
may also need to address information on the two additional tabs: “Advanced”
and “Fire Wall.”
Figure 18.10. E-mail Setup form.
• Cancel/Exit – Use the “Cancel” button to cancel a transmission in progress.
This may be necessary if an attached file is of un-expected size that creates
problems for the server or the server goes down during the transmission. Use
the “Exit” button to exit the form at any other time, whether the e-mail has been
sent or not.

18-18 The Weatherization Assistant User’s Manual (Version 8.9)
Chapter 18: Auxiliary Features
