
HP Smart Print Administrator Resource
Kit - User Guide
SUMMARY
The HP Smart Print Administrator Resource Kit (HP Smart PARK) is a collection of tools, scripts, and documents
to help print administrators install, deploy, configure, and manage the HP Smart Universal Printing Driver (HP
Smart UPD or HP sUPD) and the associated print queues.
Legal information
Copyright and License
© Copyright 2024 HP Development
Company, L.P.
Reproduction, adaptation, or translation
without prior written permission is
prohibited, except as allowed under the
copyright laws.
The information contained herein is subject
to change without notice.
The only warranties for HP products and
services are set forth in the express
warranty statements accompanying such
products and services. Nothing herein
should be construed as constituting an
additional warranty. HP shall not be liable
for technical or editorial errors or omissions
contained herein.
Edition 8.0, 5/2024
Trademark Credits
Adobe
®
, Adobe Photoshop
®
, Acrobat
®
, and
PostScript
®
are trademarks of Adobe
Systems Incorporated.
Apple and the Apple logo are trademarks of
Apple Inc., registered in the U.S. and other
countries.
macOS is a trademark of Apple Inc.,
registered in the U.S. and other countries.
AirPrint is a trademark of Apple Inc.,
registered in the U.S. and other countries.
Google™ is a trademark of Google Inc.
Microsoft®, Windows®, and Windows Server®
are U.S. registered trademarks of Microsoft
Corporation.
UNIX
®
is a registered trademark of The Open
Group.

Table of contents
1 Download the kit.................................................................................................................................................................................................................................... 1
2 Overview ................................................................................................................................................................................................................................................... 2
AddPrinterModelToComments........................................................................................................................................................................................... 2
Active Directory Administrator Template.................................................................................................................................................................... 2
Driver Configuration Utility (DCU).....................................................................................................................................................................................3
Driver Deployment Utility (DDU)......................................................................................................................................................................................... 3
HP PrintManagement.exe....................................................................................................................................................................................................... 3
'Migration from HP UPD' tool ................................................................................................................................................................................................ 4
PrnCon.................................................................................................................................................................................................................................................. 4
RemovePlugPlayDrivers or Remove Pnp Utility...................................................................................................................................................... 4
UpdateNow........................................................................................................................................................................................................................................5
3 How to use the tools.........................................................................................................................................................................................................................6
Command line prompts to use............................................................................................................................................................................................6
Use the HPPrintManagement tools..................................................................................................................................................................................7
Install SUPD to a printer.................................................................................................................................................................................................7
Install the HP Smart UPD with a Queue name and Share name.....................................................................................................8
Install a queue without setting it as a default queue............................................................................................................................... 9
Install to a printer port (v4 driver only)................................................................................................................................................................ 9
Install to a Local port .....................................................................................................................................................................................................10
Install to a standard TCP/IP port (v4 driver only)........................................................................................................................................10
Install to a WSD port (v4 driver only)..................................................................................................................................................................10
Staging the driver............................................................................................................................................................................................................. 11
Remove a printer queue .............................................................................................................................................................................................. 11
Remove a print driver (v4 driver only) ................................................................................................................................................................ 11
Unstage a print driver (v3 driver only)............................................................................................................................................................... 12
Upgrade a print driver (v4 driver) ......................................................................................................................................................................... 12
Input print queue parameters to a .csv file (v4 driver only)............................................................................................................... 12
Input/Update print queue parameters to a .csv file (v4 driver only)............................................................................................14
Input/Migrate print queue parameters to a .csv file (v4 driver only)........................................................................................... 14
Update the existing printer queue configuration..................................................................................................................................... 15
Update the Printer BIDI configuration of the queue (v4 driver only)...........................................................................................15
Use the PDL switch to change the PDL stream conversion from PCL6 to Postscript (PS) ........................................16
Migrate HP UPD queues to HP Smart UPD queues (v4 driver only)............................................................................................16
iii
Supported features when migrating using the HPPrintManagement.exe.............................................................................18
Add comments to the print queue (v4 driver only) ..................................................................................................................................19
Use the PrnCon.exe to add or remove a server connection.......................................................................................................................20
UI installer needed to update SUPD driver versions 3.08.1.2731 and older ...................................................................................... 22
Point and Print Default behavior changes............................................................................................................................................................... 23
4 Configure the HP Smart UPD...................................................................................................................................................................................................24
Pre-configure print queues using a CFG file...........................................................................................................................................................24
Disable Analytics using the HP DCU for Plug and Play installations.................................................................................................... 25
Configure HP Smart UPD default settings using the HP Smart PARK tool installer during driver installation...... 26
Configure HP Smart UPD default settings and/or print policy using Group Policy Object in Active
Directory............................................................................................................................................................................................................................................27
Pre-configure HP Smart UPD default settings using the HP Driver Configuration Utility..................................................... 28
Pre-configure the HP Smart UPD using the HP DCU............................................................................................................................ 28
Pre-configure HP Smart UPD default settings using the HP Driver Deployment Utility.........................................................30
Pre-configure the HP Smart UPD using HP DDU .....................................................................................................................................30
Configure HP Smart UPD default settings after driver installation in driver preferences................................................... 32
Manage printer default settings.......................................................................................................................................................................... 32
Manage default settings with Active Directory Group Policy for HP Smart UPD............................................................. 32
Overview of configurable functions and pre-configuration utilities......................................................................................... 33
5 Managing the HP Smart UPD with Active Directory Group Policy............................................................................................................... 35
Supported HP Smart UPD versions .............................................................................................................................................................................35
Use HP Active Directory Templates with Group Policy to manage HP Smart UPD print settings...................................35
6 Upgrading to a newer version of the Active Directory Administrator Template file.........................................................................37
Install and use the ADMX/ADML template using Microsoft Group Policy Management Console (GPMC)...............37
7 HP Smart UPD Active Directory Templates...................................................................................................................................................................39
Remove the HP Smart UPD AD Administrator template...............................................................................................................................39
Upgrade the HP Smart UPD AD Administrator template..............................................................................................................................40
Enable Active Directory Group Policy for a new or existing HP Smart UPD installation........................................................40
Configure the HP Smart UPD Active Directory Administrator template...........................................................................................40
Verification and troubleshooting..................................................................................................................................................................................... 41
How AD policies get applied to the driver................................................................................................................................................................ 42
Index.............................................................................................................................................................................................................................................................0
iv

Download the kit1
To download the HP Smart Print Administrator Resource Kit (HP Smart PARK), follow these steps.
1. Go to the Software and drivers page.
2. Click Download now.
3. Verify the language and select the operating system.
4. Click to expand the All Drivers heading.
5. Locate the HP Smart Printer Administrator Resource Kit and click Download.
6. Save the file in the preferred location.
7. Navigate to the folder where it was saved, right-click the HPSmartPARK .zip file, and then select
Extract all files.
The kit components are saved under folder names for each kit component/tool, and the file paths vary
according to driver type (v3 or v4) and system architecture.
Download the kit
1

Overview2
This document provides information about the various tools in the kit HP Smart PARK, its usage,
applicability, and some common scenarios.
Unless otherwise noted, the HP Smart PARK tools support the following operating systems
(Architectures x86, x64, ARM):
● Windows Client: Windows 11, Windows 11 ARM, Windows 10, Windows 10 ARM
NOTE: The Driver Deployment Utility (DDU) does not support ARM architecture. Only Windows 11,
and Windows 10 are supported.
● Windows Server: Windows Server 2022, Windows Server 2019, Windows Server 2016
NOTE: For the latest information on supported operating systems, refer to the HP Smart Print
Administrator Resource Kit - Release Notes.
AddPrinterModelToComments
AddPrinterModelToComments is a tool provided as part of HP PrintManagement.exe.
Used with a command prompt, it can be used to add comments to the print queue during installation.
For information on how to use this tool, see the following section(s):
●
Add comments to the print queue (v4 driver only)
Active Directory Administrator Template
The Active Directory Administrator Template allows an administrator to manage the HP Smart Universal
Printing Driver (HP Smart UPD) user policies from within the Active Directory infrastructure.
Add this AD Administrative Template into an existing Group Policy Object and assign the GPO to a user,
Group, or Organizational Unit to manage the HP Smart UPD Print Policies.
Available for download as a component of the HP Smart Print Administrator Resource Kit (HP Smart
PARK).
For information on how to use this tool, see the following chapter(s):
●
Managing the HP S-UPD with Active Directory Group Policy
●
Upgrading to a newer version of the Active Directory Administrator Template file
2
Chapter 2 Overview
●
HP S-UPD Active Directory Templates
Driver Configuration Utility (DCU)
This tool is a small Windows application used to edit the configuration file that can then be applied to
a particular print queue. The configuration file defines the default printer settings for the driver and
queues applied at the time of installation. Use the Driver Configuration Utility (DCU) tool to pre-configure
v3 and v4 drivers or to update configurations after installation.
The HP Driver Configuration Utility (DCU) does not perform the tasks of installation or driver deployment.
Rather, DCU is a file editor used to define the installation defaults such as duplex enabled, print in
grayscale, etc. The settings are saved to a driver configuration file which is utilized to establish the newly
installed printer’s default settings at the time of installation from any of the supported driver installation
methods (install.exe, Microsoft’s Add Printer Wizard, PrintUI, etc.).
Available for download as a component of the HP Smart Print Administrator Resource Kit (HP Smart
PARK).
No installation is necessary. Copy the contents of the Driver Configuration Utility directory to the
desired directory on the hard drive of the client computer where the HP Smart UPD and/or device-
specific printer drivers will be pre-configured.
For information on how to use this tool, see the following section(s):
●
Pre-configure print queues (CFG input)
●
Pre-configure HP Smart UPD default settings using the HP Driver Configuration Utility
Driver Deployment Utility (DDU)
The HP Driver Deployment Utility (DDU) is a Windows application used to package driver files for
deployment and the code needed to deploy them into *.EXE and *.CAB files. These files are run on a client
PC to copy the driver files to the Windows driver store, and for network packages to install the printer.
No installation is necessary. Copy the contents of the Driver Deployment Utility directory to the desired
directory on the hard drive of the client computer where the HP Smart UPD and/or device-specific
printer drivers will be preconfigured.
For information on how to use this tool, see the following section(s):
●
Pre-configure HP Smart UPD default settings using the HP Driver Deployment Utility
HP PrintManagement.exe
The PrintManagement tool
HP PrintManagement.exe
is one of the core tools in the HP Smart Print
Administrator Resource Kit that provides multiple functionalities. Used with a Command Prompt, this
tool helps perform the following functions:
● Print driver and queue installation,
● Print queue configuration during and after installation, and
● Print queue migration from HP UPD (v3) to HP Smart UPD (v4).
For information on how to use this tool and its features, see the chapter
Use the PrintManagement tools
.
Driver Configuration Utility (DCU)
3

'Migration from HP UPD' tool
'Migration from HP UPD' is a tool provided as part of HP PrintManagement.exe.
Used with a command prompt, it can be used to migrate driver queues.
For information on how to use this tool, see the following section(s):
●
Migrate HP UPD queues to HP Smart UPD queues (v4 driver only)
●
Supported features when migrating using the HPPrintManagement.exe
PrnCon
PrnCon.exe is a console application for removing and adding an HP network printer’s point-and-print
connection between a Windows client workstation and a print server.
Driver information is stored in a log file when adding or removing point-and-print connected network
printers.
When printer driver files are upgraded on the print server, you must synchronize the client printer driver
files with the print server to ensure that the client can print properly and use all new features provided
by the upgraded print driver.
You only need to run PRNCON on clients that do not sync up properly after a driver upgrade. Most clients
will sync up automatically and will not need PRNCON to be run.
NOTE: PRNCON must be run from the clients where the server connections exist.
To remove connection:
prncon -s prnsvr123 -p "HP LaserJet M880 PCL 6" -f "%temp%\prncon.log" –d o
To add a connection:
prncon -s prnsvr456 -p "HP LaserJet M880 PCL 6" -f "%temp%\prncon.log" -a
To reset all connections:
Running PRNCON.EXE on a client PC without any switches will reset all point-and-print connections
between the client and the print server(s).
RemovePlugPlayDrivers or Remove Pnp Utility
Also known as the Remove Pnp Utility, this tool is provided as part of HP PrintManagement.exe. The utility
searches for HP plug and play printer driver files in the Windows driver store and provides an option to
remove these staged printer driver files. Currently installed printers are not affected by this utility.
NOTE: Only the default location for staged driver files on Windows (%SYSTEMROOT%\inf) will be
searched for driver files.
For information on how to use this tool, see the following section(s):
● For v4 drivers, see the section
Remove a print driver (v4 driver only)
.
● For v3 drivers, see the section
Unstage a print driver (v3 driver only)
.
4
Chapter 2 Overview
UpdateNow
UpdateNow is a tool provided as part of HP PrintManagement.exe. It is designed to be used with a
command prompt to trigger the automatic configuration functionality in HP printer drivers. This enables
print administrators to script the automatic configuration of devices using a single command that will be
consistent across multiple versions of HP printer drivers.
For information on how to use this tool, see the following section(s):
●
Update the Printer BIDI configuration of the queue (v4 driver only)
UpdateNow 5

How to use the tools3
Learn how to use
Prncon.exe
,
HPPrintManagement.exe
, and other tools provided in the HP Smart PARK.
Command line prompts to use
Learn about the required method for installing, configuring, and managing the HP Smart UPD using the
HPPrintManagement.exe
and
Pprncon.exe
tools.
Commands to use with the
HPPrintManagement.exe
In an Enterprise environment, the preferred way to install or configure using the
HPPrintManagement.exe
tool is with a Command Prompt. The installer supports the following command
line prompts for v3 drivers and v4 drivers.
● a - Specifies the IP Address/host name for TCP installation.
● cfg - Specifies Printer Preconfiguration file.
● comment - Printer queue comments details.
● f <Path> - Specifies the path to the INF. If not mentioned, the current directory is checked.
● help - Help for the options.
● i - Stage driver files to the Windows driver store for printer plug and play software at first installation.
● l - PDL (printer language).
● location - Printer location details.
● n <Printer Name> - Uses the specified name as the name of the printer. Requires option /f.
● p <Port Name> - Creates a printer queue bound to the specified <Port>. Also requires Porttype if it’s
a new port. These are the only mandatory arguments.
● pdl - Specify the PDL to be applied to the print queue.
● portnum - Specify the Port number for TCP installation.
● q - Quiet mode, no prompts.
● rd <Driver Name> - Specify the driver name.
● rq <Printer Name> - Remove the queue with name – “Printer Name”.
6
Chapter 3 How to use the tools

● s <Share Name> - Specifies that the installed printer needs to be shared with Shared Name
provided. Requires option /f.
● snmpcom - SNMP Community name.
● t <Port Type> - Specifies the protocol to be used (Local, TCP).
Commands to use with the
Prncon.exe
Similarly, the preferred way to manage server connections using the
Prncon.exe
tool is with a Command
Prompt. The following command line prompts can be used:
● <server_name> - Print server name without \\.
● <printer_name> - Printer name as defined on server.
● <trace_file> - Name of trace file including complete path. If the –f option is not specified, the default
trace file is: %TEMP%\prncon.trc.
● -a - Used to add a printer connection.
● -d - Used to remove a printer connection.
● <milliseconds> - Number of milliseconds to wait between delete and add operations. The default is 0
milliseconds.
● -? - Display command line help.
Use the HPPrintManagement tools
Learn how to use the PrintManagement tool
HPPrintManagement.exe
to manage v3 and v4 drivers.
Requirements
● A minimum .NET framework version 4.5 is required to run the
HPPrintManagement.exe
.
● Administrator access is required for all options.
● .NET 4.6.1 is required for v4 HPPrintmanagement.exe.
NOTE: The v3 HPPrintmanagement.exe is not dependent on .NET.
Navigate to the HPPrintManagement.exe
Open the HPSmartPARK you downloaded and extracted previously, and then navigate to
PrintManagement folder.
For HP Smart PARK v4, navigate to PrintManagement\V4 to find the
HPPrintmanagement.exe
.
For HP Smart PARK v3 , navigate to PrintManagement\V3\x86 or PrintManagement\V3\x64 (depending
on system architecture) to find the
HPPrintManagement.exe
.
Install SUPD to a printer
To install a printer using a v3 or v4 driver package, use the PrintManagement tool
HPPrintManagement.exe
.
Use the HPPrintManagement tools
7

Installing the driver package to a printer is the most basic use case for the installer. To install a driver
using a printer port, follow these steps:
1. In Windows, search for the Command Prompt app and select Run as administrator.
2. From the Command Prompt, navigate to the folder containing the
HPPrintManagement.exe
.
3. Type the install command:
HPPrintManagement.exe install -f <INF File Path> --port <Port Name> --
porttype <Local, WSD, TCP>
For example:
HPPrintManagement.exe install -f c:\temp\hpgu4cdi1a1a.inf --port “FloorPrinter” --
porttype “TCP” -a “15.34.99.234”
For example:
HPPrintManagement.exe install -f c:\temp\HPOneDriverV4.inf --port “FloorPrinter” --
porttype “TCP” -a "hostname.net"
NOTE: If the -f option isn’t specified, then the installer will use the Current Directory.
Porttype
is
required for new ports, otherwise it does not need to be specified for existing ports. Since the
queue name is not mentioned, the driver name is used. If a queue with same name is already
present, then a queue with a specified name suffix with (copy n) is created where 'n' is the nth
queue with the same name.
4. Append any additional requirements.
For example: Advanced options like
–comment , --location , --snmpcom ,--portnum
can be appended
to the above command.
5. Press Enter and complete any remaining prompts.
NOTE: If a queue with the same name is already present, then a queue with a specified name suffix
with (copy n) is created where 'n' is the nth queue with the same name. If a TCP port with same name
already exists, the installer will install to same port.
Install the HP Smart UPD with a Queue name and Share name
To install the HP Smart UPD with a Queue name and Share name, use the PrintManagement tool
HPPrintManagement.exe
.
The installer can be used to specify the Queue Name and the Share Name during installation using the
following options:
● -n <Queue Name>
● --share <Share Name>
To install a driver with a Queue Name and Share Name, follow these steps:
1. In Windows, search for the Command Prompt app and select Run as administrator.
2. From the Command Prompt, navigate to the folder containing the HPPrintManagement.exe.
3. Type the install command:
HPPrintManagement.exe install -f <INF File Path> --port <Port Name> --
porttype <Local, WSD, or TCP> -n <Queue Name> --share <Share
8
Chapter 3 How to use the tools

For example:
HPPrintManagement.exe install -f c:\temp\hpgu4cdi1a1a.inf --port 15.86.163.133 --
porttype TCP -n Jade --share jadespylab
NOTE: If the -n option isn’t provided, then the queue name will default to the driver name.
Porttype
is required for new ports, otherwise, it does not need to be specified for existing ports.
4. Press Enter and complete any remaining prompts.
Install a queue without setting it as a default queue
To install a queue without setting it as a default queue, use the PrintManagement tool
HPPrintManagement.exe
.
The installer can be used to specify the queue name and an –nd switch to control if the user wants to set
the specified queue as the default or not.
NOTE: If the -n option isn’t provided, then the queue name will default to the driver name.
Porttype
is
required for new ports but does not need to be specified for existing ports. If an --nd switch is not
provided, it does not guarantee that the device will be installed as the default.
CAUTION: If there is no print queue installed on a machine and an --nd switch is applied can have
unforeseeable behavior.
To install a v4 driver queue without setting it as the default, follow these steps:
1. In Windows, search for the Command Prompt app and select Run as administrator.
2. From the Command Prompt, navigate to the folder containing the
HPPrintManagement.exe
.
3. Type the install command:
HPPrintManagement.exe install -f <INF File Path> --port <Port Name> --
porttype <Local, WSD, TCP> --nd
For example:
HPPrintManagement.exe install -f c:\temp\hpgu4cdi1a1a.inf --port 15.86.163.133 --
porttype TCP -n Jade –nd.
4. Press Enter and complete any remaining prompts.
Install to a printer port (v4 driver only)
To install the HP Smart UPD to a default printer port, use the PrintManagement tool
HPPrintManagement.exe
.
The installer will be packaged along with the core driver. In this case, the installer can pick up the INF files
from the package if the -f option wasn’t supplied on the command line.
To install a v4 driver to a local port, follow these steps:
1. In Windows, search for the Command Prompt app and select Run as administrator.
2. From the Command Prompt, navigate to the folder containing the
HPPrintManagement.exe
.
3. Type the install command:
HPPrintManagement.exe install --port <Port Name>
NOTE: The --port command is required. If it's a new port, the --porttype must also be
supplied.
Install a queue without setting it as a default queue
9

4. Press Enter and complete any remaining prompts.
Install to a Local port
To install the HP Smart UPD to a local port, use the PrintManagement tool
HPPrintManagement.exe
.
To install a driver to a local port, follow these steps:
1. In Windows, search for the Command Prompt app and select Run as administrator.
2. From the Command Prompt, navigate to the folder containing the
HPPrintManagement.exe
.
3. Type the install command:
● For new Local ports:
HPPrintManagement.exe install -f <INF File Path> --port <IP Address>
--porttype “local”
IMPORTANT: The path to the local port should be valid/existing at time the install.exe is run.
NOTE: If a local port with same name already exists, the installer will install to same port.
NOTE: For new ports, the
--porttype
option must be used. If
--porttype
“local” is used, then a
new port will be created (when the specified Port Name doesn’t already exist).
● For existing Local ports:
HPPrintManagement.exe install -f <INF File Path> --port <Port Name>
For example:
HPPrintManagement.exe install -f c:\temp\hpgu4cdi1a1a.inf --port c:\ports\test.prn --
porttype Local
4. Press Enter and complete any remaining prompts.
Install to a standard TCP/IP port (v4 driver only)
To install the HP Smart UPD to a standard TCP/IP port, use the PrintManagement tool
HPPrintManagement.exe
.
To install a v4 driver to a standard TCP/IP port, follow these steps:
1. In Windows, search for the Command Prompt app and select Run as administrator.
2. From the Command Prompt, navigate to the folder containing the
HPPrintManagement.exe
.
3. Type the install command:
● For new Standard TCP/IP ports: HPPrintManagement.exe install -f <INF File
Path> --port <IP Address> --porttype “tcp”
NOTE: For new Standard TCP/IP ports, the
--porttype
option must be used. If
--porttype
“tcp”
is used, then a new port will be created (when the specified Port Name doesn’t already exist).
● For existing Standard TCP/IP ports:
HPPrintManagement.exe install -f <INF File Path> --port
<Port Name>
4. Press Enter and complete any remaining prompts.
Install to a WSD port (v4 driver only)
To install the HP Smart UPD to a WSD port, use the PrintManagement tool
HPPrintManagement.exe
.
10
Chapter 3 How to use the tools

To install a v4 driver to a WSD port, follow these steps:
1. In Windows, search for the Command Prompt app and select Run as administrator.
2. From the Command Prompt, navigate to the folder containing the
HPPrintManagement.exe
.
3. Type the install command:
HPPrintManagement.exe install -f <INF File Path> --port <IP Address>
--porttype “wsd” -a <IP Address>
NOTE: For new WSD ports, the
IP Address
must be valid otherwise the installation will fail.
4. Press Enter and complete any remaining prompts.
Staging the driver
To stage the driver for USB/WSD installations, use the PrintManagement tool
HPPrintManagement.exe
.
To stage the driver for USB installations, or for WSD installation without using the installer, use the
/
infstage
option.
1. In Windows, search for the Command Prompt app and select Run as administrator.
2. From the Command Prompt, navigate to the folder containing the
HPPrintManagement.exe
.
3. Type the install command:
HPPrintManagement.exe install -f <INF File Path> --infstage
NOTE: Using the
/infstage
option will only stage the INFs in the specified package and will not
install the queue. All other options supplied in the path will be ignored.
4. Press Enter and complete any remaining prompts.
Remove a printer queue
To remove a printer queue for v4 or v3 drivers, use the PrintManagement tool
HPPrintManagement.exe
.
1. In Windows, search for the Command Prompt app and select Run as administrator.
2. From the Command Prompt, navigate to the folder containing the
HPPrintManagement.exe
.
3. Type the install command.
● To remove a printer queue for a v4 driver, use the –p switch.
NOTE: The -p and -d switches cannot be used at the same time.
● To remove a printer queue for a v3 driver, use the --rq switch.
NOTE: For v3 drivers, the -rq and -rd switch cannot be used at the same time.
4. Press Enter and complete any remaining prompts.
Remove a print driver (v4 driver only)
To remove a v4 print driver, use the PrintManagement tool
HPPrintManagement.exe
.
Staging the driver
11

To remove a driver, use the --rd switch.
NOTE: A driver can only be removed if it is not in use by a queue. Be sure to remove any queues first.
1. In Windows, search for the Command Prompt app and select Run as administrator.
2. From the Command Prompt, navigate to the folder containing the
HPPrintManagement.exe
.
3. Type the command (v4):
HPPrintManagement.exe --install --remove --rd <Driver Name>
NOTE: The -rq and -rd switches cannot be used at the same time.
4. Press Enter and complete any remaining prompts.
Unstage a print driver (v3 driver only)
To unload or unstage a v3 print driver, use the PrintManagement tool
HPPrintManagement.exe
.
To unstage a driver, use the --infremove switch.
NOTE: A driver can only be removed if it is not in use by a queue. Be sure to remove any queues first.
1. In Windows, search for the Command Prompt app and select Run as administrator.
2. From the Command Prompt, navigate to the folder containing the
HPPrintManagement.exe
.
3. Type the command (v3):
HPPrintManagement.exe --remove --infremove
4. Press Enter and complete any remaining prompts.
Upgrade a print driver (v4 driver)
To upgrade a v4 print driver, use the PrintManagement tool
HPPrintManagement.exe
.
The driver can be upgraded using the --upgrade switch. The driver to be used for upgrade can be
specified using the –f switch.
1. In Windows, search for the Command Prompt app and select Run as administrator.
2. From the Command Prompt, navigate to the folder containing the
HPPrintManagement.exe
.
3. Type the command:
HPPrintManagement.exe install –f <INF Path> --upgrade
NOTE: If the INF path is not specified, then the driver package in the same directory will be
selected for upgrade.
4. Press Enter and complete any remaining prompts.
Input print queue parameters to a .csv file (v4 driver only)
To input the print queue parameters to a .csv file, use the PrintManagement tool
HPPrintManagement.exe
.
12
Chapter 3 How to use the tools
A .csv file can be used to input the print queue parameters.
1. In Windows, search for the Command Prompt app and select Run as administrator.
2. From the Command Prompt, navigate to the folder containing the
HPPrintManagement.exe
.
3. Type the command (v4):
csv -i {csvFilePath}
Example: csv -i C:\*\*.csv
4. Use the following options:
● -i Installation csv
● --q quiet mode
5. Use the following .csv file field options:
● InfPath – Path to the inf of the driver
● Name- Preferred print queue name; if left blank, automatically defaults to the driver name
● Drivername – Driver name
● ShareName - Share name for the print queue
● PortName – Port name for the print queue
● PortType -Port type for the print queue
● Ipaddress – Ipaddress of the printer ( for TCP/WSD only)
● NewPort - Takes Yes/No value; if Yes, then a new port is created by appending _1 or _2 to an
existing port
● SNMPCommunity – SNMP Community name
● PortNumber- Port number
● Comment- Comment for the print queue
● Location - Location data for the print queue
● StrictMode - Takes Yes/No value; if Yes, then aborts the queue installation when the same
queue name already exists
● Set as Default - Takes Yes/No value; if No, then will not set the print queue as the default
● Offline - Takes Yes/No value; if Yes, then treats the printer as offline. The installation will
proceed even if the printer is offline.
● Configuration – Path to the DCU CFG file; if left blank, will attempt to search the current folder
for hpgstp.cfg. If not, enter a valid file path for the CFG.
6. Press Enter and complete any remaining prompts.
Input print queue parameters to a .csv file (v4 driver only)
13

Input/Update print queue parameters to a .csv file (v4 driver only)
To input the print queue parameters in a specified format to update the print queue, use the
PrintManagement tool
HPPrintManagement.exe
.
A .csv file can be used to input the print queue parameters in a specified format to update the print
queue. To do this, follow these steps:
1. In Windows, search for the Command Prompt app and select Run as administrator.
2. From the Command Prompt, navigate to the folder containing the
HPPrintManagement.exe
.
3. Type the command (v4):
csv -u {csvFilePath}
Example: csv -u C:\*\*.csv
4. Use the following options:
● -i Installation csv
● --q quiet mode
5. Use the following .csv file fields:
● QueueName - Preferred print queue name , if blank automatically takes the driver name
● Bidi – Yes/No value; Yes updates the printer configuration, and No or any other value will not
perform an update.
● ConfigUpdate - Yes/No value; Yes will update DCU configuration, and No or any other value will
not perform the configuration.
● ConfigPath – Path to the config file; this is only considered when there is Yes present in
ConfigUpdate.
6. Press Enter and complete any remaining prompts.
Input/Migrate print queue parameters to a .csv file (v4 driver only)
To input the print queue parameters in a specified format for migration, use the PrintManagement tool
HPPrintManagement.exe
.
A .csv file can be used to input the print queue parameters in a specified format for migration. To do this,
follow these steps:
NOTE: Offline mode will take more time to install than online printers due to the Microsoft method of
port creation for offline printers. Any change in the format of a .csv file will result in unpredictable
behavior.
1. In Windows, search for the Command Prompt app and select Run as administrator.
2. From the Command Prompt, navigate to the folder containing the
HPPrintManagement.exe
.
3. Type the command (v4):
csv -m {MigratecsvFilePath}
Example: csv -m C:\*\*.csv
14
Chapter 3 How to use the tools

4. Use the following options:
● -i Installation csv
● --q quiet mode
5. Use the following .csv file fields:
● QueueName - Printer queue name
NOTE: You cannot leave the queue name blank or assign Strict Mode to Yes.
● InfPath – INF file path
NOTE: All fields must have the inf entry.
6. Press Enter and complete any remaining prompts.
Update the existing printer queue configuration
To update the existing printer queue configuration, use the PrintManagement tool
HPPrintManagement.exe
.
To update the existing printer queue, use either the DCU Pre-Configuration and policy of the queue or the
Printer BIDI configuration of the queue.
1. In Windows, search for the Command Prompt app and select Run as administrator.
2. From the Command Prompt, navigate to the folder containing the
HPPrintManagement.exe
.
3. Type the command:
HPPrintManagement.exe update -n <Queuename> --bidi –cfg<Path to cfg
file>
Example: HPPrintManagement.exe update -n <HPONEDRIVER> --bidi
4. Use the following options.
NOTE: These options can be used individually or together.
● --bidi - Will perform bidi and update the print queue (only on network ports).
● --cfg - Will indicate DCU configuration needs to be updated.
● -n - Required. Queue Name to be used for the installation.
● --pdl - Printer language.
● --forcepdl - Printer language force to apply.
5. Press Enter and complete any remaining prompts.
Update the Printer BIDI configuration of the queue (v4 driver only)
To update the printer BIDI Configuration of the queue, use the PrintManagement tool
HPPrintManagement.exe
.
Update the existing printer queue configuration
15

1. In Windows, search for the Command Prompt app and select Run as administrator.
2. From the Command Prompt, navigate to the folder containing the
HPPrintManagement.exe
.
3. Type the command (v4):
HPPrintManagement.exe update -n <Queuename> --bidi
4. Press Enter and complete any remaining prompts.
Use the PDL switch to change the PDL stream conversion from PCL6 to Postscript
(PS)
By default, the print queue PDL is created as PCL6. To change the PDL type, use the PrintManagement
tool
HPPrintManagement.exe
.
To change the PDL stream conversion from PCL6 to Postscript (PS), change the PDL switch using the
HPPrintmanagement.exe with a command prompt.
NOTE: v3 and v4 drivers have separate executables.
1. In Windows, search for the Command Prompt app and select Run as administrator.
2. From the Command Prompt, navigate to the folder containing the
HPPrintManagement.exe
.
3. Type the command including the queue, port name, TCP address, driver name, and PDL type (for
Postscript and PCL6 commands).
● V4 PDL Type Names: PS (for Postscript) , PCL6 (for PCL6)
● V3 PDL Type Names: Product_PS (for Postscript) , Product_PCL6 (for PCL6)
HPPrintManagement.exe install -f "$infpath" --port "portName" --
porttype “TCP” -a"ipaddress" --pdl PS
4. Press Enter and then use the following command to update the post queue installation from PDL to
Postscript (PS):
HPPrintManagement.exe update -n <QueueName> --pdl "PS"
5. Complete any remaining prompts.
Migrate HP UPD queues to HP Smart UPD queues (v4 driver only)
To migrate HP UPD queues (versioned and non-versioned) to HP Smart UPD queues, use the
PrintManagement tool
HPPrintManagement.exe
.
For a more simple, intuitive & compelling printing experience, HP recommends migrating to the HP Smart
UPD v4 driver.
To migrate, use the PrintManagement tool
HPPrintManagement.exe
to run the Migration tool (Migration
from HP UPD) using a command prompt.
NOTE: To export or import all of the print queue settings and configurations, the settings are stored in
the current folder of the executable.
NOTE: Options set in the Printer Properties > Device Settings tab is currently not supported.
The following prerequisites must be met before continuing:
16
Chapter 3 How to use the tools

● Valid connection (bi-directional) is required for the migration to occur correctly.
● A migration will only work for HP UPD queues connected via a TCP/IP port.
● Migrations can be performed only for print queues installed on Windows 8.1 and newer, and is best
used with newer HP UPD (6.5.0 and newer) and HP Smart UPD versions.
1. In Windows, search for the Command Prompt app and select Run as administrator.
2. From the Command Prompt, navigate to the folder containing the
HPPrintManagement.exe
.
3. Type the command (v4):
HPPrintManagement.exe migrate -m -f <INFPath>
For example:
C:\HPSUPD\HPSmartPARK-
x.xx.x.xxx\PrintManagement\V4\HPPrintManagement.exe migrate
-m -f "C:\HPSUPD\V4-x64-x.xx.x.xxxx\Drivers\HPOneDriver_V4_x64.inf"
CAUTION: Abruptly closing the
.exe
will lead to undefined behavior.
NOTE: If the -f option is not specified, then the installer will use the Current Directory.
NOTE: In a "Point & Print "scenario, it is suggested to change the configuration in Printer
Properties under Advance > Printing Defaults tab, and make sure there is a valid connection with
the device over SNMP in the server Print Queue to ensure the proper print settings are reflected.
Any available HP UPD queues will be listed.
4. Select the queues from the list to be migrated:
● Select a single number to migrate a single queue, OR
● Select a range like “x-y” or comma separated queue numbers like “x,y,z” to migrate multiple
queues.
● Type All to migrate all queues.
5. Press Enter and complete any remaining prompts.
6. Wait for the tool to perform a back up.
NOTE: The tool will take a backup of queue details such as queue name, port name, etc. and print
features selected such as Duplex, paper size, etc. For a list of supported features, see the list
provided above. The tool will also attempt to back up Pre-Configuration settings. After the backup
process is completed, the tool will create temporary HP S-UPD print queues (the names of these
print queues will start by the name temp).
Migrate HP UPD queues to HP Smart UPD queues (v4 driver only)
17

7. Wait for the migration process to complete.
NOTE: After the back up process is complete, the tool then removes the HP Smart UPD print
queues and the HP Smart UPD print driver. Then, the backup settings are applied to the temporary
HP Smart UPD print queues. Finally, external bidi is performed on the HP Smart UPD print queues.
If the migration is successful, Migration completed successfully is displayed.
To verify if the UPD print queue has been migrated successfully, open Print Management. Open the
Preferences page of the print queue that you migrated and check if the print settings and print features
applied has been migrated.
The HP Smart UPD print queues will have the settings (i.e., Queue Name, Port, Share Name, etc.) and print
features applied and ready for use.
The following print settings are migrated with the queue:
● Copies
● Nup
● Mediasize
● InputBin
● Print Quality
● InkDryTime
● InkSaturation
● BlackInkSpread
● PageOrientation
● Duplex
● MediaType
● Collate
● Punching
● Staple
● OutputBin
● HPEasyColor
● Color
● Fold
Supported features when migrating using the
HPPrintManagement.exe
Learn about supported features when migrating from HP Smart UPD (v3) to HP Smart UPD (v4) using the
'Migration from HP UPD' tool in the
HPPrintManagement.exe
.
18
Chapter 3 How to use the tools
Queue Settings
● Queue Name
● Share Name
● Port Name
Print Settings
● Copies
● Nup
● Mediasize
● InputBin
● Print Quality
● InkDryTime
● InkSaturation
● BlackInkSpread
● PageOrientation
● Duplex
● MediaType
● Collate
● Punching
● Staple
● OutputBin
● HPEasyColor
● Color
● Fold
Add comments to the print queue (v4 driver only)
Learn how to use the AddPrinterModelToComments tool.
Comments can be added to the print queue to visually differentiate between different print queues.
To add comments to the print queue, change the --comment switch using the
HPPrintmanagement.exe with a command prompt.
1. In Windows, search for the Command Prompt app and select Run as administrator.
2. From the Command Prompt, navigate to the folder containing the
HPPrintManagement.exe
.
Add comments to the print queue (v4 driver only)
19

3. Type the command (v4):
HPPrintManagement.exe install -f <INF File Path> --port <Port Name> --
porttype <Local, WSD, TCP> --comment "HPModelName"
Example: HPPrintManagement.exe install -f c:\temp\hpgu4cdi1a1a.inf --
port “FloorPrinter” --porttype “TCP” -a “15.34.99.234” --comment "HP
LaserJet MFP"
4. Press Enter and complete any remaining prompts.
Use the PrnCon.exe to add or remove a server connection
Learn how to use the PrnCon console application
prncon.exe
to manage server connections.
To manage server connections, use the
prncon.exe
with a command prompt.
NOTE: The
prncon.exe
does not remove the printer driver from the client or print server. For
instructions on how to remove the driver, see sections
Remove a print driver (v4 driver only)
and
Unstage a print driver (v3 driver only)
.
Alternate Usage
Running PRNCON.EXE without any switches will reset all point-and-print connections between the client
and the print server(s).
Review the following before continuing:
● The
prncon.exe
works with HP drivers only.
● The printer must be shared on the server. <printer_name> is not the SHARE name.
NOTE: It has been observed that some clients will not properly sync up with the settings on the
print server unless there is a time lapse between the delete and add operations. If this behavior is
observed, it is recommended to start with a 3 second wait period <3000>
● For v4 drivers, pre-load before executing PRNCON on clients. The v4 driver architecture requires the
driver to be pre-loaded for network print shares to fully work.
● For instructions on how to preload the v4 driver, see the section
Staging a printer
.
1. In Windows, search for the Command Prompt app and select Run as administrator.
2. From the Command Prompt, navigate to the folder containing the
HPPrintManagement.exe
.
3. Type the command:
prncon -s <server_name> -p <printer_name> -f <trace_file> -a|-d [–w
<milliseconds>]
For example:
● To remove connection: prncon -s prnsvr123 -p "HP LaserJet 4000 PCL 6" -f
"%temp%\prncon.log" –d
● To add a connection: prncon -s prnsvr456 -p "HP LaserJet 4000 PCL 6" -f
"%temp%\prncon.log" -a
20
Chapter 3 How to use the tools

4. Press Enter and complete any remaining prompts.
See the following sample Log File and Log File Explanation.
Sample Log File
1. ------ PRNCON.exe Starting on Machine : CWDCN070D6B, Time :
Tuesday, May 25, 2010 16:15:08 ------
2. PRNCON version 10.05.24.1 :
3. Command line: prncon
4. GetPrinterConnections: \\RSM0NAM01.nam.corp.hp.com\CPP-LGR66-2-2B1D
skipped: Server Name is NULL
5. GetPrinterConnections: Adding printer
\\RSM0NAM01\CPP-2-1B-1@\\RSM0NAM01
6. GetPrinterConnections: Adding printer
\\RSM0NAM01\CPP-66-2-3E-3@\\RSM0NAM01
7. GetPrinterConnections: \\RSM0NAM01\CPP-66-2-3E-Xerox238 skipped:
Not an HP driver
8. ***************** Existing Printer Info **************
9. Printer Connection: \\RSM0NAM01\CPP-2-1B-1
10. Printer Name is : \\RSM0NAM01\CPP-2-1B-1
11. Server Name is : \\RSM0NAM01
12. Printer Driver is : HP Universal Printing PS (v5.0) 13.
************** Existing Driver Version Details ****************
14. Environment : Windows NT x86
15. Driver File : C:\WINNT\System32\spool\DRIVERS\W32X86\3\PSCRIPT5.DLL
16. Data File : C:\WINNT\System32\spool\DRIVERS\W32X86\3\hpcu091s.ppd
17. Config File : C:\WINNT\System32\spool\DRIVERS\W32X86\3\hpmdp091.dll
18. File - C:\WINNT\System32\spool\DRIVERS\W32X86\3\PSCRIPT5.DLL
19. Time Stamp - Wednesday, August 26, 2009 16:47:32
20. Language - English
21. File Version - 0.3.7600.16385
22. Prod Version - 6.1.7600.16385
23. File - C:\WINNT\System32\spool\DRIVERS\W32X86\3\hpmdp091.dll
24. Time Stamp - Wednesday, September 02, 2009 04:02:30
25. Language - English
26. File Version - 0.3.1540.66
27. Prod Version - 5.0.1.42
28. ********************************************
29. '\\RSM0NAM01\CPP-2-1B-1' Printer Connection has been deleted 30.
********************************************
31. Connecting to printer \\RSM0NAM01\CPP-2-1B-1 32. *****************
New Printer Info **************
33. Printer Name is : \\RSM0NAM01\CPP-2-1B-1
34. Server Name is : \\RSM0NAM01
35. Printer Driver is : HP Universal Printing PCL 5 (v4.7) 36.
************** New Driver Details ************
37. Environment : Windows NT x86
38. Driver File : C:\WINNT\System32\spool\DRIVERS\W32X86\3\PSCRIPT5.DLL
39. Data File : C:\WINNT\System32\spool\DRIVERS\W32X86\3\hpcu091s.ppd
40. Config File : C:\WINNT\System32\spool\DRIVERS\W32X86\3\hpmdp091.dll
41. File - C:\WINNT\System32\spool\DRIVERS\W32X86\3\PSCRIPT5.DLL
42. Time Stamp - Wednesday, August 26, 2009 16:47:32
43. Language - English
44. File Version - 0.3.7600.16385
Use the PrnCon.exe to add or remove a server connection
21

45. Prod Version - 6.1.7600.16385
46. File - C:\WINNT\System32\spool\DRIVERS\W32X86\3\hpmdp091.dll
47. Time Stamp - Wednesday, September 02, 2009 04:02:30
48. Language - English
49. File Version - 0.3.1540.66
50. Prod Version - 5.0.1.42
51. ------ PRNCON.exe Stopping Trace on Machine : CWDCN070D6B, Time :
Tuesday, May 25, 2010 16:15:40 ------
Sample Log File Explanation:
Line 1: Starting time and machine name Line 2: PRNCON version
Line 3: Command line
Line 4-7: Enumeration of all the network printers on the client
Line 4: This printer was skipped because the printer did not appear
to be a legitimate network printer. Line 5-6: Network printers flagged
for deletion and re-connection.
Line 7: This printer was skipped because it is not an hp printer.
Line 9-12: The printer and driver name of the first printer scheduled
for deletion and re-connection. Line 14-27: Driver information for the
first printer.
Line 27: This is the version of the driver currently being used for
this printer. It may be the same version as on the print server if
synchronization happened automatically.
Line 29: Indication that the printer was successfully deleted
Line 31: The connection to the printer was successfully re-established
Line 32-50: Information on the new driver. By comparing lines 27 and
50, we see that the driver versions are the same, indicating that the
synchronization had already happened automatically.
Line 51: Stop date and time
UI installer needed to update SUPD driver versions 3.08.1.2731
and older
Learn how to use the new SUPD UI Installer bundled in the Smart PARK Tools .zip file for use with previous
HP Smart UPD versions.
If the UI installer needs to be used with any previous SUPD Driver versions (prior to 3.08.1.2731), follow
these steps:
1. Extract the Smart PARK tools .zip to a folder.
2. From the extracted zip file, open the SUPDInstaller folder and navigate to the following folder:
SUPDInstaller\configuration(x64/x86/ARM64)
Take note of this location for the subsequent steps.
3. In a new window, navigate to the older version of the SUPD, and inside this folder, locate the folder
that contains the HPOnedriver*** .inf file.
4. Copy the Installer folder and all of the contents from inside SUPDInstaller\configuration(x64/x86/
ARM64) (from step 2) to the folder where the HPOnedriver*** .inf file (from step 3) is located.
22
Chapter 3 How to use the tools

5. Run the SUPDInstaller.exe from the Installer folder (from step 4) to launch the UI installer with the
previous SUPD version.
Point and Print Default behavior changes
Windows updates released August 10, 2021 and newer will, by default, require administrative privilege to
install drivers. Microsoft made this change in default behavior to address the risk in all Windows devices,
including devices that do not use Point and Print or print functionality.
By default, non-administrator users will no longer be able to perform the following tasks using Point and
Print without an elevation of privilege to administrator:
● Install new printers using drivers on a remote computer or server
● Update existing printer drivers using drivers from remote computer or server
For more information on how to address the behavior change by Microsoft, Print Administrators are
requested to follow the workarounds or solutions provided in Microsoft support article Manage new
Point and Print default driver installation behavior (CVE-2021-34481) (kb5005652).
Point and Print Default behavior changes
23

Configure the HP Smart UPD4
This chapter outlines several options for pre-configuring and configuring the default behavior and print
policy settings for the HP Smart UPD.
The options vary based on the installation method selected. Review each option to determine which
method is right for your environment. You can pre-configure the HP Smart UPD default settings before,
during, or after driver installation.
This chapter provides some representative examples, but is not a comprehensive list of all available
settings. The information in this chapter will help you select an option that best meets your needs.
The following sections explain the methods available for configuring the HP Smart UPD default settings
and creating a print policy:
● Configure HP Smart UPD default settings using HPPrintManagement.exe during driver installation
● Configure HP Smart UPD default settings and/or print policy using Group Policy Objects in Active
Directory
● Pre-configure HP Smart UPD default settings using HP Driver Configuration Utility
● Pre-configure HP Smart UPD default settings using HP Driver Deployment Utility
● Configure HP Smart UPD default settings after driver installation in driver preferences
● Overview of configurable functions and pre-configuration utilities
Configure HP Smart UPD default settings with the HP Smart PARK tool installer using the
HPPrintManagement.exe
during driver installation. See the section
HP PrintManagement
for more
information.
Pre-configure print queues using a CFG file
To pre-configure print queues, use the Driver Configuration Utility (DCU) tool with a configuration (CFG)
file.
The package has a file named
hpgstp.cfg
which needs to be loaded into DCU tool and modified with the
required values. To do this, follow these steps:
Make sure you have created and loaded a configuration (CFG) file before continuing.
1. In Windows, search for the Command Prompt app and select Run as administrator.
24
Chapter 4 Configure the HP Smart UPD
2. Type the install command:
HPPrintmanagement.exe install //Other Options// --cfg {“Cfg file path}
If no –cfg is specified, a cfg file from the current folder will be used.
● For example, to install V4 to TCP with a cfg file:
HPPrintManagement.exe install -f c:\temp\hpgu4cdi1a1a.inf --
port “FloorPrinter” --porttype “TCP” -a “15.34.99.234” --cfg
“C:\Temp\hpgstp.cfg
● For example, to install TCP to V3 with a cfg file:
HPPrintManagement.exe --install -f c:\temp\hpgu4cdi1a1a.inf -n
“MyQueue” -p “FloorPrinter” -t “TCP” -a “15.34.99.234” -d “HP Smart
Universal Printing(V3)” -c “C:\Temp\hpgstp.cfg
3. Press Enter and complete any remaining prompts.
Disable Analytics using the HP DCU for Plug and Play
installations
Learn how to use the Driver Configuration Utility (DCU) to disable analytics.
Before installing the HP Smart UPD on printers connected to the computer via a USB cable connection,
first disable analytics. To do this, follow these steps:
1. From the HP DCU Utility, open the HPGSTP.CFG file as described in section
Pre-configure print
queues using a CFG file
.
2. Disable the Consent for Analytics setting.
a. Expand the Advanced Features section.
Disable Analytics using the HP DCU for Plug and Play installations
25

b. Under the Consent for Analytics drop-down, select Decline for All.
c. Save as <FileName>.cfm.
3. Copy the cfm file to %programdata%\HP\SUPD to all the client PCs.
4. Continue with a Plug and Play installation.
NOTE: The above mentioned CFM file only supports the Disable Analytics option. Other features
are not supported.
Configure HP Smart UPD default settings using the HP Smart
PARK tool installer during driver installation
To configure the HP Smart UPD default settings using the HP Smart PARK tool installer during driver
installation, use the
HPPrintManagement.exe
.
The HP Smart UPD installer allows some driver default settings to be modified via command line
options. Some of these switches will change the system-wide behavior of the HP Smart UPD, while other
changes are specific to a single print queue.
A list of the available options for the
HPPrintManagement.exe
utility can be displayed by entering either
install --help using a command prompt in the HP Smart UPD driver folder..
The screen that displays is a comprehensive list of the available configuration options that are available
during installation of the HP Smart UPD.
For a description of command line prompts, see the
Command line prompts to use
section.
Multiple switches can be combined to create a command-line installation that is customized to meet the
requirements of your environment.
26
Chapter 4 Configure the HP Smart UPD

The default settings are changed to reflect the chosen options in each of the printers installed using
these switches.
Configure HP Smart UPD default settings and/or print policy
using Group Policy Object in Active Directory
The changes made within Group Policy Objects control the global HP Smart UPD user capabilities. An HP
Smart UPD Administrator Template can be added to create a Group Policy Object to manage the user
HP Smart UPD capabilities when a policy is running. The settings apply to any queue that uses the HP
Smart UPD. Care should be taken when locking configuration settings. The user is unable to change a
locked setting.
NOTE: See the section
Managing the HP Smart UPD with Active Directory Group Policy
for detailed
information on installing and using the Active Directory Administrator Template.
The following are typical settings available for pre-configuration.
1. Download the HP Smart PARK. For instructions, see the section
Download the kit
.
2. Configure Active Directory templates and policy. For instructions, see the following section
Use HP
Active Directory Templates with Group Policy to manage HP Smart UPD print settings
.
3. Open the Default Print Settings section of the HP Smart UPD AD Administrator Templates.
A comprehensive list of the configuration options available during installation of the HP Smart UPD
displays.
4. Configure any preferred default settings. Some of the more popular install switches include the
following options:
5.
● Duplex
● Grayscale
● Economode
● Job Storage
● Print Quality
5. To take advantage of the management capabilities through the Group Policy Objects on new and
existing queues, first enable the HP Smart UPD management capabilities.
NOTE: The HP Smart UPD policy management capabilities are disabled by default.
For instructions, see section
Install and use the ADMX/ADML template using Microsoft Group
Policy Management Console (GPMC)
.
NOTE: When using an AD template, if you open an application’s print dialog after initially connecting
to the queue and without ever opening Printing Preferences or Printer Properties, the application’s print
dialog might not reflect the policy or configuration settings depending on how the application
accesses print settings and which print settings it is accessing. However, it should print correctly
based on the policy and/or the configuration settings made through AD templates. To update the
application's print dialog, access the print driver by opening Printer Properties or Printing Preferences
through the application or the printers folder.
Configure HP Smart UPD default settings and/or print policy using Group Policy Object in Active Directory
27

Pre-configure HP Smart UPD default settings using the HP
Driver Configuration Utility
The HP Driver Configuration Utility (HP DCU) is a Windows application used to edit the configuration file
associated with a particular print driver.
The configuration file controls the print driver settings and takes effect when the driver is installed.
NOTE: Windows requires a user to have Administrator rights to install a printer driver.
The HP DCU does not handle any part of the deployment or installation of the driver. Rather, the default
configuration file is modified and saved back to the same driver directory in which it was opened
(hpgstp.cfg) or saved to the local host's directory. The HP Driver Configuration Editor is intended for use
in environments where there is an established process for deploying drivers.
Network administrators can use HP DCU to pre-configure a print driver before deploying and installing.
It is most beneficial when configuring print drivers for multiple workstations or print servers for print
queues that share the same configuration. Since the driver is not pointing to a specific device at this
point, the available settings in HP DCU are based on settings available in the driver and not a specific
device.
If you are pre-configuring the HP Smart PARK, additional trays may be shown, as well as color-related
settings such as Grayscale. If the actual device does not support a specific setting in HP DCU, the
setting is ignored.
For example, if you enable Grayscale and then connect to a monochrome printer, the Grayscale setting
is ignored. Similarly, if you enable a print quality setting such as “General Office” for an HP PageWide
device and connect to an HP LaserJet device, the print quality setting is ignored.
NOTE: The HP DCU works with HP printer drivers that are configured using a .cfg file such as the v3
and v4 versions of the HP Smart UPD.
Pre-configure the HP Smart UPD using the HP DCU
The HP DCU is included with the HP Smart Print Administrator Resource Kit (HP Smart PARK). The HP
DCU is supported on both 32-bit and 64-bit systems.
The process of configuring drivers and other software occurs before installation. This allows the driver
to be configured one time and installed on multiple server or client systems.
To pre-configure drivers, use the Driver Configuration Utility (DCU) tool with a configuration (CFG) file.
For instructions on how to pre-configure print queues, see section
Pre-configure print queues using a
CFG file).
Make sure you have created and loaded a configuration (CFG) file before continuing.
1. Download and extract the HP Smart PARK. For instructions, see the section
Download the kit
.
2. Navigate to the HP S-UPD Active Directory Administrator Template folder included in the kit.
3. Double-click HPBCFGAP.EXE to run the HP Driver Configuration Utility.
NOTE: The application automatically opens in the language specified within Region and
Languages.
28
Chapter 4 Configure the HP Smart UPD

4. Click OK.
5. Click File and then click Open.
6. Open a driver configuration file (cfg) (such as HPGSTP.CFG for the HP Smart UPD v3 and v4
drivers). These will vary in the individual folders of the
HPPrintManagement.exe
).
7. Modify any custom settings to meet the requirements of your environment.
8. Save the changes.
● File-Save As: Allows you to select the file name and extension. If only a file name is entered, the
application saves the file as (filename).cfg to the defined directory.
● File-Save: Saves the file to the same filename from where it was opened, which may impact the
digital signature. To not impact the digital signature, HP recommends using File-Save As and
saving the file as a .cfg file.
9. Install the driver using a supported method of deployment.
NOTE: HP DCU provides the most comprehensive list of configurable options and settings, but it
does not include all of the available options. In some cases, the HP DCU is the only method to
configure a specific driver setting. It might become necessary to combine some of the pre-
configuration tools to get a completely configured driver for your environment.
Pre-configure the HP Smart UPD using the HP DCU
29

Pre-configure HP Smart UPD default settings using the HP
Driver Deployment Utility
The HP Driver Deployment Utility (HP DDU) simplifies the deployment of printer drivers on client
computers. It is a simple utility that packages the driver files and the code needed to deploy them
into an *.EXE and *.CAB file. These files are run on the client PC to copy the driver files to the Windows
Driver Store and for network packages, to install the printer.
NOTE: Windows requires a user to have administrator rights to install a printer driver.
The HP Driver Deployment Utility works with printer drivers that can be installed using an .INF file. It is
designed to work with printer drivers that have their files contained in one directory structure.
Because this utility is generic, it does not have knowledge of how specific drivers are packaged. It
packages all files in the directory (and subdirectories) where the driver INF file was found.
The driver must be expanded so that the HP DDU can process the INF files. If you download an .exe with
the driver files, you need to run it first to unpack all of the files. Then run the HP DDU to package the files
for deployment on the client system.
NOTE: The HP DDU works with HP printer drivers that can be installed using an .INF file that supports
only a single platform (32-bit or 64-bit) for both v3 and v4 versions of the HP Smart UPD.
The HP DDU is used to pre-configure a print driver for deployment. When the package is run on the client
computer, the new configuration file configures the print driver after it is installed, and does not interfere
with WHQL certification. The HP DDU contains the standalone HP DCU utility inside the package and is
launched when Pre-configure driver is selected from the HP DDU tool.
Pre-configure the HP Smart UPD using HP DDU
The HP DDU is included with the HP Smart Print Administrator Resource Kit (HP Smart PARK). HP DDU is
supported on both 32-bit and 64-bit systems.
To pre-configure, use the Driver Deployment Utility (DCU) tool with a configuration (CFG) file.
Make sure you have created and loaded a configuration (CFG) file before continuing.
1. Download and extract the HP Smart PARK. For instructions, see the section
Download the kit
.
2. Navigate to the HP Driver Deployment Utility (DDU) folder included in the kit.
3. Copy the contents of the Driver Deployment Utility directory to the desired directory on the
hard drive of the client computer where the HP sUPD and/or device-specific print drivers will be
preconfigured.
4. Double-click HPBDDU.EXE to create the package.
5. From Package Source section, click Select Driver… and select the driver to package by browsing to
an INF file in the driver directory.
6. Select the Pre-configure this driver checkbox. This checkbox is enabled only for drivers that
support preconfiguration.
7. When the dialog
Select the corresponding CFG
to the selected driver displays, click OK.
8. Select the CFG file (for example, hpgstp.cfg for the HP Smart UPD and click Open.
30
Chapter 4 Configure the HP Smart UPD
9. Preload the driver.
● For direct connect, follow these steps:
a. Select Preload the driver.
b. Select the Show a prompt to connect the printer checkbox if you want to prompt the user
after the files are copied.
● When deploying network printers, follow these steps:
a. Select Create network port and install the driver.
b. Click Network Settings… to enter the network settings
c. From the Required Settings section, enter at least one way of identifying the printer (IP
address, Hardware address, or Hostname).
d. Make any changes to the Additional Settings section (port name, printer name, default
printer, sharing and share name). You can leave the default settings if you don’t need to
make changes.
e. Click OK.
10. Save the files.
a. From Package Target section, click Save As.
b. Select a location where you want to save the files.
c. Click Save.
Three files will be written here: an .exe, a .cab and an .xml with information about the package
created.
11. Create the package.
a. If you want to suppress any error messages, from the Create Package section, select the
Suppress all end user error messages checkbox.
b. Click Create Package. The Driver Configuration dialog opens.
c. Configure the driver as needed.
d. When you are finished configuring the driver, click OK.
e. After accepting the configuration changes, the package will be created.
f. Click OK.
g.
12. Run the new .exe from the client machine. You must have administrator rights to run the exe
because it will be copying files into the Windows driver store.
● For direct connect, the driver files are on the system and any user can connect a printer to
trigger the plug and play event. The printer object is not created until the printer is connected.
● For network printers, a port and printer object will be created with the information provided
above.
Pre-configure the HP Smart UPD using HP DDU
31

Configure HP Smart UPD default settings after driver
installation in driver preferences
Configurable functions and pre-configuration utilities lists which utility or utilities to use to configure
commonly used printer driver features.
Manage printer default settings
Learn about managing printer default settings.
When a printer gets installed, certain default settings are automatically set based on what capabilities
are available from the product. These default settings include items such as default paper size and type,
simplex (single sided printing), and portrait or landscape printing.
In many printing environments it is common for printing administrators to change the default settings.
Some of the more common changes are to enable printing on both sides of the paper (duplex) and to
print in grayscale. There are many ways to change or preconfigure these default settings.
This section primarily discusses how these new default settings are deployed and how to manage or
provide firmer controls on changes allowed to these default settings. Default settings and changes are
not managed.
Other sections in this chapter describe the use and procedures for changing the default settings in both
Point and Print and Direct IP Printing environments. Please refer to the sections on HP DCU, HP DDU, and
HPPrintManagement.exe for specific instructions on how to use these tools.
It is important to understand that changes to the printing default settings are at most temporary and
basically not managed. Users have the ability in both Direct IP Printing and Point and Print environments
to change the default settings on their printers through the Printing preferences. In some cases,
depending on company policies, a centralized management approach is necessary to ensure that the
default settings are not changed.
Manage default settings with Active Directory Group Policy for HP Smart UPD
The HP Active Directory Group Policy offers another way to ensure that the default settings are
maintained and managed.
HP’s solution for printer policy settings using an existing Active Directory environment is to use the
Active Directory group policy objects. This allows an administrator to set defaults for settings such as
duplex, and grayscale printing, which are be added to create a Group Policy Object to manage the user
HP Smart UPD capabilities when a policy is running. These policies are pushed locally into the users
registry and referred to during printing. This has the effect of constantly refreshing the user’s default
settings so each time a user prints, the correct default settings are present. Policies are pushed to the
client PCs. This has the effect of refreshing the default printer settings automatically.
For more information, see the sections on using Active Directory Administrator Templates.
NOTE: When using an AD template, if you open an application’s print dialog after initially connecting
to the queue and without ever opening Printing Preferences or Printer Properties, the application’s print
dialog might not reflect the policy or configuration settings depending on how the application
accesses print settings and which print settings it is accessing. However, it should print correctly
based on the policy and/or the configuration settings made through AD templates. To update the
application's print dialog, access the print driver by opening Printer Properties or Printing Preferences
through the application or the printers folder.
32
Chapter 4 Configure the HP Smart UPD

Overview of configurable functions and pre-configuration utilities
The table below shows which utility or utilities can be used to configure several commonly-used driver
features.
In some cases, more than one method will need to be used depending on the combination of settings
that are to be changed. For example, to enable policy management and set the Watermarks to
Username, use the HPPrintManagement.exe utility to enable policy management and the HP DCU tool to
set the default Watermark option.
Table 4-1 Table 4-1 Configurable functions and pre-configuration utilities
Function HPPrintManagement
.exe
AD HP DCU HP DDU
Print on Both Sides
(Duplex) (lock)
Supported Supported Supported
Orientation Supported Supported
Print in Grayscale
(lock)
Supported Supported Supported
Print Quality Supported Supported Supported
Color Options (lock) Supported Supported
EconoMode (lock) Supported Supported Supported
Paper Size Supported Supported
Media Type (lock) Supported Supported
Paper Source (lock) Supported Supported
Job Storage Mode
(lock)
Supported Supported Supported
Punch Supported Supported
Fold* Supported Supported
Staple Supported Supported
Output Bin Supported Supported
Printing Shortcuts Supported Supported
HPEasyColor Supported Supported
Job Separator Supported Supported
Pages per Sheet Supported Supported
Booklet Printing Supported Supported
Print all Text as Black Supported Supported
Raster Compression Supported Supported
Print Document On Supported Supported
Scale to Fit Supported Supported
Percent of Normal
Size
Supported Supported
Watermarks (lock) Supported Supported
Overview of configurable functions and pre-configuration utilities 33

Table 4-1 Table 4-1 Configurable functions and pre-configuration utilities (continued)
Function HPPrintManagement
.exe
AD HP DCU HP DDU
Copies Supported Supported
Collate Supported Supported
Tray 1-10 Supported Supported
Mopier Mode Supported Supported
Job Storage Supported Supported
Accessory Output
Bin
Supported Supported
Optional Output Bin* Supported Supported
Stapling Unit Supported Supported
Booklet Maker Unit Supported Supported
C-Fold Unit * Supported Supported
V-Fold Unit * Supported Supported
Punch Unit Supported Supported
Job Accounting Supported Supported
Storage Device Supported Supported
Print to Print Only Supported Supported
Enable Policy mgmt Supported
34 Chapter 4 Configure the HP Smart UPD

Managing the HP Smart UPD with Active
Directory Group Policy
5
Active Directory Group Policy and the HP Smart UPD Active Directory Administrator template
allow complete management of the HP Smart UPD printing experience within your Active Directory
infrastructure when running an active policy.
You can use the HP Smart UPD Active Directory Administrator Template to add print driver configuration
settings to an existing Group Policy Object or create new, custom HP Smart UPD Group Policy Objects
for each user, group, or Organizational Unit.
This chapter covers the following topics:
● Supported HP Smart UPD versions
● Use HP Active Directory Templates with Group Policy to manage HP Smart UPD print settings
● HP Smart UPD Active Directory Templates
Supported HP Smart UPD versions
The HP Smart UPD Active Directory Templates version 1.0 and newer is supported with HP Smart UPD
version 2.07.1.1569 and newer, and is available for download at HP.com.
NOTE: When using an AD template, if you open an application’s print dialog after initially connecting
to the queue and without ever opening Printing Preferences or Printer Properties, the application’s print
dialog might not reflect the policy or configuration settings depending on how the application
accesses print settings and which print settings it is accessing. However, it should print correctly
based on the policy and/or the configuration settings made through AD templates. To update the
application's print dialog, access the print driver by opening Printer Properties or Printing Preferences
through the application or the printers folder.
Use HP Active Directory Templates with Group Policy to
manage HP Smart UPD print settings
Learn how to use HP Active Directory Group Policy to manage the HP Smart UPD.
The decision to use HP Active Directory Group Policy to manage the HP Smart UPD depends on the size
of your business and the current software infrastructure within your business
Managing the HP Smart UPD with Active Directory Group Policy
35

In an enterprise business, use Active Directory Group Policy when your enterprise environment requires
user and Organizational Unit (OU) level HP Smart UPD configuration settings that might be based on
how the users are currently configured in your Active Directory. The HP Smart UPD Active Directory
Administrator template integrates into an existing Active Directory infrastructure and facilitates creation
of group Policy Objects to be linked to user groups and OUs. An experienced Active Directory
administrator will be able to easily integrate the HP Smart UPD Group Policy objects in large enterprise
environments.
NOTE: This chapter provides information on HP Smart UPD Active Directory Administrator templates
for configuring the HP Smart UPD printing experience within your Active Directory environment. This
chapter does not cover how to configure and manage an Active Directory environment. Active
Directory (AD) is a Microsoft product that consists of several services that run on Windows Server to
manage permissions and access to networked resources.
For information on Microsoft Active Directory, refer to Microsoft documentation and training such as
Deploy and manage identity infrastructure.
36
Chapter 5 Managing the HP Smart UPD with Active Directory Group Policy

Upgrading to a newer version of the Active
Directory Administrator Template file
6
The process of upgrading the Active Directory Administrator Template to a newer version is more
involved than a standard installation and must be followed exactly to avoid errors. To upgrade to a
newer version of the Active Directory Administrator Template, disable all existing values in the currently
installed templates, remove the templates, install the new template and reconfigure the settings.
NOTE: When using an AD template, if you open an application’s print dialog after initially connecting
to the queue and without ever opening Printing Preferences or Printer Properties, the application’s print
dialog might not reflect the policy or configuration settings depending on how the application
accesses print settings and which print settings it is accessing. However, it should print correctly
based on the policy and/or the configuration settings made through AD templates. To update the
application's print dialog, access the print driver by opening Printer Properties or Printing Preferences
through the application or the printers folder.
Install and use the ADMX/ADML template using Microsoft
Group Policy Management Console (GPMC)
The following procedure provides details for creating and linking group policy objects using Microsoft
Group Policy Management Console (GPMC). The following example creates a group policy object and
sets it as the default policy for the entire domain, which in this case is named test.local. The procedure is
similar for creating and linking group policy objects for organizational units and groups.
1. Download and extract the HP Smart PARK. For instructions, see the section
Download the kit
.
2. Navigate to the HP S-UPD Active Directory Administrator Template folder included in the kit.
3. Copy the files.
● When using the Local GPO, follow these steps:
a. Copy the ADMX template (HP-SUPD-*.admx) to the %systemroot%
\PolicyDefinitions\ location.
b. Copy the ADML file (HP_MPP_HP-SUPD*.adml) to the %systemroot%
\PolicyDefinitions\en-US location.
● When using the Domain based GPO with a central store, follow these steps:
a. First create a Central store. See the Microsoft article section Create the Central Store.
Upgrading to a newer version of the Active Directory Administrator Template file
37
b. Copy the ADMX template (HP-SUPD-*.admx) to the %systemroot%
\sysvol\domain\policies\PolicyDefinitions location.
c. Copy the ADML file (HP-SUPD*.adml) to the %systemroot%
\sysvol\domain\policies\PolicyDefinitions\EN- location.
4. Open the Microsoft Group Policy Console.
5. Right-click the server name test.local.
6. Click Create and Link a GPO here.
7. Give the new GPO a name and click OK.
8. Right-click the new Group Policy object in the right-most window pane.
9. Click Edit. The Microsoft Group Policy Management Editor opens (gpedit.msc).
10. Select User Configuration, click Policies, select Administrative Templates, and then select HP
Managed Print Policies x.y.z.
38
Chapter 6 Upgrading to a newer version of the Active Directory Administrator Template file

HP Smart UPD Active Directory Templates7
On Windows operating systems, you can use the ADMX/ADML templates. For more information on
ADMX templates, refer to Microsoft article Managing Group Policy ADMX Files Step-by-Step Guide.
Unlike ADM files, ADMX files are not stored in individual GPOs. For domain-based enterprises,
administrators can create a central store location of ADMX files that is accessible by anyone with
permission to create or edit GPOs.
The following sections provide installation instructions for both types of templates and additional
template information:
● Install and use the ADMX/ADML template using Microsoft Group Policy Management Console
(GPMC)
● Remove the HP Smart UPD Administrator template
● Upgrade the HP Smart UPD Administrator template
● Enable Active Directory Group Policy for HP Smart UPD for a new or existing HP Smart UPD
installation
● Configure the HP Smart UPD Active Directory Administrator template
● Verification and troubleshooting
Remove the HP Smart UPD AD Administrator template
1. Open the Microsoft Group Policy Editor.
2. Select User Configuration, click Policies, select Administrative Templates, and then select HP
Managed Print Policies.
3. Set each of the policies to Not configured.
4. Click Administrative Templates, and select Add/Remove Templates.
NOTE: Failure to set all the template settings to Not configured before removing the template will
leave registry settings that are no longer associated with an administrator template, resulting in errors
when the Group Policy Modeling Wizard is run.
HP Smart UPD Active Directory Templates
39
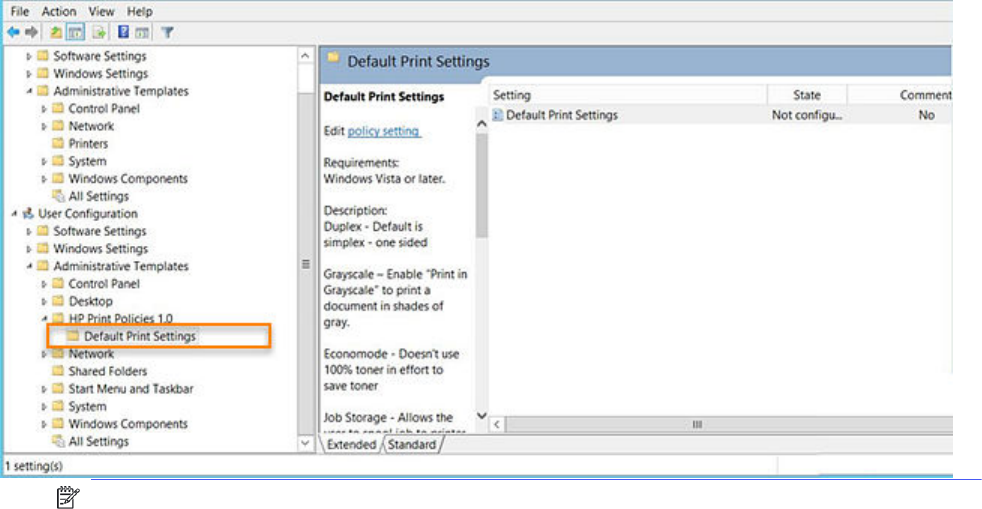
Upgrade the HP Smart UPD AD Administrator template
To upgrade the HP Smart UPD AD Administrator template, follow the steps to remove the old template
and then follow the steps to install the new template using the steps provided in this chapter.
Enable Active Directory Group Policy for a new or existing HP
Smart UPD installation
For new installations of the HP Smart UPD when an HP Active Directory Administrator Template is
installed.
For existing installations of the HP Smart UPD
To enable your existing installations of the HP Smart UPD to recognize the Active Directory group
policies, use the following procedure for every HP Smart UPD GPO that you create.
1. Open the Microsoft Group Policy Management Editor (gpedit.msc)
2. Select User Configuration, Policies, Administrative Templates, HP Managed Print Policies, UseMode
Settings.
3. Open General Settings, click Enabled, and check Enable Policy for all users, and then click OK.
Configure the HP Smart UPD Active Directory Administrator
template
To manage and configure the HP Smart UPD settings, open the Microsoft Group Policy Management
editor and select User Configuration, Policies, Administrative Templates, and then HP Managed Print
Policies.
NOTE: When configuring settings with the HP Smart UPD Active Directory Administrator template,
make sure to enable the General Settings under UseMode Settings and select Enable Policy for all
40
Chapter 7 HP Smart UPD Active Directory Templates

users. This setting allows the administrator to configure the HP Smart UPD to read AD policy without
having to configure every installed instance of the HP Smart UPD.
Configuring the settings for the HP Smart UPD is similar to configuring any other Group Policy within the
Active Directory Group Policy environment.
The following are settings that are part of the HP Smart UPD Active Directory Administrator Template.
Table 7-1 Use Mode Settings: General Settings
Option Description
Not Configured
Enabled Select this option button to make the following options
available:
● Duplex
● Grayscale Default
● Job Storage
● Private Print Pin (0000-9999)
● Secure Print password minimum length (4-12)
● Print Quality
Disabled
NOTE: When configuring settings with the HP Smart UPD Active Directory Administrator template,
make sure to enable the General Settings under UseMode Settings and select Enable Policy for all
users. This setting allows the administrator to configure the HP Smart UPD to enable AD policy without
having to configure every installed instance of the HP Smart UPD.
NOTE: When the Default Print Settings Properties window is set to Not Configured, the HP Smart UPD
uses the driver defaults for the settings.
Job Accounting and Job Delivery
NOTE: Job accounting and Job delivery are no longer supported in the HP Smart UPD Active
Directory Administrator template.
Verification and troubleshooting
Use this section to verify that the users are obtaining the HP Smart UPD settings correctly. In addition,
use this section as a guide to see where to apply settings.
Functional test
1. Use the group Policy Modeling tool to run simulations on specific users or groups and specific
machines.
NOTE: The GPMC is a Microsoft supplied tool and is an optional component on server versions
that can be downloaded from the Microsoft Web site.
2. Run the modeling wizard to verify your settings.
Verification and troubleshooting
41

3. Right-click Group Policy Modeling.
4. Click Group Policy Modeling Wizard.
5. Enter the user that you want to model.
6. Select the Skip to the final page check box.
Registry population
Use this test to verify that the settings in the group policy object populate in the registry of the client
computer.
1. Verify that the current user is logged into the domain.
2. Run regedit.exe and verify that the registry populates correctly. The registry path is
HKCU\Software\Classes\Local Settings\Printers\PropertyBags\Manufacturers\HP.
3. Verify if certain Registry keys are being created under the following path:
Software\Classes\Local Settings\Printers\PropertyBags\Manufacturers\HP\
NOTE: Active Directory does not refresh settings immediately after you make a change to the
Group Policy object. To refresh the settings on the client, you must log out and then log back in, or
you can use the Microsoft gpupdate utility with the /Force option from a command window to force
Active Directory to update the settings. Example: c:/> gpupdate /Force
Final Test
Install the latest version of the HP Smart UPD and verify that the screens and final print reflect the policy
settings entered in the Group Policy Editor (gpedit.msc).
How AD policies get applied to the driver
After the driver installation, the administrator can change the policies from the server, and those
changes get applied to all the print queues to which the Group Policy object has been linked. The print
queue will reflect the new policy.
For this to work, the HP Smart UPD driver checks for policy changes, whenever a user tries to open the
Printing Preference or Printer Properties, or when the user tries to print. In these scenarios, if the HP
Smart UPD detects that there is a policy change, it applies the new policy to the printer queues.
42
Chapter 7 HP Smart UPD Active Directory Templates
