
The How-to guide
for
measurement for
improvement

2
Contents
Introduction 3
Part 1: What is measurement for improvement?
The Model for Improvement 4
The 3 reasons for measurement 6
Making measures meaningful 7
The different types of measures 7
Ratios and percentages 8
Part 2: How do I measure for improvement?
Top tips 10
The 7 steps to take 10
Appendices
Appendix 1: Measures template 20
Appendix 2: Review meeting template 21
Appendix 3: Expected number of runs 22
Acknowledgements 23

3
To demonstrate if changes are
really improvement, you need
the ability to test changes and
measure the impact
successfully. This is essential for
any area that wants to
continuously improve safety.
To do this you may only need a
few specific measures linked to
clear objectives to demonstrate
that changes are going in the
right direction.
This guide is designed to help you to
this in your improvement projects. It
is in two parts.
Part 1 explains what measurement for
improvement is and how it differs
from other sorts of measurement that
you will have come across.
Part 2 talks you through the process
of collecting, analysing and reviewing
data. If you are familiar with the
Model for Improvement and how to
use it, you can skip Part 1 and go
straight to Part 2.
The How-to guide for measurement for improvement
“All improvement
will require
change, but not all
change will result
in improvement”
G. Langley et al.,
The Improvement Guide, 1996
Introduction

4
The Model for Improvement
The basis of measurement for improvement falls naturally out of the Model for Improvement. The Model for
Improvement was developed by Associates for Process Improvement (USA, available at www.apiweb.org). It provides a
framework around which to structure improvement activity to ensure the best chance of achieving your goals and
wider adoption of ideas. The model is based on three key questions used in conjunction with small scale testing:
The document focuses on measurement,
which is fundamental in answering
the second question: “How do we
know a change is an improvement?”
but all parts of the model are
inextricably linked. An overview of all
parts of the model can be found in
the accompanying Campaign
document “The quick guide to
implementing improvement” (available
at www.patientsafetyfirst.nhs.uk).
Small tests of changes that you hope
will have an impact on your rate of
harm need to be measured well. This
part of the model is an iterative way
as improvements/measures do not
always work first time. The testing
process not only tells you how well
the changes are working but how
good your measure and its collection
process is. You may find after a test
that your method of sampling or data
collection needs refining.
Implementing changes takes time and
money so it’s important to test
changes and measures on a small
scale first because:
• It involves less time, money and risk
• The process is a powerful tool for
learning which ones work and
which ones don’t. How many of
you have ever designed a
questionnaire or an audit form only
to realise that it didn’t give you the
information you needed? This may
have been because the information
you requested wasn’t quite right,
the way people interpreted the
questions or simply that the form
itself wasn’t clear enough for the
person to complete without
guidance
The How-to guide for measurement for improvement
Part 1: What is measurement for Improvement?
What are we trying to achieve? Constructing a clear aim statement
Choosing the right measures and planning
for how you will collect the right information
Coming up with ideas on how to
improve the current state
How will we know that a change
is an improvement?
What changes can we make that
will result in an improvement?
Testing them using PDSA cycles
Act Plan
Study Do

5
• It is safer and less disruptive for
patients and staff. You get an idea
of the impact on a small scale first
and work to smooth out the
problems before spreading the
changes more widely
• Where people have been involved
in testing and developing the ideas,
there is often less resistance.
Measurement for safety improvement
does not have to be complicated.
Tracking a few measures over time
and presenting the information well is
fundamental to developing a change
that works well and can be spread.
Measurement can show us a number
of important pieces of information:
• how well our current process is
performing
• whether we have reached an aim
• how much variation is in our
data/process
• small test of change
• whether the changes have resulted
in improvement
• whether a change has been
sustained.
The 3 reasons for measurement
There are three main reasons why we measure: research, judgement and
improvement. Understanding what you are measuring and why is vital as it
determines how you approach the measurement process
Adapted from: “The Three Faces of Performance Management: Improvement, Accountability and
Research.” Solberg, Leif I., Mosser, Gordon and McDonald, Susan Journal on Quality Improvement.
March 1997, Vol23, No. 3.
Clinical colleagues are often more familiar and comfortable with measurement
for research on a large scale with a fixed hypothesis to reduce unwanted
variation. Health service managers and those in more strategic roles may be
more familiar with measurement for judgement as a way of understanding a
level of performance. Measuring for improvement is different. The concept of
sequential testing means that there needs to be willingness to frequently
change the hypothesis (as you learn more with each test) and an acceptance
of ‘just enough’ data, working with data and information that is ‘good
enough’ rather than perfect. Measurement for improvement does not seek to
prove or disprove whether clinical interventions work – it seeks to answer the
question “how do we make it work here?”
Characteristic Judgement Research Improvement
Aim Achievement New knowledge Improvement
of target of service
Testing strategy No tests One large, Sequential,
blind test observable tests
Sample size Obtain 100% ‘Just in case’ ‘Just enough’ data
of available, data small, sequential
relevant data samples
Hypothesis No hypothesis Fixed hypothesis Hypothesis flexible;
changes as learning
takes place
Variation Adjust measures to Design to eliminate Accept consistent
reduce variation unwanted variation variation
Determining if No change Statistical tests Run chart or
change is an focus (t-test, F-test, statistical process
improvement chi-square, p-values) control (SPC) charts
The How-to guide for measurement for improvement
“Seek
usefulness, not
perfection, in the
measurement”
Nelson et al., Building Measurement
and Data Collection into Medical Practice;
Annals of Internal Medicine; 15 March
1998; Volume 128 Issue 6; Pages 460-466.

6
Making measures more
meaningful
Sometimes we ask staff to spend time
and energy testing and implementing
changes that they perceive to have
only a small impact. It is
understandable that teams prefer to
look for the ‘big win’; the one change
that will get them where they want
to be. Driver diagrams can be helpful
in showing these teams how the
work they are doing not only links to
the organisation’s strategic aims but
how all of the smaller changes add
up to achieve it. This can help
motivate teams by demonstrating the
importance of their role in improving
the safety of their patients.
Each of the ‘How to Guides’ created
for the Campaign interventions
contains a driver diagram to
demonstrate how the elements of the
intervention link to achieving the aim.
The different types of
measures
It can be helpful when you have
selected a range of measures to
check what type of question they are
addressing. Are they telling you
something about what happened to
the patient? Or are they telling you
something about the process of care?
Knowing that you have selected all of
one type might cause you to think
again about your selections. The
three types we use in improvement
work are called outcome, process and
balancing measures.
Outcome measures reflect the
impact on the patient and show the
end result of your improvement work.
Examples within the safety arena
would be the rate of MRSA or the
number of surgical site infection
cases.
Process measures reflect the way
your systems and processes work to
deliver the outcome you want.
Examples within the safety arena
would be % compliance with hand
washing or the % of patients who
received on time prophylactic
antibiotics.
Balancing measures reflect what
may be happening elsewhere in the
system as a result of the change.
This impact may be positive or
negative. For example if you want to
know what is happening to your post
operative readmission rate. If this has
increased then you might want to
question whether, on balance, you
are right to continue with the
changes or not. Listening to the
sceptics can sometimes alert us to
relevant balancing measures. When
presented with change, people can
be heard to say things like “if you
change this, it will affect that.”
Picking up on the ‘thats’ can lead to a
useful balancing measure.
Of course our main purpose is to see
outcomes improving but how can we
do that? Reliable processes are a
proven way to better outcomes.
So we need to improve our processes
first to make them extremely reliable
then improved outcomes will follow.
Therefore, we should have both
process and outcome measures and
where necessary a balancing
measure.
The How-to guide for measurement for improvement
Good measures
are linked to
your aim - they
reflect how the
aim is achieved.

7
Rations and percentages
Having decided on a topic for a
measure, for example surgical site
infections, we now need to decide
how it should be expressed. Do we
want to express it as a percentage of
patients seen, the rate per 1000
patients or simply as a count (the
number of infections)? What follows
are some guidelines to help you
decide which option to use.
Use Counts when the target
population (for example number of
patients on a ward) does not change
much. It has the advantage of
simplicity but it can be difficult to
compare with others or even with
yourself over time. So, expressing our
measure as the number of infections
per month is fine as long as the
patient population we are treating
remains reasonably constant over time.
Use Ratios or rates when you want
to relate the infections to some other
factor such as patients or bed days.
If your target population numbers are
quite variable a simple count is not
sufficient without the context. In this
case the measure would be infections
per 100 patients or infections per
1000 bed days. Now a ratio is simply
one number divided by another
(infections divided by patients) and
statisticians use specific words to
describe the two numbers that
comprise a ratio. They would call the
infections number the ‘numerator’
and the patients number the
‘denominator’.
Use Percentages when you want to
make your focus more specific.
For example, if you want to learn
about patient falls in your
organisation is your focus on the
occurrence of falls or the result of
falls in terms of patient harm? If your
focus is falls then you would measure
this as a rate or ratio. If your focus is
on what has happened to the patient
you might select a measure as the %
of patients who were harmed by their
fall. In our infection example, the
measure would be percentage of
patients who had a surgical site
infection that met your pre determined
criteria for infection. In both examples
you would probably be gathering the
same information - just expressing it a
different way. Notice that we have
moved away from counting infections
now to counting patients who had an
infection to allow us to frame the
measure as a percentage - if we were
counting the former we could not
express this as a percentage because
some patients may already have more
than one and statistically that means
it would be possible to end up with a
number that is greater than 100%!
Use ‘time between’ or ‘cases
between’ when you are tracking a
‘rare’ event, say one that occurs less
than once a week on average.
If surgical infections occur this
infrequently then measures expressed
as rates or percentages become less
useful. A count of monthy infections
might look something like:
2,3,3,3,2,3,4,3,3,2,2,4. A change of
1 infection is quite a percentage shift
and therefore our run chart would
vary wildly but based only on 1 more
or less infection. Clearly this is not
very helpful. In this case express the
measure as the number of cases since
the last infection. We might now get
values such as 75, 57, 82, 34 cases
between infections. When charted
this gives us something more useful
to look at and it is not affected by the
‘small number’ problem that can
impair rates and percentages.
The How-to guide for measurement for improvement

8
Top tips
Key things to remember when
starting to measure:
• Seek usefulness not perfection –
measurement should be used to
focus and speed improvement up
not to slow things down
• Measure the minimum. Only collect
what you need; there may be other
information out there but the aim is
to keep things as simple as possible
• Remember the goal is improvement
and not a new measurement
system. It’s easy to get sidetracked
into improving data quality,
especially if you are confronted
with challenges on the credibility of
the data (more commonly from
colleagues who may tend to trus
more rigorous research data) –
just ensure it’s ‘good enough’
• Aim to make measurement part of
the daily routine. Where possible
use forms or charts that are already
routinely used or add
recording/collection process to one
that is already in place. This
minimises the burden on staff and
also maximises the chances of it
being done reliably.
The 7 steps to take
Step 1 Decide your aim
Step 2 Choose your measures
Step 3 Confirm how to collect
your data
Step 4 Collect your baseline data
Step 5 Analyse and present
your data
Step 6 Meet to decide what it is
telling you
The How-to guide for measurement for improvement
Part 2: How do I measure for improvement?
6 Review
measures
4 Collect
data
5 Analyse &
present
7 Repeat
steps 4-6
3 Confirm collection
2 Choose measures
1 Decide aim

9
Step 1 - Decide your aim
More information on setting an aim is
contained in the accompanying
Campaign document ‘The quick
guide to implementing improvement’
(Model for improvement section)
available at:
www.patientsafetyfirst.nhs.uk.
The key points to remember about
aim setting are:
• Those involved in making the
changes should be able to
understand (and translate) the
project work to the strategic goals.
• The aim statement should be
unambiguous clear, specific,
numerical, measurable – it MUST
state “How much’ and ‘By when’.
If the aim seems quite a long way
from where your current performance
level (baseline) is, it is advisable to
break it down into statements that
make it seem more achievable e.g.
achieving 80% compliance within
1 year but improving this to 95%
within 18 months.
Step 2 - Choose your measures
Each of the Campaign intervention
How to Guides gives you an overview
of the recommended measures for
each intervention as well as
suggestions for optional measures.
You can also view a complete list of
all the Campaign measures in
‘Campaign Measures Definitions.doc’
(available at
www.patientsafetyfirst.nhs.uk). The
Campaign’s Extranet site also allows
you to create your own custom
measures so that you can choose
measures that you feel are important
to you locally. Appendix 1 contains a
template that helps you define your
own measures (also available at
www. patientsafety first.nhs.uk)
Step 3 - Confirm how you will
collect your data
Use the measurement template to
help you work through this step. You
will need to identify the date you
need and where it comes from.
Sometimes the data will be already
collected but often you may need to
set about collecting it yourself. The
process of working this out helps you
to define exactly what it is you are
measuring and sometimes you will
find that it might be so complex that
you need to rethink what the best
measure is to ensure the data is
collected reliably. It also can help you
add details to your aim statement
such as what the pilot population is if
you are using one.
Steps 1 to 3 - Getting yourself ready
The How-to guide for measurement for improvement
6 Review
measures
4 Collect
data
5 Analyse &
present
7 Repeat
steps 4-6
3 Confirm collection
2 Choose measures
1 Decide aim
6 Review
measures
4 Collect
data
5 Analyse &
present
7 Repeat
steps 4-6
3 Confirm collection
2 Choose measures
1 Decide aim
6 Review
measures
4 Collect
data
5 Analyse &
present
7 Repeat
steps 4-6
3 Confirm collection
2 Choose measures
1 Decide aim

10
Operational definitions
Measures nearly always require some
kind of operational definition. This
means specifying exactly what some
terms means and applying this
definition consistently. For example if
you want to know how many
patients had ventilator associated
pneumonia (VAP) you need to be
explicit about what constitutes a VAP
and what does not. Sometimes these
definitions can be very difficult to get
consensus on. One hospital spent a
year having discussions about how to
define a VAP! If there is disagreement
find a few examples from other
hospitals and get the team to pick
one and start using it. The team can
then spend as long as they choose
over deciding how they would like to
define a VAP but in the meantime the
work can progress
The most important thing is that once
you have established these definitions,
they are applied consistently. If you
do change them for any reason, you
will need to annotate your run chart
stating what you changed about
what you measure or the way that
you measure it.
Sampling
When do we track 100% and
when do we track a sample?
If your numbers are small enough
that you can track 100% without too
much trouble then you should do it. If
this is not feasible then you should
use a sample. For the Campaign
measures that require you to select a
sample, 10 is sufficient. This is also
the sample size use for ‘Productive
Ward’ measures.
For example, when measuring
progress in reducing VAPs then the
numbe of VAPs is not difficult to
monitor so you would count all cases
of VAP that occur. When auditing
compliance with the use of the
ventilator care bundle you would use
a weekly sample of 10.
How do we select the sample?
You need to choose a sample that is
representative of the overall
population that you are measuring.
This is so that you do not
inadvertently introduce a bias into
your results. For example, if you are
auditing to see how many patients
have had all their physiological
observations completed then you
would choose any 10 patients on the
ward / unit at random. However, if
you are auditing the number of
patients who were given fumazenil
you would need to select a sample
from a patient group who are likely to
have received midazolam (such as
from a day surgery unit).
It is difficult to ensure a truly random
sample if you are making the choices
manually. Almost inevitably some bias
can creep into those choices unless
you are very careful. One way you
can avoid this outcome is to use a
random number generator such as
the one contained in Excel. Number
all the patients you want to select
from and then use the Excel feature
to ‘select’ a sample. If you are not
familiar with how to do this in Excel,
contact your Information Department
for assistance.
The How-to guide for measurement for improvement

11
The How-to guide for measurement for improvement
Measurement itself is a process. In its
simplest form it consists of three
stages. First you collect some data,
then you analyse it and present in an
appropriate way to convert it into
useful information and finally you
review your information to see what
decisions you need to make. The
Collect-Analyse-Review or CAR cycle
then starts all over again.
Step 4 - Collect your baseline data
You will need to know your baseline
before you can track the progress of
your goal against it. By starting your
measurement and plotting points you
will be able to create your baseline.
To create a baseline or identify a
trend using a run chart, about 25
data points are ideal. However, 20
data points will provide a robust
representation. One way to get more
points is to measure more frequently.
The Campaign measures have been
set up on the assumption of monthly
reporting. Obviously to get a robust
baseline means you will need
between 1 and 2 years of monthly
data. This is fine if historic data is
available for you to use.
Often the data you need to measure
though is not being collected. If so
you should start collecting your data
straight away., But you do not have
to wait to start testing small changes.
They will not affect your overall
situation so you can be doing those
while creating your baseline.
Step 5 - Analyse and present your data
Use the Extranet
The Extranet is a web-based reporting
tool set up especially by the Institute
for Healthcare Improvement (IHI) for
The Patient Safety First Campaign.
You need to register via the
Campaign website to gain access.
Your organisation already has a
‘home page’ on the site. From this
you can select from the campaign list
of recommended measures or create
your own custom measures. Then all
you have to do is enter your data and
run charts are created for you
automatically. You can also see the
charts for other Trusts although the
ability to actually input and change
data is restricted to those individuals
that each organisation has
nominated.
When entering your data there is also
an opportunity to annotate the chart.
This is an extremely useful way of
noting when you have made changes
so that you can see whether they are
having any effect.
Steps 4 to 6 - the CAR measurement cycle
6 Review
measures
4 Collect
data
5 Analyse &
present
7 Repeat
steps 4-6
3 Confirm collection
2 Choose measures
1 Decide aim
6 Review
measures
4 Collect
data
5 Analyse &
present
7 Repeat
steps 4-6
3 Confirm collection
2 Choose measures
1 Decide aim

12
Why run charts?
The way you analyse and present
your collected data is important. Run
charts are a good way to show how
much variation there is in your
process over time. Also, plotting data
over time is a simple and effective
way to determine whether the
changes you are making are leading
to improvement.
The figure below shows the
percentage of medicines reconciled
on a medical admissions unit. It has
also been annotated with the dates
that specific changes were tested or
introduced to the medicines
reconciliation process on the ward.
In the first few months, the
percentage reconciled varied between
30% and 50%. Once a new form
was introduced in October 2007,
performance rose slightly and seemed
to stabilise at 55%. The letter from
the Clinical Director does not seem to
have had much effect whereas the
introduction of pharmacy had a more
obvious one. It is too early to tell from
this data whether the improvement is
permanent, we would need several
more months showing 90% before
we could be confident about that.
Nevertheless the run chart shows
clearly which interventions had an
impact and which ones didn’t. This is
important to know. We don’t want to
be spending time and energy
pursuing something that is not
helping us.
One more thing would help us in
using this chart. We should add a
goal or target line that represents
where we are trying to get to.
Keeping the goal line on every graph
ensures everyone viewing the graph
can see at a glance where the work is
at in relation to achieving the aim.
How do I know whether changes
are an improvement?
As you will have seen from the
previous example charts may go up
and down but we need to have some
way of knowing whether this is just
random chance or the result of a real
change. There are 4 tests that you
can apply to run charts to help you
identify what’s happening after
you’ve made change and therefore
determine whether it is really an
improvement. You can apply the 4
tests to your measures on the
Extranet by selecting the Run Chart
option from the Reports tab.
Two of the tests make use of the
mean (average) or median values of
your data and also the concept of a
‘run’. The median is simply the middle
value of all your values if they were
arranged in order. If you are creating
your own charts, you should calculate
the mean or median and plot it on
your chart – this is called the ‘typical
value’. A ‘run’ is a consecutive series
of points that are above the median
or below it. As a general rule use the
mean. If the data points look very
‘spiky’ (ie there is a frequent wide
variation in your lower and upper
figures use the median.
The tests are:
Test 1: 6 or more consecutive points
above or below the man.
These runs indicate a shift in the
process. Values are still varying but
they are doing so around a new
mean or average value. If this is shift
in the right direction, it is likely that
the change you made is having a
beneficial effect. This is the most
frequent type of change in the data
that you will see.
Test 2: 5 or more consecutive points
all increasing or decreasing.
This indicates a trend and suggests
that the change you made is having
an effect but you don’t know yet
where performance will become
stable again. You need to keep
measuring to find out. This situation
is more likely to occur if you are
rolling out a change over a period
of time.
The How-to guide for measurement for improvement

13
Test 3: Too many or too few runs.
Count them up by circling the runs as
in the example to the right. Not that
any points that fall on the
mean/median line should be ignored.
Use the table in Appendix 3 to work
out whether your variation is due to
random causes. If the number of runs
is inside the range this is what we
might expect by chance. If the
number falls outside the range then
some external factor is having an
effect. Too many runs suggest the
process has become less consistent
and it is possible that your change
has had a detrimental effect. Too few
runs suggests a more consistent
process.
Test 4: An ‘astronomical’ data point.
The example of journey times in the
sub section “Testing for changes with
SPC charts” explains what this might
look like. You should use your own
judgement to assess whether the
result in question really is ‘odd’. Often
such markedly out of range results are
caused by a data collection or data
definition problem so check that first.
If the data seems ok then try to find
out what might have caused such an
odd result. It may cause you to think
about creating a contingency plan for
if such an occasion arose again.
What is the difference between
run charts and statistical process
control (SPC) charts?
Run charts should be sufficient for
nearly all your measurement but there
may be occasion for you to need to
understand the statistical process
control or SPC chart. The SPC chart is
a further refinement of a run chart.
It introduces the idea of expected
variation, that is, how much variation
does my process typically exhibit?
SPC charts still have a ’typical value’
line (mean or median) but add 2
further lines, the upper and lower
limits. The purpose of these lines is to
show you that data points appearing
within the limits, despite going up
and down are doing so as part of the
normal variation that we see in
everyday life. If a data point spikes
above or below these limits then you
know something different has
happened – a special event, hence
this is called special cause variation.
When events like this are seen on a
chart you need to investigate what
happened. Even though the event
might be unlikely to occur again it is
still worth considering if there is
anything you can do to minimise the
impact if it did.
If our process exhibits just random
variation, we can use the SPC chart to
‘predict’ what future performance
would be like. We would expect any
future data points to vary around the
average and lie within the limits.
The How-to guide for measurement for improvement

Testing for changes with SPC charts
To illustrate how test 4 described
earlier applies also to SPC charts,
consider your journey to work. Some
days are quicker than others but you
tend to know on average how long it
takes you, on a ‘good’ day and on a
‘bad’ day. If your average journey
time is 30 minutes and it never
usually takes you more than 45
minutes or less than 15 minutes, then
you know how much time to allow.
But the day that it took you 90
minutes because you had a flat tyre
on your car and you didn’t have a
jack with you to change it, you and
your colleagues would know that
something was different (special)
about that day. Even though it might
not happen again you would still
probably take the jack out of your
garage and put it in the boot of the
car so you could change your tyre
more quickly if it did. If it actually
didn’t feel as if it took as long as 45
minutes to sort out the problem you
might also check your watch and the
clock on the wall in the office to see
if it really did take you that long or if
there was an inconsistency in the
recording of the time.
You can also use run chart tests 1 and
2 with SPC charts too. If using SPC
charts there are a few other tests that
you would do but for the purposes of
most Campaign improvement work
you are most likely to want to use SPC
to assess how likely your current process
is to deliver what you want it to.
Assessing process capability with
SPC charts
You can use the process limits of the
SPC chart to help you assess how
capable you process is of doing what
you want it to do i.e. whether you are
likely to reach a particular target. In
the chart shown, our process is
performing at an average of 50 cases
per month with an expected range of
28 to 72 cases. If we have a target of
no less than 40 cases per month
(shown as a green line), are we likely
to hit it? Yes we are but not all the
time. We would need to either shift
the whole range up so that the lower
limit now sat at 40 cases up from 28
cases which is an increase of 12
cases. But to do this we now need to
complete an average number of 62
cases per month! Alternatively we
could try to reduce the monthly
variation. We will still complete 50
cases on average but now the range
is 40 to 60 cases. Pursuing the first
option means we have to do more
work to hit our target but opting for
the second means we don’t.
14
The How-to guide for measurement for improvement
If you want to know more about variation the following book is an excellent and concise introduction: Wheeler,
Donald J. Understanding variation: the key to managing chaos. SPC Press, 2000.

15
It is vital that you set time aside to
look at what your measures are
telling you. This can be incorporated
into your Campaign steering group
meeting if you have one or other
regular meetings. If you don’t have
an existing meeting that includes the
right people, you will need to set one
up. It needn’t be a long meeting,
30 minutes is perfectly adequate to
review where you are and decide the
next actions. Remember that the
purpose of measurement is to lead
you to making the right decisions
about your improvement project.
The review meeting template in
Appendix 2 may help you to set up
and conduct your review meeting
effectively.
Who needs to know what the
data is telling you?
‘The How to Guide for Leadership for
Safety’ (available at
www.patientsafetyfirst.nhs.uk)
outlines the roles senior leaders and
the board play in monitoring progress
and driving the execution of projects.
There is however a concern amongst
this group that there is a potential for
them to become overwhelmed with
detailed data. For this reason there
needs to be clear hierarchy of
reporting so that each layer of the
organisation only receives the
information it requires for assurance
and or decision making.
The key aim is to ensure that each
layer of staff only receive the
information they need to assure them
that the changes are progressing in
the right direction and where they
stand in relation to the hard red goal
line. Balancing measures and lower
level process measures may only need
to be reported to the Board if there is
a stall in progress suggesting there is
a problem that requires their
attention or a decision from them.
The How-to guide for measurement for improvement
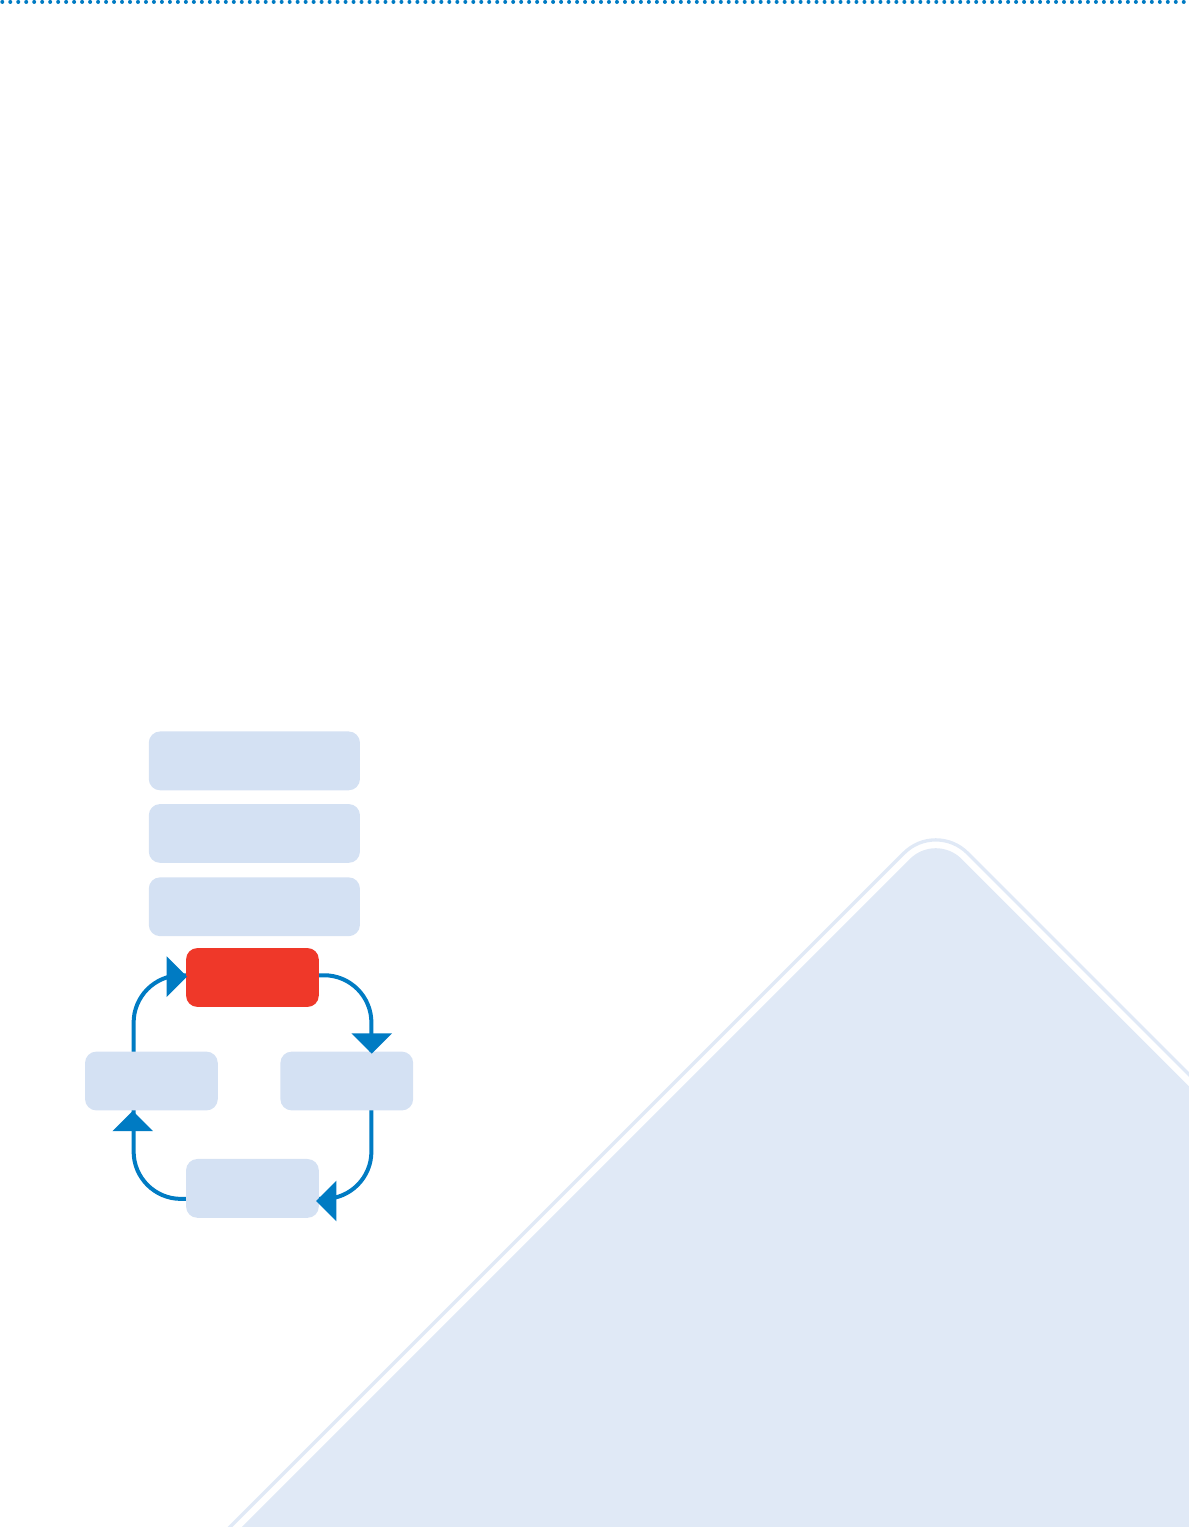
Step 6 - Review your data to decide what it is telling you
6 Review
measures
4 Collect
data
5 Analyse &
present
7 Repeat
steps 4-6
3 Confirm collection
2 Choose measures
1 Decide aim
Figure: The hierarchy of measurement reporting
Adapted from Lloyd & Caldwell, IHI. 2007
Board
& CEO
Higher level outcome
measures
Focus on
outcome
Focus on
process
Higher level outcome
measures
Balancing measures
Relevant process +
outcome measures
Relevant process +
outcome measures
Service managers
Unit/department managers,
project staff
Front line staff
16
The How-to guide for measurement for improvement
Repeat steps 4, 5 and 6 each month
or more frequently.
If you are measuring compliance with
a process (such as compliance with
handwashing or the ventilator care
bundle) aim for a minimum of 95%
for non-catastrophic process.
Obviously, for a catastrophic process
(i.e. one where if it fails it will almost
certainly result in serious injury or
death) aim for 100%. Keep making
changes until your data tells you this
is so.
For outcomes (such as surgical site
infection rate or number of central
line infections), you are aiming to
consistently meet or exceed your
goal. If you are using SPC charts,
ensure the goal sits outside the
appropriate upper or lower limit.
When do I stop measuring?
The simple answer is “you don’t”.
If you are consistently meeting your
goal you should still look to see if
there are further improvements that
could be made. If you aimed for 0%
or 100% and are meeting it
consistently you should still continue
to measure so that any deviations are
picked up and acted upon quickly. In
these cases you may decide to
measure slightly less frequently,
however be aware that the process of
measuring does have a positive effect
in keeping awareness high and
demonstrating that the goals you are
measuring are important to the
organisation.
Step 7 - Keep going!
6 Review
measures
4 Collect
data
5 Analyse &
present
7 Repeat
steps 4-6
3 Confirm collection
2 Choose measures
1 Decide aim

17
Appendix 1: Measures template
Measures checklist
Measure setup
Measurement process
Measure name:
Measure definition What data item comprises the Numerator?
What data item comprises the Denominator?
(some measurement do not require one)
What is the calculation?
Which patient groups are covered?
Goal Setting What is the numeric goal you are setting yourselves?
Who is responsible for setting this?
When will it be achieved by?
The How-to guide for measurement for improvement
Appendix
Collect
Analyse
Calculate measure and present results
Review
Is the data available?
Currently available/Available with minor changes/Prospective collection needed
Who is responsible for data collection?
What is the process of collection?
What is the process for presenting results?
E.g. enter data in extranet, create run chart in Excel
Who is responsible for the analysis?
How often is the analysis completed?
Where will decisions be made based on results?
Who is responsible for taking action?

18
The How-to guide for measurement for improvement
Appendix 2: Review meeting template
Review Meeting Guidelines
Where: When:
Objectives Participants and roles
Follow up on actions from previous meeting Chair
Understand changes in performance since Others
last meeting
Discuss Issues, identify next steps and
assign responsibility
Who do I contact if I won’t be here
or can’t update my chart?
Inputs Outputs
Agreed aims Agreed action and
responsibilities
Update measures data
Actions from previous week
Agenda
1. Welcome 1 min
2. Update on actions from previous week 5 min
3. Review charts and discuss changes since
last week 5 min
4. Agree what actions to take to improve
the measure 5 min
5. Decide who will take each action and
by when 5 min
6. Confirm attendance for next meeting 4 min

19
The How-to guide for measurement for improvement
Appendix 3: expected number of runs
Tests for Number of Runs Above and Below the Median
Number of Lower Limit Upper Limit Number of Lower Limit Upper Limit
Data Points for Number of runs for Number of runs Data Points for Number of runs for Number of runs
10 3 8 34 12 23
11 3 9 35 13 23
12 3 10 36 13 24
13 4 10 37 13 25
14 4 11 38 14 25
15 4 12 39 14 26
16 5 12 40 15 26
17 5 13 41 16 26
18 6 13 42 16 27
19 6 14 43 17 27
20 6 15 44 17 28
21 7 15 45 17 29
22 7 16 46 17 30
23 8 16 47 18 30
24 8 17 48 18 31
25 9 17 49 19 31
26 9 18 50 19 32
27 9 19 60 24 37
28 10 19 70 28 43
29 10 20 80 33 48
30 11 20 90 37 54
31 11 21 100 42 59
32 11 22 110 46 65
33 11 22 120 51 70

20
The How-to guide for measurement for improvement
Acknowledgements
This guide was produced as part of the Patient Safety Campaign.
Thanks to the English Campaign Team Members and others who have
contributed to this guide.
We also wish to thank and acknowledge the Institute for Healthcare
Improvement (IHI) for their support and contribution.
Authors:
Clarke, Julia: Field Operations Manager/Content Development Lead;
Patient Safety First Campaign. Associate (Safer Care Priority Programme);
NHS Institute for Innovation and Improvement.
Davidge, Mike: Head of Measurement, NHS Institute.
James, Lou: Associate (Safer Care Priority Programme);
NHS Institute for Innovation and Improvement.
