
Page 1 of 307
STATE OF ARKANSAS
LONG TERM CARE FACILITY NURSING ASSISTANT TRAINING CURRICULUM
Written by
The Curriculum Committee for the
Nursing Assistant Training Program
July 1988
(Revised July 1992)
(Revised July 2006)
(Revised January 2019)
For information and implementation of this curriculum contact:
Quality Assurance, Workforce Assessment, & Provider Engagement
Division of Provider Services and Quality Assurance
Department of Human Services
Post Office Box 8059 Slot S405
Little Rock, Arkansas 72203
Page 2 of 307
AUTHORITY
I.
1. The following rules and regulations for the Long Term Care Facility Nursing
Assistant Training Program are duly adopted and promulgated by the
Department of Human Services pursuant to Arkansas Code 20–10–701 et seq.
2. This initiative is pursuant to the Federal mandates of Public Law 100–203
The Nursing Home Reform Act, Subtitle C of the Omnibus Budget
and Reconciliation Act of 1987 and technical amendments of OBRA
1989 and 1990 concerning the training and competency evaluation of
nursing assistants employed in long term care facilities and the
registry of certified nursing assistants.
3. The Federal Omnibus Budget Reconciliation Act (OBRA) of 1987, 1989, and
1990 and regulations issued by the U.S. Department of Health and Human
Services – Centers for Medicare and Medicaid Services (formerly Health Care
Financing Administration, or HCFA) established the minimum requirements for
nursing assistant training and competency evaluation programs in Section
1819(a) – (f) and 1919(a) – (f) of the Social Security Act.
II.
1. The Arkansas Nursing Assistant Scope of Practice identifies the Standards of
Practice that Certified Nursing Assistants (CNA) must follow in delivering care. If
a CNA delivers care outside of the defined Standards of Practice, whether it is on
the CNA’s own initiative or at the direction of a licensed nurse, the CNA may
have violated the Arkansas Adult and Long–Term Care Facility Resident
Maltreatment Act as defined in Arkansas Code Ann. 12–12–1707 et seq.
Page 3 of 307
TABLE OF CONTENTS
Lesson #1 Introduction to the Role of the Nurse Aide .................................... 11
I. Introduction to Long Term Care .......................................................... 17
II. The Role of the Nurse Aide ................................................................ 17
III. The Care Team and the Chain of Command ...................................... 19
IV. Communication and Interpersonal Skills ............................................ 19
V. Resident-Centered Care (Person-Centered Care) ............................. 22
Lesson #2 Resident Rights ................................................................................ 23
I. Resident Rights .................................................................................. 24
II. Abuse, Neglect, and Personal
Possessions/Misappropriation ............................................................ 26
Lesson #3 Infection Control ............................................................................... 29
I. Introduction to Infection Control .......................................................... 32
II. Infection Control Practices .................................................................. 35
III. Hand Hygiene ..................................................................................... 36
IV. Personal Protective Equipment – PPE ............................................... 37
V. Precautions ........................................................................................ 37
Lesson #4 Fire Safety and Other Resident Safety Concerns .......................... 39
I. Fire Safety .......................................................................................... 39
II. Side rails/Entrapment ......................................................................... 41
III. Resident Elopement ........................................................................... 41
IV. Smoking ............................................................................................. 43
Lesson # 5 Medical Concerns/Emergency Procedures .................................... 45
I. Accidents ............................................................................................ 46
II. Falls / Fall Prevention ......................................................................... 46
III. Choking .............................................................................................. 47
IV. Burns/Scalds ...................................................................................... 48
V. Poisoning ............................................................................................ 49
VI. Medical Emergency ............................................................................ 49
VII. Safety Measures/Prevention Strategies ............................................. 50
Page 4 of 307
Lesson #6 Basic Care Skills............................................................................... 52
I. Points to Remember ........................................................................... 54
II. Unoccupied Bed ................................................................................. 55
IV. Resident Room/Environment/Fall Prevention ..................................... 55
V. Promoting Proper Nutrition and Hydration .......................................... 56
Lesson #7 Common Diseases and Disorders – Respiratory and
Urinary Systems ............................................................................... 63
Respiratory System ....................................................................................... 63
I. Respiratory System ............................................................................ 63
II. Common Conditions of the Respiratory System ................................. 63
III. Normal Changes with Age .................................................................. 64
IV. Role of the Nurse Aide regarding the Respiratory System ................. 64
Urinary System .............................................................................................. 65
I. Urinary System ................................................................................... 65
II. Common Conditions of the Urinary System ........................................ 65
III. Normal Changes with Age .................................................................. 65
IV. Problems Caused by Incontinence ..................................................... 65
V. Role of the Nurse Aide regarding the Urinary System ........................ 65
Lesson #8 Oxygen Use ....................................................................................... 67
I. Oxygen Use ........................................................................................ 67
Lesson #9 Common Diseases and Disorders – Nervous, Circulatory and
Musculo–Skeletal Systems .............................................................. 71
Nervous System ............................................................................................ 72
I. Nervous System ................................................................................. 72
II. Conditions that Affect Nervous System .............................................. 72
III. Normal Nervous System Changes with Age ....................................... 73
IV. Role of the Nurse Aide regarding the Nervous System ...................... 73
Circulatory System ........................................................................................ 74
I. Circulatory System ............................................................................. 74
II. Conditions that Affect the Circulatory System .................................... 74
III. Normal Circulatory Changes with Age ................................................ 74
IV. Role of the Nurse Aide regarding Circulatory System ........................ 74
Page 5 of 307
Musculoskeletal System ................................................................................ 75
I. Musculoskeletal System ..................................................................... 75
II. Conditions that Affect Musculoskeletal System .................................. 75
III. Importance of Exercise or Range of Motion (ROM) ............................ 76
IV. Normal Musculoskeletal Changes with Age ....................................... 77
V. Role of the Nurse Aide regarding the Musculoskeletal
System ............................................................................................... 77
Lesson #10 Common Diseases and Disorders – Gastrointestinal
and Endocrine Systems ................................................................... 79
Gastrointestinal System ................................................................................ 80
I. Gastrointestinal System ...................................................................... 80
II. Common Conditions of the Gastrointestinal System .......................... 80
III. Normal Changes with Age .................................................................. 80
IV. Role of the Nurse Aide regarding the Gastrointestinal
System ............................................................................................... 80
Endocrine System ......................................................................................... 81
I. Endocrine System .............................................................................. 81
II. Common Conditions that Affect the Endocrine System ...................... 81
III. Normal Changes with Age .................................................................. 82
IV. Role of the Nurse Aide regarding the Endocrine System ................... 82
Lesson #11 Common Diseases and Disorders – Reproductive,
Immune/Lymphatic Systems ........................................................... 84
Reproductive System .................................................................................... 85
I. Reproductive System ......................................................................... 85
II. Common Conditions that Affect the Reproductive System ................. 85
III. Normal Changes with Age .................................................................. 85
IV. Role of the Nurse Aide regarding the Reproductive
System ............................................................................................... 85
Lymphatic and Immune Systems .................................................................. 85
I. Lymphatic System .............................................................................. 85
II. Immune System.................................................................................. 85
III. Common Conditions of the Immune and Lymphatic
Systems .............................................................................................. 86
IV. Normal Changes with Age .................................................................. 86
Page 6 of 307
V. Role of the Nurse Aide regarding the Immune and
Lymphatic Systems ............................................................................ 86
Lesson #12 Activities of Daily Living - Bathing, Shampoo,
Perineal Care .................................................................................... 88
I. Bathing and Shampooing Points to Remember .................................. 88
II. Perineal and Catheter Care Points to Remember……………………..89
Lesson #13 Activities of Daily Living - Oral Care, Grooming, Nail
Care ................................................................................................... 91
I. Grooming/Personal Hygiene .............................................................. 91
Lesson #14 Activities of Daily Living - Dressing, Toileting ............................... 94
I. Dressing ............................................................................................. 95
II. Toileting .............................................................................................. 95
Lesson #15 Activities of Daily Living – Positioning/Turning,
Transfers ......................................................................................... 100
I. Proper positioning and body alignment ............................................ 101
II. Commonly used positions ................................................................ 102
III. Proper transfer ................................................................................. 103
Lesson #16 Activities of Daily Living - Devices Used for Transfer ................. 108
I. Mechanical lifts ................................................................................. 108
II. Transfer resident to stretcher/shower bed ........................................ 109
III. Transfer – Two Person Lift ............................................................... 110
Lesson #17 Resident’s Environment ................................................................ 111
I. Occupied Bed…………………………………………………………….111
Lesson #18 Skin Care/Pressure Prevention ..................................................... 113
I. Understanding the Integumentary System and Basic Skin
Care .................................................................................................. 114
II. Risk Factors for Skin Breakdown ..................................................... 116
III. Pressure Ulcer Development ............................................................ 118
IV. Prevention of Skin Breakdown ......................................................... 118
Lesson #19 Activities of Daily Living Nutrition/Hydration .............................. 121
I. Promoting Proper Nutrition and Hydration ........................................ 121
II. Promoting the Use of Proper Feeding
Technique/Assisting a Resident with Special Needs ........................ 122
III. Caring for a Resident with a Tube Feeding and the
Resident at Risk for Aspiration ......................................................... 124
Page 7 of 307
Lesson #20 Basic Nursing Skills – Vital Signs, Height and Weight ............... 127
I. Initial Steps ....................................................................................... 128
II. Final Steps ....................................................................................... 128
III. Vital signs Provide Important Information ......................................... 128
IV. Measuring Height and Weight .......................................................... 130
Lesson #21 Restraints ........................................................................................ 133
I. Physical Restraint ............................................................................. 134
Lesson #22 Rehabilitation/Restorative Services .............................................. 138
I. Rehabilitation……………………………………………………………..138
II. Restorative Services…………………………………………………….139
III. Devices which may be applied per Restorative Nursing
Program ............................................................................................ 139
Lesson #23 Devices/Interventions - Prosthetics, Hearing Aides,
Artificial Eye, Eyeglasses, Dentures, Compression
Stockings ........................................................................................ 141
I. Purpose of a Prosthetic Device ........................................................ 141
II. Types of Prosthetic Devices ............................................................. 141
III. Role of the Nurse Aide regarding Amputations &
Prosthetic Care ................................................................................. 142
IV. Role of the Nurse Aide regarding Hearing Aids ................................ 142
V. Role of the Nurse Aide regarding Artificial Eye &
Eyeglasses ....................................................................................... 142
VI. Role of the Nurse Aide regarding Dentures ...................................... 143
VII. Role of the Nurse Aide regarding Elastic/Compression
Stockings (TED Hose) ...................................................................... 143
Lesson #24 Special Care Needs – Intravenous Fluids, Non–
Pharmacologic Pain Interventions ................................................ 145
I. IV or PICC Lines ............................................................................... 146
II. Role of the Nurse Aide in caring for IV/PICC .................................... 146
III. Infection Control ............................................................................... 147
IV. Pain Factors ..................................................................................... 147
V. Role of the Nurse Aide related to Pain ............................................. 147
Lesson #25 Cognitive Impairment/Dementia/Alzheimer’s ............................... 151
I. Conditions ........................................................................................ 152
II. Behaviors, Causes and Interventions ............................................... 155
Page 8 of 307
III. Methods/Therapies to Reduce Behaviors ......................................... 158
IV. Tips to Remember when Dealing with Cognitively
Impaired Residents........................................................................... 159
V. Communication Strategies ............................................................... 159
VI. Techniques to Handle Difficult Behaviors ......................................... 159
VII. Behavior Interventions ...................................................................... 160
VIII. Activity Chart .................................................................................... 163
IX. Safety Checklist ................................................................................ 165
X. Sleep Changes ................................................................................. 167
Lesson #26 Mental Health, Depression and Social Needs .............................. 171
I. Causes of Mental Illness .................................................................. 172
II. Response to Behaviors .................................................................... 172
III. Use of Defense Mechanisms – unconscious behaviors
used to release tension or cope with stress or
uncomfortable, threatening situations or feelings. ............................ 173
IV. Types of Mental Illness ..................................................................... 173
V. Behaviors Associated with Mental Disorders – actions
and interventions .............................................................................. 175
VI. Treatment for Mental Illness ............................................................. 175
VII. Special Considerations ..................................................................... 176
VIII. Mental Illness and Intellectual Disability ........................................... 176
Lesson #27 Admission/Transfer/Discharge ..................................................... 177
I. Admitting a New Resident to the Facility .......................................... 177
II. Assisting to Transfer a Resident to a Hospital (i.e., Care
Transition) ........................................................................................ 178
III. Assisting a Resident to Discharge Home or to Another
Facility .............................................................................................. 178
Lesson #28 End of Life ....................................................................................... 179
I. Advance Directives ........................................................................... 179
II. Role of Hospice ................................................................................ 180
III. Care of the Dying Resident .............................................................. 180
IV. Signs/Symptoms of Impending Death .............................................. 181
V. Post Mortem Care ............................................................................ 181
VI. Disposition of Personal Belongings .................................................. 182
Page 9 of 307
VII. Stages of Reaction to Dying ............................................................. 182
Lesson # 29 Daily Responsibilities .................................................................... 185
I. Day-to-day Time Management/Resident Care ................................. 185
II. Interdisciplinary Care Plan Meetings ................................................ 186
Lesson #30 Protecting Your Profession ........................................................... 188
I. Reducing Stress/Burnout .................................................................. 189
II. Abuse/Neglect/Misappropriation ....................................................... 190
III. Nurse Aide Testing/Certification ....................................................... 191
IV. Certification Renewal ........................................................................ 192
V. Course Review ................................................................................. 192
Works Cited.…………………………............................................................................193
APPENDIX A Supplemental Materials………………………………………………….195
APPENDIX B Answers to Review Questions...………………………………………..199
APPENDIX C Care Skills...………………………………………………………………207
APPENDIX D Task Performance Record ……………………………………………..302
Page 10 of 307
UNIT 1

Page 11 of 307
Lesson # 1 (1 hour)
Title: Introduction to the Role of the Nurse Aide
Lesson Objectives:
I. The student will be able to describe Long Term Care in comparison with other
healthcare settings.
II. The student will be able to describe the role of the Nursing Assistant, including
the Scope of Practice and the role of facility policies and procedures which may
govern care and conduct.
III. The student will be able to explain the members and roles of the Interdisciplinary
Care Team and the Chain of Command.
IV. The student will be able to describe the importance of both verbal and non–
verbal communication, barriers to effective communication, and interpersonal
skills.
V. The student will be able to explain culture change/resident-centered care and the
need to incorporate into daily care.
Key Terms:
Abuse – any intentional unnecessary physical act that inflicts pain on, or causes injury,
to an endangered person or an impaired person (nursing home resident);
A. Any intentional and unnecessary physical act that inflicts pain on or causes
injury to an endangered person or an impaired person, excluding court-
ordered medical care or medical care requested by the patient or long-term
care facility resident or a person legally authorized to make medical decisions
on behalf of the patient or long-term care facility resident;
B. Any intentional act that a reasonable person would believe subjects an
endangered person or an impaired person, regardless of age, ability to
comprehend, or disability, to ridicule or psychological injury in a manner likely
to provoke fear or alarm, excluding necessary care and treatment provided in
accordance with generally recognized professional standards of care;
C. Any intentional threat that a reasonable person would find credible and non-
frivolous to inflict pain on or cause injury to an endangered person or an
impaired person except in the course of medical treatment or for justifiable
cause; or
D. Any willful infliction of injury, unreasonable confinement, intimidation, or
punishment with resulting physical harm, pain, or mental anguish.
Page 12 of 307
Activity Director (AD) – an individual who plans the activities for the residents and
assists them to socialize and to stay physically and mentally active.
Activities of Daily Living (ADLs) – personal daily care tasks, including bathing,
dressing, caring for teeth and hair, toileting, eating, and drinking.
Acute – a current illness that has severe symptoms and may be as a result of a sudden
onset.
Administrator – manages all departments within the facility.
Adult Day Care – care given at a facility during day time hours; generally for individuals
who need some assistance and/or supervision but are not seriously ill or disabled;
usually reside outside of the facility.
Advanced Practice Nurse – a registered nurse having education beyond the basic
nursing education and certified by a nationally recognized professional organization in a
nursing specialty, or meeting other criteria established by a Board of Nursing.
Assisted Living – facilities where residents live who need limited assistance, but do not
require skilled care.
Bedfast – Bedridden. Confined to bed, especially for a long or indefinite period of time,
due to illness or injury
Call Light – a device used to communicate a need for assistance to staff.
Certified Nursing Assistant (CNA) – an individual who has completed a state-
approved course and has successfully completed certification testing. A CNA provides
direct care under the supervision of a Registered Nurse (RN) or a Licensed Practical
Nurse (LPN).
Certified Occupational Therapist Assistant (COTA) – helps patients develop,
recover, and improve the skills needed for daily living and working. Occupational
therapy assistants provide therapy to patients under the direct supervision of
occupational therapists.
Chain of Command – the line of authority in the facility which addresses to whom each
employee/department reports.
Chronic – the disease or condition is long term or will be long lasting.
Clichés – phrases that are used frequently and which often have a different meaning,
making it difficult for the resident to understand.
Communication – the process of exchanging information with others.
Page 13 of 307
Criminal Record Check – the process of reviewing an individual’s criminal history in
order to determine if he/she is eligible for employment in a long term care facility. State
and/or national records may be reviewed for this process.
Cultural Differences – beliefs, values, habits, diet and health practices that relate to a
person’s culture or religion.
Cultural Diversity – the variety of people living and working together in the facility.
Culture – the way of life, especially the general customs and beliefs, of a particular
group of people at a particular time.
Culture Change – a philosophy that focuses on providing person–centered care to
residents and creating a positive work environment for healthcare workers.
Denial – rejection of a thought or feeling.
Dependent – requires staff assistance to carry out activities of daily living.
Displacement – transferring a strong negative feeling to something or someone else.
Endangered Adult – A long-term care facility resident or an Arkansas State Hospital
resident who:
A. Is found to be in a situation or condition that poses an imminent risk of death
or serious bodily harm to the long-term care facility resident; and
B. Demonstrates a lack of capacity to comprehend the nature and
consequences of remaining in that situation or condition.
Exploitation – illegal or unauthorized use or management of an endangered person’s
or an impaired person’s (nursing home resident) funds, assets, or property;
A. Misappropriation of property of a long–term care facility resident, that is, the
deliberate misplacement, exploitation, or wrongful, temporary, or permanent
use of a long–term care facility resident’s belonging or money without the
long–term facility resident’s consent.
Health Insurance Portability and Accountability Act (HIPAA) – federal law that
protects the privacy of individually-identifiable health information; sets national
standards for the security of electronic, protected health information; and protects
identifiable information being used to analyze patient safety events and improve patient
safety.
Home Health Care – care provided in a person’s home.
Hospice Care – care for individuals who have an estimated six months or less to live.
Hospice provides physical and emotional care and comfort.
Page 14 of 307
Housekeeping Department – responsible to maintain the facility in a clean and
sanitary manner.
Impaired Person – a person eighteen (18) years of age or older who as a result of
mental or physical impairment is unable to protect himself or herself from abuse, sexual
abuse, neglect or exploitation. A long–term care facility resident is presumed to be an
impaired person.
Independent – able to carry out activities of daily living without staff assistance.
Intermediate Care Facilities/Individuals with Intellectual Disabilities (ICF/IID) –
facilities that specialize in providing care to developmentally disabled individuals.
Interdisciplinary Team – professionals from each discipline within the nursing facility
who meet to discuss and plan the care of the resident.
Laundry Department – oversees laundering of facility linens and residents’ personal
clothing.
Licensed Practical Nurse (LPN) – A licensed professional who has completed 1 to 2
years of nursing education and has passed an exam for licensure; nurse who provides
care under the direction of registered nurses or physicians.
Long Term Care (LTC) – care for persons who require 24-hour care and assistance.
Long Term Care Facility Resident – means a person, regardless of age, living in a
long–term care facility.
Long Term Care Facility Resident Maltreatment – abuse, exploitation,
misappropriation of a resident’s property, neglect, or sexual abuse of a long–term care
facility resident as defined by Arkansas law.
Maintenance Department – maintains facility and grounds in good repair.
Medical Director – physician who provides oversight to the nursing staff regarding care
provided to the residents.
Medical Doctor (MD) – physician
Medication Assistive Person (MAP) – a certified nursing assistant who has completed
required state training and has completed examination in an effort to administer
medications and certain treatments in accordance with the specific scope of practice of
the MAP.
Neglect – an act or omission by a caregiver responsible for the care and supervision of
an endangered person or an impaired person (nursing home resident) constituting:
Page 15 of 307
A. Negligently failing to provide necessary treatment, rehabilitation, care, food,
clothing, shelter, supervision, or medical services to an endangered person or
an impaired person;
B. Negligently failing to report health problems or changes in health problems or
changes in the health condition of an endangered person or an impaired
person to the appropriate medical personnel;
C. Negligently failing to carry out a treatment plan developed or implemented by
the facility; or
D. Negligently failing to provide goods or services to a long-term care facility
resident necessary to avoid physical harm, mental anguish, or mental illness.
Non–Verbal Communication – communication without using words, such as facial
expressions, tone of voice, posture, gestures, touch, body language, etc.
Objective Information – information based on what is factually seen, heard, touched or
smelled. A direct observation.
Occupational Therapist (OT) – a therapist who helps residents to learn to compensate
for their disabilities and assist them with activities of daily living.
Office of Long Term Care – state agency that oversees the long term care facilities in
Arkansas; commonly called OLTC.
Ombudsman – resident advocate who investigates complaints and assists to achieve
agreement between parties, often defending the rights of residents.
Optometrist – health care professional who examines eyes for defects, prescribes
correctional lenses, and treats diseases of the eye.
Palliative Care – care that focuses on the comfort and dignity of the person rather than
on curing him or her.
Person–Centered Care – a philosophical approach to nursing home care that honors
and respects the voice of elders and those working closest with them. It involves a
continuing process of listening, trying new things, seeing how they work, and changing
things in an effort to individualize care and de–institutionalize the nursing home
environment.
Physical Therapist (PT) – provides therapy in the form of heat, cold, massage,
ultrasound, electricity and exercise to residents with muscle, bone and joint problems.
A PT may help a person to safely use a walker, cane, or wheelchair
Podiatrist – a physician who examines and cares for the residents’ feet.
Page 16 of 307
Policy – a course of action determined by the facility that should be taken every time a
certain situation occurs.
Post–Acute Head Injury Facility – a facility which specializes in care and services for
persons with acute head injuries.
Procedure – the steps to be taken to carry out a task. A particular way of doing
something.
Professionalism – how a person behaves when he/she is on the job.
Projection – seeing feelings in others that are really one’s own.
Rationalization – making excuses to justify a situation.
Registered Dietitian (RD) – a professional who creates special diets for residents with
specific needs and plans menus to ensure residents’ nutritional needs are met.
Registered Nurse (RN) – a licensed professional who has completed 2 to 4 years of
nursing education and has passed an exam for licensure; professional who can provide
all levels of nursing care under the direction of a physician.
Regression – going back to an old, immature behavior.
Repression – blocking painful thoughts or feelings from the mind.
Residential Care Facility (RCF) – facility licensed to provide services 24 hours a day
to individuals older than 17 who are not capable of independent living and who require
assistance and supervision. Individuals in RCF must be independently mobile, capable
of responding to reminders and guidance from staff and capable of self-administering
medication.
Respiratory Therapist – provides breathing treatment(s) and special equipment for
respiratory conditions.
Sexual Abuse – deviant sexual activity, sexual contact, or sexual intercourse, as those
terms are defined in §5–14–101, with another person who is not the actor’s spouse and
who is incapable of consent because he or she is mentally defective, mentally
incapacitated, or physically helpless as those terms are defined in §5–14–101.
Scope of Practice – the tasks for which a person is trained, thus, allowed to perform.
Skilled Care – medically-necessary care given by a nurse or therapist.
Slang – terms/words used that may be specific to a generation and not easily
recognized and/or easily misinterpreted by the resident.
Social Worker (SW) – an individual who helps residents with psycho–social needs and
assists to arrange needed services.

Page 17 of 307
Speech Therapist (ST) or Speech Language Pathologist (SLP) – a therapist who
helps residents with speech, language and swallowing problems.
Subjective Information – information that could not be or was not observed.
Information based on what a person thinks, or something that was reported by another
person that may or may not be true.
Terminal illness – a disease or condition that will eventually cause death.
Tuberculosis (TB) – a bacterial infection that usually attacks the lungs, but can attack
any part of the body, such as the kidneys, spine, and brain. An airborne disease,
carried on droplets suspended in the air, that causes coughing, difficulty breathing, fever
and fatigue.
Verbal Communication – written or spoken messages.
Content:
I. Introduction to Long Term Care
A. Long Term Care – Acute, chronic and terminal illness
B. Skilled Care
C. Adult Day Care
D. Assisted Living
E. Residential Care Facility
F. Home Health Care
G. Hospice Care
H. Palliative Care
I. Intermediate Care Facilities/Individuals with Intellectual Disabilities
(ICF/IID)
II. The Role of the Nurse Aide
A. Requirements for working in Long Term Care
1. Criminal records check performed per the Office of Long Term Care
(OLTC) guidelines
2. Tuberculosis (TB) Skin Test (or health screen and physical) and
annual flu vaccination
Page 18 of 307
3. Completion of a state-approved training program
4. Pass the state competency examination within one year of training
completion; only three test attempts will be allowed; certificate must
remain active and in good standing (no flags/disqualifications)
B. Professionalism
Examples of professional interactions with the resident include, but are not
limited to:
1. Keeping a positive attitude while doing the assigned tasks you are
trained to perform.
2. Keeping information about the resident confidential
3. Being polite – not discussing your personal problems with a
resident or with a co–worker in front of a resident
4. Not using profanity, even if a resident uses profanity.
5. Listening to the resident.
6. Calling the resident by Mr., Mrs., Ms., or by the name he/she
prefers.
7. Always explaining the care, you will be providing before beginning
to provide the care.
8. Presenting a positive image through personal hygiene, appearance
and state of mind.
9. Accountability
10. Confidentiality–Health Insurance Portability and Accountability Act
(HIPAA)
C. Scope of Practice – The Arkansas Nursing Assistant Scope of Practice
identifies the Standards of Practice that Certified Nursing Assistants
(CNA) must follow in delivering care. If a CNA delivers care outside of the
defined Standards of Practice, whether it is on the CNA’s own initiative or
at the direction of a licensed nurse, the CNA may have violated the
Arkansas Adult and Long Term Care Facility Resident Maltreatment Act
as defined in Arkansas Code Ann. §12–12–1707 et seq.
D. Provide care according to the resident’s comprehensive care plan.
1. Direct care needs/Use of a Nurse Aide Assignment Sheet
Page 19 of 307
E. Actively listen to and communicate with the resident, the family, and the
health care team.
F. Observe and report any change in the resident’s appearance, behavior or
mood to the nurse.
1. Objective observation/information
2. Subjective observation/information
3. Observations that indicate an acute condition requiring immediate
attention from the nurse include but are not limited to: severe pain,
fall/accident, seizures, swelling, bleeding, loss of consciousness,
difficulty breathing.
4. Acute change in mental status – confusion, lethargy, delirium.
G. Participate in care planning, when requested.
H. Follow policies and procedures.
I. Follow the nurse aide assignment for your shift.
III. The Care Team and the Chain of Command
A. Interdisciplinary Team – often includes Activity Director, Certified Nursing
Assistant, Licensed Practical Nurse, Medical Doctor, Social Worker,
Occupational Therapist, Physical Therapist, Medication Assistive Person,
Dietary Manager and/or Registered Dietitian, Registered Nurse, Speech
Therapist, Administrator.
1. Resident and Family Member/Responsible Party.
2. Ombudsman, upon resident request.
B. Chain of Command
1. Administrator
2. Director of Nursing
3. Licensed Nurse (charge nurse/supervisor)
4. Certified Nursing Assistant/ Medication Assistive Person
IV. Communication and Interpersonal Skills
A. Effective Communication
Page 20 of 307
1. Formulate the message.
2. Receive the message (listen).
3. Observe for feedback.
B. Verbal and Non–Verbal Communication
C. Barriers to Communication
1. Clichés
2. Slang
3. Impairments
a. A person who is visually impaired relies on verbal cues,
including words and tone of voice.
i. State your name before beginning a conversation.
ii. Describe persons, things and environment.
iii. Inform the resident when you are entering or leaving
the room.
iv. Explain in detail what you are doing and ask the
resident what they would like to do independently.
v. Touch the resident, if appropriate.
vi. Read resident’s mail or personal documents, only if
asked
vii. Sit where resident can easily see you if resident has
partial vision.
b. A person who is hearing impaired relies on nonverbal cues
including body language, sign language, and writing.
i. Speak slowly and distinctly.
ii. Use short sentences.
iii. Face the resident.
iv. Use facial expressions and gestures.
v. Reduce outside distraction
Page 21 of 307
vi. Use sign language and communication boards, if
appropriate.
vii. Be certain that the resident’s hearing aid is in place
and is working properly, if applicable. (Glasses also)
4. A person who is cognitively impaired relies on both verbal and
nonverbal cues and may need messages repeated frequently,
using short sentences and simple words.
5. Denial – refusal to acknowledge existence of something: a refusal
to believe in something or admit that something exists.
6. Displacement – transfer of emotions or behavior: the transfer of
emotion from the original focus to another less threatening person
or object, or the substitution of one response or piece of behavior
for another.
7. Rationalization – a defense mechanism whereby people attempt to
hide their true motivations and emotions by providing reasonable or
self–justifying explanations for irrational or unacceptable behavior.
8. Regression – reversion to earlier state: a return to an earlier or less
developed condition or way of behaving.
9. Repression – a mechanism by which people protect themselves
from threatening thoughts by blocking them out of the conscious
mind.
D. Call Lights as the resident’s means to Communicate with Staff
1. Ensure residents have access to their call light when they are in
their room; always place call light on the resident’s unaffected side
and within easy reach.
2. Staff should respond immediately to call lights and provide any
necessary/requested assistance upon answering.
E. Promoting resident’s independence
1. Independence versus Dependence – relying on self vs. others to
perform tasks
2. Activities of Daily Living (ADLs) – allow residents to perform as
much of the skill/duty as possible, offering assistance as needed.

Page 22 of 307
V. Resident–Centered Care (Person–Centered Care)
A. Respecting resident choice/preference
1. Provide a home–like and safe living environment with daily routines
designed to meet the resident’s specific needs and in accordance
with former lifestyle.
B. Practices which reflect resident–centered care includes, but not limited to:
1. Time to awake/retire to bed
2. Frequency of bath/shower
3. Preferred activities
4. Choice of clothing
5. Choice of mealtimes
6. Choice of toileting times
C. Cultural Diversity
D. Respecting Cultural Differences
E. Respecting Religious Preferences
Review Questions --- Lesson #1
1. To whom does the CNA report?
2. What is the difference between an objective and a subjective observation?
3. Give examples of resident choices which could be honored by the facility
to promote person–centered care.

Page 23 of 307
Lesson # 2 (1.5 hours)
Title: Resident Rights
Lesson Objectives:
I. The student will be able to explain the importance of residents’ rights.
II. The student will be able to describe the components/areas that are residents’
rights.
III. The student will be able to demonstrate ways to protect residents’ rights.
IV. The student will be able to describe the types of abuse, neglect and
misappropriation.
Key Terms:
Abuse – the willful infliction of injury, unreasonable confinement, intimidation, or
punishment with resulting physical harm, pain or mental anguish; abuse can be verbal
(something said–oral, written or gestured), physical (something done to the resident–
rough handling/treatment, hitting, slapping, pinching, etc.), emotional/mental
(humiliation, harassment, threats of punishment or deprivation) or sexual (harassment,
coercion or sexual assault). Any sexual relationship with a resident is considered to be
abuse.
Confidentiality – maintaining information as private.
Consensual – agreed to by the people involved; done with the consent of the people
involved.
Health Insurance Portability and Accountability Act (HIPAA) – federal law that
protects the privacy of individually-identifiable health information; sets national
standards for the security of electronic, protected health information; and protects
identifiable information being used to analyze patient safety events and improve patient
safety.
Informed Consent – a person, if competent, after having been informed of potential
negative outcomes, makes informed decisions about their healthcare.
Involuntary Seclusion – separation of a resident from other residents or from his/her
room or confinement to his/her own room against the resident’s will, or the will of the
resident’s legal representative.
Misappropriation – the deliberate misplacement, exploitation, or wrongful, temporary
or permanent use of a resident’s belongings or money without the resident’s consent.

Page 24 of 307
Neglect – failure to provide goods and services necessary to avoid physical harm,
mental anguish, or mental illness; failure to follow a prescribed order of treatment or the
care plan; negligently failing to provide necessary treatment, rehabilitation, care, food
clothing, shelter, supervision , or medical services; negligently failing to report health
problems or changes in health problems or changes in health condition of a resident to
the appropriate medical personnel, and failing to carry out a prescribed treatment plan
developed or implemented by the facility.
Omnibus Budget Reconciliation Act (OBRA) – law passed by federal government
establishing minimum standards for nursing home care and for nursing assistant
training.
Privacy – free of being observed or disturbed by other people.
Residents’ Rights – rights identified by OBRA relative to residents in long term care
facilities; informs residents and others of the residents’ rights within the facility.
Restraints – to physically restrict voluntary movement or use chemicals to
revise/restrict resident behavior.
Content:
I. Residents’ Rights
A. Origin – Omnibus Budget Reconciliation Act (OBRA) —passed in 1987
due to reports of poor care and abuse in nursing homes.
B. Purpose
1. Inform a resident how he/she is to be treated.
2. Provide an ethical code of conduct for healthcare workers.
C. These rights include the resident’s right to:
1. Exercise his or her rights;
2. Be informed about what rights and responsibilities he or she has;
3. If he or she wishes, have the facility manage his or her personal
funds;
4. Choose a physician, treatment and participate in decisions and
care planning;
5. Privacy and confidentiality;
Page 25 of 307
6. Voice grievances and have the facility respond to those grievances;
7. Examine survey results;
8. Work or not work;
9. Privacy in sending and receiving mail;
10. Visit and be visited by others from outside the facility;
11. Use a telephone in privacy;
12. Retain and use personal possessions to the maximum extent that
space and safety permit;
13. Share a room with a spouse or another, if mutually agreeable;
14. Refuse a transfer from a distinct part, within the facility;
15. Be free from any physical or chemical restraints; and
16. Be free from verbal, sexual, physical and mental abuse, corporal
punishment and involuntary seclusion.
D. Protection of Residents’ Rights:
1. Never abuse — know your limits.
2. Types of abuse (Refer to Lesson 30) (Arkansas Adult Maltreatment
Act, Act 584 of 2013, codified as Ark. Code Ann. § 12-12-701 et
seq.)
3. Report signs/symptoms of abuse, neglect and misappropriation
(examples provided later).
E. Privacy
1. Avoid unnecessary exposure.
2. Do not open mail without permission.
3. Knock and request permission before entering room.
F. Confidentiality
1. No gossip.
2. No sharing of resident information except with care team members.
Page 26 of 307
a. Health Insurance Portability and Accountability Act (HIPAA) – law
to keep health information private.
b. Social Media – posting any resident’s information without that
resident’s consent is considered a violation of privacy rights and
may lead to abuse as defined in the Abuse Maltreatment Act.
G. Resident Care
1. Involve resident in care.
2. Explain procedures.
3. Respect refusal in care.
4. Report refusal in care.
Note: Introduce CARE SKILLS #1 and #2– “Initial Steps” and “Final Steps”
to reinforce acknowledgement of Resident Rights. Following these steps
will help to ensure that residents’ rights are observed when providing care.
H. Report and Document
1. Be honest and truthful.
2. Notify supervisor immediately of abuse, neglect and/or
misappropriation.
3. Contact nurse with questions about caring for residents.
4. Report changes in condition.
5. Mandated reporter- person legally required to report suspected or
witnessed abuse and/or neglect. Nursing assistants are mandated
reporters. Failure to report abuse or neglect is a crime that can
result in criminal charges.
II. Abuse, Neglect, and Personal Possessions/Misappropriation
A. Types of Abuse
1. Physical - something done to the resident – rough
handling/treatment, hitting, slapping, pinching, etc.
2. Sexual - harassment, coercion or sexual assault. Any sexual
relationship with a resident is considered to be abuse.
3. Mental - humiliation, harassment, threats of punishment or
deprivation
Page 27 of 307
4. Verbal - something said – oral, written or gestured
5. Financial – improper or illegal use of the resident’s money or
possessions. Accepting money from the resident for special care or
stealing from the resident is considered financial abuse.
B. Neglect/Negligence
C. Involuntary Seclusion
D. Misappropriation
1. Personal property
2. Gifts
3. Temporary or permanent misuse of a resident’s property.
E. Signs and Symptoms
1. Abuse
a. Conditions– suspicious marks, bruises, bite marks, fractures,
dislocations, burns, scalp tenderness, nose bleeds, swelling,
welts
b. Observations– fear, pain, withdrawal, mood changes, acting
out, anxiety, guarding
c. Catastrophic reactions- are extraordinary reactions of
residents to ordinary stimuli, such as the attempt to provide
care.
2. Neglect
a. Conditions – pressure ulcers, dehydration, weight loss,
anger, sadness, fear
b. Observations – unclean, soiled bedding or clothing,
unanswered call lights, wrong clothes, no glasses/hearing
aids, uneaten food/snacks, no water available
c. Negligently failing to carry out a prescribed treatment plan
developed or implemented by the facility
3. Misappropriation
a. Conditions – anger, sadness, fear

Page 28 of 307
b. Observations – missing items, comments from resident or
family
F. Reporting
1. Know federal requirements, state requirements and requirements in
the Adult and Long–Term Care Facility Resident Maltreatment
Reporting Acts, Act 584 of 2013, codified as Ark. Code Ann. § 12-
12-701 et seq.
CARE SKILLS:
Introduce the students to:
• Initial Steps – #1
• Final Steps – #2
Review Questions --- Lesson #2
1. Give examples of Resident Rights.
2. How can Resident Rights be protected?
3. What are the different types of abuse?
4. Give examples of neglect.
5. Give an example of misappropriation.
6. What is the first thing that should be done if you feel a resident has been
abused?

Page 29 of 307
Lesson #3 (2 hours)
Title: Infection Control
Lesson Objectives:
I. The student will be able to explain the importance of Infection Control.
II. The student will be able to describe the chain of infection.
III. The student will be able to explain the importance of hand hygiene.
IV. The student will be able to describe the importance of personal protective
equipment (PPE).
V. The student will be able to explain both Standard and Transmission-Based
Precautions.
VI. The student will be able to describe conditions that are associated with
infections.
VII. The student will be able to demonstrate proper handwashing technique and
proper use of PPE.
VIII. The student will be able to describe the importance of a clean environment.
IX. The student will be able to verbalize rationale related to following proper
technique for handwashing and use of PPE.
Key Terms
Acquired Immune Deficiency Syndrome (AIDS) – a disease of the human immune
system caused by Human Immunodeficiency Virus (HIV). The illness interferes with the
immune system, making those with AIDS much more likely to get infections. Although
considered a sexually transmitted disease, it is also spread through blood, infected
needles, or to the fetus from its mother.
Airborne Precautions – measures used to protect against diseases that are
transmitted through the air after expelled.
Aseptic– preventing infection; free or freed from pathogenic microorganisms.
Blood-borne Pathogens – microorganisms in human blood which can cause infection
and disease in humans.
Body Fluids – saliva, sputum, urine, feces, semen, vaginal secretions, and pus or other
wound drainage.
Causative Agent – a biological agent (pathogen) that causes a disease.
Page 30 of 307
Centers for Disease Control and Prevention (CDC) – federal agency that issues
guidelines to protect and improve health.
Chain of Infection – an illustration to describe how a disease is transmitted from one
person (or source) to another.
Clostridium Difficile (C–Diff) – bacteria which causes severe watery diarrhea and
other intestinal disease when competing bacteria have been wiped out by antibiotics; It
is spread by spores that are difficult to kill and can be carried on the hands of caregivers
who have direct contact with residents or an environmental surface (i.e., floors, toilets,
bedpans).
Contact Precautions – measures used when there is risk of transmitting or contracting
a microorganism from touching an infected object or person.
Direct Contact – touching an infected person, or his/her secretions.
Disinfect – to decrease the spread of pathogens and disease by destroying pathogens.
Disinfection – process used to decrease the spread of pathogens by destroying them.
Chemicals are often used in this method of cleaning.
Disposable – a product designed for short–term or single use.
Droplet Precautions – measures used to protect against disease-causing
microorganisms that do not stay airborne and only travel a short distance after being
expelled.
Hand Hygiene – washing hands with soap and water or using alcohol–based hand rub.
Healthcare-Associated Infection (HAI) – infection acquired in a hospital or other
healthcare setting; also known as a nosocomial infection.
Hepatitis – inflammation of the liver caused by infection.
Indirect Contact – transmission of a disease without physical contact (e.g., touching a
common object).
Infection Control – methods used to control and prevent the spread of germs that are
present in the environment.
Influenza – an infectious disease caused by a virus. The most common symptoms
include chills, fever, sore throat, muscle pains, severe headache, coughing,
weakness/fatigue, and general discomfort. Influenza is a more severe disease than the
common cold.
Isolation – measure taken to separate (isolate) the potentially harmful microorganism
and prevent spread to other residents.
Page 31 of 307
Jaundice – a yellow/gold tint to the skin and eyes often seen in liver disease, such as
hepatitis, or liver cancer.
Localized Infection – an infection contained to a specific body part.
Methicillin-Resistant Staphylococcus Aureus (MRSA) – an antibiotic resistant
infection often acquired in hospitals and other facilities; spread by direct physical
contact.
Mode of Transmission – how the pathogen travels from one person to another.
Transmission can happen through the air, or through direct or indirect contact.
Nosocomial Infection – infection acquired in a hospital or other healthcare setting; also
known as HAI (healthcare-associated infection).
Occupational Safety and Health Administration (OSHA) – federal agency that
protects workers from hazards on the job.
Pathogen – harmful microorganism; the causative agent.
Pediculosis – an infestation of lice.
Personal Protective Equipment (PPE) – barrier between a person and a potentially
harmful microorganism.
Portal of Entry – the way pathogens enter the body (e.g., mouth, nose, skin breaks,
urinary tract and anus).
Portal of Exit – the ways pathogens leave the body (e.g., urine, feces, saliva, tears,
drainage from wounds, sores, blood, excretion from respiratory tract or genitals).
Reservoir – where pathogens live and multiply.
Scabies – a contagious skin infection that occurs among humans and other animals.
Caused by a tiny and usually not directly visible parasite which burrows under the host's
skin, causing intense allergic itching.
Standard Precautions – treating all blood, body fluids, non–intact skin and mucous
membranes as if they are infected.
Sterilization – technique that destroys all microorganisms, not just pathogens.
Susceptible Host – the person who could be infected (e.g., elderly, persons who are
not in good health, people who do not follow proper infection control precautions).
Systemic Infection – infection that occurs when pathogens enter one’s bloodstream
and move throughout the body causing general symptoms.

Page 32 of 307
Transmission-Based Precautions – special precautions implemented on the basis of
how the disease spreads.
Tuberculosis – a bacterial infection that affects the lungs, causing coughing and
difficulty breathing, fever and fatigue. It is an airborne disease, carried on droplets
suspended in the air.
Vancomycin-Resistant Enterococcus (VRE) – a strain of enterococcus that cannot be
controlled with antibiotics; it is spread through direct and indirect contact.
Content:
I. Introduction to Infection Control
A. Definition of Infection Control — methods used to prevent and control the
spread of disease, especially in a healthcare setting.
B. Role of Centers for Disease Control and Prevention (CDC)
1. CDC is the nation’s health protection agency, working 24/7 to
protect America from health and safety threats, regardless of the
origin of the threat.
C. Chain of Infection Links
1. Causative Agent – a pathogen or microorganism that causes
disease.
2. Reservoir – a place where a pathogen lives and grows.
3. Portal of Exit – a body opening on an infected person that allows
pathogens to leave.
4. Mode of Transmission – method of describing how a pathogen
travels from one person to the next person.
5. Portal of Entry – a body opening on an uninfected person that
allows pathogens to enter.
6. Susceptible Host – an uninfected person who could get sick (e.g.,
elderly, persons who are not in good health, people who do not
follow proper infection control precautions.
Page 33 of 307
D. Types of infections
1. Systemic – an infection that is in the bloodstream and spreads
throughout the body, causing general symptoms.
2. Localized – an infection that is confined to a specific location in the
body and has local symptoms.
3. Healthcare-Associated Infections (HAIs)/Nosocomial – infections
that patients acquire within healthcare settings that result from
treatment for other conditions.
E. Facility Infection Control Policy
1. Key components
a. Procedures – steps or methods that will be followed.
b. Reporting – contacting or informing required parties (such as
a nurse, doctor, Administrator, local health unit/department,
OLTC, etc.) when concerns arise or to provide updates on
previously-informed information.
c. Surveillance – monitoring surroundings and individuals to
identify potential concerns, such as the onset or first
appearance of an infection or signs that an infection has
spread.
d. Compliance – process of ensuring that steps are being
followed accordingly.
F. Infectious Disease/Infectious Condition
1. Acquired Immune Deficiency Syndrome (AIDS) – a disease of
the human immune system caused by human immunodeficiency
virus (HIV). The illness interferes with the immune system, making
those with AIDS much more likely to get infections. Although
considered a sexually transmitted disease, it is also spread through
blood, infected needles, or to the fetus from its mother.
a. Transmission – blood or body fluids; usually through contact
with blood or sexual contact.
b. Prevention– Standard Precautions
2. Clostridium Difficile (C–Diff) – bacteria which causes severe
watery diarrhea and other intestinal disease when competing
bacteria have been wiped out by antibiotics; It is spread by spores
Page 34 of 307
that are difficult to kill and can be carried on the hands of caregivers
who have direct contact with residents or an environmental surface
(i.e., floors, toilets, bedpans).
a. Transmission – spores which may survive up to six months
on inanimate objects.
b. Prevention – Contact Precautions; requires caregiver to
wash hands; do not use alcohol–based hand rubs.
3. Hepatitis – inflammation of the liver caused by infection.
a. Transmission – fecal/oral; contaminated blood or needles;
sexual intercourse.
b. Prevention – Standard Precautions; requires caregiver to
wash hands; do not use alcohol–based hand rubs
4. Influenza – an infectious disease caused by a virus. The most
common symptoms include chills, fever, sore throat, muscle pains,
severe headache, coughing, weakness/fatigue and general
discomfort. Influenza is a more severe disease than the common
cold.
a. Transmission – direct or indirect contact; may also be
airborne; when a person with the flu coughs, sneezes, or
talks, tiny droplets can land in the mouths or noses of people
nearby; the virus can also enter a person’s body if they touch
an object that has droplets on it and then touch their eyes,
mouth, or nose
b. Prevention – Standard Precautions; may require Droplet
Precautions. Frequent handwashing
5. Methicillin-Resistant Staphylococcus Aureus (MRSA) – is
bacteria that is resistant to many antibiotics. Infectious – with
symptoms. Colonized – without symptoms
a. Transmission – direct or indirect contact
b. Prevention—Standard Precautions (colonized); Contact
Precautions (infectious) dependent upon provider type;
Droplet Precautions for a respiratory infection.
6. Pediculosis – an infestation of lice.
a. Transmission –direct or indirect contact; common use of
combs/brushes, hats, linens.
Page 35 of 307
b. Prevention – Contact Precautions
7. Scabies – a contagious skin infection that occurs among humans
and other animals. Caused by a tiny and usually not directly visible
parasite which burrows under the host’s skin, causing intense
allergic itching.
a. Transmission – direct and indirect contact, by sharing
clothing, towels, or bedding
b. Prevention – Contact precautions
8. Tuberculosis – is a disease caused by a bacterium called
Mycobacterium tuberculosis.
a. Transmission–airborne; a resident who is suspected as
having active Tuberculosis will be immediately transferred to
a location where respiratory precautions (such as air
exchange limited only to the room of the resident and use of
respirators by caregivers) can be implemented.
b. Prevention – Airborne Precautions; relocation to an
appropriate environment.
9. Vancomycin-Resistant Enterococcus (VRE) – enterococci that
have become resistant to the drug Vancomycin, and thus are called
vancomycin–resistant enterococci
a. Transmission – direct or indirect contact
b. Prevention – Standard Precautions; may require Contact
Precautions.
II. Infection Control Practices
A. Environmental cleaning
1. High touch areas – bedrails, bedside equipment, remote control.
B. Disposal of contaminated items/infectious waste
1. Sharps containers
2. Bio–hazardous waste containers

Page 36 of 307
C. Linen
1. Handling clean linen
2. Handling/securing soiled linen
III. Hand Hygiene
A. Handwashing – when hands are visibly soiled
1. Washing hands is the single most important infection control
practice.
B. Alcohol–based hand rub/ hand sanitizer
C. Five Moments for hand hygiene – World Health Organization (WHO)
1. Before resident/patient contact
2. Before aseptic task
3. After exposure to blood/body fluids
4. After resident/patient contact
5. After contact with resident/patient surroundings
D. Other Handwashing moments
E. Important factors related to Hand Hygiene
1. Visibly soiled with blood or body fluids
2. Exposure to potential pathogens
a. Spores/Clostridium Difficile (C–Diff) – requires handwashing
F. Other factors related to Hand Hygiene
1. Fingernails – long fingernails harbor organisms.
2. Jewelry
3. Intact skin
G. Procedure for handwashing – (See CARE SKILLS #3)
1. Demonstrate proper handwashing.
2. Explain rationale for each step.

Page 37 of 307
IV. Personal Protective Equipment – PPE
A. Purpose of PPE – creates a barrier of protection against infectious
materials, so that the caregiver does not become contaminated; when
used correctly, PPE minimizes the spread of infection
B. Types of PPE
1. Gloves (See CARE SKILLS #4)
2. Gown (See CARE SKILLS #5)
3. Mask (See CARE SKILLS #6)
C. Procedure for PPE
V. Precautions
A. Standard Precautions - treating all blood, body fluids, non–intact skin and
mucous membranes as if they are infected.
1. Hand Hygiene
2. Personal Protective Equipment
3. Disposal of contaminated equipment/supplies
B. Transmission-Based Precautions – special precautions implemented on
the basis of how the disease spreads.
1. Airborne Precautions
2. Droplet Precautions
3. Contact Precautions
CARE SKILLS:
• Handwashing/Hand rub – #3
• Gloves – #4
• Gown – #5
• Mask – #6

Page 38 of 307
Review Questions --- Lesson #3
1. What are the links in the "Chain of Infection"?
2. What is the most important action a healthcare worker can take to prevent
spread of infection?
3. Describe the 5 Moments of Hand Hygiene.
4. Explain the importance of proper usage of personal protective equipment.
5. Provide examples of how direct contact can spread infection.
6. Provide examples of how indirect contact can spread infection.
7. If a resident has Clostridium Difficile, is an alcohol–based hand rub
effective?

Page 39 of 307
Lesson #4 (2 hours)
Title: Fire Safety and Other Resident Safety Concerns
Lesson Objectives:
I. The student will be able to describe fire safety and necessary emergency
response should a fire occur and manner of resident evacuation.
II. The student will be able to explain the rationale for use of side rails and potential
entrapment dangers associated with side rail use.
III. The student will be able to describe residents at risk of elopement and
interventions to help prevent elopement.
IV. The student will be able to explain the smoking policy, safety concerns and
interventions to promote safe smoking.
Key Terms:
Evacuation Plan – plan developed by the facility by which residents would be relocated
to a safe area within the facility, outside the facility, or to an alternate location.
Entrapment – a resident’s body part becomes lodged between the bed frame and/or
mattress and the bed rail.
Elopement – a resident exiting the facility whose whereabouts are unknown to the staff.
Fire Drill – plan executed frequently to help workers learn what to do in the case of a
fire.
Flammable – easily ignited; capable of burning quickly.
Pacing – walking back and forth in the same area of the facility.
Wandering – walking aimlessly throughout the facility.
Content:
I. Fire Safety
A. General
1. Know the evacuation plan.
2. Know how much assistance is needed, and which residents to
relocate first (i.e., ambulatory, those who need assistance, totally
dependent).
Page 40 of 307
3. Dangers of smoke inhalation
a. Stay low and cover mouth with wet cloth.
b. Shut residents’ doors.
4. Fire drills and procedures
a. Role of the nursing assistant during a fire drill and/or
evacuation.
b. Know the locations of all exits and stairways.
c. Know the locations of fire alarms, extinguishers and fire
blankets.
5. Never use an elevator in the event of a fire.
6. If your clothing catches on fire, STOP, DROP and ROLL to smother
the flames. A fire blanket, if available, can also be used to help
smother the flames.
7. A supervisor or charge nurse will give directions during an
emergency.
B. Guidelines in case of fire (See CARE SKILLS #7)
1. Remove residents from area of immediate danger.
2. Activate the fire alarm.
3. Contain the fire, if possible (close doors).
4. Extinguish, if possible.
C. Use of the fire extinguisher (See CARE SKILLS #8)
1. Pull the pin.
2. Aim at the base of the fire.
3. Squeeze the handle.
4. Sweep back and forth at the base of the fire.
Page 41 of 307
D. Types of fires
A= paper, wood, cloth
B= oil, grease
C=electrical
E. During an emergency, stay calm, listen carefully and follow directions
given.
II. Side rails/Entrapment
A. Purpose of side rail use
1. Enabling or self–help if used to assist the resident to move
independently.
2. Restrictive if their use results in confining the resident in bed;
restricting voluntary movement.
B. Zones/areas of potential bed entrapment
1. Ensure that the resident does not get caught between the bed
and/or mattress and/or side rails. Being trapped between the
spaces can result in serious injury or death.
2. Refer to the picture in Appendix A to identify zones on the bed
where entrapment can occur.
III. Resident Elopement
A. Exit-seeking behavior
1. Frequently remaining at or near exit doors.
2. Shaking door handles.
3. Pacing to and from the exit doors.
4. Voicing a desire to leave the facility and/or return home.
5. Packing clothing/belongings.
6. Wearing shoes, coat, hat, etc., although in the facility.
Page 42 of 307
B. Resident identification and monitoring
1. Facility assessment and identification of residents at risk of
elopement.
2. Pictures, logs or other means to identify residents at risk of
elopement.
C. Electronic bracelets
1. Worn by residents at risk for elopement.
2. Checked for presence and function per established facility
frequency.
3. Exits become secured when a resident with such a bracelet
approaches the exit.
4. Be cautious, as residents may remove bracelet with nail clippers,
knife, etc.
D. Coded entries
1. Requires a code to be entered to release/open the door.
2. Code should be known/available to alert and oriented residents,
visitors and staff.
3. Coded entries are unlocked during a fire alarm and must be
monitored.
E. Alarmed doors
1. Staff should suspect a resident has exited unattended when the
alarm is heard.
2. Check panel for source door sounding the alarm.
3. Immediately assess grounds near exit. If source of alarm sounding
is not visualized, conduct a headcount to confirm all residents are
safe within the facility.
4. Never silence an alarm without knowing “why” the alarm sounded.

Page 43 of 307
IV. Smoking
A. Facility policy
1. Supervised vs. unsupervised smoking per resident assessment of
ability.
2. If the facility allows unsupervised smoking, the facility should direct
how the resident is to store/manage smoking materials (i.e., lighter,
cigarettes).
3. The facility may be a “non–smoking” campus.
B. Potential safety concerns/assistive devices
1. Ability to manipulate smoking materials/cigarette extension.
2. Smoking apron if concerned with ashes dropped on clothing.
3. Appropriate non–flammable ashtrays/containers.
4. Oxygen use prohibited when smoking.
a. Oxygen supports combustion (the process of burning).
b. Never allow open flames near oxygen.
5. Monitoring for non–compliance with smoking policy.
a. Smoke odor in room.
b. Burn holes in clothing/bedding.
c. Smoking materials supplied by family members.
6. Electronic cigarettes
CARE SKILLS:
• Fire – #7
• Fire Extinguisher – #8

Page 44 of 307
Review Questions --- Lesson #4
1. Explain the acronym “RACE.”
2. Describe the proper use of the fire extinguisher using the acronym
“PASS.”
3. Describe the action to be taken should your clothing catch fire.

Page 45 of 307
Lesson #5 (2 hours)
Title: Medical Concerns/Emergency Procedures
Lesson Objectives:
I. The student will be able to explain the need for safety and prevention
measures/interventions.
II. The student will be able to explain risk factors related to different types of
accidents.
III. The student will be able to demonstrate prevention strategies for different types
of accidents.
Key Terms:
Cardiac Arrest – heart function and circulation stop.
Choking – a complete blockage of the airway requiring immediate action.
Disorientation –confusion related to time and/or place.
Environment – circumstances or conditions that surround an individual.
Fainting – sudden loss of consciousness because of inadequate blood supply to the
brain.
Fracture – broken bone.
Hemiplegia – total paralysis of the arm, leg and torso on one side of the body.
Hemorrhage – excessive loss of blood from a blood vessel.
Paralysis – loss or impairment of the ability to move a body part, usually as a result of
damage to its nerve supply.
Poisoning – to cause injury, illness, or death by chemical means.
Risk Factor – a characteristic, condition, or behavior that increases the possibility of
injury.
Scald – burn caused by hot liquids in contact with the skin.
Seizure (Convulsions) – sudden contractions of muscles due to a disturbance in brain
activity.
Shock – state of being when vital parts of the body (brain, heart and lungs) do not get
enough blood.

Page 46 of 307
Content:
I. Accidents
A. Types of Accidents
1. Falls/Fainting
2. Burns
3. Poisoning
4. Choking
B. Is the accident Neglect under Arkansas Law?
II. Falls – the consequences of falls can range from minor bruises to fractures and
life–threatening injuries.
A. Risk factors
1. Personal
a. Medications
b. Gait or balance problems
c. Diagnosis – paralysis, hemiplegia, weakness, disorientation
d. Fainting – the sudden loss of consciousness because of
inadequate blood supply to the brain. The cause can be
pain, fatigue, hunger or medical conditions.
e. Bowel/Bladder status – urgency, incontinence
f. Improperly fitting shoes or clothing
2. Environment
a. Clutter
b. Slippery/wet floors or floors that have shiny waxed finishes.
c. Uneven surfaces
d. Poor lighting
e. Call light out of reach
Page 47 of 307
f. Side rails
B. Prevention
1. Know residents that are at high risk for falls.
2. Frequent toileting program.
3. Respond to call lights promptly.
4. Use of proper shoes/clothing.
5. Keep environment clear or free of obstacles.
C. Intervention
1. If a resident begins to fall, never try to stop the fall. Gently ease the
resident to the floor and:
a. Call for help immediately, and
b. Keep the resident in the same position until the nurse
examines the resident.
D. Falling or Fainting (See CARE SKILLS #9)
III. Choking – a blockage of the airway. This can occur when eating, drinking or
swallowing.
The resident often gasps or clutches throat (the universal sign for choking).
A. Risk Factors
1. Diagnosis – stroke, swallowing difficulty
2. Medications
3. Mental Status
a. Unconscious
b. Cognitive impairment – wandering, eating others’ food at an
inappropriate consistency.
B. Prevention
1. Know residents who are at risk
2. Special diets/thickened liquids
Page 48 of 307
a. Soft/mechanical soft/pureed diets
b. Liquids – consistencies
i. Nectar thick – thicker than water
ii. Honey thick – pours very slowly
iii. Pudding thick – semi–solid (spoon should stand up
straight)
C. Choking - (See CARE SKILLS #10)
IV. Burns/Scalds
A. Risk Factors
1. Diagnosis/Conditions – stroke, paralysis, diabetes
2. Mental Status/Cognitive impairment
3. Heating appliances/equipment
4. Smoking
5. Hot liquids
B. Prevention
1. Know residents who are at risk.
2. Check/report use of heating appliances.
3. Check water temperatures (bath, shower).
4. Supervise smoking, when indicated.
5. Encourage use of smoking apron, cigarette extension, etc., when
indicated.
6. Know location of nearest fire extinguisher or fire blanket.
7. Pour hot liquids away from residents.
8. Mugs with lids/adaptive devices (specific to resident).
Page 49 of 307
V. Poisoning
A. Risk Factors
1. Diagnosis/Conditions – Dementia, Alzheimer’s disease, confusion
2. Other factors
a. Wandering
b. Hoarding
B. Prevention
1. Proper storage of medications/supplies.
2. Lock storage/cleaning rooms, closets and carts.
3. Material Safety Data Sheet (MSDS) — all chemicals have a sheet
that details the ingredients, dangers, emergency response to be
taken, and safe handling procedure; required by OSHA.
VI. Medical Emergency
A. Types of Medical Emergencies
1. Heart Attack/Cardiac Arrest – symptoms may include crushing pain
(like someone sitting on the chest) which may go down left arm, be
felt in neck or in jaw and doesn’t go away.
a. Notify the nurse immediately.
b. Loosen clothing around the neck.
c. Do not give food or fluids.
d. Be prepared to initiate CPR if qualified.
e. Remain with resident until help arrives.
2. Stroke/Cerebral Vascular Accident (CVA) – symptoms may include
dizziness, blurred vision, nausea/vomiting, headache, uneven grip
or smile, slurred speech.
a. Report symptoms to nurse immediately.
3. Seizures/Convulsions (See CARE SKILLS #11)
a. Call for nurse and stay with resident.

Page 50 of 307
b. Assist the nurse with positioning the resident on his/her side.
c. Place padding under head and move furniture away from
resident.
d. Do not restrain resident or place anything in mouth.
e. Loosen resident’s clothing, especially around the neck.
f. After the seizure stops, assist nurse to check for injury.
g. Note duration of seizures and areas involved.
4. Bleeding/hemorrhage
a. Use Standard Precautions.
b. Apply direct pressure over the area with a sterile dressing or
a clean piece of linen.
c. Raise the limb above the level of the heart, if possible.
VII. Safety Measures/Prevention Strategies
A. Prevention is the key to safety.
B. Observe for safety hazards, correct or remove hazard, report needed
repair.
C. Know residents’ risk factors for accidents.
D. Safety measures to follow:
1. Call light available.
2. Clean/clear environment.
3. Report observations that are unsafe and/or equipment in need of
repair.
CARE SKILLS:
• Falling or Fainting – #9
• Choking – #10
• Seizures – #11

Page 51 of 307
Review Questions --- Lesson #5
1. What is the universal sign that indicates choking?
2. What document provides first aid/response should a resident drink a chemical?
3. Explain the actions of the caregiver if a resident is having a seizure?

Page 52 of 307
Lesson #6 (3 hours)
Title: Basic Care Skills
Lesson Objectives:
I. The student will be able to explain the importance of individualization of the
resident’s environment.
II. The student will be able to demonstrate competence in making an unoccupied
bed.
III. The student will be able to explain environmental concerns of each resident and
any revisions necessary to accommodate the visually impaired resident or the
resident at risk for falls.
IV. The student will be able to explain the importance of proper nutrition/hydration.
V. The student will be able to identify measures and demonstrate competence in
serving a meal tray.
VI. The student will be able to identify steps to help residents remain independent
while eating.
VII. The student will be able to demonstrate competence in assisting the resident with
special needs during mealtime (i.e. plate guards, thickened liquids, etc.).
VIII. The student will be able to demonstrate competence in passing fresh ice water
and providing thickened liquids to the resident.
Key Terms:
Aspiration – inhalation of food or fluids into the lungs, which has the potential to cause
pneumonia or death.
Call Light – a means to call for assistance, when needed
Calories – the fuel or energy value of food
Carbohydrates – the main source of energy for all body functions
Closed Bed – a bed completely made with the bedspread and blankets in place.
Dehydration – excessive loss of fluid from the body.
Draw Sheet – turning sheet that is placed under residents who are unable to assist with
turning, lifting or moving up in bed.
Page 53 of 307
Fats – help the body store energy and use certain vitamins.
Fluid Overload – condition in which the body is unable to handle the amount of fluids
consumed.
Fluid Restriction – a restriction of the amount of fluids a resident may have per day;
usually divided between nursing (i.e. fluids taken with medications) and dietary (i.e.
fluids with meals).
Fortified Food – nutrients/calories added to a food; used for weight loss.
Hydration – fluids consumed. The process of providing adequate fluids/liquids to
maintain or restore a sufficient balance in the body.
Minerals – compounds found in the diet or dietary supplements; builds body tissue,
regulates body fluids, promotes bone and tooth formation, affects nerve and muscle
function.
NPO – nothing by mouth (nil per os).
Nutrients – substances found in food which provide nourishment
Nutrition – nourishment; the process by which the body takes in food to maintain
health.
Occupied Bed – bed made while a resident is in the bed
Open Bed – folding the linen down to the foot of the bed
Proteins – complex compounds found in all living matter; promote growth and repair of
tissue.
Unoccupied Bed – a bed made while no resident is in the bed.
Vitamins – organic compounds obtained from one’s diet or dietary supplements; helps
the body function.
Water – H20 (one molecule of oxygen and two molecules of hydrogen); most essential
nutrient for life.

Page 54 of 307
Content:
I. Points to Remember:
A. When a resident enters a nursing facility, he/she experiences the loss of
home and belongings. Familiar things create a positive and home–like
environment. The staff should encourage the resident to bring items from
home, as space permits.
B. The room should be arranged according to resident preference, as
possible.
C. The residents’ personal belongings should be safeguarded, as possible.
D. Types of beds may vary in each facility. Most beds have controls to raise,
lower and adjust positions. A low bed may be used for a resident at risk for
falls.
E. Temperature of the resident’s room/environment should be considered.
The resident’s condition and preferences should determine the
appropriate temperature.
F. Lighting should be sufficient for the resident’s needs/preferences. Indirect
lighting is preferable, in that glare causes fatigue, and contributes to
confusion and the potential for falls.
G. The resident’s environment should be cleaned of spills immediately, as
spills are safety hazards contributing to falls.
H. Excessive noise levels in the environment can provoke irritation and
problematic behaviors. Facilities should maintain equipment in good repair
and refrain from overhead paging.
I. Fresh ice water should be maintained and within reach in an effort to
encourage hydration, unless the resident’s fluids are restricted by the
physician. (thicken liquids)
J. The call light should be placed within the resident’s reach upon completion
of care/staff assistance.
K. Defective or unsafe equipment should be taken out of service and
reported to the nurse immediately.
Page 55 of 307
II. Unoccupied Bed (see CARE SKILLS #12)
A. Bed making Tips
1. Carry clean linens away from your body and uniform.
2. Do not shake linens when making bed.
3. Do not place clean or dirty linens on the floor.
4. Do not place clean linens on a dirty surface.
5. Check for personal belongings between the linens before removing
them from the bed (i.e. dentures, glasses, hearing aid, etc.).
6. Remove gloves after handling dirty linens. A new pair of gloves
should be worn to handle clean linens.
7. Avoid bringing unnecessary linens into a resident’s room. Unused
linens are considered contaminated once they have been in
someone’s room. Do not attempt to use them in another resident’s
room, as transferring linens from room to room increases the
spread of germs and infection. Discard unused linens as you would
soiled linens.
8. Always change soiled linens. Urine, feces, food, etc. that remain on
linens can cause irritation and sores to develop on the resident’s
skin.
9. Report damaged or odorous mattress to charge nurse immediately.
10. Ensure mattress is free of urine/feces/other body fluids. Clean
mattress as needed per facility policy.
III. Resident Room/Environment/Fall Prevention
A. Each room may have slightly different equipment. Standard room contents
include: bed, bedside stand, overbed table, chair, call light and privacy
curtain.
B. Always ensure call light is within the resident’s reach, in working condition
and answered immediately.
C. Clean the overbed table after use and place within residents reach if
commonly used items are stored on the table.
D. Remove anything that might cause odors or become safety hazards, such
as trash, clutter, spilled fluids, etc.
Page 56 of 307
E. Clean up spills promptly.
F. Report signs of insects or pests when observed.
G. Fall Prevention - to reduce the risk of falls
1. Clear all walkways of clutter and cords.
2. Use non–skid mats when needed.
3. Assist residents to wear non–skid socks or shoes. Make certain
shoes are tied and fit properly.
4. Ensure residents wear clothing that fits properly (e.g. not too tight,
not too loose, or not too long).
5. Keep frequently used items in reach of resident.
6. If ordered, ensure any devices or alarms are in place and functional
per the care plan.
7. Lock wheelchairs before assisting residents to transfer.
8. Offer to toilet resident frequently/according to toileting schedule to
prevent unassisted attempts to toilet.
9. Visual cues or devices may be used, such as a large face clock,
calendar, etc. Familiar pictures, symbols, or personal items may be
displayed or hung to assist the resident with cognitive impairment to
recognize his/her room, restroom, closet, etc.
IV. Promoting Proper Nutrition and Hydration
A. Proper Nutrition
1. Promotes physical health
2. Helps maintain muscle
3. Helps maintain skin and tissues
4. Helps prevent pressure sores
5. Increases energy level
6. Aids in resisting illness
7. Aids in the healing process
Page 57 of 307
B. Six Basic Nutrients
1. Carbohydrates
a. Provide energy for the body
b. Provide fiber for bowel elimination
2. Fats
a. Aid in absorption of vitamins
b. Provide insulation and protect organs
3. Minerals
a. Build body tissue and cell formation
b. Regulate body fluids
c. Promote bone and tooth formation
d. Affect nerve and muscle function
4. Proteins
a. Promote growth and tissue repair
b. Found in body cells
c. Provide an alternate supply of energy
5. Vitamins
a. Two types: water soluble and fat soluble
b. Body cannot produce
c. Help the body function
6. Water
a. Most essential nutrient for life
b. Up to 75% water in the human body
Page 58 of 307
C. Diet Specifics
1. Diet Cards
a. Specific to a resident
2. Basic or “regular”
3. Therapeutic/special/modified diets
a. No Added Salt (NAS)
b. No Concentrated Sweets (NCS) or Restricted Concentrated
Sweets (RCS)
c. Fortified
d. NPO (nil per os) (nothing by mouth)
e. Bland
f. High/low fiber
g. Low fat
h. High/low protein
i. Low sodium
j. Modified calorie/calorie count
k. Liquid
l. High potassium
4. Mechanically Altered Diets
a. Mechanical Soft/ground meat
b. Pureed
c. Chopped meat
5. Thickened Liquids (see CARE SKILLS #13)
a. Ordered for residents who have difficulty swallowing.
b. Always check care plan and thicken liquids to the proper
consistency ordered for the resident.
Page 59 of 307
c. Three consistencies of thickened liquids
i. Nectar thick
ii. Honey thick
iii. Pudding thick
d. Pudding thick liquids must be spoon-fed to residents.
6. Monitoring meal consumption/recording food consumed
a. Observation
b. Facility policy for recording
D. Proper Hydration
1. Promotes physical health
a. Aids digestion and elimination
b. Maintains normal body temperature
c. Helps prevent dehydration
2. Encourage fluids
a. Implemented by physician’s order or nursing care plan
b. Document per facility policy
3. Fluid Restriction
a. Implemented by physician’s order due to concerns with fluid
overload
b. Daily amount is limited and divided between dietary and
nursing
4. Recording Total Fluid Intake (See CARE SKILLS #14)
a. Use metric measurement (cubic centimeters = cc) 30cc = 1
ounce; example 8-ounce glass/carton of milk = 240cc
b. Accurately record intake of oral fluids per care plan
c. Report to charge nurse low fluid intake

Page 60 of 307
d. Approximately 2000-2500cc daily
E. Passing Fresh Ice Water (see CARE SKILLS #15)
Ice pitchers should be refilled/refreshed at least once every shift, or more
frequently if needed. Always check the resident’s care plan for special
instructions before filling the pitcher.
1. Individuals on thickened liquids also need thickened water;
prepackaged, thickened water can be kept cool at the bedside per
facility policy; if prepackaged water is not available, be sure to
thicken liquids according to facility policy and the consistency
ordered for the resident.
2. Be sure the ice scoop is stored properly when not in use. It should
not be left in the ice when filling the resident’s pitchers.
4. Make sure the resident’s water is placed within reach when
returning it to the room.
5. Know your residents. If the container is too heavy for the resident to
hold, then they won’t be able to use it. Provide a smaller container
such as a cup or glass.
F. Role of the Nurse Aide
1. Review the diet card before serving the meal to the resident to
confirm correct diet.
2. Encourage resident to eat as much of their meal as possible.
3. Note foods resident avoids or dislikes and report to the nurse.
4. Be aware of food brought in to the resident from an outside source
and potential conflict with ordered diet; report to charge nurse as
needed.
5. Record food intake according to facility policy.
6. Remind resident to drink often or offer ice/popsicles, when not on
restriction.
7. Have fresh ice water available and within the resident’s reach at all
times unless on a fluid restriction.
G. Promoting the Use of Proper Feeding Technique/Assisting a Resident with
Special Needs
Page 61 of 307
NOTE – The caregiver should provide any necessary care and offer to assist the
resident to toilet prior to meal service in an effort to promote a positive
experience.
1. Serving a Meal Tray (see CARE SKILLS #16)
a. Provide oral care before meals. Residents may eat better if
they have a clean mouth.
b. Always check the diet card and the items on the tray before
taking the tray to the resident.
c. As a safety precaution, never leave a resident who needs to
be fed unattended with a tray.
d. If a resident refuses to eat, or even if he/she is not in the
facility (in the hospital, on a home visit) when the tray
arrives, you are not allowed to eat their food.
e. Clothing protectors are optional. Ask their preference and
honor their decision.
f. Inform the nurse if the resident complains about the
flavor/taste of thickened liquids.
g. Never blow on a resident’s food to cool it. Instead, try
spreading the food out over the plate. The increased surface
area helps cool the food quicker. Cutting food into smaller
pieces also helps it to cool faster.
h. Encourage residents to do as much for themselves as
possible.
i. Be sure residents are provided with their necessary assistive
devices during each meal.
j. Inform resident of food items on tray, especially if meal is
pureed or mechanically altered.

Page 62 of 307
CARE SKILLS:
• Unoccupied bed – #12
• Thickened Liquids – #13
• Measure and Record Fluid Intake – #14
• Passing Fresh Ice Water – #15
• Serving a Meal Tray – #16
Review Questions --- Lesson #6
1. The call light should always be placed within the resident’s reach. (True
or False)
2. Excessive noise levels in the environment can provoke irritation and
problematic behaviors. (True or False)
3. What is the most essential nutrient for life?
4. What are the three types of thickened liquids?

Page 63 of 307
Lesson #7 (1 hour)
Title: Common Diseases and Disorders – Respiratory and Urinary Systems
Lesson Objectives:
I. The student will be able to describe common disease processes of the
respiratory system which affect the elderly resident.
II. The student will be able to describe common disease processes of the urinary
tract which affect the elderly resident
Key Terms:
Expiration – breathing out.
Urinary Incontinence – inability to control the bladder.
Inspiration – breathing in.
Sputum – fluid that is coughed up.
Content: Respiratory System
I. Respiratory System – brings oxygen into your body and removes carbon dioxide
and other harmful gases; consists of the mouth, nose, trachea, and lungs.
II. Common Conditions of the Respiratory System
A. Upper Respiratory Infection (URI) or cold.
B. Pneumonia – lung infection caused by a bacterial, viral or fungal infection.
C. Bronchitis – swelling of the main air passages to the lung.
D. Asthma – disorder that causes the airways to swell and become narrow.
E. Emphysema – progressive lung disease that causes shortness of breath.
A symptom of COPD.
F. Chronic Obstructive Pulmonary Disease (COPD) – chronic disease in
which residents have difficulty breathing, particularly getting air out of the
lungs.
G. Lung Cancer
Page 64 of 307
H. Tuberculosis (TB) – a contagious bacterial infection of the lungs.
III. Normal Changes with Age
A. Lung capacity decreases as chest wall and lungs become more rigid.
Deep breathing is more difficult. Air exchange decreases causing the
resident to breathe faster to get enough air when exercising, ill, or
stressed.
B. Decreased lung strength
1. Decreased lung capacity.
2. Decreased oxygen in blood.
3. Weakened voice.
IV. Role of the Nurse Aide regarding the Respiratory System
A. Observe and Report:
1. Change in respiratory rate.
2. Coughing or wheezing.
3. Complaint of pain in the chest.
4. Shallow breathing or difficulty breathing.
5. Shortness of breath.
6. Bluish color of lips or nail beds.
7. Spitting or coughing up of thick sputum or blood.
8. Need to rest with mild exertion.
B. Interventions to avoid respiratory problems
1. Encourage fluids.
2. Oxygen should be in use, if ordered.
3. Encourage exercise and movement.
4. Encourage deep breathing and coughing.
5. Frequent hand hygiene, especially during cold/flu season.

Page 65 of 307
Content – Urinary System:
I. Urinary System – gets rid of waste products through urine and helps to maintain
water balance in the body; it consists of kidneys, ureters, urinary bladder, and
urethra.
II. Common Conditions of the Urinary System
A. Urinary Tract Infection (UTI) or cystitis
B. Calculi (kidney stones)
III. Normal Changes with Age
A. Kidney function decreases, slowing removal of waste. Bladder tone
decreases, resulting in more frequent urination, incontinence, bladder
infections and urinary retention.
B. Decreased ability of kidney to filter blood.
C. Weakened bladder muscle tone.
D. Bladder holds less urine, resulting in more frequent urination.
E. Bladder does not empty completely.
IV. Problems Caused by Incontinence
A. Skin problems around the buttocks, hips, genitals, and the area between
the pelvis and the area between the pelvis and rectum (perineum).
B. Excess moisture in these areas makes skin problems such as redness,
peeling, irritation, and yeast infections likely.
C. Bedsores (pressure sores) may also develop.
V. Role of the Nurse Aide regarding the Urinary System
A. Observe and Report to the nurse
1. Changes in frequency and amount of urination.
2. Foul smelling urine or visible change in color of urine.
3. Inadequate fluid intake.
4. Pain or burning with urination.
5. Swelling in extremities.

Page 66 of 307
6. Complaint of being unable to urinate or bladder feeling full.
7. Incontinence or dribbling.
8. Pain in back or kidney region.
B. Interventions to avoid urinary problems
1. Encourage fluids.
2. Frequent toileting.
3. Keep resident clean and dry.
4. Avoid anger or frustration if resident is incontinent.
Review Questions --- Lesson #7
1. Green, yellow or blood-tinged sputum should be reported to the nurse.
(True or False)
2. Complaints of pain or burning with urination should be reported to the
nurse. (True or False)

Page 67 of 307
Lesson #8 (1 hour)
Title: Oxygen Use
Lesson Objectives:
I. The student will be able to describe the various manners in which oxygen is
supplied for a resident.
II. The student will be able to describe necessary safety precautions to be
implemented when oxygen is in use.
Key Terms:
Combustion – the process of burning.
Oxygen – a chemical that is found in the air that has no color, taste, or smell, and that
is necessary for life.
Flammable – easily ignited and capable of burning quickly.
Content:
I. Oxygen Use
A. Oxygen is prescribed by a physician; however, a nurse may initiate
oxygen in response to a medical emergency.
B. Nursing assistants are never allowed to stop (refers to turning oxygen off
and/or removing the nasal cannula or mask from face/nostrils), adjust
(refers to increasing or decreasing the amount of oxygen the resident
receives), or initiate (refers to turning oxygen on and/or placing the nasal
cannula in nares or the mask on the face) the use of oxygen. Nursing
Assistants may provide care, such as washing the face or oral care.
Ensure NC or mask is properly positioned in nares or on the resident’s
face after care.
C. Nasal Cannula – Delivery of oxygen through a long tubing from the source
to the cannula, with prongs placed in each nostril and the tubing tucked
behind the resident’s ears.
1. Observe for irritation behind the ears, as the tubing can cause skin
breakdown. Notify the nurse, if observed.
2. Provide nasal cannula care per facility policy and resident care
plan. (see CARE SKILLS #17)
Page 68 of 307
D. Mask – delivery of oxygen through a long tubing from the source to a
mask placed on the resident’s face with a band around the back of the
head.
1. Observe for irritation around the face mask and notify the nurse, if
observed.
E. Concentrator – a device that sits on the floor and plugs into the wall which
changes air in the room into air with more oxygen.
F. Liquid Oxygen – at extremely cold temperatures, oxygen changes from
gas to a liquid. The liquid oxygen is stored in a vessel similar to a
thermos. A large central unit is located in an area away from electrical
equipment that is well ventilated. Liquid oxygen can be trans–filled to a
bedside unit or can be trans–filled into a portable unit.
1. Contact with liquid oxygen or its vapors can quickly freeze tissues.
It is common to see vapors when filling a small vessel from the
large vessel. The vapors evaporate quickly and then are harmless.
To prevent injury, never touch liquid oxygen, or the frosted parts of
liquid oxygen vessels. Avoid getting the vapors in your face.
G. Portable Tank – oxygen that is stored as a gas under pressure in a
cylinder equipped with a flow meter and regulator to control the flow rate.
This system is generally prescribed when oxygen therapy is required in
emergency or for a short period of time (e.g., during transport).
Compressed oxygen tanks are under extreme pressure and must be kept
upright and handled with care.
H. Vaporizers/Humidifiers – A vaporizer works by heating water until it turns
into hot steam, a humidifier creates a cool mist. Either one may be
prescribed by a physician to loosen congestion of the resident.
1. When humidifiers and vaporizers are in use, they must be kept
clean. Germs thrive wherever there is water, thus, the device must
be periodically drained and cleaned according to facility policy.
Otherwise, the bacteria that accumulate can become vaporized into
the air and affect the resident’s lungs, where they can cause
infection.
2. Prepare vaporizer/humidifier according to manufacturer’s
instructions.
3. Position vaporizer/humidifier on the bedside stand or nearby table.
4. Plug vaporizer into electrical outlet.
5. Steam should be permitted to flow generally into the room.

Page 69 of 307
6. Frequently check the water level; refill as necessary.
7. Clean vaporizers/humidifiers routinely according to facility policy.
I. CPAP/BIPAP – Positive Airway Pressure (PAP) is respiratory ventilation
used to treat breathing disorders and supply a consistent pressure on
inspiration and expiration. As mechanical ventilation, CPAP (continuous
positive airway pressure), or BIPAP (Bi–level Positive Airway Pressure)
machines, are devices which help residents inhale more air into the lungs.
Both of these devices are used for the treatment of medical disorders like
COPD, pulmonary edema, etc. Settings of the machines are prescribed
by the physician and may only be administered and adjusted by the
licensed nurse.
J. Ventilator – a machine that supports breathing. These machines are
mainly used in hospitals. Ventilators deliver oxygen into the lungs and
remove carbon dioxide from the body. Carbon dioxide is a waste gas that
can be toxic. The ventilator breathes for people who have lost all ability to
breathe on their own. Settings of the ventilator are prescribed by the
physician and may only be adjusted by the licensed nurse.
K. Safety Precautions
1. Remember oxygen supports combustion.
2. Fire hazards should be removed from the resident’s room when
oxygen is in use.
3. Never allow candles or open flames in the area where oxygen is in
use.
4. Never allow smoking in the area where oxygen is in use.
5. Do not use electrical equipment (e.g., electric razors, hairdryers,
electric blankets, and electric heaters) in an oxygen–enriched
environment. Electrical equipment may spark and cause a fire.
6. Do not use flammable products such as rubbing alcohol, or oil–
based products such as Vaseline® near the oxygen. Use a water–
based lubricant to moisten the resident’s lips or nose.
CARE SKILLS:
• Nasal Cannula Care – #17

Page 70 of 307
Review Questions --- Lesson #8
1. It is permissible for nursing assistants to adjust the level of oxygen
administration. (True or False)
2. Smoking must never be allowed where oxygen is used or stored. (True or
False)
3. Oxygen tanks must be kept upright and handled with care. (True or False)

Page 71 of 307
Lesson #9 (1 hour)
Title: Common Diseases and Disorders – Nervous, Circulatory & Musculo–
Skeletal Systems
Lesson Objectives:
I. The student will be able to describe common disease processes of the nervous
system which affect the elderly resident.
II. The student will be able to describe common disease processes of the circulatory
system which affect the elderly resident.
III. The student will be able to describe common disease processes of the musculo–
skeletal system which affect the elderly resident.
Key Terms:
Arthritis – a disorder that involves inflammation of one or more joints.
Atrophy – wasting away, decreasing in size, and weakening of muscles.
Cerebrovascular Accident (CVA) – stroke; loss of brain function usually caused by an
effect on the flow of blood to the brain. Two main types of stroke are the hemorrhagic
stroke and occlusive (blockage) stroke.
Congestive Heart Failure (CHF) – the heart is severely damaged and cannot pump
oxygen-rich blood to the rest of the body effectively. Blood may back up in other areas
of the body, and fluid may build up in the lungs, liver, gastrointestinal tract, arms and
legs.
Contracture – permanent stiffening of a joint and muscle.
Epilepsy – brain disorder in which a resident has reported seizures (convulsions).
Medication is ordered to control/lessen seizure activity.
Fracture – broken bone.
Heart Attack (Myocardial Infarction) – blood flow to the heart is completely blocked
and oxygen cannot reach the cells in the region that is blocked.
Hypertension – high blood pressure.
Hypotension – low blood pressure.
Osteoporosis – condition when the bones become brittle and weak; may be due to
age, lack of hormones, not enough calcium in bones, alcohol, or lack of exercise.
Parkinson’s Disease – a progressive movement disorder.

Page 72 of 307
Peripheral Vascular Disease (PVD) – condition in which the extremities (commonly
legs and feet) do not have enough blood circulation due to fatty deposits in the vessels
that harden over time.
Range of Motion – exercises which put a joint through its full range of motion.
Content – Nervous System:
I. Nervous System – control and message center of the body; it controls and
coordinates all body functions and senses, and it also interprets information from
outside the body; includes the brain, spinal cord, and nerves.
II. Conditions that Affect the Nervous System
A. Dementia
1. Affects thought process: memory, communication
2. As the process progresses it will become difficult for the resident to
perform ADLs (e.g., eating, dressing, toileting, etc.).
B. Alzheimer’s disease
1. A brain disease that slowly destroys memory and thinking skills
and, eventually, the ability to carry out the simplest task. It begins
slowly and gets worse over time. Currently it has no cure.
2. Maintain regular schedule for bathing, toileting, exercise.
3. Use repetition in daily activities.
C. Parkinson’s Disease
1. A progressive, degenerative disease that affects the brain.
2. As the disease progresses, it becomes more difficult for the
resident to perform ADLs. Hands often tremor, and the limbs and
trunk become rigid.
3. Assist by placing food and drink close; use assistive devices.
D. Cerebrovascular Accident (CVA) or stroke
1. A stroke is a “brain attack”. It can happen to anyone at any time. It
occurs when blood flow to an area is cut off. It is caused by a clot or
ruptured blood vessel. When this happens, brain cells are deprived
of oxygen and begin to die.
Page 73 of 307
2. F.A.S.T. is an easy way to remember the sudden signs of a stroke.
a. Face Drooping
b. Arm Weakness
c. Speech Difficulty
d. Time to call 911
3. When dressing a resident, address the weaker side first to prevent
unnecessary bending or stretching. When undressing, address the
stronger side first.
4. Use a gait belt when walking or transferring the resident for safety
precautions. Stand on the weaker side.
E. Epilepsy
1. Seizure symptoms can vary widely. Some people with epilepsy
simply stare blankly for a few seconds during a seizure, while
others repeatedly twitch their arms or legs.
2. Observe for seizure activity; report to nurse.
3. Don’t leave the resident unattended during a seizure; have
someone else get help, if possible.
4. Keep the resident safe by moving furniture or other objects out of
the way; do NOT put anything in his/her mouth.
III. Normal Nervous System Changes with Age
A. Nerve cells die, causing decreased perception of sensory stimuli and less
awareness of pain and injury.
B. Slow responses and reflexes.
C. Sensitivity to heat and cold decreases.
D. May experience short–term memory loss.
IV. Role of the Nurse Aide regarding the Nervous System
A. Observe and Report
1. Shaking or trembling.
2. Complaints of numbness or tingling.

Page 74 of 307
3. Inability to speak clearly.
4. Inability to move one side of the body.
5. Changes in vision or hearing.
6. Difficulty swallowing.
7. Depression or mood changes.
8. Memory loss or confusion.
9. Behavior changes.
Content – Circulatory System:
I. Circulatory System – transports blood and body fluids throughout the body;
consists of the heart and blood vessels (veins, arteries, capillaries); also called
the cardiovascular system.
II. Conditions that Affect the Circulatory System
A. High blood pressure (hypertension)
1. Symptoms: headache, blurred vision, dizziness
B. Heart Attack (Myocardial Infarction)
C. Coronary Artery Disease (CAD)
D. Angina (chest pain)
E. Cerebrovascular Accident (CVA) – stroke
III. Normal Circulatory Changes with Age
A. Blood vessels become more rigid and narrow. Heart muscle has to work
harder which may result in high blood pressure and poor circulation.
IV. Role of the Nurse Aide regarding Circulatory System
A. Observe and report
1. Complaint of headache
2. Chest pain

Page 75 of 307
3. Blurred vision
4. Dizziness
5. Nausea
6. Shortness of breath, changes in breathing patterns, problems
breathing
7. Weight gain
8. Change in vital signs
9. Swelling of hands and feet
10. Pale or bluish discoloration to hands, feet, or lips
11. Weakness or fatigue
Content – Musculoskeletal System:
I. Musculoskeletal System – gives the body shape and structure, allows the body to
move, and also protects the organs; consists of the muscles, bones, ligaments,
tendons, and cartilage.
II. Conditions that Affect Musculoskeletal System
A. Fracture
1. Common Types:
a. Open fracture (also called compound fracture) – the bone
exits and is visible through the skin, or a deep wound that
exposes the bone through the skin.
b. Closed Fracture (also called simple fracture) – the bone is
broken, but the skin is intact.
c. Compression – the bone is crushed, causing the broken
bone to be wider or flatter in appearance.
d. Stress Fracture – (also called hairline fracture) – the bone
has tiny cracks.
2. Symptoms of fracture include: change in skin color, bruising, pain,
and swelling.
Page 76 of 307
B. Osteoporosis
1. Bones become brittle and can break easily.
2. Take caution when repositioning and/or transferring the resident.
C. Arthritis
1. Two common types of arthritis include: osteoarthritis and
rheumatoid.
2. Encourage independence in ADLs to preserve ability.
3. As needed, use cane or other aids.
D. Contracture
1. A contracture deformity is the result of a stiffness or constriction in
your muscles, joints, tendons, ligaments, or skin that restricts
normal movement.
2. Impaired mobility can affect all aspects of daily living such as
bathing, eating, dressing.
III. Importance of Exercise or Range of Motion (ROM)
A. Maintains physical and mental health.
B. Prevents problems related to immobility.
C. Problems/complications from lack of exercise or range of motion:
1. Loss of self– esteem
2. Depression
3. Pneumonia
4. Urinary Tract Infections
5. Constipation
6. Blood clots
7. Dulling of senses
8. Muscle atrophy or contractures
Page 77 of 307
IV. Normal Musculoskeletal Changes with Age
A. Bones become more brittle and porous and may fracture more easily.
B. Loss of muscle strength and tone causes weakness and feeling tired.
C. Less flexible joints make moving more difficult.
D. Changes in spine and feet result in height loss, postural changes and
difficulty walking.
V. Role of the Nurse Aide regarding the Musculoskeletal System
A. Observe and Report:
1. Pain with movement
2. Bruising
3. Change in movement and/or activity
4. Change in range of motion
5. Swelling of joints
6. Aches and/or pains
7. Red, pale, warm, or shiny areas over a joint
B. Fall prevention:
1. Keep mobile
2. Encourage activities and exercise
3. Participate in care
4. Proper positioning
5. Use of assistive devices
6. Keep pathways clear of spills, clutter, etc.
7. Answer call lights immediately

Page 78 of 307
CARE SKILLS:
• Passive Range of Motion – CARE SKILL #69 – to be discussed,
demonstrated, and checked-off during Lesson #22
Review Questions --- Lesson #9
1. When a resident complains of headache and blurred vision, the caregiver
must report their complaint to the nurse immediately. (True or False)
2. When assisting a resident who has had a stroke to dress, the caregiver
should dress the stronger side first. (True or False)

Page 79 of 307
Lesson #10 (45 minutes)
Title: Common Diseases and Disorders – Gastrointestinal and Endocrine Systems
Lesson Objectives:
I. The student will be able to describe common disease processes of the
gastrointestinal system which affect the elderly resident.
II. The student will be able to describe common disease processes of the endocrine
system which affect the elderly resident.
Key Terms:
Colostomy – a surgically-made opening on the abdomen that has a section of the
colon attached; the opening allows stool to be evacuated from the body and emptied
into a bag that adheres to the abdomen;
Diabetes Mellitus – the body does not produce enough or properly use insulin.
Diarrhea – frequent elimination of liquid or semi–liquid stool.
Digestion – the process of breaking down food so that it can be absorbed by the cells
of the body.
Elimination – the process of expelling solid wastes that are not absorbed into the cells
of the body.
Emesis – vomit.
Gastroesophageal Reflux Disease (GERD) – chronic condition in which the liquid
contents of the stomach back up into the esophagus.
Hemorrhoids – enlarged veins in the rectum.
Hyperthyroidism – overactive thyroid gland – excess of thyroid hormone.
Hypothyroidism – underactive thyroid gland – thyroid hormone produces below
normal.
Ileostomy – section of the intestine is removed and the stool will be evacuated through
a stoma and emptied into a bag adhered to the abdomen of the resident.
Ostomy – creation of an opening from an area inside the body to the outside of the
body.
Peptic Ulcer – ulcer that forms in the lining of the stomach, duodenum, esophagus.
Stoma – The opening of an ostomy.

Page 80 of 307
Ulcerative Colitis – chronic inflammatory bowel disease.
Content – Gastrointestinal System:
I. Gastrointestinal System – breaks down the food that is taken into the body and
absorbs the water and nutrients needed for energy; rids the body of solid wastes;
consists of the mouth, esophagus, stomach, large and small intestines, rectum,
and anus; other organs that assist with digestion include the gallbladder, liver,
and pancreas; also called the digestive system.
II. Common Conditions of the Gastrointestinal System
A. Gastroesophageal Reflux Disease (GERD)
B. Peptic Ulcer
C. Ulcerative Colitis
D. Hemorrhoids
E. Constipation
1. If a resident has not had a bowel movement within three days, most
facilities have protocols for intervention to prevent impaction (hard
stool in the rectal vault).
F. Colostomy/Ileostomy
G. Diarrhea
III. Normal Changes with Age
A. Taste buds lose sensitivity causing decreased appetite.
B. Tooth and gum problems result in inability to eat properly.
C. Digestion is less efficient causing constipation and food intolerance.
IV. Role of the Nurse Aide regarding the Gastrointestinal System
A. Observe and Report to the nurse
1. Difficulty chewing and/or swallowing, including problems with
dentures and teeth.
2. Loss of appetite.

Page 81 of 307
3. Abdominal pain or complaint of cramping.
4. Diarrhea
a. Frequency, amount, consistency
b. Observe for blood
5. Nausea and/or vomiting
a. If vomitus looks like coffee grounds, immediately report to
nurse.
6. Constipation
a. Frequency, consistency and size of bowel movements.
b. Observation of stool for blood; notify nurse.
B. Interventions to avoid problems with digestion
1. Offer fluids frequently, especially while eating.
2. Provide regular oral care, making sure that dentures are clean and
fit properly.
Content – Endocrine System:
I. Endocrine System – a collection of glands in the body that produces and
secretes hormones that regulate body functions, such as metabolism, growth and
development, reproduction, sleep and mood; also responsible for maintaining the
levels of sugar in the blood and calcium in the bones; consists of pituitary,
thyroid, parathyroid, pineal, and adrenal glands, pancreas, ovaries, testes,
thymus, and hypothalamus.
II. Common Conditions that Affect the Endocrine System
A. Diabetes Mellitus
1. Hypoglycemia (low blood sugar)
a. Sign/symptoms: cold, clammy skin, double or blurry vision,
shaking/ trembling, hunger, tingling or numbness of skin;
increased confusion.
Page 82 of 307
2. Hyperglycemia (high blood sugar)
a. Signs/symptoms: shortness of breath, breath smells fruity,
nausea/vomiting, frequent urination, thirst.
3. Hyperthyroidism
a. Sign/symptoms: can’t tolerate being hot.
b. Increased heart rate and enlarged thyroid (goiter).
4. Hypothyroidism
a. Sign/symptoms: confusion, tired.
b. Inability to tolerate the cold.
III. Normal Changes with Age
A. Insulin production decreases possibly causing excess sugar in blood.
B. Adrenal secretions decrease reducing ability to handle stress.
C. Thyroid secretions decrease slowing metabolism.
D. Levels of estrogen and progesterone decrease, which signals the onset of
menopause.
IV. Role of the Nurse Aide regarding the Endocrine System
A. Observe and Report
1. Diabetic residents who refuse meal/snack or consume less than
half of meal/snack.
2. Immediately report resident who has signs and symptoms of
hypoglycemia.
3. Diabetic resident eating foods in conflict with ordered diet; could
cause hyperglycemia.
B. Interventions to avoid problems
1. Identify residents in your care who are diabetic.
2. Encourage proper nutrition.
3. Eliminate or reduce stress when possible; offer encouragement and
listen to the resident.

Page 83 of 307
Review Questions --- Lesson #10
1. List signs/symptoms of hypoglycemia (low blood sugar).
2. The nurse must be notified immediately if (or when) the resident’s vomit
looks like coffee grounds. (True or False)

Page 84 of 307
Lesson #11 (45 minutes)
Title: Common Diseases and Disorders – Reproductive, Immune/Lymphatic
Systems
Lesson Objectives:
I. The student will be able to describe common disease processes of the
reproductive system which affect the elderly resident.
II. The student will be able to describe common disease processes of the lymphatic
system which affect the elderly resident.
Key Terms:
Genitals – the external male or female sexual organs.
HIV/AIDS – life–threatening condition that damages the immune system and interferes
with the body’s ability to fight disease.
Lymph – clear, yellowish fluid that moves in the lymph system from tiny capillaries in
the circulatory system; carries disease–fighting cells called lymphocytes.
Perineum – the area between the anus and the scrotum (male) or vulva (female).
Reproductive Systems
Female – Ovaries – produce estrogen, progesterone and ova (eggs).
A. Fallopian tubes – carry eggs from ovaries to the uterus.
B. Uterus – muscular sac where the eggs can develop.
C. Vagina – muscular canal leading out of the body.
D. Vulva – external genitalia of the female, including the labia and
clitoris.
E. Breasts – holds mammary glands which produce nutrients for
infants.
Male – Testes – glands that produce testosterone and sperm.
A. Scrotum – sac which contains the testes.
B. Prostate Gland – gland which produces the fluid for sperm.
C. Penis – external organ through which males ejaculate and urinate.

Page 85 of 307
Content: Reproductive System
I. Reproductive System – organs that work together for the purpose of producing
new life; consists of testes, scrotum, penis, and prostate gland for males;
consists of vulva, vagina, uterus, fallopian tubes, and breasts for females.
II. Common Conditions that Affect the Reproductive System
A. Breast, prostate and ovarian cancer.
B. Vaginitis – inflammation of the vagina; symptoms may include any of the
following: burning or discomfort, especially when voiding, itching or
irritation to the genital area, increase in vaginal discharge, foul odor.
III. Normal Changes with Age
A. Hormone production decreases.
B. Decreased estrogen in females causes menopause.
C. Decreased testosterone in males slows sexual response.
D. Prostate gland may become enlarged causing difficulty when urinating.
IV. Role of the Nurse Aide regarding the Reproductive System
A. Observe and Report
1. Abnormal bleeding.
2. Complaints of pain.
3. Discharge from the penis or vagina.
4. Swelling of the genitals.
5. Sores on the genitals.
6. Changes in the breast, such as lumps, size, shape, discharge from
nipple.
Content – Lymphatic and Immune Systems
I. Lymphatic System – removes excess fluids and waste products from the body’s
tissues; it works closely with the Immune and Circulatory Systems; consists of
the lymph nodes, lymph vessels, lymph, spleen, and thymus gland.
II. Immune System – fights infection, by protecting the body from disease–causing
bacteria, viruses, and microorganisms; works closely with the Lymphatic System;

Page 86 of 307
III. Common Conditions of the Immune and Lymphatic Systems
A. HIV/AIDS
1. Requires Standard Precautions unless coming in contact with blood
or body fluids for which Contact Precautions would be necessary.
B. Lymphoma (cancer of the immune system).
IV. Normal Changes with Age
A. Increased risk of infection.
B. Increased drying of tissue – causes irritation.
V. Role of the Nurse Aide regarding the Immune and Lymphatic Systems
A. Observe and Report
1. Fever
2. Diarrhea
3. Increased fatigue/weakness
B. Interventions
1. Wash hands before and after care.
2. Encourage resident to eat meals and drink plenty of fluids, assisting
as needed.
3. Keep the environment clean.
4. Remove gloves and other Personal Protective Equipment, such as
gowns, face masks, etc., before leaving the resident’s room.
5. Know and follow the infection control practices of the facility.
Review Questions --- Lesson #11
1. Fever and/or fatigue must be reported to the nurse. (True or False)
2. Abnormal bleeding from the vaginal area and/or complaint of
pain/cramping must be reported to the nurse. (True or False)
Page 87 of 307
UNIT 2

Page 88 of 307
Lesson #12 (5 hours)
Title: Activities of Daily Living (Bathing, Shampoo, Perineal Care)
Lesson Objectives:
I. The student will be able to demonstrate competence in assisting a resident to
bathe/shower.
II. The student will be able to demonstrate competence in assisting the resident to
shampoo his/her hair.
III. The student will be able to demonstrate competence in providing perineal care.
Key Terms:
Activities of Daily Living (ADL) – personal care tasks performed daily, such as
bathing, dressing, caring for teeth and hair, toileting, eating and drinking and moving
around.
Perineal Area – the area of the body between the genitals and the anus.
Content:
I. Bathing and Shampooing Points to Remember (see CARE SKILLS #18-22)
A. Bathing is an opportunity to observe the resident’s skin. Should a concern,
such as lice, a new bruise, blister, rash or open area be noted, the nurse
must be notified immediately.
B. The resident’s face, hands, underarms, and perineal area should be
washed at least daily.
C. The elderly may bathe only twice a week. Since their skin produces less
perspiration and oil, frequent bathing could cause excessive dryness.
D. Before beginning the bathing process, the caregiver should make certain
the room is warm enough and all linens and supplies are gathered so the
resident is not left alone.
E. Respect the resident’s privacy when transporting to and from the shower
room and during the shower or bath. Be certain the resident’s body is not
unnecessarily exposed.
F. If no-rinse soap or shampoo is used, be sure that it is diluted and/or used
per manufacturer’s instructions.
Page 89 of 307
G. Never leave the resident unattended during bathing.
H. Keep the water clean and at a comfortably warm temperature.
I. Back rubs are often performed after bathing. They are a good way to help
the resident relax, improve circulation, and decrease pain. When using
lotion/oils for back rubs, be sure to warm in hands before applying to
resident’s skin.
J. Hair should be shampooed at least weekly, unless otherwise noted in care
plan. Hair should be combed daily and kept neat at all times.
K. Not all residents can get out of bed to have their hair shampooed in the
shower, tub, etc. There are hair products available so that water is not
needed when shampooing hair in bed. Follow care plan to ensure proper
hair products are being used when shampooing hair in bed.
L. Do not use oils, lotions, powder, or other products that can cause the
surface of showers, tubs, whirlpools, etc. to become slippery.
M. Whirlpool baths increase circulation and promote wound healing. Be sure
to follow manufacturer’s instructions for filling the tub with water, getting
the resident in and out of the tub, and for general use of the whirlpool tub.
N. Always check the resident’s care plan before providing care. Be sure to
follow the care plan instructions at all times.
II. Perineal and Catheter Care Points to Remember (see CARE SKILLS #19)
A. Always wash from front to back.
B. Be sure to change linens if they are soiled.
C. Allow the resident to clean themselves if possible, assisting as needed.
D. Avoid pulling on the catheter and tubing. The tip of the catheter is much
larger than what is seen on the outside. If it is improperly pulled out or
dislocated, it can be very painful and cause damage to the areas involved.
E. Keep the catheter and tubing free of any kinks that could prevent the urine
from draining properly.

Page 90 of 307
CARE SKILLS:
• Shower/Shampoo – #18
• Bed Bath/Catheter Care/Perineal Care – #19
• Back Rub - #20
• Shampoo Hair in Bed – #21
• Whirlpool - #22
Review Questions --- Lesson #12
1. Explain the procedure to cleanse the perineal area (both male and female)
and rationale of importance.

Page 91 of 307
Lesson #13 (4 hours)
Title: Activities of Daily Living (Oral Care, Grooming, Nail Care)
Lesson Objectives:
I. The student will be able to explain the importance of and demonstrate
competence in the provision of oral care/denture care.
II. The student will be able to explain the importance of and demonstrate
competence in the provision of grooming, including hair and facial hair.
III. The student will be able to explain the importance of and demonstrate
competence in the provision of fingernail and foot care.
Key Terms:
Foot Care – care of the feet, including inspection for areas of concern to be reported to
the nurse.
NPO – nothing by mouth.
Oral Care – care of mouth, teeth and gums. Cleaning the teeth, gums, tongue, inside
of mouth and dentures, if used.
Content:
I. Grooming/Personal Hygiene (see CARE SKILLS #23-30)
A. Points to Remember:
1. Always allow the resident to do as much as possible for
themselves.
2. Allow the resident to make choices and respect those choices.
3. Be sensitive to established routines of the resident, incorporating
those routines into daily care, as possible.
4. Oral care (including denture care) must be performed at least twice
a day, but it’s recommended to occur more often. Unconscious oral
care should be performed more frequently to keep resident’s mouth
moist.
5. Oral care reduces the number of pathogens in the mouth, improves
the resident’s sense of well–being and appearance and improves
sense of taste, enhancing appetite.
Page 92 of 307
6. Oral care eliminates particles from beneath the gums, preventing
injury and improving ability to chew and consume meals.
7. Dentures should be handled carefully and stored in cool, clean
water in a labeled denture cup when not in use. Be sure that the
cup is kept in a safe place. Always follow manufacturer’s
instructions for cleaning dentures.
8. The caregiver should observe for ill–fitting dentures and report
concerns to the nurse. Ill–fitting dentures could affect speech and
chewing ability, thus, ultimately affecting meal consumption and
contributing to potential weight loss.
9. More frequent oral care is needed for residents who are
unconscious, breathe through their mouth, are being given oxygen,
are in the process of dying and/or are NPO.
10. Observe and report to nurse: irritation, raised areas, coated or
swollen tongue, sores, complaints of mouth pain, white spots,
loose/chipped or decayed teeth.
11. Be certain that the resident wants you to shave him/her or assist
him/her to shave before you begin.
12. Wear gloves when shaving a resident.
13. Be sure to dispose of razors in the sharps container accordingly.
14. Always use hair care products that the resident prefers for his/her
type of hair.
15. Nail care is provided when assigned or if nails appear dirty or have
jagged edges.
16. Check fingers and nails for color, swelling, cuts or splits. Check
hands for extreme heat or cold. Report any unusual findings to
nurse before continuing procedure.
17. Support the foot and ankle when providing foot care.
18. Poor circulation occurs in the resident with diabetes. Even a small
sore on the foot can become a large wound.
19. Careful foot care, including regular daily inspection is important.
20. During foot care, the feet should be checked for irritation or sores
and reported to the nurse, if observed.

Page 93 of 307
21. Soak feet in warm water to soften nails. Remove feet one at a time
and wash, using a soapy washcloth. Be sure to rinse soap from feet
prior to drying them.
22. Toenails are to be cut straight across with heavy nail clippers.
**Check with the charge nurse before trimming the resident’s toenails. Residents
with poor circulation to the feet or diseases such as diabetes will usually have
their toenails trimmed by a podiatrist. For residents without these problems, you
will need to trim the toenails regularly.
CARE SKILLS:
• Oral Care – #23
• Oral Care for Unconscious – #24
• Denture Care – #25
• Shaving with an Electric Razor – #26
• Shaving with a Safety Razor – #27
• Comb/Brush Hair – #28
• Fingernail Care – #29
• Foot Care – #30
Review Questions --- Lesson #13
1. Explain observations made during oral care that should be reported to the
nurse.
2. Explain why a nurse aide should not clip the toenails of a diabetic resident.

Page 94 of 307
Lesson #14 (4 hours)
Title: Activities of Daily Living (Dressing, Toileting)
Lesson Objectives:
I. The student will be able to demonstrate competence in dressing or undressing
the resident.
II. The student will be able to demonstrate competence in assisting the resident with
toileting needs.
Key Terms:
Catheter – tube used to drain urine from the bladder.
Condom Catheter – external catheter that has an attachment on the end that fits over
the penis; also called a Texas catheter.
Elimination – process of expelling solid waste not absorbed into the cells.
Enema – specific amount of water flowed into the colon to eliminate stool.
Fecal Impaction – hard stool in the rectum that cannot be expelled.
Fracture Pan – bedpan used for a resident who cannot assist with raising hips onto the
regular bedpan.
Hemiparesis – weakness on one side of the body.
Hemiplegia – paralysis on one side of the body, weakness, or loss of movement.
Incontinence – inability to control the bladder or bowels.
Indwelling Catheter – catheter that remains in the bladder for a period of time.
Paraplegia – loss of function of lower body and legs.
Portable Commode (Bedside) – chair with a toilet seat and a removable container
underneath.
Prosthesis – artificial body part.
Quadriplegia – loss of function of legs, trunk and arms.
Suppository – medication given rectally to cause a bowel movement.
Void – urination.

Page 95 of 307
Content:
I. Dressing (see CARE SKILLS #31-32)
A. Residents have their own style and preferences and should be honored to
the extent possible.
B. Residents should be encouraged to dress in their own clothing of choice
each day.
C. Each piece of the resident’s clothing should be inventoried according to
facility policy, adding new items and deleting discarded items as
necessary.
D. Resident clothing should be labeled/identified in an inconspicuous place.
E. Affected limbs should be dressed first and undressed last.
F. Avoid pullover garments if the resident has an affected side or difficulty
with the neck or shoulders, unless requested by the resident.
II. Toileting
A. Assist to Bathroom or Bedside Commode (see CARE SKILLS #33-34)
1. Ensure bedside commode is in good repair, clean and odor free and
has intact rubber stops to prevent commode from moving with resident
weight, potentially causing a fall.
2. After assisting a resident to toilet, it may be necessary for the nursing
assistant to perform perineal care.
a. Ensure the resident can stabilize while standing, utilizing a walker,
side grab bars, and/or with the assistance of a second caregiver
utilizing a gait/transfer belt.
b. Make sure that the resident is standing firmly, with their feet spread
apart.
c. Wipe from front to back, using a different part of the washcloth for
each stroke. Change the washcloth as necessary.
d. Rinse the resident’s perineum and pat it dry prior to raising
undergarments or applying a brief.
B. Bedpan/Fracture Pan (see CARE SKILLS #35)
1. A fracture pan is a bedpan that is flatter than a normal bedpan. It is
used for residents who cannot assist to raise their hips onto a
Page 96 of 307
regular bedpan. When using a fracture pan, position with the
handle toward the foot of the bed. If the resident cannot help, roll
the resident onto their far side, slip the fracture pan under the hips
and roll the resident back toward you onto the bedpan.
2. A standard bedpan is positioned with the wider part of the pan
aligned with the resident’s buttocks.
C. Urinal (see CARE SKILLS #36)
1. Keep urinal in easy reach of resident.
2. Empty and clean urinal after each use.
3. Avoid using hot water to rinse the urinal.
D. Bowel and Bladder Training
1. Incontinent residents may be identified as candidates for bowel and
bladder training. If so, the following guidelines will apply:
a. A record of the resident’s bowel and bladder habits will be
maintained and then observed for a pattern of elimination. A
pattern will predict the frequency in which the resident will
need to be assisted to use the bedpan or to toilet.
b. Explain the training schedule to the resident and attempt to
follow the schedule closely.
c. Offer a trip to the commode or bathroom prior to beginning
long procedures, as well as before and after meals.
d. Encourage residents to drink sufficient fluids. About 30
minutes after fluids are consumed, offer a trip to the
bathroom or use of the urinal or bedpan.
e. Answer the resident’s call light promptly, as residents cannot
wait long when the urge to void is felt.
f. Provide privacy for elimination.
g. Praise successes and attempts to control bowel and bladder.
E. Emptying urinary drainage bag/leg bag (see CARE SKILLS #37)
1. Be sure to use an alcohol pad to clean the spout once the bag is
completely drained.
Page 97 of 307
2. Measure and record output, per facility policy. (See CARE SKILLS
#14)
F. Catheter Care (see CARE SKILLS #19)
1. If a resident has a catheter, care is normally provided on each shift.
2. CNAs are NOT allowed to disconnect the urinary drainage bag
and/or tubing from the catheter. Only licensed nurses are allowed
to change the drainage and/or leg bag.
3. Privacy bags should be used for residents with catheters.
a. Privacy bags keep the catheter bag and its contents hidden
from visitors and others in the facility, which improves privacy
and dignity.
b. Privacy bags help secure the drainage bag to wheelchairs,
beds, etc., so that the drainage bag never touches the floor.
4. Be sure that the tubing and urinary drainage bag are not dragging
or touching the floor as residents ambulate, especially when in a
wheelchair.
G. Urine Specimen Collection (see CARE SKILLS #38)
1. Random urine specimens do not have to be collected directly into
the specimen container. Also, it is not necessary to clean the
resident’s genitalia before collecting the specimen. (Urine can be
poured into the container from a bedpan, bedside commode, urinal,
etc.) Clean-catch specimens are collected directly into the
specimen container and should not include the first and last part of
the urine voided.
2. If a clean–catch (midstream) urine specimen is ordered, using the
towelettes supplied, the caregiver will assist the resident to clean
the area around the meatus. For females, separate the labia. Wipe
from front to back along one side. Discard the towelette. With a new
towelette, wipe from front to back along the other side. Using a new
towelette wipe down the middle. For males, clean the head of the
penis. Use circular motions with the towelettes. Clean thoroughly,
changing the towelette after each circular motion. Discard after use.
If the male is uncircumcised, pull back the foreskin of the penis
before cleaning. Hold it back during urination. Make sure it is pulled
back down after collecting the specimen. Ask the resident to begin
urination, but to stop before urination is complete. Place the
container under the urine stream and ask the resident to begin
urinating again. Fill the container at least half full. Remove the

Page 98 of 307
container and allow the resident to finish urinating in bedpan, urinal
or toilet.
H. Stool Specimen Collection (see CARE SKILLS #39)
1. Ask the resident to inform you when he or she can have a bowel
movement.
2. Be ready to collect the specimen.
I. Application of Incontinent Brief (see CARE SKILLS #40)
1. Ensure brief is appropriate size for resident.
2. Ensure appropriate application in a manner not to cause abrasion
due to being too tight or having tape applied to skin.
3. Monitor frequently for needed perineal care and change of brief.
J. Measure and record output (urine and emesis) (see CARE SKILLS #14)
1. Graduated measuring container.
2. Use metric measurement (cubic centimeters =cc).
3. Record all fluids that go into resident (intake). Include oral intake, IV
fluids, tube feedings, medications, dialysis fluids, and flushes.
Nurses are responsible for measuring and recording fluids related
to medication administration.
4. Record all fluids excreted or withdrawn from the body (output).
This includes urine, liquid stools, drainage from drains or chest
tubes.
CARE SKILLS:
• Change Gown – #31
• Dressing a Dependent Resident – #32
• Assist to Bathroom – #33
• Assist to Bedside Commode – #34
• Bedpan/Fracture Pan – #35
• Urinal – #36
• Empty Urinary Drainage Bag – #37

Page 99 of 307
• Urine Specimen Collection – #38
• Stool Specimen Collection – #39
• Application of Incontinent Brief – #40
• Measure and Record Urinary Output #14
Review Questions --- Lesson #14
1. Explain the difference between a routine urine specimen and a clean–
catch (mid–stream) urine specimen.
2. Affected limbs should be dressed first and undressed last. (True or False)

Page 100 of 307
Lesson #15 (2 hours, 30 minutes)
Title: Activities of Daily Living (Positioning/Turning, Transfers)
Lesson Objectives:
I. The student will be able to demonstrate the importance of proper positioning and
body alignment.
II. The student will be able to recognize four commonly-used resident positions.
III. The student will be able to demonstrate competence in proper transfer
techniques.
IV. The student will be able to demonstrate competence in assisting with ambulation.
Key Terms:
Alignment – put in a straight line; shoulders directly above hips, head and neck
straight, arms and legs in a natural position.
Ambulation – walking.
Assistive Devices – equipment used to help resident increase independence.
Body Mechanics – using the body properly to coordinate balance and movement.
Cane – assistive device used by the resident with weakness on one side.
Dangle – sitting up with feet over the edge of the bed.
Deformities – abnormally formed parts of the body.
Fowler’s Position – head of bed elevated 45 to 60 degrees.
Lateral Position – lying on side, either right or left.
Logrolling – to turn or move the resident without disturbing the alignment of their body.
Pivot – to turn with one foot remaining stationary.
Positioning – the placement and alignment of the resident’s body when assisting the
resident to sit, lie down or turn.
Semi–Fowler’s Position – head of bed elevated 30 to 45 degrees.
Supine Position – lying flat on back.
Transfer – moving the resident from one surface to another.

Page 101 of 307
Transfer Belt (Gait Belt) – a safety belt used to assist the resident who is weak or
unsteady during transfers or walking.
Walker – assistive device used for support and steadiness.
Content:
I. Proper positioning and body alignment
A. Positioning
1. Frequency of repositioning
a. Recommended every 2 hours or more frequently, if
warranted.
i. Prevent deformities, development of pressure sores,
respiratory complications and decreased circulation.
B. Alignment
1. Proper alignment
a. Shoulders above hips, head and neck straight, and arms and
legs in natural position.
b. Benefits
i. Promotes physical comfort.
ii. Relieves strain.
iii. Promotes blood flow.
iv. Promotes efficient body function.
v. Prevents deformities and complications (i.e.,
contractures and prevention of pressure sores, etc.).
C. Role of the Nurse Aide
1. Provide privacy.
2. Check resident’s body alignment after position change.
3. Keep resident’s body in good alignment, as possible.
Page 102 of 307
4. Support affected limbs during repositioning.
5. Review care plan to determine which position(s) is safe for the
resident.
6. Do not cause the resident pain or injury.
a. Be gentle.
b. Do not rush.
c. Do not slide or drag resident on bed linen.
d. Use appropriate side rail when turning resident (if side rail is
used).
i. Side rail up on side of bed resident is turning toward.
e. Return bed to appropriate height and position.
7. Encourage resident to assist with positioning, if able.
8. Assist resident in moving to head of bed as needed (See CARE
SKILLS #41)
II. Commonly used positions
A. Supine Position (see CARE SKILLS #42) – Flat
1. Ensure resident is placed at the head of the bed to prevent
resident’s feet/heels from touching or resting against the footboard.
This will also help keep the trunk in position should the head of the
bed be elevated.
2. Procedures which may require supine position
a. Bed making
b. Bed bath
c. Perineal care
B. Lateral Position (see CARE SKILLS #43) – Resident placed on left or right
side
1. Reposition to side
2. Logrolling
Page 103 of 307
3. Reduces pressure on one side.
C. Fowler’s Position (see CARE SKILLS #44)
1. Head of bed elevated 45 to 60 degrees
a. Promotes breathing.
b. Caution: this position adds pressure to coccyx (tailbone).
2. Procedures which may require Fowler’s position
a. Grooming
b. Oral care
c. Eating
D. Semi–Fowler’s Position (see CARE SKILLS #45)
1. Head of bed elevated 30 to 45 degrees
a. Promotes breathing
b. Less pressure to coccyx
III. Proper transfer
A. Role of the Nurse Aide
1. Gather equipment.
2. Arrange furniture.
3. Awareness of catheters, tubing or devices.
4. Resident in shoes with non–skid soles, gripper socks, or shoes.
5. Assess need for assistance from coworker; refer to assignment
sheet.
6. Provide for privacy and encourage the resident to help as much as
possible to promote independence.
7. Use proper body mechanics.
a. Place feet shoulder-width apart.
b. Bend knees and keep back straight.
Page 104 of 307
c. Keep the weight of the resident close to you.
d. Lift using thigh muscles in a smooth motion.
e. Never lift and twist at same time.
8. Check the resident’s care plan and/or assignment sheet before
moving the resident.
9. Be patient and give the resident time to adjust to changes in
position.
10. Be aware of resident’s limbs when transferring.
11. Check condition of assistive devices.
12. Report any misuse of (or refusal of) device to nurse.
13. Observe resident for signs of discomfort or fatigue.
14. When assisting resident to walk with cane, stand on weaker side.
15. Know how to properly use wheelchair and geriatric chair. (See
CARE SKILL #46)
a. Nurse aide should know how to remove/replace equipment
as necessary (i.e., armrests and footrests on wheelchair),
lock/unlock wheels and other parts of chair, and raise/lower
adjustable parts of chair.
16. Follow safety guidelines when transporting a resident in a chair.
a. Push the wheelchair from behind, except when going in and
out of elevators. Pull the chair into and out of an elevator.
b. If moving a resident down a ramp, take the chair down
backwards. Glance over your shoulder to be sure of your
direction and to prevent collisions and falls.
c. Always place resident’s feet on footrest before moving chair.
Never push wheelchair if resident’s feet are not on footrests.
Doing so could cause serious injury to the resident.
d. Pay attention to surroundings to avoid collisions and injury to
resident. Slow down at corners and look before proceeding.
B. Transfer from bed to chair (See CARE SKILLS #47)
1. Determine if resident has weakness on one side.
Page 105 of 307
a. Place chair on unaffected side and transfer resident towards
his/her unaffected side.
2. Brace chair firmly against the bed facing the foot of the bed.
3. Lock chair wheels & remove arm and leg rests, if wheelchair.
4. Allow resident to sit on side of bed/dangle (see CARE SKILLS #48)
for approximately 10–15 seconds.
a. Feet flat on floor.
b. Regain balance.
5. Apply transfer/gait belt before transferring the resident.
6. Use proper body mechanics.
C. Using transfer/gait belt (see CARE SKILLS #49).
1. Secure belt around resident’s waist and over their clothes. Never
place gait belt on bare skin.
2. Most used when resident has fragile bones or recent fractures.
a. May not be used when resident has had abdominal surgery
or has difficulty breathing.
b. Avoid using gait belt if resident has G-tube or other
ostomies/stomas on abdomen.
3. Check for proper fit; not too tight; should not slide.
4. Use proper body mechanics.
D. Ambulation/walking (See CARE SKILLS #50)
1. Encourage/assist throughout the day.
a. Promote physical and mental well–being.
2. Stand to side and slightly behind the resident.
a. Weakness on one side, stand on that side.
3. Arm on residents back (if no gait belt).
Page 106 of 307
E. Assistive devices
1. Fitted to each resident.
a. Measurements obtained by PT or nurse.
2. Walker (see CARE SKILLS #51)
a. Used by resident who can bear weight.
b. Used for support/balance.
c. Design
i. Light weight
ii. Rubber stops should be in good repair.
iii. Wheels
d. Walking sequence
i. Walker is placed at a comfortable distance in front of
resident.
ii. Feet/wheels on ground.
iii. Resident moves to the walker, weaker side first.
3. Cane (see CARE SKILLS #52)
a. Used by resident to help maintain balance.
i. Resident should be able to bear weight.
ii. Not for weight bearing.
b. Designs
i. Curved handle
ii. Straight handle
iii. Four feet (quad–cane)
iv. Rubber stops should be in good repair.

Page 107 of 307
CARE SKILLS:
• Assist to Move to Head of Bed – #41
• Supine Position – #42
• Lateral Position – #43
• Fowler’s Position – #44
• Semi–Fowler’s Position – #45
• Use of Wheelchair and Geriatric Chair – #46
• Transfer to Chair – #47
• Sit on Edge of Bed – #48
• Using a Gait Belt to Assist with Ambulation – #49
• Walking – #50
• Assist with Walker – #51
• Assist with Cane – #52
Review Questions --- Lesson #15
1. What is proper body alignment?
2. List the four commonly used positions.
3. Which position raises the head of the bed 30–45 degrees?
4. Does this position put more or less pressure on the coccyx than Fowler’s
position?
5. When transferring a resident with right-sided weakness from the bed to
the chair, the chair should be placed on the resident’s right side. (True or
False)

Page 108 of 307
Lesson #16 (1 hour, 30 minutes)
Title: Activities of Daily Living (Devices Used for Transfer)
Lesson Objectives:
I. The student will be able to demonstrate competence in transferring a resident
using a mechanical lift.
II. The student will be able to explain how to transfer a resident to a stretcher or
shower bed.
III. The student will be able to explain how to and when to use a two-person transfer.
Key Terms:
Mechanical Lift – a hydraulic or electric device used to transfer dependent or obese
residents between surfaces. The lift may also have a scale to weigh the resident.
Stretcher – gurney; device for transporting residents unable to use a wheelchair or to
walk; a means of transporting the severely ill or an immobile resident.
Content:
I. Mechanical lifts
A. Common names and types
1. Sling– some Brand names include Hoyer and Invacare.
2. Sit to Stand– one brand name is Arjo ® Sara Lift.
B. Proper use of mechanical lifts
1. Be sure to always follow:
a. Manufacturer’s instructions – normally requires at least two
caregivers.
b. Facility policy.
C. Transferring with mechanical lift (See CARE SKILLS #53) – general
principles (but may vary with type of lift)
1. Position sling.
2. Base open and under bed, or around/straddling chair.
Page 109 of 307
3. Place the overhead bar above the resident.
4. Attach the sling.
5. Place resident’s arms across chest. Stabilize resident’s head and
neck.
6. Raise sling/resident.
7. Coworker support resident’s legs.
8. Lower sling/resident to chair or stretcher (bed).
9. Position for comfort and place sling in a manner to protect the
resident’s dignity.
D. Role of the Nurse Aide
1. Review assignment sheet before transferring.
2. Be aware of manufacturer’s instructions and facility policy.
3. Make sure lift is in proper working order.
4. Provide privacy for the resident during the transfer.
5. Be aware of catheter or tubing the resident may have.
6. Never leave resident alone in device.
II. Transfer resident to stretcher/shower bed
A. From bed to stretcher (see CARE SKILLS #54)
1. Need at least two workers to assist.
B. Return resident to bed.
1. Height of stretcher slightly higher than bed.
C. Role of the Nurse Aide.
1. Explain to the resident what you are about to do prior to
transferring.
2. Provide the resident with privacy when transferring.
3. Keep the resident covered.

Page 110 of 307
4. Be aware of any catheter or tubing the resident may have.
5. Use proper body mechanics.
6. Lock wheels on bed.
7. Ensure resident is positioned for comfort prior to exiting the room.
III. Transfer – Two Person Lift (see CARE SKILLS #55)
ONLY TO BE USED IN AN EMERGENCY – IF RESIDENT UNABLE TO BEAR
WEIGHT, A LIFT SHOULD BE USED.
A. For transferring resident unable to bear weight (i.e., history of stroke).
B. Role of the Nurse Aide.
1. Explain to the resident what you are about to do prior to the
transfer.
2. Lock wheelchair brakes.
3. Be aware of catheter or tubing the resident may have.
4. Use proper body mechanics.
CARE SKILLS:
• Transfer Using Mechanical Lift - #53
• Transfer to Stretcher/Shower Bed – #54
• Transfer: Two Person/Lift– emergency only – #55
Review Question --- Lesson #16
1. The manufacturer’s instructions state the mechanical lift can safely be used by two
qualified staff persons to transport a resident. The facility’s policy states two qualified
staff members are required to transport a resident. You were trained on how the lift
functions and are competent to use it. Mrs. Smith would like to get up in her
wheelchair. You have the lift ready to assist in the transfer. Cindy, another CNA, is
coming to help with the transfer. Five minutes have passed, and Cindy has not
arrived. It is acceptable for you to transfer Mrs. Smith by yourself. (True or False)

Page 111 of 307
Lesson #17 (2 hours)
Title: Resident’s Environment
Lesson Objectives:
I. The student will be able to demonstrate competence in making an occupied bed.
Key Terms:
Occupied Bed – bed made while a resident is in the bed.
Content:
I. Occupied Bed (see CARE SKILLS #56)
A. Points to Remember
1. Wrinkles from the linens can cause problems with circulation and
result in sores on the resident’s skin. Keep sheets as wrinkle-free
as possible.
2. Always leave extra room at the foot of the bed for the toes to move
freely.
3. Use safety precautions to ensure that the resident does not fall out
of the bed. Follow facility protocol regarding side rails.
4. Keep the resident covered throughout the procedure to ensure
privacy and comfort are maintained.
5. Before beginning an occupied bed change, check to see if the
resident has tubes or lines attached to them. If so, be sure that the
lines aren’t being pulled or pinched during the linen change.
a. Move the drainage bag to the side of the bed that the
resident will be facing while the linens are being changed.
Before moving to the second side of the bed, be sure to
move the bag, so that the resident will again be facing it
once turned onto their other side.
6. The CNA is never allowed to stop a feeding pump or to disconnect
the feeding tube for any reason. If necessary, have the nurse stop
the pump or disconnect the lines. Always be sure to notify the nurse
when you are finished, so that the resident’s feeding can be
resumed.
7. Report to the nurse if the resident refuses to have the linens
changed, or if the resident complains of pain before you begin.

Page 112 of 307
CARE SKILLS:
• Occupied Bed – #56
Review Questions --- Lesson #17
1. Wrinkled sheets under a resident do not cause problems for their skin?
(True or False)
2. You are beginning an occupied bed change for Mrs. Smith, who has an
indwelling catheter with a urinary drainage bag attached. Which side of the
bed should you place the bag on, if you are about to turn Mrs. Smith onto
her left side?

Page 113 of 307
Lesson #18 (2 hours)
Title: Skin Care/Pressure Prevention
Lesson Objectives:
I. The student will be able to explain the importance of an intact integumentary
system and basic skin care.
II. The student will be able to describe residents at risk for skin breakdown.
III. The student will be able to describe the need for pressure reducing devices.
Key Terms:
Bony Prominence – area of the body where the bone is in close proximity to the skin
(e.g., ankles, hip bones, elbows, etc.).
Dermis – inner layer of skin.
Epidermis – outer layer of skin.
Friction – skin repeatedly rubs another surface.
Integumentary System – skin and associated structures that form a natural protective
covering for the body
Offload – assisting a resident to stand, to completely remove the pressure from the
area; Any process in which pressure on the appendage is reduced
Pressure Point – any area on the body that bears the body’s weight when lying or
sitting and where a bone is close to the skin’s surface.
Pressure Sore (also called “Bed Sore” or “Decubitus Ulcer”) – a localized injury to the
skin and/or underlying tissue. Usually occurs over a bony prominence as a result of
pressure, or pressure in combination with shear and/or friction.
Reverse Push–Up – asking a resident to lift up off their buttocks using their arms in a
reverse push– up.
Shear – skin stays in one position, but underlying bone and tissue roll in the opposite
direction.
Subcutaneous tissue – the lowest layer of skin; fatty tissue.

Page 114 of 307
Content:
I. Understanding the Integumentary System and Basic Skin Care
A. The Integumentary System
1. The structure
a. Skin
b. Hair
c. Epidermis
d. Dermis
e. Subcutaneous tissue
f. Nails
g. Glands
i. Oil
ii. Sweat
h. Nerve endings
2. Function
a. Largest organ of the body
b. Sense organ
i. Heat/cold
ii. Pain
iii. Pressure
iv. Touch
c. Internal organ protection
d. Body temperature regulation
e. Bacterial protection
f. Excretes waste
Page 115 of 307
g. Prevents loss of too much water
h. Vitamin D production
3. Changes with age
a. Skin dries
b. Skin becomes more fragile
c. Subcutaneous (fatty) tissue thins
d. Brown spots develop
e. Wrinkles appear
f. Hair grays and becomes thin
g. Nails thicken
4. Care of the skin
a. Skin should be clean and dry.
i. Provide frequent care for residents who are
incontinent.
ii. Change linens/clothing.
iii. Check resident at least every 2 hours for needed care
and encourage repositioning.
b. Observe for:
i. Rashes
ii. Abrasions
iii. Dryness
iv. Changes in skin color
1. Pale
2. Red
3. Purple/Blue
Page 116 of 307
v. Pressure areas
1. Reposition at least every 2 hours.
2. No wrinkles in bottom sheet.
vi. Temperature
1. Complaints of warmth or burning
vii. Bruising
viii. Swelling
ix. Blisters
1. Ensure resident has proper fitting
shoes/slippers.
x. Scratching
xi. Broken skin
xii. Drainage
xiii. Wound or ulcer
xiv. Redness or broken skin between toes or around nails.
II. Risk Factors for Skin Breakdown
A. Sensory Perception
1. The ability to feel pressure. In general, people move regularly to
keep pressure from building up.
2. Individuals with limited sensory perception may not realize they
have not moved for a while, which increases their risk for pressure
ulcers. Medications, medical conditions, or mental status may all
cause an individual’s sensory perception to change.
B. Moisture
1. Healthy skin stays clean and dry. Individuals at risk of pressure
ulcers may have skin that stays moist because of incontinence
(urine or stool) or perspiration (sweat). When an area at risk for a
pressure ulcer is moist, a pressure ulcer is more likely to form.
Page 117 of 307
C. Activity
1. Activity means an individual’s ability to physically move (like
walking). Individuals who can walk rarely get pressure ulcers.
Individuals who are bedfast or chair bound are at higher risk of
developing pressure ulcers.
D. Mobility
1. Mobility refers to the ability to change and control body position.
Individuals with good mobility move their bodies regularly.
Individuals who are immobile or have limited mobility are at greater
risk for developing pressure ulcers because they cannot move to
relieve the pressure.
E. Nutrition
1. Everyone needs to eat the right food and drink enough liquids to
stay healthy.
Individuals who do not eat enough of the right foods or drink
enough of the right liquids are at greater risk for pressure ulcers
because their bodies do not have the energy they need.
F. Friction and Shear
1. Friction happens when skin rubs another surface over and over
(like a rough wheelchair seat rubbing the back of the individual’s
leg).
2. Shear is similar to friction, but it occurs when skin stays in one
position but the underlying bone and tissue roll in the opposite
direction (like someone sliding across a bed).
3. The rubbing and pulling of friction and shear break down the skin,
which contributes to pressure ulcers. Pressure ulcers are more
likely to develop when there is increased shear or friction.
G. Additional Risk Factors
1. Chronic conditions or illnesses (diabetes, cancer) – body is fighting
several problems at once.
2. Age– skin becomes fragile and breaks down easily.
3. Medical devices– the device may rub the skin over and over or
cause pressure to that area.
Page 118 of 307
4. Depression or mental illness– Higher risk due to individuals
neglects their own care.
5. History of pressure ulcers– old pressure ulcer scars make the skin
in that area weaker and more likely to break down.
III. Pressure Ulcer Development
A. Skin breakdown can develop when individuals stay in one position for too
long (as little as two hours) without shifting their weight.
B. The pressure of body weight reduces blood supply, causing skin and
surrounding tissue to become damaged or even die.
C. Pressure ulcers can be painful. They can cause infection, damage to
muscle and bone, and even death.
1. For the stages of pressure sores, please refer to the picture in the
Appendix A.
D. Treatment can take weeks, months, or years.
IV. Prevention of Skin Breakdown
A. Observe skin upon admission and during the provision of daily care
1. Skin Inspection (See CARE SKILLS #57)
a. Drape resident to allow you to see, feel and smell the area
you are inspecting. This can easily be done when the
individual is dressing or undressing.
b. Remove pressure – Lift heels, turn or move the individual to
inspect the skin.
i. Report to the nurse if you find redness that is not
relieved within 15 minutes of removing pressure.
c. Inspect – Focus on bony prominences, where pressure
ulcers are most likely to develop. Observe and prevent skin–
to–skin contact. Additional areas at risk are the ears, under
the breasts, the scrotum, and any skin– to–skin contact.
d. Note observations and report to the nurse – When a
potential problem is observed, notify the nurse for
assessment of the area.
Page 119 of 307
i. Report areas of discoloration, blisters, skin tears,
changes in the way the skin feels, or any other
area(s) of concern.
B. Encourage and maintain nutrition and hydration.
C. Manage moisture by providing prompt care.
D. Minimize pressure.
1. Pressure–reducing mattress
2. Pressure–reducing cushion to chair
a. Heel boots – specialty devices that surround the feet and
calves and create a cushion between the heels and the bed.
They should not be used with residents who walk. The
manufacturer’s instructions must be followed.
b. When using any device, check the other areas of the legs to
ensure you are not moving the pressure to another area, like
the calves.
3. Other pressure-reducing devices
a. Use pillows to float heels (See CARE SKILLS #58) when
residents are in bed. Pillows should also be used to help
reduce pressure under top arm when resident is side-lying.
b. Bed cradles (See CARE SKILLS #59) can be used to keep
covers from touching toes when residents are in bed. Be
sure to use per manufacturer’s instructions and drape top
covers over the cradle properly.
E. Prevent Friction and Shearing
1. Do not pull residents across surfaces when repositioning or
transferring.
2. Use the draw sheet to turn, lift, or move residents who are in bed.
3. Ask for assistance when turning, lifting, or moving residents.
F. Identify residents who have been assessed by nursing as “at risk”.
1. Braden Scale– standardized risk assessment tool completed by the
nurse.

Page 120 of 307
2. Newly-admitted residents are likely to fall into this category, due to
the number of risk factors they face and the sudden change(s) in
their body.
CARE SKILLS
• Inspecting Skin – #57
• Float Heels – #58
• Bed Cradle – #59
Review Questions --- Lesson #18
1. Most pressure ulcers develop within a few weeks of admission. (True or
False)
2. Pressure ulcers can lead to life–threatening infection. (True or False)
3. Caregivers should use draw sheets to turn, lift or move the resident up in
bed to prevent skin damage caused by shearing. (True or False)

Page 121 of 307
Lesson #19 (3 hours)
Title: Activities of Daily Living (Nutrition/Hydration)
Lesson Objectives:
I. The student will be able to demonstrate competence in proper feeding
techniques and provision of assistance for the resident with special needs.
II. The student will be able to explain the importance of following care guidelines for
a resident receiving tube feedings and observations of resident condition that
must be reported, if observed.
Key Terms:
Aspiration – inhalation of food or drink into lungs which has the potential to cause
pneumonia or death.
Gastrostomy Tube (G–Tube) – tube placed through the abdomen directly into the
stomach and used to provide nourishment.
Jejunostomy (J–Tube) – tube placed into the second part of the small intestines and
used to provide nourishment.
Nasogastric Tube – tube placed through the nose to the stomach and used to provide
nourishment.
PEG (Percutaneous Endoscopic Gastrostomy) – tube placed endoscopically, directly
into the stomach and used to provide nourishment. Often called a “G–tube”.
Content:
I. Promoting Proper Nutrition and Hydration
A. Fluid Balance
1. Observe for signs of dehydration and report to the nurse:
a. Mild symptoms (include but are not limited to): thirst, loss of
appetite, dry skin, flushed skin, dark colored urine, dry
mouth, fatigue or weakness, chills.
b. Advancing dehydration symptoms (include but are not
limited to): increased heart rate, increased respirations,
decreased sweating, decreased urination, increased body
temperature, extreme fatigue, muscle cramps, headaches,
and nausea.
Page 122 of 307
c. severe dehydration symptoms (include but are not limited
to)– muscle spasms, vomiting, racing pulse, shriveled skin,
dim vision, painful urination, confusion, difficulty breathing,
seizures.
2. Observe for and report to the nurse signs of fluid overload which
may include:
a. stretched and shiny–looking skin over a swollen area,
increased abdomen size (ascites), shortness of breath or
difficulty breathing (pulmonary edema), tightness of jewelry,
clothing or accessories, low output of urine, even when the
resident is drinking as much fluid as normal, a dimple in the
skin covering the swollen area that remains for a few
seconds after the pressing finger has been released.
b. Symptoms of more serious fluid overload include difficulty
breathing, shortness of breath when lying down, coughing,
cold hands or feet.
c. Measure Intake & Output accurately.
II. Promoting the Use of Proper Feeding Technique/Assisting a Resident with
Special Needs (See CARE SKILLS #60)
NOTE - The caregiver should provide any necessary care and offer to assist the
resident to toilet prior to meal service in an effort to promote a positive experience.
A. Tips for feeding
1. As a safety precaution, never leave a resident who needs to be fed
unattended with a tray.
2. Add salt, pepper, sugar, condiments, etc., to the resident’s
preference and in accordance with their prescribed diet. Adding the
extra flavor can help increase their appetite.
3. Reheat food if necessary.
4. Do not eat while feeding residents.
5. Avoid talking to coworkers, or others in the room, as it can make
the resident feel neglected or unimportant and cause them to stop
eating.
Page 123 of 307
B. Assistive Devices
1. Plate guards
2. Utensils with enlarged (built–up) handles
3. Drinking cups (nosey cups)
4. Divided plates
5. Non–skid plate/place mat
C. Visually impaired
1. Speak in a normal tone while facing the resident.
2. Read menu to the resident.
3. Position their food on the plate according to hands of a clock.
Explain where food items are on plate.
4. When feeding the resident, ask them to open their mouth at
appropriate time.
5. When feeding the resident, tell them what food you are giving them.
D. History of stroke
1. Place food in resident’s sight.
2. Supply assistive device(s), as appropriate, to unaffected side.
3. Report any difficulty swallowing and observe for signs of choking.
4. Report to nurse coughing and/or observed pocketing of food.
5. When feeding the resident, make sure the resident swallows before
giving more food.
6. If resident’s mouth is paralyzed, place food on the unaffected side
when feeding.
E. History of Parkinson’s Disease
1. Supply assistive devices, as appropriate.
2. Food and drinks should be placed within reach.
3. Assist the resident as needed; promote independence.
Page 124 of 307
III. Caring for a Resident with a Tube Feeding and the Resident at Risk for
Aspiration
A. Tube Feedings
1. Feeding tubes are used when food cannot pass normally from the
mouth into the esophagus and then into the stomach. The resident
who is unable to take food or fluids by mouth, or is unable to
swallow, may be fed through a tube.
The two types of tubes most commonly used in long–term care
facilities are nasogastric tubes and gastrostomy tubes.
2. A nasogastric (NG) tube is a tube that is placed through the nose
into the stomach. (“Naso” is the medical term for nose and “gastric”
means stomach.) It may be abbreviated as NG tube. An NG tube
may also be used by the nurse to suction and remove fluids from
the body.
3. A gastrostomy tube (g–tube) is a tube that is placed directly into the
stomach for feeding. A small surgical opening is made through the
abdominal wall into the stomach, and the tube is sutured to hold it
in place. This type of tube is often used for a resident who may
need tube feedings for a long time. The abbreviation for a
gastrostomy tube is G–tube. This tube can also be called a PEG
(percutaneous endoscopic gastrostomy) tube.
4. Usually the NG tube or the G–tube will be attached to an electronic
feeding pump that controls the flow of fluid. Most pumps have an
alarm that sounds when something is wrong. You must notify the
nurse immediately if the alarm sounds.
5. The resident who has a feeding tube should be observed
frequently. If the pump is not working properly, the resident may
receive the wrong amount of food or the fluid may enter too quickly.
This can cause nausea, vomiting, and aspiration. The NG tube may
have moved out of the stomach and into the lungs. Aspiration
pneumonia may result if feeding enters the lungs.
6. Residents with feeding tubes are often NPO. NPO is the
abbreviation for nothing by mouth. PO is the abbreviation used
when a person can have something by mouth.
7. Do not give the resident who has a feeding tube anything to eat or
drink without checking with the nurse.
8. The NG tube is uncomfortable and irritating to the nose and throat.
The G– tube may become dislodged from the stomach, or the skin
Page 125 of 307
may become irritated at the site of insertion. Infection can occur
with either tube, if infection control practices are not carefully
followed.
9. The resident with a feeding infusing should not lie flat. The head of
the bed should be elevated at least 30°. Some procedures will need
to be changed slightly for the resident with a feeding tube. For
example, an occupied bed cannot be flattened to change the linen
or to provide incontinence care with the feeding infusing. If the bed
must be flattened, seek the nurse’s assistance to turn off the pump
prior to the procedure and turn the pump back on after the
procedure. Your major responsibility concerning the resident with a
feeding tube is to make regular observations and promptly report
any problem.
10. Report any choking or coughing to the nurse immediately.
B. Observations to be reported to the nurse immediately:
1. Nausea
2. Discomfort during the tube feeding
3. Vomiting
4. Diarrhea
5. Distended (enlarged and swollen) abdomen
6. Coughing
7. Complaints of indigestion or heart burn
8. Redness, swelling, drainage, odor, or pain at the tube insertion site
9. Elevated temperature
10. Signs and symptoms of respiratory distress
11. Increased pulse rate
12. Complaints of flatulence (gas)
C. Comfort Measures
1. The resident with a feeding tube is usually NPO. Dry mouth, dry
lips, and sore throat are sources of discomfort. The resident’s care
plan will include frequent oral hygiene and lubricant for the lips.

Page 126 of 307
D. Risk of Aspiration
1. Any resident with ordered thickened liquids, a pureed or
mechanical soft diet, or having a diagnosis of esophageal reflux,
GERD, or respiratory difficulty is a resident who is at risk of
aspiration. The caregiver must always elevate the head of the bed
or assist the resident to an upright position prior to offering food or
fluids if the resident is at risk of choking/aspiration. Should a
resident begin to cough, gurgle or regurgitate, attempts to feed
should STOP and the nurse should be alerted immediately to
assess the resident.
2. Residents at risk of choking/aspiration should be encouraged to sit
up or remain with the head of the bed elevated for at least 30
minutes (or as long as tolerated) following consumption of food or
fluids.
3. Know your residents and ensure residents receive snacks, meals
and fluids at the ordered consistency.
CARE SKILLS:
• Feeding – #60
Review Questions --- Lesson #19
1. Name two symptoms of dehydration.
2. When a tube feeding is infusing, the head of the bed must be elevated.
(True or False)

Page 127 of 307
Lesson #20 (8 hours)
Title: Basic Nursing Skills (Vital Signs, Height and Weight)
Lesson Objectives:
I. The student will be able to demonstrate competence in completion of initial steps
to be taken prior to initiating a procedure as well as final steps following any
procedure executed.
II. The student will be able to demonstrate competence in taking and recording vital
signs.
III. The student will be able to demonstrate competence in measuring and recording
height and weight.
Key Terms:
Apical Pulse – located on the left side of the chest, under the breastbone; taken with a
stethoscope.
Brachial Pulse – located at the bend of the elbow, used for taking blood pressure
measurement.
Carotid Pulse – located on either side of the neck, supplies the head and neck with
oxygenated blood.
Diastolic Blood Pressure – the phase when the heart relaxes; the pressure in the
arteries between heartbeats. bottom number of blood pressure reading
Expiration – exhaling air out of the lungs.
Hypertension – high blood pressure.
Hypotension – low blood pressure.
Inspiration – breathing air into the lungs.
Orthostatic Hypotension – a drop in blood pressure when a resident suddenly rises
from a lying to a sitting or standing position.
Pulse Oximetry – a procedure used to measure the oxygen level (or oxygen saturation)
in the blood. It is considered to be a noninvasive, painless, general indicator of oxygen
delivery to the peripheral tissues (such as the finger, earlobe, or nose).
Radial pulse – the pulse site found on the inside of the wrist.
Respiration – the process of breathing air into lungs and exhaling air out of the lungs.

Page 128 of 307
Systolic Blood Pressure – the phase when the heart is at work, contracting and
pushing blood from the left ventricle; the pressure in the arteries when the heart beats;
top number of a blood pressure reading
Content:
I. Initial Steps– These are consistent steps to be taken prior to executing any
procedure with a resident. (See CARE SKILLS #1).
A. Includes asking the nurse about the resident’s needs, abilities and
limitations.
B. Includes following infection control guidelines and providing the resident
privacy during care.
II. Final Steps– These are consistent steps to be taken following the completion of
any procedure with a resident. (See CARE SKILLS #2).
A. Includes ensuring the resident is comfortable and safe.
B. Includes removing supplies and equipment from the resident’s room and
reporting any unexpected findings to the nurse and documenting care
provided.
III. Vital signs provide important information
A. How the body is functioning
B. How the resident is responding to treatment
C. How the resident’s condition is changing
D. Taking and Recording Vital Signs
1. Temperature (oral, axillary, tympanic) – the measurement of heat in
the body affected by time of day, age, exercise, emotional state,
environmental temperature, medication, illness and menstruation.
Types of thermometers include glass, electronic with probe cover,
paper/plastic tape, tympanic with probe cover. Glass thermometers
are seldom used. NOTE* A facility may have specific instructions in
regard to equipment to be used and/or the cleaning and disinfection
of common use equipment for those residents who require
isolation. The facility policies should be followed in regard to
residents in isolation.

Page 129 of 307
a. Oral (by mouth) – normal range 97.6 to 99.6 F (See CARE
SKILLS #61)
b. Axillary (placed in the armpit) – normal range 96.6– 98.6 F
(See CARE SKILLS #62)
c. Aural/tympanic (placed in ear) – normal range 98.6– 100.6 F
d. The above ranges are for general use. Report values that
are more than 2.4 degrees from the resident’s baseline
(normal) temperature.
2. Pulse rate is the measurement of the number of heart beats per
minute – Normal range 60 – 100 (See CARE SKILLS #63)
a. Affected by age, sex, emotions, body position, medications,
illness, fever, physical activity and fitness level.
i. Pulse points most often used are: carotid, apical,
radial, and brachial
ii. When taking the pulse rate, note the rate (number of
beats per minute), rhythm and force.
3. Respirations/Respiratory Rate – the measurement of the number of
times a person inhales per minute – Normal rate is 12-20 (See
CARE SKILLS #63).
a. Affected by age, sex, emotional stress, medication, lung
disease, heat and cold, heart disease, and physical activity.
b. When taking respirations, note rate (number of respirations
per minute; rhythm (the regularity or irregularity of
breathing); and character (the type of breathing, such as
shallow, deep or labored).
c. Without removing your fingers from resident’s wrist (or
stethoscope from resident’s chest), count respirations after
taking pulse, so that the resident is unaware that their
breathing is being monitored.
d. If resident is agitated or sleeping, place hand on resident’s
chest to feel it rise and fall during breathing.
4. Pulse Ox – A pulse oximeter continuously measures the level of
oxygen saturation of hemoglobin in the arterial blood. (See CARE
SKILLS #64)

Page 130 of 307
a. Affected by poor circulation, movement, bright light, nail
polish and fake nails (if probe is placed on finger).
b. Place probe on opposite arm of blood pressure cuff.
c. Normal ranges are typically between 95%-100% but can
vary from person to person. Report an increase or decrease
in oxygen levels to the nurse.
5. Blood Pressure – A measurement of the force the blood exerts
against the walls of the arteries. Normal range for Systolic blood
pressure is 90–139; Normal range for Diastolic blood pressure is
60–89. (See CARE SKILLS #65)
a. Abnormally high blood pressure is called hypertension.
Measurements higher than 140/90 are considered high for
adults.
b. Abnormally low blood pressure is called hypotension.
Measurements below 90/60 are considered low for adults.
c. Electronic equipment may provide both odd and even
numbers for someone’s BP. However, a manual cuff only
displays even numbers.
d. The above ranges are for general use. It is important to
know the resident’s baseline (normal) BP range and to report
values obtained outside of that range to the nurse.
* Caution: If resident has a history of mastectomy or has a dialysis
access, the blood pressure is not to be taken on the affected
side/extremity.
IV. Measuring Height and Weight
A. Height (See CARE SKILLS #66)
1. Residents who are able to stand should utilize a standing balance
scale.
2. Residents who are unable to stand should be measured while lying
flat in bed. Height can be determined by using a tape measure to
measure the distance between a mark made at the top of the
resident’s head and one made at the bottom of the resident’s feet.
3. Residents who are unable to lay flat in bed should be measured
using a tape measure. Follow the procedure used by the facility to
determine height in this manner.

Page 131 of 307
B. Weight – (See CARE SKILLS #67)
1. Have resident wear the same type of clothing each time he/she is
weighed.
2. If daily weights are ordered, attempt to weigh at approximately the
same time each day.
3. If resident wears a prosthetic device, the weight should consistently be
taken with the device in place, or not in place, to eliminate inaccurate
weight changes.
4. Follow the manufacturer’s guidelines for use of the scale.
CARE SKILLS:
• Review Initial/Final Steps – #1 and #2
• Oral Temperature – #61
• Axillary Temperature – #62
• Pulse and Respiration – #63
• Pulse Oximeter – #64
• Blood Pressure –#65
• Height – #66
• Weight – #67
Review Questions --- Lesson #20
1. What is the normal heart rate for adults?
2. What is the normal blood pressure for adults?
3. If a resident is sleeping, describe how the respiratory rate can be taken?
Page 132 of 307
UNIT 3

Page 133 of 307
Lesson #21 (1 hour)
Title: Restraints
Lesson Objectives:
I. The student will be able to explain the resident’s right to be free of physical and
chemical restraints.
II. The student will be able to explain the need for monitoring physical restraint use
and routine release.
III. The student will be able to describe devices which are enabling versus
restrictive.
IV. The student will be able to explain the potential negative outcomes of side rail
use.
Key Terms:
Chemical Restraint – any drug that is used for discipline or convenience and not
required to treat medical symptoms. A drug used to restrict the freedom of movement
of a resident or sedate a resident.
Convenience – any action taken by the facility to control or manage a resident’s
behavior with a lesser amount of effort by the facility and not in the resident’s best
interest.
Discipline – any action taken by the facility for the purpose of punishing or penalizing
residents.
Entrapment – the act of getting caught in or trapped in something.
Medical Symptom – an indication or characteristic of a physical or psychological
condition.
Physical Restraint – any manual method or physical or mechanical device, material, or
equipment attached or adjacent to the resident’s body that the individual cannot remove
easily which restricts freedom of movement or normal access to one’s body.
Side Rail – a barrier device attached to the side of a bed.

Page 134 of 307
Content:
I. Physical Restraint
A. Resident Rights – The resident has the right to be free from any physical
or chemical restraints imposed for purposes of discipline or convenience,
and not required to treat the resident’s medical symptoms.
B. Types – “Physical restraints” include, but are not limited to, leg restraints,
arm restraints, hand mitts, soft ties or vests, lap cushions, and lap trays
the resident cannot remove easily. Also included as restraints are facility
practices that meet the definition of a restraint, such as:
1. Using side rails that keep a resident from voluntarily getting out of
bed;
2. Tucking in or using Velcro to hold a sheet, fabric, or clothing tightly
so that a resident’s movement is restricted;
3. Using devices in conjunction with a chair, such as trays, tables,
bars or belts, that the resident cannot remove easily, that prevent
the resident from rising;
4. Placing a resident in a chair that prevents a resident from rising;
and
5. Placing a chair or bed so close to a wall that the wall prevents the
resident from rising out of the chair or voluntarily getting out of bed.
C. Medical Symptoms/Rationale for Use – an indication or characteristic of a
physical or psychological condition for which the device improves the
resident’s function or quality of life.
D. Guidelines for Applying Restraints (See CARE SKILLS #68)
1. A restraint shall be applied by an individual who has been properly
trained, according to facility policy.
2. A restraint shall be applied in a manner that permits rapid removal
in case of fire or another emergency.
3. Check pulse in area to ensure circulation is not occluded (cut off)
4. Nursing Assistants can only use/apply restraint when instructed to
do so by the charge nurse.
Page 135 of 307
E. Monitoring and Release
1. A record of physical restraint and seclusion of a resident shall be
kept.
2. Each resident under restraint and seclusion shall be visited by a
member of the nursing staff at least once every hour and more
frequently if the resident's condition requires. If the restraint is not
applied correctly, the resident can suffer serious injuries or even
death. It is important to check the resident frequently (every 15
minutes) to ensure that circulation and bony prominences are not
affected by the restraint. If the restraint is not removed frequently,
the skin in the area can easily become irritated and even begin to
breakdown. Restraints can also affect the resident mentally. They
can cause the resident to suffer from anxiety, stress, depression,
sleep disturbances, and loss of dignity.
3. Each physically restrained or secluded individual shall be
temporarily released from restraint or seclusion at least every two
(2) hours or more often if necessary except when the resident is
asleep.
* When the resident in restraint is temporarily released, the resident
shall be assisted to ambulate, toileted, or changed in position as
the resident's physical condition permits.
F. Self–Releasing Devices – Devices used as a reminder that the resident
needs to call for assistance and/or to assist to keep the resident seated;
the resident can self–release the device upon request. Thus, the device
does not restrict freedom of voluntary movement.
G. Side rails – Side rails sometimes restrain residents. The use of side rails
as restraints is prohibited unless they are necessary to treat a resident’s
medical symptoms. Residents who attempt to exit a bed through,
between, over or around side rails are at risk of injury or death. The
potential for serious injury is more likely from a fall from a bed with raised
side rails than from a fall from a bed where side rails are not used. They
also potentially increase the likelihood that the resident will spend more
time in bed and fall when attempting to transfer from the bed. The same
device may have the effect of restraining one individual but not another,
depending on the individual resident’s condition and circumstances. For
example, partial rails may assist one resident to enter and exit the bed
independently while acting as a restraint for another. Orthotic body
devices may be used solely for therapeutic purposes to improve the
overall functional capacity of the resident.

Page 136 of 307
H. Entrapment Zones
1. Ensure that the resident does not get caught between the bed
and/or mattress and/or side rails. Being trapped between the
spaces can result in serious injury or death.
2. Refer to the picture in the Appendix to identify zones on the bed
where entrapment can occur.
I. An enclosed framed wheeled walker, with or without a posterior seat,
would not meet the definition of a restraint if the resident could easily open
the front gate and exit the device. If the resident cannot open the front
gate (due to cognitive or physical limitations or because the device has
been altered to prevent the resident from exiting the device), the enclosed
framed wheeled walker would meet the definition of a restraint since the
device would restrict the resident’s freedom of movement (e.g.,
transferring to another chair, to the commode, or into the bed). The
decision on whether framed wheeled walkers are a restraint must be
made on an individual basis.
CARE SKILLS
• Application of Physical Restraints – #68
Review Questions --- Lesson #21
1. A resident has the right to be free from any physical or chemical restraint
imposed for purposes of discipline or convenience, and not required to
treat the resident’s medical symptoms. (True or False)
2. How often must a resident with a physical restraint in place be visited by a
staff member?
3. How frequently must the physically restrained resident be temporarily
released to ambulate, toilet or change position?

Page 137 of 307
Lesson #22 (1 hour, 30 minutes)
Title: Rehabilitation/Restorative Services
Lesson Objectives:
I. The student will be able to describe the role of rehabilitative services.
II. The student will be able to describe the role of restorative services.
III. The student will demonstrate competence in performance of range of motion
exercises.
Key Terms:
Abduction – moving a body part away from the body.
Adduction – moving a body part toward the body.
Ambulation – walking.
Contracture – the permanent stiffening of a joint and muscle.
Dorsiflexion – bending backward.
Extension – straightening a body part.
Flexion – bending a body part.
Occupational Therapy – formal therapy which assists the resident to learn to
compensate for their disabilities and assist them with activities of daily living.
Physical Therapy – formal therapy, which uses heat, cold, massage, ultrasound,
electricity and exercise, for residents with muscle, bone and joint problems. A physical
therapist may help a person to safely use a walker, cane or wheelchair.
Pronation – turning downward.
Range of Motion – exercises which put a joint through its full range of motion.
Active Range of Motion – exercises are done by the resident himself.
Passive Range of Motion – caregivers support and move the resident’s joints through
the range of motion when the resident cannot move on their own.
Rehabilitation – services managed by professionals to restore a resident to his/her
highest practicable level of functioning following a loss of ability to function due to illness
or injury.

Page 138 of 307
Restorative Services – a planned approach to keep the resident at the level achieved
by formal rehabilitation.
Rotation – turning a joint.
Speech Therapy – formal therapy which assists residents with speech and swallowing
problems.
Splint – device that remains in place at the direction of the physician to maintain a body
part in a fixed position.
Supination – turning upward.
Content:
I. Rehabilitation
A. Role of Formal Therapy
1. Physical Therapy
2. Occupational Therapy
3. Speech Therapy
B. Assistive or Adaptive Devices– devices made to support a particular
disability by helping resident complete ADLs (e.g., long–handled brushes
and combs, divided plate, built–up silverware, reacher/grabber, etc.).
II. Restorative Services
A. Ambulation
1. Cane
2. Walker
3. Gait/transfer belt
B. Range of Motion (see CARE SKILLS #69)
1. Active Range of Motion (AROM)
2. Passive Range of Motion (PROM)
Page 139 of 307
C. Points to Remember:
1. Be patient when working with the resident.
2. Be supportive and encouraging.
3. Break tasks into small steps to promote small accomplishments.
4. Be sensitive to the resident’s needs and feelings.
5. Encourage the resident to do as much for self as possible.
D. Observe and report to the nurse
1. An increase or decrease in the resident’s ability.
2. A change in motivation.
3. A change in general health.
4. Indication of depression or mood changes.
E. Splint Application (see CARE SKILLS #70)
1. Splints vary from resident to resident. Be sure you have the correct
splint for your resident and make sure it is applied properly.
2. If you notice redness, swelling, or any other concerns in the area
that the splint is to be applied, notify the nurse before putting the
device on the resident.
III. Devices which may be applied per Restorative Nursing Program
A. Abdominal Binder (see CARE SKILLS #71) – may be used to secure G–
tube and prevent resident from picking at the insertion site or to provide
support to the abdomen due to hernia or recent surgery.
B. Abduction Pillow (see CARE SKILLS #72) – may be ordered to be in place
following a surgical procedure to maintain lower extremities in an
abducted position and prevent the resident from crossing the lower legs or
ankles.
C. Knee Immobilizer (see CARE SKILLS #73) – may be ordered to be in
place following a surgical procedure to keep the leg straight while the
bone is healing. Should only be removed at the direction of the licensed
nurse.
D. Palm Cone (see CARE SKILLS #74) – may be ordered to be placed in the
palm of a resident who is at risk for developing contractures of the digits

Page 140 of 307
(i.e., prevent the fingers/nails from turning into the palm permanently and
causing skin breakdown).
CARE SKILLS:
• Passive Range of Motion – #69
• Splint Application – #70
• Abdominal Binder – #71
• Abduction Pillow – #72
• Knee Immobilizer – #73
• Palm Cones – #74
Review Questions --- Lesson #22
1. Describe the difference in “active” range of motion and “passive” range of
motion.
2. The permanent stiffening of a joint and muscle is called a _____.
3. A planned approach to keep the resident at a level achieved by formal
rehabilitation is called _____.

Page 141 of 307
Lesson #23 (1 hour, 30 minutes)
Title: Devices/Interventions – Prosthetics, Hearing Aids, Artificial Eye,
Eyeglasses, Dentures, Compression Stockings
Lesson Objectives:
I. The student will be able to describe the necessary care and maintenance of
various devices used by residents.
II. The student will be able to describe the need to monitor for complications with
the use and maintenance of devices used by residents.
Key Terms:
Amputation – the removal of some or all of a body part, usually as a result of injury or
disease.
Elastic/Compression Stockings – stockings that decrease blood pooling in the lower
extremities. The stockings help with circulation in the lower legs and decrease the risk
for blood clots. They are also referred to as TED (thromboembolic deterrent) hose.
Phantom Pain/Sensation – feeling like the limb is still there after the amputation due to
the remaining nerve endings.
Prosthesis/Prosthetic Devices – device that replaces a body part that is missing or
deformed due to accident, injury, illness or birth defect.
Content:
I. Purpose of a Prosthetic Device
A. Improve resident’s functional ability.
B. Improve appearance.
II. Types of Prosthetic Devices
A. Artificial limbs – arm, leg/foot
B. Other prosthetic devices
1. Hearing aids
2. Artificial eyes
3. Eyeglasses
Page 142 of 307
4. Dentures
III. Role of the Nurse Aide regarding Amputations & Prosthetic Care
A. Be supportive – amputation can be difficult for a resident to accept due to
the change in body image.
B. Follow care plan – know what is required related to care and needs.
C. Follow instructions for applying and removing the prosthesis.
D. Keep skin under prosthesis clean and dry – follow care plan.
E. Handle with care – prosthesis is fitted to the resident and specially made.
A prosthesis can be very expensive.
F. Observe skin on stump. Watch for pressure, redness, warmth, tenderness,
or open area. Report any concerns to the nurse.
IV. Role of the Nurse Aide regarding Hearing Aids
A. Hearing Aid – small battery-operated device that fits into the ear to amplify
sound.
B. Assisting with Hearing Aids (see CARE SKILLS #75)
1. Be sure to follow the manufacturer’s instructions when inserting the
hearing aid into the resident’s ear.
2. Be sure to follow the manufacturer’s instructions on cleaning the
hearing aid.
V. Role of the Nurse Aide regarding Artificial Eye & Eyeglasses
A. Artificial Eye – device that resembles natural eye. The resident cannot
see with the artificial eye. The artificial eye is held in the eye socket by
suction.
B. Care of artificial eye
1. Artificial eye – can be removed and reinserted. This should be done
by the nurse or independently by the resident.
2. Nurse Aide needs to observe that eye is clean.
3. If eye is removed, make sure it is stored in a safe place with proper
solution to avoid drying or cracking of artificial eye.
4. Follow directions on care plan.

Page 143 of 307
5. Provide privacy when assisting with eye care.
6. Resident with artificial eye may be able to provide self–eye care –
follow directions on care plan.
C. Care of eyeglasses
1. Make sure eyeglasses are clean.
2. Make sure resident has eyeglasses on.
3. Keep eyeglasses in a safe place when not in use.
VI. Role of the Nurse Aide regarding Dentures
A. Dentures – artificial tooth or teeth, necessary when resident’s natural tooth
or teeth have been removed due to damage or decay. Dentures may be
partial or full.
B. Care of dentures (See CARE SKILLS #25)
1. Make sure resident has dentures in place for meals.
2. Resident may want dentures removed at night.
3. Make sure dentures are cleaned.
4. Make sure dentures are in a safe place when not in use.
VII. Role of the Nurse Aide regarding Elastic/Compression Stockings (TED Hose)
(see CARE SKILLS #76)
A. Make certain stockings are on when resident is up, if ordered by the
physician.
B. Follow care plan directions in regards to when stockings are to be applied
and removed.
.
CARE SKILLS:
• Assisting with Hearing Aids – #75
• TED Hose Application – #76

Page 144 of 307
Review Questions --- Lesson #23
1. List potential observations of a stump which should be reported to the
nurse.
2. When assisting the resident with eyeglasses, it is important to ensure the
glasses are clean. (True or False)
3. When elastic/compression stockings are applied, the caregiver must
ensure there are no wrinkles or twists in the stockings. (True or False)

Page 145 of 307
Lesson #24 (1 hour, 30 minutes)
Title: Special Care Needs – Intravenous Fluids, Non–Pharmacologic Pain
Interventions
Lesson Objectives:
I. The student will be able to explain the purpose of IV/PICC lines.
II. The student will be able to describe the importance of observing and reporting
complications related to IV/PICC lines.
III. The student will be able to explain the signs/symptoms of pain and acknowledge
interventions to be attempted to relieve resident pain.
Key Terms:
Antibiotic – compound or substance that kills or slows down the growth of bacteria.
Chemotherapy – treatment of cancer with an antineoplastic drug or with a combination
of such drugs into a standardized treatment regimen; often administered intravenously
(IV).
Hydration – the supply and retention of adequate water to keep one from dehydrating.
Intravenous (IV) – refers to a soft, flexible catheter (tube) that is inserted by a nurse or
physician into a vein.
Pain – an unpleasant sensory and emotional experience arising from actual or potential
tissue damage.
Peripherally Inserted Central Catheter –PICC– a soft, flexible catheter (tube) that is
inserted by a specially trained nurse or physician into a vein for administration of
medication, total parenteral nutrition (TPN), chemotherapy, or blood products for an
extended period of time.
IV Pump – device to regulate the flow of the fluid into the vein. The pump will alarm if
there is a problem with flow, and must be managed by the licensed nurse.
Total Parenteral Nutrition (TPN) – no food is given by other routes, only intravenously.
Vein – blood vessels that carry blood toward the heart.

Page 146 of 307
Content:
I. IV or PICC Lines
A. Purpose of IV or PICC lines
1. Medication administration, such as antibiotics
2. Nutrition administration
3. Hydration
4. Blood products
5. Solutions are administered by gravity or through a portable pump
II. Role of the Nurse Aide in caring for IV/PICC
A. Observe and Report
1. If the IV or PICC line is not in place, or if it is removed by the
resident, or accidentally by staff when providing care.
2. Blood present anywhere in the tubing.
3. Tubing is disconnected.
4. Complaint of pain.
5. Fluid in bag is not observed dripping.
6. Fluid in bag is nearly gone or finished.
7. Pump is alarming.
8. Site is swollen or discolored.
9. Dressing is wet or soiled.
B. Take special caution when moving or caring for resident – avoid pulling
the tubing and make sure that it does not get caught on anything when
providing care.
C. Never disconnect IV or PICC from pump.
D. Never lower bag below IV/PICC site. Can potentially cause a back flow of
fluids from the vein, resulting in blood entering into the tubing and/or bag.
E. Do not take blood pressure in arm with IV or PICC.
Page 147 of 307
III. Infection Control
A. Use proper hand hygiene.
B. Observe site for signs of infections and report to the nurse if observed:
1. Redness
2. Swelling
3. Pain
IV. Pain Factors
A. Vital Signs should be taken, if directed by nurse to do so.
B. Information related to pain:
1. Location
2. When did it start
3. What was resident doing when pain started
4. Rate the pain, i.e., mild, moderate or severe on scale of 1–10
5. How long has resident been having pain
6. Describe the pain, i.e., ache, stabbing, crushing, dull, constant,
burning
7. Use resident’s words/description to report to nurse
V. Role of the Nurse Aide related to Pain
A. Observe and report to the nurse signs/symptoms of pain, which may
include, but are not limited to:
1. Change in vital signs – B/P, Pulse, Respiration
2. Nausea
3. Vomiting
4. Sweating
5. Tearful or frowning
6. Sighing, moaning or groaning
Page 148 of 307
7. Breathing heavy or shortness of breath
8. Restless or having difficulty moving
9. Holding or rubbing a body part
10. Tightening jaw or grinding teeth
11. Anxiety, pacing
B. Interventions to reduce pain
1. Report complaints of pain or unrelieved pain (after receiving pain
medication) to the nurse.
2. Position the resident’s body in good alignment or assist the resident
in changing to a more comfortable position.
3. Offer a back rub to the resident.
4. Assist the resident to the bathroom or offer the bedpan or urinal.
5. Encourage the resident to take slow, deep breaths.
6. Provide a quiet and calm environment.
7. Use soft music to distract the resident.
8. Be patient, caring, gentle and sympathetic in assisting the resident.
9. Observe the resident’s response to interventions attempted and
report to the nurse.
C. Barriers for resident regarding pain
1. Fear of addiction to pain medication.
2. Feeling caregivers are too busy to deal with pain.
3. Fear pain medication will cause other problems, i.e. drowsiness,
sleepiness, constipation.

Page 149 of 307
Review Questions --- Lesson #24
1. What are possible signs/symptoms of pain?
2. What are the reasons for an IV or PICC line?
3. Why would a resident not admit to having pain?
Page 150 of 307
BARBARA BROYLES ALZHEIMER AND DEMENTIA
TRAINING PROGRAM FOR NURSING ASSISTANTS
Do not ask me to remember.
Don’t try to make me understand.
Let me rest and know you’re with me.
Kiss my cheek and hold my hand.
I’m confused beyond your concept.
I am sad and sick and lost.
All I know is that I need you.
To be with me at all cost.
Do not lose your patience with me.
Do not scold or curse or cry.
I can’t help the way I’m acting.
Can’t be different though I try.
Just remember that I need you.
That the best of me is gone.
Please don’t fail to stand beside me.
Love me ‘til my life is done.
Author unknown
This Alzheimer’s/Dementia curriculum was developed to encompass provisions set forth
in Act 1184 of 2005 and incorporated into the Arkansas’ Office of Long Term Care
regulations for Nursing Assistant Training Curriculum.
Arkansas Department of Human Services

Page 151 of 307
Lesson #25 (15 hours)
Title: Cognitive Impairment/Dementia/Alzheimer’s
Lesson Objectives:
I. The student will be able to explain conditions associated with cognitive
impairment.
II. The student will be able to describe behaviors related to cognitive impairment.
III. The student will be able to identify therapies/methods used to reduce challenging
behaviors.
IV. The student will be able to demonstrate communication strategies and
techniques for use with the cognitively impaired resident.
V. The student will be able to identify one out of each six categories on safety
checklist.
VI. The student will be able to describe reasons why recreational activities are
important.
Key Terms:
Activity therapy – increased activities with a goal.
Agitation – restlessness; emotional state of excitement or restlessness.
Alzheimer’s disease – a progressive, degenerative and irreversible disease.
Alzheimer’s disease is caused by the formation of tangled nerve fibers and protein
deposits in the brain.
Aphasia – inability to speak, or to speak clearly.
A. Expressive aphasia – may be slow to speak or to formulate sentences.
B. Receptive aphasia – may be slow to respond to communication attempts due to
delay in processing the communication and the response.
Catastrophic reaction – reactions or mood changes of the resident in response to
what may seem to be minimal stimuli that can be characterized by weeping, blushing,
anger, agitation, or stubbornness.
Cognition – ability to think logically/quickly.
Cognitive impairment – inability related to thinking, concentrating, and/or
remembering.

Page 152 of 307
Confusion – inability to think clearly, trouble focusing, difficulty making decisions,
feelings of disorientation.
Delirium – state of sudden severe confusion that is usually temporary.
Delusions – believing things that are untrue. Fixed false beliefs.
Dementia – serious loss of mental abilities (thinking, remembering, reasoning and
communication).
Depression – state of low mood and lack of interest in activity.
Elopement – a cognitively impaired resident is found outside the facility and whose
whereabouts had been unknown to staff.
Hallucinations – seeing/hearing things not there. False sensory perceptions.
Hoarding – collecting and storing items in a guarded manner.
Interventions – actions to be taken by staff in response to an event or behavior.
Pacing – walking back and forth in the same area.
Pillaging – taking items that belong to someone else.
Reminiscence therapy – used to encourage residents to talk about the past.
Repetitive Phrasing – continually repeating the same phrase over and over.
Sundowning – behavioral changes that occur in the evening with improvement or
disappearance during the day.
Validation therapy – concept of validation or the returned communication of respect,
which confirms that the other person’s opinions are acknowledged, respected, and
heard, and that they are being treated with genuine respect as a legitimate expression
of their feelings.
Wandering – walking aimlessly around the facility.
Content:
I. Conditions:
A. Confusion – characterized by the inability to think clearly, trouble focusing,
difficulty making decisions, feeling of disorientation.
B. Delirium – state of sudden severe confusion that is usually temporary.
Delirium is a serious condition, occurring rapidly over hours or a few days.
Page 153 of 307
C. Dementia – a general term that refers to serious loss of mental abilities,
such as thinking, remembering, judgement, reasoning, and
communicating. Dementia is not a normal part of aging.
D. Alzheimer’s disease – a progressive, degenerative and irreversible
disease.
Alzheimer’s disease is caused by the formation of tangled nerve fibers and
protein deposits in the brain. Alzheimer’s disease is the most common
cause of dementia. Alzheimer’s disease is characterized by stages:
1. Stage 1 – no impairment (normal function) – the resident does not
experience any memory problems.
2. Stage 2 – very mild cognitive decline (may be normal age–related
changes or earliest signs of Alzheimer’s disease) – the resident
may feel as if he or she is having memory lapses – forgetting
familiar words or the location of everyday objects.
3. Stage 3 – mild cognitive decline (early stage Alzheimer’s can be
diagnosed in some, but not all, individuals with these symptoms) –
friends, family or co–workers begin to notice difficulties.
a. Noticeable problems coming up with the right word or name.
b. Trouble remembering names when introduced to new
people.
c. Having noticeably greater difficulty performing tasks in social
or work settings.
d. Forgetting material that one has just read.
e. Losing or misplacing a valuable object.
f. Increasing trouble with planning or organizing.
4. Stage 4 – moderate cognitive decline (mild or early–stage
Alzheimer’s disease) – at this point, a careful medical interview
should be able to detect clear–cut symptoms in several areas:
a. Forgetfulness of recent events.
b. Impaired ability to perform challenging mental arithmetic –
for example, counting backward from 100 by 7s.
c. Greater difficulty performing complex tasks such as planning
dinner for guests, paying bills or managing finances.
Page 154 of 307
d. Forgetfulness about one’s own personal history.
e. Becoming moody or withdrawn, especially in socially or
mentally challenging situations.
5. Stage 5 – moderately severe cognitive decline (moderate or mid–
stage Alzheimer’s disease) – gaps in memory and thinking are
noticeable, and residents begin to need help with day–to–day
activities. At this stage, those with Alzheimer’s may:
a. Be unable to recall their address or telephone number or the
high school or college from which they graduated.
b. Become confused about where they are or what day it is.
6. Stage 6 – severe cognitive decline (moderately severe or mid–
stage Alzheimer’s disease) memories continues to worsen,
personality changes may take place and individuals need extensive
help with daily activities. At this stage, residents may:
a. Lose awareness of recent experiences as well as of their
surroundings.
b. Remember their own name but have difficulty with their
personal history.
c. Distinguish familiar and unfamiliar faces but have trouble
remembering the name of a spouse or caregiver.
d. Need help dressing properly and may, without supervision,
make mistakes such as putting pajamas over daytime
clothes or shoes on the wrong feet.
e. Experience major changes in sleep patterns – sleeping
during the day and becoming restless at night.
f. Need help handling details of toileting (for example, flushing
the toilet, wiping or disposing of tissue properly).
g. Having increasingly frequent trouble controlling their bladder
or bowels.
h. Experience major personality and behavioral changes,
including suspiciousness and delusions (such as believing
that their caregiver is an imposter) or compulsive, repetitive
behavior like hand– wringing or tissue shredding.
i. Tend to wander or become lost.
Page 155 of 307
7. Stage 7 – very severe cognitive decline (severe or late–stage
Alzheimer’s disease) – in the final stages of this disease, residents
lose the ability to respond to their environment, to carry on a
conversation and, eventually, to control movement. They may still
say words or phrases. At this stage, residents need help with much
of their daily personal care, including eating or using the toilet.
They may also lose the ability to smile, to sit without support and to
hold their heads up. Reflexes become abnormal. Muscles grow
rigid. Swallowing impaired.
II. Behaviors, Causes and Interventions
A. Agitation –could be caused by noise, other residents’ behaviors, pain,
thirst, or hunger, over/under stimulation, infection, need to toilet or be
cleaned etc.).
1. Remove trigger(s), if known.
2. Maintain calm environment.
3. Stay calm.
4. Assess basic needs.
5. Patting, stroking may/may not reassure resident.
6. Validate feelings.
B. Pacing/Wandering – could be stress or fear, searching for something or
someone, boredom, basic need not met, following past routine (mailman,
security officer), a need to exercise, resident has forgotten location of
room or chair, hungry, need to toilet, pain, etc.
1. Ensure resident is in a safe area.
2. Ensure resident is wearing appropriate footwear
3. Assess basic needs.
4. Validate feelings then redirect to another activity of interest if
resident appears tired and may become at risk for falls.
C. Elopement – may be evident through exit–seeking actions, verbalizing
wanting to leave, staying close/near doors, trying to open doors/windows.
1. Redirect and engage in other activities.
2. Ensure doors remain secured/alarms functional.
Page 156 of 307
3. Report missing resident immediately.
D. Hallucinations/Delusions – may be caused by acute illness or psychiatric
diagnosis/condition.
1. Ignore harmless hallucinations or delusions. A new onset of
hallucinations should be reported to M.D. to make sure there is not
a medical cause (illness).
2. Provide reassurance.
3. Do not argue.
4. Stay calm.
5. Validate feelings then redirect to activities or to another discussion.
6. Notify nurse of hallucination(s)/delusion(s).
E. Sundowning – as this occurs in the evening, consider need for increased
activities and/or staffing in the evening.
1. Remove trigger(s).
2. Avoid stress in environment.
3. Keep environment calm and quiet.
4. Reduce/remove caffeine from evening fluids/diet, if possible.
5. Validate feelings then Redirect; offer activity or favorite food.
F. Catastrophic Reaction – may be caused by fatigue or over stimulation.
1. Remove trigger(s), if possible.
2. Offer food or quiet activity.
3. Validate feelings then Redirect.
4. May be the result of abuse or neglect and it is reportable according
to law and regulations.
G. Repetitive Phrasing – may be caused by habit, sense of insecurity or
cognitive impairment. May be caused by the person trying to express a
specific concern, ask for help, or cope with frustration (self–soothing),
anxiety and insecurity or a habit.
Page 157 of 307
1. Be patient and calm.
2. Look for reason behind repetitive phrase/question.
3. Answer question.
4. Do not try to silence or stop.
5. Validate feelings then Redirect.
H. Violence – may be caused by delusion, hallucination, acute illness,
cognitive impairment, provocation by another resident, physical
discomfort, etc.
1. Step out of reach.
2. Block blows with open hand or forearm.
3. Do not strike back or grab resident.
4. Call for help.
5. Stay calm.
6. Identify triggers and remove, if possible.
7. Give the resident space.
8. Do not take resident’s actions personal.
I. Disruptive actions – may be caused by delusion, hallucination, acute
illness, cognitive impairment, provocation by another resident, physical
discomfort etc.
1. Remain calm.
2. Avoid treating like a child.
3. Gently direct to a private area, provide distraction or activity.
4. Explain procedure(s) or change in normal pattern.
5. Be reassuring.
J. Challenging Social Acts – may be caused by delusion, hallucination, acute
illness, cognitive impairment, provocation by another resident, physical
discomfort etc.
Page 158 of 307
1. Remain calm.
2. Identify trigger, if possible.
3. Gently redirect to private area.
4. Report physical or verbal abuse to the nurse.
K. Challenging Sexual Acts – may be provoked by a thought, visual, etc.
1. Do not over–react.
2. Be sensitive.
3. Try to redirect or relocate to a private area.
4. Ensure the safety of other residents, if potentially involved.
5. Report to nurse.
L. Pillaging/Hoarding – note that either activity is not stealing, rather, a
behavior often associated with a psychiatric diagnosis.
1. Label personal belongings of all residents.
2. Regularly check rooms for items which might belong to others.
3. Provide direction to resident’s own room (a visual cue could be
helpful).
4. Mark other residents’ room with symbols or labels to avoid
residents from entering.
III. Methods/Therapies to Reduce Behaviors
A. Validation Therapy – allowing the resident to express feelings and
emotions. Caregiver not only listens but acknowledges and respects the
resident’s thoughts/concerns.
B. Reminiscence Therapy – encouraging the resident to remember; to talk
about the past. Can be accomplished through communication, pictures,
music, smells, etc.
C. Activity Therapy – using activities that the resident enjoys to prevent
boredom and frustration.
D. Music Therapy – form of sensory stimulation; hearing familiar songs can
cause a response in residents that do not respond to other therapies.
Page 159 of 307
E. Re–direction – gently and calmly encouraging the resident to do a different
action; change focus of attention.
IV. Tips to Remember when Dealing with Cognitively Impaired Residents
A. Not personal – residents do not have control over words or actions.
B. Talk with family – learn about the resident’s life, names of family
members, occupation, hobbies, pets, foods, favorites.
C. Team work – report changes or observations; be flexible and patient.
D. Handle behaviors/situations as they occur – remember that the resident
has lost the ability to remember prior directions given.
E. Know your limits – watch for signs of stress, frustration and burnout.
V. Communication Strategies
A. Always identify yourself.
B. Speak slowly, calmly in a low tone.
C. Avoid loud, noisy environments.
D. Avoid startling or scaring; approach from the front, remain visible to the
resident.
E. Allow the resident to determine how close you should be.
F. Listen to resident; Validate feelings.
G. Avoid arguing.
H. Give visual clues.
I. Ensure your body language and facial expressions are appropriate.
VI. Techniques to Handle Difficult Behaviors
A. Anxiety/Fear
1. Stay calm, speak slowly.
2. Reduce noise or distractions.
3. Explain what you are doing.
4. Use simple words and short sentences.
Page 160 of 307
5. Watch your body language and ensure it is not threatening.
B. Forgetful/ Memory Loss
1. Repeat, using same words.
2. Give short simple instructions.
3. Answer questions with brief answers.
4. Watch tone, facial expressions and body language.
C. Unable to express needs
1. Ask to point or gesture.
2. Use pictures or written words.
3. Offer comfort if resident is becoming frustrated.
D. Unsafe or abusive language or activities
1. Avoid saying “don’t” or “no”.
2. Validate feeling then Redirect to another activity or discussion.
3. Remove hazard, if possible.
4. Don’t take the residents actions/words personally.
E. Depressed, lonely or crying.
1. Take time with resident; do not rush.
2. Really listen and provide comfort.
3. Try to involve in activities to redirect resident focus.
4. If continues or repeats, report to nurse.
VII. Behavior Interventions
A. Bathing
1. Schedule at time that resident is agreeable.
2. Be organized.
3. Explain what you are going to do in simple steps.
Page 161 of 307
4. Allow resident to assist as much as possible.
5. Take your time.
6. Provide privacy.
7. Make sure resident is not afraid of tub/shower.
8. Have resident assist, as able.
9. Maintain safety; do not leave alone.
10. Do not argue with resident; if upset, try again at another time.
B. Dressing
1. Encourage to choose what to wear.
2. Do not rush.
3. Provide privacy.
4. Use simple steps; short step–by–step directions.
5. Allow resident to assist.
6. Take time and be calm.
C. Toileting
1. Encourage fluids – lack of fluids can cause dehydration and
constipation.
2. Establish a toileting schedule; for example, take to bathroom every
2 hours.
3. Toilet before and after meals.
4. If incontinent – watch for patterns to determine resident routine for
a 2–3-day period (this is also effective for night time incontinence).
5. Identify bathroom with sign or picture.
6. Avoid dark or unlit bathrooms or hallways.
7. Check briefs frequently; change when soiled and observe skin.
8. Document/track bowel movements (constipation may cause
increase in behaviors).

Page 162 of 307
9. Document and report any changes in bowel/bladder patterns as it
could be a sign of infection/illness.
D. Eating/Meals
Helping with Nutrition:
Many people with Alzheimer’s have challenges with eating. An individual
might lose his/her appetite or the ability to evaluate if food is too hot or
cold. In addition, an individual might forget that he/she has eaten and ask
you for another meal.
The individual may be experiencing physical difficulties that are causing
the changes in eating habits. Sores in the mouth, poor–fitting dentures,
gum disease or dry mouth may make eating difficult. Individuals will lose
the ability to recognize and use utensils appropriately.
To ensure the individual with dementia is receiving the proper nutrition,
you must work to prevent eating and nutrition problems. Consult with the
individual’s physician and/or dietician for guidance.
1. Schedule meals at regular times.
2. Provide adequate lighting and space.
3. Avoid delays – have meal ready, i.e., pre–cut, opened cartons or
packages.
4. Watch temperatures – avoid very hot foods.
5. Simple (white) dishes, no extra items which could confuse resident.
6. Avoid overwhelming with too many different foods.
7. Give simple instructions.
8. If the resident needs to be fed, use slow, calm, relaxed approach.
9. Watch for chewing, swallowing or pocketing issues and report to
nurse. (Pocketing refers to holding food in the mouth, especially in
the cheeks.)
10. Ensure adequate fluid intake during meal.
E. Recreational Activities: Recreational activities are an important part of a
healthy life with dementia. The benefits include:
1. Improves eating and sleeping patterns.
Page 163 of 307
2. Lessens wandering, restlessness, anxiety.
3. Reduces complications with sun downing.
4. Improved socialization and cooperation.
5. Delays deterioration of skills.
6. Eases behavior management.
7. Source of pleasure and rewards.
* It is important to find activities that are meaningful and provide
success. Meaningful activities create a sense of usefulness and
accomplishment and promote self–esteem. To promote this, match
activities to the abilities and interests of the individual. Focus on
enjoyment, not achievement. Be sure to observe the individual’s
behavior during the activity to watch for signs of boredom or tiring.
Keep activities adult–like but you may have to use children’s
materials. Do a variety of activities to hold their interest. Alternate
active and passive activities.
1. Card games or board games
2. Reminiscing and memory stimulation
3. Music
4. Crafts and art projects
5. Outings
6. Gardening
7. Pets
8. Visits from others
9. Spiritual activities
VIII. Activity Chart
A. Waking Hours (low key)
1. Personal cares
2. Reading paper
3. Discussing day ahead
Page 164 of 307
4. Having a cup of coffee
5. Engaging in conversation
B. Early Morning (quiet)
1. Clipping coupons
2. Folding laundry
3. Winding yarn balls
4. Craft projects
C. Late Morning
1. Group exercises
2. Board Games
3. Meal prep– set table, pour milk
4. Outside Walks
5. Individual projects
D. Lunchtime/early afternoon
1. Eating and sharing
2. Resting/napping
3. Helping with serving and clean up
E. Midafternoon (active)
1. Physical game skills
2. Exercising/walking
3. Music: singing along, dancing, exercising
4. Crafts
5. Memory stimulation games
6. Cleaning house
Page 165 of 307
F. Late afternoon (quiet)
1. Reminiscing
2. Helping with meal prep
3. Checkers
4. Watering plants
G. Dinnertime
1. Meal prep, serve, clean up
2. Eating and sharing
H. Early evening (quiet)
1. Soothing music
2. Walking through neighborhood
3. Reminiscing
4. Evening cares– washing and dressing for bed
I. Other examples of useful activities
1. Polishing silverware
2. Sorting buttons
3. Putting coins into rolls
4. Shelling nuts
5. Folding and stuffing envelopes, stapling, applying labels
6. Dusting furniture, sweeping floor
7. Organizing closet/drawers
8. Washing and drying dishes
IX. Safety Checklist
A. Kitchen precautions. Proper storage of:
1. Knives, utensils, gadgets; toaster, grill, etc.
Page 166 of 307
2. Remove controls for stove, cover burners
3. Locks on fridge and cupboards
4. Cover for garbage disposal
B. Bathroom precautions. Proper storage of:
1. Shavers, blow dryers, cosmetics, medicines, etc.
2. Non–skid mats in tub/shower and on floor
3. Safety rails
4. Use shower chair
5. Monitor water temperature
C. Fall precautions:
1. Remove scatter rugs
2. Keep pathways clear of clutter
3. Adequate lighting, non–glare
4. Don’t move furniture around
5. Safety rails in halls, bathrooms, and stairways
6. Gates or locks to keep person out of unsafe areas
D. Visual aids:
1. Nightlights placed throughout home.
2. Cover doorknobs with cloth same color as the door; use childproof
knobs (personal home only).
3. Camouflage doors by painting them same color as the walls
(personal home only).
4. Use black tape or paint to create a two–foot black threshold in front
of the door (personal home only).
5. Place STOP sign on door to prevent entrance into restricted area.
Page 167 of 307
E. General:
1. Post emergency numbers by phone (numbers should be 1–5).
2. Lock doors and windows.
3. Cover outlets.
4. Working smoke detectors.
5. Hot water heater secured.
F. General. Proper storage of:
1. Chemicals: cleansers, pesticides, paint
2. Medications– childproof caps
3. Sharps: scissors, glass, knives
4. First aid supplies
5. Yard tools
X. Sleep Changes
A. Common sleep changes
Many people with Alzheimer’s experience changes in their sleep patterns.
Scientists do not completely understand why this happens. As with
changes in memory and behavior, sleep changes somehow result from
the impact of Alzheimer’s on the brain. Many older adults without
dementia also notice changes in their sleep, but these disturbances occur
more frequently and tend to be more severe in Alzheimer’s. There is
evidence that sleep changes are more common in later stages of the
disease, but some studies have also found them in early stages.
Sleep changes in Alzheimer’s may include:
1. Difficulty sleeping. Many people with Alzheimer’s wake up more
often and stay awake longer during the night. Brain wave studies
show decreases in both dreaming and non–dreaming sleep stages.
Those who cannot sleep may wander, be unable to lie still, or yell
or call out, disrupting the sleep of their caregivers.
2. Daytime napping and other shifts in the sleep–wake cycle.
Individuals may feel very drowsy during the day and then be unable
to sleep at night. They may become restless or agitated in the late
afternoon or early evening, an experience often called “sun–
Page 168 of 307
downing.” Experts estimate that in late stages of Alzheimer’s,
individuals spend about 40 percent of their time in bed at night
awake and a significant part of their daytime sleeping. In extreme
cases, people may have a complete reversal of the usual daytime
wakefulness–nighttime sleep pattern.
B. Contributing medical factors
A person experiencing sleep disturbances should have a thorough
medical exam to identify any treatable illnesses that may be contributing to
the problem. Examples of conditions that can make sleep problems worse
include:
1. Depression
2. Restless legs syndrome, a disorder in which unpleasant “crawling”
or “tingling” sensations in the legs cause an overwhelming urge to
move them.
3. Sleep apnea, an abnormal breathing pattern in which people briefly
stop breathing many times a night, resulting in poor sleep quality.
* For sleep changes due primarily to Alzheimer’s disease, there are
non–drug and drug approaches to treatment. Most experts and the
National Institutes of Health (NIH) strongly encourage use of non–
drug measures rather than medication.
* Studies have found that sleep medications generally do not
improve overall sleep quality for older adults. Use of sleep
medications is associated with a greater chance of falls and other
risks that may outweigh the benefits of treatment.
C. Non–drug treatments for sleep changes
Non–drug treatments aim to improve sleep routine and the sleeping
environment and reduce daytime napping. Non–drug coping strategies
should always be tried before medications, since some sleep medications
can cause serious side effects. To create an inviting sleeping environment
and promote rest for a person with Alzheimer’s:
1. Maintain regular times for meals and for going to bed and getting
up.
2. Seek morning sunlight exposure.
3. Encourage regular daily exercise, but no later than four hours
before bedtime.
Page 169 of 307
4. Avoid caffeine and nicotine.
5. Treat any pain. Be alert to verbal and non–verbal cues for pain.
6. Make sure the bedroom temperature is comfortable.
7. Provide nightlights and security objects.
8. If the person awakens, discourage staying in bed while awake; use
the bed only for sleep.
9. Discourage watching television during periods of wakefulness.
10. 12 Tips to promote Regular Sleep Patterns
a. Try keeping bedtime rituals consistent.
b. Go to bed at similar times each night.
c. Close blinds to demonstrate differences in light levels.
d. Keep lighting dim. Use night lights if there is a safety
problem or the dark promotes anxiety.
e. Relaxing in a bathtub or having a warm shower can promote
sleep.
f. A peaceful evening with less stimulation may encourage
sleep. Play any music softly, choose relaxing music, T.V.
programs.
g. A snack before bed may help. Hunger can wake and make a
person restless.
h. Restrict caffeine and excess intake of fluids before bedtime.
i. Use the bathroom before going to bed.
j. Restlessness during the night may be due to hunger, the
need to go to the bathroom, heat or cold, discomfort.
k. Discourage naps in the day. If a nap is important try to limit
the time.
l. Encourage exercise and stimulating activities in the day.

Page 170 of 307
Review Questions --- Lesson #25
1. Believing something that is not true, for example, that you are the
President, is considered a hallucination or a delusion?
2. Should a cognitively impaired resident leave the facility unattended and
that resident’s whereabouts is unknown to staff, it is called __________.
3. Allowing the resident to believe what he or she believes to be true, without
correcting or trying to bring the resident back to current reality is called
__________.
4. Behavioral change that occurs in the evening which may result in
challenging behavior that improves or disappears during the day is called
__________.

Page 171 of 307
Lesson #26 (1 hour, 15 minutes)
Title: Mental Health, Depression and Social Needs
Lesson Objectives:
I. The student will be able to describe interventions to use in response to
challenging or problematic resident behavior.
II. The student will be able to describe the difference between mental illness and
intellectual disability (mental retardation).
III. The student will be able to explain the importance of immediately reporting
challenging or problematic behavior to the nurse.
Key Terms:
Anxiety – uneasiness or fear of a situation or condition.
Apathy – lack of interest.
Bipolar Disorder – a psychiatric diagnosis that describes mood disorders defined by
the presence of one or more episodes of abnormally elevated energy levels, cognition,
and mood with or without one or more depressive episodes. The resident experiences
extreme highs and lows.
Claustrophobia – fear of having no escape and being closed in small spaces or rooms.
Defense Mechanisms – unconscious behaviors used to release tension or cope with
stress or uncomfortable, threatening situations or feelings.
Depression – a persistent feeling of sadness and loss of interest.
Intellectual Disability – a developmental disability that causes below average mental
functioning.
Manic Depression – fluctuation between deep depression to extreme activity, including
high energy, little sleep, big speeches, rapid mood changes, high self–esteem,
overspending and/or poor judgment.
Mental Health – level of cognitive or emotional well–being or an absence of a mental
disorder.
Mental Illness – disruption in a person’s ability to function at a normal level in a family,
home, or community, often producing inappropriate behaviors.
Obsessive Compulsive Disorder (OCD) – uncontrollable need to repeat or perform
actions in a repetitive or sequential manner.

Page 172 of 307
Panic Disorder – fearful, scared or terrified for no specific reason.
Paranoid Schizophrenia – a schizophrenic disorder in which the person has false
beliefs that somebody (or some people) are plotting against them.
Phobias – an extreme form of anxiety/fears.
Post–Traumatic Stress Disorder (PTSD) – anxiety related to a disorder caused by a
traumatic experience or event.
Psychotherapy – sessions with mental health professionals during which the resident
discusses problems or issues.
Psychotropic Medication – drugs taken which affect the mental state and are used to
treat mental disorders.
Schizophrenia – a complex mental disorder that makes it difficult to tell the difference
between real and unreal experiences, to think logically, and to behave normally in social
situations.
Content:
I. Causes of Mental Illness
A. Physical factors – illness, disability, aging, substance abuse or chemical
imbalance.
B. Environmental factors – weak interpersonal skills, weak family support,
traumatic experiences.
C. Heredity – possible inherited traits.
D. Stress – inability to handle or cope with stress.
II. Response to Behaviors
A. Remain calm.
B. Do not treat as a child.
C. Be aware of body language and facial expression.
D. Maintain a normal distance.
E. Use simple, clear language.
F. Avoid arguments.
Page 173 of 307
G. Maintain eye contact.
H. Listen carefully.
I. Show respect and concern.
III. Use of Defense Mechanisms – unconscious behaviors used to release tension or
cope with stress or uncomfortable, threatening situations or feelings.
A. Denial – rejection of a thought or feeling.
B. Projection – seeing feelings in others that are really one’s own.
C. Displacement – transferring a strong negative feeling to something or
someone else.
D. Rationalization – making excuses to justify a situation.
E. Repression – blocking painful thoughts or feelings from the mind.
F. Regression – going back to an old immature behavior.
IV. Types of Mental Illness
A. Anxiety related disorders
1. Anxiety – uneasiness or fear about a situation or condition that
cannot be controlled or relieved when the cause has been
removed.
2. Panic Disorders – fearful, scared or terrified for no specific reason.
3. Obsessive Compulsive Disorders – OCD – uncontrollable need to
repeat or perform actions in a repetitive or sequential manner.
4. Post–traumatic Stress Disorder – PTSD – anxiety related to a
traumatic experience.
5. Phobias – intense fear of certain things or situations.
6. Symptoms – sweating, dizziness, choking, dry mouth, racing heart,
fatigue, shakiness, muscle aches, cold or clammy feeling,
shortness of breath or difficulty breathing.
B. Depression
1. Clinical depression – depression ranges in seriousness from mild,
temporary episodes of sadness to severe, persistent depression.
The term “clinical depression” is used to describe the more severe
Page 174 of 307
form of depression also known as “major depression” or “major
depressive disorder”.
a. Clinical depression symptoms may include:
i. Depressed mood most of the day, nearly every day.
ii. Loss of interest or pleasure in most activities.
iii. Significant weight loss or gain.
iv. Sleeping too much or not being able to sleep nearly
every day.
v. Slowed thinking or movement that others can see.
vi. Fatigue or low energy nearly every day.
vii. Feelings of worthlessness or inappropriate guilt.
viii. Loss of concentration or indecisiveness.
ix. Recurring thoughts of death or suicide.
2. Bipolar Disorder – sometimes called manic–depressive disorder –
is associated with mood swings that range from the lows of
depression to the highs of mania. When the resident becomes
depressed, he/she may feel sad or hopeless and lose interest or
pleasure in most activities. When the resident’s mood shifts in the
other direction, he/she may feel euphoric and full of energy. Mood
shifts may occur only a few times a year, or as often as several
times a day.
3. Schizophrenia – brain disorder that affects a person’s ability to think
and communicate. It affects the way a person acts, thinks, and
sees the world.
a. Does not mean “split personality”.
b. Symptoms – delusions, hallucinations, thought disorder,
disorganized behavior, loss of interest in everyday activities,
appearing to lack emotion, reduced ability to plan or carry
out activities, neglect of personal hygiene, social withdrawal,
and loss of motivation.
Page 175 of 307
V. Behaviors Associated with Mental Disorders – actions and interventions
A. Combative
1. Actions – hitting, kicking, spitting, pinching, pushing, pulling hair,
and cursing.
2. Interventions – remain calm, don’t take personal, step out of way,
remove other residents, never strike back or respond verbally,
leave resident alone to de–escalate (calm)– but only if safe, report
to nurse.
B. Anger
1. Actions – shouting, yelling, threatening, throwing things, pacing,
withdrawal, sulking.
2. Interventions – remain calm, do not argue, try to understand what
triggered anger, empathize with resident, listen, stay at a safe
distance, explain what you are doing.
C. Sexual Behaviors
1. Actions – sexual advances, comments, sexual words or gestures,
removing clothing, inappropriate touching of self or others,
exposing body parts or masturbation.
2. Interventions – do not overreact; be “matter–of–fact” and try to
redirect; gently direct to private area, report to nurse, and maintain
safety of other residents.
3. Special consideration – check for possible explanation for behavior,
such as clothing not fitting, skin irritation, need for toileting,
remember to report all inappropriate sexual behavior to the nurse.
VI. Treatment for Mental Illness
A. Medications – numerous medications are available. Physician orders the
medication dependent on diagnosis and conditions that need to be
addressed. The nursing staff is responsible for monitoring and
administration of these medications.
B. Psychotherapy –sessions during which the residents discuss problems or
issues with mental health professionals in order to identify and address
problems and develop interventions for staff to follow when caring for the
resident.

Page 176 of 307
VII. Special Considerations
A. Talk of suicide or death – any verbalization of suicide, “death wish” or
self–inflicted injury, REPORT IMMEDIATELY.
B. Changes in conditions – any changes in mood, activity, eating, extreme
behaviors or reactions, more upset or excitable, withdrawn, hallucinations
or delusions. Report to nurse immediately.
VIII. Mental Illness and Intellectual Disability
A. Intellectual Disability– a developmental disability that causes below–
average mental functioning.
1. Intellectual Disability vs. Mental Illness:
a. Intellectual Disability is a permanent condition; mental illness
can be temporary.
b. Intellectual Disability is present at birth or early childhood;
mental illness can develop at any age.
c. Intellectual Disability affects mental ability; mental illness
may or may not affect mental function.
d. No cure for Intellectual Disability. Some mental illnesses can
be cured or controlled with treatment, such as medication or
therapy.
Review Questions --- Lesson #26
1. If a resident verbalizes thoughts of suicide or an intention to cause harm to
self, when should this be reported to the nurse?
2. If a resident starts kicking or hitting you, what actions should you take?

Page 177 of 307
Lesson #27 (1 hour, 15 minutes)
Title: Admission/Transfer/Discharge
Lesson Objectives:
I. The student will be able to explain the role of the direct caregiver in familiarizing
the newly-admitted resident to their new home.
II. The student will be able to explain the role of the direct caregiver in preparing a
resident for transfer to an appointment or to the hospital.
III. The student will be able to explain the role of the direct caregiver in assisting a
resident to discharge to home or to another health care facility.
Key Terms:
Admission – resident arrival to reside at the facility.
Discharge – resident departure from the facility; no longer a resident of the facility.
Personal Inventory Record – record of personal items brought to the facility and
belonging to the resident.
Transfer – resident relocates to another location or to another area of the facility (e.g.,
Medicaid to Medicare unit).
Room Change – resident moves to another room in the same facility with the same
status.
Content:
I. Admitting a New Resident to the Facility (See CARE SKILLS #77)
A. Role of the Nurse Aide
1. Prepare the room for the resident’s arrival.
2. Introduce self to resident and family/responsible party and explain
role.
3. Explain surroundings to resident, including the use of the call light
to communicate with staff, if needed.
4. Create a trusting relationship.
5. Be available to family.

Page 178 of 307
6. Become a resource and support for the family.
7. Refer family members requesting information about a resident to
the nurse.
II. Assisting to Transfer a Resident to a Hospital (i.e., Care Transition)
A. Role of the Nurse Aide
1. Follow any instructions given by the nurse to prepare the resident
for transfer, particularly if the transfer is for an emergent condition.
2. If resident is leaving for a non–emergent appointment, ensure that
the resident has received appropriate care, assistance with
grooming, toileting and is appropriately dressed for the weather
conditions during transport.
3. Assist emergency medical personnel, as requested, to ensure safe
transfer of the resident.
III. Assisting a Resident to Discharge Home or to Another Facility (see CARE SKILL
#78)
A. Role of the Nurse Aide
1. Follow instructions given by the nurse to prepare the resident for
discharge.
2. Assist to gather personal belongings, as requested, in preparation
for transfer/discharge, using the personal inventory as reference to
personal items on site.
CARE SKILLS:
• Admission of a Resident – #77
• Transfer/discharge of the Resident – #78
Review Questions --- Lesson #27
1. Describe ways to welcome a new resident to his/her new environment.
2. The list used to describe the resident’s belongings brought to the facility is
called the ______.

Page 179 of 307
Lesson #28 (1 hour, 15 minutes)
Title: End of Life
Lesson Objectives:
I. The student will be able to explain the resident’s right to formulate an advance
directive which must be honored by staff.
II. The student will be able to describe interventions to make the dying resident as
comfortable as possible.
III. The student will be able to demonstrate the steps to be taken to provide post
mortem care to the deceased resident and prepare belongings for disposition.
Key Terms:
Advance Directive – the resident’s spoken and/or written instruction about future
medical care and treatment.
Cheyne–Stokes – a pattern of breathing with gradual increase in depth and sometimes
in rate, followed by a decrease resulting in apnea (no breathing); the cycles ordinarily
are 30 seconds to 2 minutes in duration, with 5–30 seconds of apnea (no breathing).
Cyanotic – bluish discoloration of the skin, mucous membranes, lips or nails due to lack
of sufficient oxygen in the blood.
DNR (Do not resuscitate) – no heroic measures are to be taken should the resident’s
respirations cease.
Hospice – support services provided to a resident with a terminal illness who is
anticipated to have six months or less to live.
Mottling – the skin, especially on the hands and feet, appear blue and blotchy; caused
by slow blood circulation. The underside of the body may become darker. There may be
a bluish gray color around the mouth or paleness in the face.
Content:
I. Advance Directives
A. Purpose – by stating health care choices in an advance directive, the
resident helps his/her family and physician understand their wishes about
the resident’s medical care.
B. Advance directives are normally one or more documents that list the
resident’s health care instructions. An advance directive may name a
Page 180 of 307
person of choice to make health care choices when the resident cannot
make the choices for themselves. If desired, the resident may use an
advance directive to prevent certain people from making health care
decisions on their behalf.
C. An advance directive will not take away the resident’s right to decide
his/her current health care. As long as the resident is able to decide and
express their own decisions, the resident’s advance directive will not be
used. This is true even under the most serious medical conditions. An
advance directive will only be used when the resident is unable to
communicate or when the physician decides that the resident no longer
has the mental competence to make their own choices.
* Arkansas recognizes the following types of advance directives:
1. Talking directly to your physician and family.
2. Organ and tissue donation.
3. Health Care Representative.
4. Living Will Declaration or Life–Prolonging Procedures
Declaration.
5. Psychiatric Advance Directive.
6. Out of Hospital Do Not Resuscitate Declaration and Order.
7. Power of Attorney.
II. Role of Hospice
A. Participation – Resident is not expected to live more than six months.
B. Licensed nurse, clergy, social service and primary caregiver services may
be provided.
C. Focus is on comfort measures and pain management.
D. Preserves dignity, respect and choice.
E. Plan of care is to be coordinated between facility staff and hospice staff.
F. Offers empathy and support for the resident and the family.
III. Care of the Dying Resident
A. Place resident in most comfortable position for breathing and avoiding
pain. Maintain body alignment as much as possible.
Page 181 of 307
B. Bathe and groom resident as desired by the resident/family to promote
self-esteem, yet do not be disruptive.
C. Keep resident’s environment as normal as possible, as desired by the
resident.
D. Provide skin care, including back rubs/comfort measures, frequently.
E. Provide frequent oral care as needed. Keep dry/cracked lips lubricated for
comfort.
F. Offer fluids frequently.
G. Keep the resident’s skin/linens clean.
H. Offer resident’s favorite foods.
I. Communicate with the resident, even if he is not responsive, by identifying
self and explaining everything you are doing.
J. Be guided by the resident’s attitude.
K. Respect each resident’s idea of death and spiritual beliefs.
L. Give the resident and the family privacy, but do not isolate them.
IV. Signs/Symptoms of Impending Death
A. Circulation – slows as heart fails; extremities become cool; pulse becomes
rapid and weak.
B. Respiration – irregular, rapid and shallow or slow and heavy; Cheyne
Stokes.
C. Muscle tone – jaw may sag; body becomes limp; bodily functions slow and
become involuntary.
D. Senses – sensory perception declines; the resident may stare yet not
respond; hearing is believed to be the last sense to be lost.
V. Post Mortem Care (See CARE SKILLS #79)
A. Respect the family’s religious restrictions regarding care of the body, if
applicable.
B. Provide privacy and assist a roommate to leave the area until the body is
prepared and removed.
Page 182 of 307
C. Place the body in the supine position with one pillow under the head to
prevent facial discoloration.
D. Put in dentures. Notify nurse to remove any tubes or dressings.
E. Wash the body, as necessary, and comb hair.
F. Put on a clean gown and cover perineal area with a pad.
VI. Disposition of Personal Belongings
A. Assist the family/responsible party to gather personal belongings and
compare to the personal inventory record to ensure the personal
belongings of the resident are accounted for and returned to the
family/responsible party.
B. Send dentures, eyeglasses and prosthetic devices with the body to the
mortuary.
VII. Stages of Reaction to Dying:
A. DENIAL – denying that death will occur
1. Behaviors:
a. Unrealistically cheerful.
b. Ask lots of questions.
c. Disregard medical orders.
2. Response to this behavior:
a. Listen and be accepting.
b. Do not probe.
B. ANGER – anger that this is happening to me, and anger at others
because it is not happening to them
1. Behaviors:
a. Complaining.
b. Unreasonable requests.
c. Anger at family, doctor, and nursing staff.
2. Response to this behavior:
Page 183 of 307
a. Listen.
b. Remain open and calm.
c. Don’t try to place blame.
C. BARGAINING – trying to make an agreement for postponing death
1. Behaviors:
a. May be difficult to observe this stage.
b. Person vacillates between doubt and hope.
2. Response to this behavior:
a. Listen.
b. Do not contradict plans.
c. Promote a sense of hope.
D. DEPRESSION – reality of death is unavoidable; is a reaction to getting
sicker; and is grieving for the losses they will experience
1. Behaviors:
a. Turn face away from people.
b. Not speak or speaks in expressionless voice.
c. Separating self from the world.
2. Response to behaviors:
a. Stay with the person as much as is possible.
b. Avoid cheery phrases and behavior.
c. Encourage the person to express feelings.
E. ACCEPTANCE– realizes that death is inevitable.

Page 184 of 307
CARE SKILLS:
• Post Mortem Care – #79
Review Questions --- Lesson #28
1. Blue discoloration of the skin and mucous membranes is called what?
2. Hospice services are intended to provide support to the resident who is
anticipated to have six months or less to live. (True or False)

Page 185 of 307
Lesson #29 (45 minutes)
Title: Daily Responsibilities
Lesson Objectives:
I. The student will be able to explain the importance of prioritization, organization
and time management when providing daily care.
II. The student will be able to describe the importance of the interdisciplinary team
and the ongoing revision of the care plan based upon the resident’s changing
condition/needs.
Key Terms:
Abbreviation – a shortened form of a word.
Assignment sheet – a document which lists the residents assigned to a caregiver and
the specifics regarding care to be provided.
Care plan – a plan developed for each resident by the interdisciplinary team to achieve
certain goals.
Care team – people with different education and experience who help care for
residents. It is often called the “interdisciplinary team” or “IDT”.
Chronological order – the sequence in which events occur.
Content:
I. Day-to-day Time Management/Resident Care
A. Beginning of Shift Report.
B. Use of assignment sheets/communication of resident needs.
C. Ancillary duties/assignments (e.g., cleaning, stocking supplies, etc.).
D. Documentation/Flow Records.
1. Resident’s name on each page.
2. All entries in ink, neat and legible.
3. Entries are accurate and in chronological order as they occurred.
Page 186 of 307
4. Never document before a procedure is completed.
5. Use facility–approved abbreviations.
6. No ditto marks or copycat documentation.
7. Time and date entries; sign with name and title, unless initials are
acceptable per facility policy.
8. Never document for someone else.
9. If correcting an error, draw a single line through the error, print word
“error” above entry and initial and date the correction.
10. Some facilities may use military time. In this case, for the hours
between 1:00 p.m.to 11:59 p.m., add 12 to the regular time. For
example, to change 2:00 p.m. to military time, add 2 + 12. The time
would be 1400 hours.
11. Some facilities use computers/electronic medical records. When
using, make certain information seen on the screen remains
private. Do not share confidential information with anyone except
other caregivers on the team.
12. Be sure you are documenting on the correct resident.
E. Reporting
1. Routine reporting.
2. Immediate reporting of resident change in condition, unusual
occurrence, accident, etc. Failure to do so may be neglect under
the law.
F. End of Shift Report
1. Report pertinent concerns regarding resident status.
2. Communicate any duties unable to be completed on your shift.
3. Report any resident condition that will need the attention of the
oncoming shift (e.g., resident is on the bedpan, etc.).
II. Interdisciplinary Care Plan Meetings
A. Revisions of the plan of care/communication to direct caregivers
1. The Care Plan Team reviews the plan at least quarterly and with
any significant change in condition.

Page 187 of 307
2. The care plan is reviewed and revised to reflect the current
condition(s) and needs of the resident.
3. The care plan must be accessible for review by all caregivers.
4. When revisions are made to the care plan, the assignment sheet
used by direct care staff should also be updated accordingly.
Review Questions – Lesson #29
1. Explain the procedure for correcting an error in documentation.
2. Describe information that should be communicated to the oncoming shift
during report.

Page 188 of 307
Lesson #30 (45 minutes)
Title: Protecting Your Profession
Lesson Objectives:
I. The student will be able to describe the common causes of stress/burnout in the
healthcare industry.
II. The student will be able to describe abuse/neglect/misappropriation of resident
property and will be able to explain his/her responsibility to respond and report
any allegations of abuse/neglect/misappropriation of resident property.
III. The student will be able to explain the requirements for certification and renewal
to maintain professional status.
Key Terms:
Abuse – the willful infliction of injury, unreasonable confinement, intimidation, or
punishment with resulting physical harm, pain or mental anguish. Abuse can be verbal
(something said–oral, written or gestured), physical (something done to the resident–
rough handling, hitting, slapping, pinching, etc.), emotional/mental (humiliation,
harassment, threats of punishment or deprivation) or sexual (harassment, coercion or
sexual assault). Any sexual relationship with a resident is considered to be abuse.
Burnout – a condition of feeling stressed and/or overworked to the point that the care
provided to residents is negatively affected.
Catastrophic Event – are extraordinary reactions of residents to ordinary stimuli, such
as the attempt to provide care.
Consensual – agreed to by the people involved; done with the consent of the people
involved.
Involuntary Seclusion – a separation of a resident from other residents or from their
room or confinement against the resident’s will, or the will of the legal representative.
Neglect – failure to provide goods and services necessary to avoid physical harm,
mental anguish, or mental illness; failure to follow a prescribed order of treatment or the
care plan; Negligently failing to provide necessary treatment, rehabilitation, care, food
clothing, shelter, supervision , or medical services; Negligently failing to report health
problems or changes in health problems or changes in health condition of a resident to
the appropriate medical personnel, and failing to carry out a prescribed treatment plan
developed or implemented by the facility.
Misappropriation – the deliberate misplacement, exploitation, or wrongful, temporary
or permanent use of a resident’s belongings or money without the resident’s consent.

Page 189 of 307
Stress – the state of being frightened, excited, confused, in danger, or irritated, which
can result in an emotional and/or physical response.
Stressor – something that causes stress (divorce, marriage, new baby, new job, losing
a job, etc.).
Content:
I. Reducing Stress/Burnout
A. Manage stress
1. Develop healthy habits of diet and exercise.
2. Get sufficient rest/sleep.
3. Drink alcohol in moderation.
4. Do not smoke.
5. Find time for relaxing activities such as taking walks, reading
books, etc.
B. Signs that you are not managing stress
1. Exhibiting anger toward co–workers and/or residents.
2. Arguing with a supervisor or co–workers about assignments.
3. Complaining about responsibilities.
4. Feeling tired, even when you are well-rested.
5. Difficulty focusing on residents and job duties.
C. Develop a plan to manage stress.
1. Identify the sources of stress in your life.
2. Identify when you most often feel stress.
3. Identify what effects of stress are evident in your life.
4. Identify what can be changed to decrease the stress that you are
feeling.
Page 190 of 307
5. Identify the things in your life that you will have to learn to cope with
due to an inability to change them.
II. Abuse/Neglect/Misappropriation
A. Responsibility to immediately protect the resident should a staff member
witness abuse/neglect.
1. You must stay with the resident and call for assistance.
2. Ask a caregiver to leave the room if he/she is witnessed to be
abusive to the resident
B. Know the Arkansas state law and regulation regarding reporting abuse.
Failure to report is against the law in Arkansas.
1. To whom should the Nurse Aide report? His/her immediate/direct
supervisor
2. How should you report?
a. Verbally – to your immediate/direct supervisor.
b. In writing – if requested by your immediate/direct supervisor.
c. Form used – be familiar with the facility form to report
concerns voiced by staff, family or residents.
3. When should a Nurse Aide report?
a. Immediately!
4. The Nurse Aide Must Report When He/She…
a. Receives any “allegation”, witnessed event, or reason to
suspect abuse, neglect or theft.
b. Observe signs that “suggest” abuse or neglect may have
happened, including a change in the resident's
behavior/demeanor (e.g., a resident becomes quiet,
withdrawn, or flinches as if fearful when touched), or
suspicious injuries such as teeth marks, belt buckle or strap
marks, old and new bruises, dislocation, burns of unusual
shape and in unusual locations, scratches, etc. If the aide
hears of an alleged incident from a resident or co–worker
then it must be reported according to the law.
5. The nurse aide doesn’t make a determination that abuse or neglect
“has” or “has not” occurred and then decide whether to report. If the
Page 191 of 307
resident makes an allegation (even if it doesn’t seem that it can’t be
true) it must be reported to the direct supervisor immediately. If the
nurse aide hears of an alleged incident from a resident or co–
worker, it must be reported to the direct supervisor immediately.
6. NA Investigation
a. Conducted by the administrator or the designated
representative according to state regulations using the
investigative packet provided the Arkansas Office of Long
Term Care.
b. May result in revocation of certification.
III. Nurse Aide Testing/Certification
A. To Maintain Certification
1. The CNA must renew certification with the AR CNA Registry
according to the current regulations.
2. To be eligible for renewal, the CNA must work at least one 8-hour
shift as a CNA for pay during their certification period.
3. The CNA must not have a verified complaint against them on the
registry. If a complaint of abuse or misappropriation of resident’s
property/funds is found to be valid, the CNA will lose certification in
all 50 states permanently.
4. The CNA must not be disqualified to work based on DPSQA
Criminal Record Check guidelines.
5. The nurse aide must exhibit professional behavior.
a. Be responsible, calling the facility if unable to work the
scheduled shift.
b. Be on time for your scheduled shift.
c. Arrive to work clean and neatly dressed and groomed.
d. Maintain a positive attitude.
e. Follow facility policies and procedures.
f. Document and report carefully and correctly.
g. Always ask questions, if uncertain.

Page 192 of 307
h. Report anything that keeps you from completing your
duties/assignment.
i. Offer suggestions for improving the living and working
environment.
IV. Certification Renewal
A. The CNA must renew certification with the AR CNA Registry every other
year.
1. Renewals can be processed online by the CNA, or by submitting
the renewal application to the AR Registry through the mail.
2. Renewals can be submitted and processed up to 60 days prior to
the expiration of the certificate.
3. CNAs who do not renew within the 24-month grace period, or those
who do not work during their certification period, are required to
take the State competency exam in order to have their certification
reinstated.
V. Course Review
A. Brief overview of each lesson.
B. Review of CARE SKILLS.
Review Questions – Lesson #30
1. Name common signs of stress and burnout in the healthcare industry.
2. What is the minimum work requirement for a CNA to maintain
certification?

Page 193 of 307
Works Cited
Alzheimer’s Association. (c2018). Wandering. Retrieved from https://www.alz.org/help-
support/caregiving/stages-behaviors/wandering.
Alzheimer’s Association. (c2018). Stages and behaviors. Retrieved from
https://www.alz.org/help-support/caregiving/stages-behaviors.
Alzheimer’s Foundation of America. (c2018). About Dementia. Retrieved from
https://alzfdn.org/about-dementia/.
Arkansas State Board of Nursing. (2018). Nurse practice act of the state of Arkansas.
Little Rock, AR: ARSBN. Retrieved from
https://www.arsbn.org/Websites/arsbn/images/NURSEPRACTICEACT_2018.February2
018.pdf.
Frank Broyles and the University of Arkansas Board of Trustees. (2006). Coach broyles’
playbook for alzheimer’s caregivers: A practical tips guide. Fayetteville, AR: Broyles
Foundation.
Centers for Medicare & Medicaid Services. (2017). Guidance to surveyors for long term
care facilities. State Operations Manual, Appendix PP. Retrieved from
https://www.cms.gov/Regulations-and-
Guidance/Guidance/Manuals/downloads/som107ap_pp_guidelines_ltcf.pdf.
Fazio, S., Pace, D., Maslow, K., Zimmerman, S., & Kallmyer, B. (2018). Alzheimer’s
Association Dementia Care Practice Recommendations. The Gerontologist, 58(S1),
S1–S9. doi: 10.1093/geront/gnx182
Fazio, S., Pace, D., Maslow, K., Zimmerman, S., & Kallmyer, B. (2018). The
Fundamentals of Person-Centered Care for Individuals With Dementia. The
Gerontologist, 58(S1), S10–S19. doi: 10.1093/geront/gnx122
Kandelman, N. (2017). Risk factors for burnout among caregivers working in nursing
homes. Journal of Clinical Nursing, 27(1-2), e147-e153. doi: 10.1111/jocn.13891
Mangar Health. (2016, October 20). The prevention of pressure ulcers. Retrieved from
https://mangarhealth.com/us/news/prevention-pressure-ulcers.
Manthorpe, J., & Samsi, K. (2016). Person-centered dementia care: current
perspectives. Clinical Interventions in Aging, 11, 1733–1740. doi: 10.2147/CIA.S104618
Power, A. (2010). Dementia Beyond Drugs: Changing the Culture of Care. Baltimore,
MD: Health Professions Press.
Power, A. (2014). Dementia Beyond Disease: Enhancing Well-Being. Baltimore, MD:
Health Professions Press.

Page 194 of 307
Sorrentino, S. A. & Gorek, B. (2014). Mosby’s Essentials for Nursing Assistants (5th
ed.). St. Louis, MO: Elsevier, Inc.
United States Health and Human Services, Food and Drug Administration, Center for
Devices and Radiological Health. (2006). Guidance for Industry and FDA Staff: Hospital
Bed System Dimensional and Assessment Guidance to Reduce Entrapment. Rockville,
MD: Division of Dockets Management, Food and Drug Administration. Retrieved from
https://www.fda.gov/downloads/medicaldevices/deviceregulationandguidance/guidance
documents/ucm072729.pdf.
University of Arkansas for Medical Sciences, Donald W. Reynolds Department of
Geriatrics. (2005). Dementia Care Manual. Little Rock, AR: UAMS.
University of Arkansas for Medical Sciences, Department of Psychiatry. (2001).
Behavioral Interventions Pocket Reference. Little Rock, AR: UAMS.
Woodhead, E. L., Northrop, L., & Edelstein, B. (2016). Stress, social support, and
burnout among long-term care nursing staff. Journal of Applied Gerontology, 35(1), 84-
105. doi: 10.1177/0733464814542465.
Page 195 of 307
Appendix A
Supplemental Materials
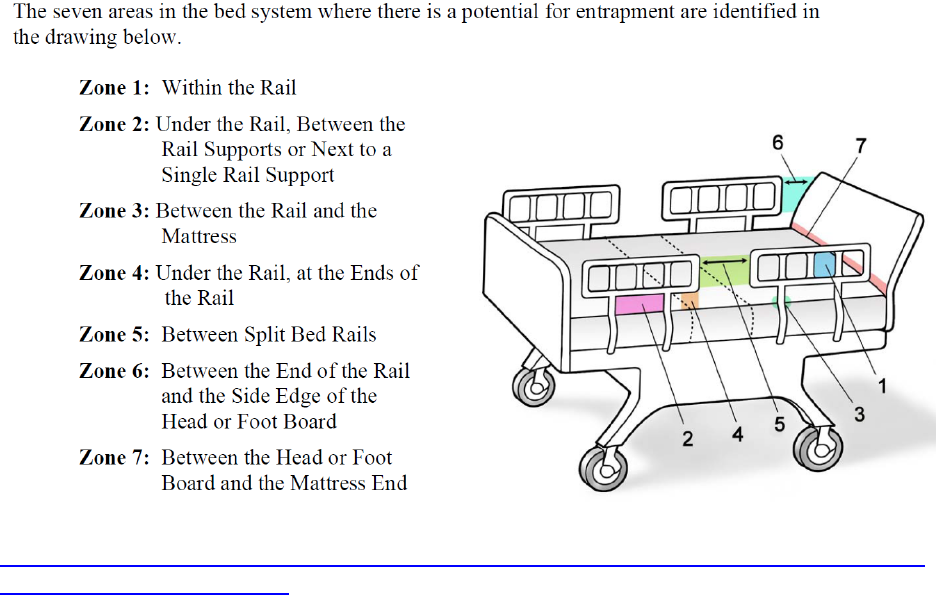
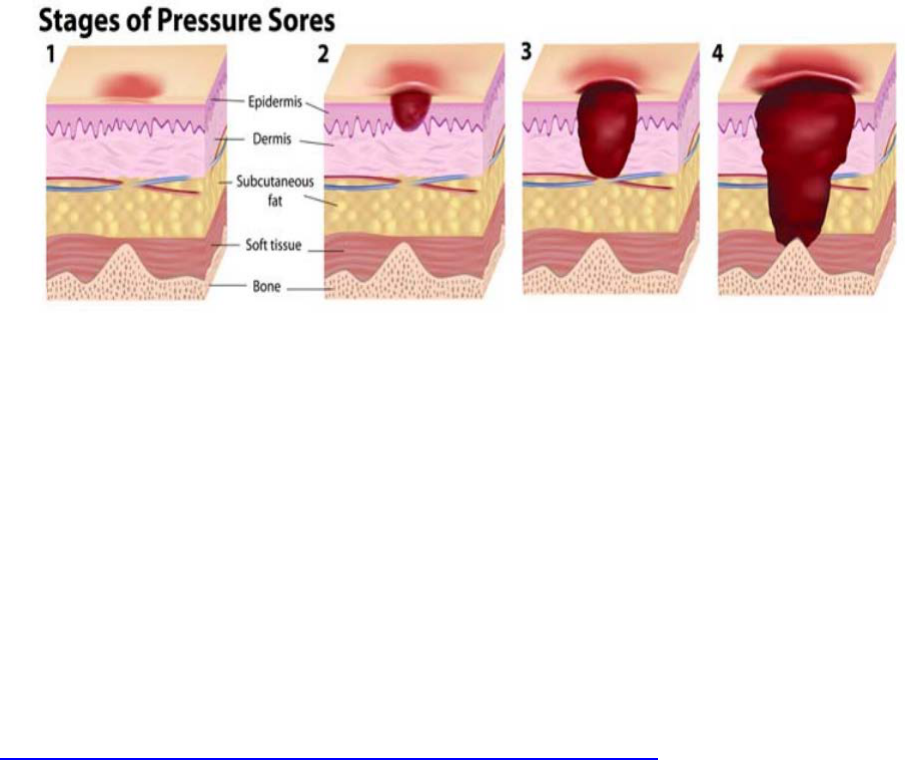
Page 197 of 307
Stage 1:
The skin is not broken. Redness that is not relieved within 15-30 minutes of pressure
being removed. Skin can be warmer than in other areas.
Stage 2:
Top layer of skin is broken. Blister or shallow sore can be seen. Second layer of skin
can be affected. Affected area is usually painful.
Stage 3:
Wound is deeper and may extend into the subcutaneous layer.
Stage 4:
Wound extends to muscle or bone, causing severe damage to the affected areas.
https://mangarhealth.com/us/news/prevention-pressure-ulcers

Page 198 of 307
COMMON MEDICAL ABBREVIATIONS
Time Abbreviations
a.m. -morning stat -immediately
p.m. -afternoon or evening noc -night
a.c. -before meals P.R.N. -whenever necessary
p.c. -after meals q.d. -every day
B.I.D. -twice a day q.h. -every hour
T.I.D. -three times a day q.o.d. -every other day
Q.I.D. -four times a day q3h -every three hours
H.S. -bedtime (hour of sleep) q4h -every four hours
Resident Orders
amt -amount NPO -Nothing by mouth
ax -axilla (sometimes NBM)
BM -bowel movement P.T. -physical therapy
BRP -bathroom privileges R -rectal or right
c -with ROM -range of motion
s -without spec. -specimen
ad lib -as desired DC -discontinued
ht -height w/c -wheelchair
wt -weight TPR -temperature, pulse,
I&O -Intake and Output respiration
ADL -activities of daily living BP -blood pressure
V.S. -vital signs (TPR & BP)
Diagnostic Terms
MI -Myocardial Infarction GI -gastro intestinal
(heart attack) or Mental Illness GU -genito-urinary
CVA -cerebrovascular accident or stroke CHF -congestive heart failure
H.O.H. -hard of hearing Ca -cancer
S.O.B. -short of breath CV -cardiovascular
fx -fracture
Page 199 of 307
Appendix B
Answers to Review Questions

Page 200 of 307
Lesson #1
1. The licensed nurse.
2. An objective observation is factually seen, heard, felt or smelled by the person
reporting; a subjective observation is what one “thinks” or “heard” happened from
someone else.
3. Time to get dressed in the morning; whether to shower or bathe in a tub; what
time to go to bed in the evening.
Lesson #2
1. Examine survey results, voice grievances, self–administer medications.
2. The caregiver must immediately report signs/symptoms of abuse, neglect or
misappropriation.
3. Verbal, physical, emotional/ mental, sexual, neglect, involuntary seclusion,
misappropriation.
4. Leaving a resident in bed soiled. Leaving the call light or water out of resident
reach.
5. Using a resident’s personal telephone to make calls. Taking a resident’s money
or personal belongings.
6. Report it immediately. Follow your facility’s policies and procedures for reporting
abuse.
Lesson #3
1. Causative Agent, Reservoir, Portal of Exit, Mode of Transmission, Portal of Entry,
Susceptible Host.
2. Handwashing.
3. Before resident/patient contact, before aseptic task, after exposure to blood/body
fluids, after resident/patient contact, after contact with resident/patient
surroundings.
4. Proper usage will provide a barrier between the caregiver and the pathogen,
thus, preventing the spread of infection.
5. Touching an infected person and then proceeding to touch another person
without washing one’s hands.

Page 201 of 307
6. Touching a contaminated object and then proceeding to touch a person without
washing one’s hands.
7. No.
Lesson #4
1. Remove residents from area of immediate danger; Activate the fire alarm;
Contain the fire, if possible (close doors); Extinguish, if possible.
2. Pull the pin; Aim at the base of the fire; Squeeze the handle; Sweep back and
forth at the base of the fire.
3. Stop, drop and roll to smother the flames.
Lesson #5
1. Clutching throat (hands around throat).
2. Material Safety Data Sheet.
3. Call/notify nurse; stay with resident; position resident on side; move furniture
away from resident; place padding under head; loosen clothing; check for injury;
note duration and areas involved; do NOT place anything in mouth; do NOT
restrain resident.
Lesson #6
1. True.
2. True.
3. Water.
4. Nectar thick, honey thick, and pudding thick.
Lesson #7
1. True.
2. True.

Page 202 of 307
Lesson #8
1. False.
2. True.
3. True.
Lesson #9
1. True.
2. False.
Lesson #10
1. Cold/clammy skin, double or blurry vision, shaking/trembling, hunger, tingling or
numbness of skin.
2. True.
Lesson #11
1. True.
2. True.
Lesson #12
1. Female: Separate labia; wash urethral area first; wash between and outside
labia in downward strokes, alternating from side to side and moving outward to
thighs. Use a different part of washcloth for each stroke.
Male: Pull back foreskin if male is uncircumcised. Wash and rinse the tip of the
penis using circular motion beginning with urethra. Continue washing down the
penis to the scrotum and inner thighs.
Rationale/Importance: Prevents the spread of infection by washing pathogens
away from the urethra and not toward the urethra where pathogens could enter.

Page 203 of 307
Lesson #13
1. Irritation, raised areas, coated or swollen tongue, sores, complaint of mouth pain,
white spots, loose/chipped or decayed teeth.
2. Due to poor circulation, even a small sore on the foot can become a large wound.
Lesson #14
1. A clean catch mid–stream requires that genitalia be cleansed prior to collecting
the urine specimen.
2. True.
Lesson #15
1. The resident’s shoulders are directly above their hips; their head and neck are
straight; their arms and legs are in a natural position.
2. Supine, Lateral, Fowler’s and Semi–Fowler’s.
3. Semi–Fowler’s.
4. Less.
5. False.
Lesson #16
1. False.
Lesson #17
1. Dry mouth, weight loss, foul smelling urine, dark urine, cracked lips and sunken
eyes.
2. True.

Page 204 of 307
Lesson #18
1. True.
2. True.
3. True.
Lesson #19
1. False.
2. On the side she will be facing – her left.
Lesson #20
1. 60 – 100 beats per minute.
2. The average BP range for adults is systolic blood pressure: 90–139; Normal
range for Diastolic blood pressure is 60–89. However, baseline ranges vary from
person to person.
3. Place your hand on the resident’s chest and feel the chest rise and fall during
breathing.
Lesson #21
1. True.
2. At least once every hour and more frequently if the resident’s condition requires.
3. At least every two hours, or more often if necessary except when the resident is
asleep.
Lesson #22
1. Active range of motion exercises are done by the resident himself; Passive range
of motion exercises are done by caregivers providing support and moving the
resident’s joints through the range of motion when the resident cannot move on
their own.
2. Contractures.
3. Restorative Services.

Page 205 of 307
Lesson #23
1. Redness, warmth, tenderness, open area.
2. True.
3. True.
Lesson #24
1. Change in vital signs – B/P, pulse, respiration, nausea, vomiting, sweating,
tearful or frowning, sighing, moaning or groaning, breathing heavy or shortness
of breath, restless or having difficulty moving, holding or rubbing a body part,
tightening jaw or grinding teeth.
2. Medication administration, such as antibiotics, nutrition administration, hydration,
blood products, solutions are administered by gravity or through a portable pump.
3. Fear of addiction to pain medication, feeling caregivers are too busy to deal with
pain, fear pain medication will cause other problems, i.e., drowsiness,
sleepiness, constipation.
Lesson #25
1. A delusion – a fixed, false belief.
2. An elopement.
3. Validation Therapy.
4. Sundowning.
Lesson #26
1. Immediately.
2. Remain calm, step out of the way, remove other residents, never strike back or
respond verbally, leave the resident alone to calm down (if safe) and report the
behaviors to the nurse immediately.
Lesson #27
1. Prepare the room for the resident’s arrival; introduce self to resident and
family/responsible party and explain role; explain surroundings to resident,
including use of call light to summon help, if needed; create a trusting

Page 206 of 307
relationship; be available to family; become a resource and support for the family;
refer family members requesting information about a resident to the nurse.
2. Personal inventory record.
Lesson #28
1. Cyanosis.
2. True.
Lesson #29
1. Draw a single line through the error, print word “error” above entry and initial and
date the correction.
2. Report any resident condition that will need the attention of the oncoming shift
(e.g., resident is on the bedpan, etc.)
Lesson #30
1. Exhibiting anger toward co–workers and/or residents; arguing with a supervisor
or co-workers about assignments; complaining about responsibilities; feeling
tired, even when you are well rested; difficulty focusing on residents and job
duties.
2. The CNA must work at least one 8-hour shift as a CNA for pay during their
certification period
Page 207 of 307
Appendix C
Care Skills
Page 208 of 307
1. Initial Steps
2. Final Steps
3. Handwashing/Hand rub
4. Gloves
5. Gown (PPE)
6. Mask
7. Fire
8. Fire Extinguisher
9. Falling or Fainting
10. Choking
11. Seizures
12. Unoccupied Bed
13. Thickened Liquids
14. Measure and Record Fluid Intake/Urinary Output
15. Passing Fresh Ice Water
16. Serving Meal Tray
17. Nasal Cannula Care
18. Shower/Shampoo
19. Bed Bath/Catheter Care/Perineal Care
20. Back Rub
21. Shampoo Hair in Bed
22. Whirlpool
23. Oral Care
24. Oral Care for the Unconscious Resident
25. Denture Care
26. Shaving with an Electric Razor
27. Shaving with a Safety Razor
28. Comb/Brush Hair
29. Fingernail Care
30. Foot Care
31. Change a Resident’s Gown
32. Dressing a Dependent Resident
33. Assist to Bathroom
Page 209 of 307
34. Bedside Commode
35. Bedpan/Fracture Bedpan
36. Urinal
37. Empty Urinary Drainage Bag
38. Urine Specimen Collection
39. Stool Specimen Collection
40. Application of Incontinent Brief
41. Assist Resident to Move to Head of Bed
42. Supine Position
43. Lateral Position & Side to Side
44. Fowler’s Position
45. Semi-Fowler’s Position
46. Use of Wheelchair/Geriatric Chair
47. Transfer to Chair
48. Sit on Edge of Bed
49. Using a Gait Belt to Assist with Ambulation
50. Walking
51. Assist with Walker
52. Assist with Cane
53. Using a Portable Mechanical Resident Lift
54. Transfer to Stretcher/Shower Bed
55. Transfer: Two Person Lift
56. Occupied Bed
57. Inspecting Skin
58. Float Heels
59. Bed Cradle
60. Feeding
61. Oral Temperature (Electronic)
62. Axillary Temperature
63. Pulse and Respiration
64. Practical Use of the Pulse Oximeter
65. Blood Pressure
66. Height
Page 210 of 307
67. Weight
68. Application of Physical Restraints
69. Passive Range of Motion
70. Splint Application
71. Abdominal Binder
72. Abduction Pillow
73. Knee Immobilizer
74. Palm Cones
75. Assisting with Hearing Aids
76. Elastic/Compression Stocking Application or Ted Hose
77. Admission of a Resident
78. Transfer/Discharge of the Resident
79. Postmortem Care

Page 211 of 307
CARE SKILLS #1: INITIAL STEPS (Lesson #2)
STEP – Initial Steps: Check the resident’s
care plan/closet care plan first.
RATIONALE
1. Ask nurse about resident’s needs, abilities
and limitations, if necessary and gather
necessary supplies.
1. Prepares you to provide best possible care
to resident.
2. Knock and identify yourself before entering
the resident’s room. Wait for permission to
enter the resident’s room.
2. Maintains resident’s right to privacy.
3. Greet resident by name per resident’s
preference.
3. Shows respect for resident.
4. Identify yourself by name and title. 4. Resident has right to know identity and
qualifications of their caregiver.
5. Explain what you will be doing; encourage
resident to help as able.
5. Promotes understanding and
independence.
6. Gather supplies and check equipment. 6. Organizes work and provides for safety.
7. Close curtains, drapes and doors. Keep
resident covered, expose only area of
resident’s body necessary to complete
procedure.
7. Maintains resident’s right to privacy and
dignity.
8. Wash your hands. 8. Provides for Infection Control.
9. Wear gloves as indicated by Standard
Precautions.
9. Protects you from contamination by bodily
fluids.
10. Use proper body mechanics. Raise bed
to appropriate height and lower side rails (if
raised).
10. Protects yourself and the resident from
injury.

Page 212 of 307
CARE SKILLS #2: FINAL STEPS (Lesson #2)
STEP – Initial Steps: Check the resident’s
care plan/closet care plan first.
RATIONALE
1. Remove gloves, if applicable, and wash
your hands.
1. Provides for Infection Control.
2. Be certain resident is comfortable and in
good body alignment. Use proper body
mechanics.
2. Reduces stress and improves resident’s
comfort and sense of well–being.
3. Lower bed height and position side rails (if
used) as appropriate.
3. Provides for safety.
4. Place call light and water within resident’s
reach.
4. Allows resident to communicate with staff
as necessary and encourages hydration.
5. Ask resident if anything else is needed. 5. Encourages resident to express needs.
6. Thank resident. 6. Shows your respect toward resident.
7. Remove supplies and clean equipment
according to facility procedure.
7. Facilities have different methods of
disposal and sanitation. You will carry out
the policies of your facility.
8. Open curtains, drapes and door according
to resident’s wishes.
8. Provides resident with right to choose.
9. Perform a visual safety check of resident
and environment.
9. Prevents injury to you and resident.
10. Report unexpected findings to nurse. 10. Provides nurse with necessary
information to properly assess resident’s
condition and needs.
11. Document procedures according to
facility procedure.
11. What you document is a legal record of
what you did. If you don’t document it, legally,
it didn’t happen.

Page 213 of 307
CARE SKILLS #3: HANDWASHING/HAND RUB (Lesson #3)
STEP – Initial Steps: Check the resident’s
care plan/closet care plan first.
RATIONALE
Wash hands when visibly soiled or prior to
giving care.
1. Handwashing is the single most effective
barrier to transmission of bacteria.
1. Turn on faucet.
2. Adjust water to acceptable temperature. 3. Hot water opens pores which may cause
irritation.
3. Angle arms down holding hands lower than
elbows. Wet hands and wrists.
4. Water should run from most clean to most
soiled.
4. Apply enough soap to cover all hand and
wrist surfaces. Work up a lather.
NOTE: Direct caregivers must rub hands
together vigorously for at least 20 seconds,
covering all surfaces of the hands, fingers
and wrists.
5. Use friction to distribute soap and create
lather cleansing front and back of hands,
between fingers, around cuticles, under nails,
and on wrists.
5. Lather and friction will loosen pathogens to
be rinsed away.
6. Rinse hands with water down from wrists
to fingertips.
6. Soap left on the skin may cause irritation
and rashes.
7. Dry thoroughly with single use towels.
8. Use towel to turn off faucet and discard
towel.
8. Prevents contamination of clean hands.
How to Use Hand Rub:
9. Apply a quarter size amount of the product
in a cupped hand.
9. Refer to label for estimated amount of
product to be placed in palm.
10. Rub hands together to distribute product
on front and back of hands, between fingers,
around cuticles, under nails, and on wrists.
10. Thorough application will reach all
surfaces of concern.
11. Allows hands to dry. Waterless hand rubs
must be rubbed for at least 10 seconds or
until dry to be effective.
11. The product must be dry to be effective.

Page 214 of 307
CARE SKILLS #4: GLOVES (Lesson #3)
STEP – Initial Steps: Check the resident’s
care plan/closet care plan first.
RATIONALE
1. Wash hands.
2. Put gloves on, one hand at a time.
3. Interlace fingers to secure gloves for a
comfortable fit.
4. Check for tears/holes and replace glove, if
necessary.
4. Damaged gloves do not protect you or the
resident.
5. If wearing a gown, pull the cuff of the
gloves over the sleeves of the gown.
5. Covers exposed skin of wrists.
6. Perform procedure.
7. Remove first glove by grasping outer
surface of other glove, just below cuff and
pulling down.
7. Both gloves are contaminated and should
not touch unprotected skin.
8. Pull glove off so that it is inside out. 8. The soiled part of the glove is then
concealed.
9. Hold the removed glove in a ball of the
palm of your gloved hand. Do not dangle the
glove downward.
9. To ensure the first glove goes into the
second glove.
10. Place two fingers of ungloved hand under
cuff of other glove and pull down so first
glove is inside second glove.
10. Touching the outside of the glove with an
ungloved hand causes contamination.
11. Dispose of gloves without touching
outside of gloves and contaminating hands.
11. Hands may be contaminated if gloves are
rolled or moved from hand to hand.
12. Wash hands.

Page 215 of 307
CARE SKILLS #5: GOWN [Personal Protective Equipment] (Lesson #3)
STEP – Initial Steps: Check the resident’s
care plan/closet care plan first.
RATIONALE
1. Wash your hands.
2. Open gown and hold out in front of you.
Let the clean gown unfold without touching
any surface.
2. Prevents contamination of the gown.
3. Slip your hands and arms through the
sleeves and pull the gown on.
4. Tie neck ties in a bow. 4. They can easily be un–tied later.
5. Overlap back of the gown and tie waist
ties.
5. Ensures that your uniform is completely
covered.
6. If gloves are required, put them on last.
7. Perform procedure.
8. Remove gloves.
9. Remove goggles and/or face shield.
10. Untie or break the waist ties.
11. Untie or break the neck ties.
12. Pull the sleeve off by grasping each
shoulder at the neckline and turn the sleeves
inside out as you remove them from your
arms.
12. Not touching the outside surface of the
gown with your bare hands prevents
contamination. The back of the gown should
not be soiled.
13. Fold gown with clean side out and place
in laundry or discard if disposable.
13. Gowns are for one use only. They must
be either discarded or laundered after each
use.
14. Wash your hands.

Page 216 of 307
CARE SKILLS #6: MASK (Lesson #3)
STEP – Initial Steps: Check the resident’s
care plan/closet care plan first.
RATIONALE
1. Wash your hands.
2. Place upper edge of the mask over the
bridge of your nose and tie the upper ties. If
mask has elastic bands, wrap the bands
around the back of your head and ensure
they are secure.
2. Your nose should be completely covered.
3. Place the lower edge of the mask under
your chin and tie the lower ties at the nape of
your neck.
3. Your mouth should be completely covered.
4. If the mask has a metal strip in the upper
edge, form it to your nose.
4. This will prevent droplets from entering the
area beneath the mask.
5. Perform procedure.
6. If the mask becomes damp or if the
procedure takes more than 30 minutes, you
must change your mask.
6. Dampness of the mask will reduce its
ability to protect you from pathogens. The
effectiveness of the mask as a barrier is
greatly diminished after 30 minutes.
7. If wearing gloves, remove them first. 7. This will prevent contamination of the
areas you will touch when untying the mask.
8. Wash your hands.
9. Untie each set of ties and discard the mask
by touching only the ties. Masks are
appropriate for one use only.
9. Hands may be contaminated if you touch
an area other than the ties. Masks must be
discarded after each use.
10. Wash your hands.

Page 217 of 307
CARE SKILLS #7: FIRE (Lesson #4)
STEP RATIONALE
1. Remove residents from area of immediate
danger.
1. Residents may be confused, frightened or
unable to help themselves.
2. Activate fire alarm. 2. Alerts entire facility of danger.
3. Close doors and windows to contain fire. 3. Prevents drafts that could spread fire.
4. Extinguish fire with fire extinguisher, if
possible.
4. Prevents fire from spreading.
5. Follow all facility policies. 5. Facilities have different methods of
responding to emergencies. You need to
follow the procedures for your facility.

Page 218 of 307
CARE SKILLS #8: FIRE EXTINGUISHER (Lesson #4)
STEP RATIONALE
1. Pull the pin. 1. Allows the extinguisher to be functional.
2. Aim at the base of the fire. 2. Targets the source of the flames, which
should be found at the base.
3. Squeeze the handle. 3. Releases the chemical(s) to extinguish the
fire.
4. Sweep back and forth at the base of the
fire.
4. Fully extinguishes the source of the fire.
CARE SKILLS #9: FALLING OR FAINTING
(Lesson #5)
STEP – Initial Steps: Check the resident’s
care plan/closet care plan first.
RATIONALE
1. Call for nurse and stay with resident. 1. Allows you to get help, yet continuously
provide for resident’s safety and comfort.
2. Check if resident is breathing. 2. Provides you with information necessary to
proceed with procedure.
3. Do not move resident. Leave in same
position until the nurse examines the
resident.
3. Prevents further damage if resident is
injured.
4. Talk to resident in calm and supportive
manner.
4. Reassures resident.
5. Apply direct pressure to any bleeding area
with a clean piece of linen.
5. Slows or stops bleeding.
6. Take pulse and respiration. 6. Provides nurse with necessary information
to properly assess resident’s condition and
needs.
7. Assist nurse as directed. Check resident
frequently according to facility policy and
procedures. Assist in documentation.

Page 219 of 307
CARE SKILLS #10: CHOKING (Lesson #5)
STEP RATIONALE
1. Call for nurse and stay with resident. 1. Allows you to get help, yet continuously
provide for resident’s safety and comfort.
2. Ask if resident can speak or cough. 2. Identifies sign of blocked airway (not being
able to speak or cough).
3. If not able to speak or cough, move behind
resident and slide arms under resident’s
armpits.
3. Puts you in correct position to perform
procedure.
4. Place your fist with thumb side against
abdomen midway between waist and ribcage.
4. Positions fist for maximum pressure with
least chance of injury to resident.
5. Grasp your fist with your other hand. 5. Allows you to stabilize resident and apply
balanced pressure.
6. Press your fist into abdomen with quick
inward and upward thrust.
6. Forces air from lungs to dislodge object.
7. Repeat until object is expelled.
8. Assist with documentation.
* Note: Discuss and demonstrate administering abdominal thrust for an unconscious
resident or for someone who is lying down.

Page 220 of 307
CARE SKILLS #11: SEIZURES (Lesson #5)
STEP RATIONALE
1. Call for nurse and stay with resident. 1. Allows you to get help, yet continuously
provide for resident’s safety and comfort.
2. Place padding under head and move
furniture away from resident.
2. Protects resident from injury.
3. Do not restrain resident or place anything
in mouth. Assist nurse with placing resident
on his/her side.
3. Any restriction may injure resident during
seizure. Positioning resident on his/her side
prevents choking if the resident should vomit.
4. Loosen resident’s clothing especially
around neck.
4. Prevents injury or choking.
5. Note duration of seizure and areas
involved.
5. Provides nurse with necessary information
to properly assess resident’s condition and
needs.

Page 221 of 307
CARE SKILLS #12: UNOCCUPIED BED (Lesson #6)
STEP – Initial Steps: Check the resident’s
care plan/closet care plan first.
RATIONALE
1. Do initial steps.
2. Collect clean linen in order of use. 2. Organizing linen allows procedure to be
completed faster.
3. Carry linen away from your uniform. 3. If linen touches your uniform, it becomes
contaminated.
4. Place linen on clean surface (bedside
stand, over bed table or back of chair).
4. Prevents contamination of linen.
5. Place bed in flat position. 5. Allows you to make a neat, wrinkle free
bed.
6. Loosen soiled linen. Roll linen from head
to foot of bed and place in barrel at door of
room or in bag or pillow case and place at
foot of bed or chair.
6. Always work from cleanest (head of bed) to
dirtiest (foot of bed) to prevent spread of
infection. Rolling dirtiest surface of linen
inward, lessening contamination.
7. Fanfold bottom sheet to center of bed and
fit corners.
8. Fanfold top sheet to center of bed.
9. Fanfold blanket over top sheet.
10. Tuck top linen under foot of mattress and
miter corner.
10. Mitering prevents resident’s feet from
being restricted by or tangled in linen when
getting in or out of bed.
11. Move to other side of bed. 11. Completing one side of bed at a time
allows procedure to be completed faster and
reduces strain on the caregiver.
12. Fit corners of bottom sheet, unfold top
linen, tuck it under foot of mattress, and miter
corner.
13. Fold top of sheet over blanket to make
cuff.
14. With one hand, grasp the clean pillow
case at the closed end, turning it inside out
over your wrist.

Page 222 of 307
15. Using the same hand that has the pillow
case over it, grasp one narrow edge of the
pillow and pull the pillow case over it with
your free hand.
16. Place the pillow at head of bed with open
edge away from the door.
16. Creates a neater, more uniform look to
rooms and beds.
17. For open bed: make toe pleat and fanfold
top linen to foot of bed with top edge closest
to center of bed.
17. Top edge of top linen must be closest to
head of bed so resident can easily reach
covers.
18. For closed bed: pull bedspread over
pillow and tuck bedspread under lower edge
of pillow.
18. Toe pleat automatically reduces pressure
of top linen on feet when resident returns to
bed.
19. Removed soiled linens. 19. Prevents contamination.
20. Do final steps.

Page 223 of 307
CARE SKILLS #13: THICKENED LIQUIDS (Lesson #6)
STEP – Initial Steps: Check the resident’s
care plan/closet care plan first.
RATIONALE
1. Do initial steps.
2. Obtain thickener and measuring spoon. 2. Measuring spoon is required to ensure
proper amount of thickener is utilized to
obtain ordered thickness. Follow your facility
policy for thickening liquids.
3. Thicken liquids to desired consistency
following manufacturer’s instructions.
3. Physician will specify thickness. Various
brands of thickener require different amounts
of product to be added.
4. Offer thickened fluid to resident.
Encourage resident to consume thickened
fluids.
4. Decreases risk of resident becoming
dehydrated.
5. Ensure the water pitcher has been
removed from the bedside unless facility
policy states otherwise.
5. Resident may attempt to drink liquids that
have not been thickened which will increase
risk of choking.
6. Do final steps.

Page 224 of 307
CARE SKILLS #14: MEASURE & RECORD FLUID INTAKE & URINARY OUTPUT
(Lessons #6 & #14)
STEP – Initial Steps: Check the resident’s
care plan/closet care plan first.
RATIONALE
1. Do initial steps.
2. Put on gloves, if necessary. 2. Gloves are not generally required for
measuring fluid intake, but they are required
for measuring urinary output.
Fluid Intake:
3. Note the amount of fluids in the container
before serving it to the resident. If necessary,
document the amount.
3. Different containers hold different amounts
of fluids. Check labels to determine how
much fluid each container holds.
4. Once the resident is finished with the
meal/snack, note the amount of fluid
remaining in the container. (If necessary,
pour the remaining fluid into a graduated
container and read it at eye level to
measure.)
4. Measuring the remaining fluid is more
accurate, but this technique is not always
necessary. Reading at eye level ensures
accuracy.
5. Subtract the remaining amount of fluid
from the total amount that was in the
container. The difference is the amount of
fluid consumed by the resident. Document
the amount according to the facility’s policy.
6. Dispose of food/drinks accordingly. (If
used, be sure to rinse, sanitize, and store the
graduated cylinder according to the facility’s
policy.)
6. Leaving unconsumed food/drinks in the
room could lead to pest concerns and can
also result in amounts being documented
multiple times. Fluids that were measured in
cylinder are now considered contaminated
and should not be consumed by the resident.
7. Wash hands.
8. Do final steps.
Urinary output:
1. Empty urine into a graduated cylinder.

Page 225 of 307
2. Place container on a flat, level surface. Be
sure to use a protective barrier between the
container and the surface, including the floor.
1. If the surface is not level, the liquid will tilt,
resulting in inaccurate readings. A barrier
should be used to avoid cross-contamination.
3. Measure the amount of urine inside of the
container at eye level.
2. Ensures accuracy.
4. Dispose of urine accordingly. Rinse,
sanitize, and store the graduated cylinder
according to the facility’s policy.
5. Remove gloves.
6. Document the amount according to the
facility’s policy.
7. Do final steps.

Page 226 of 307
CARE SKILLS #15: PASSING FRESH ICE WATER (Lesson #6)
STEP – Initial Steps: Check the resident’s
care plan/closet care plan first.
RATIONALE
1. Do initial steps.
2. Obtain cart, ice container, ice scoop and
go to ice machine. Keep ice scoop covered.
3. Fill container with ice using ice scoop.
4. Replace ice scoop in proper covered
container or cover it with a clean towel or
plastic bag to prevent contamination.
4. Keeping the ice scoop covered maintains
infection control practices.
5. Proceed to resident rooms, noting any fluid
restriction(s) prior to pass and any residents
who require thickened liquids.
5. Residents who require a fluid restriction or
thickened liquids should not have a water
pitcher placed at the bedside unless facility
policy states differently.
6. Empty water from pitcher and bedside
glass into the sink. If resident is on I&O’s –
record intake of water.
6. Emptying the pitcher of old water will allow
you to fill it with ice and fresh water. Emptying
the glass will allow you to fill it with fresh
water.
7. Take pitcher into hall and fill it with ice.
NOTE: Do not touch the pitcher with the ice
scoop.
7. The ice scoop is utilized for all residents
thus should not be contaminated by touching
a water pitcher.
8. Replace the scoop in covered container or
cover with a fresh, clean towel or plastic bag
between rooms to prevent contamination.
8. Maintains infection control practices.
9. Return to resident’s room and fill pitcher
with water at bathroom sink, not allowing
pitcher to touch faucet.
9. Ensures that resident has fresh ice water
in pitcher.
10. Pour fresh water into bedside glass and
leave a straw with the glass, if needed.
10. Ensures that water is available and ready
for resident when he/she desires it.
11. Offer the resident a drink of fresh water if
resident is present.
11. Resident may be unable to independently
obtain a drink of water.
12. Repeat procedure until all residents have
been provided with fresh ice water.
12. Ensures that all residents receive fresh
ice water.
13. Do final steps.

Page 227 of 307
CARE SKILLS #16: SERVING MEAL TRAY (Lesson #6)
STEP – Initial Steps: Check the resident’s
care plan/closet care plan first.
RATIONALE
1. Do initial steps.
2. Confirm diet card/tray. Check name, diet,
utensils and condiments.
2. This will ensure that the resident is being
served the diet as ordered; at the appropriate
consistency.
3. Confirm any adaptive equipment is
present, if indicated.
3. Provision of adaptive equipment will
encourage resident participation.
4. Assist to protect the resident’s clothing, if
desired.
4. Use of a napkin or clothing protector (if
resident desires) preserves dignity by
keeping clothing clean and free of spillage.
5. Assist to open carton(s), arrange food
items within reach, season foods per resident
preference, etc.
5. The resident may have limited hand
dexterity and/or weakness, making it difficult
to open cartons/containers.
6. Contact the nurse if the resident appears
to be having difficulty during meal, and you
are not trained on how to feed a resident If
properly trained, then offer assistance.
6. Residents may refrain from “asking” for
assistance, thus, staff should be pro–active in
observing the need for assistance and offer
the same.
7. Offer to assist in cleansing resident’s
hands/face following the meal.
7. Promotes good hygiene.
8. Assist resident to room or location of
choice.
9. Do final steps. Measure and record I&O’s if
required.

Page 228 of 307
CARE SKILLS #17: NASAL CANNULA CARE (Lesson #8)
STEP – Initial Steps: Check the resident’s
care plan/closet care plan first.
RATIONALE
1. Do initial steps.
2. Put on gloves. 2. Protects you from contamination by bodily
fluids.
3. Adjust and lift nasal cannula tubing
enough to observe the skin underneath and
to clean and dry nostrils as needed. Use a
soft cloth or tissue for cleaning area once
each shift or as needed. Do not remove
cannula from nostrils.
3. Removes any accumulation of dried
drainage that may be present. Removing the
cannula from the nostrils is considered
stopping/discontinuing the treatment/therapy,
which cannot be performed by nursing
assistants.
4. Note any redness or irritation of the nares
or behind the ears and notify nurse if present.
Continue procedure only if instructed.
4. Provides nurse with necessary information
to properly assess resident’s condition and
needs.
5. Readjust nasal cannula so that it fits
comfortably for resident. Ensure that sides
are not too tight.
5. Nasal cannula too tight can cause
discomfort. Incorrect placement could result
in decrease flow of oxygen to resident and/or
discomfort.
6. Remove gloves.
7. Do final steps.

Page 229 of 307
CARE SKILLS #18: SHOWER/SHAMPOO (Lesson #12)
STEP – Initial Steps: Check the resident’s
care plan/closet care plan first.
RATIONALE
1. Do initial steps.
2. Clean/disinfect shower area and shower
chair as per facility policy. Prep the bathing
area per facility policy. Gather supplies and
take them into the shower area.
2. Reduces pathogens and prevents spread
of infection. Have the supplies ready when
you bring the resident in the shower room to
ensure resident safety.
3. Help resident remove clothing. Provide
resident privacy—ensure door is shut,
curtains pulled, blinds closed.
3. Maintains resident’s dignity and right to
privacy by not exposing body. Keeps
resident warm.
4. Turn on water and check temperature.
Also allow resident to check water
temperature for comfort, if able.
4. Resident’s sense of touch may be different
than yours; therefore, resident is best able to
identify a comfortable water temperature.
5. Assist resident into shower via wheelchair.
Lock wheels of shower chair and wheelchair.
Transfer resident to shower chair. Use safety
belt to secure resident stability, if indicated.
Never take your eyes off the resident or turn
your back to the resident while in the shower.
5. Chair may slide if resident attempts to get
up. Ensure resident safety at all times. Never
transport resident through the facility in
shower chair. Keep eyes on resident at all
times in shower room to ensure safety (i.e.,
prevent falls, ingestion of chemicals, etc.).
Shampoo:
6. Give resident a washcloth to cover his/her
eyes during the shampoo, if he/she desires.
Place cotton balls in resident’s ears if
desired.
6. Prevents soap and water from entering the
resident’s eyes and ears.
7. Wet the resident’s hair.
8. Put a small amount of shampoo into the
palm of your hand and work it into the
resident’s hair and scalp using your
fingertips.
8. Using fingertips instead of fingernails to
massage the scalp decreases the risk of
scratching the resident.
9. Rinse the resident’s hair thoroughly. 9. Leaving soap in the hair can cause dry
scalp.
10. Use a conditioner if the resident desires
you to do so. Rinse.
Shower continued:
11. Let resident wash as much as possible, 11. Encourages resident to be independent.

Page 230 of 307
starting with face. Assist as needed to wash
and rinse the entire body going from head to
toe. Use a separate washcloth to cleanse the
perineal area last.
12. Turn off the water. Cover resident with
bath blanket or towel.
12. Prevents resident from getting cold.
13. Remove cotton balls from the resident’s
ears, if utilized.
14. Give resident towel and assist to pat dry.
Ensure that hair, neck, and ears are dried.
Thoroughly dry under breasts, between
skinfolds, in the perineal area, and between
toes.
14. Patting dry prevents skin tears and
reduces chaffing. Water left in areas,
especially in skin folds, can cause pathogens
to grow, leading to irritation and skin
breakdown.
15. Apply lotion to skin and assist resident
with dressing and combing hair. Blow dry
hair if necessary.
16. Be sure that floor is dry before assisting
resident out of shower chair. Apply non-slip
device to floor if available. Ensure shoes are
on and fit properly. Assist resident out of
shower room.
16. Wet floors and transferring resident
without shoes or nonskid socks on
17. Do final steps. Report skin
abnormalities to the nurse.

Page 231 of 307
CARE SKILLS #19: BED BATH/CATHETER CARE/PERINEAL CARE (Lesson #12)
STEP – Initial Steps: Check the resident’s
care plan/closet care plan first.
RATIONALE
1. Do initial steps.
2. Offer resident urinal or bedpan. 2. Reduces chance of urination during
procedure which may cause discomfort and
embarrassment.
3. Provide Resident privacy—including
closing doors, windows and curtains.
3. Maintains resident’s dignity and right to
privacy by not exposing body. Keeps
resident warm.
4. Fill bath basin with warm water and have
resident check water temperature for comfort,
if able.
4. Resident’s sense of touch may be different
than yours; therefore, resident is best able to
identify a comfortable water temperature.
5. Put on gloves. 5. Protects you from contamination by body
fluids.
6. Fold washcloth and wet.
7. Gently wash eye from inner corner to outer
corner, using a different part of cloth to wash
other eye. Be sure to use a different part of
the cloth with each wipe throughout
procedure/bed bath.
7. Helps prevent eye infection. Always wash
from clean to dirty. Using separate area of
cloth reduces contamination.
8. Wet washcloth and apply soap, if
requested. Wash, rinse and pat dry face,
neck, ears and behind ears.
8. Patting dry prevents skin tears and
reduces chaffing.
9. Remove resident’s gown.
10. Place towel under far arm. 10. Prevents linen from getting wet.
11. Wash, rinse and pat dry hand, arm,
shoulders and underarm.
11. Soap left on the skin may cause itching
and irritation.
12. Repeat steps with other arm.
13. Place towel over chest and abdomen.
Lower bath blanket to waist.
13. Maintains resident’s right to privacy.
14. Lift towel and wash, rinse and pat dry
chest and abdomen.
14. Exposing only the area of the body
necessary to do the procedure maintains
resident’s dignity and right to privacy.

Page 232 of 307
15. Pull up bath blanket and remove towel.
16. Uncover and place towel under far leg. 16. Prevents linen from getting wet.
17. Wash, rinse and pat dry leg and foot. Be
sure to wash, rinse and dry well between the
toes.
17. Soap left on the skin may cause itching
and irritation.
18. Repeat with other leg and foot.
19. Change bath water and gloves, wash
hands and use clean gloves and towel.
19. Water is contaminated after washing feet.
Clean water should be used for neck and
back.
20. Assist resident to spread legs and lift
knees, if possible.
20. Exposes perineal area.
21. Wet and soap folded washcloth. 21. Folding creates separate areas on cloth
to reduce contamination.
Catheter Care:
22. If resident has catheter, check for
leakage, secretions or irritation. Secure
tubing, then gently wipe four inches of
catheter from meatus out.
22. Washes pathogens away from the
meatus.
Perineal Care:
23 Wipe from front to back and from center of
perineum to thighs. If washcloth is visibly
soiled, change cloths.
For Females:
Separate labia. Wash urethral area first.
Wash between and outside labia in
downward strokes, alternating from side to
side and moving outward to thighs. Use
different part of washcloth for each stroke.
For Males:
Pull back foreskin if male is uncircumcised.
Wash and rinse the tip of penis using circular
motion beginning with urethra. Continue
washing down the penis in a circular motion
to the scrotum and inner thighs. Rinse off
soap and dry. Return foreskin over the tip of
the penis.
23. Prevents spread of infection.
Females: Removes secretions in skin folds
which may cause infection or odor.
Males: Removes secretions from beneath
foreskin which may cause infection and odor.

Page 233 of 307
24. Change water in basin. Wash hands and
change gloves. With a clean washcloth, rinse
area thoroughly in the same direction as
when washing.
24. Water used during washing contains soap
and pathogens. Soap left on the body can
cause irritation and discomfort.
25. Gently pat area dry with towel in same
direction as when washing.
25. If area is left wet, pathogens can grow
more quickly. Patting dry prevents skin tears
and reduces chaffing.
26. Assist resident to lateral position, facing
away from you.
27. Wet and soap washcloth.
28. Clean anal area from front to back. Rinse
and pat dry thoroughly.
28. Prevents spread of infection.
29. Change bath water and gloves. Use clean
washcloth and towel.
29. Water and linen are contaminated after
washing anal area.
30. Wash, rinse and pat dry from neck to
buttocks.
30. Always wash from clean to dirty.
31. Return to supine position.
32. Wash hands and change gloves.
33. Help resident put on clean gown,
undergarments or clothing of choice.
34. Do Final Steps.
35. Report any reddened areas, abrasions or
bruises to the nurse.

Page 234 of 307
CARE SKILLS #20: BACK RUB
(Lesson #12)
STEP – Initial Steps: Check the resident’s
care plan/closet care plan first.
RATIONALE
1. Do initial steps.
2. Place lotion in warm water. Shake
occasionally if necessary to ensure lotion is
warm all the way through. If hands are cold,
hold them under warm water.
2. Warm water will help warm the lotion and
hands. May need to remain in water several
minutes.
3. Assist resident with turning on side or
lying on abdomen.
4. Expose the resident’s back to the top of
the buttocks.
5. Pour small amount of lotion into palm of
hand. If not warm enough, rub lotion between
hands. Do not pour lotion directly onto
resident’s skin.
5. The friction of rubbing hands together will
help warm the lotion. Pouring lotion directly
onto the skin is cold and uncomfortable for
most individuals.
6. Use the palm of both hands to apply the
lotion to the back using long firm strokes,
beginning at the base of the back on both
sides. (Let the resident know that the lotion
may feel cool at first.) Continue strokes from
the buttocks to the back of the neck and
shoulders, exerting firm upward pressure.
7. Use gentle downward pressure rubbing in
small circular motions with palm of hands.
Do not lift hands.
Alternate method – Circle hands outward at
shoulders, then use gentle pressure to rub
down the outer edges of the back. Circle
hands again when you reach the top of the
buttocks, and firmly massage in long strokes
in the center of the back until you reach the
shoulders again. Circle out and back down
again. Repeat.
7. Regardless of the technique used,
massaging will help relieve tension and relax
resident. Whichever method the resident
prefers is what should be used.
8. Give special attention to all bony
prominences using circular motion.
8. Helps stimulate circulation and prevent
skin damage. If areas are discolored,
massage around them and be sure to report
areas to nurse.

Page 235 of 307
9. Continue rhythmic rubbing for one (1) to
three (3) minutes. Let resident know when
you are almost done.
10. Dry resident’s back by patting with a
towel.
10. Helps to remove excess lotion.
11. Assist resident with getting dressed.
12. Perform final steps.

Page 236 of 307
CARE SKILLS #21: SHAMPOO HAIR IN BED
(Lesson #12)
STEP – Initial Steps: Check the resident’s
care plan/closet care plan first.
RATIONALE
1. Do initial steps.
2. Gently comb and brush resident’s hair. 2. Reduces hair breakage, scalp pain, and
irritation.
3. Place a towel around resident’s neck and
shoulders. Lower head of bed.
3. Decreases the chance of resident getting
wet.
4. Have resident check temperature of water,
if able.
4. Resident’s sense of touch may be different
than yours, therefore, resident is best able to
identify a comfortable water temperature.
5. Place bed shampoo basin under resident’s
head according to manufacturer’s
instructions. If available, place protective
covering such as a pad, on the bed before
adding basin.
5. Pad will protect linens and mattress from
getting wet. If equipment is not applied
according to manufacturer’s instruction,
discomfort or injury could result.
6. Place wash basin or other receptacle on
chair to catch water flowing from shampoo
basin.
7. Pour water carefully over resident’s hair.
8. Lather hair with shampoo using fingertips.
Rinse thoroughly. Apply conditioner to
resident’s hair if requested. Rinse thoroughly.
8. Utilizing fingertips massages the scalp and
decreases the risk of scratching resident.
9. Squeeze excess water from hair. Towel
dry hair.
10. Replace gown or pajama top if
necessary.
11. Comb and brush resident’s hair. Dry hair
with dryer if resident wishes.
11. Helps maintain resident’s dignity and
self–esteem.
12. Do final steps.

Page 237 of 307
CARE SKILLS #22: WHIRLPOOL
(Lesson #12)
STEP – Type of whirlpool, trolley, etc., may
alter actions. Always refer to facility policy
and/or manufacturer’s instructions.
RATIONALE
1. If possible, fill tub with water before
bringing resident to bathing area.
1. Having water ready saves time.
2. Transport resident to whirlpool.
3. If tub is already filling, have resident check
water temperature for comfort. Adjust if
necessary.
3. Water should be at the resident’s desirable
temperature vs. the temperature that suits the
staff.
4. Assist resident into lift bath trolley or into
the tub per facility policy and manufacturer’s
instructions. Remove clothing and secure
straps around resident, if applicable. Lower
lift bath trolley and resident into the tub. If tub
is not already filled with water, do so now,
adjusting the temperature to the resident’s
comfort. When tub is filled, turn the system
on.
4. Secure straps for resident’s safety. Some
tubs/whirlpools are made to be pre-filled.
Others cannot be filled until the resident is
inside. Some whirlpools/tubs require the use
of a lift to lower resident inside tub. Others
have a door, allowing resident to step inside
tub. Follow manufacturer’s instructions and
the facility’s policy on when to fill tub with
water and how to get resident in/out of tub.
5. Let resident wash as much as possible,
starting with face.
5. Encourages independence.
6. You may shower the resident by using the
shower handle to gently spray over the
resident’s body. Stay with resident during
procedure.
6. Leaving resident unattended can result in
serious injury or death.
7. Turn system off after completion of bath
and return shower handle to hook, if used.
Drain water from tub.
8. Raise trolley out of tub. Assist resident to
pat dry as needed. Be sure to dry areas that
are touching the trolley, skinfolds, underneath
breasts, and the perineal area.
8. Leaving areas wet can cause irritation and
skin breakdown.
9. Assist resident with dressing and getting
out of trolley/tub. Comb hair.
10. Help resident return to room or desired
location. If necessary, leave indicator for
others to know that tub has not been
sanitized.
10. Tub should be cleaned between use.
Leaving indicator for others ensures that tub
will not be used before being cleaned.

Page 238 of 307
11. Sanitize tub per manufacturer’s
instructions.
11. Tub should be properly cleaned after use.
12. Do final steps.

Page 239 of 307
CARE SKILLS #23: ORAL CARE FOR THE ALERT AND ORIENTED RESIDENT (Lesson
#13)
STEP – Initial Steps: Check the resident’s
care plan/closet care plan first.
RATIONALE
1. Do initial steps. Check with nurse if the
resident is on swallowing precautions.
2. Raise head of bed so resident is sitting up. 2. Prevents fluids from running down
resident’s throat, causing choking.
3. Put on gloves. 3. Brushing may cause gums to bleed.
Protects you from potential contamination.
4. Drape towel under resident’s chin. 4. Protects resident’s clothing and bed linen.
5. Wet toothbrush and apply small amount of
toothpaste.
5. Water helps distribute toothpaste.
6. First brush upper teeth and then lower
teeth. Gently brush inner, outer, and chewing
surfaces of teeth. Clean entire mouth,
including the tongue and the gum line.
6. Brushing upper teeth minimizes production
of saliva in lower part of mouth.
7. Hold emesis basin under resident’s chin.
8. Ask resident to rinse mouth with water and
spit into emesis basin.
8. Removes food particles and toothpaste.
9. If requested, give resident mouthwash
diluted with half water.
9. Full strength mouthwash may irritate
resident’s mouth.
10. Check teeth, mouth, tongue and lips for
odor, cracking, sores, bleeding and
discoloration. Check for loose teeth. Report
unusual findings to nurse.
10. Provides nurse with necessary
information to properly assess resident’s
condition and needs.
11. Remove towel and wipe resident’s mouth.
12. Remove gloves.
13. Do final steps.

Page 240 of 307
CARE SKILLS #24: ORAL CARE FOR AN UNCONSCIOUS RESIDENT (Lesson #13)
STEP – Initial Steps: Check the resident’s
care plan/closet care plan first.
RATIONALE
1. Do initial steps.
2. Drape towel over pillow and a towel under
resident’s chin.
2. Protects linen.
3. Turn resident onto unaffected side. 3. Prevents fluids from running down
resident’s throat, causing choking.
4. Put on gloves. 4. Protects you from contamination by bodily
fluids.
5. Place an emesis basin under resident’s
chin.
5. Protects resident’s clothing and bed linen.
6. Dip swab in cleaning solution of ½
mouthwash and ½ water and wipe teeth,
gums, tongue and inside surfaces of mouth,
changing swab frequently.
6. Stimulates gums and removes mucous.
7. Rinse with clean swab dipped in water. 7. Removes solution from mouth.
8. Check teeth, mouth, tongue and lips for
odor, cracking, sores, bleeding and
discoloration. Check for loose teeth. Report
unusual findings to nurse.
8. Provides nurse with necessary information
to properly assess resident’s condition and
needs.
9. Cover lips with thin layer of lip moisturizer. 9. Prevents lips from drying and cracking.
Improves resident’s comfort.
10. Remove gloves.
11. Do final steps.

Page 241 of 307
CARE SKILLS #25: DENTURE CARE (Lesson #13)
STEP – Initial Steps: Check the resident’s
care plan/closet care plan first.
RATIONALE
1. Do initial steps.
2. Raise head of bed so resident is sitting up. 2. Prevents fluids from running down
resident’s throat, causing choking.
3. Put on gloves. 3. Protects you from contamination by bodily
fluids.
4. Drape towel under resident’s chin. 4. Protects resident’s clothing and bed linen.
5. Remind resident that you are going to
remove their dentures. Remove upper
dentures by placing your index finger at the
ridge on top of the right upper denture and
gently moving them up and down to release
suction. Turn lower denture slightly to lift out
of mouth. If able, have resident to remove
their dentures.
5. Prevents injury or discomfort to resident
and reduces chance of resident biting staff.
Removing upper dentures first is more
comfortable for the resident and placing your
finger at the ridge decreases the chance of
stimulating the gag reflex. Allowing resident
to remove their own dentures encourages
independence.
6. Put dentures in denture cup marked with
resident’s name and take to sink.
7. Line sink with towel and fill halfway with
water.
7. Prevents dentures from breaking if
dropped.
8. Apply denture cleaner to toothbrush.
9. Hold dentures over sink and brush all
surfaces.
9. If dropped, the dentures will fall into the
sink. The towel and water in sink will prevent
dentures from breaking.
10. Rinse dentures under warm water. Place
in a clean cup and fill with cool water.
10. Hot water may damage dentures.
11. Clean resident’s mouth with swab if
necessary. Help resident rinse mouth with
water or mouthwash diluted with half water, if
requested.
11. Removes food particles. Full strength
mouthwash may irritate resident’s mouth.
12. Check teeth, mouth, tongue and lips for
odor, cracking, sores, bleeding and
discoloration. Check for loose teeth. Report
unusual findings to nurse.
12. Provides nurse with necessary
information to properly assess resident’s
condition and needs.

Page 242 of 307
13. Help resident place dentures in mouth, if
requested. Moisturize the lips.
13. Restores resident’s dignity and keeps lips
from drying and cracking. Improves resident
comfort.
14. Remove gloves.
15. Do final steps.

Page 243 of 307
CARE SKILLS #26: SHAVING WITH AN ELECTRIC RAZOR (Lesson #13)
STEP – Initial Steps: Check the resident’s
care plan/closet care plan first.
RATIONALE
1. Do initial steps.
2. Raise head of bed so resident is sitting up. 2. Places resident in more natural position.
3. Do not use electric razor near any water
source, when oxygen is in use or if resident
has pacemaker.
3. Electricity near water may cause
electrocution. Electricity near oxygen may
cause explosion. Electricity near some
pacemakers may cause an irregular
heartbeat.
4. Drape towel under resident’s chin. 4. Protects resident’s clothing and bed linen.
5. Put on gloves. 5. Shaving may cause bleeding. Protects
you from potential contamination.
6. Apply pre–shave lotion as resident
requests.
7. Hold skin taut and shave resident’s face
and neck according to manufacturer’s
guidelines.
7. Smooth out skin. Shave beard with back
and forth motion in direction of beard growth
with foil (oscillating blades) shaver. Shave
beard in circular motion with three head
(rotary, circular blades) shaver.
8. Check for any breaks in the skin. Apply
aftershave lotion as resident requests.
8. Decreases risk of pain from aftershave
getting into any breaks in the skin. Improves
resident’s self–esteem.
9. Remove towel from resident. 9. Restores resident’s dignity.
10. Remove gloves.
11. Do final steps.

Page 244 of 307
CARE SKILLS #27: SHAVING WITH A SAFETY RAZOR (Lesson #13)
STEP – Initial Steps: Check the resident’s
care plan/closet care plan first.
RATIONALE
1. Do initial steps.
2. Raise head of bed so resident is sitting up. 2. Places resident in more natural position.
3. Fill bath basin halfway with warm water. 3. Hot water opens pores and causes
irritation.
4. Drape towel under resident’s chin. 4. Protects resident’s clothing and bed linen.
5. Put on gloves. 5. Shaving may cause bleeding. Protects you
from potential contamination.
6. Moisten beard with washcloth and spread
shaving cream over area.
6. Softens skin and hair.
7. Hold skin taut and shave beard in
downward strokes on face and upward
strokes on neck.
7. Maximizes hair removal by shaving in the
direction of hair growth.
8. Rinse resident’s face and neck with
washcloth.
8. Removes soap which may cause irritation.
9. Pat dry with towel.
10. Apply after–shave lotion, as requested. 10. May decrease skin irritation, especially
with sensitive skin. Improves resident’s self–
esteem.
11. Remove towel.
12. Remove gloves.
13. Do final steps.

Page 245 of 307
CARE SKILLS #28: COMB/BRUSH HAIR (Lesson #13)
STEP – Initial Steps: Check the resident’s
care plan/closet care plan first.
RATIONALE
1. Do initial steps.
2. Raise head of bed so resident is sitting up. 2. Places resident in position to access hair.
3. Drape towel over pillow. 3. Protects resident’s clothing and bed linen.
4. Remove resident’s glasses and any
hairpins or clips.
5. Remove tangles by dividing hair into small
sections and gently combing out from the
ends of hair to scalp.
6. Use hair products, as resident requests.
7. Style hair as resident requests. 7. Improves resident’s self–esteem.
8. Offer mirror.
9. Do final steps.

Page 246 of 307
CARE SKILLS #29: FINGERNAIL CARE (Lesson #13)
STEP – Initial Steps: Check the resident’s
care plan/closet care plan first.
RATIONALE
1. Do initial steps.
2. Check fingers and nails for color, swelling,
cuts or splits. Check hands for extreme heat
or cold. Report any unusual findings to nurse
before continuing procedure.
2. Provides nurse with information to properly
assess resident’s condition and needs.
3. Raise head of bed so resident is sitting up. 3. Places resident in more natural position.
4. Fill bath basin halfway with warm water
and have resident check water temperature
for comfort. Add soap to water. If possible
use non–rinse soap, being sure to follow
manufacturer’s instructions for dilution. If no–
rinse solution is not available, and regular
soap is used, then aide must rinse hands by
using a pitcher of water, or by taking resident
to sink, or by emptying and refilling basin.
4. Resident’s sense of touch may be different
than yours; therefore, resident is best able to
identify a comfortable water temperature.
Adding soap helps to clean resident’s hands.
5. Soak resident’s hands and pat dry. 5. Nail care is easier if nails are softened.
6. Put on gloves. 6. Nail care may cause bleeding. Protects
you from potential contamination.
7. Clean under nails with orange stick. 7. Pathogens can be harbored beneath the
nails.
8. Clip fingernails straight across, then file in
a curve.
8. Clipping nails straight across prevents
damage to skin. Filing in a curve creates
smooth nails and eliminates edge which may
catch on clothes or cause skin tear.
9. Remove gloves.
10. Do final steps.

Page 247 of 307
CARE SKILLS #30: FOOT CARE (Lesson #13)
STEP – Initial Steps: Check the resident’s
care plan/closet care plan first.
RATIONALE
1. Do initial steps.
2. Fill the basin halfway with warm water.
Have resident check the water temperature.
2. To prevent resident from scalding or
burning his/her feet.
3. Place basin on towel or bathmat.
4. Remove resident’s socks. Completely
submerge resident’s feet in water and soak
for five to ten minutes.
4. Soaking allows for softening skin
depending on thickness of calluses, etc.
5. Put on gloves.
6. Remove one foot from water. Wash entire
foot, including between the toes and around
the nail beds using a soapy washcloth.
7. Rinse entire foot, including between the
toes.
7. Soap left on the skin may cause itching
and irritation.
8. Dry entire foot, including between the toes.
Inspect the feet and in between all toes for
condition of skin, presence of corns or
callouses or other foot problems.
8. Thoroughly drying skin reduces irritation
and chaffing.
9. Check with the charge nurse before
trimming the resident’s toenails. If trimming
is allowed, trim the toenails straight across to
prevent the edges from becoming ingrown.
9. Facility may not allow nurse aides to trim
toenails and/or fingernails. Certain residents
may require licensed staff (nurses, doctors,
podiatrist, etc.) to trim their toenails,
especially if they are diabetic or have poor
circulation.
10. Repeat steps with the other foot.
11. Place lotion in hand, warm lotion by
rubbing hands together, and then massage
lotion into entire foot (top and bottom) except
between toes, removing excess with a towel.
12. Assist resident to replace socks and
shoes, as desired.
13. Do final steps.

Page 248 of 307
14. Report any cuts, sores, or other findings
to the nurse.

Page 249 of 307
CARE SKILLS #31: CHANGING RESIDENT’S GOWN (Lesson #14)
STEP – Initial Steps: Check the resident’s
care plan/closet care plan first.
RATIONALE
1. Do initial steps.
2. Untie and/or unbutton soiled gown as
needed.
2. Maintains resident’s dignity and right to
privacy by not exposing body. Keeps
resident warm.
3. Raise top sheet over resident’s chest.
4. Remove resident’s arms from gown,
unaffected arm first.
4. Undressing unaffected arm first requires
less movement.
5. Roll soiled gown from neck down and
remove from beneath top sheet. Place soiled
gown in dirty linen bag.
5. Rolling reduces spread of infection.
6. Slide resident’s arms into clean gown,
affected arm first.
6. Dressing affected side first requires less
movement and reduces stress to joints.
7. Tie or button gown as needed.
8. Remove top sheet from beneath clean
gown and cover resident.
8. Maintains resident’s dignity and right to
privacy.
9. Do final steps.

Page 250 of 307
CARE SKILLS #32: DRESSING A DEPENDENT RESIDENT
(Lesson #14)
STEP – Initial Steps: Check the resident’s
care plan/closet care plan first.
RATIONALE
1. Do initial steps. Check care plan to see if
resident is a one person or two-person assist.
2. Assist resident to choose clothing. 2. Allows resident as much choice as
possible to improve self–esteem.
3. Move resident onto back.
4. Provide privacy. 4. Maintains resident’s dignity and right to
privacy by not exposing body. Keeps
resident warm.
5. Guide feet through leg openings of
underwear and pants, affected leg first. Pull
garments up legs to buttocks.
5. Dressing affected side first requires less
movement and reduces stress to joints.
6. Slide arm into shirt sleeve, affected side
first.
6. Dressing lower and upper body together
reduces number of times resident needs to
be turned.
7. Turn resident onto unaffected side. Pull
lower garments over buttocks and hip. Tuck
shirt under resident.
8. Turn resident onto affected side. Pull
lower garments over buttocks and hip and
straighten shirt.
9. Turn resident onto back and slide arm into
shirt sleeve, align and fasten garments.
10. Do final steps.

Page 251 of 307
CARE SKILLS #33: ASSIST TO BATHROOM (Lesson #14)
STEP – Initial Steps: Check the resident’s
care plan/closet care plan first.
RATIONALE
1. Do initial steps. Check care plan to see if
resident is a one person or two-person assist.
2. Assist resident to put on non–skid socks/
footwear.
3. Walk with resident into bathroom.
4. Assist resident to lower garments and sit. 4. Allows resident to do as much as possible
to help promote independence.
5. Provide resident with call light and toilet
tissue if resident has been identified as safe
to be provided privacy. Remain with the
resident if required to do so.
5. Ensures ability to communicate need for
assistance. Provides for resident’s right to
privacy.
6. Put on gloves. 6. Protects you from contamination by bodily
fluids.
7. Assist resident to wipe area from front to
back.
7. Prevents spread of pathogens toward
meatus which may cause urinary tract
infection.
8. Remove gloves. Wash hands.
9. Assist resident to raise garments.
10. Assist resident to wash hands. 10. Handwashing is the best way to prevent
the spread of infection.
11. Walk with resident back to bed or chair.
12. Do final steps.

Page 252 of 307
CARE SKILLS #34: BEDSIDE COMMODE (Lesson #14)
STEP – Initial Steps: Check the resident’s
care plan/closet care plan first.
RATIONALE
1. Do initial steps.
2. Assist resident to put on non–skid socks/
footwear.
3. Place commode next to bed on resident’s
unaffected side.
3. Helps stabilize commode and is the
shortest distance for resident to turn.
4. Assist resident to transfer to commode by
transferring the safest way the resident is
able. Check care plan to see if resident is a
one person or two person assist.
5. Give resident call light and toilet tissue if
resident has been identified as safe to be
provided privacy and not attended by staff.
5. Ensure ability to communicate need for
assistance. Provides resident’s right to
privacy.
6. Put on gloves. 6. Protects you from contamination by bodily
fluids.
7. Assist resident to wipe from front to back. 7. Prevents spread of pathogens toward
meatus which may cause urinary tract
infection.
8. Assist resident to bed or chair.
9. Remove and cover pan and take to
bathroom.
9. Pan should be covered to prevent the
spread of infection.
10. Prior to disposal, observe urine and/or
feces for color, odor, amount &
characteristics and report unusual findings to
nurse.
10. Changes may be the first sign of a
medical problem. By alerting the nurse, you
ensure that the resident receives prompt
attention.
11. Dispose of urine and/or feces, sanitize
pan and return pan according to facility
policy.
11. Facilities have different methods of
disposal and sanitation. You need to carry
out the policies of your facility.
12. Remove gloves. Wash hands.
13. Assist resident to wash hands. 13. Handwashing is the best way to prevent
the spread of infection.
14. Do final steps.

Page 253 of 307
CARE SKILLS #35: BEDPAN/FRACTURE BEDPAN (Lesson #14)
STEP – Initial Steps: Check the resident’s
care plan/closet care plan first.
RATIONALE
1. Do initial steps.
2. Lower head of bed. 2. When bed is flat, resident can be moved
without working against gravity.
3. Put on gloves. 3. Protects you from contamination by bodily
fluids.
4. Turn resident away from you.
5. Place bedpan or fracture pan under
buttocks according to manufacturer
directions.
5. Equipment used incorrectly may cause
discomfort and injury to resident.
6. Gently roll resident back onto pan and
check for correct placement.
6. Prevents linen from being soiled.
7. Cover resident with sheet/blanket. 7. Provides for resident’s privacy.
8. Raise head of bed to comfortable position
for resident.
8. Increases pressure on bladder to
encourage with elimination.
9. Give resident call light and toilet paper. 9. Ensures ability to communicate need for
assistance.
10. Leave resident and return when called. 10. Provides for resident’s privacy.
11. Lower head of bed. 11. Places resident in proper position to
remove pan.
12. Press bedpan flat on bed and turn
resident.
12. Prevents bedpan from spilling.
13. Wipe resident from front to back. Wash
hands and change gloves.
13. Prevents spread of pathogens toward
meatus which may cause urinary tract
infection.
14. Provide perineal care, if necessary.
15. Cover bedpan and take to bathroom. 15. Pan should be covered to prevent the
spread of infection.
16. Check urine and/or feces for color, odor,
amount and characteristics and report
unusual findings to nurse.
16. Changes may be first sign of medical
problem. By alerting the nurse you ensure
that the resident receives prompt attention.

Page 254 of 307
17. Dispose of urine and/or feces, sanitize
pan and return pan according to facility
policies.
17. Facilities have different methods of
disposal and sanitation. You need to carry
out the policies of your facility.
18. Remove gloves. Wash hands.
19. Assist resident to wash hands. 19. Handwashing is the best way to prevent
the spread of infection.
20. Do final steps.

Page 255 of 307
CARE SKILLS #36: URINAL (Lesson #14)
STEP – Initial Steps: Check the resident’s
care plan/closet care plan first.
RATIONALE
1. Do initial steps.
2. Raise head of bed to sitting position. 2. Increases gravity on top of bladder to
encourage urination.
3. Put on gloves. 3. Protects you from contamination by bodily
fluids.
4. Offer urinal to resident or place urinal
between his legs and insert penis into
opening. Remove gloves.
4. Allows resident to do as much as possible
to help promote independence.
5. Cover resident. 5. Maintains resident’s right to privacy.
6. Give resident call light and toilet paper. 6. Ensures ability to communicate need for
assistance.
7. Leave resident and return when called. 7. Provides for resident’s privacy.
8. Put on gloves. Remove and cover urinal. 8. Urinal should be covered to prevent the
spread of infection.
9. Take urinal to bathroom, check urine for
color, odor, amount and characteristics and
report unusual findings to nurse.
9. Changes may be first sign of medical
problems. By alerting the nurse you ensure
that the resident receives prompt attention.
10. Dispose of urine, rinse urinal, sanitize and
return urinal according to facility policies.
10. Facilities have different methods of
disposal and sanitation. You need to carry
out the policies of your facility.
11. Remove gloves. Wash hands.
12. Assist resident to wash hands. 12. Handwashing is the best way to prevent
the spread of infection.
13. Do final steps.

Page 256 of 307
CARE SKILLS #37: EMPTY URINARY DRAINAGE BAG (Lesson #14)
STEP – Initial Steps: Check the resident’s
care plan/closet care plan first.
RATIONALE
1. Do initial steps.
2. Put on gloves. 2. Protects you from contamination by bodily
fluids.
3. Place paper towel on floor beneath bag
and place graduated cylinder on paper towel.
3. Reduces contamination of graduate
cylinder and protects floor from spillage.
4. Detach spout (if bag has one) and point
the drainage tube into center of graduated
cylinder without letting tube touch sides.
4. Prevents contamination of tubing.
5. Unclamp spout and drain urine.
6. Clamp spout. Clean using alcohol wipe. 6. Removes contaminates from spout.
7. Replace spout in holder.
8. Check urine for color, odor, amount and
characteristics and report unusual findings to
nurse.
8. Changes may be first signs of medical
problem. By alerting the nurse you ensure
that the resident receives prompt attention.
9. Measure and accurately record amount of
urine.
9. Accuracy is necessary because decisions
regarding resident’s care may be based on
your report. What you write is a legal record
of what you did. If you don’t document it,
legally it didn’t happen.
10. Dispose of urine, rinse, sanitize and
return graduated cylinder according to facility
policies.
10. Facilities have different methods of
disposal and sanitation. Follow facility policy
and procedures.
11. Remove gloves.
12. Do final steps.

Page 257 of 307
CARE SKILLS #38: URINE SPECIMEN COLLECTION (Lesson #14)
STEP – Initial Steps: Check the resident’s
care plan/closet care plan first.
RATIONALE
1. Do initial steps.
2. Prepare label for specimen with
appropriate information and place it on
specimen container, not the lid.
2. Label contains resident’s identifying
information which is essential for the
laboratory. Label should be placed on the
specimen container in the event the lid is
misplaced or thrown away.
3. Put on gloves. 3. Protects you from contamination by bodily
fluids.
4. Assist resident to bathroom or commode,
or offer bedpan or urinal.
5. Provide perineal care to the resident. 5. To ensure area is clean and free of
possible contamination of the specimen.
6. Ask resident to void into the urine hat
placed on the toilet, or to urinate in the
bedpan. Ask the resident not to put toilet
paper with the sample.
6. A clean collection device is necessary for
accurate lab evaluation. Toilet paper will
contaminate the urine and produce an
inaccurate result.
7. After urination, assist the resident as
necessary with perineal care and to wash the
resident’s hands. Change your gloves and
wash your hands.
8. Take bedpan, urinal, and commode pail to
bathroom and pour urine in to the specimen
container. The container should be at least
half full.
9. Cover the urine container with its lid. Do
not touch the inside of the container. Wipe
off the outside with a paper towel.
9. Touching the inside can contaminate the
specimen, causing inaccurate results.
10. Place the specimen container in the bag
supplied by the lab for transport.
11. Discard excess urine in bedpan or urinal;
clean and disinfect equipment as per facility
policy.
12. Do final steps.

Page 258 of 307
CARE SKILLS #39: STOOL SPECIMEN COLLECTION (Lesson #14)
STEP – Initial Steps: Check the resident’s
care plan/closet care plan first.
RATIONALE
1. Do initial steps.
2. Prepare label for specimen with
appropriate information and place it on
specimen container, not the lid.
2. Label contains resident’s identifying
information which is essential for the
laboratory. Label should be placed on the
specimen container in the event the lid is
misplaced or thrown away.
3. Put on gloves. 3. Protects you from contamination by bodily
fluids.
4. When the resident is ready to move
bowels, ask him/her not to urinate at the
same time. Ask the resident not to put toilet
paper in with the sample.
4. A clean collection device is necessary for
accurate lab evaluation. Urine contaminated
stool will produce an inaccurate result.
5. Provide the resident with a bedpan,
assisting if needed.
6. After the bowel movement, assist as
needed with perineal care.
7. Remove gloves, wash hands and put on
clean gloves.
8. Using two tongue blades, take about two
tablespoons of stool and put in the container.
Try to collect material from different areas of
the stool.
8. In order to ensure adequate amount of
stool for test ordered. Obtaining material
from different areas ensures that all possible
contents will be identified.
9. Cover the container with lid. Label as
directed per facility policy and procedure and
place in the plastic bag supplied by the lab for
transport. Dispose of remaining stool; clean
and disinfect equipment as per facility policy.
Notify nurse of collection.
10. Do final steps.

Page 259 of 307
CARE SKILLS #40: APPLICATION OF INCONTINENT BRIEF (Lesson #14)
STEP – Initial Steps: Check the resident’s
care plan/closet care plan first.
RATIONALE
1. Do initial steps.
2. Put on gloves.
3. Provide the resident privacy.
4. Unfasten and remove brief resident is
currently wearing and place in small plastic
trash bag for disposal in soiled utility bag.
4. Residents should have soiled briefs
removed promptly to decrease risk of skin
breakdown.
5. Provide perineal care as indicated. 5. Prevents infection, odor, and skin
breakdown; improves resident’s comfort.
6. Wash hands and change gloves.
7. Place back of brief under resident’s hips,
plastic side of disposable brief away from
resident’s skin.
7. Plastic may cause irritation of the
resident’s skin.
8. Bring front of brief between resident’s legs
and up to his/her waist.
9. Fasten each side of brief and adjust fit. 9. Adjusting brief to a snug fit will prevent
leakage.
10. Apply resident’s clothing.
11. Do final steps.

Page 260 of 307
CARE SKILLS #41: ASSIST RESIDENT TO MOVE TO HEAD OF BED
(Lesson #15)
STEP – Initial Steps: Check the resident’s
care plan/closet care plan first.
RATIONALE
1. Do initial steps. Ask another CNA to assist
you if needed.
2. Lower head of bed and lean pillow against
head board. Adjust bed height as needed.
2. When bed is flat, resident can be moved
without working against gravity. Pillow
prevents injury should resident hit the head of
bed. Adjusting the bed height decreases risk
of injury.
3. Ask resident to bend knees, put feet flat on
mattress.
3. Gives resident leverage to help with move.
4. Place one arm under resident’s shoulder
blades and the other arm under resident’s
thighs. If a draw sheet or pad is under
resident, two caregivers should grasp the
sheet or pad firmly, with trunk centered
between hands.
4. Putting your arm under resident’s neck
could cause injury. Use of a draw sheet/pad
causes less stress on caregiver and reduces
risk of injury.
5. Ask resident to push with feet on count of
three.
5. Enables resident to help as much as
possible and reduces strain on you.
6. Place pillow under resident’s head. 6. Provides for resident’s comfort.
7. Do final steps.

Page 261 of 307
CARE SKILLS #42: SUPINE POSITION
(Lesson #15)
STEP – Initial Steps: Check the resident’s
care plan/closet care plan first.
RATIONALE
1. Do initial steps.
2. Lower head of bed. 2. When bed is flat, resident can be moved
without working against gravity.
3. Move resident to head of bed if necessary. 3. Places resident in proper position in bed.
4. Position resident flat on back with legs
slightly apart.
4. Prevents friction in thigh area.
5. Align resident’s shoulder and hips. 5. Reduces stress to spine.
6. Use supportive padding and/or float heels,
if necessary.
6. Maintains position, prevents friction and
reduces pressure on bony prominences.
Padding may be used under neck, shoulders,
arms, hands, ankles, lower back. Never use
padding under knees, unless directed by
nurse, as it may restrict blood flow to lower
legs.
7. Do final steps.

Page 262 of 307
CARE SKILLS #43: LATERAL POSITION & SIDE TO SIDE (Lesson #15)
STEP – Initial Steps: Check the resident’s
care plan/closet care plan first.
RATIONALE
1. Do initial steps.
2. Place resident in supine position. 2. Places resident in proper position and
alignment.
3. Move resident to side of bed closest to
you.
3. Allows resident to be positioned in center
of bed when turned.
4. Cross resident’s arms over chest. 4. Reduces stress on shoulders during move.
5. Slightly bend knee of nearest leg to you or
cross nearest leg over farthest leg at ankle.
5. Reduces stress on hip joint during turn.
6. Place your hands under resident’s
shoulder blade and buttock. Turn resident
away from you onto side.
6. Prevents stress on shoulder and hip joints.
7. Place supportive padding behind back,
between knees and ankles and under top
arm.
7. Maintains position, prevents friction and
reduces pressure on bony prominences.
8. Do final steps.
Moving a Resident in Bed from Side to Side:
1. Do initial steps. Ask another CNA to assist
you if needed.
2. Put the side rail in the up position on the
far side of the bed.
3. Loosen the top sheets but do not expose
the resident.
4. Place your feet in a good position – one in
close to the bed – one back. Slide both of
your arms under the resident’s back to his far
shoulder and then slide the resident’s
shoulders toward you by rocking your weight
to your back foot. If a second aide is present,
use the draw sheet to move the resident in
bed.
5. Keep your knees bent and your back
straight as you slide the resident.

Page 263 of 307
6. Slide both your arms as far as you can
under the resident’s buttocks and slide
his/her buttocks toward you in the same way.
Use a draw sheet whenever possible for
helpless residents.
7. Place both your arms under the resident’s
feet and slide them toward you.
8. Place pillows under resident accordingly to
ensure spine is in proper alignment.
9. Do final steps.

Page 264 of 307
CARE SKILLS #44: FOWLER’S POSITION
(Lesson #15)
STEP – Initial Steps: Check the resident’s
care plan/closet care plan first.
RATIONALE
1. Do initial steps.
2. Move resident to supine position. 2. Places resident in proper position and
alignment.
3. Elevate head of bed 45 to 60 degrees. 3. Improves breathing, allows resident to see
room and visitors.
4. Use supportive padding if necessary. 4. Maintains position, prevents friction and
reduces pressure on bony prominences.
Padding may be used under neck, shoulders,
arms, hands, ankles, lower back. Never use
padding under knees, unless directed by
nurse, as it may restrict blood flow to lower
legs.
5. Do final steps.
CARE SKILLS #45: SEMI–FOWLER’S POSITION (Lesson #15)
STEP – Initial Steps: Check the resident’s
care plan/closet care plan first.
RATIONALE
1. Do initial steps.
2. Move resident to supine position. 2. Places resident in proper position and
alignment.
3. Elevate head of bed 30 to 45 degrees. 3. Improves breathing, allows resident to see
room and visitors.
4. Use supportive padding if necessary. 4. Maintains position, prevents friction and
reduces pressure on bony prominences.
Padding may be used under neck, shoulders,
arms, hands, ankles, lower back. Never use
padding under knees, unless directed by
nurse, as it may restrict blood flow to lower
legs.
5. Do final steps.

Page 265 of 307
CARE SKILLS #46: USE OF WHEELCHAIR/GERIATRIC CHAIR (Lesson #15)
STEP – Initial Steps: Check the resident’s
care plan/closet care plan first.
RATIONALE
1. Do initial steps.
2. Be sure you know how to properly operate
chair before transferring resident into it.
Reading manufacturer’s instructions may be
necessary.
2. Not all wheelchairs are made alike.
Electronic vs manual chairs differ in use.
Improper use can result in damage to chair
and injury to resident and staff.
3. Inspect the chair to ensure that it is clean
and works properly. Most wheelchairs can be
opened by pressing down on the bars on
either side of the seat. To fold, lift the center
edges of the seat.
3. Decreases spread of pathogens and
likelihood of injury.
4. Engage and disengage the wheel lock by
moving the braking device towards and away
from the wheel.
4. Locking wheels helps to ensure chair will
not move during transfers.
5. To move the footrests, press or pull the
release lever and swing it out towards the side
of the wheelchair. To remove the footrest, lift it
off when it is at the side of the chair. To
replace it, put the footrest back onto the pins
at the side of the wheelchair. Swing footrest
back to the front of the chair to lock it into
place.
5. Leaving footrest in front of chair can cause
injury and/or falls for the aide and/or the
resident during transfers.
6. Remove armrests by releasing lock and
pulling armrest straight up. Not all armrests
are detachable from chair.
6. Removing armrests can help prevent injury
during transfer.
7. To adjust footrest up or down, activate the
release mechanism before pulling or pushing
the footrest into desired position. Always
support the leg/foot when moving footrest.
7. Decreases injury and adds comfort for
resident.
8. Follow manufacturer’s instructions on how
to properly recline and engage locks for geri-
chair.
8. Process varies depending on brand of chair.
9. Do final steps.

Page 266 of 307
CARE SKILLS #47: TRANSFER TO CHAIR/WHEELCHAIR (Lesson #15)
STEP – Initial Steps: Check the resident’s
care plan/closet care plan first.
RATIONALE
1. Do initial steps.
2. Place chair on resident’s unaffected side.
Brace firmly against side of bed.
2. Unaffected side supports weight. Helps
stabilize chair and is shortest distance for
resident to turn.
3. Assist resident to sit on edge of bed.
Encourage resident to sit for a few seconds
to become steady. Check for dizziness.
3. Allows resident to adjust to position
change. A significant change in position may
cause dizziness due to a drop in blood
pressure.
4. Stand in front of resident and apply gait
belt around resident’s abdomen. (Refer to
Using a Gait Belt to Assist with Ambulation
for instructions on applying gait belt.)
4. Gait belts reduce strain on your back and
provides for security for the resident.
5. Grasp the gait belt securely on both sides
of the resident.
5. Provides security for the resident and
enables them to turn.
6. Ask resident to place his hands on your
upper arms or shoulders.
6. You may be injured if resident grabs
around your neck.
7. On the count of three, help resident into
standing position by straightening your
knees.
7. Allows you and resident to work together.
Minimizes strain on your back.
8. Allow resident to gain balance, check for
dizziness.
8. Change of position may cause dizziness
due to drop in blood pressure.
9. Move your feet to shoulder’s width apart
and slowly turn resident.
9. Improves your base of support and allows
space for resident to turn.
10. Lower resident into chair by bending your
knees and leaning forward.
10. Minimizes strain on your back.
11. Align resident’s body. Remove gait belt. 11. Shoulders and hips should be in straight
line to reduce stress on spine and joints.
12. Place feet on footrests and reattach
armrest if necessary.
13. Unlock wheels and transport resident to
desired location, as needed.
14. Do final steps.

Page 267 of 307
CARE SKILLS #48: SIT ON EDGE OF BED
(Lesson #15)
STEP – Initial Steps: Check the resident’s
care plan/closet care plan first.
RATIONALE
1. Do initial steps.
2. Adjust bed height to lowest position. 2. Allows resident’s feet to touch floor when
sitting. Reduces chance of injury if resident
falls.
3. Move resident to side of bed closest to
you.
3. Resident will be close to edge of bed when
sitting up.
4. Raise head of bed to sitting position, if
necessary.
4. Resident can move without working
against gravity.
5. Place one arm under resident’s shoulder
blades and the other arm under resident’s
thighs.
5. Placing your arm under the resident’s neck
may cause injury.
6. On count of three, slowly turn resident into
sitting position with legs dangling over side of
bed.
7. Allow time for resident to become steady.
Check for dizziness.
7. Change of position may cause dizziness
due to a drop in blood pressure.
8. Assist resident to put on shoes or slippers. 8. Prevents sliding on floor and protects
resident’s feet from contamination.
9. Move resident to edge of bed so feet are
flat on floor.
9. Allows resident to be in stable position.
10. Do final steps.

Page 268 of 307
CARE SKILLS #49: USING A GAIT BELT TO ASSIST WITH AMBULATION
(LESSON #15)
STEP – Initial Steps: Check the resident’s
care plan/closet care plan first.
RATIONALE
1. Do initial steps.
2. Assist resident to sit on edge of bed.
Encourage resident to sit for a few seconds
to become steady. Check for dizziness.
2. Allows resident to adjust to position
change. A change in position may cause
dizziness due to drop in blood pressure.
3. Place belt around resident’s waist with the
buckle in front (on top of resident’s clothes)
and adjust to a snug fit ensuring that you can
get your hands under the belt. Position one
hand on the belt at the resident’s side and the
other hand at the resident’s back.
3. Buckle is difficult to release if in back and
may cause injury to ribcage if on side.
Placing the belt on top of resident’s clothes
maintains proper infection control
procedures. The belt must be snug enough
that it doesn’t slip when you are assisting
resident to move. Ensure a female resident’s
breasts are not under the belt.
4. Assist the resident to stand on count of
three.
4. Allows you and resident to work together.
5. Allow resident to gain balance. Ask the
resident if dizzy.
5. Change in position may cause dizziness
due to a drop in blood pressure.
6. Stand to side and slightly behind resident
while continuing to hold onto belt.
6. Allows clear path for the resident and puts
you in a position to assist resident if needed.
7. Walk at resident’s pace. 7. Reduces risk of falling.
8. Return resident to chair or bed and remove
belt.
9. Do final steps.

Page 269 of 307
CARE SKILLS #50: WALKING (Lesson #15)
STEP – Initial Steps: Check the resident’s
care plan/closet care plan first.
RATIONALE
1. Do initial steps.
2. Assist resident to sit on edge of bed.
Encourage resident to sit for a few seconds
to become steady. Check for dizziness.
2. Allows resident to adjust to position
change.
3. Assist resident to stand on count of three. 3. Allows you and resident to work together.
4. Allow resident to gain balance, check for
dizziness.
4. Change in position may cause dizziness
due to a drop in blood pressure.
5. Stand to side and slightly behind resident. 5. Allows clear path for the resident and puts
you in a position to assist resident if needed.
6. Walk at resident’s pace. 6. Reduces risk of resident falling.
7. Do final steps.

Page 270 of 307
CARE SKILLS #51: ASSIST WITH WALKER (Lesson #15)
STEP – Initial Steps: Check the resident’s
care plan/closet care plan first.
RATIONALE
1. Do initial steps.
2. Assist resident to sit on edge of bed. 2. Allows resident to adjust to position
change.
3. Place walker in front of resident as close to
the bed as possible.
4. Have resident grasp both arms of walker. 4. Helps steady resident.
5. Brace leg of walker with your foot and
place your hand on top of walker.
5. Prevents walker from moving.
6. Assist resident to stand on count of three.
Check for balance and dizziness.
6. Allows you and resident to work together.
7. Stand to side and slightly behind resident. 7. Puts you in a position to assist resident if
needed.
8. Have resident move walker ahead 6 to 10
inches, then step up to walker moving the
weak or injured leg forward to the middle of
the walker while pushing down on the
handles of the walker, and then bringing the
unaffected leg forward even with the
weak/injured leg. Continue sequence until
desired destination is reached.
8. Resident may fall forward if he steps too
far into walker.
9. Do final steps.

Page 271 of 307
CARE SKILLS #52: ASSIST WITH CANE (Lesson #15)
STEP – Initial Steps: Check the resident’s
care plan/closet care plan first.
RATIONALE
1. Do initial steps.
2. Check the cane for presence of rubber
tip(s).
2. Presence of intact rubber tips decreases
the risk of falls by improving traction and
preventing slipping.
3. Assist resident to sit on edge of bed. 3. Allows resident to adjust to position
change.
4. Assist resident to stand on count of three. 4. Allows you and resident to work together.
5. Allow resident to gain balance. Check for
dizziness.
5. Change in position may cause dizziness
due to a drop in blood pressure.
6. Have resident place cane approximately 4
inches to the side of his/her stronger/
unaffected foot. The height of the cane
should be level with resident’s hip.
7. Stand to the affected side and slightly
behind resident.
7. Allows clear path for the resident and puts
you in a position to assist resident if needed.
8. Have resident move cane forward about 4–
6 inches, step forward with weak (affected)
leg to a position even with the cane. Then
have resident move strong leg forward and
beyond the weak leg and cane. Repeat the
sequence.
8. Reduces risk of resident falls.
9. Do final steps.

Page 272 of 307
CARE SKILLS #53: USING A PORTABLE MECHANICAL RESIDENT LIFT
(Lesson #16)
STEP – Initial Steps: Check the resident’s
care plan/closet care plan first.
RATIONALE
1. Never use a lift that you have not been
properly trained to use. Facility should ensure
that each aide is properly trained over facility
policy and manufacturer’s instructions for
use.
1. Misuse could result in serious injury to
resident. Different manufacturers provide
different instructions for equipment. Aide
must know how to properly work the
equipment they are responsible for using.
2. Never use a lift alone. There should always
be two aides present to transfer resident with
lift.
2. One aide should guide the lift, while the
other aide guides the resident and ensures
resident is not injured during transfer.
3. Before transferring resident, ensure that
battery for lift is charged. Also check other
equipment (i.e., lift pad, sling, straps, etc.) to
ensure it works properly and is not in need of
repair.
3. If battery is not charged, lift could shut
down during transfer. Fraying, holes, tears,
etc. on lift pad could result in resident falling.
4. Do initial steps.
5. Follow manufacturer’s instructions and
facility’s policy on transfers using the lift.
6. Be sure all locks and straps are fastened
securely. Lock brakes on lift once it is in
position. Brakes on wheelchair should be
locked before transferring resident.
6. Brakes should be locked to ensure
equipment does not move during transfer,
which could result in serious injury to resident
and/or staff.
7. Reassure and talk to resident during
transfer.
7. Helps calm anxiety and fear of falling.
8. After transfer is complete, ensure resident
is comfortable. Remove sling/lift pad if
indicated.
9. Perform final steps.

Page 273 of 307
CARE SKILLS #54: TRANSFER: TO STRETCHER/SHOWER BED (Lesson #16)
STEP – Initial Steps: Check the resident’s
care plan/closet care plan first.
RATIONALE
1. Do initial steps.
2. Loosen sheet directly under resident and
roll edges close to resident.
2. This sheet will be utilized to slide resident
from bed to stretcher.
3. Place stretcher/shower bed at bedside.
NOTE: Make certain wheels are locked. After
locking wheels, ensure bed and
stretcher/shower bed are at the same height.
Then lower side rails.
3. Wheels must be locked to prevent
stretcher from moving.
4. Staff should be present at the bedside as
well as on the opposite side of the
stretcher/shower bed. (Requires a minimum
of two staff members, except when use of
additional staff is specified in care plan and/or
facility policy.)
4. To prevent resident from falling/rolling off
the bed or stretcher.
5. Grasp sheet on each side of resident. On
the count of three, slide resident laterally onto
stretcher/shower bed.
5. Counting to three enables staff members
to work together to distribute weight evenly
and prevent injury to resident and/or staff.
6. Center and align resident. Place pillow
under his/her head, cover with a blanket, and
raise the rails of stretcher/shower bed.
6. Place resident in proper position and
alignment. Pillow provides comfort; blanket
maintains dignity, provides privacy, and
keeps resident warm; raising the rails
prevents resident injury.
7. Do final steps.

Page 274 of 307
CARE SKILLS #55: TRANSFER - TWO PERSON LIFT (Lesson #16)
*ONLY TO BE USED IN AN EMERGENCY*
STEP – Initial Steps: Check the resident’s
care plan/closet care plan first.
RATIONALE
1. Do initial steps.
2. Place chair at bedside. Brace it firmly
against side of bed. Lock wheels of
wheelchair or Geri chair.
2. Helps stabilize chair and is the shortest
distance for staff to turn. Wheel locks
prevent chair from moving.
3. Assist resident to sit on edge of bed.
Ensure there is staff on each side of the
resident.
3. Allows resident to adjust to position
change.
4. Reach around resident’s back and grasp
other assistant’s forearm above wrist. Have
resident place arms around your shoulders
(not your neck) or on your upper arms.
4. Having resident place arms on your
shoulders or upper arms reduces the chance
of injury to your neck.
5. Each NA should reach under resident’s
knees and grasp other assistant’s forearm
above wrist.
5. Grasping your partner’s forearm provides
for support and prevents resident from
slipping out of your grasp.
6. On the count of three lift resident. 6. Allows you to work together and allows
weight to be distributed evenly to prevent
injury to resident or staff.
7. Pivot and lower resident into chair.
8. Align resident in chair. 8. Shoulders and hips should be in a straight
line to reduce stress on spine and joints.
9. Do final steps.

Page 275 of 307
CARE SKILLS #56: OCCUPIED BED (Lesson #17)
STEP – Initial Steps: Check the resident’s
care plan/closet care plan first.
RATIONALE
1. Do initial steps.
2. Collect clean linen in order of use. 2. Organizing linen allows procedure to be
completed faster.
3. Carry linen away from your uniform. 3. If linen touches your uniform, it becomes
contaminated.
4. Place linen on clean surface (bedside
stand, over bed table or back of chair).
4. Prevents contamination of linen.
5. Lower head of bed and adjust bed to a
safe working level, usually waist high. Lock
bed wheels.
5. When bed is flat, resident can be moved
without working against gravity.
6. Drape the resident.
7. The caregiver will make the bed one side
at a time. The caregiver will raise the side rail
on far side of bed (if rail not in use, ensure
there is a second caregiver on the opposite
side of the bed to ensure that the resident
does not roll over the side of bed). Assist
resident to turn onto side, moving away from
you toward raised side rail (or second
caregiver).
8. Loosen bottom soiled linen on the side of
bed on which you are working. Put on gloves.
9. Roll bottom soiled linen toward resident
and tuck it snuggly against the resident’s
back. Change gloves to avoid cross–
contamination after working with soiled/dirty
linens.
9. Rolling puts dirtiest surface of linen inward,
lessening contamination. The closer the linen
is rolled to resident, the easier it is to remove
from the other side.
10. Place clean bottom linen on unoccupied
side of bed and roll remaining clean linen
under resident in the center of the bed.
11. Smooth bottom sheet out and ensure
there are no wrinkles. Roll all extra material
toward resident and tuck it under the
resident’s body.

Page 276 of 307
12. Raise the side rail nearest you (or remain
in place if a second caregiver is being
utilized) and assist the resident to turn onto
clean bottom sheet. Inform resident that
he/she may feel hump due to the covers
being rolled up. Move to opposite side of
bed, as resident will now be facing away from
you.
13. While resident is lying on side, loosen
soiled linen and roll linen from head to foot of
bed, avoiding contact with your skin or
clothing.
13. Always work from cleanest (head of bed)
to dirtiest (foot of bed) to prevent spread of
infection. Rolling dirtiest surface of linen
inward, lessening contamination.
14. Place soiled linen in barrel or bag at foot
of bed or in chair. Change gloves to prevent
possible cross contamination.
15. Pull clean bottom linen as was done on
the opposite side.
16. Assist resident to roll onto back, keeping
resident covered and comfortable.
17. Unfold the top sheet placing it over the
resident. Request the resident to hold the
clean top sheet, slip the bath blanket or
previous sheet out from underneath the clean
sheet.
17. Maintains resident’s dignity and right to
privacy by not exposing body.
18. Assist resident with blanket over the top
sheet and tuck the bottom edges of the top
sheet and blanket under the bottom of the
mattress. Miter the corners and loosen the
top linens over the resident’s feet.
18. Mitering prevents resident’s feet from
being restricted by or tangled in linen when
getting in or out of bed. Prevents pressure
on feet which can cause pressure sores.
19. Remove pillow and remove the soiled
pillow case by turning it inside out.
20. With one hand, grasp the clean pillow
case at the closed end, turning it inside out
over your wrist.
21. Using the same hand that has the pillow
case over it, grasp one narrow edge of the
pillow and pull the pillow case over it with
your free hand.
21. Prevents contamination.
22. Place the pillow under resident’s head
with open edge away from the door.
22. Creates a neater, more uniform look to
rooms and beds.

Page 277 of 307
23. Assist resident to comfortable position
and return the bed to the appropriate
position.
24. Remove soiled linens from room –
carrying away from uniform.
25. Do final steps.

Page 278 of 307
CARE SKILLS #57: INSPECTING SKIN (Lesson #18)
STEP – Initial Steps: Check the resident’s
care plan/closet care plan first.
RATIONALE
1. Do initial steps.
2. Provide the resident privacy. 2. Maintains resident’s dignity and right to
privacy by not exposing body. Keeps
resident warm.
3. Check bony areas including ears, shoulder
blades, elbows, coccyx, hips, knees, ankles
and heels for redness and warmth.
3. Redness and warmth indicates that the
skin is under pressure and position should be
changed more frequently.
4. Check friction areas including under
breasts and arms, between buttocks, groin,
thighs, skin folds, contracted areas, and
around any tubing for redness, irritation,
moisture and odor.
4. Pressure, rubbing and perspiration will
cause skin to break down.
5. Remove drape from resident, if one was
used, and assist resident with getting
comfortable and changing position if
necessary.
6. Report any unusual findings to the nurse
immediately.
6. Provides nurse with necessary information
to properly assess resident’s condition and
needs.
7. Do final steps.

Page 279 of 307
CARE SKILLS #58: FLOAT HEELS (Lesson #18)
STEP – Initial Steps: Check the resident’s
care plan/closet care plan first.
RATIONALE
1. Do initial steps.
2. Lift resident’s lower extremity.
3. Inspect the skin, especially the heels. 3. To identify any potential skin
problems/breakdown.
4. Place a full pillow under calves, leaving
heels in the air and free from pressure. (Do
not use rolled pillows or blankets.)
4. Placing the pillow directly under the heels
can increase pressure on heels.
5. Do final steps.
CARE SKILLS #59: BED CRADLE
(Lesson #18)
STEP – Initial Steps: Check the resident’s
care plan/closet care plan first.
RATIONALE
1. Do initial steps.
2. Place bed cradle on bed according to
manufacturer’s instructions.
2. If equipment is not applied according to
manufacturer’s instructions, discomfort or
injury could result.
3. Cover bed cradle with top sheet and
bedspread/blanket.
3. Keeps the top linens from applying
pressure/weight to toes, feet and lower legs.
4. Do final steps.

Page 280 of 307
CARE SKILLS #60: FEEDING (Lesson #19)
STEP – Initial Steps: Check the resident’s
care plan/closet care plan first.
RATIONALE
1. Do initial steps. Assist resident with
toileting if needed, change brief if soiled.
2. Confirm diet card/tray. Check name, diet,
utensils and condiments.
2. This will ensure that the resident is being
served the diet as ordered; at the appropriate
consistency.
3. Explain procedure.
4. Have resident wash hands, help the
resident if needed.
4. Provides good hygiene in preparation for
meal consumption.
5. Sit on unaffected side eye level with
resident and facing them.
5. Encourages interaction with the resident
and placement of spoon at an appropriate
angle.
6. Resident’s head should be elevated at
least 45 degrees, if in bed.
6. Places resident at an angle to promote
swallowing and reduce risk of choking.
7. Protect the resident’s clothing with a
clothing protector or per facility policy and
procedures.
7. Use of a napkin or clothing protector (if
resident desires) preserves dignity by
keeping clothing clean and free of spillage.
8. Offer different foods; ask resident’s
preference.
8. Involving the resident encourages
consumption.
9. Food should be in bite sized pieces or with
the spoon half full. Food should be fed to the
unaffected side of the mouth.
9. Reduces risk of choking.
10. Allow time for resident to chew and empty
mouth between bites. Notify nurse
immediately should choking occur.
10. Reduces risk of choking.
11. Frequently offer beverage. 11. Encourages swallowing.
12. Make conversation with the resident;
atmosphere should be pleasant.
12. Enhances meal experience, thus
encourages consumption.
13. Cleanse the resident’s hands/face as
needed during the meal and after.
13. Promotes good hygiene.
14. Do final steps. If required, measure and
record I&O’s and percentage of food eaten.

Page 281 of 307
CARE SKILLS #61: ORAL TEMPERATURE [ELECTRONIC] (Lesson #20)
STEP – Initial Steps: Check the resident’s
care plan/closet care plan first.
RATIONALE
Do not take oral temperature for a resident
who is unconscious, uses oxygen, or who is
confused/disoriented.
1. Remove thermometer from storage/ battery
charger.
2. Do initial steps.
3. Position resident comfortably in bed or
chair.
4. Put on disposable sheath and place
thermometer under the tongue and to one
side, press button to activate the
thermometer.
4. The thermometer measures heat from
blood vessels under the tongue.
5. The resident should be directed to breathe
through their nose.
6. Instruct resident to hold thermometer in
mouth with lips closed. Assist as necessary.
6. The lips hold the thermometer in position.
7. Leave thermometer in place until signal is
heard, indicating the temperature has been
obtained.
8. Read the temperature reading on the face
of the electronic device, remove the
thermometer, discard the sheath, and record
the reading.
8. Record temperature immediately so you
won’t forget. Accuracy is necessary because
decisions regarding resident’s care may be
based on your report. What you document is
a legal record of what you did. If you don’t
document it, legally, it didn’t happen.
9. Do final steps.
10. Return thermometer to storage/battery
charger.
11. Report unusual reading to nurse. 11. Provides nurse with necessary
information to properly assess resident’s
condition and needs.

Page 282 of 307
CARE SKILLS #62: AXILLARY TEMPERATURE (Lesson #20)
STEP – Initial Steps: Check the resident’s
care plan/closet care plan first.
RATIONALE
Often taken when inappropriate to take an
oral temperature; particularly if resident is
confused or combative
1. Remove thermometer from storage/
battery charger.
2. Do initial steps.
3. Position resident comfortably in bed or
chair.
4. Put on disposable sheath, remove
resident’s arm from sleeve of gown, wipe
armpit and ensure it is dry. Hold thermometer
in place with end in center of armpit and fold
resident’s arm over chest.
4. Places thermometer against blood vessels
to get reading.
5. Press button to activate the thermometer.
6. Hold thermometer in place until signal is
heard, indicating the temperature has been
obtained.
7. Read the temperature reading on the face
of the electronic device, remove the
thermometer, discard the sheath, and record
the reading.
7. Record temperature immediately so you
won’t forget. Accuracy is necessary because
decisions regarding resident’s care may be
based on your report. What you document is
a legal record of what you did. If you don’t
document it, legally, it didn’t happen.
8. Assist the resident to return arm through
sleeve of clothing/gown.
9. Do final steps.
10. Return thermometer to storage/battery
charger.
11. Report unusual reading to nurse. 11. Provides nurse with necessary
information to properly assess resident’s
condition and needs.

Page 283 of 307
CARE SKILLS #63: PULSE AND RESPIRATION (Lesson #20)
STEP – Initial Steps: Check the resident’s
care plan/closet care plan first.
RATIONALE
1. Place resident’s hand on comfortable
surface.
2. Feel for pulse above wrist on thumb side
with tips of first three fingers.
2. Because of artery in your thumb, pulse
would not be accurate if you use your thumb.
3. Count beats for 60 seconds, noting rate,
rhythm and force.
3. Ensures accurate count. Rate is number
of beats. Rhythm is regularity of beats. Force
is strength of beats.
4. Continue position as if feeling for pulse.
Count each rise and fall of chest as one
respiration.
4. Resident could alter breathing pattern if
aware that respirations are being taken.
5. Count respirations for 60 seconds noting
rate, regularity and sound.
5. Ensure accurate count. Rate is number of
breaths. Regularity is pattern of breathing.
Sound is type of auditory breaths heard.
6. Record pulse and respiration rates. 6. Record pulse and respirations immediately
so you won’t forget. Accuracy is necessary
because decisions regarding resident’s care
may be based on your report. What you write
is a legal record of what you did. If you don’t
document it, legally, it didn’t happen.
7. Report unusual findings to nurse. 7. Provides nurse with information to assess
resident’s condition and needs.
8. Do final steps.

Page 284 of 307
CARE SKILLS #64: PRACTICAL USE OF THE PULSE OXIMETER
(Lesson #20)
STEP – Initial Steps: Turn the pulse oximeter
on: it will go through internal calibration and
checks.
RATIONALE
1. Select the appropriate probe with particular
attention to correct sizing and where it will go
(usually finger, toe or ear).
1. If used on a finger or toe, make sure the
area is clean. Remove any nail varnish.
2. Connect the probe to the pulse oximeter.
3. Position the probe carefully; make sure it
fits easily without being too loose or too tight.
3. If possible, avoid the arm being used for
blood pressure monitoring as cuff inflation will
interrupt the pulse oximeter signal.
4. Allow several seconds for the pulse
oximeter to detect the pulse and calculate the
oxygen saturation.
5. Look for the displayed pulse indicator that
shows that the machine has detected a
pulse. Without a pulse signal, any readings
are meaningless.
6. Once the unit has detected a good pulse,
the oxygen saturation and pulse rate will be
displayed.
7. Like all machines, oximeters may
occasionally give a false reading – if in doubt,
rely on your clinical judgment, rather than the
machine.
7. The function of the oximeter probe can be
checked by placing it on your own finger.
Aide is to record pulse ox % (as in other vital
signs).
9. Adjust the volume of the audible pulse
beep to a comfortable level for your theatre –
ever use on silent.
9. Always make sure the alarms are on.
10. Record measurements as displayed on
monitor, per facility policy, and report to
charge nurse accordingly.
10. Further treatment may be needed,
depending on values that are reported. If the
numbers are not documented, then the skill
cannot be considered performed.

Page 285 of 307
CARE SKILLS #65: BLOOD PRESSURE (Lesson #20)
STEP – Initial Steps: Check the resident’s
care plan/closet care plan first.
RATIONALE
1. Clean earpieces and diaphragm of
stethoscope with antiseptic wipe.
1. Reduces pathogens; prevents spread of
infection.
2. Uncover resident’s arm to shoulder.
3. Rest resident’s arm, level with heart, palm
upward on comfortable surface.
3. A false low reading is possible, if arm is
above heart level.
4. Wrap proper sized sphygmomanometer
cuff around upper unaffected arm
approximately 1–2 inches above elbow.
4. Cuff must be proper size and placed on
arm correctly so amount of pressure on
artery is correct. If not, reading will be falsely
high or low.
5. Put earpieces of stethoscope in ears. 5. Earpieces should fit into ears snugly to
make hearing easier.
6. Place diaphragm of stethoscope over
brachial artery at elbow.
7. Close valve on bulb. If blood pressure is
known, inflate cuff to 20 mm/hg above the
usual reading. If blood pressure is unknown,
inflate cuff to 30 mm/hg past the point of
occlusion.
7. Inflating cuff too high is painful and may
damage small blood vessels.
8. Slowly open valve on bulb. 8. Releasing valve slowly allows you to hear
beats accurately.
9. Watch gauge and listen for sound of pulse.
10. Note gauge reading at first pulse sound. 10. First sound is systolic pressure.
11. Note gauge reading when pulse sound
disappears or changes.
11. Last sound is diastolic pressure.
12. Completely deflate and remove cuff. 12. An inflated cuff left on resident’s arm can
cause numbness and tingling. If you must
take blood pressure again, completely deflate
cuff and wait 30 seconds. Never partially
deflate a cuff and then pump it up again.
Blood vessels will be damaged and reading
will be falsely high or low.

Page 286 of 307
13. Accurately record systolic and diastolic
readings.
13. Record readings immediately so you
won’t forget. Accuracy is necessary because
decisions regarding resident’s care may be
based on your report. What you write is a
legal record of what you did. If you don’t
document it, legally, it didn’t happen.
14. Do final steps.
15. Report unusual readings to nurse. 15. Provides nurse with information to
properly assess resident’s condition.

Page 287 of 307
CARE SKILLS #66: HEIGHT (Lesson #20)
STEP – Initial Steps: Check the resident’s
care plan/closet care plan first.
RATIONALE
1. Using standing balance scale: Assist the
resident onto the scale, facing away from the
scale. Ask the resident to stand straight.
Raise the rod to a level above the resident’s
head. Lower the height measurement device
until it rests flat on the resident’s head.
1. Measurements are written on the rod in
inches.
2. When a resident is unable to stand: Flatten
the bed and place resident in supine position.
Place a mark on the sheet at the top of the
head and another at the bottom of the feet.
Measure the distance.
2. Places resident in proper position and
alignment; allows you to measure resident
accurately.
3. If the resident is unable to lay flat due to
contractures: Utilize a tape measure and
beginning at the top of the head, follow the
curves of the spine and legs, measuring to
the base of the heel.
3. Allows you to obtain an accurate
measurement for the resident who cannot
fully extend body.
4. Accurately record resident’s height. Assist
resident off the scale.
4. Record height immediately so you won’t
forget. Accuracy is necessary because
decisions regarding resident’s care may be
based on your report. What you write is a
legal record of what you did. If you don’t
document it, legally, it didn’t happen.
5. Do final steps.

Page 288 of 307
CARE SKILLS #67: WEIGHT (Lesson #20)
STEP – Initial Steps: Check the resident’s
care plan/closet care plan first.
RATIONALE
1. Balance scale. 1. Scale must be balanced on zero for weight
to be accurate.
2. Depending on scale used, assist resident
to stand on platform or sit in chair with feet on
footrest or transport wheelchair onto scale
and lock brakes.
2. When using chair scale, if resident has feet
on floor, weight will not be accurate. Wheel
locks prevent chair from moving when using
a wheelchair scale.
3. When using a standard scale –lower
weight to fifty-pound mark that causes arm to
drop. Move it back to previous mark. Move
upper weight to pound mark that balances
pointer in middle of square. Add lower and
upper marks. When using a digital scale –
press weigh button. Wait until numbers
remain constant.
3. When arm drops, weight is too high. When
pointer is suspended, weight is accurate.
Total gives accurate weight.
4. Subtract weight of wheelchair from total
weight, if applicable.
5. Accurately record resident’s weight. 5. Record weight immediately so you won’t
forget. Weight changes are an indicator of
resident’s condition. Accuracy is necessary
because decisions regarding resident’s care
may be based on your report. What you write
is a legal record of what you did. If you don’t
document it, legally, it didn’t happen.
6. Do final steps.
7. Report unusual reading to nurse. 7. Provides nurse with information to assess
resident’s condition and needs.

Page 289 of 307
CARE SKILLS #68: APPLICATION OF PHYSICAL RESTRAINTS (Lesson #21)
STEP – Initial Steps: Check the resident’s
care plan/closet care plan first.
RATIONALE
1. Check with the nurse before gathering
supplies. Verify the type of restraint that was
ordered for the resident. The NA should
ensure that he/she was properly trained by
the facility on how to use the restraint per the
manufacturer’s instructions and facility’s
policy.
1. NA/CNA can only use/apply restraints
when instructed to do so by the charge nurse.
Ensures that the correct restraint will be used,
as ordered by the physician. NA/CNA should
not apply a restraint that he/she has not
received training for. Although restraints
appear the same, manufacturers can provide
different instructions/guidance for use and
application. Improper application can result in
serious harm and/or death for the resident.
2. Do initial steps.
3. Follow manufacturer’s instructions and
facility’s policy on applying the restraint.
3. Same as previously stated.
4. If resident is in bed, be sure to tie restraint
to the part of the bed that moves with the
resident. Never tie restraints to side rails or
the fixed part of the bed frame (that does not
move with the resident when repositioning).
4. Tying restraints to the fixed portion of the
frame or to side rails will cause the restraint
to tighten as the bed is moved for positioning.
This can cause discomfort, pain, and
problems with circulation and lead to more
serious concerns.
5. Make sure that the restraint is not too tight.
Check pulse in the affected areas to ensure
circulation is not occluded (cut off). Make
sure that breasts and skin are not caught in
the restraint.
5. Occlusion can lead to serious
consequences for the resident, including
nerve damage, loss of use, etc.
6. Place call light in easy reach.
7. Check resident and restraint every 15
minutes, or more frequently if necessary or
instructed.
7. Constant monitoring helps to ensure that
the resident is not in distress or experiencing
discomfort due to the restraint.
8. Release the restraint at least every two
hours or more frequently as needed or
instructed. Assist the resident with toileting,
ambulating, changing position, and other
ADLs as needed.
9. Document according to facility policy.
10. Perform initial/final steps as needed when
checking on the resident.

Page 290 of 307
CARE SKILLS #69: PASSIVE RANGE OF MOTION (Lesson #22)
STEP – Initial Steps: Check the resident’s
care plan/closet care plan first.
RATIONALE
1. Do initial steps.
2. Position resident in good body alignment. 2. Reduces stress to joints.
3. Observe joints. If swelling, redness or
warmth is present, or if resident complains of
pain, notify nurse. Continue procedure only if
instructed.
3. Indicates inflammation in joint which can
be worsened if procedure is continued.
4. Support limb above and below joint.
5. Begin range of motion at shoulders and
include the shoulders, elbows, wrists,
thumbs, fingers, hips, knees, ankles and
toes.
5. Allows you to control joint movement and
minimize resident’s discomfort.
6. Slowly move joint in all directions it
normally moves.
6. Rapid movement may cause injury.
7. Repeat movement per facility policy or
care plan.
7. Ensures benefit from procedure.
8. Encourage resident to participate as much
as possible.
8. Promotes resident’s independence and
self–esteem.
9. Stop procedure at any sign of pain and
report to nurse immediately.
9. Pain is a warning sign for injury.
10. Do final steps.

Page 291 of 307
CARE SKILLS #70: SPLINT APPLICATION (Lesson #22)
STEP – Initial Steps: Check the resident’s
care plan/closet care plan first.
RATIONALE
1. Do initial steps.
2. Observe affected joints. If swelling,
redness, or warmth is present or if resident
complains of pain, notify nurse. Continue
procedure only if instructed.
2. Indicates inflammation in joint which can
be worsened if splint is applied.
3. Apply splint according to therapy
recommendation and physician’s order.
3. Application of splint not in accordance with
therapy recommendation could cause injury
or discomfort to resident.
4. Remove splint after designated period of
time. Cleanse the skin, dry thoroughly and
again observe for swelling, redness, warmth,
complaint of pain or open area. Notify the
nurse if present.
4. Indicates inflammation in joint. Notifying
nurse provides him/her with information to
assess resident’s condition and needs.
5. Do final steps.

Page 292 of 307
CARE SKILLS #71: ABDOMINAL BINDER (Lesson #22)
STEP – Initial Steps: Check the resident’s
care plan/closet care plan first.
RATIONALE
1. Do initial steps.
2. Check the skin for redness, open areas, or
needed incontinence care.
2. Allows you to identify early signs of skin
breakdown and the need for cleansing prior
to binder application.
3. Place binder flat on the bed and ask
resident to lie down with upper border at the
upper waist and lower border at the level of
the gluteal fold. If resident is in bed, assist
him/her to roll side–to–side while placing
binder underneath him/her in the same
position.
3. A binder placed above the waist interferes
with breathing; one placed too low interferes
with elimination and walking.
4. Bring the ends of binder around the
resident, and overlap them. Beginning at the
bottom of the binder, secure the Velcro
fastener strip so that the binder fits snugly.
4. A snug fit provides maximum support. If
the binder is too loose, efficacy is impaired. If
it is too tight, resident may be uncomfortable.
5. Ensure that there are no wrinkles or
creases in the binder.
5. Wrinkles and creases put pressure on the
skin increasing the risk for excoriation.
6. Do final steps.

Page 293 of 307
CARE SKILLS #72: ABDUCTION PILLOW (Lesson #22)
STEP – Initial Steps: Check the resident’s
care plan/closet care plan first.
RATIONALE
1. Do initial steps.
2. Place the pillow between the supine
resident’s legs. Slide it with the narrow end
pointing toward the groin until it touches the
legs all along its length.
3. Place the upper part of both legs in the
pillow’s indentations. Raise each leg slightly
by lifting under the knee and ankle to bring
straps under and around leg and then secure
the straps to the pillow.
3. Securing the straps prevents the pillow
from slipping out of place.
4. Do final steps.
5. Report resident intolerance or complaint of
pain upon application to the nurse.
5. Provides nurse with information to assess
resident’s condition and needs.

Page 294 of 307
CARE SKILLS #73: KNEE IMMOBILIZER (Lesson #22)
STEP – Initial Steps: Check the resident’s
care plan/closet care plan first.
RATIONALE
1. Do initial steps.
2. With resident lying supine in bed, one
caregiver will support the leg above the knee
and at the ankle and lift the leg in one motion,
providing enough height for a second
caregiver to place the immobilizer under the
affected leg. Check skin prior to applying the
immobilizer.
2. It is important to maintain the leg in a
straight position while placing the immobilizer
and to monitor for any skin
problems/breakdown.
3. The caregiver will lower the leg into the
open immobilizer, keeping the leg straight.
4. Pull both sides of the immobilizer to center
of front of leg and wrap one side over the
other, securing the Velcro strip holding the
immobilizer in place. Make sure the Velcro
stabilizer bar strips are attached to opposite
sides of the immobilizer to prevent any
motion of the knee medially or laterally.
5. Bring straps around each side and secure
to stabilize the immobilizer.
6. When removing the immobilizer for
bathing/care, support the leg in the same
manner, keeping the leg straight at all times.
Observe for any reddened areas, particularly
at the upper and lower edge of the
immobilizer, which is in contact with the
resident’s skin.
6. Constant contact with the edge of the
immobilizer can place the skin at risk of
breakdown. Early detection of any concern
can prevent further breakdown.
7. Report to the nurse any skin irritation,
open area, or complaint of pain.
7. Reporting to the nurse will ensure that
treatment is obtained, if needed.
8. Do final steps.

Page 295 of 307
CARE SKILLS #74: PALM CONES (Lesson #22)
STEP – Initial Steps: Check the resident’s
care plan/closet care plan first.
RATIONALE
1. Do initial steps.
2. Cleanse and thoroughly dry resident’s
hand.
2. Cleansing and drying of hands prevents
odor and infection.
3. Place cone with clean cover in resident’s
palm.
4. Observe hand(s) every shift; cleanse and
thoroughly dry hands. Observe for areas of
redness, swelling or open areas and report to
the nurse, if noted.
4. Allows you to identify early signs of skin
breakdown.
5. Note covering of palm cone and send to
laundry when soiled, re–covering cone with a
clean covering, as needed.
5. Maintaining cleanliness enhances
resident’s dignity.
6. Do final steps.

Page 296 of 307
CARE SKILLS #75: ASSISTING WITH HEARING AIDS (Lesson #23)
STEP – Initial Steps: Check the resident’s
care plan/closet care plan first.
RATIONALE
1. Do initial steps.
2. Gently clean resident’s ear with a damp
washcloth. Clean hearing aid of wax and dirt
when needed according to manufacturer’s
instructions.
2. To ensure ears are clean prior to insertion
of hearing aids, thus ensuring maximum
acuity.
3. Insert hearing aid into resident’s ear.
4. Assist to adjust the volume control to a
desired level.
4. To ensure that aid is turned up high
enough for resident to hear, but not so high
that noises will hurt resident’s ear(s).
5. Do final steps.
6. Report any abnormalities to nurse. 6. Provides nurse with necessary information
to properly assess resident’s condition and
needs.
7. Keep hearing aid in safe place when not in
use.
7. Helps reduce risk of damage to device.

Page 297 of 307
CARE SKILLS #76: ELASTIC/COMPRESSION STOCKING APPLICATION OR TED HOSE
(Lesson #23)
STEP – Initial Steps: Check the resident’s
care plan/closet care plan first.
RATIONALE
1. Do initial steps.
2. Observe skin prior to applying the
stockings for any redness, warmth, swelling,
excessive dryness, or open area. Notify
nurse if abnormalities present. Continue
procedure only if instructed.
2. Provides nurse with information to assess
resident’s condition and needs.
3. Apply the hose before resident gets out of
bed.
3. Hose should be applied before veins
become distended and edema (swelling)
occurs.
4. Hold heel of stocking and gather the rest in
your hand turning hose inside out to mid foot
area.
5. Support foot at the heel and slip the front
of the stocking over the toes, foot and heel.
6. Pull the stocking up until it is fully
extended.
7. Smooth away any wrinkles or twisted
areas.
7. Wrinkles, creases, or twisted areas can
irritate the skin and interfere with circulation.
8. Remove the hose at least twice daily for
skin care unless otherwise indicated by
physician.
8. Allows you to identify early signs of skin
break down.
9. Do final steps.

Page 298 of 307
CARE SKILLS #77: ADMISSION OF A RESIDENT (Lesson #27)
STEP – Initial Steps: Check the resident’s
care plan/closet care plan first.
RATIONALE
1. Do initial steps.
2. Prepare the room for the resident by
making sure that all necessary equipment
and furniture are in its proper place, in good
working condition and clean. Make sure bed
is made with clean linen and all space is
clean. Check for adequate lighting and
provide ventilation. Apply resident’s name
label on door, etc. as needed.
2, Preparing the room in advance can help
the resident feel more welcomed and at ease
upon arrival, and it allows more time to focus
on the resident.
3. Identify the new resident by asking his/her
name and by checking the identification.
Identify yourself. Greet the resident and
family courteously. Call resident by proper or
preferred name. Introduce yourself and state
your position.
3. Greeting the resident and family and
showing kindness helps ease anxiety.
Identifying them by proper name shows
respect and allows the resident the
opportunity to establish how they prefer to be
addressed.
4. Take the resident and family to the room. If
semi-private room, be sure to introduce
resident to roommate.
4. Resident should be introduced to other
residents and employees. Helps establish
bonds and ease anxiety.
5. Assist resident with getting comfortable in
the room. Provide privacy and assistance as
needed with transferring to bed/chair,
dressing/undressing, or any other task as
requested by resident and/or nurse.
6. Place call light within reach of resident and
explain how and why it is used.
6. Gets the resident familiar with how they will
contact the staff if assistance is needed.
7. Care for clothing and personal articles
according to facility policy. Assist with
unpacking and labeling clothing. Label all
personal articles and store in bedside table
(or appropriate place). Be certain that
resident and/or family member(s) know
where to place these articles.
7. Labeling articles helps the staff to identify
what items belongs to which resident.
Ensures that items will be returned to
appropriate person. Establishing placement
of articles alleviates confusion, especially
when room is being shared with another
resident.

Page 299 of 307
8. Follow and explain to the resident and
family the facility policy for inventory and
safekeeping of valuables.
8. Same rationale as above.
9. Give instructions to resident and/or family
as to time and place of meals and, as
appropriate, provide other orientation such as
facility premises, introduction to other staff,
etc.
9. Orienting resident and family to facility and
staff helps them learn the daily routine,
addresses questions/concerns they may
have, and helps get them familiar with their
new home and caregivers. Alleviates
confusion regarding their new surroundings.
10. Obtain vital signs, including temperature,
pulse, respiration, and blood pressure. Also
obtain weight and height. Record according
to facility policy. Follow guidelines for
performing each skill accordingly.
10. Establishes baseline levels for nurses to
compare to later.
11. Ensure resident is comfortable and has
call light available. If permitted, leave fresh
ice water within reach.
12. Record/report completion of procedure.
Report to charge nurse: resident’s vital
signs; any bruises, sores, etc. on the
resident’s body; any special observations
made about the resident.
Perform any additional final steps
accordingly.

Page 300 of 307
CARE SKILLS #78: TRANSFER/DISCHARGE OF THE RESIDENT
(Lesson #27)
STEP – Initial Steps: Check the resident’s
care plan/closet care plan first.
RATIONALE
1. Do initial steps.
2. Inform the resident of the move and let
them know you are there to assist. Questions
or concerns that arise should be addressed
by the nurse, unless informed otherwise.
2. Some information may be different from
what you were previously told. It is best for
the nurse to provide updates and address
any concerns/questions.
3. Collect all personal items that are to be
moved with the resident and assist with
packing as needed. Secure valuables per
facility policy. Ensure that all items on the
inventory list are there. Report to the nurse if
items are missing.
Take items to designated pick-up area.
3. Nurse should be aware of missing items so
that attempts can be made to locate them. If
possible, take belongings to designated area
first to make transporting the resident easier.
4. Assist the resident with getting dressed if
necessary.
5. Before the resident leaves the unit, confirm
with the nurse that all discharge procedures
have been completed.
5. Helps to ensure that steps are not being
missed.
6. Speak with the nurse to determine how the
resident is to be transported (in his/her own
bed, wheelchair, or stretcher). Transport
accordingly.
7. Allow and assist the resident to say
goodbye to the staff and other residents while
being transported to the designated pick-up
area.
8. Assist resident with getting into the vehicle
and ensure that their belongings are also
loaded.
9. Wash hands. Document and report.
Perform any additional final steps
accordingly.

Page 301 of 307
CARE SKILLS #79: POSTMORTEM CARE
(Lesson #28)
STEP – Initial Steps: Check the resident’s
care plan/closet care plan first.
RATIONALE
1. Do initial steps.
2. Put on gloves. 2. Protects you from contamination by bodily
fluids.
3. Respect the family’s religious restrictions
regarding the care of body, if applicable.
3. Residents/families have the right to
freedom of religion.
4. Assist roommate to leave the area until
body is prepared and removed, if applicable.
4. Reduces the roommate’s stress.
5. Place body in supine position. 5. Prepares body for procedure.
6. Place one pillow beneath resident’s head. 6. Prevents blood from discoloring the face by
settling in it.
7. Close the eyes.
8. Insert dentures, if this is the facility policy,
and close the mouth.
8. It is easier to put dentures in the mouth
right away and gives the face a natural
appearance.
9. Cleanse body as necessary. Comb hair. 9. Prepares the body for viewing by family
and friends.
10. Place a pad under the buttocks to collect
any drainage.
10. Due to total loss of muscle tone, urine
and/or stool may drain from the body even
after death.
11. Put a clean hospital gown on resident
and place body in a comfortable looking
position to allow family and friends to view
the body.
12. Remove gloves.
13. Do final steps.
14. After the mortuary has removed the body,
strip the bed and clean the room according to
facility policy.
Page 302 of 307
Appendix D
Task Performance Record

Page 303 of 307
Trainee’s Name
SS#
Primary Instructor’s Name
Program Name
Program’s Address
Telephone
TASK PERFORMANCE
Satisfactory
Performance
Date
Supervising Instructor’s
Initials
Clinical
Performance Date
Initial Steps
Final Steps
Handwashing/Hand Rub
Gloves
Gown (PPE)
Mask
Fire
Fire Extinguisher
Falling or Fainting
Choking
Seizures
Unoccupied Bed
Thickened Liquids

Page 304 of 307
TASK PERFORMANCE
Satisfactory
Performance
Date
Supervising Instructor’s
Initials
Clinical
Performance Date
Measure & Record Fluid Intake/Urinary
Output
Passing Fresh Ice Water
Serving Meal Tray
Nasal Cannula Care
Shower/Shampoo
Bed Bath/Catheter Care/Perineal Care
Back Rub
Shampoo Hair in Bed
Whirlpool
Oral Care
Oral Care for the Unconscious Resident
Denture Care
Shaving with an Electric Razor
Shaving with a Safety Razor
Comb/Brush Hair
Fingernail Care
Foot Care
Change a Resident’s Gown

Page 305 of 307
TASK PERFORMANCE
Satisfactory
Performance
Date
Supervising Instructor’s
Initials
Clinical
Performance Date
Dressing a Dependent Resident
Assist to Bathroom
Bedside Commode
Bedpan/Fracture Bedpan
Urinal
Empty Urinary Drainage Bag
Urine Specimen Collection
Stool Specimen Collection
Application of Incontinent Brief
Assist Resident to Move to Head of Bed
Supine Position
Lateral Position & Side to Side
Fowler’s Position
Semi-Fowler’s Position
Use of Wheelchair/Geriatric Chair
Transfer to Chair
Sit on Edge of Bed
Using a Gait Belt to Assist with Ambulation

Page 306 of 307
TASK PERFORMANCE
Satisfactory
Performance
Date
Supervising Instructor’s
Initials
Clinical
Performance Date
Walking
Assist with Walker
Assist with Cane
Using a Portable Mechanical Resident Lift
Transfer to Stretcher/Shower Bed
Transfer: Two Person Lift
Occupied Bed
Inspecting Skin
Float Heels
Bed Cradle
Feeding
Oral Temperature (Electronic)
Axillary Temperature
Pulse and Respiration
Practical Use of the Pulse Oximeter
Blood Pressure
Height
Weight

Page 307 of 307
TASK PERFORMANCE
Satisfactory
Performance
Date
Supervising Instructor’s
Initials
Clinical
Performance Date
Application of Physical Restraints
Passive Range of Motion
Splint Application
Abdominal Binder
Abduction Pillow
Knee Immobilizer
Palm Cones
Assisting with Hearing Aids
Elastic/Compression Stocking Application or
Ted Hose
Admission of a Resident
Transfer/Discharge of the Resident
Postmortem Care
I, as Primary Instructor, attest to the competency/skills observations shown on this Task Performance Record, whether performed by
me or designated to another training instructor.
Primary Instructor’s Signature Date
DMS-741 (Revised 01-19)
