
VMware Cloud on AWS
Networking and Security
23 August 2024
SDDC Version 1.24
VMware Cloud on AWS
You can find the most up-to-date technical documentation on the VMware by Broadcom website at:
https://docs.vmware.com/
VMware by Broadcom
3401 Hillview Ave.
Palo Alto, CA 94304
www.vmware.com
Copyright
©
2017-2024 Broadcom. All Rights Reserved. The term “Broadcom” refers to Broadcom Inc.
and/or its subsidiaries. For more information, go to https://www.broadcom.com. All trademarks, trade
names, service marks, and logos referenced herein belong to their respective companies.
VMware Cloud on AWS Networking and Security
VMware by Broadcom 2
Contents
About VMware Cloud on AWS Networking and Security 5
1 NSX Networking Concepts 6
Features Supported with NSX 11
2
Using the Networking and Security Dashboard
13
3 Configuring VMware Cloud on AWS Networking and Security Using NSX 15
SDDC Network Administration with NSX Manager 17
Open NSX Manager 18
Assign NSX Service Roles to Organization Members 21
NSX Roles and Permissions in VMware Cloud on AWS 23
Assign NSX Roles from an LDAP Identity Source 25
Connecting Your On-Premises SDDC to Remote Networks 27
Configure AWS Direct Connect Between Your SDDC and On-Premises Data Center 28
Configure a VPN Connection Between Your SDDC and On-Premises Data Center 36
Configure Management Gateway Networking and Security 58
Set vCenter FQDN Resolution Address 58
Set HCX FQDN Resolution Address 59
Add or Modify Management Gateway Firewall Rules 59
Configure Compute Gateway Networking and Security 64
Create or Modify a Network Segment 64
Add or Modify Compute Gateway Firewall Rules 70
Add or Modify Distributed Firewall Rules 73
Configure DNS Services 79
Creating and Managing SDDC Deployment Groups with VMware Transit Connect™ 81
Create or Modify an SDDC Group 89
Connect SDDC Groups in VMware Cloud on AWS 97
Add Compute Gateway Firewall Rules to Enable SDDC Group Member Workload
Connectivity 98
Attach a Direct Connect Gateway to an SDDC Group 100
Use vCenter Linking in an SDDC Group 102
Add a Custom Tier-1 Gateway to a VMware Cloud on AWS SDDC 104
Connect a VPN to a Tier-1 Gateway 106
Enabling and Using IPv6 in SDDC Networks 110
Configure a Multi-Edge SDDC With Traffic Groups 112
Enable AWS Managed Prefix List Mode for the Connected Amazon VPC 116
Aggregate and Filter Routes to Uplinks 119
VMware by Broadcom
3
View Routes Learned and Advertised over VMware Transit Connect 121
View Statistics and Manage Settings for Uplinks 121
Working With Inventory Groups 122
About Context Profiles 123
Managing Workload Connections 123
Attach a VM to or Detach a Workload VM from a Compute Network Segment 124
Request or Release a Public IP Address 125
Create or Modify NAT Rules 126
Creating Firewall Rules to Manage Traffic Between the Compute and Management Networks
130
4 Configure Monitoring and Troubleshooting Features 132
Configure IPFIX 133
Configure Port Mirroring 133
View Connected VPC Information and Troubleshoot Problems With the Connected VPC 134
Working with NSX Events and Alarms 136
NSX Alarms Catalog for VMware Cloud on AWS 138
5
About VMware vDefend Firewall Features
142
VMware Cloud on AWS Networking and Security
VMware by Broadcom 4
About VMware Cloud on AWS Networking
and Security
This guide provides information about configuring NSX networking and security for VMware
Cloud on AWS.
Intended Audience
This information is intended for anyone who wants to use VMware Cloud on AWS to create an
SDDC that has the networking and security infrastructure necessary to migrate workloads off
premises and run them securely in the cloud. It was written for readers who have used vSphere
in an on-premises environment and are familiar with the fundamentals of IP networking using
NSX
or another networking solution. In-depth knowledge of vSphere or Amazon Web Services is not
required.
VMware by Broadcom
5
NSX Networking Concepts
1
VMware Cloud on AWS uses NSX to create and manage SDDC networks. NSX provides an agile
software-defined infrastructure to build cloud-native application environments.
This guide explains how to manage your SDDC networks using NSX and the VMware Cloud
Console Networking and Security Dashboard.
You can access the NSX Manager in your SDDC in several ways:
n By using a secure reverse proxy server to connect to a public IP address reachable by any
browser that can connect to the Internet.
n By using a private network connection to reach the NSX Manager's private IP directly.
Examples of private connections include: VPN, Direct Connect (Private VIF), through an SDDC
Group, or via an EC2 instance (jump host) in the Connected VPC.
n By connecting directly to your cloud provider’s network. AWS Direct Connect provides this
kind of connection for VMware Cloud on AWS. See Configure AWS Direct Connect Between
Your SDDC and On-Premises Data Center.
See Open NSX Manager for details.
SDDC Network Topology
When you create an SDDC, it includes a Management Network. You specify the Management
Network CIDR block when you create the SDDC. It cannot be changed after the SDDC has been
created. See Deploy an SDDC from the VMC Console for details.
A VMware Cloud on AWS SDDC has two separate network layers:
The AWS Underlay Network
This is the AWS VPC subnet that you specify when you deploy the SDDC. It supports the
native AWS networking and services that provide connectivity to the SDDC.
The NSX Overlay Network
This is the layer in which all SDDC subnets are created and all SDDC appliances and
workloads run.
VMware by Broadcom
6
The two layers are connected by one or more NSX Edge appliances, which enable
communication over the Connected VPC between VMs in the SDDC and native AWS workloads,
as well as connectivity to remote networks including the Internet, AWS Direct Connect, VMware
Transit Connect (for SDDC groups), and other AWS endpoints such as VPCs, TGWs, and DXGWs.
The Management Network has two subnets:
Appliance Subnet
This subnet is used by the vCenter, NSX and HCX appliances in the SDDC. Other appliance-
based services that you add to the SDDC also connect to this subnet.
Infrastructure Subnet
This subnet is used by the ESXi hosts in the SDDC.
The Compute Network includes an arbitrary number of logical segments for your workload
VMs. See VMware Configuration Maximums for current limits on logical segments. You must
create compute network segments to meet your workloads' needs. See VMware Configuration
Maximums for applicable limits.
An SDDC network has two notional tiers:
n Tier-0 handles north-south traffic (traffic leaving or entering the SDDC, or between the
Management and Compute gateways). In the default configuration, each SDDC has a single
Tier-0 router. If an SDDC is a member of an SDDC group, you can reconfigure the SDDC to
add Tier-0 routers that handle SDDC group traffic. See Configure a Multi-Edge SDDC With
Traffic Groups.
n Tier-1 handles east-west traffic (traffic between routed network segments within the SDDC).
In the default configuration, each SDDC has a single Tier-1 router. You can create and
configure additional Tier-1 gateways if you need them. See Add a Custom Tier-1 Gateway
to a VMware Cloud on AWS SDDC.
Both tiers are created on the AWS Overlay network.
VMware Cloud on AWS Networking and Security
VMware by Broadcom 7

Figure 1-1. SDDC Network Topology
Tier0
Default
CGW
T1 MGW
Linked Customer VPC
Custom T1 -
Isolated
Direct
Connect (DX)
Customer
Site
Internet
ESXi hosts
Internet Interface
IGW
VPC Interface
Intranet Interface
VGW
VTI
(Route-based VPN)
HCX
Mgr/IX/L2C
SRM/vSR
vCenter
Edge0/1
NSX
Managers
Routed Compute
Segment
VMware Cloud on AWS
SDDC
Linked Customer AWS Account
xENI
Main Route
Table
SDDC Subnet
DXGW
BGP
Connected VPC
Transit VIF
Hosted Private
VIF
vTGW (Transit
Connect)
BGP
BGP
AWS VPC Underlay
SDDC NSX Overlay
Management
Network
Custom T1 –
Routed/NAT
BGP
NSX Edge Appliance
The default NSX Edge Appliance is implemented as a pair of VMs that run in active/standby
mode. This appliance provides the platform on which the default Tier-0 and Tier-1 routers
run, along with IPsec VPN connections and their BGP routing machinery. All north-south
traffic goes through the default Tier-0 router. To avoid sending east-west traffic through the
appliance, a component of each Tier-1 router runs on every ESXi host that handles routing for
destinations within the SDDC.
If you need additional bandwidth for the subset of this traffic routed to SDDC group
members, a Direct Connect Gateway attached to an SDDC group, HCX Service Mesh, or
to the Connected VPC, you can reconfigure your SDDC to be Multi-Edge by creating traffic
groups, each of which creates an additional T0 router. See Configure a Multi-Edge SDDC With
Traffic Groups for details.
Note VPN traffic, as well as DX traffic to a private VIF must pass through the default T0 and
cannot be routed to a non-default traffic group. In addition, because NAT rules always run on
the default T0 router, additional T0 routers cannot handle traffic subject to NAT rules. This
includes traffic to and from the SDDC's native Internet connection. It also includes traffic to
the Amazon S3 service, which uses a NAT rule and must go through the default T0.
Management Gateway (MGW)
The MGW is a Tier-1 router that handles routing and firewalling for vCenter and other
management appliances running in the SDDC. Management gateway firewall rules run on
the MGW and control access to management VMs. In a new SDDC, the Internet connection
VMware Cloud on AWS Networking and Security
VMware by Broadcom 8
is labeled Not Connected in the Overview tab and remains blocked until you create a
Management Gateway Firewall rule allowing access from a trusted source. See Add or Modify
Management Gateway Firewall Rules.
Compute Gateway (CGW)
The CGW is a Tier-1 router that handles network traffic for workload VMs connected to
routed compute network segments. Compute gateway firewall rules, along with NAT rules,
run on the Tier-0 router. In the default configuration, these rules block all traffic to and from
compute network segments (see Configure Compute Gateway Networking and Security).
Routing Between Your SDDC and the Connected VPC
When you create an SDDC, we pre-allocate 17 AWS Elastic Network Interfaces (ENIs) in the
selected VPC owned by the AWS account you specify at SDDC creation. We assign each of
these ENIs an IP address from the subnet you specify at SDDC creation, then attach each of the
hosts in the SDDC cluster Cluster-1 to one of these ENIs. An additional IP address is assigned to
the ENI where the active NSX Edge Appliance is running.
This configuration, known as the Connected VPC, supports network traffic between VMs in the
SDDC and native AWS instances and services with addresses in the Connected VPC's primary
CIDR block. When you create or delete routed network segments connected to the default CGW,
the main route table is automatically updated. When Managed Prefix List mode is enabled for the
Connected VPC, the main route table and any custom route tables to which you have added the
managed prefix list are also updated.
The Connected VPC (or SERVICES) Interface is used for all traffic to destinations within the
Connected VPC's primary CIDR. AWS services or instances that communicate with the SDDC
must be in subnets associated with the main route table of the Connected VPC when using
the default configuration. If the AWS Managed Prefix List Mode mode is enabled (see Enable
AWS Managed Prefix List Mode for the Connected Amazon VPC) then you can manually add the
Managed Prefix list to any custom route table within the connected VPC when you want AWS
services and instances using those custom route tables to communicate with SDDC workloads
over the SERVICES Interface.
When the NSX Edge appliance in your SDDC is moved to another host, either to recover from
a failure or during SDDC maintenance, the IP address allocated to the appliance is moved to the
new ENI (on the new host), and the main route table, along with any custom route tables that use
a Managed Prefix List, is updated to reflect the change. If you have replaced the main route table
or are using a custom route table but have not enabled Managed Prefix List Mode, that update
fails and network traffic can no longer be routed between SDDC networks and the Connected
VPC. See View Connected VPC Information and Troubleshoot Problems With the Connected VPC
for more about how to use the VMware Cloud Console to see the details of your Connected VPC.
VMware Cloud on AWS provides several facilities to help you aggregate routes to the Connected
VPC, other VPCs, and your VMware Managed Transit Gateways. See Enable AWS Managed
Prefix List Mode for the Connected Amazon VPC.
VMware Cloud on AWS Networking and Security
VMware by Broadcom 9

For an in-depth discussion of SDDC network architecture and the AWS network objects that
support it, read the VMware Cloud Tech Zone article VMware Cloud on AWS: SDDC Network
Architecture.
Reserved Network Addresses
Certain IPv4 address ranges are unavailable for use in SDDC compute networks. Several are used
internally by SDDC network components. Most are reserved by convention on other networks as
well.
Table 1-1. Reserved Address Ranges in SDDC Networks
n 10.0.0.0/15
n 172.31.0.0/16
These ranges are reserved within the SDDC management subnet,
but can be used in your on-premises networks or SDDC compute
network segments.
n 169.254.0.0/19
n 169.254.64.0/24
n 169.254.101.0/30
n 169.254.105.0/24
n 169.254.106.0/24
Per RFC 3927, all of 169.254.0.0/16 is a link-local range that cannot be
routed beyond a single subnet. However, with the exception of these
CIDR blocks, you can use 169.254.0.0/16 addresses for your virtual
tunnel interfaces. See Create a Route-Based VPN.
Note SDDC versions 1.20 and earlier also reserve 100.64.0.0/16 for carrier-grade NAT per
RFC 6598. Avoid using addresses in this range in SDDC versions earlier than 1.22. See VMware
Knowledge Base article 76022 for a detailed breakdown of how older SDDC networks use the
100.64.0.0/16 address range and VMware Knowledge Base article 92322 for more information
about reserved address range changes in SDDC version 1.22.
SDDC networks also observe the conventions for special Use IPv4 address ranges enumerated in
RFC 3330.
Multicast Support in SDDC Networks
In SDDC networks, layer 2 multicast traffic is treated as broadcast traffic on the network segment
where the traffic originates. It is not routed beyond that segment. Layer 2 multicast traffic
optimization features such as IGMP snooping are not supported. Layer 3 multicast (such as
Protocol Independent Multicast) is not supported in VMware Cloud on AWS.
VMware Cloud on AWS Networking and Security
VMware by Broadcom 10

MTU Considerations for Internal and External Traffic
Network traffic internal to the SDDC (including traffic to and from the Connected VPC) supports
an MTU of up to 8900 bytes. Traffic to the MGW is generally limited to 1500 bytes because
management appliance interfaces use an MTU of 1500. Other MTU defaults are listed in VMware
Configuration Maximums. The following guidelines apply to MTU values throughout the SDDC
network:
n SDDC group and DX share the same interface so must use the lower MTU value (8500 bytes)
when both connections are in use.
n All VM NICs and interfaces on the same segment need to have the same MTU.
n MTU can differ between segments as long as the endpoints support PMTUD and any firewalls
in the path permit ICMP traffic.
n The layer 3 (IP) MTU must be less than or equal to the underlying layer 2 connection's
maximum supported packet size (MTU) minus any protocol overhead. In VMware Cloud on
AWS this is the NSX segment, which supports layer 3 packets with an MTU of up to 8900
bytes.
Understanding SDDC Network Performance
For a detailed discussion of SDDC network performance, please read the VMware Cloud Tech
Zone Designlet Understanding VMware Cloud on AWS Network Performance.
Read the following topics next:
n Features Supported with NSX
Features Supported with NSX
NSX supports a wide range of networking and security solutions.
NSX was designed specifically to support diverse data center environments at scale and provide
robust capabilities for containers and the cloud.
Note NSX Configuration Maximums are now included in VMware Configuration Maximums.
Networking and Connectivity Features
NSX provides all the networking capabilities required by workloads running in the SDDC. These
capabilities allow you to:
n Deploy networks (L2, L3, and isolated) and define subnets and gateways for the workloads
that will reside there.
n L2VPNs extend your on-premises L2 domains to the SDDC, enabling workload migration
without IP address changes.
VMware Cloud on AWS Networking and Security
VMware by Broadcom 11
n Route-based IPsec VPNs can connect to on-premises networks, VPCs, or other SDDCs.
Route-based VPNs use BGP to learn new routes as networks become available.
n Policy-based IPsec VPNs can also be used to connect to on-premises networks, VPCs, or
other SDDCs.
n Isolated networks have no uplinks, and provide access only to those VMs connected to
them.
n Use AWS Direct Connect (DX) to carry traffic between on-premises and SDDC networks
over high bandwidth, low latency connectivity. You can optionally use a route-based VPN as
backup for DX traffic.
n Enable native DHCP selectively for network segments or use DHCP relay to link with an
on-premises IPAM solution.
n Create multiple DNS zones, allowing use of different DNS servers for network subdomains.
n Take advantage of distributed routing, managed by an NSX kernel module running on the
host where the workload resides, so workloads can efficiently communicate with each other.
Security Features
NSX security features include network address translation (NAT) and advanced firewall
capabilities.
n Source NAT (SNAT) is automatically applied to all workloads in the SDDC to enable Internet
access. To provide a secure environment, Internet access is blocked at edge firewalls, but
firewall policy can be changed to allow managed access. You can also request a public IP for
workloads and create custom NAT policies for them.
n Edge firewalls run on the management and compute gateways. These stateful firewalls
examine all traffic into and out of the SDDC.
n Distributed Firewall (DFW) is a stateful firewall that runs on all SDDC hosts. It provides
protection for traffic within the SDDC and enables micro-segmentation to allow fine-grained
control over traffic between workloads.
Network Operations Tools
NSX also provides several popular network operations management tools.
n Port mirroring can send mirrored traffic from a source to a destination appliance in the SDDC
or your on-premises network.
n IPFIX supports segment-specific network traffic analysis by sending traffic flows to an IPFIX
collector.
VMware Cloud on AWS Networking and Security
VMware by Broadcom 12

Using the Networking and
Security Dashboard
2
The Networking and Security dashboard provides a single-page view of SDDC networking and
security status with links to NSX Manager network management functions.
Important The legacy Networking & Security view is deprecated as of SDDC version 1.22
and will be removed in a future release. Until then, you can temporarily revert to the legacy
Networking & Security view by clicking Switch View in the Networking and Security dashboard
banner.
Information in the Dashboard View
The dashboard view provides information about SDDC connectivity, Management and Compute
gateways, and your cloud provider.
VPN
This card summarizes information about VPNs in the SDDC. Route-based and policy-based
IPsec VPNs are supported. Either type of VPN can connect to the SDDC over the Internet.
A route-based VPN can also connect to the SDDC over AWS Direct Connect. You can
also configure a Layer 2 VPN, which can be especially useful for workload migration See
Configure a VPN Connection Between Your SDDC and On-Premises Data Center for more
information about VPN types and how to configure them.
Direct Connect
This card shows the status of the SDDC's Direct Connect connection if one exists. AWS
Direct Connect (DX) is a service provided by AWS that creates a high-speed, low latency
connection between your on-premises data center and AWS services. When you configure
AWS Direct Connect, VPNs can route traffic over DX instead of the public Internet.
Because DX implements Border Gateway Protocol (BGP) routing, use of an L3VPN for the
management network is optional when you configure DX. DX traffic is not encrypted. If you
want to encrypt that traffic, configure an IPsec VPN that uses DX and a private IP address.
See Configure AWS Direct Connect Between Your SDDC and On-Premises Data Center for
more information about AWS Direct Connect.
Transit Connect
VMware by Broadcom
13
If this SDDC is a member of an SDDC group, this card shows the status of the VMware
Transit Connect connection for the group. An SDDC deployment group uses VMware Transit
Connect to provide high-bandwidth, low-latency connections between SDDCs in the group.
An SDDC group can include VPCs you own. See Creating and Managing SDDC Deployment
Groups with VMware Transit Connect™.
Management Gateway
This card shows the status of the SDDC's Management Gateway (MGW) and subnets.
The MGW is a Tier-1 router that handles routing and firewalling for vCenter and other
management appliances running in the SDDC. Management gateway firewall rules run on
the MGW and control access to management VMs. In the default configuration, these rules
block all inbound traffic to the management network. See Configure Management Gateway
Networking and Security for more information.
Default Compute Gateway
This card shows the status of the SDDC's Compute Gateway and compute network
segments. The SDDC Compute compute network includes one or more segments and
supports the DNS, DHCP, and security (gateway firewall and distributed firewall) services
that manage network traffic for workload VMs. See
Configure Compute Gateway Networking
and Security for more information.
Cloud Provider
This card provides a superset of the information available on the SDDC Connected VPC
page.
VMware Cloud on AWS Networking and Security
VMware by Broadcom 14
Configuring VMware Cloud on
AWS Networking and Security
Using NSX
3
Follow this workflow to configure NSX networking and security in your SDDC.
Procedure
1 SDDC Network Administration with NSX Manager
You can use either the NSX Web UI or the VMware Cloud Console Networking & Security
tab to manage your SDDC networks.
2 Connecting Your On-Premises SDDC to Remote Networks
To connect your VMware Cloud on AWS SDDC to your on-premises data center or another
remote network, you can create a VPN that uses the public Internet, a VPN that uses AWS
Direct Connect, or just use AWS Direct Connect alone.
3 Configure Management Gateway Networking and Security
The management network and Management Gateway are largely preconfigured in your
SDDC, but you'll still need to configure access to management network services like vCenter
and HCX and create management gateway firewall rules to allow traffic between the
management network and other networks, including your on-premises networks and other
SDDC networks.
4 Configure Compute Gateway Networking and Security
Compute Gateway networking includes a compute network with one or more segments and
the DNS, DHCP, and security (gateway firewall and distributed firewall) configurations that
manage network traffic for workload VMs. It can also include a layer 2 VPN and extended
network that provides a single broadcast domain that spans your on-premises network and
your SDDC workload network.
5 Creating and Managing SDDC Deployment Groups with VMware Transit Connect™
An SDDC deployment group uses VMware Transit Connect to provide high-bandwidth, low-
latency connections between SDDCs in the group. An SDDC group can include VPCs you
own. You can also add an AWS Direct Connect Gateway (DXGW) to provide connectivity
between group members and your on-premises SDDCs.
VMware by Broadcom
15
6 Add a Custom Tier-1 Gateway to a VMware Cloud on AWS SDDC
Every new VMware Cloud on AWS SDDC includes a default Tier-1 gateway named the
Compute Gateway (CGW). You can create and configure additional custom Tier-1 gateways
if you need them. Each Tier-1 gateway sits between the SDDC Tier-0 gateway and an
arbitrary number of compute network segments.
7 Enabling and Using IPv6 in SDDC Networks
Beginning with SDDC Version 1.22, you can enable dual-stack (IPv4 and IPv6) networking in
a new SDDC.
8 Configure a Multi-Edge SDDC With Traffic Groups
In the default configuration, your SDDC network has a single edge (T0) router through
which all North-South traffic flows. This edge supports the default traffic group, which is
not configurable. If you need additional bandwidth for the subset of this traffic routed to
SDDC group members, a Direct Connect Gateway attached to an SDDC group, VMware HCX
Service Mesh, or to the Connected VPC, you can reconfigure your SDDC to be Multi-Edge by
creating traffic groups, each of which creates an additional T0 router.
9 Enable AWS Managed Prefix List Mode for the Connected Amazon VPC
AWS Managed Prefix List Mode can simplify route table management in a Multi-Edge SDDC
and enable support in any SDDC for custom route tables and route aggregation.
10 Aggregate and Filter Routes to Uplinks
Use route aggregation and egress filtering to control the set of routes advertised to SDDC
network uplinks like Direct Connect, VMware Transit Connect and the Connected VPC. You'll
need this in cases where you have to reduce the number of entries in a VPC route table or
limit the set of routes that are advertised to uplinks.
11 View Routes Learned and Advertised over VMware Transit Connect
In an SDDC that is a member of an SDDC Group, you can open the Transit Connect page to
view routes learned and advertised by the VMware Transit Connect instance created for the
group.
12 View Statistics and Manage Settings for Uplinks
The Global Configuration page includes controls that allow you to view traffic statistics and
manage Maximum Transmissible Unit (MTU) and Unicast Reverse Path Forwarding (URPF)
settings for SDDC network uplinks.
13 Working With Inventory Groups
VMware Cloud on AWS network administrators can use NSX inventory objects to define
collections of services, groups, context profiles, and virtual machines to use in firewall rules.
14 Managing Workload Connections
Workload VMs on routed segments or HCX extended networks with MON enabled can
connect to the Internet by default. NAT rules, Compute Gateway firewall rules, and
distributed firewall rules, as well as default routes advertised by a VPN, DX, or VTGW
connection all give you fine-grained control over Internet access.
VMware Cloud on AWS Networking and Security
VMware by Broadcom 16

SDDC Network Administration with NSX Manager
You can use either the NSX Web UI or the VMware Cloud Console Networking & Security tab to
manage your SDDC networks.
NSX Manager supports a superset of the features found on the Networking & Security tab. See
NSX Manager in the
NSX Data Center Administration Guide
for information about how to use
NSX Manager.
Accessing NSX Manager
You can use a VPN to access the local NSX manager at its private IP address, or use any browser
to access it over the Internet at its public IP address. See Open NSX Manager. You can also
access the local NSX manager over Direct Connect.
Note Many NSX workflows start by telling you to "log in with admin privileges to an NSX
Manager." When you click OPEN NSX MANAGER in the VMware Cloud Console and choose
ACCESS VIA THE INTERNET, you can skip this step. This option gives you access to the SDDC
NSX manager with the rights included in your VMware Cloud on AWS organization role. The NSX
Cloud Admin role has admin access to NSX. The the NSX Cloud Auditor has read-only access
to NSX. See Assign NSX Service Roles to Organization Members for more information on service
roles and how to assign them.
If you click OPEN NSX MANAGER and log in to NSX via the internal network, your role is
determined by your NSX credentials, not your organization role.
Workflow Navigation
The Networking & Security tab combines NSX Networking page features like VPN, NAT, and
DHCP with Security page features like firewalls and features from other NSX pages including
Inventory, Plan & Troubleshoot, and System. In this publication, references to NSX user interface
items apply to both the NSX Manager Web UI and the VMware Cloud Console Networking &
Security tab.
Use this table to map starting points for workflows in this publication to the appropriate items in
the Networking & Security tab and NSX manager
Table 3-1. SDDC Network Administration Workflows
Workflow Networking & Security Tab NSX
Overview Overview Overview
Create or Modify a Network Segment Network > Segments Networking > Connectivity >
Segments
Configure a VPN Connection
Between Your SDDC and On-
Premises Data Center
Network > VPN Networking > Network Services >
VPN
Create or Modify NAT Rules Network > NAT Networking > Network Services >
NAT
VMware Cloud on AWS Networking and Security
VMware by Broadcom 17

Table 3-1. SDDC Network Administration Workflows (continued)
Workflow Networking & Security Tab NSX
Add a Custom Tier-1 Gateway to a
VMware Cloud on AWS SDDC
Network > Tier-1 Gateways Networking > Connectivity > Tier-1
Gateways
Configure a Multi-Edge SDDC With
Traffic Groups
Network > Transit Connect Networking > Cloud Services >
Transit Connect
Configure AWS Direct Connect
Between Your SDDC and On-
Premises Data Center
System > Direct Connect Networking > Cloud Services >
Direct Connect
View Connected VPC Information
and Troubleshoot Problems With the
Connected VPC
System > Connected VPC Networking > Cloud Services >
Connected VPC
Request or Release a Public IP
Address
System > Public IPs Networking > Cloud Services >
Public IPs
Configure DNS Services System > DNS Networking > IP Management > DNS
Configure Segment DHCP Properties System > DHCP Networking > IP Management >
DHCP
Add or Modify Management Gateway
Firewall Rules, Add or Modify
Compute Gateway Firewall Rules
Security > Gateway Firewall Security > Gateway Firewall
Add or Modify Distributed Firewall
Rules
Security > Distributed Firewall Security > Distributed Firewall
Chapter 5 About VMware vDefend
Firewall Features
Security > Distributed IDS/IPS Security > Distributed IDS/IPS
Working With Inventory Groups Inventory Inventory
Chapter 4 Configure Monitoring and
Troubleshooting Features
Tools Plan & Troubleshoot
Open NSX Manager
The SDDC NSX Manager is accessible at a public IP address reachable by any browser that can
connect to the Internet. Click OPEN NSX MANAGER on the SDDC Summary page.
The SDDC NSX Manager also has a private IP address on the management network, which
is protected by the management gateway (MGW). By default, the MGW blocks traffic to all
management network destinations, including NSX, from all sources. To access the local NSX
Manager at its private IP address, you must add management gateway firewall rules that allow
only secure traffic from trusted sources. You can use any of the following connection types to
connect to the SDDC NSX Manager at a private IP address:
n Configure AWS Direct Connect Between Your SDDC and On-Premises Data Center
This option provides a dedicated connection between your enterprise and the SDDC. It can
be combined with an IPsec VPN to encrypt traffic.
n Configure a VPN Connection Between Your SDDC and On-Premises Data Center
VMware Cloud on AWS Networking and Security
VMware by Broadcom 18

This option provides an encrypted connection between your enterprise and the SDDC.
If you can't use Direct Connect or a VPN, you can access the local NSX manager over the
Internet at its public IP address. All traffic to the local NSX Manager public IP is encrypted and
authenticated, which minimizes the risk of tampering with this connection or its traffic outside of
your private network. The Settings tab for your SDDC provides connection and authentication
details for connecting to the local NSX manager.
Note In an SDDC where VMware Tanzu Kubernetes Grid has been enabled, NSX Manager
can display a Load Balancers tab. Services from this load balancer are available only to Tanzu
Kubernetes Grid workloads. See VMware Knowledge Base article 86368 for more information.
Prerequisites
This operation is restricted to users who have a VMware Cloud on AWS service role of NSX
Cloud Admin or NSX Cloud Auditor. See Assign Roles to an Organization Member for more
information on VMware Cloud on AWS service roles and how to assign them.
n An NSX service role is required for users to access NSX manager using SSO authentication
(either the "Private URL (Log in through VMware Cloud Services)" or "Public URL" and/or
when using the "Open NSX Manager button").
n When accessing the NSX Manager directly using either of the NSX Manager URLs, a VMware
Cloud on AWS Service Role such as Administrator or Administrator (Delete Restricted ) is
not required as long as the user has one of the NSX roles mentioned in Assign Roles to an
Organization Member.
n When accessing the NSX Manager using "Private URL (Log in through NSX Manager
credentials)", it is also possible to assign NSX roles to LDAP users or groups in the NSX
Manager directly, or by using the predefined system roles. Predefined system roles do not
require a VMware Cloud on AWS or NSX role assigned to the user in the CSP if the user has
been granted a role directly from NSX Manager.
Procedure
1 Log in to VMware Cloud Services at https://vmc.vmware.com.
2 Click Inventory > SDDCs, then pick an SDDC card and click VIEW DETAILS.
3 Click the OPEN NSX MANAGER button on the SDDC card to open the local NSX Manager at
its default public IP address.
You are logged in to NSX using your VMware Cloud on AWS credentials.
VMware Cloud on AWS Networking and Security
VMware by Broadcom 19

4 If your SDDC includes a VPN or DX connection and you want to access NSX Manager at its
private IP address, create a Management Gateway firewall rule that allows HTTPS traffic from
the VPN or DX to the local NSX Manager, then use a browser to open a connection to one of
the NSX Manager URLs listed on the Settings tab.
a Click the OPEN NSX MANAGER button and create the firewall rule.
See Add or Modify Management Gateway Firewall Rules for more information about
how to create a Management Gateway firewall rule. The rule must have the following
parameters:
MGW Firewall Rule Property Value
Sources An IP address or CIDR block in your on-premises data center.
Important Although you can select Any as the source address
in a firewall rule, using Any as the source address in this firewall
rule can enable attacks on your NSX Manager and may lead
to compromise of your SDDC. As a best practice, configure
this firewall rule to allow access only from trusted source
addresses.
Destinations The NSX Manager system-defined group.
Services HTTPS (TCP 443)
Action Allow
b Use a browser to open a connection to NSX.
Expand the NSX Manager URLs on the Settings tab to see the URLS and accounts that
you can use.
Access NSX Manager via the Internet
This URL contains the local NSX Manager's public IP address. We use this address when you
click the OPEN NSX MANAGER button.
Access NSX Manager via internal network
This is the NSX Manager's Private IP address on the management subnet. A management
gateway firewall rule like the one shown in 4.a allows traffic to this address.
If you cannot access NSX Manager via the internal network even though you have created
the necessary firewall rules, the problem might be caused by transient network issues. Click
TRY AGAIN to re-try access via the internal network, or open a browser and connect to
NSX Manager at its public URL. NSX private and public URLs are listed on the SDDC Console
Settings page.
URL to access via internal network (Log in through VMware Cloud Services)
Open this URL in a browser and log in to NSX manager using your VMware Cloud on AWS
credentials.
URL to access via internal network (Log in through NSX Manager credentials)
VMware Cloud on AWS Networking and Security
VMware by Broadcom 20

Open this URL in a browser and log in using the credentials of the NSX Manager Admin User
Account (to perform all tasks related to deployment and administration of NSX) or the NSX
Manager Audit User Account (to view NSX service settings and events).
c (Optional) Change the NSX manager default access to use the internal network.
After you have configured access to NSX manager via the internal network, you can open
the SDDC Settings tab and change the NSX Manager button default access from Via the
Internet (Public) to Via internal network (Private). After you make this change, clicking
the OPEN NSX MANAGER button opens the local NSX Manager at its private IP address
on the internal network.
Assign NSX Service Roles to Organization Members
Grant users in your organization an NSX service role to allow them to view or configure NSX
features in the SDDC.
Unlike organization roles, which specify the privileges that an organization member has over
organization assets, service roles specify the privileges that an organization member has when
accessing
VMware Cloud Services that the organization uses. All service roles can be assigned
and changed by an organization owner. When multiple roles are assigned to an organization
member, the effective access granted is based on the union of the rights on all assigned roles.
For more about service roles available in VMware Cloud on AWS, see Assign a VMware Cloud on
AWS Service Role to an Organization Member in
VMware Cloud on AWS Getting Started
.
The following NSX service roles are defined in SDDCs at version 1.24 and later.
Note The NSX Cloud Admin and NSX Cloud Auditor roles are not automatically assigned to an
organization member. An organization owner can use VMware Cloud Services to assign them, or
you can follow the steps in Assign NSX Roles from an LDAP Identity Source to assign them to
organization members who have LDAP accounts.
NSX Cloud Admin
This role can perform all tasks related to deployment and administration of the NSX service.
NSX Cloud Auditor
This role can view NSX service settings and events but cannot make any changes to the
service.
NSX Security Admin
This role can perform all tasks accessible from the NSX Security tab. This role cannot make
role assignments.
NSX Security Auditor
This role can view but not modify settings accessible from the NSX Security tab.
NSX Network Admin
VMware Cloud on AWS Networking and Security
VMware by Broadcom 21

This role can perform all tasks accessible from the NSX Networking tab. This role cannot
make role assignments.
NSX Network Auditor
This role can view but not modify settings accessible from the NSX Networking tab.
This table lists some of the tasks typically associated with each NSX service role.
Table 3-2. NSX Roles and Permitted Tasks
Task
NSX Cloud
Admin
NSX Cloud
Auditor
NSX Security
Admin
NSX Security
Auditor
NSX Network
Admin
NSX Network
Auditor
Open NSX
Manager
YES YES YES YES YES YES
Activate NSX
Advanced
Firewall
YES No YES No YES No
View SDDC
Networking &
Security tab
YES YES YES YES YES YES
Edit NSX
Default
Access
YES No YES No YES No
For a more detailed view of the rights associated with each NSXrole, see NSX Roles and
Permissions in VMware Cloud on AWS.
Prerequisites
You must be an Organization Owner to assign a service role to an organization member.
Procedure
1 Log in to the VMware Cloud Console at https://vmc.vmware.com.
2 Click the services icon and select Identity & Access Management.
3 Select a user and click Edit Roles.
4 Select the VMware Cloud on AWS service name under Assign Service Roles.
5 Select an NSX service role to assign.
Note When multiple service roles are assigned to an organization user, permissions are
granted for the most permissive role. For example, an organization member who has both
the NSX Cloud Admin and NSX Cloud Auditor roles is granted all the NSX Cloud Admin
permissions, which include those granted to the NSX Cloud Auditor role.
6 Click SAVE to save your changes.
VMware Cloud on AWS Networking and Security
VMware by Broadcom 22

What to do next
Ensure that any users whose roles have been changed log out of VMware Cloud Services and log
back in so that the changes take effect.
NSX Roles and Permissions in VMware Cloud on AWS
NSX roles in VMware Cloud on AWS have a specific set of permissions for operations on SDDC
network objects.
This table provides a detailed breakdown of the permissions that each NSX role has for
operations on VMware Cloud on AWS SDDC network objects.
Table 3-3. NSX Roles and Permissions in VMware Cloud on AWS
Operation
NSX Cloud
Admin
NSX Cloud
Auditor
NSX Network
Admin
NSX
Network
Auditor
NSX
Security
Admin
NSX
Security
Auditor
Networking > Connectivity
> Tier-1 Gateways
Full Access
Access
Read Full Access Read Read Read
Networking > Connectivity
> Segments
Full Access Read Full Access Read Read Read
Networking > Connectivity
> Segments > Segment
Profiles
Full Access Read Full Access Read Read Read
Networking > IP
Management > DNS
Full Access Read Full Access Read Read Read
System > Certificates Full Access Read None None Full Access Read
Networking > Network
Services > NAT
Full Access Read Full Access Read Full Access Read
Networking > Network
Services > VPN
Full Access Read Full Access Read Full Access * Read
Tools > IPv6 Profiles Full Access Read Full Access Read Read Read
Plan & Troubleshoot
> Traffic Analysis >
Traceflow
Full Access Read Full Access Full Access Full Access Full Access
Plan & Troubleshoot >
Traffic Analysis > Live
Traffic Analysis
Full Access Read Full Access Full Access Full Access Full Access
Plan & Troubleshoot >
Port mirroring
Full Access Read Full Access Read Read Read
Plan & Troubleshoot >
IPFIX > Switch IPFIX and
Collectors
Full Access Read Full Access Read Read Read
Security > Distributed
Firewall
Full Access Read Read Read Full Access Read
VMware Cloud on AWS Networking and Security
VMware by Broadcom 23

Table 3-3. NSX Roles and Permissions in VMware Cloud on AWS (continued)
Operation
NSX Cloud
Admin
NSX Cloud
Auditor
NSX Network
Admin
NSX
Network
Auditor
NSX
Security
Admin
NSX
Security
Auditor
Security > Gateway
Firewall
Full Access Read Read Read Full Access Read
Security > IDS/IPS Full Access Read Read Read Full Access Read
Inventory > Context
Profiles
Full Access Read Full Access Read Full Access Read
Inventory > Virtual
Machines
Read Read Read Read Read Read
Inventory > Services Full Access Read Full Access Read Full Access Read
Inventory > Profiles Full Access Read Full Access Read Full Access Read
Inventory > Virtual
Machines > Create and
Assign Tags to VM.
Full Access Read Read Read Full Access Read
Inventory > Groups Full Access Read Full Access Read Full Access Read
Networking > Direct
Connect
Full Access Read Full Access Read Read Read
Networking >Transit
Connect
Full Access Read Full Access Read Read Read
Networking > Connected
VPC
Full Access Read Full Access Read Read Read
Networking > Public IPs>
Request Public IP
Full Access Read Full Access Read Read Read
Networking > Traffic
Groups
Full Access Read Full Access Read Read Read
Networking > Settings >
Networking Profiles
Full Access Read Full Access Read Read Read
Networking > Settings >
Global Configuration
Full Access Read Full Access Read Read Read
Networking > Settings >
Global Configuration >
Route Aggregation
Full Access Read Full Access Read Read Read
Networking > Settings >
Global Configuration >
Route Filtering
Full Access Read Full Access Read Read Read
Networking > Settings >
Global Configuration >
Uplinks
Full Access Read Full Access Read Read Read
System > Identity Firewall
AD
Full Access Read Full Access Read Full Access Read
VMware Cloud on AWS Networking and Security
VMware by Broadcom 24

Table 3-3. NSX Roles and Permissions in VMware Cloud on AWS (continued)
Operation
NSX Cloud
Admin
NSX Cloud
Auditor
NSX Network
Admin
NSX
Network
Auditor
NSX
Security
Admin
NSX
Security
Auditor
System > User
Management
Full Access Read Read Read Read Read
System> Certificates Full Access Read None None Full Access Read
Integrated Services >
Advanced Firewall Add-
On Enable/Disable
Full Access Read Full Access Read Full Access Read
Note The NSX Security Admin role cannot create an L2VPN. While the role has Full Access
to policy-based VPN and L2VPN objects, it has Read-only access to route-based VPN objects.
Because an L2VPN requires a route-based VPN, this role is effectively unable to create an
L2VPN.
Assign NSX Roles from an LDAP Identity Source
If your administrative user accounts are maintained in an LDAP identity source (Active Directory
or OpenLDAP), you can configure the SDDC NSX Manager to enable LDAP users to access NSX
with roles you assign to their account or LDAP group in NSX Manager.
In most cases, all you'll need to do after setting up the LDAP service is point NSX Manager to any
domain controller on port 389 (LDAP) or 636 (LDAPS).
If you are using Active Directory (AD), and your AD forest is comprised of multiple subdomains,
you should point NSX Manager at your AD Global Catalog (GC) and configure each subdomain
as an alternative domain name in NSX. The Global Catalog service usually runs on your primary
AD domain controllers, and is a read-only copy of the most important information from all the
primary and secondary domains. The GC service runs on port 3268 (plaintext), and 3269 (LDAP
over TLS, encrypted).
For example, if your primary domain is "example.com" and you have subdomains
"americas.example.com" and "emea.example.com", you should:
1 Configure NSX Manager to use either the LDAP protocol on port 3268 or the LDAPS protocol
on port 3269.
2 Add alternative domain names "americas.example.com" and "emea.example.com" in the NSX
LDAP configuration.
Users in one of the subdomains must log in using the appropriate domain in their login name.
For example, user "john" in the emea.example.com domain, must log in with the username
VMware Cloud on AWS Networking and Security
VMware by Broadcom 25
Prerequisites
Your SDDC NSX Manager must be configured to authenticate users using a directory service
such as Active Directory over LDAP or OpenLDAP and have access to your LDAP identity source
through the Management Gateway firewall. See LDAP Identity Source in the
NSX Administration
Guide
.
Procedure
1 Log in to VMware Cloud Services at https://vmc.vmware.com.
2 Click Inventory > SDDCs, then pick an SDDC card and click OPEN NSX MANAGER. to open
the local NSX Manager at its default public IP address. You are logged in to NSX using your
VMware Cloud on AWS credentials. See Open NSX Manager for more information about
firewall rules that may be needed when connecting to NSX Manager from the VMware Cloud
Console.
3 Assign NSX roles from the NSX Manager LDAP identity source.
In the NSX Manager UI, click System > User Management. In the User Role Assignment tab,
click
ADD ROLE FOR LDAP USER and select an LDAP domain to search.
4 Specify NSX roles for the LDAP user or group. scopes.
a Enter the first few characters of a user or group name to search the LDAP directory, then
select a user or group from the list that appears.
b On the Set Roles/Scope page, assign an NSX role to the user or group.
You can assign either of these NSX roles:
Cloud Admin
This role can perform all tasks related to deployment and administration of the NSX service.
Cloud Operator
This role can view NSX service settings and events but cannot make any changes to the
service.
No other roles can be assigned here.
c Click APPLY.
d Click SAVE.
Results
LDAP group members with NSX roles can use this workflow to log into the NSX Manager private
URL using their LDAP credentials.
On the SDDC Settings tab, navigate to NSX Information and expand NSX Manager URLs. Click
the link shown under Private URL (Log in through NSX Manager credentials) and provide your
LDAP credentials.
VMware Cloud on AWS Networking and Security
VMware by Broadcom 26

Connecting Your On-Premises SDDC to Remote Networks
To connect your VMware Cloud on AWS SDDC to your on-premises data center or another
remote network, you can create a VPN that uses the public Internet, a VPN that uses AWS Direct
Connect, or just use AWS Direct Connect alone.
You can also take advantage of SDDC groups to use VMware Transit Connect and an AWS
Direct Connect Gateway to provide centralized connectivity between a group of VMware Cloud
on AWS SDDCs, including an on-premises SDDC. See Creating and Managing SDDC Deployment
Groups with VMware Transit Connect™.
Figure 3-1. SDDC Connections to your On-Premises Data Center
172.16.10.0/24
10.10.10.0/24
192.168.10.0/24
172.16.20.0/24
10.10.10.0/24
192.168.10.0/24
172.16.10.0/24
10.10.10.0/24
192.168.10.0/24
172.16.20.0/24
10.10.10.0/24
192.168.10.0/24
L3 VPN
L2 VPN
HCX
BGP (L3 VPN optional)
L2 VPN
HCX
Public Internet
AWS Direct Connect
L3 VPN / BGP
NSX L2 VPN
HCX
Data Center VMware Cloud on AWSInterconnection
AWS Direct Connect (DX)
AWS Direct Connect is a service provided by AWS that creates a high-speed, low latency
connection between your on-premises data center and AWS services. When you configure
AWS Direct Connect, VPNs can route traffic over DX instead of the public Internet.
Because DX implements Border Gateway Protocol (BGP) routing, use of an L3VPN for the
management network is optional when you configure DX. DX traffic is not encrypted. If you
want to encrypt that traffic, configure an IPsec VPN that uses DX and a private IP address.
Layer 3 (L3) VPN
A layer 3 VPN provides a secure connection between your on-premises data center and your
VMware Cloud on AWS SDDC over the public Internet or AWS Direct Connect. These IPsec
VPNs can be either route-based or policy-based. For the on-premises endpoint, you can use
any device that supports the settings listed in the IPsec VPN Settings Reference.
Layer 2 (L2) VPN
VMware Cloud on AWS Networking and Security
VMware by Broadcom 27
A layer 2 VPN provides an extended, or stretched, network with a single IP address space
that spans your on-premises data center and your SDDC and enables hot or cold migration of
on-premises workloads to the SDDC. You can create only a single L2VPN tunnel in any SDDC.
The on-premises end of the tunnel requires NSX. If you are not already using NSX in your
on-premises data center, you can download a standalone NSX Edge appliance to provide the
required functionality. An L2 VPN can connect your on-premises data center to the SDDC
over the public Internet or AWS Direct Connect.
VMware HCX
VMware HCX, a multi-cloud app mobility solution, is provided free to all SDDCs and facilitates
migration of workload VMs to and from your on-premises data center to your SDDC. For
more information about installing, configuring, and using HCX, see the Hybrid Migration with
HCX Checklist.
Configure AWS Direct Connect Between Your SDDC and On-
Premises Data Center
Use of AWS Direct Connect is optional. If traffic between your on-premises network and
your SDDC workloads requires higher speeds and lower latency than you can achieve with
a connection over the public Internet, configure VMware Cloud on AWS to use AWS Direct
Connect.
There are a couple of ways you can configure your VMware Cloud on AWS SDDC to take
advantage of AWS Direct Connect for traffic to and from your on-premises datacenter:
Configure Direct Connect to a private VIF.
AWS Direct Connect (DX) provides a dedicated network connection between your on-
premises network infrastructure and a virtual interface (VIF) in an AWS VPC. A private
VIF provides direct private access to your SDDC. Configure DX over a private VIF to
carry workload and management traffic, including VPN, HCX, and vMotion, between your
on-premises data center and your VMware Cloud on AWS SDDC. A DX connection provides
a private path for network communications and uses BGP to advertise routes between the
SDDC and your on-premises data center. Provisioning procedures for this VIF depend on the
type of DX connection you choose.
Associate a Direct Connect Gateway (DXGW) with your SDDC Group's VMware Managed
Transit Gateway.
If you have created an SDDC Group in your VMware Cloud on AWS organization, you can use
an AWS transit VIF to connect to that group's DXGW and provide DX connectivity between
your on-premises data center and all SDDCs in the group. See Attach a Direct Connect
Gateway to an SDDC Group.
Access AWS services over a public VIF
VMware Cloud on AWS Networking and Security
VMware by Broadcom 28
If you just want to use DX to access AWS services, you can do so over a public VIF. A
public VIF is transparent to the SDDC and requires no configuration in the SDDC itself. You
cannot use a public VIF to carry the same kinds of SDDC traffic (such as vMotion) that require
a private VIF or Direct Connect Gateway. When you have a public VIF configured to learn
AWS routes in the region where your SDDC is located, any connectivity from your SDDC to
a public IP in your on-premises data center will be included in the AWS routes for that region
and will traverse your DX. In this kind of configuration, a VPN connection over the public VIF
provides secure, private connectivity to the SDDC.
Set Up an AWS Direct Connect Connection
To set up an AWS Direct Connect connection, place an order through the AWS console to create
a Direct Connect connection in a region where VMware Cloud on AWS is available.
Connection Types
AWS offers three types of Direct Connect connections:
Dedicated Connection
A dedicated connection provides a physical Ethernet port dedicated to a single customer
that supports multiple private or public virtual interfaces (VIF) and 1 transit VIF.
To order a dedicated connection, ask a member of the AWS Direct Connect Partner Program
to provision a circuit to an AWS Direct Connect location in the same region as your SDDC.
Use your (customer-managed) AWS account to make this request. After the circuit has been
provisioned, create a hosted private VIF to your SDDC using the account shown in the AWS
Account ID field of the NSX Direct Connect page. In an SDDC that is a member of an SDDC
group, you can create a Direct Connect Gateway (DXGW) in your account and connect a
transit VIF to it from the DXGW. See Creating and Managing SDDC Deployment Groups with
VMware Transit Connect.
Hosted Connection
A hosted connection is a circuit shared by multiple customers and provisioned to your AWS
account by an AWS Direct Connect Partner. After the circuit has been provisioned, create
a hosted private VIF to your SDDC using the account shown in the AWS Account ID field
of the NSX Direct Connect page. If your hosted connection speed is 1Gbps or higher and
the SDDC that is a member of an SDDC group, you also have the option to create a Direct
Connect Gateway (DXGW) in your account, and connect a transit VIF to it from the DXGW.
See Creating and Managing SDDC Deployment Groups with VMware Transit Connect.
Hosted VIF
A hosted VIF is similar to a hosted connection but only provides the ability to create a single
VIF managed by a partner. The hosted private VIF must be created by the AWS Partner
using the account number shown in the AWS Account ID field of the NSX Direct Connect
page, rather than provisioned to your own AWS account.
VMware Cloud on AWS Networking and Security
VMware by Broadcom 29

For more information about using Direct Connect with VMware Cloud on AWS, see the VMware
Designlet VMware Cloud on AWS SDDC Connectivity With Direct Connect Private VIF. For more
information about connection types and how to set them up, see AWS Direct Connect Partners,
Getting Started with AWS Direct Connect.
Configure Direct Connect to a Private Virtual Interface for SDDC Management
and Compute Network Traffic
Create a private VIF over your DX to provide direct connectivity between your on-premises
network and the SDDC's workloads, ESXi Management, and Management Appliances using their
private IPs.
Create one private virtual interface (VIF) for each Direct Connect (DX) circuit you want to attach
to your SDDC. Each private VIF establishes a separate BGP session, which can be used in active/
standby or active/active (including ECMP) designs or used for private network segments. If you
want DX redundancy, attach separate private VIFs provisioned on different DX circuits to the
SDDC.
When connecting multiple private VIFs over separate DX circuits to an SDDC for high availability,
all the DX circuits must be created in the same AWS account and delivered to different
AWS
Direct Connect Locations. When you do this, AWS attempts to leverage separate internal
network paths for the DX connectivity to provide better redundancy. See High resiliency
and Active/Active and Active/Passive Configurations in AWS Direct Connect in the AWS
documentation. See VMware Configuration Maximums for limits on the number of network
segments advertised to all private VIFs. Route aggregation is supported to provide more
flexibility, but all VIFs will have the same networks advertised by the SDDC.
Important When you connect a DX private virtual interface or an SDDC Group to an SDDC,
all outbound traffic from ESXi hosts to destinations outside the SDDC network is routed over
that interface, regardless of other routing configurations in the SDDC. This includes vMotion and
vSphere replication traffic. You must ensure that inbound traffic to ESXi hosts is also routed over
the same path so that the inbound and outbound traffic paths are symmetrical. See Creating and
Managing SDDC Deployment Groups with VMware Transit Connect in the
VMware Cloud on AWS
Operations Guide
for more about VMware Transit Connect and the VMware Managed Transit
Gateway (VTGW).
Although routes learned from a route-based VPN are advertised over BGP to other route-based
VPNs, an SDDC advertises only its own networks to an SDDC group. It does not advertise routes
learned from VPNs. See AWS Direct Connect quotas in the AWS
Direct Connect User Guide
for
detailed information about limits imposed by AWS on Direct Connect, including limits on routes
advertised and learned over BGP.
When you create a private VIF in this way, you can attach it to any of your Organization’s SDDCs
in the region where you created the VIF. The private VIF must be created in the same region as
the DX circuit, and attached to an SDDC in that same region. After you attach it to an SDDC, the
VIF cannot be detached or reassigned to another SDDC. Instead, it must be deleted and a new
VIF created. Deleting an SDDC deletes any attached VIFs.
VMware Cloud on AWS Networking and Security
VMware by Broadcom 30
Prerequisites
n Ensure that you meet the prerequisites for virtual interfaces as described in Prerequisites for
Virtual Interfaces.
n If you want to use route-based VPN as the backup to Direct Connect, you'll also need to
set the Use VPN as backup to Direct Connect switch to Enabled as shown in Step 6. Policy-
based VPNs cannot be used to back up another connection.
Procedure
1 Log in to VMware Cloud Services at https://vmc.vmware.com.
2 Click Inventory > SDDCs, then pick an SDDC card and click VIEW DETAILS.
3 Click OPEN NSX MANAGER and log in with the NSX Manager Admin User Account shown
on the SDDC Settings page. See SDDC Network Administration with NSX Manager.
You can also use the VMware Cloud Console Networking & Security tab for this workflow.
4 Log in to the AWS Console and complete the
Creating a Hosted Private Virtual Interface
procedure under Create a Hosted Virtual Interface.
If you're using a hosted VIF (see Set Up an AWS Direct Connect Connection), work with your
AWS Direct Connect Partner to create the VIF in the account shown in the AWS Account ID
field of the Direct Connect page, then skip to Step 5 of this procedure. If you are using a
dedicated or hosted connection, take these steps first.
a For Virtual interface type, choose Private and make up a Virtual interface name.
b For the Virtual interface Owner field, select Another AWS account and use the AWS
Account ID from the NSX Direct Connect page.
c For VLAN, use the value provided by your AWS Direct Connect Partner.
VMware Cloud on AWS Networking and Security
VMware by Broadcom 31

d For BGP ASN, use the ASN of the on-premises router where this connection terminates.
This value must not be the same as the BGP Local ASN shown on the NSX Direct
Connect page.
e Expand Additional Settings and make the following choices:
Address family Select IPV4
Your router peer ip Specify the IP address of the on-premises end of this
connection (your router), or leave blank to have AWS
automatically assign an address that you'll need to
configure in your router.
Amazon router peer ip Specify the IP address of the AWS end of this
connection, or leave blank to have AWS automatically
assign an address that you'll need to configure in your
router.
BGP authentication key Specify a value or leave blank to have AWS generate
a key, which you'll need to configure in your router.
Jumbo MTU (MTU size 9001) The default MTU for all SDDC networks is 1500 bytes.
To enable DX traffic to this private VIF to use a larger
MTU, select Enable under Jumbo MTU (MTU size
9001). After the VIF has been created, you'll also need
to open the NSX Global Configuration page and set a
higher MTU value under Intranet Uplink, as described
in Specify the Direct Connect MTU. Enabling this in the
connection properties, even if you don't intend to use
it right away, makes it easier to take advantage of
jumbo frames in SDDC networks when you need them.
When the interface has been created, the AWS console reports that it is ready for
acceptance.
5 Open NSX Manager or the VMC Console Networking & Security tab. Click Direct Connect
and accept the virtual interface by clicking ATTACH.
Before it has been accepted, a new VIF is visible in all SDDCs in your organization. After you
accept the VIF, it is no longer visible in any other SDDC.
It can take up to 10 minutes for the BGP session to become active. When the connection is
ready, the State shows as Attached and the BGP Status as Up.
VMware Cloud on AWS Networking and Security
VMware by Broadcom 32

6 (Optional) Configure a route-based VPN as the backup to Direct Connect.
In the default configuration, traffic on any route advertised over BGP by both DX and a
route-based VPN uses the VPN by default. To have a route advertised by both DX and VPN
use DX by default and failover to the VPN when DX is unavailable click Direct Connect and
set the Use VPN as backup to Direct Connect switch to Enabled.
Note This configuration requires a route-based VPN. You cannot use a policy-based VPN as
a backup to Direct Connect. In an SDDC that is a member of an SDDC group, traffic over a
route that is advertised by both the DX private VIF and the group's VMware Managed Transit
Gateway (VTGW) will be routed over the VTGW.
The system requires a minute or so to update your routing preference. When the operation
completes, routes advertised by both DX and VPN default to the DX connection, using the
VPN only when DX is unavailable. Equivalent routes advertised by both DX and VPN prioritize
the VPN connection.
Results
A list of Advertised BGP Routes and Learned BGP Routes is displayed as the routes are learned
and advertised. Click the refresh icon to refresh these lists. All routed subnets in the SDDC are
advertised as BGP routes, along with this subset of management network subnets:
n Subnet 1 includes routes used by ESXi host vmks and router interfaces.
n Subnet 2 includes routes used for Multi-AZ support and AWS integration.
n Subnet 3 includes management VMs.
Disconnected and extended networks are not advertised. Networks attached to custom T1s are
not advertised. If route filtering is enabled then networks attached to the default CGW are also
not advertised.
Any route aggregations defined and applied to the DX will be advertised as defined. (See
Aggregate and Filter Routes to Uplinks).
The actual CIDR blocks advertised to the private VIFs depend on your management subnet CIDR
block. The following table shows the CIDR blocks for these routes in an SDDC that uses the
default management network CIDR of 10.2.0.0 in block sizes /16, /20, and /22.
Table 3-4. Advertised Routes for 10.2.0.0 Default MGW CIDR
MGW CIDR Subnet 1 Subnet 2 Subnet 3
10.2.0.0/23 10.2.0.0/24 10.2.1.0/26 10.2.1.128/25
10.2.0.0/20 10.2.0.0/21 10.2.8.0/23 10.2.12.0/22
10.2.0.0/16 10.2.0.0/17 10.2.128.0/19 10.2.192.0/18
VMware Cloud on AWS Networking and Security
VMware by Broadcom 33

What to do next
Ensure the on-premises vMotion interfaces are configured to use Direct Connect. See Configure
vMotion Interfaces for Use with Direct Connect.
Configure vMotion Interfaces for Use with Direct Connect
If you are using a Direct Connect connection between your on-premises data center and your
cloud SDDC, you must configure the vMotion interfaces for your on-premises hosts to route
vMotion traffic over the Direct Connect connection.
Prerequisites
Configure Direct Connect and create a private virtual interface.
Procedure
1 Select one of the following methods to configure the vMotion interface on each host in your
on-premises environment.
Option Description
Override the default gateway
(vSphere 7.0 and later)
For each host, edit the VMkernel adapter used for vMotion traffic, and
select the option to override the default gateway. Enter an IP address in
your on-premises vMotion subnet that is capable of routing traffic to the
on-premises side of the Direct Connect connection. See Edit a VMkernel
Adapter Configuration.
Configure the vMotion TCP/IP stack For each host:
a Remove any existing vMotion VMkernel adapters.
b Create a new VMkernel adapter and select the vMotion TCP/IP stack.
See Place vMotion Traffic on the vMotion TCP/IP Stack of an ESXi Host.
c Edit the host vMotion TCP/IP stack to change the routing to use an IP
address in your on-premises vMotion subnet that is capable of routing
traffic to the on-premises side of the Direct Connect connection. See
Change the Configuration of a TCP/IP Stack on a Host.
2 (Optional) Test connectivity between an on-premises host and a cloud SDDC host using
vmkping.
See VMware Knowledge Base article 1003728 for more information.
Configure Direct Connect to a Public Virtual Interface for Access to AWS
Services
If your on-premises workloads need access to AWS EC2 instances and services such as S3 over a
DX connection, configure a public virtual interface for that traffic in your VPC.
Although SDDC management and workload traffic over DX must use a private VIF or DX
Gateway, you can create a DX connection from your on-premises datacenter to a public VIF
if you just want to access AWS services from your on-premises workloads or for any purpose
that requires a connection to the global AWS backbone.
VMware Cloud on AWS Networking and Security
VMware by Broadcom 34
Prerequisites
n Ensure that you meet the prerequisites for virtual interfaces as described in Prerequisites for
Virtual Interfaces.
Procedure
1 Log in to the AWS Console. and complete the steps for creating a hosted public virtual
interface under Create a Hosted Virtual Interface.
a In the Interface Owner field, select My AWS Account.
b Specify Your router peer IP and Amazon router peer IP.
c Select Auto-generate BGP key and list any on-premises routes that you want advertised
on the AWS backbone in Prefixes you want to advertise.
When the interface has been created, the AWS Console reports that it is ready for
acceptance.
2 Open NSX Manager or the VMC Console Networking & Security tab. Click Direct Connect
and accept the virtual interface by clicking ATTACH.
Before it has been accepted, a new VIF is visible in all SDDCs in your organization. After you
accept the VIF, it is no longer visible in any other SDDC.
It can take up to 10 minutes for the BGP session to become active. When the connection is
ready, the State shows as Attached and the BGP Status as Up.
Specify the Direct Connect MTU
The default Maximum Transmissible Unit (MTU) for all SDDC networks is 1500 bytes. When you
use Direct Connect and a private VIF, you can configure a larger MTU (up to 8900 bytes) on the
SDDC uplink if your DX connection supports it.
You can enable DX to use a larger MTU when you create the VIF. If you do this, you'll also need
to open the NSX Global Configuration page and set a higher Intranet MTU Value.
This larger (or Jumbo) MTU value applies only to DX connections over a private VIF and any
SDDC group connections you have configured. Any VPN, whether or not it connects over DX,
uses an MTU of 1500, regardless of other settings. To be sure that workload VMs can take
advantage of the larger MTU, verify that workload VMs using the DX connection, along with any
other interfaces along the workload's connection path, use an MTU that matches the Intranet
MTU Value.
All network interfaces on a segment should be set to the same MTU value, or communication
problems can occur. Using different MTU values on different segments is generally acceptable,
as long as path MTU discovery (PMTUD) is enabled and ICMP traffic is permitted between the
networks. If an SDDC group is configured, the Intranet Interface MTU should not be set above
8500 bytes (the maximum supported for SDDC Group traffic). In an SDDC that is part of an SDDC
group and also has a DX connection, the maximum usable MTU for all traffic is 8500 bytes, since
both the DX private VIF and the SDDC group connection share the same Intranet Interface.
VMware Cloud on AWS Networking and Security
VMware by Broadcom 35

Procedure
1 Log in to VMware Cloud Services at https://vmc.vmware.com.
2 Click Inventory > SDDCs, then pick an SDDC card and click VIEW DETAILS.
3 Click OPEN NSX MANAGER and log in with the NSX Manager Admin User Account shown
on the SDDC Settings page. See SDDC Network Administration with NSX Manager.
You can also use the VMware Cloud Console Networking & Security tab for this workflow.
4 On the Global Configuration page, click the pencil icon ( ), set a higher MTU value in the
Intranet Uplink field, then click SAVE.
The value you set must be less than or equal to the smallest MTU value for all your DX
virtual interfaces. In practice this means that you should set all your VIFs to the same MTU
value (the default, at 1500 or Jumbo, at 9001), since having any VIF that does not support a
Jumbo MTU effectively limits all DX connections to an MTU of 1500. Mixing MTU sizes within
a network can lead to packet fragmentation and other problems that result in poor network
performance.
Note To leave room for Geneve (Generic Network Virtualization Encapsulation) headers, the
SDDC intranet MTU is capped at 8900 bytes to avoid packet fragmentation at the VIF.
Configure a VPN Connection Between Your SDDC and On-Premises
Data Center
Configure a VPN to provide a secure connection to your SDDC over the public Internet or AWS
Direct Connect. Route-based and policy-based IPsec VPNs are supported. Either type of VPN
can connect to the SDDC over the Internet. A route-based VPN can also connect to the SDDC
over AWS Direct Connect.
You can also configure a Layer 2 VPN, which can be especially useful for workload migration.
For more information about IPsec VPNs, see the VMware Designlet VMware Cloud on AWS
SDDC Connectivity With IPSec VPN.
What to read next
n Create a Route-Based VPN
A route-based VPN creates an IPsec tunnel interface and routes traffic through it as dictated
by the SDDC routing table. A route-based VPN provides resilient, secure access to multiple
VMware Cloud on AWS subnets. When you use a route-based VPN, new routes are added
automatically when new networks are created.
n Create a Policy-Based VPN
A policy-based VPN creates an IPsec tunnel and a policy that specifies how traffic uses it.
When you use a policy-based VPN, you must update the routing tables on both ends of the
network when new routes are added.
VMware Cloud on AWS Networking and Security
VMware by Broadcom 36

n Configure Certificate-Based Authentication for an IPSec VPN
A certificate-based VPN uses digital certificates rather than pre-shared keys during IKE
negotiation.
n Configure a Layer 2 VPN and Extended Network Segment
You can use a VMware Cloud on AWS layer 2 Virtual Private Network (L2VPN) to extend
your on-premises network to one or more VLAN-based networks in your SDDC. This
extended network is a single subnet with a single broadcast domain. You can use it to
migrate VMs to and from your cloud SDDC without having to change their IP addresses.
n View VPN Tunnel Status and Statistics
Your SDDC NSX Manager provides status and statistics for IPsec VPNs and L2VPN
segments.
n IPsec VPN Settings Reference
The on-premises end of any IPsec VPN must be configured to match the settings you
specified for the SDDC end of that VPN.
n Troubleshooting VPN Problems in VMware Cloud on AWS
VPN problems can include authentication errors (IKE phase 1 and phase 2) and connectivity
("Peer not responding") issues.
Create a Route-Based VPN
A route-based VPN creates an IPsec tunnel interface and routes traffic through it as dictated by
the SDDC routing table. A route-based VPN provides resilient, secure access to multiple VMware
Cloud on AWS subnets. When you use a route-based VPN, new routes are added automatically
when new networks are created.
Note This topic explains how to create a route-based VPN that connects to the SDDC's default
public or private IP. If your SDDC has additional Tier-1 gateways (see Add a Custom Tier-1
Gateway to a VMware Cloud on AWS SDDC), you can click OPEN NSX MANAGER and add
IPv4 or IPv6 VPN services that terminate on those gateways. See Adding VPN Services in the
NSX Data Center Administration Guide
.
In VMware Cloud on AWS, VPN services to a Tier-1 gateway do not support BGP.
Route based VPNs in your VMware Cloud on AWS SDDC use an IPsec protocol to secure traffic
and the Border Gateway Protocol (BGP) to discover and propagate routes as networks are
added and removed. To create a route-based VPN, you configure BGP information for the local
(SDDC) and remote (on-premises) endpoints, then specify tunnel security parameters for the
SDDC end of the tunnel.
Procedure
1 Log in to VMware Cloud Services at https://vmc.vmware.com.
2 Click Inventory > SDDCs, then pick an SDDC card and click VIEW DETAILS.
VMware Cloud on AWS Networking and Security
VMware by Broadcom 37

3 Click OPEN NSX MANAGER and log in with the NSX Manager Admin User Account shown
on the SDDC Settings page. See SDDC Network Administration with NSX Manager.
You can also use the VMware Cloud Console Networking & Security tab for this workflow.
4 Click OPEN NSX MANAGER and log in with the NSX Manager Admin User Account shown
on the SDDC Settings page. See SDDC Network Administration with NSX Manager.
You can also use the VMware Cloud Console Networking & Security tab for this workflow.
5 (Optional) Change the default local Autonomous System Number (ASN).
All route-based VPNs in the SDDC default to ASN 65000. The local ASN must be different
from the remote ASN. (iBGP, which requires the local and remote ASNs to be the same, is not
supported in SDDC networks.) To change the default local ASN, click EDIT LOCAL ASN, enter
a new value in the range 64521 to 65534 (or 4200000000 to 4294967294) and click APPLY.
Note Any change in this value affects all route-based VPNs in this SDDC.
6 Click VPN > Route Based > ADD VPN and give the new VPN a Name and optional
Description.
7 Select a Local IP Address from the drop-down menu.
n If this SDDC is member of an SDDC group or has been configured to use AWS Direct
Connect, select the private IP address to have the VPN use that connection rather than
a connection over the Internet. Note that VPN traffic over Direct Connect or VMware
Managed Transit Gateway (VTGW) is limited to the default MTU of 1500 bytes even if the
link supports a higher MTU. See Configure Direct Connect to a Private Virtual Interface for
SDDC Management and Compute Network Traffic.
n Select the public IP address if you want the VPN to connect over the Internet.
8 For Remote Public IP, enter the address of your on-premises VPN endpoint.
This is the address of the device that initiates or responds to IPsec requests for this VPN. This
address must meet the following requirements:
n It must not already be in use for another VPN. VMware Cloud on AWS uses the same
public IP for all VPN connections, so only a single VPN connection (Route-based, Policy-
based, or L2VPN) can be created to a given remote public IP.
n It must be reachable over the Internet if you specified a public IP in Step 7.
n It must be reachable over VTGW or Direct Connect to a private VIF if you specified a
private IP in Step 7.
9 For BGP Local IP/Prefix Length, enter a network address from a CIDR block of size of /30
within the 169.254.0.0/16 subnet.
Some blocks in this range are reserved, as noted in Reserved Network Addresses. If you can't
use a network from the 169.254.0.0/16 subnet (due to a conflict with an existing network),
you must create a firewall rule that allows traffic from the BGP service to the subnet you
choose here. See Add or Modify Compute Gateway Firewall Rules.
VMware Cloud on AWS Networking and Security
VMware by Broadcom 38

The BGP Local IP/Prefix Length specifies both a local subnet and an IP address in it, so the
value you enter must be the second or third address in a /30 range and include the /30 suffix.
For example, a BGP Local IP/Prefix Length of 169.254.32.1/30 creates network 169.254.32.0
and assigns 169.254.32.1 as the local BGP IP (also known as the Virtual Tunnel Interface, or
VTI).
10 For BGP Remote IP, enter the remaining IP address from the range you specified in Step 9.
For example, if you specified a BGP Local IP/Prefix Length of 169.254.32.1/30, use
169.254.32.2 for BGP Remote IP. When configuring the on-premises end of this VPN, use
the IP address you specify for BGP Remote IP as its local BGP IP or VTI address.
11 For BGP Neighbor ASN, enter the ASN of your on-premises VPN gateway.
12 Choose an Authentication Mode.
n For PSK authentication, enter the Preshared Key string. The maximum key length is 128
characters. This key must be identical for both ends of the VPN tunnel.
n For Certificate-based authentication see Configure Certificate-Based Authentication for
an IPSec VPN.
13 Specify the Remote Private IP.
Leave this blank to use the Remote Public IP as the remote ID for IKE negotiation. If your
on-premises VPN gateway is behind a NAT device and/or uses a different IP for its local ID,
you need to enter that IP here.
14 Configure the Advanced Tunnel Parameters.
Parameter
Value
IKE Profile > IKE Encryption Select a Phase 1 (IKE) cipher that is supported by your
on-premises VPN gateway.
IKE Profile > IKE Digest Algorithm Select a Phase 1 digest algorithm that is supported by
your on-premises VPN gateway. The best practice is
to use the same algorithm for both the IKE Digest
Algorithm and the Tunnel Digest Algorithm.
Note If you specify a GCM-based cipher for IKE
Encryption, set IKE Digest Algorithm to None. The
digest function is integral to the GCM cipher. You must
use IKE V2 if you use a GCM-based cipher .
IKE Profile > IKE Version n Specify IKE V1 to initiate and accept the IKEv1
protocol.
n Specify IKE V2 to initiate and accept the IKEv2
protocol. You must use IKEv2 if you have specified
a GCM-based IKE Digest Algorithm.
n Specify IKE FLEX to accept either IKEv1 or IKEv2 and
then initiate using IKEv2. If IKEv2 initiation fails, IKE
FLEX will not fall back to IKEv1.
VMware Cloud on AWS Networking and Security
VMware by Broadcom 39

Parameter Value
IKE Profile > Diffie Hellman Select a Diffie Hellman group that is supported by your
on-premises VPN gateway. This value must be identical
for both ends of the VPN tunnel. Higher group numbers
offer better protection. The best practice is to select
group 14 or higher.
IPSec Profile > Tunnel Encryption Select a Phase 2 security association (SA) cipher that is
supported by your on-premises VPN gateway.
IPSec Profile Tunnel Digest Algorithm Select a Phase 2 digest algorithm that is supported by
your on-premises VPN gateway.
Note If you specify a GCM-based cipher for Tunnel
Encryption, set Tunnel Digest Algorithm to None. The
digest function is integral to the GCM cipher.
IPSec Profile > Perfect Forward Secrecy Enable or Disable to match the setting of your on-
premises VPN gateway. Enabling Perfect Forward
Secrecy prevents recorded (past) sessions from being
decrypted if the private key is ever compromised.
IPSec Profile > Diffie Hellman Select a Diffie Hellman group that is supported by your
on-premises VPN gateway. This value must be identical
for both ends of the VPN tunnel. Higher group numbers
offer better protection. The best practice is to select
group 14 or higher.
DPD Profile > DPD Probe Mode One of Periodic or On Demand.
For a periodic DPD probe mode, a DPD probe is sent
every time the specified DPD probe interval time is
reached.
For an on-demand DPD probe mode, a DPD probe is
sent if no IPSec packet is received from the peer site
after an idle period. The value in DPD Probe Interval
determines the idle period used.
DPD Profile > Retry Count Integer number of retries allowed. Values in the range 1 -
100 are valid. The default retry count is 10.
VMware Cloud on AWS Networking and Security
VMware by Broadcom 40

Parameter Value
DPD Profile > DPD Probe Interval The number of seconds you want the NSX IKE daemon
to wait between sending the DPD probes.
For a periodic DPD probe mode, the valid values are
between 3 and 360 seconds. The default value is 60
seconds.
For an on-demand probe mode, the valid values are
between 1 and 10 seconds. The default value is 3
seconds.
When the periodic DPD probe mode is set, the IKE
daemon sends a DPD probe periodically. If the peer site
responds within half a second, the next DPD probe is
sent after the configured DPD probe interval time has
been reached. If the peer site does not respond, then the
DPD probe is sent again after waiting for half a second.
If the remote peer site continues not to respond, the IKE
daemon resends the DPD probe again, until a response
is received or the retry count has been reached. Before
the peer site is declared to be dead, the IKE daemon
resends the DPD probe up to a maximum of times
specified in the Retry Count property. After the peer
site is declared dead,
NSX then tears down the security
association (SA) on the dead peer's link.
When the on-demand DPD mode is set, the DPD probe
is sent only if no IPSec traffic is received from the peer
site after the configured DPD probe interval time has
been reached.
DPD Profile
> Admin Status To enable or disable the DPD profile, click the Admin
Status toggle. By default, the value is set to Enabled.
When the DPD profile is enabled, the DPD profile is used
for all IPSec sessions in the IPSec VPN service that uses
the DPD profile.
TCP MSS Clamping To use TCP MSS Clamping to reduce the maximum
segment size (MSS) payload of the TCP session during
the IPsec connection, toggle this option to Enabled, then
select the TCP MSS Direction and optionally the TCP
MSS Value. See Understanding TCP MSS Clamping in the
NSX Data Center Administration Guide
.
15
(Optional) Under Advanced BGP Parameters, enter a BGP Secret that matches the one used
by the on-premises gateway.
16 (Optional) Tag the VPN.
See Add Tags to an Object in the
NSX Data Center Administration Guide
for more information
about tagging NSX objects.
17 Click SAVE.
VMware Cloud on AWS Networking and Security
VMware by Broadcom 41

Results
The VPN creation process might take a few minutes. When the route-based VPN becomes
available, the tunnel status and BGP session state are displayed. The following actions are
available to help you with troubleshooting and configuring the on-premises end of the VPN:
n Click DOWNLOAD CONFIG to download a file that contains VPN configuration details. You
can use these details to configure the on-premises end of this VPN.
n Click VIEW STATISTICS to view packet traffic statistics for this VPN. See View VPN Tunnel
Status and Statistics.
n Click VIEW ROUTES to open a display of routes advertised and learned by this VPN.
n Click DOWNLOAD ROUTES to download a list of Advertised Routes or Learned Routes in
CSV format.
What to do next
Create or update firewall rules as needed. Default Compute Gateway firewall rules allow the VPN
tunnel to establish and operate, but you must create a Compute Gateway firewall rule like this
one to allow your workload traffic to communicate through the VPN tunnel interface (VTI). This is
just an example. You'll need to provide your own values for
Sources and Destinations.
Name
Sources Destinations Services Applied To Action
Workload VPN
traffic
On-premises
users
Application
servers
HTTPS VPN Tunnel
Interface
Allow
To allow VPN traffic, you must specify VPN Tunnel Interface in the Applied to field. The All
Uplinks option does not include the VTI.
Create a Policy-Based VPN
A policy-based VPN creates an IPsec tunnel and a policy that specifies how traffic uses it. When
you use a policy-based VPN, you must update the routing tables on both ends of the network
when new routes are added.
Note This topic explains how to create a policy-based VPN that connects to the SDDC's
default public or private IP. If your SDDC has additional Tier-1 gateways (see Add a Custom Tier-1
Gateway to a VMware Cloud on AWS SDDC), you can click OPEN NSX MANAGER and add VPN
services that terminate on those gateways. See Adding VPN Services in the
NSX Data Center
Administration Guide
.
In VMware Cloud on AWS, VPN services to a Tier-1 gateway do not support BGP.
Policy-based VPNs in your VMware Cloud on AWS SDDC use an IPsec protocol to secure
traffic. To create a policy-based VPN, you configure the local (SDDC) endpoint, then configure
a matching remote (on-premises) endpoint. Because each policy-based VPN must create a new
IPsec security association for each network, an administrator must update routing information on
VMware Cloud on AWS Networking and Security
VMware by Broadcom 42

premises and in the SDDC whenever a new policy-based VPN is created. A policy-based VPN
can be an appropriate choice when you have only a few networks on either end of the VPN, or
if your on-premises network hardware does not support BGP (which is required for route-based
VPNs).
Important If your SDDC includes both a policy-based VPN and another connection such as
a route-based VPN, DX, or VTGW connectivity over the policy-based VPN will fail if any of
those other connections advertises the default route (0.0.0.0/0) to the SDDC. If none of those
other connections advertise the default route, all traffic matching the VPN's policy will flow over
the VPN even if the other connections provide a more specific route. In case of overlap, a
route-based VPN route is preferred over a policy-based VPN policy match. Networks configured
on a policy-based VPN cannot be used over any other connection. Traffic matching the VPN
policy is always sent to the VPN when it's enabled, regardless of the state of the VPN tunnel
itself, and will be dropped if the tunnel is down but the VPN admin state is enabled.
Procedure
1 Log in to the VMware Cloud Console at https://vmc.vmware.com.
2 Click Inventory > SDDCs, then pick an SDDC card and click VIEW DETAILS.
3 Click OPEN NSX MANAGER and log in with the NSX Manager Admin User Account shown
on the SDDC Settings page. See SDDC Network Administration with NSX Manager.
You can also use the VMware Cloud Console Networking & Security tab for this workflow.
4 Click VPN > Policy Based > ADD VPN and give the new VPN a Name and optional
Description.
5 Select a Local IP Address from the drop-down menu.
n If this SDDC is member of an SDDC group or has been configured to use AWS Direct
Connect, select the private IP address to have the VPN use that connection rather than
a connection over the Internet. Note that VPN traffic over Direct Connect or VMware
Managed Transit Gateway (VTGW) is limited to the default MTU of 1500 bytes even if the
link supports a higher MTU. See Configure Direct Connect to a Private Virtual Interface for
SDDC Management and Compute Network Traffic.
n Select the public IP address if you want the VPN to connect over the Internet.
6 Enter the Remote Public IP address of your on-premises gateway.
The address must not already be in use for another VPN. VMware Cloud on AWS uses
the same public IP for all VPN connections, so only a single VPN connection (Route-based,
Policy-based, or L2VPN) can be created to a given remote public IP. This address must be
reachable over the Internet if you specified a public IP in Step 5. If you specified a private IP,
it must be reachable over Direct Connect to a private VIF. Default gateway firewall rules allow
inbound and outbound traffic over the VPN connection, but you must create firewall rules to
manage traffic over the VPN tunnel.
VMware Cloud on AWS Networking and Security
VMware by Broadcom 43

7 Specify the Remote Networks that this VPN can connect to.
This list must include all networks defined as local by the on-premises VPN gateway. Enter
each network in CIDR format, separating multiple CIDR blocks with commas.
8 Specify the Local Networks that this VPN can connect to.
This list includes all routed compute networks in the SDDC, as well as the entire Management
network and the appliance subnet (a subset of the Management network that includes
vCenter and other management appliances, but not the ESXi hosts). It also includes the CGW
DNS Network, a single IP address used to source requests forwarded by the CGW DNS
service.
9 Choose an Authentication Mode.
n For PSK authentication, enter the Preshared Key string. The maximum key length is 128
characters. This key must be identical for both ends of the VPN tunnel.
n For Certificate-based authentication see Configure Certificate-Based Authentication for
an IPSec VPN.
10 (Optional) If your on-premises gateway is behind a NAT device, enter the gateway address
as the Remote Private IP.
This IP address must match the local identity (IKE ID) sent by the on-premises VPN gateway.
If this field is empty, the Remote Public IP field is used to match the local identity of the
on-premises VPN gateway.
11 Configure the Advanced Tunnel Parameters.
Parameter
Value
IKE Profile > IKE Encryption Select a Phase 1 (IKE) cipher that is supported by your
on-premises VPN gateway.
IKE Profile > IKE Digest Algorithm Select a Phase 1 digest algorithm that is supported by
your on-premises VPN gateway. The best practice is
to use the same algorithm for both the IKE Digest
Algorithm and the Tunnel Digest Algorithm.
Note If you specify a GCM-based cipher for IKE
Encryption, set IKE Digest Algorithm to None. The
digest function is integral to the GCM cipher. You must
use IKE V2 if you use a GCM-based cipher .
IKE Profile > IKE Version n Specify IKE V1 to initiate and accept the IKEv1
protocol.
n Specify IKE V2 to initiate and accept the IKEv2
protocol. You must use IKEv2 if you have specified
a GCM-based IKE Digest Algorithm.
n Specify IKE FLEX to accept either IKEv1 or IKEv2 and
then initiate using IKEv2. If IKEv2 initiation fails, IKE
FLEX will not fall back to IKEv1.
VMware Cloud on AWS Networking and Security
VMware by Broadcom 44

Parameter Value
IKE Profile > Diffie Hellman Select a Diffie Hellman group that is supported by your
on-premises VPN gateway. This value must be identical
for both ends of the VPN tunnel. Higher group numbers
offer better protection. The best practice is to select
group 14 or higher.
IPSec Profile > Tunnel Encryption Select a Phase 2 security association (SA) cipher that is
supported by your on-premises VPN gateway.
IPSec Profile Tunnel Digest Algorithm Select a Phase 2 digest algorithm that is supported by
your on-premises VPN gateway.
Note If you specify a GCM-based cipher for Tunnel
Encryption, set Tunnel Digest Algorithm to None. The
digest function is integral to the GCM cipher.
IPSec Profile > Perfect Forward Secrecy Enable or Disable to match the setting of your on-
premises VPN gateway. Enabling Perfect Forward
Secrecy prevents recorded (past) sessions from being
decrypted if the private key is ever compromised.
IPSec Profile > Diffie Hellman Select a Diffie Hellman group that is supported by your
on-premises VPN gateway. This value must be identical
for both ends of the VPN tunnel. Higher group numbers
offer better protection. The best practice is to select
group 14 or higher.
DPD Profile > DPD Probe Mode One of Periodic or On Demand.
For a periodic DPD probe mode, a DPD probe is sent
every time the specified DPD probe interval time is
reached.
For an on-demand DPD probe mode, a DPD probe is
sent if no IPSec packet is received from the peer site
after an idle period. The value in DPD Probe Interval
determines the idle period used.
DPD Profile > Retry Count Integer number of retries allowed. Values in the range 1 -
100 are valid. The default retry count is 10.
VMware Cloud on AWS Networking and Security
VMware by Broadcom 45

Parameter Value
DPD Profile > DPD Probe Interval The number of seconds you want the NSX IKE daemon
to wait between sending the DPD probes.
For a periodic DPD probe mode, the valid values are
between 3 and 360 seconds. The default value is 60
seconds.
For an on-demand probe mode, the valid values are
between 1 and 10 seconds. The default value is 3
seconds.
When the periodic DPD probe mode is set, the IKE
daemon sends a DPD probe periodically. If the peer site
responds within half a second, the next DPD probe is
sent after the configured DPD probe interval time has
been reached. If the peer site does not respond, then the
DPD probe is sent again after waiting for half a second.
If the remote peer site continues not to respond, the IKE
daemon resends the DPD probe again, until a response
is received or the retry count has been reached. Before
the peer site is declared to be dead, the IKE daemon
resends the DPD probe up to a maximum of times
specified in the Retry Count property. After the peer
site is declared dead,
NSX then tears down the security
association (SA) on the dead peer's link.
When the on-demand DPD mode is set, the DPD probe
is sent only if no IPSec traffic is received from the peer
site after the configured DPD probe interval time has
been reached.
DPD Profile
> Admin Status To enable or disable the DPD profile, click the Admin
Status toggle. By default, the value is set to Enabled.
When the DPD profile is enabled, the DPD profile is used
for all IPSec sessions in the IPSec VPN service that uses
the DPD profile.
TCP MSS Clamping To use TCP MSS Clamping to reduce the maximum
segment size (MSS) payload of the TCP session during
the IPsec connection, toggle this option to Enabled, then
select the TCP MSS Direction and optionally the TCP
MSS Value. See Understanding TCP MSS Clamping in the
NSX Data Center Administration Guide
.
12
(Optional) Tag the VPN.
See Add Tags to an Object in the
NSX Data Center Administration Guide
for more information
about tagging NSX objects.
13 Click SAVE.
VMware Cloud on AWS Networking and Security
VMware by Broadcom 46
Results
The VPN creation process might take a few minutes. When the policy-based VPN becomes
available, the following actions are available to help you with troubleshooting and configuring the
on-premises end of the VPN:
n Click DOWNLOAD CONFIG to download a file that contains VPN configuration details. You
can use these details to configure the on-premises end of this VPN.
n Click VIEW STATISTICS to view packet traffic statistics for this VPN. See View VPN Tunnel
Status and Statistics.
What to do next
Create or update firewall rules as needed. To allow traffic through the policy-based VPN, specify
Internet Interface in the Applied to field.
Configure Certificate-Based Authentication for an IPSec VPN
A certificate-based VPN uses digital certificates rather than pre-shared keys during IKE
negotiation.
You can use certificate-based authentication with a route-based or policy-based VPN.
In certificate based authentication for IPsec VPNs, each endpoint presents a certificate during
IKE negotiation. Both endpoints must share a common certificate authority (CA). Each endpoint
is configured with attributes from its peer certificate (like DN, email id, IP address present in
certificate), rather than an IP or CIDR, as the remote identity.
Prerequisites
If you do not have the necessary server certificates or CA certificates in NSX Manager, import the
certificates. See Import a Self-signed or CA-signed Certificate and Import a CA Certificate.
If you are importing certificates, you must create a Management Gateway firewall rule that allows
the import. Check with your Certificate Authority to find out the source address and port number
to use in the rule.
Procedure
1 Configure a local VPN endpoint on SDDC gateway and select the certificates for it.
The SDDC Compute Gateway (T0) is provisioned with local endpoints by default. If you're
connecting the VPN to a custom T1 gateway, you'll need to Add Local Endpoints to that
gateway.
VMware Cloud on AWS Networking and Security
VMware by Broadcom 47

The local ID is derived from the certificate associated with the local endpoint and depends
on the X509v3 extensions present in the certificate. The local ID can be either the X509v3
extension Subject Alternative Name (SAN) or Distinguished Name (DN). The Local ID is not
required and the ID specified there is ignored. However, for the remote VPN gateway, you
need to configure the local ID as remote ID in the peer VPN gateway.
n If X509v3 Subject Alternative Name is found in the certificate, then one of the SAN
strings is taken as the local ID value.
If the certificate has multiple SAN fields, then following order is used to select the local ID.
Order SAN Field
1 IP Address
2 DNS
3 Email Address
For example, if the configured site certificate has the following SAN fields,
X509v3 Subject Alternative Name:
DNS:Site123.vmware.com, email:[email protected], IP Address:1.1.1.1
then the IP address 1.1.1.1 is used as the local ID. If the IP address is not available, then
the DNS string is used. And if the IP address and the DNS are not available, then the email
address is used.
n If X509v3 Subject Alternative Name is not present in the certificate, then the
Distinguished Name (DN) is used as the local ID value.
For example, if the certificate does not have any SAN fields, and its DN string is
C=US, ST=California, O=MyCompany, OU=MyOrg, CN=Site123
then the DN string automatically becomes the local ID. The local ID is the peer ID on the
remote site.
VMware Cloud on AWS Networking and Security
VMware by Broadcom 48

2 Configure certificate-based authentication for the VPN.
a From the Authentication Mode drop-down menu, select Certificate.
b In the Remote Private IP/Remote ID textbox, enter a value to identify the peer site.
The remote ID must be a distinguished name (DN), IP address, DNS, or an email address
used in the peer site's certificate.
Note If the peer site's certificate contains an email address in the DN string, for example,
C=US, ST=California, O=MyCompany, OU=MyOrg, CN=Site123/[email protected]
then enter the Remote ID value using the following format as an example.
C=US, ST=California, O=MyCompany, OU=MyOrg, CN=Site123, [email protected]
Configure a Layer 2 VPN and Extended Network Segment
You can use a VMware Cloud on AWS layer 2 Virtual Private Network (L2VPN) to extend
your on-premises network to one or more VLAN-based networks in your SDDC. This extended
network is a single subnet with a single broadcast domain. You can use it to migrate VMs to and
from your cloud SDDC without having to change their IP addresses.
In addition to data center migration, you can use an extended L2VPN network for disaster
recovery, or for dynamic access to cloud computing resources as needed (often referred to as
"cloud bursting").
VMware Cloud on AWS uses NSX to provide the L2VPN server in your cloud SDDC. L2VPN client
functions are provided by an on-premises NSX Edge. See VMware Configuration Maximums for
L2VPN limits.
The VMware Cloud on AWS L2VPN feature supports extending VLAN networks. The L2VPN
connection to the NSX server uses an IPsec tunnel. The L2VPN extended network is used to
extend Virtual Machine networks and carries only workload traffic. It is independent of the
VMkernel networks used for migration traffic (ESXi management or vMotion), which use either
a separate IPsec VPN or a Direct Connect connection.
Important You cannot bring up an L2VPN tunnel until you have configured the L2VPN client and
server and created an extended network that specifies the tunnel ID you assigned to the client.
Procedure
1 Configure a Layer 2 VPN Tunnel in the SDDC
Specify local (SDDC) and remote (on-premises) IP addresses to create the SDDC end of the
Layer 2 VPN tunnel.
VMware Cloud on AWS Networking and Security
VMware by Broadcom 49

2 Configure an Extended Segment for the Layer 2 VPN
Extended networks require a layer 2 Virtual Private Network (L2VPN), which provides a
secure communications tunnel between an on-premises network and one in your cloud
SDDC.
3 Install and Configure the On-Premises NSX Edge
The on-premises end of your L2VPN must be an NSX Edge appliance. You must configure
this appliance and related on-premises vSphere networking before you can create an
L2VPN.
Configure a Layer 2 VPN Tunnel in the SDDC
Specify local (SDDC) and remote (on-premises) IP addresses to create the SDDC end of the
Layer 2 VPN tunnel.
Note This topic explains how to create a Layer 2 VPN that connects to the SDDC's default public
or private IP. If you have an SDDC with additional Tier-1 gateways (see Add a Custom Tier-1
Gateway to a VMware Cloud on AWS SDDC) you can click OPEN NSX MANAGER and add VPN
services that terminate on those gateways. See Adding VPN Services in the
NSX Data Center
Administration Guide
.
VMware Cloud on AWS supports a single Layer 2 VPN tunnel between your on-premises
installation and your SDDC.
Procedure
1 Log in to the VMware Cloud Console at https://vmc.vmware.com.
2 Click Inventory > SDDCs, then pick an SDDC card and click VIEW DETAILS.
3 Click OPEN NSX MANAGER and log in with the NSX Manager Admin User Account shown
on the SDDC Settings page. See SDDC Network Administration with NSX Manager.
You can also use the VMware Cloud Console Networking & Security tab for this workflow.
4 Click VPN > Layer 2.
5 Click ADD VPN TUNNEL.
VMware Cloud on AWS Networking and Security
VMware by Broadcom 50

6 Configure the VPN parameters.
Option Description
Local IP Address n Select the private IP address if you have configured AWS Direct Connect
for this SDDC and want the VPN to use it. See Configure Direct Connect
to a Private Virtual Interface for SDDC Management and Compute
Network Traffic.
n Select the public IP address if you want the VPN to connect to the SDDC
over Internet.
Remote Public IP Enter the remote public IP address of your on-premise L2VPN gateway. For
an L2VPN, this is always the standalone NSX Edge appliance (see Install and
Configure the On-Premises NSX Edge).
Remote Private IP Enter the remote private IP address if the on-premise gateway is configured
behind NAT.
Note To reduce the maximum segment size (MSS), TCP TMSS clamping is always enabled
for Layer 2 VPNs in SDDC version 1.15 and later.
7 (Optional) Tag the VPN.
See Add Tags to an Object in the
NSX Data Center Administration Guide
for more information
about tagging NSX objects.
8 (Optional) Add a Description.
9 Click SAVE.
Depending on your SDDC environment, the Layer 2 VPN creation process might take a few
minutes. When the Layer 2 VPN tunnel becomes available, the status changes to Up.
Configure an Extended Segment for the Layer 2 VPN
Extended networks require a layer 2 Virtual Private Network (L2VPN), which provides a secure
communications tunnel between an on-premises network and one in your cloud SDDC.
Each end of this tunnel has an ID. When the tunnel ID matches on the cloud SDDC and the
on-premises side of the tunnel, the two networks become part of the same broadcast domain.
Extended networks use an on-premises gateway as the default gateway. Other network services
such as DHCP and DNS are also provided on-premises.
You can change a logical network from routed to extended or from extended to routed. For
example, you might configure a logical network as extended to allow migration of VMs from
your on-premises data center to your cloud SDDC. When the migration is complete, you might
then change the network to routed to allow the VMs to use VMware Cloud on AWS networking
services.
Prerequisites
Verify that Layer 2 VPN tunnel is available. See Configure a Layer 2 VPN Tunnel in the SDDC.
VMware Cloud on AWS Networking and Security
VMware by Broadcom 51
Procedure
1 Log in to the VMware Cloud Console at https://vmc.vmware.com.
2 Click Inventory > SDDCs, then pick an SDDC card and click VIEW DETAILS.
3 Click OPEN NSX MANAGER and log in with the NSX Manager Admin User Account shown
on the SDDC Settings page. See SDDC Network Administration with NSX Manager.
You can also use the VMware Cloud Console Networking & Security tab for this workflow.
4 Follow the procedure in Create or Modify a Network Segment to create an Extended
segment bound to the Tunnel ID of the L2VPN tunnel.
5 Click SAVE.
6 Click DOWNLOAD CONFIG to download a file containing the peer code and other
information you'll need when configuring the on-premises of the remote side VPN
configuration.
7 Configure the client side of the L2VPN.
See Install and Configure the On-Premises NSX Edge.
Install and Configure the On-Premises NSX Edge
The on-premises end of your L2VPN must be an NSX Edge appliance. You must configure this
appliance and related on-premises vSphere networking before you can create an L2VPN.
If you have a compatible version of NSX installed in your on-premises data center, you can use
your existing NSX Edge appliance as the on-premises (client) side of an L2VPN that connects to
your SDDC. If necessary, you can download and deploy a standalone NSX Edge to use as the
L2VPN client.
The "NSX L2 VPN Client" table in Understanding Layer 2 VPN lists compatible SDDC and on-
premises versions of the NSX L2VPN software. To determine the version of NSX running in your
SDDC, see Correlating VMware Cloud on AWS with Component Releases in the
VMware Cloud on
AWS Operations Guide
.
Procedure
1 (Optional) Download the standalone NSX Edge.
If you do not have a compatible version of NSX installed in your on-premises data center,
you may be able to download and configure a standalone NSX Edge appliance to use as
the on-premises endpoint for your L2VPN. After you configure the server side of the L2VPN,
follow the instructions on the Remote L2 VPN Client Configuration page to download the
NSX Edge for VMware ESXi as an OVF file.
2 Install and configure the NSX Edge.
See Add an Autonomous Edge as an L2 VPN Client in the
NSX Data Center Administration
Guide
for information about how to install and configure the Autonomous Edge in your
on-premises vCenter.
VMware Cloud on AWS Networking and Security
VMware by Broadcom 52

View VPN Tunnel Status and Statistics
Your SDDC NSX Manager provides status and statistics for IPsec VPNs and L2VPN segments.
Status of VPN operations is reported in the Status column of the NSX Manager VPN grid. Log
messages about VPN operations are also sent to VMware Aria Operations for Logs, an optional
SDDC integrated service. See Using the VMware Aria Automation Cloud Service and the VMware
Aria Operations for Logs Documentation for more information.
Procedure
1 Log in to VMware Cloud Services at https://vmc.vmware.com.
2 Click Inventory > SDDCs, then pick an SDDC card and click VIEW DETAILS.
3 Click OPEN NSX MANAGER and log in with the NSX Manager Admin User Account shown
on the SDDC Settings page. See SDDC Network Administration with NSX Manager.
You can also use the VMware Cloud Console Networking & Security tab for this workflow.
4 On the VPN page, click Route Based, Policy Based, or Layer 2 to list VPNs of the selected
type.
Take one of the following actions:
n Click the Information icon to display a status message that provides more
information about channel (IKE Phase 1 negotiation) and tunnel status.
n Expand a row to show VPN details, then click VIEW STATISTICS to display traffic
statistics. You can retrieve aggregated status and statistics for all tunnels or for the tunnel
used by the selected VPN (0.0.0.0/0). When viewing aggregated statistics, you can click
View More in the Stats column to see a list of error statistics.
n Click the Refresh icon to refresh tunnel statistics. All VPN statistics are reset to 0
when the tunnel is disabled or re-enabled.
What to do next
For more information about troubleshooting VPN connection issues, see Troubleshooting Virtual
Private Networks (VPN) in the
NSX Data Center Administration Guide
.
IPsec VPN Settings Reference
The on-premises end of any IPsec VPN must be configured to match the settings you specified
for the SDDC end of that VPN.
Information in the following tables summarizes the available SDDC IPsec VPN settings. Some
of the settings can be configured. Some are static. Use this information to verify that your
on-premises VPN solution can be configured to match the one in your SDDC. Choose an on-
premises VPN solution that supports all the static settings and any of the configurable settings
listed in these tables.
VMware Cloud on AWS Networking and Security
VMware by Broadcom 53

Understanding how Diffie-Hellman Groups Affect IPsec VPN Performance and Security
IPsec VPN configuration requires you to choose a Diffie-Hellman (DH) group, which is used in
both phases of the IKE negotiation to securely communicate private keys between endpoints
over an untrusted path. DH Groups 19-21 represent a significant increase in security over groups
14-16 and consume fewer resources during encryption. The NIST Guide to IPsec VPNs (PDF)
provides considerably more detail on these and other IPsec VPN configuration choices.
Note DH Groups 2 and 5 are not NIST-approved, and should be used only when required for
compatibility with an older on-premises device.
As a best practice, configurable settings should be the same for both phases.
Phase 1 (IKE Profile) IPsec VPN Settings
Table 3-5. Configurable Settings
Attribute Allowed Values Recommended Value
Protocol IKEv1, IKEv2, IKE FLEX IKEv2
Encryption Algorithm AES (128, 256), AES-GCM (128,
192, 256)
AES GCM
Encryption with higher bit depths is harder to
crack but creates more load on your endpoint
device.
Tunnel/IKE Digest Algorithm SHA1, SHA2 (256, 384, 512) If you specify a GCM-based cipher for IKE
Encryption, set IKE Digest Algorithm to None.
The digest function is integral to the GCM cipher.
You must use IKE V2 if you use a GCM-based
cipher
Diffie Hellman DH Groups 2, 5, 14-16, 19-21 DH Groups 19-21 or 14-16
Table 3-6. Static Settings
Attribute Value
ISAKMP mode Main mode
ISAKMP/IKE SA lifetime 86400 seconds (24 hours)
IPsec Mode Tunnel
IKE Authentication Pre-Shared Key
Phase 2 (IPsec Profile) IPsec VPN Settings
Configurable settings are the same for Phase 1 and Phase 2.
VMware Cloud on AWS Networking and Security
VMware by Broadcom 54

Table 3-7. Configurable Settings
Attribute Allowed Values Recommended Value
Protocol IKEv1, IKEv2, IKE FLEX IKEv2
Encryption Algorithm AES (128, 256), AES-GCM (128,
192, 256)
AES GCM
Encryption with higher bit depths is harder to
crack but creates more load on your endpoint
device.
Tunnel/IKE Digest Algorithm SHA-1, SHA2 (256, 384, 512) If you specify a GCM-based cipher for IKE
Encryption, set IKE Digest Algorithm to None.
The digest function is integral to the GCM cipher.
You must use IKE V2 if you use a GCM-based
cipher
Diffie Hellman DH Groups 2, 5, 14-16, 19-21 DH Groups 19-21 or 14-16
Table 3-8. Static Settings
Attribute Value
Tunnel Mode Encapsulating Security Payload (ESP)
SA lifetime 3600 seconds (one hour)
On-Premises IPsec VPN Configuration
Click DOWNLOAD CONFIG on the status page of any VPN to download a file that contains VPN
configuration details. You can use these details to configure the on-premises end of the VPN.
Note Do not configure the on-premises side of a VPN to have an idle timeout (for example,
the NSX Session idle timeout setting). On-premises idle timeouts can cause the VPN to become
periodically disconnected.
The VMware Tech Zone IPSec VPN Configuration Reference provides detailed endpoint
configuration advice, and sample configuration files for several popular endpoint devices are
available on VMware {code}.
n Palo Alto Networks Firewall
Troubleshooting VPN Problems in VMware Cloud on AWS
VPN problems can include authentication errors (IKE phase 1 and phase 2) and connectivity
("Peer not responding") issues.
VMware Cloud on AWS Networking and Security
VMware by Broadcom 55
When an IPsec VPN session or tunnel is down, an NSX alarm is raised and the reason for the
Down alarm is displayed on the Alarms dashboard or the VPN page on the NSX Manager user
interface. See Alarms When an IPsec VPN Session or Tunnel Is Down in the
NSX Administration
Guide
.
n VPN Peer Not Responding
When a VPN goes down with a "Peer not responding" message, the root cause can be
anything from a network outage to a missing or misconfigured firewall rule.
n VPN Authentication Errors
VPN authentication errors are typically caused by a configuration mismatch between the
SDDC and on-premises VPN endpoints. While these typically prevent the VPN from coming
up at creation, they can also bring down a working VPN when one of the endpoints is
reconfigured.
VPN Peer Not Responding
When a VPN goes down with a "Peer not responding" message, the root cause can be anything
from a network outage to a missing or misconfigured firewall rule.
Problem
A new VPN fails to come up after creation, or a working VPN fails after one of the ends has been
updated or reconfigured or a route table has been changed.
Cause
Unlike other endpoints, whose reachability can be verified with commands like ping, you can’t
really verify VPN connectivity outside of the VPN itself. IPsec uses UDP, so you either get a
response from the peer or you don’t. Ping reachability depends on whether the peer has enabled
it, and many don’t.
Solution
1 Ensure the remote IP address configured in the VPN matches the IP the peer is listening on.
2 Ensure any firewalls on the remote (on-premises) site are configured to allow traffic to UDP
port 500. If the remote endpoint is NATted, firewalls on the remote site must allow traffic to
UDP port 4500.
3 IPsec VPN traffic uses multiple protocols, all of which must be allowed through the firewall.
These include:
n ESP (Encapsulating Security Payload) IP protocol 50
n AH (Authenticating Header) - IP protocol 51
n ISAKMP (Internet Security Association and Key Management Protocol which in turn uses
IKE and IKE v2 (Internet Key Exchange)
4 Ensure that the same IKE version is configured for both endpoints.
VMware Cloud on AWS Networking and Security
VMware by Broadcom 56
5 Ensure that routing is in place for each side to reach each other.
This can be validating using traceroute, but end to end path validation is not always possible
as many endpoints will not respond to standard ICMP Echo (ping) or traceroute requests.
When you configure the SDDC VPN Local IP Address as Public, VPN traffic will always flow
over the SDDC Internet Gateway. Otherwise (when the VPNLocal IP Address is Private), VPN
traffic flows over the SDDC Intranet uplink. Be sure that the remote side of the VPN sends
reply traffic over the same path.
VPN Authentication Errors
VPN authentication errors are typically caused by a configuration mismatch between the SDDC
and on-premises VPN endpoints. While these typically prevent the VPN from coming up at
creation, they can also bring down a working VPN when one of the endpoints is reconfigured.
Problem
A new VPN fails to come up after creation, or a working VPN fails after one of the ends has been
updated or reconfigured.
Cause
IKE negotiation has two phases:
n In Phase 1, the peer endpoints establish an IKE Security Association (SA), which provides a
secure channel for communication between the endpoints.
n In Phase 2, the endpoints use the SA to negotiate a key exchange using the pre-shared key
you entered when you created the VPN.
Phase 1 errors can arise when the Remote ID and Local ID values are inconsistent. Phase 2 errors
can arise when the peers are configured with different pre-shared keys.
Solution
1 Verify that the pre-shared key is exactly the same on each side. Be sure to check for the
presence of whitespace on either end of the key string.
2 If you use special characters in the pre-shared key, try using a pre-shared key that does not
contain special characters, in case one side does not correctly interpret them.
3 Ensure that the Remote ID on each side matches the Local ID used by the peer. Normally
this will be the public IP address, but when one side is behind a NAT router, it may
instead use its private IP, which will need to be manually entered as the Remote ID on the
peer’s configuration. This ID forms part of the authentication so a mismatch will result in an
authentication error.
4 Ensure that the same IKE version is configured for both endpoints. VMware Cloud on AWS
VPNs also provide an IKE FLEX version that should be compatible with either IKEv1 or IKEv2.
5 Ensure that the same IKE mode is configured for both endpoints. VMware Cloud on AWS
VPNs do not support IKE Aggressive mode.
VMware Cloud on AWS Networking and Security
VMware by Broadcom 57
Configure Management Gateway Networking and Security
The management network and Management Gateway are largely preconfigured in your SDDC,
but you'll still need to configure access to management network services like vCenter and
HCX and create management gateway firewall rules to allow traffic between the management
network and other networks, including your on-premises networks and other SDDC networks.
What to read next
Procedure
1 Set vCenter FQDN Resolution Address
You can connect to the SDDC vCenter at either a public or private IP address. A private IP
address can be resolved from an SDDC VPN. A public IP address can be resolved from the
Internet.
2 Set HCX FQDN Resolution Address
You can connect to VMware HCX at either a public or private IP address. A private IP
address can be resolved from an SDDC VPN. A public IP address can be resolved from the
internet.
3 Add or Modify Management Gateway Firewall Rules
Maintaining the safety and security of your SDDC management infrastructure is critical. By
default, the management gateway blocks traffic to all management network destinations
from all sources.
Set vCenter FQDN Resolution Address
You can connect to the SDDC vCenter at either a public or private IP address. A private IP
address can be resolved from an SDDC VPN. A public IP address can be resolved from the
Internet.
Prerequisites
Before you can access the SDDC vCenter at a private IP address, you'll need to set up a
VPN connecting your SDDC to your on-premises datacenter. See Create a Route-Based VPN
or Create a Policy-Based VPN.
Procedure
1 Log in to VMware Cloud Services at https://vmc.vmware.com.
2 Click Inventory > SDDCs, then pick an SDDC card and click VIEW DETAILS.
3 Navigate to the Settings tab of your SDDC.
4 Expand vCenter FQDN, and click Edit.
5 Under Resolution Address, select either the Public IP address or the Private IP address, and
click SAVE.
VMware Cloud on AWS Networking and Security
VMware by Broadcom 58
Set HCX FQDN Resolution Address
You can connect to VMware HCX at either a public or private IP address. A private IP address can
be resolved from an SDDC VPN. A public IP address can be resolved from the internet.
Prerequisites
Before you can access HCX at a private IP address, you'll need to set up a VPN connecting your
SDDC to your on-premises datacenter. See Create a Route-Based VPN or Create a Policy-Based
VPN.
Procedure
1 Log in to VMware Cloud Services at https://vmc.vmware.com.
2 Click Inventory > SDDCs, then pick an SDDC card and click VIEW DETAILS.
3 Navigate to the Settings tab of your SDDC.
4 Expand HCX FQDN, and click Edit.
5 Under Resolution Address select either the Public IP address or the Private IP address and
click
SAVE.
Add or Modify Management Gateway Firewall Rules
Maintaining the safety and security of your SDDC management infrastructure is critical. By
default, the management gateway blocks traffic to all management network destinations from
all sources.
When configuring access to the SDDC management infrastructure, it's important that you
create management gateway firewall rules that allow only the necessary access to the SDDC
management network. To access the Management Gateway, you can Configure AWS Direct
Connect Between Your SDDC and On-Premises Data Center , Configure a VPN Connection
Between Your SDDC and On-Premises Data Center, or do both. Direct Connect, which provides
private connectivity between your enterprise and the SDDC, can be used alone or in conjunction
with an IPsec VPN to encrypt traffic.
If you can't use Direct Connect, VMware Managed Transit Gateway, or a VPN, you can access
the SDDC vCenter directly over the Internet using public DNS and the vCenter public IP. If you
do this, you must create management gateway firewall rules that prevent untrusted sources from
accessing the management network. A VPN provides additional security through encryption and
authentication protocols.
VMware Cloud on AWS Networking and Security
VMware by Broadcom 59

Management Gateway firewall rules specify actions to take on network traffic based on the
source and destination addresses, and the service port. Either the source or destination must
be a system-defined inventory group. See Working With Inventory Groups for information about
viewing or modifying inventory groups.
Important The default Management Gateway firewall rule denies all traffic, so you must create
at least one user-defined Management Gateway firewall rule to provide access to the vCenter
Server Appliance and other management VMs and appliances. To provide appropriate security
when accessing the Management Gateway over the public Internet, configure a management
gateway firewall rule that allows traffic only from IP addresses you own or trust, and always
limit the source IP ranges, both internal and external, to the smallest possible set. For example,
an enterprise that accesses the internet from an address in the CIDR block 93.184.216.34/30
should create a management gateway firewall rule that allows only traffic with a Sources
CIDR of 93.184.216.34/30 to access management destinations like the ones shown in Example
Management Gateway Firewall Rules. Beginning with SDDC version 1.22, you cannot publish a
management gateway firewall rule that allows traffic from Sources that include Any or 0.0.0.0/0.
See VMware Knowledge Base article 84154 for more information about providing secure access
to your SDDC management infrastructure.
There are two types of firewall rules:
n Pre-defined firewall rules are created and managed by VMware Cloud on AWS. You cannot
modify or reorder these rules. There is one pre-defined Management Gateway firewall rule:
Table 3-9. Pre-Defined Management Gateway Firewall Rules
Name Sources Destinations Services Action
Default Deny All Any Any Any Drop
Because this rule operates in a default-deny mode, only traffic explicitly allowed by
customer-defined rules is permitted.
n Customer-defined firewall rules are processed in the order you specify and are always
processed before pre-defined rules. These rules require either the source or destination to be
a system-defined group, and the list of available ports and services is a limited one managed
by VMware. When Sources is a system-defined group, Services must be Any. And because
these rules must have an Allow action, rule order is generally unimportant.
Procedure
1 Log in to VMware Cloud Services at https://vmc.vmware.com.
2 Click Inventory > SDDCs, then pick an SDDC card and click VIEW DETAILS.
3 Click OPEN NSX MANAGER and log in with the NSX Manager Admin User Account shown
on the SDDC Settings page. See SDDC Network Administration with NSX Manager.
You can also use the VMware Cloud Console Networking & Security tab for this workflow.
VMware Cloud on AWS Networking and Security
VMware by Broadcom 60

4 On the Gateway Firewall card, click Management Gateway, then click ADD RULE and give
the new rule a Name.
5 Enter the parameters for the new rule.
Parameters are initialized to their default values (for example, Any for Sources and
Destinations). To edit a parameter, move the mouse cursor over the parameter value and
click the pencil icon ( ) to open a parameter-specific editor.
Option Description
Sources Enter any combination of source addresses (CIDR blocks or management
group names).
Important Although you can select Any as the source address in a
firewall rule, you cannot use Any or the wildcard 0.0.0.0/0 as the source
address when the destination is vCenter. Doing so can enable attacks on
your vCenter and may lead to compromise of your SDDC. Beginning with
SDDC version 1.22, we prevent you from publishing a management gateway
firewall rule with a source address of Any or 0.0.0.0/0 and destinations that
include vCenter.
Select System Defined Groups and select one of the following source
options:
n ESXi to allow traffic from your SDDC's ESXi hosts.
n NSX Manager to allow traffic from your SDDC's NSX appliance.
n vCenter to allow traffic from your SDDC's vCenter.
n Other integrated services enabled in the SDDC.
Select User Defined Groups to use a management group that you have
defined. See Working With Inventory Groups.
Destinations Select Any to allow traffic to any destination address or address range.
Select System Defined Groups and select one of the following destination
options:
n ESXi to allow traffic to your SDDC's ESXi management.
n NSX Manager to allow traffic to your SDDC's NSX appliance
n vCenter to allow traffic to your SDDC's vCenter.
n Other integrated services enabled in the SDDC.
Services Select the service types that the rule applies to. The list of service types
depends on your choices for Sources and Destinations.
Action The only action available for a new management gateway firewall rule is
Allow.
The new rule is enabled by default. Slide the toggle to the left to disable it.
6 Click PUBLISH to create the rule.
The system gives the new rule an integer ID value, which is used in log entries generated by
the rule.
VMware Cloud on AWS Networking and Security
VMware by Broadcom 61

Firewall rules are applied in order from top to bottom. Because there is a default Drop rule
at the bottom and the rules above are always Allow rules, management gateway firewall rule
order has no impact on traffic flow.
Example: Create a Management Gateway Firewall Rule
To create a management gateway firewall rule that enables vMotion traffic from the on-premises
ESXi hosts to the ESXi hosts in the SDDC:
1 Create a management inventory group that contains the on-premises ESXi hosts that you
want to enable for vMotion to the SDDC.
2 Create a management gateway rule with source ESXi and destination on-premises ESXi hosts.
3 Create another management gateway rule with source on-premises ESXi hosts group and
destination ESXi with a vMotion service.
What to do next
You can view Rule Hits Statistics and Flow Statistics for any rule other than the Default Deny All
rule.
n Click the gear icon to view or modify rule logging settings. Log entries are sent to the
VMware VMware Aria Operations for Logs Service. See Using VMware Aria Operations for
Logs in the
VMware Cloud on AWS Operations Guide
.
n Click the graph icon to view Rule Hits and Flow statistics for the rule.
Table 3-10. Rule Hits Statistics
Popularity Index Number of times the rule was triggered in the past 24 hours.
Hit Count Number of times the rule was triggered since it was created.
Table 3-11. Flow Statistics
Packet Count Total packet flow through this rule.
Byte Count Total byte flow through this rule.
Statistics start accumulating as soon as the rule is enabled.
Example Management Gateway Firewall Rules
Some common firewall rule configurations include opening access to the vSphere Client from the
internet, allowing access to vCenter through the management VPN tunnel, and allowing remote
console access.
Commonly Used Firewall Rules
The following table shows the Service, Source, and Destination settings for commonly-used
firewall rules.
VMware Cloud on AWS Networking and Security
VMware by Broadcom 62

Table 3-12. Commonly-Used Firewall Rules
Use Cases Service Source Destination
Provide access to vCenter
from the internet.
Use for general vSphere
Client access as well as for
monitoring vCenter
HTTPS IP address or CIDR block
from on-premises data
center
Important Although you
can select Any as the
source address in a firewall
rule, you cannot use Any
or the wildcard 0.0.0.0/0
as the source address
when the destination
is vCenter. Doing so
can enable attacks on
your vCenter and may
lead to compromise of
your SDDC. Beginning
with SDDC version 1.22,
we prevent you from
publishing a management
gateway firewall rule with a
source address of Any or
0.0.0.0/0 and destinations
that include vCenter.
vCenter
Provide access to vCenter
over VPN tunnel.
Required for Management
Gateway VPN, Hybrid
Linked Mode, and Content
Library.
HTTPS IP address or CIDR block
from on-premises data
center
vCenter
Provide access from
cloud vCenter to on-
premises services such as
Active Directory, Platform
Services Controller, and
Content Library.
Any vCenter IP address or CIDR block
from on-premises data
center.
Provisioning operations
involving network file copy
traffic, such as cold
migration, cloning from on-
premises VMs, snapshot
migration, replication, and
so on.
Provisioning IP address or CIDR block,
either public or from an
on-premises data center
connected by a VPN tunnel
ESXi Management
VMware Cloud on AWS Networking and Security
VMware by Broadcom 63

Table 3-12. Commonly-Used Firewall Rules (continued)
Use Cases Service Source Destination
VMRC remote console
access
Required for VMware Aria
Automation
Remote Console IP address or CIDR block,
either public or from an
on-premises data center
connected by a VPN tunnel
ESXi Management
vMotion traffic over VPN Any ESXi Management IP address or CIDR block
from on-premises data
center
Configure Compute Gateway Networking and Security
Compute Gateway networking includes a compute network with one or more segments and the
DNS, DHCP, and security (gateway firewall and distributed firewall) configurations that manage
network traffic for workload VMs. It can also include a layer 2 VPN and extended network
that provides a single broadcast domain that spans your on-premises network and your SDDC
workload network.
What to read next
Procedure
1 Create or Modify a Network Segment
Network segments are logical networks for use by workload VMs in the SDDC compute
network.
2 Add or Modify Compute Gateway Firewall Rules
By default, the Compute Gateway blocks traffic into and out of the SDDC Compute Network.
Add Compute Gateway firewall rules to allow traffic as needed.
3 Add or Modify Distributed Firewall Rules
Distributed firewall rules apply at the VM (vNIC) level and control East-West traffic within the
SDDC.
4 Configure DNS Services
VMware Cloud on AWS DNS forwarding services run in DNS zones, and enable workload
VMs in the zone to resolve fully-qualified domain names to IP addresses.
Create or Modify a Network Segment
Network segments are logical networks for use by workload VMs in the SDDC compute network.
VMware Cloud on AWS supports three types of network segments: routed, extended and
disconnected.
n A routed network segment (the default type) has connectivity to other logical networks in the
SDDC and, through the SDDC firewall, to external networks.
VMware Cloud on AWS Networking and Security
VMware by Broadcom 64

n An extended network segment extends an existing L2VPN tunnel, providing a single IP
address space that spans the SDDC and an on-premises network.
n A disconnected network segment has no uplink, and provides an isolated network accessible
only to VMs connected to it. Disconnected segments are designed so they can be toggled
between routed and disconnected, so they need to be configured to work in either mode.
Disconnected segments are created when needed by VMware HCX (see Getting started with
VMware HCX).
See VMware Configuration Maximums for limits on segments per SDDC and network connections
per segment.
SDDCs are created without a default network segment, so you must create at least one for your
workload VMs. When you create a segment, you start by configuring some basic parameters
and specifying how DHCP requests are handled on the segment. After the segment has been
created, you can take additional, optional steps to specify a segment profiles and create DHCP
static bindings.
Procedure
1 Log in to VMware Cloud Services at https://vmc.vmware.com.
2 Click Inventory > SDDCs, then pick an SDDC card and click VIEW DETAILS.
3 Click OPEN NSX MANAGER and log in with the NSX Manager Admin User Account shown
on the SDDC Settings page. See SDDC Network Administration with NSX Manager.
You can also use the VMware Cloud Console Networking & Security tab for this workflow.
4 Open the Segments page.
To create a new segment, click ADD SEGMENT and give the new segment a Name
and optional Description. See Enabling and Using IPv6 in SDDC Networks for additional
information about creating IPv6 or dual-stack segments.
To delete or modify a segment, click its button and choose Edit. You can modify all
segment properties, including segment type. You can also edit or delete the segment's DHCP
configuration.
Important You cannot disable or delete a segment of any type if it has attached VMs or
VIFs. Disconnect attached VMs and VIFs before deleting the segment.
VMware Cloud on AWS Networking and Security
VMware by Broadcom 65

5 Specify a segment type and connected gateway in the Connected Gateway drop-down, then
fill in the required configuration parameters.
In the default configuration, only the Compute Gateway can be selected as the Connected
Gateway. See Add a Custom Tier-1 Gateway to a VMware Cloud on AWS SDDC for
information about creating additional Tier-1 gateways in your SDDC. Networks configured on
segments connected to a secondary Tier-1 gateway will not be advertised to Direct Connect,
SDDC Group (VTGW) or ESXi management hosts by default. To establish that connectivity,
define a route aggregation that includes those networks. See Aggregate and Filter Routes to
Uplinks.
Parameter requirements depend on the segment type.
Table 3-13. Routed Segment Configuration Parameters
Parameter Value
VPN Tunnel ID N/A for Routed or Disconnected segment types.
Subnets Specify an IP address to use as the gateway, along with a
subnet mask that defines the size of the network, in CIDR format.
The gateway address cannot be the first or last IPs within the
CIDR block, which by are reserved as the network address and
broadcast address of the segment. For example, to define the
subnet represented by 192.168.1.0/24 with a gateway of 192.168.1.1,
enter 192.168.1.1/24 in this field.
The address range you specify here must not overlap your SDDC
management network, any of the CIDR clocks listed in Reserved
Network Addresses, or any of the subnets in the Connected
Amazon VPC. If any part of the block is in a public IP space, it must
be in one that has been allocated for your use by IANA or another
regional internet registry.
URPF Mode Choose Strict to apply Unicast Reverse Path Forwarding (URPF)
strict mode, as defined by RFC3704 or None to turn off URPF for
this subnet.
SET DHCP CONFIG Routed segments default to using the Compute Gateway DHCP
server. Per-segment DHCP configuration, including DHCP relay,
can be specified when you create or update the segment. See
Configure Segment DHCP Properties.
Domain Name (Optional) Enter a fully qualified domain name. Static bindings on
the segment automatically inherit this domain name.
Tags See Add Tags to an Object in the
NSX Data Center Administration
Guide
for more information about tagging NSX objects.
Table 3-14. Extended Segment Configuration Parameters
Parameter Value
VPN Tunnel ID Specify the tunnel ID of an existing L2VPN tunnel. N/A for Routed
or Disconnected segment types. If you have not already created an
L2VPN, see Configure a Layer 2 VPN Tunnel in the SDDC.
Subnets N/A for Extended segments.
VMware Cloud on AWS Networking and Security
VMware by Broadcom 66

Table 3-14. Extended Segment Configuration Parameters (continued)
Parameter Value
URPF Mode Choose Strict to apply Unicast Reverse Path Forwarding (URPF)
strict mode, as defined by RFC3704 or None to turn off URPF for
this subnet.
Domain Name (Optional) Enter a fully qualified domain name. Static bindings on
the segment automatically inherit this domain name.
Tags See Add Tags to an Object in the
NSX Data Center Administration
Guide
for more information about tagging NSX objects.
Table 3-15. Disconnected Segment Configuration Parameters
Parameter Value
VPN Tunnel ID N/A for Routed or Disconnected segment types.
Subnets Specify an IP address to use as the gateway, along with a
subnet mask that defines the size of the network, in CIDR format.
The gateway address cannot be the first or last IPs within the
CIDR block, which by are reserved as the network address and
broadcast address of the segment. For example, to define the
subnet represented by 192.168.1.0/24 with a gateway of 192.168.1.1,
enter 192.168.1.1/24 in this field.
The address range you specify here must not overlap your SDDC
management network, any of the CIDR clocks listed in Reserved
Network Addresses, or any of the subnets in the Connected
Amazon VPC. If any part of the block is in a public IP space, it must
be in one that has been allocated for your use by IANA or another
regional internet registry.
Note Disconnected segments can be toggled between routed and
disconnected, so the gateway and subnet should be defined here
with that in mind even though they will not be used or advertised as
long as the segment remains disconnected.
Domain Name (Optional) Enter a fully qualified domain name. Static bindings on
the segment automatically inherit this domain name.
URPF Mode Choose Strict to apply Unicast Reverse Path Forwarding (URPF)
strict mode, as defined by RFC3704 or None to turn off URPF for
this subnet.
Tags See Add Tags to an Object in the
NSX Data Center Administration
Guide
for more information about tagging NSX objects.
6 Click SAVE to create or update the segment.
Click YES if you want continue with segment configuration. If you click NO, you can edit the
segment later if you need to.
VMware Cloud on AWS Networking and Security
VMware by Broadcom 67

The system creates the requested segment. This operation can take up to 15 seconds to
complete. When the segment Status transitions to Up the segment is ready for use. If the
segment Status is Down, you can click the information icon for more information about
the cause of the problem.
7 (Optional) Click SEGMENT PROFILES to view profiles for the segment.
Every segment has a read-only profile that specifies how it handles IP discovery, MAC
discovery, and related security controls. Key settings include:
n Promiscuous mode is not supported.
n Forged transmits are not supported.
n MAC Learning is not supported. Only a single MAC address can be used on a NIC
connected to the segment.
n BPDU filtering is turned on.
n IP address discovery (which affects the IPs added to groups using dynamic membership)
is set to Trust on First Use. Detection uses ARP and DHCP snooping, as well as
VMware Tools. See Understanding IP Discovery Segment Profile in the
NSX Data Center
Administration Guide
.
See Enabling and Using IPv6 in SDDC Networks for additional information about profiles for
IPv6 or dual-stack segments.
8 (Optional) Configure DHCP STATIC BINDINGS.
a Click Set to specify static bindings for VMs on the segment.
Click ADD IPV4 STATIC BINDING, then give the binding a Name and specify an IPv4
address included in the segment and a MAC address. When a VM with the specified MAC
address is powered on and connected to the segment, it receives the specified address.
Click SAVE to create the binding, then add another binding or click APPLY to apply the
specified static bindings to the segment.
b Click DHCP Options to specify DHCP Classless Static Routes (Option 121) and Generic
Options.
n Each classless static route option in DHCP for IPv4 can have multiple routes with the
same destination. Each route includes a destination subnet, subnet mask, next hop
router. See RFC 3442 for information about classless static routes in DHCPv4. You can
add a maximum of 127 classless static routes on a DHCPv4 server.
n For adding Generic Options, select the code of the option and enter a value of the
option. For binary values, the value must be in a base-64 encoded format.
VMware Cloud on AWS Networking and Security
VMware by Broadcom 68

What to do next
After a segment has been created and has a status of Success, you can click VIEW STATISTICS
to view statistics for network traffic to and from the segment. Statistics begin at segment
creation. You can click VIEW RELATED GROUPS to see a list of groups that include this
segment. For more information, see Add a Group in the
NSX Data Center Administration Guide
.
Configure Segment DHCP Properties
DHCP configuration is a per-segment property. In the default configuration the Compute
Gateway DHCP server handles DHCP requests from VMs on all routed segments. To use another
DHCP server for your workload networks, you can configure the segment to use DHCP relay. You
can also configure the segment to use its own local DHCP Server.
Per-segment DHCP configuration is part of the segment create/update workflow document in
Create or Modify a Network Segment. For more information, see DHCP in the
NSX Administration
Guide
.
Procedure
1 Log in to VMware Cloud Services at https://vmc.vmware.com.
2 Click Inventory > SDDCs, then pick an SDDC card and click VIEW DETAILS.
3 Click OPEN NSX MANAGER and log in with the NSX Manager Admin User Account shown
on the SDDC Settings page. See SDDC Network Administration with NSX Manager.
You can also use the VMware Cloud Console Networking & Security tab for this workflow.
4 Open the Segments page.
Choose a DHCP Type and specify configuration details. See Configure Segment DHCP Server
on a Segment in the
NSX Administration Guide
.
Note DHCP requests from VMs in a segment use the segment's gateway address as the
source IP. To allow this traffic through the CGW firewall, create a rule that allows packets
with this source address to reach the remote DHCP server. Including the segment object as a
group member does not include the gateway IP in the group. You must add it to the group as
an IP address. See VMware Knowledge Base article 79595 for related information.
Create or Modify a DHCP Profile
A DHCP profile specifies a DHCP server type and configuration. You can use the default profile or
create others as needed.
A DHCP profile can be used to configure DHCP servers of DHCP relay servers anywhere in your
SDDC network. See Add a DHCP Profile in the
NSX-T Data Center Administration Guide
.
Procedure
1 Log in to the VMware Cloud Console at https://vmc.vmware.com.
2 In NSX Manager, click Networking Profiles > DHCP.
VMware Cloud on AWS Networking and Security
VMware by Broadcom 69

3 Click ADD DHCP PROFILE and give the profile a Name.
Choose a Profile Type and provide the required configuration parameters.
n For a DHCP Server, specify an IPv4 Server IP Address and optionally change the Lease
Time.
n For a DHCP Relay, specify the Server IP Address as the address of the target DHCP
server. If the target DHCP server is on-premises, be sure that your on-premises firewall
allows DHCP traffic (ports 67 and 68) to reach this address. Lease time is controlled by
the target server configuration.
Either type of DHCP profile can be tagged.
4 Click SAVE to create the profile.
The new profile is available for use when you specify the DHCP configuration of a routed
segment. See Create or Modify a Network Segment. The Where Used column lists segments
that specify this profile.
Add or Modify Compute Gateway Firewall Rules
By default, the Compute Gateway blocks traffic into and out of the SDDC Compute Network. Add
Compute Gateway firewall rules to allow traffic as needed.
Firewall rules for the default Compute Gateway and any additional Tier-1 gateways you create
specify actions to take on network traffic from a specified source to a specified destination and
service. Actions can be one of:
n allow (allow matching traffic)
n drop (silently drop matching traffic)
n reject (drop matching traffic and notify the source)
Rules can be applied to a selection from a list of physical network interfaces or the generic
specification All Uplinks, which applies to all traffic leaving the gateway and going to the VPC
interface, Internet interface, or Intranet (Direct Connect) interface.
Note A firewall rule applied to All Uplinks does not apply to the VPN Tunnel Interface
(VTI), which is a virtual interface and not a physical uplink. The VPN Tunnel Interface must be
specified explicitly in the Applied To parameter of any firewall rule that manages workload VM
communications over a route-based VPN.
All traffic attempting to pass through the firewall is evaluated by the rules in the order shown
in the rules table. Traffic matching the first rule follows its action (allow, drop, or reject) and
evaluation stops. Traffic not matching the first rule is passed on to subsequent rules. When it hits
a match, the traffic is allowed, dropped, or rejected as specified by the rule action, and further
rule evaluation is stopped. Traffic that does not match any customer-defined rules is handled by
a default rule.
VMware Cloud on AWS Networking and Security
VMware by Broadcom 70

There are two types of firewall rules:
n Pre-defined firewall rules are created by VMware Cloud on AWS. There are two pre-defined
Compute Gateway firewall rules:
Table 3-16. Pre-Defined Compute Gateway Firewall Rules
Name Sources Destinations Services Applied To Action
Default VTI Rule Any Any Any VPN Tunnel
Interface
Drop *
Default Uplink
Rule
Any Any Any All Uplinks Drop
* The Default VTI Rule drops all route-based VPN traffic (over the Virtual Tunnel Interface),
so to enable workload VMs to communicate over a route-based VPN, modify this rule to
Allow the traffic or move it to a lower rank in the rule hierarchy, after more permissive rules.
You cannot modify or re-order the Default Uplink Rule.
n Customer-defined firewall rules are processed in the order you specify and are always
processed before the Default Uplink Rule.
Prerequisites
Compute Gateway firewall rules require named inventory groups for Source and Destination
values. See Working With Inventory Groups.
Procedure
1 Log in to VMware Cloud Services at https://vmc.vmware.com.
2 Click Inventory > SDDCs, then pick an SDDC card and click VIEW DETAILS.
3 Click OPEN NSX MANAGER and log in with the NSX Manager Admin User Account shown
on the SDDC Settings page. See SDDC Network Administration with NSX Manager.
You can also use the VMware Cloud Console Networking & Security tab for this workflow.
4 On the GATEWAY FIREWALL page, click Compute Gateway.
5 To add a rule, click ADD RULE and give the new rule a Name.
VMware Cloud on AWS Networking and Security
VMware by Broadcom 71

6 Enter the parameters for the new rule.
Parameters are initialized to their default values (for example, All for Sources and
Destinations). To edit a parameter, move the mouse cursor over the parameter value and
click the pencil icon ( ) to open a parameter-specific editor.
Option Description
Sources Click Any in the Sources column and select an inventory group for source
network traffic, or click ADD GROUP to create a new user-defined inventory
group to use for this rule. Click SAVE.
Destinations Click Any in the Destinations column and select an inventory group for
destination network traffic, or click ADD GROUP to create a new user-
defined inventory group to use for this rule. Click SAVE.
Services Click Any in the Services column and select a service from the list or click
ADD SERVICE to create a new user-defined service to use for this rule..
Click SAVE.
Applied To Define the type of traffic that the rule applies to:
n Select VPN Tunnel Interface if you want the rule to apply to traffic over
the route-based VPN.
n Select VPC Interface if you want the rule to apply to traffic over the
linked AWS VPC connection.
n Select Internet Interface if you want the rule to apply to traffic over the
SDDC's Internet Gateway, including traffic over policy-based VPNs using
the public IP endpoint.
n Select Intranet Interface if you want the rule to allow traffic over AWS
Direct Connect, VMware Transit Connect, and policy-based VPNs using
private IP.
n All Uplinks if you want the rule to apply to the VPC Interface, the
Internet Interface, and the Intranet Interface, but not to the VPN Tunnel
Interface.
Note The VPN Tunnel Interface is not classified as an uplink.
Action n Select Allow to allow all L3 traffic to pass through the firewall.
n Select Drop to drop packets that match any specified Sources,
Destinations, and Services. This is a silent action with no notification
to the source or destination systems. Dropping the packet causes the
connection to be retried until the retry threshold is reached.
n Select Reject to reject packets that match any specified Sources,
Destinations, and Services. This action returns a "destination
unreachable message" to the sender. For TCP packets, the response
includes a TCP RST message. For UDP, ICMP and other protocols, the
response includes an "administratively prohibited" code (9 or 10). The
sender is notified immediately (without any re-tries) when connection
cannot be established.
The new rule is enabled by default. Slide the toggle to the left to disable it.
VMware Cloud on AWS Networking and Security
VMware by Broadcom 72

7 Click PUBLISH to create the rule.
The system gives the new rule an integer ID value, which is used in log entries generated by
the rule.
What to do next
You can take any or all of these optional actions with an existing firewall rule.
n Click the gear icon to view or modify rule logging settings. Log entries are sent to the
VMware VMware Aria Operations for Logs Service. See Using VMware Aria Operations for
Logs in the
VMware Cloud on AWS Operations Guide
.
n Click the graph icon to view Rule Hits and Flow statistics for the rule.
Table 3-17. Rule Hits Statistics
Popularity Index Number of times the rule was triggered in the past 24 hours.
Hit Count Number of times the rule was triggered since it was created.
Table 3-18. Flow Statistics
Packet Count Total packet flow through this rule.
Byte Count Total byte flow through this rule.
Statistics start accumulating as soon as the rule is enabled.
n Reorder firewall rules.
A rule created from the ADD NEW RULE button is placed at the top of the list of rules.
Firewall rules are applied in order from top to bottom. To change the position of a rule in the
list, select it and drag it to a new position. Click PUBLISH to publish the change.
Add or Modify Distributed Firewall Rules
Distributed firewall rules apply at the VM (vNIC) level and control East-West traffic within the
SDDC.
All traffic attempting to pass through the distributed firewall is subjected to the rules in the order
shown in the rules table, beginning at the top. A packet allowed by the first rule is passed on to
the second rule, and so on through subsequent rules until the packet is dropped, rejected, or hits
the default rule, which allows all traffic.
Attention In SDDC version 1.20, 1.20v2, or 1.20v3 a Distributed Firewall Rule that has a context
profile with FQDN attributes can trigger a PSOD failure if it receives a CNAME record in a
response from the DNS server. See VMware Knowledge Base article 91654 for details.
VMware Cloud on AWS Networking and Security
VMware by Broadcom 73

Distributed firewall rules are grouped into policies. Policies are organized by category. Each
category has an evaluation precedence. Rules in a category that has a higher precedence are
evaluated before rules in category that has a lower precedence.
Table 3-19. Distributed Firewall Rule Categories
Category Evaluation
Precedence Category Name Description
1 Ethernet Applied to all layer 2 SDDC network traffic.
Note Rules in this category require MAC addresses
as sources and destinations. IP addresses are
accepted but ignored.
2 Emergency Used for quarantine and allow rules.
3 Infrastructure Define access to shared services. Global rules, AD,
DNS, NTP, DHCP, backup, management servers.
4 Environment Rules between security zones such as production
zones, development zones, or zones dedicated to
specific business purposes.
5 Application Rules between applications, application tiers, or
microservices.
See Security Terminology in the
NSX Data Center Administration Guide
for more information
about Distributed Firewall terminology.
Prerequisites
Distributed firewall rules require inventory groups as sources and destinations and must be
applied to a service, which can be a predefined service or a custom service that you define for
your SDDC. You can create these groups and services while you are creating a rule, but it can
speed up the process if you take care of some of this beforehand. See Working With Inventory
Groups.
Procedure
1 Log in to VMware Cloud Services at https://vmc.vmware.com.
2 Click Inventory > SDDCs, then pick an SDDC card and click VIEW DETAILS.
3 Click OPEN NSX MANAGER and log in with the NSX Manager Admin User Account shown
on the SDDC Settings page. See SDDC Network Administration with NSX Manager.
You can also use the VMware Cloud Console Networking & Security tab for this workflow.
4 Open the Distributed Firewall page.
Click Category Specific Rules and select a category to view and modify policies and rules in
that category, or click All Rules to view (but not modify) rules in all policies and categories.
VMware Cloud on AWS Networking and Security
VMware by Broadcom 74
5 (Optional) Change the default connectivity strategy.
The Distributed Firewall includes default rules that apply to all layer 2 and layer 3 traffic.
These rules are evaluated after all other rules in their category, and allow traffic that doesn't
match a preceding rule to pass through the firewall. You can change either or both of these
rules to be more restrictive, but you cannot disable either rule.
n To change the Default Layer2 Rule, expand the Default Layer2 Section in the Ethernet
category and change the Action on that rule to Drop.
n To change the Default Layer3 Rule, expand the Default Layer3 Section in the Application
category and change the Action on that rule to Drop or Reject.
Click PUBLISH to update the rule.
6 To add a policy, open the appropriate category, click ADD POLICY and give the new policy a
Name.
A new policy is added at the top of the policy list for its category. To add a policy before or
after an existing policy, click the vertical ellipsis button at the beginning of the policy row to
open the policy settings menu, then click
Add Policy Above or Add Policy Below.
By default, the Applied To column is set to DFW, and the rule is applied to all workloads.
You can also apply the rule or policy to selected groups. Applied To defines the scope of
enforcement per rule, and is used mainly for optimization of host resource consumption. It
helps in defining a targeted policy for specific zones and tenants, without interfering with
other policy defined for other tenants and zones.
Note Groups consisting of only IP addresses, MAC Addresses, or Active Directory groups
cannot be used in the Applied To text box.
7 To add a rule, select a policy, click ADD RULE, and give the rule a Name.
8 Enter the parameters for the new rule.
Parameters are initialized to their default values (for example, All for Sources and
Destinations). To edit a parameter, move the mouse cursor over the parameter value and
click the pencil icon ( ) to open a parameter-specific editor.
Option
Description
Sources Click Any in the Sources column and select an inventory group for source
network traffic, or click ADD GROUP to create a new user-defined inventory
group to use for this rule. Click SAVE.
Destinations Click Any in the Destinations column and select an inventory group for
destination network traffic, or click ADD GROUP to create a new user-
defined inventory group to use for this rule. Click SAVE.
Services Click Any in the Services column and select a service from the list. Click
SAVE.
VMware Cloud on AWS Networking and Security
VMware by Broadcom 75

Option Description
Context Profiles This option is available if you have enabled NSX Advanced Firewall
features. See Chapter 5 About VMware vDefend Firewall Features for more
information.
Applied To The rule inherits its Applied To value from the containing policy.
Action n Select Allow to allow all L2 and L3 traffic to pass through the firewall.
n Select Drop to drop packets that match any specified Sources,
Destinations, and Services. This is a silent action with no notification
to the source or destination systems. Dropping the packet causes the
connection to be retried until the retry threshold is reached.
n Select Reject to reject packets that match any specified Sources,
Destinations, and Services. This action returns a "destination
unreachable message" to the sender. For TCP packets, the response
includes a TCP RST message. For UDP, ICMP and other protocols, the
response includes an "administratively prohibited" code (9 or 10). The
sender is notified immediately (without any re-tries) when connection
cannot be established.
The new rule is enabled by default. Slide the toggle to the left to disable it.
9 (Optional) Configure advanced settings.
To change the directionality or logging behavior of the rule, click the gear icon to open
the Settings page.
Direction
By default, this value is In/Out and applies the rule to all sources and destinations. You can
change this to In to apply the rule only to incoming traffic from a source, or Out to apply it
only to outgoing traffic to a destination. Changing this value can cause asymmetric routing
and other traffic anomalies, so be sure you understand the likely outcome for all sources and
destinations before you change the default value for Direction.
Logging
Logging for a new rule is disabled by default. Slide the toggle to the right to enable logging of
rule actions.
10 Click PUBLISH to create the rule.
The system gives the new rule an integer ID value, which is used to identify the rule in log
entries it generates.
What to do next
You can take any or all of these optional actions with an existing firewall rule.
n Click the gear icon to view or modify rule logging settings. Log entries are sent to the
VMware VMware Aria Operations for Logs Service. See Using VMware Aria Operations for
Logs in the
VMware Cloud on AWS Operations Guide
.
VMware Cloud on AWS Networking and Security
VMware by Broadcom 76

n Click the graph icon to view Rule Hits and Flow statistics for the rule.
Table 3-20. Rule Hits Statistics
Popularity Index Number of times the rule was triggered in the past 24 hours.
Hit Count Number of times the rule was triggered since it was created.
Table 3-21. Flow Statistics
Packet Count Total packet flow through this rule.
Byte Count Total byte flow through this rule.
Statistics start accumulating as soon as the rule is enabled.
n Reorder firewall rules.
A rule created from the ADD NEW RULE button is placed at the top of the list of rules in the
policy. Firewall rules in each policy are applied in order from top to bottom. To change the
position of a rule in the list, select it and drag it to a new position. Click
PUBLISH to publish
the change.
Manage Distributed Firewall Rules
Traffic attempting to pass through the firewall is subjected to the rules in the order shown in the
ALL RULES list.
The order of distributed firewall rules in the ALL RULES list is the union of the ordered list of
policies and the ordered list of rules in each policy. You can reorder the distributed firewall
sections and rules within a section. You can also edit existing distributed firewall configuration,
delete, or clone a firewall rule or section.
Procedure
1 Log in to VMware Cloud Services at https://vmc.vmware.com.
2 Click Inventory > SDDCs, then pick an SDDC card and click VIEW DETAILS.
3 Click OPEN NSX MANAGER and log in with the NSX Manager Admin User Account shown
on the SDDC Settings page. See SDDC Network Administration with NSX Manager.
You can also use the VMware Cloud Console Networking & Security tab for this workflow.
4 Open the Distributed Firewall page.
5 (Optional) Modify policy settings.
Click the vertical ellipsis button at the beginning of the policy row to take bulk actions, which
affect all rules in the policy. You cannot modify these settings if the policy includes any rules.
VMware Cloud on AWS Networking and Security
VMware by Broadcom 77

6 (Optional) Reorder policies.
A policy created from the ADD POLICY button is placed at the top of the list of policies.
Firewall rules in each policy are applied in policy order from top to bottom. To change the
position of a policy (and all the rules it contains) in the list, select it and drag it to a new
position. Click PUBLISH to publish the change.
7 (Optional) Clone or copy a rule.
Click at the beginning of the rule row, then click:
n Clone Rule to make a copy of the rule in this policy.
n Copy Rule to make a copy of the rule that you can add to another policy.
8 (Optional) Add or delete a rule.
Click at the beginning of the rule row, then click:
n Add Rule to add a rule in this policy.
n Delete Rule to delete the rule from this policy.
9 (Optional) Save or view distributed firewall configurations.
Distributed firewall configurations in VMware Cloud on AWS are similar to the Firewall Drafts
feature of on-premises NSX. Click ACTIONS > View to view a list of saved configurations.
Click ACTIONS > Save to save the current configuration. Configurations are auto-saved by
default. Click ACTIONS > Settings > General Settings to disable Auto Save Drafts.
10 (Optional) Configure Identity Firewall settings
This option is available if you have activated NSX Advanced Firewall features. See Chapter
5 About VMware vDefend Firewall Features for more information. Before you can use this
feature, you have to apply it to one or more SDDC clusters.
a On the Distributed Firewall tab, click ACTIONS > Settings > General Settings and toggle
Identity Firewall Status to Enable.
b Click the Identity Firewall Settings tab and choose the SDDC clusters where you want to
use this feature.
Manage the Distributed Firewall Exclusion List
The Distributed Firewall Exclusion List lets you specify inventory groups to exclude from
distributed firewall coverage. East-West network traffic to and from members of excluded
groups is exempt from distributed firewall rules that would otherwise apply.
The Distributed Firewall exclusion list lets you keep specific inventory groups from being
considered by distributed firewall rules. By default, management VMs and appliances, such as
vCenter and NSX controllers are on the exclusion list. You can edit the list to add or remove
entries.
VMware Cloud on AWS Networking and Security
VMware by Broadcom 78

Procedure
1 Log in to VMware Cloud Services at https://vmc.vmware.com.
2 Click Inventory > SDDCs, then pick an SDDC card and click VIEW DETAILS.
3 Click OPEN NSX MANAGER and log in with the NSX Manager Admin User Account shown
on the SDDC Settings page. See SDDC Network Administration with NSX Manager.
You can also use the VMware Cloud Console Networking & Security tab for this workflow.
4 Open the Distributed Firewall page.
5 Click ACTIONS > Settings > Exclusion List to display the Exclusion List page.
n To add an existing group to the exclusion list, click ADD GROUP and select an existing
Group Name.
n To create a group, from the Manage Exclusion List, click ADD GROUP, fill in the Group
Name, then click Set Members to open the inventory group creation page. See Working
With Inventory Groups for more information about using this page.
n To remove a group from the list, click the button at the beginning of the group row and
choose Delete.
6 Click APPLY to save your changes.
Configure DNS Services
VMware Cloud on AWS DNS forwarding services run in DNS zones, and enable workload VMs in
the zone to resolve fully-qualified domain names to IP addresses.
Your SDDC includes default DNS zones for the Management Gateway and Compute Gateway.
Each zone includes a preconfigured DNS service.
Use the DNS Services tab on the DNS Services page to view or update properties of DNS
services for the default zones. To create additional DNS zones or configure additional properties
of DNS services in any zone, use the DNS Zones tab.
For more information about DNS configuration choices for VMware Cloud on AWS, see DNS
Strategies for VMware Cloud on AWS.
Procedure
1 Log in to VMware Cloud Services at https://vmc.vmware.com.
2 Click Inventory > SDDCs, then pick an SDDC card and click VIEW DETAILS.
3 Click OPEN NSX MANAGER and log in with the NSX Manager Admin User Account shown
on the SDDC Settings page. See SDDC Network Administration with NSX Manager.
You can also use the VMware Cloud Console Networking & Security tab for this workflow.
4 Open the DNS page.
5 Click DNS Services to open the DNS Services page.
VMware Cloud on AWS Networking and Security
VMware by Broadcom 79
6 View or edit DNS service parameters.
Most gateway DNS service parameters are read-only but you can click the vertical ellipses
button and choose Edit DNS Server IPs to add or modify the server IP addresses for this
service.
7 Click SAVE.
Add a DNS Zone
Each DNS zone in your SDDC network represents a piece of the DNS namespace that you
manage yourself.
DNS zones in the SDDC fall into two categories:
n Default zones, where the servers listen for DNS queries from all SDDC VMs on a subnet in the
zone.
n FQDN zones, where the servers listen for DNS requests forwarded from a default zone.
The compute and management gateways are each configured with a single default DNS zone.
You can add up to four more zones of either type to either gateway to provide the flexibility
of having multiple DNS servers and subdomains. See
Add a DNS Zone in the
NSX Data Center
Administration Guide
for more information about how NSX implements DNS zones.
Procedure
1 Log in to VMware Cloud Services at https://vmc.vmware.com.
2 Click Inventory > SDDCs, then pick an SDDC card and click VIEW DETAILS.
3 Click OPEN NSX MANAGER and log in with the NSX Manager Admin User Account shown
on the SDDC Settings page. See SDDC Network Administration with NSX Manager.
You can also use the VMware Cloud Console Networking & Security tab for this workflow.
4 Open the DNS page.
5 Click DNS Zones to open the DNS Zones page.
6 To add a default zone, select ADD DNS ZONE > Add Default Zone
You can add or modify IP addresses for the Management Gateway and Compute Gateway
DNS forwarders in the default DNS zone. DNS queries from VMs in the default zone are sent
to these IP addresses by default if they don't match the criteria for any FQDN zone.
a Enter a name and optionally a description. You use this Name if you create DNS firewall
rules that apply to traffic in this zone.
b Enter the IP addresses of up to three DNS servers. All of the DNS servers you specify
must be configured identically.
c (Optional) Enter an IP address in the Source IP field.
VMware Cloud on AWS Networking and Security
VMware by Broadcom 80
7 To add an FQDN zone, select ADD DNS ZONE > Add FQDN Zone
Specify one or more FQDNs to enable DNS forwarding. A DNS forwarder is associated with
a default DNS zone and up to five FQDN DNS zones. When it receives a DNS query from
a VM in the zone, the DNS forwarder compares the domain name in the query with the
domain names in the FQDN DNS zones. If a match is found, the query is forwarded to the
DNS servers specified in the FQDN DNS zone. Otherwise the query is forwarded to the DNS
servers specified in the default DNS zone.
a Enter a name and optionally a description. You use this Name if you create DNS firewall
rules that apply to traffic in this zone.
b Enter a FQDN for the domain. This must be a fully qualified domain name, such as
example.com.
c Enter the IP address of up to three DNS servers.
d (Optional) Enter an IP address in the Source IP field.
8 (Optional) Tag the DNS zone.
See Add Tags to an Object in the
NSX Data Center Administration Guide
for more information
about tagging NSX objects.
9 Click SAVE.
Creating and Managing SDDC Deployment Groups with
VMware Transit Connect™
An SDDC deployment group uses VMware Transit Connect to provide high-bandwidth, low-
latency connections between SDDCs in the group. An SDDC group can include VPCs you own.
You can also add an AWS Direct Connect Gateway (DXGW) to provide connectivity between
group members and your on-premises SDDCs.
An SDDC deployment group (SDDC Group) is a logical entity designed to simplify management
of your organization's VMware Cloud on AWS resources at scale. Collecting SDDCs into an SDDC
Group provides a number of benefits to an organization with multiple SDDCs whose workloads
need a high-bandwidth, low-latency connection to each other. All network traffic between group
members travels over a VMware Transit Connect network. Routing between compute networks
of all SDDCs in a group is managed automatically by VMware Transit Connect as subnets are
added and deleted. You control network traffic among group member workloads with compute
gateway firewall rules. For a detailed discussion of VMware Transit Connect and SDDC Group
architecture and planning see the VMware Tech Zone designlet VMware Transit Connect for
VMware Cloud on AWS.
Any organization member who has a VMC service role of Administrator or Administrator (Delete
Restricted) can create or modify an SDDC Group.
VMware Cloud on AWS Networking and Security
VMware by Broadcom 81

Group Membership
SDDC groups are an organization-level object. An SDDC group cannot contain SDDCs from more
than one organization. An SDDC group can include members from up to three AWS regions. An
administrator can also create connections among SDDC groups in the organization. These group
interconnections can span up to three regions and include up to three groups.
An SDDC must meet several criteria to be eligible for group membership:
n Its management network CIDR block cannot overlap the management CIDR block of any
other group member.
n It cannot be a member of another SDDC Group.
While you can create a group with a single member, most practical applications of SDDC Groups
require two or more members.
Note Hybrid Linked Mode over a VPN connection is incompatible with SDDC groups. If you
add an SDDC that you've configured to use Hybrid Linked Mode over a VPN connection, the
connection will fail and you won't be able to use Hybrid Linked Mode with that SDDC. Hybrid
Linked Mode over a DX connection is unaffected when an SDDC is added to a group.
Internal Group Connectivity Using VMware Transit Connect
Peer connectivity among SDDC group members requires a VMware Managed Transit Gateway
(VTGW). This is an AWS resource owned and managed by VMware. Adding the first member
to an SDDC Group creates one of these resources and assigns it to the group. Creation and
operation of a VTGW incurs additional charges on your VMware Cloud on AWS bill. When a
group has members in more than one region, a VTGW is created in each of those regions.
VMware Cloud on AWS Networking and Security
VMware by Broadcom 82

Figure 3-2. VMware Transit Connect Connects SDDCs in the Group With Each Other
SDDC
VMware Cloud
on AWS Organization
Edge
Tier0
vCenter
vCenter
vCenter
CGW
Tier1
SDDC-1
SDDC Group
Edge
Tier0
MGW
Tier1
CGW
Tier1
SDDC-2
Edge
Tier0
VTGW
MGW
Tier1
Members can be added to and removed from a group as needed. You cannot remove a group
until all members have been removed. Removing the group also destroys the group's VMware
Managed Transit Gateway.
VMware Cloud on AWS Networking and Security
VMware by Broadcom 83
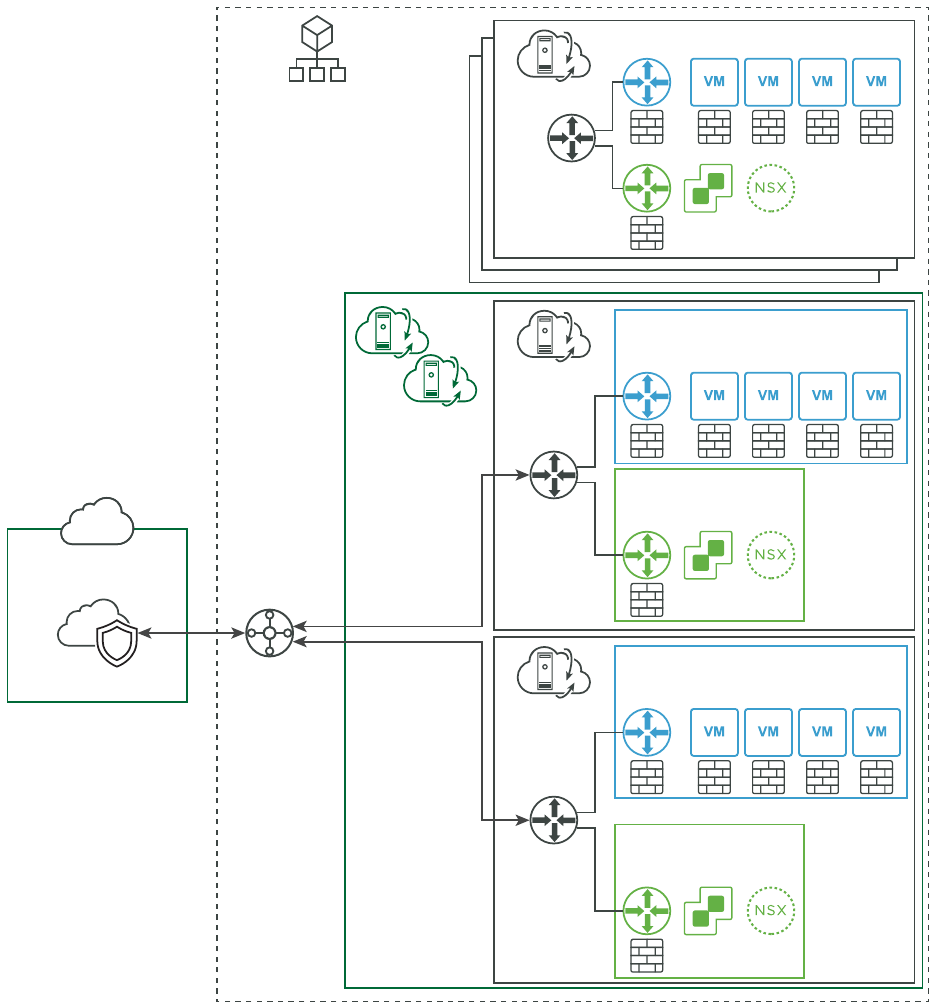
Attaching a VPC to an SDDC Group
Attaching a VPC to an SDDC group simplifies network connections between SDDCs in the
group and AWS services that run in that VPC. You use the VMware Cloud Console to make
the VTGW (an AWS resource) available for sharing, then use the AWS console to accept the
shared resource and associate it with the VPCs you'd like to attach to the SDDC Group. VTGW
connections to attached VPCs do not span regions in a multi-region group.
Figure 3-3. Using VMware Transit Connect to Attach a VPC to an SDDC Group
SDDC
VMware Cloud
on AWS Organization
Edge
Tier0
vCenter
vCenter
vCenter
CGW
Tier1
SDDC-1
SDDC Group
Edge
Tier0
MGW
Tier1
CGW
Tier1
SDDC-2
Edge
Tier0
VTGWVPC
AWS
MGW
Tier1
VMware Cloud on AWS Networking and Security
VMware by Broadcom 84

External Group Connectivity Using AWS Direct Connect Gateway
To provide network connectivity between the group and external endpoints such as on-premises
SDDCs, associate an AWS Direct Connect Gateway (DXGW) with the VMware Managed Transit
Gateway created for the group. Unlike the Direct Connect (DX) configuration that you can use
to connect your on-premises SDDC with a standalone VMware Cloud on AWS SDDC, the DXGW
that you associate with the VTGW provides DX-level connectivity to all SDDC group members.
Figure 3-4. An AWS Direct Connect Gateway Connects the SDDC Group to On-Premises SDDCs
SDDC
VMware Cloud
on AWS Organization
Edge
Tier0
vCenter
vCenter
vCenter
CGW
Tier1
SDDC-1
SDDC Group
Edge
Tier0
MGW
Tier1
CGW
Tier1
SDDC-2
Edge
Tier0
VTGW
VPC
AWS
On-Premises
SDDC
Direct Connect
Gateway
MGW
Tier1
VMware Cloud on AWS Networking and Security
VMware by Broadcom 85
Group SDDCs from Multiple Regions
A multi-region SDDC group provides the same kinds of connectivity as a single-region SDDC
group, including connections to VPCs and on-premises data centers, although connections to
VPCs do not span regions. When a group has members in more than one region, group creation
provisions a VTGW in each of those regions and connects it to the group members in that region.
This VTGW is peered with the other VTGWs in the group to provide a single IP address space
that includes all group members. VPC associations to a group are valid only within the region
occupied by the VPC. SDDC group members in other regions cannot access the VPC over the
VTGW
VMware Cloud on AWS Networking and Security
VMware by Broadcom 86

Figure 3-5. Multi-Region SDDC Group
VMware Cloud
on AWS Organization
SDDC Group
SDDC 1
SDDC 2
VTGW
AWS Region 1
SDDC 3
SDDC 4
VTGW
Direct Connect
Gateway
On-Premises SDDC
AWS Region 2
Group-to-Group Connections
An organization that has SDDC groups spread across two or three AWS regions can improve
administrative control over routing between workloads in those SDDC groups by peering the
groups' VTGWs with each other. The Connectivity between SDDC Groups workflow automates
peering of up to three VTGW instances. See Connect SDDC Groups in VMware Cloud on AWS.
VMware Cloud on AWS Networking and Security
VMware by Broadcom 87

Routing and Peering
SDDC group members advertise their local network segments, which are added to the route
tables of the SDDC's Tier-0 router and the group's VTGW. To view or download a list of VMware
Transit Connect routes learned and advertized by a member SDDC, open NSX Manager or the
legacy Networking & Security tab and click Transit Connect. See View Routes Learned and
Advertised over VMware Transit Connect. Peering between VTGW instances is supported within
the same region or across different regions.
To view the routes learned and advertised by all SDDCs in the group, click the Routing tab. You
can use the drop-down control. Select External to view routes between members or Members
to view routes between members and external endpoints like VPCs or Direct Connect Gateways.
External routes carry traffic originating from an external endpoint like a VPC or DXGW to an
SDDC group member. Members routes carry traffic originating in a member SDDC and include
SDDC group members and external endpoints.
SDDCs in the group learn routes to the networks advertised by other SDDCs in the group and
those advertised over the group's DXGW. They also learn the CIDRs for any VPCs attached to
the group. Because AWS imposes a limit of 20 prefixes that can be advertised by a DXGW to an
external endpoint like an on-premises SDDC, the CIDR block prefixes of all SDDC group members
must fall within a range that can be summarized without exceeding that limit.
VMware Transit Connect enforces several routing policies:
n Traffic originating from member SDDCs can be routed to other member SDDCs as well as
to VPCs and Direct Connect Gateways attached to the group in the same region as the
originating SDDC.
n Traffic originating from VPCs or Direct Connect Gateways attached to the group can be
routed only to SDDCs in the group that are in the same region as the originating SDDC.
n Traffic between VPCs or between a VPC and the Direct Connect Gateway is blocked.
Note When an SDDC becomes a member of an SDDC group, several aspects of existing SDDC
networking change:
n Routes advertised by a route-based VPN are preferred over routes advertised by VMware
Transit Connect or a DXGW. However, all outbound traffic from hosts to destinations outside
the SDDC network is routed to the VTGW or private VIF regardless of other routing
configurations in the SDDC. This includes vMotion and vSphere replication traffic. You must
ensure that inbound traffic to ESXi hosts is also routed over the DXGW interface so that the
inbound and outbound traffic paths are symmetrical.
n If the same route is advertised over the VTGW and DX, the VTGW path is preferred. This
includes routes from a DXGW connected to the VTGW.
n The maximum MTU for intranet traffic among group members is limited to 8500 bytes. An
MTU of up to 8900 bytes can still be used for traffic internal to the SDDC, or over DX. See
Create a Private Virtual Interface for SDDC Management and Compute Network Traffic.
VMware Cloud on AWS Networking and Security
VMware by Broadcom 88
Create or Modify an SDDC Group
To create an SDDC Group, give the group a name and description, then select SDDCs from your
organization to be members.
Prerequisites
You must be logged into the VMC console as a user with a VMC service role of Administrator or
Administrator (Delete Restricted).
Procedure
1 Log in to the VMware Cloud Console at https://vmc.vmware.com.
2 On the Inventory page, click SDDC Groups.
3 On the SDDC Groups tab, click ACTIONS and select Create SDDC Group.
Give the group a Name and optional Description, then click NEXT. You can edit the group
later to change these values.
4 On the Membership grid, select the SDDCs to include as group members.
The grid displays a list of all SDDCs in your organization. To qualify for membership in the
group, an SDDC must meet several criteria:
n Its management network CIDR block cannot overlap the management CIDR block of any
other group member.
n It cannot be a member of another SDDC Group.
When you have finished selecting members, click NEXT. You can edit the group later to add
or remove members.
5 Acknowledge that you understand and take responsibility for the costs you incur when you
create an SDDC group, then click CREATE GROUP to create the SDDC Group and its VMware
Transit Connect network.
Charges begin when you click CREATE GROUP. You cannot pause or cancel the process
after it starts. Group members won't be able to use the group's VMware Transit Connect
network until deployment is complete. Deployment typically takes about fifteen minutes.
When deployment is complete, the group's Connectivity Status changes from PENDING to
CONNECTED
6 (Optional) To modify the group name and description or to add or remove group members,
click ACTIONS and select Edit Group.
You cannot edit the group while its Connectivity Status is PENDING.
VMware Cloud on AWS Networking and Security
VMware by Broadcom 89
What to do next
To view the routes learned and advertised by SDDCs, VPCs, and TGW/DGW instances in the
group, click the Routing tab. Select External in the drop-down control to view routes used by
external endpoints like VPCs or Direct Connect Gateways. Select Members to view routes used
by member SDDCs.
To enable network traffic between workloads in member SDDCs, you'll need to create a set of
compute gateway firewall rules in each member. See Add Compute Gateway Firewall Rules to
Enable SDDC Group Member Workload Connectivity for details. You'll need to do this for each
new member you add to the group.
Attach a VPC to an SDDC Group
You can use VMware Transit Connect to attach an AWS VPC to an SDDC Group. This simplifies
network connections between SDDCs in the group and the AWS services that run in that VPC.
Although VMware Transit Connect handles all compute and management network traffic among
SDDC group members, it does not automatically configure AWS route tables to send traffic
originating from an external VPC or other AWS object to the SDDC group's VTGW. Network
topologies that require this sort of connectivity include creation of a "security VPC" through
which all traffic between the SDDC group and the Internet is routed for inspection, and any
similar requirement to enable communication between AWS objects and SDDC Group members.
This sort of network topology requires you to define the destination routes for traffic from the
SDDC group's
VTGW to the VPC, as we show in Step 8
Attaching a VPC to the SDDC group is a multi-step process that requires you to use both the
VMware Cloud Console and the AWS console. You use the VMware Cloud Console to make the
VTGW (an AWS resource managed by VMware) available for sharing. You then use the AWS
console to accept the shared resource and associate it with the VPCs you'd like to attach to the
SDDC Group.
Procedure
1 On the Inventory page of the VMware Cloud Console, click SDDC Groups, then click the
Name of the group to which you want to attach the VPC.
2 On the External VPC tab for the group, click ADD ACCOUNT and specify the AWS account
that owns the VPC you want to attach to the group.
This enables AWS resource sharing in that account for the VTGW.
3 In the AWS console, open Resource Access Manager > Shared with me to accept the shared
VTGW resource.
The resource Name has the form VMC-Group-UUID and a Status of Pending. Click the resource
name to open the resource Summary card, then click Accept resource share and confirm
acceptance,
VMware Cloud on AWS Networking and Security
VMware by Broadcom 90
4 In the VMware Cloud Console , return to the VPC Connectivity tab for the group and wait
for Status of the resource share you accepted in Step 3 to change from ASSOCIATING to
ASSOCIATED.
VPC resource association can take up to ten minutes. Once the VPC association is complete,
you can attach the VTGW.
5 Return to the AWS console Resource Access Manager to find the resource ID of the shared
VTGW resource.
It will be listed under Shared with me: Shared resources with a Resource ID of the form
TGW-UUID and a Resource type of ec2:TransitGateway.
6 Create the Transit Gateway attachment.
a Select the Transit Gateway ID identified in Step 5 and specify an Attachment type of
VPC, and select the VPC ID you would like to connect to the SDDC group.
b Select a Subnet ID in each Availability Zone (AZ) that requires connectivity to the group.
You can select only one subnet per AZ, but SDDC group members can communicate with
all VPC subnets in that AZ.
c If the VPC is an FSx VPC as described in Configure Amazon FSx for NetApp ONTAP as
External Storage, you must also select DNS support.
d Click Create Transit Gateway Attachment to create the attachment.
7 In the VMware Cloud Console, return to the External VPC tab for the group and ACCEPT the
shared VPC attachment.
When the VPC status changes to PENDING_ACCEPTANCE, click ACCEPT to accept it. The
status changes to AVAILABLE after the acceptance process completes. Acceptance can
take up to ten minutes.
8 Configure additional routes to the VPC.
In the AWS console, identify the route tables associated with any subnets in the VPC
connected to the shared VTGW and need to communicate with the SDDC Group. On the
Routes tab of the route table, click Edit Routes and add any CIDRs in the SDDC group as the
destination with the target set to the VTGW ID you identified in Step 5. The list of CIDRs for
the SDDC group can be found in the VMC Console for the SDDC group on the Routing tab,
by selecting External in the Route Table drop-down.
As an alternative to manually editing the routes, consider creating a managed prefix list and
adding it to the main route table associated with the VPC. See Use a Shared Prefix List to
Simplify Routing For External VPC and TGW Objects.
VMware Cloud on AWS Networking and Security
VMware by Broadcom 91

9 (Optional) Configure additional destination routes to the VPC.
When you create an SDDC group, the system creates routes for the VPC's primary CIDR and
any secondary CIDRs. If you need to have destinations beyond the VPC routed through it
(something you might need for a Security VPC or Transit VPC), you can define additional
CIDR blocks to route to the attached VPC.
To create or modify routing from the group's VTGW to the external VPC, open the External
VPC tab and select the AWS Account ID that owns the VPC and expand the row. If no routes
have been specified, click ADD ROUTES in the Routes column to open the Edit Routes page
and add one or more routes that use this VPC as a Target. Otherwise the Routes column
shows the first route and the number of additional routes. Click the pencil icon ( ) to open
the Edit Routes page so you can edit this list. Each prefix defines a route from the group's
VTGW to the VPC listed in the VPC ID column. Each prefix also appears as a Target on the
group's Routing tab. You can specify up to 100 routes to each attached VPC.
What to do next
n In the AWS console, create network ACLs to manage traffic between the VPCs you've added
to the group and other group members. If you want to access an AWS service running in the
VPC, you might need to modify the AWS security policy for the service. See Access an S3
Bucket Using an S3 Endpoint for an example of AWS security policy configuration for the S3
service.
Attach an AWS Transit Gateway to an SDDC Group
Attach an AWS Transit Gateway to an SDDC Group to enable SDDC Group members to facilitate
network connections between SDDCs in the group and AWS services that run in any VPC in any
region.
Attaching an AWS Transit Gateway (TGW) to an SDDC group is a multi-step process that
requires you to use both the VMware Cloud Console and the AWS console. You use the VMware
Cloud Console to request access to an existing TGW, then you use the AWS console to attach
it to the SDDC Group's VTGW. Unlike a VTGW, which is an AWS resource managed by VMware,
a TGW is a pure AWS resource that you can consume and manage on your own. See Getting
started with transit gateways in the AWS documentation.
Procedure
1 On the Inventory page of the VMware Cloud Console, click SDDC Groups, then click the
Name of the group to which you want to attach the AWS TGW.
VMware Cloud on AWS Networking and Security
VMware by Broadcom 92

2 On the External TGW tab for the group, click ADD TGW and provide the required parameter
and value information.
Parameter Value
AWS account ID The AWS account that owns the TGW.
TGW ID The AWS ID of the TGW. You can use an existing TGW owned by the
specified AWS account or create a new one in that account.
TGW Location The AWS region where the TGW resides.
VMC on AWS Region The AWS region where the SDDC group resides.
Routes AWS resource destination prefixes reachable via this peering connection
Click ADD to add the TGW as a peer to the group's VTGW. When Status column changes to
PENDING_ACCEPTANCE, proceed to Step 3
3 Log in to the AWS console with administrator credentials for the AWS Account ID you
specified in Step 2.
In the AWS console navigate to Transit Gateway Attachments, select the TGW whose TGW
ID matches the one you specified in Step 2 and click Accept Transit Gateway Attachment.
4 In the VMware Cloud Console, return to the External TGW tab for the group and verify that
the TGW State has changed to ASSOCIATED.
5 (Optional) Associate an AWS route table with the attached TGW.
Peering sessions for the new TGW require the TGW attachment to be associated with
an AWS a route table. In some environments, a route table won't be associated with the
attachment by default, so you'll need use the AWS console and associate a routing table
with the attachment. See "Add routes between the transit gateway and your VPCs" in Getting
started with transit gateways.
6 Create CGW firewall rules to enable workload traffic through the TGW.
See Add Compute Gateway Firewall Rules to Enable SDDC Group Member Workload
Connectivity.
7 Configure additional source and destination routes in the SDDC or AWS routing tables.
To create or modify routing from the group's VTGW to the external TGW, open the External
TGW tab. Select the AWS Account ID that owns the TGW and expand the row. If no routes
have been specified, the Routes column shows the first route and the number of additional
routes. Click the pencil icon (
) to open the Edit Routes page so you can edit this list, or
click ADD ROUTES in the Routes column to open the Edit Routes page. Add CIDR prefixes
specifying routes to native AWS subnets via the external TGW. Each prefix defines a route
from the group's VTGW to the external TGW listed in the TGW Peering Attachment ID
column. Each prefix also appears as a Target on the group's Routing tab. You can specify up
to 100 routes to each attached TGW.
VMware Cloud on AWS Networking and Security
VMware by Broadcom 93
As an alternative to manually editing the routes, consider creating a managed prefix list and
adding it to the main route table associated with the TGW. See Use a Shared Prefix List to
Simplify Routing For External VPC and TGW Objects.
What to do next
See Getting Started with VMware Transit Connect Intra-Region Peering for VMware Cloud on
AWS for example topologies and workflow suggestions.
Use a Shared Prefix List to Simplify Routing For External VPC and TGW Objects
When you extend SDDC Group connectivity to include native AWS objects such as VPCs, Transit
Gateways (TGWs), and Direct Connect Gateways (DXGWs) that you own and manage, you must
also edit VPC route tables or a VMware Cloud on AWS shared prefix list to establish and maintain
connectivity between the group’s VTGW and these objects.
Route management for connections between VMware Cloud on AWS networks and native AWS
objects depends on your network topology. For all topologies that include native AWS objects
such as TGWs and VPCs, you must define return paths from those objects to the SDDC group,
as shown in
Attach a VPC to an SDDC Group and Attach an AWS Transit Gateway to an SDDC
Group. Topologies that send traffic from the SDDC group to a native AWS object (such as a
"security VPC" through which all traffic between the SDDC group and the Internet is routed for
inspection) require you to configure those outbound routes manually, either by editing native
route tables as described in the AWS Virtual Private Cloud User Guide, or by using a VMware
Cloud on AWS shared prefix list.
A shared prefix list (a list of subnet CIDRs that VMware manages and shares with your AWS
account) is the best option for most SDDC groups, since it updates external VPC and TGW
route tables automatically during NSX Edge migration or failover, and whenever SDDC group
members are added and removed. For more information see the VMware Cloud Tech Zone
article Understanding Shared Prefix Lists for SDDC Groups in VMC on AWS.
Procedure
1 On the Inventory page of the VMware Cloud Console, click SDDC Groups, then click the
Name of the group that has the VPC attached.
VMware Cloud on AWS Networking and Security
VMware by Broadcom 94

2 To create a shared prefix list that you can use to simplify manual maintenance of routes to
and from the group members' subnets and external AWS objects, open the Routing tab for
the group and click CREATE PREFIX LIST.
You can skip this step if you want to manually update the external VPC's route tables.
a On the Create Prefix List card, fill in the required values, then click CREATE PREFIX LIST.
Prefix List Name Make up a name.
VMC on AWS Region Select a region from the list of AWS regions occupied
by SDDC group members.
AWS Region The region where you want the prefix list to be
created. Initially the same as the VMC on AWS Region
value, but you can change it to have the prefix list
created in a different region.
AWS Accounts to associate This list is prepopulated with the 12-digit AWS account
IDs associated with the SDDC group. You can add or
remove account IDs as needed.
When you click CREATE PREFIX LIST, the Status of the prefix list changes to Creation in
Progress.
b When the Status of the prefix list changes to Created, use an AWS identity that has
permission to accept a resource share and log into the AWS console using one of the
Associated AWS Accounts.
Click Resource Access Manager > Shared with me to see a list of AWS resources shares
the account can access. The resource Name has the form VMC-SHARED-PREFIX-LIST-ID
and a Status of Pending. Click the resource Name to open the resource share details
card, then click Accept resource share and confirm acceptance.
c In the AWS console, open Your VPCs, select a VPC, and add one or more prefixes to the
VPC's main route table.
Click Add route, enter the prefix list ID as a Destination and specify the SDDC group's
VTGW as the Target.
Note Each prefix list counts as a single Route when added to a route table but can
contain many entries, each of which counts toward the route table's quota. See AWS
VPC route table quotas and be sure that the route table has sufficient capacity to
accommodate all the routes in the prefix list.
After you add a prefix list to a VPC route table, all routes from SDDC group members to
target TGW or VPC objects are updated automatically.
3 To modify or remove a shared prefix list, open the Routing tab for the group.
n To modify a Prefix List Name or its Associated AWS Accounts click the pencil icon ( )
to open the Edit Prefix List Name or Associate AWS Accounts card.
VMware Cloud on AWS Networking and Security
VMware by Broadcom 95
n To remove a prefix list, select it and click DELETE PREFIX LIST. You must remove any
resources (such as route tables) associated with the list before you delete it.
4 To view the current set of routes programmed (either manually or from a shared prefix list)
for this SDDC group, open the Routing tab for the group.
You can view routes to Members (SDDCs in the group along with the group's VTGW and any
connected VPCs), or to External endpoints (SDDCs in other groups). You can filter each list
by object Type (SDDC, VPC, or TGW).
View SDDC Group Support Information
Support Information for an SDDC group includes its creation date, group ID, and VTGW IDs.
You can find SDDC group support Information on the Support tab for the SDDC Group. You
can also use the VMware Aria Operations for Logs service to view events logged by an SDDC
group. A VMware Aria Operations for Logs regex of the form type\:[SDDC_GROUP | SDDC_SHARE
| EXTERNAL]) returns SDDC group log entries in a stream.
Prerequisites
You must be logged into the VMC console as a user with a VMC service role of Administrator or
Administrator (Delete Restricted).
Procedure
1 Log in to the VMware Cloud Console at https://vmc.vmware.com.
2 On the Inventory page, click SDDC Groups.
3 Click VIEW DETAILS on the card for a group to open the group Summary screen.
4 Click the Support tab to view Support Information for the group.
Remove an SDDC Group
To remove an SDDC Group, remove all members from the group, then delete the group.
Removing a member from a group disconnects it from the group's VTGW but makes no other
changes in group properties. Removing an SDDC group destroys the group's VMware Transit
Connect network and any routing information associated with it, along with its VTGW.
Prerequisites
You must be logged into the VMC console as a user with a VMC service role of Administrator or
Administrator (Delete Restricted).
Procedure
1 Log in to the VMware Cloud Console at https://vmc.vmware.com.
2 On the Inventory page, click SDDC Groups and click the group you want to remove.
VMware Cloud on AWS Networking and Security
VMware by Broadcom 96

3 Click the Name checkbox to select all SDDCs in the group, then click REMOVE SDDCS.
Confirm that you understand the implications of removing the SDDCs, then click CONTINUE
to proceed with the removal. Removal can take several minutes per SDDC.
4 After all the SDDCs have been removed, click ACTIONS > Delete Group to remove the group
and its associated AWS resources.
Confirm that you understand the effects of removing the group, then click DELETE GROUP
to proceed with the removal.
Connect SDDC Groups in VMware Cloud on AWS
An organization administrator can create connections among SDDC groups in the organization.
These group-to-group connections can span up to three regions and include up to three groups.
An organization that has SDDC groups spread across two or three AWS regions can improve
administrative control over routing between workloads in those SDDC groups by peering the
groups' VTGWs with each other. The Connectivity between SDDC Groups workflow automates
peering of up to three VTGW instances.
When you connect multiple SDDC groups, only networks within the SDDCs themselves are
shared across the connection. These networks include the SDDC management CIDR, routed
segments attached to the default CGW, and any compute networks advertised to the local
SDDC group via route aggregations. External connections (such as DXGW, VPC, and TGW) to an
SDDC group are accessible only by members of the group to which they're attached. If SDDCs
in connected groups require access to these resources, you must attach them to each group
individually.
Note Group-to-group connections incur an additional cost, based on AWS TGW attachment
pricing, for each region for each connected group. See AWS Transit Gateway pricing for details.
Prerequisites
You must be logged into the VMC console as a user with a VMC service role of Administrator or
Administrator (Delete Restricted).
Procedure
1 Log in to the VMware Cloud Console at https://vmc.vmware.com.
2 On the Inventory page, click SDDC Groups.
3 Click VIEW DETAILS on a group card to open the group Summary page.
This page includes a Members grid that lists all SDDCs in the group and a Connectivity
between SDDC Groups grid that shows existing connections between your SDDC groups.
VMware Cloud on AWS Networking and Security
VMware by Broadcom 97
4 Click CREATE NEW CONNECTION to connect this SDDC group to another one in your
organization.
The New Connection card shows the name and region of this SDDC group (the Local SDDC
Group) and a drop-down control you can use to select a Peer SDDC Group to connect with.
When you select a Peer SDDC Group and click CONNECT, the Connectivity between SDDC
Groups grid displays the Peer SDDC Group ID and connection Status of IN PROGRESS and
the VMware Cloud Console displays a status message tracking the VTGW peering operation.
When the peering operation completes, the connection Status changes to CONNECTED.
What to do next
To remove a peer SDDC group from a group-to-group connection:
n Click VIEW DETAILS on the group card and open the local group Summary page.
n Expand the Connectivity between SDDC Groups grid and select the group you want to
disconnect.
n Click REMOVE CONNECTION to remove the TGW peering connection.
When you confirm your choice by clicking REMOVE on the Remove Connection card, the
Status of the peer SDDC group in the Connectivity between SDDC Groups grid changes to IN
PROGRESS and the VMware Cloud Console displays a status message tracking the removal of
VTGW peering connection. When the removal is complete, the peer SDDC no longer appears in
the grid.
Add Compute Gateway Firewall Rules to Enable SDDC Group
Member Workload Connectivity
You must create firewall rules for the Compute Gateway of each SDDC in the group. Without
these rules, workloads running on group members cannot use VMware Transit Connect to
communicate with each other.
Because all members of an SDDC Group are owned by the same VMware Cloud on AWS
organization, network traffic among members of the group can be safely treated as East-West
traffic, rather than North-South traffic that might have an external source or destination. But since
an SDDC compute gateway's default firewall rules reject external traffic, you'll need to create
firewall rules allowing that traffic through the compute gateway of each SDDC in the Group.
(SDDC Groups do not currently need to route network traffic through members' management
gateways.)
VMware Cloud on AWS defines a set of inventory groups intended for use in Compute Gateway
firewall rules that provide high-level control over traffic among group members. These groups
contain the prefixes (CIDR blocks) for routes learned over VMware Transit Connect and any AWS
Transit Gateways owned by the SDDC's AWS account owner.
Transit Connect Customer TGW Prefixes
VMware Cloud on AWS Networking and Security
VMware by Broadcom 98

Routes learned from customer-owned AWS Transit Gateways.
Transit Connect DGW Prefixes
Routes learned from the group's Direct Connect Gateway.
Transit Connect Native VPCs Prefixes
Routes learned from the group's attached VPCs.
Transit Connect other SDDCs Prefixes
Routes learned from other SDDCs in the group.
Prefixes in each of these groups are automatically added, removed, and updated as group
membership changes and new routes are learned.
For more information, see Add or Modify Compute Gateway Firewall Rules and Working With
Inventory Groups.
Procedure
1 Use the workflow defined in Add or Modify Compute Gateway Firewall Rules to create the
inventory groups and compute gateway firewall rules you need.
The system-defined inventory groups are useful for creating high-level connectivity among
group members and attached VPCs. If you need to create finer-grained firewall rules that
to apply to individual workload segments in member SDDCs, you'll need to create inventory
groups that define those segments, as shown in the example below.
2 Click Gateway Firewall > Compute Gateway, then click ADD RULE.
The system-defined inventory groups, along with any compute groups you defined are
available as choices on the Sources and Destinations pages. To enable unrestricted group
connectivity, you could add a rule like this one, which allows inbound traffic to this SDDC
from other group members .
Name
Sources Destinations Services Applied To Action
Inbound from
other SDDCs
Transit Connect
other SDDCs
Prefixes
Any Any Direct Connect
Interface
Allow
If you have created inventory groups with the CIDR blocks of your local workload segments,
you can use them to create rules at a higher precedence that apply finer-grained controls
over this traffic.
Example: CGW Firewall Rules with User-Defined Inventory Groups to Allow
Workload Traffic Between Group Members
These examples show how to use NSX Manager to create inventory groups and firewall rules.
You can also use the VMware Cloud Console Networking & Security tab for this workflow. See
SDDC Network Administration with NSX Manager.
Create the Groups
VMware Cloud on AWS Networking and Security
VMware by Broadcom 99

In NSX Manager, click Inventory > Compute Groups, then click ADD GROUP and create three
groups. You can use any names you want for the groups. The ones we show here are just
examples.
n A group named Local Workloads that includes segment prefixes for the SDDC's own
workload segments.
n A group named Peer Workloads that includes segment prefixes for workload segments
of other SDDCs in the group.
n A group named Peer SDDC vCenters that includes the private IP address of the vCenter
in each SDDC in the group.
For each group, click Set in the Compute Members column to open the Set Members tool.
In this tool, you can click ADD CRITERA and enter the IP Addresses or MAC Addresses of
group members. You ca also click ACTIONS > import to import these values from a file.
Create the Rules
As shown in Step 2, open the Gateway Firewall card, click Compute Gateway, then click ADD
RULE to create new rules that use the inventory groups you created for their Sources and
Destinations. You can use any names you want for the rules. The ones we show here are just
examples.
Name
Sources Destinations Services
Local workload to peer
workload
Local Workloads Peer Workloads As needed for outbound
traffic from local
workloads to workloads in
other group members
Peer workload to local
workload
Peer Workloads Local Workloads As needed for in traffic
to local workloads from
workloads in other group
members
All rules governing SDDC group member traffic through the compute gateway firewall should
be applied to All Uplinks and have an action of Allow.
Attach a Direct Connect Gateway to an SDDC Group
After you create an SDDC Group, you can connect an on-premises SDDC to that group's Direct
Connect Gateway to give it DX connectivity to all members of the SDDC group.
VMware Transit Connect handles all compute and management network traffic among SDDC
group members. Many SDDC group members will also need to make network connections to
your on-premises data center. To enable these connections, associate an AWS Direct Connect
Gateway with the group's VMware Managed Transit Gateway.
VMware Cloud on AWS Networking and Security
VMware by Broadcom 100

Attaching a Direct Connect Gateway to the SDDC group is a multi-step process that requires
you to use both the VMware Cloud Console and the AWS console. You use the VMware Cloud
Console to make the VTGW (an AWS resource) available for sharing. You then use the AWS
console to accept the shared resource and associate it with the Direct Connect Gateway you'd
like to attach to the SDDC Group. You'll also use the AWS console if you need to modify the list
of allowed prefixes for an existing Direct Connect Gateway.
Prerequisites
You must create an AWS Direct Connect Gateway. See Creating a Direct Connect gateway in the
AWS documentation.
Procedure
1 On the Inventory page of the VMware Cloud Console, click SDDC Groups, then click the
Name of the group to which you want to attach the Direct Connect Gateway.
2 On the Direct Connect tab for the group, click ADD ACCOUNT and specify the AWS account
that owns the Direct Connect Gateway you want to add to the group.
On the Add Direct Connect Gateway page, fill in the following values:
Option Description
Direct Connect Gateway Attachment
ID
The ID value, displayed on the AWS console Direct Connect Gateways page
for the gateway object.
Location Specifies additional regional VTGW attachments for this gateway. A single
Direct Connect gateway attachment in any region can handle traffic among
all members of a multi-region group, but transitive routing is not supported.
If a group has members in two different regions but only a single DXGW
connection, only traffic from the SDDC in the region connected to the
DXGW is routed to the on-premises data center. Use the VTGW Location
control to associate the DXGW with a VTGW in another region.
Allowed Prefixes A comma-separated list of compute network CIDR blocks of SDDC group
members for the specified VTGW Location.
Click OK to generate an association proposal in AWS for the specified gateway.
3 In the AWS console, open the Direct Connect Gateways page for the gateway object and
accept the association proposal.
Acceptance can take up to 20 minutes. When it completes:
n In the AWS console, the gateway will have a State of associated on the AWS Direct
Connect Gateways page for the gateway object.
n In the VMware Cloud Console, the gateway will have a State of Connected in the Direct
Connect tab for the group.
VMware Cloud on AWS Networking and Security
VMware by Broadcom 101
4 Attach an AWS Transit VIF between the Direct Connect Gateway and your Direct Connect
Location (Direct Connect provider).
See Transit gateway attachments to a Direct Connect gateway in the AWS VPC
documentation.
5 (Optional) Add a Direct Connect Gateway location.
In a multi-region SDDC group, you can attach a group VTGW in any region to a Direct
Connect Gateway. On the Direct Connect Gateway tab for the group, click ADD LOCATION
to open the Add Direct Connect Gateway Location card, then specify an AWS region to
attach to the gateway and one or more Allowed Prefixes.
What to do next
Create any firewall rules needed to allow traffic between the Direct Connect Gateway and the
on-premises SDDC.
Use vCenter Linking in an SDDC Group
An organization that includes an SDDC deployment group can link the vCenter systems in those
SDDCs to enable an administrator to manage their combined inventories in the same vSphere
Client view.
When you enable vCenter linking in an SDDC group, a cloud administrator can log in as
[email protected] and use the vSphere Client to manage all the vCenter systems in the
group. If the [email protected] account configures these systems to use single sign-on, then
users with accounts in that single sign-on domain can access all the linked systems in the group.
After vCenter linking has been enabled in an SDDC group, the vCenter systems in SDDCs added
to the group are linked automatically, and vCenter systems in SDDCs that are removed from the
group are unlinked automatically.
Prerequisites
Networking
The required L3 networking for this feature is offered by VMware Transit Connect which
is already configured as part of the creation of the SDDC Group. Each linked vCenter in
the group must be able to reach the other linked vCenter instances at a private IP address
using a route that goes through the group's VMware Transit Connect gateway. Other routing
configurations are not supported.
Migration with vMotion of a VM across the vCenter instances in a linked SDDC group does
not work because VMware Transit Connect creates only L3 connectivity between the group
members. Migration with vMotion requires L2 connectivity.
Service Role
This operation is restricted to users with a VMC service role of Administrator or
Administrator (Delete Restricted).
VMware Cloud on AWS Networking and Security
VMware by Broadcom 102

vCenter Name Resolution
Each linked vCenter in the group must be able to resolve the hostname and FQDN of the
other linked vCenters to a private IP address. See Set vCenter FQDN Resolution Address.
Hybrid Linked Mode
As noted in Creating and Managing SDDC Deployment Groups with VMware Transit
Connect™, use of Hybrid Linked Mode over a VPN connection is not supported when the
SDDC is a member of an SDDC group.
Important You cannot configure Hybrid Linked Mode with the VMware Cloud Gateway over
a Direct Connect Gateway (DXG) connection to a linked SDDC group member.
VMware Cloud Disaster Recovery
vCenter Linking is not supported for SDDCs that are protected by VMware Cloud Disaster
Recovery versions earlier than version 26.
Procedure
1 Log in to the VMware Cloud Console at https://vmc.vmware.com.
2 On the Inventory page, click SDDC Groups.
This page lists all the SDDC groups in your organization. To create an SDDC group, see
Create or Modify an SDDC Group.
3 On the SDDC Groups page, choose an SDDC group card, click VIEW DETAILS, and open the
vCenter Linking tab.
This page presents a list of all the SDDCs in the group, their versions, and vCenter linking
status.
4 To link all the vCenter systems in the list, click LINK ALL VCENTERS.
This action links all the vCenter systems that have a status of Unlinked. Linking vCenter
systems in an SDDC group is something you do only once. It establishes a group property
ensuring that vCenter systems in the group are always linked, regardless of the set of
member SDDCs, until you deliberately unlink them. After you LINK ALL VCENTERS in a
group vCenter linking is automatic whenever an SDDC is added to the group. Linked vCenter
systems are unlinked automatically when their SDDC is removed from the group.
5 (Optional) Configure a shared identity source for the linked vCenter systems.
If you configure the linked vCenter systems to use the same identity source, user accounts
defined in that identity source can access all linked vCenter systems with the privileges
defined for their account in the identity source. See vSphere Authentication with vCenter
Single Sign-On in the
VMware vSphere Documentation
for configuration details. If you don't
take this step, [email protected] can authenticate to all linked vCenter systems using the
credentials listed on the Settings tab of the VMware Cloud Console.
VMware Cloud on AWS Networking and Security
VMware by Broadcom 103

6 To unlink all the vCenter systems in the list, click UNLINK ALL VCENTERS.
This action unlinks all the vCenter systems that have a status of Linked. Like linking vCenter
systems in an SDDC group, unlinking is something you do only once. It establishes a group
property ensuring that vCenter systems in the group are not linked until you deliberately link
them. After you UNLINK ALL VCENTERS in a group, vCenter systems remain unlinked when
an SDDC is added to the group.
Add a Custom Tier-1 Gateway to a VMware Cloud on AWS
SDDC
Every new VMware Cloud on AWS SDDC includes a default Tier-1 gateway named the Compute
Gateway (CGW). You can create and configure additional custom Tier-1 gateways if you need
them. Each Tier-1 gateway sits between the SDDC Tier-0 gateway and an arbitrary number of
compute network segments.
Additional Tier-1 gateways provide a way for an SDDC network administrator to dedicate
workload network capacity to specific projects, tenants, or other units of administration within
a
VMware Cloud on AWS organization.
For more information about SDDC network configurations that include custom Tier-1 gateways,
read the VMware Cloud Tech Zone Designlet VMware Cloud on AWS Static Routing on Multiple
CGWs (T1s).
Procedure
1 Log in to VMware Cloud Services at https://vmc.vmware.com.
2 Click Inventory > SDDCs, then pick an SDDC card and click VIEW DETAILS.
3 Click OPEN NSX MANAGER and log in with the NSX Manager Admin User Account shown
on the SDDC Settings page. See SDDC Network Administration with NSX Manager.
You can also use the VMware Cloud Console Networking & Security tab for this workflow.
4 Click Tier-1 Gateways > ADD TIER-1 GATEWAY, then give the new gateway a Name and
optional Description.
5 Specify the gateway Type.
Type
Traffic Pattern
Routed Segment traffic is routed through the new gateway.
Isolated Segment traffic cannot traverse the new gateway. Local segments can connect
with each other. Segments are not added to the routing table.
NATted Segment traffic cannot traverse the new gateway until you create NAT rules for
it (see Create or Modify NAT Rules). Local segments can connect with each other.
Segments are not added to the routing table.
VMware Cloud on AWS Networking and Security
VMware by Broadcom 104

6 (Optional) Tag the new gateway.
See Add Tags to an Object in the
NSX Data Center Administration Guide
for more information
about tagging NSX objects.
7 Click SAVE to create or configure the custom Tier-1 gateway.
8 (Optional) Configure DNS services for the gateway.
See Add a DNS Forwarder Service in the
NSX Administration Guide
.
a Add a Compute Gateway firewall rule if you have configured DNS services for the custom
Tier-1 gateway and want connected workloads to use them.
You can skip this step if you want workloads attached to the custom Tier-1 gateway to
use the default Compute Gateway DNS forwarder.
Unlike the Compute Gateway, custom Tier-1 gateways do not have a default firewall rule
that allows DNS access from connected workloads. You need a rule like this one only if
you have created a DNS service for the gateway and want workloads attached to the
gateway to use it instead of the default Compute Gateway DNS forwarder.
Name Sources Destinations Services Applied To Action
Gateway DNS
Forwarder
DNS Service
IPshown on the
DNS Services
tab
Any DNS-UDP Whatever
interface
advertises the
SDDC
network's
default route.
Typically one
of:
n Internet
Interface
n Intranet
Interface
n VPN Tunnel
Interface
Allow
9 (Optional) Configure DHCP services for the gateway.
You can skip this step if you don't need to enable DHCP address assignment for workloads
on the custom Tier-1 gateway.
Click Set DHCP Configuration to open the DHCP Configuration page. The default DHCP
configuration Type for a new gateway is No Dynamic IP Address Allocation. In this
configuration, the gateway does not provide DHCP services. If you want the gateway
to provide DHCP services, choose a Type of DHCP Server and specify a DHCP Server
Profile. You can create a new profile or use an existing one. See Configure Segment DHCP
Properties.
VMware Cloud on AWS Networking and Security
VMware by Broadcom 105

10 (Optional) Configure traffic QoS for the gateway.
You can skip this step if you don’t need to retrieve QoS statistics for traffic that goes through
this custom Tier-1 gateway.
Click Additional Settings, then select an Ingress QoS Profile and an Egress QoS Profile for
traffic limitations. These profiles are used to set information rate and burst size for permitted
traffic. See Add a Gateway QoS Profile for more information on creating QoS profiles.
11 (Optional) Configure static routes for the gateway.
This option is not available in the VMware Cloud Console Networking & Security tab.
You can configure a non-default route for any type of custom Tier-1 gateway. A static default
route (0.0.0.0/0) can be configured only for an Isolated gateway. On the NSX Manager
Networking tab, click Tier-1 Gateways. When you create or edit a Tier-1 gateway, click
STATIC ROUTES to create or modify static routes and next hops for the gateway.
12 (Optional) Create route aggregations if you want the new gateway to be accessible from the
Connected VPC or within an SDDC group. (Does not apply to Isolated gateways.)
Networks connected to a routed or NATted custom Tier-1 gateway won't be reachable
from the Connected VPC unless you define a route aggregation that includes the NATted
or routed IPs for the custom T1 networks in its Aggregation Prefix List and apply that
aggregation to the SERVICES connectivity endpoint.
Note A route aggregation for a NATted T1 must use the translated (SNAT) IP.
In addition, if this SDDC is a member of an SDDC group, you should define a similar
route aggregation and apply that aggregation to the INTRANET connectivity endpoint.
Route aggregations require Managed Prefix mode and cannot be used with the default
configuration for the connected VPC. See Aggregate and Filter Routes to Uplinks.
Connect a VPN to a Tier-1 Gateway
If you want to connect a VPN to a Tier-1 gateway, you must create an IPsec service on the
gateway and suitable NAT rules to enable IPsec VPN traffic over the gateway's Internet interface.
In SDDC version 1.18 and later, you have the option to create a VPN that terminates on a custom
Tier-1 gateway. This configuration is especially useful when you need to provide dedicated VPN
access to a specific tenant or workgroup.
For more information see the VMware Tech Zone article Understanding VPN to Customer
Created NSX T1s in VMC on AWS
Prerequisites
Create a NATted or routed Tier-1 gateway. See Add a Custom Tier-1 Gateway to a VMware Cloud
on AWS SDDC.
VMware Cloud on AWS Networking and Security
VMware by Broadcom 106

Procedure
1 Log in to VMware Cloud Services at https://vmc.vmware.com.
2 Click Inventory > SDDCs, then pick an SDDC card and click VIEW DETAILS.
3 Click OPEN NSX MANAGER and log in with the NSX Manager Admin User Account shown
on the SDDC Settings page.
4 (Optional) Request a public IP address for the VPN endpoint.
In the typical case, where you want to reach this VPN from the Internet, its local endpoint
will need to be a public IP address. See Request or Release a Public IP Address. For this
example, we're going to use 93.184.216.34 as that address. If you want to reach this VPN over
DX or VMware Transit Connect, you can use any available IP address in the SDDC compute
network.
Note You cannot use any subnet of the Management CIDR as the local endpoint.
5 Add a VPN service to the Tier-1 gateway.
Click Networking > VPN. Open the Tier-1 tab and click VPN Services > ADD SERVICE >
IPSec. Give the IPsec service a Name, then select a Tier-1 Gateway from the drop-down
menu. Click SAVE to create the service.
6 Create the local endpoint.
Open the Local Endpoints tab and click ADD LOCAL ENDPOINT. Give the new local endpoint
a Name and optional Description. For VPN Service, use the name of the IPsec service you
created in Step 5. For the IP Address, use the Public IP address you requested in Step 4 or
any available address in the SDDC compute network. Click SAVE to create the local endpoint.
7 Configure the VPN.
Open the IPSec Sessions tab and select Route Based or Policy Based in the ADD IPSEC
SESSION drop-down.
a For VPN Service, use the name of the IPsec service you created in Step 5. For Local
Endpoint, use the one you created in Step 6.
b For Remote IP, enter the address of your on-premises VPN endpoint.
c Enter the Preshared Key string.
The maximum key length is 128 characters. This key must be identical for both ends of the
VPN tunnel.
8 Specify the Remote ID.
Leave this blank to use the Remote IP as the remote ID for IKE negotiation. If your on-
premises VPN gateway is behind a NAT device and/or uses a different IP for its local ID, you
need to enter that IP here.
VMware Cloud on AWS Networking and Security
VMware by Broadcom 107

9 Configure the Advanced Tunnel Parameters.
Parameter Value
IKE Profile > IKE Encryption Select a Phase 1 (IKE) cipher that is supported by your
on-premises VPN gateway.
IKE Profile > IKE Digest Algorithm Select a Phase 1 digest algorithm that is supported by
your on-premises VPN gateway. The best practice is
to use the same algorithm for both the IKE Digest
Algorithm and the Tunnel Digest Algorithm.
Note If you specify a GCM-based cipher for IKE
Encryption, set IKE Digest Algorithm to None. The
digest function is integral to the GCM cipher. You must
use IKE V2 if you use a GCM-based cipher .
IKE Profile > IKE Version n Specify IKE V1 to initiate and accept the IKEv1
protocol.
n Specify IKE V2 to initiate and accept the IKEv2
protocol. You must use IKEv2 if you have specified
a GCM-based IKE Digest Algorithm.
n Specify IKE FLEX to accept either IKEv1 or IKEv2 and
then initiate using IKEv2. If IKEv2 initiation fails, IKE
FLEX will not fall back to IKEv1.
IKE Profile > Diffie Hellman Select a Diffie Hellman group that is supported by your
on-premises VPN gateway. This value must be identical
for both ends of the VPN tunnel. Higher group numbers
offer better protection. The best practice is to select
group 14 or higher.
IPSec Profile > Tunnel Encryption Select a Phase 2 security association (SA) cipher that is
supported by your on-premises VPN gateway.
IPSec Profile Tunnel Digest Algorithm Select a Phase 2 digest algorithm that is supported by
your on-premises VPN gateway.
Note If you specify a GCM-based cipher for Tunnel
Encryption, set Tunnel Digest Algorithm to None. The
digest function is integral to the GCM cipher.
IPSec Profile > Perfect Forward Secrecy Enable or Disable to match the setting of your on-
premises VPN gateway. Enabling Perfect Forward
Secrecy prevents recorded (past) sessions from being
decrypted if the private key is ever compromised.
IPSec Profile > Diffie Hellman Select a Diffie Hellman group that is supported by your
on-premises VPN gateway. This value must be identical
for both ends of the VPN tunnel. Higher group numbers
offer better protection. The best practice is to select
group 14 or higher.
VMware Cloud on AWS Networking and Security
VMware by Broadcom 108

Parameter Value
DPD Profile > DPD Probe Mode One of Periodic or On Demand.
For a periodic DPD probe mode, a DPD probe is sent
every time the specified DPD probe interval time is
reached.
For an on-demand DPD probe mode, a DPD probe is
sent if no IPSec packet is received from the peer site
after an idle period. The value in DPD Probe Interval
determines the idle period used.
DPD Profile > Retry Count Integer number of retries allowed. Values in the range 1 -
100 are valid. The default retry count is 10.
DPD Profile > DPD Probe Interval The number of seconds you want the NSX IKE daemon
to wait between sending the DPD probes.
For a periodic DPD probe mode, the valid values are
between 3 and 360 seconds. The default value is 60
seconds.
For an on-demand probe mode, the valid values are
between 1 and 10 seconds. The default value is 3
seconds.
When the periodic DPD probe mode is set, the IKE
daemon sends a DPD probe periodically. If the peer site
responds within half a second, the next DPD probe is
sent after the configured DPD probe interval time has
been reached. If the peer site does not respond, then the
DPD probe is sent again after waiting for half a second.
If the remote peer site continues not to respond, the IKE
daemon resends the DPD probe again, until a response
is received or the retry count has been reached. Before
the peer site is declared to be dead, the IKE daemon
resends the DPD probe up to a maximum of times
specified in the Retry Count property. After the peer
site is declared dead,
NSX then tears down the security
association (SA) on the dead peer's link.
When the on-demand DPD mode is set, the DPD probe
is sent only if no IPSec traffic is received from the peer
site after the configured DPD probe interval time has
been reached.
DPD Profile
> Admin Status To enable or disable the DPD profile, click the Admin
Status toggle. By default, the value is set to Enabled.
When the DPD profile is enabled, the DPD profile is used
for all IPSec sessions in the IPSec VPN service that uses
the DPD profile.
TCP MSS Clamping To use TCP MSS Clamping to reduce the maximum
segment size (MSS) payload of the TCP session during
the IPsec connection, toggle this option to Enabled, then
select the TCP MSS Direction and optionally the TCP
MSS Value. See Understanding TCP MSS Clamping in the
NSX Data Center Administration Guide
.
VMware Cloud on AWS Networking and Security
VMware by Broadcom 109

10 (Optional) Tag the VPN.
See Add Tags to an Object in the
NSX Data Center Administration Guide
for more information
about tagging NSX objects.
11 Click SAVE to create the VPN.
12 Add a Compute Gateway firewall rule that allows IPsec VPN traffic through the Internet
interface of the CGW.
Open the Gateway Firewall tab and click Compute Gateway. A rule like this one will work
but is probably more permissive than you'd want for production use. Consider restricting
the Sources to a CIDR block that you trust or control. In this example, we're using public IP
address we got in Step 4 (93.184.216.34) as the Destinations address.
Name Sources Destinations Services Applied To Action
VPN Access Any 93.184.216.34 Must include
IKE (NAT
Traversal) ,
IKE (Key
Exchange) ,
IPSec VPN ESP
Internet
Interface
Allow
13 Create a NAT rule to make the public IP address of the VPN externally accessible.
Navigate to Networking > NAT > Internet. Click Add NAT Rule and create a NAT rule like this
one.
Name
Public IP Service Public Port Internal IP Firewall
VPN Access 93.184.216.34 All Traffic Any 93.184.216.34 Match External
Address
The rule must use the same address (in this example, it's the public IP address requested
in Step 4) for Public IP and Internal IP. The firewall must match the external address when
examining incoming packets.
Enabling and Using IPv6 in SDDC Networks
Beginning with SDDC Version 1.22, you can enable dual-stack (IPv4 and IPv6) networking in a
new SDDC.
In a dual-stack SDDC network, IPv6 is supported for workload communications on segments
connected to a custom T1 gateway. IPv6 is also supported for SDDC communication over AWS
Direct Connect and VMware Transit Connect. IPv6 is not yet supported for Internet connections,
or for use in the SDDC Management network or the Connected VPC. For more information and
design guidelines, read the VMware Cloud Tech Zone Designlet Understanding IPv6 in VMware
Cloud on AWS.
VMware Cloud on AWS Networking and Security
VMware by Broadcom 110

SDDC Subnet Selection and IPv6 Enablement
If you plan to enable IPv6 connectivity to the SDDC, you'll need to link it to an AWS dual-stack
VPC. See Deploy an SDDC from the VMC Console in the
VMware Cloud on AWS Operations
Guide
. After the SDDC has been created you can enable it for IPv6 by selecting Enable IPv6 from
the SDDC ACTIONS menu. When an SDDC has been enabled for IPv6, the Global Configuration
page shows an L3 Forwarding Mode of IPv4 and IPv6.
Note IPv6 enablement for an SDDC is irreversible. You can change the L3 Forwarding Mode to
IPv4 if you want, but the underlying IPv6 networking support remains in place for the lifetime of
the SDDC.
Segment Configuration
IPv6 is supported for workload communications only on segments connected to a custom T1
gateway. You cannot enable IPv6 on segments connected to the default Compute Gateway.
Segments can be dual-stack or IPv6-only. For more information, see the VMware Tech Zone
article Understanding Segments in VMC on AWS.
When creating a dual-stack or IPv6-only segment, you'll need to pay attention to a couple of the
configuration parameters described in Create or Modify a Network Segment:
Connected Gateway
Must be a custom T1 Gateway.
Segment Profiles
IP Discovery must be set to vmc-adv-ipdiscovery-profile. This enables Neighbor Detection
(ND) snooping, DHCP snooping, and VMware tools for IPv6.
IPv6 and Firewall Rules
Gateway firewall and Distributed Firewall inventory groups can include IPv6 addresses. IPv6
is also supported for Layer 7 APP-ID if the SDDC has enabled NSX Advanced Firewall. IPv6
addresses are supported for system-defined and custom services. Remember that some services
have IPv6-specific variants (ICMPv6, for example), that you'll need to consider when writing
firewall rules.
North-South Traffic Over AWS Direct Connect and VMware Managed
Transit Gateway
IPv6 traffic into and out of the SDDC is supported over AWS Direct Connect and VMware Transit
Connect. You must configure IPv6 route aggregations for Advertised Routes as described in
Aggregate and Filter Routes to Uplinks if you want IPv6 networks to be advertised to external
endpoints. Prefixes in an aggregation prefix list must all be in the same address family.
VMware Cloud on AWS Networking and Security
VMware by Broadcom 111

IPv6 over an IPv4 VPN
You can use the workflow documented in Create a Route-Based VPN to configure a VPN that
supports both IPv4 and IPv6. Configure the BGP Local IP/Prefix Length as an IPv6 subnet
(/126 or /127 are good options for size) and the BGP Remote IP as an IPv6 address on the
same subnet. For example, if you specified a BGP Local IP/Prefix Length of cccc:dddd:100/126,
usecccc:dddd::100/101 for BGP Remote IP. When configuring the on-premises end of this VPN,
use the IP address you specify for BGP Remote IP as its local BGP IP or VTI address.
There's more information about this in the VMware Cloud Tech Zone Designlet Understanding
IPv6 in VMware Cloud on AWS.
DNS Services
DNS services in SDDC version 1.24 do not support IPv6 connectivity. IPv6-only workloads must
use a customer-managed IPv6-accessible DNS server either in the SDDC network or reachable
over one of the IPv6-capable connectivity options. The SDDC IPv4 DNS service can resolve IPv6
addresses as long as the DNS requests are made over IPv4.
Configure a Multi-Edge SDDC With Traffic Groups
In the default configuration, your SDDC network has a single edge (T0) router through which all
North-South traffic flows. This edge supports the default traffic group, which is not configurable.
If you need additional bandwidth for the subset of this traffic routed to SDDC group members,
a Direct Connect Gateway attached to an SDDC group, VMware HCX Service Mesh, or to the
Connected VPC, you can reconfigure your SDDC to be Multi-Edge by creating traffic groups,
each of which creates an additional T0 router.
A traffic group uses an association map to associate a prefix list of CIDR blocks to one of the
T0 gateways that support non-default traffic groups in your SDDC. Prefixes from custom T1
gateways are not valid in traffic groups. Prefix lists are independent of gateways and do not use
standard destination-based routing. Instead, they use source-based forwarding. Traffic from an IP
matching a prefix list is forwarded to the T0 edge mapped to the prefix list's associated traffic
group for outbound routing. If that T0 does not support the destination (see Note) then the IP is
forwarded on to the default T0 for routing. This adds an additional hop, so try to make sure that
the traffic group's associated T0 supports traffic being sent from a prefix-list IP.
Note VPN traffic, as well as DX traffic to a private VIF must pass through on the default T0 and
cannot be routed to a non-default traffic group. In addition, because NAT rules always run on the
default T0 router, additional T0 routers cannot handle traffic affected by SNAT or DNAT rules.
This includes traffic to and from the SDDC's native Internet connection. It also includes traffic to
the Amazon S3 service, which uses a NAT rule and must go through the default T0. Keep these
limitations in mind when you create prefix lists.
VMware Cloud on AWS Networking and Security
VMware by Broadcom 112

Prerequisites
n Before you can create traffic groups, you must use VMware Transit Connect™ to connect
your SDDC to a VMware Managed Transit Gateway (VTGW). See Creating and Managing
SDDC Deployment Groups with VMware Transit Connect™.
n Traffic groups can be created only in SDDCs that have large-size management appliances
and at least four hosts. See Upsize SDDC Management Appliances in the
VMware Cloud on
AWS Operations Guide
for information about changing an SDDC's management appliance
size from medium to large. See Add Hosts for information about adding hosts to an SDDC.
n Each traffic group deploys two Edge VMs in addition to the two default Edge VMs. Because
Edge VMs cannot share the same host and meet performance requirements, you'll need at
least two hosts per traffic group and an additional two hosts for the default traffic group in
the management cluster (Cluster-1). The number of traffic groups that an SDDC can support
depends on the number of management hosts, and can be represented with a formula like
this:
TG=(mgmt-hosts - 2)/2|MAX
where
TG
represents the maximum number of traffic groups that the SDDC can support
and
mgmt-hosts
is the number of hosts the SDDC management cluster. Regardless of the
calculated value of
TG
, SDDC traffic group support is capped at the Maximum number of
Multi-Edge SDDC Traffic Groups per SDDC shown in VMware Configuration Maximums (
MAX
).
Procedure
1 Log in to VMware Cloud Services at https://vmc.vmware.com.
2 Click Inventory > SDDCs, then pick an SDDC card and click VIEW DETAILS.
3 Click OPEN NSX MANAGER and log in with the NSX Manager Admin User Account shown
on the SDDC Settings page. See SDDC Network Administration with NSX Manager.
You can also use the VMware Cloud Console Networking & Security tab for this workflow.
4 Create a traffic group. On the Traffic Groups tab of the Traffic Groups page, click ADD
TRAFFIC GROUP and give the new traffic group a Name, then click SAVE to create the
traffic group and an additional T0 router for it.
The Status of the traffic group transitions to In Progress while the new T0 edge is being
created. It can take up to 30 minutes for the process to complete. When it does, the Status of
the traffic group transitions to Success and you can create an association map for it.
VMware Cloud on AWS Networking and Security
VMware by Broadcom 113

5 Create a prefix list.
Because Multi-Edge SDDCs use source-based routing in their traffic groups, prefix lists must
contain source addresses, not destination addresses.
a On the IP Prefix List tab of the Traffic Groups page, click ADD IP PREFIX LIST and give
the new prefix list a Name and optional Description.
b Click Set to display the Set Prefixes window, then click ADD PREFIX and fill in the CIDR
block of an SDDC network segment that includes the source addresses of workload VMs
whose traffic you want to include in the traffic group (and route over the additional edge).
Important You cannot use the SDDC management CIDR block here or the CIDR block of
a segment that provides the local IP address of a VPN. If you add any of these CIDRs to a
prefix list, you won't be able to use the list in an association map.
Click ADD to add the specified prefix to the list. To add prefixes or edit the ones already
on the list, click to open the prefixes editor.
c Click APPLY to apply your changes to the prefix list.
d When you're done adding or editing prefixes, click SAVE to save or create the prefix list.
6 Associate a prefix list with a gateway. On the Traffic Groups tab of the Traffic Groups page,
find the traffic group you want to work with, then click and select Edit.
Click the plus icon in the ASSOCIATION MAPS area, give the mapping a Name and
select an existing prefix list from the Prefixes drop-down. Select a gateway from the Gateway
drop-down, and click SAVE to create the association map.
7 (Optional) To remove a traffic group, you must first remove its association maps.
a Find the traffic group on the Traffic Groups page. Click its button, then select Edit.
b Click the minus icon to the right of the Status label under Association Maps to select
the map for deletion, then click SAVE to delete the map.
c Click CLOSE EDITING, then return to the traffic group on the Traffic Groups page. Click
its ellipsis button and then select Delete.
It can take up to 30 minutes to remove a traffic group. Removing the traffic group removes
the T0 router that was created to support it. HCX, if in use, creates its own association map,
which you can view but not modify. To remove an association map created by HCX, you have
to uninstall HCX. See Uninstalling VMware HCX in the
VMware HCX User Guide
.
VMware Cloud on AWS Networking and Security
VMware by Broadcom 114

Example: Route Table Changes After Adding a Traffic Group
This simplified example shows the effect of creating traffic group and associating it with a prefix
list of just two host routes (/32).
Initial configuration
Assume these values for route table entries in the default traffic group and the Compute
Gateway (CGW) before adding the first traffic group (which creates an additional T0 router).
Table 3-22. Default Routes
Subnet Next Hop
0.0.0.0/0 Internet Gateway
192.168.150.51/24 CGW
192.168.151.0/24 CGW
VTGW, DXGW subnets VTGW, DXGW connections
Management CIDR MGW
Table 3-23. CGW Routes With the Default Traffic Group
Subnet Next Hop
0.0.0.0/0 Default T0
192.168.150.0/24 Default T0
192.168.151.0/24 Default T0
Multi-Edge configuration
After the first traffic group is created, new routes are added on the default T0. Assuming that
the prefix list associated with the traffic group has these entries:
192.168.150.100/32
192.168.151.51/32
then the route tables for the default T0, new T0, and CGW end up like this.
Table 3-24. Default T0 Routes After Adding a Traffic Group
Subnet Next Hop
0.0.0.0/0 Internet Gateway
192.168.150.0/24 CGW
192.168.150.100/32 New T0
192.168.151.0/24 CGW
VMware Cloud on AWS Networking and Security
VMware by Broadcom 115

Table 3-24. Default T0 Routes After Adding a Traffic Group (continued)
Subnet Next Hop
192.168.151.51/32 New T0
VTGW, DXGW subnets VTGW, DXGW connections
Management CIDR MGW
The new routes (192.168.150.100/32 and 192.168.151.51/32 in the example tables) use the new
T0 as their next-hop, and the new T0 uses longest-prefix matching to route that traffic to the
CGW.
Table 3-25. Routes on the New Traffic Group
Subnet Next Hop
0.0.0.0/0 Default T0
192.168.150.100/32 CGW
192.168.151.51/32 CGW
VTGW, DXGW subnets VTGW, DXGW connections
Management CIDR MGW
The CGW route table is updated to create the traffic group by specifying the new T0 router
as the next hop for the new routes.
Table 3-26. CGW Routes With an Additional Traffic Group
Subnet Next Hop
0.0.0.0/0 Default T0
192.168.150.0/24 Default T0
192.168.150.100/32 New T0
192.168.151.0/24 Default T0
192.168.151.51/32 New T0
Enable AWS Managed Prefix List Mode for the Connected
Amazon VPC
AWS Managed Prefix List Mode can simplify route table management in a Multi-Edge SDDC and
enable support in any SDDC for custom route tables and route aggregation.
VMware Cloud on AWS Networking and Security
VMware by Broadcom 116

When you enable AWS Managed Prefix Lists for the Connected VPC, VMware Cloud on AWS
creates an AWS prefix list populated with the default Compute Gateway prefixes and any other
prefix list aggregations you have created, then shares it with the AWS Account ID shown on the
Connected Amazon VPC page. Once you accept this AWS resource share, you can add prefix
lists to the Connected VPC route tables.
VMware Cloud on AWS uses the Managed Prefix List to update the main route table for the
Connected VPC. When a prefix list is added to a route table, that entry in the route table is
pointed to a destination ENI and the prefix list replaces the individual CIDRs the ENI includes.
Because it is a managed object, the prefix list gets updated automatically whenever new
segments or aggregations are configured. In addition, the route table entries for that prefix
list are updated to point to the correct ENI whenever the active Edge instance's host changes.
You are responsible for adding Connected VPC prefix lists to any custom route tables that
you've created. For more about managed prefix lists, see the VMware Cloud Tech Zone article
Understanding Managed Prefix List Mode for Connected VPC in VMC on AWS.
Note In a multi-edge SDDC, the managed prefix list for the Connected VPC is populated with
entries from the prefix list for the default traffic group. You'll need to manually update the prefix
list for each additional
NSX edge.
If you remove the prefix list from any routing table, including the main route table for the
Connected VPC, but later decide you want to restore it, you'll need to do that manually.
Procedure
1 Log in to VMware Cloud Services at https://vmc.vmware.com.
2 Click Inventory > SDDCs, then pick an SDDC card and click VIEW DETAILS.
3 Click OPEN NSX MANAGER and log in with the NSX Manager Admin User Account shown
on the SDDC Settings page. See SDDC Network Administration with NSX Manager.
You can also use the VMware Cloud Console Networking & Security tab for this workflow.
4 Click Connected VPC to open the Connected Amazon VPC page.
The Traffic Groups table on this page shows the default traffic group and its active AWS
network interface ID.
VMware Cloud on AWS Networking and Security
VMware by Broadcom 117

5 Enable AWS Managed Prefix List Mode.
a Toggle AWS Managed Prefix List Mode to Enabled.
Review the message and click ENABLE or CANCEL. If you click ENABLE, AWS Managed
Prefix List Mode transitions to ACTION PENDING and you are prompted to accept the
AWS resource share containing the managed prefix list.
b Log into the AWS console with an identity that has permission to accept a resource share
and click Resource Access Manager > Shared with me.
The resource Name has the form managed-prefix-list-resource-share-vpc-ID and a
Status of Pending. Click the resource Name to open the resource Summary card, then
click Accept resource share and confirm acceptance,
c In the VMware Cloud Console, return to the Connected Amazon VPC tab and wait for
AWS Managed Prefix List Mode to change from Pending to Enabled.
AWS resource association can take up to ten minutes.
In the main route table for the Connected VPC, individual routes to the management and
compute gateways are replaced by a prefix list. The Traffic Groups table now includes the
Prefix List ID, Prefix List Name, and Route Tables Programmed for the default traffic group.
Click the Prefix List Name to view the list.
What to do next
Add the prefix list to a custom route table in the Connected VPC. This allows AWS resources in
subnets associated with that custom route table to communicate with the SDDC.
VMware Cloud on AWS automatically detects the additional route table and updates the prefix
list to point to the correct ENI. After the initial update, you can manually configure the route table
to point to the same ENI that the prefix list uses. Otherwise, this update and subsequent updates
happen automatically whenever VMware Cloud on AWS detects the addition of the prefix list to a
new route table.
Note Each prefix list counts as a single Route when added to a route table but can contain many
entries, each of which counts toward the route table's quota. See AWS VPC route table quotas
and be sure that the route table has sufficient capacity to accommodate all the routes in the
prefix list. You can Aggregate and Filter Routes to Uplinks to control the set of routes advertised
to SDDC network uplinks like Direct Connect, VMware Transit Connect and the Connected VPC.
Aggregation can help in cases where you have to reduce the number of entries in a VPC
route table, and egress filtering is useful for limiting the set of routes that are advertised to
the Connected Amazon VPC (SERVICES uplink) and other uplinks.
After VMware Cloud on AWS detects the prefix list in a custom route table (this can take up
to ten minutes) it updates that entry to point to the active ENI and adds the updated route
table to the Traffic Groups table. Subsequent updates to that route table take place immediately
whenever the active ENI changes.
VMware Cloud on AWS Networking and Security
VMware by Broadcom 118
Aggregate and Filter Routes to Uplinks
Use route aggregation and egress filtering to control the set of routes advertised to SDDC
network uplinks like Direct Connect, VMware Transit Connect and the Connected VPC. You'll
need this in cases where you have to reduce the number of entries in a VPC route table or limit
the set of routes that are advertised to uplinks.
In SDDCs at version 1.18 and later, you can use NSX Manager to aggregate routes to the
INTRANET and SERVICES uplinks. And beginning at SDDC version 1.20, you can also use NSX
Manager to filter the set of routes advertised to those uplinks. Route aggregation and filtering are
not exposed in the legacy VMware Cloud Console Networking & Security tab.
In the default configuration, all segments in the SDDC Compute Network are advertised to the
Connected Amazon VPC and external connections such as AWS Direct Connect and VMware
Transit Connect. You can manage the list of CIDRs that get advertised this way by aggregating
and optionally filtering these routes. Filtered routes are not advertised to the selected uplinks.
Management subnets are always advertised. When both aggregation and filtering are applied,
aggregated subnets are advertised even if they include CIDRS that would normally be filtered
out. To view or download the current set of routes advertised to the Connected VPC open the
NSX Manager
Networking tab and click Connected VPC > Advertised. To view or download the
current set of routes advertised to Transit Connect, see View Routes Learned and Advertised
over VMware Transit Connect.
See Enabling and Using IPv6 in SDDC Networks for additional information about route
aggregation requirements when using IPv6 to communicate between members of an SDDC
group.
Procedure
1 Log in to VMware Cloud Services at https://vmc.vmware.com.
2 Click Inventory > SDDCs, then pick an SDDC card and click VIEW DETAILS.
3 Click OPEN NSX MANAGER.
4 Aggregate CGW subnet CIDRs.
a On the NSX Manager Networking tab, click Global Configuration > Route Aggregation.
b Create a prefix list of CIDR blocks to aggregate.
Under Aggregation Prefix Lists, click ADD AGGREGATION PREFIX LIST and give the list
a Name, then click Set to open the Set Prefixes editor. Add prefix CIDRS as needed.
The system normalizes any CIDRS that contain a subnet that falls in the middle of larger
range. For example, if your default CGW segments include 192.168.1.0/24, 192.168.5.0/24,
and 192.168.22.0/24, the aggregation is advertised as 192.168.0.0/16 but the individual
segments are not advertised.
VMware Cloud on AWS Networking and Security
VMware by Broadcom 119

c Add a route configuration that includes the new prefix list.
Under Route Configurations, click ADD ROUTE CONFIGURATION and give the new
configuration a Name. Select the Aggregation Prefix List you created and choose a
Connectivity Endpoint:
n Select INTRANET to apply this routing configuration to Direct Connect and VMware
Transit Connect.
n Select SERVICES to apply this routing configuration to the connected VPC. See
Enable AWS Managed Prefix List Mode for the Connected Amazon VPC for
information about how AWS Managed Prefix Lists affect aggregation of routes to
the Connected VPC.
You cannot add a route configuration to the INTERNET endpoint.
d Click SAVE to create the new configuration.
Aggregated routes are flagged in the Advertised Routes table of the Transit Connect page
and on the Advertised page of the Connected Amazon VPC tab.
5 (Optional) Apply egress filtering to uplinks.
When egress filtering is enabled for an uplink, only aggregated and non-overlapping CIDR
blocks advertised to BGP consumers on the specified uplinks. Default CGW segments that
are subnets of a configured aggregation are not advertised. You can control the application
of egress filtering to the INTRANET and SERVICES uplinks on the NSX Manager Networking
tab. click Global Configuration > Uplinks and toggle the Egress Filtering as needed.
On the NSX Manager Networking tab, click Global Configuration > Route Filtering. Toggle
Egress Filtering for an uplink to prevent CGW subnets from being advertised to BGP
consumers on the uplink.
n Select INTRANET to apply this routing configuration to Direct Connect and VMware
Transit Connect.
n Select SERVICES to apply this routing configuration to the connected VPC.
Note Before you can apply route filtering to the SERVICES uplink, you must Enable AWS
Managed Prefix List Mode for the Connected Amazon VPC.
If you turn Egress Filtering off for an uplink, all CGW subnets will be advertised. You cannot
apply egress filtering to the INTERNET uplink.
Non-default CGW segments are not advertised to the selected uplinks, although they
remain reachable when they are within an aggregation. Segments that are filtered out (not
advertised) have a Status of Filtered on the Advertised page of the Connected Amazon
VPC tab. Segments that are not filtered out (advertised) have a Status of Success on that
page. Filtered routes that include an aggregation are flagged as Aggregated here and on
the Transit Connect page (see View Routes Learned and Advertised over VMware Transit
Connect).
VMware Cloud on AWS Networking and Security
VMware by Broadcom 120
View Routes Learned and Advertised over VMware Transit
Connect
In an SDDC that is a member of an SDDC Group, you can open the Transit Connect page to view
routes learned and advertised by the VMware Transit Connect instance created for the group.
In an SDDC group, all network traffic between group members travels over a VMware Transit
Connect network. Routing between compute networks of all SDDCs in a group is managed
automatically by VMware Transit Connect as subnets are added and deleted. The Transit
Connect and SDDC Group pages provide information about routes over that network. For
information about creating an SDDC group or adding an SDDC to one, see Creating and
Managing SDDC Deployment Groups with VMware Transit Connect™.
Procedure
1 Log in to VMware Cloud Services at https://vmc.vmware.com.
2 Click Inventory > SDDCs, then pick an SDDC card and click VIEW DETAILS.
3 Click OPEN NSX MANAGER and log in with the NSX Manager Admin User Account shown
on the SDDC Settings page. See SDDC Network Administration with NSX Manager.
You can also use the VMware Cloud Console Networking & Security tab for this workflow.
4 Open the Transit Connect page, or just click the SDDC Group icon on the SDDC Overview
page.
The Transit Connect page displays lists of Learned Routes (routes learned by this SDDC from
other SDDCs in the group), and Advertised Routes (routes advertised by this SDDC to other
SDDCs in the group). Click the download icon to download either list in CSV format.
Aggregated CIDRs are flagged as Aggregated in the Advertised Routes table. Segments that
are filtered out (not advertised) have a Status of Filtered. See Aggregate and Filter Routes to
Uplinks for more about route aggregation and filtering.
View Statistics and Manage Settings for Uplinks
The Global Configuration page includes controls that allow you to view traffic statistics and
manage Maximum Transmissible Unit (MTU) and Unicast Reverse Path Forwarding (URPF)
settings for SDDC network uplinks.
In the default configuration:
n The MTU for the Services uplink (which carries traffic to the connected VPC) is set to 8900
bytes. The MTU for other uplinks is set to 1500 bytes.
n URPF is applied in Strict mode and packets are forwarded to SDDC uplinks only if they are
received on the interface that provides the best reverse path to the source of the packet.
Packets that do not meet this criterion are dropped.
You can edit these settings on the Global Configuration page.
VMware Cloud on AWS Networking and Security
VMware by Broadcom 121

Procedure
1 Log in to VMware Cloud Services at https://vmc.vmware.com.
2 Click Inventory > SDDCs, then pick an SDDC card and click VIEW DETAILS.
3 Click OPEN NSX MANAGER and log in with the NSX Manager Admin User Account shown
on the SDDC Settings page. See SDDC Network Administration with NSX Manager.
You can also use the VMware Cloud Console Networking & Security tab for this workflow.
4 Open the Global Configuration page.
This page shows the MTU and URPF settings for each of the SDDC uplinks. Each uplink also
has a VIEW STATISTICS button that you can click to see traffic statistics for the uplink.
a Manage MTU and URPF settings.
To change the MTU setting for an uplink, click EDIT and enter a new value. URPF Strict
mode, as defined by RFC3704, is required for the Internet Uplink. To change the URPF
setting for another uplink, click EDIT and choose one of the following values.
Strict Apply URPF to this uplink in Strict mode.
None Do not apply URPF to this uplink.
Click SAVE to apply your changes.
b Click VIEW STATISTICS see traffic statics for the uplink.
Statistics collected for each uplink include data (in KB), total packets, and dropped
packets. Click the Refresh icon to update statistics.
5 (Optional) Apply egress filtering.
Use the Egress Filtering toggle to control how CGW subnets are advertised to BGP
consumers on an uplink. See Aggregate and Filter Routes to Uplinks for details.
Working With Inventory Groups
VMware Cloud on AWS network administrators can use NSX inventory objects to define
collections of services, groups, context profiles, and virtual machines to use in firewall rules.
Firewall rules typically apply to a group of VMs that have certain common characteristics
including:
n names that follow a naming convention (like Win* for Windows VMs or Photon* for Photon
VMs)
n IP addresses within a specific range or CIDR block
n tags
VMware Cloud on AWS Networking and Security
VMware by Broadcom 122

They can also apply to network services, which are distinguished by characteristics like service
type and network protocol. The NSX Inventory page simplifies the process of creating groups
of VMs that have similar needs for firewall protection. It also allows you to add new network
services to the built-in list of services, so that you can include those services in firewall rules.
See Add Tags to an Object in the
NSX Data Center Administration Guide
for more information
about tagging NSX objects.
Note System-defined NSX tags should not be applied to user objects such as VMs or
groups. Doing so may impact the ability to view or manage those objects. System-defined tags
include NSX_POLICY_INTERNAL, SYSTEM_DEFINED_GROUP, HCX, and tags with scopes of autoPlumbing,
hybridity, applianceId and ServiceName.
VMware Cloud on AWS creates management groups and a service inventory in all new SDDCs.
It also maintains a list of your workload VMs and their tags. You can add or modify your own
inventory groups of management or compute VMs.
See Inventory in the
NSX Data Center Administration Guide
for more about how to create and
use NSX inventory groups.
Add a Service
You can configure a service, and specify parameters for matching network traffic such as a
port and protocol pairing
Add a Group
Groups include different objects that are added both statically and dynamically, and can be
used as the source and destination of a firewall rule.
About Context Profiles
Context profiles are a VMware Cloud on AWS add-on feature available only in an SDDC that has
activated the NSX Advanced Firewall Add-On.
There are two types of profiles: context profiles and layer 7 access profiles. Profiles enable
creating attributes key value pairs such as layer 7 App Id, and Domain Names. After a profile has
been defined, it can be used in one or more distributed firewall rules, and gateway firewall rules.
For information about how to install and use the NSX Advanced Firewall add-on, see Chapter 5
About VMware vDefend Firewall Features. You can read more about context profiles and how to
use them in VMware Cloud on AWS here.
Managing Workload Connections
Workload VMs on routed segments or HCX extended networks with MON enabled can connect
to the Internet by default. NAT rules, Compute Gateway firewall rules, and distributed firewall
rules, as well as default routes advertised by a VPN, DX, or VTGW connection all give you
fine-grained control over Internet access.
VMware Cloud on AWS Networking and Security
VMware by Broadcom 123

Workload VMs can use private IP addresses to communicate with other workloads in the same
SDDC or SDDC group. When a workload VM uses a public IP address, it gets the Source NAT
Public IP shown on the Overview page unless it is subject to a custom NAT rule that applies to all
traffic.
Workload traffic is subject to several kinds of special handling during firewall rule processing:
n Workload-to-workload traffic is not subject to CGW firewall rules.
n Distributed firewall rule processing by a source VM uses the destination public IP address and
source public IP of the destination VM, and must be IP-based. Distributed firewall rules based
on VM attributes do not affect workload-to-workload traffic.
n Workload VM communication to the vCenter public IP is subject to MGW firewall rules, but
the workload VM IP is translated to its public IP before the firewall rule is applied.
Note All VMs on a network segment should use the same MTU. The MTU for traffic internal
to the SDDC or over DX is capped at 8900 bytes. The path MTU for network traffic to other
endpoints may be lower. See VMware Configuration Maximums.
Attach a VM to or Detach a Workload VM from a Compute Network
Segment
Use the vSphere Client to manage attachment of workload VMs to compute network segments.
Prerequisites
Your SDDC compute network must have at least one segment. See Create or Modify a Network
Segment.
Procedure
1 Log in to the vSphere Client for your SDDC.
2 Select Menu > Global Inventory Lists.
3 Select Logical Networks.
4 In the vCenter Server drop down menu, select the vCenter Server that manages the logical
network you want to use.
VMware Cloud on AWS Networking and Security
VMware by Broadcom 124

5 Click next to the logical network name to select it.
6 Select whether to attach or detach VMs.
n Click Attach VM to attach VMs to the selected network.
n Click Detach VM to detach VMs from the selected network.
7 Select the virtual machine(s) you want to attach or detach, click >> to move them to the
Selected Objects column, and click Next.
8 For each VM, select the virtual NIC you want to attach and click Next.
9 Click Finish.
Request or Release a Public IP Address
You can request public IP addresses to assign to workload VMs to allow access to these VMs
from the Internet. VMware Cloud on AWS provisions the IP address from AWS.
As a best practice, release the public IP addresses that are not in use.
Prerequisites
Verify that your VM has a static IP address assigned from its logical network.
Procedure
1 Log in to VMware Cloud Services at https://vmc.vmware.com.
2 Click Inventory > SDDCs, then pick an SDDC card and click VIEW DETAILS.
3 Click OPEN NSX MANAGER and log in with the NSX Manager Admin User Account shown
on the SDDC Settings page. See SDDC Network Administration with NSX Manager.
You can also use the VMware Cloud Console Networking & Security tab for this workflow.
4 Open the Public IPs page.
5 To request a new public IP address, click REQUEST NEW IP.
You can optionally enter your notes about the request.
VMware Cloud on AWS Networking and Security
VMware by Broadcom 125

6 To release a public IP address that you no longer need, click and select Release IP.
Requests to release a public IP fail if the address is in use by a NAT rule.
7 Click SAVE.
After a few moments, a new public IP address is provisioned.
What to do next
After the public IP address is provisioned, Create or Modify NAT Rules to direct traffic from the
public IP address to the internal IP address of a workload VM.
Create or Modify NAT Rules
Network Address Translation (NAT) controls how IP addresses in packet headers appear on
either side of a gateway. Rules that run on the Compute Gateway map Internet traffic as it
enters and leaves the gateway. Rules that run on other Tier-1 gateways map traffic between the
gateway and other SDDC network interfaces.
NAT rules run on the Compute Gateway and on any additional Tier-1 gateways that you create.
See Add a Custom Tier-1 Gateway to a VMware Cloud on AWS SDDC for information about
creating additional Tier-1 gateways in your SDDC.
NAT rules that run on the SDDC's Internet interface (the Compute Gateway) map internal source
or destination IP addresses on packets from compute network segments to addresses that
are usable on the public Internet. To create a NAT rule, you provide the internal address of a
workload VM or service and an external IP address of your choice. NAT rules that run on the
Internet interface require a public IP address. See Request or Release a Public IP Address.
Firewall rules, which examine packet source and destination addresses, run on these gateways
and process traffic after it has been transformed by any applicable NAT rules. When you create
a NAT rule, you can specify whether a VM's internal or external IP address and port number are
exposed to firewall rules that affect network traffic to and from that VM.
Important Inbound traffic to the SDDC's public IP address is always processed by the NAT
rules you create. Outbound traffic (reply packets from SDDC workload VMs) is routed along
the advertised routes and is processed by NAT rules when the default route for your SDDC
network goes through the SDDC's Internet interface. But if the default route goes through a
Direct Connect, VPN, or VTGW connection or has been added as a static route to a VPC,
NAT rules run for inbound traffic but not for outbound traffic, creating an asymmetric path that
leaves the VM unreachable at its public IP address. This asymmetry can arise when, for example,
0.0.0.0/0 is advertised through BGP or there is a policy-based VPN with a remote network of
0.0.0.0/0. When the default route is advertised from the on-premises environment, you must
configure NAT rules on the on-premises network, using the on-premises Internet connection and
public IPs.
VMware Cloud on AWS Networking and Security
VMware by Broadcom 126
Prerequisites
n To create a NAT rule on the Compute Gateway (Internet interface), you must have obtained
a public IP address for use by a VM in this SDDC. See Request or Release a Public IP Address.
n The VM must be connected to a routed compute network segment. You can create NAT rules
for VMs whether they have static or dynamic (DHCP) addresses, but bear in mind that NAT
rules for VMs using DHCP address assignment can be invalidated when the VM is assigned an
internal address that no longer matches the one specified in the rule.
Procedure
1 Log in to VMware Cloud Services at https://vmc.vmware.com.
2 Click Inventory > SDDCs, then pick an SDDC card and click VIEW DETAILS.
3 Click OPEN NSX MANAGER and log in with the NSX Manager Admin User Account shown
on the SDDC Settings page. See SDDC Network Administration with NSX Manager.
You can also use the VMware Cloud Console Networking & Security tab for this workflow.
VMware Cloud on AWS Networking and Security
VMware by Broadcom 127

4 Click NAT > Internet to add NAT rules that run on the default Compute Gateway.
a Click ADD NAT RULE and give the rule a Name.
b Configure Internet NAT rule options:
Option Description
Public IP Choose from the drop-down list of public IP address that have been
provisioned for this SDDC. See Request or Release a Public IP Address.
Service n Select All Traffic to create a rule that applies to both inbound (DNAT)
and outbound (SNAT) traffic to or from the specified Internal IP.
n Select one of the listed services to create an inbound (DNAT) rule
that applies only to traffic using that protocol and port. Any custom
services you have created (see Working With Inventory Groups) are
also listed here.
Note Because services that use multiple destination ports cannot be
subject to a NAT rule, they don’t appear on this list.
Public Port If you specified Service as All Traffic, the default public port is Any.
If you selected a particular Service, then the rule applies to the assigned
public port for that service.
Internal IP Enter the internal IP address of the VM. This address must be on a routed
SDDC network segment.
Internal Port Displays the internal port used by the selected Service. To use a custom
port, Add a custom service (see Working With Inventory Groups), then
select that Service in the NAT rule.
If you specified Service as All Traffic, the default internal port is Any.
If you selected a particular Service, then the rule applies to the assigned
public port for that service.
Firewall Specify how traffic subject to this NAT rule is exposed to gateway
firewall rules. By default, these firewall rules match the combination of
Internal IP and Internal Port. Select Match External Address to have
firewall rules match the combination of External IP and External Port.
(Distributed firewall rules never apply to external addresses or ports.)
You can create multiple NAT rules that use the same Public IP and Internal IP with All
Traffic. If you do this, each Internal IP uses the Public IP for outbound (SNAT) traffic,
but only the first matching rule will be used for inbound (DNAT) traffic. The system
creates (but does not display) a default outbound rule. This rule is used for all Internal IP
addresses that do not match a specific NAT rule that applies to All Traffic. The IP used for
this rule is displayed I the Default Compute Gateway summary on the Overview page as
Source NAT Public IP.
c Choose a Priority for the rule.
A lower value means a higher precedence for this rule.
d (Optional) Toggle Logging to log rule actions.
VMware Cloud on AWS Networking and Security
VMware by Broadcom 128

e The new rule is active when created. Toggle Enable to deactivate it.
f Click SAVE to create the rule.
5 (Optional) If you have created additional an Tier-1 gateway, click NAT > Tier-1 Gateway to
add NAT rules that run on that gateway.
a Choose a Gateway where you want the rule to run.
b Click ADD NAT RULE and give the rule a Name.
c Configure Tier-1 Gateway NAT rule options:
Option Description:
Action One of:
SNAT
Source NAT. Changes the source address in the packet header. See
Configure Source NAT on a Tier-1 Router.
DNAT
Destination NAT. Changes the destination address in the packet
header. See Configure Destination NAT on a Tier-1 Router.
Specify a Translated Port if you need to.
Reflexive
Stateless NAT configuration to avoid asymmetrical routes. See
Reflexive NAT
No SNAT
Turn off source NAT.
No DNAT
Turn off destination NAT.
Match For SNAT, enter a source address to use. For DNAT, enter a destination
address to use.
Translated Enter an IPv4 address or CIDR block to use for the translated SNAT or
DNAT address.
Apply To Choose specific interfaces or labels to define the traffic that you want the
rule to affect.
Firewall Specify how traffic subject to this NAT rule is exposed to gateway
firewall rules. By default, these firewall rules match the combination of
Internal IP and Internal Port. Select Match External Address to have
firewall rules match the combination of External IP and External Port.
(Distributed firewall rules never apply to external addresses or ports.)
d Choose a Priority for the rule.
A lower value means a higher precedence for this rule.
e (Optional) Toggle Logging to log rule actions.
VMware Cloud on AWS Networking and Security
VMware by Broadcom 129
f The new rule is active when created. Toggle Enable to deactivate it.
g Click SAVE to create the rule.
Creating Firewall Rules to Manage Traffic Between the Compute and
Management Networks
In the default configuration, firewall rules prevent VMs on the compute network from accessing
VMs on the management network. To allow individual workload VMs to access management
VMs, create Workload and Management inventory groups, then create management gateway
firewall rules that reference them.
Procedure
1 Log in to VMware Cloud Services at https://vmc.vmware.com.
2 Click Inventory > SDDCs, then pick an SDDC card and click VIEW DETAILS.
3 Click OPEN NSX MANAGER and log in with the NSX Manager Admin User Account shown
on the SDDC Settings page. See SDDC Network Administration with NSX Manager.
You can also use the VMware Cloud Console Networking & Security tab for this workflow.
4 Create Compute inventory groups: one for the management network and one for the
workload VM that you want to have access to it.
On the Inventory page, click Groups > Compute Groups and create two groups:
n Click ADD GROUP > Set Members, then open the IP Addresses page, click Enter IP
Address, and type the CIDR block of the management network. Click APPLY, then SAVE
to create the group.
n Click ADD GROUP > Set Members, then click the Membership Criteria > ADD CRITERIA
and specify a Virtual Machine in your vSphere inventory. Click APPLY, then SAVE to
create the group.
5 Create a Management Group that includes the management network that you want to access
from the Compute Group.
On the Inventory page, Click Groups > Management Groups. On the Select Members page,
click Enter IP Address, and type the CIDR block of the management network. Click APPLY,
then SAVE to create the group.
6 Create a management gateway firewall rule allowing inbound traffic to vCenter and ESXi.
See Add or Modify Management Gateway Firewall Rules for information about creating
management gateway firewall rules. Assuming your workload VMs only need to access
vSphere, PowerCLI, or OVFtool, then the rule need only allow access on port 443.
VMware Cloud on AWS Networking and Security
VMware by Broadcom 130

Table 3-27. Management Gateway Rule to Allow Inbound Traffic to ESXi and vCenter
Name Source Destination Services Action
Inbound to ESXi Workload VM
private IP
ESXi HTTPS (TCP 443) Allow
Inbound to vCenter
private IP
Workload VM
private IP
vCenter private IP HTTPS (TCP 443) Allow
Inbound to vCenter
public IP
Workload VM with
NATted IP
vCenter public IP HTTPS (TCP 443) Allow
VMware Cloud on AWS Networking and Security
VMware by Broadcom 131
Configure Monitoring and
Troubleshooting Features
4
Use NSX IPFIX and Port Mirroring functionality to monitor and troubleshoot SDDC networking
and security.
By default, SDDC ESXi hosts have access to the overlay network, allowing them to communicate
with monitoring and troubleshooting applications deployed as VM workloads in your SDDC.
However, you must configure the firewall to allow traffic between the ESXi hosts and the logical
segment the workload VMs are attached to. See Creating Firewall Rules to Manage Traffic
Between the Compute and Management Networks.
To troubleshoot and monitor SDDC networking and security, you can also use Live Traffic
Analysis and Traceflow. For more information, see Live Traffic Analysis and Traceflow in the
NSX Administration
guide.
n Configure IPFIX
IPFIX (Internet Protocol Flow Information Export) is a standard for the format and export of
network flow information for troubleshooting, auditing, or collecting analytics information.
n Configure Port Mirroring
Port mirroring lets you replicate and redirect all of the traffic coming from a source. The
mirrored traffic is sent encapsulated within a Generic Routing Encapsulation (GRE) tunnel to
a collector so that all of the original packet information is preserved while traversing the
network to a remote destination.
n View Connected VPC Information and Troubleshoot Problems With the Connected VPC
The Connected Amazon VPC contains your SDDC and all its networks. Information about this
VPC, including the active ENI, VPC subnet, and VPC ID, is available on the Connected VPC
page.
n Working with NSX Events and Alarms
The NSX Manager in your VMware Cloud on AWS SDDC provides alarms to call your
attention to events that can potentially affect performance and system operation. Alarms
provide detailed event information such as which component is affected, the type of event,
and then recommends a corrective action.
VMware by Broadcom
132

Configure IPFIX
IPFIX (Internet Protocol Flow Information Export) is a standard for the format and export of
network flow information for troubleshooting, auditing, or collecting analytics information.
You can configure flow monitoring on a logical segment. All the flows from the VMs connected
to that logical segment are captured and sent to the IPFIX collector. The collector names are
specified as a parameter for each IPFIX switch profile.
Note In an SDDC that is a member of an SDDC group, all outbound traffic from hosts to
destinations outside the SDDC network is routed to the VTGW or private VIF regardless of other
routing configurations in the SDDC. This includes IPFIX and Port Mirroring traffic. See Creating
and Managing SDDC Deployment Groups with VMware Transit Connect™.
Prerequisites
Verify that a logical segment is configured. See Create or Modify a Network Segment.
Procedure
1 Log in to VMware Cloud Services at https://vmc.vmware.com.
2 Click Inventory > SDDCs, then pick an SDDC card and click VIEW DETAILS.
3 Click OPEN NSX MANAGER and log in with the NSX Manager Admin User Account shown
on the SDDC Settings page. See SDDC Network Administration with NSX Manager.
You can also use the VMware Cloud Console Networking & Security tab for this workflow.
4 Open the IPFIX page.
See Network Monitoring in the
NSX Data Center Administration Guide
for more information
about using IPFX.
Configure Port Mirroring
Port mirroring lets you replicate and redirect all of the traffic coming from a source. The mirrored
traffic is sent encapsulated within a Generic Routing Encapsulation (GRE) tunnel to a collector so
that all of the original packet information is preserved while traversing the network to a remote
destination.
Port mirroring is used in the following scenarios:
n Troubleshooting - Analyze the traffic to detect intrusion and debug and diagnose errors on a
network.
n Compliance and monitoring - Forward all of the monitored traffic to a network appliance for
analysis and remediation.
VMware Cloud on AWS Networking and Security
VMware by Broadcom 133

Port mirroring includes a source group where the data is monitored and a destination group
where the collected data is copied to. The source group membership criteria require VMs to be
grouped based on the workload such as web group or application group. The destination group
membership criteria require VMs to be grouped based on IP addresses. Port mirroring has one
enforcement point, where you can apply policy rules to your SDDC environment.
The traffic direction for port mirroring is Ingress, Egress, or Bi Directional traffic:
n Ingress is the outbound network traffic from the VM to the logical network.
n Egress is the inbound network traffic from the logical network to the VM.
n Bi Directional is the traffic from the VM to the logical network and from the logical network to
the VM. This is the default option.
Note In an SDDC that is a member of an SDDC group, all outbound traffic from hosts to
destinations outside the SDDC network is routed to the VTGW or private VIF regardless of other
routing configurations in the SDDC. This includes IPFIX and Port Mirroring traffic. See Creating
and Managing SDDC Deployment Groups with VMware Transit Connect™.
Prerequisites
Important Port mirroring can generate a lot of network traffic. As a best practice, limit its use to
a maximum of 6 VMs at a time for short periods of troubleshooting and remediation.
Verify that workload groups with IP address and VM membership criteria are available. See
Working With Inventory Groups.
Procedure
1 Log in to VMware Cloud Services at https://vmc.vmware.com.
2 Click Inventory > SDDCs, then pick an SDDC card and click VIEW DETAILS.
3 Click OPEN NSX MANAGER and log in with the NSX Manager Admin User Account shown
on the SDDC Settings page. See SDDC Network Administration with NSX Manager.
You can also use the VMware Cloud Console Networking & Security tab for this workflow.
4 Open the Port Mirroring page.
See Network Monitoring in the
NSX Data Center Administration Guide
for more information
about using port mirroring.
View Connected VPC Information and Troubleshoot
Problems With the Connected VPC
The Connected Amazon VPC contains your SDDC and all its networks. Information about this
VPC, including the active ENI, VPC subnet, and VPC ID, is available on the Connected VPC page.
VMware Cloud on AWS Networking and Security
VMware by Broadcom 134

VMware Cloud on AWS uses AWS account linking and AWS CloudFormation to obtain the
permissions it needs to access a your AWS account. When the accounts are linked, VMware
Cloud on AWS runs a CloudFormation template that creates IAM roles and grants permissions
for several VMware accounts to assume those roles. The role names are listed on the SDDC's
Connected VPC page. Details about those roles and permissions are published in AWS Roles and
Permissions in the
VMware Cloud on AWS Operations Guide
.
Assuming these roles grants VMware Cloud on AWS the rights to create, delete and assign ENIs
and modify route tables in your VPC. The roles also permit enumeration of the subnets and VPCs
in the account so that VMware Cloud on AWS can map the available resources and present
them in the SDDC creation process. These capabilities are needed at the beginning of the SDDC
creation workflow, whenever an SDDC is upgraded, and may be needed at other times during
the life of the SDDC when VPCs and their subnets need to be verified, and when route tables and
ENIs need to be examined and modified. If an organization member compromises the connected
VPC by doing things like deleting or modifying IAM roles or modifying the main route table, it can
have a variety of impacts on SDDC operations, including:
n VMware Cloud on AWS will be unable to add, replace, or remove hosts in the SDDC
management cluster.
n VMware Cloud on AWS will be unable to update the main route table when routes change or
the active NSX Edge changes hosts during an upgrade. This can break connectivity between
the SDDC and native AWS services. See Routing Between Your SDDC and the Connected
VPC for details.
n The affected organization will no longer be able to deploy SDDCs linked to that account.
Note Re-running the VMware Cloud on AWS CloudFormation template does not affect existing
SDDCs, which continue to use the IAM roles shown on their Connected Amazon VPC page. If an
existing SDDC is exhibiting any of these symptoms, contact VMware Support.
Procedure
1 Log in to VMware Cloud Services at https://vmc.vmware.com.
2 Click Inventory > SDDCs, then pick an SDDC card and click VIEW DETAILS.
3 Click OPEN NSX MANAGER and log in with the NSX Manager Admin User Account shown
on the SDDC Settings page. See SDDC Network Administration with NSX Manager.
You can also use the VMware Cloud Console Networking & Security tab for this workflow.
4 Click Connected VPC to open the Connected Amazon VPC page.
This page includes the following information:
AWS Account ID
The AWS account ID you specified when you created your SDDC.
VPC ID
VMware Cloud on AWS Networking and Security
VMware by Broadcom 135

The AWS ID of this VPC.
VPC Subnet
The AWS ID of the VPC subnet you specified when you created your SDDC.
Active Network Interface
The identifier for the ENI used by VMC in this VPC.
IAM Role Names
AWS Identity and Access Management role names defined in this VPC. See AWS Roles and
Permissions in the
VMware Cloud on AWS Operations Guide
.
Cloud Formation Stack Names
The name of the AWS Cloud Formation stack used to create your SDDC
Service Access
A list of AWS services enabled in this VPC.
Working with NSX Events and Alarms
The NSX Manager in your VMware Cloud on AWS SDDC provides alarms to call your attention
to events that can potentially affect performance and system operation. Alarms provide detailed
event information such as which component is affected, the type of event, and then recommends
a corrective action.
An alarm can be in one of the following states:
State
Description
Open Alarm is in an active, unacknowledged state.
Acknowledged Alarm has been acknowledged by a user. The alarm remains open but no longer appears in the NSX
Manager notifications.
Suppressed Status reporting for this alarm has been disabled by the user for a user-specified duration.
Resolved Alarm has been resolved, whether by the system or through user action. The alarm will continue to
appear in the alarm table in the Resolved state for up to eight days, after which it automatically deletes.
(The system may delete resolved alarms earlier to accommodate resource needs.)
Note If a user changes an alarm state to Resolved but the condition that triggered the alarm is not
resolved, a new alarm instance will be instantiated. Also, an event may be resolved for several minutes
before the reported state updates in the interface.
See NSX Alarms Catalog for VMware Cloud on AWS for a list of all NSX events and alarms
supported by VMware Cloud on AWS.
Prerequisites
Your access to NSX alerts and alarms is based on your VMware Cloud on AWS service role.
VMware Cloud on AWS Networking and Security
VMware by Broadcom 136

Table 4-1. Alarm Access by Service Role
VMware Cloud on AWS Service Role Events and Alarms Access
NSX Cloud Admin Read and modify alarms and definitions
Administrator Read alarms and definitions
Administrator (Delete Restricted) Read alarms and definitions
Auditor Read alarms and definitions
NSX Cloud Auditor Read alarms and definitions
Procedure
1 Log in to VMware Cloud Services at https://vmc.vmware.com.
2 Click Inventory > SDDCs, then pick an SDDC card and click VIEW DETAILS.
3 Click OPEN NSX MANAGER and log in with the NSX Manager Admin User Account shown
on the SDDC Settings page.
4 Navigate to the Home page and click Alarms.
Note A red exclamation mark (!) next to the Alarms panel label indicates at least one open
alarm with a severity of Critical. .
The Alarms panel appears, displaying along the top graphic dashboards such as Active
Alarms, Top Features with the Most Alarms, and Top Events by Occurrence. Below the
dashboards is a sortable, filterable list of the current alarms. The table details the following
information about each active alarm:
n Feature affected
n Event Type
n Node
n Entity
n Severity (Critical, High, Medium)
n Last Reported Time
n Alarm State (Open, Suppressed, Resolved, Acknowledged)
Each row in the Alarms table can be expanded to show more details.
5 Filter the results displayed in the dashboards by clicking the funnel icon in the upper-right
corner of the dashboards.
You can filter by the last 24 hours, last 48 hours, or custom time range, or all open alarms.
VMware Cloud on AWS Networking and Security
VMware by Broadcom 137

6 Filter the results displayed in the table by clicking the filter text box above the table.
You are prompted to specify a filter: Alarm State, Description, Entity Name, Entity Type,
Event Type, Node, and so on.
NSX Alarms Catalog for VMware Cloud on AWS
VMware Cloud on AWS supports alarms for a subset of NSX events.
The following tables describe events that trigger NSX alarms inVMware Cloud on AWS, including
alarm messages and recommended actions to resolve them. Any event with a severity greater
than LOW triggers an alarm. For more information, see Working with Events and Alarms in the
NSX Administration Guide
. Some of the events, alarms and related features supported by NSX
are not available in VMware Cloud on AWS.
Distributed Firewall Events
Event
Name Severity
Node
Type Alert Message Recommended Action
DFW CPU
Usage
Very High
Critical esx DFW CPU usage is very high. When event
detected: "The DFW CPU usage on Transport node
{entity_id}
has reached
{system_resource_usage}
%
which is at or above the very high threshold
value of
{system_usage_threshold}
%. " When event
resolved: "The DFW CPU usage on Transport node
{entity_id}
has reached
{system_resource_usage}
%
which is below the very high threshold value of
{system_usage_threshold}
%. "
Consider re-balancing the
VM workloads on this host
to other hosts. Review
the security design for
optimization. For example,
use the apply-to configuration
if the rules are not applicable
to the entire datacenter.
DFW
VMotion
Failure
Critical esx DFW vMotion failed, port disconnected. When
event detected: "The DFW vMotion for
DFW filter
{entity_id}
on destination host
{transport_node_name}
has failed and the port
for the entity has been disconnected. " When
event resolved: "The DFW configuration for
DFW filter
{entity_id}
on the destination host
{transport_node_name}
has succeeded and error
caused by DFW vMotion failure cleared. "
Check VMs on the host
in NSX Manager, manually
repush the DFW configuration
through NSX Manager UI. The
DFW policy to be repushed
can be traced by the DFW
filter
{entity_id}
. Also consider
finding the VM to which the
DFW filter is attached and
restart it.
DFW
Session
Count
High
Critical esx DFW session count is high. When event detected:
"The DFW session count is high on Transport node
{entity_id}
, it has reached
{system_resource_usage}
% which is at or above the threshold value of
{system_usage_threshold}
%. " When event resolved:
"The DFW session count on Transport node
{entity_id}
has reached
{system_resource_usage}
% which is below the the threshold value of
{system_usage_threshold}
%. "
Review the network traffic
load level of the workloads
on the host. Consider re-
balancing the workloads on
this host to other hosts.
VMware Cloud on AWS Networking and Security
VMware by Broadcom 138

IDS IPS Events
Event Name Severity Node Type Alert Message Recommended Action
IDPS Signature
Bundle Download
Failure
Medium manager Unable to download IDPS signature
bundle from NTICS.
When event detected: "Unable to
download IDPS signature bundle from
NTICS."
When event resolved: "IDPS signature
bundle download from NTICS was
successful.
Check if there is internet
connectivity from NSX
Manager to NTICS.
Distributed IDS IPS Events
Event Name Severity
Node
Type Alert Message Recommended Action
NSX IDPS
Engine
Memory
Usage High
Medium esx NSX-IDPS engine memory usage reaches 75% or above.
When event detected: "NSX-IDPS engine memory
usage has reached
{system_resource_usage}
%, which is
at or above the high threshold value of 75%. " When
event resolved: "NSX-IDPS engine memory usage has
reached
{system_resource_usage}
%, which is below the
high threshold value of 75%. "
Consider re-balancing
the VM workloads on
this host to other
hosts.
VMware Cloud on AWS Networking and Security
VMware by Broadcom 139

IPAM Events
Event
Name Severity
Node
Type Alert Message Recommended Action
IP Block
Usage
Very
High
Medium manager IP block usage is very high.
When event detected: "IP
block usage of
{intent_path}
is very high. IP block nearing
its total capacity, creation of
subnet using IP block might
fail. When event resolved: "IP
block usage of
{intent_path}
is
below threshold level. "
Review IP block usage. Use new IP block for
resource creation or delete unused IP subnet from
the IP block. To check subnet being used for IP
Block. From NSX UI, navigate to Networking >
IP Address pools > IP Address pools. Select IP
pools where IP block being used, check Subnets
and Allocated IPs column on UI. If no allocation has
been used for the IP pool and it is not going to be
used in future then delete subnet or IP pool. Use
following API to check if IP block being used by IP
pool and also check if any IP allocation done: To
get configured subnets of an IP pool, invoke the
NSX API GET /policy/api/v1/infra/ip-pools/ip-
pool/ip-subnets To get IP allocations, invoke the
NSX API GET /policy/api/v1/infra/ip-pools/ip-
pool/ip-allocations. Note: Deletion of IP pool/
subnet should only be done if it does not have
any allocated IPs and it is not going to be used in
future.
IP Pool
Usage
Very
High
Medium manager IP pool usage is very high.
When event detected: "IP pool
usage of
{intent_path}
is very
high. IP pool nearing its total
capacity. Creation of entity/
service depends on IP being
allocated from IP pool might
fail. When event resolved: "IP
pool usage of
{intent_path}
is
normal now.
Review IP pool usage. Release unused IP
allocations from IP pool or create new IP pool and
use it. From NSX UI navigate to Networking | IP
Address pools | IP Address pools Networking > IP
Address pools > IP Address pools. Select IP pools
and check Allocated IPs column, this will show IPs
allocated from the IP pool. If user see any IPs are
not being used then those IPs can be released.
To release unused IP allocations, invoke the
NSX API DELETE /policy/api/v1/infra/ip-pools/
ip-pool/ip-allocations/ip-allocation.
Groups Events
Event
Name
Severity
Node
Type Alert Message Recommended Action
Active
Directory
Groups
Modified
Medium manager Active Directory Groups are modified on AD
server.
When event detected: "Group
{policy_group_name} contains an Active Directory
Group member {old_base_distinguished_name}
that is renamed on the Active Directory server
with {new_base_distinguished_name}. Make sure
the group has a valid Identity Group Member.
When event resolved: "Group
{policy_group_name} is updated with valid Active
Directory Group member. "
In the NSX UI, navigate
to the Inventory > Groups
tab to update the group
definition of the applicable
group with the new base
distinguished name. Make
sure the group has valid
identity group members.
VMware Cloud on AWS Networking and Security
VMware by Broadcom 140

Identity Firewall Events
Event Name Severity
Node
Type Alert Message Recommended Action
Connectivity to
LDAP Service
Lost
Critical manager Connectivity to LDAP
server is lost. When
event detected: "The
connectivity to LDAP
server {ldap_server} is lost.
When event resolved: "The
connectivity to LDAP server
{ldap_server} is restored. "
Check
1 1. The LDAP server is reachable from
NSX nodes.
2 2. The LDAP server details are
configured correctly in NSX.
3 3. The LDAP server is running correctly.
4 4. There are no firewalls blocking access
between the LDAP server and NSX
nodes.
After the issue is fixed, use TEST
CONNECTION in NSX UI under Identity
Firewall AD to test the connection.
VMware Cloud on AWS Networking and Security
VMware by Broadcom 141
About VMware vDefend Firewall
Features
5
The VMware vDefend Firewall service enables your SDDC to use advanced NSX features.
The vDefend Firewall service is included in VMware Cloud on AWS. This service includes:
n NSX Layer 7 Context Profile
n NSX Identity Firewall
n NSX Distributed FQDN Filtering
To activate the vDefend Firewall service in your SDDC, open the Integrated Services tab and
click ACTIVATE on the VMware vDefend Firewall card. After the service is activated, vDefend
advanced security features become available in your SDDC.
You can find detailed documentation for all of these features in the
NSX Product Documentation
.
There are a few operational differences between how the features work on on-premises NSX
and how they work in VMware Cloud on AWS . For example, most of the procedures in the
NSX Product Documentation
include a step telling you to log in with admin privileges to an NSX
Manager. This step isn't needed in VMware Cloud on AWS since clicking OPEN NSX MANAGER
or opening the Networking & Security tab gives you admin access to the NSX manager in your
SDDC. Other differences are listed in the following sections.
Using Context Profiles in the SDDC
Click Inventory > Context Profiles. You can specify a context profile in a distributed firewall
rule by updating the value in the Profiles column of the Distributed Firewall grid. For more
information, see Layer 7 Firewall Rule Workflow in the
NSX Product Documentation
.
In VMware Cloud on AWS, context profiles are supported only for use with Distributed Firewall
rules. They cannot be used with MGW or CGW firewall rules.
Using Identity Firewall in the SDDC
Click the System > Identity Firewall AD to add an SDDC Active Directory domain so that you can
create user-based Identity firewall rules. When using this feature in VMware Cloud on AWS, keep
these operational differences in mind:
Enable the feature for one or more SDDC clusters
VMware by Broadcom
142
Before you can use this feature, you have to take the "Configure Identity Firewall settings"
step in Manage Distributed Firewall Rules to enable the feature and apply it to one or more
SDDC clusters.
Create a firewall rule to allow Active Directory access
If you're using Active Directory, you'll also need to create a Management Gateway Firewall
rule to allow NSX to access the Active Directory server you want to use. This feature doesn’t
work if access to Active Directory is interrupted in your SDDC, so it’s important to make
sure that the firewall rule you create here remains valid in the face of changes to the Active
Directory server. For more information, see Add an Active Directory in the
NSX Product
Documentation
.
Logging
In VMware Cloud on AWS, events generated by this feature are logged to VMware Aria
Operations for Logs.
Using Distributed FQDN Filtering in the SDDC
In VMware Cloud on AWS, Distributed FQDN filtering is supported only for use with Distributed
Firewall rules. It cannot be used with MGW or CGW firewall rules. To use this feature, start
by adding a DNS snooping rule, described in Filtering Specific Domains (FQDN/URLs), as the
first rule in the policy. You must also enable the predefined FQDNfiltering-spoofguard-profile
segment profile for all segments on which you want to support FQDN filtering. See Create
or Modify a Network Segment for information about applying a segment profile to an SDDC
network segment.
Deactivating the VMware vDefend Firewall Service
Before you can deactivate the VMware vDefend Firewall service, you must remove all firewall
rules that reference service features. This includes:
n All distributed firewall rules that include a context profile
n All identity-based firewall rules
After you have removed these objects, you can deactivate the service:
1 Open the Integrated Services tab in your SDDC.
2 On the VMware vDefend Firewall card, click ACTIONS > Deactivate.
3 Review the list of objects that must be removed prior to deactivation. When you are sure that
the objects have been removed, click CONFIRM DEACTIVATION.
Billing for the service stops as soon as deactivation is completed.
VMware Cloud on AWS Networking and Security
VMware by Broadcom 143
