

2
The Ultimate Guide to Optimize your Windows PC for the Stage
© 2021 Deskew Technologies, LLC
Table of Contents
1. Introduction
4
2. BIOS and UEFI settings
5
2.1 Power saving features ........................................................................................................ 5
2.2 Spread Spectrum ................................................................................................................. 6
2.3 Hyper-Threading Technology ............................................................................................. 6
2.4 Disable hardware you do not need ................................................................................... 7
3. Disable unnecessary hardware in Windows Device Manager
9
4. Power settings optimization
11
4.1 Create a power plan for ultimate performance ............................................................. 12
4.2 Device power management ............................................................................................. 15
4.3 Fast Startup ....................................................................................................................... 16
4.4 Core parking ...................................................................................................................... 17
5. Control what is running in the background
20
5.1 Remove all unnecessary programs .................................................................................. 20
5.2 Remove unnecessary features ......................................................................................... 22
5.3 Control which programs run on Windows startup ........................................................ 23
5.4 Optimizing Windows Services .......................................................................................... 23
5.5 Task scheduler ................................................................................................................... 27
5.6 Xbox Game bar and Game Mode ..................................................................................... 30
5.7 Cortana ............................................................................................................................... 31
5.8 Windows Privacy settings ................................................................................................ 32
6. Update mechanisms
35
6.1 Microsoft Store automatic updates ................................................................................ 35
6.2 The Windows Update Service .......................................................................................... 37
6.3 Antivirus updates .............................................................................................................. 42
6.4 Installed application updaters ......................................................................................... 43
6.5 Audio applications and plugin updates .......................................................................... 45
6.6 Integrated system utilities updates ................................................................................. 46
7. Optimize your Windows settings for the maximum performance
49
7.1 Turn off Windows sounds ................................................................................................ 49
7.2 Optimize your visual effects for the best performance ................................................. 51

3
The Ultimate Guide to Optimize your Windows PC for the Stage
© 2021 Deskew Technologies, LLC
Table of Contents
7.3 Page file settings ............................................................................................................... 54
7.4 ReadyBoost ........................................................................................................................ 56
7.5 Indexing of your drives ..................................................................................................... 57
7.6 Optimize and defragment drive ....................................................................................... 58
8. Optimize your sound card and audio software settings
60
8.1 Audio drivers ..................................................................................................................... 60
8.2 Choose your buffer size and sample rate ........................................................................ 62
9. Other best practices and tips
65
9.1 Create a full system backup of working configuration .................................................. 65
9.2 Registry backup ................................................................................................................. 67
9.3 Full system antivirus scan before turning it off .............................................................. 68
9.4 Microsoft Defender SmartScreen feature ....................................................................... 69
9.5 Use quality USB hubs ........................................................................................................ 72
9.6 Portable applications ........................................................................................................ 72
9.7 Keep your ASIO driver and firmware of your audio interface up-to-date .................. 74
9.8 Test the entire gig ............................................................................................................. 75
10. Troubleshooting
76
10.1 Exclusive Mode .................................................................................................................. 76
10.2 Microsoft GS Wavetable Synth ........................................................................................ 77
10.3 Nagle’s Algorithm .............................................................................................................. 78
10.4 Check disk .......................................................................................................................... 80
10.5 System file checker ........................................................................................................... 81
10.6 Test your RAM ................................................................................................................... 82
10.7 Performance monitoring .................................................................................................. 84
10.8 Troubleshooting DPC and ISR latency issues .................................................................. 86
11. Why Gig Performer?
89
12. Checklist!
91
13. Conclusion
92

4
The Ultimate Guide to Optimize your Windows PC for the Stage
© 2021 Deskew Technologies, LLC
Introduction
1 Introduction
This guide is intended to help musicians optimize their Windows PCs to process audio as fast as
possible.
To get the most from your Windows operating system for digital audio processing, many Windows
settings and features need to be configured properly. By following this guide, you will learn to
avoid issues like crackles, dropouts, audio glitches, high latency and more.
You will explore many Windows settings to understand deeply what is happening in the
background, and how to adjust those settings to fit perfectly your needs as a live or session
performing musician.
As an IT engineer, I have spent over twelve years configuring and optimizing Windows, Windows
Server and Linux operating systems for very specific scenarios. As a guitar player for twenty years
using software-based setups, I have tweaked many Windows PCs to address their audio-specific
issues and to make them run reliably.
In this guide I will condense all this experience into step-by-step instructions along with many
screenshots in an easy to follow format.
Gig Performer® was created by people who are both developers and serious touring musicians.
While including features particularly important to performers, Gig Performer® is also highly
optimized when it comes to computer resources making it the perfect tool for creating a glitch-
free environment both on-stage and in the studio.
This guide focuses on Windows 10 and Windows 11 Pro, and will be updated occasionally to
address relevant changes in future versions. Please visit https://gigperformer.com to make sure you
have the latest edition of this guide.
Important: be aware that some tips presented in this guide are only relevant if you have a
dedicated PC for audio processing. If you use your PC for other purposes or for everyday use, you
might want to skip some guidelines as it may be impractical to revert back to a computer usable
for day-to-day work.
Disclaimer: Use this guide at your own risk. Create a full system backup before following these
guidelines, and once you have modified your settings, it is critical that you test your entire gig
carefully to make sure that these optimizations work correctly.
We will start by configuring BIOS and UEFI settings and conclude with a checklist that will help you
to be fully prepared for your next glitch-free live performance.
Get this book in HTML or an e-book format (ePUB or MOBI):
Please visit: https://gigperformer.com/docs/ultimate-guide-to-optimize-windows-for-stage/

5
The Ultimate Guide to Optimize your Windows PC for the Stage
© 2021 Deskew Technologies, LLC
BIOS and UEFI settings
2 BIOS and UEFI settings
This guide starts with the first thing you will encounter while powering on your PC or laptop - the
Basic Input/Output System (BIOS) or the more recent Unified Extensible Firmware Interface
(UEFI) - a successor to the legacy PC BIOS. Please note that the actual BIOS/UEFI settings and their
organization depend on your PC’s manufacturer.
You usually enter your BIOS/UEFI by pressing one of the function keys (F1-F12, please check the
documentation of your manufacturer) when your computer powers on.
2.1 Power saving features
To prolong a laptop’s battery life, manufacturers can opt to reduce power consumption by
slowing down the CPU. Consequently, you may experience cracks, pops and clicks while you are
rehearsing, recording, composing or performing live. So first, we will review those power
consumption settings that directly impact the speed of your CPU:
Disable CPU Power Management settings and adjust all the other settings to Maximum
Performance.
Review all other power saving features such as Adaptive Thermal Management and also set them
to Maximum Performance.

6
The Ultimate Guide to Optimize your Windows PC for the Stage
© 2021 Deskew Technologies, LLC
BIOS and UEFI settings
2.2 Spread Spectrum
To meet strict US FCC regulations, computer engineers use a method called spread spectrum
clocking to reduce the amount of electro-magnetic interference (EMI). Since even the smallest
variation in a clock signal can be enough to create data transfer errors, it is recommended that you
set these entries in BIOS to Disabled.
Review your BIOS settings to see if there are any entries related to Spread Spectrum and if so,
disable them.
2.3 Hyper-Threading Technology
If you have a modern Intel processor, you probably have a Hyper-Threading Technology setting in
your BIOS.

7
The Ultimate Guide to Optimize your Windows PC for the Stage
© 2021 Deskew Technologies, LLC
BIOS and UEFI settings
This technology delivers two processing threads per physical core of the CPU. Simply said, this
means that your CPU core can run two tasks at once. This enables e.g. a two-core processor to
process four tasks at once. Highly threaded applications can benefit from this technology, getting
more work done in parallel, and completing tasks sooner.
However, in many circumstances disabling hyper-threading can bring about improvements in
audio performance, so some experimentation here may be necessary to see which setting
provides more performance for your audio setup.
The main reason that this technology often doesn’t work well in audio applications, is that two
intensive audio tasks run on a single CPU core, instead of two separate cores, which results in a
significant loss of performance, especially at very low latency levels.
Experiment with this BIOS setting to see which option works better on your own audio setup.
2.4 Disable hardware you do not need
Depending on your BIOS manufacturer and your PC configuration you may have options to disable
hardware devices and I/O ports that you do not need for your audio setup. Examples include
Bluetooth, the integrated camera, your card reader, a fingerprint device and a LAN.

8
The Ultimate Guide to Optimize your Windows PC for the Stage
© 2021 Deskew Technologies, LLC
BIOS and UEFI settings
You may also want to disable the integrated sound device on your PC since you are (hopefully)
using an external audio interface.
If there are no settings in your BIOS to disable Bluetooth and other devices, refer to the next
section and disable them via the Device manager in Windows.
Please check thoroughly other BIOS/UEFI settings on your PC to get to know your system, then
save your changes and reboot your computer once you are done.

9
The Ultimate Guide to Optimize your Windows PC for the Stage
© 2021 Deskew Technologies, LLC
Disable unnecessary hardware in Windows Device
Manager
3 Disable unnecessary hardware in Windows Device Manager
Unnecessary hardware can be disabled in the Windows Device Manager.
Use the Win key + X combination to open the Quick Access Menu and select Device Manager:
Review this list and disable any devices that you do not need, such as the Web camera, Bluetooth,
DVD/CD-ROM drives, Ethernet or Wireless network adapters, and any other unneeded devices.
To disable a device, right click on the device name and click Disable device. If you need that
device later, you can re-enable it by right clicking as before and clicking Enable device.
If you only need a Wireless network adapter on your live performance computer to receive MIDI
events or OSC messages from your tablet, you can safely disable your Ethernet adapter (and vice
versa).
Hopefully, you have a dedicated external sound card or audio interface, so you can safely disable
the built-in sound device. For best performance, we strongly recommend a dedicated audio
interface with low latency drivers. Internal sound card drivers are notorious for poor latency and
are really not suited for real-time audio processing.
Some benefits of disabling unnecessary hardware include:
- More CPU power for your PC,
- Windows will not load unnecessary drivers,
- RAM not needed by such drivers and hardware becomes available to your application.

10
The Ultimate Guide to Optimize your Windows PC for the Stage
© 2021 Deskew Technologies, LLC
Disable unnecessary hardware in Windows Device
Manager
Depending on the device and your power management settings, your operating system may turn
them off, or at least put them into a low power state. These power management settings are very
important and are discussed in the next chapter.

11
The Ultimate Guide to Optimize your Windows PC for the Stage
© 2021 Deskew Technologies, LLC
Power settings optimization
4 Power settings optimization
Windows PCs are configured to save power by default. To get the most out of your PC for reliable
real-time audio processing, without audio glitches, power settings need to be set up properly.
In Windows 10, there are two power models for PCs: the legacy S3 power model and Modern
Standby. Modern Standby systems can still be connected to a wireless local area network while in
standby, and can resume normal operation faster from a low power state.
Click on the Start button and type: choose a power plan to open your Power Options:
If your computer supports Modern Standby then by default only the Balanced power plan will be
immediately available. The good news is that you can add and/or enable other plans:

12
The Ultimate Guide to Optimize your Windows PC for the Stage
© 2021 Deskew Technologies, LLC
Power settings optimization
Rather than just having one power plan, best practice suggests the Balanced power plan for
regular use of your PC/laptop and at least one more plan optimized for audio processing to use
for your live performance. Although a new custom power plan can be created by clicking on
Create a power plan, we will show you how to enable two additional power plans intended for
better performance.
4.1 Create a power plan for ultimate performance
Open your Powershell, press Winkey + X to open the Quick Access Menu, and select Windows
PowerShell (Admin) or Windows Terminal (Admin) on Windows 11 :
Copy the following commands (one at a time, just the text in italics) to your clipboard, paste them
into the PowerShell Window and press Enter to install each new plan.
High Performance:
powercfg -duplicatescheme 8c5e7fda-e8bf-4a96-9a85-a6e23a8c635c
Ultimate Performance:
powercfg -duplicatescheme e9a42b02-d5df-448d-aa00-03f14749eb61
Open your Power Options again and you will see that two additional power plans are now
available:

13
The Ultimate Guide to Optimize your Windows PC for the Stage
© 2021 Deskew Technologies, LLC
Power settings optimization
We will use the Ultimate Performance power plan and optimize it further for our audio-
processing scenario; select it and click on Change plan settings:
If not already selected by default, choose Never for every combo box, and then click on Change
advanced power settings:

14
The Ultimate Guide to Optimize your Windows PC for the Stage
© 2021 Deskew Technologies, LLC
Power settings optimization
Many options are correctly configured by default for this power plan, e.g. see the Hard disk
section above. You definitely do not want Windows to turn off your hard drives, whether you are
running on battery or plugged in. We do however recommend that you always plug in your laptop
for your live performance.
Set the other options accordingly (use the same parameters for both On battery and Plugged in
modes):
Internet Explorer -> JavaScript Timer Frequency: Maximum Power Savings; although this
setting affects IE users only, we do not want to pay much attention to JavaScript execution
here.
Desktop background settings -> Slide show: Paused; although a background slideshow on
your desktop is quite an appealing feature, turn it off, as you do not want to spend even a
bit of CPU power for this during your gig.
Wireless Adapter Settings -> Power Saving Mode: your choice. If you did not disable your
wireless adapter (in the previous chapter) you are probably using it to send OSC/MIDI
messages to your audio plugin host or a DAW, so set it to Maximum Performance.
Sleep settings are correctly configured for the Ultimate Performance power plan. You do
not want your PC to go into Sleep, Hybrid sleep or Hibernation mode during your
performance.
USB settings -> USB selective suspend setting: Disabled; every PC used for live
performance is going to be using some USB devices, such as a USB audio interface, USB
MIDI keyboards or possibly even a USB mouse. You do not want these USB devices to be
suspended while you are gigging.
Intel(R) Graphics settings: leave as is (Maximum Performance).

15
The Ultimate Guide to Optimize your Windows PC for the Stage
© 2021 Deskew Technologies, LLC
Power settings optimization
PCI Express -> Link State Power Management: Off; this means we do not want any power
savings, and the PCI Express will stay active regardless of the state of the PC or laptop.
Processor Power Management -> set both Minimum and Maximum processor state to
100%; this means we do not want to use any CPU power saving mechanisms, so the CPU is
always ready for processing at full capacity. Additionally, set System Cooling Policy to
Active (if this setting is available). This means that the operating system will not reduce
your CPU power to cool it down, but instead will increase the speed of your fans.
Display: leave as is (Never).
Multimedia Settings: leave the default configuration of these settings for this power plan.
Battery: leave the default configuration of these settings for this power plan.
After you configure these settings, click on the OK button to save your changes.
4.2 Device power management
When you open your Device manager, you may notice that some devices have the Power
Management tab in their Properties:
Such devices include Network adapters and Universal Serial Bus controllers; right click on one of
these devices -> Properties -> Power Management and untick the option: Allow the computer to
turn off this device to save power.

16
The Ultimate Guide to Optimize your Windows PC for the Stage
© 2021 Deskew Technologies, LLC
Power settings optimization
4.3 Fast Startup
Another power option you may want to consider turning off is Fast Startup. This feature is
designed to reduce the time it takes for the PC to boot up. If you enable the Fast Startup feature
and shut down your PC it looks like it is completely shut down; however, your PC has entered a
state between hibernation and shutdown. Your PC does not really shutdown completely and
consequently audio glitches and distortions may occur when you turn it back on.
These problems are due to compatibility issues with audio devices that do not support sleep
mode or hibernation. Examples are some UAD devices, where we strongly recommend that you
disable the Fast Startup feature.
As shown above, click on the Start button and type: choose a power plan to open your Power
Options:
Click on the Choose what the power button does option:

17
The Ultimate Guide to Optimize your Windows PC for the Stage
© 2021 Deskew Technologies, LLC
Power settings optimization
Click on Change settings that are currently unavailable (1) and then uncheck Turn on fast startup
(2).
4.4 Core parking
We conclude this chapter with one last thing to review: the hidden core parking power plan
setting. The core parking feature enables you to completely shut down CPU cores to save power.
Although this feature should be disabled in Windows 10 and Windows 11 high performance
power plans by default, you might want to double-check this power setting to confirm it is
disabled.
To unhide this setting, we need to use the Registry Editor. Note: Refer to chapter Other best
practices and tips to make a registry backup before proceeding.
Press the Win key + R combination to open the Run dialog, type in regedit and click on the OK
button:

18
The Ultimate Guide to Optimize your Windows PC for the Stage
© 2021 Deskew Technologies, LLC
Power settings optimization
Click on the Computer (1), then open the Find dialog (2) by pressing the key combination CTRL+F,
and type in dec35c318583 as shown in the picture above (3). Press the F3 key or click on the Find
Next button to start searching:
Make sure your search results are related to PowerSettings (1), and ignore other search results
not related to PowerSettings. Double click on the Attributes value (2), and type in 0 as the Value
data paremeter (3). Repeat the search by pressing the F3 key, as there might be more entries
related to PowerSettings (ignore all other entries) and set the Attributes value data to 0.
Once you are done, open your power plan, as explained in the beginning of this chapter, and
navigate to the now visible setting called Processor performance core parking min cores, and
make sure it is set to 100% :

19
The Ultimate Guide to Optimize your Windows PC for the Stage
© 2021 Deskew Technologies, LLC
Power settings optimization
This way you make sure that CPU cores will not be parked which will prevent delays when
Windows is parking and unparking CPU cores. These delays may lead to drop-outs in intensive
real-time audio processing.

20
The Ultimate Guide to Optimize your Windows PC for the Stage
© 2021 Deskew Technologies, LLC
Control what is running in the background
5 Control what is running in the background
In this chapter, we will remove all unnecessary programs, features and services, and configure
their startup mode. Afterwards, we will deal with Windows privacy issues, and conclude with
other tips.
5.1 Remove all unnecessary programs
PCs and laptops with preinstalled Windows often come with many unnecessary applications
which can be removed with no consequences. Such products include third-party security
software, various trial applications and so on. These applications may already be running in the
background and consuming RAM and CPU cycles. Owners of some brand-name PCs and laptops
are familiar with this and here is a typical example from one such brand:
Make yourself familiar with all the installed software on your computer to determine which
applications can be safely removed. We recommend creating a system backup before you start
removing unnecessary software from your PC. Such software might include various download
managers, “app explorers”, support assistants, etc.
Use the Win key + X combination to open the Quick Access Menu and select Apps and Features.

21
The Ultimate Guide to Optimize your Windows PC for the Stage
© 2021 Deskew Technologies, LLC
Control what is running in the background
The Apps & features window appears though which modern UWP apps (formerly Metro apps) and
unwanted traditional desktop applications can be removed, see (1):
Remove UWP apps you do not use here, such as: 3D Viewer, Mail and Calendar, Microsoft Solitaire
Collection, Mixed Reality Portal, Skype, Snip & Sketch, Weather, Xbox Console Companion, Xbox
Live, Voice Recorder, Movies & TV, Paint 3D, One Note, Feedback Hub, and Groove Music.
Some of these applications cannot actually be uninstalled, such as Your Phone, so instead click on
each of them, select Advanced Options, and under App permissions -> Background apps click the
toggle button to show Off. You do not want these applications running in the background:

22
The Ultimate Guide to Optimize your Windows PC for the Stage
© 2021 Deskew Technologies, LLC
Control what is running in the background
Click on Programs and Features (2) to open the control panel applet Programs and Features,
where only desktop applications can be removed; remove all unnecessary applications, e.g.
various cloud storage applications, if you do not use them. Be careful not to remove important
applications and libraries such as Microsoft Visual C++ Redistributable as these are necessary for
running your audio software.
Make sure you understand the purpose of specific applications and/or are certain you do not
need them before actually removing them.
5.2 Remove unnecessary features
Look at the screenshot from the previous section where Apps & features are shown: (3) and (4)
are places where you can list features on your Windows 10 operating system. Here is a side-by-
side view of these windows:
Look on the left window and remove all installed features you do not need; for example, you may
not need the Math Recognizer, a feature for recognizing handwritten math expressions, on your
audio computer. On the right window, you can safely delete the Microsoft XPS Document Writer.
XPS was intended to be a competitor to Adobe PDF, but due to widespread acceptance of the PDF
format, XPS remains unused by most people.
Make sure you understand the purpose of these features before removing them.
To access Optional features on Windows 11, click on the Start button, type in "Optional features"
and then click on the Optional features setting.
From that window you can access the Windows Features window - just click More Windows
features under the Related settings.

23
The Ultimate Guide to Optimize your Windows PC for the Stage
© 2021 Deskew Technologies, LLC
Control what is running in the background
5.3 Control which programs run on Windows startup
When you install certain applications, such as various cloud-based services, they automatically
run in the background after Windows starts running, and may often place icons in the Notification
area. To see which programs run on Windows startup, click on the Start, type in "task manager"
and then click Task Manager (or use the key combination: Ctrl+Shift+Esc):
Click on the Startup tab to see the list of applications that run automatically; right click on each
line and select Disable for each application to prevent it from running automatically.
Many of those programs have their icon displayed in the Notification area and allow you to
control their startup behavior through their Preferences.
Review these applications and disable all the ones you do not need.
5.4 Optimizing Windows Services
Windows services are long-running executable applications that run in their own Windows
sessions. These services can be automatically started when the computer boots, and they do not
show any user interface.
Windows services are programs that run unattended in the background, often continuing to run
even if no user is logged in. They are used to implement functionality such as mail or cloud
services, time services and other ongoing operations independent of users.
As you may have guessed, there are many unnecessary Windows services that you do not need
and so can be turned off on your audio-processing and live-performance PC.
Open your Task Manager, as shown in the previous section, and click on the Services tab:

24
The Ultimate Guide to Optimize your Windows PC for the Stage
© 2021 Deskew Technologies, LLC
Control what is running in the background
Although you can review the status of your services from here and start, stop or restart them, click
on the Open Services button to open the Services management tool, as it provides more control
of your services:
Read the description of your services and identify which ones are unnecessary (we have a list of
40 or so to get you started below). Double click on a service to see what options are available to
control its behavior:

25
The Ultimate Guide to Optimize your Windows PC for the Stage
© 2021 Deskew Technologies, LLC
Control what is running in the background
Click on the Stop button to stop this service, and set the Startup type to Disabled. When you
reboot your computer, this service will not run in the background.
Carefully review your services. Here is a list of 40 services you might want to disable if they exist
on your system:
AllJoyn Router Service – if you do not use smart devices (e.g. smart bulb) or do not want
to control them through your PC.
AVCTP service – if you do not use Bluetooth Audio Devices or Wireless Headphones.
BitLocker Drive Encryption Service – if you do not use BitLocker storage encryption.
Bluetooth Audio Gateway Service – if you do not use a Bluetooth audio handsfree device
on your gig.
Bluetooth Support Service – if you do not use any Bluetooth devices.
Bluetooth User Support Service – if you do not use any Bluetooth devices.
Connected User Experiences and Telemetry – unless you want to send your data to
Microsoft so they can assess and analyze how you are using Windows on a daily basis.
Downloaded Maps Manager – if you do not use the Bing Maps app on your PC.

26
The Ultimate Guide to Optimize your Windows PC for the Stage
© 2021 Deskew Technologies, LLC
Control what is running in the background
Fax – disable it unless you want fax sending and receiving capabilities on your PC.
GameDVR and Broadcast User Service – this service is used for Game Recordings and Live
Broadcasts, so if you do not use it – disable it.
Geolocation Service – this service shares your location with apps.
HV Host Service – a service related to the Hyper-V hypervisor. Presumably you do not run
any virtual machines on your PC/laptop dedicated to real-time audio processing tasks.
Hyper-V Data Exchange Service – a service related to the Hyper-V hypervisor.
Hyper-V Guest Service Interface – a service related to the Hyper-V hypervisor.
Hyper-V Guest Shutdown Service – a service related to the Hyper-V hypervisor.
Hyper-V Heartbeat Service – a service related to the Hyper-V hypervisor.
Hyper-V PowerShell Direct Service – a service related to the Hyper-V hypervisor.
Hyper-V Remote Desktop Virtualization Service – a service related to the Hyper-V
hypervisor.
Hyper-V Time Synchronization Service – a service related to the Hyper-V hypervisor.
Hyper-V Volume Shadow Copy Requestor – a service related to the Hyper-V hypervisor.
IP Helper – you can disable it if you do not use IPv6 connections.
Netlogon – disable if you are not on a domain controller (Active Directory) environment.
Parental Controls – safe to disable.
Phone service – this legacy service manages the telephony state on the device.
Print Spooler – disable it if you do not have a printer attached to your PC/laptop.
Printer Extensions and Notifications – disable it if you do not have a printer attached to
your PC/laptop.
Remote Registry – disable it to prevent remote access to your Registry.
Retail Demo Service – this unnecessary service allows your PC to run in demo mode to
showcase the operating system's features to potential customers or resellers.
Secondary Logon – disable this service if you are either the administrator or the only user
of your PC.

27
The Ultimate Guide to Optimize your Windows PC for the Stage
© 2021 Deskew Technologies, LLC
Control what is running in the background
TCP/IP NetBIOS Helper – this service provides legacy support for NetBIOS over TCP/IP. If
your network does not use NetBIOS and/or WINS for file and printer sharing, disable this
service. See more information here.
Telephony – provides telephony API support for programs that control telephony devices
through a LAN.
Touch Keyboard and Handwriting Panel Service – disable if your PC/laptop doesn’t have a
touch-enabled screen.
Windows Error Reporting Service – disable unless you want to send error reports to
Microsoft.
Windows Image Acquisition – disable if you do not use a scanner.
Windows Camera Frame Server – disable if you do not use a webcam or an integrated
camera.
Windows Insider Service - the Windows Insider Program enables power users to test
upcoming builds of Windows before they are available to the general public. Disable it as
you will not want to risk any instabilities.
Windows Mixed Reality OpenXR Service – disable if you do not use HoloLens 2 and
immersive devices like Windows Mixed Reality headsets.
Xbox Accessory Management Service – another service for gamers that you do not need.
Xbox Live Auth Manager – another service for gamers that you do not need.
Xbox Live Networking Service – another service for gamers that you do not need.
There are other services that you might want to consider disabling. Please refer to the chapters
below where update mechanisms are discussed.
5.5 Task scheduler
The Task Scheduler is a Windows tool to schedule the launch of programs or scripts at pre-defined
times. Many software update methods or backup activities rely on the Task Scheduler.
You definitely do not want to update your software or perform automatic backups and negatively
impact your CPU, RAM and storage in the middle of your gig. Execution of these tasks during your
gig will almost certainly cause latency issues, audio glitches or other unwanted behavior.

28
The Ultimate Guide to Optimize your Windows PC for the Stage
© 2021 Deskew Technologies, LLC
Control what is running in the background
Click on the Start button, type in "task scheduler", and then click on Task Scheduler:
Click on Task Scheduler Library to show your scheduled tasks. Note that these tasks are often
scheduled to run late at night, like the Dropbox Update Task, just when you might be in the
middle of your gig. We recommend that you disable all tasks before your live performance (or to
re-schedule them, at least) so you are sure that unwanted tasks and programs do not run in the
background during your performance. Right click on each scheduled task and select Disable to
disable it. Double click on each scheduled task to edit its various parameters (triggers, actions,
schedule, etc.).
We are not done yet, that was just the tip of the iceberg! Expand the Task Scheduler Library and
you will see many scheduled tasks that are organized in folders and need your review:

29
The Ultimate Guide to Optimize your Windows PC for the Stage
© 2021 Deskew Technologies, LLC
Control what is running in the background
Review tasks that are triggered when the computer is idle.
Another option to review for each task is Run the task as soon as possible after a schedule start is
missed:
You do not want to run lots of tasks when you power on your PC and prepare for your gig, if those
tasks did not execute when scheduled. We suggest that you untick this check box.

30
The Ultimate Guide to Optimize your Windows PC for the Stage
© 2021 Deskew Technologies, LLC
Control what is running in the background
Carefully review these tasks, as there is a description available for every task, their scheduled
time for execution and what triggers them. Afterwards do the following:
While you should not just delete tasks arbitrarily, it may make sense to delete all tasks
you are absolutely sure you are never going to need. For example, if you do not have an
Xbox, you might want to delete all Xbox-related tasks. You might also delete all the
Customer Experience Improvement Program tasks as you probably do not need tasks that
collect and send usage data to Microsoft from your PC.
If you do not need some tasks now but you might need them in the future, then rather
than deleting them, you can Disable them instead. Such tasks might include Bluetooth or
DiskCleanup tasks. We recommend that you run the Disk Cleanup utility manually once in
a while to clean your drive of unnecessary files.
Reschedule other tasks so as not to overlap with the period of your live performance.
Good examples are System Restore or Windows Backup tasks.
This way you have more control over your scheduled tasks.
5.6 Xbox Game bar and Game Mode
Speaking of unneeded features, we have mentioned Xbox apps, services and tasks. In this section
we want to make sure that the focus of your optimizations is on audio rather than on gaming.
Click on the Start button, then Settings and select Gaming:
Turn off all features here, including the Xbox Game Bar, Captures -> Background recording, and
Game mode:

31
The Ultimate Guide to Optimize your Windows PC for the Stage
© 2021 Deskew Technologies, LLC
Control what is running in the background
This way you are sure your PC is not optimized for playing video games at the expense of your
needs for live performance.
5.7 Cortana
Microsoft's digital assistant Cortana is a standalone app and it is no longer an integral part of the
Windows platform, as of the Windows 10 May 2020 Update.
As of that version, you must be signed in to use Cortana. When you are signed in, Cortana learns
about you using information such as your searches, calendar, contacts, and location. Cortana can
access your calendar, email, messages and other data by default.
By default, Cortana app is added to the Startup programs and so is started automatically when you
turn on your PC. If you do not use Cortana or you want to disable its background presence on
Windows 10 and Windows 11, you can disable it from the Task Manager, as shown in section
Control which programs run on Windows startup.
If you cannot find Cortana in the Startup section in your Task Manager, you can completely
remove it through the PowerShell. If you remove it, you will free up CPU cycles and some RAM,
and have one less privacy concern.
To completely remove Cortana through your PowerShell, press Win key + X to open the Quick
Access Menu, and select Windows PowerShell (Admin) (or Windows Terminal (Admin) on
Windows 11):

32
The Ultimate Guide to Optimize your Windows PC for the Stage
© 2021 Deskew Technologies, LLC
Control what is running in the background
Copy the following command to your clipboard:
Get-AppxPackage -allusers Microsoft.549981C3F5F10 | Remove-AppxPackage
then paste it into the terminal window and press Enter to remove Cortana.
If you change your mind later you can always re-install Cortana from the Microsoft Store, as it is
just a standalone app.
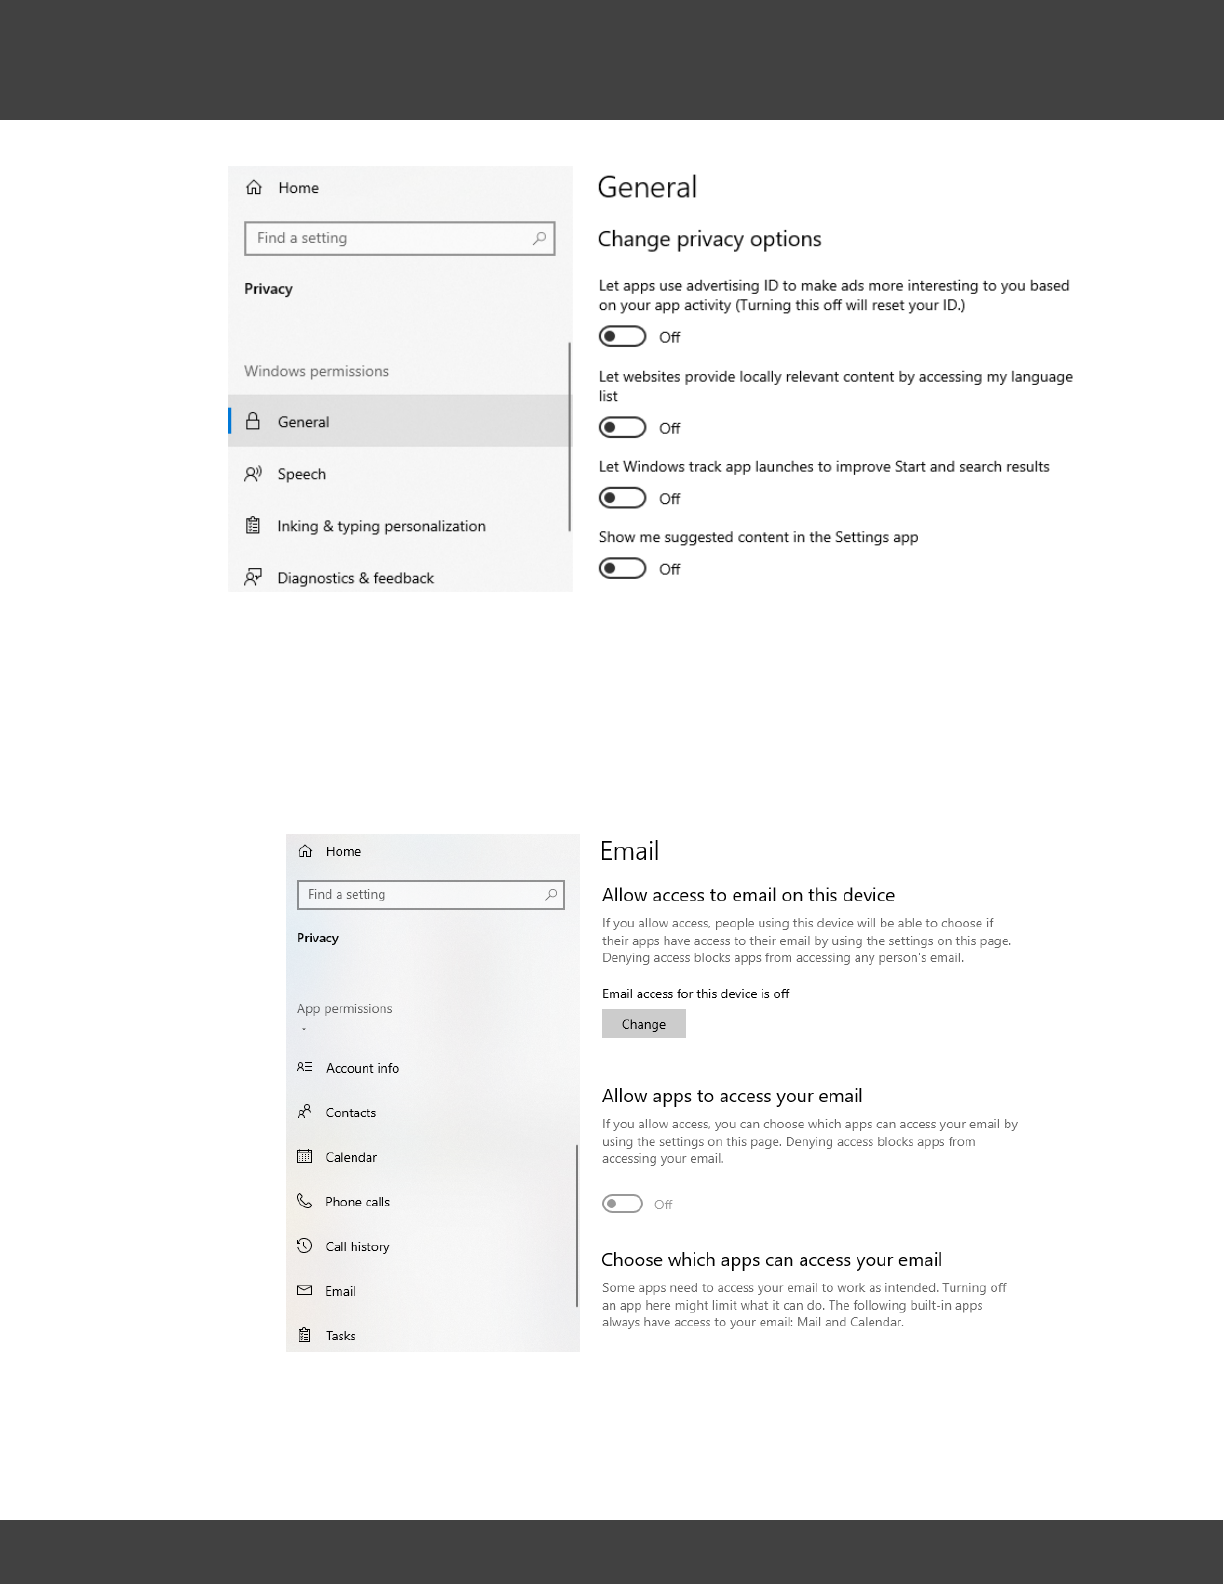
5.8 Windows Privacy settings
We finish this chapter by reviewing Windows privacy settings. Various data collection procedures
run in the background by default and send the collected data to Microsoft.
As seen in the previous sections, services, scheduled tasks, and the Cortana digital assistant are
used for collecting and sending data to Microsoft. Unless you want to send this data to Microsoft,
we recommend that you review your privacy settings, and remove the triggers for collecting and
sending data to Microsoft in background.
Click on the Start button, type in Privacy settings and then click on Privacy settings:
33
The Ultimate Guide to Optimize your Windows PC for the Stage
© 2021 Deskew Technologies, LLC
Control what is running in the background
There are many settings here, such as online speech recognition, typing history, diagnostic and
feedback data, tailored experiences, activity history, among others that you might want to turn
off.
You may also want to adjust app permissions here, e.g. which applications have access to your
location, camera, microphone, calls, e-mails, and which can run in the background:
Carefully review these settings and turn off all unneeded ones.

34
The Ultimate Guide to Optimize your Windows PC for the Stage
© 2021 Deskew Technologies, LLC
Control what is running in the background
In the next chapter we focus on the numerous update mechanisms that may run in the
background while you are performing live.
Note: make sure to review privacy and tracking settings of your plugins as well. Tracking
mechanisms of some plugins can heavily impact your CPU usage. Read this blog article for such an
example.

35
The Ultimate Guide to Optimize your Windows PC for the Stage
© 2021 Deskew Technologies, LLC
Update mechanisms
6 Update mechanisms
In this chapter we cover the numerous mechanisms that update your operating system and
applications such as updates through the Microsoft Store, Windows Update, antivirus updates and
others.
The best practice is to turn off all your update mechanisms before your live performance to make
sure automatic updates features do not download new updates and install them in the
background. Auto-installation of new updates might significantly interfere with your live
performance and cause many unwanted issues.
We recommend that you always perform manual updates and then test your whole PC-based
setup, including whole gig and plugin setup, many weeks in advance before you go on tour or
perform live. This will give you time to address any issues you encounter.
Note: some updates from Microsoft may cause Gig Performer to think you are on a different
computer and you will have to activate it again (it won't use up an additional activation).
We strongly recommend that you do not update or upgrade your PC nor any applications while
you are on tour to avoid unexpected problems. Windows updates, anti-virus updates and even
seemingly unrelated application updates can cause havoc due to underlying changes they may
make to the system.
6.1 Microsoft Store automatic updates
Microsoft Store apps (modern, UWP apps) are configured to automatically update by default,
whether or not you are signed into the Microsoft Store. We recommend that you disable such
automatic updates.
On Windows 10, click on the Start button and select Microsoft Store:

36
The Ultimate Guide to Optimize your Windows PC for the Stage
© 2021 Deskew Technologies, LLC
Update mechanisms
Click on the menu button and select Settings:
Turn off the option for updating apps automatically.
On Windows 11, click on the Start button, type in Microsoft Store and then click on the app.
Notice that there is no three dots menu and that you need to click on the Account icon, and then
select App settings. Then turn off the App updates toggle button.

37
The Ultimate Guide to Optimize your Windows PC for the Stage
© 2021 Deskew Technologies, LLC
Update mechanisms
6.2 The Windows Update Service
Windows Update is a service that automates downloading and installing Windows software
updates over the Internet. This service is configured to regularly check with Microsoft for updates
by default.
Since the focus of this guide is to create a stable system that provides maximum audio
performance, we will make sure these updates are downloaded and installed in a way that allows
you to test the updated PC long before using it for live performance.
The largest Windows updates are Feature Updates as they introduce a new set of features and
major improvements to the Windows operating system. An example of such an update is
Windows 10 May 2021 Update (codenamed "21H1"). See more information here.
The key to a stable Windows PC is the proper configuration of Windows Update. We recommend
that you pause Windows Update while you are on tour. You can pause Windows Update for up to
35 days.
On Windows 10, click on the Start button, then Settings, and select Update & Security to open
Windows Update settings:

38
The Ultimate Guide to Optimize your Windows PC for the Stage
© 2021 Deskew Technologies, LLC
Update mechanisms
Click on the Advanced options:
Click on the combo box to select a desired date. You will see the new status of your Windows
Update service, showing that updates are paused:
On Windows 11, click on the Start button, type in Windows Update settings and then click the
Windows Update settings:

39
The Ultimate Guide to Optimize your Windows PC for the Stage
© 2021 Deskew Technologies, LLC
Update mechanisms
Simply select from the combo box up to 5 weeks to pause Windows updates.
If your tour will last more than 35 days or you never want to automatically download/install
Windows updates then you can configure your Windows Group Policy so you will only be notified
that updates are available, but they will not be downloaded nor installed until you choose to
download and install them.
Use the Win key + R combination to open the Run dialog box, type gpedit.msc and press Enter:

40
The Ultimate Guide to Optimize your Windows PC for the Stage
© 2021 Deskew Technologies, LLC
Update mechanisms
On Windows 10, navigate to Computer Configuration -> Administrative Templates -> Windows
Components -> Windows Update and double click on the Configure Automatic Updates setting.
On Windows 11, navigate to Computer Configuration -> Administrative Templates -> Windows
Components -> Windows Update -> Manage end user experience and double click on the
Configure Automatic Updates setting.

41
The Ultimate Guide to Optimize your Windows PC for the Stage
© 2021 Deskew Technologies, LLC
Update mechanisms
Click on Enabled (1), and then select option 2 – Notify for download and auto install (2). Click on
the OK button to confirm the changes.
Note: if your group policy is applied, you will see in the Windows update window the information
that Some settings are managed by your organization. Any available updates will not be
automatically downloaded nor installed.
This way you have more control over the Windows update process.
Although we do not recommend it, there are musicians who want to completely disable the
Windows Update mechanism running in the background, and enable it when they want. This can
be done using some third-party applications. Please search for it on the Internet and use with
care. There is a difference between the Group Policy method and using such applications; these
applications completely disable the Windows Update mechanism, so Windows does not consume
CPU cycles for it at all. Additionally, Microsoft Update servers are not contacted for new
information about new updates, nor are notifications displayed that there are new updates ready
to be downloaded and installed.

42
The Ultimate Guide to Optimize your Windows PC for the Stage
© 2021 Deskew Technologies, LLC
Update mechanisms
6.3 Antivirus updates
If you are using the integrated Windows Security solution and Microsoft Defender antivirus,
Microsoft Defender Antivirus Security intelligence updates are delivered through Windows
Update. Additionally, you may want to temporarily disable real-time protection while you are
performing live.
Click on the Start button, type in Virus & Threat protection and then click on the Virus & threat
protection app:
Click on Manage settings:

43
The Ultimate Guide to Optimize your Windows PC for the Stage
© 2021 Deskew Technologies, LLC
Update mechanisms
Temporarily turn off your real-time protection and Cloud-delivered protection.
If you are using other antivirus software, check their documentation on how to temporarily
disable their updates and real-time protection.
Be very careful with anti-virus products. Updates can cause serious unexpected behavior such as
preventing applications (including Gig Performer) from working properly and even crashing.
6.4 Installed application updaters
Installed applications may have their own individual updaters that run in the background. Get
familiar with your installed applications and review their updater settings. Below is an example.

44
The Ultimate Guide to Optimize your Windows PC for the Stage
© 2021 Deskew Technologies, LLC
Update mechanisms
Select Do not download or install updates automatically, if you use similar applications that
provide direct control over their update process.
Some programs just depend on the Task Scheduler or Windows Services for their updates, e.g.
Dropbox, Foxit Reader and Google Chrome:
Foxit updater happens to be an example where you can adjust its settings from multiple places
(e.g. remove it from Services or disable it from Foxit Reader Preferences).
We recommend that you close any cloud-syncing applications you are using and stop their service
before you perform live.

45
The Ultimate Guide to Optimize your Windows PC for the Stage
© 2021 Deskew Technologies, LLC
Update mechanisms
Review other applications that you have installed on your PC and check their updater
preferences, and if there are corresponding scheduled tasks or services then disable them also.
6.5 Audio applications and plugin updates
We do not recommend updating your audio software or plugins while you are on tour or if you are
about to perform live. The best practice is always to test your audio setup after you update your
audio software and allow a few weeks of testing before performing live.
Above is shown the Omnisphere Smart Update system.
If you are about to perform live and your audio plugin host Gig Performer notifies you that a new
version is available, we strongly recommend that you postpone the update until your gig or tour
has ended. Gig Performer updates are tested thoroughly before they are released so problems
with new releases of Gig Performer are very rare. However, it could be that a plugin that used to
work properly with an older version of Gig Performer doesn’t work with a newer version of Gig
Performer simply because the plugin itself has a bug that only manifested itself with the newer
version. Review the update settings in Gig Performer:

46
The Ultimate Guide to Optimize your Windows PC for the Stage
© 2021 Deskew Technologies, LLC
Update mechanisms
We also recommend that you postpone audio driver or firmware updates for your audio hardware
while you are on tour. Check your manufacturer's documentation to see if there are settings for
automatic updates of your ASIO drivers, or firmware.
6.6 Integrated system utilities updates
As we already mentioned, many brand name PCs and laptops come with pre-installed software
that may update drivers, BIOS, firmware or change system settings. Examples include Lenovo
System Update and Lenovo Vantage.
Although these applications may save time and effort by helping to automate the process of
finding and installing the latest drivers, BIOS, and other applications to optimize the performance

47
The Ultimate Guide to Optimize your Windows PC for the Stage
© 2021 Deskew Technologies, LLC
Update mechanisms
of your system, like other updates, they may break things and cause latency issues and audio
glitches with your audio setup.
Carefully review these settings and disable Auto updates:
The same applies to applications like Lenovo Vantage, since they may also update your drivers,
install system updates or reconfigure your Windows settings:

48
The Ultimate Guide to Optimize your Windows PC for the Stage
© 2021 Deskew Technologies, LLC
Update mechanisms
Make sure that recommended hardware settings are not enabled, and review the automatic
update settings.
Make yourself familiar with your pre-installed software to see if there are any applications that
may perform automatic firmware or driver updates or can apply various hardware and system
settings.
It is critical for your live performance and glitch-free audio processing to have these applications
under control, since they can impact the overall stability and performance of your PC.

49
The Ultimate Guide to Optimize your Windows PC for the Stage
© 2021 Deskew Technologies, LLC
Optimize your Windows settings for the maximum
performance
7 Optimize your Windows settings for the maximum performance
In this chapter we will look at other miscellaneous Windows settings and optimize them as much
as possible for audio processing. You want your CPU cycles to be dedicated only for your gig
needs.
7.1 Turn off Windows sounds
By default, the Windows operating system plays various sounds when certain events occur.
Examples are when you connect or disconnect your thumb drive or external hard disk to your PC,
or when a notification appears.
Whether you are rehearsing or gigging, you certainly want to turn off these sounds so as not to
interfere with your performance. You also want to avoid accidentally blasting Windows sounds
through the PA system.
Click on the Start button and then type in Change system sounds; click on the Change system
sounds control panel item:
Select the No Sounds sound scheme from the combo box, and then click on OK to save your
changes.

50
The Ultimate Guide to Optimize your Windows PC for the Stage
© 2021 Deskew Technologies, LLC
Optimize your Windows settings for the maximum
performance
We also recommend that you disable the Sticky Keys, Toggle Keys, and Filter Keys accessibility
features if you do not use them. If you do use those features, you should prevent them from
making sounds.
The fact is, even with the No Sounds sound scheme selected, Windows will play a beep sound by
default if you, for example, press your SHIFT key five times in a row. This is an old Windows
feature and experienced Windows users have almost certainly activated this accidentally a few
times.
On Windows 10, click on the Start button and then type in Make a sound and click on the Make a
sound when enabling Sticky Keys, Toggle Keys, or Filter Keys system settings item:
Turn off Allow the shortcut key to start Filter Keys (1). Scroll up and also turn off this feature for
Sticky Keys and Toggle Keys. Turn off the option to show a warning message if you activate these
features (2) as it may overlap with one of your Gig Performer’s windows. Also turn off the option
to make a sound when turning these features on or off (3) as you certainly do not want any
accidental beeps during your live performance.

51
The Ultimate Guide to Optimize your Windows PC for the Stage
© 2021 Deskew Technologies, LLC
Optimize your Windows settings for the maximum
performance
On Windows 11, click on the Start button and then type in Play a sound when I turn on Sticky,
Filter, or Toggle keys and click on the Play a sound when I turn on Sticky, Filter, or Toggle keys
system settings item:
Turn off all toggle buttons and untick all check boxes.
7.2 Optimize your visual effects for the best performance
Windows enables various visual effects, such as fading or sliding menus or tooltips or windows
animations while minimizing and maximizing, to enhance the appearance of Windows.
These effects do not have much impact on your CPU and most likely will not cause any problems
with your audio setup, since your graphics card handles processing of these effects. However, if
you want to get the best performance for your PC, you might want to review the settings for
controlling the visual effects on your PC.
Click on the Start button and then type in View advanced system settings; click on the View
advanced system settings control panel item:

52
The Ultimate Guide to Optimize your Windows PC for the Stage
© 2021 Deskew Technologies, LLC
Optimize your Windows settings for the maximum
performance
Afterwards click on the Advanced tab and then on the Settings… button to show performance-
related settings:

53
The Ultimate Guide to Optimize your Windows PC for the Stage
© 2021 Deskew Technologies, LLC
Optimize your Windows settings for the maximum
performance
If you want to have the best performance at the expense of the visual appearance of your
Windows, click on the Adjust for best performance radio button. We recommend that you use a
Custom option for everyday use, balancing between appearance and performance, as the
majority of people will most likely find the adjustments for best performance overly spartan and
harder to read as font smoothing, for example, may get switched off.
We suggest that you enable the following settings, as they improve overall readability and the
user experience:
Use drop shadows for icon labels on the desktop,
Smooth edges of screen fonts,
Show windows contents while dragging,
Show thumbnails instead of icons.
On Windows 10, you might also want to adjust the Display settings, which are found under the
Ease of Access section. Click on the Start button, click on Settings and then Ease of Access:

54
The Ultimate Guide to Optimize your Windows PC for the Stage
© 2021 Deskew Technologies, LLC
Optimize your Windows settings for the maximum
performance
You can turn off animations, transparency effects and choose whether to hide scroll bars in
Windows (NB Colors setting is the other place where you can turn off transparency; Start ->
Settings -> Personalization -> Transparency effects).
On Windows 11, these settings are located under Settings -> Accessibility -> Visual effects.
7.3 Page file settings
The page file (or paging file) allows Windows to perform smoothly by allowing programs to use
more memory than is physically available. If you are running out of RAM, Windows can
temporarily store some of your data on your hard drive and restore it later. This process is called
paging.
The downside of paging is that hard drives process data more slowly than RAM, so paging
decreases the performance of your PC if you are low on installed RAM and your audio plugin host
uses RAM-hungry plugins.
Proper configuration of the page file depends on your PC’s configuration. We strongly
recommend that you use an SSD combined with fast hard disk drives, and at least 8 GB of RAM in
your PC for your live performance (16 GB or more is preferred).
For this guide, we have optimized a laptop with only 4 GB RAM i3 CPU and one hard disk, and Gig
Performer worked smoothly, with some help from its Predictive Loading feature. If you are very
short of RAM, you can use Gig Performer's Predictive Loading feature which can reduce the
amount of needed RAM but trades off instant switching if you are not following a setlist.
Open the Performance Options dialog box as shown in the previous section, and click on the
Advanced tab:

55
The Ultimate Guide to Optimize your Windows PC for the Stage
© 2021 Deskew Technologies, LLC
Optimize your Windows settings for the maximum
performance
You can see that Windows automatically allocated 2765 MB for virtual memory. Click on the
Change… button (1), and untick Automatically manage paging size for all drives (2). Choose
Custom size (3), and enter values for the Initial size and Maximum size of your page file. Then
click on the Set button and confirm with OK.
Follow these tips to properly configure your page size:
If you have 4 GB or 8 GB of RAM, choose select at least 1 x RAM for your initial page file
and 2 x RAM for the maximum size.
If you have 16 GB of RAM, you can use a smaller page file.
For 32 GB of RAM or more, select the System managed size option, as the page file is most
likely rarely used, so Windows will automatically handle the page file if a shortage of RAM
occurs.
Never use the No paging file option, as some products or services require a page file for
various reasons.
If you have an SSD, always put the page file on that drive.
We encourage you to monitor your total memory usage during your rehearsals to get a clearer
picture of how much memory you really need and experiment with the tips above.

56
The Ultimate Guide to Optimize your Windows PC for the Stage
© 2021 Deskew Technologies, LLC
Optimize your Windows settings for the maximum
performance
7.4 ReadyBoost
ReadyBoost is a mechanism that enables mass storage devices (such as SD cards and USB flash
drives) to be used as a cache between a drive and RAM.
ReadyBoost relies on the SysMain service (formerly SuperFetch) and adjusts its cache based on
your activity. It caches files and applications you frequently use and stores the cached data on a
USB flash drive or an SD memory card.
This technology may improve your PC’s performance if you are using only hard disk drives and you
are low on RAM; If your computer has a solid-state drive and plenty of free RAM, then ReadyBoost
will not improve performance.
To see the best results, use a quality USB flash drive at least USB 3.0 compatible and connect it to
the USB 3.0 port on your PC.
Open your File Explorer and click on This PC; right click on your USB flash drive and click on
Properties (1).
Click on the ReadyBoost tab (2). Windows will automatically test your USB flash drive to
determine if it is suitable to be used for the cache (it must be an NTFS or exFAT formatted drive
with a minimum transfer rate of 3.5 Mbit/s).

57
The Ultimate Guide to Optimize your Windows PC for the Stage
© 2021 Deskew Technologies, LLC
Optimize your Windows settings for the maximum
performance
Afterwards, you may either dedicate the whole USB drive to ReadyBoost or a portion of it (3). If
you do not want to dedicate the whole USB drive for cache, select Use this device, and reserve
space for the cache, e.g. 8 GB.
When you open your USB drive, you’ll see a new 8GB file called ReadyBoost.sfcache that is used
for cache.
You can use multiple USB drives or SD cards if they meet the minimum requirements for the
cache. If they do not pass the test, you will see the following information:
Please note this feature should not be used as a long-term solution, as we strongly recommend
that you upgrade your PC with more RAM and an SSD as soon as you get the opportunity.
7.5 Indexing of your drives
When Windows determines your PC is idle, it indexes folders, files and their contents to make
searching faster. Therefore, it could create or rebuild the index of your drive when you are
preparing for a gig.
The Windows Search service is responsible for indexing the content of your files and folders and
making the results available for faster searching. If you disable this service, you can still search for
files and folders, but your searches will be slower as the index is not available. Windows will
display a message: “Your searches might be slow because index is not running”.
Refer to section Optimizing Windows Services, to disable this service if you do not need it, or if
you want to get more performance at the expense of getting faster search results.
Alternatively, open your File Explorer, then click on This PC, right click on your drive, e.g. System
(C:) and select Properties:

58
The Ultimate Guide to Optimize your Windows PC for the Stage
© 2021 Deskew Technologies, LLC
Optimize your Windows settings for the maximum
performance
Make sure that both options are unchecked and click on OK. If asked to apply on all subfolders,
confirm. It may take a couple of minutes to apply this setting to all subfolders and files,
depending on how much content is on your drive.
7.6 Optimize and defragment drive
Over time, hard drive performance can slow down due to fragmentation in the file system. When
a hard drive is fragmented, its data blocks, called fragments, are scattered in multiple locations
around the surface of the hard disk and so it takes longer to retrieve the required data.
Defragmentation is the process of rearranging blocks associated with individual files so that they
occupy contiguous storage locations on the hard drive, to increase disk I/O performance by
minimizing hard drive head travel. This reduces the time it takes to read files from and write files
to the disk.
The Windows utility Defragment and Optimize Drives (formerly Disk Defragmenter) is used to
defragment hard disk drives or to optimize solid state drives. Solid-state drives can also be
fragmented, but that does not impact their performance as they do not have mechanical parts

59
The Ultimate Guide to Optimize your Windows PC for the Stage
© 2021 Deskew Technologies, LLC
Optimize your Windows settings for the maximum
performance
used for data reading and writing.
To open this utility, click on the Start button and type in Defragment; then click on Defragment
and Optimize Drives app.
Alternatively, right click on any of your drives and select Properties. Click on the Tools tab (1), and
then on the Optimize button (2). We recommend that you turn off scheduled optimization before
your gig. Click on the Change settings button (3), and untick Run on a schedule option (4). You can
revert this setting after your gig.
Before optimizing your hard disk drive click on the Analyze button and Windows will notify you if
the drive needs to be defragmented.
When it comes to solid state drives, optimization consists of performing TRIM on an SSD drive.
TRIM is a command that erases data blocks that are no longer considered in use. The use of TRIM
can improve the performance of writing data to SSDs and contribute to longer SSD life.

60
The Ultimate Guide to Optimize your Windows PC for the Stage
© 2021 Deskew Technologies, LLC
Optimize your sound card and audio software settings
8 Optimize your sound card and audio software settings
In this chapter we will present the basic audio-related settings that can affect performance of
your PC, since audio optimization is a topic on its own. It starts with "gain staging" and then
moves down the line.
These settings will be shown using the audio plugin host Gig Performer.
It is important to select the right audio driver and set up options in your audio applications such as
buffer size and sample rate to get the best performance on your live gig.
8.1 Audio drivers
A driver is a special kind of program used to help the operating system use hardware connected
to the computer. An audio driver enables Windows to recognize and interface with audio
hardware.
Many audio applications support different audio driver technologies such as ASIO, DirectSound,
WASAPI, WaveRT and others.
For live use you must use the ASIO drivers as they provide a low-latency and high-fidelity
interface between a software application and your audio interface. They are designed with real-
time audio performance in mind. Anything else will most likely not be good enough.
While Microsoft's DirectSound is commonly used as an option for non-professional users, ASIO
drivers provide professional musicians and sound engineers with a faster connection to the audio
hardware.
To download and install the latest ASIO drivers for your audio card or audio interface, refer to the
manufacturer’s web site. We always recommend that you use the audio drivers provided by the
interface manufacturer. For some audio devices however, manufacturers do not provide
proprietary ASIO drivers. An example is for example the popular Behringer UMC22 where the
manufacturer recommends the use of the generic ASIO4ALL driver:

61
The Ultimate Guide to Optimize your Windows PC for the Stage
© 2021 Deskew Technologies, LLC
Optimize your sound card and audio software settings
ASIO4ALL is a universal driver that acquires low level access to the sound card by using Windows
kernel mode drivers and provides an ASIO interface to it.
If you have problems with your proprietary ASIO drivers, and especially if you own an older audio
interface with dated ASIO drivers, such as the EMU 0404 USB you can try ASIO4ALL and see if it can
improve your performance:
If none of these works as expected, there are a couple of other universal ASIO drivers that you
might want to try, such as FlexASIO. While ASIO4ALL uses a low-level Windows audio API known

62
The Ultimate Guide to Optimize your Windows PC for the Stage
© 2021 Deskew Technologies, LLC
Optimize your sound card and audio software settings
as Kernel Streaming to operate, FlexASIO uses a different intermediate library called PortAudio
that supports many operating system sound APIs.
If you plan to buy a new audio interface, make sure its manufacturer provides a multi-client audio
driver. Unfortunately, some Windows ASIO drivers still allow only one application to use the audio
interface, and these are known as single-client drivers. Multi-client audio drivers allow you to use
the same audio device with more than one audio application at the same time (two instances of
your audio application counts as two different applications). This is important if you plan to take
advantage of Gig Performer's multi-instance feature and/or if you want to use Gig Performer
together with other audio/MIDI applications.
8.2 Choose your buffer size and sample rate
In this section we will introduce some basic terms such as audio latency, buffer size and sample
rate and suggest recommendations for live use.
Audio latency is simply the amount of time that passes between the sound being generated and
then perceived by your brain. Basically, it is a delay.
For example, if you are 10ft away from the speakers, and since the speed of sound is
approximately 1,000 ft/s in air it means that it takes 10 ft : 1000 ft/s = 0.1 seconds (or 10
milliseconds) for sound to travel from the speakers to your ears. The latency here is about 10 ms.
Buffer size is basically the number of samples that will be collected before your audio plugins get
to process them. Your audio interface is an analog-to-digital as well as digital-to-analog converter.
It takes any audio input, converts that into digital form (numbers) and then on the output side –
converts those numbers back to analog audio.
Sample rate determines how many samples your audio interface will capture every second and
do the above-mentioned conversions. A common sampling frequency for live use is 44.1 KHz.
For example, if your buffer size is 256 and your sampling rate is 44.1 KHz (44,100 times per second,
as Hz means cycles per second) then your latency will be 256/44,100 seconds which is 0.0058
seconds or 5.8 ms.
If your buffer size is 256 and the sample rate is 96 KHz you will get 256/96,000 = 2.7 ms latency.
You can experiment with this: If you change the buffer size to 128 and leave the sampling
frequency at 44.1 KHz – your latency will be 2.9 ms and so on.
These values directly affect the performance of your PC, as smaller latency values require your
computer to respond more quickly to process all those samples in time without producing any
glitches.
It has been shown that people can perceive differences between 3 ms – 10 ms, and that our brain
cannot distinguish anything below 3 ms.

63
The Ultimate Guide to Optimize your Windows PC for the Stage
© 2021 Deskew Technologies, LLC
Optimize your sound card and audio software settings
Therefore, for live performance, many musicians use a buffer size of 256 or 128 and a sample rate
of 44.1 KHz. We are not discussing here a recording scenario, which should be done slightly
differently.
Generally speaking, using higher buffer sizes or lower sample rates lets your computer run at
lower temperatures and allows you to run more intensive plugins in parallel without crackles or
pops, but the trade-off will be higher latency or lower quality respectively.
Another factor is the additional latency introduced by your audio interface. Not all audio
interfaces are created equal. Some have low internal latency for both A/D and D/A conversions
while others add more latency than perhaps you might like, so you have to lower your buffer size
to get the overall desired latency.
To find out how much extra latency your interface introduces – you can use Gig Performer's built
in Latency Measurement Tool (found under the Window menu):
Make sure you do not use any plugins, and that your input signal is not too low.
The point of this section is to create sufficient CPU headroom to ensure a glitch-free live
performance. You can also set smaller buffer sizes if that does not impact your live performance,
but at the cost of less CPU capacity for processing more plugins.

64
The Ultimate Guide to Optimize your Windows PC for the Stage
© 2021 Deskew Technologies, LLC
Optimize your sound card and audio software settings
Note: Gig Performer 4 provides you with a feature to see how much latency every new plugin
adds to your setup. Simply hover over your plugin block to show a tooltip and look for the Latency
information.

65
The Ultimate Guide to Optimize your Windows PC for the Stage
© 2021 Deskew Technologies, LLC
Other best practices and tips
9 Other best practices and tips
In this chapter we present other best practices and tips that will help you make and keep your PC
a stable platform for your live performance. Sections in this chapter will not be presented in great
detail since additional step-by-step tutorials for these topics can be easily found via your favorite
search engine.
9.1 Create a full system backup of working configuration
Once you set up your audio applications, test their behavior, and determine your current audio
setup is ready for live performance, we recommend that you make a complete system backup of
your PC.
Although you can use many free 3rd party applications for the backup purposes, Windows 10 and
Windows 11 still include a legacy tool called Backup and Restore (Windows 7) that allows you to
perform various backup options.
The easiest way to open this tool is to click on the Start button, type in sdclt and press Enter:
Creating a system image helps you to easily restore the last working PC's state, so you are always
ready for your gig. The best practice is to always test your audio setup after major changes, such

66
The Ultimate Guide to Optimize your Windows PC for the Stage
© 2021 Deskew Technologies, LLC
Other best practices and tips
as Windows feature updates, plugin updates or audio driver updates, and backup your working
setup.
Another built-in Windows feature for creating backups is File History; it backs up versions of your
files in Libraries and Desktop folders (on Windows 10 you can select a custom folder path).
Therefore, File History is a great tool to keep versions of our gig files and other files related to
your audio plugin host. To open this tool, click on the Start button and type in File History:
Using this feature, you can easily revert your progress to a version that you made a day earlier:

67
The Ultimate Guide to Optimize your Windows PC for the Stage
© 2021 Deskew Technologies, LLC
Other best practices and tips
Check out our community thread to learn more about this feature.
9.2 Registry backup
In addition to creating a system image, you may want to create a backup of your working registry
database.
The Windows Registry is a database where important system and application settings are stored.
Click on the Start button, type in regedit and press Enter:

68
The Ultimate Guide to Optimize your Windows PC for the Stage
© 2021 Deskew Technologies, LLC
Other best practices and tips
Right click on the Computer and then click on Export. Keep your exported REG file at a safe
location, i.e. on your external hard drive or at some offsite cloud storage system.
If you encounter any problems with your PC due to incompletely uninstalled applications or
malware, open your Registry Editor, click on the File menu, select Import… and locate your REG
file. The best practice is to make these backups occasionally.
Note: Many applications will store their licensing data either on your drive or in the registry.
Restoring from the backup may invalidate these licenses and you may have to re-register some of
your applications again if you registered those applications after you took the backup.
Note: some operating system upgrades can cause the computer to "look" like it is a new or
different computer. Some previously activated software products, including Gig Performer and
certain plugins may need to be reactivated after such upgrades.
9.3 Full system antivirus scan before turning it off
Antivirus products can be notorious for interfering with audio applications, causing glitches
and/or even prevent them from working properly. Gig Performer (for example) may work fine
when initially installed but your anti-virus product may interfere after either Gig Performer or the
anti-virus product is updated. Unfortunately, you cannot be without a decent anti-virus product
because you need to protect your system from malware, such as viruses and Trojans, that will also
cause your audio applications to misbehave or even crash the entire operating system at random
intervals. The real-time protection feature of many anti-virus products can also cause problems as
they take time to check files as they are being loaded or saved, something you don't want to be
happening when you're loading audio samples into memory on the fly, for example.
Therefore, the best practice is to perform a full system scan before switching off your anti-virus
system or at least its real-time protection feature.

69
The Ultimate Guide to Optimize your Windows PC for the Stage
© 2021 Deskew Technologies, LLC
Other best practices and tips
Click on the Start button and then type in virus & threat protection and click on the Virus & threat
protection system setting; click on the Scan options to list available scan options:
Select the Full scan and click on the Scan now button to check your PC for malware.
Certain malware, such as rootkits, can be particularly difficult to discover and remove from your
PC. In such cases, it is recommended that you perform an offline Microsoft Defender scan.
If your audio plugin host or entire operating system crashes at random intervals, that could be
due to faulty RAM, a faulty drive or to malware that is hiding on your system, even though your
security software didn’t detect anything. In this situation it is recommended to run an offline
Microsoft Defender scan.
If you are using other antivirus solution, such as Kaspersky antivirus, check their documentation
on how to create or download a rescue disk. Kaspersky provides a free rescue disk, which can be
used to scan your computer offline for malware (find more information about it here).
Once again - the best practice is to turn off the real-time protection and other modules of your
security software before your live performance. When you finish with gigging, turn them back
on.
9.4 Microsoft Defender SmartScreen feature

70
The Ultimate Guide to Optimize your Windows PC for the Stage
© 2021 Deskew Technologies, LLC
Other best practices and tips
Microsoft Defender SmartScreen is a security program to block rogue websites, malicious
applications and phishing attempts. Since it is reputation based, it may bring lots of confusion as
it will likely block the latest version of your legitimate audio application from running.
Make sure you have downloaded your application from the official home page and run the
installer:
If SmartScreen dialog appears, click on More info (1). Review the publisher and click on the Run
anyway button (2).
Alternatively, right click on a downloaded setup file, and select Properties:

71
The Ultimate Guide to Optimize your Windows PC for the Stage
© 2021 Deskew Technologies, LLC
Other best practices and tips
Tick the Unblock check box and confirm with clicking on OK. Setup is now marked as safe, and the
SmartScreen window will not appear.
You may want to completely disable the SmartScreen feature before your gig; click on the Start
button, type in reputation-based protection and click on the corresponding system setting:

72
The Ultimate Guide to Optimize your Windows PC for the Stage
© 2021 Deskew Technologies, LLC
Other best practices and tips
Set Check apps and files to Off.
Turn on that feature when you finish with your live performance.
9.5 Use quality USB hubs
When using a USB hub, note that the bandwidth of the PC's USB port is not increased and stays the
same. Moreover, some USB devices may be notably more demanding than others, such as multi-
channel USB audio interfaces or external hard drives, so it is crucial to test your USB hub
thoroughly if you intend to use it for real-time audio processing.
Note that all USB hubs are not created equally. A quality, self-powered, hub will go a long way.
Some interfaces require a good quality self-power hub, otherwise noise and dropout issues may
occur.
If you are troubleshooting issues with your USB audio interface, make sure it is not connected to
an external USB hub, but directly to a USB port on your PC or laptop. We recommend to always
use a spare USB port, not a hub.
If necessary, consider upgrading to a premium USB cable. If you experience hum or noise when
using your USB audio interface, you may want to upgrade your USB cable to a premium cable with
extra shielding and a Ferrite Bead (it suppresses high-frequency electronic noise in electronic
circuits) which can filter out some external noise.
Also make sure you do not allow the computer to turn off USB hub devices to save power, as
explained in Device power management section.
9.6 Portable applications
If you want to dedicate your PC fully to audio processing, and keep it as clean as possible, you
may want to consider using portable applications, instead of installed applications for your
additional non-audio related needs (Web browsing, PDF viewer, etc.). A portable application is a
program that does not need to be installed and is designed to read and write its configuration
settings into an accessible folder in the computer, usually in the folder where the portable
application can be found.
Many modern applications are offered as portable versions, besides installers:

73
The Ultimate Guide to Optimize your Windows PC for the Stage
© 2021 Deskew Technologies, LLC
Other best practices and tips
To run a portable application, you normally download the ZIP archive, unzip it to a folder on your
drive, and run the main executable.
To maintain a clean Windows environment focused on audio processing for live performance, we
recommended that you uninstall all UWP apps that you do not use, as already described in
chapter Control what is running in the background. There are several reasons for this:
Speed – UWP apps seem to be slower than installed or portable ones,
Reliability – users experienced lots of problems where UWP apps were failing, and not one
or two, but all UWP apps except Edge,
Functionality – installed or portable applications seems to be more feature-rich, and nice-
looking compared to UWP apps.
Using portable applications bring many benefits if you want to create a stable and fully optimized
PC as a platform focused for real-time audio processing:
Application traces – portable applications do not write to the Windows registry nor store
their configuration files in the user's profile; instead, they store their configuration files
in the portable directory. This way you make sure that your PC stays clean and there are
not unwanted traces in the registry, and any leftovers in Program Files, ProgramData or
other folders on your drive.
Easier to control – portable applications do not set scheduled tasks, install Windows
services, or set themselves to run automatically when Windows starts (although some
portable applications might also provide these features).
Portability – as they do not need to be installed, portable applications can run from your
thumb drive; you can insert your thumb drive into other computers or laptops, and they
will run normally, as well. If you are a musician that is often on tour and you use different
computers or laptops, you can save all your applications’ preferences and ensure the
same user experience across many PCs.

74
The Ultimate Guide to Optimize your Windows PC for the Stage
© 2021 Deskew Technologies, LLC
Other best practices and tips
You can download many portable applications from web sites like portableapps.com or
portablefreeware.com.
The PortableApps.com also provides a platform which enables you to select and install more than
400 free and portable applications, organized in categories:
This platform can also automatically update your applications, such as Thunderbird or Libre
Office.
9.7 Keep your ASIO driver and firmware of your audio interface
up-to-date
Make sure you have updated your ASIO drivers and the firmware in your audio interface.

75
The Ultimate Guide to Optimize your Windows PC for the Stage
© 2021 Deskew Technologies, LLC
Other best practices and tips
Please visit your audio interface manufacturer's website and make sure you download and install
the latest firmware and the latest ASIO driver for your version of Windows.
Refer to the manufacturers documentation on how to properly install an ASIO driver or firmware.
9.8 Test the entire gig
Once you follow these guidelines, it will be critical to test your entire gig (i.e. every song, every
Rackspace in Gig Performer) to make sure that these optimizations have not broken anything.
Please note that you should not perform these optimizations right before your gig, or a couple of
days before your gig – we strongly recommend to optimize your PC at least a few weeks before
your gig, so you have plenty of time to sort out any issues or restore from your backup if
something breaks.
If you are on tour, it is crucial to not perform any updates, or optimizations. You should keep your
working PC configuration until your tour is finished.
You do not want to think about your PC while on tour, you just expect it to work. When you get to
a show, you turn on your computer and perform - you do not even want to think about
optimizations or any other computer-related stuff.

76
The Ultimate Guide to Optimize your Windows PC for the Stage
© 2021 Deskew Technologies, LLC
Troubleshooting
10 Troubleshooting
In this chapter we present tips and techniques on how to troubleshoot issues with your PC or
audio system. In the previous chapter we mentioned that malicious programs can also cause your
audio applications or even the entire operating system to crash at random intervals, so make sure
you check your PC for malware before proceeding with the guidelines in this chapter.
10.1 Exclusive Mode
Some applications take over your audio interface when they start and do not allow any other
applications to use it. If you run into an issue where no audio plays through your audio plugin
host, make sure that exclusive mode for your audio interface is disabled.
Disabling the Exclusive Mode options in Windows Sound Preferences prevents audio applications
from taking exclusive control of your interface's driver.
Click on the Start button and then type in Change system sounds; click on the Change system
sounds control panel item:

77
The Ultimate Guide to Optimize your Windows PC for the Stage
© 2021 Deskew Technologies, LLC
Troubleshooting
Click on the Playback tab (1), then select your playback device (2), and click on Properties (3). In
the Speaker Properties window, click on the Advanced tab (4) and untick Allow applications to
take exclusive control of this device (5). Click on OK to save changes.
Repeat the same procedure for the recording device:
Click on the Recording tab (1), then select your recording device (2), and click on Properties (3). In
the Line In Properties window, click on the Advanced tab (4) and untick Allow applications to take
exclusive control of this device (5). Click on OK to save changes.
Note: under the Exclusive mode settings, you may have the Signal Enhancements settings. In that
case you may want to deselect the Enable audio enhancements check box, as there are users that
reported that audio sounded distorted when this option is enabled.
10.2 Microsoft GS Wavetable Synth
If you are using ASIO4ALL, the built-in Microsoft GS Wavetable Synth software device might
interfere with ASIO audio processing:

78
The Ultimate Guide to Optimize your Windows PC for the Stage
© 2021 Deskew Technologies, LLC
Troubleshooting
Try disabling this software device through the Device Manager (refer to chapter Disable
unnecessary hardware in Windows Device Manager for more information on how to do this):
Right click on this device and select Disable. Check if the problem is solved.
10.3 Nagle’s Algorithm
If you use network during your live performance (e.g. to send OSC commands) and experience
high latency, you can reduce the network latency by disabling support for Nagle’s algorithm.
Nagle's algorithm lowers the overall number of packets sent over the network and improves
network efficiency but at the cost of increased latency.
This algorithm works by combining a number of small network packets and sending them all at
once, and it introduces a delay up to 300 ms before the packet is sent over the network. Disabling
this algorithm will reduce your overall network latency.
Before disabling Nagle’s algorithm, make yourself familiar with network interfaces you use, and
their assigned IP addresses; to do this, press Winkey + X to open the Quick Access Menu, then
select Windows PowerShell (or Windows Terminal on Windows 11):

79
The Ultimate Guide to Optimize your Windows PC for the Stage
© 2021 Deskew Technologies, LLC
Troubleshooting
Type in ipconfig and press the Enter key; note the IPv4 address as you will need it to find the
network adapter in the Windows Registry.
Nagle’s algorithm can be disabled by using the Windows Registry. Click on the Start button, type
in regedit and press Enter:
Navigate to: HKEY_LOCAL_MACHINE -> SYSTEM -> CurrentControlSet -> Services -> Tcpip ->
Parameters -> Interfaces, and identify the interface that matches the IP address from the terminal
window.
Two DWORD (32-bit) values must be created for this interface: TcpAckFrequency and TcpNoDelay.
To create these values right click on the empty space of the interface, select New and then select
New DWORD (32-bit) Value.
Name them exactly and set the Value data field to 1, as shown in the picture below:

80
The Ultimate Guide to Optimize your Windows PC for the Stage
© 2021 Deskew Technologies, LLC
Troubleshooting
Repeat this procedure for every interface you want to disable the Nagle’s algorithm.
10.4 Check disk
You may experience many audio-related issues with your PC if your hard drive has logical or
physical errors, e.g. your plugin might load improperly or your audio plugin host might crash at
random times.
Windows contains an integrated tool called chkdsk that can be used to check for such errors. To
access it from Windows, right click on your drive, select Properties, and click on the Tools tab:

81
The Ultimate Guide to Optimize your Windows PC for the Stage
© 2021 Deskew Technologies, LLC
Troubleshooting
Click on the Check button to start the scan of your drive.
This tool checks the integrity of the file system of your drive, including file system meta data, and
fixes any logical file system errors or bad sectors that it finds. Logical file system errors include
corrupt entries in the master file table (MFT), bad security descriptors associated with files, and
other file system errors.
You can also run chkdsk directly from the terminal or the Windows PowerShell.
Faulty hard drive can cause random system or application crashes so make sure you check your
hard drives with this tool if you experience such issues.
10.5 System file checker
Sometimes your problems with audio processing occur as the result of damaged Windows system
files. Windows contains another integrated tool called SFC or System File Checker, that may help
you troubleshoot this kind of issues with your PC.
SFC allows users to scan for and correct corruptions in Windows system files. Microsoft, however,
recommends running the integrated Deployment Image Servicing and Management (DISM) tool
prior to running the System File Checker.

82
The Ultimate Guide to Optimize your Windows PC for the Stage
© 2021 Deskew Technologies, LLC
Troubleshooting
Press Winkey + X to open the Quick Access Menu, then select Windows PowerShell (Admin) (or
Windows Terminal (Admin) on Windows 11):
When you run this command, DISM uses Windows Update to retrieve the files that are required to
fix corruptions. Make sure you are connected to the Internet while using this command.
It may take several minutes for the command operation to be completed. While you are still using
PowerShell or terminal in Admin mode, use the SFC tool:
Type in sfc /scannow and press Enter to start the system scan.
This command will scan all protected system files, and replace corrupted files with a local cached
copy.
10.6 Test your RAM
Faulty memory chip sometimes results in random system or application crashes. Microsoft
provides an integrated tool called Windows Memory Diagnostic that tests your RAM for errors.
Click on the Start button, type in mdsched and press Enter:

83
The Ultimate Guide to Optimize your Windows PC for the Stage
© 2021 Deskew Technologies, LLC
Troubleshooting
Save your work and close any open programs and then click on Restart now and check for
problems.
Your computer will restart and the Windows Memory Diagnostics Tool screen will appear:
You can press the F1 key to select the Extended test, as it will include additional tests such as
MATS+, Stride38, WSCHCKR and others.

84
The Ultimate Guide to Optimize your Windows PC for the Stage
© 2021 Deskew Technologies, LLC
Troubleshooting
This process may take a while, and once done, your computer will automatically reboot and the
test results will appear when you log in (if they do not appear, then use the Event Viewer to
review recent logs).
10.7 Performance monitoring
If you experience issues with high CPU, RAM or disk usage, you can use a couple of integrated
utilities in Windows to identify bottlenecks, and fix those issues.
We have already mentioned Task Manager, and it provides the basic performance view, through
which you can get quick information on available resources:
Note the Open Resource Monitor button, located at the bottom of the screenshot above and click
on it:

85
The Ultimate Guide to Optimize your Windows PC for the Stage
© 2021 Deskew Technologies, LLC
Troubleshooting
The Resource Monitor is the second tool we want to present. This tool provides a detailed look at
your PC’s resource usage. You can select, for example, a process that has high CPU consumption
and filter it to show all associated services, modules, handles, disk and network activity. The
Resource Monitor provides much more detailed resource statistics than does the Task Manager.
Another great tool you might want to use to track performance of your PC is the Performance
Monitor. Click on the Start button, type in perfmon and press Enter:

86
The Ultimate Guide to Optimize your Windows PC for the Stage
© 2021 Deskew Technologies, LLC
Troubleshooting
The Performance Monitor can display performance data from hundreds of different performance
counters. You can use it to monitor and log your PC’s performance over specific period of time,
e.g. during your rehearsal, or you can monitor the performance of a remote computer in real-
time.
Additionally, if you right click on Monitoring tools, and select View system reliability… you can
use the Reliability Monitor, and measure hardware and software problems and other changes to
your computer.
10.8 Troubleshooting DPC and ISR latency issues
A Deferred Procedure Call (DPC) is a mechanism used to reduce the amount of time actually spent
in a high-priority thread. High-priority tasks are related to drivers or processes that run
simultaneously in the Windows operating system.
This mechanism enables device drivers and other low-level processes to perform the critical,
high-priority part of their processing quickly, and schedule the non-critical, lower priority part of
their processing for later execution.
As you might guess, there are many poorly written drivers that take longer than necessary to
process, and therefore prevent other drivers from being processed in time. These situations may
prevent your audio driver from being processed promptly thereby causing pops, clicks, dropouts
or audio distortion.
An Interrupt Service Routine (ISR) is a software procedure that hardware call on in response to an
interrupt. The hardware interrupts the CPU which then switches into kernel mode and jumps to
the ISR, causing their interrupt service routines to execute.
Unfortunately, Windows does not provide an integrated tool for troubleshooting DPC and ISR
latency issues. Luckily, there is a great application called LatencyMon (a free home edition is
available) that checks if your PC is suitable for processing real-time audio and other tasks by
measuring DPC and ISR execution time, kernel timer latency and pagefaults:

87
The Ultimate Guide to Optimize your Windows PC for the Stage
© 2021 Deskew Technologies, LLC
Troubleshooting
Click on the play button to start monitoring, let it run for a couple of minutes and then click on the
stop button.
This application provides a report where you can determine which kernel modules and processes
are responsible for causing audio latencies or might result in dropouts.
The report also includes a report on the suitability of your system for playing real-time audio:
If the execution times of all DPC and ISR routines stay below 2000 µs (microseconds), your
system is considered suitable for handling real-time audio without dropouts.
If some routines have execution times between 2000 µs and 4000 µs, your system is
considered doubtful.
If ISR or DPC routines are detected to execute for longer than 4000 µs, a system is
considered unsuitable for handling real-time audio.
Here are some tips to resolve DPC and ISR latency issues:
Update your drivers - a common cause of DPC latency is out of date device drivers. New
drivers will hopefully be better optimized and cause less interruptions in your audio
stream.
Disable devices you do not use – if you do not use network or WiFI adapters, disable
them. The same applies to card readers, other sound devices that are not in use (e.g. your
integrated audio card), Bluetooth adapters, imaging devices and others.
Research the Internet – copy the name of the problematic driver and add DPC or ISR to
your search query to find discussions on audio forums and make yourself familiar with
that driver and possible solutions. Perhaps an older driver, or a specific version may work
better than the newest one.
Find the alternative – if for example tcpip.sys or ndis.sys are reported as the culprit
(ndis.sys is displayed in the screenshot above), the chances are that the problems are

88
The Ultimate Guide to Optimize your Windows PC for the Stage
© 2021 Deskew Technologies, LLC
Troubleshooting
caused by your wireless network adapter. Therefore, try disabling the WiFi adapter and
instead connect to your LAN or to the Internet via an Ethernet cable. If you are using a
laptop and touchpad drivers are causing problems, use a USB mouse instead and re-run
the test.

89
The Ultimate Guide to Optimize your Windows PC for the Stage
© 2021 Deskew Technologies, LLC
Why Gig Performer?
11 Why Gig Performer?
The last missing piece of your optimized and a complete glitch-free setup is the audio plugin host
that provides the ultimate glitch-free experience on stage – Gig Performer. The secret behind its
robustness lies in the very finest blend of programming and musical experience: Gig Performer is
developed by people who are both software developers and serious touring musicians. Advanced
optimization techniques and heavy stress tests make sure that if you use Gig Performer on stage
for hours and hours – or even days – it will still perform without a glitch and will not stop running.
Countless hours are spent to make sure that Gig Performer uses as few CPU cycles as possible.
Many well-known music professionals worldwide rely on Gig Performer as their audio plugin host
of choice for live performance. Check Gig Performer in Action for various photos and videos of Gig
Performer during live performances or rehearsals.
Gig Performer's innovative approach and focus on usability is paired with an intuitive rack design,
called a rackspace, which transforms your plugins into the most powerful, yet user-friendly live
music software system.
Connect your plugins together any way you wish without the need to create channel strips,
busses, sends and inserts.
The impressive list of cutting edge features make Gig Performer stand out compared to other audio
plugin hosts. For example, the Predictive loading™ feature enables you to intelligently load parts
of your show, instead of loading your entire show, so you can still switch instantaneously to the

90
The Ultimate Guide to Optimize your Windows PC for the Stage
© 2021 Deskew Technologies, LLC
Why Gig Performer?
next Rackspace or a Song. This feature significantly reduces both your RAM and CPU usage so you
can perform confidently even with a very old laptop.
Gig Performer allows you to control plugin parameters by assigning them widgets or multiple
parameters by using widget groups. Widgets can be controlled using MIDI or OSC. The full OSC
implementation in Gig Performer allows you to control your show from a mobile phone, iPad,
Android tablet, or even from a Web browser.
As a software product created by musicians, for musicians, new updates and features are
implemented often in Gig Performer.
Discover endless possibilities of your audio setup and customize your rig's behavior to the max by
using its powerful, proprietary scripting language called GPScript.
Download a free, fully functional 14 day trial of this audio plugin host that truly addresses the
needs of live performers.

91
The Ultimate Guide to Optimize your Windows PC for the Stage
© 2021 Deskew Technologies, LLC
Checklist!
12 Checklist!
The final chapter is dedicated to a very brief checklist to make sure you did not forget to configure
something important.
1. Disable unnecessary devices, such as the WiFI adapter if you do not use it on your gig.
2. Select the Ultimate performance power plan.
3. Turn off all UWP background apps and close all programs you do not need for your gig in the
Task Manager.
4. Do a quick review of Windows services.
5. Make sure there are no tasks scheduled for the duration of your live performance.
6. Turn off your antivirus or other security products.
7. Pause Windows Updates or disable them completely.
8. Make sure Gig Performer's windows has the foreground focus to help you prevent your PC to
not go idle.
9. Remember to have fun!
Enjoy your live performance and Own The Stage® with Gig Performer®.

92
The Ultimate Guide to Optimize your Windows PC for the Stage
© 2021 Deskew Technologies, LLC
Conclusion
13 Conclusion
When you get a brand-new musical instrument, you would not go on stage with it immediately.
You would set it up, tune it, make sure it does exactly what you need and practice with it so as to
get the most out of your instrument.
The same applies to the PC you want to use on stage. If you spend some time tuning it up using
this guide, you will make sure you get the most out of it and end up with a super stable, well
performing platform for your live performance.
Our goal with this guide is not only to make your PC a great platform for audio processing, so you
can perform confidently, having one less worry on stage, but also to provide a deeper
understanding of what is happening behind the curtains and how to control it.
If you have other tips for PC optimizations or you want to see even more tips that were not
included in this guide, please visit our Community.
You can find us also on:
- Facebook: https://www.facebook.com/GigPerformer/
- Twitter: https://twitter.com/GigPerformer
- Instagram: https://www.instagram.com/gigperformer/
- LinkedIn: https://www.linkedin.com/company/deskew-technologies-llc/
- YouTube: https://www.youtube.com/c/GigPerformer
If you enjoyed this guide, you can subscribe to our social channels to be notified about future
updates of this guide, and like or share this guide to spread the word.
We will continue to update this guide from time to time to address new versions of Windows and
to include additional tips and tricks to make your real-time audio performance better on your PC.
