
T250 Inquiry Forms
Last Revision: 5/23/2020
Acumatica ERP 2019 R2
Development
Training Guide
| Contents | 2
Contents
Copyright......................................................................................................4
Introduction................................................................................................. 5
How to Use This Course...............................................................................6
Course Prerequisites.................................................................................... 7
Initial Configuration..................................................................................... 8
Deploying the Needed Acumatica ERP Instance for the Training Course................................... 9
Publishing the Required Customization Project................................................................... 10
Company Story and Customization Description.......................................... 11
Part 1: The Open Payment Summary Form................................................ 14
About Inquiry Forms.......................................................................................................15
Lesson 1.1: Configure the Inquiry Form............................................................................16
Before You Proceed............................................................................................... 17
Step 1.1.1: Create the Form—Self-Guided Exercise................................................... 19
Step 1.1.2: Define the DAC for the Grid..................................................................21
Step 1.1.3: Define the Inquiry Graph and the Data View........................................... 23
Step 1.1.4: Configure the ASPX page......................................................................24
Step 1.1.5: Test the Open Payment Summary Form..................................................25
Lesson Summary.................................................................................................. 27
Lesson 1.2: Configure a Filter for the Inquiry Form............................................................ 28
Step 1.2.1: Define the DAC for Filter Parameters......................................................29
Step 1.2.2: Configure the Graph............................................................................ 30
Step 1.2.3: Adjust the ASPX Page.......................................................................... 31
Step 1.2.4: Display the Filter Values in the URL....................................................... 32
Step 1.2.5: Test the Filtering Parameters.................................................................33
Lesson Summary.................................................................................................. 35
Lesson 1.3: Dynamically Add Filtering Conditions...............................................................36
Step 1.3.1: Add the New Field............................................................................... 37
Step 1.3.2: Define the Data View Delegate.............................................................. 38
Step 1.3.3: Test the Results...................................................................................40
Lesson Summary.................................................................................................. 42
Lesson 1.4: Retrieve Aggregated Data..............................................................................43
Step 1.4.1: Add the Show Total Amount to Pay check box......................................... 44
Step 1.4.2: Modify the Data View Delegate..............................................................45
Step 1.4.3: Test the Aggregation of Data................................................................ 47
Lesson Summary.................................................................................................. 48
Lesson 1.5: Add Redirection Links to the Grid................................................................... 49
Step 1.5.1: Add a Link by Using the PXSelector Attribute (Self-Guided Exercise)............50
Step 1.5.2: Add a Link by Using an Action.............................................................. 51
Step 1.5.3: Test the Redirection Links..................................................................... 54
Lesson Summary.................................................................................................. 56
Review Questions........................................................................................................... 57
| Contents | 3
Part 2: The Payment Info Tab................................................................... 58
About the PXProjection attribute...................................................................................... 59
Lesson 2.1: Add the Payment Info Tab............................................................................. 60
Step 2.1.1: Define the DAC................................................................................... 61
Step 2.1.2: Define the Data View........................................................................... 63
Step 2.1.3: Add the Tab Item (Self-Guided Exercise)................................................ 64
Step 2.1.4: Hide the Tab from the Form..................................................................65
Step 2.1.5: Test the Implemented Tab.................................................................... 66
Lesson Summary.................................................................................................. 68
Review Questions........................................................................................................... 69

| Copyright | 4
Copyright
©
2019 Acumatica, Inc.
ALL RIGHTS RESERVED.
No part of this document may be reproduced, copied, or transmitted without the express prior consent
of Acumatica, Inc.
11235 SE 6th Street, Suite 140
Bellevue, WA 98004
Restricted Rights
The product is provided with restricted rights. Use, duplication, or disclosure by the United States
Government is subject to restrictions as set forth in the applicable License and Services Agreement
and in subparagraph (c)(1)(ii) of the Rights in Technical Data and Computer Software clause at DFARS
252.227-7013 or subparagraphs (c)(1) and (c)(2) of the Commercial Computer Software-Restricted
Rights at 48 CFR 52.227-19, as applicable.
Disclaimer
Acumatica, Inc. makes no representations or warranties with respect to the contents or use of this
document, and specifically disclaims any express or implied warranties of merchantability or fitness for
any particular purpose. Further, Acumatica, Inc. reserves the right to revise this document and make
changes in its content at any time, without obligation to notify any person or entity of such revisions or
changes.
Trademarks
Acumatica is a registered trademark of Acumatica, Inc. HubSpot is a registered trademark of HubSpot,
Inc. Microsoft Exchange and Microsoft Exchange Server are registered trademarks of Microsoft
Corporation. All other product names and services herein are trademarks or service marks of their
respective companies.
Software Version: 2019 R2

| Introduction | 5
Introduction
The T250 Inquiry Forms training course shows how to create inquiry forms by using Acumatica
Framework and the customization tools of Acumatica ERP. On an inquiry form, users can view data
narrowed by the selection criteria they have specified; these forms are similar to reports but designed
for online viewing. While reports are generated in a printable format and have been designed to
meaningfully arrange the data, inquiry forms display the data in a table and give the user greater
flexibility to dynamically alter selection criteria and configure the table as needed to change the data
being viewed.
This course is intended for application developers who are starting to learn how to customize Acumatica
ERP.
The course is based on a set of examples that demonstrate the general approach to customizing
Acumatica ERP. The course is designed to give you ideas about how to develop your own embedded
applications through the customization tools. As you go through the course, you will continue the
development of the customization for the cell phone repair shop, which was performed in the previous
training courses of the T series (which we recommend that you take before completing the current
course).
After you complete all the lessons of the course, you will be familiar with the programming techniques
that are used to define the Acumatica ERP inquiry forms.
We recommend that you complete the examples in the order in which they are provided in the course,
because some examples use the results of previous ones.

| How to Use This Course | 6
How to Use This Course
To complete this course, you will complete the lessons from each part of the course in the order
in which they are presented and then pass the assessment test. More specifically, you will do the
following:
1. Complete Course Prerequisites, perform Initial Configuration, and carefully read Company Story
and Customization Description.
2. Complete the lessons in all parts of the training guide.
3. In Partner University, take T250 Certification Test: Inquiry Forms.
After you pass the certification test, you will receive the Partner University certificate of course
completion.
What Is in a Part?
The first part of the course explains how to create an inquiry form with different kinds of filtering.
The second part of the course explains how to display information from different DACs on a single tab
by using the PXProjection attribute.
Each part of the course consists of lessons you should complete.
What Is in a Lesson?
Each lesson is dedicated to a particular development scenario that you can implement by using
Acumatica ERP customization tools and Acumatica Framework. Each lesson consists of a brief
description of the scenario and an example of the implementation of this scenario.
The lesson may also include Additional Information topics, which are outside of the scope of this course
but may be useful to some readers.
Each lesson ends with a Lesson Summary topic, which summarizes the development techniques used
during the implementation of the scenario.
What Are the Documentation Resources?
All the links listed in the Related Links sections refer to the documentation available on the https://
help.acumatica.com/ website. These and other topics are also included in the Acumatica ERP instance,
and you can find them under the Help menu.

| Course Prerequisites | 7
Course Prerequisites
To complete this course, you should be familiar with the basic concepts of Acumatica Framework and
Acumatica Customization Platform. Before you begin this course, we recommend that you complete the
following training courses:
• T200 Maintenance Forms
• T210 Customized Forms and Master-Detail Relationship
• T220 Data Entry and Setup Forms
• T230 Actions
• T240 Processing Forms
Required Knowledge and Background
To complete the course successfully, you should have the following required knowledge:
• Proficiency with C#, including but not limited to the following features of the language:
• Class structure
• OOP (inheritance, interfaces, and polymorphism)
• Usage and creation of attributes
• Generics
• Delegates, anonymous methods, and lambda expressions
• Knowledge of the following main concepts of ASP.NET and web development:
• Application states
• The debugging of ASP.NET applications by using Visual Studio
• The process of attaching to IIS by using Visual Studio debugging tools
• Client- and server-side development
• The structure of web forms
• Experience with SQL Server, including doing the following:
• Writing and debugging complex SQL queries (WHERE clauses, aggregates, and subqueries)
• Understanding the database structure (primary keys, data types, and denormalization)
• The following experience with IIS:
• The configuration and deployment of ASP.NET websites
• The configuration and securing of IIS

| Initial Configuration | 8
Initial Configuration
If you have not deployed an instance of Acumatica ERP for the T240 Processing Forms course and do
not have the customization project (and its source code) for this course, do the following:
1. Make sure the environment that you are going to use for the training course conforms to the
System Requirements.
2. Make sure that the Web Server (IIS) features that are listed in Configuring Web Server (IIS)
Features are turned on.
3. Install the Acuminator extension for Visual Studio.
4. Deploy an instance of Acumatica ERP 2019 R2 with the name PhoneRepairShop and a tenant
that contains the I100 data. For information on deploying the instance for the training course,
see Deploying the Needed Acumatica ERP Instance for the Training Course.
5. Clone or download the customization project and the source code of the extension library from
the Help-and-Training-Examples repository in Acumatica GitHub to a folder on your computer.
6. Load the customization project from the folder and publish it. For details, see Publishing the
Required Customization Project.

| Deploying the Needed Acumatica ERP Instance for the Training Course | 9
Deploying the Needed Acumatica ERP Instance for the Training
Course
If you have completed the T240 Processing Forms training course, instead of deploying a new instance,
you can use the Acumatica ERP instance that you deployed and used for the training course instead of
performing the actions described in this topic.
Deploy an Acumatica ERP instance and configure it as follows:
1. Open the Acumatica ERP Configuration Wizard, and deploy a new application instance as follows:
a. On the Database Configuration page, type the name of the database: PhoneRepairShop.
b. On the Tenant Setup page, set up a tenant with the I100 data inserted by specifying the
following settings:
• Login Tenant Name: MyTenant
• New: Selected
• Insert Data: I100
• Parent Tenant ID: 1
• Visible: Selected
c. On the Instance Configuration page, in the Local Path of the Instance box, select
the folder that is outside of the C:\Program Files (x86) or C:\Program Files folder.
We recommend that you store the website folder outside of these folders to avoid an
issue with permission to work in these folders when you will perform customization of the
website.
The system creates a new Acumatica ERP instance, adds a new tenant, and loads the selected
data to it.
2. Sign in to the new tenant by using the following credentials:
• User name: admin
• Password: setup
Change the password when the system prompts you to do so.
3. In the top right corner of the Acumatica ERP screen, click the user name and then click My
Profile. On the General Info tab of the User Profile (SM203010) form, which the system has
opened, select YOGIFON in the Default Branch box; then click Save on the form toolbar.
In subsequent sign-ins to this account, you will be signed in to this branch.
4. Optional: Add the Customization Projects (SM204505) and Generic Inquiry (SM208000) forms
to Favorites. For details about how to add a form to Favorites, see To Add, Remove, and Open
Favorites.
To be able to create and pay invoices, configure the instance as follows:
1. On the Enable/Disable Features (CS100000) form, enable the Advanced SO Invoices feature.
2. On the Item Classes (IN201000) form, for the Stock Item class, select the Allow Negative
Quantity box.
3. On the Accounts Receivable Preferences (AR101000) form, clear the Validate Document
Totals on Entry and Require Payment Reference on Entry boxes to simplify the process of
releasing an invoice.

| Publishing the Required Customization Project | 10
Publishing the Required Customization Project
If you have completed the T240 Processing Forms training course and are using the Acumatica ERP
instance that you deployed and used for the course, the needed customization has already been applied to
your instance, and you should not perform the actions described in this topic.
You load the customization project with the results of the T240 Processing Forms training course and
publish this project as follows:
1. On the Customization Projects (SM204505) form, create a project with the name
PhoneRepairShop, and open it.
2. In the menu of the Customization Project Editor, click Source Control > Open Project from
Folder.
3. In the dialog box that opens, specify the path to the Customization\T240\PhoneRepairShop
folder, which you have downloaded from Acumatica GitHub, and click OK.
4. Bind the customization project to the source code of the extension library as follows:
a. Copy the Customization\T240\PhoneRepairShop_Code folder to the App_Data\Projects
folder of the website.
By default, the system uses the App_Data\Projects folder of the website as the parent
folder for the solution projects of extension libraries.
If the website folder is outside of the C:\Program Files (x86) and C:\Program
Files folders, we recommend that you use the App_Data\Projects folder for the project
of the extension library.
If the website folder is in the C:\Program Files (x86) or C:\Program Files folder,
we recommend that you store the project outside of these folders to avoid an issue with
permission to work in these folders. In this case, you need to update the links to the
website and library references in the project.
b. Open the solution, and build the PhoneRepairShop_Code project.
c. In the menu of the Customization Project Editor, click Extension Library > Bind to
Existing.
d. In the dialog box that opens, specify the path to the App_Data\Projects
\PhoneRepairShop_Code folder, and click OK.
5. In the menu of the Customization Project Editor, click Publish > Publish Current Project.
The published customization project contains all changes to the Acumatica ERP website and database
that have been performed in the previous training courses of the T series. This project also contains
the customization plug-in that fills in the tables created in these training courses with the custom
data entered in these training courses. For details about the customization plug-ins, see To Add a
Customization Plug-In to a Project; the creation of customization plug-ins is outside of the scope of this
course.

| Company Story and Customization Description | 11
Company Story and Customization Description
In this course, you will continue the development to support the cell phone repair shop of the Smart Fix
company; you began and expanded on this development while completing the previous training courses
of the T series.
If you have not completed these training courses, you have loaded and published the customization project
with the results of these courses in Initial Configuration.
In the previous training courses of the T series, you have created the following custom forms:
• The Repair Services (RS201000) maintenance form, which the Smart Fix company uses to
manage the lists of repair services that the company provides
• The Serviced Devices (RS202000) maintenance form, which the Smart Fix company uses to
manage the lists of devices that can be serviced
• The Services and Prices (RS203000) maintenance form, which provides users with the ability to
define and maintain the price for each provided repair service
• The Repair Work Orders (RS301000) data entry form, which is used to create and manage
individual work orders for repairs
• The Repair Work Order Preferences (RS101000) setup form, which an administrative user uses to
specify the company's preferences for the repair work orders
• The Assign Work Orders (RS501000) processing form, which is used to mass-assign repair work
orders.
You have also customized the following forms, which already existed in Acumatica ERP:
• The Stock Items (IN202500) form of Acumatica ERP, which has been customized so that users
can mark particular stock items as repair items—that is, items that are used for the repair
services
• The Payments and Applications (AR302000) form of Acumatica ERP, which has been customized
to automatically modify the status of a repair work order when the payment that corresponds to
the order is released
In this course, you will create the Open Payment Summary (RS401000) custom inquiry form. On this
form, users will view all repair work orders and sales orders that have not yet been paid in full, along
with information about the invoices that have been created for these orders. You will implement the
functionality of the form in stages. First, you will implement this form as an inquiry form without filters.
Then you will add filtering by using a data view and a data view delegate. You will also learn how to
aggregate data in a data view. Finally, you will add redirection links in different columns of the inquiry
form.
You will implement a new tab on the Repair Work Orders form that will be shown only if the selected
order has been paid in full; this tab will display information about the invoice and the last payment for
the repair work order.
Open Payment Summary Form
The following screenshot shows how the Open Payment Summary (RS401000) form will look once you
have completed the course.

| Company Story and Customization Description | 12
Figure: Open Payment Summary form
The form will contain the following parts:
• The filtering elements in the Selection area, which can be used to filter the list of repair work
orders by the customer and service type and to filter the list of sales orders by the customer. Also,
the Selection area will contain a check box that indicates whether subtotals for all orders with the
same status should be displayed in the Balance column along with individual balances.
• The table, which displays the list of repair work orders and sales orders that have not yet been
paid in full.
Payment Info Tab
The following screenshot shows how the Payment Info tab will look at the end of the course.

| Company Story and Customization Description | 13
Figure: Payment Info tab
The tab will contain the following elements:
• The Invoice Nbr. box, which holds the number of the invoice created for the order
• The Due Date box, which contains the due date of the invoice
• The Latest Payment box, containing the date when the most recent payment was applied
• The Latest Amount Paid box, which contains the amount of the most recently applied payment

| Part 1: The Open Payment Summary Form | 14
Part 1: The Open Payment Summary Form
The Smart Fix company needs to have a custom Acumatica ERP form on which accountants of the
company will view payment information for a particular customer: the invoices prepared for repair work
orders and sales orders, and the unpaid payments entered for these invoices. For this purpose, in this
part of the course, you will create the Open Payment Summary (RS401000) custom inquiry form, which
is described in Company Story and Customization Description.
On an inquiry form, the user can view data narrowed by the selection criteria they have specified; these
forms are similar to reports but designed for the flexible analysis of data online rather than for printing.
Typically, an inquiry form consists of a Selection area that provides elements that can be used for data
selection (filtering parameters) and a grid that lists the retrieved data; users can dynamically change
the selection criteria to change the data in the grid.
Inquiry forms have IDs that start with the two-letter module abbreviation (indicating the functional area
of the form) followed by 40, such as RS401000 for the repair services (RS) functional area. The names
of the graphs for inquiry forms have the Inq suffix. For instance, the RSSVPaymentPlanInq graph is
used for the Open Payment Summary form.
After you complete the lessons of this part, you will be able to test the functionality of the form.

| About Inquiry Forms | 15
About Inquiry Forms
Inquiry forms are forms that display data based on the provided filters. An inquiry form usually consists
of a Selection area, which consists of UI elements that provide filtering conditions, and a grid that
contains the filtered data. For the Selection area, you define a PXFilter data view that provides the
filtering (selection) elements displayed on the form. For the grid, you define a data view that retrieves
the filtered records. In certain cases, you might need to implement a dynamic query that retrieves
specific data depending on the specified filter parameters and query mode. For example, you need to
use a dynamic query when you need to display different types of entities or documents in the same
grid.
To create an inquiry form in the Screen Editor, you should use the FormDetail template. The generated
ASPX page will contain the Content element for the Selection area and the Content element for the
grid area.
Sometimes you do not need to have any filters on a form. In these cases, you can skip the defining of
the PXFilter data view. In the ASPX page, you remove the Content element for the Selection area.

| Lesson 1.1: Configure the Inquiry Form | 16
Lesson 1.1: Configure the Inquiry Form
In this lesson, you will learn how to create an inquiry form without filtering parameters. To learn about
this, you will begin to develop the Open Payment Summary (RS401000) custom inquiry form, which
will initially display information about invoices and payments for repair work orders that have been
currently not paid in full.
Description of the Form Elements
At the end of this lesson, the inquiry form will include the following parts:
• The table toolbar
• The table with rows for each repair work order and the following columns:
• Order Nbr.: The number of the repair work order
• Status: The status of the repair work order
• Invoice Nbr.: The number of the invoice created for the repair work order
• Due Date: The due date of this invoice
• Percent Paid: The percent of the invoice that has been paid
• Balance: The amount that has already been paid for the invoice
Lesson Objectives
In this lesson, you will learn how to create an inquiry form that does not have a filter.

| Before You Proceed | 17
Before You Proceed
To be able to test the inquiry page you are developing, the database should contain invoices and
payments to be displayed. Do the following:
1. On the Repair Work Orders (RS301000) form, create repair work orders with the following
properties.
Customer ID Service Device
C00000003 Battery Replacement Nokia 3310
C00000001 Liquid Damage Nokia 3310
C00000003 Liquid Damage Nokia 3310
The order gets the number 000019, 000020, and 000021.
2. Assign and complete the 000019 order.
3. Create invoices for the following repair work orders: 000008-000013 and 000019-000021.
4. Apply a 50% prepayment for the 000008 order and 10% prepayment to the 000011 order.
5. In the invoice created for the 000009 invoice, change the Due Date box value to a tomorrow's
date.
The Repair Work Orders (RS3010PL) form should look as shown in the following screenshot.

| Before You Proceed | 18
Figure: The Repair Work Orders form
For details, refer to the T230 Actions training course.
| Step 1.1.1: Create the Form—Self-Guided Exercise | 19
Step 1.1.1: Create the Form—Self-Guided Exercise
In this self-guided exercise, you will create the Open Payment Summary (RS401000) form on your
own. Although this is a self-guided exercise, you can use the details and suggestions in this topic as you
create the form. The creation of a form is described in detail in the T200 Maintenance Forms training
course. If you are using the Customization Project Editor, you can follow the instruction described later
in this step: Completing the Exercise using the Customization Project Editor.
DAC
Do not define any DACs; you will define a new DAC in Step 1.1.2: Define the DAC for the Grid. Make
sure the RSSVWorkOrder DAC is defined in the PhoneRepairShop_Code Visual Studio project.
Graph
You can use the following tips and details as you add the graph for the Payment Plan Summary
(RS401000) form:
• Assign the graph the RSSVPaymentPlanInq name.
• Do not make any standard system actions available.
• Do not define any data views. You will define the data view in Step 1.1.3: Define the Inquiry
Graph and the Data View.
The ASPX Page and Its Position in the UI
When you create the ASPX page for the Open Payment Summary (RS401000) form, you can use the
following details and tips:
• Use the following settings:
• Name of the form: Open Payment Summary
• ID of the form: RS401000
• ASPX template: FormDetail
• Include a link to the form in the Inquiries category of the Phone Repair Shop workspace, and
include in the customization project the position of the form in the UI.
Completing the Exercise using the Customization Project Editor
If you are using the Customization Project Editor to complete the self-guided exercise, you can follow
this instruction:
1. On the Customized Screens page of the Customization Project Editor, click Add Screen >
Create New Screen.
2. In the Create New Screen dialog box which opens, specify the following values:
• Screen ID: RS.40.10.00
• Graph Name: RSSVPaymentPlanInq
• Graph Namespace: PhoneRepairShop
• Page Title: Open Payment Summary
• Template: FormGrid (FormDetail)
3. Move the generated RSSVPaymentPlanInq graph to the extension library.
4. Build the project in Visual Studio.
| Step 1.1.1: Create the Form—Self-Guided Exercise | 20
5. Update the customization project with a new version of the PhoneRepairShop_Code.dll and
publish the customization project.
6. Add a link to the Open Payment Summary form to the Phone Repair Shop workspace.
7. Update the SiteMapNode item for the Open Payment Summary form in the customization
project.
| Step 1.1.2: Define the DAC for the Grid | 21
Step 1.1.2: Define the DAC for the Grid
The Open Payment Summary (RS401000) form, which you have created in the self-guided exercise,
displays information about repair work orders (including the details of the invoice created for each
order). All fields on this form are unbound, and you do not need to work with the fields on the Repair
Work Orders (RS301000) form, which works with the RSSVWorkOrder DAC. Thus, for the grid view
of the Open Payment Summary form, you will derive the new RSSVWorkOrderToPay class from
RSSVWorkOrder and extend the new class with additional DAC fields that are specific to the inquiry
form.
In the derived DAC, you will add the OrderNbr, InvoiceNbr, and Status abstract classes (which
are defined in the base RSSVWorkOrder DAC) with the new modifier. The definition of new abstract
classes is required because you will use the data fields of the derived class in BQL statements (such as
the BQL statements in the data view of the processing form and in attributes).
If you do not define the abstract classes for the original fields in the derived DAC, these fields will be
referred to in the SQL statement that corresponds to the BQL query as the fields of the original DAC. (In
this example, the OrderNbr, InvoiceNbr, and Status fields will be referred to as the fields of the
RSSVWorkOrder DAC). It may lead to data inconsistency issues when the original and the derived DACs
are used in the same BQL statement.
In the derived DAC, you will also add the PercentPaid field. During the retrieval of each of the
RSSVWorkOrder records, the value of the PercentPaid field is calculated from the database as the
percent of invoice amount which has been paid.
Define a DAC
To define the RSSVWorkOrderToPay DAC, do the following:
1. Derive the RSSVWorkOrderToPay data access class from RSSVWorkOrder, as shown in the
following code.
[PXCacheName("Repair Work Order to Pay")]
public class RSSVWorkOrderToPay : RSSVWorkOrder
{
}
2. In the RSSVWorkOrderToPay class, define the OrderNbr, InvoiceNbr, and Status
abstract classes with the new modifier, as the following code shows.
#region InvoiceNbr
public new abstract class invoiceNbr : PX.Data.BQL.BqlString.Field<invoiceNbr>
{ }
#endregion
#region Status
public new abstract class status : PX.Data.BQL.BqlString.Field<status> { }
#endregion
#region OrderNbr
public new abstract class orderNbr : PX.Data.BQL.BqlString.Field<orderNbr> { }
#endregion
3. In the RSSVWorkOrderToPay class, define the PercentPaid field, as the following code
shows.
#region PercentPaid
[PXDecimal]
[PXUIField(DisplayName = "Percent Paid")]
public virtual Decimal? PercentPaid { get; set; }
public abstract class percentPaid : PX.Data.BQL.BqlDecimal.Field<percentPaid>
{ }
#endregion

| Step 1.1.2: Define the DAC for the Grid | 22
4. In the RSSVPaymentPlanInq graph, add the calculation of the PercentPaid field value in
the FieldSelecting event. (See the following code.)
protected virtual void _(Events.FieldSelecting<RSSVWorkOrderToPay,
RSSVWorkOrderToPay.percentPaid> e)
{
if (e.Row == null) return;
if (e.Row.OrderTotal == 0) return;
RSSVWorkOrderToPay order = e.Row;
var invoices = SelectFrom<ARInvoice>.
Where<ARInvoice.refNbr.IsEqual<@P.AsString>>.View.Select(this,
order.InvoiceNbr);
if (invoices.Count == 0)
return;
ARInvoice first = invoices[0];
e.ReturnValue = (order.OrderTotal - first.CuryDocBal) / order.OrderTotal *
100;
}
In the event handler, you are selecting the invoice with the same number as the one specified in
the repair work order and calculating the percentage.
You need to use an event handler instead of attributes because checking for zero values cannot
be performed by using attributes.
5. Add required using directives.
6. Build the project.

| Step 1.1.3: Define the Inquiry Graph and the Data View | 23
Step 1.1.3: Define the Inquiry Graph and the Data View
In this step, you will add the data view to the RSSVPaymentPlanInq graph, which works with the
Open Payment Summary (RS401000) form. (You added this graph in Step 1.1.1: Create the Form—
Self-Guided Exercise).
An inquiry form usually contains two data views: one for the Selection area, and the other for the grid
area. In this lesson, you are creating the inquiry form without the Summary area (it will be added in
later lessons), so you need to define only one data view for the grid area.
In the data view that provides data for a grid, you should select only those repair work orders that are
not yet paid and the invoices for these orders. Also, you enable reusable filters on the grid by adding
the PXFilterable attribute to the data view that provides data for a grid. The attribute enables the
Filter Settings dialog box for the grid, in which the user can define and save custom filters and then
use them every time this user opens the form. Reusable filters are frequently enabled in the grid on
inquiry and processing forms, so that users can customize these forms to show specific data that is
most relevant to their needs and responsibilities. For more information on reusable filters, see Saving of
Filters for Future Use and To Filter the Data in a Table.
Before You Proceed
To display only orders which have not yet been paid, you need to compare the repair work order status
with fluent BQL constant. Define such constant for the Paid status in the Helper/Constants.cs file.
public class workOrderStatusPaid :
PX.Data.BQL.BqlString.Constant<workOrderStatusPendingPayment>
{
public workOrderStatusPaid()
: base(WorkOrderStatusConstants.Paid)
{
}
}
To Define the Data View
1. In the RSSVPaymentPlanInq graph, add the following member.
[PXFilterable]
public SelectFrom<RSSVWorkOrderToPay>.
InnerJoin<ARInvoice>.On<ARInvoice.refNbr.
IsEqual<RSSVWorkOrderToPay.invoiceNbr>>.
Where<RSSVWorkOrderToPay.status.IsNotEqual<workOrderStatusPaid>>.
View.ReadOnly DetailsView;
The InnerJoin clause adds information from the invoice that was created for the repair work
order so that you can display the due date and balance of the invoice on the ASPX page.
The Where clause removes all orders with the Paid status.
Because users don't need to edit any records on the inquiry form, you use the ReadOnly mode
type, which defines the selection of records in read-only mode. In the UI, Acumatica Framework
automatically disables the editing of data records that were retrieved through a read-only data
view.
2. If you have generated the graph using the Customization Project Editor, remove the
DetailsView member that was generated automatically.
3. Build the project.

| Step 1.1.4: Configure the ASPX page | 24
Step 1.1.4: Configure the ASPX page
In this step, you will define a grid on the Open Payment Summary (RS401000) form. In the grid, you
will add fields from the RSSVWorkOrderToPay and ARInvoice DACs selected in the DetailsView
view. Do the following:
1. In the RS401000.aspx file, for the px:PXDataSource control, specify the value of the
PrimaryView property as DetailsView.
2. If you have generated the ASPX code of the page based on the FormDetail template by using the
Screen Editor, remove the Content element that defines the Selection area of the form.
3. Define the columns for the grid as shown in the following code.
<px:PXGridLevel DataMember="DetailsView">
<Columns>
<px:PXGridColumn DataField="OrderNbr" Width="72" />
<px:PXGridColumn DataField="Status" Width="140" />
<px:PXGridColumn DataField="InvoiceNbr" Width="72" />
<px:PXGridColumn DataField="PercentPaid" Width="72" />
<px:PXGridColumn DataField="ARInvoice__DueDate" Width="72" />
<px:PXGridColumn DataField="ARInvoice__CuryDocBal" Width="100" />
</Columns>
</px:PXGridLevel>
Note that to add fields that have not been defined in the RSSVWorkOrderToPay DAC, but
have been defined in the ARInvoice DAC, which has been specified in the view, you use the
following structure: <DAC_name>__<Field_name>.
4. Publish the customization project.

| Step 1.1.5: Test the Open Payment Summary Form | 25
Step 1.1.5: Test the Open Payment Summary Form
In this step, you will test the Open Payment Summary (RS401000) inquiry form. Do the following:
1. In Acumatica ERP, open the Open Payment Summary form.
The form should look as shown in the following screenshot. Note that the table area has a
toolbar with standard actions and the Filter Settings button.
Figure: The basic Open Payment Summary form
2. Change the current business date to the day after tomorrow.
3. On the table toolbar, click the Filter Settings button.
4. In the Filter Settings dialog box, which opens, add a filter with the following settings:
• Property: Due Date
• Condition: Is Less Than
• Value: @Today
5. Click Apply.
The form displays overdue payments. An example is shown in the following screenshot.
Figure: The Open Payment Summary form with overdue payments
| Step 1.1.5: Test the Open Payment Summary Form | 26
6. To clear the filter, open the Filter Settings dialog box, clear the unnamed check box for the
filter you created in Instruction 3 in the Filter Settings dialog box, and click Apply.
7. Change the business date to the current date value.

| Lesson Summary | 27
Lesson Summary
In this lesson, you have learned how to create a simple inquiry form that displays data and provides
standard filtering. You have defined the following components of the inquiry form:
• The DAC, with unbound fields that are displayed in the grid
• The inquiry graph, in which you have defined a data view for the grid with the PXFilterable
attribute
• The ASPX page, in which you have defined columns for the grid
The following diagram shows the components that you have implemented or modified for the inquiry
form.
Figure: Implementation of the inquiry form

| Lesson 1.2: Configure a Filter for the Inquiry Form | 28
Lesson 1.2: Configure a Filter for the Inquiry Form
In this lesson, you will modify the Open Payment Summary (RS401000) inquiry form you have
developed so that it has filtering parameters. By using the UI elements associated with the filtering
parameters, a user can filter the repair work orders listed in the table on the form.
Lesson Objectives
In this lesson, you will learn how to do the following:
• Define a PXFilter data view
• Display the UI elements associated with the filter parameters in the page URL

| Step 1.2.1: Define the DAC for Filter Parameters | 29
Step 1.2.1: Define the DAC for Filter Parameters
In this step, you will define the RSSVWorkOrderToPayFilter DAC, which will be used to display the
selection criteria (filtering parameters) on the Open Payment Summary (RS401000) form. The DAC will
contain two fields (CustomerID and ServiceID) that correspond to the filtering parameters. The
DAC will contain only unbound fields, because you do not need to save the values of the parameters to
the database.
To define the filter DAC, do the following:
1. In the RSSVPaymentPlanInq graph, define the RSSVWorkOrderToPayFilter data access
class as follows.
[PXHidden]
public class RSSVWorkOrderToPayFilter : IBqlTable
{
#region ServiceID
[PXInt()]
[PXUIField(DisplayName = "Service")]
[PXSelector(
typeof(Search<RSSVRepairService.serviceID>),
typeof(RSSVRepairService.serviceCD),
typeof(RSSVRepairService.description),
DescriptionField = typeof(RSSVRepairService.description),
SelectorMode = PXSelectorMode.DisplayModeText)]
public virtual int? ServiceID { get; set; }
public abstract class serviceID : PX.Data.BQL.BqlInt.Field<serviceID> { }
#endregion
#region CustomerID
[CustomerActive(DisplayName = "Customer ID", Required = true)]
public virtual int? CustomerID { get; set; }
public abstract class customerID : PX.Data.BQL.BqlInt.Field<customerID> { }
#endregion
}
2. For the filtering parameters to be used in a BQL query, add the serviceID and customerID
fields to the RSSVWorkOrderToPay DAC as follows.
public new abstract class serviceID : PX.Data.BQL.BqlInt.Field<serviceID> { }
public new abstract class customerID : PX.Data.BQL.BqlInt.Field<customerID>
{ }
3. Build the project.

| Step 1.2.2: Configure the Graph | 30
Step 1.2.2: Configure the Graph
In this step, you will prepare the graph members that are used for filtering data on the form. You can
define filtering for inquiry forms in the same way as you did for processing forms in the T240 Processing
Forms training course. You will define the following members:
• The Cancel action, which clears the selected filter values.
• The PXFilter data view that provides filtering parameters for the processing form.
For more information on defining filters, see Data View for the Filter.
• Override the IsDirty property of the graph to make the IsDirty property always return false.
This disables the dialog box that confirms that a user wants to leave the form.
In the RSSVPaymentPlanInq graph, do the following:
1. Define a PXFilter data view (as shown below), which provides filtering parameters for the
inquiry form.
public PXFilter<RSSVWorkOrderToPayFilter> Filter;
2. Define the Cancel action, which adds the Cancel button to the form toolbar, as shown in the
following code. The button clears the filter.
public PXCancel<RSSVWorkOrderToPayFilter> Cancel;
3. Replace the definition of the DetailsView data view with the following code, which not only
selects repair work orders that do not have the Paid status but also matches the filtering criteria.
[PXFilterable]
public SelectFrom<RSSVWorkOrderToPay>.
InnerJoin<ARInvoice>.On<ARInvoice.refNbr.IsEqual<RSSVWorkOrderToPay.invoiceNbr>>.
Where<RSSVWorkOrderToPay.status.IsNotEqual<workOrderStatusPaid>.
And<RSSVWorkOrderToPayFilter.customerID.FromCurrent.IsNull.
Or<RSSVWorkOrderToPay.customerID.IsEqual<
RSSVWorkOrderToPayFilter.customerID.FromCurrent>>>.
And<RSSVWorkOrderToPayFilter.serviceID.FromCurrent.IsNull.
Or<RSSVWorkOrderToPay.serviceID.IsEqual<
RSSVWorkOrderToPayFilter.serviceID.FromCurrent>>>>.
View.ReadOnly DetailsView;
4. Override the IsDirty property of the graph, as the following code shows.
public override bool IsDirty
{
get
{
return false;
}
}
5. Rebuild the project.

| Step 1.2.3: Adjust the ASPX Page | 31
Step 1.2.3: Adjust the ASPX Page
In this step, you will add to the RS401000.aspx page the Selection area with elements to be used for
filtering.
Do the following:
1. Open the RS401000.aspx file.
2. Specify the Filter data view you defined in Step 1.2.2: Configure the Graph in the
PrimaryView property of the datasource control, as shown in the following code.
<px:PXDataSource ID="ds" runat="server" Visible="True" Width="100%"
TypeName="PhoneRepairShop.RSSVPaymentPlanInq"
PrimaryView="Filter"
>
3. Add the following code to define the Selection area of the form with filters.
You can do the same in the Screen Editor without entering the code manually.
<asp:Content ID="cont2" ContentPlaceHolderID="phF" Runat="Server">
<px:PXFormView runat="server" ID="CstFormView1" DataSourceID="ds"
DataMember="Filter" Width="100%" >
<Template>
<px:PXLayoutRule LabelsWidth="XM" runat="server" ID="CstPXLayoutRule3"
StartColumn="True" ></px:PXLayoutRule>
<px:PXSegmentMask CommitChanges="True" runat="server"
ID="CstPXSegmentMask1"
DataField="CustomerID" ></px:PXSegmentMask>
<px:PXSelector CommitChanges="True" runat="server" ID="CstPXSelector2"
DataField="ServiceID" ></px:PXSelector>
</Template>
</px:PXFormView>
</asp:Content>
The Selection area is defined by the PXFormView container control. For the DataMember property
of the PXFormView control, you specify the Filter view. Inside the PXFormView control, you add a
PXSegmentMask object to select a customer, and a PXSelector object to select a service.

| Step 1.2.4: Display the Filter Values in the URL | 32
Step 1.2.4: Display the Filter Values in the URL
When a form contains filtering parameters, it is sometimes useful to have the selected parameter
values in the form URL so that the same form (that is, the form with the same selections made) can be
opened elsewhere without the filter parameter values being entered again. For example, when the filter
parameters are specified in the form URL, a user can easily share the inquiry results with another user
by just sharing a link to the form without specifying which values need to be selected.
To display filtering parameters in the form URL, you need to configure the PageLoadBehavior attribute
in the form ASPX file.
In this step, you will configure the RS401000.aspx file to display filter parameter values in the form
URL.
Do the following:
1. In the RS401000.aspx file, find the PXDataSource control.
2. Add the PageLoadBehavior attribute value to the PXDataSource control, as the following code
shows.
<px:PXDataSource ID="ds" runat="server" Visible="True" Width="100%"
TypeName="PhoneRepairShop.RSSVPaymentPlanInq"
PageLoadBehavior="PopulateSavedValues"
PrimaryView="Filter"
>
The system puts in the URL the filter values of the primary view only (in this case, the values of
the PXFilter<RSSVWorkOrderToPayFilter> Filter view).
3. Publish the customization project.

| Step 1.2.5: Test the Filtering Parameters | 33
Step 1.2.5: Test the Filtering Parameters
In this step, you will test the Open Payment Summary (RS401000) inquiry form with the filtering
parameters.
Do the following:
1. In Acumatica ERP, open the Open Payment Summary form.
The form should looks as shown in the following screenshot. Note that the form contains a form
toolbar, the Selection area with UI elements that correspond to the filtering parameters, and a
table area with a toolbar.
Figure: The revised Open Payment Summary form
2. In the Customer ID box, select the C00000001 customer.
The table displays work orders for the C00000001 customer. Note that the page URL includes the
form ID and customer ID values as shown below.
http://localhost/PhoneRepairShop/(W(17))/Main
?ScreenId=RS401000&CustomerID=C000000001
3. In the Service ID box, select the Battery Replacement service.
The table displays the work orders for the C00000001 customer and the Battery Replacement
service. Note that the page URL contains the form ID, customer ID, and service ID values as
shown below.
http://localhost/PhoneRepairShop/(W(17))/Main
?ScreenId=RS401000&ServiceID=1&CustomerID=C000000001
4. On the form toolbar, click Cancel.
| Step 1.2.5: Test the Filtering Parameters | 34
Notice that the boxes in the Selection area are cleared and that the URL no longer includes the
filter values.

| Lesson Summary | 35
Lesson Summary
In this lesson, you have learned how to define an inquiry form with a filter. To add a filter to the inquiry
form, you have performed the following actions:
1. Defined the DAC that provides the filtering parameters for the inquiry form
2. In the graph, defined the following:
• The Cancel action
• The PXFilter data view that provides data for the filter
3. In the ASPX page, added the PXFormView container with the elements that correspond to the
filtering parameters
Also, you have learned how to display the selected filter values (that is, the selection criteria) in the
form URL by configuring the PageLoadBehavior attribute in the ASPX page.
The following diagram shows the components that you have implemented or modified in this lesson.
Figure: Adding filtering to the inquiry form

| Lesson 1.3: Dynamically Add Filtering Conditions | 36
Lesson 1.3: Dynamically Add Filtering Conditions
The Smart Fix company can both repair mobile phones and sell parts for repairing a mobile phone.
Users create repair work orders to record each repair process. They also create sales orders to record
each sale of parts associated with a repair. Employees of the Smart Fix company need to review
information on both repair work orders and sales orders, including details of the invoices created for
these orders.
Thus, in this lesson, you will modify the Payment Summary (RS401000) form so that it displays sales
orders as well as repair work orders.
You cannot implement the displaying of two different types of entities on a single form by using a single
BQL query of a data view. So you will compose a query for the form dynamically in code rather than
specify the query in the definition of a data view. When you use this approach, you can build a custom
data set that replaces the data set that the data view selects by executing a fluent BQL statement. You
add the query dynamically in code by defining the data view delegate.
Lesson Objectives
In this lesson, you will learn how to define a data view delegate.

| Step 1.3.1: Add the New Field | 37
Step 1.3.1: Add the New Field
To distinguish between sales orders and repair work orders that are listed on the Open Payment
Summary (RS4010000) form, you need to add a new column to the grid. This column will contain the
identifier of the order type: SO if the order in the row is a sales order, and WO if the order in the row is
a repair work order.
Do the following:
1. In the Constants.cs file, add the class.
public static class OrderTypeConstants
{
public const string SalesOrder = "SO";
public const string WorkOrder = "WO";
}
2. In the Messages.cs file, add the following strings to the Messages class.
// Order types
public const string SalesOrder = "SO";
public const string WorkOrder = "WO";
3. Add the following field to the RSSVWorkOrderToPay DAC.
#region OrderType
[PXString]
[PXUIField(DisplayName = "Order Type")]
[PXUnboundDefault(OrderTypeConstants.WorkOrder)]
[PXStringList(
new string[]
{
OrderTypeConstants.SalesOrder,
OrderTypeConstants.WorkOrder
},
new string[]
{
Messages.SalesOrder,
Messages.WorkOrder
})]
public virtual String OrderType { get; set; }
public abstract class orderType : PX.Data.BQL.BqlDecimal.Field<orderType> { }
#endregion
4. Build the project.
5. In the RS401000.aspx file, add the following column before the OrderNbr column.
<px:PXGridColumn DataField="OrderType" Width="70" />
6. Publish the customization project.

| Step 1.3.2: Define the Data View Delegate | 38
Step 1.3.2: Define the Data View Delegate
To display both sales orders and repair work orders in one grid, you need to define a data view delegate
in which you use two separate queries: a query to select sales orders and a query to select repair work
orders. After you select each query, you return the result with the yield key word, which allows you to
return each record without exiting the method. Thus, you don't need to create a temporary collection
with the results of the query.
About Data View Delegates
By default, when a data view object is requested by the UI or you invoke the Select() method on the
object, the system executes the query specified in the data view declaration. However, you can define
a dynamic query, which is an optional graph method (called the data view delegate) that is executed
when the data view is requested. If no dynamic query is defined in the graph, Acumatica Framework
executes the fluent BQL statement from the data view declaration.
We recommend that you use data view delegates in the following cases:
• If the query retrieves data fields that cannot be calculated declaratively by attributes—for
instance, if you are retrieving values aggregated by calculated data fields
• If the result set has data records that aren’t retrieved from the database and are composed
dynamically in code
In a graph extension, to define the delegate for a data view, you should redeclare the data view and
add a method that has the same name as the data view, except with a different case for the first letter
(for example, if the data view name is MyDataView, the name of the delegate must be myDataView).
For details on data view delegates, see Data View Delegates and To Add a Data View Delegate .
Defining the Data View Delegate
To define the needed data view delegate, do the following:
1. To compose a query that selects sales orders and invoices created for these sales orders, learn
the names of the DACs you will use in the query.
In Acumatica ERP, an invoice cannot be created directly for a sales order. A user first creates
a shipment and then creates an invoice for the shipment. The invoice number is stored in the
SO shipment record. Therefore, you need to use the DAC that contains information about SO
shipments. To learn the DAC name, do the following:
a. In Acumatica ERP, open the Sales Orders (SO301000) form.
b. Open the Shipments tab, which contains information about shipments and the
corresponding invoices.
c. While pressing Ctrl + Alt, select the Invoice Nbr. column.
In the Element Properties dialog box, which opens, note that the DAC name is
SOOrderShipment and that the Invoice Nbr. column field name is InvoiceNbr.
2. Open the source code of the SOOrderShipment DAC and investigate its fields. You can see
that the DAC contains both the sales order number (in the OrderNbr field) and the invoice
number (in the InvoiceNbr field). You will use this information later to construct a fluent BQL
statement.
3. In the RSSVPaymentPlanInq graph, define a method that converts an object of the
SOOrderShipment DAC to an object of the RSSVWorkOrderToPay DAC.
public static RSSVWorkOrderToPay RSSVWorkOrderToPay(SOOrderShipment shipment)
{
RSSVWorkOrderToPay ret = new RSSVWorkOrderToPay();
ret.OrderNbr = shipment.OrderNbr;

| Step 1.3.2: Define the Data View Delegate | 39
ret.InvoiceNbr = shipment.InvoiceNbr;
return ret;
}
4. Add the following delegate method. The method has the same name as the data view except
that it uses a different case for the first letter.
protected virtual IEnumerable detailsView()
{
foreach (PXResult<RSSVWorkOrderToPay, ARInvoice> order in
SelectFrom<RSSVWorkOrderToPay>.
InnerJoin<ARInvoice>.On<ARInvoice.refNbr.IsEqual<RSSVWorkOrderToPay.invoiceNbr>>.
Where<RSSVWorkOrderToPay.status.IsNotEqual<workOrderStatusPaid>.
And<RSSVWorkOrderToPayFilter.customerID.FromCurrent.IsNull.
Or<RSSVWorkOrderToPay.customerID.IsEqual<
RSSVWorkOrderToPayFilter.customerID.FromCurrent>>>.
And<RSSVWorkOrderToPayFilter.serviceID.FromCurrent.IsNull.
Or<RSSVWorkOrderToPay.serviceID.IsEqual<
RSSVWorkOrderToPayFilter.serviceID.FromCurrent>>>>.
View.Select(this))
{
yield return order;
}
var sorders = SelectFrom<SOOrderShipment>.
InnerJoin<ARInvoice>.On<ARInvoice.refNbr.IsEqual<SOOrderShipment.invoiceNbr>>.
Where<RSSVWorkOrderToPayFilter.customerID.FromCurrent.IsNull.
Or<SOOrderShipment.customerID.IsEqual<
RSSVWorkOrderToPayFilter.customerID.FromCurrent>>>.
View.Select(this);
foreach (PXResult<SOOrderShipment,ARInvoice> order in sorders)
{
SOOrderShipment soshipment = order;
ARInvoice invoice = order;
RSSVWorkOrderToPay workOrder = RSSVWorkOrderToPay(soshipment);
workOrder.OrderType = OrderTypeConstants.SalesOrder;
var result = new PXResult<RSSVWorkOrderToPay, ARInvoice>(workOrder,
invoice);
yield return result;
}
}
In the code above, first you select repair work orders according to the filter values and return
each repair work order. Then you select information about sales orders from SO shipments
according to the filter values; for each object of the result list order, you convert the object to
the set of the RSSVWorkOrderToPay and ARInvoice objects, and return the result.
5. Add required using directives.
6. Build the project.

| Step 1.3.3: Test the Results | 40
Step 1.3.3: Test the Results
To test the updated Open Payment Summary (RS401000), do the following:
1. In Acumatica ERP, open the Open Payment Summary form.
The form should list both repair work orders and sales orders, as shown in the following
screenshot.
Figure: The form with repair work orders and sales orders
2. In the Customer ID box, select the C00000003 customer.
The results should look as shown below.

| Step 1.3.3: Test the Results | 41
Figure: The Open Payment Summary form for a particular customer

| Lesson Summary | 42
Lesson Summary
In this lesson, you have learned how to define a data view delegate. You have also learned how to
display different types of entities in one grid by using a data view delegate.
The following diagram shows the components that you have implemented or modified in this lesson.
Figure: Implementation of a data view delegate and a new data field

| Lesson 1.4: Retrieve Aggregated Data | 43
Lesson 1.4: Retrieve Aggregated Data
On the Open Payment Summary (RS401000) form, employees of the Smart Fix company need to have
the option to view subtotals of the debt for orders of each status. To view this information, users will
select a check box in the Selection area of the form, and the results in the grid will be grouped by the
order status and subtotal amounts for each status will be calculated.
In this lesson, you will add a filtering parameter: the Show Total Amount to Pay for Each Status
check box. You will also update dynamic queries in the data view delegate so that they change when a
user selects or clears the Show Total Amount to Pay check box.
Lesson Objectives
As you complete this lesson, you will learn how to aggregate data in a fluent BQL query.

| Step 1.4.1: Add the Show Total Amount to Pay check box | 44
Step 1.4.1: Add the Show Total Amount to Pay check box
To give a user the ability to view grouped data in the grid and subtotal amounts for each status, you
need to add a check box on the Selection area of the Payment Plan Summary (RS401000) form by
doing the following:
1. In the RSSVWorkOrderToPayFilter DAC, add the field as follows.
#region GroupByStatus
[PXBool]
[PXUIField(DisplayName = "Show Total Amount to Pay")]
public bool? GroupByStatus { get; set; }
public abstract class groupByStatus : PX.Data.BQL.BqlBool.Field<groupByStatus>
{ }
#endregion
2. Build the project.
3. Add the check box to the Content section of the RS401000.aspx file that defines the Selection
area as follows.
<px:PXCheckBox CommitChanges="True" runat="server"
ID="CstPXCheckBoxGroupByStatus" DataField="GroupByStatus"/>
4. Publish the customization project.

| Step 1.4.2: Modify the Data View Delegate | 45
Step 1.4.2: Modify the Data View Delegate
In the detailsView delegate, you need to use different queries depending on the state of the Show
Total Amount to Pay check box. If the check box is selected, you need to group all the selected data
by the status and calculate the subtotal amounts to be paid for each status.
To group or aggregate records, you will append the AggregateTo<> clause to the statement and
specify the grouping condition and aggregation function by using the GroupBy clause and the Sum
aggregation function. For details on other aggregation functions, see To Select Records by Using Fluent
BQL.
Do the following:
1. In the detailsView delegate, replace the code for selecting and displaying repair work orders
with the following code.
BqlCommand query;
var filter = Filter.Current;
if (filter.GroupByStatus != true)
{
query = new SelectFrom<RSSVWorkOrderToPay>.
InnerJoin<ARInvoice>.On<ARInvoice.refNbr.IsEqual<RSSVWorkOrderToPay.invoiceNbr>>.
Where<RSSVWorkOrderToPay.status.IsNotEqual<workOrderStatusPaid>.
And<RSSVWorkOrderToPayFilter.customerID.FromCurrent.IsNull.
Or<RSSVWorkOrderToPay.customerID.IsEqual<
RSSVWorkOrderToPayFilter.customerID.FromCurrent>>>.
And<RSSVWorkOrderToPayFilter.serviceID.FromCurrent.IsNull.
Or<RSSVWorkOrderToPay.serviceID.IsEqual<
RSSVWorkOrderToPayFilter.serviceID.FromCurrent>>>>();
}
else
{
query = new SelectFrom<RSSVWorkOrderToPay>.
InnerJoin<ARInvoice>.On<ARInvoice.refNbr.IsEqual<RSSVWorkOrderToPay.invoiceNbr>>.
Where<RSSVWorkOrderToPay.status.IsNotEqual<workOrderStatusPaid>.
And<RSSVWorkOrderToPayFilter.customerID.FromCurrent.IsNull.
Or<RSSVWorkOrderToPay.customerID.IsEqual<
RSSVWorkOrderToPayFilter.customerID.FromCurrent>>>.
And<RSSVWorkOrderToPayFilter.serviceID.FromCurrent.IsNull.
Or<RSSVWorkOrderToPay.serviceID.IsEqual<
RSSVWorkOrderToPayFilter.serviceID.FromCurrent>>>>.
AggregateTo<GroupBy<RSSVWorkOrderToPay.status>,
Sum<ARInvoice.curyDocBal>>();
}
var view = new PXView(this, true, query);
foreach (PXResult<RSSVWorkOrderToPay, ARInvoice> order in
view.SelectMulti(null))
{
yield return order;
}
In the code above, first you declare the query variable. You will use it later to assign a query
depending on the filter value. Then you get the current value of the filter. Depending on whether
the Show Total Amount to Pay check box is selected, you assign a value to the query
variable. If the Show Total Amount to Pay check box is selected, you construct a query in
which you group data by the Status field value by using the AggregateTo clause.
In the AggregateTo clause, you group data by the RSSVWorkOrderToPay.status value, and
calculate the sum for each group, as shown in the code line in bold type. Then you return the
results of the query.
To calculate a value for each group, you can use the following aggregation functions: Min, Max,
Sum (which is used in this case), Avg, and Count.
| Step 1.4.2: Modify the Data View Delegate | 46
2. Build the project.

| Step 1.4.3: Test the Aggregation of Data | 47
Step 1.4.3: Test the Aggregation of Data
To test how data is grouped and calculated on the Open Payment Summary (RS401000) form, do the
following:
1. Open the Open Payment Summary form.
2. In the Selection area of the form, select the Show Total Amount to Pay check box.
The form should look as shown in the following screenshot.
Figure: The filtered and aggregated data on the Open Payment Summary form
Notice that amount of the grid lines has changed. The Balance column now displays the total
amount to be paid for all orders of a status displayed in the Status column.
No sales orders are grouped because the status field of all selected sales orders is empty. This
happens because the set of statuses for sales orders and repair work orders is different, and the
status of a sales order cannot be converted to the status of a repair work order.

| Lesson Summary | 48
Lesson Summary
In this lesson, you have learned how to group data and calculate values for grouped data. Also, you
have learned how to assign different queries depending on the selected filter value.
The following diagram shows the components that you have implemented or modified in this lesson.
Figure: Implementation of an aggregating query and a new check box

| Lesson 1.5: Add Redirection Links to the Grid | 49
Lesson 1.5: Add Redirection Links to the Grid
For easy navigation between the rows of the grid on the Open Payment Summary (RS401000) form and
the repair work orders, sales orders, and invoices listed in these lines, users need to have a fast way to
navigate to the form with detailed information about the order or invoice.
In this lesson, you will replace the text numbers in the Order Nbr. and Invoice Nbr. columns with
links to the grid links that users can click to open the data entry form for the order or invoice whose
number the user has clicked; the user can then view the data and make any needed modifications. You
will add these links in two ways: by configuring the ASPX file and by declaring an action.
Lesson Objectives
As you complete this lesson, you will learn how to do the following:
• Implement a redirection inside an action handler
• Configure a callback for the action in the ASPX file

| Step 1.5.1: Add a Link by Using the PXSelector Attribute (Self-Guided Exercise) | 50
Step 1.5.1: Add a Link by Using the PXSelector Attribute (Self-
Guided Exercise)
In the step, you will provide a redirection link to the Invoices (SO3030300) form in the Invoice Nbr.
column so that a user can review the details of the invoice and edit them.
You should provide this link in the same way as was used in the T210 Customized Forms and Master-
Detail Relationship and T230 Actions courses:
1. Make sure the PXSelector attribute is present on the InvoiceNbr field of the
RSSVWorkOrder DAC. The RSSVWorkOrderToPay DAC, which is used on the Payment Plan
Summary (RS401000) form, inherits the InvoiceNbr field, including its attributes.
2. In the RS401000.aspx file, add the CommitChanges = true attribute to the PXGridColumn
object for the InvoiceNbr column.
3. In the PXGridLevel container, add the RowTemplate element and, inside it, the PXSelector
attribute as shown in the following code.
<RowTemplate>
<px:PXSelector ID="edInvoiceNbr" runat="server"
DataField="InvoiceNbr" Enabled="False" AllowEdit="True" />
</RowTemplate>
4. Publish the customization project.

| Step 1.5.2: Add a Link by Using an Action | 51
Step 1.5.2: Add a Link by Using an Action
There are two types of orders displayed on the Open Payment Summary (RS401000) form: work orders
and sales orders. Thus, when a user clicks an order number in the Order Nbr. column of the grid, the
corresponding form should be opened: If a work order is selected, the Repair Work Orders (RS301000)
form should be opened; if a sales order is selected, the Sales Orders (SO301000) form should be
opened. This cannot be done using only ASPX and attributes. To implement this logic, you need to
declare an action, and inside the action method, implement a redirection to the corresponding form.
In this step, you will implement an action that redirects the user to the Repair Work Orders or Sales
Orders form, depending on the order type of the selected line.
Redirecting to Pages
Acumatica Framework supports the following types of redirection:
• To an another form of the Acumatica Framework-based application
• To a report
• To a generic inquiry form
• To any destination URL
To implement a redirection in an action, you need to throw one of the exceptions provided by Acumatica
Framework.
Once an exception is thrown, it interrupts the current context and propagates up the call stack until
it is handled by Acumatica Framework, which performs the redirection. You don't need to implement
the handling of the exceptions that are used for redirection. Also, this mechanism doesn't affect the
performance of the application.
The following exceptions are used for redirection:
• PXRedirectRequiredException opens the specified application page in the same window or a
new one. By default, the user is redirected in the same window.
• PXPopupRedirectException opens the specified application page in a pop-up window.
• PXReportRequiredException opens the specified report in the same window or a new one. By
default, the report opens in the same window.
• PXRedirectWithReportException opens two pages: the specified report in a new window, and
the specified application page in the same window.
• PXRedirectToUrlException opens the webpage with the specified external URL in a new window.
This exception is also used for opening an inquiry page that is loaded into the same window by
default.
To Add a Link to a Form
To implement redirection, do the following:
1. In the RSSVPaymentPlanInq graph, define the ViewOrder action as follows.
public PXAction<RSSVWorkOrderToPay> ViewOrder;
[PXButton]
[PXUIField]
protected virtual void viewOrder()
{
RSSVWorkOrderToPay order = DetailsView.Current;
// if this is a repair work order
if (order.OrderType == OrderTypeConstants.WorkOrder)
{
// create a new instance of the graph
var graph = PXGraph.CreateInstance<RSSVWorkOrderEntry>();

| Step 1.5.2: Add a Link by Using an Action | 52
// set the current property of the graph
graph.WorkOrders.Current = graph.WorkOrders.
Search<RSSVWorkOrder.orderNbr>(order.OrderNbr);
// if the order is found by its ID,
// throw an exception to open the order in a new tab
if (graph.WorkOrders.Current != null)
{
throw new PXRedirectRequiredException(graph, true,
"Repair Work Order Details");
}
}
// if this is a sales order
else
{
// create a new instance of the graph
var graph = PXGraph.CreateInstance<SOOrderEntry>();
// set the current property of the graph
graph.Document.Current = graph.Document.
Search<RSSVWorkOrder.orderNbr>(order.OrderNbr);
// if the order is found by its ID,
// throw an exception to open the order in a new tab
if (graph.Document.Current != null)
{
throw new PXRedirectRequiredException(graph, true,
"Sales Order Details");
}
}
}
In the action method, depending on the type of the order, you create a new instance of the
RSSVWorkOrderEntry or SOOrderEntry graph. In the graph, you set the Current property
of the primary view’s cache to the order if it is found by the specified ID (to learn the primary
view name, you can apply the Element Inspector to the Summary area of the entry form). If the
current data record is set for the cache object, you throw PXRedirectRequiredException to
open the form with the current data record displayed.
2. Rebuild the project.
3. In the RS401000.aspx file, do the following:
• Add the PXDSCallbackCommands to the datasource control as follows.
<CallbackCommands>
<px:PXDSCallbackCommand Visible="false" CommitChanges="true"
Name="ViewOrder" DependOnGrid="grid">
</px:PXDSCallbackCommand>
</CallbackCommands>
With the Visible property set to False, the button that corresponds to the ViewOrder
action will be invisible on the page toolbar. We need to explicitly make the button invisible,
because by default, Acumatica Framework adds a button for each action defined in the
graph with the appropriate DAC (the main DAC of the primary data view). In the example,
we need the ViewOrder action only as the command for the link in the grid, and we don't
need the button for this action on the toolbar.
The DependOnGrid property enables the posting of the current row from the grid on the
invocation of the command (before the command is executed). This property is required so
that the system can open the page and select the order whose identifier was clicked in the
grid.
• In the grid column for the OrderNbr data field, specify the action name in the
LinkCommand property as follows.
<px:PXGridColumn DataField="OrderNbr" Width="72" LinkCommand="ViewOrder">
</px:PXGridColumn>

| Step 1.5.2: Add a Link by Using an Action | 53
4. Publish the customization project.
If you needed to make a redirection to only the Repair Work Orders (RS301000) form, you could
do it declaratively, without using an action. (This is similar to the redirection you performed for
the Invoice Nbr. column, which redirected to only one form.) To do this, you would add the
[PXPrimaryGraph(typeof(RSSVWorkOrderEntry))] attribute to the RSSVWorkOrder DAC to
define a graph to be created by default for the RSSVWorkOrder DAC, and make the same changes in the
ASPX file as in Step 1.5.1: Add a Link by Using the PXSelector Attribute (Self-Guided Exercise).

| Step 1.5.3: Test the Redirection Links | 54
Step 1.5.3: Test the Redirection Links
To test the redirection links that you have implemented, do the following:
1. In Acumatica ERP, open the Open Payment Summary (RS401000) form.
The form should look as shown in the following screenshot.
Figure: The links on the Open Payment Summary form
2. Click the sales order number 000005.
In a new tab, the Sales Orders (SO301000) form opens with the 000005 sales order displayed.
3. On the Open Payment Summary form, click the repair work order number 000008.
In a new tab, the Repair Work Orders (RS301000) form opens with the 000008 repair work order
displayed.
4. On the Open Payment Summary form, click the invoice number for the repair work order number
000008.
The Invoices (SO303000) form should be opened in a new window with the INV000048 invoice
displayed.

| Step 1.5.3: Test the Redirection Links | 55
Depending on type of the invoice, the Invoices and Memos (AR301000) form may be opened
instead of the Invoices form. The logic that determines which form to open is embedded in
Acumatica ERP.
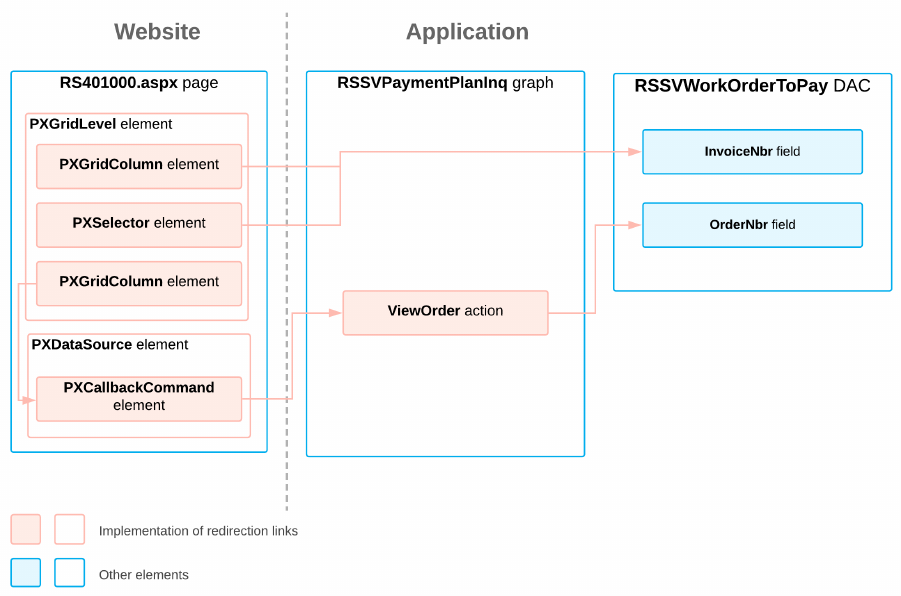
| Lesson Summary | 56
Lesson Summary
In this lesson, you have added redirection links to the Order Nbr. and Invoice Nbr. columns. You
have learned how to implement redirection by using actions and exceptions.
The following diagram shows the components that you have implemented or modified in this lesson.
Figure: Implementation of redirection links

| Review Questions | 57
Review Questions
1. Which attribute should you use to add a reusable filter to the grid on the inquiry form?
a. [PXCacheName]
b. [PXFilter]
c. [PXFilterable]
d. [PXGrid]
2. Which attribute should you use to define a data view for the filter on the inquiry form?
a. [PXHidden]
b. [PXFilter]
c. [PXFilterable]
d. [PXSummary]
3. How do you determine the name of a data view delegate?
a. The data view delegate should have the same name as the data view.
b. The data view delegate should have the same name as the data view except that you use
a different case of the first letter of the name.
c. The data view delegate should be named detailsView.
4. Select all functions that you can use to calculate values in the AggregateTo<> clause.
a. Max
b. Min
c. And
d. Or
e. Sum
f. Avg
g. Count
h. Power
5. Select all ways that you can add a redirection link to a table column.
a. By using the PXSelector attribute and configuring the ASPX page
b. By configuring a callback in the ASPX page
c. By defining an action and configuring the ASPX page
Answer Key
1. C
2. B
3. B
4. A, B, E, F, G
5. A, C

| Part 2: The Payment Info Tab | 58
Part 2: The Payment Info Tab
In the previous part, you have implemented an inquiry form that displays payment information about
repair work orders and sales orders that have not yet been paid. In this part, you will add a tab,
Payment Info, to the Repair Work Orders (RS301000) form that will display information on the invoice
related to the repair work order and the most recent payment. This tab will be displayed on the form
only if the repair work order has been paid.
The tab will have the following elements:
• Invoice Nbr.: The number of the invoice that has been created for the repair work order
• Due Date: The due date for the invoice
• Latest Payment: The number of the payment that was the most recent payment applied to the
invoice
• Latest Amount Paid: The amount paid in the payment that was applied to the invoice most
recently
This set of data is derived from different DACs. To display the UI elements on a single tab, you will learn
how to use the PXProjection attribute.

| About the PXProjection attribute | 59
About the PXProjection attribute
If you need to display data from multiple tables on a form (or a tab), you need to declare a DAC with
the PXProjection attribute, which implements the projection of data from one table or multiple tables
into a single DAC.
The PXProjection attribute binds the DAC to an arbitrary data set defined by the Select command.
The framework doesn't bind this DAC to a database table (that is, doesn't select data from the table
having the same name as the DAC). Instead, you specify an arbitrary fluent BQL Select command that
is executed to retrieve data for the DAC. The Select command can select data from one command or
multiple commands and can include any BQL clauses. An example of the PXProjection attribute usage
is shown in the following code.
[PXProjection(typeof(
SelectFrom<Supplier>.InnerJoin<SupplierProduct>.
On<SupplierProduct.accountID.IsEqual<Supplier.accountID>>))]
In the projection DAC, you should explicitly map the projection fields to the database column retrieved
by the Select command. To map a field, set the BqlField property of the attribute that binds the
field to the database (such as PXDBString and PXDBDecimal) to the type that represents the column, as
follows.
[PXDBString(15, IsUnicode = true, BqlField = typeof(Supplier.accountCD))]
Related Links
PXProjectionAttribute Class

| Lesson 2.1: Add the Payment Info Tab | 60
Lesson 2.1: Add the Payment Info Tab
In this lesson, you will add and configure a new tab on the Repair Work Orders (RS301000) form. On
this tab, you will display fields from the ARInvoice and ARPayment DACs. To display this fields, you
will use the PXProjection attribute.
Lesson Objectives
As you complete this lesson, you will learn how to display data from multiple DACs by using the
PXProjection attribute.

| Step 2.1.1: Define the DAC | 61
Step 2.1.1: Define the DAC
In this step, you will define a DAC by using the PXProjection attribute. First you will find out which
DACs you need to use in a fluent BQL query of the PXProjection attribute. Then you will declare the
DAC and its fields.
Do the following:
1. Learn which DACs you should use to display information about the invoice and its applications:
a. On the Invoices (SO303000) form, apply the Element Inspector to the Summary area of
the form to learn the DAC name for the invoice, and to the Applications tab to learn the
DAC name for payments that have been applied to the invoice. Notice that these are the
ARInvoice and ARAdjust2 DACs, respectively.
b. Learn the key fields of the ARInvoice DAC, which you will need to know to select
records in a fluent BQL query. The key fields you need to select an invoice are
ARInvoice.refNbr and ARInvoice.docType.
c. Analyze the code of the ARAdjust2 DAC: It is inherited from the ARAdjust DAC so you
can use the ARAdjust DAC.
d. Analyze the code of the ARInvoice and ARAdjust DACs and the fields that are defined
in them.
You will need the following fields:
• For the invoice number, the ARInvoice.refNbr field
• For the invoice due date, the ARINvoice.dueDate field
• For the payment number, the ARAdjust.adjgRefNbr field
• For the payment amount, the ARAdjust.curyAdjdAmt field
2. In the DAC folder of the PhoneRepairShop_Code project, create the RSSVWorkOrderPayment.cs
file.
3. Add the RSSVWorkOrderPayment DAC, as shown in the following code.
namespace PhoneRepairShop
{
[PXCacheName("Invoice and Payment of the Repair Work Order")]
[PXProjection(typeof(SelectFrom<PX.Objects.AR.ARInvoice>.
InnerJoin<ARAdjust>.On<ARAdjust.adjdRefNbr.IsEqual<ARInvoice.refNbr>.
And<ARAdjust.adjdDocType.IsEqual<ARInvoice.docType>>>.
AggregateTo<
Max<ARAdjust.adjgDocDate>,
GroupBy<ARAdjust.adjdRefNbr>,
GroupBy<ARAdjust.adjdDocType>>))]
public class RSSVWorkOrderPayment : IBqlTable
{
}
}
In the query of the PXProjection attribute, you select an invoice and all payments applied
to the invoice. To sort the payments by the date, you use the AggregateTo clause. Inside the
clause, you group all payments by their invoice number and document type (which are the same
because all payments selected are applied to the same invoice) and select the payment with the
maximum (that is, latest) document date.
4. Add to the RSSVWorkOrderPayment DAC the fields you learned in Instruction 1, as the
following code shows.
#region InvoiceNbr
[PXDBString(15, IsUnicode = true, IsKey = true, InputMask = "",

| Step 2.1.1: Define the DAC | 62
BqlField = typeof(ARInvoice.refNbr))]
[PXUIField(DisplayName = "Invoice Nbr.", Enabled = false)]
public virtual String InvoiceNbr { get; set; }
public abstract class invoiceNbr : PX.Data.BQL.BqlString.Field<invoiceNbr> { }
#endregion
#region DueDate
[PXDBDate(BqlField = typeof(PX.Objects.AR.ARInvoice.dueDate))]
[PXUIField(DisplayName = "Due Date", Enabled = false)]
public virtual DateTime? DueDate { get; set; }
public abstract class dueDate : PX.Data.BQL.BqlDateTime.Field<dueDate> { }
#endregion
#region AdjgRefNbr
[PXDBString(BqlField = typeof(ARAdjust.adjgRefNbr))]
[PXUIField(DisplayName = "Latest Payment", Enabled = false)]
public virtual String AdjgRefNbr { get; set; }
public abstract class adjgRefNbr : PX.Data.BQL.BqlString.Field<adjgRefNbr> { }
#endregion
#region CuryAdjdAmt
[PXDBDecimal(BqlField = typeof(ARAdjust.curyAdjdAmt))]
[PXUIField(DisplayName = "Latest Amount Paid", Enabled = false)]
public virtual Decimal? CuryAdjdAmt { get; set; }
public abstract class curyAdjdAmt : PX.Data.BQL.BqlDecimal.Field<curyAdjdAmt>
{ }
#endregion
Note that each field has the PXDB<type> attribute with the BqlField parameter specified to
set up the projection.
Although the RSSVWorkOrderPayment DAC has a master detail relationship with the
RSSVWorkOrder DAC, you do not need to add any PXDBDefault and PXParent attributes to the
fields because all field values are determined by the query in the PXProjection attribute.
5. Add the following using directives:
using PX.Data;
using PX.Data.BQL.Fluent;
using PX.Objects.AR;
6. Build the project.

| Step 2.1.2: Define the Data View | 63
Step 2.1.2: Define the Data View
In this step, you will define the data view that will be used on the Payment Info tab of the Repair
Work Orders (RS301000) form.
Do the following:
1. In the RSSVWorkOrderEntry class, add the following member to the DataViews region of
the class.
public SelectFrom<RSSVWorkOrderPayment>.
Where<RSSVWorkOrderPayment.invoiceNbr.IsEqual<
RSSVWorkOrder.invoiceNbr.FromCurrent>>.
View Payments;
In the view, you select data from the RSSVWorkOrderPayment DAC with same invoice number
(stored in the RSSVWorkOrder DAC) as in the Summary area of the form.
2. Rebuild the project.

| Step 2.1.3: Add the Tab Item (Self-Guided Exercise) | 64
Step 2.1.3: Add the Tab Item (Self-Guided Exercise)
In this step, you will create a new tab item named Payment Info on the Repair Work Orders
(RS401000) form. To do this, you can use the Screen Editor or define the tab manually in the
RS401000.aspx file. The tab should contain the PXFormView container. In the PXFormView container,
define the UI elements for the fields you added in the RSSVWorkOrderPayment DAC. The elements
should be organized in a single column.
Bind the PXFormView container to the Payments data view that you created in Step 2.1.2: Define the
Data View.
The Payment Info tab should look as shown on the following screenshot.
Figure: The Payments Info tab preview
For details on how to define a tab item, see the T210 Customized Forms and Master-Detail Relationship
course or the Tab Item Container (PXTabItem) topic.

| Step 2.1.4: Hide the Tab from the Form | 65
Step 2.1.4: Hide the Tab from the Form
The Payment Info tab displays information that is applicable primarily when the repair work order has
been paid. Thus, this tab should be visible on the Repair Work Orders (RS301000) form for only repair
work orders with the Paid status.
In this step, you will configure the visibility of the Payment Info tab.
For details on how to hide a tab item, see the T210 Customized Forms and Master-Detail Relationship
course or the Conditional Hiding of a Tab Item topic.
Do the following:
1. In the PRSVWorkOrderEntry graph, modify the RowSelected event handler to change the
AllowSelect property of the Payments view, as the following code shows.
Payments.Cache.AllowSelect = row.Status == WorkOrderStatusConstants.Paid;
2. Build the project.
3. In the RS301000.aspx file, specify the following attribute value in the PXTab container.
AllowAutoHide="true"
4. Publish the customization project.

| Step 2.1.5: Test the Implemented Tab | 66
Step 2.1.5: Test the Implemented Tab
To test the Payment Info tab, do the following:
1. In Acumatica ERP, apply another 50% payment to the invoice created for the 000008 repair
work order. Suppose the invoice has number INV000048.
The 000008 order status should change to Paid. The list of applications for the INV000048
invoice should look as follows.
Figure: The list of applications of the invoice
2. Open the Repair Work Orders (RS301000) form.
3. Open the 000008 repair work order.
Notice that the Payment Info tab is displayed.
4. Select the Payment Info tab.
The order has the Paid status, so the tab is visible. The Payment Info tab should look as
follows.

| Step 2.1.5: Test the Implemented Tab | 67
Figure: The Payment Info tab
Notice that the payment you applied in Instruction 1 is displayed in the Latest Payment box.
5. To open the next record, click Next on the form toolbar.
The order does not have the Paid status, so the tab is not displayed.

| Lesson Summary | 68
Lesson Summary
In this lesson, you have learned how to display information from multiple DACs on a single tab. To
do this, you have defined a new DAC with the PXProjection attribute, and specified the BqlField
property value for each field of the new DAC.
The following diagram shows the components that you have implemented or modified in this lesson.
Figure: Implementation of a new tab

| Review Questions | 69
Review Questions
1. Where can you use the PXProjection attribute?
a. With a DAC
b. With a DAC field
c. With a data view
d. With an action
2. What property should you specify for all fields in the PXProjection DAC?
a. DisplayName
b. Visibility
c. BqlField
d. IsKey
Answer Key
1. A
2. C
