
Columbia University Finance Training
Training Guide: CU Marketplace for Requesters
February, 2024
The CU Marketplace, powered by JAGGAER, provides access to negotiated contracts and pricing with Columbia’s
preferred suppliers. You can access items in the Marketplace by using the tiles for the vendors that appear in the
Showcases pane of the CU Marketplace.
Colleagues with a CU Marketplace Shopper role or other Requesters can assign you a Shopping Cart so that you can
submit it as a Requisition into approval workflow.
Table of Content
Accessing the CU Marketplace ........................................................................................................................................... 2
Shopping for Items .............................................................................................................................................................. 3
Using Search to Shop ...................................................................................................................................................... 4
Quote-to-PunchOut .......................................................................................................................................................... 5
Viewing a Shopping Cart Assigned to You by a Shopper or other Requester .................................................................... 5
Modifying Items in a Cart ................................................................................................................................................... 6
Managing Carts.................................................................................................................................................................... 7
Viewing Your Carts and Orders ...................................................................................................................................... 7
Creating a New Cart ........................................................................................................................................................ 7
Switching Between Carts ................................................................................................................................................. 8
Moving an Item from One Cart to Another ..................................................................................................................... 8
Assigning a Cart to Another Requester ............................................................................................................................... 9
Assigning a Requester from the Shopping Cart Page ...................................................................................................... 9
Assigning a Requestor at Checkout ............................................................................................................................... 10
Checking Out ..................................................................................................................................................................... 11
Updating Ship To and Bill To Addresses ...................................................................................................................... 12
Using an Ad Hoc Ship To Address................................................................................................................................ 12
Updating the ChartString (Accounting Codes) .............................................................................................................. 14
Category Codes and Natural Accounts .......................................................................................................................... 15
Capital Expense ............................................................................................................................................................. 15
Adding Attachments ...................................................................................................................................................... 16
Inserting an Ad-Hoc Approver into Workflow ............................................................................................................. 17
Placing Your Order ........................................................................................................................................................ 18
Viewing Requisition (and Purchase Order) Status ............................................................................................................ 19
Viewing Requisition History ......................................................................................................................................... 20
Adding Comments and Notifying Approvers ................................................................................................................ 21
Withdrawing a Requisition from Approval Workflow .................................................................................................. 22
Canceling Orders ........................................................................................................................................................... 23
Issues or Returns ............................................................................................................................................................ 24
Receiving for Line Items over $5000 ................................................................................................................................ 24
Getting Help ...................................................................................................................................................................... 26
Columbia University Finance Training
Training Guide: CU Marketplace for Requesters
Page 2
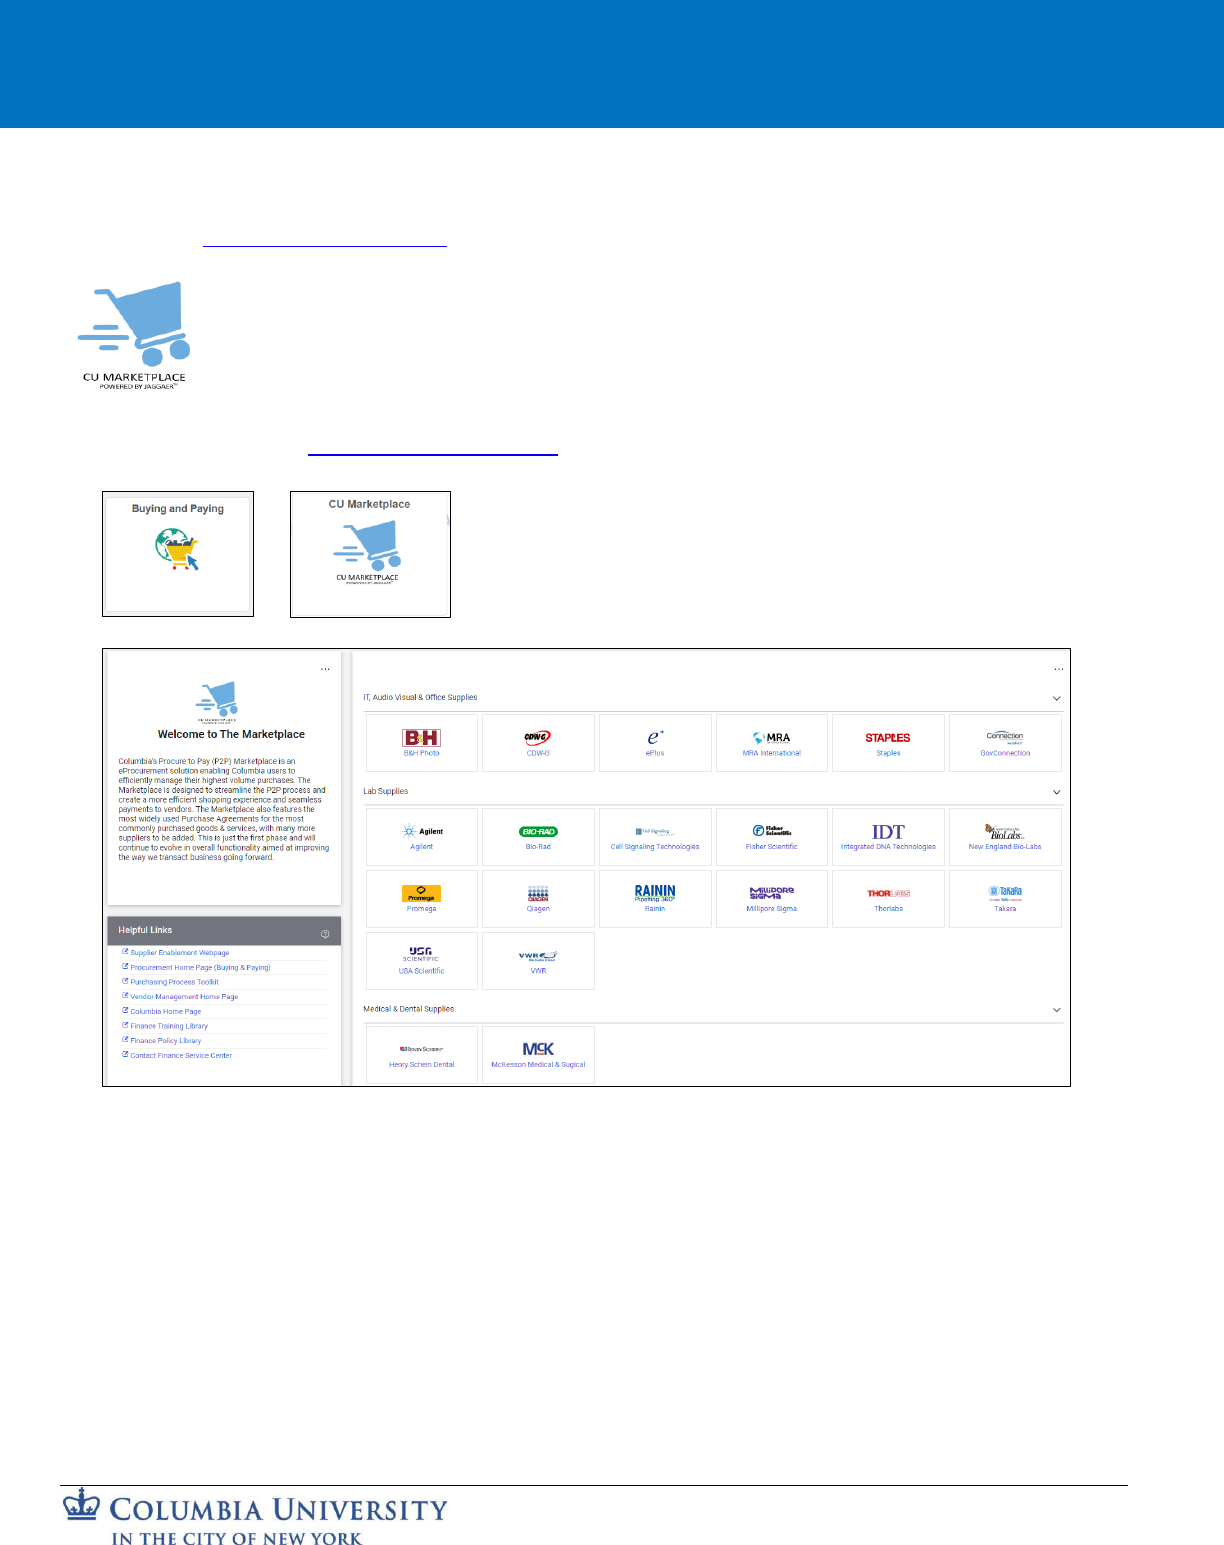
Accessing the CU Marketplace
Navigate to the Finance Buying and Paying website, click the CU Marketplace logo, and login using your Single Sign
On.
OR
1. Log into My.Columbia http://www.my.columbia.edu, click on the ARC tab and then Go to ARC.
2. Once in ARC, click the Buying and Paying tile and then click the CU Marketplace tile.
The CU Marketplace launches.
Note: The CU Marketplace will automatically timeout after thirty minutes of inactivity, consistent with other
University Enterprise Systems.

Columbia University Finance Training
Training Guide: CU Marketplace for Requesters
Page 3
Shopping for Items
Please browse and shop for your items in the CU Marketplace from any of the Enabled Suppliers. For more
information about each enabled vendor, visit the Enabled Suppliers webpage. If you are purchasing from a vendor that
is not enabled in the CU Marketplace, you must create a non-catalog requisition in ARC.
1. In the Showcases section on the Home page, click the tile for the vendor you wish to shop from.
You will then “PunchOut” to the vendor website.
Notice the gray bar at the top of the vendor website which indicates you are punched out from the Marketplace. You
can click the Cancel PunchOut button to retun to the Marketplace, if needed.
2. Shop the vendor website for the item(s) you want to purchase and add your desired items to the vendor’s cart.
3. View the vendor site cart and Submit your order. Each vendor will use different terms to submit your order.
The items you selected appear in your Marketplace Shopping Cart.

Columbia University Finance Training
Training Guide: CU Marketplace for Requesters
Page 4
You can visit other vendor PunchOut sites and add items from multiple vendors to your Marketplace Cart.
Using Search to Shop
You can also use the Search field to find products across the Marketplace vendors. Note that not all Marketplace
vendors support the Search to Shop functionality. If you do not find a result, you may need to search directly within the
appropriate vendor’s PunchOut.
1. Type the desired product in the Search field and click the Search icon. You can also use the Advanced search
to enter more specific search criteria.
The search results for the product appear.
You can use the Filters from the panel on the left to narrow your results.
2. Click the Order From Supplier button for the desired item. You will PunchOut to the vendor’s website to complete
the order.
3. Add the item to the vendor cart and Checkout/Submit. The item you selected appears in your Marketplace Shopping
Cart.

Columbia University Finance Training
Training Guide: CU Marketplace for Requesters
Page 5
Quote-to-PunchOut
If you do not see your desired item in the Marketplace from a particular supplier, review the vendor information from
the Enabled Suppliers webpage to check their Quote-to-PunchOut availability. If the supplier supports Quote-to-
PunchOut, contact the supplier directly for a quote. If the supplier offers a quote, retrieve your quote from inside the
vendor's PunchOut. Most vendors that offer Quote-to-Punchout have provided a guide that is available on the Enabled
Suppliers webpage on how to retrieve quotes from their site.
If a supplier does not support Quote-to-PunchOut, you must create a non-catalog requisition in ARC.
Viewing a Shopping Cart Assigned to You by a Shopper or other Requester
Shoppers who are not Requesters cannot submit the Cart as a requisition into the approval workflow, but they can assign
their cart to a Requester. In addition, Requesters can also assign other Requesters to a cart. As the assigned Requester,
you can submit the Cart as a Requisition into workflow. Before doing so, you must ensure that all required details are
entered. If necessary, you can send it back to the Shopper (or originating Requester) to modify items in the Cart.
1. Click the Actions Items icon and click Carts Assigned to Me.
OR
Mouse over the Shop icon and My Carts and Orders and then click View Carts.
You can also view:
Open My Active Shopping Cart – Navigate to the Shopping Cart page you are currently using for shopping,
View My Orders (Last 90 Days) – Displays a table listing the Shopping Carts from the past 90 days and their
status.
The Cart Management screen and Assigned Carts list appears. The cart labeled Active is the cart that you are
currently working.
2. Click the Assigned Carts tab to view carts assigned to you.
Note: The Assigned Carts tab will also show carts you assigned to other Requesters.
3. Click the Shopping Cart Name for the Shopping Cart you want to view. The Shopping Cart screen appears.
If necessary, you can click the Return Cart button to return the cart back to the person who assigned it to you.

Columbia University Finance Training
Training Guide: CU Marketplace for Requesters
Page 6
Modifying Items in a Cart
Marketplace vendors require you to modify items in your Shopping Cart by returning to PunchOut to the vendor’s
website to modify the items directly and bring the items back into the requisition.
1. Click the Modify Items link. Your cart on the vendor PunchOut appears.
2. You can increase or decrease the number of items, remove items, or add additional items. Adjust the cart as desired.
3. Submit the modified order. Your Marketplace Shopping Cart appears with your changes.

Columbia University Finance Training
Training Guide: CU Marketplace for Requesters
Page 7
Managing Carts
When you select items when shopping, you are adding items to your Active Shopping Cart. If you should end your CU
Marketplace session and resume shopping at a later time, you will resume adding items to the same Active cart. If
needed, you can create a new cart and begin adding new items (and assign it to a different Requester). You can also
switch between different Carts.
Viewing Your Carts and Orders
Navigate to the Shop icon > My Carts and Orders.
You can view:
• Open My Active Shopping Cart – Navigate to the Shopping Cart page you are currently using for shopping,
• View Carts - Display a table of all of your Shopping Carts and switch between your Active Cart and others
listed.
• View My Orders (Last 90 Days) – Display a table listing the Requisitions you have submitted and view their
status.
Creating a New Cart
1. Navigate to the Shop icon > My Carts and Orders > View Cart. The Cart Management screen appears.
2. Click Create Cart. The Shopping Cart page appears for the new cart.
3. Enter a Cart Name and Description. You can begin shopping to add items to the cart.

Columbia University Finance Training
Training Guide: CU Marketplace for Requesters
Page 8
Switching Between Carts
1. Navigate to the Shop icon > My Carts and Orders > View Cart. The Cart Management screen appears.
The Draft Carts tab displays the carts that you have not yet assigned to a Requester.
The Assigned Carts tab shows the carts that you have assigned to Requesters.
The Active tag indicates the cart that is currently active and any new items you select while shopping will be added
to that cart.
2. Click the Shopping Cart Name for the cart you want to view. If it’s a Draft Cart, it will display the Shopping Cart
page and this cart will become your Active cart. If it’s an Assigned Cart, it will display the Draft Requisition
Summary page.
Moving an Item from One Cart to Another
1. View the Shopping Cart page that has the item you want to move to another cart.
2. Click the Line Item Actions icon for the item you want to move and select Move to Another Cart.
3. Select Move to a new cart to create a new cart with that item or select one of the Draft Carts listed to move the
item to that cart.

Columbia University Finance Training
Training Guide: CU Marketplace for Requesters
Page 9
Assigning a Cart to Another Requester
You have the ability to assign a Cart that you created, or one that has been assigned to you, and assign it to another
Requester. This may be useful if you will be out of the office and you need a colleague to submit a Requisition on your
behalf.
Assigning a Requester from the Shopping Cart Page
1. On the Shopping Cart page, click the Assign Cart button.
The Assign Cart window appears.
2. You can Select a Requester from Favorites you created in your Profile or Search for any Requester that is setup in
the Marketplace.
Select a favorite, click the Select dropdown and click the desired Requester.
Or, to search and select a non-favorite Requester, click the Search link.
Enter the search criteria and click the Search button to view results.

Columbia University Finance Training
Training Guide: CU Marketplace for Requesters
Page 10
Click the Plus sign for the Requestor you are assigning.
3. If the Requestor is not a favorite, you have the option to select Add to Profile if you want to make them a favorite.
Type a Note to Assignee, if needed. Click the Assign button.
The assigned Requester will receive an email alerting them that your Cart has been assigned to them and include
your Note to Assignee.
Assigning a Requestor at Checkout
When you Proceed to Checkout, you have the option to update the Ship To/Bill To Addresses and the ChartString. If
you are assigning the cart to another requester, you are not required to enter this information, but you may want to
complete it for your assigned Requestor to simplify their task.
1. On the Shopping Cart page, click the Proceed to Checkout button.
The Checkout screen appears.
2. If desired, update Ship To, Bill To, and Accounting Codes, See the sections on Updating Ship To and Bill To and
Updating ChartString (Accounting Codes) at Checkout.
3. Click the Assign Cart button. The Assign Cart window appears.

Columbia University Finance Training
Training Guide: CU Marketplace for Requesters
Page 11
4. Follow steps 2 and 3 from the previous section.
Checking Out
At checkout you must ensure that the Ship To/Bill To Addresses and the ChartString information is complete and
correct. Shoppers have the option to enter this information but are not required to do so. You can update the information
entered by the Shopper, if necessary.
If this information is not complete, you must enter it before checking out. If you created default values in your Profile
(refer to the Modifying Profile Settings in JAGGAER job aid), those values will be populated.
On the Shopping Cart page, click the Proceed to Checkout button.
The Checkout screen appears.
The Status panel on the right indicates all the required information that you must complete. You can click the link to
access the field to update it. Fields within the form that require completion will be labeled Required.

Columbia University Finance Training
Training Guide: CU Marketplace for Requesters
Page 12
Updating Ship To and Bill To Addresses
You can search for on-campus addresses to use as your Ship To and Bill To addresses. If you cannot find a campus
address, you can submit a Ship To/Bill To Address request via ServiceNow.
1. On the Checkout screen, click the Edit icon for Shipping or Billing.
The Edit window will appear for the respective item you selected. It will display the Current Address populated, if
any, and a selection of Favorites you created in you profile, if any.
2. Enter a Contact Name. This is a required field.
3. Select one of your Profile favorites or type in the Search additional field to find and select an address.
4. Click the Save button.
Using an Ad Hoc Ship To Address
You are able to enter Ad Hoc Ship-To locations for off-campus addresses for orders up to $1,000 for the following
Marketplace vendors:
• Staples
• B&H
• CDW
• Connection (formerly Gov Connection)
• MRA International
If you are using an Ad Hoc Ship To Address, your Requisition will require departmental approval regardless of your
approval role.

Columbia University Finance Training
Training Guide: CU Marketplace for Requesters
Page 13
1. On the Checkout screen, click the Edit icon for Shipping or Billing.
The Edit window will appear for the respective item you selected. It will display the Current Address populated, if
any, and a selection of Favorites you created in your profile, if any.
2. In the Search additional field, type “adhoc” (no space) to search for the Ad Hoc option and select ACHOC_ADDR.
The ADHOC_ADDR fields appear.
3. Complete the address information. You can optionally select Add to my addresses and give this address a
Nickname to use this address again in the future.
4. Click the Save button.

Columbia University Finance Training
Training Guide: CU Marketplace for Requesters
Page 14
Updating the ChartString (Accounting Codes)
1. On the Checkout screen, click the Edit icon for Accounting Codes.
The Edit window will appear. It will display the default or populated ChartFields,
2. Update the ChartFields as needed. They must be entered in order left to right as the available values are dependent
on the value in the previous field. You can click the Dropdown arrow in the field you are populating to view the
available values. Click the matching value.
3. Click the Validate icon to ensure your ChartFields were entered correctly. If you corrected a ChartField and it
still appears as Required , click the Validate icon again.
You can click the Add Split icon to add an additional ChartString line and indicate % of Price or Amount of
Price for each line.
You can click the Code Favorites icon to select a favorite ChartString you created in your Profile.
4. Click the Save button.
Each item in your Cart can also be updated with different ChartStrings. Click the Line Item Actions icon for the item
and select Accounting Codes.

Columbia University Finance Training
Training Guide: CU Marketplace for Requesters
Page 15
Category Codes and Natural Accounts
As you select items from the Marketplace, the Category Codes are automatically associated with the product and
appears with each item in your cart. In addition, the Natural Account for each item is automatically mapped to the
Category Code. You should ensure that the Category and associated Account are correct and, if necessary, edit the
Category Code and/or Account. Refer to the Procurement Category Codes and Natural Accounts job aid.
1. To edit, click the Edit Line icon. The Edit Line Details window appears.
2. Search and select the Category Code.
After you enter or select the new Category Code, the Account field will initially appear to not update, but will
update after saving with the default Account associated with the new Category Code.
3. Click Save. The Category Code and the Account field will be updated.
If you need to change the Account from the default, reopen the Edit Line Details window to select from the
Accounts mapped to the Category Code.
Capital Expense
If you are purchasing an item that should be categorized as a Capital Expense, you can designate it as needed. Capital
Expense items should be on their own Requestion and not on the same Requisition as non-Capital Expense items.
1. Click the Edit Line icon for the line with a Capital Expense. The Edit Line Details window appears.
2. Select Yes from the Capital Expense? dropdown.
3. Update the Account for the Capital Expense and populate the Asset Location for the asset being purchased.

Columbia University Finance Training
Training Guide: CU Marketplace for Requesters
Page 16
Adding Attachments
If required by your school or department, you can attach additional documentation to support your transaction.
1. Click the Attachments tab.
2. Click the Add Internal Attachment button (do not select Add External Attachment). The Add Attachments dialog
box appears.
3. Drag and Drop File or Browse for the file.
4. Click the Save Changes button. Attachments are indicated on the Attachments tab and listed on the Attachments
screen.

Columbia University Finance Training
Training Guide: CU Marketplace for Requesters
Page 17
Inserting an Ad-Hoc Approver into Workflow
You can insert an additional approver into the workflow to review the Requisition.
Note: An Ad-Hoc Approver must have the Department Requisition Approver role. You can only add one Ad-Hoc
Approver. Other Approvers can also add an Ad-Hoc Approver.
Before inserting an Ad-Hoc Approver, you must ensure that the Accounting Codes (ChartString) are complete for the
Requisition.
1. Click the Ad-Hoc Approver Select link at the bottom of the General section.
The Ad Hoc Approver window appears.
2. Click into the After field and select the approval workflow step where the Approver will be inserted.
2. Click into the Ad-Hoc Approver field and select the Approver from the list. You can type to filter the list of names.
If an Approver is already included in the approval workflow for the Requisition, their name will not appear on the
list.
3. Click Save. The Requisition will indicate the Ad-Hoc Approver, which can be changed, if necessary, and the
Summary panel will indicate the extra approval workflow step.

Columbia University Finance Training
Training Guide: CU Marketplace for Requesters
Page 18
Placing Your Order
After ensuring that all required fields are populated, the Status pane will not list any further requirements.
Check to make sure there is a departmental approver as the Next Step before placing the order. If the Status panel
indicates there are no approvers, contact your DAF to ensure there is an approver assigned for your department. After an
approver is set up you can open your Requisition and place the order.
If you place the order when there is no approver, you will need to withdraw it from workflow. Withdrawing will
terminate the Requestion and you will need to create a new cart and resubmit once s departmental approver is in place.
If there are no further requirements and the approval step is indicated, click the Place Order button.
The Requisition Confirmation page appears.
If the Requisition is auto-returned, refer to the Viewing Requisition History section of this guide.
Note: If you have both the Requisition Initiator and a Level 1 ($0 - $1,000) Department Requisition Approver roles, you
do not need departmental approval for purchases of $1,000 or less if your purchase is being shipped to a campus
address.
If you have the Department Requisition Approver role for higher Levels (2 and up), but not Level 1, your Requisition
will require departmental approval even if you have an approval role.
If your purchase is greater than $1,000 and/or you are shipping to an Ad-Hoc Ship-To address, your Requisition will
require departmental approval even if you have a Level 1 approval role.

Columbia University Finance Training
Training Guide: CU Marketplace for Requesters
Page 19
Viewing Requisition (and Purchase Order) Status
Click the Requisition number from the Requisition Confirmation page.
OR
1. Navigate to the Shop icon > My Carts and Orders.
2. Click View My Orders (Last 90 Days). The My Orders screen displays a table listing the Requisitions you have
submitted and their status.
3. Click a Requisition Number to view the Requisition page. The Status Pane will indicate the approval workflow
status.
If the Requisition status is complete, you can click the Purchase Order Number under Related Documents to
display the Purchase Order page and view the status of the Purchase Order.

Columbia University Finance Training
Training Guide: CU Marketplace for Requesters
Page 20
Note: If a Purchase Order is not fulfilled within 90 days, the Procurement team will determine if the Purchase
Order should remain open. If it is determined that it should be closed, the Procurement team will reach out to you
before closing it.
Viewing Requisition History
If your Requisition was automatically returned, or you received notifications or alerts regarding the Requisition, you can
view the History tab to view the complete history of the Requisition, including a date and time of each action, the user
that took action, and what the action was.
Click the History tab.
The History tab displays what was modified, the action, by whom, the date and time of the action, and other information
or notes. If a Requisition was returned or other actions occurred that affected the processing of the Requisition, the Note
will provide details.
Note: It is possible that your Requisition may have been returned because you are missing your Admin Department
information in ARC. Refer to the Entering Your Admin Department in ARC Requester Defaults job aid for details and
instructions.

Columbia University Finance Training
Training Guide: CU Marketplace for Requesters
Page 21
Adding Comments and Notifying Approvers
After you submit a Requisition for approval and add Comments that can be emailed to selected Approvers or other
colleagues to notify them that the Requisition is awaiting approval. If the Requisition is not yet in approval workflow,
the Comment cannot be sent as an email notification and can only viewed in the Comments tab when colleagues open
and view the Requisition.
1. Click the Comments tab.
2. Click the New Comments icon. The Add Comment screen appears.
3. Type your Comment. Optionally, you can attach a file or add a link/URL.
If your Requisition has already been submitted into workflow, you can open and view the Requisition to add a
Comment. In the Add Comments screen, you can select the individuals listed who have worked with your
requisition to receive your comment as an Email Notifications.

Columbia University Finance Training
Training Guide: CU Marketplace for Requesters
Page 22
Or, you can click Add recipients to search for Approvers or individuals. This is a good way to notify an Approver
that you have a Requisition in Workflow.
Note: If you add Comments before submitting the Requisition into workflow, you will not be able to select recipients
and the Comment cannot be sent as an email notification. Colleagues can only view in the Comments tab when
colleagues open and view the Requisition.
4. Click the Complete icon. Comments are indicated on the Comments tab and listed on the Comments screen.
Withdrawing a Requisition from Approval Workflow
If the Requisition you submitted is still pending approval, you can withdraw it, if needed. Withdrawing will terminate
the Requisition and you’ll need to create a new cart if you want to resubmit the order. If you see that there is no
departmental approver as the Next Step in the Status pane, you should withdraw the order and speak with your DAF
about assigning an Approver for your department.
1. View the Requisition that you are withdrawing.
2. Click the Withdraw Entire Requisition button. The Withdraw Entire Requisition window appears.
3. Type a Reason for withdrawing the Requisition and click OK.

Columbia University Finance Training
Training Guide: CU Marketplace for Requesters
Page 23
Canceling Orders
If items from your Requisition/Purchase Order are backordered or you need to cancel your order for any reason, you
should enter a request via a comment to the Procurement team to cancel the order with the vendor. Contact the vendor
for any delivery issues.
Note that Change Orders cannot be entered in the CU Marketplace. Enter Journal Entries or Journal Vouchers in ARC
to correct ChartStrings
1. View the Requisition or Purchase Order and click the Comments tab.
Comments screen appears.
2. Click the Add icon. The Add Comment screen appears.
3. Type your Comment with instructions to the Purchasing team to cancel the order.
4. Click the Add recipient link. The Search dialog appears.

Columbia University Finance Training
Training Guide: CU Marketplace for Requesters
Page 24
5. Type “procurementsupport@columbia.edu” in the Email field and click Search.
6. Click the Add icon for the matching recipient.
7. If desired, select the check boxes for other recipients to receive an Email notification of the comment.
8. Click the Complete icon at the top right of the Add Comment screen.
Issues or Returns
If there are issues with your order, such as damages, an incomplete order, or you need to make a return, consult the CU
Marketplace Vendors page for specific guidance.
Receiving for Line Items over $5000
Receiving for CU Marketplace orders is required when a line amount is equal to or greater than $5000. It is
recommended that you place line items of $5000 or more in their own Cart/Requisition/Purchase Order, although this
not required. Once your Purchase Order has been electronically invoiced, you will receive an e-mail notification to alert
you when an item you ordered requires a receipt.

Columbia University Finance Training
Training Guide: CU Marketplace for Requesters
Page 25
You will also receive a notification within the CU Marketplace to alert you when a receipt is required.
1. Open the Purchase Order that requires receiving:
You can click the Purchase Order from the email alert or from the notification in the CU Marketplace.
Or,
You can select the Purchase Order by navigating to Orders > My Orders > My Purchase Orders.
The Purchase Order Summary screen appears. In the example below, a line item requires receiving because the total
amount has a quantity of 8 items that totals over $5000. There are other line items on this Purchase Order that do
not require receiving.
2. Click the Actions icon and click Create Quantity Receipt.
The Quantity Receipt screen appears. The Quantity field is automatically populated with total quantity ordered.
Note: If your Purchase Order and Receipt contains line items that do not require receiving, you can either fully
receive those line items or click the Trash icon to remove those items from the Receipt.

Columbia University Finance Training
Training Guide: CU Marketplace for Requesters
Page 26
3. If you fully received the total quantity of your line item, you can just click the Complete button.
Or,
If you partially received the total quantity, enter the number in the Quantity field for what you actually received
and click the Complete button.
A confirmation screen appears for the Receipt you created.
The quantity indicated on the receipt(s) must match the quantity indicated on the electronic invoice in order for the
invoice to be paid.
If you created a partial receipt, you will need to create a new receipt for the additional quantity when you receive it.
Getting Help
Please contact the Finance Service Center
http://finance.columbia.edu/content/finance-service-center
You can log an incident or request service via ServiceNow
https://columbia.service-now.com
