
MySchoolBucks
Parent User Guide

Table of Contents
MySchoolBucks Parent User Guide ............................................................................ 3
Creating a Parent Account in MySchoolBucks .......................................................... 4
Username and Password Recovery.......................................................................................... 5
Adding a Student ........................................................................................................... 8
Adding a Student on a New Account ........................................................................................ 8
Adding a Student to an Existing Account ................................................................................ 12
Parent Resources ........................................................................................................ 13
User Profile ............................................................................................................................. 13
Email Preferences ................................................................................................................... 16
Downloads .............................................................................................................................. 17
Meal Accounts ............................................................................................................. 17
Cafeteria Meal History ............................................................................................................ 18
Make a Payment ..................................................................................................................... 19
My Order History ..................................................................................................................... 21
Recent Payments History ....................................................................................................... 22
Scheduled Payments .............................................................................................................. 24
FAQ and Contacting Support ..................................................................................... 26
MyLunchMoney Migration .......................................................................................... 27
How-To Videos ....................................................................................................................... 27
View School Menus ................................................................................................................ 28
Meal Controls .......................................................................................................................... 30
Support ........................................................................................................................ 31

MSB Parent User Guide 3 of 31
MySchoolBucks Parent User Guide
MySchoolBucks is an award-winning service offered by Heartland Payment Systems, Inc.
Heartland Payment Systems is known for fair, fully disclosed pricing and empowering our
customers to take control of their payment processing costs.
Since being introduced a number of years ago, MySchoolBucks has become the product of
choice for thousands of schools throughout the United States. Whether paying for chemistry lab
fees, purchasing books, buying athletic tickets, or simply paying for school lunch,
MySchoolBucks gives parents the peace of mind when it comes to their children's school
purchases.
With MySchoolBucks, parents are able to register for an account and view information for free.
Parents are also able to view account balances or recent purchases in the school cafeteria, add
money to their student's account, and set up low balance alerts through this award-winning,
parent friendly system.

MSB Parent User Guide 4 of 31
Creating a Parent Account in MySchoolBucks
All new parent users must click SIGN UP TODAY and follow the on-screen instructions to
establish their account.
The registration process will require you to select the state, followed by the district, in which
your students attend, your first and last name, email address, and password. Your email
address will be your username when logging in.

MSB Parent User Guide 5 of 31
You are also required to select two security questions and fill out the answers. Once all
information is entered, click CREATE ACCOUNT. A welcome email will be sent to the email
address confirming that your profile was created.
Username and Password Recovery
If you have already created an account but have forgotten your login credentials, you can
recover your profile either by entering the email address associated with your account or the
mobile phone number associated with the account. To recover your profile, first click Forgot
your username or password?

MSB Parent User Guide 6 of 31
If you would like your information sent to you via text message, click Mobile Phone #, enter the
phone number associated with the account, and click Continue. If you would like your
information sent to you via email, click Email Address/Login ID, enter the email address or
login ID associated with the account, and click Continue.
Note: You must validate your mobile number before it may be used for password recovery.
A text message or email will be sent to you. Click Finish to return to the login screen.

MSB Parent User Guide 7 of 31
The email will contain a link. Click the link to begin recovering your profile. You may be
presented with the security questions set up during your account creation. Enter the answers to
the questions and click Recover Profile.
After correctly answering the security questions, you will be provided with your username. If you
remember your password, click Login and enter your password. If you do not remember your
password, click Reset Password.
To reset your password, enter a new password in the top field and re-enter it in the field below.
Then, click Update. Note that the password must be at least 6 characters

MSB Parent User Guide 8 of 31
Adding a Student
Adding a Student on a New Account
After creating your account, you will then have an opportunity to add a student. You can choose
to skip this step until a later time.
The student’s district will automatically be populated. If a new District needs to be added, click
the down arrow at the top of the screen to add the new district.
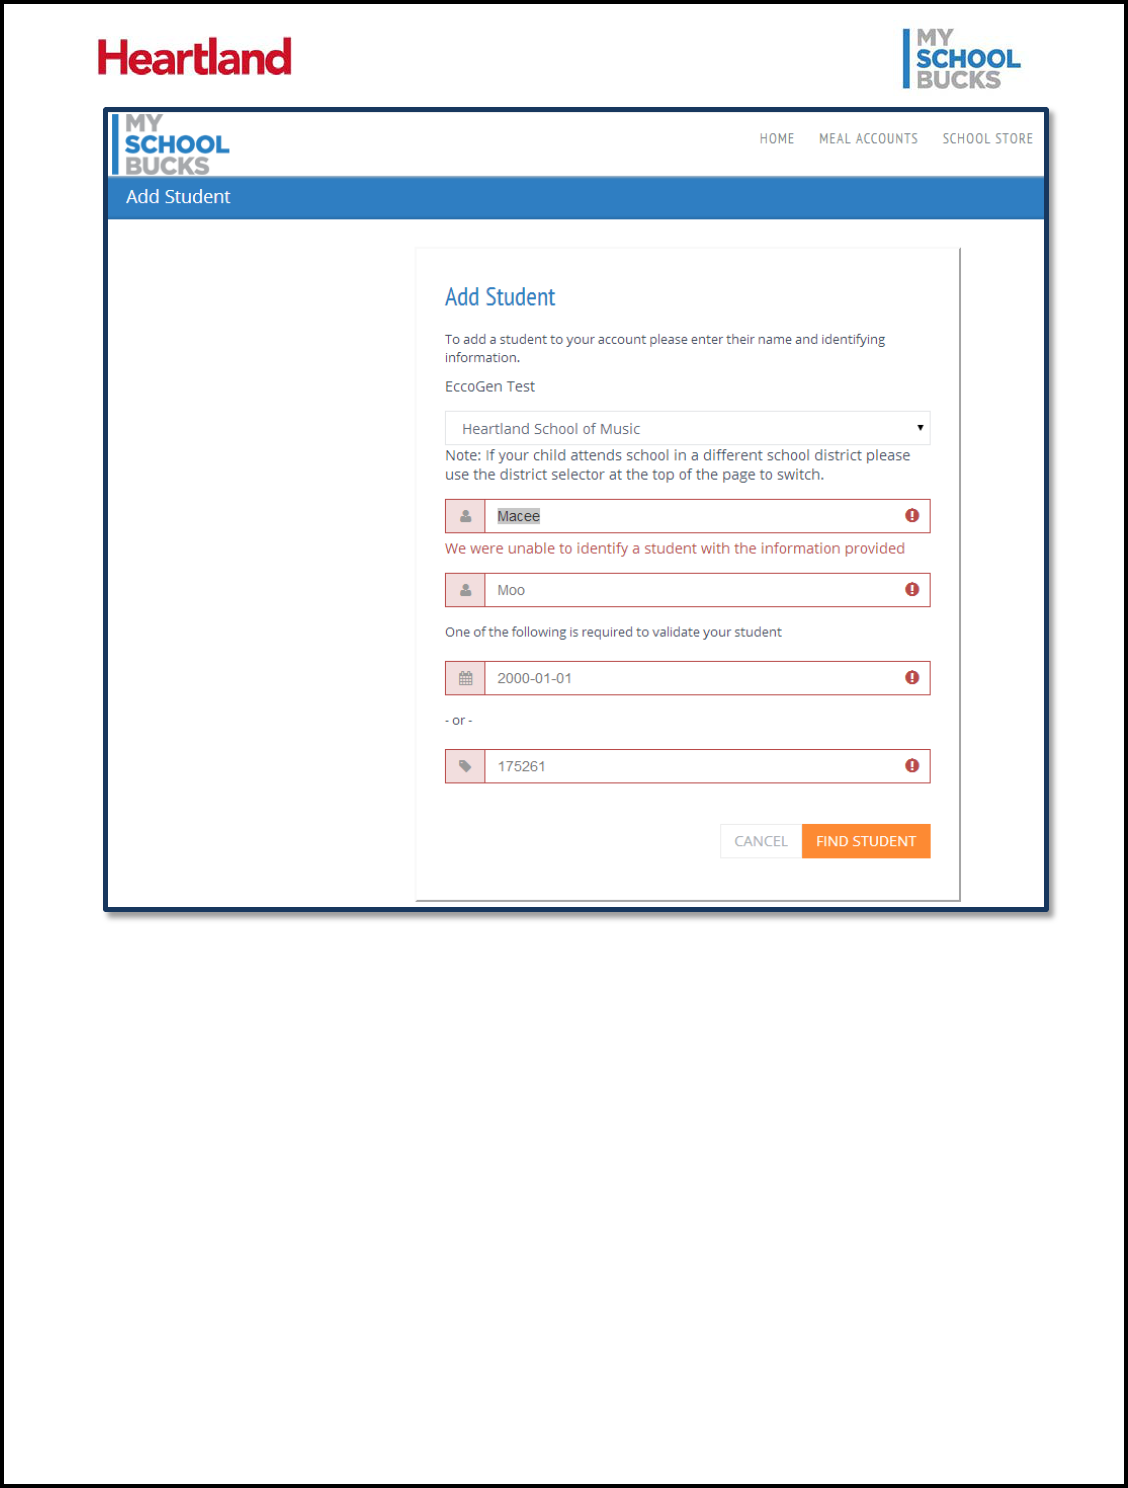
To add a student, enter the student’s school along with their first and last name, date of birth, or
student number and click FIND STUDENT.
Note: The information required to locate the student is dependent upon the individual district’s
settings. Some districts may require both the birthdate AND the student ID, while others may
only require the birthdate OR the student ID.

MSB Parent User Guide 9 of 31
If the student is not able to be found, you will see the below message.
MSB Parent User Guide 10 of 31
If you received this message, it likely means that some information was entered incorrectly. If
there are no errors in the student information and the student is still not found, you will need to
contact the school to verify your student is in their records.

MSB Parent User Guide 11 of 31
Once the student is found, you will have the option to request a “low balance” email be sent to
your email once the student’s balance falls below a dollar amount that you choose. If you do not
want a low balance email, simply un-check the box and click ADD STUDENT.
Once the student is added, you will see the below confirmation. You can click ADD ANOTHER
STUDENT to add another student or FINISH to complete the process.


MSB Parent User Guide 13 of 31
Parent Resources
User Profile
To review or change account information such as contact information or membership settings,
from the Welcome drop-down menu, click My User Profile. You will also be able to click Log
Out from here.
To edit information on this page, click EDIT next to the information you would like to update. For
example, if you would like to change your password, click EDIT in the Password row under My
Login. To edit the security questions used in case you forget your password, click EDIT next to
Security Question #1 or Security Question #2.

MSB Parent User Guide 14 of 31
To associate an account with a name, cell phone, and an email address, click EDIT next to
Name, Mobile Phone Number, and Email Address, respectively. In addition to having the option
to send low balance emails, parents may also receive emails associated with their student store
orders, such as receipts and refund confirmations, and promotional emails with updates and
news about MySchoolBucks. Parents may also opt to send text messages to their phones to be
updated with similar information.
Under My Students, in addition to editing, there are options to remove and add entries. To
remove a student, click REMOVE next to the account you would like to delete. To add a
student, click ADD STUDENT.

MSB Parent User Guide 15 of 31
Under My Membership, your current membership is displayed. A membership allows you to
make purchases without having to pay the Program Fee each time. Click Update Membership
to join or decline a membership.
Under My Billing Accounts, in addition to editing, there are options to remove and add entries.
To remove a billing account, click REMOVE next to the account you would like to delete. To add
a billing account, click or ADD ACCOUNT.
Under My School Districts, the school districts associated with your students’ accounts are
displayed. Your primary school district is indicated by whichever district has a yellow star under
Primary. The students under your account associated with the district are listed under Students.
Click Add School District if you need to add another school district. Even if all students
associated with your account go to the same district, you may need to add a district in order to
access another district’s student store, for example.

MSB Parent User Guide 16 of 31
Email Preferences
You can sign up for email notifications to inform them when your student’s balance falls below a
designated amount or after an order is placed. To sign up for low balance emails, click EDIT
under My Students next to a student account, select Send email when meal account falls
below, and enter a low balance amount. Click SUBMIT to confirm the changes.
To sign up for notifications for when a payment has been made, click EDIT under My Contact
Info next to Send Confirmation of Payment. Then, under Send confirmation of payment, click
Yes. Click Update to confirm the changes.

MSB Parent User Guide 17 of 31
Downloads
You can access MySchoolBucks digital applications by scrolling to the bottom of the page.
Currently, mobile applications for iOS, Windows Phones, and Google Play are available to
download. These resources provide you with fast and easy access to your account.
Meal Accounts
The Meal Accounts page is the landing page for parents every time they log in to their accounts.
Here, you can view student balances, active scheduled payments, and recent payments.
All students that have been added to your account will be displayed here. Some students will
have an icon next to their name. A rounded arrow icon indicates that the student is set up on an
automatic payment plan. A trophy icon indicates the student is part of a membership program.
Also displayed is the district announcement. District administrators can enter custom
announcements or notes for parents in their district to view after logging in to their accounts.

MSB Parent User Guide 18 of 31
Cafeteria Meal History
The Cafeteria Meal History page displays a list of purchases and account activity for students.
Some districts utilize software that is compatible with the running balances feature in
MySchoolBucks. However, many district cafeteria purchases will only display activity such as
purchases and deposits.
In addition to cafeteria purchases, this page also has tabs that display recent payments and
scheduled payments. Click the Recent Payments tab to view payments made recently to your
students’ accounts. Click Scheduled Payments to view payments that are pending.
Prepayments should display in cafeteria purchases and increase the student’s balance within 2
business days after the date of the prepayment.

MSB Parent User Guide 19 of 31
Make a Payment
To process a prepayment, select the “Make a Payment” option in the Meal Accounts drop-down
menu. This will navigate you to the Place Order page.
You will be able to select a store such as Cafeteria Meal Payments or School Supplies. This will
depend on the stores that have been set up for the school district that the student attends. If
there are only cafeteria payments available, you will automatically be directed to the cafeteria
payment options.
To make a payment, you will need to first select an amount to pay within the individual school
districts’ maximum payment limits. This is typically a range of $1 to $120. However, this limit
may vary depending on the district’s agreement with MySchoolBucks.
Note: On this screen, amounts in red have fallen below their “low balance” amount. Once the
balance is funded, the box will turn gray.

MSB Parent User Guide 20 of 31
Next, select a payment method, either eCheck or Credit Card. When writing an eCheck, select
the checking account from the drop-down menu. When using a credit card, select a credit card
from the drop-down menu. If the preferred payment method does not appear in the menu, click
Enter a new checking account to enter a new eCheck account or Enter a new credit card to
enter a new credit card.
When making a payment to a lunch account, you have the option to make the current payment
an automatic one. The selection is defaulted to No. This means that the current payment is
made one time at the time of purchase. If you click Yes, you can set the current payment to
recur either when the account falls below a certain balance or at sent timed intervals, such as
every week after the payment. Payments can be made to stop on a certain date or continue
going unless you manually cancel the payment.
When finished making the order, click Place Meal Order to place the order.

MSB Parent User Guide 21 of 31
At this point, the order will be placed. If you selected the option to receive an email notification
when an order is placed, the notification will be sent at this time.
My Order History
My Order History contains all orders placed through MySchoolBucks. To open the My Order
History page, click My Order History under the Home drop-down menu.

MSB Parent User Guide 22 of 31
My Order History includes both one-time prepayments and scheduled prepayments. From this
location, you can view the details of past payments such as the date that the order was placed,
the frequency of the order, and the billing account that the order is being billed to. Check the
order details by clicking View Order. You can also print orders by clicking the printer icon.
Recent Payments History
To view all payments processed from your account through MySchoolBucks, select Recent
Payments from the Home drop-down menu.

MSB Parent User Guide 23 of 31
The Recent Payments page will display the most recent payments made to the school.
Successful payments display in black text, and declined or returned payments are displayed in
red text. To view all available payment records for a student’s account, click View All under
their account name.
Note: Payments made directly to the school or through any other service will not display here.
To collapse the payment list back to only recent payments, click View Less.

MSB Parent User Guide 24 of 31
Scheduled Payments
The Scheduled Payments page lists the payments that are scheduled to process in the near
future. These payments are organized by student on the account. To view scheduled payments,
select Scheduled Payments from the Home drop-down menu.
From this page, you can view scheduled payments on your account. In addition, you can also
cancel a payment or change the billing information associated with the payment. To cancel or
change the billing information on a payment, first click View/Edit next to the payment you would
like to modify.

MSB Parent User Guide 25 of 31
To cancel the order, click Cancel This Order. Click Yes on the next screen to confirm the order
cancellation. To change the payment method used to complete the scheduled payment, click
Use a Different Billing Acct.
From here, choose the payment method you would like to use for the payment and click
Update. Note that new payment methods cannot be added from this screen.

MSB Parent User Guide 26 of 31
One-time prepayments with the status of “Closed” cannot be cancelled or voided. If you are
requesting a refund and the order has already been closed, you will need to obtain the refund
directly from the school.
FAQ and Contacting Support
Users have access to the Frequently Asked Questions as well as the parent support
phone number at the bottom of every page in MySchoolBucks by clicking Help. You
may also send Support Requests and submit User Feedback through the Contact Us
option in the top right corner or at the bottom of the page.

MSB Parent User Guide 27 of 31
MyLunchMoney Migration
Parent users migrating from MyLunchMoney to MySchoolBucks will notice options in addition to
those associated with other MySchoolBucks users. These features are meant to help provide a
smooth transition from MyLunchMoney to MySchoolBucks.
How-To Videos
When a new user migrating from MyLunchMoney logs in to MySchoolBucks, a pop-up will
appear under the Help menu. Click the link in the pop-up, How-to Videos, to watch videos that
detail how to navigate and use MySchoolBucks.
On the How-To Videos page, you will see a few videos that detail common tasks for users in
MySchoolBucks.

MSB Parent User Guide 28 of 31
When finished viewing the videos, click Let’s Get Started to return to the MySchoolBucks
homepage and begin using MySchoolBucks.
If you ever need to access the how-to videos again, they are available under Help.
View School Menus
Parents migrating from MyLunchMoney may have districts that still post school menu
information to the MyLunchMoney site. Rather than have to navigate to two separate sites,
MyLunchMoney users can find their school menus through a link on MySchoolBucks. To access
MyLunchMoney school menus, click View School Menus.

MSB Parent User Guide 29 of 31
Upon clicking View School Menus, the MyLunchMoney user should see their school’s menu on
the MyLunchMoney site.
You can also access a student’s MyLunchMoney school menu by clicking the utensil icon next
to their name on the My User Profile and View Student Balances pages.

MSB Parent User Guide 30 of 31
Meal Controls
For parent users migrating from MyLunchMoney, MySchoolBucks has a feature that is similar to
the meal control settings available on MyLunchMoney. When adding a new student or when
editing a student from the My User Profile page, the Meal Controls feature is available for you to
set spending limits for the student being added or edited.
Important: Meal Controls settings are on a per student basis, so you need to set controls for
each individual student.
Under Daily Spending Limit Amount, enter the amount of money you want to allow your student
to spend each day. Under Weekly Spending Limit Amount, enter the total amount of money you
want to allow your student to spend each week. Make sure that the amounts in these fields are
within the range shown under Daily Range and Weekly Range.
The Meal Options let you determine if your student is allowed to use cash from their account on
a la carte items. If you select Cash Account for meals/a la carte, your student will be allowed
to spend account money on a la carte items in addition to meals. If you select Cash Account
for meals only, your student will only be allowed to spend account money on meals.

MSB Parent User Guide 31 of 31
Support
For additional support, please contact Technical Support between the hours of 8 AM EST and 5 PM EST
at 1-855-832-5226.
You may also contact customer technical support by using our support request form
.
This confidential document is issued pursuant to non-disclosure agreements in place and subject to the terms and conditions
contained therein. Reproduction or use, without the express permission from Heartland School Solutions of any portion of this
manual is prohibited. Copyright 2015, Heartland School Solutions.
