
1.
Margill Loan Manager
Salesforce Connection
Content
• Important
• General concept
• Loan versus Borrower concept
• Borrower creation versus Borrower data update
• Salesforce connection configuration
• Automatic Borrower import/data updates in MLM
• First import / Update Data from Salesforce to Margill
• Import logs
• Export data to Salesforce – Automatically via Background Night tasks
• Common errors and troubleshooting
• Consult a Salesforce specialist
MLM version 5.4 and later
Important
The following text is based on the Salesforce documentation and/or tests that were made by the Margill
programmers/analysts who are not Salesforce experts. It is up to the user to ensure that data import and
export is done properly between systems. A change in the Salesforce software could lead to some of the
information in this document to become invalid and could lead to issues in the data exchange between
Margill and Salesforce.
It is highly recommended to consult a Salesforce expert in order to establish the Margill/Salesforce
connection.
The user uses this API at his own risk and Jurismedia assumes no responsibility for any loss of data,
unwanted gain of data, problematic exchanges of data and corruption of data.
If Salesforce is the primary data source, never change the Borrower's data directly in Margill without the
same data being updated in Salesforce since at the next import, the old Salesforce data will be imported
into MLM.
General concept
This Application Programming Interface (API) allows the automatic import (creation and update) of the
Borrower’s data from Salesforce (SF) to Margill. The creation and updating of data is done via a Windows
Service in almost real-time.
It is also possible to export data from Margill to Salesforce. Usually, data from Margill is very limited since
the Borrower data is entered into Salesforce. Exporting towards SF is often a summary of a few loan data

2.
(and not the Borrower data) such as current balance and next payment date and amount, for example.
Hundreds of other data could be extracted from Margill and exported to SF.
Loan versus Borrower concept
Margill Loan Manager (hereinafter MLM or Margill) is a “relational” database in which the focus is the
Loan, not the Borrower, as it is typically the case in Salesforce. So, even if a Borrower has three loans, only
one Borrower account should be present in Margill. Therefore, the software simply creates a link (relation)
between the Borrower and each of the loans.
There is no issue with importing SF data to MLM because at the moment, only the Borrower data can be
imported into MLM.
However, to export from MLM to SF, the data may relate to the Borrower or to the loan. When the
Borrower has only one loan, there are no issues since the relation is one to one. But what happens if the
Borrower has more than one loan? In SF, usually, only one account exists, that of the Borrower. If a custom
field exists in SF for the loan amount (or balance, or whatever), what about the second loan? This would
have to be discussed with a Salesforce expert if data was to be imported for this Borrower from MLM to
SF. MLM can export all data for all loans with Borrower ID and Loan ID as needed. It is then a matter of
discussing with the SF expert on how to configure SF in order to have access to this data by loan.
Borrower creation versus Borrower data update
If a Borrower is not already created in MLM, it will automatically be created with the Salesforce import.
Conversely, if a Borrower already exists in the MLM, its data will simply be updated according to the SF
export but on the condition that it has what is called a “Key”. This key comes from SF.
If the Borrower already exists in MLM but does not include the key, a new Borrower will be created, which
would be the wrong thing to do. The same Borrower would be listed twice in Margill, one with the key and
the other without the key. This, of course, is to be avoided.
Notion of “Key”
A Key allows the creation of a link between two systems or more in order to specifically identify
this person, this entity, this loan, etc. In Margill, three fields can be used as Keys:

3.
1) Borrower ID, automatically generated by MLM (this ID can be used as key only for
exporting towards Salesforce but not to import from SF since this ID will exist in MLM
only once the Borrower is created).
2) Borrower Unique Identifier 1 that can be renamed
3) Borrower Unique Identifier 2 that can be renamed
A key must always be unique; otherwise there will be a conflict. Two Borrowers cannot have
the same key.
Salesforce Key
The SF Key could be the “Id” field or a new custom field. This Id is found in the address of the
page (and there are queries to get the Ids in SF – see explanation below):
If a custom field were to be used as the Key, this field must have the characteristic of being
“unique” (no Borrowers could share the same “number” (or alpha-numeric code)). SF allows
you to give this particular characteristic to a custom field in Object Manager > General Options:
Using a Key other than the SF “Id” can be useful when this Borrower is present in many systems.
If you have a great volume of Borrowers in SF, it is possible that the same Id is given to two
Borrowers but with a different case (upper and lower case). In Excel (and other software), case
is often ignored resulting in two contacts having, for third-party software, the same key. An
“Account ID18” could be used which adds three more characters to the 15 existing (total of 18)
so that the case doesn’t matter anymore. You must create a custom field with a formula
(consult the SF Help section).

4.
Salesforce Key and its import into Margill
If a Borrower already exists in Margill, the SF Key must be imported manually into MLM for each
Borrower. We suggest importing via the Borrower “Global changes” in Margill via an Excel
sheet.
The SF Key will first have to be extracted from SF. Unfortunately, it is not that simple to extract
the SF Id. A SF expert should assist in this regard in order to extract the data from the field
which will serve as the Key and other data such as name, company, etc., in order to find the
right Borrower in MLM.
To extract several contact data in SF, do a “Data Export”.
A CSV file will be created:
This CSV will have to be converted into an Excel sheet (use the Text to columns feature):

5.
Once the file is saved in Excel, it will have to be reworked in order to have only two columns:
• Column A: Borrower ID from MLM (automatically generated by MLM) (or one of the
unique Borrower ID if already present – other than the one that will be used for the SF
Id of course…)
• Column B: SF Id
If hundreds or thousands of Borrowers already exist in MLM, it is suggested to export these
Borrowers from MLM and to use the Excel function “VLOOKUP” by using the name of the
Borrower as a “link” (in fact, acts like a key) in order to link the exported Excel sheet to the MLM
sheet.
Exporting Borrower data from MLM to an Excel sheet done like this: File > Borrowers >
Borrower selection > right mouse click:
Once the Excel sheet is completed (with Borrower ID from MLM and SF Id)…

6.
…use the Global changes and the Excel button in order to import the SF Id to the right Borrower.
From the moment of commissioning of the API, the new Borrowers will automatically be added
in MLM with the SF Id. Exceptions to this new Borrower import can be created in order to only
update data for the current MLM Borrowers (for example, SF contains Borrowers for whom the
loan has been refused and therefore need not be created in Margill).
Salesforce connection configuration
Only a Margill Administrator can configure the Margill/Salesforce API. Only a Salesforce user with access
to the “Console Service” should configure the Salesforce synchronized automated import /export service.
In Margill, go to System Settings (Administrators) > Special section, “Automated Imports” > “Borrowers
(Create and Update)” tab > select “Salesforce Synch” > Salesforce Settings:
This window will appear:

7.
Check “Enable Application Programming Interface (API) Features for Salesforce”. This way, the import and
export functions will be activated in MLM.
If you are in Test mode in Salesforce (Sandbox), choose the Sandbox mode, otherwise, choose Normal
mode. Beware, even in Sandbox mode, if you’re in live version of Margill, test data will be incorporated
into the live version, which is something that is not necessarily desired. It is suggested to create a separate
Margill Sandbox instance as well (contact Margill support).
Enter the Email address and/or the user name and password usually used to log into Salesforce, and the
Salesforce login token and press the “Save” button.
By clicking on the “Connection test” button, you will get the confirmation, or not, that you have correctly
entered the Salesforce account information.
Connection success
Connection failure - Message displayed is from Salesforce API
Troubleshooting and possible solutions for failed connection:
1- Try to connect directly into the Salesforce account. If that works, validate that the username and
password entered in the MLM configuration window are identical to those used for the direct
connection to Salesforce.

8.
2- Ask a Salesforce Administrator to Refresh the Security Token: Under Service > My personal
information > Reset security token. Once the new token is received by email, modify the Salesforce
API configuration window in MLM.
Token: In order to get a connection Token in Salesforce, follow the steps in “Generate an initial Access
Token”.
Automatic Borrower import/data updates in MLM
Start with the installation and configuration of the Windows MLM Service. An installation file separate
from the MLM installation file must be used to install the Service called: “MLM Import Service”. To find
out more on this topic, please consult this document which explains the installation and configuration of
the Service in detail: https://www.margill.com/margill-loan-manager/win_service-api.pdf
Once the Service is installed correctly, go to Tools > Settings > "Special" section > Automated Import.
This window will appear, allowing the configuration of the import from SF to MLM:
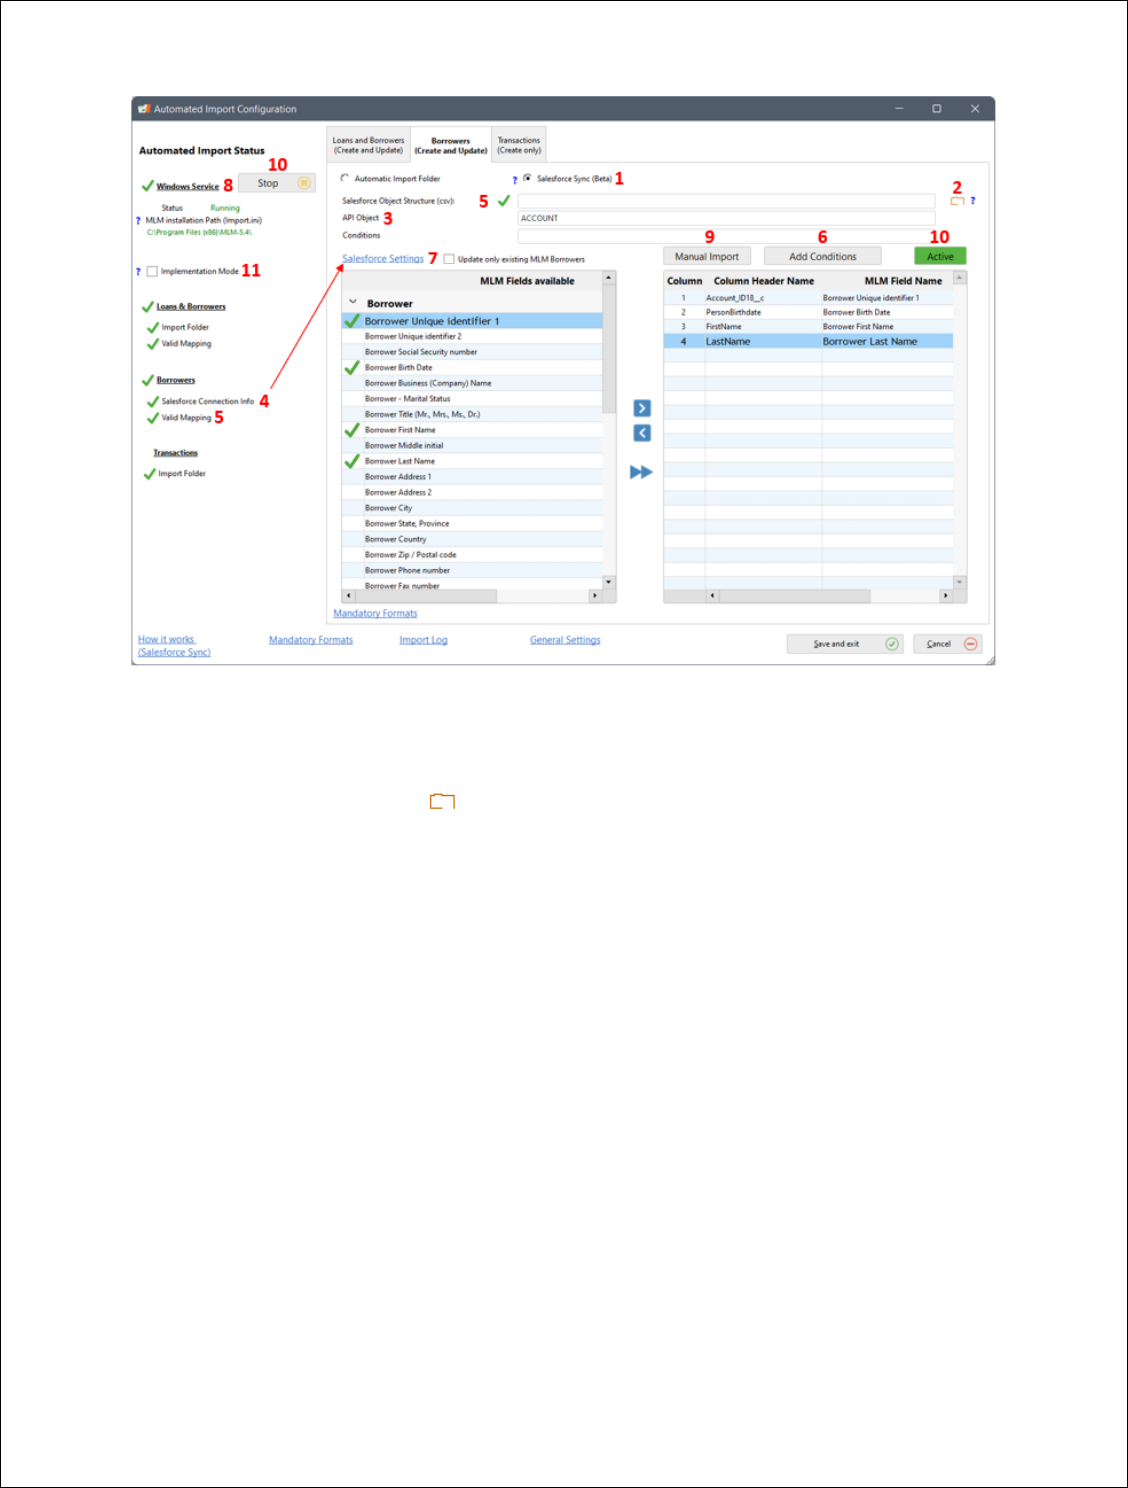
9.
The numbers hereafter correspond to the red numbers in the image above:
1. Choose the “Borrowers (Create and update)” tab. Select the option “Salesforce Sync”.
2. Click on the file icon on the right and select the .csv file that contains the variable names for the
Salesforce Object Structure. The .csv file must be closed in order to be used for the SF and MLM field
mapping.
Tip: In Salesforce, it is possible to export a file in .csv format containing all the data, by “Object” (see
the definition of "Object" below). This file contains, in the header, the names of all fields. This method
avoids transcription errors since even the upper and lower case is important in the field names This is
a fast and efficient method!
To export the list from Salesforce: Go to Setup > Home > Data > Data Export and click on “Export Now”
(ignore the Monthly Export Service):

10.
Choose the Object to export, click on “Start Export” (in our example: “Account”):
An email will then be send with the link to the Salesforce page containing the .zip file with the exported
data. Click on “Download” under “Action”:
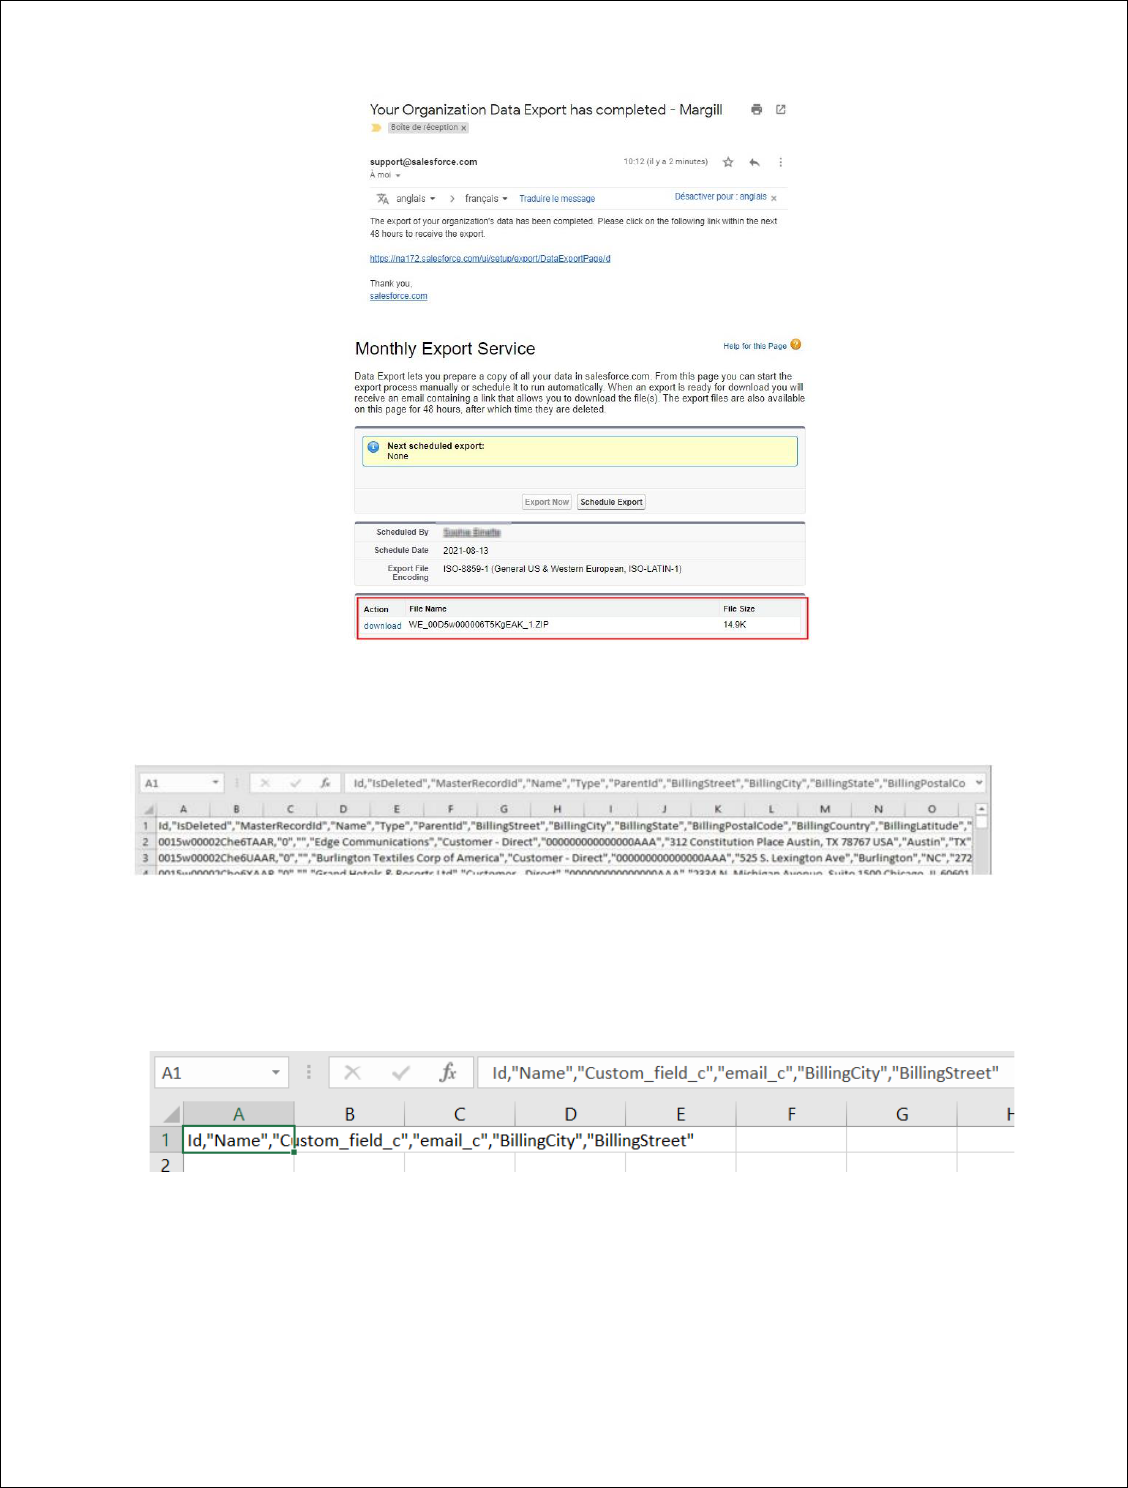
11.
A .csv file is automatically saved. Open in Excel and note that only the first line will be used for
mapping. You will have to delete all data in the following lines.
Afterwards, select the desired fields that should be imported to Margill. Delete the fields that are not
to be included in the automatic import. Keep the very important “Id” (with or without the quotation
marks) at the beginning of line 1 which will serve as the “Key” or the unique identifier between SF and
MLM.
.CSV file ready for MLM (5 data only will be imported/updated on top of the essential ID
3. For “API Object”, enter which database table the import data comes from. Make sure to enter the
Object name exactly as it appears in Salesforce, in the “Service Setup”.

12.
Definition of the "Object" concept in Salesforce: Objects are the database tables that store specific
data of your business in Salesforce. The list is available under Service Setup > User interface > Objects
and Fields > Object Manager.
Example:
Mapping
In the table to the left of the window, choose the variables and carry out the mapping between the
MLM fields and SF fields on the right by using the central blue arrows. It is critical to take into account
the format (text, currency, etc.) in order to match variables of the same type thus avoiding import
errors.
Make sure that the variables appear correctly in the left column. In this example, with a .csv in UTF-8
format, we obtain bad characters for the “Id” (left image) whereas in the right image, the “Id” appears
correctly.

13.
CSV UTF-8
CSV
Corresponding field names are in the “Field Name” column, not “Field Label”:
First Name and Last Name Fields
Usually, in Salesforce, only one field exists for the first and last name (variable “Name”). This is
unfortunate, as it is difficult to sort either by first or last name. A SF expert could help you create
two separate fields as it is the case in MLM.
If you cannot export the First and Last Names into MLM from SF, it is suggested to import the
SF variable “Name” into the MLM “Borrower Last Name” field and then to split the Name
imported from SF to First and Last Names via an Excel sheet. This operation would need to be
carried out only when new Borrowers are imported into MLM. The name splitting operation
becomes cumbersome so it is probably better to add First and Last names in SF or to keep the
full name in one MLM field, even if less "search friendly".
If you still wish to split…
To do this mass split, export the list of Borrowers (File > Borrowers) to Excel and re-import the
split column Excel sheet (use the Excel “Convert” function) with Margill’s “Global changes”.
It is important to keep the Borrower ID (the Key) in column A of the Excel sheet and then import,
one at a time, Last Name, First Name and Initials (which could be used to import the middle
name).
In the example below, the 2 first Borrowers could be divided. The other two are properly
entered in Margill:

14.
4. The “Automated Import Status” on the left of the window allow you to see if all the required
components are operational. The green check mark indicates that the Salesforce connection
information is present in the configuration window. If a red “X” appears instead, then click on the
“Salesforce Settings” link and the configuration window will appear allowing you to enter the required
connection information.
5. When all fields from the .csv file have been mapped, a green check mark will appear next to “Valid
Mapping” and to the right of "Salesforce Object Structure (csv)" even if the mapping file is no longer
displayed since it is no longer relevant once the mapping is complete.
6. The Salesforce API allows you to add Conditions to the queries to be sent to Salesforce in order to
import only a subset of Salesforce database into Margill. Configure these Conditions by clicking on the
button. This window will then appear and will allow up to 5 Conditions:
15.
Enter the Salesforce field names as they appear in the Object Manager including the "__c" if it is a
custom field and including capitals. The conditions entered must be numeric or date types. For
text fields, only an "=" operator can be used. You cannot use operations such as > or < on text
fields because the tool does not support the "Contains" or "Begins with" constraints for the
moment.
There is no notion of parentheses (for the moment). The SQL operation priorities are taken into
consideration here; that is, AND takes precedence over OR. For example, if you enter: Condition A
or Condition B AND Condition C, the query will be executed as follows: Condition A or (Condition
B AND Condition C).
Once the Conditions are entered, press on “Save and Exit”. To cancel all conditions, press on
“Cancel” and then “Save and Exit”.
A preview of the query will be visible in the “Conditions” field:

16.
7. The “Update Existing Borrowers Only” option must be selected when it is required to only update
the existing Borrowers in MLM. This way, the number of non pertinent Borrowers are excluded
from Margill.
If this option is checked, during the import, a log message will be generated advising that other
Borrowers are available in SF. This can become an irritant. Moreover, the mechanism initially
imports all Borrowers contained in SF (data added or modified since the last import or in the 29
days preceding the initial import) and then abandons those which are not already present in MLM,
thus using more system resources. This can become significant if you have thousands of contacts
in SF but only hundreds in GPM. It might be more advantageous to use Conditions (see 6. above)
instead of checking this option. A method of identifying MLM Borrowers must be available in SF
and this condition added in the MLM SF setup.
8. If the Windows Service is active and a green check mark precedes it, you only need to click on
“Save and Exit”. Every few minutes (10 minutes), a query of the selected Salesforce Object is
performed and Borrowers are automatically created or their data updated in Margill without any
further intervention.
9. It is possible to test the manual import without starting the Import service. The “Manual Import”
button will import data in your actual database. The test is a real import which will have an impact
on your database. It is often suggested to create a “Sandbox” in Margill to test this tool.
10. The "On hold / Active" button allows you, especially when first implementing the API, to stop the
SF query in order to avoid generating errors every 10 minutes when the API is not fully functional.
This stops only the Windows Service for SF, not the Service for other APIs as is the case with the
"Stop" button on the left that stops the Service for all APIs:
11. Implementation Mode

17.
By checking this box and forcing a restart of the Service, a special temporary Log will be created in
the Service installation folder, often in "C: \ Program Files (x86) \ MLMImports", file
_LogDebug.txt.
The Log allows, in case of initial problems, to obtain certain parameters that you can send to the
Margill team in order to facilitate the initial Service setup.
During this test, if you connect to Salesforce, the time between connections will be reduced to 2
minutes (instead of the usual 10 minutes) in order to facilitate implementation testing.
When exiting the current MLM section: Tools> Settings> Automated Imports, this
"Implementation Mode" feature will be automatically canceled and you will need to restart the
Service.
First import / Update Data from Salesforce to Margill
On the very first automatic import only, to reduce the risk of importing too much, possibly irrelevant, data
into Margill, only data modified or added in SF within the last 24 hours will be imported into Margill. If this
import is conclusive, it is suggested to use the "Manual Import" button which will import the data modified
or added in SF 29 days before the current date.
By default, information that has been updated in Salesforce more than 29 days from the current date, will
not be updated in MLM. For example: borrower Julie Marks was created on September 1, 2021 in SF. Then,
her email address was changed on October 15, 2021.
Scenarios of the original contact import:
• Import to Margill on September 30: Julie will be created and on October 15, the email address will
be updated correctly.
• Import to Margill on October 1: no import on October 1 (but creation of Julie during the October
15 automatic operation because of her email changed).
• Import to Margill on October 30: Julie will be created and email will be updated.
• Import to Margill on November 16: Julie not imported because her data dates back to October 16
and thus too old.
Thankfully, for the first import, it is possible to add a “Condition” (see explanation below) according to the
“LastModifiedDate” field. The date and time formats are critical for query. The format must be ISO 8601
as shown here:
YYYY-MM-DDTHR:MN:SCz
T = Time
HR = hour
MN = minute
SC= second
z = Greenwich Time, England or UTC
For example, we wish to import data from SF but only data from January 1, 2021 at 0:00, plus one second:

18.
2021-01-01T00:00:01z
In SF, when one field in a contact is updated, this date becomes the last update date and so if some changes
were not imported to Margill because of the 29-day constraint, the update of any other field for the
Borrower in SF would update the entire Borrower data in Margill including the changes older than 29 days.
For the next import, the date and time of the last import will be saved in MLM and therefore the contacts
to import or data to update will be made from that date and time to the current date and time of the new
import. Everything becomes transparent as long as Margill’s Windows Service is running. It is important to
receive the activity logs, especially the error messages. One of the errors would be if the Margill Service
is not running. You can receive activity by email or SMS (General Settings link at the bottom of the
Automatic import configuration window).

19.
Import logs
The MLM Import log will report errors and/or new imports or updates to MLM.
It is recommended to activate, especially at the start of implementation, the option that allows to receive
all alerts by email or SMS and once the system works properly, to receive only the errors. This is suggested
because “Information” type alerts are not emailed with Errors even if no Borrowers are updated or
imported. In this example, the data was more than 29 days old and therefore all ignored, hence the
importance or receiving all alerts or at least checking the Import log regularly.
To receive the alerts, go to “General Settings”:

20.
Export data to Salesforce – Automatically via Background Night tasks
Almost any data from MLM can be exported automatically at the desired frequency from MLM to
Salesforce. The data to export must be chosen in the report “Record List”:
Steps:
1) Choose the desired fields to be exported to SF. Any data related to the Borrower (Co-Borrowers and
Guarantors), to the Loan (amounts, calculations, etc.), to the Creditor, to the Employer and to any
Custom fields can be exported from Margill. However, Salesforce must still be able to import this data
to the right location. Usually, the Borrower, not the loan, is at the heart of SF while for MLM, the loan
is the central focus.
The field selection to be exported is done in the “Record List” in order to create an export template.

21.
2) The correspondence between the MLM fields and the SF fields must be made as well as the definition
of the Key and the SF Object.
It is critical to establish the Key (see box higher above) which is used to identify the Borrower in both
MLM and SF. The Key in MLM can be “Borrower ID” generated automatically by the MLM or Borrower
“Unique Identifier 1 or 2” which can be renamed.
If you look to the right of the table containing the reporting fields, you will see columns that allow you
to configure the SF export:
The “Object name for Export via API” option will appear when the first “API Variable Name” is entered.
Usually, the Salesforce “Id” should be checked under “Third-party Key” since the SF Id will be the key
and this key will be the MLM Borrower Unique Identifier 1.
As for the “Object name for Export via API”, enter which database table the import data comes from
(often "ACCOUNT").
Save the export template.

22.
3) Setup of Background Tasks (Overnight Tasks)
Create a new Overnight Task (Tools > Settings > Administrator tab > General Settings tab > Automatic
and Overnight Tasks) > button. Create a new Automatic report.
In the Automatic Report Setup window, the “Export To Salesforce” checkbox will be available once the
export template (step 2) is completed. The connection to SF must also be functional.
When selecting this box, instead of producing a report, data included in the report will be exported
to Salesforce.
Many date options are available depending on your specific needs and the field types (calculated
fields or not, how often you need data and for what period of time).
Here are a few examples:
• Balance at current date: no date required since the system will automatically take the balance on
the report production date, therefore you can choose Full Report.
• Next Due Payment (Date): same as previous by finding the next “Due Pmt”, despite the date.
• Next Due Payment (Amount): same as previous.
• All custom fields: these fields do not take in consideration the dates so Full Report can be used.
• Balance date end of report: a date must be entered in order to obtain the balance on this date.
• Accrued interest (for period): you must choose a period (interest for the day, the previous day,
last month?)
It is strongly recommended to read the ? in order to understand the dates, including the “Current Date
Mode”.
Once the Dates are chosen, you need to select the Records (not the Borrowers) to be included in the
report. Either include All Records or choose based on an Advanced Querry.

23.
It is imperative to understand that a Record (loan) is not a Borrower. The Unique ID of the Record
should be a different ID than the one of the Borrower unless the Borrower has only one loan. In this
case, the Unique ID (the Key) of the Record could be the same as the one of the Borrower (usually the
“Id” in Salesforce). If a Borrower has several loans, then you have to be more imaginative in SF since
in SF, the Borrower, and not the loan, is at the center of everything, unlike Margill.
Frequency of data export to SF
The user chooses the frequency of exports to SF. This export is done by the Windows Task Scheduler. This
Windows tool launches the “MLM_Overnight_tasks.exe” file without the need of human intervention and
at the desired time.
See the text pertaining to the Overnight Tasks on margill.com: https://www.margill.com/margill-loan-
manager/overnight-tasks.pdf and for more precise information, see the full User Guide > Automatic
background Tasks (overnight tasks) > Automatic Reports.
Export task details performed in the Overnight Tasks are available in the Automatic / Overnight Tasks LOG.
It is highly recommended to verify these on a regular basis (especially at the start of implementation) to
make sure that the data are exported to SF. To consult the log, click on Open LOG.
These details can also be included in an extern log file (Tools > Settings > Security tab – accessible to ADMIN
only), when the checkbox “Log Overnight Task Events” is selected.
It is also critical to make sure in SF, that the proper data is imported as it should be.
Common errors and troubleshooting
Here is a list of potential problems. Depending on your needs, several solutions are available to you, and
the examples below are provided for illustration purposes only:
• The first and last name of the Borrower is in one unique field, while in MLM, they are separated.
24.
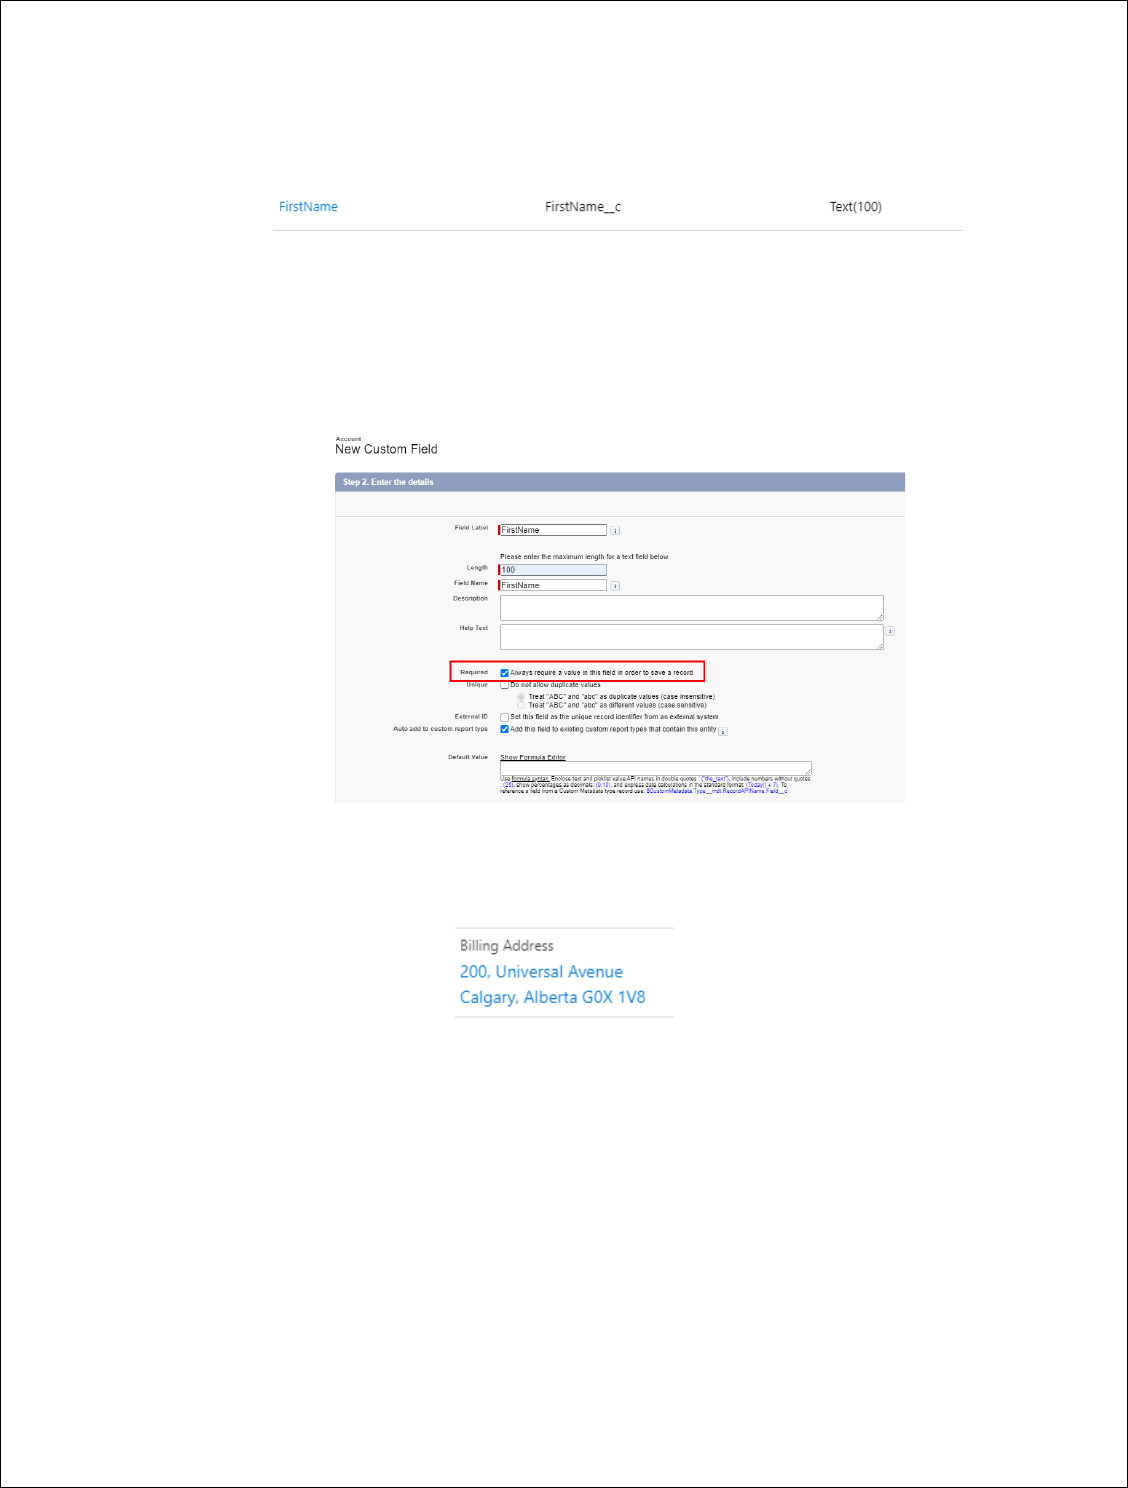
o Possible solution: Create a custom field in Salesforce via the “Service Setup console“ called
"Firstname__c".
o Since you must enter a value in at least one of these 3 fields in MLM: Name, First name or
Company, by creating a custom field “Firstname__c”, by selecting the option "Always require
a value in this field in order to save a record", potential errors in the future will be avoided
(this could probably be done for Name instead in SF).
• The Borrower's address is not imported.
o It is probably because of the Salesforce format:
o The complete address seems to be grouped in one single field in Salesforce, while in MLM,
separate fields are available in order to enter the address, the city, the state or province and
the zip or postal code. Use these fields instead: "MailingStreet","MailingPostalCode", etc., to
import these data separately.
• Other reasons why some fields are not imported:
o The SF field is Read-only. You must change this attribute in SF.
Consult a Salesforce specialist

25.
Salesforce is highly evolved software with countless functions. It is strongly suggested to consult a
Salesforce expert to help with the integration with the Margill Loan Manager.
Last updated: February 14, 2022
