
Smart Import Tool
User Guide

WWW.DATAART.COM THIS DOCUMENT IS THE PROPERTY OF DATAART. 1
Contents
Contents ................................................................................................................................ 1
Overview ........................................................................................................................ 2
Select the object for import ............................................................................................. 3
Upload a file ................................................................................................................... 4
Validate and import the data ........................................................................................... 5
Matching columns ................................................................................................... 7
Data validation ........................................................................................................ 9
Lookup values ....................................................................................................... 11
Data import ........................................................................................................... 14
Download results ................................................................................................... 15
Contact us .................................................................................................................... 16

WWW.DATAART.COM THIS DOCUMENT IS THE PROPERTY OF DATAART. 2
Overview
The Smart Import Tool allows you to import data from a broad range of file formats, including
CSV, XLSX, XLS and other, into your Salesforce Org with ease and efficiency in three steps:
1. Select the object for import,
2. Upload a file with your data,
3. Validate and correct the data in the online editor, import it and view results.
The first two steps only require a click, but the last step doesn't look as easy as the previous
two, does it? This is true! This is the place where the magic happens.
The Smart Import Tool is designed to simplify and streamline the process of importing dirty
data that may contain typos, extra spaces, and names of related records instead of their ID.
Unlike other import tools that work in the background and require you to prepare a carefully
verified CSV file, the Smart Import Tool lets you see and fix the errors in your data before
importing it. And the best part is, the import results appear on the same screen, so you can
make corrections and try again without interruption. Forget about having to download CSVs
with import errors, correct them in a spreadsheet editor, and start the import process all over
again. With the Smart Import Tool, you can get the results faster and with less hassle.

WWW.DATAART.COM THIS DOCUMENT IS THE PROPERTY OF DATAART. 3
Select the object for import
First, open the Smart Import Tool tab. If the tab is not available in App Navigation Items, you
can find it in the App Menu.
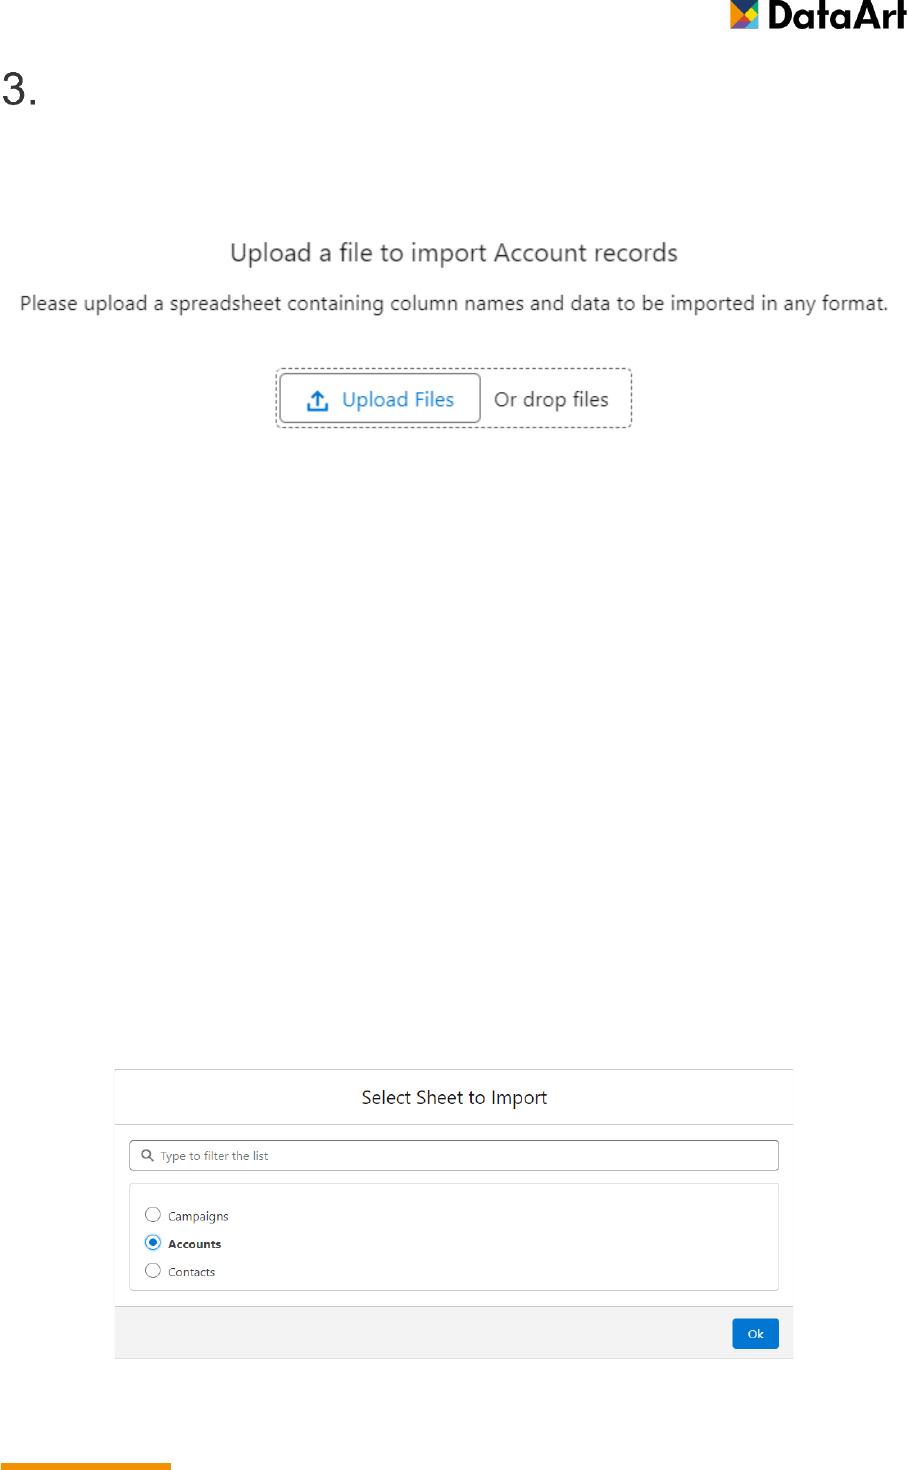
Once the app is opened, it provides a list of objects to choose from. The first step is simple:
just click the button with the desired object.
The list of objects is shortened for convenience, so you don't have to look for what you need
in a long list. If you don't see the object you need, ask your Admin to add items to the list or
change their order. The tool supports all standard and custom objects, so if you have access
to the object, it will not be difficult to fulfill your request.
WWW.DATAART.COM THIS DOCUMENT IS THE PROPERTY OF DATAART. 4
Upload a file
The second step is simple too – just click Upload Files button and select the file you need to
upload or drag-and-drop it into the area.
Prepare your file before uploading it. It should have the required data and column headings.
Ensure the heading row is at the top with no text above it to avoid confusion. Use the same
names as the Salesforce object fields (field API Name or Label) for the columns. This will
make field mapping easier. Do not worry if the document contains empty columns or rows,
the tool will automatically remove them.
The tool supports a wide range of file formats:
• Comma Separated Values (.csv)
• Microsoft Excel 2007 Worksheet (.xlsx)
• Microsoft Excel 97-2003 Worksheet (.xls)
• OpenDocument Spreadsheet (.ods, .fods)
• Lotus 1-2-3 Spreadsheet (.wk1, .wk3)
• iWork 2013+ Spreadsheet (.numbers)
• Quattro Pro Spreadsheet (.qpw)
And many other, including TXT, HTML, RTF. If using CSV or text files, prefer UTF-8 encoding
to preserve national characters. If you are using Google Sheets, click File → Download →
Comma Separated Values (.csv) menu item to export the document into a local file first.
If the uploaded document contains multiple sheets, you will be asked to select one of them.

WWW.DATAART.COM THIS DOCUMENT IS THE PROPERTY OF DATAART. 5
Validate and import the data
As soon as the file is uploaded, its contents open in the online editor. The columns are
automatically matched to the fields of the selected Salesforce object, if possible, and the data
is validated - you can see cells with colored borders.
At the top left corner, you can see a header that indicates the name of the uploaded file and
the object into which it is imported. So even if you get distracted, it will be easy to see what
exactly you are doing.
At the top right corner, you can see a few buttons which are available for clicking at any time
while working with the document:
• Import – import all the rows in the document into the selected object.
• Download – download and save a file with all the changes made.
• Reset – reset the current document and go to the 1
st
step, to start a new import.
At the bottom left corner, you can see statistics: the number of rows in the document, the
number of errors highlighted, etc.
The central place is occupied by the table with your data. Column widths adjust automatically
to provide the best appearance, but you can always change the width by dragging the
separator between the header cells.
All cells, including header cells, are editable. Just click and start typing. Depending on the
field type matched to the column, a simple input field can be replaced with a special one.
For example, cells of the picklist type open with a drop-down list. You can select an option or
start typing to filter the list. Even if you have not completed the name of the option, you can
simply press Enter and the first suitable option will be selected. You can also use Up/Down
arrow keys to navigate throw the options.

WWW.DATAART.COM THIS DOCUMENT IS THE PROPERTY OF DATAART. 6
Another example is a cell of type TextArea. To view or enter a multi-line comment, simply
drag the bottom right corner to expand the cell. Since pressing Enter saves the cell and
moves to the cell below, to start a new line in TextArea, use Ctrl-Enter or Alt-Enter shortcuts.
When editing a cell, pressing the following keys will finish editing:
• Enter – save the current cell and start editing the cell below (if exist).
• Shift-Enter – save the current cell and start editing the cell above (if exist).
• Tab – save the current cell and start editing the cell on the right (if exist).
• Shift-Tab – save the current cell and start editing the cell on the left (if exist).
• Escape – cancel editing without saving the changes.

WWW.DATAART.COM THIS DOCUMENT IS THE PROPERTY OF DATAART. 7
Matching columns
To import data, the columns in the document must be mapped to the corresponding fields of
the object in Salesforce. The Smart Import Tool does this automatically right after uploading
a file. If you were careful when naming the columns in your document, you will not have to do
anything extra.
The unmapped column is coloured grey. You can see “none” label in the second line.
For comparison, the mapped column is coloured green. In the second line you can see the
name of the mapped field and its API name in brackets. When you hover your mouse over
the field name, additional information appears.
When matching columns, the Smart Import Tool looks up the corresponding field by field
label or API name. It uses fuzzy logic so that minor typos do not interfere with matching.
Review that all columns are mapped to correct fields after uploading a file. If a column is not
mapped, it is ignored during import. If it also needs to be imported, you need to map it. To do
this, you can edit the column heading. The Smart Import Tool will try to find a match
immediately after editing.
You can also change the field mapping using the column menu – сlick on the triangle icon on
the right side of the column header. Select "Map a field..." to find and assign a field in a pop-
up window. In the pop-up window for selecting a field, you can start writing it to filter the list,
then select an option and click the Ok button. Otherwise, select the "Unset the field" menu
item to reset the mapping of the mapped column.

WWW.DATAART.COM THIS DOCUMENT IS THE PROPERTY OF DATAART. 8
Please keep in mind that only fields that you can edit are offered for selection. So, a read-
only field cannot be mapped to a column.
The Smart Import Tool checks that there are enough columns in the document to import into
the selected object. So, after every field mapping change, it checks
• all required fields which do not have default value are mapped.
• controlling fields are mapped if dependent picklist fields are mapped.
• duplicate fields are not mapped (a field must be mapped to a single column).
In case of error, an error message appears in the top of the screen.
In such cases, you should check the field mapping. If it turns out that the uploaded file did not
contain a required field, or you would like to add additional information, you do not need to
add a column to the file and upload it again. You can add a column directly in the online
editor. Just select "Add column left" or "Add column right" item from the menu of any column.
And then fill in the column cells.
It is ok if some columns are left unmapped and used as notes. However, if such columns are
not needed, you can remove them by selecting "Delete column" menu item in the column
menu.

WWW.DATAART.COM THIS DOCUMENT IS THE PROPERTY OF DATAART. 9
Data validation
The Smart Import Tool validates every cell value of mapped columns according to their field
type. It also re-validates the values after mapping columns or editing the cells. The tool
automatically removes spaces at the end of values, which often appear when filling out an
Excel sheet. Other checks cause the cell to be highlighted so you pay attention. There are
three types of highlighting depending on the importance.
1. Information message – green border.
These are changes that the tool makes automatically. In this way it corrects the spelling
of picklist options, date format, etc. You can hover your mouse over the triangle in the
lower right corner of the cell to see exactly what was done.
2. Warning message – yellow border.
In this way, the tool marks cells whose data could technically be imported, but you might
prefer to correct it. For example, it could be a non-existent option in a non-restricted
picklist. When imported, it will be added as a new inactive option. If this is what you
expect, you can ignore the message. Otherwise, select another option.
Similarly, it marks invalid URLs, empty cells, which will be replaced with the default value
during import, and other cases.
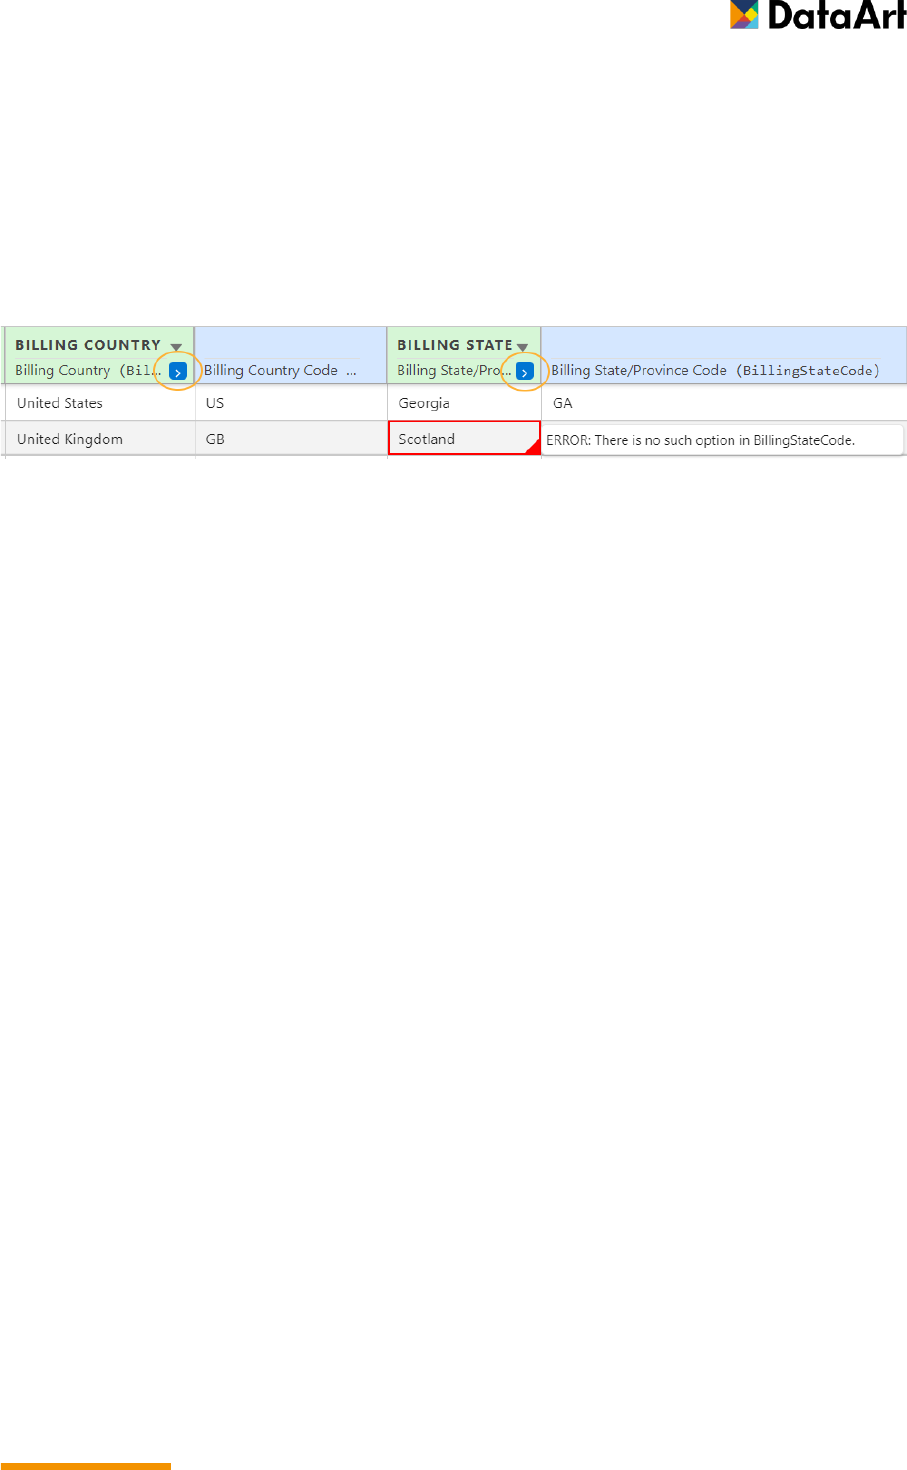
3. Error message – red border.
This marks the cells that definitely need to be corrected before the import. If you try to
import data with such value, you will receive an error from Salesforce. There can be
many examples, such as an invalid date, number, email, non-existent option in a
restricted picklist. Or, as shown in the picture, an inappropriate option in the dependent
picklist.
WWW.DATAART.COM THIS DOCUMENT IS THE PROPERTY OF DATAART. 10
If the "State and Country/Territory Picklists" are enabled in your org, Country and State fields
of complex Address fields must correspond to the specified values which are selected from
the drop-down list. The Smart Import Tool considers Country and State values like
dependent picklists. That is, the State/Province value must correspond to the selected
Country according to the settings. For example, there are no states in the United Kingdom by
default, so you cannot specify Scotland as a state.
In the picture you can also see additional columns that contain the country code and state
code; they can be expanded by clicking on the icon in the column header. You cannot edit
the values in these columns directly, they are for information only.
Despite validation being implemented for all field types, the tool cannot consider restrictions
imposed by business logic, such as Validation Rules, Duplicate Rules, checks implemented
in Flows, or Apex Triggers. So, a row that is completely valid from the tool’s point of view
may still need correction.

WWW.DATAART.COM THIS DOCUMENT IS THE PROPERTY OF DATAART. 11
Lookup values
Objects in the Salesforce are often related to each other, and when filling out one record, it is
often necessary to indicate references to records of other objects. Typically, when importing,
you must specify the Id of the record to which the current one refers. This can be done a little
easier with the Smart Import Tool. You can specify names or other identifiers instead of Id,
and then find the corresponding records in bulk mode.
Let us look at an example. When creating contacts, you usually need to specify their
company. When importing, you can do the same. However, since you provided company
names, they are not valid Ids, and the corresponding cells are highlighted in red.
You need to find the corresponding accounts and fill in their Id. Select "Lookup values..." in
the column menu to open a pop-up window. All unique names from the corresponding
column are pulled into the table in the window. Since the Ids have not yet been found, the Id
cells are highlighted in red.

WWW.DATAART.COM THIS DOCUMENT IS THE PROPERTY OF DATAART. 12
Above the table you can see a simplified query that will be executed for the search. You can
click on the blue words to change, for example, the field where to search or use a substring
match instead of an exact match. The next line specifies a condition to filter only one record.
By default, the search is performed using the Name field, which is likely in most cases. So,
you can just click the Search button and get the results.
As a result, the ID column is filled. An additional "Search Status" column also appears, where
you can see that the result has been filtered. Since all Ids are found, now you can click Apply
button to transfer the received Ids to the main table. There they appear in an additional read-
only column, which can be expanded.
Eventually, the imported contacts will be linked to the specified accounts.

WWW.DATAART.COM THIS DOCUMENT IS THE PROPERTY OF DATAART. 13
If your search in the Lookup Values window does not return any results, try changing the
search conditions and repeating the search. You can repeat the search as many times as
you like in the same window. In this case, only those records which Id has not yet been found
will be searched. If changing the conditions does not help, you may need to adjust the
Search Value in the cell. In this case, the corrected value will also be transferred to the main
table. Finally, if all else fails, you can find the desired entry in some other way and put its Id
into the ID column directly.
The Lookup Values technique can be applied to any lookup or reference fields. For example,
you can import data for multiple owners at once. Just add an Owner column and indicate the
names of the people who will own each entry. Using the Lookup Values window, you will find
the Id of their users to indicate in OwnerId field.
The next point is intended more for administrators or advanced users. The Smart Import Tool
simplifies working with Record Types if they are defined in the object to be imported. You can
simply specify their Names or Developer Names, and the tool will automatically fill in their Id
in an additional column without having to lookup values.

WWW.DATAART.COM THIS DOCUMENT IS THE PROPERTY OF DATAART. 14
Data import
After correcting and enriching the data, it is time to import. Make sure the Errors indicator in
the footer is zero and click "Import" button.
To speed up import, the Smart Import Tool splits rows into batches, with 200 rows per batch
by default. There is a progress indicator to monitor the process. Import errors on one line do
not affect others. So, the whole operation may be partially successful. And as a result, you
will receive a message like this one.
The import adds two columns to the document in the online editor: "Id" to the very first
column with the Ids of successfully imported rows, and "Import Status" to the last column
with the details of the import of each row.
If the row was inserted successfully, you will see "Item Created" in green. Otherwise, the
error will be shown in red. Analyze errors if there are any, and if it is possible to fix them by
correcting the data for import, you can do this directly in the same document. After the
correction, you can click the "Import" button again, and as many times as you like. This will
only import rows that have not yet been successfully imported. So, eventually, all the rows
can be imported, although not on the first try.
Although the Smart Import Tool has no limits on the number of imported rows at a time,
obviously working with huge documents in the online editor will not be comfortable. You may
notice some lag in the interface depending on your computer's performance. In such cases, it
is recommended to split the data into smaller files.

WWW.DATAART.COM THIS DOCUMENT IS THE PROPERTY OF DATAART. 15
Download results
Immediately after uploading a file and opening the document in the online editor, you can
click "Download" button to save the document into a new file with all the corrections made by
the Smart Import Tool. And after importing, you can download successfully and
unsuccessfully imported rows into separate files – use the Download button menu.
The resulting files contain all columns, including hidden columns for lookup fields, as well as
"Id" and "Import Status" if an import attempt was made.
By default, the Smart Import Tool exports documents in universal СSV format. If your
organization uses MS Office, Open Office, Lotus 1-2-3, or other office suits and you want to
have files in their format, ask your admin to change the downloading files format.

