
TTab
Table of Contents
Notes writer Pro
User Guide

TTab
Table of Contents
Chapter 1 Overview
1.1 What can you do with Notes Writer Pro: ................................................................................................... 5
1.2 Main document manager user interface: ................................................................................................... 5
1.2.1 Locations of files ...................................................................................................................................... 6
1.2.2 Edit your file ........................................................................................................................................... 7
1.2.3 Searching your files .................................................................................................................................. 8
1.2.4 Sorting Toolbar ........................................................................................................................................ 9
1.2.5 File Management ..................................................................................................................................... 9
1.2.6 Creating new documents ....................................................................................................................... 10
Chapter 2 Main Settings
2.1 How to change the color theme? ............................................................................................................. 11
2.2 How to enable or disable the Automatic Backups?.................................................................................. 12
2.3 How to enable Wi-Fi ?............................................................................................................................... 13
2.4 How to adjust the text to speech read aloud speed? .............................................................................. 14
2.5 How to disable the apple pencil? ............................................................................................................. 15
2.6 How to set up security pass code? ........................................................................................................... 16
2.7 How to install new true type fonts? ......................................................................................................... 17
Chapter 3 Annotating PDF and Pencil Notes
3.1 Annotating and Mark up Toolbar ............................................................................................................. 18
3.2 Additional Markup Tools .......................................................................................................................... 19
3.3 How to draw shapes in your document? .................................................................................................. 20
3.4 How to insert images, stamps, signatures and sketches? ........................................................................ 21
3.5 How to insert comments? ........................................................................................................................ 22
3.6 How to make audio notes? ....................................................................................................................... 24
3.7 Using the scissors tool .............................................................................................................................. 25
3.8 Inserting Math equations: ........................................................................................................................ 25
3.9 How to use saved annotations? ............................................................................................................... 26
3.10 Using the Undo and Redo ....................................................................................................................... 27

TTab
Table of Contents
Chapter 4 Editing Text Notes
4.1 Using the keyboard toolbar ...................................................................................................................... 28
4.2 How to define text styles? ........................................................................................................................ 31
4.3 How to set page margins and line space? ................................................................................................ 33
4.4 How to insert images and photos? ........................................................................................................... 34
4.5 Using Headers and Footer ........................................................................................................................ 35
4.6 How to export and share your documents? ............................................................................................. 36
Chapter 5 Document Editor Managing PDF and Pencil Notes
5.1 How to add new pages to a document? ................................................................................................... 37
5.2 How to delete a page? .............................................................................................................................. 38
5.3 How to Re-arrange pages? ....................................................................................................................... 39
5.4 How to duplicate a page? ......................................................................................................................... 40
5.5 How to export selected pages? ................................................................................................................ 40
5.6 How to rotate selected pages? ................................................................................................................. 41
5.7 How to copy and paste pages from other apps? ...................................................................................... 41
Chapter 6 Filling In Forms and Signing Documents
6.1 Supported form formats: .......................................................................................................................... 42
6.2 Filling in Form Fields ................................................................................................................................. 42
6.3 Adding your Signature .............................................................................................................................. 43
6.4 Add Customized stamps ........................................................................................................................... 44
Chapter 7 Exporting and Sharing your Documents
7.1 Supported file formats for exporting Text notes and Pencil Notes .......................................................... 45
7.2 Export documents from the document browser:..................................................................................... 45
7.3 Mailing documents and folders: ............................................................................................................... 46
7.4 How to print a document? ........................................................................................................................ 48
7.5 How to merge PDF and Pencil Note files? ................................................................................................ 48
Chapter 8 Sync Documents across Devices
8.1 Using On iCloud Location: ......................................................................................................................... 49
8.2 How to sync documents using Dropbox, Box or Google Drive? ............................................................... 49
8.3 How to use the In Files app to send documents to Notes Writer? .......................................................... 50

TTab
Table of Contents
8.4 How to edit “in-place” documents using the “In Files app” location? ..................................................... 51
Chapter 9 Templates
9.1 What is a template in Notes Writer? ........................................................................................................ 52
9.2 How to use the “Templates” location to create new documents? .......................................................... 52
9.3 How to add my own templates in Notes Writer? ..................................................................................... 54
9.4 How to re-order the templates in the “template browser” view? .......................................................... 55
Chapter 10 Projects
10.1 What are the tree-like projects in Notes Writer? ................................................................................... 56
10.2 How to create new blank projects in the “Projects” location? .............................................................. 56
10.3 How to import Scrivener projects via Dropbox? .................................................................................... 57
10.4 How to sync a project via Dropbox? ....................................................................................................... 57
10.5 How to add new documents to a project? ............................................................................................. 58
10.6 How to create new folders in a project? ................................................................................................ 58
10.7 How to rearrange files and folders in a project? .................................................................................... 59
10.8 How to search words and documents inside projects?.......................................................................... 60
10.9 How to Zip a project and email it?.......................................................................................................... 60

Chapter 1 Overview
Overview
Notes writer is a handy solution to all your documentation needs. A wide range of people from students,
teachers, writers and journalists to doctors, lawyers and business professionals can use Notes Writer. It keeps
your document safe and accessible from anywhere. It is also a great a way to go green and save our planet by
going paperless.
1.1 What can you do with Notes Writer Pro:
You can use Notes writer to type, write, edit, format, annotate, and draw.
You can sign documents and fill in forms in pdf.
You can keep your work organized in files, folders and sub folders.
You can sync and share all your work from iCloud, AirDrop, Email Dropbox, Box and Google Drive.
1.2 Main document manager user interface:
Tap on the Notes Writer Pro application to see the home screen.

Chapter 1 Overview
1.2.1 Locations of files
Access files on your device
Access or create files on your cloud storage
Access files saved in folders
Access to predefined project modules
Access saved files in the library
Use these apps to enhance your notes
Access files that are automatically sent to cloud storage
Access deleted files from here
Access to predefined page sizes and styles
Use to make drawings
Easily access your files in different locations on iPad or on various cloud
locations.

Chapter 1 Overview
1.2.2 Edit your file
You can edit, modify or rename your document.
How to rename your file
1. Select the location of your file
2. Tap on On My ipad to access files on your device.
3. Next screen appears.
4. Click on the Select button on top right corner.
1. All your files on the device will show
up.
2. Tap on the required file.
3. Blue border appears around the
selected folder.
4. Tap on the tool icon in the
menu bar.
5. A drop down menu will appear.
6. Select Rename from the menu.
7. Keypad will appear under the file
name.
8. Type the new name using the
keypad.
9. New name will appear under the
picture of the folder.
10. Tap Done on the keypad to save the
new name.

Chapter 1 Overview
1.2.3 Searching your files
You can search your files from different locations on Notes Writer Pro.
1. To search files
2. Select the location.
3. Pull down the screen to see the search bar.
4. Type in the file name to see your file.

Chapter 1 Overview
1.2.4 Sorting Toolbar
Pull down from the top of the screen to see the sorting tool bar. Use this toolbar to sort your files according to
date and title.
1.2.5 File Management
1. Tap on the Select button.
2. Choose your file to send in mail, share, or
edit.
Click here to email, share, send to cloud,
print or create pdf of your document.
Click on the folder icon to move your file to
another location on your device or cloud.
Click here to duplicate a folder or file.
Click on the trashcan icon to delete a
file.
Click on the tool icon to rename a file or
email a file in zipped format.

Chapter 1 Overview
1.2.6 Creating new documents
You can create new documents in Notes writer in two ways.
1. Using keypad to type or pencil icon to write your note.
2. Copying your documents from other locations.
To create a note:
1. Open the Notes writer app.
2. Tap on a location on your homepage.
3. Tap on the icon on top right of your device.
4. Select one of the following options to create a note.
To write your notes choose one of
these options.
To get files from other locations
choose one of these options as
needed to copy your file.

Chapter 2 Main Settings
2.1 How to change the color theme?
To change the color theme of your notes:
1. Open your Notes Writer pro application.
2. Tap on the top right corner of your device
screen.
3. A drop down menu will appear.
4. Tap on Settings.
5. A new window will appear.
6. Choose a color theme from the given options.
7. After tapping on the color of your choice, the
color of the screen will change.
8. Here Pink is selected as shown in the picture.

Chapter 2 Main Settings
2.2 How to enable or disable the Automatic Backups?
1. Open your Notes writer Pro.
2. Tap on the top right of the menu bar.
3. Tap on Settings option.
4. A new window will appear.
5. Slide your finger from right to left on green button next to Automatic Backup
6. Automatic backup is now turned off.
7. To turn on automatic backup Slide your finger from left to right on the button.
8. The button will turn green, indicating that Automatic backup is on.
9. Tap on Done to save and go back.

Chapter 2 Main Settings
2.3 How to enable Wi-Fi ?
To transfer files using Wi-Fi:
1. Open your Notes Writer Pro application.
2. Tap on on the top right corner of your
screen.
3. A drop down menu will show up.
4. Tap on Settings.
5. A new window will show up.
6. Slide the button next to Wi-Fi Files Transfer
from left to right.
7. The button turns green indicating that now
your Wi-Fi files transfer is enabled.
8. Tap on Done to go back to the home screen.

Chapter 2 Main Settings
2.4 How to adjust the text to speech read aloud speed?
To change the Text- to-Speech Speed:
1. Open your Notes Writer Pro application.
2. Tap on on the top right corner of your screen.
3. A drop down menu will show up.
4. Tap on Settings.
5. A new window will show up.
6. At the bottom of the window you will see the
option to change the Text-to-Speech Speed.
7. Move the button with your finger from left to right
to increase the speed or right to left to decrease the
speed.
8. Tap on Done to go back.

Chapter 2 Main Settings
2.5 How to disable the apple pencil?
To disable the apple pencil:
1. On your iPad, tap on .
2. On the settings screen, tap on Bluetooth.
3. A menu will appear on the side.
4. Tap on next to Apple pencil.
5. A new window will appear.
6. Tap on Disconnect.
7. The apple pencil is now disconnected.
8. To re-pair or reconnect the apple pencil tap on the name of the device
again in the Bluetooth menu.

Chapter 2 Main Settings
2.6 How to set up security pass code?
To set up security pass code:
1. Open your Notes Writer Pro application.
2. Tap on on the top right corner of
your screen.
3. A drop down menu will appear.
4. Tap on Set Up Security Pass code.
5. A new window will open up.
6. Type your password.
7. You will be prompted to re-enter your
password.
8. Re-enter your password.
9. Your security pass code is now set up.

Chapter 2 Main Settings
2.7 How to install new true type fonts?
First copy your TrueType Font (the .ttf or .ttc extension file) to your iPad device using the iOS Files app.
To install new TrueType Fonts:
1. Open Notes Writer Pro application on
your device.
2. Tap on icon in the top right
corner of your home screen.
3. A drop down menu will appear.
4. Tap on Install your TrueType Fonts.
5. Once installation is complete you are
ready to select from various fonts to
use into your Notes Writer Pro.

Chapter 3 Annotating PDF and
Pencil Notes
3.1 Annotating and Mark up Toolbar
1. Open Notes Pro application.
2. Select the location On My iPad .
3. Tap and open the PDF document or pencil note you want to annotate.
4. Use the tools in the tool bar to annotate.
5. Your annotation is automatically saved.
6. Tap on the back arrow on top left corner to go back.
Tap to add text box,
comment box, underline
or strike out
Tap to add
shapes
Pencil
Pen
Highlighter
Tap to turn off
the default
finger tool
Use to cut
and paste
Eraser
Tap to select color
for pen, pencil and
highlighter
Tap to find
additional tools

Chapter 3 Annotating PDF and
Pencil Notes
3.2 Additional Markup Tools
1. Open Notes Pro application.
2. Tap and open the file to you want
to annotate.
3. Tap on the sign on the tool bar.
4. A drop down menu appears with
additional tools.
5. Select a tool to annotate or
markup your document.

Chapter 3 Annotating PDF and
Pencil Notes
3.3 How to draw shapes in your document?
1. Open the PDF document
you want to annotate.
2. Tap on icon.
3. A drop down menu of
shapes appears.
4. Select a shape to add into
your document.
5. Drag your around the text
you want to add the shape
to.

Chapter 3 Annotating PDF and
Pencil Notes
3.4 How to insert images, stamps, signatures and sketches?
1. Open the document you want to annotate.
2. Tap in the menu bar.
3. A drop down menu will appear.
4. From the drop down menu make a selection
to insert in your document.
For example: To insert a stamp
1. Tap Stamp in the menu.
2. A new window with various stamp selections
appears.
3. Tap on a stamp to insert in your document.

Chapter 3 Annotating PDF and
Pencil Notes
See example in the picture below.
3.5 How to insert comments?
There are two ways to add comments while annotating a document.
Method 1
Stamp
Sketch
Signature
1. Open the PDf or Pencil Note
you want to annotate.
2. Tap on in the menu bar.
3. A new sub menu appears.
4. Tap on icon and tap again
on the place you want to
comment.
5. Keyboard appears.
6. Type in your comment.

Chapter 3 Annotating PDF and
Pencil Notes
Method 2
1. Open the document you want to annotate.
2. Tap on in the menu bar.
3. Drop down menu of additional tools appear.
4. Tap on Comment.
5. A new window titled Note appears.
6. Tap in the white space.
7. Keyboard will appear.
8. Type your comments.
9. Tap on Done to save your comments.

Chapter 3 Annotating PDF and
Pencil Notes
3.6 How to make audio notes?
Note: You can drag the
comment box to your
desired place on the
document.
1. Open the document you want to annotate.
2. Tap on in the top menu bar.
3. A drop down menu of additional tools appears.
4. Tap on Record.
5. Speaker icon appears on the screen.
6. Find the red record button at the bottom left of the
screen.
7. Tap on the red round button and start recording
audio note.
8. Tap on the blue square button to stop recording.
Chapter 3 Annotating PDF and
Pencil Notes
3.7 Using the scissors tool
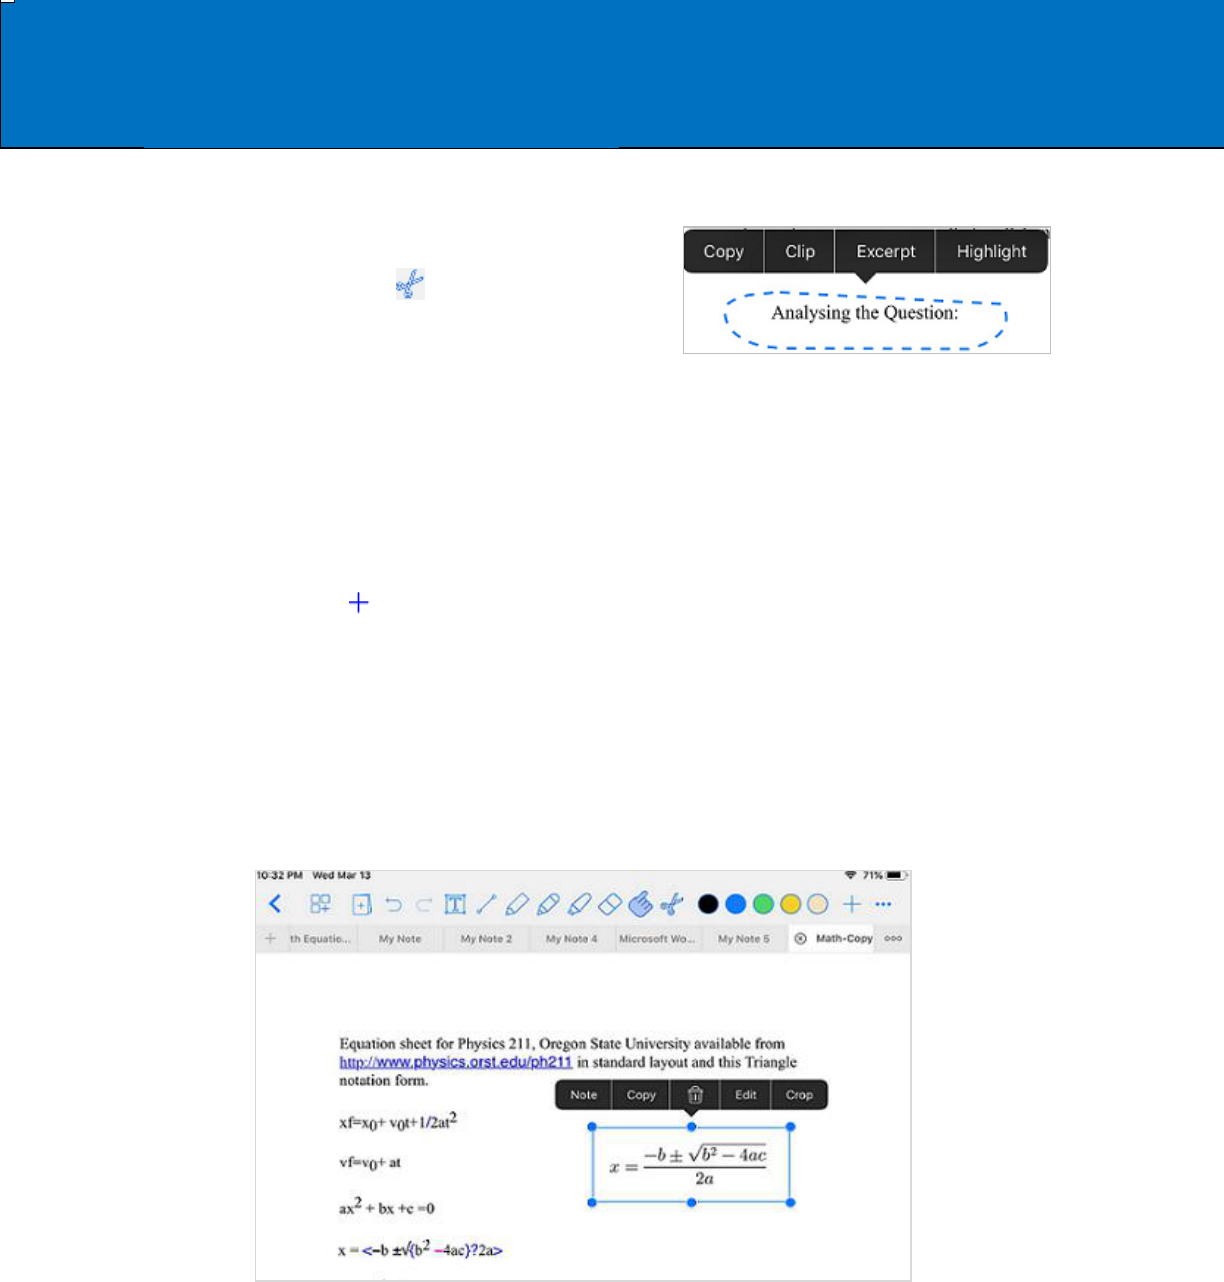
3.8 Inserting Math equations:
1. Open the document you want to markup.
2. Tap on the icon the menu bar.
3. A drop down menu appears.
4. Tap on Math Equation.
5. You will reach a new page consisting of math equations.
6. Select your equation.
7. Tap on Done.
8. You will see the equation on your document page.
1. Tap on the scissor in
the menu bar.
2. Then slide your finger on
the text you want to edit.

Chapter 3 Annotating PDF and
Pencil Notes
3.9 How to use saved annotations?
First you have to save your annotations to use them again.
To save your annotations,
1. Tap on the annotation you
want to save.
2. A tool bar appears.
3. Tap on Copy.
4. Tap on on the right of the
top menu bar.
5. Tap on Saved Annotations in
the drop down menu.
6. A new page of Saved
Annotations appears.
7. Tap on Paste.
8. Your annotation is saved for
future use.
To use Saved Annotations:
1. Tap on on the right of
top menu bar.
2. Tap on Saved annotation
in the drop down menu.
3. Tap on the annotation you
want to use again.
4. The selected annotation
appears on the note.
5. Drag it to place where
required.

Chapter 3 Annotating PDF and
Pencil Notes
3.10 Using the Undo and Redo
Undo and redo are great features in Notes writer Pro. You can use undo to delete or reverse an action.
You can redo if you want back the deleted text or object. Redo reverses undo.
You can find the undo and redo icons on the top menu bar.
Redo
Undo
Saved annotation

Chapter 4 Editing Text Notes
4.1 Using the keyboard toolbar
1. Open your application.
2. Tap on On My iPad.
3. Tap on an existing text note to open.
4. Tap on the open note to edit.
5. A keyboard appears on the screen.
6. On the top portion of the keyboard is keyboard
toolbar which is a shortcut to many styling options.
Note: Click on to see extended tool bar.
Chapter 4 Editing Text Notes
Tap on to see options to design your page.

Chapter 4 Editing Text Notes
c
• Tap on to see options to styling
your note.
• Tap on to use selections
to write your notes.

Chapter 4 Editing Text Notes
4.2 How to define text styles?
You can design your notes with several text styles available in Notes Writer Pro.
To style your texts:
1. Open a new text note or an existing text note.
2. Double tap to select the text you want to style.
3. Tap on on the top menu bar.
4. A drop down menu of style selections appears.
5. Select from one of the given styles or choose your
own font style, size and color.
6. You can also bold, italicize or underline your text.

Chapter 4 Editing Text Notes
Tap on Styles to see more style
options.

Chapter 4 Editing Text Notes
4.3 How to set page margins and line space?
1. Open your text note.
2. Tap on the top of your
text note.
3. A drop down menu appears.
4. Tap on Layout.
5. A new drop down menu
appears.
6. Now you can select page
margins and line spacing.
7. 7. Tap on and – signs to
increase or decrease
spacing, indent and margins.

Chapter 4 Editing Text Notes
4.4 How to insert images and photos?
To insert an image:
1. Open your text note.
2. Tap and place the cursor on the position
you want to insert the picture.
3. Tap on in the top menu bar.
4. A drop down menu appears.
5. Tap on Insert Image.
6. You will now reach the photo gallery on
your iPad.
7. Select a picture from the gallery.
8. The selected picture will now be seen on
your note.
To insert a photo:
1. Open your text note.
2. Tap and place the cursor on the position
you want to insert the photo.
3. Tap on the on the top menu bar.
4. A drop down menu appears.
5. Tap on Take Photo.
6. The camera on your device opens.
7. Tap on button on the screen to
take picture.
8. Tap on Use Photo on the bottom right of
the screen.
9. Photo is now inserted in your note.

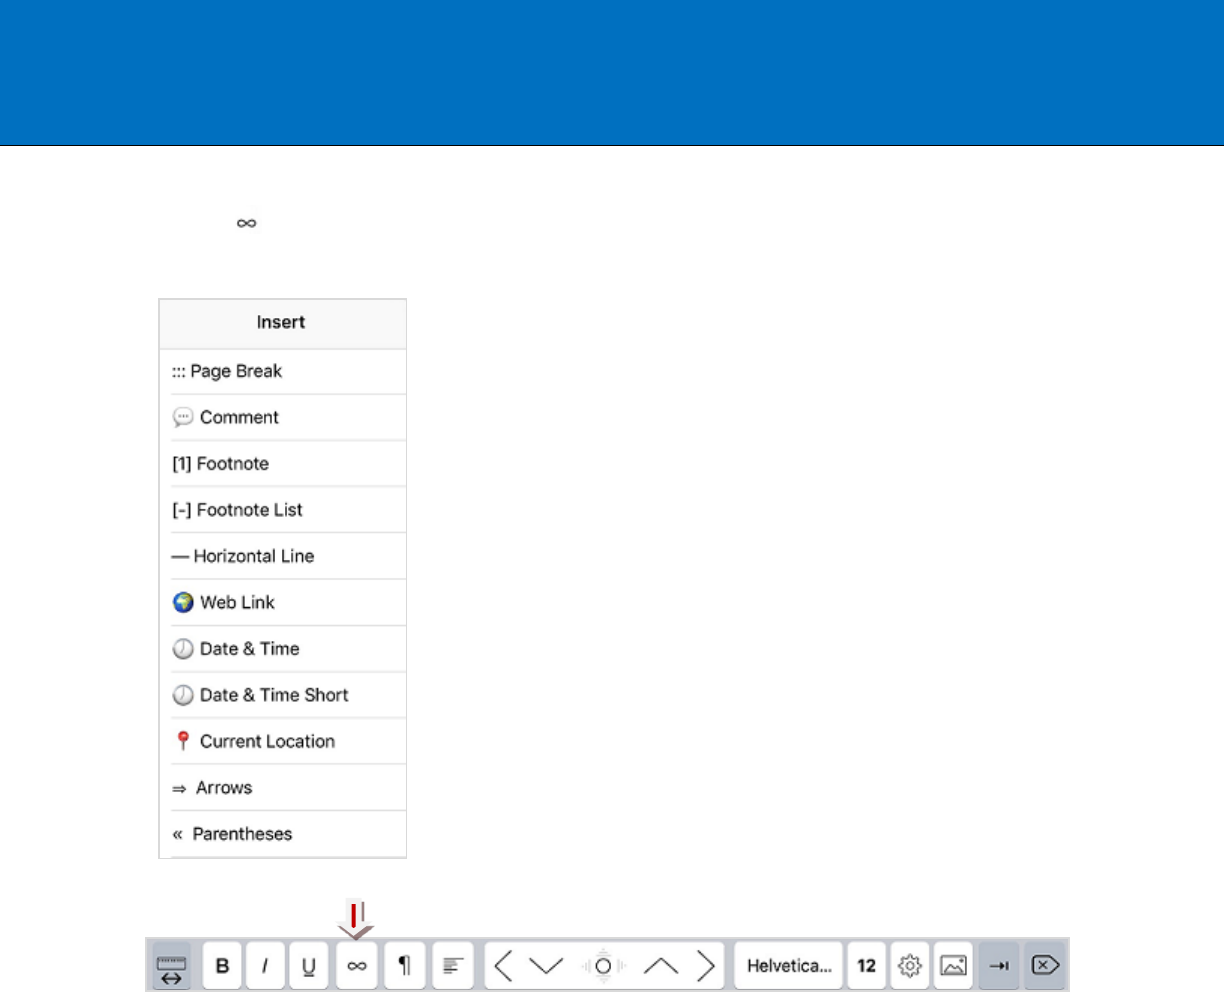
Chapter 4 Editing Text Notes
4.5 Using Headers and Footer
1. Open your text note.
2. Double tap on the screen to start
editing.
3. Tap on on the top menu bar.
4. A list of items to be inserted
appears.
5. Tap on Header and Footer.
6. A new page of header and footer
styles appears.
7. Add header text in the grey area.
8. Select font size, color, margin and
alignment for header.
9. Tap on Show Header Preview to see
the style.
10. Tap on Footer and repeat as above
to add footer.

Chapter 4 Editing Text Notes
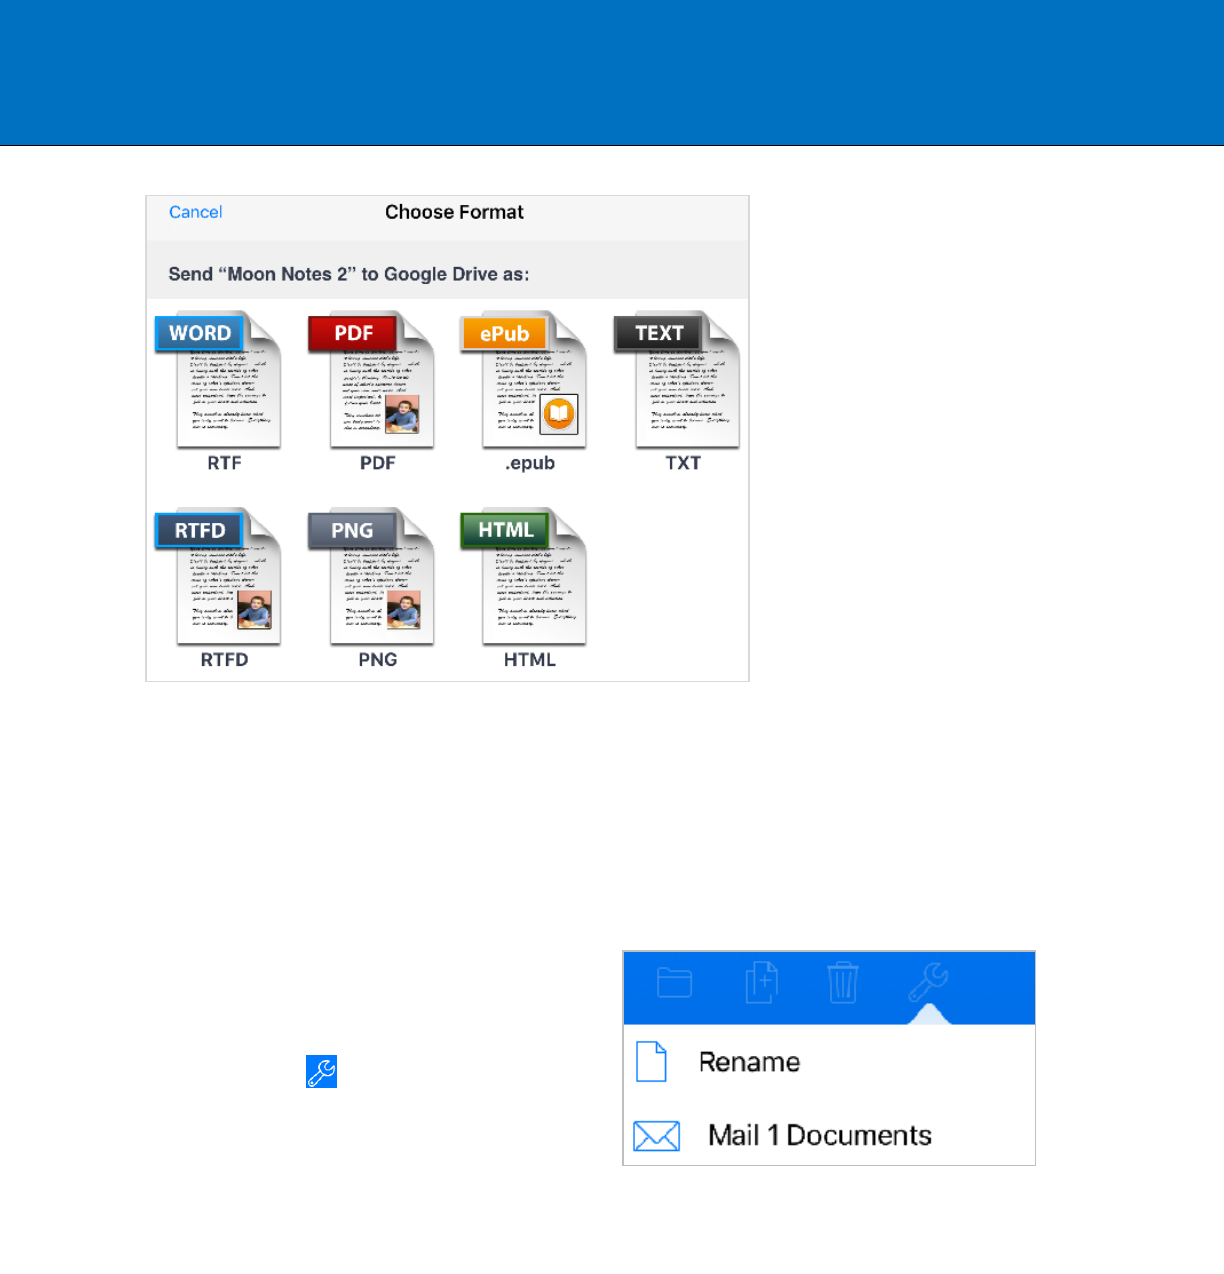
4.6 How to export and share your documents?
1. Open your text note.
2. Tap on on top right of the menu bar.
3. A list of locations appears.
4. Select the location to which you want to
send your document.
5. A new window appears asking you to
choose the format in (Word, PDF, ePub,
Text, RTFD, PNG, HTML) which you want
to send the document.
6. Select the format in which you want to
send your document.
7. To send files to Dropbox, Google Drive,
WebDAV, iCloud, you will be asked to log
into your account before sending the
document.

Chapter 5 Document Editor
Managing PDF and Pencil Note pages
Notes Writer pro allows you to edit your documents in several ways. You can add, delete, re-arrange and
duplicate your document pages. It also allows you to export your document to different locations on your iPad
or to cloud.
5.1 How to add new pages to a document?
Method 2
Method 1
1. On your iPad location open
the PDF or Pencil note want
to edit.
2. Tap on button.
3. A drop down list appears.
4. Select Blank page.
5. A blank page is inserted after
the last page of the
document.
Note: To add a page in a
certain, place scroll the
screen up or down. You will
see the option Add After
Page number.
• Tap on the option to add
page after the desired page
number.

Chapter 5 Document Editor
Method 2
5.2 How to delete a page?
5.4
1. Tap on the in the top menu bar of your open PDF or Pencil
note.
2. Tap on Edit on the top right corner of the screen.
3. Tap on the page you want to delete.
4. Tap on the in the menu bar.
5. The page is now deleted.
1. On your iPad location open the PDF or Pencil
note you want to edit.
2. Tap on grid view button.
3. All the pages are now in grid.
4. Tap on in the top menu bar.
5. A drop down menu appears.
6. Tap on Add New Page.
7. A new menu of page style options appears.
8. Select page background, background color, page
size and the number of pages to be added.
9. Tap on Add at the bottom of the page.

Chapter 5 Document Editor
5.3 How to Re-arrange pages?
1. Tap on the button in your open PDF
document.
2. You will see all the pages in grid layout.
3. Tap on Edit on the top right corner of the
screen.
4. Hold and drag the page to the desired
location on the screen.
5. Tap on Done to save the changes.

Chapter 5 Document Editor
5.4 How to duplicate a page?
5.5 How to export selected pages?
1. Tap on grid view button
in the top menu bar
of your open PDF or Pencil
note.
2. Tap on Edit on the top
right corner of the new
screen.
3. Tap on of the top left
corner of the menu bar.
4. A drop down menu
appears.
5. Tap on Import Document.
6. A new window appears.
7. Tap on the location of the
document to import.
1. Tap in the top menu bar of your open PDF or
Pencil note.
2. Tap on Edit on the top right corner of the screen.
3. Tap on a page to select or tap on to select all the
pages at once.
4. Tap on to duplicate the selected page or pages.

Chapter 5 Document Editor
5.6 How to rotate selected pages?
5.7 How to copy and paste pages from other apps?
1. Tap in your open PDF document.
2. You will see all the pages in grid layout.
3. Tap on Edit on the top right corner of
the screen.
4. A new menu appears on the top.
5. Tap on a page to select or tap on
select all page at once.
6. Tap on to rotate pages to
landscape view.
1. Open the PDF files on your iPad Location.
2. Tap and select Copy from Files/iCloud Drive.
3. You will reach the Files app.
4. Select the location like Dropbox or iCloud Drive,you want to copy the
file from.
5. Tap on the file you see on the right side.
6. The file is automatically copied to your PDF files to your iPad location.

Chapter 6 Filling in Forms and Signing Documents
6.1 Supported form formats:
Notes Writer supports PDF Acroforms to fill in and sign forms easily on your iPad. You can use your signature to
sign documents, forms and contracts.
6.2 Filling in Form Fields
1. Open the PDF Acroform
you want to fill in.
2. Tap on the text field to be
filled in.
3. The field gets highlighted.
4. Type your name and
address in the highlighted
field.
5. Tap on a box to check the
box.

Chapter 6 Filling in Forms and Signing Documents
Filling in date and time:
.
6.3 Adding your Signature
1. Tap on the top right corner
of the screen of the open pdf
document.
2. Drop down menu appears.
3. Tap Date &Time in the menu.
4. Current date and time appears
on the top of the page.
5. Drag the date box to the date
field in the form.
6. To change or delete the date
and time, tap on the field and
move the cursor to delete and
type in the new date and time.
1. Tap on the top right corner
of the screen of the open pdf
document.
2. Drop down menu appears.
3. Tap on Signature in the drop
down menu.
4. A pop up window appears.
5. Sign with your finger or apple
pencil in the blank space.
6. Tap Done.
7. Signature box will appear on
the form.
8. Drag the signature box to the
signature field in the form.

Chapter 6 Filling in Forms and Signing Documents
Storing Signature
6.4 Add Customized stamps
1. Follow the steps 1 to 5 for
Adding Signature.
2. Tap Store Signature.
3. Your signature is stored for
future use.
Note: You can store several signatures
by tapping and following the steps
1 to 3 and choose one to fill in the
form by tapping on the desired
signature.
1. Tap on your PDF document to open it.
2. Tap on icon.
3. A drop down menu appears.
4. Tap on Stamp in the dropdown menu.
5. A new menu of stamps appears.
6. Tap on Custom Stamp.
7. Type your on text to make your custom
stamp.
8. Tap on Color to change color of the
stamp.
9. Tap on the color wheel to select your
color.
10. Tap on the color bar to select the right
shade of your chosen color.
11. Tap on Create Stamp to go back to the
previous window.
12. Tap on Add to add the stamp to your
document.
13. Drag the stamp to reposition at the
desired location.
14. Tap on Add to create your custom
stamp.

Chapter 7 Exporting and Sharing your Documents
7.1 Supported file formats for exporting Text notes and Pencil Notes
Notes writer Pro acts as a great tool to convert your documents into a format of your choice. Before exporting
your documents to other file locations on your iPad or cloud drives or even mailing, you can choose to change
the format of your document into PDF, TXT, HTML, RTF and ePub.
7.2 Export documents from the document browser:
1. Open your document location.
2. Tap the Select button on top
toolbar.
3. Tap the document you want to
select.
4. Tap the button
5. Tap the location you want to
send your file to.
6. A menu of formats appears.
7. Tap on the format in which you
want to send the document.
8. You will have to log into your
Dropbox, Google Drive, Box or
WebDav account to send your
document.
Chapter 7 Exporting and Sharing your Documents
7.3 Mailing documents and folders:
How to mail a document?
1. Open the document browser.
2. Tap on Select in the top menu bar.
3. Tap on the document you want to
send in mail.
4. Tap on button on the top menu
bar.
5. Tap on Mail document.
6. Type the recipients email address
and tap on Send to send the
attached document.

Chapter 7 Exporting and Sharing your Documents
How to mail a folder as a Zip file:
1. Open your PDF documents
browser.
2. Tap Select in the top tool bar.
3. Tap on the folder you want to
mail.
4. Tap on button in the top
menu bar.
5. Tap on in the drop down
menu.
6. Type the recipients email
address in the new window.
7. Tap on Send button.
8. The PDF folder is emailed as a zip
file.

Chapter 7 Exporting and Sharing your Documents
7.4 How to print a document?
7.5 How to merge PDF and Pencil Note files?
1. Tap on Select in your document
browser.
2. Tap on the document you want to
print.
3. Tap on button.
4. A dropdown menu appears.
5. Tap on Print in the dropdown
menu.
6. Choose your printing options, like
the number of copies you want to
print.
7. Tap on Print to print your
document.
1. Tap on Select in your PDF
documents browser.
2. Tap on the documents you
want to merge.
3. Tap on button.
4. Tap on in the drop
down menu.
5. The selected documents
come together in one file.

Chapter 8 Sync documents across Devices and Apps
8.1 Using On iCloud Location:
Notes writer allows you to sync iCloud across your iOS devices and computers. When you create or copy a
document or folder in iCloud in Notes Writer application, you can access the document or folder from another
device too by syncing the two devices. To sync two devices open your same iCloud account on both the devices
like your iPhone and iPad. Any edits made in the document on one device will be automatically updated on the
other device.
8.2 How to sync documents using Dropbox, Box or Google Drive?
1. Tap On iPad in Locations.
2. Tap on button.
3. Tap on Copy from Dropbox in the drop
down menu.
4. A new window appears.
5. For the first time you are asked to login to
Dropbox.
6. Allow Notes Writer to access your files and
folders in your Dropbox.
7. Tap the file you want to import.
8. The document is copied.
9. Tap on the document.
10. Tap on button.
11. Tap Sync Now-Dropbox.
12. Any edits done in the document will
automatically be synced in Dropbox.
.

Chapter 8 Sync documents across Devices and Apps
8.3 How to use the In Files app to send documents to Notes Writer?
You can use the Files app to import /export or copy from any file provider installed on your iPad, like Dropbox,
Google Drive, Box etc. To install Dropbox, One Drive etc.
For example to import files from Dropbox via In Files App:
1. Install Dropbox.
2. Open Files app.
3. Tap Edit button and add
Dropbox option.
4. Open the Notes Writer
and select On My iPad
location.
5. Tap and select Copy
from Files/iCloud Drive.
6. Tap Dropbox.
7. Tap the file you want to
import.
8. The file is copied to On
My iPad location.
Note: You can also send documents to other apps. Select your
document and tap button. Select Send to App option.

Chapter 8 Sync documents across Devices and Apps
8.4 How to edit “in-place” documents using the “In Files app” location?
Editing documents in-place means that you can use other apps on your device to modify the files within Notes
Writer without duplicating them first as long as the other app supports in-place editing as well. You can use in-
place mode in In Files app to edit external documents from location like Dropbox, iCloud Drive, etc. If, the
other app doesn’t support in-place editing then copy the document.
.
1. Open In Files app in Locations.
2. Tap on the location you want to use, like
iCloud Drive, Dropbox etc.
3. Tap to open the file you want to edit.
4. The open file is now ready to edit in its place.

Chapter 9 Templates
9.1 What is a template in Notes Writer?
Notes Writer provides templates that are preset designs with a format that can be used for generic documents
like forms or resumes. You can choose from cards, calendars, forms and papers which are ruled, have various
background designs and graphs.
9.2 How to use the “Templates” location to create new documents?
1. Tap to open Templates in locations page.
2. In the template browser tap on the category of template you want to use
for Cards, Calendars, Forms, etc.
3. In Papers category, you have various page designs options to choose
from. You can select from circular, graph, round, square etc.
4. Tap on the page you want to use.
5. The page is automatically copied in to your iPad location as a text
document where you can make edits in the page.

Chapter 9 Templates

Chapter 9 Templates
9.3 How to add my own templates in Notes Writer?
To add your own template, you simply copy any RTF, PDF or Markdown file into Templates folder. It will
automatically become a new template to choose from.

Chapter 9 Templates
9.4 How to re-order the templates in the “template browser” view?
Templates are alphabetically ordered. To re-order templates in your choice of order, just rename them with a
number and a letter as the first two letters on the title.
For example, go to the “Templates” location, open the “Papers” folder then “Writing & Note-taking” subfolder. There
you can find the “Note Lined” template, tap the name to rename it then type “1 A Note Lined”. This name will make it
the first in the list. See attached screenshot. You can use names like “2 A Lined” or “3 A Doublelined” to move them to
the second and the third place.

Chapter 10 Projects
10.1 What are the tree-like projects in Notes Writer?
Notes Writer provides a special feature in projects where projects can be developed in a tree-like hierarchy.
This feature enables you to develop, design and access any document at any hierarchical level individually in
the project. This means you can start to design your project even before you actually begin to write the project.
10.2 How to create new blank projects in the “Projects” location?
Tap Projects on Locations page.
Tap + on the top right corner of the
screen.
Select New Project in the drop down
menu to create a new blank project.

Chapter 10 Projects
10.3 How to import Scrivener projects via Dropbox?
10.4 How to sync a project via Dropbox?
1. To sync Dropbox with Notes
writer:
2. Open your iCloud browser.
3. Tap on settings button.
4. Tap on Settings in the drop down
menu.
5. A new window appears.
6. Swipe your finger from left to
right on the button next to Sync
Projects with Dropbox.
7. The button turns green
indicating that sync is turned on.
1. Tap Projects on Locations
page.
2. Tap + on the top right
corner of the screen.
3. Select Import Project from
Dropbox in the drop down
menu to create a new blank
project.

Chapter 10 Projects
10.5 How to add new documents to a project?
10.6 How to create new folders in a project?
1. Tap the project you want to
use.
2. Tap on the top menu bar.
3. Tap the type of document you
want to select from the
dropdown menu.
4. A new document is added.
5. Rename the document in the
pop-up window.
1. Tap to open the project you want
to use.
2. Tap in the top menu bar.
3. Tap New Folder in the dropdown
menu.
4. A new folder is added.
5. Rename the new folder in the
pop-up window.

Chapter 10 Projects
10.7 How to rearrange files and folders in a project?
1. Open the project you want to work on.
2. Tap Edit on the top right corner of the screen.
3. Tap and hold the document you want to rearrange until it
turns black.
4. Now drag it to the desired position.

Chapter 10 Projects
10.8 How to search words and documents inside projects?
10.9 How to Zip a project and email it?
1. Open your project you
want to work on.
2. Tap the loupe button .
3. In the pop-up window,
type the text you want to
search for.
4. You will see the results in
the window itself.
In this picture, the word how
has been searched. The search
results are shown across all the
documents in the project.
1. Open project location.
2. Tap Select.
3. Now tap on the project
you want to mail.
4. Tap on .
5. Tap Email this Folder to
mail the zipped project.
