
CREST SHOWER SYSTEMS W: www.crestshowers.co.nz E: sales@crestshowers.co.nz P: 0800 40 40 42
1
AVA
WALK IN
INSTALLATION
INSTRUCTIONS

CREST SHOWER SYSTEMS W: www.crestshowers.co.nz E: sales@crestshowers.co.nz P: 0800 40 40 42
2
AVA WALK IN
INSTALLATION
INSTRUCTIONS
NOTE: Read and understand all instructions before installing shower.
GENERAL SHOWER INFORMATION
• Due to weight of panels and base, 2 people may be needed to install shower.
• Walls must be plumb to a 2-3mm tolerance where shower is to be installed.
• Floor must be square to wall.
GLASS SAFETY
• Keep glass standing upright.
• Always sit glass on a padded surface i.e. polystyrene.
• Take extra precautions with edges of glass panels.
• If toughened safety glass hits a hard surface or is hit by a hard object, it may shatter or compromise
the integrity of the glass.
• It is recommended that safety gloves and glasses are worn during installation.
PARTS LIST
INCLUDED
1. Glass Panels
2. Channel Extrusion Kits
3. Installation Kit
4. Shower Base
5. Easy Clean Waste OR S-Trap Waste
& Channel Drain
6. Silicone & Adhesive
7. Hardware
NEEDED
1. Caulking Gun
2. Level
3. Masking Tape
4. Drill
5. Screw Driver
6. Spray Bottle with Soapy Water
7. Paper Towels
8. Tape Measure
AVA HINGED DOOR/ /

CREST SHOWER SYSTEMS W: www.crestshowers.co.nz E: sales@crestshowers.co.nz P: 0800 40 40 42
3
AVA WALK IN
INSTALLATION
INSTRUCTIONS
IMPORTANT INFORMATION
Please read all instructions and warranty information before beginning installation.
It is assumed that this instruction is being carried out by qualified trades-people.
The AVA shower base is a durable product but care must be taken during installation. Rough handling,
impacts to wall flanges and other areas can cause unnecessary breaks which are not covered under
warranty.
Please carefully lift and lower the shower base into position. Suction handles as used by glaziers can
be very useful for this. DO NOT DROP, HIT OR SLIDE SHOWER BASE.
Once out of its freight packaging and after installation we firmly recommend keeping the surface
covered to remove the risk of unnecessary damage i.e. dropped tools, tiles, glass, paint etc. The
packaging can be easily cut down/modified to make a covering until work is complete.
AVA ORDER OF SHOWER INSTALLATION
1. Base
2. Gib Lining
3. Water Proofing
4. Channels
5. Tiles
6. Glass

CREST SHOWER SYSTEMS W: www.crestshowers.co.nz E: sales@crestshowers.co.nz P: 0800 40 40 42
4
AVA WALK IN
INSTALLATION
INSTRUCTIONS
SHOWER BASE
2. DRY FITTING THE BASE
• Clean/prepare floor surface in accordance with directions on adhesive. Check floor for level
surface, noting any humps and falls. The floor must be completely clean and free from all dust.
Walls should be plumb.
• Fit the shower base into position by carefully lifting and lowering into place. The shower base
must fit square/plumb to adjacent walls and be rock solid under foot.
• Ensure inside face of the upstand is flush with the Gib (FIG 2).
• If required, us plastic H packers to level shower base in all directions, particularly through the
drain channel (if channel waste model supplied) (FIG 1).
• Once sitting level and in correct position, carefully remove tray. Secure H packers to the floor to
prevent them shifting when refitting tray.
FIG 3.
TIMBER
FRAMING
UPSTAND
AVA BASE
WATERPROOFING
MEMBRANE
NEUTRAL CURE
SILICONE
TILE SUBSTRATE
GIB OR VILLA
BOARD
FIG 2.
INSTALLATION INSTRUCTIONS
1A. CENTRE WASTE BASE - INSTALLING
THE WASTE BODY
• Remove polystyrene block. Place waste body in position
ensuring that it is aligned with hole in base. Connect
waste body to waste outlet (FIG 1A).
• Ensure waste seal (red) is positioned properly in its recess.
FIG 1A.
1B. CHANNEL WASTE BASE - INSTALLING
THE WASTE BODY
• Fit Leak Control Flange Outlet into the floor, so it can be connected
to the outlet S-Trap or Waste Pipe.
FIG 1B.

CREST SHOWER SYSTEMS W: www.crestshowers.co.nz E: sales@crestshowers.co.nz P: 0800 40 40 42
5
AVA WALK IN
INSTALLATION
INSTRUCTIONS
4. FIX THE SHOWER BASE IN PLACE
• Carefully stand shower on edge in vertical position.
• Apply adhesive in continuous parallel 8mm lines
approximately 100mm apart (FIG 5).
• Enough adhesive must be applied to contact with the
floor and when set will provide a full and even support.
• Re-position shower base in place as per dry fit. Check
again for level.
• Seal between top of upstand and bottom of Gib with
silicone, ensuring the inside face of both are flush (FIG 6).
• Allow adhesive & silicone to fully set for at least 8 hours
before standing on the shower base.
5. WATERPROOFING
AVA bases are pre primed so do not need a primer. Crest
Showers recommends applying a waterproof bandage
covering the join between the top of the upstand and the
bottom of the Gib board before applying waterproofing
membrane down to the bottom of the upstand over the base,
down into the waste hole and out to the floor or as per your
Council’s required application area. However, it is up to your
registered waterproofer’s discretion whether they wish to
follow this recommendation.
FIG 6.
WATERPROOFING
MEMBRANE
NEUTRAL CURE
SILICONE
TILE SUBSTRATE
GIB OR VILLA
BOARD
UPSTAND
WATERPROOFING
BANDAGE
FIG 5.
3. LEVEL ENTRY KIT
• Level entry applications require Level Entry Kit flashing
(GREEN ANGLE FIG 4) to be siliconed to the base. The
waterproofing outside the shower will lap onto this
flashing as shown (RED LINE FIG 4). Please refer to
supplied dimensoin sheet for measurements.
FIG 4.

CREST SHOWER SYSTEMS W: www.crestshowers.co.nz E: sales@crestshowers.co.nz P: 0800 40 40 42
6
AVA WALK IN
INSTALLATION
INSTRUCTIONS
6A. CENTRE WASTE BASE - INSTALLING
THE WASTE TOP
• Place top waste clamp into recess and down into waste
body then fasten top clamp in place (FIG 5) by fixing
screws. Screws need to be firm but not over-tight.
• Screw waste lid onto top clamp.
• Put large polystyrene block back in position to protect
base surface.
NOTE: Do not remove protective lid label on waste cover
until end of installation process.
FIG 7A.
6B. CHANNEL WASTE BASE - INSTALLING
THE CHANNEL DRAIN
• Once the water proofing has cured, the tiler will need to
set up the height of the channel waste drain lid to align
with the finished surface of the selected tiles. This is
achieved by applying large ‘daubs’ of adhesive under
the channel drain to set the finished channel drain height.
This is to allow any leakage of water beneath the tiles
to be able to work it’s way out towards the waste outlet
under the channel drain. (A solid mass of adhesive
will only trap any water around the channel drain and
potentially cause pooling of water.)
• Position the channel drain on the daubs of adhesive
and check the final height is set below the finished tile
height. Ensure a 15-20mm clearance is around all sides
of the channel drain to accommodate for wall tiles so the
removable lid is able to be removed for cleaning.
FIG 7B.

CREST SHOWER SYSTEMS W: www.crestshowers.co.nz E: sales@crestshowers.co.nz P: 0800 40 40 42
7
AVA WALK IN
INSTALLATION
INSTRUCTIONS
GLAZING CHANNELS
7. INSTALLING GLAZING CHANNELS
• Use a 2 meter level to check walls are within 2-3mm of
plumb.
• Clean floor channels and underside of wall channel with a
dry rag.
• Slide wall channel on top of floor channel, making sure
they butt up to each other and insert channel connector
inside ‘wall to floor’ join to help line up the wall channel
(FIG 8).
• When plumb, drill 2 holes (3.5mmD) in wall channel, lining
up with framing locations. (FIG 9). The top hole should
be within 100mm of top of channel and the second hole
within 1000mm of top of channel. No screws will be
required lower than 1000mm up from bottom of base.
• Remove dust from holes and from inside floor channel.
• Clean underside of wall channel with a dry rag before
running a thick bead (be very liberal to allow overflow and
proper adhesion) of silicone in a continuous line down
the entire length of the back of the wall channel (FIG 9)
and place on wall. Pop out channel connector and apply
silicon into the floor to wall junction, pushing the channel
connector back in once done.
• Inject silicone into and around screw holes (FIG 11). Ensure
wall channel is plumb, then screw in place.
IMPORTANT
As an added waterproofing precaution, you can apply a
continuous bead of silicon down the whole length of wall
channel either on the interior or exterior of the wall channel
as at your discretion.
FIG 10.
FIG 9.
FIG 8.
FIG 11.
IMPORTANT:
PLEASE MEASURE WALL CHANNELS
For walk in showers, wall channels will
measure 1940mm.
If custom panels, your wall channels will
measure 10mm less than your glass height.

CREST SHOWER SYSTEMS W: www.crestshowers.co.nz E: sales@crestshowers.co.nz P: 0800 40 40 42
8
12x12 ANGLED EXTRUSION
INSTALLATION INSTRUCTIONS
NOTE: These instructions also apply if a
custom Sliding Door or Walk In with single fixed
panel has been supplied.
ALUMINIUM
FLOOR TRIM/STEP
GLASS RECESS
FLOOR CHANNEL
INSIDE
SHOWER
BATHROOM
FLOOR
12 X 12 ANGLED
EXTRUSION
GIB WALL
LINING
TIMBER WALL
FRAMING
CLEAN OFF
SILICON BEAD
OUTSIDE SHOWER
LEAVE SILICON
BEAD INSIDE
SHOWER
INSTALLATION INSTRUCTIONS
1. WALL CHANNEL
• Install the wall channel for the single fixed panel as per standard AVA instructions (see page 7).
2. ANGLED EXTRUSION
• Use a 2 meter level to check wall is within 2-3mm of plumb.
• Position 12 x 12 angled extrusion as pictured below.
• When plumb, drill 2 holes (3.5mmD) in angled extrusion, lining up with timber wall framing. The top hole
should be within 100 mm of top of angled extrusion and the second hole within 1000mm of top channel. No
screws will be required lower than 1000mm up from floor channel.
• Remove dust from holes and from inside floor channel.
• Clean angled extrusion with a dry rag before running a thick bead of silicon along the outside of extrusion as
pictured below.
• Apply generous bead of silicon inside the floor/wall junction underneath the angled extrusion.
• Insert silicone into and around screw holes. Ensure angled extrusion is plumb, then screw into place.
• From inside of shower, apply a bead of silicon as an extra seal between whole length of angled extrusion and
waterproofing as pictured below.
SINGLE FIXED PANEL
WALK IN EXAMPLE
FOR ALCOVE WALK IN SHOWERS WITH SINGLE FIXED PANEL / /

CREST SHOWER SYSTEMS W: www.crestshowers.co.nz E: sales@crestshowers.co.nz P: 0800 40 40 42
9
AVA WALK IN
INSTALLATION
INSTRUCTIONS
GLASS PANELS
IMPORTANT: We highly recommend dry fitting fixed panels prior to installation to ensure exact
measurements of required door gap is achieved as pictured in supplied dimension sheet. Ensure all fixed
panels are plumb and level. Use setting blocks as required to achieve this.
8. INSTALLING PANELS
• When panels are correctly aligned, remove panel 1 (FIG 2).
and run a thick continuous line of silicone down the inside
of the wall channel (FIG 13) and apply liberally in the floor to
wall channel join.
• Slide glass panel into position (FIG 14) and use small wedges
(FIG 15) or a flat plastering blade to slide glass panel back to
inside edge of channel and against silicone.
• Ensure panel is still level and plumb.
FIG 13.
FIG 14.
FIG 15.
IMPORTANT NOTE FOR TILER
• Tiling placement for Level Entry and Hob Entry as pictured n the supplied dimension sheet.
FIG 12.
A
1516 - Frame To Channel Outside
1016 - Frame To Channel Outside
10 - Glass To
Wall Tolecance
870 - Panel
584 - Door Gap
970 - Panel
8 - Glass To
Wall Tolecance
502 - Waste Centre
752 - Waste Centre
1503 - Framing
1003 - Framing
118
51
200 Floor Hole
Cut Size
B
C
Particle Board, Plywood
Or Concrete Floor
Glue Application Between
Base and Floor
Easyclean Waste
Upstand
Tiles
Wall Lining
Timber Framing
Ava Base
10mm Glass Panel
Glass To Wall Tolerance
DETAIL A
10mm Glass Panel
Glazing Wedge
3-5 3-5
Wall Joint Detail
DETAIL B
Sealant bead
Movement / Joint
Control Bandage
Waterproofing
Sealant Bead
Glass Panel Silicone Detail
DETAIL C
Sealant Bead
Glazing Wedge
LP543
Dimension Sheet
DIMENSIONS: 1000 x 1500
Customer Service
0800 40 40 42
1
2

CREST SHOWER SYSTEMS W: www.crestshowers.co.nz E: sales@crestshowers.co.nz P: 0800 40 40 42
10
AVA WALK IN
INSTALLATION
INSTRUCTIONS
9. FINISHING GLAZING CHANEL TO
GLASS PANEL JOIN
• Starting at the top of the wall channel, from outside
shower, spray with warm soapy water then insert rubber
wedge seal into gap (removing plastic wedges if used).
(FIG 16) Leave rubber wedge protruding 40mm at top to
cut o later.
IMPORTANT: Rubber wedge must be pressed into channel
lightly from top to bottom before pushing right in. This
method ensures rubber wedge does not set stretched and
then shrink later.
• Repeat steps 3 and 4 with applicable panels.
FOR GLASS TO GLASS JOINS:
• Apply masking tape down the length of the panel,
allowing a 10mm gap for the glass to butt into for the
glass to glass join (FIG 17).
• Run a continuous bead of silicon down entire length of
10mm face of installed wall to glass panel and across
floor channel to the width of the glass to glass panel (FIG
18).
• Gently place glass to glass panel into siliconed floor
channel and tilt gently upwards until it joins to glass
to wall panel (FIG 19). Ensure there is no side to side
movement while placing panel as this will smear silicone.
• Hold glass to glass join in place with masking tape.
• Cut o excess rubber wedge.
• Insert AVA door insert into door gap.
• Spray channels and glass with slightly soapy water then
use spatula provided to clean o excess silicone (FIG 20).
Repeat this process 3 times. Use minimal water then wipe
o with paper towels.
FIG 16.
FIG 17.
FIG 18.
FIG 19.
FIG 20.
FIG 21.
CREST SHOWER SYSTEMS W: www.crestshowers.co.nz E: sales@crestshowers.co.nz P: 0800 40 40 42
11
AVA WALK IN
INSTALLATION
INSTRUCTIONS
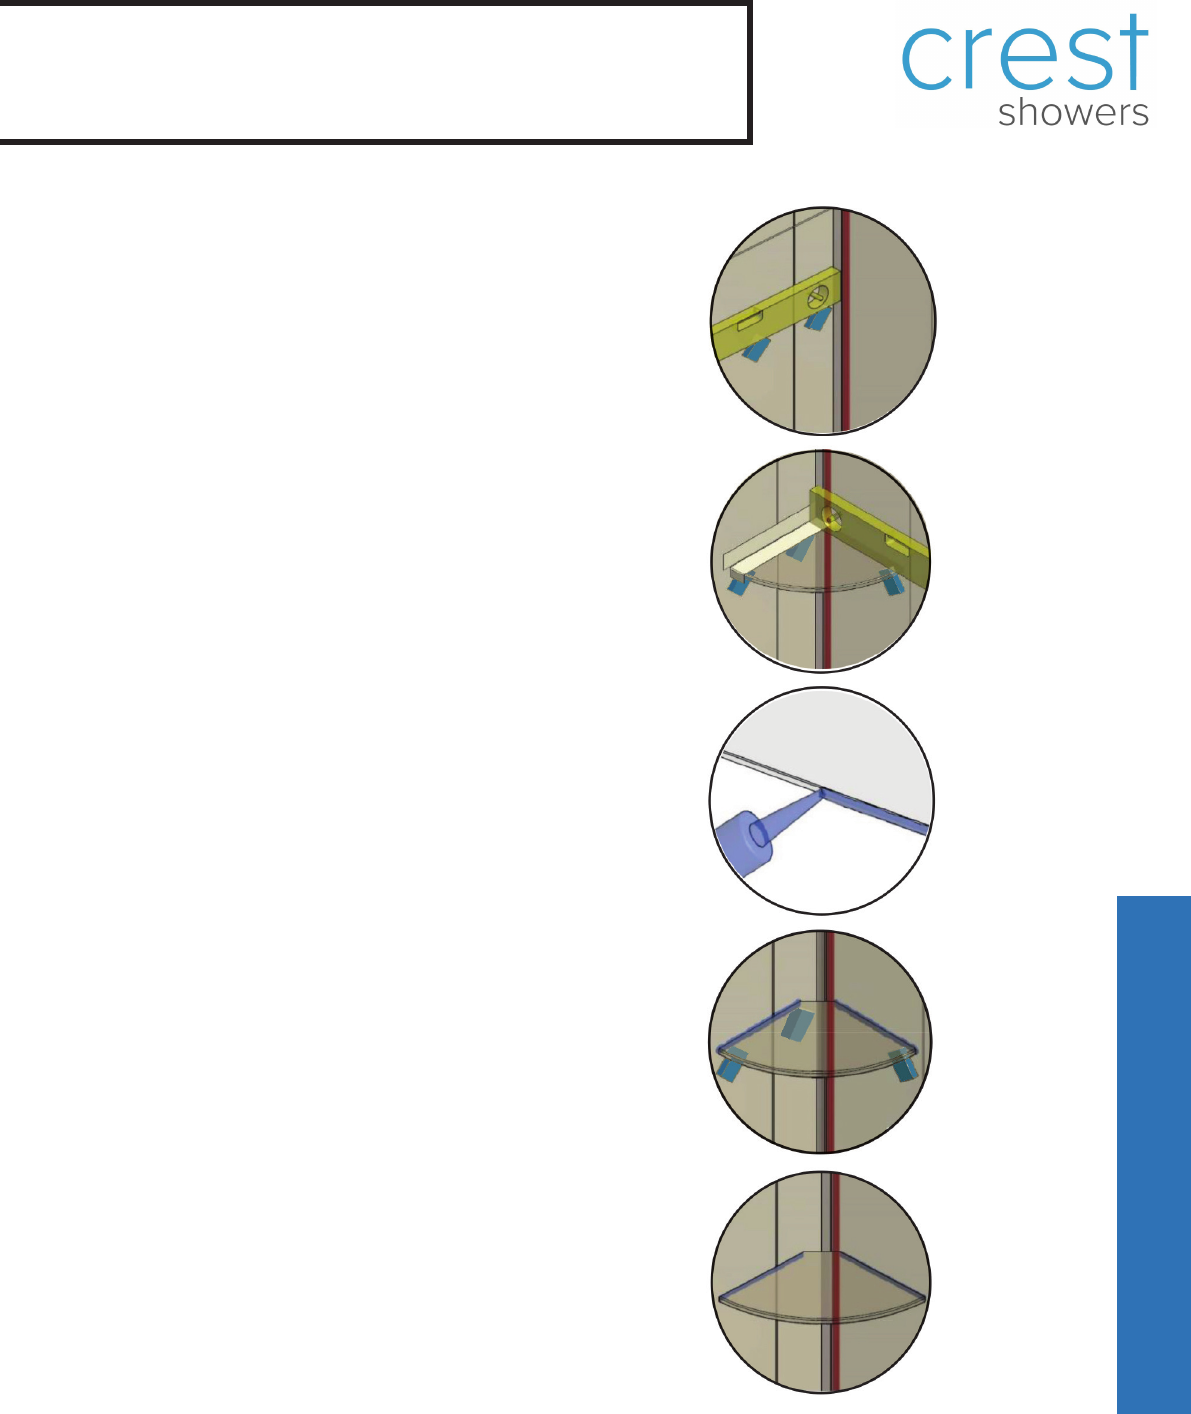
10. INSTALLING SHELVES
Crest Showers Floating Glass Shower Shelf can be installed
in any corner of a glass or tile wall. If two shelves are installed
in the same corner, ideal shelf heights o the floor are 1200 &
1600mm. When installed in dierent corners, an ideal height is
1400mm o the floor.
When installing onto Seratone, Hardiglaze or Sim, apply masking
tape to the liner then stick the stabiliser block to the masking
tape. This makes the blocks easier to remove and protects the
wall board surface.
We DO NOT recommend installing these on acrylic liners, due to
adhesion diculties.
IMPORTANT: Protect floor until adhesive has cured in case of
the unlikely event that shelf/shower is disturbed and shelf falls
o.
• Clean area shelf is being adhered to, ensuring it is free of
any dust, soap scum, cleaners or any other substance.
• Remove backing from stabiliser blocks and press firmly
onto wall (FIG 22).
• Place shelf in position and check for level. Optional -
apply masking tape to shelf/wall (FIG 23).
• Remove shelf and put a thin bead of adhesive down both
edges of shelf (FIG 24).
• Carefully place shelf on stabiliser blocks and gently push
into corner. Check for level (FIG 25).
• Clean up adhesive with spatula. Remove masking tape.
• After 24-48 hours remove stabiliser blocks (FIG 26).
FIG 22.
FIG 23.
FIG 24.
FIG 25.
FIG 26.
SHELVES

CREST SHOWER SYSTEMS W: www.crestshowers.co.nz E: sales@crestshowers.co.nz P: 0800 40 40 42
12
AVA WALK IN
INSTALLATION
INSTRUCTIONS
COMMISSIONING
11. COMMISSIONING SHOWER
• Clean glass end ensure no silicone residue remains on
glass,channel or surrounding area.
12. CARE AND MAINTENANCE
• Clean shower twice weekly using a mild detergent in warm water
and a soft lint free cloth. Ensure aluminium channels, hinges and
handle are properly cleaned.
• A quick wipe down with Shower Squeegee after each use will
become a matter of habit rather than a chore and will prohibit
water staining the glass.
• Do not use abrasive cleaners or high strength chemicals on your
shower.

CREST SHOWER SYSTEMS W: www.crestshowers.co.nz E: sales@crestshowers.co.nz P: 0800 40 40 42
13
AVA WALK IN
INSTALLATION
INSTRUCTIONS
WARRANTY
14. AVA WARRANTY
Crest Shower Systems warrants that when installed as per the supplied instructions, the AVA Shower System
will be free from manufacturing defects for a period of 25 years from the date of sale. This means that apart
from the typical surface splash, no water will be allowed to leak into the building structure for a minimum of
25 years.
25 YEAR WARRANTY 10 YEAR WARRANTY
AVA WATERPROOF
SHOWER BASE
GLASS SCREENS
HARDWARE
ALUMINIUM CHANNEL
All products supplied by Crest Shower Systems exceed the requirements of the New Zealand Building Code
and all glass is manufactured to meet AS/NZS2208 1996 Grade A Safety Glass and is permanently marked as
such in accordance with the code.
Crest Shower Systems will supply replacement parts or product at it’s discretion, free of charge where
product is covered by this warranty and proof of defect has been received within 100 days of first
appearance. To ensure warranty remains valid, the supplied care and maintenance instructions must be
adhered to and the Crest Warranty form supplied with the product must be complete and returned at time of
purchase (hard copy or Online). Warranty is non-transferable.
Crest will be liable for the replacement of products or components including their installation, or for an
equivalent product including its installation, should the supplied product or component be declared defective
by an authorised Crest Shower Systems representative. Beyond this, Crest will not be liable for any damages
including incidental or consequential damages related to the use of this product.
Warranty does not apply to the following situations:
• Shower has been improperly installed.
• Shower has been misused or damaged.
• Shower damaged or defective prior to installation.
• Supplied instructions were not adhered to during installation. Note: Discretion must have been used at all
times by installer as each situation may vary.
INSTALLATION WARRANTY
Your approved Crest shower installer should provide you with a written 5 year minimum installation
workmanship warranty. Product warranty applies regardless of who has installed the shower.

CREST SHOWER SYSTEMS W: www.crestshowers.co.nz E: sales@crestshowers.co.nz P: 0800 40 40 42
14
CREST SHOWER SYSTEMS W: www.crestshowers.co.nz E: sales@crestshowers.co.nz P: 0800 40 40 42
WARNING
This AVA Shower has just been in-
stalled.
PLEASE DO NOT WORK IN OR
AROUND THE SHOWER UNTIL
Any queries feel free to ring me on:
Best Regards
Your Shower Installer
CREST SHOWER SYSTEMS
W: www.crestshowers.co.nz
E: sales@crestshowers.co.nz
P: 0800 40 40 42
