
Sediment Sampling Guide
and
Methodologies
State of Ohio
Environmental Protection Agency
Division of Surface Water
November
2001
P.O. Box 1049, Lazarus Government Center, Columbus, Ohio 43216-1049
Robert A. Taft, Governor
Christopher Jones, Director
(2nd Edition)
Ohio EPA Sediment Sampling Guide
Ohio Environmental Protection Agency
Lazarus Government Center
P.O. Box 1049
Columbus, Ohio 43216-1049
TABLE OF CONTENTS
DEFINITIONS ................................................................. 1
1.0 - SAMPLING PURPOSE ................................................... 3
a. Bioassays ............................................................ 3
b. Biosurvey Sampling .................................................... 3
c. Monitoring ............................................................ 3
d. Contaminant Source Identification ......................................... 3
e. In-Situ Measurements ................................................... 3
f. Dredging / Section 404-401 Decisions ...................................... 3
g. Trends / Historical Contamination ......................................... 4
h. Complaint Investigation ................................................. 4
I. Sediment Collection Technique Evaluation .................................. 4
j. Nonpoint Pollution Assessment ........................................... 4
k. Nutrient Cycling ........................................................ 4
l. Bedload / Sediment Dynamics ............................................ 4
2.0 - SAFETY .................................................................. 5
3.0 - SAMPLING PLAN ........................................................ 6
a. Description of the Project ................................................ 6
b. Data Quality Objectives ................................................. 6
c. Previous Studies ....................................................... 6
d. Dates of Collection ..................................................... 6
e. Sample Site Selection .................................................. 7
f. Estimating Particle Size Percentages ...................................... 7
g. Sample Types ......................................................... 7
h. Field Screening ........................................................ 8
i. Parameter Selection .................................................... 8
j. Site and Sample Description ............................................. 8
k. Sample Preparation and Handling ......................................... 9
l. Statistics .............................................................10
m. Station Replicate Samples .............................................. 10
n. Blanks / Field Duplicate Samples ......................................... 10
o. Reporting ........................................................... 10
i
Ohio EPA Sediment Sampling Guide
4.0 METHODOLOGIES ....................................................... 11
a. Bathymetric Survey / Initial Reconnaissance ................................ 11
b. Pre-sample Collection ................................................. 11
c. Changing Sampling Site Locations ....................................... 11
d. Decontamination / Cleaning / Calibration ................................... 12
e. Suggested List of Supplies / Equipment for Sediment Collection ................ 12
f. Preparation for Sampling / General Methodologies ........................... 12
g. Standard Surface Grab Collection with Scoops and Spoons ................... 13
h. Standard Surface Grab Collection with Dredges ............................. 13
i. Standard Core Collection ............................................... 14
j. Other Types of Collection ............................................... 14
k. Compositing ......................................................... 15
l. Sample Preservation .................................................. 15
m. Holding Times ........................................................ 15
n. Other Data Collection .................................................. 15
o. Sample Labeling/ Shipping/ Paperwork / COC .............................. 16
5.0 DATA REPORTING AND STORAGE ...................................... 17
a. Data Reporting ....................................................... 17
b. Data Storage and Retrieval ............................................. 17
APPENDICES
A. Collecting Sediment samples by Vibro-coring ............................... 18
B. Sediment Oxygen Demand ............................................. 21
C. Sample Collection for Solid Phase Sediment Bioassay ........................ 23
D. Standard Sampling Form ............................................... 26
E. Table of Sediment Sampling Equipment ................................... 27
F. Sediment Sample Volume and Container Type for Samples
Submitted to Ohio EPA DES Laboratory ................................... 30
G. Sediment Sampling Locations ........................................... 31
BIBLIOGRAPHY ............................................................. 35
ii

1
DEFINITIONS AND ABBREVIATIONS
ACOE - United States Army Corps of Engineers
Aliquot - A portion or subset of a sample. An
aliquot can be any size, but it must be
representative of the parent sample.
Background - Refers to the concentration of a
chemical at an upstream site or other location
having similar physiochemical characteristics
which can be compared to the concentration of
the same chemical found at the site of interest.
BNA - Base Neutral Acid extractible compound
Cleaned - Equipment and supplies that have
been washed with water and detergent and rinsed
with local water or tap water followed by a rinse
with deionized water to ensure there is no
carryover of VOCs and metals from the tap water
to the equipment.
COC - Chain of Custody
Composite Sample - A thoroughly homogenized
set of two or more grab samples.
Contaminated Sediment - A sediment where the
concentration of a chemical exceeds a level of
toxicological concern.
Decontaminated - Equipment and supplies that
have been cleaned and subjected to
decontamination rinses using the procedures set
forth in section 4.0(d) of this manual.
DERR - Ohio EPA Division of Emergency and
Remedial Response
DES - Ohio EPA Division of Environmental
Services
DQO - Data Quality Objectives
DSW - Ohio EPA Division of Surface Water
Field Duplicate - An aliquot of a sample collected
to make an exact copy of the original sample.
Often referred to as a split sample. Duplicate
samples are used to check sample preparation
techniques, laboratory precision and comparison
of different laboratory results.
GLNPO - Great Lake National Program Office
Grab Sample - A single, discrete sample collected
from one location at one point in time.
Impacted Sediment - A contaminated sediment
where an adverse biological impact is observed.
Local Water - Stream or lake water collected near
the sediment sample.
Naturally Occurring Aquatic Substrate - Solid
materials associated with surface waters and not
of anthropogenic origin on or within which
organisms can live.
PAH - Polycyclic Aromatic Hydrocarbons
PCDD - Polychlorodibenzodioxins
PCDF - Polychlorodibenzofurans
Project Manager - For the purposes of this
document, a person that is responsible for the
design, implementation and reporting of a
sediment sampling project.
QA/QC - Quality Assurance/Quality Control
Reference Sediment - Refers to the concentration
of a chemical at an Ohio EPA ecoregional
reference site which represents conditions of least
impact as a result of known human activity.
Sediment - Unconsolidated inorganic and organic
material that is suspended in and being
transported by surface water or has settled out
and deposited under surface waters. Sediment
includes: 1) materials below the water surface
under bankfull conditions in streams, lakes, and
ditches; 2) materials at normal pool elevation for
reservoirs; 3) materials within the federal
jurisdictional boundaries of wetlands; 4) materials
at and below maximum capacity for ponds and
lagoons; 5) for Lake Erie, materials found at or
below high water conditions as defined by the

Ohio EPA Sediment Sampling Guide
2
United States Geological Survey over a five year
period.
SOP - Standard Operating Procedure
Station/ Field Replicate - Samples from a location
that were taken in the same general area (e.g., 20
to 200 meters depending on waterbody), during
the same time period, using the same sampling
equipment (decontaminated between samples),
and using the same sampling techniques as the
original sample. Station replicates are usually
used to determine sample variability at a given
location at a given point in time.
Synoptic Survey - A general investigation of a
large geographic area. Usually a basin wide
study.
TCLP - Toxicity Characteristic Leaching
Procedure
TPH - Total Petroleum Hydrocarbon
U.S. EPA SW-846 - A document containing test
methods for evaluating solid waste. SW-846
provides test procedures & guidance which are
recommended for use in conducting the
evaluations and measurements needed to comply
with the Resource Conservation and Recovery
Act (RCRA).
USGS - United States Geological Survey
VOC - Volatile Organic Compound
40 CFR Parts 87 to 149 - The Code of Federal
Regulations is a codification of the general and
permanent rules published in the Federal Register
by the Executive departments and agencies of the
Federal Government.

3
OHIO EPA SEDIMENT SAMPLING
GUIDE AND METHODOLOGIES
1 - SAMPLING PURPOSE
Sediment samples are collected by the Ohio EPA
for a variety of reasons including chemical,
physical, toxicological and biological analysis.
Due to the inherent variability of sediments,
collection techniques should be evaluated and
chosen for each sampling site and each sampling
purpose. Choosing the most appropriate
sampling device and technique depends on: 1)
The purpose of the sampling; 2) the location of
the sediment; and 3) the characteristics of the
sediment. This document should be used only as
a guide for selecting the sampling location and
proper collection technique (Appendix E contains
a table that can be used as an aid in selecting the
most appropriate sediment collection device).
Once the sampling site and collection technique
have been selected, then the specific
methodologies for the actual collection of the
samples should be closely followed. The
experience and judgement of the sample collector
should be used as much as possible in order to
obtain a representative sample of the sediment
environment compatible with the objectives of the
sampling. Whatever sampling technique and
device is used, the specific rationale and
collection methodologies should be stated in each
evaluation and report of the data. Users are
encouraged to review other references such as
Plumb (1981), Burton and Landrum (1990),
Mudroch and MacKnight (1994), and Mudroch
and Azcue (1995) for background information and
additional guidance.
The purpose of the sediment sampling should be
well defined before any sediment sampling plan
is developed. Below are brief descriptions of
sediment sampling projects that have been used
in environmental studies.
1a. Bioassays
Sediment bioassay samples are used to
determine if there is toxicity to representative
aquatic organisms from contaminated bulk
sediments. Sediment bioassay samples are
usually collected within the top 10 centimeters of
the sediment surface with equipment that causes
the least disturbance to the sediment surface
during collection. Specific methodologies have
Section 1
not been developed by Ohio EPA for collection
of pore waters or elutriate tests for bioassay.
1b. Biosurvey Sampling
Macroinvertebrates are often collected for
biosurveys from soft, fine grained sediments.
Biosurvey sampling is addressed in Part V,
Section A of the Manual of Ohio EPA Surveillance
Methods and Quality Assurance Practices,
Volume I (1991).
1c. Monitoring
Chemical and physical analysis of sediments can
be used as a tool for the monitoring of pollutant
discharges to a river or lake system. In order to
be able to make valid comparisons among
stations or reference sites, consistent sampling
techniques should be maintained. Samples
continue to be collected from the Ohio Stream
Regionalization Project sites and other
"reference" sites to improve the data base for
background conditions within each established
ecoregion. These data can then be applied as
reference for evaluation of contaminated areas.
1d. Contaminant Source Identification
Sediments can be used to help locate nonpoint,
historical, or intermittent discharges that may not
be readily apparent using samples collected from
the water column. Sediments are used to identify
the location of these sources by upstream
incremental collection of samples from a
contaminated site.
1e. In-situ Measurements
Sediment oxygen demand (SOD) is an in-situ
measure of the oxygen consumed by biochemical
decomposition of organic matter in stream or lake
sediment deposits. SOD can be used to evaluate
pollutant source control performance or as a
metric (input) for use in water quality models.
1f. Dredging / Section 404-401 Decisions
Sediment samples are often collected for use in
dredging and dredge spoil management
decisions. These samples should be collected
within the vertical profile of the dredging project to
Ohio EPA Sediment Sampling Guide
4
account for probable stratification. Discrete
sampling is preferred and the use of composite
samples for dredge management decisions
should be made with caution. In known or
suspected heavily contaminated areas, special
analyses such as PCB tests and RCRA regulated
compounds using the Toxicity Characteristic
Leaching Procedure (TCLP) in U.S. EPA SW-846
should be performed to aid in disposal decisions.
In addition, whole sediment toxicity tests have
been developed to aid in disposal decisions and
complement the TCLP test.
1g. Trends / Historical Contamination
Sediment sampling is also used as a tool in the
evaluation of the effectiveness of pollution source
controls. This can be accomplished with discrete
vertical sampling (assuming the sediments have
not been mixed or otherwise disturbed) or by
reproducing earlier sampling efforts.
1h. Complaint Investigation
Sediment sampling to help address citizen
complaints requires a great deal of assessment
and judgement by the sample collector. The
design of each complaint sampling investigation
should be evaluated on a case by case basis.
Because of cost and often long turn around times,
sediment sampling for the sole purpose of
resolving citizen complaints should be used
judiciously.
1i. Sediment Collection Technique Evaluation
Comparison of samples using sediment collection
techniques and devices can be made to
determine the easiest and most effective
sampling method. Evaluation of other techniques
such as sediment traps can also be made to
make sediment collection more reproducible.
1j. Nonpoint Pollution Assessment
Sediment samples can be collected for evaluation
of nonpoint pollution. Selection of parameter
coverage for analysis of the samples can
sometimes be important in defining the source of
sediments (e.g., high pesticide/herbicide
contamination would indicate agricultural run-off).
1k. Nutrient Cycling
Sediment samples can be collected in lake or
river habitats to determine potential release of
nutrients (e.g., phosphorus) back into the water
column.
1l. Bedload / Sediment Dynamics
Prediction of sediment resuspension, both
modeling and measurement procedures, are still
experimental. The dynamics of the movement,
transport and fate of contaminants adsorbed to
sediment is not thoroughly understood and are
beyond the scope of this document.

5
OHIO EPA SEDIMENT SAMPLING
GUIDE AND METHODOLOGIES
2 - SAFETY
Prior to the development of the sampling plan,
Ohio EPA safety policies should be consulted.
Everyone involved in the preparation, collection
and analysis of the sediment samples should be
familiar with the safety policies. Special attention
should be given to physical dangers such as slip,
trip and fall hazards when working around water.
In general, it is recommended that the sample
collector(s) avoid skin contact with all sediments
and inhalation of odor should be avoided. Special
precautions may have to be taken when working
with contaminated sediments especially near
potential or known contaminant sources such as
unpermitted outfalls, NPDES permitted outfalls,
landfills or hazardous waste sites. Specific site
safety plans for sampling near unregulated
hazardous waste (DERR) sites should be
followed when sampling is done in conjunction
with a DERR project or any other project where
contaminated sediments may pose a risk to
sampling personnel.
Section 2

6
OHIO EPA SEDIMENT SAMPLING
GUIDE AND METHODOLOGIES
3 - SAMPLING PLAN
Sediment sampling usually entails relatively
higher expense in personnel, collection effort and
analytical costs per sample than the collection
and analysis of water samples. A sampling plan
should be developed, written and approved by the
project manager prior to the collection of sediment
samples to maximize resource allocation. The
plan should incorporate a statement as to the
purpose and the data quality objectives of the
proposed sediment sampling.
Sample collection is often governed by logistic
and resource constraints rather than specific
project objectives. As a result, the data from such
studies are often incomplete and the benefits
from the collection of that data is reduced if not
eliminated as a result of the constraints. If
resources are unavailable to perform an adequate
study to meet the data quality objectives, then the
sampling project should be reevaluated.
3a. Description of the Project
A brief description of the sampling project should
be included in the sampling plan. A description of
how the sediment sampling will be integrated with
other planned studies and an explanation of how
the sediment sampling information will be used
should be stated.
3b. Data Quality Objectives
This important section of the sampling plan
should state what type of information needs to be
collected in order to meet the objectives of the
sampling project. This information should
include:
C Purpose of the sampling.
C How the data from the sampling will be used.
C What actions will be taken as a result of the
sampling.
C Identification of the laboratory performing the
analyses.
C The parameters for analysis including method
detection limits (see Part VI of the Manual of
Ohio EPA Surveillance Methods and Quality
Assurance Practices if the Ohio EPA laboratory
is being used).
Section 3
C Number and type of quality control samples
such as field blanks, equipment rinses, field
duplicates, station replicates, reference and
background samples.
C Statistical analysis and criteria (allowable
errors) used to evaluate the data.
C Standards, background or benchmark criteria
used to compare the analytical results.
C Number and location of samples to be collected
to meet the purpose of the project.
C How the information will be reported.
C Whether the data will be entered into an
electronic database and, if so, the structure and
file type of the database.
3c. Previous Studies
A thorough review and assessment of existing
data and information of the sampling area should
be performed to assist in this portion of the
planning process. A brief summary of that
information and an assessment should be
included in the written sampling plan. In
reviewing existing information, attention should be
given to the purpose of the collection of the
historical data and what sampling techniques,
analytical procedures and laboratories were used
in performing the analyses. This information is
important in order to determine the usefulness of
the historical data for the proposed project.
3d. Dates of Collection
The general time of year when the samples will
be collected should be considered during the
planning of the sampling activities. In general,
sediment sampling in the low flow conditions of
summer and fall are the most practical. Seasonal
variations of sediment deposits and quality can
occur due to high flows and ice scour on rivers,
leaf litter in the fall, land use practices (e.g.,
agricultural pesticide applications) or seasonal
variations in benthic populations. Winter may be
a convenient time to sample some inland lakes
through the ice, while ice cover may be a severe
safety concern in the collection of river sediment
samples. The analytical laboratory should be
contacted early in the planning process for proper
coordination to ensure all needs are met.
Ohio EPA Sediment Sampling Guide
7
3e. Sample Site Selection
Selection of the sampling locations and number of
samples is one of the most important decisions to
be made in the planning process. The selections
should be made based upon the data quality
objectives of the study and resources available to
the project. Rationale for the selection of the
sampling locations should be included in the plan.
The chemical and physical nature of sediments is
strongly influenced by the size of the individual
particles of sediment. Sediments composed of
sands (0.06-2.0 mm) and larger sized particles
are often stable inorganic silicate minerals.
These larger particles form non-consolidated
deposits, have a relatively lower specific capacity
(amount of interstitial water) and a more neutral
surface electrical charge. These types of
materials are usually not associated with
contaminants and are not recommended for
analysis. Fine grained silts and clays (<0.06 mm),
however, have a much larger specific capacity,
have unbalanced electrical charges and much
larger surface area to volume ratio. These
properties make the finer grained sediments
much more chemically, physically and biologically
interactive. These are the types of sediments that
should be submitted for analysis and most of the
sediment sampling locations should be biased
towards collecting these types of sediments (see
Appendix G).
3f. Estimating Particle Size Percentages
A goal of sediment collection is > 30% silt and
clays in the sediment sample. If these sediment
types are not found, then it should be noted on
the laboratory submission sheets and field
collection form. The percentage of silts and clays
in a sample can be estimated in the field by
marking a line on a clear jar and then marking
30% of the way up to that line on the jar with
another line. Fill the jar to the top line with
sediment and vigorously shake the jar and set
aside to settle. A one inch headspace in the jar
allows for easier mixing. After settling for 10
minutes, an estimate of the particle size
distribution can be made with a visual inspection
of the sediment stratification in the jar. If the fines
stop below the 30% line, then the silt/clay fraction
is likely to be <30%.
It's assumed that the finer grained sediments are
located in still waters of the sample area in deep
water, at stream margins, behind boulders and
other obstructions, or at inside bends of river
meanders. An initial reconnaissance of the
sample area should be performed, if possible,
prior to the completion of the sampling plan. This
reconnaissance can often identify field limitations
in the study design that can be addressed prior to
sample collection. An initial reconnaissance
should include a cursory bathymetric survey using
a wading staff in shallow streams and rivers or an
echosounding (sonar) depth finder for deeper
waters. Local knowledge or recent navigation
charts (USGS surveys or ACOE harbor/waterway
soundings in navigable waters) can often provide
similar information to an echosounding survey.
3g. Sample Types
A description and rationale for the types of
samples to be collected should be included in the
written plan.
Cores - Vertical discrete grab samples. Most
appropriate for historical contamination
information or dredging decisions at heavily
contaminated areas.
Cores - Depth integrated composite samples.
Most appropriate for reference and Section
404/401 issues.
Scoops and Dredges - Surface (top two to four
centimeters) sediment grab samples. Most
appropriate for benthic, sediment oxygen
demand (in-situ), recent ambient conditions and
recent contaminant investigation.
Scoops and Dredges - Surface sediment
composite samples. May be used to reduce
costs for specific conditions/situations such as
some Section 404/401 issues or ambient or
specific historical data. In general, however,
discrete sampling is preferred if resources are
available. An example of a discrete sample
would be taking a section of one centimeter of
sediment from a core sample that was originally
one meter long.

Ohio EPA Sediment Sampling Guide
8
3h. Field Screening
The use of field screening devices such as head
space analysis with Photo Ionization Detectors
(PID) and Flame Ionization Detectors (FID) is
encouraged for intensive sampling programs. A
preliminary screening program or “phased
approach” can give a lot of direction as to where
more intensive sampling is needed and can give
insight as to the types of analyses which may or
may not be needed for subsequent sampling
phases. These field screening devices have
different sensitivities to different compounds. In
general, PIDs are more useful for detection of
chlorinated and aromatic compounds while FIDs
are more useful for aliphatic compounds.
To use this technique, an aliquot of sample is
placed in a glass jar and covered with aluminum
foil. After the atmosphere in the jar has reached
equilibrium with the sediment, the PID or FID
probe tip is inserted into the jar through the
aluminum foil and the measurements recorded.
Action level criteria for head space analysis
results should be specified in the data quality
objectives section of the sampling plan. Head
space analysis tests must be performed only by
personnel specifically trained in the use of these
instruments.
3i. Parameter Selection
Selection of the chemical and physical analysis to
be performed on each sample is based upon the
purpose of the study, the data quality objectives
and available resources. Each sediment sample
should be analyzed, at a minimum, for Total
Organic Carbon (TOC) and Particle size. All
analyses should conform to SW-846, 40 CFR Part
136, Manual of Ohio EPA Surveillance Methods
and Quality Assurance Practices, or Standard
Methods as appropriate.
Possible analyses include:
CHEMICAL
C Total Organic Carbon (TOC)
C Metals (Pb, Ni, Cu, Zn, Cd, Cr, Fe, Mn, Hg, As
and other metals as necessary)
C Nutrients (COD, Total Phosphorus, Total
Kjeldahl Nitrogen (TKN), Ammonia)
C Cyanide
C Oil and Grease
C Persistent Organics (Pesticides, Insecticides,
Herbicides, PCB's, BNA's, TPH's, PCDD,
PAH's, and PCDF's in special circumstances)
C Volatile Organics (including trihalomethanes)
C Volatile Sulfides
C Oxidation Reduction Potential(ORP)/redox
C pH
PHYSICAL
C Particle size
C Appearance/Texture/Odor/Color
C Radiochemistry
C Shear strength and water content (for dredging
purposes only)
BIOLOGICAL/BIOCHEMICAL
C Sediment Oxygen Demand (SOD)
C Bioassay
C Macroinvertebrate Survey
OTHER DATA COLLECTION
C Overlying water quality including: Water
Temperature, Water Depth, Dissolved
Oxygen, Conductivity, pH, Turbidity, Water
Velocity.
3j. Site and Sample Description
Each sample station should have the following
information recorded:
C Date and time of the sample collection.
C Latitude/Longitude of site.
C River Mile of site from PEMSO maps, if
available.
C Location description with reference to visual
landmarks.
C Sampling location marked on a 7.5 minute
USGS Quadrangle map (to show exact location
of grab sample). More detailed custom maps
should be made as needed.
C Water Depth/Results of bathymetric survey.
C Description of current.
C Unusual conditions (weather, equipment
malfunction, ship traffic, etc.).
C Photographs of samples (close up) and sample
locations are recommended.
C Physical description of sample (color as
determined by the Munsell
®
soil color chart,
texture, odor, obvious materials such as coal
fines, metallic chips, oil and grease, etc.
Ohio EPA Sediment Sampling Guide
9
C Collection device used.
C Grab or composite sample (include detailed
compositing information if not a grab).
C Indicate collection of field duplicate or replicate.
C Sediment depth used for sample (i.e., 1-3 cm;
10-15 cm etc.).
C Sampling crew members.
C Field measurements performed such as head
space analyses and water temperature, pH,
conductivity, dissolved oxygen and turbidity.
C Any site codes used to I.D. the sample station.
C The sediment collection form included in these
methodologies (Appendix D) can be used to
record the site and sample description
information.
3k. Sample Preparation and Handling
This section of the sampling plan should detail the
appropriate sample collection and handling
procedures.
Compositing - A brief description of type of
composite and compositing techniques.
Sample Volume and Container Type - The
volume of sample and type of container should
be listed in the plan for each sample collected.
The sample container type(s) must be
consistent with the container type(s) specified in
the methodology. Sample size should conform
to the request of the analytical laboratory
receiving the sample. Sediment samples
submitted to Ohio EPA’s DES Laboratory for
analysis should be collected into containers in
accordance with Appendix F. Volatile organic
samples should be collected as discrete grab
samples and packed to exclude as much air
space as possible. Surficial water from the
sediment sample may be added to exclude all
air. Because of field conditions, some samples
may not yield enough material for analysis.
These samples are to be handled on a case by
case basis. When this or other special
conditions occurs, contact the laboratory
sample coordinator for advice. Proper
communication between the sample collector
and laboratory is essential to ensure all needs
can be met.
Special Considerations - In special
circumstances to meet specific data quality
objectives, sediment samples may be sieved in
the field to a uniform screen or particle size.
The samples should be screened to retain
0.060 mm or smaller particles. In order to
calculate concentrations, the sediment volume
screened and the specific gravity of the
unscreened sediment must be known.
Sediment samples for VOC analysis should not
be screened. In addition, stream debris such as
rocks, sticks and leaves should be removed
from sediment samples.
Sample Labeling - All sample containers should
be labeled with the site name as it appears on
the laboratory submission form, the date and
time of the sample collection and the name of
the sample collector or other information
specified by the laboratory.
Preservation - All sediment samples for
chemical or bioassay analysis should be
immediately chilled and stored at 4EC.
Equipment Decontamination - A description of
equipment, supplies and decontamination
procedures should be included. For efficiency
and to reduce field decontamination activities,
all sampling equipment should be cleaned and
decontaminated at the laboratory or field office
before going to a sample site. It is easier to
clean and decontaminate as soon as possible
after returning from the field. If possible, a
separate set of cleaned and decontaminated
equipment should be available for each
sampling site.
Sample Handling and Shipment - Sample
containers should be placed in clear plastic
bags to minimize soiling of the shipping
container and to protect laboratory personnel.
Glass containers should be protected from
breakage. All sediment samples should be
chilled and stored in coolers or similar
containers at 4EC. A description of how the
samples were packed in the field, what
preservatives were used and how they were
shipped to the laboratory should be recorded.
A chain of custody form must accompany each
sample shipment.
Ohio EPA Sediment Sampling Guide
10
3l. Statistics
Refer to Sediment Sampling Quality Assurance
User's Guide (U.S.EPA 1985) for a more
exhaustive discussion of statistical analysis of
environmental sampling.
C Determine number of samples.
C Determine components of variance and
difference of means that are significant.
C Evaluate field duplicates/station replicates and
criteria for acceptance of data.
3m. Station Replicate Samples
Station replicate samples are a complete
separate collection of a sample at one site.
Station replicate samples can be collected to
determine the variability of the concentrations of
contaminants in the sediment at a specific site
and/or as an assessment of field sampling
techniques.
3n. Blanks / Field Duplicate Samples
The number and type of quality control samples
should be included in the sampling plan. Ten
percent (10%) of the sediment samples should be
collected as duplicates and 5% as blanks or
equipment rinses. Field duplicate samples are
collected to determine laboratory analytical
variability and/or field compositing techniques and
of sediment heterogeneity within a single
collected sample. Duplicates are collected by
“splitting” a sample that has already been
collected into two identical samples for analysis.
Equipment rinse samples for sediment samples
are comprised of a distilled and deionized water
rinse following equipment decontamination. Field
blanks are samples of uncontaminated silica sand
collected using the same sampling equipment
and techniques as the sediment sample
collections. The equipment rinse samples and
field blank samples are used to demonstrate that
significant amounts of contaminants are not
introduced into the sediment samples from
sampling equipment or sample handling.
3o. Reporting
A description of the format of the final report
should be included in the sampling plan. At a
minimum, the following data should be tabulated,
including:
C Calculation of mean, median, range and
number of samples for large scale synoptic
surveys.
C QA/QC sample results.
C Any deviations from the sampling plan.
Finally, the plan should be reviewed and the
question answered: Will the implemented plan
meet the stated sampling and data quality
objectives?

11
OHIO EPA SEDIMENT SAMPLING
GUIDE AND METHODOLOGIES
4 - METHODOLOGIES
Once the sampling plan has been completed and
approved, then the following methodologies
should be used for the actual collection of the
samples. Examples of sampling locations and
sediment types are identified in Appendix G.
4a. Bathymetric Survey / Initial
Reconnaissance
The starting point of the survey should be at a
location that is readily identifiable in the field and
that can be found and used at a later date to
reproduce the sampling.
Echo sounding surveys for lakes and large rivers
should be made from boats by moving slowly
along parallel lines perpendicular to the river
current and noting the reading on the depth
finder. The proposed sampling area should be
equally divided into 10 transects with depth
readings taken continuously or at least every 10
feet along the transects.
Operation of the depth finder should be in
accordance with the manufacturers instructions
and resolution of the sounder should be set for
the expected depth of the water. Sensitivity of the
depth finder can be set to determine relative
densities of the bottom.
The data from the survey should be recorded in
field notes and the deepest area used for sample
site selection.
In medium sized rivers, the river can be waded or
a boat used to determine the deepest sites using
a calibrated staff.
If bathymetric information is not available,
samples from free flowing rivers or streams
should be collected from:
C Both banks of a relatively straight section of a
stream or;
C On the inside edges of a meander or;
C In slack water or eddy current areas.
C In navigation channels and the Ohio River and
depending on the data quality objectives
(DQOs), samples should be collected far from
Section 4
the center of the dredged portion of the
channel/river on alternating sides of the
channel/river.
C On medium sized and smaller rivers and
streams, the use of hands, feet, fingers and
toes with the "Wading Braille" technique
(locating sediments by touch and feel) in
conjunction with best professional judgement
can be extremely effective in locating fine
grained deposits. This sampling technique is
the most commonly used technique by Ohio
EPA for sediment sample collection.
C Contaminant source investigations in lakes
should be biased towards the down current
(usually the eastern side for Lake Erie's Ohio
shore) side of littoral drift.
C Any contaminant source investigation should be
biased towards sampling sediments in the most
likely sink.
4b. Pre-Sample Collection
Collection of exploratory grab samples should be
used to revise sampling location in the field due to
unforeseen site conditions such as lack of
suitable sediment for sampling.
The person collecting the samples should be
open to revisions and able to adapt the sampling
design to meet unforeseen site conditions while
still meeting the data quality objectives of the
study. The sample should contain, as a goal,
more than 30% silt (<0.06 mm) or smaller particle
size by volume for an acceptable sample.
Use the soil classification description on the
sediment sampling form (Appendix D) to
determine the sample composition.
4c. Changing Sampling Site Locations
If exploratory grab samples do not meet the
criteria for the objectives of the study or the site
contains more than 70 percent sand or larger
particles, the location should be abandoned and
another location chosen.
If no other suitable location meets the criteria,
then a sample may be collected, but the results of
the analysis should be annotated in the report
Ohio EPA Sediment Sampling Guide
12
with a description of the sample.
The results of field screening techniques can be
used to determine appropriate sampling locations.
4d. Decontamination / Cleaning / Calibration
All collection equipment and supplies such as
dredges, corers, spoons, scoops and compositing
trays that may come into contact with the sample
should be cleaned prior to use as follows:
1 - Wash with Phosphate-Free Liquinox Soap
2 - Tap water rinse
3 - ASTM water (distilled water) rinse
4 - Methanol rinse
5 - Hexane rinse
6 - Allow to air dry
7 - Cleaned, decontaminated, and dried
equipment should be wrapped in aluminum
foil or sealed in reclosable plastic bags.
If field decontamination is necessary all Methanol
and Hexane rinses are collected in appropriate
containers for proper disposal at a later time.
All instruments must be calibrated before any
samples are collected. All portable units must be
calibrated with one or more calibration standards.
A log book/record must be properly maintained to
indicate which instrument or meter is calibrated,
date of calibration, standard concentration, age of
standards and field personnel. Good quality
control requires a known standard be used to
check the calibration before the sampling event.
All field instruments should have a written
standard operating procedure for each piece of
equipment which insures consistent calibration
requirements and proper maintenance.
4e. Suggested List of Supplies / Equipment for
Sediment Collection
C Sampler (Dredge, Corer, Scoop, SOD
Chamber, etc.)/extra weights/extra corer inserts
C Extra sample containers for sediment and water
samples. Be prepared for unexpected
additional sampling
C Depth Finder/ Calibrated Wading Staff
C Calibrated D.O./Temperature/Conductivity/pH
Meters/Turbidity
C Extra Rope
C Distilled and Deionized Water Wash Bottle(s)
C Distilled and Deionized Water for Field Blanks
C Teflon Solvent Wash Bottle
C Waste Solvent/Acid Collection Container
C Towels/Cleanup Supplies
C Plastic Trash Bags
C Ice and Sample Cooler(s)
C Sample Containers, Labels and Markers
C Leather, Latex, Neoprene or Rubber Gloves
C Rain Gear or Plastic Aprons
C Appropriate Safety Supplies
C Compositing Container/ Bowl and Mixing Spoon
C Rinse Bucket(s) and/or Water Pump and Hose
C Self Sealing Plastic Bags
C Clear tape for sealing container labels
C Shoulder Length Neoprene Gloves
C Chest Waders
C Field Notebook, camera
C PID/FID
C Duct Tape/Electrical Tape
C Sediment Collection forms
C Chain of Custody Forms
C GPS unit
C Munsell color chart
C Flow meter
C Topo maps with sample locations marked
C Copy of the sampling/ work plan
4f. Preparation for Sampling/General
Methodologies
While wading in shallow water, the sediment
collector should be standing on the downstream
side of the collection site. Care should be taken
to create the least disturbance to the sampling
site as possible especially from wading or
disturbance of the sediment from currents
induced by wading.
When using a boat or other sampling platform, all
engines should be turned off. The samples
should be collected upstream from the engines or
any other machinery that may release exhaust
fumes/oils into the sample.
Sampling equipment and supplies that may come
into contact with the sample should be cleaned
and decontaminated in accordance with the
decontamination procedures in the sampling plan.
In synoptic surveys, the most upstream or
reference sediment site should be collected first
to reduce chances of contamination between
Ohio EPA Sediment Sampling Guide
13
sites. If the sediment sampling locations are
located within a short distance of each other, then
the most downstream sample should be collected
first to avoid contamination from disturbance and
resuspension of sediment due to sampling
activities.
In general the finest grained sediments at each
sampling location should be collected and the
sample should contain, as a goal, more than 30%
coarse silt (<0.06 mm) or smaller particle size by
volume for an acceptable sample. Results of
headspace analysis can also be used to help
locate sampling sites.
Sampling in areas of aquatic vegetation where
macrophyte roots or other vegetation may be
collected should be avoided.
As much water as possible should be decanted
from the sample prior to placement into the
collection pan or bowl. Care should be taken
however to avoid loss of extremely fine material
from the sample during decanting.
A physical description and photograph, if
possible, of the undisturbed sample should be
made. The sediment collection form in Appendix
D should be used to record the sample
information.
For composite samples, the number of grab
samples collected for the composite should be
noted. The subsamples (grabs), of equal
volumes, should be placed in a cleaned stainless
steel or plastic basin. When all grab samples
have been collected, the sample should be
thoroughly mixed with an appropriate scoop or
spoon. Once mixed, a physical description and
photograph of the sample should be made. The
sediment should then be placed into appropriate
containers. Continuous mixing of the sample
should occur to prevent stratification of the
sample. The sediment collection form in
Appendix D should be used to record the sample
information.
All stones, shells, detritus, roots and other foreign
matter should be removed from the sample.
Samples for analysis of VOCs should not be
composited or homogenized and should be
collected first as discrete grabs. Containers
should be filled according to the following
sequence: Grab samples for VOC analysis first,
followed by composite samples for BNA's,
Pesticides/PCB's, nutrients, metals and particle
size.
4g. Standard Surface Grab Collection With
Scoops and Spoons
Scoops and spoons are inexpensive, widely
available, non-mechanical, very portable, able to
sample nearly every sediment type and easy to
use.
Scoops are used to collect sediment samples
primarily from shallow waters. Attaching the
scoop to telescoping poles allows for collection of
sediments in deeper waters.
Care should be taken when the scoop is raised
through the water column or is passed through a
river current during retrieval to minimize the loss
of extremely fine material.
With very little experience, a sampler can “feel”
the substrate with the scoop attached to a pole
and quickly find appropriate material for sample
collection.
Some disadvantages to using a scoop or spoon
includes: limited sample volume; possible loss of
very fine material during retrieval; not useable in
waters greater than 4-5 feet deep.
4h. Standard Surface Grab Collection With
Dredges
Surface sediment samplers (dredges) are
relatively inexpensive, are widely used and
available, are standard for some sampling
purposes (benthos), often don't need expensive
equipment to operate and come in a wide variety
of sizes.
The sampler should be “set” according to the
manufacturers instructions and lowered through
the water column. Dredges should never be
allowed to free fall into the substrate. The
sampler should be carefully lowered the last few
feet to minimize dispersal of fine material due to
a sampler induced shock wave.
Ohio EPA Sediment Sampling Guide
14
In shallow waters, some samplers can be pushed
directly into the sediment. Five and ten foot
extension handles can be attached to Eckman
dredges for sampling in shallow waters to plunge
the sampler into the sediment. These handles
can minimize some of the limitations of the
dredge.
The sampler is then tripped.
The sampler should be slowly raised through the
water column and placed in an appropriate
container (see the compositing section below). If
an insufficient or improper sample is collected,
additional weights should be added (if
appropriate) to the sampler to allow deeper
penetration into the sediment.
If additional weights do not help in the collection
of a sample, then the sampling equipment and
techniques should be reevaluated for the type of
sediment encountered.
For compositing, a minimum of three to five grab
samples (as near the same volume as possible)
from a site should be taken and thoroughly mixed.
An aliquot of that composite should be collected
and submitted as the sample for the site.
Some disadvantages to the use of surface
sediment samplers (dredges) include: shallow
depth of penetration; possible shock wave and
loss of very fine grained surface deposits;
potential for water column contamination and
nearby downcurrent sediment redeposition; loss
of depth profile; not appropriate for waters with
current (sampler drifts in current, “lies down” and
can’t be triggered); larger materials such as twigs
and stones prevents jaw closure; probable loss of
some water soluble and volatile organic
compounds; and it is possible to dilute the toxic
pore water with relatively clean surface water
(which is important in conducting sediment
bioassays).
4i. Standard Core Collection
Sediment corers are usually simple inexpensive
sampling devices, are manufactured in a variety
of materials, can collect samples at depth, can
maintain a more representative vertical profile of
the sediment stratigraphy, create less disturbance
by shock waves and can collect more highly
consolidated deposits.
Sediment corers are slowly lowered to the
substrate (gravity corers are released at the water
surface and allowed to free fall) and simply
allowed to penetrate the sediment under the
samplers own weight or pushed or vibrated
(vibro-core) into the sediments. Corers can be as
simple as homemade tubes of steel, plastic or
glass.
Commercial corers often contain core catcher
inserts (also known as chinese fingers or
eggshells) and one-way valves that allow the
sample to enter the tube, but not exit and to hold
it in place. Inserts should not be reused between
sample locations unless decontaminated.
Inserts made of plastic should not be used when
collecting samples for organic analysis. Upon
retrieval, the corer can be disassembled (e.g.,
split spoons, some core tips unscrew) and the
sample laid in a container or a prepared
decontaminated surface for further processing.
Cores from simple tubes and most other corers
often drop out or can be pushed out with a clean
rod.
Plastic or thin walled metal corers (or core liners)
can be cut, the ends capped, secured with tape
and the entire segment sent to the lab. This
process and the split spoon sampler reduces
contamination from one segment to another in
vertically stratified samples.
Detailed description of a vibro-core collection is
included in Appendix A.
Some disadvantages to the use of sediment
corers include: they do not work well with sandy
sediments; they collect limited sample volume
and very small surface area; they sometimes
require expensive and bulky equipment to work in
deeper waters and sediments.
4j. Other Types of Collection
In some cases, sediment can be collected directly
from the substrate by a diver using SCUBA gear
or supplied air.
C The sediment can be collected directly into the

Ohio EPA Sediment Sampling Guide
15
sample container or placed into the container
by the diver with a scoop and sealed and
composited at the surface.
C The diver should be downstream of the sample
site and should use caution not to disturb the
fine grained sediment at the substrate surface.
Coffer dams can be used in very small streams.
Coffer dams are temporary barriers that allow a
small segment of stream to be isolated from the
main water body and the isolated stream segment
de-watered. After de-watering, the sediment
inside the coffer dam can be collected with a
scoop similar to a soil sample.
C The coffer dam can be made by placing a 6"
diameter or larger pipe on the stream bottom
parallel to the stream current. This reduces
eddy currents and possible scour of the
sediment when installing the pipe as a coffer
dam.
C Quickly tilt the pipe vertically so the top of the
pipe is above the water surface.
C Care should be taken to avoid washing fines
from the sediment surface during installation of
the pipe.
C Once in place, the pipe should be pushed into
the substrate with a circular back and forth
motion.
C Water inside the pipe is removed by a pump or
by bailing.
C The sediment inside the pipe can then be
sampled with a simple scoop.
C Sieve samples for special circumstances.
Measure the volume sieved and the specific
gravity of unsieved sample to calculate
concentrations.
4k. Compositing
Preferred composition of the compositing
container:
C a plastic container for metals analyses
C a glass container for all types of analyses
C a stainless steel container for organics analyses
C a solid Teflon container for all types of analyses
(high costs usually prohibit its use)
Disposable aluminum trays are acceptable
compositing containers provided blank samples
or equipment rinses are collected from it prior to
use.
After a description of the sample is made, the
sediment is thoroughly homogenized with a
spatula or similar device comprised of a material
appropriate for the analysis performed. A
thoroughly homogenized sample is uniform in
color, consistency and water content. Care
should be taken to avoid spilling fines and
interstitial water during mixing.
Sampling equipment and supplies do not have to
be cleaned between subsamples of a composite
sample at a site. Equipment and supplies must
be decontaminated and cleaned between station
replicate sample collection and collections at
different sites.
All composite samples should be identified as to
the method of sample collection, depth and
volume of each discrete sample and the number
of samples per composite.
4l. Sample Preservation
All sediment samples for chemical, physical and
bioassay analysis should be cooled to 4EC as
soon as possible after collection.
4m. Holding Times
Samples for organic analysis should be extracted
within 14 days. Samples for metals, except for
mercury, must be analyzed within six months.
Sediment samples for mercury and nutrients must
be analyzed within 28 days.
4n. Other Data Collection
Field measurements for temperature,
conductivity, pH and dissolved oxygen should be
collected from the water column within one meter
of the sediment prior to sediment sample
collection. Depth profiles (at least surface,
mid-depth, bottom) for these parameters should
be made in waters that are too deep to wade.
The sampling location (with sufficient detail to
allow a revisit to the same sample location)
including latitude and longitude, river mile (if
available), a brief description of the sampling site
and information about unusual conditions should
be recorded for each location. A hand drawn map
of the sampling site showing landmarks and
depicting the sample location (including
Ohio EPA Sediment Sampling Guide
16
measurements from trees, etc.) can be very
effective in re-locating the exact sampling spot.
4o. Sample Labeling / Shipping / Paperwork /
COC
For samples submitted to the Ohio EPA
laboratory, procedures are the same as described
in Part III of the Manual of Ohio EPA Surveillance
Methods and Quality Assurance Practices Volume
I (1991). This manual should be used as guiding
principles for the information needed. Specific
procedures or forms should adhere to any
Administrative Order, contract or sampling plan
directive for samples submitted to non-Ohio EPA
laboratories.

17
OHIO EPA SEDIMENT SAMPLING
GUIDE AND METHODOLOGIES
5 - DATA REPORTING AND STORAGE
5a. Data Reporting
The data should be reported by the lab on a dry
weight (ug/g or mg/kg) basis.
Information to be included in any report of the
data include: rationale for site, sampling
equipment and analysis selection; a description of
how the sample location was found and recorded;
a map (preferably a 7.5 minute USGS Quad) of
the study area showing the sampling locations
(Latitude/Longitude and PEMSO River Mile);
sampling dates and type of sampling equipment
and methodologies used; sample handling and
preservation; sample COC; summary of QA/QC
samples; applicable statistics as identified in the
sampling plan. Analytical data reporting sheets
should include the sampler's name, station,
sample location, sample type, county, sample
number, collection date and time, date the sample
was received in the laboratory, date analyzed,
analytical methodology, data qualifiers, Method
Detection Limit (MDL) and Practical Quantitation
Limit (PQL). In addition to a list of parameters for
analysis, any comments need to be documented.
5b. Data Storage and Retrieval
Analytical data is to be entered into an electronic
database and include River Code, River Mile,
Location Description, Ohio EPA District, Latitude,
Longitude, STORET number, Waterbody ID
number, Ecoregion, if the location is a Reference
Site and collection information such as sampler
type, composite or grab, and depth of sample.
Section 5

Ohio EPA Sediment Sampling Guide
18
APPENDIX A COLLECTING SEDIMENT BY VIBRO-CORING
APPENDIX A - Collecting Sediment Samples
by Vibro-coring (Pole or Submersible)
Either of two types of vibro-coring systems:
A Rossfelder designed, submersible vibro-coring
system as used on the R/V Mudpuppy (see
EPA/GLNPO SOP); or
A Pole vibro-coring system per AScI design,
consisting of: electric vibrator motor (12 V DC)
and mounting plate with socket for attachment of
2” diameter extension poles; two, 12 V DC
storage batteries with charger; core tube adapter
and clamp with check valve and retrieval lines
attached; 2-10 ft. extension poles, 6.5 ft. (2
meter) lengths of 2” diameter core tube (CAB or
cellulose acetate butyrate polymer) with CAB core
catchers attached, 2” diameter PE (polyethylene)
end caps; duct tape, marker pens, portable drill
and 1/4” bit; tube cutter tool; glass or
polypropylene sample bottles; field crew of at
least 2.
A.1 Collecting the Core
1. Locate the sampling station with an
appropriate field positioning system that
provides suitable accuracy (± 6 to 15 ft.).
2. Measure the water depth using appropriate
means, such as a sounding line, marked pole
or fathometer.
3. Check for secure attachment of the retrieval
lines to the core tube mounting clamp.
4. Insert a 6.5 ft. length of 2” diameter CAB core
tube (core catcher end down) into the
mounting clamp and tighten the four wing nuts
securely by hand. Make sure clamp is
tightened evenly.
5. Choose an extension pole of appropriate
length (water depth or longer) and insert it into
the mounting plate socket; secure it using a
1/4” bolt and locknut.
6. Slip the flared lower end of the extension
tube over the check-valve end of the core
tube adapter, and hold it on by applying
upward tension on the retrieval lines. Lower
the system vertically (CAB tubing first) into
the water to the bottom. Press and
vibrate tube into the sediment until
it is inserted 6 ft., or until refusal
occurs. Note insertion length by
markings on extension pole.
7. Disengage the extension pole and
stow on board sampling vessel.
8. Retrieve the core tube containing
the sample by pulling on the two
retrieval lines, either manually, or
by using a davit mounted hand
winch.
9. With tube and barrel held vertically
in the boat, drill hole in tube just
above the top of the sediment
column to drain off water.
10. Cut off the tube just above the
sediment surface and cap both
ends.
11. Label the tube lengths with sample
station ID codes using a permanent
marker; make sure the upper ends
are marked as such.
12. Stow core within a cooler or
enclosed box with bag ice.
Transport ashore for processing as
soon as possible.
A.2 Processing the Core
The sediment core is usually processed
in a nearby field facility in order to
describe it's structure and create
subsamples for chemical analysis. This
is important to document the core
content and to maintain sample quality.
Both the 2” pole vibro-cores and the 4”
submersible vibro-cores, contained and
transported ashore in CAB plastic tubes
after sampling, are processed in the
same way. First, cut off, cap and tape
the cores in sections no longer than 48", and
preferably 40” (about 1 meter) in length. This
Ohio EPA Sediment Sampling Guide
19
length fits onto a stainless steel tray on the core
processing table, and can be photographed
conveniently in only three frames of film. Make
these core cuts with either a hacksaw or the
vibrating cutter tool described below. When sub-
sampling the core later on, take care not to
include any sediment from this cut surface, or any
plastic chips from the saw cut.
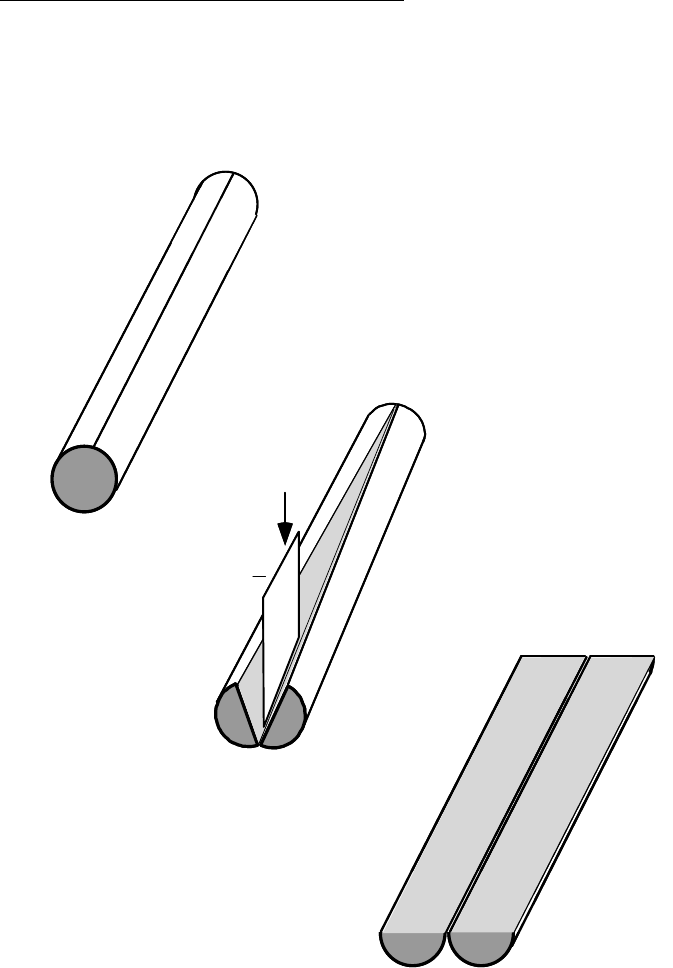
Next, cut the CAB core liner (filled with sediment)
lengthwise along opposite sides of the 40” section
(See Summary Diagram below, Step 1.). Note:
cut through the liner wall without cutting
significantly into the sediment core itself.
Disturbed sediment adjacent to the liner wall
should not be sampled anyway, but it is important
not to contaminate the undisturbed interior of the
core with plastic chips or other debris from the
cutting process. If, before coring, the outer wall of
the CAB liner (1/16” thick) is scored or pre-cut
halfway through with a circular saw or other tool,
then the final cut during processing can be made,
with a razor knife. However, CAB plastic is very
tough, and cutting with a razor knife can be
dangerous and difficult to control without cutting
into the core. The best hand tool available for
cutting hard plastic liners is an electrical vibrating
or "reciprocating" saw of the type used in industry
to cut sheet metal or in medical practice to cut off
plaster casts. When used with a blade guider the
cut depth can be controlled so as to barely cut
through the liner walls. The cuttings tend to form
ribbons rather than chips, which helps in avoiding
contamination of the sediment inside. Also, the
vibrating blade is much safer to use than a
conventional saw blade, since it does not readily
cut soft material such as skin.
Once the liner wall is cut through along opposite
sides (top and bottom of the horizontal core) , use
a flat, thin blade of rectangular shape to cut the
sediment core lengthwise into two half-cylinders,
using a series of vertical cuts along the core's
radial axis (Step 2, below). Vertical cutting in
discrete steps, rather than "dragging" the blade
through the core, insures that the layered
structure of the core is not obscured, and that
contaminants are not spread across layers.
Between each vertical cut, wash and scrub all
adhering sediment off of the blade in a bucket of
clean tap water. Note: it is usually not practical to
decontaminate the blade fully after each cut, but
any chance of contaminant carryover between
zones can be minimized by cutting through the
less oily parts of the core first, (it helps if the blade
is wet when cutting through oily silt or stiff clay
sediments, which tend to adhere). A cleanly cut
surface is best for documenting core structure.
Arrange the two half-cylinders of the core section
side-by-side, with the cut surfaces facing up (Step
3, below). Extend a tape measure along them,
starting at the original top end of the core.
Photograph the core in color with a track-mounted
35mm camera. With 160 watts (4, 4’ lamps) of
fluorescent light, 200 speed film is suitable for
good results. Insure that the wet surface of the
core does not reflect light directly into the camera
lens. A polarizing filter helps to reduce
reflectance off the wet core surface. Photograph
the core section in overlapping frames; place a
small label with core field ID number so that it
appears in each frame. Advance the tape
measure appropriately for any additional sections
of the same core. While the core section is still
intact record a general description of the core
structure, noting zones of different color
(consistent with the Munsell
®
color chart), texture,
sediment type (silt, sand, clay, gravel, etc.), and
apparent oiliness.
Collect each core interval, as pre-determined in
the study plan, from the undisturbed core interior
with a clean, stainless steel spoon or spatula.
Place the sediment from an individual core
interval into a clean stainless steel mixing bowl of
appropriate size (bowls and spoons are
precleaned according to Ohio EPA protocols).
Mix the sediment with a clean stainless steel
spoon thoroughly or until visually homogeneous.
During this operation, remove any obviously "non-
sediment" objects from the sample; bottle caps,
broken glass, sticks, large rocks, etc.
Place approximately 150 ml of sediment collected
from each core interval into a labeled 250 ml
wide-mouth glass jar (precleaned according to
Ohio` EPA protocols), leaving space at the top of
the bottle for later mixing (unless the samples are
for volatile organics analysis, in which case the jar
should be completely filled). Label each jar with
a unique station identification number, with a
suffix indicating the layer (X cm - Y cm) of the
Ohio EPA Sediment Sampling Guide
20
STEP 1
STEP 2
STEP 3
Blade
STEP 1
STEP 2
STEP 3
Blade
sample. Record a description of the layers in
each core on core Observation Log Sheets.
Store the sample bottles on ice or in a refrigerator
until transfer shipment to the analytical
laboratories.
Summary Diagram of Core Processing Steps

Ohio EPA Sediment Sampling Guide
21
APPENDIX B SEDIMENT OXYGEN DEMAND
APPENDIX B - Sediment Oxygen Demand
(SOD)
Sediment oxygen demand is a measure of the
oxygen consumed by biochemical decomposition
of organic matter in stream or lake deposits.
Sediment can be divided into two broad
categories, benthic and sludge according to Velz,
1970. Benthic deposits originate from runoff
containing detrital matter. These deposits are
characterized by Velz as "old compacted
accumulations of partially stabilized organic
residues and river muds". They are relatively
inactive, decomposing at a very slow rate.
Sludge deposits are described by Velz as "fresh
organic deposits arising primarily from current
municipal and industrial waste discharges".
These deposits undergo "active decomposition of
a semi-anaerobic character, with end products
readily leaching into the overflowing stream and
utilizing dissolved oxygen from that water.”
Sludge deposition is a result of settling and
therefore, a function of stream flow conditions and
particle size. Following a period of high stream
flow and accompanying scour, sediments should
be allowed sufficient time to settle and
accumulate prior to measuring their oxygen
demand. According to Velz, sludge deposits
resulting from a day or two of deposition following
a storm will have a negligible effect on instream
dissolved oxygen. It takes 40 to 50 days for
deposition of accumulated sludge deposits to
have a pronounced effect on the instream
dissolved oxygen. SOD sampling locations
should be in areas of extensive sludge deposits
that have large (> 100%) diurnal D.O. swings.
Procedures for the Large SOD Chamber:
C Measure and record the water velocity (2.4
inches) above the sediment surface.
C Calibrate the D.O. meter and measure and
record the surface D.O.
C Record the SOD chamber number.
C Insert the D.O. probe into the SOD chamber.
C Raise the chamber top and lower the entire
chamber into the water.
C Turn on the stirrer and verify proper operation.
C Adjust the rheostat to duplicate the measured
stream velocity at the site.
C Lower the respirometer to the bottom
with the top extended.
C The ammeter (located to the left of the
rheostat) displays the current in
amperes which is converted to water
velocity by using the graph in Figure 1.
Lower the chamber top to seal the
chamber. Record the water depth.
C Record the starting time and initial
D.O. concentrations. If a D.O. meter
chart is being used, the starting time
should be marked directly on the chart
paper.
C Manual readings should be taken
every five minutes and adjusted as
needed depending on the oxygen
uptake of the sediment.
C The readings are complete after D.O.
concentrations decrease by 2 mg/l or
after two hours (which ever occurs
first).
Procedures for the Small SOD
Chamber:
C Measure and record water velocity
measurements (2.4 inches) above the
sediment surface.
C Calibrate the D.O. meter. Measure
and record the surface D.O.
C Record the SOD chamber number.
C Place the chamber in sediments.
C If the sediments are disturbed, wait
several minutes for the sediments to
re-settle, then insert the D.O. probe
into the chamber.
C Make sure that no air is trapped within
the chamber.
C Turn on the chamber motor and use
the rheostat to regulate the velocity to
the measured stream velocity. Water
velocity within the chamber is shown
directly on the rheostat's dial.
C Install a second SOD chamber
adjacent to the first one and seal the
bottom with a plastic lid prior to
placement to exclude sediments from entering
the chamber. This chamber will be used to
measure the oxygen demand of the water
column. If only one SOD chamber is available,
use the D.O. change in dark productivity bottles
for water oxygen demand.
Ohio EPA Sediment Sampling Guide
22
C Record starting time and initial D.O.
concentration. If a D.O. meter chart is being
used, the starting time should be marked
directly on the chart paper.
C Manual readings should be taken every five
minutes and adjusted as needed depending
upon the oxygen uptake of the sediment.
C The readings are complete after D.O.
concentrations decrease by 2 mg/l or after two
hours (which ever occurs first).
Additional Data:
C surface incident light radiation using a
pyranometer
C light and dark bottle productivity
C water temperature
C surface and bottom water turbidity
C light reaching sediments (using a photometer
and submerged cell)
C sediment description and sample location; (see
data sheet)
C bathymetric survey results
C water samples for BOD
20
, cBOD
20
, COD and
Chlorophyll a
Calculations
SOD = 1.44 (V/A)(b
1
b
2
)
where:
SOD = Sediment Oxygen Demand in
g/m
2
/day
1.44 = conversion factor to convert to
g/m
2
/day
V = volume of chamber in liters
A = area of chamber in square meters (A
= Jr
2
)
b
1
= rate of D.O. change inside the SOD
chamber
b
2
= rate of D.O. change inside the
"blank" SOD chamber or dark
productivity bottles.
Results should be normalized to 20E C using the
following equation:
SOD
T
= SOD
20
/(1.065T-20)
where:
SOD
T
= SOD at original temperature in EC
SOD
20
= SOD at 20EC
T = Temp in EC

Ohio EPA Sediment Sampling Guide
23
APPENDIX C SAMPLES FOR SOLID PHASE SEDIMENT BIOASSAYS
APPENDIX C - Sample Collection for Solid
Phase Sediment Bioassays
Grab samples of sediment are collected using a
stainless steel dredge, corer, or scoop. A transect
or grid is established at each site and sediment is
collected from a minimum of three subsites. The
number of subsites/site will vary (e.g., depending
upon width of the waterbody, water flow patterns,
size and orientation of objects at the bottom,
depth of sediment). Aliquots of the top 10
centimeters (cm) from each station replicate
subsite are composited to form the site sample.
These aliquots should be as near the same size
as possible and thoroughly mixed prior to splitting
between containers for toxicity testing and
chemical analysis.
The mixing must produce a homogeneous
sample (i.e., uniform in color, texture, and
moisture content). Separate samples are
collected from reference sediment and sediment
of concern sites. One reference site may be used
with more than one sediment of concern site. The
concept of reference and sediment of concern
sites is somewhat similar to the upstream and
mixing zone samples, respectively, used in
effluent bioassays. The reference sediment is
similar (e.g., particle size, organic enrichment) to
the sediment of concern when previous physical
and chemical analyses are available to assist in
site selection. If the data do not exist, the
reference sediment and sediment of concern
should be collected from sites where it appears
that similar depositional patterns have occurred.
Location of the site selected for collection of the
reference sediment and overlying water is
dependent upon the purpose of the test and the
possibility of a point source or nonpoint source
affecting interpretation of results obtained with the
sediment(s) of concern. These guidelines are
based upon those contained in ASTM (1994).
Overlying Water Collection: Ohio EPA rearing
unit water is routinely used in the sediment
bioassay as the overlying water. The EPA
rearing unit water is carbon-filtered and oyster
shell-filtered Columbus city tap water that has
been aged at least 48 hours. This water is of an
acceptable
quality to support aquatic life as shown by its
routine use in our rearing units. Water
from the reference site collected for use
as overlying water for the sediments
used in the toxicity test may be used if it
better suits the project objectives.
Another source of high quality water
(e.g., further upstream or from a nearby
watershed) may be used if water from
the reference site is not available in
sufficient volume or is otherwise
unsuitable for use in a test.
Volumes of Sample Required and
Collection Containers:
Sediment should be collected from a
depth that will represent expected
exposure (U.S. EPA 1994). Aliquots of
sediment at each subsite are composites
in a stainless steel bucket and
thoroughly homogenized using a
stainless steel scoop. The sample is
transferred to labeled wide mouth
bottles. High density polyethylene
(HDPE) bottles are routinely used, but
glass bottles fitted with Teflon-lined caps
should be used if organic chemicals are
a concern. Two HDPE bottles each
containing 540 milliliters (ml) of sediment
are required for each site. Four 250 ml
glass bottles are required.
Overlying Water Samples (if Rearing
Unit Water is not Used):
Nine gallons of water are required to
overlay the sediments (three gallons per
each control, reference, and sediment of
concern) during the 10 day test. The
water is collected as grab samples and
poured into labeled 1 gallon linear
polyethylene cubitainers. The stainless
steel bucket used to collect the site
water is rinsed with site water prior to
filling the cubitainers.
Additional Information:
Samples may be collected during a
rainstorm but are not collected during flood
conditions. Headspace in the sample containers
is kept to a minimum. Bioassay sample

Ohio EPA Sediment Sampling Guide
24
containers are labeled with the sample source,
date and time of collection, and name(s) of the
collectors. The samples are routinely packed on
water ice in insulated containers for transport.
Samples for chemical analyses should be
collected in accordance with this manual from an
aliquot of the sediment sent to the lab.
All samples for solid phase sediment toxicity tests
are transported to the Ohio EPA Division of
Environmental Services in Columbus where they
are stored at 4EC prior to use in a test. Sample
storage time is kept to a minimum ( < 2 weeks)
prior to use in a toxicity test, and most tests are
initiated within 4 days of sample arrival.
Hyalella azteca Maintenance:
Culture Vessels - Hyalella azteca are cultured in
rectangular polypropylene pans. The start of the
Ohio EPA culture was obtained from Mark Smith
at the U.S. EPA EMSL-Cincinnati, Newtown,
Ohio facility in July 1992. U.S. EPA (1994),
EMSL-Cincinnati (1991), and methods described
by Brooke et al.(1993) are the basis of the Ohio
EPA culture and test methods for H. azteca.
The 5 liter pans are 12 inches long, 7.75 inches
wide and 5.125 inches in height. Pans are filled
to approximately one-half capacity with 2-3.5 liters
of rearing unit water. Aeration is supplied to each
pan by a small bore glass pipette connected by
plastic tubing to the oil-free lab air supply. Each
culture pan contains a sheet of non-bleached
paper toweling substrate for the Hyalella. The
Hyalella may utilize toweling as an alternative
food source. The toweling is replaced when it
degrades, generally each week. The pans are
not routinely covered. These culture vessels are
on racks in our rearing lab and receive a 16-hour
light 8-hour dark photoperiod. Luminescence
averages 1256 lux (range is 800-1530 lux).
Culture water is changed in each pan on Monday,
Wednesday, and Friday. When working with
mature adults and intermediate-sized subadults,
the water is changed by pouring old water through
stacked number 30 (0.60 mm mesh) or 40 (0.425
mm mesh) and number 60 (0.25 mm mesh)
stainless steel U.S.A. standard testing sieves
meeting ASTM E-11 specification. The number
30 or 40 sieve retaining the larger organisms is
then back washed with new water to flush these
larger adult or subadult organisms into a clean
culture pan. The number 60 sieve will retain any
new young. These newly-hatched animals of a
known age range are placed into their own culture
by backwashing the number 60 sieve directly into
a clean culture pan. The next time culture water
is changed, the two to three day old animals are
collected with a number 60 sieve and divided
between two culture containers of 300 animals
each to facilitate growth and diminish competition
for food. When the Hyalella reach 15 days or
older, too old for use in tests, young within seven
days of age are combined and 300 animals are
reserved for breeding purposes. If a reproductive
count is desired, the young in the number 60
sieve are first rinsed into a large glass culture dish
and counted on a lighted surface before being
placed in the new culture pan. Culture pans are
labeled with the age of organisms they contain.
To culture the younger animals, number 50 (0.30
mm mesh) and/or 60 sieves are used when
changing the water.
A glass pipette (3 mm bore size or greater) is
used to facilitate counting and transfer of the
juveniles. Any culture thinning or other handling
of the older organisms (adults or intermediate
subadults) requires a glass pipette of at least 5 to
6 mm bore size. Cultures are kept for
approximately 90 days then are discarded unless
needed for more production or
initiating/supplementing a back-up culture.
Feeding - The Hyalella cultures are maintained
on a diet of Cerophyl and Tetramin flake fish food.
Five grams of each ingredient are added to one
liter of deionized water. The amount of each solid
ingredient is weighed on a Mettler AE 163
balance. The mixture is blended for
approximately 4 minutes on a medium setting to
mix and chop up the food. Solids content of this
food is approximately 9.1 g/L + 10 % (range 8.2-
10 g/L). Feeding rate is 2.5 ml food per liter of
culture water. Typically, each culture pan
receives 5 ml of food solution once per day on
weekdays and for convenience, once per day on
weekends when toxicity tests are being
conducted. The stock food container is gently
agitated prior to each use and as needed during
feeding. The food container is stored in a
Ohio EPA Sediment Sampling Guide
25
refrigerator at 4EC between uses. Food not used
within a 30-day period is discarded.
The Ohio EPA Division of Environmental Services
should be contacted for revisions or updates to
the sediment bioassay procedures.

Ohio EPA Sediment Sampling Guide
26
APPENDIX D STANDARD SAMPLING FORM
APPENDIX D - Standard Sampling Form
Ohio EPA Sediment Data Collection Sheet
Project:_______________________________________________________________
Collection Date:______________________ Collection Time:__________________
Collector(s):__________________________________________________________________________________
Weather Conditions: ___________________________________________________________________________
Sample Location Description (Provide Diagram of Sampling Location(s) on opposite Side) :
Waterbody Name: _______________________________ River Mile Location: ________________
Latitude: _______________________________ Longitude: ________________________________
Sample Site Description: ______________________________________________________________
Ambient Site Information (water):
Conductivity _______________ Dissolved Oxygen _________________ pH ______________
Temperature _______________ Current Velocity _________________
Sediment Collection Information:
Water Depth Above Sample: _______________ Sediment Sample Depth: _____________________
Collection Device: Scoop ______ Eckman Dredge ______ Corer ______ Other ______
Sample Type: Grab ______ Composite: ______
Sample Replicate Collected? YES or NO Sample Duplicate Collected? YES or NO
Replicate ID/Name: _______________________ Duplicate ID/Name: _________________________
Sample Information:
Sediment pH (undisturbed) _____________ Sediment pH (post-homogenization) ____________
Color (Munsell Soil Color Chart Number): _________________________________________________
Texture (particle size description): ________________________________________________________
Odor: _______________________________________________________________________________
Additional Comments: _________________________________________________________________
Sand - Particles 0.06-2.0 mm in diameter, possessing a gritty texture when rubbed between fingers. Loose materials (not cohesive) that often
cannot be molded into shapes (non-plastic).
Silt - Particles 0.004-0.06 mm in diameter, generally fine material possessing a greasy or smooth, talc-like feel when rubbed between fingers.
Non-plastic and not cohesive.
Clay - Particles less than 0.004 mm in diameter, which forms a dense, gummy surface that is difficult to penetrate with tools (hardpan). Clay is
both plastic and cohesive.
Marl - Calcium carbonate, usually greyish-white, often containing fragments of mollusc shells.
Detritus - Dead, unconsolidated organic material including sticks, wood, leaves, and other partially decayed coarse plant material.
Peat - Partially decomposed plant materials characterized by an acidic pH; parts of plants such as Sphagnum moss sometimes visible.
Muck - Black, extremely fine, flocculant material composed of completely decomposed organic material (excluding sewage).
Sludge - Organic matter that is decidedly of human or animal origin.

Ohio EPA Sediment Sampling Guide
27
APPENDIX E SEDIMENT SAMPLING EQUIPMENT
APPENDIX E - Table of Sediment Sampling Equipment
TYPE MODEL CURRENT SUBSTRATE
TYPE
REMARKS ILLUSTRATION
GRAB Spoon
Scoop
Zero to
Slight
All C Use only in relatively calm and
shallow water.
C Relatively little sample
disturbance.
C Simple and inexpensive
C Fines may washout when
retrieved through water column
GRAB Eckman
(Birge)
Zero to
Very Slight
Clay and Silt C Use in relatively calm water.
C Pebbles and branches may
interfere with jaw closure
C Excellent jaw shape and cut.
C Relatively little sample
disturbance.
C Poor stability. Light weight
allows for tendency to “swim”
in a current. Sometimes
causes miss triggers.
C 0.02 m
2
sample area.
C Weight with sample is 10 kg.
GRAB Petite
Ponar
Peterson
Zero to
Very Slight
Clay to fine
gravel
C Need relatively calm/sheltered
waters.
C Good stability.
C Poor jaw shape and cut.
Sample disturbance.
C Less washout if extra weights
are used.
C More cumbersome than an
Eckman; requires a winch.
C 0.1 - 0.2 m
2
sample area.
C Weight with sample is 30 - 50
kg.
CORE Box Zero to
moderate
Clay to sand C Difficult to handle.
C Large sample size.
C Requires boat/barge with
winch.
C Rectangular shaped box.

Ohio EPA Sediment Sampling Guide
28
TYPE MODEL CURRENT SUBSTRATE
TYPE
REMARKS ILLUSTRATION
GRAB Shipek Zero to
strong
Clay to gravel C Requires boat/barge with
winch (mini shipek can be
used manually).
C One of the most reliable in
terms of triggering, stability,
washout, and leaching.
C Excellent jaw shape and cut.
Extremely clean cutting action.
C 0.04 m
2
sample area.
C Weight with sample is 60 - 70
kg (mini shipek weight with
sample is 20 - 30 kg).
CORE Manual Zero to
strong
Clay to sand.
Inserts
needed for
sandy
samples.
C Recommended for use in
shallow water.
C Deployed by hand or by driver
(hammer).
C Extension handles can be
used for deeper waters.
CORE Coring
Tubes
Zero to
moderate
Clay to sand.
Inserts
needed for
sandy
samples.
C Quick and easy.
C Relatively undisturbed sample.
C Small sample volume.
C Samples sometimes
compressed.
CORE Split
Spoon
Zero to
moderate
Clay to sand.
Inserts
needed for
sandy
samples.
C Recommended for use in
shallow water.
C Deployed by hand or by driver
(hammer).
C Vertical profile remains intact
and is visible.
C Point design can reduce
sample compaction.
C Stones can interfere with
collection.
C Equipment is heavy.

Ohio EPA Sediment Sampling Guide
29
TYPE MODEL CURRENT SUBSTRATE
TYPE
REMARKS ILLUSTRATION
CORE Gravity Zero to
moderate
Silts and
clays
C Recommended for rivers.
C Depths up to 10 meters
CORE Phleger Zero to
moderate
Silts C Good for short cores in soft
sediments.
C Quick and easy.
C Relatively undisturbed sample.
C Small sample volume.
C Samples sometimes
CORE KB Core Zero to
moderate
Clay to sand.
Inserts
needed for
sandy
samples.
C Quick and easy.
C Relatively undisturbed sample.
C Small sample volume.
C Samples sometimes
compressed.
In-situ SOD Zero to
moderate
Clay to gravel C For determining sediment
oxygen demand.
C Not for collection of sediment
samples.
Adapted from Environment Canada, 1987; Fay, 1987;Plumb, 1981

Ohio EPA Sediment Sampling Guide
30
APPENDIX F SEDIMENT SAMPLE VOLUME AND CONTAINER TYPE
APPENDIX F - Sediment Sample Volume and Container Type for Samples Submitted to the Ohio
EPA Division of Environmental Services Laboratory
Parameter Sample amount No. Containers Container Type
VOC's 60 mls by volume 1 Septum vial or 60 ml wide
mouth glass with Teflon lined lid
- fill to eliminate head space
BNA's 100 g 1 500 ml wide mouth amber glass
with Teflon lined lid
Pesticides/PCB's 100 g 1* 500 ml wide mouth amber glass
with Teflon lined lid
Metals 250 g 1 500 ml wide mouth glass with
Teflon lined lid or 500 ml HDPE
Nutrients 500 ml wide mouth glass with
Teflon lined lid or 500 ml HDPE
Bioassay 540 mls by volume 2 500 ml wide mouth amber glass
with Teflon lined lid. HDPE
may be used if organics are not
a concern.
Particle Size 500 g 1 Plastic “zip lock” bag or 500 ml
HDPE
All other samples (TOC, CN, etc.) 1 125 ml glass jar with Teflon
lined lid. One jar for all
remaining parameters.
* The analysis can be performed on an aliquot from the BNA container. Therefore, a separate container for
Pesticide/PCB analysis does not need to be submitted if a sample for BNA analysis is also submitted.
Ohio EPA Sediment Sampling Guide
35
BIBLIOGRAPHY
ASTM. 1994. Standard Guide for Collection, Storage, Characterization, and Manipulation of
Sediments for Toxicological Testing. ASTM E1391-94. ASTM Annual Book of Standards, 11.04.
Blomquist, S. 1985. Reliability of Core Sampling of Soft Bottom Sediment - an in-situ study.
Hydrobiology.
Brooke, L.T., D.J. Call, G.T. Ankley, D.A. Benoit, C.W. West, and R.A. Hoke. 1993. A Short-term
Method for Estimating the Toxicity of Solid Phase Sediment to the Amphipod Hyalella azteca.
March Draft.
Burton, G. A., Jr. and Landrum, P. F. 1990. ASTM Standard Guide For Collection, Storage,
Characterization, and Manipulation of Sediments for Toxicological Testing.
EMSL Cincinnati. 1991. Hyalella azteca Culture Standard Operating Procedure. December 199 Draft.
Environment Canada. 1987. Sampling for Water Quality. Water Quality Branch, Inland Waters
Directorate, Environment Canada, Ottawa, Canada.
Fay, L. A. 1987. Great Lakes Methods Manual, Field Procedures, prepared for International Joint
Commission Surveillance Work Group. Center for Great Lakes Area Research, Columbus, Ohio.
Flannagan, J. F. 1970. Efficiencies of Various Grabs and Cores in Sampling Freshwater Benthos. J.
Fish. Res. Board Can. 27:11691-1700.
Hatcher, K.J. 1986. Sediment Oxygen Demand: Processes Modeling and Measurement. Institute of
Natural Resources, University of Georgia, Athens, Georgia.
Howmiller, R.P. 1971. A Comparison of the Effectiveness of Eckman and Ponar Grabs. Trans. Amer.
Fish. Soc. 100:560-563.
Indiana State Board of Health. 1982. Field and Laboratory Procedures Manual. Division of Water
Pollution Control, Indianapolis, Indiana.
Koltun, G.F. and Helsel, D. R. 1986. Influence of Size Fractioning Techniques on Concentrations
of Selected Trace Metals in Bottom Materials From Two Streams in Northeastern Ohio. U.S.
Geological Survey. Water - Resources Investigations Report 86-4114.
Mudroch, A. and MacKnight, S. D. 1994. Handbook of Techniques for Aquatic Sediment Sampling.
Lewis Publishers, Chelsea, Michigan.
Mudroch, A. and Azcue, J. 1995. Manual of Aquatic Sediment Sampling. Lewis Publishers, Boca
Raton, Florida.
New York State Department of Environmental Conservation. November 1993. Technical Guidance for
Screening Contaminated Sediment.
Ohio Environmental Protection Agency. 1991. Ohio EPA Manual of Surveillance Methods and
Quality Assurance Practices. Division of Environmental Services, Columbus, Ohio.
Ohio EPA Sediment Sampling Guide
36
Plumb, Russell H. Jr. 1981. Procedure for the Handling and Chemical Analysis of Sediment and
Water Samples, Technical Report EPA/CE-81-1, prepared by Great Lakes Laboratory, State
University College at Buffalo, Buffalo, N.Y., for the U.S. EPA/U.S. Army Corps of Engineers
Technical Committee on Criteria for Dredged and Fill Material. Published by the U.S. Engineer
Waterways Experiment Station, CE, Vickburg, Mississippi.
Rochon, Renè and Chevalier, Michel. 1987. Sediment Sampling and Preservation Methods for
Dredging Projects. Environment Canada, Québec Region, Montreal, Québec, Canada.
U.S. Department of the Interior. 1977. National Handbook of Recommended Methods for Water-Data
Acquisition. Office of Water Data Coordination, Geological Survey, U.S. DOI, Reston, Virginia.
U.S. EPA. 1994. Methods for Measuring the Toxicity and Bioaccumulation of Sediment-associated
Contaminants with Freshwater Invertebrates. C.G. Ingersoll, G.T. Ankley, G.A. Burton, F.J.
Dwyer, R.A. Hoke, T.J. Norberg-King, P.V. Winger, D.A. Benoit, I.E. Greer, and E.L. Brunson.
Office of Research and Development, U.S. Environmental Protection Agency, Duluth, MN.
EPA 600/R-94/-024, June 1994.
U.S. EPA. SAB 1992. Review of Sediment Criteria Development Methodology for Non-Ionic Organic
EPA-SAB-EPEC-93-002
U.S EPA. September 1992. Sediment Methods Classification Compendium. U.S. EPA Office of Water
(WH-556) Sediment Oversight Technical Committee. EPA 823-R
U.S. EPA. 1988. Interim Sediment Criteria Values for Nonpolar Hydrophobic Organic Contaminants.
SCD #14. U.S EPA Office of Water Regulations and Standards, Criteria and Standards Division,
Washington, DC.
U.S. EPA. April 1988. Guidance for the Design and Execution of Sediment Sampling and Testing
Efforts Related to Navigational Maintenance Dredging in Region V. U.S EPA Environmental
Review Branch, Washington, DC.(PAGE 17)
U.S. EPA. 1986. Polynuclear Aromatic Hydrocarbon Sediment Investigation, LTV Steel Corporation,
Warren, Ohio NPDES Permit No. OH0011274. U.S. EPA Region V, Environmental Services
Division, Eastern District Office, Westlake, Ohio.
U.S EPA. 1985. Sediment Sampling Quality Assurance User's Guide. Environmental Monitoring and
Support Laboratory, EPA 600/4/85/048, Las Vegas, Nevada.
U.S. EPA. 1980. Design Manual, Onsite Wastewater Treatment and Disposal Systems. Office of
Water Program Operations, Office of Research and Development, Municipal Environmental
Research Laboratory, EPA 625/1-80-012, Cincinnati, Ohio.
U.S. EPA. 1977. Methods Manual for Bottom Sediment Sample Collection. U.S. EPA, Region V, Great
Lakes Surveillance Branch, Chicago, Illinois.
U.S EPA. 1977. Research and Development. Interim Methods for the Sampling and Analysis of
Priority Pollutants in Sediments and Fish Tissue. EPA 600/4-81-055. Physical and Chemical
Methods Branch, Environmental Monitoring and Support Laboratory, Cincinnati, Ohio.
Velz, Clarence. 1970. Applied Stream Sanitation. Wiley Interscience. New York, NY.
