
Verizon
Router
USER
GUIDE
Model CR1000B
©2022 Verizon

CONTENTS
01 /
INTRODUCTION
Package Contents
System Requirements
Features
Getting to Know Your
Verizon Router
02 /
CONNECTING YOUR VERIZON
ROUTER
Setting up Your Verizon
Router
Computer Network
Configuration
Main Screen
03 /
WIFI SETTINGS
Overview
Basic Settings
Advanced Settings
04 /
CONNECTED DEVICES
Device Settings
Setting Parental
Controls
Universal Plug & Play

TABLE OF CONTENTS
3
©2022 Verizon. All Rights Reserved
05 /
CONFIGURING ADVANCED
SETTINGS
Security & Firewall
Network Settings
Diagnostics &
Monitoring
System
06 /
TROUBLESHOOTING
Troubleshooting
Tips
Frequently Asked
Questions
07 /
SPECIFICATIONS
General
Specifications
LED Indicators
Environmental
Parameters
08 /
NOTICES
Regulatory Compliance
Notices


5
/ INTRODUCTION
©2022 Verizon. All Rights Reserved
Verizon Router lets you transmit and
distribute digital entertainment and
information to multiple devices in your
home/office.
Your Verizon Router supports
networking using coaxial cables,
Ethernet, or Wi-Fi, making it one of the
most versatile and powerful routers
available.

PACKAGE CONTENTS
./ PACKAGE CONTENTS
Your package contains:
• Verizon Router
• Power adapter
• Ethernet cable, three meters (white)
./ SYSTEM REQUIREMENTS
System and software requirements are:
• A computer or other network device supporting Wi-Fi or wired
Ethernet
• A web browser, such as Chrome™, Firefox®, Internet Explorer 8®
or higher, or Safari® 5.1 or higher
./ FEATURES
Your Verizon Router features include:
• Support for multiple networking standards, including
– WAN – 10 Gigabit Ethernet
– LAN – 802.11 a/b/g/n/ac/ax, 10/2.5 Gigabit Ethernet and
MoCA 2.5 interfaces
• Integrated wired networking with 3-port Ethernet switch and
Coax (MoCA)
– Ethernet supports speeds up to 10 Gbps
PACKAGE CONTENTS, SYSTEM
REQUIREMENTS AND FEATURES

7
/ INTRODUCTION
©2022 Verizon. All Rights Reserved
– MoCA 2.5 LAN enabled to support speeds up to 2500 Mbps
over coaxial cable
• One Type-C USB 3.0 port
• Integrated Wi-Fi networking with 802.11a/b/g/n/ac/ax access
point featuring:
– backward compatible to 802.11a/b/g/n/ac
– 2.4 GHz 11ax 4x4
– 5 GHz 11ax 4x4
– 6 GHz 11ax 4x4
• Enterprise-level security, including:
– Fully customizable firewall with Stateful Packet Inspection
(SPI)
– Content filtering with URL-keyword based filtering, parental
controls, and customizable filtering policies per computer
– Intrusion detection with Denial of Service protection against
IP spoofing attacks, scanning attacks, IP fragment overlap
exploit, ping of death, and fragmentation attacks
– Virtual server functionality; providing protected access to
internet services such as web, FTP, email, and telnet
– DMZ (demilitarized zone) host support of a network security
neutral zone between a private network and the internet
– Event logging
– Home Network Protection
– SIP ALG

FEATURES
– Static NAT
– Port forwarding
– Port triggering
– Access control
– Advanced Wi-Fi protection featuring WPA2 & WPA3 Modes
and MAC address filtering
– Wi-Fi Multimedia (WMM) for Wi-Fi QoS (quality-of-service)
• Dual-stack network configuration of IPv4 and IPv6
• DHCP server
• WAN interface auto-detection
• Dynamic DNS
• DNS server
• LAN IP and WAN IP address selection
• MAC address cloning
• QoS support (end to end layer 2/3) featuring: Dierentiated
Services (Diserv), 802.1p/q prioritization, and pass-through of
WAN-side DSCPs, Per Hop Behaviors (PHBs), and queuing to
LAN-side devices
• Secure remote management using HTTPS or Verizon app
• Static routing
• VPN (VPN pass through only)
• IGMP
• Daylight savings time support

9
/ INTRODUCTION
©2022 Verizon. All Rights Reserved
./ GETTING TO KNOW YOUR VERIZON ROUTER
1.3a/ FRONT PANEL
The Router Status LED will be solid
white when your Verizon Router is
turned on, connected to the internet,
and functioning normally.
Router Status LED
Condition Status LED Color Verizon Router
Normal WHITE Normal operation (50% solid)
Setup complete (solid)
Router is booting (soft blink)
System restart (fast blink)
BLUE Pairing mode (hard blink)
WPS pairing successful (fast blink)
GREEN Wi-Fi has been turned o (solid)
Issue(s) YELLOW No internet connection (solid)
RED Hardware/System failure detected (hard
blink)
Overheating (fast blink)
WPS pairing failure (fast blink)
Power OFF Power o

GETTING TO KNOW YOUR
VERIZON ROUTER
1.3b/ REAR PANEL
The rear panel of your router has a label that contains important
information about your device, including the default settings for the
Verizon Router’s Wi-Fi name (SSID), Wi-Fi password (WPA2 key),
local URL for accessing the router’s network settings, and network
settings password. The label also contains a QR code that you can
scan with your smartphone, tablet, or other camera-equipped Wi-Fi
device to allow you to automatically connect your device to your
Wi-Fi network without typing in a password (requires a QR code
reading app with support for Wi-Fi QR codes).
The rear panel has six ports; F-type coax, Ethernet LAN (three),
Ethernet WAN, and USB. The rear panel also includes a DC power
jack and a reset button.

11
/ INTRODUCTION
©2022 Verizon. All Rights Reserved
• WPS ButtonWPS Button - allows quick access to the Wi-Fi Protected Setup
(WPS) feature and pairing mode.
The WPS button is used to initiate Wi-Fi Protected Setup. This is an
easy way to add WPS capable devices to your Wi-Fi network. To
activate the WPS function, press and hold the WPS button located
on the rear of your Verizon Router for more than two seconds.
When WPS is initiated from your router, the Router Status LED
slowly flashes blue for up to two minutes, allowing time to complete
the WPS pairing process on your Wi-Fi device (also known as a
Wi-Fi client). When a device begins connecting to your router using
WPS, the Router Status LED rapidly flashes blue for a few seconds,
and then solid white as the connection completes.
If there is an error during the WPS pairing process, the Router
Status LED rapidly flashes red for two minutes after the error
occurs.
Refer to the “Connecting A Wi-Fi Device Using WPS” on page 33
for more details. In addition, the Router Status LED also provides
a quick view of the operational state of the Verizon Router using
various colors as indicated in the chart above.
• Ethernet LANEthernet LAN - connects devices to your Verizon Router using
Ethernet cables to join the local area network (LAN). The three
Ethernet LAN ports:
– one 10GE LAN port is 100 Mbps, 1/2.5/5/10 Gbps
auto-sensing
– the other two 2.5GE LAN ports are 10/100 Mbps, 1/2.5 Gbps
auto-sensing

GETTING TO KNOW YOUR
VERIZON ROUTER
• Type - C USBType - C USB - provides up to 1000 mA at 5 VDC for attached
devices. For example, you could charge a cell phone.
• 10Gbps Ethernet WAN 10Gbps Ethernet WAN - connects your Verizon Router to the
internet using an Ethernet cable.
• Coax LANCoax LAN - connects your router to other MoCA devices using
a coaxial cable.
Warning: The coax port is intended for connection to Verizon
devices only. It must not be connected to any exterior or interior
coaxial wires not designated for Verizon devices.
• Reset ButtonReset Button - allows you to reset your router to the factory
default settings. To perform a soft reboot, press and hold the
button for at least three seconds. To reset your router to the
factory default settings, press and hold the button for at least
ten seconds.
• PowerPower - connects your Verizon Router to an electrical wall outlet
using the supplied power adapter.
Warning: The included power adapter is for home use only,
supporting voltages from 105-125 voltage in AC. Do not use in
environments with greater than 125 voltage in AC.

13
/ INTRODUCTION
©2022 Verizon. All Rights Reserved
1.3c/ REAR LIGHTED INDICATORS
LAN/WAN Ethernet
• Unlit – Indicates no Ethernet link or dims after 5 minutes idle
Left LED
• Solid yellow – Indicates less than 1 Gbps link
• Flash yellow – Indicates LAN/WAN activity. The trac can be in
either direction.
Right LED
• Solid white – Indicates 1/2.5/5/10 Gbps link
• Flash white – Indicates LAN/WAN activity. The trac can be in
either direction.
1.3d/ MOUNTING THE VERIZON ROUTER TO A WALL
For optimum performance, the Verizon Router is designed to stand
in a vertical upright position. Verizon does not recommend wall
mounting the Verizon Router. However, if you wish to mount your
Verizon Router, you can purchase a wall mount bracket from the
Verizon Accessories Store at
verizon.com/home/accessories/networking-wifi
To mount your Verizon Router to a wall:
1. Select a mounting spot near a power outlet and the Ethernet
port of the device that provides internet on your premises.
GETTING TO KNOW YOUR
VERIZON ROUTER
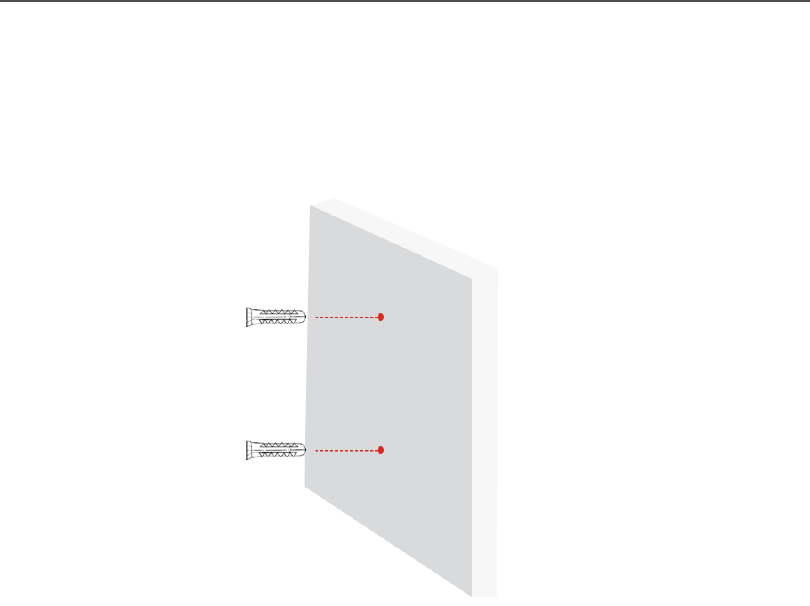
2. Mark screw hole positions on the wall. Drill holes for the wall
anchors using a 1/4 inch (6.35 mm) drill bit.
3. Insert the anchors in the drilled holes and hammer until they
are flush with the wall.


GETTING TO KNOW YOUR
VERIZON ROUTER
5. Align the mounting hole located on the bottom of the router
to the screw of the wall mount bracket.

17
/ INTRODUCTION
©2022 Verizon. All Rights Reserved
6. Rotate and align the router to the preferred position. While
using the hole in the mounting bracket, connect the Ethernet
cable providing internet to the router’s WAN port and other
cables as needed. Tighten the bracket screw to lock the
device in place.

GETTING TO KNOW YOUR
VERIZON ROUTER
7. To fasten the attached cables of the router, manage the
cables, then tighten the Velcro® strap with buckle.


SETTING UP YOUR VERIZON ROUTER
./ SETTING UP YOUR VERIZON ROUTER
Before you begin, if you are replacing an existing router, disconnect
it. Remove all old router components, including the power supply.
They will not work with your new Verizon Router.
2.0a/ INSTALLATION INSTRUCTIONS
. CONNECT YOUR CABLESCONNECT YOUR CABLES
A. Connect the coax cable from the coax port on your
router to a coax outlet. (Required for Verizon TV; skip
for 5G Home installation)
• Separate subscription required for Verizon TV; not
available in all areas.
B. Connect the Ethernet cable from your router’s WAN
port to an Ethernet outlet. (Required for internet speeds
greater than 100 Mbps)
C. Connect the power cord to your router then to an
electrical outlet.

22
/ CONNECTING YOUR
VERIZON ROUTER
©2022 Verizon. All Rights Reserved
D. Router will take up to 10 minutes to update completely.
Move on when the front light is solid white.
2. CCONNECT YOUR DEVICESONNECT YOUR DEVICES
Wired or Wi-Fi? Your choice.Wired or Wi-Fi? Your choice.
WiredWired
A. Connect the Ethernet cable
to any LAN port on your
router.
B. Connect the other end to
your computer.
Wi-FiWi-Fi
A. Get the Wi-Fi name
and password o the
label on your router.
B. On your device, choose your
Wi-Fi name when it appears.
C. Enter the Wi-Fi password exactly as it is on your router
label.

SETTING UP YOUR VERIZON ROUTER
Wi-Fi NetworkWi-Fi Network
The Verizon Router has one Wi-Fi name supporting 2.4
and 5 GHz signals. 6 GHz can be enabled and included as
well with heightened security, WPA3. The Self-Organizing
Network (SON) feature lets your devices move between
these signals automatically for an optimized Wi-Fi
connection.
3. CCOMPLETE ACTIVATIONOMPLETE ACTIVATION
Activate your service by opening a web browser on your
computer and following the prompts.
2.0b/ CONFIGURE YOUR VERIZON ROUTER
1. Open a web browser on the device connected to your
Verizon Router network.
2. In the browser address field (URL), enter:
mynetworksettings.com, then press the EnterEnter key on your
keyboard.
Alternately, you can enter: https://192.168.1.1

24
/ CONNECTING YOUR
VERIZON ROUTER
©2022 Verizon. All Rights Reserved
3. You may see a security message warning that Your Your
connection is not privateconnection is not private when you visit mynetworksettings.
com (https://192.168.1.1) for GUI management. To get to the
login screen, click the ADVANCEDADVANCED button, then on Proceed Proceed
to 192.168.1.1 (unsafe) to 192.168.1.1 (unsafe) link.
4. The login screen will appear.
The first time you access your Verizon Router, an Easy Setup
Wizard displays to help step you through the setup process.
5. On the Step 1: Please log in to your routerStep 1: Please log in to your router screen, enter
the password that is printed next to the Network Settings
Password on the label on the rear of your router. Click
ContinueContinue.

SETTING UP YOUR VERIZON ROUTER
6. The Change Wi-Fi nameChange Wi-Fi name screen displays. You can continue
with the default settings or customize them as needed. For
your protection, your Verizon Router is pre-set at the factory
to use WPA2 (Wi-Fi Protected Access II) encryption for your
Wi-Fi network. This is the best setting for most users and
allows the most devices to securely connect.
7. You can optionally set up the Guest Wi-FiGuest Wi-Fi network by
toggling the selection to OnOn. You can continue with the
default settings or customize them as needed.

26
/ CONNECTING YOUR
VERIZON ROUTER
©2022 Verizon. All Rights Reserved
8. You can optionally enable the 6 GHz Wi-Fi6 GHz Wi-Fi band by toggling
the selection to OnOn. Review the notification that enabling
6GHz will modify the existing 2.4 & 5 GHz security from
WPA2 to WPA2/WPA3 and 6 GHz will be enabled using
WPA3. You can continue to use one Wi-Fi Name and
Password across all Wi-Fi bands.
The IoT Wi-Fi will also be enabled for any devices that do
not support WPA3, and this will use a unique Wi-Fi name and
password based on the default SSID & Password. Devices on
this Wi-Fi will be able to communicate with other devices on
the Primary network with no firewall restrictions separating
them.
9. Click ContinueContinue to review your settings.
10. The Apply Wi-Fi changesApply Wi-Fi changes screen is displayed. Review your
current settings. You may optionally save your settings
as an image on your device by selecting the button, Save Save
as Imageas Image. Click ApplyApply to save the Wi-Fi changes to your
Verizon Router.

SETTING UP YOUR VERIZON ROUTER
For your protection, your Verizon Router is pre-set at the
factory to use WPA2 (Wi-Fi Protected Access II) encryption
for your Wi-Fi network. This is the best setting for most
users and provides security.
11. Click ContinueContinue. The Apply Wi-Fi changesApply Wi-Fi changes screen appears.
You have an option of saving the Wi-Fi settings as an image
on your device by clicking the Save as imageSave as image button. After
you click Save as imageSave as image to save your Wi-Fi settings as
an image, click ApplyApply to save the Wi-Fi changes to your
Verizon Router.

28
/ CONNECTING YOUR
VERIZON ROUTER
©2022 Verizon. All Rights Reserved
Note: If you select Save as imageSave as image, the image file is saved to your
web browser’s download folder.
Important: If you are on a Wi-Fi device when setting up your
Verizon Router and changes are made to the Wi-Fi name or
password, then you will be disconnected from the Wi-Fi network.
When this occurs, review the Wi-Fi networks available and
choose the network name when it appears. Enter the Wi-Fi
password you have applied, and your device will reconnect to
the Verizon Router.

SETTING UP YOUR VERIZON ROUTER
The You’re all set up!You’re all set up! screen displays once your Verizon Router
verifies the final settings and has successfully connected to the
internet and is ready for use. You can click on Go to Network Go to Network
SettingsSettings to access the main screen of the Verizon Router.
If your Verizon Router is subsequently reset to the factory default
settings, the settings printed on the label will again be in eect.
If your Verizon Router fails to connect, follow the troubleshooting
steps in the Troubleshooting section of this guide.

30
/ CONNECTING YOUR
VERIZON ROUTER
©2022 Verizon. All Rights Reserved
./ COMPUTER NETWORK CONFIGURATION
Each network interface on your computer should either
automatically obtain an IP address from the upstream Network
DHCP server (default configuration) or be manually configured with
a statically defined IP address and DNS address. We recommend
leaving this setting as it is.
2.1a/ CONFIGURING DYNAMIC IP ADDRESSING
To configure a computer to use dynamic IP addressing:
WINDOWS 7/8
1. In the Control Panel, locate Network and InternetNetwork and Internet, then select
View Network Status and TasksView Network Status and Tasks.
2. In the View your active networks – Connect or disconnectView your active networks – Connect or disconnect
section, click Local Area ConnectionLocal Area Connection in the Connections Connections
field. The Local Area Connection Status window displays.
3. Click PropertiesProperties. The Local Area Connection Properties
window displays.
4. Select Internet Protocol Version 4 (TCP/IPv4)Internet Protocol Version 4 (TCP/IPv4), then click
PropertiesProperties. The Internet Protocol Version 4 (TCP/IPv4)
Properties window displays.
5. Click the Obtain an IP address automaticallyObtain an IP address automatically radio button.
6. Click the Obtain DNS server address automaticallyObtain DNS server address automatically radio
button, then click OKOK.

COMPUTER NETWORK CONFIGURATION
7. In the Local Area Connection Properties window, click OKOK
to save the settings.
8. To configure Internet Protocol Version 6 (TCP/IPv6) to use
dynamic IP addressing, repeat steps 1 to 7. However for
step 4, select Internet Protocol Version 6 (TCP/IPv6) Internet Protocol Version 6 (TCP/IPv6) in the
PropertiesProperties option (refer to IPv6 section for Verizon Router
configuration).
WINDOWS 10
1. On the Windows desktop, click on the StartStart icon. Select
SettingsSettings and click Network & InternetNetwork & Internet.
2. In the Network & Internet, click EthernetEthernet.
3. Select Network and Sharing CenterNetwork and Sharing Center. The View your basic View your basic
network information and set up connectionsnetwork information and set up connections window
displays.
4. In the View your active networksView your active networks, click EthernetEthernet in the
Connections Connections field. The Ethernet StatusEthernet Status window displays.
5. Click PropertiesProperties. The Ethernet PropertiesEthernet Properties window displays.
6. Select Internet Protocol Version 4 (TCP/IPv4)Internet Protocol Version 4 (TCP/IPv4), then click
PropertiesProperties. The Internet Protocol Version 4 (TCP/IPv4)Internet Protocol Version 4 (TCP/IPv4)
PropertiesProperties window displays.
7. Click the Obtain an IP address automaticallyObtain an IP address automatically radio button.
8. Click the Obtain DNS server address automaticallyObtain DNS server address automatically radio
button, then click OKOK.

32
/ CONNECTING YOUR
VERIZON ROUTER
©2022 Verizon. All Rights Reserved
9. In the Local Area Connection Properties Local Area Connection Properties window, click OK OK to
save the settings.
10. To configure Internet Protocol Version 6 (TCP/IPv6) to use
dynamic IP addressing, repeat steps 1 to 9. However for
step 6, select Internet Protocol Version 6 (TCP/IPv6)Internet Protocol Version 6 (TCP/IPv6) in the
PropertiesProperties option (refer to IPv6 section for Verizon Router
configuration).
MACINTOSH OS X
1. Click the AppleApple icon in the top left corner of the desktop. A
menu displays.
2. Select System PreferencesSystem Preferences. The System Preferences
window displays.
3. Click NetworkNetwork.
4. Verify that EthernetEthernet, located in the list on the left, is
highlighted and displays ConnectedConnected.
5. Click Assist MeAssist Me.
6. Follow the instructions in the Network Diagnostics AssistantNetwork Diagnostics Assistant.
2.1b/ CONNECTING OTHER COMPUTERS AND NETWORK
DEVICES
You can connect your Verizon Router to other computers or set top
boxes using an Ethernet cable, Wi-Fi connection (Wi-Fi), or coaxial
cable.

COMPUTER NETWORK CONFIGURATION
ETHERNET
1. Plug one end of an Ethernet cable into one of the open
Ethernet ports on the back of your Verizon Router.
2. Plug the other end of the Ethernet cable into an Ethernet
port on the computer.
3. Repeat these steps for each computer to be connected to
your Verizon Router using Ethernet. You can connect up to
three.
CONNECTING A WIFI DEVICE USING WPS
Wi-Fi Protected Setup (WPS) is an easier way for many devices
to set up a secure Wi-Fi network connection. Instead of manually
entering passwords or multiple keys on each Wi-Fi client, such as a
laptop, printer, or external hard drive, your Verizon Router creates a
secure Wi-Fi network connection.
In most cases, this only requires the pressing of two buttons – one
on your Verizon Router and one on the Wi-Fi client. This could be
either a built-in button or one on a compatible Wi-Fi adapter/card,
or a virtual button in software. Once completed, this allows Wi-Fi
clients to join your Wi-Fi network.
To initialize the WPS process, you can either press and hold the
WPS button located on the rear of your Verizon Router for more
than two seconds or use the UI and press the on-screen button.
You can easily add Wi-Fi devices to your Wi-Fi network using the
WPS option if your Wi-Fi device supports the WPS feature.

34
/ CONNECTING YOUR
VERIZON ROUTER
©2022 Verizon. All Rights Reserved
To access WPS using the user interface:
1. From the BasicBasic menu, select Wi-FiWi-Fi settings, then click
Wi-Fi Protected SetupWi-Fi Protected Setup.
2. Enable the protected setup by moving the selector to onon.
3. Use one of the following methods:
• If your Wi-Fi client device has a WPS button, press the
WPS button on your router for more than two seconds,
then click the start WPSstart WPS button in the Option 1Option 1 to start the
WPS registration process.
• If your client device has a WPS PIN, locate the PIN printed
on the client’s label or in the client documentation. Enter
the PIN number in the Enter PINEnter PIN field. The Client WPS PINClient WPS PIN
field is located in the Option 2Option 2 on the user interface.
• Click RegisterRegister.

COMPUTER NETWORK CONFIGURATION
• Alternatively, you can enter the router’s PIN shown on
this screen into the WPS user interface of your device, if
this PIN mode is supported by your Wi-Fi device.
4. After pressing the WPS button on your router, you have two
minutes to press the WPS button on the client device before
the WPS session times out.
When the WPS button on your router is pressed, the Router
Status LED on the front of your router begins flashing blue.
The flashing continues until WPS pairing to the client device
completes successfully. At this time, the Router Status LED
turns solid white.
If WPS fails to establish a connection to a Wi-Fi client
device within two minutes, the Router Status LED on your
router flashes red for two minutes to indicate the WPS
pairing process was unsuccessful. After flashing red, the
light returns to solid white to indicate that Wi-Fi is on.
Note: Wi-Fi Protected Setup (WPS) cannot be used if WPA3
security is enabled or SSID broadcast is disabled or if MAC
address authentication is enabled with an empty white list.
CONNECTING A WI-FI DEVICE USING A PASSWORD
1. Verify each device that you are connecting with Wi-Fi has
built-in Wi-Fi or an external Wi-Fi adapter.
2. Open the device’s Wi-Fi settings application.

36
/ CONNECTING YOUR
VERIZON ROUTER
©2022 Verizon. All Rights Reserved
3. Select your Verizon Router’s Wi-Fi network name (SSID)
from the device’s list of discovered Wi-Fi networks.
4. When prompted, enter your Verizon Router’s Wi-Fi password
(WPA2 or WPA3 key) into the device’s Wi-Fi settings.
Your router’s default Wi-Fi network name and password
are located on the sticker on the rear panel of your
Verizon Router.
5. Verify the changes were implemented by using the device’s
web browser to access a site on the internet.
6. Repeat these steps for every device that you are connecting
with Wi-Fi to your router.
COAX
1. Verify all coax devices are turned o.
2. Disconnect any adapter currently connected to the coaxial
wall jack in the room where your router is located.
3. Connect one end of the coaxial cable to the coaxial wall jack
and the other end to the coax port on your network device.
4. Power up the network device.

MAIN SCREEN
./ MAIN SCREEN
When you log into your router, the dashboard main page displays
the navigation menus of Basic and Advanced settings, Wi-Fi
settings, Devices, Parental Controls, and connection status, and
Basic quick links.
The configuration options available via the left-hand main menu are
described in the following chapters:
• Basic Settings
– System - this chapter
– Wi-Fi - Chapter 3
– Devices - Chapter 4
• Advanced Settings - Chapter 5

38
/ CONNECTING YOUR
VERIZON ROUTER
©2022 Verizon. All Rights Reserved
2.2a/ SYSTEM
SYSTEM STATUS
To view the status:
1. Access the dashboard HomeHome page.
2. You can quickly view your router’s status by clicking
System\System Status System\System Status on the screen. This section displays
the status of your router’s local network (LAN) and
internet connection (WAN), firmware and hardware version
numbers, MAC Address, IP settings of Verizon Router and
Extender Mini(s) (if connected).

MAIN SCREEN


OVERVIEW
./ OVERVIEW
Your Verizon Router provides you with Wi-Fi connectivity using the
802.11a, b, g, n, ac or ax standards. These are the most common
Wi-Fi standards.
The Verizon Router contains 2.4 GHz, 5 GHz and 6 GHz Wi-Fi
bands, and the operation modes and speeds are listed as follows:
• 2.4 GHz
– Legacy operation mode: supports IEEE 802.11b/g/n with
maximum theoretical rate at 600 Mbps
– Compatibility mode: supports IEEE 802.11ax
• backward compatible with IEEE 802.11b/g/n/ac
• maximum theoretical rate up to 1.1 Gbps
• 5 GHz
– Legacy operation mode: supports IEEE 802.11a/n/ac with
maximum theoretical rate at 2.2 Gbps
– Compatibility mode: supports IEEE 802.11ax
• backward compatible with IEEE 802.11a/n/ac
• maximum theoretical rate up to 2.4 Gbps
• 6 GHz
– Operation mode: supports IEEE 802.11ax
– Maximum rate up to 4.8 Gbps
Note: 802.11a, 802.11b, and 802.11g are legacy modes and are not
recommended. Even one such device connected to the network
will slow your entire Wi-Fi network.

44
/ WIFI SETTINGS
©2022 Verizon. All Rights Reserved
The Wi-Fi service and Wi-Fi security are activated by default. The
level of security is preset to WPA2 encryption using a unique default
WPA2 key (also referred to as a passphrase or password) pre-
configured at the factory. This information is displayed on a sticker
located on the rear of your router.
Your router integrates multiple layers of security. These include
Wi-Fi Protected Access, and firewall.
./ BASIC SETTINGS
3.1a/ PRIMARY NETWORK
You can configure the basic security settings for 2.4 GHz, 5 GHz or
6 GHz of your Wi-Fi network.

BASIC SETTINGS
To configure the Primary Wi-Fi name & password and security
settings:
1. From the Basic Basic menu, select Wi-Fi Wi-Fi from the left pane and
then click Primary Network Primary Network.
2. To activate the Wi-Fi radio, move the selector to onon. If the
radio is not enabled, no Wi-Fi devices will be able to connect
to the home network.
3. If desired, enter a new name and password for the
Wi-Fi network or leave the default name and password that
displays automatically.
Note: The SSID is the network name. All devices must use the
same SSID.
4. To configure the Wi-Fi SecuritySecurity, click the setup button
and select WPA2 WPA2 or WPA3WPA3.
Caution: These settings should only be configured by
experienced network technicians. Changing the settings could
adversely aect the operation of your router and your local
network.
• Broadcast Wi-Fi network name (SSID)Broadcast Wi-Fi network name (SSID)
You can configure the Verizon Router’s SSID broadcast capabilities
to allow or disallow Wi-Fi devices from automatically using a
broadcast SSID name to detect your router Wi-Fi network.
– To enable SSID broadcasting, move the selector to onon.
SSID broadcast is enabled by default. The SSID of the Wi-Fi
network will be broadcast to all Wi-Fi devices.

46
/ WIFI SETTINGS
©2022 Verizon. All Rights Reserved
– To disable SSID broadcasting, move the selector to o. o. The
public SSID broadcast will be hidden from all Wi-Fi devices.
You will need to manually configure additional Wi-Fi devices
to join the Wi-Fi network.
• MAC AuthenticationMAC Authentication
You can configure your router to limit access to your Wi-Fi network
to only those devices with specific MAC addresses.
To set Wi-Fi MAC authentication:
1. To setup access control, click on the Edit listEdit list.
2. Select either:
• Access ListAccess List – allows the listed devices to access the Wi-Fi
network.

BASIC SETTINGS
Warning: This will block Wi-Fi network access for all devices not
in the list. Only devices in the list will be able to connect to the
Wi-Fi network.
• Device AccessDevice Access – Wi-Fi devices will be able to access the
Wi-Fi network if they use the correct Wi-Fi password.
3. Enter the MAC address of a device and click Add new Add new
devicedevice.
4. Repeat step 2 and step 3 to add additional devices, as
needed.
5. When all changes are complete, click Apply ChangesApply Changes to
save the changes.
3.1b/ GUEST NETWORK
The Guest NetworkGuest Network is designed to provide internet connectivity
to your guests but restricts access to your primary network and
shared files. The primary network and the guest network are
separated from each other through firewalls. You create one Guest
Wi-Fi SSID and one password, and use it for all guests. The guest
network SSID does not change when you make a change to your
primary network SSID.
The Verizon Router is shipped from the factory with Guest Wi-Fi
turned o. The default SSID for Guest Wi-Fi is preconfigured at
the factory to the default Wi-Fi network name (SSID) which is
displayed on a sticker located at the rear of the router followed by

48
/ WIFI SETTINGS
©2022 Verizon. All Rights Reserved
hyphen guest (-Guest). For example – if the router is shipped with a
default SSID of “Verizon-ABCDE” then the default SSID for Guest
Wi-Fi is “Verizon-ABCDE-Guest”.
To configure the security settings for your guest network:
1. From the Basic Basic menu, select Wi-Fi Wi-Fi and then click Guest Guest
NetworkNetwork.
2. Move the selector to onon.
3. If desired, enter a new name and password for the
Wi-Fi network or leave the default name and password that
displays automatically.
4. Press Apply ChangesApply Changes to save the changes.
Important: It is not recommended to create a guest network
without a password.

BASIC SETTINGS
3.1c/ IOT NETWORK
The router supports connection of multiple IoT devices on a
separate Wi-Fi SSID. The IoT Network is designed to provide an
easier setup experience for your Internet of Things (IoT) devices
which benefit from connecting to the 2.4 GHz band while keeping
your Primary Network settings unchanged. IoT devices and Primary
devices can communicate with no firewall restrictions separating
them.
The Verizon Router is shipped from the factory with IoT Wi-Fi
turned o. The default SSID for IoT Wi-Fi is preconfigured at
the factory to the default Wi-Fi network name (SSID) which is
displayed on a sticker located at the rear of the router followed
by hyphen IoT (-IoT). For example – if the router is shipped with
a default SSID of “Verizon-ABCDE” then the default SSID for IoT
Wi-Fi is “Verizon-ABCDE-IoT”.

50
/ WIFI SETTINGS
©2022 Verizon. All Rights Reserved
To enable IoT Wi-Fi link:
1. From the Basic Basic menu, select Wi-Fi Wi-Fi and then click IoT IoT
NetworkNetwork.
2. Move the selector to on.on.
3. If desired, enter a new name and password for the
Wi-Fi network or leave the default name and password that
displays automatically.
4. Press Apply ChangesApply Changes to save the changes.
3.1d/ WIFI PROTECTED SETUP WPS
Wi-Fi Protected Setup (WPS) is an easier way for many devices
to set up a secure Wi-Fi network connection. Instead of manually
entering passwords or multiple keys on each Wi-Fi client, such as a
laptop, printer, or external hard drive, your Verizon Router creates a
secure Wi-Fi network connection.
In most cases, this only requires the pressing of two buttons – one
on your Verizon Router and one on the Wi-Fi client. This could be
either a built-in button or one on a compatible Wi-Fi adapter/card,
or a virtual button in software. Once completed, this allows Wi-Fi
clients to join your Wi-Fi network.
To initialize the WPS process, you can either press and hold the
unified button located on the front of your Verizon Router for more
than two seconds or use the UI and press the on-screen button.

BASIC SETTINGS
You can easily add Wi-Fi devices to your Wi-Fi network using the
WPS option if your Wi-Fi device supports the WPS feature.
To access WPS using the user interface:
1. From the Basic Basic menu, select Wi-Fi Wi-Fi and then click Wi-Fi Wi-Fi
Protected Setup (WPS)Protected Setup (WPS).
2. Enable the protected setup by moving the selector to onon.
3. Use one of the following methods:
• If your Wi-Fi client device has a WPS button, press the
unified button on your router for more than two seconds,
then click the start WPSstart WPS button in the Option 1Option 1 to start
the WPS registration process.
• If your client device has a WPS PIN, locate the PIN
printed on the client’s label or in the client documentation.
Enter the PIN number in Option 2Option 2 on the user interface.

52
/ WIFI SETTINGS
©2022 Verizon. All Rights Reserved
• Click RegisterRegister.
• Alternatively, you can enter the router’s PIN shown on this
screen into the WPS user interface of your device, if this
PIN mode is supported by your Wi-Fi device.
4. After pressing the unified button (WPS) on your router, you
have two minutes to press the WPS button on the client
device before the WPS session times out.
When the unified button (WPS) on your router is pressed,
the Router Status LED on the front of your router begins
flashing blue. The flashing continues until WPS pairing to the
client device completes successfully. At this time, the Router
Status LED turns solid blue.
If WPS fails to establish a connection to a Wi-Fi client device
within two minutes, the Router Status LED on your router
flashes red for two minutes to indicate the WPS pairing
process was unsuccessful. After flashing red, the light
returns to solid white to indicate that Wi-Fi is on.
Note: Wi-Fi Protected Setup (WPS) cannot be used if WPA3
security is enabled or SSID broadcast is disabled or if MAC
address authentication is enabled with an empty white list.

ADVANCED SETTINGS
./ ADVANCED SETTINGS
3.2a/ PRIMARY NETWORK
Self-Organizing Network (SON)
The Verizon Router supports 2.4 GHz, 5 GHz and 6 GHz signals.
The Self-Organizing Network (SON) feature lets your devices
move between these signals automatically for an optimized Wi-Fi
connection.
To configure SON, Wi-Fi radio, SSID and security settings:
1. From the Advanced Advanced menu, select Wi-Fi Wi-Fi from the left pane
and then click Primary Network Primary Network.
2. To enable SON, move the selector to onon.

54
/ WIFI SETTINGS
©2022 Verizon. All Rights Reserved
3. To activate the Wi-Fi radio, move the selector to onon. If the
radio is not enabled, no Wi-Fi devices will be able to connect
to the primary network.
4. If desired, enter a new name and password for the
Wi-Fi network or leave the default name and password that
displays automatically.
Note: The SSID is the network name. All devices must use the
same SSID.
5. To configure the Wi-Fi security, click the setup button.
Caution: These settings should only be configured by
experienced network technicians. Changing the settings could
adversely aect the operation of your router and your local
network.

ADVANCED SETTINGS
• Group keyGroup key - to update the WPA shared key, move the selector
to onon.
• Wi-Fi QoS (WMM)Wi-Fi QoS (WMM) - improves the quality of service (QoS) for
voice, video, and audio streaming over Wi-Fi by prioritizing these
data streams.
• WMM Power SaveWMM Power Save - improves battery life on mobile Wi-Fi
devices such as smart phones and tablets by fine-tuning power
consumption.
3.2b/ RADIO MANAGEMENT
You can configure the channel settings for the 2.4 GHz, 5 GHz and
6 GHz band(s) of your Wi-Fi network.

56
/ WIFI SETTINGS
©2022 Verizon. All Rights Reserved
To view and configure the channel settings:
1. From the Advanced Advanced menu, select Wi-Fi Wi-Fi and then click Radio Radio
ManagementManagement.
2. Click on SettingsSettings on the top right-hand side of the Radio Radio
ManagementManagement page to configure the channel scan settings:
• Select the Keep my channel selection during power cycleKeep my channel selection during power cycle
check box to save your channel selection when your
Verizon Router is rebooted.
• Enable DFS channels during channel scanEnable DFS channels during channel scan: DFS channels
are enabled by default during channel scans.
Note: DFS channels are a subset of the 5 GHz network that
is shared with radar systems. Some consumer devices do
not support these channels and cannot connect to routers
using them. Examples include some media streaming devices.
Disabling this feature will allow the router to select the best
available channel to broadcast on and allow these devices to
connect.
• Press Apply ChangesApply Changes to save the changes.

ADVANCED SETTINGS
3. Click ScanScan to perform channel availability scan for the
Verizon Router accommodating the best radio channel and
providing the best Wi-Fi performance.
4. On the Channel SettingsChannel Settings page for either 2.4 GHz, 5 GHz
or 6 GHz, the following information displays and can be
configured:
• Channel AnalysisChannel Analysis - scans and displays channel
bandwidth and signal strength of available APs. Channel Channel
ScoreScore displays a network congestion score of one to ten
in each Wi-Fi channel. It can be used to determine which
channels to use or to avoid. Higher score indicates less
congestion in a channel.
• ChannelChannel Settings Settings - this is the radio channel used by the
Wi-Fi router and its clients to communicate with each
other. The channel must be the same on the router
and all of its Wi-Fi clients. Select the channel you want
the Wi-Fi radio to use to communicate, or accept the
default (Auto)Auto) channel selection. Then the router will
automatically assign itself a radio channel.
• WidthWidth - displays the Wi-Fi channel currently in use on
each band. Users can select from available channels.

58
/ WIFI SETTINGS
©2022 Verizon. All Rights Reserved
• 802.11 Mode802.11 Mode
You can limit the Wi-Fi access to your network by selecting
the 2.4GHz and 5 GHz Wi-Fi communication standard
best suited for the devices you allow to access your Wi-Fi
network.
Select the Wi-Fi mode as follows:
– Compatibility – This is the default mode setting on
5GHz, providing a good balance of performance and
interoperability with existing Wi-Fi devices. 802.11a,n,ac
and ax devices can connect.
– Legacy – This is the default mode setting on 2.4 GHz,
providing broad connection support for old and new Wi-Fi
devices. 802.11a,b,g,n and ac devices can connect.
Notes:
802.11n is available on both 2.4 GHz and 5 GHz frequencies.
Connecting 802.11a, b or g devices will cause your Wi-Fi network
to slow on that radio and is not recommended.
• Transmit PowerTransmit Power – adjusts the power of the Wi-Fi signal.

ADVANCED SETTINGS
To view the channel settings history:
1. From the Advanced Advanced menu, select Wi-Fi Wi-Fi and then click Radio Radio
ManagementManagement.
2. Click on History History to display the channel settings history.


61
/ CONNECTED
DEVICES
©2022 Verizon. All Rights Reserved
You can view the settings of the
network devices connected to your
Verizon Router’s network.
The abundance of harmful information
on the internet poses a serious
challenge for employers and parents
alike as they ask “How can I regulate
what my employee or child does on the
internet?”
With that question in mind, your
Verizon Router’s Parental Controls were
designed to allow control of internet
access on all locally networked devices.

DEVICE SETTINGS
./ DEVICE SETTINGS
To view and manage the connected devices on your network:
1. From the Basic Basic menu, select Devices Devices from the left pane. .
2. The screen displays information about connected devices
including Device NameDevice Name and identifiers, Parental ControlsParental Controls, the
type of network connection, and settings that you can view
and configure.
3. To easily add a new device to the network:
i. Click Add DeviceAdd Device button on the screen.
ii. Select the preferred Network TypeNetwork Type from the dropdown
list (PrimaryPrimary, GuestGuest or IoTIoT).
iii. Scan the provided QR code with the device’s camera.
iv. Tap the push notification to connect the device to your
network.

63
/ CONNECTED
DEVICES
©2022 Verizon. All Rights Reserved
v. You can add the new device to your Wi-Fi network using
the WPS option if your Wi-Fi device supports the WPS
feature. Refer to “3.1d/ Wi-Fi Protected Setup (WPS)” on
page 50.
vi. Click DoneDone to save the changes.
4. Click the Block/AllowBlock/Allow option to quickly disable/enable a
device from having internet access.
For additional information about blocking websites, refer to
“Setting Parental Controls” on page 67.

DEVICE SETTINGS
5. Click the Settings icon to access the Device SettingsDevice Settings page
for that device:

65
/ CONNECTED
DEVICES
©2022 Verizon. All Rights Reserved
– Device InformationDevice Information:
• Device Type, Name/Host Name, Location, Device Type, Name/Host Name, Location, and Mobility Mobility
- Displays the current known information of the device.
These can be updated or corrected as needed. Click EditEdit
and SaveSave to apply any changes.
• This section also provides the device MAC Address,
Access Point information the device is connected to as
well as the IPv4 Address of the device.
– Device Add-OnsDevice Add-Ons
Port ForwardingPort Forwarding - Port Forwarding allows your network
to be exposed to the internet in specific limited and
controlled ways. For example, you could allow specific
applications, such as gaming, voice, and chat, to access

DEVICE SETTINGS
servers in the local network. To access the Port
Forwarding page, click the setup button.
For additional information, refer to the Port Forwarding
section in Chapter 5 Configuring Advanced Settings.
Access ControlAccess Control - Access Control restricts access from
the local network to the internet. To access the Access
Control page, click the setup button.
For additional information, refer to the Access Control
section in Chapter 5 Configuring Advanced Settings.
DMZ hostDMZ host - DMZ host allows a single device on your
primary network to be fully exposed to the internet for
special purposes such as internet gaming. To access the
DMZ host page, click the setup button.
For additional information, refer to the section in
Chapter 5 Configuring Advanced Settings.
DNS ServerDNS Server - DNS Server manages the DNS server host
name and IP address. To access the DNS Server page,
click the setup button.
For additional information, refer to the section in
Chapter 5 Configuring Advanced Settings.
– Device ConnectionDevice Connection
This section displays Connection information of how and
how well the device is connected to the Access Point. It
also displays the Network related information, including
IPv6 addresses and a Ping TestPing Test option.

67
/ CONNECTED
DEVICES
©2022 Verizon. All Rights Reserved
./ SETTING PARENTAL CONTROLS
4.1a/ ACTIVATING PARENTAL CONTROLS
You can create a basic access policy or using the provided Rule Rule
TemplatesTemplates for any computer or device on your Verizon Router
network. Parental controls limit internet access to specific websites
based on a schedule that you create.
Access can be limited on specific websites or keywords embedded
in a website. For example, you can block access to the ‘www.
anysite.com’ as well as block any website that has the word ‘any’ in
its site name.
To limit device access:
1. From the Basic Basic menu, select Devices Devices from the left pane and
then click Parental ControlsParental Controls.

SETTING PARENTAL CONTROLS
2. To use the default Rule Templates, Rule Templates, select one of the pre-
defined rules as shown on screen to quickly setup access
policy for devices on your network.
3. To create a new access policy, click on the New Rule New Rule and
the configuration page displays.
4. Create a rule name.
5. Create a schedule by selecting User defined User defined from the
dropdown list.

69
/ CONNECTED
DEVICES
©2022 Verizon. All Rights Reserved
6. Select the days of the week when the rule will be active or
inactive.
7. Set the time when the rule will be active or inactive, then
specify the start time and end time.
8. Click ApplyApply to save changes.
9. Select the ConditionCondition rule of Internet is always oInternet is always o/Internet is Internet is
always onalways on to block/allow the access to all internet websites.
10. Create the DevicesDevices rule by selecting User defined User defined from
the dropdown list and select the computers or clicking Add Add
Devices Devices to add a device where you are limiting access.
11. Click ApplyApply to save changes.
12. To remove a device from the llist, click Remove Remove to the
assigned device.

SETTING PARENTAL CONTROLS
13. Click Add Exceptions Add Exceptions for the following exception options:
• Enter the name of the website or keywords within a URL
to block/allow the specified websites and websites with
names containing the specified keyword.
14. Click Apply Apply to save changes.
4.1b/ ACTIVE RULES
You can view the rules created for your Verizon Router shown on
the Parental ControlsParental Controls page.

71
/ CONNECTED
DEVICES
©2022 Verizon. All Rights Reserved
./ UNIVERSAL PLUG & PLAY
You can use Universal Plug and Play (UPnP) to support new devices
without configuring or rebooting your Verizon Router.
In addition, you can enable the automatic cleanup of invalid rules.
When enabled, this functionality verifies the validity of all UPnP
services and rules every five minutes. Old and unused UPnP defined
services are removed, unless a user-defined rule depends on it.
UPnP services are not deleted when disconnecting a computer
without proper shutdown of the UPnP applications, such as
messenger. Services may often not be deleted and eventually this
leads to the exhaustion of rules and services. No new services can
be defined. The cleanup feature locates the invalid services and
removes them, preventing services exhaustion.
To access this setting:
1. From the Advanced Advanced menu, select Devices Devices from the left pane
and then click Universal Plug & PlayUniversal Plug & Play.

UNIVERSAL PLUG & PLAY
2. To enable UPnP and allow UPnP services to be defined on
any network hosts, select the UPnP EnabledUPnP Enabled check box.
3. To enable automatic cleanup of invalid rules, select Enable Enable
Automatic Cleanup of Old Unused UPnP ServicesAutomatic Cleanup of Old Unused UPnP Services check
box.
4. Click Apply changesApply changes to save changes.


74
/ CONFIGURING
ADVANCED SETTINGS
©2022 Verizon. All Rights Reserved
Advanced settings cover a wide range
of sophisticated configurations for your
Verizon Router’s firmware, security setup
and network.
Verizon Router’s security suite includes
comprehensive and robust security
services, such as stateful packet
inspection, firewall security, user
authentication protocols, and password
protection mechanisms.
These and other features help protect
your computers from security threats on
the internet.

This chapter covers the following advanced features:
Security & FirewallSecurity & Firewall
• General Firewall - select the security level for the firewall.
• Access Control - restrict access from the local network to the
internet.
• DMZ Host - allows a single device on your primary network to
be fully exposed to the internet for special purposes such as
internet gaming.
• IPv6 Pinholes - provide access tunnel to a service on a host for
a particular application.
• Port Forwarding - enable access from the internet to specified
services provided by computers on the local network.
• Port Forwarding Rules – displays port forwarding rules.
• Port Triggering - define port triggering entries to dynamically
open the firewall for some protocols or ports.
• Scheduler Rules Settings – limits the activation of firewall rules
to specific time periods.
• SIP ALG - supports the Application Layer Gateway for Session
Initiation Protocol.

76
/ CONFIGURING
ADVANCED SETTINGS
©2022 Verizon. All Rights Reserved
Network SettingsNetwork Settings
• ARP Table – displays active devices with their IP and MAC
addresses.
• DNS Server - manages the DNS server host name and IP
address.
• Dynamic DNS - allows a static domain name to be mapped to
the dynamic IP address.
• IPv4/IPv6 Address Distribution - adds computers configured as
DHCP clients to the network.
• IPv6 – enables IPv6 support.
• MAC Cloning – clones the MAC address.
• NDP (Neighbor Discovery Protocol) Table – displays active
devices with their IPv6 and MAC addresses of DHCP
connection.
• Network Connections – displays and manages the details of a
specific network connection.
• Network Objects – defines a group, such as a group of
computers.
• Port Configuration – sets up the Ethernet ports as either full- or
half-duplex ports, at either 10 Mbps, 100 Mbps, or 1000 Mbps.
• Routing – manages the routing and IP address distribution rules.
• Static NAT - allow multiple static NAT IP addresses to be
designated to devices on the network.

Diagnostics & MonitoringDiagnostics & Monitoring - performs diagnostic tests and displays
the details and status of:
• Bandwidth Monitoring
• System Logging
• Full Status/System wide Monitoring of Connections/Trac
Monitoring
• Backhaul Logging
Advanced System SettingsAdvanced System Settings
• Date & Time Settings – sets the time zone and enables
automatic time updates.
• Factory Reset – resets your Verizon Router to its default
settings.
• LED Brightness - controls the Router Status LED light to either
dim or brighten.
• Reboot Router – restarts your Verizon Router.
• Remote Administration – enable remote configuration of your
Verizon Router from any internet-accessible computer.
• System Settings - sets up various system and management
parameters.

78
/ CONFIGURING
ADVANCED SETTINGS
©2022 Verizon. All Rights Reserved
./ SECURITY & FIREWALL
The firewall is the cornerstone of the security suite for your
Verizon Router. It has been exclusively tailored to the needs of the
residential or oce user and is pre-configured to provide optimum
security.
The firewall provides both the security and flexibility that home
and oce users seek. It provides a managed, professional level
of network security while enabling the safe use of interactive
applications, such as internet gaming and video conferencing.
Additional features, including surfing restrictions and access
control, can also be configured locally through the user interface or
remotely by a service provider.
The firewall regulates the flow of data between the local
network and the internet. Both incoming and outgoing data are
inspected, then either accepted and allowed to pass through your
Verizon Router or rejected and barred from passing through your
Verizon Router, according to a flexible and configurable set of rules.
These rules are designed to prevent unwanted intrusions from
the outside, while allowing local network users access to internet
services.
The firewall rules specify the type of services on the internet that
are accessible from the local network and types of services in the
local network that are accessible from the internet.

SECURITY & FIREWALL
Each request for a service that the firewall receives is checked
against the firewall rules to determine whether the request should
be allowed to pass through the firewall. If the request is permitted
to pass, all subsequent data associated with this request or
session is also allowed to pass, regardless of its direction.
For example, when accessing a website on the internet, a request
is sent to the internet for this site. When the request reaches your
Verizon Router, the firewall identifies the request type and origin,
such as HTTP and a specific computer in the local network. Unless
your Verizon Router is configured to block requests of this type
from this computer, the firewall allows this type of request to pass
to the internet.
When the website is returned from the web server, the firewall
associates the website with this session and allows it to pass;
regardless HTTP access from the internet to the local network is
blocked or permitted. It is the origin of the request, not subsequent
responses to this request, which determines whether a session can
be established.
5.0a/ SETTING FIREWALL CONFIGURATION
You can select a normal, high, or low security level to limit, block,
or permit all trac. The following table shows request access for
each security level.

80
/ CONFIGURING
ADVANCED SETTINGS
©2022 Verizon. All Rights Reserved
Security Level
Internet Requests
Incoming Trac
Local Network Requests
Outgoing Trac
High Blocked Limited
Normal Blocked Unrestricted
Low Unrestricted Unrestricted
The request access is defined as:
• Blocked trac - no access allowed, except as configured in Port
Forwarding and Remote Access
• Limited - permits only commonly used services, such as email
and web browsing
• Unrestricted - permits full access of incoming trac from the
internet and allows all outgoing trac, except as configured in
Access Control
SPECIFYING GENERAL SETTINGS FOR IPV4 OR IPV6
To set your firewall configuration:
1. From the Security & Firewall GeneralSecurity & Firewall General settings page, click on
desired IPv4 settings/IPv6 settingsIPv4 settings/IPv6 settings option to configure IPv4/
IPv6 security.

SECURITY & FIREWALL
2. Select a security level by clicking one of the radio buttons.
Using the Low SecurityLow Security setting may expose the local
network to significant security risks, and should only be
used for short periods of time to allow temporary network
access.
3. Click Apply ChangesApply Changes to save changes.
5.0b/ ACCESS CONTROL
You can block individual computers on your local network from
accessing specific services on the internet. For example, you
could block one computer from accessing the internet, then block
a second computer from transferring files using FTP as well as
prohibit the computer from receiving incoming email.
Access control incorporates a list of preset services, such as
applications and common port settings.

82
/ CONFIGURING
ADVANCED SETTINGS
©2022 Verizon. All Rights Reserved
ALLOW OR RESTRICT SERVICES
To allow or restrict services:
1. From the Advanced Advanced menu, select Security & Firewall Security & Firewall from the
left pane and then click Access Control Access Control. The Access ControlAccess Control
page opens with the Allows and Blocked sections displayed.
The Allowed section only displays when the firewall is set to
maximum security.
2. To block a service, click AddAdd. The Add Access Control Add Access Control page
displays.

SECURITY & FIREWALL
3. To apply the rule to:
• Networked Computer/Device - select AnyAny.
• Specific devices only - select User DefinedUser Defined.
4. In the ProtocolProtocol field, select the internet protocol to be
allowed or blocked. If the service is not included in the list,
select User DefinedUser Defined. The Edit ServiceEdit Service page displays. Define
the service, then click ApplyApply. The service is automatically
added to the Add Access Control Add Access Control section.
5. Specify when the rule is active as AlwaysAlways or User DefinedUser Defined.
6. Enter the rule name, specify days of the week, and set
the start time and end time when the rule will be active or
inactive.
7. Click ApplyApply to save changes.
8. The Access Control Access Control page displays a summary of the new
access control rule.

84
/ CONFIGURING
ADVANCED SETTINGS
©2022 Verizon. All Rights Reserved
DISABLE ACCESS CONTROL
You can disable an access control and enable access to the service
without removing the service from the Access Control table. This
can make the service available temporarily and allow you to easily
reinstate the restriction later.
• To disable an access control, clear the check box next to the
service name.
• To reinstate the restriction, select the check box next to the
service name.
• To remove an access restriction, select the service and click
RemoveRemove. The service is removed from the Access Control table.
5.0c/ DMZ HOST
DMZ Host allows a single device on your primary network to be fully
exposed to the internet for special purposes like internet gaming.
Warning: Enabling DMZ Host is a security risk. When a device on
your network is a DMZ Host, it is directly exposed to the internet
and loses much of the protection of the firewall. If it is compromised,
it can also be used to attack other devices on your primary network.
Follow these steps to designate a device on your primary network
as a DMZ Host:
1. From the Advanced Advanced menu, select Security & Firewall Security & Firewall and
then click DMZ HostDMZ Host.
2. Select EnableEnable for the DMZ Host.

SECURITY & FIREWALL
3. Enter the IP address or select the MAC address of the
device you want to designate as the DMZ Host.
4. Click Apply ChangesApply Changes to save changes.
5.0d/ IPV PINHOLES
The IPv6 Pinhole feature of the Verizon Router allows an
application to send incoming packets for a certain port number to
the destination computer by setting up the rule of authorization.
To configure the rules:
1. From the Advanced Advanced menu, select Security & Firewall Security & Firewall and
then click IPv6 PinholeIPv6 Pinhole.

86
/ CONFIGURING
ADVANCED SETTINGS
©2022 Verizon. All Rights Reserved
2. Select external and internal host, protocol and the
application port type.
3. To schedule the rule, select either AlwaysAlways or User DefinedUser Defined in
the ScheduleSchedule list box.
4. Click Add to listAdd to list. The screen displays opened pinhole port
and its status. It shows the IP addresses of remote device
and connected device on your network.
5. Click Apply ChangesApply Changes to save changes.

SECURITY & FIREWALL
5.0e/ PORT FORWARDING
You can activate port forwarding to expose the network to the
internet in a limited and controlled manner. For example, enabling
applications, such as gaming and voice, to work from the local
network as well as allowing internet access to servers within the
local network.
To create port forwarding rules:
1. From the Advanced Advanced menu, select Security & Firewall Security & Firewall from
the left pane and then click Port ForwardingPort Forwarding. The Port Port
ForwardingForwarding page opens with the current rules displayed.
2. To create a new rule, enter the application name, configure
its inbound and outbound port numbers, forwarding
destination address, then select the protocol.

88
/ CONFIGURING
ADVANCED SETTINGS
©2022 Verizon. All Rights Reserved
3. To schedule the rule, select either AlwaysAlways or User DefinedUser Defined in
the ScheduleSchedule list box.
4. Click Add to listAdd to list. The rule displays in the Rules ListRules List section.
5. Click Apply ChangesApply Changes to save changes.
5.0f/ PORT FORWARDING RULES
You can view, modify, and delete port forwarding rules.
To access the rules:
1. Select Port Forwarding RulesPort Forwarding Rules in the Security & FirewallSecurity & Firewall
section.
2. To create or edit a protocol rule, click the Add newAdd new or EditEdit
icon in the action column. The Edit ServiceEdit Service page displays.

SECURITY & FIREWALL
3. Modify the Service NameService Name and Service DescriptionService Description, as
needed.
4. To add server ports, click AddAdd.
5. To modify the current protocol, click the EditEdit icon in the
action column. The Edit Service Server PortsEdit Service Server Ports page displays.
6. Enter the Protocol, Source PortsProtocol, Source Ports and Destination PortsDestination Ports, as
needed.
7. Click ApplyApply to save changes.

90
/ CONFIGURING
ADVANCED SETTINGS
©2022 Verizon. All Rights Reserved
5.0g/ PORT TRIGGERING
Port triggering can be described as dynamic port forwarding. By
setting port triggering rules, inbound trac arrives at a specific
network host using ports that are dierent than those used for
outbound trac. The outbound trac triggers the ports where the
inbound trac is directed.
For example, a gaming server is accessed using UDP protocol on
port 2222. The gaming server then responds by connecting the
user using UDP on port 3333, when a gaming session is initiated.
In this case, port triggering must be used since it conflicts with the
following default firewall settings:
• Firewall blocks inbound trac by default.
• Server replies to your Verizon Router IP, and the connection is
not sent back to the host since it is not part of a session.
To resolve the conflict, a port triggering entry must be defined,
which allows inbound trac on UDP port 3333 only after a network
host generated trac to UDP port 2222. This results in your
Verizon Router accepting the inbound trac from the gaming
server and sending it back to the network host which originated the
outgoing trac to UDP port 2222.
To configure port triggering:
1. From the Advanced Advanced menu, select Security & Firewall Security & Firewall and
then click Port TriggeringPort Triggering.

SECURITY & FIREWALL
2. To add a service as an active protocol, enter the application
name, configure its inbound and outbound (triggered/
forwarded) port range, then select the protocol.
3. To schedule the rule, select either AlwaysAlways or User DefinedUser Defined in
the ScheduleSchedule list box.
4. Click Add to listAdd to list. The rule displays in the Rules ListRules List section.
5. Click Apply ChangesApply Changes to save changes.
5.0h/ SCHEDULER RULES
Scheduler RulesScheduler Rules are used for limiting the activation of firewall rules
to specific time periods. The time periods are either for days of the
week or for hours of each day based on activity or inactivity.
To define a rule:
1. Verify that the date and time of your Verizon Router is
correct.

92
/ CONFIGURING
ADVANCED SETTINGS
©2022 Verizon. All Rights Reserved
2. Select Scheduler RulesScheduler Rules in the Security & FirewallSecurity & Firewall section.
3. Click AddAdd. The Rule ScheduleRule Schedule page displays.
4. Enter the name of the rule, select the active or inactive days
of the week and the start and end time range.

SECURITY & FIREWALL
5. Specify if the rule is activeactive at the scheduled time or inactiveinactive
at the scheduled time.
6. Click Apply changesApply changes to save changes.
5.0i/ SIP ALG
SIP ALG (Application Level Gateway) - supports various multiple
application protocols by allowing dynamic ephemeral TCP/ UDP
ports to communicate with the known ports which a particular
client application (such as FTP, VoIP service, net meeting or
streaming media) requires.
To enable the SIP ALG settings:
1. From the Advanced Advanced menu, select Security & Firewall Security & Firewall and
then click SIP ALGSIP ALG.
2. Select EnabledEnabled for the SIP ALG.
3. Click Apply ChangesApply Changes to save changes.

94
/ CONFIGURING
ADVANCED SETTINGS
©2022 Verizon. All Rights Reserved
./ NETWORK SETTINGS
5.1a/ ARP TABLE
You can view the IPv4 and MAC addresses of each DHCP
connection.
To view the IPv4 and MAC addresses for each device:
From the
Advanced Advanced menu, select Network Settings Network Settings and then click ARP TableARP Table.
5.1b/ DNS SERVER
You can edit the host name and/or IP address, if the host was
manually added to the DNS table. If not, you can only modify the
host name.
To access the DNS server:
1. From the Advanced Advanced menu, select Network Settings Network Settings and then
click DNS Server DNS Server.

NETWORK SETTINGS
2. To disable DNS rebind protection for all devices connected
to the Verizon Router, untick the check box of Enable DNS Enable DNS
Rebind Protection.Rebind Protection.
Warning: Disabling this protection may create a risk of
cybersecurity attack to devices connected to this router.
3. To add a computer stored in the DNSDNS table, click Add DNS Add DNS
EntryEntry. The DNS EntryDNS Entry page displays.

96
/ CONFIGURING
ADVANCED SETTINGS
©2022 Verizon. All Rights Reserved
4. In the Host NameHost Name field, enter the name of the computer, then
enter the IP addressIP address and click ApplyApply to save changes.
5. Then the DNS ServerDNS Server page displays.
6. To add a new IP address entry, select the Add Exceptions Add Exceptions
EntryEntry in the Exceptions to DNS Rebind Protection Exceptions to DNS Rebind Protection section.
The Add Exceptions List Add Exceptions List page displays. Edit the IP address.
7. To remove a host from the DNS table, click the RemoveRemove icon
on the screen.
8. Click Apply changesApply changes to save changes.
5.1c/ DYNAMIC DNS
Typically, when connecting to the internet, your router is assigned
an unused public IP address from a pool, and this address changes
periodically.
Dynamic DNS allows a static domain name to be mapped to the
dynamic IP address, allowing a computer within your network to be
more easily accessible from the internet.
When using Dynamic DNS, each time the public IP address
changes, the DNS database is automatically updated with the new
IP address. In this way, even though the IP address changes often,
the domain name remains constant and accessible.
To set up dynamic DNS:
1. Select Dynamic DNSDynamic DNS in the Network SettingsNetwork Settings section.

NETWORK SETTINGS
2. To set up a new entry, click the AddAdd button.
3. Configure the following parameters:
• Host NameHost Name – enter the full domain name for your
Dynamic DNS domain.
• ProviderProvider – select the Dynamic DNS account provider
from the menu.
• User NameUser Name – enter your user name for your Dynamic
DNS account.

98
/ CONFIGURING
ADVANCED SETTINGS
©2022 Verizon. All Rights Reserved
• PasswordPassword – enter the password for your Dynamic DNS
account.
• SSL ModeSSL Mode – select if your Dynamic DNS service supports
SSL.
4. Click ApplyApply to save your changes.
5.1d/ IPV ADDRESS DISTRIBUTION
You can easily add computers configured as DHCP clients to the
network. The DHCP server provides a mechanism for allocating IP
addresses to these hosts and for delivering network configuration
parameters to the hosts.
For example, a client (host) sends a broadcast message on the
network requesting an IP address for itself. The DHCP server
then checks its list of available addresses and leases a local IP
address to the host for a specific period of time and simultaneously
designates this IP address as taken. At this point, the host is
configured with an IP address for the duration of the lease.
The host can renew an expiring lease or let it expire. If it renews a
lease, the host receives current information about network services,
as it did during the original lease, allowing it to update its network
configurations to reflect any changes that occurred since the first
connection to the network.
If the host wishes to terminate a lease before its expiration, it sends
a release message to the DHCP server. This makes the IP address
available for use by other hosts.

NETWORK SETTINGS
The DHCP server performs the following functions:
• Displays a list of all DHCP host devices connected to your
Verizon Router
• Defines the range of IP addresses that can be allocated in the
network
• Defines the length of time the dynamic IP addresses are
allocated
• Provides the above configurations for each network device and
can be configured and enabled or disabled separately for each
network device
• Assigns a static lease to a network computer to receive the
same IP address each time it connects to the network, even if
this IP address is within the range of addresses that the DHCP
server may assign to other computer
• Provides the DNS server with the host name and IP address of
each computer connected to the network
To view a summary of the services provided by the DHCP server:
1. Select IPv4 Address DistributionIPv4 Address Distribution in the Network SettingsNetwork Settings
section.

100
/ CONFIGURING
ADVANCED SETTINGS
©2022 Verizon. All Rights Reserved
2. You can edit the DHCP server settings for a device. On the
IPv4 Address DistributionIPv4 Address Distribution page, click the EditEdit icon on the
screen. The DHCP Settings page opens with the device
information displayed.
3. To enable the DHCP server, select DHCP ServerDHCP Server in the IPv4 IPv4
Address DistributionAddress Distribution field.
4. Once enabled, the DHCP server provides automatic IP
assignments (IP leases) based on the preset IP range
defined below.
5. To configure the DHCP server, complete the following fields:
• Start IP AddressStart IP Address – enter the first IP address that your
Verizon Router will automatically begin assigning IP
addresses from. Since your Verizon Router’s default IP
address is 192.168.1.1, the default start IP address should
be 192.162.1.2.

NETWORK SETTINGS
• End IP AddressEnd IP Address – enter the last IP address that your
Verizon Router will stop at for the IP address allocation.
The maximum end IP address range that can be entered
is 192.168.1.254.
• WINS ServerWINS Server – determines the IP address associated
with a network device.
• Lease Time in MinutesLease Time in Minutes – assigns the amount of time in
minutes that each device is assigned an IP address by
the DHCP server when it connects to the network.
When the lease expires, the server determines if the
computer has disconnected from the network. If it has,
the server may reassign this IP address to a newly
connected computer.
6. Click ApplyApply to save changes.
IPv4 Address Distribution According to DHCP option 60 (Vendor
Class Indentifier)
DHCP vendor class is related to DHCP option 60 configuration
within the router. User can add option 60 configurations such that
particular vendor can get lease from a specified pool of address.
The existing vendor class ID, IP address, MAC address and QoS
are shown on the screen above.
DHCP Connection List
You can view a list of the connections currently assigned and
recognized by the DHCP server.

102
/ CONFIGURING
ADVANCED SETTINGS
©2022 Verizon. All Rights Reserved
To view a list of computers:
1. On the IPv4 Address DistributionIPv4 Address Distribution page, click Connection ListConnection List.
2. To define a new static connection with a fixed IP address,
click Add static connectionAdd static connection.
3. Enter the host name.
4. Enter the fixed IP address to be assigned.
5. Enter the MAC address of the network interface of the
computer used with this DHCP static connection.
6. Click ApplyApply to save changes.

NETWORK SETTINGS
5.1e/ IPV
Use the IPv6 feature settings to enable, disable, or configure an
IPv6 Internet connection and IPv6 LAN settings.
1. To configure your network to use the IPv6 Internet
connection type, select IPv6IPv6 in the Network SettingsNetwork Settings section
to display the IPv6 service options:
2. Select EnabledEnabled in the Enable IPv6 SupportEnable IPv6 Support field. (Once IPv6
is enabled the default setting will be IPv6 WAN as DHCPv6
and IPv6 LAN as Stateless).
3. Select the appropriate IPv6 connection method from the
dropdown list (DHCPv6 or Static) to specify the method to
be used to obtain your WAN IPv6 Address.

104
/ CONFIGURING
ADVANCED SETTINGS
©2022 Verizon. All Rights Reserved
4. Click Apply changesApply changes to have changes take eect.
Note: The Internet IPv6 service is required for this feature to
work over the internet.
5. To disable the IPv6 service, move the selector to oo in the
Enable IPv6 SupportEnable IPv6 Support field.
6. Click Apply changesApply changes to have changes take eect.
Once configured using valid IPv6 WAN and LAN configurations, you
should not see any errors when you click on the Apply changesApply changes
button and the Basic/System/System StatusBasic/System/System Status page will reflect the
router’s new IPv6 address.
You should also see the IPv6 address for all IPv6 supported devices
on your local network displayed on the BasicBasic/DevicesDevices/DevicesDevices page
by selecting the Settings icon to access the Device SettingsDevice Settings page
for that device.

NETWORK SETTINGS
Static - WAN IPv6 Address Connection
The IPv6 WAN Static configurations are IPv6 settings that you
enter manually. These specific IPv6 addresses and settings are not
expected to change frequently.
1. To configure IPv6 WAN Static mode, select the StaticStatic option
on the IPv6 Configuration ControlsIPv6 Configuration Controls page as shown below:
2. Specify the StaticStatic method to be used to obtain your WAN
IPv6 Address by entering:
• IPv6 WAN ConfigurationIPv6 WAN Configuration (select Static)
• Assigned PrefixAssigned Prefix (A numeric value between 16 and 128)
• IPv6 WAN AddressIPv6 WAN Address
• Default GatewayDefault Gateway: Verizon Router

106
/ CONFIGURING
ADVANCED SETTINGS
©2022 Verizon. All Rights Reserved
• IPv6 IPv6 (Primary) DNS Address 1DNS Address 1
• IPv6IPv6 (Secondary) DNS Address 2DNS Address 2
3. After entering all appropriate IPv6 settings, click Apply Apply
changeschanges to have changes take eect.
Static WAN with LAN IPv6 Stateful Settings
1. To configure IPv6 LAN Stateful mode with StaticStatic WAN, select
the Stateful (DHCPv6)Stateful (DHCPv6) option on the IPv6 Configuration IPv6 Configuration
ControlsControls page as shown below:
2. Specify the Stateful (DHCPv6)Stateful (DHCPv6) settings to be used to assign
LAN IPv6 addresses by entering the following details:
• IPv6 LAN ConfigurationIPv6 LAN Configuration (select StatefulStateful from the
dropdown list)

NETWORK SETTINGS
• LAN Prefix LAN Prefix (automatically populated)
• IPv6 LAN Address IPv6 LAN Address (automatically populated)
• DHCPv6 Client Address RangeDHCPv6 Client Address Range (start and end)
• LAN Link Local AddressLAN Link Local Address (automatically populated)
• Router Advertisement LifetimeRouter Advertisement Lifetime (minutes between 0-150)
• IPv6 Address LifetimeIPv6 Address Lifetime (minutes between 3-150)
• Option: Allow ICMPv6 Echo Request for LAN devices Option: Allow ICMPv6 Echo Request for LAN devices
using their Global IPv6 Address from WAN sideusing their Global IPv6 Address from WAN side -
requesting an IPv6 address from any available DHCPv6
servers available on the ISP
3. After entering all appropriate IPv6 settings, click Apply Apply
changeschanges to have changes take eect.
Static WAN with LAN IPv6 Stateless Settings
1. To configure IPv6 LAN Stateless mode with StaticStatic WAN,
select the StatelessStateless option on the IPv6 Configuration IPv6 Configuration
ControlsControls page as shown below:

108
/ CONFIGURING
ADVANCED SETTINGS
©2022 Verizon. All Rights Reserved
2. Specify the settings to be used to assign LAN IPv6
addresses by entering the following details:
• IPv6 LAN ConfigurationIPv6 LAN Configuration (select StatelessStateless from the
dropdown list)
• LAN Prefix LAN Prefix (automatically populated)
• IPv6 LAN Address IPv6 LAN Address (automatically populated)
• LAN Link Local AddressLAN Link Local Address (automatically populated)
• Router Advertisement LifetimeRouter Advertisement Lifetime (minutes between 0-150)
• Option: Allow ICMPv6 Echo Request for LAN devices Option: Allow ICMPv6 Echo Request for LAN devices
using their Global IPv6 Address from WAN sideusing their Global IPv6 Address from WAN side -
requesting an IPv6 address from any available DHCPv6
servers available on the ISP
3. After entering all appropriate IPv6 settings, click Apply Apply
changeschanges to have changes take eect.
DHCPv6 PD - WAN IPv6 Address Connection
The IPv6 WAN DHCPv6 configurations are IPv6 settings that you
enter that will allow your IPv6 connection to be updated by the ISP
as needed.
1. To configure IPv6 WAN Stateful (DHCPv6) mode, select the
DHCPv6-PDDHCPv6-PD option on the IPv6 Configuration ControlsIPv6 Configuration Controls page
as shown below:

NETWORK SETTINGS
2. Check to either Obtain IPv6 DNS Server address Obtain IPv6 DNS Server address
automaticallyautomatically, or Use the following IPv6 DNS Server Use the following IPv6 DNS Server
addressesaddresses
3. After entering all appropriate IPv6 settings, click Apply Apply
changeschanges to have changes take eect.
DHCPv6 WAN with LAN IPv6 Stateful (DHCPv6) Settings
1. To configure IPv6 WAN Stateful (DHCPv6) mode, select
the Stateful (DHCPv6)Stateful (DHCPv6) option on the IPv6 Configuration IPv6 Configuration
ControlsControls page as shown below:
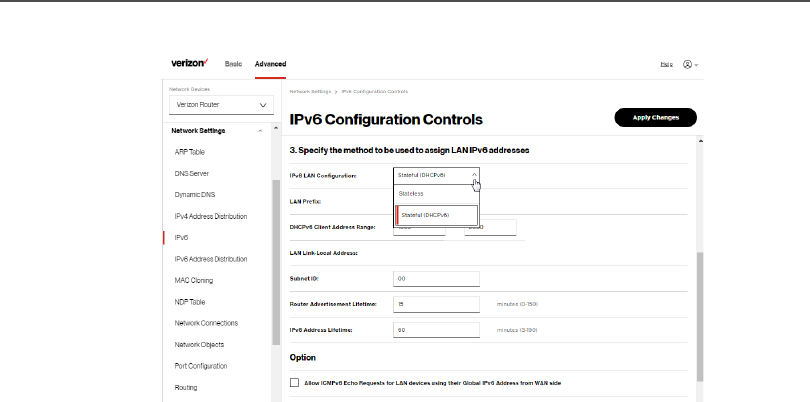
110
/ CONFIGURING
ADVANCED SETTINGS
©2022 Verizon. All Rights Reserved
2. Specify the Stateful (DHCPv6)Stateful (DHCPv6) settings to be used to assign
LAN IPv6 addresses by entering the following details:
• IPv6 LAN ConfigurationIPv6 LAN Configuration (select StatefulStateful from the
dropdown list)
• LAN Prefix LAN Prefix (automatically populated)
• DHCPv6 Client Address RangeDHCPv6 Client Address Range (start and end)
• LAN Link Local AddressLAN Link Local Address (automatically populated)
• Subnet IDSubnet ID - set the site topology for your internal site
• Router Advertisement LifetimeRouter Advertisement Lifetime (minutes between 0-150)
• IPv6 Address LifetimeIPv6 Address Lifetime (minutes between 3-150)
• Option: Allow ICMPv6 Echo Request for LAN devices Option: Allow ICMPv6 Echo Request for LAN devices
using their Global IPv6 Address from WAN sideusing their Global IPv6 Address from WAN side -
requesting an IPv6 address from any available DHCPv6
servers available on the ISP

NETWORK SETTINGS
3. After entering all appropriate IPv6 settings, click Apply Apply
changeschanges to have changes take eect.
DHCPv6 WAN with LAN IPv6 Stateless Settings
1. To configure IPv6 LAN Stateless mode with DHCPv6 WAN,
select the StatelessStateless option on the IPv6 Configuration IPv6 Configuration
ControlsControls page as shown below:
2. Specify the settings to be used to assign LAN IPv6
addresses by entering the following details:
• IPv6 LAN ConfigurationIPv6 LAN Configuration (select StatelessStateless from the
dropdown list)
• LAN Prefix LAN Prefix (automatically populated)
• LAN Link Local AddressLAN Link Local Address (automatically populated)
• Subnet IDSubnet ID - set the site topology for your internal site
• Router Advertisement LifetimeRouter Advertisement Lifetime (minutes between 0-150)

112
/ CONFIGURING
ADVANCED SETTINGS
©2022 Verizon. All Rights Reserved
• Option: Allow ICMPv6 Echo Request for LAN devices Option: Allow ICMPv6 Echo Request for LAN devices
using their Global IPv6 Address from WAN sideusing their Global IPv6 Address from WAN side -
requesting an IPv6 address from any available DHCPv6
servers available on the ISP
3. After entering all appropriate IPv6 settings, click Apply Apply
changeschanges to have changes take eect.
LAN IPv6 Configuration without An IPv6 WAN Connection
1. To configure IPv6 to use either the IPv6 LAN Stateful
or Stateless mode without using an IPv6 Internet WAN
connection, select the NoneNone option on the IPv6 Configuration IPv6 Configuration
ControlsControls page.
2. After entering all appropriate IPv6 settings, click Apply Apply
changeschanges to have changes take eect.

NETWORK SETTINGS
LAN IPv6 Stateful (DHCPv6) with No WAN Settings
1. To configure IPv6 LAN Stateful mode with no WAN
connection, select the Stateful option on the IPv6 IPv6
Configuration ControlsConfiguration Controls page as shown below:
2. Specify the Stateful (DHCPv6)Stateful (DHCPv6) settings to be used to assign
LAN IPv6 addresses by entering the following details:
• IPv6 LAN ConfigurationIPv6 LAN Configuration (select StatefulStateful from the
dropdown list)
• DHCPv6 Client Address RangeDHCPv6 Client Address Range (start and end)
• LAN Link Local AddressLAN Link Local Address (automatically populated)
• Router Advertisement LifetimeRouter Advertisement Lifetime (minutes between 0-150)
• IPv6 Address LifetimeIPv6 Address Lifetime (minutes between 3-150)

114
/ CONFIGURING
ADVANCED SETTINGS
©2022 Verizon. All Rights Reserved
• Option: Allow ICMPv6 Echo Request for LAN devices Option: Allow ICMPv6 Echo Request for LAN devices
using their Global IPv6 Address from WAN sideusing their Global IPv6 Address from WAN side -
requesting an IPv6 address from any available DHCPv6
servers available on the ISP
3. After entering all appropriate IPv6 settings, click Apply Apply
changeschanges to have changes take eect.
LAN IPv6 Stateless with No WAN Settings
1. To configure IPv6 LAN Stateless mode with no WAN
connection, select the StatelessStateless option on the IPv6 IPv6
Configuration ControlsConfiguration Controls page as shown below:
2. Specify the settings to be used to assign LAN IPv6
addresses by entering the following details:
• IPv6 LAN ConfigurationIPv6 LAN Configuration (select StatelessStateless from the
dropdown list)

NETWORK SETTINGS
• LAN Link Local AddressLAN Link Local Address (automatically populated)
• Router Advertisement LifetimeRouter Advertisement Lifetime (minutes between 0-150)
• Option: Allow ICMPv6 Echo Request for LAN devices Option: Allow ICMPv6 Echo Request for LAN devices
using their Global IPv6 Address from WAN sideusing their Global IPv6 Address from WAN side -
requesting an IPv6 address from any available DHCPv6
servers available on the ISP
3. After entering all appropriate IPv6 settings, click Apply Apply
changeschanges to have changes take eect.
5.1f/ IPV ADDRESS DISTRIBUTION
To view a summary of the services provided by the DHCP server:
1. Select IPv6 Address DistributionIPv6 Address Distribution in the Network SettingsNetwork Settings
section.
2. You can edit the DHCP server settings for a device. On the
IPv6 Address DistributionIPv6 Address Distribution page, click the EditEdit icon on the
screen column. The DHCP Settings page opens with the
device information displayed.

116
/ CONFIGURING
ADVANCED SETTINGS
©2022 Verizon. All Rights Reserved
3. To configure the DHCP server complete the following fields:
• Start IPv6 AddressStart IPv6 Address – the starting IPv6 address in the
consecutive list of addresses that makes up this LAN pool
for the DHCPv6 server.
• End IPv6 AddressEnd IPv6 Address – the ending IPv6 address in the
consecutive list of addresses that makes up this LAN pool
for the DHCPv6 server.
• Lease Time in MinutesLease Time in Minutes – assigns the amount of time in
minutes that each device is assigned an IP address by the
DHCP server when it connects to the network.
When the lease expires, the server determines if the
computer has disconnected from the network. If it has,
the server may reassign this IP address to a newly
connected computer.
4. Click ApplyApply to save changes.
DHCP Connection List
You can view a list of the connections currently assigned and
recognized by the DHCP server.
To view a list of computers:
1. On the IPv6 Address DistributionIPv6 Address Distribution page, click Connection ListConnection List.
2. To define a new static connection with a fixed IP address,
click Add static connectionAdd static connection.
3. Enter the host name.
4. Enter the fixed IP address to be assigned.

NETWORK SETTINGS
5. Enter the MAC address of the network interface of the
computer used with this DHCP static connection.
6. Click ApplyApply to save changes.
5.1g/ MAC CLONING
A MAC address is a hexadecimal code that identifies a device on a
network. All networkable devices have a unique MAC address.
When replacing a network device on your Verizon Router, you can
simplify the installation process by copying the MAC address of the
existing device to your Verizon Router.
To copy the MAC address of the existing device:
1. Select MAC CloningMAC Cloning in the Network SettingsNetwork Settings section.
2. In the To physical addressTo physical address field, enter the MAC address of
your new device.

118
/ CONFIGURING
ADVANCED SETTINGS
©2022 Verizon. All Rights Reserved
3. To locate the MAC address, refer to the documentation from
the device manufacturer.
4. Click ApplyApply to save changes.
5.1h/ NDP TABLE
You can view the IPv6 and MAC addresses of each DHCP
connection.
To view the IPv6 and MAC addresses for each device:
select NDP NDP
(Neighbor Discovery Protocol ) Table Table in the Network SettingsNetwork Settings
section.

NETWORK SETTINGS
5.1i/ NETWORK CONNECTIONS
Caution: The settings described in this chapter should only be
configured by experienced network technicians. Changes could
adversely aect the operation of your router and your local
network.
To view the network connections:
1. From the Advanced Advanced menu, select Network Settings Network Settings from the
left pane and then click Network Connections.Network Connections.
2. To view and edit the details of a specific network
connection, click the hyperlinked name or the action
icon. The following sections detail the types of network
connections that you can view.

120
/ CONFIGURING
ADVANCED SETTINGS
©2022 Verizon. All Rights Reserved
NETWORK HOME/OFFICE CONNECTION
You can view the properties of your local network. This connection
is used to combine several network interfaces under one virtual
network. For example, you can create a home/oce network
connection for Ethernet and other network devices.
Note: When a network connection is disabled, the underlying
devices formerly connected to it will not be able to obtain a new
DHCP address from that Verizon Router network interface.
To view the connection:
1. On the Network ConnectionsNetwork Connections page, click the Network Network
(Home/Oce)(Home/Oce) connection link. The Network (Home/ Oce) Network (Home/ Oce)
PropertiesProperties page displays.

NETWORK SETTINGS
2. To rename a network connection, enter the new network
name in the NameName field.
3. Click SaveSave to save the changes.
CONFIGURING THE HOME/OFFICE NETWORK
To configure the network connection:
1. In the Network (Home/Oce) Network (Home/Oce) properties page, click
SettingsSettings. The configuration page displays.


NETWORK SETTINGS
2. Configure the following sections, as needed.
General
In the GeneralGeneral section, verify the following information:
• StatusStatus - displays the connection status of the network.
• Connection TypeConnection Type - displays the type of connection
interface.
• Physical AddressPhysical Address - displays the physical address of the
network card used for the network.
• MTUMTU - displays the Maximum Transmission Unit (MTU)
indicating the largest packet size permitted for internet
transmissions:

124
/ CONFIGURING
ADVANCED SETTINGS
©2022 Verizon. All Rights Reserved
– AutomaticAutomatic: sets the MTU (Maximum Transmission
Unit) at 1500.
– Automatic by DHCPAutomatic by DHCP: sets the MTU according to the
DHCP connection.
– ManualManual: allows you to manually set the MTU.
• IP addressIP address and Subnet MaskSubnet Mask: the network connection
uses a permanent or static IP addressIP address and Subnet MaskSubnet Mask
address, provided by Verizon or experienced network
technician.
• BridgeBridge
In the BridgeBridge section of the Network (Home/Oce) Network (Home/Oce)
properties, you can configure the various LAN interfaces.
Caution: Do not change these settings unless specifically
instructed to by Verizon. Changes could adversely aect
the operation of your Verizon Router and your local
network.
Verify the following information:
– StatusStatus – displays the connection status of a specific
network connection.
– ActionAction – contains an EditEdit hyperlink that, when clicked,
generates the next level configuration page for the
specific network connection or network device.

NETWORK SETTINGS
• IP Address DistributionIP Address Distribution
The IP Address DistributionIP Address Distribution section is used to configure
the Dynamic Host Configuration Protocol (DHCP) server
parameters of your Verizon Router.
Once enabled and configured, the DHCP server
automatically assigns IP addresses to any network
devices which are set to obtain their IP address
dynamically.
If DHCP Server is enabled on your Verizon Router,
configure the network devices as DHCP Clients. There
are 2 basic options in this section: DisabledDisabled and DHCP DHCP
ServerServer.
To set up the Verizon Router’s network bridge to function
as a DHCP server:
1. In the IP Address DistributionIP Address Distribution section, select the
DHCP serverDHCP server. Once enabled, the DHCP server
provides automatic IP assignments (also referred to
as IP leases) based on the preset IP range defined
below.
– Start IP AddressStart IP Address – Enter the first IP address
in the IP range that the Verizon Router will
automatically begin assigning IP addresses
from. Since your Verizon Router’s IP address
is 192.168.1.1, the default Start IP Address is
192.168.1.2.
– End IP AddressEnd IP Address – Enter the last IP address
in the IP range that the Verizon Router will

126
/ CONFIGURING
ADVANCED SETTINGS
©2022 Verizon. All Rights Reserved
automatically stop the IP address allocation at.
The maximum end IP address range that can be
entered is 192.168.1.254.
2. If Windows Internet Naming Service (WINS) is being
used, enter the WINS ServerWINS Server address.
3. In the Lease time in minutesLease time in minutes field, enter the amount
of time a network device is allowed to connect to the
Verizon Router with its currently issued dynamic IP
address.
• IP Address Distribution According to DHCP option 60 IP Address Distribution According to DHCP option 60
(vendor class Identifier)(vendor class Identifier)
DHCP vendor class is related to DHCP option 60
configuration within the router. Adding option 60
configurations allows a particular vendor to get a lease
from a specified pool of addresses.
Routing Table
You can configure your Verizon Router to use static or dynamic
routing.
• Static routingStatic routing – specifies a fixed routing path to neighboring
destinations based on predetermined metrics.
• Dynamic routingDynamic routing – automatically adjusts how packets travel on
the network. The path determination is based on network/device
reachability and the status of the network being traveled.
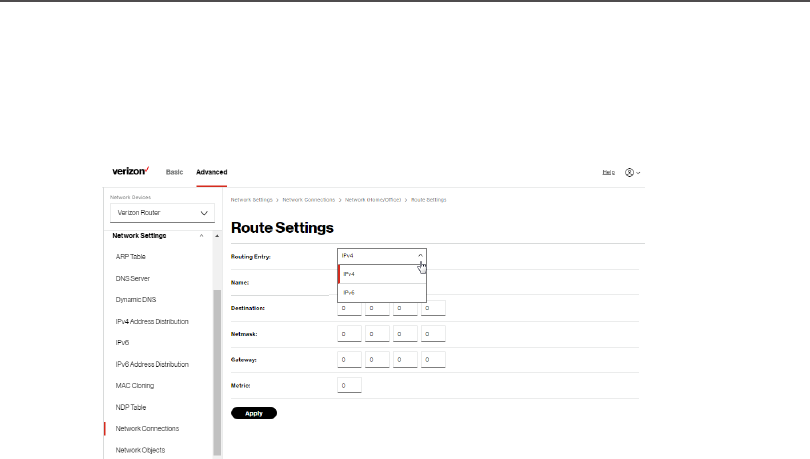
NETWORK SETTINGS
To configure routing:
1. In the Routing TableRouting Table section, click Add new routeAdd new route button to
display and modify the new route configuration page.
2. To save your changes click ApplyApply.
Wi-Fi ACCESS POINT CONNECTION
A Wi-Fi Access Point network connection allows Wi-Fi devices to
connect to the local area network (LAN) using the 2.4 GHz or
5 GHz Wi-Fi network.
Note: Once disabled, all Wi-Fi devices connected to that Wi-Fi
network will be disconnected from the LAN network and internet.
To view the connection settings:
1. From the Advanced Advanced menu, select Network Settings Network Settings from the
left pane and then click Network Connections.Network Connections.

128
/ CONFIGURING
ADVANCED SETTINGS
©2022 Verizon. All Rights Reserved
2. To access the connection settings pages, click on the link
of the Wi-Fi Access Point connections listed under Network Network
name name on the Network ConnectionsNetwork Connections page.
3. From the connection’s Enable SettingsEnable Settings page, to enable or
disable the connection, move the selector to on on or o o.
4. To rename the connection, enter a name in the NameName field.
5. Click ApplyApply to save the changes.
6. Reboot your Verizon Router.

NETWORK SETTINGS
CONFIGURING Wi-Fi ACCESS POINT PROPERTIES
To configure the connection:
1. On the bottom of the Access Point’s specific Enable Enable
SettingsSettings page, click SettingsSettings. The configuration page
displays.
2. Verify the following information:
General
• StatusStatus - displays the connection status of the network.
• NetworkNetwork – displays the type of network connection.
• Connection TypeConnection Type - displays the type of connection
interface.
• Physical AddressPhysical Address - displays the physical address of the
network card used for the network.

130
/ CONFIGURING
ADVANCED SETTINGS
©2022 Verizon. All Rights Reserved
• MTUMTU - specifies the largest packet size permitted for
internet transmissions:
– AutomaticAutomatic: set the MTU (Maximum Transmission Unit)
at 1500.
– Automatic by DHCPAutomatic by DHCP: sets the MTU according to the
DHCP connection.
– ManualManual: allows you to manually set the MTU.
3. Click ApplyApply to save changes.
ETHERNET CONNECTION
You can view the properties of your Ethernet LAN connection
using an Ethernet cable inserted into one of your Verizon Router’s
Ethernet LAN ports.
To view the connection settings:
1. To access the Ethernet Ethernet properties page, click the EthernetEthernet
link listed under Network name Network name on the Network ConnectionsNetwork Connections
page.

NETWORK SETTINGS
2. To rename the network connection, enter the new name in
the NameName field.
3. Click ApplyApply to save changes.
CONFIGURING ETHERNET PROPERTIES
To configure the connection:
1. In the Ethernet Ethernet page, click SettingsSettings. The configuration page
displays.

132
/ CONFIGURING
ADVANCED SETTINGS
©2022 Verizon. All Rights Reserved
2. Verify the following information:
General
• StatusStatus - displays the connection status of the network.
• NetworkNetwork – displays the type name of network connection.
• Connection TypeConnection Type - displays as Hardware Ethernet SwitchHardware Ethernet Switch.
• Physical AddressPhysical Address - displays the physical address of the
network card used for the network.
• MTUMTU - specifies the largest packet size permitted for
– AutomaticAutomatic: sets the MTU (Maximum Transmission Unit
at 1500).

NETWORK SETTINGS
– Automatic by DHCPAutomatic by DHCP: sets the MTU according to the
DHCP connection.
– ManualManual: allows you to manually set the MTU.
• HW Switch PortsHW Switch Ports - displays the status of each LAN port.
3. Click ApplyApply to save the changes.
COAX CONNECTION
You can view the properties of your LAN connection using a
coaxial cable.
To view the connection settings:
1. To access the Coax Coax properties page, click the CoaxCoax link
listed under Network name Network name on the Network ConnectionsNetwork Connections
page.

134
/ CONFIGURING
ADVANCED SETTINGS
©2022 Verizon. All Rights Reserved
2. From the connection’s Enable SettingsEnable Settings page, to enable or
disable the connection, move the selector to on on or o o.
3. To rename the network connection, enter the new name in
the NameName field.
4. Click ApplyApply to save changes.
CONFIGURING COAX PROPERTIES
To configure the connection:
1. In the Coax Coax page, click SettingsSettings. The configuration page
displays.

NETWORK SETTINGS
2. Verify the following information:
General
• StatusStatus - displays the connection status of the network.
• NetworkNetwork – displays the type name of network connection.
• Connection TypeConnection Type - displays as HardwareMoCAHardwareMoCA.
• Physical AddressPhysical Address - displays the physical address of the
network card used for the network.
• MTUMTU - specifies the largest packet size permitted for
– AutomaticAutomatic: sets the MTU (Maximum Transmission
Unit at 1500).
– Automatic by DHCPAutomatic by DHCP: sets the MTU according to the
DHCP connection.
– ManualManual: allows you to manually set the MTU.
Coax Link
• Privacy - Privacy - to set PrivacyPrivacy, select the EnabledEnabled check box.
This causes all devices connected to the coaxial cable to
use the same password. This is recommended.
• Password - tPassword - to set the privacy password, enter the Coax
Link password.
• To view the devices connected using the coaxial cable,
click the Go to LAN Coax StatusGo to LAN Coax Status link.
3. Click ApplyApply to save changes.
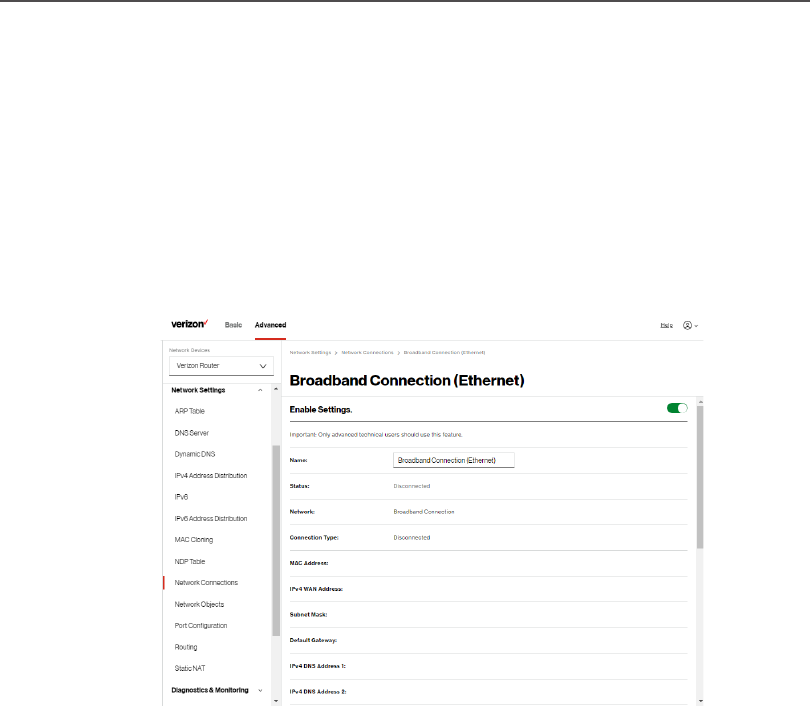
136
/ CONFIGURING
ADVANCED SETTINGS
©2022 Verizon. All Rights Reserved
BROADBAND CONNECTION ETHERNET
You can view the properties of your broadband connection (your
connection to the internet). This connection may be via Ethernet
cable.
To view the connection settings:
1. In the Network ConnectionsNetwork Connections page, click the Broadband Broadband
Connection (Ethernet)Connection (Ethernet).

NETWORK SETTINGS
2. From the connection’s Enable SettingsEnable Settings page, to enable or
disable the connection, move the selector to on on or o o.
3. To rename the network connection, enter the new name in
the NameName field.
4. Click ApplyApply to save changes.
CONFIGURING THE ETHERNET CONNECTION
To configure the connection:
1. In the Broadband Connection (Ethernet) PropertiesBroadband Connection (Ethernet) Properties page,
click SettingsSettings. The configuration page displays.


NETWORK SETTINGS
2. Configure the following settings, as needed.
General
Verify the following information:
• StatusStatus - displays the connection status of the network.
• NetworkNetwork – displays the type of network connection.
• Connection TypeConnection Type - displays the type of connection
interface.
• Physical AddressPhysical Address - displays the physical address of the
network card used for the network.
• MTUMTU - specifies the largest packet size permitted for
internet transmissions:
– AutomaticAutomatic: sets the MTU (Maximum Transmission
Unit at 1500).
– Automatic by DHCPAutomatic by DHCP: sets the MTU according to the
DHCP connection.
– ManualManual: allows you to manually set the MTU.
WAN IP Address
• In the Internet ProtocolInternet Protocol section of WAN IP AddressWAN IP Address,
specify one of the following:
– No IPv4 AddressNo IPv4 Address: the connection has no IP address.
This is useful if the connection operates under a
bridge.

140
/ CONFIGURING
ADVANCED SETTINGS
©2022 Verizon. All Rights Reserved
– Obtain an IPv4 Address AutomaticallyObtain an IPv4 Address Automatically: the network
connection is required by Verizon to obtain an IP
address automatically. The server assigning the IP
address also assigns a subnet mask address, which
can be overridden by entering another subnet mask
address.
– Use the Following IP AddressUse the Following IP Address: the network connection
uses a permanent or static IP addressIP address and Subnet Subnet
MaskMask address, provided by Verizon or experienced
network technician.
• To override the subnet mask, select the Override Subnet Override Subnet
MaskMask check box, then enter the new subnet mask.
• Click ReleaseRelease/RenewRenew in the DHCP LeaseDHCP Lease field to drop/get
an IP address from the DHCP server.
• In the Expires In Expires In field, enter the amount of time a network
device is allowed to connect to the Verizon Router with its
currently issued dynamic IP address.
• IPv4 DNS - IPv4 DNS - selects Obtain IPv4 DNS Address DynamicallyObtain IPv4 DNS Address Dynamically
for using Dynamic DNS. Each time the public IP address
changes, the DNS database is automatically updated
with the new IPv4 address. In this way, even though the
IP address changes often, the domain name remains
constant and accessible.
• Internet Connection Firewall - Internet Connection Firewall - allows you to enable or
disable the firewall configuration on this interface.
3. Click ApplyApply to save changes.

NETWORK SETTINGS
5.1j/ NETWORK OBJECTS
Network objects define a group, such as a group of computers, on
your Verizon Router network by MAC address, IP address, and/
or host name. The defined group becomes a network object. You
can apply settings, such as configuring system rules, to all devices
defined in the network object.
For example, instead of setting the same website filtering
configuration individually to five computers one at a time, you can
define the computers as a network object. Website filtering can
then be simultaneously applied to all the computers.
You can use network objects to apply security rules based on host
names, instead of IP addresses. This is useful since IP addresses
change from time to time. In addition, you can define network
objects according to MAC address to make the rule application
more persistent against network configuration settings.
To define a network object:
1. From the Advanced Advanced menu, select Network Settings.Network Settings.
2. Select Network ObjectsNetwork Objects in the Network SettingsNetwork Settings section.

142
/ CONFIGURING
ADVANCED SETTINGS
©2022 Verizon. All Rights Reserved
3. To define a network object, click Add newAdd new. The Edit Network Edit Network
ObjectsObjects page displays.
4. In the DescriptionDescription field, enter a name for the network object.
5. Click AddAdd. The Edit ItemEdit Item page displays.

NETWORK SETTINGS
6. Select and configure the type of network object as IP
address, IP subnet, IP range, MAC address, host name, or
DHCP option, and click ApplyApply to save changes.
7. Repeat the above steps to create additional network
objects.
8. When complete, click Apply changesApply changes to save changes.
5.1k/ PORT CONFIGURATION
Ethernet port configuration allows you to set up the Ethernet ports
as either full- or half-duplex ports, at either 10 Mbps, 100 Mbps, or
1000 Mbps.
To configure the ports:
1. Select Port ConfigurationPort Configuration in the Network SettingsNetwork Settings section.

144
/ CONFIGURING
ADVANCED SETTINGS
©2022 Verizon. All Rights Reserved
2. To emulate the speed and duplex configuration of the port
with which it’s communicating, select AutoAuto or select the port
speed and duplicity.
3. Click Apply changesApply changes to save changes.
5.1l/ ROUTING
You can view the routing and IP address distribution rules as well as
add, edit, or delete the rules.
Routing Table
To view the rules:
1. Select RoutingRouting in the Network SettingsNetwork Settings section.

NETWORK SETTINGS
2. To add a new Route, click New RouteNew Route.
3. Specify the following parameters:
• Routing Entry - Routing Entry - select the IP address type.
• NameName – the network connection type.
• DestinationDestination - enter the destination IP of the destination
host, subnet address, network address, or default route.
The destination for a default route is 0.0.0.0.

146
/ CONFIGURING
ADVANCED SETTINGS
©2022 Verizon. All Rights Reserved
• NetmaskNetmask – enter the network mask. This is used in
conjunction with the destination to determine when a
route is used.
• GatewayGateway – enter the IP address of your Verizon Router.
• MetricMetric – enter a measurement preference of the route.
Typically, the lowest metric is the most preferred route. If
multiple routes exist to a specific destination network, the
route with the lowest metric is used.
4. Click Apply Apply and Apply changes Apply changes to save changes.
Internet Group Management Protocol (IGMP)
IGMP allows for managing a single upstream interface and multiple
downstream interfaces of the IGMP/MLD (Multicast Listener
Discovery)-based forwarding. This function enables the system
to send IGMP host messages on behalf of hosts that the system
discovers through standard IGMP interfaces. Also, IGMP snooping
allows an Ethernet switch to “listen in” on the IGMP conversation
between hosts and routers, while IGMP querier will send out
periodic IGMP queries.
To enable this function:
1. Choose the IGMP interfaces by clicking on the check boxes
on the screen.
2. Click Apply changesApply changes to save changes.

NETWORK SETTINGS
5.1m/ STATIC NAT
Static NAT allows devices located behind a firewall that is
configured with private IP addresses to appear to have public IP
addresses to the internet. This allows an internal host, such as a
web server, to have an unregistered (private) IP address and still be
accessible over the internet.
To configure static NAT:
1. Select Static NATStatic NAT in the Network SettingsNetwork Settings section.
2. To create a static NAT, select a source address in the
DeviceDevice field.
3. Enter the Public IP AddressPublic IP Address.
4. If using port forwarding, select the Enabled Port forward Enabled Port forward
check box.
5. Click AddAdd. The rule displays in the Rules ListRules List section.
6. Click Apply ChangesApply Changes to save changes.

148
/ CONFIGURING
ADVANCED SETTINGS
©2022 Verizon. All Rights Reserved
7. Click Add another entryAdd another entry and repeat these steps to add
additional static IP addresses.
./ DIAGNOSTICS & MONITORING
5.2a/ BANDWIDTH MONITORING
You can view and monitor the recorded bandwidth usage measured
in Kbps.
To view the bandwidth:
1. From the Advanced Advanced menu, select Diagnostics & Monitoring.Diagnostics & Monitoring.
2. In the Diagnostics & MonitoringDiagnostics & Monitoring section, select Bandwidth Bandwidth
MonitoringMonitoring.
3. To refresh the page, click RefreshRefresh.
4. To continuously refresh the page, click Auto-refresh onAuto-refresh on.

DIAGNOSTICS & MONITORING
5.2b/ DIAGNOSTICS
You can use diagnostics to test network connectivity.
To diagnose network connectivity:
1. Select DiagnosticsDiagnostics in the Diagnostics & MonitoringDiagnostics & Monitoring section.
2. To ping an IP address, enter the IP address or domain name
in the DestinationDestination field and click GoGo.
The diagnostics will display the number of pings, status,
packets sent, and round trip time.
If no diagnostic status displays, click refresh in your web
browser.

150
/ CONFIGURING
ADVANCED SETTINGS
©2022 Verizon. All Rights Reserved
5.2c/ SYSTEM LOGGING
System logging provides a view of the most recent activity of your
Verizon Router. In addition, you can view additional logs, such as the
security, advanced, firewall, WAN DHCP and LAN DHCP.
To view the system log:
1. Select System LoggingSystem Logging in the Diagnostics & MonitoringDiagnostics & Monitoring
section.
2. To view a specific time of log event, click on the OptionsOptions
button.

DIAGNOSTICS & MONITORING
3. Select your preferred logging time.
4. Click Save Save to save changes.
5. To view a specific type of log event such as Security Log,
WAN DHCP Log, etc., click the appropriate link in the menu
on the top.
6. To update the data, click RefreshRefresh.
5.2d/ SYSTEM-WIDE CONNECTIONS
You can view a summary of the monitored data collected for your
Verizon Router.
To view your Verizon Router’s full system status and trac
monitoring data:
1. Select System-wide ConnectionsSystem-wide Connections in the Diagnostics & Diagnostics &
MonitoringMonitoring section.


DIAGNOSTICS & MONITORING
2. To modify the connection properties, click the individual
connection links.
3. To continuously refresh the page, click Auto-refresh onAuto-refresh on.
5.2e/ BACKHAUL LOGGING
You can view a summary of the BHM (backhaul modes: Ethernet,
coax and Wi-Fi) status of your network.
To view the backhaul modes log:
1. Select Backhaul LoggingBackhaul Logging in the Diagnostics & MonitoringDiagnostics & Monitoring
section.

154
/ CONFIGURING
ADVANCED SETTINGS
©2022 Verizon. All Rights Reserved
2. To refresh the page, click RefreshRefresh.
3. To delete the log information, click ClearClear.
4. To save the log information, click SaveSave.
./ SYSTEM
5.3a/ SYSTEM STATUS
To view the status:
1. From the AdvancedAdvanced menu, select SystemSystem.
2. You can quickly view your router’s status by selecting
System StatusSystem Status in the SystemSystem section.
3. To refresh the page, click RefreshRefresh.

SYSTEM
This section displays the status of your router’s local network
(LAN) and internet connection (WAN), firmware and hardware
version numbers, MAC Address, IP settings of Verizon Router and
Extender(s) (if connected).


SYSTEM
5.3b/ DATE & TIME SETTINGS
You can set the time zone and enable automatic time updates.
To configure the settings:
1. From the Advanced Advanced menu, select System.System.
2. Select Date & TimeDate & Time in the SystemSystem section.
3. Select the local time zone. Your Verizon Router
automatically detects daylight saving times for selected
time zone.
4. In the Automatic Time UpdateAutomatic Time Update section, select the EnableEnable
check box to perform an automatic time update.
5. Define the time server addresses.
6. Enter the IP address or domain name of the time server,
then click Apply Apply to save changes.

158
/ CONFIGURING
ADVANCED SETTINGS
©2022 Verizon. All Rights Reserved
5.3c/ FACTORY RESET
You can use this functionality to save and load configuration
files. These files are used to backup and restore the current
configuration of your Verizon Router.
Only configuration files saved on a specific Verizon Router can be
applied to that Verizon Router. You cannot transfer configuration
files between Verizon Routers.
Warning: Manually editing a configuration file can cause your
Verizon Router to malfunction or become completely inoperable.
Save Options
To save the configuration file:
1. From the Advanced Advanced menu, select System. System.
2. Select Factory ResetFactory Reset in the SystemSystem section.

SYSTEM
3. Select Save to router and your Verizon accountSave to router and your Verizon account or Save Save
as fileas file to save the current configuration, then click Save as Save as
configurationconfiguration.
4. If you select Save as fileSave as file, the configuration file is saved to
you web browser’s download folder.
Restore Options
You can restore your configuration settings to your Verizon Router
factory default settings. Restoring the default settings erases the
current configuration, including user defined settings and network
connections. All connected DHCP clients must request new IP
addresses. Your Verizon Router must restart.
Prior to restoring the factory defaults, you may want to save your
current configuration to a file. This allows you to reapply your
current settings and parameters to the default settings, as needed.
Note: When restoring defaults, the setting and parameters of your
Verizon Router are restored to their default values. This includes
the administrator password. A user-specified password will no
longer be valid.
To backup your Verizon Router’s settings:
1. Select Factory ResetFactory Reset in the SystemSystem section.
2. To take a backup of the current settings, click Automated Automated
Backups Backups or Manual Backup Manual Backup. You will be prompted to save a
file with the extension “.enc”.
3. Click BackupBackup to begin the configuration backup process.

160
/ CONFIGURING
ADVANCED SETTINGS
©2022 Verizon. All Rights Reserved
To restore your Verizon Router’s factory default settings:
1. Select Factory ResetFactory Reset in the SystemSystem section.
2. Click Factory DefaultFactory Default.
• Default SettingsDefault Settings – will erase all router settings including
user settings for SSID and Passwords.
• Default Settings except current user settingsDefault Settings except current user settings – will erase
all router settings but will retain the user settings for SSID
and passwords.
3. Click Restore configurationRestore configuration button. The factory default
settings are applied and your Verizon Router restarts. Once
complete, the Login page for the First Time Easy Setup
Wizard displays.
To load the configuration file:
1. Select Factory ResetFactory Reset in the SystemSystem section.
2. To load a previously saved configuration file, select Load a Load a
File File then click choose filechoose file.

SYSTEM
3. Browse to the location of the file, and click Restore Restore
configurationconfiguration button to begin the configuration uploading
process.
4. Accessing the My VerizonMy Verizon app or the My VerizonMy Verizon account
also allows you to restore the previously saved settings.
Click Restore From Account Restore From Account and select Go to Apple App Go to Apple App
Store/Go to Google Play Store Store/Go to Google Play Store to restore the saved settings
to the router.
5. Click Restore configurationRestore configuration button. Your Verizon Router will
automatically restart with that configuration.
5.3d/ LED
BRIGHTNESS
The Verizon Router allows you to set the LED brightness to turn
O(0%) or stay bright (50% or 100%) using the user interface.
To control the LED brightness:
1. Select LED Brightness LED Brightness in the SystemSystem section.

162
/ CONFIGURING
ADVANCED SETTINGS
©2022 Verizon. All Rights Reserved
2. Slide the bar to adjust the brightness of the LED.
3. Select your preferred timeout period (in minutes) from the
dropdown list for the LED dimming setting. The Status LED
will automatically turn o after the timeout period.
4. Click Apply changesApply changes to save changes.
Note: The light will activate again on status changes like WPS
pairing or loss of connection.
5.3e/ OPEN SOURCE SOFTWARE
To view:
From the Advanced Advanced menu, select SystemSystem from the left pane
and then click Open Source SoftwareOpen Source Software.

SYSTEM
5.3f/ REBOOT VERIZON ROUTER
Warning: Only select Reboot Router if instructed to do so by
Verizon support.
You can reboot your Verizon Router using the Reboot Router Only
feature. Refer to 1.3a/ FRONT PANEL for power button options.
To reboot your Verizon Router using the user interface:
1. Select Reboot Router Reboot Router in the SystemSystem section.
2. To reboot, click Reboot DeviceReboot Device. Your router will reboot. This
may take up to a minute.
3. To access your Verizon Router user interface, refresh your
web browser.
4. After the Router Status LED on the front panel turns solid
white, you will automatically be sent to the web browser
login page.

164
/ CONFIGURING
ADVANCED SETTINGS
©2022 Verizon. All Rights Reserved
5.3g/ REMOTE ADMINISTRATION
Caution: Enabling Remote Administration places your
Verizon Router network at risk from outside attacks.
You can access and control your Verizon Router not only from
within the local network, but also from the internet using Remote Remote
AdministrationAdministration.
You can allow incoming access to the following:
• Allow Incoming WAN Access to Web-Management Allow Incoming WAN Access to Web-Management - used to
obtain access to your Verizon Router’s UI and gain access to all
settings and parameters through a web browser.
• Diagnostic ToolsDiagnostic Tools - used for troubleshooting and remote system
management by a user or Verizon.
Web Management remote administration access may be used
to modify or disable firewall settings. Web Management services
should be activated only when absolutely necessary.
To enable remote administration:
1. Select Remote AdministrationRemote Administration in the SystemSystem section.

SYSTEM
2. To enable access, select the check box.
3. To remove access, clear the check box.
4. Click Apply changesApply changes to save changes.
5.3h/ SYSTEM SETTINGS
You can configure various system and management parameters.
To configure system settings:
1. Select System SettingsSystem Settings in the SystemSystem section..


SYSTEM
2. In the Router StatusRouter Status section, configure the following:
• Router’s HostnameRouter’s Hostname – enter the host name of your
Verizon Router.
• Local DomainLocal Domain – view the local domain of the network.
• LocationLocation – select your current location of the router from
the dropdown list.
3. In the User SettingsUser Settings section, you can view the administration
user that can currently access your Wi-Fi network.
In addition, you can modify the login password and
manage the number of unsuccessful login attempts the
administration user can enter before your Verizon Router
temporarily denies all further login attempts by the user.
4. In the RouterRouter section, configure the following by selecting
the check box:
• Automatic Refresh of System Monitoring Web PagesAutomatic Refresh of System Monitoring Web Pages –
activates the automatic refresh of system monitoring
web pages.
• Prompt for Password when Accessing via LANPrompt for Password when Accessing via LAN – causes
your Verizon Router to ask for a password when trying to
connect to the network.
• Warn User Before Configuration ChangesWarn User Before Configuration Changes – activates
user warnings before network configuration changes
take eect.
• In the Session LifetimeSession Lifetime field, specify the length of time
required before re-entering the login password after your
Verizon Router has been inactive.

168
/ CONFIGURING
ADVANCED SETTINGS
©2022 Verizon. All Rights Reserved
• In the Number of concurrent sessions that can be logged Number of concurrent sessions that can be logged
into the routerinto the router field, select the number of users that can
access your Verizon Router at the same time.
5. In the Remote AdministrationRemote Administration section, configure the
following:
• Enter the Primary HTTP Management PortPrimary HTTP Management Port.
Refer to 5.3g Remote Administration for using this feature.
• In the System LoggingSystem Logging section move the selector to onon to
activate system logging.
• Remote System Notify LevelRemote System Notify Level – specify the type of
information, such as none, error, warning, and information,
received for remote system logging.
• Remote Security Notify LevelRemote Security Notify Level – specify the type of
information, such as none, error, warning, and information,
received for remote network security logging.
• In the DHCP TimeoutDHCP Timeout section, specify the DHCP timeout.
6. Click Apply changesApply changes to save changes.


170
/ TROUBLESHOOTING
©2022 Verizon. All Rights Reserved
This chapter lists solutions for issues
that may be encountered while using
your Verizon Router as well as frequently
asked questions.
Although the majority of the router’s
internet connectivity is automatic and
transparent, if an issue does occur
accessing the internet (e.g. complete
loss of connectivity, inability to access
services, etc.), you may need to take
additional steps to resolve the problem.

TROUBLESHOOTING TIPS
Note: The advanced settings should only be configured by
experienced network technicians to avoid adversely aecting the
operation of your Verizon Router and your local network.
./ TROUBLESHOOTING TIPS
6.0a/ IF YOU ARE UNABLE TO CONNECT TO THE INTERNET:
• The first thing to check is whether your Verizon Router is
powered on and is connected to the internet. Check the Router
Status LED on the front of the Verizon Router. Be sure to refer
to the “1.3a/ FRONT PANEL” on page 9 to determine
status of the Verizon Router. Check the WAN cable connecting
your Verizon Router to the internet to make sure it is properly
connected on both ends.
• If the prior tips do not resolve your connection issue, try
restarting (rebooting) the router portion of the Verizon Router
by manually pressing the ‘red’ reset power button on the rear
panel of the Verizon Router for 2-4 seconds (the Router Status
LED should go o) to begin rebooting your Verizon Router. Your
Verizon Router will begin rebooting and will return to service in
3 - 5 minutes depending on your network connection. Check
Router Status LED and if it is solid white, try again to access the
internet.
• If rebooting your router does not resolve your connection issue,
try power cycling the Verizon Router by unplugging the power
cable from the adapter or the wall and wait 2 minutes. During
the 2 min. wait period, also power cycle the network device (e.g.
the computer, tablet, etc.) and then plug the power cable back

172
/ TROUBLESHOOTING
©2022 Verizon. All Rights Reserved
into the Verizon Router. After 3-5 minutes, recheck the Router
Status LED and try again to access the internet.
6.0b/ IF YOU ARE UNABLE TO CONNECT TO YOUR
VERIZON ROUTER USING WIFI:
• Be sure your Wi-Fi device is within range of your Verizon Router;
move it closer to see if your connection improves.
• Check your network device’s Wi-Fi settings to be sure your
device’s Wi-Fi is on (enabled) and that you have the correct Wi-Fi
network and password (if using a Wi-Fi password) as configured
on your Verizon Router.
• Be sure you are connecting to the correct Wi-Fi network; check
to be sure you are using your Verizon Router’s SSID. In some
cases, if using a Wi-Fi password, you may need to enter the
Wi-Fi password into your network device again to be sure your
device accepts the password.
• Check to be sure you are running the latest software for your
network device.
• Try turning your network device’s Wi-Fi o and on, and try to
connect.
• If you have made any changes in your network settings and
turning your network device’s Wi-Fi o and on does not help, try
to restart your network device.
• You may need to turn the Wi-Fi settings from on to o, and back
to on again and apply the changes.

TROUBLESHOOTING TIPS
• If you are still unable to access your Verizon Router, you may
need to try connecting to the Verizon Router using another
network device. If the issue goes away with another network
device, the issue is likely with that individual network device’s
configuration.
6.0c/ ACCESSING YOUR VERIZON ROUTER IF YOU ARE
LOCKED OUT
• If your Verizon Router connection is lost while making
configuration changes, a setting that locks access to your
Verizon Router’s UI may have inadvertently been activated.
The common ways to lock access to your Verizon Router are:
• Scheduler - If a schedule has been created that applies to the
computer over the connection being used, your Verizon Router
will not be accessible during the times set in the schedule.
• Access Control - If the access control setting for the computer
is set to block the computer, access to your Verizon Router is
denied.
To gain access, restore the default settings to your Verizon Router.
6.0d/ RESTORING YOUR VERIZON ROUTER’S DEFAULT
SETTINGS
There are two ways to restore your Verizon Router’s default
settings. It is important to note that after performing either

174
/ TROUBLESHOOTING
©2022 Verizon. All Rights Reserved
procedure, all previously save settings on your Verizon Router will
be lost.
For additional information regarding the Restore Defaults feature,
refer to section 5.3c/ Factory Reset/Restore Options.
• Using the tip of a ballpoint pen or pencil, press and hold the
Reset button on the back of your Verizon Router for three
seconds.
• Access the UI and navigate to the Advanced/System page.
Select the Factory Reset option. After saving your configuration,
if desired, click the Factory Default radio button. For additional
details, refer to the 5.3c/ Factory Reset section of this guide.
Note: If you reset or reboot your Verizon Router, you may also need
to disconnect your Verizon Router’s power supply for a few minutes
(3 or more) and then reconnect the power cable. However, in order
to provide full synchronization to the coaxial network, disconnecting
and reconnecting the power may be required.
6.0e/ LAN CONNECTION FAILURE
To troubleshoot a LAN connection failure:
• Verify your Verizon Router is properly installed, LAN connections
are correct, and that the Verizon Router and communicating
network devices are all powered on.
• Confirm that the computer and Verizon Router are both on the
same network segment.

TROUBLESHOOTING TIPS
If unsure, let the computer get the IP address automatically by
initiating the DHCP function, then verify the computer is using
an IP address within the default range of 192.168.1.2 through
192.168.1.254. If the computer is not using an IP address within the
correct IP range, it will not connect to your Verizon Router.
• Verify the subnet mask address is set to 255.255.255.0.
6.0f/ TIMEOUT ERROR OCCURS WHEN ENTERING THE URL OR
IP ADDRESS
Verify the following:
• All computers are working properly.
• IP settings are correct.
• Verizon Router is on and connected properly.
• Verizon Router settings are the same as the computer.
For connections experiencing lag or a slow response:
• Check for other devices on the network utilizing large portions
of the bandwidth and if possible temporarily stop their current
utilization and recheck the connection.
• If lag still exists, clear the cache on the computer and if
still needed, unplug the Ethernet cable or disable the Wi-Fi
connection to the computer experiencing the slow connection
and then reconnect or enable the Wi-Fi connection and try the
connection again.

176
/ TROUBLESHOOTING
©2022 Verizon. All Rights Reserved
In rare cases you may also need to:
• Unplug the Ethernet cable to Verizon Router and restart the
Verizon Router, wait 1-2 mins. and insert the Ethernet cable
again.
• Under limited circumstances you may use a port forwarding
configuration on the router, based on the application you are
using (refer to the 5.0e/ Port Forwarding section or Verizon’s
support online help for more details).
6.0g/ ROUTER STATUS LED
The Router Status LED provides a visual display of the Verizon
Router’s current condition. Refer to the chart below for details.
Condition Status LED Color Verizon Router
Normal WHITE Normal operation (50% solid)
Setup complete (solid)
Router is booting (soft blink)
System restart (fast blink)
BLUE Pairing mode (hard blink)
WPS pairing successful (fast blink)
GREEN Wi-Fi has been turned o (solid)

TROUBLESHOOTING TIPS
Condition Status LED Color Verizon Router
Issue(s) YELLOW No internet connection (solid)
RED Hardware/System failure detected (hard
blink)
Overheating (fast blink)
WPS pairing failure (fast blink)
Power OFF Power o
Flash Speed
• Soft blink: 1000ms on 1000ms o
• Hard blink: 800ms on, 800ms o
• Fast blink: 200ms on, 200ms o
6.0h/ REAR LIGHTED INDICATORS
Left LED
• Solid yellow – Indicates less than 1 Gbps link
• Flash yellow – Indicates LAN/WAN activity. The trac can be in
either direction.
Right LED
• Solid white – Indicates 1/2.5/5/10 Gbps link
• Flash white – Indicates LAN/WAN activity. The trac can be in
either direction.

178
/ TROUBLESHOOTING
©2022 Verizon. All Rights Reserved
./ FREQUENTLY ASKED QUESTIONS
6.1a/ I’VE RUN OUT OF ETHERNET PORTS ON MY
VERIZON ROUTER. HOW DO I ADD MORE COMPUTERS
OR DEVICES?
Plugging in an Ethernet hub or switch expands the number of ports
on your Verizon Router.
• Run a straight-through Ethernet cable from the Uplink port of the
new hub to the Verizon Router.
Use a crossover cable if there is no Uplink port/switch on your hub,
to connect to the Verizon Router.
• Remove an existing device from the Ethernet port on your
Verizon Router and use that port.
6.1b/ HOW DO I CHANGE THE PASSWORD ON MY
VERIZON ROUTER UI?
To change the password:
1. On the main screen, select AdvancedAdvanced, then select UsersUsers in
the UtilitiesUtilities section.
2. Click the EditEdit in the ActionAction column. The User SettingsUser Settings page
displays.
3. Edit the user name and set a new password.

FREQUENTLY ASKED QUESTIONS
6.1c/ IS THE WIFI OPTION ON BY DEFAULT ON MY
VERIZON ROUTER?
Yes, your Verizon Router’s Wi-Fi option is activated out of the
box.
6.1d/ IS THE WIFI SECURITY ON BY DEFAULT WHEN THE WIFI
OPTION IS ACTIVATED?
Yes, with the unique WPA2 (Wi-Fi Protected Access II)
key that is printed on the sticker on the rear panel of your
Verizon Router.
6.1e/ ARE MY VERIZON ROUTER’S ETHERNET PORTS AUTO-
SENSING?
Yes. Either a straight-through or crossover Ethernet cable can
be used.
6.1f/ CAN I USE AN OLDER WIFI DEVICE TO CONNECT TO MY
VERIZON ROUTER?
Yes, your Verizon Router can interface with 802.11b, g, n, ac or
ax devices. Your Verizon Router also can be setup to handle
only
n Wi-Fi cards, g Wi-Fi cards, b Wi-Fi cards, or any combination
of the three.

180
/ TROUBLESHOOTING
©2022 Verizon. All Rights Reserved
6.1g/ CAN MY WIFI SIGNAL PASS THROUGH FLOORS, WALLS,
AND GLASS?
The physical environment surrounding your Verizon Router can
have a varying eect on signal strength and quality. The denser
the object, such as a concrete wall compared to a plaster wall,
the greater the interference. Concrete or metal reinforced
structures experience a higher degree of signal loss than those
made of wood, plaster, or glass.
6.1h/ HOW DO I LOCATE THE IP ADDRESS THAT MY COMPUTER
IS USING?
In Windows 7 or Windows 10, click the Windows button and
select Control Panel, then click View Network Status and Tasks.
In the next window, click Local Area Connection. In the Local
Area Network Connection Status window, click Details.
On Mac OS X, open System Preferences and click the Network
icon. The IP address displays near the top of the screen.
To find the IP address from the router GUI:
1. From the Basic Basic menu, select Devices Devices from the left pane..
2. Select Expanded ListExpanded List from the dropdown list to view detailed
IP address information for all connected devices.

FREQUENTLY ASKED QUESTIONS
6.1i/ I USED DHCP TO CONFIGURE MY NETWORK. DO I
NEED TO RESTART MY COMPUTER TO REFRESH MY IP
ADDRESS?
No. In Windows 7, Windows 10 and Mac OSX, unplug the
Ethernet cable or Wi-Fi card, then plug it back in.
6.1j/ I CANNOT ACCESS MY VERIZON ROUTER UI. WHAT
SHOULD I DO?
If you cannot access the UI, verify the computer connected
to your Verizon Router is set up to dynamically receive an IP
address.
6.1k/ I HAVE A FTP OR WEB SERVER ON MY NETWORK. HOW
CAN I MAKE IT AVAILABLE TO USERS ON THE INTERNET?
For a web server, enable port forwarding for port 80 to the IP
address of the server. Also, set up the web server to receive
that port. Configuring the server to use a static IP address is
recommended.
For a FTP server, enable port forwarding for port 21 to the IP
address of the server. Also, set up the web server to receive
that port. Configuring the server to use a static IP address is
recommended.

182
/ TROUBLESHOOTING
©2022 Verizon. All Rights Reserved
6.1l/ HOW MANY COMPUTERS CAN BE CONNECTED
THROUGH MY VERIZON ROUTER?
Your Verizon Router is capable of 254 connections, but we
recommend having no more than 132 connections. As the
number of connections increases, the available speed for each
computer decreases.


GENERAL SPECIFICATIONS
Note: The specifications listed in this chapter are subject to change
without notice.
./ GENERAL SPECIFICATIONS
Model Number: CR1000B
Standards: IEEE 802.3x, 802.3u, 802.3ab,
802.3bz, 802.3 an
IEEE 802.11a/b/g/n/ac/ax
IP: IP versions 4 and 6
MoCA LAN: 1125 – 1675 MHz
2500 Mbps
Speed: Wired:
10GE WAN Ethernet: 100 Mbps,
1/2.5/5/10 Gbps auto-sensing
10GE LAN Ethernet: 100 Mbps,
1/2.5/5/10 Gbps auto-sensing
2.5GE LAN Ethernet: 10/100 Mbps,
1/2.5 Gbps auto-sensing
Wireless:
2.4 GHz -
IEEE 802.11b/g/n: maximum up to
600 Mbps
IEEE 802.11ax: maximum up to
1.1Gbps

186
/ SPECIFICATIONS
©2022 Verizon. All Rights Reserved
5 GHz -
IEEE 802.11a/n/ac: maximum up to
2.2 Gbps
IEEE 802.11ax: maximum up to
2.4Gbps
6 GHz -
IEEE 802.11ax: maximum up to
4.8Gbps
Cabling Type: Ethernet 100BaseT: UTP/STP
Category 5
Ethernet 1000BaseT: UTP/STP
Category 5e
Ethernet 2.5/5/10GBaseT: UTP/STP
Category 6a
Firewall: ICSA certified
./ LED INDICATORS
Front Panel: Router Status LED
Rear Panel: WAN Ethernet and LAN Ethernet [3]

ENVIRONMENTAL PARAMETERS
./ ENVIRONMENTAL PARAMETERS
DIMENSIONS AND WEIGHT
Verizon Router (unit only):
Size: 4.72” wide x 9.85” high x 4.72”
deep
Weight: 3.682 lbs / 1.670 kg
Complete System (inc. packaging):
Size: 10.71” wide x 7” high x 8.66”
deep
Weight: 6.232 lbs / 2.826 kg
Power: External, 12V, 5A
Mounting Bracket (optional):
Size: 3.97” wide x 6.86” high x 6.6”
deep
Weight: 0.39 lbs / 175 g
Screws (optional): PH TP+N: 0.157” x 0.984”
PE Anchor: 0.236” x 0.984”


REGULATORY COMPLIANCE NOTICES
./ REGULATORY COMPLIANCE NOTICES
8.0a/ Class B Equipment
Federal Communication Commission Interference Statement:
This equipment has been tested and found to comply with the
limits for a Class B digital device, pursuant to Part 15 of the FCC
Rules. These limits are designed to provide reasonable protection
against harmful interference in a residential installation. This
equipment generates, uses and can radiate radio frequency energy
and, if not installed and used in accordance with the instructions,
may cause harmful interference to radio communications. However,
there is no guarantee that interference will not occur in a particular
installation. If this equipment does cause harmful interference to
radio or television reception, which can be determined by turning
the equipment o and on, the user is encouraged to try to correct
the interference by one of the following measures:
• Reorient or relocate the receiving antenna.
• Increase the separation between the equipment and receiver.
• Connect the equipment into an outlet on a circuit dierent from
that to which the receiver is connected.
• Consult the dealer or an experienced radio/TV technician for
help.
FCC Caution: Any changes or modifications not expressly
approved by the party responsible for compliance could void the
user’s authority to operate this equipment.

192
/ NOTICES
©2022 Verizon. All Rights Reserved
This device complies with Part 15 of the FCC Rules. Operation
is subject to the following two conditions: (1) This device may
not cause harmful interference, and (2) this device must accept
any interference received, including interference that may cause
undesired operation.
This device is restricted for indoor use.
FCC regulations restrict the operation of this device to indoor use
only.
The operation of this device is prohibited on oil platforms, cars,
trains, boats, and aircraft, except that operation of this device is
permitted in large aircraft while flying above 10,000 feet.
Operation of transmitters in the 5.925-7.125 GHz band is prohibited
for control of or Communications with unmanned aircraft systems.
IMPORTANT NOTE:
FCC Radiation Exposure Statement:
This equipment complies with FCC radiation exposure limits set
forth for an uncontrolled environment. This equipment should be
installed and operated with minimum distance 53cm between the
radiator & your body.

REGULATORY COMPLIANCE NOTICES
8.0b/ Safety Warning:
The screen of the coaxial cable is intended to be connected to
earth in the building installation.
The cable distribution system should be grounded (earthed)
in accordance with ANSI/NFPA 70, the National Electrical
Code (NEC), in particular Section 820.93, Grounding of Outer
Conductive Shield of a Coaxial Cable.
8.0c/ Alerte de sécurité:
L’écran du câble coaxial est destiné à être mis à la terre dans
l’installation du bâtiment.
Le système de distribution par câble doit être mis à la terre
conformément à ANSI / NFPA 70, Code national de l’électricité
(NEC), en particulier à la section 820.93, Mise à la terre du
blindage conducteur extérieur d’un câble coaxial.
8.0d/ NEBS (Network Equipment Building System) Statement
An external SPD is intended to be used with CR1000B/CE1000A.
WARNING:WARNING: The intra-building ports of the equipment or
subassembly is suitable for connection to intra-building or
unexposed wiring or cabling only. The intra-building port(s) of the
equipment or subassembly MUST NOT be metallically connected

194
/ NOTICES
©2022 Verizon. All Rights Reserved
to interfaces that connect to the OSP or its wiring. These interfaces
are designed for use as intra-building interfaces only (Type 4 ports
as described in GR-1089) and require isolation from the exposed
OSP cabling. The addition of Primary Protectors is not sucient
protection in order to connect these interfaces metallically to OSP
wiring.
Caution: The Verizon Router must be installed inside the home. The
Router is not designed for exterior installation.
8.0e/ GENERAL PUBLIC LICENSE
This product includes software made available under open source
licenses. Additional information about that software, applicable
licenses, and downloadable copies of source code, is available at:
https://verizon.com/opensource/
All open source software contained in this product is distributed
WITHOUT ANY WARRANTY. All such software is subject to the
copyrights of the authors and to the terms of the applicable
licenses included in the download.
This information is provided for those who wish to edit or otherwise
change such programs. You do not need a copy of any of such open
source software source code to install or operate the device.
