
Creating Accessible, Section 508 Compliant Microsoft
Excel Documents
WHAT:
Accessibility refers to the way we design products, devices, services, or environments to make them
available to as many people as possible—specifically, to people with disabilities. This includes access by
people who are mobile impaired, blind, low vision, deaf, hard of hearing, or who have cognitive
impairments.
WHY:
School Webmasters is dedicated to providing accessible web content. What’s more, Section 508 of the
Rehabilitation Act requires that all electronic and information technology be accessible to people with
disabilities. Not only are educational institutions bound by these standards; it just makes sense that
schools would want their publications to be accessible by everyone. It’s important that the documents
included on school websites be 508 compliant. School websites are our business, so we have a vested
interest in helping you comply.
HOW:
In this document, we will demonstrate how to make a Microsoft Excel document accessible. The steps
for checking accessibility and making the necessary adjustments for compliance may vary slightly across
different versions of Excel but will remain very similar.
We will cover the following items in this document:
● Alternative text
● Links
● Hyperlink text and screentips
● Tables
● Color
● Document title
● Checking for accessibility
● Converting to a PDF

2
Alternative Text
Every non-text element on your document (so, any image) must include Alternate Text that describes
the image. Alternate text allows visually impaired people to understand what the image means to
communicate. A screen reader will read the alt text in place of the image. The alt text needs to
describe the content without being too verbose or too vague. A simple trick to decide what to put for
your alternative text is to image you are describing the image to someone over the phone. The more
important the image is, the more descriptive you should be.
If the image is only used for decorative purposes and serves no other purpose, the alt text may be null
(alt=””). A simple test to decide if an image serves a purpose or is merely decorative is to ask yourself, “If
I did not use this image here, what would I put in its place?” If your answer is “nothing,” your alt text can
be null. To do this, simply leave the alternative text blank. You may also use a null alt text if the image is
described nearby in the body of the page.
Note: If this document will be converted to a PDF, any images with an alt text of null should be marked
as an artifact. This will allow assistive technology to skip this image since it does not add information to
the page.
Complex images such as pie charts, organizational charts, maps, and graphs need a detailed description.
The preferred way of doing this is to include the description in the surrounding content.
Add alt text to a picture or shape:
1. Right-click an image.
2. Select Format Picture > Size & Properties.
3. Select Alt Text.
4. Type a description and a title.
3
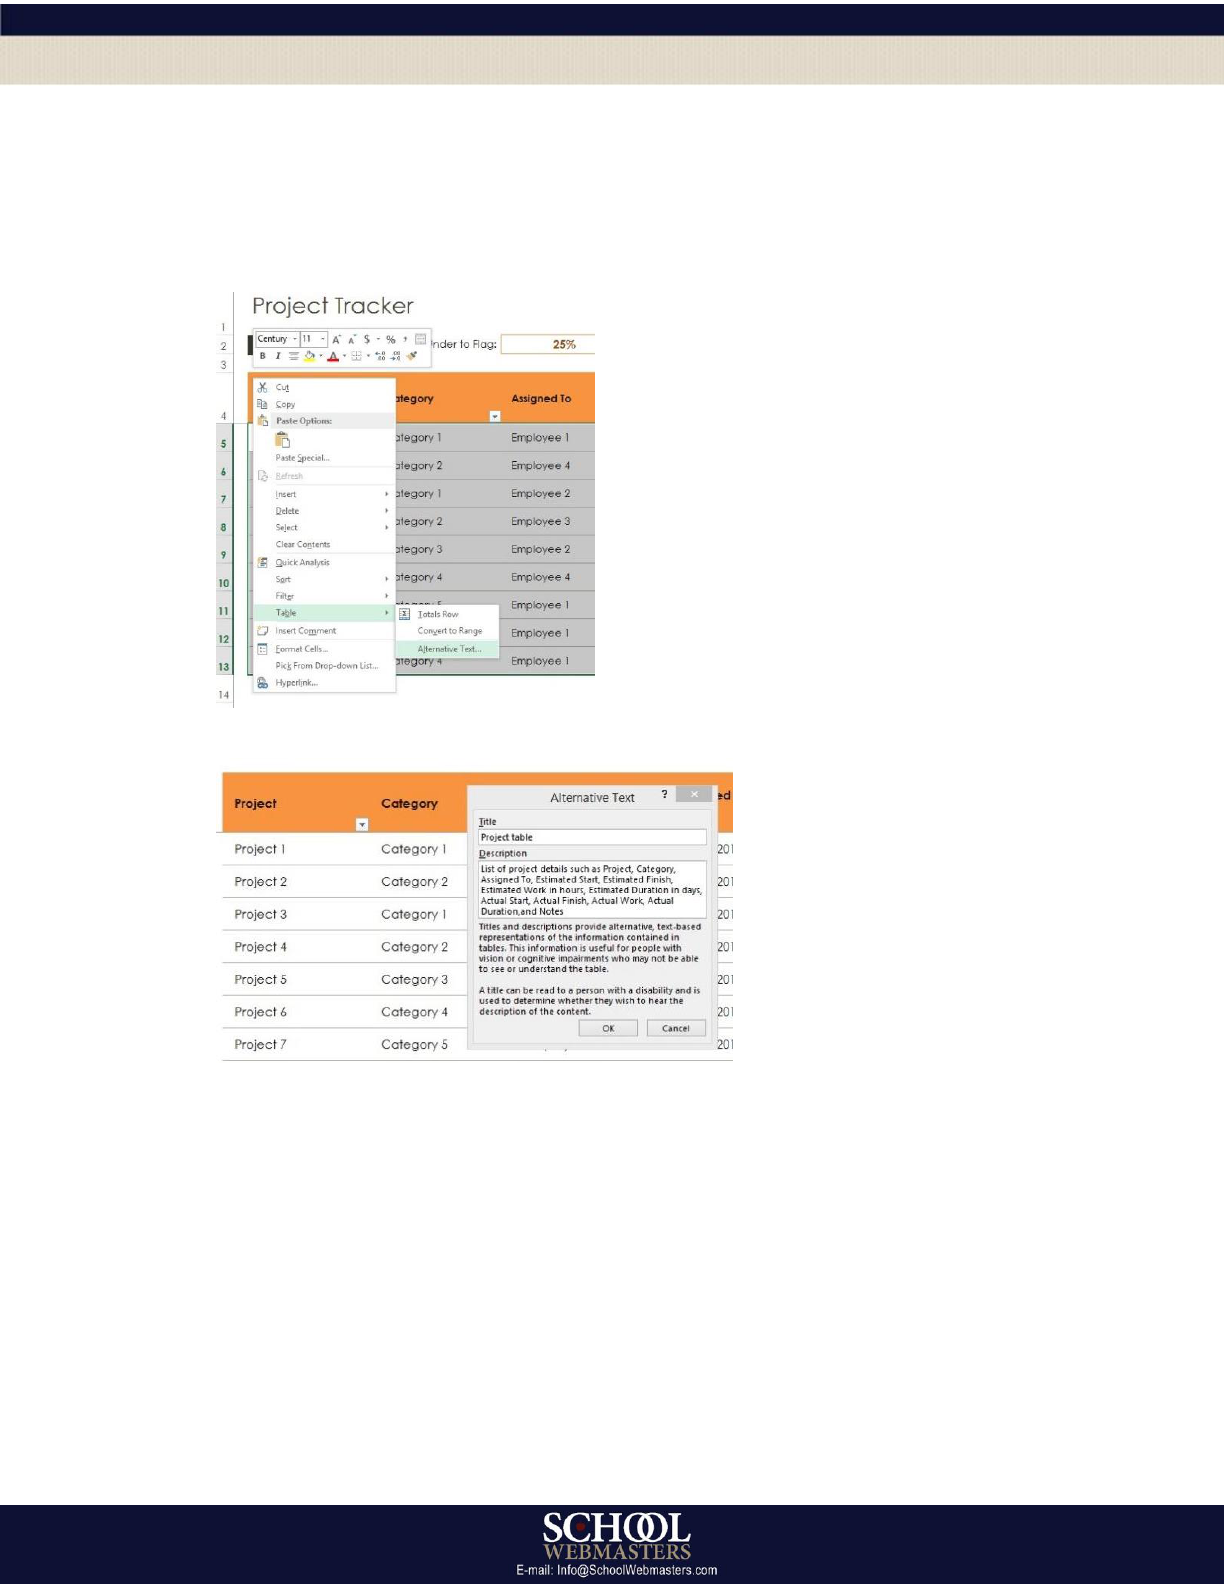
Add alt text to tables:
If there are tables within your document, be sure to add alt text to them.
1. Right-click a table.
2. Select Table > Alternative Text.
3. Type a Title and a Description.
4. Select OK.
Links
It is important that the links make sense to a user when they are read out of context. When a screen
reader is reading text and there is a link, the reader will say the word “link” with the linked text to let
the user know that it is a hyperlink.
A user can also choose to only hear a list of links on a page. If the linked words for the link to an
accessibility policy are “click here,” that is the only text the user will hear. Imagine if you wanted to find
the accessibility link on a page where all of the linked text uses “click here.” When you ask for a list of
links, this is what you would hear:
● Click Here. Link.

4
● Click Here. Link.
● Click Here. Link.
You would have no way of knowing which link to follow.
A better choice of linked text would be “School Webmasters’ Accessibility Policy,” because this text
makes sense even out of context. The screen reader would read this as “School Webmasters’
Accessibility Policy. Link.”
Another option to avoid is linking the actual URL. If the linked text is
“www.schoolwebmasters.com/accessibility,” the screen reader would read this as “w w w dot
schoolwebmasters dot com slash accessibility. Link.” Again, a better choice of linked text would be
“School Webmasters’ Accessibility Policy.”
Hyperlink Text and ScreenTips
Use hyperlink text that accurately describes the link.
A ScreenTip is a tip that appears when your mouse hovers over a hyperlink. A screen reader will read
this tip similar to the way it reads alt text.
1. Right-click a cell.
2. Select Hyperlink.
3. In the Text to display box, type the hyperlink text.
4. In the Address box, enter the destination address for the hyperlink.
5. Select the ScreenTip button, and in the ScreenTip text box, type a ScreenTip.
Tables
Clear headings assist navigation of the table’s contents.
Add headers to a new table
1. Select the cells you want to include in the table.
2. On the Insert tab, in the Tables group, select Table.

5
3. Select the My table has headers check box.
4. Select OK.
Add headers to existing tables
1. While the cursor is anywhere in the table, on the Table Tools Design tab and in the Table Style
Options group, select the Header Row check box.
2. Type column headings.
Avoid Blank Cells, Rows, and Columns
A blank cell, row, or column may lead a user to believe there is nothing more in the table. Delete any
blank cells, rows, or columns that are not necessary.
Do Not Merge or Split Cells
Keep tables as straightforward and simple as possible. Merging or splitting cells can make navigating
with assistive technology very difficult or impossible.

6
Color
Using appropriate colors and contrast enables all users, regardless of visual limitations, to see and
understand the meaning of everything in the document. Because Microsoft Excel will give you an RGB
color code, we recommend using the color contrast checker provided by Acart Communications.
Avoid using color as the only means to convey information. For example, in the table below, the
complete and incomplete items may appear the same to someone who is color blind:
Task
Due Date
Completed
Task 1
January 1, 2017
X
Task 2
January 15, 2017
X
Task 3
January 31, 2017
X
A better option would be to to provide another way of conveying the information other than only with
color as shown in the table below:
Task
Due Date
Completed
Task 1
January 1, 2017
Y
Task 2
January 15, 2017
N
Task 3
January 31, 2017
Y
Provide a Unique Name for Each Tab
Each tab in an Excel file should be unique. To rename a sheet:
1. Right-click the sheet tab.

7
2. Select Rename.
3. Type a unique name for the sheet.
Add Metadata to Document Properties
Metadata is the information and data provided about a file. Editing the metadata will help identify
accessible documents and PowerPoint presentations to search engines. The document should at
minimum have content in the Title field.
1. Select File tab.
2. On the right side, under Properties, add a Title.
Check Accessibility
If you begin with an Excel document that is not accessible, you are almost certain to have an inaccessible
PDF. To test how accessible your document is (or isn’t) before converting it to a PDF, Microsoft Excel has
a built-in accessibility feature; however, do not only rely solely on this feature to check accessibility. We
recommend manual testing and using assistive technology such as screen readers as well as using a tool
such as Adobe Acrobat Pro DC to confirm accessibility of your PDF document.
To access the accessibility checker:
1. In the File tab, select Info.
2. Select Check for Issues.

8
3. Select Check Accessibility.
4. Correct any errors.
5. Review warnings to confirm there are no issues needing correction.
Convert Compliant Document to PDF
If you need to convert your compliant document to a PDF format, the universally recognized format
for web documents, you will need to use additional tools in a PDF editing program such as Adobe
Acrobat DC in order to confirm compliance of the PDF document. Readers can view a PDF (Portable
Document Format) on both a Mac and a PC as well as on mobile devices. It is important to remember
that once a document is converted to PDF, there is not a 100% equivalent conversion process for
converting a document back into its native form. For this reason, we highly recommend ensuring your
document is accessible prior to conversion.
1. Select File.
2. Select Save as Adobe PDF.
3. Select Convert to PDF.
4. Select Options.

9
5. Select the Enable Accessibility and Reflow with tagged Adobe PDF check box.
6. Select OK.
7. Select Save.
