
Training Module- Pivot Tables
A pivot table is a data summarization tool found in Excel. Among other functions, a pivot-table
can automatically sort, count, total or give the average of the data stored in one table or
spreadsheet. It displays the results in a second table showing the summarized data.
Pivot tables are also useful for quickly creating unweighted cross tabulations. The user sets up
and changes the summary's structure by dragging and dropping fields graphically. This
"rotation" or pivoting of the summary table gives the concept its name.
A pivot table usually consists of row, column and data (or fact) fields.
To create a pivot table in Excel.
1. Open an .xlsx file.
(You cannot save pivot tables or other calculations in .csv files.)
2. Click the Insert tab. Then click the PivotTable icon.
3. A pivot table dialog box will open showing the range of data selected.
(The default is to select the entire worksheet.)
4. Click OK and the pivot table will open on a new tab.
SAMPLE

5. On the pivot table tab, right click in the PivotTable1 report box to open PivotTable
Options.
6. In PivotTable Options, click the
Display tab. One the display tab,
select Classic PivotTable layout.
(This layout allows for easier
formatting of the final report and
the ability to drag fields in and out
of the report box.)
7. Click OK.
SAMPLE

8. The pivot table reprt box will now look like this.
9. On the pivot table tab you will see a Pivot Table Field List.
This list shows all the fields in the parent dataset.
10. The boxes below the field list correspond to the axes of the
pivot table, Rows and Columns.
11. Report Filters are the fields that need to be filtered in order
to get an accurate count or sum.
12. Values are the items that are being counted.
13. To create the pivot table, check or drag the required fields
into the boxes, or into the pivot table axes in the blue
outlined box.
14. The pivot table will begin to sort and calculate numbers
based on the row and column criteria. (See following
examples.)
SAMPLE
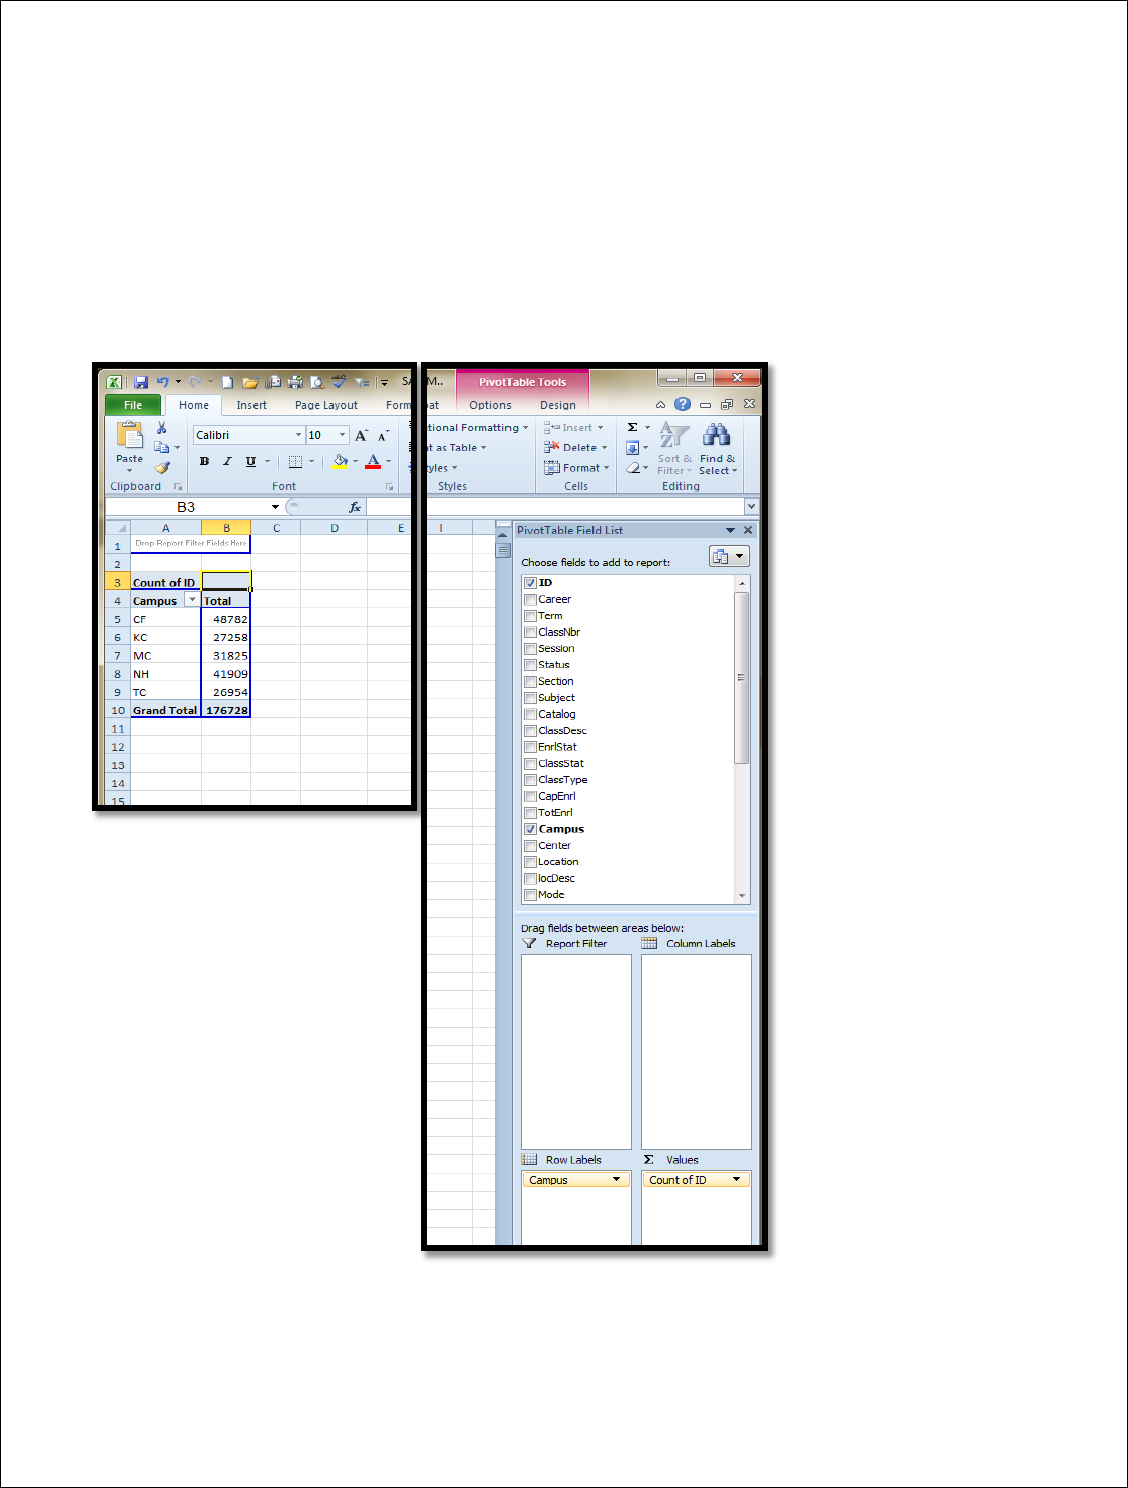
Pivot Table Sample: Using SAMPLE 1 Fall 11 Official Day Enrollments
In the first sample you will count the number of IDs divided by campus. Each time the ID
appears at a particular campus, it is counted in the total number of IDs for that campus.
The pivot table fields and table will look like this:
If you look at the raw data tab, you can count the number of rows to see that they match the
grand total: 176,728. If you use filters in the raw data, and filter on just the campus "MC" you will
find 31,825 records. The pivot table does this filtering and calculating for you instantly.
SAMPLE

Sample 2:
Using the pivot table for multiple breakdowns.
We can use the count function of the pivot to tell us how many students (IDs) appear in different
subject at a particular campus.
1. From the pivot table in Example 1, drag the campus field to the Row Labels.
2. Then, in the pivot table report box choose the down arrow in Subject to limit the subjects
to ACCT and ACNT.
a. Uncheck Select All.
b. Then check the box next to ACCT and ACNT.
c. Click OK.
Your pivot table should now show the number of
students (IDs) in ACCT and ACNT at each
campus. Note that Totals for each campus are
provided, summing the two lines of data for each
campus.
SAMPLE

There are different functions in the value field settings to help you perform specific calculations.
Right clicking in any value will allow you to select
the Value Field Settings and change the functions
of the values.
Function
Description
Sum
The sum of the values. This is the default
function for numeric data.
Count The number of data values. The Count
summary function works the same as the
COUNTA worksheet function. Count is the
default function for data other than numbers.
Average
The average of the values.
Max
The largest value.
Min
The smallest value.
Product
The product of the values.
Count Nums
The number of data values that are numbers.
The Count Nums summary function works the
same as the COUNT worksheet function.
StDev
An estimate of the standard deviation of a
population, where the sample is a subset of
the entire population.
StDevp
The standard deviation of a population, where
the population is all of the data to be
summarized.
Var
An estimate of the variance of a population,
where the sample is a subset of the entire
population.
Varp
The variance of a population, where the
population is all of the data to be summarized.
SAMPLE


ORIE Training Guide: Headcount and Enrollments 1
ORIE Training Module #1
Headcount and Enrollments
Report Request: Please provide headcount and enrollments broken down by campus and
center with a system-wide summary for Fall 2011.
Data Dictionary:
Headcount
Unique students at each campus. Total of all campuses equals system
headcount.
Enrollment
All courses students are enrolled in.
Campus
One of the six Lone Star College System campuses
Center
Satellite centers tied to one of the main campuses. Headcount for centers
are unduplicated separately from the campus location, as students my
enrolled at both locations.
Status
“E” for Enrolled Student. All other statuses are filtered out.
Class Status
(ClassStat)
“A” for Active, or "S" for Stop Enrollment. All other statuses are filtered out.
ClassType
“E” for Enrollment Section. All other statuses are filtered out.
Official Day
Day of Record/ Census Day.12
th
class day for the spring and fall semesters
Data Source:
File Name (s)
Source
File Type
Fall 2011 Official Day Raw
Data.fmp
These data are pulled from
iStar using the daily
registration query.
.fmp (Filemaker Pro)
Protocol:
Step
Action
Protocol
1
Create working folder labeled with your
name.
2
Copy raw data file and save off working file
into your folder.
Note: For standard (non-training) requests
you should keep 3 folders. 1. Raw Data, 2.
Work, 3. Report.
3
Delete bad statuses from raw data file.
To filter: In FMP click Find. Use fields and
statuses above (in Data Dictionary) to limit
the raw enrollments to enrolled students in
active courses. Click the green records
circle. This will change the view to all
omitted statuses. Click Records>Delete
Found Records.
4
Add column called “Center Coding”
In FMP click Manage Database and add
text column named Center Coding. Save.
5
Perform Find to code Centers
In FMP click Find. In blank row use the
following attributes to code for LSC
Centers.
Campus: KC, Location: 284 =Atascocita
Campus: MC, Location: 401 =Conroe
Campus: CF, Location: 510 =Fairbanks
SAMPLE

ORIE Training Guide: Headcount and Enrollments 2
*Tip to code records in FMP use Find
function, type in coding to column, then
Click Records>Replace Field Contents>Ok
Campus: NH, Location: 127 =Greenspoint
Campus: NH, Location: 197 =Victory
Campus: NH, Location: 198 =Victory
6 Export results to Excel File: Save/Send Record as Excel
Save as Fall 2011 Headcount and
Enrollment Work to your folder.
7
In Excel spreadsheet rename worksheet
tab “Enrollments.” Open 2 new worksheets,
rename one “Headcount by Campus,” one
“Headcount by Center” Copy all data from
Enrollment worksheet and paste into each
new worksheet.
8
Find headcount by campus.
In “Headcount by Campus”
Select all fields.
Click on Data tab.
Click Remove Duplicates
In the dialog box click Unselect All
Select EMPLID and Campus to remove
duplicates.
Click Ok.
9
Find headcount by center.
In “Headcount by Center”
Select all fields.
Click on Data tab.
Click Remove Duplicates
In the dialog box click Unselect All
Select EMPLID and Center to remove
duplicates.
Click Ok.
10
Insert PivotTable to count enrollments by
campus.
On the “Enrollments” worksheet, Select all
data on worksheet and click Insert > Pivot
Table > New Sheet> Ok. Rename tab to
"pivot campus enrollments"
Change pivot table settings to Classic
View. (This view makes formatting easier.)
Right Click in pivot table box. Click Pivot
Table Options > Display > Classic Pivot
Table Layout
Show Campuses as Column Labels. Count
EMPLID.
11
Insert PivotTable to count enrollments by
center.
On the “Enrollments” worksheet, Select all
data on worksheet and click Insert > Pivot
Table > New Sheet> Ok. Rename tab to
"pivot center enrollments"
Change pivot table settings to Classic
View. (This view makes formatting easier.)
Right Click in pivot table box. Click Pivot
Table Options > Display > Classic Pivot
SAMPLE

ORIE Training Guide: Headcount and Enrollments 3
Table Layout
Show "Center Coding" in the Column
Labels. Count EMPLID.
Then swap Campus field for Center Coding
field
12
Insert PivotTable to count number of
students at each campus and center
Using the “Headcount by…” worksheets,
create a PivotTable on a new tab. (see
above)
Campuses/Centers should appear across
the top. Count EMPLID.
12 Format final reports.
Create a Final Report tab for campuses
and a Final Report tab for centers. Copy
corresponding data from each pivot table
(Enrollments and Headcount pivots) and
paste onto the appropriate worksheet for
formatting. (See SAMPLE Report.)
Tip: For easier formatting. Under Pivot
Table Options> Design> PivotTable Styles,
Select the dropdown arrow.
Change the design to "Clear"
Use ORIE Style Guide in your handbook to
format the reports. You may compare your
final report to the example in the training
folder.
Report Title: Lone Star College System,
Enrollments and Headcount,
Official Day Fall 2011
Remember:
Arial font, 10-12 points.
Row Height: 15 pts.
SAMPLE

ORIE Training Guide: Headcount and Enrollments 4
Header Row Height: 30 pts.
Title Row Height: 90 pts.
Header: Bold font, light blue fill, bold
outside border.
Bold outside border around entire report.
Insert logo.
Complete report footnote.
13
Save final report to your folder.
Save Final Report tabs as .PDF or Adobe
PDF.
14
Add footer to PDF document and save.
In Adobe Professional, add ORIE footer to
document. (If you have not done so, set up
a custom report setting in Adobe- ask for
assistance if needed.)
Click Tools
Click Pages
Click Add Header/Footer
Footer:
Center: Office of Research and Institutional
Effectiveness
Right: Page number
Follow-up assignment
Using the same raw data, create a report that shows the number of enrollments in all
developmental courses for Fall 2011 by campus. Developmental courses include: MATH 0306
MATH 0308, MATH 0310, ENGL 0304, ENGL 0305, ENGL 0306, ENGL 0307
SAMPLE

ORIE Training Guide: Enrollments by Delivery Method 1
ORIE Training Module #2
Enrollments by Delivery Method
Report Request: Please provide a count of enrollments by delivery method for LSC-UP
broken out by subject and catalog number for Fall 2013 Official Day. In order to keep the
report a reasonable length, please only report the following subjects: GOVT, HIST, MATH
and SPCH.
Data Dictionary:
Enrollment
All courses students are enrolled in.
Campus
One of the six Lone Star College System campuses
Delivery Method/
Instruction Mode
This is how the course is delivered/ taught- Face-to-Face, Online or a
Hybrid of the two.
Status
“E” for Enrolled Student. All other statuses are filtered out.
Class Status
“A” for Active. All other statuses are filtered out.
Class Type
“E” for Enrollment Section. All other statuses are filtered out.
Data Source:
File Name (s)
Source
File Type
Fall 2013 Official Day Raw
Data.fmp
These data are pulled from
iStar using the daily
registration query.
.fmp (Filemaker Pro)
Protocol:
Step
Action
Protocol
1
Create working folder labeled with your
name.
You should have completed this step in the
first module. Please save work to this
folder.
2 Copy raw data file and save off working file
into your folder.
3
Find good statuses in raw data file.
To filter: In FMP click Find. Use fields and
statuses above (in Data Dictionary) to limit
the raw enrollments to enrolled students in
active courses.
4
Once fields are limited to only good
statuses then use the toolbar to delete all
remaining records.
In the toolbar locate the green circle
(Found Records).
Click on the green circle, this will switch the
view to all records with the “bad” statuses.
Go to “Records” tab and select “Delete
Found Records”
5
In FMP add a column: Delivery Method
6
Code Delivery Method groups
Using column “Mode” find each code
below. In column “Delivery Method” type in
SAMPLE

ORIE Training Guide: Enrollments by Delivery Method 2
the correct mode group and replace all
blank fields. To replace all blank fields:
Type text you want to appear in first field.
Click “Record.”
Select “Replace Field Contents.”
Select “OK.”
Mode
WG: Hybrid
WL: Hybrid
RG: Hybrid
PG: Hybrid
R: Hybrid
P: Face-to-Face
OL: Online
W: Online
7
Export results to Excel
In “File” tab select “Save/Send Record as
Excel”
Choose file type: Excel .xlsx
Save as Fall 2013 Enrollments by
Delivery Method to your folder.
8
Count enrollments by delivery method for
LSC-University Park. Break-out data by
Subject and Catalog number. (Only the
required subjects.)
In Excel, Insert a PivotTable on a new tab.
Right click inside PivotTable
Select “Pivot Table Options”
On “Display” tab, select “Classic Pivot
Table Layout” Click “Ok”
Select fields for report.
Show Delivery Method in Column Labels,
Subject, Catalog Number in Row Labels.
Show Campus in Report Filter, limit to
“UP”
Count EMPLID in the Values field.
9
Copy pivot table data to a new Tab.
Rename tab: LSC-University Park.
Before you copy- change the pivot table
Design to CLEAR. Copy, then paste
special- Values and Source Formatting to
maintain the pivot format.
10
Format final report tabs according to style
guide.
Note: You may use the sample report as
reference.
Make sure to check/adjust page breaks on
any multi-page report.
Follow-up assignment
Using the same data, create a report showing which courses had the most online enrollments
for Fall 2013 for LSC-University Park. Select the top 20 courses for your report. Show how
these data compare to the top 20 online courses system-wide.
SAMPLE

ORIE Training Guide: Headcount and Enrollments 1
ORIE Training Module #3
Completion and Success
Report Request: Please provide the Completion and Success rates for all enrollments
system-wide, broken down by campus.
Data Dictionary:
Enrollment
All (or any) course that a student is enrolled in.
Completion
Final grade given. Student did not withdraw.
Success
Final grade of A, B or C. Percentage is calculated from students who
completed the course.
W
Withdrawal from course after Official Day, but before the "final withdrawal
date" at the end of the term.
Data Source:
File Name (s)
Source
File Type
Fall 2011 End of Term
Enrollment Data
These data are as of the end
of the term to reflect final
recorded grades.
.FMP (Excel)
Protocol:
Step
Action
Protocol
1
Create working folder
2
Open SQL Developer and open
connection to CS90STG.
3
Run Alter Session Set
Current_Schema
Cut and paste the following into the worksheet
and click Run. Alter Session Set
Current_Schema = Sysadm
4
Clear SQL worksheet.
5
Paste in Enrollments by Campus with
Final Grade query (banked in iStar
Queries.)
select a.strm, b.campus, b.location,
b.session_code, a.emplid, b.subject,
b.catalog_nbr, b.class_section,
B.Instruction_Mode, a.crse_grade_off
from ps_stdnt_enrl a,
ps_class_tbl b
where a.strm = '1118'
and a.stdnt_enrl_status = 'E'
and b.class_stat in ('A','S')
and b.class_type = 'E'
And A.Acad_Career = 'CR'
and a.strm = b.strm
and a.session_code = b.session_code
and a.class_nbr = b.class_nbr
Order By A.Strm, B.Campus, B.Session_Code,
SAMPLE

ORIE Training Guide: Headcount and Enrollments 2
B.Subject, B.Catalog_Nbr, B.Class_Section
6
Make sure the term is correct for Fall
2011. Click Run.
7
Export returned results to .csv file
called Fall 2011 End of Term
Enrollment Data. Save to Desktop.
8
Convert .csv file to Filemaker.
On Desktop, locate Fall 2011 End of Term
Enrollment Data.csv. Right click on icon and
chose Open With > Filemaker Pro. Choose
"Field Names." Click Save.
9
Add three new columns to the FMP
file.
Click Manage > Database
Type in Field Name- Enrolled
Set the Type to Number.
Click Create.
Enter the next Columns with the same criteria:
Completion
Success
Click OK
10
Code for each column criteria.
Enrolled = '1' unless Crse_Grade_Off is blank
Completion = '1' if Crse_Grade_Off = Any
grade but 'W'
Success = '1' if Crse_Grade_Off = 'A','B','C'
11
Code Campus Codes for easier
reporting.
CF= LSC-CyFair
KC= LSC-Kingwood
MC= LSC-Montgomery
TC= LSC-Tomball
NH= LSC-North Harris
UP= LSC-University Park
12
Export file to Excel.
Click File > Save Send as > Excel
Name file Fall 2011 Enrollment Data WORK
Change type to .xlsx
Click Save.
13 Open Excel file. Rename first tab "raw
data"
14
Insert Pivot Table to count
enrollments, completion and success
Select all data on "raw data" and click Insert >
Pivot Table > New Sheet. Rename tab to
"pivot"
Change pivot table settings to Classic View.
(This view makes formatting easier.)
Right Click in pivot table box. Click Pivot Table
Options > Display > Classic Pivot Table Layout
Campus names should appear as Row Labels.
Enrollments, Completion and Success should
appear Values.
SAMPLE

ORIE Training Guide: Headcount and Enrollments 3
15
Insert Calculated Field to show
percentage of Completion and
Success.
Under Pivot Table Options, click Fields, Items
and Sets >Insert Calculated Field
In the dailog box rename Field 1 to
"%Complete" and insert the formula
"=Completion/Enrolled"
Repeat step for % Success. The formula for
%Success is "=Success/Completion"
In the pivot drag calculated fields to place them
next to the corresponding number fields.
Change number format to Percentage.
16
Copy pivot table contents and paste to
new tab for final report formatting.
17
Format final report based on ORIE
Style Guide.
18
Save final report to your folder.
19 Add footer to PDF document and save. In Adobe Professional, add ORIE footer to
document.
SAMPLE

ORIE Training Guide: Headcount and Enrollments 4
Follow-up assignments
1.Please provide the Completion and Success Rates for your campus (or choose a campus if
you are a System Analyst) broken down by discipline. Please limit the report to the following
disciplines: BMGT, BUSG, BUSI, HRPO, IBUS, MRKG.
2.Using the same data, add a separate coding field called 'Delivery Method.'
Using the following coding, label Face-to-Face and Online enrollments.
If Instruction_Mode = 'P', then Face-to-Face
If Instruction_Mode = 'OL' or 'W' then Online
Provide a report for your campus showing the above rubrics comparing success rates by
delivery method.
SAMPLE

Recorded by Deseree Probasco
* = modified
Training Module 4 Notes:
This module will help you learn how to:
1. Create an internal contact list based on a set of criteria.
2. Read and follow a protocol to replicate a previous ticket using the analyst's methodology
document.
3. Create a detailed methodology document for each ticket that you are assigned.
The following pages show the parts of ORIE's standard Methodology document. Italic notes
have been inserted to explain functions or elaborate on the steps.
Tips and Tricks:
• Contact lists for internal clients include all students even if they have a FERPA flag.
• Contact lists for external clients always exclude students with a FERPA flag.
• Final reports are alphabetized by last name.
• Contact lists are always delivered to the client in Excel format.
SAMPLE

Recorded by Deseree Probasco
* = modified
Methodology Ticket #: Training Module 4
Request Description:
*Give a description of the data elements and client request- can be pasted from the work order.
This helps the final reviewer see what the client requested without having to consult the work
order.
Please provide a contact list showing students with 30+ Credit Hours (excluding DEV credits)
enrolled at LSC-CF in Spring 2013 who have an academic plan of AA and a home campus of
LSC-CyFair.
Data Definitions:
Credit Hours
Hours that the student earns per completed course. The banked query
excludes Developmental credit hours (courses which fall below college-
level, catalog number begins with "0") and only counts the College-level
course credit hours (catalog number begins with "1" or "2".)
Academic Plan
A student's major (degree or certificate).
Home campus
The campus where a student's major is filed. This information is available in
the banked Plan query as "Campus."
Steps Taken:
*List the steps in the order performed. Detail is important, especially when combining data sets,
coding, or calculating.
1. Determine which queries were appropriate for this request.
2. Copy the following “Banked Queries” for this request.
*Listed on the following pages under Modified Queried Used
Z:\1 ORIE Reference Resources and Analyst Toolbox\SQL Queries\iStar
a. Headcount and Enrollments -> Headcount by Campus
b. Demographics -> Contact Query
c. GPA and Credit Hours -> Credit Hours No Dev Crs with Sum
d. Other -> Plan Query
3. Run the above queries in SQL Developer.
4. Export the data from SQL Developer to the following .csv file names and save to folder.
a. CF Headcount
b. Contact Information
c. Credit Hours No Dev
d. Acad Plan
SAMPLE

Recorded by Deseree Probasco
* = modified
5. Convert CF Headcount.csv to Filemaker format.
*For conversion instructions refer back to FMP training module.
Add additional fields to CF Headcount.fmp and imported data from .csv files.
*For importing instructions refer back to FMP training module.
a. Fields for contact information: First Name, Last Name, Address, Address 2, City,
State, Zip Code, Home Phone, Email. (Matching on ID).
*Tip: After importing Home Phone to Filemaker, change the field type to
"Number" for easier formatting in Excel later.
b. Credit Hours (Matching on ID). *Tip: For easier sorting change Credit Hour field
type to "Number."
c. Academic Plan, Home Campus (Matching on ID).
6. Find and delete records were earned credit hours were less than 30.
7. Find and delete records where home campus was a campus other than 'CF'
8. Use Save Send as Excel, and export remaining data to Excel file (.xlsx) Open file.
9. Save Raw data and Work data on separate tabs.
10. Format according to the Style Guide.
11. Save contact list and close worksheet.
12. Update Work Order folders and SNOW ticket.
13. Send reports to QA review.
Modified Query Used:
Headcount and Enrollments -> Headcount by Campus
select distinct a.strm, a.emplid, b.campus
from ps_stdnt_enrl a,
ps_class_tbl b
where a.strm = '1131'
and b.campus = 'CF'
and a.stdnt_enrl_status = 'E'
and b.class_stat in ('A','S')
and b.class_type = 'E'
and a.acad_career = 'CR'
and a.strm = b.strm
and a.session_code = b.session_code
and a.class_nbr = b.class_nbr
order by a.strm, a.emplid, b.campus
SAMPLE

Recorded by Deseree Probasco
* = modified
Demographics -> Contact Query
SELECT distinct A.EMPLID, b.LAST_NAME, b.FIRST_NAME, A.ADDRESS1, A.ADDRESS2, A.CITY, A.STATE, A.POSTAL,
e.email_addr, d.phone as homePhone, c.phone as cellPhone
FROM PS_PERSON_address A
left join ps_person_name b on (A.EMPLID = b.EMPLID)
Left Join Ps_Personal_Phone C On (A.Emplid = C.Emplid And C.Phone_Type = 'CELL')
Left Join Ps_Personal_Phone D On (A.Emplid = D.Emplid And D.Phone_Type = 'HOME')
left join ps_email_addresses e on (A.EMPLID = e.EMPLID and e.e_addr_type = 'CAMP')
where a.address_type = 'HOME'
and a.emplid in
(select distinct emplid from ps_stdnt_enrl
where acad_career = 'CR'
And Strm = '1131'
and stdnt_enrl_status = 'E')
GPA and Credit Hours -> Credit Hours No Dev Crs with Sum
select a.emplid, sum(a.unt_earned) as totCreds
from ps_stdnt_enrl a,
ps_class_tbl b
where a.strm <= '1131'
and a.stdnt_enrl_status = 'E'
and a.acad_career = 'CR'
and a.crse_grade_off in ('A','B','C','D')
and b.class_stat in ('A','S')
and b.class_type = 'E'
and a.repeat_code <> 'EXCL'
and a.strm = b.strm
and a.session_code = b.session_code
and a.class_nbr = b.class_nbr
and a.emplid in (
select z.emplid
from ps_stdnt_enrl z
where z.strm in ('1131')
and z.stdnt_enrl_status = 'E'
and z.acad_career = 'CR'
and a.emplid = z.emplid)
and b.crse_id not in (select crse_id from ps_crse_attributes where crse_attr = 'DEV')
having sum(a.unt_earned) >= '30'
group by a.emplid
Other - > Plan Query
SELECT DISTINCT A.STRM, B.CAMPUS, A.EMPLID, C.ACAD_PLAN, D.DESCR, D.ACAD_PLAN_TYPE,
B.PROG_STATUS,D.INSTITUTION,D.ACAD_PLAN,TO_CHAR(D.EFFDT,'YYYY-MM-DD')
FROM sysadm.ps_STDNT_ENRL A, sysadm.ps_ACAD_PROG B, sysadm.ps_ACAD_PLAN C, sysadm.ps_ACAD_PLAN_TBL D
WHERE A.ACAD_CAREER = 'CR'
AND A.STRM = '1131'
AND A.STDNT_ENRL_STATUS = 'E'
AND A.EMPLID = B.EMPLID
AND A.ACAD_CAREER = B.ACAD_CAREER
AND B.EFFDT =
(SELECT MAX(B_ED.EFFDT) FROM sysadm.ps_ACAD_PROG B_ED
WHERE B.EMPLID = B_ED.EMPLID
AND B.ACAD_CAREER = B_ED.ACAD_CAREER
AND B.STDNT_CAR_NBR = B_ED.STDNT_CAR_NBR
AND B_ED.EFFDT <= SYSDATE)
AND B.EFFSEQ =
(SELECT MAX(B_ES.EFFSEQ) FROM sysadm.ps_ACAD_PROG B_ES
WHERE B.EMPLID = B_ES.EMPLID
AND B.ACAD_CAREER = B_ES.ACAD_CAREER
AND B.STDNT_CAR_NBR = B_ES.STDNT_CAR_NBR
AND B.EFFDT = B_ES.EFFDT)
AND B.EMPLID = C.EMPLID
AND B.ACAD_CAREER = C.ACAD_CAREER
SAMPLE

Recorded by Deseree Probasco
* = modified
AND B.STDNT_CAR_NBR = C.STDNT_CAR_NBR
AND B.EFFSEQ = C.EFFSEQ
AND C.EFFDT =
(SELECT MAX(C_ED.EFFDT) FROM sysadm.ps_ACAD_PLAN C_ED
WHERE C.EMPLID = C_ED.EMPLID
AND C.ACAD_CAREER = C_ED.ACAD_CAREER
AND C.STDNT_CAR_NBR = C_ED.STDNT_CAR_NBR
AND C_ED.EFFDT <= SYSDATE)
AND C.EFFSEQ =
(SELECT MAX(C_ES.EFFSEQ) FROM sysadm.ps_ACAD_PLAN C_ES
WHERE C.EMPLID = C_ES.EMPLID
AND C.ACAD_CAREER = C_ES.ACAD_CAREER
AND C.STDNT_CAR_NBR = C_ES.STDNT_CAR_NBR
AND C.EFFDT = C_ES.EFFDT)
AND C.ACAD_PLAN = D.ACAD_PLAN
AND D.EFFDT =
(SELECT MAX(D_ED.EFFDT) FROM sysadm.ps_ACAD_PLAN_TBL D_ED
WHERE D.INSTITUTION = D_ED.INSTITUTION
AND D.ACAD_PLAN = D_ED.ACAD_PLAN
And D_Ed.Effdt <= Sysdate)
And B.Prog_Status not in ('CM','DC')
ORDER BY 1, 2, 3, 6 DESC
Additional Assignment:
Using the basic steps above (and using the ORIE banked queries):
Please create a contact list for female students with an Associate of Science academic plan,
who were enrolled in any upper-level Math class Spring 2013.
MATH 2318
MATH 2320
MATH 2412
MATH 2413
MATH 2414
MATH 2415
Please create a standard methodology document as you work, following the module template.
SAMPLE
