
iLab Core User Guide
iLab
System Role: Core User
VUMC Office of Research

1
Guide Contents
Registering For iLab ................................................................................................................................................................. 2
Instructions for VUMC PIs, Lab Managers, and Lab Members ....................................................................................... 2
Lab Group Management ......................................................................................................................................................... 4
Accessing & Navigating your Lab Group(s) ..................................................................................................................... 4
Lab Group Roles .............................................................................................................................................................. 6
Spending Thresholds and Approval Requirements per Lab Group ................................................................................. 6
Department Administrators .................................................................................................................................................... 6
Billing Number Management .................................................................................................................................................. 7
VUMC Billing Numbers .................................................................................................................................................... 7
VU Billing Numbers ......................................................................................................................................................... 9
Vouchers ....................................................................................................................................................................... 10
Scholarships .................................................................................................................................................................. 12
How To: Request Services ..................................................................................................................................................... 13
Requesting Services ...................................................................................................................................................... 13
Approving a Request ..................................................................................................................................................... 15
How To: Request an Equipment Reservation ....................................................................................................................... 17
Invoice Review ...................................................................................................................................................................... 21
Reporting............................................................................................................................................................................... 22
2
Registering For iLab
Instructions for VUMC PIs, Lab Managers, and Lab Members
VUMC Users (PIs, Lab Managers, & Lab Members) must register for an iLab account before being able to access VUMC
Cores in the iLab System.
Once registered, All Vanderbilt University Medical Center (VUMC) users will use their VUNet ID and ePassword to access
the application.
Account registration for First-time Users
If you’ve not logged into iLab before, you’ll need to register. To register, complete the following steps:
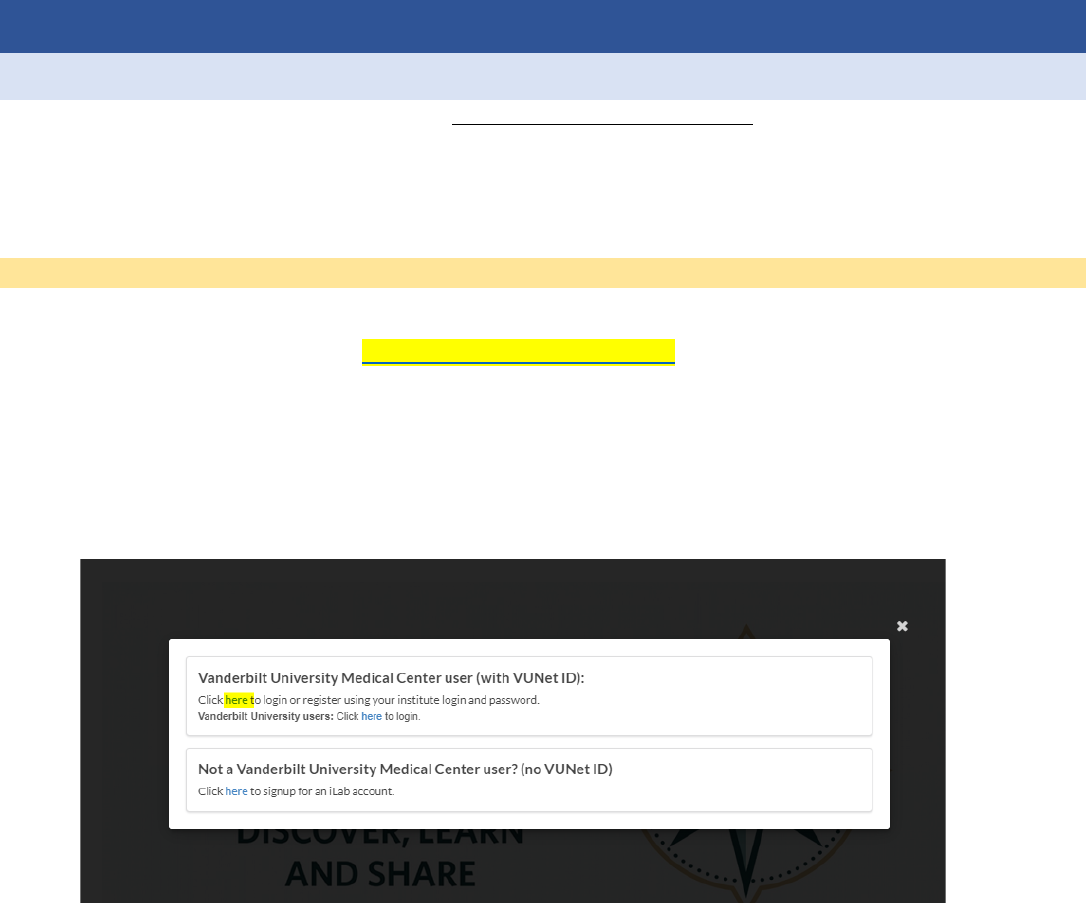
1. Go to the iLab application here: https://vumc.corefacilities.org
a. All users will use their VUNet ID and ePassword to access the application.
2. Click the sign-up button in the top right corner of the screen.
3. Click the here link in the pop-up window under the Vanderbilt University Medical Center user (with VUNet ID)
header.
4. A VUNet ID login screen will display.
a. Enter your VUNet ID and ePassword.

3
5. A registration page will open.
6. It will pre-fill your first name, last name, and phone number.
a. Complete any fields that have not been pre-filled
b. NOTE: Only use your VUMC work email address for your email in the system.
7. In the PI group drop down menu, select the appropriate lab group.
VUMC Research Staff (PI, Lab
Manager, Lab Member)
• Select your PI’s lab group.
• If your PI’s lab group is not listed or you are a new PI, select the
AAA (Default) VUMC Lab
VUMC Department
Administrators:
• Select the Admin (VUMC) Lab.
• The Office of Research will contact you to complete your
account registration.
VUMC Core Managers & Staff:
• Select your core director's Lab Group.
VU Students:
• All VU Students are assigned to VU as their home institution. Use
the VU URL to access iLab.
• Select the AAA (VU) Lab to register.
• Contact VUMCcores@vumc.org with the name of your PI.
o The Office of Research will contact you to complete your
account registration.
If you are unsure what lab group,
you need or you do not see your
PI’s Lab Group:
• Select the AAA Default (VUMC) Lab.
• The Office of Research will contact you to complete your
account registration.
If you work with multiple investigators, select one Lab Group to initially set up your account. Then
contact VUMCcores@vumc.org with a list of other PI names. The Office of Research will update your
iLab account and grant you access to the other PI Lab Groups.
8. The Office of Research will update your iLab account and send a confirmation.
9. Click register.
10. Once you register, the a message box will display stating your account activation is pending.
11. Your account will need to be approved.
a. The Office of Research will approve requests within 24-48 business hours.
12. Upon account request approval, you will be able to access and request services from VUMC cores and review
invoices.

4
Lab Group Management
Accessing & Navigating your Lab Group(s)
To access your group, hover over the "my groups" link on the left-side navigation
panel.
Navigating Within a Lab Group
Depending on your access in iLab, there are 5 function tabs within a lab group. The 2 that are utilized are:
• Membership Requests & Fund Numbers: Here you can, accept/reject group membership request and manage
assignment of funding to group members.
o NOTE: Only PIs and Lab Managers will be able to access this function tab.
• Members: Here you can manage group members.
On the members tab: lab managers and PIs will be able to add, remove, and manage memberships for the group.

5
Editing Lab Memberships
When you click the edit membership (pencil) icon, a pop-up will display to allow you to edit a user’s membership.
Adding a New Member
To add a new member, you must have a PI or Lab Manager role within that group, and the new user must have an
existing iLab account.
1. Within the members tab, navigate to the bottom of the page and click the Link Existing User button.
2. In the search box, type in the user’s name and select the correct account.
3. Select their role (Member or Lab Manager).
4. Hit the Invite button.

6
Lab Group Roles
PI
• View available fund numbers.
o Grant worktags – PI automatically has access via Workday nightly feed.
o All other funds – PI will need to claim the fund. Contact your department administrator.
• Automatically granted access to voucher funds once activated via StarBRITE feed.
• Can grant self-access and grant lab members access to VUMC billing numbers, vouchers, and scholarships.
• Can add new individuals as a member or manager of the lab.
• Can view invoices and reporting activity across all fund sources assigned to the lab.
• Can purchase core services and request reservations (once fund is activated).
Lab Manager
• Can grant self-access or grant lab members access to VUMC billing numbers, vouchers, and scholarships.
• Can add new individuals as a member of the lab.
• Can view invoices and reporting activity across all fund sources assigned to the lab.
• Can purchase core services and request reservations (once fund is activated and access is granted to specific
fund).
Lab Member
• Can purchase core services and request reservations (once access is granted to active fund).
• Can view invoice and reporting activity if member directly requested service or reservation in iLab.
Financial Manager
• This is an add-on to the other roles of the lab.
• A green dollar sign will display next to individuals that have the financial contact access to the lab.
• The first financial contact in the lab will receive iLab email notifications (Invoice notification, financial approval
needed, scholarship fund activated, etc.).
• This role is responsible for approving service requests that exceeds the lab group auto-approval threshold
amount. If approval is needed, the user will receive an email notification.
Spending Thresholds and Approval Requirements per Lab Group
• Lab-level setting
• Any orders/reservations exceeding the threshold submitted by the PI’s lab members must be approved by PI or
those with financial contact ($) access to the lab group.
o Any orders impacted by threshold will display with the “Awaiting Financial Approval” status.
Department Administrators
Only those with the department administrator role can claim Cost Centers, Gift or Program Worktags into a PI’s Lab
Group. The PI or Lab Manager does not have this functionality.
Department Administrator Role
• Department modules are established within workday. Department Administrators are assigned the
administrator role per department.
• PI lab groups are added to department modules. If the PI lab group is assigned to your department module, you
can:
o View invoices and charge reporting
o Claim cost centers, gift or program worktags into the PI’s Lab Group
o Assist in managing access to funds to various lab members after the fund numbers have been activated.

7
Billing Number Management
VUMC Billing Numbers
All internal VUMC billing numbers for VUMC investigators are activated via a nightly feed from Workday.
Key Points
• Sponsored Funds:
o Types: Grant Worktags
o Auto assigned to PI’s VUMC Lab Group via feed.
o Only one PI lab group per sponsored fund. This cannot be edited in iLab, it is controlled by Workday
integration.
• Non-Sponsored Funds:
o Types: Gift worktag, Project worktag, Cost Center
o PI or Department must ‘claim’ the fund number in the PI’s Lab Group Module.
o Multiple lab groups can claim the same non-sponsored fund number.
Claiming a Gift, Project, or Cost Center Worktag
After the nightly feed, the PI or lab manager will need to claim a gift, project, or cost center worktag for the lab group.
Instructions for PIs or Lab Managers:
1. Click on the my groups on the left side of the iLab page.
2. Click on the lab name under the Labs/Groups I Manage section.
3. Click on the Membership Requests & Billing Numbers tab
a. All active and claimed billing numbers, vouchers, and scholarships will display here.
4. Click on the Request access to additional Billing Numbers option.
a. In the appropriate box (Gift, Grant, Program, or Cost Center) type in the billing number exactly as it
appears in Workday and hit Request.

8
Granting Lab Members Access to VUMC Funding
After a billing number is claimed, the PI or Lab Manager can grant lab members access to the specific fund numbers.
If you also need the lab manager role for your investigators to assist with this process, email VUMCcores@vumc.org
and we will update your account.
Instructions for PIs or Lab Managers:
1. Click on my groups on the left side of the iLab page.
2. Click the lab name under the Labs/Groups I Manage section.
3. Click the Membership Requests & Billing Numbers tab to view the active center numbers for the lab.
4. All lab members and active centers will be displayed.
a. Check the box on the row for the user to grant access to the specific center number.
5. The system will automatically save your changes. All new changes will be highlighted green.
TIP: Use the Filter options at the top of the lab group grid to find the billing number (cost center, voucher, scholarship
fund)

9
VU Billing Numbers
To activate or manage VU billing numbers, users should complete a webform on the Office of Research website.
• VU Department Administrators, PIs, Lab Managers, or Lab Members can submit the webform.
• Please allow 24-72 business hours for processing.
Examples of VU Billing Numbers
VU users are instructed to use their full CoA/ POET numbers.
COA number for all VUMC Cores usage except for Division of Animal Care
###.05.#####.6250.###.###.###.0.0
COA for Division of Animal Care
###.05.#####.6265.###.###.###.0.0
VU Project billing number consist of the project number concatenated with task number with a period
separating them. Please note task number can range from 1 - 20 digits).
######.#
AA_######.#
AAA_######.#
Granting Lab Members Access to VUMC Funding
• VU will indicate on the webform if the VU number should be shared with all members of the VU Lab Group or
specific members.
• If the PI or Lab Manager wants to add members later or add a new member of the lab, email
VUMCcores@vumc.org
. We will grant access to the VU billing number for the new VU lab member.

10
Vouchers
VICTR vouchers are activated via an overnight feed from the StarBRITE application. If the user that has been awarded
the voucher has a VUMC lab group setup in their name, the voucher will automatically appear.
Key Points
• Vouchers are added into iLab via overnight feed from the StarBRITE application.
• The voucher is added into iLab based on the awarded investigators email.
o Make sure the email listed in iLab matches what is on the voucher award in StarBRITE.
• Voucher funds are core specific. You can only use your voucher to purchase services from the assigned VUMC
core facility.
• Any pending purchases will also encumber against the available balance in iLab.
• Since the vouchers represent funding from VICTR. A VUMC lab group will need to exist for the individual
awarded the voucher.
o VUMC Users: The PI will see their voucher in their “VUMC” Lab group.
Example: Smith, Jane (VUMC) Lab
o VU Users: The PI will see their voucher in their “VUMC Scholarship & Voucher” Lab group.
Example: Johnson, Jake (VUMC Scholarship & Voucher) Lab
Troubleshooting: If you are unable to view see your voucher in iLab, please contact the VUMC Office of Research
support team at VUMC[email protected]. To resolve, we will need the voucher redemption ticket associated with your
award. The ticket will reference the VICTR award number (VR) and the name of the individual that received the award.

11
Viewing Voucher Information in iLab
PIs and Lab Managers can view the following information for each awarded voucher in the PI’s fund grid.
*Only the PI and lab managers will have access to the PI’s fund grid.
• Voucher Number (i.e, V0000012345)
• Hover over the voucher number to view:
o Expiration date
o Core Name
o Balance: the remaining amount available to spend
NOTE: To view the PI’s fund grid, click ‘My Groups’ in the left-hand navigation panel. Select the applicable lab group.
Then click the ‘Membership Requests & Billing Numbers’ tab of the lab group module.
The remaining balance can also be viewed when requested core services or making a reservation in iLab.
• The amount that displays next to the voucher number is the remaining balance amount.
Balance Notes: Any pending purchases will also encumber against the available balance in iLab. This includes:
1. Service added to an open project that have not yet been marked as complete.
a. This typically happens when a core has provided an estimate/quote of services via the iLab
application.
2. Pending reservations that have not yet occurred.

12
Scholarships
Scholarships are credit vouchers redeemable in center-supported core facilities. They are center and core specific and
are awarded by centers to member investigators at the beginning of each center's grant year and expired at the end of
that year. Once expired, a scholarship voucher cannot be reactivated, and the unused funds do not roll forward. Viewing
Scholarship Information in iLab
PIs and Lab Managers can view the following information for each awarded scholarship in the PI’s fund grid. The PI and
lab managers will have access to the PI’s fund grid.
• Scholarship fund number (i.e, 1240063)
• Expiration date
• Core Name
• Awarded amount

13
How To: Request Services
Requesting Services
Some cores will require you to initiate new service requests in iLab. Once you have selected a core, you can request a
service by doing the following:
1. Click on the Request Services tab.
a. On the Request Services page, there will be a list of available services.
2. Click on the Request Service button to the right of the service you would like to request.
a. A submission form will open.
3. Complete the submission form.
a. Be sure to complete all required fields marked by a red star.

14
4. In the payment information section, select the correct center number from the drop-down menu.
a. If the center number is not available, contact your lab manager.
i. Lab members will need to be granted access to activated center numbers by the PI and/or the Lab
Manager.
ii. PI or Lab Managers will need to contact the department administrators to activate new center
numbers in iLab.
b. Split Charge: The cost-of-service requests can be allocated across center numbers.
i. To allocate across multiple center number, click
split charge.
ii. Select the additional center number from the
drop-down menu.
iii. Enter the % allocations to split the cost across the
center numbers.
5. Click the submit request to core button at the bottom of the page to submit your request.
6. After submitting your request, you will be redirected to the View My Request tab, where you can review the
status of your request, and any quotes provided by the core.
7. You will receive emails from iLab if further actions are required for your request to be processed.
a. Please follow the instructions in the emails.
b. Contact the core or support@ilabsolutions.com
if you have any questions.

15
Approving a Request
When service requests are submitted to core facilities by members of your lab, there may be times when the request
requires financial approval. In most cases, this approval step is triggered when the quoted cost of the service exceeds
the amount the lab member is auto-approved to spend per the lab's auto-approval settings. For any questions about
auto-approval amounts, contact your PI or Lab Manager.
1. You can see all requests that require your approval by clicking on view requests under the core facilities section
on the left-hand menu on any iLab page.
2. All service requests awaiting your approval will be listed. Click the blue arrow beside the service request to
expand the information displayed.
3. If all information is correct, you may approve the service request by clicking approve.

16
4. Once you approve the request, a pop-up window will display. If needed, you can update the payment number
and click Submit.
5. Once you have approved the request, the status will update to Waiting for Core to Begin, and a notification will
be sent to the core manager that the request has been approved.
Email Notification Notes:
If you are set up to be a financial contact for your lab you will receive an email when a request requires your approval.
You can approve service requests by clicking the link within the notification email sent when the service request is
submitted for approval.
• Once logged in, you will see the service request where you can view the details, click on approve to provide
payment information, and submit the approved request to the core facility.

17
How To: Request an Equipment Reservation
Once you have selected a core, you can request a reservation by doing the following:
1. Click on the Schedule Equipment tab. On the Schedule Equipment page, there will be a list of available
instruments.
2. Click on the View Schedule button to the right of the instrument you would like to reserve.
3. Click and drag on the time frame you would like to schedule your reservation.

18
4. A submission form will open, complete the form.
a. Enter a description of the event in the Event Notes field (optional). This information will display on the
calendar.
b. Be sure to complete all required fields marked by a red star.

19
5. In the payment information section, select the correct center number from the drop-down menu.
a. If the center number is not available, contact your lab manager.
i. Lab members will need to be granted access to activated center numbers by the PI and/or the Lab
Manager.
ii. PI or Lab Managers will need to contact the department administrators to activate new center
numbers in iLab.
b. Split Charge: The cost-of-service requests can be allocated across center numbers.
i. To allocate across multiple center number, click split charge.
ii. Select the additional center number from the drop-down menu.
iii. Enter the % allocations to split the cost across the center numbers.
6. Select Save Reservation button at the bottom of the page to submit your reservation request.
7. You will receive emails from iLab if actions are required for your request to be processed.
a. Please follow the instructions in the emails.
b. Contact the core if you have any questions.

20
Equipment Reservation Notes
Trained Users:
In some cases, cores require only allow trained (or approved) users to schedule time on specific instruments.
• If you have access to the calendar, you will be able to select view schedule and make a reservation.
• If you do not have access, you will need to select “Request Training” to request approval from the core to use
the instrument.
Reservation Approval:
In some cases, cores require core approval for reservations. If the customer has reserved time on a calendar that
requires core approval, that event will display in orange. When the reservation has been approved, the event will display
in Gray.

21
Invoice Review
From the left-hand menu, click the Invoices label to access invoice and pre-invoice reports. Users can view all invoices
created by any core for any billing number connected to the user’s department.
1. Click on Invoices in the left-hand menu. A list of invoices will appear.
2. Use the filter panel on the left to reduce and sort the invoices that display.
a. Example: Use the ‘payment number’ filter and select the invoice number. Click ‘Apply Filters’.
b. Example: Use the ‘keyword search’ and type in the invoice number. Click ‘Apply Filters’.
3. On the far right, click the magnifying glass to view the actual invoice.
22
Reporting
The reporting functionality within iLab will allow users to generate reports to see amount spent across billing numbers,
PIs, and cores.
Running a Report in iLab
1. Click on the My Departments label in the left menu to navigate to your department module.
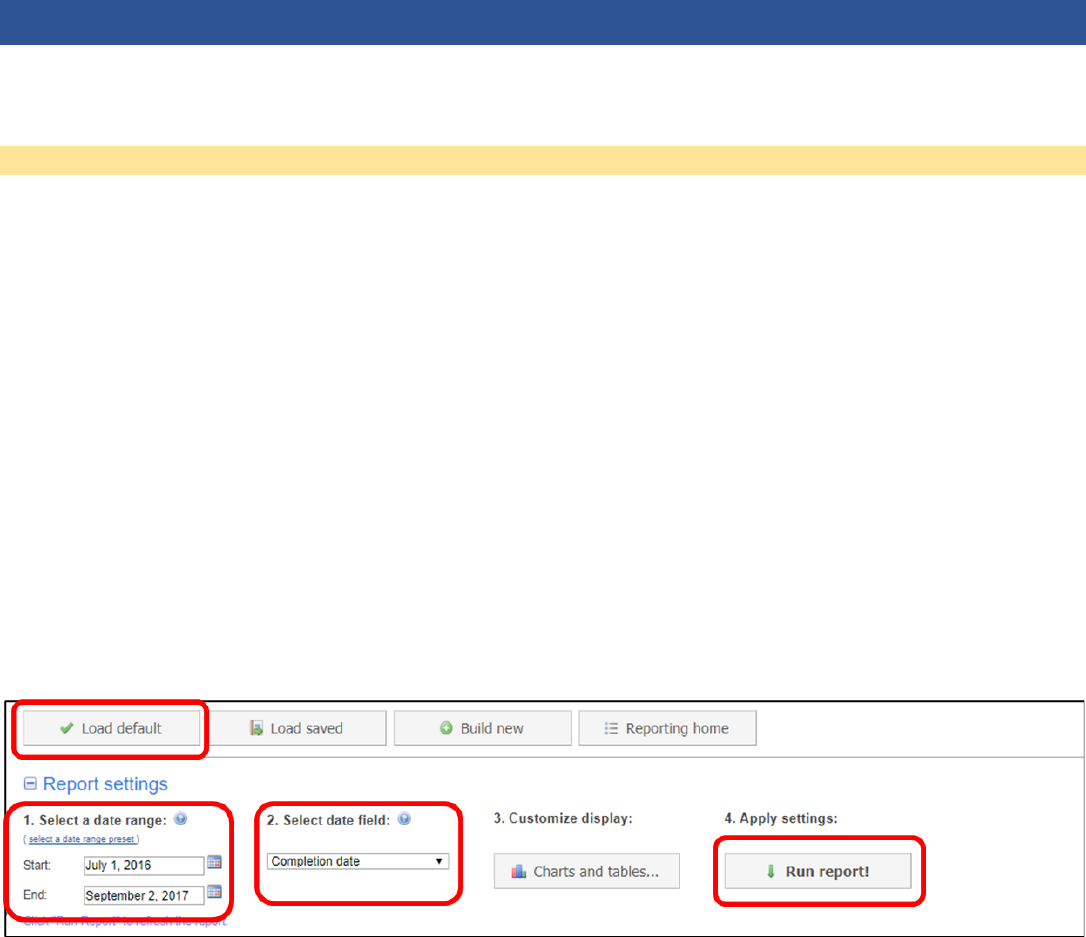
2. Once your department module displays, click the Reporting tab.
3. The reporting module will display. Select Load Default to load the iLab default report settings (recommended).
4. Enter the Report Settings:
a. Select the date range for the report.
b. Select the date field: Change to Completion date.
c. OPTIONAL: Click Charts & Tables to adjust and modify the reports that will populate.
5. Click Run Report
a. This will generate a high-level report that will include charges across billing numbers, PIs, and cores.

23
Refining the Report
To refine the report and specify the data down to a certain PI, billing number (VUMC center number), and/or core.
1. Using the filter panel on the left side, adjust the filters (i.e., “payment number”) to refine the report.
2. Click Apply filters.
3. The report will update with data specific to those filters.
24
Reviewing and Exporting Reports
To review the expense activity, download the data or export the reports to excel.
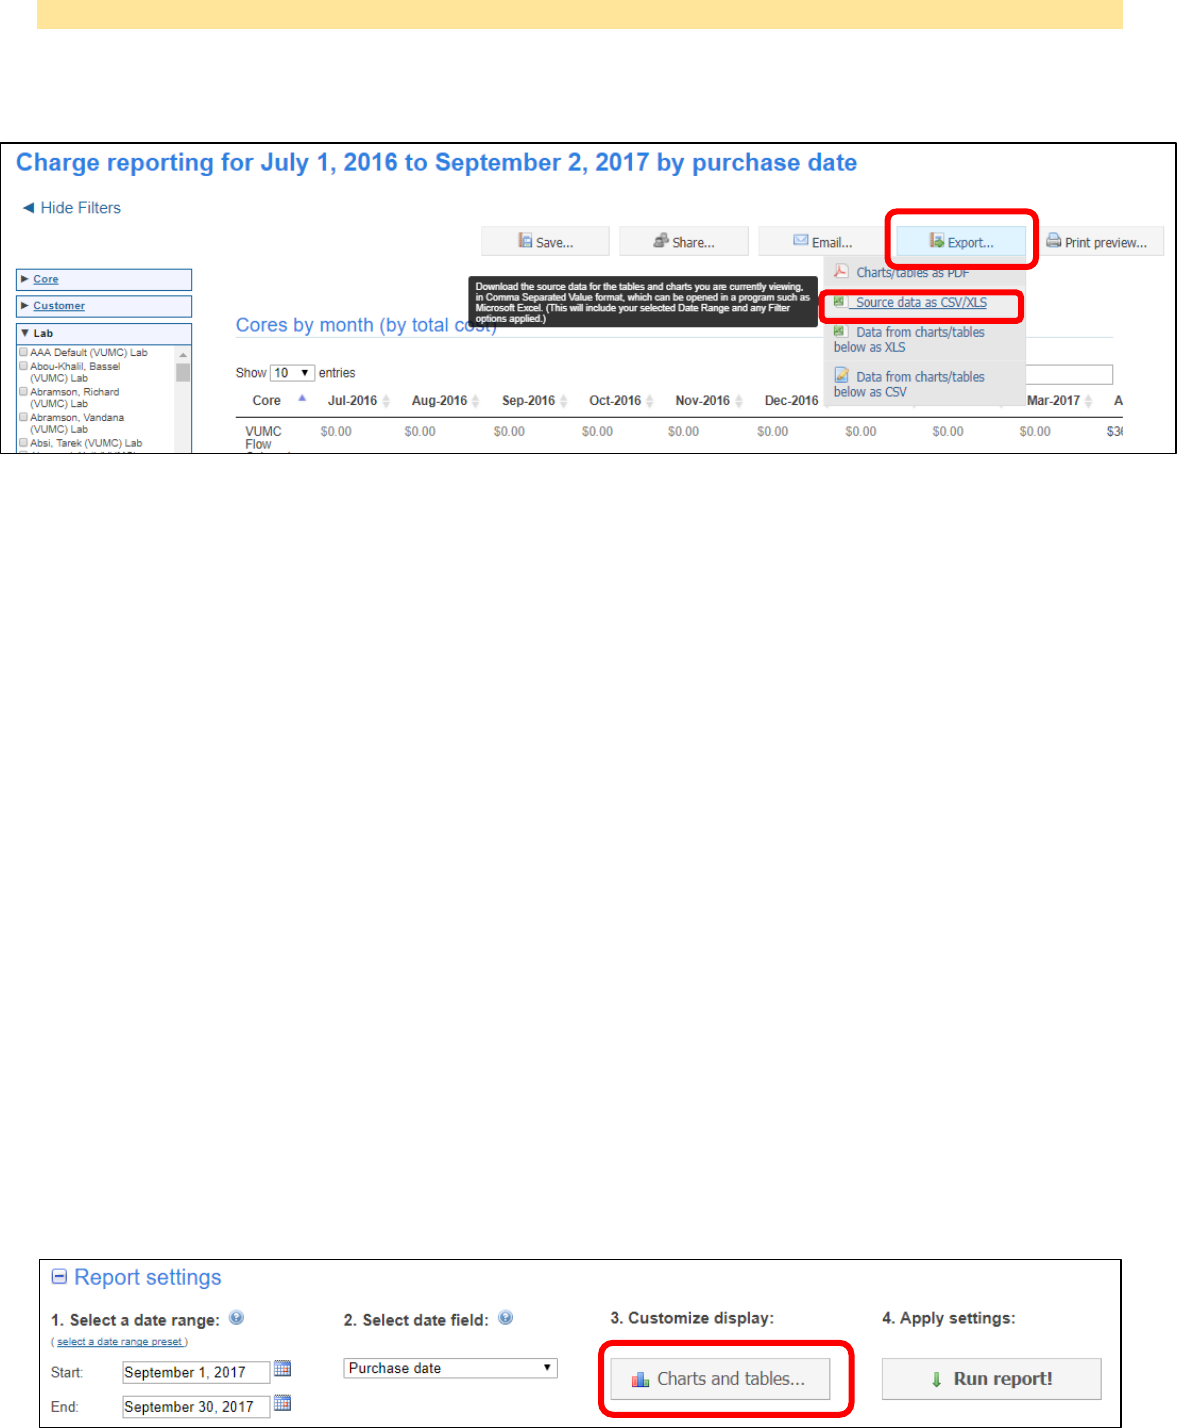
1. Click Export
2. Select Source data as CSV/XLS.
3. An excel document will download.
Report Export Notes
1. Billing Status column:
a. ready_to_bill: Charge is included in either a pre-invoice or a final invoice
b. billing_initialized: Charge has been completed for billing. An invoice will be generated at month-end.
c. not_ready_to_bill: Activity requested by lab. This activity has not yet been marked ready to bill by the
core; therefore, the work has not been completed.
i. NOTE: This activity is only displayed if the “purchase date” is used in the report filters.
2. Date columns:
a. Purchase Date: Date the service was requested or date of reservation
b. Completion Date: Date the reservation occurred or the date the core completed the work and billed
the charge.
c. Billing Date: Date the core finalized all charges for the period.
R
Charts & Tables: This information can also be viewed without generating an export file through the Charts and Table
option.
1. In the report settings, click the Charts and Tables icon.

25
2. TIP: Click the red x to remove all the pre-populated charts.
3. Click Add a new chart or table.
4. Select the following options from the drop-down options for each of the fields.
a. Click the green check icon to save the filter choices.
b. Click Apply to save the changes.
5. A data table for each cost center within the user’s purview will display.
a. Tip: Use the filter panel to drill down to a specific center number.

26
Saving a Report to be Generated Again
A user can save report settings including the Charts and Tables to quickly run as needed.
1. Enter the report settings.
2. Enter the Charts and Tables Settings
3. Run the Report
4. Click the Save icon.
5. Enter a name for the report. Click Save.

27
To run a saved report:
1. Click Load saved
2. Select the saved report.
3. Click Load
a. Update the dates for the report and click Run report!
Reporting Tutorial
For additional details on available reporting tools in iLab, view the iLab reporting tutorial.
