
®
Last Update: JULY 23, 2024
Table of Contents
1 Getting Started ....................................................................................................................... 1
1.1 What is DOCLINE? ............................................................................................................................................................ 1
1.2 Who Can Use DOCLINE? ................................................................................................................................................ 2
1.3 Recommended Library Best Practices ....................................................................................................................... 2
1.4 How to join DOCLINE (New Library) .......................................................................................................................... 3
1.5 Library Records & LIBIDs ................................................................................................................................................ 3
1.6 User Account information ............................................................................................................................................. 4
External Accounts .................................................................................................................................................................. 4
Requesting Accounts ........................................................................................................................................................... 4
1.7 Login ...................................................................................................................................................................................... 5
1.8 Login Methods ................................................................................................................................................................... 5
Additional Accounts for Alternative Login Methods ............................................................................................... 6
1.9 Logging in Steps ............................................................................................................................................................... 6
1.10 DOCLINE: System Requirements ................................................................................................................................. 7
Cookies ...................................................................................................................................................................................... 7
Mac OS ...................................................................................................................................................................................... 7
Configuring my browser ..................................................................................................................................................... 8
Barcodes on DOCLINE Requests...................................................................................................................................... 8
2 Getting Help ........................................................................................................................... 8
2.1 Documentation .................................................................................................................................................................. 8
User Manual ............................................................................................................................................................................ 8
Other Resources, Videos, Webinars ............................................................................................................................... 8
Frequently Asked Questions (FAQs) ............................................................................................................................... 8
2.2 Getting assistance ............................................................................................................................................................. 9
Report a problem using DOCLINE .................................................................................................................................. 9
Contact the NLM ILL Unit about a DOCLINE Request Filled or Rejected by NLM ........................................ 9
3 Getting News .......................................................................................................................... 9
3.1 DOCLINE-L Email Discussion List ................................................................................................................................ 9
3.2 Regional RML and other NNLM blogs ................................................................................................................... 10
4 System Overview .................................................................................................................. 10
4.1 Main Menu ....................................................................................................................................................................... 10
4.2 DOCLINE Home Page ................................................................................................................................................... 10
4.3 Activity & Status Cards ................................................................................................................................................ 11
My Lending ........................................................................................................................................................................... 11
My Borrowing ...................................................................................................................................................................... 12
5 Lend ....................................................................................................................................... 12
5.1 Lending Overview .......................................................................................................................................................... 12
5.2 Service Levels Offered .................................................................................................................................................. 13
5.3 Receipting Lend Requests .......................................................................................................................................... 13
Reprinting Lend Requests ............................................................................................................................................... 14
5.4 Updating Lend Requests ............................................................................................................................................. 14
Filling Lend Requests ........................................................................................................................................................ 14
Rejecting Lend Requests ................................................................................................................................................. 15
5.5 Lender Inaction and Time-Triggered Actions ..................................................................................................... 16
For Normal Requests ........................................................................................................................................................ 16
For Rush and Urgent Patient Care Requests ............................................................................................................ 16
Time-Triggered Actions (TTA) Schedule .................................................................................................................... 16
5.6 Pause or temporarily deactivate Lending ............................................................................................................. 17
5.7 Lend Information (Preferences) ................................................................................................................................ 18
5.8 Lend Search ...................................................................................................................................................................... 18
Lend Request Search Terms and Filters ..................................................................................................................... 18
5.9 Request Removal Reasons ......................................................................................................................................... 20
5.10 Request Rejection Reasons ........................................................................................................................................ 20
5.11 Warnings for Lender Inactivity .................................................................................................................................. 21
6 Borrow ................................................................................................................................... 22
6.1 Requesting Overview .................................................................................................................................................... 22
Place request – PMIDs ...................................................................................................................................................... 23
Place request – Journal IDs ............................................................................................................................................. 23
Place request – Manual .................................................................................................................................................... 23
Requesting Journals Not Found in LocatorPlus NLM’s Catalog ....................................................................... 23
Requesting Books or other physical items ............................................................................................................... 23
6.2 Understanding the “Place Order” page ................................................................................................................. 24
Citation Information .......................................................................................................................................................... 24
Request Information ......................................................................................................................................................... 24
Routing Information .......................................................................................................................................................... 25
Delivery information .......................................................................................................................................................... 26
6.3 How to Request with PMIDs ...................................................................................................................................... 27
6.4 How to Request with Journal Information ........................................................................................................... 28
6.5 How to use Request Manual ..................................................................................................................................... 28
6.6 No Lenders Found ......................................................................................................................................................... 29
6.7 Resubmitting Retired Unfilled Request ................................................................................................................. 29
6.8 Cancelling a Borrow Request .................................................................................................................................... 30
6.9 Warnings for Borrower ................................................................................................................................................ 31
Previously Ordered PMID ................................................................................................................................................ 31
You May Already Own This ............................................................................................................................................. 31
Copyright Review ............................................................................................................................................................... 31
Free full-text may be available ...................................................................................................................................... 31
Author manuscript available .......................................................................................................................................... 31
6.10 Understanding Routing ............................................................................................................................................... 32
Routing Options .................................................................................................................................................................. 32
Route Directly to Library .................................................................................................................................................. 32
Automated Routing Table (using cells selected) .................................................................................................... 32
NLM (after Automated Routing) ................................................................................................................................... 33
All Other Libraries (after Automated Routing) ........................................................................................................ 33
Manual Routing (M/A/N Map) ...................................................................................................................................... 34
Select Lenders with specified journal format ........................................................................................................... 34
Avoid Lenders: Do Not Route to .................................................................................................................................. 34
Routing Embargo Evaluation ......................................................................................................................................... 35
6.11 Viewing Request History ............................................................................................................................................. 35
6.12 Borrow Search ................................................................................................................................................................. 35
Borrow Search Terms and Filters .................................................................................................................................. 36
7 Libraries ................................................................................................................................. 37
7.1 Manage Library ............................................................................................................................................................... 37
Library Addresses & Other Information ..................................................................................................................... 37
Other Identifiers .................................................................................................................................................................. 37
Library & Organization Type .......................................................................................................................................... 38
Borrow Information ........................................................................................................................................................... 38
Lend Information ................................................................................................................................................................ 42
Library Schedule .................................................................................................................................................................. 45
Journal Holdings ................................................................................................................................................................. 46
7.2 Switch Library .................................................................................................................................................................. 48
7.3 Search Libraries ............................................................................................................................................................... 48
Libraries Search Terms ...................................................................................................................................................... 48
Libraries Search Filters ...................................................................................................................................................... 48
7.4 Pending Approvals ........................................................................................................................................................ 49
7.5 Contacting Other Libraries ......................................................................................................................................... 50
7.6 Closing Permanently ..................................................................................................................................................... 50
8 Journals ................................................................................................................................. 50
8.1 Journals Overview .......................................................................................................................................................... 51
8.2 Holdings Record Elements ......................................................................................................................................... 51
Format .................................................................................................................................................................................... 51
Currently Received ............................................................................................................................................................. 52
My Access Includes ............................................................................................................................................................ 52
Retention Policy – Permanent or Limited .................................................................................................................. 52
8.3 My Journals ...................................................................................................................................................................... 53
Changing Holdings Format ............................................................................................................................................ 53
Adding a NEW Journal to my Journal Holdings ..................................................................................................... 54
Adding ranges to existing Holdings records ........................................................................................................... 54
Adding “Gap Years” Holdings ranges ......................................................................................................................... 54
Changing Holdings from Permanent to Limited Retention ............................................................................... 54
Recording Holdings Outside Publication Dates ..................................................................................................... 55
Journal Holdings Import/Export ................................................................................................................................... 55
Adding Holdings for Titles not in DOCLINE ............................................................................................................. 57
Reviewing and Combining Duplicated Format Holdings Records ....................................................................... 57
Background: Why are there duplicate records? .......................................................................................................... 57
Comparing and Combining Holdings Records in Import/Export ......................................................................... 58
8.4 Journals Search ............................................................................................................................................................... 58
Finding Titles ........................................................................................................................................................................ 58
Holdings Search Filters ..................................................................................................................................................... 59
Sorting Search results ....................................................................................................................................................... 60
9 Reports .................................................................................................................................. 60
9.1 EFTS Manual Billing File ............................................................................................................................................... 60
9.2 Request Statistical Reports ......................................................................................................................................... 60
Monthly “Activity Summaries” ....................................................................................................................................... 61
Quarterly ”Detailed by Library Reports”: Lend and Borrow ................................................................................ 63
Annual “Detailed by Journal Reports”: Lend and Borrow .................................................................................... 64
9.3 Journal Holdings Reports............................................................................................................................................ 65
Holdings by Library Report ............................................................................................................................................. 65
9.4 Routing Table Reports ................................................................................................................................................. 66
Automated Routing Table Report ................................................................................................................................ 66
Manual Routing Table Report ....................................................................................................................................... 67
10 Library Groups ...................................................................................................................... 67
10.1 Finding Group Information in DOCLINE ............................................................................................................... 68
10.2 How to Add, Join or Leave a Library Group ......................................................................................................... 68
11 EFTS ....................................................................................................................................... 68
11.1 What is EFTS? .................................................................................................................................................................. 68
11.2 How Does EFTS Work? ................................................................................................................................................. 69
11.3 Who Uses EFTS? ............................................................................................................................................................. 69
11.4 Why Use EFTS? ................................................................................................................................................................ 69
11.5 How Can My Library Join EFTS? ............................................................................................................................... 69
11.6 How Does My Library leave EFTS? ........................................................................................................................... 69
11.7 How Can I Get Help With EFTS? ............................................................................................................................... 69
12 Third-Party ILL Software and DOCLINE ............................................................................. 69

1
1 Getting Started
What is DOCLINE?
DOCLINE is the National Library of Medicine's (NLM) Interlibrary Loan (ILL) request routing system. It
was developed to increase the speed and efficiency of biomedical ILL by linking the journal holdings of
participant libraries and by routing the requests based on these holdings quickly throughout
the Network of the National Library of Medicine (NNLM) (https://nnlm.gov/) and beyond.
DOCLINE provides efficient lending and borrowing by finding potential lenders for ILL requests via the
Routing Algorithm, which matches requests to lenders, based on their reported journal holdings. The
Routing Algorithm is what makes DOCLINE ILL prompt and accurate.
Requests can be created, routed, received, and updated in this system. Requested materials cannot be
transmitted through the website. DOCLINE participants can check the status of requests for which they
are either the borrowing or lending library. This manual assists the user through the steps needed to
accomplish Lending, Borrowing, and other user tasks.
The system is intended for reciprocal ILL among biomedical libraries in the United States and Canada. It
supports resource sharing among participating libraries by enabling them to borrow from and lend to
one another; it is not an article purchasing mechanism.
DOCLINE is available 24 hours a day, seven days a week. Some DOCLINE activities are suspended on
U.S. national holidays. Scheduled maintenance is announced to subscribers of the DOCLINE-L email
discussion list.
The dates and times used by the DOCLINE System are based on Eastern Time.
There is no charge for participation in DOCLINE for NNLM members. Interlibrary loan transaction
charges vary by lender.

2
Who Can Use DOCLINE?
Full Participant:
Libraries with a health sciences or biomedical literature collection and mission, within the U.S. or
Canada, may participate in DOCLINE. Participating libraries list a minimum of 10 journals from which
they will fulfill lending requests for other DOCLINE libraries.
NLM Only Participant:
Libraries who cannot lend and libraries located outside of the U.S. and Canada who would like to
borrow only from NLM.
Not Part of a Library:
Individuals not affiliated with a library and commercial document delivery vendors are not eligible for
DOCLINE membership.
For more information on participation guidelines, please see DOCLINE® Participation Guidelines
(nih.gov)
If you have any questions about DOCLINE participation, contact DOCLINE Support.
Recommended Library Best Practices
To ensure best results when using DOCLINE, we recommend the following:
• Configure Lend Alerts (See section 7.1) to ensure timely Receipt and Update of Requests
(https://www.nlm.nih.gov/docline/support/TTA.html).
• Use Library Schedule and Out of Office dates to reflect Library’s availability.
• Lend to other DOCLINE libraries.
• Follow copyright law and/or guidelines as appropriate.
• Annually review and update your Library Profile and Routing Tables.
• Annually review and update your Journal Holdings Records.
• Notify your Regional Medical Library (https://support.nlm.nih.gov/knowledgebase/article/KA-
04867/en-us) of any changes to your library’s participation in DOCLINE.
• Subscribe to NLM's DOCLINE email updates to get news from NLM about the system.
Libraries may also:
• Contact DOCLINE Technical Support (https://support.nlm.nih.gov/support/create-case/) to report
issues
• Submit new (within scope) journal titles (https://simpleform.nlm.nih.gov/doclinejournals/) to NLM
for inclusion in DOCLINE
• Submit feedback or suggestions (https://support.nlm.nih.gov/support/create-case/) to DOCLINE

3
How to join DOCLINE (New Library)
Once you have determined that your library is appropriate for DOCLINE and that you can follow
recommended best practices:
1. Use the Apply Now button on the DOCLINE home page and supply information about your
library. (https://docline.gov/docline/needs_a5uthentication/?next=/docline/)
2. Select the type of library you would like to create
• I am a US or Canadian library with 10 or more biomedical journals to lend. (New Library)
• I am a library but do not have 10 or more biomedical journals to lend. (New Library -
Request from NLM Only)
3. You will receive an email confirming that your request has been made. Once it has been
reviewed, you will receive an email regarding the results of the review. If your request was
approved, you will be able to login to DOCLINE with your new account.
4. Each individual user must have an external account (such as Google or Login.gov) to sign into
the system.
(See 1.7 for more information).
5. If the “I am a US or Canadian library with 10 or more biomedical journals to lend. (New
Library)” option was chosen, libraries should ideally expect to begin active lending and
borrowing within three (3) months of account set up.
To do so, participants:
• Complete their Library Profile
• Establish Borrowing preferences, including Routing Tables
• Configure Lending Options, including schedule and service offerings
• Create at least ten (10) DOCLINE Journal holdings records
• Contact DOCLINE Support staff once the steps above are complete.
Once established, libraries are encouraged to follow DOCLINE Best Practices (see 1.3).
Library Records & LIBIDs
Every DOCLINE library has a LIBID. A LIBID is a unique library Identifier that is assigned to all libraries
that use DOCLINE or borrow from NLM. The LIBID consists of six alphabetic characters.
For U.S. and Canadian institutions, the first two characters of a LIBID are the Geographical Code (U.S.
state or Canadian province abbreviation) and are followed by a "U" for U.S. or a "C" for Canada, and
then three alphabetic characters.
The LIBID for other countries consists of the first two letters of the Universal Postal Union (UPU) code,
followed by the letter X and three alphabetic characters.

4
• MDUNLM: Maryland, US
• PAUTEM: Pennsylvania, US
• NSCRQW: Nova Scotia, Canada
• ONCCIS: Ontario, Canada
• FRXTLC: France
• AUXFSD: Australia
User Account information
NLM recommends that each user have their own individual DOCLINE user account for logging in, to
maximize security and accountability, rather than a single shared account for the library. All user
accounts linked to a library have the same access and can view the results of others’ actions with the
exception of users with the ILL role who can approve or reject new user account requests.
NOTE:
• Each user must have two accounts to log in: an externally-issued, externally-verified account
plus a matching DOCLINE user account. These accounts work in conjunction with each other for
login.
• Password maintenance is part of a user’s externally-issued, externally-verified account and not
managed within DOCLINE.
External Accounts
Google, Login.gov, Research Organization (for NIH-affiliated research bodies) or federal CAC or PIV
cards may be used to verify identity and sign into DOCLINE. Google accounts based on existing work
email addresses (https://support.google.com/accounts/answer/27441?hl=en#existingemail) are suggested,
although users may choose to use a new or existing Gmail account if preferred. (See 1.8 Login Methods
for more information). For more a more detailed login guide, see DOCLINE Login Guide (nih.gov).
Requesting Accounts
Additional user accounts may be requested if needed, using the Apply Now button on the DOCLINE
login screen. Select “I am part of a library in DOCLINE, and I would like a user account. (New User
Account)”. The email address provided in the application must be the one that will be assigned as the
DOCLINE username. The Library ID of the library you would like to be a part of will be needed as well.
Every account application is verified with the associated library before the user account is issued.
If multiple user accounts are required at one time, please contact DOCLINE Support so that all accounts
can be verified at once.
User accounts should be secured to prevent unauthorized access to DOCLINE.

5
Login
When you log in to DOCLINE, the method you choose determines who verifies or authenticates your
identity. There are several options displayed to users on the “NIH Sign In” portal which displays after
clicking the Log in to DOCLINE button (https://www.DOCLINE.gov).
Figure 1-NIH Sign In
Users verify their identity via the portal before they are returned to DOCLINE. Google accounts are
used by nearly 90% of DOCLINE libraries.
NOTE: After the first successful sign in, users cannot change to a different verification method.
The Sign In portal is supported by the National Institutes of Health Computer and Information
Technology (NIH CIT) division. The password and help links on the NIH Sign In portal are NOT
recommended resources for DOCLINE libraries.
Login Methods
When you log in to DOCLINE, the method you use determines the entity that verifies or authenticates
your identity. There are several options displayed to users on the NIH Sign In portal* after you click the
Login to DOCLINE button (https://DOCLINE.gov). For more a more detailed login guide, see DOCLINE
Login Guide (https://www.nlm.nih.gov/docline/login.html).
NOTE: After the first successful sign in, users cannot change to a different verification method.
Supported methods
If a method is supported, NLM tests it with releases and provides help on its use.

6
• Google: Log in with your own Google account and password or your own Gmail account and
password (email address) that matches established DOCLINE username. This is the most used
method. See NLM’s Google Best Practices for more information.
• Research Organization: Log in with your own university or other workplace network credentials
(email address) that matches established DOCLINE username. Institution must be an NIH
federated research partner and belong to Incommon.org to be listed.
• Login.gov: Login.gov is listed as a Research Organization option on the NIH Sign In portal. See
Login.gov’s Help for more information.
• Federal Libraries: Log in with your CAC or PIV card that matches established DOCLINE
username. NIH staff have the option to use internal network credentials (username and
password).
• Unsupported methods: Unsupported methods may work but have not been tested, could have
unpredictable results, and are not recommended. The unsupported options are Microsoft and
PayPal.
Additional Accounts for Alternative Login Methods
An authorized user can maintain a secondary login for use when they are at an alternative worksite or
when primary authentication method is unavailable. Both logins provide identical access to the user’s
library and request activities. Contact DOCLINE Support to request a secondary account.
*The National Institutes of Health account and identity management team maintains and supports the
NIH Sign In portal.
Logging in Steps
Follow the steps below, or see DOCLINE Login Instructions, (https://www.nlm.nih.gov/docline/login.html) if
you prefer instructions with screenshots.
STEPS
1. If you or your user account is new, recheck your login method (ex: Google
(https://www.google.com/), Research Institution, Login.gov), by verifying that you can use it
successfully to login outside of DOCLINE before attempting to sign into the DOCLINE system
2. Go to the DOCLINE login page (https://docline.gov)
3. Select Log in to DOCLINE button
4. On the NIH Sign in screen the appropriate sign in button or link for your login method
5. On the subsequent sign in pages follow your normal sign in
6. Click NEXT
If successful, you will see the Activity & Status area for your library.

7
If login fails, please follow the suggested troubleshooting steps and Google account management tips
before contacting DOCLINE Support. (https://support.nlm.nih.gov/knowledgebase/article/KA-05201/en-us and
https://www.nlm.nih.gov/docline/support/pdfs/best_practices_google.pdf)
NOTE: Passwords cannot be reset within DOCLINE or by DOCLINE support staff.
DOCLINE: System Requirements
The minimum system requirements for DOCLINE are:
• A stable high-speed Internet connection
• Windows 8 or later
• Web browser application: Edge, Chrome or Firefox are preferred
• DOCLINE requires cookies
• The DOCLINE website design is responsive, and most features should work on any internet-
connected device, regardless of operating system or browser. DOCLINE is not tested with, nor
supported for use with, browsers or operating systems not listed above.
Cookies
When you visit any web site, it may place a small text file, known as a "cookie" on your computer. The
cookie allows the web site to "remember" specific information about your visit while you are connected
or when you return to that site. The Office of Management and Budget Memo M-10-22, Guidance for
Online Use of Web Measurement and Customization Technologies, 6/25/10,
(https://digital.gov/resources/m-10-22-guidance-for-online-use-of-web-measurement-and-customization-
technologies/) allows Federal agencies to use session and persistent cookies.
The cookie makes it easier for you to use the dynamic features of Web pages. Cookies from NLM Web
pages only collect information about your browser's visit to the site; they do not collect personal
information about you. While visiting certain NLM sites, you may occasionally encounter a Web page
that automatically employs cookies to make it easier to use the dynamic features of these Web pages.
For more information on how NLM uses cookies, refer to the NLM Privacy Policy
(https://www.nlm.nih.gov/privacy.html).
Mac OS
NLM does not support Apple devices for use with DOCLINE. Unlike other NLM systems, DOCLINE is not
a public system; it is closed to all but DOCLINE users. Given the range of variations in environments
introduced by the Mac, NLM cannot currently give adequate time and attention to critical testing and
support required to ensure proper system performance.
If you have a Mac and have used DOCLINE successfully, there is no reason why you cannot continue to
do so. However, we do not recommend the purchase of Macs specifically for use with DOCLINE, nor can
we provide technical support for existing Macs in the network.

8
Configuring my browser
NLM actively tests and supports Chrome and Edge for use with DOCLINE. Firefox is also supported,
however due to the Firefox accelerated release schedule, we are only able to certify the version that is
current at the time of major DOCLINE releases.
Please note that each browser version (major and minor releases) may have specific issues which NLM
cannot always address. If you install a later browser version, please be sure to maintain one of the
supported browsers to ensure access to DOCLINE.
Barcodes on DOCLINE Requests
Barcodes appear in the top left corner of request receipts directly above the 8-digit DOCLINE request
number. Barcodes speed request processing for those with barcode scanners. To check to see if your
browser is correctly displaying barcodes, view the Barcode Font Test page
(https://www.nlm.nih.gov/docline/font_header.html).
2 Getting Help
Documentation
User Manual
This manual contains the most complete user documentation for DOCLINE. You can navigate through
the document using the hyperlinked table of contents for navigation or PDF bookmarks.
The DOCLINE website layout is mirrored in this document. After the overview and introductory content,
main menu items are presented in this manual as laid out, from left to right, with sub-menu elements
and page level elements presented in the order in which they appear on the screen.
Other Resources, Videos, Webinars
The DOCLINE Resources (https://www.nlm.nih.gov/docline/newdocline.html) page includes short ‘how to’
videos, webinar recordings and Medical Library Association annual meeting presentations.
Frequently Asked Questions (FAQs)
Articles in the NLM Support Center knowledgebase answer the most commonly asked questions
(https://support.nlm.nih.gov/search/?logicalNames=&q=docline) about DOCLINE.

9
Getting assistance
Report a problem using DOCLINE
Regional User Help: If you need assistance logging in, or using any system features, please contact the
DOCLINE Coordinator at your RML.
NLM DOCLINE Support: If you are seeing errors when trying to complete a task, or aspects of the
system that are not functioning as expected, contact NLM by submitting a Help Desk ticket. Please
provide as much detail as possible regarding your question or issue, including screenshots, error
messages, steps taken, and status. To speed response to your inquiries, be sure to mention DOCLINE
and include your LIBID.
There are two ways to contact DOCLINE Support at NLM:
• Web form: Use NLM’s Write to the Help Desk form. From within DOCLINE, select Need Help?
(https://support.nlm.nih.gov/support/create-case/) at the top right of every page. The help desk form
is also available outside of DOCLINE.
• Email: [email protected]:[email protected]
NOTE: If you have technical issues when using third-party ILL software such as Clio, ILLiad, QuickDOC,
etc. but no problem when using the DOCLINE website directly with a web browser, please refer to the
user documentation or customer service for the third-party software.
Contact the NLM ILL Unit about a DOCLINE Request Filled or Rejected by NLM
There are three options to connect with NLM ILL staff:
• DOCLINE’s Contact Library feature. Prepopulates email with request number and Library
information. (See section 7.4 for more information).
• Web form: customer Support form (https://support.nlm.nih.gov/support/create-case/)
• Email: [email protected]
Include your LIBID and NLM REG number if known, as well as DOCLINE request number. Include
specifics of the issue and desired resolution if applicable.
3 Getting News
DOCLINE-L Email Discussion List
The DOCLINE-L email discussion list provided by NIH serves as a forum for DOCLINE users to
communicate with each other about any issue related to DOCLINE or resource sharing among the
greater biomedical library community.

10
The list is unmoderated; however, postings are limited to list subscribers. Information about subscribing,
participating, and unsubscribing is posted here: https://www.nlm.nih.gov/docline/newdocline_l.html.
DOCLINE users are also encouraged to subscribe to discussion lists for their own RML as well.
Regional RML and other NNLM blogs
Each region of The Network of the National Library of Medicine offers its own email blog or newsletter.
Check your regional web page (https://nnlm.gov/about/regions) for more information.
4 System Overview
DOCLINE provides users the ability to request copies or loans of biomedical literature from other
libraries. Borrow requests can be initiated in multiple ways, depending on what information is available
about the desired item or article. Borrowers’ requests are routed to a selection of potential lenders
determined by Borrower Defaults as well as availability of the requested material.
The DOCLINE Routing Algorithm matches borrowers’ requests to active libraries that report holding the
correct volume or year of the desired journal, as well as matching in other respects. Lenders receipt
requests and either update them as Filled, or reject them with appropriate reject reasons such as Not on
Shelf (NOS), Not Yet Received (NYR), License (LIC), etc. (See DOCLINE Help: Reason Codes (nih.gov)
(https://www.nlm.nih.gov/docline/context_help/context_help_reasons.html) for a list of reject reasons).
DOCLINE is fast and accurate for article requests because participant libraries add their journal holdings
to the system, which enables the Routing Algorithm to match requests to lenders. Participants’
monographic holdings are not in DOCLINE, so no automated routing is possible for book or chapter
requests.
Main Menu
The DOCLINE navigation bar or main menu has the five menu tabs: Lend, Borrow, Libraries, Journals and
Reports. Select a tab to display its submenu items. Many tasks can be initiated from the menu as well
as from hyperlinks throughout DOCLINE. These menu options are each covered later in this manual.
Tabs and submenu items will only display if user has rights to those functions.
DOCLINE Home Page
The DOCLINE home page is the first page that displays after signing into DOCLINE. The central “Activity
& Status” area displays the LIBID for the current session and DOCLINE request status or notices. Users
linked to more than one Library see a “Switch Library” option displayed next to their LIBID.
You will find the following options available in the header and footer of every DOCLINE page:
• Need Help?: displays Support Center DOCLINE FAQs

11
• Contact Help: opens NLM’s customer service form
Many of the most frequent DOCLINE tasks are immediately available on the home page:
• Got PMIDs? Get articles!: starts a new PMID request
• Pending Approvals: displays pending DOCLINE User Accounts
• Search Lend Requests: generates a pre-filtered search
• Search Borrow Requests: generates a pre-filtered search
Clicking Search without any other input quickly leads lenders and borrowers to all recent requests.
Activity & Status Cards
In the Activity & Status area of the DOCLINE Home Page, you will see cards headed “MY LENDING”
and “MY BORROWING”. The cards display the status of DOCLINE Lend Requests your library is
processing for others or the status or activity of Borrow Requests you have placed.
Removal Warnings do not appear in the Activity & Status Area. Instead, these warnings of removal by
Time-Triggered Actions appear for both the borrower and lender in Request Search results. (See 5.11
for more information on warnings).
NOTE: the DOCLINE system layout throughout follows the Lend – Borrow sequence of the main menu.
This means that Lending elements or actions will always display on the left and Borrow elements or
actions will always display on the right, for instance in the Activity & Status area cards, and in Activity
Summary reports.
My Lending
MY LENDING home page links result in pages where the lender takes action on requests (Receipt or
Update requests).
## To Receipt (requests awaiting lender receipt or ‘acceptance’.)
• Click on the appropriate row to receipt and print new DOCLINE requests routed to your
library to fill for others.
• Special Handling requests appear in their own row. Special Handling requests have two
different Service Levels: Rush and Urgent Patient Care.
## To Update (received requests awaiting completion.)
• Clicking an Update row opens Lend Update so that requests can be updated as Filled or
Rejected with an appropriate reject reason (See for 5.10 for more on Reject Reasons).

12
My Borrowing
MY BORROWING home page links result in a display of pre-filtered search results
## Open Requests
• requests awaiting lender receipt or update.
## Retired Requests (last 7 days)
• Completed requests, Not Filled and Filled. Click through links to view your requests that you
may need to follow up on. For unfilled requests that you plan to resubmit, be sure to view the
history of the request so that you can determine what changes to make to the Routing
Instructions to improve chances it will be filled the second time it is submitted.
PENDING APPROVAL home page link results in a display of pending DOCLINE User Accounts and will
only be visible to users with the ILL Role. The Pending approval section in the activity status page will
only be visible if there is anything to approve or reject.
## Users Pending
• Click on the More Details button for further information
• Each approval card includes information from the user registration
• Approve or Reject buttons appear for Contacts with the ILL Role
• Approval or Rejection email notifications are sent to users automatically
• Rejection Reasons, if given, will be shared with users
• Approved Users have immediate access to your Library
5 Lend
Lending Overview
Requests route to each lending library from borrowing libraries. Lenders receipt requests, determine
whether they can fill them from their collection, and then return to DOCLINE to Update requests as
Filled or Rejected. High fill rates and low turnaround time are the hallmarks of a good lender.
Requests must be receipted and updated in a timely manner or else they will be automatically routed
away from the potential lender by Time-Triggered Actions (See 5.5 for more information).
• Normal service level requests must be receipted within one business day of routing to the
lender
• Rush and Urgent Patient Care Requests must be receipted the same day they route to the
lender
For the most efficient lending that minimizes rejected or unreceipted requests:
1. Maintain up to date Journal Holdings in DOCLINE to prevent getting requests for journal titles,
formats, or years that you no longer own.

13
2. Use the Lend Alert feature that notifies you with an email when a request routes to your library
to be filled for another library. Libraries can choose which notification emails to receive. (See
5.2 for more information).
3. Maintain an up-to-date Library Schedule in your Library Profile
4. Libraries that are mid- to high-volume lenders are encouraged to login daily to receipt and
process Lend Requests, if lend alerts are not practical for their processes.
Lender performance statistics display as part of the public Library Profile, under Lend Information, and
are part of the Monthly Activity Summaries. Lending Fill Rates around 70% are considered average.
Some libraries may achieve 85% or higher, particularly those with dedicated ILL staff.
Service Levels Offered
Service Levels determine how quickly a request should be filled, governing the amount of time a lender
is given to Receipt and subsequently Update a request as Filled or Not Filled. If a lender doesn’t take
action within the appropriate timeframe, DOCLINE’s Time-Triggered Actions will remove the request,
and then either re-route it to the next potential lender or retire it Unfilled.
• Normal: Standard ILL service
o Request will reroute if not receipted within 1 business day. Receipted request will route
away if not Updated within 3 business days.
• Rush: Same day delivery
o Request will reroute at midnight if not receipted the same business day. Receipted
request will route away if not Updated within 1 business day.
• Urgent Patient Care: Process and ship immediately
o Lenders should check for Urgent requests at least every 2 hours or turn on Lend Alerts.
Request will reroute at midnight if not receipted the same business day. Receipted
request will route away if not Updated within 1 business day.
Receipting Lend Requests
Libraries are notified that requests are awaiting Receipt or Update in the MY LENDING Activity & Status
card on the homepage or by Lend Alert emails (5.43). Receipting or accepting incoming new request(s)
changes their status to “Received” in the system and starts the clock ticking for "Days to Process (filled)
or (not filled)” the turnaround time.
Libraries can view a request without receipting within Lend>Receipt or Lend>Search. In search results,
the requests that have not been receipted will show "New” as the Latest Action on the card for the
request.
NLM encourages the timely receipt of requests. Doing so provides a more accurate picture of request
status, which benefits both borrowers and lenders. Timely receipting also prevents unnecessary
rerouting of requests via Time-Triggered Actions (https://www.nlm.nih.gov/docline/support/TTA.html).
NOTE: Requests must be receipted before they can be updated as Filled or Rejected.
STEPS

14
1. Choose Receipt Requests from the Lend menu
-OR-
In the MY LENDING card beneath Activity & Status on the homepage, click through the link(s)
under To Receipt
Barcoded Request Receipt(s) display(s)
2. Select Print Requests (optional)
3. Select Mark All As Receipted and Return To DOCLINE (required)
Reprinting Lend Requests
Lenders can print or reprint request receipts or ‘pick slips’ from the homepage or Lend menu.
STEPS
1. Input the request number, patron name, or delivery email into homepage Search Lend
Requests box and click Search
-OR-
Choose Search Requests from the Lend menu, input the request number, patron name, or
delivery email, select appropriate dates or filters, and click Search
2. Select request(s) to be printed using the checkboxes on the individual request cards, or the
Select All button in the Actions for Selected Requests panel beneath the Filters on the left
3. Click the Print Selected button and follow your computer’s print prompts
Updating Lend Requests
After receipting and processing a request, lenders must Update the request status to Filled or reject the
request with an appropriate Reject Reason (See Request Rejection Reasons for more information).
Up to ten requests can be updated at one time. Lenders are returned to the Update screen after each
update.
Filling Lend Requests
STEPS
1. Choose Update Requests from the Lend menu. Requests must first be receipted before they
can be updated as Filled or Rejected. (See 5.3 for more on Receipt)
-OR-
In the MY LENDING card beneath Activity & Status on the homepage, click through the link(s)
under To Update
Available Requests display on cards and are listed beneath the Request Numbers input box.

15
2. Select requests for update by choosing button(s) above the cards, checkboxes on individual
requests shown, by copying and pasting request numbers, or scanning with barcodes. Individual
request numbers must be separated with a space, a comma, or a carriage return.
3. If Filled as Requested by Borrower (sent by Borrower’s primary delivery method) select Filled as
Requested by Borrower radio button
-OR-
Select Filled Via and choose actual delivery method from the pull-down menu, then select
Update Requests button at bottom left
Success message with request numbers and update details displays, or users are prompted to make a
choice (Fill or Reject) to enable successful update.
Rejecting Lend Requests
Lenders may choose from a variety of reject reasons. (See 5.10 for more information). There are three
reasons that prevent a request from routing on to other lenders, including COP, indicating lack of
copyright compliance. While the burden of compliance falls to the borrower and every DOCLINE
request includes a statement of copyright compliance, lenders may reject requests for COP if they
determine that requested items by a single borrower constitute nearly a whole journal issue or entire
monograph.
Choose the reject reason which mostly closed describes why your library is unable to fulfill the request.
STEPS
1. Choose Update Requests from the Lend menu. Requests must first be receipted before they
can be updated as Filled or Rejected. (See 5.3 for more on Receipt)
-OR-
In the MY LENDING card beneath Activity & Status on the homepage, click through the link(s)
under To Update.
Available Requests display on cards and are listed beneath the Request Numbers input box.
2. Select requests for update by choosing button(s) above the cards, checkboxes on individual
requests shown, by copying and pasting request numbers or scanning in from barcodes.
Individual request numbers must be separated with a space, a comma, or a carriage return.
3. Select Rejected Because.
4. Choose Reject reason from the pull-down menu, then select Update Requests button.
Success message with request numbers and update details displays, or users are prompted to make a
choice to enable successful update.

16
Lender Inaction and Time-Triggered Actions
Several Time-Triggered Actions (TTA) occur automatically in DOCLINE, based on the request’s service
level (Normal, Rush, Urgent Patient Care), the length of time an ILL request is in the system, and the
actions that have been taken on it.
For Normal Requests
• An ILL request must be receipted by the lending library to which it routed within one (1)
business day.
• If a request remains not receipted on the day following its routing to the lender, at 12:05 AM on
the next business day, DOCLINE removes the request and routes it to another potential lender.
• On the second working day after an ILL request is receipted, DOCLINE displays a warning
message in Lend and Borrow Request Search results that there is one more day to update a
request.
• If an ILL request is receipted but not acted upon (updated as filled or rejected) within three (3)
working days, DOCLINE automatically re-routes the request to another potential lender.
For Rush and Urgent Patient Care Requests
• A Rush (same day delivery) or Urgent Patient Care (process and ship immediately) request
must be receipted by the lending library on the same day the request routes to the potential
lender.
• If a request is not receipted on the same day it routes to the lender, DOCLINE removes the
request and routes it to another potential lender at 12:05 AM the following morning.
• On the day after a Rush or Urgent Patient Care request is receipted, DOCLINE displays a warning
message in Lend and Borrow Request Search results that there is one more day to update a
request.
• If a request is receipted but not acted upon (updated as filled or rejected) within one (1)
business day, DOCLINE automatically re-routes the request to another potential lender at 12:05
AM the following morning.
NOTE: Weekends are not counted in the calculation of days. Only Monday - Friday count as business
days, excluding the holidays listed in TTA Schedule, below.
Time-Triggered Actions (TTA) Schedule
Time-Triggered Actions run between 12:05 AM - 12:15 AM (Eastern Time) Monday through Friday,
except the holidays noted below. Users should avoid receipting and updating requests while the system
is running Time-Triggered Actions.
Time-Triggered Actions do not run on the following U.S. national holidays*:
• New Year's Day - January 1

17
• Memorial Day - Last Monday in May
• Juneteenth National Independence Day - June 19
• Independence Day - July 4
• Labor Day - First Monday in September
• Thanksgiving Day - Fourth Thursday in November
• Christmas Day - December 25
*Time-Triggered Actions do run on the following U.S. federal holidays because many libraries are open:
1. Martin Luther King, Jr.'s, Birthday - Third Monday in January
2. Presidents' Day - Third Monday in February
3. Columbus Day - Second Monday in October
4. Veterans' Day - November 11
NOTE: If the holiday falls on Sunday, it is usually observed on Monday. If the holiday falls on Saturday, it
is usually observed on Friday.
Pause or temporarily deactivate Lending
When there is no staff available to fill lend requests due to vacations or similar outages, libraries can set
themselves "Out of Office" in DOCLINE, which makes them Temporarily Inactive for lending, and
prevents requests from routing to them.
The library will be deactivated immediately if the outage Start Date is today. If the Start Date is in the
future, on that date (at 12:05 am) Time-Triggered Actions will automatically change the library's status
to "Temporarily Inactive." (https://www.nlm.nih.gov/docline/support/TTA.html)
STEPS
1. In the main menu, select Libraries
2. Select Manage library
3. Scroll down to Library Schedule
4. Click the hyperlinked words Library Schedule
5. Click Edit
6. Click cursor in Start Date to display calendar widget or type dates (MM/DD/YYYY)
7. Input start and end dates for time periods when requests should not route to your library. For
additional blank “Out of Office” date ranges, complete displayed date ranges and
click Update Library, then click Edit again. Additional ranges will display.
8. Click Update Library to save changes
At the end of the last active day, please receipt any new requests and update all pending requests as
'Not Filled' so they will immediately route on to the next potential lender.
Out of Office date ranges in the past should be manually deleted.

18
Lend Information (Preferences)
The Lend Information in your Library Profile is used by the system to determine which requests to
route to you, and by other DOCLINE users to evaluate your library as a potential lender.
The Manage Library section of the manual includes details about setting your Lending defaults. (See
section 7.1 for more information)
Lend Search
Lend Search is available directly on the homepage and from the Lend menu. Only requests that are
Filled, Received, or Pending Receipt by the Lender may be viewed in Lend Search. Clicking Search
without any other input will return all available results from the prior 150 days.
New requests which have been cancelled by the Borrower prior to Lender receipt, or requests which
have been automatically routed away by Time-Triggered Actions (TTA) due to lender inaction, cannot
be retrieved in Lend Search.
WARNINGs for impending TTA-removal of lend requests due to your library’s inaction with them will
display ONLY in Request Search Results.
Request search results display in a card for each individual request found. The lender and borrower
view of Request cards differs.
Lend request cards show:
• Request number,
o hyperlink displays request receipt in a new window
• Citation summary
o e.g. Clin Ther 2000 Dec;22(12):1433-42
• Borrowing Institution name and LIBID
• Via:
o How request was matched or routed to lender
• Request Date:
o Date and time request originally placed by the borrower
• Latest Action:
o The present state of the request. If “Filled” actual delivery method also displays
• Latest Action Date:
o Date and time of last or final action applied to request
Lend Request Search Terms and Filters
Requests can be retrieved with these search terms:
• Request Number(s)

19
• Patron Name
• Delivery Email
And further limited by:
• Date (Latest Action Date)
• Request Status
o Pending Receipt or Update
o Filled
o Warning
o Any
• Service Level
o Rush
o Urgent Patient Care
Sort options are available at the bottom of the Filters panel. By default, Request search results are in
date order, with the oldest first. Other Sort options are:
• Requests – Newest
• Lending Library – LIBID
• Patron Name
• Journal Title
These values are displayed on request receipts on the Last Route row labeled “Via” as well as in the
Show History view in Borrow Search.
These routing reasons explain how the Borrower and System selected the Lender.
Table 1 - Routing Reasons
Direct to Library
Borrower chose to Route Directly to Library, sending request
to an individual library before all other possible lenders.
(referred to as ‘prefixing’ in earlier DOCLINE versions)
Cells 1-9
The request routed to lender based upon its cell position (1-
9) in the borrower's Automated Routing Table.
NLM
Request routed to NLM based on borrower's Routing
Instructions. Requests route to NLM when route to NLM is
selected.
All Other libraries
The All Other Libraries checkbox offers the option to have a
request routinely route to an additional 20 libraries if NLM
cannot fill it or if the borrower did not select route to NLM.

20
Manual
The request routed to this lender based on the borrower's
monograph, audiovisual, non-NLM (M/A/N) Manual routing
table values.
5.9 Request Removal Reasons
In Show Request History, Removal Reasons explain why the request was removed from one lender and
re-routed to a different lender by TTA.
Table 2 - Removal Reasons
RCP - Removed for Non-
Receipt (TTA)
DOCLINE’s Time-Triggered Actions rerouted the request
because the lender did not Receipt the request the same
day it routed to them (Rush, Urgent Patient Care), or within
one business day of routing (Normal).
ACT – Removed because
Not acted upon (TTA)
DOCLINE’s Time-Triggered Actions routed the request to a
new lender 3 days after receipt (normal service level) or the
same day received (Rush or Urgent Patient Care), because
the lender did not take action (update as filled or rejected)
after receipting the request.
Request Rejection Reasons
Rejection Reasons are chosen by a potential lender as a reason for not filling a Lend request.
Reject reasons marked with an asterisk – Cancelled, Copyright, Cost, and Incomplete – are ‘kill codes’
that prevent requests from routing onward to other lenders, who would likely reject the request for the
same reason.
• Copyright: All requests must include a copyright compliance statement but also must not
exceed copyright guidelines for how much of a work can be copied, etc. Routing ends.
• Cost: DOCLINE Routing tables built according to recommended practices will have higher cost
lenders in higher numbered cells; it is therefore unlikely that the request will route onward to
less expensive lenders. Routing ends.
• Incomplete: Either there is missing information which prevents the request from being
completed or the information provided is inaccurate. Routing ends.
Table 3 - Reject Reasons
Code
Rejection
Reason
Description

21
BDY
Bindery
The lender holds the journal requested, but it is currently at the bindery and unavailable
for loan or copying.
CAN
Cancelled*
The request was cancelled by the lender at the borrower's request.
POR
Condition
The material is held, but the physical condition of the volume or issue prohibits lending
or copying.
EXL
Copy limit
The number of pages requested exceeds the copy limit imposed by this institution.
COP
Copyright*
The lender has determined that this request is in violation of copyright
compliance. Prevents a request from routing to other lenders.
CST
Cost*
The lender's minimum cost to supply the requested item is greater than the maximum
cost authorized by the borrower. Prevents a request from routing to other lenders.
PRO
In Process
The material has been received but is not yet ready for use.
USE
In Use
The lender reports the volume/issue was in use and unavailable for loan or copy at the
time of the request.
INC
Incomplete*
The lender believes that the citation on the request is either incomplete or incorrect.
Prevents a request from routing to other lenders.
LAC
Lacking
The lender has the journal title but is missing the requested issue or volume.
LIC
License
Restriction
The lender's journal subscription prohibits ILL under the conditions specific to this
request. For example, article is within embargo period, or subscription prohibits ILL from
the online journal to libraries outside the lender's country.
LOS
Lost
The lender declares this title or volume/issue is lost or withdrawn from its collection.
NCR
Non-circ
The lender owns this item but reports that it is not available for loan.
NYR
Not yet
received
The title is owned, but lender reports volume/issue has not yet been received.
NOS
Not on shelf
The lender owns this title but reports that it was not on the shelf at the time the request
was received.
ORD
On order
The item has been ordered but has not been received by the library.
OTH
Other
Request was rejected for a reason other than those listed. Please check with lender.
NOT
Title not
owned
The requested title is not owned by the lending library.
Warnings for Lender Inactivity
Both Lenders and Borrowers are warned of potential automatic re-routing by Time-Triggered Actions.
Warnings display on search results cards in Lend and Borrow Search.

22
NORMAL Service Level:
Receipt
• Request must be receipted by the lending library to which it routed within one (1) business day.
• If a request is NOT receipted by the lender on the second working day after it routed to a
lender, a WARNING displays in Search results.
! Will reroute tonight if not receipted
Updating
• Request must be updated by the lender after receipt within three (3) business days.
• On the second working day after an ILL request is receipted, DOCLINE displays a warning
message that there is one more day to update a request.
! Will reroute in one more day if not updated
the next day it says
! Will reroute tonight if not receipted
RUSH or Urgent Patient Care Service Level:
Receipt
• No warning, same day receipt required.
Updating
• On the day after a Rush or Urgent Patient Care request is receipted, DOCLINE
displays a warning message that there is one more day to update a request.
! Will reroute in one more day if not updated
6 Borrow
Requesting Overview
Each time you create a Borrow Request, DOCLINE pre-fills in the request with your library’s Borrowing
Defaults or preferences. These are configured in your Library Profile (see 7.1 for more information).
Default values can be modified when creating a request. Borrowing defaults play an important role in
which Lenders will be selected to fill your requests.
There are three (3) different ways to start a Borrow request depending on how much is known about
the desired item. Each request form is pre-filled in with the borrower’s default choices for cost, delivery,
routing, etc. drawn from their Library Profile Borrow Defaults. (See 7.1 for more information).
The details of the requested material may also be automatically filled in, depending on how the request
is initiated.
While most DOCLINE requests are for articles, the Manual order method may be used to request loans
of books or copies of book chapters.

23
Place request – PMIDs
This is the top option in the Borrow menu and is the most frequently used request initiation method.
Using a PMID (a PubMed indexed article’s unique PubMed identifier) is the most efficient method of
requesting for both Borrowers and Lenders. User inputs up to ten (10) PMIDS and the resulting request
is fully populated with journal and article information. Routes automatically.
Place request – Journal IDs
User inputs a Journal Unique ID number (UI), for example NLM UI, ISSN, or OCLC number and the
request is filled in with journal information. The user completes request by adding citation (article
details). Routes automatically.
NOTE: may also be initiated from Journals Search with journal title.
Place request – Manual
For ordering books, chapters or articles from Journals not listed in DOCLINE or NLM’s LocatorPlus
catalog. User inputs all details about desired material (article, book, book chapter). Routes on Manual
Routing table.
Requests begun with a PMID or Journal ID have enough detailed journal information that the DOCLINE
Routing Algorithm can select potential lenders from the Borrower’s Automated Routing Table by
matching to Lenders’ reported DOCLINE Journal Holdings. Manual requests route only to the 9 libraries
in the Borrower’s Manual Routing Table because without any Journal UIs, the system cannot match the
request to holdings and libraries do not report monograph (book) holdings in DOCLINE.
Requesting Journals Not Found in LocatorPlus NLM’s Catalog
When the desired journal does not have a bibliographic record in LocatorPlus, borrowers cannot use
Journal UI ordering or PMID ordering, and must use the manual request method (See 6.5 for more
information). Without a bibliographic record, no holdings can be recorded, so automated holdings-
based routing is not possible.
Requesting Books or other physical items
Book ordering is now available. This enables users to request books that are in LocatorPlus
(https://catalog.nlm.nih.gov/discovery/search?vid=01NLM_INST:01NLM_INST). Book ordering search
bar allows users to search via multiple unique IDs.

24
Understanding the “Place Order” page
The routing algorithm uses the information on the Place Order page to determine where your requests
will route. The Place Order page differs depending on the way the request is begun. Many of the values
filled in are taken from the Borrow defaults set in your Library Profile. Information displayed can be
modified on a request-by-request basis as needed.
Citation Information
The Citation Information portion of the request form is fully complete and not editable for requests
begun with PMIDs. Requests started with Journal UI or title search have Journal Information filled in,
with Article Information blank. Citation Information is completely blank for Manual Requests.
Request Information
The Request Information part of the request form is where users are most likely to make changes
regarding individual requests. The Request Information portion contains the same choices regardless of
request method. The fields are largely pre-populated from Borrower defaults or with universal request
defaults (i.e., Service Type=Copy, Service Level=Normal, Fill from Format=Any Format). All fields are
editable.
Authorized By
Lists staff information indicating who authorized and/or placed request (required).
Service Type
• Copy – request for reproduction of specific article or chapter (default).
• Loan – physical loan of entire journal issue, monograph, or A/V materials
(required).
Service Level
• Normal – request will be processed as part of lender’s normal ILL processes (default).
• Rush – lender should process request the same day.
• Urgent Patient Care – lender should process and ship request immediately. Lenders should
check for new requests at least every 2 hours.
(See 5.5 for rules on when requests will reroute for each service level).
Fill from Format
Indicates borrower’s choice for format of the journal from which to fill request. Default is “Any” format
(required).
NOTE: Choose “E-Journal” to limit your lenders to Lenders reporting Electronic holdings.

25
Maximum cost
Indicates the maximum amount the borrower is willing to pay for the ILL request (required). Input 0
(zero) if you need “no cost” borrowing.
While cost is not used in determining routing, routing tables should be constructed with lowest cost
potential lenders in the lowest number cells for the most cost-efficient borrowing.
Patron Name
Listing the Patron name enables incoming articles to be matched to your original requestors. Most
lenders include a copy of the request with delivered material. Using codes for your patrons may reduce
risks to privacy. (optional)
Need by Date
Date beyond which requested material is no longer wanted. Need by Date is checked at every reroute. If
request is at Received status when Need by Date passes, the lender may still update the request as
Filled. If the lender rejects the request, DOCLINE will then retire the request as Expired. (optional)
Copyright compliance
• Guidelines: Indicates that the borrower’s ILL request complies with U.S copyright law under
Section 108, including items borrowed within the CONTU Guidelines “Suggestion of Five”.
• Law: Indicates that the borrower’s ILL request complies with copyright law by being a “Fair Use”
under Section 107 of the U.S. law OR your country’s equivalent of “Fair Use”, paying royalties to
copyright holder directly or through an agent such as Copyright Clearance Center (CCC); or
requested item is not covered by copyright. For more information, see DOCLINE Copyright
Options (https://www.nlm.nih.gov/docline/context_help/copyright_choices.html).
Important: NLM cannot advise libraries on copyright law. Please refer to your institution’s legal counsel,
the United States Copyright Office or your country’s copyright law. (required)
Comments to Lender
Do not duplicate information that automatically displays on request. Use sparingly to add clarity or
emphasis. (optional)
Routing Information
Only Route to EFTS Participants
If you select EFTS as a limit in routing or in your Borrowing Preferences, DOCLINE will send your borrow
requests only to EFTS participants that also match the rest of your routing instructions.
To set default routing for all requests to go to EFTS participants only, do the following:

26
STEPS
1. Select Libraries from the DOCLINE main menu
2. Select Manage Library
3. Scroll to Borrow Defaults in your Library Profile
4. Click Edit, then select 'Yes' for 'Route Only to Libraries Participating in Electronic Funds
Transfer Service (EFTS)' under Automated Routing Borrow Defaults
5. Click Update Library
NOTE: If your library is a member of the FreeShare Library Group, selecting 'EFTS only' may prevent
your Borrow requests from routing to non-EFTS FreeShare Libraries that would like to reciprocate.
Route Directly to Library
If a valid LIBID is entered, request will route first to this library if the library meets other routing
instructions. Holdings are not considered. (optional) Limit of one (1) LIBID.
Routing Cells
Indicates which of the borrower’s (Automated or Manual) Routing Table cells will be used during the
routing of request. Cells may be selected or deselected optionally.
Additional Routing Options
Route to NLM
Determines whether the routing algorithm will send the request to NLM (LIBIDs: MDUNLM, MDULMF,
and MDUHMD) during routing. (optional)
Route to All Other Libraries
Determines whether the routing algorithm will attempt to route the request to All Other participant
libraries. Not available for Manual Routing. (optional)
Do Not Route to the Following Libraries
Used to prevent PMID or Journal requests from routing to individual libraries in Library Groups in
Automated Routing Table, or All Other Libraries; or to temporarily prevent requests from routing to
lenders listed individually in Automated Routing Table cells. Limit of twenty (20) LIBIDs. Not available for
Manual Routing. (optional)
Delivery information
This portion is fully populated from Borrower defaults and can be edited as needed. The more delivery
methods accepted the wider the pool of potential lenders.

27
• Primary Delivery Method: Indicates borrower’s preferred delivery method to receive
requested materials.
• Alternate Delivery Methods: Indicates borrower’s accepted alternate delivery methods to
receive requested materials.
• Electronic Address: Addresses to be used for delivery via Email, Odyssey, or Fax.
• Physical Address: Address to be used for delivery of loans or photocopies.
How to Request with PMIDs
Requests that start with PMIDs are most efficient for Borrowers because “official NLM” complete article
and journal information is automatically filled in. It is most efficient for Lenders because a valid
complete (PubMed) citation means it can be matched to them based on their DOCLINE Journal
holdings, and because it contains all required information to fill (fewer INC rejections).
There are two (2) ways to begin a request if you already have article PMIDs.
The easiest method is to paste or type PMIDs directly into the home page search box labeled Got
PMIDs? Get articles! Alternatively, users may choose Place request – PMIDs from the Borrow menu
and input PMIDs in the same manner.
Up to ten PMIDs may be entered at a time. PMIDs may be separated by spaces or commas.
STEPS
1. (a) Type or paste PMIDs into Homepage Search box and click Search
-OR-
(b) Go to Borrow>Place Request – PMIDs, input PMIDs and click Find PMIDs.
All articles are selected by default on the resulting Citation Information page.
2. If individual articles are for different patrons, have different need by dates, or require different
service levels, uncheck the articles that need to be ordered separately to input those values
3. You may abandon ordering (de-select articles) if system prompts alert you to circumstances
that mean the article is no longer needed via ILL. For more information on borrower warnings,
such as “Free Alerts” see section 6.9.
4. Click Next
5. Review the different sections of the resulting “PMID Request – Place Order(s)” screen and
make changes as necessary to “Request Information”, “Routing Information” and “Delivery
Information”
6. Click Place Order
When the transaction(s) complete successfully, the PMID Request – Results page displays with the
citation(s), the DOCLINE request numbers, the Lender to which each request routed, as well as the Library
and Username of the Borrower.
Users may select Return to Citation List (if unordered articles remain)

28
-OR-
View All Request Receipts to print and file hard copies of requests
How to Request with Journal Information
There are two (2) ways to start a request with journal information, which allows your request to be
matched to lenders based on journal holdings. You can begin with a Journal Unique ID (UI) or with a
Journal title.
STEPS
1. Go to Borrow>Place Request – Journal ID (ISSN, NLMUI, OCLC), input UI in the search box and
select the appropriate Identifier Type and select Find Journal
-OR-
Go to Journals>Search, input Title or UI and select Search. For the desired journal, select the
hyperlinked title to drill down to the Holdings level, then select Request Item.
2. Review the different sections of the resulting Unique Journal ID Order – Place Order screen
and input Article Information in the “Citation Information” section
3. Make changes as necessary to “Request Information”, “Routing Information” and “Delivery
Information”
4. Click Place Order
When the transaction completes successfully, the “Unique Journal ID Order – Success” page displays the
DOCLINE request number and the Lender to which request routed.
5. Users may select View Request Receipt to print
-OR-
Go Home to return to the Activity & Status area
How to use Request Manual
This option should be used when desired articles are in journals not found in DOCLINE Journals, or for
requesting books or book chapters. Because there are no holdings for books or non-NLM journals in
DOCLINE, Manual requests are not matched to lenders by the algorithm. They route sequentially to up
to nine (9) libraries listed in the borrower’s Manual Routing Table, or to LIBIDs input at the time of
ordering.
STEPS
1. Go to Borrow>Place Request – Manual
2. Review the different sections or panes of the resulting Manual Order – Place Order screen
and fill in the Citation Information portion
3. Make changes as necessary to “Request Information”, “Routing Information” and “Delivery
Information” sections
29
4. NOTE: If desired journal or book is not in LocatorPlus (NLM’s catalog), NLM does not own
the item. Deselect Route to NLM, if checked.
5. Click Place Order
6. When the transaction completes successfully, the “Manual Order – Success” page displays
the DOCLINE request number and the Lender to which request routed
7. Users may select View Request Receipt to print
-OR-
Go Home to return to the Activity & Status area
No Lenders Found
If your borrow request(s) cannot be matched to any active lenders this message displays:
“We couldn’t find a lender | Note: Change your requested routing, delivery, service level, or
format options during ordering to increase the number of potential lenders.”
Users may return to the previous screen to make different choices as suggested. This message may
result on weekends and holidays when many lenders are inactive. (See 6.10 for details on different
aspects of routing.)
Resubmitting Retired Unfilled Request
You may resubmit a request that has ended (retired) unfilled, so that you do not have to fill out an
entirely new request. The original form inputs are re-used so that you can review and revise the
information on the new request before submitting.
Retired Requests (last 7 days) show on the homepage Activity & Summary MY BORROWING card.
Click through links to view your unfilled requests that may require follow up. Be sure to review the
history of the Request if you plan to resubmit it, to determine what changes to make to the Routing
Instructions.
Requests most commonly retire as unfilled due to copyright, cost, or incomplete citation information.
See DOCLINE Help: Tips for Resubmitting a Retired Unfilled Request (nih.gov)
(https://www.nlm.nih.gov/docline/context_help/resubmit_tips.html) for more details on adjusting a retired
request for resubmission.
STEPS
1. From the Activity & Status section of the home page in the My Borrowing pane click on
Retired Requests (last 7 days)
-OR-
Borrow > Search requests
2. Either enter specified search parameters and then click Search or leave search fields empty (null
search) and click search to return all borrow requests

30
3. Scroll to the retired request that you wish to resubmit
4. Click Show Request History to identify any possible issues with the way it was submitted
previously (often it's due to questions of copyright, cost, or incomplete information)
5. Click Resubmit Request, then revise the original request in hopes of fulfillment
NOTE: Choosing to resubmit a request will result in the same ordering method as originally
used.
6. Click Resubmit Request
The "Resubmit Borrow Request for Your Library Name (LIBID) - Success" page will display including
DOCLINE request number and the Lender to which request routed.
7. Users can choose to Go Home or View Request
Cancelling a Borrow Request
Borrowers may cancel requests; however, cancellation success depends on the status of the request at
the time.
Requests with the following statuses can be cancelled immediately.
• New - new request entered by borrower, but not yet received by a lender.
• Rerouted Online - request was not filled by previous lender and has been rerouted to the next
potential lender.
• Rerouted TTA - rerouted because of DOCLINE time-triggered actions after potential lender did
not receipt or act upon the request.
Cancelling requests that have not been receipted yet results in this message: “Success! The following
request was cancelled”.
Requests that have already been Received by an institution can only be marked Pending Cancellation.
The potential lender may be in the process of filling a received request and is given the opportunity to
update the request as "Filled".
After selecting Cancel, the user sees: “Success! The following request is pending cancellation. The
current lender has opportunity to update before cancellation is processed.” In search results the
request now shows “Pending Cancellation”.
If the request is updated as "Not Filled" by the lender, the request is immediately cancelled. Borrowers
can call the lender to notify them of the pending cancellation, but the lender's workflow may not permit
this accommodation.
STEPS
1. If the request number, patron name or delivery email is known, input it in the homepage
Borrow Search box, otherwise use Borrow Search to retrieve the desired request using date or
other filters

31
2. Select Search
3. Search results display. A Cancel button appears on requests which are still open.
4. Click Cancel
Warnings for Borrower
To alert the user to circumstances that might lead them to abandon their ILL request(s) the system
prompts the borrower with warnings.
Previously Ordered PMID
This message appears on the citation information page that displays after PMIDs are input.
“You previously ordered this citation on Date, Time, (Request Number).”
This notification displays only for PMID requests completed within the last 30 days.
You May Already Own This
This message appears if the volume -or- year of the desired article falls within your own reported
journal holdings.
“You May Already Own This. Your library reports holding Volume # or Year YYYY of Title”
This message appears within both PMID and Journal UI requests.
NOTE: Borrower’s own embargoes are not evaluated as part of this message display.
Copyright Review
Users are prompted to review their articles being requested.
Free full-text may be available
This message appears during PMID ordering if the PubMed record includes links to free online full-text
of the published article.
“Free full-text may be available. Check availability before completing your request. “
Author manuscript available
This message appears during PMID ordering if the PubMed record includes links to the Author
Manuscript version of the article, in PubMed Central (PMC).
“Author manuscript available. It may differ from published article. Check availability before
completing your request.”
32
Understanding Routing
The Borrowers’ routing choices determine how few or how many libraries are considered potential
lenders by the system. The individual factors that are matched up vary depending on requesting
(routing) method. Users can establish default values for routing in the Borrow Information section of
their Library Profile.
Routing Options
While Borrowers should rely on a well-crafted Automated Routing Table which allows their requests to
be matched to lenders based on multiple factors, there are other options for use when Automated
Routing has failed or is not possible.
Route Directly to Library
If selected by borrower when placing a request, this option sends request to a single library (previously
referred to as prefixing). If the ‘prefixed’ library is inactive at time of routing, and additional routing
options are selected, “Direct to Library” will be skipped and other routing options will be applied.
Borrowers should rely on Automated Routing, which is randomized, balances the lending
load, and generally ensures that lenders can provide the requested materials; However,
routing directly to a single lender may be used when automated routing has been
unsuccessful or if the requested item is a book or is not in LocatorPlus, NLM’s.
NOTE: with “Route Direct to Library” option, the Routing Algorithm does NOT compare request to
library journal holdings.
The routing algorithm will only directly route a request to a library IF
1. the selected Primary Delivery Method OR one of the Alternate Delivery Methods is supported by
that library, AND
2. the library is Active at the time of routing AND
3. the library is not in the borrower’s Do Not Route to List AND
4. the library provides the selected Service level (if above Normal) AND
5. the library is an EFTS participant (if selected).
NOTE: Selecting an individual library to “Route Directly to” should not be necessary in most cases. If
your requests are frequently not routing to preferred lenders, review your routing table with DOCLINE
Support. (https://support.nlm.nih.gov/support/create-case/)
Automated Routing Table (using cells selected)
The system will select up to 20 potential lenders from your routing table that match your borrowing
criteria and have the desired journal.

33
The routing algorithm will randomly route a request to a library IF
1. the selected Primary Delivery Method is offered by that library AND
2. that library reports owning either the volume OR year of the title AND
3. the library holdings are in the requested format (if selected) AND
4. the library is Active at the time of routing AND
5. the library is not in the borrower’s Do Not Route to List AND
6. the library provides the selected Service level (if above Normal) AND
7. the library is an EFTS participant (if selected) AND
8. the library holdings are not embargoed* (if E-Journal);
THEN if less than 20 libraries matched for routing, the algorithm loops back and looks for Lenders
offering your Alternate Delivery methods AND
9. conditions 2-8 are met.
** Then repeat for routing cell 2, cell 3, etc. **
* NOTE: Embargoes can only be evaluated for PMID requests with an EpubDate.
NLM (after Automated Routing)
If selected by Borrower default or when placing a request, this option sends request to the National
Library of Medicine. If desired journal or book is not in LocatorPlus, NLM does not own the item. DO
NOT Route to NLM.
NOTE: Routing Algorithm does NOT compare request to NLM’s journal holdings.
Request will route to the National Library of Medicine IF
1. Route to NLM is checked AND
2. the selected Primary Delivery Method OR one of the Alternate Delivery Methods is offered by
NLM.
3. NLM provides the selected Service level (if above Normal) AND
4. NLM is Active at the time of routing.
All Other Libraries (after Automated Routing)
The routing algorithm checks libraries not previously evaluated as potential lenders.
(If selected) The routing algorithm will randomly route a request to a library IF
1. the selected Primary Delivery Method is offered by that library AND
2. that library reports owning either the volume OR year of the title AND
3. the library holdings are in the requested format (if selected) AND
4. the library is Active at the time of routing AND
5. the library is not in the borrower’s Do Not Route to List AND
6. the library provides the selected Service level (if above Normal) AND

34
7. the library is an EFTS participant (if selected) AND
8. the library holdings are not embargoed* (if E-Journal);
9. the request did not previously route to institution AND
10. THEN if less than 20 libraries matched for routing, the algorithm loops back and looks for
Lenders offering your Alternate Delivery methods AND
11. conditions 2-9 are met.
* NOTE: Embargoes can only be evaluated for PMID requests with an EpubDate.
Manual Routing (M/A/N Map)
This routing method should be used only to request Monographs (books), A/V materials or articles in
journals Not found in NLM’s catalog.
NOTE: Because manual routing is expressly for materials without catalog records and therefore without
Unique IDs -- or for monographic materials, holdings of which are not reported in DOCLINE -- the
Routing Algorithm cannot compare request to library holdings.
In Manual Routing, request routes sequentially through cells 1-9 to the libraries designated IF
1. the selected Primary Delivery Method OR one of the Alternate Delivery Methods is supported
by that Library AND
2. the library is Active at the time of routing AND
3. the library provides the selected Service level (if above Normal) AND
4. the institution is an EFTS participant (if selected).
Select Lenders with specified journal format
To filter out lenders that do not report owning the desired format of the journal (print or
electronic), borrowers may select the specific format needed. When access to physical
collections is limited, choose E-Journal in the Fill from Format field in the Request
Information section of Borrow requests.
The options for Fill from Format are E-Journal, Print and Any Format. The default is fill
from “Any format”.
Avoid Lenders: Do Not Route to
The Do Not Route To list may be used to prevent requests from routing to individual
libraries in Library Groups in a Routing Table or in All Other Libraries routing; or to
temporarily prevent requests from routing to lenders listed individually in Automated
Routing Table cells.

35
Borrowers can prevent their requests from routing to a specific Library by adding the LIBID to the Do
Not Route To list. This can be done for an individual request during the Borrow process, or with a set
list of Do Not Route To LIBIDs in the Borrow Information>Automated Routing Borrow Defaults section
of your Library Profile.
NOTE: Users who want to permanently prevent requests from routing to libraries listed individually in
their Routing tables should remove the LIBIDs from their Routing Tables rather than using the Do Not
Route To feature.
Routing Embargo Evaluation
Because Journal UI and Manual Requests often do not include complete or well-formatted article
publication dates, only PMID requests can be compared against Holdings Embargoes. Additionally, the
PubMed record for the PMID must include an EPubdate, which is used to calculate the article’s ‘age’ to
be compared to the embargo period.
Holdings Embargoes are not compared for article requests placed with the Journal UI or Manual
request method.
Viewing Request History
With the Show Request History button that appears on Request Cards in Borrow Search, borrowing
libraries can view the detailed routing history of their requests.
Request History includes:
• Date/Time: When Action occurred. System time is US Eastern Time.
• Action: Request status or what happened to it
• Reason: If request is Rejected or otherwise re-routed it displays in this column. (See 5.10 for
reasons). Otherwise, blank or “request”
• Library: Name and LIBID of the library when Action or Reason was applied
• Via: Method by which request was matched to lender or removed from lender, for instance “Cell
1”, or “Direct to Lender”
Borrow Search
Borrow Search is available directly on the homepage and from the Borrow menu. Any requests created
by the borrowing library within the last 150 days requests may be viewed in Borrow Search.
Clicking Search without any other input will return all available results.
WARNINGs for impending TTA-removal display in Request Search Results ONLY for both Borrower and
Lender. (See 5.11 for more details)
Borrow request cards show:

36
• Request number
o hyperlink displays request receipt in a new window
• Citation summary
o e.g. Clin Ther 2000 Dec;22(12):1433-42
• Lender Institution name and LIBID
• Request Date:
o Date and time request originally placed by the borrower
• Latest Action:
o The present state of the request. If “Filled” actual delivery method also displays
• Latest Action Date
o Date and time request reached present state
• Action buttons (not visible in Lender view)
o Show Request History
o Cancel Request (displays if unfilled and not yet retired)
o Resubmit Request (displays if retired unfilled)
Borrow Search Terms and Filters
Clicking Search without any search terms or filters returns all requests from the last 150 days.
Requests can be retrieved with these search terms:
• Request Number(s)
• Patron Name
• Delivery Email
And further limited by:
• Date (Latest Action Date)
• Request Status
o Open
o Retired – Filled
o Retired – Unfilled
o Any
• Service Level
By default, Request search results are in date order, with the oldest first. Other Sort options are:
• Requests – Newest
• Lending Library – LIBID
• Patron Name
• Journal Title
Sort options are available in the bottom of the Filters panel.

37
7 Libraries
The Libraries menu options: Manage library, Switch library (if applicable), Search libraries, Pending
Requests give users the ability to modify information and preferences for their own library (or libraries,
if they manage more than one with the same user account), as well as the ability to search for other
libraries to view information about their lending policies, performance, or fees.
Every library has a LIBID, which is a unique Library Identifier that is assigned to all libraries that use
DOCLINE or borrow from NLM. (See 1.5 for more information).
Manage Library
Manage library opens your Library Profile. This record contains all the information about a library, as
well as the default settings (preferences) that govern Lending and Borrowing.
It is important to keep your Library Profile information up to date as it pre-populates your borrowing
requests and determines which requests will route to you to fill. For instance, choosing Odyssey as your
primary way to receive articles limits the number of potential lenders as not all offer that delivery
method. Likewise, lenders with only one delivery method offered may receive fewer requests to fill.
To view the details of each section, click the hyperlinked words or anywhere in the shaded area to
expand that portion of the profile.
NOTE: All the information in the Library Profile is visible to other DOCLINE participants, except for the
contents of the Automated routing table.
Library Addresses & Other Information
Delivery & Billing
The Delivery & Billing panel contains all the physical and digital address information needed to deliver
an article or book to your library, regardless of delivery method. It also contains the same information
for your organization’s billing or accounts payable information for delivery of invoices.
The Delivery Email address displays on request receipts and is also used by the system for Lend Alert
and Contact Library emails.
Fax numbers and Odyssey addresses appear on receipts if selected as Alternative Delivery Methods.
Billing address information is transmitted to EFTS for libraries that participate.
Other Identifiers
This optional information may be used by libraries during billing for ILL, confirming lenders for book
loans, or locating NCBI LinkOut participants.
• Federal Employer Identification Number (FEIN)
• OCLC symbol

38
• LinkOut Name Abbreviation
Library & Organization Type
Library Type is an available filter in Libraries Search. It is established when the library record is
originally created.
Library Types:
• Hospital
• Academic
• Public
• Other
Organization Types are used for display and system analysis only. Organization Types:
• Federal
• Other
Borrow Information
Setting Borrow Defaults
Borrow Defaults (preferences) automatically fill in your request forms every time you order. Your
Borrow Defaults help determine which lenders your requests are routed to by the system. Selecting
more delivery methods allows a larger pool of possible lenders thus a greater likelihood of a successful
transaction.
STEPS
To set or update your Borrow Defaults:
1. Select Libraries from the DOCLINE main menu
2. Select Manage Library
Your organization’s Library Profile displays
3. Scroll to Borrow Information
4. Expand the Borrow Defaults section
5. Select Edit to change the values that will populate your requests:
▪ Preferred Delivery Method for receiving materials
▪ Acceptable Alternate Delivery Methods
▪ Maximum Willing to Pay (Max Cost) for ILL requests. If you need material free,
enter “0.00”. Required, cannot be blank.
▪ Copyright Compliance: Guidelines or Law *
▪ Authorized By the name or initials of the person responsible for placing and
paying for requests (optional)
6. Select Update Library to save your changes
* NOTE: DOCLINE libraries are required to comply with the copyright law in their geographic area. In
the U.S., the requesting library (borrower) is responsible for complying with copyright law, either the
U.S. Copyright Act of 1976 (CCL) or the Copyright Guidelines (CCG). For more information, see the

39
DOCLINE Copyright Compliance Options
(https://www.nlm.nih.gov/docline/context_help/copyright_choices.html).
Automated Routing Defaults
The Routing Algorithm automatically picks lenders from the borrower’s Automated Routing Table cells,
based on reported Journal Holdings and other factors.
Depending on how a library’s Automated Routing Table is structured, their Journal Routing Defaults –
which Routing Table cells are regularly checked for lenders – may vary. If cells have been set aside for
‘special purpose’ routing they should not be selected for everyday routing.
Choosing Lenders, Routing Table Options
To get the best results for cost-effective and efficient borrowing, structure your Routing Table so that
preferred no- or low-cost lenders are in lower numbered cells, followed by preferred lenders with
higher costs in subsequent cells. Consider the location of lenders in Routing Table organization in
addition to cost, adding libraries in your state or region in lower numbered cells, followed by other
more remote libraries in higher numbered cells.
When choosing lenders, consider the Lend Information in their Library Profile:
• Lender Performance statistics (time to fill – AKA “turnaround time”, fill rate)
• Library Lending Groups
• Request Charges
You may also consider the lender’s collection size listed in Journal Holdings, and days of service listed
in their Library Schedule. See table below for more information.
Table 4 - Sample Routing Table Configuration
Cell Number
Suggested Lender relationship(s) or categorization
1
Local Reciprocal Agreements
2
Library Group 1
3
In state universities or large medical centers
4
Selected large collection, low-cost lenders
5
Library Group 2
6
Alternate Coast Lenders
7
Weekend Lenders
8
Nursing Schools
…
Health Departments

40
Libraries may opt to create ‘special purpose’ cells, for instance east or west coast cells if they regularly
order rush requests and want DOCLINE to attempt routing to a certain geographic region or time zone
first.
Each Automated Routing Table cell may contain up to 20 libraries, and 1 Library Group. Only Library
Groups of which you are a member are available to add to your routing table. Individual libraries and
libraries in a Library Group within the same cell are treated equally by the routing algorithm. Libraries
are displayed in alphabetical order, although lender selection is randomized.
Routing table cells can be selected or deselected during the requesting process.
Automated Routing Borrow Options
These selections are used to limit routing of your borrow requests, or determine routing options if
Automated Routing does not result in a filled request.
STEPS
1. Select Libraries from the DOCLINE main menu
2. Select Manage Library
Your organization’s Library Profile displays
Scroll to Borrow Information
3. Expand the Automated Routing Borrow Defaults section
4. Select Edit to modify the choices that will determine routing for your requests:
o Route Only to EFTS Participants – available only if Library is an EFTS participant. If
selected, Routing Algorithm filters out lenders that are not EFTS participants, including
those in your routing cells and library groups such as FreeShare.
o Route to NLM After Automated Routing – if selected, Routing Algorithm will
automatically route to NLM if request cannot be filled by, or remains unfilled by, Routing
Table libraries
o Route to All Libraries After Automated Routing – if selected, Routing Algorithm will
automatically search for lenders among “All Other Libraries” if request cannot be filled
by, or remains unfilled by, Automated Routing Table libraries and NLM
5. Do Not Route to the Following Libraries – excludes entered libraries from consideration as
lenders (See 7.1 for more information on avoiding Lenders)
6. Select Update Library to save your changes
Updating your Automated Routing Table
Routing Table – Select Cells
For cost-effective, efficient borrowing, Routing Table structure should include reciprocal agreement, and
preferred no- or low-cost lenders in lower numbered cells, including Library Groups, and preferred
lenders with higher costs in higher numbered cells.

41
Depending on how a library’s Automated Routing Table is structured, their Journal Routing Defaults –
which Routing Table cells are regularly checked for lenders – may vary. If cells have been set aside for
‘special purpose’ routing they should not be selected for everyday routing.
STEPS
1. Select Libraries from the DOCLINE main menu
2. Select Manage Library
Your organization’s Library Profile displays
3. Scroll to Borrow Information
4. Expand the Automated Routing Table section
5. Select the Edit button to change the Journal Routing Defaults determining which numbered
Routing Cells are checked for Lenders
6. Select Update Library to save your changes
Routing Table – Add Libraries
STEPS
1. Select Libraries from the DOCLINE main menu
2. Select Manage Library
Your organization’s Library Profile displays
3. Scroll to Borrow Information
4. Expand the Automated Routing Table section
5. Select the large Routing Table Management button to update the preferred Lenders or
Library Groups* in each of nine Automated Routing Table Cells
6. Select Update Library to save your changes.
*Only Library Groups of which your library is a member are available to add to Routing cells.
Manual Routing Table (M/A/N Map)
This routing method should be used only to request Monographs (books), A/V materials or articles
published in journals Not found in NLM’s catalog. Manual routing lender defaults are not required.
Because larger collections - such as those held by large universities, medical schools or teaching
hospitals - are most likely to contain a wider variety of books needed or journal titles that are not in
NLM’s catalog, users may choose to prepopulate their Manual Routing Table with larger institutional
lenders.
In general, borrowers should start their routing with local lenders before selecting lenders from the
broader state or region.
STEPS
1. Select Libraries from the DOCLINE main menu

42
2. Select Manage Library
Your organization’s Library Profile displays.
3. Scroll to Borrow Information
4. Expand Manual Routing (M/A/N Map) section
5. Select the Edit button to update the preferred lenders in each of nine Manual Routing Table
Cells
6. Select Update Library to save your changes
NOTE: Because manual routing is expressly for materials without catalog records and therefore without
Unique IDs, or for monographic materials, holdings of which are not reported in DOCLINE, the Routing
Algorithm cannot compare manually routed requests to library holdings.
Lend Information
General service information
To set or update your Lend Defaults:
1. Select Libraries from the DOCLINE main menu
2. Select Manage Library
Your organization’s Library Profile displays
3. Scroll to Lend Information
4. Expand the General section by clicking on the word General or anywhere within the General
row
5. Select Edit to change the values that will affect what requests are routed to your library:
o Participates in Electronic Funds Transfer Service (EFTS): Yes/No
o Fills rush requests: Yes/No
o Fills Urgent Patient Care requests: Yes/No
o Comment to borrowers
o Delivery Methods Offered: (select all that apply)
▪ Article Exchange (OCLC application)
▪ Email (PDF) (required)
▪ Fax
▪ Mail
▪ Odyssey (OCLC application)
▪ Pickup
▪ Web (PDF)
o Send Lend Alert Notification Emails
▪ Normal
▪ Rush (on by default)
▪ Urgent Patient Care (on by default)
6. Select Update Library to save your changes.

43
Participates in EFTS
Indicates whether library participates in the Electronic Funds Transfer System which allows lenders to
submit filled request charges electronically and automatically collect fees from other participating
libraries. (See section 11 for information)
NOTE: To begin or end EFTS participation, email EFTS Customer Support ([email protected]).
Fills Rush Requests / Urgent Patient Care Requests
indicates what level of expedited service your institution can provide borrowers over and above
'normal'. Rush requests must be processed the same day, while Urgent requests should be processed
immediately.
NOTE: Libraries must be sufficiently staffed daily if choosing to offer Rush or Urgent Patient Care
service. Lenders providing Urgent Patient Care service should check for new requests at least every 2
hours and should consider using the Lend Alert feature that sends an email notification each time a new
request routes to the library. (See 5.5 for more information on Service Levels and Time-Triggered
Actions).
Comments to borrowers
Lender comments should briefly describe institution’s key information or service notes not reflected in
other Library Profile sections.
Ex: “Open 9-5”, “call for UPC”, “surcharges may apply”, “Rush, $5 extra,” “Fills only from E-Journals”
Delivery Methods Offered
Indicates which methods your library uses to deliver ILL copy request material.
• Article Exchange - OCLC post-to-web application. Borrower receives email with link to
retrieve/download article
• Email (PDF) – PDF as email attachment sent to your Library Contact, specified in Delivery section
of your Library Profile
• Fax
• Mail – Postal mail. Unchecking this method prevents borrowers from requesting loans of
physical objects.
• Odyssey - FTP transmission method developed by Atlas Systems
• Pickup – you will send someone to physically pick up the item from lender
• Web (PDF) - post-to-web. Borrower receives email with link to retrieve/download article
NOTE: The delivery method values are checked by DOCLINE when routing copy requests.
Send Lend Alert Notification Emails
For each request type, indicate whether your library wants to receive an email message each time a
request routes to your library to be filled for another library.

44
Lend Alert emails are sent to the Lender’s Delivery Email address, as well as to each Contact marked
with the ILL Role.
Lender Performance Statistics
This panel displays the library’s Fill Rate and Days to Process (turnaround time) for filled requests
during the previous calendar month. These statistics are used by other libraries to evaluate your library’s
lending activities.
The Request Report Dashboard button, which is revealed when the panel is expanded, takes the user to
the Request Reports landing page where prior months Activity Summaries are available. The button
does not display to other libraries.
Refer to Request Report Help for details of how these figures are calculated. (See section 9 for more
information.
Library Lending Groups
The Library Lending Groups of which the library is a member are displayed in this panel. To be added to
or removed from a Library Group contact DOCLINE Support.
Request Charges
In this panel enter your library’s Base Fees for lending. Separate fees listed for:
• My Library Group Members
• My Reciprocal Partner Libraries
• Any Other Libraries
Lender Request Charges and Borrower’s Max Cost are not used by the DOCLINE Routing Algorithm
when it determines potential lenders. Borrowers should structure their Routing Tables based on Lender
charges. (See 5.10 for more information).
My Library Group Members
Each group your library belongs to is listed. The Base Fee and Comment is drawn from the
Library Group record and cannot be edited by members. Only the library group owner(s) can
alter these features.
My Reciprocal Partner Libraries
Individual or local reciprocal agreements. Users can modify their base fee and enter
additional comments.
Any Other Libraries
Libraries with which your library has no reciprocal agreements or no common group
membership. Users can modify their base fee and enter additional comments.

45
Loaning Policies (Original Materials)
This section of the Library Profile contains information about what physical items (books or journals) are
presently available from your library and whether you may be able to provide scans from print or to
lend books, complete journal issues or bound journal volumes. Choose Edit to update the information
displayed to borrowers about your physical collection and lender policies. Select Update Library to
save changes.
NOTE: These values are not used by the routing algorithm.
Print Resources Available
Check this box to indicate you are currently filling copy or loan requests from your physical collection.
This indicator is used by the “Print Resources Available” Library Search filter, but not in routing.
Books
Modify this setting to indicate that your library lends out physical copies of monographs (books) and to
provide details regarding your library’s policies about length of loan period and whether renewals are
allowed. If Will Loan box is checked, a loan period greater than zero must be entered. (The default
value of zero is required even if policy is set to No).
Journals
Modify this setting to indicate that your library lends out physical copies of journals (single issues or
bound volumes) and to provide details regarding your library’s policies about length of loan period and
whether renewals are allowed. If Will Loan box is checked, a loan period greater than zero must be
entered. (The default value of zero is required even if policy is set to No).
International Service Offerings
This section of the Library Profile contains information about services offered to international libraries, if
any. Choose Edit to update the information displayed.
NOTE: These values are not used by the routing algorithm.
International Copy Service
If you modify this setting to indicate that your library Sends copies to international libraries (is set to
Yes) you must also choose countries served or choose ‘Select All’. Select Update Library to save
changes.
Library Schedule
The Library Schedule portion of the Library Profile allows user to include the days their library is usually
open for ILL lending, as well as the time zone, the Out of Office option for holidays, vacations, and other
outages.

46
Lending Days
Libraries can indicate the days of the week that they are normally available to fill Lend requests by
setting their Standard Lending Days. The system requires at least two days per week.
STEPS
To modify your library’s daily schedule:
1. Select Libraries from the DOCLINE main menu
2. Select Manage Library
Your organization’s Library Profile displays
3. Scroll to Library Schedule
4. Expand the Library Schedule section
5. Select Edit button to modify the Library’s Standard Lending Days
6. Select Update Library to save your changes
Out of Office – Temporary Deactivation
When temporarily unavailable to lend, libraries can input Out of Office dates. The maximum time span
is three months.
STEPS
To modify or input out of office dates:
1. Select Libraries from the DOCLINE main menu
2. Select Manage Library
Your organization’s Library Profile displays
3. Scroll to Library Schedule
4. Expand the Library Schedule section
5. Select Edit button to input Out of Office time periods
6. Select Update Library to save your changes
NOTE: If Out of Office date rows are filled and additional Out of Office dates are desired, select Update
Library to save, then Edit and new blank rows will appear. Prior Out of Office time spans should be
manually deleted.
Journal Holdings
The information in this panel is drawn from other parts of DOCLINE and is not editable. Summary data
about your library’s holdings, as well as information about how and when it was last updated is
displayed. This information may be used by other libraries when they are considering your library as a
potential lender to see how large your collection is and how up to date your holdings information is.

47
Holdings Summary displays the following:
• Total Holdings: total number of holdings records, so may exceed total number of titles held as
libraries may report owning titles in multiple formats
• E-Journal (Embargoed): total number of Electronic format holdings records as well as the
subtotal ( ) that include embargoed access
• Print: total number of Print format holdings records
• Other: total number of Other format holdings records
The Last Updated information includes the date any of the library’s holdings records were last modified,
whether the update was system or user applied, the username (if applicable) and the update method
used. Recommended Best Practices suggest that libraries should annually review their holdings to
avoid receiving requests for titles they no longer own.
Contacts
Every library must have at least one contact. Contacts are assigned roles. ILL, Billing and Serial Holdings
are required roles. If there is only one contact, they must be assigned all three roles. Emailed Lend
Alerts are sent to those with the ILL role.
There is also an “Other Role(s)” option. Contacts assigned ‘Other Role(s)’ may be explained with a
comment, for example “Library Director”.
Add, Edit or Delete Contacts
Use the Add Contact button that displays above the Contacts panel to add new contact records.
To Edit or Delete a contact record, expand the panel and select the appropriate button. After
modifying a contact, select Update Contact to save your changes.
STEPS
1. From the DOCLINE main menu, select Libraries
2. Select Manage Library
The Library Profile page displays
3. Scroll down to Contacts section
• Click Add Contact button to add a contact
• Click Update Contact
• To edit an existing contact
• Click the person’s name, then edit
• Click Update Contact
• To delete an existing contact
• Click the person’s name, then click Delete

48
• Confirm the deletion when prompted
You may be unable to save a contact record if the required roles are not selected in it or in another
contact record.
Contacts with the ILL Role can Approve and Deny New Accounts.
Switch Library
If your username is linked to more than one DOCLINE library because you are responsible for multiple
libraries, you will see a Switch Library option displayed to the right of your LIBID, above the Activity &
Status cards on the homepage.
You will also see a Switch Library option in the Libraries menu. This option only displays for user
accounts linked to multiple libraries.
Choosing this option displays all the libraries that are linked to the username you are signed in with.
After choosing a new library, it becomes the Active Library.
To add additional LIBIDs to an existing user account, contact DOCLINE Support.
Search Libraries
You can use Search Libraries to find the Library Profile of another library and view detailed information
about it, whether you are considering them as a lender or are lending to them.
• Library Search is pre-set to filter out libraries that are not DOCLINE participant libraries or that
are permanently closed. This can be modified.
• If you do not input any search terms, Search Libraries returns a list of all participating libraries.
• Default Sort is by alphabetical by LIBID.
Libraries Search Terms
Users can input the following search terms:
• LIBID, Institution, or Department Name
• Library Contact
• OCLC Symbol
• Email address
Libraries Search Filters
Users can select these filters to limit results:
• Print Resources Available
If checked, limits search to libraries that have indicated they can provide loans or copies
from print materials

49
• EFTS Participants
If checked, limits search to libraries that participate in EFTS. (11.1)
• Rush Service
If checked, limits search to libraries that offer Rush Service
• Urgent Patient Care Service
If checked, limits search to libraries that offer Urgent Patient Care Service
Users may also make choices from these additional filters:
• Region
Any is default, other options are In My Region, Not in My Region
• City
Any is default, City Names listed in DOCLINE Library Profiles may be selected
• State
Any is default, individual States or Provinces may be selected
• Country
Any is default, individual Countries may be selected
• Limit to My Library Groups
If checked limits results to Libraries that belong to the same Library Groups as the user’s
library
• Limit to These Library Groups
Any is default, multiple Library Groups may be selected
• Routing Table
Any is default, other options are In My Routing Table, Not in My Routing Table
• Lending Days
If checked limits results to libraries that offer lending service on days selected
• Delivery Methods
Any is default, options are Article Exchange, Mail, Email, Odyssey, Fax, Pickup, Web PDF
(Mail and Pickup options are only available for US and Canada)
• DOCLINE Participant
Any is default, other options are NLM Only and Participant
• Open/Closed
Any is default, other options are Closed and Open
• Library Type
Any is default, other options are Hospital, Academic, Public, Other, Federal
7.4 Pending Approvals
• Click on the More Details button for further information
• Each approval card includes information from the user registration

50
• Approve or Reject buttons appear for Contacts with the ILL Role
• Approval or Rejection email notifications are sent to users automatically
• Rejection Reasons, if given, will be shared with users
• Approved Users have immediate access to your Library
7.5 Contacting Other Libraries
You can send a message to another library about a request from within DOCLINE (“Contact Library”) or
find the ILL Contact information listed in each library's profile. Outgoing Contact Library emails are
addressed to the recipient library's "Delivery Email Address" (See 7.1) and to each ILL Contact listed in
their Library Profile (See 7.1).
STEPS
To contact another library about a request, use Lend or Borrow Search (as appropriate) to locate the
specific request, then
1. In the Search Results request display, the Contact Library envelope icon appears to the right of
the Lender or Borrower Name
2. Click the icon to display the “Contact Library” form
The form is populated with the request number as well as To*: and From: information
3. Add your message
4. Edit email address in the "Your Contact" section (the address cc’d on the message), if desired
5. Complete "I'm not a Robot" CAPTCHA
6. Click Send Message
NOTE: copies of outgoing emails are not retained by DOCLINE
7.6 Closing Permanently
If your organization has decided to merge two libraries or to close your library, and it will no longer
have a collection or staff, please contact DOCLINE Support to have the Library Profile set to “Closed” in
DOCLINE.
Users may want to save copies of “Journal Holdings Reports” or Request statistical Reports before the
library is closed and user accounts are disconnected.
As part of the closure process, user accounts are de-linked from library records and library holdings are
permanently deleted. EFTS libraries need to close EFTS accounts separately (see 11.6).
8 Journals
Holdings input and update is the primary function of the Journals module. Libraries should maintain up
to date Journal Holdings in DOCLINE to prevent requests for journal titles, formats, or years that they

51
no longer own from routing to them, as well as to prevent erroneous alerts about owned journals
during the borrowing process.
8.4 Journals Overview
The Journals that are available in DOCLINE originate with bibliographic records in NLM’s catalog. If
your library owns a title that is in scope but is not in DOCLINE, you may request that NLM catalogers
add a bibliographic record (https://support.nlm.nih.gov/knowledgebase/article/KA-03617/en-us) so that you
can add DOCLINE holdings.
Participating libraries subscribe to and maintain holdings for at least ten (10) DOCLINE journals (those
with bibliographic records in NLM’s catalog) from which they can fulfill ILL requests.
At the Holding Library level, this bibliographic information displays along with the journal Title.
• Place of Publication
• Dates of Publication
• Publisher*
• ISSN(s)
• OCLC Number
• NLM Unique ID
• Continuation Notes: (if present) *
NOTE: Except for Publisher and Continuation Notes, the same bibliographic information displays on
each Journals Search results card.
8.5 Holdings Record Elements
Format
A library may report owning a journal in multiple formats but cannot have more than one record with
the same format. The default format for new Holdings Records is Electronic. There are only three
possible formats in DOCLINE 6.
Originally, DOCLINE holdings statements were assigned formats based on ANSI/NISO Z39.71-2006
(R2011) - Holdings Statements for Bibliographic Items. Existing Holdings imported into DOCLINE 6.0
(October 2018) were assigned to the three formats listed below:
• Print: any Text format (T*)
• Electronic: any Computer format (C*)
• Other: any remaining ANSI formats
These codes correspond to the codes defined in the 007 field of the USMARC Bibliographic Format.
NOTE: As of 2018 DOCLINE holdings records no longer are stored in a way compatible with USMARC,
nor have they been converted to BIBFRAME (https://www.loc.gov/bibframe/). Once NLM has moved to a
new integrated library and discovery system, as well as fully moved to multiple-record cataloging

52
methodology that meshes better with other institutions’ cataloging practices, holdings records may be
modified.
Currently Received
Currently Received indicates that your library still subscribes to the journal. It is selected by default for
new Holdings Records. If ‘Currently Received’ is selected, then the holdings ranges cannot contain an
End Date or End Volume. When deselected, user is prompted to enter ending date or volume number.
If the library reports they currently receive a title, their holdings display as open-ended, for example:
• v.211(1970)-
• v.153(1960)-
instead of v.241(1978)-312(2014) or ‘closed’ holdings.
My Access Includes
Your library’s subscription licenses for electronic journals must permit interlibrary loan or you should
not report owning the title in DOCLINE. Electronic format holdings access may also include:
• Embargo Period (Months)
• E-Pub Ahead of Print
• Supplementary Data
Other aspects of electronic journals licensing may limit or expand access, over and above standard
subscription license terms.
DOCLINE 6.x request routing takes embargoes into consideration when matching certain PMID requests
to lender holdings. Embargoes are NOT considered by the system when alerting the borrower that they
own the requested title.
NOTE: Embargo Period must have a value of zero, even if not selected.
Retention Policy – Permanent or Limited
This setting Indicates whether library retains every issue received (Permanent) or only keeps the latest #
months, years, or editions of a journal (Limited). (required)
If the retention policy is Permanently Retained, users may enter the following:
• Begin Volume, End Volume
• Begin Year, End Year
Multiple date ranges, rows or time spans may be used to represent holdings with the most accuracy.

53
Currently Received holdings cannot be saved with if they include a final End Year or Volume
NOTE: Requests are matched to lenders’ holdings based on reported Volume OR Year
If the retention policy is Limited Period Only, (Retaining the Latest*), users select
• Retention Period Type
o Months
o Years
o Editions
DOCLINE's routing algorithm interprets months held (if less than 12) as "this year" and editions held as
years held. For example:
• Latest 1 year or 1 edition is interpreted as "this year"
• Latest 2 years or Latest 2 editions are interpreted as "this year and last year"
• Latest 12 (or fewer) months are interpreted as "this year"
The number of months held is divided by 12 to calculate the years held; remainder months are
dropped. For Example:
• 36 months are interpreted as "this year and the preceding 2 years"
• 24 months are interpreted as "this year and last year"
• 33 months would be interpreted as this year and last year
Limited Retention must have a value of zero, even the option is not selected.
8.6 My Journals
The My Journals menu option is a pre-filtered search, limited to journals for which the library has
holdings records in DOCLINE.
Changing Holdings Format
STEPS
1. Choose Journals>My Journals
2. Input title or other information about the journal you want to modify
3. Click Search
4. In the search results, select the journal you want to add by clicking the title link
5. Click the Edit Holdings button
6. Change the 'Format' to correct format
7. Click Update Holdings
NOTE: "Limited Retention Period" and "Embargo Period" must both have a value of zero, even if they
are not selected.

54
Adding a NEW Journal to my Journal Holdings
STEPS
1. Choose Journals>Search Journals
2. Input title or other information about the journal you want to add
3. Click Search
4. In the search results, select the journal you want to add by clicking the Title link
5. Click the Add Holdings button
6. Complete the required information in the form ('Currently Received' and 'Format' of Electronic is
automatically filled in, but may be modified)
7. Click Create Holdings
Adding ranges to existing Holdings records
STEPS
1. Choose Journals>Search Journals or My Journals
2. Input title or other information about the journal you want to edit
3. Click Search
4. In the search results, select the journal you want to edit by clicking the Title link
5. Click the Edit button on the holdings record you want to update
6. De-select 'Currently Received' checkbox, temporarily
7. Complete existing date ranges with both begin and end Volumes or Years
8. Click Update Holdings
9. Click the Edit button again on the holdings record you are updating
New rows will display
Repeat steps 7-9 as needed to accurately represent holdings
10. Select 'Currently Received' checkbox if you still subscribe to this journal
Adding “Gap Years” Holdings ranges
STEPS
1. In the Journals Search or My Holdings, input title or other search term to locate journal
2. Click Search
3. In the search results, select the journal you want to edit by clicking the title link
4. Click the Edit button on the holdings record you want to update. End year and beginning year
cannot overlap or be the same on two different rows.
Changing Holdings from Permanent to Limited Retention
To change a Holdings Record indicating "permanently held" that includes years/volumes ranges, into a
"Limited Retention" holdings record, do the following.

55
STEPS
1. Select the radio button for "Limited Period Only" instead of "Permanently Retained"
2. Select the DELETE checkbox at the right end of holdings ranges that contain volume/year
values
3. Input the number of years (or other unit) your library keeps
4. Choose unit (months, years, editions)
5. Click Update Holdings button at the bottom of the page
Recording Holdings Outside Publication Dates
Sometimes libraries find it necessary to report holdings that fall outside a journal’s official publication
dates. For example, if a journal title changed, but there is not an additional bibliographic record for the
newer (succeeding) title or the prior (preceding) title.
Users are warned if they input and attempt to save holdings dates that do not fall within the publication
dates listed in the selected bibliographic record.
To continue with dates that are outside the stated publication dates for the journal, select the “Ignore
warnings for Retention Ranges outside of the Journal's Publication Dates” option that appears
directly beneath the journal bibliographic data, before selecting Update Holdings to save the record.
Journals Holdings Import/Export
DOCLINE provides a way to download a list of your journal holdings and make batch changes.
Export
• The Export side of the page is where you can download a list of your current holdings.
• It also provides the date and record of up to 5 previous export files under “Successfully
completed exports.”
• Note that these will only be available for the past 7 days, and you may delete them yourself at
any time.
• Pending Export files may take some time depending on the number of holdings.
• And if you encounter any issues, they will be recorded under Export Errors.
STEPS
1. Choose Journals>Import/Export Holdings
2. Click Build Export File
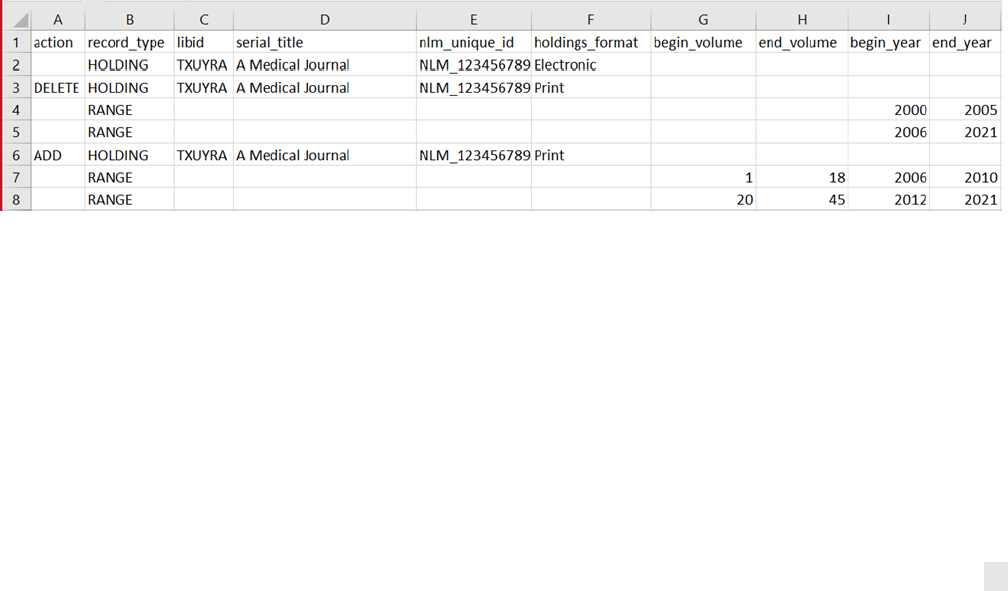
56
3. Once the file has been created, we will be shown a “Success!” page saying your export file is
ready or has been queued depending on the number of holdings
4. Click on Go back to holdings import/export dashboard button
5. Click on Download CSV at the top of the list. Queued exports will run within an hour.
• This will download a comma-separated values (or CSV) file to your computer
• Information about your holdings include the record type, title, NLM Unique ID, volume and year
range, and ISSN, among other data
• Batch changes can be made to this file for import into DOCLINE
• You can delete or add holdings under the Action column
• After making some updates, re-save the file
Delete or Add
• The Action column is where you specify the action required (e.g. Delete or Add).
• You can indicate the changes to your Journal Holdings under the Action column to the left of
the Holding value. You do not have to enter an Action for Range rows.
• Each column field, if it does have data, must be formatted.
• If the data in the cell doesn't match the requirements (for example, Dlt instead of Delete), your
spreadsheet import will show you the error.
Edit Volume and Date Range
• In order to edit a holding, you will first need to Delete then Add. This can be done by
copying/inserting desired rows. First delete old holdings, then add the new updated holdings. If
you don’t need to update something, you can leave the action blank.
Import
STEPS
1. Choose Journals>Import/Export Holdings
2. On the Import side of the dashboard, click Choose File to select our CSV file we just saved
3. Click on Import/Update Holdings with CSV

57
4. Once DOCLINE has imported your file, you should see a Success page
5. Click on Go back to holdings import/export dashboard button
• Note that we have a new entry under “Successfully Completed Imports” that displays the date
imported and allows you to download the CSV file again.
• Import records are also kept for 7 days. Up to 5 uploads can be displayed and may be deleted
manually at any time.
• Pending Imports are currently being processed and will complete within an hour. This may show
if you have a large number of holdings.
• When you Import a CSV file and you get an “Import Failed” screen or the queued import file has
failed, review the error message displayed. The row where the error occurred along with the
cause of the error will be displayed.
• Your spreadsheet must contain all of the original column headers as your Export File. If your
spreadsheet does not contain these fields, or if Journal Holdings in your spreadsheet are missing
these values, your spreadsheet will not import successfully.
Adding Holdings for Titles not in DOCLINE
If your library owns a title that is in scope but is not in DOCLINE, you may request that NLM catalogers
add a bibliographic record (https://support.nlm.nih.gov/knowledgebase/article/KA-03617/en-us) so that you
can add DOCLINE holdings. You can see the criteria for journal additions, here:
https://www.nlm.nih.gov/tsd/serials/nlm_locatorplus_add_mod_for_serhold.html
Reviewing and Combining Duplicated Format Holdings Records
Background: Why are there duplicate records?
DOCLINE offers only three Holding Formats (Electronic, Print, Other), where it used to have dozens. The
result is that some libraries now have two (or more) holdings records with the same format, after the
holdings were imported into DOCLINE 6 from the old system and assigned one of the three remaining
formats.
With the new Holdings Import/Export feature, the system now allows only one record in each format, so
duplicates need to be reviewed, combined, and deleted.
Examples:
Electronic Format: If a library used to report Online holdings, and CD-ROM holdings of the same title,
they’d now have two different ‘electronic format’ holdings records, with different ranges of access.
Other format: If a Library had two different holdings records for microfiche and microfilm in DOCLINE
5, they now have two “Other” format records in DOCLINE 6, which include different coverage.

58
Comparing and Combining Holdings Records in Import/Export
STEP 1
1. Export file of your holdings
2. For each duplicate Journal Title, compare ranges in Holdings
3. Review the start and end dates, or start and end volumes, in both records then insert the correct
data into new replacement range(s)
a. Create new ranges with the longest time span coverage (or greatest volume number
span)
b. Choose open holdings record (no End Vol or Year) if one is open and the other closed
4. Input the word ADD in the Action column for the new combined record
5. Save this CSV for step 3
STEP 2
1. Choose Journals>My Journals
2. Input title or other information about the journal you want to modify
3. Click Search
4. In the search results, select the journal you want to modify by clicking the title link
5. Click the DELETE button for all duplicated holdings of the same format
STEP 3
1. Go to Journals>Import/Export Holdings
2. Upload the CSV file you saved earlier by selecting Choose File
3. Select the Import/Update Holdings with CSV
8.7 Journals Search
Finding Titles
Use Journals Search if you want to add holdings for new titles or when you want to populate a Journal
Unique ID request form when the journal is known, but the article lacks a PMID.
Users can search for journal titles by Title, NLM Unique ID (NLMUI), ISSN(s) or OCLC number.

59
Once the desired journal is found, click through the journal title link to see the libraries that own it and
the details of their holdings.
NOTE: Titles must be entered exactly as shown in NLM’s catalog, or search will not return results. If
the title has variants, and a unique ID is not available, users may want to use the more robust search
capabilities of NLM’s catalog (https://catalog.nlm.nih.gov/discovery/search?vid=01NLM_INST:01NLM_INST).
Holdings Search Filters
Journal Search may also be used to find libraries that report owning a particular journal, if automated
routing has been unsuccessful or in circumstances when you need to locate an active lender
immediately. In most circumstances, users should rely on automated routing to keep request fulfillment
speedy and efficient for borrowers and lenders, and to ensure that requests are distributed randomly
among potential lenders.
The Holdings Filters panel does not display until a single journal has been selected. Once the desired
journal record is located, click through the Title link to see the libraries that report owning it, and for
additional search filters.
Holdings Filters may be combined; for instance, to find a library owning a specific year, and in the
required format. The following filters are available at the holdings level:
• Year
• Volume
• Format
o Any
o Electronic
o Print
o Other
• License:
o Embargo
▪ Any
▪ Has Embargo
▪ No Embargo
o Limit to (libraries reporting) E-Pub Ahead of Print
o Limit to (libraries reporting) Supplementary Data
• Limit to Libraries that offer Service Level
o Any
o Urgent Patient Care
o Rush
• Limit to My Library Groups
• Limit to these Library Groups (multi-select, all available groups)
• Not My Routing Table (unselected by default, returns all libraries that report owning a title. After
unsuccessful routing borrowers searching for new lenders should select this option.)

60
Sorting Search results
Options for sorting the list of libraries that report owning a title are included beneath Holdings Filters.
The default sort is by LIBID which results in libraries listed by state.
9 Reports
Request statistics reports, Journal Holdings reports, and EFTS Lend reports (if applicable) are all
available via this menu option.
9.1 EFTS Manual Billing File
The EFTS manual billing report is available to libraries that participate in EFTS. The spreadsheet it
produces may serve as an offline record of filled EFTS requests. Users may set the date range for the
report output. Requests are retrievable for 150 days after completion (filled or unfilled). Requests
included are limited to borrowers who are EFTS participants. However, reports will only include requests
filled for borrowers who are EFTS participants at the time the EFTS Manual Billing report is
produced. File is NOT uploadable.
9.2 Request Statistical Reports
Request reports provide data that enables users to make informed choices about their ILL service, ILL
partners, and journal subscriptions. Use DOCLINE reports to optimize lending and borrowing, and to
make evidence-based collection management decisions.
• To improve speed and efficiency getting articles from other libraries, review any low
performance statistics for lenders in report Borrow tables. Low fill rates and slow turnaround
times may indicate that you should adjust your Automated Routing Table to include lenders
with better performance statistics, update your 'Do Not Route to' List, or may point to over
reliance on ‘Direct to Library’ routing.
• To improve your speed and efficiency providing articles to other libraries, review any low
performance statistics for borrowers in report Lend tables. Low fill rates may indicate that your
library’s journal holdings need updating, especially if many requests are being rejected as ‘Not
Owned’. Low fill rates may also result if Borrowers rely on ‘Direct to Library’ routing. If your
library has a high rate of Not Receipted requests, turning on Lend Alert emails can help reduce
the number of Lend requests your library misses.
DOCLINE offers monthly total (summary) request statistics, detailed reports of quarterly request
activity

61
NOTE: Monthly, Quarterly, and Annual request totals will not always match because each report type
employs different filters.
Only requests completed (filled or retired) within the report period are included in report calculations,
regardless of when the request was originally created.
Monthly “Activity Summaries”
The Monthly Activity Summary allows users to view summary statistics and performance data about
Lend and Borrow requests completed during previous calendar months.
The Activity Summary data is refreshed every month. The prior 12 months’ summary data remains
available.
Libraries using Activity Summary data for monthly statistics reporting should copy and paste the table
data into a local spreadsheet for future reference.
The elements of the Activity Summary reports are described in the tables below.
Activity Summary: Lend Request Statistics, Performance Tables
LEND Request Statistics
Routed to Lender
The number of requests that routed to your library to be filled.
Cancelled Before Receipt
The number of requests that routed to your library that were
cancelled by the borrower before Lend receipt.
Expired Before Receipt
The number of requests that routed to your library that expired due
to a borrower “Need by Date” before Lend receipt.
Removed for Non-
Receipt
The number of requests re-routed away by Time-Triggered Actions
because your library did not receipt them within allotted time.
Received
The number of requests that were receipted by your library.
Filled
Of Received Requests, this indicates the number your library updated
as Filled.
Not Filled
Of Received Requests, this indicates the number your library did not
Fill.
Rejected
Of Not Filled Received Requests, this indicates the number your
library updated with Reject Reasons
Removed for Non-
Action
The number of Received requests re-routed away by Time-Triggered
Actions because your library did not update the requests as ‘Filled’ or
‘Rejected’ within allotted time.

62
*Exceptions
Requests with incomplete or invalid data that cannot be accurately
categorized. Seldom displays.
LEND Performance Statistics
‡
Library Fill Rate
The percent of Received Requests that the lender updated as
Filled.
Days to Process (Filled)
“Turnaround time”, the average time it took for your library to
update lend requests as filled. The number is shown in one-
hundredths of a day based upon calendar days. 0.00 indicates
Lender's average turnaround time for the reporting period is
less than 15 minutes.
Days to Process (Not Filled)
“Turnaround time”, the average time it took for your library to
update lend requests as not filled or to be rerouted away for
non-activity by the lender. The number is shown in one-
hundredths of a day based upon calendar days.
‡ Lender Performance Statistics (Fill Rate, Days to Process: Filled) display to other libraries in the Lend Information portion of your Library Profile.
Activity Summary: Borrow Request Statistics, Performance Tables
BORROW Request Statistics
Requested
The number of requests placed by your library to be filled
by other libraries
Filled
The number of your library's requests that were updated as
filled by lenders
Not Filled
The number of requests placed by your library that retired
unfilled.
BORROW Performance Statistics*
Library Fill Rate
The percent of Received Requests that lenders updated as
Filled.
Days to Process (Filled)
“Turnaround time”, the average time it took for lenders to
update your requests as filled in DOCLINE. The number is

63
shown in one-hundredths of a day based upon calendar
days.
Days to Process (Not Filled)
“Turnaround time”, the average time it took for your
requests to retired unfilled. The number is shown in one-
hundredths of a day based upon calendar days.
*low performance statistics in your Borrow table may indicate that your routing table needs to be
updated to include lenders with better fill rates and turnaround times.
Quarterly ”Detailed by Library Reports”: Lend and Borrow
The quarterly Detailed by Library reports provide the total numbers of requests per quarter, broken
down by request activity, grouped by library (Lender or Borrower), state/province, and country; as well
as by service type: copy/loan. There are both Lender and Borrower reports, which include performance
statistics.
Report Frequency:
Reports are posted quarterly.
Report Availability:
Users have access to the eight (8) most recent quarterly reports. When a new report is generated it will
replace the oldest of the listed reports. Users wanting to retain data should save reports locally as the
older report will no longer be available via DOCLINE once a newer report is posted.
Report Contents:
The request activity and status are grouped and reported by
• LIBID of Lender/Borrower
• State
• Country
Statistics Reported
Totals:
• Number of requests
• Number of Receipted requests

64
• Number of Requests Filled
• Percent of Requests Filled
• Number of Requests Not Filled
• Number of Requests Not Receipted
• Days to Process – Filled
• Days to Process – Unfilled
• Number of Filled Requests broken down by Copy/Loan
• Number of Not Filled request broken down by Copy/Loan
Annual “Detailed by Journal Reports”: Lend and Borrow
The annual Journal Request Reports, Lend: Titles Filled and Borrow: Titles Requested, provide a list of
journal titles ranked by the number of times each journal has been requested during the report period.
• Only requests completed (filled or retired) within the time period are included in the report
• This report counts only requests for material from journals that are in NLM’s catalog and that
have an NLM Unique Identifier
• Cancelled requests are not included
This report data is useful to support decisions regarding journal subscriptions and copyright
compliance.
Report Frequency:
-Cumulative reports are posted annually for two time periods.
• January 1 through December 31 of the same year (“Calendar Year”)
• July 1 through June 30 of the following year (“Academic Year”)
Report Availability:
Users have access to the two (2) most recent annual reports. When a new report is generated it will
replace the oldest of the listed reports. Users wanting to retain data should save reports locally as the
older report will no longer be available via DOCLINE once a newer report is posted.
Report Contents:
Journal Bibliographic Information
• Journal Title
• NLM Unique ID
• ISSNs
• Publication Dates
Statistics Reported

65
Totals:
• Number of requests
• Number of filled requests
• Number of titles requested
Subtotals by Title:
• Times Requested
• Number Filled
• Article Year (Filled/Requested): broken down by article year and final request status
9.3 Journal Holdings Reports
Libraries may wish to run a Journal Holdings by Library Report as a tool for holdings maintenance
activities. The user’s active library is the report default LIBID.
The Holdings Report page offers the user the option to build a report and displays the status of
pending or completed reports.
• Reports are generated every hour and are run in the order they are submitted
• Holdings reports are current as of the time they are run
• If there are multiple completed reports, the first report in the list is the most recent
• Each report is deleted from the system one week after it has been created, even if the report has
not been viewed
Holdings by Library Report
This report lists all holdings for a single library. To see more information about the elements of each
holdings record, refer to the following section.
STEPS
To generate your report,
1. Choose Holdings Reports from the Reports Menu
2. Select the Build Report button
The queued report displays under Pending Reports
When complete, report displays in the Completed Reports card with a Download CSV button
An Open or Save system dialog opens for downloading the report file (.csv format)
Save downloaded report
The report is sorted by journal title. Columns for every field are included, even if the value is null, empty
or zero for your library.
Included columns are listed below. Additional information on Holdings Records elements may be
found in section 8.5.

66
• LIBID
• Serial Title
• NLM Unique ID
• ISSN
• Holdings Format
o if multiple formats, each has a record/row
• Holdings
o Currently received (“open”) holdings display with a hyphen following a Begin Year and/or
Volume (for example: v.1(1975)- )
o Not currently received (no longer subscribe or license) (“closed”) holdings will have an
end volume or year after the hyphen (e.g. v.3(2000)-13(2013) ).
• Retention Policy
o Permanent or Limited – Library retains every journal issue received or discards older
issues and only retains a limited number.
• Limited Retention Period
o number
• Limited Retention Type
o months
o years
o editions
• Embargo Period
o Number of Months (zero for print and other, zero for electronic if license terms do not
include an embargo).
• Access to Epub Ahead Print indicator
• Access to Supplementary data indicator
• Last Modified
o Date record was last modified
NOTE: OCLC number is not included because existing NLM bibliographic records for serials include
OCLC numbers for the corresponding OCLC print record, almost exclusively. This is due to NLM's single
bibliographic record cataloging approach prior to the implementation of BIBFRAME.
9.4 Routing Table Reports
Routing Table reports list the borrowers that have your library as a potential lender in their routing
table cells. Use Routing Table reports to discover in which cell others have placed your shared Library
Groups (Automated Routing), or as one of nine lenders in their Manual Routing table.
Automated Routing Table Report
This report lists the borrowers that have your library as a potential lender in one of the cells of their
Automated Routing Table.

67
• For individual borrowers, each report row includes the routing cell number, their LIBID and
library name.
• Library Group rows display the routing cell number, the code and name of the Library Group,
and how many of the total group members list the group within the cell.
• Library Groups rows can be expanded to see which of the members have placed it within the
cell.
• LIBIDs are hyperlinked to full Library Profiles.
Report Frequency:
On Demand
Report Availability:
Single-use (current as of date/time created))
Manual Routing Table Report
This report lists all the borrowers that have your library as one of nine default potential lenders in their
Manual (M/A/N) Routing Table cells.
• Some borrowers use manual routing if they are unfamiliar with other requesting methods that
require PMIDs or NLM UIs.
• Contact Library can be used to reach out to borrowers that rely on manual rather than holdings-
based routing.
Report Frequency:
On Demand
Report Availability:
Single-use (current as of date/time created)
10. Library Groups
Library Groups are available in the system to make it easier for group members to route requests to one
another without having to individually add and maintain group members in their own routing tables.
Groups may be formed by a professional association; around a medical specialty, e.g., nursing or
pediatrics; or focused on a geographic area or another shared trait, such as federal libraries. These
groups may offer services or other resource sharing opportunities to members beyond reciprocal ILL.
Library Group members agree to provide each other no charge or low charge ILL fulfillment. Group
charges may not be edited by members but are part of the Library Group record itself.

68
New Library Groups may be added to DOCLINE if the proposed group has at least ten (10)
members. Groups that were added to the system prior to October 2018 may have fewer than ten
members. Organization and management of groups, which may have websites, chairpersons, or
contacts, is external to DOCLINE.
10.1 Finding Group Information in DOCLINE
You can use Libraries Search to view Library Group membership. There are two Library Group filters:
• Limit to My Library Groups
If checked limits results to Libraries that belong to the same Library Groups as the user’s
library
• Limit to These Library Groups
Any is default, multiple Library Groups may be selected
These same two filters are also available in Journal Holdings search.
Library Group membership displays across the system in multiple places.
• In Borrow and Lend
o All the Borrowers’ Library Groups are listed on Request Receipts
• In Library Profiles, Groups are available
o to add to routing cells: Borrow Information>Automated Routing Table Cell>Edit.
Only Library Groups of which you are a member are available to add.
o to view by potential borrowers: Lend Information>Library Lending Groups
• In Journals Search, at the Holdings level (after clicking through title link), Library Group filters
are visible:
o Limit to these Library Groups selector (lists all available groups)
o My Library Groups selector
10.2 How to Add, Join or Leave a Library Group
Adding a Library Group to DOCLINE, modifying existing group information, and adding or deleting
member libraries are Administrator activities. Contact your RML’s DOCLINE Coordinator for help.
If you join or leave a Library Group, update your Automated Routing Table to reflect the change. Refer
to “Updating your Automated Routing Table” for more details.
11. EFTS
11.1 What is EFTS?
The Electronic Fund Transfer System (EFTS) (https://efts.mlanet.org/account/login) is a transaction-based
electronic billing system for interlibrary loan (ILL) and document delivery charges. It is maintained by

69
the Medical Library Association in support of resource sharing among the medical library community. It
substantially reduces the costs incurred with paper-based billing and payment.
11.2 How Does EFTS Work?
For libraries that choose the option, DOCLINE ILL transactions are automatically transmitted daily to
EFTS for participant libraries. EFTS libraries log into EFTS to review filled requests, to bill borrowers for
non-reciprocal lending requests, or to manage their accounts and configuration.
11.3 Who Uses EFTS?
Libraries using DOCLINE and others in The Network of the National Library of Medicine (NNLM) are
encouraged to join EFTS.
11.4 Why Use EFTS?
EFTS reduces the need to create invoices and to process reimbursement checks for interlibrary loans
between participants. It also could:
• Reduce costs associated with interlibrary loan and improves cash flow
• Assist with collection development monitoring by tabulating borrowing costs
• Reduce human error and increases efficiency
• Provide management reports
11.5 How Can My Library Join EFTS?
Visit the MLA-EFTS website (https://www.mlanet.org/efts/configuration) for more information or email EFTS
Support at MLA: [email protected].org.
11.6 How Does My Library leave EFTS?
If you will no longer be participating in DOCLINE, please let DOCLINE Support
(https://support.nlm.nih.gov/support/create-case/) know so that your library can be deactivated for lending.
Then, connect with EFTS Support (efts@mail.mlahq.org) to settle your EFTS accounts.
11.7 How Can I Get Help With EFTS?
For questions and assistance, please contact EFTS Customer Support ([email protected]) at MLA, or call
+1 312.728.3415 from 9am to 5pm (Chicago, USA), Monday through Friday.
12 Third-Party ILL Software and DOCLINE
Some libraries may use additional ILL processing or management software applications such as
QuickDoc/QDPortal, Clio, ILLiad, and Relais. These users interact with DOCLINE via their ILL application
rather than accessing the DOCLINE system with a web browser directly.
Vendors are provided access to upcoming changes in advance in order to minimize interruption of ILL
services for our mutual users.

70
If there appear to be integration difficulties between your library’s ILL system and DOCLINE, isolate or
circumvent the issue by logging directly into DOCLINE with a web browser. NLM cannot assist with
integration of DOCLINE data into other applications.
Please contact your vendor for further assistance with your third-party ILL software.
13 API
API stands for "Application Programming Interface". The DOCLINE Lend and Borrow API allows vendors
to integrate DOCLINE with their systems. The vendor can use APIs to communicate with DOCLINE
without having to open DOCLINE in a browser.
Accepting an API connection
The vendor will provide you with an authorization link. The link will take you to a DOCLINE page where
you will be asked to approve the vendor as an authorized API user. Once authorized, the vendor will be
able to make DOCLINE API requests (lend/borrow) on your behalf.
Revoking an API Connection
Users can click on their username on the top right corner of the DOCLINE application and select "API
Settings" from the dropdown menu. API connections can be revoked at any time on the API Settings
page.
Vendors
If you are a third-party vendor and would like more information about this feature, please reach out to
the Help Desk (https://support.nlm.nih.gov/support/create-case/).

