
Classic
Elegance
Alliance
USER MANUAL
FREECURVE
EN
01823 661037


FOREWORD
CONTENT
Make everyday life easier....
USER MANUAL
OPTIONS
IMPORTANT INFORMATION
FAULT FINDING
ATTACHMENTS
A. Reminders
B. Remote control
C. Tap 2 oor
2
11
15
20
24
24
25
26
Thank you for choosing a Handicare stairlift.
This manual is for the Classic and Elegance/
Alliance seat types, and includes instructions
for the standard features and optional upgra-
des.
USER MANUAL 1

7
1
2
3
4
5
6
868MHz
8
CLASSIC
OPTIONS
Autoswivel
Folding hinge
Turn & Go
Pow. footrest
The illustration opposite shows the features
used to operate the Classic seat. The Classic
can be upgraded with the automatic swivel
seat, powered footrest, hinged rail and Turn &
Go options to create even more seat comfort
and user-friendliness.
[6]Seat swivel lever
[7]Footplate
[8]Remote control
[1]LED
[2]Joystick
[3]Emergency
stop
[4]Key switch
[5]Seat belt
2 USER MANUAL

868MHz
3
1
2
7
4
5
6
8
ELEGANCE / ALLIANCE
OPTIONS
Autoswivel
Pow. footrest
Folding hinge
Turn & Go
ActiveSeat
The illustration opposite shows the
features used to operate the Elegance/
Alliance
seat. The Elegance/Alliance can
be upgraded with
the automatic swivel
seat, powered footrest, hinged rail,Turn
& Go and Active Seat options to create
even more seat comfort and
user-friendliness.
[1]LED
[2]Joystick
[3]Emergency stop
[4]Key switch
[5]Seat belt
[6]Seat swivel lever
[7]Footplate
[8]Remote control
USER MANUAL 3
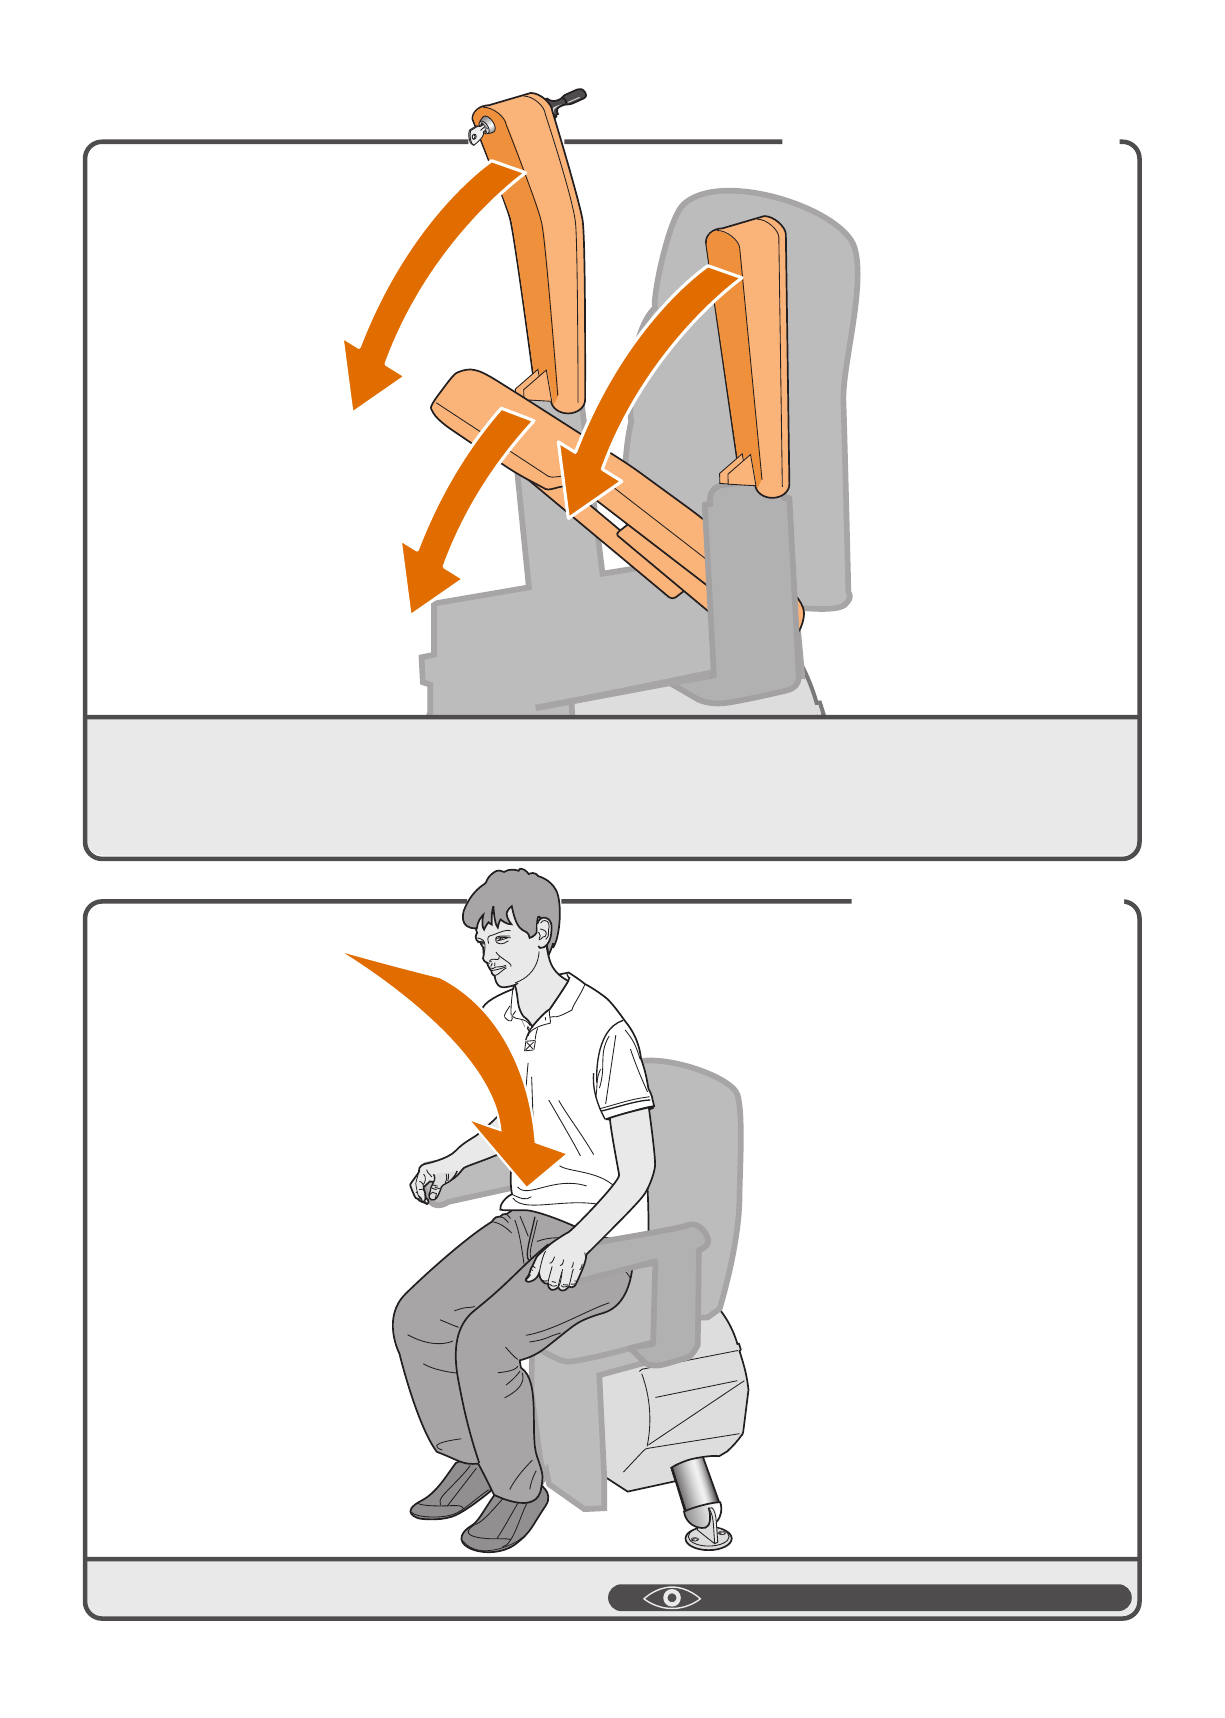
FOLD DOWN
Fold down the armrests and seat.
SIT DOWN
Sit down on the seat.
page 14 > OPTIONAL ACTIVE SEAT
4 USER MANUAL

1
UNFOLD FOOTREST
Fold down the footplate.
PLACE FEET
Place your feet on the footplate. Ensure that both feet are completely on the
plate.
page 12 > OPTIONAL POWERED FOOTREST
USER MANUAL 5

CLICK!
3x
SAFETY FIRST
Fasten the seat belt securely, ensuring that it clicks into the holder. Put the key in
the switch and turn it ninety degrees clockwise. The LED on the armrest lights
up faintly.
RIDE
Move the joystick in the desired direction of travel. The LED lights up. The lift
beeps three times, then gradually starts to move.
6 USER MANUAL

CLICK!
B
A
EMERGENCY STOP
In an emergency, press the emergency stop once. The lift stops straight away.
To release the lift, press the emergency stop again.
SWIVEL
The lift stops automatically at the end of the rail. You can now swivel the seat
manually, making it easier to get on and off. To do this, push down the lever{A}.
Swivel the seat until you hear a 'click'. The seat is now in the correct position{B}.
page 11 > OPTIONAL AUTOSWIVEL
USER MANUAL 7

FOLD FOOTREST
Fold up the footplate.
LOOSEN BELT
Unfasten the seat belt.
page 12 > OPTIONAL POWERED FOOTREST
8 USER MANUAL

B
A
CLICK!
STAND UP
Stand up from the seat.
FOLD UP
Fold up the armrests and seat {A}. Push the handle, located to the left or right
under the seat, downwards. Swivel the seat until you hear a 'click'. The seat is
now in the locked position {B}.
page 14 > OPTIONAL ACTIVE SEAT
USER MANUAL 9

PARK
Press and hold the button on the remote control until the lift reaches a charge
point. Upon arrival, the lift stops automatically and the LED on the remote
control goes out.
CHARGE
There are charge points for recharging the lift's batteries at the top and bottom
of the rail (there may be additional charge points). If the lift is not in the correct
position at the charge point, the lift beeps for three minutes and the LED in the
armrest flashes. The lift does not work if the batteries are flat.
10 USER MANUAL

CLICK!
OPTIONS
AUTOSWIVEL
The AUTOMATIC SWIVEL SEAT option let you swivel the seat automatically to
face the direction you are going to walk in. To do this, push and hold the joystick
in the upwards direction.
AUTOSWIVEL
POWERED FOOTREST
FOLDING HINGE
TURN & GO
ACTIVE SEAT
page 11
page 12
page 12
page 13
page 14
USER MANUAL 11

1
OPTION
POWERED FOOTREST
The POWERED FOOTPLATE option lets you fold the footplate up and down
automatically using the switch on the side of the armrest. The footplate lights up
when folded down.
FOLDING HINGE
With the FOLDING HINGE option, the seat stops just above the hinged rail.
Move the joystick up or down to fold or unfold the rail.
12 USER MANUAL

A
C
B
FOLDING HINGE [PARK]
Do not leave the lift on the hinged rail after use. Use the remote control to move
the lift to a charge point and recharge the batteries. The first stopping point is at
the hinged rail. Keep moving the lift until it reaches a charge point further up.
TURN & GO
The TURN & GO option swivels the seat so that you travel up and down with
your back to the stairs {B}. Hold the joy stick in the desired direction of travel, at
the start and end of the rail {A and C}.
USER MANUAL 13

CLICK!
ACTIVE SEAT
With the ACTIVE SEAT option, the seat assists you when sitting down and
standing up. To stand up, pull the handle, located to the left or right under the
seat, upwards. The seat pushes you up. When you sit back down, the seat
slowly returns to its normal position and clicks into place.
The lift will not move until the seat is securely clicked in place.
14 USER MANUAL

IMPORTANT INFORMATION
Project:
Date:
USER MANUAL 15

1
FOREWORD
Your stairlift is a sophisticated stairlift, specifically developed to carry one person sitting
on the chair up to a maximum weight of 125 kg. The information provided in properties
and working methods known to us at the time of publication; alterations and any
improvements are therefore excepted. Before using the stairlift read this manual
thoroughly and familiarise yourself with the working and operation of the stairlift. Users
who can not see and hear should receive assistance when using the stairlift. Your
stairlift has been constructed in accordance with state-of-the-art technology and
satisfies recognized safety regulations. Nevertheless during the wrong use of the stairlift
risk to the user or third parties, or damage to your stairlift or other goods, can arise. So
use your stairlift only when it is in good working order, in accordance with the intended
use described above and with due attention to this manual. Always keep this manual in
the vicinity of the stairlift.
The strength and the suitability in general of wall, staircases, terraces, upper
floors,banisters, plinths etc. which are to support or surround the installation have been
verified and ensured by the customer, who therefore accepts all relative responsibilities.
Neither Handicare nor its authorized dealers may be held responsible for the suitability
of the structures which surround and support the installation. All tests, except for the
operating test, shall be performed by the customer.
TECHNICAL SUPPORT
Should problems occur that are not dealt with in this document, contact your supplier.
The Service department staff will always be pleased to help you. For quick handling it is
important that you keep the following items/particulars to hand:
• this manual;
• your name, address, postcode, town and telephone number;
• lift number.
GUARANTEE AND LIABILITY
As the user of this stairlift, you are always fully responsible for the observance of locally
prevailing safety regulations and guidelines.the manufacturer guarantees that this
stairlift (excluding batteries) will be repaired free of charge should manufacturing and/or
material defects occur within 24 months of the purchase date, during normal use in
accordance with the recommended user, installation and maintenance instructions.
Excluded from guarantee: damage caused by normal wear and tear, overloading or
misuse, the replacement of batteries in the remote control. Under no circumstances
can the manufacturer accept responsibility for death, personal injury, damage to
property, or incidental, unforeseen consequences and/or costs or damage resulting
from the use of your stairlift. The carrying out of alterations to the product is not
permitted. The manufacturer is not liable for damage resulting from such alterations.
The manufacturer accepts no liability for damage or injury caused by the
non-observance, or inadequate observance, of the safety regulations and safety
instructions in this manual, or by negligence during the installation, use, maintenance
and repair or this stairlift. Installation and servicing may
16 USER MANUAL

1
only be carried out under the responsibility of dealers or installers/service engineers
authorised by the manufacturer, in the course of which locally prevailing regulations
must be observed.
The wallbuttons of this stairlift work radiographic. Handicare does not accept any
responsability for the non-functioning of these wallbuttons due to interference by a
source outside this stairlift.
This equipment has been tested and found to comply with the limits for a Class B
digital device, pursuant to part 15 of the FCC Rules. These limits are designed to
provide reasonable protection against harmful interference in a residential installation.
This equipment generates, uses and can radiate radio frequency energy, and if not
installed and used in accordance with the instructions, may cause harmful interference
to radio communications. However, there is no guarantee that interference will not
occur in a particular installation. If this equipment does cause harmful interference to
radio or television reception, which can be determined by turning the equipment OFF
and ON, the user is encouraged to try to correct the interference by one or more of the
following measures:
• Reorient or relocate the receiving antenna.
• Increase the separation between the equipment and receiver.
• Connect the equipment into an outlet on a circuit different from that to which the
receiver is connected.
• Consult the dealer or an experienced radio/TV technician for help.
SAFETY INSTRUCTIONS
When using the stairlift always observe locally prevailing safety regulations regarding
risk of electric shock and physical injury.
1. Provide an unobstructed environment. The entire track must be free of obstacles.
2. Take environmental influences into account. Do not expose the lift to damp or
extreme sunlight. Make sure that the environment is well lit. The entire track must
be visible from the stopping places.
3. Keep uninstructed persons and domestic pets away from the stairlift.
Do not use the stairlift to carry animals or goods. Never use the stairlift with more
than one person sitting on it. The stairlift may only be used by adults who have
signed the instructed person’s declaration. Keep children away from the stairlift.
Remove the key after use.
4. Keep limbs and clothing away from moving parts. Make sure that wide or loose
clothing cannot become trapped between the chair and, say, the stairs or rail.
5. Ensure a safe position. Always ensure a correct, stable position. Sit right up against
the back support, use the armrests and place the feet squarely on the foot rest.
Always use the safety belt. Never stand on the stairlift.
6. Take care at all times. Concentrate on the operation of the stairlift.
7. Check for damage. Before use check the lift for external damage. Report unusual
noises, such as squeaking and creaking, to your supplier. The lift must comply with
all prevailing safety regulations. Do not use the lift if a part is defective.
USER MANUAL 17

1
To prevent accidents, repairs and preventive maintenance must only be carried out
by engineers qualified to do so.
8.
The stairlift must not be used in the event of a fire or as a means of escape during a fire.
9.
If the stairlift is not fitted with a communication device, we recommend that you
always
have one to hand.
10.
Only leave the stairlift at the designated points at the top and bottom of the rail.
(only for the installer)
Open stair rails (e.g. banisters) should be closed off so that the lift is not accessible
from behind.
The electrical connection must comply with section 4.3 of EN60204-1
11. Check for damage
Before the installation inspect the parts carefully for damage in order to make sure
that the lift will function properly. The lift must comply with all prevailing safety
regulations. Do not use defective parts; only use original parts.
12. Safety devices
All safety devices must be fitted correctly and may only be removed for
maintenance and repair work by qualified service engineers trained to do so.
The product must never be used if the safety devices are incomplete or absent,
or have been put out of action or are defective.
The safety devices must be checked regularly to see that they are working correctly
and, if necessary, must be repaired immediately.
13. Use and installation in accordance with intended use.
Where necessary use safety equipment such as face and hearing protection, safety
shoes and hard hat during assembly and servicing. Only use approved tools.
Before you start the assembly, please check whether the stairs and the
environment meet the safety requirements.
MAINTENANCE
Cleaning
Clean the stairlift lift regularly.
Avoid excessive use of water. Clean the seat, back support, armrests and footrest only
with a slightly damp cloth. Clean the track regularly with a dry cloth. Do not clean the
metal rack. If dirty spots appear on the rail, these can easily be removed with a damp
cloth using a mild detergent. In time the track wheels can leave a mark on the rail.
During the first 50 rides of the stairlift scales of paint might fall on the stairs due to
running in of the stairlift.
Preventive maintenance
In addition to cleaning your stairlift, periodic preventive maintenance is necessary for
long-term correct functioning.
The stairlift must be serviced at least once a year. This service must be carried out by a
qualified person. Contact your supplier to conclude a service agreement. If your stair lift
runs over more than 2 floors and/or has more than 2 users, it needs at least 2
maintenances a year.
18 USER MANUAL

1
Technical specifications
Supply voltage
Frequency
Current
Power
Fuses
Load (max.)
Speed
Ambient temperature
Relative humidity
Users pattern
Noise
Remote control
230 VAC
50/60 Hz
1 A
360 watt
30 A
125 kg
0.15 m/s (max.)
0 - 40 °C
20 - 80 %
15 rides per 24 hours
10 rides continuous
56 dB
868 Mhz
An electrical output socket shall be available to the stairlift for local lighting during
inspection and servicing. Lighting to a minimum value of 50 lux shall be provided at the
boarding points whilst the stairlift is in use.
All rights reserved. No part of this publication may be reproduced and/or published by means of print, photocopy, microfilm or in any
other way or form, without prior written permission from the manufacturer. This also applies for the accompanying drawings and
diagrams. the manufacturerreserves the right to change parts at any time, without prior or direct notification to the customer. The
contents of this manual can also be changed without prior warning. This manual is intended for the standard model of the lift. the
manufacturertherefore cannot be held liable for any damage resulting from specifications which differ from those of the standard model
of the lift supplied to you. For information concerning adjustment, maintenance or repairs not provided in this manual, you are asked to
contact the technical department of your supplier.
This manual has been compiled with every possible care but the manufacturer cannot accept responsibility for any errors in this manual
or for the consequences thereof.
The Dutch manual is the original language
USER MANUAL 19

A
B
OBSTACLE
FAULTFINDING
Problem: the lift travels in one direction only and the LED flashes when the
joystick is operated.
Cause: there is an obstacle between the lift and the stairs.
Solution: move the lift in the opposite direction {A} and remove the obstacle {B}.
CAUSE SOLUTION
OBSTACLE
CHAIRPOSITION
EMERGENCY STOP
ARMREST
KEY
BATTERIES RC
POWER
page 20
page 21
page 21
page 22
page 22
page 23
page 23
20 USER MANUAL

CLICK!
1
1
2
CHAIRPOSITION
Problem: the lift does not travel in either direction and the LED flashes when the
joystick is operated.
Cause: the seat is not locked and is in a swivelled position.
Solution:
swivel the seat using the handle located to the left or right under the seat.
EMERGENCY STOP
Problem:
the lift does not travel in either direction, the LED[1] flashes when the
joystick is operated
and the emergency stop [2] is illuminated.
Cause: the emergency stop has been pressed.
Solution: press the emergency stop once.
CAUSE SOLUTION
CAUSE SOLUTION
USER MANUAL 21

ARMREST
Problem: the lift does not travel in either direction and the LED on the armrest
lights up when the joystick is operated. Cause: an armrest has not been folded
down. Solution: fold down the armrest fully.
KEY
Problem: the lift does not travel in either direction and the LED on the armrest
does not light up when the joystick is operated.
Cause: the key-operated switch is in the off position.
Solution: turn the key-operated switch ninety degrees clockwise.
CAUSE SOLUTION
CAUSE SOLUTION
22 USER MANUAL

1
BATTERIES RC
FAULTFINDING
Problem: the lift does not travel in either direction and the LED on the remote
control does not light up when the remote control is operated.
Cause: the batteries in the remote control are flat.
Solution: replace the batteries in the remote control.
CAUSE SOLUTION
CAUSE SOLUTION
POWER
Problem: the lift batteries are not recharging, the LED is flashing and the lift
beeps for three minutes.
Cause: the lift is not in the correct position at a charge point or the plug is not in
the socket.
Solution: move the lift to a charge point or put the plug in the socket.
USER MANUAL 23

BA C
ATTACHMENTS
[A]Remove the key from the switch whenever you leave the lift.
[B]Never remove the lift plug from the wall socket.
[C]The powered footplate has a light, which goes off automatically when the
footplate is folded up or when the lift is not at a charge point.
REMINDERS
REMINDERS
REMOTE CONTROL
TAP 2 FLOOR
page 24
page 25
page 26
24 USER MANUAL

?
Rembrandt / Van Gogh
REMOTE CONTROL
USER MANUAL 25

TAP
2
FLOOR
OPTION
Stairlift with powered swivel can swivel automatic on a preferent intermediate
landing after tapping. Before the start of the lift, the joystick (not the remote con-
trol) is operated in the direction of travel (Tap). The number of operations (taps)
indicates the desired floor. Tapping must be done rather quickly. After each tap
you hear a beeping sound. LAST press (when holding the joystick
to start driving) is NOT counted as a tap !!
(GROUND FLOOR)
26 USER MANUAL

1
H0013194
H0013191
12 A
8 A
H0013183
C0030021
D1002010
C0020310
C1061010
SP000100
E0004300
C1010800
E0005100
E0005200
E0006100
C3020900
C0040000
C3020010
C1001413
(
868 Mhz
)
C0030011
C1001513
868 Mhz
11K00014
B0020500
C3002100
FR093100
FR095410
FR010000
FR099100
B5030120
20 A
C0030011
SP001000
UNIT 868 Mhz
R250
C0020057
C0040010
(
BATTERY
)
C2010520
(
CHARGER
)
REPEATER SET
VOICE CONNECTION KIT
Set: SP001500

Handicare Monte-escaliers
4 Rue des Piverts
ZAC de l’ Aunaie
91610 Ballancourt-sur-Essonne
France
Tel: +33 (0) 1 69 46 86 10
Fax: +33 (0) 1 69 46 86 19
Handicare GmbH
Hausberger Straße 16
32457 Porta Westfalica
Deutschland
Tel: +49 (0) 571 973398-55
Fax: +49 (0) 571 973398-56
Handicare
10888 Metro Court
St. Louis, MO 63043
United States of America
Toll Free: 1.866.891.6502
Local: 314.692.9135
Fax: 314.692.7858
USER MANUAL
11P00388
, rev.H
*11P00388*
