How to Edit a PDF With Adobe Acrobat DC
1. Acrobat DC is on both the PC and the Mac
2. Click on the Windows icon in the lower left hand corner of the screen and open Adobe Acrobat DC
3. On the Mac click on the Launchpad and then on the Adobe Acrobat DC icon.
4. Click on File>Open, select your PDF file and click Open
Click Here
Then Here
Click Here
Click Here
Select File
Click Here
Then Here

5. Your PDF will open.
6. To edit your PDF click on Edit PDF in the right hand panel. Your editing tools will open.
Click Here
Editing Tools
Tools

7. Click on “Edit” to highlight change text and fonts, resize images and move images and text boxes
within the document.
8. To add text click on “Add Text”, draw a text box where you will like your additional text to appear
and type in your text.
9. To add images click on “Add Image” in the Content Editing pane, a window will pop up showing
your files. Non-images will be grayed out. Click on the image you want to import and click “Open”.
Click Here
Draw Text Box
and Add Text
Click Here
Highlight to Overwrite Text
or Change Fonts
Select Your Image and Click Here
Use Handles to
Resize Images
Click Here

10. You can now place and size your image as you like.
11. To rearrange your document’s pages open the Page Thumbnails view by dragging on the arrow
under the Edit PDF icon on the far left of your workspace. Then click on the Thumbnails icon to
open the icons. You can then drag and drop the thumnails into the order you’d like them.
Your Image Inserted
Click On
Arrow and
Drag Right
Move and Resize
as Desired
Click On
Thumbnail
Icon to
Open Page
Thumbnails
Drag to
Rearrange
Thumbnails

12. To crop your PDF click on “Crop Pages” and use your tool to draw a box around what you would
LIKE TO KEEP. When your selection is as you want it, hit the “Enter” key on the keyboard.
13. You can choose margin sizes for your cropped area, change the page size and apply the same
crop area to one page, certain pages, or all the pages in your document. When your settings are
correct, click OK to apply the changes.
14. We recommend you save your cropped PDF under a new name at this point so you do not lose
your original document.
Click Here
Highlight what you want to keep
Click Here
Click Here
Then Here

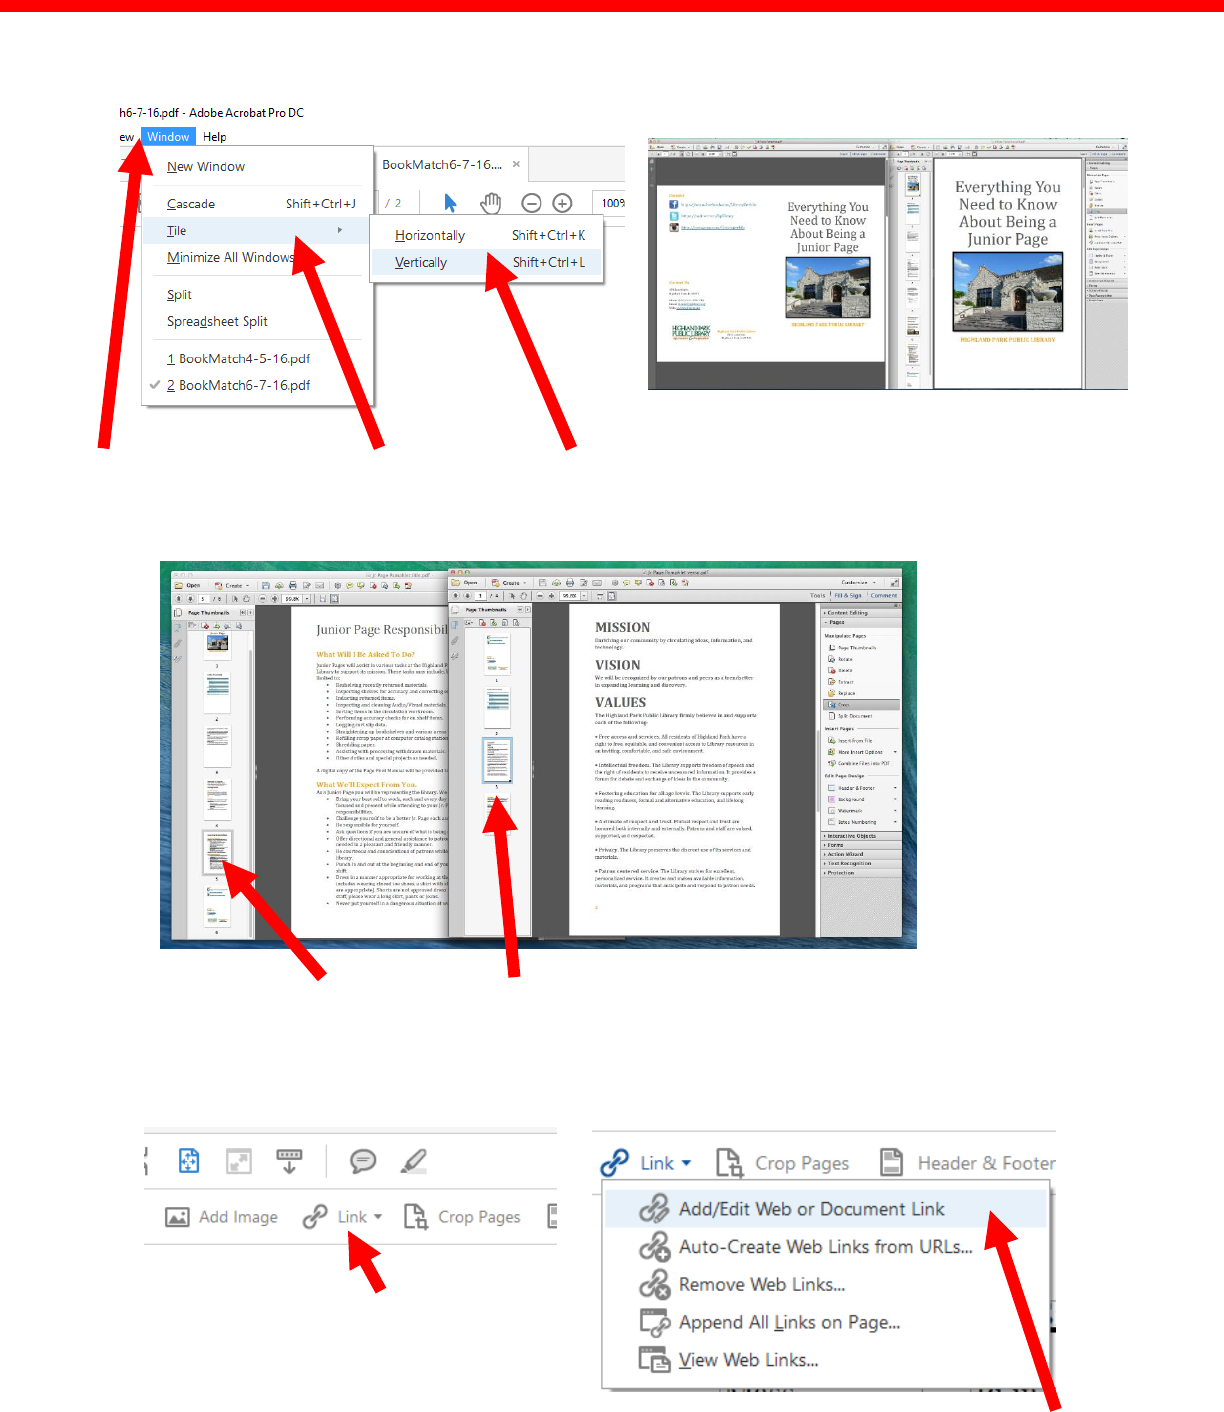
15. You can work in two documents at once by clicking on Window>Tile and choosing to view your
pages either horizontally or vertically.
16. You can move pages from one PDF to another by opening the thumbnail view and dragging the
thumbnails pages from one document to the other.
17. Add links to your document by clicking on the “Link” dropdown and choose Add/Edit Web or
Document Link
Drag This and Drop Here
Tiled Vertically
Click Here
Then Here
Choose View
Click Here
Click Here

18. Use the tool to highlight the area you would like to link from.
19. Choose how you want your link to look and what you would like it to do then click Next
20. If you choose “Got to a page view” you will be asked to choose where in your document you want
the link to send the viewer. Go to that page view and then click “Set Link”.
Outline Your Link
Choose Visible or Invisible Link
Choose Your Link’s Action
When Finished Click Here
Click Here to Make the Link

21. Double click on a link to edit it. You can change the link’s appearance and/or lock it so that
viewers cannot make changes. To change what the link does click on the Actions button
22. Use the dropdown menu to choose a behavior for your link and then follow the online instructions
to complete the action. Click OK when you are finished.
23. You can add a watermark to your document by clicking on Watermark and choosing Add… from
the dropdown.
Click Here to Change
What the Link Does
Choose a Behavior
Click Here When Done
Click Here
Choose Add…

24. Type your watermark text in or upload an image file. Set your watermark opacity and angle. If you
only want the watermark on certain pages, click on Page Range Options and choose the pages
you would like the watermark to appear on. Click OK when your settings are complete.
25. You can convert your PDF to a Word file by clicking on File>Export To>Microsoft Word and
choosing the version of Word you’d like to convert to.
26. Save your file(s) to the storage device of your choice.
Type in Text
Upload File
Set Rotation
Set Opacity
Choose
Pages
Preview
Click Here to Add Watermark
