
Identity & Access System Quick Reference Guide
11/01/2022 1
I&A System Quick Reference Guide Table of Contents
Contents
I&A System Quick Reference Guide Table of Contents ..................................................................................... 1
I&A Features ...................................................................................................................................................... 3
Create an Account ................................................................................................................................................. 3
Retrieve and Reset Forgotten Usernames and Passwords ................................................................................... 3
Unlock an Account ................................................................................................................................................. 3
Register to access CMS Systems on behalf of your Organization ......................................................................... 3
Add and Manage Staff within your Organization .................................................................................................. 3
Work in CMS Systems on behalf of Individual or Organizational Providers .......................................................... 3
Registering/Updating Information in the Identity & Access Management (I&A) System ..................................... 3
Connections in the Identity & Access Management (I&A) System ....................................................................... 4
What Type of User are You? .............................................................................................................................. 4
Individual Provider/Supplier .................................................................................................................................. 4
Organizational Provider ......................................................................................................................................... 4
3
rd
Party Organization ............................................................................................................................................ 4
Authorized Official (AO) ........................................................................................................................................ 4
Access Manager (AM) ............................................................................................................................................ 4
Staff End User (SEU) .............................................................................................................................................. 5
Surrogate ............................................................................................................................................................... 5
What You Can Do? ............................................................................................................................................. 5
Examples - Setting Up Your Account and Gaining Provider Access................................................................... 6
Create Your Account .............................................................................................................................................. 6
Forgotten Password or Account Locked due to Invalid Password Attempts ...................................................... 19
Retrieve Forgotten User ID .................................................................................................................................. 23
Logging into I&A with MFA .................................................................................................................................. 24
Account is MFA (Multi-Factor Authentication) Locked ....................................................................................... 29
Register as an Authorized Official, Access Manager or Staff End User for your employer ................................. 31
How to Setup Your Account if you are a Sole Owner .......................................................................................... 38
How to Initiate a Connection (Surrogate) Request to a Provider ....................................................................... 40

Identity & Access System Quick Reference Guide
11/01/2022 2
How to Initiate Adding Multiple Connection (Surrogate) Requests to a Provider .............................................. 48
How to Approve/Reject a Surrogacy Connection Request .................................................................................. 53
How to Manage your Employees and Their Access ............................................................................................ 58
How to view a staff user’s access .................................................................................................................... 58
How to Modify a staff user’s access ................................................................................................................ 59
How to approve staff user requests ................................................................................................................ 64
How to Invite a Staff Users .............................................................................................................................. 65
How New I&A Users Register from a Staff End Users (SEU) or Access Manager (AM) Invitation ....................... 72
How an Existing I&A User Responds to a Staff End Users (SEU) or Access Manager (AM) Invitation ................ 75
How to Cancel an Employer Request .................................................................................................................. 77
How to Cancel a Pending Employer Role Change Request ................................................................................ 78
How to Disassociate from Your Employer ........................................................................................................... 79
How to Retrieve Forgotten User ID when logging into PECOS ............................................................................ 82
How to Reset a Forgotten Password For a User Who Has Not Completed His/Her User Information Security
Check when logging into PECOS .......................................................................................................................... 90
How to Upload Documents ................................................................................................................................. 99
Examples - Common Connection/Surrogate Scenarios ................................................................................. 104
Example #1: Individual Provider approves Group Practice to manage his information ................................... 104
Example #2: Organizational Provider hires 3
rd
Party Organization to manage their enrollments .................... 105
Example #3: Group Practice hires 3rd Party Organization to manage their information ................................. 106
Example #4: Individual Provider adds Office Manager granting access to manage his information ................ 107
Example #5: Individual Provider Hires 3
rd
Party Organization to manage his information ............................... 108
Appendix A - Acronyms, Key Terms, and Definitions .................................................................................... 109

Identity & Access System Quick Reference Guide
11/01/2022 3
I&A Features
The recent updates have streamlined access when it comes to managing your information in NPPES, PECOS, and
HITECH. If you accessed any of these systems prior to October 7
th
2013, your existing account will still work
just as it did previously, and has been updated to take advantage of the new features.
Create an Account
Depending on the type of user you are, and how you have setup your account, I&A will allow you to access
various CMS computer systems such as NPPES, PECOS, and HITECH and perform actions such as creating an NPI
or updating Medicare Enrollment information.
Retrieve and Reset Forgotten Usernames and Passwords
All Users will have the ability to retrieve forgotten user IDs and reset forgotten passwords through the online
tools, rather than contacting CMS External Users Services (EUS).
Unlock an Account
Users who lock their account by incorrectly entering the User ID and/or Password will have the opportunity to
unlock their account through the online tools, rather than contacting CMS External User Services (EUS).
Register to access CMS Systems on behalf of your Organization
Authorized Officials and Access Managers will be able to add their Organization as an employer in I&A, in order
to access PECOS or HITECH on behalf of their Organization, or so their 3
rd
Party Organization can work on behalf
of Providers.
Add and Manage Staff within your Organization
I&A allows Authorized Officials and Access Managers to add and remove Staff from their Organization, and
control the functions accessible to those staff.
Work in CMS Systems on behalf of Individual or Organizational Providers
I&A allows its users to quickly and securely manage connections between Individual Providers or Organizational
Providers, and their relationships with Surrogates who work on their behalf.
IMPORTANT NOTE:
Registering/Updating Information in the Identity & Access Management (I&A) System
Registering or updating information in the I&A system does not automatically enroll you in Medicare, register
you for an NPI, or perform any other actions or updates in the PECOS, NPPES, or HITECH systems.
If you created your account prior to October 7
th
2013, and the information shown under your profile information,
employers, or connections is not accurate please see the Frequently Asked Questions (FAQ) for more information
on how to update your information.

Identity & Access System Quick Reference Guide
11/01/2022 4
Connections in the Identity & Access Management (I&A) System
Group Practices or any other Organization who act on behalf of Providers as Surrogates, and have 1,000 or more
Connections to Individual Providers (IPs) in the Identity & Access Management (I&A) system may experience an
issue when attempting to access records for these providers in NPPES, PECOS, or HITECH (R&A). Until a fix can be
implemented you can avoid any issues by reducing the number of IPs that any one Staff End User within your
Organization has connections to within I&A. If a user acts on behalf of 1,000 or less IPs they should not have any
issues accessing records within NPPES, PECOS, or HITECH(R&A).
What Type of User are You?
Review the terms. Which term best defines you and your organization? Depending on your situation it may
change.
Individual Provider/Supplier
• An individual that provides services to Medicare beneficiaries and submits claims to Medicare and/or
reassigns benefits to an Organizational Provider (such as a group practice or hospital) that submits
claims to Medicare on their behalf (e.g., Provider working for a Group Practice, or Solo Provider).
• Must have or be eligible for a Type 1 NPI in NPPES.
Organizational Provider
• An Organization that provides medical items and/or services to Medicare beneficiaries (e.g., DMEPOS
Supplier, Physician Group Practice, Hospital, etc.) that submits claims to the Medicare Part A and/or Part
B programs
• Must have or be eligible for a Type 2 NPI in NPPES.
3
rd
Party Organization
• A third-party organization (e.g., billing agency, credentialing consultant, or other staffing company)
that has business relationships with Individual Providers or Organizational Providers to work on their
behalf.
Authorized Official (AO)
• An appointed official of an Organizational Provider or 3
rd
Party Organization with the authority to
legally bind that organization and conduct business on behalf of the organization. If an Organizational
Provider, also ensure the organization’s compliance with Medicare statutes, regulations and
instructions.
• Able to initiate or accept surrogacy connections, and manage staff on behalf of his or her
organization.
Access Manager (AM)
• An individual, delegated by the Authorized Official of an Organizational Provider or 3
rd
Party
Organization, with the authority to legally bind the organization and conduct business on behalf of the
organization. If an Organizational Provider, also ensure the organization’s compliance with Medicare
statutes, regulations and instructions.
• Able to initiate or accept surrogacy connections, and manage staff on behalf of his or her
organization.

Identity & Access System Quick Reference Guide
11/01/2022 5
Staff End User (SEU)
• An individual (e.g., Credentialing Specialist, Office Manager, etc.) who has been approved by an
Authorized Official or an Access Manager of an Organizational Provider or 3
rd
Party Organization, or
who has been approved by an Individual Provider, as an employee of that Organization, or is
employed by that Provider.
• An employee of an Individual Provider or Organizational Provider that is authorized to access, view,
and modify information within a CMS computer systems on behalf of their employer
Surrogate
• An Organizational Provider that has a business relationship with an Individual Provider to access,
view, and modify information within CMS computer systems on their behalf;
OR
• A Third-Party Organization that has a business relationship with an Individual Provider or
Organizational Provider to access, view, and modify information within CMS computer systems on
their behalf.
What You Can Do?
Role
Represent an
Organization
Manage
Staff
Approve/Manage
Connections
Act on behalf of a
Provider in CMS
systems
Individual Provider
Yes
Yes
Yes
Yes
Authorized Official
Yes
Yes
Yes
Yes
Access Manager
Yes
Yes
Yes
Yes
Staff End User
No
No
No
Yes
Surrogate
No
No
No
Yes

Identity & Access System Quick Reference Guide
11/01/2022 6
Examples - Setting Up Your Account and Gaining Provider Access
Create Your Account
If you have received an Invitation E-mail containing a PIN and you don’t yet have an I&A account, follow the
instructions in section How New I&A Users Register from a Staff End Users (SEU) or Access Manager (AM)
Invitation.
If you have received an Invitation E-mail containing a PIN and you already have an I&A account, follow the
instructions in section How an Existing I&A User Responds to a Staff End Users (SEU) or Access Manager (AM)
Invitation Access Manager (AM).
1. select button or select the register link on the I&A login
page
and you will be navigated to the User Registration page.

Identity & Access System Quick Reference Guide
11/01/2022 7
2. Enter your email address and the text seen in the image on the User Registration page. If you have
trouble seeing the image you can either select the Listen to Audio link or select the
icon to have the image refreshed.
Once you have successfully entered the required data, select the Submit button

Identity & Access System Quick Reference Guide
11/01/2022 8
3. Enter the required data on the User Security page and select the Continue button.
Security Questions and Answers cannot be duplicated. You must select 5 different questions, each
having a unique answer (different from the other 4 answers).

Identity & Access System Quick Reference Guide
11/01/2022 9
4. Enter the required data on the User Information page and select the Continue button.

Identity & Access System Quick Reference Guide
11/01/2022 10
5. The system will attempt to standardize your address to meet USPS standards. If the standardized
address is different from what you entered. The system will alert you. We encourage you to use the
standardized address unless it is incorrect.

Identity & Access System Quick Reference Guide
11/01/2022 11
6. You will be required to set up at least one Multi-Factor Authentication (MFA) method. And will be
given the option to set up a second (alternative) method. Select your Primary Authentication Method
from the dropdown list and select Continue.

Identity & Access System Quick Reference Guide
11/01/2022 12
7. If you select E-mail Address, the e-mail address will be pre-populated with your primary e-mail
address you entered when you started registration, however you may change it.
Identity & Access System Quick Reference Guide
11/01/2022 13
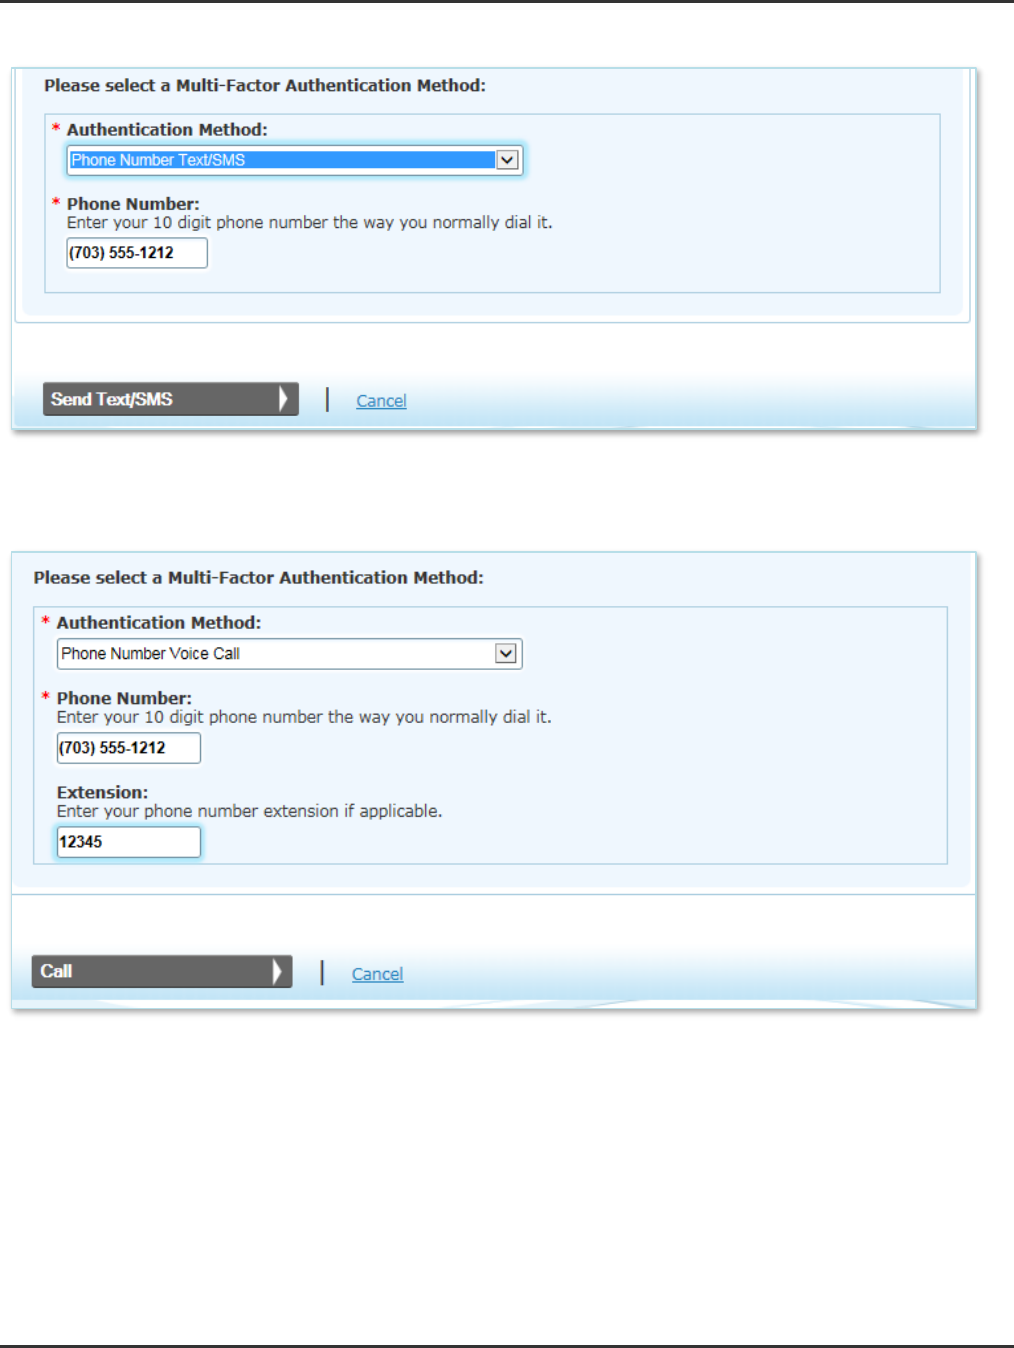
If you select Phone Number Text/SMS, you must enter your 10 digit phone number.
If you select Phone Number Voice Call, you must enter your 10 digit phone number, and have the ability
to enter an extension.

Identity & Access System Quick Reference Guide
11/01/2022 14
8. Enter the code you receive and select Verify Code.
If for some reason you do not receive a code, select the link (Resend E-mail, Resend Text/SMS or Call
Again) to have a new code sent to you. If you need to change your method or update your e-mail
address (Phone Number, if you selected Text/SMS or Voice Call) select the Back to Setup Page link to
start the set up again.
If you selected Phone Number Text/SMS, you will see the following on the verification page

Identity & Access System Quick Reference Guide
11/01/2022 15
If you selected Phone Number Voice Call, you will see the following on the verification page

Identity & Access System Quick Reference Guide
11/01/2022 16
9. Your Primary MFA Method was successfully set up. You may now choose to either set up an
alternative (second) method, or Complete your registration.
10. Your registration is complete, select the Continue to Home page button to be navigated to your I&A
Home page.

Identity & Access System Quick Reference Guide
11/01/2022 17
11. You have successfully created your I&A account.

Identity & Access System Quick Reference Guide
11/01/2022 18

Identity & Access System Quick Reference Guide
11/01/2022 19
Forgotten Password or Account Locked due to Invalid Password Attempts
Your account will be locked if you incorrectly entered your User ID and/or Password three times. When this
happens you will receive the following error message and will have the opportunity to unlock your account
online by resetting your Password.
1. Select the Forgot Password hyperlink within the error message or below the Sign In button on the I&A
Sign In page.
2. On the Reset Forgotten Password – User ID page, enter the User ID associated with locked account and
select the Continue button.

Identity & Access System Quick Reference Guide
11/01/2022 20
3. On the Reset Forgotten Password – Challenge Information page, you have the choice of either entering
the User Information associated with your locked account or answering three of your Security Questions.
Enter the data and select the appropriate Continue button.

Identity & Access System Quick Reference Guide
11/01/2022 21
4. On the Reset Password page, enter your new password and select the Reset button.
The Password Compliance section of the Reset Password page will aid you in creating your new password.
When the compliance is met, you will see a green checkmark next to the compliance. When compliance is
not met, you will see a red X.
Be sure to view the list of valid special characters by hovering your cursor over “valid special character”

Identity & Access System Quick Reference Guide
11/01/2022 22
5. When you receive the Reset Forgotten Password – Confirmation, you will have successfully unlocked the
account without involving EUS. You can then select the Continue to Login Page button to login to I&A or
navigate to the NPPES/PECOS/EHR system and login.

Identity & Access System Quick Reference Guide
11/01/2022 23
Retrieve Forgotten User ID
o On the I&A Sign In page select the Retrieve Forgotten User ID hyperlink.
o On the Retrieve Forgotten User ID - Information page, you can chose to enter your E-mail
Information OR User Information associated with your account and then select the Continue
button.
o When you choose to enter your E-mail Information, on the Retrieve Forgotten User ID -
Confirmation, you will see that your user ID has been sent to the e-mail address provided. Select
the Continue to Login Page button to continue.
o When you choose to enter User Information associated with your account, on the Retrieve
Forgotten User ID - Confirmation page, you will see the user ID associated with your user
information. Select the Continue to Change Password button to continue.
o On the Reset Password page, enter your new password and select the Reset button.
o On the Reset Forgotten Password - Confirmation page, you will see that your password has been
reset. Select the Continue to Login Page button to continue. You will also receive a confirmation
e-mail informing you that your password has been changed.
See an example screen shot of the Retrieve Forgotten User ID - Information page below

Identity & Access System Quick Reference Guide
11/01/2022 24
Logging into I&A with MFA
1. First you enter your User ID and Password, and select the Sign In button.

Identity & Access System Quick Reference Guide
11/01/2022 25

Identity & Access System Quick Reference Guide
11/01/2022 26
2. Then you select which MFA methods you wish to use authenticate. If you have only defined/set up one,
then you will only have one choice. Select the Send Verification Code button to have your code sent to
your selected device.

Identity & Access System Quick Reference Guide
11/01/2022 27
3. You will then be asked if you are logging into the system on a Public or Private device. If you are using a
private device, and you agree to let the system store a cookie on your device browser, you will be able to
bypass MFA when logging into I&A for the next 24 hours.
Enter your code and select the Verify Code button. If you are having trouble getting the code or need a new
code sent, select Send New Code.
4. If you select Private Device you will see the following pop-up window. If you give your consent to allow
the system to store a cookie on you device browser, you will be able to bypass MFA when logging into I&A
for the next 24 hours.

Identity & Access System Quick Reference Guide
11/01/2022 28

Identity & Access System Quick Reference Guide
11/01/2022 29
Account is MFA (Multi-Factor Authentication) Locked
Your account will become MFA locked if you fail to correctly enter your MFA code before exhausting you
maximum number of attempts. When this happens, you will navigated to the Multi-Factor Authentication (MFA)
– Locked page where you need to select the Reset/Unlock MFA button.
1. You will then be navigated to the Reset/Unlock Multi-Factor Authentication (MFA) - Challenge
Information page where you have the choice of either entering the User Information associated with
your locked account or answering three of your Security Questions. Enter the data and select the
appropriate Continue button.

Identity & Access System Quick Reference Guide
11/01/2022 30
2. If you enter the correct information, you will be navigated to the Reset/Unlock Multi-Factor
Authentication (MFA) – Confirmation page. Here you will be able to modify (delete existing and/or
add new) your MFA method setup and/or Proceed to Log into I&A.

Identity & Access System Quick Reference Guide
11/01/2022 31
Register as an Authorized Official, Access Manager or Staff End User for your employer
Once you have created your I&A account by following the instructions outlined in the Create Your Account
section of this document, you can request to be an Authorized Official or an Access Manager for your
organization.
1. Log in to your I&A account.
2. On the Home tab please read the “Are you responsible for an Organization?” paragraph. It will
instruct you to select the My Profile tab
3. On the My Profile tab, scroll to the bottom of the page - under Employer Information - and select the
Add an Employer button.

Identity & Access System Quick Reference Guide
11/01/2022 32
4. On the My Profile - Add Employer Search page, enter criteria to search for your employer and select
the Search button. (NPI Search is recommended for Organizational Providers with an existing NPI.)

Identity & Access System Quick Reference Guide
11/01/2022 33
5. If your Employer is returned in the search, select the Employer from the list by selecting on the radio
button next to the employer.
• NOTE: If your Employer is not found in the Search, select the Add Employer Not in List button.
Enter all of the required fields; select the e-mail address that you wish to use for the Employer.

Identity & Access System Quick Reference Guide
11/01/2022 34
6. Once you select on the radio button, the page will expand so that you can select the role you are
requesting for this employer:
• Authorized Official (signatory for your organization authorized to legally bind the organization in
agreements)
• Access Manager (managing users, updating account information for your provider/organization
• Staff End User (working in approved CMS applications for your provider/organization)
7. Depending on the Role selection you make the page will further expand.
Authorized Officials must attest to being an Authorized Official for your employer by checking the
checkbox.

Identity & Access System Quick Reference Guide
11/01/2022 35
Access Manager and Staff End Users must enter the required information about an Authorized Official
for your employer.
8. On the My Profile - Add Employer - Confirmation and Review page, review the actions you will need to
take in order to be approved as the Authorized Official, Access Manager, or Staff End User and select
the Done button. A confirmation email will be sent to you.

Identity & Access System Quick Reference Guide
11/01/2022 36
• If you are already listed as the Authorized Official or an Access Manager for an Organizational
Provider, which is currently enrolled in Medicare then your application should be approved
immediately.
• If your Organization is not currently enrolled, not eligible to enroll, or you are not already listed as
an AO or AM for an enrolled Medicare Provider you will be required to submit verification
information to CMS External Users Services for review before you can be approved.
o The verification documents can be uploaded on the Add Employer Confirmation and
Review page
If you are requesting to be an Authorized Official:
• You must submit to the EUS help desk a copy of the CP 575 [or approved alternate] for the
organization for which you have requested to work on behalf of as an Authorized Official (To help

Identity & Access System Quick Reference Guide
11/01/2022 37
expedite your request please write the I&A Tracking ID on the copy of the CP 575 you submit to
EUS).
• You will receive an e-mail from EUS when your request has been processed.
If you are requesting to be an Access Manager:
You MUST complete Option A or Option B below before your registration to act on behalf of the
Organization below will take effect in CMS applications.
• OPTION A:
Print, Sign and Submit to CMS the Access Manager Certification for this request, along with the CP
575 [or approved alternate]issued by the IRS for the Organization for which you are requesting to
be an Access Manager.
• OPTION B:
Please have an existing Authorized Official for this Organization approve your request by logging in
to this system.
If you are requesting to be a Staff End User:
You MUST complete Option A or Option B below before you can act on behalf of the Organization in
CMS applications.
• OPTION A:
Please have an existing Authorized Official for this Organization approve your request by logging in
to the I&A system.
• OPTION B:
If you are only trying to gain access to your organization's Type 2 NPIs in NPPES, you can contact
the NPI Enumerator for assistance.
9. You can track your employer request status at the bottom of your My Profile tab.
Important Note: Once your Authorized Official/Access Manager request is approved, please wait up to 2
hours for your account to synchronize before attempting to access the HITECH system.

Identity & Access System Quick Reference Guide
11/01/2022 38
How to Setup Your Account if you are a Sole Owner
Note: As a Sole Owner you have both an Individual Provider NPI (Type 1 NPI) and an Organization NPI (Type
2 NPI). If you have not applied for your NPIs, please do so before continuing with the I&A steps below. As a
Sole Owner you must include both NPIs, Type 1 and Type 2, on your My Profile tab under the Employer
Information section. Below are additional details on this setup.
1. Log in to your I&A account with your Type 1 user ID and password.
2. On the My Profile tab scroll to the bottom of the page. Under Employer Information section you will
be listed as the Authorized Official of yourself (your Type 1 NPI).
3. Next, add your Type 2 NPI under the Employer Information section. To do so, select the Add an
Employer button under the Employer Information and follow the instructions outlined in the
“Register as an Authorized Official, Access Manager, or Staff End User for your employer” section of
this document to register as the Authorized Official of your Organization
4. You can track your Authorized Official request status at the bottom of your My Profile tab.
Employer Information section of the My Profile tab with the employers collapsed

Identity & Access System Quick Reference Guide
11/01/2022 39
Employer Information section of the My Profile tab with the employers expanded
Important Note: Once your Authorized Official request is approved, please wait up to 2 hours for your
account to synchronize before attempting to access the HITECH EHR system.

Identity & Access System Quick Reference Guide
11/01/2022 40
How to Initiate a Connection (Surrogate) Request to a Provider
1. As an Authorized Official/Access Manager, login to your I&A account.
2. On the My Connections tab, select the employer that you are going to create a surrogacy connection
for by selecting the (plus sign icon) next to the employer name.

Identity & Access System Quick Reference Guide
11/01/2022 41
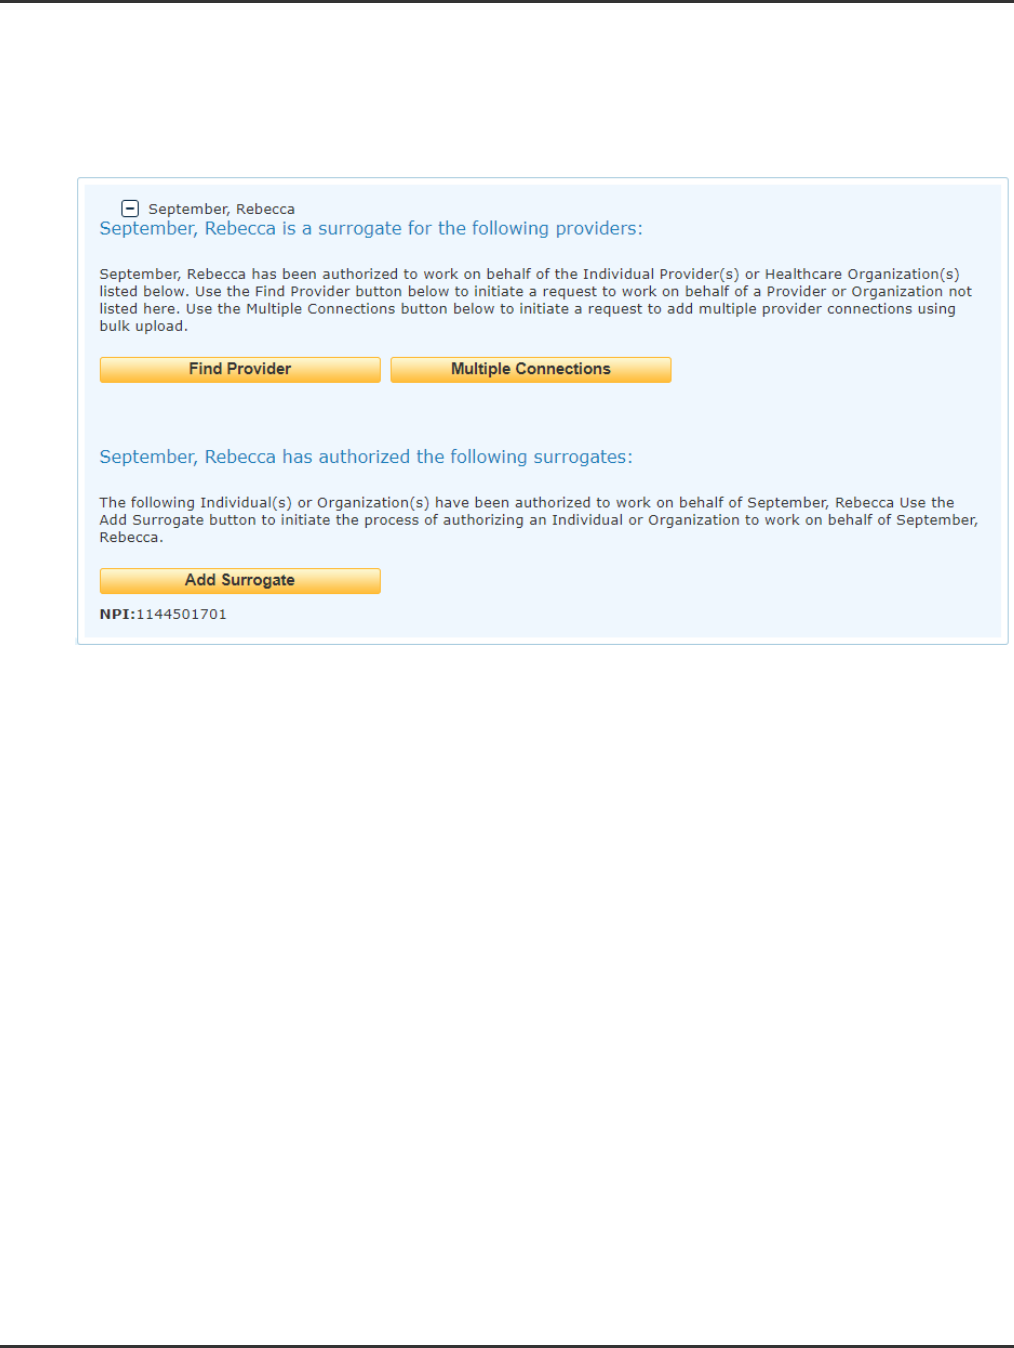
• To request to have your employer work on behalf of a provider select the Find Provider button.
• To request to an organization to work on behalf of your Provider Organization, select the Add
Surrogate button.
o NOTE: if your employer does not have an Active NPI, the Add Surrogate button will not display.

Identity & Access System Quick Reference Guide
11/01/2022 42
3. On the Add Provider/Add Surrogate screen, enter the search criteria and select the Search button.
4. Under the section “Search Results”, select radio button next to the provider’s name. This expands the
screen so that you can select the business functions you would like to access on behalf of the
provider. Select the checkbox next to PECOS/EHR/NPPES and select the Continue button.
Identity & Access System Quick Reference Guide
11/01/2022 43
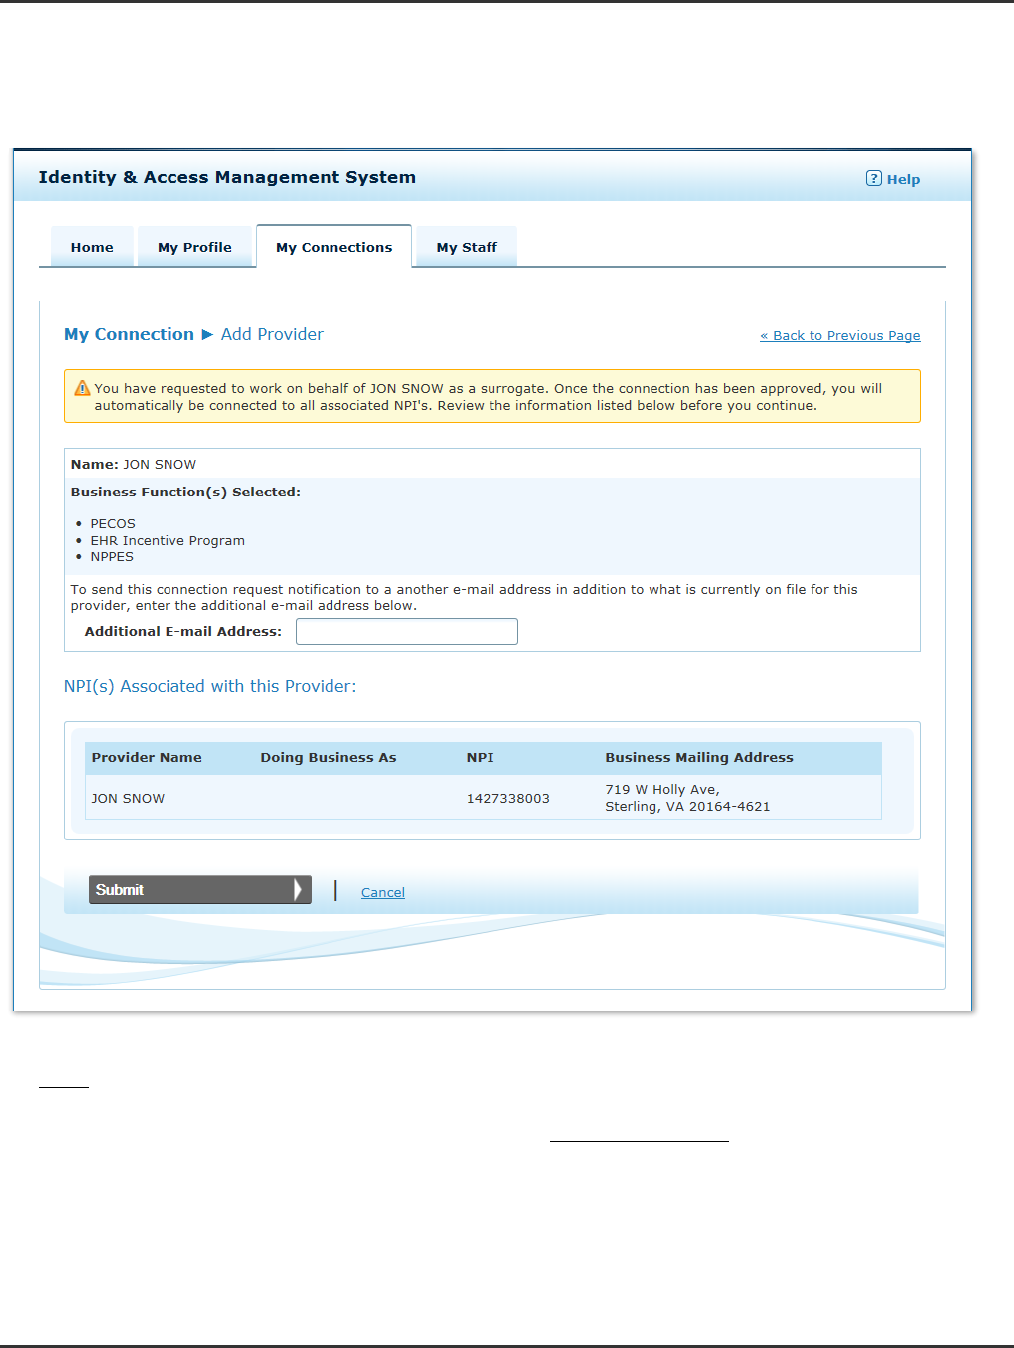
5. On the Add Provider Confirmation page (Add Surrogate Confirmation page if you are adding a
surrogate), review the information on the page for accuracy. If you wish to receive a copy of the
connection request e-mail notification that will be sent to the provider, enter your e-mail address in
the Additional E-mail Address field. Select the Submit button to move forward with the request.
NOTE: Once you select the Submit button an e-mail will be sent to the provider/surrogate, and a copy will be
sent to the e-mail address entered in the Additional E-mail Address field, notifying him/her of your
surrogacy connection request. Please also note that you have not completed the connection request steps
until you select the Done button at the bottom of the Add ProviderReview / Add Surrogate Review
page seen below.

Identity & Access System Quick Reference Guide
11/01/2022 44
6. On the Add Provider Review or Add Surrogate Review page you will see a summary of your
connection request.

Identity & Access System Quick Reference Guide
11/01/2022 45
Note: Once you have successfully created your surrogacy connection requests, the request must be
approved before the surrogate can work on behalf of the provider in the requested systems.
If a surrogate initiates a Connection Request to an Individual Provider, the surrogate has the option of
printing out the Optional Surrogacy Confirmation (link to the form is on the top of the page) and have the
Provider sign the form, then upload the form along with the additional required documents, to have EUS
approve the connection request on the Provider’s behalf.
For more information about Uploading Documents see section How to Upload Documents

Identity & Access System Quick Reference Guide
11/01/2022 46
7. After you select the Done button you will be returned to the My Connections tab where you will now
see the newly added Provider.
8. If you select the icon next to the provider’s name, you will see the business functions and status of
each surrogacy connection request associated with Provider.

Identity & Access System Quick Reference Guide
11/01/2022 47
Note: Once you have created a Surrogacy Connection to an Individual Provider requesting to work on behalf of
the provider, you can access the Optional Surrogacy Confirmation form from the Connection Detail page by
selecting the Tracking ID on the My Connections tab.

Identity & Access System Quick Reference Guide
11/01/2022 48
How to Initiate Adding Multiple Connection (Surrogate) Requests to a Provider
1. As an Authorized Official/Access Manager/Vetted Individual Provider, login to your I&A account.
2. On the My Connections tab, expand the details for the employer that you are going to create multiple
surrogacy connections for by selecting the (plus sign icon) next to the employer name.
Identity & Access System Quick Reference Guide
11/01/2022 49
3. To request to have your employer work on behalf of multiple providers, select the Multiple Connections
button.
o NOTE: If you are requesting to have your employer work on behalf of ONE provider, refer to the
previous section of this guide.

Identity & Access System Quick Reference Guide
11/01/2022 50
4. On the Multiple Connections page, you must choose a CSV file that adheres to the format listed on the page
and select the Upload button.

Identity & Access System Quick Reference Guide
11/01/2022 51
5. On the new Uploaded Connections Information screen, your uploads will be listed along with the success
and/or error messages of each connection request. Error messages will be populated only for rejected
connection requests. These uploads can be sorted by NPI and downloaded for your own personal records by
selecting Export Messages to CSV.

Identity & Access System Quick Reference Guide
11/01/2022 52
6. Click on the My Connections tab where you will now see the newly added Provider.
7. If you select the icon next to the provider’s name, you will see the business functions and status of each
surrogacy connection request associated with the Provider.

Identity & Access System Quick Reference Guide
11/01/2022 53
How to Approve/Reject a Surrogacy Connection Request
After the provider/surrogate receives the connection request e-mail, an Authorized Official of Access Manager
for the Provider or Organization can take the following steps to approve/reject the request.
1. Log in to I&A
a. if the user does not already have an account see section Create an Account
b. if, once logged into I&A if the user is not an Authorized Official or an Access Manager for the health
care provider, see section Register as an Authorized Official, Access Manager or Staff End User for
your employer
If the user is an approved Authorized Official or Access Manager for the Provider or Surrogate
organization that did not initiate the surrogacy request, the user can Approve/Reject pending surrogacy
connection requests from either the Home tab or via the My Connection tab.
2. To Approve or Reject pending Connections via the Home tab, select the Business Function(s) you wish
to Approve or Reject and then select the appropriate button (Approve All Selected or Reject All
Selected).
Note: There is a separate check box for each Business Function for each provider/surrogate
3. To Approve or Reject pending Connections via the My Connections tab,
a. expand the employer by selecting the next to the employer name

Identity & Access System Quick Reference Guide
11/01/2022 54
b. then expand the Provider and/or Surrogate by selecting the next to the Provider or
Surrogate name.
c. select the Tracking ID next to the Business Function you wish to Approve or Reject

Identity & Access System Quick Reference Guide
11/01/2022 55
d. you will be navigated to the Connection Detail page where you can select the Approve or
Reject button next to the pending surrogacy connection you with to Approve/Reject

Identity & Access System Quick Reference Guide
11/01/2022 56

Identity & Access System Quick Reference Guide
11/01/2022 57
e. you will then be asked to confirm your action
Or if you are rejecting a request
f. repeat this process until each connection is approved or rejected.

Identity & Access System Quick Reference Guide
11/01/2022 58
How to Manage your Employees and Their Access
Note: Only an Authorized Official (AO) or Access Manager (AM) has the ability to manage Staff for their
employers.
The AO or AM of the employer should first Log in to I&A and navigate to the My Staff tab
Locate the Staff End User whose access you wish to Modify by scrolling down the screen or using the
Search By: Last Name / First Name search boxes.
How to view a staff user’s access
View staff user’s access on the Active Staff page of the My Staff tab
1. Select the (plus sign icon) next to the Employer Name to expand the employer to see the list of
providers and business functions for which the employer has been approved to work on the provider’s
behalf in the identified application.
2. With the employer expanded, the screen displays the list of providers and the business function
access that has been granted to the user via the surrogacy connection between the Employer and the
Provider.

Identity & Access System Quick Reference Guide
11/01/2022 59
How to Modify a staff user’s access
1. Select the Modify button under the Role heading next to the staff user whose access you wish to
modify
Identity & Access System Quick Reference Guide
11/01/2022 60
2. The Modify Staff page will display.
On this page you have 2 options.
1) modify the user’s Employer access to all of your employers using the Modify All Current Access bar
2) Modify/Adding the user’s access to a specific Employer or modify the user’s surrogate access to
providers for which the Employer is an approved surrogate.
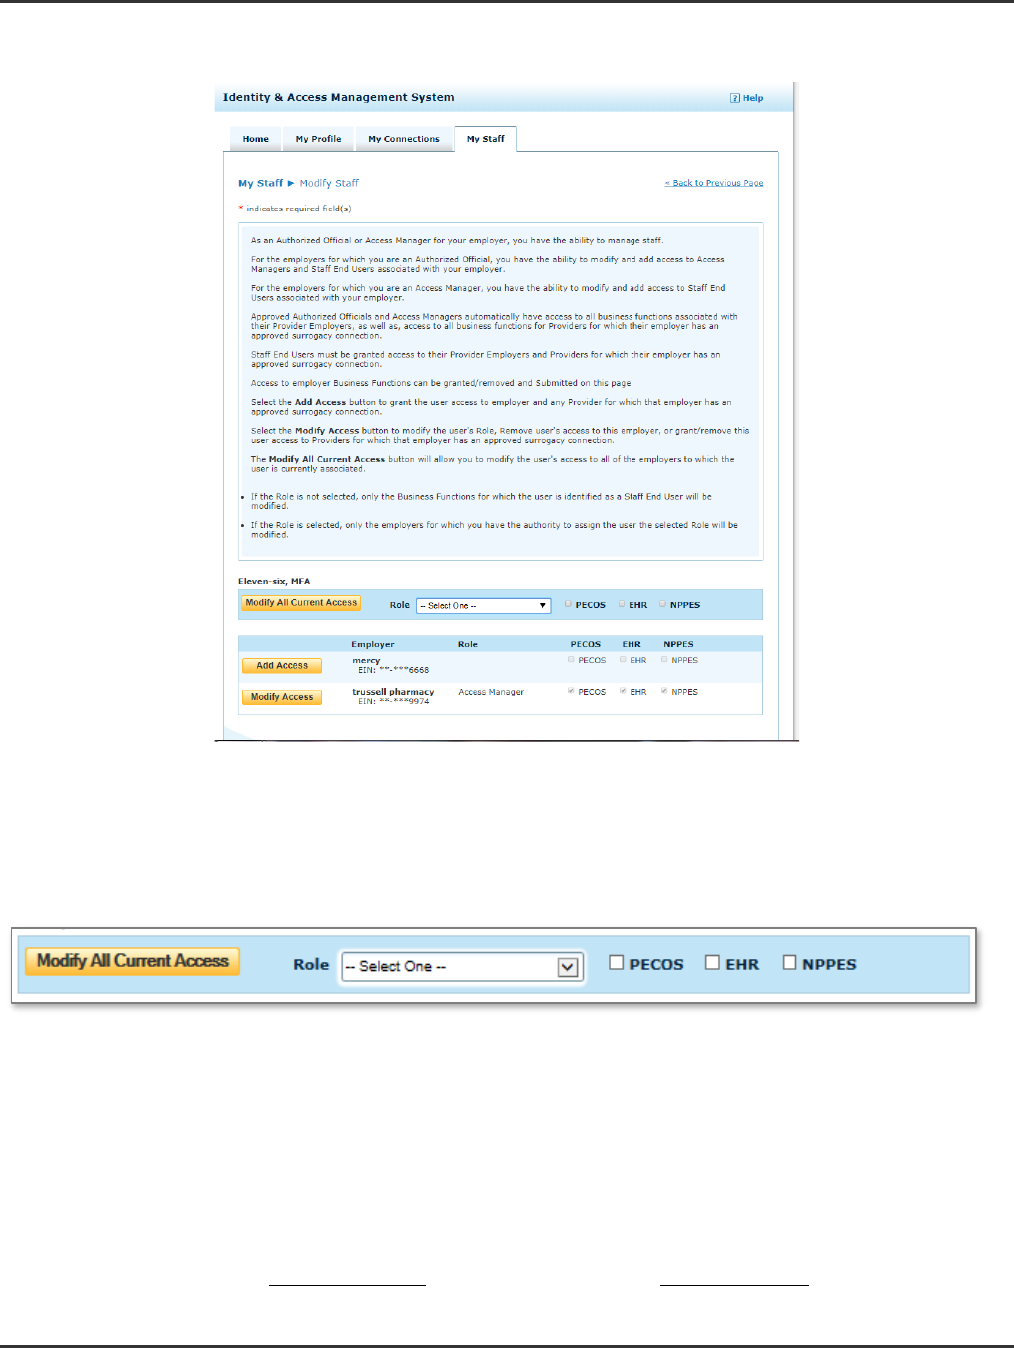
Modifying a Staff User’s access to all Employers at one time.
Using the Modify All Current Access bar, you can select a Role and Business Function access to be applied to the
user for ALL employers. This is useful when trying to grant a Staff End User access to all of your employers.
To do this:
1. Simply select the Role you wish to assign from the Role dropdown box
2. Select the Business Functions you want to grant access to
3. Select the Modify All Current Access button
Modifying a Staff User’s access associated with one Employer time.
To modify or add access for a specific employer or modify the staff user’s surrogate access to providers for
which the employer is an approved surrogate, select the Modify Access or Add Access button next to the

Identity & Access System Quick Reference Guide
11/01/2022 61
desired employer. If no button exists, then you don’t have the authority to modify the user’s access associated
with the employer (for example, Access Managers cannot manage other Access Managers access)
Modifying Access.
1. Select the Modify Access button next to the Employer you wish to modify access for
2. You will be navigated to the Modify Staff page

Identity & Access System Quick Reference Guide
11/01/2022 62
Here you will:
a. select the Role or remove access by selecting No Access (Disassociate)
i. If you are an AO for the selected Employer, you will have three Role options
1) Staff End User
2) Access Manager
3) No Access (Disassociate)
ii. If you are an AM for the selected Employer, you will have two Role options
1) Staff End User
2) No Access (Disassociate)

Identity & Access System Quick Reference Guide
11/01/2022 63
b. select the Employer Business functions you wish to grant the user access to
c. select the surrogate Business functions you wish to grant the user access to.
To grant a Staff End User access to a provider, you can individually check the checkbox next to
the Business Function(s) for the desired provider(s), or you can grant access to all providers by
checking the checkbox(es) in the Provider column header row.
IMPORTANT: Per CMS security standards the I&A page will timeout after about 10-15 minutes of
inactivity. Simply checking boxes on the screen will cause the page to timeout so CMS encourages
users to select 10 - 20 providers for their Staff End User (or as many providers as you can select) and
select the Submit button to ensure the page does not timeout. The AO or AM should then go back to
modify the Staff End User’s account and continue selecting providers.
3. Once you have assigned the appropriate access to the staff user, scroll to the bottom of the page,
choose whether or not they wish to send an e-mail notification to the staff user, and select the
Submit button.
4. After the Staff End User is assigned access to the provider(s) AND the AO or AM selects the Submit
button the Staff End User must wait up to 2 hours for the system to synchronize the account
updates to the EHR system. After 2 hours the Staff End User can log in to EHR and work on behalf of
the provider(s).
5. To remove a Staff End User’s access to a provider, follow steps 1 - 4 above, in step 2 instead of
checking the checkbox, you would uncheck the checkbox next to the Business Function(s) of the
provider for whom the Staff End User should no longer have access.

Identity & Access System Quick Reference Guide
11/01/2022 64
How to approve staff user requests
Approved Authorized Officials and Access Managers will see the My Staff. Select the Role Requests button to
navigate to the My Staff Pending Role Requests page.
New employer requests and role change requests that you have the ability/rights to take action on will display.
You will have the ability to either approve or reject the request.
Once you select the Approve or Reject button you will be navigated to the confirmation page. You have the
ability to send an e-mail notification to the requestor. If you uncheck the checkbox, no e-mail notification will be
sent. Once you have reviewed your action, select the Submit button the request.

Identity & Access System Quick Reference Guide
11/01/2022 65
How to Invite a Staff Users
Note: Only an Authorized Official (AO) can invite Access Managers (AMs), while both AOs and AMs can invite a
Staff End Users (SEUs) for their employers.
1. Log in to I&A and navigate to the My Staff tab
2. Select the Add Staff button.

Identity & Access System Quick Reference Guide
11/01/2022 66
3. On the Add Staff page, the AO or AM will enter the user’s First Name, Last Name, and E-mail address,
then select the employer you wish to add the user as an employee.

Identity & Access System Quick Reference Guide
11/01/2022 67
4. When you check the checkbox next to the Employer the Role dropdown will become enabled and you
can select the role you with to assign to the user. If you are an Authorized Official for the Employer,
you will be able to assign the user the role of Staff End User or Access Manager. If you are an Access
Manager for the Employer, you will only be able to assign the user the role of Staff End User. You will
also select the Business Function(s) which will grant the user access to the Employer in the named
CMS application.
Business functions are only available for employers who are providers (i.e., they have an active NPI in
NPPES). If an employer has no active NPI, the business functions will not appear.

Identity & Access System Quick Reference Guide
11/01/2022 68
5. You can also grant access to multiple employers at once by using the checkboxes and Role in the
Header row. The same applies for the Business Functions (PECOS, EHR, and NPPES).
6. After you complete the user’s Role and Business Function(s) selection for the employer, select the
Submit button

Identity & Access System Quick Reference Guide
11/01/2022 69
7. The Submit button will take you to the Add Staff > Review page where you will verify the information
for accuracy. It is important that the e-mail address entered in the Add Staff page is accurate so the
Staff End User will receive their invitation and PIN to register. Once the information is complete,
select the Continue button.
8. Upon selecting the Continue button an e-mail invite will be sent to the E-mail Address you entered
and you will be navigated to an Add Staff confirmation page.

Identity & Access System Quick Reference Guide
11/01/2022 70
9. Below is an example of the e-mail invitation that is generated.
From: [email protected]
Subject: You’ve been invited to register with the Centers for Medicare and Medicaid Identity & Access System
Jon Snow requested that you register as a staff user for your employer(s) AAG
Org One, JON SNOW in the Centers for Medicare and Medicaid Services Identity
& Access (I&A) system. To continue, please either click on the PIN Entry Page
link provided below or cut and paste the link into your browser and enter the
e-mail address and the PIN provided below. Note that the PIN will expire in
72 hours if not used.
PIN Entry Page: https://nppes.cms.cmstest/IAWeb/register/register_pin.do
PIN: 2534694877
Invitation Tracking ID: I11355
Systems that currently accept I&A log in credentials:
Internet-based PECOS (https://pecos.cms.hhs.gov)
EHR Incentive Program (https://ehrincentives.cms.gov)
NPPES (https://nppes.cms.hhs.gov)
Please do not reply to this message via e-mail. This address is automated,
unattended, and cannot help with questions or requests. If you have any
questions, please contact the External User Services (EUS) Help Desk:
External User Services (EUS) Help Desk
PO Box 792750
San Antonio, TX 78279
1-866-484-8049

Identity & Access System Quick Reference Guide
11/01/2022 71
10. The newly added Staff End User will exist on the My Staff tab under the Inactive Staff heading,
Registration Pending, until he/she registers in I&A.
Once the user accepts the invitation (see How New I&A Users Register from a Staff End Users (SEU) or
Access Manager (AM) Invitation and How New I&A Users Register from a Staff End Users (SEU) or
Access Manager (AM) Invitation sections of this document) the user will show under the Active Staff
heading on the My Staff page

Identity & Access System Quick Reference Guide
11/01/2022 72
How New I&A Users Register from a Staff End Users (SEU) or Access Manager (AM) Invitation
Note: PINs included in the Staff End User Invitation will expire in 72 hours if not used.
1. The user should access their e-mail and look for e-mail Subject: You've been invited to register with
the Centers for Medicare and Medicaid Identity & Access System. An example of this e-mail is
available in step 8 of the How to Invite a Staff End User (SEU).
2. In the body of the e-mail the Staff End User should locate the web address provided after the text PIN
Entry Page: and copy and paste the web address in his/her Internet browser and select Enter.
3. The user is then navigated to the Terms and Conditions page where they should review and terms and
conditions. To continue, the user must select the Accept button.

Identity & Access System Quick Reference Guide
11/01/2022 73
4. The user is then directed to the Enter Pin page.
a. The user will enter the e-mail address where they received the Staff End User Invitation
b. Enter the PIN found in the body of the e-mail
c. And select the Submit button to continue
5. On the Invited User page, the user will decide if he/she is new to I&A OR if he/she is already a
registered I&A user.
Important: The invited user must register or sign in under his/her own account, not the account of the
person who sent the invitation.
a. Users who have already registered will enter their User ID and Password and select the Sign In
button
b. Users who are new to I&A will select the Continue To Registration button
The steps that follow are for a user who is new to I&A. A new I&A user will select the Continue To
Registration button.

Identity & Access System Quick Reference Guide
11/01/2022 74
6. After selecting the Continue to Registration button, the user is taken through the User Registration
Process. (see the Create Your Account example)
7. Once the user has completed creating their account, the can navigate to the My Profile tab and scroll
to the bottom of the page to see their Approved employer relationships under the Employer
Information section.

Identity & Access System Quick Reference Guide
11/01/2022 75
How an Existing I&A User Responds to a Staff End Users (SEU) or Access Manager (AM) Invitation
Note: PINs included in the Staff End User Invitation will expire in 72 hours if not used.
1. The user should access their e-mail and look for e-mail Subject: You've been invited to register with
the Centers for Medicare and Medicaid Identity & Access System. An example of this e-mail is
available in step 8 of the How to Invite a Staff End User (SEU).
2. In the body of the e-mail the Staff End User should locate the web address provided after the text PIN
Entry Page: and copy and paste the web address in his/her Internet browser and select Enter.
3. The user is then navigated to the Terms and Conditions page where they should review and terms and
conditions. To continue, the user must select the Accept button.
4. The user is then directed to the Enter Pin page.
a. The user will enter the e-mail address where they received the Staff End User Invitation
b. Enter the PIN found in the body of the e-mail
c. And select the Submit button to continue
5. On the Invited User page, the user will decide if he/she is new to I&A OR if he/she is already a
registered I&A user.
Important: The invited user must register or sign in under his/her own account, not the account of the
person who sent the invitation.
a. Users who have already registered will enter their User ID and Password and select the Sign In
button
b. Users who are new to I&A will select the Continue To Registration button
The steps that follow are for a user who has already registered in I&A and has a user ID and
password. The user will enter his/her User ID and Password and select the Sign In button.

Identity & Access System Quick Reference Guide
11/01/2022 76
6. The user will then log in and navigate to the My Profile tab and scroll to the bottom of the page to see
their Approved Staff End User status under the Employer Information section.
7. Staff End User have the ability to cancel their initial Employer Role Request for their AO, AM and SEU
(This can only be canceled before the request is approved or being processed) as well as Disassociate
themselves from their current employer.

Identity & Access System Quick Reference Guide
11/01/2022 77
How to Cancel an Employer Request
Employer Request can only be canceled before the request is approved or being processed.
Please follow the following steps to cancel an Employer Request:
Step 1:
Login to I&A and click on My Profile Tab. Scroll to bottom of page and click the + sign icon next to the employer
name (Status must be Pending Approval).
Scroll down and click on the button that says Cancel Employer Request.

Identity & Access System Quick Reference Guide
11/01/2022 78
Step 2:
Below, you can see the option to select “Yes” to cancel the Employer Request.
The status with your Employer will be Cancelled.
How to Cancel a Pending Employer Role Change Request
Employer Role Change Requests can only be canceled before the request is approved or being processed.
Follow the following steps to cancel your Employer Role Change Request:
Step 1:
Login to I&A and click on My Profile Tab. Scroll down to the Employer Information section.
In the example below, you will see in the user is an Approved Access Manager for Organizational Provider
AAG Org One and has submitted a Role Change Request to be an Authorized Official.
Select the + sign icon next to the employer name to expand the employer.

Identity & Access System Quick Reference Guide
11/01/2022 79
Step 2:
Select the Cancel Pending Role Change Request button to cancel the Role Change Request that is Pending
Approval.
Step 3:
Confirm you wish to Cancel your pending Role Change Request be selecting “Yes” .
You will then see that your Role Change Request no longer exists and your Role and Status with your Employer is
unchanged
How to Disassociate from Your Employer
You can Disassociate yourself from an Employer if your status with the Employer is Approved and you are not an
Individual Provider trying to disassociate yourself from your own Individual Provider Organization.
In the example below, you will see Individual Provider John Doe’s Employer Information.
He is currently an approved employee of:
a. Organizational Provider Cox Pharmacy
b. Individual Provider Doe, John – his own IP org
c. Individual Provider Trussell, Jack
And is Pending Approval for Organizational Provider American Pharmacy

Identity & Access System Quick Reference Guide
11/01/2022 80
John Doe can disassociate himself from Cox Pharmacy and Individual Provider Jack Trussell. When these two
Employers are expanded, the Disassociate From Employer button will only be is visible/available.

Identity & Access System Quick Reference Guide
11/01/2022 81
However, John Doe cannot disassociate himself from his own Individual Provider Organization or American
Pharmacy (since he is not currently Approved as an employee). If you expand either one of those two
Employers, you will not see a Disassociated From Employer button.
Follow the following steps to disassociate yourself from Your employer:
Step 1:
Login to I&A and click on My Profile Tab. Scroll to bottom of page and click the + sign icon next to the employer
name (Status must be Approved). Scroll down and click on the button that says Disassociate From Employer.
Step 2:
Confirm you wish to Disassociate your pending Role Change Request be selecting “Yes”
The status with your Employer will be Disassociated, and you will no longer have Provider access via the
employer relationship.

Identity & Access System Quick Reference Guide
11/01/2022 82
How to Retrieve Forgotten User ID when logging into PECOS
1. From the PECOS logon page the user selects Forgot User ID? Hyperlink. The user is then redirected to
the I&A Retrieve Forgotten User ID - Information page.

Identity & Access System Quick Reference Guide
11/01/2022 83
2. On the Retrieve Forgotten User ID - Information page, the user enters his/her e-mail address and
selects the Continue button.

Identity & Access System Quick Reference Guide
11/01/2022 84
3. In this example, the user enters the incorrect e-mail address and receives an error message stating
“The e-mail address is not associated with a User ID.” The user attempts to enter a different e-mail
address and selects the Continue button.
4. The user tries two additional times to enter the correct e-mail address associated with his/her
account and after the third attempt when the user selects the Continue button the user receives an
error message stating “You have entered an invalid e-mail address three times. Please enter the User
Information below associated with your account to continue.”
Note: Continue button under the E-mail Information heading is disabled and the user is forced to
complete the User Information fields.
The user enters the personal information collected in the User Information fields and selects the
Continue button.

Identity & Access System Quick Reference Guide
11/01/2022 85
5. On the Retrieve Forgotten User ID - Confirmation page, the user ID associated with the user’s account
is displayed. The user must copy/make note of their user ID and select the Continue to Change
Password button.

Identity & Access System Quick Reference Guide
11/01/2022 86
6. On the Reset Password page, the user is prompted to enter a new password and select the Reset
button The Password Compliance section of the Reset Password page will aid you in creating your new
password. When the compliance is met, you will see a green checkmark next to the compliance.
When the compliance is not met, you will see a red X.

Identity & Access System Quick Reference Guide
11/01/2022 87
Be sure to view the list of valid special characters by hovering your cursor over “valid special character”
7. Once the user selects the Reset button on the Reset Password page the user is taken to the Reset
Forgotten Password - Confirmation page. The user will select the Continue to Login Page button
access the I&A logon screen.
a. Note: The user will also receive an e-mail notification confirming that the password on the user’s
account has been changed. See an example e-mail below
From: [email protected]
Subject: Password Change Notification

Identity & Access System Quick Reference Guide
11/01/2022 88
This is to inform you the password on your account whitneysteve was
recently reset. If you did not reset your password, please contact the
External User Services (EUS) Help Desk immediately.
8. On the I&A logon page the user will enter his/her user ID and newly reset password and select the
Sign In button.

Identity & Access System Quick Reference Guide
11/01/2022 89
9. Since this user has previously logged in to their I&A account he/she will be taken directly to their I&A
Home page.
10. Once the user is finished in his/her I&A account the user can logout using the Sign Out hyperlink in the
top right hand corner of the screen.
11. The user can now take their user ID and newly reset password and login to NPPES, PECOS and/or EHR.

Identity & Access System Quick Reference Guide
11/01/2022 90
How to Reset a Forgotten Password For a User Who Has Not Completed His/Her User Information
Security Check when logging into PECOS
1. From the PECOS logon page the user selects Forgot Password? Hyperlink. The user is then redirected
to the I&A Reset Forgotten Password - User ID page.
2. On the Reset Forgotten Password - User ID page, the user enters his/her user ID and selects the
Continue button.

Identity & Access System Quick Reference Guide
11/01/2022 91
3. On the Reset Forgotten Password - Challenge Information page, the user attempts to enter his/her
Security Questions and selects the Continue button.
4. In this example, the user incorrectly answers the Security Questions and receives an error message
stating “One or more Answers are incorrect. The security questions may have changed. Please input
the correct answers. You will be required to enter the User Information associated with the account
after 3 incorrect attempts.” The user attempts to enter his/her Security Questions and selects the
Continue button.

Identity & Access System Quick Reference Guide
11/01/2022 92
5. The user attempts to correctly answer the Security Questions two additional times and after the third
attempt when the user selects the Continue button the user receives an error message stating “You
have incorrectly answered your security questions three times. Your account has been locked. Please
enter the User Information associated with your account to unlock the account and reset your
password. After three unsuccessful attempts to correctly enter your User Information you
will be required to contact EUS to unlock your account.”
Note: Continue button under the Security Questions heading is disabled and the user is forced to
complete the User Information fields.

Identity & Access System Quick Reference Guide
11/01/2022 93
The user enters the personal information collected in the User Information fields and selects the
Continue button.

Identity & Access System Quick Reference Guide
11/01/2022 94
6. On the Reset Password page, the user is prompted to enter a new password and select the Reset button.
7. Once the user selects the Reset button on the Reset Password page the user is taken to the Reset
Forgotten Password - Confirmation page. The user will select the Continue to Login Page button access
the I&A logon screen.
Note: The user will also receive an e-mail notification confirming that the password on the user’s
account has been changed. See an example e-mail below

Identity & Access System Quick Reference Guide
11/01/2022 95
From: [email protected]
To: NOT-CONVERTED-TESTUSER
Subject: Password Change Notification
This is to inform you the password on your account TESTUSER was recently
reset. If you did not reset your password, please contact the External User
Services (EUS) Help Desk immediately.
8. On the I&A logon page the user will enter his/her user ID and newly reset password and select the
Sign In button.

Identity & Access System Quick Reference Guide
11/01/2022 96
9. Before the user is able to access his/her I&A Home page the user must complete the User Information
Integrity Check. On User Information Integrity Check - Notice page, the user will select the Continue
to Start button to continue.
Note: In this example, this is the first time the user has logged into his/her I&A account so the user
has not completed the User Information Integrity Check. If the user has previously logged in to
his/her I&A account the user will be taken directly to their Home page.
10. On the User Information Integrity Check - E-mail page the user must enter a unique e-mail address.
After the user enters their e-mail address the user will select the Continue button.
-
11. On the User Information Integrity Check - Profile page the user must complete all required fields.
Once completed, the user will select the Continue button. Note that if the user is an Individual
Provider with an Active Type 1 NPI, the user will not be able to modify the information on the left side

Identity & Access System Quick Reference Guide
11/01/2022 97
of the screen because it is on the user's NPI. If the information on the left side needs to be modified,
the user should complete this process and then login to NPPES to correct the information on his/her
NPI. The information will then be updated in I&A automatically.

Identity & Access System Quick Reference Guide
11/01/2022 98
12. After the user completes Step 1 - E-mail and Step 2 - Profile, the user is taken to Final Complete. On
the User Information Integrity Check - Complete page the user will select the Continue to home Page
button to access their Home tab.
13. From the user’s Home tab they can see if there are any Pending Provider or Surrogate requests. The
user will also be able to navigate to other tabs available to them depending on the role of their
account (i.e., Authorized Official, Access Manager, or Staff End User).
14. Once the user is finished in his/her I&A account the user can logout using the Sign Out hyperlink in the
top right hand corner of the screen.
15. The user can now take their user ID and newly reset password and login to NPPES, PECOS and/or EHR.

Identity & Access System Quick Reference Guide
11/01/2022 99
How to Upload Documents
The Add a Document button can be found on the following pages:
a. Add Employer Confirmation and Review page
i. Displays at the end of the Add Employer process
ii. Displays when the Tracking ID of a Pending Employer Request is selected on the My
Profile tab in the Employer Information section
b. Add Provider page
i. Displays at the end of the Add Provider Process when the Provider is an Individual
Provider
c. Connection Details page
i. Displays when a surrogacy connection is in a Pending Status and your employer
imitated the surrogacy connection to an Individual Provider
1. Select the Browse button to search for your file
2. Navigate to your file and select the file

Identity & Access System Quick Reference Guide
11/01/2022 100
3. Identify what Type of Document you are uploading

Identity & Access System Quick Reference Guide
11/01/2022 101
4. Once your document is successfully uploaded, you have the ability to View the uploaded
document, add a comment associated with the uploaded document, or delete the uploaded
document or comment, as long as, the request is in a Pending or Rejected status.

Identity & Access System Quick Reference Guide
11/01/2022 102
5. Selecting the ICON will bring up the Add Document Comment page.
Once the comment is added you will see in the Comments column

Identity & Access System Quick Reference Guide
11/01/2022 103
You have the ability to Delete uploaded documents while the request is Pending or after it has been Rejected

Identity & Access System Quick Reference Guide
11/01/2022 104
Examples - Common Connection/Surrogate Scenarios
Providers can grant access to employees and/or surrogates to manage and access their information in any (or
all) of the following systems:
• NPPES
• PECOS
• EHR (HITECH R&A)
Example #1: Individual Provider approves Group Practice to manage his information
John Smith (Individual Provider) is part of a group practice Health Group Inc. (Organizational Provider). Brian
Johnson is the Authorized Official for Health Group Inc. Tom and Alex (Staff) are both credentialing specialists
that work for Health Group Inc. John has made business arrangements with Health Group Inc. to manage his
enrollment information within PECOS and his information in NPPES and EHR.
Assumption: Health Group Inc. is already found in I&A and already has an NPI. Brian, Tom, and Alex are already
established with their respective roles in I&A. John already has an NPI.
Brian Johnson (AO for Health Group Inc.):
1. Logs in to I&A;
2. Goes to My Connections, and selects Find Provider, under Health Group Inc.;
3. Searches for John Smith by his NPI;
4. Selects him and then the PECOS, NPPES, and EHR business functions; and
5. Confirms the connection request.
John Smith (Individual Provider):
6. John Smith receives notification of the requested connection.
7. Logs in to I&A;
8. Sees the pending request from the group to add him on both the Home page and in the list of
connections on the My Connections page;
9. John approves the request;
10. John receives notification of approved connection request;
11. Health Group Inc. receives notification of approved connection request.
These steps establish the connection (surrogacy relationship) between John Smith and Health Group Inc. - which
allows any member of Health Group Inc.'s staff (i.e., Brian, Tom, or Alex) to access information for John Smith. If
Health Group Inc. had established an Access Manager they could also initiate the connection request.

Identity & Access System Quick Reference Guide
11/01/2022 105
Example #2: Organizational Provider hires 3
rd
Party Organization to manage their enrollments
Health
Product Store (Organizational Provider) has made business arrangements with a 3
rd
party consulting company,
Billing Medical (3
rd
Party Organization) to manage their enrollment information in PECOS. Jane Foster is the
Authorized Official of Health Product Store, Jack Lee is the Authorized Official of Billing Medical, and Tom (Staff)
is a credentialing specialist that works for Billing Medical.
Assumption: Health Product Store already has an NPI, Billing Medical is already established in I&A, and Jane,
Jack, and John are setup with their respective roles.
Jack Lee (Authorized Official of Billing Medical):
1. Logs in to I&A;
2. Goes to My Connections, and selects Find Provider, under Billing Medical.;
3. Searches for Health Product Store by its NPI;
4. Selects Health Product Store and then the PECOS business function; and
5. Confirms the connection request.
Jane Foster (Authorized Official of Health Product Store):
6. Health Product Store Authorized Official receives notification of the requested connection.
7. Logs in to I&A;
8. Sees the pending request on both the Home page and in the list of connections on the My
Connections page;
9. Jane approves the request;
10. Jane receives notification of approved connection request;
11. Billing Medical receives notification of approved connection request.
These steps establish the connection (surrogacy relationship) between Health Product Store and Billing Medical -
which allows any member of Billing Medical’s Staff to access information for Health Product Store. If Billing
Medical had established an Access Manager they could also initiate the connection request.

Identity & Access System Quick Reference Guide
11/01/2022 106
Example #3: Group Practice hires 3rd Party Organization to manage their information
Group Practice hires 3rd Party Consulting Organization to manage their information for itself, AND all the
Individual Providers who have already connected to it. In this example, the Organizational Provider is only
granting access to their information PECOS, however; the same can be applied to both NPPES and EHR.
Health Group Inc. (Organizational Provider) has made business arrangements with a 3
rd
party consulting
company, Billing Medical (3
rd
Party Organization) to manage their enrollment information in PECOS, and the
enrollment information for all their Individual Providers who have previously connected to Health Group Inc.
Brian Smith is the Authorized Official for Health Group and Alex (Staff) is the office manager. Jack Lee is the
Authorized Official for Billing Medical, and Tom (Staff) is already a member of the Staff on Billing Medical, and
will be the only person working on information for Health Group or any of its Providers.
Assumption: Health Group Inc. already has an NPI, Billing Medical is already established in I&A, and both Brian
and Tom are setup with their respective role, Individual Providers have established connections with Health
Group Inc.
Brian (Authorized Official):
1. Logs in to I&A;
2. Goes to My Staff, and selects Add Staff;
3. Enters Tom’s name and e-mail address;
4. Submits the request.
Tom (Staff of 3
rd
Party Organization):
5. Receives an e-mail requesting that he register as a staff for Health Group Inc.;
6. Selects the link from the e-mail;
7. Enters his e-mail address and the PIN provided in the e-mail;
8. Since Tom is already a registered user in I&A he log’s in and finalizes the registration.
9. Upon successful registration Tom will now see he is a Staff member for Health Group Inc.
These steps establish the connection (surrogacy relationship) between Health Group Inc. and Billing Medical via
Tom, a member of Billing Medical’s staff. Tom from Billing Medical can now access information for Health
Group Inc., AND all of the Individual Providers who have previously approved connections between themselves
and Health Group Inc.
IMPORTANT NOTE: If Health Group Inc. creates a CONNECTION to Billing Medical rather than making an
individual of Billing Medical’s Staff a member of their staff, Billing Medical’s Staff would only have access to the
PECOS information for Health Group Inc., NOT any of the Individual Providers who previously authorized Health
Group Inc. to work on their behalf.

Identity & Access System Quick Reference Guide
11/01/2022 107
Example #4: Individual Provider adds Office Manager granting access to manage his information
Joe Brown (Individual Provider) has a private practice JB Medical Clinic. Sarah Douglas is Joe Brown’s office
manager and will be managing his enrollment information within PECOS and information in EHR and NPPES.
Assumption: Joe Brown already has an NPI and is already established in I&A.
Joe Brown (Individual Provider):
1. Logs in to I&A;
2. Goes to My Staff, and selects Add Staff;
3. Enters Sarah’s name and e-mail address;
4. Selects Sarah’s employer (Joe) and Role - Staff End User and then the PECOS/HER/NPPES business
functions; and
5. Submits the request.
Sarah Douglas (Staff - Office Manager):
6. Sarah receives an e-mail requesting that she register as a staff end user for Joe;
7. Sarah selects the link from the e-mail;
8. Enters her e-mail address and PIN provided in the e-mail;
9. Since Sarah is not currently a registered user in I&A she will select Continue to Registration;
10. Sarah follows the screens through the Registration process.
11. Once registration is successful Sarah will see on her My Profile tab that she now a Staff End User for
Joe Brown
These steps establish the employment relationship between Joe Brown and Sarah Douglas. Sarah Douglas. As a
member of Joe Brown’s Staff she can now act as a surrogate for Joe Brown.

Identity & Access System Quick Reference Guide
11/01/2022 108
Example #5: Individual Provider Hires 3
rd
Party Organization to manage his information
Joe
Brown (Individual Provider) has a private practice JB Medical Clinic, and has made a business arrangements with
a 3
rd
party consulting company, Billing Medical (3
rd
Party Organization) to manage his enrollment in PECOS and
his information in NPPES and EHR. Jack Lee is the Authorized Official of Billing Medical.
Assumption: Billing Medical is already established in I&A, and Jack is already setup as the AO. Joe Brown already
has an NPI and is already established in I&A.
Jack Lee (AO for Billing Medical):
1. Logs in to I&A;
2. Goes to My Connections, and selects Find Provider, under Billing Medical.;
3. Searches for Joe Brown by his NPI;
4. Selects him and then the NPPES, PECOS, and EHR business functions; and
5. Confirms the connection request.
Joe Brown (Individual Provider):
6. Joe Brown receives notification of the requested connection.
7. Logs in to I&A;
8. Sees the pending request on both the Home page and in the list of connections on the My
Connections page;
9. John approves the request;
10. Billing Medical receives notification of approved connection request
These steps establish the connection (surrogacy relationship) between Joe Brown and Billing Medical - which
allows any member of Billing Medical’s staff to access information for Joe Brown. If Billing Medical had
established an Access Manager they could also initiate the connection request.

Identity & Access System Quick Reference Guide
11/01/2022 109
Appendix A - Acronyms, Key Terms, and Definitions
Acronym
Description
AO
Authorized Official
AM
Access Manager
EHR R&A
Electronic Health Records Registration & Attestation System
EUS
External User Services
HITECH
Health Information Technology for Economic and Clinical Health Act
I&A
Identity & Access system
IP
Individual Provider
MFA
Multi-Factor Authentication
NPI
National Provider Identifier
NPPES
National Plan & Provider Enumeration System
PECOS
Provider Enrollment, Chain and Ownership System
Staff End User (SEU)
Staff user who is allowed to work for an EIN/organization but does not have the authority to
perform AO and AM tasks. Staff End Users only have access to those EINs, Individual
Providers, and Business Functions granted to them by an AO or AM.
Status - Account/Profile
Account/Profile Status - Status of the user’s account/profile. This is not the same as the user’s
status with his employer(s).
Active - user successfully ID-proofed and can see his Home page and profile information
(what he sees for the employer info is dependent on the status the user has with his
employer(s))
Deactivated - deactivated by EUS (User must have their account Reactivated by EUS)
Disabled - account has been “disabled” due to inactivity > X days but < Y days. (The user
must reset their password.)
Archived - account/profile has been archived due to inactivity > Y days. (The user must
create a new account/profile.)
Status - Connection
Connection Status - Status of the a connection between two entities (provider + surrogate)
Approved - Connection has been approved
Pending - Connection request has been submitted but it has not yet been acted on
Disabled - Previously approved connection has been disabled
Rejected - Connection request was rejected and was never approved OR was not acted on
within 30 days of its initiation
Deactivated - Last Provider NPI associated with connection has been deactivated
Cancelled - Connection was cancelled by the initiator before being acted on by the recipient
Status - E-mail
E-mail Status - status of an e-mail address
Validated - e-mail address has been validated
Pending Validation - e-mail address has been submitted for validation but user has not yet
responded to the validation request
Not Validated - e-mail address has not been validated nor has it been submitted for
validation

Identity & Access System Quick Reference Guide
11/01/2022 110
Acronym
Description
Status - Employer
Employer Status - Status of the user with regards to employer(s). A user will have a status for
each employer.
Approved - user has been approved for the employer
Pending Approval - user has not yet been approved for the employer. This may occur in the
following situations:
• AO or AM awaiting vetting and approval by EUS for a new employer
• AM awaiting approval by AO for a new employer
• AM or Staff End User awaiting approval of a role change request
Disassociated - user no longer has access to the employer
Rejected - request for approval was rejected
Archived - User's User ID has been archived
Status - Invitation
Invitation Status - status of a staff invitation request issued by an AO/AM/IP to a new staff
user
Registration Pending - an invitation has been issued but has not yet been responded to/acted
on
Registration Cancelled - a pending registration invitation was cancelled before the staff user
responded to the invitation
Expired - an invitation request that has been Pending Registration for more than 72 hours
Accepted - invitation has been accepted by the user who received it
Status - PIN
PIN Status - status of a PIN that has been issued following a request
Active - PIN is still active and can be used
Expired - PIN has expired and can no longer be used.
Used - PIN has been used and cannot be reused
Cancelled - the action taken that resulted in the generation of the PIN was cancelled (e.g.,
when an AO/AM/IP cancels a staff user’s invitation before that staff user registers.)
Deactivated - a user attempted to use PIN but was not able to enter the correct e-mail address
in three tries. The PIN has been deactivated and cannot be used.
