
© 2022 ZOOM CORPORATION
Copying or reprinting this manual in part or in whole without permission is prohibited.
You must read the Usage and Safety Precautions before use.
This document cannot be displayed properly on black-and-white displays.
Operation Manual

Operation Manual overview
You might need this manual in the future. Always keep it in a place where you can access it easily. The
contents of this document and the specifications of the product could be changed without notice.
• iOS is a trademark or registered trademark of Cisco Systems, Inc. (USA).
• The terms HDMI and HDMI High-Definition Multimedia Interface, and the HDMI Logo are trademarks or
registered trademarks of HDMI Licensing Administrator, Inc. in the United States and other countries.
• Other product names, registered trademarks and company names in this document are the property of
their respective companies.
Note: All trademarks and registered trademarks in this document are for identification purposes only and
are not intended to infringe on the copyrights of their respective owners.
Recording from copyrighted sources, including CDs, records, tapes, live performances, video works and
broadcasts, without permission of the copyright holder for any purpose other than personal use is prohib-
ited by law. Zoom Corporation will not assume any responsibility related to infringements of copyrights.
2

Introduction
Thank you very much for purchasing a ZOOM Handy Video Recorder (hereafter, “ ”).
The
has the following features.
Capture the immediacy of live performances in both audio and video
Using the wide angle lens, you can record video even when close to the subject. With the XY format con-
denser mic that has excellent sound pressure resistance, you can record even clearer stereo images at
high resolutions up to 24-bit/96 kHz.
Record fine video details
By recording with 4K resolution, you can capture images that are four times as detailed as full HD.
With ultra-high-resolution technology, clarity is not lost even when changing viewing angles.
Capture extreme lighting changes beautifully
Incorporating high dynamic range (HDR) technologies enables video recording of live performances with
extreme lighting changes that avoids undersaturation and oversaturation.
Scene settings for a wide range of filming conditions
Along with settings good for recording live performances, monochrome and sepia special effect settings
as well as a flat setting ideal for color matching have been added.
Easy live streaming
Connect to a computer and use the web camera function to easily set up a live streaming system with
high audio and video quality.
3

Introduction .................................................................................................................................................. 3
Contents ........................................................................................................................................................ 4
Names of parts ............................................................................................................................................. 6
Preparations ................................................................................................................................................ 10
Supplying power .................................................................................................................................... 10
Using batteries .................................................................................................................................... 10
Using an AC adapter ............................................................................................................................11
Inserting microSD cards ........................................................................................................................ 12
Turning the power on/off ....................................................................................................................... 13
Turning the power on ......................................................................................................................... 13
Setting up when first turned on ............................................................................................................ 14
Setting the language shown............................................................................................................... 14
Setting the date and time ................................................................................................................... 15
Recording .................................................................................................................................................... 16
Recording Screen overview .................................................................................................................. 16
Making video recording settings .......................................................................................................... 17
Setting the video quality ..................................................................................................................... 17
Setting the field of view ...................................................................................................................... 18
Setting the scene type......................................................................................................................... 19
Setting low-frequency noise reduction ............................................................................................ 20
Setting the audio quality..................................................................................................................... 20
Adjusting recording levels .................................................................................................................... 21
Adjusting levels manually .................................................................................................................. 21
Using automatic level adjustment ..................................................................................................... 22
Recording ................................................................................................................................................ 23
Connecting external input devices ....................................................................................................... 24
Playing recordings ...................................................................................................................................... 25
Playback Screen overview ..................................................................................................................... 25
Playing recordings ................................................................................................................................. 26
Playback operations ............................................................................................................................ 27
Adjusting the output volume ............................................................................................................. 28
Headphone/line output .......................................................................................................................... 29
Viewing on an HDMI-compatible TV ..................................................................................................... 30
Managing files ............................................................................................................................................ 31
Checking file information ...................................................................................................................... 31
Deleting files ........................................................................................................................................... 32
Using USB functions .................................................................................................................................. 34
Connecting to computers and iOS devices ......................................................................................... 34
Turning the power on when connected to a computer....................................................................... 37
Contents
4
Using as a web camera ......................................................................................................................... 38
Compensating for lags between video and audio ............................................................................ 38
Using as a card reader ........................................................................................................................... 39
Using as a USB mic ............................................................................................................................... 40
Enabling direct monitoring ................................................................................................................. 40
Battery settings .......................................................................................................................................... 41
Setting the type of battery used ............................................................................................................ 41
Enabling energy saving ......................................................................................................................... 43
Setting the display backlight time ...................................................................................................... 43
Setting the Auto Power Off function .................................................................................................. 45
Setting the date and time .......................................................................................................................... 47
Setting the volume of the operation sound ............................................................................................. 48
Enabling continuous playback .................................................................................................................. 49
Using mics that support plug-in power ................................................................................................... 50
Setting the standard frame rate ................................................................................................................ 51
Setting the language shown ..................................................................................................................... 52
Formatting microSD cards ......................................................................................................................... 53
Restoring factory default settings ............................................................................................................. 54
Updating the firmware ............................................................................................................................... 56
Responding to warning messages ............................................................................................................ 58
Troubleshooting .......................................................................................................................................... 59
Recording/playback trouble ................................................................................................................ 59
Specifications .............................................................................................................................................. 60
5

Names of parts
Front
Built-in XY mic
Lens
REC LED
Built-in XY mic
The two crossing directional mics can record a three-dimensional sound with natural depth and width.
Lens
This lens has an F2.8 brightness and 150° wide angle.
REC LED
This LED shows the recording status. It lights red during recording.
6

Back
Display (LCD)
Function buttons Function buttons
POWER/PLAY button
REC button
SETTING/EXIT button
Display (LCD)
This shows the video and various types of information.
Function buttons
Use these to operate the functions shown on the display.
POWER/PLAY button
Use this to turn the power ON/OFF and to start video playback.
REC button
Use this to start and stop recording. Use this to confirm on setting and confirmation screens.
SETTING/EXIT button
Use this to open and close the Setting Screen. Use this to cancel on setting and confirmation screens.
7

Sides
Output volume
Input volume
Headphone jack
Strap hole
External input jack
Micro HDMI
connector
USB (Micro-B)
port
Output volume control
Use to adjust the output volume.
Headphone jack
This outputs sound to headphones or a connected device.
External input jack
Use this to input sound from a connected device.
Input volume dial
Use to adjust the recording level.
USB (Micro-B) port
Connect this to a computer or iOS device to use as a web camera, card reader or USB mic.
The dedicated AC adapter (ZOOM AD-17) can also be connected here to use AC power.
Micro HDMI connector
This can output video and audio to an HDMI-compatible TV or other device.
Strap hole
A strap can be attached to help prevent dropping.
Attaching the included lens cap to a strap could help prevent loss.
8

Bottom
Battery/SD card
compartment cover
Tripod mounting
threads
Battery/SD card compartment cover
Remove when installing batteries and microSD cards.
Tripod mounting threads
Use these screw threads to attach a tripod (not included).
9

Preparations
Supplying power
Using batteries
1.
Open the battery/card compartment cover.
2.
Install the batteries.
AA batteries
3.
Close the battery/card compartment cover.
NOTE
• Use only one type of battery (alkaline, NiMH or lithium) at a time.
• After installing batteries, set the correct battery type. ( “Setting the type of battery used” on page 41)
10

Using an AC adapter
1.
Connect the cable of an AD-17 AC adapter to the USB port.
USB (Micro-B)
2.
Plug the AC adapter into an outlet.
HINT
When connected to a computer, power can be supplied by USB.
11

Inserting microSD cards
1.
Open the battery/card compartment cover.
2.
Insert the microSD card into the card slot.
microSD card
To remove a microSD card, push it further into the slot and then pull it out.
3.
Close the battery/card compartment cover.
NOTE
• Always make certain that the power is off when inserting or removing a microSD card. Inserting or
removing a card while the power is on could result in data loss.
• When inserting a microSD card, be sure to insert the correct end with the top side up as shown.
•
After purchasing a new microSD card, always format it using the
to maximize performance.
To format a microSD card, see “Formatting microSD cards” on page 53.
• Use a microSD card that is Class 10 or higher.
When recording at 4K resolution, use as microSD card that is UHS Speed Class 3 or higher.
12

Turning the power on/off
Turning the power on
1.
Press and hold .
After startup completes, the REC LED on the front will light green and the Recording Screen will ap-
pear on the display.
HINT
To turn the power off, keep pressing
until "Goodbye See You!” appears on the display.
13

Setting up when first turned on
The first time the is turned on, the display language and the date and time must be set.
HINT
Language display and date and time settings can be changed later on the Setting Screen. ( “Setting the
language shown” on page 52, “Setting the date and time” on page 47)
Setting the language shown
1.
Use < and > to select the language displayed.
LO CUTVIDEO
AUDIOFOV
AUTO GAIN
SCENE
EXIT
2.
Press to confirm.
LO CUTVIDEO
AUDIOFOV
AUTO GAIN
SCENE
EXIT
14

Setting the date and time
1.
Press the button for the item to be set.
LO CUTVIDEO
AUDIOFOV
AUTO GAIN
SCENE
EXIT
2.
Press to confirm.
LO CUTVIDEO
AUDIOFOV
AUTO GAIN
SCENE
EXIT
NOTE
• If power is not supplied by an AC adapter or batteries for a long time, date and time settings will be
reset.
• If the date and time setting screen appears during startup, set them again.
15

Recording
Recording Screen overview
The Recording Screen opens when the power is turned on.
Level meters Peak indicators
When recording: recording time
In recording standby: available recording time
Remaining battery charge
VIDEO setting
FOV setting
SCENE setting
LO CUT setting
AUDIO setting
AUTO GAIN setting
HINT
If the power is turned on when connected to a computer, the USB function selection screen will open. (
“Turning the power on when connected to a computer” on page 37)
16

Making video recording settings
Use the buttons on both sides of the display to change settings.
Video quality
Field of view
Scene
Low-frequency noise
reduction
Audio quality
Setting the video quality
The video quality (resolution) and frame rate per second can be set.
1.
Press
VIDEO
on the Recording Screen to set the video quality.
LO CUTVIDEO
AUDIOFOV
AUTO GAIN
SCENE
EXIT
Setting Resolution
Frames/
second
Explanation File size
4K·30
VIDEO
3840×2160
30
Record 4K video quality.
Use when video quality is the top recording priority.
Large
4K·24
CINEMA
3840×2160
24
Record 4K video quality.
Record with the frame rate used for filming movies.
This is good for recording movies and music videos.
1080·60
SMOOTH
1920×1080
60
Use when you want to record subjects that move
quickly.
1080·30
VIDEO
1920×1080
30 This is suitable for all kinds of video recording.
1080·24
CINEMA
1920×1080
24
Record with the frame rate used for filming movies.
This is good for recording movies and music videos.
720·30
VIDEO
1280×720
30
This is good when you want to balance recording
time with video quality.
CAMERA OFF − − Use this to only record audio.
Small
HINT
The standard frame rate can also be set for the regional video format. ( “Setting the standard frame
rate” on page 51)
17

Setting the field of view
This sets the field of view (FOV) for videos.
1.
Press
FOV
on the Recording Screen to set the field of view.
LO CUTVIDEO
AUDIOFOV
AUTO GAIN
SCENE
EXIT
Setting Explanation Distortion correction
WIDE This widens the field of view. —
·
0
·
TELE This narrows the field of view.
18

Setting the scene type
This sets the camera settings for the recording conditions (scene).
1.
Press
SCENE
on the Recording Screen to set the scene type.
LO CUTVIDEO
AUDIOFOV
AUTO GAIN
SCENE
EXIT
Setting Explanation
AUTO Settings change according to the recording conditions.
OUTDOOR Settings are optimized for outdoor recording.
SUNSET Settings are optimized for sunset scenes.
NIGHT Adjustments are made for night and other dark situations.
CONCERT LIGHT Settings are suitable for concert lighting that is bright and changes drastically.
JAZZ CLUB Settings are suitable for jazz clubs and similar venues.
DANCE CLUB
Settings are suitable for dance clubs and venues where lighting changes drasti-
cally.
MONOCHROME Recording is processed to be like black and white film.
SEPIA Recording is processed with a sepia tone.
FILM Recording is processed to be like film.
X-PROCESS A cross-processing effect is applied.
FLAT This is suitable for color matching with other cameras in post-processing.
19

Setting low-frequency noise reduction
The low-cut filter can be set to reduce the sound of wind, vocal pops and other noise.
1.
Press
LO CUT
on the Recording Screen to set the low-frequency noise reduction.
LO CUTVIDEO
AUDIOFOV
AUTO GAIN
SCENE
EXIT
Setting Explanation
OFF Low-frequency noise reduction is disabled.
80 Hz
These set the cutoff frequency.120 Hz
160 Hz
NOTE
The higher the cutoff frequency is set, the stronger the low-frequency noise reduction effect will be.
Since this also affects other low-frequency sounds, though, check the effect while you are making this
setting.
Setting the audio quality
This sets the sampling frequency (kHz) and bit rate.
1.
Press
AUDIO
on the Recording Screen to set the audio quality.
LO CUTVIDEO
AUDIOFOV
AUTO GAIN
SCENE
EXIT
Setting Explanation Audio quality File size
44.1 kHz/16-bit
The higher the sampling frequency (kHz) and bit rate
are set, the better the audio quality will be.
Low Small
48 kHz/24-bit
96 kHz/24-bit
High Large
20

Adjusting recording levels
Adjusting levels manually
1.
Turn to adjust the recording level.
HighLow
Adjust so that the level meters are around −12 dB with the loudest sounds.
Peak indicatorsLevel meters
NOTE
• The peak indicators light and the REC LED on the front blinks when loud sounds are input.
• Recording when the indicators are lit could cause the sound to become distorted. Lower the input vol-
ume to avoid this.
• If the sound distorts even when you lower the input volume, try changing mic positions and adjusting
the output levels of connected devices.
HINT
To clear the peak indicators, press
to open the Setting Screen once.
21

Using automatic level adjustment
The recording level can be adjusted automatically according to the use conditions.
1.
Press
AUTO GAIN
on the Recording Screen to set the automatic gain adjustment.
LO CUTVIDEO
AUDIOFOV
AUTO GAIN
SCENE
EXIT
Setting Explanation
OFF This disables automatic level adjustment. Adjust the recording level manually.
CONCERT
This is suitable for recording band performances, concerts and other loud situa-
tions.
SOLO Use for solo performances and other quiet sounds.
MEETING Use for meetings and field recordings.
NOTE
When automatic gain adjustment is in use, manual adjustments cannot be made using .
22

Recording
Recording video
1.
Press .
LO CUTVIDEO
AUDIOFOV
AUTO GAIN
SCENE
EXIT
This starts video recording.
2.
Press
again to stop video recording.
NOTE
• The energy saving function will make the screen dim during recording. ( “Setting the display back-
light time” on page 43)
• During video recording, the REC LED on the front lights red.
• If the internal temperature of the rises during use, a warning message will appear and it will
turn off automatically. Wait for the temperature to decrease before using it again.
• By connecting an HDMI-compatible TV or other device, you can monitor the video and audio during
recording. ( “Viewing on an HDMI-compatible TV” on page 30)
• The maximum resolution of HDMI output is 1920×1080 when recording.
• When recording video, connecting or disconnecting an HDMI cable will cause video and audio record-
ing to stop.
HINT
When recording for long periods of time with a microSDHC card, recording files will be split after 4 GB.
When using a microSDXC card, recording will continue in one file even if the file size exceeds 4 GB.
23

Connecting external input devices
You can capture audio with an external mic or audio device when recording video or audio.
1.
Connect the external mic or audio device to the external input jack.
EXT IN
NOTE
The built-in mics are disabled when an external device is connected to the external input jack.
HINT
• This jack can provide plug-in power to mics that use it. ( “Using mics that support plug-in power” on
page 50)
24

Playing recordings
Playback Screen overview
From the Recording Screen, press to open the Playback Screen.
Remaining battery charge
Progress bar (shows playback position)
Remaining playback time
Status indicator
Playing :
Paused :
Stopped :
Current file/total
number of files
File name
Peak indicators
Level meters
25

Playing recordings
1.
Press on the Recording Screen.
LO CUTVIDEO
AUDIOFOV
AUTO GAIN
SCENE
EXIT
Playback of the last recorded file or the most recently played file will start.
NOTE
•
The
can only play videos that it recorded.
2.
Press to stop playback and reopen the Recording Screen.
26

Playback operations
The following operations are possible during playback.
Changing the playback position
Pause/resume
Press
Search forward
Press and hold
Search backward
Press and hold
Selecting files
Move to next file
Press
Move to previous file
Press
Playing files continuously
Playback can be set so that after playback of one file completes the next file can be played back without
stopping. ( “Enabling continuous playback” on page 49)
27

Adjusting the output volume
1.
Use to adjust the volume.
LO CUTVIDEO
AUDIOFOV
AUTO GAIN
SCENE
EXIT
HINT
• The volume can be adjusted separately for the speaker and headphones.
• The volume can be set from 0 to 30.
28
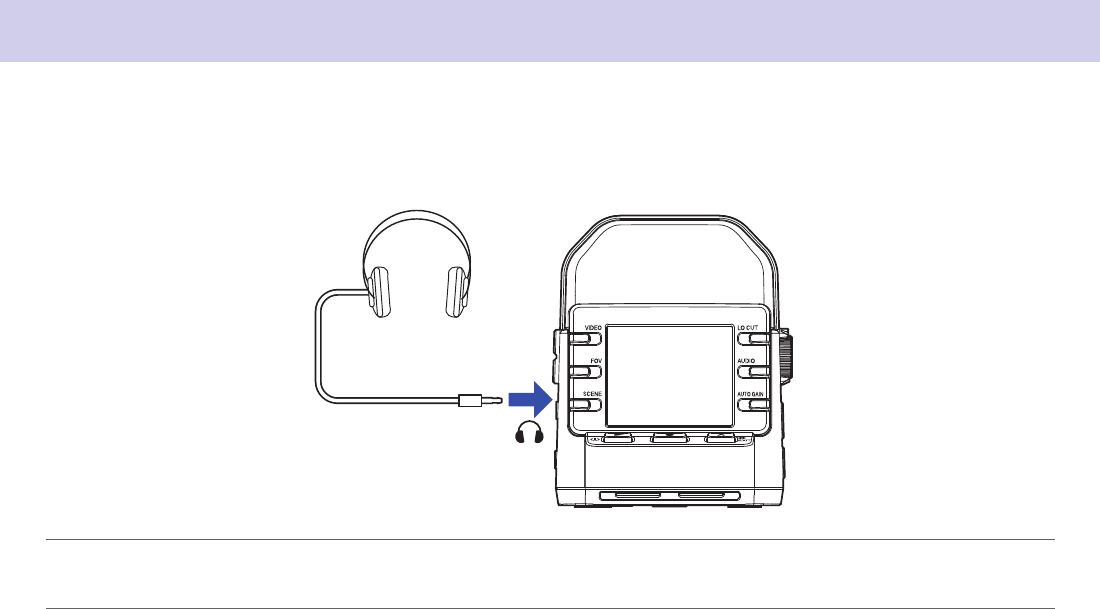
Headphone/line output
You can listen to the audio with headphones or an external audio amplifier.
1.
Connect headphones or audio equipment to the headphone jack using a stereo mini plug cable.
HINT
When the Recording Screen is open, you can monitor the input sound.
29

Viewing on an HDMI-compatible TV
Use an HDMI cable to connect with an HDMI-compatible TV to view video recordings on it.
1.
Connect an HDMI cable (not included) to the Micro HDMI connector.
Micro HDMI
2.
Press to play the video and audio.
LO CUTVIDEO
AUDIOFOV
AUTO GAIN
SCENE
EXIT
The display on the recorder will turn off and the recorded file will play on the TV screen.
HINT
The recorder can be operated while outputting to a TV. ( “Playback operations” on page 27)
NOTE
• During TV output, file information cannot be shown and files cannot be deleted.
• Some TVs do not support some audio formats, so correct playback might not always be possible.
30

Managing files
Checking file information
You can view a variety of information about the current playback file.
1.
Press on the Playback Screen.
LO CUTVIDEO
AUDIOFOV
AUTO GAIN
SCENE
EXIT
This shows information about the current playback file.
Information about the duration, size, date, time, video and audio can be checked.
2.
Press .
This reopens the Playback Screen.
31

Deleting files
You can delete files that you do not need.
1.
Press on the Playback Screen.
LO CUTVIDEO
AUDIOFOV
AUTO GAIN
SCENE
EXIT
The deletion screen will open.
2.
Press
to select a file.
LO CUTVIDEO
AUDIOFOV
AUTO GAIN
SCENE
EXIT
A check will appear in the box at the top left of the file image.
HINT
You can use < and > to change files and add checks to multiple files.
3.
Press .
LO CUTVIDEO
AUDIOFOV
AUTO GAIN
SCENE
EXIT
This opens a deletion confirmation screen.
32

4.
Press to select Yes .
LO CUTVIDEO
AUDIOFOV
AUTO GAIN
SCENE
EXIT
The checked files will be deleted.
To cancel deletion, press
to select No ×.
33

Using USB functions
Connecting to computers and iOS devices
Use a USB cable to connect to a computer or iOS device and use the recorder as a web camera, card
reader or USB mic.
1.
Press on the Recording Screen.
LO CUTVIDEO
AUDIOFOV
AUTO GAIN
SCENE
EXIT
This opens the Setting Screen.
2.
Press .
LO CUTVIDEO
AUDIOFOV
AUTO GAIN
SCENE
EXIT
This opens the USB Connection Setting Screen.
34

3.
Press the button for the function to be used.
LO CUTVIDEO
AUDIOFOV
AUTO GAIN
SCENE
EXIT
Function Explanation
WEB Camera
Use as a web camera with a computer ( “Using as a web camera” on page 38)
Card Reader
Use as an SD card reader with a computer ( “Using as a card reader” on page 39)
Card reader
for iOS
Use as an SD card reader with an iOS device ( “Using as a card reader” on page 39)
USB Mic
Use as a USB mic with a computer ( “Using as a USB mic” on page 40)
USB Mic
for iOS
Use as a USB mic with an iOS device ( “Using as a USB mic” on page 40)
4.
Press on the Confirmation Screen to select Yes .
LO CUTVIDEO
AUDIOFOV
AUTO GAIN
SCENE
EXIT
This activates the selected function.
5.
Use a USB cable to connect a computer or iOS device.
USB (Micro-B)
NOTE
Use a USB cable that supports data transfer.
35
6.
To end use, press on any function screen.
7.
Press on the Confirmation Screen to select Yes .
This reopens the Recording Screen.
NOTE
• When connected to a computer, power can be supplied by USB.
• When connected to an iOS device, use batteries because power cannot be supplied by USB.
• A list of iOS devices that have been confirmed to work with this unit can be checked at zoomcorp.com.
• An iPad Camera Connection Kit or Lightning to USB Camera Adapter (not included) is necessary to
connect to an iOS device.
36

Turning the power on when connected to a computer
If the power is turned on when connected to a computer, the USB function selection screen will
open.
1.
Use < and > to select the function to use.
LO CUTVIDEO
AUDIOFOV
AUTO GAIN
SCENE
EXIT
2.
Press to confirm.
LO CUTVIDEO
AUDIOFOV
AUTO GAIN
SCENE
EXIT
3.
Press on the Confirmation Screen to select Yes .
This activates the selected mode.
Press
to open the Recording Screen.
37

Using as a web camera
The can be used as a web camera to input audio and video to a computer.
1.
Connect the with a computer.
(
“Connecting to computers and iOS devices” on page 34)
NOTE
Web camera use is not possible with an iOS device.
2.
Launch an application that uses a camera on the computer, and select the .
NOTE
• The recorder can simultaneously transmit video and audio with resolutions up to 720 p HD and
48 kHz/16-bit to a computer.
• The cannot output computer playback signals
HINT
Refer to the manual for the application that you are using for the procedures to select the .
3.
To end the connection, conduct the necessary disconnection procedures on the computer.
Compensating for lags between video and audio
If a timing difference occurs between the video and audio when using the recorder as a web camera, you
can set an audio delay time so that it matches the timing of the video.
1.
During web camera use, press DELAY.
LO CUTVIDEO
AUDIOFOV
AUTO GAIN
SCENE
EXIT
Press DELAY again repeatedly to lengthen the audio delay time.
Setting Explanation
0.0 F
The delay time can be set in increments of 0.5 F. (1 F is 33 msec.)
The maximum delay time is 10.0 F (330 msec).
10.0 F
38

Using as a card reader
The can be used as a card reader to read and write data from computers and iOS devices.
1.
Connect the to a computer or iOS device.
(
“Connecting to computers and iOS devices” on page 34)
2.
Open a file management screen on the computer or iOS device and show the contents of the mi-
croSD card in the
.
3.
Work with the files on the microSD card.
4.
To end the connection, conduct the necessary disconnection procedures on the computer or iOS de-
vice.
HINT
Refer to the manual for the computer or iOS device that you are using for detailed operation procedures.
5.
Press .
6.
Press on the Confirmation Screen to select Yes .
This reopens the Recording Screen.
39

Using as a USB mic
The can be used as a USB mic to input audio to a computer or iOS device.
1.
Connect the to a computer or iOS device.
(
“Connecting to computers and iOS devices” on page 34)
2.
Launch an application that uses a mic on the computer or iOS device, and select the .
HINT
Refer to the manual for the application that you are using for the procedures to select the .
3.
To end the connection, conduct the necessary disconnection procedures on the computer or iOS de-
vice.
Enabling direct monitoring
The input sound can be monitored directly during USB mic use.
1.
During USB mic use, press DIRECT MNTR.
LO CUTVIDEO
AUDIOFOV
AUTO GAIN
SCENE
EXIT
This turns direct monitoring ON/OFF.
40

Battery settings
Setting the type of battery used
Set the type of battery used so that the amount of remaining battery charge can be accurately displayed.
1.
Press on the Recording Screen.
LO CUTVIDEO
AUDIOFOV
AUTO GAIN
SCENE
EXIT
This opens the Setting Screen.
2.
Press three times to change the Setting Screen.
LO CUTVIDEO
AUDIOFOV
AUTO GAIN
SCENE
EXIT
41

3.
Press Battery Type to set the type of battery used.
LO CUTVIDEO
AUDIOFOV
AUTO GAIN
SCENE
EXIT
The options are Alkaline, Ni-MH and Lithium.
4.
Press .
This reopens the Recording Screen.
42

Enabling energy saving
Setting the display backlight time
Power can be saved by shortening the amount of time that the backlight stays lit.
1.
Press on the Recording Screen.
LO CUTVIDEO
AUDIOFOV
AUTO GAIN
SCENE
EXIT
This opens the Setting Screen.
2.
Press three times to change the Setting Screen.
LO CUTVIDEO
AUDIOFOV
AUTO GAIN
SCENE
EXIT
43

3.
Press Power Save, and set the time until the backlight dims.
LO CUTVIDEO
AUDIOFOV
AUTO GAIN
SCENE
EXIT
Setting Explanation
Off The backlight always stays bright.
1 min The backlight dims if no operation occurs for 1 minute.
3 min The backlight dims if no operation occurs for 3 minutes.
5 min The backlight dims if no operation occurs for 5 minutes.
4.
Press
.
This reopens the Recording Screen.
44

Setting the Auto Power Off function
Set to turn off automatically if not used at all for a set amount of time when running on battery power.
NOTE
This function is disabled during recording and playback as well as when it is powered through its USB
port.
1.
Press on the Recording Screen.
LO CUTVIDEO
AUDIOFOV
AUTO GAIN
SCENE
EXIT
This opens the Setting Screen.
2.
Press three times to change the Setting Screen.
LO CUTVIDEO
AUDIOFOV
AUTO GAIN
SCENE
EXIT
45

3.
Press Auto Power Off, and set the time until the power turns off.
LO CUTVIDEO
AUDIOFOV
AUTO GAIN
SCENE
EXIT
Setting Explanation
Off The Auto Power Off function is disabled.
1 min The power will turn off automatically 1 minute after the last operation.
3 min The power will turn off automatically 3 minutes after the last operation.
5 min The power will turn off automatically 5 minutes after the last operation.
4.
Press
.
This reopens the Recording Screen.
46

Setting the date and time
If the date and time are set, the recorder can add the recording date and time to files.
1.
Press on the Recording Screen.
LO CUTVIDEO
AUDIOFOV
AUTO GAIN
SCENE
EXIT
This opens the Setting Screen.
2.
Press two times to change the Setting Screen.
LO CUTVIDEO
AUDIOFOV
AUTO GAIN
SCENE
EXIT
This opens the Date and Time Setting Screen.
3.
Press the button for the item to be set.
LO CUTVIDEO
AUDIOFOV
AUTO GAIN
SCENE
EXIT
4.
Press .
This reopens the Recording Screen.
47

Setting the volume of the operation sound
Set the volume of the operation sound.
1.
Press on the Recording Screen.
LO CUTVIDEO
AUDIOFOV
AUTO GAIN
SCENE
EXIT
This opens the Setting Screen.
2.
Press Beep, and set the volume.
LO CUTVIDEO
AUDIOFOV
AUTO GAIN
SCENE
EXIT
Setting Explanation
No operation sound is output.
A low-volume operation sound is output.
A high-volume operation sound is output.
3.
Press .
This reopens the Recording Screen.
48

Enabling continuous playback
Playback can be set so that after playback of one file completes the next file can be played back without
stopping.
1.
Press on the Recording Screen.
LO CUTVIDEO
AUDIOFOV
AUTO GAIN
SCENE
EXIT
This opens the Setting Screen.
2.
Press Play Mode, and set whether continuous playback is enabled.
LO CUTVIDEO
AUDIOFOV
AUTO GAIN
SCENE
EXIT
Setting Explanation
Play One Playback stops after one file completes playing.
Play All
After one file completes playing, the next file plays back without stopping.
Files will play back in the order of the time they were recorded. Playback will stop
after the most recent file completes playing.
3.
Press .
This reopens the Recording Screen.
49

Using mics that support plug-in power
Enable plug-in power from the for mics that support it.
1.
Press on the Recording Screen.
LO CUTVIDEO
AUDIOFOV
AUTO GAIN
SCENE
EXIT
This opens the Setting Screen.
2.
Press Plug-in Power and set it to On.
LO CUTVIDEO
AUDIOFOV
AUTO GAIN
SCENE
EXIT
3.
Press .
This reopens the Recording Screen.
50

Setting the standard frame rate
This sets the standard recording frame rate used according to the regional video format.
1.
Press on the Recording Screen.
LO CUTVIDEO
AUDIOFOV
AUTO GAIN
SCENE
EXIT
This opens the Setting Screen.
2.
Press NTSC/PAL to set the standard frame rate.
LO CUTVIDEO
AUDIOFOV
AUTO GAIN
SCENE
EXIT
Setting Explanation
NTSC (30 FPS) The standard frame rate for the NTSC format is used for recording.
PAL (25 FPS)
The standard frame rate for the PAL format is used for recording.
The VIDEO setting options will change to 4K·25 VIDEO, 1080·50 SMOOTH, 1080·25
VIDEO and 720·25 VIDEO.
3.
Press .
This reopens the Recording Screen.
51

Setting the language shown
Set the language shown on the display.
1.
Press on the Recording Screen.
LO CUTVIDEO
AUDIOFOV
AUTO GAIN
SCENE
EXIT
This opens the Setting Screen.
2.
Press three times to change the Setting Screen.
LO CUTVIDEO
AUDIOFOV
AUTO GAIN
SCENE
EXIT
3.
Press Language.
LO CUTVIDEO
AUDIOFOV
AUTO GAIN
SCENE
EXIT
This changes the display language.
4.
Press .
This reopens the Recording Screen.
52

Formatting microSD cards
To maximize the performance of a microSD card, use the to format it.
1.
Press on the Recording Screen.
LO CUTVIDEO
AUDIOFOV
AUTO GAIN
SCENE
EXIT
This opens the Setting Screen.
2.
Press SD Format.
LO CUTVIDEO
AUDIOFOV
AUTO GAIN
SCENE
EXIT
This opens a formatting confirmation screen.
3.
Press to select Yes .
This will start microSD card formatting.
“Done" will appear on the display when formatting completes.
NOTE
• After purchasing a new microSD card, always format it using the .
• All data previously saved on the microSD card will be deleted when it is formatted.
53

Restoring factory default settings
You can restore all settings to their factory defaults.
1.
Press on the Recording Screen.
LO CUTVIDEO
AUDIOFOV
AUTO GAIN
SCENE
EXIT
This opens the Setting Screen.
2.
Press three times to change the Setting Screen.
LO CUTVIDEO
AUDIOFOV
AUTO GAIN
SCENE
EXIT
3.
Press Setting Reset.
LO CUTVIDEO
AUDIOFOV
AUTO GAIN
SCENE
EXIT
This opens a reset confirmation screen.
54

4.
Press to select Yes .
LO CUTVIDEO
AUDIOFOV
AUTO GAIN
SCENE
EXIT
This starts resetting the .
After resetting completes, the power will automatically turn off.
55

Updating the firmware
The firmware can be updated to the latest versions.
1.
Install new batteries in the or connect an AC adapter.
NOTE
Executing a firmware update is not possible if the remaining battery power is low.
2.
Copy the firmware update file to the root directory on a microSD card.
The latest firmware update file can be downloaded from zoomcorp.com.
3.
Insert the microSD card into the microSD card slot.
4.
While pressing , press to turn the power on.
LO CUTVIDEO
AUDIOFOV
AUTO GAIN
SCENE
EXIT
This opens an update confirmation screen.
5.
Press to select Yes .
LO CUTVIDEO
AUDIOFOV
AUTO GAIN
SCENE
EXIT
This opens a final confirmation screen.
56

6.
Press to select Yes .
After updating completes, a notification screen appears.
NOTE
Do not turn the power off during a firmware update.
7.
Press and hold to turn the power off.
57

Responding to warning messages
If one of the warning messages below appears, follow the instructions to respond to it.
Warning messages that appear during startup
Message Explanation and response
The date and time setting were initialized. Reset the time. ( “Setting the date
and time” on page 15)
Data recording was not completed properly, so the unit tried to recover it but re-
covery failed.
Warning message that appear when using batteries
Message Explanation and response
The remaining battery charge has become low. Replace the batteries with new
ones.
Warning messages that appear when the Recording Screen is open
Message Explanation and response
No microSD card is loaded. Load a microSD card.
Recording stopped because the writing speed to the microSD card was insuffi-
cient. Use a microSD card that has been formatted by the
and con-
firmed to work with it. Please check the list of cards that have been confirmed to
work on the ZOOM website (zoomcorp.com).
The microSD became full. Delete unneeded data or replace it with a new microSD
card.
The power will turn off because the temperature inside the unit has become high.
Wait for the temperature to decrease before using it again.
Warning messages that appear when the Playback Screen is open
Message Explanation and response
The file is invalid. Files cannot be played if they were not created by the
or they are invalid because recording did not stop properly.
The number of files with check marks for deletion exceeded the maximum (999).
Reduce the number of checks.
The file is protected so it could not be deleted. Check the file characteristics on a
computer.
58

Troubleshooting
If you think that the is operating strangely, check the following items first.
Recording/playback trouble
It becomes warm
• The unit and the microSD card might become warm but this is not a malfunction.
There is no sound or it is very quiet
• Check the connections with connected devices and their volume settings.
• Confirm that the output volume is not set low.
Recorded sound cannot be heard or is very quiet
• Check the recording level setting. ( “Adjusting recording levels” on page 21)
• If a CD player or other device is connected to an input jack, raise the output level of that device.
Recording audio/video is not possible
• Checked the remaining recordable time on the Recording Screen. ( “Recording Screen overview” on
page 16)
A “Low Speed Card!” warning appears frequently/Stopping recording takes a very
long time
• microSD cards can become worn out. Speed can decrease after repeated writing and erasing.
• Formatting the card with the
might improve this. ( “Formatting microSD cards” on page 53)
• If formatting a microSD card does not improve this, we recommend replacing the card. Please check the
list of cards that have been confirmed to work on the ZOOM website (zoomcorp.com).
NOTE
This is not a guarantee of specific microSD card recording performance for microSD cards that have
been confirmed to work.
This list is provided as a guideline to help find suitable cards.
59

Specifications
Image sensor 1/2.3" 16 M-pixel CMOS sensor
Lens F 2.8, 150° FOV
Video format MPEG-4 AVC/H.264 (MOV)
Video resolutions 4K: 30 p, 25 p, 24 p
1080: 60 p, 50 p, 30 p, 25 p, 24 p
720: 30 p, 25 p
Audio formats WAV: 96 kHz/24-bit, 48 kHz/24-bit, 44.1 kHz/16-bit
Audio functions · LO CUT: OFF, 80 Hz, 120 Hz, 160 Hz
· AUTO GAIN: OFF, CONCERT, SOLO, MEETING
· DELAY: 0.0 F, 0.5 F–10.0 F (only during web camera use)
· DIRECT MONITOR ON/OFF (only during USB mic use)
Image functions · FOV: WIDE · 0 · TELE (5 steps)
· SCENE: AUTO, OUTDOOR, SUNSET, NIGHT, CONCERT LIGHT, JAZZ CLUB,
DANCE CLUB, MONOCHROME, SEPIA, FILM, X-PROCESS, FLAT
Display 1.77" full-color LCD (160 × 128)
Audio inputs Mic Fixed 120° XY stereo mic
Maximum sound pressure: 120 dBSPL
Input gain: −∞ db – +39 dB
Line Input connector: stereo mini jack (supports plug-in power)
Input gain: −∞ dB – +39 dB
2 kΩ or higher input impedance
Plug-in power (2.5 V) supported
Output connector Combined headphone/line stereo mini jack
HDMI micro Type D
Built-in speaker 300 mW 8 Ω mono speaker
Recording media microSD / microSDHC / microSDXC (256 GB maximum)
USB
micro USB
• Use a USB cable that supports data transfer. USB bus power is supported.
WEBCAM
Class: UVC 1.0 + UAC 1.0
Formats: 720 p WVGA video
48 kHz/16-bit audio
CARD READER
Class: USB Mass Storage
USB MIC
Class: UAC 1.0
Format: 44.1 kHz/16-bit
Note: card reader and USB mic functions support iOS devices
Power 2 AA batteries : alkaline LR6 (1.5 V), nickel metal hydride HR6 (1.2 V) or lithium FR6 (1.5 V)
AC adapter (ZOOM AD-17): DC 5 V/1 A
Note: USB bus power supported
Estimated continuous recording time using
batteries
Video resolution Alkaline LR6 (1.5 V) Ni-MH HR6 (1.2 V) Lithium FR6 (1.5 V)
720/30 p 2.0 hours 3.0 hours 6.0 hours
1080/30 p 1.2 hours 2.0 hours 4.0 hours
4K/30 p 0.5 hours 1.0 hours 2.0 hours
Audio quality: 48 kHz/24-bit
• The above values are approximate.
• Continuous battery operation times were determined using in-house testing
methods. They will vary greatly according to use conditions.
External dimensions Main unit (maximum dimensions): 58.7 mm (D) × 68.5 mm (W) × 83.0 mm (H)
Weight (including batteries) 170 g
60

