
1
SmartTools
Introduction to SmartTools .................................................................................................................................. 2
Use SmartTexts .................................................................................................................................................... 2
Find your favorite SmartTexts faster ................................................................................................................... 2
Use SmartPhrases and SmartLinks....................................................................................................................... 3
Use SmartLists ...................................................................................................................................................... 4
Create or Edit a User SmartList ............................................................................................................................ 5
Pull lab results into your note with SmartLinks ................................................................................................... 6
Create a SmartPhrase to reuse text you commonly type .................................................................................... 8
Customize your SmartPhrases ............................................................................................................................. 8
Share SmartPhrases ........................................................................................................................................... 10

2
Introduction to SmartTools
SmartTools are charting shortcuts that you can use to pull various information into your documentation.
SmartTools
Use to pull in
SmartTexts
Templates or blocks of text
SmartPhrases
Templates or blocks of text that you (or your IT team) can create
SmartLinks
Information from another part of the chart
SmartLists
A predefined list of choices
You can use SmartTools in many places throughout Epic, such as notes, patient instructions, and
letters. If you see these buttons, the field is SmartTool-enabled:
Use SmartTexts
SmartTexts are standard templates or blocks of text used to write notes for routine visits or problems you
treat often, such as diabetes. SmartTexts can also be used to write routine patient instructions and other types
of documentation.
1. Enter a few letters of the SmartText's name in the Insert SmartText field and press Enter.
2. Double-click a SmartText to insert it.
3. Press F2 to complete any SmartLists and wildcards (***) in the SmartText.
Preview the contents of a SmartText on the right-hand side of the SmartText Lookup window
before adding it to your documentation.
Find your favorite SmartTexts faster
There are hundreds of available SmartTexts, but you might use only a handful. Quickly find the ones you use
most often by marking them as your favorites.
1. Open a new note.
2. In the Insert SmartText field, enter the first few letters of the SmartText you want and press Enter.
3. In the SmartText Lookup window, click next to the SmartText.
4. Add other commonly used SmartTexts to your favorites by searching for them and repeating step 3.
5. Select the Favorites Only checkbox.
From now on, when you click , your favorite SmartTexts appear.
Additionally, when you search for a SmartText in the Insert SmartText field, only your favorites
appear initially. If the SmartText you need isn't among your favorites, clear the Favorites Only
checkbox.

3
Use SmartPhrases and SmartLinks
Use a SmartPhrase
SmartPhrases allow you to type a few characters that automatically expand to a longer phrase, paragraph, or
template. For example, typing ".hpipneu" and selecting the HPIPNEUMONIAGEN SmartPhrase expands to an
HPI template for pneumonia.
1. In a SmartTool-enabled field, enter a period (.) followed by the SmartPhrase's name. For example,
enter ".hpianemia". As you type, a list of matching SmartPhrases and SmartLinks appears.
2. Use the arrow keys to select the SmartPhrase you want to use and press Spacebar to insert it.
3. Press F2 to jump to the first SmartLists or wildcard (***) in the SmartPhrase.
A wildcard (***) is a placeholder. You can type over it with your own text or delete the placeholder.
Refer to p. 4 for more information on using SmartLists.
Use a SmartLink
SmartLinks help you write notes quickly by pulling or "linking" information from the patient's chart directly
into your documentation. SmartLinks often appear within SmartPhrases, but you can also use them on the fly.
Enter a period (.) followed by the SmartLink's name, as you do when using a SmartPhrase.
When inserting a SmartLink, press Enter to start a new paragraph after pulling in the SmartLink.
Press Spacebar to continue with the same sentence or paragraph.
Browse available SmartPhrases and SmartLinks
1. Click on the SmartTools toolbar to see any SmartPhrases you've created. If none appear, select
System SmartPhrases to see all available phrases.
The Abbrev column shows you what to type after the period (.) to use the phrase or link in a note.
The Expansion column shows you the text that the phrase or link pulls in or, for longer phrases,
includes a general description of the text.
indicates a SmartPhrase.
4
indicates a SmartLink.
2. To find phrases and links, you can:
a. Use the Filter tab to select the SmartTools you want to see.
b. Search for specific links or phrases.
c. Click to mark links and phrases as favorites.
d. Use the Sort tab to control which items are listed first.
3. Double-click a SmartPhrase or SmartLink to insert it.
To see all available phrases and links, enter ".?" in a note.
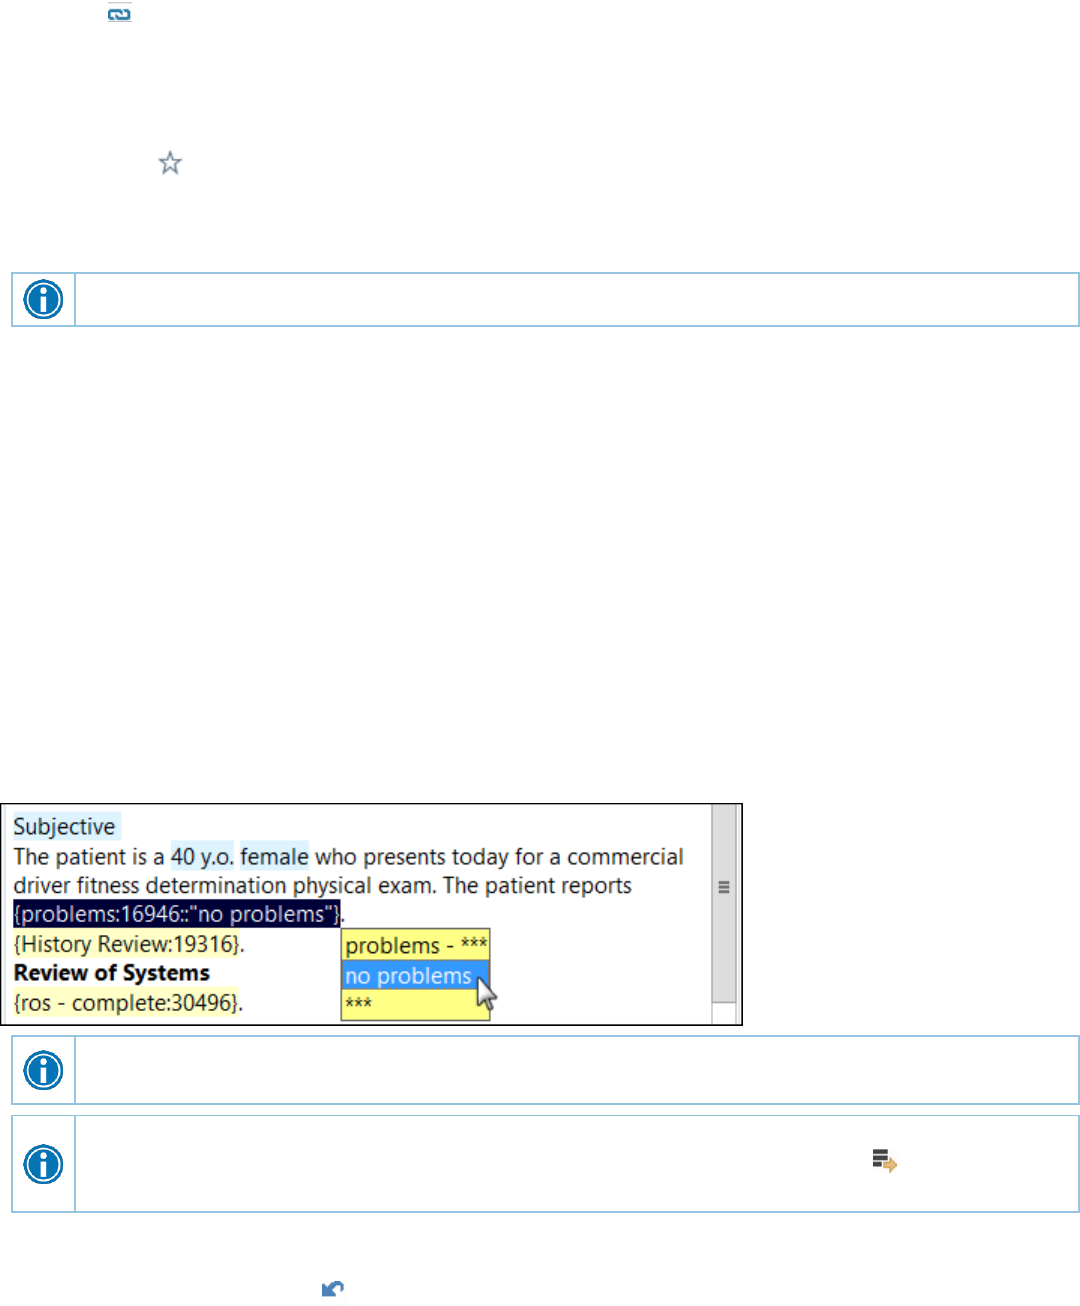
Use SmartLists
SmartLists are lists of common choices that help you quickly customize your documentation. For example, the
respiratory history SmartList contains choices like asthma and COPD. SmartLists are used in SmartTexts and
SmartPhrases and look something like this: {resp history:19195}.
Select from a SmartList
1. Press F2 to jump to the next SmartList or wildcard (***) in your note. Some values in a SmartList might
be selected by default. You can change them if needed.
2. Click other values to select them.
A yellow background indicates that you can select only one value.
A blue background indicates that you can select one or more values.
3. If you accidentally select a value, click again to clear it.
4. Right-click in the SmartList to save your selections and move to the next SmartList or wildcard.
Use the mnemonic "left-click to pick, right-click to stick" to remember which mouse button to use
when you're making selections.
You can save time by documenting any abnormal values first and then applying any default values
for the remaining SmartLists in one click. After selecting abnormal values, click on the
SmartTool toolbar to apply any available default values for the remaining SmartLists.
Undo a SmartList selection
To undo your last selection, click or press Ctrl+Z.
To undo any SmartList selection, right-click the SmartList and choose Reselect This SmartList's Selections.

5
You can also use the keyboard to complete SmartLists. With a SmartList selected, press Up
Arrow and Down Arrow to move through the list. Press Spacebar to select a choice. Press
Enter to accept your choices and move to the next SmartList or wildcard (***).
Create or Edit a User SmartList
You can create and edit your own User SmartLists or share your SmartLists with other users.
Create a User SmartList
1. Use Chart Search to open the SmartList Editor and select Create SmartList.
2. Enter a name for the SmartList.
3. If you're able to also create and edit System SmartLists, you see a Type prompt. Select User.
4. Click Accept to create the SmartList and open the SmartList Editor.
Edit an Existing User SmartList
1. Use Chart Search to open the SmartList Editor and search for the SmartList. If you're searching for
someone else's SmartList, select the Include all SmartLists check box.
2. Click Accept to open the User SmartList in the SmartList Editor.
Define the User SmartList Options
1. In the Choice table, enter the choices in the SmartList (A). Select the check box next to an option to
mark it as the default option.
2. To add another SmartTool (SmartText, SmartList, or SmartLink) to a choice in the SmartList, click the
and select one of the options (B):
Insert SmartText
Insert SmartList
Insert SmartLink
These fields are SmartTool-enabled, meaning you can use dotphrases to enter SmartLists, or use
keyboard shortcuts to open the lookup windows.
3. If you want to be able to select more than one option in the SmartList, select the Multiple Select
option (C).
4. In the Connection Logic section, specify how the selections appear in the SmartLink's generated text.
For example, And logic would produce "Red, White, Blue, and Green" if all options in this SmartList
were selected. Hover over each option for a description.
5. If the SmartList includes choices that shouldn't be selected together (for example, "Red and White" can
be selected together but "Red and Blue" can't):
a. Select the Mutually exclusive groups button.
b. In the Group column (D), enter the group to which the selection belongs. If a selection has a group
specified, it can only be selected by itself, with another option from the same group, or with an
option that has a blank group name.
6. If you want to show a label in the generated text (for example, "Color: Red and White"), enter Yes in
the Label? field (E) and enter the display text in the Label text field.
7. The Reselectable button (F) is selected by default, which allows you to re-select your options when
using the SmartList. Unselect this checkbox if you do not want to be able to re-select options.
8. To make the SmartList optional, meaning that you don't have to complete it before saving the text that
contains it, select the Optional? check box (G).

6
9. When you're done editing your SmartList, click Accept to save your SmartList and exit the SmartList
editor.
Let Other Users Use Your SmartList
1. In the Sharing section (H), list the users who can use the SmartList in the User column.
2. Select the Can Edit? check box to allow a user to modify your SmartList.
Copy Users from a SmartPhrase or SmartList
If a SmartPhrase or SmartList has a list of users that you want to copy:
1. Click Copy Users.
2. Toggle the Search on option to search for a SmartList or a SmartPhrase.
3. Select a SmartPhrase or SmartList. Its users appear in the Users to Copy section. Users who can edit
the selected SmartPhrase or SmartList have a check mark icon next to their name.
Pull lab results into your note with SmartLinks
By setting different parameters, you can specify which result components to include, as well as whether to
pull in a certain number of results or to include all the results within a given period of time.
Look up component base names
To pull in results for a specific component, you need to know the component's abbreviation, or base name.
You can find components' base names in lab reports in Chart Review.
1. In Chart Review, select the Labs tab and select a result that includes the component you're interested
in.
2. In the lab report, scroll to the Lab Component SmartPhrase Guide and click the link for this test.
3. Note the entry in the Base Name column of the table. This is the base name that you can use with any
of the following SmartLinks to pull results for this component into your note:
RESUFAST

7
LABRSLT
LABRCNTIP
The RESUFAST and LABRSLT SmartLinks are typically used for outpatient contexts, while the LABRCNTIP
SmartLink is typically used for inpatient contexts.
Pull in recent results for specific components with a SmartLink
To keep your note brief, use one of the following SmartLinks to pull in the results of a recent lab of your choice
in a table listing the date, result value, reference range, and status of the result, as well as any comments
entered with the result:
RESUFAST
LABRSLT
LABRCNTIP
The RESUFAST and LABRSLT SmartLinks are typically used for outpatient contexts, while the LABRCNTIP
SmartLink is typically used for inpatient contexts.
Let's say you wanted to use the RESUFAST SmartLink. In your note, place your cursor where you want to insert
the results, enter ".resufast[BASENAME:#", and press Enter.
In place of "BASENAME", enter the base name of the component for which you want to insert results.
In place of "#", enter the number of results you want to insert. For example, enter ".resufast[pocglu:3"
to insert the patient's last three POC glucose results.
To insert all of a patient's results for the component, enter "*" instead of a number.
To insert only the most recent result, omit ":#" and just enter ".resufast[BASENAME".
To insert results for multiple components, separate them with commas. For example, enter
".resufast[pocglu:3,poccreat" to insert the patient's last 3 POC glucose results and her most recent POC
creatinine result.
These bullet points apply to all three of the SmartLinks mentioned above.
For additional instructions on using any of the aforementioned SmartLinks or other lab-related
SmartLinks that require you to set parameters, enter a period (.) followed by the name of the
SmartLink and press Enter. For example, enter ".labrcnt" and press Enter. Instead of pulling in
lab results, the SmartLink pulls in help text. When you've read the text and successfully inserted
the lab results you want, just delete the help text.
Pull in all of a patient's recent lab results with the GETLABS SmartLink
If you need to insert all of a patient's recent lab results, use the GETLABS SmartLink. You can specify the time
period in which to search for results and the display format.
If a patient has many recent lab results, using the GETLABS SmartLink can cause your note to
become quite long, making it more difficult to read. We recommend using the any of the following
SmartLinks instead to pull in results for specific components:
RESUFAST
LABRSLT
LABRCNTIP
In your note, place your cursor where you want to insert your patient's results. To pull in all of a patient's lab
results from the past 6 months, enter ".getlabs[6M,1".

8
Entering "6M" pulls in results within six months of the current visit or admission. Replace "M" with "D",
"W", or "Y" to specify days, weeks, or years, respectively.
The second parameter controls what information appears. Enter "1 "to pull in the component name,
value, reference range, and status of each result. Enter "2" to pull in only the component name and
value of each result.
Create a SmartPhrase to reuse text you commonly type
Create a SmartPhrase from text you type
1. While charting, type the text you want to save as a SmartPhrase. Make sure the text doesn't include
any patient-specific information, so you can reuse it for other patients.
You can create a SmartPhrase anywhere you see this toolbar:
2. Select the text and click .
3. In the SmartPhrase Editor, enter a short, intuitive name for your SmartPhrase in the Name field. This is
the name you'll type to insert the SmartPhrase in a note.
You can't include spaces or symbols in the name.
Preface the name with your initials so you can find it easily.
4. Enter a summary of your SmartPhrase in the Description field.
When you search for your SmartPhrase, this description appears in the results after the
SmartPhrase name. If you leave the description blank, the beginning of the SmartPhrase text
appears.
5. Click Accept to save and close your new SmartPhrase.
6. To use your SmartPhrase in a note or letter, type a period immediately followed by the SmartPhrase
name. Press the Spacebar to insert your SmartPhrase in the note.
Create a SmartPhrase from a SmartText
If you frequently make the same changes to a certain SmartText, save your edited version of the text as a
SmartPhrase.
1. In a note, click to open the SmartPhrase Editor.
2. In the Insert SmartText field, search for the SmartText you want to edit.
3. Edit the text to reflect your preferences.
4. Name your new SmartPhrase and click Accept.
Customize your SmartPhrases
To edit a SmartPhrase you created, open My SmartPhrases from Chart Search. Double-click the SmartPhrase
you want to edit.
To delete any duplicate or unused personal SmartPhrases, select it and click Remove.

9
Add a SmartLink to your SmartPhrase to pull in patient-specific information
1. In the location where you want the SmartLink to appear, enter a period followed by the first few letters
of the SmartLink's name. A list of matching SmartLinks appears.
2. Double-click a SmartLink to insert it. The SmartLink appears in your SmartPhrase between @ symbols,
such as @NAME@.
3. Click Accept. The next time you use this SmartPhrase, patient-specific information appears where you
added the SmartLink.
Add synonyms to quickly find your SmartPhrases
When writing a note, you can pull in your SmartPhrase with its name or a synonym.
1. Open one of your SmartPhrases.
2. In the Synonym field on the right, enter any other names you might use to search for this SmartPhrase.
For example, you might name a SmartPhrase ABDOMINALPAIN and include a synonym of
STOMACHPAIN.
3. Click Accept.
Add a SmartList to your SmartPhrase
Use SmartLists to select from a list of common choices when writing your note.
1. Open one of your SmartPhrases. In the Insert SmartList field, enter the first few letters of the SmartList
and press Enter.
2. Select the SmartList you want.
3. Click Accept. The next time you use this SmartPhrase, you must make selections from all included
SmartLists before you can sign the note.

10
Share SmartPhrases
1. In the Sharing section, list the users who can use the SmartPhrase in the User column.
2. Select the Can Edit? check box to allow a user to modify your SmartPhrase.
Copy Users from a SmartPhrase or SmartList
If a SmartPhrase or SmartList has a list of users that you want to copy:
1. Click Copy Users.
2. Toggle the Search on option to search for a SmartList or a SmartPhrase.
3. Select a SmartPhrase or SmartList. Its users appear in the Users to Copy section. Users who can edit
the selected SmartPhrase or SmartList have a check mark icon next to their name.

© 2018 Epic Systems Corporation. All rights reserved. PROPRIETARY INFORMATION - This item and its contents may not be accessed, used,
modified, reproduced, performed, displayed, distributed or disclosed unless and only to the extent expressly authorized by an agreement with
Epic. This item is a Commercial Item, as that term is defined at 48 C.F.R. Sec. 2.101. It contains trade secrets and commercial information that
are confidential, privileged and exempt from disclosure under the Freedom of Information Act and prohibited from disclosure under the Trade
Secrets Act. After Visit Summary, Analyst, App Orchard, ASAP, Beaker, BedTime, Bones, Break-the-Glass, Caboodle, Cadence, Canto, Care
Everywhere, Charge Router, Chronicles, Clarity, Cogito ergo sum, Cohort, Colleague, Community Connect, Cupid, Epic, EpicCare, EpicCare Link,
Epicenter, Epic Earth, EpicLink, EpicWeb, Good Better Best, Grand Central, Haiku, Happy Together, Healthy Planet, Hyperspace, Kaleidoscope,
Kit, Limerick, Lucy, MyChart, OpTime, OutReach, Patients Like Mine, Phoenix, Powered by Epic, Prelude, Radar, Resolute, Revenue Guardian,
Rover, Share Everywhere, SmartForms, Sonnet, Stork, Tapestry, Trove, Welcome, Willow, Wisdom, and With the Patient at Heart are registered
trademarks, trademarks or service marks of Epic Systems Corporation in the United States of America and/or other countries. Other company,
product and service names referenced herein may be trademarks or service marks of their respective owners. U.S. and international patents
issued and pending.
This guide is based on November 2018.
