
PROJECT complete
Marking software

PROJECT complete
Marking made easy
Intuitive confi guration, intelligent functions, and a
customizable user interface: the PROJECT complete
software is currently the most innovative solution for
straightforward creation of the corresponding markings.
Video
Planning and marking software
PROJECT complete
2
PHOENIX CONTACT

Contents
Easy and convenient creation
of markings 4
Interface overview 6
Inserting new material 8
Inputting data 9
Text editing 10
Special characters 12
Automatic sequencing 14
Autofi ll function 17
Automatic wire marking function 18
Setting the length of endless material 19
Printing 20
Importing data from Excel 21
Inserting graphics 26
Inserting barcodes 30
Changing materials 32
Creating a template 34
Setting up a printer 42
Perfect CAE integration 45
COMPLETE line 46
PHOENIX CONTACT 3

Easy and convenient creation
ofmarkings
The software PROJECT complete marking can be
used to create your marking easily and conveniently –
despite the wide range of di erent marking materials.
• The areas that can be labled are indicated
• Handling is extremely user friendly
• All printing systems from PhoenixContact, as well
asstandard printers can be controlled
• Individual label creation with a template designer
Perfect CAE integration
PROJECT complete marking
comes equipped with
optimized interfaces to all
common CAE programs.
Withjust a mouse click,
the software imports all the
marking data for your project.
Intuitive software
operation
PROJECT complete marking
provides you with a new user
interface with a confi gurable
‘search function’ and dynamic
taskbars.
4
PHOENIX CONTACT

The new standard for
the control cabinet.
More information on
pages 46 to 49.
Simply Easy
PROJECT complete markingis
suitable for all Phoenix Contact
marking systems. The integrated
template designer allows the
user to change label layout and
create custom labels designs
easily.
Intelligent functions like
the ready-to-use material
descriptions automate many
planning steps and ensure
signifi cant time savings.
PHOENIX CONTACT 5

Interface overview
The user interface of PROJECT complete marking is
based on dynamic ribbon technology, which gives the
user a familiar feel to the layout of the application.
Functions are grouped into di erent tabs and depend
on the application.
Project tree
The marking material that
is associated with a project,
including the function and
location information, are
listedin an overview.
Marking Editor
Working area where the
marking material is visible
inreal and the marking
information can be entered
m anually.
6
PHOENIX CONTACT

Tabs
The dynamic task bar contains
a summary of the functions in
tabs. Certain functions only
show up in their own tabs in
the task bar when they are
needed.
Insertion Center
Products can be found by
entering the order number
or name of material.
The live search suggests
material descriptions during
the input process.
Favorites
You can add regularly used
material descriptions to
your favorites list and
create a short cut to the
material.
Product information
General data on the material
isdisplayed here.
PHOENIX CONTACT 7

Inserting new material
The initial starting page will display the ability to create a new
marking project.
• You may search for material by entering the part number,
typedescription or scroll through the list.
• Using the Insertion Center navigation panel, select your printer
(if Insertion Center is not active, go to View and click the
insertion center icon).
• Using the list of material associated with your printer,
selectthe required material for your application.
• Double click on the selected material to edit.
8
PHOENIX CONTACT

Inputting data
The material is ready to use now and you can manually enter
your information on the selected material.
• Click on the marker to enter data.
• To enter multiple lines of text on a marker, hold Alt + Enter
or use the down arrow on the key pad.
• By hitting Enter or Tab, you will be moved to the next row
ofmarkers.
PHOENIX CONTACT 9

Text editing
PROJECT complete marking provides a fully integrated text
editor to adjust the font settings.
• Click “Home” tab
(you must highlight the marker before changing font)
• Choose font type. Arial is the default.
• Set font size if needed.
10
PHOENIX CONTACT

• Set font alignment.
• Text rotation
PHOENIX CONTACT 11

Special characters
• “Special characters”
The working area: special characters oers a large range of
characters and symbols for dierent applications.
Working area: special characters
• Click on “View”.
• Click “Special characters”.
12
PHOENIX CONTACT

• Choose symbols from categories by selecting the tab
along the top of the window.
• The drop-down menu opens up other choices under
system fonts only. All others have just one type.
• Select the desired symbol.
• Click “Insert”, double click, or drag and drop onto marker.
PHOENIX CONTACT 13

Oers the possibilityto create labels based on numeric
andalphanumeric sequences.
Automatic sequencing
• Label numbering
• Click “View”.
• Click on “Label numbering”.
Working area: Label numbering
14
PHOENIX CONTACT

• Click “Start”.
• Choose between numbers or letters.
• Select the start value, end value, and increment.
• Enter any alphanumeric prefixes if needed.
PHOENIX CONTACT 15

Label numbering example
• Symbol
• Enumeration with the prefix A- and postfix -T3.
• Font style and size
• Text rotation
Special characters and label numbering examples
Font settings example
16
PHOENIX CONTACT

This fills the remaining markers with the same content
• Only available for labels with multiple rows of markers
Autofill function
• The remaining markers are filled with that data.
• Enter data into the first marker.
• Right click on the first marker and select “Fill”.
PHOENIX CONTACT 17

Create 360° visibility, ideal for wire marking.
Automatic wire marking function
• Data is then automatically repeated in as many rows possible
to ensure visibility in all directions.
(Font must be small enough for multiple rows)
• Enter the data on the wire marker.
• Make sure the marker is selected as indicated by the
green highlight.
• Select “Cable wrap” under the Home tab.
18
PHOENIX CONTACT

Unit of measurement is metric by default.
Change the unit of measure in options.
Setting the length of endless material
• Select an endless material.
(designated with an “E” in the parentheses)
• Right click on the marker and under “Set material length”
typein the desired length. Hit enter to apply.
PHOENIX CONTACT 19

After finishing the data input start the printing process.
Printing
• Click on Print.
• Print manager
• Click “Print” in print manager.
20
PHOENIX CONTACT

Data can be created in Microsoft Excel (or another source)
and imported into PROJECT complete. This requires an initial
configuration of the data exchange manager.
Importing data from Excel
• It is possible to import from more than one column.
• Click “File”.
• Click “Data Exchange”.
Start the data exchange manager
PHOENIX CONTACT 21

Create a new import configuration
• Click “New”.
• Click the Browse button to find the Excel file.
(You may have to change to all files to find the Excel file)
• Click “Open”.
22
PHOENIX CONTACT

• Preview the data.
• Click “Material mapping”.
• Click “Enforce default material”.
The insertion center will automatically pop up.
Define the needed marking material for
theapplication
PHOENIX CONTACT 23

• Select the desired material.
• Click “Insert”.
• Select your printer.
24
PHOENIX CONTACT

• Click “Run Import”.
• The file has been imported and you are returned to
the standard view.
• You may make any changes as needed and print the project.
PHOENIX CONTACT 25

Inserting graphics
• Select desired material and click “Insert” at top.
Click on material.
• Click “Bitmap”.
• Draw a box for estimated size of graphic.
Project complete supports any image file
(.jpg, .tif, .gif, .bmp, etc.).
26
PHOENIX CONTACT

• In the pop-up window, browse to select graphic.
• Use the yellow grab points for resizing the graphic.
Pure black and white is recommended for best print quality
(unless using the Bluemark ID color printer).
PHOENIX CONTACT 27

Re-sizing an positioning graphics
For specific requirements.
A grid helps visually lay out the graphic on the label.
• Need to be in “View”.
• Click in marker area to use the visual grid and snap to grid
(graphic must be highlighted for this menu to be visible).
• Toggle “Use grid” and “Snap to grid” on or o,
depending on preference.
• “Use grid” and “Snap to grid” turned on.
28
PHOENIX CONTACT
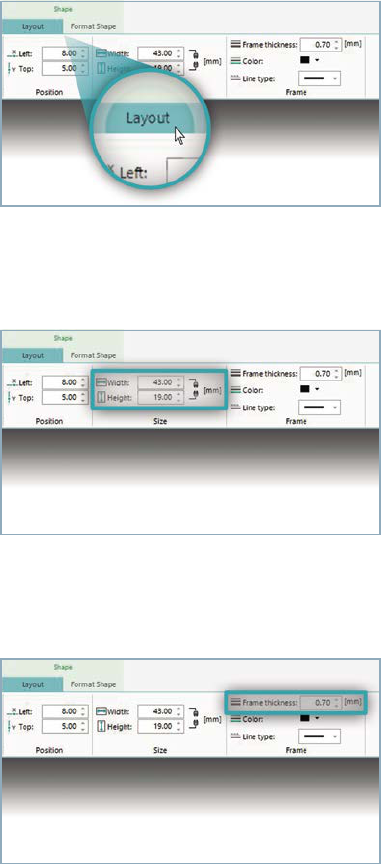
Layout tab
• Click “Layout” and input specific dimensions
for width and height.
• To change the width and height independently,
click the chain icon to break the link.
• The frame option outlines the graphic.
Adjust the line thickness and choose line type
from the dropdown.
PHOENIX CONTACT 29

PROJECT complete marking oers a lot of dierent
barcodetypes (Code 39/128/93, EAN 8/13/128, ISBN,
DataMatrix, QRCode, etc.)
Inserting barcodes
• Click to highlight the marker.
• Click “Insert” and select “Barcode”.
• Use dropdown to choose barcode type.
Working area: barcode
30
PHOENIX CONTACT

• Use the mouse to draw a box where you want the barcode.
• Type in the information for the barcode into the white area
and hit enter.
• Use the yellow grab points to resize barcode if needed.
PHOENIX CONTACT 31

This wizard is helpful for changing the material type
of an existing project.
Changing materials
• Click the “Home” tab.
• Click “Change material”.
• Then click “Select material”.
32
PHOENIX CONTACT

You can change the material to any type regardless of
material type or printer.
• Choose material and click “Insert”.
• Click “OK”.
PHOENIX CONTACT 33

PROJECT complete oers the template creation that is used to
design custom labels on existing material.
Inserting text fields
Creating a template
• Here is an example of a template for a machine type label.
• Permanent text field: for text that you wish to remain constant.
i.e same on every label, titles like Date/Part number etc.
• Dynamic data input: where the data can be edited.
e.g the actual date.
34
PHOENIX CONTACT

Starting a template
• Click “File”.
• Click “New” and “New template”.
• Choose printer and material.
PHOENIX CONTACT 35

• Highlight template.
• Click “View tab” and choose “Snap to grid” and “Use grid”.
• Click “Insert” and select “Text field”.
• Insert box the estimated size of text field
(can be adjusted later).
36
PHOENIX CONTACT

• For indexing through text fields, you need to click on
“Properties” to access the text field name and number.
• Click on the area to be protected.
• Click “Content Protection” and “Location Protection”.
This locks the graphics and text fields so they cannot
be changed.
PHOENIX CONTACT 37

• Click in the text field and give it a name (optional), hit enter.
Give it a number in the index box and select the checkmark.
• Indexing example, 1, 2, 3
38
PHOENIX CONTACT

Saving the created template
• Click “File”, then click “Save as”.
• Name the template and click “Save”.
PHOENIX CONTACT 39
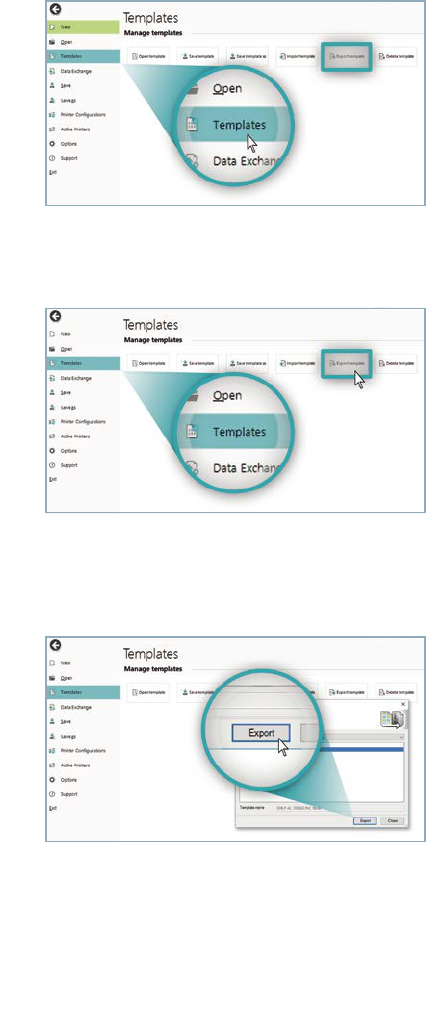
Export template
Exporting the template allows you to save the template outside
of the PROJECT complete library for saving to other computers.
• Click “File”, “Templates”, Export template.
• Select the template to be exported.
• Click “Export template” and save file in desired location.
• Select the template to be exported and click “Export”.
40
PHOENIX CONTACT

Import template
Importing templates adds templates to the PROJECT complete
library that were designed on another computer.
• Click “File”, “Templates” and select “Import template”.
• Select previous exported template and open to view
from new location.
PHOENIX CONTACT 41

Note: Make sure you have the printer driver installed before
completing this step.
Setting up a printer
• Click “File”, “Printer configurations”, then click “New”
and select printer.
• Then click drop-down box and select the printer.
• Your printer is now set up as an output device to print.
42
PHOENIX CONTACT

Setting print alignment and speed
Note: Make sure you have the printer driver installed before
completing this step.
• Click “File”, “Printer configurations”, choose the
printer.
• In printer calibration choose the material that needs to
be aligned. Double click under the “Oset X” or “Y”
depending on how the alignment needs to be adjusted.
• Click up or down arrows to make adjustments.
PHOENIX CONTACT 43

Cutter options
For material that is on an endless roll.
Note: Make sure you have the printer driver installed before
completing this step.
• In the printer configuration area, click “Print calibration”,
choose the material and then double click the perforation
mode to activate the drop down menu. Then select the option
you require.
44
PHOENIX CONTACT

®
PROJECT complete marking comes equipped with optimized
interfaces to all common CAE programs. With just a click of the
mouse, the software imports the data from electrical plans and
automatically creates the corresponding marking solutions.
Perfect CAE integration
PROJECT complete
planning has bidirectional
interfaces to CAE
programs
The bidirectional interface
allows you to send terminal
strips from CAE programs to
PROJECT complete planning.
You can make the following
changes to your terminal
strips in PROJECT complete
planning:
1. Replace terminals
2. Add accessories
3. Replace wire bridges with
jumpers
After the terminal strips
havebeen edited, the changes
are exported to the CAE
programs.
CAE program
PROJECT complete planning
PHOENIX CONTACT 45

COMPLETE line –
The comprehensive solution for
your control cabinet
COMPLETE line is a system comprising technologically
leading and coordinated hardware and software
products, consulting services, and system solutions that
help you optimize your processes in control cabinet
manufacturing. Engineering, purchasing, installation,
andoperation become significantly easier for you.
46 PHOENIX CONTACT

PHOENIX CONTACT 47

Comprehensive product portfolio
With COMPLETE line, we o er a complete product portfolio
oftechnologically leading products.
Save time throughout the entire engineering process
The PROJECT complete planning and marking software supports
the entire process of control cabinet manufacturing.
Intuitive handling
Thanks to the simple, intuitive handling of the coordinated
hardware components, you will save time during installation,
startup, and maintenance.
Your advantages in detail
48 PHOENIX CONTACT

Optimized processes in control cabinet manufacturing
COMPLETE line supports you, from engineering through to
manufacturing, in designing your control cabinet production as
ecient as possible.
The new standard for the control cabinet
Discover the extensive COMPLETEline product portfolio and
find out more about COMPLETEline and your comprehensive
solutions for the control cabinet.
phoenixcontact.com/completeline
Reduced logistics costs
Reduced variety of parts, thanks to standardized marking,
bridging, and testing accessories.
PHOENIX CONTACT 49

Notes
50 PHOENIX CONTACT

PHOENIX CONTACT 51

ICS03-20.000.L3 MNR 1231452/2020-12-01/00
You can fi nd your local partner at
phoenixcontact.com
Open communication with customers and
partnersworldwide
Phoenix Contact is a global market leader based in Germany. We
are known for producing future-oriented components, systems,
and solutions in the fi elds of electrical engineering, electronics,
and automation. With a global network reaching across more
than 100 countries with over 17,600 employees, we maintain
close relationships with our customers, something we believe is
essential for our common success.
Our wide variety of innovative products makes it easy for our
customers to implement the latest technology in a variety of
applications and industries. We focus on developing the fi elds of
energy, infrastructure, process, and factory automation.
Blomberg, Germany
China
USA
Portugal
Spain
France
Switzerland
Austria
Italy
Netherlands
Belgium
Luxembourg
Poland
Czech Republic
Slovakia
Hungary
Croatia
Romania
United Kingdom
Ireland
Turkey
Israel
UAE
Vietnam
Philippines
Taiwan, China
Thailand
Singapore
New Zealand
Chile
Argentina
Colombia
Canada
Russia
Finland
Estonia
Latvia
Lithuania
Belarus
Ukraine
Sweden
Norway
Denmark
Kazakhstan
South Korea
Japan
Mexico
Brazil
Australia
Indonesia
Malaysia
India
South Africa
Myanmar
Morocco
Cyprus
Uruguay
Slovenia
Greece
Macedonia
Montenegro
Kosovo
Bosnia and
Herzegovina
Serbia
Bulgaria
Georgia
Azerbaijan
Lebanon
Saudi Arabia
Oman
Bahrain
Qatar
Bangladesh
Honduras
Ecuador
Venezuela
Peru
Bolivia
Paraguay
Nicaragua
Costa Rica
Panama
Guatemala
Iceland
Sri Lanka
Pakistan
Kuwait
Iraq
Jordan
Egypt
Tunisia
Algeria
Kenya
Uganda
Tanzania
Namibia
Botswana
Zimbabwe
Mozambique
Zambia
Nigeria
Ghana
Cameroon
Mauritius
Moldova
Armenia
Trinidad and To bago
Dominican Republic
Mongolia
Uzbekistan
