Web Forms Guide
12/02/2020Blackbaud Altru 5.19 Web Forms US
©2020 Blackbaud, Inc. This publication, or any part thereof, may not be reproduced or transmitted in any form or
by any means, electronic, or mechanical, including photocopying, recording, storage in an information retrieval
system, or otherwise, without the prior written permission of Blackbaud, Inc.
The information in this manual has been carefully checked and is believed to be accurate. Blackbaud, Inc., assumes
no responsibility for any inaccuracies, errors, or omissions in this manual. In no event will Blackbaud, Inc., be liable
for direct, indirect, special, incidental, or consequential damages resulting from any defect or omission in this
manual, even if advised of the possibility of damages.
In the interest of continuing product development, Blackbaud, Inc., reserves the right to make improvements in
this manual and the products it describes at any time, without notice or obligation.
All Blackbaud product names appearing herein are trademarks or registered trademarks of Blackbaud, Inc.
All other products and company names mentioned herein are trademarks of their respective holder.
WebForms-2020

Contents
Web Forms
4
Donation Forms
5
Donation Form Options 6
Configure Options for Additional Donations in the Shopping Cart 9
Program Forms
11
Program Form Options 13
Configure Options for Member Restricted Events 16
Manage Combination Forms
19
Membership Forms
19
Membership Form Options 21
Membership Renewal Options 23
Event Registration Forms
25
Event Registration Form Options 27
Configure Options for Member Restricted Preregistered Events 30
Event Package Forms
33
Event Package Form Options 34
Approve and Exclude from Website
36
Custom Acknowledgment Emails for Web Forms
37
Configuration Tasks
38
Design Acknowledgement Email
38
Best Practices for Acknowledgement Emails 40
Email Alerts for Online Sales
40
Manage Email Alerts
41
Design Email Preferences Page
42
Design eTickets Page
44
Design Web Pages
46
Design Privacy Policy Page
51
Browser Settings and Home Page URL
52
Design User Registration
53
Create Shopping Cart
55
Matching Criteria
57

Web Forms
Donation Forms 5
Donation Form Options 6
Configure Options for Additional Donations in the Shopping Cart 9
Program Forms 11
Program Form Options 13
Configure Options for Member Restricted Events 16
Manage Combination Forms 19
Membership Forms 19
Membership Form Options 21
Membership Renewal Options 23
Event Registration Forms 25
Event Registration Form Options 27
Configure Options for Member Restricted Preregistered Events 30
Event Package Forms 33
Event Package Form Options 34
Approve and Exclude from Website 36
Custom Acknowledgment Emails for Web Forms 37
In Web, you can create web forms to supplement your website and accept online payments.
You can create donation forms to accept donations for designations, program forms to sell
tickets for programs and their events, membership forms to sell memberships, and event
registration forms to register guests for special events.
Before you create any web forms, you configure general settings such as the appearance of the
web pages that display the forms and the shopping cart that processes transactions. For
information about general settings, see:
l Design Web Pages on page 46
l Browser Settings and Home Page URL on page 52
l Create Shopping Cart on page 55
l Design Acknowledgement Email on page 38
l Design Privacy Policy Page on page 51
l Design Email Preferences Page on page 42.

After you configure the general settings, you configure form-specific settings for each type of
web form. For example, you can set minimum gift amounts for donation forms, specify how
long to keep tickets in shopping carts for program forms, select fields to include on
membership forms, and select price types to include on event registration forms.
To manage web forms, go to Web and click the task for a form type. To create a form, select an
item in the grid and click Approve for website. A green checkmark appears under Live on
website, and the URL appears in the item details. Website users can access this URL to make
donations, purchase tickets or memberships, or register for events.
Note: Designations, programs, memberships, and special events must be active when you
click Approve for website. And the date range must also be current for designations.
Donation Forms
From Web, you can create and manage web forms to accept donations to your designations.
These donation forms can complement your organization’s existing website. For example, you
can link to donation forms from your website. Other than the links, this requires no changes to
your website, and if you stop accepting donations to a designation, you can remove its form
from the web.
Note: The program displays each form on a web page with a standard design and format.
Each form also shares a shopping cart, home page URL, and acknowledgement email message.
To configure these settings, go to Web and select the tasks under Configuration. For
information about these options, see Design Web Pages on page 46, Browser Settings and
Home Page URL on page 52, Create Shopping Cart on page 55, and Design Acknowledgement
Email on page 38.
To create donation forms, go to Web and click Manage donation forms. The Manage
Donation Forms page appears. The grid displays your organization’s designation hierarchy. You
can access designation records, edit designations, create web forms for designations, and edit
options for donation forms.

Under Designations, your organization’s designation hierarchy from Fundraising appears. For
information about designations and the designation hierarchy, see the Fundraising Guide. Under
Live on website, green checkmarks appear for designations that have web forms. When you
select an entry in the grid, details about the designation and its web form appear.
To create donation forms and manage existing web forms, select designations in the hierarchy
and use the buttons on the Manage Donation Forms page.
l To open a designation record, click the name in the Public name column. The
designation record appears.
l To edit a designation’s properties, click Edit. The Edit designation screen appears. For a
detailed explanation of the options on this screen, see the Fundraising Guide.
l To create a donation form for a designation, click Approve for website. If the
designation is active and the current date is between its start and end dates, the program
creates a donation form and a green checkmark appears under Live on website. The URL
appears with the designation details in the grid. On the donation form, website users can
donate to the designation and any child designations in the hierarchy that are approved
for the website. If the green checkmark does not appear under Live on website, check
the designation’s status and its start and end dates to confirm that it is active and the date
range is current.
l To remove a donation form, click Exclude from website. The designation still exists in
the fundraising designation hierarchy, but its form is no longer active. If users attempt to
access the form, the program redirects them to the home page you designate on the
Website URL screen. For information about the home page, see Browser Settings and
Home Page URL on page 52.
l To configure donation form options such as minimum gift amount and whether to allow
recurring gifts, click Options. The donation options screen appears. When you approve a
designation for the website, it inherits the default donation form options. With the
donation options, you can adjust the settings for each donation form. For more
information, see Donation Form Options on page 6.
l To filter the designations in the grid, use the filter tool. You can filter by the designation's
name and whether it is approved for the website and whether a donation form is posted.
Donation Form Options
When you approve a designation for the website to create a web form, it inherits the default
settings for donation forms. You can edit these settings as necessary for each donation form.
To configure donation form options, go to Web and click Manage donation forms. On the
Manage Donation Forms page, select a designation with a web form and click Options. The
donation form options appear. You can enter the minimum gift amount, select whether to
allow recurring gifts, select the types of donations to allow, and set up your giving levels.
Note: The program routes all transactions through a shopping cart, and you must configure
payment settings for the shopping cart before you process transactions. The program uses a
single shopping cart for all web forms. To create the shopping cart, go to Web and click Web
payment settings under Configuration. For more information, see Create Shopping Cart on
page 55.

Configure options for a donation form
1. From Web, click Manage donation forms. The Manage Donation Forms page appears.
2. Under Designations, select a designation with a web form and click Options. The
donation form options appear.
3. In the Minimum gift amount field, enter the minimum donation amount. To accept any
gift amount, enter “0” or leave the field blank.
4. Under One-time and recurring gifts, you can allow recurring gifts. To include recurring
gift options on the donation form, select which giving schedules to make available. If you
do not want to allow online recurring gifts, only select "One-time gift." Select Default
for the option you want selected by default on the web form.

Note: You must use a responsive web from layout in Page Designer to enable online
recurring gifts. If you are not using a responsive layout, the One-time and recurring
gifts section is not available.
Note: If you include a recurring gifts schedule on a donation form for a top-level
designation, those selected options do not automatically apply to donation forms for
any lower-level designations in the hierarchy. You will have to configure each
designation in the hierarchy individually.
Also, if you configure a recurring gifts schedule on the top-level designation, all
designations in the hierarchy that are approved for the website are included as options
in the Designation field on the web form. If you do not want users able to choose from
all approved designations in the hierarchy, we recommend that you configure recurring
gift schedules only on the lower-level designations you want to make available.
5. Under Donor options, select Allow comments to allow donors to enter comments on
the donation form. A Comments field appears on the donation form. When you
download user comments, they appear as notes on the Documentation tab of revenue
records.
6. Under Giving levels, click Add giving level to create a giving level for your donors
a. Under Display name, enter the giving level name to appear on the website.
b. Under Amount, enter the minimum gift amount for the giving level.

c. To include a blank field on the donation form for users to enter their own gift
amounts, select Allow other amount.
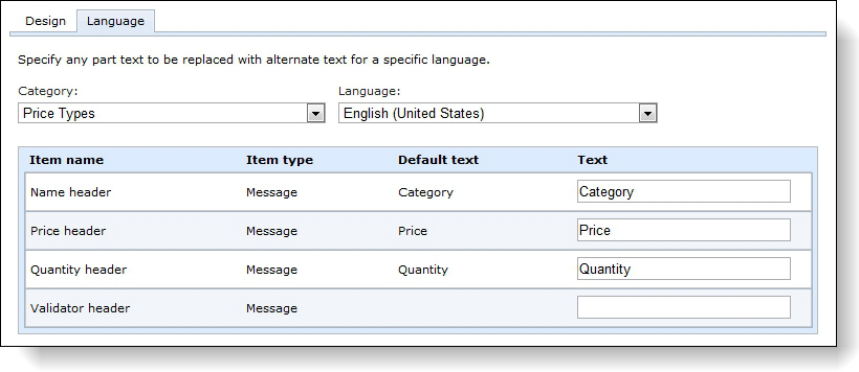
7. To rename labels, headings, and other text on your donation forms, select the Language
tab. You can also use this tab to enter localized text for other languages.
8. In the Category field, select the section of the donation form to edit.
9. In the Language field, select the language to localize.
10. The Item name and Item type columns identify items on the donation form, and the
Default text column displays the default text. Under Text, rename the default labels,
headings, and other text as necessary.
For example, to change the Amount field label to “Total,” enter the new label under
Text. Likewise, to localize the field label, select a language in the Language field and
enter localized text under Text.
11. Click Save. You return to the Manage Donation Forms page.
Configure Options for Additional Donations in the Shopping
Cart
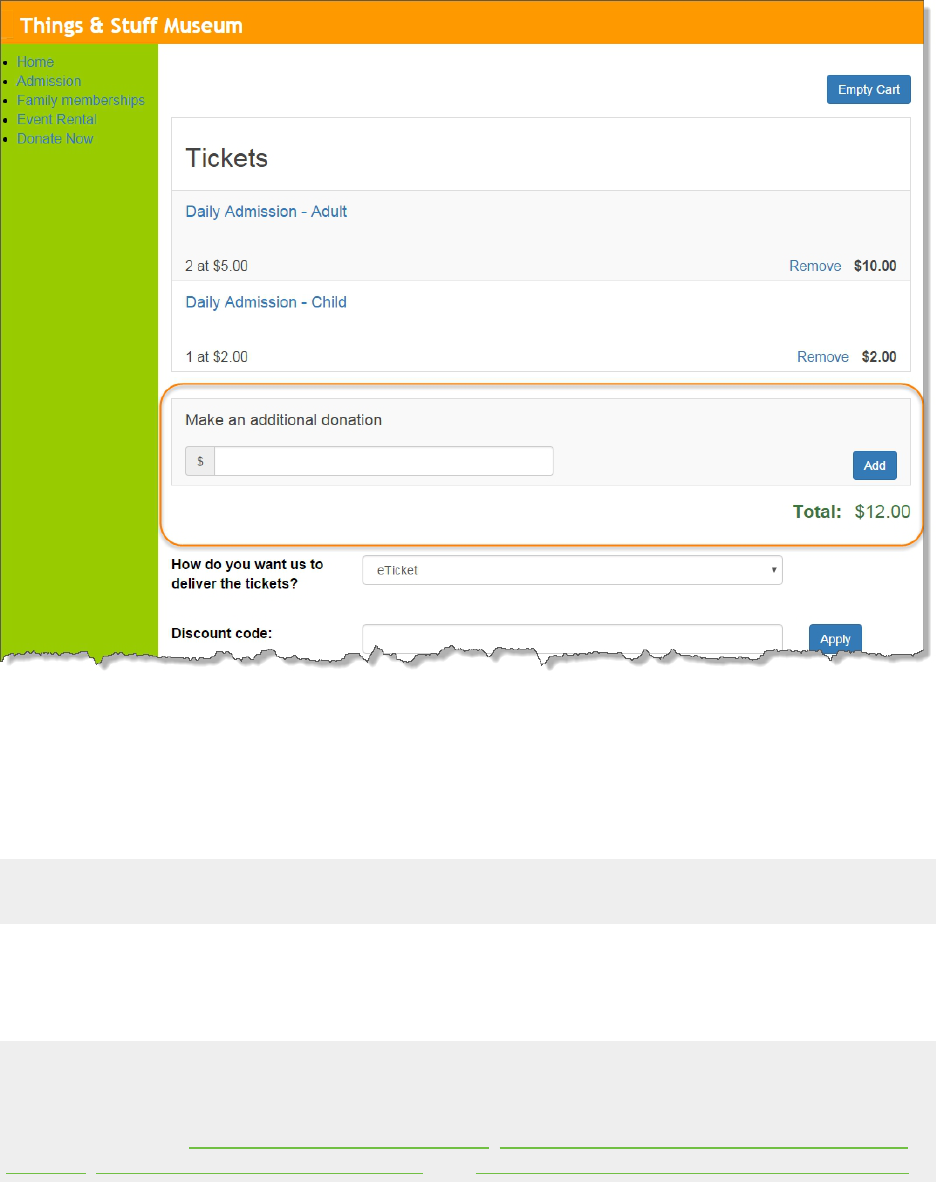
Web site users can make an additional donation from the shopping cart as part of an online
sales transaction.
From the Manage Donation Forms page in Web, click Additional donation options under
Configuration.
Note: You must use a responsive web from layout in Page Designer to enable additional
donations. If you are not using a responsive layout, the Additional donation options
configuration task does not appear on the Manage Donation Forms page.

On the Additional donations options screen, select Add an "Additional donation" option to
the shopping cart and select the designation to credit. If you'd like to use a different label for
the option on the web form, enter it in the Text to display field.
Once enabled, the additional donation option appears in the shopping cart. Web site users can
enter the amount they want to give.
Program Forms
From Web, you can create and manage web forms to allow website users to purchase tickets to
your programs and events.
Note: The program form does not apply to program events that require registration. To sell
tickets to program events that require registration, you use the event registration form.
Your program forms complement your organization’s existing website. For example, you can
create program forms and post links on your website. Other than the links, this requires no
changes to your website, and when an event ends and you no longer want to sell tickets, you
can exclude the event to remove the form from the web.
Note: Each form appears on a web page with a standard design and format. Each form also
shares a shopping cart, home page URL, and acknowledgement email message. To configure
these settings, go to Web and select the tasks under Configuration. For information about
these options, see Design Web Pages on page 46, Browser Settings and Home Page URL on
page 52, Create Shopping Cart on page 55, and Design Acknowledgement Email on page 38.
To create program forms, go to Web and click Manage program forms. The Manage Program
Forms page appears. The grid displays your organization’s programs and events. You can access

program and event records, edit programs and events, approve programs and events for the
website to create web forms, and edit the program form options that apply to all program
forms.
Under Programs and events, your organization’s programs and events from Tickets appear. For
information about programs and events, see the Tickets Guide. Under Live on website, green
checkmarks appear for programs or events that have web forms. When you select an entry in
the grid, details about the program or event and its web form appear.
To create program forms and manage existing web forms, select programs or events in the
grid and use the buttons on the Manage Program Forms page.
l To open a program or event record, click the name in the Name column. The program or
event record appears.
l To edit an event’s properties, select it and click Edit, Event. The Edit event screen
appears. For a detailed explanation of the options on this screen, see the Tickets Guide.
l To edit the description for an event’s web form, click Edit, Description. The Edit event
description for web forms screen appears. By default, events inherit descriptions from
programs. For more information, see the Tickets Guide.
l To create a program form for a program or event, click Approve for website. If the
program or event is active, the program creates a program form and a green checkmark
appears under Live on website. The URL appears with the program or event details in the
grid. On the program form, website users can purchase tickets for the program or event.
For programs, they can also purchase tickets for any of its events that are approved for
the website. If the green checkmark does not appear under Live on website, check the
program or event’s status to confirm that it is active.
l To remove a program form, click Exclude from website. The program or event still exists
in the database, but its form is no longer active. If users attempt to access the form, the
program redirects them to the home page you designate on the Website URL screen. For
information about the home page, see Browser Settings and Home Page URL on page 52.

l To filter the programs and events in the grid, use the filter tool. You can filter by event
name or by when a program or event occurs.
l To configure program form options such as such as how far in advance to sell tickets and
how long tickets can remain in shopping carts, click Online settings for tickets under
Configuration. The program options screen appears. The settings on this screen apply to
all program forms. For more information, see Program Form Options on page 13.
Program Form Options
Before you approve a program or event for the website, you must configure program form
options such as how far in advance to sell tickets and how long tickets can remain in shopping
carts.
Note: Unlike donation forms and membership forms, you cannot edit settings for each
program form. Settings for program forms apply to all programs and events that you enable
for the website.
To configure program form options, go to Web and click Manage program forms. On the
Manage Program Forms page, click Online settings for tickets under Configuration. The
program options screen appears. You can select a thumbnail for tickets in the shopping cart,
when to put tickets on sale, how many tickets website users can buy, how long tickets remain in
shopping carts, when to indicate tickets are nearly sold out, and whether to display sold out
events. You can also enter an email address for website users to contact.
Note: The program routes all transactions through a shopping cart, and you must configure
payment settings for the shopping cart before you process transactions. The program uses a
single shopping cart for all web forms. To create the shopping cart, go to Web and click Web
payment settings under Configuration. For more information, see Create Shopping Cart on
page 55.
Configure options for program forms
1. From Web, click Manage program forms. The Manage Program Forms page appears.
2. Under Configuration, click Online settings for tickets. The program form options
appear.

3. To select an image to appear beside tickets in the shopping cart, click Select in the
Thumbnail field. The Select Image From Image Library screen appears.
l To select an image in a category folder, select the folder on the Categories tab.
Images in the folder appear. To create, rename, or delete category folders, use the
buttons on the Categories tab.
l To search for an image, select the Search tab. You can search by name, ID, type,
approval status, and category folder. Click Search. The images that meet your
search criteria appear.
l To upload an image, click Add image(s). On the Add image(s) screen, click Browse.
On the Choose file screen, select an image and click Open. Under Name and
Caption, enter a name for the image and a caption to appear on the website.
Under Image options, select a category folder or enter a name to create a folder.

To approve the image for the website, select Approved. Click Upload Image(s).
You return to Select Image From Image Library screen.
After you select an image, click OK. You return to the Program Forms Options screen.
4. In the On-sale period field, enter how far in advance to sell tickets.
5. In the Ticket limit field, enter the maximum number of tickets that a website user can
purchase at a time for the program or event.
Note: Ticket limits set for members only programs and events override the ticket limit
set here.
6. In the Timeout field, enter how long users can keep tickets in their shopping carts. If the
time limit passes, the program removes tickets from shopping carts and returns them to
the available pool of tickets so that other website users can purchase them.
Note: The minimum timeout is 15 minutes, but for no timeout, you can enter “0.”
7. In the Threshold for low availability field, enter when to indicate that events are near
maximum capacity. When the number of tickets falls below the threshold, the program
indicates on program forms that the event is nearly sold out.
8. To continue to display events on program forms after tickets sell out, select Continue to
post events after tickets sell out.
9. In the Contact email address field, enter the email address for website users to contact
your organization with questions about events or programs.
Note: To display your contact email address on the program form, you must add a
"MAILTO" href on the Language tab. For example, you can display the email address in
the message that appears after an event sells out. On the Language tab, you can go to
the Text column for the "Sold out availability label, long" entry and overwrite the
default text with something like "This event has sold out. Please contact MAILTO for
more information."
10. To allow users to filter the programs and events that appear on forms, select Allow users
to filter summary lists by category.
11. To rename labels, headings, and other text on your program forms, select the Language
tab. You can also use this tab to enter localized text for other languages.
Note: To edit date formats in the Event Details, Events, and Programs categories for
programs and events, you must use valid date format specifiers. For information about
specifiers, see http://msdn.microsoft.com/en-us/library/8kb3ddd4.aspx.
12. In the Category field, select the section of the program form to edit.
13. In the Language field, select the language to localize.
14. The Item name and Item type columns identify items on the program form, and the
Default text column displays the default text. Under Text, rename the default labels,
headings, and other text as necessary.
For example, to change the first sold out message from “Sold Out!” to “Event is Sold
Out,” enter “Event is Sold Out” under Text in the Sold Out availability label, long field.
Likewise, to localize the same message, select a language in the Language field and
enter localized text under Text in the Sold Out availability label, long field.
15. Click Save. You return to the Manage Program Forms page.
Configure Options for Member Restricted Events
You can sell online tickets to members only events. For example, you can offer access to special
events, such as a Behind the Scenes Tour or a Meet the Author Night, as a benefit of
membership. On scheduled programs and events, you can specify which types of members are
eligible to purchase tickets and set the maximum number of tickets they are allowed to buy.
Members must sign in to your website to verify their eligibility to purchase restricted tickets. If
users are not eligible members, customizable text and options appear on the form to
encourage them to purchase the required membership.
You must configure options for each members only program event you want to sell online.
From the Manage Program Forms page in Web, expand the event to configure. Then click the
Options button. This button appears only for programs and events with members only
restrictions.

On the Options screen, you can customize the buttons and text that appear on the form for this
event.
l You can include a sign-in button to verify membership eligibility. (You must have User
Registration enabled in Web.)
l You can include a button that directs users to the page where they can purchase the
required membership. Enter the URL for the eligible membership form or for your main
membership page, if multiple types of memberships are eligible. If you do not enter a
valid URL, the purchase button will not appear.
l You can customize the form's headings and error messages. The Ticket limit per
transaction field displays a default message with the ticket limit and how many tickets
the patron currently has in the cart. You can edit only the words in this message—if you
edit the existing merge fields ({0} or {1}), or add new merge fields, you will receive an
error.

Here is an example of what the default options will look like on a form for non-members that
are logged in.

Manage Combination Forms
Use combination web forms to sell ticket combinations online. With this web form, patrons can
select which combinations to purchase, add them to the cart, enter payment information, check
out, and then print tickets. Unlike other types of web forms, online combinations are
configured directly from the combination record in Tickets. On the Web forms tab of the
combination record, you can configure descriptions for the combination and all related
programs and events. You can also create a custom acknowledgement email and select whether
to allow event conflicts. For more information, refer to Configure Combination Web Forms.
From Web, you can click Manage combination forms link to open the Combinations page.
From this page, you can open online combinations to make adjustments to their web form
configurations. The Approved for web column quickly identifies which combinations can be
sold online.
Membership Forms
From Web, you can create and manage web forms to allow website users to purchase
memberships from your organization. These membership forms complement your
organization’s existing website. For example, you can create membership forms and post links
on your website. Other than the links, this requires no changes to your website, and if a

membership program ends, you can exclude the membership program to remove the form
from the web.
Note: Each form appears on a web page with a standard design and format. Each form also
shares a shopping cart, home page URL, and acknowledgement email message. To configure
these settings, go to Web and select the tasks under Configuration. For information about
these options, see Design Web Pages on page 46, Browser Settings and Home Page URL on
page 52, Create Shopping Cart on page 55, and Design Acknowledgement Email on page 38.
To create membership forms, go to Web and click Manage membership forms. The Manage
Membership Forms page appears. The grid displays your organization’s membership programs
and their membership levels. You can access membership program and level records, edit
membership programs and levels, approve membership programs and levels for the website to
create web forms, and edit the membership form options for your web forms.
Under Membership programs, your organization’s membership programs and their
membership levels from Fundraising appear. For information about membership programs, see
the Fundraising Guide. Under Live on website, green checkmarks appear for the membership
programs and levels that have web forms. When you select an entry in the grid, details about
the membership program or level and its web form appear.
To create membership forms and manage existing web forms, select membership programs or
membership levels in the grid and use the buttons on the Manage Membership Forms page.
l To open a membership program or membership level record, click the name in the
Name column. The membership program or level record appears.
l To edit a membership program or level’s properties, click Edit. The Edit membership
program screen or Edit membership level screen appears. For a detailed explanation of

the options on this screen, see the Fundraising Guide.
l To create a membership form for a membership program or membership level, click
Approve for website. If the membership program is active, the program creates a
membership form and a green checkmark appears under Live on website. The URL
appears with the membership program or membership level in the gird. On the
membership form, website users can purchase memberships. If the green checkmark
does not appear under Live on website, check the membership program’s status to
confirm that it is active.
Note: Membership forms are only available for annual membership programs with
dues-based membership levels. Other types of membership programs, such as recurring
or lifetime memberships, may appear on the Manage Membership Forms page, but the
Approve for website button is disabled when you select them.
l To remove a membership form, click Exclude from website. The membership program
or level still exists in the database, but its form is no longer active. If users attempt to
access the form, the program redirects them to the home page you designate on the
Website URL screen. For information about the home page, see Browser Settings and
Home Page URL on page 52. Also, if you exclude a membership level but not its
membership program, users can not select that level on the web form for the
membership program.
l To configure membership form options such as the fields to include, click Options. The
Membership Form Options screen appears. When you approve a membership program
or level for the website, it inherits the default membership form options. With the
membership form options, you can adjust the settings for each membership form. For
more information, see Membership Form Options on page 21.
l To filter the membership programs and levels in the grid, use the filter tool. You can
filter by membership program name or by whether the membership programs are active.
l To configure renewal form options such as the fields to include, click Renewal options
under Configuration. The Renewal options screen appears. The settings on this screen
apply to all membership renewal forms. For more information, see Membership Renewal
Options on page 23.
Note: If an existing member purchases a membership for a membership program that
only allows one membership per person, the membership form automatically renews
the membership. But if the membership program allows multiple members, the
membership form adds an additional membership to the patron record.
Warning: If a membership program has too many members available for a web form,
you may encounter performance issues or a poor user experience. If these occur, reduce
the number of possible members on the Levels tab of the membership program record.
We recommend allowing no more than 10-15 members per level.
Membership Form Options
When you approve a membership program or level for the website to create a web form, it
inherits the default settings for membership forms. You can edit these settings as necessary for

each membership form.
To configure membership form options, go to Web and click Manage membership forms. On
the Manage Membership Forms page, select a membership program or level with a web form
and click Options. The membership form options appear. You can select the fields to include
and require and edit text that appears on the form.
Note: The program routes all transactions through a shopping cart, and you must configure
payment settings for the shopping cart before you process transactions. The program uses a
single shopping cart for all web forms. To create the shopping cart, go to Web and click Web
payment settings under Configuration. For more information, see Create Shopping Cart on
page 55.
Configure options for a membership form
1. From Web, click Manage membership forms. The Manage Membership Forms page
appears.
2. Under Membership programs, select a membership program or level with a web form
and click Options. The membership form options appear.
3. If the membership program is configured to allow automatic renewals, under
Automatically renew, select Automatically renew membership. With this option
selected, the Renew this membership automatically when it expires option appears on
the membership web form.
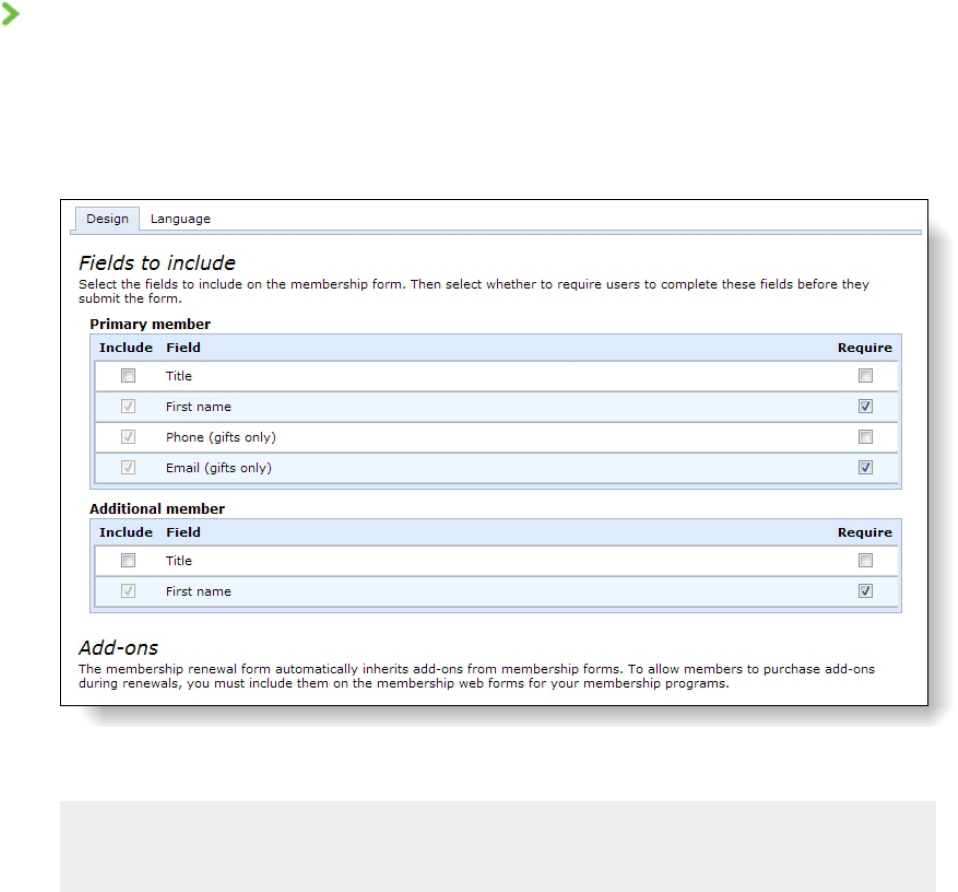
4. Under Fields to include, select the optional fields to include on the form and whether to
require website users to complete these fields.
You cannot exclude fields that are included by default, but you can select whether to
require users to complete them.
5. Under Add-ons, select the add-ons to include on the form and how many to make
available. Add-ons allow website users to add additional members or "benefit" type add-
ons to their memberships. If your membership program does not include add-ons, the
grid does not appear.
Note: Additional member add-ons do not affect the number of cards that are available
for membership programs. You enter the number of available cards on membership
programs, and add-on members only receive cards if they are still available after all
other members receive their cards.
For more information about add-ons, see Memberships Guide.
6. On the Language tab, you can rename labels, headings, and other text for the
membership form. You can also enter localized text for other languages.

7. In the Category field, select the section of the membership form.
8. In the Language field, select the language to localize.
9. The Item name and Item type columns identify items on the membership form, and the
Default text column displays the default text. Under Text, rename the default labels,
headings, and other text as necessary.
For example, to change the Membership Level Required message to “Select a level for
your membership,” enter the new message under Text. Likewise, to localize the message,
select a language in the Language field and enter localized text under Text.
10. Click Save. You return to the Manage Membership Forms page.
Membership Renewal Options
In addition to the membership forms that you create to sell memberships online, the program
also creates a membership renewal form. When you send membership renewal notices via
email, you can include a link to the renewal form to allow website users to renew memberships
online. Users can renew memberships online even when membership programs do not have
membership forms.
For information about how to set up and process membership renewal notices, see the
Memberships Guide.
Note: If website users try to renew memberships on a membership form, they may
unintentionally purchase additional memberships. If the membership program only allows
one membership per person, the web form automatically renews the membership. However,
if the membership program allows multiple memberships, the web form adds an additional
membership to the patron record.
To configure renewal form options, go to Web and click Manage membership forms. On the
Manage Membership Forms page, click Renewal options under Configuration. The Renewal
options screen appears. You can rename labels, headings, and other text that appear on the
membership renewal form.
Configure options for membership renewal forms
1. From Web, click Manage membership forms. The Manage Membership Forms page
appears.
2. Under Configuration, click Renewal options. The Renewal options screen appears.
3. Under Fields to include, select the optional fields to include on the form and whether to
require website users to complete these fields.
You cannot exclude fields that are included by default, but you can select whether to
require users to complete them.
Note: When a website user opens a membership renewal form, the fields display data
for existing members. To change the members for a membership, users can edit the
data in the member fields as necessary.
4. On the Language tab, you can rename labels, headings, and other text for the
membership renewal form. You can also enter localized text for other languages.

5. In the Category field, select the section of the membership renewal form.
6. In the Language field, select the language to localize.
7. The Item name and Item type columns identify items on the membership renewal form,
and the Default text column displays the default text. Under Text, rename the default
labels, headings, and other text as necessary.
For example, to change the Membership Level Required message to “Select a level for
your membership,” enter the new message under Text. Likewise, to localize the message,
select a language in the Language field and enter localized text under Text.
8. Click Save. You return to the Manage Membership Forms page.
Event Registration Forms
From Web, you can create and manage web forms to allow website users to register for special
events and pre-registered program events.
Note: The event registration form does not apply to program events that do not require
registration. To sell tickets to program events that do not require registration, you use the
program form.
Your event registration forms can complement your organization’s existing website. For
example, you can link to event registration forms from your website. Other than the links, this
requires no changes to your website, and when an event ends, you can simply remove the form
from the web and its link from your site.
Note: Each form appears on a web page with a standard design and format. Each form also
shares a shopping cart, home page URL, and acknowledgement email message. To configure

these settings, go to Web and select the tasks under Configuration. For information about
these options, see Design Web Pages on page 46, Browser Settings and Home Page URL on
page 52, Create Shopping Cart on page 55, and Design Acknowledgement Email on page 38.
To create event registration forms, go to Web and click Manage event registration forms. The
Manage Event Registration Forms page appears. The grid displays your organization’s special
events and program events that require registration. You can access event records, edit events,
create web forms, and edit options for the forms.
Under Events, your organization’s special events from Events and program events that require
registration appear. For information about special events, see the Events Guide. For information
about program events, see the Tickets Guide.Under Live on website, green checkmarks appear
for events that have web forms. When you select an entry in the grid, details about the event
and its web form appear.
To create event registration forms and manage existing web forms, select events in the grid
and use the buttons on the Manage Event Registration Forms page.
l To open an event record, click the name in the Name column. The event record appears.
l To edit an event’s properties, click Edit, Event. The Edit event screen appears. For a
detailed explanation of the options on this screen, see the Events Guide for special events
or the Tickets Guide for program events.
l To edit the description for an event's web form, select it and click Edit, Description. The
Edit event description for web forms screen appears. By default, program events inherit
descriptions from programs. For more information, see the Events Guide for special
events or the Tickets Guide for program events.
l To create a web form, click Approve for website. If the event is active, the program
creates an event registration form and a green checkmark appears under Live on website.
The URL appears with the event details in the grid, and website users can access this URL

to register for the event. If the green checkmark does not appear under Live on website,
check the event’s status to confirm that it is active.
l To remove an event registration form, click Exclude from website. The event still exists
in the database, but its form is no longer active. If users attempt to access its URL, the
program redirects them to the home page that you enter on the Website URL screen. For
information about the home page, see Browser Settings and Home Page URL on page 52.
l To configure options for the event registration form such as the price types to display
and how many attendees website users can register, click Options. The event registration
options screen appears. When you approve an event for the website, it inherits default
settings, but you can edit these settings as necessary for each form. For more
information, see Event Registration Form Options on page 27.
l To filter the events in the grid by name, status, or date, use the filter tool.
Event Registration Form Options
When you approve a special event for the website to create a web form, it inherits default
settings. You can edit these settings as necessary for each event registration form.
To configure the options for an event registration form, go to Web and click Manage event
registration forms. On the Manage Event Registration Forms page, select an event with an
active web form and click Options. The event registration form options appear. You can select
a thumbnail for registrations in the shopping cart, the price types to display, the number of
attendees that a website user can register, how long registrations remain in shopping carts, and
when to indicate that an event is nearly sold out. You can also edit text that appears on the
form.
Note: The program routes all transactions through a shopping cart, and you must configure
payment settings for the shopping cart before you process transactions. The program uses a
single shopping cart for all web forms. To create the shopping cart, go to Web and click Web
payment settings under Configuration. For more information, see Create Shopping Cart on
page 55.
Configure options for an event registration form
1. From Web, click Manage event registration forms. The Manage Event Registration
Forms page appears.
2. Under Events, select an event with a web form and click Options. The event registration
options appear.

3. To select an image to appear beside registrations in the shopping cart, click Select in the
Thumbnail field. The Select Image From Image Library screen appears.
l To select an image in a category folder, select the folder on the Categories tab.
Images in the folder appear. To create, rename, or delete category folders, use the
buttons on the Categories tab.To upload an image, click Add image(s). On the Add
image(s) screen, click Browse. On the Choose file screen, select an image and click
Open. Under Name and Caption, enter a name for the image and a caption to
appear with it. Under Image options, select a category folder or enter a name to
create a folder. To approve the image for the website, select Approved. Click
Upload Image(s). You return to Select Image From Image Library screen
l To search for an image, select the Search tab. You can search by name, ID, type,
approval status, and category folder. Click Search. The images that meet your
search criteria appear.
l To upload an image, click Add image(s). On the Add image(s) screen, click Browse.
On the Choose file screen, select an image and click Open. Under Name and
Caption, enter a name for the image and a caption to appear with it. Under Image

options, select a category folder or enter a name to create a folder. To approve the
image for the website, select Approved. Click Upload Image(s). You return to
Select Image From Image Library screen
After you select an image, click OK. You return to the event registration form options.
4. In the price type grid, select the price types to include on the event registration form. To
edit the order of price types on the form, click and drag them within the grid.
5. In the On-sale period field, enter how far in advance to sell tickets for program events
that require registration. This option is not available for special events.
6. In the Ticket limit field, enter the maximum number of attendees that a website user can
register at a time for the event.
7. In the Timeout field, enter how long users can keep registrations in their shopping carts.
If the time limit passes, the program removes registrations from shopping carts.
Note: The minimum timeout is 15 minutes, but for no timeout, you can enter “0.”
8. In the Threshold for low availability field, enter when to indicate that the event is near
maximum capacity. When the number of openings for attendees falls below the
threshold, the program indicates on the form that the event is nearly sold out.
Note: You must enter a low-availability message on the Language tab. In the Event
details category, enter this message in the Low availability field. You can also enter a
message in the Ample availability field to display before the event reaches low
availability.
9. Under Fields to include, select the optional fields to include on the form for each price
type and whether to require website users to complete these fields.
The grid does not display required fields. Likewise, you cannot exclude fields that are
included by default, but you can select whether to require users to complete these fields.
10. To rename labels, headings, and other text on your event registration form, select the
Language tab. You can also use this tab to enter localized text for other languages.

11. In the Category field, select the section of the event registration form to edit.
12. In the Language field, select the language to localize.
13. The Item name and Item type columns identify items on the form, and the Default text
column displays the default text. Under Text, rename the default labels, headings, and
other text as necessary.
For example, to change the sold out message from “Sold Out!” to “This event is sold
out,” enter “This event is sold out” under Text in the Sold out availability field. Likewise,
to localize the same message, select a language in the Language field and enter
localized text under Text in the Sold out availability field.
14. Click Save. You return to the Manage Event Registrations Forms page.
Configure Options for Member Restricted Preregistered Events
You can sell online tickets to members only events. For example, you can offer access to special
events, such as a Behind the Scenes Tour or a Meet the Author Night, as a benefit of
membership. On preregistered programs and events, you can specify which types of members
are eligible to purchase tickets and set the maximum number of tickets they are allowed to
buy.
Members must sign in to your website to verify their eligibility to purchase restricted tickets. If
users are not eligible members, customizable text and options appear on the form to
encourage them to purchase the required membership.
You must configure options for each members only preregistered program event you want to
sell online. From the Manage Event Registration Forms page in Web, expand the preregistered
event and click Options.
On the Design tab, you can include a sign-in button to verify membership eligibility. (You must
have User Registration enabled in Web.) You can also include a button that directs users to the
page where they can purchase the required membership.

On the Language tab, you can customize the form's headings and error messages. In the
Category field, select "Membership - Member event and sign in information" or "Membership
- Not eligible to purchase information" to customize those sections of the form.
l In the Direct ineligible users to another page URL field, enter the URL to the eligible
membership form or to your main membership page, if multiple types of memberships
are eligible. If you do not enter a valid URL, the purchase button will not appear.
l You can customize the form's headings and error messages. The Ticket limit per
transaction field displays a default message with the ticket limit and how many tickets
the patron currently has in the cart. You can edit only the words in this message—if you
edit the existing merge fields ({0} or {1}), or add new merge fields, you will receive an
error.

Here is an example of what the default options will look like on a form for non-members that
are logged in.

Event Package Forms
From Web, you can create and manage web forms to allow website users to register for event
packages.
Note: The event package form only applies to programs that require registration and contain
event packages. To sell tickets to programs that do not contain packages, use the program
form or event registration form.
Your event package forms can complement your organization’s existing website. For example,
you can link to event package forms from your website. Other than the links, this requires no
changes to your website, and when an event ends, you can simply remove the form from the
web and its link from your site.
Note: Each form appears on a web page with a standard design and format. Each form also
shares a shopping cart, home page URL, and acknowledgement email message. To configure
these settings, go to Web and select the tasks under Configuration. For information about
these options, see Design Web Pages on page 46, Browser Settings and Home Page URL on
page 52, Create Shopping Cart on page 55, and Design Acknowledgement Email on page 38.
To create event package forms, go to Web and click Manage event package forms. The
Manage Event Package Forms page appears. The grid displays your organization’s preregistered
programs with event packages and their associated events.
To enable event package forms and manage existing web forms, select packages in the grid
and use the buttons on the Manage Event Package Forms page. If Allow patrons to register
for individual events sold online or through Daily Sales is selected on a package record, you
can also select events in the grid to manage web form settings for the individual events.
l To open a package or event record, click the name in the Name column. The selected
record appears.
l To edit a package or event’s properties, click Edit, Package or Edit, Event. The Edit
screen appears.
l To edit the description for a package or event web form, select it and click Edit,
Description. The Edit event description for web forms screen appears.
l To create a web form, click Approve for website. If the package or event has an active
web form, a green checkmark appears under Live on website. The URL appears with the
event details in the grid, and website users can access this URL to register for the package
or event.
Note: If Allow patrons to register for individual events sold online or through Daily Sales
is selected on a package record, you'll need to approve each individual event you want to sell
on the website.
l To remove a package or event registration form, click Exclude from website. The record
still exists in the database, but its web form is no longer active. If users attempt to access
its URL, the program redirects them to the home page that you enter on the Website URL
screen. For information about the home page, see Browser Settings and Home Page URL
on page 52.

l To configure options for package and event forms, such as the price types to display and
how many attendees website users can register, click Options. The event registration
options screen appears. When you approve an event for the website, it inherits default
settings, but you can edit these settings as necessary for each form. For more
information, see Configure options for an event package form on page 34.
l To create a custom default acknowledgment email, select the item in the grid, and click
Acknowledgment email, Edit. The Acknowledgment screen appears. For information
about the Acknowledgement screen, see Design an acknowledgement email message on
page 39.
l To filter the events in the grid by name, status, or date, use the filter tool.
Event Package Form Options
When you approve an event package for the website to create a web form, it inherits default
settings. You can edit these settings as necessary for each form.
To configure the options for an event package form, go to Web and click Manage event
package forms. On the Manage Event Package Forms page, select an package with an active
web form and click Options. The event package form options appear. You can select a
thumbnail for registrations in the shopping cart, the price types to display, the number of
attendees that a website user can register, how long registrations remain in shopping carts, and
when to indicate that an event is nearly sold out. You can also edit text that appears on the
form.
Note: The program routes all transactions through a shopping cart, and you must configure
payment settings for the shopping cart before you process transactions. The program uses a
single shopping cart for all web forms. To create the shopping cart, go to Web and click Web
payment settings under Configuration. For more information, see Create Shopping Cart on
page 55.
Configure options for an event package form
1. From Web, click Manage event package forms. The Manage Event Package Forms page
appears.
2. Under Packages, select a package with a web form and click Options. The event package
options appear.
Note: If Allow patrons to register for individual events sold online or through Daily
Sales is selected on a package record, you can also select events in the grid to manage
options for the individual events.
3. To select an image to appear beside registrations in the shopping cart, click Select in the
Thumbnail field. The Select Image From Image Library screen appears.
l To select an image in a category folder, select the folder on the Categories tab.
Images in the folder appear. To create, rename, or delete category folders, use the
buttons on the Categories tab.To upload an image, click Add image(s). On the Add

image(s) screen, click Browse. On the Choose file screen, select an image and click
Open. Under Name and Caption, enter a name for the image and a caption to
appear with it. Under Image options, select a category folder or enter a name to
create a folder. To approve the image for the website, select Approved. Click
Upload Image(s). You return to Select Image From Image Library screen
l To search for an image, select the Search tab. You can search by name, ID, type,
approval status, and category folder. Click Search. The images that meet your
search criteria appear.
l To upload an image, click Add image(s). On the Add image(s) screen, click Browse.
On the Choose file screen, select an image and click Open. Under Name and
Caption, enter a name for the image and a caption to appear with it. Under Image
options, select a category folder or enter a name to create a folder. To approve the
image for the website, select Approved. Click Upload Image(s). You return to
Select Image From Image Library screen
After you select an image, click OK. You return to the event package form options.
4. In the price type grid, select the price types to include on the event package form. To
edit the order of price types on the form, click and drag them within the grid.
5. In the On-sale period field, enter how far in advance to sell tickets for event packages.
6. In the Ticket limit field, enter the maximum number of attendees that a website user can
register at a time for the event package.
7. In the Timeout field, enter how long users can keep registrations in their shopping carts.
If the time limit passes, the program removes registrations from shopping carts.
Note: The minimum timeout is 15 minutes, but for no timeout, you can enter “0.”
8. In the Threshold for low availability field, enter when to indicate that the event package
is near maximum capacity. When the number of openings for attendees falls below the
threshold, the program indicates on the form that the package is nearly sold out.
Note: You must enter a low-availability message on the Language tab. In the Event
details category, enter this message in the Low availability field. You can also enter a
message in the Ample availability field to display before the event reaches low
availability.

9. Under Fields to include, select the optional fields to include on the form for each price
type and whether to require website users to complete these fields.
The grid does not display required fields. Likewise, you cannot exclude fields that are
included by default, but you can select whether to require users to complete these fields.
10. To rename labels, headings, and other text on your event registration form, select the
Language tab. You can also use this tab to enter localized text for other languages.
11. In the Category field, select the section of the event package form to edit.
12. In the Language field, select the language to localize.
13. The Item name and Item type columns identify items on the form, and the Default text
column displays the default text. Under Text, rename the default labels, headings, and
other text as necessary.
For example, to change the sold out message from “Sold Out!” to “This event is sold
out,” enter “This event is sold out” under Text in the Sold out availability field. Likewise,
to localize the same message, select a language in the Language field and enter
localized text under Text in the Sold out availability field.
14. Click Save. You return to the Manage Event Package Forms page.
Approve and Exclude from Website
To create a web form for a designation, event, program, or membership program, go to the
applicable page in Web, select the item in the grid, and click Approve for website. To create a
web form, the item you select also must have an active status and the current date must fall
between its start and end dates.
For example, to create a donation form, go to on the Manage Donation Forms page, select a
designation under Designations and click Approve for website. If the designation is active and
the current date is between its start and end dates, the program creates a donation form and a
green checkmark appears under Live on website. On the donation form, website users can
donate to the designation and to any of its child designations in the hierarchy that are
approved for the website. Similarly, on the Manage Program Forms page, you can select a
program or event and click Approve for website to create a program form. And on the

Manage Membership Forms page, you can select a membership program and click Approve
for website to create a membership form.
The URL for the web form you create appears under Details. If the URL does not appear and
the green checkmark does not appear under Live on website, check the status and start and
end dates under Details to confirm that the item is active and the date range is current.
To remove a web form from your website, select it and click Exclude from website. The
designation, event, program, or membership program still exist in your database, but the web
form is no longer active. If users attempt to access the form, the program redirects them to the
home page you enter on the Website URL screen. For information about how to designate the
home page, see Browser Settings and Home Page URL on page 52.
Custom Acknowledgment Emails for Web
Forms
After you setup a default Acknowledgement email for your web forms, you can edit it so it can
be used for specific designations, event programs, and membership programs. For information
about how to create a default Acknowledgement email, see Design Acknowledgement Email
on page 38.
To create a custom default acknowledgment email, go to the applicable page in Web, select
the item in the grid, and click Acknowledgment email, Edit. The Acknowledgement screen
appears. Make the necessary changes and click Save. For information about the
Acknowledgement screen, see Design an acknowledgement email message on page 39.
To enable an acknowledgement email for a specific designation, event or membership level,
select the item in the grid, and click Acknowledgment email, Enable.
Note: If you do not edit the default acknowledgement email for a specific item, the default
acknowledgement email is sent. If you edit an acknowledgement email for a top-level
program it applies to the programs below it. Any enabled acknowledgement email specific to
an item overrides any of the defaults.

Configuration Tasks
Design Acknowledgement Email 38
Best Practices for Acknowledgement Emails 40
Email Alerts for Online Sales 40
Manage Email Alerts 41
Design Email Preferences Page 42
Design eTickets Page 44
Design Web Pages 46
Design Privacy Policy Page 51
Browser Settings and Home Page URL 52
Design User Registration 53
Create Shopping Cart 55
Matching Criteria 57
Before you create web forms in Web to supplement your organization’s website, you must configure
general settings for the web pages where the forms appear. You use the page designer to format the
appearance of the pages. When you create web forms, the program creates web pages to display the
forms and uses the design settings from the page designer. You also create a shopping cart to process
transactions, and the program routes all transactions from your web forms to the shopping cart. You
can also enter a URL for when the program needs to redirect users, design an acknowledgement
message, edit your privacy policy, and edit the email preferences page.
After you configure these general settings for all web pages, you also configure settings for donation,
program, and membership web forms. For example, you can set minimum gift amounts for donation
forms, specify how long to keep tickets in shopping carts, and rename labels on membership forms.
For information about these form types and their individual settings, see Donation Forms on page 5,
Program Forms on page 11, or Membership Forms on page 19.
Design Acknowledgement Email
Before you create web forms in Web, we recommend that you design an acknowledgement message
to send after users check out. After website users donate on donation forms or purchase tickets and
memberships on program forms and membership forms, the program directs users to shopping carts
to process their transactions. If you design an acknowledgement message, the program emails it to
users after they check out.
chapter 2

To design the acknowledgement message, go to Web and click Acknowledgement email under
Configuration. The Acknowledgement email screen appears. On this screen, you use the HTML editor
to design and format your email message.
You can also edit the default Acknowledgement message on a specific designation, event program,
and membership program. For information about how to edit an Acknowledgement messsage, see
Custom Acknowledgment Emails for Web Forms on page 37.
In addition to the acknowledgement message, you also must configure the appearance and format of
your web pages and create a shopping cart to process transactions. For information about these
options, see Design Web Pages on page 46 and Create Shopping Cart on page 55. You can also enter a
URL for when the program needs to redirect users, edit your privacy policy, and edit the email
preferences page. For information about these options, see Browser Settings and Home Page URL on
page 52, Design Privacy Policy Page on page 51, and Design Email Preferences Page on page 42.
Design an acknowledgement email message
1. From Web, click Acknowledgement email under Configuration. The Acknowledgement screen
appears.
2. Under Acknowledgement email, enter a name for the acknowledgement email message, a
subject to include in the Subject field of the email message, and an email address and name to
include in the From field of the email message.
3. To receive responses at a different email address than the one you use to send the message,
enter a return address in the Reply address field.
39 CHAPTER 2

Tip: Most of the fields under Acknowledgement email are also used for system email
messages. The name and subject are specific to the acknowledgement email, but the other
fields apply to confirmation emails that website users receive after they register and to eTicket
emails that users receive after they purchase tickets online for program events.
4. In the HTML editor, enter the content for the acknowledgement email message and format the
appearance and layout. To include personalized information, use merge fields.
For information about the buttons and menus on the HTML editor toolbar, see the General
Features Guide.
5. Click Save. You return to Web.
Best Practices for Acknowledgement Emails
l Include the name of your organization in the subject line.
l Click More Options link and select the option to receive failures. Enter the email address you
want to receive failure alerts. This allows you to follow up with constituents that are missing
confirmation for transactions.
l Use the HTML editor to insert your organization’s logo or banner to reinforce your visual brand.
l Use a table to restrict the width of the email to 580 px to display on a mobile screen without
horizontal scroll.
l Include merge fields such as the user's name to personalize the message.
l Always include a link back to your organization's website and event calendar.
l Include text that explains how the transaction will appear on the user's credit card statement.
Email Alerts for Online Sales
From Web and Sales, you can set up email alerts for online sales to notify you when website users
submit orders on your web forms. You can use these alerts to track activity on your web forms and to
access registrant information and sales order information outside of the program. For example, you
can use alerts to monitor how quickly events fill up so that you can adjust capacity or resources as
necessary, or you can use them as prompts to follow up with registrants, major donors, or other
website users who submit web forms.
To set up email alerts, you specify an email address to send the alerts to and then select the types of
online transactions that prompt alerts. For example, to receive alerts after online donations, include the
donation transaction type so that you will receive alerts after any online sales order that includes a
donation.
To set up email alerts, go to Web or Sales and click Email alerts for online sales under Configuration.
The Email alerts for online sales screen appears.
CONFIGURATIO N TA SKS 40

In the Email address field, enter an email address to send alerts to after web form transactions.
Note: Application users can only set up email alerts for one email address per user, and they cannot
set up alerts for email addresses that already receive alerts.
In the list of checkboxes, select the types of transactions to receive alerts for. You can receive alerts for
ticket sales, event registrations, membership sales, and donations.
Note: The Daily admissions, Scheduled program events, and Fundraising events checkboxes all
relate to events. To receive alerts when you sell tickets to program events on your program forms,
select Daily admissions. To receive alerts when you sell tickets to pre-registered program events on
your event registration forms, select Scheduled program events. And to receive alerts when you sell
registrations to special fundraising events from Events on your event registration forms, select
Fundraising events.
Manage Email Alerts
After you set up email alerts in Web or Sales to notify you about transactions on web forms, you can
use the Email alerts management page to view email alert settings and remove alerts for email
addresses as necessary. For example, if employees leave your organization, you can remove the alerts
for their email addresses.
To access the Email alerts management page, go to Web and click Email alerts management under
Configuration. The Email alerts management page appears.
41 CHAPTER 2

The Subscriptions grid displays a list of the email addresses that receive email alerts and the types of
alerts that they receive. To remove alerts for an email address, select its entry in the grid and click
Delete.
Design Email Preferences Page
In addition to the web forms you create in Web, the program also creates a page where website users
can opt out of email messages from your organization. You can include a link to this page in the email
messages you send. The page consists of a page header and a checkbox for users to refuse email.
When a website user selects the opt-out checkbox, the program updates the constituent record to
select the Do not send email to this address checkbox for the email address.
To edit the email preferences page, go to Web and click Email preferences under Configuration. The
Email preferences screen appears. On this screen, you can edit the page title and the label for the opt-
out checkbox.
In addition to the email preferences, you also must configure the appearance and format of your web
pages and create a shopping cart to process transactions. For information about these options, see
Design Web Pages on page 46 and Create Shopping Cart on page 55. You can also enter a URL for
when the program needs to redirect users, design an acknowledgement message, and edit your
privacy policy. For information about these options, see Browser Settings and Home Page URL on page
52, Design Acknowledgement Email on page 38, and Design Privacy Policy Page on page 51.
CONFIGURATIO N TA SKS 42

Edit email subscription preferences
1. From Web, click Email preferences under Configuration. The Email preferences screen appears.
2. In the Title field, enter a header for the web page.
3. In Opt-out checkbox label field, enter the label for the checkbox that users select to opt out of
email messages from you organization.
For verification purposes, users who opt out of email messages must enter their email addresses.
If email addresses are not registered, user cannot opt out because they are not on the email list.
4. To customize the message that appears after users opt out of email messages, select the
Language tab. You can also use this tab to enter localized text for other languages.
5. In the Category field, “Messages” is the only option.
43 CHAPTER 2

6. In the Language field, select the language to localize.
7. Under Text, edit the confirmation messages that appear when users opt in or out of email
messages. The Default text column displays the default messages.
8. Click Save. You return to Web.
Design eTickets Page
The eTickets page allows patrons to access tickets for programs and events that they purchase through
Advance Sales or OnlineSales. When a patron chooses the eTickets delivery method, Altru
automatically sends them an email message with a link to the eTickets page. On this page, they can
view their tickets and print them from home to present at program events. Tickets include the ticket
number and a barcode that allows you to scan tickets. The ticket number and barcode ensure that a
ticket cannot be used twice.
Note: Note:To enable eTickets, you must include it as a delivery method under the sales method
configuration. From Tickets, select Sales methods, then select Advance Sales orOnline Sales. Under
Delivery methods, add the eTickets delivery method. If you don't want to use the default eTickets
delivery method, you can create your own delivery method to deliver tickets via email. For
information about how to manage delivery methods and sales methods, see the Tickets Guide.
On the editor for the eTickets page, you can edit the page's default text as necessary and add
additional text above or below the tickets. For example, you can include instructions about how users
should present their tickets or additional information about tickets.
CONFIGURATIO N TA SKS 44

Edit the eTickets page
1. From Web, click eTickets under Configuration. The eTickets screen appears.
2.
To add an image to the eTickets page, under Logo, select the binoculars . Choose the image
from the image library, or upload a new file from your device or network.
3. In the text box at the top of the editor, a default header for the eTickets page appears. You can
edit it as necessary.
4. In the text boxes below the header and the sample ticket, you can enter additional text for the
body and footer of the eTickets page. For example, you can provide instructions or
communicate special considerations about tickets. By default, no text appears in these text
boxes.
Note: The Print button and sample ticket on the editor are for display only, and you cannot
edit them.
5. To edit the error messages associated with the eTickets page, select the Language tab. You can
also use this tab to enter localized text for other languages.
45 CHAPTER 2

6. In the Category field, the "Validation"section of the eTickets page is selected by default.
7. In the Language field, select the language to localize.
8. The Item name and Item type columns identify items on the eTickets page, and the Default
text column displays the default text. In the Text column, edit the text as necessary.
9. Click Save. You return to Web.
Design Web Pages
Before you create web forms in Web, you must configure design settings to determine the appearance
and format of the web pages where the forms appear. The pages that display donation, program, and
membership web forms all inherit these design settings.
Note: The secure payment page that processes credit card transactions also inherits your design
settings. However, to help you comply with the Payment Card Industry Data Security Standard (PCI
DSS), the program analyzes the secure payment page for compliance purposes and removes content
that is not PCI DSS compliant. The program removes active content such as script tags, inline data in
custom stylesheets, buttons, and dynamic HTML markup. As a result, if you include active content in
the header, footer, or columns of your web page design, the secure payment page’s appearance
differs slightly from the pages that contain your web forms.
To configure the design settings, go to Web and click Page designer under Configuration. The page
designer appears. On the Select Layout tab, select a layout to organize the items on your web pages.
Each layout is "responsive" which means it automatically adjusts the page's size and format to
accommodate all screen sizes, including mobile devices. The layout shifts the form's fields and options
neatly into a row to fit the narrow width of a mobile device and the fonts are enlarged to make it
easier to read text and complete transactions.
Warning: If your organization implemented Altru before November 2015, the Page Designer will
also include non-responsive layouts. If your web forms are still using a non-responsive layout, we
recommend that you convert to get the benefits and features provided by responsive layouts.
CONFIGURATIO N TA SKS 46

If your current layout is customized, you will need to modify the responsive layout’s design to match
your website. Making these updates requires significant knowledge of HTML and CSS. Contact your
account manager for professional design assistance
On the Color & Styles tab, edit the background colors and fonts. On the Configure Content tab, edit
the content in the header, footer, and side columns.
In addition to the design settings for your web pages, you also must create a shopping cart to process
transactions. For information, see Create Shopping Cart on page 55. You can also enter a URL for when
the program needs to redirect users, design an acknowledgement message, edit your privacy policy,
and edit the email preferences page. For information about these options, see Browser Settings and
Home Page URL on page 52, Design Acknowledgement Email on page 38, Design Privacy Policy Page
on page 51, and Design Email Preferences Page on page 42.
Design the appearance and format of web pages
1. From Web, click Page designer under Configuration. The page designer appears.
2. On the Select Layout tab, select a layout for your web pages. The layout appears under Preview.
The layout determines where items appear on your web pages. You cannot design a custom
layout; you must select from the default options.
3. Click Next. The Color & Styles tab appears. The Basic colors and styles section allows you to
make basic tweaks to fonts and colors, while the Advanced colors and styles section allows you
to edit the style sheet directly.
47 CHAPTER 2
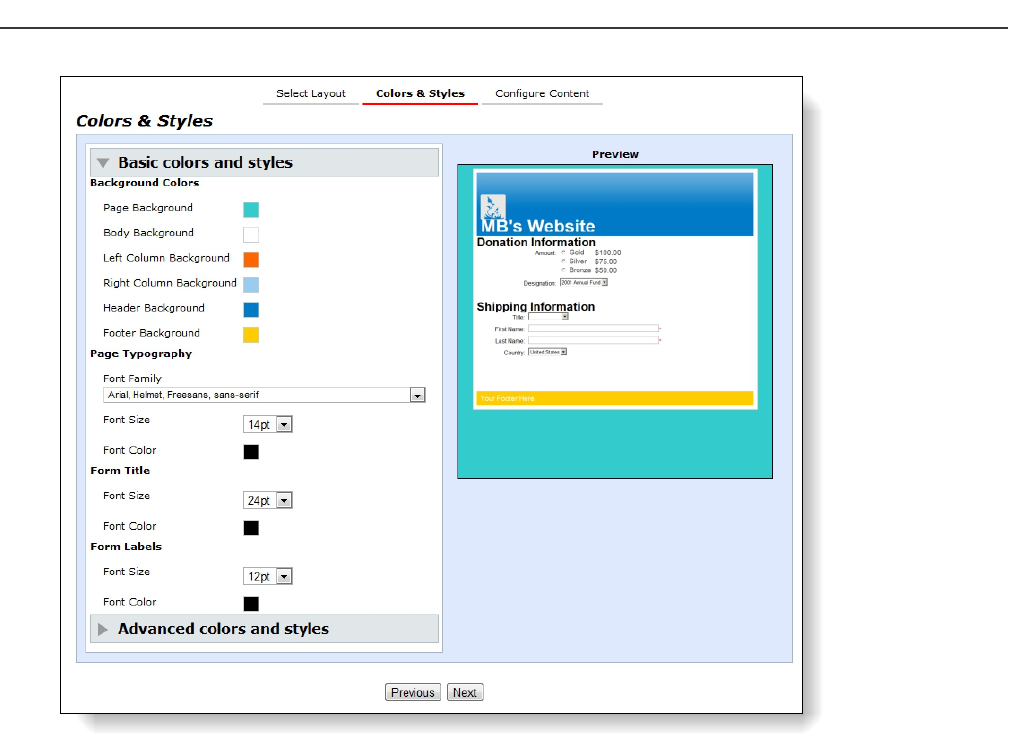
4. Under Background Colors, select background colors for sections of your web pages. When you
click a checkbox, a color palette appears.
5. Under Page Typography, select the font for all text on your web pages, and select the size and
color for body text.
6. Under Form Title, select the font size and color for section headers.
7. Under Form Labels, select the font size and color for field labels.
8. To use Cascading Style Sheets (CSS) to edit the web page’s appearance, select Advanced colors
and styles and click Edit stylesheet. The Stylesheet text editor appears.
CONFIGURATIO N TA SKS 48

On this screen, you can edit properties through CSS. For example, you can edit the web page’s
fonts, colors, backgrounds, and other properties. You can also insert HTML tags and apply styles
to them.
9. To load the CSS selectors that allow you to edit the appearance of forms, click Insert CSS
selectors. The CSS Selectors screen appears. You can access this screen multiple times to add
multiple selectors.
10. In the Insert selectors for field, select the CSS selector to load in the Stylesheet text editor. To
include the default styles along with class names, select Include defaults.
11. Click Insert. You return to the Stylesheet text editor, and the selectors appear in a new section
within the editor. Edit the styles as necessary.
12. To save your edits and return to the page designer, click Save. Or to save your edits and keep
the Stylesheet text editor open, click Apply.
Warning: When you save or apply changes in the Stylesheet text editor, the changes go into
effect immediately. Website users who access forms can view your changes. We recommend
that you check your web forms when you save or apply changes to confirm that the changes
have the desired effect.
13. To erase all changes to the style sheet and restore the design settings in the Basic color and
styles section, click Reset.
49 CHAPTER 2

14. Click Next. The Configure Content tab appears. On this tab, you can edit the header, footer and
columns for the web pages where your forms appear.
Tip: If you expect website users to print web pages, you should keep this in mind when you
style headers, footers, and columns. For example, if you include a menu with many links and
website users print the confirmation page, the printed ouptut may be spread over multiple
pages. On the Colors & Styles tab, you can select Advance colors and styles to address this
scenario with a CSS media query in the style sheet.
15. Click a header, footer, or side column. An HTML editor appears.
Note: You cannot edit content in the center of the page with the page designer because this
section displays your web forms and payment forms. If you click this section, the screen that
appears does not include an HTML editor. To edit this content, you edit the payment settings
and web forms. For more information, see Create Shopping Cart on page 55, Donation Forms
on page 5, Program Forms on page 11, or Membership Forms on page 19.
CONFIGURATIO N TA SKS 50

16. In the HTML editor, edit the content for your web pages. You can format the appearance and
layout to make the pages that you create in Web look similar to the rest of your website. For
example, you can include the same images and text in the header that you include in the header
of your organization’s website.
Note: If you include links to web pages that do not secure content with Secure Sockets Layer
(SSL), a warning appears when website users click the links.
For information about the buttons and menus on the HTML editor toolbar, see the General
Features Guide.
Warning: If you use the Edit HTML source button to edit the HTML source code for your web
forms, do not include a reference to load jQuery. Web forms already include a recent version of
jQuery, so any additional reference is unnecessary and could conflict with the basic features of
web forms.
Tip: If you use the Insert image button to upload images to match your website, remember
that the program does not reflect any changes on your website. To update images on the web
pages you create in Web, open the page designer and upload updated versions of the images.
17. After you review the format and appearance of your web pages, click Submit. You return to Web.
Note: Design settings are active as soon as you select them in the page designer, but to apply
them to the secure payment page, you must click Submit. To help you comply with PCI DSS,
the program analyzes the design settings for compliance purposes and removes content that is
not PCI DSS compliant. To apply your design settings to the secure payment page, click
Submit.
Design Privacy Policy Page
In addition to the web forms that you create in Web, the program also creates a page to display your
organization’s privacy policy.
Note: When the program creates the web page with the privacy policy, it automatically includes a
generic policy. We strongly recommend that you review this default policy to ensure that it is right
51 CHAPTER 2

for your organization. If the generic policy does not match your organization’s privacy policy, you can
edit it as necessary.
To edit the privacy policy, go to Web and click Privacy policy under Configuration. The Privacy policy
screen appears. On this screen, use the HTML editor to design and format the privacy policy that
appears on the web page that the program creates.
In addition to the privacy policy, you also must configure the appearance and format of your web
pages and create a shopping cart to process transactions. For information about these options, see
Design Web Pages on page 46 and Create Shopping Cart on page 55. You can also enter a URL for
when the program needs to redirect users, design an acknowledgement message, and edit the email
preferences page. For information about these options, see Browser Settings and Home Page URL on
page 52, Design Acknowledgement Email on page 38, and Design Email Preferences Page on page 42.
Edit the privacy policy
1. From Web, click Privacy policy under Configuration. The Privacy policy screen appears.
2. In the HTML editor, edit the content of the privacy policy and format the appearance and layout
as necessary.
For information about the buttons and menus on the HTML editor toolbar, see the General
Features Guide.
3. Click Save. You return to Web.
Browser Settings and Home Page URL
From Web, you can enter a label such as your organizations’s name to display in the title bar of web
browsers when users access your web forms.
CONFIGURATIO N TA SKS 52

You can also designate a home page to redirect users when necessary. For example, donation forms
are only available online when designations are active and the start and end dates are current. If a
designation becomes inactive or out of date, the program removes the donation form. If website users
attempt to access the form, the program redirects them to the home page you designate.
To enter the title bar label and home page URL, go to Web and click URL and browser settings under
Configuration. The URL and browser settings screen appears.
In the Page title field, enter the label to display in the title bar when users access your web forms.
In the Home page URL field, enter the URL to redirect website users to when a donation, program or
membership form is not available.
In addition to the home page, you also must configure the appearance and format of your web pages
and create a shopping cart to process transactions. For information about these options, see Design
Web Pages on page 46 and Create Shopping Cart on page 55. You can also design an
acknowledgement message, edit your privacy policy, and edit the email preferences page. For
information about these options, see Design Acknowledgement Email on page 38, Design Privacy
Policy Page on page 51, and Design Email Preferences Page on page 42.
Design User Registration
In addition to the web forms that you create in Web for online transactions, you can also create a
registration form that allows website users to register with your organization. When you enable
registration, website users can create login credentials for your web forms and provide their contact
information. The program uses email addresses as user names, and users enter their own passwords.
Login credentials for website users are associated with constituent records in your database. When
registered users access web forms and log in, data from their constituent records automatically
appears on the web forms.
Note: A user may receive an error message during online registration if the program is unable to
create a new user account, the user cannot be linked to a constituent, or if the user name is already
taken because the user attempted to register with the same email address earlier. Because these are
issues that need to be fixed by your organization, the default error message the user receives is, "We
cannot process your registration. For more information, please contact us by phone or email." To
update this message, go to Web and click User registration settings. On the Language Tab, select
"Validation" for the Category. In the Text field, edit the error message. For example, you can include
a specific phone number or email address to contact for assistance. Or, you can provide more
detailed instructions. For example, if the error is the user is already registered or the user name is
already taken, you can tell the user to click Sign in to access the password reset page.
53 CHAPTER 2

Edit user registration settings
1. From Web, click User registration settings under Configuration. The User registration settings
screen appears.
2. To allow users to create login credentials for your web forms, select Enable registration. The
program uses email addresses as user names, and users enter their passwords. Login credentials
for website users are associated with constituent records, and when users log in, data from their
constituent records automatically appears on web forms.
The registration form is available at the URLin the Registration form URL field, and users can
click Register on web forms to access the URL. In addition, a Registration information section
appears in the shopping cart and allows users to register during checkout.
3. Under Confirmation email, select whether to send users a default confirmation email message
after they register. The email thanks registrants and reminds them of their usernames.
4. Under Required fields, select whether to require users to enter first names, titles, or phone
numbers when they register. To ensure you download complete constituent information, we
recommend that you make all these fields required.
5. To rename labels, headings, and other text on the registration form, select the Language tab. You
can also use this tab to enter localized text for other languages.
6. In the Category field, select the section of the registration form to edit.
7. In the Language field, select the language to localize.
8. The Item name and Item type columns identify items on the registration form, and the Default
text column displays the default text. Under Text, rename the default labels, headings, and other
text as necessary.
For example, to change the Confirm password field label to “Enter password again,” enter the
new label under Text. Likewise, to localize the field label, select a language in the Language
field and enter localized text under Text.
9. Click Save. You return to Web.
CONFIGURATIO N TA SKS 54

Create Shopping Cart
Before you create web forms in Web, you must create a shopping cart to process transactions. The
program uses the shopping cart for all the web forms you create, and it routes all transactions to the
shopping cart.
To create the shopping cart, go to Web and select Web payment settings under Configuration. The
Web payment settings screen appears. On this screen, you can:
l set how long to maintain shopping carts for anonymous users.
l enable reCAPTCHA on the BlackbaudCheckout payment form.
l enable a "Continue shopping" button.
l design a confirmation screen to appear after users check out.
l select required fields for when users check out.
l choose which merchant account to process credit card payments.
l select payment methods for website users.
In addition to the shopping cart, you also must configure the appearance and format of your web
pages. For information, see Design Web Pages on page 46. You can also enter a URL for when the
program needs to redirect users, design an acknowledgement message, edit your privacy policy, and
edit the email preferences page. For information about these options, see Browser Settings and Home
Page URL on page 52, Design Acknowledgement Email on page 38, Design Privacy Policy Page on
page 51, and Design Email Preferences Page on page 42.
Note: When a website user makes a payment on a web form without logging in, the program checks
your database for records that matches the user. If the program finds a match, it associates the
transaction with that record. If not, the program creates a constituent record for the website user. To
determine whether a match exists, the program uses the match settings from the Constituent
matching page in Administration unless the transaction is a special event registrations. For
information about the Constituent matching page, see the Administration Guide. For information
about matching criteria for special even registrations, see Matching Criteria on page 57.
Create the shopping cart
1. From Web, click Web payment settings under Configuration. The Web payment settings
screen appears.
2. Under General, enter how long to maintain shopping carts for website users who are not logged
in.
Warning: If you enter “0” in the Days to keep anonymous carts field, the program does not
maintain cookies to identify website users. If users add items to shopping carts and do not
check out, they cannot return to the cart later. Depending on the browser, the carts are cleared
either when the browsing session times out or when users close the browser.
3. To include a Continue shopping button in the cart, under Continue Shopping settings, select
Display "Continue shopping" button and then select the web form or URL to redirect the
patron to. For example, you can redirect them to the web form page they were on before
checkout or to a specific URL on your website.
4. Under Confirmation screen, design a confirmation screen to display after users check out.
55 CHAPTER 2
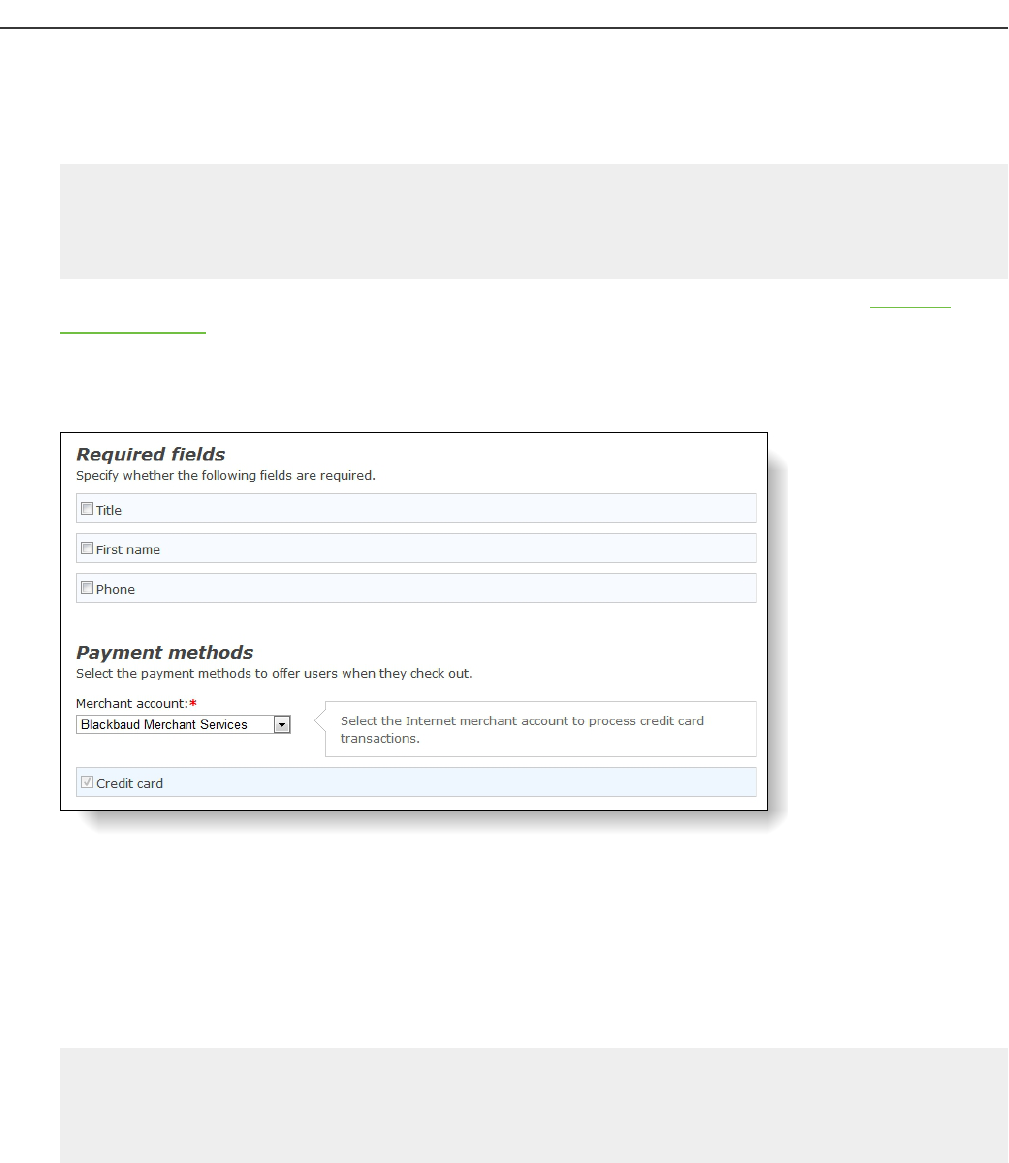
In the HTML editor, edit the content for the confirmation and format the appearance and layout.
To include personalized information, use merge fields. To clear your changes and use the
program’s default confirmation, click Restore default messsage.
Tip: Keep in mind that some users may want to print the confirmation page. If headers, footers,
or columns on your web pages include items that print differently than they render in web
browsers, this can cause problems when these users print. On the Colors & Styles tab of the
page designer, you can add a CSS media query to the style sheet to address this scenario.
For information about the buttons and menus on the HTML editor toolbar, see the General
Features Guide.
5. Under Required fields, select whether to require users to enter first names, titles, or phone
numbers when they check out. To ensure you download complete constituent information, we
recommend that you make all these fields required.
6. Under Payment methods, select a merchant account to process credit card transactions. For
example, you can use your organization’s BBMSaccount. The system administrator sets up
merchant accounts.
7. Select the payment methods to offer to website users. By default, the shopping cart accepts
credit card payments. If your organization processes credit cards through Blackbaud Merchant
Services, you can choose to include digital wallet payment solutions to accept payments from
ApplePay, Masterpass, and Visa Checkout.
Note: To help you comply with the Payment Card Industry Data Security Standard (PCI DSS), the
shopping cart directs credit card transactions to BlackbaudCheckout to process payments. The
secure payment form uses Blackbaud Payment Service to securely process biographical billing
information and payment information for the shopping cart.
8. To rename labels, headings, and other text in your shopping cart, select the Language tab. You
can also use this tab to enter localized text for other languages.
CONFIGURATIO N TA SKS 56

9. In the Category field, select the section of the shopping cart to edit.
10. In the Language field, select the language to localize.
11. The Item name and Item type columns identify items on the shopping cart, and the Default
text column displays the default text. In the Text column, rename default labels, headings, and
other text as necessary.
For example, to change the Empty Cart button label to “Clear cart,” enter the new label under
Text. Likewise, to localize the button label, select a language in the Language field and enter
localized text under Text.
12. Click Save. You return to Web.
Matching Criteria
Note: The matching criteria in this section only apply to special event registrations. All other web
form transactions now use match settings from the Constituent matching page in Administration.
Special event registrants will continue to use the current criteria until the new algorithm is
implemented in a future release. The one exception for special event registrations is the host (the
order patron). The shopping cart determines the host, and since it uses the new matching algorithm,
hosts on special event registrations are matched based on the match settings on the Constituent
matching page. For information about the match settings, see the Administration Guide.
When website users submit payments for special events on your web forms, the program associates
the transactions with constituent records. To determine whether website users match existing
constituents in your database, the program uses matching criteria to compare data on web forms to
the corresponding data on constituent records. If the program finds a match, it associates the record
with the transaction and updates it with any new data on the payment form. Otherwise, it creates a
record and associates the transaction with that new record.
Note: When the program creates a constituent, address, phone, or email address record based on a
web form, it selects “Web Forms” in the Information source field and does not allow you to edit the
selection. In queries, you can use the Origin and Origin information fields to include the information
57 CHAPTER 2

source in query results or to filter queries based on whether records were created manually by
program users or automatically based on web forms.
To determine whether a matching record exists, the program compares the following fields on the
payment form with the corresponding fields on constituent records.
l Title
l First Name
l Last Name
l Address
l City
l Country
l State
l Zip
l Email Address
l Phone
For a website user to be considered a match for an existing constituent, these fields must all match
exactly according to the following matching criteria.
l The program only compares website users to individual constituent records. It does not consider
organizations or groups. It also does not compare website users to constituents who are inactive
or deceased.
l Matching criteria is not case-sensitive, so the program treats “Smith” and “SMITH” as an exact
match.
l Because the Title, First Name, and Phone fields are not always required fields, the program
treats them as matching fields when data exists in one location but not the other. If the fields
contain data on both the payment form and the constituent record, then an exact match is
required.
l The program compares first names on payment forms to the First Name, Nickname, and Alias
fields on constituent records. If an exact match exists to any of these fields, the program treats it
as a match.
l The program does not consider types such as Home or Business when it compares addresses,
phone numbers, and email addresses. If an address, phone number, or email address on a
payment form matches any address, phone number, or email address of any type on a record,
the program treats it as a match.
l For Zip codes, the program only compares the first five digits.
l For addresses, the program treats the primary street names and standard abbreviations in the
U.S. Postal Service’s list of street suffix abbreviations as exact matches. So if a user enters a Postal
Service abbreviation but an address record includes the full name, the program treats this an
exact match. For example, if a website user enters “123 Main St” but an address record uses “123
Main Street,” the program treats these fields as a match. For the list of Postal Service
abbreviations, go to http://pe.usps.gov/text/pub28/pub28apc_002.htm.
CONFIGURATIO N TA SKS 58

If the fields on a payment form and constituent record match exactly according to these matching
criteria, the program associates the online transaction with the constituent record and updates the
record with any new data from the payment form.
If the fields are not exact matches, the program creates a constituent record for the website user and
associates the transaction with that new record.
Note: The program can only match a website user to a single record. If your database includes
duplicate records and the website user matches multiple constituents, the program disregards the
matches and creates a new record for the website user.
59 CHAPTER 2
