

www.extentia.com
© Extentia Information Technology, a Merkle Company
Page | 2
TABLE OF CONTENTS
Overview........................................................................................................ 5
Need of Map Plotter .............................................................................................. 5
System Requirement ............................................................................................. 5
Accessing Map Plotter ........................................................................................... 5
Accessing via Salesforce Lightning .......................................................................................... 6
Accessing via Salesforce Classic ............................................................................................... 8
Map Plotter Settings ...................................................................................... 9
Setting API Keys ..................................................................................................... 9
Free Google API key ................................................................................................................ 9
Enabling Google Maps Billing ................................................................................................ 16
Setting API Keys in Map Plotter ............................................................................................. 29
Setting Up Custom Mapping ................................................................................ 30
Mapping an Object ................................................................................................................ 30
Geocoding the Mapped Object .............................................................................................. 32
Deleting a Geocoded Object ................................................................................................. 33
Checking Geocoding Status ................................................................................. 34
To View Geocoding Status ..................................................................................................... 34
Map Plotter Tab ........................................................................................... 36
Locations .............................................................................................................. 36
To Plot Objects Using Locations Tab in Map Plotter ............................................................. 37
Filter ..................................................................................................................... 42
Creating a New Filter ............................................................................................................. 42
Editing a Filter........................................................................................................................ 48
Executing a Filter ................................................................................................................... 49
Search .................................................................................................................. 50
To Search a Data Point Name ................................................................................................ 50

www.extentia.com
© Extentia Information Technology, a Merkle Company
Page | 3
Applying Tools on Mapped Data Points ....................................................... 52
Draw Area Tool ...................................................................................................................... 52
Clusters .................................................................................................................................. 53
Getting Directions in Map Plotter ................................................................. 54
Getting Direction Between the Plotted Points .................................................... 54
To Get Directions Between Any Two Points.......................................................................... 54
Adding Destination in Map Plotter ...................................................................... 56
To Add A New Destination .................................................................................................... 56
Getting Direction from Your Current Location .................................................... 59
To Get Direction From Your Current Location ...................................................................... 59
Viewing Map Point Information ................................................................... 60
Salesforce Information ........................................................................................ 60
To View Salesforce data ........................................................................................................ 60
Weather Information ........................................................................................... 61
To View Weather Conditions ................................................................................................ 61
Food/Stay Information......................................................................................... 62
To View the Food/ Stay Information for a Record ................................................................ 62
Nearby Location Information .............................................................................. 63
To Locate Near Data Points ................................................................................................... 63
Uninstalling Map Plotter ............................................................................... 64
To Uninstall the Map Plotter Application .............................................................................. 64
Troubleshooting ........................................................................................... 66
General Errors and Fixes ...................................................................................... 66
Error Messages and Description .......................................................................... 68
How to Bypass a Trigger ........................................................................................................ 73
Device and Browser Requirements for Map Plotter ...................................... 74
New Features ............................................................................................... 76
Disable Export Button for the Mapped Data Points ............................................ 76

www.extentia.com
© Extentia Information Technology, a Merkle Company
Page | 4
Filter Accessibility by Other Users ....................................................................... 77
Export Filter Button on the Filter Tab .................................................................. 77

www.extentia.com
© Extentia Information Technology, a Merkle Company
Page | 5
Overview
Map Plotter is a geocoding app, which helps to visualize the Salesforce data on the map. With
this app, businesses can see where their objects are in relation to their physical location. It
helps in planning the daily route, filtering the data based on business requirements and plotting
the results on the map, filtering the map points, and many such things.
• This document is a detailed user guide for Map Plotter
• This user guide includes topics such as installing the application, setting up the required
keys, mapping an object, geocoding an object, and plotting the required objects
• It gives information about accessing Salesforce from the app, filtering Data Points,
plotting them on the map, and getting directions between more than two mapped Data
Points
Need of Map Plotter
• Map Plotter helps you to view sales data and plot it on a map
• It provides the concentration of sales data in a region and allows you to apply filter
criteria as per your need
• You can search, select an object(s) that you want to view, find sales data within a
selected area, get directions between mapped points, look at the weather conditions,
and many more things
System Requirement
To start harnessing the power of Map Plotter, you just need to have the Map Plotter app
installed in your system and have your Org ready to use.
• For more details on browser and device requirements please refer to Device and
Browser Requirements for Map Plotter
• To install the Map Plotter app please refer document Installing Map Plotter from here
See Also
•
Uninstalling Map Plotter
•
Troubleshooting
Accessing Map Plotter
You can use the Map Plotter app both with Salesforce lightning and Salesforce classic.
• The look and feel of the app are the same in both cases
• The only difference is the way you access it

www.extentia.com
© Extentia Information Technology, a Merkle Company
Page | 6
Accessing via Salesforce Lightning
To access Map Plotter when you are using Salesforce Lightning:
Switch to Lightning Experience.
Step 1: Go to your
“Salesforce Org”, Enter the
“credentials”, and Click
“Log In.
Step 2: Click on the “Map
Plotter” from the top menu
bar and select “Switch to
Lightning Experience”.

www.extentia.com
© Extentia Information Technology, a Merkle Company
Page | 7
Step 3: Open “App Launcher”
by clicking on and
searching for “Map Plotter”
in the search box.
Step 4: Click on the “Map
Plotter” Icon to open the
app.
“Home Page” will
be displayed.
Click “Map Plotter Settings”,
to access the setting tab
Click “Map
Plotter” to
access the
Map Plotter
home.
You can go back to Salesforce Classic
by clicking the “Profile” button and
selecting “Switch to Salesforce
Classic”.

www.extentia.com
© Extentia Information Technology, a Merkle Company
Page | 8
Accessing via Salesforce Classic
To access Map Plotter when you are using Salesforce Classic:
Open the “Map Plotter” app and the Salesforce classic view of the Map Plotter app
will be displayed.
See Also
•
Uninstalling Map Plotter
•
Troubleshooting
You can access the settings tab by
clicking on “Map Plotter Settings” tab.
You can access the Map Plotter Home
Page by clicking on the “Map Plotter”
tab.

www.extentia.com
© Extentia Information Technology, a Merkle Company
Page | 9
Map Plotter Settings
• With the release of Map Plotter, you can map custom objects too
• The standard objects available to plot are Accounts, Leads, and Contacts
Setting API Keys
The Map Plotter application uses Google’s geocoding services to geocode addresses. Hence, it
becomes mandatory to generate the key and enter it before using the application.
• At the time of installation of the app, you will receive a daily quota (that is, the number
of records that you can geocode)
• This quota is refreshed at midnight, Pacific Time every day
Note:
• At a time, a key can be used in only one org or Sandbox. Only one key can be active in an
org.
Let us go through the steps to generate the API key:
Free Google API key
Step 1: Open code.google.com/apis/console.
Step 2: Enter your “Google credentials” to sign in to “Google Developers Console”.
Step 3: In the Google APIs
screen, click on “NEW
PROJECT”.

www.extentia.com
© Extentia Information Technology, a Merkle Company
Page | 10
Step 4: Enter the project
name in the “Project
name” text box and click
“Create”.
The new project is created, and you are
redirected to the “Dashboard”.

www.extentia.com
© Extentia Information Technology, a Merkle Company
Page | 11
Step 5: In the “API
manager”, select
“Credentials”.
Step 6: Click on “CREATE
CREDENTIALS”
Step 7: Select
the “API key”
from the
dropdown
list.
A dropdown list
would appear when
you click on “CREATE
CREDENTIALS.”

www.extentia.com
© Extentia Information Technology, a Merkle Company
Page | 12
The “API key” gets
generated, and
make sure you
copy this key.
Step 8: Click
“Close”.
Step 9: Select the
“Library” tab.
These Tabs
would be
present.
Step 10:
Select the
“Maps
JavaScript
API” tab.
Map Plotter only
works with “API
keys” that are in
unrestricted
mode. So please
do not add
restrictions to the
generated API key

www.extentia.com
© Extentia Information Technology, a Merkle Company
Page | 13
Step 12: Click
“Back” (“left
arrow” icon) to
return to the
previous screen
and select the
remaining APIs.
Step 11: Click the “Enable” on the
Maps JavaScript API screen.
“Welcome to the new API
Library” screen appears.
Step 13: Click “VIEW ALL”

www.extentia.com
© Extentia Information Technology, a Merkle Company
Page | 14
Step 14: Select “Geocoding
API”.
Step 16: Select “Places
API”.
Step 15: Click “Enable”
on the Geocoding API
screen.

www.extentia.com
© Extentia Information Technology, a Merkle Company
Page | 15
Step 17: Click “Enable”
on the Places API
screen.
Step 18: Select
“Directions API”.
Step 19: Click “Enable”
on the Directions API
screen.

www.extentia.com
© Extentia Information Technology, a Merkle Company
Page | 16
Enabling Google Maps Billing
Google has recently made changes to its maps platform that affected Google’s free Maps API
system, so there is the $200 monthly usage for no charge,that applies towards each Maps-
related billing account you create with the monthly credit. This monthly credit resets on the
first day of each month, at midnight Pacific time.
To use this $ 200-month usage, we need to enable Google Maps Billing and then generate a
free Google Maps API key.
Note:
While Map Plotter is a completely free app, it uses Google’s APIs internally, and Google has a
pricing policy where they give users a free $200 credit each month but need a credit card on file
in case you exceed that. If you have less than 30,000 records in Salesforce, that you plan to map
in Map Plotter, it is very unlikely that you will be charged anything.
• Here is a Google link with the details of the pricing for all APIs including the 4 that Map
Plotter uses (Geocoding, Maps JavaScript, Directions, Places)
https://developers.google.com/maps/billing-and-pricing/billing#assistance-from-google
Caveat:
• You will need to provide your credit card details to enable Google Maps and generate
an API Key.
To enable Google Maps Billing, follow these steps:
Step 1: Open https://cloud.google.com/.
Step 2: Enter your “Google credentials” to sign in to “Google Developers Console”.
Step 3: Click the “Select a Project”
button to select a project.

www.extentia.com
© Extentia Information Technology, a Merkle Company
Page | 17
The “Select a project” pop-up
window appears.
Step 4: Select a “Project” under Name.
Step 5: Click
on “Billing”.
The selected “Project’s
dashboard” appears.

www.extentia.com
© Extentia Information Technology, a Merkle Company
Page | 18
The Billing page appears where you can
“Link a billing account” or “Manage billing
account”.
Step 6: Click on the “Link A Billing Account”
button.
The “Enable billing for project” pop-up
appears.
Step 7: Click on “CREATE BILLING ACCOUNT”.

www.extentia.com
© Extentia Information Technology, a Merkle Company
Page | 19
Step 8:
Select your
country
under the
“Country”
dropdown
list.
Step 9: Select
which best
describes your
“organization or
needs”.
Step 10: Check the “Box” once
you read and agreed to the
Terms and Conditions and click
“Continue”.
The “Google Cloud Platform”
screen appears.

www.extentia.com
© Extentia Information Technology, a Merkle Company
Page | 20
Step 11:
Select
“Account
Type”, Enter
your “Business
name” and
“Card details”.
The “Payment Information
Verification” screen appears where
you need to enter the necessary
information.
Step 12: Enter “Tax
information” and click “START
MY FREE TRAIL”.

www.extentia.com
© Extentia Information Technology, a Merkle Company
Page | 21
Step 13: In the “Billing” screen, click the button at
the top left corner to open the Navigation menu and
click “APIs & Services”.
Step 14: In the “APIs & Services” screen, click “ENABLE
APIS AND SERVICES”.
Step 15: In the “Maps” section,
click on “VIEW ALL”.

www.extentia.com
© Extentia Information Technology, a Merkle Company
Page | 22
Step 16: Click “Maps JavaScript
API”.
Step 17: Click the “Enable” on the
Maps JavaScript API screen.

www.extentia.com
© Extentia Information Technology, a Merkle Company
Page | 23
Step 18: In the next screen, on the
top navigation, click “Quotas”.
Step 19: In the “Map Loads”
section, click the icon for the
“Map loads per day” option.
Step 20: In the
Map loads
quota limit pop
up, “uncheck”
the Unlimited
check box and
enter your
“daily limit” in
the Quota limit
text box.
www.extentia.com
© Extentia Information Technology, a Merkle Company
Page | 24
Step 22: Select the “confirmation” checkbox and click “Save”.
Step 23: Click the icon for the Map loads “per 100 seconds” option and repeat “Steps 20 and
21”.
• You can plan to divide your budget using the Google Pricing Calculator for the following
services.
i. Maps
➢ Dynamic Maps
ii. Routes
➢ Directions
iii. Places
➢ Places - Nearby Search + Basic Data + Contact Data + Atmosphere Data
➢ Geocoding
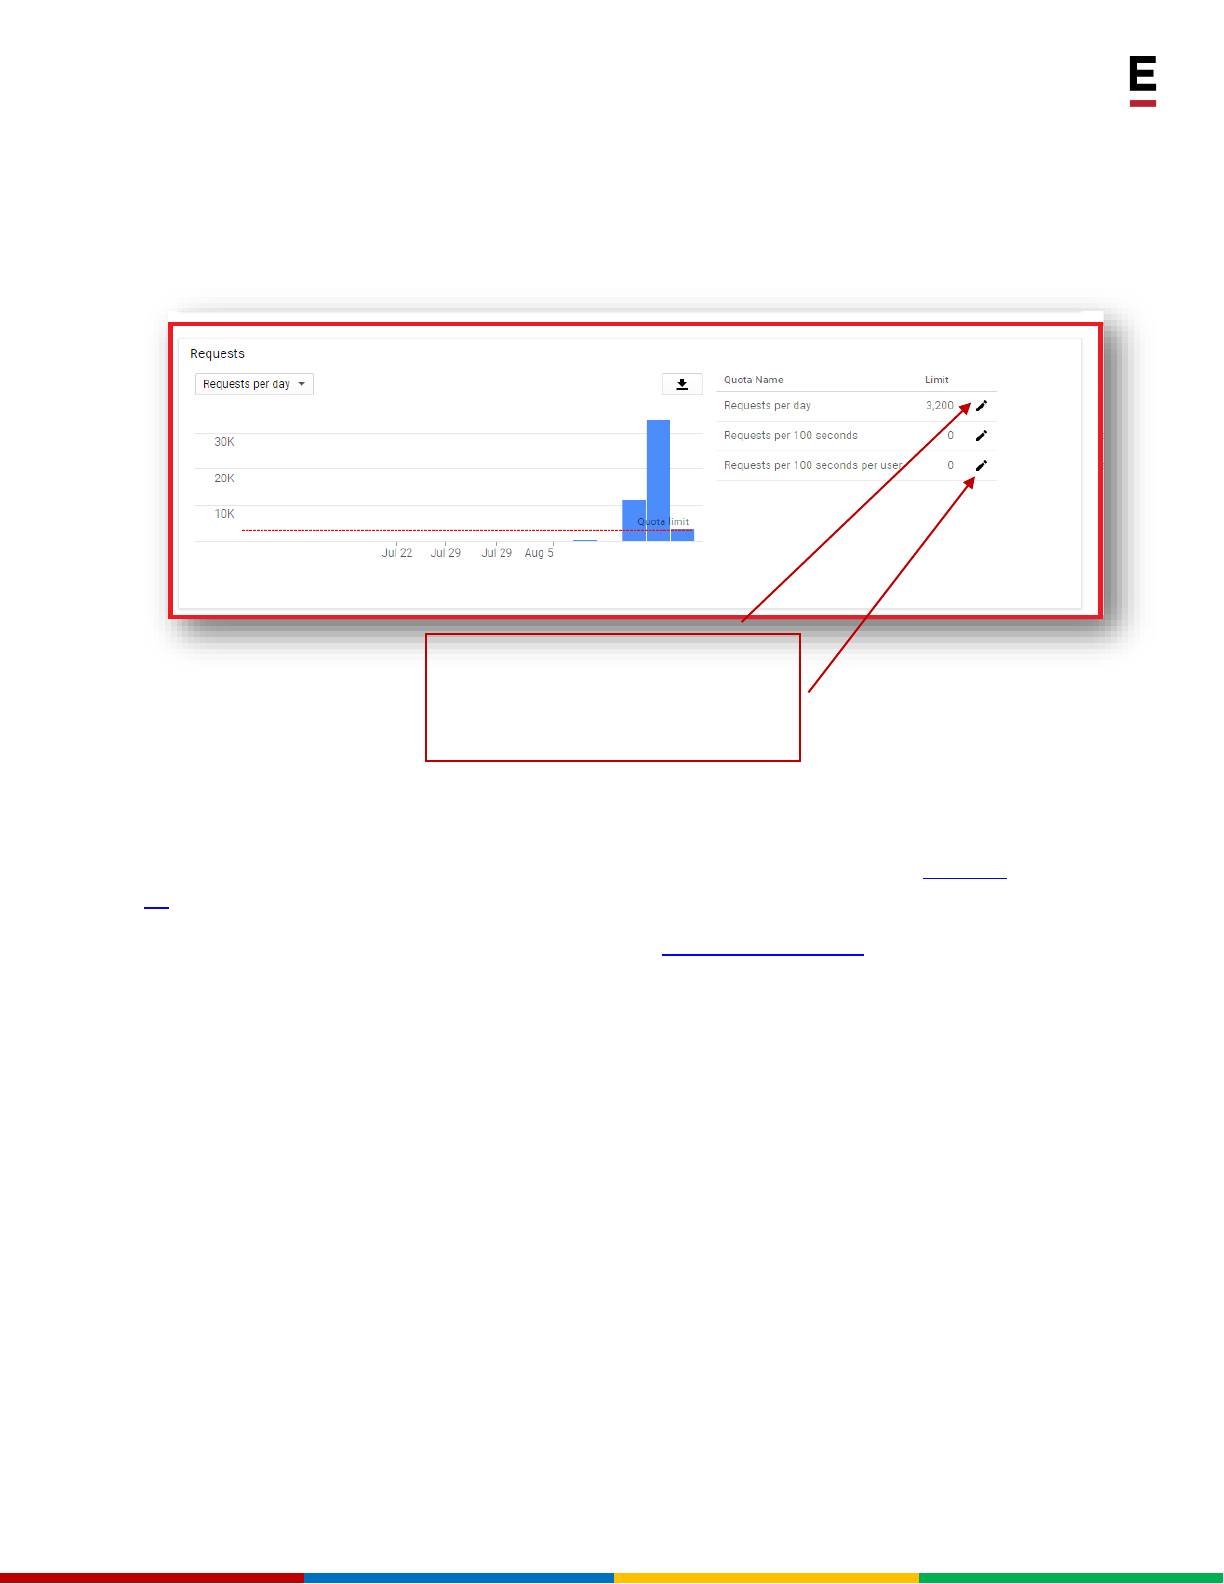
Step 21: In the Requests sections, set the
“Requests per day” and other Requests
limit options.

www.extentia.com
© Extentia Information Technology, a Merkle Company
Page | 25
Step 24: Go to “APIs &
Services” in the navigation
menu and Click on
“Credentials”.
Step 25: Click on
“CREATE CREDENTIALS”

www.extentia.com
© Extentia Information Technology, a Merkle Company
Page | 26
Step 26:
Select the
“API key”
from the
dropdown
list.
A dropdown list
would appear when
you click on “CREATE
CREDENTIALS”.
The API key is
created.
Step 27: Click on “Edit
API key”.

www.extentia.com
© Extentia Information Technology, a Merkle Company
Page | 27
Step 28: Enter a
“Name” for the API
key, select “HTTP
refers (Websites)”
and enter the “URL
of the Map Plotter
Website”.
Step 29: Click
“RESTRICT
KEY” to
restrict this API
Key and click
“Save”.


www.extentia.com
© Extentia Information Technology, a Merkle Company
Page | 29
Setting API Keys in Map Plotter
After generating the google API key, let us see the steps on how to use them in the
Map Plotter application.
Setting up the free Google API key
Step 1: Log in to the Map Plotter app.
Note:
• This completes the setup required to start using the Map Plotter app
Step 2: Click “Map
Plotter Settings”.
The “Setup
Geocoding
API” tab
will be
displayed.
Step 3: Enter the “Google API key” and click “Submit”.
For more details on how to generate the key, please
refer to, Setting API Keys.

www.extentia.com
© Extentia Information Technology, a Merkle Company
Page | 30
Setting Up Custom Mapping
Before you can start plotting Data Points in Map Plotter, you have to,
1)
Map an object
2)
Geocode the mapped object
Mapping an Object
To map an object:
Step 1: Click on Setup
Custom Mapping
Step 2: Select a “custom object” or a
“standard object” that you wish you mapped.
Step 3: Select
the “necessary
details” for the
object and
click “Save”.
Object will be added to
the list of objects to be
geocoded on “Object
Going to Geocode”.

www.extentia.com
© Extentia Information Technology, a Merkle Company
Page | 31
Note:
• Make sure that the mapping fields related to custom objects are correct
• Use string data type for Country, City, State, Zip, and street - Map Plotter will be able
to successfully geocode a custom object if the data is available
Caveat:
While creating a custom object make sure to “check” the Allow Search option. This way Map
Plotter will be able to show the custom objects in the drop-down list of Setup Custom Mapping.

www.extentia.com
© Extentia Information Technology, a Merkle Company
Page | 32
Geocoding the Mapped Object
To geocode a mapped object:
Note:
• Map Plotter can geocode a maximum of 10 objects at a time
• The records in the object are geocoded in batches of 50
Caveat:
• Once the geocoding process has started, wait for it to complete before clicking
Geocode button again
Step 1: Click on “Map Plotter
Settings” tab.
Step 2: Click on “Setup
Custom Mapping”.
Step 3: Click “Geocode” for the
object that you wish to geocode.

www.extentia.com
© Extentia Information Technology, a Merkle Company
Page | 33
Deleting a Geocoded Object
To delete a geocoded object
Step 1: Click on “Map Plotter
Settings” tab.
Step 2: Click on “Setup
Custom Mapping”.
Step 3: Click “Delete” for the
object that you want to delete.

www.extentia.com
© Extentia Information Technology, a Merkle Company
Page | 34
Checking Geocoding Status
• The geocoding status shows the result of geocoding for an object
• It shows the number of successfully geocoded points
• It also shows the failed and pending geocoded points
• You can pull the status for each geocoded object
To View Geocoding Status
Step 1: Click on “Map Plotter
Settings” tab.
Step 2: Click on
“Geocoding
Status”.
Step 3: Select the “object” you wish to see
the geocoding result for and click “Show
Results”.
Step 4: The geocoding
result will be displayed.
Step 5: To view record details as per
their geocoding status, click the
“result” box for each status.

www.extentia.com
© Extentia Information Technology, a Merkle Company
Page | 35
See Also
•
Viewing Map Point Information
Step 6: You can use the “Search” box to
search for a specific record.
.
You can enter search value
for any of the field as
shown in the status. For
example, if you enter USA it
will search for all records
with matching keyword and
display it in the results.
Step 7: You can sort the results as per the
headings, by using the “arrows”.
.
Step 8: You can
export the
status in csv,
Excel, and PDF
format by
clicking the
“Export”
button and
selecting the
required
format.

www.extentia.com
© Extentia Information Technology, a Merkle Company
Page | 36
Map Plotter Tab
• Once the objects are geocoded, you can plot them on a map
• Successfully geocoded points can be plotted on the map
Map Plotter is the second tab in the Map Plotter app.
• It lists the Data Points that are available.
• At the highest level, you will find the country, then the next level is the
state within the country and the last level is the city within the state
• You can expand the view by using the down arrow and selecting the state
or city that you wish to plot on a map
• You can use the check box on the left-hand side to select your choice. Let
us look at the various options available in this tab
• You can filter Data Points and plot them on the map using the following options:
1. Locations
2. Filter
3. Search
4. Tools
Locations
• In this tab, you get to see all the available locations in the “Select Location”
window
• You can search for locations and arrange the location in the order of your
choice from this window. Let us see more details about it

www.extentia.com
© Extentia Information Technology, a Merkle Company
Page | 37
To Plot Objects Using Locations Tab in Map Plotter
Step 2: The
“Locations”
tab will be
displayed.
Step 3: Select
the
“Location(s)”.
Step 4: Click on “Next”.
Step 1: Click on “Map Plotter”
tab.

www.extentia.com
© Extentia Information Technology, a Merkle Company
Page | 38
Step 5: If you wish to change the Data Points that you had selected earlier, click
the “Edit Locations” button. Follow the same steps to select the Data Points.
Step 6: If not, select the “Data Point
Name’ that you wish to plot on map.
Note that a color- coded pin is
associated with every Data Point
Name.
Step 7: Use can use “Search” box to
locate a specific record in the ”Data
Point Name” list.
Step 8: You can sort the “Data Points
by Data Point Name or Type”. Use the
arrows provided to sort the record list.
You can export the data in csv, Excel, or
PDF format by clicking the Export
button.

www.extentia.com
© Extentia Information Technology, a Merkle Company
Page | 39
Step 9: Click the “Plot on Map” button.
Note:
• Map Plotter can plot a maximum of 10,000 records at a time
• If you have more than 10,000 records, please click “Plot More”, to continue plotting the
records on a map
The selected Data Points will be
plotted, and you can locate
them by using the legend.

www.extentia.com
© Extentia Information Technology, a Merkle Company
Page | 40
• You can get directions between the plotted points, Please refer to Getting
Directions in Map Plotter for more details
• For further filtering the mapped Data Points, you can use the draw tool, Please
refer to Applying tools on Mapped Data Points for more details

www.extentia.com
© Extentia Information Technology, a Merkle Company
Page | 41
Adding Data Points
• You can select to view Data Points related to only a selected object too
• Map Plotter has the option to show Data Points depending on the object
To add Data Points for an object:
Step 1: Open the “Map Plotter” app.
Step 4: Click “+” and “Add
Data Points” window will
be displayed.
Step 2: Click on “Map Plotter”
tab.
Step 3: Select
the
“Location(s)”
to be mapped.
Step 5: Select the
“objects”, for which you
wish to see Data Points.
Step 6: Click
on “Done”.
Step 7: Click “Next” from
the Select Location window.
Step 8: Map Plotter will
show map Data Points
corresponding to the
selected object(s) only.
Step 9: you can select the “object(s)”
from the top menu bar. Remove the
object(s), for which you do not wish
to plot Data Points on map, by
clicking “X”

www.extentia.com
© Extentia Information Technology, a Merkle Company
Page | 42
Filter
• You can create your filters to pull Data Points for a set of criteria. Map Plotter
provides you with the option to save these filters for future use
Creating a New Filter
• Filters are nothing but queries, which you can write on Salesforce objects
• You can write and store these queries to find records matching your business
and plot them on a map
• In Map Plotter, you can create a Normal or Colored filter. Click here to know
how to create a Normal filter
• Map Plotter provides you with the facility to create and store filters with color-
coding
• You can use this type of filter when you have to filter data points satisfying
certain conditions and belonging to a group. For example, you can color code
Account Names starting with C, A, etc., for different Billing Countries
• Let us look at how you can achieve this, click here
To Create a New Normal Filter:
Step 1: Click on “Map Plotter” tab and
Click on “Filter”.
Step 2: Click on
“+Manage Filter”.

www.extentia.com
© Extentia Information Technology, a Merkle Company
Page | 43
Step 3: Click on
the “Create Filter”
tab.
Step 4: Give a unique
name for the filter in
“Filter Name”.
Step 5: Provide
more details
for your
reference in
“Description”.
Step 6: Select the object for which
you wish to create the Filter from
the drop-down in “Base Objects”.
Step 7: Select “Filter Type” as Normal.
Step 8: Click on Add “Criteria”.
You can add filter criteria. Click “Add
Criteria” to add more filter criteria.
Maximum allowed filter criteria are
10.

www.extentia.com
© Extentia Information Technology, a Merkle Company
Page | 44
Step 10: Click the “Save Filter” button.
Step 9: If more than one criterion is
added, then Map Plotter automatically
applies AND condition for the “Filter
Logic”.
“Filter Logic” is edited; the system
does not automatically apply “AND”
condition the next time the Filter is
changed.
You will find the Filter in “Manage Filter tab”.
You can delete
, edit , or clone a filter from this location.

www.extentia.com
© Extentia Information Technology, a Merkle Company
Page | 45
To Create a New Colored Filter:
Step 1: Click on “Map Plotter” tab and
Click on “Filter”.
Step 2: Click on
“+Manage Filter”.
Step 3: Click on
the “Create Filter”
tab.
Step 4: Give a unique
name for the filter in
“Filter Name”.
Step 5:
Provide more
details for
your
reference in
“Description”.
Step 6: Select the object for which
you wish to create the Filter from
the drop-down in “Base Objects”.
Step 7: Select “Filter Type” as Colored.

www.extentia.com
© Extentia Information Technology, a Merkle Company
Page | 46
Caveat:
• You have to choose the color from the palette and click “Save”.
Note:
• You can add 10 basic filter criteria and 5 refined filter criteria for a colored filter
Step 8: Click “Add Criteria” and select
the “base object” for which you wish to
create the new filter.
You can use only Equals to
operator for the basic
filter criteria.
Step 9: Choose the color you wish to
keep for the pin by clicking the “Pin”.

www.extentia.com
© Extentia Information Technology, a Merkle Company
Page | 47
Step 11: Click the “Save Filter” button.
Step 10: To add the “Refine Filter”,
click “Add Criteria”.
System automatically applies an “OR” condition (not
editable) for the basic filter criteria. It applies an
“AND” condition for the Refine “Filter Logic”. If the
Filter Logic is edited, the system does not
automatically apply the “AND” condition when the
Filter is edited later.
You will find the Filter in “Manage Filter tab”.
You can delete
, edit , or clone a filter from this location.

www.extentia.com
© Extentia Information Technology, a Merkle Company
Page | 48
Editing a Filter
Step 4: Make the changes in the filter criteria and click “Save Filter”.
• Please refer to Creating a New Filter for more details on adding filter criteria
and filter logic to your query
Step 1: Click on “Map Plotter” tab and
Click on “Filter”.
Step 2: Click on
“+Manage Filter”.
Step 3: In “Manage filter” tab, click to edit the filter
criteria that you wish to change.

www.extentia.com
© Extentia Information Technology, a Merkle Company
Page | 49
Executing a Filter
• Once you have created and saved a filter, you can execute it to pull the Data
Points to plot on the map
To execute a Filter:
Step 9: The selected Data Points will be plotted on the map.
• You can get directions between the plotted points
• Please refer to Getting Directions in Map Plotter, for more details
• For further filtering the mapped Data Points you can use the draw tool, please
refer to Applying Tools on Mapped Data Points for more details
Step 2: Select the “Filter”,
which you wish to execute from
the drop-down menu.
Step 1: Click on “Map
Plotter” tab and Click
on “Filter”.
Step 3: Click on “Show Results”.
Step 6: You
can use the
“Search”
option to
find a
specific
record.
Step 4: A list of “Data Point
Name” will be displayed,
satisfying the filter criteria.
Step 5: Select the “Data
Points”, which you wish to
plot on map.
Step 7: You can also sort
the listed Data Points by
“Data Point Name” and
“Type”.
Step 8: Click on “Plot on Map”.

www.extentia.com
© Extentia Information Technology, a Merkle Company
Page | 50
Search
To view Data Points belonging to an object you can use the “Search” option.
• In this option, you can search a string within an object and plot the result on a
map
To Search a Data Point Name
Step 1: Click on “Map
Plotter” tab and Click
on “Search”.
Step 2:
Select the
“object(s)”,
for which
you wish to
search the
data point
name.
Step 3: Type
at least 3
characters
of the Data
Point name
and click
“Search”.
Step 4: A
list of
“Data
Point
Name”
will be
displayed.
Step 5: You can sort the list on
“Data Point Name” and “Type”
by clicking “the arrows”.
Step 6: Select the “Data Point
Name” that you wish to plot on
map.
Step 7: Click Plot on Map.

www.extentia.com
© Extentia Information Technology, a Merkle Company
Page | 51
• You can get directions between the plotted points.
• Please refer to Getting Directions in Map Plotter, for more details.
• For further filtering the mapped Data Points, you can use the draw tool. Please
refer to Applying tools on Mapped Data Points for more details.

www.extentia.com
© Extentia Information Technology, a Merkle Company
Page | 52
Applying Tools on Mapped Data Points
• Map Plotter provides you with more options to customize the results and
choose the Data Points that you wish to view on the map
Draw Area Tool
• This tool gives the option to draw circle, square, and polygon shapes to
define the area of the search
• Map Plotter shows the Data Points which fall within the selected shape and
removes all other Data Points from the map
To apply drawing tool:
Step 1: Map Data Points on the map. Please refer to Map Plotter Tab for more details.
Step 2: Once you have plotted
the Data Points on map, “Draw
Area” ribbon will be displayed.
Step 3: Click “Draw Area” and then select
the “Shape” that you wish to draw on the
map from the “Draw Area” ribbon.
Step 4:
“Draw” on
the map.
Map Plotter
will show
only the
Data Points
falling within
the drawn
area.
Step 5:
To
remove
the
search
result,
click on
“Clear
All” from
the
“Draw
Area”
ribbon.

www.extentia.com
© Extentia Information Technology, a Merkle Company
Page | 53
Clusters
• Map Plotter groups the map points on a map to ease accessibility and
improve the readability
• Clusters show the concentration of points in a particular area
• Clusters are formed when the search results in more than 200 points on the
map
See Also
•
Map Plotter Settings
•
Viewing Map Point Information

www.extentia.com
© Extentia Information Technology, a Merkle Company
Page | 54
Getting Directions in Map Plotter
Map Plotter provides the ability to plot Data Points on the map and get directions
between the points.
• This feature can help you to plan your day’s route and execute it to your
benefit
• You can choose to get the directions between two points or select a single
Data Point to get directions from your current location
• You can also add destinations to your route plan
• Map Plotter can save the directions into a PDF file for future use
• You can also opt to print the map for your reference
Getting Direction Between the Plotted Points
• Once the Data Points are plotted on the map, you can get the direction between any
two points
• To get more details about plotting the points, please refer to Map Plotter Tab
Note:
• To get directions, at least one point must be selected
To Get Directions Between Any Two Points
Step 1:
Select at
least one
“Data
Point” from
the list to
get
direction.
Step 2: Click on “Get Direction”.

www.extentia.com
© Extentia Information Technology, a Merkle Company
Page | 55
• If you want to add more location(s) to get directions, please refer to Adding
Destination in Map Plotter
Note:
• Using standard print selection options, you can save the directions in PDF format
Step 3: The Map Plotter app
shows the “directions” between
the “selected points”.
Step 4: You can “swap” the
source and destination by clicking
on the “Swap icon”.
Step 5: Click on Print to get
a hard copy of the route
plan.

www.extentia.com
© Extentia Information Technology, a Merkle Company
Page | 56
Adding Destination in Map Plotter
Map Plotter provides the ability to add more than two points to get directions.
• When adding more destinations, the original destination becomes via point
and the newly added point becomes the destination
Note:
• You can add a maximum of 8 destinations to your route
To Add A New Destination
Follow these Steps:
Step 1: Plot at least two Data Points on the map and get directions.
• For more details, please refer to Getting direction between the plotted points
Step 2: Click on “Add Destination”.

www.extentia.com
© Extentia Information Technology, a Merkle Company
Page | 57
Step 3: Select “destination(s)” from the list
and click on “Add”.
Step 4: Map Plotter will map the points
and show the “directions” between the
“selected points”.
you can drag
and drop the
“map point”
from the map
onto the
“direction
panel” to add
it to the route
plan.

www.extentia.com
© Extentia Information Technology, a Merkle Company
Page | 58
Note:
• You can add a maximum of 8 destinations
Step 5: You can “delete” selected destinations
by Clicking on “X” besides the mapped Data
Points to remove it from the route.

www.extentia.com
© Extentia Information Technology, a Merkle Company
Page | 59
Getting Direction from Your Current Location
Map Plotter provides the ability to get directions to a Data Point from your present location.
To Get Direction From Your Current Location
Step 1: Plot the Data Point on the map. For more details, refer to Map Plotter Tab.
Step 3: Click on “Get Direction”.
Step 4: A warning window might pop up, Click on “OK” to confirm that you want to
get the route to this location from your current location.
See Also
•
Filter
Step 2: Select the “Data Point” that you wish to
get direction to from your current location.
Step 5: Map Plotter will show you
the “direction”.

www.extentia.com
© Extentia Information Technology, a Merkle Company
Page | 60
Viewing Map Point Information
Map Plotter provides the following information about a map point,
1)
Salesforce information
2)
Weather information
3)
Food/ Stay information
4)
Nearby location information
Salesforce Information
The “Overview” tab in the map point window takes you to Salesforce to view the “Overview” of
the Data point.
To View Salesforce data
Step 1: Click the Data Point, for which you wish to check the Salesforce data.
Step 5: If you wish, you can edit the “Salesforce record”.
Step 2: “Info”
window will
be displayed.
Step 4: Click
on the
“Header” to
check the
Salesforce
information.
Step 3: The first
tab that you see
is the “Overview
tab”. It provides
the Location
Details.
Step 6: You can view “Data
Points” within a set radius from
either your current location or
the selected “Data Point”. For
more details, refer Nearby
Location Information.

www.extentia.com
© Extentia Information Technology, a Merkle Company
Page | 61
Weather Information
Map Plotter provides the ability to check the current weather condition and weather conditions
for the next three days.
To View Weather Conditions
Step 3: Click
on “Weather”
tab.
Step 2: “Info”
window will
be displayed.
Step 4:
You can
“view current
weather” and click
“Blue Arrow” to
scroll right to view
weather for next five
days.
Step 1: Click the
“Data Point”, for
which you wish to
“check weather”.

www.extentia.com
© Extentia Information Technology, a Merkle Company
Page | 62
Food/Stay Information
The “Food/Stay” tab shows a list of nearby places.
To View the Food/ Stay Information for a Record
Step 3: Click on
“Food/Stay” tab.
Step 4: It will show a “list of
available options”. You can
“scroll up and down” to
check the options.
Step 1: Click the
“Data Point”, for
which you can use to
check food and stay
option(s).
Step 2: “Info”
window will
be displayed.

www.extentia.com
© Extentia Information Technology, a Merkle Company
Page | 63
Nearby Location Information
You can find Data Points located within a defined radius of the selected Data Point on the map.
To Locate Near Data Points
Step 4: Map Plotter will show all the “Data Points” falling within the “set radius”.
See Also
•
Map Plotter Settings
•
Map Plotter Tab
Step 1: Open the “info” window of the “Data Point”. For
details on how to open the info window, please refer
Viewing Map Point Information.
Step 2: In the
“Overview”
tab, select the
“Radius and
unit” of
distance (mi or
Km).
Step 3: Click
on “View Data
Points”.

www.extentia.com
© Extentia Information Technology, a Merkle Company
Page | 64
Uninstalling Map Plotter
Note:
• APEX Triggers should be disabled or deleted before starting the uninstallation process
• Map Plotter Permission Sets should be unassigned from the users
To Uninstall the Map Plotter Application
Step 1: Login into your “Salesforce org”.
Step 2: Click on “Setup”.
Step 3: In Quick find/Search
look for “Installed
Packages”.
Step 4: Click on
“Installed Packages”.
Step 5: It will
show the list of
installed
packages. Click
“Uninstall” next
to the Map
Plotter package.

www.extentia.com
© Extentia Information Technology, a Merkle Company
Page | 65
Step 6: It will show all “the package components, custom objects” that will be
uninstalled. “Verify” all the components before proceeding.
Step 9: The Map Plotter package will be “Uninstalled”.
See Also
•
Overview
•
Map Plotter Settings
Step 7: Select an
“appropriate option” as
per your requirement.
Step 8: Click on “Uninstall”.

www.extentia.com
© Extentia Information Technology, a Merkle Company
Page | 66
Troubleshooting
General Errors and Fixes
Sr.
No
Error Description
Reason
Fix
1.
There are no
Objects / Records /
Map points listed in
the list view and
you see an error
message saying
“No Data
Available”.
1.
Invalid API key
entered
2.
Custom objects are
not mapped
3.
Fields for the
custom objects are
not valid
4.
Custom / Standard
objects are not
successfully
geocoded
1.
Generate a valid API key and
reenter
Refer to Setting API Keys.
2.
Map custom objects and retry.
Refer to Geocoding the mapped
object
3.
Check the “custom object
mapping” and make sure the fields
are correct and have data
Check the “geocoding reports”
to make sure the objects you are
looking for were geocoded
successfully. The status should
not be failed or pending.
4.
Refer to Checking Geocoding
Reports
2.
You do not find the
custom object that
you have created,
to geocode.
Map Plotter is unable to
search the custom object.
When creating a “custom
object” select allow search in
the search status. Refer to Allow
Search.

www.extentia.com
© Extentia Information Technology, a Merkle Company
Page | 67
3.
You get an error
message
“Something went
wrong” when trying
to execute a Filter.
1.
A comma is used
in the currency field
while creating a
Filter
2.
The date format
used in the query
criteria is not correct
3.
Special characters
are used in the query
1.
Check the “Filter” that you are
trying to execute. Make sure that no
Commas are used in the currency
field
Example: Use “100000” instead
of 1,00,000
2.
Verify that the date format used
for queries is “YYYY-MM-DD”
3.
Make sure there are no special
characters used in the queries
4.
You are unable to
geocode object(s)
using Map Plotter.
1.
You may have
exceeded the Daily
Quota, that you can
geocode
2.
Mapped fields may
not be of the right data
type
1.
Open “Google API Manager” from
Map Plotter Settings. Check the
Usage. It might have exceeded the
Daily Quote available to you. If this is
the case, you can wait for the quota
to be refreshed... For more details,
please refer to Setting API Keys
2.
Verify that the “datatype” used
for the mapping fields is a string
5.
In the Safari
browser, Map
Plotter is unable to
retrieve data.
Map Plotter does not
have access to cookies
and website data.
Correct the “Safari browser”
settings to always allow access
to cookies and website data. For
more information, please refer
to Safari Specific Browser
Settings.

www.extentia.com
© Extentia Information Technology, a Merkle Company
Page | 68
Error Messages and Description
Sr.
No
Error Message
Fix
1.
Invalid Google API key. Please verify the
key and try again.
Check the “Google API key” that you have
entered. Make sure that it is valid and re-
enter.
2.
Select at least one object to save.
Select “=Object” to map fields and then
click Save.
3.
Please select Entity Name.
Select “Entity Name” and then click “Save”.
4.
Please select City Name.
Select “City Name” and then click “Save”.
5.
Please select Street Name.
Select “Street Name” and then click “Save”.
6.
Please select State Name.
Select “State Name” and then click “Save”.
7.
Please select Country Name.
Select “Country Name” and then click
“Save”.
8.
Please select Postal Code.
Select “Postal Code” and then click “Save”.

www.extentia.com
© Extentia Information Technology, a Merkle Company
Page | 69
9.
This field has already been selected.
Make sure that the “Map Field” that you
are selecting is not selected already.
10.
You have already added Ten Custom
Objects.
Map Plotter allows a maximum of 10
objects to be mapped. Verify and clean up
the “objects” that you have mapped.
11.
Are you sure? Custom mapping for Group
will be deleted.
This is a “confirmation message” to make
sure that you want to delete the mapping. If
not, click outside the information box.
12.
No Data Found
You are trying to find “records in the
object(s)” which are not geocoded. Check
and start geocoding from the Setup Custom
Mapping tab for the object that you are
trying to view the result for.
13.
Select at least one City to continue.
This is an “Alert message”. In the Select
Location, window select at least one city
before clicking “next”.
14.
Select a source and a destination.
In the Map Plotter tab, select at least two
“Data Points” before clicking “Get
Direction”.
15.
Do you want to get the route to this
location from your location?
This is an “alert message”. If you want to
get directions to the selected Data Point
from your current location, click “OK”.
16.
Directions Not Available.
If google maps are unable to find the
direction between the selected Data Points
this message will be displayed. Verify the
selected “Data Points” and then click “Get
Direction”.

www.extentia.com
© Extentia Information Technology, a Merkle Company
Page | 70
17.
Select a point as a new destination to
continue.
From the “Add Destination” list select at
least one Data Point and then click “Add”.
18.
You can add only 8 destinations.
You have reached the maximum limit of
destinations that can be added. Verify and
remove a few “Data Points” before adding
a “new destination”.
19.
The maximum number of destinations has
been reached.
You have reached the maximum limit of
destinations that can be added. Verify and
remove a few “Data Points” before adding
a “new destination”.
20.
Please Enter Name.
Check the “Query Name” field. Give a
uniquely identifiable name before clicking
“Save Filter”.
21.
Enter a valid radius.
In the map info window, enter the value of
the radius and unit before clicking “View
Data Points”.
22.
No Objects Mapped.
Add Objects from the “Map Plotter
Settings” tab before going to the “Map
Plotter” tab.
23.
No objects added.
Add objects from the “Setup Custom
Mapping” tab and then go to the “Reports”
tab.

www.extentia.com
© Extentia Information Technology, a Merkle Company
Page | 71
24.
No data available
Add objects from the “Setup Custom
Mapping” tab, geocode the object, and then
go to the “Reports” tab.
25.
Geocoding in Process. Check after some
time.
Geocoding for the object has started, and
the results will be available in some time.
Wait for a couple of minutes before
“checking” again.
26.
Select at least one Custom Object to
continue.
In the “Search” tab select at least one object
before clicking search.
27.
Enter a keyword.
In the “Search” tab enter at least 1 search
character before clicking search.
28.
Enter a valid search term.
In the “Search” tab do not enter special
characters in the search field. Only characters
are allowed.
29.
No results found.
In the “Search” tab select successfully
geocoded object(s) to search Data Point.
30.
No records matching query condition.
Verify the plot “filter criteria” that you are
trying to execute. Check the “filter
conditions” and “filter logic” to make sure
that you have valid records.
31.
Local Storage not available.
Map Plotter is unable to access your local
storage. Verify that the “Safari browser” is
opened in Normal Mode. “Do not open” it as
New Private Window.

www.extentia.com
© Extentia Information Technology, a Merkle Company
Page | 72
Safari-Specific Browser Settings
It is very important to check the following settings before using Map Plotter in Safari:
Step 1: Open the “Safari browser” in Normal Mode.
Step 2: Use the following “Safari settings” in
Preferences.

www.extentia.com
© Extentia Information Technology, a Merkle Company
Page | 73
How to Bypass a Trigger
1. Open the custom setting MapPlotterTriggerSettings
(Extentia_SIM__MapPlotterTriggerSettings__c) and click on "Manage"
2. Enter the following two custom settings for "Bypass Contact Trigger" and "Bypass Account
Trigger" and mark the "Bypass Trigger" field as checked
3. If you are working with custom objects, for the Name field in the custom setting for that
object, you need to add “Bypass ObjectName Trigger” and the Object Name must be without
"__c". E.g.: “Bypass Employee Trigger”. Where Employee is a custom object
If you “Bypass the trigger”, new
records added to Salesforce will not
be geocoded immediately. They will
be geocoded in the daily batch that
runs once a day.

www.extentia.com
© Extentia Information Technology, a Merkle Company
Page | 74
Device and Browser Requirements for Map Plotter
Browser
Version
Platform
Resolution
IE
11+/Edge
Desktop (Windows)
Any
Chrome
43+
Desktop (Windows)
Any
Firefox
32+
Desktop (Windows)
Any
Safari
6.0/8,0
Desktop (Windows)
Any
iPhone4 – Default
Safari Browser/Good
Access
Mobile Safari 6.0
iOS 8.2
640 * 960 (Landscape
and Portrait)
iPhone5 – Default
Safari Browser
Mobile Safari 6.0
iOS 8.2
640 * 1136 (Landscape
and Portrait)
iPhone6/6+ – Default
Safari Browser
Mobile Safari 6.0
iOS 8.2
750 * 1334 (Landscape
and Portrait)
iPad mini
iPad3 - Default Safari
browser
Mobile Safari 6.0
iOS 8.2
2048 * 1536
(Landscape and
Portrait)
Android Phones -
Google Chrome
4.4 and above
Android Phone
1. Xlarge screens
are at least
960dp x 720dp
2. Large screens are
at least 640dp x
480dp
3. Normal screens
are at least
470dp x 320dp
4. Small screens are
at least 426dp x
320dp

www.extentia.com
© Extentia Information Technology, a Merkle Company
Page | 75
Android Tablets - Good
Access
4.4 and above
Android Tablet
1024 * 600/1280*800
(Landscape and
Portrait) – Samsung
Tab2
Nokia Lumia 1020 and
HTC 8X phones -
Microsoft Internet
Explorer 11
Windows 8.1 update
Windows Phone
1. 480 × 800
2. 768 × 1280
3. 720 × 1280
4. 1080 x 1920
BlackBerry Z10 phones
- BlackBerry Browser
BlackBerry OS 10.2 or
later
BlackBerry Z30 phones
BlackBerry OS
10.2.1.3175 or later

www.extentia.com
© Extentia Information Technology, a Merkle Company
Page | 76
New Features
Disable Export Button for the Mapped Data Points
• By default export button is enabled to all the users. However, to disable the
Export Button for certain users. System Admins can add the user profile name
in the Custom Setting as shown below
• Custom Setting name: Export&MUEnabler (Export_MUEnabler__c)

www.extentia.com
© Extentia Information Technology, a Merkle Company
Page | 77
Filter Accessibility by Other Users
• The System Admin can use the permission set “No Other User Filters
Permission” to restrict users to access other users filters
Export Filter Button on the Filter Tab
To use this feature for Account, Contact, and Lead Object.
• The System Admin can create a Field Set that can be used to create the Excel Sheet that
contains the exported Filter Data
• When a System Admin create/edit a filter the Fields Set get automatically created in the
respective object as the same name as the filter name.
Note: Do not use anything special caracter, coma, hifhen etc. in between words other
then Space and underscore to name a filter.
• The filters created by system admins will have a asterisk (*) in the suffix.
• If there is no default filter available in the object user will get these error.

www.extentia.com
© Extentia Information Technology, a Merkle Company
Page | 78
• To rectify the error. Please follow the this steps.
Step 1: Open the “Salesforce” Org and go to “Setup”.
Step 2: Click on the “Object Manager”.
Step 3: Search for any of these objects “(Account, Contact, and Lead)” for which you
see the error on the screen when exporting the Filter data.
Step 4: Click on “Field Set”.
Step 5: Click on the “New” button.
Note: Use the below information to create the “Field Set”.
• Field Set Label – ExportFilteredList
• Field Set Name - ExportFilteredList
• Where is this used? - Export field set fields on click of export
Step 6: Open the
Field Set and add
the required fields
that needs to be
exported.
Step 7: Click
on “OK”.
