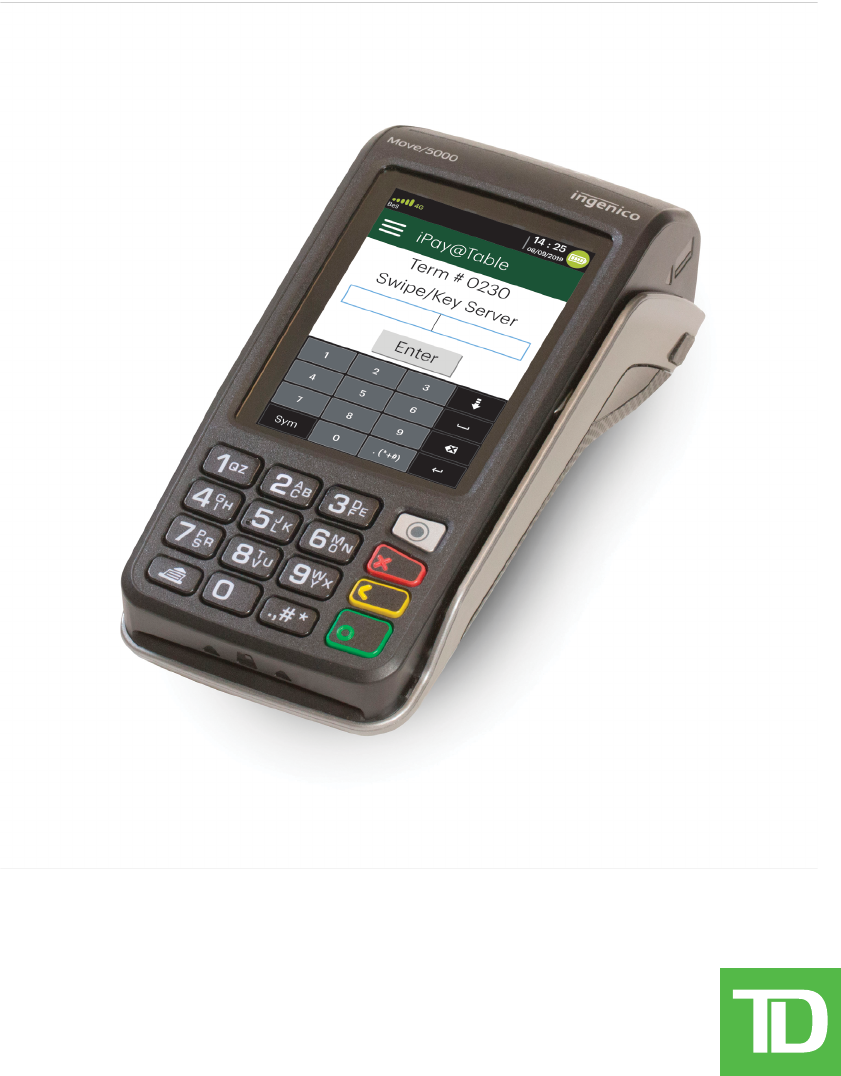
iPay@Table
Quick Start Guide
For the TD Move 5000
• with the iPay@Table application

COPYRIGHT © 2019 by The Toronto-Dominion Bank
This publication is conidential and proprietary to The Toronto-Dominion Bank and is intended solely for the
use of Merchant customers of TD Merchant Solutions. This publication may not be reproduced or distributed,
in whole or in part, for any other purpose without the written permission of an authorized representative of The
Toronto-Dominion Bank.
The Bluetooth® word mark and logos are registered trademarks owned by Bluetooth SIG, Inc. and any use of such
marks by TD is under license. Other trademarks and trade names are those of their respective owners.
NOTICE
The Toronto-Dominion Bank reserves the right to make changes to speciications at any time and without notice.
The Toronto-Dominion Bank assumes no responsibility for the use by the Merchant customers of the information
furnished in this publication, including without limitation for infringements of intellectual property rights or other
rights of third parties resulting from its use.
MERCHANT INFORMATION
Merchant Name __________________________________________________________________________
Merchant Number ________________________________________________________________________
i
Contents
About this Guide ......................................................................1
Welcome kit contents ............................................................................. 1
Glossary ................................................................................................... 1
The Terminal ............................................................................ 2
Accessibility features .............................................................................. 2
Screens ....................................................................................................3
Home screen ....................................................................................................3
iPay@Table Home screen ...............................................................................3
Terminal communication modes ..........................................................4
Bluetooth ..........................................................................................................4
WiFi .....................................................................................................................4
4G .......................................................................................................................5
Web applications ....................................................................................5
Adding applications ........................................................................................5
Accessing applications ...................................................................................5
Peripherals ...............................................................................................6
The Bluetooth base ..........................................................................................6
The charging base (optional) ........................................................................6
Cardholder Privacy and Security ........................................... 7
Terminal security .................................................................................... 7
Fraud prevention ..................................................................................... 7
Manually entered credit card transactions ................................................. 7
Call for authorization ......................................................................................7
Financial Transactions ............................................................ 8
Available transactions ............................................................................8
Accepted card types...............................................................................8
Payment method options .......................................................................8
Payment ...................................................................................................9
Cash ...................................................................................................................9
Credit card ...................................................................................................... 10
Debit card ........................................................................................................11
Gift card .......................................................................................................... 12
Refund ................................................................................................... 12
Receipts ................................................................................................. 12
Receipt examples .......................................................................................... 13
Settlement ............................................................................................. 14
Reporting ............................................................................... 14
ii
Coniguration ........................................................................ 15
Comms setup ........................................................................................ 15
iPAY@Table setup .................................................................................. 15
RMS Type ......................................................................................................... 15
Serial # Type .................................................................................................... 15
Sort order ........................................................................................................ 16
Demo Options ................................................................................................ 16
Font Size .......................................................................................................... 16
Refund Setup .................................................................................................. 16
Enable RMS Polling ........................................................................................ 17
Table Name ..................................................................................................... 17
Prompt Table .................................................................................................. 17
Prompt Check ................................................................................................. 17
SSL ................................................................................................................... 18
Change password ................................................................................. 18
Settlement ............................................................................................. 18
Core payment application settings ..................................................... 18
Troubleshooting .................................................................... 19
Who do I contact? ................................................................................. 19
Terminal error messages ..................................................................... 20
What problems can I easily resolve? ....................................................22
Reference ...............................................................................23
Charging your terminal ........................................................................23
Maintaining your terminal ....................................................................23
Storing your terminal ............................................................................23
Changing the paper roll .......................................................................23
Lost or stolen equipment ......................................................................23
1
About this Guide
This Guide provides an introduction to your TD Move 5000 terminal with the iPay@Table
application. This guide covers hardware functionality, performing inancial transactions,
administration features and troubleshooting. For more information regarding its use and
available features, please review the Configuration and Troubleshooting Guide.
Welcome kit contents
We are pleased to provide Merchants new to TD Merchant Solutions with the included
Welcome Kit from. The enclosed information was prepared with you in mind, and
includes the following:
• Paper rolls for the terminal
• Cleaning card and instructions
• Card acceptance decals (Visa®, MasterCard®, Discover®, American Express®,
Interac® Direct Payment, etc.)
• Information to help you protect your business and customers from fraud
Glossary
The following are terms used throughout this document. By understanding these terms
you will be better able to use the iPay@Table application.
Electronic Point of Sale (EPOS)
This is an electronic cash register package or computer that houses your Restaurant
Management Software.
Restaurant Management Solution or Software (RMS)
This is the software that resides on your EPOS that manages your restaurant’s food and
drink orders.
Terminal
This is the physical device that the customer uses to pay their bill. In this case, it is called
a TD Move 5000 semi-integrated terminal.
iPay@Table application
This is the application that connects the terminal to your RMS. The application pulls the
check and table information to the terminal so that customers can pay for their bill.
Core Financial application
This is the application that connects the terminal to the Payment Card Network so that
customers can pay their bill with their credit or debit cards. For more information on TD Core
Payment application settings, please refer to the Configuration and Troubleshooting Guide.
2
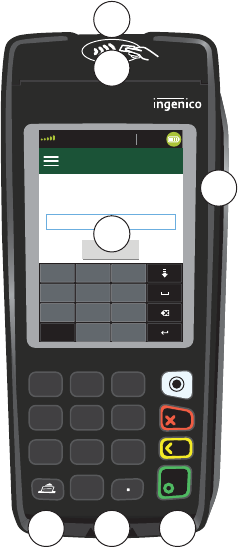
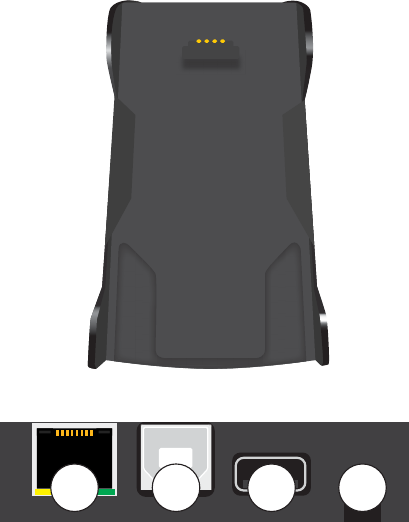
The Terminal
You will use the terminal to initiate transactions
for customers using credit, debit, or gift cards.
Depending on your settings, some card types
may not be accepted by your terminal.
1. Command keys
• Web Applications (silver)
• Cancel (red)
• Correction (yellow)
• OK / Enter (green)
2. Touchscreen
All terminal navigation is performed
through the touchscreen.
3. Paper advance key
4. Paper chamber panel
5. Card readers
a) Insert chipped cards
b) Swipe cards
c) Contactless cards (Tap the
card on the contactless
icon, not the touchscreen.)
Accessibility features
The terminal has the following accessibility features:
• Backlit keypad and adjustable screen brightness to create visual contrast
• Adjustable font size
• Adjustable key stroke sound when a key is pressed
• A raised identiier on the:
• 5 key,
• Main Menu key,
• Cancel key,
• Correction key, and
• OK key.
Move/5000
09:17
20/JL/2017
$
Sale Pre-Auth
PA Return
ADMINLANGUAGE
07/20/201
iPay@Table
Term # 0230
Swipe/Key Server
Enter
Sym
1 2 3
4 5 6
7 8 9
0 . (*+#)
08/09/2019
4G
Bell
14 : 25
1
4
7
3
6
9
2
5
8
0
4
2
3 1
5a
5b
5c
3
Screens
Home screen
This is the irst screen that you will see when
you start the terminal. It is called the Core
Financial Home screen. It displays important
information and dierent ways to access
terminal functionality. They are:
1. Communication icons
The icons on this bar will be
dierent depending on which
setup or comms method is chosen.
2. Power
The battery icon in the top-right
corner indicates the terminal
battery level. When the lightning
bolt appears on top of the battery
icon, it means it is charging.
3. Admin
This icon will open the Admin Menu.
4. Language
This icon will open the Language Menu.
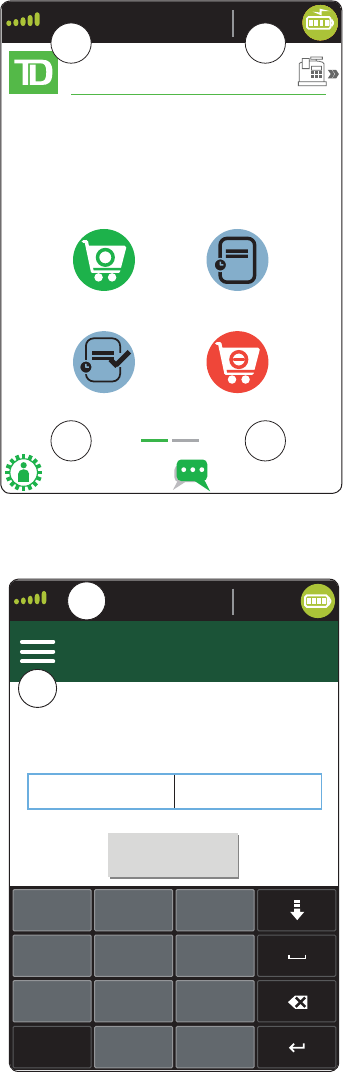
iPay@Table Home screen
The default screen is called the iPay@
Table Home screen. It displays important
information, and dierent ways to access
terminal functionality. They are:
1. Communication icons
The icons on this bar will be
dierent depending on which
setup or comms method
is chosen. See below for
explanations on each icon type.
2. Settings menu
This icon will open the iPay@Table
Settings menu.
09:17
20/JL/2017
$
Sale Pre-Auth
PA Comp Return
ADMIN LANGUAGE
07/20/201
04/17/2019
4G
Bell
14 : 25
1 2
3 4
iPay@Table
Term # 0230
Swipe/Key Server
Enter
Sym
1 2 3
4 5 6
7 8 9
0 . (*+#)
08/09/2019
4G
Bell
14 : 25
1
2
4
Terminal communication modes
The terminal has up to three different communication modes and their explanations
are described below.
Version Hardware Communication Method
Bluetooth®
(short range)
Terminal and a Bluetooth
base
Uses the Bluetooth base to connect to
the Payment Card Network via the
Merchant’s Internet connection
WiFi
(short range)
Terminal, charging base, and
a wireless router / modem
supplied by the Merchant
Uses a WiFi signal that connects to the
Payment Card Network via the
Merchant’s router
4G
(long range)
Terminal and a charging
base
Uses the 4G cellular towers to connect
to the Payment Card Network
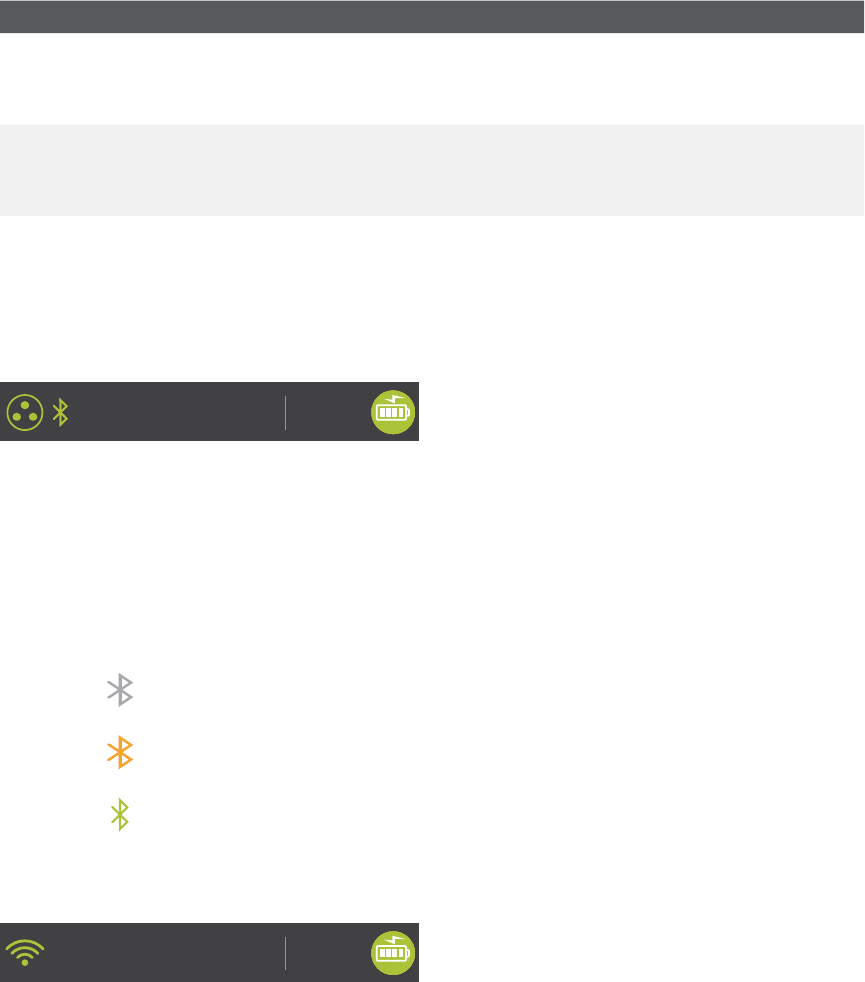
Bluetooth
1. Ethernet connection icon
The Ethernet icon in the top-left corner indicates that the Bluetooth base’s
connection to the Internet. It will be one of two colours: grey (disconnected), or
green (connected).
2. Bluetooth connection icon
The Bluetooth icon in the top-left corner indicates the terminal’s connection to
the Bluetooth base. It will be one of three colours: grey (disconnected), orange
(searching for connection) or green (connected).
The grey icon indicates that Bluetooth is active on the terminal but not
connected to a Bluetooth base.
The orange icon indicates that the terminal is connecting to a Bluetooth
base.
The green icon indicates that the terminal is connected to a Bluetooth
base.
WiFi
1. WiFi signal strength icon
The WiFi icon in the top-left corner indicates the terminal’s connection to a WiFi
network. It will be one of three colours: grey (disconnected), orange (searching for
connection) or green (connected). When connected, it will display the WiFi signal
strength with zero to three bands with three being the best signal strength.
14 : 25
08/09/2019
14 : 25
08/09/2019

5
The grey icon indicates that WiFi is present but not activated on the terminal.
The orange icon indicates that the terminal is connecting to a router / modem.
The green icon indicates that the terminal is connected to a router / modem.
4G
1. 4G signal strength icon
This icon in the top-left corner indicates the terminal’s connection and signal
strength to a 4G network. It will be one of two colours: green (connected) or grey
(disconnected).
When connected, it will display the 4G wireless signal strength with zero to ive
bars with ive being the best connection. It can display, and connect to, a 3G
or a 2G signal if 4G is not currently available. Below the icon is the 4G carrier
name — in this case it’s Bell®.
Web applications
Adding applications
The terminal can accept a wide range of third-party applications to meet your business needs
and are similar very to the applications on your smart phone. For example, if you want to
accept gift cards, you would have to:
1. Sign up for the appropriate program with the application provider.
2. Contact the TD Merchant Solutions Help Desk to enable it and have the application
downloaded to your terminal.
3. Access the applications via the Web
Application screen. If you accept gift
cards, they are automatically oered
as a tender option during the
transaction.
Accessing applications
To access your applications:
1. Press the silver Application key
(above the red Cancel key).
a) Core Financial application
This is the default application
when you power on your
terminal.
b) iPay@Table application
14 : 25
04/17/2019
4G
Bell
iP@T
14 : 25
08/09/2019
TSA 0610
a
b
App 2
c
6
c) Third Party applications
Any available third-party applications will appear.
2. Select the desired application.
3. Follow the instructions provided by the application creator.
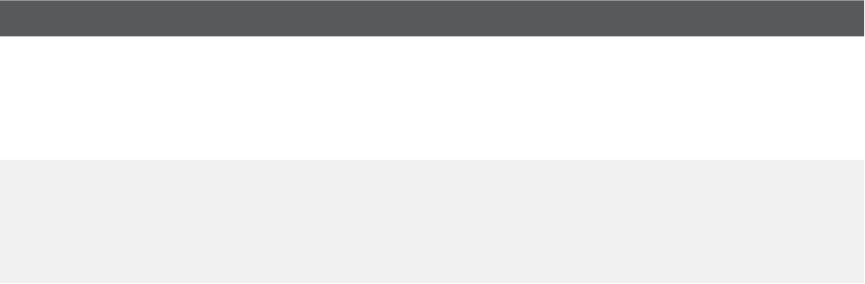
Peripherals
The Bluetooth base
The Bluetooth base is used with the
terminal when a wired Internet connection is
available. It acts as a connection to the
payment network and as a short range
wireless base for your terminal. This base
also acts as a charging station for the terminal.
Ports
The base has four ports on the back but
you are only using the Ethernet port and
the power port:
1. Ethernet port
2. Printer port
3. USB port
4. Power cord — You must remove
the back plate to unplug the cord.
Communication options
The Bluetooth base offers an Ethernet connection. You can set this however you wish to
suit your existing place of business’ setup. To learn more about communication options
see pages 4 and 5.
The charging base (optional)
The charging base is physically identical to the Bluetooth base, but only has a power cord (#4).
1 2 3 4
7
Cardholder Privacy and Security
Terminal security
It is the Merchant’s responsibility to secure the terminal, any user IDs or passwords and to
prevent unauthorized use. In any event the Merchant will be liable for any unauthorized use
of the terminal or any user IDs or passwords. For more information on TD Core Financial
application settings, please refer to the Configuration and Troubleshooting Guide.
Fraud prevention
The following information will help you protect yourself from fraudulent transactions.
Manually entered credit card transactions
There is an inherent risk associated with these transactions as they have an increased rate
of fraud. If you do manually enter a credit card transaction which is deemed fraudulent,
you will be held responsible for any chargebacks associated with it.
If you are uncomfortable manually entering a credit card it’s within your rights as a
business owner to request another form of payment (debit, cash, etc.).
Call for authorization
Sometimes, due to a communication or security issue, a transaction cannot or should not be
completed. See the list of messages and events below that will cause you to call for authorization.
Note: You must call for authorization for every force post transaction performed on your terminal.
Whenever Action
…the card number on the
screen does not match the
number embossed on the card.
Press the Cancel key and call for a voice authorization immediately.
Request a CODE 10 authorization. In this situation, you may be
dealing with a fraudulent card and CODE 10 will alert the
inancial institution to this possibility.
…the cardholder signature
on the receipt does not
match the signature on the
reverse of the card.
Call for a voice authorization.
Request a CODE 10 authorization. The inancial institution
will be able to advise whether or not the correct individual is
using the card. They will also tell you how to proceed.
…you have any doubts
about the validity of a card
or a transaction.
Call for a voice authorization.
Request a CODE 10 authorization. The inancial institution
will be able to advise whether or not the correct individual is
using the card. They will also tell you how to proceed.
8
Financial Transactions
Available transactions
The iPay@Table solution can perform the following transactions:
• Payment*
• Refund
* Gift card transactions are only possible on the terminal if you have enrolled in a gift
card program, and installed their application on your terminal.
Accepted card types
Your terminal(s) will accept whatever cards you indicated when you signed your contract
with TD Merchant Solutions. If you wish to adjust your accepted card list, please contact
the TD Merchant Solutions Help Desk to discuss.
Payment method options
There are three types of payments that the server can accept:
Full
If this method is selected the bill will be paid in full by one payment.
For example, if a table of three is paying a $15.01 bill, and customer A decides to pay the
entire bill, customer A pays the entire bill of $15.01.
Split
If this method is selected the bill will be paid in full by X number of equal payments with
the last covering any rounded amounts. Once selected, all payments must be completed
by split payments.
For example, if a table of three is paying a $15.01 bill, and they split it three ways, customer
A pays $5.00, customer B pays $5.00 and customer C pays the balance of $5.01.
Note: If a split payment is declined for any reason, the iPay@Table application will take it
as paid. After all of the other payments are completed, you must leave the application
and reselect the table. This will pull the unpaid amount from the RMS and then the
customer can reattempt their payment.
Partial
If this method is selected the bill is paid in full by X number of payments where each
payment is determined by each customer. Once selected, all payments must be
completed by partial payments.
For example, if a table of three is paying a $15.01 bill, and they each pay their share,
customer A pays $5.01, customer B pays $2.00 and customer C pays the balance of $8.00.
9
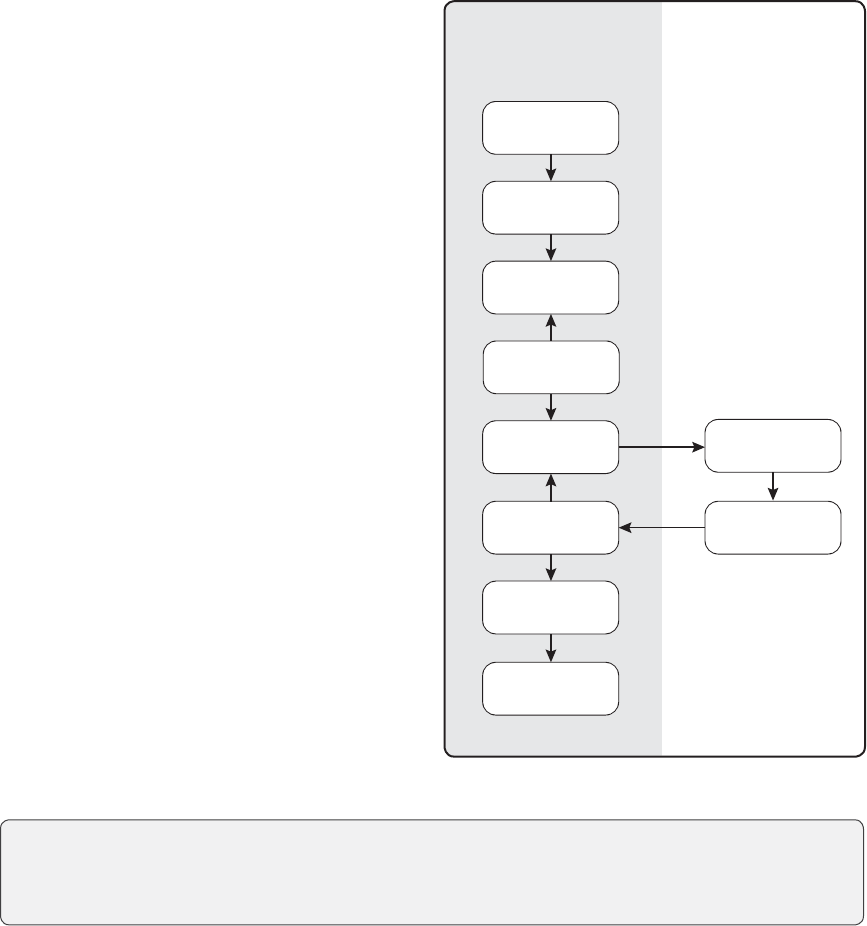
Payment
Use these instructions to process a bill.
1. Enter your Server ID and tap Enter.
2. Select the table that is to be paid
out. You may be required to select
it from a list of available tables or
entering the table number
depending on your RMS and/or
settings. If you don’t enter a table
or check number and just tap
Continue, a list of open tables
under your server ID will appear.
3. Select the payment method: Full,
Split or Partial.
a) If you selected Full, go
to step 4.
b) If you selected Split,
enter the number of
customers to split the
bill between and press
OK. Go to step 4.
c) If you selected Partial,
enter the Partial amount
without a decimal and
press OK. Go to step 4.
d) Select the appropriate
tender payment option
(Cash (below), Credit
card (page 11), Debit card
(page 12) or Gift card
(page 13).
Cash
4. Select Cash.
5. The terminal will print the receipt for the cash transaction. You must collect the
cash, any tip, and note it on the customer’s receipt.
6. If there is a balance remaining, please go to step 3.
If the bill has been paid in full, the transaction is completed. The Merchant
copy prints and the table is closed.
Core Financial
Application
Customer
Select table
Server
iPay@Table App
Enter server ID
Retrieve check
Full, Split
or Partial
Select tender
Process tender
Close table
Balance owed?
Customer
Receipt
Yes
No
Merchant
Receipt
If a split payment is declined for any reason, the iPay@Table application will take it as paid.
After all of the other payments are compelted, you must reselect the table. This will pull the
unpaid amount from the RMS and then the customer can complete the payment.

10
Credit card
4. Select CR/DB.
5. The customer conirms the total amount (Yes or No).
Tips (optional)
6. The customer selects a tip option and presses OK.
7. The customer conirms the total amount (Accept or Change).
Payment method
8. If you have gift cards enabled on your terminal, you must select CR/DB one
more time. Otherwise, go to step 9.
9. Perform one of the following payment methods: Insert, Swipe, Tap or Key
(Manual Entry).
Insert credit card
a) The customer inserts their credit card.
b) The customer enters their PIN and presses OK. Go to step 10.
Swipe credit card
a) Swipe the credit card.
b) UnionPay co-branded cards only - The customer indicates if the card is
<Other Card> or UnionPay. Other Card can be Visa, Mastercard, American
Express, etc.
c) Press OK.
If UnionPay is selected, enter the PIN and press OK. The customer may
bypass the PIN but if it is requested again, they must enter it.
If <Other Card> is selected, go to step d.
d) Perform a fraud check on the card and signature.
e) Verify the card info with what is on the terminal screen and press OK.
Go to step 10.
Tap credit card
a) The customer taps their contactless-enabled credit card on the contactless
card reader. The customer may be required to insert or swipe their card in
some cases. Go to step 10.
Manually enter credit card
There is an inherent fraud risk for manually entered transactions. Please see
page 8 for more information.
a) Enter the account number and press OK.
b) Enter the expiry date and press OK.
11
c) Enter the CVD number and press OK. This number is generally located on
the back of the credit card. This can be an optional step depending on
your settings.
d) If prompted, indicate if the card was present for the transaction (Yes or
No). Go to step 10.
10. The screen shows that authorization number, the transaction total and the customer
receipts print. The screen will show how much has been applied to the bill.
If there is still a balance remaining, go to step 3.
If the bill has been fully paid, the transaction is completed. The Merchant copy
prints and the table is closed.
Note: If a UnionPay card is used in this transaction, the customer may be
required to sign the receipt. Review the receipt to see if a customer
signature is requested.
Debit card
4. Select CR/DB.
5. The customer conirms the total amount (Yes or No).
Tips (optional)
6. The customer selects a tip option and presses OK.
7. The customer conirms the total amount (Accept or Change).
Payment method
8. If you have gift cards enabled on your terminal, you must select CR/DB one
more time. Otherwise, go to step 9.
9. Perform one of the following payment methods: Insert or Tap).
Insert debit card
a) The customer inserts their debit card.
b) The customer selects which account they want to use (Chq or Sav).
c) The customer enters their PIN and presses OK. Go to step 10.
Tap debit card
a) The customer taps their contactless-enabled debit card on the
contactless card reader. The customer may be required to insert their
card in some cases. Go to step 10.
10. The screen shows that authorization number, the transaction total and the customer
receipts print. The screen will show how much has been applied to the bill.
If there is still a balance remaining, please go to step 3.
If it is a UnionPay debit transaction, you will not see step b.

12
If the bill has been fully paid, the transaction is completed. The Merchant copy
prints and the table is closed.
Gift card
This tender option is only available through the terminal if you have downloaded a gift
card web application to your terminal. See page 6 for more information.
4. Select CR/DB.
Tips (optional)
5. The customer selects a tip option and presses OK.
6. The customer conirms the total amount (Accept or Change).
Payment tender
7. Select Gift.
Payment method
8. Perform one of the following payment methods: Swipe or Key (Manual Entry).
Swipe gift card
a) Swipe the gift card. Go to step 9.
Manually enter gift card
a) Enter the account number and press OK. Go to step 9.
9. The screen shows the transaction total and the customer receipts print. The screen
will show how much has been applied to the bill.
If there is still a balance remaining, please go to step 3.
If the bill has been fully paid, the transaction is completed. The Merchant copy
prints and the table is closed.
Refund
You must create check with a negative amount in your RMS as settle it with the customer.
Receipts
Each transaction has a dierent receipt and most of the information is purely for record
keeping. There is important information that you need to be aware of to ensure that your
transactions have completed correctly.
You cannot reprint cash receipts.
13
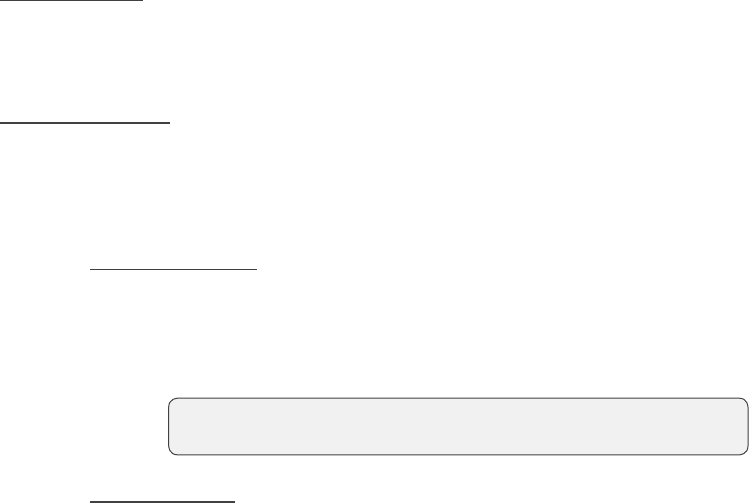
Receipt examples
The information that you will use the most is explained below.
Card entry method
C Chip card transaction
CM Chip card transaction that was
forced to become a manually
entered transaction
CNP Manually entered transaction and
the card was not present. This is a
mail or telephone transaction
CP Manually entered transaction and
the card was present
CS Chip card transaction that was forced
to become a swipe transaction
M Manually entered transaction and
the card was present
P Contactless transaction
S Swiped transaction
Important information
Server # Clerk ID
Table # The table number associated with the check
Check # The check number
# Customers The number of customers associated with the check
Batch# Batch number the transaction is located in
Invoice # Invoice number
APPR
CODE
The approval code for this transaction
RRN The retrieval reference number
REF# The reference number
Signature The card issuer determines when a signatures is required for a transaction
Host
Response
Always ensure that the transaction was APPROVED as it could be
DECLINED or NOT COMPLETED
Merchant Name
Address
City, Province
Merchant Number
Terminal ID
SALE
Server #: 01 B Smith
Table #: 1234
Check #: 1234567890
Batch #: 1234567890
MM/DD/YY
A
VS: N
Invoice #: 1234567890
APPR CODE 12345678
********7892 M
VISA
A
ID: AAAAAAAAAAA
TVR: XX XX XX XX XX
TSI: XX XX
TC: 007B6441F0A45DEE
A
MOUNT
TIP
CASH BACK
TOTAL
# Customers: 1234
RRN: 1234567890
HH:MM:SS
CVC: X
REF#: 12345678
TCD XXXX
Manual Entry CP
**/**
$XX.XX
$XX.XX
$XX.XX
$XX.XX
XXX APPROVED
(PIN VERIFIED)
X_____________________________________
I AGREE TO PAY THE ABOVE TOTA L
AMOUNT ACCORDING TO THE CARD
ISSUER AGREEMENT
RETAIN THIS COPY FOR YOUR
RECORDS
RECEIPT FOOTER LINE 1
RECEIPT FOOTER LINE 2
RECEIPT FOOTER LINE 3
RECEIPT FOOTER LINE 4
RECEIPT FOOTER LINE 5
RECEIPT FOOTERLINE 6
RECEIPT FOOTERLINE 7
MERCHANT COPY

14
Settlement
A settlement must be performed on each terminal in order to maintain accurate records
and balance your accounts. This is important as it:
• Closes all open batches.
• Checks for and downloads available updates.
• Prints selected reports.
• Starts a new business day on the terminal by opening a new batch.
There are two options for settlements:
• Automatic daily settlement (the system settles each night at 11:59 ET) if you
have this set up through TD Merchant Solutions.
• Manual settlement is managed by yourself and is best performed daily. You
have a deadline to perform a manual settlement. This is called your balancing
window and it is set on the system. If your manual settlement is completed
before your balancing window ends, you’ll receive same or next business day
deposit for credit and debit card totals. Otherwise, they will be forwarded to
the next business day.
To perform a manual settlement:
1. Go to the iPay@Table Setting menu.
2. Tap the Settlement menu option.
3. Enter Manager ID and password.
4. Conirm that you want to close the business day (Yes or No).
5. Conirm that you want to print the settlement reports (Yes or No).
6. The terminal reboots.
Reporting
For more information on TD Core Financial application reports, please refer to the
Configuration and Troubleshooting Guide.
• Performing a settlement will not close any third party applications on your terminal. You
must go into the application and perform a day close separately for it.
• This process may take a while if a lot of transactions have been processed during the day.
• Do not process any transactions, press any buttons, or disconnect your Internet
service, until the settlement process is complete.

15
Coniguration
There are various options and settings available for the iPay@Table solution. They are all
contained within the iPay@Table Settings menu. To access this menu:
• At the Home Screen, tap the three horizontal bars icon ( ) to open the Settings
menu. From here you have the following menu options:
• Comms Setup
• iPAY@Table Setup
• Change password
• Settlement
• Some settings are either enabled or disabled. This is indicated by a sliding
button to the right of the setting.
Enabled
Disabled
• To leave any screen you can press the red Cancel button on the terminal or tap
the back icon (<<) in the top-left corner of the screen.
Comms setup
This menu allows you to set the communications settings for iPay@Table application in
order to conigure the RMS IP addresses and Ports.
1. Enter the following information: the RMS Client IP Address, and the RMS Client
Port. Entering the Secondary Client IP Address, and the Secondary Client
Port is optional.
2. Click Continue. You may quit without saving the changes by pressing the back
icon or pressing the red Cancel key.
iPAY@Table setup
This menu allows you to set the desired options for your iPay@Table application. The
following settings are available.
RMS Type
This setting determines how the terminal will communicate with your restaurant management
system (RMS). Depending on which RMS you use, functionality may change on the terminal. Do
not change these settings unless instructed to do so.
Serial # Type
This setting identiies which serial number will be used to communicate with the Restaurant
Management System (RMS). Do not change these settings unless instructed to do so.
1. Tap the Serial # Type menu option.

16
2. You have two options: Use Injected S/N and Use Device S/N. The default
setting is Use Injected S/N.
3. Tap the back icon or press the red Cancel key.
Sort order
This setting is only available if RMS Type is set to Type 3 (Squirrel). This setting indicates
how the tables and checks are sorted for display.
1. Tap the Sort Order menu option.
2. Set the sort option to Alpha/Numeric or Numeric/Alpha. The default setting is
Alpha/Numeric.
3. Tap the back icon in the header or press the Cancel key.
Demo Options
This setting allows iPay@Table to pull tables from RMS when you enter Demo Mode from
the Core Financial application. Otherwise, this setting will be ignored.
1. Tap the Demo Options menu option.
2. Select Enable or Disable. The default setting is Enabled.
If Enabled, the iPay@Table solution connects to the RMS to retrieve table/check
list while in demo mode. This will allow a more realistic demo mode to help
train new employees, but it carries some risks.
If Disabled, the iPay@Table solution doesn’t connect with RMS so get tables
and get checks from RMS are simulated while in demo mode.
3. Tap the back icon or press the red Cancel key.
Font Size
This settings controls the iPay@Table font.
1. Tap the Font Size menu option.
2. Select the desired font size (Large or Normal). The default setting is Large.
3. Tap the back icon or press the red Cancel key.
Refund Setup
This setting allows the ability to perform a Refund transaction from the RMS by entering a
negative amount. When this option is enabled and the table amount received from RMS is
negative, iPay@Table will initiate a Refund transaction to be processed by the Core Payment
Application. Note: This does not override Core Payment Application refund settings.
1. Tap the Refund Setup menu option.
If you retrieve an actual table in demo mode, and select Cash to make a
payment on it, the live check will be modiied by the demo cash amount. We
suggest that you Disable this feature to avoid accidental check modiications.
17
2. Select Enable or Disable. The default setting is Disabled.
3. Tap the back icon or press the red Cancel key.
Enable RMS Polling
This setting controls how often the RMS and terminal with the iPay@Table application try
to communicate with one another when the terminal is idle.
1. Tap the Enable RMS Polling menu option.
2. Enter the polling interval and press OK. The default interval is 15 minutes (and
minimum setting) and the maximum is 60 minutes.
3. Tap the back icon or press the red Cancel key.
Table Name
This setting is only available if the RMS Type (see page 16) is set to Type 1 (Other). This
setting allows you to name your tables versus using a table number. If your RMS uses table
names this option must be set to On.
Aloha RMS: If Table Name is enabled, and alpha-numeric tables are selected, only the
Table Name will print on the receipt.
For all other RMS, both Table Number and Table Name are printed on the transaction receipt.
1. Tap the Table Name menu option.
2. Select Enable or Disable. The default setting is Disabled.
3. Tap the back icon or press the red Cancel key.
Prompt Table
This setting will automatically prompt the server for a table when a server enters their ID.
1. Tap the Prompt Table menu option.
2. Select Enable or Disable. The default setting is Enabled.
3. Tap the back icon or press the red Cancel key.
Prompt Check
This setting will automatically prompt the server for a check number when a server
enters their ID. This will not appear if Prompt Table is disabled.
1. Tap the Prompt Check menu option.
2. Select Enable or Disable. The default setting is Enabled.
3. Tap the back icon or press the red Cancel key.

18
SSL
This setting enables/disables SSL security between the terminal and the RMS. Do not
change these settings unless instructed to do so.
1. Tap the SSL menu option.
2. Select Enable or Disable. The default setting is Enabled.
3. Tap the back icon or press the red Cancel key.
Change password
This allows you to change the iPay@Table password. This password provides access to
the Settings, Communications, and Settlement menus.
1. Tap the Change Password menu option.
2. Enter your current password to access this menu and tap Enter.
3. Enter your Old Password.
4. Enter your New Password. The new password must be 7 to 10 alpha-numeric
characters in length. This password can be numbers only if you like.
5. Re-enter your New Password.
6. Tap Continue when inished.
Settlement
This settings option allows you to start a manual settlement in the payment application.
1. Enter your password to proceed.
2. The iPay@Table application will close and take you to the payment application
and the settlement process begins.
3. Once completed, you will be returned to the iPay@Table Home screen.
Core payment application settings
To change the following settings you must:
1. Press the silver Application key (above the red Cancel key).
2. Select the TD Core Payment application.
3. Follow the instructions for the desired setting.
Note: Depending on your settings, you may have to enter the Admin password
to change the functionality.
The following settings can be modiied on your terminal as well. To make any of changes
to these settings permanent, you must call TD Merchant Solutions Help Desk and then
perform a parameter download.
This does not settle gift card transactions. You must settle these through the
gift card application.
19
Setting Explanation
Clerk Wording Set this option to add or change an existing clerk tile
(server or clerk for example). It requires a higher level user
to change it. For example, it would take a manager tor
supervisor to aect a clerk’s name. You must enable
ClkPrompt to use this feature.
Communications Priority Use this option to set your terminal’s communication
priority list. This list determines the order in which the
terminal connects to the RMS solution. Do not change these
settings unless instructed to do so.
RMS Cash Enable or disable this option to allow cash tender within
iPay@Table.
RMS Type This sets the desired Restaurant Management System
(RMS) for iPay@Table Web application. Do not change
these settings unless instructed to do so.
Terminal Language Set the language settings on the terminal.
Tip Settings Enable, disable, or change the tip settings on the terminal.
RMS Cash
This enables or disables the support of cash tender within the iPay@Table application.
Troubleshooting
Who do I contact?
You must contact the correct help desk to resolve any issues with the iPay@table
solution. Below are some issues and the appropriate help desk to contact.
You would contact the RMS vendor for the following issues:
• RMS software issues
• Communication issues between iPay@Table application and RMS such as
entering a server ID and receiving a comms error
You would contact the third party application vendor for the following issues:
• Any issues encountered when using the third party application such as gift
cards, loyalty cards, etc.
You would contact TD Merchant Solutions Help Desk for the following issues:
• Hardware issues such as blank screen, batteries not holding a charge,
malfunctioning Bluetooth / charging bases
• Reconciliation issues on the TD Core Financial Application
• Communication issues with debit or credit inancial transactions

20
• Any changes to terminal functionality that require a Host 2 download such as
tip settings
Terminal error messages
If you’re unable to resolve the problem after performing the following steps, please refer to
the Configuration and Troubleshooting Guide for more troubleshooting tips.
Error codes Explanation Action required
Apply Failed: $99999.99 The RMS cannot apply the
approved amount to the check.
Press OK.
Close the transaction
manually in the RMS.
Apply Payment Failed
Please Retry
1Yes 2No
The system cannot apply
the approved amount to
the check.
If you select:
Yes, the terminal resends the
payment info to restaurant
system.
No, the transaction will not be
posted to the RMS, and will
need to be closed manually.
Apply Payment
Check/Table Already
Closed
The Apply Payment was not
successful because the Check
or Table is already closed.
The server needs to update the
RMS as required.
Apply Payment
Comm Error OK
There is a communication
issue while applying the
payment of an approved
transaction.
Reprocess the payment.
The server must manually close
the ticket on the RMS.
Applied: $99999.99
Apply Failed: $99999.99
Not all payment records
have been successfully
applied in a multi-record
transaction.
The server needs to open
any outstanding checks and
accept payment from the
customer(s).
If the transaction is approved,
the server must close the
ticket manually on the RMS.
Comm Error There has been a
communication error.
Press OK to return to the
iPay@Table Home screen.
Verify that the network is
working.
Verify that the comm icons are
connected / green.
Check the Comms Setup in
the iPay@Table settings
menu to make sure valid IPs
and Ports are entered.

21
Error codes Explanation Action required
Connection failed,
please retry
The terminal failed to retrieve
the check details from the RMS
due to a communication issue.
Try to pull the check details
again.
Function not available The selected function is not
enabled or available.
Change the settings to enable
the function.
Get Tables
Communication Error
The terminal is unable to
retrieve a table from the RMS.
Conirm that the communi-
cation icons on the terminal
are green and try to retrieve
the table again.
Get Tables
Get Tables Not Available
There could be a number of
possible reasons:
• The RMS returned a
table count of 0.
• The RMSType does not
match the POS system.
• The terminal does not
have an injected serial #
and Use Injected Serial
# is enabled.
• The user cannot retrieve
any tables from RMS.
Investigate which of the
reasons are causing this error.
No Open Table Is
Available
There are currently no
open tables.
Press OK to return to the
iPay@Table Home screen.
Payment App Initialization
Required
The payment application is not
set up or only partially set up to
support iPay@Table Web
application.
Complete the set up setup of
the Financial application to
support the iPay@Table Web
application.
POS System Error The RMS has returned an
invalid response to the terminal.
The Merchant must contact
the RMS solution provider.
Setup Required The iPay@Table application is
not set up or only partially set up
– for example if the RMSType
and Comms Setup are not set.
Access the iPay@Table
Settings Menu and complete
set up of the web application.

22
What problems can I easily resolve?
Problem Action Required
Bad Communication There was a communication failure after the transaction
was initiated.
• Verify your connections.
• Press Cancel and try again.
Chip cards cannot be
processed
• Try inserting a dierent card. If this card can be read,
the problem is with the irst card.
• Use a cleaning card to clean the problem card reader.
Display screen is blank • Ensure that the power cable is irmly connected to the
power port and the electrical outlet.
Magnetic stripe card
reader won’t read cards
• Try swiping the card more quickly or more slowly or
from the top of the reader towards you.
• Request another form of payment. If this card can be
read, the problem is with the irst card.
• Use a cleaning card to clean the problem card reader.
Printer does not print • Is there paper in the device? If there is, ensure that the
paper is loaded correctly.
Printer jam • Ensure that the paper feed is clear and that the paper
roll is seated correctly.
• Ensure the printer lid is completely closed.
Terminal isn’t powering on • Ensure that the power cord is properly inserted into the
Bluetooth base / charging base and an electrical outlet.
Ensure that the terminal is properly seated in the base.
OR
• Ensure that the power cord is properly inserted into the
terminal and a power source.
Transaction is not going
through
• Ensure that the terminal is connected to the network via
Bluetooth, WiFi or 4G.
• Check your Internet connection to ensure that it is
working. Bluetooth, WiFi only.
23
Reference
Charging your terminal
• If you are using a Bluetooth or charging base, ensure that your terminal is
properly seated.
• If you are using a charging cord, ensure that it is connected properly to your
terminal and to the electrical outlet.
Maintaining your terminal
• Don’t place it on a magnetized pad — this will cause it to malfunction.
• Routinely clean it with a damp cloth so that spills don’t get into the inner workings.
• Use TD-approved cleaning cards for the chip and magnetic card readers.
Storing your terminal
• It must be stored in temperatures between 0° and 50° Celsius.
• Do not leave it outdoors overnight, especially in the winter.
Changing the paper roll
1. Gently pull up on the paper chamber panel along the top of terminal and
remove the old paper roll.
2. Unwrap a new paper roll and place it in the paper chamber so that the loose
end of the paper feeds up from under the paper roll towards you.
3. Press down on the panel until it clicks shut and ensure there is enough paper
sticking out from the chamber that it touches the top of the terminal screen.
Lost or stolen equipment
If your device has been lost or stolen, please:
1. Contact the TD Merchant Solutions Help Desk immediately to report the incident.
(stolen or lost)
2. Contact the police to ile a report. (stolen only)
What should I do when the police arrive regarding the stolen device?
If a police oicer arrives on site please record the following:
• Oicer’s name
• Oicer’s jurisdiction
24
• Oicer’s contact information
• Stolen device’s serial number
The oicer should provide you with a report number. After obtaining the above from the
oicer, please contact the TD Merchant Solutions Help Desk and provide this information
so that you can receive a replacement device.
25
26

Call Centre Information
Please call the TD Merchant Solutions Help Desk at 1-800-363-1163. We would be happy
to answer any questions you may have.
Authorization:
24 hours a day, seven days a week
Terminal Inquiries:
24 hours a day, seven days a week
General Merchant Inquiries:
Monday – Friday, 8 a.m. – 8 p.m. ET
Printer / Stationery Supplies:
Monday – Friday, 8 a.m. – 5 p.m. ET
Documentation Portal
This guide covers the most commonly used information in order to get you started. Your
terminal has more features and functionality to explore on our documentation portal which
you can ind at www.tdmerchantsolutions.com/posresources.

535782 (1120)
