Payrix + Xero
Automated invoice payments and reconciliation
User guide
USA
Updated 07 October 2021
P: 844-517-5981
E: support@payrix.com.au
www.payrix.com/au

XERO USER GUIDE
TABLE OF CONTENTS
Page 2 of 42 User guide: Payrix + Xero (USA)
07 October 2021
Contents
1. Introduction ........................................................................................................................................... 3
1.1. About this guide ..................................................................................................................................... 3
1.2. Requirements to get started .......................................................................................................... 4
1.3. Important note on importing contacts ........................................................................................ 4
2. Creating and sending invoices...................................................................................................... 5
2.1. Overview ................................................................................................................................................... 5
2.2. Single invoices ....................................................................................................................................... 6
2.3. Repeating invoices ............................................................................................................................. 10
3. Paying an invoice: the customer experience ....................................................................... 15
4. Bank reconciliation ......................................................................................................................... 19
4.1. Auto-reconciliation of payments and invoices .................................................................... 20
4.2. Completing your bank reconciliation ........................................................................................ 24
5. Overpayments .................................................................................................................................. 27
6. Updating customer payment details ...................................................................................... 28
6.1. Editing a customer ID in Payment Portal ............................................................................ 32
7. Managing and resolving payment issues .............................................................................. 34
7.1. Viewing payment records .............................................................................................................. 34
7.2. Reattempting failed transactions ............................................................................................... 36
7.3. Requesting a new transaction limit ........................................................................................... 38
7.4. Resolving an invalid Xero account ............................................................................................... 39
8. Help and support ............................................................................................................................. 42

XERO USER GUIDE
INTRODUCTION
Page 3 of 42 User guide: Payrix + Xero (USA)
07 October 2021
1. Introduction
Payrix + Xero is a fast and simple way to collect payments for both repeating and single
invoices.
It can bring so many benefits to your business, such as:
• It will reduce the time you spend on payment collection and administration, as well as
improving your cash flow.
• It’s simple to automate repeating payments – ideal for subscriptions and regular fees.
• Having a ‘pay now’ button on your invoices gives your customers a faster and more
convenient way to pay.
• Your customers will get the widest choice of payment options available – credit and debit
card, and ACH debit.
• Invoice payments are processed securely – Payrix is certified at the highest compliance
level for the Payment Card Industry Data Security Standard (PCI DSS).
• Bank reconciliation is automated – matching bank account and Xero transactions has
never been quicker or easier.
1.1.
About this guide
This guide explains how to send invoices with online payment options for your customers. We
cover six main topics:
1. Creating and sending invoices
2. Payi
n
g an invo
ice: the customer
ex
perience
3. Bank
reconciliation
4. Overpayments
5. Updating
c
ustomer
payment details
6.
Managing and resolving payment issues
XERO USER GUIDE
INTRODUCTION
Page 4 of 42 User guide: Payrix + Xero (USA)
07 October 2021
1.2.
Requirements to get started
Before proceeding, you should have already connected your Xero and Payrix accounts, and
configured them for invoice payments.
If you haven’t yet, you can follow the steps in our setup guide:
Payrix + Xero setup guide [PDF]
1.3.
Important note on importing contacts
In most instances you will not need to import your Xero contacts into Payment Portal.
Importing Xero contacts is automatically done for you when a customer agrees to future
payments on their first auto debit invoice.
A manual import can be done when faced with these scenarios:
•
You already have a debit agreement for your customer(s) – you can import their
details from Xero, and then add payment account information BEFORE sending an
auto debit invoice.
•
You would like your customer(s) t o complete a debit agreement BEFORE sending an
auto debit invoice.
For audit purposes it is not possible to delete any contacts that are imported. If you need
to import your contacts manually, you should contact our Client Support team before
attempting this – they can advise on the best approach for your business.
Xero’s new design and navigation
In December 2018 Xero updated its website design and navigation. Payrix's setup
process remains the same, but Xero’s navigation has changed slightly within some
of our steps.
This setup guide incorporates these changes. It’s up-to-date with the latest
information you’ll need to complete your integration of Payrix and Xero.
XERO USER GUIDE
CREATING AND SENDING INVOICES
Page 5 of 42 User guide: Payrix + Xero (USA)
07 October 2021
2. Creating and sending invoices
2.1. Overview
Xero + Payrix lets you choose the invoice and payments options that work best for your
business.
In Xero you can create, schedule and send single or repeating invoices. Our payment
options are determined by the branding themes you created during your initial setup of Xero
+ Payrix.
We recommend using these most common invoice options:
• Single invoice:
o Also known as one-off invoices, where a customer makes a payment with no
agreement for future payments.
o Xero invoice type: single
o Branding theme: Payrix Pay Now
• Repeating invoice:
o Xero calls them ‘repeating’ and we refer to them as ‘recurring’, but they’re the
same thing. For this guide we’ll call them ‘repeating’.
o The first invoice will include a
billing agreement
for automatic payments covering
future invoices in the repeating cycle.
o Xero invoice type: repeating
o Branding theme: Payrix Auto Debit
There are different variations of these invoice options. Xero + Payrix caters for a wide range
of business needs, such as single invoices with billing agreements for future automatic
payments.
To discuss other invoice and payment options
contact our Client Support
team.
XERO USER GUIDE
CREATING AND SENDING INVOICES
Page 6 of 42 User guide: Payrix + Xero (USA)
07 October 2021
2.2. Single invoices
Single invoices with payment options can be created using the Payrix Pay Now
branding, which you created during your initial setup of Xero + Payrix.
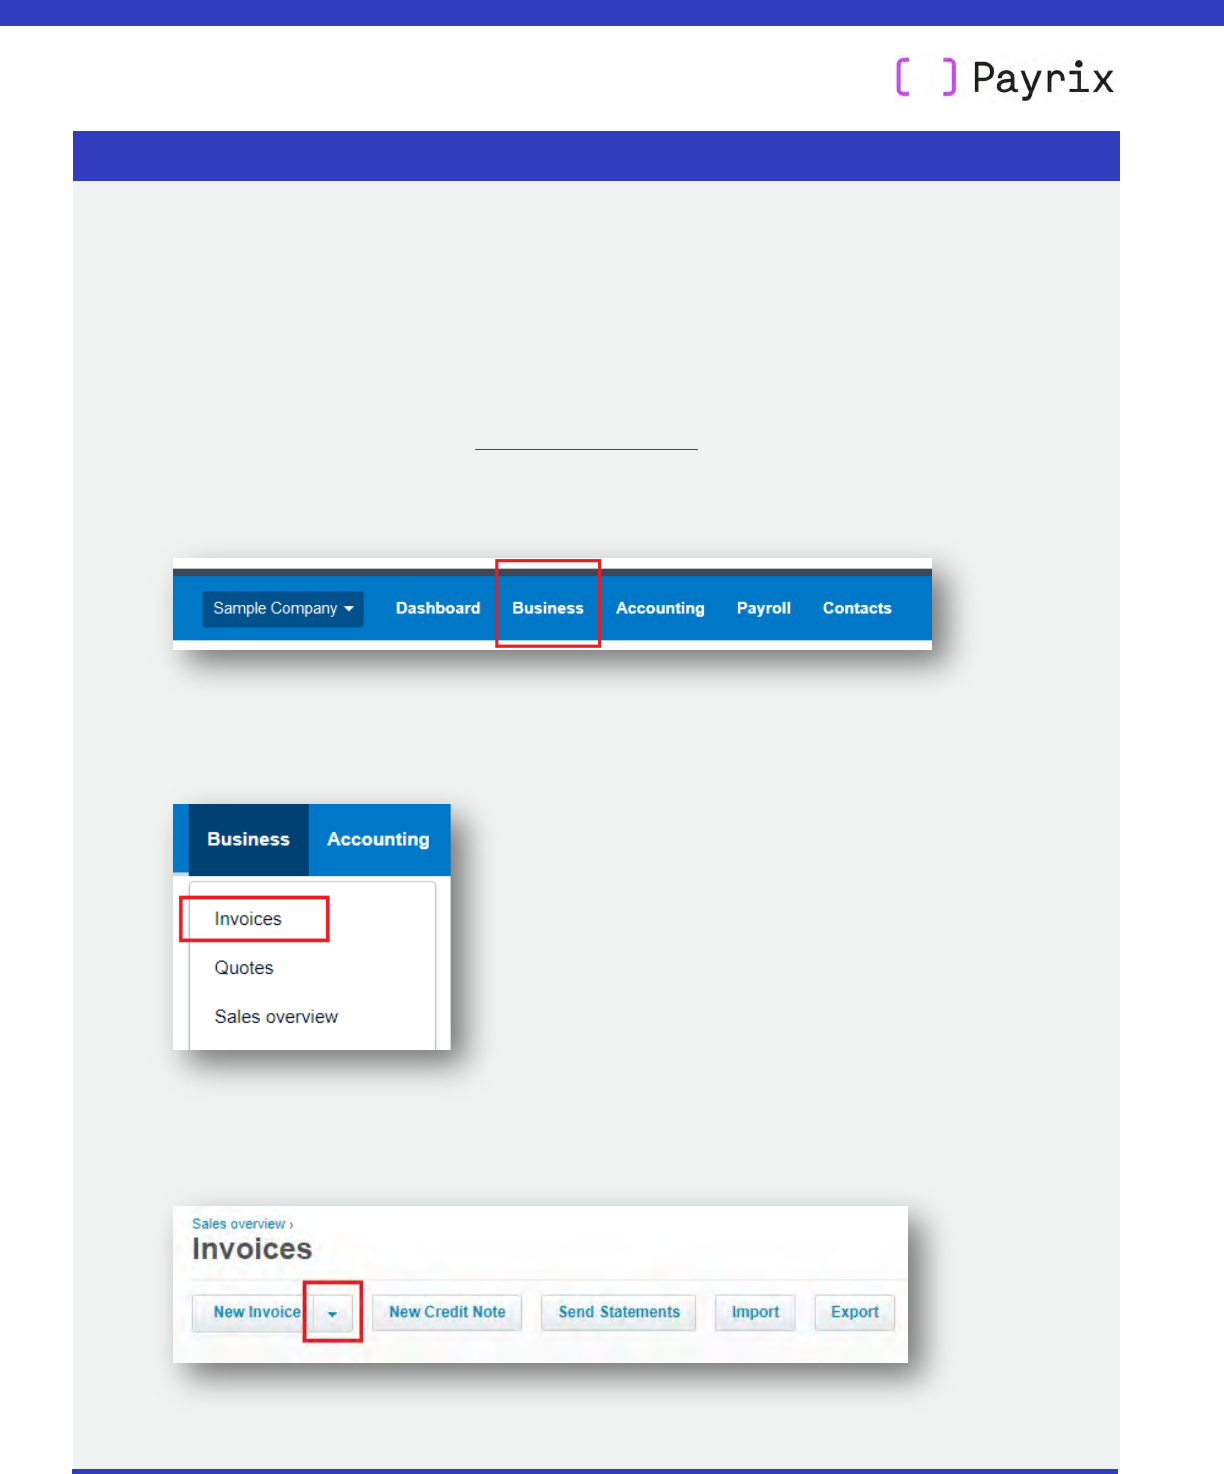
Follow these steps to create a single invoice:
• Login to your Xero account: https://login.xero.com
•
On the navigation bar,
click Business.
•
On the drop-down menu, click on Invoices
• Click the down arrow ▼ next to New Invoice.
XERO USER GUIDE
CREATING AND SENDING INVOICES
Page 7 of 42 User guide: Payrix + Xero (USA)
07 October 2021
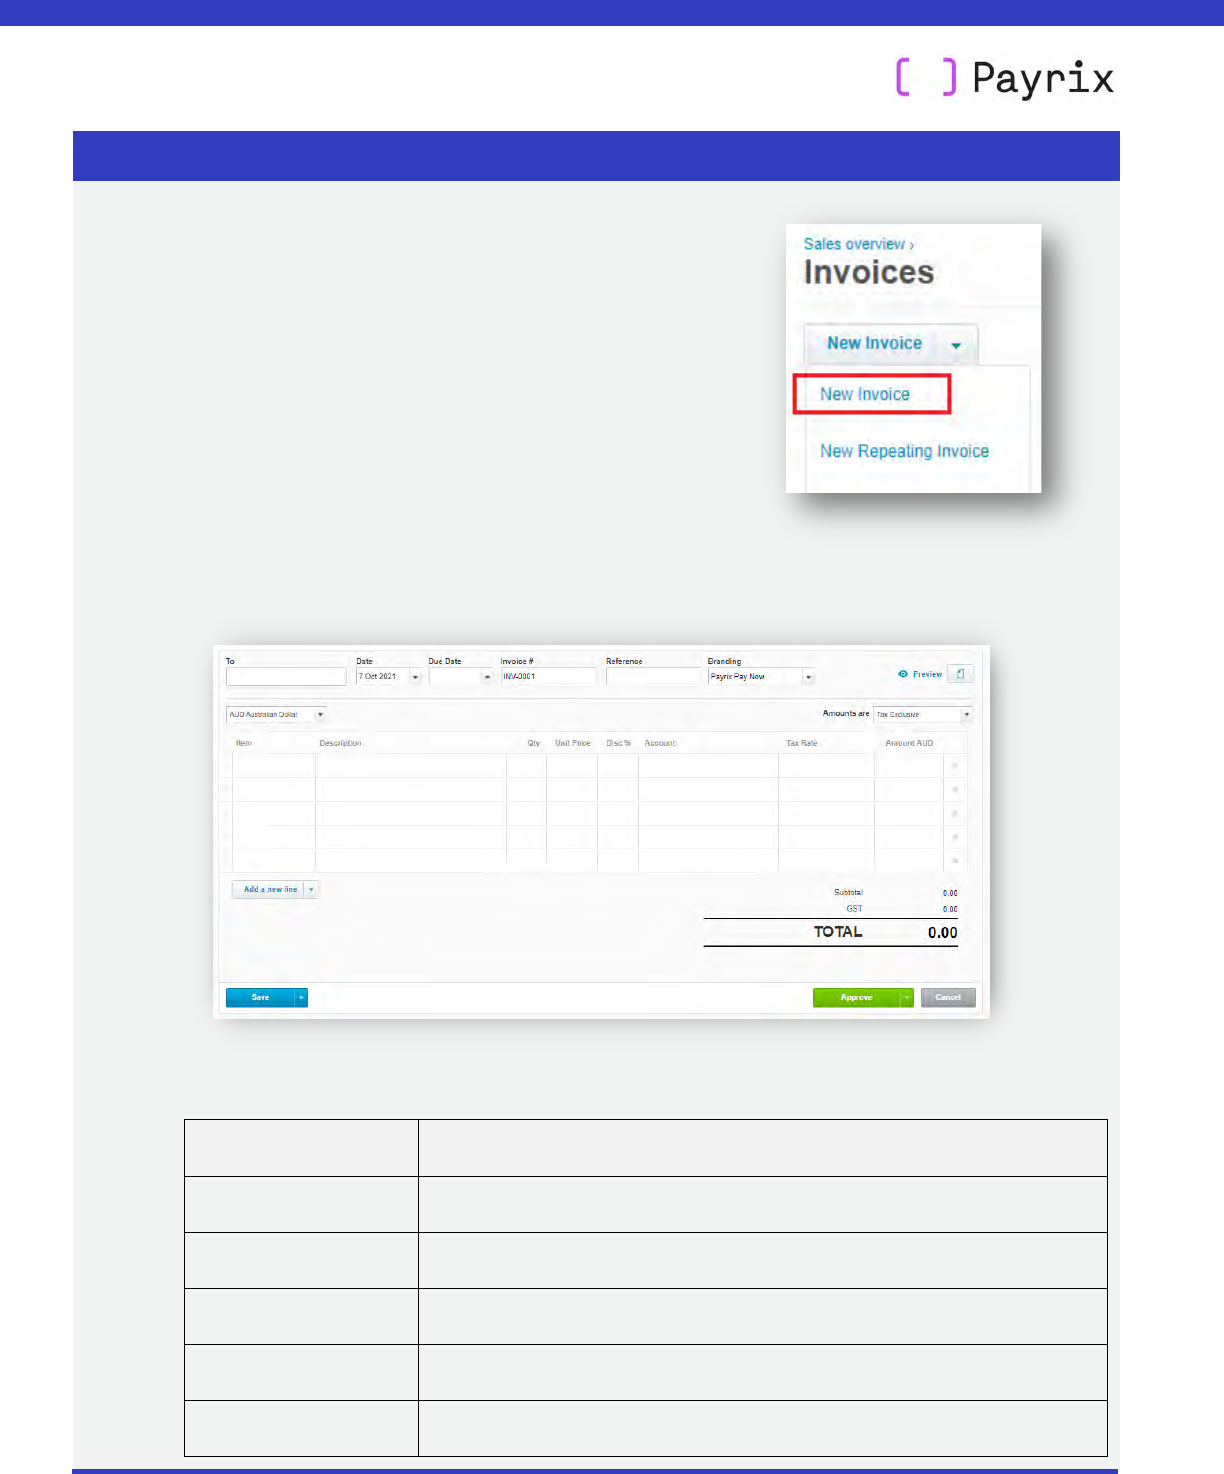
• On the drop-down menu, select New Invoice.
• A New Invoice screen will appear.
• Enter your invoice details – instructions are provided in the table below.
Invoice field Instructions
To This field is connected to your Contacts in Xero.
Reference Enter your reference for the invoice.
Invoice number Enter your invoice reference.
Issued date Enter the date to be displayed on the invoice.
Due Date Enter the due date for payment.

XERO USER GUIDE
CREATING AND SENDING INVOICES
Page 8 of 42 User guide: Payrix + Xero (USA)
07 October 2021
Currency Select the billing currency.
Invoice branding
theme
Select Payrix Pay Now from the drop-down.
Item Add the products or services that you are selling – this
is connected to your Inventory in Xero.
Subtotal tax
preference
Select the tax preference – tax already included (including),
add tax to each item amount (excluding), or no tax.
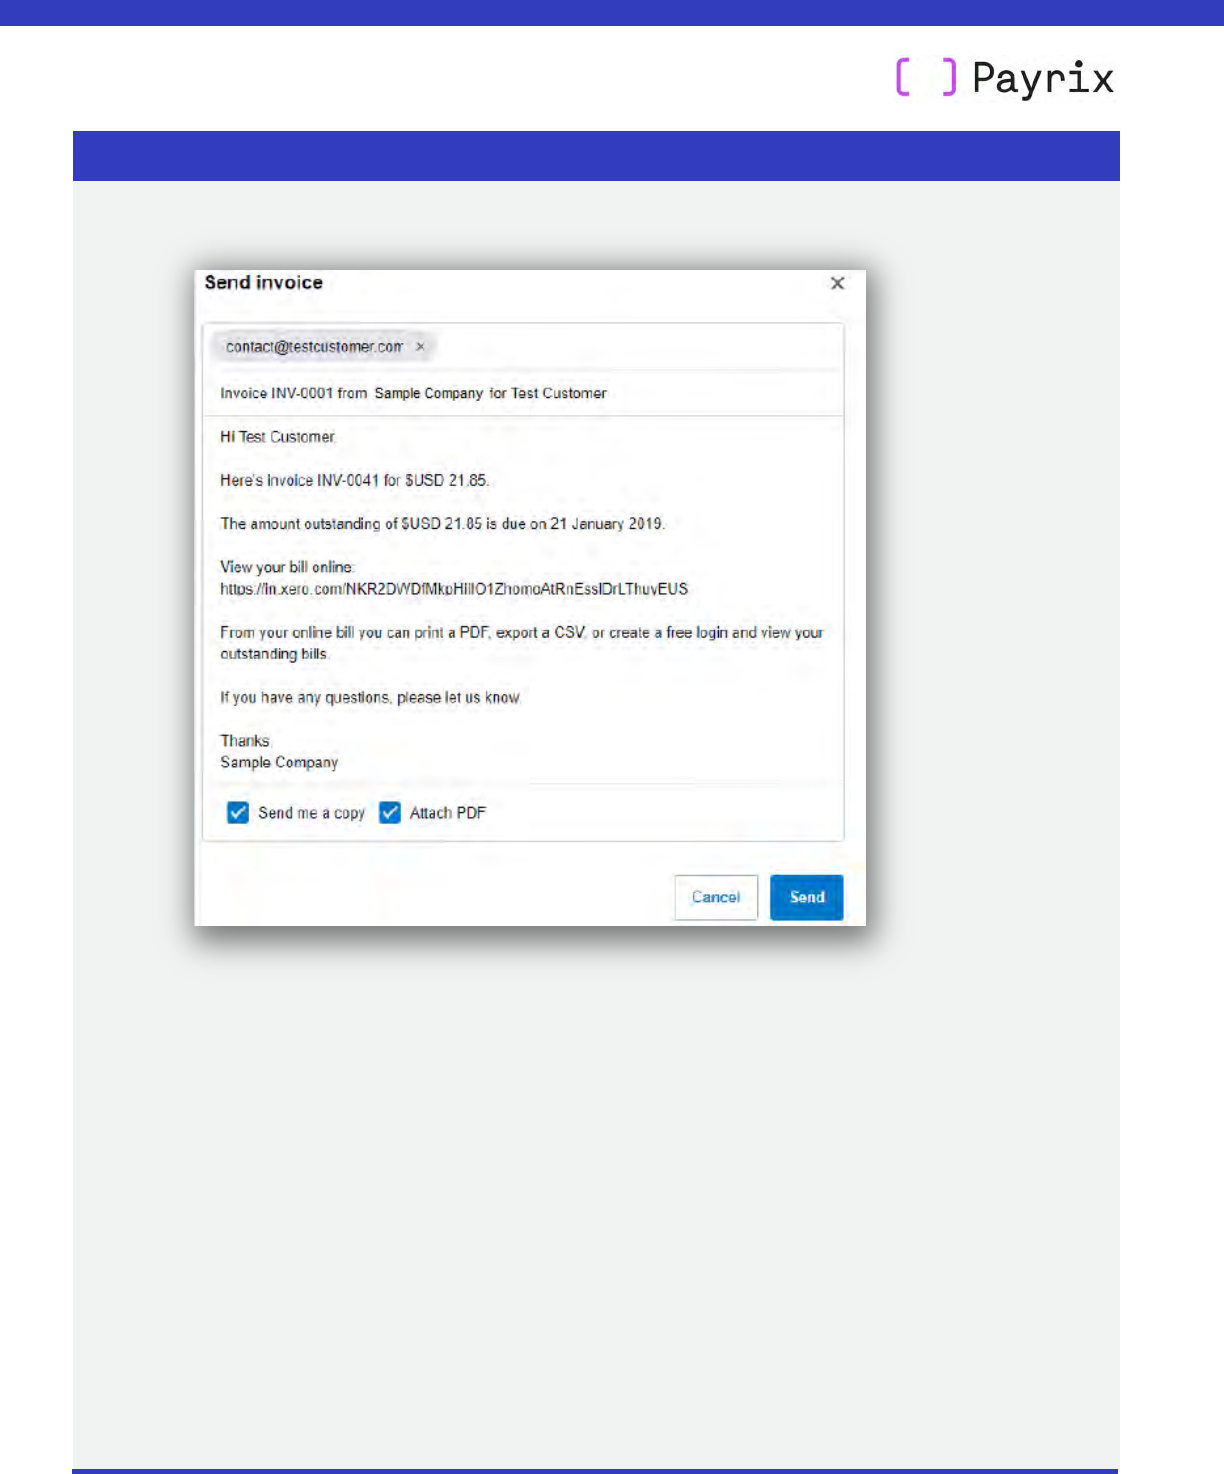
• If you have finished the invoice and it’s ready to send, click Approve at the bottom right of
the invoice.
• The Send Invoice pop-up will then be displayed.
• You can edit or add to any of the content displayed – recipient email ad
dress, subject line
and body text.
• At the bottom of the message are two check box options:
a. Send a copy of the invoice to yourself
b. Attach a PDF version of the invoice, which is automatically done for you.
XERO USER GUIDE
CREATING AND SENDING INVOICES
Page 9 of 42 User guide: Payrix + Xero (USA)
07 October 2021
• When you’re ready to send the invoice, click Send.
XERO USER GUIDE
CREATING AND SENDING INVOICES
Page 10 of 42
User guide: Payrix + Xero (USA)
07 October 2021
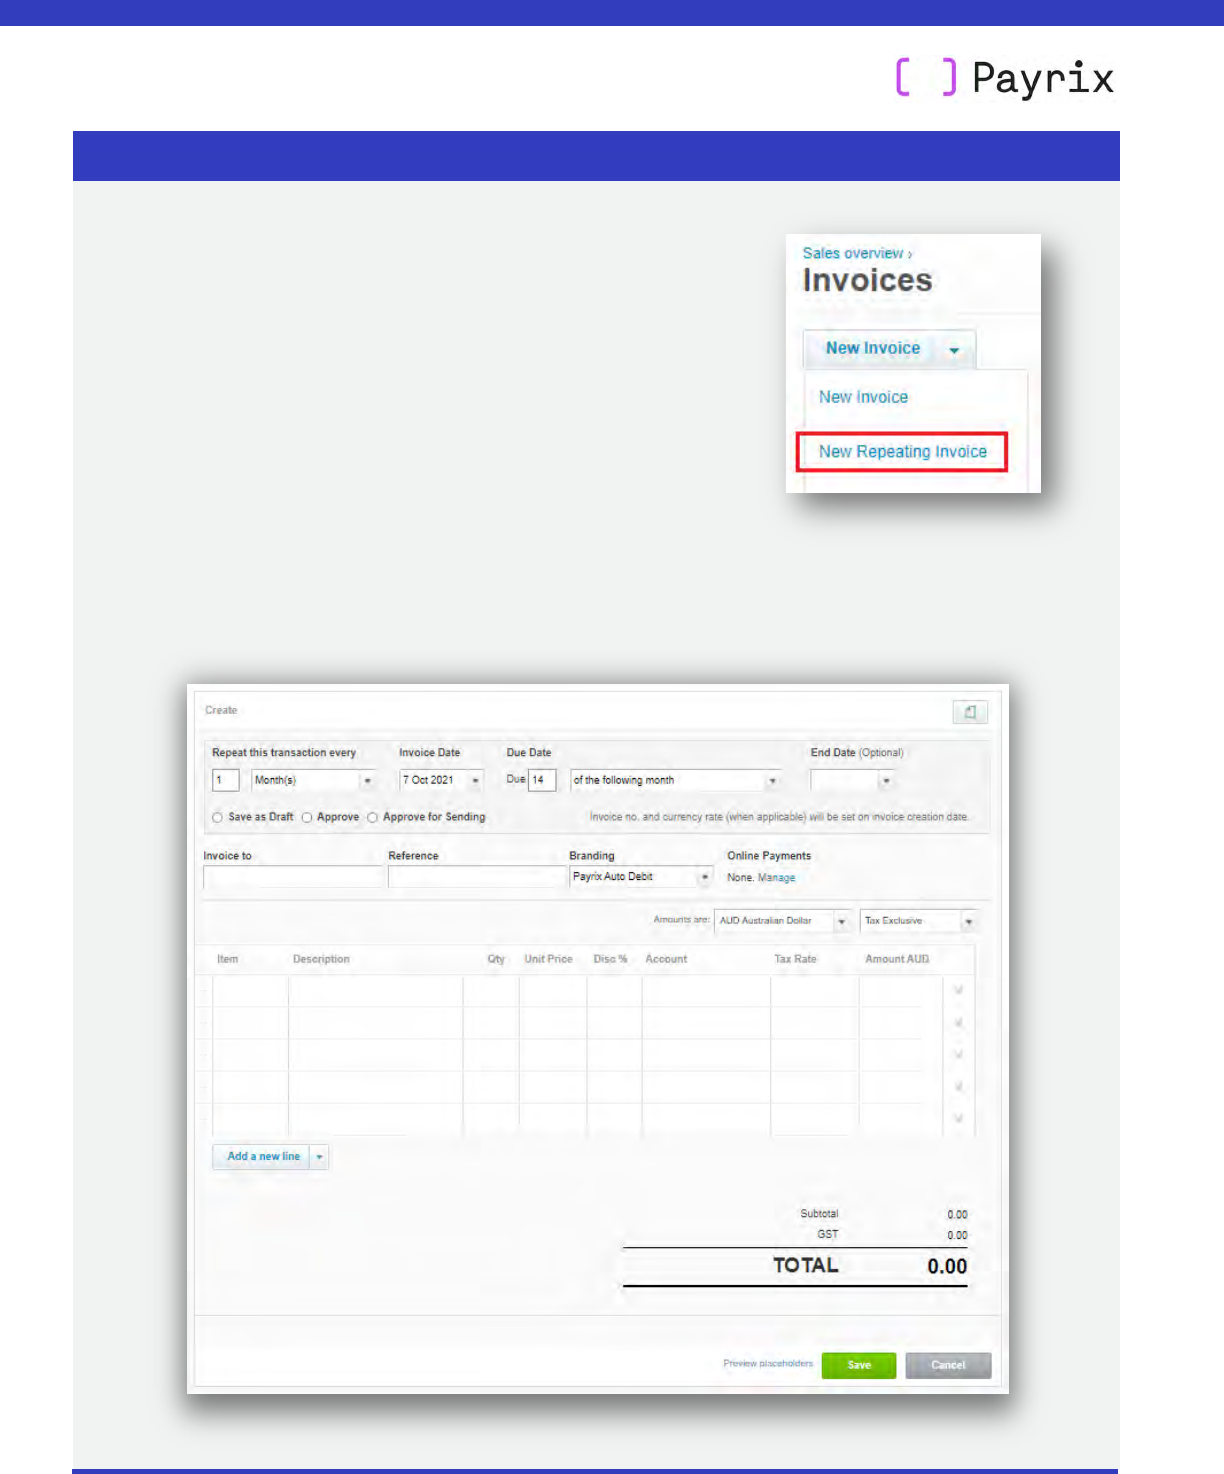
2.3. Repeating invoices
Repeating invoices with payment options can be created using the Payrix Auto Debit
branding theme – you will have created this during your initial setup of Xero + Payrix.
Follow these steps to create a repeating invoice:
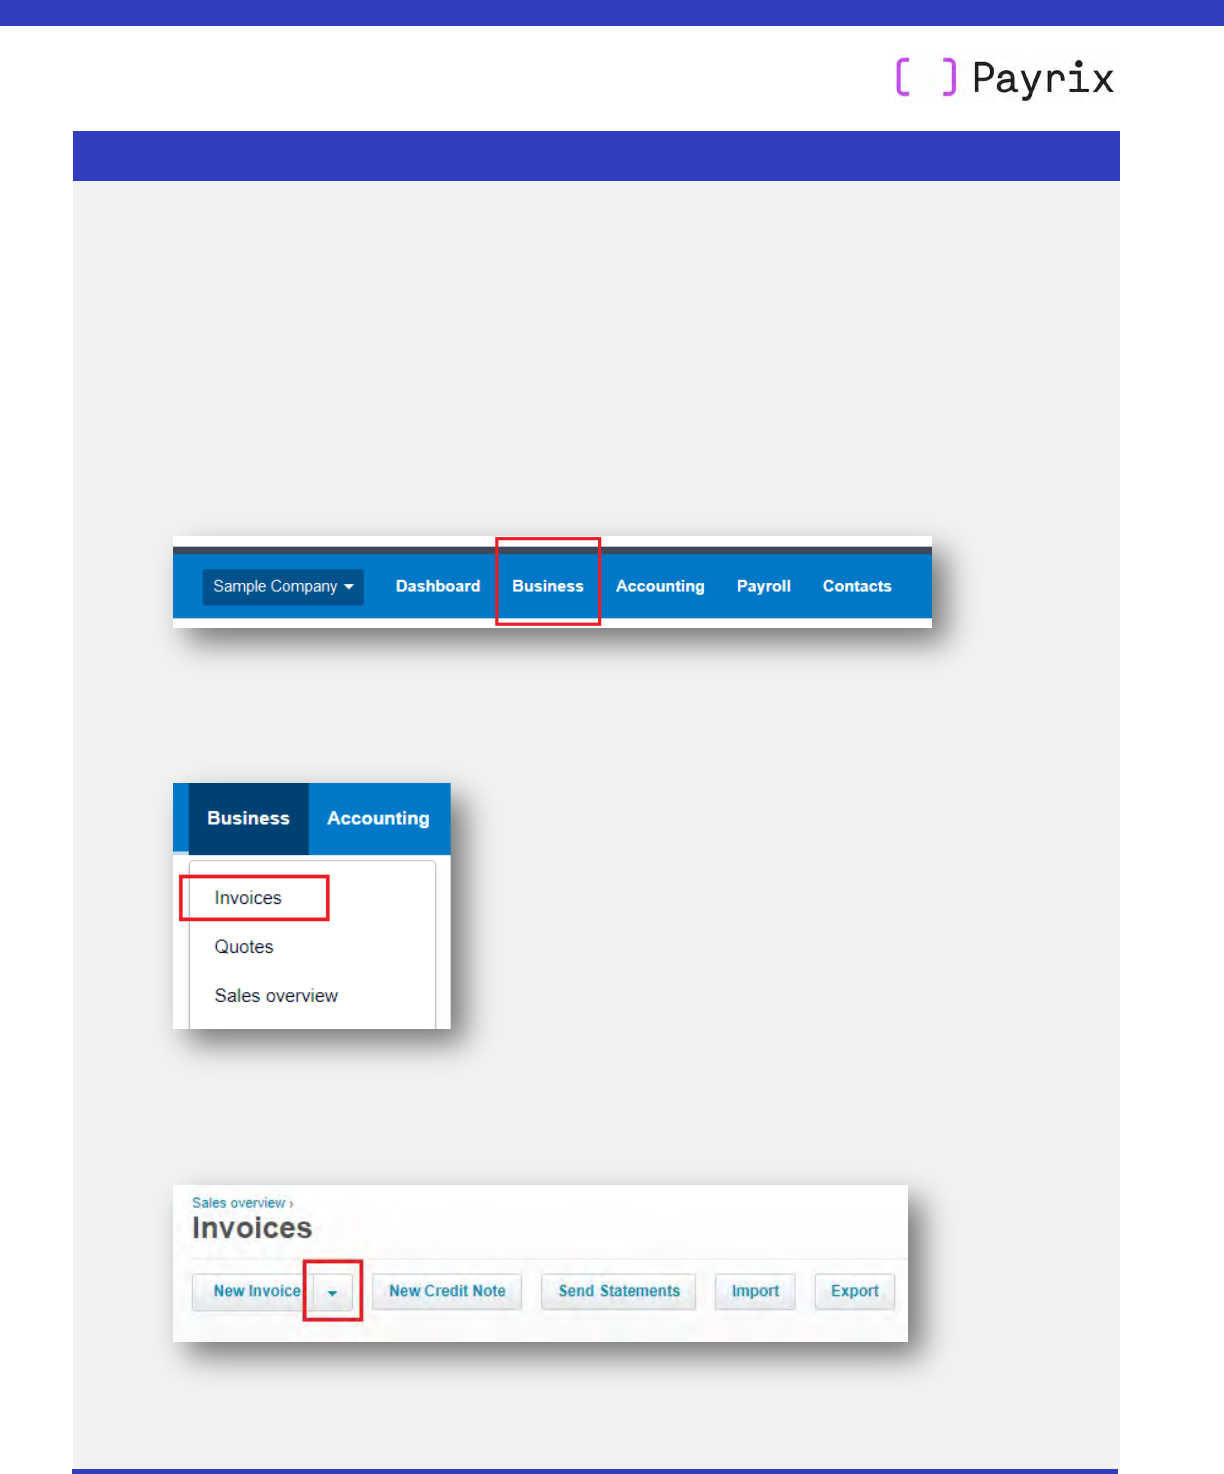
•
On the navigation bar ,
click Business.
•
On the drop-down menu, click on Invoices
• Click the down arrow ▼ next to New Invoice.
XERO USER GUIDE
CREATING AND SENDING INVOICES
Page 11 of 42
User guide: Payrix + Xero (USA)
07 October 2021
• Select Repeating Invoice.
• A New Repeating Invoice screen will appear.
XERO USER GUIDE
CREATING AND SENDING INVOICES
Page 12 of 42
User guide: Payrix + Xero (USA)
07 October 2021
• Enter your invoice details – instructions are provided in the table below.
Invoice field Instruction
Repeat this
transaction every:
Select the frequency of your invoice.
Invoice date Enter the date that the first invoice will be issued.
Ideally this should be any future date (tomorrow onwards).
Avoid setting it as today or earlier as the invoice will not
automatically be sent – you will need to send it manually via
Sales > Awaiting Payment.
Due date Select the repeating date that invoices will be due.
This will be the date that Payrix will start processing each
payment in the repeating cycle.
End date (optional) Enter the date when repeating invoices should end.
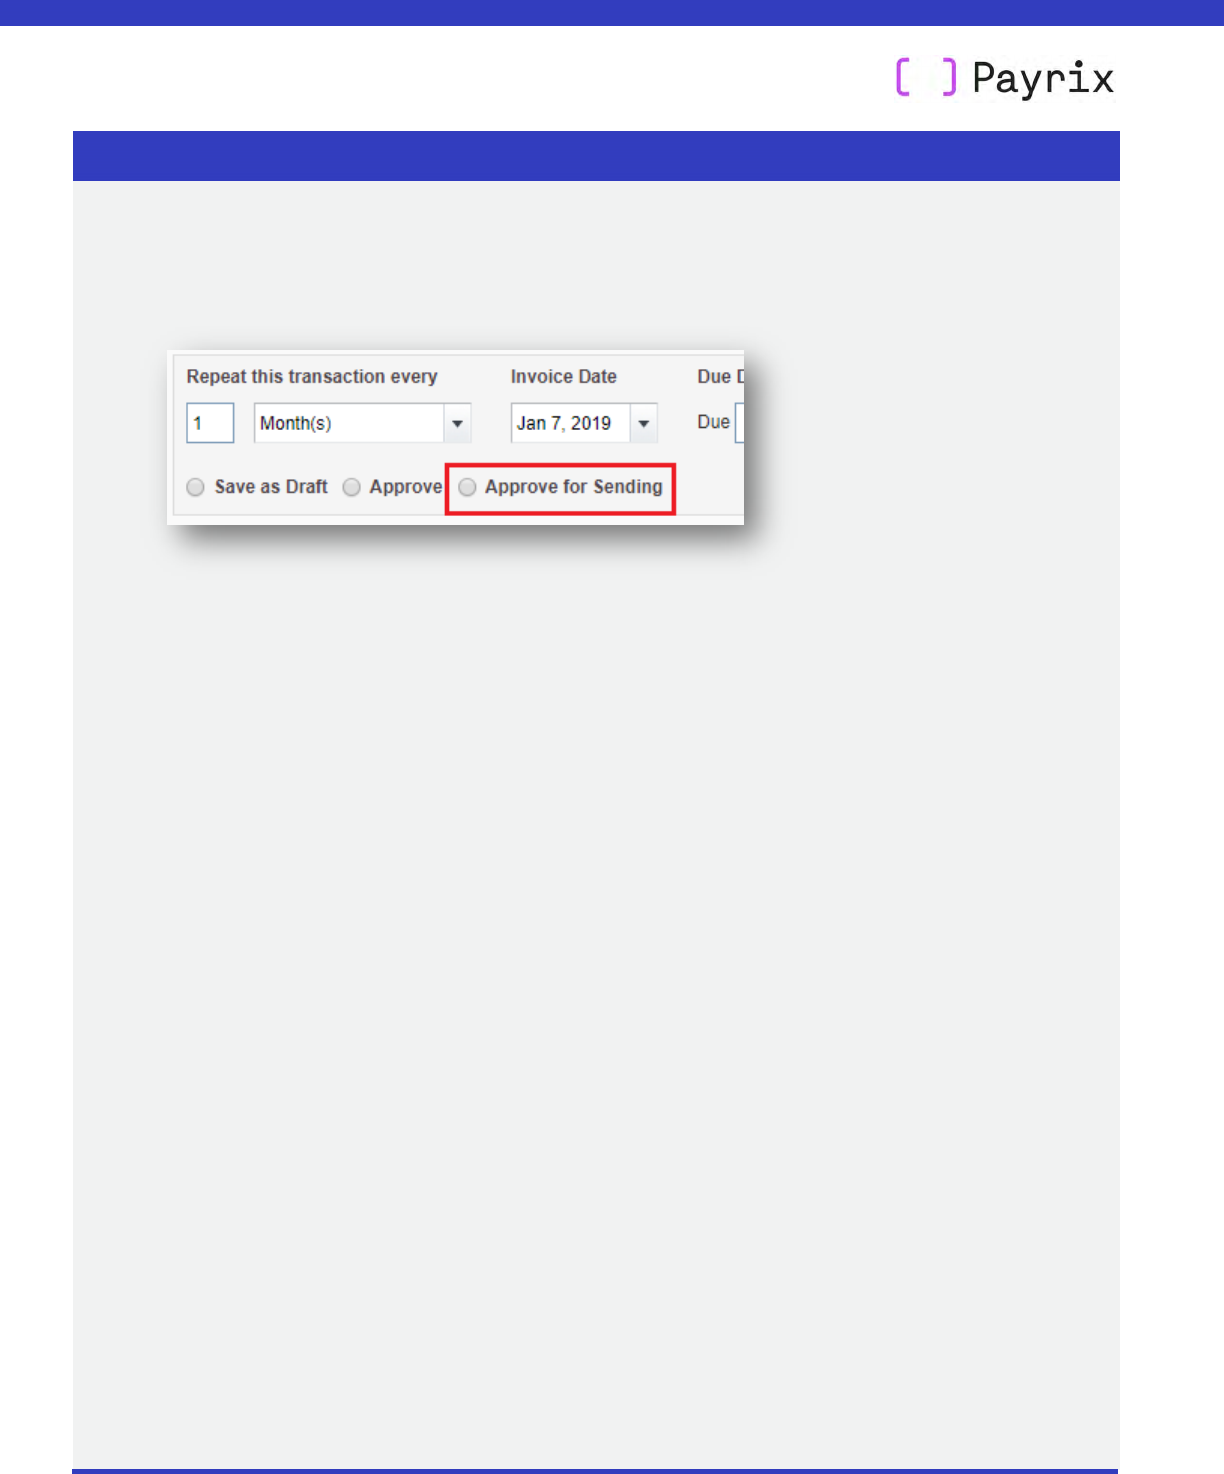
Save as draft:
Approve:
Approve for sending
Only select an option after you’ve completed all your other
fields. Selecting too early will just send you back to complete
all fields.
Invoice to This field is connected to your Contacts.
Reference Enter a reference for the repeating invoice.
Branding Select Payrix Auto Debit from the drop-down.
Amounts are: • Select your billing currency
• Select your tax preference – tax already included
(including), add tax to each item amount (excluding), or no
tax.
Item Add the products or services that you are selling – this field is
connected to your Inventory.
Document icon
(Optional)
Upload any files you want attached to the invoice.
XERO USER GUIDE
CREATING AND SENDING INVOICES
Page 13 of 42
User guide: Payrix + Xero (USA)
07 October 2021
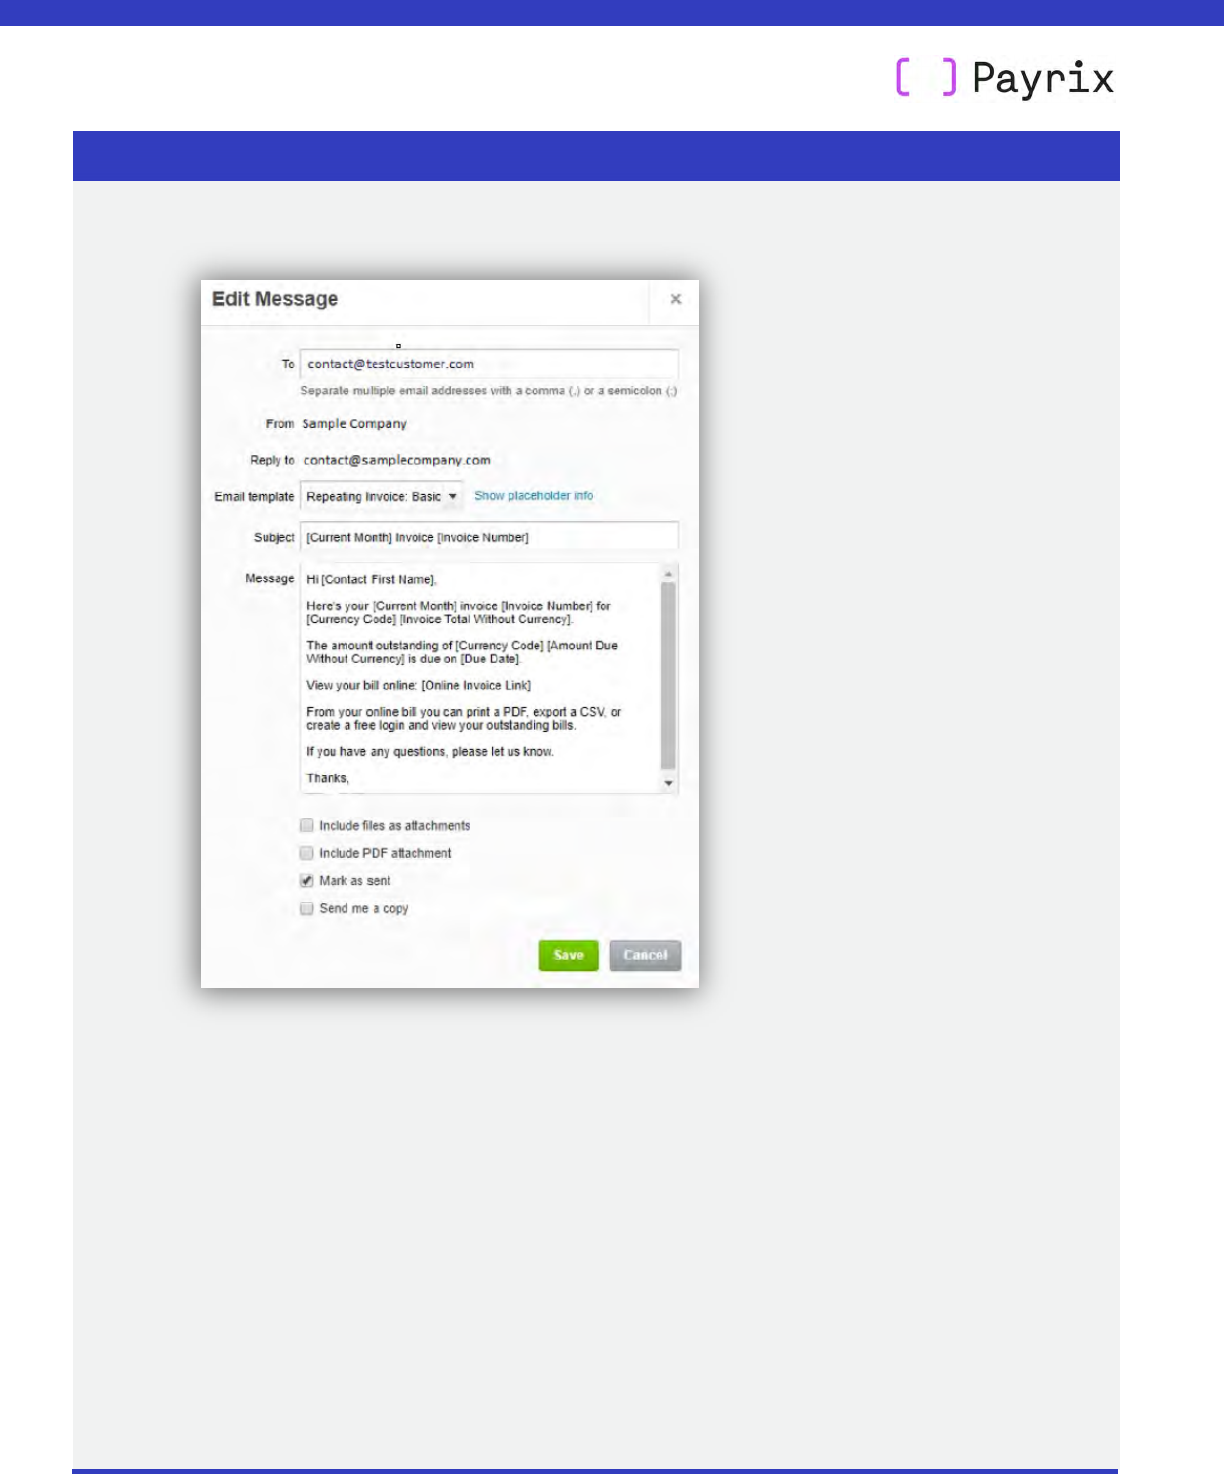
• When you’ve finished creating the invoice, and it’s ready to go to your customer, click
Approve for sending – you’ll find this at the top of the form, underneath the date fields.
• The Edit Message pop-up will then be displayed – review your text and options before
sending:
– You can edit or add to any of the content displayed – recipient
email address,
subject line and text for your message.
– The email template is dependent on what Xero email templates are available to
your organisation.
– At the bottom of the message are four check box options:
-
Includes files as attachments - enables you to attach any documents
such as contracts, pu
rchase orders etc.
-
Include PDF attachment - enables you to attach a PDF copy of the
invoice to the email.
-
Mark as sent
- th
is will mark the invoice as Sent in your Xero account.
-
Send me a copy - a copy of the email plus attachments will be sent to
you.
XERO USER GUIDE
CREATING AND SENDING INVOICES
Page 14 of 42
User guide: Payrix + Xero (USA)
07 October 2021
• When you have completed all fields, click Save.
• The first invoice in the repeating cycle will be automatically emailed to your customer
on the invoice date.
XERO USER GUIDE
PAYING AN INVOICE: CUSTOMER EXPERIENCE
Page 15 of 42
User guide: Payrix + Xero (USA)
07 October 2021
3. Paying an invoice: the customer experience
This section describes the customer experience for paying both single and repeating invoices.
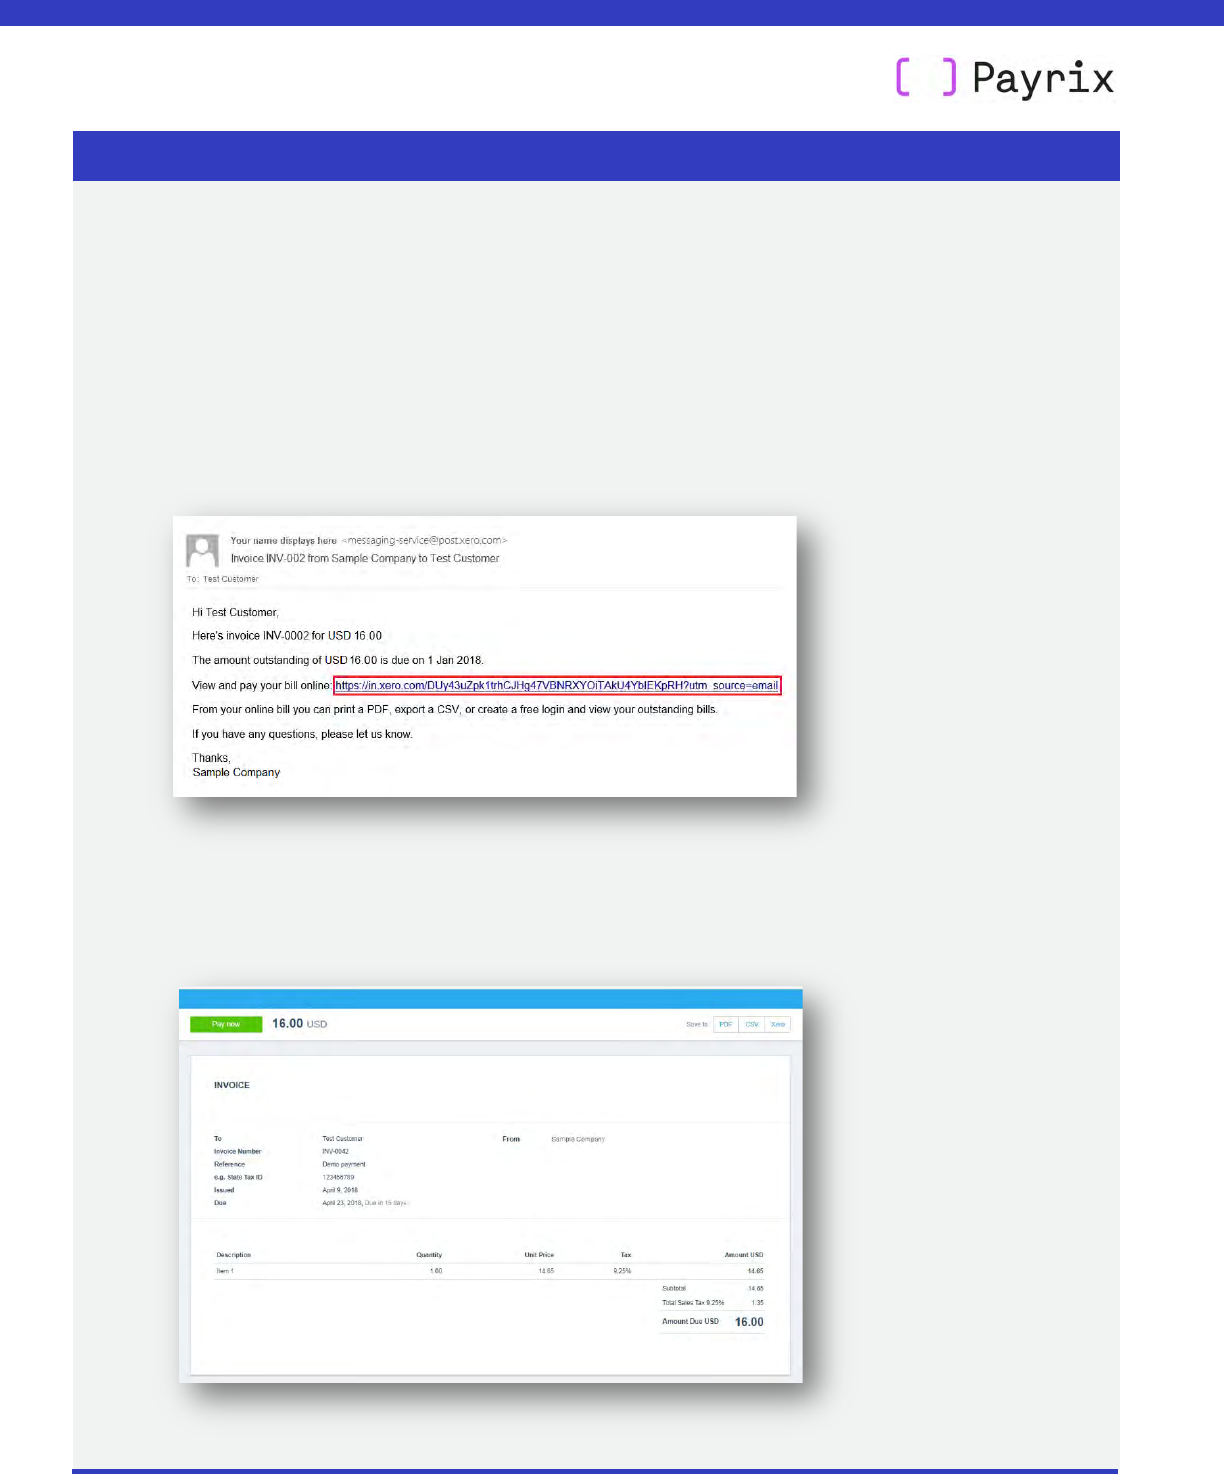
• Your customer will receive an email with a link
to view and pay the invoice online.
• This link will open an online version of the invoice in the customer’s web browser,
featuring the Pay N
ow button.
XERO USER GUIDE
PAYING AN INVOICE: CUSTOMER EXPERIENCE
Page 16 of 42
User guide: Payrix + Xero (USA)
07 October 2021
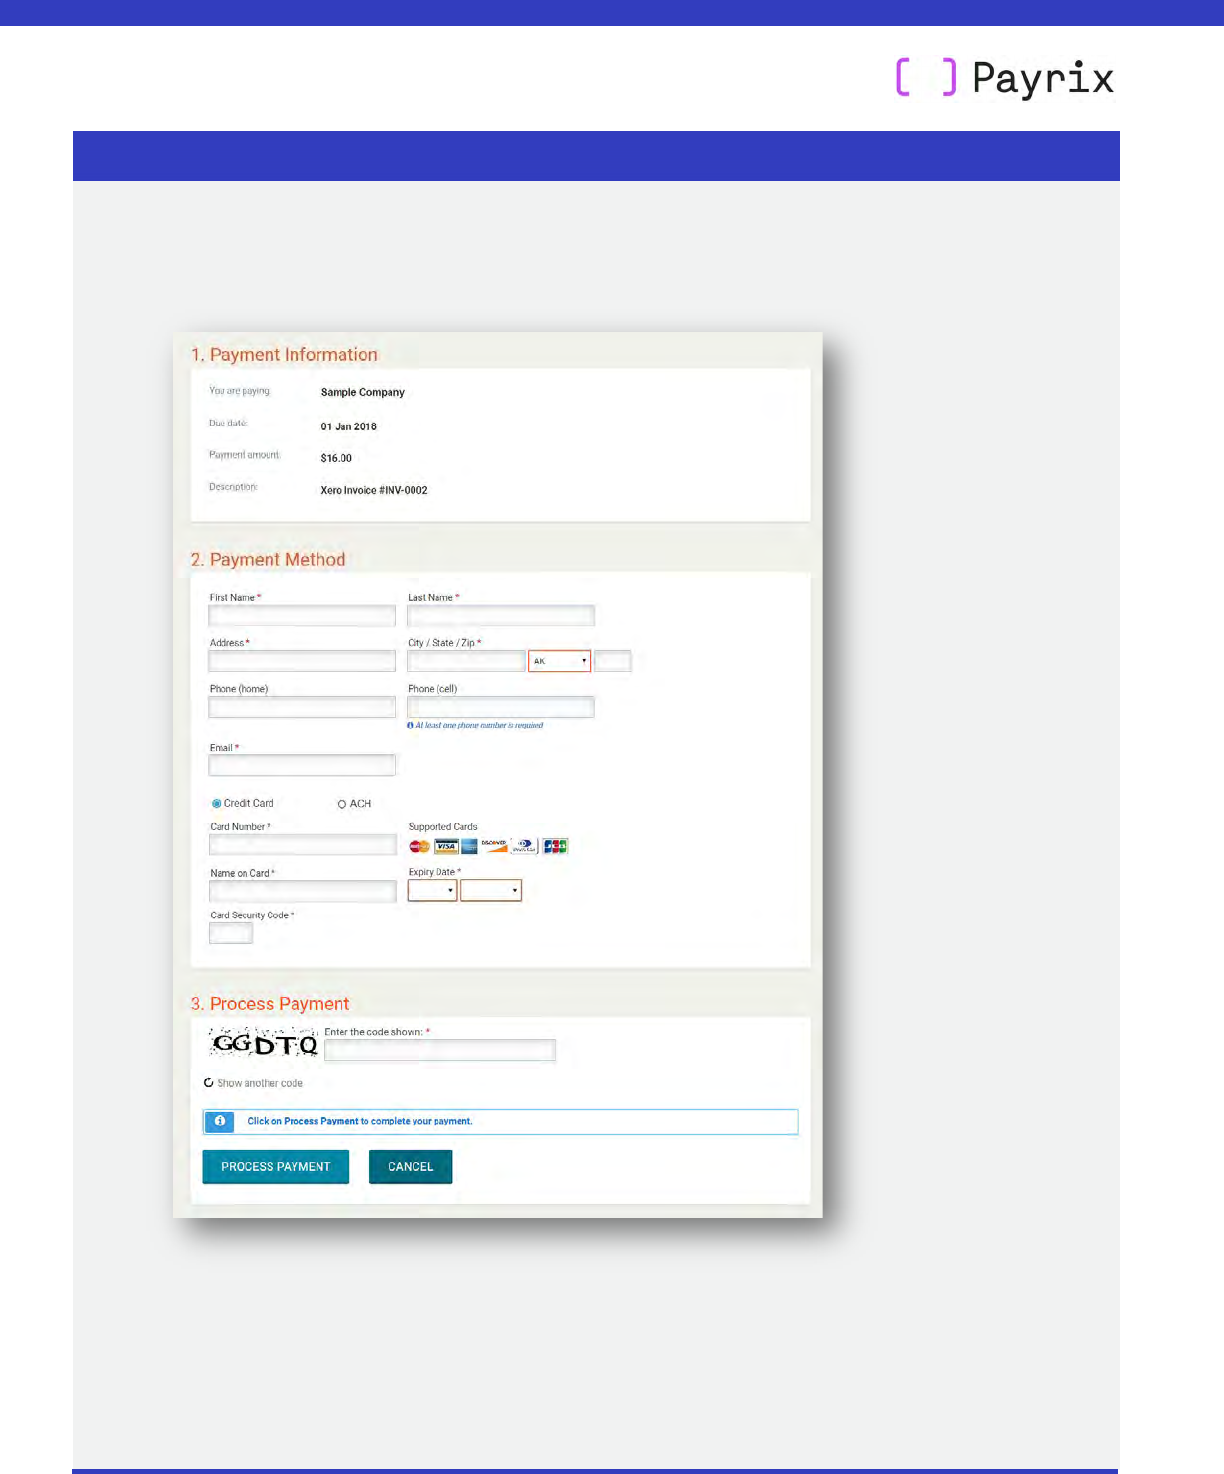
• Clicking the Pay Now button will direct the customer to your Payrix hosted
payment page, where a secure payment can be made.
• The customer is then asked to enter either their credit card or bank account details.
Whether or not a customer gets a choice of credit card or ACH depends on your
business’s configuration with Payrix.
XERO USER GUIDE
PAYING AN INVOICE: CUSTOMER EXPERIENCE
Page 17 of 42
User guide: Payrix + Xero (USA)
07 October 2021
• Customers are then asked to enter the charcaters displayed in the CAPTCHA security
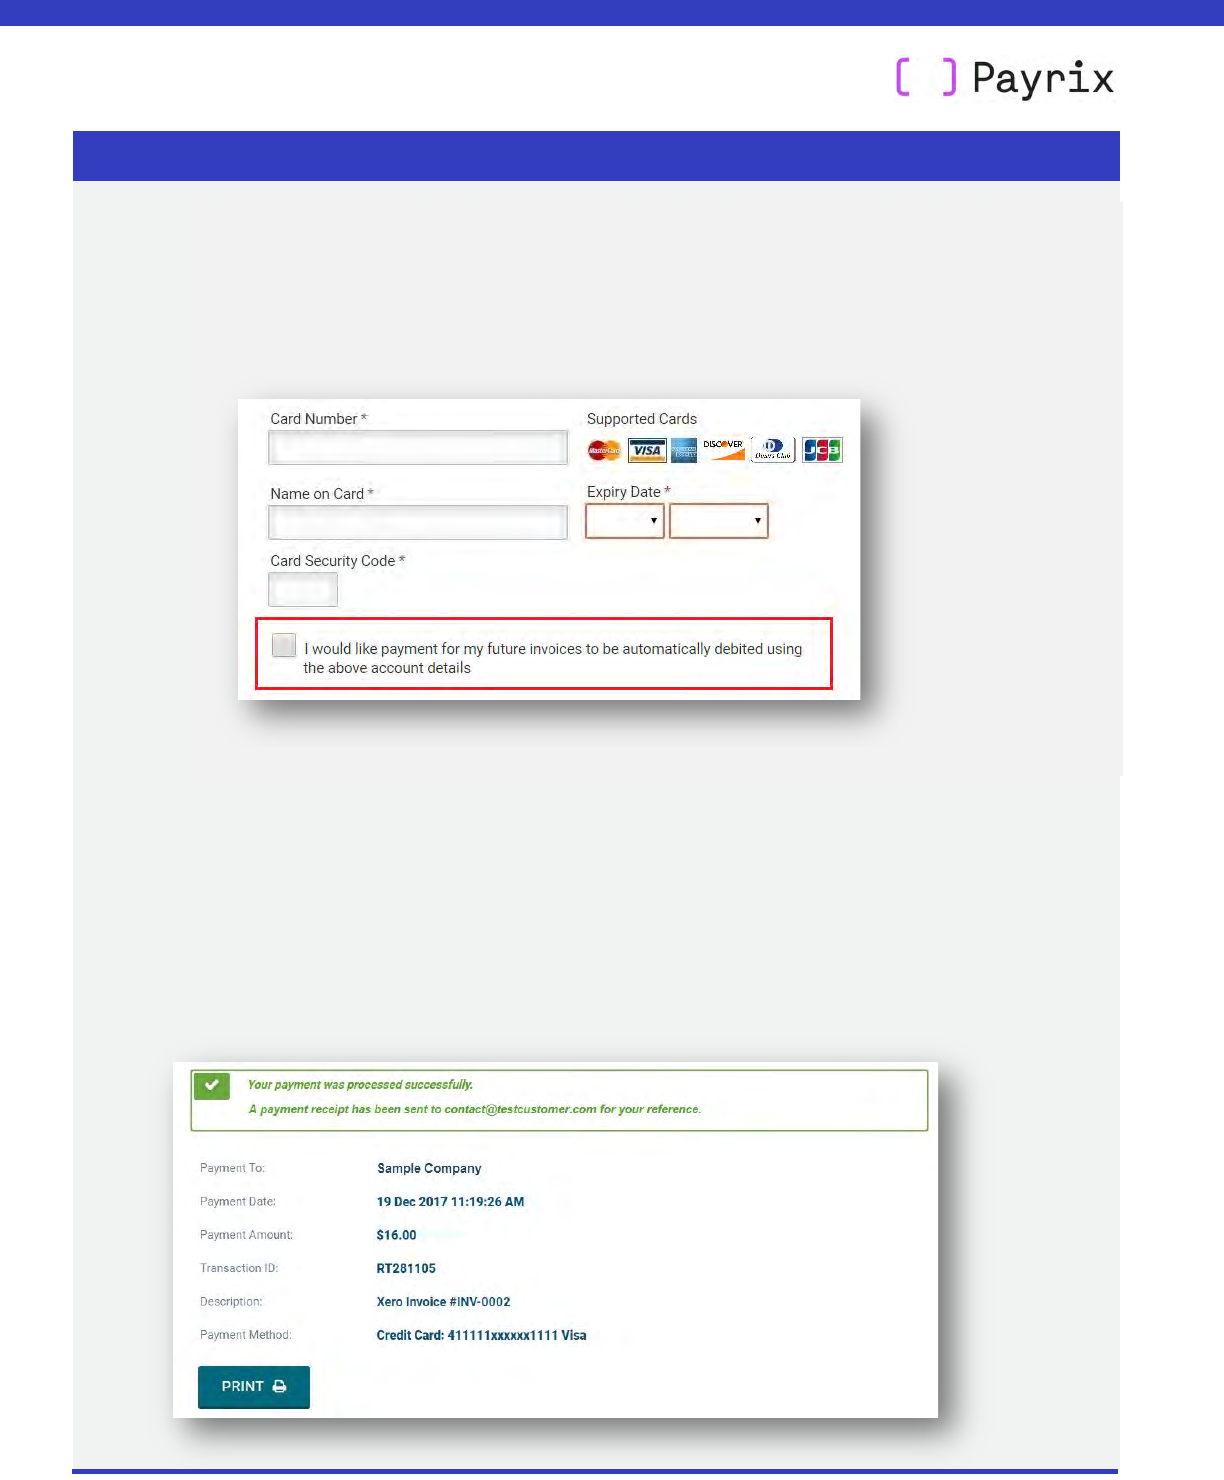
feature, and then click Process payment.
• A successful payment will take the customer to a receipt page detailing the successful
payment.
Additional step for customers paying a repeating invoice
When a customer is submitting payment for their first invoice they will be asked to
agree to their account details being used for future payments.
XERO USER GUIDE
PAYING AN INVOICE: CUSTOMER EXPERIENCE
Page 18 of 42
User guide: Payrix + Xero (USA)
07 October 2021
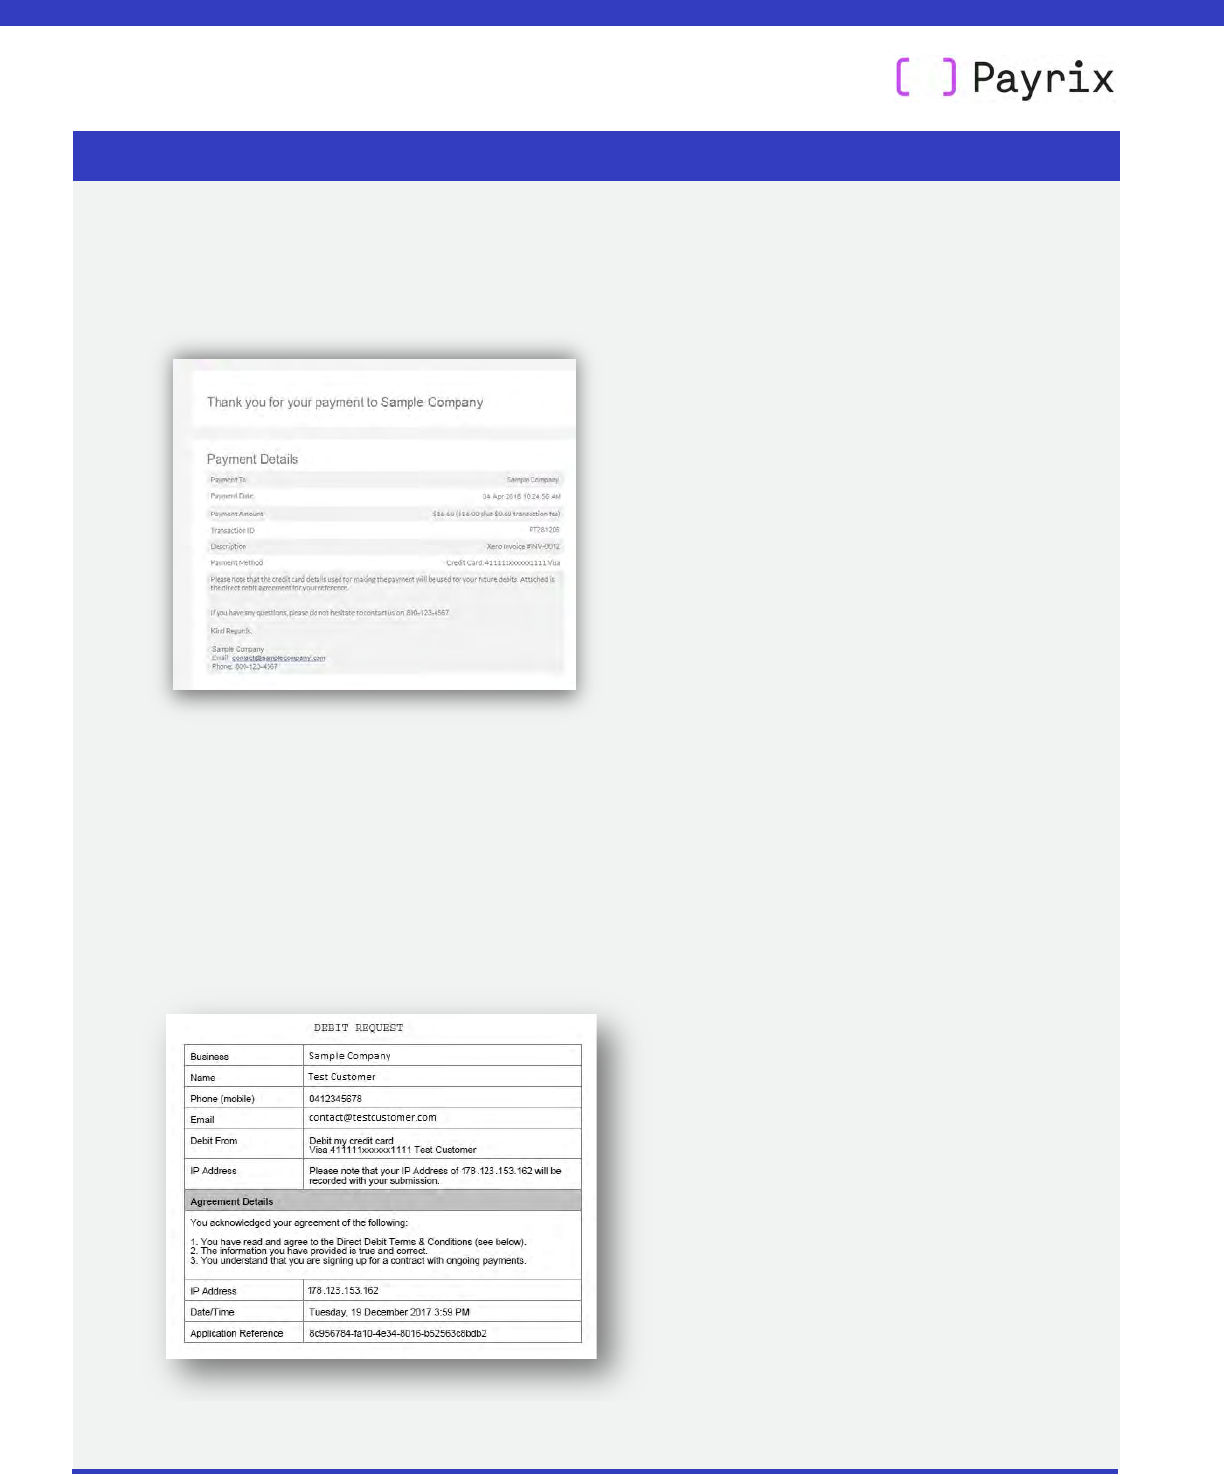
• Your customer will also receive an email receipt for the successful payment.
Additional information for customers paying a repeating invoice
Customers paying a repeating invoice will have a PDF document attatched to their
email confirming their
authorization for the automatic debit of future invoices.

XERO USER GUIDE
BANK RECONCILIATION
Page 19 of 42
User guide: Payrix + Xero (USA)
07 October 2021
4. Bank reconciliation
Bank reconciliation is the process of matching transactions in your bank account with your
transactions in Xero.
This section guides you through the processes we’ve automated for you, and the simple steps
for completing your bank reconciliation.
Xero + Payrix lets you reconcile your bank account with multiple invoice
payments in just one click. Reconciliation has never been quicker or easier.
Here’s a summary of how we do it:
1. We give you a head-start by automatically reconciling your payments and
invoices. This is all done for you, a big time-saver.
At the same time, we automatically apply this payment amount to your Clearing
Account in Xero as a debit.
2. As your payment processor, we deposit cleared funds into your settlement
account – this is the same bank account you use in Xero, kept up-to-date with
bank feeds and statement imports.
Our funds deposit will include all invoice payments during your settlement period.
This gives you just one bank statement line to reconcile, instead of multiple lines
for separate payments provided by other Xero add-ons.
3. To reconcile a bank statement line displaying an Payrix deposit, you simply apply
our recommended Bank Rule – this automatically credits your Clearing Account in
Xero, which returns it to zero balance, and reconciliation is complete.
And that’s it – just one click to reconcile your bank account.
Unlike other payment add-ons, there’s no need to scroll down the page
matching multiple bank statement lines and payments. Using Xero + Payrix lets
you can reconcile with just one click.
XERO USER GUIDE
BANK RECONCILIATION
Page 20 of 42
User guide: Payrix + Xero (USA)
07 October 2021
Below we describe the two main parts of the bank reconciliation process:
• Auto-reconciliation of payments and invoices – this is all done automatically for you,
there are no tasks
for you in this part unless you are required to manually make a
correction.
• Completing your bank reconciliation – we show you how to reconcile multiple
payments with your bank account in just one click.
4.1. Auto-reconciliation of payments and invoices
Xero + Payrix automatically reconciles your customer payments and invoices. This cuts out
a big task in the bank reconciliation process.
You can follow the steps below to view the updates that have been automated for you. Or
you can skip to 4.2 where we explain how to complete your bank reconciliation.
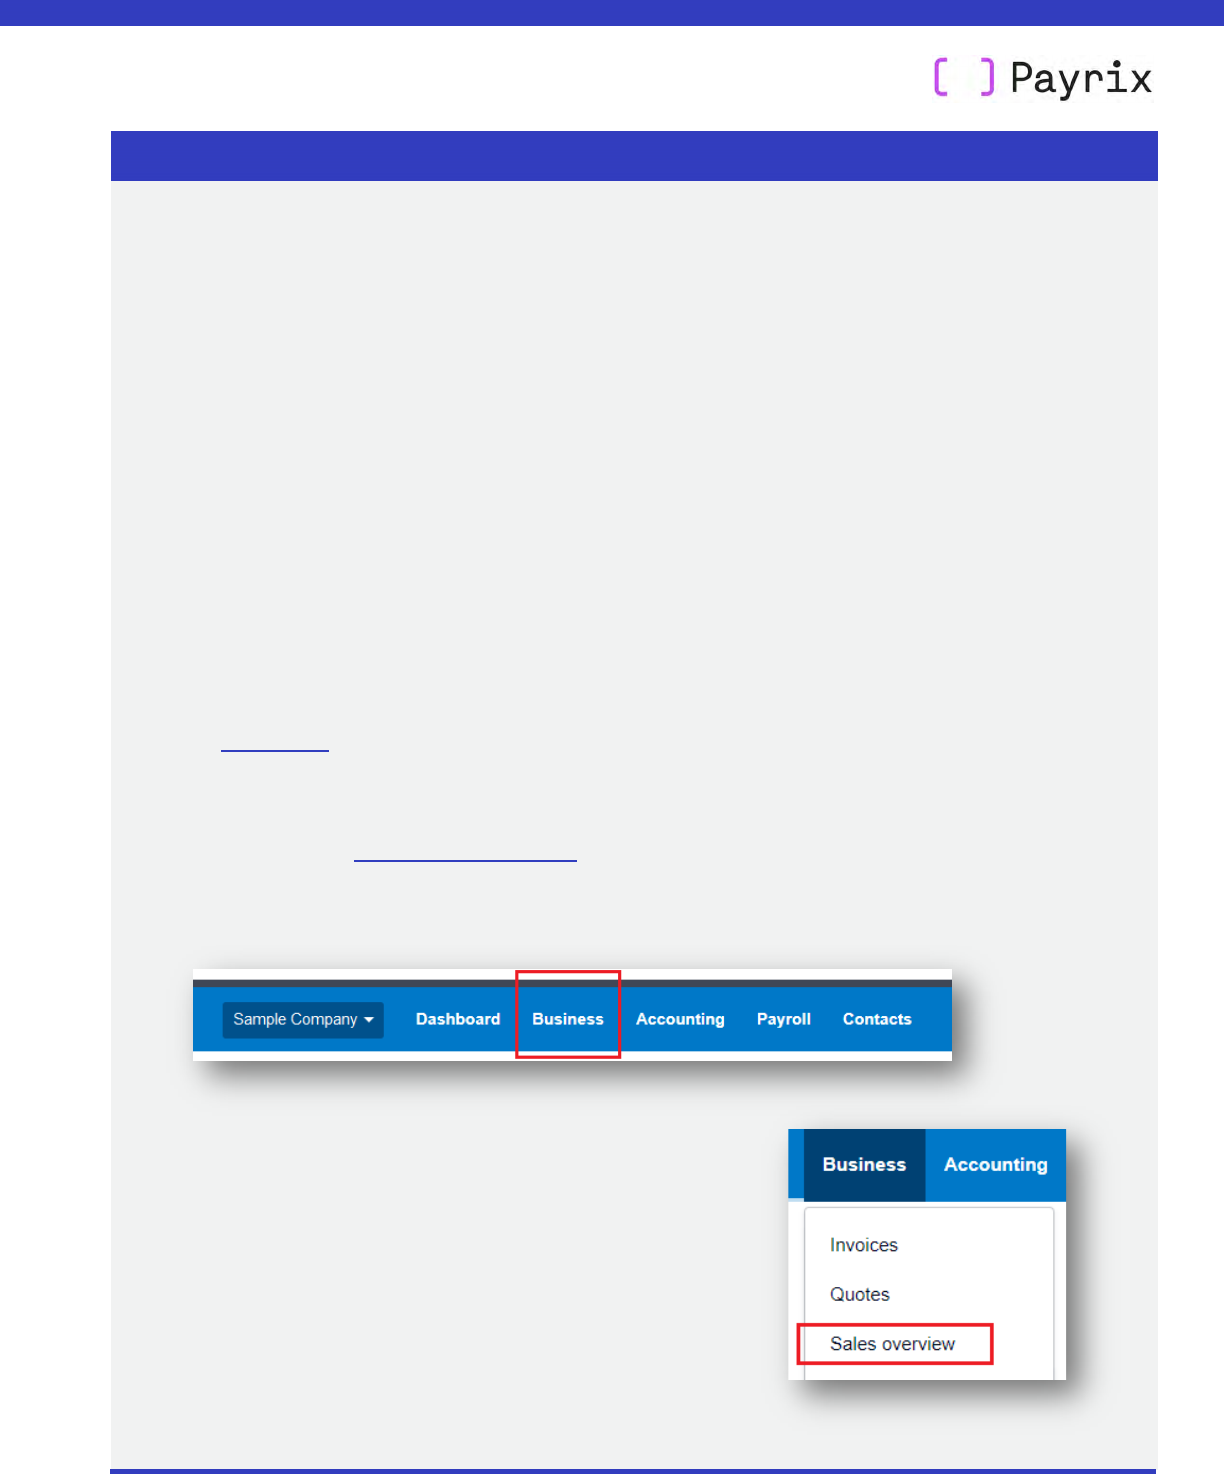
• Login to Xero: https://login.xero.com
•
On the navigation bar,
click Business.
•
On the drop-down menu, click on Sales Overview
XERO USER GUIDE
BANK RECONCILIATION
Page 21 of 42
User guide: Payrix + Xero (USA)
07 October 2021
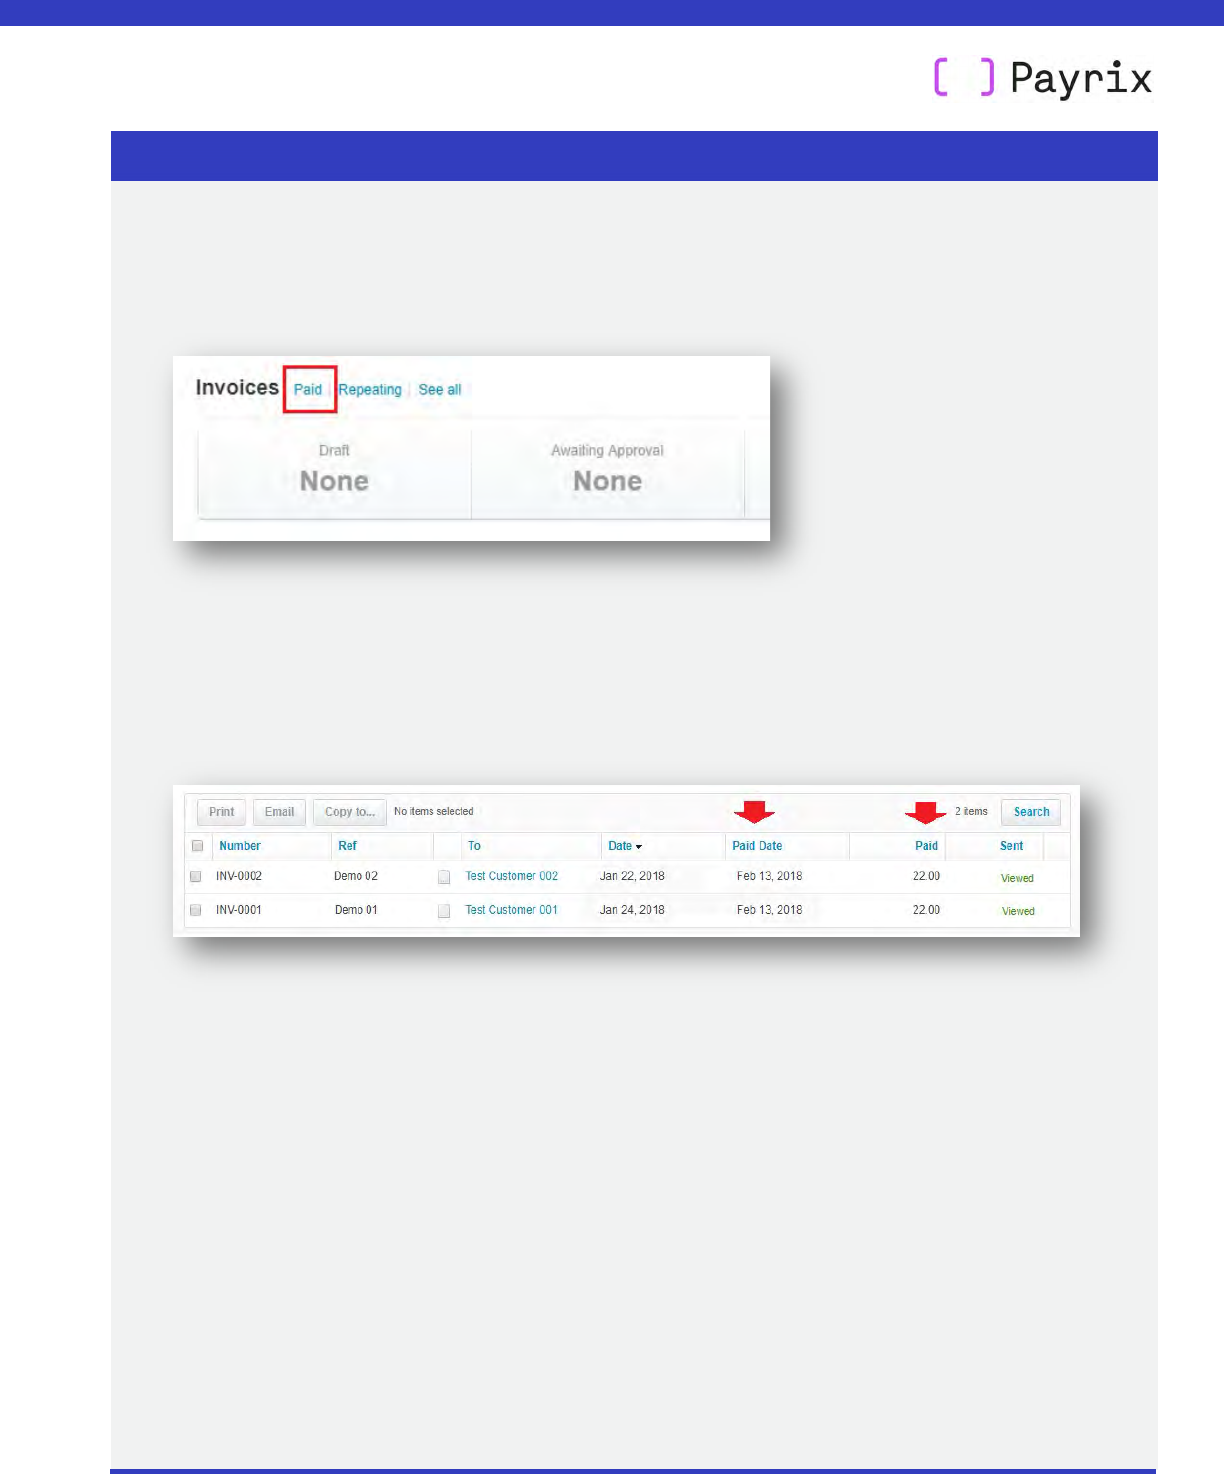
• The sales dashboard will be displayed showing your invoices and payments
• Next to the Invoices sub-heading, click Paid.
• Your list of paid invoices will be displayed.
• You will see that paid invoices have been updated
showing the Paid Date, and the
Paid amount.
• The content on each paid invoice will also be updated to reflect the details of the
payment.
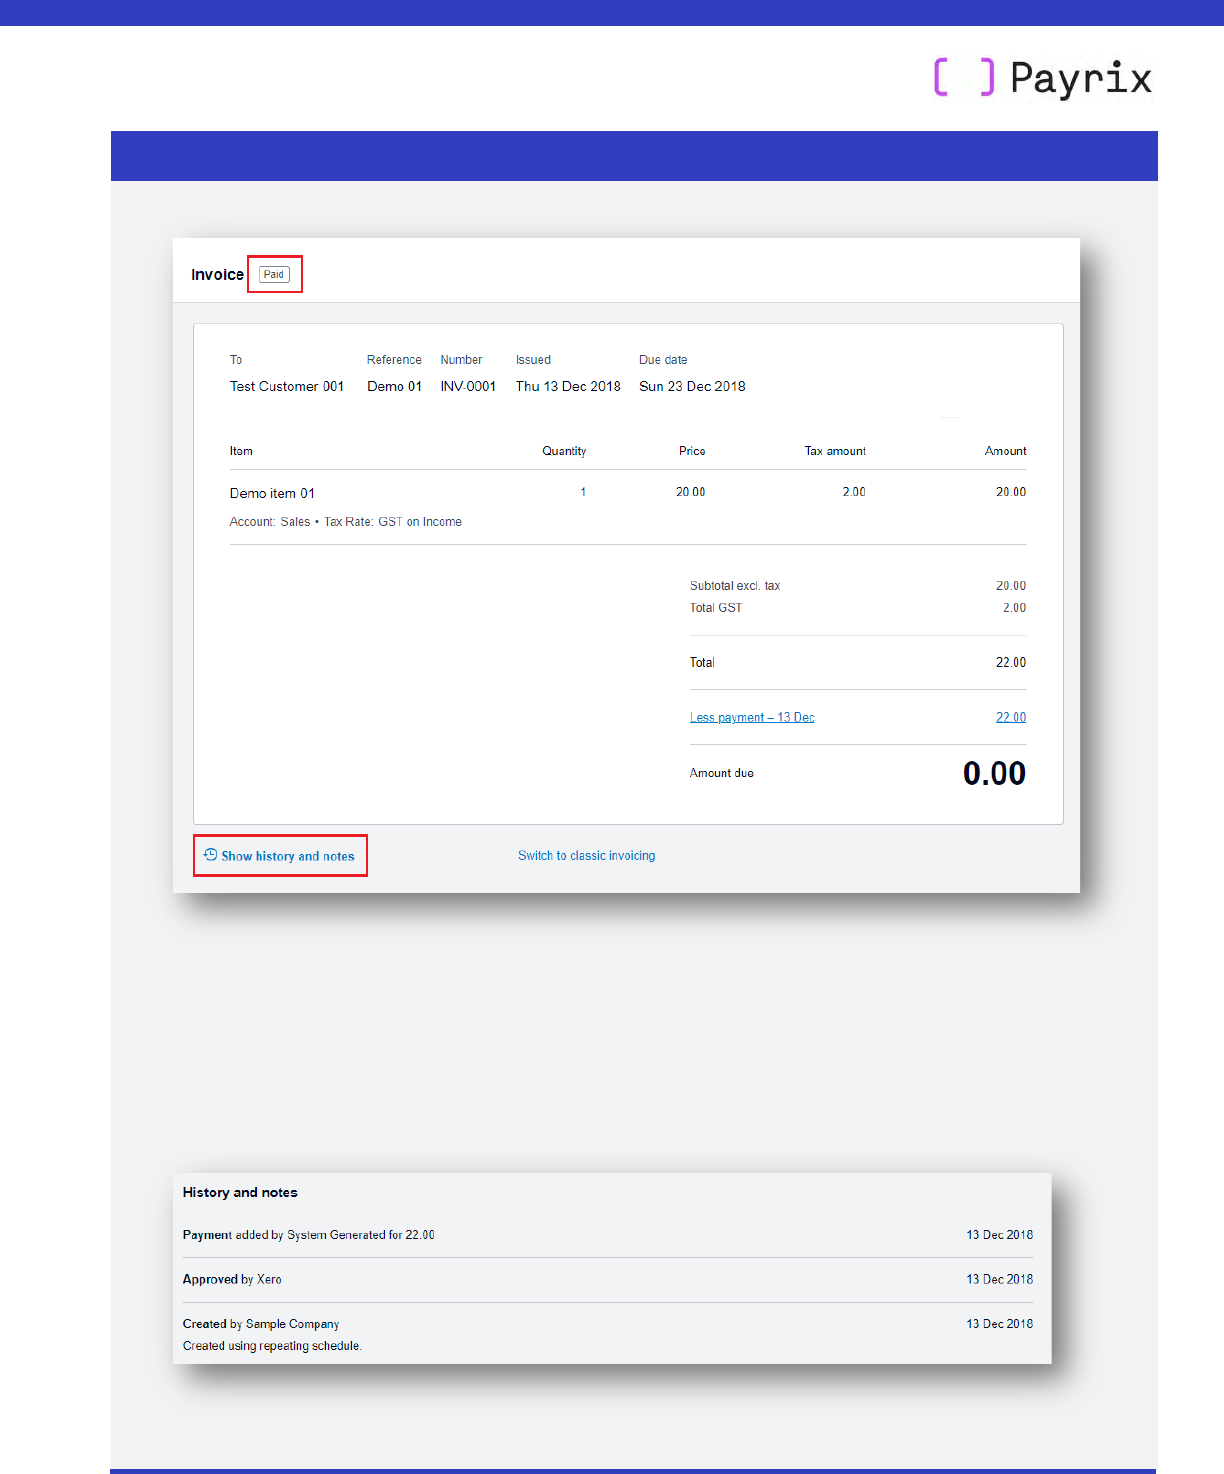
• To open an
invoice click anywhere on the invoice row – further details of the invoice will
be displayed.
o At the top of the invoice the Paid status will be displayed.
o On the bottom of the invoice you can click on Show history and notes to display
these details.
XERO USER GUIDE
BANK RECONCILIATION
Page 22 of 42
User guide: Payrix + Xero (USA)
07 October 2021
•
If you click Show history and notes, further details about the invoice will be
displayed – such as date c reated, branding theme used, approval date, and
payment date.
XERO USER GUIDE
BANK RECONCILIATION
Page 23 of 42
User guide: Payrix + Xero (USA)
07 October 2021
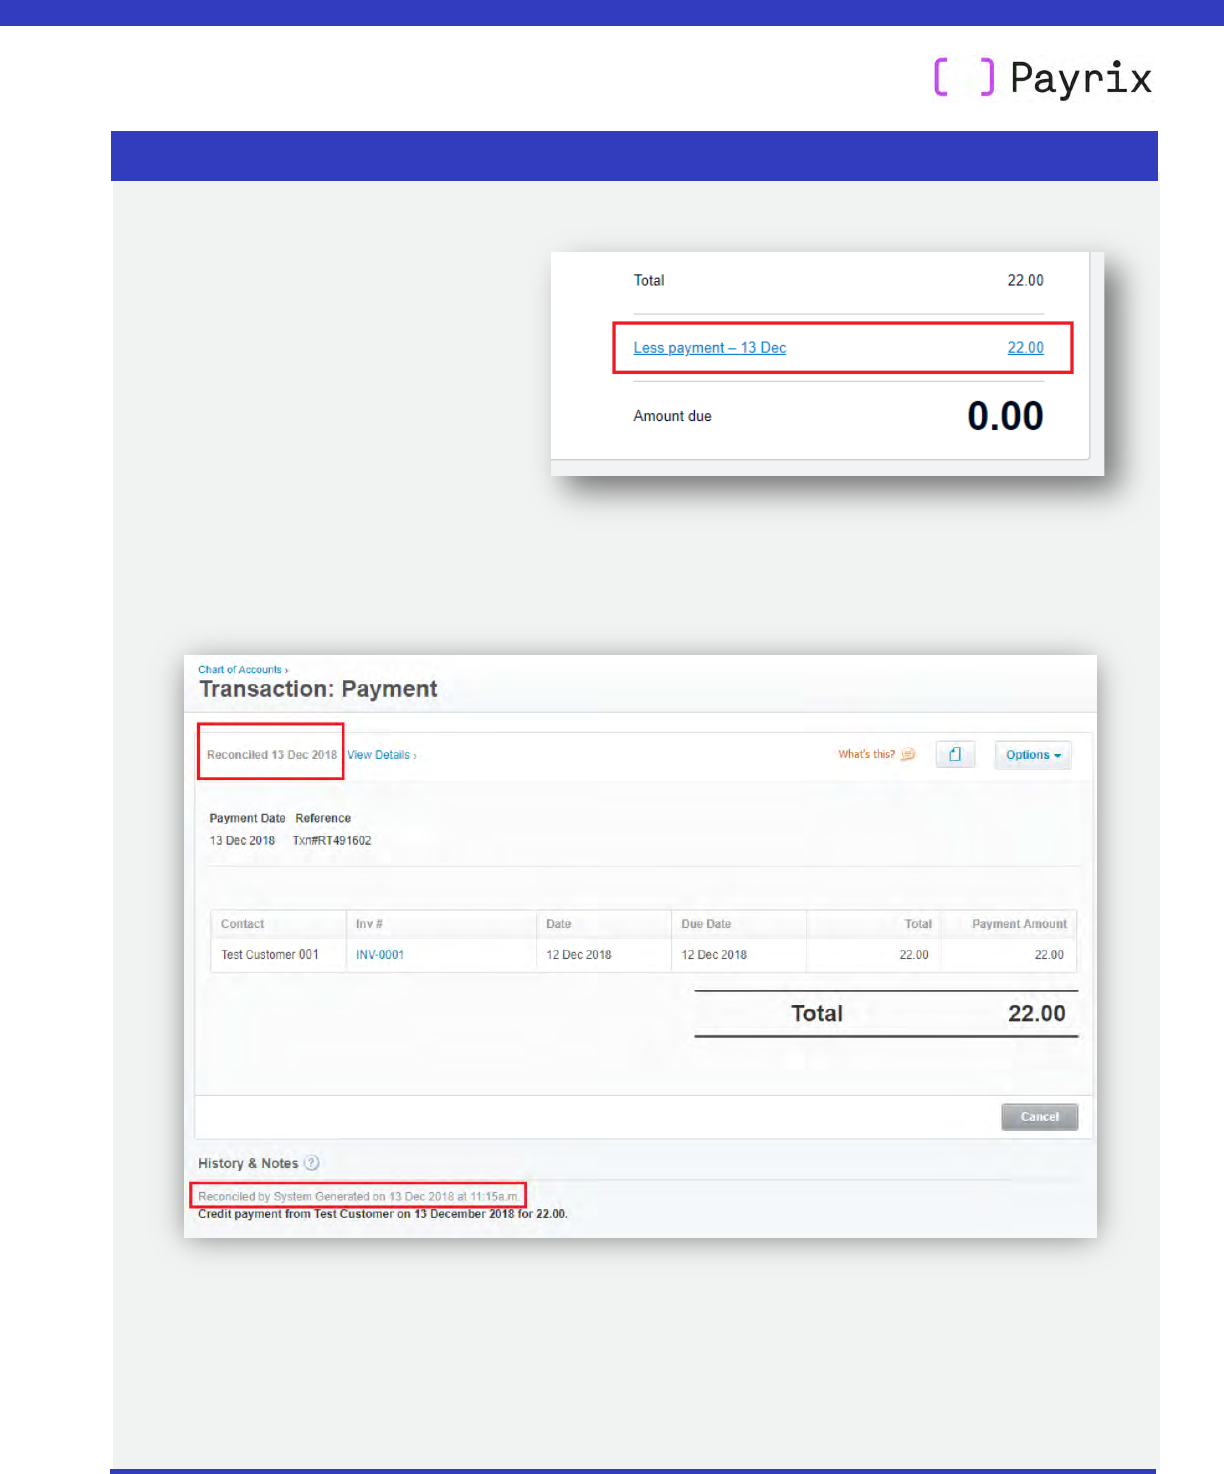
• To view the reconciled
status of the payment, click
on Less Payment on the
right side of the invoice.
• Details of this reconciliation will be displayed.
• At the same time, Payrix automatically applies this payment amount to your
Clearing Account in Xero as a debit.
• The next part describes how to balance your Clearing Account and complete the
bank reconciliation process.
XERO USER GUIDE
BANK RECONCILIATION
Page 24 of 42
User guide: Payrix + Xero (USA)
07 October 2021
4.2. Completing your bank reconciliation
This part explains how to reconcile your bank account in just one click.
Follow these steps to complete your bank reconciliation:
• Login to Xero: https://login.xero.com
• Your bank account in Xero will have been updated (as above) by either your bank feed or
bank statement import.
• If Xero finds any new transactions in your bank account that haven’t been reconciled yet,
it will alert you – a notification button will appear in two places:
Before reconciling your bank account, Xero must be updated with recent
transactions in your bank account. This can be done by two methods:
•
Bank feeds – some banks automatically update Xero with transactions. For a
list of banks offering this visit Xero Help Centre: direct feeds
•
Bank statement import – a manual option if your bank doesn’t offer bank
feeds. For more information visit Xero Help Centre: bank statements
XERO USER GUIDE
BANK RECONCILIATION
Page 25 of 42
User guide: Payrix + Xero (USA)
07 October 2021
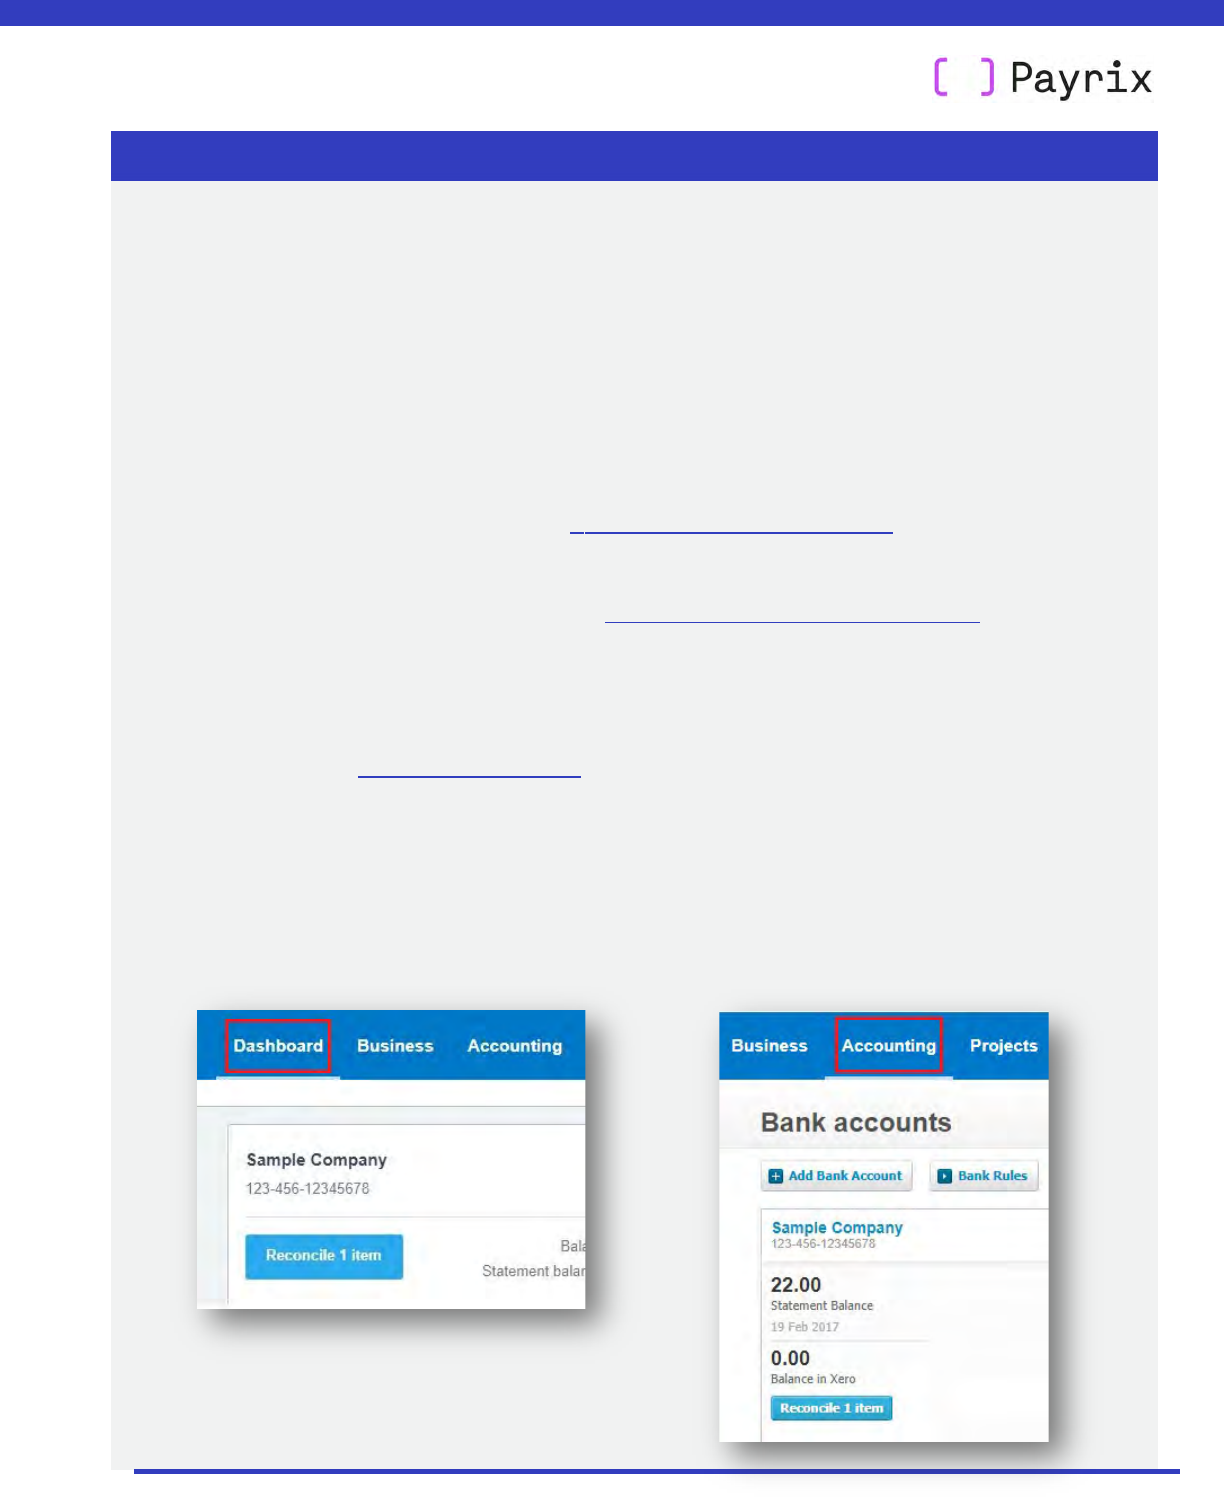
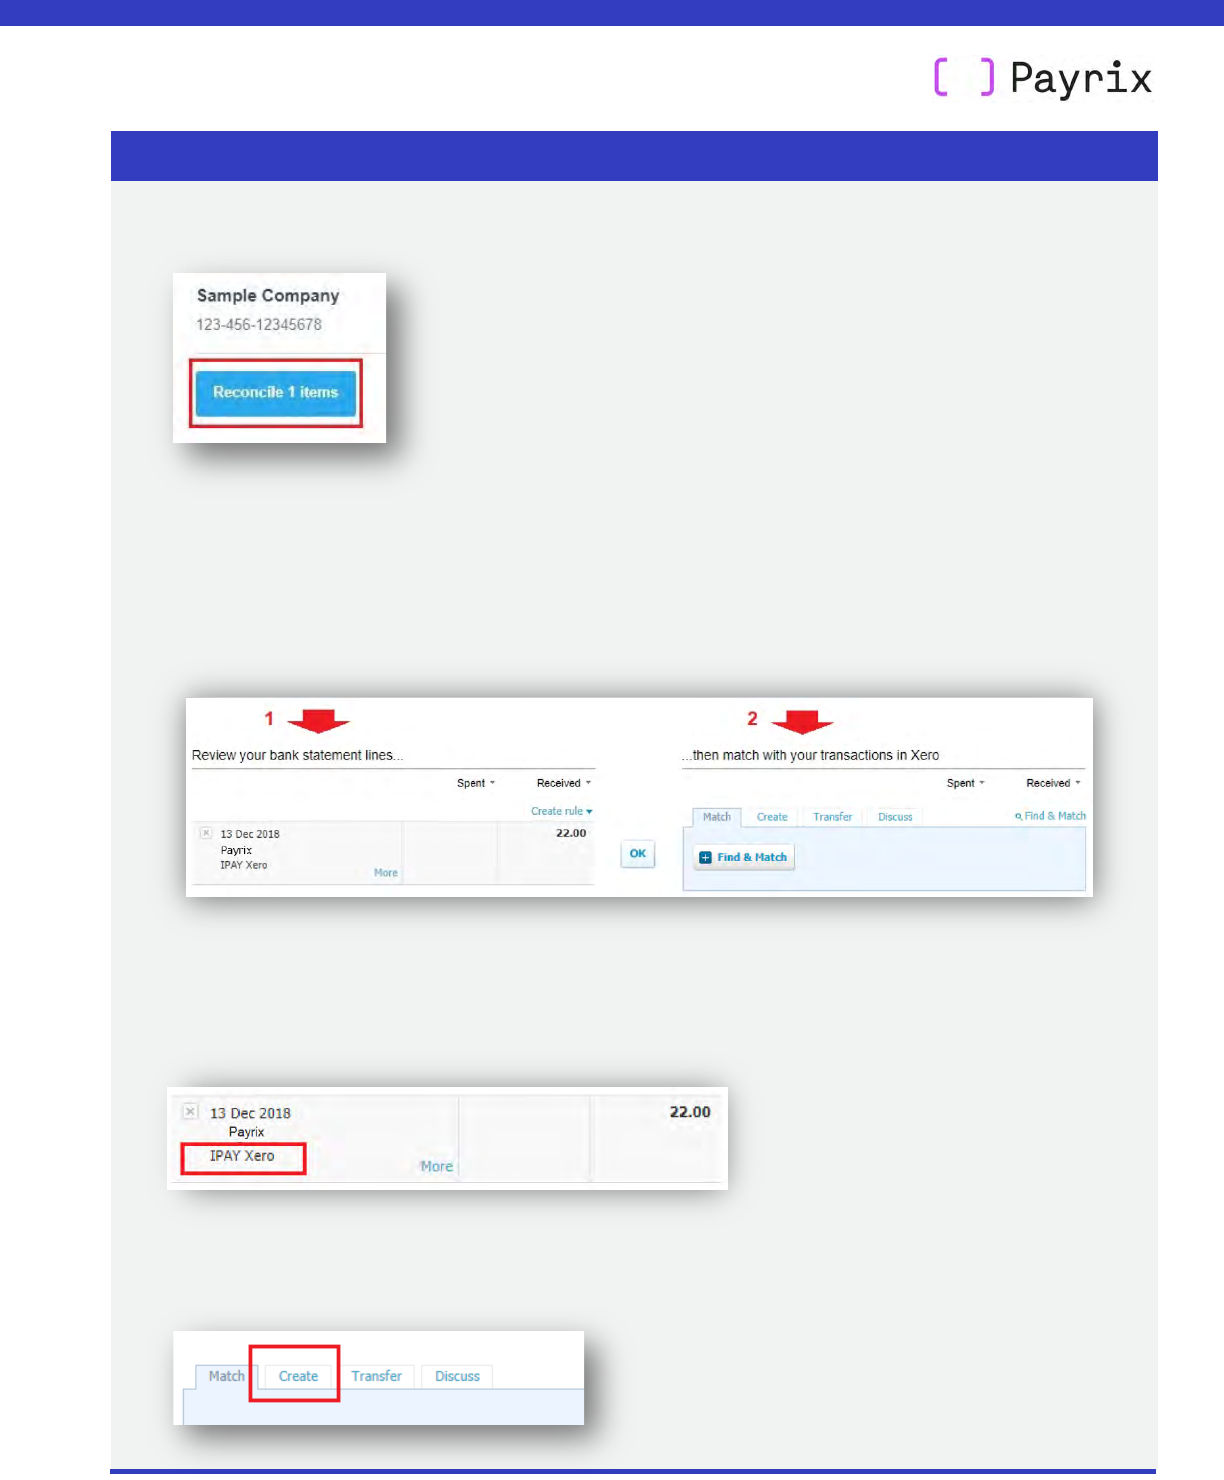
• For either location, click on the Reconcile [number] items button.
• A table will be displayed with two columns:
o Transactions from your bank account on the left
o Transactions in Xero on the right
• Cleared funds that Payrix deposits into your bank account (for invoice payments) will
include the reference IPAY Xero – this is what you’ll be reconciling in the next steps.
• In the right column, click the second option Create.
XERO USER GUIDE
BANK RECONCILIATION
Page 26 of 42
User guide: Payrix + Xero (USA)
07 October 2021
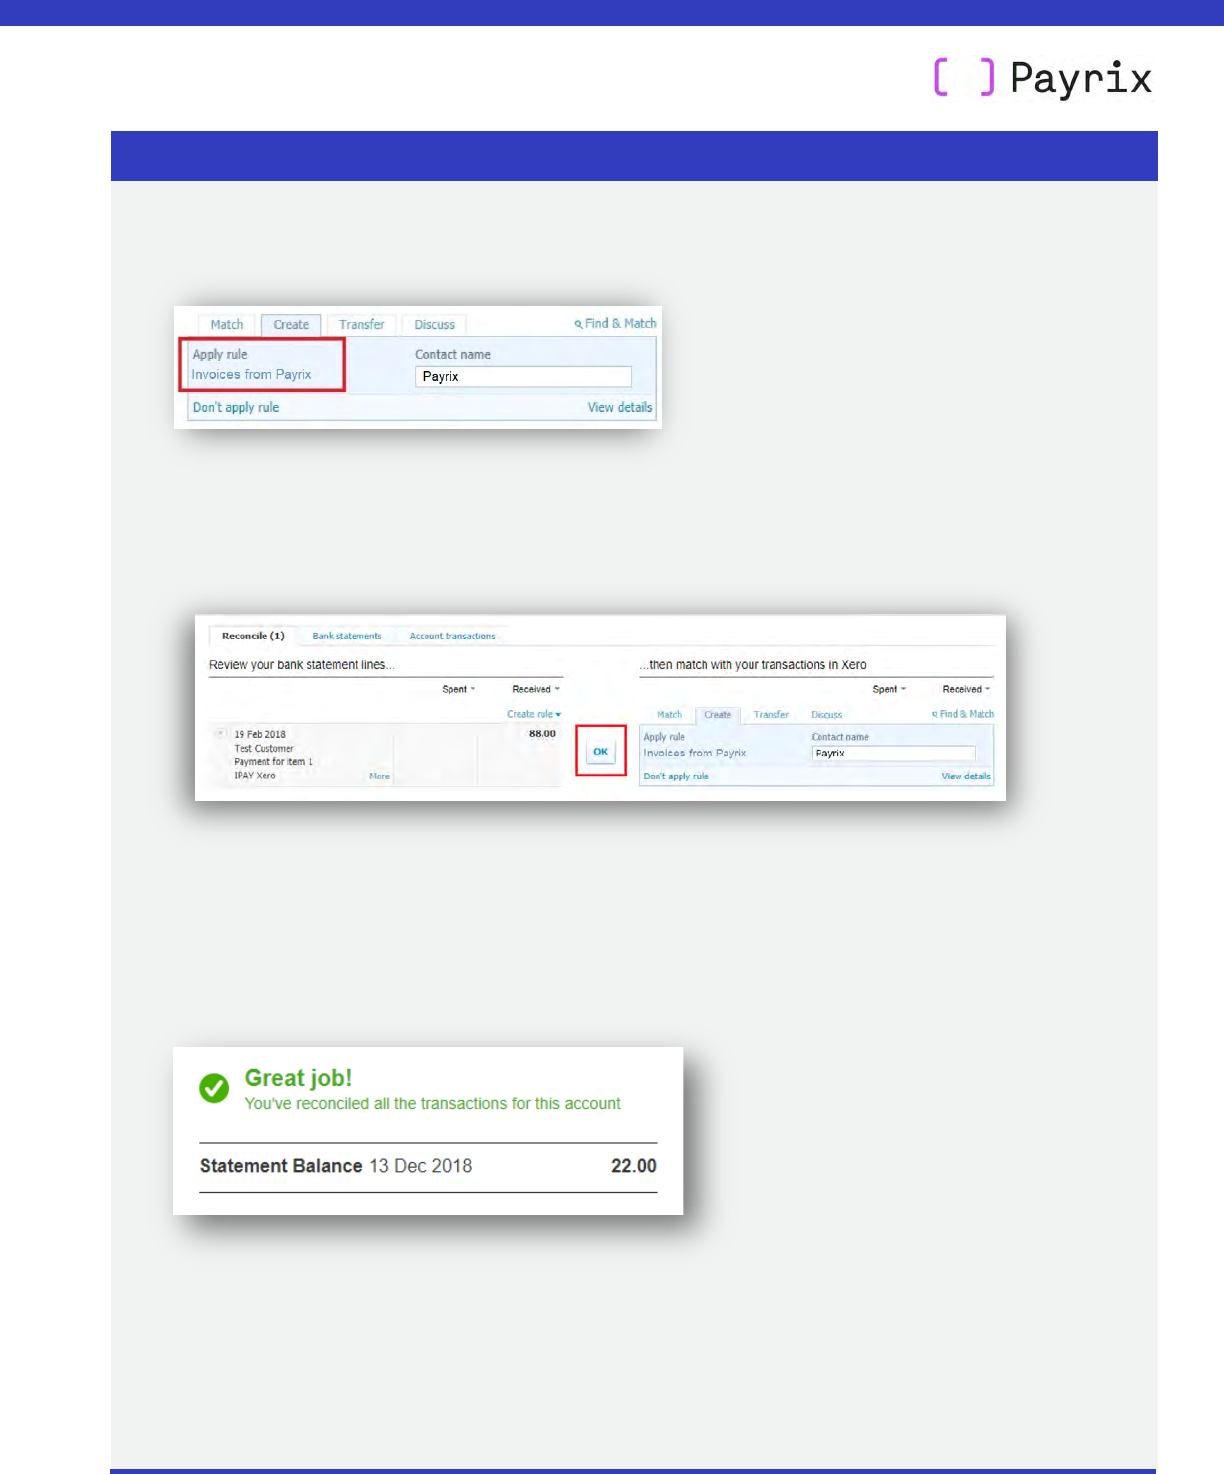
• Your Bank Rule (called Invoices from Payrix) will be displayed.
• To confirm that you want to match this bank account transaction with your Bank Rule,
click OK.
• The Bank Rule applies a credit to your Clearing Account, and the balance will return to
zero. You have now reconciled all transactions in your bank account.
• A final confirmation message will be displayed – reconciliation is now complete.
XERO USER GUIDE
OVERPAYMENTS
Page 27 of 42
User guide: Payrix + Xero (USA)
07 October 2021
5. Overpayments
• An overpayment is when a customer’s payment is more than the invoice total.
• Two common reasons for overpayment are:
o The customer paid more than was required.
o The invoice was updated by you (the biller) to paid or void after a payment had
already been scheduled.
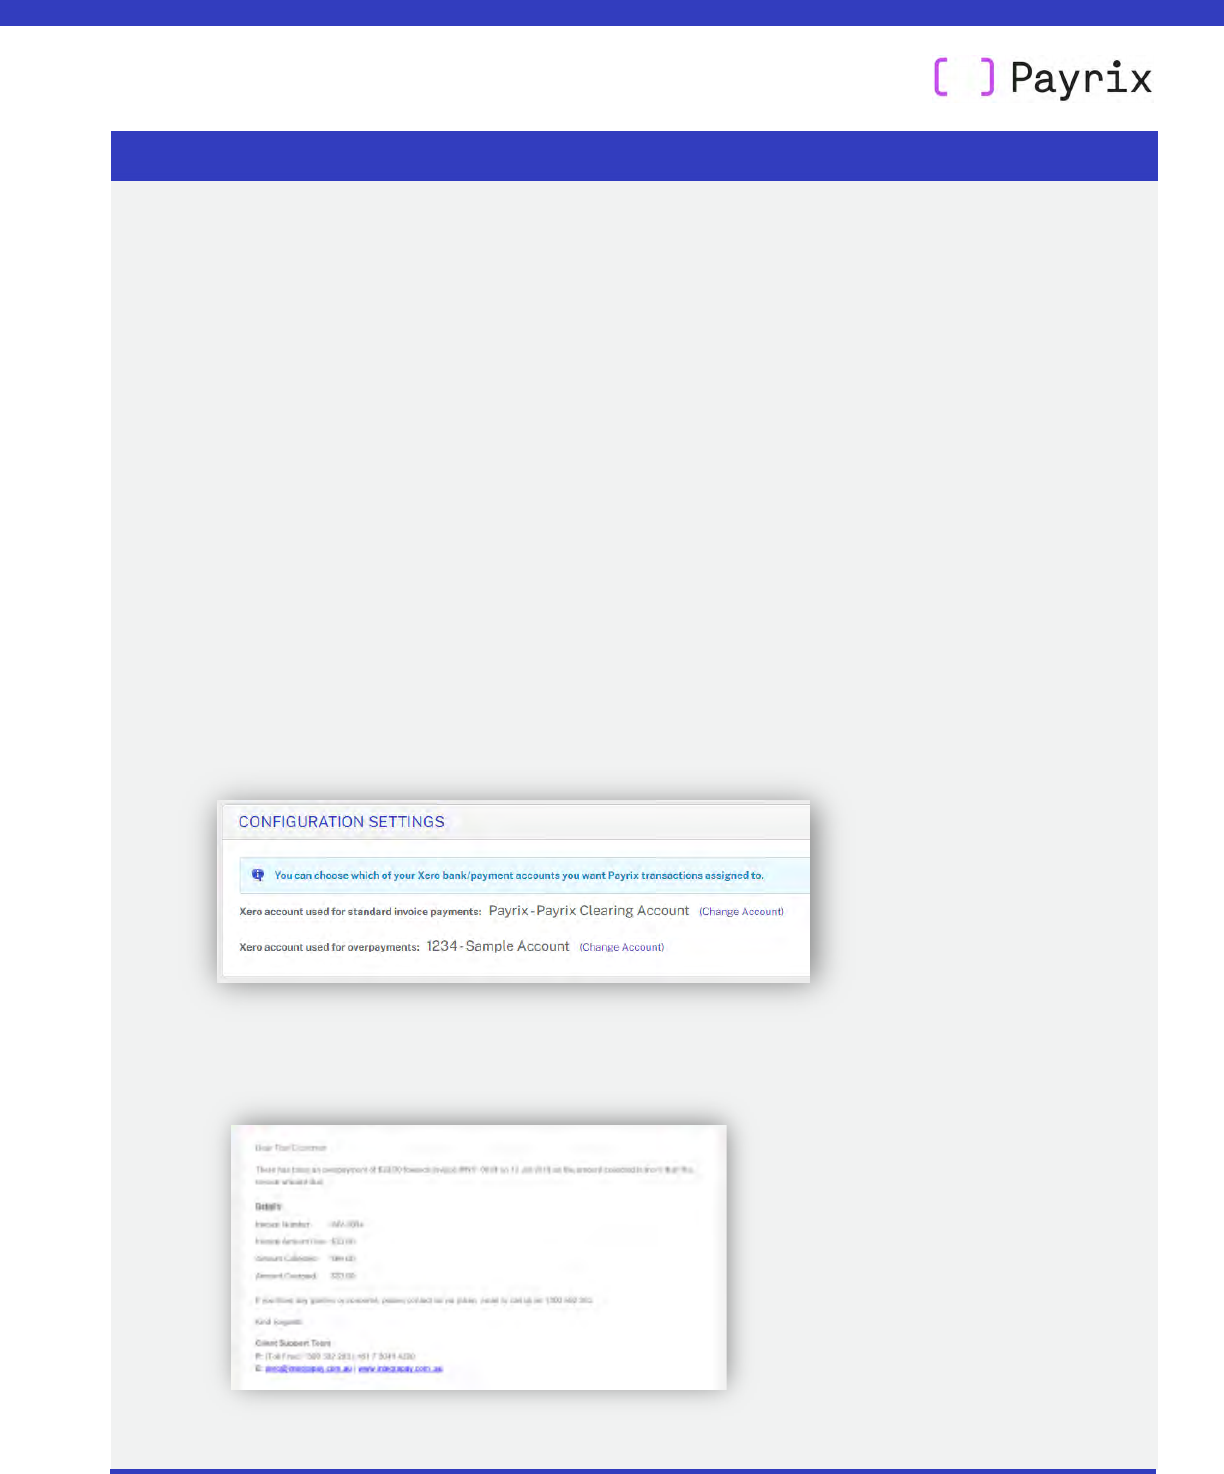
• Payrix will automatically update Xero with any overpayments.
An overpayment amount is applied to your bank account within Xero – you selected this
account during your initial setup of Xero + Payrix.
• This account is listed in Payment Portal via Xero > Config Settings.
• Details of any overpayments paid into your account will be emailed to you.
XERO USER GUIDE
UPDATING CUSTOMER PAYMENT DETAILS
Page 28 of 42
User guide: Payrix + Xero (USA)
07 October 2021
6. Updating customer payment details
Your customers can request a change to their card or bank account details.
For such requests, you will need to send the customer an eAmendment form. They will need
to complete this form to authorize the changes.
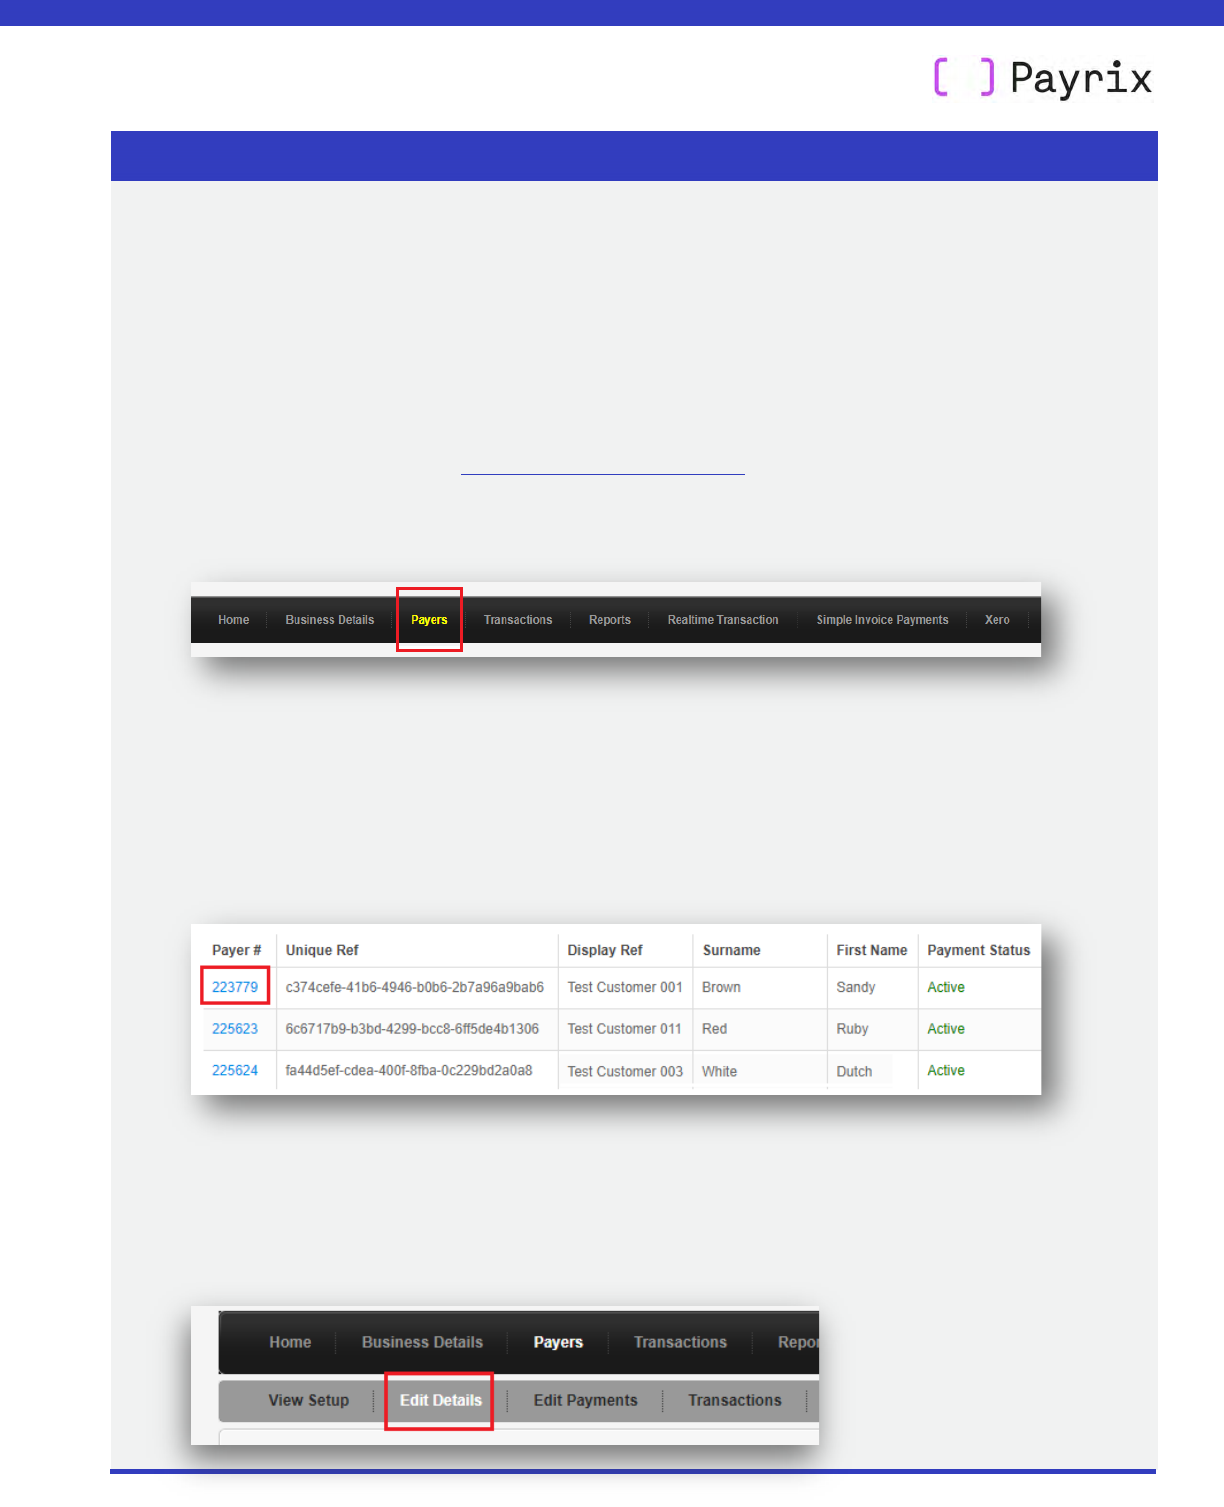
• Login to Payment Portal: https://Portal.Payrix.com.au
• On the main menu, click Payers.
• A list of all your customers will be displayed.
You may also want to use the Payer Search fields to find your customer.
• To select a customer, click on the ID link in the Payer # column.
• Your customer’s details will be displayed on a Payer Setup page.
• Click on Edit Details.
XERO USER GUIDE
UPDATING CUSTOMER PAYMENT DETAILS
Page 29 of 42
User guide: Payrix + Xero (USA)
07 October 2021
• Near the bottom of the page, click Send eAmendment Email.
• Your customer will receive an email with a link to a secure online form.
XERO USER GUIDE
UPDATING CUSTOMER PAYMENT DETAILS
Page 30 of 42
User guide: Payrix + Xero (USA)
07 October 2021
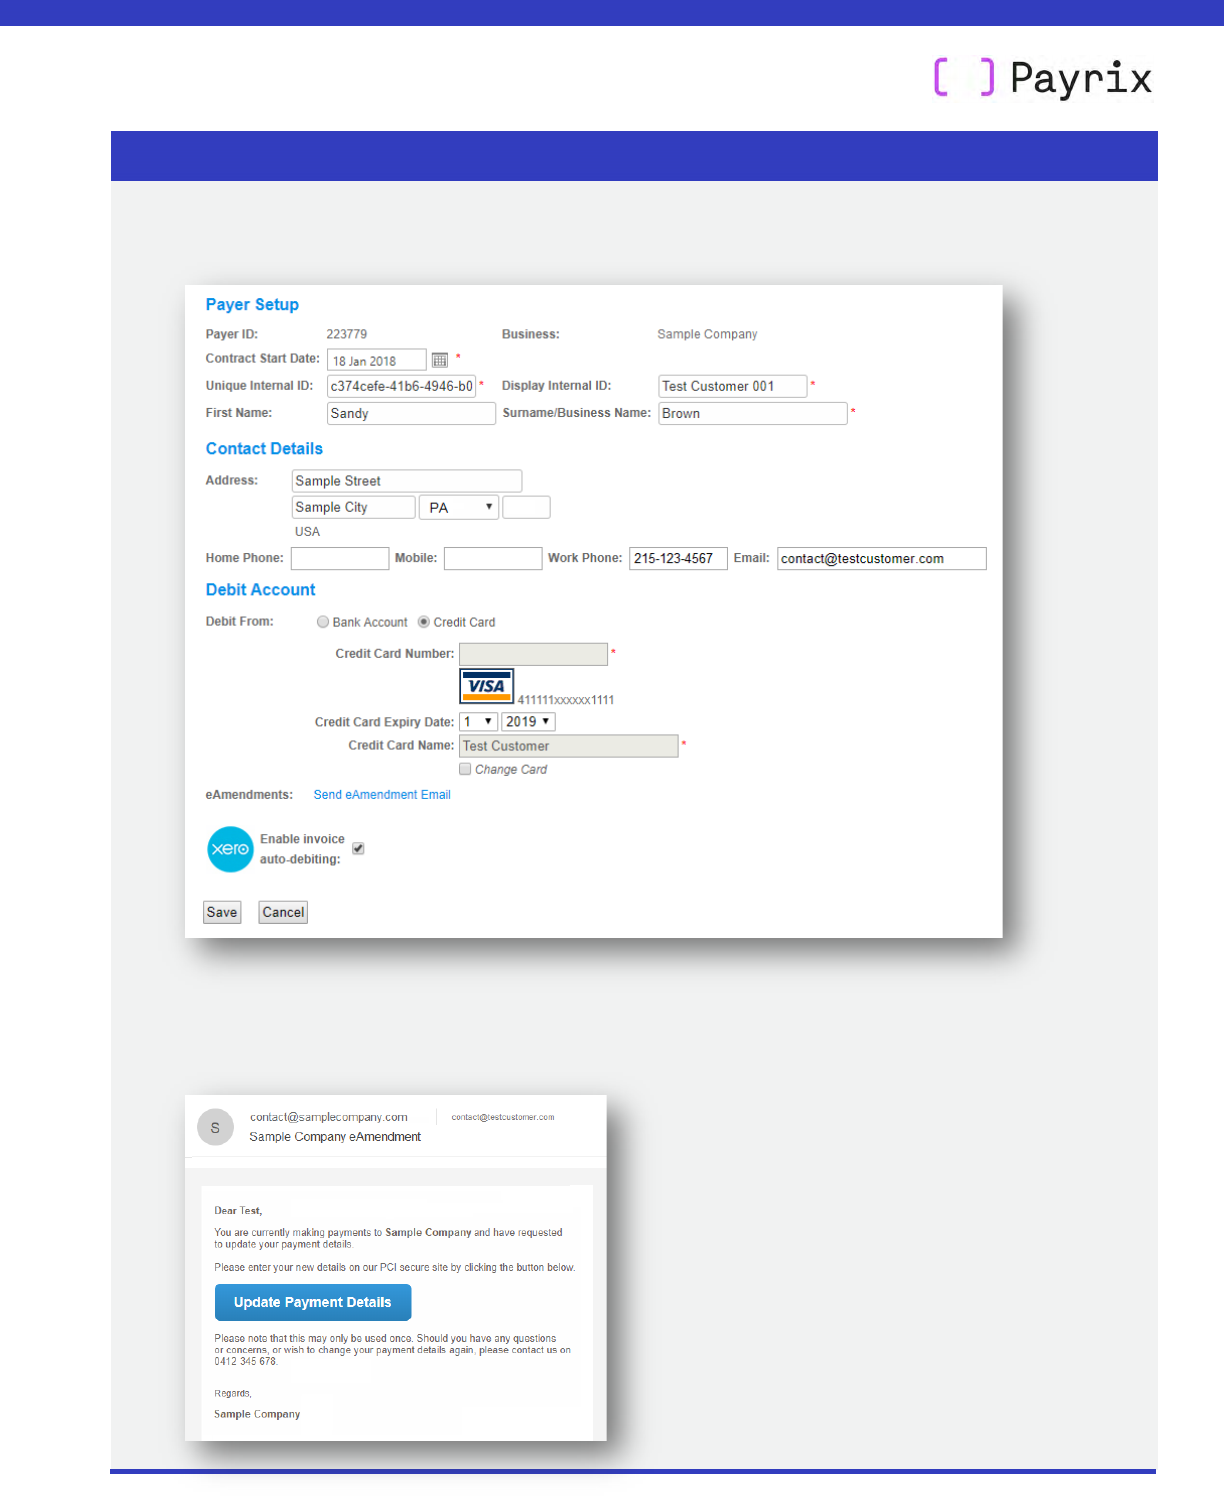
• The customer can then update their details and authorize ongoing payments.
• When finished, the customer will click Continue and Confirm.
• A confirmation page will then be displayed with their updated details – the customer
then clicks on Complete Authorization.
Page 31 of 42
User guide: Payrix + Xero (USA)
07 October 2021
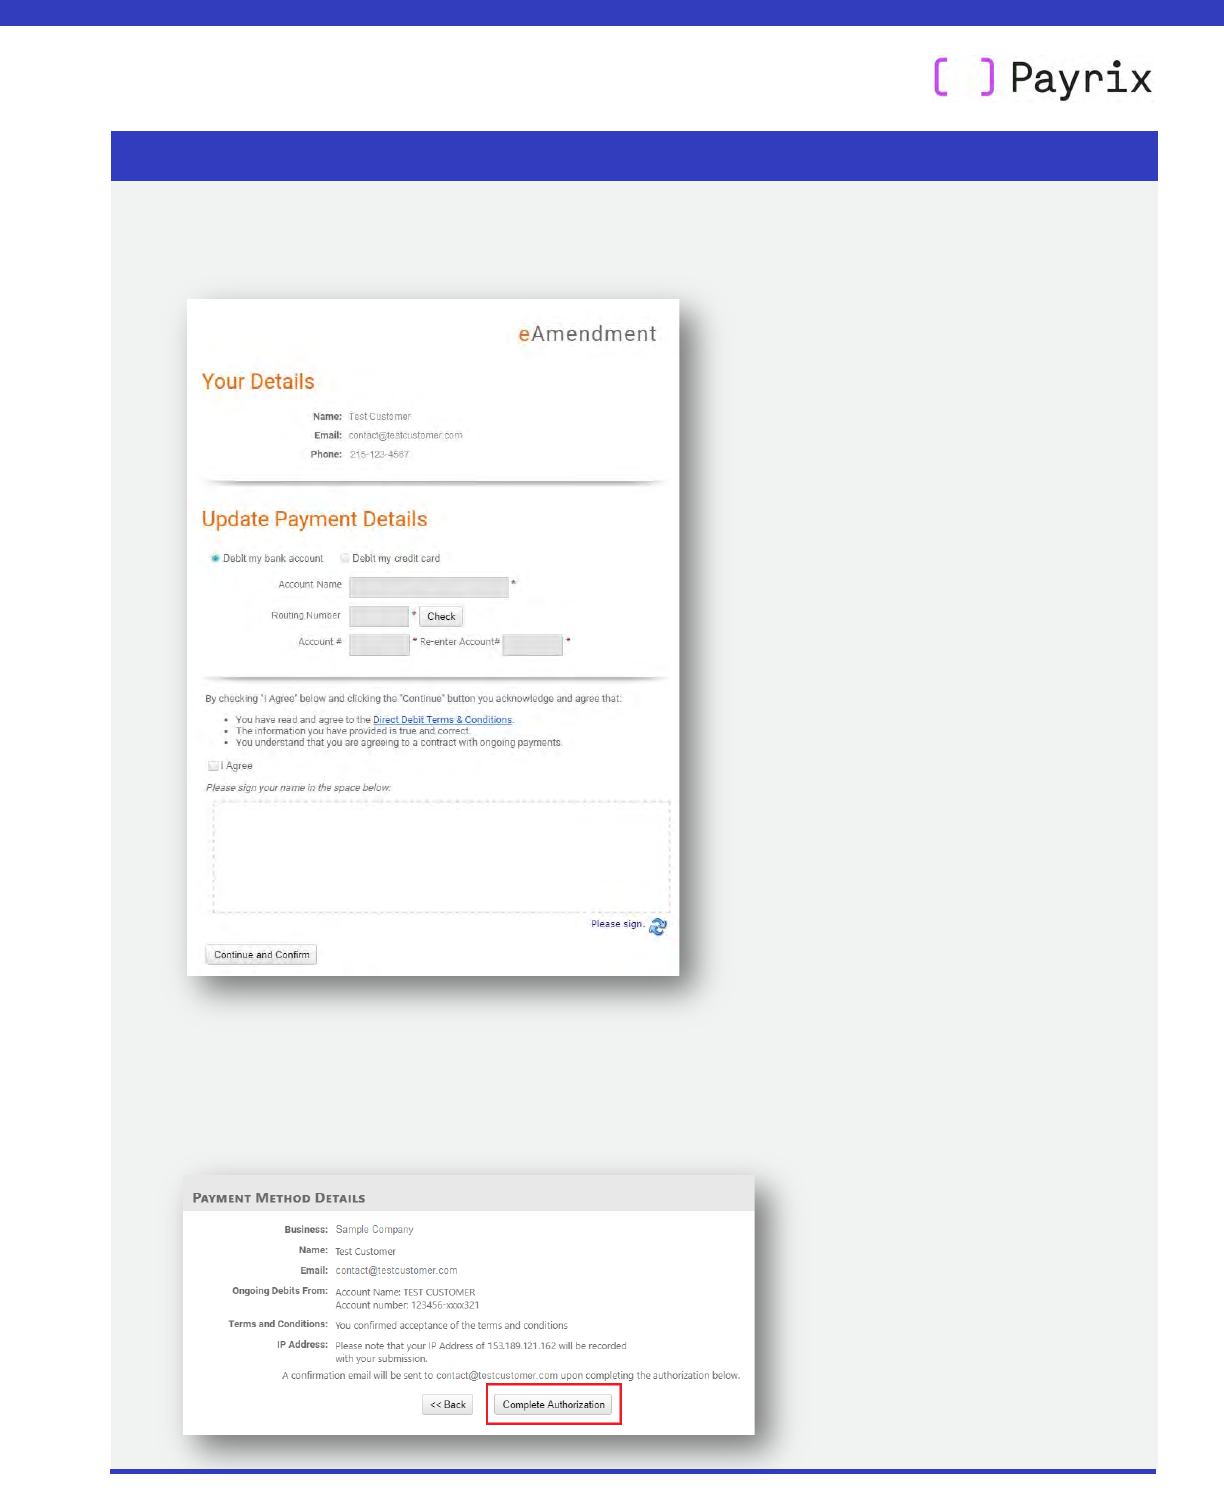
• An ‘amendment complete’ message is then displayed.
• A confirmation email will
a
lso be sent to your customer – this will include a PDF
document detailing t
he
ir updated au
thorization
for
t
he automatic debit of future
invoices.
• The customer’s new payment details will be updated automatically in Payment
Portal.
XERO USER GUIDE
UPDATING CUSTOMER PAYMENT DETAILS
XERO USER GUIDE
UPDATING CUSTOMER PAYMENT DETAILS
Page 32 of 42
User guide: Payrix + Xero (USA)
07 October 2021
6.1. Editing a customer ID in Payment Portal
This part explains how you can update a customer ID in Payment Portal so that it matches
the same customer’s ID in Xero.
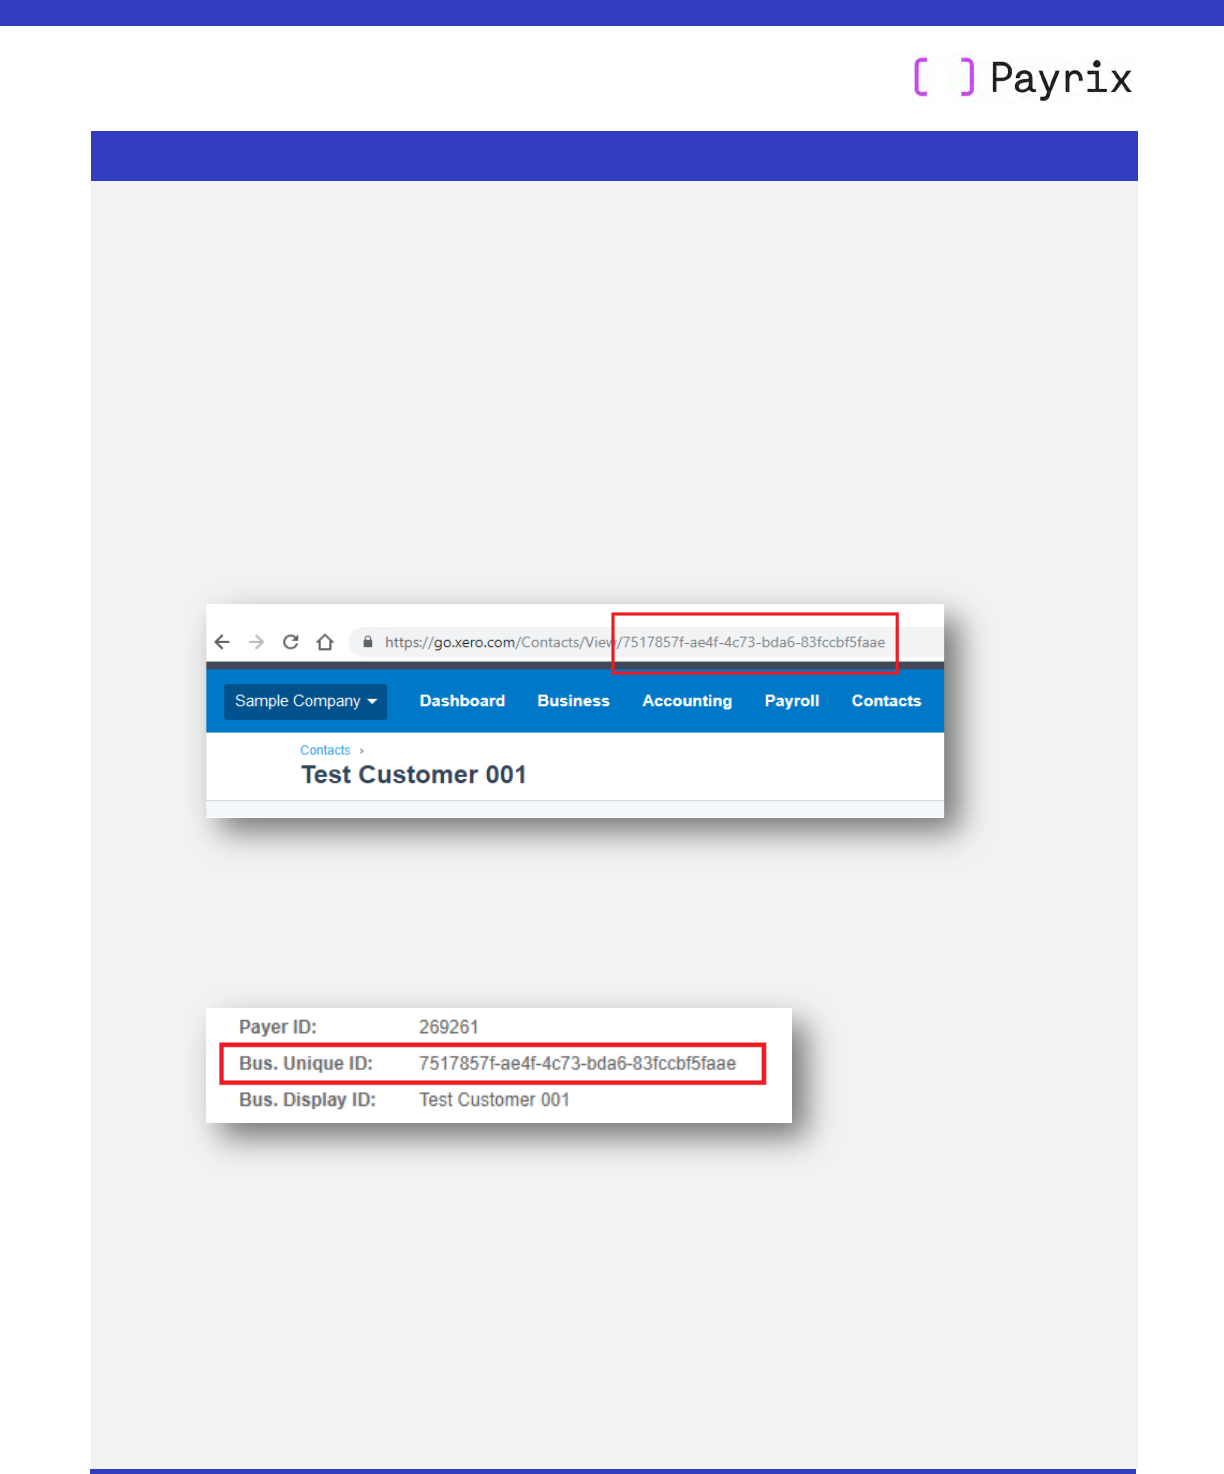
Both Xero and Payrix share the same identifier for contacts.
Each Xero contact has a Globally Unique Identifier (GUID) – the characters at
the end of the URL (web address) of that customer’s details page in Xero.
Payment Portal automatically uses this GUID for each contact’s Business
Unique ID when a payer record is created.
The GUID cannot be edited in Xero, but the Business Unique ID can be edited
in Payment Portal – this is useful for ensuring both systems have the same
ID for a customer.
XERO USER GUIDE
UPDATING CUSTOMER PAYMENT DETAILS
Page 33 of 42
User guide: Payrix + Xero (USA)
07 October 2021
Follow these steps to change a Business Unique ID in Payment Portal:
• Login to Payment Portal: https://Portal.Payrix.com.au
• Click Payers.
• From the list of customers, click on the ID link in the Payer # column.
• Your customer’s details will be displayed.
• Click Edit Details.
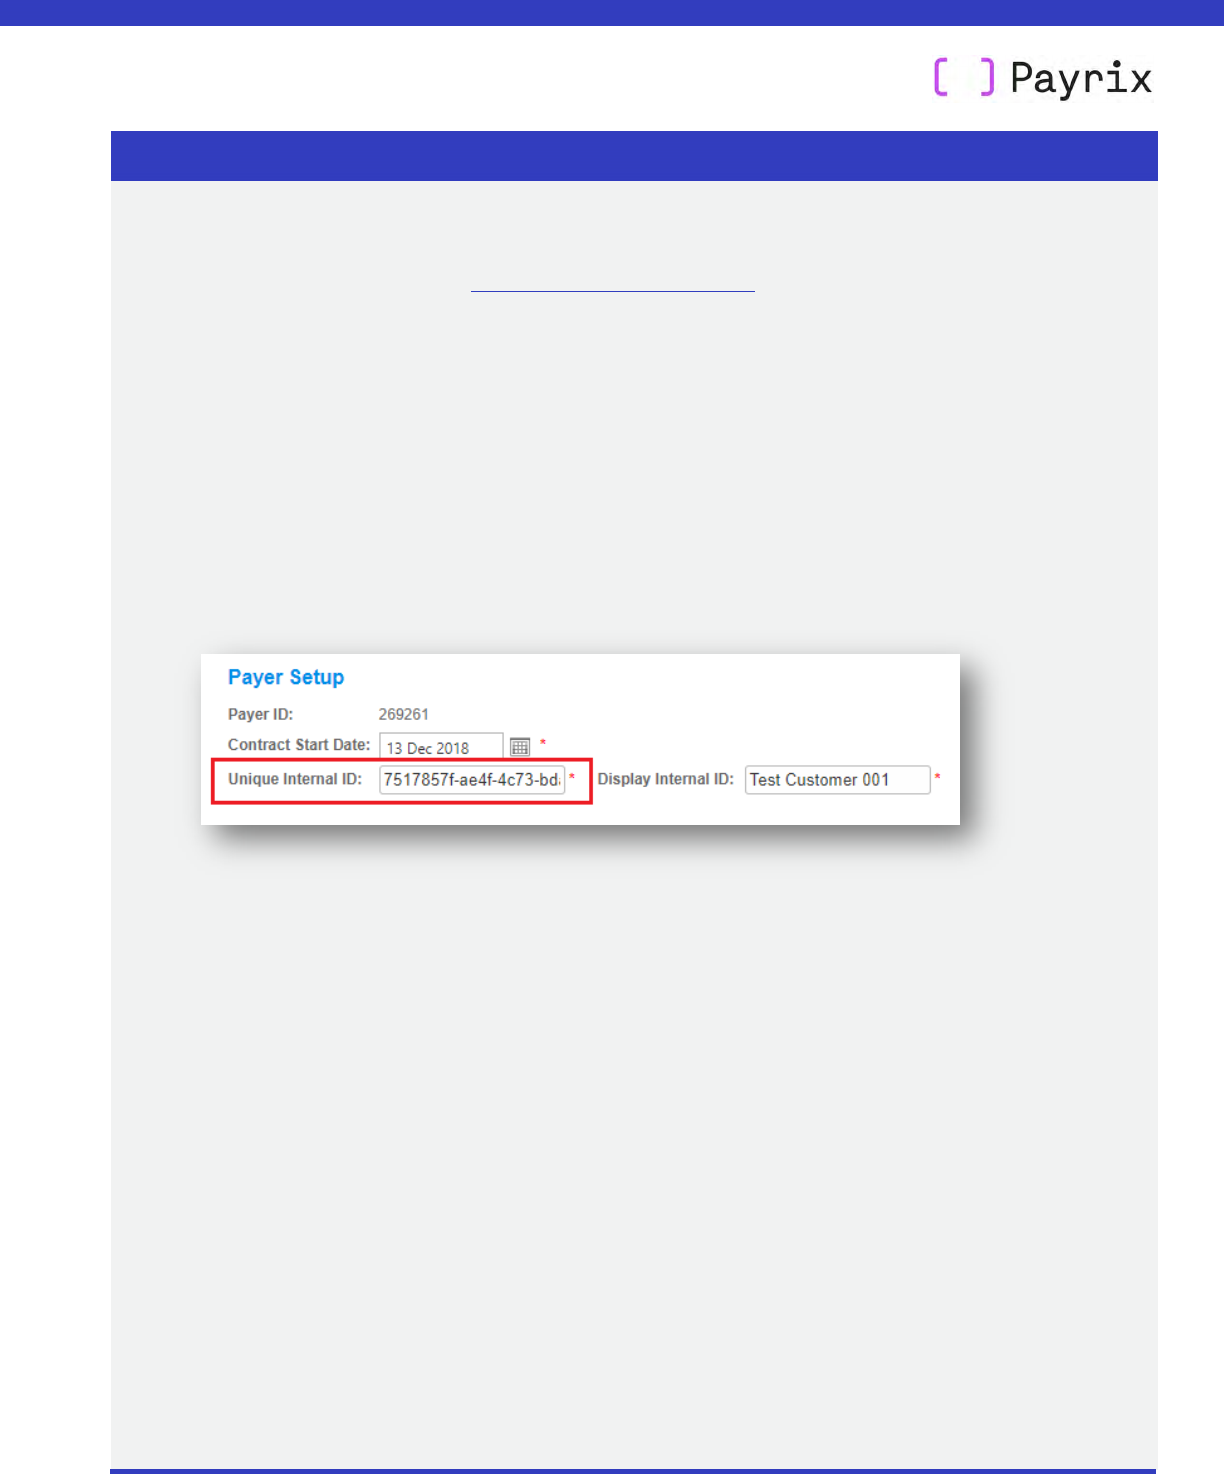
• On the Payer Details page, the Business Unique ID is referred to as the Unique Internal
ID – they’re exactly the same thing.
• Edit the Unique Internal ID field to match your customer’s GUID in Xero.
• Click Save.

Page 34 of 42
User guide: Payrix + Xero (USA)
07 October 2021
7. Managing and resolving payment issues
In this section we outline common payment management tasks within Payment Portal:
• Viewing payment records
• Reattempting failed transactions
• Requesting a new transaction l
imit
• Resolving an invalid Xero account
7.1. Viewing payment records
• Login to Payment Portal: https://portal.payrix.com.au
• On the main menu, click on Xero, and then Payments.
• The list of payment has two main elements:
o A search function covering date range, transaction status, and invoice #.
o Two tabs: payment history
and pending payment.
XERO USER GUIDE
MANAGING AND RESOLVING PAYMENT ISSUES
XERO USER GUIDE
MANAGING AND RESOLVING PAYMENT ISSUES
Page 35 of 42
User guide: Payrix + Xero (USA)
07 October 2021
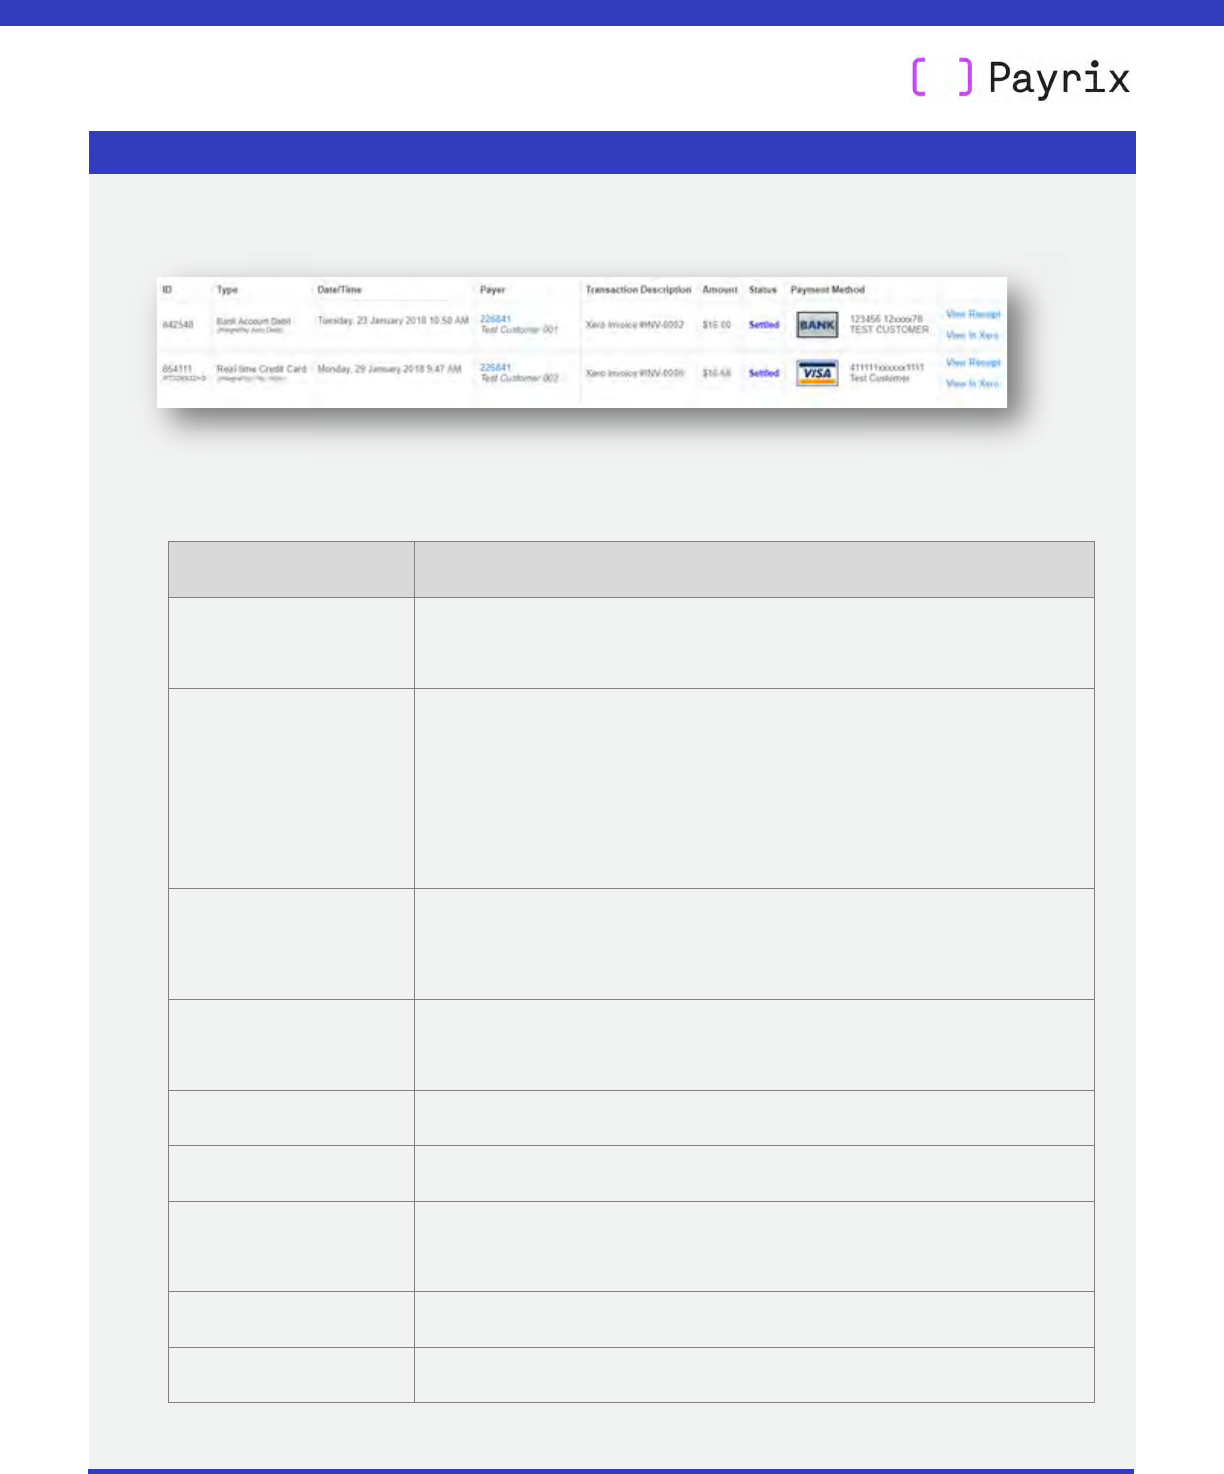
• Details of a payment are given in nine columns.
• The table below summarizes these columns.
Column Description
ID This is assigned when a payment has been made, and is
different to the invoice number in Xero.
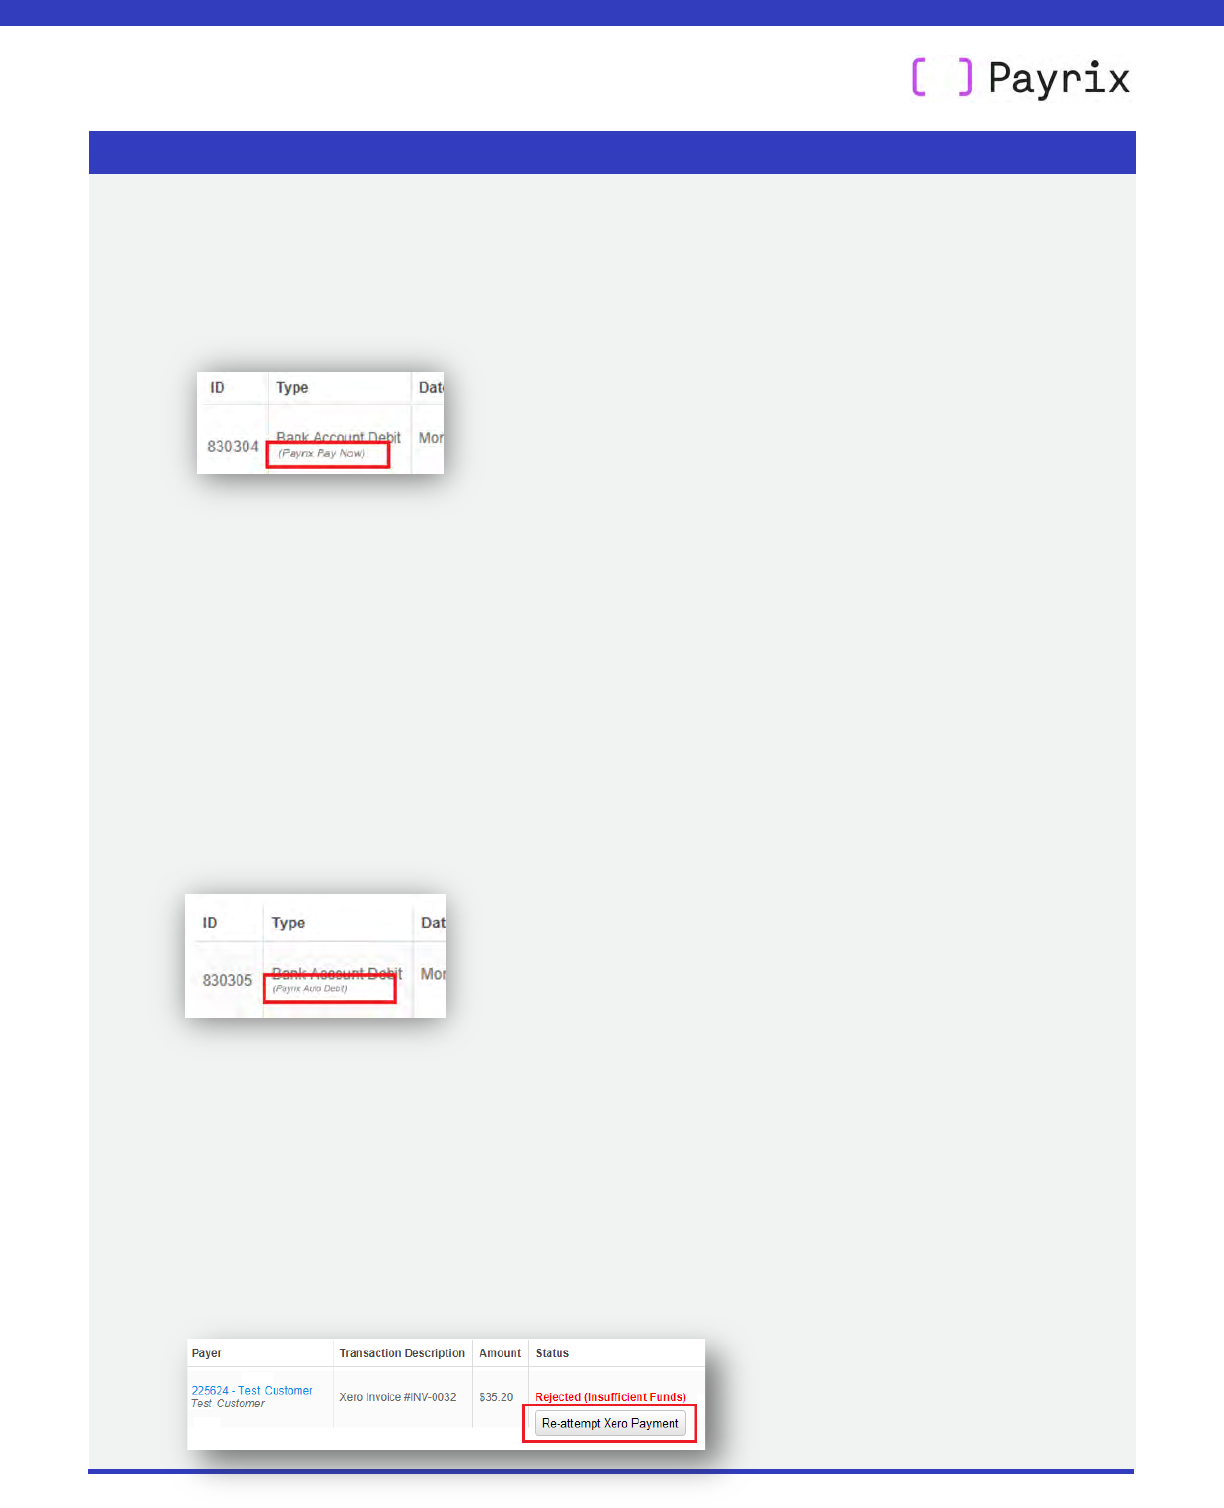
Type This column tells you two things:
• Payment type – credit card or bank account.
• The Xero branding theme you used for the invoice –
Payrix Auto Debit or Payrix Pay Now.
Payer The reference and name of your customer. This
link takes you to details about the customer.
Transaction
description
The Xero invoice number.
Status The status of payment.
Amount The invoice’s total amount.
Payment method Gives an indication of a customer’s card/bank details – these
are masked for security reasons.
Link to View Receipt Opens the payment receipt with full details of a transaction.
Link to View in Xero Opens the original invoice within Xero.
XERO USER GUIDE
MANAGING AND RESOLVING PAYMENT ISSUES
Page 36 of 42
User guide: Payrix + Xero (USA)
07 October 2021
7.2. Reattempting failed transactions
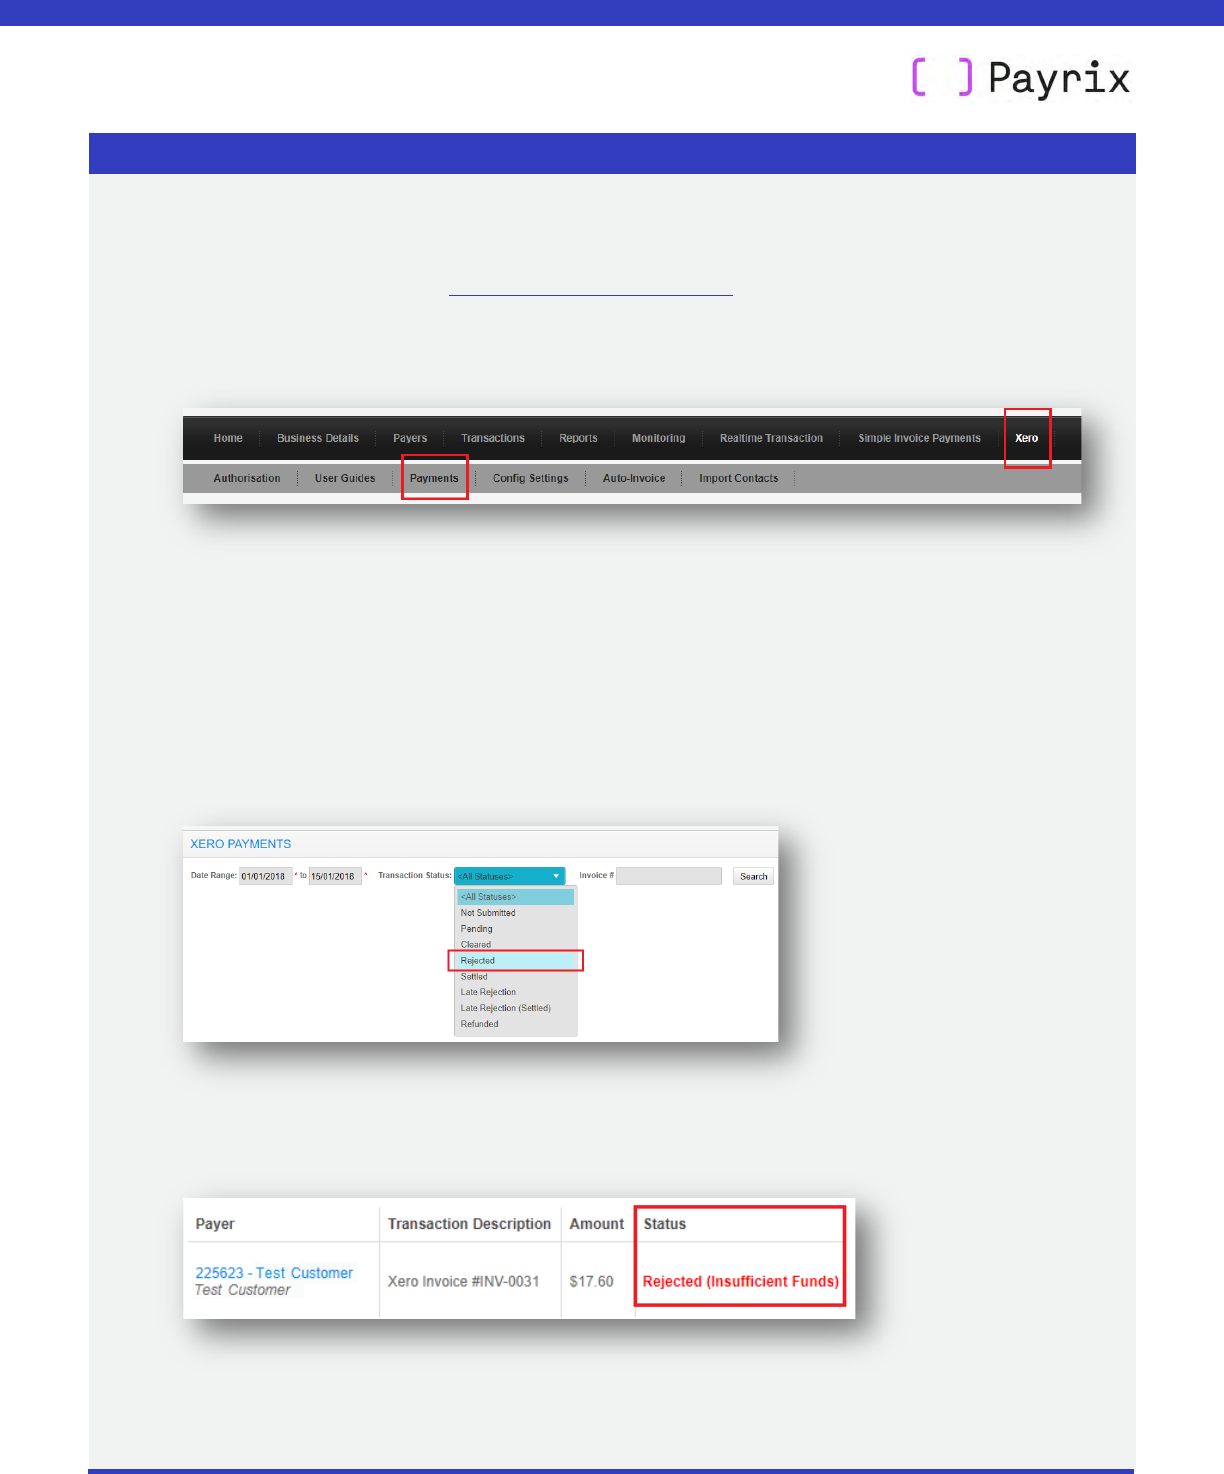
• Login to Payment Portal: https://Portal.Payrix.com.au
• On the main menu, click
on Xero, and then Payments.
• A list of all your Xero payments will be displayed.
• Using the search function above the list:
o Select a Date Range.
o On the Transaction Status drop-down menu select Rejected.
• Any failed transactions will then be displayed, with details in the Status column.
The process for re-attempting a transaction differs for single and repeating invoices, as
described below.
XERO USER GUIDE
MANAGING AND RESOLVING PAYMENT ISSUES
Page 37 of 42
User guide: Payrix + Xero (USA)
07 October 2021
1. Single invoice transaction re-attempt
• In most instances a single invoice will use the Payrix Pay Now branding theme –and
this is marked in the Type column.
• Re-attempting single payments is done by the customer, not by you (the biller)
• You should advise your customer that they can re-attempt payment by clicking on the link
in their email invoice.
2. Repeating invoice transaction re-attempt
• In most instances a repeating invoice will use the Payrix Auto Debit branding
theme – and this is marked in the Type column.
• For the first invoice only, a re-attempt is done by the customer, and not by you (the
biller) – they can do this by clicking on the link in their email invoice.
• For all invoices after the first one, you (the biller) can re-attempt the transaction by
clicking the Re-attempt Xero payment.
This button will only be visible for 60 days after the original transaction.
XERO USER GUIDE
MANAGING AND RESOLVING PAYMENT ISSUES
Page 38 of 42
User guide: Payrix + Xero (USA)
07 October 2021
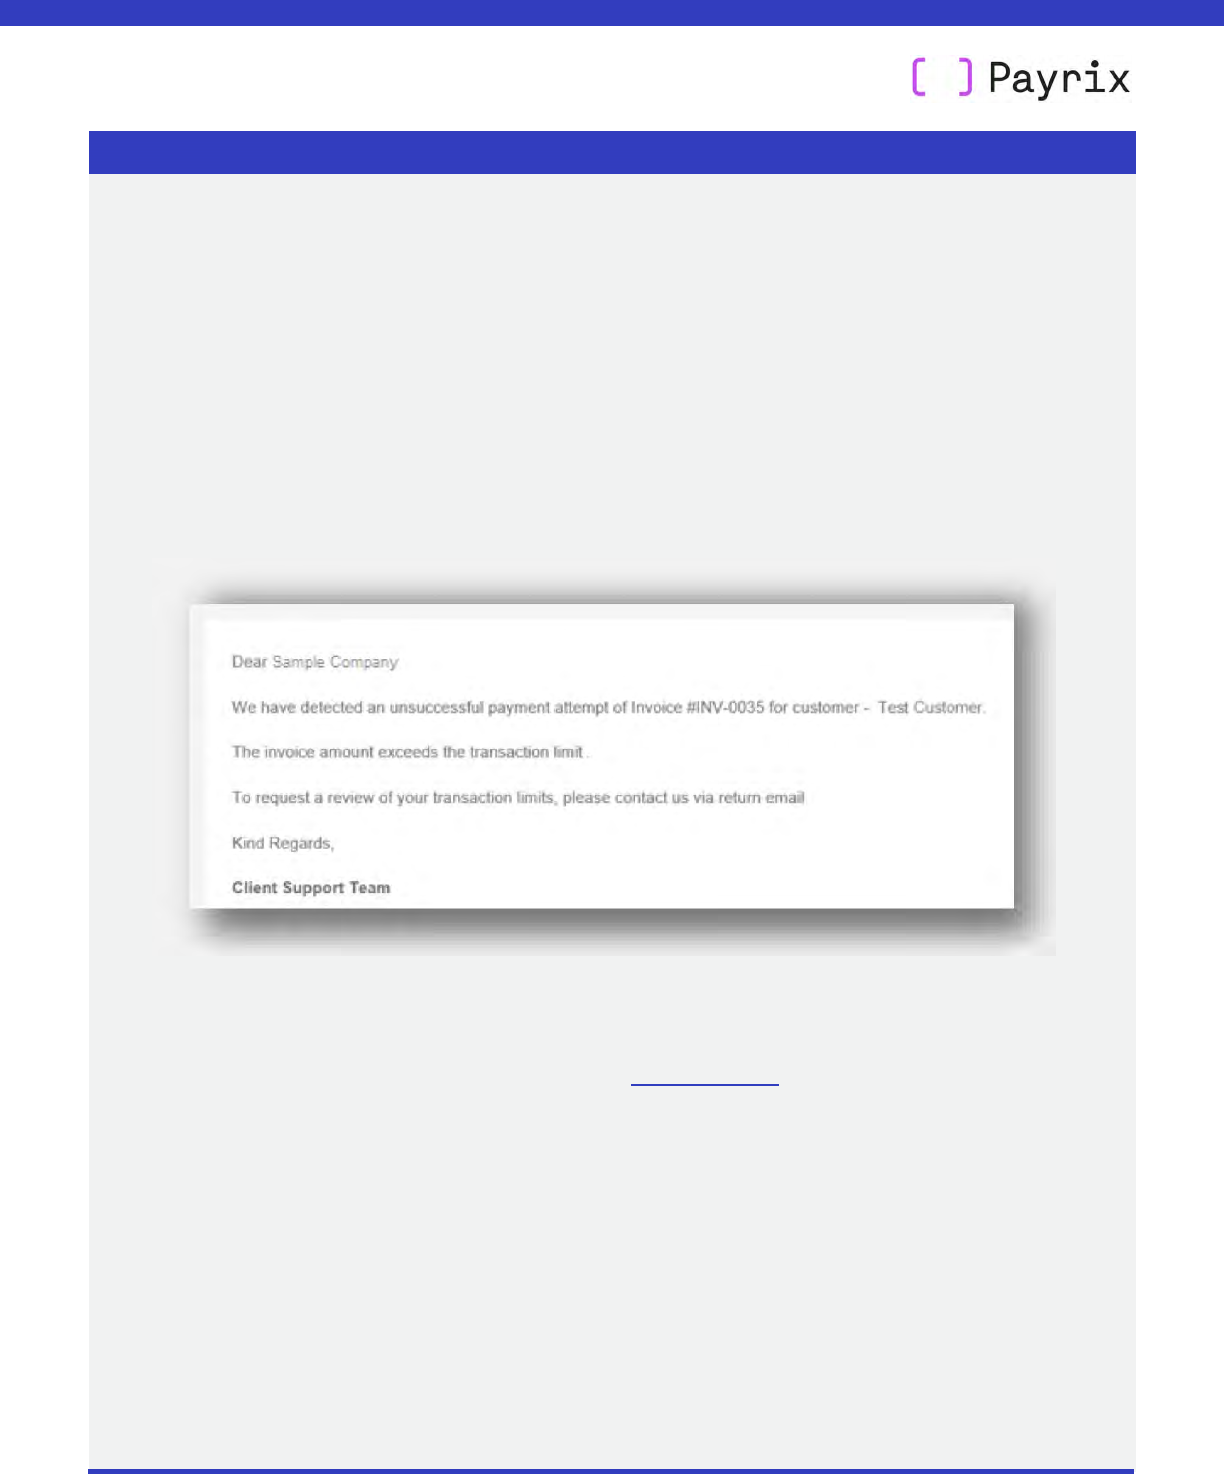
7.3. Requesting a new transaction limit
• Payrix clients all have different transaction limits, depending on characteristics
such as industry sector, organization size and type, and geolocation.
• A customer payment will fail if your invoice is more than your transaction limit.
• If this happens, Payrix will send you an email advising you on next steps.
• As outlined in the email, you will need to contact Payrix to request a review of your
limit.
• Payrix will assess your request, and you will be advised on the outcome.
XERO USER GUIDE
MANAGING AND RESOLVING PAYMENT ISSUES
Page 39 of 42
User guide: Payrix + Xero (USA)
07 October 2021
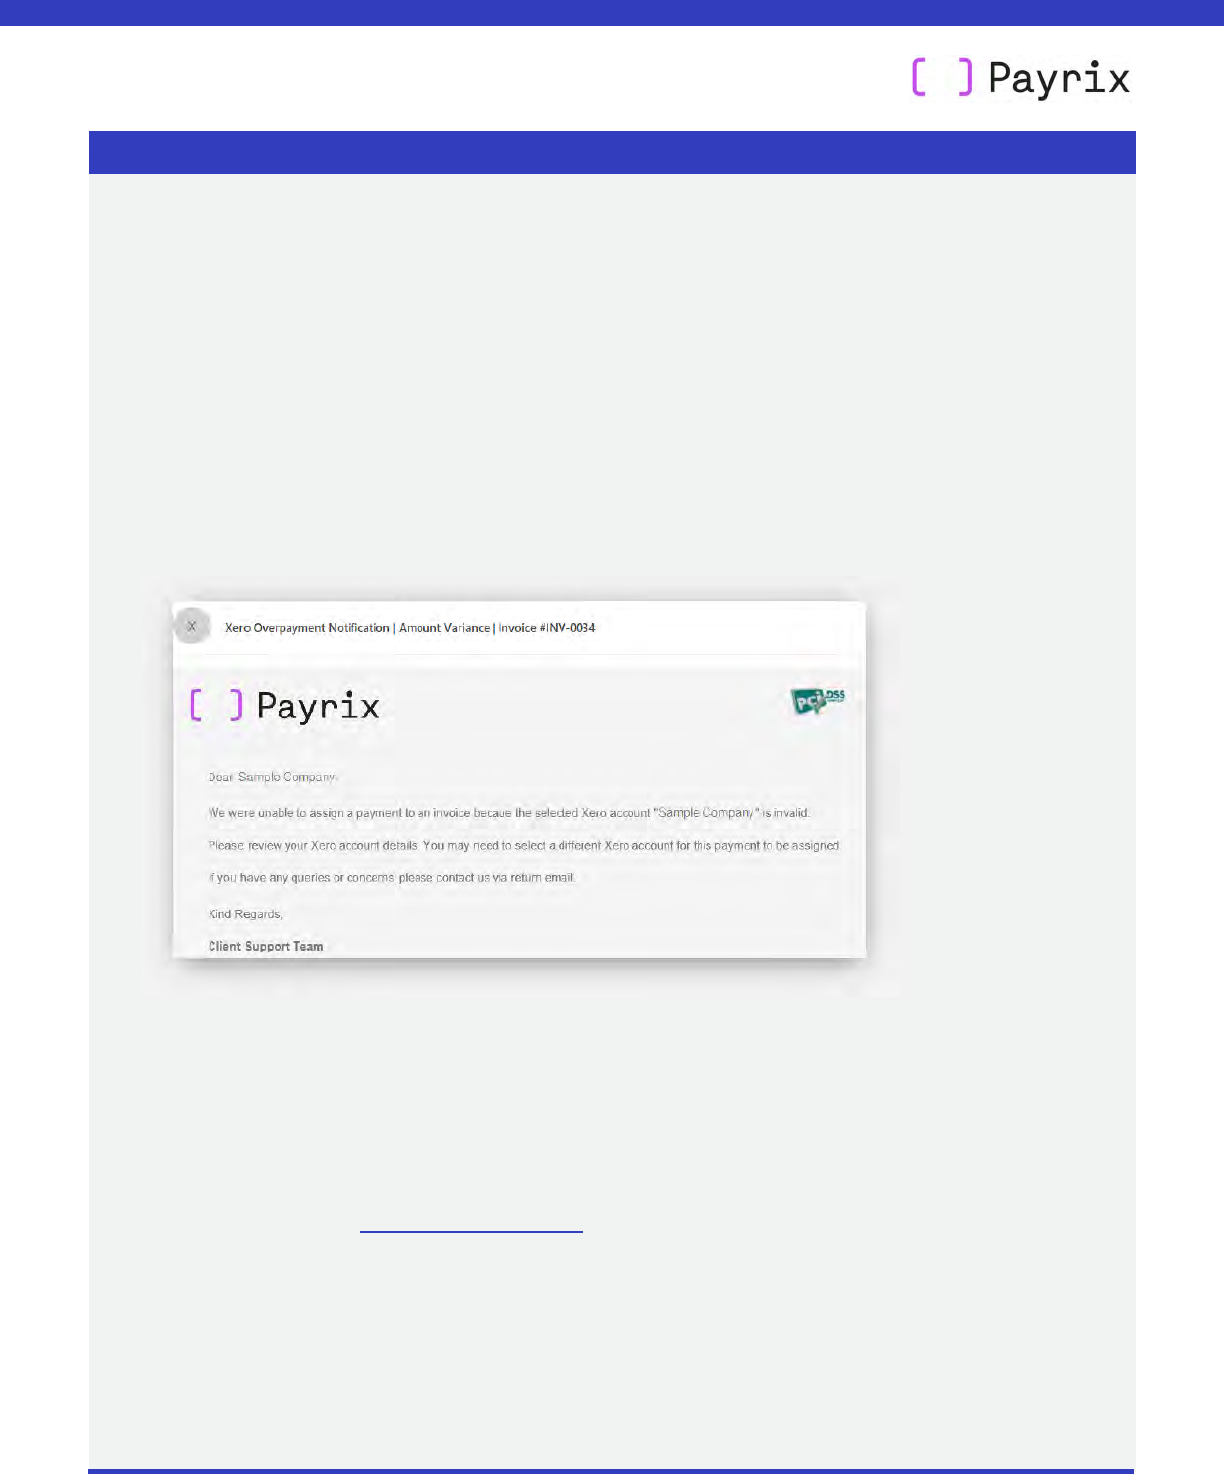
7.4. Resolving an invalid Xero account
During your initial setup of Xero + Payrix you created two accounts in Xero:
• Bank Account – your bank account in Xero should be the same as the settlement
account you use with Payrix for your ongoing funds deposits
• Clearing Account – within Xero this is classed as a ‘current asset’ account, and is used
in our reconciliation process.
If there is a problem with either of these accounts, you will receive an email notification.
Follow the steps below to ensure both Xero and Payrix details are correct.
Review your accounts in Xero:
• Login to Xero: https://login.xero.com
• Click on Settings > Accounting > General Settings > Chart of Accounts.
• Click on the account that you have been notified about.
XERO USER GUIDE
MANAGING AND RESOLVING PAYMENT ISSUES
Page 40 of 42
User guide: Payrix + Xero (USA)
07 October 2021
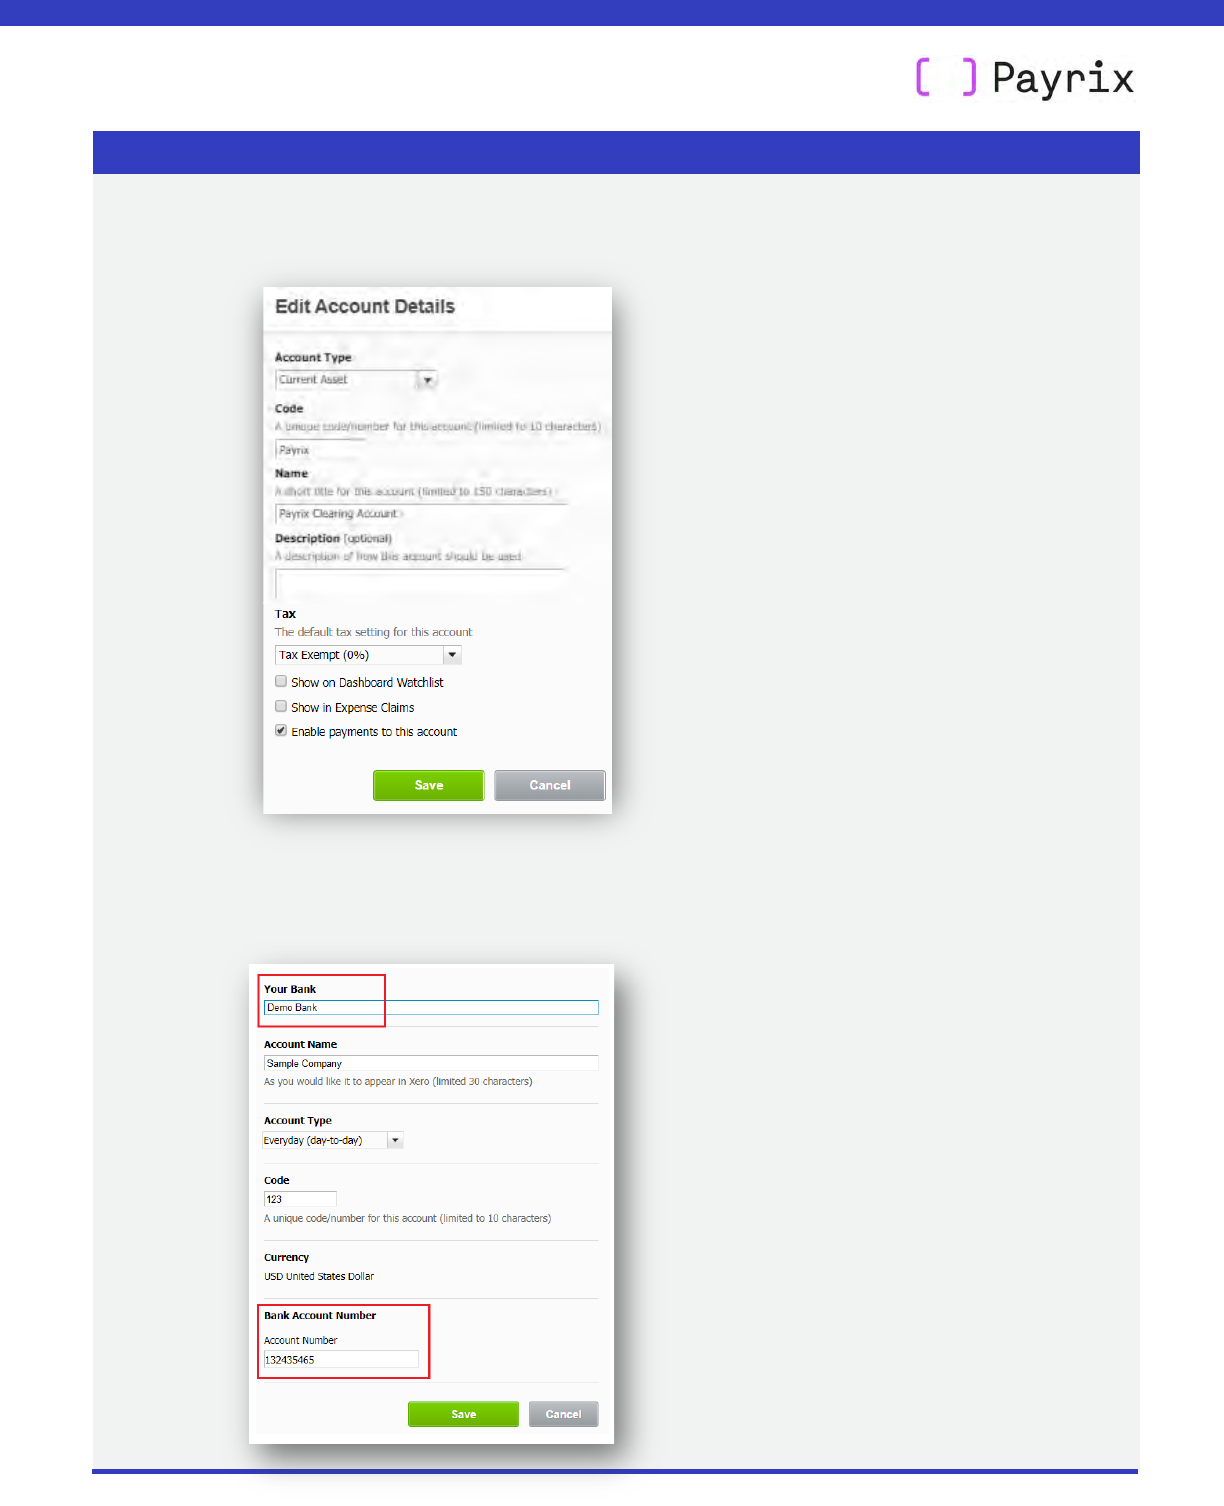
• For Payrix Clearing Account, make sure that the last field is ticked (Enable
payments to this account).
• For your Bank Account, make sure that your
Bank name and Bank Account
Number are correct.
Page 41 of 42
User guide: Payrix + Xero (USA)
07 October 2021
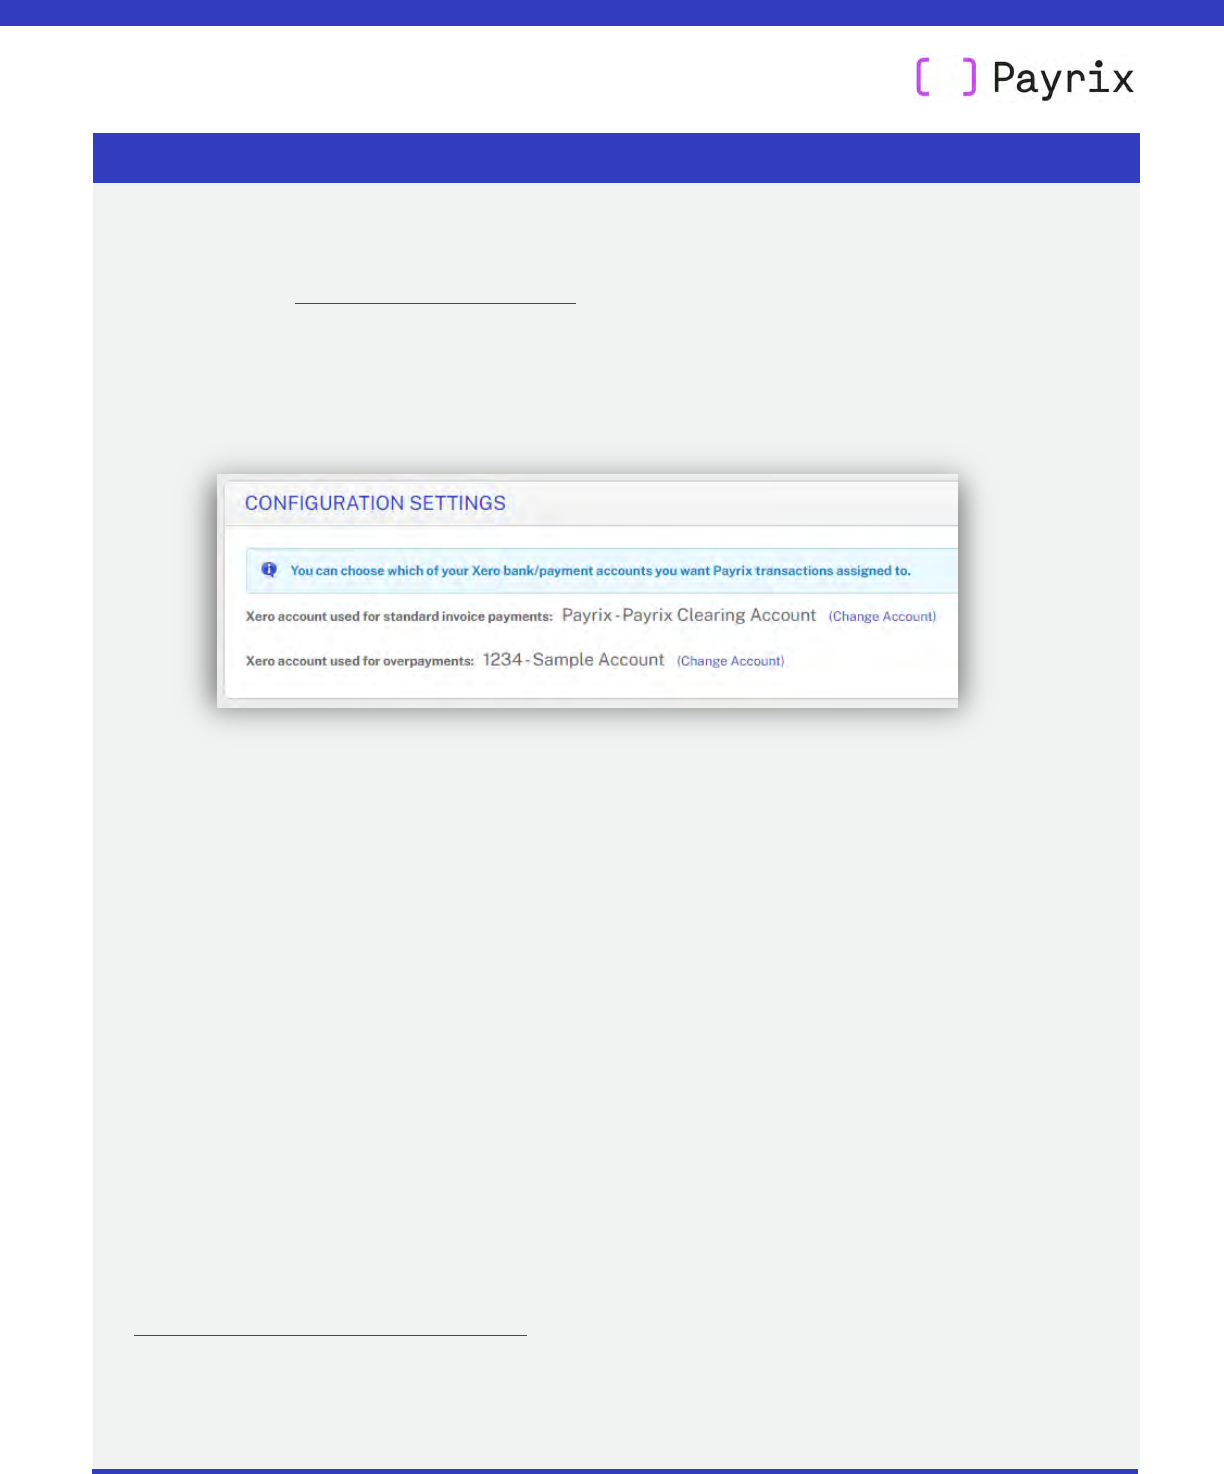
Review your accounts in Payment Portal:
• Login to https://portal.payrix.com.au
• On the main menu, click on Xero and then Config Settings.
• You will see your two accounts listed.
• Both accounts must be exactly the same as your two accounts in Xero, otherwise invoice
payments and reconciliation will not function
o The first option (standard invoice payments) must be the Payrix Clearing Account
that you’re using in Xero
o The second option (overpayments) must be the Bank Account you’re using in Xero
– and this is the same as your settlement account you use with Payrix for ongoing
funds deposits
• If you need to change either account listed in Payment Portal to make it consistent with
Xero, click one of the Change Account link, select the correct account and click Save
Account.
For further information about setting up your accounts, refer to our setup guide:
Payrix + Xero setup guide [PDF 0.7MB]
XERO USER GUIDE
MANAGING AND RESOLVING PAYMENT ISSUES