1
External MyVP
Table of Contents
Xenroll Process: .............................................................................................................................................. 2
Password Reset process: ............................................................................................................................. 4
Forgot password: ........................................................................................................................................ 5
Logging In ........................................................................................................................................................ 8
Home screen: .................................................................................................................................................. 8
Manage Vendor number: ............................................................................................................................... 9
Add Vendor Number: .................................................................................................................................. 9
Removing a Vendor: .................................................................................................................................. 10
Vendor Number Selection: ....................................................................................................................... 11
View Invoices: ............................................................................................................................................... 11
Search by Date: ......................................................................................................................................... 11
Filtering your search: ................................................................................................................................ 12
View Invoice Image: .................................................................................................................................. 12
View Invoice Details: ................................................................................................................................. 12
Create New Ticket in Invoice Details ................................................................................................... 13
View Payment Document Details: ............................................................................................................ 13
Create New Ticket in Payment Details: ............................................................................................... 14
Sort/Pin/Hide Columns: ............................................................................................................................ 14
Export Data: .................................................................................................................................................. 15
Export All Data: ......................................................................................................................................... 15
Export Visible Data: ................................................................................................................................... 15
View EPayables:............................................................................................................................................ 15
Search by Date: ......................................................................................................................................... 16
Filtering your search: ................................................................................................................................ 16
Sort/Pin/Hide Columns: ............................................................................................................................ 16
View Invoice Details .................................................................................................................................. 17
Create New Ticket in Invoice Details ................................................................................................... 17
View Payment Document Details: ............................................................................................................ 17
Create New Ticket in Payment Details: ............................................................................................... 18

2
View PO Number: ......................................................................................................................................... 18
Filtering your search: ................................................................................................................................ 18
Sort/Pin/Hide Columns: ............................................................................................................................ 19
View PO Details ......................................................................................................................................... 19
Create New Ticket in PO Details .......................................................................................................... 20
View Payments: ............................................................................................................................................ 20
Search by Date: ......................................................................................................................................... 20
Filtering your search: ................................................................................................................................ 20
Sort/Pin/Hide Columns: ............................................................................................................................ 21
View Payment Details ............................................................................................................................... 21
Create New Ticket in Payment Doc Details ......................................................................................... 22
View Consignments: ..................................................................................................................................... 22
Search by Date: ......................................................................................................................................... 22
Filtering your search: ................................................................................................................................ 22
Sort/Pin/Hide Columns: ............................................................................................................................ 23
View Consignment Invoice Details ............................................................................................................ 23
Create New Ticket in Consignment Details ......................................................................................... 24
JIRA Sign-up and Login Instructions .......................................................................................................... 25
Create Jira Tickets: .................................................................................................................................... 27
Sort/Pin/Hide Columns: ............................................................................................................................... 35
Sort Columns: ....................................................................................................................................... 35
Pin Columns: ......................................................................................................................................... 36
Hide Columns: ...................................................................................................................................... 36
Clear Multiple Filters: ........................................................................................................................... 37
Error Messages ............................................................................................................................................. 38
Logging Out: .................................................................................................................................................. 39
FAQ’s: ............................................................................................................................................................ 39
Glossary: ....................................................................................................................................................... 39
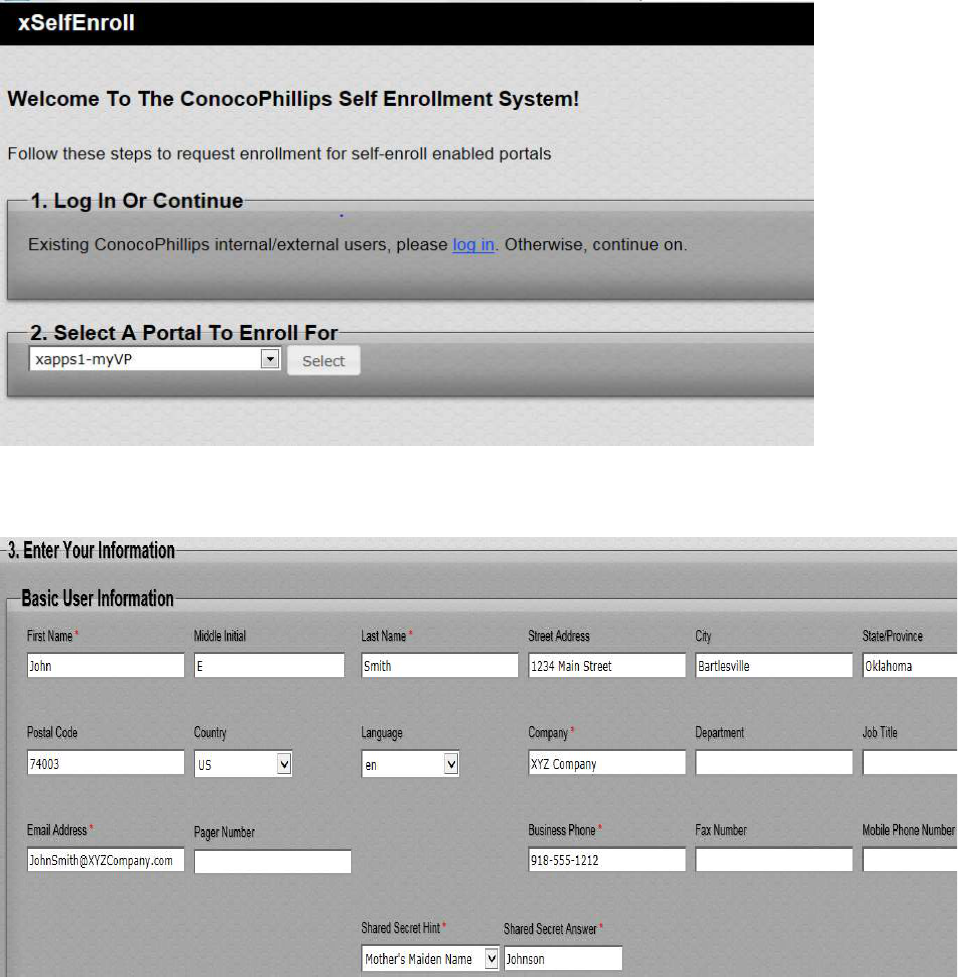
Xenroll Process:
In order to obtain your login credentials and access to MyVP, please follow the process below.
Logon to portal: https://apps.conocophillips.com/xSelfEnroll
3
Click on the drop down beside “Select A Portal to Enroll for” & choose xapps1-myVP.
Click Select
Enter your Basic User Information (Name, Address, Company, Email, Phone, Shared Secret Hint & Shared
Secret Answer), on section 3. This will also have to be provided on the next step to the Help Desk.
Red * are mandatory fields
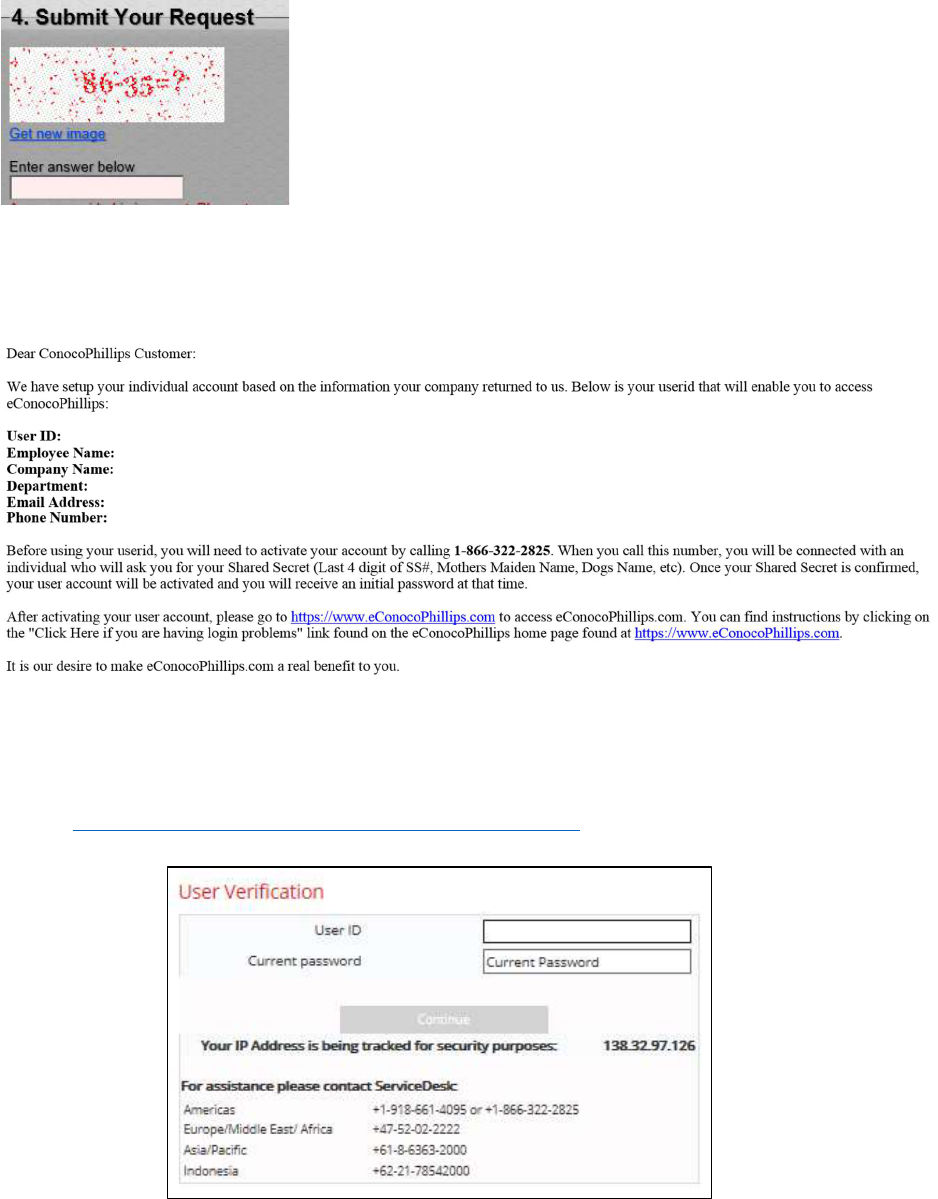
On section 4, enter the answer to the question in the image box as shown below. Example: 51
4
Click Submit
User will receive an email providing a User ID and a Phone Number to contact 1-866-322-2825. You will
need to provide them your Secret Answer to receive a temporary password. Example of email is below:
*The ConocoPhillips Help Desk can also reset passwords when needed.
Password Reset process:
1. Go to the ConocoPhillips Extranet Password Reset Page:
https://www.econocophillips.com/idmgmt/ResetID.aspx
2. Enter a new password, following the guidelines listed.
3. Select “Submit”.
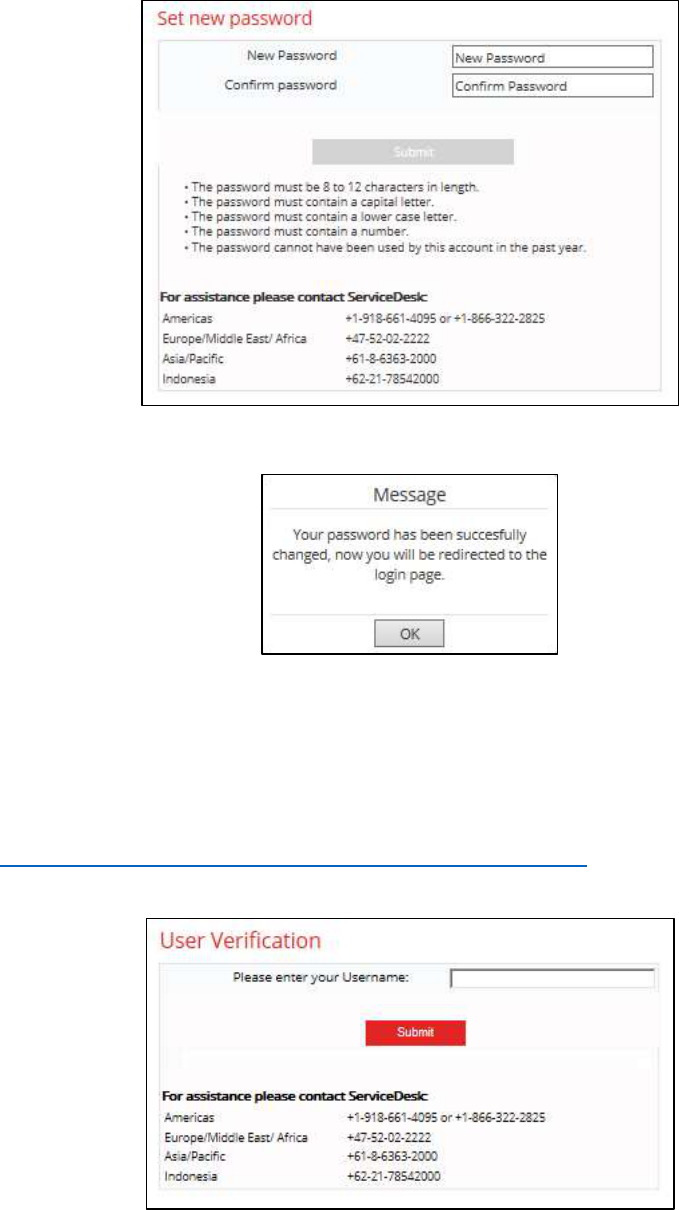
5
4. You will receive confirmation that your password has been changed:
5. You will be re-directed to the log in page. No further action is required.
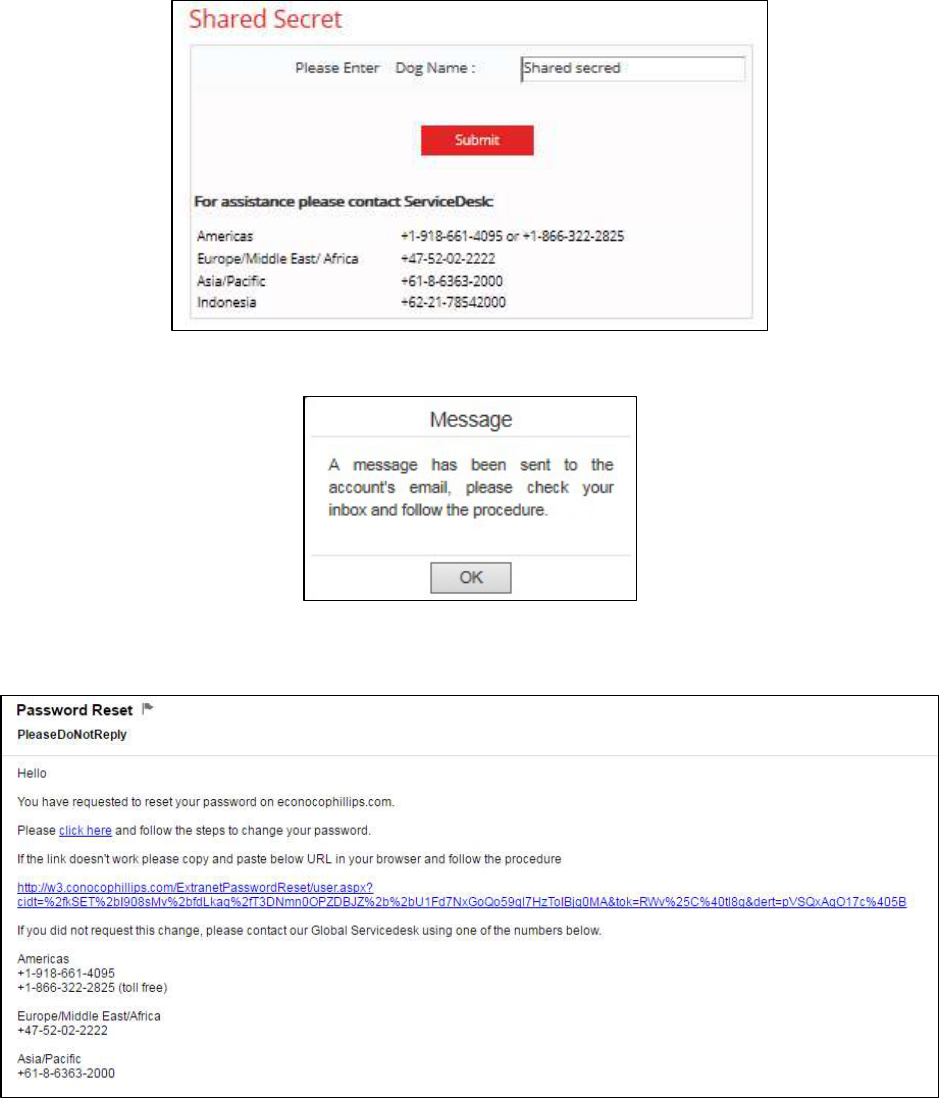
Forgot password:
1. If you cannot remember your password, go to:
https://w3.conocophillips.com/ExtranetPasswordReset/user.aspx
2. Enter your Username and select “Submit”:
3. You will be asked to answer a security question. Enter the answer and select “Submit”.
o NOTE: Each question depends on the individual’s selection at the time of set up.
6
o If you do not know the answer, you will need to contact the ServiceDesk using the phone
numbers provided.
4. You will receive the message below:
5. You will receive an email, like the one below, providing a link to follow to complete the password
change.
6. Re-enter your userID:
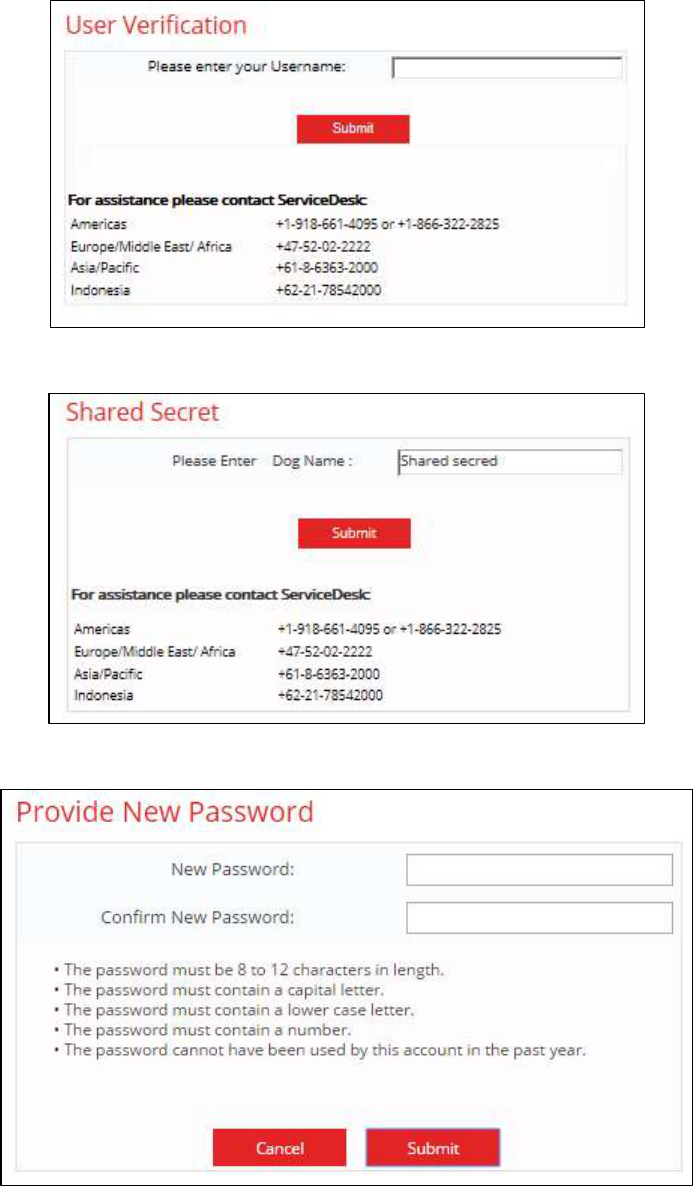
7
7. Re-enter your security question:
8. Enter a new password, following the guidelines provided:
9. Once the new password has been accepted, no further action is required.
8
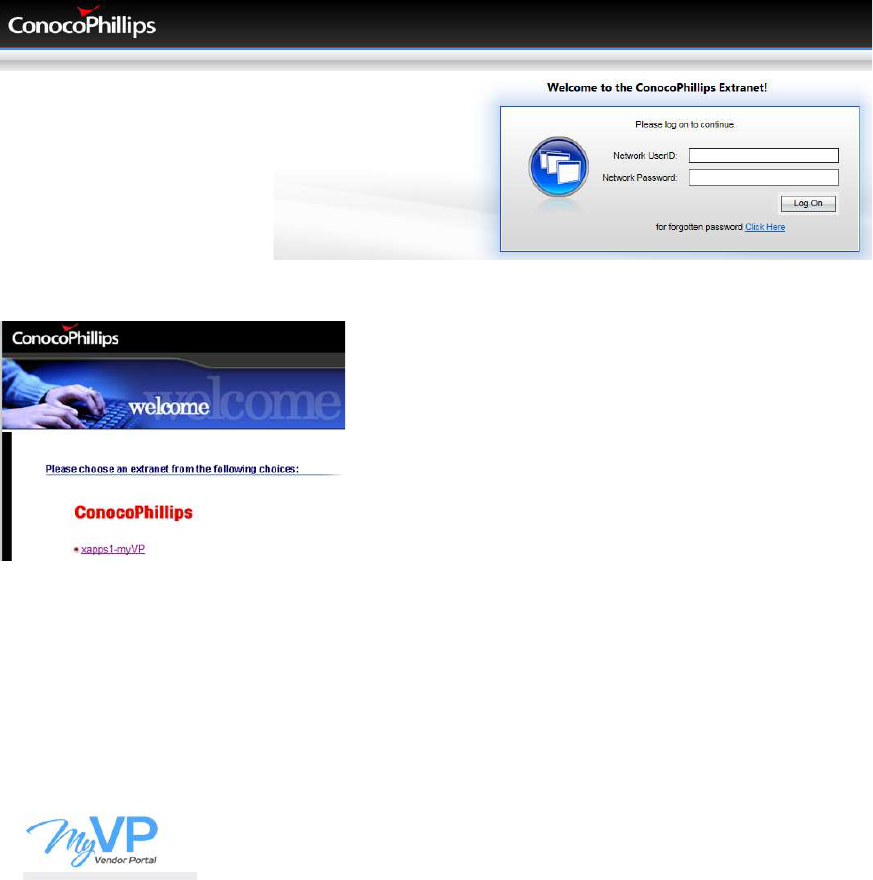
Logging In
Once you have your User ID and the ConocoPhillips Help Desk has provided you a temporary password,
please copy this this link into your internet browser to log in: xapps1.econocophillips.com/myvp
Enter User ID and Password, then select Log On.
*If you see this screen, prior to landing on the Home screen, choose xapps1-myVP:
Once logged in, you will be on the Home screen.
*Note – It is possible that you may have to log in a second time, this is a known glitch with MyVP at this
time.
Home screen:
*At any time you can click on the MyVP logo & it will take you back to the Home page.
*The Help Button on the top Right will assist you with MyVP instructions, including website links, plus
information on:
Invoice Payment & Status
Invoice Options & Requirements
Payments
Form 1099
Supplier Quick Reference Guide
9
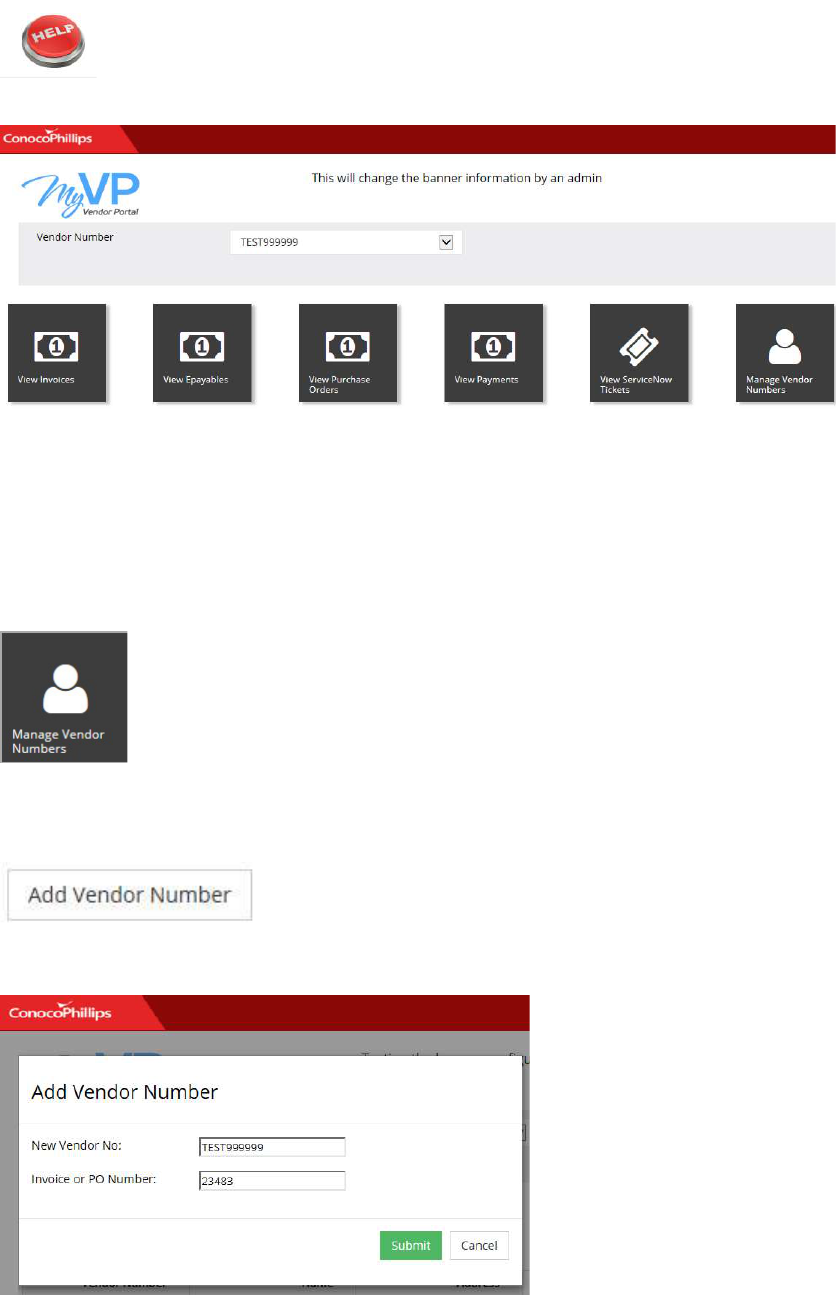
There are several tiles to choose from on the Home page, see below:
These tiles allow you to search & view Invoices, Epayables, Purchase Orders, Payments, JIRA Tickets &
Vendor Numbers.
Manage Vendor number:
In order to view invoicing information, you will be required to add your Vendor Number(s) utilizing the
Manage Vendor Number tile.
Add Vendor Number:
To add a vendor number, click on the Add Vendor Number button on the Right side of your screen.
Enter Vendor Number and a Paid Invoice Number, then click Submit.
10
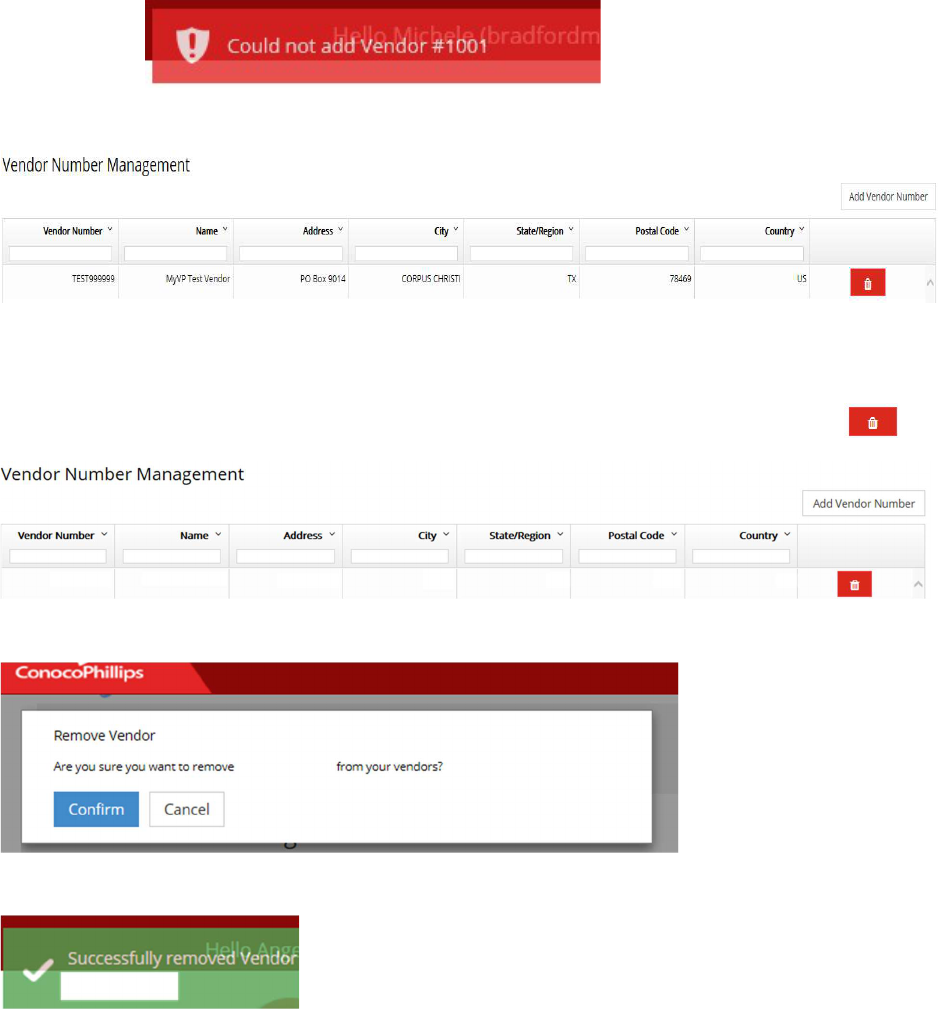
*When adding a vendor, there will be a display box on the top Right-hand corner of your screen showing
the status of your vendor being added or not. This screen will quickly go away, so you’ll want to watch for
it.
If the vendor is unable to be added, you will see a message like this:
If Vendor is successfully added it should now be reflected as example shown below:
*If you have multiple Vendor numbers to add, repeat process above.
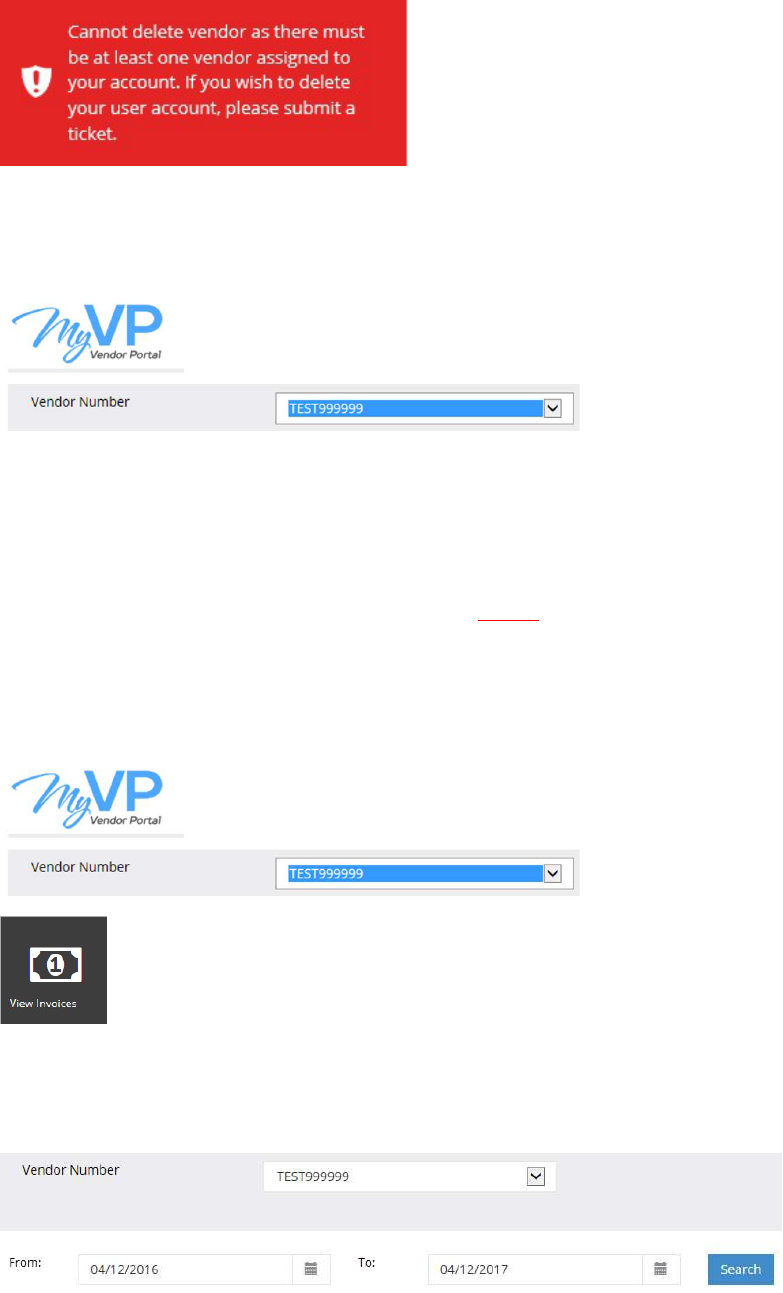
Removing a Vendor:
Vendor numbers can also be removed by clicking on the Trash Can Icon next to each Vendor.
You will be asked to confirm if selected Vendor should be Removed (click confirm).
Receive confirmation that Vendor is Successfully removed.
When trying to remove the only remaining vendor number, you will receive a message directing you to
create a service ticket.
11
Vendor Number Selection:
Once you have a vendor number or numbers added, you can choose the Vendor Number you would like to
view from the drop down beside Vendor Number.
*Remember you can click on the MyVP logo to revert back to the Home screen at any time.
View Invoices:
*Note – All iPay invoices will be visible here, but only posted ePay invoices can be viewed.
From the Home page, Click on the View Invoices tile & select the vendor number you would like to view
invoices for.
Search by Date:
You can also select a vendor number from the drop down here to view. Minimize your search by entering a
date range, then click Search. *Note the date range default is from 1 year prior thru current date.
12
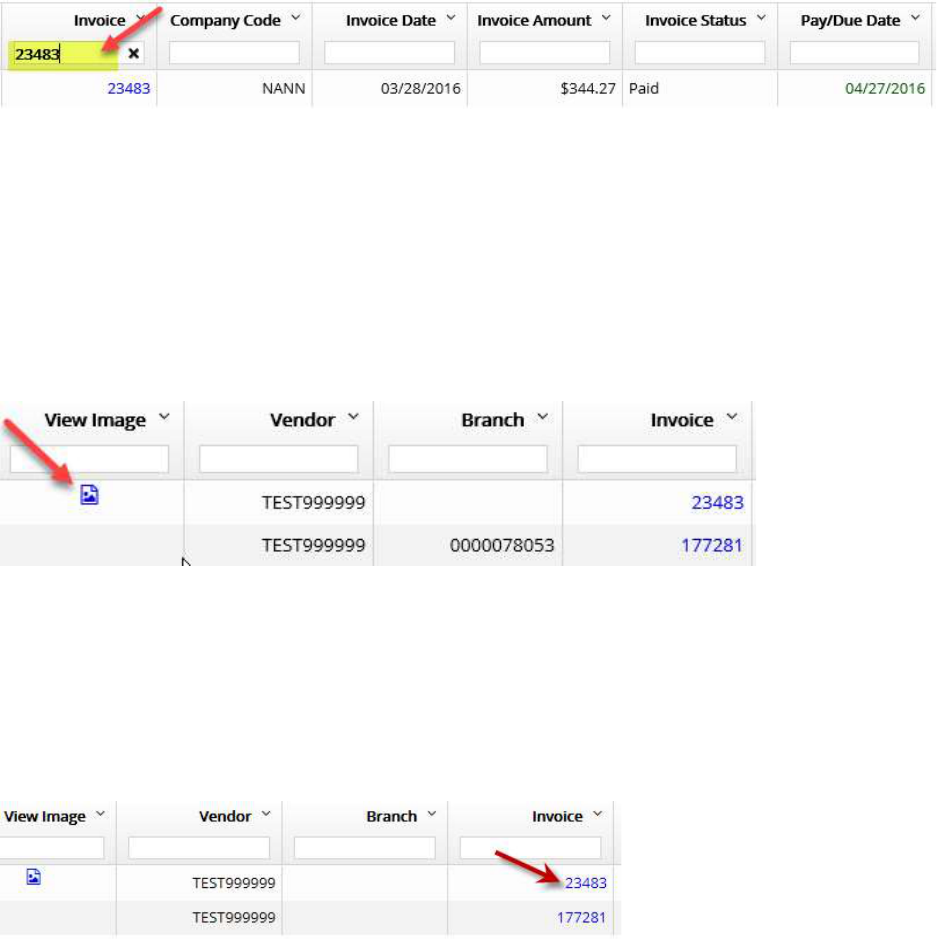
Filtering your search:
You can Filter using specific data, like Invoice Number, Invoice Date, Invoice Amount or Payment Date. In
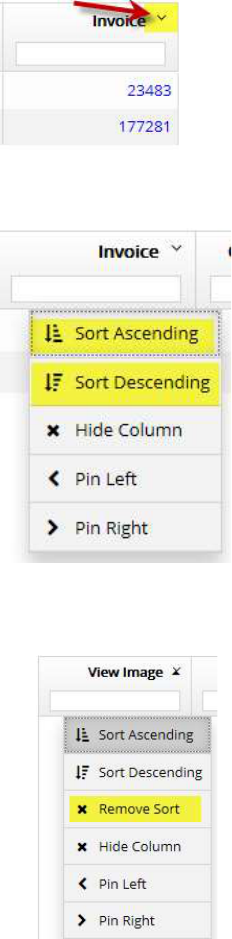
the example below, type Invoice number 23483 in the Invoice field and it will only display that invoice data.
*When finished with the search, click the “X” in the search field, to cancel the search & display all data. For
more information on Filtering, see section on Sorting, Rearranging and Hiding Columns.
View Invoice Image:
*Note – Only IPay invoice images are available to view here.
To view an invoice image, click on the picture icon shown below “View Image”, next to the invoice you
would like to view. Invoice will display in a pop up box. “X” to close pop up box.
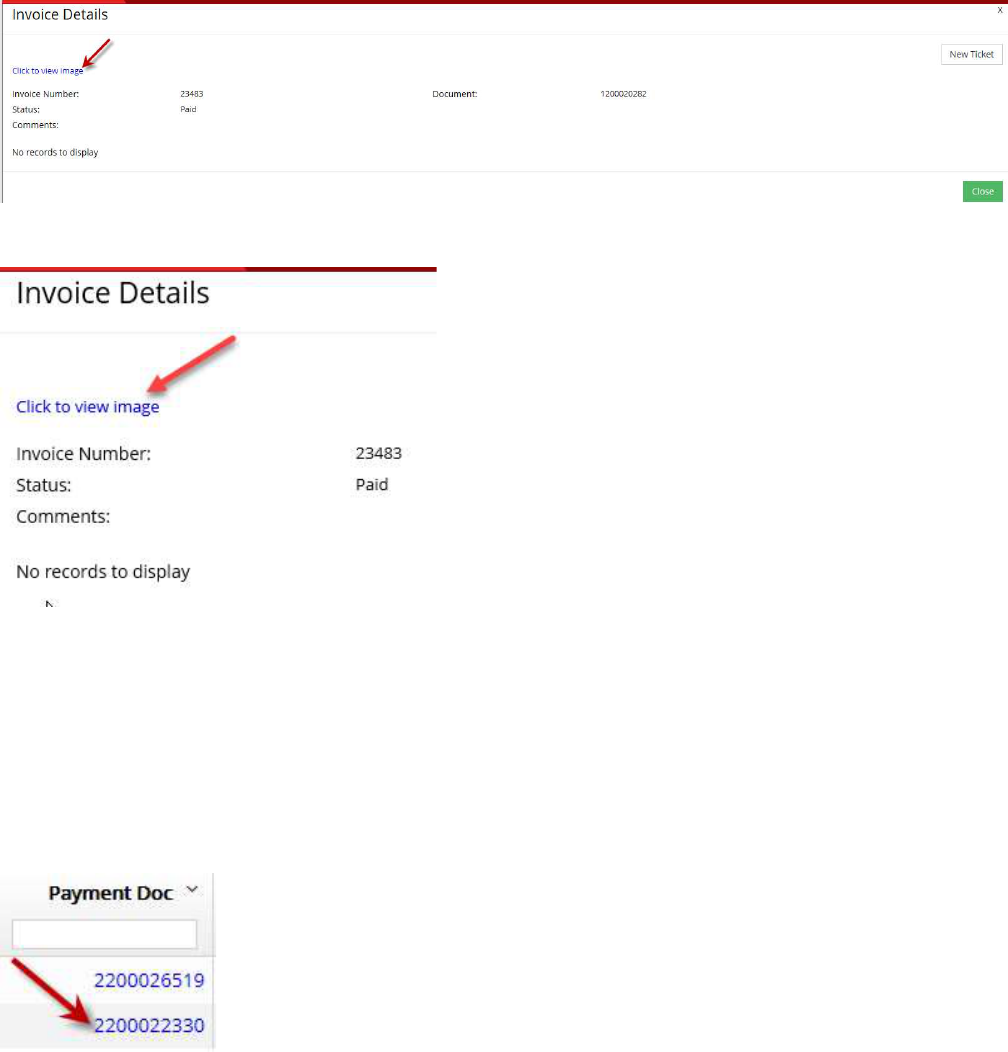
View Invoice Details:
*Note – Only iPay invoice details are available to view here.
To view Invoice details, click on one of the invoice numbers:
You should see a pop up box with invoice details:
13
This will include another link to view the invoice image.
Create New Ticket in Invoice Details
See section on Create JIRA Tickets.
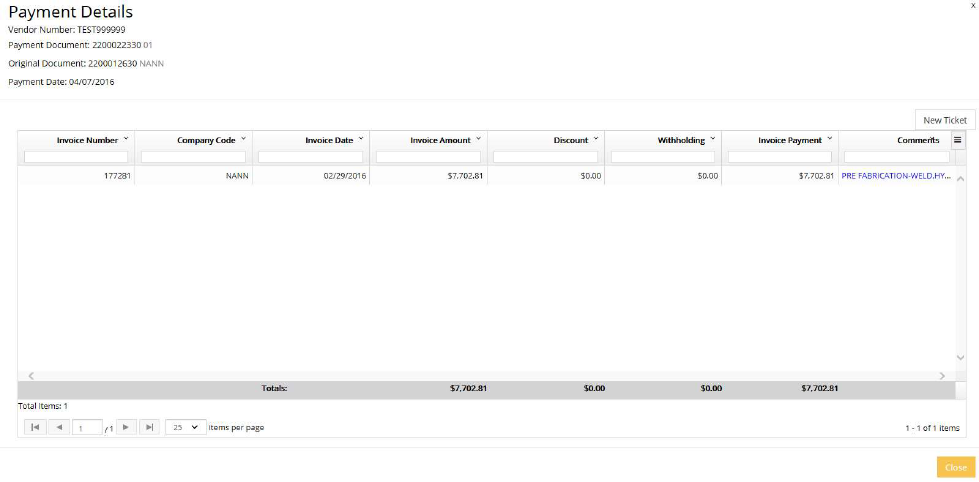
View Payment Document Details:
To view Payment Details, click on a Payment Document Number:
You should receive a pop up box with Payment Details:
14
Create New Ticket in Payment Details:
Once you have the Payment Details pulled up, you can open a New Ticket here also.
See section on Create JIRA tickets.
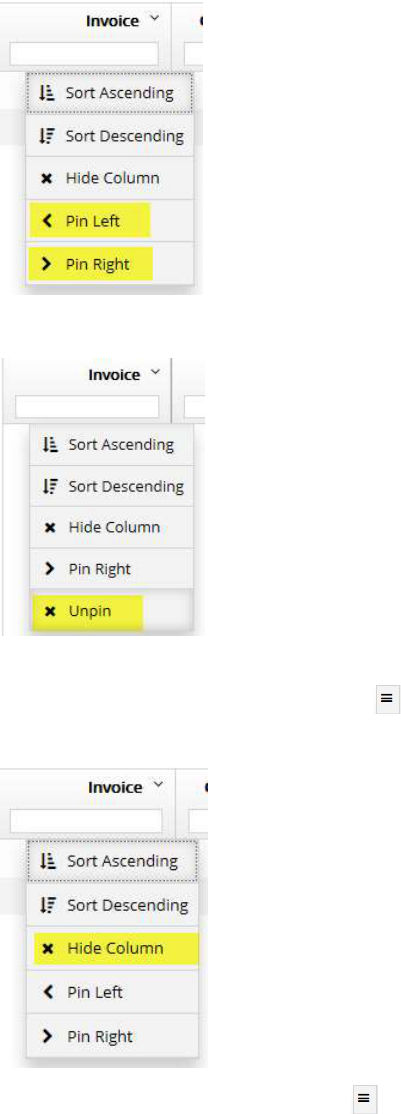
Sort/Pin/Hide Columns:
From the View Invoices section, you can Sort, Pin & Hide Columns in this view.
Columns include:
o View Image
o Vendor
o Branch
o Invoice
o Company Code
o Invoice Date
o Invoice Amount
o Invoice Status
o Pay/Due Date
o Payment Doc
o Source System
*See section Sort/Pin/Hide Columns section on how to navigate screens.
15
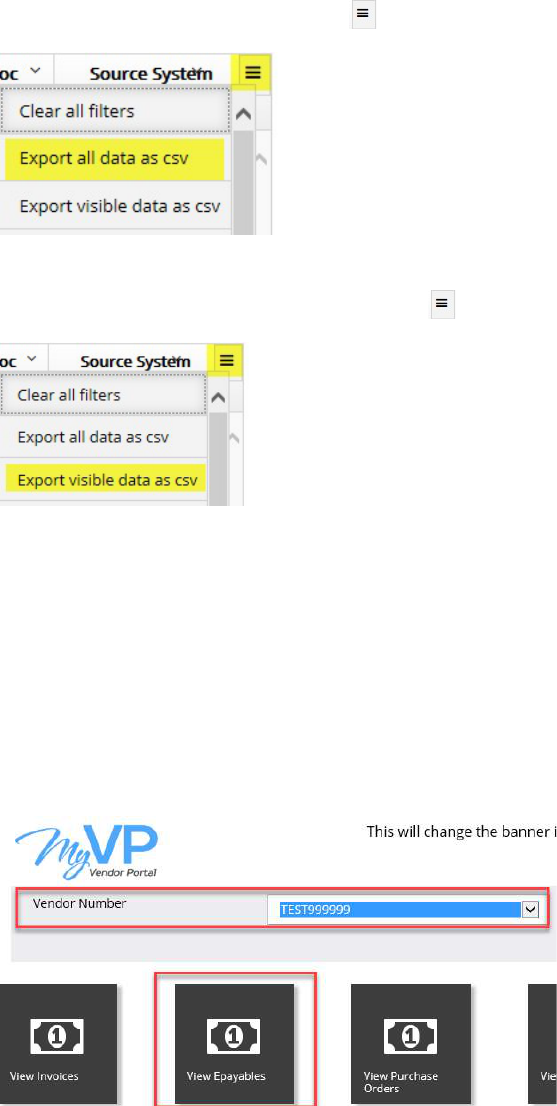
Export Data:
Data can be exported from MyVP in 2 different ways. You can Export All Data, or only Export Visable Data.
CSV is Excel format.
Export All Data:
Export All Data, by Clicking on the Icon on the Right, then selecting “Export all data as csv”.
Export Visible Data:
Export Visible Data only, by Clicking on the Icon on the Right, then selecting “Export visible data as csv”.
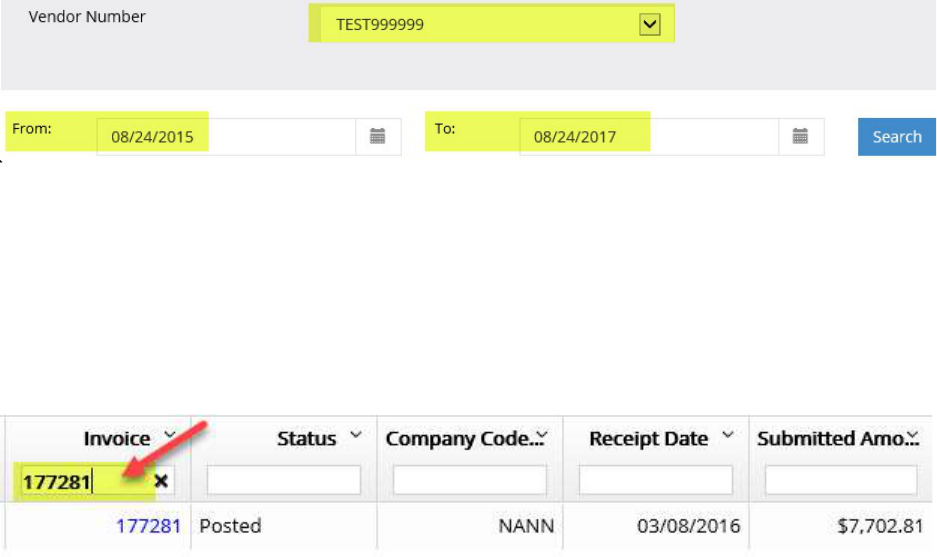
View EPayables:
From the Home page, Click on the View Epayables tile after selecting your Vendor Number you would like
to view from the drop down. *Remember you can click on the MyVP logo to revert back to the Home
screen at any time.
16
Search by Date:
You can minimize your search by Selecting a Vendor Number from the drop down here also, then Enter a
Date Range and click Search. *Note the date range default is from 1 year prior thru current date.
Filtering your search:
You can Filter using specific data in each column, including Invoice Number, Receipt Date, Submitted
Amount, Payment Date, Payment Document. In example below, type Invoice number 177281 in the invoice
field and it will only display that invoice data
*When finished with the search, click the “X” in the search field, to cancel the search & display all data.
Sort/Pin/Hide Columns:
From the View Epayables section, you can Sort, Pin & Hide Columns in this view.
Columns include:
o Vendor
o Invoice
o Status
o Company Code
o Receipt Date
o Submitted Amount
o Variance
o Calculated Amount
o Posted Date
o Payment Date
o Payment Doc
o Purchase Doc
o Source System
17
*See section Sort/Pin/Hide Columns section on how to navigate screens.
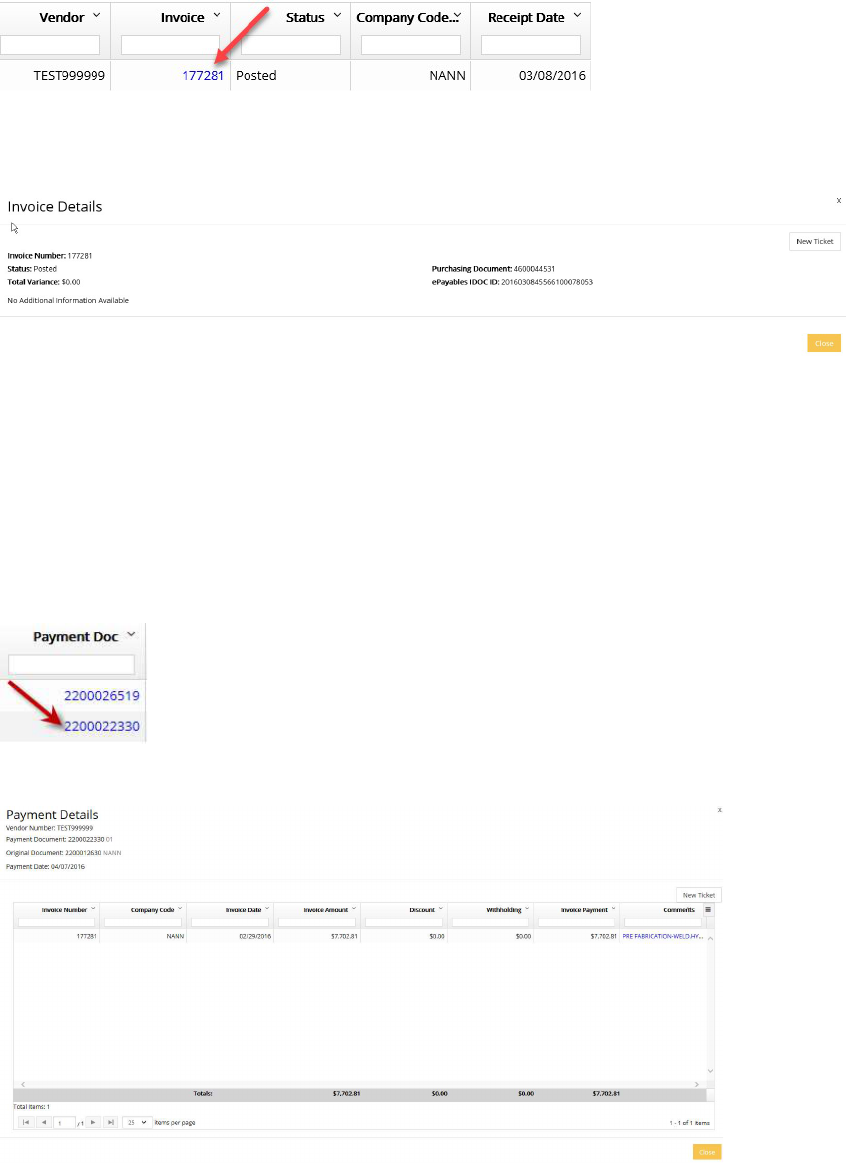
View Invoice Details
To view Invoice details, click on one of the invoice numbers:
You should see a pop up box with invoice details:
Create New Ticket in Invoice Details
See section on Create JIRA Tickets.
View Payment Document Details:
To view Payment Details, click on a Payment Document Number:
You should receive a pop up box with Payment Details:
18
Create New Ticket in Payment Details:
Once you have the Payment Details pulled up, you can open a New Ticket here also.
See section on Create JIRA tickets.
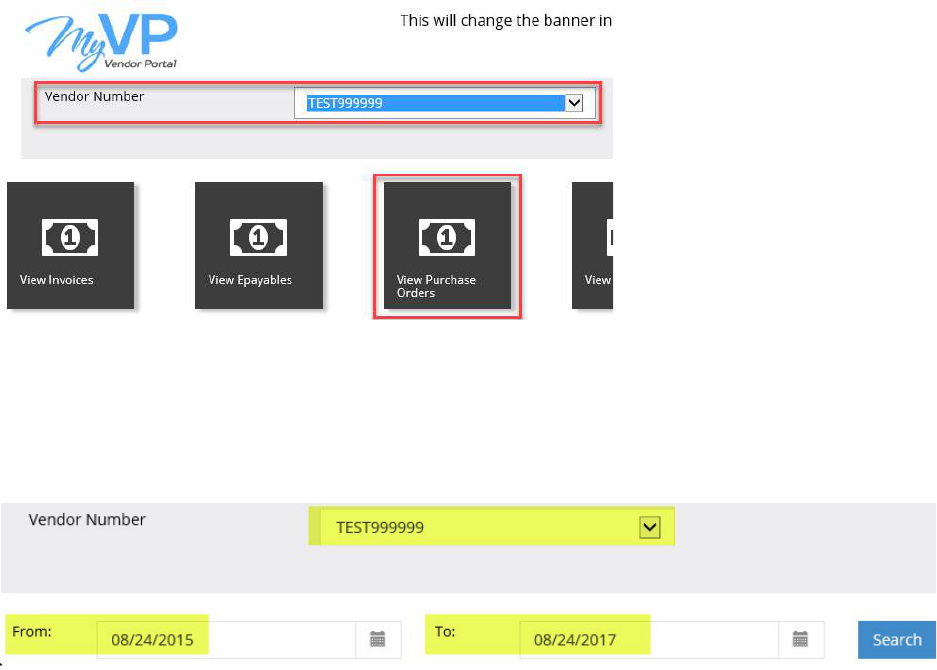
View PO Number:
From the Home page, Click on the View Purchase Order tile after selecting your Vendor Number you would
like to view from the drop down. *Remember you can click on the MyVP logo to revert back to the Home
screen at any time.
Search by Date:
You can minimize your search by Selecting a Vendor Number from the drop down here also, then Enter a
Date Range and click Search. *Note the date range default is from 1 year prior thru current date.
Filtering your search:
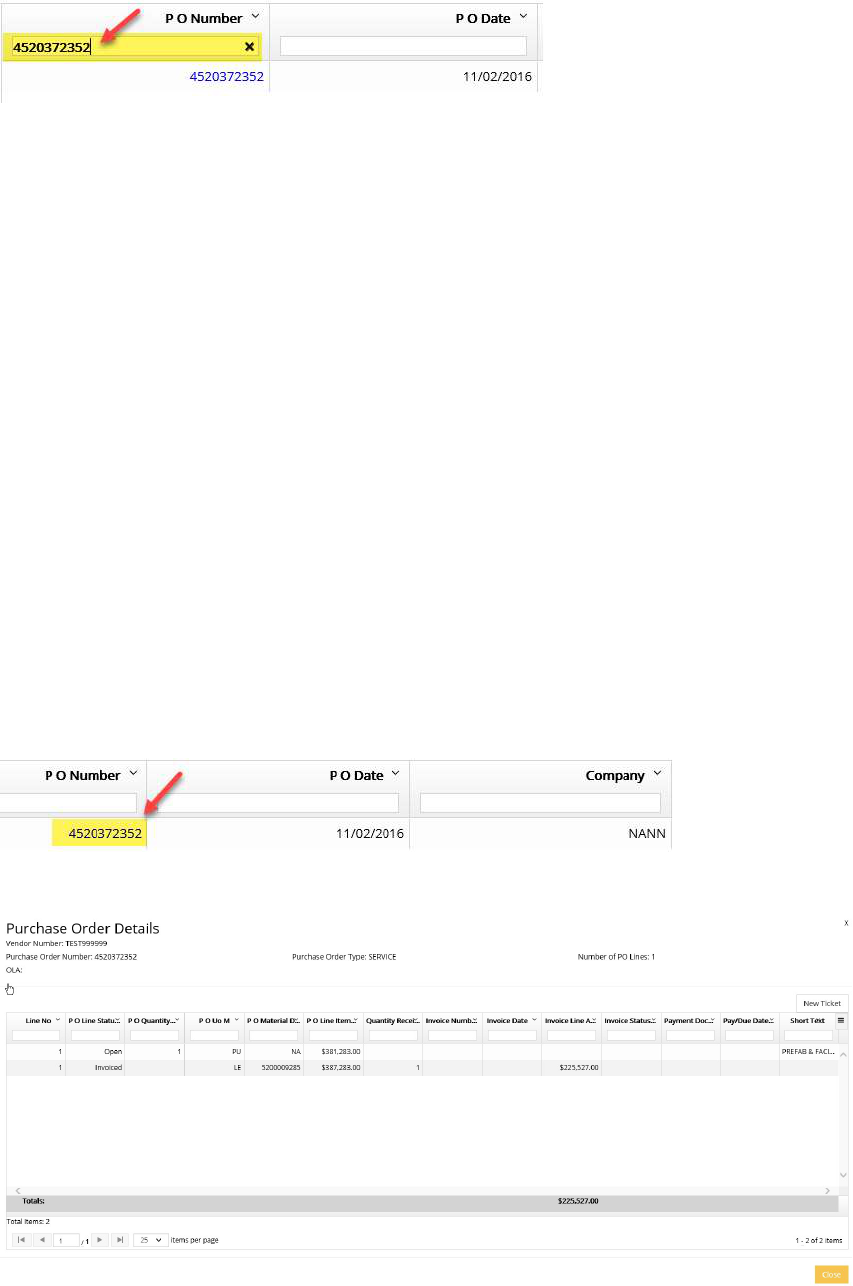
You can Filter using specific data in each column, including PO Number, PO Date, PO Amount, Inco Terms.
In example below, type PO Number 4520372352 in the PO Number field and it will only display that PO
Data.
19
*When finished with the search, click the “X” in the search field, to cancel the search & display all data.
Sort/Pin/Hide Columns:
From the View Purchase Orders screen you can Sort, Pin & Hide Columns in this view.
Columns include:
o PO Number
o PO Date
o Company Code
o PO Amount
o Inco Terms
o Reference
See section Sort/Pin/Hide Columns section on how to navigate screens.
View PO Details
To view PO details, click on one of the PO numbers:
You should see a pop up box with PO details:
20
Create New Ticket in PO Details
See section on Create JIRA Tickets.
View Payments:
From the Home page, Click on the View Payments tile after selecting your Vendor Number you would like
to view from the drop down. *Remember you can click on the MyVP logo to revert back to the Home
screen at any time.
Search by Date:
You can minimize your search by Selecting a Vendor Number from the drop down here also, then Enter a
Date Range and click Search. *Note the date range default is from 1 year prior thru current date.
Filtering your search:
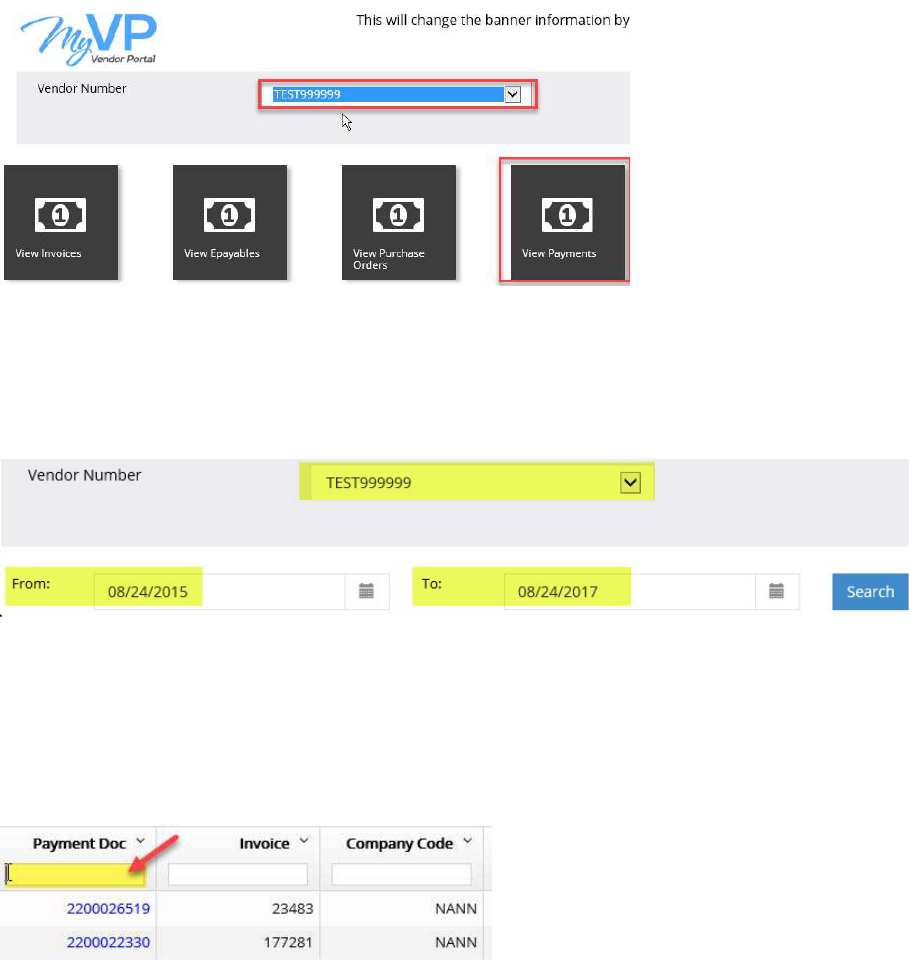
You can Filter using specific data in each column, including Payment Document Number, Invoice Number,
Invoice Amount, Invoice Payment Amount. In example below, type Payment Number 2200026519 in the
Payment Doc field and it will only display that Payment Document Data.
21
*When finished with the search, click the “X” in the search field, to cancel the search & display all data.
Sort/Pin/Hide Columns:
From the View Payments screen you can Sort, Pin & Hide Columns in this view.
Columns include:
o Payment Document Number
o Invoice
o Company Code
o Invoice Date
o Invoice Amount
o Discount
o Withholding
o Invoice Payment
o Payment Total
o Payment Date
o Invoice Type
See section Sort/Pin/Hide Columns section on how to navigate screens.
View Payment Details
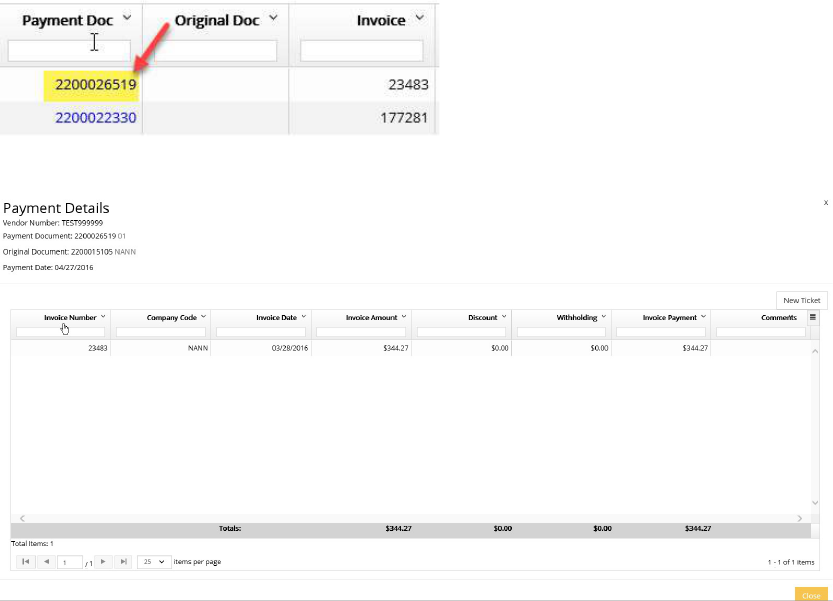
To view Payment Document Details, click on one of the Payment Doc numbers:
You should see a pop up box with Payment Details:
22
Create New Ticket in Payment Doc Details
See section on Create JIRA Tickets.
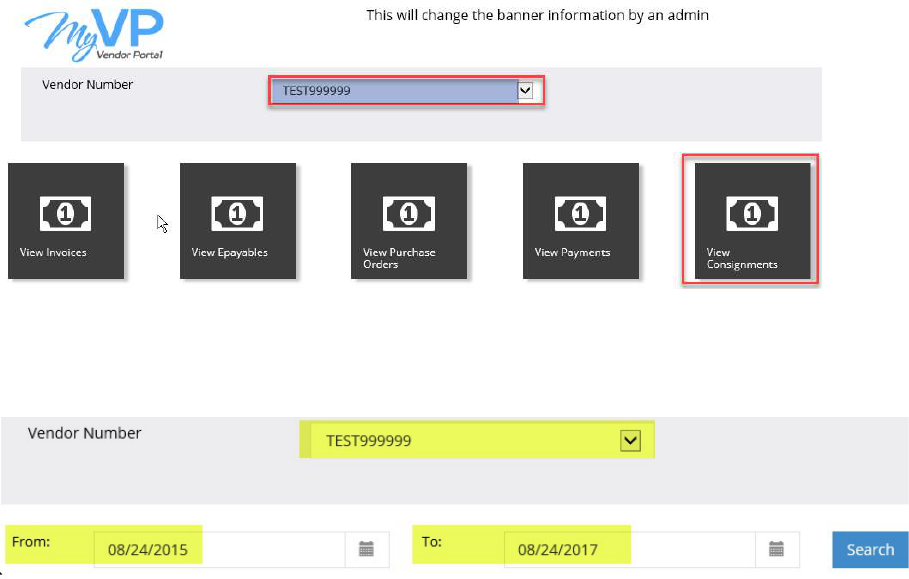
View Consignments:
From the Home page, Click on the View Consignments tile after selecting your Vendor Number you would
like to view from the drop down. *Remember you can click on the MyVP logo to revert back to the Home
screen at any time.
Search by Date:
You can minimize your search by Selecting a Vendor Number from the drop down here also, then Enter a
Date Range and click Search. *Note the date range default is from 1 year prior thru current date.
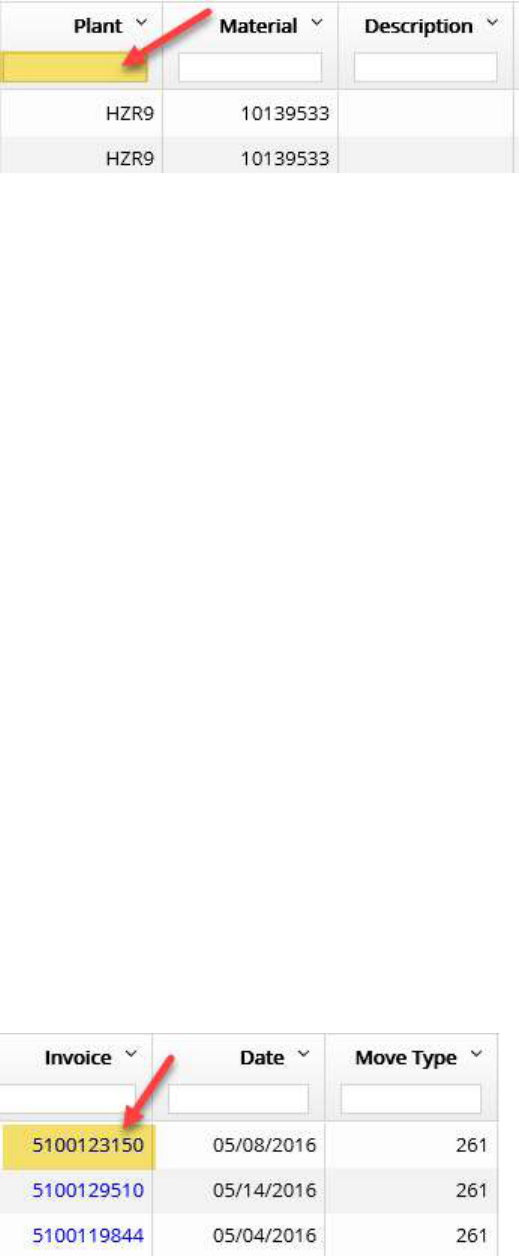
Filtering your search:
You can Filter using specific data in each column, including Plant, Material, Invoice, Date, Unit Price. In
example below, type Plant HZR9 in the Payment Doc field and it will only display that Payment Document
Data.
23
*When finished with the search, click the “X” in the search field, to cancel the search & display all data.
Sort/Pin/Hide Columns:
From the View Consignments screen you can Sort, Pin & Hide Columns in this view.
Columns include:
o Plant
o Material
o Description
o Your Mat No
o Invoice
o Date
o Move Type
o Quantity
o Unit
o Unit Price
o Net Value
o Plant Company
o Plant Address
o Plant City
o Plant Region
o Plant Postal Code
o Invoice Status
*See section Sort/Pin/Hide Columns section on how to navigate screens.
View Consignment Invoice Details
To view Consignment Invoice Details, click on one of the Invoice numbers:

24
You should see a pop up box with Consignment Invoice Details:
Create New Ticket in Consignment Details
See section on Create JIRA Tickets.
25
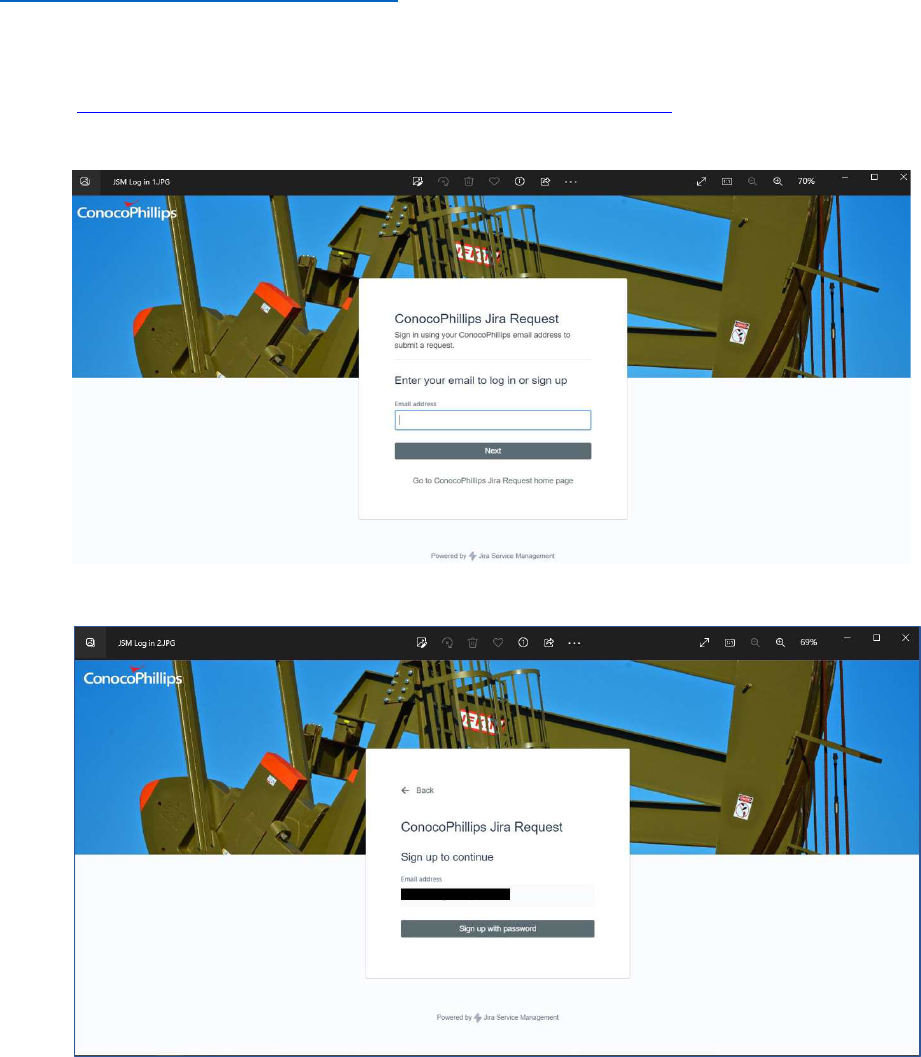
JIRA Sign-up and Login Instructions
Step-by-step instructions on how to sign-up and log into JIRA.
Go to the Customer landing page in JIRA.
JSM-Global Supply-Chain - Jira Service Management (atlassian.net)
Enter the email address to sign-up and click next.
Select sign-up with password.
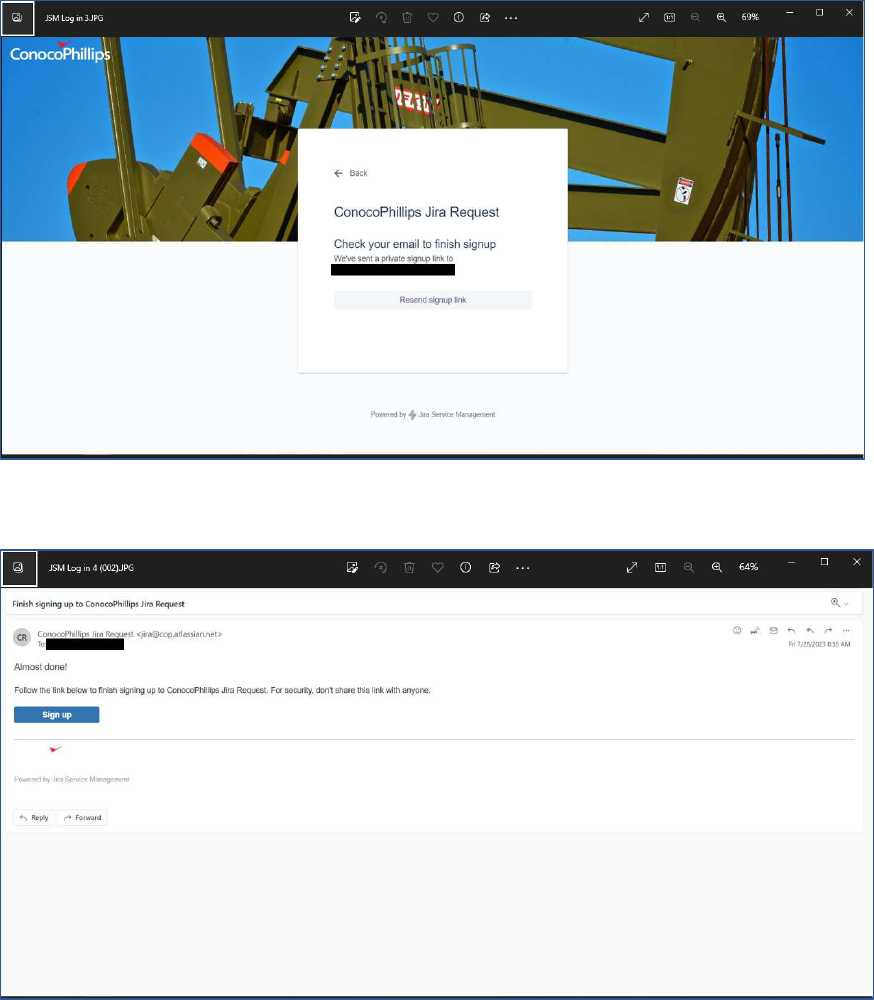
26
Close out of browser and check your email to finish the sign-up process.
After closing out of browser, click the sign-up button to finish the
process.
27
Enter full name and password then select sign-up to complete the process.
Create Jira Tickets:
JIRA tickets can be created from within the different tiles (sections) of MyVP. You can create tickets when
you are in these tiles:
View Invoices
View EPayables
View PO Number
View Payments
View Consignments
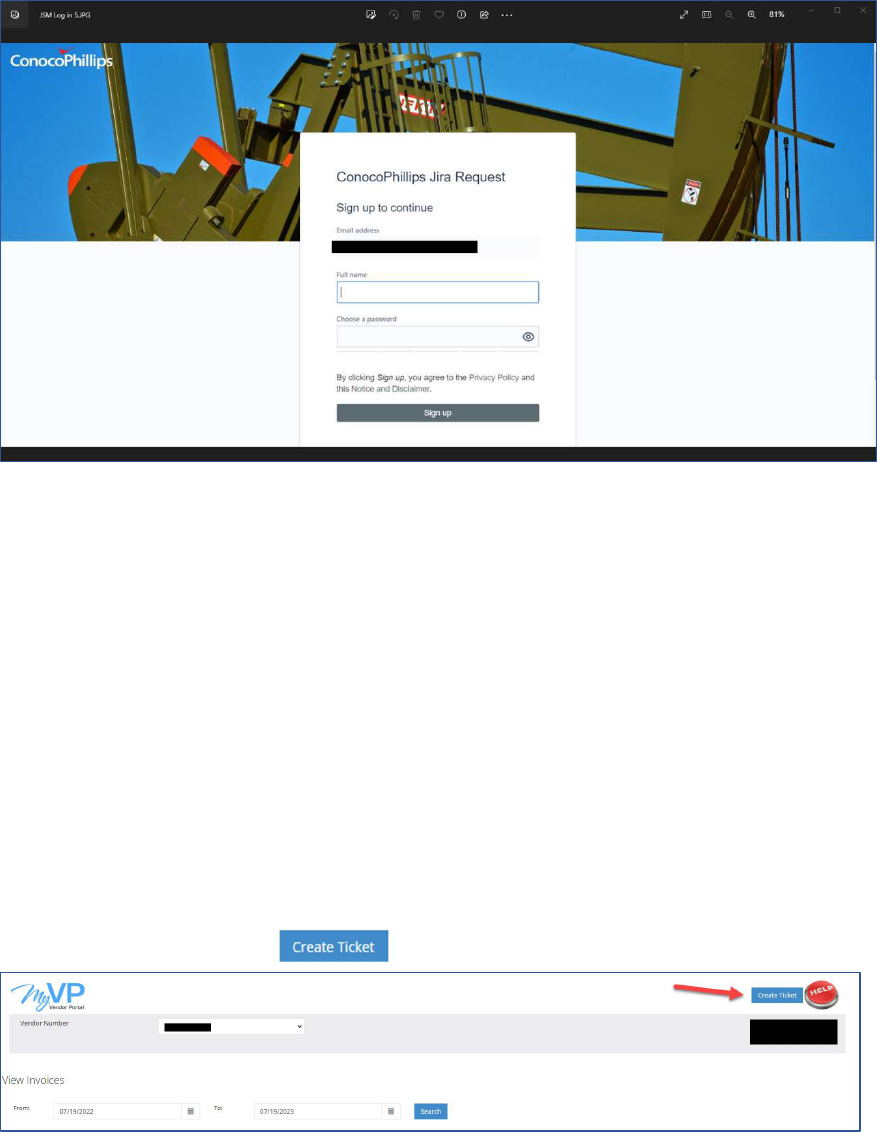
JIRA ticket submission through the MyVP portal
From the MyVP portal click the button in the top right-hand corner of any screen
28
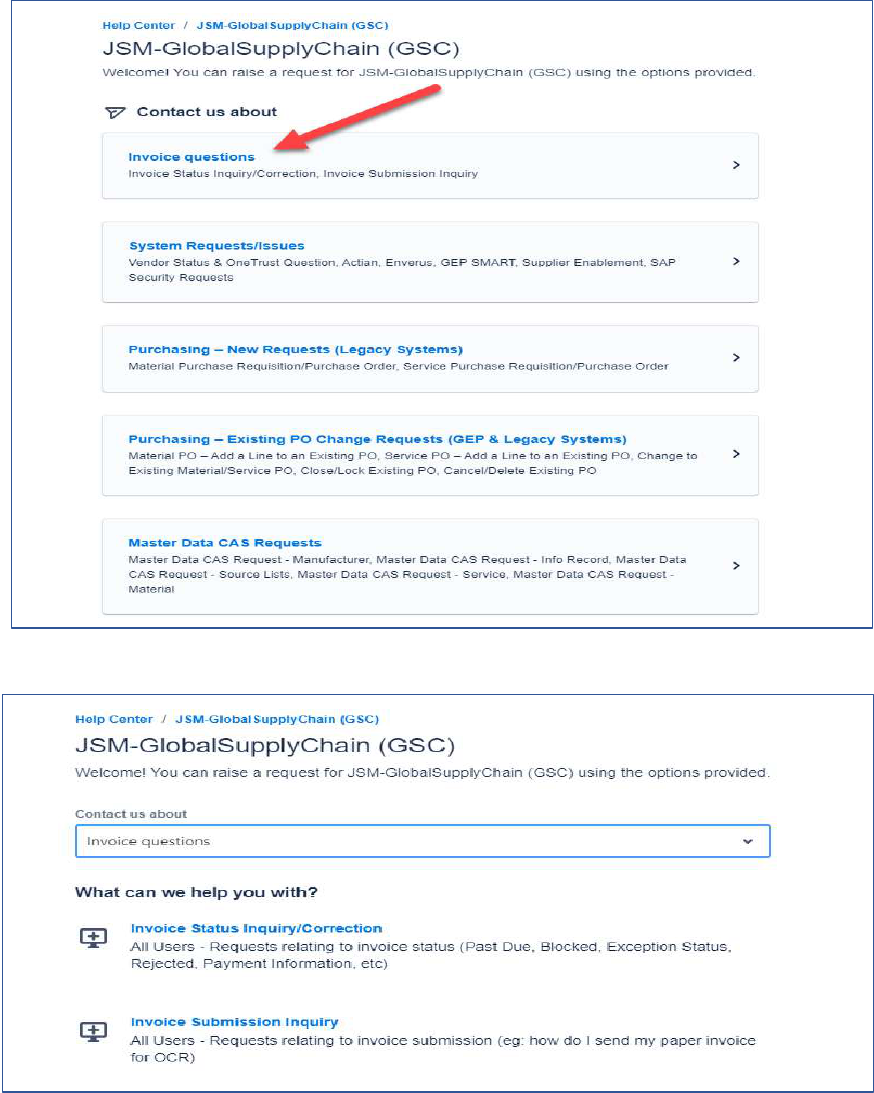
Choose the option that aligns with your inquiry. If you have an invoicing question, please choose
“Invoice questions”.
If "Invoice Questions" is selected, you will be prompted to select the type of invoice inquiry.
29
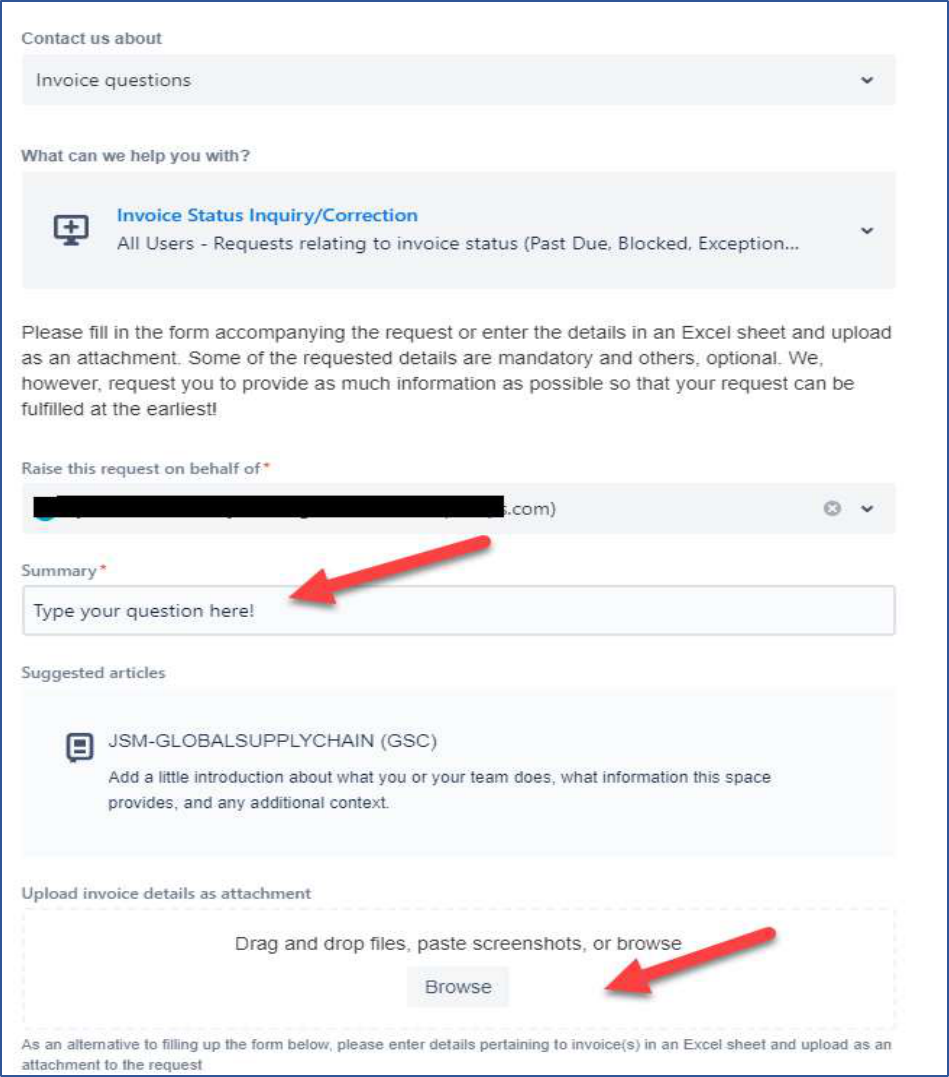
Complete the mandatory fields, the system will automatically fill in your email address that is associated with
your JIRA account.
Summary = A summary of why you are submitting a ticket
30
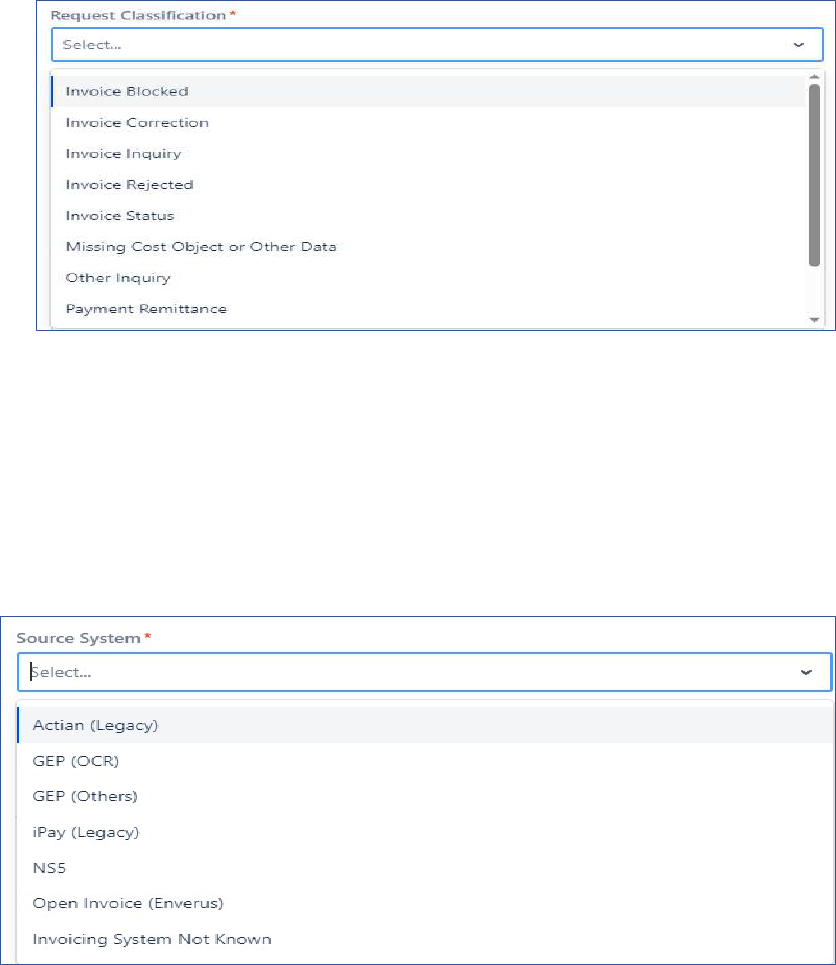
Request Classification
o Invoice Blocked - an invoice shows blocked in our system.
o Invoice Correction - an invoice in our system needs to be corrected.
o Invoice Inquiry
o Invoice Rejected - invoice shows rejected; you need more information as to why.
o Invoice Status - need status of invoice that is past the due date.
o Missing Cost Object or Other Data
o Other Inquiry
o Payment Remittance - need payment details
Source System (how did you submit your invoice)
o Actian (Legacy) - Lower48 and Alaska vendors, submitted through the Actian portal.
o GEP (OCR) – Canada vendors only, emailed invoices.
o GEP (Other) – Canada vendors only, entered directly into the GEP system.
o iPay (Legacy) – Lower48 and Alaska vendors, emailed invoices
o NS5 – Polar Tanker vendors only
o Open Invoice (Enverus)
o Invoicing System Not Known
31
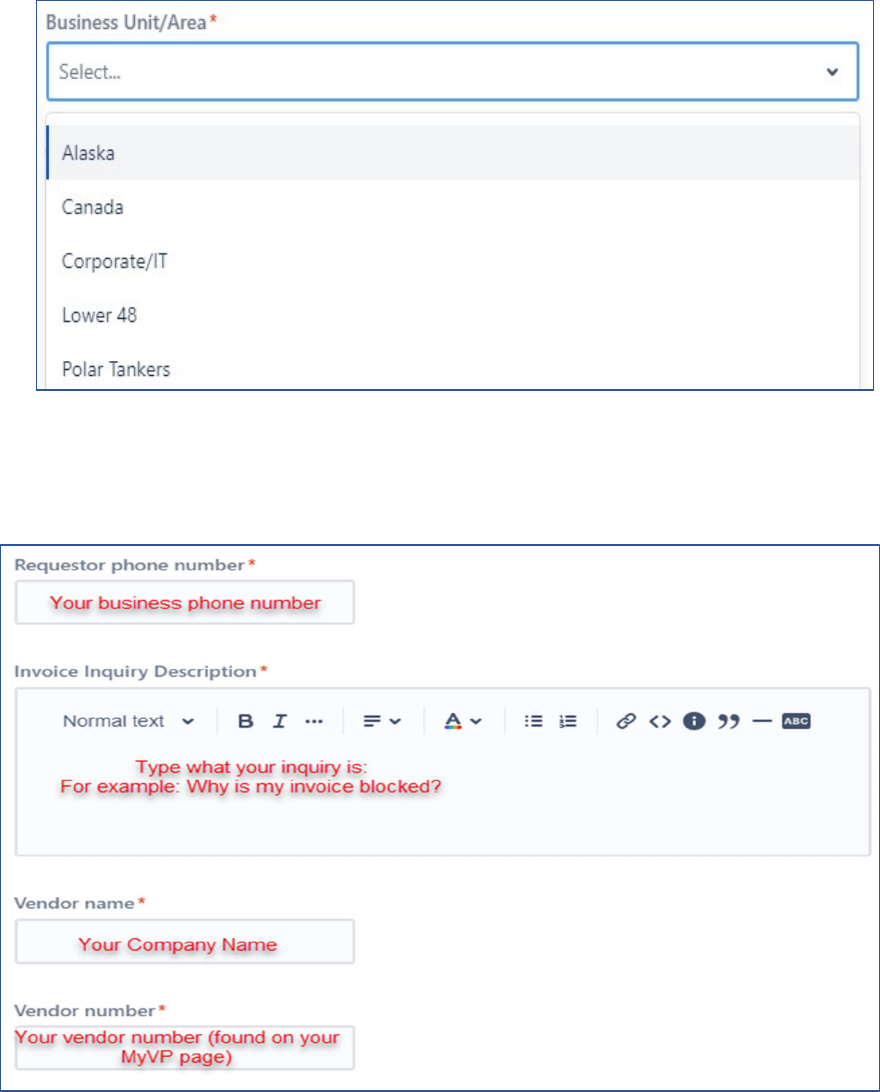
Business Unit/Area – choose the area you have invoiced.
o Alaska
o Canada
o Corporate/IT
o Lower 48 (US)
o Polar Tankers
Requestor phone number (your phone number)
Invoice Inquiry Description – add the question you have and details regarding your inquiry.
Vendor name
Vendor number – found on your MyVP page.
32
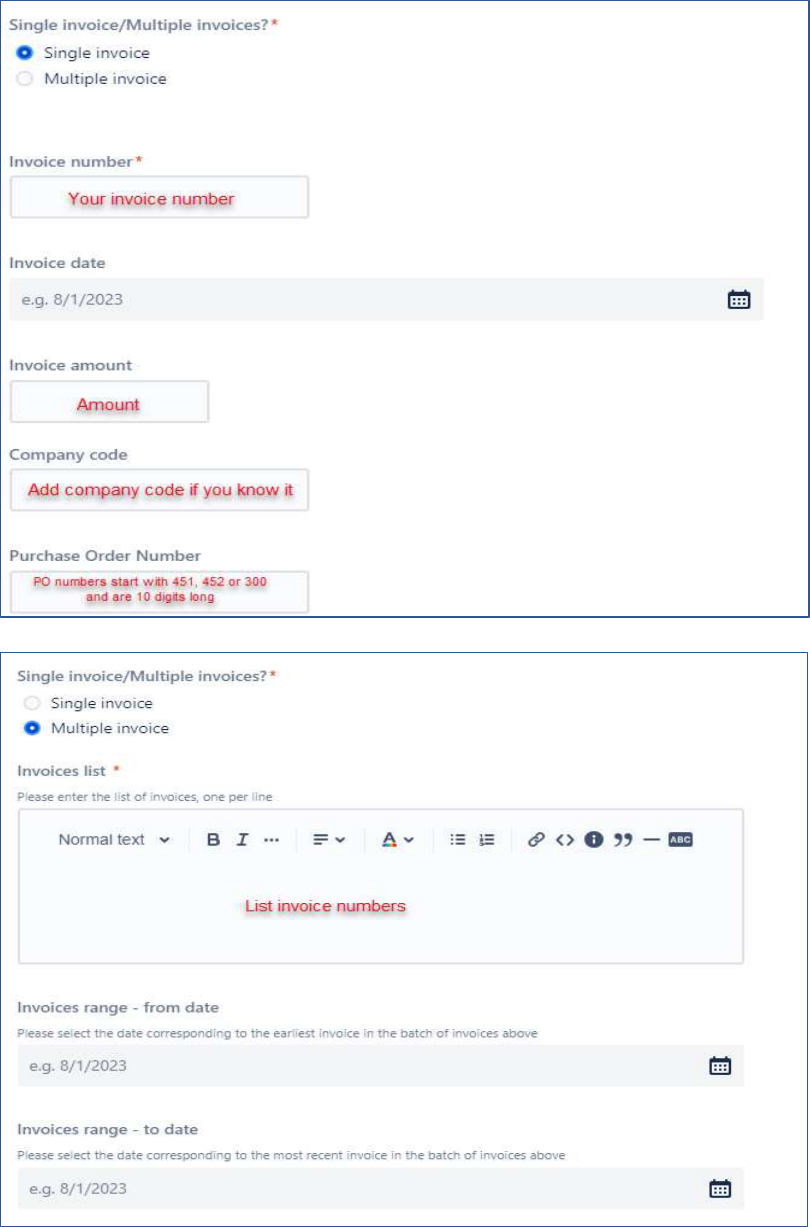
Single invoice/Multiple invoice – are you asking about one invoice or multiple invoices.
o Single invoice sample:
o Multiple invoice sample:
33
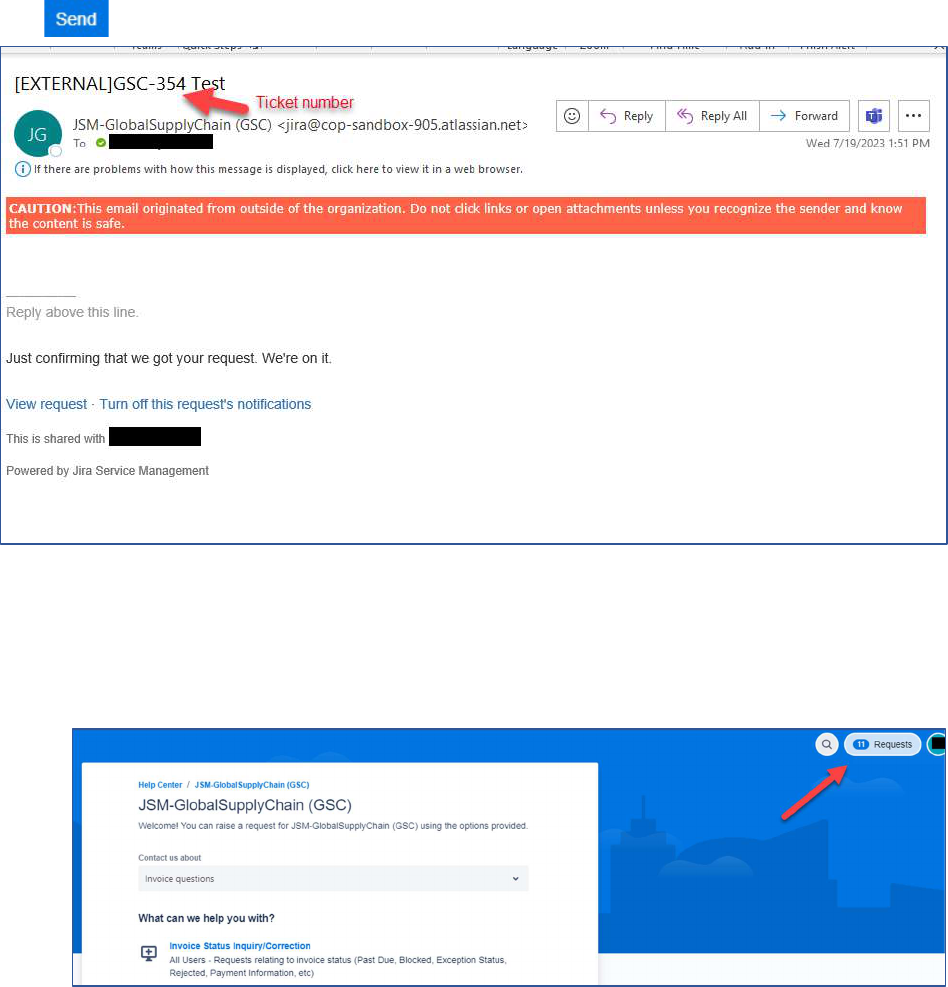
Click , you will receive an email with your ticket number and details.
From the email you received with your ticket number you will be able to click the View request and check
the status of your tickets and add comments directly to your ticket.
To see the status of the tickets you created.
Go to the JIRA ticketing site.
Click “Requests in the top right-hand corner.
34
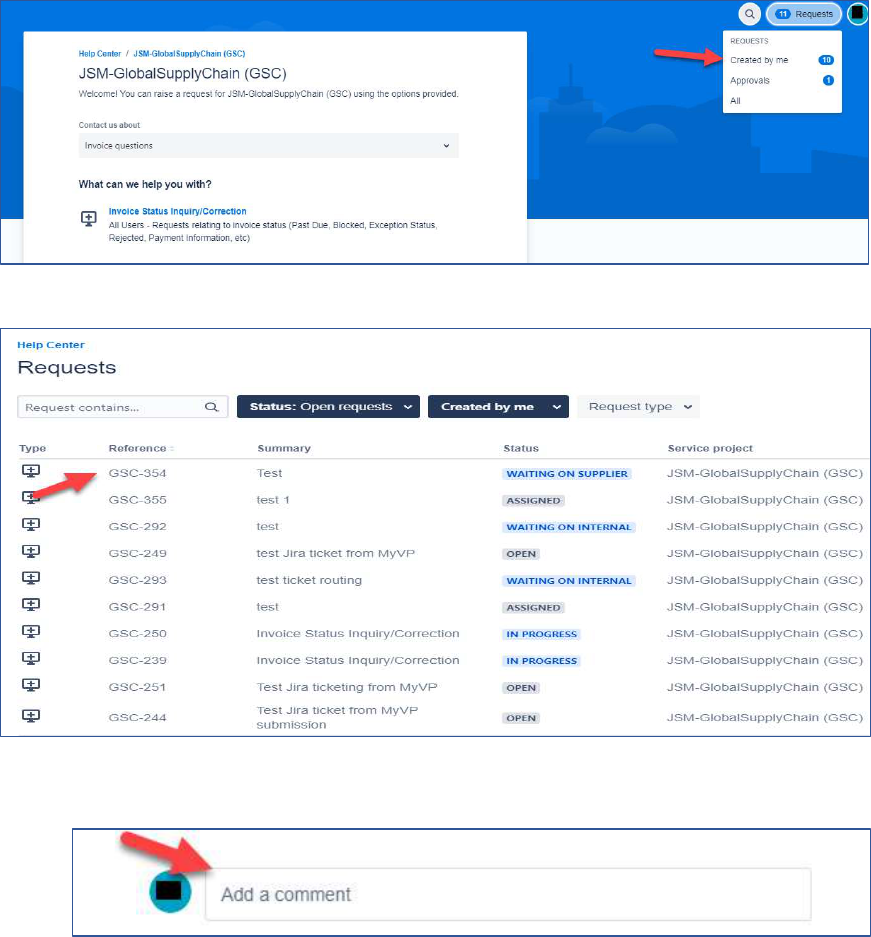
Click “Created by me”
Click the ticket number.
o You can add a comment to your existing ticket that will go directly to the ConocoPhillips
employee who is working your ticket.
35
Sort/Pin/Hide Columns:
These examples below are from the View Invoices section, but you can Sort, Pin & Hide Columns in each of
the different sections.
Sort Columns:
Sort data by using the Drop-Down Arrows next to each Column Name.
Sort each Column in an Ascending or Descending order:
To delete the Sort, Click on the drop down again & choose “Remove Sort”:
36
Pin Columns:
Rearrange Columns by clicking on Pin Left or Pin Right:
Remove PIN by Clicking on the drop down again & choose “Unpin”:
Hide Columns:
Hide Column’s by clicking on the Icon at the Right of the Column name and choosing “X Hide
Column”:
To Un-Hide a Column, click on the Icon at the Right and Select the Column Name you want to Un-
Hide that has an “X” next to it:
37
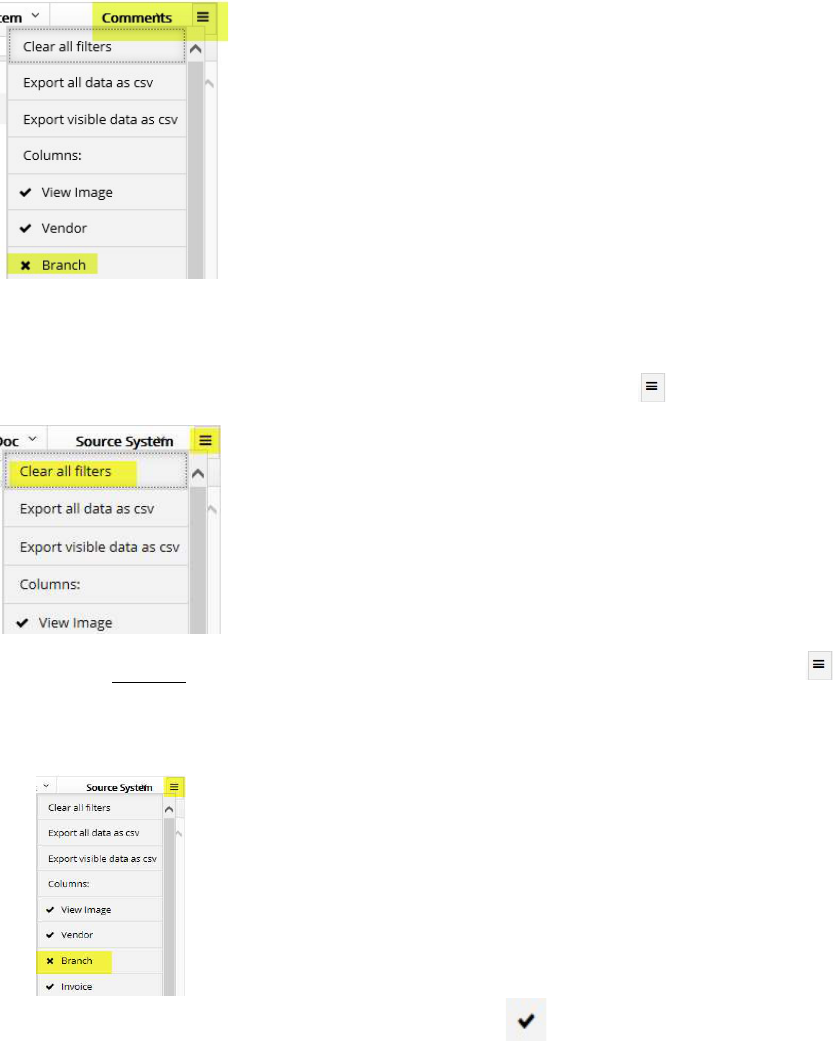
Clear Multiple Filters:
You can also clear all filters at one time, by clicking on this icon at the Right & choosing “Clear all filters”.
To clear multiple Filters at one time, (but not all), Click on the Filters Icon on the Right .
Column names that have an “X” beside them are currently Filtered out.
o To remove the Filter on selected column names, Click on each of those column names that
currently have an “X” beside them. This will remove those Filters.
The column name status will revert to a Check Mark .
38
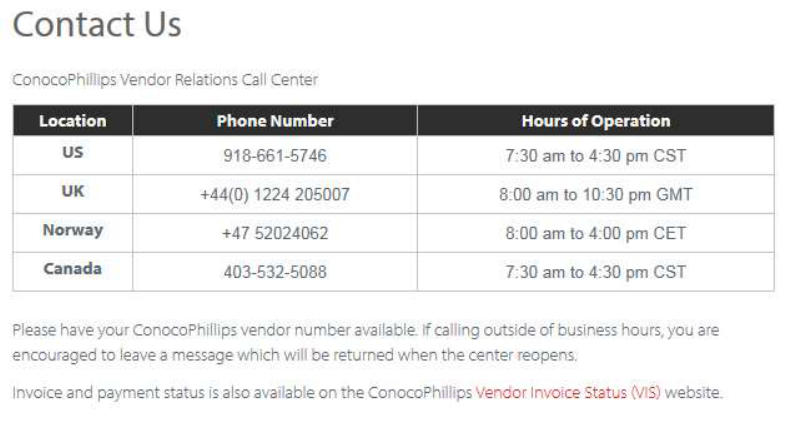
Error Messages
If you receive an Error message, click on the Red Help button on the Right.
Click on the Contact Us section on the Right.
This will provide phone numbers for our Help Desk (by Country). Please have your Vendor Number ready
when calling.
*Note – The AP Help Desk is available to assist vendors in learning to navigate MyVP and identify answers
to invoice inquiries. They can also teach vendors how to submit an invoice inquiry (incident) ticket for
additional help.
39
Logging Out:
*Note – When exiting this website, simply close (no logout is required).
FAQ’s:
1. Idle time – The system will log you out after 20 minutes of idle time. It might seem that you can
still navigate screens, but as the data is cached, any call back to the server will not make contact
with our database.
2. A Layout that you created will not save once you exit a screen.
3. Date format is specific in search functions MM/DD/YYYY.
4. When adding a new vendor all alpha-characters must be upper case.
5. Service Now Tickets – You can attach documents viewing tickets, you will not be able to see that
one was sent with the ticket.
Glossary:
iPay vs ePay: Vendor invoices can be submitted into Accounts Payable via iPay or ePay. Both platforms
accept FI/AP and PO invoices. The primary difference in the two systems is the method in which a vendor
submits the invoice and the level in which ConocoPhillips Accounts Payable system accepts the invoice.
iPay – iPay will accept a “paper” invoice via a physically mailed invoice that is scanned or via an e-mail
account. An iPay invoice is accepted at a summary level only. For instance, if an invoice has 2 lines of detail
representing 2 distinct items at $100 each, the invoice total of $200 is what will be entered into
ConocoPhillips Accounts Payable system, not the individual lines.

40
ePay – ePayables accepts electronic invoices only from a 3rd party provider, Actian. Vendors will either
enter invoice details directly into Actian via a web portal or larger vendors will transmit a file to Actian. In
both cases, certain edit checks are completed prior to Actian transmitting the data to COP-ePayables. In
addition to FI/AP and PO invoices, ePayables can accept invoices referenced against a contract. This is
possible because all ePayables invoices transmit at a line item level. Therefore, in the example above the 2
line invoice referenced would be captured so that the distinct items would each appear on a separate line
with the line item value which can be automatically compared to a PO or contract price.
FI/AP – This type of invoice is not tied to a contract or purchase order. It is very important that the
vendor submits this invoice with reference to a valid ConocoPhillips employee userid. The userid should be
provided to the vendor by a ConocoPhillips employee involved in the transaction with the vendor. This
userid is used by ConocoPhillips’ invoicing systems to route the invoice to the individual user so they can
record the liability and enable a payment to be generated.
PO – (Purchase Order) - A buyer-generated document that authorizes a purchase transaction. When
accepted by the seller, it becomes a contract binding on both parties. A purchase order sets forth the
descriptions, quantities, prices, discounts, payment terms, date of performance or shipment, other
associated terms and conditions, and identifies a specific seller. Valid ConocoPhillips Purchase Order
Numbers are 10-digit all numeric numbers beginning with 300, 430, 431, 450, 451 or 452.
Consignment - Consignment occurs when goods are sent by their owner (the consignor) to an agent
(the consignee), who undertakes to sell the goods. The consignor continues to own the goods until they are
sold, so the goods appear as inventory in the accounting records of the consignor, not the consignee.
Incoterms – Standard trade definitions most commonly used in international sales contracts (can be
used domestically). Includes 13 Trade Terms established by the International Chamber of Commerce (ICC).
Specifies certain obligations within the sales contract. Provides internationally accepted definitions of
Responsibility of buyer and seller, Allocation of cost and Assumptions of risk.
Branch Vendor / Head Office Vendor – When a vendor has one or more purchasing locations
with different addresses than the vendor’s remittance address, a Branch-Head Office relationship is
setup. A Head Office vendor is setup with the remittance address and banking. One or more Branch
vendors are setup for each unique purchasing location and tied to the Head Office. Typically, all invoices
are posted on the branch vendor(s) and paid through the Head Office vendor. *Vendors should add all
Branch and Head office vendors to MyVP. If they are struggling finding an invoice, it is best to search under
all associated numbers before submitting a help desk ticket.
