
Princeton University - Office of Information Technology Page 1
Additional Resources
• Service-Now KB Article ID: KB0013416
• Microsoft Documentation: MS Bookings Resources
• Checklist/Questionnaire: Getting Started Checklist/Questionnaire
• MS Teams Site Bookings Channel: Bookings Training SPOT
• Princeton’s Bookings Website: bookings.princeton.edu
• 1-1 Bookings Support: Book time with Bookings specialist
Quick Reference Directory
Function Page
Resources & Quick Function Lookup 1
Recommended Order of Steps 2
Step 1. Setup Wizard 2
Step 2. Business Information 3
Step 3. Booking Page 4, 5
Step 4. Add Staff 6
Step 5. Define Services 7, 8, 9
Step 6. Schedule Closures and Time Off 10
Microsoft Bookings - Quick Reference Guide
Quick Function Lookup
Once the Bookings calendar has been setup, it may need to be updated/
changed based on changes to availability. Use the table below to quickly
navigate to actions you may take to manage your calendar.
Quick Function Page
Update Office Hours
3
Unpublish Calendar
4
Date/Time Sync
5
Change Staff Role
6
Set Max Number of Attendees
7
Assign Staff to Service
8
Customize email Confirmation
8
Open Blocks of Time on the Fly
9
Time Off and Closures
10
Update Staff Hours
10
Note: All the resources listed above can be found within the Princeton Bookings
website: bookings.princeton.edu.

Step 1 - Create a New Bookings
Calendar – Setup Wizard
1. Navigate to Princeton’s Microsoft Portal
(portal.office.com) and login in with your
Princeton NETID and Password.
2. From the App Launcher, locate and select
Bookings.
Note: The first time you use Bookings, you’ll be
asked to click Get it Now to get started.
3. From the Bookings Landing Page, click
Create New Calendar
A Wizard will launch, walking you through steps to
create a new Calendar. Only the first step is
required. We recommend skipping to Step 4 by
clicking Next on the bottom-right of the Wizard
window.
Microsoft Bookings - Quick Reference Guide
Wizard Step 1 of 4 – Create a New
Bookings Calendar
Name: This is a required field. The information
entered here is used to create a Bookings
Mailbox and a unique public-facing Booking Page
for appointment management. Only the Name
field is required. This URL cannot be changed
once created.
Your Calendar is created and ready for custom
configuration. It contains left-navigation menu items
for which we recommend a specific order:
Wizard Step 4 of 4 (Optional) –
Choose who can Book Appointments
This step allows you to set permissions for whom
should be able to access the Bookings Page and book
appointments with you.
Princeton University - Office of Information Technology Page 2
Recommended Order of Steps
1. Create a Bookings Calendar - Wizard (Step 1)
2. Enter Business Information
3. Customize the Booking Page*
4. Add Staff
5. Define Services
6. Schedule Closures and Time Off
*Booking Page – The default scheduling
configuration is setup here. Additional modifications
to the schedule can be made in the Services section.
Note: Completion of the wizard will not result in
a finalized calendar.
The following other fields in this step can be
skipped and added later.
• Add a Logo
• Business Type
• Business Hours
Note: While the URL cannot be changed, the
Business Name (as seen by the end-user on the
Bookings Page) can be modified. See Business
Information section of this guide (Step 2).
Note: This option can be modified in the future.
See Booking Page section of this guide (Step 3).

The Business Hours are intended to indicate all hours
of operation. These are the windows in which you or
those you support are accepting appointments and
are generally expected to be working. The approach
you take to these fields are contingent on how you
intend to use Bookings:
• Single User: If you are only scheduling one type of
appointment for yourself only, you can define your
Business Hours as the hours you want to accept
appointments.
• Multiple Users: If you are offering multiple
appointment types at different times/days of the
week and have multiple colleagues associated with
each appointment type, you will need to define
your Business Hours in terms of the working hours
comprising all availability for all of your Services
and Staff.
Use the icons found in the columns to the right to
Add/Delete windows of time or remove days of the
week that should not be bookable by any Staff. Scroll
to the top of the page to Save (upper-left), when you
are finished.
Step 2: Enter Business Information
Click Business Information from the left-navigation
pane. The information entered here will be visible
on the public-facing Bookings Page to anyone
seeking to book time with you.
Enter Business Information
The Business Information tab lists five sections that
help you set up your Calendar. It is recommended
that you review the fields in two essential areas:
Basic Details and Business Hours.
Microsoft Bookings - Quick Reference Guide
Princeton University - Office of Information Technology Page 3
Pull down the caret in each section to reveal the
fields in each section.
Business Name
By default, Bookings pre-populates the Business
Name field with the name you gave your Calendar.
This information is displayed as a heading/calendar
title on the public-facing Booking Page and can be
modified.
Note: Changes to the Business Name field will
only be reflected at the top of your published
Booking Page. Your calendar cannot be renamed
on the backend.
Send Customer Replies To
The email address entered here will receive
notifications regarding activity on the Calendar.
This could be the Administrator (owner) of the
Calendar, a listserv, a Service Account, etc.
Note: At this time, this field cannot exceed one
email address.
Basic Details
The information entered in this section provides
users with at-a-glance information you wish to
share on the Booking Page such as office location,
phone number, and website URL. There are two
main components of the Basic Details section to be
aware of:
Business Hours

Microsoft Bookings - Quick Reference Guide
Set or modify permissions for who should be able to see the Bookings
Page, check availability, and book appointments.
• Available to anyone: Anyone with the link and internet access
can view the Booking Page.
• No self-service: Your calendar will not be published. You can
use this option to ‘unpublish’ your calendar as well.
• Available to people in your organization: Only individuals that
authenticate through Princeton CAS can access the page.
Step 3: Customize Booking Page
Click Booking Page from the left-navigation pane to
make edits to the configuration of your Booking
Page. Here you can set access, retrieve your unique
Booking Page URL to be shared, set your Default
Scheduling Policy, set your time zone, and
customize the look and feel for those who land on
your page to book an appointment with you.
Princeton University - Office of Information Technology Page 4
Note: The settings found in the Default Scheduling
Policy are also the default settings in place for
each of the Services (appointment types) you
create. Each new Service can either take the
defaults created here, or you can override the
default scheduling policy with unique settings you
define (see Step 3, D2: Default Scheduling Policy).
Configure Booking Page
Note: Students may be trying to book time with you via their personal device, which may not be logged into the Princeton
network. Choosing to make this Available to Anyone will allow anyone with the link to book time with you.
Manage your Booking Page
The fields in the Manage your Booking Page section provide an opportunity to further manage access and data usage
consent. The two main components to focus on are under the Business Page Access Control section:
• Disable direct search engine indexing of booking page:
This setting prevents your page from appearing in the
search results for Google, Bing, and other search engines.
Selecting this box will ensure access to the page is limited
to the generated page link. If this feature is not disabled,
anyone
can find the Bookings Page on the open web and
book time on the calendar.
Business Page Access Control
Step 3 Continued: Customize Booking Page
• Require a one-time password to create bookings:
When this option is enabled, the user will be prompted to verify their email
address by retrieving and entering the verification code sent to the email address
provided in order to proceed with the booking.

Microsoft Bookings - Quick Reference Guide
• Time Increments: You can set up the increments for appointment times in increments of 5
minutes to 4 hours.
• Minimum Lead Time: This is how many hours you want in advance to prepare for an appointment.
For example, are you able to respond to same day appointments? If not, consider allowing for a
24-hour minimum lead time.
• Maximum Lead Time: How far in advance should users be able to book appointment with you?
Should you have your calendar bookable for a semester? The default is 365 days.
Email Notifications
• Notify the business via email when a booking is created or changed: When this option is selected,
notifications are sent to the ‘business’ email address provided in the Send Customer Replies to
field in the Business Information section.
• Send a meeting invite to the customer: This option allows those booking time with you to add a
placeholder for this appointment to their personal calendar.
Staff Control
• Allow customers to choose a specific person for the booking: If you have multiple Staff members
setup for a Service, this setting allows for users to select from a list of those available Staff to meet
with.
Availability
In general, a Service can be booked when its Staff are free. If you wish to customize this further, you
have the option to change the General Availability or set custom availability for a specific date range.
Princeton University - Office of Information Technology Page 5
Default Scheduling Policy
The settings found here are the default settings you determine for each of the Services (appointment types) you create in the Calendar. Each subsequent Service create
can either take the defaults you create here, or you can override the default scheduling policy with unique settings you define.
Region and Time Zone Settings
Use this section to verify the current time zone reflects your current geographic location.
Select the option to Always show time slots in business time zone.
Note: Use caution when applying the Default Scheduling Policy to other Services created, as this will affect
availability for those Services.

Microsoft Bookings - Quick Reference Guide
Princeton University - Office of Information Technology Page 6
The Staff page is where you add and manage staff member details and their specific availability.
Step 4: Add Staff
Note: By default, the creator of the Calendar is pre-populated in this area with the role of
Administrator.
Click Staff from the left-navigation and click the Add New Staff button.
Upon adding a new Staff member, assign them an appropriate role.
• Administrator: Can edit all settings, add and remove staff, and create, edit and delete
bookings.
• Scheduler: Can manage bookings and customer details on the calendar, itself. They have
‘read-only’ access to settings, staff, and services.
• Team member: Can manage their own bookings calendar and can edit their own
availability. When adding or editing a booking in their calendar, they’ll be assigned as
Staff.
• Viewer: Can view all the bookings on the calendar but cannot modify or delete.
Permissions are set to ‘read-only’.
• Guest: Can be assigned to bookings but cannot open the Bookings mailbox.
Email notifications:
Checking this box will enable the Staff member to receive emails when a booking with them is made or
changed.
Availability:
Select Events on Office calendar affect availability if you want the free/busy information from Staff
members’ Outlook calendars to reflect availability in Bookings.
If the Staff member’s availability differs from the Business Hours
entered in the Business Information section, toggle the Use
Business Hours off and edit the hours of availability as
appropriate.
Note: It is a best practice to have more than one Administrator of the Calendar.

Microsoft Bookings - Quick Reference Guide
Step 5 – Define Services
In this section, set the details of each of the Services you
plan to offer. Select the Services tab from the left-
navigation. Here, you can add new services or edit existing
services.
To add a new Service, click the Add New Service button.
Princeton University - Office of Information Technology Page 7
• Copy/Clone a Service: If an additional Service should be
created that is very similar to an existing Service, hover
over an existing Service and click the Copy Service icon.
Edit the Service details as appropriate.
Note: If only one Service is listed, you will not be able to
delete it. There must be at least one Service listed at all
times.
At a minimum, one service is required at all times. By
default, Bookings has created a Service which should be
edited to suit your needs or deleted once another Service
has been created.
• Edit service: Hover over an existing Service and click
the Edit Service icon, revealed to the right of the
Service name.
• Deleting a Service: Hover over an existing Service and
click the Delete Service icon, revealed to the right of
the Service name.
Adding/Editing a Service is comprised of 5 sections. The details in each
section will help you further define your Service.
Be sure to go through each of the options listed to ensure your Service, its
availability, Staff members, custom fields, reminders and notifications are
reflected appropriately on the Calendar.
Basic Details
Give your Service a name and description to ensure
those who book time with you are selecting the
correct offering.
In the Location field, choose whether this appointment
should take place in a physical location or choose to
Add an Online Meeting.
Note: Choosing Add Online Meeting will provision
a meeting link in Microsoft Teams. If you wish for
the online meeting to take place in Zoom, a PMI
can be added in the Location field or added to
your confirmation email.
• Duration: Choose the appropriate amount of time for the appointment.
• Buffer Time: Enabling this setting allows for the addition of extra time to the Staff members calendar
before and/or after each appointment to prepare or debrief, as necessary.
• Maximum number of Attendees: This setting allows you to create services that require the ability for
multiple people to book the same appointment date/time with the same staff member. The
appointment time slot for the selected service, staff, and time will be available to book until the
maximum number of attendees, specified by you, has been reached.
Note: It is important to determine whether this is a single-attendee service or multi-attendee service prior
to saving the service. Once the Service is saved for a single attendee, the Max Number of Attendees
cannot be changed to allow for more than one attendee. Likewise, if the Service is saved for multi-
attendees, it cannot be changed to less than 2.
Step 5 Continued: Define Services
Don’t Save until all
sections are complete.

Microsoft Bookings - Quick Reference Guide
This section allows you to determine which of
the canned information fields should be
captured on the Booking Page for the user to
provide and whether the fields should be
required or optional. Additionally, Bookings lets
you create custom questions associated with
your Service
Select each of the default fields under Customer
Information that should be visible on the
Booking Page and determine which should be
required by toggling on/off.
If additional information should be collected,
click Add a Custom Field. Once the question has
been created, you will need to select it and
determine whether the field should be required.
Make sure to add the appropriate Staff member(s) to
their corresponding Service.
If you wish for those booking time with you to choose
from a list of multiple Staff members, toggle the switch
below ON.
Princeton University - Office of Information Technology Page 8
Default Scheduling Policy:
Determine whether this
Service should take the
Default Scheduling Policy. If
not, turn this setting off and
edit details accordingly.
Publishing Options: If a
specific Service should not be
shown on the Booking Page
for a period of time, simply
toggle this setting OFF.
As you continue to define your Services, you’ll notice
there are two additional switches under the five
sections:
Availability Options
The options here will default to the scheduling details
you provided on the Booking Page. If this Service is
NOT taking the Default Scheduling Policy, use the
fields in this section to customize your availability
settings as appropriate. See Page 5: Booking
Page >
Default
Scheduling Policy
Assign Staff
Custom Fields
Notifications
Here, you can set up reminders and notifications which can be sent to those booking appointments with you,
the Staff member(s) associated with the appointment types, or both, at a specified time before the
appointment. Multiple messages can be created for each appointment, according to your preference. By
default, a reminder is sent those who book time with you one day before. You can customize this message
and determine the number of reminders that go out and when.
Text Message Notifications: If you’re requiring a phone number, decide whether notifications should be sent
via text message.
Email Notifications: Determine whether the business should be notified when an appointment is created or
changed and whether the person booking time with you should receive a meeting invite to add to their
calendar.
Email Confirmation: You can include any additional text you would like here, such as information about
rescheduling or what should be brought to the appointment.
When all information has been entered, click Save Changes button.
Microsoft Bookings - Quick Reference Guide
Princeton University - Office of Information Technology Page 8
Users may find it more appropriate to quickly open blocks of time strictly for specific (non-recurring) dates/times outside of their general availability. Because this is not
how Bookings was initially designed to work, some modifications to the Availability Options for the appointment type (or Service) being offered must be made.
The steps below will assist with the necessary configuration:
1. Click Services from the left navigation menu.
2. Choose to either create a new Service OR edit an existing Service.
Each section on the Service menu should be reviewed and edited as appropriate (see
more info), but the main elements to pay attention to are:
Opening Blocks of Time (Ad-hoc Hours) for Faculty Advising on the Fly
3. Under Basic Details:
• Duration: Set your appointments to the appropriate timeframe.
4. Under Availability Options:
• Time Increments: Enter the appropriate number of minutes for which your Booking Page should show availability.
• Minimum Lead Time: Enter the amount of advance notice you’ll need prior to an appointment being booked.
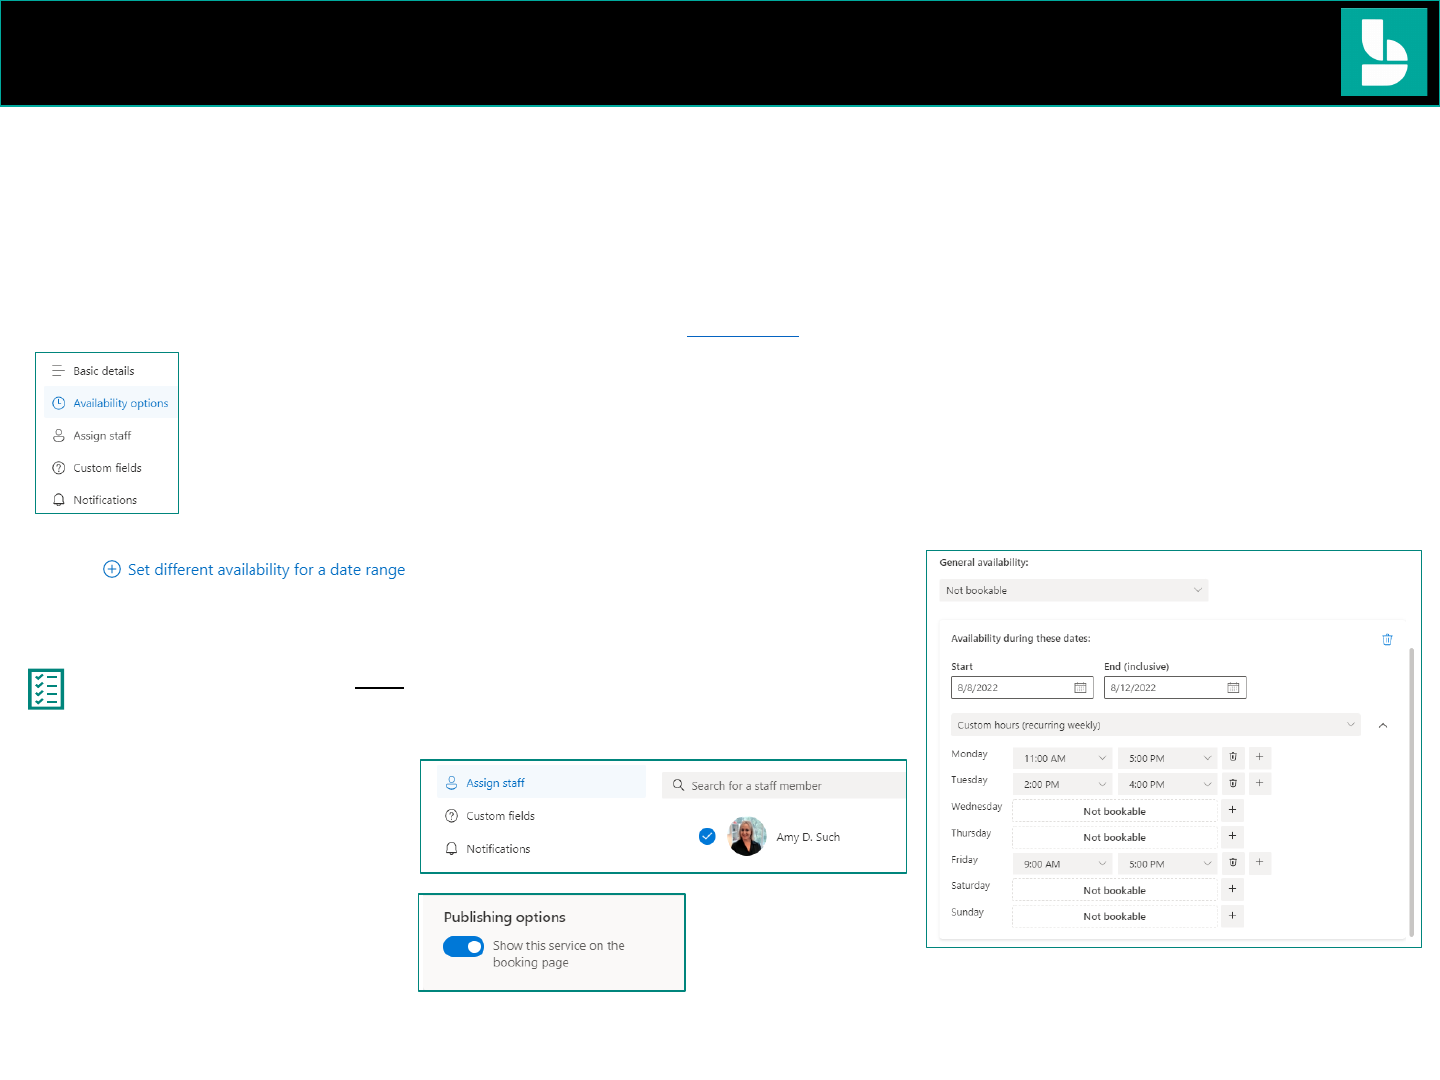
3. Under Assign Staff:
• Make sure to assign yourself
(or the appropriate Staff
member) to this appointment
type (Service) by checking the
box next to your name.
Note: Be careful to limit the blocks of unique availability to one week at a time only, making sure that dates line
up to days of the week. You may need to delete days if your blocks of time start later in the week.
• General Availability: Set this to Not Bookable.
• Click and enter the appropriate availability during these dates.
Repeat this for each week of time you wish to open up.
Use the + to add more than one block of time for a given day.
Use the trash icon to delete a day during the timeframe selected.
4. Ensure that the Service is published
on the Booking page by toggling the
switch ON, if it’s not on by default.
5. Click Save Changes.

Microsoft Bookings - Quick Reference Guide
Step 6: Schedule Closures and Time Off
Occasionally, you'll want to close your business for holidays or team events, or your employees will need time off when they're sick, on vacation, or unavailable for other
reasons. You can schedule time off from the Microsoft Bookings calendar, and the employee will be unavailable for bookings during the specified time. Once the business
reopens or employees return to work, everyone will be listed on the booking page according to their established work hours.
Schedule Employee Time Off
1. Fill in any necessary fields under Time Off Details.
2. If the employee will be gone for a full day or for several days, switch the
toggle for All day ON.
3. Select the Staff member(s) who will be taking the time off.
4. Click Create Time Off to save changes.
Princeton University - Office of Information Technology Page 9
Click Calendar from the left-navigation. Locate and select Add Time Off from the top menu, above the calendar.
Schedule Business Closures
1. Fill in any necessary fields under Time Off Details.
2. If the ‘business’ will be closed for a full day or for several days, switch the
toggle for All day ON.
3. Select ALL Staff members listed to ensure no availability is open.
4. Click Create Time Off to save changes.
