
Server Direct Print
User’s Manual
M00062904
Rev.E
Overview
Sample Program
Request and Response
Status Notification
Describes the operating environment and system
configuration of Server Direct Print.
Describes how to use the sample program and how to
configure the system.
Describes the requests and responses of Server Direct
Print.
Describes the Status Notification function.

2
Cautions
• No part of this document may be reproduced, stored in a retrieval system, or transmitted in any form or
by any means, electronic, mechanical, photocopying, recording, or otherwise, without the prior written
permission of Seiko Epson Corporation.
• The contents of this document are subject to change without notice. Please contact us for the latest
information.
• While every precaution has taken in the preparation of this document, Seiko Epson Corporation assumes
no responsibility for errors or omissions.
• Neither is any liability assumed for damages resulting from the use of the information contained herein.
• Neither Seiko Epson Corporation nor its affiliates shall be liable to the purchaser of this product or third
parties for damages, losses, costs, or expenses incurred by the purchaser or third parties as a result of:
accident, misuse, or abuse of this product or unauthorized modifications, repairs, or alterations to this
product, or (excluding the U.S.) failure to strictly comply with Seiko Epson Corporation’s operating and
maintenance instructions.
• Seiko Epson Corporation shall not be liable against any damages or problems arising from the use of any
options or any consumable products other than those designated as Original EPSON Products or EPSON
Approved Products by Seiko Epson Corporation.
Trademarks
EPSON and EXCEED YOUR VISION are registered trademarks of Seiko Epson Corporation in Japan and other
countries/regions.
Windows
and Internet Explorer
are either registered trademarks or trademarks of Microsoft Corporation in
the United States and other countries.
Safari
TM
and TrueType
are either registered trademarks or trademarks of Apple Inc. in the United States and
other countries.
© Seiko Epson Corporation 2013 - 2014. All rights reserved.

3
For Safety
Key to Symbols
The symbols in this manual are identified by their level of importance, as defined below. Read the following
carefully before handling the product.
Restriction of Use
When this product is used for applications requiring high reliability/safety such as transportation devices
related to aviation, rail, marine, automotive etc.; disaster prevention devices; various safety devices etc; or
functional/precision devices etc, you should use this product only after giving consideration to including fail-
safes and redundancies into your design to maintain safety and total system reliability. Because this product
was not intended for use in applications requiring extremely high reliability/safety such as aerospace
equipment, main communication equipment, nuclear power control equipment, or medical equipment
related to direct medical care etc, please make your own judgment on this product’s suitability after a full
evaluation.
Provides information that must be observed to avoid damage to your equipment or a
malfunction.
Provides important information and useful tips.

4
About this Manual
Aim of the Manual
This manual presents information that is necessary information for using the TM-Intelligent.
The TM-Intelligent series in this manual is a generic term for the TM-DT series and TM-i series.
The TM-DT series in this manual is a generic term for the following printers.
The TM-i series in this manual is a generic term for the following printers.
Manual Content
The manual is made up of the following sections:
TM-T88V-DT TM-T70II-DT TM-H6000IV-DT
TM-T88V-i TM-T70-i TM-T82II-i TM-L90-i
Chapter 1 Overview
Chapter 2 Sample Program
Chapter 3 Request and Response
Chapter 4 Status Notification

5
Contents
■ For Safety .............................................................................................................................. 3
Key to Symbols ....................................................................................................................................... 3
■ Restriction of Use .................................................................................................................. 3
■ About this Manual................................................................................................................ 4
Aim of the Manual ................................................................................................................................. 4
Manual Content .................................................................................................................................... 4
■ Contents................................................................................................................................ 5
Overview ........................................................................................7
■ Overview of Server Direct Print ........................................................................................... 7
Printing Process....................................................................................................................................... 9
■ Overview of Status Notification......................................................................................... 10
■ Operating Environment ..................................................................................................... 11
How to Access the Web server .......................................................................................................... 11
Number of URLs accessible for Server Direct Print............................................................................ 11
TM Intelligent Printer............................................................................................................................. 12
TM Printer............................................................................................................................................... 12
■ Contents In the Package................................................................................................... 13
Manual.................................................................................................................................................. 13
Sample Program .................................................................................................................................. 13
Utility ...................................................................................................................................................... 13
Download ............................................................................................................................................. 13
■ TM-DT Version ..................................................................................................................... 14
■ TM-i Version......................................................................................................................... 15
■ Restriction ........................................................................................................................... 16
Sample Program ..........................................................................17
■ Overview............................................................................................................................. 17
Hardware Configuration ..................................................................................................................... 18
File Configuration................................................................................................................................. 18
Printing Result ....................................................................................................................................... 19
Program Flow........................................................................................................................................ 19
■ Environment Settings.......................................................................................................... 20
■ Sample Program Configuration ........................................................................................ 21
■ TM Printer Network Settings ............................................................................................... 22
■ TM-i Settings........................................................................................................................ 23
IP Address Settings ............................................................................................................................... 23
Registration of TM Printer..................................................................................................................... 24
Server Direct Print Settings .................................................................................................................. 27
■ TM-DT Settings..................................................................................................................... 31

6
Initial OS Settings...................................................................................................................................31
Initializing the ePOS-Device.................................................................................................................32
IP Address Settings................................................................................................................................33
Service startup settings ........................................................................................................................34
Server Direct Print Settings ...................................................................................................................35
Registration of TM Printer .....................................................................................................................37
■ Execution of Sample Program .......................................................................................... 39
Request and Response ...............................................................41
■ Request (Print Request)...................................................................................................... 41
■ Response (Print request).................................................................................................... 42
Response When No Printing Is Performed..........................................................................................45
About Response Message...................................................................................................................45
■ Request (Printing Result) .................................................................................................... 48
Error code..............................................................................................................................................50
Response (Printing Result)....................................................................................................................50
■ Digest Access Authentication........................................................................................... 51
Digest Access Authentication Settings ..............................................................................................51
■ Program Example............................................................................................................... 52
Status Notification........................................................................53
■ Overview............................................................................................................................. 53
■ Overview of Status Notification Sample Program ........................................................... 54
TM Intelligent Printer Settings...............................................................................................................54
Execution of Sample Program ............................................................................................................59
■ Status Type.......................................................................................................................... 60
■ Request and Response...................................................................................................... 63
Request..................................................................................................................................................63
Response ...............................................................................................................................................63
Digest Access Authentication.............................................................................................................63

7
Chapter 1 Overview
1
Overview
This chapter describes the overview of Server Direct Print and Status Notification.
Overview of Server Direct Print
Server Direct Print function enables the TM intelligent printer (TM-i and TM-DT) to obtain the print data from
the Web server and print the data. TM intelligent printer can be used also for controllable printers in the
network.
The TM intelligent printer can print to a TM printer in the network.
TM intelligent printer periodically sends a print request ((1) in the figure above) to the Web server.
The Web server application includes print data in the response ((2) in the figure above) to a print request
from the TM intelligent printer. (When no print data exists, the Web server returns an empty response.)
If print data for the TM printer is included in a response, the TM intelligent printer controls the TM printer in
order to do the printing ((3) in the figure above).
The print data can be printed in the ePOS-Print XML format.
Upon receipt of a response of print data including print layout from the Web server application, the TM
intelligent printer converts the ePOS-Print XML format into the print layout and prints it.
Web server
Application
TM Intelligent Printer
TM Printer
(1) Request
(2) Response
<Data to be printed>
(3) TM printer print data
(1) (2)
(3)

8
Difference from General Printing System
In general printing systems, the application sends a print instruction to the printer.
With Server Direct Print, the printer sends an Inquiry of print request to the Web application, and the Web
application returns a response that has print data included in it.
Computer
Application
TM Printer
Print layout data
Print data
Specifies a printer
TM Intelligent Printer
Web Server
Global IP Address
Application
Traditional Printing
Server Direct Print

9
Chapter 1 Overview
1
Printing Process
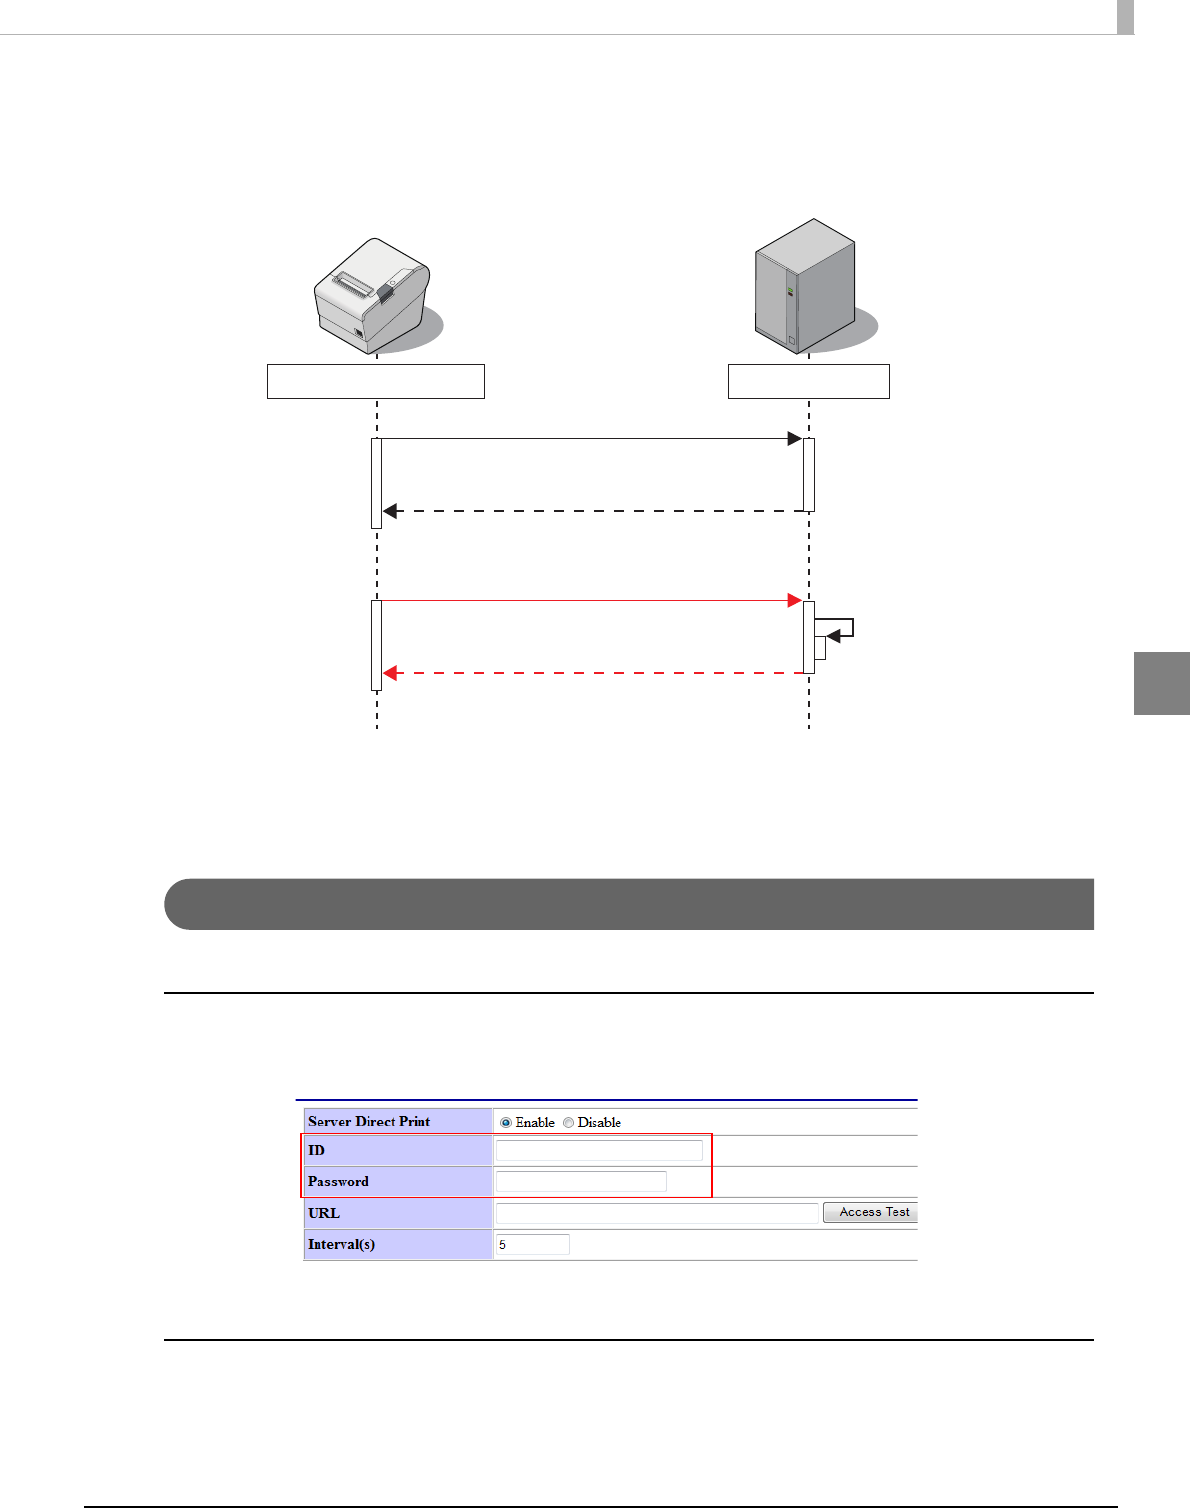
1
TM intelligent printer asks the Web server whether data to be printed exists.
2
When data to be printed exists, the Web server application creates an XML-format
response containing the data to be printed, and returns it to the TM intelligent
printer.
When no data to be printed exists, an empty response is returned.
3
TM intelligent printer prints the data to the specified printer.
4
TM intelligent printer sends a request (printing result) to check whether the data
was printed properly.
5
Upon receipt of the printing result, the application performs the required process.
The Web server automatically responds with an empty response.
The printing flow is as follows:
1 : HTTP Request (Print request)
2.2 : HTTP Response (Print request)
6.2 : HTTP Response (Printing result)
5 : HTTP Request (Printing result)
TM Intelligent Printer
Web Server
2.1 : Create XML from a
database or other system
6.1 : Register printing result to a
database or other system
3 : Create print data
4 : Print

10
Overview of Status Notification
Status Notification is the function used to periodically notify the printer status to the Web server. The web
server registers status from TM intelligent printer to database, then responds with an empty response to TM
intelligent printer.
Operating the printer management application created by the user with the Web server enables grasp of
the status of the printers installed in a shop from a remote place.
2 : Register the status to the database
2.1 : HTTP Response (Status Information)
TM Intelligent Printer
Web Server
1 : HTTP Request (Status Information)

11
Chapter 1 Overview
1
Operating Environment
How to Access the Web server
●: Supported, ▲: Not supported
*1: Available only for Web contents automatic updating
*2: TM-i firmware ver.4.0 or later
*3: Available only for Server Direct Print and Status Notification
*4: ePOS-Device ver.2.2 or later
Number of URLs accessible for Server Direct Print
How to access TM-DT TM-i
Proxy server ●
*1
●
*2
Proxy authentication ▲ ●
*2
Digest authentication ●
*3
●
*2
HTTPS communication ●
*4
●
*2
HTTPS communication with server authentication ▲●
*2
Model Ver sion Number of URLs accessible
TM-DT 1
TM-i
TM-i firmware ver.4.0 or later 3
TM-i firmware ver.3.x or earlier 1

12
TM Intelligent Printer
●: Supported, ▲: Not supported
*1: ePOS-Device ver.2.2 or later
*2: TM-i firmware ver.3.0 or later
TM Printer
●: Supported, ▲: Not supported
*1: TM-i firmware ver.4.0 or later
*2: TM-i firmware ver.3.0 or later
TM Intelligent Printer ePOS-Print
TM-DT
TM-T88V-DT
TM-T70II-DT
TM-H6000IV-DT
●
*1
TM-i
TM-T88V-i
TM-T70-i
TM-T82II-i
TM-L90-i
●
*2
TM Printer TM-i TM-DT
TM-T88V ●●
TM-T88IV ● ▲
TM-T70 ●●
TM-T70II ●
*1
●
TM-T90 ●●
TM-T20 ●
*2
●
TM-T20II ●
*1
●
TM-T82II ●
*1
●
TM-L90 ●●
TM-U220 ●
*2
●
TM-P60II ●
*2
●
TM-P60II Peeler ●
*2
●
TM-P80 ●
*1
▲

13
Chapter 1 Overview
1
Contents In the Package
Manual
❏ Server Direct Print User's Manual (This Document)
❏ Detailed user's manual for each printer
Sample Program
The sample program is included in the Server Direct Print User's Manual package.
❏ epsonsample_eposprint.zip: Sample Program for ePOS-Print XML
Utility
Used to register NV logo to the printer.
Download
For customers in North America, go to the following web site:
http://www.epsonexpert.com/ and follow the on-screen instructions.
For customers in other countries, go to the following web site:
https://download.epson-biz.com/?service=pos
Utility TM printer
Utility specialized for each model
TM-T88V Utility TM-T88V-i/ TM-T88V-DT/ TM-T88V
TM-T70II Utility TM-T70II-DT/ TM-T70II
TM-H6000IV Utility TM-H6000IV/ TM-H6000IV-DT
TM-T20 Utility TM-T20
TM-T20II Utility TM-T20II
TM-T82II Utility TM-T82II-i/TM-T82II
TM-P60II Utility TM-P60II/ TM-P60II Peeler
TM-P80 Utility TM-P80
Logo registration utility (TMFLogo)
TM-L90/ TM-L90-i
TM-T90
TM-T88IV
TM-T70-i/ TM-T70
TM-U220

14
TM-DT Version
The functions that can be implemented vary with the TM-DT software version (ePOS-device Version) of the
TM-DT.
If you update the ePOS-Device, you will be able to use Server Direct Print's new functions.
Confirming the ePOS-Device version
You can confirm the version of the ePOS-Device on the EPSON TMNet WebConfig title bar.
Downloading the ePOS-Device update program
Download the following file from the Epson website and save it in your local environment.
• File name: ePOS-Device System Update Package
For more information about the update method, refer to the Readme file in the ePOS-Device update
package.
The ePOS-Device cannot be rolled back to an earlier version.
15
Chapter 1 Overview
1
TM-i Version
The functions that can be implemented vary with the TM-i firmware version. Inquire with your dealer
concerning updates for the TM-i firmware.
Confirming the TM-i firmware version
You can confirm the version of the ePOS-Device on the EPSON TMNet WebConfig title bar.
Make sure that this printer is ready to print (the paper is set and the power is turned on), and hold down the
push button at the rear of this printer for at least 3 seconds before releasing it.
TM-i firmware ver.4.0 or later TM-i firmware ver.3.x or earlier
“Firmware” (TM-i Firmware Version) is printed under
<General Information>.
“Software” (TM-i Firmware Version) is printed under
<General Information>.
<General Information>
Firmware
X.XX
ePOS-Device
X.XX
Model
TM-T88V-i
Time
<General Information>
Software
X.XX
Model
TM-T88V-i
Time
yyyy-mm-dd hh:nn:ss
GMT+hh:nn

16
Restriction
❏ If power is restored the device or the cover is open during printing, printing may not occur properly.
❏ To turn the device power off and on, be sure to allow an interval of five seconds or more between power
off and on.
❏ Use a switching hub to connect the device.
If no switching hubs are used, the device in online status is more likely to be judged as offline depending
on the traffic condition.
❏ Drawer open operates when the TM intelligent printer is in online status (when the roll paper is loaded
and the roll paper cover is closed).
If you are using a TM-i (firmware version 3.0 or later)/ TM-DT (firmware version 2.2 or later), if you designate
forced transmission mode with ePOS-Print XML, it will operate offline.
❏ When the specified timeout time has passed after printing starts, the printing is canceled, but the data
recognized by the printer before print cancelling process starts is printed.

17
Chapter 2 Sample Program
2
Sample Program
This chapter describes how to use the sample program for Server Direct Print.
Overview
Use the sample program screen to enter orders. The Web server sends a response containing print data for
a request sent from the TM intelligent printer. The TM intelligent printer uses the returned response data to
print a delivery slip to the main unit and two pieces of cooking slip to the TM printer. The print results appear
on the screen.
• In this chapter, a system configuration using a Web server is explained as an example.
• In this chapter, the Web server is described as a Web server configured with IIS (Microsoft
Internet Information Services).
When using other environment, interpret the descriptions accordingly.

18
Hardware Configuration
The system configuration of the sample program is as shown below.
❏ Web Server
(Its operation has already been checked using IIS and XAMP.)
❏ Router
❏ TM Intelligent Printer
TM-T88V-i, TM-T70-i, TM-L90-i, TM-T88V-DT, TM-T70II-DT or TM-H6000IV-DT
❏ TM Printer
File Configuration
File Name Description
Test_print.php
The server returns a response containing print data when the
printer sends a request.
resultPrint.log
The printing result is retained in this file. The file is created after
printing.
demo
index.html Sends a print instruction and displays the printing result.
sample.xml The data of response message.
Web Server
[192.168.192.10]
Router
[192.168.192.1]
TM Printer
[192.168.192.21]
TM Intelligent Printer
(TM-T88V-i)
[192.168.192.20]
19
Chapter 2 Sample Program
2
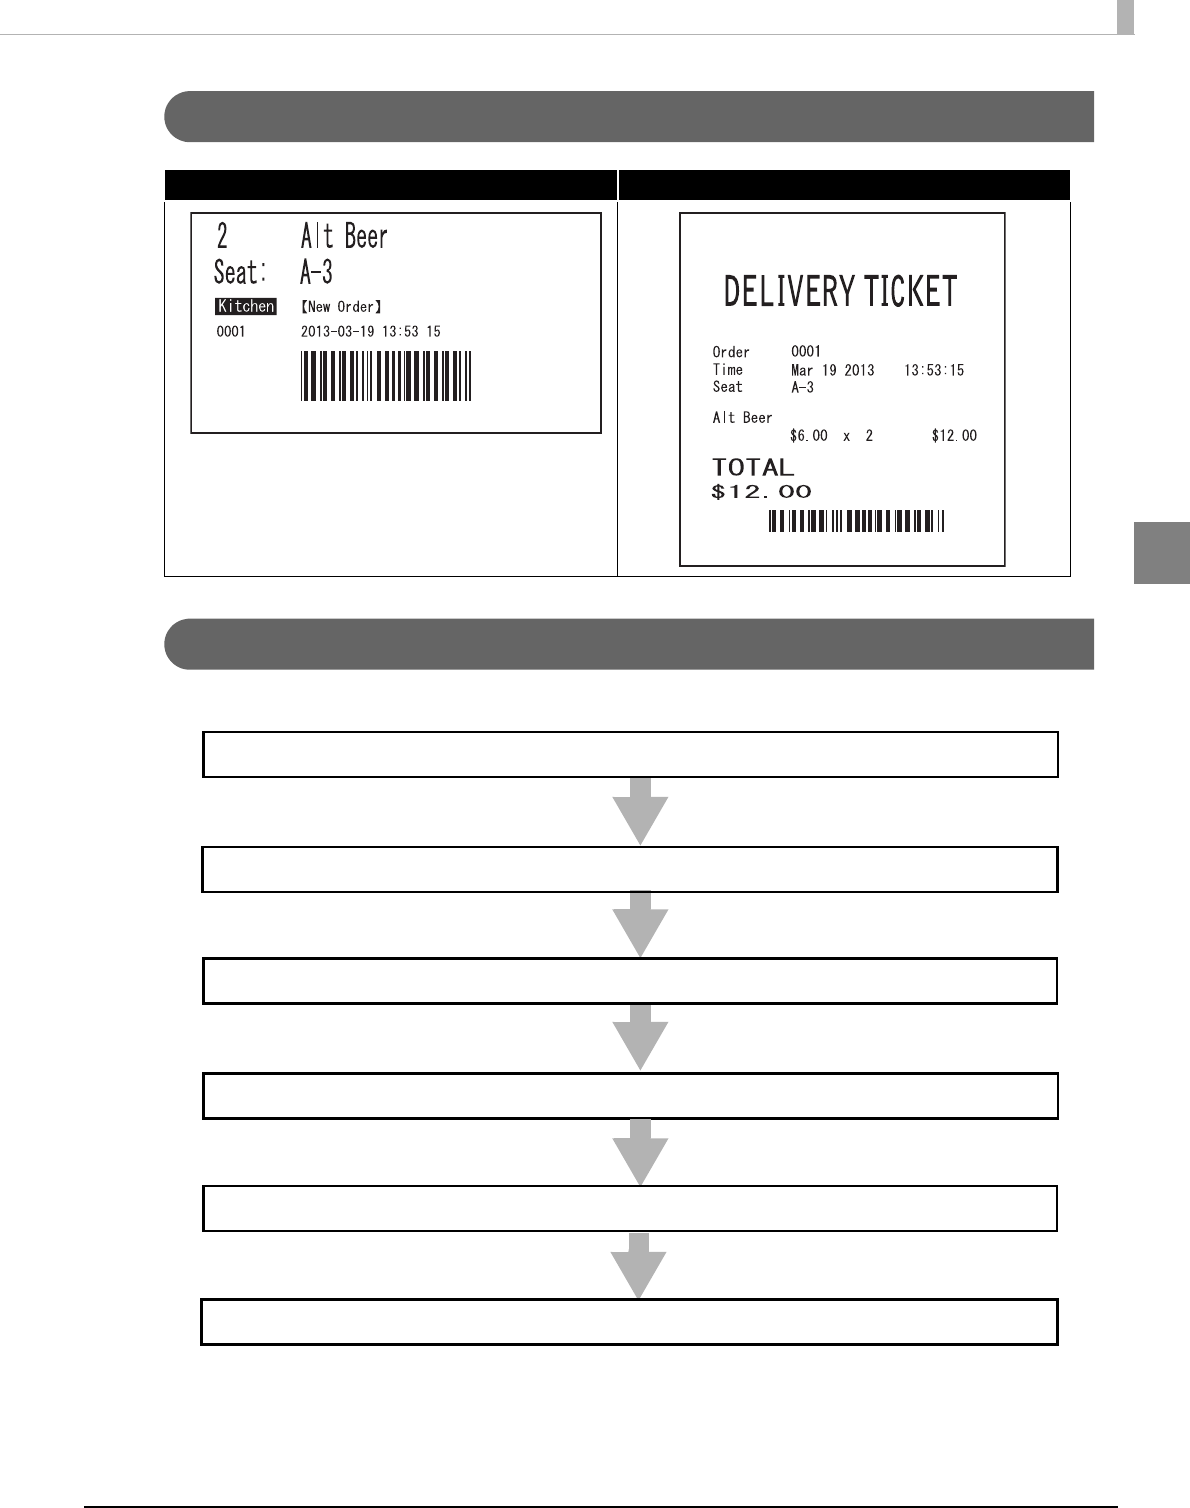
Printing Result
Program Flow
The flow from the initial display to the print completion of the sample program is as shown below.
Cooking Slip Delivery Slip
3. Receive a request from the printer.
2. Enter the order.
1. Start the browser.
4. Responses print data (sample.xml) to the printer.
5. Output the printing result sent from the printer to resultPrint.log after
6. Display the printing result on the screen.

20
Environment Settings
The environment setting flow of the sample program is as shown below.
1. Router Settings
Set information such as SSID, IP address, DHCP and allocated IP address. For details, see
the manual for each device.
1. Web Server Configuration
Configure IIS and XAMPP in the computer.
2. Sample Program Configuration (p.21)
Save the sample program files in the computer.
2. Web Server Settings
3. Network Settings
Configure the network settings such as IP address to the computer.
3.TM Printer Network Settings (p.22)
Set an IP address to the TM printer to be connected.
21
Chapter 2 Sample Program
2
Sample Program Configuration
Save the sample program files to the Web server.
Save the files directly under the following folders:
Environment Folder Saved File
IIS inetpub\wwwroot Test_print.php
demo\index.html
\sample.xml
(Expansion of epsonsample_eposprint.zip)
XAMPP xampp\htdocs
4.TM Intelligent Printer Settings
❏ TM-i (p. 23)
IP Address Setting
Register the TM Printers (Device ID, IP Address)
Server authentication setting * (set this as necessary)
Proxy server setting * (set this as necessary)
Server Direct Print Setting
*: TM-i firmware ver.4.0 or later.
❏ TM-DT (p. 31)
Initial OS Settings
Initializing the ePOS-Device
IP Address Setting
Service Startup Settings
Server Direct Print Setting
Register the TM Printers (Device ID, IP Address)

22
TM Printer Network Settings
Configure the network settings such as IP address from the Web browser on the setup PC to the printer, using
EPSON TMNet WebConfig.
Configure the settings according to the following procedure:
1
Start the setup computer.
2
Connect the printer to the network and turn the power ON.
3
Start the Web browser and type the URL of the TM printer interface into the address
bar. Enter the password.
http://[IP address of the TM printer]/PrinterConfigurationPage/
4
EPSON TMNet WebConfig starts.
Select as [Configuration] - [Network] - [TCP/IP].
5
The “TCP/IP Setting” screen appears.
Configure the network settings for the TM printer and click [SUBMIT].
6
Print the status sheet with the TM printer to confirm that the IP address is updated,
and turn off the TM printer.
7
Repeat Step 2 to 6 for all TM printers.
Be sure to set the TM printer network settings for each TM printer.
• The default ID address of TM printer is "192.168.192.168".
• The login name for the TM printer is “epson”, and the default password is “epson”.

23
Chapter 2 Sample Program
2
TM-i Settings
Configure the following settings to TM-i.
❏ IP Address Settings (p. 23)
❏ Registration of TM Printer (p. 24)
❏ Server Direct Print Settings (p. 27)
IP Address Settings
There are two ways of setting IP address of TM-i.
Automatic Setting Using DHCP
Manual Setting Using EPSON TMNet WebConfig
Automatic Setting Using DHCP
1
Make sure the power of TM-i is turned off, and then connect it to the network.
2
Turn on the TM-i.
IP address is obtained automatically by DHCP.
3
If automatic acquisition of IP address using DHCP successed, the IP address is
printed.
Manual Setting Using EPSON TMNet WebConfig
1
Start the setup computer.
2
Connect all TM printers to the network and power on.
3
Start the Web browser on the setup computer and enter as follows:
<TM-i Firmware ver.3.x or earlier>
http://[IP address of the TM-i]/PrinterConfigurationPage/
<TM-i Firmware ver.4.0 or later>
http://[IP address of the TM-i]/webconfig
4
EPSON TMNet WebConfig will start. Make the network setting.
For detail, refer to Technical Reference Guide of each TM-i. After making the setting, click [Apply].
5
Print the TM-i status sheet and check the network setting.
If automatic acquisition of IP address using DHCP fails, the IP address is set to
"192.168.192.168".

24
Registration of TM Printer
Register the device ID and IP address of the controlled TM printer to TM-i. Use EPSON TMNet WebConfig to
register the device ID.
TM-i firmware ver.3.x or earlier
Use the following procedure for registration.
1
Start the setup computer.
2
Connect all TM printers to the network and power on.
3
Start the Web browser on the setup computer and enter as follows:
http://[IP address of the TM-i]/PrinterConfigurationPage/
For details about the IP address settings for TM-i, see IP Address Settings (p.23).
4
EPSON TMNet WebConfig starts.
Select as [Device].
• TM-i printer cannot be deleted from the device.
• The device ID of TM-i printer can be changed.

25
Chapter 2 Sample Program
2
5
The “Device Settings” screen appears.
Set the following items and click [Submit].
6
The information of the registered device is displayed in "Device List".
Click [Test Print] to check if the registered printer operates properly.
Item Description
Device ID Set the ID for the controlled printer. (Any character string)
Model Select the model for the controlled printer.
IP Address Set the printer IP address for each device ID. (p. 22)
Retry Interval (ms)
Set the timeout retry interval.
Specify "100".

26
TM-i firmware ver.4.0 or later
Use the following procedure for registration.
1
Start the setup computer.
2
Connect all TM printers to the network and power on.
3
Start the Web browser on the setup computer and enter as follows:
http://[IP address of the TM-i]/PrinterConfigurationPage/
For details about the IP address settings for TM-i, see IP Address Settings (p.23).
4
EPSON TMNet WebConfig starts. Select [Web Service Settings] - [Printer].
5
The “Printer” screen appears.
Configure the following items, click [Add].
6
The information of the registered device is displayed in "Registered printers".
Click [Test Print] to check if the registered printer operates properly.
Item Description
Device ID Set the ID for the controlled printer. (Any character string)
Model Select the model for the controlled printer.
IP Address Set the printer IP address for each device ID. (p. 23)
Retry Interval (ms)
Set the timeout retry interval.
Specify "100".
27
Chapter 2 Sample Program
2
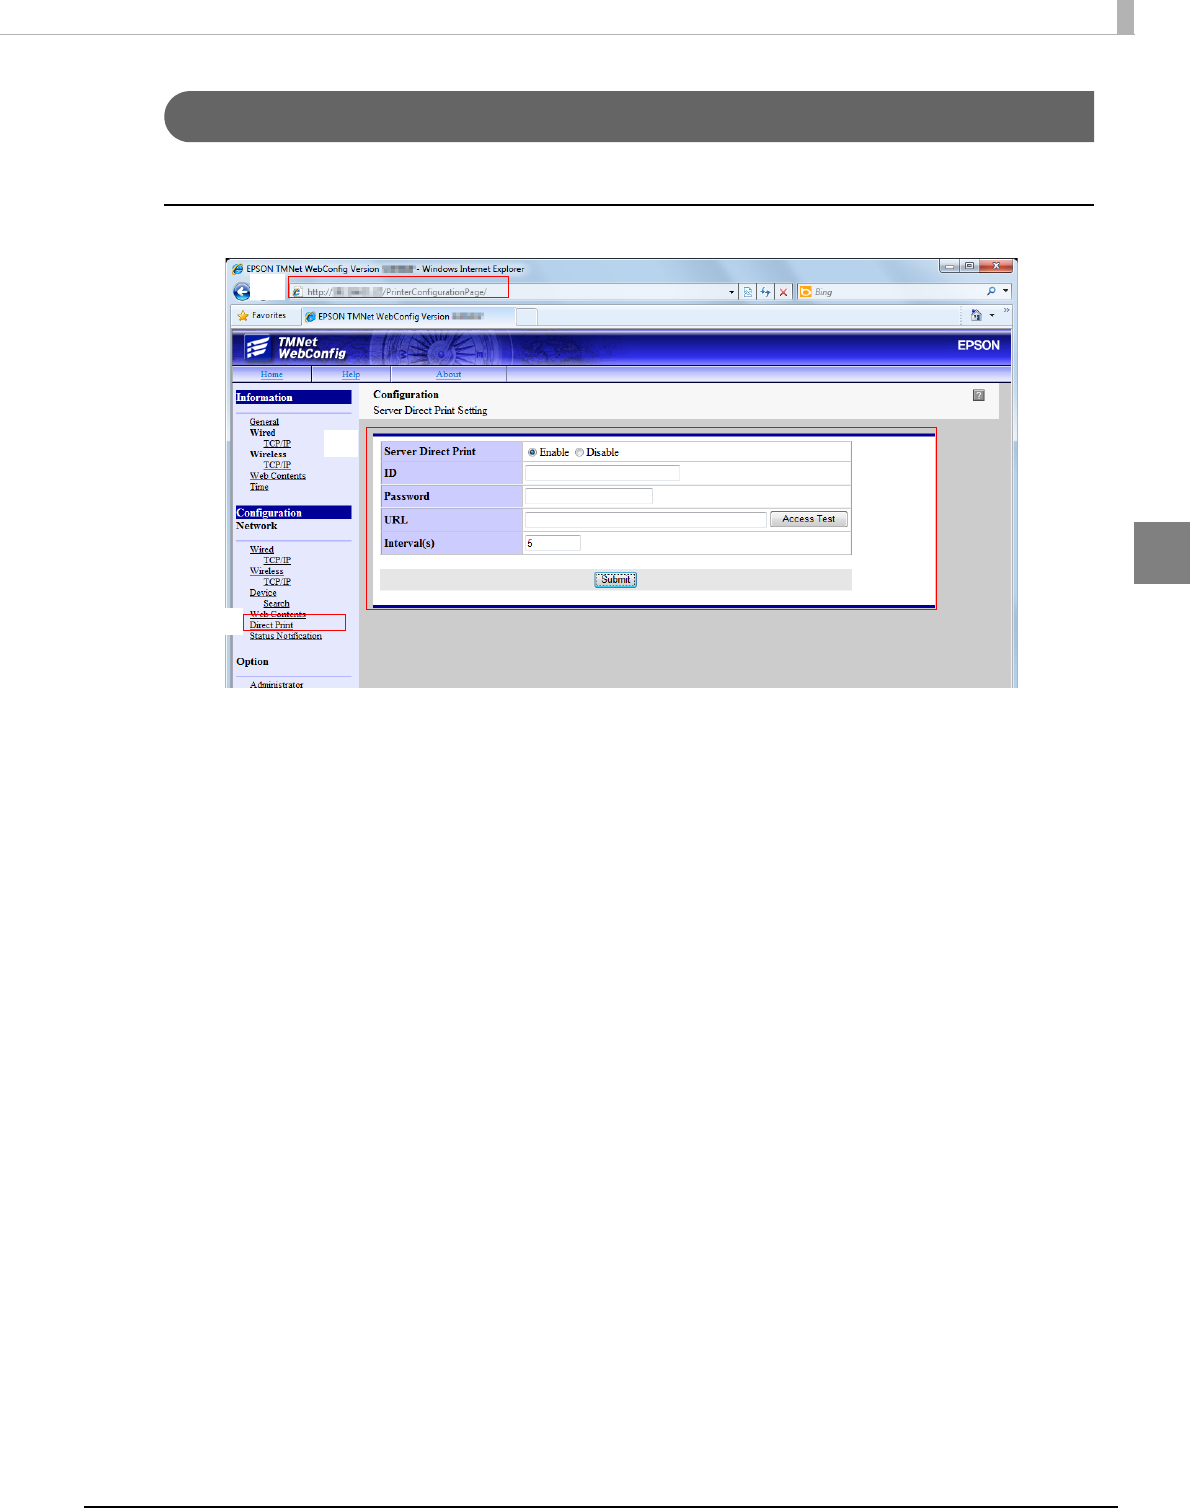
Server Direct Print Settings
Configure the Server Direct Print settings using EPSON TMNet WebConfig.
TM-i firmware ver.3.x or earlier
Use the following procedure for registration.
1
Start the setup computer.
2
Connect the TM-i to the network and turn the power ON.
3
Start the Web browser on the setup computer and enter as follows:
http://[IP address of the TM-i]/PrinterConfigurationPage/
For details about the IP address settings for TM-i, see IP Address Settings (p.23).
4
EPSON TMNet WebConfig starts.
Select as [Direct Print].

28
5
The “Server Direct Print Setting” screen appears.
Set the following items and click [Submit].
Item Description
Server Direct Print Select the [Enable].
ID
Set ID for the server-side program to identify TM-i. This ID becomes
the user ID used for Digest access authentication. The set value
will also be passed as an ID parameter value for the form data
posted to the server.
Not required for the sample program.
Password
Set your password used for Digest access authentication.
Not required for the sample program.
URL
Specify the Test_print.php address of the Web server.
Example: http://[IP address of Web server]/Test_print.php
Click the [Access Test] button to check if the address is accessible.
Interval(s) Set the request interval.

29
Chapter 2 Sample Program
2
TM-i firmware ver.4.0 or later
Use the following procedure for registration.
1
Start the setup computer.
2
Connect the TM-i to the network and turn the power ON.
3
Start the Web browser on the setup computer and enter as follows:
http://[IP address of the TM-i]/PrinterConfigurationPage/
For details about the IP address settings for TM-i, see IP Address Settings (p.23).
4
EPSON TMNet WebConfig starts.
Select [Web Service Settings] - [Direct Print].
5
The “Direct Print” screen appears.
Set the following items and click [Apply].
Item Description
Server Direct Print Select the [Enable].
ID
Set ID for the server-side program to identify TM-i. This ID becomes
the user ID used for Digest access authentication. The set value
will also be passed as an ID parameter value for the form data
posted to the server.
Not required for the sample program.
Password
Set your password used for Digest access authentication.
Not required for the sample program.
Server 1
URL
Specify the Test_print.php address of the Web server.
Example: http://[IP address of Web server]/Test_print.php
Click the [Access Test] button to check if the address is accessible.
Interval(s) Set the request interval.
30
6
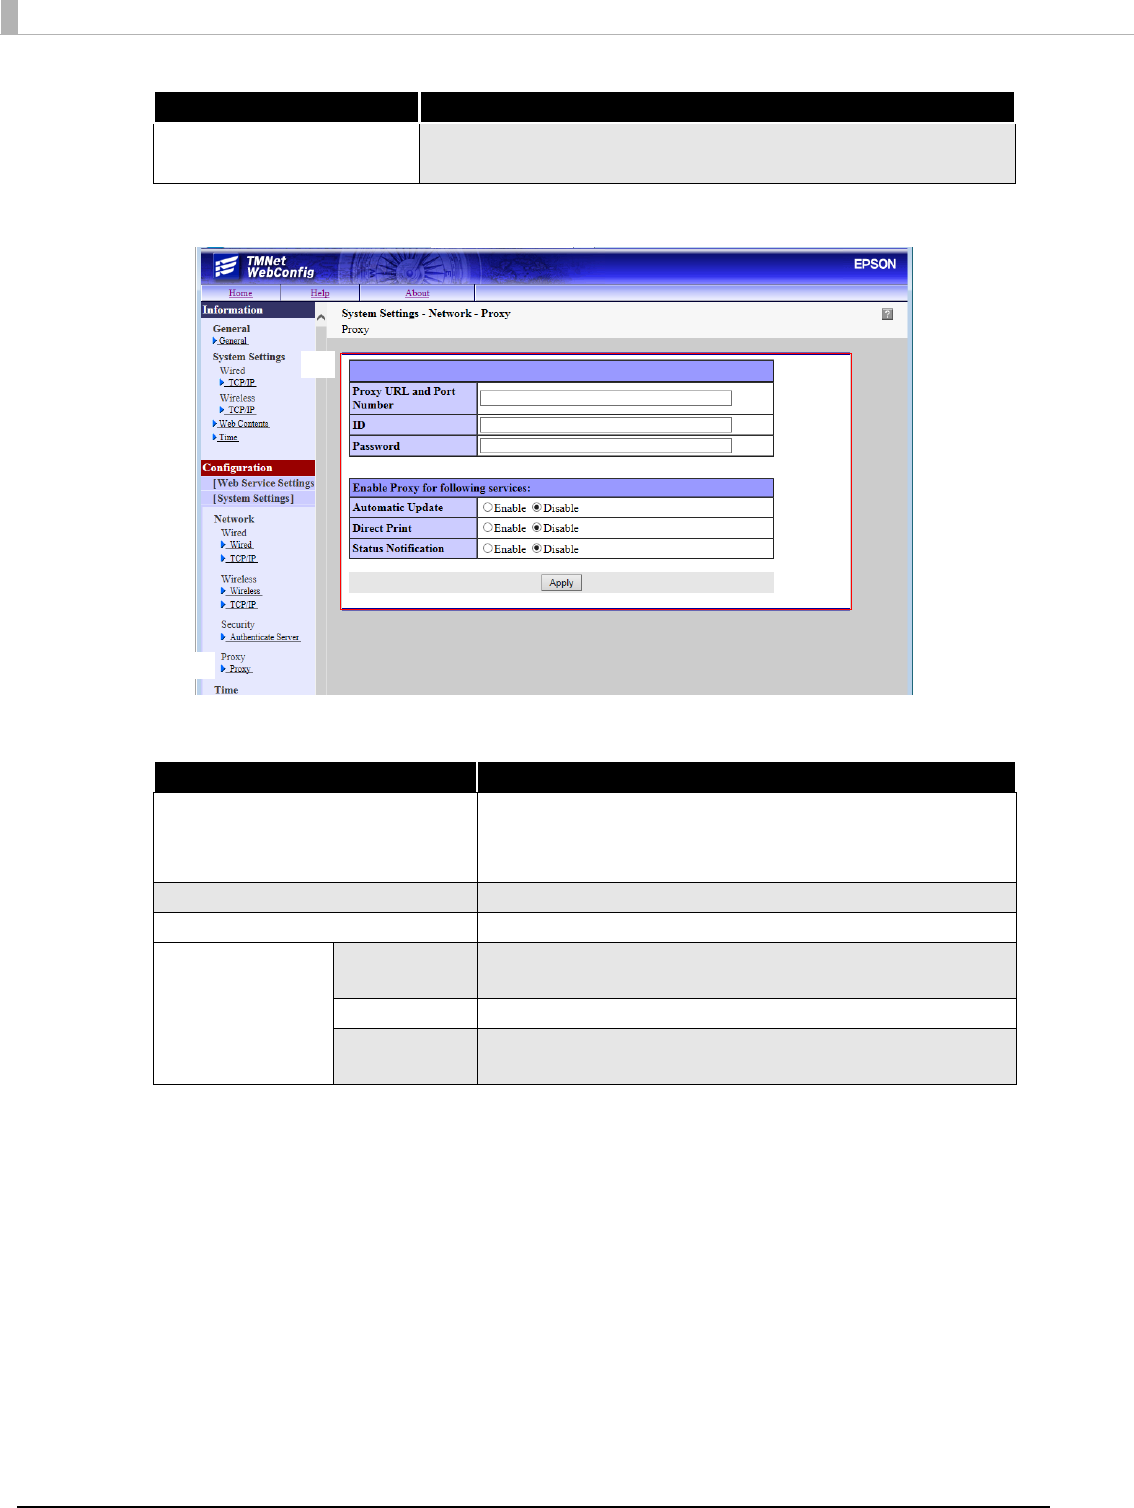
When using Server, select [System Settings] - [Proxy].
7
The “Proxy” screen appears. Set the following items, then click [Apply].
Authenticate Server
Sets whether the server authentication is performed with the
registered certificate when accessed through https.
Item Description
Proxy URL and Port Number
Enter the proxy server URL and port number in the following:
"http://host name: port number".
Example: http://10.0.0.1:8008
ID Registers the proxy authentication ID.
Password Registers the proxyauthentication password.
Enable Proxy for
following services
Automatic
Update
Sets whether the proxy is used for automatic update of
Web contents.
Direct Print Sets whether the proxy is used for Server Direct Print.
Status
Notification
Sets whether the proxy is used for Status Notification.
Item Description

31
Chapter 2 Sample Program
2
TM-DT Settings
Configure the following settings to TM-DT.
❏ Initial OS Settings (p. 31)
❏ Initializing the ePOS-Device (p. 32)
❏ IP Address Settings (p. 33)
❏ Service Startup Settings (p. 34)
❏ Server Direct Print Settings (p. 35)
❏ Registration of TM Printer (p. 37)
Initial OS Settings
This section describes the procedure for making OS settings when the TM-DT is turned on for the first time.
1
Make sure the power to the TM-DT is off, and then connect the display and
keyboard.
2
When the power to the TM-DT is turned on for the first time, the Windows
Embedded POS Ready 2009 Setup screen is displayed briefly.
3
The logon screen is displayed. Enter your user name and password.
Refer to the TM-DT Technical Reference Guide for details about initial settings.
4
The desktop for the OS is displayed. Select [Start] - [Control Panel] - [Clock,
Language, and Region] - [Date and Time]. Set the date, time, and time zone.
• A display and keyboard are required to set up the OS.
• Connect the display when the power to the TM-DT is off.
Connecting the display when the power is on could cause the display to not function
correctly.
This section describes details for Windows Embedded POS Ready 2009. If you are using a
different OS, substitute the name of the OS as appropriate.

32
Initializing the ePOS-Device
Use the shortcut on the desktop to enable the ePOS-Device.
[Enabled] is set in the default factory settings.
Enabling the ePOS-Device
Select the [ePOS-Device Enabled] shortcut on the desktop.

33
Chapter 2 Sample Program
2
IP Address Settings
Set an IP address. This setting is the same as for Windows computers. Use the following procedure.
Setting in Windows
Setting in EPSON TMNet WebConfig (TM-DT software ver. 2.x or later)
Setting in EPSONNet Config (TM-DT software ver. 2.x or later)
Setting in Windows
Click [Start] - [Control Panel] - [View network status and tasks] and make a "Network connection".
Right-click the connection you want to set, and then select the connection properties.
Setting in EPSON TMNet WebConfig
You can make these settings via a network from the computer you want to set. You can set an IP address
even if a display is not connected to TM-DT. Use the following procedure.
1
Start EPSON TMNet WebConfig from the shortcut on the desktop.
EPSON TMNet WebConfig starts.
2
Select as [Settings]-[System settings]-[Wired LAN]-[TCP/IP].
The "TCP/IP Setting (Wired)" screen appears.
3
Make the other network settings, and then click [Apply].
Setting in EPSONNet Config
To set an IP address for TM-DT from an external device, use EPSONNet Config. You can set an IP address
even if a display is not connected to TM-DT. For more information, refer to the EPSONNet Config Operation
Guide.
The default IP address for TM-DT is 192.168.192.168.
If you are making settings from an external device, set the TM-DT IP address in the
address for the Web browser. The default IP address for TM-DT is 192.168.192.168.
http://[IP address of TM-DT]/webconfig/

34
Service startup settings
To make service startup settings, use EPSON TMNet WebConfig and the following procedure.
1
Start EPSON TMNet WebConfig from the shortcut on the desktop.
EPSON TMNet WebConfig starts.
2
Select as [Settings]-[Web service settings]-[Startup settings].
The "Startup settings" screen appears.
3
Set the following according to the system you are using, and then click [Apply].
If you are making settings from an external device, set the TM-DT IP address in the
address for the Web browser. The default IP address for TM-DT is 192.168.192.168.
http://[IP address of TM-DT]/webconfig/
Item Description Setting
Device control
Sets whether to use TM-DT to control peripheral
POS devices.
On (Default)
Automatic update of
web content
Sets whether to automatically update web
content.
Off
Server direct print Sets whether to use server direct print. On
Status notification
Sets whether to send status notification when using
the server direct print function.
On/Off

35
Chapter 2 Sample Program
2
Server Direct Print Settings
Configure the Server Direct Print settings using EPSON TMNet WebConfig.
1
Start EPSON TMNet WebConfig from the shortcut on the desktop.
EPSON TMNet WebConfig starts.
2
Select as [Settings]-[Web service settings]-[Direct print].
The "Server direct print" screen appears.
If you are making settings from an external device, set the TM-DT IP address in the
address for the Web browser. The default IP address for TM-DT is 192.168.192.168.
http://[IP address of TM-DT]/webconfig/

36
3
Set the following items and click [OK].
Item Description
ID
Set ID for the server-side program to identify TM-DT. This ID
becomes the user ID used for Digest access authentication. The
set value will also be passed as an ID parameter value for the form
data posted to the server.
Not required for the sample program.
Password
Set your password used for Digest access authentication.
Not required for the sample program.
URL
Specify the Test_print.php address of the Web server.
Example: http://[IP address of Web server]/Test_print.php
Click the [Access Test] button to check if the address is accessible.
Intercal (sec) Set the request interval.

37
Chapter 2 Sample Program
2
Registration of TM Printer
Register the device ID and IP address of the controlled TM printer to TM-DT. Use EPSON TMNet WebConfig to
register the device ID.
This printer is already registered with the "local_printer" device ID, and therefore this setting is not required.
Use the following procedure for registration.
1
Start EPSON TMNet WebConfig from the shortcut on the desktop.
EPSON TMNet WebConfig starts.
2
Select as [Settings]-[Web service settings]-[Printer].
The "Printer" screen appears.
If you are making settings from an external device, set the TM-DT IP address in the
address for the Web browser. The default IP address for TM-DT is 192.168.192.168.
http://[IP address of TM-DT]/webconfig/

38
3
Set the following items and click [Add].
4
The information of the registered device is displayed in "Registered printers".
Click [Test Print] to check if the registered printer operates properly.
Item Description
Device ID Set the ID for the controlled printer. (Any character string)
Model no. Select the model for the controlled printer.
IP address Set the printer IP address for each device ID. (p. 22)
Retry interval (ms)
Set the timeout retry interval.
Specify "100".

39
Chapter 2 Sample Program
2
Execution of Sample Program
1
Using EPSON TMNet WebConfig, confirm that Server Direct Print settings are valid.
2
Open the sample program page from the Web browser.
Example: http://[IP address of the Web server]/demo/index.html
3
Click [Order Entry].
4
In response to a request from the TM intelligent printer, print data is sent and a slip is
printed from the printer.
5
resultPrint.log is created from the printing result sent from the TM intelligent printer
and the printing result is displayed on the screen.

40

41
Chapter 3 Request and Response
3
Request and Response
This chapter describes requests from the TM intelligent printer and responses from the Web server.
User's application can start printing by returning a response containing print data to a HTTP POST request
(print request) from the printer.
It can also check if printing is properly finished by analyzing a HTTP POST request (print request) from the
printer.
Request (Print Request)
This section describes the request (print request) from the TM-i.
TM intelligent printer periodically sends a HTTP POST request (print request) shown below.
The format of request message is URL-encoded form data (application/x-www-form-urlencoded).
Set the sending destination and sending interval according to "Server Direct Print Settings" (p. 27).
Parameter Value
ConnectionType GetRequest
ID The ID set with WebConfig (p. 27)
1 : HTTP Request (Print request)
2.2 : HTTP Response (Print request)
2.1 : Create XML from a
database or other system
TM Intelligent Printer
Web Server
POST /demo/Test_print.php HTTP/1.1
Host: 192.168.192.10
Content-Type: application/x-www-form-urlencoded
Content-Length: 29
ConnectionType=GetRequest&ID=
Header

42
Response (Print request)
This section describes the response (print request) containing the print data from the Web server.
The application responds by creating response data as shown below. This data contains print data. The
format of response message is XML(text/xml).
1 : HTTP Request (Print request)
2.2 : HTTP Response (Print request)
2.1 : Create XML from a
database or other system
TM Intelligent Printer
Web Server
HTTP/1.1 200 OK
Content-Type: text/xml; charset=utf-8
Content-Length: xxx
<?xml version="1.0" encoding="utf-8"?>
<PrintRequestInfo>
<ePOSPrint>
.
.
.
</ePOSPrint>
<ePOSPrint>
.
.
.
</ePOSPrint>
</PrintRequestInfo>
<ePOSPrint> tag
Print request 1
Note: Enclosing the ePOSPrint tag in the PrintRequestInfo tags enables sending multiple print requests
to the printer.
<ePOSPrint> tag
Print request 2
43
Chapter 3 Request and Response
3
The print data configuration is as follows:
HTTP/1.1 200 OK
Content-Type: text/xml; charset=utf-8
Content-Length: xxx
<?xml version="1.0" encoding="utf-8" ?>
<PrintRequestInfo>
<ePOSPrint>
<Parameter>
<devid>local_printer</devid>
<timeout>10000</timeout>
</Parameter>
<PrintData>
<epos-print xmlns="http://www.epson-pos.com/schemas/2011/03/epos-print">
<text lang="en" />
<text smooth="true" />
<text align="center" />
<text font="font_b" />
<text width="2" height="2" />
<text reverse="false" ul="false" em="true" color="color_1" />
<text>DELIVERY TICKET</text>
<feed unit="12" />
<text></text>
<text align="left" />
<text font="font_a" />
<text width="1" height="1" />
<text reverse="false" ul="false" em="false" color="color_1" />
<text>Order 0001</text>
<text width="1" height="1" />
<text reverse="false" ul="false" em="false" color="color_1" />
<text>Time Mar 19 2013 13:53:15</text>
<text>Seat A-3</text>
<text></text>
<text width="1" height="1" />
<text reverse="false" ul="false" em="false" color="color_1" />
<text>Alt Beer</text>
<text>$6.00 x 2</text>
<text x="384" />
<text>$12.00</text>
<text></text>
<text reverse="false" ul="false" em="true" />
<text width="2" height="1" />
<text>TOTAL</text>
<text x="264" />
<text>$12.00</text>
<text reverse="false" ul="false" em="false" />
<text width="1" height="1" />
<feed unit="12" />
<text align="center" />
<barcode type="code39" hri="none" font="font_a" width="2" height="60">0001
</barcode>
<feed line="3" />
<cut type="feed" />
</epos-print>
</PrintData>
</ePOSPrint>
<ePOSPrint>
<Parameter>
<devid>kitchen_printer</devid>
<timeout>10000</timeout>
</Parameter>
<PrintData>
Header
Specify the
device ID
<ePOSPrint>tag

44
<epos-print xmlns="http://www.epson-pos.com/schemas/2011/03/epos-print">
<text lang="en" />
<text smooth="true" />
<text rotate="true" />
<text align="center" />
<barcode type="code39" hri="none" font="font_a" width="2" height="60">0001
</barcode>
<feed unit="30" />
<text align="left" />
<text>0001</text>
<text>03-19-2013 13:53:15</text>
<text reverse="true" />
<text>Kitchen</text>
<text reverse="false" />
<text />
<text>[New Order]</text>
<text></text>
<text width="1" height="2" />
<text>Seat:</text>
<text width="2" height="2" />
<text>A-3</text>
<text width="1" height="1" />
<text></text>
<text width="2" height="2" />
<text>2</text>
<text width="1" height="2" />
<text>Alt Beer</text>
<text width="1" height="1" />
<text></text>
<cut type="feed" />
<text rotate="false" />
</epos-print>
</PrintData>
</ePOSPrint>
</PrintRequestInfo>
<ePOSPrint>tag

45
Chapter 3 Request and Response
3
Response When No Printing Is Performed
When no printing is required, to notify no print data, the following response is returned for a HTTP request
(print request) sent from the TM intelligent printer.
See Test_print.php of the sample program.
About Response Message
A response message consists of a header and <ePOSPrint> tags.
<Parameter> tag
Set the <Parameter> tag as shown below.
HTTP/1.1 200 OK
Content-Type: text/xml; charset=utf-8
Content-Length: 0
<Parameter>
<devid>(Device ID used for slip printing)</devid>
<timeout>(Timeout time (in milliseconds))</timeout>
</Parameter>
<Parameter>
<devid>local_printer</devid>
<timeout>10000</timeout>
</Parameter>
Example

46
Print Data
Describe the print data in the ePOS-Print format and specify the data to the <epos-print> tag. For ePOS-
Print XML reference, see Chapter 4 "ePOS-Print XML Reference" in "ePOS-Print XML User's Manual"
included in the package.
HTTP/1.1 200 OK
Content-Type: text/xml; charset=utf-8
Content-Length: xxx
<?xml version="1.0" encoding="utf-8" ?>
<PrintRequestInfo>
<ePOSPrint>
<Parameter>
<devid>local_printer</devid>
<timeout>10000</timeout>
</Parameter>
<PrintData>
<epos-print xmlns="http://www.epson-pos.com/schemas/2011/03/epos-print">
<text lang="en" />
<text smooth="true" />
<text align="center" />
<text font="font_b" />
<text width="2" height="2" />
<text reverse="false" ul="false" em="true" color="color_1" />
<text>DELIVERY TICKET</text>
<feed unit="12" />
<text></text>
<text align="left" />
<text font="font_a" />
<text width="1" height="1" />
<text reverse="false" ul="false" em="false" color="color_1" />
<text>Order 0001</text>
<text width="1" height="1" />
<text reverse="false" ul="false" em="false" color="color_1" />
<text>Time Mar 19 2013 13:53:15</text>
<text>Seat A-3</text>
<text></text>
<text width="1" height="1" />
<text reverse="false" ul="false" em="false" color="color_1" />
<text>Alt Beer</text>
<text>$6.00 x 2</text>
<text x="384" />
<text>$12.00</text>
<text></text>
<text reverse="false" ul="false" em="true" />
<text width="2" height="1" />
<text>TOTAL</text>
<text x="264" />
<text>$12.00</text>
<text reverse="false" ul="false" em="false" />
<text width="1" height="1" />
<feed unit="12" />
<text align="center" />
<barcode type="code39" hri="none" font="font_a" width="2" height="60">0001
</barcode>
<feed line="3" />
<cut type="feed" />
</epos-print>
</PrintData>
Header
Specify the
device ID
<ePOSPrint>tag

47
Chapter 3 Request and Response
3
</ePOSPrint>
<ePOSPrint>
<Parameter>
<devid>kitchen_printer</devid>
<timeout>10000</timeout>
</Parameter>
<PrintData>
<epos-print xmlns="http://www.epson-pos.com/schemas/2011/03/epos-print">
<text lang="en" />
<text smooth="true" />
<text rotate="true" />
<text align="center" />
<barcode type="code39" hri="none" font="font_a" width="2" height="60">0001</barcode>
<feed unit="30" />
<text align="left" />
<text>0001</text>
<text>03-19-2013 13:53:15</text>
<text reverse="true" />
<text>Kitchen</text>
<text reverse="false" />
<text />
<text>[New Order]</text>
<text></text>
<text width="1" height="2" />
<text>Seat:</text>
<text width="2" height="2" />
<text>A-3</text>
<text width="1" height="1" />
<text></text>
<text width="2" height="2" />
<text>2</text>
<text width="1" height="2" />
<text>Alt Beer</text>
<text width="1" height="1" />
<text></text>
<cut type="feed" />
<text rotate="false" />
</epos-print>
</PrintData>
</ePOSPrint>
</PrintRequestInfo>
<ePOSPrint>tag

48
Request (Printing Result)
TM intelligent printer sends a HTTP POST request (printing result) shown below after printing.
The application can check the printing result (if printing is properly finished) and the printer status by
analyzing request data.
Check the <response> tag for the printing result.
Parameter Value
ConnectionType SetResponse
ID The ID set with WebConfig (p. 27)
ResponseFile Printing result
1 : HTTP Request (Print request)
2.2 : HTTP Response (Print request)
6.2 : HTTP Response (Printing Result)
5 : HTTP Request (Printing Result)
2.1 : Create XML from a
database or other system
6.1 : Register printing result to a
database or other system
3 : Create print data
4 : Print
TM Intelligent Printer
Web Server
POST /demo/Test_print.php HTTP/1.1
Host: 192.168.192.10
Content-Type: application/x-www-form-urlencoded
Content-Length: xxx
ConnectionType=SetResponse&ID=&ResponseFile=Printing Result
<?xml version="1.0" encoding="utf-8"?>
<PrintResponseInfo Version="1.00">
#Success
<response xmlns="http://www.epson-pos.com/schemas/2011/03/epos-print"
success="true" code="" status="251854870" battery="0"/>
#Failed
<response xmlns="http://www.epson-pos.com/schemas/2011/03/epos-print"
success="false" code="EX_BADPORT" status="1" battery="0"/>
</PrintResponseInfo>
<response>tag

49
Chapter 3 Request and Response
3
Checking Error Occurrence
Check if the <response> tag indicates "success" or "failed".
On failure, an error code is described in "code".
For details, see "Error code" (p.50).
Item Description
true Success
false Failed
<PrintResponseInfo Version="1.00">
#Success
<response xmlns="http://www.epson-pos.com/schemas/2011/03/epos-print" success="true" code=""
status="251854870" battery="0"/>
#Failed
<response xmlns="http://www.epson-pos.com/schemas/2011/03/epos-print" success="false"
code="EX_BADPORT" status="1" battery="0"/>
</PrintResponseInfo>

50
Error code
Request Error
This occurs when the device has a problem. The following table shows errors that can occur.
Response (Printing Result)
The format of response message is XML(text/xml).
To indicate that the server received the printing result, the Web server returns a response as follows:
Code Message Cause
EPTR_AUTOMATICAL
An automatically recoverable
error occurred.
Continuous printing of high-density
printing
EPTR_COVER_OPEN The device has a problem. The cover is open.
EPTR_CUTTER The device has a problem. The cutter has a foreign matter.
EPTR_MECHANICAL The device has a problem. Mechanical error, etc.
EPTR_REC_EMPTY There is no paper. No paper
EPTR_UNRECOVERABLE
An unrecoverable error
occurred.
Low voltage
EX_BADPORT
The port is invalid or the device is
not connected.
The registered information is
invalid.
The device power is off.
The device is not connected.
Other device control software
exists on the system.
EX_TIMEOUT
Timeout occurred. The process was not completed
within a certain period of time.
A large amount of data was sent
with 1 method.
HTTP/1.1 200 OK
Content-Type: text/xml; charset=utf-8
Content-Length: 0
51
Chapter 3 Request and Response
3
Digest Access Authentication
This section describes the flow and settings for carrying out Digest access authentication with the web
server.
For Digest access authentication, the printer sends a dummy HTTP request before sending a print-related
request to the server. The server returns a response with HTTP status code "401 Unauthorized". The printer
sends a print-related request containing the user ID and password. The server carries out the Digest access
authentication process. Once authenticated, the server continues to carry out the print-related process.
Digest Access Authentication Settings
Digest access authentication requires settings for the TM intelligence printer and the server.
TM Intelligent Printer
Use EPSON TMNet WebConfig of TM-i/TM-DT to set your user ID and password required for Digest access
authentication.
For details, see "Server Direct Print Settings" for individual TM intelligent printers.
(TM-i: p. 27/ TM-DT: p. 34)
Web Server Settings
For detailed information on how to set Web server's Digest access authentication, see individual Web server
documents, etc.
1 : HTTP Request (Dummy)
2 : HTTP Response (401 Unauthorized)
3.2 : HTTP Response (Print request / Printing Result)
3 : HTTP request containing a user ID and password
(Print request / Printing Result)
3.1 : Server process
TM Intelligent Printer
Web Server

52
Program Example
See the following programming data (file name: Test_print.php)
<?php
header('Content-Type: text/xml; charset=UTF-8');
define("REQUEST_XML_PATH", "demo/request/sample.xml");
define("RESPONSE_XML_PATH", "demo/response/sample.xml");
if (isset($_POST["ConnectionType"])) {
$http_request = $_POST["ConnectionType"];
}
if ($http_request == 'GetRequest') {
# send print data
# ID
$shop_id = $_POST["ID"];
# create print data
if (file_exists(REQUEST_XML_PATH)) {
# return print data
$handle = fopen(REQUEST_XML_PATH, "r");
fpassthru($handle);
fclose($handle);
# move file
rename(REQUEST_XML_PATH, RESPONSE_XML_PATH);
}
} else if ($http_request == 'SetResponse') {
# get print result
$xml = simplexml_load_string($_POST["ResponseFile"]);
if (count($xml->response) != 0) {
# save log
$fhandle = @fopen("ResultPrint.log", "wt");
foreach ($xml->response as $response) {
fprintf($fhandle, "success : %s\ncode : %s\n", $response['success'],
$response['code']);
}
fclose($fhandle);
}
} else {
# Ignore other connectionType than GetRequest and SetResponse.
}
?>

53
Chapter 4 Status Notification
4
Status Notification
This chapter describes the Status Notification function.
Overview
Status Notification is used to periodically notify the TM intelligent printer status to the Web server. The Web
server automatically responds with an empty response.
Operating the printer management application created by the user with the Web server enables grasp of
the status of the printers installed in a shop from a remote place.
For TM-DT, enable the following settings in EPSON TMNet WebConfig.
• ePOS-Device (p. 32)
• Service startup settings (p. 34)
• Device control (p. 37)
• Server direct print (p. 35)
• Status notification (p. 54)
2 : Register the status to the database
2.1 : HTTP Response (Status Information)
TM Intelligent Printer
Web Server
1 : HTTP Request (Status Information)

54
Overview of Status Notification Sample Program
This program displays the status of the connected printer on the screen.
For the configuration such as Hardware Configuration (p. 18) and Environment Settings (p. 20), the same
configuration is used as with the Server Direct Print. (p. 18)
File Configuration
TM Intelligent Printer Settings
TM-i Settings
TM-i firmware ver.3.x or earlier
Configure the Status Notification settings using EPSON TMNet WebConfig.
Use the following procedure for registration.
1
Start the setup computer.
2
Connect the printer to the network and turn the power ON.
3
Start the Web browser on the setup computer and enter the IP address of TM-i set
in "IP Address Settings" (p.23).
File Name Description
Test_status.php Obtains and displays the result in response to a request from the printer.
resultPrint.log The printing result is retained in this file. The file is created after printing.
demo indexStatus.html Displays the printer status.
The registration screen will vary according to the model of TM Intelligent printer.
• "TM-i Settings" (p.54)
• "TM-DT Settings" (p.57)

55
Chapter 4 Status Notification
4
4
EPSON TMNet WebConfig starts.
Select [Status Notification].
5
The "Status Notification Settings" screen appears.
Set the following items and click [Submit].
TM-i firmware ver.4.0 or later
1
Start the setup computer.
2
Connect the printer to the network and turn the power ON.
3
Start the Web browser on the setup computer and enter as follows:
http://[IP address of the TM-i]/PrinterConfigurationPage/
For details about the IP address settings for TM-i, see "IP Address Settings" (p.23).
Item Description
Status Notification Select the [Enable].
ID
Set ID for the server-side program to identify TM-i. This ID becomes the user
ID used for Digest access authentication. The set value will also be passed
as an ID parameter value for the form data posted to the server.
Not required for the sample program.
Password
Set your password used for Digest access authentication.
Not required for the sample program.
URL
Specify the Test_print.php address of the Web server.
Example: http://[IP address of the Web Server]/Test_status.php
Click the [Access Test] button to check if the address is accessible.
Interval(s) Set the request interval.

56
4
EPSON TMNet WebConfig starts.
Select [Web Service Settings] - [Status Notification].
5
The "Status Notification" screen appears.
Set the following items and click [Submit].
Item Description
Status Notification Select the [Enable].
ID
Set ID for the server-side program to identify TM-i. This ID becomes the user
ID used for Digest access authentication. The set value will also be passed
as an ID parameter value for the form data posted to the server.
Not required for the sample program.
Password
Set your password used for Digest access authentication.
Not required for the sample program.
URL
Specify the Test_print.php address of the Web server.
Example: http://[IP address of the Web Server]/Test_status.php
Click the [Access Test] button to check if the address is accessible.
Interval(s) Set the request interval.
Authenticate
Server
Sets whether the server authentication is performed with the registered
certificate when accessed through https.

57
Chapter 4 Status Notification
4
TM-DT Settings
Configure the Status Notification settings using EPSON TMNet WebConfig.
Use the following procedure for registration.
1
Connect the TM-DT to the network and turn the power ON.
2
Start EPSON TMNet WebConfig from the shortcut on the desktop.
EPSON TMNet WebConfig starts.
3
Select as [Settings]-[Web service settings]-[Status notification].
The "Status notification" screen appears.
Ifyouaremakingsettingsfromanexternaldevice,settheTM‐DTIPaddressinthe
addressfortheWebbrowser.ThedefaultIPaddressforTM‐DTis192.168.192.168.
http://[IPaddressofTM‐DT]/webconfig/

58
4
Set the following items and click [Apply].
Item Description
ID
Set ID for the server-side program to identify TM-DT. This ID becomes the
user ID used for Digest access authentication. The set value will also be
passed as an ID parameter value for the form data posted to the server.
Not required for the sample program.
Password
Set your password used for Digest access authentication.
Not required for the sample program.
URL
Specify the Test_print.php address of the Web server.
Example: http://[IP address of the Web Server]/Test_status.php
Click the [Access Test] button to check if the address is accessible.
Interval (sec) Set the request interval.

59
Chapter 4 Status Notification
4
Execution of Sample Program
1
Confirm that Status Notification of TM intelligent printer is set.
2
Open the sample program page from the Web browser.
Example: http://[IP address of the Web Server]/demo/indexStatus.html
3
The “resultPrint.log” is created from the message from the TM intelligent printer and
the result is displayed on the screen.

60
Status Type
The following types of ASB (AutoStatusBack) status can be obtained from the TM-i.
Code Description
0x00000001 No printer response
0x00000002 Print complete
0x00000004 Status of the drawer kick number 3 connector pin = "H"
0x00000008 Offline status
0x00000020 Cover is open
0x00000040 Paper feed switch is feeding paper
0x00000100 Waiting for online recovery
0x00000200 Paper feed switch is being pressed
0x00000400 Mechanical error occurred
0x00000800 Auto cutter error generated
0x00002000 Unrecoverable error generated
0x00004000 Auto recovery error generated
0x00020000 No paper in the roll paper near end detector
0x00080000 No paper in the roll paper end detector
0x01000000 Buzzer activated (supported model only)
0x80000000 Stop the spooler

61
Chapter 4 Status Notification
4
Program Example
Refer to the programming below. (File name: Test_status.php)
<?php
header('Content-Type: text/xml; charset=UTF-8');
# Open the file to save status.
$fhandle = @fopen("ResultStatus.log", "wt");
# Update the printer status.
if (isset($_POST["Status"])) {
$status = $_POST["Status"];
}
$xml = simplexml_load_string($status);
foreach ($xml->printerstatus as $printerstatus) {
$asb = hexdec($printerstatus['asbstatus']);
$strmsg = "";
if (($asb & 0x00000001) == 0x00000001)
{
$strmsg .= " No TM printer response\n";
}
if (($asb & 0x00000002) == 0x00000002)
{
$strmsg .= " Print completed \n";
}
if (($asb & 0x00000004) == 0x00000004)
{
$strmsg .= " Status of the drawer kick number 3 connector pin\n";
}
if (($asb & 0x00000008) == 0x00000008)
{
$strmsg .= " Offline status \n";
}
if (($asb & 0x00000020) == 0x00000020)
{
$strmsg .= " Cover is open \n";
}
if (($asb & 0x00000040) == 0x00000040)
{
$strmsg .= " During paper feeding by pressing paper feed switch \n";
}
if (($asb & 0x00000100) == 0x00000100)
{
$strmsg .= " Waiting for online recovery \n";
}
if (($asb & 0x00000200) == 0x00000200)
{
$strmsg .=" Paper feed switch is being pressed (ON) \n";
}
if (($asb & 0x00000400) == 0x00000400)
{
$strmsg .= " Mechanical error generated \n";
}
if (($asb & 0x00000800) == 0x00000800)
{
$strmsg .= " Auto cutter error generated \n";
}

62
if (($asb & 0x00002000) == 0x00002000)
{
$strmsg .= " Unrecoverable error generated \n";
}
if (($asb & 0x00004000) == 0x00004000)
{
$strmsg .= " Auto recovery error generated \n";
}
if (($asb & 0x00020000) == 0x00020000)
{
$strmsg .= " No paper in the roll paper near end detector \n";
}
if (($asb & 0x00080000) == 0x00080000)
{
$strmsg .= " No paper in the roll paper end detector \n";
}
if (($asb & 0x80000000) == 0x80000000)
{
$strmsg .= " Stop the spooler \n";
}
$result = fprintf($fhandle, "Printer name = %s : Status ASB value is
%s \n", $printerstatus['devicename'], $asb);
$result = fprintf($fhandle, "%s\n", $strmsg);
if ($result) {
# OK
} else {
# N.G
}
}
fclose($fhandle);
?>

63
Chapter 4 Status Notification
4
Request and Response
Request
The format of request message is URL-encoded form data (application/x-www-form-urlencoded).
The status information configuration is as follows:
Response
The format of response message is XML(text/xml).
To indicate that the server received the status notification, the Web server returns a response as follows:
Digest Access Authentication
Digest access authentication can be used for the status notification.
See "Digest Access Authentication" (p.51)
Parameter Value
ConnectionType Status
ID The ID set with WebConfig (p. 54)
ResponseFile Status Information
POST /demo/Test_status.php HTTP/1.1
Host: 192.168.192.10
Content-Type: application/x-www-form-urlencoded
Content-Length: xxx
ConnectionType=SetStatus&ID=&Status=Status Information
<?xml version="1.0" encoding="utf-8"?>
<statusmonitor Version="1.00">
<printerstatus devicename="kitchen_printer" asbstatus = "0x00000001"/>
<printerstatus devicename="kitchen_printer2" asbstatus = "0x00000001"/>
<printerstatus devicename="local_printer" asbstatus = "0x0F00003C"/>
</statusmonitor>
Obtain the ASB status
HTTP/1.1 200 OK
Content-Type: text/xml; charset=utf-8
Content-Length: 0

64
