
Underfloor
heating
user guide
neoStat
UNDERFLOOR
HEATING
SOLAR
THERMAL
HEAT
PUMPS
© Nu-Heat 2016
v8

2
For expert advice call us on 01404 549770
working with you
your project
before,
& after
during
Nu-Heat
Know-How

3
For more information visit www.nu-heat.co.uk
Contents
Welcome 04
About the Nu-Heat system 05
System startup 05
Operation 06
Systems with programmable thermostats 07
Systems with neoStats 07
Hot water control option 07
Optional control from a Smart Phone 08
Pairing the neoHub+ 08
Pairing the neoStat 08
What is a mesh network? 08
Sharing access to the system 08
Mode 1 – thermostat operation 09
Error codes 09
Cooling 09
Temperature display 10
Setting the clock 10
Setting the heating periods and temperatures 10
Temperature control 11
Temperature hold 11
Locking and unlocking the neoStat 11
Frost mode 11
Power ON/OFF 12
Holiday mode 12
Optional features explained 13
Adjusting the optional settings 14
Factory reset 14
Mode Select 15
Mode 2 – time clock operation 16
Optional features explained 16
Optional settings – features table 16
Setting the switching times 17
Timer override 17
General system checks 18
General sequence of operation 19
Manifold components 19
Seasonal adjustments 20
Geo-Location 21
Understanding and setting up Geo-Location 21
System adjustments 22
Servicing requirements 23
Energy eciency (ErP) 23
Product support 23

4
For expert advice call us on 01404 549770
Welcome
System Ref:
Congratulations, you are the owner of a Nu-Heat warm water underfloor heating
system, designed and supplied by Nu-Heat UK Ltd., the largest supplier of domestic
underfloor systems in the UK.
This manual is provided to help you understand how the system operates and the
correct settings required to get the most from your heating.
Nu-Heat did not install your system, therefore any installation matters should be
referred to the contractor concerned. Please record the installer’s details below.
For more information on the operation of your system and also troubleshooting
help, please visit the Nu-Heat website at nu-heat.co.uk.
Installer details
Company:
Contact name:
Contact telephone no.:
Address:
Every Nu-Heat system is a custom
design. Please record your unique system
reference number above for future
reference.

5
For more information visit www.nu-heat.co.uk
About the Nu-Heat System
System startup
Description
Underfloor heating works by pumping warm water through special plastic tubing
embedded in the floor. This warms the floor and maintains the room at a
comfortable temperature.
Benefits
In particular, underfloor heating systems:
• Provide a more comfortable heated environment,
• Permit unlimited interior design options,
• Increase the useable space within a property.
Moreover, all these benefits are available from a system which can be significantly
less expensive to run than a conventional, radiator-based system.
Underfloor heating
Locate the main components of your
installation: the boiler, hot water cylinder,
underfloor heating pump/Optiflo
manifold assembly(s), thermostats,
timeclocks, underfloor heating
wiring box.
Electricity supply
Ensure that the electrical installation is
complete and that the heating system
is turned on. The location of the main
supply on/o switch may vary but is
often positioned next to the boiler.
There may be additional switches located
at each underfloor heating wiring box
which also need to be on.
Water supply
Ensure that the water is turned
on ready for domestic hot water
operation, check that a high flow of
water is available from the cold taps.
If there is poor flow or none at all,
check that the stop-cock for the
property is fully open.
Once your system has been commissioned it should be fully operational. To initially
check that your system is turned on and working please follow these simple steps:

6
For expert advice call us on 01404 549770
Operation
Your underfloor system is designed for
performance and economy. Each heating
zone is controlled by its own wall-mounted
thermostat. If a room has no thermostat
it will be connected to, and controlled
by, an adjacent zone.
UNDERFLOOR HEATING
Unlike traditional dial thermostats
controlled by a timeclock,
programmable thermostats do not
work on the basis of ON and OFF
times. Instead dierent temperatures
are set at dierent times throughout
the day. If the property is to be
unoccupied during the day, for example,
then the temperature can be set low
(setback temperature), whereas during
the morning and evening it can be set
at the desired comfort temperature.
The best way to find the optimum
temperature setting is to set a low
comfort temperature (e.g.18°C) and
then turn it up by 1°C each day until the
temperature is right.
Consideration should be given to the
dierent floor constructions and
finishes used in your property, as these
factors will aect the time the system
will take to achieve comfort conditions.
However, the neoStat incorporates
Optimum Start, a self-learning feature
that enables it to manage when the
heating should be switched on, in order
to hit the target temperature that has
been programmed. This means that the
thermostats can be set to the comfort
temperature at the times
that heating is required. It will then
automatically manage the varying floor
response times, and bring the heating
on in time.
The Optimum Start feature will need to
be set up in the thermostat – for details
see page 13.
The temperature chosen as the setback
temperature will depend upon the
situation:
• For new build properties this will
generally be 4-6°C lower than the
comfort setting, although again, this
can be experimented with.
• Renovated properties may work best
with a lower setback temperature,
in order that the heating remains o
outside of the times at which the
comfort temperature is selected.
The fast response time of LoProMax
™
makes this method particularly
suitable.
• Less thermally responsive floors, in
particular screed floors greater than
65mm thick, will achieve comfort
temperatures more quickly when
the setback temperature is closer
to the comfort temperature.

7
For more information visit www.nu-heat.co.uk
Systems with programmable
thermostats
THE EFFECT OF SETBACK (for illustration only)
Programmable room thermostats oer
the ideal solution to maintaining dierent
background temperatures at dierent
times. They can easily be set to achieve
the desired temperature at all times of
day and night.
20˚C
15˚C
10˚C
1 2 3 4 5 6 7 8 9 10 11 1 2 3 4 5 6 7 8 9 10 11
Midnight Midday Midnight
16˚C
set-back
16˚C
set-back
16˚C
daytime
20˚C
early
morning
20˚C
evening
Systems with neoStat
HOT WATER CONTROL OPTION
A supplementary neoStat can be configured as a timer to control your hot water.
See page 16 for details of how to set this up.
Each room thermostat combines the functions of a room
thermostat, timeclock and set-back thermostat.
For enhanced heating performance and eciency the unit also provides
self-learning Optimum Start in the morning.
Four adjustable time/temperature zones are available for the days of the week, and
a further four during the weekend as standard, giving enhanced heating control.
A 7-day mode is also available.

8
For expert advice call us on 01404 549770
SHARING ACCESS TO THE NEO SYSTEM
At this stage access to other users may be granted, on a full or restricted basis.
Optional control from a
SmartPhone (systems with neoHub+)
PAIRING THE NEOHUB+
To pair the neoHub+ with the neoApp, follow these steps:
PAIRING THE NEOSTATS
The next step is to pair each neoStat to the neoHub+, starting with the neoStat located nearest to the neoHub+.
To add a neoStat, follow these steps:
WHAT IS A MESH NETWORK?
NeoStats work using a mesh network, meaning neoStats have
the ability to send and receive signals via other thermostats
on the network. This signal is relayed from one thermostat to
another until it reaches its destination. This communication
method extends the communication range whilst oering
increased network stability when compared with standard
RF thermostats.
The MESH symbol is shown when the device is communicating
with the neoHub, if the mesh symbol disappears this
indicates connection to the neoHub+ has been lost.
Ideal uses for the Share Feature.
• Where there is more than one household member.
• To give restricted access to tenants in a rented property.
• To give temporary control to a heating engineer or
service partner.
To setup a Share Access, follow these steps:
1 Select Share Access
2 Press + to add a user
3 Enter the User Details and press User Mode
4 Select Admin or Guest
Admin or Guest?
Admin users have complete control. They can add and
remove zones, adjust heating times and temperatures and
can setup Geo Location.
Guest users have temporary control – so they can adjust the
temperature using the scroll wheel but they cant reprogram
the heating times and temperatures or add and remove
zones. They also don’t have access to the Geo Location
feature.
Note: To use Geo Location – each user in the home must
have their own Share Account.
You can remove a user at any time by going in the Share
Access menu and selecting the Delete User option.
1 Connect the power supply to the neoHub+.
2 Connect the neoHub+ to your router with the Ethernet
cable provided. The router will automatically assign an IP
address to the neoHub+, the ‘Link’ LED will light up once
the neoHub+ has connected to your network.
3 Download the FREE Nu-Heat neoApp from the Apple App
Store, Google Play Store or Amazon App Store and
register an account.
4 Once you have registered your account, press the LOGIN
button then press the ADD LOCATION option.
5 Press the CONNECT button on the neoHub+to add the
location to your account.
6 When successfully connected, enter a title for the new
location (e.g. Home) and configure the time zone for the
system.
1 From the neoApp, select ADD ZONE, enter a zone title
and press ADD ZONE again.
2 You now have two minutes to pair the neoStat to the
neoHub+.
3 On the neoStat, use the < / > keys to select setup and
press 3. Feature 01 is displayed on screen.
4 Press the 3 key to pair the neoStat to the neoHub+
5 The MESH symbol appears flashing on the display (see p.9).
APPLE HOMEKIT INITIAL SETUP
1 Setup your thermostats via the Nu-Heat neoApp with the
names and details required.
2 Using the pre-installed HOME application on Apple
products, link the NeoHub+ to the HOME App. This will
import all the thermostats’ setup on the neoHub into HOME.
3 Arrange the thermostats to the rooms as set in the
HOME App.
The thermostats can now interact with other HomeKit
enabled products to allow for smart home integration.

9
For more information visit www.nu-heat.co.uk
Day
Mesh symbol
Floor limit symbol
Frost symbol
Flame symbol
Heat/Cool (cool not active)
Floor temp/Room temp
Set*
Key lock indicator
Programme indicator
Main menu navigation
Temperature format
Temperature (current)
Cool on (not used)
Clock
Holiday left
Hold left
1
1
3
3
7
7
8
8
9
9
10
10
17
17
16
16
15
15
14
14
13
13
12
12
11
11
4
4
5
5
6
6
2
2
Mode 1 – thermostat operation
*SET = Displayed when changes are being made to the program schedule or
current set point.
ERROR CODES
When used as a thermostat the screen will display an error code if a fault is
detected.
E0 = The internal sensor has developed a fault.
E1 = The remote FLOOR probe has not been connected / is faulty.
E2 = The remote AIR probe has not been connected / has not been wired
correctly / is faulty.
COOLING
The neoStat cooling control feature is not used.

10
For expert advice call us on 01404 549770
Temperature display
The neoStat can be configured for dierent sensor options such as remote air
sensor, floor sensor or both. The display will clearly indicate which sensor is
being used by showing either ROOM TEMP or FLOOR TEMP before the actual
temperature value.
When the neoStat is set to use both the air & the floor sensor, the room
temperature will be displayed by default.
1 To view the current floor temperature, press and hold the < and > arrow keys
for 5 seconds, the floor temperature will then be displayed.
Setting the clock
To set the clock, follow these steps.
1 Use the < / > keys to scroll to ‘CLOCK’
2 Press 3 to confirm selection
3 Use the 6/5 keys to set the hours (24 hour format)
4 Press 3 to confirm selection
5 Use 6/5 keys to set the minutes
6 Press 3 to confirm selection
7 Use < / > keys to set the the day
8 Press 3 to confirm selection and return to the main display
The neoStat oers three program
mode options: Weekday/Weekend
programming, 7 Day programming and
24 Hour programming. There is also
the option to use the thermostat as
a Non-Programmable thermostat.
When thermostats are connected to the
mesh network, the program mode for
the system is configured by using the
neoApp.
The thermostat is supplied with comfort
levels already programmed, but these
can be changed easily. The default
times and temperature settings are;
07:00 / 21˚C (wake)
09:00 / 16˚C (leave the house)
16:30 / 21˚C (return home)
22:00 / 16˚C (sleep)
To program the comfort levels, use the
< / > keys to scroll to EDIT
1 Press 3 to confirm selection
2 Use the < / > keys to select day /
period of week
(the selection will flash).
3 Press 3 to confirm selection
4 WAKE will flash and current time
and temperature setting will be
shown.
5 Press 3 to alter wake settings
6 Use the 6/5 keys to set the hours
7 Press 3 to confirm
8 Use the 6/5 keys to set the
minutes
9 Press 3 to confirm
10 Use the 6/5 keys to set the
temperature
11 Press 3 to confirm the settings
12 Press the > arrow key
13 LEAVE will flash and current settings
will be displayed.
14 Press 3 to alter leave settings
15 Repeat these steps to set all comfort
levels.
16 For any unused periods set time to
--:--
17 Use the < / > keys to scroll to done
and press 3
Setting the heating periods and temperatures

11
For more information visit www.nu-heat.co.uk
Temperature control
1 The 6/5 allow you to adjust the set temperature. When you press either key,
you will see the word SET and the desired temperature value. Use the 6/5
keys to adjust the set value.
2 Press 3 to confirm settings and return to the main display.
Note: This new temperature is maintained only until the next programmed comfort
level. At this time, the thermostat will revert back to the programmed levels.
Temperature hold
The temperature hold function allows you to manually override the current
operating program and set a dierent temperature for a desired period.
1 Use the < / > keys to scroll to HOLD
2 Press 3 to confirm selection
3 Use the 6/5 keys to set the desired Hold period
4 Press 3 to confirm selection
5 Use the 6/5 keys to set the desired Hold temperature
6 Press 3 to confirm selection
You will see the HOLD LEFT indication is displayed on screen. The time will
countdown the set duration and then revert to the normal program.
To cancel a temperature hold, repeat these steps but reduce the HOLD time
to 00:00 hrs.
Locking the neoStat
The thermostat has a keypad lock facility. To activate the lock follow these steps:
1 Use the < / > keys to scroll to HOLD & press 3 for 10 seconds.
2 The display will show 00:00 and you will need to set a four digit pin number.
3 Use the 6/5 keys to enter the first two digits
4 Press 3 to confirm
5 Use the 6/5 keys to enter the second two digits
6 Press 3 to confirm
The display will return to the main screen and display the keypad lock indicator Ï
Note: The keypad lock indicator is only displayed when the lock is active.
Unlocking the neoStat
To unlock the neoStat press 3 once. The display will show 00:00 and you will need
to enter the four digit pin number you set previously.
1 Use the 6/5 and 3 keys to enter the first two digits
2 Use the 6/5 and 3 keys to enter the second two digits
The display will unlock and return to the main screen.
Frost mode
1 Use the < / > keys to scroll to the POWER icon. The FROST icon will toggle
ON/OFF each time 3 is pressed.
In this mode, the neoStat will display the frost icon and will only turn the heating
ON should the room temperature drop below the set frost temperature
(see pages 13–14).
If the heating is turned ON whilst in frost mode, the flame symbol will be displayed.
To cancel the frost protect mode, navigate to the POWER button again and press 3.

12
For expert advice call us on 01404 549770
Power ON/OFF
The heating is indicated ON when the flame icon is displayed. When the flame icon
is absent, there is no requirement for heating to achieve the set temperature but
the neoStat remains active.
1 To turn the neoStat o completely, scroll to the POWER icon and hold the 3
key for approximately 4 seconds until the display goes blank.
The display and heating output will be turned OFF. To turn the thermostat back ON,
press the 3 key once.
Holiday
In thermostat mode, the HOLIDAY function reduces the set temperature in your
home to the frost protection temperature setting (see pages 13–14).
In time clock mode, the holiday function maintains the timed output as OFF. The
thermostat will maintain this setting for the duration of the holiday and will then
automatically return to the program mode on your return.
1 Use the < / > keys to scroll to holiday and press 3
2 Using the 6/5 keys enter number of days holiday
3 Press 3 to confirm settings
Note: A holiday period does not start until 00:00 the next day. For example, if you
set a holiday period on Friday for 2 days, Saturday will be counted as the first day
and the thermostat will revert back to the programmed schedule at 00:00 on
Monday.
To cancel, repeat these steps but reduce the Holiday duration to 00 days.

13
For more information visit www.nu-heat.co.uk
OPTIONAL FEATURES EXPLAINED
The following settings are optional and in most cases need not be adjusted.
FEATURE
DESCRIPTION SETTING EXPLANATION
01 Pairing Used to add zone to neoHub Used to connect the thermostat to the
neoHub
02 Switching dierential 00 = 0.5˚C
01=01˚C (default)
02=2˚C
03=3˚C
Allows you to increase the switching
dierential of the thermostat.
03 Frost protection temp. 07˚–17˚C (12˚C = default) The temperature maintained when the
thermostat is in Frost Mode.
04 Output delay 00 – 15 Minutes; (00 = Default) To prevent rapid switching, an output
delay can be entered. This can be set
from 00–15 minutes.
05 Up/Down Temp limit 00˚ – 10˚C; (00 = Default) Limit the use of the up and down
temperature arrow keys. This limit is
also applicable when the thermostat is
locked and so allows you to give others
limited control over the heating system.
06 Sensor selection 00 = Built in Sensor (Default)
01 = Remote Air Sensor
02 = Floor Sensor Only
03 = Built in & Floor Sensor
04 = Remote Air & Floor Sensor
Selects the active sensors. Select
between air temperature, floor
temperature, or both. When both
sensors are enabled, the floor sensor is
used as a floor limiting sensor to prevent
the floor from overheating.
07 Floor temp limit 20–45˚C (28˚C default) Available when feature 06 is set to
03 or 04. Set to the required floor
temperature limit (see instructions on
page 11)
08 Optimum Start 00 – 05 Hours; (00 = Default) Adjusts the start time within the preheat
range to allow for current conditions.
Heating is brought on before the start
time, but at the latest possible moment
to avoid unnecessary heating whilst
ensuring that the building is warm at
the programmed time.
09 Rate of change Minutes to raise by 1˚C This setting is calculated by the
thermostat. Number of minutes for 1˚C
temperature rise.
10 Cool enable 00 = Disabled
11 Cool set temp Not enabled
12 Program mode 00 = Non – Programmable
01 = Weekday/Weekend (Default)
02 = 7 Day Programming
03 = 24 Hour Mode
Weekday/ Weekend – 4 comfort levels
for the weekday and 4 dierent comfort
levels for the weekend.
7 Day Program Mode – Each day has 4
comfort levels that can be programmed
independently.
24 Hour Mode – All days are
programmed the same and repeat
continuously.
13 Temperature format 00 = ˚C, 01 = ˚F; (00 = Default) Select between ˚C and ˚F.

14
For expert advice call us on 01404 549770
Adjusting the Optional Settings
To adjust the settings, follow these steps:
1 Use the < / > keys to select SETUP
2 Press 3 to confirm selection
3 Use the 6/5 keys to scroll through features
4 Use the < / > keys to adjust the setting within each feature
5 Press 3 to confirm settings
Setting value Feature number
Re-calibrating the thermostat
Warning: The thermostat must be fixed in a wall. When re-calibrating the
thermostat avoid warming it with your hands or breath, as this will cause an
inaccurate setting.
To re-calibrate the thermostat, follow these steps:
1 Use the < / > keys to scroll to the POWER icon
2 Press and hold 3 to turn the display OFF
3 Press and hold the 3 and 6 keys together for 10 secs
4 The current temperature will appear on the display.
5 Use the 6/5 keys to configure the new temp value
6 Press the 3 key to confirm change and the display will go blank
7 Press the 3 key once to turn the thermostat ON
Factory reset
To return all settings to their factory default:
1 Use the < / > keys to scroll to SETUP
2 Press and hold the 3 key for 10 seconds. All of the icons on the display will
appear for 2 seconds, then the display will show option 1 or 2.
3 Use the < / > keys to scroll between modes (selection will flash)
Mode 1 = Thermostat
Mode 2 = Time Clock
4 Press the 3 key to confirm selection
The thermostat will revert to the main display screen for the selected mode.
Note: Factory reset will cancel all parameters that were entered during the set-up
and pairing operations. These processes must be repeated after factory reset is
completed.

15
For more information visit www.nu-heat.co.uk
Mode Select
The neoStat can either be used as a thermostat or a time clock. Thermostat mode
is the default setting.
To change between THERMOSTAT or TIME CLOCK modes, follow these steps:
1 Use the < / > keys to scroll to SETUP
2 Press and hold the 3 button for 10 seconds
3 Use the < / > keys to scroll between modes
mode 1 = Thermostat
mode 2 = Time Clock
Note: the selected option will flash.
4 Press the 3 key to confirm selection
The neoStat will revert to the main display screen for the selected mode.

16
For expert advice call us on 01404 549770
Day
Mesh symbol
Set
Key lock symbol
Programme indicator
Main menu
Timer status
Clock
Holiday left
Hold left
DISPLAY SYMBOLS AND FUNCTIONS
Mode 2
Time clock operation
1
1
3
3
4
4
5
5
10
10
9
9
8
8
7
7
6
6
2
2
OPTIONAL FEATURES EXPLAINED
Feature 01 – Pairing To neoHub: This function is used to
connect the time clock to neoHub.
Feature 02 – Weekday/Weekend (5/2), 7 Day Programming
or 24 Hour Mode:
The time clock oers three programming methods;
Weekday/ Weekend (5/2) – Allows you to program
4 on/o switching times for weekdays and 4 on/o switching
times for the weekend.
7 Day Program Mode – Each day has 4 on/o switching
times that can be programmed independently.
24 Hour Mode – All days are programmed with the same
on/o switching times.
OPTIONAL SETTINGS FEATURE TABLE
Feature Description Setting
01 Pairing Used to pair to the neoHub
02 Program mode 01 = Weekday/Weekend
Programming (Default)
02 = 7 Day Programming
03 = 24 Hour Mode
17
For more information visit www.nu-heat.co.uk
Setting the switching times
To program the switching times, follow these steps:
1 Use the < / > keys to scroll to EDIT and press 3
2 Use the < / > keys to select day/period of the week
3 Press 3 to confirm selection
4 1 will now flash and the current ON time will be displayed. The OFF time can be
viewed by pressing the6key.
5 Select a switching time and press the 3 key
6 Use the 6/5 keys to select ON time HOURS and press 3
7 Use the 6/5 keys to select the ON time MINUTES
8 Press 3 to confirm selection
9 Use the 6/5 keys to select OFF time HOURS and press 3
10 Use the 6/5 keys to select the OFF time MINUTES
11 Press 3 to confirm selection
12 Press the > arrow key
13 2 will flash and current ON time will be displayed.
14 Repeat the steps above to set all periods. For any unused periods enter -- : --
15 When complete, use < / > keys to scroll to DONE
16 Press 3 to confirm all changes
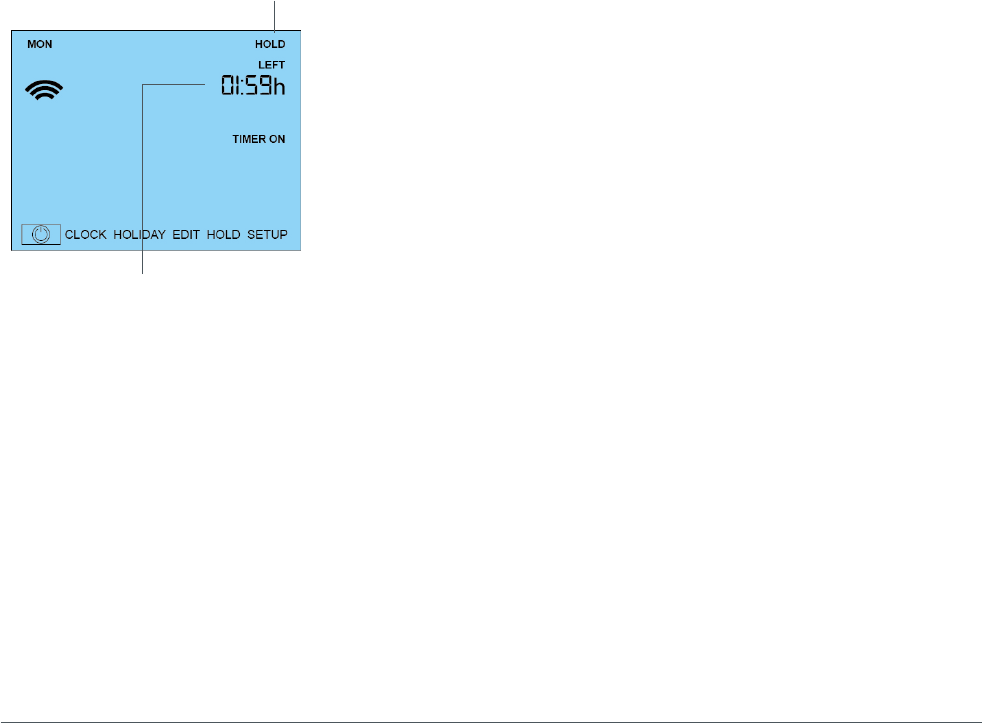
Timer override
To override the TIMED OUTPUT ON, follow these steps:
1 Use the 6/5 keys to set the override duration, e.g. 02:00 hours
2 Press 3 to confirm settings and return to main display
HOLD LEFT and the remaining time will now be displayed.
HOLD LEFT indicator
HOLD TIME remaining

18
For expert advice call us on 01404 549770
General system checks
The expansion vessel and filling loop is
usually positioned near the boiler.
Adjust the temperature of the boiler water
by turning the boiler control thermostat.
Never set the boiler water temperature
lower than the cylinder thermostat.
System pressure
The majority of heating systems are
sealed and include an expansion vessel
which maintains the system pressure.
This red vessel would normally be
found positioned near to the boiler.
If you have a combination boiler or
system boiler the main pump and
expansion vessel will be inside the
boiler. The best way to identify this
is that the boiler will have a pressure
gauge on its panel.
You will need to check the system
pressure regularly as it is normal for
a system to lose a small amount of
pressure. The gauge should read
approximately between 1 and 2 bar
depending on whether the system is
cold or hot.
If the pressure is below 1 bar, top the
pressure up to 1 bar by opening the
valve on the filling loop connected to
the red vessel (or boiler if no red vessel
is fitted). Only top up when the system
is cold. If your system rapidly looses
pressure you need to consult a heating
engineer.
If there is no red expansion vessel or
gauge on the boiler then your system is
not sealed but open vented and will be
topped up automatically by a feed tank
and ballcock in the loft.
Boiler thermostat
The temperature of water generated by
your boiler is altered by adjusting the
boiler control thermostat dial.
If you have a hot water cylinder it
is important that the boiler water
temperature is always at least 5˚C
above the temperature of your
cylinder thermostat.

19
For more information visit www.nu-heat.co.uk
General sequence of operation
Every time heat is required in a room the following sequence is initiated:
If the heating is in an on period and the room requires heating, the room
thermostat will call for heat :–
1 A flame symbol will appear on
the display.
The floor pump, either on the
Optiflo manifold serving that zone,
or on the remote-mounted pump
module will be switched on.
The actuator on the Optiflo
manifold circuit connected to the
zone will open, indicated by the button
on top of the actuator head rising.
The flow gauge on this circuit will
indicate flow and the flow pipe will
get warm.
Over a period of time as the room
comes up to temperature, the return
pipe will warm up as well.
For standard systems with conventional
boilers/cylinders or combination boilers
the boiler and boiler pump are turned
on to supply and circulate heat.
MANIFOLD COMPONENTS
Flow gauges
Flow temperature gauge
Flow adjustment
Pressure gauge
Filling/drain o valve
Actuators
Manual air vent
Return temperature guage
Floor heating pump
(direct mounted)
Main isolating valve (return)
Main isolating valve (flow)
Temperature blending valve
Note: Pump may be mounted directly
or installed remotely.
1
2
3
4
5
6
7
8
9
10
11
12
11
33
66
1
6
2
3
4
5
7
5
8
9
10
11
12

20
For expert advice call us on 01404 549770
Seasonal adjustments
Leaving the property unoccupied
in winter
Rather than turning the heating system
o, it is possible to leave background
heating on as frost protection.
Each room/zone can be set to frost
protection individually. Please refer
to the instructions (Frost Protection
on page 11), which detail how the
thermostat can be put into a hold
mode and the required frost protection
temperature adjusted.
Instant hot water and heated
towel rail
Hot water and heated towel rails will
be available all year round regardless
of your requirement for underfloor
heating.
If you require to turn the heating o (for example when servicing) always use the
main heating isolation switch.
Underfloor heating can be left active
all year round as it is thermostatically
controlled by the room temperature. In
warm weather it will simply not come on.

21
For more information visit www.nu-heat.co.uk
Geo-Location
UNDERSTANDING & SETTING UP GEOLOCATION
Geo Location is a feature that makes use of a smart phone’s location services to
turn the heating o when the homeowner is out and back on for their return.
It works by the setting of a Leave and Return Trigger distance along with a required
temperature. When the triggers are activated, Neo will automatically adjust the
temperature in the home. It also works with multi users, so will only adjust the
heating when the last person leaves and the first person arrives home.
Ideal uses for the Geo Location
• Automatically turn the heating o when you’re out, perfect for weekends when
you may have your heating programmed to be on all day.
• Always return to a warm home. For those occasions when you return home
outside a programmed heating period, Geo Location will automatically turn the
heating on and then turn it o when you leave.
Note: Geo-Location works well for radiators and for LoPro™Max, which respond
quickly. However, for other UFH floor constructions, with longer response times,
Geo-Location will not necessarily give the desired performance and comfort.
1 Select Geo Location
2 Turn on Geo Location
3 Work through the settings to
Configure
4 Press Home Location to locate your
home.
5 Press Selected Rooms, 3 the
applicable rooms
6 Enter the Leaving Trigger Distance
7 Enter the Return Trigger Distance
8 Enter the Leave & Return
Temperatures
Things to remember
1 Account per User – To use Geo Location – each user in the home must have
their own Share Account.
2 Enable Location Services – Geo Location uses your phones location services,
so you must have this enabled for the Geo Location feature to work.
3 Enable WiFi – Geo Location uses WiFi to get a more accurate lock on your
position. Your phone doesn’t need to be connected to a WiFi network for this to
work, your phone will constantly scan available networks and use this data to
more accurately determine your location.
4 Last Out – First Home – Remember that Geo Location will only turn the
heating o when the last person has left and back on when the first person
arrives home. You will receive a notification on your phone if the temperature
in your home has been adjusted because of your location.
5 Location Services – If you setup a 1 mile leave trigger, your phone will send
a signal to your neoHub+to reduce the temperature in your home once your
phone’s location services indicates to the neoApp that you have passed this
point. Your phone will determine how often to update your location – it does
this to reduce the impact on battery performance. Therefore, you should expect
a slight delay after passing the trigger point before Neo adjusts the temperature in
your home.
Privacy
• Neither Nu-Heat nor Heatmiser ever knows or stores your home location
or your current position.
• Only your mobile phone knows your home location and your current
position. Using this data it calculates when you have passed the configured
trigger points.
• The state (Home/Away) is stored on the neo Server per user, and this is used to
calculate when everyone has left home therefore allowing neo to reduce the
temperature or to calculate when the first person is arriving home.

22
For expert advice call us on 01404 549770
Clockwise = default seng
An-clockwise
Clockwise = default seng
An-clockwise
+/- +/-
Press to accept
System adjustments
To do this:
When the system is operating, turn the
thermostat up in that room.
Identify from the pipe markings at the
manifold which actuator head serves
the zone you want to change.
Note: If the zones are not clearly
marked turn o all the other room
stats. The zone that is operating will be
shown by a raised button on the top of
the actuator (a) and the flow gauge will
indicate a flow reading (b).
Please note that the button can take up
to 3 minutes to respond.
Turn the flow gauge – anti-clockwise
for more flow, clockwise for less.
The red flow indicator will drop further
the greater the flow rate.
Note: Adjust a little at a time to suit
your requirements. Increasing the flow
to one zone may decrease the flow to
others. There is a limit to how much
extra flow can be achieved and if, after
adjusting one or several zones, further
action is required the flow temperature
can be increased.
To do this:-
With the system running note the
water flow temperature on the gauge
(c) on the top rail of the manifold. This
temperature can be increased (see d1
and d2 below).
Note: Adjust a little at a time to suit
your requirements.
If additional heat is required in a selected room or rooms the
water flow rate(s) serving these areas can be increased.
d2
c
d1
a b
Remote pump module (d2)
To increase the temperature:
1 Push the button above the illuminated
display in and across to the right to
scroll to the temperature menu.
2 Adjust the temperature by pushing
the button to the left or right.
3 Press the button again to confirm
the change.
Direct-mounted pump module (d1)
To increase the temperature:
1 Turn the control head anticlockwise

23
For more information visit www.nu-heat.co.uk
Servicing requirements
Energy eciency (ErP)
Product support
MONTHLY
Check the expansion vessel water
pressure as displayed on the gauge, the
pressure should normally be between 1
bar and 2 bar depending on whether
the system is cold or hot.
Please refer to the System Checks
section (page 18) for further-information.
ANNUALLY
Underfloor heating
Whilst there is no requirement for
annual servicing it is important that the
level of central heating inhibitor is
sucient to protect the system.
For further information on the operation of your underfloor heating system and
also troubleshooting help, please visit the Nu-Heat website at nu-heat.co.uk.
The neoStat is rated as Class I under Section 5.2.1.2 Temperature control, of EU
Commission Delegated Regulation No. 811/2013.
H
E
A
T
I
N
G
E
F
F
I
C
I
E
N
C
Y
R
A
T
I
N
G
E
R
P
A
++
ERP
E
N
E
R
G
Y
E
F
F
I
C
I
E
N
C
Y
R
A
T
I
N
G
E
R
P
C
A
++
E
R
P
H
E
A
T
I
N
G
&
H
O
T
W
A
T
E
R
E
F
F
I
C
I
E
N
C
Y
R
A
T
I
N
G
A
ERP
E
N
E
R
G
Y
E
F
F
I
C
I
E
N
C
Y
R
A
T
I
N
G
E
R
P
B
E
N
E
R
G
Y
E
F
F
I
C
I
E
N
C
Y
R
A
T
I
N
G
E
R
P
|
CLASS
E
N
E
R
G
Y
E
F
F
I
C
I
E
N
C
Y
R
A
T
I
N
G
E
R
P
E
N
E
R
G
Y
E
F
F
I
C
I
E
N
C
Y
R
A
T
I
N
G
E
R
P
|||
CLASS
E
N
E
R
G
Y
E
F
F
I
C
I
E
N
C
Y
R
A
T
I
N
G
E
R
P
H
E
A
T
I
N
G
E
F
F
I
C
I
E
N
C
Y
R
A
T
I
N
G
E
R
P
A
+
E
N
E
R
G
Y
E
F
F
I
C
I
E
N
C
Y
R
A
T
I
N
G
E
R
P
D
E
N
E
R
G
Y
E
F
F
I
C
I
E
N
C
Y
R
A
T
I
N
G
E
R
P
E

24
For expert advice call us on 01404 549770
Freephone
0800 731 1976 or 01404 549770
Follow us
@nuheatuk
See our videos
/nuheatuk
Online
www.nu-heat.co.uk
Nu-Heat UK Ltd I Heathpark House I Devonshire Road I Heathpark Industrial Estate I Honiton I Devon EX14 1SD
