
Messenger
Administration Guide
April 2024

2
Legal Notices
Copyright 1996 - 2024 Open Text.
The only warranties for products and services of Open Text and its affiliates and licensors (“Open Text”) are as may be set
forth in the express warranty statements accompanying such products and services. Nothing herein should be construed as
constituting an additional warranty. Open Text shall not be liable for technical or editorial errors or omissions contained
herein. The information contained herein is subject to change without notice

Contents 3
Contents
About This Guide 7
1 Understanding Your GroupWise Messenger System 9
Messaging Agent. . . . . . . . . . . . . . . . . . . . . . . . . . . . . . . . . . . . . . . . . . . . . . . . . . . . . . . . . . . . . . . . . . . . . . . . . . 9
Archive Agent . . . . . . . . . . . . . . . . . . . . . . . . . . . . . . . . . . . . . . . . . . . . . . . . . . . . . . . . . . . . . . . . . . . . . . . . . . . . 9
GroupWise Admin Console . . . . . . . . . . . . . . . . . . . . . . . . . . . . . . . . . . . . . . . . . . . . . . . . . . . . . . . . . . . . . . . .10
Database Objects . . . . . . . . . . . . . . . . . . . . . . . . . . . . . . . . . . . . . . . . . . . . . . . . . . . . . . . . . . . . . . . . . . . . . . . .10
Language Availability . . . . . . . . . . . . . . . . . . . . . . . . . . . . . . . . . . . . . . . . . . . . . . . . . . . . . . . . . . . . . . . . . . . . .10
2 Managing the Messaging Agent 13
Starting the Messaging Agent . . . . . . . . . . . . . . . . . . . . . . . . . . . . . . . . . . . . . . . . . . . . . . . . . . . . . . . . . . . . . . 13
Configuring the Messaging Agent . . . . . . . . . . . . . . . . . . . . . . . . . . . . . . . . . . . . . . . . . . . . . . . . . . . . . . . . . . . 13
Configuring the Messaging Agent with SSL Encryption . . . . . . . . . . . . . . . . . . . . . . . . . . . . . . . . . . . . . . . . . . 15
Generating a Certificate Signing Request and Private Key . . . . . . . . . . . . . . . . . . . . . . . . . . . . . . . . . . 15
Submitting the Certificate Signing Request to a Certificate Authority . . . . . . . . . . . . . . . . . . . . . . . . 15
Installing the Certificate on the Server . . . . . . . . . . . . . . . . . . . . . . . . . . . . . . . . . . . . . . . . . . . . . . . . . 16
Modifying the Server Object SSL Certificate . . . . . . . . . . . . . . . . . . . . . . . . . . . . . . . . . . . . . . . . . . . . . 16
Modifying the SSL Cipher Suite. . . . . . . . . . . . . . . . . . . . . . . . . . . . . . . . . . . . . . . . . . . . . . . . . . . . . . . .17
Monitoring the Messaging Agent . . . . . . . . . . . . . . . . . . . . . . . . . . . . . . . . . . . . . . . . . . . . . . . . . . . . . . . . . . . 17
Using the Messaging Agent Web Console . . . . . . . . . . . . . . . . . . . . . . . . . . . . . . . . . . . . . . . . . . . . . . . 17
Using Messaging Agent Log Files . . . . . . . . . . . . . . . . . . . . . . . . . . . . . . . . . . . . . . . . . . . . . . . . . . . . . . 19
Using GroupWise Monitor . . . . . . . . . . . . . . . . . . . . . . . . . . . . . . . . . . . . . . . . . . . . . . . . . . . . . . . . . . . 20
Using SNMP Monitoring Programs. . . . . . . . . . . . . . . . . . . . . . . . . . . . . . . . . . . . . . . . . . . . . . . . . . . . .21
Optimizing Messaging Agent Performance. . . . . . . . . . . . . . . . . . . . . . . . . . . . . . . . . . . . . . . . . . . . . . . . . . . .22
Managing the Messaging Server . . . . . . . . . . . . . . . . . . . . . . . . . . . . . . . . . . . . . . . . . . . . . . . . . . . . . . . . . . . .22
Binding the Messaging Agent to a Specific IP Address . . . . . . . . . . . . . . . . . . . . . . . . . . . . . . . . . . . . .23
Changing the Messaging Server's Network Address. . . . . . . . . . . . . . . . . . . . . . . . . . . . . . . . . . . . . . . 23
Moving the Messaging Agent Working Directory . . . . . . . . . . . . . . . . . . . . . . . . . . . . . . . . . . . . . . . . . 23
Using Messaging Agent Startup Switches . . . . . . . . . . . . . . . . . . . . . . . . . . . . . . . . . . . . . . . . . . . . . . . . . . . . . 24
/certfile. . . . . . . . . . . . . . . . . . . . . . . . . . . . . . . . . . . . . . . . . . . . . . . . . . . . . . . . . . .
. . . . . . . . . . . . . . . .25
/certpath. . . . . . . . . . . . . . . . . . . . . . . . . . . . . . . . . . . . . . . . . . . . . . . . . . . . . . . . . . . . . . . . . . . . . . . . . .26
/dhparm . . . . . . . . . . . . . . . . . . . . . . . . . . . . . . . . . . . . . . . . . . . . . . . . . . . . . . . . . . . . . . . . . . . . . . . . . . 26
/httppassword . . . . . . . . . . . . . . . . . . . . . . . . . . . . . . . . . . . . . . . . . . . . . . . . . . . . . . . . . . . . . . . . . . . . . 26
/httpport. . . . . . . . . . . . . . . . . . . . . . . . . . . . . . . . . . . . . . . . . . . . . . . . . . . . . . . . . . . . . . . . . . . . . . . . . .26
/httpssl . . . . . . . . . . . . . . . . . . . . . . . . . . . . . . . . . . . . . . . . . . . . . . . . . . . . . . . . . . . . . . . . . . . . . . . . . . .27
/httpuser . . . . . . . . . . . . . . . . . . . . . . . . . . . . . . . . . . . . . . . . . . . . . . . . . . . . . . . . . . . . . . . . . . . . . . . . . 27
/ip . . . . . . . . . . . . . . . . . . . . . . . . . . . . . . . . . . . . . . . . . . . . . . . . . . . . . . . . . . . . . . . . . . . . . . . . . . . . . . . 27
/keepalive. . . . . . . . . . . . . . . . . . . . . . . . . . . . . . . . . . . . . . . . . . . . . . . . . . . . . . . . . . . . . . . . . . . . . . . . .28
/keyfile . . . . . . . . . . . . . . . . . . . . . . . . . . . . . . . . . . . . . . . . . . . . . . . . . . . . . . . . . . . . . . . . . . . . . . . . . . . 28
/keypassword. . . . . . . . . . . . . . . . . . . . . . . . . . . . . . . . . . . . . . . . . . . . . . . . . . . . . . . . . . . . . . . . . . . . . . 28
/log . . . . . . . . . . . . . . . . . . . . . . . . . . . . . . . . . . . . . . . . . . . . . . . . . . . . . . . . . . . . . . . . . . . . . . . . . . . . . .28
/logdays . . . . . . . . . . . . . . . . . . . . . . . . . . . . . . . . . . . . . . . . . . . . . . . . . . . . . . . . . . . . . . . . . . . . . . . . . .29
/logdiskoff. . . . . . . . . . . . . . . . . . . . . . . . . . . . . . . . . . . . . . . . . . . . . . . . . . . . . . . . . . . . . . . . . . . . . . . . .29
/loglevel . . . . . . . . . . . . . . . . . . . . . . . . . . . . . . . . . . . . . . . . . . . . . . . . . . . . . . . . . . . . . . . . . . . . . . . . . . 29
/logmax. . . . . . . . . . . . . . . . . . . . . . . . . . . . . . . . . . . . . . . . . . . . . . . . . . . . . . . . . . . . . . . . . . . . . . . . . . .30

4 Contents
/maxconns . . . . . . . . . . . . . . . . . . . . . . . . . . . . . . . . . . . . . . . . . . . . . . . . . . . . . . . . . . . . . . . . . . . . . . . . 30
/nosnmp . . . . . . . . . . . . . . . . . . . . . . . . . . . . . . . . . . . . . . . . . . . . . . . . . . . . . . . . . . . . . . . . . . . . . . . . . .30
/port . . . . . . . . . . . . . . . . . . . . . . . . . . . . . . . . . . . . . . . . . . . . . . . . . . . . . . . . . . . . . . . . . . . . . . . . . . . . .30
/productinfo . . . . . . . . . . . . . . . . . . . . . . . . . . . . . . . . . . . . . . . . . . . . . . . . . . . . . . . . . . . . . . . . . . . . . . . 31
/sslciphersuite . . . . . . . . . . . . . . . . . . . . . . . . . . . . . . . . . . . . . . . . . . . . . . . . . . . . . . . . . . . . . . . . . . . . . 31
/ssloption . . . . . . . . . . . . . . . . . . . . . . . . . . . . . . . . . . . . . . . . . . . . . . . . . . . . . . . . . . . . . . . . . . . . . . . . .31
/threads . . . . . . . . . . . . . . . . . . . . . . . . . . . . . . . . . . . . . . . . . . . . . . . . . . . . . . . . . . . . . . . . . . . . . . . . . .31
3 Managing Messenger Client Users 33
Adding Users to Your Messenger System . . . . . . . . . . . . . . . . . . . . . . . . . . . . . . . . . . . . . . . . . . . . . . . . . . . . . 33
Enabling Automatic Account Creation for New GroupWise Users . . . . . . . . . . . . . . . . . . . . . . . . . . . 33
Adding Existing GroupWise Users to Messenger . . . . . . . . . . . . . . . . . . . . . . . . . . . . . . . . . . . . . . . . .34
Linking GroupWise Users to Migrated Messenger 3.x Users . . . . . . . . . . . . . . . . . . . . . . . . . . . . . . . . 34
Providing User Searches Based on Email Addresses . . . . . . . . . . . . . . . . . . . . . . . . . . . . . . . . . . . . . . . . . . . .34
Establishing a Hostname for Your Messenger System . . . . . . . . . . . . . . . . . . . . . . . . . . . . . . . . . . . . .34
Setting User Policies . . . . . . . . . . . . . . . . . . . . . . . . . . . . . . . . . . . . . . . . . . . . . . . . . . . . . . . . . . . . . . . . . . . . . . 35
Editing the Default User Policy . . . . . . . . . . . . . . . . . . . . . . . . . . . . . . . . . . . . . . . . . . . . . . . . . . . . . . . . 36
Creating a User Policy . . . . . . . . . . . . . . . . . . . . . . . . . . . . . . . . . . . . . . . . . . . . . . . . . . . . . . . . . . . . . . .36
Customizing Messenger Client Features . . . . . . . . . . . . . . . . . . . . . . . . . . . . . . . . . . . . . . . . . . . . . . . . 37
Customizing Personal History Features . . . . . . . . . . . . . . . . . . . . . . . . . . . . . . . . . . . . . . . . . . . . . . . . . 39
Controlling Users' Contact Lists . . . . . . . . . . . . . . . . . . . . . . . . . . . . . . . . . . . . . . . . . . . . . . . . . . . . . . . 39
Setting Up a Default Privacy List. . . . . . . . . . . . . . . . . . . . . . . . . . . . . . . . . . . . . . . . . . . . . . . . . . . . . . .40
Selecting Default Display Attributes. . . . . . . . . . . . . . . . . . . . . . . . . . . . . . . . . . . . . . . . . . . . . . . . . . . .41
Creating A Custom Status . . . . . . . . . . . . . . . . . . . . . . . . . . . . . . . . . . . . . . . . . . . . . . . . . . . . . . . . . . . . 42
Applying a Policy to Specific Users . . . . . . . . . . . . . . . . . . . . . . . . . . . . . . . . . . . . . . . . . . . . . . . . . . . . . 43
Distributing the Messenger Client Software. . . . . . . . . . . . . . . . . . . . . . . . . . . . . . . . . . . . . . . . . . . . . . . . . . . 43
Using the GroupWise Messenger Download Page . . . . . . . . . . . . . . . . . . . . . . . . . . . . . . . . . . . . . . . .44
Setting Up Auto-Update . . . . . . . . . . . . . . . . . . . . . . . . . . . . . . . . . . . . . . . . . . . . . . . . . . . . . . . . . . . . . 44
Configuring Your Web Server to Download the Messenger Client . . . . . . . . . . . . . . . . . . . . . . . . . . .45
Configuring the Messenger Client Software . . . . . . . . . . . . . . . . . . . . . . . . . . . . . . . . . . . . . . . . . . . . . . . . . . . 46
Using the Configuration File (setup.cfg) When Installing the Windows Messenger Client . . . . . . . .46
Using Startup Switches When Starting the Messenger Client . . . . . . . . . . . . . . . . . . . . . . . . . . . . . . . 49
Using URL Commands in Your Web Browser on Windows. . . . . . . . . . . . . . . . . . . . . . . . . . . . . . . . . . 53
Using Multi-Factor Authentication . . . . . . . . . . . . . . . . . . . . . . . . . . . . . . . . . . . . . . . . . . . . . . . . . . . . . . . . . .55
4 Configuring Messenger for Mobile Devices 57
Submitting a Certificate Signing Request . . . . . . . . . . . . . . . . . . . . . . . . . . . . . . . . . . . . . . . . . . . . . . . . . . . . .57
Installing the Signed Certificate into Your Messenger System . . . . . . . . . . . . . . . . . . . . . . . . . . . . . . . . . . . .58
Configuring Novell Push Notification Service . . . . . . . . . . . . . . . . . . . . . . . . . . . . . . . . . . . . . . . . . . . . . . . . . . 58
Understanding Novell Push Notification Service. . . . . . . . . . . . . . . . . . . . . . . . . . . . . . . . . . . . . . . . . .59
Configuring Novell Push Notification Service . . . . . . . . . . . . . . . . . . . . . . . . . . . . . . . . . . . . . . . . . . . .60
Allowing or Blocking Mobile Access for Users . . . . . . . . . . . . . . . . . . . . . . . . . . . . . . . . . . . . . . . . . . . . . . . . . 61
Managing Mobile Devices using MobileIron . . . . . . . . . . . . . . . . . . . . . . . . . . . . . . . . . . . . . . . . . . . . . . . . . . 61
Adding and Configuring the Android App in MobileIron . . . . . . . . . . . . . . . . . . . . . . . . . . . . . . . . . . . 61
Adding and Configure the iOS App in MobileIron. . . . . . . . . . . . . . . . . . . . . . . . . . . . . . . . . . . . . . . . .62
Distributing the Messenger App to Devices . . . . . . . . . . . . . . . . . . . . . . . . . . . . . . . . . . . . . . . . . . . . . 63
5 Enabling and Managing Archiving 65
Using Local Archiving . . . . . . . . . . . . . . . . . . . . . . . . . . . . . . . . . . . . . . . . . . . . . . . . . . . . . . . . . . . . . . . . . . . . . 65
Starting the Archive Agent . . . . . . . . . . . . . . . . . . . . . . . . . . . . . . . . . . . . . . . . . . . . . . . . . . . . . . . . . . . 65

Contents 5
Enabling Archiving in Your Messenger System . . . . . . . . . . . . . . . . . . . . . . . . . . . . . . . . . . . . . . . . . . .66
Granting Authorized User Access to the Archive . . . . . . . . . . . . . . . . . . . . . . . . . . . . . . . . . . . . . . . . . 66
Configuring the Archive Agent in the GroupWise Admin Console . . . . . . . . . . . . . . . . . . . . . . . . . . . 66
Enhancing Archive Security with SSL Encryption . . . . . . . . . . . . . . . . . . . . . . . . . . . . . . . . . . . . . . . . .67
Monitoring the Archive Agent . . . . . . . . . . . . . . . . . . . . . . . . . . . . . . . . . . . . . . . . . . . . . . . . . . . . . . . . 68
Optimizing Connections between the Archive Agent and Messenger Users . . . . . . . . . . . . . . . . . . . 69
Managing the Archive Server . . . . . . . . . . . . . . . . . . . . . . . . . . . . . . . . . . . . . . . . . . . . . . . . . . . . . . . . . 69
Using Archive Agent Startup Switches . . . . . . . . . . . . . . . . . . . . . . . . . . . . . . . . . . . . . . . . . . . . . . . . . . 72
Using OpenText Retain Archiving. . . . . . . . . . . . . . . . . . . . . . . . . . . . . . . . . . . . . . . . . . . . . . . . . . . . . . . . . . . . 79
6 Managing Chat Rooms 81
Creating Chat Rooms . . . . . . . . . . . . . . . . . . . . . . . . . . . . . . . . . . . . . . . . . . . . . . . . . . . . . . . . . . . . . . . . . . . . . 81
Creating a Chat Room in the GroupWise Admin Console. . . . . . . . . . . . . . . . . . . . . . . . . . . . . . . . . . . 81
Creating a Chat Room in the Client . . . . . . . . . . . . . . . . . . . . . . . . . . . . . . . . . . . . . . . . . . . . . . . . . . . . 81
Editing Chat Room Settings . . . . . . . . . . . . . . . . . . . . . . . . . . . . . . . . . . . . . . . . . . . . . . . . . . . . . . . . . . . . . . . .82
Editing Chat Room Settings In the GroupWise Admin Console . . . . . . . . . . . . . . . . . . . . . . . . . . . . . .82
Editing Chat Room Settings in the Client . . . . . . . . . . . . . . . . . . . . . . . . . . . . . . . . . . . . . . . . . . . . . . . .83
Allowing or Blocking Chat Room Access . . . . . . . . . . . . . . . . . . . . . . . . . . . . . . . . . . . . . . . . . . . . . . . . . . . . . . 84
Allowing Users to Create Chat Rooms. . . . . . . . . . . . . . . . . . . . . . . . . . . . . . . . . . . . . . . . . . . . . . . . . . . . . . . .84
7 Integrating OpenText Vibe with GroupWise Messenger 85
8 Securing GroupWise Messenger 87
Limiting Physical Access to Messenger Servers . . . . . . . . . . . . . . . . . . . . . . . . . . . . . . . . . . . . . . . . . . . . . . . . 87
Limiting Physical Access to Client Workstations . . . . . . . . . . . . . . . . . . . . . . . . . . . . . . . . . . . . . . . . . . . . . . . . 87
Securing File System Access . . . . . . . . . . . . . . . . . . . . . . . . . . . . . . . . . . . . . . . . . . . . . . . . . . . . . . . . . . . . . . . .88
Securing the Messenger Agents . . . . . . . . . . . . . . . . . . . . . . . . . . . . . . . . . . . . . . . . . . . . . . . . . . . . . . . . . . . . 88
Updating SSL Certificates for the Messenger Agents . . . . . . . . . . . . . . . . . . . . . . . . . . . . . . . . . . . . . . 88
Enabling SSL for the Web Console . . . . . . . . . . . . . . . . . . . . . . . . . . . . . . . . . . . . . . . . . . . . . . . . . . . . . 88
Enabling Password Protection for the Web Console. . . . . . . . . . . . . . . . . . . . . . . . . . . . . . . . . . . . . . . 88
Securing the Data Files . . . . . . . . . . . . . . . . . . . . . . . . . . . . . . . . . . . . . . . . . . . . . . . . . . . . . . . . . . . . . . 88
Securing the Messenger System . . . . . . . . . . . . . . . . . . . . . . . . . . . . . . . . . . . . . . . . . . . . . . . . . . . . . . . . . . . .90
Configuring Remember Passwords. . . . . . . . . . . . . . . . . . . . . . . . . . . . . . . . . . . . . . . . . . . . . . . . . . . . .90
Understanding History and Save Conversation Security. . . . . . . . . . . . . . . . . . . . . . . . . . . . . . . . . . . .90

6

About This Guide 7
About This Guide
This GroupWise Messenger Administration Guide helps you configure and manage your GroupWise
Messenger system.
Chapter 1, “Understanding Your GroupWise Messenger System,” on page 9
Chapter 2, “Managing the Messaging Agent,” on page 13
Chapter 3, “Managing Messenger Client Users,” on page 33
Chapter 4, “Configuring Messenger for Mobile Devices,” on page 57
Chapter 5, “Enabling and Managing Archiving,” on page 65
Chapter 6, “Managing Chat Rooms,” on page 81
Chapter 7, “Integrating OpenText Vibe with GroupWise Messenger,” on page 85
Chapter 8, “Securing GroupWise Messenger,” on page 87
Audience
This guide is intended for network administrators who administer Messenger.
Feedback
We want to hear your comments and suggestions about this manual and the other documentation
included with this product. Please use the
comment on this topic feature at the bottom of each page
of the online documentation.
Additional Documentation
For additional Messenger documentation, see the GroupWise documentation website.

8 About This Guide

1
Understanding Your GroupWise Messenger System 9
1
Understanding Your GroupWise Messenger
System
The following components make up your Messenger system:
“Messaging Agent” on page 9
“Archive Agent” on page 9
“GroupWise Admin Console” on page 10
“Database Objects” on page 10
“Language Availability” on page 10
Messaging Agent
The Messaging Agent performs the following activities:
Authenticates users to the Messenger system when they start the Messenger client, searches
for contacts as users build their contact lists, saves users' option settings for the Messenger
client, and so on
Transfers instant messages back and forth between Messenger users
Maintains presence information about Messenger users so that the Messenger client can show
user availability status (such as online, busy, away, and idle)
Passes conversations to the Archive Agent if archiving is enabled
The Messaging Agent is highly scalable. If you are setting up a large Messenger system, you should
run the Messaging Agent on a dedicated server with a processor speed of 1-2 GHz and with 1 GB of
RAM. The Messaging Agent has been tested to easily support 1000 active conversations on such
hardware. If you assume that 2% of Messenger users might be conversing simultaneously, you could
plan on your Messenger system including as many as 50,000 users. Although Messenger has not
been tested with this many actual users, you can be confident that it can scale to meet the needs of
a very large number of users. For more information on the Messaging Agent, see Managing the
Messaging Agent.
Archive Agent
The Archive Agent performs the following activities:
Grants authorized users access to the Messenger archive
Receives completed conversations from the Messaging Agent and stores them in the Messenger
archive
Indexes the archived conversations so that they can be searched by authorized Messenger users
Performs searches in the Messenger archive for authorized Messenger users

10 Understanding Your GroupWise Messenger System
Manages expiration of old conversations
Repairs the Messenger archive in case of damage to its database
For more information on the Archive Agent, see Enabling and Managing Archiving.
GroupWise Admin Console
Messenger system administration is performed in the GroupWise Admin Console. During the
Messenger install, you were prompted for the GroupWise Admin console information to set up the
initial configuration of Messenger.
Database Objects
Messenger uses the ArangoDB to store objects instead of eDirectory. When you create your
Messenger system, the Messenger objects are created in the database and configured in the
GroupWise Admin console. The objects created include: Messenger Service, Servers, Agents, Users,
Chats, Hosts, and Policies.
Language Availability
You can run the Messenger Installation program, administer your Messenger system in the
GroupWise Admin console, and run the Messenger agents in the following languages:
English
French
German
Spanish
Portuguese
By default, the Messenger Installation program and the Messenger agents start in the language of
the operating system, if it is available. If the operating system language is not available for
Messenger, the next default language is English. In the Installation program, you can select from
among the available languages to override the English default.
You can run the Messenger client in the following languages:
Czech
Chinese - Simplified
Chinese - Traditional
Danish
Dutch
English
Finnish
French
German

Understanding Your GroupWise Messenger System 11
Hungarian
Italian
Japanese
Korean
Norwegian
Polish
Portuguese
Russian
Spanish
Swedish
Users can select the languages they want when they install the Messenger client.
By default, the Messenger client starts in the language of the operating system, if it is available. If the
operating system language is not available, the next default language is English. In the Messenger
client, you can click
Tools > Options, then select an interface language from those that have been
installed. When starting the Messenger client, you can use the /l startup switch to override the
English default and select an interface language from those that have been installed.

12 Understanding Your GroupWise Messenger System

2
Managing the Messaging Agent 13
2
Managing the Messaging Agent
The Messaging Agent is the heart of your Messenger system. To review its various roles, see
Messaging Agent. The following sections help you manage and monitor the Messaging Agent in your
Messenger system:
“Starting the Messaging Agent” on page 13
“Configuring the Messaging Agent” on page 13
“Configuring the Messaging Agent with SSL Encryption” on page 15
“Monitoring the Messaging Agent” on page 17
“Optimizing Messaging Agent Performance” on page 22
“Managing the Messaging Server” on page 22
“Using Messaging Agent Startup Switches” on page 24
Starting the Messaging Agent
When you finish creating your Messenger system, the Installation program starts the Messenger
agents for you. You can manually start, stop, restart, or check the status of the service it in a terminal
window so status messages are displayed. In addition, you can monitor the Messaging Agent from
your browser, as described in Using the Messaging Agent Web Console.
To start the Messaging Agent:
At the Linux server, become root by entering
su
and the root password.
Enter the following command:
systemctl start gwm-nmma.service
You can also use the stop, restart, and status options for the Messaging Agent using systemctl.
Messaging Agent log files are created in the
/var/opt/novell/log/messenger
directory.
The Messaging Agent can be monitored using the agent Web Consoles from your browser, as
described in Using the Messaging Agent Web Console.
Configuring the Messaging Agent
The advantage to configuring the Messaging Agent in the GroupWise Admin console as opposed to
using startup switches in the Messaging Agent startup file, is that the Messaging Agent configuration
settings are stored in eDirectory.
In the GroupWise Admin console, navigate to Messenger > MessengerService > Messaging
Agents, and then select the Messaging Agent.

14 Managing the Messaging Agent
Table 2-1 summarizes the Messaging Agent configuration settings in the Messaging Agent object
property pages and how they correspond to Messaging Agent startup switches (as described in Using
Messaging Agent Startup Switches):
Table 2-1 Messaging Agent Configuration Settings in the Messaging Agent Object Property Pages
GroupWise Admin console
Properties Pages and Settings
Corresponding Tasks and Startup Switches
General Page Displays general information about the Messaging agent,
including the object name, version, working path, and if the
services and SNMP are enabled.
Work Path See Moving the Messaging Agent Working Directory.
Enable Messenger Services Turns on and turns off the availability of instant messaging for all
Messenger users.
Enable SNMP See Using SNMP Monitoring Programs. See also /nosnmp.
Agent Settings
TCP/IP Address
Client/Server Port Description
Bind to This Address
Displays the Messaging Agent server information established
during installation.
HTTP User Name, Password, and
port
See Setting Up the Messaging Agent Web Console. See also /
httpport, /httpuser, /httppassword, and /httpssl.
Queue Path See Moving the Messaging Agent Conversation Holding Queue.
Enable NPNS for mobile devices See Configuring Novell Push Notification Service
Maximum Number of Users Client/
Server Threads Default Number of
Connections Idle TImeout
Maximum Number of Connections
Maximum Query Results
See Optimizing Messaging Agent Performance.
Expire files after x days Sets the number of days before files are removed from the
server.
Log Settings
Log Level Enable Disk Logging Log
Files Path Log Maximum Age Log
Maximum Size
See Using Messaging Agent Log Files. See also /loglevel, /log, /
logdays, /logmax, and /logdiskoff.
SSL Settings
Certificate Path SSL Certificate SSL
Key File Set Password Enable SSL for
Client/Server Enable SSL for
Message Transfer Protocol
See Configuring the Messaging Agent with SSL Encryption. See
also /certpath, /certfile, /keyfile, and /keypassword.

Managing the Messaging Agent 15
After you install the Messaging Agent software, you can further configure the Messaging Agent by
using a startup file. See Using Messaging Agent Startup Switches to survey additional ways the
Messaging Agent can be configured.
Configuring the Messaging Agent with SSL Encryption
Secure Sockets Layer (SSL) ensures secure communication between programs by encrypting the
complete communication flow between the programs. The Installation program required configuring
the messaging agent for SSL encryption, as described in “Installing and Setting Up Your GroupWise
Messenger System” in the GroupWise Messenger Installation Guide.
When you set up SSL encryption during installation, the Installation program copied the certificate
file and key file you specified to the
/opt/novell/messenger/certs
directory to ensure
availability for the Messenger agents.
IMPORTANT: Certificates must follow the requirements for certificates found in Messenger Server
Requirements under Server Certificates requirements.
If you want to import a new certificate or switch from internal to external certificates, you must
complete the following tasks:
“Generating a Certificate Signing Request and Private Key” on page 15
“Submitting the Certificate Signing Request to a Certificate Authority” on page 15
“Installing the Certificate on the Server” on page 16
“Modifying the Server Object SSL Certificate” on page 16
“Modifying the SSL Cipher Suite” on page 17
Generating a Certificate Signing Request and Private Key
Before the Messaging Agent can use external SSL encryption, you must create a certificate by
generating a certificate signing request (CSR) and having it issued by a certificate authority (CA). This
can be issued either by a public CA or a local CA, such as Novell Certificate Server. (Novell Certificate
Server, which runs on a server with NetIQ eDirectory, enables you to establish your own Certificate
Authority and issue server certificates for yourself. For more information, see the Novell Certificate
Server documentation site.). The CSR includes the hostname of the server where the Messaging
Agent runs. The Messaging Agent and the Archive Agent can use the same certificate if they run on
the same server. The CSR also includes your choice of name and password for the private key file
that must be used with each certificate. This information is needed when configuring the Messaging
Agent to use SSL encryption.
Submitting the Certificate Signing Request to a Certificate
Authority
To receive a server certificate, you need to submit the certificate signing request
(
server_name.csr
file) to a certificate authority. If you have not previously used a certificate
authority, you can use the keywords “Certificate Authority” to search the web for certificate
authority companies. You can also issue your own certificates with a local CA, such as Novell

16 Managing the Messaging Agent
Certificate Server. (Novell Certificate Server, which runs on a server with NetIQ eDirectory, enables
you to establish your own Certificate Authority and issue server certificates for yourself. For more
information, see the Novell Certificate Server documentation site.)
The certificate authority must be able to provide the certificate in Base64/PEM or PFX format.
IMPORTANT: You cannot use an eDirectory root certificate (
rootcert.der
file) as a public
certificate.
The process of submitting the CSR varies from company to company. Most provide online
submission of the request. Follow their instructions for submitting the request.
Installing the Certificate on the Server
After processing your CSR, the certificate authority returns to you a certificate (
server_name.crt
)
file and a private key (
server_name.key
) file. Copy the files to the
certs
subdirectory of the
Messenger agent installation directory.
Modifying the Server Object SSL Certificate
After you have a certificate and a private key file available on the server where the Messaging Agent
runs, you are ready to configure the Messaging Agent to use SSL encryption.
In the GroupWise Admin console, navigate to Messenger > MessengerService > Servers, and
then select the server.
On the SSL Settings tab, fill in the following fields:
Certificate Path: Certificates are placed by default in
/opt/novell/messenger/certs
.
IMPORTANT: The certificate path must be located on the same server where the Messenger
agents are installed. If your SSL certificate and key file are located on a different server, you
must copy them into the directory specified in the
Certificate Path field so that they are always
accessible to the Messenger agents.
SSL Certificate: Browse to and select the certificate file. Or, if it is located in the directory
specified in the
Certificate Path field, you can simply type the file name.
SSL Key File: Browse to and select your private key file. Or, if it is located in the directory
specified in the
Certificate Path field, you can simply type the file name.
Set Password: Provide the key file password you established when you submitted the certificate
signing request.
Because you provided the SSL information on the Messenger Server object, it applies to both
the Messaging Agent and the Archive Agent if both agents are running on the same server. The
same information can be provided on the Security page of each Messenger agent if necessary.
Click Save.
Restart the Messaging Agent to start using SSL encryption.
Corresponding Startup Switches: You can also use the /certpath, /certfile, /keyfile, and /
keypassword startup switches in the Messaging Agent startup file to modify the Messaging Agent
SSL certificates.

Managing the Messaging Agent 17
Modifying the SSL Cipher Suite
You can modify the SSL cipher suite if you need to disable certain ciphers that do not work in your
environment. The ciphers suite can be modified both on the Archive Agent and the Messaging agent.
IMPORTANT: Unless you are required to modify the cipher suite for your environment, consider
carefully before you make any changes as this decreases the security of your Messenger system.
The cipher list must be in OpenSSL format. For more information on OpenSSL format, see cipher list
format (https://www.openssl.org/docs/man1.1.1/man1/ciphers.html).
To modify the SSL cipher suite use the /sslciphersuite startup switch.
Monitoring the Messaging Agent
By monitoring the Messaging Agent, you can determine whether its current configuration is meeting
the needs of your Messenger users. You have a variety of tools to help you monitor the operation of
the Messaging Agent:
“Using the Messaging Agent Web Console” on page 17
“Using Messaging Agent Log Files” on page 19
“Using GroupWise Monitor” on page 20
“Using SNMP Monitoring Programs” on page 21
Using the Messaging Agent Web Console
The Messaging Agent Web Console enables you to monitor and control the Messaging Agent from
any location where you have access to a browser and the Internet. This provides substantially more
flexible access than the Messaging Agent console, which can only be accessed from the server where
the Messaging Agent is running.
“Setting Up the Messaging Agent Web Console” on page 17
“Accessing the Messaging Agent Web Console from Your Web Browser” on page 18
“Monitoring the Messaging Agent at the Web Console” on page 18
“Accessing the Messaging Agent Web Console from GroupWise Monitor” on page 19
Setting Up the Messaging Agent Web Console
In the GroupWise Admin console, navigate to Messenger > MessengerService > Messaging
Agents. Then, select the Messaging Agent and select Agent Settings.
Fill in the following fields in the HTTP section:
HTTP User Name: If you want to restrict access to the Messaging Agent Web Console, specify a
user name for the Messaging Agent to prompt for before allowing access to the Web Console.
HTTP Password/Confirm Password: Specify the password for the Messaging Agent to prompt
for before allowing access to the Web Console.

18 Managing the Messaging Agent
Port: Specify the port number for the Messaging Agent to listen on for service requests from
your browser; for example, 8313.
SSL Select this option if you want the Messaging Agent to use SSL encryption when
communicating with your browser.
In order to use SSL encryption for the Web Console, you must properly configure the Messaging
Agent, as described in Configuring the Messaging Agent with SSL Encryption.
Click Save.
Restart the Messaging Agent to put the HTTP settings into effect.
Corresponding Startup Switches: You can also use the /httpport, /httpuser, /httppassword, and /
httpssl startup switches in the Messaging Agent startup file to enable and secure the Messaging
Agent Web Console.
Accessing the Messaging Agent Web Console from Your Web Browser
To monitor the Messaging Agent from your browser, view the following URL:
http://Messenger_server:agent_port
where Messenger_server represents the IP address or hostname of the server where the Messaging
Agent is running and agent_port represents the port number you specified in Setting Up the
Messaging Agent Web Console. For example:
http://172.16.5.18:8313
Monitoring the Messaging Agent at the Web Console
The Messaging Agent Web Console provides several pages of information to help you monitor the
performance of the Messaging Agent. The bar at the top of the Messaging Agent Web Console
displays the name of the agent. Below this bar appears the Web Console menu that lists the pages of
information available in the Messaging Agent Web Console.
“Monitoring Messaging Agent Status” on page 18
“Checking Monitor Agent Configuration” on page 19
“Checking the Messaging Agent Operating System Environment” on page 19
“Viewing and Searching Messaging Agent Log Files” on page 19
Monitoring Messaging Agent Status
When you first access the Messaging Agent Web Console, the Status page is displayed.
Click
Current Users to display a list of current Messenger users and their IP addresses. Click the User
ID, and then click
Disconnect User to disconnect the user.
Click
C/S Handler Threads to display the Messaging Agent client/server threads, the number of
requests each thread has handled, and each thread's current activity.

Managing the Messaging Agent 19
Click Chat Rooms to display a list of current chat rooms and their CN names, owners, and number of
active participants. Click
Re-initialize Chat List to re-initialize the chat room process. By re-initializing
the chat room process, chat rooms that are added in the GroupWise Admin console are added to the
list of chat rooms. Users can also use the GroupWise Admin console to access the chat rooms after
they have been added.
Checking Monitor Agent Configuration
On the Messaging Agent Web Console menu, click Configuration to display Messaging Agent
configuration information.
Checking the Messaging Agent Operating System Environment
On the Messaging Agent Web Console menu, click Environment to display information about the
operating system where the Messaging Agent is running.
Viewing and Searching Messaging Agent Log Files
On the Messaging Agent Web console menu, click Log Files to display and search Messaging Agent
log files.
To view a particular log file, select the log file, and then click
View Events.
To search all log files for a particular string, type the string in the
Events Containing field, select Select
All
, and then click View Events. You can also manually select multiple log files to search. The results
of the search are displayed on a separate page, which can be printed.
To start a new log file, click
Cycle Log.
To view your log settings for the current Messaging Agent session, click
Event Log Settings to display
the Configuration page. To change your log settings for the current Message Agent session, click
Event Log on the Configuration page.
Accessing the Messaging Agent Web Console from GroupWise Monitor
If you use GroupWise Monitor to monitor your GroupWise agents, you can add the Messaging Agent
to the list of monitored agents. Continue with Using GroupWise Monitor.
Using Messaging Agent Log Files
Error messages and other information about Messaging Agent functioning are written to log files as
well as displaying on the Messaging Agent console. Log files can provide a wealth of information for
resolving problems with Messaging Agent functioning.
In the GroupWise Admin console, navigate to Messenger > MessengerService > Messaging
Agents
. Then, select the Messaging Agent and select Agent Settings.
Fill in the following fields:
Log Level: Controls the amount of information logged by the Messaging Agent. Logged
information is displayed in the log message box and written to the Messaging Agent log file
during the current agent session. The default is Normal, which displays only the essential

20 Managing the Messaging Agent
information suitable for a smoothly running Messaging Agent. Use Verbose to display the
essential information, plus additional information helpful for troubleshooting. Use Diagnostic
where very detailed, code-specific information is required.
Enable disk logging: Select this option so that the information displayed in the message log box
at the Messaging Agent console is also saved to disk in log files.
Log Files Path: Specify the directory where the Messaging Agent stores its log files. The default
location is
/var/opt/novell/log/messenger/ma
.
Typically, you find multiple log files in the specified directory. The first four characters represent
the date. The next three identify the agent. A three-digit extension allows for multiple log files
created on the same day. For example, a log file named
0518nma.001
indicates that it is a
Messaging Agent log file, created on May 18. If you restarted the Messaging Agent on the same
day, a new log file started, named
0518nma.002
.
Log Maximum Age: Specify how many days to keep Messaging Agent log files on disk. The
default is 14 days.
Log Maximum Size: Specify the maximum amount of disk space for all Messaging Agent log
files. When the specified disk space is consumed, the Messaging Agent deletes existing log files,
starting with the oldest. The default is 128 MB.
Click Save.
Restart the Messaging Agent to put the new log settings into effect.
Corresponding Startup Switches: You can also use the /log, /loglevel, /logdays, and /logmax startup
switches in the Messaging Agent startup file to configure Messaging Agent log files.
Using GroupWise Monitor
GroupWise Monitor can be configured to monitor the Messaging Agent as well as the GroupWise
Agents (Post Office Agent, Message Transfer Agent, Internet Agent, and GroupWise Web. For
background information about GroupWise Monitor, see “Monitor” in the GroupWise Administration
Guide.
Enable the Messaging Agent Web Console, as described in Setting Up the Messaging Agent Web
Console.
At the Windows Monitor Agent console, click Configuration > Add GroupWise Messenger
System.
Fill in the following fields:
GroupWise Messenger System Object: Browse to and select the MessengerService object.
User Name: Browse to and select a User object that has sufficient rights to enable the Monitor
Agent to access Messenger agent object properties in eDirectory.
Password: Specify the eDirectory password associated with the selected User object.
Provide the same directory access information as you provided during installation:
Click OK to save the information about your Messenger system.
The Messaging Agent appears in the root agent group, along with the Archive Agent. You might
want to create an agent group specifically for the Messenger agents. See “Creating and
Managing Agent Groups” in the GroupWise Administration Guide.

Managing the Messaging Agent 21
Using SNMP Monitoring Programs
You can monitor the Messaging Agent from the Management and Monitoring component of any
SNMP management and monitoring program. When properly configured, the Messaging Agent
sends SNMP traps to network management consoles for display along with other SNMP monitored
programs. It also responds to requests for configuration and status information from SNMP
management and monitoring programs.
Although the Messaging Agent is SNMP-enabled by default, the server where the Messaging Agent is
installed must be properly configured to support SNMP, and the Messaging Agent object in
eDirectory must be properly configured as well. To set up SNMP services for your Messenger server,
complete the following tasks:
“Setting Up SNMP Services for the Messaging Agent” on page 21
“Copying and Compiling the Messaging Agent MIB File” on page 22
Setting Up SNMP Services for the Messaging Agent
Select the instructions for the platform where the Messaging Agent runs:
The Messaging Agent is compatible with NET-SNMP. An older version of SNMP called UCD-SNMP
cannot be used with the Messaging Agent. NET-SNMP comes with the versions of Red Hat Linux
supported for Messenger 1.0 for Linux, but it does not come with the supported versions of SUSE
Linux. If you are using SUSE Linux, you must update to NET-SNMP in order to use SNMP to monitor
the Messaging Agent.
Ensure you are logged in as root.
If NET-SNMP is not already set up on your Linux server, use the following command to configure
SNMP:
snmpconf -g basic_setup
The
snmpconf
command creates the
snmpd.conf
file in one of the following directories,
depending on your version of Linux:
/usr/share/snmp
~
/usr/local/share/snmp
/.snmp
Locate the
snmpd.conf
file on your Linux server.
In a text editor, add the following line to the
snmpd.conf
file:
dlmod Nmweb /opt/novell/messenger/lib/libnmsnmp.so.1
Restart the SNMP daemon (snmpd) to put the changes into effect.
In a text editor, make the following changes to the
nmsnmp.conf
file in the
/etc/opt/
novell/messenger
directory:
Set /daemonPort to a unique port number for the Messaging Agent to listen on; for
example, 8305.
If you have not already configured the Messaging Agent Web Console, as described in
Setting Up the Messaging Agent Web Console, assign an HTTP port for the Messaging
Agent.

22 Managing the Messaging Agent
In the GroupWise Admin console, navigate to Messenger > MessengerService > Objects >
Messaging Agents. Then, select the Messaging Agent > General > Enable SNMP.
Restart the Messaging Agent.
Continue with Copying and Compiling the Messaging Agent MIB File.
Copying and Compiling the Messaging Agent MIB File
An SNMP-enabled Messaging Agent returns information contained in a Management Information
Base (MIB). The MIB is an ASCII data structure that defines the information gathered. It also defines
the properties that can be monitored and managed on the SNMP-enabled Messaging Agent.
Before you can monitor an SNMP-enabled Messaging Agent, you must compile the
nmma.mib
file by
using your SNMP management program. The Messenger MIBs are located in the
/etc/opt/
novell/messenger/mibs
directory after installation.
Optimizing Messaging Agent Performance
You can adjust how the Messaging Agent functions to optimize its performance. Before attempting
optimization, you should run the Messaging Agent long enough to observe its efficiency and its
impact on other network applications running on the same server. See Monitoring the Messaging
Agent.
Also, remember that optimizing your network hardware and operating system can make a difference
in Messaging Agent performance.
In the GroupWise Admin console, navigate to Messenger > MessengerService > Objects >
Messaging Agents. Then, select the Messaging Agent > Agent Settings.
Use the settings in the Performance Preferences to specify how the Messaging Agent
communicates with the Messenger users.
Save your settings, and then stop and start the Messaging Agent to put the settings into effect.
Corresponding Startup Switches: You can also use the /maxconn and /threads startup switches in
the Messaging Agent startup file to configure Messaging Agent performance.
Managing the Messaging Server
As your Messenger system grows and evolves, you might need to reconfigure the server where the
Messaging Agent runs or move Messaging Agent directories to different locations.
“Binding the Messaging Agent to a Specific IP Address” on page 23
“Changing the Messaging Server's Network Address” on page 23
“Moving the Messaging Agent Working Directory” on page 23

Managing the Messaging Agent 23
Binding the Messaging Agent to a Specific IP Address
On a server with multiple IP addresses, the Messaging Agent binds to all available IP addresses, and
Messenger clients can communicate with the Messaging Agent on all available IP addresses unless
you bind them to a specific address.
Stop the Messaging Agent on the server.
In the GroupWise Admin console, navigate to Messenger > MessengerService > Objects >
Messaging Agents. Then, select the Messaging Agent > Agent Settings.
Make sure the IP address you want to use is set in the TCP/IP Address field and select Bind
exclusively to TCP/IP Address in the Network Address section.
Save your settings, and then start the Messaging Agent to put the settings into effect.
Changing the Messaging Server's Network Address
If you change the IP address or DNS hostname of the server where the Messaging Agent is running,
you must also update the server information for your Messenger system.
Stop the Messaging Agent on the server.
Reconfigure the server with the new IP address.
In the GroupWise Admin console, navigate to Messenger > MessengerService > Objects >
Messaging Agents. Then, select the Messaging Agent > Agent Settings.
Specify the new IP address in the TCP/IP Address field.
Save your settings, and then start the Messaging Agent to put the settings into effect.
Moving the Messaging Agent Working Directory
The Messaging Agent uses its working directory for saving various temporary files during message
processing. By default, the Messaging Agent and the Archive Agent use the same working directory if
they are running on the same server, as specified on the
General tab of the Messenger Server object.
The location specified for the Messaging Agent object overrides the location specified for the
Messenger Server object. To change the working directory:
Stop the Messaging Agent on the server.
Copy the Messaging Agent working directory to the new location. The default working directory
is
/var/opt/novell/messenger/temp
.
In the GroupWise Admin console, navigate to Messenger > MessengerService > Objects >
Messaging Agents. Then, select the Messaging Agent > General.
In the Work Path field, specify the new working directory.
Save your settings, and then start the Messaging Agent to put the settings into effect.

24 Managing the Messaging Agent
Using Messaging Agent Startup Switches
You can override settings provided in the GroupWise Admin console by using startup switches in the
Messaging Agent startup file (
strtup.ma
). The startup file is located in
/etc/opt/novell/
messenger.
You can override startup switches provided in the startup file by using startup switches
on the command line. For more information about starting the Messaging Agent, see Starting the
Messaging Agent.
This section contains information on the following startup switches:
“/certfile” on page 25
“/certpath” on page 26
“/dhparm” on page 26
“/httppassword” on page 26
“/httpport” on page 26
“/httpssl” on page 27
“/httpuser” on page 27
“/ip” on page 27
“/keepalive” on page 28
“/keyfile” on page 28
“/keypassword” on page 28
“/log” on page 28
“/logdays” on page 29
“/logdiskoff” on page 29
“/loglevel” on page 29
“/logmax” on page 30
“/maxconns” on page 30
“/nosnmp” on page 30
“/port” on page 30
“/productinfo” on page 31
“/sslciphersuite” on page 31
“/ssloption” on page 31
“/threads” on page 31
The following table summarizes the Messaging Agent startup switches and how they correspond to
configuration settings in the GroupWise Admin console.
Table 2-2 Messaging Agent Startup Switches
Messaging Agent GW Admin Console Setting
--certfile SSL Certificate
--certpath Certificate Path

Managing the Messaging Agent 25
/certfile
Specifies the full path to the certificate files used to provide secure SSL communication between the
Messaging Agent and other programs. See Configuring the Messaging Agent with SSL Encryption.
See also /certpath, /keyfile, and /keypassword.
--dhparm N/A
--httppassword HTTP Password
--httpport HTTP Port
--httpuser HTTP Username
--httpssl Enable SSL for Web Console
--ip Host IP Address with Bind to this
Address selected
--keepalive N/A
--keyfile SSL Key File
--keypassword SSL Set Password
--log Log Files Path
--logdays Log Maximum Age
--logdiskoff Enable Disk Logging
--loglevel Log Level
--logmax Log Maximum Size
--maxconns Maximum Number of Users
--nosnmp Enable SNMP
--port Client/Server Port
--productinfo N/A
--sslciphersuite N/A
--ssloption N/A
--threads Client/Server Threads
Linux Messaging Agent
Syntax: --certfile=/dir/file
Example: --certfile=/certs/gw.crt
Messaging Agent GW Admin Console Setting

26 Managing the Messaging Agent
/certpath
Specifies the full path to the directory where certificate files are stored on your system. See
Configuring the Messaging Agent with SSL Encryption.
See also /certfile, /keyfile, and /keypassword.
/dhparm
Specifies a Diffie-Hellman cipher parameters file used for SSL/TLS to replace the default parameters
set by Messenger. Messenger uses default Diffie-Hellman parameters of 2048 bits to generate the
DH key. A valid DH parameter is in PEM format.
/httppassword
Specifies the password for the Messaging Agent to prompt for before allowing Messaging Agent
status information to be displayed in your browser. Unless you are using SSL encryption, do not use
an existing LDAP password because the information passes over the connection between your
browser and the Messaging Agent. See Using the Messaging Agent Web Console.
See also /httpuser.
/httpport
Sets the HTTP port number used for the Messaging Agent to communicate with your browser. The
setting must be unique on the server where the Messaging Agent runs. See Using the Messaging
Agent Web Console.
Linux Messaging Agent
Syntax: --certpath=/dir
Example: --certpath=/certs
Linux Messaging Agent
Syntax: --dhparm directory/pemfile
Example: --dhparm /var/tmp/dh.pem
Linux Messaging Agent
Syntax: --httppassword= unique_password
Example: --httppassword=AgentWatch

Managing the Messaging Agent 27
/httpssl
Sets the availability of SSL encryption between the Messaging Agent and the Web Console displayed
in your browser. Valid values are enable and disable. See Using the Messaging Agent Web Console.
/httpuser
Specifies the user name for the Messaging Agent to prompt for before allowing Messaging Agent
status information to be displayed in a browser. Providing a user name is optional. Unless you are
using SSL encryption, do not use an existing LDAP user name because the information passes over
the connection between your browser and the Messaging Agent. See Using the Messaging Agent
Web Console.
See also /httppassword.
/ip
Binds the Messaging Agent to a specific IP address when the server where it runs uses multiple IP
addresses, such as in a clustering environment. Without the /ip switch, the Messaging Agent binds
to all available IP addresses and Messenger clients can communicate with the Messaging Agent on
all available IP addresses.
Linux Messaging Agent
Syntax: --httpport=port_number
Example: --httpport=8315
Linux Messaging Agent
Syntax: --httpssl=setting
Example: --httpssl=enable
Linux Messaging Agent
Syntax: --httpuser=unique_username
Example: --httpuser=NMWebConsole
Linux Messaging Agent
Syntax: --ip=IP_address
Example: --ip=172.16.5.19

28 Managing the Messaging Agent
/keepalive
Adjusts the default ping interval at which the Messenger clients notify the Messaging Agent that
they are still active. The default interval is every 10 minutes. This regular communication between
the Messaging Agent and the client prevents firewalls and routers from disconnecting connections
that seem to be inactive. You can decrease the interval if client users are being unexpectedly
disconnected. You can increase the interval to decrease network traffic. Use a setting of 0 (zero) to
turn off the ping activity.
The ping interval can be adjusted for individual clients by using the /keepalive startup switch with
the Messenger client.
/keyfile
Specifies the full path to the private file used to provide SSL encryption between the Messaging
Agent and other programs. See Configuring the Messaging Agent with SSL Encryption.
See also /keypassword.
/keypassword
Specifies the password used to encrypt the private SSL key file when it was created. See Configuring
the Messaging Agent with SSL Encryption.
See also /keyfile.
/log
Specifies the directory where the Messaging Agent will store its log files. The default location is the
\novell\nm\ma\log
directory. See Using Messaging Agent Log Files.
Linux Messaging Agent
Syntax: --keepalive=minutes
Example: --keepalive=5
Linux Messaging Agent
Syntax: --keyfile=/dir/file
Example: ---keyfile=/certs/gw.key
Linux Messaging Agent
Syntax: --keypassword=password
Example: --keypassword=gwssl

Managing the Messaging Agent 29
See also /loglevel, /logdays, /logmax, and /logdiskoff.
/logdays
Specifies how many days to keep Messaging Agent log files on disk. The default is 14 days. See Using
Messaging Agent Log Files.
See also /log, /loglevel, /logmax, and /logdiskoff.
/logdiskoff
Turns off disk logging for the Messaging Agent so no information about the functioning of the
Messaging Agent is stored on disk. The default is for logging to be turned on. See Using Messaging
Agent Log Files.
See also /log, /loglevel, /logdays, and /logmax.
/loglevel
Controls the amount of information logged by the Messaging Agent. Logged information is displayed
in the log message box and written to the Messaging Agent log file during the current agent session.
The default is Normal, which displays only the essential information suitable for a smoothly running
Messaging Agent. Use Verbose to display the essential information, plus additional information
helpful for troubleshooting. Use Diagnostic to include very detailed, code-specific information. See
Using Messaging Agent Log Files.
See also /log, /logdays, /logmax, and /logdiskoff.
Linux Messaging Agent
Syntax: --log=/dir
Example: --log=/nm/log/ma
Linux Messaging Agent
Syntax: --logdays=days
Example: --logdays=30
Linux Messaging Agent
Syntax: --logdiskoff
Linux Messaging Agent
Syntax: --loglevel=level
Example: --loglevel=diagnostic

30 Managing the Messaging Agent
/logmax
Sets the maximum amount of disk space for all Messaging Agent log files. When the specified disk
space is consumed, the Messaging Agent deletes existing log files, starting with the oldest. The
default is 128 MB. See Using Messaging Agent Log Files.
See also /log, /loglevel, /logdays, and /logdiskoff.
/maxconns
Specifies the maximum number of connections between the Messaging Agent and Messenger
clients. The default is 5120. See Optimizing Messaging Agent Performance.
See also /threads.
/nosnmp
Disables SNMP for the Messaging Agent. The default is to have SNMP enabled. See Using SNMP
Monitoring Programs.
/port
Sets the port number on which the Messaging Agent listens for service requests from Messenger
clients. The default is 8300. See Configuring the Messaging Agent.
Linux Messaging Agent
Syntax: --logmax=megabytes
Example: --logmax=256
Linux Messaging Agent
Syntax: --maxconns=connections
Example: --maxconns=10000
Linux Messaging Agent
Syntax: --nosnmp
Linux Messaging Agent
Syntax: --port=port_number
Example: --port=8302

Managing the Messaging Agent 31
/productinfo
Sets the level of anonymous product information that is sent to OpenText. The level is initially set
during the install or upgrade. The following options are available:
0: Turns off anonymous product information collection.
1: Enables basic collection which collects the uptime, product version, OS type, and number of
peak users.
2: Enables basic collection additional data collection which adds message traffic, chat room
usage, number of conversations, and other similar information.
/sslciphersuite
Sets the SSL cipher suites used by the Archive Agent, the Messaging Agent, and Messenger clients.
The cipher list must be in OpenSSL format. The default cipher string is located in the agent startup
files and may be updated from time to time in newer installations. For more information on OpenSSL
format, see Cipher List Format (https://www.openssl.org/docs/apps/ciphers.html#CIPHER-LIST-
FORMAT)
/ssloption
Specify a specific SSL protocol to disable. By specifying SSL_OP_NO_TLSv1, Messenger will disable
TLSv1 support. Specify additional options by adding the SSL key work separated by a comma.
/threads
Specifies the maximum number of client/server threads the Messaging Agent can create. The default
is 15. See Optimizing Messaging Agent Performance.
Linux Messaging Agent
Syntax: --productinfo=value
Example: --productinfo=1
Linux Messaging Agent
Syntax: --sslciphersuite “setting”
Example: --sslciphersuite
“HIGH:!AECDH:!EXP:@STRENGTH”
Linux Messaging Agent
Syntax: --ssloption SSL_protocol
Example: --ssloption
SSL_OP_NO_TLSv1,SSL_OP_NO_TLSv1_
1


3
Managing Messenger Client Users 33
3
Managing Messenger Client Users
Although users can begin to use the GroupWise Messenger client immediately after you have set up
your Messenger system, as described in the GroupWise Messenger Installation Guide, you might
want to do some additional system setup, as described in the following sections:
“Adding Users to Your Messenger System” on page 33
“Providing User Searches Based on Email Addresses” on page 34
“Setting User Policies” on page 35
“Distributing the Messenger Client Software” on page 43
“Configuring the Messenger Client Software” on page 46
“Using Multi-Factor Authentication” on page 55
IMPORTANT: Make sure that you have at the GroupWise MTA LDAP enabled for users to work
properly for Messenger. This was a prerequisite for installing Messenger. For more information see,
“GroupWise Requirements” in the GroupWise Messenger Installation Guide.
Adding Users to Your Messenger System
After installing Messenger, you need to add users to your system. They can be either GroupWise
users or just Messenger users. If you upgraded from Messenger 3.x to a Messenger 18 or later
version, your Messenger users were migrated from eDirectory. You can link these users to their
GroupWise user profile by associating them.
NOTE: If you enable automatic account creation, existing GroupWise users do not synchronize to
Messenger, but must be manually added to Messenger or associated to Messenger accounts.
“Enabling Automatic Account Creation for New GroupWise Users” on page 33
“Adding Existing GroupWise Users to Messenger” on page 34
“Linking GroupWise Users to Migrated Messenger 3.x Users” on page 34
Enabling Automatic Account Creation for New GroupWise Users
You can configure Messenger to automatically add new GroupWise users to Messenger:
In the GroupWise Admin console, navigate to Messenger > MessengerService > Settings >
Account Management, and then select the Automatically create and delete accounts for
GroupWise users.

34 Managing Messenger Client Users
Adding Existing GroupWise Users to Messenger
To add existing GroupWise users to Messenger, you need to manually enable the users in
Messenger:
Navigate to Users in the GroupWise Admin Console, and select the users you want to add to
Messenger.
Select Messenger > Enable.
Users are imported into Messenger. Any issues with the import are displayed.
Linking GroupWise Users to Migrated Messenger 3.x Users
When you migrate from Messenger 3.x to a Messenger 18 or later version, your Messenger users are
migrated from eDirectory and are stored in the Messenger database. You can associate these users
with your GroupWise users to manage both the GroupWise settings and Messenger user settings in
one location. To associate users:
In the GroupWise Admin Console, go to Users > select a user > Messenger > Associate.
Select the users in Messenger that corresponds to the GroupWise user.
You can now manage the user’s Messenger preferences using the Messenger tab for the user.
Providing User Searches Based on Email Addresses
By default, Messenger users can search for other users to add to their contact lists in the Messenger
client by first name, by last name, by first and last name, and by LDAP user ID. You can add the
capability of searching on email addresses by setting up Messenger addresses that are equivalent to
users' existing email addresses. To set up Messenger addresses, you must add one or more
hostnames to your Messenger system.
Establishing a Hostname for Your Messenger System
If all of your Messenger users have email addresses that are part of the same Internet domain (for
example, Corporate.com), you can set up your Messenger system to recognize that Internet domain
name as a Messenger address. This enables users to locate contacts by searching for their email
addresses (for example, JSmith@Corporate.com).
In the GroupWise Admin console, navigate to Messenger > MessengerService > Hosts, and select
New.
Specify a descriptive name for the new Host.
For simplicity, you might want to name the new host profile after the Internet domain name it
represents. For example, if users receive email at username@Corporate.com, then you could
use Corporate as the name of the host profile.
In the Host Name field, specify the Internet domain name that appears in users' email addresses
(for example, Corporate.com).
Click Ok to save the Host. Select the Host and select Enabled, and then save.
Go to Messenger Settings tab > Host Settings.

Managing Messenger Client Users 35
Add the new host that you created previously.
Click Save.
Restart the Messaging Agent to put the new hostname into effect.
Messenger users can now specify email addresses as well as user IDs in the Messenger client
Use
This User ID field.
If archiving is enabled, authorized Messenger users can search the Messenger archive for users'
conversations by specifying their email addresses. Conversations archived before the hostname was
established are not searchable by email address.
NOTE: If your organization is large, it might be divided into units. For example, Corporate.com might
include Development.Corporate.com, Sales.Corporate.com, and so forth. By setting up multiple
hostnames, you enable Messenger users to search for contacts within subsets of your organization.
Setting User Policies
As an administrator, you can set user policies to control how some Messenger client features work
and to establish defaults for some Messenger client functionality. You can configure user policies to
apply to all Messenger users or to selected Messenger users.
“Editing the Default User Policy” on page 36
“Creating a User Policy” on page 36
“Customizing Messenger Client Features” on page 37
“Customizing Personal History Features” on page 39
“Controlling Users' Contact Lists” on page 39
“Setting Up a Default Privacy List” on page 40
“Selecting Default Display Attributes” on page 41
“Creating A Custom Status” on page 42
“Applying a Policy to Specific Users” on page 43

36 Managing Messenger Client Users
Editing the Default User Policy
If you use the same policy for all Messenger users, editing the default user policy affects all users. If
you have multiple user policies, editing the default user policy affects those users who are not
governed by another policy.
In the GroupWise Admin console, navigate to Messenger > MessengerService > Policy >
DefaultPolicy, and customize the policy as desired:
Click Save.
After you modify the Default Policy object, restart the Messenger agents to put the new default
policy into effect throughout your Messenger system.
Creating a User Policy
If you want to provide different policies for different users, you need to create multiple Policy
objects.
In the GroupWise Admin console, navigate to Messenger > MessengerService > Policy, and
select
New.
Specify a descriptive name for the new policy.
Policy Property Page Policy Options
General Enable GroupWise Messenger services, Archive message sessions, Allow
users to search eDirectory for other users, Allow users to send broadcast
messages to other users, Allow users to send system broadcast
messages, Allow users to use chat rooms, Allow users to create chat
rooms, Allow users to change their password, Allow users to use
Remember Password, Enable users to connect multiple clients
simultaneously, Allow users to use Messenger mobile apps, Default
host, Scope profile
Personal History Allow users to print and save conversations, Allow users to use Personal
History
Contact List Maximum number of contacts, Maximum number of folders, Contact
List
Privacy Allowed/Blocked
Information List Selected Attributes
Custom Status Custom Status List
Used By Reference List

Managing Messenger Client Users 37
Select the new policy to edit it and customize it as needed:
Click Save.
After you create a new policy, you do not need to restart the Messenger agents in order for the
updated policy to be in effect. The new policy is in effect the next time users governed by the
policy log in to Messenger, as described in Applying a Policy to Specific Users.
Customizing Messenger Client Features
The options on the General page of the Policy object customize how the Messenger client works for
users governed by the policy you are creating or editing. You can set these options to enable or
disable certain functionality and to provide some settings that override comparable settings on the
Messenger Service object.
Edit or create a user policy.
Click Policy > General.
Fill in the following fields:
Enable GroupWise Messenger services: Use this option to enable or disable the Messenger
client for the users governed by this policy. It is enabled by default.
Archive message sessions: Use this option to enable or disable conversation archiving for users
governed by this policy. It is disabled by default. If you want to enable archiving, see Enabling
and Managing Archiving.
Allow users to search for other users: Use this option to allow or prevent Messenger users
from building their contact lists by searching for users. It is enabled by default. If you disable this
option, users governed by this policy can only add known user IDs to their contact lists.
Policy Property Page Policy Options
General Enable GroupWise Messenger services, Archive message sessions, Allow
users to search eDirectory for other users, Allow users to send broadcast
messages to other users, Allow users to send system broadcast
messages, Allow users to use chat rooms, Allow users to create chat
rooms, Allow users to change their password, Allow users to use
Remember Password, Enable users to connect multiple clients
simultaneously, Allow users to use Messenger mobile apps, Default
host, Scope profile
Personal History Allow users to print and save conversations, Allow users to use Personal
History
Contact List Maximum number of contacts, Maximum number of folders, Contact List
Privacy Allowed/Blocked
Information List Selected Attributes
Custom Status Custom Status List
Used By Reference List

38 Managing Messenger Client Users
Allow users to send broadcast messages to other users: Use this option to enable or disable
users to send broadcast messages to other users. It is enabled by default. If you disable this
option, users governed by this policy cannot send broadcast messages to other users.
Allow users to send system broadcast messages: Use this option to enable or disable users to
send system broadcast messages to all users who are online. It is disabled by default. If you
enable this feature, users governed by this policy can send broadcast messages to all online
users.
Allow users to use chat rooms: Use this option to enable or disable users to use Messenger
chat rooms. It is enabled by default. If you disable this feature, users governed by this policy
cannot join Messenger chat rooms.
Allow users to create chat rooms: Use this option to enable or disable users to create
Messenger chat rooms. It is disabled by default. If you enable this option, users governed by this
policy can create Messenger chat rooms.
Allow users to change their password: Use this option to enable or disable users to change
their eDirectory passwords from the Messenger client. It is disabled by default because
Messenger authenticates users by using their eDirectory passwords and you might not want
users changing their eDirectory passwords in the Messenger client. If you enable this option,
users governed by this policy have a
Change Password item on the Tools menu in the Messenger
client where they can change their eDirectory passwords.
Allow users to use remember password: Use this option to enable or disable users to use
Remember Password. It is enabled by default. If you disable this option, users governed by this
policy cannot use Remember Password in the client.
Enable users to connect multiple clients simultaneously: Use this option to allow users in this
policy to connect to multiple Messenger clients simultaneously. If this option is not selected,
users are logged out of the first client when they log in to a second client.
Allow users to use Messenger mobile apps: Use this option to allow users in this policy to use
the Messenger mobile apps. If this option is not selected, users cannot log in to Messenger from
the mobile app.
Enable File Transfer: Use this option to allow users in this policy to send files to other users.
Maximum file size: Specify the maximum file size that users can send.
Default host: If you have set up multiple hosts in your Messenger system, as described in
Providing User Searches Based on Email Addresses, browse to and select the host that applies to
the users governed by this policy.
If you do not want an option to be changeable for individual Messenger users, click the Lock
button next to it.
Each option is accompanied by a
Lock button. When an option is unlocked, it can be overridden
by changing the option setting on the GroupWise Messenger General page of individual User
objects.
Click Save.
Continue with Customizing Personal History Features.
or
If you are finished configuring the policy and you are not modifying the Default Policy, skip to
Applying a Policy to Specific Users.

Managing Messenger Client Users 39
Customizing Personal History Features
The options on the History page of the Policy object customize how the Messenger client works for
users governed by the policy you are creating or editing. You can set these options to enable or
disable certain functionality and to provide some settings that override comparable settings on the
Messenger Service object.
Edit or create a user policy.
Click Policy > Personal History.
Fill in the following fields:
Allow Users to Print and Save Conversations: Use this option to enable or disable users to print
or save their conversations. It is enabled by default. If you disable this feature, users governed
by this policy cannot print or save their conversations.
Allow Users to Use Personal History: Use this option to enable or disable users to use Personal
History. It is enabled by default. If you disable this feature, users governed by this policy cannot
use Personal History.
If you do not want an option to be changeable for individual Messenger users, click the Lock
button next to it.
Click Save.
Continue with Controlling Users' Contact Lists.
or
If you are finished configuring the policy and you are not modifying the Default Policy, skip to
Applying a Policy to Specific Users.
Controlling Users' Contact Lists
By default, users build their own contact lists in the Messenger client and they can add as many as
100 contacts. As an administrator, you can control the size of the contact list and you can create a
default contact list for Messenger users, so that users governed by this policy have something to
start with when they first use the Messenger client.
Edit or create a user policy.
Click Policy > Contact List.
Fill in the following fields to control the size of users' contact lists:
Maximum Number of Contacts: Specify the maximum number of users that users governed by
this policy can add to their contact lists. The default is 100. Users' contact lists are stored on
their User objects in your Messenger system. Therefore, you might want to limit the amount of
space occupied by contact lists in eDirectory.
Maximum Number of Folders: Specify the maximum number of folders that users governed by
this policy can create in their contact lists. The default is 50.
If you want to create a default contact list for the users governed by this policy:
To add users to the default contact list, click Add User, browse to and select one or more
User objects, and then click
OK.
To add a folder in the default contact list, click Add Folder, select the new folder, click Edit,
specify the name of the folder, and then click
OK.

40 Managing Messenger Client Users
To add users to a folder, select the folder, click Add User, browse to and select one or more
User objects, and then click
OK.
You cannot drag and drop users into a folder.
To expand or collapse the list of users in a folder, double-click the folder.
To change the way a user name displays in the default contact list, select the user, click Edit,
specify the user name that you want to appear in the contact list, and then click
OK.
This does not rename the eDirectory User object.
To delete a user or folder from the default contact list, select the user or folder, and then
click
Remove.
Folders do not need to be empty to be deleted. You are not prompted for confirmation.
There is no undo.
If you are creating an extensive default contact list, click Apply occasionally to save your
work.
New Messenger users see the default contact list when they first start the Messenger
client. Existing Messenger users who already have their own contact lists are not affected
by your default contact list.
Each contact list option is accompanied by a
Lock button. When an option is unlocked, it
can be overridden by changing the option setting on the GroupWise Messenger General
page of individual User objects, or in the case of the contact list, by Messenger users
themselves.
If you do not want an option to be changeable for individual Messenger users, click the Lock
button next to it.
IMPORTANT: If you lock the contact list, users cannot change their contact lists in the
Messenger client.
Click Save.
Continue with Setting Up a Default Privacy List.
or
If you are finished configuring the policy and you are not modifying the Default Policy, skip to
Applying a Policy to Specific Users.
Setting Up a Default Privacy List
By default, all users whose User objects are located in a context listed in a scope profile have access
to Messenger. Users control who can see their online status and who can send them messages. As an
administrator, you can establish a default privacy list for users governed by the policy you are
creating or editing.
Edit or create a user policy.
Click Policy > Privacy.
To add users to the Allowed list, click in the Allowed list, and then click the + button.
or
To add users to the
Blocked list, click in the Blocked list, and then click the + button.
Browse to and select one or more users.

Managing Messenger Client Users 41
To move users from one list to the other, select one or more users, and then click the right-
arrow or left-arrow button.
To delete users from either list, select one or more users, and then click the Remove button.
New Messenger users see the default privacy list when they first start the Messenger client.
Existing Messenger users who already have their own privacy lists are not affected by your
default privacy list.
The privacy list option is accompanied by a
Lock button. When an option is unlocked, it can be
overridden by changing the option setting on the GroupWise Messenger General page of
individual User objects, or in the case of the privacy list, by Messenger users themselves.
If you do not want the default privacy list to be changeable for individual Messenger users, click
the
Lock button.
IMPORTANT: If you lock the privacy list, users cannot change their privacy lists in the
Messenger client.
Click Save.
Continue with Selecting Default Display Attributes.
or
If you are finished configuring the policy and you are not modifying the Default Policy, skip to
Applying a Policy to Specific Users.
Selecting Default Display Attributes
When Messenger users display contact property information in their Messenger contact lists, the
following information is displayed if it is available in LDAP:
First Name
Last Name
Department
Title
Email Address
Description
You can make more or less LDAP information available for display in the Messenger client to meet
the needs of your users.
Edit or create a user policy.
Click Policy > Information List.
The information is listed according to its LDAP attribute name.
If the list includes information that you do not want users to be able to see, select an attribute,
and then click
Remove.

42 Managing Messenger Client Users
If you want to add more attributes to the list:
Click Add.
Specify a valid attribute for the directory you are using. If you are using GroupWise LDAP,
valid attributes can be found in “GroupWise LDAP Attributes” in the GroupWise
Administration Guide.
If you do not want the default information list to be changeable for individual Messenger users,
click the
Lock button.
Click Save.
Continue with Creating A Custom Status.
or
If you are finished configuring the policy and you are not modifying the Default Policy, skip to
Applying a Policy to Specific Users.
Creating A Custom Status
By default, the Messenger client provides the following selectable user statuses that indicate user
presence in the Messenger system:
In the Messenger client, users can create their own custom statuses to indicate their presence. As an
administrator, you can create custom statuses to be available to all users governed by this policy.
Edit or create a user policy.
Click Policy > Custom Status.
Any existing custom status is listed.
Click Add to create a new custom status.
Fill in the following fields:
Show As: Select
Online, Away, or Busy to determine the icon to accompany the custom status.
Title: Specify a descriptive name for the new status.
Auto-Reply Message: (Optional) Specify a message for the Messenger Agent to return
automatically whenever the new status is selected in the Messenger client.
Click OK to add the new custom status to the list.
Repeat the previous steps to create additional custom statuses.
New Messenger users see your custom statuses when they first start the Messenger client.
Existing Messenger users who might have created their own custom statuses are not affected by
your custom statuses.
Icon Status
Online
Busy
Away
Appear Offline

Managing Messenger Client Users 43
The custom status list option is accompanied by a Lock button. When an option is unlocked, it
can be overridden by changing the option setting on the GroupWise Messenger General page of
individual User objects, or in the case of the custom status list, by Messenger users themselves.
If you do not want the custom statuses to be changeable for individual Messenger users, click
the
Lock button.
IMPORTANT: If you lock the custom status list, users cannot create their own custom statuses in
the Messenger client.
Click Save, and then continue with Applying a Policy to Specific Users.
or
If you are modifying the Default Policy, click
OK to save it.
Applying a Policy to Specific Users
After you have set the needed policy options, you select the Messenger users to be governed by the
policy.
Edit or create a user policy.
Click Policy > Used By.
Any users currently governed by the policy are listed.
Click Add, and then browse to and select those users that you want to be governed by this
policy.
The reference list option is accompanied by a
Lock button. When an option is unlocked, it can be
overridden by changing the option setting on the GroupWise Messenger General page of
individual User objects.
If you do not want the reference list to be changeable for individual Messenger users, click the
Lock button.
Click OK to save the user policy.
You do not need to restart the Messaging Agent in order for the new policy to be in effect. The new
policy takes effect for users governed by the policy the next time they log in to Messenger.
Distributing the Messenger Client Software
You have many alternatives for helping users install the Messenger client:
“Using the GroupWise Messenger Download Page” on page 44
“Setting Up Auto-Update” on page 44
“Configuring Your Web Server to Download the Messenger Client” on page 45

44 Managing Messenger Client Users
Using the GroupWise Messenger Download Page
The GroupWise Messenger download page is available to users as soon as you finish running the
Messenger Installation program (as described in the GroupWise Messenger Installation Guide) and
start the Messaging Agent (as described in Starting the Messaging Agent).
In order for users to access the GroupWise Messenger download page in their browsers, you need to
tell them the IP address or DNS hostname of the server where the Messaging Agent is running and
the port number (8300 by default). For example, if you installed the Messaging Agent on a server
with an IP address of 172.16.5.18, the GroupWise Messenger download page is:
http://172.16.5.18:8300
When users click the GroupWise Messenger link, they download the
gwmsgr.exe
file from the
\novell\nm\ma\software\client\win32
directory. By following the instructions on the
download page, users can install and start the Messenger client quickly and easily.
Setting Up Auto-Update
You can require Messenger users to update their Messenger client software whenever a new version
of the client is available.
In the GroupWise Admin console, navigate to Messenger > MessengerService > Settings > Client
Settings, and configure the following information:
Enable Client Download Through a Browser: Select this option so that users can download the
updated Messenger client software from the GroupWise Messenger download page, as
described in Using the GroupWise Messenger Download Page.
Version: Specify the minimum acceptable version number for the Messenger client software.
Date: Click the
Calendar button to specify the earliest acceptable date for the Messenger client
software.
If you fill in the
Version and/or Date fields, users cannot run the Messenger client until they
update their software, unless you allow grace logins.
Grace Logins: Specify the number of times users can log in to the Messenger system without
updating their Messenger client software.
If you leave the
Date and Version fields blank, users can choose whether to update their
Messenger client software when they are notified that a new version is available.
Client version information is stored on each user's workstation in the
nmcl32.ver
file.
Update Message: If desired, type the message that you want Messenger users to see when
they are notified about the Messenger client update.
Client Download URLs: Click
Add to specify each URL where the user's browser or the
Messenger client are redirected when attempting to download the updated client software.
The URLs in the list you create are tried in the order you list them. Ensure that the Messenger
gwmsgr.exe
file is available for download from each URL in the list. For more information, see
Configuring Your Web Server to Download the Messenger Client.
Click Save.

Managing Messenger Client Users 45
When Messenger users start the Messenger client, they are notified whenever updated client
software is available.
Configuring Your Web Server to Download the Messenger Client
By default, the Messaging Agent handles downloading Messenger client software to Messenger
users. If this activity seems to interfere with its ability to handle its instant messaging functions in a
timely manner, you can configure your web server to download the client software instead. Before
performing the following steps, you should already have created your Messenger system and have
the Messenger agents running.
In the GroupWise Admin console, navigate to Messenger > MessengerService > Settings > Client
Settings, and then in the Client Download URLs list, click Add.
Specify the URL of your web server. For example:
http://nm.novell.com:80
Be sure to include both the http:// and the port number where your web server listens for
service requests.
Click OK to close the Download URL dialog box, and then click Save.
From the Messenger software subdirectory(
/opt/novell/messenger/software
), copy the
index.htm
file and the
msgricon.gif
file to the primary document directory of your web
server.
If you want to provide the GroupWise Messenger download page in a language other than
English, copy the
index.htm
file from the appropriate language subdirectory beneath the
Messenger software directory.
Edit the
index.htm
file to remove all instances of
~down
. For example:
Before:
/~down/client/win32/gwmsgr.exe
/~down/client/linux/gwmsgr.bin
/
~down/client/mac/nvlmsgr.sit
After:
/client/win32/gwmsgr.exe
/client/xplat/linux/gwmsgr.bin
/client/
xplat/mac/nvlmsgr.sit
Depending on the requirements of your web server, save the file as either
index.htm
or
index.html
.
Under the primary document directory of your web server, create a client subdirectory, and
then create a platform-specific subdirectory in it, to create the following directory structure:
primary_doc_dir/client/win32
primary_doc_dir/client/xplat/linux
primary_doc_dir/client/xplat/mac
From the platform-specific subdirectory (
win32
,
linux
, or
mac
) of the Messenger software
directory, copy the appropriate Messenger file (
gwmsgr.exe
,
gwmsgr.bin
, or
nvlmsgr.sit
)
into the corresponding
primary_doc_dir
platform-specific subdirectory.
In the platform-specific
primary_doc_dir
subdirectory, create an ASCII text file named
files.txt
with one of the following lines depending on your client platform:
client/win32/gwmsgr.exe
client/xplat/linux/gwmsgr.bin
client/xplat/mac/
nvlmsgr.sit
After typing the appropriate platform-specific line, press Enter so that there is an empty line at
the end of the file.

46 Managing Messenger Client Users
Save the updated
files.txt
file.
Repeat the previous steps for each platform-specific subdirectory you created
so that you have three
files.txt
files, one for each platform.
Restart the Messenger agents to put the list of client download URLs into effect.
You do not need to restart the web server in order for Messenger users to be able to download the
Messenger client software.
Configuring the Messenger Client Software
The following sections describe some specialized ways to configure the Messenger client software:
“Using the Configuration File (setup.cfg) When Installing the Windows Messenger Client” on
page 46
“Using Startup Switches When Starting the Messenger Client” on page 49
“Using URL Commands in Your Web Browser on Windows” on page 53
Using the Configuration File (setup.cfg) When Installing the
Windows Messenger Client
The Messenger configuration file (
setup.cfg
) controls how the Windows Messenger client
software is installed by client users. It includes the following sections and parameters:
[NMSetup] Path= ProgramFolder= LaunchNow= ViewReadme= IconOnDesktop= LaunchOnStartup=
ServerAddress= ServerPort= ForceAddressAndPort= UseWindowsColors=
ShowRememberPassword=
[Languages]
[Show Dialogs] HideAllDialogs= SelectDestination= SelectProgramFolder= LanguageSelect=
SetupComplete=
After you change information in the
setup.cfg
file, you must delete the
gwmsgr.exe
file, and
then stop and restart the Messaging Agent so that it re-creates the
gwmsgr.exe
file with the new
configuration information. The new configuration information then applies the next time users
install or update their client software.
“[NMSetup]” on page 46
“[Languages]” on page 48
“[Show Dialogs]” on page 48
[NMSetup]
The
[NMSetup]
section of the
setup.cfg
file enables you to control the options the Messenger
client Installation program presents to the user during installation.
Path=
Specify the path where you want the Installation program to install the client software.

Managing Messenger Client Users 47
ProgramFolder=
Specify the item on the Start > Programs menu where you want the Messenger client to appear. For
example, you can specify GroupWise Messenger.
LaunchNow=
By default, the Start GroupWise Messenger Now check box on the Setup Complete page is selected.
Specify
No
if you want it deselected by default when the user installs the client software.
LaunchOnStartup=
By default, the Messenger client starts when Windows starts. Specify
No
if you don’t want it to start
when Windows starts. Users then need to use the desktop icon to start the Messenger client.
ViewReadme=
By default, the View the GroupWise Messenger Readme check box on the Setup Complete page is
selected. Specify
No
if you want it deselected by default when the user installs the client software.
IconOnDesktop=
By default, the Put an Icon on the Desktop check box on the Setup Complete page is selected. Specify
No
if you want it deselected by default when the user installs the client software.
RegKeyForDefaultPath=
Use this Windows registry key to specify a default installation path.
RegKeyForDefaultFolder=Software\Novell\GroupWise\Setup\PROGRAMFOLDER
Use this Windows registry key to specify the item on the Start > Programs menu where you want the
Messenger client to appear.
ServerAddress=
Defaults to the IP address of the server where the Messaging Agent is installed.
ServerPort=
Defaults to 8300. Specify a different port number if the default port number is already in use on the
server.
ForceAddressAndPort=
If you change the server address or port information, specify
No
if you want existing Messenger
client installations to continue using the original server address and/or port while new Messenger
client installations use the updated server and/or port information. Specify
Yes
for both existing and
new installations to use the updated information.
If you do not set
ForceAddressAndPort=Yes
after changing the server address and port
information, users need to use the /ipa and /ipp client startup switches to manually provide this
information when they start the Messenger client, or they need to update the Address and Port
values of the
\HKEY_CURRENT_USER\Software\Novell\Messenger\Login
key in the

48 Managing Messenger Client Users
Windows registry. Using the
ForceAddressAndPort=Yes
parameter makes life much easier for
users. They are prompted to update their client software and the address and port information is
automatically changed for them.
UseWindowsColors=
By default, the Messenger client uses its own custom color scheme. Specify
Yes
to use standard
Windows colors instead.
ShowRememberPassword=
This setting controls whether the user sees the Remember Password option during the initial login to
the client.
The default setting displays the Remember Password option on the Messenger Login window.
Setting ShowRememberPassword to
No
causes the Remember Password option to not display during
the initial login.
After the initial login, this option is controlled by its setting in the GroupWise Admin console.
[Languages]
The
[Languages]
section of the
setup.cfg
file enables you to control what languages are
selected by default on the Language Selection page. Specify
Yes
for a language that you want
selected by default. Specify
No
for each language that you want deselected by default. For example:
ChineseSimplified=No
Chinese=No
Czech=No
BrazilianPortuguese=No
Danish=No
Dutch=No
English=Yes
Finnish=No
French=Yes
German=Yes
...
If you suppress the Language Selection page, all selected languages are automatically installed on
users' workstations.
[Show Dialogs]
The
[Show Dialogs]
section of the
setup.cfg
file enables you to control what interactions take
place when users install the Messenger client for the first time. If you choose to suppress a page, use
the corresponding parameter in the
[NMSetup]
section to provide the information that the
Installation program needs from the suppressed page.
HideAllDialogs=
Specify
Yes
for a completely non-interactive installation of the Messenger client. Provide all
required information in the
[NMSetup]
section.

Managing Messenger Client Users 49
SelectDestination=
Specify
No
to suppress the Choose Destination Location page during installation. Ensure you have set
the
Path=
parameter to the location where you want the client software to be installed on users'
workstations.
SelectProgramFolder=
Specify
No
to suppress the Select Program Folder page during installation. Ensure you have set the
ProgramFolder=
parameter to the item on the Start > Programs menu where you want the
Messenger client to appear.
LanguageSelect=
Specify
No
to suppress the Language Selection page during installation. Ensure you have specified
Yes
for each language in the
[Languages]
section that you want to be installed on users'
workstations.
SetupComplete=
Specify
No
to suppress the Setup Complete page at the end of the installation. If you suppress this
page, users cannot review the Messenger client Readme. Ensure you have set the
LaunchNow=
and
IconOnDesktop=
parameters to control whether the client starts automatically and whether users
have desktop icons to start the client.
Using Startup Switches When Starting the Messenger Client
In general, Messenger client users do not need to be concerned with startup switches. However,
they can learn about client startup switches by looking up “startup options” in Messenger online
help. The client startup switches are summarized below as a reference for administrators:
/background
Starts the Messenger client without displaying the main window. By default, the client displays its
main window on the desktop.
Windows Messenger
Client
Linux/Mac Messenger Client
/background -background
/import -import
/initstatus /initstatus
/ipa -ipa
/ipp -ipp
/keepalive -keepalive
/l -l
/u or /@u -u or -@u

50 Managing Messenger Client Users
/import
Specifies the name of a file containing Messenger contacts to import. The file is created in the
Messenger client by using
File > Export Contact List. The
.nmx
extension identifies the file as a
Messenger contacts file. If the contacts file is not in the same directory where the client software is
located, you must provide a full path name.
/initstatus
Specifies your presence at the time of login. The possible values are Away, Busy, and Offline. Online
is the default status if no initstatus argument is specified.
/ipa
Specifies the IP address or DNS hostname of the server where the Messaging Agent is running.
On Windows, the Messenger user does not need to be aware of this information because the
Messenger server Installation program adds the network address and port information to the
setup.cfg
file that it installs into the
\novell\nm\ma\software\client\win32
directory.
When the user downloads the client software and installs it, the Messenger client Installation
program reads the server information in the
setup.cfg
file and updates the Windows registry of
the user's workstation with the information necessary for the Messenger client to start. This startup
switch, as well as the
/ipp
switch, are only needed to override the server information automatically
stored in the registry.
Windows Messenger
Client
Linux/Mac Messenger Client
Syntax: /background -background
Windows Messenger Client Linux/Mac Messenger Client
Syntax: /import-[\directory\]filename.nmx -import [/directory/]filename.nmx
Example: /import-contacts.nmx /import-
d:\shared\contacts.nmx
-import contacts.nmx -import /nm/contacts.nmx
Windows Messenger Client Linux/Mac Messenger Client
Syntax: /initstatus-presence -initstatus-presence
Example: /initstatus-away -initstatus-away
Windows Messenger Client Linux/Mac Messenger Client
Syntax: /ipa-network_address -ipa network_address
Example: /ipa-172.16.5.18 /ipa-
nmserver
-ipa 172.16.5.19 -ipa nmserver2

Managing Messenger Client Users 51
/ipp
Specifies the port number on which the Messaging Agent listens for service requests. By default, the
port number is 8300.
/keepalive
Overrides the current ping interval at which the Messenger client notifies the Messaging Agent that
it is still active. The default interval is every 10 minutes or as specified by the Messaging Agent
/
keepalive
startup switch. This regular communication between the Messaging Agent and the
client prevents firewalls and routers from disconnecting connections that seem to be inactive. You
can decrease the interval if a specific client user keeps getting unexpectedly disconnected. Use a
setting of 0 (zero) to turn off the ping activity.
/l
Specifies the language to start the Messenger client in. By default, Messenger starts in the language
of the operating system, if it is available. If the operating system language is not available,
Messenger starts in English; however after it has started, you can choose a different language using
Tools > Options > User Interface Language.
For the Windows client, this language is saved in the Windows registry and is used as the default
thereafter. For the Cross-Platform client, it is saved in the Java preferences file for Messenger (
~/
.java/.userPrefs/Novell/Messenger/prefs.xml
on Linux and
~/Library/
Preferences/com.apple.java.util.prefs.plist
on Macintosh).
Use one of the following language codes with the /l switch to select the language for Messenger:
Table 3-1 Messenger Language Codes
Windows Messenger Client Linux/Mac Messenger Client
Syntax: /ipp-port_number -ipp port_number
Example: /ipp-8400 /ipp 8301
Windows Messenger Client Linux/Mac Messenger Client
Syntax: /keepalive-minutes -keepalive-minutes
Example: /keepalive-5 -keepalive 0
Windows Messenger Client Linux/Mac Messenger Client
Syntax: /l language_code -l language_code
Example: /l-ru -l de
Language Language Code
Czech CS

52 Managing Messenger Client Users
/u or /@u
Specifies the user name to log in to your Messenger system with.
For the Windows client, the user's initial successful login is stored in the Windows registry and is
used as the default thereafter. If multiple users regularly need to run Messenger from the same
workstation, you could set up a shortcut on the desktop using the /u startup switch for each user.
Within Messenger, one user can log out and another log in using
File > Log Out > Log In as a Different
User.
For the Cross-Platform client, the user information is saved in the Java preferences file for
Messenger (
~/.java/.userPrefs/Novell/Messenger/prefs.xml
on Linux and
~/Library/
Preferences/com.apple.java.util.prefs.plist
on Macintosh).
Chinese-Simplified zhCN
Chinese-Traditional zhTW
Danish DA
Dutch NL
English EN
Finnish FI
French FR
German DE
Hungarian HU
Italian IT
Japanese JA
Korean KO
Norwegian NO
Polish PL
Portuguese PT
Russian RU
Spanish ES
Swedish SV
Windows Messenger Client Linux/Mac Messenger Client
Syntax: /u-username /@u-
username
-username /@username
Example: /u-LTanaka /@u-SJones -u MPalu -@u GSmith
Language Language Code

Managing Messenger Client Users 53
Using URL Commands in Your Web Browser on Windows
You can use URL commands in web pages and applications to make specific Windows Messenger
client dialog boxes appear from those locations. Some URL commands take parameters. Use a
question mark (?) between the command and the parameter. Use an ampersand (&) between
multiple parameters.
The following URL commands are available:
“nim:launchNM” on page 53
“nim:startIm” on page 53
“nim:addContact” on page 53
“nim:import” on page 54
“nim:invite” on page 54
“nim:preferences” on page 54
“nim:close” on page 54
“nim:open” on page 54
“nim:exit” on page 54
nim:launchNM
Starts Messenger.
nim:startIm
Opens the Send Instant Message dialog box so you can select a contact, or opens the Conversation
dialog box, if you use parameters to specify a contact and, optionally, a message.
Syntax:
nim:startIm
nim:startIm?username=username
nim:startIm?username=username&message=message
Example:
nim:startIm
nim:startIm?username=LTanaka
nim:startIm?username=LTanaka&message=Good+morning
Use a plus (+) between words in the message. The message must not include spaces.
See also “nim:invite” on page 54.
nim:addContact
Opens the Find dialog box so you can search for a new contact, or adds the specified contact to the
specified folder in the Messenger main window, if you use parameters to specify a contact and,
optionally, a folder.
Syntax:

54 Managing Messenger Client Users
nim:addContact
nim:addContact?username=username
nim:addContact?username=username&Folder=folder_name
Example:
nim:addContact
nim:addContact?username=LTanaka
nim:addContact?username=LTanaka&foldername=Team+Members
If the folder name consists of more than one word, use a plus (+) between words instead of a space.
nim:import
Opens the Import Contact List dialog box so you can browse to and select a
.nmx
file, or immediately
imports the contacts from the file into the Messenger main window, if you use a parameter to
specify the
.nmx
file.
Syntax:
nim:import
nim:import?filename=filename
Example:
nim:import
nim:import?filename=c:\temp\contacts.nmx
nim:invite
Equivalent to nim:startIm.
nim:preferences
Opens the Options dialog box.
nim:close
Closes the Messenger main window but does not exit the Messenger client.
nim:open
Opens the Messenger main window after it has been closed.
nim:exit
Exits Messenger.

Managing Messenger Client Users 55
Using Multi-Factor Authentication
Multi-Factor Authentication (MFA) enables you to protect your GroupWise system by adding
additional authentication on top of your GroupWise login. GroupWise supports MFA through NetIQ
Advanced Authentication that allows you to add different methods of authentication to your
GroupWise LDAP password login. Strong MFA is achieved by using two of the following methods of
authentication:
Something you know such as password, PIN, and security questions.
Something you have such as smartcard, token, and mobile phone.
Something you are such as biometric (fingerprint or iris).
MFA must be configured in the GroupWise Admin Console for Messenger to use it. The steps to
configure MFA and a full list of the methods available to Mobility can be found in “Multi-Factor
Authentication” in the GroupWise Administration Guide.
WARNING: The Linux Messenger client does not support reCaptchas, which can be enabled as part
of MFA. If you have users using Messenger on Linux, do not enable reCaptchas or it will break the
Linux Messenger client and the users will not be able to login.

56 Managing Messenger Client Users

4
Configuring Messenger for Mobile Devices 57
4
Configuring Messenger for Mobile Devices
GroupWise Messenger allows users to connect to the Messenger system from their iOS, Android,
and BlackBerry mobile devices by downloading and using native mobile applications. (For more
information about how to use the Messenger mobile applications, see “Using GroupWise
Messenger on Your Mobile Device” in the GroupWise Messenger Client User Guide.
This service is enabled by default with your Messenger system. However, you must submit a
Certificate Signing Request (CSR) in order for Push notifications to be sent to iOS devices on your
Messenger system. No special configuration is required for Push notifications to work with Android
or BlackBerry devices.
“Submitting a Certificate Signing Request” on page 57
“Installing the Signed Certificate into Your Messenger System” on page 58
“Configuring Novell Push Notification Service” on page 58
“Allowing or Blocking Mobile Access for Users” on page 61
“Managing Mobile Devices using MobileIron” on page 61
Submitting a Certificate Signing Request
You need to provide a client CSR that your Messenger system can use to communicate with the
NPNS service. You can obtain this client CSR either by creating it yourself (by using tools such as
Open SSL) and importing it, or OpenText can create one for you.
Sign in to the OpenText Portal (https://www.novell.com/npns) by using your OpenText
customer account user name and password.
(Recommended) Import a CSR.
From an OS X or Linux command prompt, run the following command:
openssl req -nodes -newkey rsa:2048 -keyout novell.key -out
novell.csr
Click Import a CSR.
Copy the contents of the
novell.csr
file into the CSR field.
Click Validate.
Continue with Installing the Signed Certificate into Your Messenger System.
If you don’t have a CSR, OpenText can create one for you.
IMPORTANT: Using this method requires that OpenText generates the private key and sends it
to you across the wire. This is a potential security vulnerability.
However, the following points are important to understand:
OpenText does not store the private key.

58 Configuring Messenger for Mobile Devices
The private key that OpenText sends is SSL-encrypted.
The private key can only be used to access the NPNS server; it cannot be used to access
your Messenger system.
Click Create a key and certificate.
Specify your user information, and then click Generate.
The private key, signed certificate, and root certificate are available to be downloaded from
the OpenText Portal.
Download the private key, signed certificate, and root certificate by clicking Download
private key and certificates
. You will need these files when you install the signed certificate
into the Messenger system.
The key length encryption is 2048.
Continue with Installing the Signed Certificate into Your Messenger System.
Installing the Signed Certificate into Your Messenger
System
This section assumes that you have completed the steps in Submitting a Certificate Signing Request.
Install the signed certificate into the Messenger system by copying the following items to the
server where the Messaging Agent is installed:
NOTE: The default certificate location for Messenger is
/opt/novell/messenger/certs
.
The private key that was created when your CSR was generated (
npnsKey.pem
)
The signed certificate (
npnsCertificate.crt
) that you received from the OpenText
Portal
The CA Certificate (
CertificateAuthority.crt
) that you received from the OpenText
Portal
Continue with Configuring Novell Push Notification Service.
Configuring Novell Push Notification Service
“Understanding Novell Push Notification Service” on page 59
“Configuring Novell Push Notification Service” on page 60
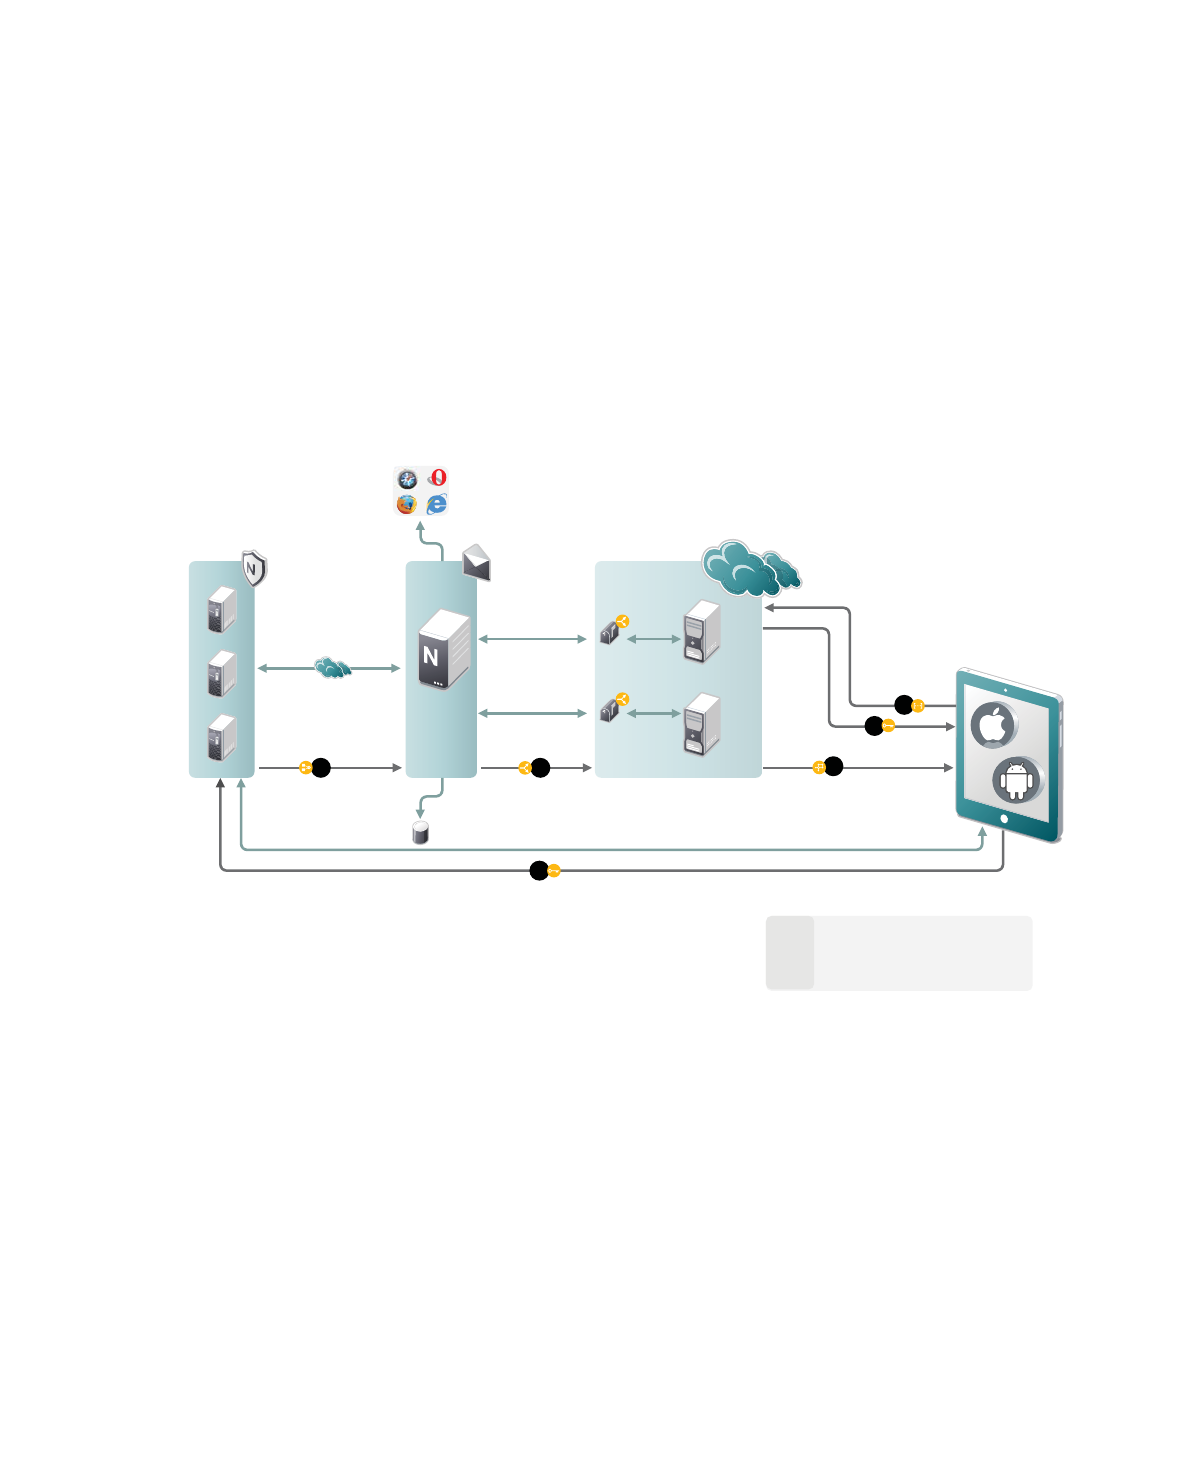
Configuring Messenger for Mobile Devices 59
Understanding Novell Push Notification Service
Novell Push Notification Service (NPNS) uses push technology through an open IP connection to
push notifications from the server application to mobile devices when the app is no longer running.
The end result is that notifications are immediately available on a user’s mobile device, even when
the device is asleep or when the app is in the background.
For example, the GroupWise Messenger mobile application uses NPNS to push instant messages
from the Messenger server to iOS mobile devices.
“Flow Process for Novell Push Notification Service” on page 59
“Supported Third-Party Push Notification Services” on page 60
Flow Process for Novell Push Notification Service
1. The application registers with the third-party push notification service (such as Apple Push
Notification Service) via the client on the device.
2. The application receives a token key or URI from the third-party push notification service.
3. The application sends the token (along with other information) to the application server.
4. The application server relays the notification along with information about the device to NPNS.
5. NPNS sends the notification to the third-party push notification service.
6. The third-party push notification service sends the notification to the device.
5
6
1
4
3
2
REST / JSON
Post
Post
Data
Normal Operation
Client on Device
APNS:
APNS
c2dm
c2dm:
Apple Push Notification Client
Novell
Push
Notification
Client
Google Push Notification Client
JSON: JavaScript Object Notation
Web Management Portal

60 Configuring Messenger for Mobile Devices
Supported Third-Party Push Notification Services
NPNS can communicate with the following third-party push notification services:
Apple Push Notification Services (APNS)
When using Push notifications for iOS devices, consider the following:
Apple does not guarantee delivery of any Push notification. (However, Apple’s Push
notification service is quite reliable.)
When a device is turned off, Apple delivers only the last message that was sent. After the
device is turned on and the user accesses Messenger, all messages are displayed.
Google Push Notification Services (c2dm)
GroupWise Messenger does not leverage Google Push Notification Services (c2dm) to
accomplish Push to Android devices. Therefore, this is not required for Push notifications to
work with Android.
Configuring Novell Push Notification Service
You need to configure Novell Push Notification Service (NPNS) if you have iOS devices in your
environment. Android devices do not require NPNS to be enabled in order to receive push
notifications.
Before you can enable NPNS, ensure the following:
The certificates have been created as described in Submitting a Certificate Signing Request.
The certificates have been copied to the Messenger server as described in Installing the Signed
Certificate into Your Messenger System.
The Messenger server can communicate to
https://npns.novell.com
. This it the server
which sends the notification to the third-party push notification service as described in
Understanding Novell Push Notification Service.
Follow the steps below to enable the NPNS service:
In the GroupWise Admin Console, navigate to Messenger > MessengerService > Messaging
Agents, and then select the Messaging Agent.
On the Agent Settings tab, in the NPNS Settings section, select Enable Novell Push Notification
Service (NPNS) for mobile devices
, and then specify the following information:
Show message text in notification: Select this option to display the message text in the
notification.
Show sender’s name in notification: Select this option to display the name of the user who
sends the message in the notification.
Root Certificate: Specify the path to the CA certificate for the NPNS service
(
CertificateAuthority.crt
).
Certificate: Specify the path to the signed certificate for the Messaging Agent
(
npnsCertificate.crt
).
Key: Specify the path to the private key that matches the signed certificate (
npnsKey.pem
).
Set Key Password: Click this option to specify the password for the key if it has one.

Configuring Messenger for Mobile Devices 61
Click Save.
Restart the Messaging Agent.
Allowing or Blocking Mobile Access for Users
You can enable or disable mobile access for all users, for a user policy, or for a certain user.
The GroupWise Admin Console > Messenger > MessengerService > Policy, edit the default policy
(all users), a user policy (users governed by the policy), or a go to
Users and select a user.
Select or deselect Allow users to use Messenger mobile apps.
Click Save.
Managing Mobile Devices using MobileIron
You can manage the Messenger application on users’ mobile device with MobileIron.
“Adding and Configuring the Android App in MobileIron” on page 61
“Adding and Configure the iOS App in MobileIron” on page 62
“Distributing the Messenger App to Devices” on page 63
Adding and Configuring the Android App in MobileIron
To add the Android Messenger app to MobileIron, you need to upload the
.apk
file and then apply
the Android label to the application. Once that is done, you need to add an AppConnect Container
Policy and An AppConnect Configuration.
Download the
.apk
file for the Messenger mobile app from the OpenText downloads site.
Upload the file to MobileIron:
In the MobileIron Admin Portal, click the Apps tab.
On the App Distribution Library tab, in the Select Platform drop-down list, select Android.
Click Add App.
Follow the steps in the wizard to upload the app. Note the following:
Distribution Type is In-house App
Silent Install is not supported
App Name, Display Version, and Code Version cannot be changed.
Apply the Android label to your app:
From the App Distribution Library tab on the Apps tab, select the Messenger App that you
just created, and then click
Actions > Apply To Label.
Select Android.
Create the AppConnect Container Policy:
In the MobileIron Admin Portal, click the Policies & Configs tab.

62 Configuring Messenger for Mobile Devices
On the Configurations tab, select Add New > AppConnect > Container Policy.
Specify a Name and enter the Package Name for the Application. Fill in the rest of the
information as desired.
Create the AppConnect Configuration:
In the MobileIron Admin Portal, click the Policies & Configs tab.
On the Configuration tab, select Add New > AppConnect > Configuration.
Specify a Name and enter the Package Name for the Application. Fill in the rest of the
information as desired.
In the
App-specific Configurations table, you can specify the following as Key-Value Pairs:
server: Specify the URL of your Messenger site. For example, messenger.acme.com.
port: Specify the port for your Messenger site.
username: Specify $USERID$ to cause MobileIron to automatically populate the app
with the user’s MobileIron user ID.
password: Specify $PASSWORD$ to cause MobileIron to automatically populate the
app with the user’s MobileIron password.
Adding and Configure the iOS App in MobileIron
To add the iOS Messenger app to MobileIron, you need to import the app from the Apple Appstore
and then apply the iOS label to the application. Once that is done, you need to add an AppConnect
Container Policy and An AppConnect Configuration.
Import the app from the Apple Appstore.
In the MobileIron Admin Portal, click the Apps tab.
On the App Distribution Library tab, in the Select Platform drop-down list, select iOS.
Click App Store Import.
In the App Store Search dialog box, enter
GroupWise Messenger
, select the correct
country for the App Store, and click
Search.
Click Import next to the GroupWise Messenger app, and then click OK.
Apply the iOS label to your application:
From the App Distribution Library tab on the Apps tab, select the GroupWise Messenger
app that you just created, and then click
Actions > Apply To Label.
Select iOS.
Once this is done, click the
Edit icon next to GroupWise Messenger and note the iTunes Store Id
or the
Bundle Identifier.
Create the AppConnect Container Policy:
In the MobileIron Admin Portal, click the Policies & Configs tab.
On the Configurations tab, select Add New > AppConnect > Container Policy.
Specify a Name and enter the iTunes Store ID or the Bundle Identifier for the Application.
Fill in the rest of the information as desired.
Create the AppConnect Configuration:
In the MobileIron Admin Portal, click the Policies & Configs tab.

Configuring Messenger for Mobile Devices 63
On the Configuration tab, select Add New > AppConnect > Configuration.
Specify a Name and enter the iTunes Store ID or the Bundle Identifier for the Application.
Fill in the rest of the information as desired.
In the
App-specific Configurations table, you can specify the following as Key-Value Pairs:
server: Specify the URL of your Messenger site. For example, messenger.acme.com.
port: Specify the port for your Messenger site.
username: Specify $USERID$ to cause MobileIron to automatically populate the app
with the user’s MobileIron user ID.
Distributing the Messenger App to Devices
You need to distribute the Messenger app to devices in your organization via MobileIron if this is the
first time your organization is using MobileIron with Messenger, or any time a new device enters the
organization.
It is possible that some users independently download the Messenger app from the app store before
their device is managed by MobileIron. In this case, you still need to push the app to their device via
MobileIron. These devices will loose any history within the Messenger app after their device
becomes managed and the Messenger app is pushed to their device.

64 Configuring Messenger for Mobile Devices

5
Enabling and Managing Archiving 65
5
Enabling and Managing Archiving
The Messaging Agent passes completed conversations to the Archive Agent for storage. The Archive
Agent saves the conversations, indexes them, and searches them when requested by authorized
Messenger client users. If you do not need to archive everyone's conversations, you can set up a
policy to determine whose conversations are archived and whose are not.
Archiving is optional. Because all users' conversations are stored together in the Messenger archive,
archiving is only necessary if you need to retain conversations for legal reasons, such as to comply
with a corporate email retention policy that has been extended to instant messages.
You can use either local Messenger archiving or OpenText Retain to store your archive.
NOTE: Using OpenText Retain for archiving was first introduced in Messenger 18.1.
“Using Local Archiving” on page 65
“Using OpenText Retain Archiving” on page 79
Using Local Archiving
The following sections help you enable and manage archiving locally:
“Starting the Archive Agent” on page 65
“Enabling Archiving in Your Messenger System” on page 66
“Granting Authorized User Access to the Archive” on page 66
“Configuring the Archive Agent in the GroupWise Admin Console” on page 66
“Enhancing Archive Security with SSL Encryption” on page 67
“Monitoring the Archive Agent” on page 68
“Optimizing Connections between the Archive Agent and Messenger Users” on page 69
“Managing the Archive Server” on page 69
“Using Archive Agent Startup Switches” on page 72
Starting the Archive Agent
When you finish creating your Messenger system, the Installation program can start the Messenger
agents for you. To start the Archive agent manually, do the following:
In a terminal, become
root
.
Run the following:
systemctl start gwm-nmaa.service

66 Enabling and Managing Archiving
Enabling Archiving in Your Messenger System
If you want to archive the conversations of all Messenger users, select Archive Sessions on the
General page of the Default Policy object, as described in Editing the Default User Policy. After you
edit the default policy, you must stop and then start the Messenger agents in order to put the
modified policy into effect throughout your Messenger system. Thereafter, the next time users log in
to the Messenger system, their conversations are archived.
If you want to archive the conversations of some users but not others, you must create a policy that
lists the users whose conversations you want to archive, as described in Creating a User Policy. You
do not need to stop and then start the Messenger agents after creating the new policy. The next
time the users governed by the policy log in to the Messenger system, their conversations are
archived.
When users' conversations are being archived, the GroupWise Messenger client displays a page icon
notifying users that their conversations are being logged into the archive.
Granting Authorized User Access to the Archive
The Messenger archive is a single archive containing the conversations of all Messenger users for
whom archiving is enabled. Therefore, access to the archive should be granted only to users who can
appropriately view everyone's conversations. Users who can search the Messenger archive must be
added to the Messenger access control list (ACL).
In the GroupWise Admin console, navigate to Messenger > MessengerService > Settings >
Archive Settings; in the Archive ACL heading, click Add.
Browse to and select those users that you want to grant access to the Messenger archive.
Click Save.
Restart the Archive Agent to put the access control list into effect.
Have authorized users log out and back in to the Messenger system in order to add the Search
Archive item on the File menu.
Configuring the Archive Agent in the GroupWise Admin Console
In the GroupWise Admin console, navigate to Messenger > MessengerService > Archive Agents, and
select the Archive Agent.
The table below summarizes the Archive Agent configuration settings in the Archive Agent object
property pages and how they correspond to Archive Agent startup switches (as described in Using
Archive Agent Startup Switches):
Table 5-1 Archive Agent Configuration Settings
GroupWise Admin console
Properties Pages and
Settings
Corresponding Tasks and Startup Switches
General Page
Work Path See Moving the Archive Agent Working Directory.

Enabling and Managing Archiving 67
Enhancing Archive Security with SSL Encryption
Messenger archive security is initially established with the archive passphrase. The passphrase
enables the Archive Agent to encrypt conversations as they are saved on disk.
Secure Sockets Layer (SSL) ensures secure communication between programs by encrypting the
complete communication flow between the programs. The Installation program required configuring
the messaging agent for SSL encryption, as described in “Installing a GroupWise Messenger System”
in the GroupWise Messenger Installation Guide.
You can also modify the SSL cipher suite if you need to disable certain ciphers that do not work in
your environment. The ciphers suite can be modified both on the Archive Agent and the Messaging
agent.
IMPORTANT: Unless you are required to modify the cipher suite for your environment, consider
carefully before you make any changes as this decreases the security of your Messenger system.
Enable Messenger Services Turns on and turns off the availability of archiving and archive searching
for Messenger users.
Enable SNMP See Using SNMP Monitoring Programs. See also /nosnmp.
Agent Settings Page
IP Address DNS Host Name
Bind to This Address Client/
Server Port Message Transfer
Port Description
Displays the Archive Agent server information established during
installation.
HTTP Port HTTP Username
HTTP Password
Enable SSL for Web Console
Using the Archive Agent Web Console and GroupWise Monitor. See also
/httpport, /httpuser, /httppassword, and /httpssl.
Queue Path Passphrase
Delay Interval Expire
See Moving the Archive Queue Directories. See Maintaining the Archive
Store.
Log Settings Page
Log Level Enable Disk
Logging Log Files Path Log
Maximum Age Log Maximum
Size
See Using Archive Agent Log Files. See also /loglevel, /log, /logdays, /
logmax, and /logdiskoff.
SSL Settings Page
Certificate Path SSL
Certificate SSL Key File Set
Password
Enable SSL for Client/Server
Enable SSL for Message
Transfer Protocol
See Enhancing Archive Security with SSL Encryption. See also /certpath,
/certfile, /keyfile, /keypassword, and /ssl.
GroupWise Admin console
Properties Pages and
Settings
Corresponding Tasks and Startup Switches

68 Enabling and Managing Archiving
The cipher list must be in OpenSSL format. For more information on OpenSSL format, see Cipher List
Format (https://www.openssl.org/docs/man1.0.2/apps/ciphers.html).
To modify the SSL cipher suite use the /sslciphersuite startup switch.
Monitoring the Archive Agent
By monitoring the Archive Agent, you can determine whether its current configuration is meeting
the archiving and indexing needs being placed upon it. You have a variety of tools to help you
monitor the operation of the Archive Agent:
“Using the Archive Agent Web Console and GroupWise Monitor” on page 68
“Using Archive Agent Log Files” on page 68
“Using SNMP Monitoring Programs” on page 68
Using the Archive Agent Web Console and GroupWise Monitor
The Archive Agent Web Console enables you to monitor and control the Archive Agent from any
location where you have access to a browser and the Internet. This provides substantially more
flexible access than the Archive Agent Web Console, which can only be accessed from the server
where the Archive Agent is running.
You can use the same procedure to set up the Archive Agent Web Console as the Messaging Agent
Web Console. For instructions, see Using the Messaging Agent Web Console. In addition, you can
compress the archive indexes and perform maintenance on the archive from the Web Console.
As with the Messaging Agent, you can access the Archive Agent Web Console console from
GroupWise Monitor. For setup and usage instructions, Using GroupWise Monitor.
Using Archive Agent Log Files
Error messages and other information about the Archive Agent are written to log files as well as
displaying on the Archive Agent console. Log files can provide a wealth of information for resolving
problems with Archive Agent functioning. he default location is
/var/opt/novell/log/
messenger/aa
.
You can use the same procedure for Archive Agent log files as for Messaging Agent log files. For
instructions, see Using Messaging Agent Log Files.
Using SNMP Monitoring Programs
You can monitor the Archive Agent from the Management and Monitoring component of any SNMP
management and monitoring program. When properly configured, the Archive Agent sends SNMP
traps to network management consoles for display along with other SNMP monitored programs. It
also responds to requests for configuration and status information from SNMP management and
monitoring programs.
You can use the same procedure for setting up the Archive Agent as for the Messaging Agent. For
instructions, see Using SNMP Monitoring Programs.

Enabling and Managing Archiving 69
Optimizing Connections between the Archive Agent and
Messenger Users
To optimize connections between the Archive Agent and Messenger users:
In the GroupWise Admin console, navigate to Messenger > MessengerService > Archive Agents,
and select the Archive Agent.
On the Agent Settings tab, fill in the following fields under Performance Preferences to configure
how the Archive Agent communicates with Messenger users:
Maximum Number of Users: Specify the maximum number of Messenger users that you want
the Archive Agent to be able to search the archive for at once. The default is 5120, which should
be adequate for a very large Messenger system.
Client/Server Threads: Specify the number of client/server threads that you want the Archive
Agent to start. The Archive Agent uses its client/server threads to search the archive for
Messenger users, to communicate with the Messaging Agent in order to receive conversations
to archive, and to maintain and index the archive.
The default number of client/server threads is 15. For a large Messenger system with archiving
enabled for all users, you could increase the number to 50 or more, depending on the system
resources of the server where the Archive Agent is running.
Click Save.
Restart the Messaging Agent to put the new performance settings into effect.
Corresponding Startup Switches: You can also use the /maxconns and /threads startup switches in
the Archive Agent startup file to configure Archive Agent performance.
Managing the Archive Server
As your Messenger system grows and evolves, you might need to reconfigure the server where the
Archive Agent runs or move Archive Agent directories to different locations.
“Binding the Archive Agent to a Specific IP Address” on page 69
“Changing the Archive Server's IP Address or DNS Host Name” on page 70
“Moving the Archive Agent Working Directory” on page 70
“Moving the Archive” on page 70
“Maintaining the Archive Store” on page 70
“Moving the Archive Queue Directories” on page 71
Binding the Archive Agent to a Specific IP Address
On a server with multiple IP addresses, the Archive Agent binds to all available IP addresses, and
Messenger clients can communicate with the Archive Agent on all available IP addresses unless you
bind it to a specific address.
You can use the same procedure to bind the Archive Agent as you use to bind the Messaging Agent.
See Binding the Messaging Agent to a Specific IP Address.

70 Enabling and Managing Archiving
Changing the Archive Server's IP Address or DNS Host Name
If you change the IP address or DNS hostname of the server where the Archive Agent is running, you
must update the server information for your Messenger system as well.
You can use the same procedure for the Archive Agent as for the Messaging Agent. See Changing the
Messaging Server's Network Address.
Moving the Archive Agent Working Directory
The Archive Agent uses its working directory for saving various temporary files during archiving and
indexing. By default, the Archive Agent and the Messaging Agent share the same working directory if
they are running on the same server.
You can use the same procedure to move the Archive Agent working directory as you use to move
the Messaging Agent working directory. See Moving the Messaging Agent Working Directory.
Moving the Archive
Depending on the volume of conversations to archive and the length of time conversations must be
retained, the Messenger archive can grow to be quite large. The default location is
/var/opt/
novell/messenger/aa/store
. If necessary, you can move it to a different location where more
disk space is available. However, the archive must reside on the same server where the Archive
Agent runs.
Stop the Archive Agent.
Copy the Messenger archive (store directory) to the desired location.
In the GroupWise Admin console, navigate to Messenger > MessengerService > Archive Agents,
and select the Archive Agent.
In the File Module > Store Path field, browse to and select the new location of the Messenger
archive.
Click Save.
Start the Archive Agent.
Delete and regenerate the archive indexes from the Archive Agent console.
Maintaining the Archive Store
When messages are added to the archive store, they are not immediately indexed. Before a user can
search for a message in the archive, it must be indexed. You can set when the store starts indexing,
the interval time between indexing, and how long a message should be kept in the archive.
Stop the Archive Agent.
In the GroupWise Admin console, navigate to Messenger > MessengerService > Archive Agents,
and select the Archive Agent.
On the File Module tab, edit the settings under QuickFinder Maintenance as desired.
In the Delay field, select the number of hours to wait until the first index is created, based
upon how many hours after 12 a.m.

Enabling and Managing Archiving 71
In the Update interval field, select the number of hours to wait between indexings.
In the Compress interval field, select the number of hours between QuickFinder
compression.
Click Save.
Start the Archive Agent.
Moving the Archive Queue Directories
When archiving is enabled, the Messaging Agent passes conversations to the Archive Agent when
the conversations are completed. If the Messaging Agent cannot communicate with the Archive
Agent when it has a conversation to archive, it saves the conversation in its holding directory (queue)
until it can communicate with the Archive Agent again. When the Archive Agent receives a
conversation to archive, if it is already busy processing other conversations, it temporarily stores the
conversation in its holding directory (queue). Either of these holding queues can be moved if
necessary.
“Moving the Messaging Agent Conversation Holding Queue” on page 71
“Moving the Archive Agent Conversation Holding Queue” on page 71
Moving the Messaging Agent Conversation Holding Queue
The default location for the Messaging Agent holding queue is
/var/opt/novell/messenger/
ma/queue
.
To move the Messaging Agent queue:
Stop the Messaging Agent.
If there are conversations waiting to be passed to the Archive Agent, copy the Messaging Agent
queue directory and its contents to the desired location.
In the GroupWise Admin console, navigate to Messenger > MessengerService > Messaging
Agents, and select the Messaging Agent.
On the Agent Settings tab in the Messaging Queue Path field, browse to and select the new
location of the Messaging Agent queue.
Click Save.
Start the Messaging Agent.
Moving the Archive Agent Conversation Holding Queue
The default location for the Archive Agent holding queue is
/var/opt/novell/messenger/aa/
queue
.
Stop the Archive Agent.
While the Archive Agent is stopped, the Messaging Agent is storing conversations to archive in
its holding queue.
If there are conversations waiting to be archived in the Archive Agent holding queue, copy the
Archive Agent queue directory and its contents to the new location.
In the GroupWise Admin console > Messenger > MessengerService > Archive Agents, select the
Archive Agent.

72 Enabling and Managing Archiving
On the Agent Settings tab in the Queue Path field, browse to and select the new location of the
Archive Agent holding queue.
Click Save.
Start the Archive Agent.
Using Archive Agent Startup Switches
You can override settings provided in the GroupWise Admin console by using startup switches in the
Archive Agent startup file (
strtup.aa
). The startup file is located in
/etc/opt/novell/
messenger
. You can override startup switches provided in the startup file by using startup switches
on the command line. For more information about starting the Archive Agent, see Starting the
Archive Agent.
This section contains information on the following Archive Agent startup switches:
“/certfile” on page 73
“/certpath” on page 74
“/dhparm” on page 74
“/httppassword” on page 74
“/httpport” on page 74
“/httpssl” on page 75
“/httpuser” on page 75
“/ip” on page 75
“/keyfile” on page 76
“/keypassword” on page 76
“/log” on page 76
“/logdays” on page 76
“/logdiskoff” on page 77
“/loglevel” on page 77
“/logmax” on page 77
“/maxconns” on page 77
“/nosnmp” on page 78
“/productinfo” on page 78
“/sslciphersuite” on page 78
“/ssloption” on page 79
“/threads” on page 79
The table below summarizes the Archive Agent startup switches and how they correspond to
configuration settings in the GroupWise Admin console. These startup switches must begin with a
dash (-) when used in the Cross-Platform client.

Enabling and Managing Archiving 73
Table 5-2 Archive Agent Startup Switches
/certfile
Specifies the full path to the certificate file used to provide secure SSL communication between the
Archive Agent and other programs. See Enhancing Archive Security with SSL Encryption.
See also /certpath, /keyfile, and /keypassword.
Linux Archive Agent GroupWise Admin console Setting
--certfile SSL Certificate
--certpath Certificate Path
--dhparm N/A
--httppassword HTTP Password
--httpport HTTP Port
--httpuser HTTP Username
--httpssl Enable SSL for Web Console
--ip Host IP Address with Bind to this Address selected
--keyfile SSL Key File
--keypassword SSL Set Password
--log Log Files Path
--logdays Log Maximum Age
--logdiskoff Enable Disk Logging
--loglevel Log Level
--logmax Log Maximum Size
--maxconns Maximum Number of Users
--nosnmp Enable SNMP
--productinfo N/A
--sslciphersuite N/A
--ssloption N/A
--threads Client/Server Threads
Linux Archive Agent
Syntax: --certfile /dir/file
Example: --certfile /certs/gw.crt

74 Enabling and Managing Archiving
/certpath
Specifies the full path to the directory where certificate files are stored on your system. See
Enhancing Archive Security with SSL Encryption.
See also /certfile, /keyfile, and /keypassword.
/dhparm
Specifies a Diffie-Hellman cipher parameters file used for SSL/TLS to replace the default parameters
set by Messenger. Messenger uses default Diffie-Hellman parameters of 2048 bits to generate the
DH key. A valid DH parameter is in PEM format.
/httppassword
Specifies the password for the Archive Agent to prompt for before allowing Archive Agent status
information to be displayed in your browser. Unless you are using SSL encryption, do not use an
existing eDirectory password because the information passes over the connection between your
browser and the Archive Agent. See Using the Archive Agent Web Console and GroupWise Monitor.
See also /httpuser.
/httpport
Sets the HTTP port number used for the Archive Agent to communicate with your browser. The
setting must be unique on the server where the Archive Agent runs. See Using the Archive Agent
Web Console and GroupWise Monitor.
Linux Archive Agent
Syntax: --certpath /dir
Example: --certpath /certs
Linux Archive Agent
Syntax: --dhparm directory/pemfile
Example: --dhparm /var/tmp/dh.pem
Linux Archive Agent
Syntax: --httppassword unique_password
Example: --httppassword AgentWatch

Enabling and Managing Archiving 75
/httpssl
Sets the availability of SSL encryption between the Archive Agent and the Web Console displayed in
your browser. Valid values are enable and disable. See Using the Archive Agent Web Console and
GroupWise Monitor.
/httpuser
Specifies the user name for the Archive Agent to prompt for before allowing Archive Agent status
information to be displayed in a browser. Providing a user name is optional. Unless you are using SSL
encryption, do not use an existing eDirectory user name because the information passes over the
connection between your browser and the Archive Agent. See Using the Archive Agent Web Console
and GroupWise Monitor.
See also /httppassword.
/ip
Binds the Archive Agent to a specific IP address when the server where it runs uses multiple IP
addresses, such as in a clustering environment. Without the /ip switch, the Archive Agent binds to all
available IP addresses and Messenger clients can communicate with the Messaging Agent on all
available IP addresses.
Linux Archive Agent
Syntax: --httpport port_number
Example: --httpport 8314
Linux Archive Agent
Syntax: --httpssl setting
Example: --httpssl enable
Linux Archive Agent
Syntax: --httpuser unique_username
Example
:
--httpuser NMWebConsole
Linux Archive Agent
Syntax: --ip IP_address
Example: --ip 172.16.5.19

76 Enabling and Managing Archiving
/keyfile
Specifies the full path to the private file used to provide SSL encryption between the Archive Agent
and other programs. See Enhancing Archive Security with SSL Encryption.
See also /keypassword.
/keypassword
Specifies the password used to encrypt the private SSL key file when it was created. See Enhancing
Archive Security with SSL Encryption.
See also /keyfile.
/log
Specifies the directory where the Archive Agent stores its log files. The default location is the
\novell\nm\aa\log
directory. See Using Archive Agent Log Files.
See also /loglevel, /logdays, /logmax, and /logdiskoff.
/logdays
Specifies how many days to keep Archive Agent log files on disk. The default is 14 days. See Using
Archive Agent Log Files.
See also /log, /loglevel, /logmax, and /logdiskoff.
Linux Archive Agent
Syntax: --keyfile /dir/file
Example: --keyfile /certs/gw.key
Linux Archive Agent
Syntax: --keypassword password
Example: --keypassword gwssl
Linux Archive Agent
Syntax: --log /dir
Example: --log /nm/log/aa
Linux Archive Agent
Syntax: --logdays days
Example: --logdays 30

Enabling and Managing Archiving 77
/logdiskoff
Turns off disk logging for the Archive Agent so that no information about the functioning of the
Archive Agent is stored on disk. The default is for logging to be turned on. See Using Archive Agent
Log Files.
See also /log, /loglevel, /logdays, and /logmax.
/loglevel
Controls the amount of information logged by the Archive Agent. Logged information is displayed in
the log message box and written to the Archive Agent log file during the current agent session. The
default is Normal, which displays only the essential information suitable for a smoothly running
Archive Agent. Use Verbose to display the essential information, plus additional information helpful
for troubleshooting. Use Diagnostic to include code-specific information. See Using Archive Agent
Log Files.
See also /log, /logdays, /logmax, and /logdiskoff.
/logmax
Sets the maximum amount of disk space for all Archive Agent log files. When the specified disk space
is consumed, the Archive Agent deletes existing log files, starting with the oldest. The default is 128
MB. See Using Archive Agent Log Files.
See also /log, /loglevel, /logdays, and /logdiskoff
/maxconns
Specifies the maximum number of connections between the Archive Agent and Messenger clients.
The default is 5120. See Optimizing Connections between the Archive Agent and Messenger Users.
Linux Archive Agent
Syntax: --logdiskoff
Linux Archive Agent
Syntax: --loglevel level
Example: --loglevel diagnostic
Linux Archive Agent
Syntax: --logmax megabytes
Example: --logmax 256

78 Enabling and Managing Archiving
See also /threads.
/nosnmp
Disables SNMP for the Archive Agent. The default is to have SNMP enabled. See Using SNMP
Monitoring Programs.
/productinfo
Sets the level of anonymous product information is sent to OpenText. The level is initially set during
the install or upgrade. The following options are available:
0: Turns off anonymous product information collection.
1: Enables basic collection which collects the uptime, product version, OS type, and number of
peak users.
2: Enables basic collection additional data collection which adds message traffic, chat room
usage, number of conversations, and other similar information.
/sslciphersuite
Sets the SSL cipher suites used by the Archive Agent, the Messaging Agent, and Messenger clients.
The cipher list must be in OpenSSL format. For more information on OpenSSL format, see Cipher List
Format (https://www.openssl.org/docs/man1.0.2/apps/ciphers.html)
See also /certpath, /certfile, /keyfile, and /keypassword.
Linux Archive Agent
Syntax: --maxconns connections
Example: --maxconns 10000
Linux Archive Agent
Syntax: --nosnmp
Linux Messaging Agent
Syntax: --productinfo=value
Example: --productinfo=1
Linux Archive Agent
Syntax: --sslciphersuite “setting”
Example: --sslciphersuite
“HIGH:!AECDH:!EXP:@STRENGTH”

Enabling and Managing Archiving 79
/ssloption
Specify a specific SSL protocol to disable. By specifying SSL_OP_NO_TLSv1, GroupWise will disable
TLSv1 support. Specify additional options by adding the SSL key work separated by a comma.
/threads
Specifies the maximum number of client/server threads the Archive Agent can create. The default is
15. See Optimizing Connections between the Archive Agent and Messenger Users.
See also /maxconns.
Using OpenText Retain Archiving
OpenText Retain lets you store all of your archiving in one location for all of your systems. You must
know the configuration for your Retain system to enable Retain archiving. If you are using a Retain
Server or Router, you need your Tenant ID, Retain server address and port, and a Key and Secret from
a REST Collector for Messenger. If you are using Retain Cloud, you only need your Tenant ID. To
configure Retain, go to GroupWise Messenger Module in the Retain documentation.
IMPORTANT: The Retain Service must have the SSL (TLS) connection enabled and running for the
GroupWise Messenger Archiving solution to work. Enabling SSL is optional and not part of the
default configuration when installing the Retain system.
To enable Retain Archiving, do the following:
Obtain the Retain settings for your system.
In the GroupWise Admin Console, navigate to Messenger > MessengerService > Objects >
Archive Agents, click the Archive Agent, and then select the Retain Settings tab.
Select Enable Retain and fill in the settings for your Retain system.
Linux Archive Agent
Syntax: --ssloption SSL_protocol
Example: --ssloption
SSL_OP_NO_TLSv1,SSL_OP_NO_TLSv1_
1
Linux Archive Agent
Syntax: --threads number
Example: --threads 20

80 Enabling and Managing Archiving

6
Managing Chat Rooms 81
6
Managing Chat Rooms
You can create chat rooms for users to participate in, or you can allow them to create their own chat
rooms. When you initially create your Messenger system, there are no chat rooms. In order for users
to start using chat rooms, you must to do some additional system setup, as described in the
following sections:
“Creating Chat Rooms” on page 81
“Editing Chat Room Settings” on page 82
“Allowing or Blocking Chat Room Access” on page 84
“Allowing Users to Create Chat Rooms” on page 84
Creating Chat Rooms
There are two ways to create a chat room: in the client interface and in the GroupWise Admin
Console.
“Creating a Chat Room in the GroupWise Admin Console” on page 81
“Creating a Chat Room in the Client” on page 81
Creating a Chat Room in the GroupWise Admin Console
To create a chat room in the GroupWise Admin console:
In the GroupWise Admin console, navigate to Messenger > MessengerService > Chats, and select
New.
Enter a name, display name, and owner for the chat room and choose if the chat room is
searchable.
The chat room is created; however, you might want to change some additional settings after
creation. For more information about editing chat room settings, see Editing Chat Room
Settings In the GroupWise Admin Console.
To make the chat room visible, you must restart the Messaging Agent.
Creating a Chat Room in the Client
Both administrators and users can create chat rooms in the client. However, users must be granted
access in the GroupWise Admin console before they can create a chat room. For information on how
to allow users to create chat rooms in the client, see Allowing Users to Create Chat Rooms.
Click Tools > Chat Rooms, and then click Create.
(Optional) Select the owner of the chat room.
By default, the owner is the user who is creating the chat room.
Type the chat room name.

82 Managing Chat Rooms
(Optional) Type a description and a welcome message for the chat room.
(Optional) Select the maximum number of participants.
(Optional) Select if you want to archive the chat room.
(Optional) Select if you want the chat room to be searchable.
(Optional) Click the Access tab, and then select the access rights for all users and a particular
user.
Click OK to create the chat room.
Editing Chat Room Settings
You can edit the chat room settings either in the GroupWise Admin console or in the client interface.
Users can modify chat room settings in the client interface if they have been granted access to do so.
For information on how to allow users to create and edit chat rooms in the client, see Allowing Users
to Create Chat Rooms.
“Editing Chat Room Settings In the GroupWise Admin Console” on page 82
“Editing Chat Room Settings in the Client” on page 83
Editing Chat Room Settings In the GroupWise Admin Console
In the GroupWise Admin console, you can change the general settings and the access settings for a
chat room.
“General Settings” on page 82
“Access Settings” on page 83
General Settings
To change general settings:
In the GroupWise Admin console, navigate to Messenger > MessengerService > Chats, and select
a chat room to edit.
Edit the following settings as desired:
Display name
Owner
Description
Disclaimer
Max Users
Archive messages in this chat
Chat room is searchable
Click Save.

Managing Chat Rooms 83
Access Settings
To change access settings:
In the GroupWise Admin console, navigate to Messenger > MessengerService > Chats, and select
a chat room to edit.
Select the Access Control tab.
By default, general user access is displayed in the access list. To add another user to the access
list, click
Add.
Browse to and select the user.
Select the access rights for the user.
View: Allows the user to view the chat room.
Send: Allows the user to send a message to the chat room.
Modify Rights: Allows the user to modify the rights to the chat room.
Moderator: Allows the moderator to delete a user and change the topic of the chat room.
(Optional) Click Set Password to set a password for the chat room.
This requires users to enter a password to join the chat room. There is only one password for all
participants in the chat room.
Click Save.
Editing Chat Room Settings in the Client
In the client, you can change the general settings and the access settings for the chat room.
“General Settings” on page 83
“Access Settings” on page 84
General Settings
Users can edit the settings for a chat room only if the administrator has granted access to create chat
rooms. The default access does not allow users to create or edit a chat room.
For information on allowing users to create and edit chat rooms, see Allowing Users to Create Chat
Rooms.
Click Tools > Chat Rooms, select the chat room to edit, and then click Properties.
(Optional) Select the owner of the chat room.
By default, the owner is the user who is creating the chat room.
Type the chat room name.
(Optional) Type a description and a welcome message for the chat room.
(Optional) Select the maximum number of participants.
(Optional) Select if you want to archive the chat room.
(Optional) Select if you want the chat room to be searchable.

84 Managing Chat Rooms
(Optional) Click the Access tab, and then select the access rights for all users and a particular
user.
Click OK to save the settings.
Access Settings
You can modify the access rights for a chat room if you have been granted rights to do so.
Click Tools > Chat Rooms, select the chat room to modify, and then click Properties.
By default, general user access is displayed in the access list. To add another user to the access
list, click
Find User.
Type the user's name in the Name field, and then click Next.
Select the user in the list, and then click Finish.
Select the access rights for the user:
View: Allows the user to view the chat room.
Send: Allows the user to send a message to the chat room.
Modify Rights: Allows the user to modify the rights to the chat room.
Moderator: Allows the moderator to delete a user and change the topic of the chat room.
Click Set Password to set a password for the chat room.
This requires users to enter a password to join the chat room. There is only one password for all
participants in the chat room.
Click OK or Apply to save the settings.
Allowing or Blocking Chat Room Access
By default, users are allowed to use chat rooms. However, you can disable this functionality for all
users, for a user policy, or for a certain user.
In the GroupWise Admin console, navigate to Messenger > MessengerService, and select either
the default policy (all users), a user policy (users governed by the policy), or a user.
Select or deselect Allow Users to Use Chat Rooms.
Click Save.
Allowing Users to Create Chat Rooms
By default, users are not allowed to create chat rooms. However, you can enable this functionality
for all users, for a user policy, or for a certain user.
In the GroupWise Admin console, navigate to Messenger > MessengerService, select either the
default policy (all users), a user policy (users governed by the policy), or a user, and then click
Properties.
Select Allow users to create chat rooms.
Click Save.
Restart the Messaging Agent to make the option visible to users.

7
Integrating OpenText Vibe with GroupWise Messenger 85
7
Integrating OpenText Vibe with GroupWise
Messenger
When you integrate GroupWise Messenger with your OpenText Vibe system, Vibe users can see
GroupWise Messenger presence information directly from the Vibe interface.
To set up this integration, create a new user with limited rights. Then, make this user the new
Allowed Service User who is responsible for displaying Messenger presence information in Vibe:
Create a new Messenger user and give this user a user name and password.
For information about how to create a new Messenger user, see Adding Users to Your
Messenger System.
In the GroupWise Admin console, navigate to Messenger > MessengerService > Settings >
Service ACL, select Add, and then add the user you created in the previous step.
Add the user to the OpenText Vibe installation following the steps found in “Configuring
Presence” in the OpenText Vibe 4.0.3 Installation Guide.

86 Integrating OpenText Vibe with GroupWise Messenger

8
Securing GroupWise Messenger 87
8
Securing GroupWise Messenger
This section provides specific instructions on how to install, configure, and maintain GroupWise
Messenger in the most secure way possible.
“Limiting Physical Access to Messenger Servers” on page 87
“Limiting Physical Access to Client Workstations” on page 87
“Securing File System Access” on page 88
“Securing the Messenger Agents” on page 88
“Securing the Messenger System” on page 90
Limiting Physical Access to Messenger Servers
Servers where Messenger data resides should be kept physically secure so that unauthorized
persons cannot gain access to the server consoles.
Limiting Physical Access to Client Workstations
Beginning with Messenger 3.0, Messenger supports multiple client connections. This means that a
user can be connected to the Messenger system on the workstation in their office, while at the same
time being connected from their laptop and mobile phone.
This might be viewed as a potential security concern because another user could access sensitive
information on an unattended device or even masquerade as the real user by sending messages
from the device. In previous versions of Messenger this wasn’t as much of a concern because only
one connection was allowed at a time, so connecting to Messenger on one device would disconnect
Messenger on the device where it was already running.
If you feel that allowing multiple simultaneous client connections to your Messenger system is a
security concern, you can disable this ability:
Navigate to Messenger in the GroupWise Admin Console, right-click either the default policy (all
users), a user policy (users governed by the policy), or a user, and then click
Properties.
Deselect Enable users to connect to multiple clients simultaneously.
Click OK to save the settings.
For more information about editing the user policy settings, see Editing the Default User Policy.

88 Securing GroupWise Messenger
Securing File System Access
In the GroupWise Admin console, Server objects for servers where Messenger agents reside should
be assigned appropriate trustees and rights to prevent access from unauthorized persons.
For additional data security, encrypted file systems should be used on servers where Messenger
agents and archives reside.
Securing the Messenger Agents
“Updating SSL Certificates for the Messenger Agents” on page 88
“Enabling SSL for the Web Console” on page 88
“Enabling Password Protection for the Web Console” on page 88
“Securing the Data Files” on page 88
Updating SSL Certificates for the Messenger Agents
SSL is enabled by default during the install. You can use your own certificates or have Messenger
create the certificates for you. You can update the certificates for Messenger in the GroupWise
Admin console at
Messenger > MessengerService > Objects > Servers > selected server > SSL Settings.
You can then upload new certificates to Messenger.
Enabling SSL for the Web Console
The Web Console should already be configured to use SSL when SSL is configured during the
installation. However, additional configuration is needed to enable SSL for the Web Console. For
information on how to secure and configure the Web Console, see Setting Up the Messaging Agent
Web Console and Using the Archive Agent Web Console and GroupWise Monitor.
Enabling Password Protection for the Web Console
The Web Console should be configured to use SSL and password protection, but password
protection needs to be enabled. For information on how to enable password protection for the Web
Console, see Setting Up the Messaging Agent Web Console and Using the Archive Agent Web
Console and GroupWise Monitor.
Securing the Data Files
Reference these sections to learn how to secure data files.
“Securing the Data Store” on page 89
“Securing the Queue Files” on page 89
“Securing the Log Files” on page 89
“Securing the Startup Files” on page 89
“Securing the Root Certificate” on page 90

Securing GroupWise Messenger 89
Securing the Data Store
The data store files should be protected from access by unauthorized persons. The data store files
are identified by an eight-digit hexadecimal number followed by either
.maf
or
.mai.
They are
found in the following default locations:
Table 8-1 Messenger Data Store File Locations
Securing the Queue Files
The queue files should be protected from access by unauthorized persons. The queue files are
identified by an eight-digit hexadecimal number followed by three numbers. They are found in the
following default locations:
Table 8-2 Messenger Queue File Locations
Securing the Log Files
The log files for all Messenger agents should be protected from access by unauthorized persons.
Some contain very detailed information about your Messenger system and Messenger users. They
are found in the following default locations:
Table 8-3 Messenger Agent Log File Locations
Securing the Startup Files
The startup files for all Messenger agents should be protected from access by unauthorized persons.
They are found in the following default locations:
Platform Directory Store Files
Linux
/var/opt/novell/messenger/aa/store xxxxxxxx.maf
xxxxxxxx.mai
Platform Directory Queue Files
Linux
/var/opt/novell/messenger/ma/queue
/var/opt/novell/messenger/aa/queue
xxxxxxxx.nnn
Platform Directory Log Files
Linux
/var/opt/novell/log/messenger/ma/
/var/opt/novell/log/messenger/aa
mmddnma.nnn
mmddnaa.nnn

90 Securing GroupWise Messenger
Table 8-4 Messenger Agent Startup File Locations
Securing the Root Certificate
The root certificate files should be protected from access by unauthorized persons. The root
certificate files are copied to the following default locations:
Table 8-5 Root Certificate File Locations
Securing the Messenger System
Reference these sections to learn how to secure the Messenger system.
“Configuring Remember Passwords” on page 90
“Understanding History and Save Conversation Security” on page 90
Configuring Remember Passwords
Messenger can be configured to remember passwords for the client login. However, this can cause
security concerns. If a workstation is left unlocked, anyone can log in as that user if the Remember
Password setting is selected. In addition, some third-party software packages might store the
passwords in plain text.
For security reasons, the ability to remember passwords should be disabled. For information on how
to disable the Remember Password option, see Customizing Messenger Client Features.
Understanding History and Save Conversation Security
Reference these sections to learn how history files and conversations are stored and secured.
“History Security” on page 90
“Saved Conversation Security” on page 91
History Security
When the history option is enabled, the history files are stored on the client workstation in the
following locations by default:
Platform Directory Startup Files
Linux
/etc/init.d novell-nmma
novell-nmaa
Platform Directory Startup Files
Linux
/opt/novell/messenger/certs certname.der

Securing GroupWise Messenger 91
Table 8-6 Default History File Locations
The history files are stored as XML files, so anyone with access to the machine can view the files. For
maximum security, the History option should be disabled. For information on how to disable the
History option, see Customizing Messenger Client Features.
Saved Conversation Security
A saved conversation is stored as a text file, so anyone with access to the machine can view the file.
For maximum security, the ability to save conversations should be disabled. For information on how
to do this, see Customizing Messenger Client Features.
Operating System Location
Windows
C:\Documents and Settings\username\Local
Settings\Application Data\Novell\Messenger\history
Linux
/home/username/.novell//messenger/history
Macintosh
/User/username/.novell/messenger/history

92 Securing GroupWise Messenger
