

Contents
Change history.............................................................................................. 8
Overview.......................................................................................................12
Understanding Markvision Enterprise.......................................................................................................... 12
Getting started.............................................................................................13
Best practices......................................................................................................................................................13
System requirements........................................................................................................................................ 15
Supported languages........................................................................................................................................16
Supported printer models................................................................................................................................16
Setting up the database................................................................................................................................... 19
Setting up a run-as user.................................................................................................................................. 20
Installing MVE.....................................................................................................................................................20
Installing MVE silently........................................................................................................................................21
Accessing MVE.................................................................................................................................................. 23
Changing the language................................................................................................................................... 23
Changing your password................................................................................................................................ 24
Maintaining the application...................................................................... 25
Upgrading to MVE 4.3......................................................................................................................................25
Backing up and restoring the database......................................................................................................26
Updating the installer settings after installation........................................................................................28
Setting up user access...............................................................................29
Overview..............................................................................................................................................................29
Understanding user roles................................................................................................................................29
Managing users................................................................................................................................................. 30
Enabling LDAP server authentication........................................................................................................... 31
Installing LDAP server certificates.................................................................................................................33
Adding a root CA certificate in the Java truststore.................................................................................. 33
Discovering printers................................................................................... 34
Creating a discovery profile............................................................................................................................34
Managing discovery profiles.......................................................................................................................... 36
Sample scenario: Discovering printers........................................................................................................ 37
Contents 2

Managing the security dashboard........................................................... 38
Overview..............................................................................................................................................................38
Accessing the security dashboard............................................................................................................... 38
Managing Device Security Information....................................................................................................... 38
Managing Device Conformance Check...................................................................................................... 39
Viewing printers..........................................................................................40
Viewing the printer list..................................................................................................................................... 40
Viewing the printer information..................................................................................................................... 43
Exporting printer data.......................................................................................................................................44
Managing views................................................................................................................................................. 44
Changing the printer listing view.................................................................................................................. 46
Filtering printers using the search bar.........................................................................................................46
Managing keywords..........................................................................................................................................47
Using saved searches...................................................................................................................................... 47
Understanding printer life cycle states...................................................................................................................47
Running a saved search ............................................................................................................................................ 49
Creating a saved search............................................................................................................................................ 49
Understanding search rules settings .....................................................................................................................50
Managing saved searches........................................................................................................................................ 53
Sample scenario: Monitoring the toner levels of your fleet................................................................... 53
Securing printer communications............................................................55
Understanding printer security states......................................................................................................... 55
Securing printers using the default configurations..................................................................................56
Understanding permissions and function access controls.................................................................... 58
Configuring printer security............................................................................................................................58
Securing printer communications on your fleet........................................................................................59
Other ways to secure your printers..............................................................................................................60
Managing printers....................................................................................... 61
Restarting the printer.........................................................................................................................................61
Viewing the printer Embedded Web Server............................................................................................... 61
Auditing printers................................................................................................................................................. 61
Updating printer status..................................................................................................................................... 61
Setting the printer state...................................................................................................................................62
Assigning configurations to printers............................................................................................................ 62
Contents 3

Unassigning configurations............................................................................................................................62
Enforcing configurations................................................................................................................................. 62
Checking the printer conformance with a configuration........................................................................ 63
Deploying files to printers...............................................................................................................................63
Updating the printer firmware........................................................................................................................64
Uninstalling applications from printers........................................................................................................65
Assigning events to printers...........................................................................................................................65
Assigning keywords to printers.....................................................................................................................65
Entering credentials to secured printers.....................................................................................................66
Configuring default printer certificates manually......................................................................................66
Removing printers............................................................................................................................................. 67
Managing configurations.......................................................................... 68
Overview..............................................................................................................................................................68
Creating a configuration..................................................................................................................................68
Creating a configuration from a printer........................................................................................................ 71
Sample scenario: Cloning a configuration...................................................................................................71
Creating an advanced security component from a printer......................................................................71
Generating a printable version of the configuration settings................................................................72
Understanding dynamic settings...................................................................................................................72
Understanding variable settings....................................................................................................................72
Configuring the color print permissions...................................................................................................... 73
Creating an applications package.................................................................................................................73
Importing or exporting a configuration........................................................................................................ 74
Importing files to the resource library.......................................................................................................... 74
Managing
certificates
.................................................................................75
Setting up MVE to manage certificates automatically............................................................................. 75
Understanding the automated certificate management feature.................................................................... 75
Configuring MVE for automated certificate management.................................................................................77
Configuring Microsoft Enterprise CA with NDES ................................................................................................ 79
Managing certificates using Microsoft Certificate Authority through SCEP.......................................79
Overview........................................................................................................................................................................80
Installing the root CA server.....................................................................................................................................80
Configuring Microsoft Enterprise CA with NDES ................................................................................................. 81
Configuring subordinate CA server......................................................................................................................... 81
Configuring the Certification Distribution Point and Authority Information Access settings .................. 83
Configuring CRL accessibility................................................................................................................................... 84
Configuring the NDES server................................................................................................................................... 84
Contents 4

Configuring NDES for MVE....................................................................................................................................... 85
Managing certificates using Microsoft Certificate Authority through MSCEWS...............................86
System requirements ................................................................................................................................................. 86
Network connectivity requirements ....................................................................................................................... 87
Creating SSL certificates for CEP and CES servers ........................................................................................... 87
Creating certificate templates.................................................................................................................................. 88
Understanding authentication methods................................................................................................................ 89
Delegation requirements .......................................................................................................................................... 89
Configuring windows-integrated authentication.................................................................................................90
Configuring client certificate authentication ....................................................................................................... 92
Configuring username-password authentication ..............................................................................................95
Managing certificates using OpenXPKI Certificate Authority through SCEP.................................... 97
Configuring OpenXPKI CA........................................................................................................................................ 97
Configuring OpenXPKI CA manually.................................................................................................................... 100
Generating CRL information....................................................................................................................................105
Configuring CRL accessibility..................................................................................................................................106
Enabling the SCEP service.......................................................................................................................................106
Enabling the Signer on Behalf (enrollment agent) certificate.........................................................................107
Enabling automatic approval of certificate requests in OpenXPKI CA ........................................................107
Creating a second realm ..........................................................................................................................................108
Enabling multiple active certificates with same subject to be present at a time........................................110
Setting the default port number for OpenXPKI CA .............................................................................................111
Rejecting certificate requests without Challenge Password in OpenXPKI CA ............................................111
Adding client authentication EKU in certificates..................................................................................................111
Getting the full certificate subject when requesting through SCEP ..............................................................112
Revoking certificates and publishing CRL ............................................................................................................112
Managing certificates using OpenXPKI Certificate Authority through EST.......................................113
Configuring OpenXPKI CA........................................................................................................................................113
Configuring OpenXPKI CA manually......................................................................................................................117
Creating a second realm ..........................................................................................................................................124
Managing printer alerts............................................................................130
Overview............................................................................................................................................................ 130
Creating an action........................................................................................................................................... 130
Understanding action placeholders.............................................................................................................131
Managing actions.............................................................................................................................................132
Creating an event............................................................................................................................................ 132
Understanding printer alerts......................................................................................................................... 133
Managing events..............................................................................................................................................137
Viewing task status and history..............................................................138
Overview............................................................................................................................................................ 138
Contents 5

Viewing the task status.................................................................................................................................. 138
Stopping tasks.................................................................................................................................................. 138
Viewing logs......................................................................................................................................................138
Clearing logs..................................................................................................................................................... 138
Exporting logs...................................................................................................................................................138
Scheduling tasks.......................................................................................140
Creating a schedule........................................................................................................................................140
Managing scheduled tasks.............................................................................................................................141
Performing other administrative tasks...................................................142
Configuring general settings........................................................................................................................ 142
Configuring e‑mail settings........................................................................................................................... 142
Adding a login disclaimer.............................................................................................................................. 143
Signing the MVE certificate........................................................................................................................... 143
Removing user information and references..............................................................................................144
Managing SSO...........................................................................................146
Overview............................................................................................................................................................ 146
Setting the claim‑issuance policy for GroupRule.................................................................................... 146
Setting the claim‑issuance policy for Name ID........................................................................................ 146
Enabling ADFS Server authentication........................................................................................................ 147
Accessing MVE by way of ADFS..................................................................................................................147
Logging out from MVE....................................................................................................................................147
Frequently asked questions.................................................................... 148
Markvision Enterprise FAQ............................................................................................................................148
Troubleshooting.........................................................................................151
User has forgotten the password.................................................................................................................151
Admin user has forgotten the password.................................................................................................... 151
Page does not load......................................................................................................................................... 152
Cannot discover a network printer............................................................................................................. 152
Incorrect printer information......................................................................................................................... 152
MVE does not recognize a printer as a secured printer........................................................................153
Enforcement of configurations with multiple applications fails in the first attempt but
succeeds in the subsequent attempts...................................................................................................153
Enforcement of configurations with printer certificate fails..................................................................154
Contents 6

OpenXPKI Certificate Authority....................................................................................................................154
Database access........................................................................................157
Dierences in supported databases data types......................................................................................157
FRAMEWORK tables and field names........................................................................................................ 157
Printer ............................................................................................................................................................................157
Keywords...................................................................................................................................................................... 173
Configurations............................................................................................................................................................. 173
Discovery profiles.......................................................................................................................................................180
ESF .................................................................................................................................................................................182
Certificate management ...........................................................................................................................................185
Authentication and authorization...........................................................................................................................187
Security settings .........................................................................................................................................................188
Views and data export ..............................................................................................................................................189
Event manager............................................................................................................................................................190
Miscellaneous..............................................................................................................................................................192
Quartz DB .....................................................................................................................................................................193
Appendix.................................................................................................... 194
Notices........................................................................................................198
Glossary.....................................................................................................200
Index........................................................................................................... 201
Contents 7

Change history
January 2023
• Added information on Markvision
TM
Enterprise (MVE) configuration and workflow for ADFS.
• Updated the information on accessing the security dashboard.
• Added the Database access chapter.
August 2022
• Added information on the following:
– Enrollment over Secure Transport (EST) protocol as
defined
in RFC 7030
– Security Dashboard
– Automatic assignment of keywords during discovery
– Support for e‑mail over SSL/TLS
– Support for Windows Server 2022
• Updated information on the following:
– Supported printer models
– Managing certificates using Microsoft CA through Microsoft Certificate Enrollment Web Services
(MSCEWS)
–
Configuring
OpenXPKI CA server
– Managing MVE
configurations
March 2022
• Updated information on the supported printer models.
• Added information on creating a client
certificate.
May 2021
• Updated information on the following:
– Supported printer models
– Managing Microsoft Certificate Authority (CA)
– Configuring MVE for automated certificate management
– Configuring Microsoft Enterprise CA with Network Device Enrollment Service (NDES)
• Added information on the following:
– Managing certificates using Microsoft CA through Microsoft Certificate Enrollment Web Services
(MSCEWS)
– Creating SSL Certificate for Certificate Enrollment Policy Web Service (CEP) and Certificate Enrollment
Web Service (CES) servers
– Authentication methods for CEP and CES
– Named device certificate
Change history 8

November 2020
• Updated information on the following:
– Supported printer models
– Supported databases
• Added information on the following:
– Managing and deploying configurations
– Backing up and restoring the database
– Managing
certificates
using OpenXPKI and Microsoft
Certificate
Authority
• Added support for the following:
– Managing and deploying configurations to a group of printer models
– Creating custom database names
February 2020
• Updated information on the following:
– Supported printer models
– Supported servers
– Supported databases
– Valid MVE upgrade path
• Added information on the following:
– Instructions for best practices
– Instructions on managing automated certificates
– Default advanced security components and their settings
– Other ways in securing printers
– Sample scenarios
June 2019
• Updated information on the following:
– Footnotes added to printer models that require certificates
– Assigning dbo rights when setting up the database
– Valid upgrade path when upgrading to version 3.4
– Files that are needed when backing up and restoring the database
– LDAP server authentication settings
– Certificate validity status, dates, and time zone parameters are added to the search rule settings
– Configuring the permissions and function access controls in the printer security settings
– Selecting a firmware file from the resource library when updating the printer firmware
– Selecting the start date, start and pause time, and days of the week when updating the printer
firmware
– Managing
configurations
• Added information on the following:
– Understanding printer security states
– Configuring advanced security components
– Creating an advanced security component from a printer
Change history 9

– Generating a printable version of the configuration settings
– Uploading a printer fleet certificate authority
– Removing user information and references
– Understanding permissions and function access controls
– Troubleshooting steps when enforcement of
configurations
with multiple applications fails
– Troubleshooting steps when an Admin user has forgotten the password
August 2018
• Updated information on the following:
– Supported printer models
– Setting up the database
– Upgrading to MVE 3.3
– Frequently asked questions
– Creating an action
– Creating a schedule
• Added information on the following:
– Setting up a run‑as domain user account
– Exporting logs
– Troubleshooting steps when MVE does not recognize secured printers
July 2018
• Updated information on upgrading to MVE 3.2.
April 2018
• Updated information on the following:
– Supported printer models
– Setting up the database
– Backing up and restoring database files
– The URL for accessing MVE
– Understanding variable settings
• Added information on the following:
–
Configuring
printer
certificates
– Stopping tasks
– Updating printer
firmware
September 2017
• Updated information on the following:
– System requirements
– Communication between MVE and Lexmark
TM
Forms Printer 2580, 2581, 2590, and 2591 models
– Manual dropping of Microsoft SQL Server databases
– Backing up and restoring database files
Change history 10

– Required security settings for function access controls when deploying firmware and solution files to
printers
– Support for licenses when deploying applications
– Printer alerts and their associated actions
– Printer state automatic recovery
– Events and keywords assignment
June 2017
• Initial document release for MVE 3.0.
Change history 11

Overview
Understanding Markvision Enterprise
Markvision Enterprise (MVE) is a web-based printer management utility software designed for IT professionals.
With MVE, you can manage a large fleet of printers in an enterprise environment eciently by doing the
following:
• Find, organize, and track a fleet of printers. You can audit a printer to collect printer data such as status,
settings, and supplies.
• Create configurations and assign them to printers.
• Deploy firmware, printer certificates, certificate authority (CA), and applications to the printers.
• Monitor printer events and alerts.
This document provides information on how to configure, use, and troubleshoot the application.
This document is intended for administrators.
Overview 12

Getting started
Best practices
This topic outlines the recommended steps to use MVE in managing your fleet eectively.
1 Install MVE in your environment.
a Create a server using the latest Windows Server environment.
Related content:
Web server requirements
b Create a domain user account that does not have administrator access.
Related content:
Setting up a run-as user
c Create a Microsoft SQL Server database, set up encryption, and then give the new user account access
to the databases.
Related content:
• Database requirements
• Setting up the database
d Install MVE using the domain user account and the SQL server with Windows Authentication.
Related content:
Installing MVE
2 Set up MVE, and then discover and organize your
fleet.
a Sign the server certificate.
Related content:
• Signing the MVE certificate
• Setting up MVE to manage
certificates
automatically
b Set up the LDAP settings.
Related content:
• Enabling LDAP server authentication
• Installing LDAP certificates
c Connect to an e‑mail server.
Related content:
Configuring e‑mail settings
d Discover your
fleet.
Related content:
Discovering printers
e Schedule audits and status updates.
Related content:
• Auditing printers
• Updating printer status
Getting started 13

f Set up basic settings, such as contact names, locations, asset tags, and time zones.
g Organize your fleet. Use keywords, such as locations, to categorize the printers.
Related content:
• Assigning keywords to printers
• Creating a saved search
3 Secure your
fleet.
a Secure printer access using the default advanced security components.
Related content:
• Securing printers using the default configurations
• Understanding permissions and function access controls
• Other ways to secure your printers
b Create a secured
configuration
that includes
certificates.
Related content:
• Creating a configuration
• Importing files to the resource library
c Enforce the configuration on your current fleet.
Related content:
• Assigning configurations to printers
• Enforcing configurations
d Schedule enforcements and conformance checks.
Related content:
Creating a schedule
e Add configurations to discovery profiles to secure new printers.
Related content:
Creating a discovery
profile
f Sign printer certificates.
Related content:
Signing the MVE certificate
4 Keep your firmware up to date.
Related content:
Updating the printer
firmware
5 Install and configure applications.
Related content:
• Creating a configuration
• Importing files to the resource library
6 Monitor your fleet.
Related content:
Creating a saved search
Getting started 14

System requirements
MVE is installed as a web server and can be accessed from a web browser on any computer on the network.
MVE also uses a database to store information about the printer fleet. The following lists are the requirements
for the web server, database, and user system:
Web server requirements
Processor At least 2GHz dual‑core processor that uses Hyper‑Threading Technology (HTT)
RAM At least 4GB
Hard disk drive At least 60GB
Note: MVE, Lexmark Document Distributor (LDD), and Device Deployment Utility (DDU) cannot be run on the
same server.
Supported servers
•
Windows Server 2022 Standard Edition
• Windows Server 2019
• Windows Server 2016 Standard Edition
• Windows Server 2012 Standard Edition
• Windows Server 2012 R2
Note: MVE supports virtualization for the supported servers in a premise-based environment.
Database requirements
Supported databases
•
Firebird
®
database (built‑in)
• Microsoft SQL Server 2019
• Microsoft SQL Server 2017
• Microsoft SQL Server 2016
• Microsoft SQL Server 2014
• Microsoft SQL Server 2012
Note: The recommended minimum database size is 60GB to allocate 20MB for FRAMEWORK, and 4.5MB
for MONITOR and QUARTZ. For more information, see
“Setting up the database” on page 19.
User system requirements
Supported web browsers
•
Microsoft Edge
• Mozilla Firefox (latest version)
• Google Chrome
TM
(latest version)
• Apple Safari (latest version)
Getting started 15

Screen resolution
At least 1280 x 768 pixels
Supported languages
• Brazilian Portuguese
• English
• French
• German
• Italian
• Simplified Chinese
• Spanish
Supported printer models
• Lexmark 6500
• Lexmark B2236
2
• Lexmark B2338
2
, B2442
2
, B2546
2
, B2650
2
, B2865
1
• Lexmark B3440
2
, B3442
2
• Lexmark C2132
• Lexmark C2240
2
, C2325
2
, C2425
2
, C2535
2
• Lexmark C2335
2
• Lexmark C3224
2
• Lexmark C3326
2
• Lexmark C3426
2
• Lexmark C4150
2
, C6160
2
, C9235
2
• Lexmark C4342
2
, C4352
2
• Lexmark C746, C748
• Lexmark C792
• Lexmark C925
1
, C950
• Lexmark CS310, CS410, CS510
• Lexmark CS317, CS417, CS517
• Lexmark CS331
2
• Lexmark CS421
2
, CS521
2
, CS622
2
• Lexmark CS431
2
• Lexmark CS531
2
, CS632
2
• Lexmark CS720
2
, CS725
2
• Lexmark CS727
2
, CS728
2
• Lexmark CS730
2
• Lexmark CS735
2
• Lexmark CS820
2
, CS827
2
• Lexmark CS921
2
, CS923
2
, CS927
2
Getting started 16

• Lexmark CS943
2
• Lexmark CX310, CX410, CX510
• Lexmark CX317, CX417, CX517
• Lexmark CX331
2
• Lexmark CX421
2
, CX522
2
, CX622
2
, CX625
2
• Lexmark CX431
2
• Lexmark CX532
2
• Lexmark CX625
2
• Lexmark CX635
2
• Lexmark CX725
2
• Lexmark CX728
2
• Lexmark CX730
2
• Lexmark CX735
2
• Lexmark CX820
2
, CX825
2
, CX827
2
, CX860
2
• Lexmark CX920
2
, CX921
2
, CX922
2
, CX923
2
, CX924
2
, CX927
2
• Lexmark CX930
2
, CX931
2
• Lexmark CX942
2
, CX943
2
, CX944
2
• Lexmark Forms Printer 2580
4
, 2581
4
, 2590
4
, 2591
4
• Lexmark M1140, M1145, M3150
• Lexmark M1242
2
, M1246
2
, M3250
2
, M5255
2
, M5265
2
, M5270
2
• Lexmark M3350
2
• Lexmark M5155, M5163, M5170
• Lexmark M5255
2
, M5265
2
, M5270
2
• Lexmark MB2236
2
• Lexmark MB2338
2
, MB2442
2
, MB2546
2
, MB2650
2
, MB2770
2
• Lexmark MB3442
2
• Lexmark MC2325
2
, MC2425
2
, MC2535
2
, MC2640
2
• Lexmark MC3224
2
• Lexmark MC3326
2
• Lexmark MC3426
2
• Lexmark MS310, MS312, MS315, MS410, MS415, MS510, MS610
• Lexmark MS317, MS417, MS517
• Lexmark MS321
2
, MS421
2
, MS521
2
, MS621
2
, MS622
2
• Lexmark MS331
2
, MS431
2
• Lexmark MS531
2
, MS631
2
, MS632
2
• Lexmark MS617, MS817, MS818
• Lexmark MS710, MS711, MS810, MS811, MS812
• Lexmark MS725
2
, MS821
2
, MS822
2
, MS823
2
, MS824
2
, MS825
2
, MS826
2
• Lexmark MS911
• Lexmark MX310, MX410, MX510, MX511, MX610, MX611
• Lexmark MX317, MX4 17, MX517
Getting started 17

• Lexmark MX321
2
, MX421
2
, MX521
2
, MX522
2
, MX622
2
• Lexmark MX331
2
, MX431
2
• Lexmark MX432
2
• Lexmark MX532
2
, MX632
2
• Lexmark MX617, MX717, MX718
• Lexmark MX6500
• Lexmark MX710, MX711, MX810, MX811, MX812
• Lexmark MX721
2
, MX722
2
, MX725
2
, MX822
2
, MX824
2
, MX826
2
• Lexmark MX910, MX911, MX912
• Lexmark MX931
2
• Lexmark T650
1
, T652
1
, T654
1
, T656
1
• Lexmark X651
1
, X652
1
, X654
1
, X656
1
, X658
1
, XS651
1
, XS652
1
, XS654
1
, XS658
1
• Lexmark X746, X748, X792
• Lexmark X850
1
, X852
1
, X854
1
, X860
1
, X862
1
, X864
1
, XS864
1
• Lexmark X925, X950, X952, X954
• Lexmark XC2130, XC2132
• Lexmark XC2235
2
, XC2240
2
, XC4240
2
• Lexmark XC2335
2
• Lexmark XC4140
2
, XC4150
2
, XC6152
2
, XC8155
2
, XC8160
2
• Lexmark XC9225
2
, XC9235
2
, XC9245
2
, XC9255
2
, XC9265
2
• Lexmark XC9325
2
, XC9335
2
• Lexmark XC9445
2
, XC9455
2
, XC9465
2
• Lexmark XM1135, XM1140, XM1145, XM3150
• Lexmark XM1242
2
, XM1246
2
, XM3250
2
• Lexmark XM3142
2
• Lexmark XM3350
2
• Lexmark XM5163, XM5170, XM5263, XM5270
• Lexmark XM5365
2
, XM5370
2
• Lexmark XM7155, XM7163, XM7170, XM7263, XM7270
• Lexmark XM7355
2
, MX7365
2
, MX7370
2
• Lexmark XM9145, XM9155, XM9165
• Lexmark XM9335
2
• Lexmark XC2326
• Lexmark XC2326
• Lexmark XC4342
2
, XC4352
2
1
A printer certificate update is required. In this release, the Java platform security and performance update
remove support for some
certificate-signing
algorithms, such as MD5 and SHA1. This change prevents MVE
from working with some printers. For more information, see the
help information documentation.
2
SNMPv3 support must be enabled on the printer.
3
If an advanced security password is set on the printer, then MVE cannot support the printer.
Getting started 18

4
MVE cannot communicate with Lexmark Forms Printer 2580, 2581, 2590, and 2591 models that are in the Not
Ready state. The communication works only when MVE has previously communicated with the printer in the
Ready state. The printer can be in the Not Ready state when there are errors or warnings, such as empty
supplies. To change the state, resolve the error or warning, and then press Ready.
Setting up the database
You can use either Firebird or Microsoft SQL Server as the back-end database. The following table can help
you decide on what database to use.
Firebird Microsoft SQL Server
Server installation Must be installed on the same server as
MVE.
Can be run from any server.
Communication Locked down to only localhost. Communicates over a static port or a dynamic
named instance.
SSL/TLS communication with a secured Microsoft
SQL server is supported.
Performance Shows performance issues with large
fleets.
Shows the best performance for large fleets.
Database size Default database sizes are 6MB for
FRAMEWORK, and 1MB for MONITOR and
QUARTZ. The FRAMEWORK table grows
at 1KB for each printer record that is
added.
Default database sizes are 20MB for
FRAMEWORK, and 4.5MB for MONITOR and
QUARTZ. The FRAMEWORK table grows at 1KB for
each printer record that is added.
Configuration Configured automatically during
installation.
Requires preinstallation setup.
If you are using Firebird, then the MVE installer installs and
configures
Firebird with no other
configuration
required.
If you are using Microsoft SQL Server, then before installing MVE, do the following:
• Allow the application to run automatically.
• Set the network libraries to use TCP/IP sockets.
• Create the following databases:
Note: The following are default database names. You can also provide custom database names.
– FRAMEWORK
– MONITOR
– QUARTZ
• If you are using a named instance, then set the Microsoft SQL Server Browser service to start automatically.
Otherwise, set a static port on the TCP/IP sockets.
Getting started 19

• Create a user account with dbowner rights to all three databases that MVE uses to connect to and set up
the database. If the user is a Microsoft SQL Server account, then enable the Microsoft SQL Server and the
Windows Authentication modes on the Microsoft SQL Server.
Note: Uninstalling MVE that is configured to use Microsoft SQL Server does not drop the created tables
or databases. After uninstalling, the FRAMEWORK, MONITOR, and QUARTZ databases must be dropped
manually.
• Assign the dbo rights to the database user, and then set the dbo schema as the default schema.
Setting up a run-as user
During installation, you can specify MVE to execute either as a local system account or as a domain user account.
Executing MVE as a run-as domain user account provides a more secure installation. The domain user account
has limited privileges compared to a local system account.
Run‑as domain user account Run‑as local system
Local system
permissions
• File all access to the following:
– $MVE_INSTALL/tomcat/logs
– $MVE_INSTALL/tomcat/temp
– $MVE_INSTALL/tomcat/work
– $MVE_INSTALL/apps/library
– $MVE_INSTALL/apps/dm-mve/picture
– $MVE_INSTALL/../mve_truststore*
– $MVE_INSTALL/jre/lib/security/cacerts
– $MVE_INSTALL/apps/dm-mve/WEB-INF/ldap
– $MVE_INSTALL/apps/dm-mve/download
Where $MVE_INSTALL is the installation directory.
• Windows privilege: LOGON_AS_A_SERVICE
Administrator permissions
Database connection
authentication
• Windows Authentication with Microsoft SQL Server
• SQL Authentication
SQL Authentication
Configuration A domain user must be configured before installation. Configured automatically
during installation
If you set up MVE as a run-as domain user account, then create the user on the same domain as the MVE server.
Installing MVE
1 Download the executable file into a path that does not contain any spaces.
2 Run the
file
as an administrator, and then follow the instructions on the computer screen.
Notes:
• Passwords are hashed and stored securely. Make sure that you remember your passwords, or store
them in a secure location because passwords cannot be decrypted once stored.
• If you are connecting to the Microsoft SQL Server using Windows Authentication, then no connection
verification occurs during installation. Make sure that the user designated to execute the MVE windows
Getting started 20

service has a corresponding account in the Microsoft SQL Server instance. The designated user must
have dbowner rights to the FRAMEWORK, MONITOR, and QUARTZ databases.
Installing MVE silently
Database settings for silent installation
Setting Description Value
--help Shows the list of valid options.
--version Shows the product information.
--unattendedmodeui
<unattendedmodeui>
The user interface for unattended
mode.
Default: none
Allowed:
• none
• minimal
• minimalWithDialogs
--optionfile <optionfile> The installation option file. Default:
--debuglevel <debuglevel> The debug information level of
verbosity.
Default: 2
Allowed:
• 0
• 1
• 2
• 3
• 4
--mode <mode> The installation mode. Default: win32
Allowed:
• win32
• unattended
--debugtrace <debugtrace> The debug file name. Default:
--installer-language
<installer-language>
The language selection. Default: en
Allowed:
• en
• es
• de
• fr
• it
• pt_BR
• zh_CN
--encryptionKey
<encryptionKey>
The encryption key. Encryption key:
Default:
--prefix <prefix> The installation directory. Default: C:\Program Files
Getting started 21

Setting Description Value
--mveLexmark_runas
<mveLexmark_runas>
The run‑as user options. Default: LOCAL_SYSTEM
Allowed:
• LOCAL_SYSTEM
• SPECIFIC_USER
--serviceRunAsUsername
<serviceRunAsUsername>
The run‑as user name. User name:
Default:
--serviceRunAsPassword
<serviceRunAsPassword>
The run‑as user password. Password:
Default:
--mveLexmark_database
<mveLexmark_database>
The database type. Default:
Allowed:
• FIREBIRD
• SQL_SERVER
--firebirdUsername
<firebirdUsername>
The Firebird database user name. User name:
Default:
--firebirdPassword
<firebirdPassword>
The Firebird database password. Password:
Default:
--firebirdFWDbName
<firebirdFWDbName>
The Firebird database name for
FRAMEWORK.
Database names:
Default: FRAMEWORK
--firebirdMNDbName
<firebirdMNDbName>
The Firebird database name for
MONITOR.
Default: MONITOR
--firebirdQZDbName
<firebirdQZDbName>
The Firebird database name for
QUARTZ.
Default: QUARTZ
--databaseIPAddress
<databaseIPAddress>
The database IP address or host
name.
IP address or host name:
Default:
--databasePort
<databasePort>
The database port number. Port number:
Default:
--instanceName
<instanceName>
The instance name. Instance name:
Default:
--instanceIdentifier
<instanceIdentifier>
The instance. Default: databasePort
Allowed:
• databasePort
• instanceName
--databaseUsername
<databaseUsername>
The database user name. User name:
Default:
--databasePassword
<databasePassword>
The database password. Password:
Default:
Getting started 22

Setting Description Value
--
sqlServerAuthenticationMet
hod
<sqlServerAuthenticationMe
thod>
The Microsoft SQL server
authentication method.
Default:
sqlServerDbAuthentication
Allowed:
• sqlServerDbAuthenticatio
n
• sqlServerWindowsAuthenti
cation
--fWDbName <fWDbName> The database name for
FRAMEWORK.
Database names:
Default: FRAMEWORK
--mNDbName <mNDbName> The database name for MONITOR. Default: MONITOR
--qZDbName <qZDbName> The database name for QUARTZ. Default: QUARTZ
--mveAdminUsername
<mveAdminUsername>
The administrator user name. User name:
Default: admin
--mveAdminPassword
<mveAdminPassword>
The administrator password. Password:
Default:
Accessing MVE
To access MVE, use the login credentials that you created during installation. You can also set up other login
methods, such as LDAP, Kerberos, or other local accounts. For more information, see
“Setting up user access”
on page 29.
1 Open a web browser, and then type https://MVE_SERVER/mve/, where MVE_SERVER is the host name
or IP address of the server hosting MVE.
2 If necessary, accept the disclaimer.
3 Enter your credentials.
4 Click Log In.
Notes:
• After logging in, make sure that you change the default administrator password that was used during
installation. For more information, see
“Changing your password” on page 24.
• If MVE is idle for more than 30 minutes, then the user is logged out automatically.
Changing the language
1 Open a web browser, and then type https://MVE_SERVER/mve/, where MVE_SERVER is the host name
or IP address of the server hosting MVE.
2 If necessary, accept the disclaimer.
3 On the upper‑right corner of the page, select a language.
Getting started 23

Changing your password
1 Open a web browser, and then type https://MVE_SERVER/mve/, where MVE_SERVER is the host name
or IP address of the server hosting MVE.
2 If necessary, accept the disclaimer.
3 Enter your credentials.
4 Click Log In.
5 On the upper‑right corner of the page, click your user name, and then click Change password.
6 Change the password.
Getting started 24

Maintaining the application
Upgrading to MVE 4.3
Before you begin the upgrade, do the following:
• Back up the database, application, and properties files. For more information, see “Backing up and restoring
the database” on page 26.
• If necessary, provide custom database names.
If upgrading from version 1.x, then upgrade to version 2.0 first, then respectively to version 3.3 and 4.0, before
upgrading to version 4.3. The policy migration process is performed only when upgrading to MVE 2.0.
Valid upgrade path 3.3 to 4.0 to 4.3
Invalid upgrade path 1.6.x to 4.3
2.0 to 4.3
1 Back up your database and application files. Any upgrade or uninstallation creates a risk of unrecoverable
data loss. You can use the backup
files
to restore the application to its previous state in case the upgrade
fails.
Warning—Potential Damage: When you upgrade MVE, the database is changed. Do not restore a
database backup that was created from a previous version.
Note: For more information, see
“Backing up and restoring the database” on page 26.
2 Download the executable file into a temporary location.
3 Run the installer as an administrator, and then follow the instructions on the computer screen.
Notes:
• When you upgrade to MVE 2.0, policies that are assigned to printers are migrated into a single
configuration for each printer model. For example, if fax, copy, paper, and print policies are assigned
to an X792 printer, then those policies are consolidated into an X792
configuration.
This process
does not apply to policies that are not assigned to printers. MVE generates a log
file
confirming
that
the policies are migrated to a configuration successfully. For more information, see
“Where can I find
the log files?” on page 148.
• After upgrading, make sure to clear the browser cache before accessing the application again.
• When MVE is upgraded to version 3.5 or later, the advanced security components are factored out of
the configurations that they are in. If one or more advanced security components are the same, then
they are combined into one component. The created advanced security component is added to the
advanced security components library automatically.
Maintaining the application 25

Backing up and restoring the database
Note: There is potential data loss when performing backup and restore procedures. Make sure to perform
the steps properly.
Backing up the database and application files
We recommend backing up your database regularly.
1 Stop the Firebird service and the Markvision Enterprise service.
a Open the Run dialog box, and then type services.msc.
b Right‑click Firebird Guardian - DefaultInstance, and then click Stop.
c Right‑click Markvision Enterprise, and then click Stop.
2 Browse to the folder where Markvision Enterprise is installed.
For example, C:\Program Files\
3 Back up the application and database files.
Backing up the application files
Copy the following
files
to a safe repository:
• Lexmark\mve_encryption.jceks
• Lexmark\mve_truststore.p12
• Lexmark\Markvision Enterprise\apps\dm-mve\WEB-INF\classes\database.properties
• Lexmark\Markvision Enterprise\apps\dm-mve\WEB-INF\classes\encryption.properties
• Lexmark\Markvision Enterprise\apps\dm-mve\WEB-INF\classes\platform.properties
• Lexmark\Markvision Enterprise\apps\library
• Lexmark\Markvision Enterprise\apps\mve-data-service\WEB-INF\classes\database.properties
• Lexmark\Markvision Enterprise\apps\mve-data-service\WEB-INF\classes\encryption.properties
• Lexmark\Markvision Enterprise\jre\lib\security\cacerts
• Lexmark\Markvision Enterprise\tomcat\conf\server.xml
Note: Make sure that these files are properly stored. Without the encryption keys in the
mve_encryption.jceks file, data stored in an encrypted format in the database and on the file system
cannot be recovered.
Backing up the database files
Do either of the following:
Note: The following
files
are using the default database names. These instructions also apply to
customized database names.
• If you are using a Firebird database, then copy the following
files
to a safe repository. These
files
must
be backed up regularly to avoid data loss.
– Lexmark\Markvision
Enterprise\firebird\security2.fdb
If you are using custom database names, then update the following:
• Lexmark\Markvision Enterprise\apps\dm-mve\WEB-INF\classes\database.properties
• Lexmark\Markvision Enterprise\apps\mve-data-service\WEB-INF\classes\database.properties
Maintaining the application 26

• Lexmark\Markvision Enterprise\apps\mve-data-service/WEB-INF\classes\application.yml
• Lexmark\Markvision Enterprise\firebird\aliases.conf
– Lexmark\Markvision Enterprise\firebird\data\QUARTZ.FDB
– Lexmark\Markvision Enterprise\firebird\data\MONITOR.FDB
– Lexmark\Markvision
Enterprise\firebird\data\FRAMEWORK.FDB
• If you are using Microsoft SQL Server, then create a backup for FRAMEWORK, MONITOR, and QUARTZ.
For more information, contact your Microsoft SQL Server administrator.
4 Restart the Firebird service and the Markvision Enterprise service.
a Open the Run dialog box, and then type services.msc.
b Right‑click Firebird Guardian - DefaultInstance, and then click Restart.
c Right‑click Markvision Enterprise, and then click Restart.
Restoring the database and application
files
Warning—Potential Damage: When you upgrade MVE, the database may be changed. Do not restore a
database backup that was created from a previous version.
1 Stop the Markvision Enterprise service.
For more information, see
step 1 of “Backing up the database and application files” on page 26.
2 Browse to the folder where Markvision Enterprise is installed.
For example, C:\Program Files\
3 Restore the application
files.
Replace the following files with the files that you saved during the backup process:
• Lexmark\mve_encryption.jceks
• Lexmark\mve_truststore.p12
• Lexmark\Markvision Enterprise\apps\dm-mve\WEB-INF\classes\database.properties
• Lexmark\Markvision Enterprise\apps\dm-mve\WEB-INF\classes\encryption.properties
• Lexmark\Markvision Enterprise\apps\dm-mve\WEB-INF\classes\platform.properties
• Lexmark\Markvision Enterprise\apps\library
• Lexmark\Markvision Enterprise\apps\mve-data-service\WEB-INF\classes\database.properties
• Lexmark\Markvision Enterprise\apps\mve-data-service\WEB-INF\classes\encryption.properties
• Lexmark\Markvision Enterprise\jre\lib\security\cacerts
• Lexmark\Markvision Enterprise\tomcat\conf\server.xml
Note: You can restore a database backup to a new MVE installation only if the new MVE installation is the
same version.
4 Restore the database files.
Do either of the following:
• If you are using a Firebird database, then replace the following files that you saved during the backup
process:
Note: The following files are using the default database names. This instruction also applies to
customized database names.
Maintaining the application 27

– Lexmark\Markvision Enterprise\firebird\security2.fdb
If you are using custom database names, then the following files are also restored:
• Lexmark\Markvision Enterprise\apps\dm-mve\WEB-INF\classes\database.properties
• Lexmark\Markvision Enterprise\apps\mve-data-service\WEB-INF\classes\database.properties
• Lexmark\Markvision Enterprise\apps\mve-data-service/WEB-INF\classes\application.yml
• Lexmark\Markvision Enterprise\firebird\aliases.conf
– Lexmark\Markvision Enterprise\firebird\data\QUARTZ.FDB
– Lexmark\Markvision Enterprise\firebird\data\MONITOR.FDB
– Lexmark\Markvision Enterprise\firebird\data\FRAMEWORK.FDB
• If you are using Microsoft SQL Server, then contact your Microsoft SQL Server administrator.
5 Restart the Markvision Enterprise service.
For more information, see
step 4 of “Backing up the database and application
files”
on page 26.
Updating the installer settings after installation
The Markvision Enterprise Password Utility lets you update the Microsoft SQL Server settings that have been
configured
during installation without reinstalling MVE. The utility also lets you update the run-as user domain
account credentials, such as user name and password. You can also use the utility to create another Admin
user if you forget your previous Admin user credentials.
1 Browse to the folder where Markvision Enterprise is installed.
For example, C:\Program Files\
2 Launch the mvepwdutility-windows.exe file in the Lexmark\Markvision Enterprise\ directory.
3 Select a language, and then click OK > Next.
4 Follow the instructions on the computer screen.
Maintaining the application 28

Setting up user access
Overview
MVE lets you add internal users directly to the MVE server or use the user accounts registered in an LDAP
server. For more information on adding internal users, see
“Managing users” on page 30. For more information
on using LDAP user accounts, see
“Enabling LDAP server authentication” on page 31.
When adding users, roles must be assigned. For more information, see
“Understanding user roles” on
page 29.
During authentication, the system checks the user credentials of the internal users present in the MVE server.
If MVE cannot authenticate the user, then it tries to authenticate the user in the LDAP server. If the user name
exists in both the MVE server and the LDAP server, then the password in the MVE server is used.
Understanding user roles
MVE users can be assigned to one or more roles. Depending on the role, users can perform the following tasks:
• Admin—Access and perform tasks in all menus. They also have administrative privileges, such as adding
users to the system or configuring the system settings. Only users with an Admin role can stop any running
task no matter what user type started it.
• Printers
– Manage discovery profiles.
– Set the printer states.
– Perform an audit.
– Manage categories and keywords.
– Schedule an audit, data export, and printer discovery.
•
Configurations
– Manage configurations, including importing and exporting configuration files.
– Upload files to the resource library.
– Assign and enforce configurations to printers.
– Schedule a conformance check and
configurations
enforcement.
– Deploy
files
to printers.
– Update the printer firmware.
– Generate printer certificate signing requests.
– Download printer certificate signing requests.
• Event Manager
– Manage actions and events.
– Assign events to printers.
– Test actions.
• Service Desk
– Update the printer status.
– Reboot printers.
Setting up user access 29

– Run a conformance check.
– Enforce configurations to printers.
Notes:
• All users in MVE can view the printer information page, and manage saved searches and views.
• For more information on assigning user roles, see “Managing users” on page 30.
Managing users
1 Click on the upper‑right corner of the page.
2 Click User, and then do any of the following:
Add a user
a Click Create.
b Type the user name, user ID, and password.
c Select the roles.
Note: For more information, see
“Understanding user roles” on page 29.
d Click Create User.
Edit a user
a Select a user ID.
b Configure the settings.
c Click Save Changes.
Delete users
a Select one or more users.
b Click Delete, and then confirm deletion.
Note: A user account is locked out after three consecutive failed login attempts. Only an Admin user can
reactivate the user account. If the Admin user is locked out, then the system reactivates it automatically
after five minutes.
Setting up user access 30

Enabling LDAP server authentication
LDAP is a standards-based, cross-platform, extensible protocol that runs directly on top of TCP/IP. It is used to
access specialized databases called directories.
To avoid maintaining multiple user credentials, you can use the company LDAP server to authenticate user IDs
and passwords.
As a prerequisite, the LDAP server must contain user groups that correspond to the required user roles. For
more information, see
“Understanding user roles” on page 29.
1 Click on the upper‑right corner of the page.
2 Click LDAP, and then select Enable LDAP for authentication.
3 In the LDAP server hostname field, type the IP address or the host name of the LDAP server where the
authentication occurs.
Note: If you want to use encrypted communication between the MVE server and the LDAP server, then
use the fully qualified domain name (FQDN).
4 Specify the server port number according to the encryption protocol selected.
5 Select the encryption protocol.
• None
• TLS—A security protocol that uses data encryption and certificate authentication to protect the
communication between a server and a client. If this option is selected, then a START_TLS command is
sent to the LDAP server after the connection is established. Use this setting if you want a secure
communication over port 389.
• SSL/TLS—A security protocol that uses public‑key cryptography to authenticate the communication
between a server and a client. Use this option if you want a secured communication from the start of the
LDAP bind. This option is typically used for port 636 or other secured LDAP ports.
6 Select the binding type.
• Simple—The MVE server produces the specified credentials to the LDAP server to use the LDAP server
lookup facility.
a Type the bind user name.
b Type the bind password, and then confirm the password.
• Kerberos—To configure the settings, do the following:
a Type the bind user name.
b Type the bind password, and then confirm the password.
c Click Choose File, and then browse to the krb5.conf
file.
• SPNEGO—To configure the settings, do the following:
a Type the service principal name.
b Click Choose File, and then browse to the krb5.conf file.
c Click Choose File, and then browse to the Kerberos keytab file.
This option is used only for configuring the Simple and Protected GSSAPI Negotiation Mechanism
(SPNEGO) to support the Single Sign-On functionality.
Setting up user access 31

7 From the Advanced Options section, configure the following:
• Search Base—The base distinguished name (DN) of the root node. In the LDAP community server
hierarchy, this node must be the ancestor of the user node and group node. For example,
dc=mvetest,dc=com.
Note: When specifying the root DN, make sure that only dc and o are part of the root DN. If ou or cn
is the ancestor of the user and group nodes, then use ou or cn in the user and group search bases.
• User search base—The node in the LDAP community server where the user object exists. This node is
under the root DN where all the user nodes are listed. For example, ou=people.
• User search
filter
—The parameter for locating a user object in the LDAP community server. For example,
(uid={0}).
Examples of allowed multiple conditions and complex expressions
Log in using In the User search filter field, type
Common name (CN={0})
Login name (sAMAccountName={0})
User Principal Name (userPrincipalName={0})
Tel e ph o n e n u mbe r (telephoneNumber={0})
Login name or common name (|(sAMAccountName={0})(CN={0}))
Note: Only the {0} and {1} patterns can be used. If {0} is used, then MVE searches for the LDAP
user DN. If {1} is used, then MVE searches for the MVE user login name.
• Search User base object and whole subtree—The system searches all the nodes under the user search
base.
• Group search base—The node in the LDAP community server containing the user groups that
correspond to the MVE roles. This node is under the root DN where all the group nodes are listed. For
example, ou=group.
• Group search
filter
—The parameter for locating a user within a group that corresponds to a role in MVE.
Note: The only valid pattern is {0}, which means that MVE searches for the MVE user login name.
• Group role attribute—Type the LDAP attribute for the full name of the group. An LDAP attribute has a
specific
meaning and
defines
a mapping between the attribute and a
field
name. For example, the LDAP
attribute cn is associated with the Full Name field. The LDAP attribute commonname is also mapped to
the Full Name
field.
Generally, this attribute must be left to the default value of cn.
• Search User base object and whole subtree—The system searches all the nodes under the group
search base.
8 From the LDAP Groups to MVE Role Mapping section, type the names of the LDAP groups that correspond
to the MVE roles.
Notes:
• For more information, see “Understanding user roles” on page 29.
• You can assign one LDAP group to multiple MVE roles. You can also type more than one LDAP group
in a role
field,
using the vertical bar character (|) to separate multiple groups. For example, to include
the admin and assets groups for the Admin role, type admin|assets in the LDAP groups for
Admin role field.
Setting up user access 32

• If you want to use only the Admin role and not the other MVE roles, then leave the fields blank.
9 Click Save Changes.
Installing LDAP server certificates
To establish an encrypted communication between the MVE server and the LDAP server, MVE must trust the
LDAP server certificate. In the MVE architecture, when MVE is authenticating with an LDAP server, MVE is the
client and the LDAP server is the peer.
1 Click on the upper‑right corner of the page.
2 Click LDAP, and then configure the LDAP settings. For more information, see “Enabling LDAP server
authentication” on page 31.
3 Click Test LDAP.
4 Enter a valid LDAP user name and password, and then click Start Test.
5 Examine the certificate for validity, and then accept it.
Adding a root CA certificate in the Java truststore
Some MVE LDAP configurations use a load balancer or a virtual IP (VIP) to redirect LDAPS requests. In these
cases, the root CA certificate of the domain must be installed and trusted in the MVE Java truststore.
1 Import the root CA certificate, and then confirm that the certificate is trusted.
2 Back up your database and application files.
3 Stop the MVE service.
4 Run the command prompt as an administrator, and then type the following:
"C:\Program Files\Lexmark\Markvision Enterprise\jre\bin\keytool.exe" -import
-trustcacerts -alias EnterpriseRootCA -file C:\temp\EnterpriseRootCA.cer -
keystore "C:\Program Files\Lexmark\Markvision Enterprise\jre\lib\security
\cacerts"
5 When prompted to enter the keystore password, type changeit.
6 When prompted whether to trust the
certificate,
type yes.
Notes:
• If the process is successful, then a Certificate was added to keystore message appears.
• If the file-level permissions for the cacerts file do not allow you to update the file, then an
access‑denied message appears. You can either update the permissions for the file or run the
command prompt as an administrator who has the permission to update the file.
7 Restart the MVE service.
Setting up user access 33

Discovering printers
Creating a discovery profile
Use a discovery profile to find printers in your network and add them to the system. In a discovery profile, do
either of the following to include or exclude a list of IP addresses or host names:
• Adding entries one at a time
• Importing entries using a TXT or CSV file
You can also assign and enforce a configuration automatically to a compatible printer model. A configuration
must contain printer settings, applications, licenses, firmware, and CA certificates that can be deployed to the
printers.
1 From the Printers menu, click Discovery
Profiles
> Create.
2 From the General section, type a unique name and description for the discovery profile, and then configure
the following:
• Timeout—How long the system waits for a printer to respond.
• Retries—The number of times the system attempts to communicate with a printer.
• Automatically manage discovered printers—Newly discovered printers are set to a Managed state
automatically, and the New state is skipped during discovery.
3 From the Addresses section, do either of the following:
Add the addresses
a Select Include or Exclude.
b Type the IP address, host name, subnet, or IP address range.
10.20.xx.xx,
2001:dbx:x:x:x:x:x:x,
2001:dbx::x:x
10.195.x.x-10.195.x.xx.xxx
Add only one entry at a time. Use the following formats for the addresses:
• 10.195.10.1 (single IPv4 address)
• myprinter.example.com (single host name)
• 10.195.10.3-10.195.10.255 (IPv4 address range)
• 10.195.*.* (wildcards)
• 10.195.10.1/22 (IPv4 Classless Inter‑Domain Routing or CIDR notation)
• 2001:db8:0:0:0:0:2:1 (full IPv6 address)
• 2001:db8::2:1 (collapsed IPv6 address)
Discovering printers 34

Note: If separate discovery profiles are created for the IPv6 and the IPv4 address for the same printer,
then the last discovered address is shown. For example, if a printer is discovered using IPv6, and is
discovered again using IPv4, then only the IPv4 address is shown in the printer list.
c Click Add.
Import the addresses
a Click Import.
b Select whether to include or exclude IP addresses during the discovery.
c Browse to the text file that contains a list of addresses. Each address entry must be placed on a separate
line.
Sample text file
10.195.10.1
myprinter.example.com
10.195.10.3-10.195.10.255
10.195.*.*
10.195.10.1/22
2001:db8:0:0:0:0:2:1
2001:db8::2:1
d Click Import.
4 From the SNMP section, select Version 1, Version 2c or Version 3, and then set the access permissions.
Note: To discover printers using SNMP version 3, create a user name and password in the printer
Embedded Web Server, and then restart the printer. If a connection cannot be established, then
rediscover the printers. For more information, see the Embedded Web Server Administrator’s Guide.
5 If necessary, from the Enter Credentials section, select the authentication method that the printers are using,
and then enter the credentials.
Note: This feature lets you establish communication with secured printers during discovery. The correct
credentials must be provided to perform tasks on the secured printers, such as audit, status update, and
firmware update.
6 If necessary, from the Assign Configurations section, associate a configuration with a printer model. For
information on creating a configuration, see
“Creating a configuration” on page 68.
7 If necessary, from the Assign Keywords section, associate a keyword with a printer model during discovery.
For information on assigning keywords to printers, see
“Assigning keywords to printers” on page 65
Notes:
• All the printers discovered through this profile are assigned with the new keywords.
Discovering printers 35

• The new keywords are added to the existing list of keywords which are already assigned to a printer.
8 Click Save
Profile
or Save and Run
Profile
.
Note: A discovery can be scheduled to occur regularly. For more information, see
“Creating a schedule” on
page 140.
Managing discovery profiles
1 From the Printers menu, click Discovery Profiles.
2 Do any of the following:
Edit a profile
a Select a profile, and then click Edit.
b Configure the settings.
c Click Save
Profile
or Save and Run
Profile
.
Copy a profile
a Select a profile, and then click Copy.
b Configure the settings.
c Add the IP addresses. For more information, see “Add the addresses” on page 34.
d Click Save Profile or Save and Run Profile.
Delete a
profile
a Select one or more profiles.
b Click Delete, and then confirm deletion.
Run a
profile
a Select one or more profiles.
b Click Run. Check the discovery status from the Tasks menu.
Discovering printers 36

Sample scenario: Discovering printers
Company ABC is a large manufacturing company occupying a nine-story building. The company just bought
30 new Lexmark printers, distributed among the nine floors. As the IT personnel, you must add these new
printers to MVE. The printers are already connected to the network, but you do not know all the IP addresses.
You want to secure the following new printers in the Accounting department.
10.194.55.60
10.194.56.77
10.194.55.71
10.194.63.27
10.194.63.10
Sample implementation
1 Create a discovery profile for the printers in the Accounting department.
2 Add the five IP addresses.
3 Create a configuration that secures the specified printers.
4 Include the
configurations
in the discovery
profile.
5 Save and run the
profile.
6 Create another discovery profile for the rest of the printers.
7 Include the IP addresses using a wildcard. Use the following: 10.194.*.*
8 Exclude the five printer IP addresses in the Accounting department.
9 Save, and then run the profile.
Discovering printers 37

Managing the security dashboard
Overview
The Security dashboard lets you view the health of the device security settings. It is a visual representation of
various security settings, such as, ports, protocols, disk encryption status, device administrator accounts, and
default certificate status. It provides visibility to the security posture of your fleet, which helps administrators to
identify and fix the settings which are out of compliance.
Accessing the security dashboard
1 From the MVE web portal, click Dashboard.
Note: The security dashboard is the default landing page for Admin users.
2 Click either of the following widgets:
• Device Security Information
• Device Conformance Check
Showing or hiding the security dashboard
• Modify the dashboard.display parameter in the platform.properties file to hide or show the Security
Dashboard.
• You can find the platform.properties file in \Installation Location\Markvision Enterprise
\apps\dm-mve\WEB-INF\classes, where Installation Location is the installation folder of MVE.
• The default value of this parameter is True. If you enter an incorrect value or leave the
field
blank for this
parameter, then the dashboard is displayed.
• To disable the dashboard, set the dashboard.display parameter to False.
• After you modify the parameter, restart the MVE service.
Managing Device Security Information
This widget summarizes the security view of the fleet.
1 Click any bar of the chart to go to the Device Security Information window.
2 Hover your mouse over the bars to view the following details:
• Port number
• Number of associated printers
• Whether the printer settings are open/enabled
3 Click Print to get a printable format of the detailed view.
Notes:
• The Device Security Information window provides the user with a drill‑down feature.
• Clicking any bar item in the chart enables the user to navigate to a filtered view of the printer listing
page. For more information, see
“Viewing the printer list” on page 40.
Managing the security dashboard 38

Managing Device Conformance Check
This widget summarizes the detailed view of the conformance check of the
fleet.
1 Click any section of the pie chart to go to the Device Conformance Check window.
2 From the left pane, apply the Date Range filter.
Note: Default range is 7 days.
3 Click Print to get a printable format of the detailed view.
Notes:
• The Device Conformance Check window provides the user with a drill‑down feature.
• Clicking any section of the pie chart enables the user to navigate to a filtered view of the printer listing
page. For more information, see
“Viewing the printer list” on page 40.
Managing the security dashboard 39

Viewing printers
Viewing the printer list
The Printer Listing page is the default landing page when you access MVE. The table shows the list of the
printers that are added in MVE.
1 From the Printers menu, click Printer Listing.
2 From the Printer Listing page, do any of the following:
• To se a r c h fo r
specific
printers, do any of the following:
– Use the search box to search for an IP address, host name, system name, or serial number.
Viewing printers 40

– Change the printer listing view. For more information, see “Changing the printer listing view” on
page 46.
Note: If you are using the search box, then the application searches for all the printers in the
system. The selected filters and saved searches are ignored. If you run a saved search, then the
criteria specified in the saved search are used. The selected filters and the IP address or host
name typed in the search box are ignored. You can also use the filters to narrow down the
current search results.
Viewing printers 41

– Use the filters.
– Run a saved search. For more information, see “Running a saved search” on page 49.
• To sort the printers, from the printer list table, click any column header. The printers are sorted according
to the selected column header.
• To view more information about the printers, resize the columns. Place your cursor over the vertical
border of the column header, and then drag the border to the left or to the right.
Viewing printers 42

Viewing the printer information
To see the complete list of information, make sure that an audit is performed on the printer. For more information,
see
“Auditing printers” on page 61.
1 From the Printers menu, click Printer Listing.
2 Click the IP address of the printer.
3 View the following information:
• Status—The status of the printer.
• Supplies—The supply details and remaining supply percentage.
• Identification—The printer network identification information.
Note: The time zone information is available only in some printer models.
• Dates—The date the printer is added to the system, the discovery date, and the most recent audit date.
• Firmware—The printer firmware properties and code levels.
• Capabilities—The printer features.
• Memory Options—The hard disk size and user flash free space.
• Input Options—The settings for the available trays.
• Output Options—The settings for the available bins.
• eSF Applications—The information about the installed Embedded Solutions Framework (eSF)
applications on the printer.
• Printer Statistics—The specific values for each of the printer properties.
• Change Details—The information about the changes in the printer.
Note: This information is available only in printers that are in a Managed (Changed) state. For more
information, see
“Understanding printer life cycle states” on page 47.
• Printer Credentials—The credentials used in the configuration assigned to the printer.
• Printer
Certificate
—The properties of the following printer
certificates:
– Default
– HTTPS
– 802.1x
– IPSec
Notes:
– This information is available only in some printer models.
– An Expiring Soon validity status indicates the expiry date, as set in the
Certificate
Authority
section under System Configuration.
• Configuration Properties—The properties of the configuration assigned to the printer.
• Active Alerts—The printer alerts that are waiting to be cleared.
• Assigned Events—The events assigned to the printer.
Viewing printers 43

Exporting printer data
MVE lets you export the printer information that is available in your current view.
1 From the Printers menu, click Printer Listing.
2 Select one or more printers.
3 Click Printer > Export data.
Notes:
• The exported data is saved in a CSV file.
• Exporting data can be scheduled to occur regularly. For more information, see “Creating a schedule”
on page 140.
Managing views
The Views feature lets you customize the information that is shown in the printer listing page.
1 From the Printers menu, click Views.
2 Do any of the following:
Create a view
a Click Create.
b Type a unique name for the view and its description.
c From the View Columns section, in the Column 1 menu, select the
identifier
column.
Viewing printers 44

d From the Possible columns section, expand a category, select the information that you want to show as
a column, and then click >.
• Capabilities—Shows whether the selected features are supported on the printer.
• Certificate—Shows the printer certificate creation date, enrolment status, expiration date, renewal
date, revision number, certificate subject, validity, and signing status.
• Configuration Information—Shows configuration-related printer information, such as conformance,
configuration name, and state.
• Dates—Shows the last audit, last conformance check, last discovery, and the date the printer was
added to the system.
• Events—Shows event-related printer information.
• Firmware—Shows firmware‑related information, such as the firmware version.
• Identification—Shows information about the printer, such as the IP address, host name, and serial
number.
• Input Options—Shows information about the input options, such as the tray size and media type.
• Options—Shows information about the printer options, such as hard disk and flash drive.
• Printer Statistics—Shows information about the printer usage, such as the number of printed or
scanned pages, and total number of faxed jobs.
• Solutions—Shows the eSF applications installed on the printer, and their version numbers.
• Status—Show the printer and supplies status.
• Supplies—Shows supplies‑related information.
• Printer Ports—Shows ports‑related information.
Note: An Unknown option in the port value means that either the port does not exist on the
printer or MVE cannot retrieve the port.
• Printer Security Options—Shows TLS and Cipher information.
e Click Create View.
Edit a view
a Select a view.
b Click Edit, and then edit the settings.
Viewing printers 45

c Click Save Changes.
Copy a view
a Select a view.
b Click Copy, and then
configure
the settings.
c Click Create View.
Delete views
a Select one or more views.
b Click Delete, and then confirm deletion.
Set a default view
a Select a view.
b Click Set As Default.
The following views are system‑generated, and cannot be edited or deleted:
•
Configuration
• Printer List
• Event
• Security
• Service Desk
• Standard
Changing the printer listing view
For more information, see “Managing views” on page 44.
1 From the Printers menu, click Printer Listing.
2 Click Views, and then select a view.
Filtering printers using the search bar
Note the following when using the search bar to search for printers.
• To search for an IP address, make sure to type the complete IP address or range.
For example:
– 10.195.10.1
– 10.195.10.3-10.195.10.255
– 10.195.*.*
– 2001:db8:0:0:0:0:2:1
• If the search string is not a full IP address, then the printers are searched according to their host name,
system name, or serial number.
• The underscore character ( _ ) can be used as a wildcard character.
Viewing printers 46

Managing keywords
Keywords let you create custom tags and assign them to printers.
1 From the Printers menu, click Keywords.
2 Do either of the following:
• Add, edit, or delete a category.
Note: Categories group keywords together.
• Add, edit, or delete a keyword.
For information on assigning keywords to printers, see
“Assigning keywords to printers” on page 65.
Using saved searches
Understanding printer life cycle states
System-generated saved searches show the printers in the following printer life cycle states:
• All Printers—All printers in the system.
• Managed Printers—Printers that appear can be in any of the following states:
– Managed (Normal)
– Managed (Changed)
– Managed (Missing)
– Managed (Found)
• Managed (Changed) Printers—Printers in the system whose following properties were changed at the last
audit:
– Property tag
– Host name
– Contact name
– Contact location
– Memory size
– Duplex
– Supplies (excluding levels)
– Input options
– Output options
– eSF applications
– Default printer certificate
• Managed (Found) Printers—Printers that were reported as missing, but have now been found.
• Managed (Missing) Printers—Printers that the system was unable to communicate with.
• Managed (Normal) Printers—Printers in the system whose properties have remained the same since the
last audit.
• New Printers—Printers that are newly discovered and are not set to a Managed state automatically.
Viewing printers 47

• Retired Printers—Printers marked as no longer active in the system.
• Unmanaged Printers—Printers marked for exclusion from activities performed in the system.
New
Normal Unmanaged
RetiredMissing FoundChanged
Managed states
Beginning state Ending state Transition
Start Normal
Discovered.
1
Start New
Discovered.
2
Any Normal, Unmanaged, or Retired Manual (Missing does not change to Normal).
Retired Normal
Discovered.
1
Retired New
Discovered.
2
Normal, Missing, or Found Changed New address when discovered.
Normal Changed Audit properties do not match the database
properties.
Normal, Changed, or Found Missing Not found on audit or update status.
Changed Normal Audit properties match the database properties.
Missing Found Discovered, audit, or update status.
Found Normal Discovered, audit, or update status.
1
The "Automatically manage discovered printers" setting is enabled in the discovery profile.
2
The "Automatically manage discovered printers" setting is disabled in the discovery profile.
Viewing printers 48

Running a saved search
A saved search is a saved set of parameters that returns the latest printer information that meets the parameters.
You can create and run a customized saved search, or run the default system‑generated saved searches. The
system-generated saved searches show the printers in their life cycle states. For more information, see
“Understanding printer life cycle states” on page 47.
1 From the Printers menu, click Printer Listing.
2 In the drop‑down menu, select a saved search.
Creating a saved search
Using filters
1
From the Printers menu, click Printer Listing.
2 On the left side of the page, select the filters.
Note: The selected
filters
are listed above the search results header.
3 Click Save, and then type a unique name for your saved search and its description.
4 Click Create Saved Search.
Using the Saved Search page
1
From the Printers menu, click Saved Searches > Create.
2 From the General section, type a unique name for your saved search and its description.
3 From the Rules and Rule Groups section, in the Match menu, specify whether the search results must match
all or any of the rules.
4 Do either of the following:
Viewing printers 49

Add a rule
a Click Add Rule.
b Specify the parameter, operation, and value for your search rule. For more information, see
“Understanding search rules settings” on page 50.
Add a rule group
A rule group may contain a combination of rules. If the Match menu is set to ANY rules and rule groups,
then the system searches for printers that match all the rules in the rule group. If the Match menu is set to
ALL rules and rule groups, then the system searches for printers that match any of the rules in the rule
group.
a Click Add Rule Group.
b Specify the parameter, operation, and value for your search rule. For more information, see
“Understanding search rules settings” on page 50.
c To add another rule, click Add Rule.
5 Click Create Saved Search or Create and Run Saved Search.
Understanding search rules settings
Search for printers using one or more of the following parameters:
Parameter Description
Asset Tag The value of the asset tag setting on the printer.
Certificate Creation Date
1
The date that the certificate was created.
Certificate Enrollment Status
1
The enrollment status of the certificate.
Certificate Expiration Date
1
The date that the certificate expires.
Certificate Renewal Date
1
The date that the certificate is renewed.
Viewing printers 50

Parameter Description
Certificate Revision Number
1
The revision number of the certificate.
Certificate Signing Status
1
The status of the certificate.
Certificate Validity Status
1
The validity of the certificate.
Note: An Expiring Soon status indicates that the
certificate
expires within 30
days.
Color Capability The printer prints in color or in black and white.
Configuration The configuration name assigned to the printer.
Configuration Conformance The conformance status of the printer against the assigned configuration.
Contact Location The value of the contact location setting on the printer.
Contact Name The value of the contact name setting on the printer.
Copy The printer supports the copy function.
Date: Added to System The date that the printer was added to the system.
Date: Last Audited The date that the printer was last audited.
Date: Last Conformance
Check
The date that the printer configuration conformance was last checked.
Date: Last Discovered The date that the printer was last discovered.
Disk Encryption The printer is configured for disk encryption.
Disk Wiping The printer is configured for disk wiping.
Duplex The printer supports two-sided printing.
eSF Capability The printer supports managing eSF applications.
eSF Information The information about the eSF application installed on the printer, such as name,
state, and version.
Event Name The name of the assigned events.
Fax Name The value of the fax name setting on the printer.
Fax Number The value of the fax number setting on the printer.
Fax Receive The printer supports receiving fax.
Firmware Information The information about the firmware installed on the printer.
• Name—The name of the
firmware.
For example, Base or Kernel.
• Version—The printer firmware version.
Host Name The printer host name.
IP Address The printer IP address.
Note: You can use an asterisk in the last three octets to search for multiple
entries. For example, 123.123.123.*, 123.123.*.*, 123.*.*.*,
2001:db8::2:1, and 2001:db8:0:0:0:0:2:1.
Keyword The assigned keywords.
Lifetime Page Count The lifetime page count value of the printer.
MAC Address The printer MAC address.
Viewing printers 51

Parameter Description
Maintenance Counter The value of the printer maintenance counter.
Manufacturer The printer manufacturer name.
Marking Technology The marking technology that the printer supports.
MFP Capability The printer is a multifunction product (MFP).
Model The printer model name.
Modular Serial Number The modular serial number.
Printer Status The printer status. For example, Ready, Paper Jam, Tray 1 Missing.
Printer Status Severity The value of the most severe status present on the printer. For example, Unknown,
Ready, Warning, or Error.
Profile The printer supports profiles.
Scan to E-mail The printer supports Scan to E‑mail.
Scan to Fax The printer supports Scan to Fax.
Scan to Network The printer supports Scan to Network.
Secure Communication State The printer security or authentication state.
Serial Number The printer serial number.
State The current printer state in the database.
Supply Status The printer supplies status.
Supply Status Severity The value of the most severe supply status present on the printer. For example,
Unknown, OK, Warning, or Error.
System Name The printer system name.
Time Zone The time zone of the region where the printer is located.
TLI The value of the TLI setting on the printer.
1
Certificate-related
parameters are applicable for the following device
certificates:
• Default
• HTTPS
• 802.1x
• IPSec
Use the following operators when searching for printers:
• Exactly Matches—A parameter is equivalent to a
specified
value.
• Is Not—A parameter is not equivalent to a
specified
value.
• Contains—A parameter contains a specified value.
• Does Not Contain—A parameter does not contain a specified value.
• Begins With—A parameter begins with a specified value.
• Ends With—A parameter ends with a specified value.
• Date
– Older than—A parameter to search days before the days specified.
– Within last—A parameter to search within days specified before today.
Viewing printers 52

– Within the next—A parameter to search within days specified after today.
Note: To search for printers that have parameters with empty values, use _EMPTY_OR_NULL_. For example,
to search for printers that have empty Fax Name, in the Value field, type _EMPTY_OR_NULL_.
Managing saved searches
1 From the Printers menu, click Saved Searches.
2 Do any of the following:
Edit a saved search
a
Select a saved search, and then click Edit.
Note: System‑generated saved searches cannot be edited. For more information, see
“Understanding
printer life cycle states” on page 47.
b Configure the settings.
c Click Save Changes or Save and Run.
Copy a saved search
a
Select a saved search, and then click Copy.
b Configure the settings.
c Click Create Saved Search or Create and Run Saved Search.
Delete saved searches
a
Select one or more saved searches.
Note: System‑generated saved searches cannot be deleted. For more information, see
“Understanding printer life cycle states” on page 47.
b Click Delete, and then confirm deletion.
Sample scenario: Monitoring the toner levels of your fleet
As the IT personnel of Company ABC, you must organize the printer fleet to monitor them easily. You want to
monitor the toner usage of the printers to determine whether the supplies need replacement.
Sample implementation
1 Create a saved search that retrieves the printers whose supplies have errors or warnings.
Sample rule for your saved search
Parameter: Supply Status Severity
Operation: Is Not
Value: Supplies OK
2 Create a view that shows the supply status, capacity, and level for each printer.
Sample columns to show in your supplies view
Supply Status
Black Cartridge Capacity
Viewing printers 53

Black Cartridge Level
Cyan Cartridge Capacity
Cyan Cartridge Level
Magenta Cartridge Capacity
Magenta Cartridge Level
Yellow Cartridge Capacity
Yellow Cartridge Level
3 Run the saved search while using the view.
Note: The information shown in the printer listing view is based on the last audit. Perform an audit and
status update to get the current printer status.
Viewing printers 54

Securing printer communications
Understanding printer security states
During discovery, the printer can be in any of the following security states:
• Unsecured—MVE does not need credentials to communicate with the device.
• Secured—MVE needs credentials and they were provided.
• Missing credentials—MVE needs credentials but they were not provided.
• Invalid credentials—MVE needs credentials but incorrect credentials were provided.
Missing
credentials
Invalid
credentials
Secured
Unsecured
- Create a
configuration from
the printer
- Enter credentials
in MVE
- Enforce a secured
configuration
- Enforce an
unsecured
configuration
- Create a configuration
from the printer
- Enter credentials
in MVE
- Enter invalid
credentials
- Enter invalid
credentials
A printer is in the Invalid credentials state when the credentials are found to be invalid during discovery, audit,
status update, conformance check, or
configuration
enforcement.
The printer is in an Unsecured state only when it does not require credentials during discovery.
To change the status from Unsecured to Secured, enforce a secured configuration.
To move a printer from the Missing credentials or Invalid credentials state, enter the credentials in MVE manually
or create a
configuration
from the printer.
Securing printer communications 55

Securing printers using the default configurations
On some printer models, there is no default administrator user. The Guest user has open access and is not
logged in. This setup grants the user access to all printer permissions and access controls. MVE handles this
risk through default configurations. After a fresh installation, two advanced security components are created
automatically. Each component contains the default security settings and preconfigured local administrator
account. You can use these security components when creating a
configuration,
and then deploy and enforce
the configuration to the new printers.
From the Configurations menu, click All Advanced Security Components.
Simple account-based authentication
This security component contains a User Name/Password Local Account called admin.
The admin account is a member of the Admin Group, whose permissions include function access controls and
permissions to secure the printer and restrict public access. For more information, see
“Understanding
permissions and function access controls” on page 58.
Securing printer communications 56

Before adding this component to a configuration, make sure to set the admin password and the printer
credentials.
Simple template-based authentication
This security component contains a security template called Admin Password Protected that is configured with
a Password Local Account.
This security template is applied to the following access controls:
• Firmware Updates
• Remote Management
• Security Menu remotely
The remaining access controls are set to No Security. However, you can always set the other administrative
printer menus to use the security template for more protection. For more information on the access controls,
see
“Understanding permissions and function access controls” on page 58.
Before adding this component to a configuration, make sure to set the password and the printer credentials.
Securing printer communications 57

Understanding permissions and function access controls
Printers can be
configured
to restrict public access to administrative menus and device management features.
In newer printer models, permissions to access printer functions can be secured through dierent types of
authentication methods. In older printer models, a security template can be applied to a function access control
(FAC).
To communicate with these secured printers and manage them, MVE requires certain permissions or FACs,
depending on the printer model.
The following table explains what printer management functions can be managed in MVE and what permissions
or FACs are required.
Note that MVE requires the authentication credentials when Remote Management is secured. If other
administrative menus and device management permissions or FACs are secured, then Remote Management
must also be secured. Otherwise, MVE cannot perform the functions.
These permissions and function access controls are predefined in MVE as default advanced security
components, and can readily be used in a configuration. For more information, see
“Securing printers using
the default
configurations”
on page 56.
If you are not using the default advanced security components, then make sure that these permissions and
function access controls are configured in the printer manually. For more information, see
“Configuring printer
security” on page 58.
Permissions or FACs Description
Remote Management The ability to read and write settings remotely. If any other permissions or FACs
listed in this table are secured, then Remote Management must also be
secured.
Firmware Updates The ability to update firmware from any method.
Apps Configuration The ability to install or remove applications from the printer and send
application settings files to the printer.
Import / Export All Settings
or
Configuration File Import / Export
The ability to send configuration files to the printer.
Security Menu
or
Security Menu Remotely
The ability to manage login methods and configure printer security options.
To secure newer printer models in MVE, disable public access for the Remote Management and Security Menu
permissions. For older printer models, apply a security template to the Remote Management FAC.
Configuring printer security
1 From the Printers menu, click Printer Listing.
2 Click the IP address of the printer, and then click Open Embedded Web Server.
3 Click Settings or Configuration.
4 Depending on your printer model, do either of the following:
• Click Security > Login Methods, and then do the following:
Securing printer communications 58

For newer printer models
a From the Security section, create a login method.
b Click Manage Group/Permissions or Manage Permissions beside the login method.
c Expand Administrative Menus, and then select Security Menu.
d Expand Device Management, and then select the following permissions:
– Remote Management
– Firmware Updates
– Apps Configuration
– Import / Export All Settings
e Click Save.
f From the Public section, click Manage Permissions.
g Expand Administrative Menus, and then clear Security Menu.
h Expand Device Management, and then clear Remote Management.
i Click Save.
• Click Security > Security Setup or Edit Security Setup, and then do the following:
For older printer models
a From the Advanced Security Setup section, create a building block and a security template.
b Click Access Controls, and then expand Administrative Menus.
c In the Security Menu Remotely menu, select the security template.
d Expand Management, and then select the security template for the following function access
controls:
– Apps Configuration
– Remote Management
– Firmware Updates
–
Configuration
File Import / Export
e Click Submit.
Securing printer communications on your fleet
1 Discover a secured printer. For more information, see “Discovering printers” on page 34.
Notes:
• A printer is secured when appears next to it. For information on securing a printer, see the
help document.
• For more information on printer security states, see “Understanding printer security states” on
page 55.
2 Create a configuration from a printer. For more information, see “Creating a configuration from a printer” on
page 71.
3 Assign the configuration to your fleet. For more information, see “Assigning configurations to printers” on
page 62.
4 Enforce the configuration. For more information, see “Enforcing configurations” on page 62. A padlock
symbol appears next to the secured printer.
Securing printer communications 59

Other ways to secure your printers
For more information on
configuring
printer security settings, see the Embedded Web Server Administrator's
Guide for your printer.
Check your printers for the following settings:
• Disk encryption is enabled.
• The following ports are restricted:
– TCP 79 (Finger)
– TCP 21 (FTP)
– UDP 69 (TFTP)
– TCP 5001 (IPDS)
– TCP 9600 (IPDS)
– TCP 10000 (Telnet)
• The default cipher list is the OWASP Cipher String ‘B.’
Securing printer communications 60

Managing printers
Restarting the printer
1 From the Printers menu, click Printer Listing.
2 Click the IP address of the printer.
3 Click Restart Printer.
Viewing the printer Embedded Web Server
The Embedded Web Server is a software built into the printer that provides a control panel for configuring the
printer from any web browser.
1 From the Printers menu, click Printer Listing.
2 Click the IP address of the printer.
3 Click Open Embedded Web Server.
Auditing printers
An audit collects information from any printers in the Managed state, and then stores the information in the
system. To make sure that the information in the system is current, perform an audit regularly.
1 From the Printers menu, click Printer Listing.
2 Select one or more printers.
3 Click Printer > Audit.
Note: An audit can be scheduled to occur regularly. For more information, see
“Creating a schedule” on
page 140.
Updating printer status
The Update Status feature lets you update the printer status and supplies information. To make sure that the
printer status and supplies information is current, update the status regularly.
1 From the Printers menu, click Printer Listing.
2 Select one or more printers.
3 Click Printer > Update status.
Note: A status update can be scheduled to occur regularly. For more information, see
“Creating a
schedule” on page 140.
Managing printers 61

Setting the printer state
For more information on the printer states, see “Understanding printer life cycle states” on page 47.
1 From the Printers menu, click Printer Listing.
2 Select one or more printers.
3 Click Printer, and then select one of the following:
• Set state to managed—The printer is included in all activities that can be performed in the system.
• Set state to unmanaged—The printer is excluded in all activities that can be performed in the system.
• Set state to retired—The printer is removed from the network. The system retains the printer information,
but does not expect to see the printer on the network again.
Assigning configurations to printers
Before you begin, make sure that a
configuration
for the printer is created. Assigning a
configuration
to a printer
allows the system to run conformance checks and enforcements. For more information, see
“Creating a
configuration” on page 68.
1 From the Printers menu, click Printer Listing.
2 Select one or more printers.
3 Click
Configure
> Assign
configurations
.
4 From the
Configuration
section, select a
configuration.
Note: If the system is set to Use Markvision to manage device
certificates
, then select Trust the
selected devices. This
confirmation
is the way for the user to verify that the printers are real devices and
not spoofed.
5 Click Assign Configurations.
Unassigning configurations
1 From the Printers menu, click Printer Listing.
2 Select one or more printers.
3 Click Configure > Unassign configurations.
4 Click Unassign Configurations.
Enforcing configurations
MVE runs a conformance check against the printer. If some settings are out of conformance, then MVE changes
those settings on the printer. MVE runs a final conformance check after changing the settings. Updates that
require the printer to reboot, such as firmware updates, may require a second enforcement to complete.
Managing printers 62

Before you begin, make sure that a configuration is assigned to the printer. For more information, see “Assigning
configurations to printers” on page 62.
1 From the Printers menu, click Printer Listing.
2 Select one or more printers.
3 Click Configure > Enforce configurations.
Notes:
• If the printer is in an error state, then some settings may not be updated.
• For MVE to deploy
firmware
and solution
files
to a printer, the Firmware Updates function access control
must be set to No Security. If security is applied, then the Firmware Updates function access control
must use the same security template as the Remote Management function access control. For more
information, see
“Deploying files to printers” on page 63.
• An enforcement can be scheduled to occur regularly. For more information, see “Creating a schedule”
on page 140.
Checking the printer conformance with a configuration
During a conformance check, MVE checks the printer settings, and verifies whether they match the assigned
configuration. MVE does not make changes to the printer during this operation.
Before you begin, make sure that a configuration is assigned to the printer. For more information, see
“Assigning
configurations to printers” on page 62.
1 From the Printers menu, click Printer Listing.
2 Select one or more printers.
3 Click
Configure
> Check conformance.
Notes:
• You can view the results in the task status page.
• A conformance check can be scheduled to occur regularly. For more information, see “Creating a
schedule” on page 140.
Deploying files to printers
You can deploy the following
files
to the printer:
• CA
Certificates
—.cer or .pem
files
that are added to the printer trust store.
• Configuration bundle—.zip files that are exported from a supported printer or obtained directly from
Lexmark.
• Firmware update—An .fls file that is flashed to the printer.
• Generic file—Any file that you want to send to the printer.
– Raw socket—Sent over port 9100. The printer treats it like any other print data.
– FTP—Send file over FTP. This deployment method is not supported on secured printers.
• Printer certificate—A signed certificate that is installed on the printer as the default certificate.
Managing printers 63

• Universal Configuration File (UCF)—A configuration file exported from a printer.
– Web service—The HTTPS web service is used when the printer model supports it. Otherwise, the printer
uses the HTTP web service.
– FTP—Send file over FTP. This deployment method is not supported on secured printers.
1 From the Printers menu, click Printer Listing.
2 Select one or more printers.
3 Click Configure > Deploy file to printers.
4 Click Choose File, and then browse to the file.
5 Select a
file
type, and then select a deployment method.
6 Click Deploy File.
Notes:
• For MVE to deploy
firmware
and solution
files
to a printer, the Firmware Updates function access control
must be set to No Security. If security is applied, then the Firmware Updates function access control
must use the same security template as the Remote Management function access control.
• A file deployment can be scheduled to occur regularly. For more information, see “Creating a schedule”
on page 140.
Updating the printer firmware
1 From the Printers menu, click Printer Listing.
2 Select one or more printers.
3 Click Configure > Update firmware to printers.
4 Select a firmware file from the resource library, or click Choose File, and then browse to the firmware file.
Note: For more information on adding firmware files to the library, see
“Importing files to the resource
library” on page 74.
5 If necessary, to schedule the update, select Define update window, and then select the start date, start and
pause time, and days of the week.
Note: The
firmware
is sent to the printers within the
specified
start time and pause time. The task is
paused after the pause time, and then resumes at the next start time until it is completed.
6 Click Update Firmware.
Note: For MVE to update the printer
firmware,
the Firmware Updates function access control must be set to
No Security. If security is applied, then the Firmware Updates function access control must use the same
security template as the Remote Management function access control. In this case, MVE must manage the
printer securely. For more information, see
“Securing printer communications” on page 55.
Managing printers 64

Uninstalling applications from printers
MVE can uninstall only applications that have been added to the system in the Package Builder format. For
more information on uploading applications to the system, see
“Importing files to the resource library” on
page 74.
1 From the Printers menu, click Printer Listing.
2 Select one or more printers.
3 Click
Configure
> Uninstall Apps from printers.
4 Select the applications.
5 Click Uninstall Apps.
Assigning events to printers
Assigning events to printers lets MVE perform the associated action whenever one of the associated alerts
occurs on the assigned printer. For more information on creating events, see
“Managing printer alerts” on
page 130.
Note: Events can be assigned only to unsecured printers.
1 From the Printers menu, click Printer Listing.
2 Select one or more printers.
3 Click Assign > Events.
4 Select one or more events.
Note: If some of the selected printers already have the event assigned to them, then a dash in the check
box appears. If you leave it as a dash, then the event does not change. If you select the check box, then
the event is assigned to all the selected printers. If you clear the check box, then the event is unassigned
from the printers it was previously assigned to.
5 Click Assign Events.
Assigning keywords to printers
Assigning keywords to printers lets you organize your printers. For more information on creating keywords,
see
“Managing keywords” on page 47.
1 From the Printers menu, click Printer Listing.
2 Select one or more printers.
3 Click Assign > Keywords.
4 If necessary, in the View menu, select a category.
Managing printers 65

5 Select one or more keywords.
Note: Keywords are listed following a category. If some of the selected printers already have the keyword
assigned to them, then a dash in the check box appears. If you leave it as a dash, then the keyword is not
assigned or unassigned to the selected printers. If you select the check box, then the keyword is
assigned to all the selected printers. If you clear the check box, then the keyword is unassigned from the
printers it was previously assigned to.
6 Click Assign Keywords.
Entering credentials to secured printers
Secured printers can be discovered and enrolled. To communicate with these printers, you can either enforce
a configuration or enter the credentials in MVE directly.
Note: A printer is secured when a
appears next to it.
To enter the credentials, do the following:
1 From the Printers menu, click Printer Listing.
2 Select one or more secured printers.
3 Click Security > Enter Credentials.
4 Select the authentication method, and then enter the credentials.
5 Click Enter Credentials.
Note: Enrolled printers that are secured but do not have the correct credentials saved in MVE are tagged
as Missing credentials under the Communications filter. After the correct credentials are entered, the
printers are tagged as Secured.
Configuring default printer certificates manually
When not using the automated certificate management feature, MVE can help facilitate the process of signing
the default printer certificate on a fleet of printers. MVE gathers the certificate‑signing requests from the fleet,
and then deploys the signed certificates to the proper printers after they are signed.
A system administrator must do the following:
1 Generate the printer certificate‑signing requests.
a From the Printers menu, click Printer Listing.
b Select one or more printers.
c Click Security > Generate printer certificate signing requests.
Note: You can select one or more printers when generating certificate-signing requests, but only one set
of requests can exist at a time. To avoid overwriting any existing certificate-signing requests, you must
download the certificate-signing requests before generating another set.
2 Wait for the task to finish, and then download the printer certificate‑signing requests.
a From the Printers menu, click Printer Listing.
b Click Security > Download printer certificate signing requests.
3 Use a trusted CA to sign the
certificate
‑signing requests.
Managing printers 66

4 Save the signed certificates in a ZIP file.
Note: All the signed
certificates
must be in the root location of the ZIP
file.
Otherwise, MVE cannot parse
the
file.
5 From the Printers menu, click Printer Listing.
6 Select one or more printers.
7 Click Configure > Deploy file to printers.
8 Click Choose File, and then browse to the ZIP file.
9 In the File type menu, select Printer Certificates.
10 Click Deploy File.
Removing printers
1 From the Printers menu, click Printer Listing.
2 Select one or more printers.
3 Click Printer.
4 If necessary, to remove the printer certificate, select Delete associated device certificate(s).
Note: If MVE is managing the device
certificates,
then removing the printer
certificate
deletes the default
certificate
from the printer. The printer then generates a new self-signed
certificate.
5 Do either of the following:
• To retain the printer information, click Retire Printer.
• To remove the printer from the system, click Delete Printer.
Managing printers 67

Managing
configurations
Overview
MVE uses configurations to manage the printers in your fleet.
A configuration is a collection of settings that can be assigned and enforced to a printer or a group of printer
models. Within a configuration, you can modify printer settings and deploy applications, licenses, firmware, and
printer certificates.
You can create a configuration that is composed of the following:
• Basic printer settings
• Advanced security settings
• Color print permissions
Note: This setting is available only in configurations for supported color printers.
• Printer firmware
• Applications
• CA
certificates
• Resource Files
Using configurations, you can do the following to manage the printers:
• Assign a configuration to printers.
• Enforce the configuration to the printers. The settings that are specified in the configuration are applied to
the printers. The firmware, applications, printer certificate, application files (.fls), and CA certificates are
installed.
• Check whether the printers are in conformance against a configuration. If a printer is out of conformance,
then the
configuration
can be enforced to the printer.
Note:
Configuration
enforcement and conformance checking can be scheduled to occur regularly.
• If the printer supports the configuration settings but the values are not applicable, then the printer shows
as out of conformance.
Creating a configuration
A configuration is a collection of settings that can be assigned and enforced to a printer or a group of printers.
Within a configuration, you can modify printer settings and deploy applications, licenses, firmware, and CA
certificates to printers.
1 From the Configurations menu, click All Configurations > Create.
2 Type a unique name for the configuration and its description.
3 In the Setting list, do one or more of the following:
• From the Basic tab, select one or more settings, and then specify the values. If the value is a variable
setting, then enclose the header with ${}. For example, ${Contact_Name}. To use a variable setting
Managing configurations 68

file, select the file from the Use variable setting data file menu, or import the file. For more information,
see
“Understanding variable settings” on page 72.
– Select one or more settings, and then specify the values. If the value is a variable setting, then enclose
the header with ${}. For example, ${Contact_Name}. To use a variable setting file, select the file
from the Use variable setting data
file
menu, or import the
file.
For more information, see
“Understanding variable settings” on page 72.
– If one or more certificates are added to this configuration, you can select any of the certificates from
the Value drop‑down menu.
• From the Advanced Security tab, select an advanced security component.
Notes:
– To create an advanced security component, see “Creating an advanced security component from
a printer” on page 71.
– You can manage the advanced security settings only when creating a
configuration
from a
selected printer. For more information, see
“Creating a configuration from a printer” on page 71.
• From the Color Print Permissions tab, configure the settings. For more information, see “Configuring the
color print permissions” on page 73.
Note: This setting is available only in configurations for supported color printers.
Managing configurations 69

• From the Firmware tab, select a firmware file. If multiple versions of the same firmware are present in a
configuration,
only the higher
firmware
version is considered during conformance and enforcement. To
import a
firmware
file,
see
“Importing
files
to the resource library” on page 74.
• From the Apps tab, select one or more applications to deploy. For more information, see “Creating an
applications package” on page 73.
Note: MVE does not support deploying applications with trial licenses. You can deploy only free
applications or applications with production licenses.
• From the Certificates tab, select one or more certificates to deploy. To import a certificate file, see
“Importing files to the resource library” on page 74.
Note: Select Use Markvision to manage device
certificates
for MVE to assess missing, invalid,
revoked, and expired
certificates,
and then replace them automatically.
Select either of the following options:
– Default Device Certificate
– Named Device Certificate
Note: By default, a user can add 10 named
certificates
per MVE installation and 5 named
certificates
per MVE
configuration.
Note: For more information, see
“Configuring MVE for automated certificate management” on
page 77.
• From the Resource Files tab, select any of the following file types to deploy:
– Application file (.fls)
– Configuration bundle (.zip)
– Universal configuration file (.ucf)
Notes:
– Any option under the resource tab is not conformance checked.
– We do not recommend using multiple UCF and configuration bundles in a single configuration.
– This method is not applicable to UCF files when configuring scan to network on legacy printers.
UCF files must be deployed using the Deploy file to printer action.
4 Click Create Configuration.
Note: The following list shows the deployment sequence in a
configuration:
• CA
Certificates
• Application Files
• Solution Packages
• Advanced Security
• Device Certificates
• Basic Settings
• UCF and configuration bundle
• Firmware
Managing configurations 70

Creating a configuration from a printer
The following components are not included:
• Printer
firmware
• Applications
• Certificates
To add the firmware, applications, and certificates, edit the configuration in MVE.
1 From the Printers menu, click Printer Listing.
2 Select the printer, and then click
Configure
> Create
configuration
from printer.
3 If necessary, select Include advanced security settings to create an advanced security component from
the selected printer.
4 If the printer is secured, then select the authentication method, and then enter the credentials.
5 Type a unique name for the configuration and its description, and then click Create Configuration.
6 From the Configurations menu, click All Configurations.
7 Select the configuration, and then click Edit.
8 If necessary, edit the settings.
9 Click Save Changes.
Sample scenario: Cloning a configuration
Fifteen Lexmark MX812 printers were added to the system after discovery. As the IT personnel, you must apply
the settings of the existing printers to the newly discovered printers.
Note: You can also clone a
configuration
from a printer, and then enforce the
configuration
to a group of
printer models.
Sample implementation
1 From the existing printers list, select a Lexmark MX812 printer.
2 Create a configuration from the printer.
Note: To secure the printers, include the advanced security settings.
3 Assign, and then enforce the configuration to the newly discovered printers.
Creating an advanced security component from a printer
Create an advanced security component from a printer to manage the advanced security settings. MVE reads
all the settings from that printer, and then creates a component that includes the settings. The component can
be associated to multiple configurations for printer models that have the same security framework.
1 From the Printers menu, click Printer Listing.
2 Select the printer, and then click Configure > Create advanced security component from printer.
3 Type a unique name for the component and its description.
Managing configurations 71

4 If the printer is secured, then select the authentication method, and then enter the credentials.
5 Click Create Component.
Note: When you create and enforce a
configuration
with an advanced security component that contains
local accounts, the local accounts are added to the printers. Any existing local accounts that are
preconfigured in the printer are retained.
Generating a printable version of the configuration
settings
1 Edit a configuration or advanced security component.
2 Click Printer‑friendly version.
Understanding dynamic settings
• These settings include 802.1x Device
Certificate,
HTTPS Device
Certificate,
and IPSec Device
Certificate
which are listed under the Basic tab of a configuration.
• The options for each of these settings are populated with the certificates selected in the Certificate tab.
• When you clone, export, or import a configuration, the preselected values of these settings are cleared. You
must select the values manually.
Understanding variable settings
Variable settings let you manage settings across your fleet that are unique to each printer, such as host name
or asset tag. When creating or editing a configuration, you can select a CSV file to be associated with the
configuration.
Sample CSV format:
IP_ADDRESS,Contact_Name,Address,Disp_Info
1.2.3.4,John Doe,1600 Penn. Ave., Blue
4.3.2.1,Jane Doe,1601 Penn. Ave., Red
2.3.6.5,"Joe, Jane and Douglas",1601 Penn. Ave.,Yellow
2.3.6.7,"Joe, Jane and Douglas",1600 Penn. Ave.,He is 6’7” tall
In the header row of the variable file, the first column is a unique printer identifier token. The token must be
one of the following:
• HOSTNAME
• IP_ADDRESS
• SYSTEM_NAME
• SERIAL_NUMBER
Each subsequent column in the header row of the variable
file
is a user‑
defined
replacement token. This token
must be referenced within the configuration using the ${HEADER} format. It is replaced with the values in the
subsequent rows when the configuration is enforced. Make sure that the tokens do not contain any spaces.
Managing configurations 72

You can import the CSV file containing the variable settings when creating or editing a configuration. For more
information, see
“Creating a configuration” on page 68.
Configuring the color print permissions
MVE lets you restrict color printing for host computers and specific users.
Note: This setting is available only in configurations for supported color printers.
1 From the Configurations menu, click All Configurations.
2 Create or edit a
configuration.
3 From the Color Print Permissions tab, do either of the following:
Configure the color print permissions for host computers
a In the View menu, select Host computers, and then select Include color print permissions for host
computers.
b Click Add, and then type the host computer name.
c To let the host computer print in color, select Allow color printing.
d To let users that log in to the host computer print in color, select Override user permission.
e Click Save and Add or Save.
Configure the color print permissions for users
a In the View menu, select Users, and then select Include color print permissions for users.
b Click Add, and then type the user name.
c Select Allow color printing.
d Click Save and Add or Save.
Creating an applications package
1 Log in to Package Builder at iss.lexmark.com/cdp/package-builder.
2 From the Packages page, click Create package.
3 From the Create Package page, enter the package name.
4 Click Add Product, select a product, and then click Add Product.
5 If necessary, select Redeem an activation code for licensed product.
6 Click Create Package.
7 Download the package by doing either of the following:
• Click the package name, and then click Download.
• In the Download Package column, click Download.
Managing configurations 73

Notes:
• MVE does not support deploying applications with trial licenses. You can deploy only free applications or
applications with production licenses. If you need activation codes, then contact your Lexmark
representative.
• To add the applications to a
configuration,
import the applications package to the resource library. For
more information, see
“Importing files to the resource library” on page 74.
Importing or exporting a configuration
Before you begin importing a configuration file, make sure that it is exported from the same version of MVE.
1 From the
Configurations
menu, click All
Configurations
.
2 Do either of the following:
• To import a
configuration
file,
click Import, browse to the
configuration
file,
and then click Import.
• To export a configuration file, select a configuration, and then click Export.
Notes:
– When you export a configuration, the passwords are excluded. After importing, manually add the
passwords.
– UCF, configuration bundles, and application files are not part of an exported configuration.
Importing files to the resource library
The resource library is a collection of firmware files, CA certificates, and application packages that are imported
to MVE. These
files
can be associated with one or more
configurations.
1 From the Configurations menu, click Resource Library.
2 Click Import > Choose File, and then browse to the
file.
Note: Only firmware files (.fls), application files (.fls), application packages or configuration bundles (.zip),
CA
certificates
(.pem), and universal
configuration
files
(.ucf) can be imported.
3 Click Import Resource.
Managing configurations 74

Managing
certificates
Setting up MVE to manage certificates automatically
Understanding the automated
certificate
management feature
You can configure MVE to manage printer certificates automatically, and then install them to the printers through
configuration enforcement. The following diagram describes the end-to-end process of the automated
certificate management feature.
Managing certificates 75

The certificate authority endpoints, such as the CA server and server address, must be defined in MVE.
The following CA servers are supported:
• OpenXPKI CA—Users can use either of the following protocols:
– Secure
Certificate
Encryption Protocol (SCEP)
– EST Connector
Notes:
– EST is the recommended way to connect to the OpenXPKI server.
– For more information on configuring OpenXPKI CA using EST protocol, see “Managing certificates
using OpenXPKI Certificate Authority through EST” on page 113
– For more information on
configuring
OpenXPKI CA using SCEP protocol, see “Managing
certificates
using OpenXPKI
Certificate
Authority through SCEP” on page 97
• Microsoft CA Enterprise—Users can use either of the following protocols
– Secure Certificate Encryption Protocol (SCEP)
– Microsoft Certificate Enrollment Web Services (MSCEWS)
Notes:
– MSCEWS is the recommended way to connect to the Microsoft CA Enterprise server.
– For more information on configuring Microsoft CA using MSCEWS protocol, see “Managing
certificates using Microsoft Certificate Authority through MSCEWS” on page 86
– For more information on configuring Microsoft CA using SCEP protocol, see “Managing certificates
using Microsoft Certificate Authority through SCEP” on page 79
The connection between MVE and the CA servers must be validated. During validation, MVE communicates
with the CA server to download the certificate chain and the Certificate Revocation List (CRL). The enrollment
agent certificate or test certificate is also generated. This certificate enables the CA server to trust MVE.
For more information on defining the endpoints and validation, see
“Configuring MVE for automated certificate
management” on page 77.
A configuration that is set to Use Markvision to manage device certificates must be assigned and enforced
to the printer.
For more information, see the following topics:
• “Creating a configuration” on page 68
• “Enforcing
configurations”
on page 62
During enforcement, MVE checks the printer for conformance.
For Default Device
Certificate
• The
certificate
is validated against the
certificate
chain downloaded from the CA server.
• If the printer is out of conformance, a Certificate Signing Request (CSR) is raised for the printer.
For Named Device Certificate
• The certificate is validated against the certificate chain downloaded from the CA server.
• MVE creates a self-signed named device
certificate
on the device.
• If the printer is out of conformance, a CSR is raised for the printer.
Notes:
• MVE communicates with the CA server using the
configured
protocols.
Managing certificates 76

• The CA server generates the new certificate, and then MVE sends the certificate to the printer.
• If a named certificate exists in the printer, then a new named certificate is not created, but a CSR is
raised for the printer.
Configuring
MVE for automated
certificate
management
1 Click on the upper‑right corner of the page.
2 Click Certificate Authority > Use Certificate Authority Server.
Note: The Use Certificate Authority Server button appears only when configuring the certificate authority
for the first time, or when the certificate is deleted.
3 Configure the server endpoints.
• CA Server—The Certificate Authority (CA) server that generates the printer certificates. You can select
either of the following:
– OpenXPKI CA
– Microsoft CA- Enterprise
Note: User can also configure a CA server which supports the Enrollment over Secure Transport
(EST) protocol.
– The CA server must implement the EST protocol as defined in RFC 7030.
Note: Any deviation from the specification may result in an invalid setup.
– EST is the recommended protocol to connect to the OpenXPKI CA server.
Note: Microsoft CA Enterprise server does not support the EST protocol.
• CA Server Address—The IP address or host name of your CA server. This field is only applicable for
SCEP and EST protocols.
Note: Type any of the following:
– For MSCA server (using SCEP): <Server IP Address or Hostname>/certsrv/mscep/mscep.dll
– For OpenXPKI server (using SCEP): <Server IP Address or Hostname>/scep/scep
– For EST, type any of the following:
• https://172.87.95.240
• https://estserver.com
• estserver.com
• CA Server Label (Optional)— If the user creates a new realm, the same realm name must be put in this
field.
• CEP Server Address— This field is only applicable for the MSCEWS protocol.
Note: Type any of the following:
– For Username and Password Authentication:
https://democep.com/ADPolicyProvider_CEP_UsernamePassword/service.svc/CEP
– For Windows Integrated Authentication:
https://democep.com/ADPolicyProvider_CEP_Kerberos/service.svc/CEP
– For Client Certificate Authentication:
https://democep.com/ADPolicyProvider_CEP_Certificate/service.svc/CEP
Managing certificates 77

• CA Server Hostname—The host name of your CA server.
Note: For example, for MSCEWS protocol, user may select democa.lexmark.com
• CES Server Hostname—The host name of your CES server.
Note: For example, for MSCEWS protocol, user may select democes.lexmark.com
• Challenge Password—Challenge Password is required to assert the identity of MVE to the CA server.
This password is only required for OpenXPKI CA. It is not supported in Microsoft CA Enterprise.
Note: Depending on your CA server, you must configure the server authentication mode. Do either of the
following:
• If you select EST protocol, then from the CA Server Authentication Mode menu, select any of the
following:
– Username and Password Authentication
– Client Certificate Authentication
• If you select MSCEWS protocol, then from the CA Server Authentication Mode menu, select any of the
following:
– Username and Password Authentication
– Client Certificate Authentication
– Windows Integrated Authentication
• SCEP protocol only supports the Challenge Password authentication mode.
Note: Depending on your CA server, see any of the sections:
• “Managing
certificates
using OpenXPKI
Certificate
Authority through SCEP” on page 97
• “Managing certificates using Microsoft Certificate Authority through SCEP” on page 79
• “Managing certificates using Microsoft Certificate Authority through MSCEWS” on page 86
• “Managing certificates using OpenXPKI Certificate Authority through EST” on page 113
4 Click Save Changes and Validate > OK.
Notes:
• The Discard Changes option only works if the changes are not yet saved or saved and validated.
• User cannot recover data from an invalid configuration as MVE does not store the last valid state of
any configuration. MVE only stores one single certificate configuration at a time, which may or may
not be valid.
Notes:
• The connection between MVE and the CA servers must be validated. During validation, MVE
communicates with the CA server to download the
certificate
chain and the
Certificate
Revocation
List (CRL). The enrollment agent certificate or test certificate is also generated. This certificate
enables the CA server to trust MVE.
• You can select one or multiple CEP templates when using MSCEWS protocol. Do the following:
a After clicking Save Changes and Validate, the CEP Template Selection window appears.
b Select one or more from the available templates.
• The Use Certificate Authority Server dialog fetches the certificate revocation list.
• A dialog
confirms
that
certificate
validation is successful.
c You can see the selected CEP templates in the CA server configuration page.
Managing certificates 78

Note: When you enforce this configuration to any device, a certificate is created according to the
selected template.
5 Navigate back to the System Configuration page, and then review the CA certificate.
Note: You can also download or delete the CA
certificate.
Configuring Microsoft Enterprise CA with NDES
Overview
In the following deployment scenario, all permissions are based on permissions set on
certificate
templates
that are published in the domain controller. The certificate requests sent to the CA are based on certificate
templates.
For this setup, make sure that you have the following:
• A machine hosting the subordinate CA
• A machine hosting the NDES service
• A domain controller
Required users
Create the following users in the domain controller:
• Service Administrator
– Named as SCEPAdmin
– Must be a member of the local admin and Enterprise Admin groups
– Must be logged locally when the installation of NDES role is triggered
– Has Enroll permission for the
certificate
templates
– Has Add template permission on CA
• Service Account
– Named as SCEPSvc
– Must be member of the local IIS_IUSRS group
– Must be a domain user and has read and enroll permissions on the configured templates
– Has request permission on CA
• Enterprise CA Administrator
– Named as CAAdmin
– Member of Enterprise Admin group
– Must be a part of the local admin group
Managing certificates using Microsoft Certificate
Authority through SCEP
This section provides instructions on the following:
• Configuring Microsoft Enterprise Certificate Authority (CA) using Microsoft Network Device Enrollment
Service (NDES)
• Create a root CA server
Managing certificates 79

Note: The Windows Server 2016 operating system is used for all setups in this document.
Overview
The root CA server is the main CA server in any organization, and is the top of the PKI infrastructure. The root
CA authenticates the subordinate CA server. This server is generally kept in oine mode to prevent any
intrusion and to secure the private key.
To configure the root CA server, do the following:
1 Make sure that the root CA server is installed. For more information, see “Installing the root CA server” on
page 80.
2 Configure the Certification Distribution Point and Authority Information Access settings. For more
information, see
“Configuring the Certification Distribution Point and Authority Information Access settings”
on page 83.
3 Configure the CRL accessibility. For more information, see “Configuring CRL accessibility” on page 84.
Installing the root CA server
1 From Server Manager, click Manage > Add Roles and Feature.
2 Click Server Roles, select Active Directory Certificate Services and all its features, and then click Next.
3 From the AD CS Role Services section, select
Certification
Authority, and then click Next > Install.
4 After installation, click
Configure
Active Directory
Certificate
Services on the destination server.
5 From the Role Services section, select Certification Authority > Next.
6 From the Setup Type section, select Standalone CA, and then click Next.
7 From the CA Type section, select Root CA, and then click Next.
8 Select Create a new private key, and then click Next.
9 From the Select a cryptographer provider menu, select RSA#Microsoft Software Key Storage Provider.
10 From the Key length menu, select 4096.
11 In the hash algorithm list, select SHA512, and then click Next.
12 In the Common name for this CA field, type the hosting server name.
13 In the Distinguished name sux field, type the domain component.
Sample CA name configuration
Machine Fully
Qualified
Domain Name (FQDN): test.dev.lexmark.com
Common Name (CN): TEST
Distinguished name sux: DC=DEV,DC=LEXMARK,DC=COM
14 Click Next.
15 Specify the validity period, and then click Next.
Note: Generally, the validity period is 10 years.
Managing certificates 80

16 Do not change anything in the database locations window.
17 Complete the installation.
Configuring Microsoft Enterprise CA with NDES
Overview
In the following deployment scenario, all permissions are based on permissions set on
certificate
templates
that are published in the domain controller. The certificate requests sent to the CA are based on certificate
templates.
For this setup, make sure that you have the following:
• A machine hosting the subordinate CA
• A machine hosting the NDES service
• A domain controller
Required users
Create the following users in the domain controller:
• Service Administrator
– Named as SCEPAdmin
– Must be a member of the local admin and Enterprise Admin groups
– Must be logged locally when the installation of NDES role is triggered
– Has Enroll permission for the
certificate
templates
– Has Add template permission on CA
• Service Account
– Named as SCEPSvc
– Must be member of the local IIS_IUSRS group
– Must be a domain user and has read and enroll permissions on the configured templates
– Has request permission on CA
Configuring subordinate CA server
Overview
The subordinate CA server is the intermediate CA server and is always online. It generally handles the
management of certificates.
To configure the subordinate CA server, do the following:
1 Make sure that the subordinate CA server is installed. For more information, see “Installing the subordinate
CA server” on page 82.
2 Configure the Certification Distribution Point and Authority Information Access settings. For more
information, see
“Configuring the Certification Distribution Point and Authority Information Access settings”
on page 83.
3 Configure the CRL accessibility. For more information, see “Configuring CRL accessibility” on page 84.
Managing certificates 81

Installing the subordinate CA server
1 From the server, log in as a CAAdmin domain user.
2 From Server Manager, click Manage > Add Roles and Feature.
3 Click Server Roles, select Active Directory Certificate Services and all its features, and then click Next.
4 From the AD CS Role Services section, select Certification Authority and Certificate Authority Web
Enrollment, and then click Next.
Note: Make sure that all the features of Certificate Authority Web Enrollment are added.
5 From the Web Server Role (IIS) Role Services section, retain the default settings.
6 After installation, click Configure Active Directory Certificate Services on the destination server.
7 From the Role Services section, select Certification Authority and Certificate Authority Web Enrollment,
and then click Next.
8 From the Setup Type section, select Enterprise CA, and then click Next.
9 From the CA Type section, select Subordinate CA, and then click Next.
10 Select Create a new private key, and then click Next.
11 From the Select a cryptographer provider menu, select RSA#Microsoft Software Key Storage Provider.
12 From the Key length menu, select 4096.
13 In the hash algorithm list, select SHA512, and then click Next.
14 In the Common name for this CA field, type the host server name.
15 In the Distinguished name sux field, type the domain component.
Sample CA name configuration
Machine Fully Qualified Domain Name (FQDN): test.dev.lexmark.com
Common Name (CN): TEST
Distinguished name sux: DC=DEV,DC=LEXMARK,DC=COM
16 In the
Certificate
Request dialog box, save the request
file,
and then click Next.
17 Do not change anything in the database locations window.
18 Complete the installation.
19 Sign the CA request of the root CA, and then export the signed
certificate
in PKCS7 format.
20 From the subordinate CA, open Certification Authority.
21 From the left panel, right‑click the CA, and then click All Tasks > Install CA Certificate.
22 Select the signed certificate, and then start the CA service.
Managing certificates 82

Configuring the Certification Distribution Point and Authority Information
Access settings
Note:
Configure
the
Certification
Distribution Point (CDP) and Authority Information Access (AIA) settings for
Certificate
Revocation List (CRL).
1 From Server Manager, click Tools >
Certification
Authority.
2 From the left panel, right‑click the CA, and then click Properties > Extensions.
3 In the Select extension menu, select CRL Distribution Point (CDP).
4 In the certificate revocation list, select the C:\Windows\system32\ entry, and then do the following:
a Select Publish CRLs to this location.
b Clear Publish Delta CRLs to this location.
5 Delete all other entries except for C:\Windows\system32\.
6 Click Add.
7 In the Location field, add
http://serverIP/CertEnroll/<CAName><CRLNameSuffix><DeltaCRLAllowed>.crl, where
serverIP is the IP address of the server.
Note: If your server is reachable by using the FQDN, then use the <ServerDNSName> instead of the
server IP address.
8 Click OK.
9 Select Include in the CDP extension of issued
certificates
for the created entry.
10 In the Select extension menu, select Authority Information Access (AIA).
11 Delete all other entries except for C:\Windows\system32\.
12 Click Add.
13 In the Location field, add
http://serverIP/CertEnroll/<ServerDNSName>_<CAName><CertificateName>.crt,
where serverIP is the IP address of the server.
Note: If your server is reachable by using the FQDN, then use the <ServerDNSName> instead of the
server IP address.
14 Click OK.
15 Select Include in the AIA extension of issued certificates for the created entry.
16 Click Apply > OK.
Note: If necessary, restart the certification service.
17 From the left panel, expand the CA, right‑click Revoked Certificates, and then click Properties.
18 Specify the value for CRL publication interval and for Publish Delta CRLs Publication interval, and then click
Apply > OK.
19 From the left panel, right‑click Revoked Certificates, click All Tasks, and then publish the New CRL.
Managing certificates 83

Configuring CRL accessibility
Note: Before you begin, make sure that Internet Information Services (IIS) Manager is installed.
1 From IIS Manager, expand the CA, and then expand Sites.
2 Right‑click Default Web Site, and then click Add Virtual Directory.
3 In the Alias field, type CertEnroll.
4 In the Physical path
field,
type C:\Windows\System32\CertSrv\CertEnroll.
5 Click OK.
6 Right‑click CertEnroll, and then click Edit Permissions.
7 From the Security tab, remove any write access except for the system.
8 Click OK.
Configuring the NDES server
1 From the server, log in as an SCEPAdmin domain user.
2 From Server Manager, click Manage > Add Roles and Feature.
3 Click Server Roles, select Active Directory
Certificate
Services and all its features, and then click Next.
4 From the AD CS Role Services section, clear Certification Authority.
5 Select Network Device Enrollment Service and all its features, and then click Next.
6 From the Web Server Role (IIS) Role Services section, retain the default settings.
7 After installation, click Configure Active Directory Certificate Services on the destination server.
8 From the Role Services section, select Network Device Enrollment Service, and then click Next.
9 Select the SCEPSvc service account.
10 From the CA for NDES section, select either CA name or Computer name, and then click Next.
11 From the RA Information section, specify the information, and then click Next.
12 From the Cryptography for NDES section, do the following:
• Select the appropriate signature and encryption key providers.
• From the Key length menu, select the same key length as the CA server.
13 Click Next.
14 Complete the installation.
You can now access the NDES server from a web browser as an SCEPSvc user. From the NDES server, you can
view the CA certificate thumbprint, the enrollment challenge password, and the validity period of the challenge
password.
Accessing the NDES server
Open a web browser, and then type http://NDESserverIP/certsrv/mscep_admin, where
NDESserverIP is the IP address of the NDES server.
Managing certificates 84

Configuring NDES for MVE
Note: Before you begin, make sure that the NDES server is working properly.
Creating a certificate template
1 From the subordinate CA (certserv), open Certification Authority.
2 From the left panel, expand the CA, right‑click
Certificate
Templates, and then click Manage.
3 In Certificate Templates Console, create a copy of Web Server.
4 From the General tab, type MVEWebServer as the template name.
5 From the Security tab, give the SCEPAdmin and SCEPSvc users the appropriate permissions.
Note: For more information, see
“Required users” on page 81.
6 From the Subject Name tab, select Supply in the request.
7 From the subordinate CA (certserv), open Certification Authority.
8 From the Extensions tab, select Application Policies > Edit.
9 Click Add >Client Authentication > OK.
10 From the left panel, expand the CA, right‑click Certificate Templates, and then click New > Certificate
Template to Issue.
11 Select the newly created certificates, and then click OK.
You can now access the templates using the CA web enrollment portal.
Accessing the templates
1 Open a web browser, and then type http://CAserverIP/certsrv/certrqxt.asp, where
CAserverIP is the IP address of the CA server.
2 In the
Certificate
template menu, view the templates.
Setting certificate templates for NDES
1 From your computer, launch the registry editor.
2 Navigate to HKEY_LOCAL_MACHINE >SOFTWARE >Microsoft > Cryptography > MSCEP.
3
Configure
the following, and then set them to MVEWebServer:
• EncryptionTemplate
• GeneralPurposeTemplate
• SignatureTemplate
4 Give the SCEPSvc user full permission to MSCEP.
5 From IIS Manager, expand the CA, and then click Application Pools.
6 From the right panel, click Recycle to restart the SCEP application pool.
7 From IIS Manager, expand the CA, and then expand Sites > Default Web Site.
8 From the right panel, click Restart.
Managing certificates 85

Disabling Challenge Password in Microsoft CA server
1 From your computer, launch the registry editor.
2 Navigate to HKEY_LOCAL_MACHINE > SOFTWARE > Microsoft > Cryptography > MSCEP.
3 Set EnforcePassword to 0.
4 From IIS Manager, expand the CA, click Application Pools, and then select SCEP.
5 From the right panel, click Advanced Settings.
6 Set Load User Profile to True, and then click OK.
7 From the right panel, click Recycle to restart the SCEP application pool.
8 From IIS Manager, expand the CA, and then expand Sites > Default Web Site.
9 From the right panel, click Restart.
When opening the NDES from web browser, you can now only view the CA thumbprint.
Managing
certificates
using Microsoft
Certificate
Authority through MSCEWS
This section provides information on configuring Certificate Enrollment Policy Web Service (CEP) and Certificate
Enrollment Web Service (CES). As Microsoft recommends installing CEP and CES in two dierent machines, we
are following the same in this document. We refer to these web services as CEP server and CES server,
respectively.
Note: The user must have a
preconfigured
Enterprise
Certificate
Authority (CA) and a domain controller.
System requirements
The Windows Server 2012 R2 and onwards operating system is used for all setups in this section. The following
installation requirements and capabilities apply to both CEP and CES, unless otherwise specified.
Managing certificates 86

Create the following types of accounts in the domain controller:
• Service Administrator: Named as CEPAdmin and CESAdmin
– This user must be a part of the local admin group in the respective CEP and CES servers.
– This user must be a member of the Enterprise Admin group.
• Service Account: Named as CEPSvc and CESSvc
– This user must be a part of the local IIS_IUSRS group.
– Requires Request Certificates permission on the CA for the respective CEPSvc and CESSvc.
Network connectivity requirements
• Network connectivity requirements are a key part of deployment planning, particularly for scenarios where
the CEP and CES are hosted in a perimeter network.
• All client connectivity to both services occurs within an HTTPS session, so only HTTPS
trac
is allowed
between the client and the web services.
• CEP communicates with Active Directory Domain Services (AD DS), using standard Lightweight Directory
Access Protocol (LDAP) and secure LDAP (LDAPS) ports (TCP 389 and 636 respectively).
• CES communicates with CA using Distributed Component Object Model (DCOM).
Notes:
– By default, DCOM uses random ephemeral ports.
– CA can be
configured
to reserve a
specific
range of ports to simplify
firewall
configuration.
Creating SSL
certificates
for CEP and CES servers
CES and CEP must use Secure Sockets Layer (SSL) for communication with clients (by using HTTPS). Each
service must have a valid certificate that has an Enhanced Key Usage (EKU) policy of server authentication in
the local computer
certificate
store.
1 Install the IIS service in the server.
2 Log in to the CEP server, and then add the Root CA certificate in the Trusted Root Certification Authority
store.
3 Launch the IIS Manager Console and then, select Server Home.
4 From the main view section, open Server Certificates.
5 Click Actions > Create
Certificate
Request.
6 In the Distinguished Name Properties window, provide the necessary information and then, click Next.
7 In the Cryptographic Service Provider Properties dialog, select the bit length, and then click Next.
8 Save the
file.
9 Get the file signed by the CA that you are planning to use for CEP and CES.
Note: Make sure that Server Authentication EKU is enabled in the signed
certificate.
10 Copy the signed file back to the CEP server.
11 From the IIS Manager Console, select Server Home.
12 From the Main View section, open Server Certificates.
Managing certificates 87

13 Click Actions > Complete Certificate Request.
14 In Specify Certificate Authority Response window, select the signed file.
15 Type a name, and then in the
Certificate
Store menu, select Personal.
16 Complete the certificate installation.
17 From IIS Manager Console, select the default website.
18 Click Actions > Bindings.
19 In the Site Bindings dialog, click Add.
20 In the Add Site Binding dialog, set Type to https, and then from the SSL certificate, browse for the newly
created
certificate.
21 From the IIS Manager Console, select Default Web Site, and then open the SSL settings.
22 Enable Require SSL and set Client
certificates
to Ignore.
23 Restart IIS.
Note: Follow the same process for CES server.
Creating
certificate
templates
The user must create a certificate template for the certificate enrollment. Do the following to copy from an
existing certificate template:
1 Log in to the Enterprise CA with CA administrator credentials.
2 Expand the CA, right‑click Certificate Templates, and then click Manage.
3 In the Certificate Templates Console, right‑click Web Server Certificate Template, and then click Duplicate
Templat e.
4 From the General tab of the template, name the template MVEWebServer.
5 In the Security tab, give the CA administrator Read, Write, and Enroll permissions.
6 Give Read and Enroll permissions to the authenticated users.
7 In the Subject Name tab, select Supply in the request.
8 In the General tab, set the certificate validity period.
9 If you plan to use this certificate template for issuing a 802.1X Certificate for printers, then do the following:
a From the Extensions tab, select Application Policies from the list of extensions included in this template.
b Click Edit > Add.
c In Add Application Policy dialog box, select Client Authentication.
d Click OK.
10 In the Certificate Template Properties dialog box, click OK.
11 In the CA window, right‑click Certificate Templates, and then click New > Certificate template.
12 Select MVEWebServer, and then click OK.
Managing certificates 88

Understanding authentication methods
CEP and the CES support the following authentication methods:
• Windows‑integrated authentication, also known as Kerberos Authentication
• Client certificate authentication, also known as X.509 Certificate Authentication
• Username and Password Authentication
Windows-integrated authentication
Windows-integrated authentication uses Kerberos to provide an uninterrupted authentication
flow
for devices
connected to the internal network. This method is preferred for internal deployments because it uses the
existing Kerberos infrastructure within AD DS. It also requires minimal changes to certificate client computers.
Note: Use this authentication method if you need clients to access only the web service while connected
directly to your internal network.
Client certificate authentication
This method is preferred over user name and password authentication because it is more secure. It does not
require a direct connection to the corporate network.
Notes:
• Use this authentication method if you plan to provide clients with digital X.509 certificates for
authentication.
• This method enables the web services available on the Internet.
User name and password authentication
The user name and password method is the simplest form of authentication. This method is typically used for
servicing clients who are not directly connected to the internal network. It is a less secure authentication option
than client certificate authentication, but it does not require provisioning a certificate.
Note: Use this authentication method when you can access the web service on the internal network or over
the Internet.
Delegation requirements
Delegation enables a service to impersonate a user or computer account to access resources throughout the
network.
Delegation is required for the CES server when all the following scenarios apply:
• CA and CES are not residing on the same computer.
• CES can process initial enrollment requests, as opposed to only processing
certificate
renewal requests.
• The authentication type is set to Windows-integrated authentication or Client certificate authentication.
Delegation is not required for the CES server in the following scenarios:
• CA and CES are residing on the same computer.
• User name and password is the authentication method.
Managing certificates 89

Notes:
• Microsoft recommends running CEP and CES as domain user accounts.
• Users must create an appropriate service principal name (SPN) before configuring delegation on the
domain user account.
Enabling delegation
1 To create an SPN for a domain user account, use the setspn command as follows:
setspn -s http/ces.msca.com msca\CESSvc
Notes:
• The account name is CESSvc.
• CES is running on a computer with a fully qualified domain name (FQDN) of ces.msca.com in the
msca.com domain.
2 Open the CESSvc domain user account in the domain controller.
3 From the Delegation tab, select Trust this user for delegation to specified services only.
4 Select the appropriate delegation based on the authentication method.
Notes:
• If you select Windows-integrated authentication, then
configure
delegation to use Kerberos only.
• If the service is using client
certificate
authentication, then
configure
delegation to use any
authentication protocol.
• If you plan to configure multiple authentication methods, then configure delegation to use any
authentication protocol.
5 Click Add.
6 In the Add Services dialog, select Users or Computers.
7 Type your CA server host name, and then click Check Names.
8 From the Add Services dialog, select either of the following services to delegate:
• Host service (HOST) for that CA server
• Remote Procedure Call System Service (RPCSS) for that CA server
9 Close the domain user properties dialog.
For CEP domain users using Windows-integrated authentication, do the following:
1 To create an SPN for a domain user account, use the setspn command as follows:
setspn -s http/cep.msca.com msca\CEPSvc
Note: The account name is CEPSvc.
2 Open the CEPSvc domain user account in the domain controller.
3 From the Delegation tab, select Do not trust this user for delegation.
Configuring
windows-integrated authentication
To install CEP and CES, use Windows PowerShell.
Managing certificates 90

Configuring CEP
The Install-AdcsEnrollmentPolicyWebService cmdlet
configures
the
Certificate
Enrollment Policy Web Service
(CEP). It is also used to create other instances of the service within an existing installation.
1 Log in to the CEP server using CEPAdmin user name, and then launch PowerShell in administrative mode.
2 Run the command Import-Module ServerManager.
3 Run the command Add-WindowsFeature Adcs-Enroll-Web-Pol.
4 Run the command Install-AdcsEnrollmentPolicyWebService -AuthenticationType
Kerberos -SSLCertThumbprint "sslCertThumbPrint".
Note: Replace <sslCertThumbPrint> with the thumbprint of the SSL certificate created for the CEP server,
after deleting the spaces between the thumbprint values.
5 Complete the installation either by selecting either Y or A.
6 Launch the IIS Manager Console.
7 In the Connections pane, expand the web server that is hosting CEP.
8 Expand Sites, expand Default Web Site, and then click the appropriate installation virtual application name,
ADPolicyProvider_CEP_Kerberos.
9 In the virtual application called Home , double-click the application settings, and then double‑click
FriendlyName.
10 Type a name under Value, and then close the dialog.
11 Double‑click URI, and then copy Value.
Notes:
• If you want to configure another authentication method on the same CEP server, then you must
change the ID.
• This URL is used in MVE or any client application.
12 From the left pane, click Application Pools.
13 Select WSEnrollmentPolicyServer, and then from the right pane, click Actions > Advanced Settings .
14 Select the identity field under Process Model.
15 In the Application Pool Identity dialog box, select the custom account, and then type CEPSvc as the domain
user name.
16 Close all dialog boxes, and then recycle IIS from the right pane of the IIS Manager Console.
17 From PowerShell, type iisreset to restart IIS.
Configuring CES
The Install-AdcsEnrollmentWebService cmdlet configures the Certificate Enrollment Web Service (CES). It is
also used to create other instances of the service within an existing installation.
1 Log in to the CES server using CESAdmin as user name, and then launch PowerShell in administrative mode.
2 Run the command Import-Module ServerManager.
3 Run the command Add-WindowsFeature Adcs-Enroll-Web-Svc.
Managing certificates 91

4 Run the command Install-AdcsEnrollmentWebService -ApplicationPoolIdentity -
CAConfig "CA1.contoso.com\contoso-CA1-CA" -SSLCertThumbprint
"sslCertThumbPrint" -AuthenticationType Kerberos.
Notes:
• Replace <sslCertThumbPrint> with the thumbprint of the SSL certificate created for the CES server,
after deleting the spaces between the thumbprint values.
• Replace CA1.contoso.com with your CA computer name.
• Replace contoso-CA1-CA with your CA common name.
5 Complete the installation by selecting either Y or A.
6 Launch the IIS Manager Console.
7 In the Connections pane, expand the web server that is hosting CES.
8 Expand Sites, expand Default Web Site, and then click the appropriate installation virtual application name:
contoso-CA1-CA _CES_Kerberos.
9 From the left pane, click Application Pools.
10 Select WSEnrollmentServer, and then from the right pane, click Actions > Advanced Settings .
11 Select the identity field under Process Model.
12 In the Application Pool Identity dialog, select the custom account, and then type CESSvc as the
domain user name.
13 Close all dialogs, and then recycle IIS from the right pane of IIS Manager Console.
14 From PowerShell, type iisreset to restart IIS.
15 For CESSvc domain users, enable delegation. For more information, see “Enabling delegation” on page
90.
Configuring client certificate authentication
Configuring CEP
The Install-AdcsEnrollmentPolicyWebService cmdlet configures CEP. It is also used to create other instances
of the service within an existing installation.
1 Log in to the CEP server using CEPAdmin user name, and then launch PowerShell in administrative mode.
2 Run the command Import-Module ServerManager.
3 Run the command Add-WindowsFeature Adcs-Enroll-Web-Pol.
4 Run the command Install-AdcsEnrollmentPolicyWebService -AuthenticationType
Certificate -SSLCertThumbprint “sslCertThumbPrint”.
Note: Replace <sslCertThumbPrint> with the thumbprint of the SSL
certificate
created for the CEP server,
after deleting the spaces between the thumbprint values.
5 Complete the installation by selecting either Y or A.
6 Launch the IIS Manager Console.
Managing certificates 92

7 In the Connections pane, expand the web server that is hosting CEP.
8 Expand Sites, expand Default Web Site, and then click the appropriate installation virtual application name
ADPolicyProvider_CEP_Certificate.
9 In the virtual application called Home , double-click the application settings, and then double‑click
FriendlyName.
10 Type a name under Value and close the dialog.
11 Double‑click URI, and then copy Value.
Notes:
• If you want to configure another authentication method on the same CEP server, then you must
change the ID.
• This URL is used in MVE or any client application.
12 From the left pane, click Application Pools.
13 Select WSEnrollmentPolicyServer, and then from the right pane, click Actions > Advanced Settings.
14 Select the identity field under Process Model.
15 In the Application Pool Identity dialog box, select the custom account, and then type CEPSvc as the domain
user name.
16 Close all dialog boxes, and then recycle IIS from the right pane of the IIS Manager Console.
17 From PowerShell, type iisreset to restart IIS.
Configuring CES
The Install-AdcsEnrollmentWebService cmdlet
configures
the
Certificate
Enrollment Web Service (CES). It is
also used to create other instances of the service within an existing installation.
1 Log in to the CES server using CESAdmin as user name, and then launch PowerShell in administrative mode.
2 Run the command Import-Module ServerManager.
3 Run the command Add-WindowsFeature Adcs-Enroll-Web-Svc.
4 Run the command Install-AdcsEnrollmentWebService -ApplicationPoolIdentity -
CAConfig “CA1.contoso.com\contoso-CA1-CA” -SSLCertThumbprint
“sslCertThumbPrint” -AuthenticationType Certificate.
Notes:
• Replace <sslCertThumbPrint> with the thumbprint of the SSL
certificate
created for the CES server,
after deleting the spaces between the thumbprint values.
• Replace CA1.contoso.com with your CA computer name.
• Replace contoso-CA1-CA with your CA common name.
• If you have already configured one authentication method in the host, then remove
ApplicationPoolIdentity from the command.
5 Complete the installation either by selecting Y or A.
6 Launch the IIS Manager Console.
7 In the Connections pane, expand the web server that is hosting CEP.
Managing certificates 93

8 Expand Sites, expand Default Web Site, and then click the appropriate installation virtual application name:
contoso-CA1-CA _CES_Certificate.
9 From the left pane, click the Application Pools.
10 Select WSEnrollmentServer, and then from the right pane, click Actions > Advanced Settings.
11 Select the identity field under Process Model.
12 In the Application Pool Identity dialog, select the custom account, and then type CESSvc as the domain user
name.
13 Close all dialogs, and then recycle IIS from the right pane of the IIS Manager Console.
14 From PowerShell, type iisreset to restart IIS.
15 For CESSvc domain user, enable delegation. For more information, see “Enabling delegation” on page 90.
Creating a client certificate
1 From any domain user account, open certlm.msc.
2 Click
Certificates
> Personal >
Certificates
> All Tasks > Request New
Certificate
.
3 Click Next.
4 Click Active Directory Enrollment > Client access.
Note: Do the following if you do not want to use Active Directory Enrollment options:
a Click Configured by You > Add New.
b Enter the Enrollment Policy Server URI as CEP server address for either Username_Password or
Kerberos Authentication.
c Select Authentication type as Windows Integrated.
d Click Validate Server.
e After successful validation, click Add.
f Click Next.
g Select any template.
5 Click Details > Properties.
6 Click Enroll.
7 In the Subject tab, provide a fully qualified domain name (FQDN).
8 In the Private Key tab, select Make private key exportable.
9 Click Apply > Enroll.
After enrolling the client certificate, do the following to export the client certificate in PFX format.
1 Click Certificate > All Tasks > Export.
2 Click Next > Yes, export the private key.
3 Click Next.
4 Type the password provided by the client.
Managing certificates 94

5 Click Next.
6 Specify the file name in the Certificate Export dialog box.
7 Click Next > Finish.
Configuring
username-password authentication
Configuring CEP
The Install-AdcsEnrollmentPolicyWebService cmdlet configures the Certificate Enrollment Policy Web Service
(CEP). It is also used to create other instances of the service within an existing installation.
1 Log in to the CEP server using CEPAdmin user name, and then launch PowerShell in administrative mode.
2 Run the command Import-Module ServerManager.
3 Run the command Add-WindowsFeature Adcs-Enroll-Web-Pol.
4 Run the command Install-AdcsEnrollmentPolicyWebService -AuthenticationType
UserName -SSLCertThumbprint “sslCertThumbPrint”.
Note: Replace <sslCertThumbPrint> with the thumbprint of the SSL certificate created for the CEP server,
after deleting the spaces between the thumbprint values.
5 Complete the installation by selecting either Y or A.
6 Launch the IIS Manager Console.
7 In the Connections pane, expand the web server that is hosting CEP.
8 Expand Sites, expand Default Web Site, and then click the appropriate installation virtual application name:
ADPolicyProvider_CEP_UsernamePassword.
9 In the virtual application called Home , double-click the application settings, and then double click
FriendlyName.
10 Type a name under Value and close the dialog.
11 Double‑click URI, and then copy Value.
Notes:
• If you want to configure another authentication method on the same CEP server, then you must
change the ID.
• This URL is used in MVE or any client application.
12 From the left pane, click Application Pools.
13 Select WSEnrollmentPolicyServer, and then from the right pane, click Actions > Advanced Settings.
14 Select the identity field under Process Model.
15 In the Application Pool Identity dialog box, select the custom account, and then type CEPSvc.
16 Close all dialog boxes, and then recycle IIS from the right pane of the IIS Manager Console.
17 From PowerShell, type iisreset to restart IIS.
Managing certificates 95

Configuring CES
The Install-AdcsEnrollmentWebService cmdlet
configures
the
Certificate
Enrollment Web Service (CES). It is
also used to create other instances of the service within an existing installation.
1 Log in to the CES server using CESAdmin as user name, and then launch PowerShell in administrative mode.
2 Run the command Import-Module ServerManager.
3 Run the command Add-WindowsFeature Adcs-Enroll-Web-Svc.
4 Run the command Install-AdcsEnrollmentWebService -ApplicationPoolIdentity -
CAConfig “CA1.contoso.com\contoso-CA1-CA” -SSLCertThumbprint
“sslCertThumbPrint” -AuthenticationType UserName.
Notes:
• Replace <sslCertThumbprint> with the thumbprint of the SSL certificate created for the CES server,
after deleting the spaces between the thumbprint values.
• Replace CA1.contoso.com with your CA computer name.
• Replace contoso-CA1-CA with your CA common name.
• If you have already configured one authentication method in the host, then remove
ApplicationPoolIdentity from the command.
5 Complete the installation by selecting either Y or A.
6 Launch the IIS Manager Console.
7 In the Connections pane, expand the web server that is hosting CES.
8 Expand Sites, expand Default Web Site, and then click the appropriate installation virtual application name:
contoso-CA1-CA_CES_UsernamePassword.
9 From the left pane, click Application Pools.
10 Select WSEnrollmentServer, and then from the right pane, click Actions > Advanced Settings under
Actions.
11 Select the identity field under Process Model.
12 In the Application Pool Identity dialog, select the custom account, and then type CESSvc as the domain
user name.
13 Close all dialogs, and then recycle IIS from the right pane of IIS Manager Console.
14 From PowerShell, type iisreset to restart IIS.
Managing certificates 96

Managing certificates using OpenXPKI Certificate
Authority through SCEP
This section provides instructions on how to
configure
OpenXPKI CA version 2.5.x using Simple
Certificate
Enrollment Protocol (SCEP).
Notes:
• Make sure that you are using the Debian 8 Jessie operating system.
• For more information on OpenXPKI, go to www.openxpki.org.
Configuring
OpenXPKI CA
Installing OpenXPKI CA
1 Connect the machine using PuTTY or another client.
2 From the client, run the sudo su - command to go to the root user.
3 Enter the root password.
4 In nano /etc/apt/sources.list, change the source for installing the updates.
5 Update the file. For example:
#
# deb cdrom:[Debian GNU/Linux 8.11.1 _Jessie_ - Official amd64 CD Binary-1
20190211-02:10]/ jessie local main
# deb cdrom:[Debian GNU/Linux 8.11.1 _Jessie_ - Official amd64 CD Binary-1
20190211-02:10]/ jessie local main
deb http://security.debian.org/ jessie/updates main
deb-src http://security.debian.org/ jessie/updates main
# jessie-updates, previously known as 'volatile'
# A network mirror was not selected during install. The following entries
# are provided as examples, but you should amend them as appropriate
# for your mirror of choice.
#
deb http://ftp.debian.org/debian/jessie-updates main
deb-src http://ftp.debian.org/debian/jessie-updates main
deb http://ftp.us.debian.org/debian/jessie main
6 Save the file.
7 Run the following commands:
• apt-get update
• apt-get upgrade
8 Update the CA
certificate
lists in the server using apt-get install ca-certificates.
9 Install en_US.utf8 locale using dpkg-reconfigure locales.
10 Select the en_US.UTF-8 UTF-8 locale, and then make it the default locale for the system.
Note: Use the Tab and spacebar keys for selecting and navigating the menu.
Managing certificates 97

11 Check the locales that you have generated using locale –a.
Sample output
C
C.UTF-8
en_IN
en_IN.utf8
en_US.utf8
POSIX
12 Copy the fingerprint of the OpenXPKI package using nano /home/Release.key. For this instance, copy
the key in /home.
13 Type 9B156AD0 F0E6A6C7 86FABE7A D8363C4E 1611A2BE 2B251336 01D1CDB4 6C24BEF3 as
the value.
14 Run the following command:
gpg --print-md sha256 /home/Release.key
15 Add the package using the wget https://packages.openxpki.org/v2/debian/Release.key
-O - | apt-key add - command.
16 Add the repository to your source list (jessie) using echo "deb
http://packages.openxpki.org/v2/debian/jessie release"
> /etc/apt/sources.list.d/openxpki.list, and then aptitude update.
17 Install MySQL and Perl MySQL binding using aptitude install mysql-server libdbd-mysql-
perl.
18 Install apache2.2-common using aptitude install apache2.2-common.
19 In nano /etc/apt/sources.list, install the fastcgi module to speed up the user interface.
Note: We recommend using mod_fcgid.
20 Add the deb http://http.us.debian.org/debian/jessie main line in the file, and then save it.
21 Run the following commands:
apt-get update
aptitude install libapache2-mod-fcgid
22 Enable the fastcgi module using a2enmod fcgid.
23 Install the OpenXPKI core package using aptitude install libopenxpki-perl openxpki-cgi-
session-driver openxpki-i18n.
24 Restart the Apache
®
server using service apache2 restart.
25 Check whether the installation is successful using openxpkiadm version.
Note: If the installation is successful, then the system shows the version of the installed OpenXPKI. For
example, Version (core): 2.5.5.
26 Create the empty database, and then assign the database user using mysql -u root –p.
Notes:
• This command must be typed in the client. Otherwise, you cannot enter the password.
• Type the password for the MySQL. For this instance, root is the MySQL user.
• openxpki is the user on which OpenXPKI is installed.
Managing certificates 98

CREATE DATABASE openxpki CHARSET utf8;
CREATE USER 'openxpki'@'localhost' IDENTIFIED BY 'openxpki';
GRANT ALL ON openxpki.* TO 'openxpki'@'localhost';
flush privileges;
If the MySQL service is not running, then run /etc/init.d/mysql start to start the service.
27 Type quit to exit from MySQL.
28 Store the used credentials in /etc/openxpki/config.d/system/database.yaml.
Sample
file
content
debug: 0
type: MySQL
name: openxpki
host: localhost
port: 3306
user: openxpki
passwd: openxpki
Note: Change user and passwd to match the MySQL user name and password.
29 Save the
file.
30 For empty database schema, run zcat /usr/share/doc/libopenxpki-perl/examples/schema-
mysql.sql.gz | \mysql -u root --password --database openxpki from the provided
schema file.
31 Enter the password for the database.
Configuring OpenXPKI CA using default script
Note: The default script
configures
only the default realm, ca-one. The CDP and CRLs are not
configured.
1 Unzip the sample script for installing the certificate using gunzip -k /usr/share/doc/libopenxpki-
perl/examples/sampleconfig.sh.gz.
2 Run the script using bash /usr/share/doc/libopenxpki-perl/examples/sampleconfig.sh.
3 Confirm the setup using openxpkiadm alias --realm ca-one.
Sample output
=== functional token ===
scep (scep):
Alias : scep-1
Identifier: YsBNZ7JYTbx89F_-Z4jn_RPFFWo
NotBefore : 2015-01-30 20:44:40
NotAfter : 2016-01-30 20:44:40
vault (datasafe):
Alias : vault-1
Identifier: lZILS1l6Km5aIGS6pA7P7azAJic
NotBefore : 2015-01-30 20:44:40
NotAfter : 2016-01-30 20:44:40
ca-signer (certsign):
Alias : ca-signer-1
Identifier: Sw_IY7AdoGUp28F_cFEdhbtI9pE
NotBefore : 2015-01-30 20:44:40
NotAfter : 2018-01-29 20:44:40
=== root ca ===
Managing certificates 99

current root ca:
Alias : root-1
Identifier: fVrqJAlpotPaisOAsnxa9cglXCc
NotBefore : 2015-01-30 20:44:39
NotAfter : 2020-01-30 20:44:39
upcoming root ca:
not set
4 Check whether the installation is successful using openxpkictl start.
Sample output
Starting OpenXPKI...
OpenXPKI Server is running and accepting requests.
DONE.
5 Do the following to access the OpenXPKI server:
a From a web browser, type http://ipaddress/openxpki/.
b Log in as Operator. The default password is openxpki.
Note: The Operator login has two preconfigured operator accounts, raop and raop2.
6 Create one certificate request, and then test it.
Configuring OpenXPKI CA manually
Overview
Note: Before you begin, make sure that you have a basic knowledge on creating OpenSSL certificates.
To
configure
OpenXPKI CA manually, create the following:
1 Root CA
certificate.
For more information, see “Creating a root CA
certificate”
on page 102.
2 CA signer certificate, signed by the root CA. For more information, see “Creating a signer certificate” on
page 102.
3 Data vault certificate, self‑signed. For more information, see “Creating a vault certificate” on page 103.
4 SCEP
certificate,
signed by the signer
certificate.
Notes:
• When selecting the signature hash, use either SHA256 or SHA512.
• Changing the public key size is optional.
For this instance, we are using the /etc/certs/openxpki_ca-one/ directory for certificate generation. However,
you can use any directory.
Creating an OpenSSL configuration file
1 Run the following command:
nano /etc/certs/openxpki_ca-one/openssl.conf
Note: If your server is reachable using the fully qualified domain name (FQDN), then use the DNS of the
server instead of its IP address.
Managing certificates 100

Sample file
# x509_extensions = v3_ca_extensions
# x509_extensions = v3_issuing_extensions
# x509_extensions = v3_datavault_extensions
# x509_extensions = v3_scep_extensions
# x509_extensions = v3_web_extensions
# x509_extensions = v3_ca_reqexts # not for root self-signed, only for issuing
## x509_extensions = v3_datavault_reqexts # not required self-signed
# x509_extensions = v3_scep_reqexts
# x509_extensions = v3_web_reqexts
[ req ]
default_bits = 4096
distinguished_name = req_distinguished_name
[ req_distinguished_name ]
domainComponent = Domain Component
commonName = Common Name
[ v3_ca_reqexts ]
subjectKeyIdentifier = hash
keyUsage = digitalSignature, keyCertSign, cRLSign
[ v3_datavault_reqexts ]
subjectKeyIdentifier = hash
keyUsage = keyEncipherment
extendedKeyUsage = emailProtection
[ v3_scep_reqexts ]
subjectKeyIdentifier = hash
[ v3_web_reqexts ]
subjectKeyIdentifier = hash
keyUsage = critical, digitalSignature, keyEncipherment
extendedKeyUsage = serverAuth, clientAuth
[ v3_ca_extensions ]
subjectKeyIdentifier = hash
keyUsage = digitalSignature, keyCertSign, cRLSign
basicConstraints = critical,CA:TRUE
authorityKeyIdentifier = keyid:always,issuer
[ v3_issuing_extensions ]
subjectKeyIdentifier = hash
keyUsage = digitalSignature, keyCertSign, cRLSign
basicConstraints = critical,CA:TRUE
authorityKeyIdentifier = keyid:always,issuer:always
crlDistributionPoints = URI:http://FQDN of the server/CertEnroll/MYOPENXPKI.crl
authorityInfoAccess = caIssuers;URI:http://FQDN of the server/CertEnroll/MYOPENXPKI.crt
[ v3_datavault_extensions ]
subjectKeyIdentifier = hash
keyUsage = keyEncipherment
extendedKeyUsage = emailProtection
basicConstraints = CA:FALSE
authorityKeyIdentifier = keyid:always,issuer
[ v3_scep_extensions ]
subjectKeyIdentifier = hash
basicConstraints = CA:FALSE
authorityKeyIdentifier = keyid,issuer
[ v3_web_extensions ]
subjectKeyIdentifier = hash
keyUsage = critical, digitalSignature, keyEncipherment
extendedKeyUsage = serverAuth, clientAuth
basicConstraints = critical,CA:FALSE
subjectAltName = DNS:stlopenxpki.lexmark.com
crlDistributionPoints = URI:http://FQDN of the server/CertEnroll/MYOPENXPKI_ISSUINGCA.crl
authorityInfoAccess = caIssuers;URI:http://FQDN of the
server/CertEnroll/MYOPENXPKI_ISSUINGCA.crt
Managing certificates 101

2 Change the IP address and CA certificate name with your setup information.
3 Save the file.
Creating a password file for certificate keys
1 Run the following command:
nano /etc/certs/openxpki_ca-one/pd.pass
2 Type your password.
3 Save the file.
Creating a root CA certificate
Note: You can create a self‑signed root CA
certificate
or generate a
certificate
request, and then get it
signed by the root CA.
Run the following commands:
Note: Replace the key length, signature algorithm, and certificate name with the appropriate values.
1 openssl genrsa -out /etc/certs/openxpki_ca-one/ca-root-1.key -passout
file:/etc/certs/openxpki_ca-one/pd.pass 4096
2 openssl req -new -key /etc/certs/openxpki_ca-one/ca-root-1.key -
subj /DC=COM/DC=LEXMARK/DC=DEV/DC=CA-ONE/CN=MYOPENXPKI_ROOTCA -
out /etc/certs/openxpki_ca-one/ca-root-1.csr
3 openssl req -config /etc/certs/openxpki_ca-one/openssl.conf -extensions
v3_ca_extensions -x509 -days 3560 -in /etc/certs/openxpki_ca-one/ca-
root-1.csr -key /etc/certs/openxpki_ca-one/ca-root-1.key -
out /etc/certs/openxpki_ca-one/ca-root-1.crt -sha256
Creating a signer certificate
Note: Replace the key length, signature algorithm, and
certificate
name with the appropriate values.
1 Run the following command:
openssl genrsa -out /etc/certs/openxpki_ca-one/ca-signer-1.key -passout
file:/etc/certs/openxpki_ca-one/pd.pass 4096
2 Change the subject in the request with your CA information using openssl req -
config /etc/certs/openxpki_ca-one/openssl.conf -reqexts v3_ca_reqexts -new -
key /etc/certs/openxpki_ca-one/ca-signer-1.key -
subj /DC=COM/DC=LEXMARK/DC=DEV/DC=CA-ONE/CN=MYOPENXPKI_ISSUINGCA -
out /etc/certs/openxpki_ca-one/ca-signer-1.csr.
3 Get the
certificate
signed by the root CA using openssl x509 -req -
extfile /etc/certs/openxpki_ca-one/openssl.conf -extensions
v3_issuing_extensions -days 3650 -in /etc/certs/openxpki_ca-one/ca-
signer-1.csr -CA /etc/certs/openxpki_ca-one/ca-root-1.crt -
CAkey /etc/certs/openxpki_ca-one/ca-root-1.key -CAcreateserial -
out /etc/certs/openxpki_ca-one/ca-signer-1.crt -sha256.
Managing certificates 102

Creating a vault certificate
Notes:
• The vault
certificate
is self‑signed.
• Replace the key length, signature algorithm, and
certificate
name with the appropriate values.
1 Run the following command:
openssl genrsa -out /etc/certs/openxpki_ca-one/vault-1.key -passout
file:/etc/certs/openxpki_ca-one/pd.pass 4096
2 Change the subject in the request with your CA information using openssl req -
config /etc/certs/openxpki_ca-one/openssl.conf -reqexts v3_datavault_reqexts
-new -key /etc/certs/openxpki_ca-one/vault-1.key -
subj /DC=COM/DC=LEXMARK/DC=DEV/DC=CA-
ONE/DC=STLOPENXPKI_INTERNAL/CN=MYOPENXPKI_DATAVAULT -
out /etc/certs/openxpki_ca-one/vault-1.csr.
3 Run the following command:
openssl req -config /etc/certs/openxpki_ca-one/openssl.conf -extensions
v3_datavault_extensions -x509 -days 3560 -in /etc/certs/openxpki_ca-
one/vault-1.csr -key /etc/certs/openxpki_ca-one/vault-1.key -
out /etc/certs/openxpki_ca-one/vault-1.crt
Creating an SCEP certificate
Note: The SCEP certificate is signed by the signer certificate.
Run the following commands:
Note: Replace the key length, signature algorithm, and certificate name with the appropriate values.
1 openssl genrsa -out /etc/certs/openxpki_ca-one/scep-1.key -passout
file:/etc/certs/openxpki_ca-one/pd.pass 4096
2 openssl req -config /etc/certs/openxpki_ca-one/openssl.conf -reqexts
v3_scep_reqexts -new -key /etc/certs/openxpki_ca-one/scep-1.key -
subj /DC=COM/DC=LEXMARK/DC=DEV/DC=CA-ONE/CN=MYOPENXPKI_SCEPCA -
out /etc/certs/openxpki_ca-one/scep-1.csr
3 openssl x509 -req -extfile /etc/certs/openxpki_ca-one/openssl.conf -
extensions v3_scep_extensions -days 900 -in /etc/certs/openxpki_ca-
one/scep-1.csr -CA /etc/certs/openxpki_ca-one/ca-signer-1.crt -
CAkey /etc/certs/openxpki_ca-one/ca-signer-1.key -CAcreateserial -
out /etc/certs/openxpki_ca-one/scep-1.crt -sha256
Copying the key file and creating a symlink
1 Copy the key files to /etc/openxpki/ca/ca-one/.
Note: The key
files
must be readable by OpenXPKI.
cp /etc/certs/openxpki_ca-one/ca-signer-1.key /etc/openxpki/ca/ca-one/
cp /etc/certs/openxpki_ca-one/vault-1.key /etc/openxpki/ca/ca-one/
Managing certificates 103

cp /etc/certs/openxpki_ca-one/scep-1.key /etc/openxpki/ca/ca-one/
2 Create the symlink.
Note: Symlinks are aliases used by the default configuration.
ln -s /etc/openxpki/ca/ca-one/ca-signer-1.key /etc/openxpki/ca/ca-one/ca-signer-1.pem
ln -s /etc/openxpki/ca/ca-one/scep-1.key /etc/openxpki/ca/ca-one/scep-1.pem
ln -s /etc/openxpki/ca/ca-one/vault-1.key /etc/openxpki/ca/ca-one/vault-1.pem
Importing certificates
Import the root
certificate,
signer
certificate,
vault
certificate,
and SCEP
certificate
into the database with the
appropriate tokens.
Run the following commands:
1 openxpkiadm certificate import --file /etc/certs/openxpki_ca-one/ca-
root-1.crt
2 openxpkiadm certificate import --file /etc/certs/openxpki_ca-one/ca-
signer-1.crt --realm ca-one --token certsign
3 openxpkiadm certificate import --file /etc/certs/openxpki_ca-one/scep-1.crt
--realm ca-one --token scep
4 openxpkiadm certificate import --file /etc/certs/openxpki_ca-one/vault-1.crt
--realm ca-one --token datasafe
5 Check whether the import is successful using openxpkiadm alias --realm ca-one.
Sample output
=== functional token ===
scep (scep):
Alias : scep-1
Identifier: YsBNZ7JYTbx89F_-Z4jn_RPFFWo
NotBefore : 2015-01-30 20:44:40
NotAfter : 2016-01-30 20:44:40
vault (datasafe):
Alias : vault-1
Identifier: lZILS1l6Km5aIGS6pA7P7azAJic
NotBefore : 2015-01-30 20:44:40
NotAfter : 2016-01-30 20:44:40
ca-signer (certsign):
Alias : ca-signer-1
Identifier: Sw_IY7AdoGUp28F_cFEdhbtI9pE
NotBefore : 2015-01-30 20:44:40
NotAfter : 2018-01-29 20:44:40
=== root ca ===
current root ca:
Alias : root-1
Identifier: fVrqJAlpotPaisOAsnxa9cglXCc
NotBefore : 2015-01-30 20:44:39
NotAfter : 2020-01-30 20:44:39
upcoming root ca:
not set
Managing certificates 104

Starting OpenXPKI
1 Run the openxpkictl start command.
Sample output
Starting OpenXPKI...
OpenXPKI Server is running and accepting requests.
DONE.
2 Do the following to access the OpenXPKI server:
a From a web browser, type http://ipaddress/openxpki/.
Note: Instead of ipaddress, you can also use the FQDN of the server.
b Log in as Operator. The default password is openxpki.
Note: The Operator login has two preconfigured operator accounts, raop and raop2.
3 Create one
certificate
request, and then test it.
Generating CRL information
Note: If your server is reachable using the FQDN, then use the DNS of the server instead of its IP address.
1 Stop the OpenXPKI service using Openxpkictl stop.
2 In nano /etc/openxpki/config.d/realm/ca-one/publishing.yaml, update the connectors: cdp section to
the following:
class: Connector::Builtin::File::Path
LOCATION: /var/www/openxpki/CertEnroll/
file: "[% ARGS.0 %].crl"
content: "[% pem %]"
a In nano /etc/openxpki/config.d/realm/ca-one/profile/default.yaml, update the following:
• crl_distribution_points: section
critical: 0
uri:
- http://FQDN of the server/CertEnroll/[% ISSUER.CN.0 %].crl
- ldap://localhost/[% ISSUER.DN %]
• authority_info_access: section
critical: 0
ca_issuers: http://FQDN of the server/CertEnroll/MYOPENXPKI.crt
ocsp: http://ocsp.openxpki.org/
Change the IP address and CA certificate name according to your CA server.
b In nano
/etc/openxpki/config.d/realm/ca-one/crl/default.yaml
, do the following:
• If necessary, update nextupdate and renewal.
• Add ca_issuers to the following section:
extensions:
authority_info_access:
critical: 0
# ca_issuers and ocsp can be scalar or list
ca_issuers: http://FQDN of the server/CertEnroll/MYOPENXPKI.crt
#ocsp: http://ocsp.openxpki.org/
Change the IP address and CA
certificate
name according to your CA server.
Managing certificates 105

3 Start the OpenXPKI service using Openxpkictl start.
Configuring CRL accessibility
1 Stop the Apache service using service apache2 stop.
2 Create a CertEnroll directory for crl in the /var/www/openxpki/ directory.
3 Set openxpki as the owner of this directory, and then configure the permissions to let Apache read and
execute, and other services to read only.
chown openxpki /var/www/openxpki/CertEnroll
chmod 755 /var/www/openxpki/CertEnroll
4 Add a reference to the Apache alias.conf
file
using nano /etc/apache2/mods-
enabled/alias.conf.
5 After the <Directory "/usr/share/apache2/icons"> section, add the following:
Alias /CertEnroll/ "/var/www/openxpki/CertEnroll/"
<Directory "/var/www/openxpki/CertEnroll">
Options FollowSymlinks
AllowOverride None
Require all granted
</Directory>
6 Add a reference in the apache2.conf file using nano /etc/apache2/apache2.conf.
7 Add the following in the Apache2 HTTPD server section:
<Directory /var/www/openxpki/CertEnroll>
Options FollowSymlinks
AllowOverride None
Allow from all
</Directory>
8 Start the Apache service using service apache2 start.
Enabling the SCEP service
1 Stop the OpenXPKI service using openxpkictl stop.
2 Install the openca-tools package using aptitude install openca-tools.
3 Start the OpenXPKI service using openxpkictl start.
Test the service using any client, such as certnanny with SSCEP.
Note: SSCEP is a command line client for SCEP. You can download SSCEP from
https://github.com/certnanny/sscep.
Managing certificates 106

Enabling the Signer on Behalf (enrollment agent) certificate
For automatic certificate requests, we are using the Signer on Behalf certificate feature of OpenXPKI.
1 Stop the OpenXPKI service using openxpkictl stop.
2 In nano /etc/openxpki/config.d/realm/ca-one/scep/generic.yaml, from the authorized_signer:
section, add a rule for the subject name of the signer
certificate.
rule1:
# Full DN
subject: CN=Markvision_.*
Notes:
• In this rule, any certificate CN starting with Markvision_ is the Signer on Behalf certificate.
• The subject name is set in MVE for generating the Signer on Behalf certificate.
• Review the space and indention in the script file.
• If the CN is changed in MVE, then add the updated CN in OpenXPKI.
• You can specify only one certificate as Signer on Behalf, and then specify the full CN.
3 Save the file.
4 Start the OpenXPKI service using openxpkictl start.
Enabling automatic approval of certificate requests in OpenXPKI CA
1 Stop the OpenXPKI service using openxpkictl stop.
2 In nano /etc/openxpki/config.d/realm/ca-one/scep/generic.yaml, update the eligible: section:
Old content
eligible:
initial:
value@: connector:scep.generic.connector.initial
args: '[% context.cert_subject_parts.CN.0 %]'
expect:
- Build
- New
New content
eligible:
initial:
value: 1
# value@: connector:scep.generic.connector.initial
# args: '[% context.cert_subject_parts.CN.0 %]'
# expect:
# - Build
# - New
Notes:
• Review the space and indention in the script file.
• To approve certificates manually, comment value: 1, and then uncomment the other lines that are
previously commented.
Managing certificates 107

3 Save the file.
4 Start the OpenXPKI service using openxpkictl start.
Creating a second realm
In OpenXPKI, you can configure multiple PKI structures in the same system. The following topics show how to
create another realm for MVE named ca-two.
Copying and setting the directory
1 Copy the /etc/openxpki/config.d/realm/ca-one sample directory tree to a new directory (cp -
avr /etc/openxpki/config.d/realm/ca-one /etc/openxpki/config.d/realm/ca-two) within the realm directory.
2 In /etc/openxpki/config.d/system/realms.yaml, update the following section:
Old content
# This is the list of realms in this PKI
# You only need to enable the realms which are visible on the server
ca-one:
label: Verbose name of this realm
baseurl: https://pki.example.com/openxpki/
#ca-two:
# label: Verbose name of this realm
# baseurl: https://pki.acme.org/openxpki/
New content
# This is the list of realms in this PKI
# You only need to enable the realms which are visible on the server
ca-one:
label: CA-ONE
baseurl: https://pki.example.com/openxpki/
ca-two:
label: CA-TWO
baseurl: https://pki.example.com/openxpki/
3 Save the
file.
Creating certificates
The following instructions show how to generate the signer
certificate,
vault
certificate,
and SCEP
certificate.
The root CA signs the signer certificate, and then the signer certificate signs the SCEP certificate. The vault
certificate is self‑signed.
1 Generate, and then sign the
certificates.
For more information, see
“Configuring
OpenXPKI CA manually”
on page 100.
Note: Change the certificate common name so that the user can easily distinguish between dierent
certificates for dierent realms. You may change DC=CA-ONE to DC=CA-TWO. The certificate files are
created in the /etc/certs/openxpki_ca-two/ directory.
2 Copy the key
files
to /etc/openxpki/ca/ca-two/.
Note: The key
files
must be readable by OpenXPKI.
Managing certificates 108

cp /etc/certs/openxpki_ca-two/ca-signer-1.key /etc/openxpki/ca/ca-two/
cp /etc/certs/openxpki_ca-two/vault-1.key /etc/openxpki/ca/ca-two/
cp /etc/certs/openxpki_ca-two/scep-1.key /etc/openxpki/ca/ca-two/
3 Create the symlink. Also, create a symlink for the root CA certificate.
Note: Symlinks are aliases used by the default
configuration.
ln -s /etc/openxpki/ca/ca-one/ca-root-1.crt /etc/openxpki/ca/ca-two/ca-root-1.crt
ln -s /etc/openxpki/ca/ca-two/ca-signer-1.key /etc/openxpki/ca/ca-two/ca-signer-1.pem
ln -s /etc/openxpki/ca/ca-two/scep-1.key /etc/openxpki/ca/ca-two/scep-1.pem
ln -s /etc/openxpki/ca/ca-two/vault-1.key /etc/openxpki/ca/ca-two/vault-1.pem
4 Import the signer certificate, vault certificate, and SCEP certificate into the database with the appropriate
tokens for ca-two.
openxpkiadm certificate import --file /etc/certs/openxpki_ca-two/ca-signer-1.crt --realm
ca-two –issuer /etc/openxpki/ca/ca-two/ca-one-1.crt --token certsign
openxpkiadm certificate import --file /etc/certs/openxpki_ca-two/scep-1.crt --realm ca-
two --token scep
openxpkiadm certificate import --file /etc/certs/openxpki_ca-two/vault-1.crt --realm ca-
two --token datasafe
5 Check whether the import is successful using openxpkiadm alias --realm ca-two.
Sample output
=== functional token ===
scep (scep):
Alias : scep-1
Identifier: YsBNZ7JYTbx89F_-Z4jn_RPFFWo
NotBefore : 2015-01-30 20:44:40
NotAfter : 2016-01-30 20:44:40
vault (datasafe):
Alias : vault-1
Identifier: lZILS1l6Km5aIGS6pA7P7azAJic
NotBefore : 2015-01-30 20:44:40
NotAfter : 2016-01-30 20:44:40
ca-signer (certsign):
Alias : ca-signer-1
Identifier: Sw_IY7AdoGUp28F_cFEdhbtI9pE
NotBefore : 2015-01-30 20:44:40
NotAfter : 2018-01-29 20:44:40
=== root ca ===
current root ca:
Alias : root-1
Identifier: fVrqJAlpotPaisOAsnxa9cglXCc
NotBefore : 2015-01-30 20:44:39
NotAfter : 2020-01-30 20:44:39
upcoming root ca:
not set
In this instance, the root CA information is the same for ca-one and ca-two.
6 If you changed the certificate key password during certificate creation, then update
nano
/etc/openxpki/config.d/realm/ca-two/crypto.yaml
.
7 Generate the CRLs for this realm. For more information, see “Generating CRL information” on page 105.
Managing certificates 109

8 Publish the CRLs for this realm. For more information, see “Configuring CRL accessibility” on page 106.
9 Restart the OpenXPKI service using openxpkictl restart.
Sample output
Stopping OpenXPKI
Stopping gracefully, 3 (sub)processes remaining...
DONE.
Starting OpenXPKI...
OpenXPKI Server is running and accepting requests.
DONE.
10 Do the following to access the OpenXPKI server:
a From a web browser, type http://ipaddress/openxpki/.
b Log in as Operator. The default password is openxpki.
Note: The Operator login has two
preconfigured
operator accounts, raop and raop2.
Configuring SCEP endpoint for multiple realms
The default realm SCEP endpoint is http://<ipaddress>/scep/scep. If you have multiple realms, then
configure
a unique SCEP endpoint (dierent configuration file) for each realm. In the following instructions, we use two
PKI realms, ca-one and ca-two.
1 Copy the default configuration file in cp /etc/openxpki/scep/default.conf /etc/openxpki/scep/ca-one.conf.
Note: Name the file as ca-one.conf.
2 In nano /etc/openxpki/scep/ca-one.conf, change the realm value to realm=ca-one.
3 Create another
configuration
file
in cp /etc/openxpki/scep/default.conf /etc/openxpki/scep/ca-two.conf.
Note: Name the file as ca-two.conf.
4 In nano /etc/openxpki/scep/ca-two.conf, change the realm value to realm=ca-two.
5 Restart the OpenXPKI service using openxpkictl restart.
The SCEP endpoints are the following:
• ca‑one—http://ipaddress/scep/ca-one
• ca-two—http://ipaddress/scep/ca-two
If you want to dierentiate between login credentials and default certificate templates for dierent PKI realms,
then you may need advanced configuration.
Enabling multiple active certificates with same subject to be present at a
time
By default, in OpenXPKI only one certificate with the same subject name can be active at a time. But when you
are enforcing multiple Named Certificates, multiple active certificates with the same subject name must be
present at a time.
1 In
/etc/openxpki/config.d/realm/REALM
NAME/scep/generic.yaml, from the policy section, change the
value of max_active_certs from 1 to 0.
Managing certificates 110

Notes:
• REALM NAME is the name of the realm. For example, ca‑one.
• Review the space and indentation in the script file.
2 Restart the OpenXPKI service using openxpkictl restart.
Setting the default port number for OpenXPKI CA
By default, Apache listens in port number 80. Set the default port number for OpenXPKI CA to avoid conflicts.
1 In /etc/apache2/ports.conf, add or modify a port. For example, Listen 8080.
2 In /etc/apache2/sites-enabled/000-default.conf, add or modify the VirtualHost section to map new
port. For example, <VirtualHost *:8080>.
3 Restart the Apache server using systemctl restart apache2.
To check the status, run netstat -tlpn| grep apache. The OpenXPKI SCEP URL is now http://ipaddress:
8080/scep/ca-one, and the web URL is http://ip address:8080/openxpki.
Rejecting
certificate
requests without Challenge Password in OpenXPKI
CA
By default, OpenXPKI accepts requests without checking the challenge password. The
certificate
request is
not rejected, and the CA and CA administrator determine whether to approve or reject the request. To avoid
potential security concerns, disable this feature so that any certificate requests that contain invalid passwords
are rejected immediately. In MVE, Challenge Password is required only when generating the enrollment agent
certificate.
1 In etc/openxpki/config.d/realm/REALM NAME/scep/generic.yaml, from the policy section, change the
value of allow_man_authen from 1 to 0.
Notes:
• REALM NAME is the name of the realm. For example, ca‑one.
• Review the space and indentation in the script
file.
2 Restart the OpenXPKI service using openxpkictl restart.
Adding client authentication EKU in certificates
1 In /etc/openxpki/config.d/realm/REALM NAME/profile/I18N_OPENXPKI_PROFILE_TLS_SERVER.yaml,
from the extended_key_usage: section, change the value of client_auth: to 1.
Notes:
• REALM NAME is the name of the realm. For example, ca‑one.
• Review the space and indentation in the script file.
2 Restart the OpenXPKI service using openxpkictl restart.
Managing certificates 111

Getting the full certificate subject when requesting through SCEP
By default, OpenXPKI reads only the CN of the subject of the requesting certificate. The rest of the information,
such as country, locality, and DC, are hard‑coded. For example, if a certificate subject is C=US, ST=KY,
L=Lexington, O=Lexmark, OU=ISS, CN=ET0021B7C34AEC.dhcp.dev.lexmark.com, then after signing
the
certificate
through SCEP, the subject is changed to DC=Test Deployment, DC= OpenXPKI,
CN=ET0021B7C34AEC.dhcp.dev.lexmark.com.
Note: REALM NAME is the name of the realm. For example, ca‑one.
1 In /etc/openxpki/config.d/realm/REALM NAME/profile/I18N_OPENXPKI_PROFILE_TLS_SERVER.yaml,
from the enroll section, change the value of dn to the following:
CN=[% CN.0 %][% IF OU %][% FOREACH entry = OU %],OU=[% entry %][% END %][% END %][% IF O
%][% FOREACH entry = O %],O=[% entry %][% END %][% END %][% IF L %],L=[% L.0 %][% END %]
[% IF ST %],ST=[% ST.0 %][% END %][% IF C %],C=[% C.0 %][% END %][% IF DC %][% FOREACH
entry = DC %],DC=[% entry %][% END %][% END %][% IF EMAIL %][% FOREACH entry = EMAIL
%],EMAIL=[% entry %][% END %][% END %]
2 Save the file.
3 Create a file titled l.yaml in the /etc/openxpki/config.d/realm/REALM NAME/profile/template directory.
4 Add the following:
id: L
label: L
description: I18N_OPENXPKI_UI_PROFILE_L_DESC
preset: L
type: freetext
width: 60
placeholder: Kolkata
5 Save the file.
6 Create a
file
titled st.yaml in the
/etc/openxpki/config.d/realm/REALM
NAME/profile/template
directory.
7 Add the following:
id: ST
label: ST
description: I18N_OPENXPKI_UI_PROFILE_ST_DESC
preset: ST
type: freetext
width: 60
placeholder: WB
8 Save the file.
Note: OpenXPKI must own both
files
and must be readable, writable, and executable.
9 Restart the OpenXPKI service using openxpkictl restart.
Revoking
certificates
and publishing CRL
1 Access the OpenXPKI server.
a From a web browser, type http://ipaddress/openxpki/.
b Log in as Operator. The default password is openxpki.
Note: The Operator login has two preconfigured operator accounts, raop and raop2.
2 Click Workflow Search > Search now.
3 Click a certificate to revoke, and then click the certificate link.
Managing certificates 112

4 From the Action section, click revocation request.
5 Type the appropriate values, and then click Continue > Submit request.
6 On the next page, approve the request. The
certificate
revocation is waiting for the next CRL publish.
7 From the PKI Operation section, click Issue a certificate revocation list (CRL).
8 Click Enforce creation of revocation lists > Continue.
9 From the PKI Operation section, click Publish CA/CRL.
10 Click Workflow Search > Search now.
11 Click the revoked certificate with a certificate_revocation_request_v2 type.
12 Click Force wake up.
In the new CRL, you can find the serial number and the revocation reason of the revoked certificate.
Managing
certificates
using OpenXPKI
Certificate
Authority through EST
This section helps user to configure OpenXPKI CA version 3.x.x using EST protocol..
Notes:
• Make sure that you are using the Debian 10 Buster operating system.
• For more information on OpenXPKI, go to www.openxpki.org.
Configuring OpenXPKI CA
Installing OpenXPKI CA
1 Connect the machine using PuTTY or another client.
2 From the client, run the sudo su - command to go to the root user.
3 Enter the root password.
4 In nano /etc/apt/sources.list, change the source for installing the updates.
5 Update the file. For example:
#
# deb cdrom:[Debian GNU/Linux testing _Buster_ - Official Snapshot amd64 DVD Binary-1
20190527-04:04]/ buster contrib main
# deb cdrom:[Debian GNU/Linux testing _Buster_ - Official Snapshot amd64 DVD Binary-1
20190527-04:04]/ buster contrib main
deb http://security.debian.org/debian-security buster/updates main contrib
deb-src http://security.debian.org/debian-security buster/updates main contrib
# buster-updates, previously known as 'volatile'
# A network mirror was not selected during install. The following entries
# are provided as examples, but you should amend them as appropriate
# for your mirror of choice.
#
deb http://ftp.debian.org/debian/ buster-updates main
Managing certificates 113

deb-src http://ftp.debian.org/debian/ buster-updates main
deb http://ftp.us.debian.org/debian/ buster main
6 Save the file.
7 Run the following commands:
• apt-get update
• apt-get upgrade
8 Update the CA certificate lists in the server using apt-get install ca-certificates.
9 Install en_US.utf8 locale using dpkg-reconfigure locales.
10 Select the en_US.UTF-8 UTF-8 locale, and then make it the default locale for the system.
Note: Use the Tab and spacebar keys for selecting and navigating the menu.
11 Check the locales that you have generated using locale –a.
Sample output
C
C.UTF-8
en_IN
en_IN.utf8
en_US.utf8
POSIX
12 Copy the fingerprint of the OpenXPKI package using nano /home/Release.key. For this instance, copy
the key in /home.
13 Type 55D89776 006F632B E0196E3E D2495509 BAFDDC74 22FEAAD2 F055074E 0FE3A724 as
the value.
14 Run the following command:
gpg --print-md sha256 /home/Release.key
15 Add the package using the wget https://packages.openxpki.org/v3/debian/Release.key
-O - | apt-key add - command.
16 Add the repository to your source list (buster) using echo " deb
http://packages.openxpki.org/v3/debian/ buster release"
> /etc/apt/sources.list.d/openxpki.list, and then apt update.
17 Install MySQL and Perl MySQL binding using apt install mariadb-server libdbd-mariadb-
perl.
18 Install apache2.2-common using apt install apache2.
19 In nano /etc/apt/sources.list, install the fastcgi module to speed up the user interface.
Note: We recommend using mod_fcgid.
20 Add the deb http://http.us.debian.org/debian/ buster main line in the file, and then save
it.
21 Run the following commands:
apt-get update
apt install libapache2-mod-fcgid
22 Enable the fastcgi module using a2enmod fcgid.
Managing certificates 114

23 Install the OpenXPKI core package using apt install libopenxpki-perl openxpki-cgi-
session-driver openxpki-i18n.
24 Restart the Apache server using service apache2 restart.
25 Check whether the installation is successful using openxpkiadm version.
Note: If the installation is successful, then the system shows the version of the installed OpenXPKI. For
example, Version (core): 3.18.2.
26 Create the empty database, and then assign the database user using mariadb -u root -p.
Notes:
• This command must be typed in the client. Otherwise, you cannot enter the password.
• Type the password for the MySQL. For this instance, root is the MySQL user.
• openxpki is the user on which OpenXPKI is installed.
CREATE DATABASE openxpki CHARSET utf8;
CREATE USER 'openxpki'@'localhost' IDENTIFIED BY 'openxpki';
GRANT ALL ON openxpki.* TO 'openxpki'@'localhost';
flush privileges;
If the MySQL service is not running, then run /etc/init.d/mysql start to start the service.
27 Type quit to exit from MySQL.
28 Store the used credentials in /etc/openxpki/config.d/system/database.yaml.
Sample file content
main:
debug: 0
type: MariaDB
name: openxpki
host: localhost
port: 3306
user: openxpki
passwd: openxpki
Note: Change user and passwd to match the MariaDB user name and password.
29 Save the file.
30 For empty database schema, run zcat /usr/share/doc/libopenxpki-perl/examples/schema-
mariadb.sql.gz | \ mysql -u root --password --database openxpki from the provided
schema
file.
31 Type the password for the database.
Managing certificates 115

Configuring OpenXPKI CA using the default script
Note: The default script configures only the default realm, ca-one. The CDP and CRLs are not configured.
1 Run the script using bash /usr/share/doc/libopenxpki-perl/examples/sampleconfig.sh.
2 Confirm the setup using openxpkiadm alias --realm democa.
Sample output
=== functional token ===
scep (scep):
Alias : scep-1
Identifier: YsBNZ7JYTbx89F_-Z4jn_RPFFWo
NotBefore : 2015-01-30 20:44:40
NotAfter : 2016-01-30 20:44:40
vault (datasafe):
Alias : vault-1
Identifier: lZILS1l6Km5aIGS6pA7P7azAJic
NotBefore : 2015-01-30 20:44:40
NotAfter : 2016-01-30 20:44:40
ca-signer (certsign):
Alias : ca-signer-1
Identifier: Sw_IY7AdoGUp28F_cFEdhbtI9pE
NotBefore : 2015-01-30 20:44:40
NotAfter : 2018-01-29 20:44:40
=== root ca ===
current root ca:
Alias : root-1
Identifier: fVrqJAlpotPaisOAsnxa9cglXCc
NotBefore : 2015-01-30 20:44:39
NotAfter : 2020-01-30 20:44:39
upcoming root ca:
not set
3 Check whether the installation is successful using openxpkictl start.
Sample output
Starting OpenXPKI...
OpenXPKI Server is running and accepting requests.
DONE.
4 Do the following to access the OpenXPKI server:
a From a web browser, type http://ipaddress/openxpki/.
b Add the user name and their corresponding passwords in a userdb.yaml file. To add the user name
and the password, do the following:
• Check out to /home/pkiadm, and then nano userdb.yaml.
• Paste the following:
estRA:
digest:"{ssha256}somePassword”
role: RA Operator
Note: In this instance, estRA refers to the user name. To generate the password, type
openxpkiadm hashpwd. When a message asking for the password and a ssha256 encrypted
password appears, copy and paste it to the digest of any user.
Note: The available roles in the Operator login are RA Operator, CA Operator, and user.
Managing certificates 116

5 Enter the user name and password.
6 Create one certificate request, and then test it.
Configuring OpenXPKI CA manually
Overview
Note: Before you begin, make sure that you have a basic knowledge on creating OpenSSL certificates.
To configure OpenXPKI CA manually, create the following:
1 Root CA certificate. For more information, see “Creating a root CA certificate” on page 102.
2 CA signer certificate, signed by the root CA. For more information, see “Creating a signer certificate” on
page 102.
3 Data vault certificate, self‑signed. For more information, see “Creating a vault certificate” on page 103.
4 Web
certificate,
signed by the signer
certificate.
For more information, see “Setting up the webserver” on
page 120.
Notes:
• When selecting the signature hash, use either SHA256 or SHA512.
• Changing the public key size is optional.
For version 3.10 or later, you can manage the keys directly using the openxpkiadm alias command:
• Run mkdir -p /etc/openxpki/local/keys to create the directory. The default location of the directory
is /etc/openxpki/local/keys.
• Run openxpkictl start to start the server.
For this instance, we are using the /etc/certs/openxpki_democa/ directory for certificate generation. However,
you can use any directory.
Creating an OpenSSL configuration file
The OpenSSL
configuration
file
contains X.509 extensions for generating and signing
certificate
requests.
1 Run the following command:
nano /etc/certs/openxpki_democa/openssl.conf
Note: If your server is reachable using the fully
qualified
domain name (FQDN), then use the DNS of the
server instead of its IP address.
Sample file
# x509_extensions = v3_ca_extensions
# x509_extensions = v3_issuing_extensions
# x509_extensions = v3_datavault_extensions
# x509_extensions = v3_scep_extensions
# x509_extensions = v3_web_extensions
# x509_extensions = v3_ca_reqexts # not for root self-signed, only for issuing
## x509_extensions = v3_datavault_reqexts # not required self-signed
# x509_extensions = v3_scep_reqexts
# x509_extensions = v3_web_reqexts
[ req ]
default_bits = 4096
Managing certificates 117

distinguished_name = req_distinguished_name
[ req_distinguished_name ]
domainComponent = Domain Component
commonName = Common Name
[ v3_ca_reqexts ]
subjectKeyIdentifier = hash
keyUsage = digitalSignature, keyCertSign, cRLSign
[ v3_datavault_reqexts ]
subjectKeyIdentifier = hash
keyUsage = keyEncipherment
extendedKeyUsage = emailProtection
[ v3_scep_reqexts ]
subjectKeyIdentifier = hash
[ v3_web_reqexts ]
subjectKeyIdentifier = hash
keyUsage = critical, digitalSignature, keyEncipherment
extendedKeyUsage = serverAuth, clientAuth
[ v3_ca_extensions ]
subjectKeyIdentifier = hash
keyUsage = digitalSignature, keyCertSign, cRLSign
basicConstraints = critical,CA:TRUE
authorityKeyIdentifier = keyid:always,issuer
[ v3_issuing_extensions ]
subjectKeyIdentifier = hash
keyUsage = digitalSignature, keyCertSign, cRLSign
basicConstraints = critical,CA:TRUE
authorityKeyIdentifier = keyid:always,issuer:always
crlDistributionPoints = URI:https://FQDN of your system/openxpki/CertEnroll/MYOPENXPKI.crl
authorityInfoAccess = caIssuers;URI:https://FQDN of your system/download/MYOPENXPKI.crt
[ v3_datavault_extensions ]
subjectKeyIdentifier = hash
keyUsage = keyEncipherment
extendedKeyUsage = emailProtection
basicConstraints = CA:FALSE
authorityKeyIdentifier = keyid:always,issuer
[ v3_scep_extensions ]
subjectKeyIdentifier = hash
basicConstraints = CA:FALSE
authorityKeyIdentifier = keyid,issuer
[ v3_web_extensions ]
subjectKeyIdentifier = hash
keyUsage = critical, digitalSignature, keyEncipherment
extendedKeyUsage = serverAuth, clientAuth
basicConstraints = critical,CA:FALSE
subjectAltName = DNS:FQDN of est server
crlDistributionPoints = URI:https://FQDN of your
system/openxpki/CertEnroll/MYOPENXPKI_ISSUINGCA.cr
authorityInfoAccess = caIssuers;URI:https://FQDN of your
system/download/MYOPENXPKI_ISSUINGCA.crt
2 Replace the IP address and CA certificate name with your setup information.
3 Save the file.
Creating a password file for certificate keys
1 Run the following command:
nano /etc/certs/openxpki_democa/pd.pass
2 Type your password.
Managing certificates 118

3 Save the file.
Creating a root CA certificate
You can create a self‑signed root CA certificate, or generate a certificate request and then get it signed by the
root CA.
Note: Replace the key length, signature algorithm, and certificate name with the appropriate values.
1 Run the following command:
openssl genrsa -out /etc/certs/openxpki_democa/ca-root-1.key -passout
file:/etc/certs/openxpki_democa/pd.pass 4096
2 Replace the subject in the request with your CA information using openssl req -new -
key /etc/certs/openxpki_democa/ca-root-1.key -
out /etc/certs/openxpki_democa/ca-root-1.csr.
3 Get the certificate signed by the root CA using openssl req -
config /etc/certs/openxpki_democa/openssl.conf -extensions v3_ca_extensions -
x509 -days 3560 -in /etc/certs/openxpki_democa/ca-root-1.csr -
key /etc/certs/openxpki_democa/ca-root-1.key -
out /etc/certs/openxpki_democa/ca-root-1.crt - sha256.
4 Go to /etc/certs/openxpki_democa/ where ca-root-1.crt is saved.
5 Run the following command:
openxpkiadm certificate import --file ca-root-1.crt
Creating a signer certificate
Note: Replace the key length, signature algorithm, and certificate name with the appropriate values.
1 Run the following command:
openssl genrsa -out /etc/certs/openxpki_democa/ca-signer-1.key -passout
file:/etc/certs/openxpki_democa/pd.pass 4096
2 Replace the subject in the request with your CA information using openssl req -
config /etc/certs/openxpki_democa/openssl.conf -reqexts v3_ca_reqexts -new -
key /etc/certs/openxpki_democa/ca-signer-1.key -
subj /DC=COM/DC=LEXMARK/DC=DEV/DC=CA-ONE/CN=MYOPENXPKI_ISSUINGCA -out /
etc/certs/openxpki_democa/ca-signer-1.csr.
3 Get the
certificate
signed by the root CA using openssl x509 -req -
extfile /etc/certs/openxpki_democa/openssl.conf -extensions
v3_issuing_extensions -days 3650 -in /etc/certs/openxpki_democa/ca-
signer-1.csr -CA /etc/certs/openxpki_democa/ca-root-1.crt -
CAkey /etc/certs/openxpki_democa/ca-root-1.key -CAcreateserial -
out /etc/certs/openxpki_democa/ca-signer-1.crt -sha256.
4 Run the following command:
openxpkiadm alias --realm democa --token certsign --file ca-signer-1.crt --
key ca-signer-1.key
Managing certificates 119

Creating a vault certificate
Notes:
• The vault
certificate
is self‑signed.
• Replace the key length, signature algorithm, and
certificate
name with the appropriate values.
1 Run the following command:
openssl req -new -x509 -keyout vault.key -out vault.crt -days 1100 -
config /etc/certs/openxpki_democa/openssl.conf
2 Change the subject in the request with your CA information using openxpkiadm certificate import
--file vault.crt.
3 Run the following command:
openxpkiadm alias --realm democa --token datasafe --file vault.crt --key
vault.key
Note: Provide the necessary values, but keep /CN=DataVault as the subject.
Creating a web certificate
1 Run the following command:
openssl genrsa -out /etc/certs/openxpki_democa/web-1.key -passout
file:/etc/certs/openxpki_democa/pd.pass 4096
2 Replace the subject in the request with your CA information using openssl req -
config /etc/certs/openxpki_democa/openssl.conf -reqexts v3_web_reqexts -new -
key /etc/certs/openxpki_democa/web-1.key -
subj /DC=COM/DC=LEXMARK/DC=DEV/DC=CA-ONE/CN=FQDN of your system -
out /etc/certs/openxpki_democa/web-1.csr.
3 Run the following command:
openssl x509 -req -extfile /etc/certs/openxpki_democa/openssl.conf -
extensions v3_web_extensions -days 900 -
in /etc/certs/openxpki_democa/web-1.csr -CA /etc/certs/openxpki_democa/ca-
signer-1.crt -CAkey /etc/certs/openxpki_democa/ca-signer-1.key -
CAcreateserial -out /etc/certs/openxpki_democa/web-1.crt -sha256
Setting up the webserver
1 Run the following commands:
a2enmod ssl rewrite headers
a2ensite openxpki
a2dissite 000-default default-ssl
mkdir -m755 -p /etc/openxpki/tls/chain
cp /etc/certs/openxpki_democa/ca-root-1.crt /etc/openxpki/tls/chain/
cp /etc/certs/openxpki_democa/ca-signer-1.crt /etc/openxpki/tls/chain/
c_rehash /etc/openxpki/tls/chain/
mkdir -m755 -p /etc/openxpki/tls/endentity
mkdir -m700 -p /etc/openxpki/tls/private
Managing certificates 120

cp /etc/certs/openxpki_democa/web-1.crt /etc/openxpki/tls/endentity/openxp
ki.crt
cat /etc/certs/openxpki_democa/ca-signer-1.crt
>> /etc/openxpki/tls/endentity/openxpki.crt
openssl rsa -in /etc/certs/openxpki_democa/web-1.key -passin
file:/etc/certs/openxpki_democa/pd.pass -
out /etc/openxpki/tls/private/openxpki.pem
chmod 400 /etc/openxpki/tls/private/openxpki.pem
2 Restart the Apache service using apache2 restart.
3 Run the following command to check the successful import of the
files:
openxpkiadm alias --realm democa
Sample output
=== functional token ===
ca-signer (certsign):
Alias : ca-signer-2
Identifier: XjC6MPbsnyfLZkI9Poi9vm4Z5rk
NotBefore : 2022-04-06 10:03:01
NotAfter : 2032-04-03 10:03:01
vault (datasafe):
Alias : vault-2
Identifier: G8ekluAsskGVC0N-jZhB2n9kvdM
NotBefore : 2022-04-06 09:53:57
NotAfter : 2025-04-10 09:53:57
scep (scep):
not set
ratoken (cmcra):
not set
=== root ca ===
current root ca:
Alias : root-2
Identifier: prTHU5vCfcJuCnQWyb5wUknvXQM
NotBefore : 2022-04-06 09:40:27
NotAfter : 2032-01-04 09:40:27
Making the certificate key password available to OpenXPKI
1 Change the value in the nano /etc/openxpki/config.d/system/crypto.yaml file.
2 Uncomment the cache: daemon under secret: default:
secret:
default:
label: Global Secret group
export: 0
method: literal
value: root
cache: daemon
Managing certificates 121

Starting OpenXPKI
1 Run the openxpkictl start command.
Sample output
Starting OpenXPKI...
OpenXPKI Server is running and accepting requests.
DONE.
2 Access the OpenXPKI server:
a From a web browser, type http://ipaddress/openxpki/.
b Add the user names and corresponding passwords in a userdb.yaml file:
• Check out to /home/pkiadm and then to nano userdb.yaml.
• Paste the following:
estRA:
digest:"{ssha256}somePassword”
role: RA Operator
Note: Here estRA refers to the user name.
• To generate the password, type openxpkiadm hashpwd. A message showing the password and
an ssha256 encrypted password appears.
• Copy the password, and then paste it in the digest of any user.
Note: The Operator login has two preconfigured available roles: RA Operator, CA Operator, and user.
3 Type the user name and password.
4 Create one certificate request, and then test it.
Generating CRL information
Note: If your server is reachable using the FQDN, then use the DNS of the server instead of its IP address.
1 Stop the OpenXPKI service using openxpkictl stop.
2 In nano /etc/openxpki/config.d/realm/democa/publishing.yaml, update the connectors: cdp section
to the following:
class: Connector::Builtin::File::Path
LOCATION: /var/www/openxpki/CertEnroll/
file: "[% ARGS.0 %].crl"
content: "[% pem %]"
a In nano /etc/openxpki/config.d/realm/democa/profile/default.yaml, update the following:
• crl_distribution_points: section
critical: 0
uri:
- https://FQDN of the est/openxkpi/CenrtEnroll/[% ISSUER.CN.0 %].crl
- ldap://localhost/[% ISSUER.DN %]
• authority_info_access: section
critical: 0
ca_issuers: http://FQDN of the est/download/MYOPENXPKI.crt
ocsp: http://ocsp.openxpki.org/
Change the IP address and CA certificate name according to your CA server.
Managing certificates 122

Note: The authority_info_access (AIA) path is saved in the Download folder, but you can set the
location according to your preference.
b In nano /etc/openxpki/config.d/realm/democa/crl/default.yaml, do the following:
• If necessary, update nextupdate and renewal.
• Add ca_issuers to the following section:
extensions:
authority_info_access:
critical: 0
# ca_issuers and ocsp can be scalar or list
ca_issuers: https://FQDN of the est/download/MYOPENXPKI.crt
#ocsp: http://ocsp.openxpki.org/
Change the IP address and CA
certificate
name according to your CA server.
3 Start the OpenXPKI service using openxpkictl start.
Publishing CRL information
After creating the CRLs, you must publish them to be accessed by all.
1 Stop the Apache service using service apache2 stop.
2 Create a CertEnroll directory for the CRL in the /var/www/openxpki/ directory.
3 Set openxpki as the owner of this directory, and then configure the permissions to let Apache read and
execute, and other services to read only.
chown openxpki /var/www/openxpki/CertEnroll
chmod 755 /var/www/openxpki/CertEnroll
4 Add a reference to the Apache alias.conf file using nano /etc/apache2/mods-
enabled/alias.conf.
5 After the <Directory "/usr/share/apache2/icons"> section, add the following:
Alias /CertEnroll/ "/var/www/openxpki/CertEnroll/"
<Directory "/var/www/openxpki/CertEnroll">
Options FollowSymlinks
AllowOverride None
Require all granted
</Directory>
6 Add a reference in the apache2.conf file using nano /etc/apache2/apache2.conf.
7 Add the following in the Apache2 HTTPD server section:
<Directory /var/www/openxpki/CertEnroll>
Options FollowSymlinks
AllowOverride None
Allow from all
</Directory>
8 Start the Apache service using service apache2 start.
Managing certificates 123

Enabling automatic approval of certificate requests in OpenXPKI CA
1 Stop the OpenXPKI service using openxpkictl stop.
2 In
/etc/openxpki/config.d/realm/democa/est/default.yaml
, update the eligible: section:
Old content
eligible:
initial:
value@: connector:scep.generic.connector.initial
args: '[% context.cert_subject_parts.CN.0 %]'
expect:
- Build
- New
New content
eligible:
initial:
value: 1
# value@: connector:scep.generic.connector.initial
# args: '[% context.cert_subject_parts.CN.0 %]'
# expect:
# - Build
# - New
Notes:
• Review the space and indention in the script file.
• To approve certificates manually, comment value: 1, and then uncomment the other lines that are
previously commented.
3 Save the file.
4 Start the OpenXPKI service using openxpkictl start.
Changing details to enable ca-certs download
1 Run the following command:
nano /usr/lib/cgi-bin/est.fcgi
2 Replace my $mime = "application/pkcs7-mime; smime-type=certs-only"; with my $mime
= "application/pkcs7-mime";.
3 Start the OpenXPKI service using openxpkictl.
Creating a second realm
In OpenXPKI, you can
configure
multiple PKI structures in the same system. The following topics show how to
create another realm for MVE named democa-two.
Copying and setting the directory
1 Create a directory, namely democa2, for the second realm inside /etc/openxpki/config.d/realm.
2 Copy the
/etc/openxpki/config.d/realm/ca-one
sample directory tree to a new directory (cp -
r /etc/openxpki/config.d/realm.tpl/*/etc/openxpki/config.d/realm/democa2) within the realm directory.
Managing certificates 124

3 In /etc/openxpki/config.d/system/realms.yaml, update the following section:
Old content
# This is the list of realms in this PKI
# You only need to enable the realms which are visible on the server
democa:
label: Verbose name of this realm
baseurl: https://pki.example.com/openxpki/
#democa2:
# label: Verbose name of this realm
# baseurl: https://pki.acme.org/openxpki/
New content
# This is the list of realms in this PKI
# You only need to enable the realms which are visible on the server
democa:
label: Example.org Demo CA
baseurl: https://pki.example.com/openxpki/
democa2:
label: Example.org Demo CA2
baseurl: https://pki.example.com/openxpki/
4 Save the file.
Configuring EST endpoint for multiple realms
You can
configure
the EST endpoint with a tuple composed of the authority portion of the URI and the optional
label (for example, www.example.com:80 and arbitraryLabel1). In the following instructions, we use two PKI
realms, democa and democa2.
1 Copy the default configuration file in cp /etc/openxpki/est/default.conf /etc/openxpki/est/democa.conf.
Note: Name the file as democa.conf.
2 In nano /etc/openxpki/est/democa.conf, change the realm value to realm=democa.
Note: According to your needs, you may need to uncomment the corresponding lines for the
simpleenroll, simplereenroll, csrattrs, and cacerts sections. Keep the environment sections commented.
Do the same for default.conf.
3 Create another
configuration
file
in cp /etc/openxpki/est/default.conf /etc/openxpki/est/democa2.conf.
Note: Name the file as democa2.conf.
4 In nano /etc/openxpki/est/democa2.conf, change the realm value to realm=democa2.
Note: According to your needs, you may need to uncomment the corresponding lines for the
simpleenroll, simplereenroll, csrattrs, and cacerts sections. Keep the environment sections commented.
5 Copy the default.yaml file in the following locations:
• cp /etc/openxpki/config.d/realm/democa/est/default.yaml
• /etc/openxpki/config.d/realm/democa/est/democa.yaml
Note: Name the
file
as democa.yaml.
Managing certificates 125

6 Copy the default.yaml file in the following locations:
• cp /etc/openxpki/config.d/realm/democa2/est/default.yaml
•
/etc/openxpki/config.d/realm/democa2/est/democa2.yaml
Note: Name the file as democa2.yaml.
7 Restart the OpenXPKI service using openxpkictl restart.
Select the following URLs to open the EST server corresponding to a realm via a web browser:
• democa—http://ipaddress/est/democa
• democa2—http://ipaddress/est/democa2
If you want to dierentiate between login credentials and default certificate templates for dierent PKI realms,
then you may need advanced configuration.
Creating a signer certificate
The following instructions show how to generate a signer certificate in the second realm. You can use the same
root and vault certificates as those in the first realm.
1 Create an OpenSSL configuration file in nano /etc/certs/openxpki_democa2/openssl.conf.
Note: Change the
certificate
common name so that the user can easily distinguish between
dierent
certificates
for
dierent
realms. The
certificate
files
are created in the /etc/certs/openxpki_democa2/
directory.
2 Go to the directory of the vault certificate in the first realm, and then import the certificate from the first realm.
3 Run the following code:
openxpkiadm alias --realm democa2 --token datasafe --file vault.crt
Creating a password file for certificate keys
1 Run the following command:
nano /etc/certs/openxpki_democa2/pd.pass
2 Type your password.
3 Create a signer certificate. For more information, see “Creating a signer certificate” on page 102.
4 Check whether the import is successful using openxpkiadm alias --realm democa2.
Note: If you changed the key password of the certificate during certificate creation, update
nano /etc/openxpki/config.d/realm/democa2/crypto.yaml.
5 Generate the CRLs for the second realm. For more information, see “Generating CRL information” on
page 105.
Note: Make sure that you use the correct CA
certificate
name according to the realm.
6 Publish the CRLs for this realm. For more information, see “Publishing CRL information” on page 123.
7 Restart the OpenXPKI service using openxpkictl restart.
Sample output
Stopping OpenXPKI
Stopping gracefully, 3 (sub)processes remaining...
Managing certificates 126

DONE.
Starting OpenXPKI...
OpenXPKI Server is running and accepting requests.
DONE.
Enabling multiple active certificates with the same subject to be present at a time
By default, in OpenXPKI only one
certificate
with the same subject name can be active at a time. But when you
are enforcing multiple Named Certificates, multiple active certificates with the same subject name must be
present at a time.
1 In
/etc/openxpki/config.d/realm/REALM
NAME/est/< REALM NAME >.yaml, from the policy section,
change the value of max_active_certs from 1 to 0.
Notes:
• REALM NAME is the name of the realm. For example, ca‑one.
• Review the space and indentation in the script file.
2 Restart the OpenXPKI service using openxpkictl restart.
Setting the default port number for OpenXPKI CA
By default, Apache listens in port number 443 for https. Set the default port number for OpenXPKI CA to avoid
conflicts.
1 In /etc/apache2/ports.conf, modify the 443 port to any other port. For example:
Old content
Listen 80
<IfModule ssl_module>
Listen 443
</IfModule>
<IfModule mod_gnutls.c>
Listen 443
</IfModule>
New content
Listen 80
<IfModule ssl_module>
Listen 9443
</IfModule>
<IfModule mod_gnutls.c>
Listen 9443
</IfModule>
2 In /etc/apache2/sites-available/openxpki.conf, add or modify the VirtualHost section to map a new
port. For example, <VirtualHost *:443> to <VirtualHost *:9443>.
3 In /etc/apache2/sites-available/default-ssl.conf, add or modify the VirtualHost_default section to
map a new port. For example, change <VirtualHost *:443> to <VirtualHost *:9443>.
Managing certificates 127

4 Restart the Apache server using systemctl restart apache2.
Note: If it asks for the SSL/TLS passphrase, then type the password while adding the TLS web server
certificate
in the EST server.
5 In tinddopenxpkiweb01.dhcp.dev.lexmark.com:9443 (RSA):, enter the passphrase for the SSL/TLS keys.
To check the status, run netstat -tlpn| grep apache. The OpenXPKI SCEP URL is now
https://ipaddress, and the web URL is FQDN:9443/openxpki.
Enabling basic authentication
1 Run the following command:
apt -y install apache2-utils
2 Create a user account that has access to the server. Enter the following details:
htpasswd -c /etc/apache2/.htpasswd <username>
New password:
Re-type new password:
Adding password for user <username>
3 Go to directory cd /etc/apache2/sites-enabled/.
4 In nano openxpki.conf, add the following lines in <VirtualHost *: 443 block>:
#HTTPS BASIC AUTH FOR LABELS
Location /.well-known/est/*/simpleenroll
AuthType Basic
AuthName "estrealm"
AuthUserFile /etc/apache2/.htpasswd
require valid-user
</Location>
#HTTPS BASIC AUTH FOR NO LABEL
<Location /.well-known/est/simpleenroll>
AuthType Basic
AuthName "estrealm"
AuthUserFile /etc/apache2/.htpasswd
require valid-user
</Location>
5 Add ErrorDocument 401 %{unescape:%00} before SSLEngine in the same virtual Host block.
Example
ServerAlias *
DocumentRoot /var/www/
ErrorDocument 401 %{unescape:%00}
SSLEngine On
6 Restart the apache2 service using service apache2 restart.
Note: Basic authentication works using the above user name and password.
Enabling Client Certificate Authentication
1 Go to the following directory: cd /etc/apache2/sites-enabled/.
2 For the required host in nano openxpki.conf, add SSLVerifyClient require.
For example, if you are using port 443, modify the VirtualHost section to:
<VirtualHost *:443>
SSLVerifyClient require
</VirtualHost>
Managing certificates 128

3 Remove the SSLVerifyClient optional_no_ca command.
4 Save the file, and then type quit to exit from MySQL.
5 Go to the following directory: cd /etc/openxpki/config.d/realm/democa/est.
6 Open default.yaml and democa.yaml.
Note: If the label is
dierent,
then change the YAML
file.
7 Run the following command:
vi default.yaml
8 In the authorized_signer section, add the following:
authorized_signer:
rule2:
subject: CN=,.
For example, if your client certificate subject name is test123, then add the following in the
authorized_signer section:
authorized_signer:
rule1:
# Full DN
subject: CN=.+:pkiclient,.
rule2:
subject: CN=test123,.*
9 Save the file, and then type quit to exit MySQL.
10 Restart the OpenXPKI service using openxpkictl restart.
11 Restart the Apache service using service apache2 restart.
What causes the SAN mismatch error that prevents the system from fetching the CRL?
The SAN mismatch error may occur when you are enabling the CRL information. This error indicates that the
IP or host name does not match the value of the SAN in the web certificate. To avoid getting this error, use the
FQDN in the path of the CRL instead of the IP. You can also configure the web certificate and use the FQDN of
your system in the SAN field.
Why are the ca‑signer‑1 and vault‑1 tokens
oine?
If the System Status page shows that your ca‑signer‑1 and vault‑1 tokens are oine, then do the following:
1 In
/etc/openxpki/config.d/realm/realm
name/crypto.yaml, change the corresponding key value.
2 Restart the OpenXPKI service.
Managing certificates 129

Managing printer alerts
Overview
Alerts are triggered when a printer requires attention. Actions let you send customized e-mails or run scripts
when an alert occurs. Events define which actions are executed when specific alerts are active. To register for
alerts from a printer, create actions and then associate them with an event. Assign the event to the printers that
you want to monitor.
Note: This feature is not applicable to secured printers.
Creating an action
An action is either an e‑mail
notification
or an event viewer log. Actions assigned to events are triggered when
a printer alert occurs.
1 From the Printers menu, click Events & Actions > Actions > Create.
2 Type a unique name for the action and its description.
3 Select an action type.
E‑mail
Note: Before you begin, make sure that the e‑mail settings are
configured.
For more information, see
“Configuring
e‑mail settings” on page 142.
a In the Type menu, select E‑mail.
b Type the appropriate values in the fields. You can also use the available placeholders as the entire or
part of the subject title, or as part of an e‑mail message. For more information, see
“Understanding action
placeholders” on page 131.
c Click Create Action.
Managing printer alerts 130

Log event
a In the Type menu, select Log event.
b Type the event parameters. You can also use the available placeholders in the drop‑down menu. For
more information, see
“Understanding action placeholders” on page 131.
c Click Create Action.
Understanding action placeholders
Use the available placeholders in the subject title or e‑mail message. Placeholders represent variable elements,
and are replaced with actual values when used.
• ${eventHandler.timestamp}—The date and time that MVE processed the event. For example, Mar 14,
2017 1:42:24 PM.
• ${eventHandler.name}—The name of the event.
• ${configurationItem.name}—The system name of the printer that triggered the alert.
• ${configurationItem.address}—The MAC address of the printer that triggered the alert.
• ${configurationItem.ipAddress}—The IP address of the printer that triggered the alert.
• ${configurationItem.ipHostname}—The host name of the printer that triggered the alert.
• ${configurationItem.model}—The model name of the printer that triggered the alert.
• ${configurationItem.serialNumber}—The serial number of the printer that triggered the alert.
• ${configurationItem.propertyTag}—The property tag of the printer that triggered the alert.
• ${configurationItem.contactName}—The contact name of the printer that triggered the alert.
• ${configurationItem.contactLocation}—The contact location of the printer that triggered the alert.
•
${configurationItem.manufacturer}
—The manufacturer of the printer that triggered the alert.
• ${alert.name}—The name of the alert that is triggered.
• ${alert.state}—The state of the alert. It can be active or cleared.
• ${alert.location}—The location within the printer where the triggered alert occurred.
• ${alert.type}—The severity of the triggered alert, such as Warning or Intervention Required.
Managing printer alerts 131

Managing actions
1 From the Printers menu, click Events & Actions > Actions.
2 Do any of the following:
Edit an action
a Select an action, and then click Edit.
b Configure the settings.
c Click Save Changes.
Delete actions
a Select one or more actions.
b Click Delete, and then
confirm
deletion.
Test an action
a Select an action, and then click Test.
b To verify the test results, see the tasks logs.
Notes:
• For more information, see “Viewing logs” on page 138.
• If you are testing an e‑mail action, then verify if the e‑mail was sent to the recipient.
Creating an event
You can monitor alerts in your printer
fleet.
Create an event, and then set an action to execute when the
specified
alerts occur. Events are not supported in secured printers.
1 From the Printers menu, click Events & Actions > Events > Create.
2 Type a unique name for the event and its description.
3 From the Alerts section, select one or more alerts. For more information, see “Understanding printer alerts”
on page 133.
4 From the Actions section, select one or more actions to execute when the selected alerts are active.
Note: For more information, see
“Creating an action” on page 130.
5 Enable the system to execute selected actions when alerts are cleared on the printer.
6 Set a grace period before executing any selected actions.
Note: If the alert is cleared during the grace period, then the action is not executed.
7 Click Create Event.
Managing printer alerts 132

Understanding printer alerts
Alerts are triggered when a printer requires attention. The following alerts can be associated with an event in
MVE:
• Automatic Document Feeder (ADF) jam—A paper is jammed in the ADF and must be physically removed.
– Scanner ADF Exit Jam
– Scanner ADF Feeder Jam
– Scanner ADF Inverter Jam
– Scanner ADF Paper Cleared
– Scanner ADF Paper Missing
– Scanner ADF PreRegistration Jam
– Scanner ADF Registration Jam
– Scanner Alert - Replace All Originals if Restarting Job
• Door or cover open—A door is open on the printer and must be closed.
– Check Door/Cover - Mailbox
– Door Open
– Cover Alert
– Cover Closed
– Cover Open
– Cover Open Or Cartridge Missing
– Duplex Cover Open
– Scanner ADF Cover Open
– Scanner Jam Access Cover Open
• Incorrect media size or type—A job is printing and requires certain paper to be loaded in a tray.
– Incorrect Envelope Size
– Incorrect Manual Feed
– Incorrect Media
– Incorrect Media Size
– Load Media
• Memory full or error—The printer is running low on memory and must apply changes.
– Complex Page
– Files Will Be Deleted
–
Insucient
Collation Memory
–
Insucient
Defrag Memory
– Insucient Fax Memory
– Insucient Memory
– Insucient Memory - Held Jobs May Be Lost
–
Insucient
Memory For Resource Save
– Memory Full
– PS Memory Shortage
Managing printer alerts 133

– Scanner Too Many Pages - Scan Job Canceled
– Resolution Reduction
• Option malfunction—An option attached to the printer is in an error state. Options include input options,
output options, font cards, user flash cards, disks, and finishers.
– Check Alignment/Connection
– Check Duplex Connection
– Check Finisher/Mailbox Installation
– Check Power
– Corrupted Option
– Defective Option
– Detach Device
– Duplex Alert
– Duplex Tray Missing
– External Network Adapter Lost
– Finisher Alert
– Finisher Door Or Interlock Open
– Finisher Paper Wall Open
– Incompatible Duplex Device
– Incompatible Input Device
– Incompatible Output Device
– Incompatible Unknown Device
– Incorrect Option Installation
– Input Alert
– Input Configuration Error
– Option Alert
– Output Bin Full
– Output Bin Nearly Full
– Output Configuration Error
– Option Full
– Option Missing
– Paper Feed Mechanism Missing
– Print Jobs On Option
– Reattach Device
– Reattach Output Device
– Too Many Inputs Installed
– Too Many Options Installed
– Too Many Outputs Installed
– Tray Missing
– Tray Missing During Power On
– Tray Sensing Error
– Uncalibrated Input
Managing printer alerts 134

– Unformatted Option
– Unsupported Option
– Reattach Input Device
• Paper jam—A paper is jammed in the printer and must be physically removed.
– Internal Paper Jam
– Jam Alert
– Paper Jam
• Scanner error—The scanner has a problem.
– Scanner Back Cable Unplugged
– Scanner Carriage Locked
– Scanner Clean Flatbed Glass/Backing Strip
– Scanner Disabled
– Scanner Flatbed Cover Open
– Scanner Front Cable Unplugged
– Scanner Invalid Scanner Registration
• Supplies error—A printer supply has a problem.
– Abnormal Supply
– Cartridge Region Mismatch
– Defective Supply
– Fuser Unit Or Coating Roller Missing
– Invalid Or Missing Left Cartridge
– Invalid Or Missing Right Cartridge
– Invalid Supply
– Priming Failure
– Supply Alert
– Supply Jam
– Supply Missing
– Toner Cartridge Eject Handle Pulled
– Toner Cartridge Not Installed Correctly
– Uncalibrated Supply
– Unlicensed Supply
– Unsupported Supply
• Supplies or consumable empty—A printer supply must be replaced.
– Input Empty
– Life Exhausted
– Printer Ready for Maintenance
– Scheduled Maintenance
– Supply Empty
– Supply Full
– Supply Full or Missing
Managing printer alerts 135

Note: The printer sends the alert as an error and a warning. If one of these alerts is triggered, then its
associated action occurs twice.
• Supplies or consumable low—A printer supply is running low.
– Early Warning
– First Low
– Input Low
– Life Warning
– Nearly Empty
– Nearly Low
– Supply Low
– Supply Nearly Full
• Uncategorized alert or condition
– Color Calibration Failure
– Data Transmission Error
– Engine CRC Failure
– External Alert
– Fax Connection Lost
– Fan Stall
– Hex Active
– Insert Duplex Page and Press Go
– Internal Alert
– Internal Network Adapter Needs Service
– Logical Unit Alert
– Oine
– Oine for Warning Prompt
– Operation Failed
– Operator Intervention Alert
– Page Error
– Port Alert
– Port Communication Failure
– Port Disabled
– Power Saver
– Powering
O
– PS Job Timeout
– PS Manual Timeout
– Setup Required
– SIMM Checksum Error
– Supply Calibrating
– Toner Patch Sensing Failed
– Unknown Alert Condition
– Unknown Configuration
Managing printer alerts 136

– Unknown Scanner Alert Condition
– User(s) Locked Out
– Warning Alert
Managing events
1 From the Printers menu, click Events & Actions > Events.
2 Do either of the following:
Edit an event
a Select an event, and then click Edit.
b
Configure
the settings.
c Click Save Changes.
Delete events
a Select one or more events.
b Click Delete, and then confirm deletion.
Managing printer alerts 137

Viewing task status and history
Overview
Tasks are any printer management activities performed in MVE, such as printer discovery, audit, and
configurations enforcement. The Status page shows the status of all currently running tasks and the tasks run
in the last 72 hours. Information on the currently running tasks is entered into the log. Tasks older than 72 hours
can be viewed only as individual log entries in the Log page, and can be searched using the task IDs.
Viewing the task status
From the Tasks menu, click Status.
Note: The task status is updated in real time.
Stopping tasks
1 From the Tasks menu, click Status.
2 From the Currently Running Tasks section, select one or more tasks.
3 Click Stop.
Viewing logs
1 From the Tasks menu, click Logs.
2 Select task categories, task types, or a time period.
Notes:
• Use the search field to search for multiple Task IDs. Use commas to separate multiple Task IDs or a
hyphen to indicate a range. For example, 11, 23, 30-35.
• To export the search results, click Export to CSV.
Clearing logs
1 From the Tasks menu, click Log.
2 Click Clear Log, and then select a date.
3 Click Clear Log.
Exporting logs
1 From the Tasks menu, click Log.
2 Select task categories, task types, or a time period.
Viewing task status and history 138

3 Click Export to CSV.
Viewing task status and history 139

Scheduling tasks
Creating a schedule
1 From the Tasks menu, click Schedule > Create.
2 From the General section, type a unique name for the scheduled tasks and its description.
3 From the Task section, do one of the following:
Schedule an audit
a Select Audit.
b Select a saved search.
Schedule a conformance check
a Select Conformance.
b Select a saved search.
Schedule a printer status check
a Select Current Status.
b Select a saved search.
c Select an action.
Schedule a configuration deployment
a Select Deploy File.
b Select a saved search.
c Browse to the file, and then select the file type.
d If necessary, select a deployment method or protocol.
Schedule a discovery
a Select Discovery.
b Select a discovery profile.
Schedule a configuration enforcement
a Select Enforcement.
b Select a saved search.
Schedule a certificate validation
Select Validate Certificate.
Note: During validation, MVE communicates with the CA server to download the
certificate
chain and
the
Certificate
Revocation List (CRL). The enrolment agent
certificate
is also generated. This
certificate
enables the CA server to trust MVE.
Scheduling tasks 140

Schedule a view export
a Select View Export.
b Select a saved search.
c Select a view template.
d Type the list of e‑mail addresses where the exported files are sent.
4 From the Schedule section, set the date, time, and frequency of the task.
5 Click Create Scheduled Task.
Managing scheduled tasks
1 From the Tasks menu, click Schedule.
2 Do either of the following:
Edit a scheduled task
a Select a task, and then click Edit.
b
Configure
the settings.
c Click Edit Scheduled Task.
Note: The Last Run information is removed when a scheduled task is edited.
Delete a scheduled task
a Select a task, and then click Delete.
b Click Delete Scheduled Task.
Scheduling tasks 141
Performing other administrative tasks
Configuring general settings
1 Click on the upper‑right corner of the page.
2 Click General, and then select a host name source.
• Printer—The system retrieves the host name from the printer.
• Reverse DNS Lookup—The system retrieves the host name from the DNS table using the IP address.
3 Set the alert reregistration frequency.
Note: Printers may lose the alert registration state when changes are made, such as rebooting or
updating the firmware. MVE attempts to recover the state automatically on the next interval set in the
alert reregistration frequency.
4 Configure the following system log settings:
• System log cleanup start time—The time when the cleanup of system or task logs starts.
• System log retention period (weeks)—The number of weeks that system logs are stored in the database.
Note: Entries stored in the database for more than 52 weeks are removed.
• System log archive—Allows the system to archive the system logs and the encoded entries on the file
system. The destination and format of the archive files are defined in the log4j2.xml file.
5 Click Save Changes.
Configuring e‑mail settings
Enable SMTP
configuration
to let MVE send data export
files
and event
notifications
through e‑mail.
1 Click on the upper‑right corner of the page.
2 Click E‑mail, and then select Enable E‑mail SMTP
configuration
.
3 Type the SMTP mail server and port.
4 Select the proper encryption.
Notes:
• For SSL encryption, select port 465.
• For TLS/STARTTLS encryption, select port 587.
5 Type the e‑mail address of the sender.
6 If a user must log in before e‑mailing, then select Login required, and then type the user credentials.
7 Click Save Changes.
Performing other administrative tasks 142

Adding a login disclaimer
You can
configure
a login disclaimer to be shown when users log in with a new session. Users must accept the
disclaimer before they can access MVE.
1 Click on the upper‑right corner of the page.
2 Click Disclaimer, and then select Enable disclaimer prior to login.
3 Type the disclaimer text.
4 Click Save Changes.
Signing the MVE certificate
Secure Socket Layer (SSL) or Transport Layer Security (TLS) is a security protocol that uses data encryption and
certificate authentication to protect server‑client communication. In MVE, TLS is used to protect the sensitive
information shared between the MVE server and the web browser. The protected information can be printer
passwords, security policies, MVE user credentials, or printer authentication information, such as LDAP or
Kerberos.
TLS enables the MVE server and the web browser to encrypt the data before sending it, and then decrypt it
after it is received. SSL also requires the server to present the web browser with a certificate that proves that
the server is who it claims to be. This certificate is either self-signed or signed using a trusted third-party CA.
By default, MVE is configured to use a self-signed certificate.
1 Download the
certificate
signing request.
a Click on the upper‑right corner of the page.
b Click TLS > Download.
c Select Certificate signing request.
Note: The
certificate
signing request includes Subject Alternative Names (SANs).
2 Use a trusted CA to sign the certificate signing request.
3 Install the CA-signed certificate.
a Click on the upper‑right corner of the page.
b Click TLS > Install Signed Certificate.
c Upload the CA-signed certificate, and then click Install Certificate.
d Click Restart MVE Service.
Note: Restarting the MVE service reboots the system, and the server may be unavailable for the next
few minutes. Before restarting the service, make sure that no tasks are currently running.
Performing other administrative tasks 143

Removing user information and references
MVE is compliant with the data protection rules under General Data Protection Regulation (GDPR). MVE can be
configured to apply the right to be forgotten and remove private user information from the system.
Removing users
1 Click on the upper‑right corner of the page.
2 Click User, and then select one or more users.
3 Click Delete > Delete Users.
Removing user references in LDAP
1 Click on the upper‑right corner of the page.
2 Click LDAP.
3 Remove any user‑related information in the search
filters
and binding settings.
Removing user references in the e-mail server
1 Click on the upper‑right corner of the page.
2 Click E‑mail.
3 Remove any user‑related information, such as user credentials used for authenticating with the e‑mail server.
Removing user references in the task logs
For more information, see “Clearing logs” on page 138.
Removing user references in a configuration
1 From the Configurations menu, click All Configurations.
2 Click the
configuration
name.
3 From the Basic tab, remove any user‑related values from the printer settings, such as contact name and
contact location.
Removing user references in an advanced security component
1 From the Configurations menu, click All Advanced Security Components.
2 Click the component name.
3 From the Advanced Security Settings section, remove any user‑related values.
Removing user references in saved searches
1 From the Printers menu, click Saved Searches.
2 Click a saved search.
3 Remove any search rule that uses any user‑related values, such as contact name and contact location.
Performing other administrative tasks 144

Removing user references in keywords
1 From the Printers menu, click Printer Listing.
2 Unassign user‑related keywords from the printers.
3 From the Printers menu, click Keywords.
4 Remove any keyword that uses user‑related information.
Removing user references in events and actions
1 From the Printers menu, click Events & Actions.
2 Remove any actions that contain e‑mail references to users.
Performing other administrative tasks 145

Managing SSO
Overview
Active Directory Federation Services (ADFS) is an identity access solution that provides client computers with
Single Sign-On (SSO) access to protected applications or services. Users can access these applications or
services even when their accounts and applications are in completely dierent networks or organizations.
ADFS uses Security Assertion Markup Language (SAML) authentication and Claims-based Access Control
(CBAC) authorization to ensure security across applications using the federated identity.
You must establish encrypted communication between the MVE and ADFS servers. To do so, ADFS must trust
the MVE server. ADFS also contains user groups from the Active Directory (AD) server that must correspond to
the required MVE user roles.
When you set up the ADFS server, the following information is required from the MVE application:
• Relying party trust identifier—https://mve-host/mve/saml
• Relying party SAML 2.0 SSO Service URL or Endpoint—https://mve-host/mve/adfs/saml
Note: In the URLs, mve-host is the IP address or FQDN of the MVE server.
Setting the claim‑issuance policy for GroupRule
1 From the AD FS window, click Relying Party Trusts, and then right-click the applicable relying‑party trust.
2 Click Edit Claim Issuance Policy, and then Add Rule.
3 From the Claim rule template list, select Send LDAP Attributes as Claims.
4 In the Claim rule name field, type GroupRule.
5 From the Attribute store list, select Active Directory.
6 Set LDAP attribute to Token-Groups - Unqualified Names, and then set Outgoing Claim Type to
MVEGroup.
7 Click Finish.
Setting the claim‑issuance policy for Name ID
1 From the AD FS window, click Relying Party Trusts, and then right-click the applicable relying‑party trust.
2 Click Edit Claim Issuance Policy, and then Add Rule.
3 From the Claim rule template list, select Send LDAP Attributes as Claims.
4 In the Claim rule name field, type Name ID.
5 From the Attribute store list, select Active Directory.
6 Set LDAP attribute to SAM-Account-Name, and then set Outgoing Claim Type to Name ID.
7 Click Finish.
Managing SSO 146

Enabling ADFS Server authentication
1 Click on the upper‑right corner of the page.
2 Click ADFS, and then select Enable ADFS for authentication.
3 In the SSO URL (Required) field, type the SSO URL that is published by the ADFS server as an identity
provider.
4 In the ADFS Groups to MVE Role Mapping section, enter the ADFS group names that correspond to the
MVE roles.
5 Click Save Changes.
Accessing MVE by way of ADFS
When you enable ADFS, and then access MVE, the ADFS login page automatically opens. Perform the
authentication on the ADFS page before you are redirected to the MVE home page.
1 Open a web browser, and then type https://MVE_SERVER/mve/, where MVE_SERVER is the host name
or IP address of the server hosting MVE.
2 When the ADFS login page opens, enter your ADFS credentials, and then click Sign in.
Notes:
• If users encounter issues when accessing MVE by way of ADFS, then administrators can log in to MVE
using their localhost credentials and resolve the issue.
• If ADFS is not configured in the MVE server, then the default MVE login page is displayed for both
localhost and non-localhost users. In this case, the users must log in to MVE using the accounts that are
configured in the MVE server.
Logging out from MVE
If you accessed MVE using ADFS, then the Log out button does not appear on the MVE home page. The MVE
session ends only if you close the MVE page or the MVE session is idle for more than 30 minutes. If you try to
access the MVE URL after 30 minutes of inactivity, then you are redirected to the ADFS login page.
Note: If you accessed MVE using your localhost MVE credentials, then the Log out button still appears on the
MVE home page.
Managing SSO 147

Frequently asked questions
Markvision Enterprise FAQ
Why can I not choose multiple printers in the supported models list when
creating a configuration?
Configuration settings and commands dier between printer models.
Can other users access my saved searches?
Yes. All users can access saved searches.
Where can I find the log files?
Yo u ca n
find
the installation log
files
in the hidden directory of the user installing MVE. For example, C:\Users
\Administrator\AppData\Local\Temp\mveLexmark-install.log.
Yo u c a n fi n d t h e *.log application log files in the installation_dir\Lexmark\Markvision Enterprise
\tomcat\logs folder, where installation_dir is the installation folder of MVE.
What is the dierence between host name and reverse DNS lookup?
A host name is a unique name assigned to a printer on a network. Each host name corresponds to an IP address.
Reverse DNS lookup is used to determine the designated host name and domain name of a given IP address.
Where can I find reverse DNS lookup in MVE?
Reverse DNS lookup can be found in the general settings. For more information, see “Configuring general
settings” on page 142.
How do I manually add rules to the Windows firewall?
Run the command prompt as an administrator, and then type the following:
firewall add allowedprogram "installation_dir/Lexmark/Markvision
Enterprise/tomcat/bin/tomcat9.exe" "Markvision Enterprise Tomcat"
firewall add portopening UDP 9187 "Markvision Enterprise NPA UDP"
firewall add portopening UDP 6100 "Markvision Enterprise LST UDP"
Where installation_dir is the installation folder of MVE.
How do I set up MVE to use a dierent port than port 443?
1 Stop the Markvision Enterprise service.
a Open the Run dialog box, and then type services.msc.
b Right‑click Markvision Enterprise, and then click Stop.
Frequently asked questions 148

2 Open the installation_dir\Lexmark\Markvision Enterprise\tomcat\conf\server.xml
file.
Where installation_dir is the installation folder of MVE.
3 Change the Connector port value to another unused port.
<Connector port="443" protocol="org.apache.coyote.http11.Http11NioProtocol"
sslImplementationName="org.apache.tomcat.util.net.jsse.JSSEImplementation"
SSLEnabled="true" scheme="https" secure="true" clientAuth="false"
compression="on" compressableMimeType="text/html,text/xml,text/plain,text/css,
text/javascript,application/javascript,application/json" maxThreads="150"
maxHttpHeaderSize="16384" minSpareThreads="25" enableLookups="false"
acceptCount="100" connectionTimeout="120000" disableUploadTimeout="true"
URIEncoding="UTF-8" server="Apache" sslEnabledProtocols="TLSv1,TLSv1.1,TLSv1.2"
sslProtocol="TLS" keystoreFile="C:/Program Files/Lexmark/Markvision Enterprise/
../mve_truststore.p12" keystorePass="markvision" keyAlias="mve" keyPass="markvision"
keystoreType="PKCS12" ciphers="TLS_ECDHE_RSA_WITH_AES_128_CBC_SHA256,
TLS_ECDHE_RSA_WITH_AES_128_CBC_SHA,TLS_RSA_WITH_AES_128_CBC_SHA256,
TLS_RSA_WITH_AES_128_CBC_SHA"/>
4 Change the redirectPort value to the same port number used as the connector port.
<Connector port="9788" maxHttpHeaderSize="16384" maxThreads="150" minSpareThreads="25"
enableLookups="false" redirectPort="443" acceptCount="100" connectionTimeout="120000"
disableUploadTimeout="true" compression="on" compressableMimeType="text/html,text/xml,
text/plain,text/css,text/javascript,application/javascript,application/json"
URIEncoding="UTF-8" server="Apache"/>
5 Restart the Markvision Enterprise service.
a Open the Run dialog box, and then type services.msc.
b Right‑click Markvision Enterprise, and then click Restart.
6 Access MVE using the new port.
For example, open a web browser, and then type https://MVE_SERVER:port/mve.
Where MVE_SERVER is the host name or IP address of the server hosting MVE, and port is the connector
port number.
How do I customize the ciphers and TLS versions that MVE uses?
1 Stop the Markvision Enterprise service.
a Open the Run dialog box, and then type services.msc.
b Right‑click Markvision Enterprise, and then click Stop.
2 Open the installation_dir\Lexmark\Markvision Enterprise\tomcat\conf\server.xml
file.
Where installation_dir is the installation folder of MVE.
3
Configure
the ciphers and TLS versions.
For more information on the configuration, see the
Apache Tomcat SSL/TLS configuration instructions.
For more information on the protocols and cipher values, see the
Apache Tomcat SSL support information documentation.
4 Restart the Markvision Enterprise service.
a Open the Run dialog box, and then type services.msc.
b Right‑click Markvision Enterprise, and then click Restart.
Frequently asked questions 149

How do I manage CRL files when using Microsoft CA Enterprise?
1 Obtain the CRL
file
from the CA server.
Notes:
• For Microsoft CA Enterprise, the CRL is not automatically downloaded through SCEP.
• For more information, see the Microsoft Certificate Authority Configuration Guide.
2 Save the CRL file in the installation_dir\Lexmark\Markvision Enterprise\apps\library
\crl folder, where installation_dir is the installation folder of MVE.
3
Configure
the
certificate
authority in MVE.
Note: This process is only applicable SCEP protocol is used.
Frequently asked questions 150

Troubleshooting
User has forgotten the password
Reset the user password
You need administrative rights to reset the password.
1 Click on the upper‑right corner of the page.
2 Click User, and then select a user.
3 Click Edit, and then change the password.
4 Click Save Changes.
If you have forgotten your own password, then do either of the following:
• Contact another Admin user to reset your password.
• Contact Lexmark Customer Support Center.
Admin user has forgotten the password
Create another Admin user, and then delete the previous account
You can use the Markvision Enterprise Password Utility to create another Admin user.
1 Browse to the folder where Markvision Enterprise is installed.
For example, C:\Program Files\
2 Launch the mvepwdutility-windows.exe file in the Lexmark\Markvision Enterprise\ directory.
3 Select a language, and then click OK > Next.
4 Select Add User Account > Next.
5 Enter the user credentials.
6 Click Next.
7 Access MVE, and then delete the previous Admin user.
Note: For more information, see
“Managing users” on page 30.
Troubleshooting 151

Page does not load
This problem may occur if you have closed the web browser without logging out.
Try one or more of the following:
Clear the cache, and delete the cookies in your web browser
Access the MVE login page, and then log in using your credentials
Open a web browser, and then type https://MVE_SERVER/mve/login, where MVE_SERVER is the host
name or IP address of the server hosting MVE.
Cannot discover a network printer
Try one or more of the following:
Make sure that the printer is turned on
Make sure that the power cord is securely plugged into the printer and into a properly
grounded electrical outlet
Make sure that the printer is connected to the network
Restart the printer
Make sure that TCP/IP is enabled on the printer
Make sure that the ports used by MVE are open, and SNMP and mDNS are enabled
For more information, see “Understanding ports and protocols” on page 194.
Contact your Lexmark representative
Incorrect printer information
Perform an audit
For more information, see “Auditing printers” on page 61.
Troubleshooting 152

MVE does not recognize a printer as a secured printer
Make sure that the printer is secured
Make sure that mDNS is turned on and is not blocked
Delete the printer, and then rerun the printer discovery
For more information, see “Discovering printers” on page 34.
Enforcement of configurations with multiple applications
fails in the first attempt but succeeds in the subsequent
attempts
Increase the timeouts
1 Browse to the folder where Markvision Enterprise is installed.
For example, C:\Program Files\
2 Navigate to the Lexmark\Markvision Enterprise\apps\dm-mve\WEB-INF\classes folder.
3 Using a text editor, open the platform.properties file.
4 Edit the cdcl.ws.readTimeout value.
Note: The value is in milliseconds. For example, 90000 milliseconds is equal to 90 seconds.
5 Using a text editor, open the devCom.properties file.
6 Edit the lst.responseTimeoutsRetries values.
Note: The value is in milliseconds. For example, 10000 milliseconds is equal to 10 seconds.
For example, lst.responseTimeoutsRetries=10000 15000 20000. The
first
connection retry
is after 10 seconds, the second connection retry is after 15 seconds, and the third connection retry is
after 20 seconds.
7 If necessary, when you are using LDAP GSSAPI, then create a parameters.properties
file.
Add the following setting: lst.negotiation.timeout=400
Note: The value is in seconds.
8 Save the changes.
Troubleshooting 153

Enforcement of configurations with printer certificate fails
Sometimes, no new
certificate
is issued during enforcement.
Increase the number of enrolment retries
Add the following key in the platform.properties file:
enrol.maxEnrolmentRetry=10
The retry value must be greater than
five.
OpenXPKI Certificate Authority
Certificate issuance failed using the OpenXPKI CA server
Make sure that the “signer on behalf” key in MVE matches the authorized signer key in the CA server
For example:
If the following is the ca.onBehalf.cn key in the platform.properties file in MVE,
ca.onBehalf.cn=Markvision_SQA-2012-23AB.lrdc.lexmark.ds
then the following must be the authorized_signer key in the generic.yaml file in the CA server.
rule1:
# Full DN
Subject: CN=Markvision_SQA-2012-23AB.lrdc.lexmark.ds
For more information on configuring the OpenXPKI CA server, see the OpenXPKI Certificate Authority
Configuration Guide.
An internal server error occurs
Install the en_US.utf8 locale
1 Run the dpkg-reconfigure locales command.
2 Install the en_US.utf8 (locale -a | grep en_US) locale.
Troubleshooting 154

The login prompt does not appear
When accessing http://yourhost/openxpki/, you get only the Open Source Trustcenter banner, without a login
prompt.
Enable fcgid
Run the following commands:
1 a2enmod fcgid
2 service apache2 restart
A nested connector without class error occurs
An EXCEPTION: Nested connector without class (scep.scep-
server-1.connector.initial) error at /usr/share/perl5/Connector/Multi.pm line 201 appears.
Update scep.scep-server-1
In /etc/openxpki/config.d/realm/REALM/scep/generic.yaml, replace scep.scep-server-1 with
scep.generic.
Note: Replace REALM with the name of your realm. For example, when using the default realm, use ca-
one.
eligible:
initial:
value@: connector:scep.generic.connector.initial
Cannot manually approve certificates
The Manual Approve button does not appear when approving certificates manually.
Update scep.scep-server-1
In /etc/openxpki/config.d/realm/REALM/scep/generic.yaml, replace scep.scep-server-1 with
scep.generic.
Note: Replace REALM with the name of your realm. For example, when using the default realm, use ca-
one.
eligible:
initial:
value@: connector:scep.generic.connector.initial
A Perl error occurs when approving enrollment requests
Update scep.scep-server-1
In /etc/openxpki/config.d/realm/REALM/scep/generic.yaml, replace scep.scep-server-1 with
scep.generic.
Note: Replace REALM with the name of your realm. For example, when using the default realm, use ca-
one.
Troubleshooting 155

eligible:
initial:
value@: connector:scep.generic.connector.initial
The ca-signer-1 and vault-1 tokens are oine
The System Status page shows that the ca-signer-1 and vault-1 tokens are
oine.
Try one or more of the following:
Change the certificate key password
In
/etc/openxpki/config.d/realm/ca-one/crypto.yaml
, change the
certificate
key password.
Create correct symlinks and copy the key file
For more information, see “Copying the key file and creating a symlink” on page 103.
Make sure that the key file is readable by OpenXPKI
Troubleshooting 156

Database access
Dierences in supported databases data types
MVE supports Firebird and Microsoft SQL Server. The following table shows the Firebird data types used in
MVE and their corresponding data types in Microsoft SQL Server.
Firebird data types Microsoft SQL Server data types
BIGINT Bigint
VARCHAR(x) varchar(x)
TIMESTAMP Datetime
INTEGER Int
SMALLINT/ TINYINT
*
Bit
BLOB SUB_TYPE 0 varbinary(1024)
*
This data type is required for Microsoft SQL Server.
FRAMEWORK tables and field names
This document lists and explains most of the tables in the FRAMEWORK database and describes the fields that
each table contains. The tables and columns in the database are subject to change from one release to the
next.
Printer
The following tables deal with the logical representation of a physical printer.
CONFIG_ITEM
The CONFIG_ITEM table represents the ITIL configuration items (CI) of the printer. It shows the state of the CI
and time stamps of its creation, initial management, last discovery, and other actions. The table does not
represent any physical portion of a printer; it is simply an abstract representation of the device.
Field Name Data Type Description
CI_ID BIGINT Primary key.
CI_STATE VARCHAR(255) The current state of the CI. The
options are NEW, MANAGED,
MISSING, FOUND, CHANGED,
UNMANAGED, and RETIRED.
CREATION_DATE TIMESTAMP The date when the CI first entered the
system.
INITIAL_MANAGEMENT_DATE TIMESTAMP The date when the CI first entered the
MANAGED state or substate.
Database access 157

Field Name Data Type Description
LAST_AUDIT_DATE TIMESTAMP The date of the last audit attempted
on the CI (whether or successful or
not).
PRINTER_ID BIGINT The foreign key to
NETWORK_PRINTER.PRINTER_ID.
LAST_DISCOVERY_DATE TIMESTAMP The date when the last discovery was
attempted on the CI (whether
successful or not).
LAST_SUCCESSFUL_AUDIT_DATE TIMESTAMP The date of the last successful audit
of the CI.
LAST_SUCCESSFUL_DISCOVERY_
DATE
TIMESTAMP The date of the last successful
discovery of the CI.
DEFAULT_CERT_COMMON_NAME VARCHAR(255) The name of the default certificate.
DEFAULT_CERT_ISSUER_NAME VARCHAR(255) The name of the issuer of the
certificate.
DEFAULT_CERT_SIGNING_STATUS VARCHAR(255) The certificate signing status of the
printer. The options are SIGNED,
INVALID_CERT, NO_CA, and
UNKNOWN.
DEFAULT_CERT_VALID_FROM TIMESTAMP The starting date of the validity of the
certificate.
DEFAULT_CERT_VALID_TO TIMESTAMP The last date of the validity of the
certificate.
DEFAULT_CERTIFICATE VARCHAR(8190) The default certificate.
DEFAULT_CERT_SERIAL_NUMBER VARCHAR(255) The serial number of the default
certificate.
NETWORK_ADAPTER
This table represents the network adapter (also known as the print server) of a physical printer.
Field name Data type Description
ADAPTER_TYPE VARCHAR(31) Always INA (internal network adapter).
ADAPTER_ID BIGINT The primary key.
FIRMWARE_REVISION VARCHAR(255) The current network firmware
revision.
MANUFACTURER VARCHAR(255) N/A.
MODEL_NAME VARCHAR(255) N/A.
SERIAL_NUMBER VARCHAR(50) N/A.
SYSTEM_NAME VARCHAR(255) N/A.
*
This data type is required for Microsoft SQL Server.
Database access 158

Field name Data type Description
RETRIES INTEGER The number of times to retry
communicating with a printer.
SNMP_READ_COMMUNITY_NAME VARCHAR(255) The SNMP community name for
reading.
TIMEOUT BIGINT The number of milliseconds to wait for
a particular communication attempt
with a printer to succeed.
CONTACT_LOCATION VARCHAR(255) N/A.
CONTACT_NAME VARCHAR(255) N/A.
DOMAIN_NAME_SUFFIX VARCHAR(191) The domain name sux associated
with this network adapter (for
example, foo.lexmark.com). Combine
with HOSTNAME to get the fully
qualified domain name (FQDN).
HOSTNAME VARCHAR(63) The host name associated with this
network adapter. MVE can be
configured
to retrieve the host name
from DNS or from the network adapter
itself. Combine with
DOMAIN_NAME_SUFFIX to get the
fully qualified domain name (FQDN).
IP_ADDRESS VARCHAR(15) The integer representation of the IP
address of this network adapter.
Deprecated.
IP_ADDRESS_INT INTEGER The integer representation of the IP
address of this network adapter.
IP_ADDRESS_SUBNET INTEGER The integer representation of the
subnet on which this network adapter
resides.
MAC_CANONICAL VARCHAR(12) The MAC address of the network
adapter, in canonical format.
PORTS INTEGER The number of ports that the network
adapter supports. Always 1.
RAND_MAC
SMALLINT/ TINYINT
*
The flag indicating whether the
current value of MAC_CANONICAL
was randomly generated.
CREDENTIAL_REQUIRED
SMALLINT/ TINYINT
*
The flag indicating whether a
credential is necessary to
communicate with the associated
printer.
CREDENTIAL_PASSWORD BLOB SUB_TYPE 0 This value is encrypted and not
available for use outside MVE.
*
This data type is required for Microsoft SQL Server.
Database access 159

Field name Data type Description
CREDENTIAL_PIN BLOB SUB_TYPE 0 This value is encrypted and not
available for use outside MVE.
CREDENTIAL_REALM VARCHAR(64) The credential realm, if set.
CREDENTIAL_USERNAME VARCHAR(255) The credential username, if set.
PORT_CONFIG_LST_TCP_OPEN
SMALLINT/ TINYINT
*
The flag indicating whether this port
on the associated printer is open.
PORT_CONFIG_LST_UDP_OPEN
SMALLINT/ TINYINT
*
The flag indicating whether this port
on the associated printer is open.
PORT_CONFIG_MDNS_OPEN
SMALLINT/ TINYINT
*
The flag indicating whether this port
on the associated printer is open.
PORT_CONFIG_NPA_TCP_OPEN
SMALLINT/ TINYINT
*
The flag indicating whether this port
on the associated printer is open.
PORT_CONFIG_NPA_UDP_OPEN
SMALLINT/ TINYINT
*
The flag indicating whether this port
on the associated printer is open.
PORT_CONFIG_RAW_PRINT_OPE
N
SMALLINT/ TINYINT
*
The flag indicating whether this port
on the associated printer is open.
PORT_CONFIG_SNMP_OPEN
SMALLINT/ TINYINT
*
The flag indicating whether this port
on the associated printer is open.
PORT_CONFIG_XML_TCP_OPEN
SMALLINT/ TINYINT
*
The flag indicating whether this port
on the associated printer is open.
PORT_CONFIG_XML_UDP_OPEN
SMALLINT/ TINYINT
*
The flag indicating whether this port
on the associated printer is open.
SECURE_COMMUNICATION_STAT
E
VARCHAR(255) The state of the communication. The
options are UNSECURED,
MISSING_CREDENTIALS, and
SECURED.
USER_PASSWORD Blob sub_type 0 The username portion of the
credentials.
SNMP_USERNAME VARCHAR(32) The user name used for SNMPv3
communications.
SNMP_PASSWORD VARCHAR(255) This value is encrypted and not
available for use outside MVE.
SNMP_MIN_AUTHENTICATION_LE
VEL
Varchar(50) The minimum authentication level
used for SNMPv3 communications.
SNMP_AUTHENTICATION_HASH VARCHAR(50) The hash authentication used for
SNMPv3 communications.
SNMP_PRIVACY_ALGORITHM VARCHAR(50) The privacy algorithm used for
SNMPv3 communications.
LOGIN_METHOD VARCHAR(256) The authentication method used to
log in to the printer.
*
This data type is required for Microsoft SQL Server.
Database access 160

Field name Data type Description
LOGIN_METHOD_NAME VARCHAR(256) If LOGIN_METHOD is either LDAP or
LDAP+GSSAPI, then this field shows
the name of the authentication
method.
TRACING_SERIAL_NUMBER VARCHAR(64) The authentication method used to
trace the serial number.
*
This data type is required for Microsoft SQL Server.
NETWORK_PRINTER
This table represents the actual printer portion of the physical printer.
Field Name Data Type Description
PRINTER_ID BIGINT The primary key.
MANUFACTURER VARCHAR(255) The company that actually made the
printer. May dier from
DISPLAY_MANUFACTURER.
MODEL_NAME VARCHAR(255) The model name of the printer.
SERIAL_NUMBER VARCHAR(50) The serial number of this printer.
SYSTEM_NAME VARCHAR(255) The name used to identify the device.
COPY
SMALLINT/ TINYINT
*
The flag indicating whether the
printer supports copying.
DUPLEX
SMALLINT/ TINYINT
*
The flag indicating whether the
printer supports two‑sided printing.
ESF
SMALLINT/ TINYINT
*
The flag indicating whether the
printer supports eSF applications.
MARKING_TECHNOLOGY VARCHAR(255) The type of marking technology used
by the printer (for example,
electrophotographic).
MEMORY BIGINT The amount of memory, in bytes.
PROFILE
SMALLINT/ TINYINT
*
The flag indicating whether this
printer supports profiles.
RECEIVE_FAX
SMALLINT/ TINYINT
*
The flag indicating whether this
printer supports receiving faxes.
SCAN_TO_EMAIL
SMALLINT/ TINYINT
*
The flag indicating whether this
printer supports scanning to email.
SCAN_TO_FAX
SMALLINT/ TINYINT
*
The flag indicating whether this
printer supports scanning to fax.
SCAN_TO_NETWORK
SMALLINT/ TINYINT
*
The flag indicating whether this
printer supports scanning to a
network.
*
This data type is required for Microsoft SQL Server.
Database access 161

Field Name Data Type Description
SPEED VARCHAR(255) The number of sheets that the paper
can print per minute.
DISPLAY_MANUFACTURER VARCHAR(255) The name that appears on the
outside of the printer. For example,
MANUFACTURER could be
LEXMARK, but
DISPLAY_MANUFACTURER could
be Dell.
FAMILY_ID INTEGER The NPA family ID.
INITIAL_DISCOVERY_TIMESTAMP TIMESTAMP When the printer was first discovered.
LIFETIME_PAGE_COUNT BIGINT The lifetime page count.
MAINTENANCE_COUNTER BIGINT The maintenance counter.
ADAPTER_PORT INTEGER The port on which this printer is
connected to its associated network
adapter. For now, the data is always 1.
PROPERTY_TAG VARCHAR(255) The asset, brass, or property tag.
ADAPTER_ID BIGINT The foreign key to
NETWORK_ADAPTER.ADAPTER_ID.
RAND_SN
SMALLINT/ TINYINT
*
The flag indicating whether the
current value of SERIAL_NUMBER
was randomly generated.
DEV_STATUS_REG_COUNTER INTEGER The number of device status
registrations.
SCANNER_SERIAL_NUMBER VARCHAR(12) For modular MFPs, the serial number
of the scan head.
DISK_ENCRYPTION VARCHAR(8) The frequency at which disk
encryption is enabled.
DISK_WIPING VARCHAR(8) The frequency at which disk wiping is
enabled.
COLOR
SMALLINT/ TINYINT
*
The flag indicating whether the
printer prints in color.
PRINTER_STATUS_SUMMARY
SMALLINT/ TINYINT
*
The indicator of the most severe
status message that is present on the
printer.
SUPPLY_STATUS_SUMMARY
SMALLINT/ TINYINT
*
The indicator of the most severe
supply status message that is present
on the printer.
TLI VARCHAR(255) The Top Level Indicator (TLI) of the
printer model.
FAX_STATION_NAME VARCHAR(255) The value of the fax name setting on
the printer.
*
This data type is required for Microsoft SQL Server.
Database access 162

Field Name Data Type Description
FAX_STATION_NUMBER VARCHAR(255) The value of the fax number setting
on the printer.
SCANNER_SERIAL_NUMBER VARCHAR(50) The serial number of the scanner of
the printer.
TIME_ZONE VARCHAR(255) The ID for dierent time zones
supported by the printer.
MODULAR_SERIAL_NUMBER VARCHAR(255) The modular serial number.
TRACING_SERIAL_NUMBER VARCHAR(64) The authentication method that is
used to trace the serial number.
*
This data type is required for Microsoft SQL Server.
PRINTER_CURRENT_STATUS
This table represents the printer status when data was collected. There is a row in this table for each status
condition on a given printer, all pointing to the same PRINTER_ID.
Field Name Data Type Description
STATUS_ID BIGINT The primary key.
STATUS_MESSAGE VARCHAR(255) The text for this status (for example,
Tray 1 Low).
STATUS_SEVERITY VARCHAR(255) The severity of this status (for
example, Warning).
STATUS_TYPE VARCHAR(255) The type of this status (for example,
Printer or Supply).
PRINTER_ID BIGINT The foreign key to
NETWORK_PRINTER.PRINTER_ID.
PRINTER_ESF_APPS
This table represents the installed eSF applications on printers when data was collected. There is a row in this
table for each eSF application currently installed on a given printer, all pointing to the same PRINTER_ID.
Field Name Data Type Description
APPLICATION_ID BIGINT The primary key.
NAME VARCHAR(255) The application name.
STATE VARCHAR(255) The current state.
VERSION VARCHAR(255) The current version.
PRINTER_ID BIGINT The foreign key to
NETWORK_PRINTER.PRINTER_ID.
Database access 163

PRINTER_INPUT_OPTIONS
This table represents installed input options on printers when data was collected. There is a row in this table
for each input option currently installed on a given printer, all pointing to the same PRINTER_ID.
Field Name Data Type Description
INPUT_OPTION_ID BIGINTThe primary key.
NAME VARCHAR(255) The name of the input option (for
example, Multipurpose Tray).
PRINTER_ID BIGINT The foreign key to
NETWORK_PRINTER.PRINTER_ID.
PRINTER_INPUT_TRAYS
This table represents input trays associated with an input option. There is a row in this table for each input tray
associated with a given input option, all pointing to the same INPUT_OPTION_ID.
Field Name Data Type Description
INPUT_OPTION_ID BIGINTThe foreign key to
PRINTER_INPUT_OPTIONS.INPUT_
OPTION_ID.
CAPACITY BIGINT The maximum number of sheets that
the tray can hold.
FEED_TYPE VARCHAR(255) Manual or Auto.
FORM_SIZE VARCHAR(255) The current paper size (for example,
Letter).
FORM_TYPE VARCHAR(255) The current paper type (for example,
Plain Paper).
TYPE VARCHAR(255) The type of input tray (for example,
Multipurpose Feeder).
PRINTER_OPTIONS
This table represents installed options on printers when data was collected. There is a row in this table for each
option currently installed on a given printer, all pointing to the same PRINTER_ID. Typically, the option is a
storage device.
Field Name Data Type Description
OPTION_ID BIGINT The primary key.
FREESPACE_ BIGINT The amount of space remaining on
the storage device.
NAME VARCHAR(255) The name of the printer option (for
example, DISK).
SIZE_ BIGINT The total amount of space.
PRINTER_ID BIGINT The foreign key to
NETWORK_PRINTER.PRINTER_ID.
Database access 164

PRINTER_OUTPUT_BINS
This table represents output bins associated with an output option. There is a row in this table for each output
bin associated with a given output option, all pointing to the same OUTPUT_OPTION_ID.
Field name Data type Description
OUTPUT_OPTION_ID BIGINT The foreign key to
PRINTER_OUTPUT_OPTIONS.OUTP
U T_OPTION_ID.
BINDING
SMALLINT/ TINYINT
*
The flag indicating whether this bin
supports binding.
BURSTING
SMALLINT/ TINYINT
*
The flag indicating whether this bin
supports bursting.
CAPACITY BIGINT The maximum number of sheets that
the bin can hold.
COLLATION
SMALLINT/ TINYINT
*
The flag indicating whether this bin
supports collation.
FACE_DOWN
SMALLINT/ TINYINT
*
The flag indicating whether paper is
loaded facedown in this bin.
FACE_UP
SMALLINT/ TINYINT
*
The flag indicating whether paper is
loaded faceup in this bin.
LEVEL_SENSING
SMALLINT/ TINYINT
*
The flag indicating whether this bin
supports paper‑level sensing.
PUNCHING
SMALLINT/ TINYINT
*
The flag indicating whether this bin
supports hole punching.
SECURITY
SMALLINT/ TINYINT
*
The flag indicating whether this bin
supports security.
SEPARATION
SMALLINT/ TINYINT
*
The flag indicating whether this bin
supports separation.
STITICHING
SMALLINT/ TINYINT
*
The flag indicating whether this bin
supports stitching.
TYPE VARCHAR(255) The type of printer output bin (for
example, Standard Bin, Bin 5, etc.)
*
This data type is required for Microsoft SQL Server.
PRINTER_OUTPUT_OPTIONS
This table represents installed output options on printers. There is a row in this table for each output option
currently installed on a given printer, all pointing to the same PRINTER_ID.
Field Name Data Type Description
OUTPUT_OPTION_ID BIGINT The primary key.
NAME VARCHAR(255) The name of the option (for example,
Integrated Hopper, Mailbox, and
Finisher).
Database access 165

Field Name Data Type Description
PRINTER_ID BIGINT The foreign key to
NETWORK_PRINTER.PRINTER_ID.
PRINTER_STATISTICS
This table contains information gathered from the meters and counters data of the printer. Each row represents
data for an individual printer. Depending on the printer model with which the record is associated, not all
columns apply.
Field Name Data Type Description
STATISTICS_ID BIGINT The primary key.
COVG_LAST_JOB_BLACK BIGINT The black toner coverage of the last
print job.
COVG_LIFETIME_BLACK BIGINT The black toner coverage of lifetime
print jobs.
CART_PAGES_PRINT_BLACK BIGINT The count of the printed pages that
used black toner cartridge.
BLACK_TONER_LEVEL VARCHAR(255) The current supply level of the black
toner cartridge.
PHOTO_COND_LEVEL_K VARCHAR(255) The current supply level of the
photoconductor (black).
BLANK_SAFE_SIDE_COPY BIGINT The count of the blank safe sides from
a copy.
BLANK_SAFE_SIDE_FAX BIGINT The count of the blank safe sides from
a fax.
BLANK_SAFE_SIDE_PRINT BIGINT The count of the blank safe sides from
a print.
PAPER_CHANGE BIGINT The count of paper change events.
COVER_OPEN BIGINT The count of cover open events.
COVG_LAST_JOB_CYAN BIGINT The cyan toner coverage of the last
print job.
COVG_LIFETIME_CYAN BIGINT The cyan toner coverage of lifetime
print jobs.
CART_PAGES_PRINT_CYAN BIGINT The count of the printed pages that
used the cyan toner cartridge.
CYAN_TONER_LEVEL VARCHAR(255) The current supply level of the cyan
toner cartridge.
CYAN_TONER_STATUS VARCHAR(255) The supply status for the cyan
cartridge (for example, Intermediate).
YELLOW_TONER_STATUS VARCHAR(255) The supply status for the yellow
cartridge (for example, Intermediate).
Database access 166

Field Name Data Type Description
MAGENTA_TONER_STATUS VARCHAR(255) The supply status for the magenta
cartridge (for example, Intermediate).
BLACK_TONER_STATUS VARCHAR(255) The supply status for the black
cartridge (for example, Intermediate).
PHOTO_COND_LEVEL_C VARCHAR(255) The current supply level of the
photoconductor (cyan).
DEVICE_INSTALL_DATE TIMESTAMP The time stamp of the first installation
of the printer.
FUSER_CURRENT_LEVEL VARCHAR(255) The current supply level of the fuser.
IMG_SAFE_SIDE_COPY BIGINT The count of imaged printed sides of
a copy job.
IMG_SAFE_SIDE_FAX BIGINT The count of imaged printed sides of
a fax job.
IMG_SAFE_SIDE_PRINT BIGINT The count of imaged printed sides of
a print job.
LAST_FAX_JOB_DATE TIMESTAMP The time stamp of the last fax job.
LAST_PRINTED_JOB_DATE TIMESTAMP The time stamp of the last print job.
LAST_SCAN_JOB_DATE TIMESTAMP The time stamp of the last scan job.
COVG_LAST_JOB_MAGENTA BIGINT The magenta toner coverage of the
last job.
COVG_LIFETIME_MAGENTA BIGINT The magenta toner coverage of
lifetime jobs.
CART_PAGES_PRINT_MAGENTA BIGINT The count of the printed pages that
used the magenta toner cartridge.
MAGENTA_TONER_LEVEL VARCHAR(255) The current supply level of the
magenta toner cartridge.
PHOTO_COND_LEVEL_M VARCHAR(255) The current supply level of the
photoconductor (magenta).
MAINT_KIT_LEVEL VARCHAR(255) The current supply level of the
maintenance kit.
MEDIA_SIZE_TYPE_MONO_SIDE_
SAFE
BIGINT The mono printed sides (safe).
MEDIA_SIZE_TYPE_COLOR_SIDE_
SAFE
BIGINT The color printed sides (safe).
SUPPLY_EVENTS BIGINT The count of other supply events.
PAPER_JAMS BIGINT The count of paper jam events.
PAPER_LOAD BIGINT The count of paper load events.
PRINT_SHEET_USE_PICKED BIGINT The printed sheets (picked).
PRINT_SIDE_USE_PICKED BIGINT The printed sides (picked).
POR BIGINT The count of Power-On Resets.
Database access 167

Field Name Data Type Description
PRINT_AND_HOLD_JOB BIGINT The count of print-and-hold jobs.
SAFE_SHT_COPY BIGINT The printed sheets (safe) from copy
jobs.
SAFE_SHT_FAX BIGINT The printed sheets (safe) from fax
jobs.
SAFE_SHT_PRINT BIGINT The printed sheets (safe) from print
jobs.
SCAN_PAPER_JAMS BIGINT The count of scanner jams.
PRINTED_FROM_PRINT_AND_HOL
D
BIGINT The count of printed print-and-hold
jobs.
PRINTED_FROM_USB BIGINT The count of prints from USB.
TRANS_BELT_LEVEL VARCHAR(255) The current supply level of the
transfer belt.
USB_DIRECT_JOB BIGINT The count of USB insertions.
WASTE_TONER_LEVEL VARCHAR(255) The current level of the waste toner
bottle.
COVG_LAST_JOB_YELLOW BIGINT The yellow toner coverage of the last
job.
COVG_LIFETIME_YELLOW BIGINT The yellow toner coverage of lifetime
jobs.
CART_PAGES_PRINT_YELLOW BIGINT The count of the printed pages that
used the yellow toner cartridge.
YELLOW_TONER_LEVEL VARCHAR(255) The current supply level of the yellow
toner cartridge.
PHOTO_COND_LEVEL_Y VARCHAR(255) The current level of the
photoconductor (yellow).
IMG_SAFE_SIDE_PRINT_MONO BIGINT The count of imaged mono printed
sides (safe) from print jobs.
IMG_SAFE_SIDE_PRINT_COLOR BIGINT The count of imaged color printed
sides (safe) from print jobs.
IMG_SAFE_SIDE_COPY_MONO BIGINT The count of imaged mono printed
sides (safe) from copy jobs.
IMG_SAFE_SIDE_COPY_COLOR BIGINT The count of imaged color printed
sides (safe) from copy jobs.
IMG_SAFE_SIDE_FAX_MONO BIGINT The count of imaged mono printed
sides (safe) from fax jobs.
IMG_SAFE_SIDE_FAX_COLOR BIGINT The count of imaged color printed
sides (safe) from fax jobs.
FAX_JOB_RECV BIGINT The count of received fax jobs.
FAX_JOB_SENT BIGINT The count of sent fax jobs.
Database access 168

Field Name Data Type Description
FAX_PAGE_RECV BIGINT The count of received fax pages.
FAX_PAGE_SENT BIGINT The count of sent fax pages.
SCAN_COPY BIGINT The count of scans from copy jobs.
SCAN_FAX BIGINT The count of scans from fax.
SCAN_LOCAL BIGINT The count of local scans.
SCAN_NET BIGINT The count of scans to network.
SCAN_FLAT BIGINT The count of scans from the scanner
glass flatbed.
SCAN_ADF_SIMPLEX BIGINT The count of scans from the ADF
(simplex).
SCAN_ADF_DUPLEX BIGINT The count of scans from the ADF
(duplex).
SCAN_USB_DIRECT BIGINT The count of scans directly to USB.
USB_DIRECT_INSERT BIGINT The count of USB insertions.
CART_INST_DATE_CYAN TIMESTAMP The time stamp of the cyan cartridge
installation.
CART_INST_DATE_YELLOW TIMESTAMP The time stamp of the yellow
cartridge installation.
CART_INST_DATE_MAGENTA TIMESTAMP The time stamp of the magenta
cartridge installation.
CART_INST_DATE_BLACK TIMESTAMP The time stamp of the black cartridge
installed.
PRINTER_ID BIGINT The foreign key to
NETWORK_PRINTER.PRINTER_ID.
MAINT_KIT_STATUS_100K VARCHAR(255) The 100K maintenance kit level.
MAINT_KIT_STATUS_160K VARCHAR(255) The 160K maintenance kit level.
MAINT_KIT_STATUS_200K VARCHAR(255) The 200K maintenance kit level.
MAINT_KIT_STATUS_300K VARCHAR(255) The 300K maintenance kit level.
MAINT_KIT_STATUS_320K VARCHAR(255) The 320K maintenance kit level.
MAINT_KIT_STATUS_480K VARCHAR(255) The 480K maintenance kit level.
MAINT_KIT_STATUS_600K VARCHAR(255) The 600K maintenance kit level.
PRINTER_SUPPLIES
This table represents supplies in printers. There is a row in this table for each supply in a given printer, all
pointing to the same PRINTER_ID. Depending on the type, not all columns apply.
Database access 169

Field Name Data Type Description
SUPPLY_ID BIGINT The primary key.
CAPACITY BIGINT The maximum sheet capacity of the
supply.
COLOR VARCHAR(255) The color of the supply (for example,
Black, Cyan, or NULL).
NAME VARCHAR(255) The name of the supply (for example,
Black Toner, Fuser, and Waste Bottle).
SMART_CARTRIDGE_PREBATE
SMALLINT/ TINYINT
*
The flag indicating whether this
supply is a smart cartridge prebate.
SMART_CARTRIDGE_REFILLED
SMALLINT/ TINYINT
*
The flag indicating whether this
supply is a smart cartridge refill.
SMART_CARTRIDGE_SERIAL_NUM
BER
VARCHAR(255) The smart cartridge serial number.
TYPE VARCHAR(255) The type of supply (for example,
Toner, Transfer Belt, Fuser, Container,
or Imaging Unit).
PRINTER_ID BIGINT The foreign key to
NETWORK_PRINTER.PRINTER_ID.
PERCENT_FULL BIGINT The calculated remaining percentage
of the supply.
*
This data type is required for Microsoft SQL Server.
CHANGED_SETTINGS
This table contains information about settings that changed between the last two audits.
Field Name Data Type Description
ID BIGINT The primary key.
CI_ID BIGINT Refers to CONFIG_ITEM.ID.
SETTING_NAME VARCHAR(255) The name of the setting that
changed.
CHANGE_TYPE VARCHAR(255) The type of change. The options are
ADD, UPDATE, and REMOVE.
PRINTER_PORTS
This table contains information about the status of the printer TCP/UDP ports.
Field name Data type Description
PRINTER_PORTS_ID BIGINT The primary key.
PRINTER_ID BIGINT Refers to PRINTER.ID.
Database access 170

Field name Data type Description
TCP21 VARCHAR(255) The options are OFF, ON,
UNKNOWN, and NONE.
UDP69 VARCHAR(255) The options are OFF, ON,
UNKNOWN, and NONE.
TCP79 VARCHAR(255) The options are OFF, ON,
UNKNOWN, and NONE.
TCP80 VARCHAR(255) The options are OFF, ON,
UNKNOWN, and NONE.
UDP137 VARCHAR(255) The options are OFF, ON,
UNKNOWN, and NONE.
UDP161 VARCHAR(255) The options are OFF, ON,
UNKNOWN, and NONE.
UDP162 VARCHAR(255) The options are OFF, ON,
UNKNOWN, and NONE.
TCP515 VARCHAR(255) The options are OFF, ON,
UNKNOWN, and NONE.
TCP631 VARCHAR(255) The options are OFF, ON,
UNKNOWN, and NONE.
TCP5001 VARCHAR(255) The options are OFF, ON,
UNKNOWN, and NONE.
UDP5353 VARCHAR(255) The options are OFF, ON,
UNKNOWN, and NONE.
TCP8000 VARCHAR(255) The options are OFF, ON,
UNKNOWN, and NONE.
TCP9100 VARCHAR(255) The options are OFF, ON,
UNKNOWN, and NONE.
TCP9200 VARCHAR(255) The options are OFF, ON,
UNKNOWN, and NONE.
UDP9200 VARCHAR(255) The options are OFF, ON,
UNKNOWN, and NONE.
UDP9300 VARCHAR(255) The options are OFF, ON,
UNKNOWN, and NONE.
UDP9301 VARCHAR(255) The options are OFF, ON,
UNKNOWN, and NONE.
UDP9302 VARCHAR(255) The options are OFF, ON,
UNKNOWN, and NONE.
TCP9400 VARCHAR(255) The options are OFF, ON,
UNKNOWN, and NONE.
TCP9500 VARCHAR(255) The options are OFF, ON,
UNKNOWN, and NONE.
TCP9501 VARCHAR(255) The options are OFF, ON,
UNKNOWN, and NONE.
Database access 171

Field name Data type Description
TCP9600 VARCHAR(255) The options are OFF, ON,
UNKNOWN, and NONE.
UDP9700 VARCHAR(255) The options are OFF, ON,
UNKNOWN, and NONE.
TCP9000 VARCHAR(255) The options are OFF, ON,
UNKNOWN, and NONE.
TCP5000 VARCHAR(255) The options are OFF, ON,
UNKNOWN, and NONE.
TCP443 VARCHAR(255) The options are OFF, ON,
UNKNOWN, and NONE.
TCP4000 VARCHAR(255) The options are OFF, ON,
UNKNOWN, and NONE.
UDP6100 VARCHAR(255) The options are OFF, ON,
UNKNOWN, and NONE.
TCP6100 VARCHAR(255) The options are OFF, ON,
UNKNOWN, and NONE.
TCP65002 VARCHAR(255) The options are OFF, ON,
UNKNOWN, and NONE.
TCP65004 VARCHAR(255) The options are OFF, ON,
UNKNOWN, and NONE.
TCP65004 VARCHAR(255) The options are OFF, ON,
UNKNOWN, and NONE.
TCP65001 VARCHAR(255) The options are OFF, ON,
UNKNOWN, and NONE.
TCP65003 VARCHAR(255) The options are OFF, ON,
UNKNOWN, and NONE.
PRINTER_SECURITY-OPTIONS
This table contains information related to the security details of the printer.
Field Name Data Type Description
PRINTER_SECURITY_ID BIGINT The primary key.
PRINTER_ID BIGINT Refers to PRINTER.ID.
OWASP_CIPHER_CATEGORY VARCHAR(500) The list of cipher categories
supported by the device.
TLS10 VARCHAR(255) The options are OFF, ON,
UNKNOWN, and NONE.
TLS11 VARCHAR(255) The options are OFF, ON,
UNKNOWN, and NONE.
Database access 172

Keywords
The following tables deal with MVE keywords.
ASSIGNED_KEYWORDS
This table represents the keywords assigned to their respective CIs and printers.
Field Name Data Type Description
KEYWORD_ID BIGINT The composite primary key, and the
foreign key to
KEYWORD.KEYWORD_ID.
CI_ID BIGINT The composite primary key, and the
foreign key to
CONFIGURATION_ITEM.CI_ID.
KEYWORD
This table represents all the keywords defined in the system.
Field Name Data Type Description
KEYWORD_ID BIGINT The primary key.
KEYWORD_VALUE VARCHAR(255) The keyword name.
CATEGORY_ID BIGINT The foreign key to
KEYWORD_CATEGORY.CATEGORY
_ID.
KEYWORD_CATEGORY
This table lists all the categories defined in the system. It is used for grouping keywords together.
Field Name Data Type Description
CATEGORY_ID BIGINT The primary key.
CATEGORY_VALUE VARCHAR(255) The category name.
Configurations
The following tables deal with MVE’s configurations.
CONFIGURATION
This table represents a printer configuration at the highest level, including the printer name, model, and whether
it can be assigned.
Database access 173

Field name Data type Description
CONFIGURATION_ID BIGINT The primary key.
CONFIGURATION_NAME VARCHAR(255) The configuration name.
ASSIGNABLE
SMALLINT/ TINYINT
*
The flag indicating whether the
configuration is assignable.
DESCRIPTION VARCHAR(4000) A user‑entered description of the
configuration.
LAST_MODIFIED TIMESTAMP The time stamp of the last edit of the
configuration.
MANAGING_DEV_CERTIFICATE BOOLEAN The default Boolean value. This field
indicates whether this configuration
manages the device certificate
automatically.
*
This data type is required for Microsoft SQL Server.
CONFIGURATION_COMPONENT
This table represents one component of a configuration.
Field name Data type Description
CONFIGURATION_COMPONENT_I
D
BIGINT The primary key.
COMPONENT_TYPE VARCHAR(255) The component type. The options are
DEVICE_SETTINGS,
SECURITY_CAESAR1,
SECURITY_CAESAR2, ESF, and
FIRMWARE.
CREDENTIAL_PASSWORD BLOB SUB_TYPE 0 The encrypted credential password,
if set.
CREDENTIAL_PIN BLOB SUB_TYPE 0 The encrypted credential PIN, if set.
CREDENTIAL_REALM VARCHAR(255) The credential realm, if set.
CREDENTIAL_USERNAME VARCHAR(255) The credential user name, if set.
COMPONENT_NAME VARCHAR(255) The component name.
LICENSE_TYPE VARCHAR(255) The license type of the configuration
component. The options are
PRODUCTION, TRIAL, and FACTORY.
LOGIN_METHOD VARCHAR(256) The authentication method used to
log in to the printer.
MERGE_DATA_PATH VARCHAR(255) The file location of a variable settings
file.
FLASH_FILE_SHA1 VARCHAR(255) The SHA1 hash of the flash file for a
firmware component.
Database access 174

Field name Data type Description
LOGIN_METHOD_NAME VARCHAR(256) If the LOGIN_METHOD is either LDAP
or LDAP+GSSAPI, then this field
shows the name of the particular
login method.
DESCRIPTION VARCHAR(4000) This field shows the description if it is
added in a component.
LAST_MODIFIED TIMESTAMP The time stamp of the last
modification.
ASSIGNABLE Boolean The value is true if the component is
assigned to a printer. Otherwise, the
value is false.
PRE_POPULATED Boolean Added to identify pre-populated
Advanced Security Components.
CONFIGURATION_COMPONENTS
This table contains information about
dierent
components related to
dierent
configurations,
if selected.
Field Name Data Type Description
CONFIGURATION_ID BIGINT The foreign key to
CONFIGURATION.CONFIGURATION
_ID.
CONFIGURATION_COMPONENT_I
D
BIGINT The foreign key to
CONFIGURATION_COMPONENT.
CONFIGURATION_COMPONENT_I
D.
COMPONENT_TYPE VARCHAR(255) Added to discriminate among Device
Setting Component and eight other
components.
ASSIGNED_CONFIGURATIONS
This table shows which
configurations
are assigned to which CIs and printers.
Field Name Data Type Description
CI_ID BIGINT The composite primary key, and the
foreign key back to
CONFIGURATION_ITEM.CI_ID.
CONFIGURATION_ID BIGINT Composite primary key, and the
foreign key back to
CONFIGURATION.CONFIGURATION
_ID.
COMPLIANCE_STATE VARCHAR(255) The current conformance state for
the configuration.
LAST_COMPLIANCE_CHECK TIMESTAMP Time stamp of the last conformance
check was run.
Database access 175

FAILED_COMPONENT
This table includes all components that have a setting out of conformance.
Field Name Data Type Description
FAILED_COMPONENT_ID BIGINT The primary key.
CI_ID BIGINT The foreign key back to
ASSIGNED_CONFIGURATIONS.CI_I
D.
CONFIGURATION_ID BIGINT (not null) The foreign key back to
ASSIGNED_CONFIGURATIONS.CO
NFIGURATION_ID.
COMPONENT_TYPE VARCHAR(255) The type of the failed component.
COMPONENT_NAME VARCHAR(255) The name of the failed component.
FAILED_COMPONENT_SETTINGS
This table includes all settings that are out of conformance and their values.
Field Name Data Type Description
TYPE
SMALLINT/ TINYINT
*
, Default 0
Added to discriminate conformance
failure reasons among Discrepancy,
Inapplicable, Unsupported, Resource
not in Library, and Unable to Merge
Token Settings.
FAILED_COMPONENT_ID BIGINT (not null) The foreign key back to
FAILED_COMPONENT.FAILED_CO
MPONENT_ID.
SETTING_NAME VARCHAR(255) The name of the failed setting.
PRINTER_VALUE dropNotNullConstraint Can be a null value.
COMPONENT_VALUE dropNotNullConstraint Can be a null value.
*
This data type is required for Microsoft SQL Server.
FLASHFILE
This table represents information about MVE Firmware library resources.
Field Name Data Type Description
ID BIGINT The primary key.
FILENAME VARCHAR(256) The file name and location within the
MVE repository.
SHA1 VARCHAR(255) The SHA1 hash of the flash file.
DISPLAY_NAME VARCHAR(255) A version identifier of the flash file.
DATE_IMPORTED TIMESTAMP The date when the flash file was
imported.
Database access 176

Field Name Data Type Description
DESCRIPTION VARCHAR(255) The description of the flash file.
FLASH_NET_IDS
This table stores the NETFLASH ID found at the top of each
flash
file
in the Resource Library.
Field Name Data Type Description
FLASHNETID BIGINT The primary key.
NET_ID VARCHAR(255) The NETFLASH ID.
CERTIFICATES
This table represents information about the MVE CA certificate library resources.
Field Name Data Type Description
CERTIFICATE_ID BIGINT The primary key.
NAME VARCHAR(255) The user‑friendly name of a CA
certificate.
PEM_CERTIFICATE BLOB The PEM representation of a CA
certificate.
DATE_IMPORTED TIMESTAMP The date when the CA certificate was
imported to MVE.
PEM_CERTIFICATE_SHA2 VARCHAR (64) SHA2 hash of this CA certificate.
DESCRIPTION VARCHAR (255) Description of the CA certificate.
CERTIFICATE_COMP_CERTIFICATES
This table shows the linking of
certificate
in the Resource Library to a
configuration
component, and thus to a
configuration.
Field Name Data Type Description
CONFIGURATION_COMP
ONENT_ID
BIGINT The foreign key back to
CONFIGURATION_COMPONENT.C
ONFIGURATION_ COMPONENT_ID.
CERTIFICATE_ID BIGINT The foreign key back to
CERTIFICATES.CERTIFICATE_ID.
COMPONENT_SETTINGS
This table represents settings contained within a given
configuration
component. There is a row in this table
for each setting associated with the configuration component, all pointing to the same
CONFIGURATION_COMPONENT.CONFIGURATION_COMPONENT_ID. The values are encrypted and not
available outside of MVE.
Database access 177

Field Name Data Type Description
SETTING_ID BIGINT The primary key.
SETTING_NAME VARCHAR(255) The name of the setting.
SETTING_VALUE VARCHAR(1280) The encrypted setting value.
CONFIGURATION_COMPONENT_I
D
BIGINT The foreign key to
CONFIGURATION_COMPONENT.C
ONFIG URATION_COMPONENT_ID.
DISCRIMINATOR VARCHAR(255) The options are SIMPLE_SETTING
and TABULAR_SETTING.
TABULAR_SETTING_VALUE_ID BIGINT The foreign key to
COMPONENT_TAB_SETTING_VAL
UE.TA BULAR_SETTING_VALUE_ID.
COMPONENT_TAB_TABLE
This table represents Color Print Permission tables included in
configurations.
Field name Data type Description
TABLE_ID BIGINT The primary key.
TABLE_TYPE VARCHAR(255) The options are HOST_TABLE and
USER_TABLE.
COMPONENT_TAB_ROW
This table represents a row from the Color Print Permissions tables. Values are encrypted and cannot be used
outside MVE.
Field Name Data Type Description
TABLE_ID BIGINT The foreign key to
COMPONENT_TAB_TABLE.TABLE_I
D
HOST_NAME VARCHAR(255) The value of the Host Name setting in
the hosts table.
USER_NAME VARCHAR(255) The value of the User Name setting in
the users table.
ALLOWED_TO_PRINT_COLOR
SMALLINT/ TINYINT
*
The value of the Allow Color Printing
setting for both host and user tables.
USER_PERMISSION_OV ERRIDDEN
SMALLINT/ TINYINT
*
The value of the Overrides User
Permission setting in the host table.
*
This data type is required for Microsoft SQL Server.
COMPONENT_TAB_SETTING_VALUE
This table shows the correlation of Color Print Permissions tables to components, and thus to configurations.
Database access 178

Field Name Data Type Description
TABULAR_SETTING_VALUE_ID BIGINT The foreign key to
COMPONENT_SETTINGS.TABULAR
_SETTING_VALUE_ID.
TABLE_ID BIGINT The foreign key to
COMPONENT_TAB_TABLE.TABLE_I
D.
CC_SUPPORTED_MODEL_BACKUP
Field Name Data Type Description
ID BIGINT The primary key.
SUPPORTED_MODEL VARCHAR(255) Used for creating a backup from
CONFIGURATION and
CONFIGURATION_COMPONENT for
Device Setting Components.
ESF_COMP_PRODUCTS
Field Name Data Type Description
CONFIGURATION_COMPONENT_I
D
BIGINT The foreign key references.
Table:
CONFIGURATION_COMPONENT
Column:
CONFIGURATION_COMPONENT_I
D
PART_NUMBER VARCHAR(255) The product part number of the
solution component.
VCCFILE
Field Name Data Type Description
ID BIGINT The primary key.
FILENAME VARCHAR(255) The uploaded file name.
DISPLAY_NAME VARCHAR(255) The VCC file name displayed in MVE.
DATE_IMPORTED TIMESTAMP The time stamp of the upload of the
file.
SHA1 VARCHAR(255) The file content hash.
DESCRIPTION VARCHAR(255) The description of the VCC file.
Database access 179

UCFFILE
Field Name Data Type Description
ID BIGINT The primary key.
FILENAME VARCHAR(255) The uploaded file name.
DISPLAY_NAME VARCHAR(255) The UCF file name displayed in MVE.
DATE_IMPORTED TIMESTAMP The time stamp of the upload of the
file.
SHA1 VARCHAR(255) The file content hash.
DESCRIPTION VARCHAR(255) The description of the UCF file.
UCF_VCC_RESOURCE_FILES
This table contains information on the status of the printer TCP/UDP ports.
Field Name DataType Description
RESOURCE_ID BIGINT The primary key.
SHA1 VARCHAR(255) The file content hash.
RESOURCE_TYPE VARCHAR(255) The type of resource file. The options
are UCF_FILE, VCC_FILE, and
APP_FLS.
CONFIGURATION_COMPONENT_I
D
VARCHAR(255) The foreign key of the ID of the
CONFIGURATION_COMPONENT
table.
Discovery
profiles
The following tables are used to track the discovery profiles of MVE.
DISCOVERY_PROFILE
Field Name Data Type Description
ID BIGINT The primary key.
NAME VARCHAR(255) The user-supplied name for the profile.
RETRIES INTEGER The number of times to retry communicating with a
printer.
SNMP_READ_COMMUNITY_NAME VARCHAR(255) The SNMP community name to use when reading.
TIMEOUT BIGINT The number of milliseconds to wait for a particular
communication attempt with a printer to succeed.
SNMP_USERNAME VARCHAR(32) The user name for SNMP communication.
SNMP_PASSWORD VARCHAR(32) The password for SNMP communication.
SNMP_MIN_AUTHENTICATION_LEVEL VARCHAR(255) The minimum authentication level for SNMP.
SNMP_AUTHENTICATION_HASH VARCHAR(50) The hash used for SNMP authentication.
Database access 180

Field Name Data Type Description
SNMP_PRIVACY_ALGORITHM VARCHAR(50) The algorithm used for SNMP privacy.
DISCOVERY_PROFILE_CI
This table contains the CI-specific pieces of the discovery profile.
Field Name Data Type Description
CI_DP_ID BIGINT The primary key, and the foreign key to
DISCOVERY_PROFILE.ID.
AUTOMANAGE
SMALLINT/ TINYINT
*
The flag indicating whether CIs discovered using this profile
must be automatically managed.
DESCRIPTION VARCHAR(4000) The user-provided description of the discovery profile.
LAST_RUN TIMESTAMP Time stamp of the last run of the profile.
CREDENTIAL_USERNAME VARCHAR(255) The credential user name, if set.
CREDENTIAL_REALM VARCHAR(64) The credential realm, if set.
LOGIN_METHOD VARCHAR(256) The authentication method used to log in to the printer.
LOGIN_METHOD_NAME VARCHAR(256) The name of the authentication method if LOGIN_METHOD
is either LDAP or LDAP+GSSAPI.
CREDENTIAL_PASSWORD BLOB This value is encrypted and not available for use outside
MVE.
CREDENTIAL_PIN BLOB This value is encrypted and not available for use outside
MVE.
ASSIGN_KEYWORD_IDS VARCHAR(512) The assigned keywords in a discovery profile.
*
This data type is required for Microsoft SQL Server.
EXCLUDE_PROFILE_ITEM
This table represents the Exclude list for a
profile.
Each excluded item has a row in this table.
Field Name Data Type Description
DISCOVERY_PROFILE_ID BIGINT The composite primary key, and the foreign key to
DISCOVERY_PROFILE.ID.
VALUE_ VARCHAR(255) The composite primary key. This field defines what items to
exclude.
INCLUDE_PROFILE_ITEM
This table represents the Include list for a profile. Each included item has a row in this table.
Field Name Data Type Description
DISCOVERY_PROFILE_ID BIGINT The composite primary key, and the foreign key to
DISCOVERY_PROFILE.ID.
VALUE_ VARCHAR(255) The composite primary key. This field defines what items to
include.
Database access 181

DISCOVERY_PROFILE_MODEL_CONFIG
This table represents the Assign
Configurations
portion of a discovery
profile.
Field Name Data Type Description
ID BIGINT The primary key.
MODEL VARCHAR(255) The model name of the printers to which the configuration is
assigned.
DISCOVERY_PROFILE_ID BIGINT The foreign key to DISCOVERY_PROFILE.ID.
CI_CONFIGURATION_ID BIGINT The foreign key to CONFIGURATION.CONFIGURATION_ID.
ESF
ESF_APPLICATION
This table contains all the eSF applications in all deployable eSF packages. There may be many eSF applications
in each deployable package.
Field name Data type Description
ESF_APP_ID BIGINT The primary key.
ESF_DP_ID BIGINT The foreign key back to ESF_DEPLOYABLE_PACKAGE.ESF_DP_ID.
APP_ID VARCHAR(255) The application ID of the eSF applications.
VERSION VARCHAR(255) The eSF application version.
DESCRIPTION_URI VARCHAR(255) The URI description to the ESF application.
FLS_URI VARCHAR(255) The URI to the flash file.
ESF_APPLICATION_LOCALE
This table contains the name and description of each eSF application in all languages supported by MVE.
Field Name Data Type Description
ESF_APP_LOCALE_ID BIGINT The primary key.
ESF_APP_ID BIGINT The foreign key to ESF_APPLICATION.ESF_APP_ID.
LOCALE VARCHAR(255) The two‑character language code.
NAME VARCHAR(255) The name of the eSF application in the language indicated by LOCALE.
DESCRIPTION VARCHAR(510) The description of the eSF application in the language indicated by
LOCALE.
Database access 182

ESF_COMP_DEPLOYABLE_PACKAGE
This table contains one row for each deployable package in use by an MVE
configuration.
Field Name Data Type Description
ESF_COMPONENT_ID BIGINT The foreign key to
CONFIGURATION_COMPONENT.CONFIGURATION_COMPONENT_ID.
ESF_DP_ID VARCHAR(255) The foreign key to ESF_DEPLOYABLE_PACKAGE.ESF_DP_ID.
ESF_DEPLOYABLE_PACKAGE
This table represents all the deployable packages uploaded to the MVE library.
Field Name Data Type Description
ESF_DP_ID BIGINT The primary key.
NAME VARCHAR(255) The name of the deployable package.
PART_NUMBER VARCHAR(255) The part number of the deployable package.
PART_REVISION VARCHAR(255) The part revision of the deployable package.
LICENSE_REQUIRED
SMALLINT/ TINYINT
*
The flag indicating whether a license is required for the deployable
package.
URI VARCHAR(255) The URI of the deployable package.
DATE_IMPORTED TIMESTAMP The date when the deployable package was imported.
VERSION VARCHAR(255) The version of the deployable package.
DESCRIPTION VARCHAR(255) The description of the deployable package.
*
This data type is required for Microsoft SQL Server.
ESF_DEPLOYABLE_PACKAGE_LOCALE
This table contains the name and description for each deployable package in all languages supported by MVE.
Field Name Data Type Description
ESF_DP_LOCALE_ID BIGINT The primary key.
ESF_DP_ID BIGINT The foreign key to ESF_DEPLOYABLE_PACKAGE.ESF_ DP_ID.
LOCALE VARCHAR(255) The two‑character language code.
NAME VARCHAR(255) The name of the deployable package in the language indicated by
LOCALE.
DESCRIPTION VARCHAR(2048) The increased description length, from 510 to 2048 characters.
ESF_DP_SUPPORTED MODELS
This table contains one row for each model supported by a deployable package in the MVE library.
Field Name Data Type Description
ESF_DP_ID BIGINT The foreign key back to ESF_DEPLOYABLE_PACKA GE.ESF_DP_ID.
SUPPORTED_MODEL VARCHAR(255) The model name of printer supported by the deployable package.
Database access 183

ESF_LICENSE
This table represents the licenses for eSF applications available in the MVE library.
Field Name Data Type Description
ESF_LICENSE_ID BIGINT The primary key.
PRINTER_SERIAL VARCHAR(255) The serial number of the printer to which the license is tied.
PART_NUMBER VARCHAR(255) The part number of the package to which the license is tied.
PART_REVISION VARCHAR(255) The part revision of the package to which the license is tied.
LICENSE_TYPE VARCHAR(255) The options are TRIAL and PRODUCTION.
FILE_NAME VARCHAR(255) The file name of the license binary.
DEPLOYED
SMALLINT/ TINYINT
*
The flag indicating whether the license has been deployed.
*
This data type is required for Microsoft SQL Server.
RAWESFAPPFILE
This table represents the raw eSF application file details available in the MVE library.
Field Name Data Type Description
ID BIGINT The primary key.
FILENAME VARCHAR(255) The name of the package file.
DISPLAY_NAME VARCHAR(255) The display name of the package file.
DATE_IMPORTED TIMESTAMP The time stamp of the import of the package.
SHA1 VARCHAR(255) The SHA1 hash of the package.
DESCRIPTION VARCHAR(255) The description of the package.
APP_ID VARCHAR(255) The application ID of the package.
VERSION VARCHAR(255) The version of the package.
APP_FLS_RESOURCE_FILES
This table represents the association of eSF applications file available in the MVE library with configuration.
Field Name Data Type Description
RESOURCE_ID BIGINT The primary key.
SHA1 VARCHAR(255) The SHA1 hash of the package.
RESOURCE_TYPE VARCHAR(255) The type of the Resource File. The
options are UCF_FILE, VCC_FILE,
and APP_FLS.
CONFIGURATION_COMPONENT_I
D
BIGINT The foreign key with the ID column
of
CONFIGURATION_COMPONENT.
Database access 184

Certificate management
The following represents the list of certifications to be verified.
ENROLLMENT_STATUS
The following table lists the issued certificates.
Field Name Data Type Description
ENROLLMENT_STATUS_ID BIGINT The primary key.
CERTIFICATE_ENROL_STATUS VARCHAR(255) The certificate enrollment status. The options are
Issued, Pending, and Failed.
CERT_ENROL_TRANSACTION_ID VARCHAR(2048) The pending certificate response for EST. Sometimes,
this field shows the transaction ID for certificate
enrollment.
CERT_SUBJECT_IDENTITY VARCHAR(255) The subject identity of the certificate.
CERT_SERIAL_NUMBER VARCHAR(255) The serial number of the certificate issued.
PRINTER_ID BIGINT The reference printer.
DEFAULT_CERT_REVISION_NO VARCHAR(255) The revision number of the certificate that is renewed.
DEFAULT_CERT_RENEWAL_DATE VARCHAR(255) The renewal date of the certificate.
CERTIFICATE_FRIENDLY_NAME VARCHAR(255) The friendly name of the certificate.
CERTIFICATE_USED_FOR VARCHAR(255) The association of the named certificate. The options
are DEFAULT, HTTPS, WIRELESS, IPSEC, and
UNASSIGNED.
CA_CERT_REVOCATION_COMP_LIST
The following table lists information about the revoked certificates.
Field Name Data Type Description
ID BIGINT The unique identifier.
SERIAL_NUMBER VARCHAR(255) The serial number of the certificate present in the revocation list
primary key.
CERTIFICATE_SUBJECT VARCHAR(255) The subject of the revoked certificate.
REVOCATION_DATE TIMESTAMP The date when the certificate is revoked.
ISSUER VARCHAR(255) The issuer of the revoked certificate.
REVOCATION_REASON VARCHAR(255) The revocation reason.
NAMED_CERTIFICATE_SETTINGS
The following table lists the name and association of named certificate.
Field Name Data Type Description
CERT_SETTING_ID BIGINT The unique identifier.
FRIENDLY_NAME VARCHAR(255) The friendly name of the named certificate.
Database access 185

Field Name Data Type Description
CERT_USED_FOR VARCHAR(255) The association of the named certificate. The options
are DEFAULT, HTTPS, WIRELESS, IPSEC, and
UNASSIGNED.
CONFIGURATION_COMPONENT_ID BIGINT The foreign key associated with ID of the
CONFIGURATION_COMPONENT table.
TEMPLATE_ID BIGINT The ID of the associated template.
PRINTER_CERTIFICATE
The following table represents the details of the named certificate.
Field Name Data Type Description
CERTIFICATE_ID BIGINT The unique identifier.
CERTIFICATE_FRIENDLY_NAME VARCHAR(255) The friendly name of the certificate.
CERTIFICATE_COMMON_NAME VARCHAR(255) The common name of the certificate.
CERTIFICATE_ISSUER_NAME VARCHAR(255) The name of the issuer of the certificate.
CERTIFICATE_SIGNING_STATUS VARCHAR(255) The signing status of the certificate. The options are
SIGNED, INVALID_CERT, NO_CA, REVOKED, and
UNKNOWN.
CERTIFICATE_VALID_FROM TIMESTAMP The time when the certificate started to be valid.
CERTIFICATE_VALID_TO TIMESTAMP The time when the certificate is no longer valid.
CERTIFICATE_SIGNATURE VARCHAR(8190) The signature of the certificate.
CERTIFICATE_SERIAL_NUMBER VARCHAR(255) The serial number of the certificate.
TYPE VARCHAR(255) The type of the certificate. The options are DEFAULT,
HTTPS, WIRELESS, IPSEC, and UNASSIGNED.
PRINTER_ID BIGINT The foreign key associated with ID of
CONFIGURATION_COMPONENT table.
ENROLLED_CERTIFICATE_TYPE
The following table shows the relationship between
certificate
and enrollment status.
Field Name Data Type Description
TYPE_ID BIGINT The unique identifier.
ENROLLMENT_STATUS_ID BIGINT The foreign key of the ID column of ENROLLMENT_STATUS
table.
TYPE VARCHAR(255) The type of the certificate. The options are DEFAULT, HTTPS,
WIRELESS, IPSEC, and UNASSIGNED.
Database access 186

CA_TEMPLATE
The following table shows the details of the templates selected when setting up the MSCA server using the
MSCEWS protocol.
Field Name Data Type Description
TEMPLATE_ID BIGINT The unique identifier for templates for MSCA Server with MSCEWS (cannot
be null).
TEMPLATE_NAME VARCHAR(255) The name of templates in the CEP server.
TEMPLATE_OID VARCHAR(255) The corresponding SNMP MIB path.
Authentication and authorization
The following tables are used for the user authentication and authorization mechanism of MVE.
MASTER_ROLE
This table contains all the roles supported by MVE.
Field name Data type Description
ID BIGINT The primary key.
ROLE_NAME VARCHAR(255) The name of the role.
USERS
This table lists all the internal user accounts of MVE.
Field name Data type Description
ID BIGINT The primary key.
USER_NAME VARCHAR(15) The user-supplied user name.
USER_PASS VARCHAR(1024) The user-supplied password.
ENABLED
SMALLINT/ TINYINT
*
The flag indicating whether this account is enabled.
NAME VARCHAR(255) The user’s full name.
LAST_LOGIN TIMESTAMP The time stamp of the last login attempt.
LOGIN_ATTEMPT BIGINT The current number of attempts made at a successful login.
REFRESH_TOKEN VARCHAR(1024) The authentication token when the user logs in.
*
This data type is required for Microsoft SQL Server.
USER_ROLE
This table describes the association of users to roles.
Field name Data type Description
ID BIGINT The primary key.
USER_NAME VARCHAR(15) The foreign key back to USERS.USER_NAME.
Database access 187

Field name Data type Description
ROLE_NAME VARCHAR(30) The foreign key back to MASTER_ROLE.ROLE_NAME.
Security settings
The following tables describe security settings in a configuration. The security configuration information is
encrypted for data safety, unavailable outside of MVE, and not useful in the scope of this document. So the
details of the following tables are omitted.
• SEC_ACCESS_CONTROL
• SEC_AUTH_GROUP
• SEC_BUILDING_BLOCK
• SEC_BUILDING_BLOCK_SETTINGS
• SEC_COMPONENT_MISC_SETTINGS
• SEC_INTERNAL_ACCOUNT
• SEC_INTERNAL_ACCOUNT_GROUPS
• SEC_INTERNAL_ACCOUNT_SETTINGS
• SEC_SECURITY_TEMPLATE
• SEC_SECURTY_TEMPLATE_BBS
• SEC_SECURITY_TEMPLATE_GROUPS
• CAESAR2_LOCAL_ACCOUNTS
• CAESAR2_MISC_SETTINGS
• CAESAR2_KRB_SETUP
• CAESAR2_COMP_LOCAL_ACCTS
• CAESAR2_LOCAL_ACCOUNT_GROUPS
• CAESAR2_GROUPS
• CAESAR2_COMP_GROUPS
• CAESAR2_GROUP_PERMISSIONS
• CAESAR2_KRB_SETUP_PERMISSIONS
• CAESAR2_COMP_PUBLIC_PERMS
• CAESAR2_LDAP_SETUPS
• CAESAR2_COMP_LDAP_SETUPS
• CAESAR2_LDAP_SEARCH_OBJECTS
• CAESAR2_LDAP_SETUP_GROUPS
• CAESAR2_LDAP_SERVER_INFO
• CAESAR2_LDAP_DEVICE_CREDS
• CAESAR2_SOLUTION_ACCTS
• CAESAR2_LDAP_ADDRESS_BOOKS
• CAESAR2_LDAP_SEARCH_ATTRS
• CAESAR2_COMP_SOLN_ACCTS
• CAESAR2_SOLUTION_ACCT_GROUPS
Database access 188

CAESAR2_MISC_SETTINGS
Field Name Data Type Description
MINIMUM_PASSWORD_LENGTH
SMALLINT/ TINYINT
*
Added new miscellaneous setting under
Advanced Security Component.
PROTECTED_FEATURES VARCHAR(255)
PRINT_PERMISSION_PRINT VARCHAR(255)
PRINT_PERMISSION_BROWSER VARCHAR(255)
PRINT_PERMISSION_CONTROL_PAN EL VARCHAR(255)
*
This data type is required for Microsoft SQL Server.
Views and data export
The following tables describe information on Views in MVE and fields included in each view.
DATA_EXPORT_TEMPLATE
This table contains information on Views in MVE.
Field Name Data Type Description
DATA_EXPORT_ID BIGINT The primary key.
NAME VARCHAR(255) The name of the view.
DEFAULT_TEMPLATE
SMALLINT/ TINYINT
*
Whether the template is the default template to be shown when
initially logged in, only one view can have this value set to True.
LANGUAGE_CODE VARCHAR(255) Deprecated.
INCLUDE_HEADER
SMALLINT/ TINYINT
*
Deprecated.
WRAP_FIELDS
SMALLINT/ TINYINT
*
Deprecated.
DESCRIPTION VARCHAR(4000) The description of the view.
IS_SYSTEM
SMALLINT/ TINYINT
*
This field indicates whether the template is in system view, which
cannot be edited or deleted.
IDENTIFIER_FIELD VARCHAR(255) The identifier field chosen for this view.
*
This data type is required for Microsoft SQL Server.
DATA_EXPORT_FIELDS
This table contains the fields included in each view.
Field Name Data Type Description
FIELD_INDEX Integer The primary key.
FIELD VARCHAR(255) The name of the field to be included in the view.
DATA_EXPORT_ID BIGINT The foreign key to DATA_EXPORT_TEMPLATE.DATA_EXP ORT_ID.
Database access 189

Event manager
The following tables deal with information related to creating and managing events.
ALERT
This table contains all the alerts that MVE supports.
Field name Data type Description
ID BIGINT The primary key
NAME VARCHAR(255) The textual name of the alert. For example, “Supply Alert.”
SEVERITY VARCHAR(255) For example, “ERROR.”
CATEGORY VARCHAR(255) For example, “SUPPLIES.”
ASSIGNED_EVENTS
This table links events with their assigned Configuration Items.
Field name Data type Description
CI_ID BIGINT The composite primary key. Refers to CONFIG_ITEM.CI_ID.
EVENT_ID BIGINT The composite primary key. Refers to EVENT.EVENT_ID.
EVENT_REGISTRATION_STATE VARCHAR(255) The options are REGISTERED and NOT_REGISTERED.
DESTINATION
This table represents an action within the Event Manager module.
Field name Data type Description
ID BIGINT The primary key.
DESTINATION_TYPE VARCHAR(31) The type of destination, currently either email or shell command.
Depending on the type, not all columns apply.
NAME VARCHAR(255) The user-supplied name of the destination.
EMAIL_BODY VARCHAR(255) The email body text.
EMAIL_CC VARCHAR(255) The email CC list.
EMAIL_FROM VARCHAR(255) The email From text.
EMAIL_SUBJECT VARCHAR(255) The email Subject text.
EMAIL_TO VARCHAR(255) The email to text.
COMMAND_PATH VARCHAR(255) The full path to the command.
COMMAND_PARAMS VARCHAR(255) Any parameters to send to the command.
DESCRIPTION VARCHAR(4000) An optional user description of the action.
LAST_MODIFIED Timestamp The date of the last edit of the action.
Database access 190

EVENT
This table contains user-created events, which consist of a name, a description, and a collection of alerts to
include.
Field name Data type Description
NAME VARCHAR(255) The user-supplied name of the event.
DESCRIPTION VARCHAR(255) The user-supplied description of the event.
EVENT_ID BIGINT The primary key.
TRIGGER_DESTINATIONS VARCHAR(255) The trigger destinations of the event. The options are
on_active_only and on_active_and_clear.
GRACE_PERIOD_ENABLED
SMALLINT/ TINYINT
*
The flag indicating whether a grace period is enabled.
GRACE_PERIOD_MINUTES INTEGER The number of minutes for the grace period.
LAST_MODIFIED TIMESTAMP The time of the last edit of the event.
*
This data type is required for Microsoft SQL Server.
EVENT_ALERTS
This table links an event to the collection of alerts it includes.
Field name Data type Description
EVENT_ID BIGINT The composite primary key. Refers to EVENT.EVENT_ID.
ALERT_ID BIGINT The composite primary key. Refers to ALERT.ALERT_ID.
EVENT_DESTINATIONS
This table links an event to an associated action.
Field name Data type Description
EVENT_ID BIGINT The composite primary key. Refers to EVENT.EVENT_ID.
DESTINATION_ID BIGINT The composite primary key. Refers to DESTINATION.DESTINATION_ID.
PRINTER_EVENT_ACTIVE_CONDITIONS
This table represents the active conditions or alerts for printers with events that trigger that condition or alert.
Multiple conditions have their corresponding rows, all pointing to the same PRINTER_ID.
Field name Data type Description
ACTIVE_CONDITION_ID BIGINT The primary key.
LOCATION VARCHAR(255) For example, “Tray 1.”
MESSAGE VARCHAR(255) For example, “Tray Missing.”
TYPE VARCHAR(255) For example, “Intervention Required.”
CI_ID BIGINT Refers to CONFIG_ITEM.ID.
DESTINATION_TASK_ID VARCHAR(80) The foreign key back to SYSTEM_LOG.TASK_ID.
Database access 191

Miscellaneous
The following tables provide useful storage but do not fit into any of the previous table categories.
APPLICATION_SETTINGS
This table currently holds all the MVE system settings. The values are encrypted and not available outside of
MVE.
Field name Data type Description
ID BIGINT The primary key.
SETTING_KEY VARCHAR(255) The preference name.
SETTING_VALUE VARCHAR(8190) The preference value.
BOOKMARK
This table contains all saved searches of MVE. They are currently stored as BLOB, so they cannot be edited
outside of MVE.
Field name Data type Description
ID BIGINT The primary key.
DEFAULT_SEARCH
SMALLINT/ TINYINT
*
The flag indicating whether this bookmark is one of the defaults that
come with MVE.
NAME VARCHAR(255) The user-supplied name of the bookmark.
SEARCH_CRITERIA BLOB SUB_TYPE 0 The binary representation of the bookmark.
DESERIALIZABLE
SMALLINT/ TINYINT
*
Indicates whether the saved search is deserializable.
DESCRIPTION VARCHAR(4000) An optional user‑entered description of the saved search.
*
This data type is required for Microsoft SQL Server.
Liquibase and Hibernate Tables
Liquibase and Hibernate are third‑party libraries that MVE uses to help maintain the database. The following
tables are used by these libraries. These tables do not contain any significant printer data so their contents are
not detailed here.
• DATABASECHANGELOG
• DATABASECHANGELOGLOCK
• All tables whose names begin with HT_.
• HIBERNATESEQUENCE
Database access 192

SMTP_CONFIGURATION
This table contains
configuration
for the Simple Mail Transfer Protocol (SMTP), which allows MVE users to send
emails.
Field name Data type Description
ID BIGINT The primary key.
FROM_ADDRESS VARCHAR(255) The email address of the sender.
LOGIN_ID VARCHAR(255) The user ID for the SMTP server.
LOGIN_PASSWORD VARCHAR(255) The password associated with the user ID for the SMTP server.
LOGIN_REQ
SMALLINT/ TINYINT
*
The flag indicating whether the SMTP server requires a login.
SMTP_PORT BIGINT The port of the SMTP server.
SMTP_SERVER VARCHAR(255) The host name or IP address of the SMTP server.
SMTP_ENABLE
SMALLINT/ TINYINT
*
The flag indicating whether SMTP is enabled.
EMAIL_ENCRYPTION VARCHAR(64) Refers to the supported encryption types., default is null.
*
This data type is required for Microsoft SQL Server.
SYSTEM_LOG
This table contains all of the system log messages that are produced as MVE carries out its tasks. This table
can get very large.
Field name Data type Description
LOG_ID BIGINT The primary key.
TIMESTAMP_ TIMESTAMP The time when the message was logged.
TASKID BIGINT The task instance that generated the message.
TASKNAME VARCHAR(50) The task that generated the message.
LEVEL_ INTEGER The options are DEBUG, INFO, etc.
MESSAGE_ VARCHAR(8000) The actual log message.
USER_NAME VARCHAR(255) The username of the user who performed the action.
IP_ADDRESS VARCHAR(50) The client IP address.
Quartz DB
QRTZ_FIRED_TRIGGERS
Field name Data type Description
SCHED_TIME BIGINT A new column added for Scheduled Time.
Database access 193
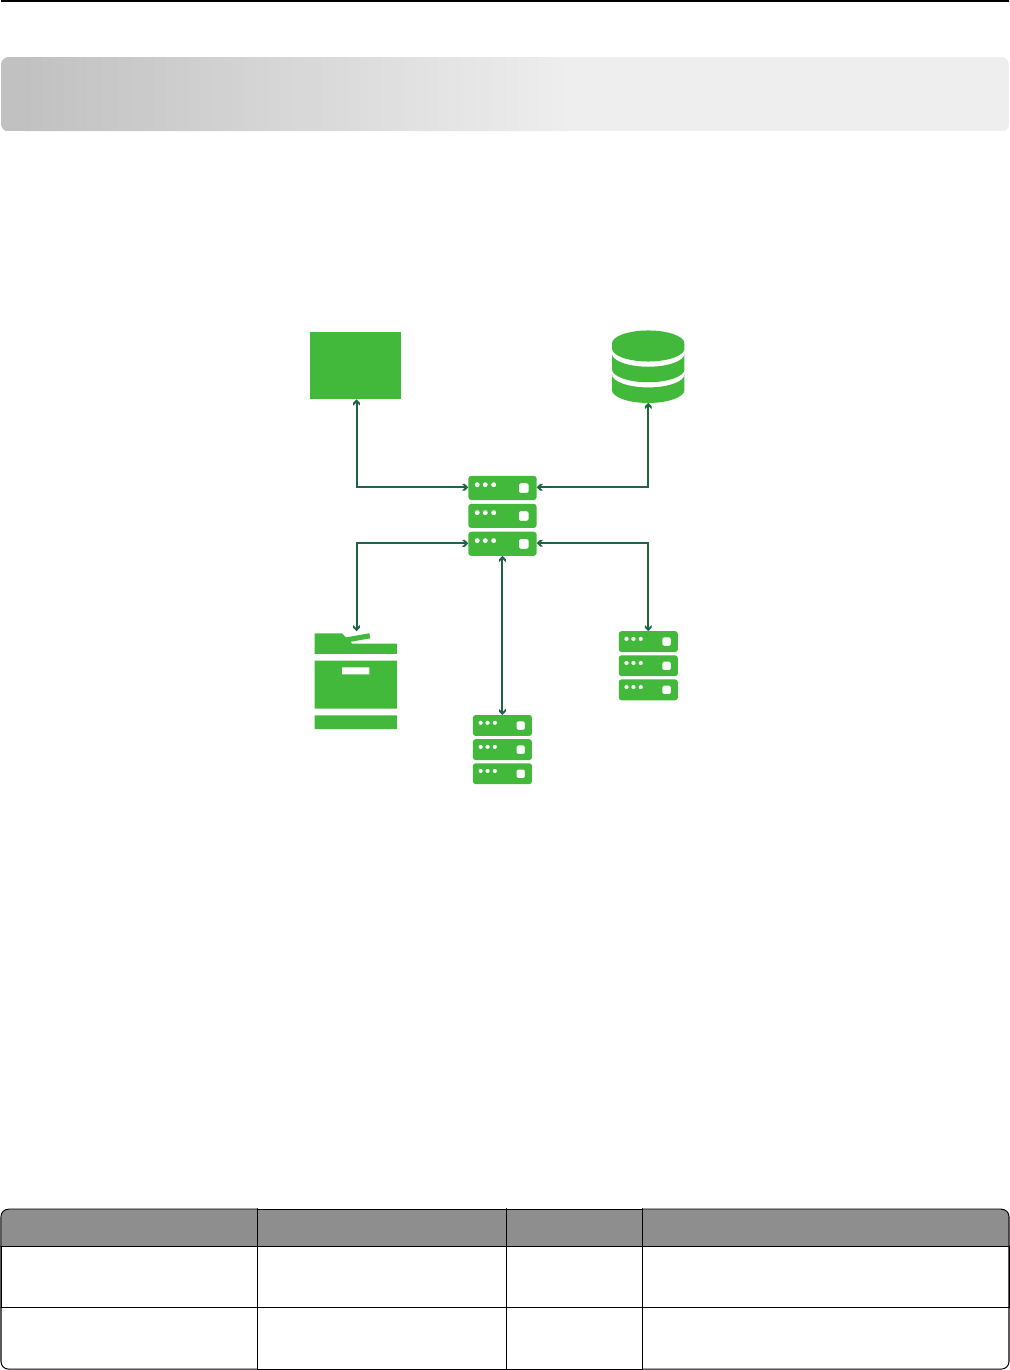
Appendix
Understanding ports and protocols
MVE uses dierent ports and protocols for several types of network communication, as shown in the following
diagram:
Browser
client
TCP 443
TCP 3050 (Firebird)
User-defined port (Microsoft SQL Server)
User-defined port
UDP 69, 161, 5353,
6000, 6100, 9187,
9300
TCP 21, 80,
5000, 6110, 9100
User-defined port
Microsoft SQL Server
and Firebird database
Network devices
LDAP or
Kerberos server
Mail server
MVE server
Notes:
• The ports are bidirectional and must be open or active for MVE to function properly. Make sure that all
the printer ports are enabled.
• Some communications require an ephemeral port, which is an allocated range of available ports on the
server. When a client requests a temporary communication session, the server assigns a dynamic port to
the client. The port is valid only for a short duration and can become available for reuse when the
previous session expires.
Server‑to‑printer communication
Ports and protocols used during communication from the MVE server to network printers
Protocol MVE server Printer Used for
Network Printing Alliance
Protocol (NPAP)
UDP 9187 UDP 9300 Communicating with Lexmark network
printers.
XML Network Transport
(XMLNT)
UDP 9187 UDP 6000 Communicating with some Lexmark
network printers.
Appendix 194

Protocol MVE server Printer Used for
Lexmark Secure Transport
(LST)
UDP 6100
Ephemeral Transmission
Control Protocol (TCP) port
(handshaking)
UDP 6100
TCP 6110
(handshaking)
Communicating securely with some
Lexmark network printers.
Multicast Domain Name
System (mDNS)
Ephemeral User Datagram
Protocol (UDP) port
UDP 5353 Discovering Lexmark network printers
and determining the security capabilities
of printers.
Note: This port is required to allow MVE
to communicate with secured printers.
Simple Network
Management Protocol
(SNMP)
Ephemeral UDP port UDP 161 Discovering and communicating with
Lexmark and third-party network
printers.
File Transfer Protocol (FTP) Ephemeral TCP port TCP 21
TCP 20
Deploying files.
Hypertext Transfer
Protocol (HTTP)
Ephemeral TCP port TCP 80 Deploying files or enforcing
configurations.
TCP 443 Deploying files or enforcing
configurations.
Hypertext Transfer
Protocol over SSL (HTTPS)
Ephemeral TCP port TCP 161
TCP 443
Deploying files or enforcing
configurations.
RAW Ephemeral TCP port TCP 9100 Deploying files or enforcing
configurations.
Printer‑to‑server communication
Port and protocol used during communication from network printers to the MVE server
Protocol Printer MVE server Used for
NPAP UDP 9300 UDP 9187 Generating and receiving alerts
Server‑to‑database communication
Ports used during communication from the MVE server to databases
MVE server Database Used for
Ephemeral TCP port User‑defined port. The default port is TCP
1433.
Communicating with an SQL Server database.
Ephemeral TCP port TCP 3050 Communicating with a Firebird database.
Appendix 195

Client‑to‑server communication
Port and protocol used during communication from the browser client to the MVE server
Protocol Browser Client MVE server
Hypertext Transfer Protocol over SSL (HTTPs) TCP port TCP 443
Server-to-mail-server communication
Port and protocol used during communication from the MVE server to a mail server
Protocol MVE server SMTP server Used for
Simple Mail
Transfer Protocol
(SMTP)
Ephemeral TCP port User‑defined port. The default
port is TCP 25.
Providing the e‑mail functionality
used to receive alerts from printers.
Server-to-LDAP-server communication
Ports and protocols used during communication from the MVE server to an LDAP server
involving user groups and authentication functionality
Protocol MVE server LDAP server Used for
Lightweight Directory
Access Protocol (LDAP)
Ephemeral TCP port User‑defined port. The
default port is TCP 389.
Authenticating MVE users
using an LDAP server.
Lightweight Directory
Access Protocol over TLS
(LDAPS)
Ephemeral TCP port User‑defined port. The
default port is TCP 636.
Authenticating MVE users
using an LDAP server over
TLS.
Kerberos Ephemeral UDP port User‑defined port. The
default port is UDP 88.
Authenticating MVE users
using Kerberos.
Enabling automatic approval of certificate requests in
Microsoft CA
By default, all CA servers are in pending mode and you must manually approve each signed certificate request.
Since this method is not feasible for bulk requests, enable the automatic approval of signed certificates.
1 From Server Manager, click Tools > Certification Authority.
2 From the left panel, right‑click the CA, and then click Properties > Policy Module.
3 From the Request Handling tab, click Follow the settings in the
certificate
template if applicable, and then
click OK.
Note: If Set the certificate request status to pending is selected, then you must manually approve the
certificate.
4 Restart the CA service.
Appendix 196

Revoking certificates
Note: Before you begin, make sure that the CA server is
configured
for CRLs and that they are available.
1 From the CA server, open Certification Authority.
2 From the left panel, expand the CA, and then click Issued Certificates.
3 Right‑click a
certificate
to revoke, and then click All Tasks > Revoke
Certificate
.
4 Select a reason code and the date and time for revocation, and then click Ye s .
5 From the left panel, right‑click Revoked
Certificates
, and then click All Tasks > Publish.
Note: Make sure that the certificate that you revoked is in Revoked Certificates.
You can see the revoked certificate serial number in the CRL.
Appendix 197

Notices
Edition notice
January 2023
The following paragraph does not apply to any country where such provisions are inconsistent with local
law: LEXMARK INTERNATIONAL, INC., PROVIDES THIS PUBLICATION “AS IS” WITHOUT WARRANTY OF ANY
KIND, EITHER EXPRESS OR IMPLIED, INCLUDING, BUT NOT LIMITED TO, THE IMPLIED WARRANTIES OF
MERCHANTABILITY OR FITNESS FOR A PARTICULAR PURPOSE. Some states do not allow disclaimer of
express or implied warranties in certain transactions; therefore, this statement may not apply to you.
This publication could include technical inaccuracies or typographical errors. Changes are periodically made
to the information herein; these changes will be incorporated in later editions. Improvements or changes in the
products or the programs described may be made at any time.
References in this publication to products, programs, or services do not imply that the manufacturer intends to
make these available in all countries in which it operates. Any reference to a product, program, or service is
not intended to state or imply that only that product, program, or service may be used. Any functionally
equivalent product, program, or service that does not infringe any existing intellectual property right may be
used instead. Evaluation and verification of operation in conjunction with other products, programs, or services,
except those expressly designated by the manufacturer, are the user’s responsibility.
For Lexmark technical support, go to
http://support.lexmark.com.
For information on Lexmark's privacy policy governing the use of this product, go to
www.lexmark.com/privacy.
For information on supplies and downloads, go to
www.lexmark.com.
© 2017 Lexmark International, Inc.
All rights reserved.
Trademarks
Lexmark, the Lexmark logo, and Markvision are trademarks or registered trademarks of Lexmark International,
Inc. in the United States and/or other countries.
Windows, Microsoft, Microsoft Edge, PowerShell, SQL Server, and Windows Server are trademarks of the
Microsoft group of companies.
Firebird is a registered trademark of the Firebird Foundation.
Google Chrome is a trademark of Google LLC.
Apple and Safari are registered trademarks of Apple Inc.
Java is a registered trademark of Oracle and/or its
aliates.
All other trademarks are the property of their respective owners.
Notices 198

GOVERNMENT END USERS
The Software Program and any related documentation are "Commercial Items," as that term is
defined
in 48
C.F.R. 2.101, "Computer Software" and "Commercial Computer Software Documentation," as such terms are
used in 48 C.F.R. 12.212 or 48 C.F.R. 227.7202, as applicable. Consistent with 48 C.F.R. 12.212 or 48 C.F.R.
227.7202-1 through 227.7207-4, as applicable, the Commercial Computer Software and Commercial Software
Documentation are licensed to the U.S. Government end users (a) only as Commercial Items and (b) with only
those rights as are granted to all other end users pursuant to the terms and conditions herein.
JmDNS License
This library is free software; you can redistribute it and/or modify it under the terms of the GNU Lesser General
Public License as published by the Free Software Foundation; either version 2.1 of the License, or (at your option)
any later version.
This library is distributed in the hope that it will be useful, but WITHOUT ANY WARRANTY; without even the
implied warranty of MERCHANTABILITY or FITNESS FOR A PARTICULAR PURPOSE. See the GNU Lesser
General Public License for more details.
You should have received a copy of the GNU Lesser General Public License along with this library; if not, write
to the Free Software Foundation, Inc., 59 Temple Place, Suite 330, Boston, MA 02111-1307 USA
Arthur van Ho
avh@strangeberry.com
Rick Blair
** JmDNS
Licensing notices
All licensing notices associated with this product can be viewed from the program folder.
Notices 199

Glossary
action An e‑mail notification or a command‑line operation. Actions assigned to
events are triggered when a printer alert occurs.
audit The task of collecting printer data such as printer status, supplies, and
capabilities.
configuration A collection of settings that can be assigned and enforced to a printer or a
group of printer models. Within a configuration, you can modify printer
settings and deploy applications, licenses,
firmware,
and CA
certificates
to
the printers.
discovery profile A profile that contains a set of parameters used to find printers on a network.
It may also contain predefined configurations that can be assigned and
enforced to printers automatically during the discovery.
event Defines which actions are executed when specific alerts are active.
keyword A custom text assigned to printers that you can use to search for those
printers within the system. When you filter a search using a keyword, only
printers that are tagged with the keyword are shown.
secured printer A printer that is configured to communicate through an encrypted channel,
and requires authentication to access its functions or applications.
token An identifier that represents printer data values for variable settings in a
configuration.
variable settings A set of printer settings containing dynamic values that can be integrated
into a configuration.
Glossary 200

Index
A
accessing MVE 23
action
placeholders 131
action placeholders
understanding 131
actions
creating 130
deleting 132
editing 132
managing 132
testing 132
adding a login disclaimer 143
adding client authentication EKU
in
certificates
111
adding root CA certificate
Java truststore 33
ADFS server
enabling authentication 147
admin user has forgotten the
password 151
advanced security component
creating 71
AES256 encryption
configuring 148
AIA
configuring 83
application log files
locating 148
applications
uninstalling 65
applications package
creating 73
ASSIGNED_CONFIGURATIONS
175
ASSIGNED_KEYWORDS 173
assigning a keyword 65
assigning configurations to
printers 62
assigning events to printers 65
auditing printers 61
authentication
client certificate 89
user name and password 89
Windows-integrated 89
authentication and
authorization 187
authentication methods 89
Authority Information Access
configuring
83
automated certificate
management
configuring
77
automated certificate
management feature 75
automatic approval of
certificate
requests
enabling in Microsoft CA 196
enabling in OpenXPKI
CA 107, 124
B
backing up and restoring the
database 26
basic authentication
enabling 128
best practices 13
C
ca-signer-1 is oine
troubleshooting 156
cannot discover a network
printer 152
cannot manually approve
certificates 155
ca‑certs download
changing details to enable 124
CC_SUPPORTED_MODEL_BACK
UP 179
CDP
configuring 83
CEP
configuring 91, 92, 95
installing 90
CEP and CES servers
creating SSL certificates 87
certificate issuance failed using
the OpenXPKI CA server 154
certificate key password
making available to
openXPKI 121
certificate keys
creating password
files 102, 118, 126
Certificate management 185
certificate management 75
certificate
requests in Microsoft
CA
automatic approval 196
certificate requests in OpenXPKI
CA
automatic approval 107, 124
certificate requests without
Challenge Password
rejecting in OpenXPKI CA 111
certificate templates 88
creating 85
certificate
templates for NDES
setting 85
CERTIFICATE_COMP_CERTIFICA
TES 177
CERTIFICATES 177
certificates
creating 108, 126
importing 104
revoking 112, 197
certificates with the same
subject
enabling 127
Certification
Distribution Point
configuring 83
CES
configuring
91, 93, 96
installing 90
Challenge Password
disabling in Microsoft CA
server 86
change history 8
CHANGED_SETTINGS 170
changing the installer settings
after installation 28
changing the language 23
changing the printer listing
view 46
changing your password 24
checking printer conformance
with a configuration 63
ciphers
customizing 148
claim‑issuance policy for
GroupRule
setting 146
Index 201

claim‑issuance policy for Name
ID
setting 146
clearing logs 138
client authentication EKU
adding in certificates 111
client certificate 94
client certificate
authentication 89
cloning configurations
sample scenario 71
color print permissions
configuring 73
COMPONENT_SETTINGS 177
COMPONENT_TAB_ROW 178
COMPONENT_TAB_SETTING_V
ALUE 178
COMPONENT_TAB_TABLE 178
CONFIG_ITEM 157
CONFIGURATION 173
configuration
conformance 63
creating 68, 71
exporting 74
importing 74
configuration settings
printable version 72
CONFIGURATION_COMPONENT
174
CONFIGURATION_COMPONENT
S 175
configurations
assigning 62
enforcing 62
managing 68
unassigning 62
configuring Authority Information
Access settings 83
configuring CEP 91, 92, 95
configuring Certification
Distribution Point settings 83
configuring CES 91, 93, 96
configuring CRL
accessibility 84, 106
configuring EST endpoints for
multiple realms 125
configuring e‑mail settings 142
configuring general settings 142
configuring Microsoft Enterprise
CA with NDES
overview 79, 81
configuring MVE for automated
certificate management 77
configuring NDES servers 84
configuring Network Device
Enrollment Service servers 84
configuring OpenXPKI CA
manually 100, 117
configuring OpenXPKI CA using
default script 99, 116
configuring printer certificates
manually 66
configuring printer security 58
configuring root CA server
overview 80
configuring SCEP endpoints for
multiple realms 110
configuring subordinate CA
server overview 81
configuring the color print
permissions 73
conformance
checking 63
connectivity requirements 87
copying directory 108
copying discovery profiles 36
copying key files 103
copying saved searches 53
copying the directory 124
copying views 44
creating a configuration 68
creating a configuration from a
printer 71
creating a custom saved
search 49
creating a discovery profile 34
creating a schedule 140
creating an action 130
creating an advanced security
component from a printer 71
creating an applications
package 73
creating an event 132
creating certificate
templates 85, 88
creating certificates 108
creating client certificate 94
creating keywords 47
creating OpenSSL configuration
files 100
creating password files for
certificate keys 102, 126
creating root CA certificates 102
creating SCEP certificates 103
creating signer certificates 102
creating SSL certificates
CEP and CES servers 87
creating symlinks 103
creating vault certificates 103
credentials
entering 66
CRL
publishing 112
CRL accessibility
configuring 84, 106
CRL information
generating 105, 122
publishing 123
CSV
variable settings 72
custom saved search
creating 49
D
dashboard
accessing 38
database
backing up 26
requirements 15
restoring 26
setting up 19
database requirements 15
default configurations 56
default port numbers
changing for OpenXPKI CA 127
setting for OpenXPKI CA 111
default port numbers for
OpenXPKI CA
changing 127
delegation
enabling 90
requirements 89
delegation requirements 89
deleting actions 132
deleting discovery profiles 36
deleting keywords 47
deleting saved searches 53
deleting schedules 141
deleting views 44
deploying files to printers 63
Device Conformance Check
managing 39
Device Security Information
managing 38
Index 202

dierences in supported
databases data types 157
directory
copying and setting 124
disabling Challenge Password in
Microsoft CA server 86
discovering printers 37
discovery profile
creating 34
Discovery profiles 180
discovery profiles
copying 36
deleting 36
editing 36
managing 36
running 36
dynamic settings
understanding 72
E
editing actions 132
editing discovery profiles 36
editing keywords 47
editing saved searches 53
editing schedules 141
editing views 44
Embedded Web Server
viewing 61
enabling ADFS server
authentication 147
enabling automatic approval of
certificate requests in Microsoft
CA 196
enabling automatic approval of
certificate requests in OpenXPKI
CA 107
enabling basic
authentication 128
enabling LDAP server
authentication 31
enabling multiple active
certificates
same subject 110
enabling SCEP service 106
enabling Signer on Behalf
certificates 107
enforcement of configurations
with multiple applications fails in
the first attempt but succeeds in
the subsequent attempts 153
enforcement of configurations
with printer certificate fails 154
enforcing configurations 62
entering credentials to secured
printers 66
ESF 182
ESF_COMP_PRODUCTS 179
EST endpoints
configuring for multiple
realms 125
event
creating 132
Event manager 190
events
assigning 65
deleting 137
editing 137
managing 137
exporting CSV
variable settings 72
exporting logs 138
exporting printer data 44
e‑mail action 130
e‑mail settings
configuring 142
F
FAILED_COMPONENT 176
FAILED_COMPONENT_SETTING
S 176
FAQs 129
files
deploying 63
filtering printers using the search
bar 46
Firebird database 19
FLASH_NET_IDS 177
FLASHFILE 176
frequently asked questions 129
full certificate subjects
requesting through SCEP 112
function access controls
understanding 58
G
general settings
configuring 142
generating CRL information 105
getting full
certificate
subjects
when requesting through
SCEP 112
H
host name lookup
reverse lookup 148
I
importing
certificates
104
importing CSV
variable settings 72
importing
files
to resource
library 74
importing files to the resource
library 74
importing or exporting a
configuration 74
incorrect printer information 152
installation log
files
locating 148
installer settings
changing 28
installing LDAP server
certificates
33
installing MVE 20
installing MVE silently 21
installing OpenXPKI CA 97, 113
installing root CA servers 80
installing subordinate CA
servers 82
internal server error 154
K
key files
copying 103
KEYWORD 173
keyword
assigning 65
KEYWORD_CATEGORY 173
keywords
creating 47
deleting 47
editing 47
managing 47
L
language
changing 23
languages
supported 16
LDAP server
enabling authentication 31
Index 203

LDAP server certificates
installing 33
log event action 130
log files
locating 148
logging out from MVE
by way of ADFS 147
login disclaimer
adding 143
login prompt does not
appear 155
logs
clearing 138
exporting 138
viewing 138
M
managing actions 132
managing configurations 68
managing discovery profiles 36
managing events 137
managing keywords 47
managing printer alerts
overview 130
managing saved searches 53
managing schedules 141
managing users 30
managing views 44
Markvision Enterprise
understanding 12
Microsoft Enterprise CA
configuring 148
Microsoft Enterprise CA with
NDES
configuring 79, 81
Microsoft SQL Server 19
Miscellaneous 192
monitoring printers 53
multiple active certificates with
the same subject
enabling 127
MVE
accessing 23
installing 20
upgrading 25
MVE by way of ADFS
ADSF 147
MVE certificate
signing 143
MVE Configuration Workflow for
ADFS
overview 146
MVE does not recognize a printer
as a secured printer 153
MVE silent installation 21
N
NDES servers
configuring 84
nested connector without class
error 155
network connectivity
requirements 87
Network Device Enrollment
Service servers
configuring
84
NETWORK_ADAPTER 158
NETWORK_PRINTER 161
O
OpenSSL configuration file
creating 100, 117
OpenXPKI
starting 105, 122
OpenXPKI CA
configuring
manually 100, 117
configuring
using default
script 99, 116
installing 97, 113
OpenXPKI CA default port
numbers
changing 127
overview
configuring
root CA server 80
configuring subordinate CA
server 81
managing
configurations
68
managing printer alerts 130
Markvision Enterprise 12
security dashboard 38
setting up user access 29
viewing task status and
history 138
P
page is loading infinitely 152
password
changing 24
resetting 151
password files for certificate
keys
creating 102, 118, 126
Perl error 155
permissions
understanding 58
placeholders 130
ports
configuring 148
understanding 194
printer
conformance 63
restarting 61
printer alerts
understanding 133
printer certificates
configuring manually 66
printer communications
securing 59
printer data
exporting 44
printer firmware
updating 64
printer information
viewing 43
printer life cycle states
understanding 47
printer list
viewing 40
printer listing view
changing 46
printer models supported 16
printer security
configuring 58
printer security states
understanding 55
printer state
setting 62
printer status
updating 61
PRINTER_CURRENT_STATUS
163
PRINTER_ESF_APPS 163
PRINTER_INPUT_OPTIONS 164
PRINTER_INPUT_TRAYS 164
PRINTER_OPTIONS 164
PRINTER_OUTPUT_BINS 165
PRINTER_OUTPUT_OPTIONS
165
PRINTER_PORTS 170
PRINTER_SECURITY-
OPTIONS 172
PRINTER_STATISTICS 166
PRINTER_SUPPLIES 169
printers
auditing 61
Index 204

deploying files 63
discovering 37
events 65
filtering 46
removing 67
securing 56, 60
protocols
understanding 194
publishing CRL 112
Q
Quartz DB 193
R
rejecting certificate requests
without Challenge Password in
OpenXPKI CA 111
removing printers 67
removing user information and
references 144
requirements
network connectivity 87
system 86
resource library
importing
files
to 74
restarting the printer 61
reverse DNS lookup 148
revoking
certificates
112, 197
root CA certificates
creating 102, 119
root CA servers
installing 80
run-as user
setting up 20
running a saved search 49
running discovery
profiles
36
S
sample scenario for cloning
configurations 71
saved searches
accessing 148
copying 53
deleting 53
editing 53
managing 53
running 49
SCEP certificates
creating 103
SCEP endpoints
configuring for multiple
realms 110
SCEP service
enabling 106
schedule
creating 140
schedules
deleting 141
editing 141
managing 141
search bar
filtering printers 46
search rules
operators 50
parameters 50
search rules settings
understanding 50
secured printers
authenticating 66
securing printer communications
on your fleet 59
securing printers 60
securing printers using the
default configurations 56
Security settings 188
setting a default view 44
setting certificate templates for
NDES 85
setting default port numbers for
OpenXPKI CA 111
setting directory 108
setting the claim‑issuance policy
GroupRule 146
Name ID 146
setting the directory 124
setting the printer state 62
setting up MVE as a run-as
user 20
setting up the database 19
setting up user access
overview 29
setting up webserver 120
signer certificates
creating 102, 119, 126
Signer on Behalf certificates
enabling 107
signing the MVE certificate 143
silent installation
MVE 21
Simple Certificate Enrollment
Protocol
enabling 106
SSL certificates
creating 87
starting OpenXPKI 105
stopping tasks 138
subordinate CA servers
installing 82
supported databases 15
supported databases data types
dierences 157
supported languages 16
supported models
configuration 148
supported operating systems 15
supported printer models 16
supported servers 15
supported web browsers 15
symlinks
creating 103
system requirements 86
T
task status
viewing 138
tasks
stopping 138
testing actions 132
TLS versions
customizing 148
troubleshooting
admin user has forgotten the
password 151
ca-signer-1 is oine 156
cannot discover a network
printer 152
cannot manually approve
certificates 155
certificate
issuance failed using
the OpenXPKI CA server 154
enforcement of configurations
with multiple applications fails
in the
first
attempt but
succeeds in the subsequent
attempts 153
enforcement of configurations
with printer certificate fails 154
incorrect printer
information 152
internal server error 154
Index 205

login prompt does not
appear 155
MVE does not recognize a
printer as a secured
printer 153
nested connector without class
error 155
page is loading infinitely 152
Perl error 155
user has forgotten the
password 151
vault-1 is oine 156
U
UCF_VCC_RESOURCE_FILES
180
UCFFILE 180
unassigning configurations 62
understanding action
placeholders 131
understanding printer alerts 133
understanding printer life cycle
states 47
understanding user roles 29
uninstalling applications from
printers 65
updating printer status 61
updating the printer firmware 64
upgrading to the latest version of
MVE 25
user has forgotten the
password 151
user information
removing 144
user name and password
authentication 89
user roles
understanding 29
user system
requirements 15
user system requirements 15
users
adding 30
deleting 30
editing 30
managing 30
V
variable settings
understanding 72
vault certificates
creating 103, 120
vault-1 is oine
troubleshooting 156
VCCFILE 179
viewing logs 138
viewing task status and history
overview 138
viewing the printer Embedded
Web Server 61
viewing the printer
information 43
viewing the printer list 40
viewing the task status 138
views
copying 44
deleting 44
editing 44
managing 44
Views and data export 189
W
web certificate
creating 120
web server
requirements 15
web server requirements 15
webserver
setting up 120
Windows firewall
adding rules 148
Windows-integrated
authentication 89
Index 206
