
Hall Booking Online
An Administrator's Guide
Hall Booking Online is a trading name of Fen Street Designs Ltd. Registered in England and Wales Reg. No:14446544.
Registered office: Fl.1, 17 Fen St, Nayland, Colchester CO6 4HT
Nobody likes reading instruction manuals, so we have designed Hall Booking Online
to be as intuitive as possible. With any luck, you won't need to refer to this guide!
Support can be found at our knowledge base at:
https://hallbookingonline.com/knowledgebase
If you need further help, contact us at [email protected]
or call 07805 648935.
© Hall Booking Online 2024

1
Table of Contents
Introduction ................................................................................................................................ 3
Setting up your Venue ................................................................................................................ 3
Importing Existing Bookings ....................................................................................................... 4
Finding Your Way Around ........................................................................................................... 4
The Events Dashboard ................................................................................................................ 4
Adding an Event.......................................................................................................................... 5
Adding Repeating Events ............................................................................................................ 5
Approving an Event .................................................................................................................... 6
Viewing all Future Events ........................................................................................................... 7
Making Changes to an Event (Editing an Event) ......................................................................... 7
Searching for an Event ................................................................................................................ 9
Deleting an Event ....................................................................................................................... 9
Deleting Multiple Events............................................................................................................. 9
Unapproving an Event .............................................................................................................. 10
Unapproving Multiple Events ................................................................................................... 10
Restoring Deleted Events .......................................................................................................... 10
Declining a Booking .................................................................................................................. 10
Invoicing ................................................................................................................................... 11
Using a Logo on Invoices........................................................................................................... 11
Updating the Invoice Number ................................................................................................... 11
Invoice PDF and Email Templates ............................................................................................. 12
Accepting PayPal or Stripe Payments ....................................................................................... 12
Sending an Invoice .................................................................................................................... 13
Managing Your Invoices ........................................................................................................... 14
Sending an ad-hoc Invoice ........................................................................................................ 15
Receiving Notifications of Online Invoice Payment................................................................... 15
Sending a Credit Note ............................................................................................................... 16
Exporting Invoice Data ............................................................................................................. 16
Sending a Receipt ..................................................................................................................... 17
Invoicing FAQs .......................................................................................................................... 17
Pricing Suggestions for Invoices ................................................................................................ 18
Data Reporting ......................................................................................................................... 20
Settings for your Venue ............................................................................................................ 21
Changing Email Address for Email Notifications ....................................................................... 21
Editing the Rooms ..................................................................................................................... 22
2
Changing the Room Display Order on the Calendar.................................................................. 22
Changing your Login ID ............................................................................................................. 22
Managing Administrators ........................................................................................................ 23
Booking Cancellation Rule ........................................................................................................ 24
Booking Date Limit ................................................................................................................... 24
Minimum Spacing Between Bookings....................................................................................... 25
Uploading Your Documentation ............................................................................................... 26
Venue Photographs .................................................................................................................. 27
Changing Venue Photographs .................................................................................................. 28
Deleting a Venue Photograph................................................................................................... 28
Removing the Photographs Section .......................................................................................... 28
Booking Email Templates ......................................................................................................... 29
Your Venue Webpages: Changing the Text ............................................................................... 30
Page Display Options: Choosing Which Pages to Display ......................................................... 31
Facebook and Instagram URL ................................................................................................... 31
Main Venue Website ................................................................................................................ 31
Setting up the Directions Map and Text ................................................................................... 32
Printing out Lists of Events ....................................................................................................... 33
Exporting Data.......................................................................................................................... 34
Advanced Settings .................................................................................................................... 35
Administrator Title ................................................................................................................... 35
Default Calendar View .............................................................................................................. 35
Start Week On .......................................................................................................................... 36
Minutes between Bookings ...................................................................................................... 36
Opening Hours .......................................................................................................................... 36
Display Currency ....................................................................................................................... 36
Confirmation Emails ................................................................................................................. 36
Number Attending .................................................................................................................... 36
Default Privacy Level ................................................................................................................ 36
Personalising the Booking Form ............................................................................................... 37
Displaying Calendars on Another Website ................................................................................ 37
Hirer Accounts [Optional] ......................................................................................................... 38
Privacy ...................................................................................................................................... 39
Contact ..................................................................................................................................... 39
Appendix 1: Integrating Hall Booking Online with your venue's PayPal Account ..................... 40
Appendix 2: Integrating Hall Booking Online with your venue's Stripe Account ....................... 43
3
Introduction
Hall Booking Online allows you to manage all your venue bookings online. Prospective hirers
can see when your venue is available and make a booking request. You will receive an email
alerting you to the booking. You can then approve or reject the booking. You can send an
email invoice through the website and integrate PayPal or Stripe payments with the invoicing.
Everything is done online using a computer, tablet or phone. No one needs to download any
software.
Your venue has a public page. If you haven't yet arranged a sixty-day evaluation, you can view
a demonstration public page at https://hallbookingonline.com/demo. Your venue will have
the name of your location instead of the word 'demo'.
Setting up your Venue
You need your username and password. These are case sensitive – don't mix up capital letters
and small letters or add extra spaces.
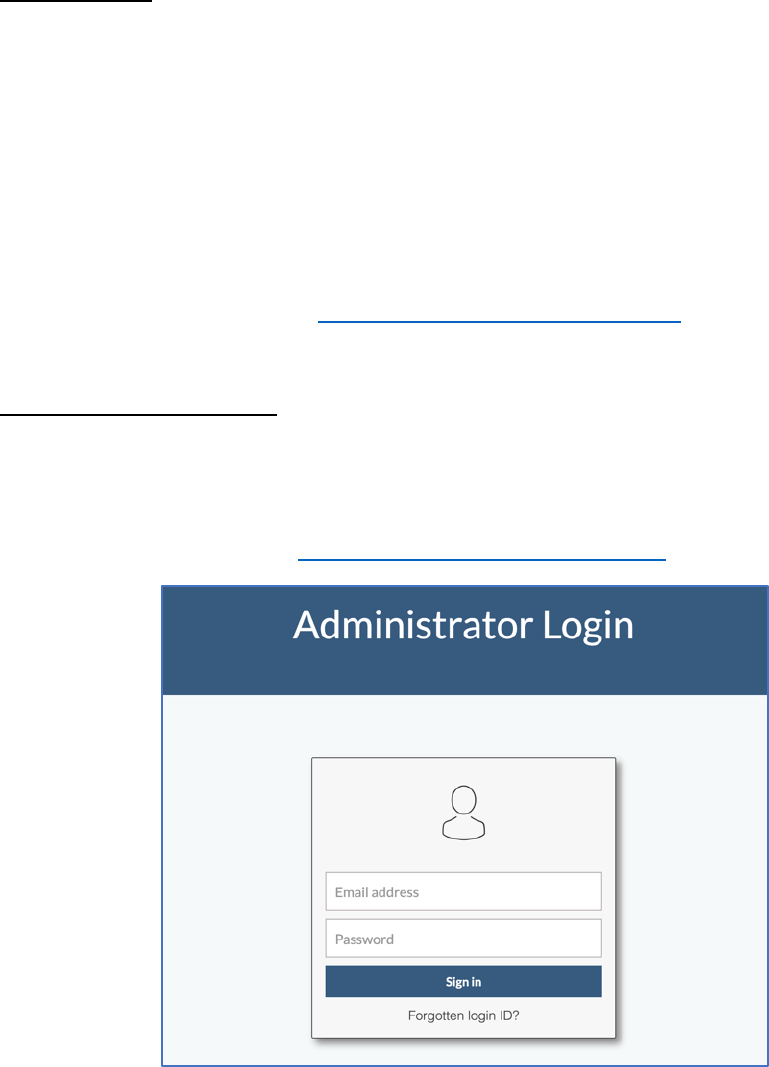
Head to the login page. This is https://hallbookingonline.com/admin
Administrator's Login Page
Enter your login ID. You'll be taken to the Events Dashboard. From here you can see
bookings that need approving. If there are no bookings listed, it means you're all caught up.
We recommend you do the following: (Instructions are further on in this guide.)
1. Check that all the rooms for your venue are listed on the form.
2. Check the text of the email messages the system sends to hirers. We have set up
generic text, which you might need to edit.
3. Upload some photos of your venue.
4. Edit the text telling users about your venue.
5. Upload documents your hirers need. (e.g. terms and conditions)
4
Importing Existing Bookings
You may have lots of existing bookings that you would like to transfer to your new booking
system.
Administrators can add recurring bookings easily. If you have lots of one-off bookings which
you need to import, get in touch with support at info@hallbookingonline.com and we will be
pleased to help you out.
If you're adding some bookings that are already confirmed through an old system, you might
not want Hall Booking Online to send another confirmation email. You can temporarily switch
off emailing while you are setting up your venue's calendar. This option can be found under
'Advanced Settings'.
Finding Your Way Around
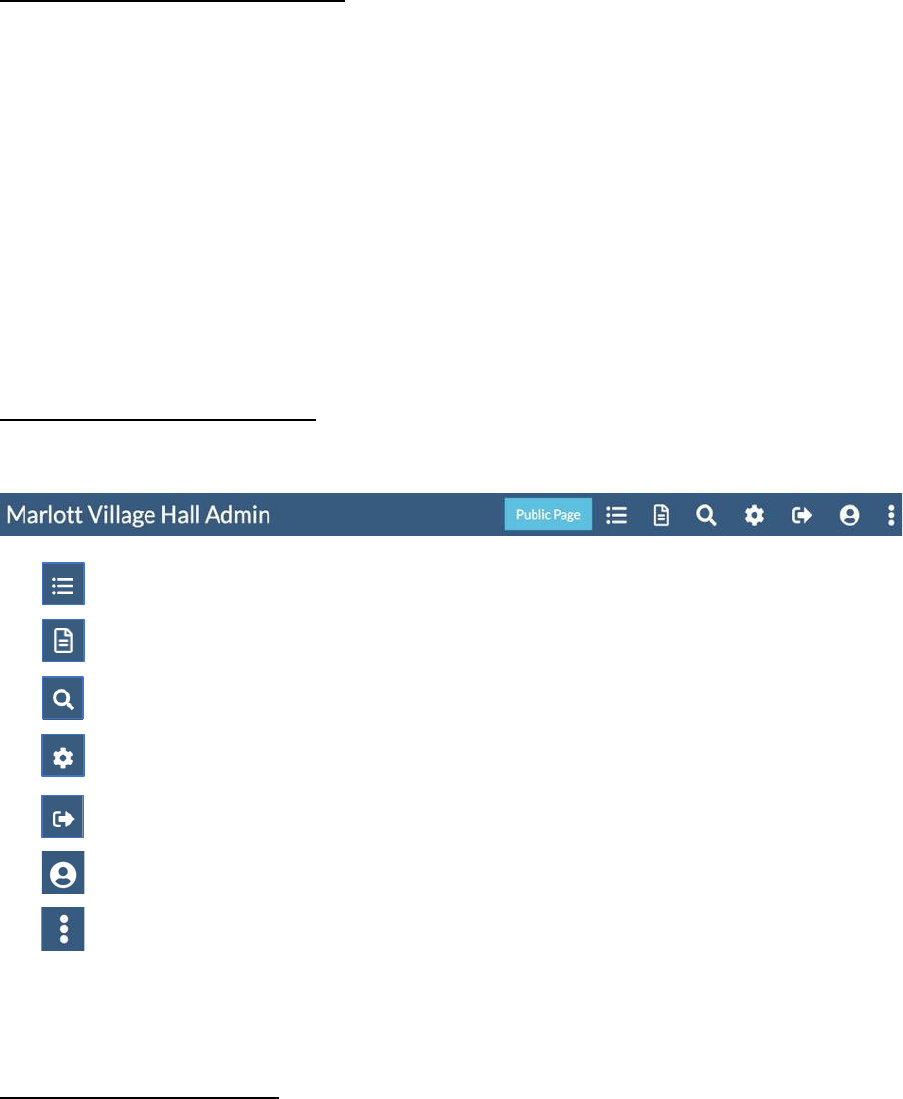
It's really easy to jump to the right part of the website. Just use the top navigation icons.
Unapproved Bookings These are in chronological order.
Invoice Management View and manage paid / unpaid invoices.
Search Find any booking in seconds.
Settings Personalise your venue with text and pictures.
Log out Use this if you're on a public computer.
Your Account View and edit your administrator account.
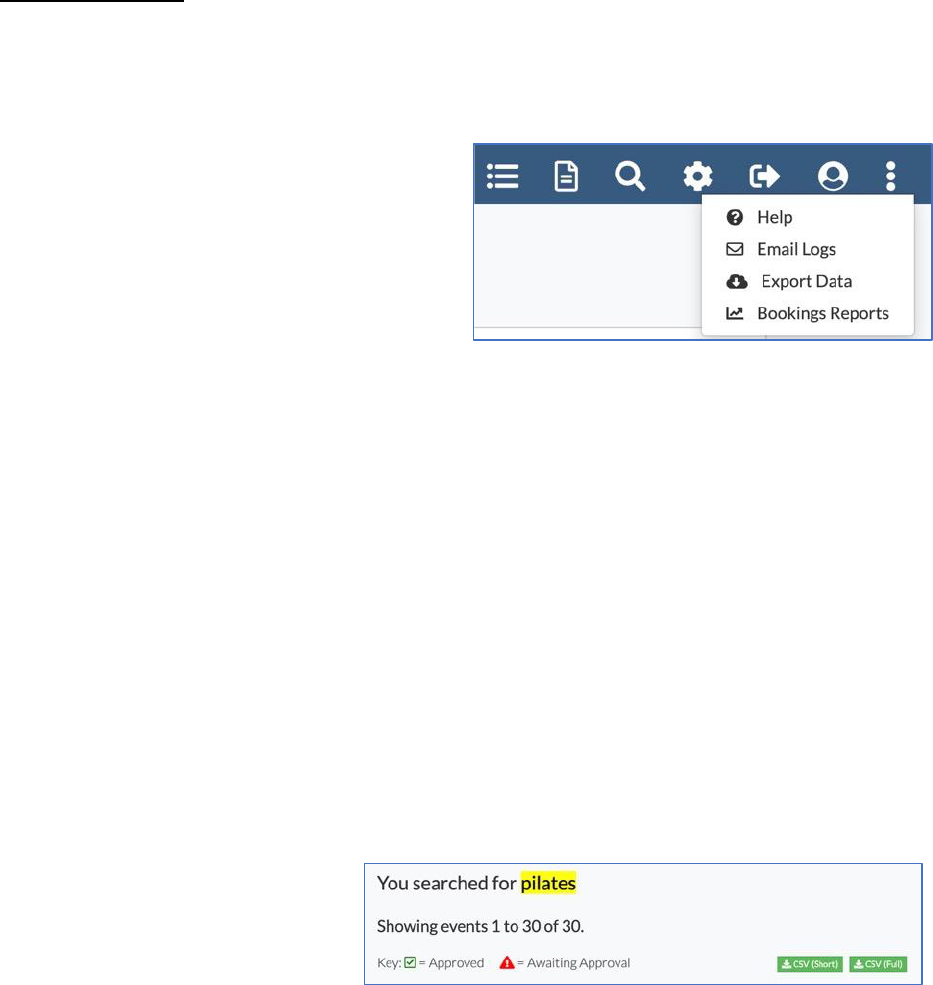
Additional Options Links to reports, data export and more.
The Public Booking Page will open in a new window, so that you can see your venue's public
pages.
The Events Dashboard
When you log in as an administrator, you will start on the Events Dashboard.
From here there are four buttons:
• Awaiting Approval a chronological list of events which aren't yet approved
• Upcoming Events a chronological list of all events (whether approved or not)
• Calendar a calendar display of events
• Invoicing a list of all paid and unpaid invoices
Click on the button to go to that page.
5
Adding an Event
You won't always need to add new events yourself. Instead, the hirer can check the calendar
and then make a provisional booking. However, an administrator can also add events. When
you're first setting up your venue, you'll probably want to add the events yourself.
You can add events either from the public URL for your venue, or from the calendar displayed
on the administrator's dashboard.
On the calendar page, find the date for the event. If it’s a repeating event, choose the first
day.
Click on + New Booking. The form will open. If you’re logged in as an administrator, you only
need to fill in the fields marked with an asterisk.
When the booking has been added, the system will send notification emails. You can switch
these off by heading to Settings >> Advanced Settings.
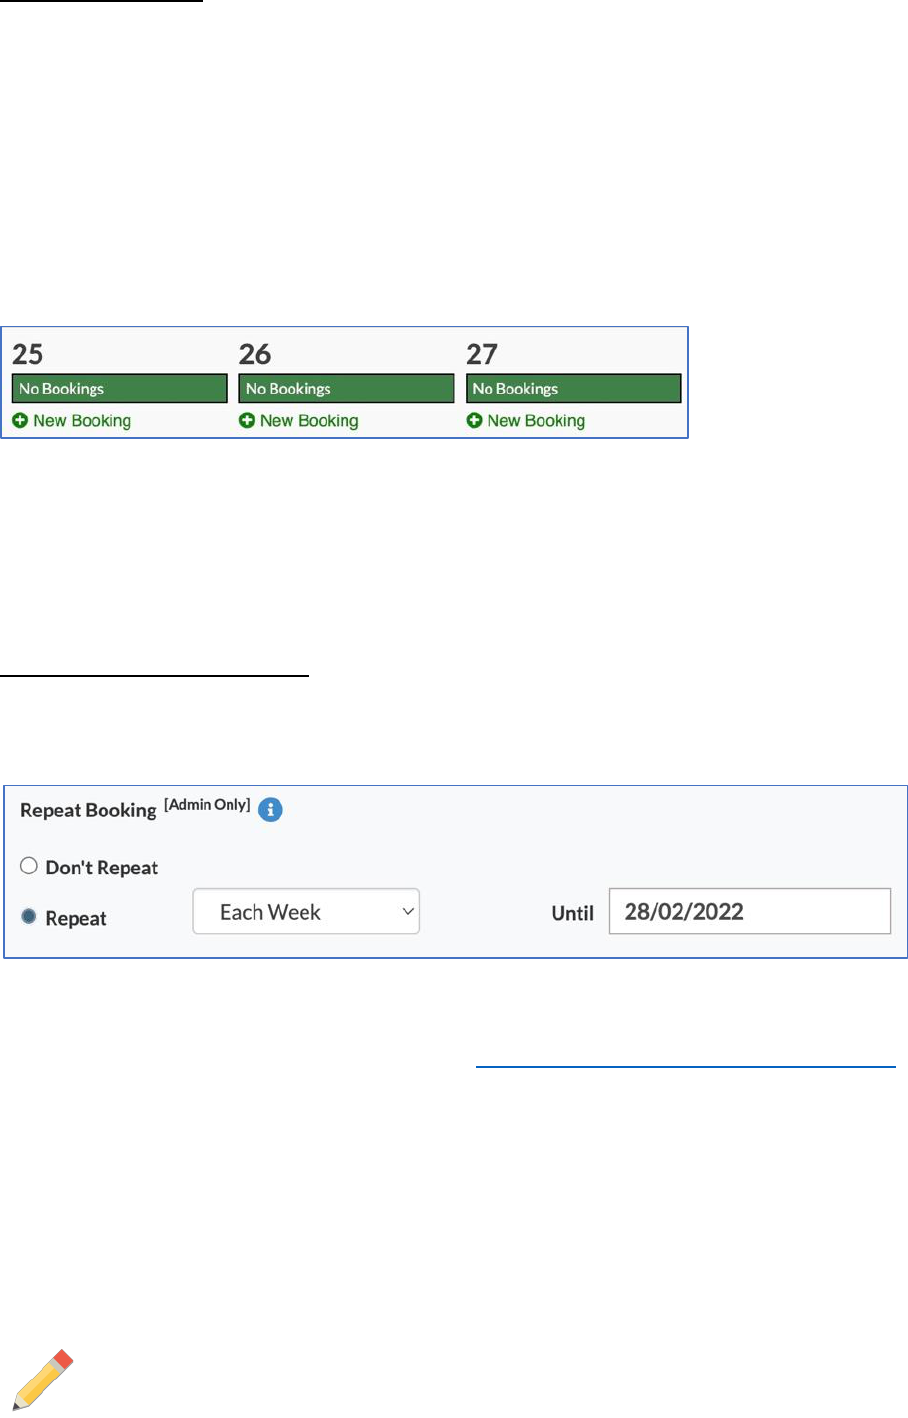
Adding Repeating Events
Events can be added which repeat every day, on weekdays, weekly, every other week or
monthly.
Administrator's view of booking page, showing option for repeating events.
By default, only administrators can add repeat bookings. However, you can change this to
allow the public to make regular bookings. More details can be found online here.
For monthly events, the event will be added once a month on the same day of the same
week. (e.g. the first Monday of the month)
When an administrator creates a repeating event, the system will add a 'bulk booking
reference' in the administrator's notes. (e.g. Bulk Booking Reference: THJYWY).
You can search for this booking reference if you have made a mistake and want to delete the
bookings you have just made.
If you need a booking that repeats weekly with exceptions (such as not in August, or not the fifth
Monday in a month) it's easiest to book the entire duration, and then untick the weeks you don’t
need on the pre-confirmation page. You can also search for the bookings to remove days you don’t
need.
6
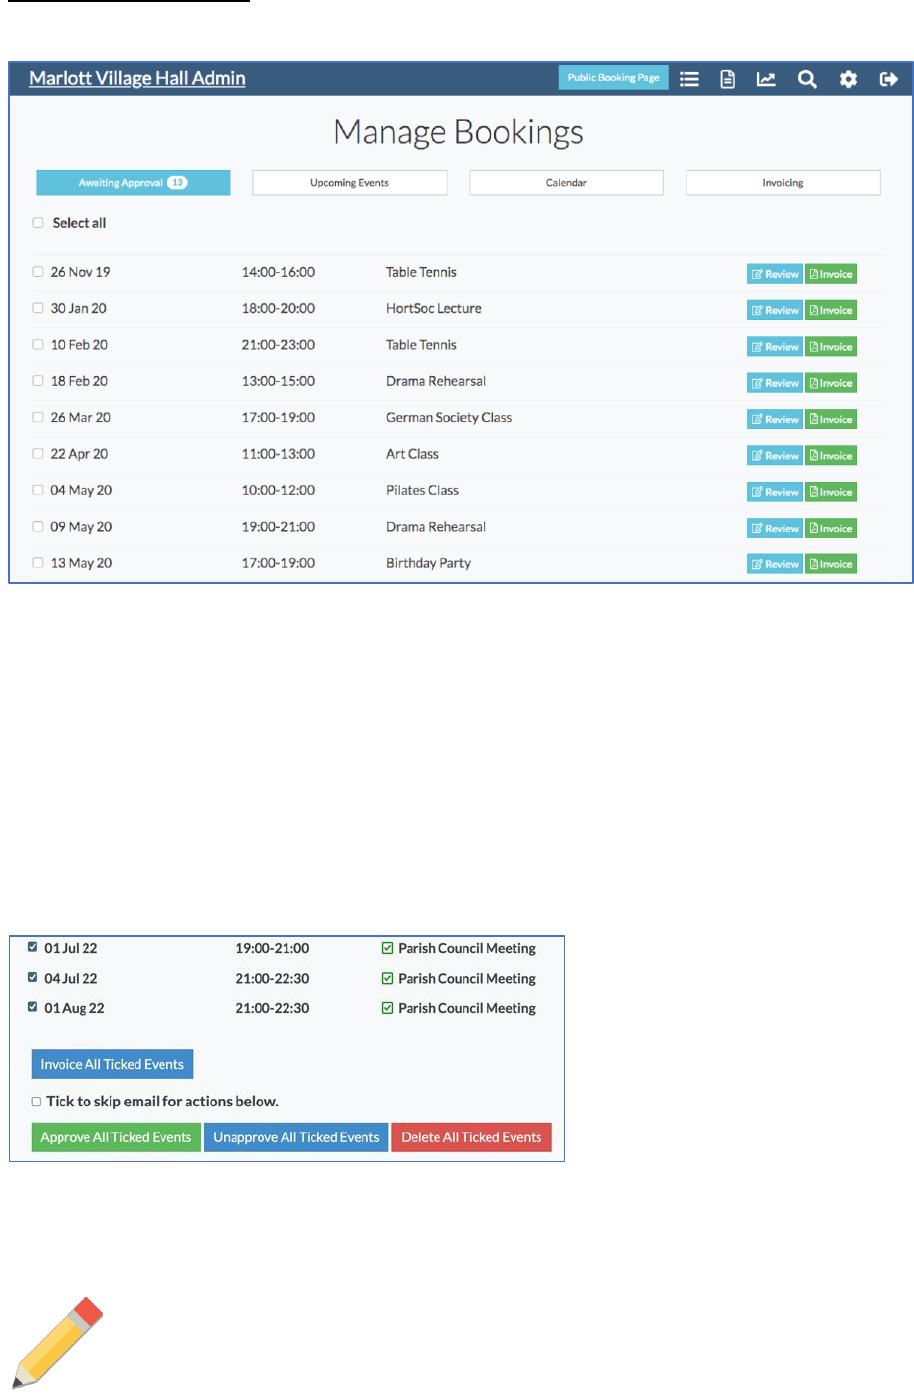
Approving an Event
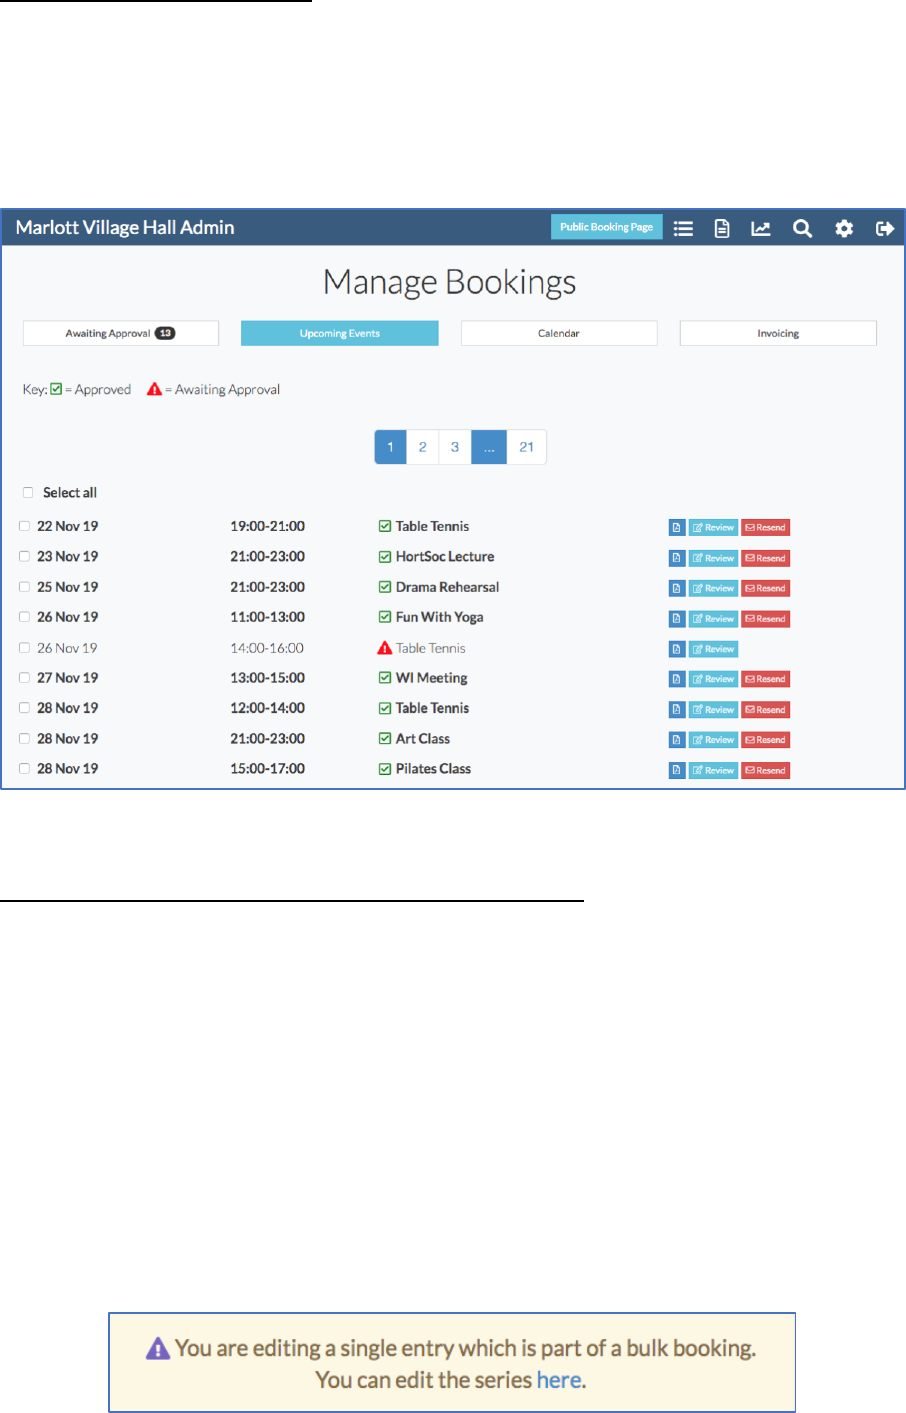
The Dashboard showing Unapproved Events
The dashboard shows you upcoming events that are awaiting approval. They are in
chronological order.
To approve a booking, click on Review. You can then see the full booking. Under the booking
information are four options.
Click on Approve to approve the booking. They system will send an approval email to the
hirer.
If you want to approved multiple
bookings at once, use the tick
boxes to select the bookings you
need. You might want to search
for a series of bookings first. After
ticking the boxes to select the
bookings, scroll down to the
bottom and click approved.
From this page you can also delete the event. Click on Back to go back to your list of
unapproved events.
When you approve an event, the hirer can no longer make changes to the booking. If the hirer
wants to make a change (e.g. adjusting the time), he/she will need to contact you directly.
A hirer can delete a booking after it has been approved. However, you can set a minimum notice
period (e.g. 30 days) after which bookings cannot be deleted by the hirer.
7
Viewing all Future Events
Click on 'Upcoming Events' on the dashboard to see all events – both approved and
unapproved. They are in chronological order.
On this page you can review bookings, send invoices, resend booking confirmation emails and
make changes to upcoming events.
The Dashboard Showing all Future Events
Making Changes to an Event (Editing an Event)
You can make changes to a booking. For example, you can adjust the time of a booking, or fill
in the box about payment being received. You can also make private notes about a booking.
The hirer cannot see these notes.
You can edit an event by finding it in the 'Upcoming Events' list on the Dashboard. If it is an
unapproved event, it will also be displayed on the 'Unapproved Events' section.
Click on 'Review'. You will see an overview of the event. To make changes, click on
'Edit Booking'.
If you're editing a booking that it part of a series of repeating bookings, you can click through
to edit the entire series. (Or from a specific date.)
8
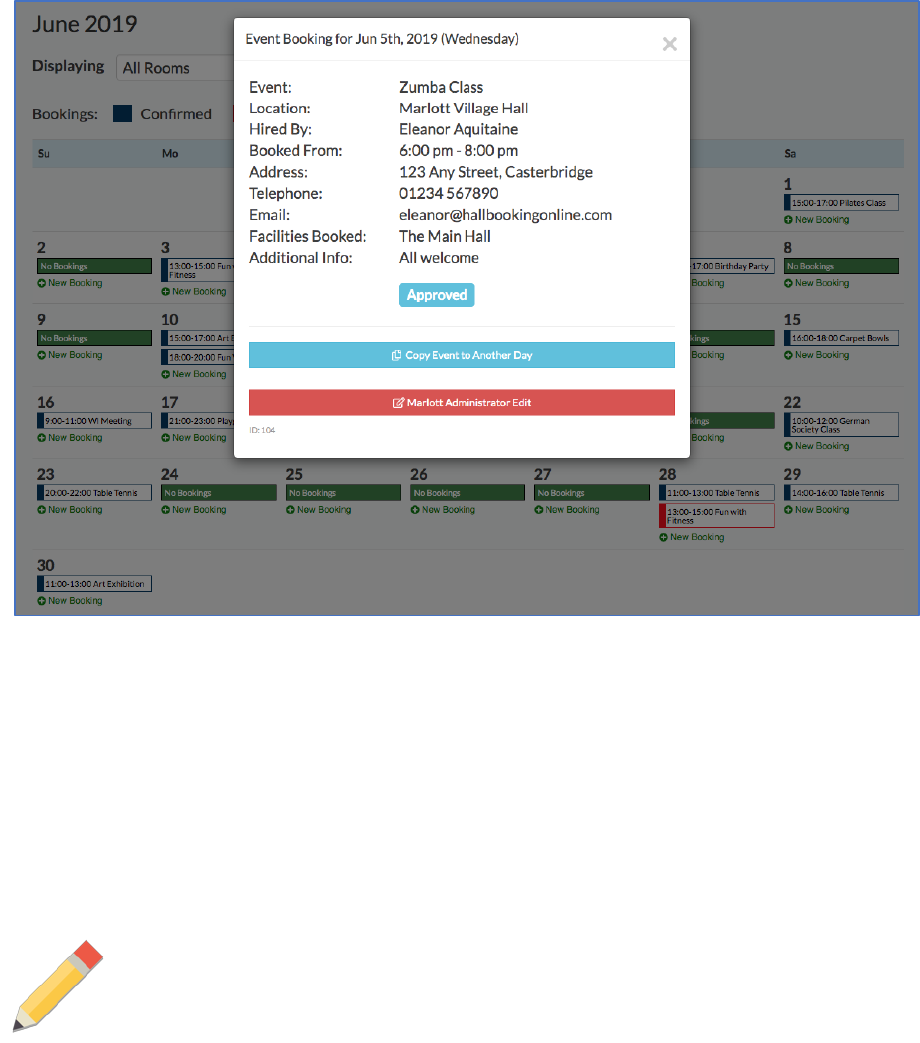
Alternatively, you can find it on the calendar. If you're logged in, you'll see the option
'Administrator Edit'. (See image below.) Click on that to make changes.
An individual event. Clicking on the red edit button will let you make changes.
After making the changes, scroll down to the bottom of the screen and select Save.
An administrator can make changes even after the event has been approved. After making
the changes, click on save.
For already-approved events, you can click on the option to resend the approval email.
You can also use the Edit Event page to unapprove an event. (i.e. to rescind approval.)
If a hirer makes an edit to a booking request that’s already been submitted, we’ll send an email to
you if there’s a change to the date, time, event type or email address.
Hirers can make changes to booking requests which have not yet been confirmed.
If they make a change to the time, date, rooms or event purpose, a notification email will be
sent to you listing the new details, along with the previous information.
9
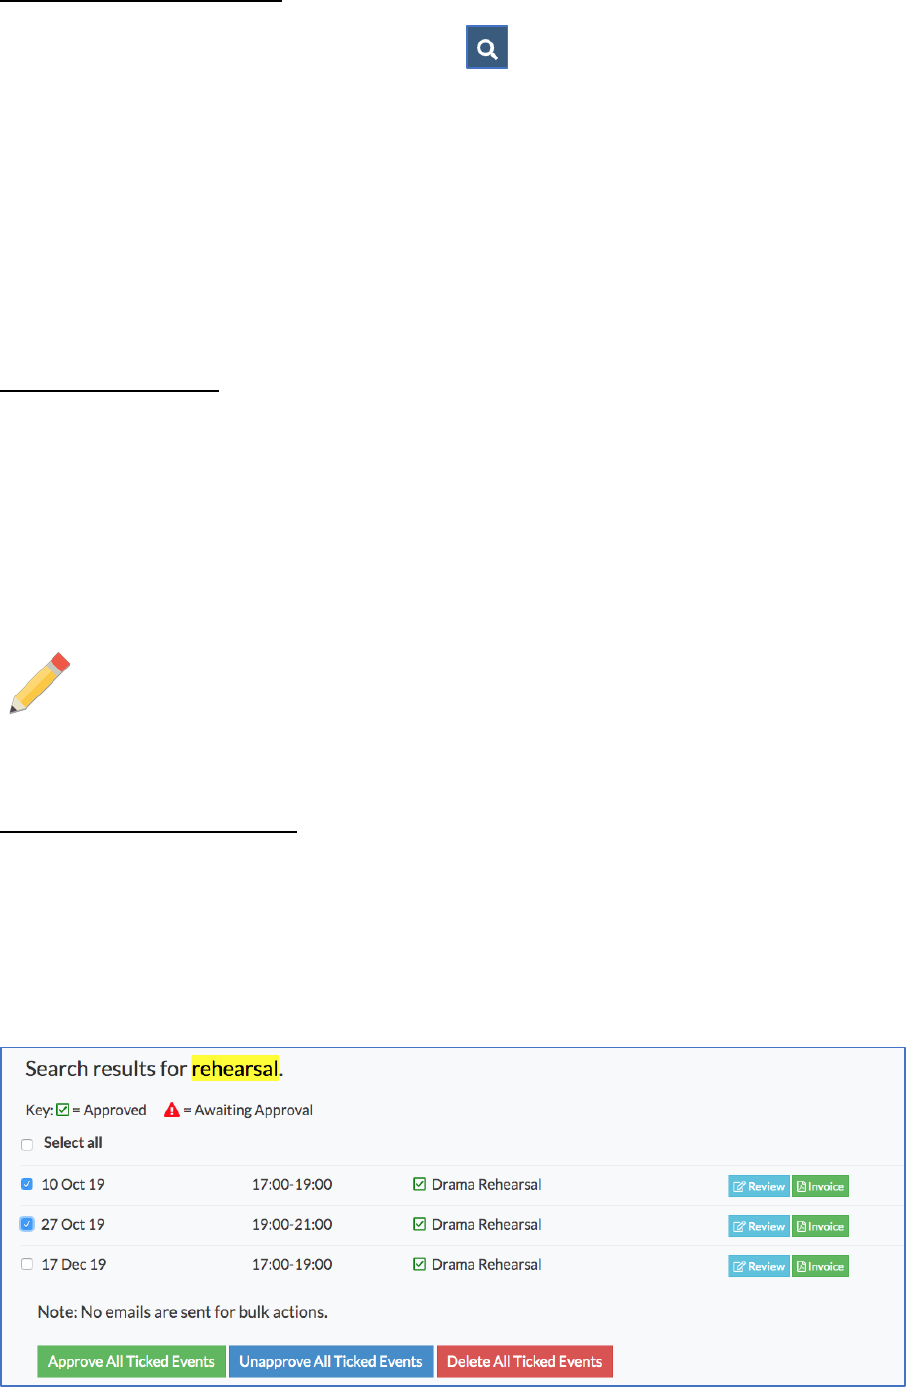
Searching for an Event
You can quickly find an event by clicking on the search icon on the navigation bar.
A search box will be displayed. You can search for any word from the event name, hirer, event
description, administrator notes or invoice number.
You can search for events in the past or future.
You can export the search results as a CSV file.
Hall Booking Online stores historical data for the previous two calendar years.
Deleting an Event
Find the event in the calendar (or upcoming events list). Click on edit.
Scroll down. At the bottom, there is the option to delete an event. If you delete an event, it
will be removed from the calendar and placed in your deleted bookings bin. It will remain
there for sixty days and then be wiped. During the sixty days, you can retrieve the booking
and restore it to the calendar.
Administrators can delete any event at any time.
The hirer can also delete an event. However, you can set a minimum notice period needed (e.g.
30 days). After that time, it's not possible for the hirer to delete a booking. He / She will need to
contact you.
Deleting Multiple Events
You can delete multiple events by clicking on the tick box on the left of upcoming bookings /
unapproved bookings / search result pages.
When you tick boxes, scroll down. You'll see the option to delete all the ticked events.
Example for deleting two events.

10
Unapproving an Event
You can unapprove a previously approved event. (i.e. rescind the approval)
Find the event and click on 'edit'. Scroll down and click on 'Unapprove'.
The system will optionally send the hirer a short email informing him / her that the event
status has been changed to 'unapproved'.
Unapproving Multiple Events
You can unapprove multiple events by clicking on the tick boxes on the left of event listings.
Scroll down and select 'Unapprove'.
As this is for multiple events, the system will not send out emails.
You can use the search function to find specific events to unapproved. Click on the search
icon on the navigation bar.
You can unapprove, approve or delete any or all the events found through the search results.
Restoring Deleted Events
You can review deleted bookings by clicking on the Deleted Bookings button on either the
Awaiting Approvals or Upcoming Events page.
Bookings will be permanently wiped sixty days after they were deleted.
You can 'undelete' a booking by clicking on 'More' and then on 'Restore Booking'.
Declining a Booking
In the unlikely event that you receive a booking request that your venue is unable to accept,
it's best to get in touch with the hirer to explain why you're unable to accept a booking.
If there are certain categories of bookings that you are unable to accept (such as teenage
birthday parties, or events involving alcohol), you could add a note at the top of the booking
form in order to pre-empt such booking requests being made.
Head to the Advanced Settings to add a note to the booking form page.
11
Invoicing
You can send an invoice to a hirer by email. This is sent as a PDF attachment.
Before you send an invoice for the very first time, you need to set up the header and footer
for the PDF you're sending.
To update the invoice header and footer go to the Settings Page and choose Invoice Settings.
Using a Logo on Invoices
You can set an optional logo for your invoices. If you upload a logo, it will appear in the top
left corner of the PDF invoice.
You can upload a JPEG logo by clicking on the link for Upload Logo on the Settings Page.
The system will automatically reduce the size of larger images so that it's 130pixels high.
Updating the Invoice Number
Invoices automatically increment as you send them. You can change both the prefix and the
number by from the Invoice Settings page.
12
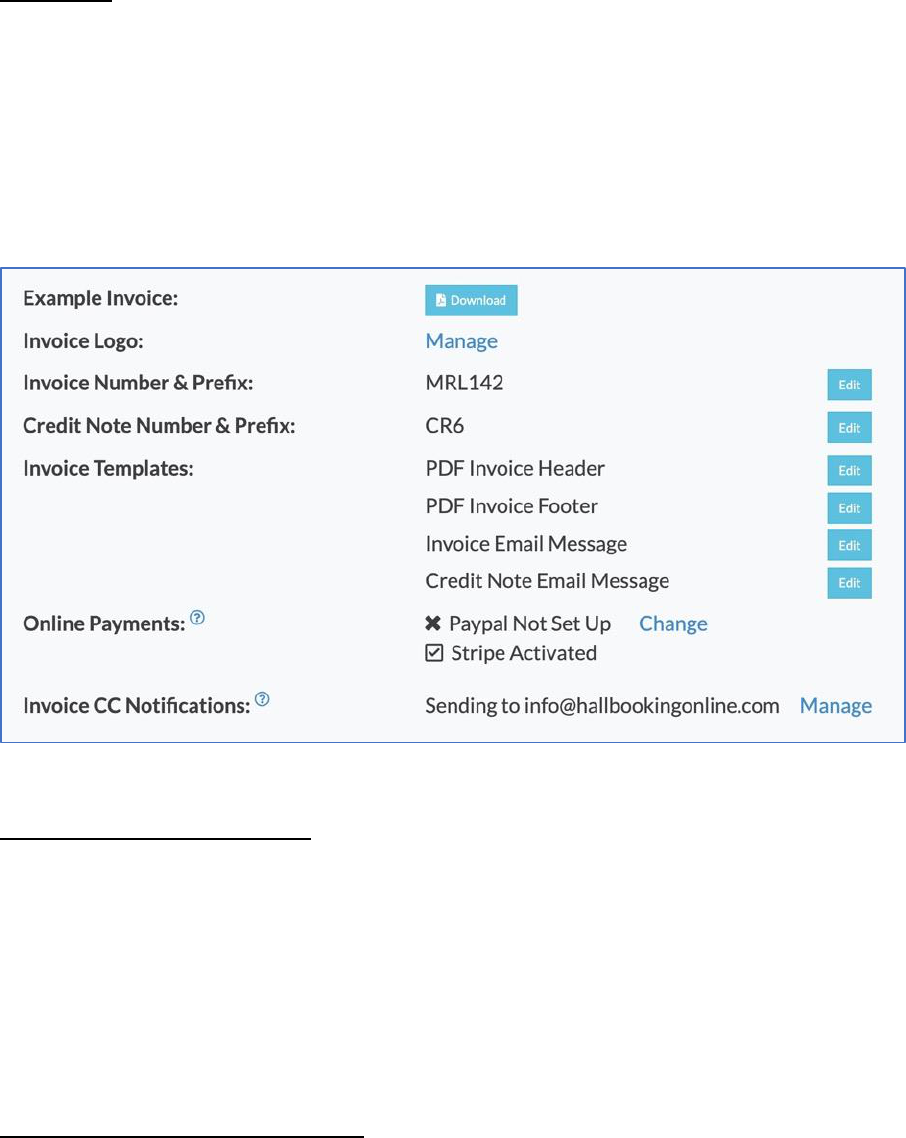
Invoice PDF and Email Templates
The system can send a hirer an invoice for a booking. If you are using this website to invoice
your users, you should set up the templates before you invoice for the first time.
There are three templates to update: Invoice Header, Footer and Email.
If you plan to send credit notes, you also need to check the Credit Note email template.
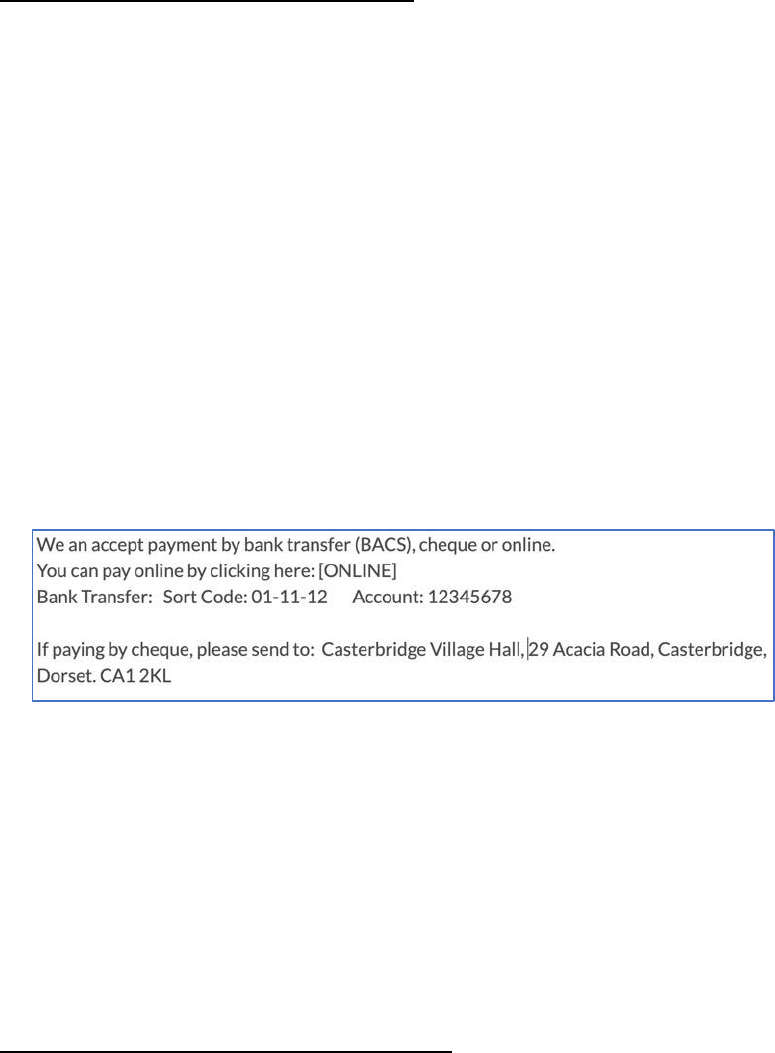
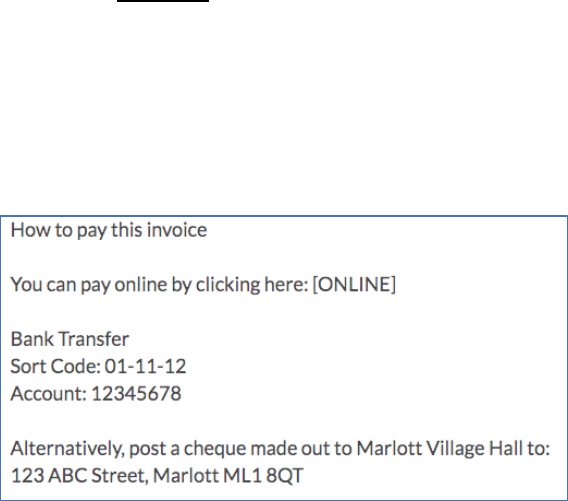
The header and footer are the top and bottom part of the invoice. The header should have
your address. The footer should state how to pay the invoice. You might include bank transfer
information or who to make a cheque payable to. If your venue has a PayPal or Stripe account,
you can add a placeholder for the payment link. See the appendices for more information on
linking your venue's PayPal / Stripe account to Hall Booking Online.
The email template is the email message that accompanies the invoice attachment.
Something simple should suffice: ("Thank you for your provisional booking at XYZ. Please find
attached the invoice for the booking.").
Image: Example footer listing payment methods.
When an invoice is sent, [ONLINE] is replaced with a link that the hirer can click on to make a
payment. If your venue doesn't use PayPal or Stripe, you can just remove this line from the
template.
It's a good idea to check the template before you send your first real invoice. You can view
the invoice template by clicking on the download button on the invoice settings page.
Accepting PayPal or Stripe Payments
You can link your PayPal / Stripe account to Hall Booking Online. We don't take any
commission or have any access to your users' payment information. Instead, the
transactions occur on your secure PayPal or Stripe page.
When the payment goes through, Hall Booking Online will notify you that an invoice has been
paid. We can also send a copy of the email to your treasurer. The invoice is marked on your
dashboard as paid, and the transaction number is logged.
For details on how to link PayPal or Stripe to your Hall Booking Online account, please see the
appendices at the end of this guide.
13
Sending an Invoice
You can send an invoice for a single event by clicking on 'Invoice' in the Awaiting Approval or
Upcoming Bookings tab.
If you’re invoicing an event from the past, use the search to find the bookings. (Just
type in part of the event title / email / hirer’s name.)
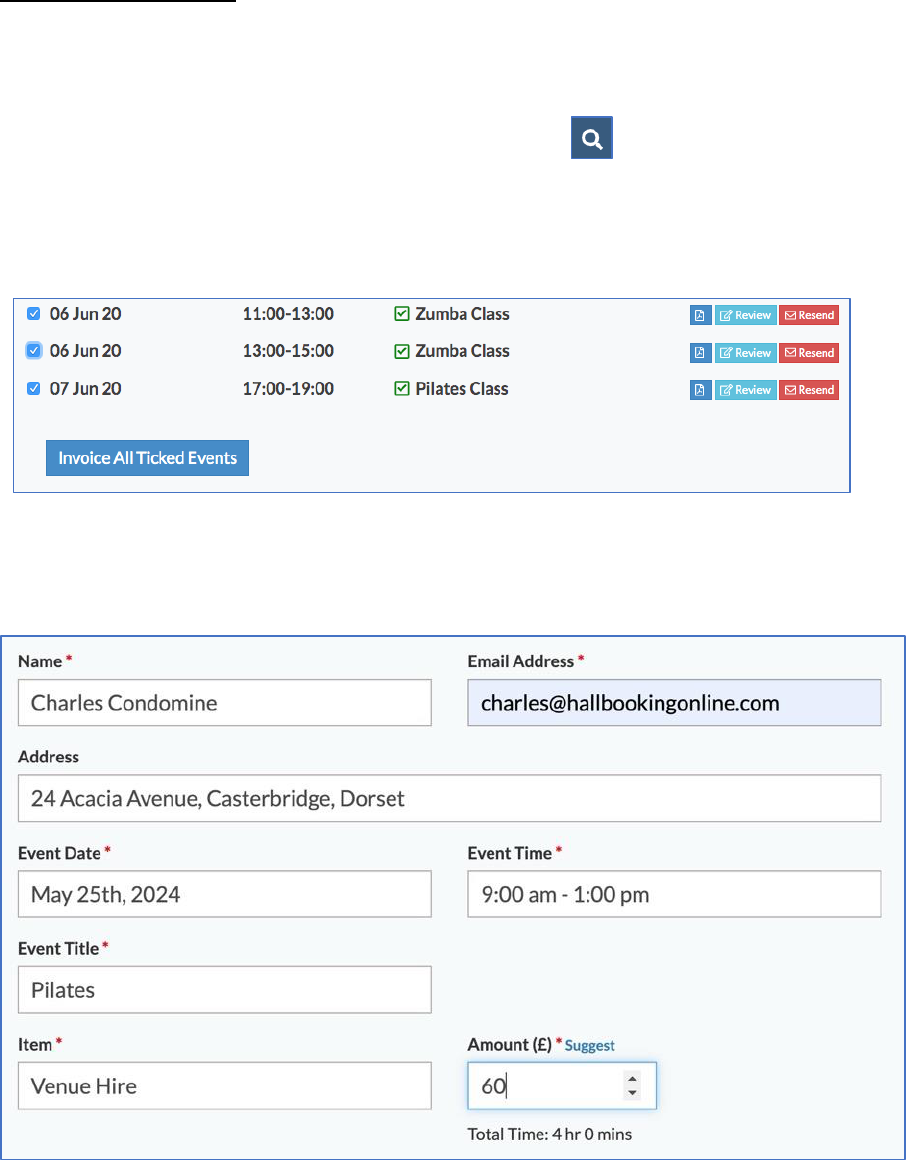
To send an invoice for multiple events, click on the tick-boxes and then select 'Invoice All
Ticked Events' at the bottom of the page.
The invoice has boxes pre-filled in, based on the event you clicked through from. However,
you can make changes. Updating these boxes will not affect the associated booking.
You must fill in the boxes marked with a red asterisk (*). For the amount, you can simply enter
the price you would like to charge.
Alternatively, you can set up pricing suggestions. Head to Settings >> Invoice Settings to enter
hourly or fixed rates. The system will then suggest amounts to charge. You can have multiple
hourly or fixed rates for bookings.
14
If there is more than one item you wish to invoice for (such as a deposit, glasses, projector
and the like) click on 'Show Additional Items'. The system will automatically add up all the
amounts to give you a total.
Before sending, you can click on 'Preview' to download a preview of the invoice.
To send the invoice, click on 'Email Invoice'. The system will then:
1) Send the invoice email with the attachment.
2) Store the amount you have invoiced for. This will be displayed in the
approved/unapproved events listing after the event name, so that you know who you
have invoiced.
3) Store the following information: date of invoice, invoice number and amount. This is
stored in the 'admin notes' for the event.
You can automatically send a Blind Carbon Copy (BCC) of the invoice email to your Treasurer.
Head to the Invoice Settings page to set this up.
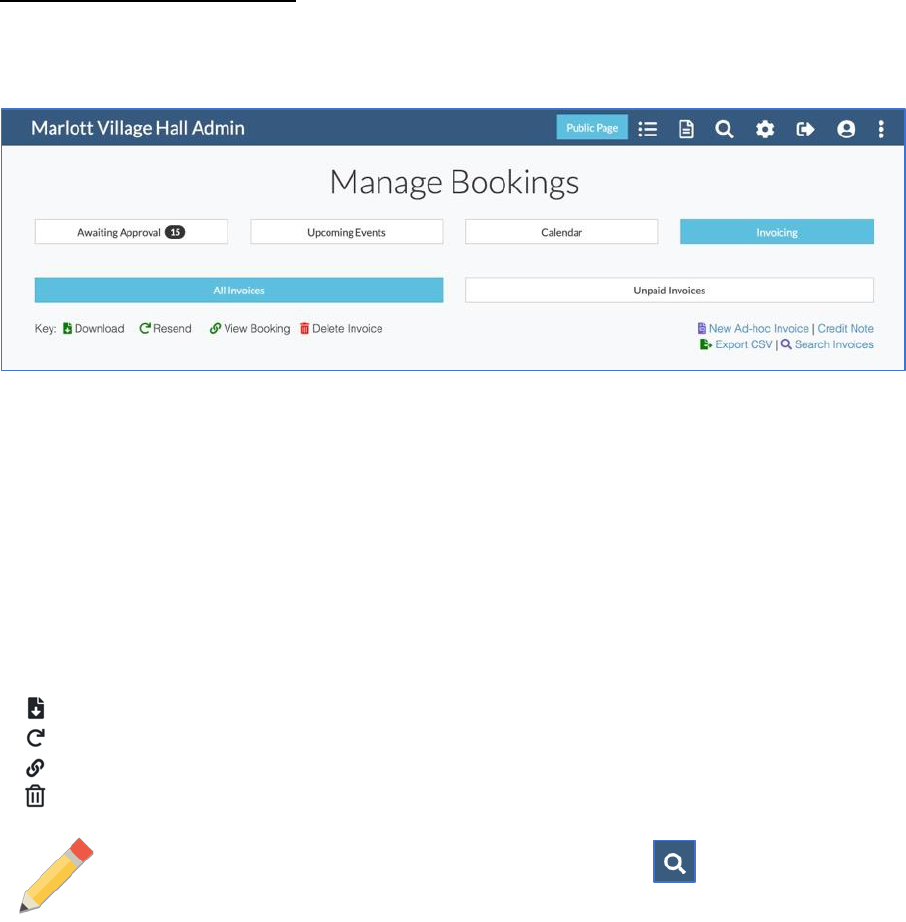
Managing Your Invoices
From the admin dashboard, click on the Invoices button. You will see a list of invoices,
divided into two categories: all invoices and unpaid invoices.
You can view either all invoices or a list of unpaid invoices. They are listed in chronological
order of when they were issued.
One event can have multiple invoices. For example, you could separately invoice a deposit
and then the final balance.
Invoice Management Options:
From this page, you can also click on an icon to:
Download the PDF invoice to your device.
Resend the invoice (with a message) to the same (or a different) person.
View the associated booking.
Delete the invoice. This does not delete the event.
You can easily find an event by its invoice number. Just click on at the top and enter the
invoice number.
15
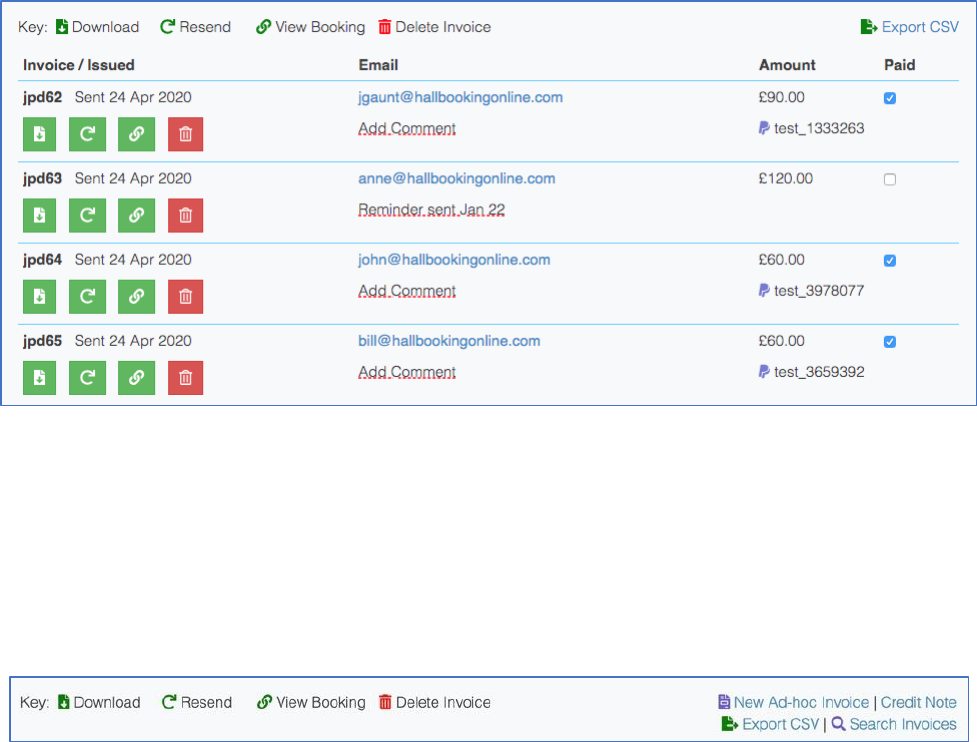
Marking an Invoice as Paid
To mark an invoice as 'Paid' just select the 'Paid' tick-box on the right. On the event listing
pages (unapproved and upcoming bookings) the invoices will be marked as paid.
If you're accepting payment online through PayPal or Stripe, the 'Paid' box is automatically
ticked when a payment goes through. The transaction number and date are also logged.
In the example above, the second invoice hasn't been paid. The other invoices have been paid
online. The system has automatically added the PayPal transaction ID.
You can add a comment for your invoices, such as when you sent a reminder or how offline
invoices have been paid.
Sending an ad-hoc Invoice
You can send ad-hoc invoices through Hall Booking Online. An ad-hoc invoice is one that is
not connected with a specific booking.
To send an ad-hoc invoice, click on the invoices tab and then on 'New Ad-hoc Invoice'.
Receiving Notifications of Online Invoice Payment
If you have linked PayPal or Stripe to Hall Booking Online, the system will automatically send
you an email whenever an invoice has been paid. This email is sent to the standard email
address used for booking notifications.
From the invoice settings page, you can add a CC email address for these notifications. This
could be used, for example, to alert your Treasurer that an invoice has been paid.
16
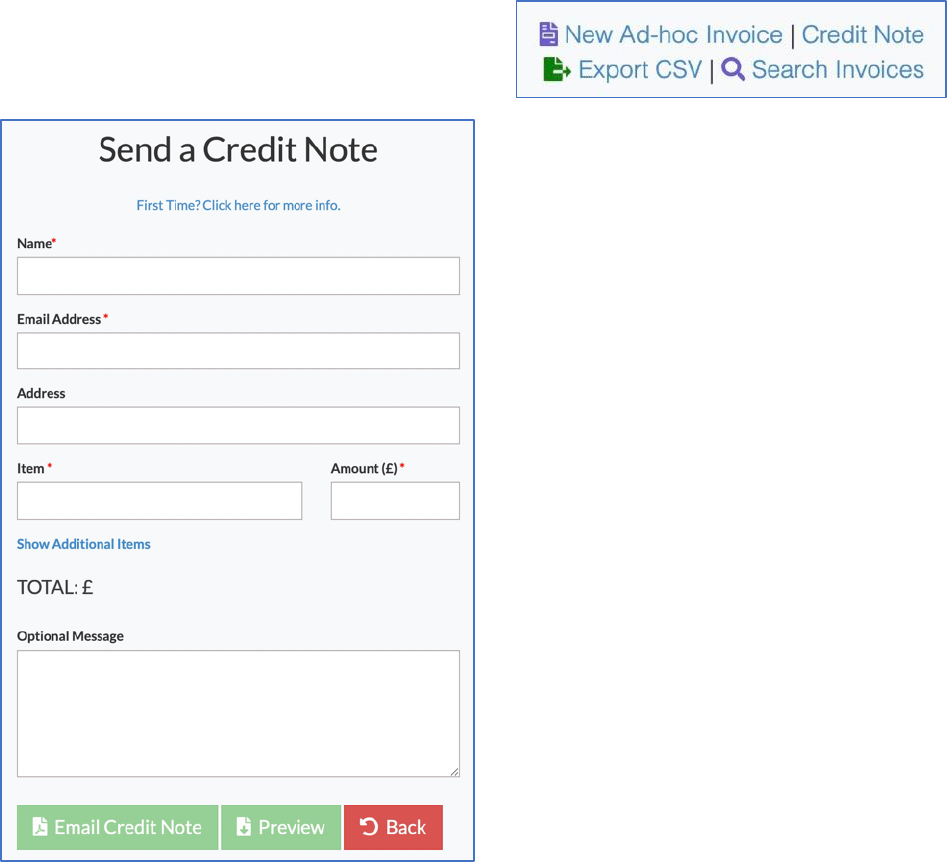
Sending a Credit Note
Go to the invoicing tab. Click on Credit Note.
Fill in the details of the credit note.
Write the amount as a positive number.
Credit notes have their own unique
reference number. By default, this is
CR1. It is separate to the invoice
numbering system.
You can adjust both the prefix (CR) and
the counter (1) from the invoice settings
page.
Credit notes share the same header as
the invoice. However, they don't have
the 'how to pay' footer.
You can edit the email template that is
used for credit notes. Head to the
Invoice settings page to do this.
Exporting Invoice Data
You can export Invoice data for use in other accounting applications.
On the invoice overview page, click on Export CSV. Select the time period for the export and
click on Download CSV File.
If you have issued credit notes, these will be listed as negative amounts.

17
Sending a Receipt
Go to the invoicing tab and find the invoice you wish to send a receipt for.
Make sure the invoice is ticked to show that the invoice has been paid.
Click on the three vertical dots on the right to bring up a menu. Choose 'Send Receipt'.
The system will display a short form and will then send the receipt.
If you wish to mark the date of the payment, but not send a receipt, click on 'Received Date'
instead.
Invoicing FAQs
Do I have to invoice before approving a booking?
No. You can approve a booking at your discretion. For hirers you know, you might invoice
after the event, or at the end of the month or quarter. For newer customers, you may wish
to invoice and confirm payment before you approve a booking.
Can the system calculate how much to charge?
Yes: the system can suggest amounts to invoice. You’ll need to set up Pricing Suggestions in
advance. (Head to Settings >> Invoice Settings) You can have multiple rates and these can be
hourly or a fixed price per booking. You can also round up to the nearest hour / half hour.
Can I invoice after an event has taken place? (i.e. invoice past events)
Yes. To find a past booking, click on the magnifying glass at the top and search for a keyword
(such as Pilates). The bookings will come up in the search result. Choose the booking you want
to invoice or tick the boxes to select multiple bookings.
Can I send one invoice for multiple bookings?
Yes. Use the tick boxes and then scroll down and click on the invoice button. The bookings
will be listed on the invoice.
Can I export the invoicing data to accounting software?
Yes. Choose the CSV Download option. CSV is a standard format for data which can be
imported into commercial accounting packages or Excel.
18
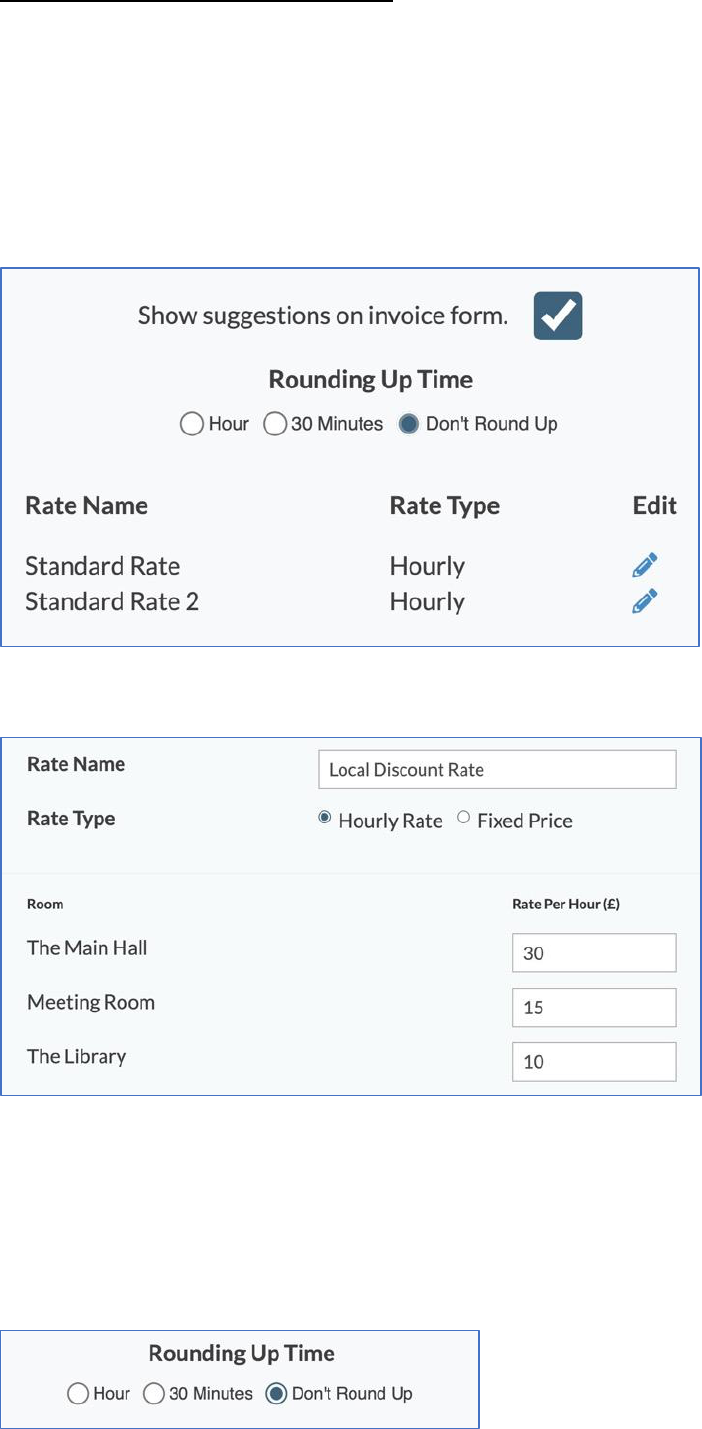
Pricing Suggestions for Invoices
You can add your hire rates to the system to help with invoice calculations.
When sending an invoice, the system can calculate the total, based on the rate you select plus
the time. You can have both hourly and fixed (session) rates. You can also have multiple rates
- such as local and business.
To set up the rates, head to Settings >> Invoice Settings >> Pricing Suggestions.
Click on + Add New Rate to set a new rate. You can set multiple rates and edit existing rates.
Click on 'Add Rate' when finished.
Rounding Up Prices
If your charge by the hour, you may want to round up the prices to the nearest hour or half
hour. (e.g. charging two hours for a 90-minute booking.)
You can set the rounding up option on the
pricing settings page.
19
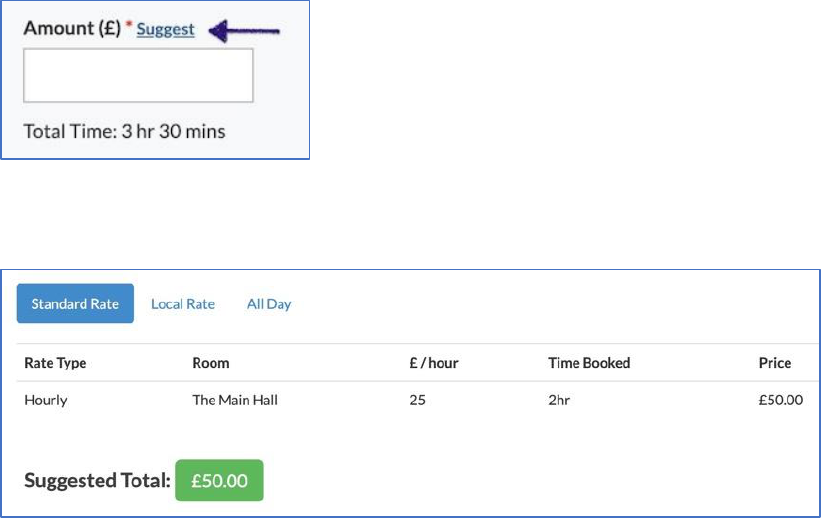
Using the Suggestions
To see the suggestions, create an invoice.
On the invoice form, click on the 'Suggest' link.
Choose which rate you'd like to use (if you have more than one). To accept the suggestion,
click on the green button showing the total price.
IMPORTANT
You don't have to accept the suggestion - or using the pricing system. If you'd prefer just to
calculate the rate yourself and type in the amount, that works too!
20
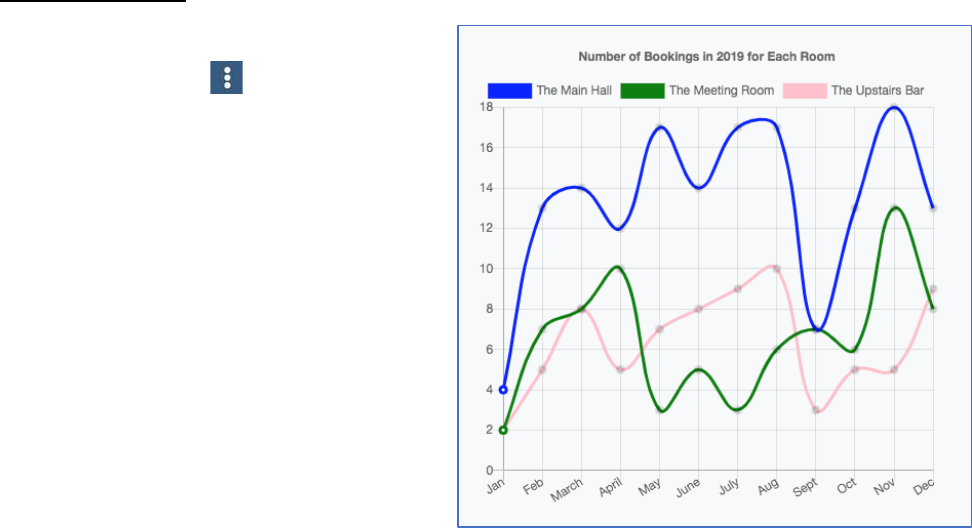
Data Reporting
You can find the settings by logging in and
then clicking on the icon on the top
navigation bar and choosing Bookings
Reports.
The data reporting page will show this
year's usage statistics. Click on a link to see
the data for another year.
Click on the Graphs button to see the data
presented as a line graph.
You can show/hide room data by clicking
on the name of the room in the graph
legend.
You can also download the data set as a
CSV file by choosing Download Data.
21
Settings for your Venue
You can find the settings by logging in and then clicking on the icon on the top navigation
bar.
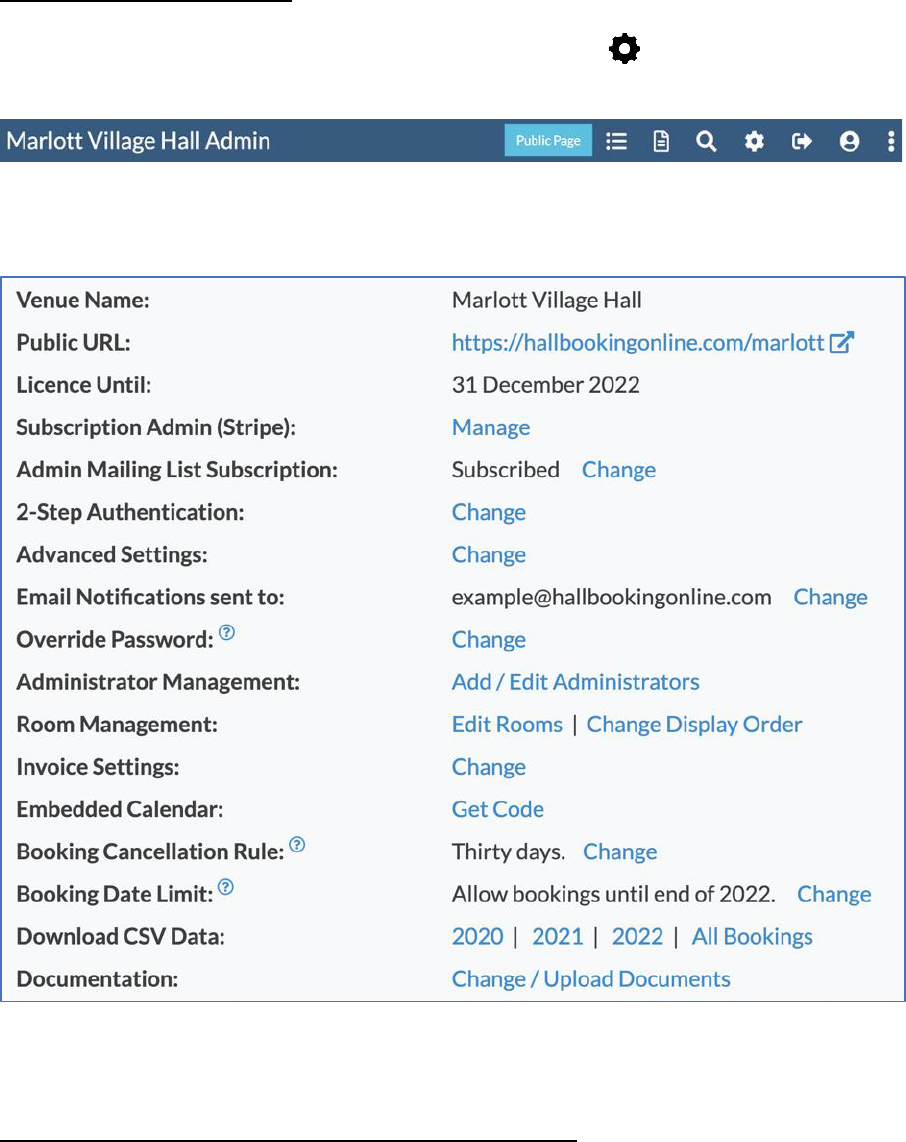
The Settings Page is where you can update the email messages, upload photos and
documents and much more.
The Settings Page
Changing Email Address for Email Notifications
When someone makes a booking, the system sends your venue an email notification. You can
change the email address used. Click on 'Change' and choose a new email address.
This is also the address we use to contact you. The address is publicly displayed on your
venue's webpage.
The email address for notifications can be separate to your login ID email address.

22
Editing the Rooms
If your venue has more than one room (e.g. committee room, meeting room) you can
manage them from the settings page. Hirers can request to use one room or multiple rooms
in a single booking.
Head to Settings >> Room Management.
You will see the list of rooms.
You can edit the names of the rooms and the colour that's used on the booking calendar.
The short name is used on some calendar views where there is limited space. It should be one
(short!) word.
If a room has no bookings, you can delete it. If you want to delete a room which has existing
bookings, get in touch with at info@hallbookingonline.com , as removing the room will also
delete the room's booking history.
You can add a new room to the system from this page. The system allows eight rooms. The
standard licence for Hall Booking Online covers one venue. If you would like to add an
additional building to the system using the shared calendar or if you need more than eight
rooms, please get in touch. We can upgrade your licence for a small fee to cover this.
Changing the Room Display Order on the Calendar
Go to Settings and follow the link under Room Management to change the room order.
On a PC or Mac, you can drag the rooms to a different order.
If you only have access to touch screen devices (such as an iPad) get in touch with us. We'll
change the order of the rooms for you.
Changing your Login ID
Go to 'Your Admin Account' on the settings page to edit your account, including the password.
23
If you forget your password and you can't log in, you can also request a password reset email
from the login page.
Your login ID is stored separately to the email address we send booking notifications to. You
can have multiple administrators, each having their own login ID.
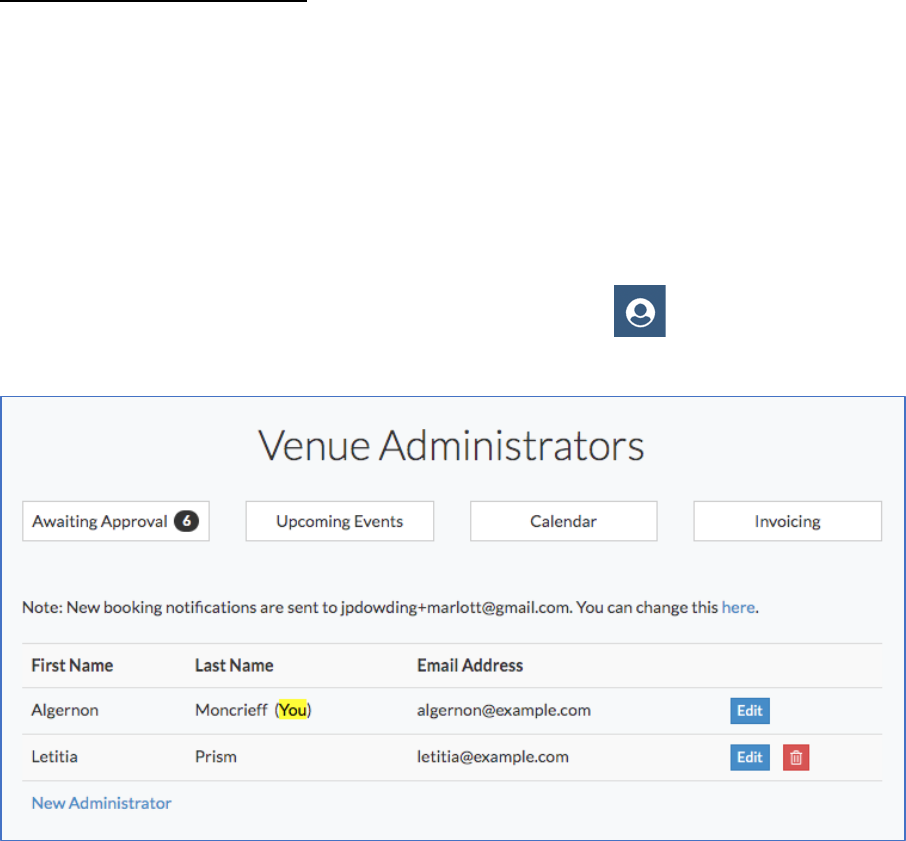
Managing Administrators
You can view and manage the administrators for your venue. These users can log in and
approve bookings. Administrators with elevated privileges can add, delete and reset other
administrators. You can also create 'read-only' accounts. This is useful for anyone on your
team who needs unrestricted access to the calendar, but is not involved in the bookings
approval process.
Click on Add / Edit Administrators to manage your admins. This is on the settings page. If you
cannot see this option, it is because your account does not allow it.
All administrators can edit their own details by clicking on the icon at the top of any
administrator screen.
Choose 'New Administrator' to add a new admin. Enter a name and email address. The system
will send an email to that person inviting him/her to click on a link to choose a password.
When creating a new administrator, you need to choose whether the new administrator is
allowed to add / edit / delete other administrators.
Note that you cannot delete your own account. You can change the email address used.
If you no longer need an account, ask another administrator to delete yours.
This page also has a link to change the email address we send booking notifications to.

24
Booking Cancellation Rule
Hirers can, as a rule, delete bookings they have made. However, your venue might have a
policy about late cancellations. You can block late cancellations by setting a minimum number
of days needed to cancel a booking.
Booking Cancellation Rule
On the settings page, click to choose the number of days. For example, if you enter 28, a hirer
cannot cancel a booking with less than four weeks' notice.
If a hirer wants to cancel a booking at short notice, he/she will need to contact you directly.
Booking Date Limit
You can limit how far in the future your venue can accept
bookings.
There are two groups of choices: Auto Update or Fixed Date.
Under Auto Update you can choose the end of either this
year, next year or the year after.
If you choose one of these options, it will automatically
adjust the date when a new year begins.
If you choose a Fixed Date option, it will not change when a
new year begins. You will need to do this manually.
The booking date setting only affects hirers making bookings. It does not apply if you are
logged in as an administrator. This means you can make bookings before the time period is
released to the general public.
25
The booking date setting does not affect bookings that have already been made. If you
temporarily restrict bookings to the current year, bookings already made for dates beyond
this are still saved in the system.
You can also block all new bookings temporarily.
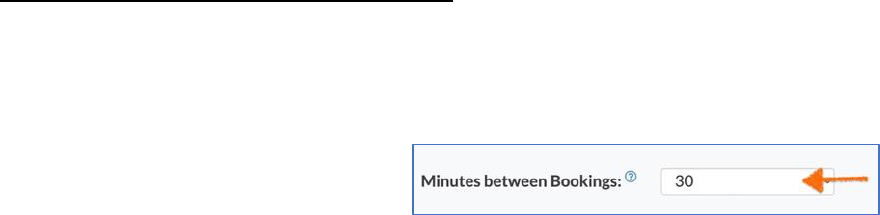
Minimum Spacing Between Bookings
Some venues have rules about minimum spaces between bookings – i.e. disallowing
consecutive bookings. You may, for example, wish to have at least 30 minutes between two
bookings.
To set the minimum spacing, go to
Settings >> Advanced Settings.
The minimum spacing rule only applies to booking requests made by the public.
If you are logged in as an administrator, you can make bookings which are consecutive.

26
Uploading Your Documentation
Your venue can upload its documentation to the Hall Booking site. You can upload any PDF
that your venue needs. Examples might include:
• a hire charges sheet
• a paper booking form
• terms and conditions of hire
• general information
• an alcohol licence booking form
• a floor plan
Editing the name of a document
If you have a document written in Word, you can save it as a PDF. You don't need any special
software to create a PDF. Contact support if you need help with this.
If you need to change a document, just upload the new version and it will automatically
replace the old one.
The documents you upload will be publicly displayed on the documentation page.
To upload a PDF, click on 'Choose New Document'. Select the document. Then click on the
green 'Upload' button. Repeat for each document.
Click on the underlined title and enter the name for the document. Click on 'Save' to change.
If you don't need a document, click on the red 'trash' icon. Download it first to your device in
case you need it in the future.
You can change the order we display your PDF documents. Go to Settings >> Documents >>
Change Order.
27
Venue Photographs
You can upload photographs of your venue.
It's best if the photographs are the same size – and landscape orientation. They'll display on
the page better this way.
You need to upload jpeg format photos. Photographs taken directly from a camera or mobile
phone tend to be very large. If this is the case, our system will resize the uploaded photo to
around 750pixels wide.
If you have photographs in a non-jpeg format, we can convert them for you. Please sent them
to us full size by email.
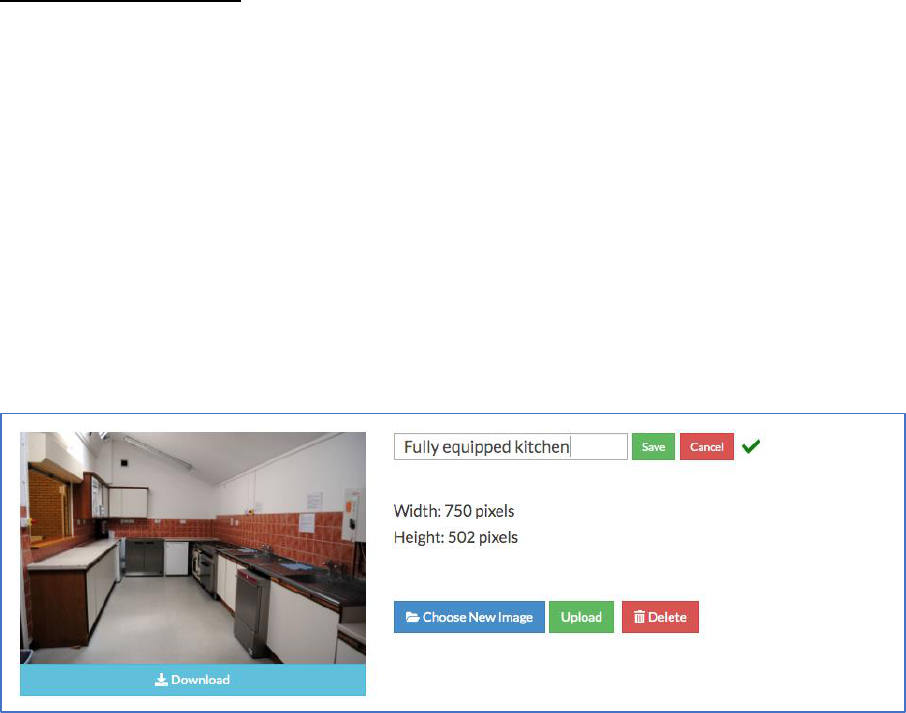
Image Management Page
When you have your photos (you don't need all eight) you can upload them from the Settings
page. Click on Change / Upload photos.
You can also upload a 'main image'. This is the background image used on your venue page.
This is best 'wide and thin', like a letterbox. We recommend 1200 pixels wide by 400 pixels
high. If your photograph is greater than 1200 pixels wide, our system will resize it once it has
been uploaded.
You can edit the caption for each image. The caption appears on the main page for your venue.
Click on the underlined caption to edit it.
Note: The front page top image doesn't have a caption.

28
Changing Venue Photographs
You can change your venue photographs any time. Uploading a new photograph will erase
the previous photo. Remember to update the caption, if necessary.
Deleting a Venue Photograph
On the Uploading page, click on the trash can to delete a photograph. Alternatively, upload a
different photograph to replace it.
When you delete a photo, it is permanently removed from our servers. Make sure you have
a copy on your computer.
Removing the Photographs Section
If you don't need the photographs section on the front page – or you haven't yet organised
which photos you'd like to upload, you can remove the section. Just delete the all the venue
photos that have been uploaded. The section will then disappear from the public page.
29
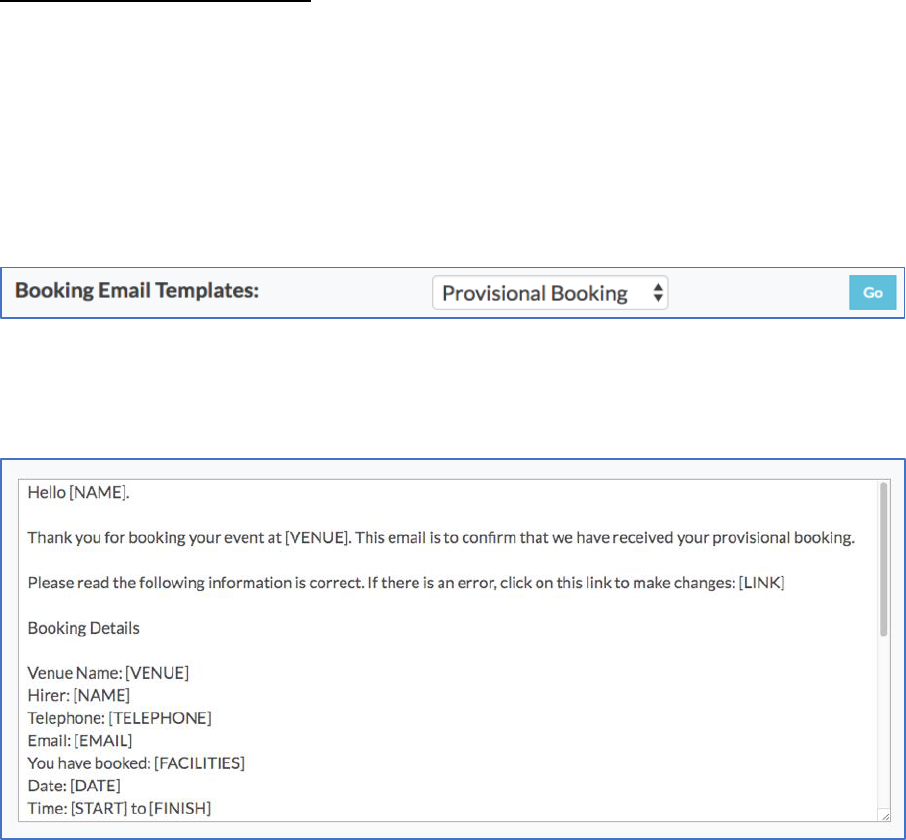
Booking Email Templates
The bookings system sends email messages both to the hirer and the registered booking
notification email address.
You can customise the emails to suit your venue. This is done from the Settings Page.
From the Settings Page, you can tailor the 'Provisional Booking' email message and the
'Booking Confirmation' email message.
Changing the text of your emails.
Select the email template you wish to update.
The Email Template Editor
Change the text and click on 'Preview Changes'. Review your email text and then click on
'Save'.
You can include 'placeholders' for the booking data. These are listed on the email page. For
example, if you put [DATE] in the email template (with square brackets and capital letters)
the system will replace this with the actual date of the booking.
For the confirmed booking template, the time date and room(s) are contained in the
[BOOKINGINFO] block. If you're confirming multiple dates, they will all be listed in this block.
30
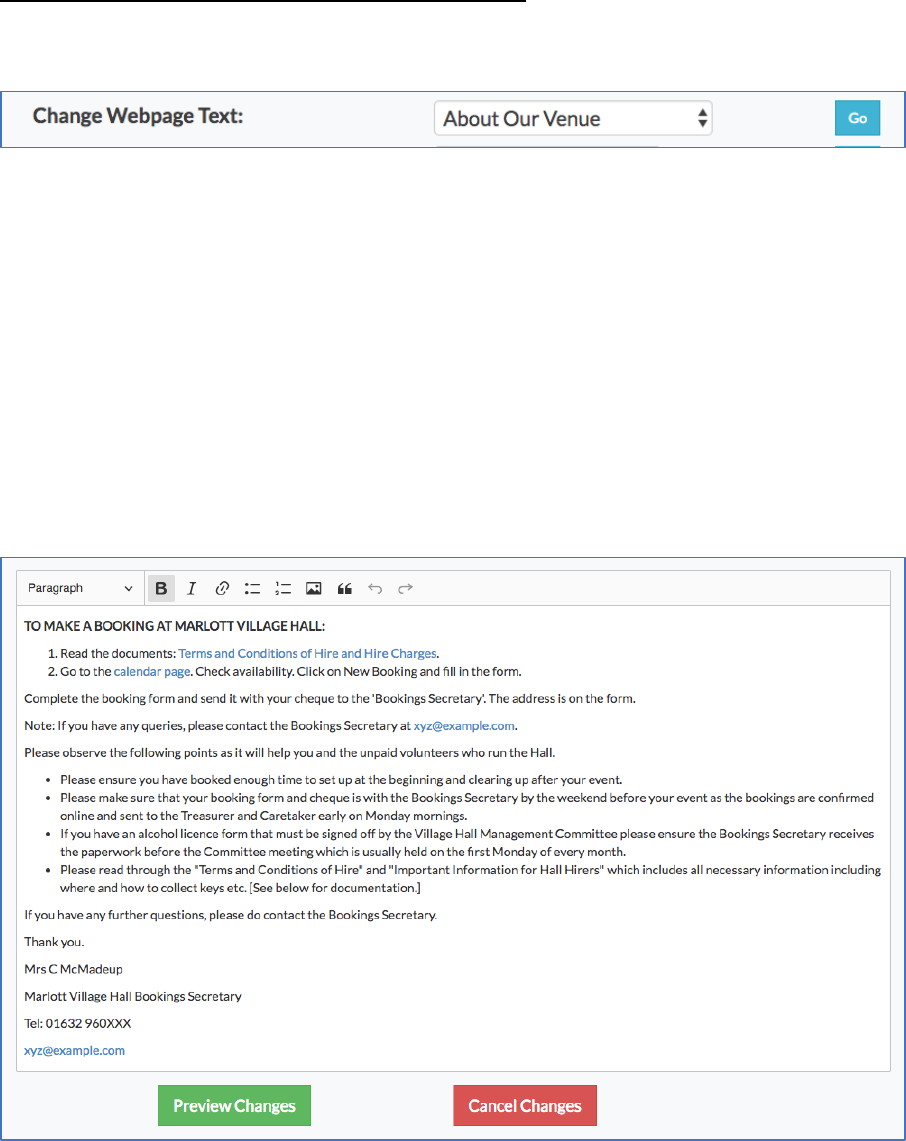
Your Venue Webpages: Changing the Text
You can customise the text of the webpages for your venue.
Settings Page Option to Edit Webpage Text
The text on the following pages can be edited:
• About Our Venue
• How to Book
• Directions to Venue (Displayed under Google Map to venue)
• Thank you for Booking (displayed after a provisional booking is made)
• Contact Us
If you don't need all these pages, you can remove them. Head to Settings >> Page Display
Options.
Editing the 'How to Book' Page
On the text editing page, you can type in and change the text. You can have links to other
pages and documents.
When you have finished entering the text, click on Preview Changes. Double check your text
and then scroll down and click on confirm.
Be careful: after you have confirmed, the text is live.
31
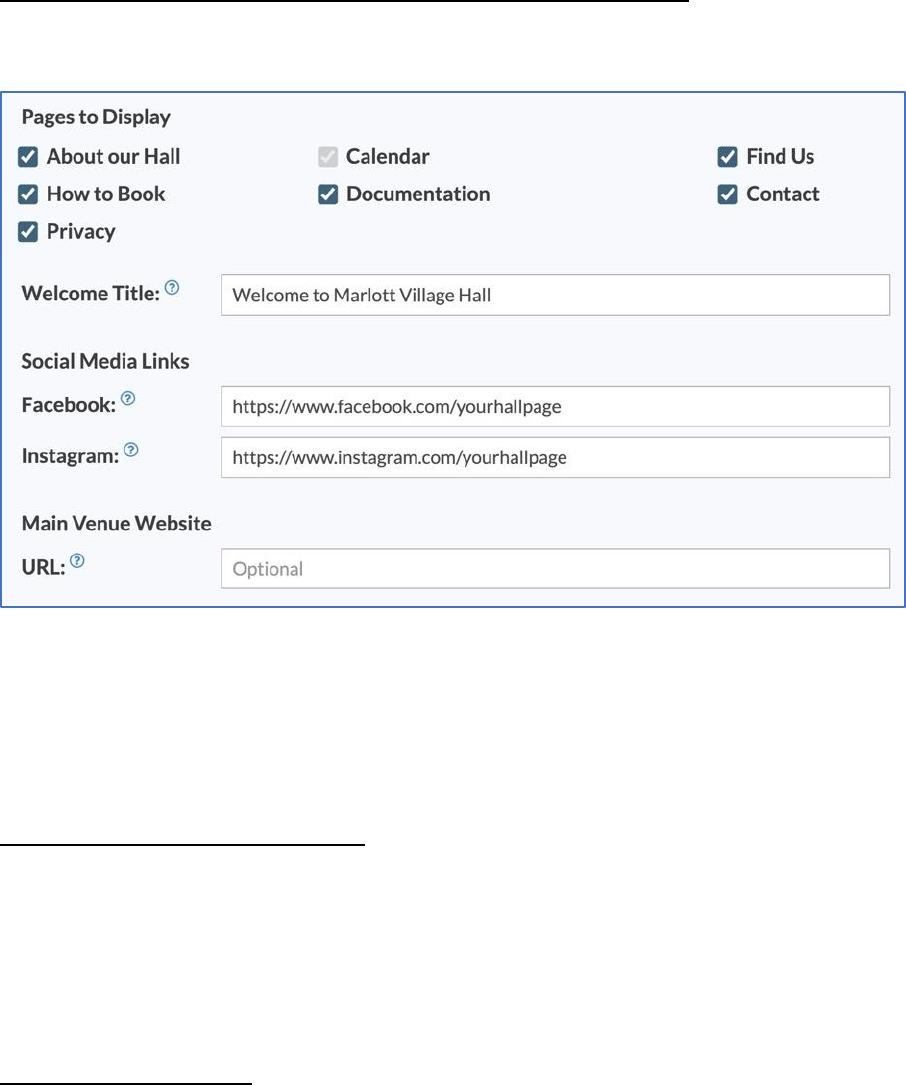
Page Display Options: Choosing Which Pages to Display
If you already have a website for your venue which has information on your venue, you can
remove the duplicate pages from Hall Booking Online.
Untick the pages that you don't need. Any template data you previously entered won't be
deleted, so you can bring a page back if you wish.
You can also use this page to edit the main title on the welcome page of the venue.
Facebook and Instagram URL
If your site has a Facebook or Instagram page, write the URLs in here. We'll then display the
social media icon on your venue's top navigation bar.
It this is left blank, the Facebook / Instagram icon won't appear.
Main Venue Website
You can put a 'return' link back to another website at the bottom of Hall Booking Online pages.
This is useful if you have a separate website for your venue.
Make sure the URL you enter starts with https:// or http://

32
Setting up the Directions Map and Text
We have set up your venue site with a Google Map.
You may want to add some additional information below the map. For example, you could
mention the best place for visitors to park.
The link to edit the text is found under 'Change Webpage Text' on the Settings page. From
the dropdown list, choose 'Directions to Venue'.
Google's Map
We have added a map to the location. Occasionally, Google has outdated or incorrect location
details for a venue.
If the data on Google Maps is wrong, you can let Google know, and they will make the change.
When the change has gone through, contact us and we will update the map data as well.
If your venue's location is marked in the wrong location (or has the wrong name), click on the
pin and in the options, and report the error to Google. (Go to Google Maps to do this.)
If your venue doesn't exist on Google Maps, you can right-click the location on the map and
add a missing place.
If you need assistance, please get in touch with us.
33
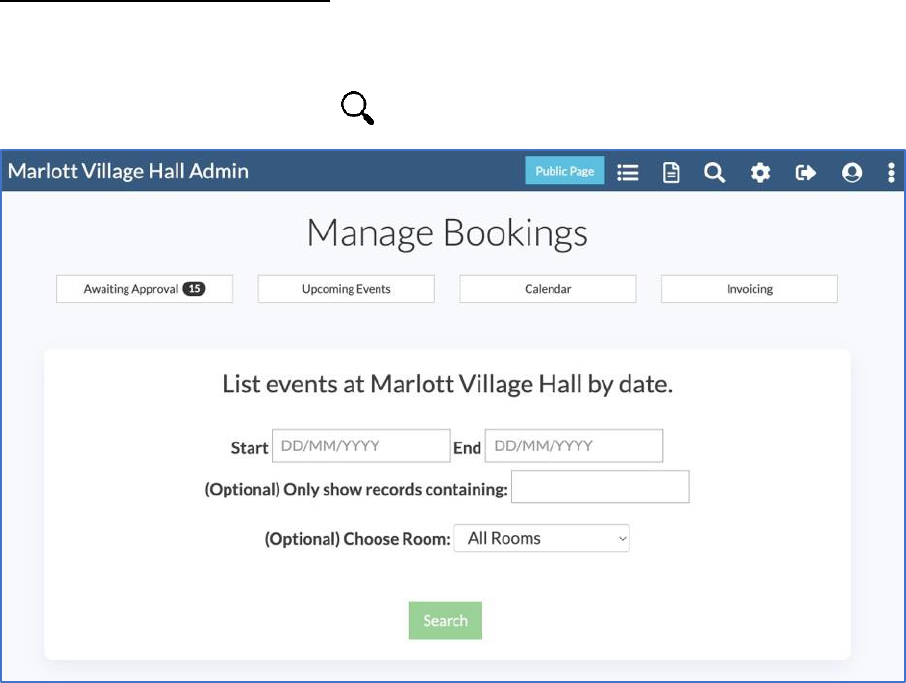
Printing out Lists of Events
You can print out a list of all events between two dates, or specific events between two dates.
On the Events Dashboard, click on and then 'Advanced Search / List'.
Enter the dates you wish to search between. You can add an optional filter.
e.g. 'pilates' or another event name, or the surname of the hirer.
The system will display those records. They can then be printed. <Control P> on a PC or
<Cmd P> on a Mac. You may find it best to print in landscape.
You can also export the data from your search as a CSV file. You have the choice of just
exporting a minimal set of data or exporting everything.
The export options are available at the bottom of the list of events you have searched for.
You can also print upcoming events by viewing on Calendar from the administrator's
dashboard. Click on Export as PDF to download a PDF of the month. By default, events in all
rooms are exported to the PDF. If you would like to print the events in one room, you can
filter the view to show just the room before exporting the PDF.
34
Exporting Data
You can export calendar and invoice data from Hall Booking Online.
We keep data for the previous two calendar years. If you'd like to keep data for longer, you
can download it.
To download data, click on the additional
options icon (right) and select 'Export Data
from the drop-down menu.
On the Export Calendar and Invoice Data page, you can choose to download a particular year,
or download all bookings.
The file will download as CSV (Comma Separated Values). This can be opened in Excel and
other applications.
To download Invoice data, click on the 'Invoice Data' tab. Again, you can download either
year-by-year, or all data in a single file.
Exporting Specific Bookings
If you wish to export data with different criteria (such as more specific start / finish dates, or
bookings from specific people), you can do so from the search results page. Just click on the
magnifying glass at the top of an administrator's page the Events Dashboard.
On the search results page, click on
either CSV (Short) or CSV (Full) to
download the results as a file.
35
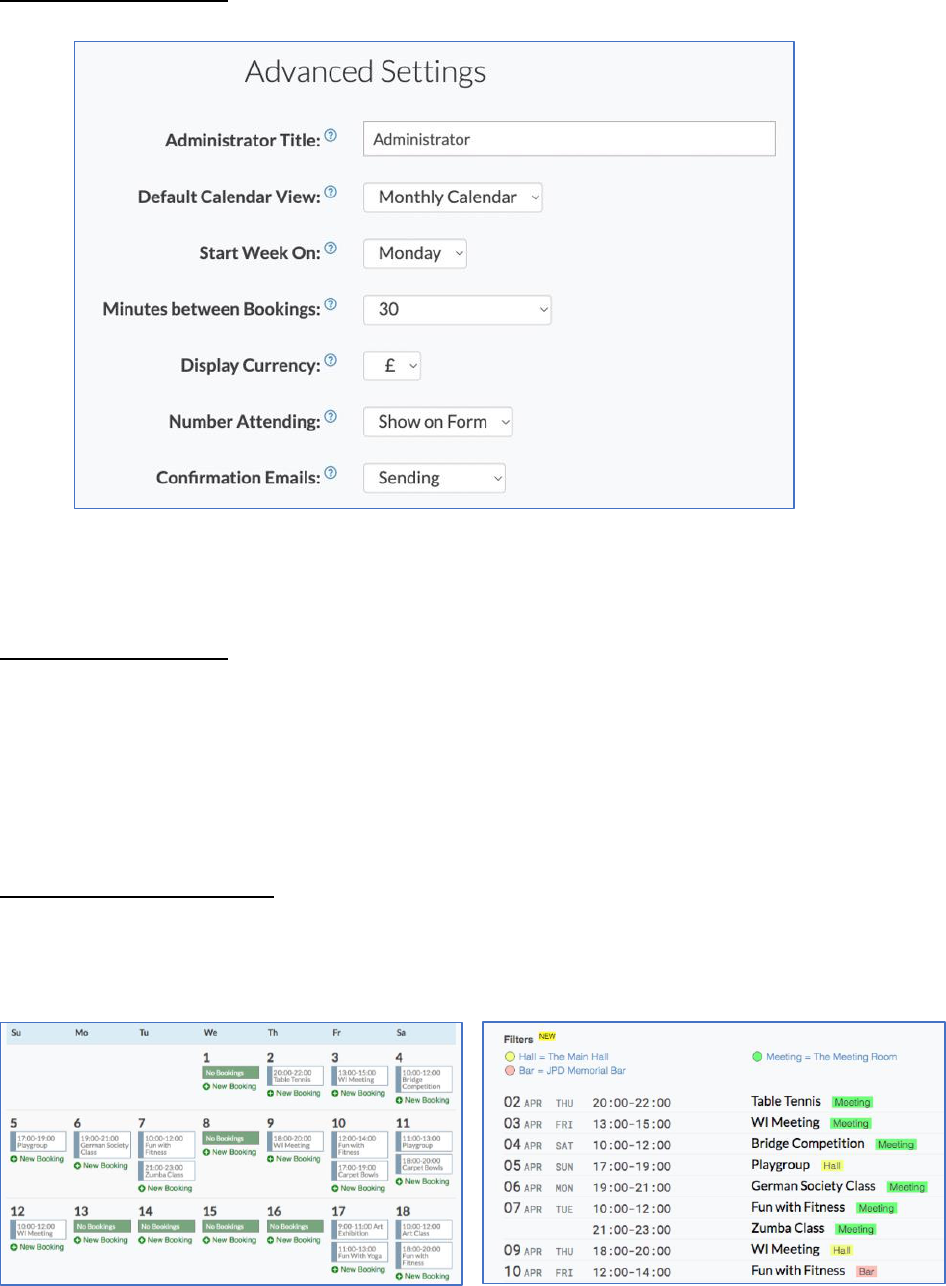
Advanced Settings
By clicking on 'Advanced Settings' on the 'Settings' Page, you can make further changes to
your venue's pages.
Administrator Title
Are you the Booking Secretary, the Manager or the Administrator? You can set the job title
here, so that it corresponds with other documentation you use.
The job title should be written with no 'the' article. The words look best if they begin with a
capital letter.
Default Calendar View
The bookings calendar can be displayed either as a traditional monthly calendar, or as a list
of events. If you have a busy venue, or have lots of rooms, the list is probably better.
Calendar View List View
You can switch from view to calendar on the calendar page. You can also apply a filter to
display just the events in a particular room. Click on the name of the room to activate the
filter.

36
Start Week On
You can switch the style of the calendar so that the first day of the week is either a Sunday or
a Monday.
Minutes between Bookings
If your venue allows consecutive bookings (i.e. no space between bookings), this can be left
at zero. If a higher value is set, this only applied to the public making booking requests. You
(as an administrator) can always make consecutive bookings.
Opening Hours
You can set the hours between which hirers can make limit the time between which you can
accept bookings.
To accept bookings for any time, set the times as 00:00 and 23:59.
Times should be entered in 24-hour clock format.
Note: Administrators are not bound by these limits.
Display Currency
By default, the currency is set as £. You can switch this to $ or €. Other currencies are available
– please contact us.
Confirmation Emails
If you're transferring bookings from a previous system, you might not want to resend
confirmation emails. Turn emailing off and on here.
Number Attending
You can show or hide the field on the booking form which asks the number of people
attending an event.
Default Privacy Level
When a hirer makes a provisional booking, there is a default setting for privacy. 'Hide Contact
Info' will hide the name, address and contact info for the hirer from the public calendar.
'Private Booking' will hide everything except the start and finish time of the booking.
37
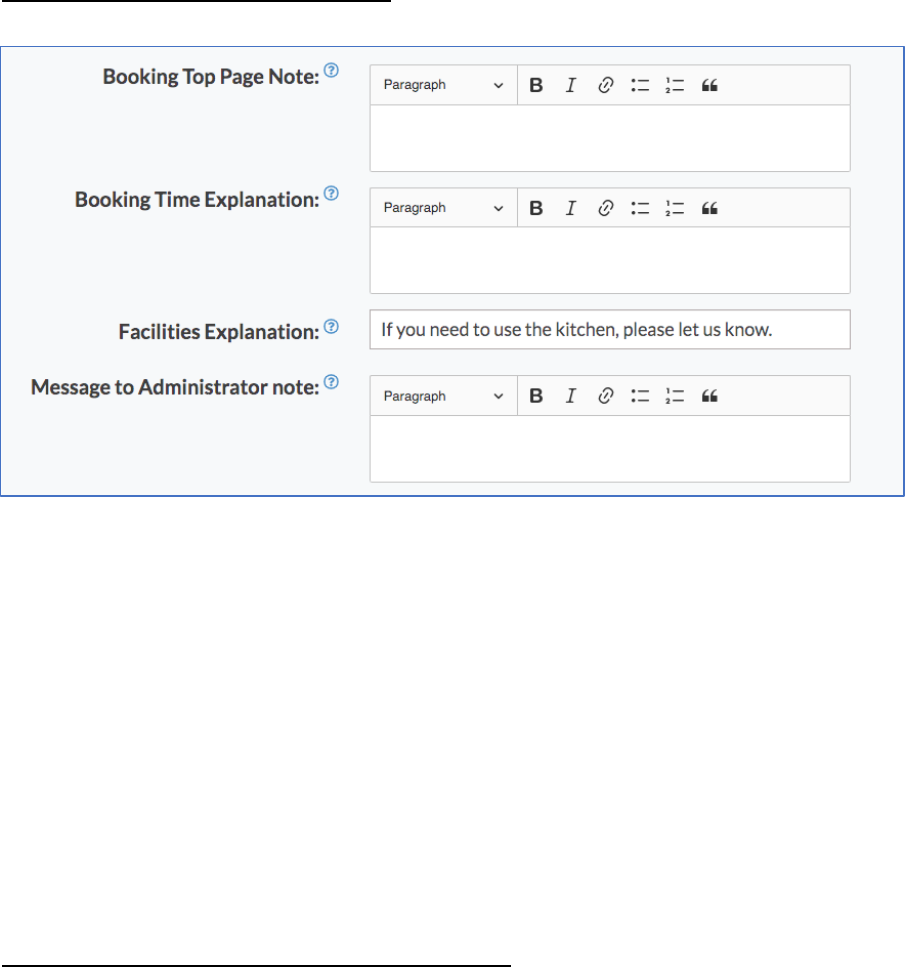
Personalising the Booking Form
You can add helper text to your booking form. The following are available:
Booking Top Page Note: This appears at the very top of the booking page.
Booking Time Note: Do you have specific rules about the length of a booking
or the time of booking sessions? Write them here!
Facilities Explanation: Do your hirers need guidance on which rooms are
available? You can add a note here.
Message to the Administrator: Is there other information you need? If so, you can write
a note here, asking the hirer to respond in the 'message
to administrator' field below.
Displaying Calendars on Another Website
You can display a bookings calendar on an external website. This is done through an iframe,
which is a line of code that you can insert on your site.
If you have a multi-room venue, you can display a calendar for each room.
Alternatively, you can have one combined calendar.
To get the line of code you need for your site, head to the link by Embedded Calendar on
your venue settings page.
If you wish to embed the calendar, you must use the iframe code supplied.
For security reasons, embedding an entire Hall Booking Online page is not permitted.
38
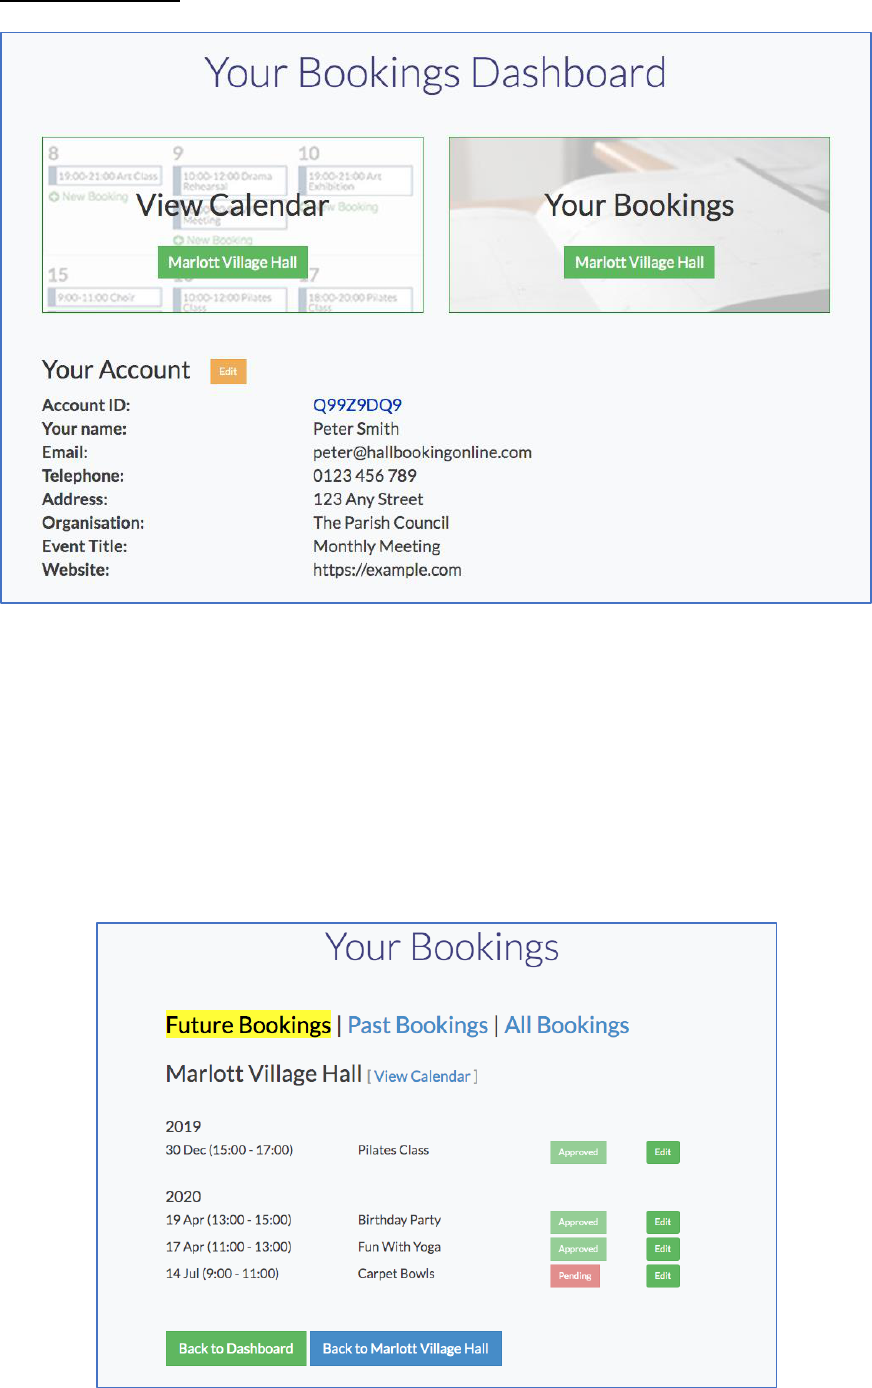
Hirer Accounts [Optional]
Your booking pages are designed so that hirers won't usually need to create an account before
making a booking.
You can also allow your registered hirers to create repeat bookings.
If they create an account, any bookings an administrator makes for the customer will appear
on the list of bookings.
Hirers can manage bookings from the Bookings link on their dashboard.

39
Privacy
We take privacy very seriously.
The calendar does not display the contact information for hirers.
You can set the default level of privacy for the bookings. There are two options:
Hide Contact Details: Personal information (including, name, address and other contact
ID) is not displayed on the public calendar. However, other people
can see the title of the event and the description.
Private: No personal information is publicly displayed. The event title is also
hidden. Only the start, finish time and rooms being used are
displayed on the public calendar.
You can upload a privacy policy for your venue. On the settings page, go to documentation.
You will then see the button to upload a PDF privacy policy.
For hirers making one-off bookings who haven't created an account, he/she needs to choose
a password. This is used by the hirer to make changes to a booking, or to delete it altogether.
If an event password is lost and needed again, an administrator can set a new password.
All passwords (event, administrator and override) are encrypted. It isn't realistically possible
to decrypt the password.
Hall Booking Online does not pass on any information from the bookings database to third
parties. We also do not have any third-party advertising on the site.
As with most websites, we use cookies. These are used for two reasons:
1) To allow the Administrators to log in.
2) To optimise the site by keeping a general record of site usage.
Cookies don't identify individual users and are not used for advertising purposes.
If you have questions about privacy, please get in touch.
Contact
Our knowledge base has the answer to many of the most common questions.
If you have any questions which aren't answered in our knowledge base, you can get in touch
with us by any of the following methods:
1) Email Send your queries to info@hallbookingonline.com
2) Online Form Head to https://hallbookingonline.com/contact
3) Telephone Call on 07805 648935 (UK)
40
Appendix 1: Integrating Hall Booking Online with your venue's PayPal Account
You can integrate your venue's PayPal account with Hall Booking Online.
Your PayPal account is separate to Hall Booking Online. We do not take commission or have access to your
PayPal account. Instead, Hall Booking Online adds a PayPal payment link on your invoices.
How to Integrate Hall Booking Online with your venue's PayPal Account
Step 1 Make sure you have already set up your venue's PayPal account. You will need the PayPal email
address you use to accept payments. Head to paypal.com to set up a PayPal account.
Step 2 Log in to your Hall Booking Online account.
Go to Settings >> Invoice Settings >> PayPal Account Settings. Enter your registered PayPal account
email address accurately.
Step 3 Add a link to your PDF Invoice template footer.
Go to Settings >> Invoice Settings >> Invoice PDF & Email Templates >> Invoice Footer
Add a line of text followed by [ONLINE]. This needs to be in capital letters with square brackets,
similar to the image below:
When the invoice is generated, [ONLINE] will be replaced with a PayPal payment link. You can still
list other payment methods on your invoice. (e.g. bank transfer or cheque)
Step 4 (Optional) You can also add an online payment link to the invoice email template. This is the email
that contains the PDF invoice attachment.
Go to Settings >> Invoice Settings >> Invoice PDF & Email Templates >> Invoice Email
Again, write a sentence that includes [ONLINE].
Step 5 PayPal IPN (Instant Payment Notifications)
This step is optional but recommended. When a PayPal payment is made, you will receive
an email from PayPal. The purchaser will also get an email receipt.
Continued >>
41
By setting up IPN, PayPal will additionally notify Hall Booking Online that an invoice has
been paid. The system will log the PayPal transaction number, mark the invoice as paid,
and send an email to the administrator confirming that the invoice has been paid.
How to Set up IPN
Log into your venue's PayPal account.
Click on the settings cog and choose Account Settings.
Click on Notifications. (If you're using a regular PC / Mac, it's usually on the left-hand
column.)
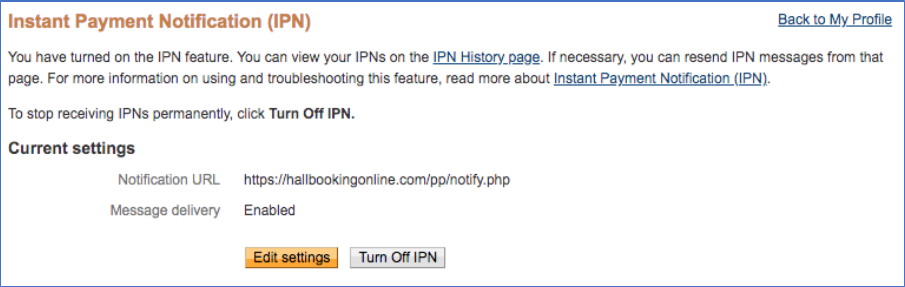
Click on Choose IPN Settings. Enter the following Notification URL:
https://hallbookingonline.com/pp/notify.php
Make sure it's set below to Receive IPN messages (Enabled)
Example of IPN set up on PayPal page
Step 6 Important: Test the IPN
Create a test booking. Send an invoice to yourself for £1 and click on the payment link.
Make the payment. Note that PayPal doesn't allow you to send money to yourself, so you
will need to pay the £1 with a card that is not registered with your PayPal account. You
don't need to create a second PayPal account. Instead, just follow the link on the PayPal
page to pay by credit / debit card.
When the payment goes through, you should receive emails from both PayPal and one
from Hall Booking Online to confirm that the invoice has been paid. Be patient: it can take
a moment or two for the emails to arrive.
Finally, log into your administrator's account on Hall Booking Online. The invoice will be
marked as paid and the transaction number logged.
If this were a real booking, you would now be ready to send the booking approval email.
42
PayPal Integration FAQ
Does Hall Booking Online take commission for payments made through PayPal?
No. We just create a link on the invoices to your PayPal account. Payments for bookings
go direct to you. You manage your PayPal account.
How to I turn off the PayPal integration?
On the PayPal settings page on Hall Booking Online, click the link to disconnect PayPal
as a payment method. You should also remove the [ONLINE] placeholder text from your
invoice and invoice email templates.
If we set up PayPal integration, can we still accept payments by other methods?
Yes. Just write them in the footer of the PDF invoice template.
Can you help to integrate our PayPal account with Hall Booking Online?
Yes. Just get in touch.

43
Appendix 2: Integrating Hall Booking Online with your venue's Stripe
Account
You can integrate your venue's Stripe account with Hall Booking Online.
Your Stripe account is separate to Hall Booking Online. We do not take commission or have
access to your Stripe account. Instead, Hall Booking Online adds a Stripe payment link on
your invoices.
If you would like to Integrate Stripe, you first need to set up a Stripe account.
Stripe accounts are free to set up. If you don't yet have a Stripe account for your venue,
head to https://stripe.com to set one up.
If you're a developer who is familiar with Stripe, let us know and we'll send the details of the
Stripe keys we need and the webhook that needs setting up.
If you're not a developer, we can connect your Stripe account for you. Just get in touch with
us after setting up your Stripe account, and we'll make the arrangements.
Stripe Integration FAQ
Does Hall Booking Online take commission for payments made through Stripe?
No - we don't charge a 'platform fee'. We just create a link on the invoices to your Stripe
account. Payments for bookings go direct to you. You manage your Stripe account.
Does Stripe send an email receipt when a payment goes through?
It can. You can turn on receipts in the email section of your Stripe account settings.
How to I turn off the Stripe integration?
Send an email to info@hallbookingonline.com. We'll switch it off.
If we set up Stripe integration, can we still accept payments by other methods?
Yes. Just write them in the footer of the PDF invoice template.
Can you help to integrate our Stripe account with Hall Booking Online?
Yes. Just contact us and we'll link the two systems and test them for you.
Can we set up Stripe just as a test?
Yes – you can. Contact us, and we'll explain how.
