
1
083016

2
Lashing is a method used to join together poles (or ‘spars’ as
they are often called) with rope to build camp projects like wash stands, tables, and even a
camp shower!
Knowing how to attach two pieces of wood together securely and at the proper angle gives you
a real advantage in the outdoors. Lashing is a wonderful skill because it is creative, builds
teamwork, and provides great satisfaction after the completion of a sturdy and useful lashing
project.
Lashing has been around for a long time. Early lashing probably
involved wrapping a few strips of bark around branches to make a shelter, or using vines to
attach a stone to a branch to make an ax. In modern times, the same methods are used, but
strips of bark and vines have been replaced with natural and synthetic fiber ropes. We no longer
cut or collect branches from the wild.
‘Pioneering’ is the art of making structures by using lashing. If you are searching the internet for
project ideas try using “pioneering projects” as a search term.
Basic knot skills are essential in order to build a sturdy structure.
The clove hitch, the square knot (aka: reef knot) are the two knots you must know and be
consistent at tying well. Practice these knots until you know them upside down and backwards.
Some styles of lashing can use the timber hitch as an alternative to starting a lashing.
Try it! You’ll like it!
Clove Hitch Square Knot Timber Hitch

3
There are several methods of lashing poles together; each method has a specific application to
build the strongest project. Most projects will utilize several of these methods. The types include:
SQUARE LASHING: This is the most commonly used lashing method. It is used to
attach two poles to one another at a 90° angle or very close to that. This form of lashing
will keep the two poles from sliding over each other.
TRIPOD LASHING: This type is used to bring together three poles to form a tripod. This
same kind of lashing can be used for four poles to make a quadpod which is more stable.
DIAGONAL LASHING: This type of lashing is used where the poles are at an angle other
than 90° and where the poles have to be pulled together or when they tend to spring apart
from each other. An example is the cross-brace of a framework.
SHEER LASHING: This method is used to join two poles together to form a scissor shape
often used for table legs (sheer legs).
ROUND LASHING: This method is used to join two poles to make a longer length, for
example when making a flagpole.
CONTINUOUS LASHING: This method is used to join flat planks (lath) or small poles onto
a horizontal surface. This is the last step in building a table top or chair seat.
STRONG verses WRONG: Since lashing has been around for so long and is
practiced in every country on the planet, there are many different ways to lash. Keep in
mind that NO one way is the ONLY way – rather judge your technique based on how
strong or secure it is and how neat the lashing looks. Keep trying different standard ways
until you find a method that works best for you and your project.
The Possibilities are Endless!
This trebuchet shows 5 types of
lashing: Sheer, Round, Square,
Tripod, and Diagonal.

4
Poles: As mentioned earlier, harvesting wood from the wilderness does not align with the Girl
Scout principles of protecting our natural environment. Therefore, wood used in lashing projects
will need to be obtained from lumber or gardening stores.
Pine poles are easy to find milled at lumber yards. They are available in a variety of
thicknesses (diameter) and lengths.
Tree or gardening stakes can be obtained from gardening centers. They come in a variety
of lengths and diameters. Make sure they are sturdy enough.
Bamboo is light weight and inexpensive. It can handle vertical stress. However, it has a
tendency to splinter, has a slick surface and does not have great horizontal strength.
Ending with square knots is highly recommended due to the slick surface.
PVC pipe is lightweight but is NOT recommended because it is too slick.
Keep in mind that materials may be found from recycled sources – like an old broom handle or
closet pole. For a typical camp project poles usually vary in length from 2-10 feet. Depending on
the strength needed, the diameter of the poles generally ranges from ¾” to 3 inches.
Rope: The size and length of the rope you need are among the first questions you have to
answer. Braided rope from 1/8 to 3/16 inches in diameter is recommended and can be purchased
inexpensively. To determine the length of rope needed for each lashing, add the diameters (in
inches) of the two poles at the point the lashing is being made. For example, if one pole is 3/4
inches in diameter and the other is 2 inches in diameter, the total equals 2.75 inches. Multiply this
total by 3 to calculate the length of the rope (in feet) needed (2.75 X 3 = 8.25 feet or 8 feet plus 3
inches). The thicker the rope you use, the longer it needs to be.
It is better to err on the long side when making lengths of rope. Excess rope can usually be used
for additional wraps and fraps or it can be wound around the pole. However, if your rope is too
short, you may connect two lengths of rope using a square knot. For safety, don’t leave the lashing
short; always have a minimum of 3 wraps and 3 fraps.
Note: Many Service Units have lashing supplies in their equipment stores. Check to see if you
can borrow materials as opposed to purchasing them.
Being competent in tying square and clove hitch knots is the first step. As an introduction to
lashing, miniature scaled projects can be taught/built using short (˜1.5 ft.) dowels and smaller
diameter rope. Begin by teaching the square and tripod lashing methods; these are the two most
functional types. Focus on neatness of the wraps and fraps, not speed. Girls can work on a table
or the floor in pairs. Teach one type of lashing at a time, allowing them to feel confident before
moving to the next type.

5
SQUARE LASHING: This is the most commonly used lashing method. It is used where the
poles will try to slide over each other and are at 90° or very close to that.
Learn how to square lash:
1. Begin with a clove hitch underneath the pole to be supported (figure 1). Leave enough of
a tail (standing end) to tie a squre knot when lashing is complete. Alternatively, end with
a clove hitch as shown in Figure 5.
2. Position the horizonal pole above the clove hitch.
3. Wrap the rope up over the horizonal pole, then across behind the vertical pole, pulling tight
all the time (figure 2).
4. Next bring the rope down over the horizontal pole then across behind the vertical pole.
This finishes one complete wrap (figure 2). Continue wrapping in the same way making
sure your rope sits on the outside of the previous wrap. The wraps should not overlap so
the rope won’t slip and loosen the lashing. All wraps should be neat, even, and tight.
5. After 3-4 wraps, next frap ~3 times. Frapping is when you wind the rope between the
poles, pulling tightly each time you go around. This tightens the rope turns already made
even tighter, preventing the poles from moving (figure 3 & 4).
6. Finish off with a square knot using the standing end or with a clove hitch (figure 5).
Example Project: Fire Bucket Holder
1
2
3
4
5
Here are the suggested materials:
one 4-foot x 2-inches stake
two 2-foot x 1-inches
straight poles
Three 9-foot x ~5/32”
diameter lashing ropes

6
TRIPOD LASHING (AKA: Figure of Eight lashing): This method is used to bring together three
poles to form a tripod. There are several ways to lash a tripod. Below is the most common and
effective method.
Learn how to tripod lash:
1. Lay 3 poles side-by-side. If poles vary in length be sure to have the butt ends aligned.
2. Start with a clove hitch on one of the outside poles. (figure 1)
3. Coninue with 4-6 turns over and under the poles not too tightly; in a figure of eight
pattern. (figure 2 & 3)
4. Make ~3 frapping turns between each pole. (figure 4 & 5)
5. Finish with a square knot using the standing end of the original clove hitch.
6. Alternatively, some end the lashing with a clove hitch instead of a squre knot.
Setting up a tripod:
Cross the outside poles so that the cross point is under
the center pole. This evenly distributes the load via the
wood-to-wood contact.
1
2
3
4
5
NOTE: Tripod lashing that is too tight or has too many wraps
may either prevent the tripod from being formed or may
overload the rope. In this respect tripod lashing differs from
other lashings: it is possible to make it too tight! On occasion,
trial and error may be required to obtain the correct tension.

7
DIAGONAL LASHING: This method is used where the poles have to be pulled together or when
they tend to spring apart from each other for example in the cross-brace of a framework. Often
the two poles form an “X” and prevent a project from racking. Diagonal lashing should also be
used when the angle which the poles are placed is other than 90°.
Learn how to diagonal lash:
Begin with a timber (figure 1) or clove hitch around both poles to draw the poles together.
Wrap 3-4 turns around the two poles in one axis (figure 1).
Next make 3-4 turns, this time over the center hitch (figure 2).
Tighten the turns by applying ~3 frapping turns between the poles, pulling each turn tightly
(figure 3).
Finish with a clove hitch (figure 4).
Alternatively, you may start with a clove hitch around both poles and end with a
square knot.
Example Project: Wheel Barrow
1 2 3 4
Here are the suggested materials:
Four 4-foot x 2-inch poles
One 3-foot x 2-inches poles (handle)
One 2-foot x 2-inch poles (axle)
One wheel
Nine 12-foot x ~5/32-inch diameter
lashing ropes

8
SHEER LASHING: (sometimes spelled ‘shear’) This method is used to join two poles together
to form a scissor shape often used for table legs (sheer legs). With this application the poles
might either lift or support weights.
Learn how to sheer lash:
1. Line up the two ends of the poles. If poles are of uneven length, align butt ends.
2. Start with a timber (figure 1) or clove hitch around one pole.
3. Continue with 6-8 turns which are made firmly, but not too tight (figure 2).
4. Next, make ~3 frapping turns between the two poles to tighten the lashings (figure 3).
5. Finish with a square knot or clove hitch and spay legs open (figure 4).
Note: Sheer legs need to have diagonal support to prevent racking.
Example Project: Simple 4’ Table
Notice the diagonal rope under the table
tied from side-to-side to prevent racking.
Here are the suggested materials:
Seven 6-foot x 2-inch poles (legs & stringers)
Four 3-foot x 2-inch poles (leg supports)
Sixteen 12-foot x ~5/32-inch diameter lashing ropes
Two 24-foot x ~5/32-inch diameter lashing ropes
(for continuous lashing – see pg. 9)
Lath material for table top (4-foot X 3-foot)
Figure 1 Figure 2 Figure 3 Figure 4

9
ROUND LASHING: This method is the most commonly used lashing for extending the length of
a pole.
Learn how to round lash:
1. Begin with a good overlap of poles; at least a quarter of the total length, better still is an
overlap of one third.
2. Start with a clove hitch around both poles near the end of the overlap.
3. Continue with 8-10 tight turns round both poles.
4. Finish with a clove hitch.
5. To tighten, insert small wedges inside the turns; from both above and below.
Note: Poles longer than about 2’ should add a second lashing to strengthen the overlap so no
movement is possible in any direction. (see flagpole below for illustration)
Example Project: Flag Pole
Special Note: Unlike all other
lashing methods, round lashing
has NO frapping turns. The
manner in which these lashings
are applied results in the poles
being in a position where they are
already tightly touching. Taking
frapping turns between the parallel
poles would only weaken the
connection.
Here are the suggested materials:
Seven 6-foot x 2-inch poles
Nine 12-foot x ~5/32-inch diameter
lashing ropes
Two 15-foot x ~5/32-inch diameter lashing
ropes (guy ropes)
One flag, one eye-bolt, and two spring-
loaded clamps

10
CONTINUOUS LASHING: This method takes 3 people and is used to attach flat planks (lath) or
small poles onto a horizontal surface. This is the last step in building a table or deck.
Learn how to do continuous lashing:
1. Before starting, ensure that the support poles (stringers) are parallel, flat, and that the
distance between them is appropriate for the length of the planks.
2. Begin with 2 long lengths of rope; each 6 times the distance that will be lashed.
3. Find the center of each rope and mark with tape or marker.
4. Bundle each half so it can easily be held in the hand. You can wind the rope on a paddle
or secure with a loose rubber band (bundle in a way ensuring that the working end slides
freely when being pulled/used).
5. Start with a clove hitch in the center of the rope on each stringer pole.
a. Note: two girls will work together, each lashing a
stringer. The third girl will slide the next lath/pole
in place and keep things even.
6. Hold both paddles/bundles of rope, one in each hand
like horse reins.
7. Place the first plank and bring both ropes over it.
8. Next, bring ropes under stringer pole and crisscross.
9. Bring ropes back to top and slide in next plank.
10. Continue going over, under, crisscross and up, then
sliding in a new plank until continuous lashing is
complete.
11. Finish with a square knot using the two ends.
Example Project: Chippewa Kitchen
Top View underneath View
Here are the suggested materials:
Six 6-foot x 1-inch poles for tripods
Four 8-foot x 1-inch poles for stringers and
braces
Six 3-foot x 1-inch poles for braces
Eighteen 5-foot x 1/8-inch rope
Two 40-foot x 1/8-inch rope for continuous
lashing
Planks for table top (2-foot x 7-foot area)

11
So, now that you have all of the knowledge and have practiced each lashing skill, you can begin
building more camp gadgets and even larger campsite improvements. Below are some additional
lashing project ideas.
The fun, adventure, involvement, and challenges are built right in —
and also the success...
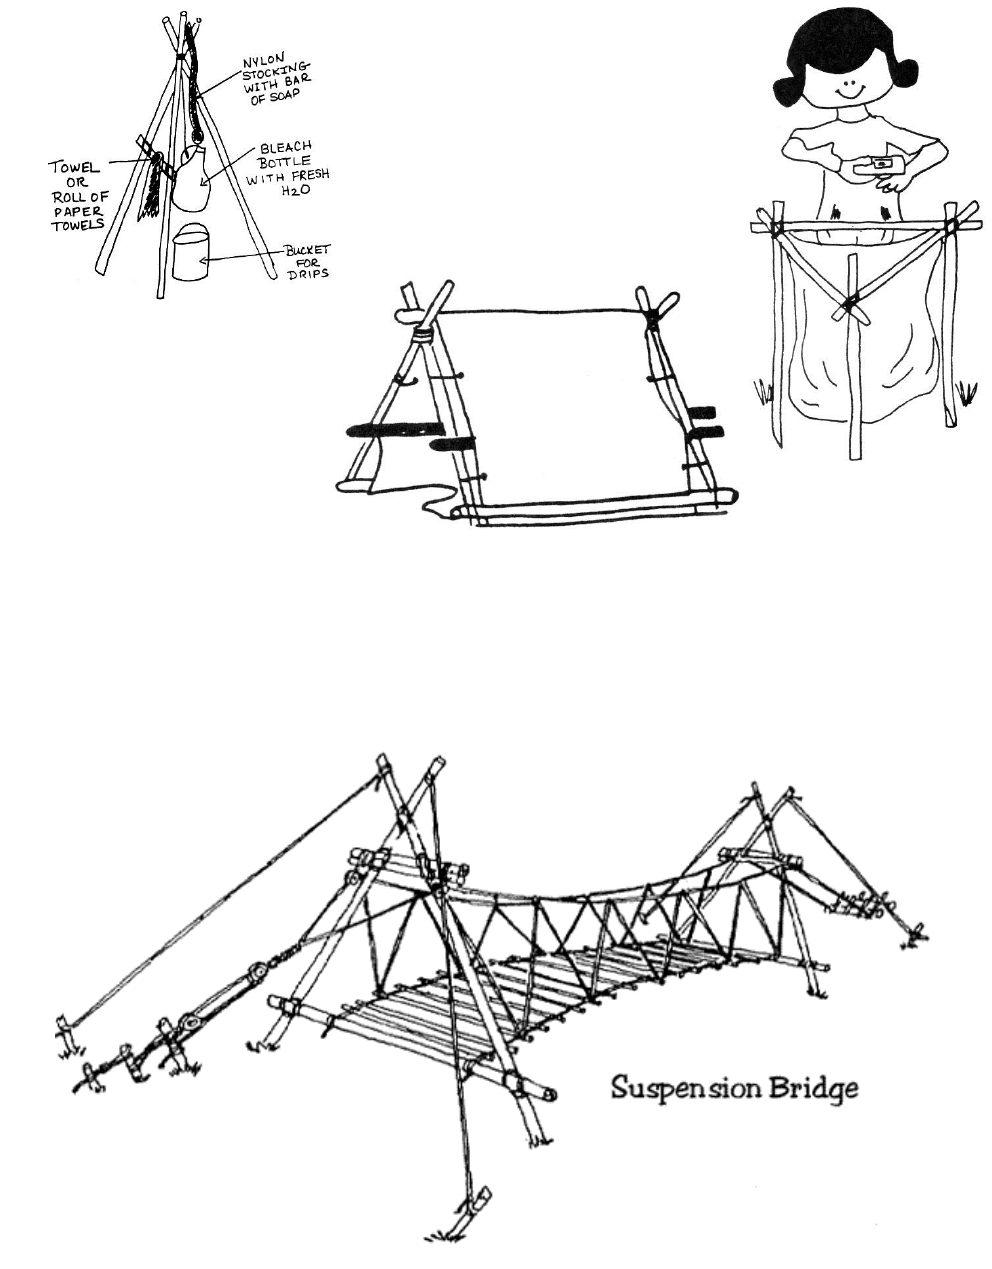
Camp Shower Firewood Shed Picnic Table
3-Sink Dishwashing Station w/ rack
Drying Rack
Low picnic table Chair Tripod Table

12
Trebuchet—what in the world would you do with something like this?
13
Tripod Hand wash Station
Even staying clean can be FUN!
Tent Three-legged trash bag holder

14
Butt end. The term butt end refers to the end of a pole that will be on the ground. If the
pole has a tapered diameter the butt end would be the end with the largest circumference.
Frap. A frap is a turn made between the poles. It goes around the wraps to pull the wraps
tighter.
Lath. Lath is a flat plank of wood often used in continuous lashing to form a table top.
Racking. Racking is the undesirable movement of the project from side to side due to
insufficient structural support.
Spar. A spar is a strong pole used in lashing projects. Sometimes also called a stave
(smallest in size).
Stake. A stake is a pole with one sharpen end. Used to drive into the ground.
Standing end. The standing end (or standing part) of a rope is the part not active in knot
tying. It is the part opposite of the working end.
Stringer. Stringer refers to two parallel poles that are used as the foundation to attach
planks using continuous lashing.
Turn. The term turn is often used to describe going around a pole (a wrap).
Working end. The working end (or working part) of a rope is the part active in knot tying.
It is the part opposite of the standing end.
Wedge. A wedge is a small tapered stick that is used to tighten a round lashing.
Wrap. A wrap is a turn made around the two poles to hold the poles tightly together.
We made it! That’s all that matters!
