
Instruction Manual
DIGITAL CAMERA
EN
Model No. : IM032
Thank you for purchasing our digital camera. Before you start to use your new camera, please
read these instructions carefully to enjoy optimum performance and a longer service life.
Be sure you have read and understood the contents of “SAFETY PRECAUTIONS”, before
using this product. Keep these instructions available for future reference.
We recommend that you take test shots to get accustomed to your camera before taking important
photographs.
The screen and camera illustrations shown in this manual were produced during the development
stages and may dier from the actual product.
If there are additions and/or modications of functions due to rmware update for the camera, the
contents will dier. For the latest information, please visit our website.

Table of Contents
Introduction. . . . . . . . . . . . . . . . . . . . . . . . . . . . . . . . . . . . . . . . . . . . . . . . . . . . . . . . . . . . . . . . . . . . . 11
Before You Begin. . . . . . . . . . . . . . . . . . . . . . . . . . . . . . . . . . . . . . . . . . . . . . . . . . . . . . . . . . . . . . . . . . . . . . . 11
User Registration. . . . . . . . . . . . . . . . . . . . . . . . . . . . . . . . . . . . . . . . . . . . . . . . . . . . . . . . . . . . . . . . . . . . . 11
Installing PC Software/Apps. . . . . . . . . . . . . . . . . . . . . . . . . . . . . . . . . . . . . . . . . . . . . . . . . . . . . . . . . . . 12
About This Manual. . . . . . . . . . . . . . . . . . . . . . . . . . . . . . . . . . . . . . . . . . . . . . . . . . . . . . . . . . . . . . . . . . . . . . 13
How to find what you want to know. . . . . . . . . . . . . . . . . . . . . . . . . . . . . . . . . . . . . . . . . . . . . . . . . . . . 13
How to read this manual. . . . . . . . . . . . . . . . . . . . . . . . . . . . . . . . . . . . . . . . . . . . . . . . . . . . . . . . . . . . . . 14
Names of parts. . . . . . . . . . . . . . . . . . . . . . . . . . . . . . . . . . . . . . . . . . . . . . . . . . . . . . . . . . . . . . . . . . . . . . . . . 15
Preparation. . . . . . . . . . . . . . . . . . . . . . . . . . . . . . . . . . . . . . . . . . . . . . . . . . . . . . . . . . . . . . . . . . . . . . 17
Unpacking the Box Contents. . . . . . . . . . . . . . . . . . . . . . . . . . . . . . . . . . . . . . . . . . . . . . . . . . . . . . . . . . . . . 17
Attaching the Strap. . . . . . . . . . . . . . . . . . . . . . . . . . . . . . . . . . . . . . . . . . . . . . . . . . . . . . . . . . . . . . . . . . . . . 18
Inserting and Removing the Battery and Card. . . . . . . . . . . . . . . . . . . . . . . . . . . . . . . . . . . . . . . . . . . . . . 19
Inserting the battery and card. . . . . . . . . . . . . . . . . . . . . . . . . . . . . . . . . . . . . . . . . . . . . . . . . . . . . . . . . 19
Removing the battery. . . . . . . . . . . . . . . . . . . . . . . . . . . . . . . . . . . . . . . . . . . . . . . . . . . . . . . . . . . . . . . . . 20
Removing the card. . . . . . . . . . . . . . . . . . . . . . . . . . . . . . . . . . . . . . . . . . . . . . . . . . . . . . . . . . . . . . . . . . . 21
Usable cards. . . . . . . . . . . . . . . . . . . . . . . . . . . . . . . . . . . . . . . . . . . . . . . . . . . . . . . . . . . . . . . . . . . . . . . . . 21
Charging the Battery. . . . . . . . . . . . . . . . . . . . . . . . . . . . . . . . . . . . . . . . . . . . . . . . . . . . . . . . . . . . . . . . . . . . 23
Charging the battery using an optional USB-AC adapter. . . . . . . . . . . . . . . . . . . . . . . . . . . . . . . . . . 23
Charging with a USB device. . . . . . . . . . . . . . . . . . . . . . . . . . . . . . . . . . . . . . . . . . . . . . . . . . . . . . . . . . . 25
Turning the Camera On. . . . . . . . . . . . . . . . . . . . . . . . . . . . . . . . . . . . . . . . . . . . . . . . . . . . . . . . . . . . . . . . . . 27
Sleep Mode. . . . . . . . . . . . . . . . . . . . . . . . . . . . . . . . . . . . . . . . . . . . . . . . . . . . . . . . . . . . . . . . . . . . . . . . . 27
Initial Setup. . . . . . . . . . . . . . . . . . . . . . . . . . . . . . . . . . . . . . . . . . . . . . . . . . . . . . . . . . . . . . . . . . . . . . . . . . . . 28
What to Do If You Can’t Read the Display. . . . . . . . . . . . . . . . . . . . . . . . . . . . . . . . . . . . . . . . . . . . . . . . . . 30
Shooting. . . . . . . . . . . . . . . . . . . . . . . . . . . . . . . . . . . . . . . . . . . . . . . . . . . . . . . . . . . . . . . . . . . . . . . . 31
Information displays while shooting. . . . . . . . . . . . . . . . . . . . . . . . . . . . . . . . . . . . . . . . . . . . . . . . . . . . . . . 31
Switching the information display. . . . . . . . . . . . . . . . . . . . . . . . . . . . . . . . . . . . . . . . . . . . . . . . . . . . . . 33
Shooting Still Pictures. . . . . . . . . . . . . . . . . . . . . . . . . . . . . . . . . . . . . . . . . . . . . . . . . . . . . . . . . . . . . . . . . . . 35
Shooting modes. . . . . . . . . . . . . . . . . . . . . . . . . . . . . . . . . . . . . . . . . . . . . . . . . . . . . . . . . . . . . . . . . . . . . 35
Using the zoom. . . . . . . . . . . . . . . . . . . . . . . . . . . . . . . . . . . . . . . . . . . . . . . . . . . . . . . . . . . . . . . . . . . . . . 37
Letting the camera choose the settings (AUTO mode). . . . . . . . . . . . . . . . . . . . . . . . . . . . . . . . . . . . . . . 38
2
Table of Contents

Letting the camera choose aperture and shutter speed (P: Program AE). . . . . . . . . . . . . . . . . . . . . . . 39
Choosing aperture (A: Aperture-Priority AE). . . . . . . . . . . . . . . . . . . . . . . . . . . . . . . . . . . . . . . . . . . . . . . 41
Shooting in scene mode (SCN mode). . . . . . . . . . . . . . . . . . . . . . . . . . . . . . . . . . . . . . . . . . . . . . . . . . . . 43
Types of scene modes. . . . . . . . . . . . . . . . . . . . . . . . . . . . . . . . . . . . . . . . . . . . . . . . . . . . . . . . . . . . . . . . 43
[Live Composite]: Live composite photography. . . . . . . . . . . . . . . . . . . . . . . . . . . . . . . . . . . . . . . . . . 46
[Panorama]: Shooting a panorama. . . . . . . . . . . . . . . . . . . . . . . . . . . . . . . . . . . . . . . . . . . . . . . . . . . . . 47
Shooting at very close range (7 mode). . . . . . . . . . . . . . . . . . . . . . . . . . . . . . . . . . . . . . . . . . . . . . . . . . . 49
Matching settings to underwater scenes (6 mode). . . . . . . . . . . . . . . . . . . . . . . . . . . . . . . . . . . . . . . 51
Using Custom Modes (Custom Mode C1/C2). . . . . . . . . . . . . . . . . . . . . . . . . . . . . . . . . . . . . . . . . . . . . . 52
Saving settings. . . . . . . . . . . . . . . . . . . . . . . . . . . . . . . . . . . . . . . . . . . . . . . . . . . . . . . . . . . . . . . . . . . . . . . 52
Recalling settings. . . . . . . . . . . . . . . . . . . . . . . . . . . . . . . . . . . . . . . . . . . . . . . . . . . . . . . . . . . . . . . . . . . . 53
Recording movies. . . . . . . . . . . . . . . . . . . . . . . . . . . . . . . . . . . . . . . . . . . . . . . . . . . . . . . . . . . . . . . . . . . . . . . 54
Recording movies in photo shooting modes. . . . . . . . . . . . . . . . . . . . . . . . . . . . . . . . . . . . . . . . . . . . . 54
Recording movies in movie mode (n mode). . . . . . . . . . . . . . . . . . . . . . . . . . . . . . . . . . . . . . . . . . . . 55
Shooting Settings. . . . . . . . . . . . . . . . . . . . . . . . . . . . . . . . . . . . . . . . . . . . . . . . . . . . . . . . . . . . . . . . 56
Shooting settings. . . . . . . . . . . . . . . . . . . . . . . . . . . . . . . . . . . . . . . . . . . . . . . . . . . . . . . . . . . . . . . . . . . . . . . 56
Direct Buttons. . . . . . . . . . . . . . . . . . . . . . . . . . . . . . . . . . . . . . . . . . . . . . . . . . . . . . . . . . . . . . . . . . . 57
Settings accessible via Direct Buttons. . . . . . . . . . . . . . . . . . . . . . . . . . . . . . . . . . . . . . . . . . . . . . . . . . . . . 57
Controlling exposure (Exposure Compensation). . . . . . . . . . . . . . . . . . . . . . . . . . . . . . . . . . . . . . . . . . . . 58
Adjusting Exposure Compensation. . . . . . . . . . . . . . . . . . . . . . . . . . . . . . . . . . . . . . . . . . . . . . . . . . . . . 58
Zoom (digital teleconverter). . . . . . . . . . . . . . . . . . . . . . . . . . . . . . . . . . . . . . . . . . . . . . . . . . . . . . . . . . . . . . 59
Sequential shooting/using the self-timer. . . . . . . . . . . . . . . . . . . . . . . . . . . . . . . . . . . . . . . . . . . . . . . . . . . 60
Shooting without a release time lag (Pro Capture shooting). . . . . . . . . . . . . . . . . . . . . . . . . . . . . . . . . . 62
Using flash (flash photography). . . . . . . . . . . . . . . . . . . . . . . . . . . . . . . . . . . . . . . . . . . . . . . . . . . . . . . . . . . 64
Focus lock. . . . . . . . . . . . . . . . . . . . . . . . . . . . . . . . . . . . . . . . . . . . . . . . . . . . . . . . . . . . . . . . . . . . . . . . . . . . . 66
Using the LED illuminator. . . . . . . . . . . . . . . . . . . . . . . . . . . . . . . . . . . . . . . . . . . . . . . . . . . . . . . . . . . . . . . . 67
Turning the LED illuminator on. . . . . . . . . . . . . . . . . . . . . . . . . . . . . . . . . . . . . . . . . . . . . . . . . . . . . . . . . 67
To turn the LED illuminator off. . . . . . . . . . . . . . . . . . . . . . . . . . . . . . . . . . . . . . . . . . . . . . . . . . . . . . . . . 67
Live Control. . . . . . . . . . . . . . . . . . . . . . . . . . . . . . . . . . . . . . . . . . . . . . . . . . . . . . . . . . . . . . . . . . . . . 69
Settings accessible via Live Control. . . . . . . . . . . . . . . . . . . . . . . . . . . . . . . . . . . . . . . . . . . . . . . . . . . . . . . . 69
Available settings. . . . . . . . . . . . . . . . . . . . . . . . . . . . . . . . . . . . . . . . . . . . . . . . . . . . . . . . . . . . . . . . . . . . 69
Processing options (Picture Mode). . . . . . . . . . . . . . . . . . . . . . . . . . . . . . . . . . . . . . . . . . . . . . . . . . . . . . . . 71
3
Table of Contents

Picture mode options. . . . . . . . . . . . . . . . . . . . . . . . . . . . . . . . . . . . . . . . . . . . . . . . . . . . . . . . . . . . . . . . . 71
Using [Partial Color]. . . . . . . . . . . . . . . . . . . . . . . . . . . . . . . . . . . . . . . . . . . . . . . . . . . . . . . . . . . . . . . . . . 73
Changing ISO sensitivity (ISO Sensitivity). . . . . . . . . . . . . . . . . . . . . . . . . . . . . . . . . . . . . . . . . . . . . . . . . . 74
Adjusting color (white balance). . . . . . . . . . . . . . . . . . . . . . . . . . . . . . . . . . . . . . . . . . . . . . . . . . . . . . . . . . . 75
One Touch WB. . . . . . . . . . . . . . . . . . . . . . . . . . . . . . . . . . . . . . . . . . . . . . . . . . . . . . . . . . . . . . . . . . . . . . . 77
Selecting a focus mode (AF mode). . . . . . . . . . . . . . . . . . . . . . . . . . . . . . . . . . . . . . . . . . . . . . . . . . . . . . . . 78
Setting the aspect ratio. . . . . . . . . . . . . . . . . . . . . . . . . . . . . . . . . . . . . . . . . . . . . . . . . . . . . . . . . . . . . . . . . . 79
Photo file and image size options (K Image quality). . . . . . . . . . . . . . . . . . . . . . . . . . . . . . . . . . . . . . . 80
Frame size, rate, and compression (n Movie Quality). . . . . . . . . . . . . . . . . . . . . . . . . . . . . . . . . . . . . . . 82
Available movie quality options. . . . . . . . . . . . . . . . . . . . . . . . . . . . . . . . . . . . . . . . . . . . . . . . . . . . . . . . 82
Reducing camera shake (Image stabilizer). . . . . . . . . . . . . . . . . . . . . . . . . . . . . . . . . . . . . . . . . . . . . . . . . . 84
Adjusting flash output (Flash intensity control). . . . . . . . . . . . . . . . . . . . . . . . . . . . . . . . . . . . . . . . . . . . . 85
Choosing how the camera measures brightness (Metering). . . . . . . . . . . . . . . . . . . . . . . . . . . . . . . . . . 86
Automatic face detection (Face priority). . . . . . . . . . . . . . . . . . . . . . . . . . . . . . . . . . . . . . . . . . . . . . . . . . . 87
Using optional accessories (Accessory). . . . . . . . . . . . . . . . . . . . . . . . . . . . . . . . . . . . . . . . . . . . . . . . . . . . 88
Playback. . . . . . . . . . . . . . . . . . . . . . . . . . . . . . . . . . . . . . . . . . . . . . . . . . . . . . . . . . . . . . . . . . . . . . . . 89
Information display during playback. . . . . . . . . . . . . . . . . . . . . . . . . . . . . . . . . . . . . . . . . . . . . . . . . . . . . . 89
Playback image information. . . . . . . . . . . . . . . . . . . . . . . . . . . . . . . . . . . . . . . . . . . . . . . . . . . . . . . . . . . 89
Switching the information display. . . . . . . . . . . . . . . . . . . . . . . . . . . . . . . . . . . . . . . . . . . . . . . . . . . . . . 91
Viewing photographs and movies. . . . . . . . . . . . . . . . . . . . . . . . . . . . . . . . . . . . . . . . . . . . . . . . . . . . . . . . 92
Viewing still pictures. . . . . . . . . . . . . . . . . . . . . . . . . . . . . . . . . . . . . . . . . . . . . . . . . . . . . . . . . . . . . . . . . . 92
Viewing movies. . . . . . . . . . . . . . . . . . . . . . . . . . . . . . . . . . . . . . . . . . . . . . . . . . . . . . . . . . . . . . . . . . . . . . 93
Finding pictures quickly (Index and Calendar Playback). . . . . . . . . . . . . . . . . . . . . . . . . . . . . . . . . . . . . . 94
Zooming in (Close-up Playback). . . . . . . . . . . . . . . . . . . . . . . . . . . . . . . . . . . . . . . . . . . . . . . . . . . . . . . . . . 95
Scrolling playback of panoramas. . . . . . . . . . . . . . . . . . . . . . . . . . . . . . . . . . . . . . . . . . . . . . . . . . . . . . . . . . 96
Selecting multiple pictures (Share Order Selected, 0, Erase Selected). . . . . . . . . . . . . . . . . . . . . . . . 97
Deleting pictures (Erase). . . . . . . . . . . . . . . . . . . . . . . . . . . . . . . . . . . . . . . . . . . . . . . . . . . . . . . . . . . . . . . . . 98
Using functions during playback. . . . . . . . . . . . . . . . . . . . . . . . . . . . . . . . . . . . . . . . . . . . . . . . . . . . . . . . . . 99
Playing back voice memos (Play H) when the associated image is displayed. . . . . . . . . . . . . . . . . . 101
Retouching pictures (RAW Data Edit/JPEG Edit). . . . . . . . . . . . . . . . . . . . . . . . . . . . . . . . . . . . . . . . . . . . 102
Retouching RAW Pictures (RAW Data Edit). . . . . . . . . . . . . . . . . . . . . . . . . . . . . . . . . . . . . . . . . . . . . 102
Retouching JPEG Pictures (JPEG Edit). . . . . . . . . . . . . . . . . . . . . . . . . . . . . . . . . . . . . . . . . . . . . . . . . . 103
4
Table of Contents

Editing movies (Movie Edit). . . . . . . . . . . . . . . . . . . . . . . . . . . . . . . . . . . . . . . . . . . . . . . . . . . . . . . . . . . . . 105
Creating movie stills (In-Movie Image Capture). . . . . . . . . . . . . . . . . . . . . . . . . . . . . . . . . . . . . . . . . 105
Trimming movies (Movie Trimming). . . . . . . . . . . . . . . . . . . . . . . . . . . . . . . . . . . . . . . . . . . . . . . . . . . 105
Selecting pictures for sharing (Share Order). . . . . . . . . . . . . . . . . . . . . . . . . . . . . . . . . . . . . . . . . . . . . . . 107
Protecting Pictures (0). . . . . . . . . . . . . . . . . . . . . . . . . . . . . . . . . . . . . . . . . . . . . . . . . . . . . . . . . . . . . . . 108
Adding audio to pictures (c). . . . . . . . . . . . . . . . . . . . . . . . . . . . . . . . . . . . . . . . . . . . . . . . . . . . . . . . . . . . 109
Rotating pictures (Rotate). . . . . . . . . . . . . . . . . . . . . . . . . . . . . . . . . . . . . . . . . . . . . . . . . . . . . . . . . . . . . . . 110
Playback images automatically (C). . . . . . . . . . . . . . . . . . . . . . . . . . . . . . . . . . . . . . . . . . . . . . . . . . . . . 111
Combining pictures (Image Overlay). . . . . . . . . . . . . . . . . . . . . . . . . . . . . . . . . . . . . . . . . . . . . . . . . . . . . 112
Print order (DPOF). . . . . . . . . . . . . . . . . . . . . . . . . . . . . . . . . . . . . . . . . . . . . . . . . . . . . . . . . . . . . . . . . . . . . 113
Creating a print order. . . . . . . . . . . . . . . . . . . . . . . . . . . . . . . . . . . . . . . . . . . . . . . . . . . . . . . . . . . . . . . . 113
Removing all or selected pictures from the print order. . . . . . . . . . . . . . . . . . . . . . . . . . . . . . . . . . . 114
Deleting pictures (Erase). . . . . . . . . . . . . . . . . . . . . . . . . . . . . . . . . . . . . . . . . . . . . . . . . . . . . . . . . . . . . . . . 116
Menu Functions. . . . . . . . . . . . . . . . . . . . . . . . . . . . . . . . . . . . . . . . . . . . . . . . . . . . . . . . . . . . . . . . . 117
Basic menu operations. . . . . . . . . . . . . . . . . . . . . . . . . . . . . . . . . . . . . . . . . . . . . . . . . . . . . . . . . . . . . . . . . 117
Using Shooting Menu 1/Shooting Menu 2. . . . . . . . . . . . . . . . . . . . . . . . . . . . . . . . . . . . . . . . . . . 120
Shooting Menus1 and 2. . . . . . . . . . . . . . . . . . . . . . . . . . . . . . . . . . . . . . . . . . . . . . . . . . . . . . . . . . . . . . . 120
Restoring Default Settings (Reset). . . . . . . . . . . . . . . . . . . . . . . . . . . . . . . . . . . . . . . . . . . . . . . . . . . . . . . . 121
Saving Settings (Assign to Custom Mode). . . . . . . . . . . . . . . . . . . . . . . . . . . . . . . . . . . . . . . . . . . . . . . . 122
Processing options (Picture Mode). . . . . . . . . . . . . . . . . . . . . . . . . . . . . . . . . . . . . . . . . . . . . . . . . . . . . . . 123
Selecting the focusing area (AF Area). . . . . . . . . . . . . . . . . . . . . . . . . . . . . . . . . . . . . . . . . . . . . . . . . . . . . 125
Setting the AF target (Area). . . . . . . . . . . . . . . . . . . . . . . . . . . . . . . . . . . . . . . . . . . . . . . . . . . . . . . . . . 125
Continuously focusing on moving subjects (Tracking). . . . . . . . . . . . . . . . . . . . . . . . . . . . . . . . . . . . 125
Shooting automatically with a fixed interval (Interval Shooting). . . . . . . . . . . . . . . . . . . . . . . . . . . . . . 127
Varying focus little by little over a series of pictures (Focus BKT). . . . . . . . . . . . . . . . . . . . . . . . . . . . . 130
Increasing depth of field (Focus Stacking Settings). . . . . . . . . . . . . . . . . . . . . . . . . . . . . . . . . . . . . . . . . 131
Date stamps (Date Stamp). . . . . . . . . . . . . . . . . . . . . . . . . . . . . . . . . . . . . . . . . . . . . . . . . . . . . . . . . . . . . . 132
Picture + Sound. . . . . . . . . . . . . . . . . . . . . . . . . . . . . . . . . . . . . . . . . . . . . . . . . . . . . . . . . . . . . . . . . . . . . . . 133
Using the Video Menu. . . . . . . . . . . . . . . . . . . . . . . . . . . . . . . . . . . . . . . . . . . . . . . . . . . . . . . . . . . . 134
The Video Menu. . . . . . . . . . . . . . . . . . . . . . . . . . . . . . . . . . . . . . . . . . . . . . . . . . . . . . . . . . . . . . . . . . . . . . . 134
Using the Playback Menu. . . . . . . . . . . . . . . . . . . . . . . . . . . . . . . . . . . . . . . . . . . . . . . . . . . . . . . . . 135
The Playback Menu. . . . . . . . . . . . . . . . . . . . . . . . . . . . . . . . . . . . . . . . . . . . . . . . . . . . . . . . . . . . . . . . . . . . 135
5
Table of Contents

Automatically Rotating Portrait-Orientation Pictures for Playback (n). . . . . . . . . . . . . . . . . . . . . . . 136
Removing Protection from All Pictures (Reset Protect). . . . . . . . . . . . . . . . . . . . . . . . . . . . . . . . . . . . . . 137
Cancelling a share order (Reset share Order). . . . . . . . . . . . . . . . . . . . . . . . . . . . . . . . . . . . . . . . . . . . . . 138
Using the Setup Menu. . . . . . . . . . . . . . . . . . . . . . . . . . . . . . . . . . . . . . . . . . . . . . . . . . . . . . . . . . . . 139
The Setup Menu. . . . . . . . . . . . . . . . . . . . . . . . . . . . . . . . . . . . . . . . . . . . . . . . . . . . . . . . . . . . . . . . . . . . . . . 139
Formatting the card (Card Setup). . . . . . . . . . . . . . . . . . . . . . . . . . . . . . . . . . . . . . . . . . . . . . . . . . . . . . . . 141
Deleting all images (Card Setup). . . . . . . . . . . . . . . . . . . . . . . . . . . . . . . . . . . . . . . . . . . . . . . . . . . . . . . . . 142
Selecting a language. . . . . . . . . . . . . . . . . . . . . . . . . . . . . . . . . . . . . . . . . . . . . . . . . . . . . . . . . . . . . . . . . . . 143
Using the Custom Menus. . . . . . . . . . . . . . . . . . . . . . . . . . . . . . . . . . . . . . . . . . . . . . . . . . . . . . . . . 144
The Custom Menus. . . . . . . . . . . . . . . . . . . . . . . . . . . . . . . . . . . . . . . . . . . . . . . . . . . . . . . . . . . . . . . . . . . . 144
A AF/MF. . . . . . . . . . . . . . . . . . . . . . . . . . . . . . . . . . . . . . . . . . . . . . . . . . . . . . . . . . . . . . . . . . . . . . . . . . . . 145
B Disp/o/PC. . . . . . . . . . . . . . . . . . . . . . . . . . . . . . . . . . . . . . . . . . . . . . . . . . . . . . . . . . . . . . . . . . . . . . . 146
C Exp/ISO. . . . . . . . . . . . . . . . . . . . . . . . . . . . . . . . . . . . . . . . . . . . . . . . . . . . . . . . . . . . . . . . . . . . . . . . . . . 147
DA Custom. . . . . . . . . . . . . . . . . . . . . . . . . . . . . . . . . . . . . . . . . . . . . . . . . . . . . . . . . . . . . . . . . . . . . . . . . 148
E X/WB/Color. . . . . . . . . . . . . . . . . . . . . . . . . . . . . . . . . . . . . . . . . . . . . . . . . . . . . . . . . . . . . . . . . . . . . 149
F Record. . . . . . . . . . . . . . . . . . . . . . . . . . . . . . . . . . . . . . . . . . . . . . . . . . . . . . . . . . . . . . . . . . . . . . . . . . . . 151
G Field Sensor. . . . . . . . . . . . . . . . . . . . . . . . . . . . . . . . . . . . . . . . . . . . . . . . . . . . . . . . . . . . . . . . . . . . . . . 153
HK Utility. . . . . . . . . . . . . . . . . . . . . . . . . . . . . . . . . . . . . . . . . . . . . . . . . . . . . . . . . . . . . . . . . . . . . . . . . 154
Assist Manual Focus (MF Assist). . . . . . . . . . . . . . . . . . . . . . . . . . . . . . . . . . . . . . . . . . . . . . . . . . . . . . . . . 155
Adding information displays using the INFO button (G/Info Settings). . . . . . . . . . . . . . . . . . . . . . 156
qInfo (Playback information displays). . . . . . . . . . . . . . . . . . . . . . . . . . . . . . . . . . . . . . . . . . . . . . . 156
LV-Info (Shooting information displays). . . . . . . . . . . . . . . . . . . . . . . . . . . . . . . . . . . . . . . . . . . . . . . . 157
G Settings (Index/calendar display). . . . . . . . . . . . . . . . . . . . . . . . . . . . . . . . . . . . . . . . . . . . . . . . . . 158
Viewing camera images on TV (HDMI). . . . . . . . . . . . . . . . . . . . . . . . . . . . . . . . . . . . . . . . . . . . . . . . . . . 159
Combinations of JPEG image sizes and compression rates (X Set). . . . . . . . . . . . . . . . . . . . . . . . . 161
Using the Construction Menus. . . . . . . . . . . . . . . . . . . . . . . . . . . . . . . . . . . . . . . . . . . . . . . . . . . . . 162
Construction Menu. . . . . . . . . . . . . . . . . . . . . . . . . . . . . . . . . . . . . . . . . . . . . . . . . . . . . . . . . . . . . . . . . . . . 162
Cautions. . . . . . . . . . . . . . . . . . . . . . . . . . . . . . . . . . . . . . . . . . . . . . . . . . . . . . . . . . . . . . . . . . . . . . . . . . . . . . 163
Displaying the Construction Menu. . . . . . . . . . . . . . . . . . . . . . . . . . . . . . . . . . . . . . . . . . . . . . . . . . . . . . . 164
[Construction] in SCN mode. . . . . . . . . . . . . . . . . . . . . . . . . . . . . . . . . . . . . . . . . . . . . . . . . . . . . . . . . . 165
Configuring an image size for the Construction Menu. . . . . . . . . . . . . . . . . . . . . . . . . . . . . . . . . . . . . . 167
6
Table of Contents

Configuring settings from Image quality for still pictures. . . . . . . . . . . . . . . . . . . . . . . . . . . . . . . . . 167
Configuring settings from the Shooting Menu (Easy CALS). . . . . . . . . . . . . . . . . . . . . . . . . . . . . . . 167
[Displayed Grid] in the Construction Menu. . . . . . . . . . . . . . . . . . . . . . . . . . . . . . . . . . . . . . . . . . . . . . 169
Connecting the Camera to External Devices. . . . . . . . . . . . . . . . . . . . . . . . . . . . . . . . . . . . . . . . . . 170
Connecting to External Devices. . . . . . . . . . . . . . . . . . . . . . . . . . . . . . . . . . . . . . . . . . . . . . . . . . . . . . . . . . 170
Cautions for the use of Wi-Fi and Bluetooth
®
functions. . . . . . . . . . . . . . . . . . . . . . . . . . . . . . . . . . . . 171
Disabling the Camera’s Wireless Functions. . . . . . . . . . . . . . . . . . . . . . . . . . . . . . . . . . . . . . . . . . . . . . . . 172
Connecting the Camera to a Smartphone. . . . . . . . . . . . . . . . . . . . . . . . . . . . . . . . . . . . . . . . . . . . 173
Connecting to Smartphones. . . . . . . . . . . . . . . . . . . . . . . . . . . . . . . . . . . . . . . . . . . . . . . . . . . . . . . . . . . . 173
Pairing the Camera and Smartphone. . . . . . . . . . . . . . . . . . . . . . . . . . . . . . . . . . . . . . . . . . . . . . . . . . . . . 174
Wireless Connection Standby Setting for When the Camera Is On. . . . . . . . . . . . . . . . . . . . . . . . . . . 176
Transferring images to a smartphone. . . . . . . . . . . . . . . . . . . . . . . . . . . . . . . . . . . . . . . . . . . . . . . . . . . . 177
Shooting remotely with a smartphone (Live View). . . . . . . . . . . . . . . . . . . . . . . . . . . . . . . . . . . . . . . . . 178
Shooting remotely with a smartphone (Remote Shutter). . . . . . . . . . . . . . . . . . . . . . . . . . . . . . . . . . . . 179
Resetting wireless LAN/Bluetooth
®
settings. . . . . . . . . . . . . . . . . . . . . . . . . . . . . . . . . . . . . . . . . . . . . . 180
Changing the password. . . . . . . . . . . . . . . . . . . . . . . . . . . . . . . . . . . . . . . . . . . . . . . . . . . . . . . . . . . . . . . . 181
Connecting the Camera to a Computer. . . . . . . . . . . . . . . . . . . . . . . . . . . . . . . . . . . . . . . . . . . . . . 182
Connecting the Camera to a Computer. . . . . . . . . . . . . . . . . . . . . . . . . . . . . . . . . . . . . . . . . . . . . . . . . . . 182
Copying Pictures to a Computer. . . . . . . . . . . . . . . . . . . . . . . . . . . . . . . . . . . . . . . . . . . . . . . . . . . . . . . . . 183
Installing the PC software. . . . . . . . . . . . . . . . . . . . . . . . . . . . . . . . . . . . . . . . . . . . . . . . . . . . . . . . . . . . . . . 184
Using the Remote Control. . . . . . . . . . . . . . . . . . . . . . . . . . . . . . . . . . . . . . . . . . . . . . . . . . . . . . . . . 185
Names of parts. . . . . . . . . . . . . . . . . . . . . . . . . . . . . . . . . . . . . . . . . . . . . . . . . . . . . . . . . . . . . . . . . . . . . . . . 185
Connecting the camera and remote control. . . . . . . . . . . . . . . . . . . . . . . . . . . . . . . . . . . . . . . . . . . . . . . 186
Wireless connection. . . . . . . . . . . . . . . . . . . . . . . . . . . . . . . . . . . . . . . . . . . . . . . . . . . . . . . . . . . . . . . . . 186
Deleting pairing. . . . . . . . . . . . . . . . . . . . . . . . . . . . . . . . . . . . . . . . . . . . . . . . . . . . . . . . . . . . . . . . . . . . . 187
Shooting from the remote control. . . . . . . . . . . . . . . . . . . . . . . . . . . . . . . . . . . . . . . . . . . . . . . . . . . . . . . 188
Data transfer indicator of the remote control. . . . . . . . . . . . . . . . . . . . . . . . . . . . . . . . . . . . . . . . . . . 189
MAC address of the remote control. . . . . . . . . . . . . . . . . . . . . . . . . . . . . . . . . . . . . . . . . . . . . . . . . . . . . . 190
Precautions for using the remote control. . . . . . . . . . . . . . . . . . . . . . . . . . . . . . . . . . . . . . . . . . . . . . . . . 191
Connecting to TVs or External Displays via HDMI. . . . . . . . . . . . . . . . . . . . . . . . . . . . . . . . . . . . . 192
Connecting the Camera to TVs or External Displays (HDMI). . . . . . . . . . . . . . . . . . . . . . . . . . . . . . . . . 192
Viewing Pictures on a TV (HDMI). . . . . . . . . . . . . . . . . . . . . . . . . . . . . . . . . . . . . . . . . . . . . . . . . . . . . . . . 193
7
Table of Contents

HDMI Output. . . . . . . . . . . . . . . . . . . . . . . . . . . . . . . . . . . . . . . . . . . . . . . . . . . . . . . . . . . . . . . . . . . . . . . 193
Connecting the Camera to a TV. . . . . . . . . . . . . . . . . . . . . . . . . . . . . . . . . . . . . . . . . . . . . . . . . . . . . . . 195
Operating the camera using a TV remote control. . . . . . . . . . . . . . . . . . . . . . . . . . . . . . . . . . . . . . . 196
Using Field Sensor Data. . . . . . . . . . . . . . . . . . . . . . . . . . . . . . . . . . . . . . . . . . . . . . . . . . . . . . . . . . 198
Field Sensor. . . . . . . . . . . . . . . . . . . . . . . . . . . . . . . . . . . . . . . . . . . . . . . . . . . . . . . . . . . . . . . . . . . . . . . . . . . 198
GPS and other data displays. . . . . . . . . . . . . . . . . . . . . . . . . . . . . . . . . . . . . . . . . . . . . . . . . . . . . . . . . . 198
GPS: Precautions for use. . . . . . . . . . . . . . . . . . . . . . . . . . . . . . . . . . . . . . . . . . . . . . . . . . . . . . . . . . . . . . . . 199
GPS function, electronic compass. . . . . . . . . . . . . . . . . . . . . . . . . . . . . . . . . . . . . . . . . . . . . . . . . . . . . . . . 200
Before using GPS function (A-GPS data). . . . . . . . . . . . . . . . . . . . . . . . . . . . . . . . . . . . . . . . . . . . . . . . . . 201
Updating the A-GPS data using a smartphone. . . . . . . . . . . . . . . . . . . . . . . . . . . . . . . . . . . . . . . . . . 201
Updating the A-GPS data using a PC. . . . . . . . . . . . . . . . . . . . . . . . . . . . . . . . . . . . . . . . . . . . . . . . . . 201
Using GPS. . . . . . . . . . . . . . . . . . . . . . . . . . . . . . . . . . . . . . . . . . . . . . . . . . . . . . . . . . . . . . . . . . . . . . . . . . . . 202
Recording and Saving Logs. . . . . . . . . . . . . . . . . . . . . . . . . . . . . . . . . . . . . . . . . . . . . . . . . . . . . . . . . . . . . 203
Recording logs. . . . . . . . . . . . . . . . . . . . . . . . . . . . . . . . . . . . . . . . . . . . . . . . . . . . . . . . . . . . . . . . . . . . . . 203
Saving logs. . . . . . . . . . . . . . . . . . . . . . . . . . . . . . . . . . . . . . . . . . . . . . . . . . . . . . . . . . . . . . . . . . . . . . . . . 203
Using Buffered and Saved Logs. . . . . . . . . . . . . . . . . . . . . . . . . . . . . . . . . . . . . . . . . . . . . . . . . . . . . . . . . . 204
Things you can do with the designated app, OM Image Share. . . . . . . . . . . . . . . . . . . . . . . . . . . . 204
Viewing Location Data. . . . . . . . . . . . . . . . . . . . . . . . . . . . . . . . . . . . . . . . . . . . . . . . . . . . . . . . . . . . . . . . . 205
Location data displays. . . . . . . . . . . . . . . . . . . . . . . . . . . . . . . . . . . . . . . . . . . . . . . . . . . . . . . . . . . . . . . 205
Shooting Modes and Default Settings. . . . . . . . . . . . . . . . . . . . . . . . . . . . . . . . . . . . . . . . . . . . . . . 206
List of configurable shooting modes. . . . . . . . . . . . . . . . . . . . . . . . . . . . . . . . . . . . . . . . . . . . . . . . . . . . . 206
Default Settings. . . . . . . . . . . . . . . . . . . . . . . . . . . . . . . . . . . . . . . . . . . . . . . . . . . . . . . . . . . . . . . . . . . . . . . 216
Direct Button. . . . . . . . . . . . . . . . . . . . . . . . . . . . . . . . . . . . . . . . . . . . . . . . . . . . . . . . . . . . . . . . . . . . . . . . . . 217
Live Control. . . . . . . . . . . . . . . . . . . . . . . . . . . . . . . . . . . . . . . . . . . . . . . . . . . . . . . . . . . . . . . . . . . . . . . . . . . 218
KShooting Menus. . . . . . . . . . . . . . . . . . . . . . . . . . . . . . . . . . . . . . . . . . . . . . . . . . . . . . . . . . . . . . . . . . . 219
nVideo Menu. . . . . . . . . . . . . . . . . . . . . . . . . . . . . . . . . . . . . . . . . . . . . . . . . . . . . . . . . . . . . . . . . . . . . . . 221
qPlayback Menu. . . . . . . . . . . . . . . . . . . . . . . . . . . . . . . . . . . . . . . . . . . . . . . . . . . . . . . . . . . . . . . . . . . . 222
CCustom Menus. . . . . . . . . . . . . . . . . . . . . . . . . . . . . . . . . . . . . . . . . . . . . . . . . . . . . . . . . . . . . . . . . . . . . 223
eSetup Menu. . . . . . . . . . . . . . . . . . . . . . . . . . . . . . . . . . . . . . . . . . . . . . . . . . . . . . . . . . . . . . . . . . . . . . . . . 226
Memory Card Capacity. . . . . . . . . . . . . . . . . . . . . . . . . . . . . . . . . . . . . . . . . . . . . . . . . . . . . . . . . . . 227
Number of still pictures. . . . . . . . . . . . . . . . . . . . . . . . . . . . . . . . . . . . . . . . . . . . . . . . . . . . . . . . . . . . . . . . . 227
Memory card capacity: movies. . . . . . . . . . . . . . . . . . . . . . . . . . . . . . . . . . . . . . . . . . . . . . . . . . . . . . . . . . 229
8
Table of Contents

Cautions. . . . . . . . . . . . . . . . . . . . . . . . . . . . . . . . . . . . . . . . . . . . . . . . . . . . . . . . . . . . . . . . . . . . . . . 231
Water and shock resistance. . . . . . . . . . . . . . . . . . . . . . . . . . . . . . . . . . . . . . . . . . . . . . . . . . . . . . . . . . . . . 231
Using the camera underwater. . . . . . . . . . . . . . . . . . . . . . . . . . . . . . . . . . . . . . . . . . . . . . . . . . . . . . . . . . . 232
Before using the camera underwater. . . . . . . . . . . . . . . . . . . . . . . . . . . . . . . . . . . . . . . . . . . . . . . . . . 232
When using the camera underwater. . . . . . . . . . . . . . . . . . . . . . . . . . . . . . . . . . . . . . . . . . . . . . . . . . . 232
After using the camera underwater. . . . . . . . . . . . . . . . . . . . . . . . . . . . . . . . . . . . . . . . . . . . . . . . . . . . 232
Storage and maintenance. . . . . . . . . . . . . . . . . . . . . . . . . . . . . . . . . . . . . . . . . . . . . . . . . . . . . . . . . . . . 233
Other cautions. . . . . . . . . . . . . . . . . . . . . . . . . . . . . . . . . . . . . . . . . . . . . . . . . . . . . . . . . . . . . . . . . . . . . . 233
Batteries. . . . . . . . . . . . . . . . . . . . . . . . . . . . . . . . . . . . . . . . . . . . . . . . . . . . . . . . . . . . . . . . . . . . . . . . . . . . . . 234
Using your USB-AC adapter abroad. . . . . . . . . . . . . . . . . . . . . . . . . . . . . . . . . . . . . . . . . . . . . . . . . . . . . . 235
Information. . . . . . . . . . . . . . . . . . . . . . . . . . . . . . . . . . . . . . . . . . . . . . . . . . . . . . . . . . . . . . . . . . . . 236
Using Separately Sold Accessories. . . . . . . . . . . . . . . . . . . . . . . . . . . . . . . . . . . . . . . . . . . . . . . . . . . . . . . 236
Attaching optional silicone jackets. . . . . . . . . . . . . . . . . . . . . . . . . . . . . . . . . . . . . . . . . . . . . . . . . . . . 236
Taking pictures with the Wireless RC Flash System. . . . . . . . . . . . . . . . . . . . . . . . . . . . . . . . . . . . . . . 236
Optional accessories. . . . . . . . . . . . . . . . . . . . . . . . . . . . . . . . . . . . . . . . . . . . . . . . . . . . . . . . . . . . . . . . . 237
Cleaning and storing the camera. . . . . . . . . . . . . . . . . . . . . . . . . . . . . . . . . . . . . . . . . . . . . . . . . . . . . . . . 242
Cleaning the camera. . . . . . . . . . . . . . . . . . . . . . . . . . . . . . . . . . . . . . . . . . . . . . . . . . . . . . . . . . . . . . . . . 242
Storage. . . . . . . . . . . . . . . . . . . . . . . . . . . . . . . . . . . . . . . . . . . . . . . . . . . . . . . . . . . . . . . . . . . . . . . . . . . . 243
Pixel Mapping - Checking the image processing functions. . . . . . . . . . . . . . . . . . . . . . . . . . . . . . . 243
Shooting tips and information. . . . . . . . . . . . . . . . . . . . . . . . . . . . . . . . . . . . . . . . . . . . . . . . . . . . . . . . . . . 244
The camera does not turn on even when a battery is loaded. . . . . . . . . . . . . . . . . . . . . . . . . . . . . . 244
A dialog prompting you to choose a language is displayed. . . . . . . . . . . . . . . . . . . . . . . . . . . . . . . 244
No picture is taken when the shutter button is pressed. . . . . . . . . . . . . . . . . . . . . . . . . . . . . . . . . . 245
The date and time have not been set. . . . . . . . . . . . . . . . . . . . . . . . . . . . . . . . . . . . . . . . . . . . . . . . . . 246
Set functions are restored to their factory default settings. . . . . . . . . . . . . . . . . . . . . . . . . . . . . . . . 246
Some settings are unavailable. . . . . . . . . . . . . . . . . . . . . . . . . . . . . . . . . . . . . . . . . . . . . . . . . . . . . . . . 247
Pictures are grainy. . . . . . . . . . . . . . . . . . . . . . . . . . . . . . . . . . . . . . . . . . . . . . . . . . . . . . . . . . . . . . . . . . 247
Pictures are “washed out”. . . . . . . . . . . . . . . . . . . . . . . . . . . . . . . . . . . . . . . . . . . . . . . . . . . . . . . . . . . . 247
Light appears in the picture. . . . . . . . . . . . . . . . . . . . . . . . . . . . . . . . . . . . . . . . . . . . . . . . . . . . . . . . . . 247
Unknown bright dot(s) appear on the subject in the picture taken. . . . . . . . . . . . . . . . . . . . . . . . . 247
The lens is cloudy or the monitor is hard to read. . . . . . . . . . . . . . . . . . . . . . . . . . . . . . . . . . . . . . . . 248
Movies do not play back smoothly when viewed on a TV. . . . . . . . . . . . . . . . . . . . . . . . . . . . . . . . 248
9
Table of Contents

The heading is not correct. . . . . . . . . . . . . . . . . . . . . . . . . . . . . . . . . . . . . . . . . . . . . . . . . . . . . . . . . . . . 248
Functions that cannot be selected from menus. . . . . . . . . . . . . . . . . . . . . . . . . . . . . . . . . . . . . . . . . 248
Only the subject is displayed and no information is shown. . . . . . . . . . . . . . . . . . . . . . . . . . . . . . . 248
Error codes. . . . . . . . . . . . . . . . . . . . . . . . . . . . . . . . . . . . . . . . . . . . . . . . . . . . . . . . . . . . . . . . . . . . . . . . . . . 249
Specifications. . . . . . . . . . . . . . . . . . . . . . . . . . . . . . . . . . . . . . . . . . . . . . . . . . . . . . . . . . . . . . . . . . . . . . . . . 253
Camera. . . . . . . . . . . . . . . . . . . . . . . . . . . . . . . . . . . . . . . . . . . . . . . . . . . . . . . . . . . . . . . . . . . . . . . . . . . . 253
Lithium-ion battery. . . . . . . . . . . . . . . . . . . . . . . . . . . . . . . . . . . . . . . . . . . . . . . . . . . . . . . . . . . . . . . . . . 257
SAFETY PRECAUTIONS. . . . . . . . . . . . . . . . . . . . . . . . . . . . . . . . . . . . . . . . . . . . . . . . . . . . . . . . . . . 258
SAFETY PRECAUTIONS. . . . . . . . . . . . . . . . . . . . . . . . . . . . . . . . . . . . . . . . . . . . . . . . . . . . . . . . . . . . . . . . . 258
General Precautions. . . . . . . . . . . . . . . . . . . . . . . . . . . . . . . . . . . . . . . . . . . . . . . . . . . . . . . . . . . . . . . . . 258
SWARNING. . . . . . . . . . . . . . . . . . . . . . . . . . . . . . . . . . . . . . . . . . . . . . . . . . . . . . . . . . . . . . . . . . . . . . . 259
SCAUTION. . . . . . . . . . . . . . . . . . . . . . . . . . . . . . . . . . . . . . . . . . . . . . . . . . . . . . . . . . . . . . . . . . . . . . . . 261
SNOTICE. . . . . . . . . . . . . . . . . . . . . . . . . . . . . . . . . . . . . . . . . . . . . . . . . . . . . . . . . . . . . . . . . . . . . . . . . 261
Trademarks. . . . . . . . . . . . . . . . . . . . . . . . . . . . . . . . . . . . . . . . . . . . . . . . . . . . . . . . . . . . . . . . . . . . . . . . . 264
10
Table of Contents

Introduction
Before You Begin
Read and Follow Safety Precautions
To prevent incorrect operations that may result in fire or other damage to property or harm to yourself
or to others, read the entirety of “SAFETY PRECAUTIONS” (P.258) before using the camera.
While using the camera, consult this manual to ensure safe and correct operation. Be sure to keep the
manual in a safe place after reading it.
Our company will not be held liable for violations of local regulations arising from use of this product
outside the country or region of purchase.
Wireless LAN, Bluetooth
®
, and GPS
The camera features built-in wireless LAN, Bluetooth
®
, and GPS. Use of these features outside the
country or region of purchase may violate local wireless regulations. Be sure to check with local
authorities before using these features. Our company will not be held liable for the user’s failure to
comply with local regulations.
Disable wireless LAN, Bluetooth
®
, and GPS in areas where their use is prohibited. g “Disabling the
Camera’s Wireless Functions” (P.172), “GPS: Precautions for use” (P.199)
User Registration
Be sure to register your purchase. Visit our website for information on registering your products.
11
Before You Begin

Installing PC Software/Apps
OM Workspace
This computer application is used to download and view photos and movies recorded with the camera.
It can also be used to update the camera firmware. The software can be downloaded from our website.
Be prepared to provide the camera serial number when downloading the software.
OM Image Share
Download pictures marked for sharing to your smartphone. You can also operate the camera remotely
and take pictures from your smartphone. Visit our website for information about the application.
12
Before You Begin

About This Manual
How to find what you want to know
You can use the following methods to find what you want to know in this manual.
Search method Where to look
Search based on what you want to do
g“Table of Contents”
Search based on names of buttons and parts of the camera
g“Names of parts” (P.15)
Search based on menus and terms displayed on the monitor
g“Default Settings” (P.216)
13
About This Manual
How to read this manual
Symbols in this manual
The following symbols are used throughout this manual.
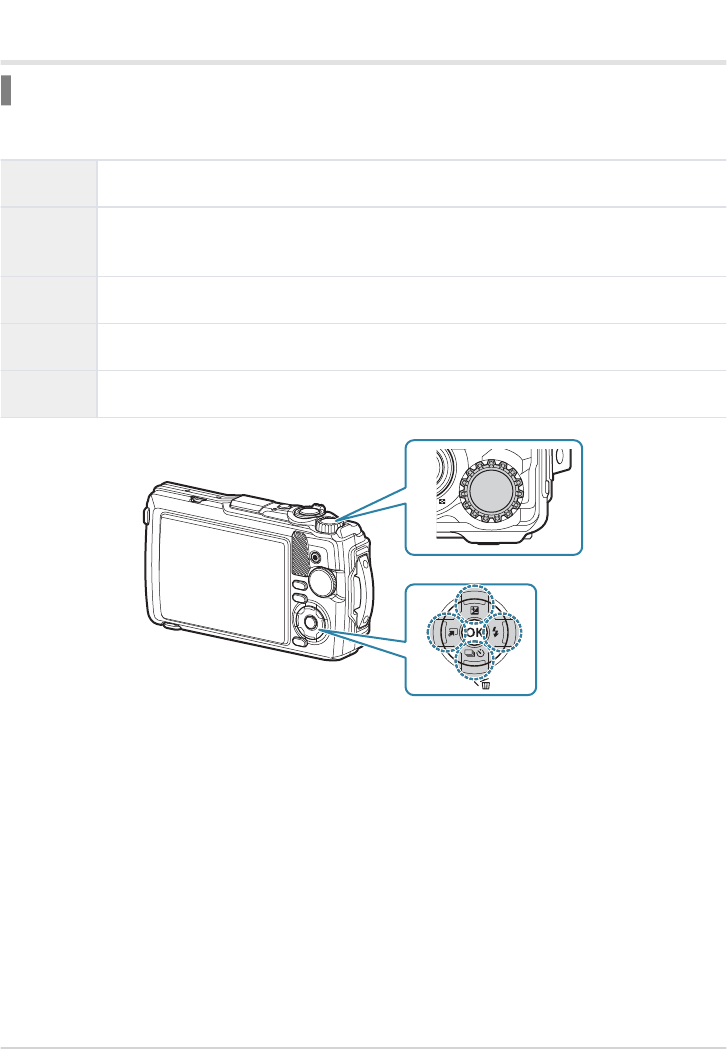
p
Indicates an operation performed using the front dial (a).
FGHI
Indicates an operation performed by pressing the up, down, left, and right arrow
buttons on the arrow pad (b).
C
Indicates cautions and limitations.
B
Indicates tips and other helpful information for using the camera.
g
Indicates references to other pages in this manual.
a
b
14
About This Manual

Lens
Lens ring (removable) (P.239)
Self-timer lamp/LED illuminator/AF illuminator
(P.60, P.67, P.145)
Internal flash (P.64)
Connector cover (P.23)
Connector cover lock (P.23)
Lock knob (P.23)
Speaker
Lens ring release button (P.239)
1
2
3
4
5
6
7
8
9
USB connector (Type-C) (P.23, P.182)
HDMI connector (Type-D) (P.159)
Battery/card compartment cover (P.19)
Lock knob (P.19)
Battery/card compartment cover lock (P.19)
Tripod socket
Monitor (P.31, P.89, P.154)
Strap eyelet (P.18)
10
11
12
13
14
15
16
17
Names of parts
1
2
8
10
11
7
6
5
4
3
9
12
13
14
15
16
17
15
Names of parts

Stereo microphone (P.109)
LOG switch (P.203)
INFO button (P.33, P.91, P.67)
q (playback) button (P.92)
MENU / Wi-Fi button (P.117)
GPS antenna (P.202)
Indicator lamp (P.23, P.203)
ON/OFF button (P.27)
Zoom lever (P.37, P.96, P.94, P.95)
Shutter button (P.35)
Control dial(P.92)
1
2
3
4
5
6
7
8
9
10
11
R (movie)/4 button (P.54, P.97)
Mode dial (P.35)
OK button (P.69, P.92, P.117)
Arrow pad (P.57)
F / F (exposure compensation) button
(P.58)
G / gY (sequential shooting/self-timer)
button / D (erase) button (P.60, P.98)
H / Y (mode function) button (P.49,
P.51)
I / A (Flash) button (P.64)
12
13
14
15
2
1
3
4
5
6
7
8
9
11
10
12
13
14
15
16
Names of parts
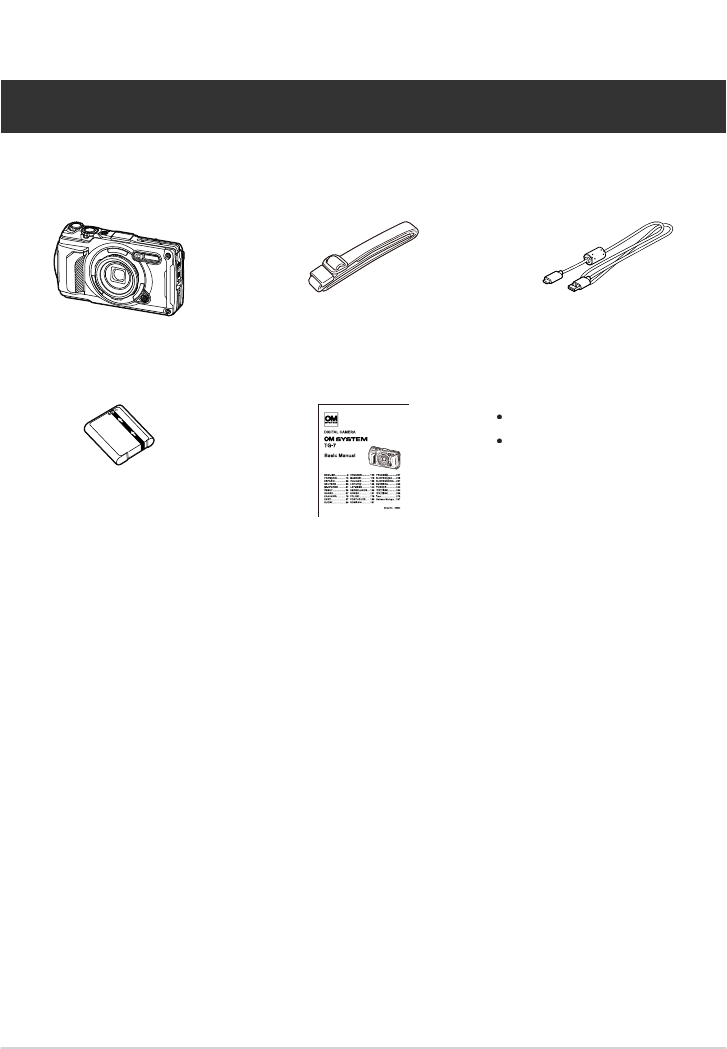
Camera
(with removable lens ring)
Strap
USB cable CB-USB14
Lithium-ion battery LI-92B
Basic Manual
Warranty Card
Maintaining Water Resistance
Preparation
Unpacking the Box Contents
At purchase, the package contains the camera and the following accessories.
If anything is missing or damaged, contact the dealer from whom you purchased the camera.
The battery will not be fully charged at the time of purchase. Charge the battery before use (P.23).
17
Unpacking the Box Contents
C

Attaching the Strap
Pass the end of the strap through the strap eyelet on the camera and back through the keeper
loop.
Pass the end of the strap through the buckle and tighten as shown.
After attaching the strap, pull on it firmly to ensure that it will not come loose.
18
Attaching the Strap
1.
2.

Open the battery/card compartment cover.
2
1
1 3
2
3
Battery/card compartment
cover
Lock knob
Battery/card compartment
cover open/close knob
1
2
3
Insert the battery.
Use only LI-92B batteries (P.17).
Insert the battery as illustrated with the b mark toward the
battery lock knob.
If you insert the battery in the wrong direction, the camera
will not turn on. Be sure to insert it in the correct direction.
1
Battery lock knob
1
Inserting and Removing the Battery and Card
In this manual, all storage devices are referred to as “cards”. The following types of SD cards
(commercially available) can be used with this camera: SD, SDHC, and SDXC.
Cards must be formatted with this camera before first use or after being used with other cameras or
computers. g“Formatting the card (Card Setup)” (P.141)
Inserting the battery and card
It is recommended to set aside a backup battery for prolonged shooting in case the battery
in use drains.
See also “Batteries” (P.234).
19
Inserting and Removing the Battery and Card
1.
2.
B
B

Insert the card.
Slide the card in until it is locked into place.
1
Terminal area
1
Close the battery/card compartment cover.
While holding the battery/card compartment cover in the
direction indicated by 1, slide the open/close knob of the
battery/card compartment cover and the lock knob to lock
the cover (2, 3).
When using the camera, be sure to close and lock the
battery/card compartment cover.
1
2
3
Turn off the camera before opening or closing the battery/card
compartment cover. To remove the battery, first push the battery
lock knob in the direction of the arrow, then remove it.
Do not remove the battery while the card write indicator is
displayed.
125 F5.6
ISO -A
200
L
N
S-IS
ON
S-IS
ON
0.00.0
01:02:0301:02:03
10231023
P
FHD
30p30p
F
1
Card write indicator
1
Do not forcibly insert a damaged or deformed card. Doing so may damage the card slot.
Removing the battery
Contact an authorized distributor or service center if you are unable to remove the battery. Do not
forcibly remove the battery.
20
Inserting and Removing the Battery and Card
3.
C
4.
C
C

Press the inserted card lightly to eject it. Pull out the card.
The following types of SD cards (commercially available) can
be used with this camera: SD, SDHC, and SDXC. For the latest
information, please visit our website.
The SD card body has a write protect switch. Setting the switch
to “LOCK” prevents data being written to the card. Return the
switch to the unlock position enable writing.
LOCK
Removing the card
Do not remove the card while the card write indicator is displayed (P.20).
Usable cards
SD card write protect switch
The data in the card will not be erased completely even after formatting the card or deleting the
data. When discarding, destroy the card to prevent leakage of personal information.
21
Inserting and Removing the Battery and Card
C
B

File storage locations
Data on the card are stored in the following folders:
100OMSYS
999OMSYS
DCIM
GPSLOG
SNSLOG
1
2
3
a
DCIM: Images are stored in the sub-folders (a). Sub-folders are automatically numbered
sequentially.
GPSLOG: GPS logs are stored in this folder.
SNSLOG: Sensor logs are stored in this folder.
22
Inserting and Removing the Battery and Card
1
2
3

USB-AC adapter F‑5AC (sold separately)
AC outlet
USB cable (supplied)
1
2
3
USB connector (Type-C)
Indicator lamp
4
5
Charging the Battery
The battery will not be fully charged at the time of purchase. Charge the battery before use.
The ambient temperature for charging is 0°C to 40°C.
The camera can be charged using the following methods.
Using the F-5AC (sold separately) (P.23)
Connecting the camera to a computer (P.182)
Using a commercially available USB device (P.25)
Charging the battery using an optional USB-AC
adapter
Check that the battery is in the camera, and connect the USB cable and USB-AC adapter.
Do not use any USB cable other than the USB cable supplied with the camera (CB-USB14) or
an optional USB cable (CB-USB11).
3
3
2
1
5
4
2
3
1
The menu will be displayed on the monitor.
23
Charging the Battery
C
C
C
-
-
-
1.
B

USB
Charge
Exit
MTP
Storage
Set
The indicator lamp will light and charging will begin.
The indicator lamp turns off when charging is complete.
Charging takes about 3 hours. Charging times may increase
at high ambient temperatures.
Highlight [Charge] using the FG buttons on the arrow pad and press the OK button.
Be sure to unplug the power plug of the USB-AC adapter from the wall outlet when charging
is complete.
Use the USB-AC adapter for prolonged shooting. In that case, make sure that the battery is inserted
into the camera and select [Charge] in the dialog displayed after the USB cable is connected.
Pressing the ON/OFF button after the monitor turns off turns the monitor back on, and pictures can
be taken during the charging.
To charge the battery abroad, see “Using your USB-AC adapter abroad” (P.235).
Never use any cable other than the supplied cable or a designated USB cable. Using another cable
can cause smoking or burning.
If the indicator lamp is not lit, reconnect the USB cable and USB-AC adapter to the camera.
A charger (UC-92: sold separately) can be used to charge the battery.
Handling the USB-AC adapter
When cleaning the camera, unplug the USB-AC adapter from the power outlet. Cleaning the
camera without unplugging the USB-AC adapter may cause electric shock or injury.
24
Charging the Battery
2.
C
B
B
C
C
B
C

After confirming that the battery is inside the camera, connect
the camera to a USB device using an USB cable.
The menu will be displayed on the monitor.
USB
Charge
Exit
MTP
Storage
Set
The indicator lamp will be lit while charging is in
progress. Charging time varies depending on the output
specifications of the connected USB device. The indicator
lamp turns off when charging is complete.
When to charge the batteries
If the camera displays the message shown in the illustration, charge the battery.
125 F5.6
ISO -A
200
L
N
S-IS
ON
S-IS
ON
0.00.0
01:02:0301:02:03
10231023
P
FHD
30p30p
F
Battery Empty
1
Flashes in red
Charging with a USB device
The battery inside the camera can be charged by connecting the camera to a commercially available
USB device using a USB cable.
Highlight [Charge] using the FG buttons on the arrow pad and press the OK button.
If the indicator lamp is not lit, reconnect the USB cable and USB-AC adapter to the camera.
25
Charging the Battery
1
1.
2.
C

Charging time varies greatly depending on the types of USB devices. USB devices that support
an output of 7.5W (5V/1.5A) are recommended. Some USB devices may not be used to charge
camera batteries via USB. For details, refer to the documentation provided with the USB device.
26
Charging the Battery
C

Battery level indicator
The battery level is displayed on a battery
icon.
7 (green): The camera is ready to
shoot.
8 (green): The battery is not full.
9 (blinks red): Charge the battery.
125 F5.6
ISO -A
200
L
N
S-IS
ON
S-IS
ON
0.00.0
01:02:0301:02:03
10231023
P
FHD
30p30p
F
Turning the Camera On
Press the ON/OFF button to turn on the camera.
When the camera is turned on, the monitor will turn on.
To turn the camera off, press the ON/OFF button again.
Sleep Mode
If no controls are used for a set period, the camera will automatically go into standby to reduce the
drain on the batteries. This is referred to as “sleep mode”.
When the camera enters sleep mode, the monitor will turn off and operation will be suspended.
Pressing the shutter or q button reactivates the camera.
If no operations are performed for five minutes after the camera enters sleep mode, the camera will
turn off automatically. The camera can be reactivated by turning it on again.
The delay before the camera enters sleep mode can be selected in the CCustom Menu. At default
settings, the camera will enter sleep mode after one minute. gCCustom MenuH > [Sleep]
(P.154)
27
Turning the Camera On
1.
C

Press the OK button when the initial setup dialog prompting
you to choose a language is displayed.
Please select your language.
Por favor, selecciona tu idioma.
Veuillez choisir votre langue.
Bitte wählen Sie Ihre Sprache.
嶤嵫儛㉕䠱嶚宭҉
Highlight the desired language using the control dial or the
FGHI buttons.
Česky
Suomi
Italiano
Polski
Ὶ㜴)䴭℀*
Nederlands
Français
Português(Pt)
Español
Ὶ㜴)修℀*
English
Deutsch
Norsk
Русский
Türkçe
Set
ไทย
Svenska
W
Press the OK button when the desired language is highlighted.
Set
W
Česky
Suomi
Italiano
Polski
Ὶ㜴)䴭℀*
Nederlands
Français
Português(Pt)
Español
Ὶ㜴)修℀*
English
Deutsch
Norsk
Русский
Türkçeไทย
Svenska
Initial Setup
After turning the camera on for the first time, perform the initial setup by choosing a language and
setting the camera clock.
File names are created based on date and time information. Be sure to set the correct date and time
before using the camera. Some functions cannot be used if the date and time have not been set.
If you press the shutter button before pressing the OK button, the camera will exit to
shooting mode and no language will be selected. You can perform the initial setup by
turning the camera off and then on again to display the initial setup dialog and repeating the
process from Step1.
The language can be changed at any time from the menu. g “What to Do If You Can’t
Read the Display” (P.30)
28
Initial Setup
C
1.
2.
3.

Set the date, time, and date format.
Use the HI buttons to highlight items.
Use the FG buttons or control dial to change the
highlighted item.
The time is displayed using a 24-hour clock.
Y M D Time
2023
Y/M/D
Cancel
The clock can be adjusted at any time from the menu. geSetup Menu> [mSettings]
(P.139)
Press the OK button.
Highlight a time zone using the FG buttons and press the OK button.
Press the INFO button to enable or disable daylight saving time.
Press the OK button to save changes and exit.
Date and time information is recorded on the card together with the images.
If the battery is removed and left outside of the camera for a while, the date and time may be reset.
If this happens, set the date and time from the menu. geSetup Menu> [mSettings] (P.139)
You may also need to adjust the frame rate before shooting movies. g “Frame size, rate, and
compression (n Movie Quality)” (P.82)
29
Initial Setup
4.
5.
6.
7.
B
B
B

Press the MENU button to
view the menus.
2
1
1
เมนูถ่ายภาพ 1
กลับ ตั*งค่า
พื
*
นที0กรอบ AF
โหมดภาพ
X
รีเซ
็
ต/เลือกโหมดกําหนดเอง
Highlight the e (Setup Menu)
tab using the FG buttons
and press the OK button.
2
1
เมนูตังค่า
กลับ
ตังค่า
การตังค่า Wi-Fi/Bluetooth
ตรวจดูภาพ
b
W
m
การตังค่า
0.5 วินาที
p
±0
ไทย
ตังค่าการ์ด
การก่อสร้าง
Highlight [W] using the FG buttons and press the OK
button.
2
1
เมนูตังค่า
กลับ
ตังค่า
0.5 วินาที
ไทย
ตังค่าการ์ด
b
W
m
การตังค่า
p
±0
การตังค่า Wi-Fi/Bluetooth
ตรวจดูภาพ
การก่อสร้าง
Highlight the desired language using the FGHI buttons
and press the OK button.
Back
Set
W
Česky
Suomi
Italiano
Polski
Ὶ㜴)䴭℀*
Nederlands
Français
Português(Pt)
Español
Ὶ㜴)修℀*
English
Deutsch
Norsk
Русский
Türkçeไทย
Svenska
What to Do If You Can’t Read the Display
If you see unfamiliar characters or words in other languages, you may not have selected the language
you intended. Follow the steps below to choose another language.
30
What to Do If You Can’t Read the Display
1.
2.
3.
4.

Shooting
Information displays while shooting
Monitor display during still photography
FHD
125 F5.6
ISO-A
200
L
N
4:3
S-IS
ON
S-IS
ON
+
2.0
+
2.0
01:02:0301:02:03
10231023
HDRDate
FD-1FD-1
C1
AFAF
WB
AUTO
WB
AUTO
1.4
x
1.4
x
FocusFocus
LOG
P
30p30p
F
2
99
BKT
HDR
1.4
x
1.4
x
2.0
x
2.0
x
2 2
1 2 3
39 37 36 35 34 33 3238 31
49
45
46
48
47
40
41
42
43
44
26
25
23
22
24
27
28
29
30
5 6
7
12 14 15 21
8 9
10 11 13 16 17
2019
18
4
Monitor display during movie mode
M-IS ONM-IS ON
L
R
L
R
1:02:03
1.4
x
1.4
x
ISO-A
200
L
N
16:9
AFAF
WB
AUTO
WB
AUTO
n
+
2.0
+
2.0
FHD
30p30p
F
50
31
Information displays while shooting

Card write indicator (P.20, P.21)
Active Bluetooth connection (P.174)
Active remote control connection (P.186)
Grid (P.146)
Date stamps (P.132)
Recording location information (P.203)
AF target (P.35, P.125)
HDR (P.43, P.51)
Bracketing (P.130)
Handheld starlight (P.43)
Focus stacking (P.49)
Accessory (P.88, P.237)
Digital teleconverter
1
(P.59)
Interval/time lapse shooting (P.127)
Face priority (P.87)
Movie sound recording (P.54, P.134)
Wind noise reduction (P.134)
Level gauge (tilt) (P.33, P.157)
Optical zoom ratio/magnification
1
(P.37,
P.49)
Internal temperature warning (P.249)
Flash (blinks: charging in progress, lights up:
charging completed) (P.64)
AF confirmation mark (P.35)
Picture Mode (P.71, P.123)
ISO sensitivity (P.74)
White balance (P.75)
AF mode (P.78)
Aspect ratio (P.79)
1
2
3
4
5
6
7
8
9
10
11
12
13
14
15
16
17
18
19
20
21
22
23
24
25
26
27
Image quality (still images) (P.80)
Image quality (movie) (P.82)
Available recording time(P.229)
Number of storable still pictures (P.227)
Top: Flash intensity control (P.85)
Bottom: Exposure compensation (P.58)
Level gauge (horizon) (P.33, P.157)
Exposure compensation (P.58)
Aperture value (P.39, P.41)
Shutter speed (P.39, P.41)
Histogram (P.33, P.157)
AF fine-tuning guide (P.66, P.78)
LOG icon/warning (P.203, P.249)
Shooting mode (P.35)
Custom modes (P.52, P.122)
GPS icon (P.202)
Picture + Sound (P.133)
Metering mode (P.86)
Sequential/self-timer shooting (P.60)
Flash intensity control (P.85)
Flash mode (P.64)
Image stabilizer (P.84)
Battery level (P.27)
Recording level meter (P.55)
28
29
30
31
32
33
34
35
36
37
38
39
40
41
42
43
44
45
46
47
48
49
50
Displayed at all times if [f Microscope Control] (P.49) is in use.
32
Information displays while shooting
1

You can switch the information displayed in the monitor during
shooting using the INFO button.
Basic Information
1
Image only
1
2
Histogram display (Custom1)
Level gauge display (Custom2)
3
4
Switching the information display
INFO
INFO
INFOINFO
250 F5.6
ISO -A
200
L
N
S-IS
ON
S-IS
ON
0.00.0
01:02:0301:02:03
10231023
P
FHD
30p30p
F
250 F5.6
ISO -A
200
S-IS
ON
S-IS
ON
0.00.0
01:02:0301:02:03
10231023
P
250 F5.6
ISO -A
200
S-IS
ON
S-IS
ON
0.00.0
01:02:0301:02:03
10231023
P
1 2
4 3
Not displayed in n mode (movie mode) unless recording is in progress.
You can change Custom1 and Custom2 settings. g[G/Info Settings]> [LV-Info] (P.157)
The information display screens can be switched in either direction by rotating the control dial while
pressing the INFO button.
33
Information displays while shooting
1

A histogram showing the distribution of brightness in the image
is displayed. The horizontal axis gives the brightness, the vertical
axis the number of pixels of each brightness in the image. During
shooting, overexposure is indicated in red, underexposure in blue,
and the range metered using spot metering in green.
More
Less
1
2
Dark
Bright
3
4
1
2
4
3
Histogram display
Level gauge display
The orientation of the camera is indicated. The “tilt” direction is indicated on the vertical bar and the
“horizon” direction on the horizontal bar. The camera is level and plumb when the bars turn green.
Use the indicators on the level gauge as a guide.
If there are any errors in the display, perform Level Adjust (P.154).
34
Information displays while shooting

Rotate the mode dial to set the mode you wish to use.
Shooting Still Pictures
Shooting modes
0
AUTO (P.38)
P
Program AE (P.39)
A
Aperture-priority AE (P.41)
SCN
Scene (P.43)
7
Microscope (P.49)
6
Underwater (P.51)
C1
Custom (P.52)
C2
For information on the n position on the mode dial, see “Recording movies in movie mode (n
mode)” (P.55).
35
Shooting Still Pictures
B
1.

Landscape position Portrait position
Position the AF frame over your subject.
125 F5.6
ISO -A
200
L
N
S-IS
ON
S-IS
ON
0.00.0
01:02:0301:02:03
10231023
P
FHD
30p30p
F
1
AF frame
1
Lightly press the shutter button down to the first position
(press the shutter button halfway).
The AF confirmation mark (N) will be displayed, and a green
frame (AF target) will be displayed in the focus location.
125 F5.6
ISO-A
200
L
N
S-IS
ON
S-IS
ON
01:02:0301:02:03
10231023
P
FHD
30p30p
F
1.0
x
1.0
x
1
2
AF target
AF confirmation mark
1
2
Frame the shot.
Be careful that your fingers or the camera strap do not obstruct the lens or AF illuminator.
Adjust the focus.
If the camera is unable to focus, the AF confirmation mark will flash (P.245).
36
Shooting Still Pictures
2.
C
3.
C

Release the shutter.
Press the shutter button the rest of the way down (fully).
The camera will release the shutter and take a picture.
The shot image will be displayed on the monitor.
Press the shutter button all the
way down.
21
60 F2.0
ISO - A
20 0
L
N
S-IS
ON
S-IS
ON
0.00.0
01:02:0301:02:03
10231023
P
FHD
30p30p
F
1.0
x
1.0
x
Wide (W) side
1
50 F3.2
ISO - A
20 0
L
N
S-IS
ON
S-IS
ON
0.00.0
01:02:0301:02:03
10231023
P
FHD
30p30p
F
2.0
x
2.0
x
Telephoto (T) side
2
Using the zoom
Zoom in to photograph distant objects or zoom out to increase the area visible in the frame. Zoom can
be adjusted using the zoom lever.
37
Shooting Still Pictures
4.

Rotate the mode dial to 0.
Letting the camera choose the settings (AUTO
mode)
The camera adjusts settings to suit the scene. All you have to do is press the shutter button.
In auto mode, the camera automatically selects the scene mode option appropriate to your
subject when you press the shutter button halfway. Once the selection has been made, the
0 icon in the bottom left corner of the display will be replaced by the icon for the chosen
scene.
Release the shutter.
38
Letting the camera choose the settings (AUTO
mode)
1.
2.

Rotate the mode dial to P.
Focus and check the display.
The shutter speed and aperture chosen by the camera are
displayed.
125 F5.6
ISO - A
20 0
L
N
S-IS
ON
S-IS
ON
0.00.0
01:02:0301:02:03
10231023
P
FHD
30p30p
F
1 2 3 4
Exposure mode
Shutter speed
Aperture
Exposure compensation
amount
1
2
3
4
Letting the camera choose aperture and
shutter speed (P: Program AE)
The camera chooses the optimal aperture and shutter speed according to subject brightness.
Exposure compensation (P.58) can be adjusted by rotating the control dial or by pressing
the F (F) button and then using HI.
Release the shutter.
39
Letting the camera choose aperture and shutter
speed (P: Program AE)
1.
2.
3.

If the subject is too dark or too bright
If the camera is unable to achieve optimal exposure, the shutter speed and aperture displays will flash
as shown.
Display Problem/solution
Large aperture (low f/-number)/slow shutter
speed
2" F2.8
The subject is too dark.
Use flash.
Small aperture (high f/-number)/fast shutter
speed
2000 F11
The subject is too bright.
The limits of the camera metering system
have been exceeded.
If ISO sensitivityis not set to [AUTO], optimal exposure may be achieved by changing the setting.
g“Changing ISO sensitivity (ISO Sensitivity)” (P.74)
40
Letting the camera choose aperture and shutter
speed (P: Program AE)
B

Rotate the mode dial to A.
Rotate the control dial to adjust exposure compensation.
125 F5.6
ISO - A
20 0
L
N
S-IS
ON
S-IS
ON
01:02:0301:02:03
10231023
A
FHD
30p30p
F
1
Aperture
1
Choosing aperture (A: Aperture-Priority AE)
By choosing the aperture value (F value) in this mode, the camera will automatically set the shutter
speed for optimal exposure according to subject brightness. Lower aperture values (larger apertures)
reduce the depth of the area that appears to be in focus (depth of field), blurring the background.
Higher aperture values (smaller apertures) increase the depth of the area that appears to be in focus in
front of and behind the subject.
The camera will automatically select the optimal shutter speed, which will appear in the
display.
After pressing the F (F) button, you can adjust exposure compensation (P.58) by using
the control dial or HI.
Release the shutter.
41
Choosing aperture (A: Aperture-Priority AE)
1.
2.
3.

If the subject is too dark or too bright
If the camera is unable to achieve optimal exposure, the shutter-speed display will flash as shown.
Display Problem/solution
Slow shutter speed
F5.61"
The problem is caused by underexposure.
Choose a lower aperture value.
Fast shutter speed
2000 F5.6
The problem is caused by overexposure.
Choose a higher aperture value.
If ISO sensitivityis not set to [AUTO], optimal exposure may be achieved by changing the setting.
gChanging ISO sensitivity (ISO Sensitivity) (P.74)
42
Choosing aperture (A: Aperture-Priority AE)
B

Shooting in scene mode (SCN mode)
The camera automatically optimizes settings according to the subject or scene.
The procedures for using [Live Composite] and [Panorama] differ from the other scene
modes. For more information, see “[Live Composite]: Live composite photography" (P.46) and
“[Panorama]: Shooting a panorama” (P.47).
Types of scene modes
People
B
Portrait Suitable for shooting portraits. Skin texture is brought out.
E
e-Portrait
Smooths out skin tones and texture. The camera records two
pictures: one with the effect applied and one without.
D
Portrait+ Landscape
Suitable for portraits featuring a landscape in the background. Blues,
greens, and skin tones are captured beautifully.
J
Portrait+ Nightscape
Suitable for shooting portraits against a night view backdrop. We
recommend that you use a tripod and take pictures remotely with
either OM Image Share or an optional remote control (P.178, P.179,
P.188).
S
Children
Suitable for photographs of children and other active subjects. The
camera will take multiple photos while the shutter button is pressed.
Nightscapes
G
Nightscape
Suitable for shooting night scenes using a tripod. We recommend
that you use a tripod and take pictures remotely with either OM
Image Share or an optional remote control (P.178, P.179, P.188).
J
Portrait+ Nightscape
Suitable for shooting portraits against a night view backdrop. We
recommend that you use a tripod and take pictures remotely with
either OM Image Share or an optional remote control (P.178, P.179,
P.188).
43
Shooting in scene mode (SCN mode)

O
Handheld Starlight
Suitable for shooting night scenes without a tripod. Reduces blur
when shooting low light/illuminated scenes. The camera makes eight
exposures and combines them into a single photograph.
K
Fireworks
Suitable for shooting fireworks at night. We recommend that you use
a tripod and take pictures remotely with either OM Image Share or
an optional remote control (P.178, P.179, P.188).
T
Live Composite
The camera automatically shoots multiple images, takes only areas
that have become bright, and composites them into a single image.
With normal long exposure, images of light traces such as star trails
with bright buildings tend to become too bright. This mode allows
you to capture such scenes without over exposure while checking
the progress. We recommend that you use a tripod and take pictures
remotely with either OM Image Share or an optional remote control
(P.178, P.179, P.188).
For information on taking photos using this feature, see “[Live
Composite]: Live composite photography” (P.46).
Motion
C
Sport
Suitable for shooting fast action. The camera will take multiple
photos while the shutter button is pressed.
S
Children
Suitable for photographs of children and other active subjects. The
camera will take multiple photos while the shutter button is pressed.
Scenery
F
Landscape Suitable for shooting landscapes.
Y
Sunset Suitable for shooting sunsets.
L
Beach& Snow
Suitable for shooting at snow-capped mountains, sunny beaches,
and other similar scenes.
X
Panorama
Shoot a series of images that are combined to create a panorama.
For information on taking photos using this feature, see
“[Panorama]: Shooting a panorama” (P.47).
44
Shooting in scene mode (SCN mode)

A
Backlight HDR
Suitable for high-contrast scenes. This mode captures multiple
images and merges them into one, properly exposed image. When
the shutter button is pressed, four photographs will be taken
automatically. After shooting, the camera automatically combines the
frames into a single image.
Indoors
N
Candlelight Suitable for shooting candlelit scenes. Warm colors are preserved.
B
Portrait Suitable for shooting portraits. Skin texture is brought out.
E
e-Portrait
Smooths out skin tones and texture. The camera records two
pictures: one with the effect applied and one without.
S
Children
Suitable for photographs of children and other active subjects. The
camera will take multiple photos while the shutter button is pressed.
A
Backlight HDR
Suitable for high-contrast scenes. This mode captures multiple
images and merges them into one, properly exposed image. When
the shutter button is pressed, four photographs will be taken
automatically. After shooting, the camera automatically combines the
frames into a single image.
When [Construction Menu] (P.164) is set to [On], the scene mode is specifically configured for
shooting in construction sites (P.165).
To maximize the benefits of the scene modes, some of the shooting function settings are disabled.
Some time may be needed to record pictures taken using [e-Portrait]. In addition, when the image
quality mode is [RAW], the image is recorded in RAW+JPEG.
[Handheld Starlight] pictures taken with [RAW] selected for image quality will be recorded in
RAW+JPEG format, with the first frame recorded as a RAW image and the final composite as a JPEG
image.
[Backlight HDR] records HDR-processed images in JPEG format. When the image quality mode is
set to [RAW], the image is recorded in RAW+JPEG.
Noise may be more noticeable in photos taken in conditions associated with slow shutter speeds.
For best results, secure the camera in place by, for example, mounting it on a tripod.
The image displayed on the monitor while shooting will differ from the HDR-processed image.
The picture mode is fixed to [Natural] and the color space is fixed to [sRGB].
45
Shooting in scene mode (SCN mode)
B
C
C
C
C
-
-
-
-

Rotate the mode dial to SCN.
Use FGHI or the control dial to highlight a scene and
press the OK button.
Motion Scenery
Nightscapes
Indoors
People
Highlight the desired scene mode using HI or the control
dial and press the OK button.
To return to the previous display, press the MENU button
without pressing the OK button to select a scene mode.
Portrait
Release the shutter.
To choose a different scene, press the Y(H) button.
[Live Composite]: Live composite photography
Rotate the mode dial to SCN.
Highlight [Nightscapes] using FGHI or the control dial and press the OK button.
Highlight [Live Composite] using HI or the control dial and press the OK button.
Press the shutter button halfway to focus.
In order to stabilize the camera, we recommend that you secure the camera firmly in place
using a tripod and take pictures remotely with either OM Image Share or an optional remote
control (P.178, P.179, P.188).
If the focus indicator blinks, the camera is not in focus.
46
Shooting in scene mode (SCN mode)
1.
2.
3.
4.
1.
2.
3.
4.

Press the shutter button all the way down to start shooting.
The camera configures the proper settings automatically and starts shooting.
After pressing the shutter button, there is a time lag until shooting starts.
The composite image will be displayed at regular intervals.
Press the shutter button again to stop shooting.
View the changing result in the monitor and press the shutter button to end shooting once
the desired result is achieved.
The maximum recording length of one shot is 3 hours.
[Panorama]: Shooting a panorama
Rotate the mode dial to SCN.
Highlight [Scenery] using FGHI or the control dial and press the OK button.
Highlight [Panorama] using HI or the control dial and press the OK button.
Press the shutter button to shoot the first frame.
Pan the camera slowly to frame the second shot.
A target mark will be displayed.
47
Shooting in scene mode (SCN mode)
5.
6.
1.
2.
3.
4.
5.

Move the camera slowly so that the pointer and the target
mark overlap. The camera releases the shutter automatically
when the pointer and the target overlap.
Cancel Save
1 2
To combine images from left
to right
Target mark
Pointer
1
2
Press the OK button to combine only the two frames.
Repeat step 5 to take a third frame. The camera automatically combines the frames into a single
panorama image.
To cancel the panorama function, press the MENU button.
Focus, exposure, and other settings are fixed at the values in effect at the start of shooting.
If you press the OK button or press the shutter button again before panning the camera to move
the target over the pointer, shooting will end and a panorama will be created from the frames shot
to that point.
48
Shooting in scene mode (SCN mode)
6.
7.
B
B

Rotate the mode dial to 7.
Shooting at very close range (7 mode)
Images can be taken from up to 1 cm away from the subject. In this mode, you can shoot images with
a large depth of field and perform focus bracket shooting of a set number of images.
Sub mode Description
c
Microscope Images can be taken from up to 1 cm away from the subject.
d
Focus
Stacking
The camera shoots a number of images, automatically shifting the focus
in each image. These can then be combined into a composite image with
a large depth of field. Two images are recorded, the first frame and the
composite image. The number of shots and the length of time the camera
waits before shooting starts can be selected in [Focus Stacking Settings]
(P.131).
In some cases, it may not be possible to create a composite image due
to shaking of the camera.
e
Focus
Bracketing
In this mode, the camera shoots a number of images, automatically
shifting the focus in each image. The number of images and shooting steps
are set in [Focus BKT] (P.130).
f
Microscope
Control
Optimized for close-ups with the subject magnified in the monitor. The
magnification level when the shooting distance is 1cm is displayed on the
monitor. Press I to zoom in on the view through the lens (2× zoom).
Press again for 4× zoom. Pressing I when 4× zoom is selected cancels
zoom. At high magnification levels, the image may be grainy.
49
Shooting at very close range (7 mode)
C
1.

Highlight a secondary (“sub”) mode using HI or the control
dial and press the OK button.
Microscope
Release the shutter.
To take a series of shots at the same focus distance, use focus lock (P.66) or MF (P.78).
To choose a different scene, press the Y (mode function) (H) button.
50
Shooting at very close range (7 mode)
2.
3.

Rotate the mode dial to 6.
Highlight a secondary (“sub”) mode using HI or the control
dial and press the OK button.
Underwater Snapshot
Matching settings to underwater scenes (6
mode)
Underwater photographs can be shot with the appropriate settings only by selecting a sub mode
according to the subject or the scene.
Sub mode Description
g
Underwater
Snapshot
Optimized for underwater photography shot using natural light.
H
Underwater Wide Optimized for shooting underwater.
I
Underwater Macro Optimized for taking underwater shots close to subjects.
h
Underwater
Microscope
Suitable for shooting subjects under water from distances as close
as 1cm.
i
Underwater HDR
Suitable for underwater scenes with high contrast. This mode
captures multiple images and merges them into a single properly
exposed image. This mode may not be suitable for shooting fast-
moving subjects.
Release the shutter.
To take a series of shots at the same focus distance, use focus lock (P.66) or MF (P.78).
To choose a different scene, press the Y (mode function) (H) button.
51
Matching settings to underwater scenes (6
mode)
1.
2.
3.

Highlight the 6 tab using the FGH buttons and press the
OK button.
2
1
1
Back
Set
Shooting Menu 1
AF Area
Picture Mode
Reset/Assign Custom Modes
X
Using Custom Modes (Custom Mode C1/C2)
Frequently-used settings and shooting modes can be saved as custom modes and recalled as needed
by simply rotating the mode dial.
Different settings can be stored in each of the two custom modes (C1 and C2).
At default settings, custom modes are equivalent to mode P.
Saving settings
Adjust camera settings as desired.
Rotate the mode dial to a position other than n (movie mode).
Press the MENU button to view the menus.
Highlight [Reset/Assign Custom Modes] and press the OK button.
Highlight [Custom Mode C1] or [Custom Mode C2] and press the OK button.
Highlight [Set] and press the OK button.
The [Reset/Assign Custom Modes] menu will be displayed again.
Any existing settings will be overwritten.
To restore default settings for the selected custom mode, highlight [Reset] and press the OK
button.
52
Using Custom Modes (Custom Mode C1/C2)
1.
2.
3.
4.
5.
6.

Rotate the mode dial to C1 or C2.
Recalling settings
The settings saved using [Reset/Assign Custom Modes]> [Custom Mode C1] or [Custom
Mode C2] in Shooting Menu 1 will be recalled.
Release the shutter.
53
Using Custom Modes (Custom Mode C1/C2)
1.
2.

Press the R button to begin recording.
Recording movies
You can film movies using the camera’s dedicated n (movie) mode or perform basic recording
operations without ending still photography.
Movies are recorded using the R (movie) button.
Movie-related options and indicators can be displayed by rotating the mode dial to select n (movie)
mode.
1
2
n (movie) mode
Select this mode if you will primarily be filming movies.
Still photography modes
Select these modes to film movies during still photography.
CMOS image sensors of the type used in the camera generate a “rolling shutter” effect that can
cause distortion in pictures of moving objects. This distortion is a physical phenomenon that occurs
in pictures of fast-moving subjects or if the camera is moved during shooting. It is particularly
noticeable in pictures taken at long focal lengths.
Recording movies in photo shooting modes
The movie you are recording will be displayed on the monitor.
Press the R button again to stop recording.
54
Recording movies
1
2
C
1.
2.

Rotate the mode dial to n.
Press the R button to begin recording.
Press the R button again to stop recording.
During movie recording, you can check the recording volume
on the recording level meter. The more the recording level
meter extends in the red direction, the louder the recording
volume.
M-IS ONM-IS ON
L
R
L
R
0:07:48
ISO - A
20 0
AFAF
n
FHD
30p30p
F
N
REC 00:01
N
REC 00:01
1
Recording level meter
1
The R button cannot be used to record movies in the following instances:
While the shutter button is pressed halfway or while sequential, interval timer, live composite, or
panorama photography is in progress
Recording movies in movie mode (n mode)
The recording volume can be adjusted in the n Movie Menu. g[Recording Volume]
(P.134)
The camera does not beep when it focuses in movie mode.
55
Recording movies
C
-
1.
2.
C

Frequently used functions are assigned to FGHI. You can
select the assigned function directly just by pressing the button.
Some features may be unavailable depending on the shooting
mode and camera settings. g“List of configurable shooting
modes” (P.206)
AUTOAUTO
Natural
L
N
4:3
AFAF
FHD
30p30p
F
WB
AUTO
WB
AUTO
P
ISO
AUTO
Adjust settings while previewing the results in the display. Some
functions are not available in some shooting modes. g“List of
configurable shooting modes” (P.206)
2
1
1
Shooting Menu 1
AF Area
Picture Mode
X
Reset/Assign Custom Modes
Back
Set
Access a wide variety of functions, including shooting, playback,
time and date, and display settings.
Shooting Settings
Shooting settings
Shooting settings can be adjusted using any of the following:
Direct Buttons (P.57)
Live Control (P.69)
Menu (P.117)
56
Shooting settings

Direct Buttons
Settings accessible via Direct Buttons
Frequently used functions are assigned to FGHI. You can select the assigned function directly by
simply pressing the button.
Some features may be unavailable depending on the shooting mode and camera settings. g“List of
configurable shooting modes” (P.206)
The buttons to which functions can be assigned are listed below.
f
a
g
c
e
d b
Direct Button Assigned function
a
F button (F)
Exposure compensation (P.58)
b
A button (I)
Flash (P.64)
c
gY button (G)
Sequential shooting/self-timer (P.60)
d
Y button (H)
Mode function (P.43, P.49, P.51)
e
OK button Live Control (P.69)
f
R button
Movie recording (P.54)
g
INFO button Information display (P.33)
57
Settings accessible via Direct Buttons

Controlling exposure (Exposure
Compensation)
Select positive (“+”) values to make pictures brighter, and negative (“−”) values to make pictures darker.
Exposure can be adjusted by ±2.0EV.
1 2 3
Negative (−)
No compensation (0)
Positive (+)
Adjusting Exposure Compensation
The method used varies with the shooting mode.
Exposure mode Method
P/C1/C2/n/7/6
Rotate the control dial.
or
Press the F button (F) and then press HI.
A
Press the F button (F), then rotate the control dial.
or
Press the F button (F), then press HI.
Exposure compensation is not available in 0 or SCN mode.
58
Controlling exposure (Exposure Compensation)
1
2
3

Rotate the mode dial to P, A, n, or 7.
If the mode dial is rotated to 7, select f(Microscope
Control).
If the mode dial is rotated to P, A, or n, the monitor
display zoom is increased by 2×, and S is displayed.
Images are recorded at the selected zoom ratio. Press H
again to cancel zoom.
125 F5.6
ISO - A
20 0
L
N
S-IS
ON
S-IS
ON
0.00.0
01:02:0301:02:03
10231023
P
FHD
30p30p
F
2
Zoom (digital teleconverter)
Zoom in on the center of the frame and record. In P, A, and n modes, the zoom ratio increases by
about 2×. When f (Microscope Control) is selected in 7 mode, you have a choice between 2× and
4× zoom.
If the mode dial is rotated to P, A, or n, press H.
If the mode dial is rotated to 7, press I.
If the mode dial is rotated to 7, pressing I increases zoom by 2×. Press I again for 4×
zoom, and a third time to cancel zoom.
JPEG images are recorded at the selected zoom ratio. In the case of RAW images, a frame shows the
zoom crop. A frame showing the zoom crop is displayed on the image during playback.
In the case of 4K and high-speed movies, the digital teleconverter is automatically disabled when
recording starts.
[AF Area] is fixed at [X] (single target).
59
Zoom (digital teleconverter)
1.
2.
B
B
B

Sequential shooting/using the self-timer
Adjust settings for burst or self-timer photography. Choose an option according to your subject.
Secure the camera firmly on a tripod for self-timer shooting.
Press the gY (G) button.
Highlight an option using HI or the control dial.
F
Single One frame is taken at a time when the shutter button is pressed.
i
Sequential
High
Hold the shutter-release button all the way down to take a series of
photographs.
To select a frame advance rate, highlight [Sequential High] and
press the INFO button before you press the OK button. Select
from frame advance rates of approximately 10 frames per second
(10fps) or 20frames per second (20fps). Use FGHI or the
control dial to highlight a frame advance rate and press the OK
button to select.
Flash is disabled.
h
Sequential
Low
Pictures will be taken at about 5 fps while the shutter button is
pressed all the way down.
j
Self-timer
12sec
Press the shutter button halfway to focus, then all the way down to
start the timer. First, the self-timer lamp lights up for approximately
10 seconds, then it blinks for approximately 2seconds, and then the
picture is taken.
k
Self-timer
2sec
Press the shutter button halfway to focus, then all the way down
to start the timer. The self-timer lamp blinks for approximately 2
seconds, and then the picture is taken.
l
Custom Self-
timer
Press the INFO button to set [Y Timer], [Number of Frames], and
[Interval Length]. Use HI to highlight items and FG to select a
value. Focus, exposure, and white balance are fixed at the values for
the first shot of each series.
60
Sequential shooting/using the self-timer
C
C
1.
2.

s
Pro Capture
Sequential shooting begins when you press the shutter button
halfway. Press the shutter button all the way down to begin
recording captured images to the card, including those captured
when the shutter button was pressed halfway. Focus, exposure,
and white balance are locked at the values for the first shot of
each series. g“Shooting without a release time lag (Pro Capture
shooting)” (P.62)
Flash is disabled.
Press the OK button.
During sequential shooting, if the battery level icon blinks due to low battery, the camera stops
shooting and starts saving the pictures you have taken on the card. The camera may not save all of
the pictures depending on how much battery power remains.
If you stand in front of the camera to press the shutter button when using the self-timer, the picture
may be out of focus.
When you are using h, live view is displayed. In i mode, the shot immediately preceding the
current frame is displayed.
To cancel the activated self-timer, press the MENU button.
Self timer is not canceled automatically after shooting.
61
Sequential shooting/using the self-timer
C
3.
C
B
B
B
B

Up to 5 frames
Burst shooting continues
Shutter lag
1
2
3
a Shutter button pressed halfway
b Moment you want to capture
c Shutter button pressed all the way down
Press the gY button (G).
Shooting without a release time lag (Pro
Capture shooting)
In Pro Capture mode, the camera records pictures at a rate of about 10frames per second, starting
approximately 0.5seconds before the shutter button is pressed all the way down. Use this mode to
capture moments you might otherwise miss due to shutter lag.
1 2
3
a
b c
To eliminate the lag between the time the shutter button is pressed all the way down and the start of
recording, the camera starts shooting a series of pictures using the electronic shutter when the shutter
button is pressed halfway, and begins recording the pictures—including those taken when the shutter
button was pressed halfway (up to 5)—to the card when the shutter button is pressed all the way
down.
Highlight [s] (Pro Capture) using HI or the control dial and press the OK button.
Press the shutter button halfway to start capturing.
The camera will continue shooting for up to a minute while the shutter button is pressed
halfway. To resume shooting, press the button halfway again.
Press the shutter button all the way down to start saving pictures to the memory card.
62
Shooting without a release time lag (Pro Capture
shooting)
1.
2.
3.
4.

Flickering caused by fluorescent lights, large movements by the subject, etc. may result in distortion
in images.
When capturing, the display will not become dark, and no shutter sound will be made.
The slowest shutter speed is limited.
63
Shooting without a release time lag (Pro Capture
shooting)
C
C
C

Press the A button (I).
Using flash (flash photography)
You can use flash when shooting.
Highlight a flash mode using HI or the control dial and press the OK button.
AUTO
Flash Auto
The flash fires automatically in dim or backlit
conditions.
A
Fill In The flash fires regardless of lighting conditions.
e
Red-eye The flash fires to reduce the red-eye phenomenon.
B
Flash Off The flash does not fire.
f
Slow Synchronization
+ Red-eye
Slow synchronization is combined with red-eye
reduction flash.
g
Slow Synchronization
(1st Curtain)
The flash fires with slow shutter speeds to brighten
dimly-lit backgrounds.
h, i,
etc.
Manual Value
Control flash output manually. If you highlight
[Manual Value] and press the INFO button before
pressing the OK button, you can adjust flash output
using FGHI or the control dial.
j
Remote Control
The dedicated underwater flash or wireless RC flash
is used to take pictures. For details, refer to “Taking
pictures with the Wireless RC Flash System” (P.236).
k
LED On
The LED illuminator turns on when a picture is
taken. This is effective for taking close up pictures.
64
Using flash (flash photography)
1.
2.

When using [e] (Red-eye), it takes about 1 second for the shutter to release following the initial
pre-flashes. Do not move the camera until shooting is complete.
[e] (Red-eye) may not work effectively under some shooting conditions.
The shutter speed becomes slower in [g] (Slow Synchronization (1st Curtain)). Use a tripod to
secure the camera in place.
Some features may be unavailable depending on the shooting mode and camera settings. g ”List
of configurable shooting modes” (P.206)
65
Using flash (flash photography)
C
C
C
C

While keeping the shutter button pressed halfway, press the
OK button.
The camera focuses and locks the position.
125 F5.6
ISO - A
20 0
L
N
S-IS
ON
S-IS
ON
0.00.0
01:02:0301:02:03
10231023
P
FHD
30p30p
F
FocusFocus
1
AF lock indicator
1
Focus lock
Lock the focus at the desired position.
Press the shutter button halfway to focus.
While focus lock is in effect, the focus distance can be fine-tuned using FG or the control dial.
Pressing the OK button, zooming in or out, pressing the MENU button, or performing other
operations also releases the focus lock.
If the focus indicator blinks when the shutter button is pressed halfway with [TLive Composite]
(P.43, P.46) selected for SCN mode, you can set focus to infinity by pressing the OK button.
Focus lock is not available in 0 mode and some SCN modes.
66
Focus lock
1.
2.
B
B
B
C

Press and hold the INFO button.
Release the button when the LED illuminator lights up.
The illuminator will light up even if the camera is off.
Using the LED illuminator
Unlike the flash, which lights up only briefly, the LED illuminator stays lit for longer periods. It can also
serve as a flashlight.
Turning the LED illuminator on
If the camera is on
The LED illuminator will remain lit for up to around 90 seconds while camera controls are in use, or up
to 30 seconds if no operations are performed.
The LED illuminator can be used during movie recording. It cannot, however, be used to film 4K
movies.
If the camera is off
The LED illuminator will remain lit for up to around 30 seconds, whether or not you attempt to operate
camera controls.
The LED illuminator turns off automatically if you:
press the ON/OFF button,
use the LOG switch,
display the menu,
connect or disconnect a USB cable, or
connect to a Wi-Fi network.
67
Using the LED illuminator
1.
2.
-
-
-
-
-

To turn the LED illuminator off
Press and hold the INFO button down until the LED illuminator turns off.
68
Using the LED illuminator

You can use Live Control to select the shooting function
while checking the effect on the screen.
The selected settings apply in P, A, and n modes.
AUTOAUTO
Natural
L
N
4:3
AFAF
FHD
30p30p
F
WB
AUTO
WB
AUTO
P
ISO
AUTO
1
2
Functions
Settings
1
2
Picture Mode (P.71)
Scene mode
1
(P.43)
ISO sensitivity (P.74)
White balance (P.75)
AF mode (P.78)
Aspect ratio (P.79)
K Image quality (P.80)
n Movie quality (P.82)
K Image stabilization settings
2
(P.84)
n Image stabilization settings
3
(P.84)
Flash
2, 4
(P.64)
Flash intensity control
2
(P.85)
Sequential/self-timer shooting (P.60)
Metering
2
(P.86)
Face priority (P.87)
Accessory (P.88)
Press the OK button to display Live Control.
To hide Live Control, press the OK button again.
Live Control
Settings accessible via Live Control
Available settings
Displayed only in scene modes.
Not displayed in movie mode.
Displayed only in movie mode.
The camera stores the settings for P or A, 6 (underwater mode), and 7 (microscope mode)
separately and restores them the next time the mode is selected, even after the camera has been
turned off.
69
Settings accessible via Live Control
1
2
3
4
1.

Use FG to highlight the desired function and HI
to highlight a setting, and then press the OK button.
You can also use the control dial to select a setting.
The selected settings take effect automatically if no
operations are performed for about 8 seconds.
AUTOAUTO
Natural
L
N
4:3
AFAF
FHD
30p30p
F
WB
AUTO
WB
AUTO
P
ISO
AUTO
12
1
F
G
HI pHI p
Cursor
Displays the selected function name
1
2
Some functions are not available in some shooting modes. g”List of configurable shooting
modes” (P.206)
For the default settings of each option, refer to “Default Settings” (P.216).
70
Settings accessible via Live Control
2.
B

Press the OK button and then highlight Picture Mode using
FG.
AUTOAUTO
Natural
L
N
4:3
AFAF
FHD
30p30p
F
WB
AUTO
WB
AUTO
P
ISO
AUTO
Processing options (Picture Mode)
Select the color tone of the image. You can also make individual adjustments to contrast, sharpness,
and other parameters (P.123). Changes to parameters are stored for each picture mode separately.
Highlight an option using HI and press the OK button.
Picture mode options
i-Enhance Produces more impressive-looking results suited to the scene.
Vivid Produces vivid colors.
Natural Produces natural colors.
Muted Produces flat tones.
Portrait Produces beautiful skin tones.
Monochrome Produces a black and white tone.
Custom
Select an existing picture mode, edit its parameters, and save it as a custom
picture mode.
e-Portrait
Smooths out skin tones and texture. This mode cannot be used with bracket
photography or when shooting movies.
Underwater
Process pictures to preserve the vivid colors seen under water.
We recommend selecting [Off] for [A+WB] (P.148) when [6
Underwater] is in effect.
Pop Art I/II Enhances the color and atmosphere of an image to be brighter and vivid.
71
Processing options (Picture Mode)
1.
2.

Soft Focus
Produces an ethereal atmosphere with soft tones, making the image appear
dreamlike.
Pale&Light Color I/II
Produces the effect of subjects floating in gentle light by scattering light
across the image and slightly overexposing it.
Light Tone Produces a high-quality image by softening both shadows and highlights.
Grainy Film I/II Produces the impact and roughness of a black and white photograph.
Pin Hole I/II/III
Produces a tunnel effect like that produced using an old-fashioned camera
or a toy camera by reducing peripheral brightness.
Diorama I/II
Produces the effect of a surreal miniature world by enhancing the saturation
and contrast and blurring the out-of-focus areas of the image.
Cross Process I/II Produces an unsettled, surreal atmosphere.
Gentle Sepia
Produces a high-quality image with a calm atmosphere by drawing out
shadows and softening the overall image.
Dramatic Tone I/II
Enhances the local contrast of an image, emphasizing the difference
between bright areas and dark areas.
Key Line I/II Produces the effect of an illustration by emphasizing edges.
Watercolor I/II
Produces a soft, bright image by removing dark areas, blending pale colors
on a white canvas, and further softening contours.
Vintage I/II/III
Produces a slice-of-life effect in a nostalgic, vintage tones with the
discoloration and fading seen in printed film.
Partial Color I/II/III
Makes the subject appear more impressive by extracting the colors you
want to emphasize and keeping everything else monotone.
Bleach Bypass I/II
Often seen in movies and other productions, the “bleach bypass” effect is
added to give greater impact to cityscapes and metal textures.
Instant Film
A contemporary take on the skin tones and shadow gradations typical
typical of film.
II and III are altered versions of the original (I).
72
Processing options (Picture Mode)

Press the INFO button.
A color ring appears in the display.
ColorColor
P
When [ART] is selected for picture mode, [Color Space] will be fixed at [sRGB]. gCCustom
Menu E > [Color Space] (P.149)
Using [Partial Color]
Record only selected hues in color.
Press the OK button and then highlight Picture Mode using FG.
Highlight [Partial Color I/II/III] using HI.
Select a color using HI or the control dial.
The effect is visible in the display.
Release the shutter.
73
Processing options (Picture Mode)
1.
2.
3.
4.
5.

Press the OK button and then highlight ISO sensitivity using
FG.
AUTOAUTOAUTOAUTO
AUTOAUTO
L
N
4:3
AFAF
FHD
30p30p
F
WB
AUTO
WB
AUTO
P
250 0.0F5.6
Recommend
100100 125125 160160 200200 250250 320320
ISO
AUTO
ISO
AUTO
Changing ISO sensitivity (ISO Sensitivity)
Select a value according to subject brightness. Higher values enable you to photograph darker scenes
but also increase image “noise” (mottling).
Highlight an option using HI and press the OK button.
AUTO
Sensitivity is adjusted automatically according to shooting conditions. The
maximum ISO sensitivity value and other auto ISO settings can be adjusted
using the [ISO-Auto Set] option in Custom Menu (P.147).
100–12800 The sensitivity is set to the selected value.
74
Changing ISO sensitivity (ISO Sensitivity)
1.
2.

Press the OK button and then highlight White balance using
FG.
AUTOAUTO
P
WB Auto
AUTOAUTO
L
N
4:3
AFAF
FHD
30p30p
F
WB
AUTO
WB
AUTO
ISO
AUTO
Adjusting color (white balance)
White balance (WB) ensures that white objects in images recorded by the camera appear white. [N]
is suitable in most circumstances, but other values can be selected according to the light source when
[N] fails to produce the desired results or you wish to introduce a deliberate color cast into your
images.
Highlight an option using HI and press the OK button.
WB mode
Color
temperature
Light conditions
N
Auto white
balance
—
Most normal scenes (scenes containing
objects that are white or close to white).
This mode is recommended in most
situations.
75
Adjusting color (white balance)
1.
2.

WB mode
Color
temperature
Light conditions
A
Preset white
balance
5300K Sunlit outdoor scenes, sunsets, fireworks
B
7500K Daylight shots of subjects in the shade
D
6000K Shots taken in daylight under overcast skies
G
3000K Subjects under incandescent lighting
H
4000K Subjects under fluorescent lighting
7
—
For pictures taken in shallow waters
(approximately 3m (9.8ft.) or less)
8
—
For pictures taken underwater at depths of
from 3 to 15m (9.8 to 49.2ft.)
9
—
For pictures taken underwater at below
15m (49.2ft.)
Use an underwater case at depths below
15m (49.2ft.).
O
5500K For flash shooting
J/
K/
L/
M
One-touch
white
balance
Color
temperature set
for One Touch
WB
Situations in which you want to set white
balance for a specific subject
Color temperature is set to a value
metered from a white object under the
lighting what will be used in the final
photograph (P.77).
8–
9
Custom
white
balance
2000K–14000K
Situations in which you can identify the
appropriate color temperature
After pressing the INFO button, use
FGHI to select a color temperature
and then press the OK button.
The water depths described for 7, 8, and 9 are only for guide. They may vary
depending on weather and sea conditions.
76
Adjusting color (white balance)
B

After selecting [J], [K], [L], or [M] (One Touch WB 1,
2, 3, or 4), press the INFO button.
One Touch WB
White balance is measured by framing a piece of paper or other white object under the lighting that
will be used in the final photograph. This is useful when shooting a subject under natural light, as well
as under various light sources with different color temperatures.
The One Touch WB screen appears.
Photograph a piece of colorless (white or gray) paper.
Frame the piece of paper so that it fills the display. Ensure that it is free of shadows.
Highlight [Yes] and press the OK button.
The new value is saved as a preset white balance option.
The new value is stored until One Touch WB is measured again. Turning the power off does
not erase the data.
77
Adjusting color (white balance)
1.
2.
3.

Press the OK button and then highlight AF mode using FG.
Auto Focus
L
N
4:3
AFAF
FHD
30p30p
F
WB
AUTO
WB
AUTO
P
AFAF
MFMF
ISO
AUTO
Selecting a focus mode (AF mode)
Select a focusing method (focus mode).
Separate options can be selected for still photography and movie mode.
Highlight an option using HI and press the OK button.
AF
Auto Focus
The camera focuses automatically when the shutter button is
pressed halfway. You can select the focus area in the shooting
menu.
The camera adjusts focus continuously during movie recording.
MF
Manual Focus
Use FG or the control dial to focus manually on a subject
anywhere in the frame. Manual focus can be enabled by pressing
and holding the OK button during shooting.
1
AF Super
Macro
Focus at short distances using auto focus.
2
MF Super
Macro
Focus at short distances using manual focus.
The camera may be unable to focus if the subject is poorly lit, obscured by mist or smoke, or lacks
contrast.
[1] and [2] are available only in P, A, and n modes.
78
Selecting a focus mode (AF mode)
1.
2.
B
B

Press the OK button and then highlight Aspect ratio using
FG.
P
4000×3000
L
N
4:3
AFAF
FHD
30p30p
F
4:3
16
:9
3:2 1:1 3:4
WB
AUTO
WB
AUTO
ISO
AUTO
Setting the aspect ratio
Choose the ratio of width to height for pictures according to your intent, what you want to achieve
when printing the photo, and so on. In addition to the standard aspect (width-to-height) ratio of [4:3],
the camera offers settings of [16:9], [3:2], [1:1], and [3:4].
Highlight an option using HI and press the OK button.
Aspect ratio can only be set for still images.
JPEG images cropped to the selected aspect ratio are saved. RAW images are not cropped and are
saved with the selected aspect ratio information.
When RAW images are played back, the selected aspect ratio is indicated by a frame.
79
Setting the aspect ratio
1.
2.
B
B
B

Press the OK button and then highlight K Image quality
using FG.
P
4000×3000
AFAF
FHD
30p30p
F
WB
AUTO
WB
AUTO
RAW
4:3
L
N
SF
L
F
L
10231023
ISO
AUTO
L
N
N
M1
+RAW+RAW
L
SFSF
Photo file and image size options (K Image
quality)
You can select an image quality mode for still images. Select a quality suitable for the application (such
as for processing on PC, using on a website, etc.).
80
Photo file and image size options (K Image
quality)
1.

Highlight an option using HI and press the OK button.
You have a choice of JPEG (LSF, LF, LN, and aN) and RAW modes. When JPEG+RAW is
selected, images in both JPEG and RAW format will be recorded at the same time. JPEG is
made up of a combination of image size (L/a/b/S) and compression ratio (SF/F/N).
Option Pixel count Compression ratio File format
LSF
4000×3000 SuperFine (1/2.7) JPG
LF
4000×3000 Fine (1/4) JPG
LN
4000×3000 Normal (1/8) JPG
aN
3200×2400 Normal (1/8) JPG
RAW 4000×3000 Lossless compression ORF
RAW+JPEG RAW plus the JPEG option selected above
Pictures taken with an image quality setting of RAW are automatically recorded as
JPEG+RAW in the following modes:
[i Underwater HDR], [d Focus stacking], [B e-Portrait], [O Handheld
starlight], [E Backlight HDR]
The individual JPEG and RAW files recorded when taking photos while JPEG+RAW is
selected cannot be deleted separately. Deleting one automatically deletes the other. (If
you delete the JPEG copy on a computer and then copy the RAW image back to the
camera, you will be able to edit the image (P.102) but you will not be able to select it for
printing (P.113).)
The image size/compression combination can be changed in the menu. gCCustom
Menu E> [X Set] (P.149)
RAW images are unprocessed image data to which settings such as exposure compensation and
white balance have yet to be applied. They serve as raw data for images that will be processed after
shooting.
RAW image files: Have the extension “.orf”
Cannot be viewed on other cameras.
Can be viewed using OM Workspace digital photo management and editing software
Can be saved in JPEG format using the camera’s [RAW Data Edit] (P.102) retouch option
81
Photo file and image size options (K Image
quality)
2.
C
-
C
C
B
-
-
-
-

Press the OK button and then highlight n Movie quality
using FG.
1920×1080 Fine 30p
AFAF
FHDFHD
30p30p
F
WB
AUTO
WB
AUTO
16:9
1:02:031:02:03
L
N
ISO
AUTO
FHD HS
120fps
FHD HS
120fps
Frame size, rate, and compression (n Movie
Quality)
You can set a movie quality suitable for the desired use.
Highlight an option using HI and press the OK button.
“Movie quality” is a combination of frame size, bit rate (compression ratio), and frame rate.
Available movie quality options
The options available for movie quality vary with the options selected for [Video Frame Rate] and
[Video Bit Rate] in the video menu (P.134).
When shooting movies that will be viewed on a television, select a frame rate that matches the
video standard used in the device, as the movie may not play back smoothly otherwise. Video
standards vary by country or region: some use NTSC, others PAL.
When shooting for display on NTSC devices, select 60p (30p)
When shooting for display on PAL devices, select 50p(25p)
Movies are stored in MPEG-4 AVC/H.264 format. The maximum size of individual file is limited to
4GB. The maximum recording time of a single movie is limited to 29minutes.
Depending on the card used, recording may end before the maximum length is reached.
The picture modes available vary with the option selected for the movie quality.
Use UHS-I cards with a UHS Speed Class of 3 when filming 4K or high-speed movies.
Use a card with a Speed Class of 10 or higher when filming FHD/HD movies.
4K movies may not play on some computer systems. More information is available on our website.
82
Frame size, rate, and compression (n Movie
Quality)
1.
2.
-
-

1
2
Image size
4K: 3840×2160
Frame rate
30p
25p
1
2
1 2
3
Image size
FHD: 1920×1080
HD: 1280×720
Bit rate (compression)
SF (Super Fine)
F (Fine)
N (Normal)
Frame rate
60P (30p)
50P (25p)
1
2
3
1
2
Image size
Frame rate
FHD: 1920×1080 120fps
HD: 1280×720 240fps
SD: 640×360 480fps
1
2
Record mode: 4K
Record 4K movies.
Record mode: FHD/HD
Record standard movies.
Record mode: HS (High-speed)
Record slow-motion movies. Footage shot at a high frame rate plays back at approximately 30fps.
Recording can continue for up to 20seconds.
Focus and exposure are fixed at the start of recording.
Sound is not recorded.
This mode is not available in 0 or SCN mode.
83
Frame size, rate, and compression (n Movie
Quality)
B
C
C
C

Press the OK button and then highlight Image stabilizer using
FG.
ONON
OFFOFF
Still-I.S. On
P
S-IS
ON
S-IS
ON
S-IS
ON
S-IS
ON
ACC
OFF
ACC
OFF
OFFOFF
Reducing camera shake (Image stabilizer)
You can reduce the amount of camera shake that can occur when shooting in low light conditions or
shooting with high magnification.
The image stabilizer starts when you press the shutter button halfway.
Highlight an option using HI and press the OK button.
Still pictures
S-IS Off Image stabilizer is off.
S-IS On Optimal image stabilizer enabled.
Movie
M-IS Off Image stabilizer is off.
M-IS On Image stabilizer enabled.
The edges of the frame are cropped out when [M-IS On] is selected, reducing the area recorded.
Image stabilizer is set to [M-IS Off] when [x], [y], or [z] are selected for movie quality.
When using a tripod, set Image stabilizer to [S-IS Off] or [M-IS Off].
Image stabilizer may be unable to fully compensate for the effects of camera movement if the
movement is very large or the shutter speed very slow. In these cases, it is recommended that you
use a tripod.
You may notice an operating sound or vibrations when the image stabilizer is activated.
84
Reducing camera shake (Image stabilizer)
1.
2.
B
B
B
C
C

Press the OK button, then highlight Image stabilizer using
FG.
7
0.0
0
P
S-IS
ON
S-IS
ON
ACC
OFF
ACC
OFF
OFFOFF
Adjusting flash output (Flash intensity control)
Flash output can be adjusted if you find that your subject appears overexposed, or that it appears
underexposed even though the exposure in the rest of the frame is just right.
Highlight an option using HI and press the OK button.
Flash brightness can be reduced by selecting negative values (the lower the value, the
dimmer the flash) or increased by selecting positive values (the higher the value, the brighter
the flash).
Not available in 0 mode, when [i Underwater HDR] is selected in 6 mode, or in SCN
mode.
85
Adjusting flash output (Flash intensity control)
1.
2.
C

Press the OK button and then highlight Metering using FG.
ESP
P
S-IS
ON
S-IS
ON
ACC
OFF
ACC
OFF
OFFOFF
Choosing how the camera measures
brightness (Metering)
You can select how the camera meters subject brightness.
Highlight an option using HI and press the OK button.
A
ESP
Balances brightness across the screen when shooting (The brightness at the
center and surrounding areas of the screen are measured separately). When
[ESP] is selected, the center may appear dark when shooting against strong
backlighting.
B
Spot
Shoots the subject at the center in backlit conditions (The brightness is
measured at the center of the screen).
86
Choosing how the camera measures brightness
(Metering)
1.
2.

Press the OK button and then highlight Face priority using
FG.
Face Priority Off
P
S-IS
ON
S-IS
ON
ACC
OFF
ACC
OFF
ONON OFFOFF
OFFOFF
Automatic face detection (Face priority)
The camera detects faces and adjusts focus and digital ESP.
Highlight an option using HI and press the OK button.
ON
Face Priority On The camera detects and focuses on faces.
OFF
Face Priority Off Face priority is off.
87
Automatic face detection (Face priority)
1.
2.

Press the OK button and then highlight Accessory using FG.
Accessory Off
P
S-IS
ON
S-IS
ON
ACC
OFF
ACC
OFF
FD-1FD-1
OFFOFF
OFFOFF
Using optional accessories (Accessory)
Use this option when optional accessories are attached.
Highlight an option using HI and press the OK button.
OFF
Accessory Off Take pictures using the camera alone.
3
PTWC-01
Select according to the optional accessory attached.
4
TCON-T01
5
FCON-T01
6
FCON-T02
FD-1
FD-1
g“Optional accessories” (P.237)
88
Using optional accessories (Accessory)
1.
2.

Playback
Information display during playback
Playback image information
Simplified display
2023.08.15 12:30:00 15
100-0015
1012hPa
145°23’ 59” W
39°12’ 30” N
10m
20.5°C
×10×10
4
:
3
L
N
HDR1
1
22
4 5
17 1621 20 15
6
7 8
9
14
13
12
11
10
19 18
2 3
Overall display
F5.6F5.6
+1.0+1.0
G+4G+4A+4A+4
NaturalNatural
sRGBsRGBISO 400ISO 400
125125
+2.0+2.0 18mm18mm
1/84000×3000
4
:
3
L
N
15
100-0015
WB
AUTO
P
2023.08.15 12:30:00
×10×10
23 24 25 26 27
34
33
32
31
30
29
28
36 35373839
89
Information display during playback

Battery level (P.27)
Active Bluetooth
®
connection (P.174)
Remote control (P.186)
Including GPS information (P.202)
Print order
Number of prints (P.113)
Share Order (P.107)
Record Sound (P.109)
Protect (P.108)
Sel. Image (P.97)
Latitude (P.205)
Longitude (P.205)
Direction information (P.205)
Atmospheric (P.205)
File number
gCCustom Menu F> [File Name]
(P.151)
Frame number
Image quality (P.80, P.82)
Aspect ratio (P.79)
Focus stacking (P.49)
HDR image (P.43, P.51)
1
2
3
4
5
6
7
8
9
10
11
12
13
14
15
16
17
18
19
Altitude/water depth (P.205)
Temperature (water temperature) (P.205)
Date and time (P.28)
Aspect border
1
(P.79)
AF target display (P.125)
Shooting mode (P.35)
Shutter speed (P.39, P.41)
Exposure compensation (P.58)
Aperture value (P.39, P.41)
Focal length
Flash intensity control (P.85)
White balance compensation (P.149)
Color Space (P.149)
Picture Mode (P.71)
Compression rate (P.80, P.161)
Pixel count (P.80, P.161)
ISO sensitivity (P.74)
White balance (P.75)
Metering mode (P.86)
Histogram
20
21
22
23
24
25
26
27
28
29
30
31
32
33
34
35
36
37
38
39
Displayed only if an aspect ratio other than 4:3 is selected with a RAW image quality option.
90
Information display during playback
1

You can switch the information displayed during playback by
pressing the INFO button.
Switching the information display
INFO
INFO
INFO
2023.08.15 12:30:00 15
100-0015
1012hPa
145°23’ 59” W
39°12’ 30” N
10m
20.5°C
×10×10
4
:
3
L
N
F5.6F5.6
+1.0+1.0
G+4G+4A+4A+4
NaturalNatural
sRGBsRGBISO 400ISO 400
125125
+2.0+2.0 18mm18mm
1/84000×3000
4
:
3
L
N
15
100-0015
WB
AUTO
P
2023.08.15 12:30:00
×10×10
1
3 2
Simplified display
Overall display
Image only
You can add histogram and highlight-and-shadow displays to the information shown during
playback. gCCustom Menu B> [G/Info Settings]> [q Info] (P.156)
91
Information display during playback
1
2
3
B

2023.08.15 12:30:00 20
100-0020
1012hPa10m
20.5°C
4
:
3
L
N
Still pictures
Viewing photographs and movies
Viewing still pictures
Press the q button.
The last photograph you shot will be displayed.
Select the desired photograph or movie using the control dial or arrow pad.
To return to shooting mode, press the shutter button halfway or press the q button.
Control dial
Single-frame playback: Previous (q)/Next (r)
Close-up playback: You can display the next frame or the previous frame
during close-up playback (P.95).
Index/calendar playback: Highlight image (P.94)
Arrow pad
(FGHI)
Single-frame playback: display the next frame (I)/display the previous
frame (H)
Close-up playback: Changing the close-up position (P.95)
You can display the next frame (I) or the previous frame (H) during
close-up playback by pressing the INFO button.
Index/calendar playback: Highlight image (P.94)
Zoom lever
Rotate the zoom lever counterclockwise for index or calendar playback
(P.94).
Rotate the zoom lever clockwise for close-up playback (P.95).
INFO button View image info (P.91)
D button (G)
Delete picture (P.98)
92
Viewing photographs and movies
1.

Press the q button.
The last photograph you shot will be displayed.
4
100-0004
P
WB
AUTO
30
p
30
p
4K
2023.08.15
12:30:00
Movie
Press the OK button.
The playback direct menu will be displayed.
Movie
Share Order
Movie Edit
Play Movie
0
Erase
Back
Set
OK button
Display the menu (or exit to single-frame playback from close-up playback
or calendar playback). g“Using functions during playback” (P.99)
R button (4)
You can select multiple images for [0], [Erase Selected] or [Share Order
Selected]. g“Selecting multiple pictures (Share Order Selected, 0,
Erase Selected)” (P.97)
Viewing movies
Highlight [Play Movie] and press the OK button.
Movie playback will start.
Fast forward and rewind using H/I.
Press the OK button to pause playback. While the movie is paused, press F to display the
first frame and G to display the last frame. Move to previous or next frames using HI or
the control dial.
To end playback, press the MENU button.
Use FG to adjust the volume during playback.
93
Viewing photographs and movies
1.
2.
3.

Rotating the zoom lever counterclockwise (toward G) during
single-frame playback initiates index playback. Rotate to the end
for calendar playback.
21
Counterclockwise (G side)
Clockwise (8 side)
1
2
Finding pictures quickly (Index and Calendar
Playback)
Use FGHI or the control dial to move the cursor.
Rotate the zoom lever clockwise (8 side) to proceed in turn from calendar to index to single-frame
playback.
To exit from calendar to single-frame playback, press the OK button.
2023.08.15 12:30:00 20
100-0020
1012hPa10m
20.5°C
4
:
3
L
N
20
2023.08.15 12:30:00
12
19181716151413
26252423222120
213130292827
76543
543213130
116 7 8 9 10
2023.08
Sun Mon Tue Wed Thu Fri Sat
G
8
G
8
1 2 3
OK
Single-frame playback
Index display
Calendar display
You can change the number of frames for index display. g[G Settings] (P.158)
94
Finding pictures quickly (Index and Calendar
Playback)
1
2
3
B

To use zoom on the current picture during single-frame playback,
rotate the zoom lever clockwise (toward 8) to zoom in and
counterclockwise (toward G) to zoom out. Press the OK button
to return to single-frame playback.
21
Counterclockwise (G side)
Clockwise (8 side)
1
2
Single-frame playback
Close-up playback
1
2
2× zoom
14× zoom
3
4
Zooming in (Close-up Playback)
2023.08.15 12:30:00 20
100-0020
1012hPa10m
20.5°C
4
:
3
L
N
14x
2x
1 3
2
4
8
G
8
G
OK
Press FGHI to scroll through an image in the direction of the button you pressed.
To view other images while zoomed in, press the INFO button and then press HI. Press the INFO
button again to re-enable scrolling. You can also view other images using the control dial.
95
Zooming in (Close-up Playback)

Rotate the zoom lever clockwise (toward 8).
Press FGHI to scroll through an image in the direction
of the button you pressed.
1x
1
Area currently playing back
1
To view other images while zoomed in at a ratio of 2× or higher,
press the INFO button, then press HI. Press the INFO button
again to re-enable scrolling. You can also view other images using
the control dial.
Scrolling playback of panoramas
Perform scrolling playback of a series of images that are combined to create a panorama.
Select a panorama using single-frame playback.
To use zoom on the current picture during scrolling playback of a panorama, rotate the zoom lever
clockwise for zoom in (ratios of 2× to 14×), and counterclockwise to zoom out. Press the OK button
to return to single-frame playback.
96
Scrolling playback of panoramas
1.
2.

Press the OK button to display the menus and choose [Share
Order Selected], [0], or [Erase Selected].
Selected
Erase Selected
0
Share Order Selected
Back
Set
Selecting multiple pictures (Share Order
Selected, 0, Erase Selected)
You can select multiple images for [Share Order Selected], [0], or [Erase Selected].
Select pictures by pressing the 4 (R) button during playback.
The image will be selected and P will be displayed.
To cancel selection, press the button again.
You can select an image during single-frame playback and index playback.
97
Selecting multiple pictures (Share Order Selected,
0, Erase Selected)
1.
2.

Display an image you want to delete and press the D (G)
button.
Highlight [Yes] and press the OK button.
Erase
Yes
No
Back
Set
Deleting pictures (Erase)
The image will be deleted.
98
Deleting pictures (Erase)
1.
2.

JPEG
Back
Set
JPEG Edit
Share Order
0
c
Rotate
Play H (P.101)
Raw Data Edit (P.102)
JPEG Edit (P.103)
Play Movie (P.93)
Movie Edit (P.105)
Share Order (P.107)
0 (P.108)
c (P.109)
Rotate (P.110)
C (P.111)
Image Overlay (P.112)
N (P.113)
Erase (P.116)
Using functions during playback
The playback direct menu can be displayed by pressing the OK button during playback. Highlight the
desired option and select it by pressing the OK button.
The options displayed vary with the type of image selected.
RAW JPEG RAW+JPEG Movie
Play H
○ ○ ○ ×
RAW Data Edit ○ × ○ ×
JPEG Edit × ○ ○ ×
Play Movie × × × ○
Movie Edit × × × ○
Share Order ○ ○ ○ ○
0
○ ○ ○ ○
c
○ ○ ○ ×
Rotate ○ ○ ○ ×
99
Using functions during playback

RAW JPEG RAW+JPEG Movie
C
○ ○ ○ ○
Image Overlay ○ × ○ ×
N
× ○ ○ ×
Erase ○ ○ ○ ○
100
Using functions during playback

Playing back voice memos (Play H) when the
associated image is displayed
Voice memos (P.109, P.133) are played back when the associated image is displayed.
Select a photo with audio and press the OK button.
Highlight [Play H] and press the OK button.
Audio playback will start.
To end audio playback, press the OK or MENU button.
Use FG to adjust volume during playback.
101
Playing back voice memos (Play H) when the
associated image is displayed
1.
2.

Retouching pictures (RAW Data Edit/JPEG
Edit)
Create retouched copies of pictures. In the case of RAW pictures, you can adjust the settings in effect
at the time the picture was taken, such as white balance and picture mode (art filters included). With
JPEG pictures, you can make simple edits such as cropping and resizing.
RAW
Data Edit
Retouch pictures and save the resulting copies in JPEG format (P.102). The following
options are available:
[Current]: Save the picture using the settings currently selected on the camera.
[ART BKT]: The camera creates multiple JPEG copies of each image, one for each art
filter selected. Select one or more filters and apply them to one or more images.
JPEG Edit Retouch JPEG pictures and save the resulting copies in JPEG format (P.103).
Retouching RAW Pictures (RAW Data Edit)
During playback, display the photo you want to retouch and press the OK button.
Highlight [RAW Data Edit] and press the OK button.
Edit options will be displayed.
If the current picture is not a RAW image, [RAW Data Edit] will not be displayed. Select a
different image.
Highlight items using the FG buttons.
To apply current camera settings, highlight [Current] and press the OK button. The current
settings will be applied.
Highlight [Yes] using FG and press the OK button to create a JPEG copy using the
selected settings.
Highlighting [ART BKT] and pressing I displays a list of art filters. Highlight art filters
and press the OK button to select or deselect. Selected filters are marked with a P. Press
the MENU button to return to the previous display once all the desired filters have been
selected.
Press the OK button to record the image after processing with the selected art filter.
102
Retouching pictures (RAW Data Edit/JPEG Edit)
1.
2.
C
3.
-
-

To create additional copies from the same original, highlight [Reset] and press the OK button.
To exit without creating more copies, highlight [No] and press the OK button.
Selecting [Reset] displays editing options. Repeat the process from Step3.
RAW pictures cannot be retouched if:
there is not enough space on the memory card or if the picture was created with a different
camera.
Retouching JPEG Pictures (JPEG Edit)
The [JPEG Edit] menu contains the options listed below.
Shadow Adj Brighten back-lit subjects.
Red-eye Fix Reduce “red-eye” in pictures taken with flash.
M
Crop pictures. Adjust the crop size with the control dial and position it with
FGHI.
Aspect
Change the aspect ratio from the standard 4:3 to [3:2], [16:9], [1:1], or [3:4]. After
choosing an aspect ratio, use FGHI to position the crop.
Black & White Create a black-and-white copy of the current picture.
Sepia Create a sepia copy of the current picture.
Saturation Adjust the vividness of colors. The results can be previewed in the display.
L
Create a copy resized to 1280 × 960, 640 × 480, or 320 × 240 pixels.
Pictures with an aspect ratio other than the standard 4:3 are resized to dimensions
as close as possible to the selected option.
e-Portrait
Produce smooth complexions. The desired effect may not be achieved if no faces
are detected.
Red-eye correction may not work depending on the image.
Editing of a JPEG image is not possible in the following cases:
When an image is processed on a PC, when there is not enough space in the card memory, or
when an image is recorded on another camera
[L] cannot be used to make pictures larger.
103
Retouching pictures (RAW Data Edit/JPEG Edit)
4.
C
-
C
C
-
C

[L] cannot be applied to some.
[M] (crop) and [Aspect] only apply to pictures with an aspect ratio of 4:3 (standard).
During playback, display the photo you want to retouch and press the OK button.
Highlight [JPEG Edit] and press the OK button.
Edit options will be displayed.
If the current picture is not a JPEG image, [JPEG Edit] will not be available. Select a different
image.
Highlight an option using FG and press the OK button.
The effect can be previewed in the display. If multiple options are listed for the selected item,
use FG to choose the desired option.
When [M] is selected, you can adjust the crop size using the control dial and position it
using FGHI.
When [Aspect] is selected, you can position the crop using FGHI.
Highlight [Yes] and press the OK button.
The edited image is stored in the card.
104
Retouching pictures (RAW Data Edit/JPEG Edit)
C
C
1.
2.
C
3.
4.

Editing movies (Movie Edit)
Edit movies.
Creating movie stills (In-Movie Image Capture)
Save a still copy (aspect ratio [16:9]) of a frame selected from a 4K movie recorded with the camera.
During playback, display the movie you want to edit and press the OK button.
Highlight [Movie Edit] and press the OK button.
Use FG to highlight [In-Movie Image Capture] and press the OK button.
Use HI to select a frame to be saved as a still image and press the OK button.
Use FG to skip multiple frames.
Press the MENU button to return to single-frame playback.
The date of recording of the still may differ from that of the original movie.
Trimming movies (Movie Trimming)
Trim selected footage from movies recorded with the camera and either overwrite the original with the
edited footage or save the edited copy separately.
During playback, display the movie you want to edit and press the OK button.
Highlight [Movie Edit] and press the OK button.
Use FG to highlight [Movie Trimming] and press the OK button.
Highlight [Overwrite] or [New File] and press the OK button.
If the image is protected, you cannot select [Overwrite].
105
Editing movies (Movie Edit)
1.
2.
3.
4.
C
1.
2.
3.
4.

Use HI to highlight the desired option for whether the section to be deleted begins with the
first frame or the last frame, then press the OK button.
To jump to the first or last frame, rotate the control dial.
Use HI to select the section to be deleted.
The section to be deleted is shown in red.
Press the OK button.
Highlight [Yes] and press the OK button.
The date of recording of the still may differ from that of the original movie.
106
Editing movies (Movie Edit)
5.
6.
7.
8.
C

Selecting pictures for sharing (Share Order)
You can select images you want to transfer to a smartphone in advance.
Display an image you want to transfer and press the OK button.
The playback menu will be displayed.
Select [Share Order] and press the OK button. Then, press F or G.
The image is marked for sharing. A 9 icon and the file type will be displayed.
Up to 200 pictures can be marked for sharing at a time.
To cancel a share order, press F or G.
Share orders cannot include RAW images.
You can select images you want to transfer in advance and set a share order all at once.
g“Selecting multiple pictures (Share Order Selected, 0, Erase Selected)” (P.97), “Transferring
images to a smartphone” (P.177)
107
Selecting pictures for sharing (Share Order)
1.
2.
C
B

Protected images are indicated by a 0 (“protected”) icon.
2023.08.15 12:30:00 20
100-0020
1012hPa10m
20.5°C
4
:
3
L
N
Protecting Pictures (0)
Protect images from accidental deletion.
Display an image you want to protect and press the OK button.
Select [0] and press the OK button. Then, press F or G.
Press F or G to remove protection.
You can also protect multiple selected images. g“Selecting multiple pictures (Share Order
Selected, 0, Erase Selected)” (P.97)
Formatting the card erases all data including protected images.
108
Protecting Pictures (0)
1.
2.
B
C

Select [c] and press the OK button.
JPEG
Back
Set
JPEG Edit
Share Order
0
c
Rotate
Select [c Start] and press the OK button to begin recording.
c
c
Start
No
Erase
Back
Set
Adding audio to pictures (c)
You can record audio using the built-in stereo microphone and add it to pictures. The recorded audio
provides a simple replacement for written notes about the pictures. Audio recordings can be up to 30s
long.
Display the image to which you want to add audio and press the OK button.
Audio recording is not available with protected images.
To exit without adding audio, select [No].
Press the OK button to end recording.
Pictures with audio are indicated by H icons.
To delete recorded audio, select [Erase] in Step3.
Audio can also be added to pictures using the [Edit] option in the q playback menu (P.135). Use
[Edit] > [Sel.Image] to select the picture, then press the OK button and select [c].
The recorded audio can be played back using [Play H] (P.101).
109
Adding audio to pictures (c)
1.
2.
3.
4.
B
B

Rotating pictures (Rotate)
Choose whether to rotate photographs.
Display an image you want to rotate and press the OK button.
Select [Rotate] and press the OK button.
Press F to rotate the image counterclockwise and G to rotate it clockwise. The image rotates
each time the button is pressed.
Press the OK button to save changes and exit.
The rotated image is saved in its current orientation.
Movies and protected images cannot be rotated.
The camera can be configured to automatically rotate portrait-orientation pictures during playback.
gqPlayback Menu> [n] (P.136)
[Rotate] is not available when [Off] is selected for [n].
110
Rotating pictures (Rotate)
1.
2.
3.
B
C

Highlight [C] and press the OK button.
JPEG Edit
Share Order
Rotate
JPEG
Back
Set
0
c
Playback images automatically (C)
This function displays images stored on the card one after another.
Press the OK button in the playback display.
Configure the slideshow.
Start
Start the slideshow. Images are displayed in order, starting with the current
image.
BGM Turn the background music [On] or [Off].
Slide Set the type of data to be played back.
Slide Interval Select the length of time each slide is displayed from 2 to 10 seconds.
Movie
Interval
Select [Full] to play back full length of each movie clip in the slideshow or
[Short] to play back only the opening portion of each movie clip.
Highlight [Start] and press the OK button.
The slideshow will start.
Press FG during the slideshow to adjust the overall volume of the camera speaker. Press
HI while the volume adjustment indicator is displayed to adjust the balance between the
sound recorded with the image or movie and background music.
Press the OK button to stop the slideshow.
111
Playback images automatically (C)
1.
2.
3.
4.

A P icon will appear on the selected images. Press the OK
button again to remove the P icon.
Image Overlay
RAW RAW RAW
RAW
RAW RAW RAW
Back Set
Adjust the gain for each of the images in the overlay.
Highlight images using the HI buttons and adjust gain
using the FG buttons.
Gain can be adjusted in the range 0.1 – 2.0. Check the results
in the monitor.
×1.5×1.5×0.3 ×0.5
Image Overlay
Back
Set
Combining pictures (Image Overlay)
Overlay existing RAW photos to create a new picture. Up to 3 pictures can be included in the overlay.
The results can be modified by adjusting brightness (gain) separately for each picture.
Play the photograph back and press the OK button.
Select [Image Overlay] and press the OK button.
Select the number of images to be overlaid and press the OK button.
Highlight RAW images for the overlay using FGHI and press the OK button.
An overlay will be displayed once the number of images selected in Step3 have been
selected.
Press the OK button. A confirmation dialog will be displayed.
Highlight [Yes] and press the OK button.
The image is saved with the image quality set at the time the image is saved (if [RAW] was selected
for image quality, it will be saved as [LF+RAW]).
Overlays saved in RAW format can in turn be combined with other RAW images to create overlays
containing 4 or more pictures.
112
Combining pictures (Image Overlay)
1.
2.
3.
4.
5.
6.
B
B

Press HI to select a frame you want to add to the print order
and then press FG to choose the number of prints.
Print Order
Back
Set
ALL
Print order (DPOF)
You can save on the memory card digital “print orders” that list the pictures to be printed and the
number of copies of each print. You can then have the pictures printed at a print shop that supports
DPOF. A memory card is required when creating a print order.
Creating a print order
Press the OK button during playback and select [N] (Print Order).
Select [N] or [O] and press the OK button.
Individual pictures
Repeat this step as desired to add more pictures to the print order. Press the OK button
when all the desired pictures have been selected.
All pictures
Select [O] and press the OK button.
113
Print order (DPOF)
1.
2.

Select the date and time format and press the OK button.
Time
Date
No
Back
Set
No The pictures are printed without the date and time.
Date The pictures are printed with the shooting date.
Time The pictures are printed with the shooting time.
When printing images, the setting cannot be changed between images.
Select [Set] and press the OK button.
The setting will be applied to the images saved on the card being used for playback.
The camera cannot be used to modify print orders created with other devices. Creating a new print
order deletes any existing print orders created with other devices.
Print orders cannot include RAW images or movies.
Removing all or selected pictures from the print
order
You can reset all print order data or just the data for selected pictures.
Press the OK button during playback and select [N] (Print Order).
Select [N] and press the OK button.
To remove all pictures from the print order, select [Reset] and press the OK button. To exit
without removing all pictures, select [Keep] and press the OK button.
You can also remove all pictures from the print order by selecting [O] and choosing
[Reset].
114
Print order (DPOF)
3.
C
4.
C
C
1.
2.

Press HI to select images you wish to remove from the print order.
Use G to set the number of prints to 0. Press the OK button once you have removed all the
desired pictures from the print order.
Select the date and time format and press the OK button.
This setting is applied to all images with print order data.
The setting will be applied to the images saved on the card being used for playback.
Select [Set] and press the OK button.
115
Print order (DPOF)
3.
4.
5.

Deleting pictures (Erase)
Delete the current image.
Play back the photograph you want to delete and press the OK button.
Highlight [Erase] and press the OK button.
Highlight [Yes] and press the OK button.
The image will be deleted.
116
Deleting pictures (Erase)
1.
2.
3.

Menu Functions
Basic menu operations
Menus can be used to customize the camera for ease of use and include shooting and playback
options not displayed in the Live Control screen or elsewhere.
Tab Tab name Description
6
Shooting Menu1
Photography options. Ready the camera for shooting or access basic
photo settings. g“Shooting Menus1 and 2” (P.120)
7
Shooting Menu2
Photography options. Adjust advanced photo settings. g“Shooting
Menus1 and 2” (P.120)
n
Video Menu
Movie recording options. Adjust basic and custom settings. g“The
Video Menu” (P.134)
q
Playback Menu
Playback and retouch options. g“The Playback Menu” (P.135)
C
Custom Menu
Camera customization options. g“The Custom Menus” (P.144)
e
Setup Menu
Options for setting the clock, choosing a language, and more.
g“The Setup Menu” (P.139)
Functions that cannot be selected from menus
Some items may not be selectable from the menus when using the arrow pad.
Items that cannot be set with the current shooting mode. g”List of configurable shooting
modes” (P.206)
Items that cannot be set because of an item that has already been set:
Settings such as picture mode are unavailable when the mode dial is rotated to 0.
117
Basic menu operations
-

2
1
1
Shooting Menu 1
AF Area
Picture Mode
X
Reset/Assign Custom Modes
Back
Set
Preliminary and basic
shooting options.
5
3
2
1
4
Guide
Press the OK button to confirm the setting
Press the MENU button to go back one
screen
Operation guide
Tab
1
2
3
4
5
Menu group tabs appear when CCustom Menu is
selected. Use FG to select the menu group and press the
OK button.
2
1
A. AF/MF
A
B
C
D
E
F
G
H
AF Illuminator
MF Assist
Off
Back
Set
A
1
Menu groups
1
Press the MENU button to view the menus.
A guide is displayed about 2seconds after you select an option. Press the INFO button to
view or hide guides.
Highlight a tab using the FG buttons and press the OK button.
Select an item using FG and press the OK button to display options for the selected item.
2
1
1
2
2
2
Shooting Menu 2
Focus BKT Off
Focus Stacking Settings
Date Stamp Off
Off
Interval Shooting
Back
Set
Back
Set
Shooting Menu 2
Focus BKT Off
Focus Stacking Settings
Date Stamp Off
Picture + Sound Off
Picture + Sound Off
Off
Interval Shooting
Off
On
OK
21
Function
The current setting is displayed
Use FG to highlight an option and press the OK button to select.
Press the MENU button repeatedly to exit the menu.
118
Basic menu operations
1.
2.
3.
1
2
4.

Depending on camera status and settings, some items may be unavailable. Items that are not
available are grayed out and cannot be selected.
For the default settings of each option, refer to “Default Settings” (P.216).
You can also navigate the menus using the front and rear dials in place of the arrow pad.
119
Basic menu operations
C
B
B

6 Shooting Menu1
Reset/Assign Custom Modes (P.52, P.121)
Picture Mode (P.71, P.123)
AF Area (P.125)
7 Shooting Menu2
Interval Shooting (P.127)
Focus BKT (P.130)
Focus Stacking Settings (P.131)
Date stamps (P.132)
Picture + Sound (P.133)
Using Shooting Menu 1/Shooting
Menu 2
Shooting Menus1 and 2
2
1
1
Shooting Menu 1
AF Area
Picture Mode
X
Reset/Assign Custom Modes
Back
Set
120
Shooting Menus1 and 2

Highlight [Reset] and press the OK button.
Reset/Assign Custom Modes
Custom Mode C2
Custom Mode C1
Reset
Back
Set
Restoring Default Settings (Reset)
Camera settings can be easily restored to default settings. You can opt to reset almost all settings or
only those directly related to photography.
Highlight [Reset/Assign Custom Modes] in 6Shooting Menu1 and press the OK button.
Highlight [Full] or [Basic], and press the OK button.
Full Reset all settings with a few exceptions, such as date/time setting and display.
Basic Reset basic photography-related settings.
Highlight [Yes] and press the OK button.
121
Restoring Default Settings (Reset)
1.
2.
3.
4.

Saving Settings (Assign to Custom Mode)
Frequently-used settings and shooting modes can be saved to custom modes (C1, C2) (P.52) and
recalled for use as required simply by rotating the mode dial (P.52).
At default settings, custom modes are equivalent to mode P.
122
Saving Settings (Assign to Custom Mode)

Select [Picture Mode] in 6Shooting Menu1 and press the
OK button.
2
1
1
Back
Set
Shooting Menu 1
AF Area
Picture Mode
Reset/Assign Custom Modes
X
Processing options (Picture Mode)
You can make individual adjustments to contrast, sharpness and other parameters via [Picture Mode]
(P.71) settings. Changes to parameters are stored for each picture mode separately.
The camera will display the picture mode available in the current shooting mode.
123
Processing options (Picture Mode)
1.

Highlight an option using the FG buttons and press the OK button.
Press I to set the detailed options for the selected picture mode. Detailed options are not
available for some picture modes.
Sharpness The outlines are enhanced to give the image a sharp, clear look.
Contrast
Adjust the difference between light and dark in the image.
Accentuating the difference between light and dark can give the
image a clear and powerful impression.
Saturation
Adjust the hues and color intensity of the image. Increasing the
saturation produces an impactful image with clear tones.
Gradation
Adjust the hues and color intensity of the image. The overall image
is brightened or darkened according to the impression of the subject.
Both dark and light tones can be produced according to the contrast.
Color Filter
Color filter effects can be added to the [Monochrome] setting
in Picture Mode. The subject can be brightened, or the contrast
sharpened depending on the color. Contrast is sharpened in the order
of yellow, orange, and red. Green is effective for portrait photography.
Monochrome
Color
Color effects can be added to the [Monochrome] setting in Picture
Mode.
Effect
Configure the intensity of the effect applied when Picture Mode is set
to [i-Enhance].
Add Effects Art filters also allow you to set up frame effects and other effects.
Changes to contrast have no effect when settings other than [Normal] are used.
124
Processing options (Picture Mode)
2.
C

Selecting the focusing area (AF Area)
You can select the position and size of the focus area for auto focus.
b (All Targets)
The camera automatically selects from the full set of focus targets.
X (Single Target)
You can select a single AF target.
Tracking
The camera tracks the subject movement automatically to focus on it
continuously.
Setting the AF target (Area)
You can select the position of the AF target manually.
Select [AF Area] in 6Shooting Menu1 and press the OK button.
Highlight [X] and press the OK button.
Highlight the position of the AF target using the FGHI buttons and press the OK button.
Pressing and holding the OK button before setting the position returns the AF target to the
center.
To reposition the AF target when the camera is ready to shoot, press and hold the OK button.
The number and size of the AF targets changes with the aspect ratio (P.79).
The position of the AF target cannot be changed while the digital teleconverter is in use.
Continuously focusing on moving subjects
(Tracking)
The camera can track the subject movement automatically to focus on it continuously.
Select [AF Area] in 6Shooting Menu1 and press the OK button.
125
Selecting the focusing area (AF Area)
1.
2.
3.
B
B
C
1.

Select [Tracking] and press the OK button.
Press the MENU button to return to the shooting display.
Align the AF target with the subject and press the OK button while keeping the shutter button
pressed halfway.
When the subject is detected, the AF target will track its movement and automatically focus on
it continuously.
To cancel the function, press the OK button.
The camera may be unable to stabilize the focus or track the subject depending on the subject and
shooting conditions.
If the camera is unable to track the subject, the AF target will light up in red.
When using a digital teleconverter, AF target selection is fixed at [X] (single target).
126
Selecting the focusing area (AF Area)
2.
3.
4.
5.
C
B
B

Highlight [Interval Shooting] in 7Shooting Menu2 and
press the OK button.
2
1
2
Shooting Menu 2
Focus BKT Off
Focus Stacking Settings
Date Stamp Off
Picture + Sound Off
Off
Interval Shooting
Back
Set
Shooting automatically with a fixed interval
(Interval Shooting)
You can set the camera to shoot automatically with a set time lapse. The shot frames can also be
recorded as a single movie.
Highlight [On] and press I.
Adjust the following settings and press the OK button.
Number of
Frames
Choose the number of frames shot.
[2]–[299] (frames)
Start Waiting
Time
Choose how long the camera waits before starting interval-timer
photography and taking the first shot.
[00:00:00]–[24:00:00]
Interval Length
Choose how long the camera waits between shots once shooting has
begun.
[00:00:01]–[24:00:00]
Interval Mode
Choose whether the camera prioritizes taking photographs at the selected
interval or taking the selected number of photographs.
[Time Priority]/[Frames Priority]
If [Time Priority] is selected, the previous exposure may not end
before the next is due to begin. The final number of photographs
may be less than that chosen for [Number of Frames] if, for example,
[Interval Length] is very short or shooting for each interval takes a
long time to complete.
127
Shooting automatically with a fixed interval
(Interval Shooting)
1.
2.
3.

A t icon will appear in the shooting display (the icon
shows the selected number of shots).
125 F5.6
ISO - A
20 0
L
N
S-IS
ON
S-IS
ON
0.00.0
01:02:0301:02:03
10231023
P
FHD
30p30p
F
99
Exposure
Smoothing
Adjust exposure to average out differences between shots. This smooths
exposure changes during the time-lapse movie.
[Off]/[On]
Time Lapse
Movie
Choose whether to record a time-lapse movie.
[Off]: The camera saves the individual shots but does not use them to
create a time-lapse movie.
[On]: The camera records the individual shots and also uses them to
create a time-lapse movie.
Movie Settings
Choose the frame size ([Movie Resolution]) and frame rate ([Frame
Rate]) for movies created using [Time Lapse Movie].
The options available for [Movie Resolution] are:
[4K], [FullHD], [HD]
The options available for [Frame Rate] are:
[30fps], [15fps], [10fps], [5fps]
The actual [Start Waiting Time], [Interval Length] and [Estimated Start Time] may differ
from the selected value depending on shooting settings. The values listed are for use as
guidelines only.
Press the OK button repeatedly to return to 7Shooting Menu2.
Press the MENU button to exit the menus.
Release the shutter.
The specified number of frames will be shot automatically.
Time lapse shooting will be canceled if any of the following occurs:
The mode dial, MENU button, or q button are operated; or a USB cable is connected
Turning the camera off ends interval-timer photography.
128
Shooting automatically with a fixed interval
(Interval Shooting)
C
4.
5.
-

The [Image Review] (P.139) option in the eSetup Menu functions with a display time of
0.5seconds.
If the time until shooting or the shooting interval is 1minute 31seconds or longer, the monitor will
go dark and the camera will enter sleep mode if no operations are performed for 1minute. The
display will turn on automatically 10seconds before shooting for the next interval begins. It can also
be reactivated by pressing the ON/OFF button at any time.
No time lapse movie will be created if any frame is not recorded correctly.
If there is insufficient space on the card, the time lapse movie will not be recorded.
If there is not enough charge left on the battery, the shooting may end partway through. Use fully
charged batteries, or use the USB-AC adapter to shoot for longer periods of time. If you are using
the USB-AC adapter, insert the battery in the camera and select [Charge] in the dialog displayed
after the USB cable is connected. Once the monitor has turned off, you can press the ON/OFF
button to turn the monitor on again and continue to take pictures while charging is in progress.
Time-lapse movies created at a size of [4K] may not display on some computer systems. More
information is available on our website.
129
Shooting automatically with a fixed interval
(Interval Shooting)
C
C
C
C
C
C

Varying focus little by little over a series of
pictures (Focus BKT)
Each time the shutter button is pressed, the camera will automatically vary focus over a series of 10, 20,
or 30shots.
Select [Focus BKT] in 7Shooting Menu2 and press the OK button.
Highlight [On] and press I.
Adjust the following settings and press the OK button.
Start Waiting Time 0 to 30 sec
Select the length of time the camera waits
before shooting starts.
Set number of shots 10/20/30 (frames)
Select the number of frames in the bracketing
sequence.
Set focus differential
Narrow/Normal/
Wide
Select the amount by which the focus
changes with each shot.
Press the shutter button halfway to focus.
If the focus indicator blinks, the camera is not in focus.
Press the shutter button all the way down to start shooting.
The camera takes the number of shots selected for [Set number of shots] while varying focus with
each shot. The camera will take pictures at the focus distance selected when the shutter button is
pressed halfway, as well as distances in front of and behind it.
The t indicator turns green during bracketing.
Shooting ends when focus reaches O (infinity).
AF target selection is fixed at [X] (single target).
Exposure and white balance are fixed at the values for the first shot in each series.
130
Varying focus little by little over a series of
pictures (Focus BKT)
1.
2.
3.
4.
5.
C
C

Increasing depth of field (Focus Stacking
Settings)
Vary focus over the selected number of shots and combine the resulting pictures to form a single
image. The camera records two pictures: the first shot taken and the composite image.
Highlight [Focus Stacking Settings] in 7Shooting Menu2 and press the OK button.
Adjust the following settings and press the OK button.
Start Waiting Time Select the length of time the camera waits before shooting starts.
Set number of
shots
Select the number of shots that will be taken and combined to create
the final picture.
The first shot is not included.
Rotate the mode dial to 7.
Highlight [Focus Stacking] using HI and press the OK button.
Press the shutter button halfway to focus.
If the focus indicator blinks, the camera is not in focus.
To take a series of shots at the same focus distance, use focus lock (P.66) or MF (P.78).
Press the shutter button all the way down to start shooting.
AF target selection is fixed at [X] (single target).
Exposure and white balance are fixed at the values for the first shot in each series.
131
Increasing depth of field (Focus Stacking
Settings)
1.
2.
3.
4.
5.
6.
C
C

Date stamps (Date Stamp)
Stamp photos with the date and/or time of recording.
Off Do not place date and time stamps on photos.
Date Stamp photos with the date of recording.
Time Stamp photos with the time of recording.
Date + Time Stamp photos with the date and time of recording.
The p icon is displayed when [Date Stamp] is enabled.
Date/time stamps cannot be removed.
This option will not be available if the date and time have not been set. g“Initial Setup” (P.28)
This option is not available for:
RAW pictures (including pictures shot using JPEG+RAW); movies; pictures recorded using [e-
Portrait], [Handheld Starlight], [Live Composite], [Panorama], or [Backlight HDR] in SCN
mode; pictures taken using [Focus Stacking] or [Focus Bracketing] in 7 mode; pictures taken
using [Underwater HDR] in 6 mode; photos taken with [ART] selected for picture mode;
photos taken with the mode dial rotated to n; pictures taken in burst mode; or photos created
using the [Edit] option in the playback menu.
132
Date stamps (Date Stamp)
C
C
C
-

Picture + Sound
When set to [On], the camera automatically records audio for 4 seconds after the shutter is released.
This is useful when you want to record comments about the shot.
The c icon is displayed when [Picture + Sound] is enabled.
The recorded audio can be played back using [Play H] (P.101).
The [Set number of shots] setting for [Custom Self-timer] will be fixed at 1.
This option is not available for:
Pictures taken using 0 mode; pictures recorded using [e-Portrait], [Handheld Starlight], [Live
Composite], [Panorama], or [Backlight HDR] in SCN mode; pictures taken using [Focus
Stacking] or [Focus Bracketing] in 7 mode; pictures taken using [Underwater HDR] in 6
mode; pictures taken using [Interval Shooting]
133
Picture + Sound
C
C
-

Movie recording functions are set in the Video Menu.
2
1
Video Menu
Video Bit Rate
Video Frame Rate
Recording Volume
Fine
30p
±0
On
Movie
c
Back
Set
Using the Video Menu
The Video Menu
Option Description
Movie c
Adjust settings for recording sound while recording movies (P.54).
[Off]: Record movies without sound.
[On]: Record movies with sound.
[On Z]: Record movies with sound; wind noise reduction enabled.
Recording
Volume
Adjust the sensitivity of the built-in microphone. Adjust the sensitivity using
FG while checking the peak sound level picked up by the microphone over
the previous few seconds.
Video Frame
Rate
Select the frame rate for movie recording (P.82).
When shooting movies that will be viewed on a television, select a frame rate
that matches the video standard used in the device, as the movie may not
play back smoothly otherwise. Video standards vary by country or region:
some use NTSC, others PAL.
When shooting for display on NTSC devices, select 60p (30p)
When shooting for display on PAL devices, select 50p(25p)
Video Bit Rate Select the compression rate for movie recording (P.82).
Operation sounds of the lens and camera may be recorded when recording a movie. To prevent
these from being recorded, reduce the operation sounds by minimizing the button operations of
the camera.
Sound is not recorded with high-speed movies or movies shot with g (Diorama) selected for
picture mode.
When Movie Sound Recording is set to [Off], V is displayed.
134
The Video Menu
-
-
B
C
B


Automatically Rotating Portrait-Orientation
Pictures for Playback (n)
If set to [On], images in portrait orientation are automatically rotated to be displayed in the correct
orientation on the playback display.
136
Automatically Rotating Portrait-Orientation
Pictures for Playback (n)

Removing Protection from All Pictures (Reset
Protect)
Remove protection from multiple pictures simultaneously.
Highlight [Reset Protect] in the qPlayback Menu and press the OK button.
Highlight [Yes] and press the OK button.
137
Removing Protection from All Pictures (Reset
Protect)
1.
2.

Cancelling a share order (Reset share Order)
Cancel share orders that are set on images.
Highlight [Reset share Order] in the qPlayback Menu and press the OK button.
Highlight [Yes] and press the OK button.
138
Cancelling a share order (Reset share Order)
1.
2.

Adjust basic camera settings. Examples include language selection
and monitor brightness. The setup menu also contains options
used during the initial setup process.
2
1
Setup Menu
Wi-Fi/Bluetooth Settings
Image Review
b
W
m
Settings
0.5 sec
p
±0
English
Card Setup
Back
Set
Construction Menu Off
You can adjust the brightness of the
monitor. Highlight an option using the
FG buttons.
+1
Back
Set
Using the Setup Menu
The Setup Menu
Option Description
Card Setup You can format the card or delete all images (P.141, P.142).
m Settings (Date/
time setting)
Set the date and time (P.28).
W (Changing the
display language)
Choose a language for camera menus and guides displayed when
configuring functions (P.143).
b (Monitor
brightness
adjustment)
Image Review
Choose whether pictures are automatically displayed after shooting. You
can also configure how long the pictures are displayed. This is useful for
a brief check of the picture you have taken. You can shoot the next shot
by pressing the shutter button halfway even while the captured image is
displayed on the monitor.
[0.3sec] – [20sec]: Sets the length of time (seconds) to display the
captured image on the monitor.
[Off]: The captured image is not displayed on the monitor.
[Auto q]: Displays the captured image, and then switches to playback
mode. This is useful for erasing a picture after checking it.
139
The Setup Menu

Option Description
Wi-Fi/Bluetooth
Settings
Adjust settings for connection to Wi-Fi/Bluetooth®-compatible
smartphones and optional remote controls using the camera’s wireless
function (P.180, P.172).
Construction Menu Use and configure settings related to shooting construction photos (P.164).
140
The Setup Menu

A menu will be displayed if the card contains data. Highlight
[Format] and press the OK button.
Card Setup
Format
All Erase
Back
Set
Formatting the card (Card Setup)
Cards must be formatted with this camera before first use or after being used with other cameras or
computers.
All data stored on the card, including protected images, is erased when the card is formatted. When
formatting a used card, confirm that there are no images that you still want to keep on the card.
g“Usable cards” (P.21)
Highlight [Card Setup] in the eSetup Menu and press the OK button.
Highlight [Yes] and press the OK button.
The card will be formatted.
141
Formatting the card (Card Setup)
C
1.
2.

Highlight [Card Setup] in the eSetup Menu and press the OK
button.
Card Setup
Format
All Erase
Back
Set
Deleting all images (Card Setup)
All images on a card can be deleted at the same time. Protected images are not deleted.
Highlight [All Erase] and press the OK button.
Highlight [Yes] and press the OK button.
All images are deleted.
142
Deleting all images (Card Setup)
1.
2.
3.

Highlight the desired language using the control dial or the
FGHI buttons.
Back
Set
W
Česky
Suomi
Italiano
Polski
Ὶ㜴)䴭℀*
Nederlands
Français
Português(Pt)
Español
Ὶ㜴)修℀*
English
Deutsch
Norsk
Русский
Türkçeไทย
Svenska
Selecting a language
Select a different language for the menus and messages displayed in the monitor.
Highlight [W] in the e Setup Menu and press the OK button.
Press the OK button when the desired language is highlighted.
143
Selecting a language
1.
2.
3.

Camera settings can be customized using the CCustom Menus.
2
1
A. AF/MF
A
B
C
D
E
F
G
H
AF Illuminator
MF Assist
Off
Back
Set
A
Using the Custom Menus
The Custom Menus
Custom Menu
A AF/MF (P.145)
B Disp/o/PC (P.146)
C Exp/ISO (P.147)
DA Custom (P.148)
E X/WB/Color (P.149)
F Record (P.151)
G Field Sensor (P.153)
HK Utility (P.154)
144
The Custom Menus


B Disp/o/PC
MENU Q C Q B
Option Description
G/Info
Settings
Select the information displayed when the INFO button is pressed (P.156).
[q Info]: Select the information displayed in full frame playback.
[LV-Info]: Select the information displayed when the camera is in shooting mode.
[G Settings]: Select the information shown in the index and calendar displays.
Live View
Boost
[Off]: Changes to settings such as exposure compensation are reflected in the
display in the monitor.
[On]: Changes to settings such as exposure compensation are not reflected in the
display in the monitor; instead, brightness is adjusted to bring the display as close
as possible to optimal exposure.
Flicker
Reduction
Reduce the effects of flicker under some kinds of lighting, including fluorescent
lamps. When flicker is not reduced by the [Auto] setting, set to [50Hz] or [60Hz]
in accordance with the commercial power frequency of the region where the
camera is used.
Displayed
Grid
Select [R] or [S] to display a grid on the monitor.
Peaking Color
Select the color of the outlines (red, yellow, white, or black) in the focus peaking
display when [MF Assist] is [On].
o (Beep
sound)
Use FG to adjust the volume of the sounds made in response to camera
controls. Select “0” to disable sounds such as those made when the camera
focuses or the shutter is released.
HDMI
Configure settings for HDMI connection (P.159).
[Output Size]: Select the digital video signal format for connecting to a TV via an
HDMI cable.
[HDMI Control]: Select [On] to allow the camera to be operated using remotes
for TVs that support HDMI control. This option takes effect when pictures are
displayed on a TV.
146
B Disp/o/PC

C Exp/ISO
MENU Q C Q C
Option Description
Exposure
Shift
Adjust correct exposure separately for each metering mode.
The effects are not visible in the monitor. To make normal adjustments to the
exposure, perform exposure compensation (P.58).
ISO-Auto
Set
[Upper Limit / Default]: Select the upper limit and default value used for ISO
sensitivity when [Auto] is selected for ISO.
[Upper Limit]: Select the upper limit for auto ISO sensitivity selection.
[Default]: Select the default value for auto ISO sensitivity selection.
[Lowest S/S Setting]: Select the shutter speed below which the camera will
automatically raise ISO sensitivity in modes P and A. If set to [Auto], the camera
automatically sets the shutter speed.
Noise Filter Select the amount of noise reduction performed at high ISO sensitivities.
Noise
Reduct.
This function reduces the noise that is generated during long exposures.
[Auto]: Noise reduction is performed at slow shutter speeds, or when the internal
temperature of the camera has risen.
[On]: Noise reduction is performed with every shot.
[Off]: Noise reduction off.
The time required for noise reduction is shown in the display.
[Off] is selected automatically during sequential shooting.
This function may not work effectively with some shooting conditions or subjects.
Noise in images
While shooting at slow shutter speeds, noise may appear on screen. These phenomena occur
when the temperature rises in the image pickup device or image pickup device internal drive
circuit, causing current to be generated in those sections of the image pickup device that are
not normally exposed to light. This can also occur when shooting with a high ISO setting in a
high-temperature environment. To reduce this noise, the camera activates the noise reduction
function.
147
C Exp/ISO

DA Custom
MENU Q C Q D
Option Description
7+F
When set to [On], the exposure compensation value is added to the flash compensation
value (P.58, P.85).
A+WB
Adjust white balance for use with flash.
[Off]: The camera uses the value currently selected for white balance.
[N]: The camera uses auto white balance ([N]).
[O]: The camera uses flash white balance ([O]).
148
DA Custom

X
Set
Pixel Count : 4000×3000
1
X
2
X
3
X
4
X
Back
Set
SFL FL N
L
N
M1
1
2
Image size
Compression ratio
1
2
E X/WB/Color
MENU Q C Q E
Option Description
X Set
Change the image quality mode for JPEG images. You can choose from combinations
of 4 image sizes and 3 compression rates(P.80, P.161).
Highlight the image size and compression ratio from [X1] to [X4]
using the HI buttons and adjust the value using the FG buttons.
Press the OK button. A confirmation dialog will be displayed.
WB
Set the white balance. You can also fine-tune the white balance for each mode (P.75).
Highlight the white balance option you wish to fine-tune and press I.
Highlight the A (amber–blue) or G (green–magenta) axis and use FG to
select a value.
Higher values on the A (amber–blue) axis give images a red cast, while
lower values give images a blue cast.
Higher values on the G (green–magenta) axis heighten greens, while
lower values give images a magenta cast.
N Keep
Warm
Color
Select [On] to preserve “warm” colors in pictures taken under incandescent lighting.
149
E X/WB/Color
1.
2.
1.
2.

Option Description
Color
Space
You can select a format to ensure that colors are correctly reproduced when shot
images are regenerated on a monitor or using a printer.
[sRGB]: This is a standard color space stipulated by an organization that establishes
international standards. It is used in standard displays, printers, digital cameras, and
various applications. In normal settings, use [sRGB] as the standard setting.
[Adobe RGB]: This color space produces a wider color gamut than sRGB. Software
and hardware such as a display, printer, etc. that are compatible with this standard are
required for images to be output correctly. The first character of the file name will be
displayed as an underscore (_) (e.g., _xxx0000.jpg).
150
E X/WB/Color

F Record
MENU Q C Q F
Option Description
File Name
Choose how the camera assigns file numbers.
[Auto]: Even when a new card is inserted, the file numbers are retained from the
previous card. File numbering continues from the last number used or from the
highest number available on the card.
[Reset]: When you insert a new card, the folder numbers starts at 100 and the file
name starts at 0001. If a card containing images is inserted, the file numbers start at
the number following the highest file number on the card.
Edit
Filename
Choose how files are named when photos and movies are saved to thememory card.
You can change the following portions of the file name.
sRGB: Pmdd0000.jpg --- Pmdd
Adobe RGB: _mdd0000.jpg --- mdd
Highlight [sRGB] or [Adobe RGB] and press I.
Use HI to move the cursor and FG to edit the highlighted character.
Select [Off] to use the default prefixes.
Repeat Step 2 as necessary to create the desired filename and then press
the OK button.
151
F Record
1.
2.
3.
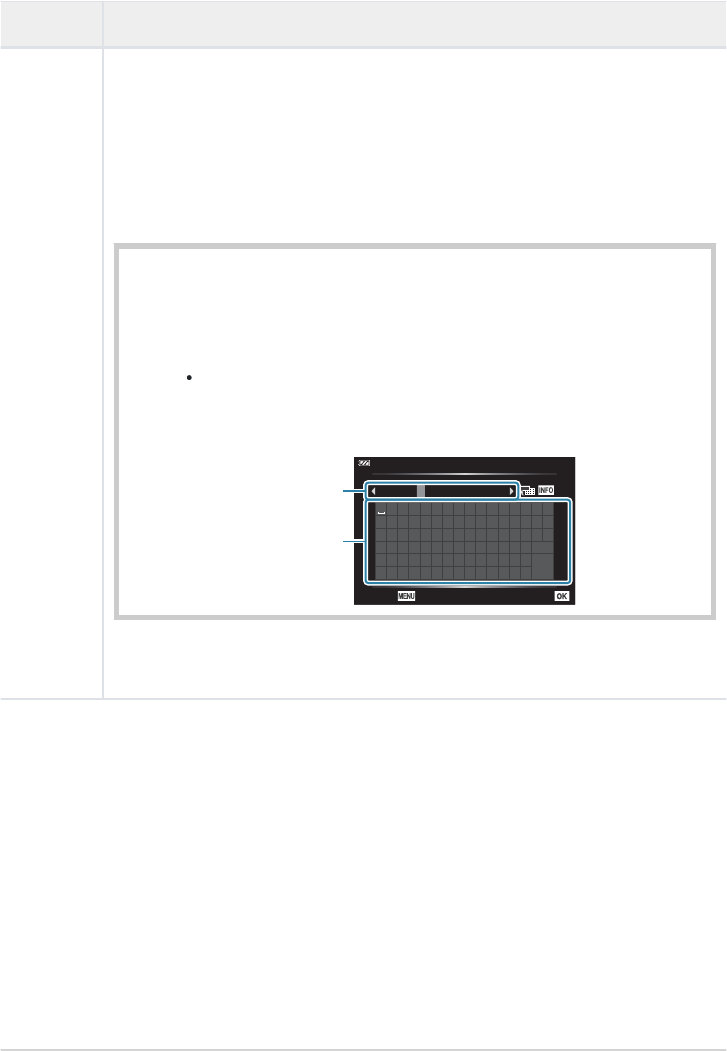
Option Description
Copyright
Settings
Add the names of the photographer and copyright holder to new photographs.
Names can be up to 63 characters long.
[Copyright Info.]: Select [On] to include the names of the photographer and
copyright holder in the Exif data for new photographs.
[Artist Name]: Enter the name of the photographer.
[Copyright Name]: Enter the name of the copyright holder.
Select characters from a and press the OK button. The selected characters
appear in b.
Repeat Step1 to complete the name, then highlight [END] and press the
OK button.
To delete a character, press the INFO button to place the cursor inb
and highlight the character. After pressing the INFO button again to
return to a, highlight [Delete] and press the OK button.
! ” # $ % &
( )
* + , - . /
0 1 2 3 4 5 6 7
’
8 9 : ; < = > ?
@
A B C D E F G H I J K L M N O
P Q R S T U V W X Y Z
[ ] _
a b c d e f g h i j k l m n
END
Delete
o p q r s t u v w x y z
{ }
ABC D E
05/63Copyright Name
Cancel
Set
b
a
We do not accept liability for damages arising from disputes involving the use of
[Copyright Settings]. Use at your own risk.
152
F Record
1.
2.
C

G Field Sensor
MENU Q C Q G
Option Description
Record GPS
location
Select [On] to record location data with pictures as they are taken.
Elevation/
Temperature
Select the units used for temperature and altitude in the sensor data display. You
can also calibrate altitude.
[Calibrate Elevation]: Calibrate altitude when the current altitude and the value
shown by the camera do not match.
[m/ft]: Select whether altitude is shown in meters (m) or feet (ft).
[ºC/ºF]: Select whether the temperature is displayed in degrees Celsius (ºC) or
degrees Fahrenheit (ºF).
Highlight the desired item using FG.
Press I.
Highlight items using FG and press the OK button to select.
153
G Field Sensor
1.
2.
3.

HK Utility
MENU Q C Q H
Option Description
Pixel Mapping
Perform simultaneous checks on the camera’s image sensor and image processing
functions (P.243).
Level Adjust
You can calibrate the angle of the level gauge.
[Reset]: Reset the gauge to factory default settings.
[Adjust]: Choose the current camera angle as the 0 position.
Sleep
Choose the delay before the camera enters sleep mode when no operations are
performed. In sleep mode, camera operations are suspended and the monitor
turns off.
Normal operation can be restored by pressing a button or pressing the shutter
button halfway.
Certification Display certification icons.
154
HK Utility

Assist Manual Focus (MF Assist)
MENU Q C Q A Q [MF Assist]
This feature is used to assist manual focus. If the focus position changes during focus lock or manual
focus, the camera will enhance outlines or zoom the display in on an area of the frame.
Magnify
Magnifies a portion of the screen.
The subject in the center of the frame is displayed at a higher magnification. If you
are using focus lock (P.66), the location on which focus is locked will be displayed at a
higher magnification.
Peaking
Displays clearly defined outlines with edge enhancement. You can select the color of the
outlines. g[Peaking Color] (P.146)
When peaking is in use, the edges of small subjects tend to be enhanced more strongly. This is no
guarantee of accurate focusing.
Depending on the subject, outlines may be hard to see when [On] is selected for both [Magnify]
and [Peaking].
155
Assist Manual Focus (MF Assist)

Use [q Info] to add the following playback information displays.
The added displays are displayed by repeatedly pressing the INFO
button during playback. You can also opt to not show displays
that appear at the default setting. g“Switching the information
display” (P.91)
q
Info
Image Only
Overall
Highlight&Shadow
Back
A histogram showing the distribution of brightness in the image is
displayed. The horizontal axis gives the brightness, the vertical axis
the number of pixels of each brightness in the image.
15
Areas above the upper limit of brightness for the image are shown
in red, and those below the lower limit are shown in blue.
Shadow
Highlight
15
Adding information displays using the INFO
button (G/Info Settings)
MENU Q C Q B Q [G/Info Settings]
qInfo (Playback information displays)
Histogram display
Highlight & Shadow display
156
Adding information displays using the INFO
button (G/Info Settings)

The histogram, Highlight & Shadow, and level gauge displays can
be added to [LV-Info]. Select [Custom 1] or [Custom 2] and select
the displays you wish to add. The added displays are can be viewed
by repeatedly pressing the INFO button during shooting. You can
also opt to not show displays that appear at the default setting.
Custom1
Highlight&Shadow
Level Gauge
Back
LV-Info (Shooting information displays)
Choose the info shown in the live view shooting display. g“Switching the information display” (P.33)
Level gauge display
The orientation of the camera is indicated. The “tilt” direction is indicated on the vertical bar and the
“horizon” direction on the horizontal bar. The camera is level and plumb when the bars turn green.
Use the indicators on the level gauge as a guide.
Error in the display can be corrected via calibration (P.154).
157
Adding information displays using the INFO
button (G/Info Settings)

You can change the number of frames to be displayed on the
index display and set to not display the screens that are set to be
displayed by default with [G Settings]. The displays marked with
a check can be viewed by rotating the zoom lever.
G
Settings
Calendar
Back
9
4
25
100
21
Counterclockwise (G side)
Clockwise (8 side)
1
2
Single-frame playback
4 frames
9, 25, or 100 frames
1
2
3
Index display
Calendar display
4
5
G Settings (Index/calendar display)
2023.08.15 12:30:00 20
100-0020
1012hPa10m
20.5°C
4
:
3
L
N
2023.08.15
20
12:30:00
2023.08.15 12:30:00
20
20
2023.08.15 12:30:00
202023.08.15 12:30:00
12
19181716151413
26252423222120
213130292827
76543
543213130
116 7 8 9 10
2023.08
Sun Mon Tue Wed Thu Fri Sat
G
8
G
8
1 2
5
4
3
OK
G8
158
Adding information displays using the INFO
button (G/Info Settings)

Viewing camera images on TV (HDMI)
MENU Q C Q B Q [HDMI]
Use the separately sold cable with the camera to playback recorded images on your TV. This function is
available during shooting. Connect the camera to an HD TV using an HDMI cable to view high-quality
images on a TV screen.
1
32
HDMI connector (Type-D)
HDMI cable
Type A
Connect the TV and camera and switch the input source of the TV.
The camera monitor will turn off when an HDMI cable is connected.
For information on switching to HDMI input, see the manual provided with the TV.
If the camera is connected via an HDMI cable, you will be able to choose the digital video signal
type. Match output settings to the input settings on the TV.
4K If possible, the signal is output in 4K (3840× 2160).
1080p If possible, the signal is output in Full HD (1080p).
720p If possible, the signal is output in HD (720p).
480p/576p The signal is output in 480p/576p format.
Depending on TV settings, the image may be cropped and some indicators may not be visible.
Do not connect the camera to other HDMI output devices. Doing so may damage the camera.
HDMI cannot be used while the camera is connected to a computer via USB.
The output format used when [4K] is selected in photo mode is 1080p priority.
159
Viewing camera images on TV (HDMI)
1
2
3
B
B
C
C
C
C

Using the TV remote control
The camera can be operated by a TV remote control when connected to a TV that supports HDMI
control. Select [On] for [HDMI Control]. When [On] is selected, the camera can be used for
playback only.
The camera monitor turns off.
You can operate the camera by following the operation guide displayed on the TV.
During single-frame playback, you can display or hide the information display by pressing the
“Red” button, and display or hide the index display by pressing the “Green” button.
Some televisions may not support all features.
160
Viewing camera images on TV (HDMI)
C

Combinations of JPEG image sizes and
compression rates (X Set)
MENU Q C Q E Q [X Set]
You can set the JPEG image quality by combining image size and compression rate.
Image size
(Pixel count)
Compression ratio
Application
Super
Fine
Fine Normal
Large (4000 × 3000)
LSF LF LN
Select for the print size
Middle1 (3200 × 2400)
aSF aF aN
Middle2 (1920 × 1440)
bSF bF bN
Small (1280×960)
SSF SF SN
For small prints and use on a website
161
Combinations of JPEG image sizes and
compression rates (X Set)


Cautions
This camera was developed, manufactured, and sold as a general-purpose camera. It has not been
specifically designed to provide mechanical performance for a particular intended use.
Since the camera’s built-in GPS function and electronic compass function were not designed for
use cases that require accuracy, there is no guarantee that the measured values (latitude, longitude,
heading, temperature, etc.) are accurate.
With the exception of the warranty set forth in our warranty policy, we will not compensate for any
damages (including financial loss, interruption of work, loss of work or work information, or other
time or monetary losses) resulting from the use of this product or the inability to use this product.
163
Cautions

Highlight [Construction Menu] in the e Setup Menu and
press the OK button.
[Construction Menu] cannot be set if the date and time are
not set on the camera.
C
2
1
Construction Menu Off
Setup Menu
b
W
m
Settings
0.5 sec
p
±0
English
Card Setup
Back
Set
Wi-Fi/Bluetooth Settings
Image Review
Displaying the Construction Menu
Press the MENU button to view the menus.
Highlight [On] and press OK.
Press the MENU button to exit the menus.
164
Displaying the Construction Menu
1.
2.
3.
4.

Rotate the mode dial to SCN.
Highlight [Construction] using the FGHI buttons and
press the OK button.
Construction
Motion Scenery
Nightscapes
Indoors
People
[Construction] in SCN mode
Shoot clear images by using the camera in a manner suited to the shooting location.
Use HI to highlight a scene mode and press the OK button.
q
Construction 1
Shoot standard construction photos. The phenomenon in which
dust and rain appear as white dots on the image is reduced.
If you experience camera shake, using [Construction 2] may
solve the problem.
The maximum ISO sensitivity value is 3200.
r
Construction 2
Use this setting when pictures taken using [Construction 1]
appear dark. This setting is less susceptible to camera shake. If you
still experience camera shake when using [Construction 2], use a
tripod.
Images may appear grainy due to increased ISO sensitivity, so
check the image to confirm that the image quality is suitable for
the intended use.
The maximum ISO sensitivity value is 6400.
s
Construction 3
Dark areas will appear brighter compared to [Construction 1],
making this setting suitable for sites with significant variations in
lighting.
When shooting in bright locations, such as outdoors on a sunny
day, the entire image may appear white.
The maximum ISO sensitivity value is 1600.
165
[Construction] in SCN mode
B
B
C
B
C
B
1.
2.
3.

u
Indoor
This setting is suitable for shooting using flash in wide spaces.
Images will appear bright from the foreground to the background.
t
Slow Shutter
This setting is effective for shooting using a tripod at night.
In addition, using the self-timer (P.60) will prevent camera shake
when the shutter is released.
Z
Documents
This setting is suitable for shooting printed materials of A4 or A3
size, such as documents and drawings.
X
Panorama Shoot images with a wide angle of view.
Release the shutter.
When shooting, you can lean against a wall or otherwise brace yourself to prevent blurring.
Some functions cannot be selected when using [Construction 1], [Construction 2], or
[Construction 3].
Flash is disabled when [Construction 1], [Construction 2], [Construction 3], [Slow Shutter],
[Documents], or [Panorama] are selected, preventing suitable images from being shot in places
with no light at all. In such cases, select a SCN (scene) mode in which flash is enabled.
166
[Construction] in SCN mode
4.
B
C
C

Press the OK button and then highlight K Image quality
using FG.
P
4000×3000
AFAF
FHD
30p30p
F
WB
AUTO
WB
AUTO
RAW
4:3
L
N
SF
L
F
L
N
M
10231023
ISO
AUTO
L
N
+RAW+RAW
L
SFSF
Configuring an image size for the
Construction Menu
When [Construction Menu] is set to [On], the image size (CALS H/CALS) and compression rate (N) for
the Construction Menu can be set from Image quality for still pictures.
Configuring settings from Image quality for still
pictures
Highlight x or w using HI and press the OK button.
To use [CALS H] or [CALS] in combination with another compression rate (SF or F), change the
settings in [X Set] (P.149).
When [Construction Menu] is set to [On], a is displayed as M, b is displayed as d, and S
is displayed as c.
Configuring settings from the Shooting Menu
(Easy CALS)
When [Easy CALS] is set to [CALS H] or [CALS], an image quality for the Construction Menu is
automatically selected when the camera is turned on.
Press the MENU button to view the menus.
167
Configuring an image size for the Construction
Menu
1.
2.
B
B
1.

Select [Easy CALS] in 6Shooting Menu1 and press the OK
button.
2
1
1
Easy CALS Off
Shooting Menu 1
AF Area
Picture Mode
X
Reset/Assign Custom Modes
Back
Set
Highlight [CALS H] or [CALS] using the FG buttons and press the OK button.
When [CALS H] is selected, x will be selected automatically when the camera is turned on.
When [CALS] is selected, w will be selected automatically when the camera is turned on.
When [Off] is selected, the image size and compression rate will be set to the settings that
were in use immediately before the camera was turned off.
Press the MENU button to exit the menus.
For the [Panorama] setting for [Construction] in SCN (Scene) mode, the size of the combined
image may exceed approximately 3M (1920 × 1440), even when the image mode is set to [CALS H]
or [CALS].
168
Configuring an image size for the Construction
Menu
2.
3.
4.
C

[Displayed Grid] in the Construction Menu
When [R] is selected for [Displayed Grid], an orange 25-segment grid guide will be displayed. When
[S] is selected, a gray golden ratio grid guide will be displayed.
The histogram cannot be displayed while the orange 25-segment grid guide is displayed.
169
[Displayed Grid] in the Construction Menu
C

Connecting the Camera to External
Devices
Connecting to External Devices
A number of tasks can be accomplished by connecting the camera to an external device such
as a computer or smartphone. g“Connecting to Smartphones” (P.173), “Copying Pictures to a
Computer” (P.183), “Connecting the camera and remote control” (P.186), “Connecting the Camera to
TVs or External Displays (HDMI)” (P.192)
170
Connecting to External Devices

Cautions for the use of Wi-Fi and Bluetooth
®
functions
Disable wireless LAN and Bluetooth
®
in countries, regions, and locations where their use is prohibited.
The camera is equipped with built-in wireless LAN and Bluetooth
®
. Use of these features outside the
country or region of purchase may violate local wireless regulations.
In certain countries and regions, it may be illegal to acquire position information without prior
application to the government. Because of this, in certain sales regions, the camera may be set up
not to display position information.
When taking the camera abroad, be aware that some regions or countries may have laws regulating
the use of this function. Check the applicable laws in advance and abide by them when using the
camera. Our company will not be held liable for the user’s failure to comply with local regulations.
In airplanes and other places where the use of Wi-Fi is prohibited, disable this function. gDisabling
the Camera’s Wireless Functions (P.172)
Radio wave communications may be intercepted. Please be aware of this in advance.
The antenna used for transmitting and receiving data is located in the grip. Keep metal objects away
as much as possible.
When carrying the camera in a bag or other container, its signal may be blocked by the material of
the bag or other objects therein, which may prevent your camera from communicating with your
smartphone.
The battery drains faster when the camera is connected to Wi-Fi. If the battery is low,
communication may be interrupted even in the middle of transmission or reception.
Communication may be difficult or slow in areas where magnetic fields, static electricity, or radio
waves are generated, such as near microwave ovens and cordless phones.
Some wireless LAN functions cannot be used when the card write-protect switch is set to the
“LOCK” side.
171
Cautions for the use of Wi-Fi and Bluetooth
®
functions
C
C
C
C
C
C

Disabling the Camera’s Wireless Functions
Disable the camera’s wireless (Wi-Fi/Bluetooth
®
) functions.
Highlight [Wi-Fi/Bluetooth Settings] in the e Setup Menu and press I.
Select [Wireless Functions] and press I.
Select [Off] and press the OK button.
The following functions will be disabled.
[Device Connection] (P.174), [Bluetooth] (P.176)
To disable wireless connection standby and terminate wireless transmissions when the camera
is turned on, select [Off] for [Wi-Fi/Bluetooth Settings]> [Bluetooth] in the eSetup Menu.
g“Wireless Connection Standby Setting for When the Camera Is On” (P.176)
172
Disabling the Camera’s Wireless Functions
1.
2.
3.
C
-
B

Connecting the Camera to a
Smartphone
Connecting to Smartphones
Use the camera’s wireless LAN (Wi-Fi) and Bluetooth
®
features to connect to a smartphone and use
the dedicated app to make your experience more enjoyable both before and after shooting. Once
a connection has been established, you can download and take pictures remotely and add position
information to images.
Operation is not guaranteed on all smartphones.
Things you can do with the designated app, OM Image Share
Download images from the camera to the smartphone
Download pictures marked for sharing (P.107) to your smartphone.
You can also use the smartphone to select images for download from the camera.
Remote shooting from a smartphone
You can remotely operate the camera and shoot using a smartphone.
Beautiful image processing
Use intuitive controls to apply impressive effects to images downloaded to your smartphone.
Addition of GPS tags to camera images
Using the smartphone’s GPS function, you can add position information when taking pictures with
the camera.
For details, visit our website.
173
Connecting to Smartphones

Scan the QR code, using
the OI.Share app.
Bluetooth Name
Bluetooth Passcode
Wi-Fi SSID
Wi-Fi Password
: xxxxxxxxxxx
: 000000
: xxx-x-x-xxxxxxxx
: 0000000000000000
Device Connection 3/3
Disconnect
q
GG
3
1
2
Bluetooth local name
Bluetooth Passcode
Wi-Fi SSID
Wi-Fi Password
QR code
1
2
3
Pairing the Camera and Smartphone
Follow the steps below when connecting the devices for the first time.
Adjust pairing settings using the OM Image Share app, not the settings app included in the
smartphone operating system.
Launch the dedicated OM Image Share app that you installed on your smartphone in advance.
Select [Device Connection] in the q Playback Menu and press I.
You can also start [Device Connection] by pressing and holding the MENU button when the
camera is ready to shoot.
Follow the on-screen guide to adjust Wi-Fi/Bluetooth settings.
The Bluetooth local name and passcode, the Wi-Fi SSID and password, and a QR code are
displayed in the monitor.
Tap the camera icon at the bottom of the OM Image Share display.
The [Easy Setup] tab will be displayed.
Follow the on-screen instructions in OM Image Share to scan the QR code and adjust
connection settings.
If you are unable to scan the QR code, follow the on-screen instructions in OM Image Share
to adjust settings manually.
Bluetooth: To connect, select the local name and enter the passcode displayed in the
camera monitor into the Bluetooth settings dialog displayed in OM Image Share.
Wi-Fi: To connect, enter the SSID and password displayed on the camera monitor into the
Wi-Fi settings dialog displayed in OM Image Share.
G1 will be displayed when pairing is complete.
The Bluetooth
®
icon indicates the status as follows:
p: The camera is emitting a wireless signal.
q: Wireless connection has been established.
174
Pairing the Camera and Smartphone
1.
2.
3.
4.
5.
-
-
-
-

To end the Wi-Fi connection, press MENU on the camera.
You can also use OM Image Share to turn the camera off and end the connection.
At default settings, Bluetooth
®
is kept active even after the Wi-Fi connection is terminated,
allowing you to shoot remotely with a smartphone. To set the camera to also terminate
Bluetooth
®
connection when terminating the Wi-Fi connection, set [Bluetooth] to [Off].
175
Pairing the Camera and Smartphone
6.

Wireless Connection Standby Setting for
When the Camera Is On
You can choose whether the camera will be on standby for wireless connection with a smartphone or
optional remote control when the power is on.
Highlight [Wi-Fi/Bluetooth Settings] in the e Setup Menu and press I.
Highlight [Bluetooth] and press I.
Pair the camera with the smartphone or optional remote control before proceeding.
[Bluetooth] cannot be selected unless pairing has been completed.
Highlight the desired option and press the OK button.
Off
The camera will not be on standby for wireless connection and a wireless signal will
not be emitted even when the power is on. For connection with a smartphone, start
[Device Connection] (P.174) in the Playback Menu of the camera.
Onq
When the camera is on, it will emit a wireless signal and be on standby for wireless
connection.
By operating OM Image Share, you can connect the camera to the smartphone and
shoot remotely or transfer images.
Onr
When the camera is turned on, it will start transmitting wireless signals, and if it
has already been paired with an optional remote control (P.186), it will stand by for
connection with the remote control.
Because the options in the [Bluetooth] menu also serve to indicate Bluetooth
®
status,
[Stopped] or [Running] will appear alongside the [Off], [Onq], and [Onr] options.
If the GPS track log is enabled in the dedicated OM Image Share app, location data
downloaded from the app will be added to pictures taken while [Onq] is selected.
176
Wireless Connection Standby Setting for When
the Camera Is On
1.
2.
C
3.
B

Transferring images to a smartphone
You can select images in the camera and load them to a smartphone. You can also use the camera to
select images you want to share in advance. g “Selecting pictures for sharing (Share Order)” (P.107)
If [Off] or [Onr] is selected for [Bluetooth] (P.176), select [Onq].
Selecting [Onq] for [Bluetooth] (P.176) puts the camera on standby, ready for a wireless
connection.
Tap [Import Photos] in OM Image Share on the smartphone.
Depending on the smartphone, a confirmation screen for Wi-Fi connection may appear.
Follow the on-screen guidance to connect the smartphone and the camera.
The images in the camera are displayed in a list.
Select the pictures you want to transfer and tap the Save button.
When saving is completed, you can turn off the camera from the smartphone.
[Import Photos] can be used to download pictures to smartphones connected via the
[Device Connection] option in the camera menus even when [Off] or [Onr] is selected
for [Bluetooth] (P.176).
177
Transferring images to a smartphone
1.
C
2.

Shooting remotely with a smartphone (Live
View)
You can shoot remotely by operating the camera with a smartphone while checking the live view on
the smartphone screen.
The camera shows the connection screen and all operations are performed from the smartphone.
If [Off] or [Onr] is selected for [Bluetooth] (P.176), select [Onq].
Selecting [Onq] for [Bluetooth] (P.176) puts the camera on standby, ready for a wireless
connection.
Launch OM Image Share and tap [Remote Control].
Tap [Live View].
Tap the shutter button to shoot.
The image taken is saved on the memory card in the camera.
[Live View] can be used to take pictures from smartphones connected via the [Device Connection]
(P.174) option in the camera menus even when [Off] or [Onr] is selected for [Bluetooth] (P.176).
Available shooting options are partially limited.
178
Shooting remotely with a smartphone (Live View)
1.
2.
3.

Shooting remotely with a smartphone
(Remote Shutter)
You can shoot remotely by operating the camera with a smartphone (Remote Shutter).
All operations are available on the camera. In addition, you can shoot pictures and record movies
using the shutter button displayed on the smartphone screen.
If [Off] or [Onr] is selected for [Bluetooth] (P.176), select [Onq].
Selecting [Onq] for [Bluetooth] (P.176) puts the camera on standby, ready for a wireless
connection.
Launch OM Image Share and tap [Remote Control].
Tap [Remote Shutter].
Tap the shutter button to shoot.
The image taken is saved on the memory card in the camera.
[Remote Shutter] can be used to take pictures from smartphones connected via the [Device
Connection] (P.174) option in the camera menus even when [Off] or [Onr] is selected for
[Bluetooth] (P.176).
179
Shooting remotely with a smartphone (Remote
Shutter)
1.
2.
3.

Resetting wireless LAN/Bluetooth
®
settings
To restore [Wi-Fi/Bluetooth Settings] to default values:
Highlight [Wi-Fi/Bluetooth Settings] in the eSetup Menu and press I.
Highlight [Reset Settings] and press I.
Select [Yes] and press the OK button.
The following settings will be reset:
[Wireless Functions] (P.172), [Bluetooth] (P.176), and [Connection Password] (P.181)
Resetting wireless settings ends pairing between the camera and smartphones. Before
connecting to a smartphone, you will need to pair the devices again (P.174). Resetting
wireless settings also ends pairing between the camera and remote controls. Before
connecting to a remote control, you will need to pair the devices again (P.186).
180
Resetting wireless LAN/Bluetooth
®
settings
1.
2.
3.
B
-
B

Changing the password
To change the password for smartphone connections:
Highlight [Wi-Fi/Bluetooth Settings] in the eSetup Menu and press I.
Highlight [Connection Password] and press I.
Press the R button as directed by the on-screen guide.
A new password will be set.
You can change both password for smartphone connections and Bluetooth
®
connection passcode.
Reconnect to the smartphone after changing passwords. g “Pairing the Camera and
Smartphone” (P.174)
181
Changing the password
1.
2.
3.

Connecting the Camera to a Computer
Connecting the Camera to a Computer
32
1
USB connector (Type-C)
USB cable (supplied)
USB port
When the camera is connected to a computer via USB, a dialog should be displayed in the monitor
prompting you to select a host.
The battery can be charged while the camera is connected to the computer via USB. The charging
time varies depending on the performance of the computer. (There may be cases in which it takes
approx. 10 hours.)
If nothing is displayed on the camera screen even after connecting the camera to the computer, the
battery may be exhausted. Use a fully charged battery.
Data transfer is not guaranteed in the following environments, even if your computer is equipped
with a USB port.
Computers with a USB port added by means of an extension card, etc., computers without a
factory-installed OS, or home-built computers
Camera controls cannot be used while the camera is connected to a computer.
If the computer does not detect the camera, disconnect the USB cable and then reconnect it to the
computer.
182
Connecting the Camera to a Computer
1
2
3
C
C
C
-
C
C

Highlight [Storage] or [MTP] using FG. Press the OK
button.
[Storage]: Connect the camera as a card reader.
[MTP]: Connect the camera as a portable device.
USB
Charge
Exit
MTP
Storage
Set
Copying Pictures to a Computer
Turn the camera off and connect it to the computer.
The location of the USB port varies with the computer. For details, refer to your computer’s
manual.
The selection screen for the USB connection is displayed.
Copy pictures to the computer as soon as the computer recognizes the camera as a new device.
183
Copying Pictures to a Computer
1.
2.
3.

Installing the PC software
Install the following software to access the camera while it is connected directly to the computer via
USB.
OM Workspace
This computer application is used to download and view photos and movies recorded with the camera.
It can also be used to update the camera firmware. The software can be downloaded from our website.
Be prepared to provide the camera serial number when downloading the software.
184
Installing the PC software

Using the Remote Control
Names of parts
RM-WR1
1 2
3
4
5
6
7
8
Shutter button
Data transfer indicator
Shutter button lock
Mode dial (4 / K / n / CONNECT)
Cable connector
Battery compartment lid
Battery compartment cover
Strap eyelet
185
Names of parts
1
2
3
4
5
6
7
8

When a message is displaying
stating that pairing is in
progress, rotate the mode
dial on the remote control to
CONNECT and keep it in this
position.
Wireless Shutter Setting
r
Pairing is complete.
Bluetooth setting is changed to On
r
.
Close
AA:BB:CC:DD:EE:FF
Connecting the camera and remote control
Wireless connection
For wireless connection, you must pair the camera and the remote control first.
Highlight [Wi-Fi/Bluetooth Settings] in the e Setup Menu and press I.
Highlight [Wireless Shutter Setting] and press I.
Highlight [Start Pairing] and press the OK button.
Pairing starts when it is kept in this position for 3seconds. Keep it in the CONNECT position
until pairing is complete. If you rotate the mode dial before it is complete, the data transfer
indicator flashes rapidly.
The data transfer indicator lights when pairing starts.
186
Connecting the camera and remote control
1.
2.
3.
4.

When a message indicating that pairing is complete is
displayed, press the OK button.
Wireless Shutter Setting
Cancel
r
Pairing in progress.
Please perform pairing operation
on the wireless shutter release.
The data transfer indicator turns off when pairing is complete.
[Bluetooth] (P.176) will automatically be set to [Onr] when pairing is complete.
If you rotate the mode dial of the remote control or press the MENU button of the camera
before the pairing completion message is displayed, the pairing process ends. Paired device
information will be reset. Pair the devices again.
If you rotate the mode dial of a remote control that is not currently paired to CONNECT and
keep it in this position for 3seconds, or if pairing fails, the pairing information from previous
connections will be reset. Pair the devices again.
Deleting pairing
Highlight [Wi-Fi/Bluetooth Settings] in the e Setup Menu and press I.
Highlight [Wireless Shutter Setting] and press I.
Select [Delete Pairing] and press the OK button.
Select [Yes] and press the OK button.
If you have paired the camera with a remote control, you will need to perform [Delete Pairing] to
reset pairing information before you can pair the camera with a new remote control.
187
Connecting the camera and remote control
5.
C
C
1.
2.
3.
4.
C

Rotate the mode dial of the remote control to K or n.
Press the shutter button on the remote control to take pictures.
Shooting from the remote control
Before establishing a wireless connection between the camera and remote control, confirm that
[Onr] is selected for [Bluetooth] (P.176). When set to [Onr], r appears in the display and the
camera will be on standby for wireless communication with the remote control as soon as it is turned
on.
When the mode dial of the remote control is set to K (still photography mode): When you
lightly press the shutter button of the remote control down to the first position (press the
shutter button halfway), the AF confirmation mark (N) will be displayed, and a green frame
(AF target) will be displayed in the focus location.
When the mode dial of the remote control is set to n (movie recording mode): When you
press the shutter button of the remote control, movie recording starts. Press the shutter
button of the remote control again to stop movie recording.
188
Shooting from the remote control
1.
2.

Data transfer indicator of the remote control
Lights once Remote control operation is sent to the camera correctly.
Flashes rapidly
(1second)
Remote control operation is not sent to the camera correctly. Shorten the
distance between the camera and the remote control. If the problem is not
solved, check the setting of the camera.
Flashes rapidly
(3seconds)
There is a problem with the pairing of the camera and remote control. Pair the
devices again.
Does not light
This may occur in the following situations.
The battery in the remote control is dead.
The mode dial of the remote control is in the 3/OFF position.
The camera and remote control are connected with a cable.
You can connect to smartphones via [Device Connection] (P.174) even when [Onr] is selected
for [Bluetooth] (P.176). However, you cannot control the camera from the remote control when it is
connected to a smartphone.
Pairing and remote photography are not available when [Off] is selected for [Wireless Functions]
(P.172).
The camera does not enter sleep mode when a remote control is connected wirelessly.
The camera will, however, enter sleep mode in accordance with the option selected for [Sleep] if
the mode dial on the remote control is in the 4 position. gCCustom MenuH> [Sleep]
(P.154)
The camera will not enter sleep mode when [Onr] is selected for [Bluetooth] (P.176) unless the
mode dial on the remote control is in the 4 position.
If you operate the remote control while the camera is in sleep mode, it may take a longer time for
the camera to resume operation.
The camera cannot be controlled from the remote control while it is waking from sleep. Operate the
remote control after the camera has resumed operation.
Rotate the mode dial of the remote control to the 4 position when you have finished using the
remote control.
189
Shooting from the remote control
C
C
C
C
C
C
C
C

MAC address of the remote control
The MAC address of the remote control is printed on the warranty card provided with the remote
control.
190
MAC address of the remote control

Precautions for using the remote control
Do not tug on the battery compartment cover or use it to turn the battery compartment lid.
Do not pierce batteries with sharp objects.
Confirm that the battery compartment lid is free of foreign matter before closing it.
191
Precautions for using the remote control

Connecting to TVs or External
Displays via HDMI
Connecting the Camera to TVs or External
Displays (HDMI)
Pictures can be displayed on televisions connected to the camera via HDMI. Use the television to
display pictures to an audience. The TV remote can be used to control the display while the television
is connected to the camera. No app or other software is required.
You can also film movies while the camera is connected to an external monitor or video recorder via
HDMI.
HDMI cables are available from third-party suppliers. Use an HDMI-certified cable.
192
Connecting the Camera to TVs or External
Displays (HDMI)
C

Display C Custom MenuB (Disp/o/PC).
2
1
B. Disp/o/PC
A
B
C
D
E
F
G
H
G
/Info Settings
Off
Live View Boost
Flicker Reduction
Peaking Color
Auto
White
o
3
HDMI
Off
Displayed Grid
Back
Set
B
Viewing Pictures on a TV (HDMI)
Photos and movies can be viewed on a high-definition TV connected directly to the camera by means
of an HDMI cable. A remote control can be used to operate the display while it is connected to the
camera.
HDMI Output
Choose the signal output to the HDMI device. You can adjust movie frame size and frame rate to
match TV specifications and the video standards supported in your country or region. Match output
settings to the input settings on the TV.
Output
Size
The format for the video signal output via the HDMI connector can be chosen from
the options below.
[4K]: 4K (3840× 2160) priority
[1080p]: Full High Definition (1080p) priority
[720p]: High Definition (720p) priority
[480p/576p]: 480p/576p
HDMI
Control
The television remote control can be used to operate the camera in playback mode
(P.196). Choose from [Off] and [On]. When [On] is selected, the camera can be used
for playback only.
[HDMI Control] settings cannot be changed while the camera is connected to another device via
HDMI.
Audio can be output only on devices that support the audio format selected with the camera.
The options available via [HDMI Control] vary with the device connected. See the device manual
for details.
Press the MENU button to view the menus.
193
Viewing Pictures on a TV (HDMI)
1.
2.

Highlight [HDMI] using the FG buttons and press the I
button.
2
1
B. Disp/o/PC
G
/Info Settings
Off
Live View Boost
Flicker Reduction
Peaking Color
Auto
White
o
3
HDMI
Off
Displayed Grid
Back
Set
A
B
C
D
E
F
G
H
Highlight an item using the FG buttons and press the I
button.
HDMI
Back
Set
HDMI Control
Output Size
4K
Off
Highlight the desired option using the FG buttons and press
the OK button.
HDMI
Back
Set
HDMI Control
Output Size
4K
Off
4K
1080p
720p
480p/576p
Repeat Steps4 and 5 as required.
Press the MENU button repeatedly to exit the menu.
194
Viewing Pictures on a TV (HDMI)
3.
4.
5.
6.

Connecting the Camera to a TV
Connect the camera using an HDMI cable.
After confirming that the camera is off, connect it to the TV using an HDMI cable.
1
32
HDMI connector (Type-D)
HDMI cable
Type A
Switch the TV to HDMI input and turn the camera on.
The TV will show the content of the camera monitor. Press the q button to view pictures.
If [On] is selected for [HDMI Control] (P.196), the camera monitor will turn off when an HDMI cable
is connected.
For information on switching to HDMI input, see the manual provided with the TV.
Depending on TV settings, the image may be cropped and some indicators may not be visible.
HDMI cannot be used while the camera is connected to a computer via USB.
The output format used when [4K] is selected in photo mode is 1080p priority.
195
Viewing Pictures on a TV (HDMI)
1.
1
2
3
2.
B
B
C
C
C

Select [HDMI] in C Custom MenuB (Disp/o/PC), then
press the I button.
2
1
B. Disp/o/PC
G
/Info Settings
Off
Live View Boost
Flicker Reduction
Peaking Color
Auto
White
o
3
HDMI
Off
Displayed Grid
Back
Set
A
B
C
D
E
F
G
H
Highlight [HDMI Control] using the FG buttons and press
the I button.
HDMI
HDMI Control
Output Size
4K
Off
Back
Set
Highlight [On] using the FG buttons and press the OK
button.
HDMI
HDMI Control
Output Size
4K
Off
Back
Set
Off
On
Operating the camera using a TV remote control
A remote control can be used to operate the display while the camera is directly connected to the TV
using an HDMI cable.
The TV must support HDMI Control. See the device manual for details.
On
The television remote control can be used to operate the camera in playback mode. When
[On] is selected, the camera can be used for playback only.
Off
The television remote control cannot be used to operate the camera. Information will only be
displayed on the TV screen.
Press the MENU button to view the menus.
Press the
MENU button repeatedly to exit the menu.
196
Viewing Pictures on a TV (HDMI)
1.
2.
3.
4.
5.

Connect the camera to the TV using an HDMI cable.
Use the TV remote control for operation. You can operate the camera by following the
operation guide displayed on the TV.
During single-frame playback, you can display or hide the information display by pressing
the “Red” button, and display or hide the index display by pressing the “Green” button.
Some televisions may not support all features.
The camera monitor turns off while the content is displayed on the TV.
197
Viewing Pictures on a TV (HDMI)
6.
C
C

Using Field Sensor Data
Field Sensor
The camera can log data on position, altitude, and other data acquired via GPS, as well as data from
temperature and pressure sensors. These data can also be recorded with photographs. Logs can be
viewed using the OM Image Share smartphone app.
Visit our website for information about OM Image Share.
The camera also supports the Quazi-Zenith Satellite System (QZSS) and GLONASS.
Latitude and longitude are displayed on images to which position information has been added.
The camera is not equipped for GPS navigation.
Be sure to use the latest version of the app.
GPS and other data displays
These displays are not intended for applications that require a high degree of precision, and the
accuracy of the data (latitude and longitude, heading, altitude, temperature, etc.) they provide is not
guaranteed. The accuracy of these displays may be also affected by factors not under the control of
the manufacturer.
Altitude can be adjusted in Custom Menu G [Elevation/Temperature]. gCCustom Menu
G> [Elevation/Temperature] (P.153)
198
Field Sensor
B

GPS: Precautions for use
Before using the GPS function, read “GPS function, electronic compass” (P.200).
In certain countries and regions, it may be illegal to acquire position information without prior
application to the government. Because of this, in certain sales regions, the camera may be set up
not to display position information. When taking the camera abroad, be aware that some regions or
countries may have laws regulating the use of this function. Be sure to abide by all local laws.
Before boarding an aircraft or entering other locations where the use of GPS devices is prohibited,
be sure to rotate the LOG switch to OFF and select [Off] for both [Record GPS location] (P.153)
and [Auto Time Adjust] in [m Settings] (P.139).
199
GPS: Precautions for use

GPS function, electronic compass
In locations with limited overhead clearance (inside buildings, underground, underwater, in forests,
near high buildings) or in locations subject to strong magnetic or electric fields (near new high-
voltage power lines, magnets or electrical goods, 1.5GHz mobile telephones), it may not be possible
to determine measurements or errors may occur.
The altitude displayed on the measurement information screen or picture playback screen etc. is
displayed and recorded based on information from pressure sensors built into the camera body.
Please be aware that the displayed altitude is not based on GPS location data.
Electronic compass errors may be caused by the effects of strong magnetic or electrical fields
(such as televisions, microwaves, large motors, radio towers and high-voltage lines). To restore the
electronic compass function, hold the camera firmly and rotate it in a figure-eight motion while
turning your wrist.
Since the GPS function and electronic compass function are not required to be accurate, there is no
guarantee that the measured values (latitude, longitude, compass direction, altitude, temperature,
etc.) are accurate.
If your model is equipped with GPS and Wi-Fi functions, contact the service center in your country
or region in advance, as the repair service may not be available in some countries or regions due to
local laws and regulations.
200
GPS function, electronic compass

Before using GPS function (A-GPS data)
Depending on the status of the camera and communication, it may take time to acquire the position
information. When the A-GPS is used, the position determination time can be shortened from a
few seconds to a few tens of seconds. Download A-GPS data using OM Image Share, the dedicated
smartphone app, or OM Workspace, an image management and editing program for PCs, and write
the data to the camera.
Make sure that the camera's date and time settings are set correctly in advance.
A-GPS data must be updated every 4 weeks. Use the newest possible A-GPS data since the time to
acquire position information could take longer as time has elapsed after the last update.
The provision of A-GPS data may be terminated without prior notice.
Updating the A-GPS data using a smartphone
Install the dedicated smartphone app OM Image Share in advance. Refer to our website for details on
how to update the A-GPS data.
Updating the A-GPS data using a PC
Download the OM Workspace software and install it on your PC in advance. Refer to our website for
details on how to update the A-GPS data.
201
Before using GPS function (A-GPS data)
C
C

Using GPS
Any of the following enable GPS:
Rotating the LOG switch to LOG (P.203), setting [Record GPS location] (P.153) to [On], setting
[Auto Time Adjust] in [m Settings] (P.139) to [On]
Do not cover the GPS antenna (P.15) with your hands or metal objects.
If you are using the GPS function for the first time and the A-GPS has not been updated, or if the
function has not been used for a long time, it may take a few minutes for the position measurement
to end.
If the GPS icon is displayed, GPS information is being acquired. It indicates that some error has
occurred when the icon is shown in red. Contact our service center if the error persists after the
camera is turned off and on.
202
Using GPS
C
C
B

Rotate the LOG switch to LOG.
Logging will start. The indicator lamp will blink while logging is
in progress.
Recording and Saving Logs
While the LOG switch is in the LOG position, the camera will log GPS and other sensor data (P.198).
Logs can be viewed using the OM Image Share smartphone app.
Recording logs
Logging ends automatically when the battery runs low (P.249).
In LOG mode, the camera draws on the battery continuously to acquire location data.
No data can be added to the log once the memory allocated to temporary log storage is full (P.249),
in which case you will need to rotate the LOG switch to OFF to save the log to the card.
Saving logs
The current log is saved to the card when the LOG switch is rotated to OFF. Log files are recorded to
the “GPSLOG” and “SNSLOG” folders on the card (P.22).
A message is displayed in the monitor while the log is being saved. Do not remove the card until
the message has cleared from the display. Removing the card while the log is being saved could
cause loss of the log file or camera or card malfunction.
The camera may not begin saving the log to the card when the LOG switch is rotated to OFF if, for
example, wireless data transfer is in progress or the card is full or write-protected, in which case you
should terminate wireless data transfer, delete unwanted data from the card, or otherwise enable
the log to be saved. Do not remove the battery from the camera until the log has been saved.
The log will not be saved if no card is inserted.
Logs will not be saved if the battery is low. Charge the battery.
Each card can store up to 199 log files. An error message will be displayed when the log file count
approaches this number. Should this occur, insert another card or delete log files after copying them
to a computer. g“Error codes” (P.249)
203
Recording and Saving Logs
C
C
C
C
C
C
C

Using Buffered and Saved Logs
To use the logs, the logs stored on the card must be transferred to OM Image Share, the dedicated
smartphone app. Connect to your smartphone using the camera’s wireless LAN function (P.174).
Things you can do with the designated app, OM
Image Share
Logs stored on the card and images shot while recording logs can be transferred to your
smartphone.
Transferred logs can be loaded and viewed as tracks.
Transferred logs can be linked to images for viewing and management.
For details, visit our website.
204
Using Buffered and Saved Logs

Pressing the INFO button when the camera is off displays location
data in the monitor.
Time
Log recording in progress
Direction information
Temperature (water temperature)
Atmospheric pressure
1
2
3
4
5
Altitude (depth)
GPS icon
Latitude
Longitude
6
7
8
9
Viewing Location Data
The accuracy of the data displayed varies with weather conditions and other factors. The values
listed are for use as guidelines only.
Location data displays
N
270
90
240
6
0
210
30
180
0
150
330
120
300
S
NW
SE
W
E
SW
NE
39°12’
30” N
W
145°23’
59”
12:34
-
3
LOG
1023 hPa
1227 m
270
.0
°
240 255
W
285 300
1
2
3
4
5
7
8
9
6
Latitude and longitude
If the GPS icon blinks or is not displayed, the camera is unable to determine the current position.
GPS and other data displays
These displays are not intended for applications that require a high degree of precision, and
the accuracy of the data (latitude, longitude, heading, depth, temperature, etc.) provided is not
guaranteed. The accuracy of these displays may be also affected by factors not under the control
of the manufacturer.
205
Viewing Location Data
C

Shooting Modes and Default Settings
List of configurable shooting modes
0/P/A/7/6/n Mode
*1: Some settings are unavailable.
0
P A
7
c d e f
Exposure compensation ―
P P P P P P
Picture mode ―
P P
*1 *1 *1 *1
ISO sensitivity ―
P P P P P P
White balance ―
P P P P P P
AF mode ―
P P
*1 *1 *1 *1
Aspect ratio
P P P P P P
―
K Image quality
P P P P
*1
P P
n Movie quality
P P P P P P P
K Image stabilizer
―
P P P P P P
nImage stabilizer
― ― ― ― ― ― ―
Flash *1
P P
*1 *1 *1 *1
Flash intensity control ―
P P P P P P
Sequential shooting/Self-timer *1
P P P
*1 *1
P
Metering ―
P P P P P P
206
List of configurable shooting modes

0
P A
7
c d e f
Face priority ―
P P
― ― ― ―
Accessory *1
P P
*1 *1 *1 *1
Reset/Assign Custom Modes
P P P P P P P
AF Area
P P P
― ― ― ―
Easy CALS
P P P P P P P
Interval Shooting ―
P P P
― ―
P
Focus BKT ―
P P
― ―
P
―
Focus Stacking Settings
P P P P P P P
Date stamp
P P P P
― ―
P
Picture + Sound ―
P P P
― ―
P
Movie c
P P P P P P P
Recording Volume
P P P P P P P
Video Frame Rate
P P P P P P P
Video Bit Rate
P P P P P P P
207
List of configurable shooting modes

6
n
g I H h i
Exposure compensation
P P P P P P
Picture mode ― ― ― ― ― *1
ISO sensitivity ― ― ― ― ― ―
White balance
P P P P P P
AF mode *1 *1 *1 *1 *1
P
Aspect ratio
P P P P P
―
KImage quality
P P P P
*1
P
nMovie quality
P P P P P P
KImage stabilizer
P P P P P
―
nImage stabilizer
― ― ― ― ― *1
Flash *1 *1 *1 *1 ― ―
Flash intensity control
P P P P
― ―
Sequential shooting/Self-timer *1 *1 *1 *1 ― *1
Metering ― ― ― ― ― ―
Face priority ― ― ― ― ― *1
Accessory *1 *1 *1 *1 *1 *1
Reset/Assign Custom Modes
P P P P P
*1
AF Area
P P P
―
P P
Easy CALS
P P P P P P
Interval Shooting ― ― ― ― ― ―
208
List of configurable shooting modes

6
n
g I H h i
Focus BKT ― ― ― ― ― ―
Focus Stacking Settings
P P P P P P
Date stamp
P P P P
― ―
Picture + Sound
P P P P
―
P
Movie c
P P P P P
*1
Recording Volume
P P P P P
*1
Video Frame Rate
P P P P P
*1
Video Bit Rate
P P P P P
*1
209
List of configurable shooting modes

SCN mode
*1: Some settings are unavailable.
B E D J S G O K
Exposure compensation ―
P
― ― ― ― ― ―
Picture mode ― ― ― ― ― ― ― ―
ISO sensitivity ― ― ― ― ― ― ― ―
White balance ― ― ― ― ― ― ― ―
AF mode ― ― ― ― ― ― ― ―
Aspect ratio
P P P P P P P P
KImage quality
P
*1
P P P P
*1
P
nMovie quality
*1 *1 *1 *1 *1 *1 *1 *1
KImage stabilizer
P P P P P P P P
nImage stabilizer
― ― ― ― ― ― ― ―
Flash *1 *1 *1 *1 *1 ― ― ―
Flash intensity control ― ― ― ― ― ― ― ―
Sequential shooting/Self-timer *1 *1 *1 *1 *1 *1 ― *1
Metering ― ― ― ― ― ― ― ―
Face priority ― ― ― ― ― ― ― ―
Accessory *1 *1 *1 *1 *1 *1 *1 *1
Reset/Assign Custom Modes
P P P P P P P P
AF Area
P P P P P P P
―
Easy CALS
P P P P P P P P
210
List of configurable shooting modes

B E D J S G O K
Interval Shooting ― ― ― ― ― ― ― ―
Focus BKT ― ― ― ― ― ― ― ―
Focus Stacking Settings
P P P P P P P P
Date stamp
P
―
P P P P
―
P
Picture + Sound
P
―
P P P P
―
P
Movie c
P
―
P P P P
―
P
Recording Volume
P
―
P P P P
―
P
Video Frame Rate
P P P P P P P P
Video Bit Rate
P P P P P P P P
211
List of configurable shooting modes

T C F Y L X A N
Exposure compensation ― ― ― ― ―
P
― ―
Picture mode ― ― ― ― ― ― ― ―
ISO sensitivity ― ― ― ― ― ― ― ―
White balance ― ― ― ― ―
P
― ―
AF mode ― ― ― ― ― ― ― ―
Aspect ratio
P P P P P
―
P P
KImage quality
P P P P P
― *1
P
nMovie quality
*1 *1 *1 *1 *1 *1 *1 *1
KImage stabilizer
―
P P P P P P P
nImage stabilizer
― ― ― ― ― ― ― ―
Flash ― *1 *1 ― *1 ― ― ―
Flash intensity control ― ― ― ― ― ― ― ―
Sequential shooting/Self-timer ― *1 *1 *1 *1 ― ― *1
Metering ― ― ― ― ― ― ― ―
Face priority ― ― ― ― ― ― ― ―
Accessory *1 *1 *1 *1 *1 *1 *1 *1
Reset/Assign Custom Modes
P P P P P P P P
AF Area
P P P P P
*1
P P
Easy CALS
P P P P P P P P
Interval Shooting ― ― ― ― ― ― ― ―
Focus BKT ― ― ― ― ― ― ― ―
212
List of configurable shooting modes

T C F Y L X A N
Focus Stacking Settings
P P P P P P P P
Date stamp ―
P P P P
― ―
P
Picture + Sound ―
P P P P
― ―
P
Movie c
―
P P P P
― ―
P
Recording Volume ―
P P P P
― ―
P
Video Frame Rate
P P P P P P P P
Video Bit Rate
P P P P P P P P
213
List of configurable shooting modes

q r s u t Z
Exposure compensation
P P P P P P
Picture mode ― ― ― ― ― ―
ISO sensitivity ― ― ― ― ― ―
White balance
P P P P P P
AF mode ― ― ― ― ― ―
Aspect ratio
P P P P P P
KImage quality
P P P P P P
nMovie quality
*1 *1 *1 *1 *1 *1
KImage stabilizer
P P P P P P
nImage stabilizer
― ― ― ― ― ―
Flash ― ― ― *1 ― ―
Flash intensity control ― ― ― ― ― ―
Sequential shooting/Self-timer *1 *1 *1 *1 *1 *1
Metering ― ― ― ― ― ―
Face priority ― ― ― ― ― ―
Accessory *1 *1 *1 *1 *1 *1
Reset/Assign Custom Modes
P P P P P P
AF Area
P P P P P
*1
Easy CALS
P P P P P P
Interval Shooting ― ― ― ― ― ―
Focus BKT ― ― ― ― ― ―
214
List of configurable shooting modes

q r s u t Z
Focus Stacking Settings
P P P P P P
Date stamp
P P P P P P
Picture + Sound
P P P P P P
Movie c
― ― ― ― ― ―
Recording Volume ― ― ― ― ― ―
Video Frame Rate
P P P P P P
Video Bit Rate
P P P P P P
215
List of configurable shooting modes


Direct Button
*1: Items that can be stored in [Custom Mode C1] or [Custom Mode C2].
*2: Default settings will be restored for this function when [Reset] (Full) is performed.
*3: Default settings will be restored for this function when [Reset] (Basic) is performed.
Function Default *1 *2 *3
Exposure compensation ±0.0
P P P
Flash
For [c] in 7 mode and [I], [H], and
[h] in 6 mode
A
P P P
For [g] in 6 mode
AUTO
P P P
All other modes
B
P P P
Sequential shooting/Self-
timer
F
P P P
217
Direct Button

Live Control
*1: Items that can be stored in [Custom Mode C1] or [Custom Mode C2].
*2: Default settings will be restored for this function when [Reset] (Full) is performed.
*3: Default settings will be restored for this function when [Reset] (Basic) is performed.
Function Default *1 *2 *3
Picture mode Natural
P P P
ISO sensitivity AUTO
P P P
White balance AUTO
P P P
AF mode AF
P P P
Aspect ratio 4:3
P P P
KImage quality
LF
P P P
nMovie quality
1920×1080 Fine 30p
P P P
KImage stabilizer
ON
P P P
nImage stabilizer
ON
P P P
Flash
For [c] in 7 mode and [I], [H],
and [h] in 6 mode
A
P P P
For [g] in 6 mode
AUTO
P P P
All other modes
B
P P P
Flash intensity control ±0.0
P P P
Sequential shooting/Self-timer
F
P P P
Metering
A
P P P
Face priority OFF
P P P
Accessory OFF
P P P
218
Live Control

KShooting Menus
*1: Items that can be stored in [Custom Mode C1] or [Custom Mode C2].
*2: Default settings will be restored for this function when [Reset] (Full) is performed.
*3: Default settings will be restored for this function when [Reset] (Basic) is performed.
6 Shooting Menu1
Function Default *1 *2 *3
Reset/Assign Custom Modes
Reset Basic ― ― ―
Custom Mode C1 ― ―
P
―
Custom Mode C2 ― ―
P
―
Picture mode Natural
P P
―
AF Area
X
P P P
Easy CALS Off ―
P P
7 Shooting Menu2
Function Default *1 *2 *3
Interval Shooting Off ―
P P
219
KShooting Menus

Function Default *1 *2 *3
Number of Frames 99 ―
P P
Start Waiting Time 00:00:01 ―
P P
Interval Length 00:00:01 ―
P P
Interval Mode Time Priority ―
P P
Exposure Smoothing On ―
P P
Time Lapse Movie Off ―
P P
Movie Settings
Movie Resolution FullHD ―
P P
Frame rate 10fps ―
P P
Focus BKT Off
P P P
Start Waiting Time 0 sec
P P P
Set number of shots 30
P P P
Set focus differential Normal
P P P
Focus Stacking Settings
Start Waiting Time 0 sec
P P P
Set number of shots 8
P P P
Date stamp Off
P P P
Picture + Sound Off
P P P
220
KShooting Menus

nVideo Menu
*1: Items that can be stored in [Custom Mode C1] or [Custom Mode C2].
*2: Default settings will be restored for this function when [Reset] (Full) is performed.
*3: Default settings will be restored for this function when [Reset] (Basic) is performed.
Function Default *1 *2 *3
Movie c
On ―
P
―
Recording Volume ±0 ―
P
―
Video Frame Rate 30p ―
P
―
Video Bit Rate Fine ―
P
―
221
nVideo Menu

qPlayback Menu
*1: Items that can be stored in [Custom Mode C1] or [Custom Mode C2].
*2: Default settings will be restored for this function when [Reset] (Full) is performed.
*3: Default settings will be restored for this function when [Reset] (Basic) is performed.
Function Default *1 *2 *3
C
Start ― ― ― ―
BGM On ―
P P
Slide All ―
P P
Slide Interval 3 sec ―
P
―
Movie Interval Short ―
P
―
n
On ―
P P
Edit
Sel. Image
RAW Data Edit ―
P P P
JPEG Edit ― ― ― ―
Movie Edit ― ― ― ―
c
― ― ― ―
Image Overlay ― ― ― ―
Print Order ― ― ― ―
Reset Protect ― ― ― ―
Reset share Order ― ― ― ―
Device Connection ― ― ― ―
222
qPlayback Menu

CCustom Menus
*1: Items that can be stored in [Custom Mode C1] or [Custom Mode C2].
*2: Default settings will be restored for this function when [Reset] (Full) is performed.
*3: Default settings will be restored for this function when [Reset] (Basic) is performed.
A AF/MF
Function Default *1 *2 *3
AF Illuminator Off
P P P
MF Assist
Magnify Off
P P
―
Peaking Off
P P
―
B Disp/o/PC
Function Default *1 *2 *3
G/Info Settings
qInfo
Image only, Overall
P P P
LV-Info
Custom1 (X), Custom2 (Level Gauge)
P P P
GSettings
25, Calendar
P P
―
Live View Boost Off
P P P
Flicker Reduction Auto
P P
―
Displayed Grid Off
P P
―
Peaking Color White
P P
―
o
3
P P P
HDMI
Output Size 1080p ―
P
―
HDMI Control Off ―
P
―
223
CCustom Menus

C Exp/ISO
Function Default *1 *2 *3
Exposure Shift
A
±0
P P
―
C
±0
P P
―
ISO-Auto Set
Upper Limit / Default
Upper Limit: 1600
Default: 100
P P P
Lowest S/S Setting Auto
P P P
Noise Filter Standard
P P P
Noise Reduct. Auto
P P P
D ACustom
Function Default *1 *2 *3
7+F
Off
P P P
A+WB
N
P P
―
E X/WB/Color
Function Default *1 *2 *3
X Set
X1: LSF
X2: LF
X3: LN
X4: aN
P P P
WB Auto
P P P
N Keep Warm Color
On
P P P
Color space sRGB
P P P
224
CCustom Menus

F Record
Function Default *1 *2 *3
File Name Reset ―
P
―
Edit Filename Off ―
P
―
Copyright Settings
Copyright Info. Off ―
P
―
Artist Name ― ― ― ―
Copyright Name ― ― ― ―
G Field Sensor
Function Default *1 *2 *3
Record GPS location Off ―
P
―
Elevation/Temperature
Calibrate Elevation ― ―
P
―
m/ft m ―
P
―
°C/°F °C ―
P
―
HK Utility
Function Default *1 *2 *3
Pixel Mapping ― ― ― ―
Level Adjust ― ―
P
―
Sleep 1 min ―
P P
Certification ― ― ― ―
225
CCustom Menus

eSetup Menu
*1: Items that can be stored in [Custom Mode C1] or [Custom Mode C2].
*2: Default settings will be restored for this function when [Reset] (Full) is performed.
*3: Default settings will be restored for this function when [Reset] (Basic) is performed.
Function Default *1 *2 *3
Card Setup ― ― ― ―
m Settings
― ― ― ―
m
― ― ― ―
Time Zone ― ― ― ―
Auto Time Adjust Off ― ― ―
W
English ― ― ―
b
p±0
―
P
―
Image Review 0.5 sec
P P
―
Wi-Fi/Bluetooth
Settings
Wireless Function On ―
P
―
Bluetooth Off ―
P
―
Wireless Shutter
Setting
― ― ― ―
Connection Password ― ― ― ―
Reset Settings ― ― ― ―
Construction Menu Off ― ― ―
226
eSetup Menu

Memory Card Capacity
Number of still pictures
Figures are for a 64GB SDXC card used to record photos with an aspect ratio of 4:3.
Image quality
Image size
(Pixel count)
Compression ratio File format
Number of storable still
pictures
RAW
4000×3000
Lossless compression ORF 4518
LSF
1/2.7
JPEG
6971
LF
1/4 10166
LN
1/8 19520
aSF
3200×2400
1/2.7 10608
aF
1/4 15250
aN
1/8 28706
bSF
1920×1440
1/2.7 27111
bF
1/4 37538
bN
1/8 61000
SSF
1280×960
1/2.7 54222
SF
1/4 69715
SN
1/8 97601
The number of storable still pictures may change according to the subject, whether or not print
orders have been made, and other factors. In certain instances, the number of storable still pictures
displayed on the monitor will not change even when you take pictures or erase stored images.
The actual file size varies according to the subject.
The maximum number of storable still pictures displayed on the monitor is 9999.
227
Number of still pictures

When [Construction Menu] is set to [On], a is displayed as M, b is displayed as d, and S
is displayed as c.
228
Number of still pictures

Memory card capacity: movies
Figures are for a 64GB SDXC memory card.
Image size/bit rate/frame rate Capacity (approx.)
1
3840×2160 30p
1hour 21minutes
e
3840×2160 25p
f
1920×1080 Super Fine 60p
2hours 40minutes
g
1920×1080 Super Fine 50p
h
1920×1080 Super Fine 30p
i
1920×1080 Super Fine 25p
j
1920×1080 Fine 60p
4hours 40minutes
k
1920×1080 Fine 50p
l
1920×1080 Fine 30p
m
1920×1080 Fine 25p
n
1920×1080 Normal 60p
7hours 53minutes
o
1920×1080 Normal 50p
p
1920×1080 Normal 30p
q
1920×1080 Normal 25p
r
1280×720 Super Fine 30p
5hours 24minutes
s
1280×720 Super Fine 25p
t
1280×720 Fine 30p
10hours 13minutes
u
1280×720 Fine 25p
229
Memory card capacity: movies

Image size/bit rate/frame rate Capacity (approx.)
v
1280×720 Normal 30p
14hours 32minutes
w
1280×720 Normal 25p
The maximum size of a single movie file is limited to 4GB.
The maximum recording time of a single movie is limited to 29minutes.
230
Memory card capacity: movies

Cautions
Water and shock resistance
This product is waterproof and shockproof.
Water resistance: The camera is certified under JIS/IEC protection class 8 (IPX8)
1
and can be used to
shoot at water depths of up to 15m.
Shock resistance: The camera has cleared drop tests conducted under conditions specified by our
company.
Indicates that the camera can be used under water for a specified amount of time and under a
specified amount of water pressure.
The indicated water and shock resistance of this product are based on in-house testing
conditions and do not guarantee against damage or failure.
231
Water and shock resistance
1

Using the camera underwater
Before using the camera underwater
Check the seals of the battery/card compartment cover and connector cover and their contact
surfaces for dust, sand, or other foreign matter. If any foreign matter is found on the gasket, remove
it with a clean cloth that is free of fiber debris.
Ensure that there are no cracks, scratches, or other defects on the seals of the battery/card
compartment cover and connector cover or their contact surfaces.
Firmly close the LOCK knob of the battery/card compartment cover and connector cover.
Avoid opening and closing the battery/card compartment cover or connector cover near water
(such as while at sea, on a lake, by the sea, or by a lake) or with wet hands.
The camera sinks underwater.
It cannot be used in hot springs.
When using the camera underwater
Do not use the camera at depths greater than 15 m or underwater for more than 60 minutes.
While underwater, do not open or close the battery/card compartment cover or connector cover.
Do not subject the camera to shock, such as by diving into the water with force. The shock may
cause the battery/card compartment cover or connector cover to open.
After using the camera underwater
Using a cloth that is free of fiber debris, thoroughly wipe off any water droplets or dirt of the
camera, then open the battery/card compartment cover and connector cover.
232
Using the camera underwater

Open the battery/card compartment cover and connector cover slowly in the orientation
shown in the figure to prevent water droplets from entering the inside of the covers. If water
droplets come into contact with the inside surface of the covers, be sure to wipe them before
use.
2
1
Battery/card compartment cover
Connector cover
Storage and maintenance
Do not use chemicals for cleaning, rust prevention, anti-fogging, repair, or other maintenance.
Doing so may break down water resistance.
When you have finished using the camera underwater, firmly close the battery/card
compartment cover and connector cover. After locking the covers, remove the lens ring and
soak the camera in a bucket or other container filled with clean water for about 10 minutes,
then allow it to dry in the shade in a well-ventilated environment.
After using the camera underwater, do not allow 60 or more minutes to pass without soaking
it in clean water. Failure to observe this caution may result in damage to the camera's
appearance and deterioration of its water resistance.
To maintain water resistance, we recommend replacing the waterproof seals once a year. (You
will be charged for replacement of the waterproof seals.)
For distributors and repair stores that can replace the waterproof seals, please refer to our
website.
Other cautions
The accessories included with this product (such as the rechargeable battery) are not waterproof.
Subjecting the camera to shocks may break down water resistance.
The camera is not subject to waterproof with the battery/card compartment cover or connector
cover opened.
233
Using the camera underwater
1
2

Batteries
The camera uses our lithium-ion battery. Never use any battery other than our genuine batteries.
The camera’s power consumption varies widely with usage and other conditions.
As the following consume a lot of power even without shooting, the battery will be drained quickly.
Using the zoom repeatedly
Performing auto focus repeatedly by pressing the shutter button halfway in shooting mode
Displaying images on the monitor for a prolonged period
Connecting the camera to a computer
Leaving wireless LAN/Bluetooth
®
enabled
Using GPS
When using a drained battery, the camera may turn off without the low battery warning being
displayed.
Remove the batteries before putting the camera into storage for periods of a month or more.
Leaving the batteries in the camera for extended periods shortens their lives, potentially rendering
them unusable.
The normal charging time using the optional USB-AC adapter is approximately 3 hours (estimated).
Charging times may increase at high ambient temperatures.
Do not use USB-AC adapters or chargers not specifically designated for use with batteries of the
supplied type. Similarly, do not use the supplied USB-AC adapter with batteries (cameras) other than
those of the designated type.
There is a risk of explosion if the battery is replaced with the incorrect battery type.
Dispose of the used battery following the instructions “CAUTION” in the instruction manual.
To ensure stable operation, please keep the battery inserted even when using the USB-AC adapter.
234
Batteries
-
-
-
-
-
-

The illustration shows one example of a commercially
available plug adapter. For details, check with an
electronics store or a travel agent.
1
Commercially available plug adapter
1
Using your USB-AC adapter abroad
The USB-AC adapter (F-5AC) can be used with most home electrical sources within the range of
100V to 240V AC (50/60 Hz) around the world. However, depending on the country or area you are
in, the AC wall outlet may be shaped differently and the USB-AC adapter may require a plug adapter
to match the wall outlet.
Do not use third-party travel adapters as the USB-AC adapter may malfunction.
235
Using your USB-AC adapter abroad

1. 2.
Information
Using Separately Sold Accessories
Attaching optional silicone jackets
Attach the jacket as shown. Reverse the steps to remove the jacket.
Do not use excessive force. Failure to observe this precaution could damage the jacket.
Precautions for using silicone jackets
Be careful not to let any foreign matter such as dust or sand enter the space between this product
and the camera, as this can result in scratches.
If the silicone jacket gets dirty, wash it with water and allow it to dry completely before use.
Due to the non-slip property of silicone, the camera does not fit easily into a camera case when the
silicone jacket is on.
Taking pictures with the Wireless RC Flash System
You can take pictures and underwater pictures with a wireless flash when using a flash compatible with
the Wireless RC Flash System.
The setup range for wireless flash shooting varies depending on the environment, but the standard
range is 1 to 2 m from the camera's built-in flash.
The camera’s built-in flash is used for communication between the camera and flash.
To use a dedicated underwater strobe, prepare an underwater case, a fiber-optic cable, and other
equipment.
For details on the operation of wireless flash and underwater strobes, refer to the instruction
manual for the dedicated external flash device or the underwater case.
236
Using Separately Sold Accessories

Turn on the dedicated strobe.
Set the flash mode of the dedicated strobe to RC mode.
If channel and group settings are required, select CH1 for the channel, and A for the group.
Highlight Flash in Live Control and select [ARC] (Remote Control) (P.64).
Take a test shot to check the operation of the flash and the resulting image.
Be sure to check the charge level of the camera and wireless flash before taking pictures.
When the camera flash is set to [ARC], the camera’s built-in flash is used for communication with
the wireless flash. It cannot used for taking pictures.
To take pictures with wireless flash, point the remote sensor of the special external flash toward the
camera, and point the flash in the direction of the subject.
Optional accessories
Using optional accessories allows you enjoy shooting in various ways.
To attach an accessory, remove the lens ring that comes with the camera.
LED Light Guide (LG-1)
Prevents uneven illumination of the macro LED when shooting in 7
(Microscope) mode or during macro shooting.
Do not use flash.
This accessory cannot be used underwater.
Flash Diffuser (FD-1)
Allows you to get close to the subject for flash photography when
shooting in 7 (Microscope) mode or during macro shooting.
Lens Barrier (LB-T01)
Prevents smudges and scratches from appearing on the lens surface
when shooting or carrying the lens.
This accessory cannot be used at the same time as a silicone jacket.
Fisheye Converter
(FCON-T01)
1
Allows you to shoot wider scenes.
Circular Fisheye
Converter (FCON-T02)
1
Take both circular fisheye and diagonal fisheye shots by simply changing
the zoom position.
237
Using Separately Sold Accessories
1.
2.
3.
4.

Tele Converter (TCON-
T01)
1
Allows you to objects that are farther away.
Protection Filter (PRF-
D40.5 PRO)
1
Prevents smudges and scratches from appearing on the lens surface
when shooting or carrying the lens.
A converter adapter (CLA-T01) is required to attach this accessory to the camera.
To use optional accessories, configure the accessory settings in Live Control. g“Using optional
accessories (Accessory)” (P.88)
After using the camera underwater, wash it with clean water.
For more information, visit our website.
238
Using Separately Sold Accessories
1

4
3
2
5
1
Lens ring
Detachment direction
Attachment direction
Lens ring release button
Attachment marker
1
2
3
4
5
1
2
3
4
5
LED light guide
Detachment direction
Attachment direction
Lens ring release button
Attachment marker
1
2
3
4
5
Removing and attaching the lens ring
Removing the accessory
Rotate the accessory in the detachment direction while pressing the lens ring release button.
Attaching the accessory
Align the accessory with the attachment marker and rotate it in the attachment direction until it clicks
into place.
Attaching and removing the LED light guide
Attaching the accessory
Align the accessory with the attachment marker and rotate it in the attachment direction until it clicks
into place.
Removing the accessory
Rotate the accessory in the detachment direction while pressing the lens ring release button.
239
Using Separately Sold Accessories

2
3
4
5
1
Flash diffuser
Detachment direction
Attachment direction
Lens ring release button
Attachment marker
1
2
3
4
5
The light intensity can be switched.
3
2
4
5
1
Lens barrier
Detachment direction
Attachment direction
Lens ring release button
Attachment marker
1
2
3
4
5
Attaching and removing the flash diffuser
Attaching the accessory
Align the accessory with the attachment marker and rotate it in the attachment direction until it clicks
into place.
Removing the accessory
Rotate the accessory in the detachment direction while pressing the lens ring release button.
Attaching and removing the lens barrier
Attaching the accessory
Align the accessory with the attachment marker and rotate it in the attachment direction until it clicks
into place.
The attachment marker is located on the back of the lens ring.
Removing the accessory
Rotate the accessory in the detachment direction while pressing the lens ring release button.
240
Using Separately Sold Accessories

4
4
4
5
5
5
3
1
2
6
7
Conversion lens
Protection filter
Converter adapter
Detachment direction
Attachment direction
Lens ring release button
Attachment marker
1
2
3
4
5
6
7
Attaching and removing the conversion lens/protection
filter
Attaching the accessory
Attach the converter adapter.
Align the accessory with the attachment marker and rotate it in the attachment direction
until it clicks into place.
Rotate the conversion lens/protection filter in the attachment direction, and screw on the
converter adapter.
Removing the accessory
Rotate the conversion lens/protection filter in the detachment direction.
Detach the converter adapter.
Rotate the accessory in the detachment direction while pressing the lens ring release button.
241
Using Separately Sold Accessories
1.
2.
1.
2.

Fill a bucket or other container with fresh water, immerse
the camera facing downward in the bucket and shake the
camera thoroughly. Furthermore, rinse the camera by placing
it directly under a strong stream of tap water with pressing
the button.
Cleaning and storing the camera
Cleaning the camera
Turn off the camera and remove the battery before cleaning the camera.
Do not use strong solvents such as benzene or alcohol, or a chemically treated cloth.
Exterior:
Wipe gently with a soft cloth. If the camera is very dirty, soak the cloth in mild soapy water and
wring well. Wipe the camera with the damp cloth and then dry it with a dry cloth. If you have used
the camera at the beach, soak the cloth in clean water and wring well.
Foreign matter may adhere to the camera when using the camera in conditions where foreign
matter such as dirt, dust or sand are present. If you continue to use the camera in such conditions,
it could cause damage to the camera. To avoid such damage, wash the camera using the following
method.
Close and lock the battery/card compartment cover and connector cover firmly (P.15).
Monitor:
Wipe gently with a soft cloth.
Lens:
Cloths may scratch the lens if used without first removing sand, dust, or other foreign matter.
Remove dust from the lens with a third-party blower and then gently clean it with lens cleaning
paper.
Mold may form on the lens surface if the lens is left dirty.
Battery/USB-AC adapter:
Wipe gently with a soft, dry cloth.
242
Cleaning and storing the camera
1.
2.

Storage
When not using the camera for a prolonged period, remove the battery and card. Store the camera
in a cool, dry place that is well ventilated.
Insert the battery periodically and test the camera’s functions.
Clean the camera after use.
Do not store in the same place as insect repellent.
In order to protect the camera from corrosion, avoid storing the camera in places where chemicals
are treated.
Mold may form on the lens surface if the lens is left dirty.
Check each part of the camera before use if it has not been used for a long time. Before taking
important pictures, be sure to take a test shot and check that the camera works properly.
Pixel Mapping - Checking the image processing
functions
The pixel mapping feature allows the camera to check and adjust the image sensor and image
processing functions. For best results, wait at least a minute after shooting and playback have ended
before performing pixel mapping.
Highlight [Pixel Mapping] in CCustom MenuH (P.154).
Press the OK button when [Start] (Submenu 2) is displayed.
The [Busy] bar is displayed when pixel mapping is in progress. When pixel mapping is
finished, the menu is restored.
If you accidentally turn the camera off during pixel mapping, start again from Step1.
243
Cleaning and storing the camera
1.
2.

The dialog is displayed in the following situations.
The camera is turned on for the first time.
You have not chosen a language.
Please select your language.
Por favor, selecciona tu idioma.
Veuillez choisir votre langue.
Bitte wählen Sie Ihre Sprache.
嶤嵫儛㉕䠱嶚宭҉
Shooting tips and information
The camera does not turn on even when a battery
is loaded
The battery is inserted in the wrong direction
If you insert the battery in the wrong direction, the camera will not turn on. Be sure to insert it in the
correct direction. g“Inserting the battery and card” (P.19)
The battery is not fully charged
Charge the battery. g“Charging the Battery” (P.23)
The battery is temporarily unable to function because of
the cold
Battery performance drops at low temperatures. Remove the battery and warm it by putting it in
your pocket for a while.
A dialog prompting you to choose a language is
displayed
See “Initial Setup” (P.28) for information on choosing a language.
244
Shooting tips and information

Subject has low contrast Excessively bright light in
center of frame
Subject contains no vertical
lines
1
No picture is taken when the shutter button is
pressed
The camera has turned off automatically
The camera automatically enters sleep mode to reduce the drain on the battery if no operations are
performed for a set period of time. Press the shutter button halfway to exit sleep mode. The camera
will turn off automatically if left in sleep mode for 5 minutes. gCCustom MenuH > [Sleep]
(P.154)
The flash is charging
On the monitor, the A mark blinks when charging is in progress. Wait for the blinking to stop, then
press the shutter button.
The camera temperature is elevated
The camera may shut down if its internal temperature rises after extended use. Remove the battery
and wait until the internal temperature has dropped enough for the camera to be used again. The
camera may also become warm to the touch during use, but this does not indicate a malfunction.
Unable to focus
The camera cannot focus on subjects that are too close to the camera or that are not suited to
Auto Focus (the AF confirmation mark will blink in the monitor). Increase the distance to the subject
or focus on a high contrast object at the same distance from the camera as your main subject,
compose the shot, and shoot.
Subjects that are difficult to focus on
It may be difficult to focus using Auto Focus in the following situations.
The AF confirmation mark is blinking.
The camera will not be able to focus under the following conditions.
245
Shooting tips and information
-

Subjects at different distances
Fast-moving subject Subject not inside AF area
The AF confirmation mark lights up, but the subject is not in focus.
It is also effective to compose the shot by holding the camera vertically to focus, and then
returning to the horizontal position to take the picture.
Noise reduction is activated
When shooting night scenes, shutter speeds are slower and noise tends to appear in images. The
camera activates the noise-reduction process after shooting at slow shutter speeds. During this
process, shooting is not possible. You can set [Noise Reduct.] to [Off]. gCCustom Menu
C> [Noise Reduct.] (P.147)
The date and time have not been set
The camera is used with the settings at the time of purchase
The date and time of the camera are not set when purchased. Set the date and time before using
the camera. g“Initial Setup” (P.28)
The battery has been removed from the camera
The date and time settings will revert to the factory default settings if the camera is left without
the battery for approximately 1 day (according to in-house experiments). The settings will revert
more quickly if the battery was only loaded in the camera for a short amount of time before being
removed. Before taking important pictures, check that the date and time settings are correct.
Set functions are restored to their factory default
settings
In shooting modes other than P/A/n, rotating the mode dial or turning off the power reverts the set
functions to their default settings.
246
Shooting tips and information
-
1

Some settings are unavailable
Some features may be unavailable depending on the shooting mode and camera settings. g”List of
configurable shooting modes” (P.206)
Pictures are grainy
In KImage quality, set the pixel count to a higher value or set compression to SF or F. g“Photo
file and image size options (KImage quality)” (P.80)
Image “noise” mottling can sometimes be reduced by lowering ISO sensitivity. g“Changing ISO
sensitivity (ISO Sensitivity)” (P.74)
Pictures are “washed out”
This may occur when the picture is taken in backlit or semi-backlit conditions. This is due to a
phenomenon called flare or ghosting. Frame the shot so that as few strong light sources as appear in
the picture as possible. Flare may occur even when light sources are not present in the picture. Use
your hand or other object to shade the lens from direct light sources.
Light appears in the picture
Shooting with flash in dark conditions results in images with the flash visibly reflected on specks of
dust in the air.
Unknown bright dot(s) appear on the subject in
the picture taken
This may be due to stuck pixel(s) on the image sensor. Perform [Pixel Mapping]. If this does not solve
the problem, try performing Pixel Mapping multiple times. g“Pixel Mapping - Checking the image
processing functions” (P.243)
247
Shooting tips and information

The lens is cloudy or the monitor is hard to read
Rapid temperature changes may cause lens fogging (condensation) to occur. Turn off the power, and
wait for the camera body to become acclimated to the surrounding temperature and dry out before
taking pictures.
Movies do not play back smoothly when viewed on
a TV
The movie frame rate may not match the video standard used in the TV. View the movie on a computer
instead. Before recording movies for display on a TV, select a frame rate that matches the video
standard used in the device. g[Video Frame Rate] (P.134)
The heading is not correct
The compass does not function as expected in the vicinity of strong electromagnetic fields, such as
from televisions, microwaves, large electric motors, radio transmitters, and high-voltage power lines.
Normal function can sometimes be restored by moving the camera in a figure eight while rotating your
wrist.
Functions that cannot be selected from menus
Some items may not be selectable from the menus when using the arrow pad.
Items that cannot be set with the current shooting mode.
Items that cannot be set because of an item that has already been set:
Settings such as picture mode are unavailable when the mode dial is rotated to 0.
Only the subject is displayed and no information is
shown
The display has been switched to “image only”. Press the INFO button and switch to another display
mode.
248
Shooting tips and information
-

Error codes
Monitor indication Possible cause/Corrective action
No Card
No card inserted or card not recognized.
Insert a card or remove and reinsert the current card.
Card Error
There is a problem with the card.
Insert the card again. If the problem persists, format the card. If the card
cannot be formatted, it cannot be used.
Write Protect
Writing to the card is prohibited.
The card write-protect switch is set to the “LOCK” side. Return the switch to
the unlocked position (P.21).
Card Full
The card is full and no additional pictures can be taken.
Replace the card or erase unwanted pictures.
Before erasing, download important images to a PC.
Card Full
There is no space in the card.
Replace the card or erase unwanted pictures.
Before erasing, download important images to a PC.
No Picture
There are no pictures to play back.
The card contains no pictures.
Take pictures before beginning playback.
Picture Error
The selected file is damaged and cannot be played back. Alternatively,
the picture is in a format that is not supported by the camera.
View the picture using computer imaging software or another method.
If the picture cannot be displayed on a computer, the file may be corrupt.
The Image Cannot Be
Edited
Camera retouch features cannot be applied to pictures recorded with
other devices.
Retouch the picture on a computer or other device.
249
Error codes

Monitor indication Possible cause/Corrective action
Y/M/D
The clock is not set.
Set the clock (P.28).
The internal temperature of the camera has risen due to sequential
shooting.
Turn off the camera and wait for the internal temperature to cool.
Internal camera
temperature is too
high.
Please wait for
cooling before
camera use.
The internal temperature of the camera has risen due to sequential
shooting.
Wait a moment for the camera to turn off automatically.
Allow the internal temperature of the camera to cool before resuming
operations.
Battery Empty
The battery is exhausted.
Charge the battery.
No Connection
The camera is not correctly connected to a computer, HDMI display, or
other devices.
Reconnect the camera.
Logging function
cannot be used at
this time.
The area of camera memory used for temporary storage of the log file
is full.
Insert a card or confirm that the current card is correctly inserted and
transfer to log file to the card.
The battery is exhausted.
Charge the battery.
The camera is connected to a television or other device via an HDMI
cable.
Disconnect the HDMI cable.
The USB-AC adapter is being used to supply power to the camera from
an electrical outlet while the battery is removed.
Insert the battery and unplug the USB-AC adapter from the outlet.
250
Error codes

Monitor indication Possible cause/Corrective action
Card log capacity is
full.
Cannot record new
log files.
The current log cannot be saved to the card.
Copy log files to a computer and delete them from the card.
Each card can store up to 199 log files.
(Blinking)
The current log has not been saved to the card.
Insert a card or confirm that the current card is correctly inserted and
transfer to log file to the card.
The current log cannot be saved to the card.
Copy log files to a computer and delete them from the card.
Each card can store up to 199 log files.
There is a problem with the card.
Insert a new card.
Writing to the card is prohibited.
The card write-protect switch is set to the “LOCK” side. Return the switch to
the unlocked position (P.21).
There is no space in the card.
Replace the card or erase unwanted pictures.
Before erasing, download important images to a PC.
251
Error codes

Monitor indication Possible cause/Corrective action
(Solid)
The area of camera memory used for temporary storage of the log file
is full.
Insert a card or confirm that the current card is correctly inserted and
transfer to log file to the card.
The battery is exhausted.
Charge the battery.
The camera is connected to a television or other device via an HDMI
cable.
Disconnect the HDMI cable.
The USB-AC adapter is being used to supply power to the camera from
an electrical outlet while the battery is removed.
Insert the battery and unplug the USB-AC adapter from the outlet.
The clock is not set.
Set the clock and select a time zone.
252
Error codes

Specifications
Camera
Model
Digital camera (for shooting and displaying)
Recording system
Still pictures
Digital recording, JPEG (in accordance with Design rule for Camera File
system (DCF)),RAW data
Applicable standards Exif 2.31, Digital Print Order Format (DPOF)
Sound with still pictures Wave format
Movie MOV (MPEG-4AVC/H.264)
Memory
SD/SDHC/SDXC (supports UHS-I)
Total no. of pixels
Approx. 12.71 million
No. of effective pixels
12 million
Image pickup device
1/2.3” CMOS
253
Specifications

Lens
4.5mm to 18.0mm, f2.0 to f4.9 (equivalent to 25mm to 100mm on
35mm film)
Photometric system
Digital ESP metering, spot metering system
Shutter speed
1/2–1/2000sec. (slowest shutter speed available increases to 4sec. in
A mode, 1/10–1/32000sec. in i10fps and s, 1/20–1/32000sec. in
i20fps)
Shooting range
Normal
0.1m (0.3ft.) to O (W/T)
Super macro 0.01m (0.03ft.) to 0.3m (1.0ft.) (f=5.4mm to 18.0mm)
Microscope mode 0.01m (0.03ft.) to 0.3m (1.0ft.) (f=5.4mm to 18.0mm)
Monitor
3.0” TFT color LCD display, Approx. 1.04 million dots
Connector
USB connector (Type-C)/HDMI connector (Type-D)
Automatic calendar system
2000 up to 2099
254
Specifications

Water resistance
Type
IEC 60529 IPX8 (under in-house test conditions), usable in 15m (49.2ft.)
deep water
Meaning
The camera can be used under water for a specified amount of time and
under a specified amount of water pressure.
Dust resistance
IEC 60529 IPX6
Wireless LAN
Compatible standards IEEE802.11b/g/n
Bluetooth
®
Compatible standards Bluetooth Version 4.2 BLE
GPS
Reception frequency
1575.42 MHz (GPS/Galileo/Quazi-Zenith Satellite System (QZSS))
1598.0625 MHz to 1605.3750 MHz (GLONASS)
Geodetic system WGS84
Operating environment
Temperature
−10°C to 40°C (14°F to 104°F) (operation)/−20°C to 60°C (−4°F to
140°F) (storage)
Humidity 30% – 90% (operation)/10% – 90% (storage)
Power supply
One designated lithium ion battery (LI-92B) or USB-AC adapter (F-5AC)
255
Specifications

Dimensions
113.9mm (W) × 65.8mm (H) × 32.7mm (D) (4.5 × 2.6 × 1.3in.)
(excluding protrusions)
Weight
249g (8.9oz) (including battery and card)
256
Specifications

The terms HDMI and HDMI High-Definition Multimedia Interface,
and the HDMI Logo are trademarks or registered trademarks of
HDMI Licensing Administrator, Inc. in the United States and other
countries.
Lithium-ion battery
Model No. LI-92B
Product type Lithium ion rechargeable battery
Nominal voltage DC3.6V
Standard voltage 1350mAh
Battery life Approx. 300 full charges (varies on usage)
Ambient operating temperature 0°C to 40°C (32°F to 104°F) (charging)
SPECIFICATIONS ARE SUBJECT TO CHANGE WITHOUT ANY NOTICE OR OBLIGATION ON THE
PART OF THE MANUFACTURER.
Visit our website for the latest specifications.
257
Specifications

SAFETY PRECAUTIONS
SAFETY PRECAUTIONS
CAUTION
RISK OF ELECTRIC SHOCK
DO NOT OPEN
CAUTION: TO REDUCE THE RISK OF ELECTRICAL SHOCK, DO NOT REMOVE
COVER (OR BACK). NO USER-SERVICEABLE PARTS INSIDE. REFER SERVICING TO
QUALIFIED SERVICE PERSONNEL.
An exclamation mark enclosed in a triangle alerts you to important operating and
maintenance instructions in the documentation provided with the product.
WARNING
If the product is used without observing the information given under this symbol,
serious injury or death may result.
CAUTION
If the product is used without observing the information given under this symbol, injury
may result.
NOTICE
If the product is used without observing the information given under this symbol,
damage to the equipment may result.
WARNING!
TO AVOID THE RISK OF FIRE OR ELECTRICAL SHOCK, NEVER DISASSEMBLE THIS PRODUCT.
General Precautions
Read All Instructions — Before you use the product, read all operating instructions. Store all manuals
and documentation for future reference.
Water and Moisture — For precautions on products with weatherproof designs, read the
weatherproofing sections.
Power Source — Connect this product only to the power source described on the product label.
Foreign Objects — To avoid personal injury, never insert a metal object into the product.
Cleaning — Always unplug this product from the wall outlet before cleaning. Use only a damp cloth
for cleaning. Never use any type of liquid or aerosol cleaner, or any type of organic solvent to clean this
product.
Heat — Never use or store this product near any heat source such as a radiator, heat register, stove, or
any type of equipment or appliance that generates heat, including stereo amplifiers.
Lightning — If a lightning storm occurs while using a USB-AC adapter, remove it from the wall outlet
immediately.
Attachments — For your safety, and to avoid damaging the product, use only accessories
recommended by our company.
258
SAFETY PRECAUTIONS

Location — To avoid damage to the product, mount the product securely on a stable tripod, stand, or
bracket.
SWARNING
Do not use the camera near flammable or explosive gases.
Do not use the flash and LED (including AF illuminator) on people (infants, small children,
etc.) at close range.
You must be at least 1 m (3 ft.) away from the faces of your subjects. Firing the flash too close to
the subject’s eyes could cause a momentary loss of vision.
Do not look at the sun or strong lights with the camera.
Keep young children and infants away from the camera.
Always use and store the camera out of the reach of young children and infants to prevent the
following dangerous situations which could cause serious injury:
Becoming entangled in the camera strap, causing strangulation.
Accidentally swallowing the battery, cards or other small parts.
Accidentally firing the flash into their own eyes or those of another child.
Accidentally being injured by the moving parts of the camera.
If you find that the USB-AC adapter or charger is extremely hot or notice any unusual odors,
noise, or smoke around it, unplug the power plug from wall outlet immediately and stop
using it. Then, contact an authorized distributor or service center.
Stop using the camera immediately if you notice any unusual odors, noise, or smoke around
it.
Never remove the batteries with bare hands, which may cause a fire or burn your hands.
Do not leave the camera in places where it may be subject to extremely high temperatures.
Doing so may cause parts to deteriorate and, in some circumstances, cause the camera to catch
fire. Do not use the charger or USB-AC adapter if it is covered (such as a blanket). This could
cause overheating, resulting in fire.
Handle the camera with care to avoid getting a low-temperature burn.
When the camera contains metal parts, overheating can result in a low-temperature burn. Pay
attention to the following:
When used for a long period, the camera will get hot. If you hold on to the camera in this
state, a low-temperature burn may be caused.
In places subject to extremely cold temperatures, the temperature of the camera’s body may
be lower than the environmental temperature. If possible, wear gloves when handling the
camera in cold temperatures.
259
SAFETY PRECAUTIONS

To protect the high-precision technology contained in this product, never leave the camera in the
places listed below, no matter if in use or storage:
Places where temperatures and/or humidity are high or go through extreme changes. Direct
sunlight, beaches, locked cars, or near other heat sources (stove, radiator, etc.) or humidifiers.
In sandy or dusty environments.
Near flammable items or explosives.
In wet places, such as bathrooms or in the rain.
In places prone to strong vibrations.
The camera uses a lithium ion battery specified by our company.
Charge the battery with the specified USB-AC adapter or charger. Do not use any other USB-AC
adapters or chargers.
Never incinerate or heat batteries in microwaves, on hot plates, or in pressure vessels, etc.
Never leave the camera on or near electromagnetic devices.
This may cause overheating, burning, or exploding.
Do not connect terminals with any metallic objects.
Take precautions when carrying or storing batteries to prevent them from coming into contact
with any metal objects such as jewelry, pins, fasteners, keys, etc.
The short circuit may cause overheating, exploding, or burning, which burn or damage you.
To prevent causing battery leaks or damaging their terminals, carefully follow all instructions
regarding the use of batteries. Never attempt to disassemble a battery or modify it in any
way, solder, etc.
If battery fluid gets into your eyes, flush your eyes immediately with clear, cold running water
and seek medical attention immediately.
If you cannot remove the battery from the camera, contact an authorized distributor or
service center.
Do not try to remove the battery by force.
Damage to the battery exterior (scratches, etc.) may produce heat or an explosion.
Always store batteries out of the reach of small children and pets. If they accidentally swallow
a battery, seek medical attention immediately.
To prevent batteries from leaking, overheating, or causing a fire or explosion, use only batteries
recommended for use with this product.
If rechargeable batteries have not been recharged within the specified time, stop charging them and
do not use them.
Do not use batteries with scratches or damage to the casing, and do not scratch the battery.
Never subject batteries to strong shocks or continuous vibration by dropping or hitting.
This may cause exploding, overheating, or burning.
If a battery leaks, has unusual odor, becomes discolored or deformed, or becomes abnormal in any
other way during operation, stop using the camera, and keep away from fire immediately.
If a battery leaks fluid onto your clothing or skin, remove the clothing and flush the affected area
with clean, running cold water immediately. If the fluid burns your skin, seek medical attention
immediately.
Never use lithium-ion batteries in a low-temperature environment. Doing so may cause generation
of heat, ignition, or explosion.
260
SAFETY PRECAUTIONS

The lithium-ion battery is designed to be used only for the digital camera. Do not use the battery to
other devices.
Do not allow children or animals/pets to handle or transport batteries (prevent dangerous
behavior such as licking, putting in mouth or chewing).
Use Only Dedicated Rechargeable Battery, Battery Charger
and USB-AC adapter
We strongly recommend that you use only the genuine rechargeable battery, battery charger, and
USB-AC adapter specified by our company with this camera. Using a non-genuine rechargeable
battery, battery charger and/or USB-AC adapter may result in fire or personal injury due to leakage,
heating, ignition or damage to the battery. Our company does not assume any liability for accidents or
damage that may result from the use of a battery, battery charger, and/or USB-AC adapter that are not
specified genuine accessories.
SCAUTION
Never store batteries where they will be exposed to direct sunlight, or subjected to high
temperatures in a hot vehicle, near a heat source, etc.
Keep batteries dry at all times.
The battery may become hot during prolonged use. To avoid minor burns, do not remove it
immediately after using the camera.
This camera uses one of our lithium-ion batteries. Use the specified genuine battery. There is a risk
of explosion if the battery is replaced with the incorrect battery type.
Please recycle batteries to help save our planet’s resources. When you throw away dead batteries, be
sure to cover their terminals and always observe local laws and regulations.
Do not cover the flash with a hand while firing.
SNOTICE
Do not use or store the camera in dusty or humid places.
Use SD/SDHC/SDXC cards only. Never use other types of cards.
If you accidently insert another type of card into the camera, contact an authorized distributor or
service center. Do not try to remove the card by force.
Regularly back up important data to a computer or other storage device to prevent accidental loss.
Our company accepts no liability for any loss of data associated with this device.
Be careful with the strap when you carry the camera. It could easily catch on stray objects and cause
serious damage.
Before transporting the camera, remove a tripod and all other accessories made by other
companies.
Never drop the camera or subject it to severe shocks or vibrations.
261
SAFETY PRECAUTIONS

When attaching the camera to or removing it from a tripod, rotate the tripod screw, not the camera.
Do not touch electric contacts on cameras.
Do not leave the camera pointed directly at the sun. This may cause lens or shutter curtain damage,
color failure, ghosting on the image sensor, or may possibly cause fires.
Do not leave the viewfinder exposed to a strong light source or direct sunlight. The heat may
damage the viewfinder.
Do not push or pull severely on the lens.
Be sure to remove any water droplets or other moisture from the product before replacing the
battery or opening or closing covers.
Before storing the camera for a long period, remove the batteries. Select a cool, dry location for
storage to prevent condensation or mold from forming inside the camera. After storage, test the
camera by turning it on and pressing the shutter button to make sure that it is operating normally.
The camera may malfunction if it is used in a location where it is subject to a magnetic/
electromagnetic field, radio waves, or high voltage, such as near a TV set, microwave, video game,
loud speakers, large monitor unit, TV/radio tower, or transmission towers. In such cases, turn the
camera off and on again before further operation.
Always observe the operating environment restrictions described in the camera’s manual.
Insert the battery carefully as described in the operating instructions.
Before loading, always inspect the battery carefully for leaks, discoloration, warping, or any other
abnormality.
Always unload the battery from the camera before storing the camera for a long period.
When storing the battery for a long period, select a cool location for storage.
Power consumption by the camera varies depending on which functions are used.
During the conditions described below, power is consumed continuously and the battery becomes
exhausted quickly.
The zoom is used repeatedly.
The shutter button is pressed halfway repeatedly in shooting mode, activating the auto focus.
A picture is displayed on the monitor for an extended period of time.
GPS is used.
Using an exhausted battery may cause the camera to turn off without displaying the battery level
warning.
If the battery’s terminals get wet or greasy, camera contact failure may result. Wipe the battery well
with a dry cloth before use.
Always charge a battery when using it for the first time, or if it has not been used for a long period.
When operating the camera with battery power at low temperatures, try to keep the camera and
spare battery as warm as possible. A battery that has run down at low temperatures may be
restored after it is warmed at room temperature.
Before going on a long trip, and especially before traveling abroad, purchase extra batteries. A
recommended battery may be difficult to obtain while traveling.
262
SAFETY PRECAUTIONS

Using the wireless LAN/Bluetooth
®
functions
Turn off the camera in hospitals and other locations where medical equipment is present.
The radio waves from the camera may adversely affect medical equipment, causing a malfunction
that results in an accident. Be sure to disable wireless LAN/Bluetooth
®
functions in the vicinity of
medical equipment (P.172).
Turn off the camera when onboard aircraft.
Using wireless devices onboard may hinder safe operation of the aircraft. Be sure to disable wireless
LAN/Bluetooth
®
functions onboard aircraft (P.172).
Monitor
Do not push the monitor forcibly; otherwise the image may become vague, resulting in a playback
mode failure or damage to the monitor.
A strip of light may appear on the top/bottom of the monitor, but this is not a malfunction.
When a subject is viewed diagonally in the camera, the edges may appear zigzagged on the
monitor. This is not a malfunction; it will be less noticeable in playback mode.
In places subject to low temperatures, the monitor may take a long time to turn on or its color may
change temporarily.
When using the camera in extremely cold places, it is a good idea to occasionally place it in a warm
place. The monitor exhibiting poor performance due to low temperatures will recover in normal
temperatures.
The monitor of this product is manufactured with high-quality accuracy, however, there may be a
stuck or dead pixel on the monitor. These pixels do not have any influence on the image to be
saved. Because of the characteristics, the unevenness of the color or brightness may also be found
depending on the angle, but this is due to the structure of the monitor. This is not a malfunction.
Legal and Other Notices
Our company makes no representations or warranties regarding any damages, or benefit expected
by using this unit lawfully, or any request from a third person, which are caused by the inappropriate
use of this product.
Our company makes no representations or warranties regarding any damages or any benefit
expected by using this unit lawfully which are caused by erasing picture data.
Disclaimer of Warranty
Our company makes no representations or warranties, either expressed or implied, by or concerning
any content of these written materials or software, and in no event shall be liable for any implied
warranty of merchantability or fitness for any particular purpose or for any consequential, incidental
or indirect damages (including but not limited to damages for loss of business profits, business
interruption and loss of business information) arising from the use or inability to use these written
materials or software or equipment. Some countries do not allow the exclusion or limitation of
liability for consequential or incidental damages or of the implied warranty, so the above limitations
may not apply to you.
263
SAFETY PRECAUTIONS

Apical logo is a registered trademark of Apical Limited.
Our company reserves all rights to this manual.
Warning
Unauthorized photographing or use of copyrighted material may violate applicable copyright laws. Our
company assumes no responsibility for unauthorized photographing, use or other acts that infringe
upon the rights of copyright owners.
Copyright Notice
All rights reserved. No part of these written materials or this software may be reproduced or used in
any form or by any means, electronic or mechanical, including photocopying and recording or the use
of any type of information storage and retrieval system, without the prior written permission of our
company. No liability is assumed with respect to the use of the information contained in these written
materials or software, or for damages resulting from the use of the information contained therein. Our
company reserves the right to alter the features and contents of this publication or software without
obligation or advance notice.
Trademarks
SDXC Logo is a trademark of SD-3C, LLC.
Wi‑Fi is a registered trademark of the Wi‑Fi Alliance.
The Bluetooth
®
word mark and logos are registered trademarks owned by the Bluetooth SIG, Inc.
and any use of such marks by OM Digital Solutions Corporation is under license.
QR Code is a trademark of Denso Wave Inc.
The standards for camera file systems referred to in this manual are the “Design Rule for Camera File
System/DCF” standards stipulated by the Japan Electronics and Information Technology Industries
Association (JEITA).
All other company and product names are registered trademarks and/or trademarks of their
respective owners. “™” and “®” symbols may sometimes be omitted.
THIS PRODUCT IS LICENSED UNDER THE AVC PATENT PORTFOLIO LICENSE FOR THE PERSONAL AND
NONCOMMERCIAL USE OF A CONSUMER TO (i) ENCODE VIDEO IN COMPLIANCE WITH THE AVC
STANDARD (“AVC VIDEO”) AND/OR (ii) DECODE AVC VIDEO THAT WAS ENCODED BY A CONSUMER
ENGAGED IN A PERSONAL AND NON-COMMERCIAL ACTIVITY AND/OR WAS OBTAINED FROM A
VIDEO PROVIDER LICENSED TO PROVIDE AVC VIDEO. NO LICENSE IS GRANTED OR SHALL BE IMPLIED
FOR ANY OTHER USE. ADDITIONAL INFORMATION MAY BE OBTAINED FROM MPEG LA, L.L.C. SEE
HTTP://WWW.MPEGLA.COM
264
SAFETY PRECAUTIONS

The software in this camera may include third party software. Any third party software is subject to the
terms and conditions, imposed by the owners or licensors of that software, under which software is
provided to you.
Those terms and other third party software notices, if any, may be found in the software notice PDF file
stored at
https://support.jp.omsystem.com/en/support/imsg/digicamera/download/notice/notice.html
265
SAFETY PRECAUTIONS

date of issue 2023.09.
WD941200
https://www.om-digitalsolutions.com/
© 2023
