
PeopleSoft PeopleTools 8.58
Deployment Packages Installation
July 2022

PeopleSoft PeopleTools 8.58 Deployment Packages Installation
Copyright © 2022, Oracle and/or its affiliates.
This software and related documentation are provided under a license agreement containing restrictions on use
and disclosure and are protected by intellectual property laws. Except as expressly permitted in your license
agreement or allowed by law, you may not use, copy, reproduce, translate, broadcast, modify, license, transmit,
distribute, exhibit, perform, publish, or display any part, in any form, or by any means. Reverse engineering,
disassembly, or decompilation of this software, unless required by law for interoperability, is prohibited.
The information contained herein is subject to change without notice and is not warranted to be error-free. If you
find any errors, please report them to us in writing.
If this is software or related documentation that is delivered to the U.S. Government or anyone licensing it on
behalf of the U.S. Government, then the following notice is applicable:
U.S. GOVERNMENT END USERS: Oracle programs (including any operating system, integrated software, any
programs embedded, installed or activated on delivered hardware, and modifications of such programs) and
Oracle computer documentation or other Oracle data delivered to or accessed by U.S. Government end users are
"commercial computer software" or "commercial computer software documentation" pursuant to the applicable
Federal Acquisition Regulation and agency-specific supplemental regulations. As such, the use, reproduction,
duplication, release, display, disclosure, modification, preparation of derivative works, and/or adaptation of i)
Oracle programs (including any operating system, integrated software, any programs embedded, installed or
activated on delivered hardware, and modifications of such programs), ii) Oracle computer documentation and/or
iii) other Oracle data, is subject to the rights and limitations specified in the license contained in the applicable
contract. The terms governing the U.S. Government's use of Oracle cloud services are defined by the applicable
contract for such services. No other rights are granted to the U.S. Government.
This software or hardware is developed for general use in a variety of information management applications. It is
not developed or intended for use in any inherently dangerous applications, including applications that may create
a risk of personal injury. If you use this software or hardware in dangerous applications, then you shall be
responsible to take all appropriate fail-safe, backup, redundancy, and other measures to ensure its safe use. Oracle
Corporation and its affiliates disclaim any liability for any damages caused by use of this software or hardware in
dangerous applications.
Oracle and Java are registered trademarks of Oracle and/or its affiliates. Other names may be trademarks of their
respective owners.
Intel and Intel Inside are trademarks or registered trademarks of Intel Corporation. All SPARC trademarks are
used under license and are trademarks or registered trademarks of SPARC International, Inc. AMD, Epyc, and the
AMD logo are trademarks or registered trademarks of Advanced Micro Devices. UNIX is a registered trademark
of The Open Group.
This software or hardware and documentation may provide access to or information about content, products, and
services from third parties. Oracle Corporation and its affiliates are not responsible for and expressly disclaim all
warranties of any kind with respect to third-party content, products, and services unless otherwise set forth in an
applicable agreement between you and Oracle. Oracle Corporation and its affiliates will not be responsible for any
loss, costs, or damages incurred due to your access to or use of third-party content, products, or services, except as
set forth in an applicable agreement between you and Oracle.
The business names used in this documentation are fictitious, and are not intended to identify any real companies
currently or previously in existence.
Documentation Accessibility
For information about Oracle's commitment to accessibility, visit the Oracle Accessibility Program website at
http://www.oracle.com/pls/topic/lookup?ctx=acc&id=docacc.
Access to Oracle Support
Oracle customers that have purchased support have access to electronic support through My Oracle Support. For
information, visit http://www.oracle.com/pls/topic/lookup?ctx=acc&id=info or visit
http://www.oracle.com/pls/topic/lookup?ctx=acc&id=trs if you are hearing impaired.

Copyright © 2022, Oracle and/or its affiliates. All Rights Reserved.
3
Contents
Preface
About this Documentation ................................................................................................................................... 11
Understanding This Documentation ...................................................................................................................... 11
Audience ................................................................................................................................................................ 11
Typographical Conventions ................................................................................................................................... 12
Products .................................................................................................................................................................. 13
Related Information ............................................................................................................................................... 14
Comments and Suggestions ................................................................................................................................... 15
Chapter 1
Prerequisites ......................................................................................................................................................... 17
Understanding the PeopleSoft PeopleTools Deployment Packages ...................................................................... 17
Reviewing Hardware Requirements ...................................................................................................................... 18
Reviewing Hardware Requirements for Microsoft Windows .......................................................................... 18
Reviewing Hardware Requirements on AIX, HP-UX, Linux, or Solaris ......................................................... 19
Reviewing Software Requirements ........................................................................................................................ 20
Reviewing Software Requirements on Microsoft Windows ............................................................................ 20
Reviewing Software Requirements on Linux ................................................................................................... 21
Reviewing Software Requirements on AIX ..................................................................................................... 22
Reviewing Software Requirements on HP-UX ................................................................................................ 23
Reviewing Software Requirements on Solaris ................................................................................................. 25
Reviewing Requirements for the Puppet Software on Microsoft Windows ..................................................... 26
Reviewing Requirements for the Puppet Software on Linux ........................................................................... 27
Reviewing Requirements for the Puppet Software on AIX .............................................................................. 29
Reviewing Requirements for the Puppet Software on HP-UX ......................................................................... 30
Reviewing Requirements for the Puppet Software on Solaris .......................................................................... 31
Cataloging the Database for DB2 z/OS ................................................................................................................. 32
Reviewing the System Parameters on Linux, AIX, HP-UX, or Solaris ................................................................. 33
Understanding the System Parameters on Linux, AIX, HP-UX, or Solaris ..................................................... 33
Reviewing the sysctl Parameters ...................................................................................................................... 33
Reviewing the ulimit Parameters ...................................................................................................................... 34
Chapter 2
Deploying the PeopleSoft PeopleTools Deployment Packages ......................................................................... 35
Obtaining the PeopleSoft PeopleTools DPKs ........................................................................................................ 35

Contents
4
Copyright © 2022, Oracle and/or its affiliates. All Rights Reserved.
Obtaining the PeopleSoft PeopleTools DPKs from My Oracle Support .......................................................... 35
Obtaining the PeopleSoft PeopleTools DPKs from Oracle Software Delivery Cloud ..................................... 36
Reviewing the PeopleSoft PeopleTools DPKs ................................................................................................. 36
Using the PT-INFRA DPK for Additional Component Software ......................................................................... 37
Reviewing the DPK Setup Script Options ............................................................................................................. 38
Using the DPK Setup Script Options ................................................................................................................ 38
Using the DPK Setup Script Option use_alternate_puppet_install ................................................................... 42
Preparing to Run the DPK Setup Script ............................................................................................................ 45
Deploying as a Non-Root User on Linux, AIX, HP-UX, or Solaris ...................................................................... 46
Preparing to Run the DPK Setup Script as a Non-Root User on Linux, AIX, HP-UX, or Solaris ................... 47
Running the DPK Setup Prerequisite Step for Linux, AIX, HP-UX, or Solaris ............................................... 49
Running the DPK Setup Script as a Non-Root User on Linux, AIX, HP-UX, or Solaris ................................ 51
Running the DPK Setup Script for Mid-Tier Deployment .................................................................................... 51
Understanding the Mid-Tier Deployment ......................................................................................................... 51
Prerequisites ...................................................................................................................................................... 52
Running with the Mid-Tier Option on Microsoft Windows ............................................................................. 53
Running with the Mid-Tier Option on Linux, AIX, HP-UX, or Solaris as the Root User ............................... 59
Running with the Mid-Tier Option on Linux, AIX, HP-UX, or Solaris as a Non-Root User .......................... 65
Running the DPK Setup Script to Install Mid-Tier Software Only ....................................................................... 70
Understanding the Mid-Tier Software Installation ........................................................................................... 70
Running the DPK Setup Script to Install Mid-Tier Software on Microsoft Windows ..................................... 71
Running the DPK Setup Script as the Root User to Install Mid-tier Software on Linux, AIX, HP-UX, or
Solaris ............................................................................................................................................................... 73
Running the DPK Setup Script as a Non-Root User to Install Mid-Tier Software on Linux, AIX, HP-UX, or
Solaris ............................................................................................................................................................... 75
Running the DPK Setup Script to Deploy an Application Server Domain ............................................................ 77
Understanding the Application Server Domain Deployment ........................................................................... 77
Running the DPK Setup Script for the Application Server Domain Deployment on Microsoft Windows ...... 78
Running the DPK Setup Script for the Application Server Domain Deployment on Linux, AIX, HP-UX, or
Solaris as the Root User .................................................................................................................................... 81
Running the DPK Setup Script for the Application Server Domain Deployment on Linux, AIX, HP-UX, or
Solaris as a Non-Root User ............................................................................................................................... 84
Running the DPK Setup Script to Deploy a Process Scheduler Domain ............................................................... 87
Understanding the Process Scheduler Domain Deployment ............................................................................ 87
Running the DPK Setup Script for the Process Scheduler Domain Deployment on Microsoft Windows ....... 88
Running the DPK Setup Script for the Process Scheduler Domain Deployment on Linux, AIX, HP-UX, or
Solaris as the Root User .................................................................................................................................... 91
Running the DPK Setup Script for the Process Scheduler Domain Deployment on Linux, AIX, HP-UX, or
Solaris as a Non-Root User ............................................................................................................................... 94
Running the DPK Setup Script to Deploy an Application Server and a Process Scheduler Domain .................... 97
Understanding the Application Server and Process Scheduler Domain Deployment ...................................... 97
Running the DPK Setup Script for the Application Server and Process Scheduler Domain Deployment on
Microsoft Windows .......................................................................................................................................... 98
Running the DPK Setup Script for the Application Server and Process Scheduler Domain Deployment on

Contents
Copyright © 2022, Oracle and/or its affiliates. All Rights Reserved.
5
Linux, AIX, HP-UX, or Solaris as the Root User ........................................................................................... 101
Running the DPK Setup Script for the Application Server and Process Scheduler Domain Deployment on
Linux, AIX, HP-UX, or Solaris as a Non-Root User ...................................................................................... 104
Running the DPK Setup Script to Deploy a PIA Domain ................................................................................... 107
Understanding the PIA Domain Deployment ................................................................................................. 107
Prerequisites for the PIA Domain Deployment .............................................................................................. 108
Running the DPK Setup Script for the PIA Domain Deployment on Microsoft Windows ........................... 108
Running the DPK Setup Script for the PIA Domain Deployment on Linux, AIX, HP-UX, or Solaris as the
Root User ........................................................................................................................................................ 112
Running the DPK Setup Script for the PIA Domain Deployment on Linux, AIX, HP-UX, or Solaris as a Non-
Root User ........................................................................................................................................................ 116
Running the DPK Setup Script to Install PS_HOME Only ................................................................................. 120
Understanding the PS_HOME Deployment ................................................................................................... 120
Installing PS_HOME Only on Microsoft Windows ....................................................................................... 121
Installing PS_HOME Only on Linux, AIX, HP-UX, or Solaris ..................................................................... 124
Deploying the PeopleTools Client DPK .............................................................................................................. 127
Understanding the Standalone Mode Deployment ......................................................................................... 128
Preparing for the PeopleTools Client DPK Deployment ................................................................................ 129
Deploying in Standalone Mode ...................................................................................................................... 129
Chapter 3
Deploying the PeopleSoft PeopleTools Deployment Packages in Silent Mode ............................................. 135
Understanding Silent Mode Installation ............................................................................................................... 135
Reviewing the Response File Sample for Mid-tier Installation ........................................................................... 137
Reviewing the Response File Sample for Mid-tier Installation on Microsoft Windows ................................ 137
Reviewing the Response File Sample for Mid-tier Installation as the Root User on Linux, AIX, HP-UX, or
Solaris ............................................................................................................................................................. 138
Reviewing the Response File Sample for Mid-tier Installation as a Non-Root User on Linux, AIX, HP-UX, or
Solaris ............................................................................................................................................................. 138
Reviewing the Response File Sample to Deploy an Application Server Domain ............................................... 139
Reviewing the Response File Sample to Deploy an Application Server Domain on Microsoft Windows .... 139
Reviewing the Response File Sample to Deploy an Application Server Domain on Linux, AIX, HP-UX, or
Solaris as the Root User .................................................................................................................................. 140
Reviewing the Response File Sample to Deploy an Application Server Domain on Linux, AIX, HP-UX, or
Solaris as a Non-Root User ............................................................................................................................. 140
Reviewing the Response File Sample to Deploy a Process Scheduler Domain .................................................. 140
Reviewing the Response File Sample to Deploy a Process Scheduler Domain on Microsoft Windows ....... 141
Reviewing the Response File Sample to Deploy a Process Scheduler Domain on Linux, AIX, HP-UX, or
Solaris as the Root User .................................................................................................................................. 141
Reviewing the Response File Sample to Deploy a Process Scheduler Domain on Linux, AIX, HP-UX, or
Solaris as a Non-Root User ............................................................................................................................. 141
Reviewing the Response File Sample to Deploy an Application Server and a Process Scheduler Domain ....... 142
Reviewing the Response File Sample to Deploy an Application Server and a Process Scheduler Domain on

Contents
6
Copyright © 2022, Oracle and/or its affiliates. All Rights Reserved.
Microsoft Windows ........................................................................................................................................ 142
Reviewing the Response File Sample to Deploy an Application Server and a Process Scheduler Domain on
Linux, AIX, HP-UX, or Solaris as the Root User ........................................................................................... 142
Reviewing the Response File Sample to Deploy an Application Server and a Process Scheduler Domain on
Linux, AIX, HP-UX, or Solaris as a Non-Root User ...................................................................................... 143
Reviewing the Response File Sample to Deploy a PIA Domain ......................................................................... 143
Reviewing the Response File Sample to Deploy a PIA Domain on Microsoft Windows .............................. 144
Reviewing the Response File Sample to Deploy a PIA Domain on Linux, AIX, HP-UX, or Solaris as the Root
User ................................................................................................................................................................. 144
Reviewing the Response File Sample to Deploy a PIA Domain on Linux, AIX, HP-UX, or Solaris as a Non-
Root User ........................................................................................................................................................ 145
Reviewing the Response File Sample to Install PS_HOME Only ....................................................................... 145
Reviewing the Response File Sample to Install PS_HOME Only on Microsoft Windows ........................... 145
Reviewing the Response File Sample to Install PS_HOME Only on Linux, AIX, HP-UX, or Solaris ......... 146
Running the DPK Setup Script in Silent Mode for Default Initialization ............................................................ 146
Running the DPK Setup Script in Silent Mode with Customizations .................................................................. 147
Running the DPK Setup Script in Silent Mode for Default Initialization with use_alternate_puppet_install Option .
147
Running the DPK Setup Script in Silent Mode with Customizations and use_alternate_puppet_install Option . 148
Chapter 4
Completing the DPK Initialization with Customizations ............................................................................... 151
Understanding PeopleSoft Environment Customizations .................................................................................... 151
Preparing Customization Files for Linux, AIX, HP-UX, or Solaris Users and Groups ...................................... 156
Preparing the Customization File for a Single User and Single Group .......................................................... 157
Preparing the Customization File for a New Single User, New Primary Group, and Existing Secondary Group .
159
Preparing the Customization File for Existing Users and Groups .................................................................. 160
Preparing the Customization File for JDK on AIX .............................................................................................. 164
Preparing the Customization File for JDK on HP-UX ......................................................................................... 165
Preparing the Customization File for PeopleSoft Domain Definitions ................................................................ 166
Preparing the psft_customizations.yaml File .................................................................................................. 166
Reviewing the Domain Definitions in psft_configuration.yaml ..................................................................... 167
Reviewing the Customization File for a Single Application Server Domain ................................................. 171
Reviewing the Customization File for a Single Process Scheduler Domain .................................................. 172
Reviewing the Customization File for a Single PIA Domain ......................................................................... 173
Reviewing the Customization File for a PIA Domain on a Separate Host ..................................................... 174
Reviewing the Customization File for Multiple Web Sites in a Single Web Domain ................................... 175
Reviewing the Customization File for Multiple Domains .............................................................................. 177
Preparing the Customization File to Create PeopleSoft Domains Without Configuration .................................. 181
Preparing the Customization File for Component Software Locations ............................................................... 182
Preparing the Customization File for Unicode ..................................................................................................... 184

Contents
Copyright © 2022, Oracle and/or its affiliates. All Rights Reserved.
7
Preparing the Customization Files for the PeopleSoft Homes ............................................................................. 185
Preparing the Customization File for the PS_HOME Location ...................................................................... 185
Preparing the Customization File for the PS_APP_HOME Location ............................................................ 186
Preparing the Customization File for the PS_CFG_HOME Location ............................................................ 187
Preparing the Customization File for the PS_CUST_HOME Location ......................................................... 188
Preparing the Customization File for Jolt SSL and WSL SSL Ports ................................................................... 188
Preparing the Customization File for Oracle HTTP Server ................................................................................. 191
Preparing the Customization File for Session Cookie Names ............................................................................. 193
Preparing the Customization File for JVM Heap Sizes ....................................................................................... 194
Preparing the Customization File for Mid-Tier Connection to a Microsoft SQL Server Database ..................... 196
Preparing the Customization File for Mid-Tier Connection to a DB2 z/OS Database ........................................ 197
Preparing the Customization File to Exclude Oracle Database Client Installation ............................................. 201
Preparing the Customization File for sysctl and ulimit Parameters on Linux, AIX, HP-UX, or Solaris ............. 201
Preparing the Customization File to Change the setup_sysctl Parameter ....................................................... 201
Preparing the Customization File to Overwrite the sysctl Parameters ........................................................... 202
Preparing the Customization File to Overwrite the ulimit Parameters ........................................................... 203
Completing the Customized Deployment ............................................................................................................ 204
Chapter 5
Using and Maintaining the PeopleSoft Environment ..................................................................................... 207
Using the PeopleSoft Installation ......................................................................................................................... 207
Accessing the PeopleSoft Environment .......................................................................................................... 207
Reviewing the Deployment File System ......................................................................................................... 208
Reviewing the DPK-Created Users for Root Deployments on Linux, AIX, HP-UX, and Solaris ................. 212
Working with PeopleSoft Utilities and Programs for Root Deployments on Linux, AIX, HP-UX, and Solaris . 213
Setting Environment Variables for the Non-Root User on Linux, AIX, HP-UX, or Solaris ............................... 213
Sourcing the psft_env.sh Script ..................................................................................................................... 214
Creating a psft_env.sh Script .......................................................................................................................... 215
Removing a Deployed PeopleSoft Environment ................................................................................................. 216
Understanding the Removal Process .............................................................................................................. 216
Using the DPK Setup Script to Remove the PeopleSoft Environment on Microsoft Windows ..................... 216
Using the DPK Setup Script to Remove the PeopleSoft Environment on Linux, AIX, HP-UX, or Solaris .. 217
Using the DPK Setup Script to Remove the PeopleSoft Environment on Linux, AIX, HP-UX, or Solaris as a
Non-Root User ................................................................................................................................................ 218
Using the psft_puppet_apply.cmd Script to Remove the PeopleSoft Environment on Microsoft Windows . 218
Using the psft_puppet_apply.sh Script to Remove the PeopleSoft Environment on Linux, AIX, HP-UX, or
Solaris ............................................................................................................................................................. 219
Manually Removing the PeopleSoft Environment on Microsoft Windows ................................................... 219
Manually Removing the PeopleSoft Environment on Linux, AIX, HP-UX, or Solaris ................................. 221

Contents
8
Copyright © 2022, Oracle and/or its affiliates. All Rights Reserved.
Appendix A
Applying PeopleTools Patches Using DPKs .................................................................................................... 223
Reviewing PeopleTools Patch Application Options ............................................................................................ 223
Using Scenario 1 .................................................................................................................................................. 224
Understanding Scenario 1 ............................................................................................................................... 225
Stopping and Deleting the Domains on the Initial Environment .................................................................... 225
Stopping the Services for the Domains ........................................................................................................... 225
Updating the site.pp File ................................................................................................................................. 225
Removing the Existing PeopleTools Components ......................................................................................... 226
Downloading and Deploying the PeopleTools Client for the New Release ................................................... 226
Applying the PeopleTools Patch Using Change Assistant ............................................................................. 227
Deploying the New Release in Mid-Tier Mode .............................................................................................. 228
Preparing psft_customizations.yaml and Completing the Deployment .......................................................... 231
Reviewing the Results ..................................................................................................................................... 232
Verifying the Patch Application ..................................................................................................................... 232
Using Scenario 2 .................................................................................................................................................. 233
Understanding Scenario 2 ............................................................................................................................... 233
Stopping and Deleting the Domains on the Initial Environment .................................................................... 234
Stopping the Services for the Domains ........................................................................................................... 234
Downloading and Deploying the PeopleTools Client for the New Release ................................................... 234
Applying the PeopleTools Patch Using Change Assistant ............................................................................. 235
Deploying the New Release in Mid-tier Mode ............................................................................................... 236
Preparing psft_customizations.yaml and Completing the Deployment .......................................................... 239
Reviewing the Results ..................................................................................................................................... 240
Verifying the Patch Application ..................................................................................................................... 240
Using Scenario 3 .................................................................................................................................................. 241
Understanding Scenario 3 ............................................................................................................................... 241
Stopping and Deleting the Domains on the Initial Environment .................................................................... 242
Stopping the Services for the Domains ........................................................................................................... 242
Downloading and Deploying the PeopleTools Client for the New Release ................................................... 242
Applying the PeopleTools Patch Using Change Assistant ............................................................................. 243
Deploying the New Release in Mid-tier Mode ............................................................................................... 244
Preparing psft_customizations.yaml and Completing the Deployment .......................................................... 247
Reviewing the Results ..................................................................................................................................... 248
Verifying the Patch Application ..................................................................................................................... 248
Appendix B
Performing a PeopleTools-Only Upgrade Using the PeopleSoft PeopleTools DPKs ................................... 251
Understanding the PeopleTools-Only Upgrade Using the PeopleSoft PeopleTools DPKs ................................. 251

Contents
Copyright © 2022, Oracle and/or its affiliates. All Rights Reserved.
9
Performing the PeopleTools-Only Upgrade Using DPKs ................................................................................... 252
Reviewing the Results of the PeopleTools-Only Upgrade Using DPKs ............................................................. 254
Appendix C
Installing PeopleSoft Change Assistant ............................................................................................................ 255
Understanding PeopleSoft Change Assistant ....................................................................................................... 255
Using the Change Assistant Setup Script to Install, Upgrade, or Uninstall ......................................................... 256
Running the Change Assistant Setup Script with Command-Line Parameters .............................................. 257
Running the Change Assistant Setup Script with a Response File ................................................................. 258
Running the Change Assistant Setup Script Interactively to Install ............................................................... 258
Running the Change Assistant Setup Script Interactively to Upgrade ........................................................... 259
Running the Change Assistant Setup Script Interactively to Uninstall .......................................................... 260
Using Change Assistant on Linux ................................................................................................................... 261
Configuring and Using PeopleSoft Change Assistant ......................................................................................... 261
Verifying the Path Variable ............................................................................................................................ 261
Specifying Options .......................................................................................................................................... 261
Scanning the Workstation ............................................................................................................................... 262
Exporting Jobs to XML, HTML, or Microsoft Excel Format ........................................................................ 262
Validating Change Assistant Settings .................................................................................................................. 262
Appendix D
Encrypting Passwords for Customizations on Linux, AIX, HP-UX, or Solaris ........................................... 265
Encrypting Passwords for Customization Files on Linux, AIX, HP-UX, or Solaris ........................................... 265
Appendix E
Learning About the PeopleSoft Deployment Process ..................................................................................... 267
Understanding the PeopleSoft Deployment Framework ...................................................................................... 267
Understanding PeopleSoft Components .............................................................................................................. 268
Understanding Puppet and the PeopleSoft Puppet Modules ................................................................................ 269
Understanding Puppet ..................................................................................................................................... 269
Understanding Hiera ....................................................................................................................................... 270
Understanding Puppet Modules ...................................................................................................................... 270
Understanding How the PeopleSoft DPKs Use Puppet .................................................................................. 271
Understanding PeopleSoft Puppet Component Modules ................................................................................ 272
Understanding PeopleSoft Puppet Profiles and Roles Modules ..................................................................... 272
Understanding Puppet Third-Party Modules .................................................................................................. 273
Understanding the Deployment Packages Uses and Contents ............................................................................. 273
Understanding How Deployment Packages are Used .................................................................................... 273
Defining the Types of Deployment Packages ................................................................................................. 274

Contents
10
Copyright © 2022, Oracle and/or its affiliates. All Rights Reserved.
Reviewing the PeopleSoft PeopleTools Patch DPKs ........................................................................................... 275
Reviewing the PeopleTools Client DPK .............................................................................................................. 277

Copyright © 2022, Oracle and/or its affiliates. All Rights Reserved.
11
About this Documentation
This preface discusses:
• Understanding This Documentation
• Audience
• Typographical Conventions
• Products
• Related Information
• Comments and Suggestions
Understanding This Documentation
This documentation is designed to guide you through the deployment of the Oracle's PeopleSoft Deployment
Packages. It is not a substitute for the documentation provided for PeopleSoft PeopleTools or PeopleSoft
applications.
Audience
This documentation is written for the individuals responsible for installing and administering the PeopleSoft
environment. This documentation assumes that you have a basic understanding of the PeopleSoft system. One of
the most important components in the installation and maintenance of your PeopleSoft system is your on-site
expertise.
You should be familiar with your operating environment and RDBMS and have the necessary skills to support
that environment. You should also have a working knowledge of:
•
SQL and SQL command syntax.
• PeopleSoft system navigation.
• PeopleSoft windows, menus, and pages, and how to modify them.
• Microsoft Windows.
Oracle recommends that you complete training, particularly a PeopleSoft Server Administration and Installation
course, before performing an installation.
See Oracle University, http://education.oracle.com.

Preface
12
Copyright © 2022, Oracle and/or its affiliates. All Rights Reserved.
Typographical Conventions
To help you locate and understand information easily, the following conventions are used in this documentation:
Convention Description
Monospace
Indicates a PeopleCode program or other code, such as
scripts that you run during the install. Monospace is also
used for messages that you may receive during the install
process.
Italics
Indicates field values, emphasis, and book-length publication
titles. Italics is also used to refer to words as words or letters
as letters, as in the following example:
Enter the letter O.
Italics are also used to indicate user-supplied information.
For example, the term domain is used as a placeholder for
the actual domain name in the user's environment. When two
such placeholders are used together, they may be set apart
with angle brackets. For example, the path
<PS_CFG_HOME>/appserv/<domain> includes two
placeholders that require user-supplied information.
Initial Caps Field names, commands, and processes are represented as
they appear on the window, menu, or page.
lower case File or directory names are represented in lower case, unless
they appear otherwise on the interface.
Menu, Page A comma (,) between menu and page references indicates
that the page exists on the menu. For example, "Select Use,
Process Definitions" indicates that you can select the Process
Definitions page from the Use menu.
Cross-references Cross-references that begin with See refer you to additional
documentation that will help you implement the task at hand.
We highly recommend that you reference this
documentation.
Cross-references under the heading See Also refer you to
additional documentation that has more information
regarding the subject.
⇒ (line-continuation arrow)
A line-continuation arrow inserted at the end of a line of
code indicates that the line of code has been wrapped at the
page margin. The code should be viewed or entered as a
continuous line of code, without the line-continuation arrow.
" " (quotation marks) Indicate chapter titles in cross-references and words that are
used differently from their intended meaning.

Preface
Copyright © 2022, Oracle and/or its affiliates. All Rights Reserved.
13
Convention Description
Note. Note text.
Text that begins with Note. indicates information that you
should pay particular attention to as you work with your
PeopleSoft system.
Important! Important note text.
A note that begins with Important! is crucial and includes
information about what you need to do for the system to
function properly.
Warning! Warning text.
A note that begins with Warning! contains critical
configuration information or implementation considerations;
for example, if there is a chance of losing or corrupting data.
Pay close attention to warning messages.
Products
This documentation may refer to these products and product families:
•
Oracle® BPEL Process Manager
•
Oracle® Enterprise Manager
•
Oracle® Tuxedo
•
Oracle® WebLogic Server
•
Oracle's PeopleSoft Application Designer
•
Oracle's PeopleSoft Change Assistant
•
Oracle's PeopleSoft Change Impact Analyzer
•
Oracle's PeopleSoft Data Mover
• Oracle's PeopleSoft Process Scheduler
• Oracle's PeopleSoft Pure Internet Architecture
•
Oracle's PeopleSoft Customer Relationship Management
•
Oracle's PeopleSoft Enterprise Learning Management
•
Oracle's PeopleSoft Enterprise Performance Management
•
Oracle's PeopleSoft Financial Management
•
Oracle's PeopleSoft Human Capital Management
•
Oracle's PeopleSoft Interaction Hub
•
Oracle's PeopleSoft Pay/Bill Management
•
Oracle's PeopleSoft PeopleTools
•
Oracle's PeopleSoft Staffing Front Office
•
Oracle's PeopleSoft Supply Chain Management
See the Products area on the Oracle web site, http://www.oracle.com/us/products/product-list/products-a-
z/index.html.

Preface
14
Copyright © 2022, Oracle and/or its affiliates. All Rights Reserved.
Related Information
Oracle provides reference information about PeopleSoft PeopleTools and your particular PeopleSoft Application.
You can access documentation for recent releases of PeopleSoft PeopleTools and PeopleSoft Applications at the
PeopleSoft page in the Oracle Help Center. You can also find documentation by searching for the product name
on My Oracle Support.
• PeopleSoft on the Oracle Help Center
You can access PeopleSoft Online Help, or download the PeopleBooks PDFs, from the PeopleSoft page in the
Oracle Help Center. Select PeopleTools or your PeopleSoft application from the navigation list on the left. On
the page for the selected product application, select the PeopleTools release or image number at the top and go
to the Online Help and PeopleBooks section.
See Oracle Help Center, https://docs.oracle.com/en/applications/peoplesoft/index.html.
• PeopleTools: Getting Started with PeopleTools for your release.
This documentation provides a high-level introduction to PeopleTools technology and usage.
See PeopleTools on the Oracle Help Center,
https://docs.oracle.com/en/applications/peoplesoft/peopletools/index.html.
•
PeopleSoft Application Fundamentals for your PeopleSoft Application and release
This documentation provides essential information about the setup, design, and implementation of your
PeopleSoft Application.
See Oracle Help Center, https://docs.oracle.com/en/applications/peoplesoft/index.html.
• Installation guides
You can find the installation guides for PeopleSoft PeopleTools and your PeopleSoft application on the
appropriate Oracle Help Center page. Select your release or update image at the top and then go to the Install
and Upgrade section.
• My Oracle Support
This support platform requires a user account to log in. Contact your PeopleSoft representative for
information.
See My Oracle Support, https://support.oracle.com.
You can find several pages which compile documentation, links, and known issues for various PeopleSoft
product areas. For a list of many of the PeopleSoft pages, select the PeopleSoft tab on the Oracle Information
Center Catalog.
See Oracle Information Center Catalog, My Oracle Support, Doc ID 50.2.
To install additional component software products for use with PeopleSoft products, including those products that
are packaged with your PeopleSoft products as well as products from other vendors, you should refer to the
documentation provided with those products, as well as this documentation. For those additional components that
are offered by Oracle, such as Oracle Middleware products, see the documentation on the Oracle Help Center.
See Oracle Help Center, https://docs.oracle.com/en/.

Preface
Copyright © 2022, Oracle and/or its affiliates. All Rights Reserved.
15
Comments and Suggestions
Your comments are important to us. We encourage you to tell us what you like, or what you would like changed
about PeopleSoft documentation and other Oracle reference and training materials. Please send your suggestions
to:
While we cannot guarantee to answer every email message, we will pay careful attention to your comments and
suggestions. We are always improving our product communications for you.


Copyright © 2022, Oracle and/or its affiliates. All Rights Reserved.
17
Chapter 1
Prerequisites
This chapter discusses:
• Understanding the PeopleSoft PeopleTools Deployment Packages
• Reviewing Hardware Requirements
• Reviewing Software Requirements
• Cataloging the Database for DB2 z/OS
• Reviewing the System Parameters on Linux, AIX, HP-UX, or Solaris
Understanding the PeopleSoft PeopleTools Deployment Packages
The PeopleSoft PeopleTools deployment packages (DPKs) enable you to install the PeopleSoft PeopleTools
server and client software, application server, Process Scheduler, and PeopleSoft Pure Internet Architecture (PIA)
domains, as well as required supporting software, for use with an existing PeopleSoft database. For details about
the PeopleTools DPKs, see the following sections in this documentation:
For information about this topic: See this section:
How to obtain the DPKs from My Oracle Support or Oracle
Software Delivery Cloud
"Deploying the PeopleSoft PeopleTools Deployment
Packages," Obtaining the PeopleSoft PeopleTools DPKs
Using the DPKs to install PeopleSoft application server,
Process Scheduler, and PIA domains (referred to as a mid-
tier environment)
"Deploying the PeopleSoft PeopleTools Deployment
Packages," Running the DPK Setup Script for Mid-Tier
Deployment
Using the DPKs to install only the installation directory for
the PeopleSoft PeopleTools server software (PS_HOME)
"Deploying the PeopleSoft PeopleTools Deployment
Packages," Running the DPK Setup Script to Install
PS_HOME Only
Using the DPK to install PeopleTools Client software "Deploying the PeopleSoft PeopleTools Deployment
Packages," Deploying the PeopleTools Client DPK
How to customize the DPK installation for your environment
Note. If you are connecting to a database platform other than
Oracle, you must use customizations.
"Completing the DPK Initialization with Customizations"
Install updated supporting software, such as Oracle
WebLogic and others, using the PT-INFRA DPK.
"Deploying the PeopleSoft PeopleTools Deployment
Packages," Using the PT-INFRA DPK for Additional
Component Software

Prerequisites Chapter 1
18
Copyright © 2022, Oracle and/or its affiliates. All Rights Reserved.
For information about this topic: See this section:
Methods for using the DPKs for patching a PeopleSoft
PeopleTools 8.58 release
"Applying PeopleTools Patches Using DPKs"
How to perform a PeopleTools-only upgrade to PeopleSoft
PeopleTools 8.58.xx, using the PeopleSoft PeopleTools
DPKs.
"Performing a PeopleTools-Only Upgrade Using the
PeopleSoft PeopleTools DPKs"
Using the DPKs for other selective installations, such as an
application server domain alone.
"Deploying the PeopleSoft PeopleTools Deployment
Packages," Reviewing the DPK Setup Script Options
The terminology used with DPK deployment, and the
contents of the DPKs
"Learning About the PeopleSoft Deployment Process,"
Reviewing the Deployment Packages
The PeopleSoft components installed by the DPK
deployment
"Learning About the PeopleSoft Deployment Process,"
Understanding PeopleSoft Components
The Puppet open-source software used in DPK development "Learning About the PeopleSoft Deployment Process,"
Understanding Puppet and the PeopleSoft Puppet Modules
Note. Beginning with PeopleSoft PeopleTools 8.58.20, only the PeopleSoft Relocatable Puppet is used for
deployment on all the supported operating systems and the option --use_alternate_puppet_install is
no longer needed. See the information in the software requirements sections.
Task 1-1: Reviewing Hardware Requirements
This section discusses:
•
Reviewing Hardware Requirements for Microsoft Windows
•
Reviewing Hardware Requirements on AIX, HP-UX, Linux, or Solaris
Task 1-1-1: Reviewing Hardware Requirements for Microsoft Windows
You can install the PeopleSoft Application Image deployment packages (DPKs) or PeopleSoft PeopleTools DPKs
directly on a system running a Microsoft Windows operating system. The PeopleSoft Application Images and
PeopleSoft PeopleTools DPKs are certified to run on those Microsoft Windows operating systems that are
certified for the current PeopleSoft PeopleTools release. The Microsoft Windows system can be a physical
computer (sometimes called "bare-metal") or a virtual machine.
Oracle strongly recommends that you dedicate a Microsoft Windows machine for the PeopleTools client. This
should be a machine that is not used for other PeopleSoft purposes.
See "Deploying the PeopleSoft PeopleTools Deployment Packages," Deploying the PeopleTools Client DPK in
Standalone Mode, for information on installing the PeopleTools client utilities.
•
Host computer
: The PeopleSoft DPKs can be deployed directly on any supported Microsoft Windows host,
bare-metal or virtual.
If you deploy on a virtual host computer, you are responsible for provisioning the virtual machine before
beginning the deployment.

Chapter 1 Prerequisites
Copyright © 2022, Oracle and/or its affiliates. All Rights Reserved.
19
• Host operating system: The host operating system (OS) must be a 64-bit platform that is certified by Oracle
for PeopleSoft systems.
Note. My Oracle Support Certification notes include information about the PeopleSoft PeopleTools
components that are certified for each operating system. Some OSs are certified only for browsers and clients.
If you want to deploy a full PeopleSoft environment, verify that the OS you want to use is certified for server
installation.
See My Oracle Support, Certifications.
See PeopleSoft PeopleTools Certifications, My Oracle Support, Doc ID 747587.1, for help searching
PeopleSoft Certifications.
• RAM (Memory): A minimum of 8 GB RAM is required to run a PeopleSoft environment.
• Disk space: The disk space requirements vary depending upon the type of environment you set up.
See "Preparing to Deploy," Understanding PeopleSoft Components.
• 25–35 GB free disk space for the downloaded zip files
You may remove these files after you have successfully initialized your virtual machine.
•
150 GB free disk space is required to deploy and set up a full tier PeopleSoft environment.
•
25 GB free disk space is required to deploy and set up a mid-tier PeopleSoft environment.
See Also
Tech Update - Main Page, My Oracle Support, Doc ID 764222.1
Task 1-1-2: Reviewing Hardware Requirements on AIX, HP-UX, Linux, or
Solaris
You can install the PeopleSoft Application Image deployment packages (DPKs) directly on a system running an
Oracle Linux operating system. You can install the PeopleSoft PeopleTools deployment packages (DPKs) directly
on a system running an IBM AIX, HP-UX, Linux, or Solaris operating system. The PeopleSoft Application
Images and PeopleSoft PeopleTools DPKs are certified to run on those operating systems that are certified for the
current PeopleSoft PeopleTools release. The AIX, HP-UX, Linux, or Solaris system can be a physical computer
(sometimes called "bare-metal") or a virtual machine.
• Host computer: The PeopleSoft DPKs can be deployed on any supported AIX, HP-UX, Linux, or Solaris host,
either a physical computer or virtual machine. The PeopleSoft DPKs can also be deployed on Oracle Exalogic
Elastic Cloud.
If you deploy on a virtual host computer, you are responsible for provisioning the virtual machine before
beginning the deployment.
• Host operating system: The host operating system must be a 64-bit platform that is certified by Oracle for
PeopleSoft systems.
For full-tier installations on Linux, the minimum version is Oracle Linux 7.6.
See My Oracle Support, Certifications.
See PeopleSoft PeopleTools Certifications, My Oracle Support, Doc ID 747587.1, for help searching
PeopleSoft Certifications.
• RAM (Memory): A minimum of 8 GB RAM is required to run a PeopleSoft environment.
• Disk space: The disk space requirements vary depending upon the type of environment you set up.

Prerequisites Chapter 1
20
Copyright © 2022, Oracle and/or its affiliates. All Rights Reserved.
See "Preparing to Deploy," Understanding PeopleSoft Components.
• 25–35 GB free disk space for the downloaded zip files
You may remove these files after you have successfully initialized your virtual machine.
• 150 GB free disk space is required to deploy and set up a full tier PeopleSoft environment.
• 25 GB free disk space is required to deploy and set up a mid-tier PeopleSoft environment.
See Also
My Oracle Support, Certifications.
Tech Update - Main Page, My Oracle Support, Doc ID 764222.1
Task 1-2: Reviewing Software Requirements
This section discusses:
• Reviewing Software Requirements on Microsoft Windows
• Reviewing Software Requirements on Linux
• Reviewing Software Requirements on AIX
• Reviewing Software Requirements on HP-UX
•
Reviewing Software Requirements on Solaris
•
Reviewing Requirements for the Puppet Software on Microsoft Windows
•
Reviewing Requirements for the Puppet Software on Linux
•
Reviewing Requirements for the Puppet Software on AIX
•
Reviewing Requirements for the Puppet Software on HP-UX
•
Reviewing Requirements for the Puppet Software on Solaris
Task 1-2-1: Reviewing Software Requirements on Microsoft Windows
Here are the software requirements for using the PeopleSoft Deployment Packages on a Microsoft Windows
machine:
• Administrative permission
• Read, write, and execute permission on the default temporary folder.
The deployment of a PeopleSoft environment by the DPKs installs required supporting software, such as
Oracle WebLogic and Oracle Tuxedo. The DPK process to install this software uses the default temporary
folders, as specified by the environment variable for the operating system. The user running the DPK setup
script must have read/write/execute permission to these default temporary folders for successful DPK
installation, or the deployment steps that install these components will fail.
• The DPK setup script can be run from any drive, regardless of the drive where the Windows operating system
is installed.
• Web Browser
You need a version certified for the current PeopleSoft PeopleTools release for end-users.
See PeopleSoft Update Manager (PUM) Home Page, My Oracle Support, Doc ID 1641843.2.

Chapter 1 Prerequisites
Copyright © 2022, Oracle and/or its affiliates. All Rights Reserved.
21
See My Oracle Support, Certifications.
• Zip utility
You need a utility that is able to extract (unzip) the DPK zip files for your operating system.
• Verify that the PATHEXT environment variable includes the extension .bat.
This is a requirement for running Puppet. For example:
PATHEXT=.COM;.EXE;.BAT;.CMD;.VBS;.VBE;.JS;.JSE;.WSF;.WSH;.MSC
• Python 3.7.4 is included with the DPKs.
• Microsoft Visual C++ Redistributable files
The current PeopleSoft PeopleTools release was developed using Microsoft Visual Studio 2017. PeopleSoft
PeopleTools programs require Microsoft Visual C++ Redistributable for Visual Studio 2017 files to be present
or the programs will not run. The required Visual C++ Redistributable for Visual Studio 2017 packages are
installed by the DPK setup script. After you have completed the PeopleSoft installation, if necessary, you can
install the files from PS_HOME\setup\psvccrt.
•
Specifying PS_APP_HOME
The DPK setup script creates the installation location for the PeopleSoft application files, PS_APP_HOME, in
a default location. If you want to use an existing PS_APP_HOME, or specify a non-default location, follow
the instructions to perform the deployment using the DPK customizations.
See "Completing the DPK Initialization with Customizations," Preparing the Customization File for the
PeopleSoft Homes.
• Specifying PS_CUST_HOME
If you wish to use a PS_CUST_HOME location to store your site's custom files, you must perform the
deployment using the DPK customizations, and specify the PS_CUST_HOME location.
See "Completing the DPK Initialization with Customizations," Preparing the Customization File for the
PeopleSoft Homes.
Task 1-2-2: Reviewing Software Requirements on Linux
Here are the software requirements for using the PeopleSoft Deployment Packages on a Linux machine:
• You must have root access to deploy the PeopleSoft DPKs.
See "Deploying the PeopleSoft PeopleTools Deployment Packages," Deploying as a Non-Root User on Linux,
AIX, HP-UX, or Solaris.
• Read, write, and execute permission on the default temporary folder.
The deployment of a PeopleSoft environment by the DPKs installs required supporting software, such as
Oracle WebLogic and Oracle Tuxedo. The DPK process to install this software uses the default temporary
folders, as specified by the environment variable for the operating system. The user running the DPK setup
script must have read, write, and execute permission to these default temporary folders for successful DPK
installation, or the deployment steps that install these components will fail.
• Verify the umask value.
For a default deployment (that is, with no customizations) run by the root user, the DPK setup script uses the
system umask value when it creates users (for example, psadm1, psadm2, and psadm3) and user home
directories. Be sure that the umask value allows the DPK-created users the necessary access to the user home
directories and other directories they need to use.
See Using the PeopleSoft Installation.
• If you are installing the PeopleSoft DPKs on a supported version of Oracle Linux with Unbreakable

Prerequisites Chapter 1
22
Copyright © 2022, Oracle and/or its affiliates. All Rights Reserved.
Enterprise Kernel (UEK), apply the latest UEK kernel from the Oracle YUM repository at http://public-
yum.oracle.com/index.html.
• Zip utility
You need a utility that is able to extract (unzip) the DPK zip files for your operating system; for example, tar
or unzip.
• Specifying PS_APP_HOME
The DPK setup script creates the installation location for the PeopleSoft application files, PS_APP_HOME, in
a default location. If you want to use an existing PS_APP_HOME, or specify a non-default location, follow
the instructions to perform the deployment using the DPK customizations.
See "Completing the DPK Initialization with Customizations," Preparing the Customization File for the
PeopleSoft Homes.
• Specifying PS_CUST_HOME
If you wish to use a PS_CUST_HOME location to store your site's custom files, you must perform the
deployment using the DPK customizations, and specify the PS_CUST_HOME location.
See "Completing the DPK Initialization with Customizations," Preparing the Customization File for the
PeopleSoft Homes.
• Python 3.7.4 is included with the DPKs.
Task 1-2-3: Reviewing Software Requirements on AIX
Here are the software requirements for using the PeopleSoft Deployment Packages on an IBM AIX machine:
• You must have root access to deploy the PeopleSoft DPKs.
See "Deploying the PeopleSoft PeopleTools Deployment Packages," Deploying as a Non-Root User on Linux,
AIX, HP-UX, or Solaris.
• Read, write, and execute permission on the default temporary folder.
The deployment of a PeopleSoft environment by the DPKs installs required supporting software, such as
Oracle WebLogic and Oracle Tuxedo. The DPK process to install this software uses the default temporary
folders, as specified by the environment variable for the operating system. The user running the DPK setup
script must have read, write, and execute permission to these default temporary folders for successful DPK
installation, or the deployment steps that install these components will fail.
• Verify the umask value.
For a default deployment (that is, with no customizations) run by the root user, the DPK setup script uses the
system umask value when it creates users (for example, psadm1, psadm2, and psadm3) and user home
directories. Be sure that the umask value allows the DPK-created users the necessary access to the user home
directories and other directories they need to use.
See Using the PeopleSoft Installation.
• Utilities for extracting the DPK zip files
You need both the gunzip and unzip utilities for your operating system in order to extract the DPK zip files,
and the PATH for the root user must include the gunzip and unzip locations.
• OpenSSL
Obtain the latest version of OpenSSL for your AIX operating system from your IBM support contact, and
install it on the host.

Chapter 1 Prerequisites
Copyright © 2022, Oracle and/or its affiliates. All Rights Reserved.
23
Note. Beginning with PeopleSoft PeopleTools 8.58.09, only the Relocatable Puppet is used for deployment on
AIX, and it includes OpenSSL. You do not have to do the separate installation.
See the section Reviewing Requirements for the Puppet Software on AIX.
• JDK 8.0
You must manually install JDK 8.0 from the IBM web site. To obtain 64-bit IBM JDK for IBM AIX:
1. Go to the IBM JDK download and service site.
http://www.ibm.com/developerworks/java/jdk/aix/service.html
Note. You need a user name and password for downloading IBM JDK. If you don't have the required
credentials, contact IBM AIX support.
2. Select the link for Java 8 64-bit under Java SE Version 8.
3. Provide the required information to sign in.
4. Install the JDK on the AIX computer where you will install the PeopleSoft AIX DPK.
5. Make a note of the installation location.
For the AIX DPK installation, you must perform the deployment using the DPK customizations, and
specify the AIX JDK installation location.
See "Completing the DPK Initialization With Customizations," Preparing the Customization File for JDK
on AIX.
•
Specifying PS_APP_HOME
The DPK setup script creates the installation location for the PeopleSoft application files,
PS_APP_HOME,
in
a default location. If you want to use an existing
PS_APP_HOME,
or specify a non-default location, follow
the instructions to perform the deployment using the DPK customizations.
See "Completing the DPK Initialization with Customizations," Preparing the Customization File for the
PeopleSoft Homes.
•
Specifying PS_CUST_HOME
If you wish to use a PS_CUST_HOME location to store your site's custom files, you must perform the
deployment using the DPK customizations, and specify the PS_CUST_HOME location.
See "Completing the DPK Initialization with Customizations," Preparing the Customization File for the
PeopleSoft Homes.
• Python 3.7.4 is included with the DPKs.
Task 1-2-4: Reviewing Software Requirements on HP-UX
Here are the software requirement for using the PeopleSoft Deployment Packages on HP-UX Itanium.
•
You must have root access to deploy the PeopleSoft DPKs.
See "Deploying the PeopleSoft PeopleTools Deployment Packages," Deploying as a Non-Root User on Linux,
AIX, HP-UX, or Solaris.
•
Read, write, and execute permission on the default temporary folder.
The deployment of a PeopleSoft environment by the DPKs installs required supporting software, such as
Oracle WebLogic and Oracle Tuxedo. The DPK process to install this software uses the default temporary
folders, as specified by the environment variable for the operating system. The user running the DPK setup
script must have read, write, and execute permission to these default temporary folders for successful DPK

Prerequisites Chapter 1
24
Copyright © 2022, Oracle and/or its affiliates. All Rights Reserved.
installation, or the deployment steps that install these components will fail.
• Verify the umask value.
For a default deployment (that is, with no customizations) run by the root user, the DPK setup script uses the
system umask value when it creates users (for example, psadm1, psadm2, and psadm3) and user home
directories. Be sure that the umask value allows the DPK-created users the necessary access to the user home
directories and other directories they need to use.
See Using the PeopleSoft Installation.
• Utilities for extracting the DPK zip files
Install tar and zip/unzip utilities from Hewlett Packard and add the locations to your PATH:
1. Go to HP-UX Porting & Archiving Centre, at http://hpux.connect.org.uk.
2. Follow the instructions on the HP-UX Porting & Archiving Centre to install tar and its runtime
dependencies, gettext, libiconv, and libunistring.
3. Install zip/unzip from the HP-UX Porting & Archiving Centre, at http://hpux.connect.org.uk.
4. Add the installation locations for tar, zip, and unzip to PATH.
Make sure that the installation location for tar is first in the PATH. For example, if you installed tar to
/usr/local/bin:
exportPATH=/usr/local/bin:$PATH
5. Set LD_LIBRARY_PATH. For example, if your installation location above was in /usr/local:
exportLD_LIBRARY_PATH=/usr/local/lib${LD_LIBRARY_PATH+:$LD_LIBRARY_⇒
PATH}
•
OpenSSL
Install the latest version of OpenSSL on the host where you will run the DPK setup script.
Note. Beginning with PeopleSoft PeopleTools 8.58.20, only the Relocatable Puppet is used for deployment on
HP-UX, and it includes OpenSSL. You do not have to do the separate installation.
See the section Reviewing Requirements for the Puppet Software on HP-UX.
1. Go to the HP-UX Porting and Archive Centre web site, at http://hpux.connect.org.uk/hppd/hpux/.
2. Search for openssl, and locate the latest version of OpenSSL in the list of results.
3. Select the link for the latest OpenSSL package, for example openssl-1.0.2p.
4. Download the gzipped binary package for 64-bit Itanium; for this example, this is openssl-1.0.2p-ia64-
11.31.depot.gz.
5. Use the installation documentation on the same page to install the OpenSSL package.
• JDK 8.0
You must manually install JDK 8.0 from the Hewlett Packard web site. To obtain 64-bit JDK for HP-UX
Itanium:
1. Go to the Hewlett Packard Software Depot.
See Hewlett Packard Software Depot,
https://h20392.www2.hpe.com/portal/swdepot/index.do?lc=EN_US.
2. Locate the link for the latest JDK/JRE 8.0 for your HP-UX operating system.
Note. Beginning with PeopleSoft PeopleTools 8.58.06, you can use the latest JDK/JRE 8.0 for HP-UX.

Chapter 1 Prerequisites
Copyright © 2022, Oracle and/or its affiliates. All Rights Reserved.
25
3. Install the JDK on the HP-UX computer where you will install the PeopleSoft HP-UX DPK.
4. Make a note of the installation location.
For the HP-UX DPK installation, you must perform the deployment using the DPK customizations, and
specify the HP-UX JDK installation location.
See "Completing the DPK Initialization With Customizations," Preparing the Customization File for JDK
on HP-UX.
• Specifying PS_APP_HOME
The DPK setup script creates the installation location for the PeopleSoft application files, PS_APP_HOME, in
a default location. If you want to use an existing PS_APP_HOME, or specify a non-default location, follow
the instructions to perform the deployment using the DPK customizations.
See "Completing the DPK Initialization with Customizations," Preparing the Customization File for the
PeopleSoft Homes.
• Specifying PS_CUST_HOME
If you wish to use a PS_CUST_HOME location to store your site's custom files, you must perform the
deployment using the DPK customizations, and specify the PS_CUST_HOME location.
See "Completing the DPK Initialization with Customizations," Preparing the Customization File for the
PeopleSoft Homes.
• Python 3.7.4 is included with the DPKs.
Task 1-2-5: Reviewing Software Requirements on Solaris
Here are the software requirements for using the PeopleSoft Deployment Packages on Solaris:
• You must have root access to deploy the PeopleSoft DPKs.
See "Deploying the PeopleSoft PeopleTools Deployment Packages," Deploying as a Non-Root User on Linux,
AIX, HP-UX, or Solaris.
• Read, write, and execute permission on the default temporary folder.
The deployment of a PeopleSoft environment by the DPKs installs required supporting software, such as
Oracle WebLogic and Oracle Tuxedo. The DPK process to install this software uses the default temporary
folders, as specified by the environment variable for the operating system. The user running the DPK setup
script must have read, write, and execute permission to these default temporary folders for successful DPK
installation, or the deployment steps that install these components will fail.
• Verify the umask value.
For a default deployment (that is, with no customizations) run by the root user, the DPK setup script uses the
system umask value when it creates users (for example, psadm1, psadm2, and psadm3) and user home
directories. Be sure that the umask value allows the DPK-created users the necessary access to the user home
directories and other directories they need to use.
See Using the PeopleSoft Installation.
• Zip utility
You need a utility that is able to extract (unzip) the DPK zip files for your operating system; for example, tar
or unzip.
• OpenSSL
Obtain the latest version of OpenSSL for your operating system and install it on the host.

Prerequisites Chapter 1
26
Copyright © 2022, Oracle and/or its affiliates. All Rights Reserved.
Note. Beginning with PeopleSoft PeopleTools 8.58.20, only the Relocatable Puppet is used for deployment on
Solaris, and it includes OpenSSL. You do not have to do the separate installation.
See the section Reviewing Requirements for the Puppet Software on Solaris.
• Specifying PS_APP_HOME
The DPK setup script creates the installation location for the PeopleSoft application files, PS_APP_HOME, in
a default location. If you want to use an existing PS_APP_HOME, or specify a non-default location, follow
the instructions to perform the deployment using the DPK customizations.
See "Completing the DPK Initialization with Customizations," Preparing the Customization File for the
PeopleSoft Homes.
• Specifying PS_CUST_HOME
If you wish to use a PS_CUST_HOME location to store your site's custom files, you must perform the
deployment using the DPK customizations, and specify the PS_CUST_HOME location.
See "Completing the DPK Initialization with Customizations," Preparing the Customization File for the
PeopleSoft Homes.
• Python 3.7.4 is included with the DPKs.
Task 1-2-6: Reviewing Requirements for the Puppet Software on Microsoft
Windows
The PeopleSoft DPKs are delivered with the PeopleSoft Puppet modules, which are initialization and
management scripts based upon open-source Puppet software.
See "Learning About the PeopleSoft Deployment Process," Understanding Puppet and the PeopleSoft Puppet
Modules.
•
These are the minimum requirements for the software versions associated with using Puppet with the
PeopleSoft DPKs on Microsoft Windows operating systems:
• Puppet Agent 5.5.14 (open source, and stand-alone architecture)
• Hiera 3.4.6
• Facter 2.5.1
•
Ruby 2.4.6
• The Puppet installation location depends upon the patch level.
Beginning with PeopleSoft PeopleTools 8.58.20, the DPK setup script installs open-source Puppet software
that has been modified for the PeopleSoft installation. This method, referred to as Relocatable Puppet, installs
the Puppet software by default in the location specified by the DPK setup script, BASE_DIR/
psft_puppet_agent.
For PeopleTools 8.58.19 and previous patch releases, the DPK setup script installs Puppet software in
C:\Program Files\Puppet Labs\Puppet by default. The previous patch releases install the open-source version
that is packaged by Puppet.
• Puppet installation location
• You have the option to use a command-line parameter to install to a non-default location, including drives
other than the C: drive.
You can install in any writable local drive, but you cannot install in a network drive.

Chapter 1 Prerequisites
Copyright © 2022, Oracle and/or its affiliates. All Rights Reserved.
27
Note. This command is not valid for Microsoft Windows installations on PeopleSoft PeopleTools 8.58.20
and later, which install the Relocatable Puppet for the deployment.
See "Deploying the PeopleSoft PeopleTools Deployment Packages, "Reviewing the DPK Setup Script
Options.
• You can only specify a non-default location by using the command-line location when running the script.
• Whether you accept the default installation location, or specify a different location on the command line,
the Puppet installation location is set in the Microsoft Windows registry.
• Running the DPK setup script with an existing Puppet installation
Note. This does not apply to Microsoft Windows installations on PeopleTools 8.58.20 and later, which install
the Relocatable Puppet for the deployment. The Relocatable Puppet is the only Puppet software shipped with
the DPK.
•
If you run the DPK setup script on a host with an existing Puppet installation, the script gets the Puppet
location from the Microsoft Windows registry.
If the existing Puppet is a lower version than that packaged with the DPKs, the script asks whether to keep
the existing Puppet or install the version packaged with the DPK.
• If you respond that you want to install the version packaged with the DPK, it will install in the default
location, C:\Program Files\Puppet Labs\Puppet.
This is true whether or not you installed Puppet previously to a non-default location using the command-
line option. That is, you cannot specify a different installation location after you start running the script.
• If you answer that you do not want to install the version packaged with the DPK, the script continues
without installing the Puppet that is provided with the DPKs.
Note that Oracle recommends that you use the Puppet version that is packaged with the DPK.
See Also
"Learning About the PeopleSoft Deployment Process," Understanding Puppet and the PeopleSoft Puppet Modules
Task 1-2-7: Reviewing Requirements for the Puppet Software on Linux
The PeopleSoft DPKs are delivered with the PeopleSoft Puppet modules, which are initialization and
management scripts based upon open-source Puppet software.
• You must have root access to deploy the PeopleSoft DPKs.
See "Deploying the PeopleSoft PeopleTools Deployment Packages," Deploying as a Non-Root User on Linux,
AIX, HP-UX, or Solaris.
•
The Puppet directory and its scripts must have read and execute permissions for all users.
Puppet must be installed by the root user, either by running the DPK setup for any env_type or by running the
prereq step for non-root users. If the root user has a non-default umask, when Puppet is installed by the root
user, the files in the Puppet directory will not have the correct permissions for other users, which would
impact non-root users who subsequently try to run the DPK setup.
Note. Beginning with PeopleSoft PeopleTools 8.58.19, it is not necessary for the root user to run a prereq step
on Linux. The DPK setup script installs the Relocatable Puppet software in BASE_DIR/psft_puppet_agent by
default.

Prerequisites Chapter 1
28
Copyright © 2022, Oracle and/or its affiliates. All Rights Reserved.
For example, if root has umask of 027, the permissions would be set as in the following example:
-rwxr-x---1rootroot126Feb122018/opt/puppetlabs/puppet/bin⇒
/wrapper.sh
In this case, the root user has read, write, and execute permissions for files in this Puppet installation. The
group that root belongs to has read and execute permission, and all other users have no permissions. So a non-
root user will not have read and execute permissions for running the scripts in the Puppet directory
(wrapper.sh in this example). Without the necessary permissions for the Puppet files, when the non-root user
runs the DPK setup, Puppet execution will fail, because that user will not be able to execute any script or
binary from the Puppet directory.
• These are the minimum requirements for the software versions associated with using Puppet with the
PeopleSoft DPKs on Linux operating systems:
• Puppet Agent 5.5.14 (open source, and stand-alone architecture)
• Hiera 3.4.6
• Facter 2.5.1
• Ruby 2.4.6
• The Puppet installation location depends upon the patch level.
Beginning with PeopleSoft PeopleTools 8.58.19, the DPK setup script installs open-source Puppet software
that has been modified for the PeopleSoft installation. This method, referred to as Relocatable Puppet, installs
the Puppet software by default in the location specified by the DPK setup script, BASE_DIR/
psft_puppet_agent.
For PeopleTools 8.58.18 and previous patch releases, the DPK setup script installs Puppet software in
/opt/oracle/puppetlabs by default. The previous patch releases install the open-source version that is packaged
by Puppet.
• Running the DPK setup script with an existing Puppet installation
Note. This does not apply to Linux installations on PeopleTools 8.58.19 and later, which install the
Relocatable Puppet for the deployment. The Relocatable Puppet is the only Puppet software shipped with the
DPK.
•
If you run the DPK setup script on a host with an existing Puppet installation, the script searches for
Puppet in standard installation locations.
If the existing Puppet is a lower version than that packaged with the DPKs, the script asks whether to keep
the existing Puppet or install the version packaged with the DPK.
• If you respond that you want to install the version packaged with the DPK, it will install in the default
location, /opt/puppetlabs/puppet/bin.
•
If you answer that you do not want to install the version packaged with the DPK, the script continues
without installing the Puppet that is provided with the DPKs.
Note that Oracle recommends that you use the Puppet version that is packaged with the DPK.
See Also
"Learning About the PeopleSoft Deployment Process," Understanding Puppet and the PeopleSoft Puppet Modules

Chapter 1 Prerequisites
Copyright © 2022, Oracle and/or its affiliates. All Rights Reserved.
29
Task 1-2-8: Reviewing Requirements for the Puppet Software on AIX
The PeopleSoft DPKs are delivered with the PeopleSoft Puppet modules, which are initialization and
management scripts based upon open-source Puppet software.
• You must have root access to deploy the PeopleSoft DPKs.
See "Deploying the PeopleSoft PeopleTools Deployment Packages," Deploying as a Non-Root User on Linux,
AIX, HP-UX, or Solaris.
• The Puppet directory and its scripts must have read and execute permissions for all users.
Puppet must be installed by the root user, either by running the DPK setup for any env_type or by running the
prereq step for non-root users. If the root user has a non-default umask, when Puppet is installed by the root
user, the files in the Puppet directory will not have the correct permissions for other users, which would
impact non-root users who subsequently try to run the DPK setup.
Note. Beginning with PeopleSoft PeopleTools 8.58.09, it is not necessary for the root user to run a prereq step
on AIX. The DPK setup script installs the Relocatable Puppet software in BASE_DIR/psft_puppet_agent by
default.
For example, if root has umask of 027, the permissions would be set as in the following example:
-rwxr-x---1rootroot126Feb122018/opt/oracle/puppetlabs/wrapper.sh
In this case, the root user has read, write, and execute permissions for files in this Puppet installation. The
group that root belongs to has read and execute permission, and all other users have no permissions. So a non-
root user will not have read and execute permissions for running the scripts in the Puppet directory
(wrapper.sh in this example). Without the necessary permissions for the Puppet files, when the non-root user
runs the DPK setup, Puppet execution will fail, because that user will not be able to execute any script or
binary from the Puppet directory.
• If you are installing the PeopleSoft DPKs for IBM AIX, check the Puppet web site for Puppet dependencies or
limitations for those operating systems.
• These are the minimum requirements for the software versions associated with using Puppet with the
PeopleSoft DPKs on AIX operating systems:
•
Puppet Agent 5.5.14 (open source, and stand-alone architecture)
• Hiera 3.4.6
•
Facter 2.5.1
•
Ruby 2.4.6
• The Puppet installation location on AIX depends upon the patch level.
Beginning with PeopleSoft PeopleTools 8.58.09, the DPK setup script installs open-source Puppet software
that has been modified for the PeopleSoft installation. This method, referred to as Relocatable Puppet, installs
the Puppet software by default in the location specified by the DPK setup script, BASE_DIR/
psft_puppet_agent.
For PeopleTools 8.58.08 and previous patch releases, the DPK setup script installs Puppet software in
/opt/oracle/puppetlabs by default. The previous patch releases install the open-source version that is packaged
by Puppet.
• Running the DPK setup script with an existing Puppet installation
Note. This does not apply to AIX installations on PeopleTools 8.58.09 and later, which install the Relocatable
Puppet for the deployment. The Relocatable Puppet is the only Puppet software shipped with the DPK.

Prerequisites Chapter 1
30
Copyright © 2022, Oracle and/or its affiliates. All Rights Reserved.
• If you run the DPK setup script on a host with an existing Puppet installation, the script searches for
Puppet in a standard installation locations.
If the existing Puppet is a lower version than that packaged with the DPKs, the script asks whether to keep
the existing Puppet or install the version packaged with the DPK.
• If you respond that you want to install the version packaged with the DPK, it will install in the default
location, /opt/oracle/puppetlabs.
• If you answer that you do not want to install the version packaged with the DPK, the script continues
without installing the Puppet that is provided with the DPKs.
Note that Oracle recommends that you use the Puppet version that is packaged with the DPK.
See Also
"Learning About the PeopleSoft Deployment Process," Understanding Puppet and the PeopleSoft Puppet Modules
Task 1-2-9: Reviewing Requirements for the Puppet Software on HP-UX
The PeopleSoft DPKs are delivered with the PeopleSoft Puppet modules, which are initialization and
management scripts based upon open-source Puppet software.
•
You must have root access to deploy the PeopleSoft DPKs.
See "Deploying the PeopleSoft PeopleTools Deployment Packages," Deploying as a Non-Root User on Linux,
AIX, HP-UX, or Solaris.
•
The Puppet directory and its scripts must have read and execute permissions for all users.
Puppet must be installed by the root user, either by running the DPK setup for any env_type or by running the
prereq step for non-root users. If the root user has a non-default umask, when Puppet is installed by the root
user, the files in the Puppet directory will not have the correct permissions for other users, which would
impact non-root users who subsequently try to run the DPK setup.
Note. Beginning with PeopleSoft PeopleTools 8.58.20, it is not necessary for the root user to run a prereq step
on HP-UX.
For example, if root has umask of 027, the permissions would be set as in the following example:
-rwxr-x---1rootroot126Feb122018/opt/oracle/puppetlabs/wrapper.sh
In this case, the root user has read, write, and execute permissions for files in this Puppet installation. The
group that root belongs to has read and execute permission, and all other users have no permissions. So a non-
root user will not have read and execute permissions for running the scripts in the Puppet directory
(wrapper.sh in this example). Without the necessary permissions for the Puppet files, when the non-root user
runs the DPK setup, Puppet execution will fail, because that user will not be able to execute any script or
binary from the Puppet directory.
• If you are installing the PeopleSoft DPKs for HP-UX, check the Puppet web site for Puppet dependencies or
limitations for those operating systems.
• These are the minimum requirements for the software versions associated with using Puppet with the
PeopleSoft DPKs on HP-UX operating systems:
• Puppet Agent 5.5.14 (open source, and stand-alone architecture)
• Hiera 3.4.6
• Facter 2.5.1
• Ruby 2.4.6

Chapter 1 Prerequisites
Copyright © 2022, Oracle and/or its affiliates. All Rights Reserved.
31
• The Puppet installation location depends upon the patch level.
Beginning with PeopleSoft PeopleTools 8.58.20, the DPK setup script installs open-source Puppet software
that has been modified for the PeopleSoft installation. This method, referred to as Relocatable Puppet, installs
the Puppet software by default in the location specified by the DPK setup script, BASE_DIR/
psft_puppet_agent.
For PeopleTools 8.58.19 and previous patch releases, the DPK setup script installs Puppet software in
/opt/oracle/puppetlabs by default. The previous patch releases install the open-source version that is packaged
by Puppet.
• Running the DPK setup script with an existing Puppet installation
Note. This does not apply to HP-UX installations on PeopleTools 8.58.20 and later, which install the
Relocatable Puppet for the deployment. The Relocatable Puppet is the only Puppet software shipped with the
DPK.
• If you run the DPK setup script on a host with an existing Puppet installation, the script searches for
Puppet in a standard installation locations.
If the existing Puppet is a lower version than that packaged with the DPKs, the script asks whether to keep
the existing Puppet or install the version packaged with the DPK.
• If you respond that you want to install the version packaged with the DPK, it will install in the default
location, /opt/oracle/puppetlabs.
•
If you answer that you do not want to install the version packaged with the DPK, the script continues
without installing the Puppet that is provided with the DPKs.
Note that Oracle recommends that you use the Puppet version that is packaged with the DPK.
See Also
"Learning About the PeopleSoft Deployment Process," Understanding Puppet and the PeopleSoft Puppet Modules
Task 1-2-10: Reviewing Requirements for the Puppet Software on Solaris
The PeopleSoft DPKs are delivered with the PeopleSoft Puppet modules, which are initialization and
management scripts based upon open-source Puppet software.
• You must have root access to deploy the PeopleSoft DPKs.
See "Deploying the PeopleSoft PeopleTools Deployment Packages," Deploying as a Non-Root User on Linux,
AIX, HP-UX, or Solaris.
• The Puppet directory and its scripts must have read and execute permissions for all users.
Puppet must be installed by the root user, either by running the DPK setup for any env_type or by running the
prereq step for non-root users. If the root user has a non-default umask, when Puppet is installed by the root
user, the files in the Puppet directory will not have the correct permissions for other users, which would
impact non-root users who subsequently try to run the DPK setup.
Note. Beginning with PeopleTools 8.58.20, it is not necessary for the root user to run a prereq step on Solaris.
For example, if root has umask of 027, the permissions would be set as in the following example:
-rwxr-x---1rootroot126Feb122018/opt/oracle/puppetlabs/wrapper.sh
In this case, the root user has read, write, and execute permissions for files in this Puppet installation. The
group that root belongs to has read and execute permission, and all other users have no permissions. So a non-

Prerequisites Chapter 1
32
Copyright © 2022, Oracle and/or its affiliates. All Rights Reserved.
root user will not have read and execute permissions for running the scripts in the Puppet directory
(wrapper.sh in this example). Without the necessary permissions for the Puppet files, when the non-root user
runs the DPK setup, Puppet execution will fail, because that user will not be able to execute any script or
binary from the Puppet directory.
• Before installing the PeopleSoft DPKs for Solaris, check the Puppet web site for Puppet dependencies or
limitations for those operating systems.
• These are the minimum requirements for the software versions associated with using Puppet with the
PeopleSoft DPKs on Oracle Solaris for SPARC operating systems:
• Puppet Agent 5.5.14 (open source, and stand-alone architecture)
• Hiera 3.4.6
• Facter 2.5.1
• Ruby 2.4.6
• The Puppet installation location on Solaris depends upon the patch level.
Beginning with PeopleSoft PeopleTools 8.58.20, the DPK setup script installs open-source Puppet software
that has been modified for the PeopleSoft installation. This method, referred to as Relocatable Puppet, installs
the Puppet software by default in the location specified by the DPK setup script, BASE_DIR/
psft_puppet_agent.
For PeopleTools 8.58.19 and previous patch releases, the DPK setup script installs Puppet software in
/opt/oracle/puppetlabs by default. The previous patch releases install the open-source version that is packaged
by Puppet.
• Running the DPK setup script with an existing Puppet installation
Note. This does not apply to Solaris installations on PeopleTools 8.58.20 and later, which install the
Relocatable Puppet for the deployment. The Relocatable Puppet is the only Puppet software shipped with the
DPK.
•
If you run the DPK setup script on a host with an existing Puppet installation, the script searches for
Puppet in a standard installation locations.
If the existing Puppet is a lower version than that packaged with the DPKs, the script asks whether to keep
the existing Puppet or install the version packaged with the DPK.
•
If you respond that you want to install the version packaged with the DPK, it will install in the default
location, /opt/oracle/puppetlabs.
•
If you answer that you do not want to install the version packaged with the DPK, the script continues
without installing the Puppet that is provided with the DPKs.
Note that Oracle recommends that you use the Puppet version that is packaged with the DPK.
See Also
"Learning About the PeopleSoft Deployment Process," Understanding Puppet and the PeopleSoft Puppet Modules
Task 1-3: Cataloging the Database for DB2 z/OS
For all installations on DB2 z/OS, you must catalog the database before mid-tier deployment using DPKs. To
catalog the database, see the documentation for DB2 z/OS for information.

Chapter 1 Prerequisites
Copyright © 2022, Oracle and/or its affiliates. All Rights Reserved.
33
Task 1-4: Reviewing the System Parameters on Linux, AIX, HP-
UX, or Solaris
This section discusses:
• Understanding the System Parameters on Linux, AIX, HP-UX, or Solaris
• Reviewing the sysctl Parameters
• Reviewing the ulimit Parameters
Understanding the System Parameters on Linux, AIX, HP-UX, or Solaris
The generated YAML file for UNIX operating systems includes settings for certain system parameters. When you
run the DPK setup script on Linux, AIX, HP-UX, or Solaris, the script overwrites existing system-level
parameters that are different from the values in BASE_DIR/dpk/puppet/production/data/psft_unix_system.yaml.
You can perform a customized deployment to make certain changes to the way that the DPK deployment handles
these system parameters, but be aware that the values listed in the psft_unix_system.yaml file are the minimum
requirements for the DPK deployment.
Task 1-4-1: Reviewing the sysctl Parameters
If you do not want the DPK setup script to overwrite the sysctl parameters, you can perform one of these
customized deployments:
•
If the existing sysctl settings on your system meet the DPK requirements, you can change the value of the
parameter setup_syscfg from true to false.
This change will prevent the DPK setup script from overwriting the parameters.
See "Completing the DPK Initialization with Customizations," Preparing the Customization File to Change
the setup_sysctl Parameter.
• If you want to allow the DPK setup script to change the sysctl settings on your system, retain the parameter
setup_syscfg: true, and specify values for the following sysctl parameters that are greater than those
given in the generated psft_unix_system.yaml file.
sysctl:
kernel.msgmnb:65538
kernel.msgmni:1024
kernel.msgmax:65536
kernel.shmmax:68719476736
kernel.shmall:4294967296
kernel.core_uses_pid:1
net.ipv4.tcp_keepalive_time:90
net.ipv4.tcp_timestamps:1
net.ipv4.tcp_window_scaling:1
net.ipv4.ip_local_port_range:'1000065500'
See "Completing the DPK Initialization with Customizations," Preparing the Customization File to Overwrite
the sysctl Parameters.

Prerequisites Chapter 1
34
Copyright © 2022, Oracle and/or its affiliates. All Rights Reserved.
Task 1-4-2: Reviewing the ulimit Parameters
The psft_unix_system.yaml file includes the following ulimit parameters. These are the minimum requirements
for the deployment. If you do not want the DPK setup script to overwrite the ulimit parameters, you can perform a
customized deployment and specify values for the ulimit parameters that are greater than those given in the
generated psft_unix_system.yaml file.
ulimit:
group:
hard.nofile:65536
soft.nofile:65536
hard.nproc:65536
soft.nproc:65536
hard.core:unlimited
soft.core:unlimited
hard.memlock:500000
soft.memlock:500000
hard.stack:102400
soft.stack:102400
user:
hard.nofile:131072
soft.nofile:131072
hard.nproc:131072
soft.nproc:131072
hard.core:unlimited
soft.core:unlimited
hard.memlock:500000
soft.memlock:500000
See "Completing the DPK Initialization with Customizations," Preparing the Customization File to Overwrite the
ulimit Parameters.

Copyright © 2022, Oracle and/or its affiliates. All Rights Reserved.
35
Chapter 2
Deploying the PeopleSoft PeopleTools
Deployment Packages
This chapter discusses:
• Obtaining the PeopleSoft PeopleTools DPKs
•
Using the PT-INFRA DPK for Additional Component Software
•
Reviewing the DPK Setup Script Options
•
Deploying as a Non-Root User on Linux, AIX, HP-UX, or Solaris
•
Running the DPK Setup Script for Mid-Tier Deployment
•
Running the DPK Setup Script to Install Mid-Tier Software Only
•
Running the DPK Setup Script to Deploy an Application Server Domain
•
Running the DPK Setup Script to Deploy a Process Scheduler Domain
•
Running the DPK Setup Script to Deploy an Application Server and a Process Scheduler Domain
•
Running the DPK Setup Script to Deploy a PIA Domain
•
Running the DPK Setup Script to Install PS_HOME Only
•
Deploying the PeopleTools Client DPK
Task 2-1: Obtaining the PeopleSoft PeopleTools DPKs
This section discusses:
•
Obtaining the PeopleSoft PeopleTools DPKs from My Oracle Support
•
Obtaining the PeopleSoft PeopleTools DPKs from Oracle Software Delivery Cloud
• Reviewing the PeopleSoft PeopleTools DPKs
Task 2-1-1: Obtaining the PeopleSoft PeopleTools DPKs from My Oracle
Support
The PeopleSoft PeopleTools patches are available on My Oracle Support. Contact Oracle if you need a user ID
and password for My Oracle Support.
To locate and download the DPKs:
1. Go to the PeopleSoft PeopleTools Patches Home Page, My Oracle Support, Doc ID 2062712.2, to find the
information on locating and downloading the latest PeopleSoft PeopleTools patch.
This page includes documentation and links to the most recent patches. To find earlier PeopleSoft

Deploying the PeopleSoft PeopleTools Deployment Packages Chapter 2
36
Copyright © 2022, Oracle and/or its affiliates. All Rights Reserved.
PeopleTools patches:
a. Sign in to My Oracle Support.
b. Select the Patches & Updates tab.
c. Select Product or Family (Advanced), and search for PeopleSoft PeopleTools.
2. Download the DPK zip files into a single directory, referred to in this documentation as DPK_INSTALL.
Be sure that the DPK_INSTALL directory has adequate available space for all the zip files. When you
download, there will probably be multiple zip files. The multiple files are needed due to size limitations.
This documentation typically refers to the downloaded zip files as FILENAME_#ofn.zip. The filename syntax
is described in following section.
Task 2-1-2: Obtaining the PeopleSoft PeopleTools DPKs from Oracle
Software Delivery Cloud
At the general availability date for PeopleSoft PeopleTools 8.58 for on premises installations, you can obtain the
PeopleSoft PeopleTools DPKs from Oracle Software Delivery Cloud. Later patches are available only on My
Oracle Support. To obtain the PeopleSoft PeopleTools DPKs from Oracle Software Delivery Cloud:
1. Sign in to Oracle Software Delivery Cloud.
See Oracle Software Delivery Cloud, https://edelivery.oracle.com.
2. Search for the current PeopleSoft PeopleTools release.
3. In the search results, locate the PeopleSoft PeopleTools download package, and click the button to add it to
your cart.
4. Select Checkout.
5. On the Selected Software page, select your operating system from the Platforms/Languages drop-down list.
Select or clear the check boxes if you do not want all the items.
6. Click Continue.
7. Review and accept the terms and conditions.
8. Download the DPK zip files, for example V123456-0#.zip, into a single directory, referred to in this
documentation as DPK_INSTALL.
Be sure that the DPK_INSTALL directory has adequate available space for all the zip files. When you
download, there will probably be multiple zip files. The multiple files are needed due to size limitations.
This documentation typically refers to the downloaded zip files as FILENAME_#ofn.zip. The filename syntax
is described in the next section.
Task 2-1-3: Reviewing the PeopleSoft PeopleTools DPKs
The PeopleSoft PeopleTools DPKs are delivered for each PeopleTools patch on My Oracle Support. The files are
double-zipped. This table describes the downloaded zip files and the embedded zip files. Be sure to review the
instructions in this documentation before unzipping the files.
Downloaded Zip Files* Embedded Zip Files Description
PEOPLETOOLS-
<OS>
-
<Rel.Patch>
_1of4.zip
The setup folder, including the setup
script and other files.
Setup DPK

Chapter 2 Deploying the PeopleSoft PeopleTools Deployment Packages
Copyright © 2022, Oracle and/or its affiliates. All Rights Reserved.
37
Downloaded Zip Files* Embedded Zip Files Description
PEOPLETOOLS-<OS>-<Rel.Patch>
_2of4.zip
PT-DPK-<OS>-<Rel.Patch>-1of2.zip PeopleTools server, Part 1
PEOPLETOOLS-<OS>-<Rel.Patch>
_3of4.zip
PT-DPK-<OS>-<Rel.Patch>-2of2.zip PeopleTools server, Part 2
PEOPLETOOLS-<OS>-<Rel.Patch>
_4of4.zip
PTC-DPK-<OS>-<Rel.Patch>-
1of1.zip
PeopleTools Client for 8.58
* This refers to the name of the files downloaded from My Oracle Support.
The zip files have the following format:
PEOPLETOOLS-<OS>-<Rel.Patch>_#ofn.zip
For example:
PEOPLETOOLS-WIN-8.58.04_1of4.zip
The files names are comprised of the following parts:
• <OS> is one of these operating systems:
•
AIX for IBM AIX
•
HPI for HP-UX
•
LNX for Linux
•
SOL for Oracle Solaris
•
WIN for Microsoft Windows
•
<Rel.Patch> is the release and patch number for the product, such as 8.58.04.
•
n represents the total number of zip files.
Task 2-2: Using the PT-INFRA DPK for Additional Component
Software
The PT-INFRA DPK contains supporting (third-party) software that is required for a PeopleSoft installation. A
separate PT-INFRA DPK is delivered as needed to provide security updates or other patches for one or more of
the components. You can use this separate PT-INFRA DPK in a new installation to take advantage of up-to-date
Critical Patch Updates (CPUs).
The PT-INFRA DPK includes the following:
• Oracle Tuxedo
• Oracle WebLogic
• Oracle Database Client
• JDK and JRE
See PT-INFRA Deployment Package Installation (PeopleSoft PeopleTools 8.58), Oracle's PeopleSoft PeopleTools
8.58 Home Page, Installation and Upgrade tab, My Oracle Support, Doc ID 2602329.2.

Deploying the PeopleSoft PeopleTools Deployment Packages Chapter 2
38
Copyright © 2022, Oracle and/or its affiliates. All Rights Reserved.
Task 2-3: Reviewing the DPK Setup Script Options
This section discusses:
• Using the DPK Setup Script Options
• Using the DPK Setup Script Option use_alternate_puppet_install
• Preparing to Run the DPK Setup Script
Task 2-3-1: Using the DPK Setup Script Options
The PeopleSoft PeopleTools DPK setup script alleviates the installation process by automating most of the
manual tasks on a virtual or bare-metal host running a supported operating system. By convention, the setup DPK
is the first zip file (FILENAME_1ofn.zip) in the group of PeopleSoft DPK zip files you download from My Oracle
Support.
The DPK setup zip file includes a script, psft-dpk-setup, that you use to set up a PeopleSoft environment. The
DPK setup script offers a variety of options for setting up mid-tier components, PS_HOME folder, and PeopleSoft
domains, depending upon the options you supply. The script is an interactive script that detects the downloaded
DPKs and verifies that they are correct. It also prompts the user for input, and once that information is gathered,
will set up a complete functional PeopleSoft mid-tier environment connecting to an existing PeopleSoft database.
Note. This document includes several examples of using the script. In some cases the examples have been
formatted to make them easier to read. It is a good idea to type the script directly into your command or terminal
window. If you copy from this document and paste it, the pasted text may not be correct.
Note. The DPK setup script does not provide any default passwords. It is a good idea to be prepared to supply
passwords such as user ID, PeopleSoft Connect ID, Application Server Domain Connection, and so on.
The following table lists the options available for the DPK setup script, psft-dpk-setup.bat for Microsoft Windows
and psft-dpk-setup.sh for Linux, AIX, HP-UX, or Solaris. The suffix <ext> in the table refers to the operating
system specific extension.
Note that the command options require two dashes when running on Microsoft Windows, Linux, AIX, HP-UX, or
Solaris.
See the section Preparing to Run the DPK Setup Script as a Non-Root User on Linux, AIX, HP-UX, or Solaris for
additional script options.
Note. The commands in the table include line feeds to improve readability.

Chapter 2 Deploying the PeopleSoft PeopleTools Deployment Packages
Copyright © 2022, Oracle and/or its affiliates. All Rights Reserved.
39
Deployment DPK Setup Script Command
Perform the following:
• Install the software required for the mid-tier
components, including Oracle Tuxedo, Oracle
WebLogic, and Oracle database client.
• Deploy and set up the domains for the mid-tier
components (Application Server, web server, Process
Scheduler and Oracle database client).
The deployment sets up one each of Application Server,
web server, and Process Scheduler domains.
• Install the PS_HOME directory.
psft-dpk-setup.<ext>
--env_typemidtier
or
psft-dpk-setup.<ext>
--env_typemidtier
--domain_typeall
Perform the following:
• Install the software required for the mid-tier
components, including Oracle Tuxedo, Oracle
WebLogic and Oracle database client, without setting up
the mid-tier domains.
• Install the PS_HOME directory.
*There is additional information following this table.
psft-dpk-setup.<ext>
--env_typemidtier
--deploy_only
or
psft-dpk-setup.<ext>
--env_typemidtier
--deploy_only
--deploy_typeall
Deploy the PS_HOME directory only.
This option does not set up any domains.
*There is additional information following this table.
psft-dpk-setup.<ext>
--env_typemidtier
--deploy_only
--deploy_typetools_home
Deploy and set up the domain for the Application Server
only.
Install the Oracle Tuxedo and Oracle WebLogic software.
psft-dpk-setup.<ext>
--env_typemidtier
--domain_typeappserver
Deploy and set up the domain for the Process Scheduler
only.
Install the Oracle Tuxedo and Oracle WebLogic software.
psft-dpk-setup.<ext>
--env_typemidtier
--domain_typeprcs
Deploy and set up the domain for PIA only.
Install the Oracle Tuxedo and Oracle WebLogic software.
Note. Before beginning the PIA domain deployment, ensure
that application server and Process Scheduler domains are
available.
psft-dpk-setup.<ext>
--env_typemidtier
--domain_typepia
Deploy and set up the domains for the Application Server
and the Process Scheduler.
Install the Oracle Tuxedo and Oracle WebLogic software.
psft-dpk-setup.<ext>
--env_typemidtier
--domain_typeappbatch

Deploying the PeopleSoft PeopleTools Deployment Packages Chapter 2
40
Copyright © 2022, Oracle and/or its affiliates. All Rights Reserved.
Deployment DPK Setup Script Command
Specify the full path of the downloaded DPKs.
The script assumes that the downloaded DPKs are in the
parent directory of the DPK setup script. If the DPKs are
located in a different directory, use this option.
psft-dpk-setup.<ext>
--env_typemidtier
--dpk_src_dir<full_DPK_path>
Specify the installation location for Puppet software on
Microsoft Windows.
The DPK setup script installs Puppet in C:\Program
Files\Puppet Labs\Puppet by default. Use this option to
install Puppet in a different location, including drives other
than the C: drive. You can install in any writable local drive,
but you cannot install in a network drive. Specify the full
path to the installation location. Use this option with the
desired deployment command.
Note. This command is not valid for Microsoft Windows
installations on PeopleSoft PeopleTools 8.58.20 and later,
which install the Relocatable Puppet for the deployment.
psft-dpk-setup.bat
--env_typemidtier
--puppet_win_install_dir<full_⇒
puppet_path>
Use the option --use_alternate_puppet_install to install
Puppet software under the BASE_DIR that is specified when
running the DPK setup script.
See Using the DPK Setup Script Option
use_alternate_puppet_install
Run the DPK setup script in silent mode for default
initialization.
You perform the deployment in silent mode by providing all
the required information in a response file.
See Running the DPK Setup Script in Silent Mode.
psft-dpk-setup.<ext>
--silent
--response_file=<response_file>
Run the DPK setup script in silent mode with a
customization file.
Use this command to specify a customization YAML file.
psft-dpk-setup.<ext>
--silent
--response_file=<response_file>
--customization_file=<dpk_⇒
customization_file>
Remove a deployed environment.
See "Using and Maintaining the PeopleSoft Environment,"
Removing a Deployed PeopleSoft Environment.
psft-dpk-setup.<ext>
--cleanup
List the DPK setup script usage.
psft-dpk-setup.<ext>--help

Chapter 2 Deploying the PeopleSoft PeopleTools Deployment Packages
Copyright © 2022, Oracle and/or its affiliates. All Rights Reserved.
41
Deployment DPK Setup Script Command
Reduce the size of the log file produced by the DPK setup
script by adding the nodebug option to any of the other
commands in this table.
This option turns off debug messages generated by Puppet.
Be aware that if you contact Oracle support regarding a
deployment problem, Oracle support will request the log file.
If the log file does not include the debugging messages it
may not be helpful in resolving the issue.
The log file produced when you use this option also does not
record the underlying steps performed by the Puppet lookup
with Hiera. This may also affect your debugging.
Combine the option with the other DPK setup script
commands listed in this table. Here are three examples:
psft-dpk-setup.<ext>
--env_typemidtier
--nodebug
psft-dpk-setup.<ext>
--env_typemidtier
--deploy_only
--nodebug
psft-dpk-setup.<ext>
--env_typemidtier
--domain_typeappserver
--nodebug
Specify the location for the installation log file by adding the
log_file option to any of the other commands in this table.
Combine the option with the other DPK setup script
commands listed in this table. Here are three examples:
psft-dpk-setup.<ext>
--env_typemidtier
--log_file<log file>
psft-dpk-setup.<ext>
--env_typemidtier
--deploy_only
--log_file<log file>
psft-dpk-setup.<ext>
--env_typemidtier
--domain_typeappserver
--log_file<log file>
The following options are also available for the PeopleSoft Application Images. These options require the
presence of PeopleSoft application DPK zip files in the deployment folder. If DPK_INSTALL includes only the
PeopleTools DPK zip files, you cannot use these options.
See PeopleSoft 9.2 Application Installation for your database platform.
Deployment with PeopleSoft Application DPKs Present DPK Setup Script Command
Deploy the PS_APP_HOME directory only.
This option does not set up any domains.
*There is additional information following this table.
psft-dpk-setup.<ext>
--env_typemidtier
--deploy_only
--deploy_typeapp_home
Deploy the PS_HOME and PS_APP_HOME directories
only.
This option does not set up any domains.
*There is additional information following this table.
psft-dpk-setup.<ext>
--env_typemidtier
--deploy_only
--deploy_typeapp_and_tools_home
* When you use the --deploy_only options on Linux, AIX, HP-UX, or Solaris operating systems, the
deployment does not set environment variables needed for subsequent tasks. After the deployment is complete,
you can set the environment variables using one of these methods:

Deploying the PeopleSoft PeopleTools Deployment Packages Chapter 2
42
Copyright © 2022, Oracle and/or its affiliates. All Rights Reserved.
• Change directory to BASE_DIR/pt/ps_home8.58.xx and run ../psconfig.sh.
• Run the following command.
<PUPPET_DIR>/puppetapply--confdir=<BASE_DIR>/dpk/puppet
-e"include::pt_profile::pt_psft_environment"
--logdest<DPK_INSTALL>/<log_file_name>
For Linux, PUPPET_DIR is /opt/puppetlabs/bin. For AIX, HP-UX or Solaris, PUPPET_DIR is
/opt/oracle/puppetlabs/bin.
Note. The command text given here includes line feeds for readability.
Task 2-3-2: Using the DPK Setup Script Option
use_alternate_puppet_install
Use the DPK setup script option --use_alternate_puppet_install to install Puppet software under the
BASE_DIR that is specified when running the DPK setup script. Using this script option installs the default, open-
source version that has been sufficiently modified to allow it to be installed in this non-default location.
This installation method is referred to as Relocatable Puppet. You can use this DPK setup script option for
PeopleTools patch releases that do not install Relocatable Puppet by default. If the DPK setup script does not
install Relocatable Puppet, the setup script installs the open-source version that is packaged by Puppet in
operating system-specific locations. It also sets environment variables on Linux, AIX, HP-UX, and Solaris, and
creates a registry entry on Microsoft Windows.
For AIX (beginning with PeopleTools 8.58.09), Linux (beginning with PeopleTools 8.58.19), Microsoft
Windows, HP-UX, and Solaris (beginning with PeopleTools 8.58.20) the option --
use_alternate_puppet_install is not needed, because the DPK setup script only uses the Relocatable
Puppet for the deployment.
If you are on earlier PeopleTools patch releases, you can use the --use_alternate_puppet_install
option on Linux and Microsoft Windows beginning with 8.58.01, and on AIX, HP-UX, and Solaris beginning
with 8.58.05.
•
Add this option to the command line for any supported deployment.
For example, you cannot use it to install Puppet in a separate step, followed by running the DPK setup script
for a mid-tier deployment.
•
When you use the DPK setup script to remove an environment that you deployed using
--
use_alternate_puppet_install
, you must include the same option in the command.
psft-dpk-setup.<ext>--use_alternate_puppet_install--cleanup
The cleanup will remove the Puppet that was installed under BASE_DIR.
• Puppet will be installed in BASE_DIR/psft_puppet_agent.
• You cannot specify a different installation location.
• The Puppet installation is deployment-specific; that is, each setup that is run with this command has its own
Puppet installation.
• The installation does not modify environment variables or the Microsoft Windows registry.
• If you are running as a non-root user Linux, AIX, HP-UX, or Solaris, and you include this option in the DPK
script commands, the root user does not need to run the prerequisite step to install Puppet or install Puppet and
system configuration first.
See Deploying as a Non-Root User on Linux, AIX, HP-UX, or Solaris.

Chapter 2 Deploying the PeopleSoft PeopleTools Deployment Packages
Copyright © 2022, Oracle and/or its affiliates. All Rights Reserved.
43
Note. Using the --use_alternate_puppet_install option has a different function from using the
command:
psft-dpk-setup.bat --puppet_win_install_dir <full_puppet_path>
That command is only for Microsoft Windows, requires an installation directory as input, and it does modify the
Windows registry. When you run a cleanup with the DPK setup script, the Puppet installation is not removed.
The following table lists the options available for the DPK setup script, psft-dpk-setup.bat for Microsoft Windows
and psft-dpk-setup.sh for Linux, AIX, HP-UX, or Solaris. The suffix <ext> in the table refers to the operating
system specific extension.
Note that the command options require two dashes when running on Microsoft Windows, Linux, AIX, HP-UX, or
Solaris.
Deployment DPK Setup Script Command
Perform the following:
• Install Puppet software in BASE_DIR/
psft_puppet_agent.
• Install the software required for the mid-tier
components, including Oracle Tuxedo, Oracle
WebLogic, and Oracle database client.
• Deploy and set up the domains for the mid-tier
components (Application Server, web server, Process
Scheduler and Oracle database client).
The deployment sets up one each of Application Server,
web server, and Process Scheduler domains.
• Install the PS_HOME directory.
psft-dpk-setup.<ext>
--env_typemidtier
--use_alternate_puppet_install
or
psft-dpk-setup.<ext>
--env_typemidtier
--domain_typeall
--use_alternate_puppet_install
Perform the following:
• Install Puppet software in BASE_DIR/
psft_puppet_agent.
• Install the software required for the mid-tier
components, including Oracle Tuxedo, Oracle
WebLogic and Oracle database client, without setting up
the mid-tier domains.
• Install the PS_HOME directory.
*There is additional information following this table.
psft-dpk-setup.<ext>
--env_typemidtier
--deploy_only
--use_alternate_puppet_install
or
psft-dpk-setup.<ext>
--env_typemidtier
--deploy_only
--deploy_typeall
--use_alternate_puppet_install
Install Puppet software in
BASE_DIR/
psft_puppet_agent.
Deploy the PS_HOME directory only.
This option does not set up any domains.
*There is additional information following this table.
psft-dpk-setup.<ext>
--env_typemidtier
--deploy_only
--deploy_typetools_home
--use_alternate_puppet_install

Deploying the PeopleSoft PeopleTools Deployment Packages Chapter 2
44
Copyright © 2022, Oracle and/or its affiliates. All Rights Reserved.
Deployment DPK Setup Script Command
• Install Puppet software in BASE_DIR/
psft_puppet_agent.
• Deploy and set up the domain for the Application Server
only.
• Install the Oracle Tuxedo and Oracle WebLogic
software.
psft-dpk-setup.<ext>
--env_typemidtier
--domain_typeappserver
--use_alternate_puppet_install
• Install Puppet software in BASE_DIR/
psft_puppet_agent.
• Deploy and set up the domain for the Process Scheduler
only.
• Install the Oracle Tuxedo and Oracle WebLogic
software.
psft-dpk-setup.<ext>
--env_typemidtier
--domain_typeprcs
--use_alternate_puppet_install
• Install Puppet software in BASE_DIR/
psft_puppet_agent.
• Deploy and set up the domain for PIA only.
• Install the Oracle Tuxedo and Oracle WebLogic
software.
Note. Before beginning the PIA domain deployment, ensure
that application server and Process Scheduler domains are
available.
psft-dpk-setup.<ext>
--env_typemidtier
--domain_typepia
--use_alternate_puppet_install
• Install Puppet software in BASE_DIR/
psft_puppet_agent.
• Deploy and set up the domains for the Application
Server and the Process Scheduler.
• Install the Oracle Tuxedo and Oracle WebLogic
software.
psft-dpk-setup.<ext>
--env_typemidtier
--domain_typeappbatch
--use_alternate_puppet_install
Specify the full path of the downloaded DPKs.
The script assumes that the downloaded DPKs are in the
parent directory of the DPK setup script. If the DPKs are
located in a different directory, use this option.
Install Puppet software in
BASE_DIR/
psft_puppet_agent.
psft-dpk-setup.<ext>
--env_typemidtier
--dpk_src_dir<full_DPK_path>
--use_alternate_puppet_install
Run the DPK setup script in silent mode for default
initialization.
You perform the deployment in silent mode by providing all
the required information in a response file.
See Running the DPK Setup Script in Silent Mode.
psft-dpk-setup.<ext>
--silent
--response_file=<response_file>
--use_alternate_puppet_install

Chapter 2 Deploying the PeopleSoft PeopleTools Deployment Packages
Copyright © 2022, Oracle and/or its affiliates. All Rights Reserved.
45
Deployment DPK Setup Script Command
Run the DPK setup script in silent mode with a
customization file.
Use this command to specify a customization YAML file.
psft-dpk-setup.<ext>
--silent
--response_file=<response_file>
--customization_file=<dpk_⇒
customization_file>
--use_alternate_puppet_install
Remove a deployed environment that was created using the
--use_alternate_puppet_install option.
See "Using and Maintaining the PeopleSoft Environment,"
Removing a Deployed PeopleSoft Environment.
psft-dpk-setup.<ext>
--cleanup
--use_alternate_puppet_install
Reduce the size of the log file produced by the DPK setup
script by adding the nodebug option to any of the other
commands in this table.
This option turns off debug messages generated by Puppet.
Be aware that if you contact Oracle support regarding a
deployment problem, Oracle support will request the log file.
If the log file does not include the debugging messages it
may not be helpful in resolving the issue.
The log file produced when you use this option also does not
record the underlying steps performed by the Puppet lookup
with Hiera. This may also affect your debugging.
Combine the option with the other DPK setup script
commands listed in this table. Here are three examples:
psft-dpk-setup.<ext>
--env_typemidtier
--nodebug
--use_alternate_puppet_install
psft-dpk-setup.<ext>
--env_typemidtier
--deploy_only
--nodebug
--use_alternate_puppet_install
psft-dpk-setup.<ext>
--env_typemidtier
--domain_typeappserver
--nodebug
--use_alternate_puppet_install
* When you use the --deploy_only options on Linux, AIX, HP-UX, or Solaris operating systems, the
deployment does not set environment variables needed for subsequent tasks. After the deployment is complete,
you can set the environment variables using one of these methods:
• Change directory to BASE_DIR/pt/ps_home8.58.xx and run ../psconfig.sh.
•
Run the following command.
<PUPPET_DIR>/puppetapply--confdir=<BASE_DIR>/dpk/puppet
-e"include::pt_profile::pt_psft_environment"
--logdest<DPK_INSTALL>/<log_file_name>
For Linux,
PUPPET_DIR
is /opt/puppetlabs/bin. For AIX, HP-UX or Solaris,
PUPPET_DIR
is
/opt/oracle/puppetlabs/bin.
Note. The command text given here includes line feeds for readability.
Task 2-3-3: Preparing to Run the DPK Setup Script
Include the following decisions in preparing to install with the DPK setup script:
• Non-root deployment

Deploying the PeopleSoft PeopleTools Deployment Packages Chapter 2
46
Copyright © 2022, Oracle and/or its affiliates. All Rights Reserved.
On Linux, AIX, HP-UX, or Solaris, you have the option to deploy the PeopleSoft environment as a non-root
user.
See Preparing to Run the DPK Setup Script as a Non-Root User on Linux, AIX, HP-UX, or Solaris
• Default or manual configuration
After extracting the DPKs, you are given the option to exit the process, create a customization file, and
complete the configuration manually using the psft_puppet_apply script with a user-written customization file.
Use the manual configuration if you want to change installation locations and so on.
See "Completing the DPK Initialization with Customizations."
The following installation scenarios require manual configuration using the customizations:
• Installing on an AIX operating system
See Reviewing the Software Requirements on AIX
See Preparing the Customization File for JDK on AIX.
• Installing on HP-UX operating system.
See Reviewing the Software Requirements on HP-UX.
See Preparing the Customization File for JDK on HP-UX.
•
Connecting to a non-Oracle RDBMS platform
See Preparing the Customization File for Mid-Tier Connection to a Microsoft SQL Server Database
See Preparing the Customization File for Mid-Tier Connection to a DB2 z/OS Database
• User IDs and password
The DPK setup script does not provide any default passwords. It is a good idea to be prepared to supply
passwords such as user ID, PeopleSoft Connect ID, Application Server Domain Connection, and so on.
• Unicode or non-Unicode
While running the DPK setup script, you can choose to install a Unicode or non-Unicode environment.
Alternatively, specify Unicode using the customizations and psft_puppet_apply script.
See "Completing the DPK Initialization with Customizations," Preparing the Customization File for Unicode.
• Specifying PS_CUST_HOME
You may wish to set up a PS_CUST_HOME (PeopleSoft Customization Home) directory in your environment
to store your site's customized files, separate from
PS_HOME
and
PS_APP_HOME.
If you wish to use a
PS_CUST_HOME
for your environment, you must perform the deployment using the DPK customizations,
and specify the PS_CUST_HOME location.
See "Completing the DPK Initialization with Customizations," Preparing the Customization File for the
PeopleSoft Homes.
Task 2-4: Deploying as a Non-Root User on Linux, AIX, HP-UX, or
Solaris
This section discusses:
• Preparing to Run the DPK Setup Script as a Non-Root User on Linux, AIX, HP-UX, or Solaris
• Running the DPK Setup Prerequisite Step for Linux, AIX, HP-UX, or Solaris
• Running the DPK Setup Script as a Non-Root User on Linux, AIX, HP-UX, or Solaris

Chapter 2 Deploying the PeopleSoft PeopleTools Deployment Packages
Copyright © 2022, Oracle and/or its affiliates. All Rights Reserved.
47
Preparing to Run the DPK Setup Script as a Non-Root User on Linux, AIX,
HP-UX, or Solaris
Review the information in this section before deploying on Linux, AIX, HP-UX, or Solaris. You have the option
of downloading the DPK zip files and deploying the PeopleSoft environment as a non-root user.
To run the DPK setup script as a non-root user, fulfill the following requirements:
• You can use an existing non-root user account. It is not necessary to create a new user.
• The deployment supports only a single non-root user who deploys into a single BASE_DIR.
• The non-root user's home directory must be writable.
• The non-root user must be configured to use the Bash, Bourne, or Korn shell.
• The non-root user must have permission to read and execute the DPK_INSTALL folder and its contents,
including the downloaded zip files, and DPK_INSTALL/setup.
If the root user downloads the DPK zip files and saves them in DPK_INSTALL, the root user must ensure that
the necessary permissions are granted to allow the non-root user to read and execute the files.
• Before a non-root user deploys the PeopleSoft environment, the root user must perform a prerequisite task.
After the non-root user completes the deployment:
•
The non-root user owns all of the deployed environment, including PS_HOME and PS_CFG_HOME.
•
The log files for the non-root deployment are saved in <USER_HOME>/psft_dpk_work/psft_dpk_setup_
<PID>.log, where <USER_HOME> is the home directory for the user running the script, and <PID> is a
process ID.
For example, if the home directory for the root user is /root, when the root user runs the command ./psft-
dpk-setup.sh --prereq
, the log file is /root/psft_dpk_work/psft_dpk_setup_1234.log.
For example, if the home directory for the non-root user is /home/psft_user, when the non-root user runs
./psft-dpk-setup.sh --midtier, or another deployment command, the log file is
/home/psft_user/psft_dpk_work/psft_dpk_setup_5678.log.
The following table lists the high-level steps required to deploy a PeopleSoft environment by a non-root user,
with a root user performing a prerequisite step. The table uses a mid-tier deployment as an example, but the
process also applies to other deployments, such as deploying full-tier, or deploying PeopleSoft domains only, and
so on.
Note. The commands in the table include line feeds to improve readability.
Step Reference Comment
1. Obtain DPKs and extract the first zip
file.
Obtaining the PeopleSoft PeopleTools
DPKs
NA
2. Select and run one or more
prerequisite commands.
Running the DPK Setup Prerequisite
Step for Linux, AIX, HP-UX, or Solaris
Important! This step must be run by
the root user.
This action is required once for each
host.

Deploying the PeopleSoft PeopleTools Deployment Packages Chapter 2
48
Copyright © 2022, Oracle and/or its affiliates. All Rights Reserved.
Step Reference Comment
3. Run the DPK setup script. For
example, to deploy a mid-tier
environment:
./psft-dpk-setup.sh
--env_typemidtier
Running the DPK Setup Script as a
Non-Root User on Linux, AIX, HP-
UX, or Solaris
For other deployment options, see the
table in the section Using the DPK
Setup Script Options.
4. If necessary, run the cleanup
command.
./psft-dpk-setup.sh
--cleanup
"Using and Maintaining the PeopleSoft
Environment," Using the DPK Setup
Script to Remove the PeopleSoft
Environment on Linux, AIX, HP-UX,
or Solaris as a Non-Root User
Run cleanup of the environment
(optional).
5. Source the script to set environment
variables:
sourceBASE_DIR/pt⇒
/psft_env.sh
"Using and Maintaining the PeopleSoft
Environment," Setting Environment
Variables for the Non-Root User on
Linux, AIX, HP-UX, or Solaris
Before using PeopleSoft utilities and
programs, source the script to set the
required environment variables.
The following table lists the high-level steps required to deploy a PeopleSoft environment by a non-root user who
uses the script option --use_alternate_puppet_install, with a root user performing a prerequisite
step. The table uses a mid-tier deployment as an example, but the process also applies to other deployments, such
as deploying full-tier, or deploying PeopleSoft domains only, and so on.
Note. The commands in the table include line feeds to improve readability.
Step Reference Comment
1. Obtain DPKs and extract the first zip
file.
Obtaining the PeopleSoft PeopleTools
DPKs
NA
2. Run the prerequisite command.
./psft-dpk-setup.sh
--prereq--create_⇒
central_orainv_only
Running the DPK Setup Prerequisite
Step for Linux, AIX, HP-UX, or Solaris
Important! This step must be run by
the root user.
This action is required once for each
host.
3. Run the DPK setup script. For
example, to deploy a mid-tier
environment:
./psft-dpk-setup.sh
--env_typemidtier
--use_alternate_puppet_⇒
install
Running the DPK Setup Script as a
Non-Root User on Linux, AIX, HP-
UX, or Solaris
For other deployment options, see the
table in the section Using the DPK
Setup Script Options.

Chapter 2 Deploying the PeopleSoft PeopleTools Deployment Packages
Copyright © 2022, Oracle and/or its affiliates. All Rights Reserved.
49
Step Reference Comment
4. If necessary, run the cleanup
command.
./psft-dpk-setup.sh
--cleanup
--use_alternate_puppet_⇒
install
"Using and Maintaining the PeopleSoft
Environment," Using the DPK Setup
Script to Remove the PeopleSoft
Environment on Linux, AIX, HP-UX,
or Solaris as a Non-Root User
Run cleanup of the environment
(optional).
5. Source the script to set environment
variables:
sourceBASE_DIR/pt⇒
/psft_env.sh
"Using and Maintaining the PeopleSoft
Environment," Setting Environment
Variables for the Non-Root User on
Linux, AIX, HP-UX, or Solaris
Before using PeopleSoft utilities and
programs, source the script to set the
required environment variables.
Task 2-4-1: Running the DPK Setup Prerequisite Step for Linux, AIX, HP-
UX, or Solaris
This section discusses:
•
Understanding the DPK Setup Prerequisite Step
•
Running the DPK Setup Prerequisite Step to Install Puppet and Set the System Configuration on Linux
•
Running the DPK Setup Prerequisite Step to Install Puppet
Understanding the DPK Setup Prerequisite Step
Before a non-root user can install the PeopleSoft environment, the root user should review this section and
determine what prerequisite steps are needed.
Note. Beginning with PeopleSoft PeopleTools 8.58.09 on AIX, 8.58.19 on Linux, and 8.58.20 on HP-UX or
Solaris, the root user does not need to run the prerequisite step. The DPK setup script installs the Relocatable
Puppet software in BASE_DIR/psft_puppet_agent by default.
This table lists the prerequisite commands:
Note. The commands include line feeds for readability.
Action DPK Setup Script Command
Use this command only on Linux to install the Puppet
software and update the system configuration on the host.
This command installs the required Puppet software to the
default location. It also sets system configuration variables
such as kernel parameters, user and group ulimits.
./psft-dpk-setup.sh--prereq
--syscfg
Install only the Puppet software.
Use this command if you do not want to update the system
configuration variables on your host.
./psft-dpk-setup.sh--prereq

Deploying the PeopleSoft PeopleTools Deployment Packages Chapter 2
50
Copyright © 2022, Oracle and/or its affiliates. All Rights Reserved.
Use these guidelines in deciding which command to use:
1. Determine whether the non-root user used the --use_alternate_puppet_install option for the
deployment.
Running the DPK setup script with --use_alternate_puppet_install installs the Puppet software
under the BASE_DIR. In this case, the Puppet software is owned by the non-root user, and has the appropriate
permissions for the BASE_DIR and all its subdirectories.
See "Deploying the PeopleSoft Application Deployment Packages," Reviewing the DPK Setup Script
Options.
2. If the non-root deployment did not use the --use_alternate_puppet_install option, the root user
must run one of these prerequisite commands to install Puppet to the standard location:
• ./psft-dpk-setup.sh --prereq
• ./psft-dpk-setup.sh --prereq --syscfg
3. If the non-root deployment used the --use_alternate_puppet_install option, the root user does
not have to run either of the prerequisite commands to install Puppet in step 2.
4. Whether or not the non-root deployment used the --use_alternate_puppet_install option, the
root user should run the command to create a central inventory location for the Oracle 19c Database Server
installation.
./psft-dpk-setup.sh--prereq--create_central_orainv_only
See "Preparing for Installation," Reviewing the Oracle Central Inventory File Location and Permissions on
Linux.
Running the DPK Setup Prerequisite Step to Install Puppet and Set the System
Configuration on Linux
The option --syscfg is supported only for Linux. To run the DPK setup script prerequisite step to install
Puppet and set the system configuration:
1. Open a terminal window as a user with root access, and extract the first zip file (FILENAME_1ofn.zip).
The extraction creates the DPK_INSTALL/setup folder and other files.
Note. It is a good idea to extract into the same directory where you downloaded the zip files, DPK_INSTALL.
2. Change directory to
DPK_INSTALL/
setup.
3. Run the script as follows:
./psft-dpk-setup.sh--prereq--syscfg
4. After the script completes the Puppet software installation, log out and log in as a non-root user to deploy the
PeopleSoft environment.
Running the DPK Setup Prerequisite Step to Install Puppet
To install Puppet without performing system configuration:
1. Open a terminal window as a user with root access, and extract the first zip file
(FILENAME
_1ofn.zip).
The extraction creates the
DPK_INSTALL/
setup folder and other files.
Note. It is a good idea to extract into the same directory where you downloaded the zip files, DPK_INSTALL.

Chapter 2 Deploying the PeopleSoft PeopleTools Deployment Packages
Copyright © 2022, Oracle and/or its affiliates. All Rights Reserved.
51
2. Change directory to DPK_INSTALL/setup.
3. Run the script as follows:
./psft-dpk-setup.sh--prereq
The DPK setup log is written to the file <ROOT_HOME>/psft_dpk_work/psft_dpk_setup_<PID>.log, where
<ROOT_HOME> is the home directory for the root user running the script, and <PID> is a process ID.
4. After the script completes the Puppet software installation, log out and log in as a non-root user to deploy the
PeopleSoft environment.
Task 2-4-2: Running the DPK Setup Script as a Non-Root User on Linux,
AIX, HP-UX, or Solaris
After the root user completes the prerequisite, start a terminal session as a non-root user and run the DPK setup
script with the appropriate options. The following items are specific to the process when run by a non-root user.
See Reviewing the DPK Setup Script Options.
• The DPK setup script includes a prompt for PS_CFG_HOME.
The script validates whether the specified PS_CFG_HOME location is writable and has 10 GB free space.
• More than one non-root user can run the DPK setup script from the same DPK_INSTALL/setup.
• The non-root user must have permission to read and execute the DPK_INSTALL folder and its contents,
including the downloaded zip files, and DPK_INSTALL/setup.
If the root user downloads the DPK zip files and saves them in DPK_INSTALL, the root user must ensure that
the necessary permissions are granted to allow the non-root user to read and execute the files.
• The DPK setup log is written to the file <USER_HOME>/psft_dpk_work/psft_dpk_setup_<PID>.log, where
<USER_HOME> is the home directory for the user running the script, and <PID> is a process ID.
Task 2-5: Running the DPK Setup Script for Mid-Tier Deployment
This section discusses:
• Understanding the Mid-Tier Deployment
•
Prerequisites
•
Running with the Mid-Tier Option on Microsoft Windows
•
Running with the Mid-Tier Option on Linux, AIX, HP-UX, or Solaris as the Root User
•
Running with the Mid-Tier Option on Linux, AIX, HP-UX, or Solaris as a Non-Root User
Understanding the Mid-Tier Deployment
Use this procedure to install the PeopleSoft mid-tier components The deployment includes the following:
• PS_HOME installed to the default location under the DPK base directory
• Oracle Tuxedo installed to the default location under the DPK base directory
• Oracle WebLogic installed to the default location under the DPK base directory
• Oracle Database Client installed to the default location under the DPK base directory

Deploying the PeopleSoft PeopleTools Deployment Packages Chapter 2
52
Copyright © 2022, Oracle and/or its affiliates. All Rights Reserved.
Note. This is an Oracle 12c Database Client. The client can be used with the Oracle Database releases that are
supported for the current PeopleSoft PeopleTools release. See the Certifications for PeopleSoft PeopleTools
on My Oracle Support.
• Deployed and set up PeopleSoft domains. There is a single Application Server domain, single Process
Scheduler domain, and single PIA domain.
• The Microsoft Windows DPKs include Microsoft Visual C++ Redistributable Packages for Visual Studio,
which include required Microsoft C++ runtime libraries
Prerequisites
Before performing the mid-tier deployment, be sure that you have fulfilled the following requirements:
• You have downloaded all of the required PeopleSoft PeopleTools DPKs, and saved them in a location
accessible to the Microsoft Windows, Linux, AIX, HP-UX, or Solaris host, referred to here as
DPK_INSTALL.
See Obtaining the PeopleSoft PeopleTools DPKs.
Note. After the DPK setup script extracts the downloaded zip files, it will delete the original zip files in
DPK_INSTALL. If you want to save the original zip files, make a backup copy in a different folder.
•
Remove any previous installations of the same version of Oracle Tuxedo.
•
The user running the script
must have administrative permission
on Microsoft Windows.
Note. Restarting services for the deployed PeopleSoft environment, such as those for Oracle Tuxedo, must be
performed by the same user (with administrative permission) who carried out the installation.
•
You must have root access to deploy the PeopleSoft DPKs on Linux, AIX, HP-UX, or Solaris.
For information on non-root deployment, see the section Deploying as a Non-Root User on Linux, AIX, HP-
UX, or Solaris.
•
For deployment on Linux, AIX, HP-UX, or Solaris, there is a writable directory available for the home for the
users that own the PeopleSoft environment.
If you install as a non-root user, the DPK setup script uses the home directory of the logged-in user as the
default home directory for the user, and for the deployment log files. The non-root deployment includes a
prompt for
PS_CFG_HOME.
If you do the entire installation as root, the DPK setup script creates default users, and includes a prompt for
the home directory for these generated default users. The default is /home. In this case,
PS_CFG_HOME
is
installed as a subdirectory of the psadm2 default user's home directory.
See "Using and Maintaining the PeopleSoft Environment," Using the PeopleSoft Installation.
•
There is enough space on the host for the PeopleSoft environment.
See "Prerequisites," Reviewing Hardware Requirements on Microsoft Windows.
•
For deployment with the AIX or HP-UX DPK, you have installed JDK required for the operating system.
See Reviewing Software Requirements.
•
You have installed database connectivity software for the database that you want to access on the machine on
which you deploy the mid-tier components.
See "Completing the DPK Initialization with Customizations."
When installing mid-tier components for environments on Microsoft SQL Server or DB2 z/OS, you must use

Chapter 2 Deploying the PeopleSoft PeopleTools Deployment Packages
Copyright © 2022, Oracle and/or its affiliates. All Rights Reserved.
53
customizations to complete the installation. The delivered YAML files may not include the necessary
RDBMS client information for your environment. Create a psft_customizations.yaml file, and include the
correct client information.
See the chapter "Completing the DPK Initialization with Customizations" for information on setting up a mid-
tier connection to Microsoft SQL Server, or DB2 z/OS databases.
• For all installations on DB2 z/OS, you must catalog the database before mid-tier deployment using DPKs. To
catalog the database, see the documentation for DB2 z/OS for information.
• The mid-tier deployment constructs a tnsnames.ora entry for use by the PeopleSoft mid-tier components (that
is, application server and Process Scheduler) to connect to a database using SERVICE_NAME. If you plan to
connect to an Oracle database, ensure that your database can be accessed using SERVICE_NAME in the
tnsnames.ora entry.
• You have the information for the database to connect to, including:
• RDBMS platform
• Database name, service name, host, and listening port
•
Unicode or non-Unicode database
•
For DB2 z/OS, database catalog information
• You have the information for the user IDs and passwords needed for the deployment, including the following:
•
PeopleSoft Connect ID and password
•
PeopleSoft operator ID (such as PS or VP1) and password
•
Application Server Domain Connection password (optional)
•
PTWEBSERVER web profile user password
•
Oracle WebLogic server administrator password
•
Integration Gateway administrator and password
•
Integration Gateway keystore password
When you run the DPK setup script, the prompts for some of the passwords do not explicitly specify the
restrictions as they did in previous releases.
See E-DPK Password restrictions are not reflected in the DPK setup script prompts, My Oracle Support, Doc ID
2639270.1.
Task 2-5-1: Running with the Mid-Tier Option on Microsoft Windows
To deploy mid-tier components on physical or virtual Microsoft Windows hosts:
1. Extract the first zip file, FILENAME_1ofn.zip.
It is recommended that you extract into the same directory where you downloaded the zip file,
DPK_INSTALL. The extraction creates the DPK_INSTALL/setup folder and other files.
2. Open a command prompt window with Run as Administrator.
3. Change directory to the location where you extracted the first zip file, DPK_INSTALL/setup.
4. Run the script with the mid-tier option to set up the Application Server, PIA, and web server mid-tier
components.

Deploying the PeopleSoft PeopleTools Deployment Packages Chapter 2
54
Copyright © 2022, Oracle and/or its affiliates. All Rights Reserved.
Note. If you see an error message similar to "The application has failed to start because its side-by-side
configuration is incorrect," it indicates that your machine does not include the necessary Microsoft C++
runtime libraries. Go to the Microsoft Web site, locate the Microsoft Visual C++ redistributable package for
your system, and install as directed.
• If you extracted the first zip file into the same directory where you downloaded the zip files, use this
command:
psft-dpk-setup.bat–-env_typemidtier
• If you extracted the first zip file into a different directory, include the option dpk_src_dir to specify
the location of the downloaded zip files, such as DPK_INSTALL.
psft-dpk-setup.bat--dpk_src_dirDPK_INSTALL–-env_typemidtier
Note. Running the DPK setup script with the --env_type midtier option deploys all servers. If you want to
deploy one of the servers (application server, Process Scheduler server, PIA, or application server and Process
Scheduler server) see the command options in "Installing the PeopleSoft Homes," Reviewing the DPK Setup
Script Options.
5. Wait while the script locates the valid PeopleSoft DPK zip files and extracts them.
The system displays messages indicating the steps in the setup process. The success or failure of each step is
indicated by [ OK ] or [ FAILED ].
After the script completes the extraction, it deletes the original files. Make a backup copy if you want to keep
them.
See Obtaining the PeopleSoft PeopleTools DPKs, for the filename syntax of the DPK zip files
StartingthePeopleSoftEnvironmentSetupProcess:
ValidatingUserArguments:[OK]
ValidatingPeopleSoftSupportedPlatform:[OK]
6. Specify whether to install the Puppet software if necessary at the next prompt.
The script verifies if Puppet software is installed in the default location specified by the DPKs. If not, answer
y
(yes) to install the Puppet software and
n
to abort the PeopleSoft environment setup process. The default
action (if nothing is entered at the prompt) is to install the software.
If there is any error during the Puppet software installation, the script aborts the setup process. Review the log
file in DPK_INSTALL/setup.
VerifyingifPuppetSoftwareisInstalled:[OK]
PuppetSoftwareisnotinstalledontheHost.IfthisHostis
usedtosetupaPeopleSoftenvironment,PuppetSoftwareshould
beInstalled.
DoyouwanttoInstallPuppetSoftwareonthisHost?[Y|n]:y
InstallingPuppetSoftwareontheHost:[OK]
The script verifies the eYAML software.
VerifyingifeYAMLHieraBackendisInstalled:[OK]
The script verifies if the DPKs are available in
DPK_INSTALL,
and aborts with the message [FAILED] if they
are not.

Chapter 2 Deploying the PeopleSoft PeopleTools Deployment Packages
Copyright © 2022, Oracle and/or its affiliates. All Rights Reserved.
55
CheckingifPeopleSoftDPKsarePresent:[OK]
7. At the following prompt, enter a location that is accessible to the host to be used as the PeopleSoft base
directory.
The base folder is used to extract the PeopleSoft DPKs as well as for deploying PeopleSoft components. The
script creates the folder if it is not present.
Note. When entering the path for the base folder, use forward slashes (/). For example, C:/psft. Enclose
any names with special characters in double quotes. Do not use a name for the base folder that begins with a
number.
ThebasefolderisusedtoextractthePeopleSoftDPKs.Itisalso
usedtodeploythePeopleSoftcomponents.Thisfoldershouldbe
accessibleontheWindowsVM,musthavewritepermissionsandshould
haveenoughfreespace.
EnterthePeopleSoftBaseFolder:C:/psft
Areyouhappywithyouranswer?[Y|n|q]:
The script validates if there is enough free space available under the specified base directory for the
PeopleSoft environment. The PeopleSoft environment setup is aborted if there is not enough free space.
Note. A mid-tier setup of a PeopleSoft environment requires about 25 GB of disk space.
CheckingiftheBaseFolderhasEnoughFreeSpace:[OK]
The script creates the following three sub-directories under the user provided base directory, BASE_DIR:
• BASE_DIR\
dpk
The script uses this directory to extract the archives from the PeopleSoft DPKs, and contains the Puppet
YAML files for the deployment.
• BASE_DIR\
pt
The script uses this directory to deploy PeopleSoft components.
• BASE_DIR\
db
This directory is not used for a mid-tier deployment.
8. Review the status messages as the script validates the files found in
DPK_INSTALL
and extracts the DPK
archives.
The script carries out validations for the mid-tier deployment. If any of the validations fail, the PeopleSoft
environment setup is aborted.
Note. The messages have been truncated for brevity.
ValidatingthePeopleSoftDPKsintheWindowsVM:
[...]
ExtractingthePeopleSoftDPKArchivesintheWindowsVM:
[...]
9. Review the status messages as the script sets up the Puppet file system.
The script sets up Puppet on the host or VM. It then copies the PeopleSoft Puppet modules to the standard
location under the base folder (BASE_DIR\dpk) and updates the YAML files to reflect the type of PeopleSoft
environment setup.

Deploying the PeopleSoft PeopleTools Deployment Packages Chapter 2
56
Copyright © 2022, Oracle and/or its affiliates. All Rights Reserved.
SettingupPuppetontheWindowsVM:
GeneratingeYAMLHieraBackendEncryptionKeys:[OK]
UpdatingthePuppetHieraYAMLFilesintheWindowsVM:[OK]
UpdatingtheRoleinPuppetSiteFilefortheWindowsVM:[OK]
10. Specify the information for the database that you want to connect to.
a. For the database platform, enter ORACLE, MSSQL (Microsoft SQL Server), or DB2ODBC (DB2 for
z/OS).
EnterthePeopleSoftdatabaseplatform[ORACLE]:
b. Enter y (yes) if the database you are connecting to is a Unicode database, or n (no) for a non-Unicode
database.
IsthePeopleSoftdatabaseunicode?[Y|n]:
c. Enter the database name.
EnteranewPeopleSoftdatabasename.Ensurethatthedatabase
namestartwithaletterandcontainsonlyuppercaselettersand
numbersandisnomorethan8charactersinlength[HCM92]:
d. Enter the database service name.
Note. The service name is required for Oracle RDBMS.
For the service name, enter the full name, including the domain, if the database was installed with the
domain. Use forward slashes if necessary. If the service name includes non-alphanumeric characters such
as periods, enclose the name in double quotes. For example, "HCM.92.example.com". Do not enter an IP
address.
EnterthePeopleSoftdatabaseservicename[HCM92]:
e. Enter the name of the host where the database is installed, and the port number:
Use forward slashes if necessary. If the host name includes non-alphanumeric characters such as periods,
enclose the name in double quotes. For example, "host.example.com". Do not enter an IP address.
EnterthePeopleSoftdatabasehostname:
EnterthePeopleSoftdatabaseport[1521]:1521
11. Enter the PeopleSoft Connect ID at the following prompt:
The default is people.
EnterthePeopleSoftdatabaseConnectID[people]:
12. Enter a password for the PeopleSoft Connect ID, and enter again on the next line, at the following prompt.
See E-DPK Password restrictions are not reflected in the DPK setup script prompts, My Oracle Support, Doc
ID 2639270.1.
EnterthePeopleSoftdatabaseConnectID[people]password.
Ensurethatthepasswordmeetsthelengthandcomplexityrequirements
foryourdatabaseplatform:
Re-EnterthePeopleSoftConnectIDpassword:
13. Enter the PeopleSoft Operator ID (user ID) at the next prompt:
EnterthePeopleSoftdatabaseOperatorID[PS]:

Chapter 2 Deploying the PeopleSoft PeopleTools Deployment Packages
Copyright © 2022, Oracle and/or its affiliates. All Rights Reserved.
57
14. Enter the password twice for the PeopleSoft operator ID, such as PS or VP1.
EnteranewPeopleSoftdatabaseOperatorID[PS]password.
Ensurethatthepasswordisbetween1and32charactersinlength.
Youmayincludethesespecialcharacters!@#$%^&:
Re-EnterthePeopleSoftOperatorIDpassword:
15. Enter the Application Server Domain Connection password, following the guidelines in the prompt.
The window does not display masking characters as you type. There is no default password.
Note. This is an optional password. If no password is entered, the connection between Web Server and
Application Server will not be password protected.
[Optional]EnteranewApplicationServerDomainconnectionpassword.
Ensurethatthepasswordisbetween8and30charactersinlength:
Youmayincludethesespecialcharacters!@#$%^&:
Re-EntertheApplicationServerDomainconnectionpassword:
16. Enter the password for the PTWEBSERVER web profile user.
EnteranewPeopleSoftWebProfileuser[PTWEBSERVER]password.
Ensurethatthepasswordisbetween8and32charactersinlength.
Youmayincludethesespecialcharacters!@#$%^&:
Re-EnterthePeopleSoftWebProfileuserpassword:
17. Enter the Oracle WebLogic Server Admin password, following the guidelines in the prompt.
The default Oracle WebLogic server administrator is system. The window does not display masking
characters as you type. There is no default password.
EnteranewWebLogicServerAdminuser[system]password.
Ensurethatthepasswordisbetween8and30charactersinlength
withatleastonelowercaseletterandoneuppercaseletter.
Itmustalsocontainonenumberor
oneofthesespecialcharacters!@#$%^&:
Re-EntertheWebLogicServerAdminuserpassword:
Enter the Integration Gateway user ID and password at the following prompt.
The default user ID is administrator.
EnterthePeopleSoftIntegrationGatewayuser[administrator]:
EnterthePeopleSoftIntegrationGatewayuser[administrator]password.
Ensurethepasswordisbetween8and30charactersinlength:
Youmayincludethesespecialcharacters!@#$%^&:
Re-EnterthePeopleSoftIntegrationGatewayuserpassword:
18. Enter the Integration Gateway keystore password.
You see this prompt beginning with PeopleSoft PeopleTools 8.58.04.
See the information on using the integrationGateway.properties file and configuring security in the Integration
Broker product documentation.
See
PeopleTools: Integration Broker Administration,
"Configuring Security and General Properties."
EnterthePeopleSoftIntegrationGatewayKeystorepassword.Ensure
thepasswordisbetween8and30charactersinlength.
Youmayincludethesespecialcharacters!@#$%^&:

Deploying the PeopleSoft PeopleTools Deployment Packages Chapter 2
58
Copyright © 2022, Oracle and/or its affiliates. All Rights Reserved.
Re-EnterthePeopleSoftIntegrationGatewayKeystorepassword:
19. If you want to change any of the answers to the previous questions, enter n (no) at the following prompt, or
enter y (yes) to continue:
Areyouhappywithyouranswers?[y|n]:
20. Review the status messages as the script updates the Puppet YAML files with the user input.
EncryptingthePasswordsintheUserData:[OK]
UpdatingthePuppetHieraYAMLFileswithUserData:[OK]
21. If you want to continue running the initialization script using the default configuration, answer y (yes) to the
following prompt, and continue with the next step.
Note. If you select the default initialization process, the PeopleSoft environment is created with one
Application Server domain, one Process Scheduler domain, and one PIA domain.
If you want to customize the PeopleSoft environment, answer n (no) to stop the script. You must use
customizations to complete the mid-tier deployment.
ThebootstrapscriptisreadytodeployandconfigurethePeopleSoft
environmentusingthedefaultconfigurationdefinedinthePuppet
HieraYAMLfiles.Youcanproceedbyanswering'y'atthefollowing
prompt.And,ifyouwanttocustomizetheenvironmentbyoverriding
thedefaultconfiguration,youcananswer'n'.Ifyouanswer'n',you
shouldfollowtheinstructionsinthePeopleSoftInstallationGuide
forcreatingthecustomizationHieraYAMLfileandrunningthePuppet
'apply'commanddirectlytocontinuewiththesetupofthePeopleSoft
environment.
Doyouwanttocontinuewiththedefaultinitializationprocess?[y|n]:
22. Review the status messages as the script runs Puppet profiles to set up the PeopleSoft environment.
A message of [ OK ] indicates that the profile has been applied successfully while a message [FAILED]
indicates that the profile application failed.
The script stops and exits the first time a profile application fails, and displays an error message. This example
shows the error message after the first step failed:
StartingtheDefaultInitializationofPeopleSoftEnvironment:
DeployingPeopleToolsComponents:[FAILED]
TheinitializationofPeopleSoftenvironmentsetupfailed.Checkthe
logfile[C:\DPK_INSTALL\setup\psft_dpk_setup.log]fortheerrors.
Aftercorrectingtheerrors,runthefollowingcommandstocontinue
withthesetupofPeopleSoftenvironment.
StartacmdwindowasAdministratorandrunC:\psft\psft_puppet_⇒
apply.cmd
ExitingthePeopleSoftenvironmentsetupprocess.
Upon successful completion, the DPK setup script displays the following message:
StartingtheDefaultInitializationofPeopleSoftEnvironment:

Chapter 2 Deploying the PeopleSoft PeopleTools Deployment Packages
Copyright © 2022, Oracle and/or its affiliates. All Rights Reserved.
59
DeployingPeopleToolsComponents:[OK]
SettingupPeopleSoftOSUsersEnvironment:[OK]
SettingupPeopleSoftApplicationServerDomain:[OK]
SettingupPeopleSoftProcessSchedulerDomain:[OK]
SettingupPeopleSoftPIADomain:[OK]
ChangingthePasswordsfortheEnvironment:[OK]
ConfiguringPre-BootPeopleSoftEnvironment:[OK]
StartingPeopleSoftDomains:[OK]
ConfiguringPost-BootPeopleSoftEnvironment:[OK]
SettingupSourceDetailsforPeopleToolsClient:[OK]
ThePeopleSoftEnvironmentSetupProcessEnded.
The complete setup log is written to the file psft_dpk_setup.log in the same location as the DPK setup script.
Task 2-5-2: Running with the Mid-Tier Option on Linux, AIX, HP-UX, or
Solaris as the Root User
If you are installing the PeopleSoft environment as a non-root user, see the following section, Running with the
Mid-Tier Option on Linux, AIX, HP-UX, or Solaris as a Non-Root User.
To deploy mid-tier components on Linux, AIX, HP-UX, or Solaris hosts as the root user:
1. Open a terminal window and change directory to DPK_INSTALL/setup.
2. Run the script as follows:
• If you extracted the first zip file into the same directory where you downloaded the zip files, use this
command:
./psft-dpk-setup.sh--env_typemidtier
• If you extracted the first zip file into a different directory, include the option dpk_src_dir to specify
the location of the downloaded zip files, such as DPK_INSTALL.
./psft-dpk-setup.sh--dpk_src_dirDPK_INSTALL--env_typemidtier
Note. Running the DPK setup script with the --env_type midtier option deploys all servers. If you want to
deploy one of the servers (application server, Process Scheduler server, PIA, or application server and Process
Scheduler server) see the command options in the section Reviewing the DPK Setup Script Options.
3. Wait while the script locates the valid PeopleSoft DPK zip files and extracts them.
The system displays messages indicating the steps in the setup process. The success or failure of each step is
indicated by [ OK ] or [FAILED].
After the script completes the extraction, it deletes the original files. Make a backup copy if you need to keep
them.
See Obtaining the PeopleSoft PeopleTools DPKs, for the filename syntax of the DPK zip files.
StartingthePeopleSoftEnvironmentSetupProcess:
ValidatingUserArguments:[OK]
ValidatingPeopleSoftSupportedPlatform:[OK]
4. Specify whether to install the Puppet software if necessary at the next prompt.
The script verifies if Puppet software is installed in the default location specified by the DPKs. If not, answer
y
(yes) to install the Puppet software and
n
to abort the PeopleSoft environment setup process. The default
action (if nothing is entered at the prompt) is to install the software.

Deploying the PeopleSoft PeopleTools Deployment Packages Chapter 2
60
Copyright © 2022, Oracle and/or its affiliates. All Rights Reserved.
If there is any error during the Puppet software installation, the script aborts the setup process. Review the log
file in DPK_INSTALL/setup.
VerifyingifPuppetSoftwareisInstalled:[OK]
PuppetSoftwareisnotinstalledontheHost.IfthisHostis
usedtosetupaPeopleSoftenvironment,PuppetSoftwareshould
beInstalled.
DoyouwanttoInstallPuppetSoftwareonthisHost?[Y|n]:
InstallingPuppetSoftwareontheHost:[OK]
The script verifies the eYAML software.
VerifyingifeYAMLHieraBackendisInstalled:[OK]
The script verifies if the DPKs are available in DPK_INSTALL, and aborts with the message [FAILED] if they
are not.
CheckingifPeopleSoftDPKsarePresent:[OK]
5. At the following prompt, enter a location that is accessible to the host to be used as the PeopleSoft base
directory.
The base directory is used to extract the PeopleSoft DPKs as well as for deploying PeopleSoft components.
The directory /cs1/psft is used in this example:
Note. When entering the path for the base directory, use forward slashes (/). For example, /cs1/psft. If the
name includes any non-alphanumeric characters such as periods, enclose the name in double quotes. Do not
use a name for the base directory that begins with a number. Do not end the base directory name with a
forward slash (for example, do not enter /ds1/psft/).
ThebasedirectoryisusedtoextractthePeopleSoftDPKs.Itisalso
usedtodeploythePeopleSoftcomponents.Thisdirectoryshouldbe
accessibleontheLinuxVM,musthavewritepermissionsandshould
haveenoughfreespace.
EnterthePeopleSoftBaseDirectory:/cs1/psft
Areyouhappywithyouranswer?[Y|n|q]:
The script validates if there is enough free space available under the specified base directory for the
PeopleSoft environment. The PeopleSoft environment setup is aborted if there is not enough free space.
Note. A mid-tier setup of a PeopleSoft environment takes about 25 GB of disk space.
CheckingiftheBaseDirectoryhasEnoughFreeSpace:[OK]
The script creates the following three sub-directories under the user provided base directory, BASE_DIR:
• BASE_DIR/
dpk
The script uses this directory to extract the archives from the PeopleSoft PeopleTools DPKs, and contains
the Puppet YAML files for the deployment.
• BASE_DIR/pt
The script uses this directory to deploy PeopleSoft components.
• BASE_DIR/db

Chapter 2 Deploying the PeopleSoft PeopleTools Deployment Packages
Copyright © 2022, Oracle and/or its affiliates. All Rights Reserved.
61
This directory is not used for this deployment.
6. Specify a writable directory for the user home directory at the following prompt.
You see this prompt beginning with PeopleSoft PeopleTools 8.58.04.
The PeopleSoft environment setup using DPKs creates local users on the host. These users deploy the
PeopleSoft components and own the PeopleSoft runtime domains. Enter a new location to be used for creating
the home directories for these local users, or specify the default home directory, /home.
EnteradirectoryontheLinuxVMthatiswritable[/home]:/ds1
Areyouhappywithyouranswer?[y|n|q]:
If the script finds that the location you enter (either a new location or the default) is not writable, it exits with
the following message.
TheUserdoesnothavewritepermissiontocreatetheuser'shome
directoryunder[<user input>]ontheLinuxVM.
ExitingthePeopleSoftenvironmentsetupprocess.
7. Review the status messages as the script validates the files found in DPK_INSTALL and extracts the DPK
archives.
The script carries out validations for the mid-tier deployment. If any of the validations fail, the PeopleSoft
environment setup is aborted.
Note. The messages have been truncated for brevity.
ValidatingthePeopleSoftDPKsintheLinuxVM:
[...]
ExtractingthePeopleSoftDPKArchivesintheLinuxVM:
[...]
8. Review the status messages as the script sets up the Puppet file system.
The script sets up Puppet on the host or VM. As part of this setup, if the eYAML files are installed, it will
generate the encryption keys. It then copies the PeopleSoft Puppet modules to the standard location (
BASE_DIR/
dpk) and updates the YAML files to reflect the type of PeopleSoft environment setup.
SettingupPuppetontheLinuxVM:
GeneratingeYAMLHieraBackendEncryptionKeys:[OK]
UpdatingthePuppetHieraYAMLFilesintheLinuxVM:[OK]
UpdatingtheRoleinPuppetSiteFilefortheLinuxVM:[OK]
9. Specify the information for the database that you want to connect to.
a. For the database platform, enter ORACLE or DB2ODBC (DB2 for z/OS).
EnterthePeopleSoftdatabaseplatform[ORACLE]:
b. Enter
y
(yes) if the database you are connecting to is a Unicode database, or
n
(no) for a non-Unicode
database.
IsthePeopleSoftdatabaseunicode?[Y|n]:
c. Enter the database name.
EnterthePeopleSoftdatabasename:
d. Enter the database service name.

Deploying the PeopleSoft PeopleTools Deployment Packages Chapter 2
62
Copyright © 2022, Oracle and/or its affiliates. All Rights Reserved.
Note. The service name is required for Oracle RDBMS.
For the service name, enter the full name, including the domain, if the database was installed with the
domain. Use forward slashes if necessary. If the service name includes non-alphanumeric characters such
as periods, enclose the name in double quotes. For example, "HCM.92.example.com". Do not enter an IP
address.
EnterthePeopleSoftdatabaseservicename[HCM92]:
e. Enter the name of the host where the database is installed, and the port number:
Use forward slashes if necessary. If the host name includes non-alphanumeric characters such as periods,
enclose the name in double quotes. For example, "host.example.com". Do not enter an IP address.
EnterthePeopleSoftdatabasehostname:
EnterthePeopleSoftdatabaseport[1521]:1521
10. Enter the PeopleSoft Connect ID at the following prompt:
The default is people.
EnteranewPeopleSoftdatabaseConnectID[people]:
11. Enter a password for the PeopleSoft Connect ID, and enter again on the next line, at the following prompt.
See E-DPK - Password restrictions are not reflected in the DPK setup script prompts, My Oracle Support, Doc
ID 2639270.1
EnteranewPeopleSoftdatabaseConnectID[people]password.
Ensurethatthepasswordmeetsthelengthandcomplexityrequirements
foryourdatabaseplatform:
Re-EnterthePeopleSoftConnectIDpassword:
12. Enter the PeopleSoft Operator ID (user ID):
EnterthePeopleSoftdatabaseOperatorID[PS]:
13. Enter the password twice for the PeopleSoft operator ID, such as PS or VP1.
EnteranewPeopleSoftdatabaseOperatorID[PS]password.
Ensurethatthepasswordisbetween1and32charactersinlength.
Youmayincludethesespecialcharacters!@#$%^&:
Re-EnterthePeopleSoftOperatorIDpassword:
14. Enter the Application Server Domain Connection password, following the guidelines in the prompt.
The window does not display masking characters as you type. There is no default password.
Note. This is an optional password. If no password is entered, the connection between Web Server and
Application Server will not be password protected.
[Optional]EnteranewApplicationServerDomainconnectionpassword.
Ensurethepasswordisbetween8and30charactersinlength.
Youmayincludethesespecialcharacters!@#$%^&:
Re-EntertheApplicationServerDomainconnectionpassword.
15. Enter the password twice for the PTWEBSERVER web profile user.
EnteranewPeopleSoftWebProfileuser[PTWEBSERVER]password.
Ensurethatthepasswordisbetween8and32charactersinlength.

Chapter 2 Deploying the PeopleSoft PeopleTools Deployment Packages
Copyright © 2022, Oracle and/or its affiliates. All Rights Reserved.
63
Youmayincludethesespecialcharacters!@#$%^&:
Re-EnterthePeopleSoftWebProfileuserpassword:
16. Enter the Oracle WebLogic Server Admin password, following the guidelines in the prompt.
The default Oracle WebLogic server administrator is system. The window does not display masking
characters as you type. There is no default password.
EnteranewWebLogicServerAdminuser[system]password.
Ensurethatthepasswordisbetween8and30charactersinlength
withatleastonelowercaseletterandoneuppercaseletter.
Itmustalsocontainonenumberor
oneofthesespecialcharacters!@#$%^&:
Re-EntertheWebLogicServerAdminuserpassword:
17. Enter the Integration Gateway user ID and password.
The default user ID is administrator.
EnterthePeopleSoftIntegrationGatewayuser[administrator]:
EnterthePeopleSoftIntegrationGatewayuser[administrator]password.
Ensurethepasswordisbetween8and30charactersinlength.
Youmayincludethesespecialcharacters!@#$%^&:
Re-EnterthePeopleSoftIntegrationGatewayuserpassword:
18. Enter the Integration Gateway keystore password.
You see this prompt beginning with PeopleSoft PeopleTools 8.58.04.
See the information on using the integrationGateway.properties file and configuring security in the Integration
Broker product documentation.
See
PeopleTools: Integration Broker Administration,
"Configuring Security and General Properties."
EnterthePeopleSoftIntegrationGatewayKeystorepassword.Ensure
thepasswordisbetween8and30charactersinlength.
Youmayincludethesespecialcharacters!@#$%^&:
Re-EnterthePeopleSoftIntegrationGatewayKeystorepassword:
19. If you want to change any of the answers to the previous questions, enter n (no) at the following prompt, or
enter y (yes) to continue:
Areyouhappywithyouranswers?[y|n]:
20. Review the status messages as the script updates the Puppet YAML files with the user input.
If eYAML files are installed, the passwords are encrypted and updated in the YAML file.
EncryptingthePasswordsintheUserData:[OK]
UpdatingthePuppetHieraYAMLFileswithUserData:[OK]
21. If you want to continue running the initialization script using the default configuration, answer
y
(yes) to the
following prompt, and continue with the next step.
Note. If you select the default initialization process, the PeopleSoft environment is created with one
Application Server domain, one Process Scheduler domain, and one PIA domain.
If you want to customize the PeopleSoft environment, answer n (no) to stop the script. You must use
customizations to complete the mid-tier deployment.
See "Completing the DPK Initialization with Customizations."

Deploying the PeopleSoft PeopleTools Deployment Packages Chapter 2
64
Copyright © 2022, Oracle and/or its affiliates. All Rights Reserved.
ThebootstrapscriptisreadytodeployandconfigurethePeopleSoft
environmentusingthedefaultconfigurationdefinedinthePuppet
HieraYAMLfiles.Youcanproceedbyanswering'y'atthefollowing
prompt.And,ifyouwanttocustomizetheenvironmentbyoverriding
thedefaultconfiguration,youcananswer'n'.Ifyouanswer'n',you
shouldfollowtheinstructionsinthePeopleSoftInstallationGuide
forcreatingthecustomizationHieraYAMLfileandrunningthePuppet
'apply'commanddirectlytocontinuewiththesetupofthePeopleSoft
environment.
Doyouwanttocontinuewiththedefaultinitializationprocess?[y|n]:
22. Review the status messages as the script runs Puppet profiles to set up the PeopleSoft environment.
A message of [ OK ] indicates that the profile has been applied successfully while a message [FAILED]
indicates that the profile application failed.
The script stops and exits the first time a profile application fails, and displays an error message. This example
shows the error message after the first step failed:
StartingtheDefaultInitializationofPeopleSoftEnvironment:
SettingUpSystemSettings:[FAILED]
TheinitializationofPeopleSoftenvironmentsetupfailed.Checkthe
logfile[/cs1/DPK_INSTALL/setup/psft_dpk_setup.log]fortheerrors.
Aftercorrectingtheerrors,runthefollowingcommandstocontinue
withthesetupofPeopleSoftenvironment.
Fromtheshell,run/cs1/psft/psft_puppet_apply.sh
ExitingthePeopleSoftenvironmentsetupprocess.
ThePeopleSoftEnvironmentSetupProcessEnded.
See "Completing the DPK Initialization with Customizations."
Upon successful completion, the DPK setup script displays the following message:
StartingtheDefaultInitializationofPeopleSoftEnvironment:
SettingUpSystemSettings:[OK]
DeployingPeopleToolsComponents:[OK]
DSettingupPeopleSoftOSUsersEnvironment:[OK]
SettingupPeopleSoftApplicationServerDomain:[OK]
SettingupPeopleSoftProcessSchedulerDomain:[OK]
SettingupPeopleSoftPIADomain:[OK]
ChangingthePasswordsfortheEnvironment:[OK]
ConfiguringPre-BootPeopleSoftEnvironment:[OK]
StartingPeopleSoftDomains:[OK]
ConfiguringPost-BootPeopleSoftEnvironment:[OK]
SettingupSourceDetailsforPeopleToolsClient:[OK]
ThePeopleSoftEnvironmentSetupProcessEnded.
The complete setup log is written to the file psft_dpk_setup.log in the same location as the DPK setup script.

Chapter 2 Deploying the PeopleSoft PeopleTools Deployment Packages
Copyright © 2022, Oracle and/or its affiliates. All Rights Reserved.
65
Task 2-5-3: Running with the Mid-Tier Option on Linux, AIX, HP-UX, or
Solaris as a Non-Root User
If you are installing the PeopleSoft environment as a non-root user, ensure that you fulfill the prerequisites in the
section Deploying as a Non-Root User on Linux, AIX, HP-UX, or Solaris.
To deploy mid-tier components on Linux, AIX, HP-UX, or Solaris hosts as a non-root user
1. Open a terminal window and change directory to DPK_INSTALL/setup.
2. Run the script as follows:
• If you extracted the first zip file into the same directory where you downloaded the zip files, use this
command:
./psft-dpk-setup.sh--env_typemidtier
• If you extracted the first zip file into a different directory, include the option dpk_src_dir to specify
the location of the downloaded zip files, such as DPK_INSTALL.
./psft-dpk-setup.sh--dpk_src_dirDPK_INSTALL--env_typemidtier
Note. Running the DPK setup script with the --env_type midtier option deploys all servers. If you want to
deploy one of the servers (Application Server, Process Scheduler server, PIA, or application server and Process
Scheduler server) see the command options in the section Reviewing the DPK Setup Script Options.
3. Answer y (yes) at the following prompt:
YouarerunningDPKsetupwithoutroot/administratoraccess.
Thisisfineaslongasthesystemadministratorhasperformed
allnecessarytasksandallprerequisiteshavebeenmet.
Pleaseseethedocumentationtodeterminetheprerequitetasks
thatneedtobeperformedtosuccessfullyrunDPKsetup
withoutroot/administratorprivilege.
Wouldyouliketoproceedwiththesetupasanon-rootuser?[y/n]:y
4. Wait while the script verifies that the necessary PeopleSoft DPK zip files are available and that the Puppet
software is installed.
The system displays messages indicating the steps in the setup process. The success or failure of each step is
indicated by [ OK ] or [FAILED].
ValidatingUserArguments:[OK]
ValidatingPeopleSoftSupportedPlatform:[OK]
VerifyingifPuppetSoftwareisinstalled:[OK]
VerifyingifeYAMLHieraBackendisInstalled:[OK]
CheckingifPeopleSoftDPKsarePresent:[OK]
5. At the following prompt, enter a location that is accessible to the host to be used as the PeopleSoft base
directory.
The base directory is used to extract the PeopleSoft DPKs as well as for deploying PeopleSoft components.
The directory /cs1/psft is used in this example:

Deploying the PeopleSoft PeopleTools Deployment Packages Chapter 2
66
Copyright © 2022, Oracle and/or its affiliates. All Rights Reserved.
Note. When entering the path for the base directory, use forward slashes (/). For example, /cs1/psft. If the
name includes any non-alphanumeric characters such as periods, enclose the name in double quotes. Do not
use a name for the base directory that begins with a number. Do not end the base directory name with a
forward slash (for example, do not enter /ds1/psft/).
ThebasedirectoryisusedtoextractthePeopleSoftDPKs.Itisalso
usedtodeploythePeopleSoftcomponents.Thisdirectoryshouldbe
accessibleontheLinuxVM,musthavewritepermissionsandshould
haveenoughfreespace.
EnterthePeopleSoftBaseDirectory:/cs1/psft
Areyouhappywithyouranswer?[Y|n|q]:
The script validates if there is enough free space available under the specified base directory for the
PeopleSoft environment. The PeopleSoft environment setup is aborted if there is not enough free space.
Note. A mid-tier setup of a PeopleSoft environment takes about 25 GB of disk space.
CheckingiftheBaseDirectoryhasEnoughFreeSpace:[OK]
The script creates the following three sub-directories under the user provided base directory,
BASE_DIR
:
• BASE_DIR/dpk
The script uses this directory to extract the archives from the PeopleSoft PeopleTools DPKs, and contains
the Puppet YAML files for the deployment.
• BASE_DIR/pt
The script uses this directory to deploy PeopleSoft components.
• BASE_DIR/db
This directory is not used for this deployment.
6. Enter a writable directory with at least 10 GB available space for PS_CFG_HOME.
The default is USER_HOME/psft/pt/8.58, where USER_HOME is the home directory for the logged-in user.
The PS_CFG_HOME directory holds the configuration and log files for the PeopleSoft Application Server,
Process Scheduler, and PIA domains.
Enterawritableps_config_homedirectoryforPeopleSoftdomains
withatleast10.0GBspace[/home/psftuser/psft/pt/8.58]:
Areyouhappywithyouranswer?[Y|n|q]:y
7. Review the status messages as the script validates the files found in DPK_INSTALL and extracts the DPK
archives.
The script carries out validations for the mid-tier deployment. If any of the validations fail, the PeopleSoft
environment setup is aborted.
Note. The messages have been truncated for brevity.
ValidatingthePeopleSoftDPKsintheLinuxVM:
[...]
ExtractingthePeopleSoftDPKArchivesintheLinuxVM:
[...]
8. Review the status messages as the script sets up the Puppet file system.

Chapter 2 Deploying the PeopleSoft PeopleTools Deployment Packages
Copyright © 2022, Oracle and/or its affiliates. All Rights Reserved.
67
The script sets up Puppet on the host or VM. As part of this setup, if the eYAML files are installed, it will
generate the encryption keys. It then copies the PeopleSoft Puppet modules to the standard location
(BASE_DIR/dpk) and updates the YAML files to reflect the type of PeopleSoft environment setup.
SettingupPuppetontheLinuxVM:
GeneratingeYAMLHieraBackendEncryptionKeys:[OK]
UpdatingthePuppetHieraYAMLFilesintheLinuxVM:[OK]
UpdatingtheRoleinPuppetSiteFilefortheLinuxVM:[OK]
9. Specify the information for the database that you want to connect to.
a. For the database platform, enter ORACLE or DB2ODBC (DB2 for z/OS).
EnterthePeopleSoftdatabaseplatform[ORACLE]:
b. Enter y (yes) if the database you are connecting to is a Unicode database, or n (no) for a non-Unicode
database.
IsthePeopleSoftdatabaseunicode?[Y|n]:
c. Enter the database name.
EnterthePeopleSoftdatabasename:
d. Enter the database service name.
Note. The service name is required for Oracle RDBMS.
For the service name, enter the full name, including the domain, if the database was installed with the
domain. Use forward slashes if necessary. If the service name includes non-alphanumeric characters such
as periods, enclose the name in double quotes. For example, "HCM.92.example.com". Do not enter an IP
address.
EnterthePeopleSoftdatabaseservicename[HCM92]:
e. Enter the name of the host where the database is installed, and the port number:
Use forward slashes if necessary. If the host name includes non-alphanumeric characters such as periods,
enclose the name in double quotes. For example, "host.example.com". Do not enter an IP address.
EnterthePeopleSoftdatabasehostname:
EnterthePeopleSoftdatabaseport[1521]:1521
10. Enter the PeopleSoft Connect ID at the following prompt:
The default is people.
EnteranewPeopleSoftdatabaseConnectID[people]:
11. Enter a password for the PeopleSoft Connect ID, and enter again on the next line, at the following prompt.
See E-DPK Password restrictions are not reflected in the DPK setup script prompts, My Oracle Support, Doc
ID 2639270.1.
EnteranewPeopleSoftdatabaseConnectID[people]password.
Ensurethatthepasswordmeetsthelengthandcomplexity
requirementsforyourdatabaseplatform:
Re-EnterthePeopleSoftdatabaseConnectIDpassword:
12. Enter the PeopleSoft Operator ID (user ID):
EnterthePeopleSoftdatabaseOperatorID[PS]:

Deploying the PeopleSoft PeopleTools Deployment Packages Chapter 2
68
Copyright © 2022, Oracle and/or its affiliates. All Rights Reserved.
13. Enter the password twice for the PeopleSoft operator ID, such as PS or VP1.
EnterthePeopleSoftdatabaseOperatorID[PS]password.
Ensurethatthepasswordisbetween1and32charactersinlength.
Youmayincludethesespecialcharacters!@#$%^&:
Re-EnterthePeopleSoftdatabaseOperatorIDpassword:
14. Enter the Application Server Domain Connection password, following the guidelines in the prompt.
The window does not display masking characters as you type. There is no default password.
Note. This is an optional password. If no password is entered, the connection between Web Server and
Application Server will not be password protected.
[Optional]EnteranewApplicationServerDomainconnectionpassword.
Ensurethatthepasswordisbetween8and30charactersinlength:
Youmayincludethesespecialcharacters!@#$%^&:
Re-EntertheApplicationServerDomainconnectionpassword.
15. Enter the password twice for the PTWEBSERVER web profile user.
EnterthePeopleSoftWebProfileuser[PTWEBSERVER]password.
Ensurethatthepasswordisbetween8and32charactersinlength:
Youmayincludethesespecialcharacters!@#$%^&:
Re-EnterthePeopleSoftWebProfileuserpassword:
16. Enter the Oracle WebLogic Server Admin password, following the guidelines in the prompt.
The default Oracle WebLogic server administrator is system. The window does not display masking
characters as you type. There is no default password.
EnteranewWebLogicServerAdminuser[system]password.
Ensurethatthepasswordisbetween8and30charactersinlength
withatleastonelowercaseletterandoneuppercaseletter.
Itmustalsocontainonenumberor
oneofthesespecialcharacters!@#$%^&:
Re-EntertheWebLogicServerAdminuserpassword:
17. Enter the Integration Gateway user ID and password.
The default user ID is administrator.
EnterthePeopleSoftIntegrationGatewayuser[administrator]:
EnterthePeopleSoftIntegrationGatewayuser[administrator]password.
Ensurethatthepasswordisbetween8and30charactersinlength:
Youmayincludethesespecialcharacters!@#$%^&:
Re-EnterthePeopleSoftIntegrationGatewayuserpassword:
18. Enter the Integration Gateway keystore password.
You see this prompt beginning with PeopleSoft PeopleTools 8.58.04.
See the information on using the integrationGateway.properties file and configuring security in the Integration
Broker product documentation.
See PeopleTools: Integration Broker Administration, "Configuring Security and General Properties."
EnterthePeopleSoftIntegrationGatewayKeystorepassword.Ensure
thepasswordisbetween8and30charactersinlength.
Youmayincludethesespecialcharacters!@#$%^&:
Re-EnterthePeopleSoftIntegrationGatewayKeystorepassword:

Chapter 2 Deploying the PeopleSoft PeopleTools Deployment Packages
Copyright © 2022, Oracle and/or its affiliates. All Rights Reserved.
69
19. If you want to change any of the answers to the previous questions, enter n (no) at the following prompt, or
enter y (yes) to continue:
Areyouhappywithyouranswers?[y|n]:
20. Review the status messages as the script updates the Puppet YAML files with the user input.
If eYAML files are installed, the passwords are encrypted and updated in the YAML file.
EncryptingthePasswordsintheUserData:[OK]
UpdatingthePuppetHieraYAMLFileswithUserData:[OK]
21. If you want to continue running the initialization script using the default configuration, answer y (yes) to the
following prompt, and continue with the next step.
Note. If you select the default initialization process, the PeopleSoft environment is created with one
Application Server domain, one Process Scheduler domain, and one PIA domain.
If you want to customize the PeopleSoft environment, answer
n
(no) to stop the script. You must use
customizations to complete the mid-tier deployment.
See "Completing the DPK Initialization with Customizations."
ThebootstrapscriptisreadytodeployandconfigurethePeopleSoft
environmentusingthedefaultconfigurationdefinedinthePuppet
HieraYAMLfiles.Youcanproceedbyanswering'y'atthefollowing
prompt.And,ifyouwanttocustomizetheenvironmentbyoverriding
thedefaultconfiguration,youcananswer'n'.Ifyouanswer'n',you
shouldfollowtheinstructionsinthePeopleSoftInstallationGuide
forcreatingthecustomizationHieraYAMLfileandrunningthePuppet
'apply'commanddirectlytocontinuewiththesetupofthePeopleSoft
environment.
Doyouwanttocontinuewiththedefaultinitializationprocess?[y|n]:
22. Review the status messages as the script runs Puppet profiles to set up the PeopleSoft environment.
A message of [ OK ] indicates that the profile has been applied successfully while a message [FAILED]
indicates that the profile application failed.
The script stops and exits the first time a profile application fails, and displays an error message. This example
shows the error message after the first step failed:
StartingtheDefaultInitializationofPeopleSoftEnvironment:
SettingUpSystemSettings:[FAILED]
TheinitializationofPeopleSoftenvironmentsetupfailed.Checkthe
logfile[/cs1/DPK_INSTALL/setup/psft_dpk_setup.log]fortheerrors.
Aftercorrectingtheerrors,runthefollowingscripttocontinue
withthesetupofPeopleSoftenvironment.
Fromtheshell,run/cs1/psft/psft_puppet_apply.sh
ExitingthePeopleSoftenvironmentsetupprocess.
ThePeopleSoftEnvironmentSetupProcessEnded.
See "Completing the DPK Initialization with Customizations."

Deploying the PeopleSoft PeopleTools Deployment Packages Chapter 2
70
Copyright © 2022, Oracle and/or its affiliates. All Rights Reserved.
Upon successful completion, the DPK setup script displays the following message:
StartingtheDefaultInitializationofPeopleSoftEnvironment:
SettingUpSystemSettings:[OK]
DeployingPeopleToolsComponents:[OK]
DSettingupPeopleSoftOSUsersEnvironment:[OK]
SettingupPeopleSoftApplicationServerDomain:[OK]
SettingupPeopleSoftProcessSchedulerDomain:[OK]
SettingupPeopleSoftPIADomain:[OK]
ChangingthePasswordsfortheEnvironment:[OK]
ConfiguringPre-BootPeopleSoftEnvironment:[OK]
StartingPeopleSoftDomains:[OK]
ConfiguringPost-BootPeopleSoftEnvironment:[OK]
SettingupSourceDetailsforPeopleToolsClient:[OK]
ThePeopleSoftEnvironmentSetupProcessEnded.
The setup.log is written to the file <USER_HOME>/psft_dpk_work/psft_dpk_setup_<PID>.log, where
<USER_HOME> is the home directory for the user running the script, and <PID> is a process ID
Task 2-6: Running the DPK Setup Script to Install Mid-Tier
Software Only
This section discusses:
•
Understanding the Mid-Tier Software Installation
•
Running the DPK Setup Script to Install Mid-Tier Software on Microsoft Windows
•
Running the DPK Setup Script as the Root User to Install Mid-tier Software on Linux, AIX, HP-UX, or
Solaris
•
Running the DPK Setup Script as a Non-Root User to Install Mid-Tier Software on Linux, AIX, HP-UX, or
Solaris
Understanding the Mid-Tier Software Installation
Use this option to install PS_HOME and the software required for mid-tier deployment, without deploying the
PeopleSoft domains. The deployment includes the following:
• PS_HOME
installed to the default location under the DPK base directory
•
Oracle Tuxedo installed to the default location under the base directory
•
Oracle WebLogic installed to the default location under the base directory
•
Oracle Database Client installed to the default location under the base directory
Note. This is an Oracle 12c Database Client. The client can be used with the Oracle Database releases that are
supported for the current PeopleSoft PeopleTools release. See the Certifications for PeopleSoft PeopleTools
on My Oracle Support.
• The Microsoft Windows DPKs include Microsoft Visual C++ Redistributable Packages for Visual Studio,
which include required Microsoft C++ runtime libraries
The script requires the following information:
• Database platform type

Chapter 2 Deploying the PeopleSoft PeopleTools Deployment Packages
Copyright © 2022, Oracle and/or its affiliates. All Rights Reserved.
71
• Unicode or non-Unicode
In addition, ensure that you fulfill the items in the Prerequisites section in the task Running the DPK Setup Script
for Mid-Tier Deployment.
See Also
"Using and Maintaining the PeopleSoft Environment," Using the PeopleSoft Installation
Task 2-6-1: Running the DPK Setup Script to Install Mid-Tier Software on
Microsoft Windows
This procedure assumes you have obtained the four PeopleSoft PeopleTools DPK zip files and saved them in
DPK_INSTALL.
Note. Some of the informational script messages have been omitted for brevity.
1. Extract the first zip file (FILENAME_1ofn.zip).
Note. It is a good idea to extract into the same directory where you downloaded the zip files, DPK_INSTALL.
The extraction creates the DPK_INSTALL/setup folder and other files.
2. Open a command prompt with Run as Administrator.
3. Change directory to DPK_INSTALL/setup.
4. Run the script as follows:
Note. On Microsoft Windows, if you see an error message similar to "The application has failed to start
because its side-by-side configuration is incorrect," it indicates that your machine does not include the
necessary Microsoft C++ runtime libraries. Go to the Microsoft Web site, locate the Microsoft Visual C++
redistributable package for your system, and install as directed.
• If you extracted the first zip file into the same directory where you downloaded the zip files, use this
command:
psft-dpk-setup.bat--env_typemidtier--deploy_only
•
If you extracted the first zip file into a different directory, include the option
dpk_src_dir
to specify
the location of the downloaded zip files, such as
DPK_INSTALL,
as follows:
psft-dpk-setup.bat--dpk_src_dirDPK_INSTALL--env_typemidtier⇒
--deploy_only
5. Specify whether to install the Puppet software if necessary at the next prompt.
The script verifies if Puppet software is installed in the default location specified by the DPKs. If not, answer
y (yes) to install the Puppet software and n to abort the PeopleSoft environment setup process. The default
action (if nothing is entered at the prompt) is to install the software.
If there is any error during the Puppet software installation, the script aborts the setup process.
VerifyingifPuppetSoftwareisInstalled:
PuppetSoftwareisnotinstalledontheWindowsHost.IfPeopleSoft
environmentneedstobesetuponthisHost,Puppetsoftware

Deploying the PeopleSoft PeopleTools Deployment Packages Chapter 2
72
Copyright © 2022, Oracle and/or its affiliates. All Rights Reserved.
shouldbeInstalled.
DoyouwanttoproceedwiththePuppetInstallation?[Y|n]:y
InstallingPuppetSoftwareontheWindowsHost:[OK]
6. At the following prompt, enter a location that is accessible to the host to be used as the PeopleSoft base
directory, referred to here as BASE_DIR.
The base directory is used to extract the DPKs as well as for deploying PeopleSoft components. The script
creates the base directory if it does not exist.
Use forward slashes only (/) when specifying the base directory; for example, C:/psft. Do not use a base
directory name that begins with a number.
ThebasefolderisusedtoextractthePeopleSoftDPKs.Itisalso
usedtodeploythePeopleSoftcomponents.Thisfoldershouldbe
accessibleontheWindowsVM,musthavewritepermissionsandshould
haveenoughfreespace
EnterthePeopleSoftBaseFolder:
Areyouhappywithyouranswer?[Y|n|q]:
The script validates if there is enough free space available under the specified base directory for the
PeopleSoft environment. The PeopleSoft environment setup is aborted if there is not enough free space.
Note. A mid-tier setup of a PeopleSoft environment requires about 25 GB of disk space.
CheckingiftheBaseFolderhasEnoughFreeSpace:[OK]
7. Specify the type of database platform.
Enter MSSQL for Microsoft SQL Server, DB2ODBC for DB2 for z/OS, or ORACLE.
EnterthePeopleSoftdatabaseplatform[ORACLE]:
8. Specify whether you want support for a Unicode database.
IsthePeopleSoftdatabaseunicode?[Y|n]:
9. Enter y to continue with the script.
Areyouhappywithyouranswers?[y|n]:y
EncryptingthePasswordsintheUserData:[OK]
UpdatingthePuppetHieraYAMLFileswithUserData:[OK]
10. If you want to continue running the initialization script using the default configuration, answer y (yes) to the
following prompt, and continue with the next step.
If you want to customize the PeopleSoft environment using the Puppet YAML files, answer n (no) to stop the
script.
ThebootstrapscriptisreadytodeployandconfigurethePeopleSoft
environmentusingthedefaultconfigurationdefinedinthePuppet
HieraYAMLfiles.Youcanproceedbyanswering'y'atthefollowing
prompt.And,ifyouwanttocustomizetheenvironmentbyoverriding
thedefaultconfiguration,youcananswer'n'.Ifyouanswer'n',you
shouldfollowtheinstructionsinthePeopleSoftInstallationGuide
forcreatingthecustomizationHieraYAMLfileandrunningthePuppet
'apply'commanddirectlytocontinuewiththesetupofthePeopleSoft

Chapter 2 Deploying the PeopleSoft PeopleTools Deployment Packages
Copyright © 2022, Oracle and/or its affiliates. All Rights Reserved.
73
environment
Doyouwanttocontinuewiththedefaultinitializationprocess?[y|n]:
11. Review the status messages as the script runs Puppet profiles to set up the PeopleSoft environment.
A message of [ OK ] indicates that the profile has been applied successfully while a message [FAILED]
indicates that the profile application failed.
Upon successful completion, the DPK setup script displays the following message:
ThePeopleSoftEnvironmentSetupProcessEnded.
The complete setup log is written to the file psft_dpk_setup.log in the same location as the DPK setup script.
Task 2-6-2: Running the DPK Setup Script as the Root User to Install Mid-
tier Software on Linux, AIX, HP-UX, or Solaris
This procedure assumes you have obtained the four PeopleSoft PeopleTools DPK zip files and saved them in
DPK_INSTALL.
Note. Some of the informational script messages have been omitted for brevity.
1. Extract the first zip file
(FILENAME
_1of
n.
zip).
Note. It is a good idea to extract into the same directory where you downloaded the zip files, DPK_INSTALL.
The extraction creates the DPK_INSTALL/setup folder and other files.
2. Open a terminal windows as the root user.
3. Change directory to DPK_INSTALL/setup.
4. Run the script as follows:
•
If you extracted the first zip file into the same directory where you downloaded the zip files, use this
command:
./psft-dpk-setup.sh--env_typemidtier--deploy_only
• If you extracted the first zip file into a different directory, include the option dpk_src_dir to specify
the location of the downloaded zip files, such as
DPK_INSTALL,
as follows:
./psft-dpk-setup.sh--dpk_src_dirDPK_INSTALL--env_typemidtier⇒
--deploy_only
5. Specify whether to install the Puppet software if necessary at the next prompt.
The script verifies if Puppet software is installed in the default location specified by the DPKs. If not, answer
y
(yes) to install the Puppet software and
n
to abort the PeopleSoft environment setup process. The default
action (if nothing is entered at the prompt) is to install the software.
If there is any error during the Puppet software installation, the script aborts the setup process.
VerifyingifPuppetSoftwareisInstalled:
PuppetSoftwareisnotinstalledontheWindowsHost.IfPeopleSoft
environmentneedstobesetuponthisHost,Puppetsoftware
shouldbeInstalled.

Deploying the PeopleSoft PeopleTools Deployment Packages Chapter 2
74
Copyright © 2022, Oracle and/or its affiliates. All Rights Reserved.
DoyouwanttoproceedwiththePuppetInstallation?[Y|n]:y
InstallingPuppetSoftwareontheWindowsHost:[OK]
6. At the following prompt, enter a location that is accessible to the host to be used as the PeopleSoft base
directory, referred to here as BASE_DIR.
The base directory is used to extract the DPKs as well as for deploying PeopleSoft components. The script
creates the base directory if it does not exist.
Use forward slashes only (/) when specifying the base directory; for example, /home/psft. Do not use a base
directory name that begins with a number. Do not end the base directory name with a forward slash (for
example, do not enter /ds1/psft/).
ThebasefolderisusedtoextractthePeopleSoftDPKs.Itisalso
usedtodeploythePeopleSoftcomponents.Thisfoldershouldbe
accessibleontheWindowsVM,musthavewritepermissionsandshould
haveenoughfreespace
EnterthePeopleSoftBaseFolder:
Areyouhappywithyouranswer?[Y|n|q]:
The script validates if there is enough free space available under the specified base directory for the
PeopleSoft environment. The PeopleSoft environment setup is aborted if there is not enough free space.
Note. A mid-tier setup of a PeopleSoft environment requires about 25 GB of disk space.
CheckingiftheBaseFolderhasEnoughFreeSpace:[OK]
7. Specify a writable directory for the user home directory at the following prompt.
You see this prompt beginning with PeopleSoft PeopleTools 8.58.04.
The PeopleSoft environment setup using DPKs creates local users on the host. These users deploy the
PeopleSoft components and own the PeopleSoft runtime domains. Enter a new location to be used for creating
the home directories for these local users, or specify the default home directory, /home.
EnteradirectoryontheLinuxVMthatiswritable[/home]:/ds1
Areyouhappywithyouranswer?[y|n|q]:
If the script finds that the location you enter (either a new location or the default) is not writable, it exits with
the following message.
TheUserdoesnothavewritepermissiontocreatetheuser'shome
directoryunder[<user input>]ontheLinuxVM.
ExitingthePeopleSoftenvironmentsetupprocess.
8. Specify the type of database platform.
Enter MSSQL for Microsoft SQL Server, DB2ODBC for DB2 for z/OS, or ORACLE.
EnterthePeopleSoftdatabaseplatform[ORACLE]:
9. Specify whether you want support for a Unicode database.
IsthePeopleSoftdatabaseunicode?[Y|n]:
10. Enter y to continue with the script.
Areyouhappywithyouranswers?[y|n]:y
EncryptingthePasswordsintheUserData:[OK]

Chapter 2 Deploying the PeopleSoft PeopleTools Deployment Packages
Copyright © 2022, Oracle and/or its affiliates. All Rights Reserved.
75
UpdatingthePuppetHieraYAMLFileswithUserData:[OK]
11. If you want to continue running the initialization script using the default configuration, answer y (yes) to the
following prompt, and continue with the next step.
If you want to customize the PeopleSoft environment using the Puppet YAML files, answer n (no) to stop the
script.
ThebootstrapscriptisreadytodeployandconfigurethePeopleSoft
environmentusingthedefaultconfigurationdefinedinthePuppet
HieraYAMLfiles.Youcanproceedbyanswering'y'atthefollowing
prompt.And,ifyouwanttocustomizetheenvironmentbyoverriding
thedefaultconfiguration,youcananswer'n'.Ifyouanswer'n',you
shouldfollowtheinstructionsinthePeopleSoftInstallationGuide
forcreatingthecustomizationHieraYAMLfileandrunningthePuppet
'apply'commanddirectlytocontinuewiththesetupofthePeopleSoft
environment
Doyouwanttocontinuewiththedefaultinitializationprocess?[y|n]:
12. Review the status messages as the script runs Puppet profiles to set up the PeopleSoft environment.
A message of [ OK ] indicates that the profile has been applied successfully while a message [FAILED]
indicates that the profile application failed.
Upon successful completion, the DPK setup script displays the following message:
ThePeopleSoftEnvironmentSetupProcessEnded.
The complete setup log is written to the file psft_dpk_setup.log in the same location as the DPK setup script.
Task 2-6-3: Running the DPK Setup Script as a Non-Root User to Install
Mid-Tier Software on Linux, AIX, HP-UX, or Solaris
To install the mid-tier software as a non-root user:
Note. Some of the informational script messages have been omitted for brevity.
1. Open a terminal window as a non-root user.
2. Change directory to DPK_INSTALL/setup.
3. Run the script as follows:
• If you extracted the first zip file into the same directory where you downloaded the zip files, use this
command:
./psft-dpk-setup.sh--env_typemidtier--deploy_only
• If you extracted the first zip file into a different directory, include the option dpk_src_dir to specify
the location of the downloaded zip files, such as DPK_INSTALL, as follows:
./psft-dpk-setup.sh--dpk_src_dirDPK_INSTALL--env_typemidtier⇒
--deploy_only
4. At the following prompt, enter a location that is accessible to the host to be used as the PeopleSoft base
directory, referred to here as
BASE_DIR.
The base directory is used to extract the DPKs as well as for deploying PeopleSoft components. The script
creates the base directory if it does not exist.

Deploying the PeopleSoft PeopleTools Deployment Packages Chapter 2
76
Copyright © 2022, Oracle and/or its affiliates. All Rights Reserved.
Use forward slashes only (/) when specifying the base directory; for example, /home/psft. Do not use a base
directory name that begins with a number. Do not end the base directory name with a forward slash (for
example, do not enter /ds1/psft/).
ThebasefolderisusedtoextractthePeopleSoftDPKs.Itisalso
usedtodeploythePeopleSoftcomponents.Thisfoldershouldbe
accessibleontheWindowsVM,musthavewritepermissionsandshould
haveenoughfreespace
EnterthePeopleSoftBaseFolder:
Areyouhappywithyouranswer?[Y|n|q]:
The script validates if there is enough free space available under the specified base directory for the
PeopleSoft environment. The PeopleSoft environment setup is aborted if there is not enough free space.
Note. A mid-tier setup of a PeopleSoft environment requires about 25 GB of disk space.
CheckingiftheBaseFolderhasEnoughFreeSpace:[OK]
5. Specify the type of database platform.
Enter MSSQL for Microsoft SQL Server, DB2ODBC for DB2 for z/OS, or ORACLE.
EnterthePeopleSoftdatabaseplatform[ORACLE]:
6. Specify whether you want support for a Unicode database.
IsthePeopleSoftdatabaseunicode?[Y|n]:
7. Enter y to continue with the script.
Areyouhappywithyouranswers?[y|n]:y
EncryptingthePasswordsintheUserData:[OK]
UpdatingthePuppetHieraYAMLFileswithUserData:[OK]
8. If you want to continue running the initialization script using the default configuration, answer y (yes) to the
following prompt, and continue with the next step.
If you want to customize the PeopleSoft environment using the Puppet YAML files, answer n (no) to stop the
script.
ThebootstrapscriptisreadytodeployandconfigurethePeopleSoft
environmentusingthedefaultconfigurationdefinedinthePuppet
HieraYAMLfiles.Youcanproceedbyanswering'y'atthefollowing
prompt.And,ifyouwanttocustomizetheenvironmentbyoverriding
thedefaultconfiguration,youcananswer'n'.Ifyouanswer'n',you
shouldfollowtheinstructionsinthePeopleSoftInstallationGuide
forcreatingthecustomizationHieraYAMLfileandrunningthePuppet
'apply'commanddirectlytocontinuewiththesetupofthePeopleSoft
environment
Doyouwanttocontinuewiththedefaultinitializationprocess?[y|n]:
9. Review the status messages as the script runs Puppet profiles to set up the PeopleSoft environment.
A message of [ OK ] indicates that the profile has been applied successfully while a message [FAILED]
indicates that the profile application failed.
Upon successful completion, the DPK setup script displays the following message:

Chapter 2 Deploying the PeopleSoft PeopleTools Deployment Packages
Copyright © 2022, Oracle and/or its affiliates. All Rights Reserved.
77
ThePeopleSoftEnvironmentSetupProcessEnded.
The complete setup log is written to the file psft_dpk_setup.log in the same location as the DPK setup script.
Task 2-7: Running the DPK Setup Script to Deploy an Application
Server Domain
This section discusses:
• Understanding the Application Server Domain Deployment
• Running the DPK Setup Script for the Application Server Domain Deployment on Microsoft Windows
• Running the DPK Setup Script for the Application Server Domain Deployment on Linux, AIX, HP-UX, or
Solaris as the Root User
• Running the DPK Setup Script for the Application Server Domain Deployment on Linux, AIX, HP-UX, or
Solaris as a Non-Root User
Understanding the Application Server Domain Deployment
Use this option to set up an application server domain only, for example, on a host separate from the database.
The deployment includes the following:
• PS_HOME
installed to the default location under the DPK base directory.
• PS_CFG_HOME installed to the default location
• Oracle Tuxedo installed to the default location under the base directory
• Oracle WebLogic installed to the default location under the base directory
• PeopleSoft application server domain is installed and running.
• The Microsoft Windows DPKs include Microsoft Visual C++ Redistributable Packages for Visual Studio,
which include required Microsoft C++ runtime libraries
The script requires the following information:
• Database platform type
• Database name
• Database host name
• Database port
• Unicode or non-Unicode
• PeopleSoft Connect ID and password
• PeopleSoft operator ID and password
• Application Server Domain Connection password (optional)
If you are installing on Linux, AIX, HP-UX, or Solaris, see the information about running as non-root in the
section Reviewing the DPK Setup Script Options.
In addition, ensure that you fulfill the items in the Prerequisites section in the task Running the DPK Setup Script
for Mid-Tier Deployment.

Deploying the PeopleSoft PeopleTools Deployment Packages Chapter 2
78
Copyright © 2022, Oracle and/or its affiliates. All Rights Reserved.
See Also
"Using and Maintaining the PeopleSoft Environment," Using the PeopleSoft Installation
Task 2-7-1: Running the DPK Setup Script for the Application Server
Domain Deployment on Microsoft Windows
This procedure to deploy an application server domain assumes you have obtained the four PeopleSoft
PeopleTools DPK zip files and saved them in DPK_INSTALL.
1. Extract the first zip file (FILENAME_1ofn.zip).
Note. It is a good idea to extract into the same directory where you downloaded the zip files, DPK_INSTALL.
The extraction creates the DPK_INSTALL/setup folder and other files.
2. Open a command prompt with Run as Administrator.
3. Change directory to DPK_INSTALL/setup.
4. Run the script as follows:
Note. If you see an error message similar to "The application has failed to start because its side-by-side
configuration is incorrect," it indicates that your machine does not include the necessary Microsoft C++
runtime libraries. Go to the Microsoft Web site, locate the Microsoft Visual C++ redistributable package for
your system, and install as directed.
• If you extracted the first zip file into the same directory where you downloaded the zip files, use this
command:
psft-dpk-setup.bat--env_typemidtier--domain_typeappserver
•
If you extracted the first zip file into a different directory, include the option dpk_src_dir to specify
the location of the downloaded zip files, such as
DPK_INSTALL,
as follows:
psft-dpk-setup.bat--dpk_src_dirDPK_INSTALL--env_typemidtier⇒
--domain_typeappserver
5. Specify whether to install the Puppet software if necessary at the next prompt.
The script verifies if Puppet software is installed in the default location specified by the DPKs. If not, answer
y
(yes) to install the Puppet software and
n
to abort the PeopleSoft environment setup process. The default
action (if nothing is entered at the prompt) is to install the software.
If there is any error during the Puppet software installation, the script aborts the setup process.
VerifyingifPuppetSoftwareisInstalled:
PuppetSoftwareisnotinstalledontheWindowsHost.IfPeopleSoft
environmentneedstobesetuponthisHost,Puppetsoftware
shouldbeInstalled.
DoyouwanttoproceedwiththePuppetInstallation?[Y|n]:y
InstallingPuppetSoftwareontheWindowsHost:[OK]
6. At the following prompt, enter a location that is accessible to the host to be used as the PeopleSoft base

Chapter 2 Deploying the PeopleSoft PeopleTools Deployment Packages
Copyright © 2022, Oracle and/or its affiliates. All Rights Reserved.
79
directory, referred to here as BASE_DIR.
The base directory is used to extract the DPKs as well as for deploying PeopleSoft components. The script
creates the base directory if it does not exist.
Use forward slashes only (/) when specifying the base directory; for example, C:/psft. Do not use a base
directory name that begins with a number.
ThebasefolderisusedtoextractthePeopleSoftDPKs.Itisalso
usedtodeploythePeopleSoftcomponents.Thisfoldershouldbe
accessibleontheWindowsVM,musthavewritepermissionsandshould
haveenoughfreespace
EnterthePeopleSoftBaseFolder:
Areyouhappywithyouranswer?[Y|n|q]:
The script validates if there is enough free space available under the specified base directory for the
PeopleSoft environment. The PeopleSoft environment setup is aborted if there is not enough free space.
Note. A mid-tier setup of a PeopleSoft environment requires about 25 GB of disk space.
CheckingiftheBaseFolderhasEnoughFreeSpace:[OK]
7. Specify the type of database platform.
Enter MSSQL for Microsoft SQL Server, for DB2 for z/OS, or ORACLE.
EnterthePeopleSoftdatabaseplatform[ORACLE]:
8. Specify whether you want a Unicode database.
IsthePeopleSoftdatabaseunicode?[Y|n]:
9. Enter the database name.
EnterthePeopleSoftdatabasename:
10. Enter the database service name.
The default is the same as the database name. Do not enter an IP address.
EnterthePeopleSoftdatabaseservicename[PSFT92DB]:
11. Enter the name of the host where the database is installed.
Do not enter an IP address.
EnterthePeopleSoftdatabasehostname:
12. Enter the database listener port number:
EnterthePeopleSoftdatabaseport[1521]:
13. Enter the PeopleSoft Connect ID at the following prompt:
The default is people.
EnterthePeopleSoftdatabaseConnectID[people]:
14. Enter a password for the PeopleSoft Connect ID, and enter again on the next line, at the following prompt.
See E-DPK - Password restrictions are not reflected in the DPK setup script prompts, My Oracle Support, Doc
ID 2639270.1.

Deploying the PeopleSoft PeopleTools Deployment Packages Chapter 2
80
Copyright © 2022, Oracle and/or its affiliates. All Rights Reserved.
EnterthePeopleSoftdatabaseConnectID[people]password.
Ensurethatthepasswordmeetsthelengthandcomplexityrequirements
foryourdatabaseplatform:
Re-EnterthePeopleSoftdatabaseConnectIDpassword:
15. Enter the PeopleSoft user ID (operator ID), such as PS or VP1.
EnterthePeopleSoftdatabaseOperatorID[VP1]:
16. Enter the password twice for the PeopleSoft operator ID.
EnterthePeopleSoftdatabaseOperatorID[VP1]password.
Ensurethatthepasswordisbetween1and32charactersinlength.
Youmayincludethesespecialcharacters!@#$%^&:
Re-EnterthePeopleSoftdatabaseOperatorIDpassword:
17. Enter the Application Server Domain Connection password, following the guidelines in the prompt.
Note. This is an optional password. If no password is entered, the connection between Web Server and
Application Server will not be password protected.
[Optional]EnteranewApplicationServerDomainconnectionpassword.
Ensurethatthepasswordisbetween8and30charactersinlength.
Youmayincludethesespecialcharacters!@#$%^&:
Re-EntertheApplicationServerDomainconnectionpassword:
18. Enter y to continue with the script.
Areyouhappywithyouranswers?[y|n]:y
EncryptingthePasswordsintheUserData:[OK]
UpdatingthePuppetHieraYAMLFileswithUserData:[OK]
19. If you want to continue running the initialization script using the default configuration, answer y (yes) to the
following prompt, and continue with the next step.
If you want to customize the PeopleSoft environment using the Puppet YAML files, answer n (no) to stop the
script.
ThebootstrapscriptisreadytodeployandconfigurethePeopleSoft
environmentusingthedefaultconfigurationdefinedinthePuppet
HieraYAMLfiles.Youcanproceedbyanswering'y'atthefollowing
prompt.And,ifyouwanttocustomizetheenvironmentbyoverriding
thedefaultconfiguration,youcananswer'n'.Ifyouanswer'n',you
shouldfollowtheinstructionsinthePeopleSoftInstallationGuide
forcreatingthecustomizationHieraYAMLfileandrunningthePuppet
'apply'commanddirectlytocontinuewiththesetupofthePeopleSoft
environment
Doyouwanttocontinuewiththedefaultinitializationprocess?[y|n]:
20. Review the status messages as the script runs Puppet profiles to set up the PeopleSoft environment.
A message of [ OK ] indicates that the profile has been applied successfully while a message [FAILED]
indicates that the profile application failed.
Upon successful completion, the DPK setup script displays the following message:
ThePeopleSoftEnvironmentSetupProcessEnded.

Chapter 2 Deploying the PeopleSoft PeopleTools Deployment Packages
Copyright © 2022, Oracle and/or its affiliates. All Rights Reserved.
81
The complete setup log is written to the file psft_dpk_setup.log in the same location as the DPK setup script.
Task 2-7-2: Running the DPK Setup Script for the Application Server
Domain Deployment on Linux, AIX, HP-UX, or Solaris as the Root User
This procedure to deploy an application server domain assumes you have obtained the four PeopleSoft
PeopleTools DPK zip files and saved them in DPK_INSTALL.
If you are installing the PeopleSoft environment as a non-root user, see the section Running the DPK Setup Script
for the Application Server Domain Deployment on Linux, AIX, HP-UX, or Solaris as a Non-Root User.
Note. Some of the informational script messages have been omitted for brevity.
To deploy the domain:
1. Extract the first zip file (FILENAME_1ofn.zip).
Note. It is a good idea to extract into the same directory where you downloaded the zip files, DPK_INSTALL.
The extraction creates the DPK_INSTALL/setup folder and other files.
2. Open a terminal window as root.
3. Change directory to DPK_INSTALL/setup.
4. Run the script as follows:
•
If you extracted the first zip file into the same directory where you downloaded the zip files, use this
command:
./psft-dpk-setup.sh--env_typemidtier--domain_typeappserver
• If you extracted the first zip file into a different directory, include the option dpk_src_dir to specify
the location of the downloaded zip files, such as DPK_INSTALL, as follows:
./psft-dpk-setup.sh--dpk_src_dirDPK_INSTALL--env_typemidtier⇒
--domain_typeappserver
5. Specify whether to install the Puppet software if necessary at the next prompt.
The script verifies if Puppet software is installed in the default location specified by the DPKs. If not, answer
y
(yes) to install the Puppet software and
n
to abort the PeopleSoft environment setup process. The default
action (if nothing is entered at the prompt) is to install the software.
If there is any error during the Puppet software installation, the script aborts the setup process.
VerifyingifPuppetSoftwareisInstalled:
PuppetSoftwareisnotinstalledontheLinuxHost.IfPeopleSoft
environmentneedstobesetuponthisHost,Puppetsoftware
shouldbeInstalled.
DoyouwanttoproceedwiththePuppetInstallation?[Y|n]:y
InstallingPuppetSoftwareontheLinuxHost:[OK]
6. At the following prompt, enter a location that is accessible to the host to be used as the PeopleSoft base
directory, referred to here as BASE_DIR.
The base directory is used to extract the DPKs as well as for deploying PeopleSoft components. The script

Deploying the PeopleSoft PeopleTools Deployment Packages Chapter 2
82
Copyright © 2022, Oracle and/or its affiliates. All Rights Reserved.
creates the base directory if it does not exist.
Use forward slashes only (/) when specifying the base directory; for example, /home/psft. Do not use a base
directory name that begins with a number. Do not end the base directory name with a forward slash (for
example, do not enter /ds1/psft/).
ThebasedirectoryisusedtoextractthePeopleSoftDPKs.Itisalso
usedtodeploythePeopleSoftcomponents.Thisdirectoryshouldbe
accessibleontheLinuxVM,musthavewritepermissionsandshould
haveenoughfreespace
EnterthePeopleSoftBaseDirectory:
Areyouhappywithyouranswer?[Y|n|q]:
The script validates if there is enough free space available under the specified base directory for the
PeopleSoft environment. The PeopleSoft environment setup is aborted if there is not enough free space.
Note. A mid-tier setup of a PeopleSoft environment requires about 25 GB of disk space.
CheckingiftheBaseFolderhasEnoughFreeSpace:[OK]
7. Specify a writable directory for the user home directory at the following prompt.
You see this prompt beginning with PeopleSoft PeopleTools 8.58.04.
The PeopleSoft environment setup using DPKs creates local users on the host. These users deploy the
PeopleSoft components and own the PeopleSoft runtime domains. Enter a new location to be used for creating
the home directories for these local users, or specify the default home directory, /home.
EnteradirectoryontheLinuxVMthatiswritable[/home]:/ds1
Areyouhappywithyouranswer?[y|n|q]:
If the script finds that the location you enter (either a new location or the default) is not writable, it exits with
the following message.
TheUserdoesnothavewritepermissiontocreatetheuser'shome
directoryunder[<user input>]ontheLinuxVM.
ExitingthePeopleSoftenvironmentsetupprocess.
8. Specify the type of database platform.
Enter DB2ODBC for DB2 for z/OS, or ORACLE.
EnterthePeopleSoftdatabaseplatform[ORACLE]:
9. Specify whether you want a Unicode database.
IsthePeopleSoftdatabaseunicode?[Y|n]:
10. Enter the database name.
EnterthePeopleSoftdatabasename:
11. Enter the database service name.
The default is the same as the database name. Do not enter an IP address.
EnterthePeopleSoftdatabaseservicename[PSFT92DB]:
12. Enter the name of the host where the database is installed.
Do not enter an IP address.

Chapter 2 Deploying the PeopleSoft PeopleTools Deployment Packages
Copyright © 2022, Oracle and/or its affiliates. All Rights Reserved.
83
EnterthePeopleSoftdatabasehostname:
13. Enter the database listener port number:
EnterthePeopleSoftdatabaseport[1521]:
14. Enter the PeopleSoft Connect ID at the following prompt:
The default is people.
EnterthePeopleSoftdatabaseConnectID[people]:
15. Enter a password for the PeopleSoft Connect ID, and enter again on the next line, at the following prompt.
See E-DPK - Password restrictions are not reflected in the DPK setup script prompts, My Oracle Support, Doc
ID 2639270.1.
EnterthePeopleSoftdatabaseConnectID[people]password.
Ensurethatthepasswordmeetsthelengthandcomplexityrequirements
foryourdatabaseplatform:
Re-EnterthePeopleSoftdatabaseConnectIDpassword:
16. Enter the PeopleSoft user ID (operator ID), such as PS or VP1.
EnterthePeopleSoftdatabaseOperatorID[VP1]:
17. Enter the password twice for the PeopleSoft operator ID.
EnterthePeopleSoftdatabaseOperatorID[VP1]password.
Ensurethatthepasswordisbetween1and32charactersinlength.
Youmayincludethesespecialcharacters!@#$%^&:
Re-EnterthePeopleSoftdatabaseOperatorIDpassword:
18. Enter the Application Server Domain Connection password, following the guidelines in the prompt.
Note. This is an optional password. If no password is entered, the connection between Web Server and
Application Server will not be password protected.
[Optional]EnteranewApplicationServerDomainconnectionpassword.
Ensurethatthepasswordisbetween8and30charactersinlength.
Youmayincludethesespecialcharacters!@#$%^&:
Re-EntertheApplicationServerDomainconnectionpassword:
19. Enter
y
to continue with the script.
Areyouhappywithyouranswers?[y|n]:y
EncryptingthePasswordsintheUserData:[OK]
UpdatingthePuppetHieraYAMLFileswithUserData:[OK]
20. If you want to continue running the initialization script using the default configuration, answer
y
(yes) to the
following prompt, and continue with the next step.
If you want to customize the PeopleSoft environment using the Puppet YAML files, answer
n
(no) to stop the
script.
ThebootstrapscriptisreadytodeployandconfigurethePeopleSoft
environmentusingthedefaultconfigurationdefinedinthePuppet
HieraYAMLfiles.Youcanproceedbyanswering'y'atthefollowing
prompt.And,ifyouwanttocustomizetheenvironmentbyoverriding
thedefaultconfiguration,youcananswer'n'.Ifyouanswer'n',you
shouldfollowtheinstructionsinthePeopleSoftInstallationGuide

Deploying the PeopleSoft PeopleTools Deployment Packages Chapter 2
84
Copyright © 2022, Oracle and/or its affiliates. All Rights Reserved.
forcreatingthecustomizationHieraYAMLfileandrunningthePuppet
'apply'commanddirectlytocontinuewiththesetupofthePeopleSoft
environment
Doyouwanttocontinuewiththedefaultinitializationprocess?[y|n]:
21. Review the status messages as the script runs Puppet profiles to set up the PeopleSoft environment.
A message of [ OK ] indicates that the profile has been applied successfully while a message [FAILED]
indicates that the profile application failed.
Upon successful completion, the DPK setup script displays the following message:
ThePeopleSoftEnvironmentSetupProcessEnded.
The complete setup log is written to the file psft_dpk_setup.log in the same location as the DPK setup script.
Task 2-7-3: Running the DPK Setup Script for the Application Server
Domain Deployment on Linux, AIX, HP-UX, or Solaris as a Non-Root User
This procedure to deploy an application server domain assumes you have fulfilled the prerequisites.
If you are installing the PeopleSoft environment as a non-root user, see the section Running the DPK Setup Script
for the Application Server Domain Deployment on Linux, AIX, HP-UX, or Solaris as the Root User.
Note. Some of the informational script messages have been omitted for brevity.
To deploy the domain as a non-root user:
1. Open a terminal window.
2. Change directory to DPK_INSTALL/setup.
3. Run the script as follows:
• If you extracted the first zip file into the same directory where you downloaded the zip files, use this
command:
./psft-dpk-setup.sh--env_typemidtier--domain_typeappserver
• If you extracted the first zip file into a different directory, include the option dpk_src_dir to specify
the location of the downloaded zip files, such as DPK_INSTALL, as follows:
./psft-dpk-setup.sh--dpk_src_dirDPK_INSTALL--env_typemidtier⇒
--domain_typeappserver
4. If you are running as a non-root user, answer
y
(yes) at the following prompt:
YouarerunningDPKsetupwithoutroot/administratoraccess.
Thisisfineaslongasthesystemadministratorhasperformed
allnecessarytasksandallprerequisiteshavebeenmet.
Pleaseseethedocumentationtodeterminetheprerequitetasks
thatneedtobeperformedtosuccessfullyrunDPKsetup
withoutroot/administratorprivilege.
Wouldyouliketoproceedwiththesetupasanon-rootuser?[y/n]:y
5. At the following prompt, enter a location that is accessible to the host to be used as the PeopleSoft base
directory, referred to here as
BASE_DIR.
The base directory is used to extract the DPKs as well as for deploying PeopleSoft components. The script

Chapter 2 Deploying the PeopleSoft PeopleTools Deployment Packages
Copyright © 2022, Oracle and/or its affiliates. All Rights Reserved.
85
creates the base directory if it does not exist.
Use forward slashes only (/) when specifying the base directory; for example, /home/psft. Do not use a base
directory name that begins with a number. Do not end the base directory name with a forward slash (for
example, do not enter /ds1/psft/).
ThebasedirectoryisusedtoextractthePeopleSoftDPKs.Itisalso
usedtodeploythePeopleSoftcomponents.Thisfoldershouldbe
accessibleontheLinuxVM,musthavewritepermissionsandshould
haveenoughfreespace
EnterthePeopleSoftBaseDirectory:
Areyouhappywithyouranswer?[Y|n|q]:
The script validates if there is enough free space available under the specified base directory for the
PeopleSoft environment. The PeopleSoft environment setup is aborted if there is not enough free space.
Note. A mid-tier setup of a PeopleSoft environment requires about 25 GB of disk space.
CheckingiftheBaseFolderhasEnoughFreeSpace:[OK]
6. Enter a writable directory with at least 10 GB available space for PS_CFG_HOME.
The default is USER_HOME/psft/pt/8.58, where USER_HOME is the home directory for the logged-in user.
The PS_CFG_HOME directory holds the configuration and log files for the PeopleSoft Application Server,
Process Scheduler, and PIA domains.
Enterawritableps_config_homedirectoryforPeopleSoftdomains
withatleast10.0GBspace[/home/psftuser/psft/pt/8.58]:
Areyouhappywithyouranswer?[Y|n|q]:y
7. Specify the type of database platform.
Enter DB2ODBC for DB2 for z/OS, or ORACLE.
EnterthePeopleSoftdatabaseplatform[ORACLE]:
8. Specify whether you want a Unicode database.
IsthePeopleSoftdatabaseunicode?[Y|n]:
9. Enter the database name.
EnterthePeopleSoftdatabasename:
10. Enter the database service name.
The default is the same as the database name. Do not enter an IP address.
EnterthePeopleSoftdatabaseservicename[PSFT92DB]:
11. Enter the name of the host where the database is installed.
Do not enter an IP address.
EnterthePeopleSoftdatabasehostname:
12. Enter the database listener port number:
EnterthePeopleSoftdatabaseport[1521]:
13. Enter the PeopleSoft Connect ID at the following prompt:
The default is people.

Deploying the PeopleSoft PeopleTools Deployment Packages Chapter 2
86
Copyright © 2022, Oracle and/or its affiliates. All Rights Reserved.
EnterthePeopleSoftdatabaseConnectID[people]:
14. Enter a password for the PeopleSoft Connect ID, and enter again on the next line, at the following prompt.
See E-DPK - Password restrictions are not reflected in the DPK setup script prompts, My Oracle Support, Doc
ID 2639270.1.
EnterthePeopleSoftdatabaseConnectID[people]password.
Ensurethatthepasswordmeetsthelengthandcomplexityrequirements
foryourdatabaseplatform:
Re-EnterthePeopleSoftdatabaseConnectIDpassword:
15. Enter the PeopleSoft user ID (operator ID), such as PS or VP1.
EnterthePeopleSoftdatabaseOperatorID[VP1]:
16. Enter the password twice for the PeopleSoft operator ID.
EnterthePeopleSoftdatabaseOperatorID[VP1]password.
Ensurethatthepasswordisbetween1and32charactersinlength.
Youmayincludethesespecialcharacters!@#$%^&:
Re-EnterthePeopleSoftdatabaseOperatorIDpassword:
17. Enter the Application Server Domain Connection password, following the guidelines in the prompt.
Note. This is an optional password. If no password is entered, the connection between Web Server and
Application Server will not be password protected.
[Optional]EnteranewApplicationServerDomainconnectionpassword.
Ensurethatthepasswordisbetween8and30charactersinlength.
Youmayincludethesespecialcharacters!@#$%^&:
Re-EntertheApplicationServerDomainconnectionpassword:
18. Enter y to continue with the script.
Areyouhappywithyouranswers?[y|n]:y
EncryptingthePasswordsintheUserData:[OK]
UpdatingthePuppetHieraYAMLFileswithUserData:[OK]
19. If you want to continue running the initialization script using the default configuration, answer y (yes) to the
following prompt, and continue with the next step.
If you want to customize the PeopleSoft environment using the Puppet YAML files, answer n (no) to stop the
script.
ThebootstrapscriptisreadytodeployandconfigurethePeopleSoft
environmentusingthedefaultconfigurationdefinedinthePuppet
HieraYAMLfiles.Youcanproceedbyanswering'y'atthefollowing
prompt.And,ifyouwanttocustomizetheenvironmentbyoverriding
thedefaultconfiguration,youcananswer'n'.Ifyouanswer'n',you
shouldfollowtheinstructionsinthePeopleSoftInstallationGuide
forcreatingthecustomizationHieraYAMLfileandrunningthePuppet
'apply'commanddirectlytocontinuewiththesetupofthePeopleSoft
environment
Doyouwanttocontinuewiththedefaultinitializationprocess?[y|n]:
20. Review the status messages as the script runs Puppet profiles to set up the PeopleSoft environment.

Chapter 2 Deploying the PeopleSoft PeopleTools Deployment Packages
Copyright © 2022, Oracle and/or its affiliates. All Rights Reserved.
87
A message of [ OK ] indicates that the profile has been applied successfully while a message [FAILED]
indicates that the profile application failed.
Upon successful completion, the DPK setup script displays the following message:
ThePeopleSoftEnvironmentSetupProcessEnded.
If you are running as a non-root user, the setup.log is written to the file <USER_HOME>/
psft_dpk_work/psft_dpk_setup_<PID>.log, where <USER_HOME> is the home directory for the user
running the script, and <PID> is a process ID
Task 2-8: Running the DPK Setup Script to Deploy a Process
Scheduler Domain
This section discusses:
• Understanding the Process Scheduler Domain Deployment
•
Running the DPK Setup Script for the Process Scheduler Domain Deployment on Microsoft Windows
•
Running the DPK Setup Script for the Process Scheduler Domain Deployment on Linux, AIX, HP-UX, or
Solaris as the Root User
•
Running the DPK Setup Script for the Process Scheduler Domain Deployment on Linux, AIX, HP-UX, or
Solaris as a Non-Root User
Understanding the Process Scheduler Domain Deployment
Use this option to set up a single Process Scheduler domain, for example, to install on a host separate from the
database. The deployment includes the following:
• PS_HOME installed to the default location under the DPK base directory.
• PS_CFG_HOME installed to the default location
• Oracle Tuxedo installed to the default location under the DPK base directory
• Oracle WebLogic installed to the default location under the DPK base directory
• PeopleSoft Process Scheduler domain is installed and running.
• The Microsoft Windows DPKs include Microsoft Visual C++ Redistributable Packages for Visual Studio,
which include required Microsoft C++ runtime libraries
The script requires the following information:
• Database platform type
• Database name
• Database host name
• Database port
• Unicode or non-Unicode
• PeopleSoft Connect ID and password
•
PeopleSoft operator ID and password
•
Application Server Domain Connection password (optional)
In addition, ensure that you fulfill the items in the Prerequisites section in the task Running the DPK Setup Script
for Mid-Tier Deployment.
Deploying the PeopleSoft PeopleTools Deployment Packages Chapter 2
88
Copyright © 2022, Oracle and/or its affiliates. All Rights Reserved.
See Also
"Using and Maintaining the PeopleSoft Environment," Using the PeopleSoft Installation
Task 2-8-1: Running the DPK Setup Script for the Process Scheduler
Domain Deployment on Microsoft Windows
This procedure to deploy a Process Scheduler domain assumes that you have obtained the four PeopleSoft
PeopleTools DPK zip files and saved them in DPK_INSTALL.
1. Extract the first zip file (FILENAME_1ofn.zip).
Note. It is a good idea to extract into the same directory where you downloaded the zip files, DPK_INSTALL.
The extraction creates the DPK_INSTALL/setup folder and other files.
2. Open a command prompt with Run as Administrator.
3. Change directory to DPK_INSTALL/setup.
4. Run the script as follows:
Note. If you see an error message similar to "The application has failed to start because its side-by-side
configuration is incorrect," it indicates that your machine does not include the necessary Microsoft C++
runtime libraries. Go to the Microsoft Web site, locate the Microsoft Visual C++ redistributable package for
your system, and install as directed.
• If you extracted the first zip file into the same directory where you downloaded the zip files, use this
command:
psft-dpk-setup.bat--env_typemidtier--domain_typeprcs
•
If you extracted the first zip file into a different directory, include the option dpk_src_dir to specify
the location of the downloaded zip files, such as
DPK_INSTALL,
as follows:
psft-dpk-setup.bat--dpk_src_dirDPK_INSTALL--env_typemidtier⇒
--domain_typeprcs
5. Specify whether to install the Puppet software if necessary at the next prompt.
The script verifies if Puppet software is installed in the default location specified by the DPKs. If not, answer
y
(yes) to install the Puppet software and
n
to abort the PeopleSoft environment setup process. The default
action (if nothing is entered at the prompt) is to install the software.
If there is any error during the Puppet software installation, the script aborts the setup process.
VerifyingifPuppetSoftwareisInstalled:
PuppetSoftwareisnotinstalledontheWindowsHost.IfPeopleSoft
environmentneedstobesetuponthisHost,Puppetsoftware
shouldbeInstalled.
DoyouwanttoproceedwiththePuppetInstallation?[Y|n]:y
InstallingPuppetSoftwareontheWindowsHost:[OK]
6. At the following prompt, enter a location that is accessible to the host to be used as the PeopleSoft base

Chapter 2 Deploying the PeopleSoft PeopleTools Deployment Packages
Copyright © 2022, Oracle and/or its affiliates. All Rights Reserved.
89
directory, referred to here as BASE_DIR.
The base directory is used to extract the DPKs as well as for deploying PeopleSoft components. The script
creates the base directory if it does not exist.
Use forward slashes only (/) when specifying the base directory; for example, C:/psft. Do not use a base
directory name that begins with a number.
ThebasefolderisusedtoextractthePeopleSoftDPKs.Itisalso
usedtodeploythePeopleSoftcomponents.Thisfoldershouldbe
accessibleontheWindowsVM,musthavewritepermissionsandshould
haveenoughfreespace
EnterthePeopleSoftBaseFolder:
Areyouhappywithyouranswer?[Y|n|q]:
The script validates if there is enough free space available under the specified base directory for the
PeopleSoft environment. The PeopleSoft environment setup is aborted if there is not enough free space.
Note. A mid-tier setup of a PeopleSoft environment requires about 25 GB of disk space.
CheckingiftheBaseFolderhasEnoughFreeSpace:[OK]
7. Specify the type of database platform.
Enter MSSQL for Microsoft SQL Server, DB2ODBC for DB2 for z/OS, or ORACLE.
EnterthePeopleSoftdatabaseplatform[ORACLE]:
8. Specify whether you want a Unicode database.
IsthePeopleSoftdatabaseunicode?[Y|n]:
9. Enter the database name.
EnterthePeopleSoftdatabasename:
10. Enter the database service name.
The default is the same as the database name. Do not enter an IP address.
EnterthePeopleSoftdatabaseservicename[PSFT92DB]:
11. Enter the name of the host where the database is installed.
Do not enter an IP address.
EnterthePeopleSoftdatabasehostname:
12. Enter the database listener port number:
EnterthePeopleSoftdatabaseport[1521]:
13. Enter the PeopleSoft Connect ID at the following prompt:
The default is people.
EnterthePeopleSoftdatabaseConnectID[people]:
14. Enter a password for the PeopleSoft Connect ID, and enter again on the next line, at the following prompt.
See E-DPK - Password restrictions are not reflected in the DPK setup script prompts, My Oracle Support, Doc
ID 2639270.1.

Deploying the PeopleSoft PeopleTools Deployment Packages Chapter 2
90
Copyright © 2022, Oracle and/or its affiliates. All Rights Reserved.
EnterthePeopleSoftdatabaseConnectID[people]password.
Ensurethatthepasswordmeetsthelengthandcomplexityrequirements
foryourdatabaseplatform:
Re-EnterthePeopleSoftdatabaseConnectIDpassword:
15. Enter the PeopleSoft user ID (operator ID), such as PS or VP1.
EnterthePeopleSoftdatabaseOperatorID[VP1]:
16. Enter the password twice for the PeopleSoft operator ID.
EnterthePeopleSoftdatabaseOperatorID[VP1]password.
Ensurethatthepasswordisbetween1and32charactersinlength.
Youmayincludethesespecialcharacters!@#$%^&:
Re-EnterthePeopleSoftdatabaseOperatorIDpassword:
17. Enter the Application Server Domain Connection password, following the guidelines in the prompt.
Note. This is an optional password. If no password is entered, the connection between Web Server and
Application Server will not be password protected.
[Optional]EnteranewApplicationServerDomainconnectionpassword.
Ensurethatthepasswordisbetween8and30charactersinlength.
Youmayincludethesespecialcharacters!@#$%^&:
Re-EntertheApplicationServerDomainconnectionpassword:
18. Enter y to continue with the script.
Areyouhappywithyouranswers?[y|n]:y
EncryptingthePasswordsintheUserData:[OK]
UpdatingthePuppetHieraYAMLFileswithUserData:[OK]
19. If you want to continue running the initialization script using the default configuration, answer y (yes) to the
following prompt, and continue with the next step.
If you want to customize the PeopleSoft environment using the Puppet YAML files, answer n (no) to stop the
script.
ThebootstrapscriptisreadytodeployandconfigurethePeopleSoft
environmentusingthedefaultconfigurationdefinedinthePuppet
HieraYAMLfiles.Youcanproceedbyanswering'y'atthefollowing
prompt.And,ifyouwanttocustomizetheenvironmentbyoverriding
thedefaultconfiguration,youcananswer'n'.Ifyouanswer'n',you
shouldfollowtheinstructionsinthePeopleSoftInstallationGuide
forcreatingthecustomizationHieraYAMLfileandrunningthePuppet
'apply'commanddirectlytocontinuewiththesetupofthePeopleSoft
environment
Doyouwanttocontinuewiththedefaultinitializationprocess?[y|n]:
20. Review the status messages as the script runs Puppet profiles to set up the PeopleSoft environment.
A message of [ OK ] indicates that the profile has been applied successfully while a message [FAILED]
indicates that the profile application failed.
Upon successful completion, the DPK setup script displays the following message:
ThePeopleSoftEnvironmentSetupProcessEnded.

Chapter 2 Deploying the PeopleSoft PeopleTools Deployment Packages
Copyright © 2022, Oracle and/or its affiliates. All Rights Reserved.
91
The complete setup log is written to the file psft_dpk_setup.log in the same location as the DPK setup script.
Task 2-8-2: Running the DPK Setup Script for the Process Scheduler
Domain Deployment on Linux, AIX, HP-UX, or Solaris as the Root User
This procedure to deploy a Process Scheduler domain assumes that you have obtained the four PeopleSoft
PeopleTools DPK zip files and saved them in DPK_INSTALL.
Note. Some of the informational script messages have been omitted for brevity.
If you are installing the PeopleSoft environment as a non-root user, see the section Running the DPK Setup Script
for the Process Scheduler Domain Deployment on Linux, AIX, HP-UX, or Solaris as a Non-Root User.
To deploy the domain:
1. Extract the first zip file (FILENAME_1ofn.zip).
Note. It is a good idea to extract into the same directory where you downloaded the zip files, DPK_INSTALL.
The extraction creates the DPK_INSTALL/setup folder and other files.
2. Open a terminal window as root or a non-root user.
3. Change directory to DPK_INSTALL/setup.
4. Run the script as follows:
•
If you extracted the first zip file into the same directory where you downloaded the zip files, use this
command:
./psft-dpk-setup.sh--env_typemidtier--domain_typeprcs
• If you extracted the first zip file into a different directory, include the option dpk_src_dir to specify
the location of the downloaded zip files, such as DPK_INSTALL, as follows:
./psft-dpk-setup.sh--dpk_src_dirDPK_INSTALL--env_typemidtier⇒
--domain_typeprcs
5. Specify whether to install the Puppet software if necessary at the next prompt.
The script verifies if Puppet software is installed in the default location specified by the DPKs. If not, answer
y
(yes) to install the Puppet software and
n
to abort the PeopleSoft environment setup process. The default
action (if nothing is entered at the prompt) is to install the software.
If there is any error during the Puppet software installation, the script aborts the setup process.
VerifyingifPuppetSoftwareisInstalled:
PuppetSoftwareisnotinstalledontheLinuxHost.IfPeopleSoft
environmentneedstobesetuponthisHost,Puppetsoftware
shouldbeInstalled.
DoyouwanttoproceedwiththePuppetInstallation?[Y|n]:y
InstallingPuppetSoftwareontheLinuxHost:[OK]
6. At the following prompt, enter a location that is accessible to the host to be used as the PeopleSoft base
directory, referred to here as BASE_DIR.
The base directory is used to extract the DPKs as well as for deploying PeopleSoft components. The script

Deploying the PeopleSoft PeopleTools Deployment Packages Chapter 2
92
Copyright © 2022, Oracle and/or its affiliates. All Rights Reserved.
creates the base directory if it does not exist.
Use forward slashes only (/) when specifying the base directory; for example, /home/psft. Do not use a base
directory name that begins with a number. Do not end the base directory name with a forward slash (for
example, do not enter /ds1/psft/).
ThebasefolderisusedtoextractthePeopleSoftDPKs.Itisalso
usedtodeploythePeopleSoftcomponents.Thisfoldershouldbe
accessibleontheLinuxVM,musthavewritepermissionsandshould
haveenoughfreespace
EnterthePeopleSoftBaseFolder:
Areyouhappywithyouranswer?[Y|n|q]:
The script validates if there is enough free space available under the specified base directory for the
PeopleSoft environment. The PeopleSoft environment setup is aborted if there is not enough free space.
Note. A mid-tier setup of a PeopleSoft environment requires about 25 GB of disk space.
CheckingiftheBaseDirectoryhasEnoughFreeSpace:[OK]
7. Specify a writable directory for the user home directory at the following prompt.
You see this prompt beginning with PeopleSoft PeopleTools 8.58.04.
The PeopleSoft environment setup using DPKs creates local users on the host. These users deploy the
PeopleSoft components and own the PeopleSoft runtime domains. Enter a new location to be used for creating
the home directories for these local users, or specify the default home directory, /home.
EnteradirectoryontheLinuxVMthatiswritable[/home]:/ds1
Areyouhappywithyouranswer?[y|n|q]:
If the script finds that the location you enter (either a new location or the default) is not writable, it exits with
the following message.
TheUserdoesnothavewritepermissiontocreatetheuser'shome
directoryunder[<user input>]ontheLinuxVM.
ExitingthePeopleSoftenvironmentsetupprocess.
8. Specify the type of database platform.
Enter DB2ODBC for DB2 for z/OS or ORACLE.
EnterthePeopleSoftdatabaseplatform[ORACLE]:
9. Specify whether you want a Unicode database.
IsthePeopleSoftdatabaseunicode?[Y|n]:
10. Enter the database name.
EnterthePeopleSoftdatabasename:
11. Enter the database service name.
The default is the same as the database name. Do not enter an IP address.
EnterthePeopleSoftdatabaseservicename[PSFT92DB]:
12. Enter the name of the host where the database is installed.
Do not enter an IP address.

Chapter 2 Deploying the PeopleSoft PeopleTools Deployment Packages
Copyright © 2022, Oracle and/or its affiliates. All Rights Reserved.
93
EnterthePeopleSoftdatabasehostname:
13. Enter the database listener port number:
EnterthePeopleSoftdatabaseport[1521]:
14. Enter the PeopleSoft Connect ID at the following prompt:
The default is people.
EnterthePeopleSoftdatabaseConnectID[people]:
15. Enter a password for the PeopleSoft Connect ID, and enter again on the next line, at the following prompt.
See E-DPK - Password restrictions are not reflected in the DPK setup script prompts, My Oracle Support, Doc
ID 2639270.1.
EnterthePeopleSoftdatabaseConnectID[people]password.
Ensurethatthepasswordmeetsthelengthandcomplexityrequirements
foryourdatabaseplatform:
Re-EnterthePeopleSoftdatabaseConnectIDpassword:
16. Enter the PeopleSoft user ID (operator ID), such as PS or VP1.
EnterthePeopleSoftdatabaseOperatorID[VP1]:
17. Enter the password twice for the PeopleSoft operator ID.
EnterthePeopleSoftdatabaseOperatorID[VP1]password.
Ensurethatthepasswordisbetween1and32charactersinlength.
Youmayincludethesespecialcharacters!@#$%^&:
Re-EnterthePeopleSoftdatabaseOperatorIDpassword:
18. Enter the Application Server Domain Connection password, following the guidelines in the prompt.
Note. This is an optional password. If no password is entered, the connection between Web Server and
Application Server will not be password protected.
[Optional]EnteranewApplicationServerDomainconnectionpassword.
Ensurethatthepasswordisbetween8and30charactersinlength.
Youmayincludethesespecialcharacters!@#$%^&:
Re-EntertheApplicationServerDomainconnectionpassword:
19. Enter
y
to continue with the script.
Areyouhappywithyouranswers?[y|n]:y
EncryptingthePasswordsintheUserData:[OK]
UpdatingthePuppetHieraYAMLFileswithUserData:[OK]
20. If you want to continue running the initialization script using the default configuration, answer
y
(yes) to the
following prompt, and continue with the next step.
If you want to customize the PeopleSoft environment using the Puppet YAML files, answer
n
(no) to stop the
script.
ThebootstrapscriptisreadytodeployandconfigurethePeopleSoft
environmentusingthedefaultconfigurationdefinedinthePuppet
HieraYAMLfiles.Youcanproceedbyanswering'y'atthefollowing
prompt.And,ifyouwanttocustomizetheenvironmentbyoverriding
thedefaultconfiguration,youcananswer'n'.Ifyouanswer'n',you
shouldfollowtheinstructionsinthePeopleSoftInstallationGuide

Deploying the PeopleSoft PeopleTools Deployment Packages Chapter 2
94
Copyright © 2022, Oracle and/or its affiliates. All Rights Reserved.
forcreatingthecustomizationHieraYAMLfileandrunningthePuppet
'apply'commanddirectlytocontinuewiththesetupofthePeopleSoft
environment
Doyouwanttocontinuewiththedefaultinitializationprocess?[y|n]:
21. Review the status messages as the script runs Puppet profiles to set up the PeopleSoft environment.
A message of [ OK ] indicates that the profile has been applied successfully while a message [FAILED]
indicates that the profile application failed.
Upon successful completion, the DPK setup script displays the following message:
ThePeopleSoftEnvironmentSetupProcessEnded.
The complete setup log is written to the file psft_dpk_setup.log in the same location as the DPK setup script.
Task 2-8-3: Running the DPK Setup Script for the Process Scheduler
Domain Deployment on Linux, AIX, HP-UX, or Solaris as a Non-Root User
If you are installing the PeopleSoft environment as a non-root user, ensure that you fulfill the prerequisites in the
section Deploying as a Non-Root User on Linux, AIX, HP-UX, or Solaris.
Note. Some of the informational script messages have been omitted for brevity.
To deploy the domain:
1. Open a terminal window as a non-root user.
2. Change directory to
DPK_INSTALL/
setup.
3. Run the script as follows:
• If you extracted the first zip file into the same directory where you downloaded the zip files, use this
command:
./psft-dpk-setup.sh--env_typemidtier--domain_typeprcs
•
If you extracted the first zip file into a different directory, include the option dpk_src_dir to specify
the location of the downloaded zip files, such as
DPK_INSTALL,
as follows:
./psft-dpk-setup.sh--dpk_src_dirDPK_INSTALL
--env_typemidtier⇒
--domain_typeprcs
4. Answer
y
(yes) at the following prompt:
YouarerunningDPKsetupwithoutroot/administratoraccess.
Thisisfineaslongasthesystemadministratorhasperformed
allnecessarytasksandallprerequisiteshavebeenmet.
Pleaseseethedocumentationtodeterminetheprerequitetasks
thatneedtobeperformedtosuccessfullyrunDPKsetup
withoutroot/administratorprivilege.
Wouldyouliketoproceedwiththesetupasanon-rootuser?[y/n]:y
5. At the following prompt, enter a location that is accessible to the host to be used as the PeopleSoft base
directory, referred to here as BASE_DIR.
The base directory is used to extract the DPKs as well as for deploying PeopleSoft components. The script
creates the base directory if it does not exist.

Chapter 2 Deploying the PeopleSoft PeopleTools Deployment Packages
Copyright © 2022, Oracle and/or its affiliates. All Rights Reserved.
95
Use forward slashes only (/) when specifying the base directory; for example, /home/psft. Do not use a base
directory name that begins with a number. Do not end the base directory name with a forward slash (for
example, do not enter /ds1/psft/).
ThebasedirectoryisusedtoextractthePeopleSoftDPKs.Itisalso
usedtodeploythePeopleSoftcomponents.Thisdirectoryshouldbe
accessibleontheLinuxHost,musthavewritepermissionsandshould
haveenoughfreespace
EnterthePeopleSoftBaseDirectory:
Areyouhappywithyouranswer?[Y|n|q]:
The script validates if there is enough free space available under the specified base directory for the
PeopleSoft environment. The PeopleSoft environment setup is aborted if there is not enough free space.
Note. A mid-tier setup of a PeopleSoft environment requires about 25 GB of disk space.
CheckingiftheBaseDirectoryhasEnoughFreeSpace:[OK]
6. Enter a writable directory with at least 10 GB available space for PS_CFG_HOME.
The default is USER_HOME/psft/pt/8.58, where USER_HOME is the home directory for the logged-in user.
The PS_CFG_HOME directory holds the configuration and log files for the PeopleSoft Application Server,
Process Scheduler, and PIA domains.
Enterawritableps_config_homedirectoryforPeopleSoftdomains
withatleast10.0GBspace[/home/psftuser/psft/pt/8.58]:
Areyouhappywithyouranswer?[Y|n|q]:y
7. Specify the type of database platform.
Enter DB2ODBC for DB2 for z/OS or ORACLE.
EnterthePeopleSoftdatabaseplatform[ORACLE]:
8. Specify whether you want a Unicode database.
IsthePeopleSoftdatabaseunicode?[Y|n]:
9. Enter the database name.
EnterthePeopleSoftdatabasename:
10. Enter the database service name.
The default is the same as the database name. Do not enter an IP address.
EnterthePeopleSoftdatabaseservicename[PSFT92DB]:
11. Enter the name of the host where the database is installed.
Do not enter an IP address.
EnterthePeopleSoftdatabasehostname:
12. Enter the database listener port number:
EnterthePeopleSoftdatabaseport[1521]:
13. Enter the PeopleSoft Connect ID at the following prompt:
The default is people.

Deploying the PeopleSoft PeopleTools Deployment Packages Chapter 2
96
Copyright © 2022, Oracle and/or its affiliates. All Rights Reserved.
EnterthePeopleSoftdatabaseConnectID[people]:
14. Enter a password for the PeopleSoft Connect ID, and enter again on the next line, at the following prompt.
See E-DPK - Password restrictions are not reflected in the DPK setup script prompts, My Oracle Support, Doc
ID 2639270.1.
EnterthePeopleSoftdatabaseConnectID[people]password.
Ensurethatthepasswordmeetsthelengthandcomplexityrequirements
foryourdatabaseplatform:
Re-EnterthePeopleSoftdatabaseConnectIDpassword:
15. Enter the PeopleSoft user ID (operator ID), such as PS or VP1.
EnterthePeopleSoftdatabaseOperatorID[VP1]:
16. Enter the password twice for the PeopleSoft operator ID.
EnterthePeopleSoftdatabaseOperatorID[VP1]password.
Ensurethatthepasswordisbetween1and32charactersinlength.
Youmayincludethesespecialcharacters!@#$%^&:
Re-EnterthePeopleSoftdatabaseOperatorIDpassword:
17. Enter the Application Server Domain Connection password, following the guidelines in the prompt.
Note. This is an optional password. If no password is entered, the connection between Web Server and
Application Server will not be password protected.
[Optional]EnteranewApplicationServerDomainconnectionpassword.
Ensurethepasswordisbetween8and30charactersinlength.
Youmayincludethesespecialcharacters!@#$%^&:
Re-EntertheApplicationServerDomainconnectionpassword:
18. Enter y to continue with the script.
Areyouhappywithyouranswers?[y|n]:y
EncryptingthePasswordsintheUserData:[OK]
UpdatingthePuppetHieraYAMLFileswithUserData:[OK]
19. If you want to continue running the initialization script using the default configuration, answer y (yes) to the
following prompt, and continue with the next step.
If you want to customize the PeopleSoft environment using the Puppet YAML files, answer n (no) to stop the
script.
ThebootstrapscriptisreadytodeployandconfigurethePeopleSoft
environmentusingthedefaultconfigurationdefinedinthePuppet
HieraYAMLfiles.Youcanproceedbyanswering'y'atthefollowing
prompt.And,ifyouwanttocustomizetheenvironmentbyoverriding
thedefaultconfiguration,youcananswer'n'.Ifyouanswer'n',you
shouldfollowtheinstructionsinthePeopleSoftInstallationGuide
forcreatingthecustomizationHieraYAMLfileandrunningthePuppet
'apply'commanddirectlytocontinuewiththesetupofthePeopleSoft
environment
Doyouwanttocontinuewiththedefaultinitializationprocess?[y|n]:
20. Review the status messages as the script runs Puppet profiles to set up the PeopleSoft environment.

Chapter 2 Deploying the PeopleSoft PeopleTools Deployment Packages
Copyright © 2022, Oracle and/or its affiliates. All Rights Reserved.
97
A message of [ OK ] indicates that the profile has been applied successfully while a message [FAILED]
indicates that the profile application failed.
Upon successful completion, the DPK setup script displays the following message:
ThePeopleSoftEnvironmentSetupProcessEnded.
The complete setup log is written to the file psft_dpk_setup.log in the same location as the DPK setup script.
The setup.log is written to the file <USER_HOME>/psft_dpk_work/psft_dpk_setup_<PID>.log, where
<USER_HOME> is the home directory for the user running the script, and <PID> is a process ID
Task 2-9: Running the DPK Setup Script to Deploy an Application
Server and a Process Scheduler Domain
This section discusses:
• Understanding the Application Server and Process Scheduler Domain Deployment
• Running the DPK Setup Script for the Application Server and Process Scheduler Domain Deployment on
Microsoft Windows
• Running the DPK Setup Script for the Application Server and Process Scheduler Domain Deployment on
Linux, AIX, HP-UX, or Solaris as the Root User
• Running the DPK Setup Script for the Application Server and Process Scheduler Domain Deployment on
Linux, AIX, HP-UX, or Solaris as a Non-Root User
Understanding the Application Server and Process Scheduler Domain
Deployment
Use this option to set up a single application server and a single Process Scheduler domain, for example to install
on a host separate from the database. The deployment includes the following:
• PS_HOME installed to the default location under the DPK base directory.
• PS_CFG_HOME
installed to the default location
• Oracle Tuxedo installed to the default location under the DPK base directory
• Oracle WebLogic installed to the default location under the DPK base directory
• An Application Server domain and a Process Scheduler domains are installed and running.
• The Microsoft Windows DPKs include Microsoft Visual C++ Redistributable Packages for Visual Studio,
which include required Microsoft C++ runtime libraries
The script requires the following information:
• Database platform type
• Database name
• Database host name
• Database port
• Unicode or non-Unicode
• PeopleSoft Connect ID and password
• PeopleSoft operator ID and password

Deploying the PeopleSoft PeopleTools Deployment Packages Chapter 2
98
Copyright © 2022, Oracle and/or its affiliates. All Rights Reserved.
• Application Server Domain Connection password (optional)
If you are installing on Linux, AIX, HP-UX, or Solaris, see the information about running as non-root in the
section Reviewing the DPK Setup Script Options.
In addition, ensure that you fulfill the items in the Prerequisites section in the task Running the DPK Setup Script
for Mid-Tier Deployment.
See Also
"Using and Maintaining the PeopleSoft Environment," Using the PeopleSoft Installation
Task 2-9-1: Running the DPK Setup Script for the Application Server and
Process Scheduler Domain Deployment on Microsoft Windows
This procedure to deploy an application server and a Process Scheduler domain assumes that you have obtained
the four PeopleSoft PeopleTools DPK zip files and saved them in DPK_INSTALL.
To deploy the domains:
1. Extract the first zip file
(FILENAME
_1of
n.
zip).
Note. It is a good idea to extract into the same directory where you downloaded the zip files, DPK_INSTALL.
The extraction creates the DPK_INSTALL/setup folder and other files.
2. Open a command prompt with Run as Administrator.
3. Change directory to DPK_INSTALL/setup.
4. Run the script as follows:
Note. On Microsoft Windows, if you see an error message similar to "The application has failed to start
because its side-by-side configuration is incorrect," it indicates that your machine does not include the
necessary Microsoft C++ runtime libraries. Go to the Microsoft Web site, locate the Microsoft Visual C++
redistributable package for your system, and install as directed.
•
If you extracted the first zip file into the same directory where you downloaded the zip files, use this
command:
psft-dpk-setup.bat--env_typemidtier--domain_typeappbatch
• If you extracted the first zip file into a different directory, include the option dpk_src_dir to specify
the location of the downloaded zip files, such as DPK_INSTALL, as follows:
psft-dpk-setup.bat--dpk_src_dirDPK_INSTALL--env_typemidtier⇒
--domain_typeappbatch
5. Specify whether to install the Puppet software if necessary at the next prompt.
The script verifies if Puppet software is installed in the default location specified by the DPKs. If not, answer
y (yes) to install the Puppet software and n to abort the PeopleSoft environment setup process. The default
action (if nothing is entered at the prompt) is to install the software.
If there is any error during the Puppet software installation, the script aborts the setup process.
VerifyingifPuppetSoftwareisInstalled:
PuppetSoftwareisnotinstalledontheWindowsHost.IfPeopleSoft

Chapter 2 Deploying the PeopleSoft PeopleTools Deployment Packages
Copyright © 2022, Oracle and/or its affiliates. All Rights Reserved.
99
environmentneedstobesetuponthisHost,Puppetsoftware
shouldbeInstalled.
DoyouwanttoproceedwiththePuppetInstallation?[Y|n]:y
InstallingPuppetSoftwareontheWindowsHost:[OK]
6. At the following prompt, enter a location that is accessible to the host to be used as the PeopleSoft base
directory, referred to here as BASE_DIR.
The base directory is used to extract the DPKs as well as for deploying PeopleSoft components. The script
creates the base directory if it does not exist.
Use forward slashes only (/) when specifying the base directory; for example, C:/psft. Do not use a base
directory name that begins with a number.
ThebasefolderisusedtoextractthePeopleSoftDPKs.Itisalso
usedtodeploythePeopleSoftcomponents.Thisfoldershouldbe
accessibleontheWindowsVM,musthavewritepermissionsandshould
haveenoughfreespace
EnterthePeopleSoftBaseFolder:
Areyouhappywithyouranswer?[Y|n|q]:
The script validates if there is enough free space available under the specified base directory for the
PeopleSoft environment. The PeopleSoft environment setup is aborted if there is not enough free space.
Note. A mid-tier setup of a PeopleSoft environment requires about 25 GB of disk space.
CheckingiftheBaseFolderhasEnoughFreeSpace:[OK]
7. Specify the type of database platform.
Enter MSSQL for Microsoft SQL Server, DB2ODBC for DB2 for z/OS, or ORACLE.
EnterthePeopleSoftdatabaseplatform[ORACLE]:
8. Specify whether you want a Unicode database.
IsthePeopleSoftdatabaseunicode?[Y|n]:
9. Enter the database name.
EnterthePeopleSoftdatabasename:
10. Enter the database service name.
The default is the same as the database name. Do not enter an IP address.
EnterthePeopleSoftdatabaseservicename[PSFT92DB]:
11. Enter the name of the host where the database is installed.
Do not enter an IP address.
EnterthePeopleSoftdatabasehostname:
12. Enter the database listener port number:
EnterthePeopleSoftdatabaseport[1521]:
13. Enter the PeopleSoft Connect ID at the following prompt:

Deploying the PeopleSoft PeopleTools Deployment Packages Chapter 2
100
Copyright © 2022, Oracle and/or its affiliates. All Rights Reserved.
The default is people.
EnterthePeopleSoftdatabaseConnectID[people]:
14. Enter a password for the PeopleSoft Connect ID, and enter again on the next line, at the following prompt.
See E-DPK - Password restrictions are not reflected in the DPK setup script prompts, My Oracle Support, Doc
ID 2639270.1.
EnterthePeopleSoftdatabaseConnectID[people]password.
Ensurethatthepasswordmeetsthelengthandcomplexityrequirements
foryourdatabaseplatform:
Re-EnterthePeopleSoftdatabaseConnectIDpassword:
15. Enter the PeopleSoft user ID (operator ID), such as PS or VP1.
EnterthePeopleSoftdatabaseOperatorID[VP1]:
16. Enter the password twice for the PeopleSoft operator ID.
EnterthePeopleSoftdatabaseOperatorID[VP1]password.
Ensurethatthepasswordisbetween1and32charactersinlength.
Youmayincludethesespecialcharacters!@#$%^&:
Re-EnterthePeopleSoftdatabaseOperatorIDpassword:
17. Enter the Application Server Domain Connection password, following the guidelines in the prompt.
Note. This is an optional password. If no password is entered, the connection between Web Server and
Application Server will not be password protected.
[Optional]EnteranewApplicationServerDomainconnectionpassword.
Ensurethatthepasswordisbetween8and30charactersinlength.
Youmayincludethesespecialcharacters!@#$%^&:
Re-EntertheApplicationServerDomainconnectionpassword:
18. Enter y to continue with the script.
Areyouhappywithyouranswers?[y|n]:y
EncryptingthePasswordsintheUserData:[OK]
UpdatingthePuppetHieraYAMLFileswithUserData:[OK]
19. If you want to continue running the initialization script using the default configuration, answer y (yes) to the
following prompt, and continue with the next step.
If you want to customize the PeopleSoft environment using the Puppet YAML files, answer n (no) to stop the
script.
ThebootstrapscriptisreadytodeployandconfigurethePeopleSoft
environmentusingthedefaultconfigurationdefinedinthePuppet
HieraYAMLfiles.Youcanproceedbyanswering'y'atthefollowing
prompt.And,ifyouwanttocustomizetheenvironmentbyoverriding
thedefaultconfiguration,youcananswer'n'.Ifyouanswer'n',you
shouldfollowtheinstructionsinthePeopleSoftInstallationGuide
forcreatingthecustomizationHieraYAMLfileandrunningthePuppet
'apply'commanddirectlytocontinuewiththesetupofthePeopleSoft
environment
Doyouwanttocontinuewiththedefaultinitializationprocess?[y|n]:

Chapter 2 Deploying the PeopleSoft PeopleTools Deployment Packages
Copyright © 2022, Oracle and/or its affiliates. All Rights Reserved.
101
20. Review the status messages as the script runs Puppet profiles to set up the PeopleSoft environment.
A message of [ OK ] indicates that the profile has been applied successfully while a message [FAILED]
indicates that the profile application failed.
Upon successful completion, the DPK setup script displays the following message:
ThePeopleSoftEnvironmentSetupProcessEnded.
The complete setup log is written to the file psft_dpk_setup.log in the same location as the DPK setup script.
Task 2-9-2: Running the DPK Setup Script for the Application Server and
Process Scheduler Domain Deployment on Linux, AIX, HP-UX, or Solaris as
the Root User
This procedure to deploy an application server and a Process Scheduler domain assumes that you have obtained
the four PeopleSoft PeopleTools DPK zip files and saved them in DPK_INSTALL.
Note. Some of the informational script messages have been omitted for brevity.
If you are installing the PeopleSoft environment as a non-root user, see the following section, Running the DPK
Setup Script for the Application Server and Process Scheduler Domain Deployment on Linux, AIX, HP-UX, or
Solaris as a Non-Root User.
To deploy the domains:
1. Extract the first zip file
(FILENAME
_1of
n.
zip).
Note. It is a good idea to extract into the same directory where you downloaded the zip files, DPK_INSTALL.
The extraction creates the DPK_INSTALL/setup folder and other files.
2. Open a terminal window as root.
3. Change directory to DPK_INSTALL/setup.
4. Run the script as follows:
•
If you extracted the first zip file into the same directory where you downloaded the zip files, use this
command:
./psft-dpk-setup.sh--env_typemidtier--domain_typeappbatch
• If you extracted the first zip file into a different directory, include the option dpk_src_dir to specify
the location of the downloaded zip files, such as DPK_INSTALL, as follows:
./psft-dpk-setup.sh--dpk_src_dirDPK_INSTALL--env_typemidtier⇒
--domain_typeappbatch
5. Specify whether to install the Puppet software if necessary at the next prompt.
The script verifies if Puppet software is installed in the default location specified by the DPKs. If not, answer
y
(yes) to install the Puppet software and
n
to abort the PeopleSoft environment setup process. The default
action (if nothing is entered at the prompt) is to install the software.
If there is any error during the Puppet software installation, the script aborts the setup process.
VerifyingifPuppetSoftwareisInstalled:
PuppetSoftwareisnotinstalledontheLinuxHost.IfPeopleSoft
environmentneedstobesetuponthisHost,Puppetsoftware

Deploying the PeopleSoft PeopleTools Deployment Packages Chapter 2
102
Copyright © 2022, Oracle and/or its affiliates. All Rights Reserved.
shouldbeInstalled.
DoyouwanttoproceedwiththePuppetInstallation?[Y|n]:y
InstallingPuppetSoftwareontheLinuxHost:[OK]
6. At the following prompt, enter a location that is accessible to the host to be used as the PeopleSoft base
directory, referred to here as BASE_DIR.
The base directory is used to extract the DPKs as well as for deploying PeopleSoft components. The script
creates the base directory if it does not exist.
Use forward slashes only (/) when specifying the base directory; for example, /home/psft. Do not use a base
directory name that begins with a number. Do not end the base directory name with a forward slash (for
example, do not enter /ds1/psft/).
ThebasedirectoryisusedtoextractthePeopleSoftDPKs.Itisalso
usedtodeploythePeopleSoftcomponents.Thisdirectoryshouldbe
accessibleontheLinuxVM,musthavewritepermissionsandshould
haveenoughfreespace
EnterthePeopleSoftBaseDirectory:
Areyouhappywithyouranswer?[Y|n|q]:
The script validates if there is enough free space available under the specified base directory for the
PeopleSoft environment. The PeopleSoft environment setup is aborted if there is not enough free space.
Note. A mid-tier setup of a PeopleSoft environment requires about 25 GB of disk space.
CheckingiftheBaseFolderhasEnoughFreeSpace:[OK]
7. Specify a writable directory for the user home directory at the following prompt.
You see this prompt beginning with PeopleSoft PeopleTools 8.58.04.
The PeopleSoft environment setup using DPKs creates local users on the host. These users deploy the
PeopleSoft components and own the PeopleSoft runtime domains. Enter a new location to be used for creating
the home directories for these local users, or specify the default home directory, /home.
EnteradirectoryontheLinuxVMthatiswritable[/home]:/ds1
Areyouhappywithyouranswer?[y|n|q]:
If the script finds that the location you enter (either a new location or the default) is not writable, it exits with
the following message.
TheUserdoesnothavewritepermissiontocreatetheuser'shome
directoryunder[<user input>]ontheLinuxVM.
ExitingthePeopleSoftenvironmentsetupprocess.
8. Specify the type of database platform.
Enter DB2ODBC for DB2 for z/OS or ORACLE.
EnterthePeopleSoftdatabaseplatform[ORACLE]:
9. Specify whether you want a Unicode database.
IsthePeopleSoftdatabaseunicode?[Y|n]:
10. Enter the database name.

Chapter 2 Deploying the PeopleSoft PeopleTools Deployment Packages
Copyright © 2022, Oracle and/or its affiliates. All Rights Reserved.
103
EnterthePeopleSoftdatabasename:
11. Enter the database service name.
The default is the same as the database name. Do not enter an IP address.
EnterthePeopleSoftdatabaseservicename[PSFT92DB]:
12. Enter the name of the host where the database is installed.
Do not enter an IP address.
EnterthePeopleSoftdatabasehostname:
13. Enter the database listener port number:
EnterthePeopleSoftdatabaseport[1521]:
14. Enter the PeopleSoft Connect ID at the following prompt:
The default is people.
EnterthePeopleSoftdatabaseConnectID[people]:
15. Enter a password for the PeopleSoft Connect ID, and enter again on the next line, at the following prompt.
See E-DPK - Password restrictions are not reflected in the DPK setup script prompts, My Oracle Support, Doc
ID 2639270.1.
EnterthePeopleSoftdatabaseConnectID[people]password.
Ensurethatthepasswordmeetsthelengthandcomplexityrequirements
foryourdatabaseplatform:
Re-EnterthePeopleSoftdatabaseConnectIDpassword:
16. Enter the PeopleSoft user ID (operator ID), such as PS or VP1.
EnterthePeopleSoftdatabaseOperatorID[VP1]:
17. Enter the password twice for the PeopleSoft operator ID.
EnterthePeopleSoftdatabaseOperatorID[VP1]password.
Ensurethatthepasswordisbetween1and32charactersinlength.
Youmayincludethesespecialcharacters!@#$%^&:
Re-EnterthePeopleSoftdatabaseOperatorIDpassword:
18. Enter the Application Server Domain Connection password, following the guidelines in the prompt.
Note. This is an optional password. If no password is entered, the connection between Web Server and
Application Server will not be password protected.
[Optional]EnteranewApplicationServerDomainconnectionpassword.
Ensurethatthepasswordisbetween8and30charactersinlength.
Youmayincludethesespecialcharacters!@#$%^&:
Re-EntertheApplicationServerDomainconnectionpassword:
19. Enter y to continue with the script.
Areyouhappywithyouranswers?[y|n]:y
EncryptingthePasswordsintheUserData:[OK]
UpdatingthePuppetHieraYAMLFileswithUserData:[OK]
20. If you want to continue running the initialization script using the default configuration, answer
y
(yes) to the
following prompt, and continue with the next step.

Deploying the PeopleSoft PeopleTools Deployment Packages Chapter 2
104
Copyright © 2022, Oracle and/or its affiliates. All Rights Reserved.
If you want to customize the PeopleSoft environment using the Puppet YAML files, answer n (no) to stop the
script.
ThebootstrapscriptisreadytodeployandconfigurethePeopleSoft
environmentusingthedefaultconfigurationdefinedinthePuppet
HieraYAMLfiles.Youcanproceedbyanswering'y'atthefollowing
prompt.And,ifyouwanttocustomizetheenvironmentbyoverriding
thedefaultconfiguration,youcananswer'n'.Ifyouanswer'n',you
shouldfollowtheinstructionsinthePeopleSoftInstallationGuide
forcreatingthecustomizationHieraYAMLfileandrunningthePuppet
'apply'commanddirectlytocontinuewiththesetupofthePeopleSoft
environment
Doyouwanttocontinuewiththedefaultinitializationprocess?[y|n]:
21. Review the status messages as the script runs Puppet profiles to set up the PeopleSoft environment.
A message of [ OK ] indicates that the profile has been applied successfully while a message [FAILED]
indicates that the profile application failed.
Upon successful completion, the DPK setup script displays the following message:
ThePeopleSoftEnvironmentSetupProcessEnded.
The complete setup log is written to the file psft_dpk_setup.log in the same location as the DPK setup script.
Task 2-9-3: Running the DPK Setup Script for the Application Server and
Process Scheduler Domain Deployment on Linux, AIX, HP-UX, or Solaris as
a Non-Root User
If you are installing the PeopleSoft environment as a non-root user, ensure that you fulfill the prerequisites in the
section Deploying as a Non-Root User on Linux, AIX, HP-UX, or Solaris.
Note. Some of the informational script messages have been omitted for brevity.
To deploy the domains:
1. Open a terminal window as a non-root user.
2. Change directory to
DPK_INSTALL/
setup.
3. Run the script as follows:
• If you extracted the first zip file into the same directory where you downloaded the zip files, use this
command:
./psft-dpk-setup.sh--env_typemidtier--domain_typeappbatch
•
If you extracted the first zip file into a different directory, include the option
dpk_src_dir
to specify
the location of the downloaded zip files, such as
DPK_INSTALL,
as follows:
./psft-dpk-setup.sh--dpk_src_dirDPK_INSTALL
--env_typemidtier⇒
--domain_typeappbatch
4. Answer y (yes) at the following prompt:
YouarerunningDPKsetupwithoutroot/administratoraccess.
Thisisfineaslongasthesystemadministratorhasperformed
allnecessarytasksandallprerequisiteshavebeenmet.

Chapter 2 Deploying the PeopleSoft PeopleTools Deployment Packages
Copyright © 2022, Oracle and/or its affiliates. All Rights Reserved.
105
Pleaseseethedocumentationtodeterminetheprerequitetasks
thatneedtobeperformedtosuccessfullyrunDPKsetup
withoutroot/administratorprivilege.
Wouldyouliketoproceedwiththesetupasanon-rootuser?[y/n]:y
5. At the following prompt, enter a location that is accessible to the host to be used as the PeopleSoft base
directory, referred to here as BASE_DIR.
The base directory is used to extract the DPKs as well as for deploying PeopleSoft components. The script
creates the base directory if it does not exist.
Use forward slashes only (/) when specifying the base directory; for example, /home/psft. Do not use a base
directory name that begins with a number. Do not end the base directory name with a forward slash (for
example, do not enter /ds1/psft/).
ThebasedirectoryisusedtoextractthePeopleSoftDPKs.Itisalso
usedtodeploythePeopleSoftcomponents.Thisdirectoryshouldbe
accessibleontheLinuxHost,musthavewritepermissionsandshould
haveenoughfreespace
EnterthePeopleSoftBaseDirectory:
Areyouhappywithyouranswer?[Y|n|q]:
The script validates if there is enough free space available under the specified base directory for the
PeopleSoft environment. The PeopleSoft environment setup is aborted if there is not enough free space.
Note. A mid-tier setup of a PeopleSoft environment requires about 25 GB of disk space.
CheckingiftheBaseDirectoryhasEnoughFreeSpace:[OK]
6. Enter a writable directory with at least 10 GB available space for PS_CFG_HOME.
The default is USER_HOME/psft/pt/8.58, where USER_HOME is the home directory for the logged-in user.
The PS_CFG_HOME directory holds the configuration and log files for the PeopleSoft Application Server,
Process Scheduler, and PIA domains.
Enterawritableps_config_homedirectoryforPeopleSoftdomains
withatleast10.0GBspace[/home/psftuser/psft/pt/8.58]:
Areyouhappywithyouranswer?[Y|n|q]:y
7. Specify the type of database platform.
Enter DB2ODBC for DB2 for z/OS or ORACLE.
EnterthePeopleSoftdatabaseplatform[ORACLE]:
8. Specify whether you want a Unicode database.
IsthePeopleSoftdatabaseunicode?[Y|n]:
9. Enter the database name.
EnterthePeopleSoftdatabasename:
10. Enter the database service name.
The default is the same as the database name. Do not enter an IP address.
EnterthePeopleSoftdatabaseservicename[PSFT92DB]:
11. Enter the name of the host where the database is installed.

Deploying the PeopleSoft PeopleTools Deployment Packages Chapter 2
106
Copyright © 2022, Oracle and/or its affiliates. All Rights Reserved.
Do not enter an IP address.
EnterthePeopleSoftdatabasehostname:
12. Enter the database listener port number:
EnterthePeopleSoftdatabaseport[1521]:
13. Enter the PeopleSoft Connect ID at the following prompt:
The default is people.
EnterthePeopleSoftdatabaseConnectID[people]:
14. Enter a password for the PeopleSoft Connect ID, and enter again on the next line, at the following prompt.
See E-DPK - Password restrictions are not reflected in the DPK setup script prompts, My Oracle Support, Doc
ID 2639270.1.
EnterthePeopleSoftdatabaseConnectID[people]password.
Ensurethatthepasswordmeetsthelengthandcomplexityrequirements
foryourdatabaseplatform:
Re-EnterthePeopleSoftdatabaseConnectIDpassword:
15. Enter the PeopleSoft user ID (operator ID), such as PS or VP1.
EnterthePeopleSoftdatabaseOperatorID[VP1]:
16. Enter the password twice for the PeopleSoft operator ID.
EnterthePeopleSoftdatabaseOperatorID[VP1]password.
Ensurethatthepasswordisbetween1and32charactersinlength.
Youmayincludethesespecialcharacters!@#$%^&:
Re-EnterthePeopleSoftdatabaseOperatorIDpassword:
17. Enter the Application Server Domain Connection password, following the guidelines in the prompt.
Note. This is an optional password. If no password is entered, the connection between Web Server and
Application Server will not be password protected.
[Optional]EnteranewApplicationServerDomainconnectionpassword.
Ensurethatthepasswordisbetween8and30charactersinlength.
Youmayincludethesespecialcharacters!@#$%^&:
Re-EntertheApplicationServerDomainconnectionpassword:
18. Enter
y
to continue with the script.
Areyouhappywithyouranswers?[y|n]:y
EncryptingthePasswordsintheUserData:[OK]
UpdatingthePuppetHieraYAMLFileswithUserData:[OK]
19. If you want to continue running the initialization script using the default configuration, answer
y
(yes) to the
following prompt, and continue with the next step.
If you want to customize the PeopleSoft environment using the Puppet YAML files, answer
n
(no) to stop the
script.
ThebootstrapscriptisreadytodeployandconfigurethePeopleSoft
environmentusingthedefaultconfigurationdefinedinthePuppet
HieraYAMLfiles.Youcanproceedbyanswering'y'atthefollowing
prompt.And,ifyouwanttocustomizetheenvironmentbyoverriding

Chapter 2 Deploying the PeopleSoft PeopleTools Deployment Packages
Copyright © 2022, Oracle and/or its affiliates. All Rights Reserved.
107
thedefaultconfiguration,youcananswer'n'.Ifyouanswer'n',you
shouldfollowtheinstructionsinthePeopleSoftInstallationGuide
forcreatingthecustomizationHieraYAMLfileandrunningthePuppet
'apply'commanddirectlytocontinuewiththesetupofthePeopleSoft
environment
Doyouwanttocontinuewiththedefaultinitializationprocess?[y|n]:
20. Review the status messages as the script runs Puppet profiles to set up the PeopleSoft environment.
A message of [ OK ] indicates that the profile has been applied successfully while a message [FAILED]
indicates that the profile application failed.
Upon successful completion, the DPK setup script displays the following message:
ThePeopleSoftEnvironmentSetupProcessEnded.
The setup.log is written to the file <USER_HOME>/psft_dpk_work/psft_dpk_setup_<PID>.log, where
<USER_HOME> is the home directory for the user running the script, and <PID> is a process ID.
Task 2-10: Running the DPK Setup Script to Deploy a PIA Domain
This section discusses:
•
Understanding the PIA Domain Deployment
•
Prerequisites for the PIA Domain Deployment
•
Running the DPK Setup Script for the PIA Domain Deployment on Microsoft Windows
•
Running the DPK Setup Script for the PIA Domain Deployment on Linux, AIX, HP-UX, or Solaris as the
Root User
• Running the DPK Setup Script for the PIA Domain Deployment on Linux, AIX, HP-UX, or Solaris as a Non-
Root User
Understanding the PIA Domain Deployment
Use these instructions to set up a PeopleSoft Pure Internet Architecture (PIA) domain only, for example to install
on a host separate from the database.
The PIA domain deployment includes the following:
• PS_HOME installed to the default location under the DPK base directory
• PS_CFG_HOME installed to the default location
• Oracle Tuxedo installed to the default location under the DPK base directory
• Oracle WebLogic installed to the default location under the DPK base directory
• PIA domain is installed and running.
• The Microsoft Windows DPKs include Microsoft Visual C++ Redistributable Packages for Visual Studio,
which include required Microsoft C++ runtime libraries
See Also
"Using and Maintaining the PeopleSoft Environment," Using the PeopleSoft Installation

Deploying the PeopleSoft PeopleTools Deployment Packages Chapter 2
108
Copyright © 2022, Oracle and/or its affiliates. All Rights Reserved.
Prerequisites for the PIA Domain Deployment
Review the following item to prepare for the PIA domain deployment:
• Before beginning the PIA domain deployment, ensure that Application Server and Process Scheduler domains
are available.
• Ensure that you fulfill the items in the Prerequisites section in the task Running the DPK Setup Script for Mid-
Tier Deployment.
• If you are installing on Linux, AIX, HP-UX, or Solaris, see the information about running as non-root in the
section Reviewing the DPK Setup Script Options.
• If your environment includes separate hosts for the PIA domain and the Application Server domain, you must
use customizations to designate the application server that the PIA domain will access.
See "Completing the DPK Initialization with Customizations," Reviewing the Customization File for a PIA
Domain on a Separate Host.
The script requires the following information:
• Database platform type
• Database name
• Database host name
•
Database port
•
Unicode or non-Unicode
•
PeopleSoft Connect ID and password
•
PeopleSoft operator ID and password
•
Application Server Domain Connection password (optional)
•
PeopleSoft Web profile user (PTWEBSERVER) password
•
WebLogic server administrator password
•
Integration Gateway administrator user and password
•
Integration Gateway keystore password
•
Application Server Domain Connections string
• Process Scheduler Domain Server Name
Task 2-10-1: Running the DPK Setup Script for the PIA Domain Deployment
on Microsoft Windows
This procedure to deploy a single PIA domain assumes that you have obtained the four PeopleSoft PeopleTools
DPK zip files and saved them in DPK_INSTALL.
Note. Some of the informational script messages have been omitted for brevity.
1. Extract the first zip file
(FILENAME
_1of
n.
zip).
Note. It is a good idea to extract into the same directory where you downloaded the zip files, DPK_INSTALL.
The extraction creates the
DPK_INSTALL/
setup folder and other files.
2. Open a command prompt with Run as Administrator.

Chapter 2 Deploying the PeopleSoft PeopleTools Deployment Packages
Copyright © 2022, Oracle and/or its affiliates. All Rights Reserved.
109
3. Change directory to DPK_INSTALL/setup.
4. Run the script as follows:
Note. If you see an error message similar to "The application has failed to start because its side-by-side
configuration is incorrect," it indicates that your machine does not include the necessary Microsoft C++
runtime libraries. Go to the Microsoft Web site, locate the Microsoft Visual C++ redistributable package for
your system, and install as directed.
• If you extracted the first zip file into the same directory where you downloaded the zip files, use this
command:
psft-dpk-setup.bat--env_typemidtier--domain_typepia
• If you extracted the first zip file into a different directory, include the option dpk_src_dir to specify
the location of the downloaded zip files, such as DPK_INSTALL, as follows:
psft-dpk-setup.bat--dpk_src_dirDPK_INSTALL--env_typemidtier⇒
--domain_typepia
5. Specify whether to install the Puppet software if necessary at the next prompt.
The script verifies if Puppet software is installed in the default location specified by the DPKs. If not, answer
y (yes) to install the Puppet software and n to abort the PeopleSoft environment setup process. The default
action (if nothing is entered at the prompt) is to install the software.
If there is any error during the Puppet software installation, the script aborts the setup process.
VerifyingifPuppetSoftwareisInstalled:
PuppetSoftwareisnotinstalledontheWindowsHost.IfPeopleSoft
environmentneedstobesetuponthisHost,Puppetsoftware
shouldbeInstalled.
DoyouwanttoproceedwiththePuppetInstallation?[Y|n]:y
InstallingPuppetSoftwareontheWindowsHost:[OK]
6. At the following prompt, enter a location that is accessible to the host to be used as the PeopleSoft base
directory, referred to here as BASE_DIR.
The base directory is used to extract the DPKs as well as for deploying PeopleSoft components. The script
creates the base directory if it does not exist.
Use forward slashes only (/) when specifying the base directory; for example, C:/psft. Do not use a base
directory name that begins with a number.
ThebasefolderisusedtoextractthePeopleSoftDPKs.Itisalso
usedtodeploythePeopleSoftcomponents.Thisfoldershouldbe
accessibleontheWindowsVM,musthavewritepermissionsandshould
haveenoughfreespace
EnterthePeopleSoftBaseFolder:
Areyouhappywithyouranswer?[Y|n|q]:
The script validates if there is enough free space available under the specified base directory for the
PeopleSoft environment. The PeopleSoft environment setup is aborted if there is not enough free space.
Note. A mid-tier setup of a PeopleSoft environment requires about 25 GB of disk space.

Deploying the PeopleSoft PeopleTools Deployment Packages Chapter 2
110
Copyright © 2022, Oracle and/or its affiliates. All Rights Reserved.
CheckingiftheBaseFolderhasEnoughFreeSpace:[OK]
7. Specify the type of database platform.
Enter MSSQL for Microsoft SQL Server, DB2ODBC for DB2 for z/OS, or ORACLE.
EnterthePeopleSoftdatabaseplatform[ORACLE]:
8. Specify whether you want a Unicode database.
IsthePeopleSoftdatabaseunicode?[Y|n]:
9. Enter the database name.
EnterthePeopleSoftdatabasename:
10. Enter the database service name.
The default is the same as the database name. Do not enter an IP address.
EnterthePeopleSoftdatabaseservicename[PSFT92DB]:
11. Enter the name of the host where the database is installed.
Do not enter an IP address.
EnterthePeopleSoftdatabasehostname:
12. Enter the database listener port number:
EnterthePeopleSoftdatabaseport[1521]:
13. Enter the PeopleSoft Connect ID at the following prompt:
The default is people.
EnterthePeopleSoftdatabaseConnectID[people]:
14. Enter a password for the PeopleSoft Connect ID, and enter again on the next line, at the following prompt.
See E-DPK - Password restrictions are not reflected in the DPK setup script prompts, My Oracle Support, Doc
ID 2639270.1.
EnterthePeopleSoftdatabaseConnectID[people]password.
Ensurethatthepasswordmeetsthelengthandcomplexityrequirements
foryourdatabaseplatform:
Re-EnterthePeopleSoftdatabaseConnectIDpassword:
15. Enter the PeopleSoft user ID (operator ID), such as PS or VP1.
EnterthePeopleSoftdatabaseOperatorID[VP1]:
16. Enter the password twice for the PeopleSoft operator ID.
EnterthePeopleSoftdatabaseOperatorID[VP1]password.
Ensurethatthepasswordisbetween1and32charactersinlength.
Youmayincludethesespecialcharacters!@#$%^&:
Re-EnterthePeopleSoftdatabaseOperatorIDpassword:
17. Enter the Application Server Domain Connection password, following the guidelines in the prompt.
Note. This is an optional password. If no password is entered, the connection between Web Server and
Application Server will not be password protected.

Chapter 2 Deploying the PeopleSoft PeopleTools Deployment Packages
Copyright © 2022, Oracle and/or its affiliates. All Rights Reserved.
111
[Optional]EnteranewApplicationServerDomainconnectionpassword.
Ensurethatthepasswordisbetween8and30charactersinlength.
Youmayincludethesespecialcharacters!@#$%^&:
Re-EntertheApplicationServerDomainconnectionpassword:
18. Enter the password for the PTWEBSERVER web profile user at the following prompt:
EnteranewPeopleSoftWebProfileuser[PTWEBSERVER]password.Ensure
thepasswordisbetween8and32charactersinlength.
Youmayincludethesespecialcharacters!@#$%^&:
Re-EnterthePeopleSoftWebProfileuserpassword:
19. Enter the Oracle WebLogic Server Admin password, following the guidelines in the prompt.
The default Oracle WebLogic server administrator is system. The window does not display masking
characters as you type. There is no default password.
EnteranewWebLogicServerAdminuser[system]password.
Ensurethatthepasswordisbetween8and30charactersinlength
withatleastonelowercaseletterandoneuppercaseletter.Itmust⇒
also
containonenumberoroneofthesespecialcharacters!@#$%^&:
Re-EntertheWebLogicServerAdminuserpassword:
20. Enter the Integration Gateway user ID and password at the following prompt.
The default user ID is administrator.
EnterthePeopleSoftIntegrationGatewayuser[administrator]:
EnterthePeopleSoftIntegrationGatewayuser[administrator]password.
Ensurethatthepasswordisbetween8and30charactersinlength:.
Youmayincludethesespecialcharacters!@#$%^&:
Re-EnterthePeopleSoftIntegrationGatewayuserpassword:
21. Enter the Integration Gateway keystore password.
You see this prompt beginning with PeopleSoft PeopleTools 8.58.04.
See the information on using the integrationGateway.properties file and configuring security in the Integration
Broker product documentation.
See PeopleTools: Integration Broker Administration, "Configuring Security and General Properties."
EnterthePeopleSoftIntegrationGatewayKeystorepassword.Ensure
thepasswordisbetween8and30charactersinlength.
Youmayincludethesespecialcharacters!@#$%^&:
Re-EnterthePeopleSoftIntegrationGatewayKeystorepassword:
22. Enter the Application Server Domain Connection string, in the format <Server_name>:<Port>.
To specify the Application Server Domain Connect string, enter the application server name and a colon,
followed by the Jolt port that the PIA domain connects to. For example, psftserver:9000.
See
PeopleTools: System and Server Administration,
"Configuring Jolt Failover and Load Balancing."
See
PeopleTools: System and Server Administration,
"Configuring SSL for Workstation Listener and Jolt
Listener."
EntertheApplicationServerDomainConnectionsString:
23. Enter the name of the server with the Process Scheduler domain.

Deploying the PeopleSoft PeopleTools Deployment Packages Chapter 2
112
Copyright © 2022, Oracle and/or its affiliates. All Rights Reserved.
EntertheProcessSchedulerDomainServerName:
24. Enter y to continue with the script.
Areyouhappywithyouranswers?[y|n]:y
EncryptingthePasswordsintheUserData:[OK]
UpdatingthePuppetHieraYAMLFileswithUserData:[OK]
25. If you want to continue running the initialization script using the default configuration, answer y (yes) to the
following prompt, and continue with the next step.
If you want to customize the PeopleSoft environment using the Puppet YAML files, answer n (no) to stop the
script.
ThebootstrapscriptisreadytodeployandconfigurethePeopleSoft
environmentusingthedefaultconfigurationdefinedinthePuppet
HieraYAMLfiles.Youcanproceedbyanswering'y'atthefollowing
prompt.And,ifyouwanttocustomizetheenvironmentbyoverriding
thedefaultconfiguration,youcananswer'n'.Ifyouanswer'n',you
shouldfollowtheinstructionsinthePeopleSoftInstallationGuide
forcreatingthecustomizationHieraYAMLfileandrunningthePuppet
'apply'commanddirectlytocontinuewiththesetupofthePeopleSoft
environment
Doyouwanttocontinuewiththedefaultinitializationprocess?[y|n]:
26. Review the status messages as the script runs Puppet profiles to set up the PeopleSoft environment.
A message of [ OK ] indicates that the profile has been applied successfully while a message [FAILED]
indicates that the profile application failed.
Upon successful completion, the DPK setup script displays the following message:
ThePeopleSoftEnvironmentSetupProcessEnded.
The complete setup log is written to the file psft_dpk_setup.log in the same location as the DPK setup script.
Task 2-10-2: Running the DPK Setup Script for the PIA Domain Deployment
on Linux, AIX, HP-UX, or Solaris as the Root User
This procedure to deploy a single PIA domain assumes that you have obtained the four PeopleSoft PeopleTools
DPK zip files and saved them in DPK_INSTALL.
Note. Some of the informational script messages have been omitted for brevity.
If you are installing the PeopleSoft environment as a non-root user, see the next section, Running the DPK Setup
Script for the PIA Domain Deployment on Linux, AIX, HP-UX, or Solaris as a Non-Root User
To deploy the domain:
1. Extract the first zip file (FILENAME_1ofn.zip).
Note. It is a good idea to extract into the same directory where you downloaded the zip files, DPK_INSTALL.
The extraction creates the DPK_INSTALL/setup folder and other files.
2. Open a terminal windows as root.
3. Change directory to DPK_INSTALL/setup.

Chapter 2 Deploying the PeopleSoft PeopleTools Deployment Packages
Copyright © 2022, Oracle and/or its affiliates. All Rights Reserved.
113
4. Run the script as follows:
• If you extracted the first zip file into the same directory where you downloaded the zip files, use this
command:
./psft-dpk-setup.sh--env_typemidtier--domain_typepia
• If you extracted the first zip file into a different directory, include the option dpk_src_dir to specify
the location of the downloaded zip files, such as DPK_INSTALL, as follows:
./psft-dpk-setup.sh--dpk_src_dirDPK_INSTALL--env_typemidtier⇒
--domain_typepia
5. Specify whether to install the Puppet software if necessary at the next prompt.
The script verifies if Puppet software is installed in the default location specified by the DPKs. If not, answer
y (yes) to install the Puppet software and n to abort the PeopleSoft environment setup process. The default
action (if nothing is entered at the prompt) is to install the software.
If there is any error during the Puppet software installation, the script aborts the setup process.
VerifyingifPuppetSoftwareisInstalled:
PuppetSoftwareisnotinstalledontheLinuxHost.IfPeopleSoft
environmentneedstobesetuponthisHost,Puppetsoftware
shouldbeInstalled.
DoyouwanttoproceedwiththePuppetInstallation?[Y|n]:y
InstallingPuppetSoftwareontheLinuxHost:[OK]
6. At the following prompt, enter a location that is accessible to the host to be used as the PeopleSoft base
directory, referred to here as
BASE_DIR.
The base directory is used to extract the DPKs as well as for deploying PeopleSoft components. The script
creates the base directory if it does not exist.
Use forward slashes only (/) when specifying the base directory; for example, /home/psft. Do not use a base
directory name that begins with a number. Do not end the base directory name with a forward slash (for
example, do not enter /ds1/psft/).
ThebasedirectoryisusedtoextractthePeopleSoftDPKs.Itisalso
usedtodeploythePeopleSoftcomponents.Thisdirectoryshouldbe
accessibleontheLinuxVM,musthavewritepermissionsandshould
haveenoughfreespace
EnterthePeopleSoftBaseDirectory:
Areyouhappywithyouranswer?[Y|n|q]:
The script validates if there is enough free space available under the specified base directory for the
PeopleSoft environment. The PeopleSoft environment setup is aborted if there is not enough free space.
Note. A mid-tier setup of a PeopleSoft environment requires about 25 GB of disk space.
CheckingiftheBaseDirectoryhasEnoughFreeSpace:[OK]
7. Specify a writable directory for the user home directory at the following prompt.
You see this prompt beginning with PeopleSoft PeopleTools 8.58.04.
The PeopleSoft environment setup using DPKs creates local users on the host. These users deploy the

Deploying the PeopleSoft PeopleTools Deployment Packages Chapter 2
114
Copyright © 2022, Oracle and/or its affiliates. All Rights Reserved.
PeopleSoft components and own the PeopleSoft runtime domains. Enter a new location to be used for creating
the home directories for these local users, or specify the default home directory, /home.
EnteradirectoryontheLinuxVMthatiswritable[/home]:/ds1
Areyouhappywithyouranswer?[y|n|q]:
If the script finds that the location you enter (either a new location or the default) is not writable, it exits with
the following message.
TheUserdoesnothavewritepermissiontocreatetheuser'shome
directoryunder[<user input>]ontheLinuxVM.
ExitingthePeopleSoftenvironmentsetupprocess.
8. Specify the type of database platform.
Enter DB2ODBC for DB2 for z/OS, or ORACLE.
EnterthePeopleSoftdatabaseplatform[ORACLE]:
9. Specify whether you want a Unicode database.
IsthePeopleSoftdatabaseunicode?[Y|n]:
10. Enter the database name.
EnterthePeopleSoftdatabasename:
11. Enter the database service name.
The default is the same as the database name. Do not enter an IP address.
EnterthePeopleSoftdatabaseservicename[PSFT92DB]:
12. Enter the name of the host where the database is installed.
Do not enter an IP address.
EnterthePeopleSoftdatabasehostname:
13. Enter the database listener port number:
EnterthePeopleSoftdatabaseport[1521]:
14. Enter the PeopleSoft Connect ID at the following prompt:
The default is people.
EnterthePeopleSoftdatabaseConnectID[people]:
15. Enter a password for the PeopleSoft Connect ID, and enter again on the next line, at the following prompt.
See E-DPK - Password restrictions are not reflected in the DPK setup script prompts, My Oracle Support, Doc
ID 2639270.1.
EnterthePeopleSoftdatabaseConnectID[people]password.
Ensurethatthepasswordmeetsthelengthandcomplexityrequirements
foryourdatabaseplatform:
Re-EnterthePeopleSoftdatabaseConnectIDpassword:
16. Enter the PeopleSoft user ID (operator ID), such as PS or VP1.
EnterthePeopleSoftdatabaseOperatorID[VP1]:
17. Enter the password twice for the PeopleSoft operator ID.

Chapter 2 Deploying the PeopleSoft PeopleTools Deployment Packages
Copyright © 2022, Oracle and/or its affiliates. All Rights Reserved.
115
EnterthePeopleSoftdatabaseOperatorID[VP1]password.
Ensurethepasswordisbetween1and32charactersinlength.
Youmayincludethesespecialcharacters!@#$%^&:
Re-EnterthePeopleSoftdatabaseOperatorIDpassword:
18. Enter the Application Server Domain Connection password, following the guidelines in the prompt.
Note. This is an optional password. If no password is entered, the connection between Web Server and
Application Server will not be password protected.
[Optional]EnteranewApplicationServerDomainconnectionpassword.
Ensurethepasswordisbetween8and30charactersinlength.
Youmayincludethesespecialcharacters!@#$%^&:
Re-EntertheApplicationServerDomainconnectionpassword:
19. Enter the password for the PTWEBSERVER web profile user at the following prompt:
EnteranewPeopleSoftWebProfileuser[PTWEBSERVER]password.Ensure
thatthepasswordisbetween8and32charactersinlength.
Youmayincludethesespecialcharacters!@#$%^&:
Re-EnterthePeopleSoftWebProfileuserpassword:
20. Enter the Oracle WebLogic Server Admin password, following the guidelines in the prompt.
The default Oracle WebLogic server administrator is system. The window does not display masking
characters as you type. There is no default password.
EnteranewWebLogicServerAdminuser[system]password.
Ensurethatthepasswordisbetween8and30charactersinlength
withatleastonelowercaseletterandoneuppercaseletter.Itmust⇒
also
containonenumberoroneofthesespecialcharacters!@#$%^&:
Re-EntertheWebLogicServerAdminuserpassword:
21. Enter the Integration Gateway user ID and password at the following prompt.
The default user ID is administrator.
EnterthePeopleSoftIntegrationGatewayuser[administrator]:
EnterthePeopleSoftIntegrationGatewayuser[administrator]password.
Ensurethatthepasswordisbetween8and30charactersinlength.
Youmayincludethesespecialcharacters!@#$%^&:
Re-EnterthePeopleSoftIntegrationGatewayuserpassword:
22. Enter the Integration Gateway keystore password.
You see this prompt beginning with PeopleSoft PeopleTools 8.58.04.
See the information on using the integrationGateway.properties file and configuring security in the Integration
Broker product documentation.
See
PeopleTools: Integration Broker Administration,
"Configuring Security and General Properties."
EnterthePeopleSoftIntegrationGatewayKeystorepassword.Ensure
thepasswordisbetween8and30charactersinlength.
Youmayincludethesespecialcharacters!@#$%^&:
Re-EnterthePeopleSoftIntegrationGatewayKeystorepassword:
23. Enter the Application Server Domain Connection string, in the format <Server_name>:<Port>.

Deploying the PeopleSoft PeopleTools Deployment Packages Chapter 2
116
Copyright © 2022, Oracle and/or its affiliates. All Rights Reserved.
To specify the Application Server Domain Connect string, enter the application server name and a colon,
followed by the Jolt port that the PIA domain connects to. For example, psftserver:9000.
See PeopleTools: System and Server Administration, "Configuring Jolt Failover and Load Balancing."
See PeopleTools: System and Server Administration, "Configuring SSL for Workstation Listener and Jolt
Listener.."
EntertheApplicationServerDomainConnectionsString:
24. Enter the name of the server with the Process Scheduler domain.
EntertheProcessSchedulerDomainServerName:
25. Enter y to continue with the script.
Areyouhappywithyouranswers?[y|n]:y
EncryptingthePasswordsintheUserData:[OK]
UpdatingthePuppetHieraYAMLFileswithUserData:[OK]
26. If you want to continue running the initialization script using the default configuration, answer y (yes) to the
following prompt, and continue with the next step.
If you want to customize the PeopleSoft environment using the Puppet YAML files, answer n (no) to stop the
script.
ThebootstrapscriptisreadytodeployandconfigurethePeopleSoft
environmentusingthedefaultconfigurationdefinedinthePuppet
HieraYAMLfiles.Youcanproceedbyanswering'y'atthefollowing
prompt.And,ifyouwanttocustomizetheenvironmentbyoverriding
thedefaultconfiguration,youcananswer'n'.Ifyouanswer'n',you
shouldfollowtheinstructionsinthePeopleSoftInstallationGuide
forcreatingthecustomizationHieraYAMLfileandrunningthePuppet
'apply'commanddirectlytocontinuewiththesetupofthePeopleSoft
environment
Doyouwanttocontinuewiththedefaultinitializationprocess?[y|n]:
27. Review the status messages as the script runs Puppet profiles to set up the PeopleSoft environment.
A message of [ OK ] indicates that the profile has been applied successfully while a message [FAILED]
indicates that the profile application failed.
Upon successful completion, the DPK setup script displays the following message:
ThePeopleSoftEnvironmentSetupProcessEnded.
The complete setup log is written to the file psft_dpk_setup.log in the same location as the DPK setup script.
Task 2-10-3: Running the DPK Setup Script for the PIA Domain Deployment
on Linux, AIX, HP-UX, or Solaris as a Non-Root User
If you are installing the PeopleSoft environment as a non-root user, ensure that you fulfill the prerequisites in the
section Deploying as a Non-Root User on Linux, AIX, HP-UX, or Solaris.
Note. Some of the informational script messages have been omitted for brevity.
To deploy the domain:
1. Open a terminal windows as a non-root user.

Chapter 2 Deploying the PeopleSoft PeopleTools Deployment Packages
Copyright © 2022, Oracle and/or its affiliates. All Rights Reserved.
117
2. Change directory to DPK_INSTALL/setup.
3. Run the script as follows:
• If you extracted the first zip file into the same directory where you downloaded the zip files, use this
command:
./psft-dpk-setup.sh--env_typemidtier--domain_typepia
• If you extracted the first zip file into a different directory, include the option dpk_src_dir to specify
the location of the downloaded zip files, such as DPK_INSTALL, as follows:
./psft-dpk-setup.sh--dpk_src_dirDPK_INSTALL--env_typemidtier⇒
--domain_typepia
4. Answer y (yes) at the following prompt:
YouarerunningDPKsetupwithoutroot/administratoraccess.
Thisisfineaslongasthesystemadministratorhasperformed
allnecessarytasksandallprerequisiteshavebeenmet.
Pleaseseethedocumentationtodeterminetheprerequitetasks
thatneedtobeperformedtosuccessfullyrunDPKsetup
withoutroot/administratorprivilege.
Wouldyouliketoproceedwiththesetupasanon-rootuser?[y/n]:y
5. At the following prompt, enter a location that is accessible to the host to be used as the PeopleSoft base
directory, referred to here as BASE_DIR.
The base directory is used to extract the DPKs as well as for deploying PeopleSoft components. The script
creates the base directory if it does not exist.
Use forward slashes only (/) when specifying the base directory; for example, /home/psft. Do not use a base
directory name that begins with a number. Do not end the base directory name with a forward slash (for
example, do not enter /ds1/psft/).
ThebasedirectoryisusedtoextractthePeopleSoftDPKs.Itisalso
usedtodeploythePeopleSoftcomponents.Thisdirectoryshouldbe
accessibleontheLinuxVM,musthavewritepermissionsandshould
haveenoughfreespace
EnterthePeopleSoftBaseDirectory:
Areyouhappywithyouranswer?[Y|n|q]:
The script validates if there is enough free space available under the specified base directory for the
PeopleSoft environment. The PeopleSoft environment setup is aborted if there is not enough free space.
Note. A mid-tier setup of a PeopleSoft environment requires about 25 GB of disk space.
CheckingiftheBaseFolderhasEnoughFreeSpace:[OK]
6. Enter a writable directory with at least 10 GB available space for
PS_CFG_HOME.
The default is
USER_HOME/
psft/pt/8.58, where
USER_HOME
is the home directory for the logged-in user.
The
PS_CFG_HOME
directory holds the configuration and log files for the PeopleSoft Application Server,
Process Scheduler, and PIA domains.
Enterawritableps_config_homedirectoryforPeopleSoftdomains
withatleast10.0GBspace[/home/psftuser/psft/pt/8.58]:
Areyouhappywithyouranswer?[Y|n|q]:y

Deploying the PeopleSoft PeopleTools Deployment Packages Chapter 2
118
Copyright © 2022, Oracle and/or its affiliates. All Rights Reserved.
7. Specify the type of database platform.
Enter DB2ODBC for DB2 for z/OS or ORACLE.
EnterthePeopleSoftdatabaseplatform[ORACLE]:
8. Specify whether you want a Unicode database.
IsthePeopleSoftdatabaseunicode?[Y|n]:
9. Enter the database name.
EnterthePeopleSoftdatabasename:
10. Enter the database service name.
The default is the same as the database name. Do not enter an IP address.
EnterthePeopleSoftdatabaseservicename[PSFT92DB]:
11. Enter the name of the host where the database is installed.
Do not enter an IP address.
EnterthePeopleSoftdatabasehostname:
12. Enter the database listener port number:
EnterthePeopleSoftdatabaseport[1521]:
13. Enter the PeopleSoft Connect ID at the following prompt:
The default is people.
EnterthePeopleSoftdatabaseConnectID[people]:
14. Enter a password for the PeopleSoft Connect ID, and enter again on the next line, at the following prompt.
See E-DPK - Password restrictions are not reflected in the DPK setup script prompts, My Oracle Support, Doc
ID 2639270.1.
EnterthePeopleSoftdatabaseConnectID[people]password.
Ensurethatthepasswordmeetsthelengthandcomplexityrequirements
foryourdatabaseplatform:
Re-EnterthePeopleSoftdatabaseConnectIDpassword:
15. Enter the PeopleSoft user ID (operator ID), such as PS or VP1.
EnterthePeopleSoftdatabaseOperatorID[VP1]:
16. Enter the password twice for the PeopleSoft operator ID.
EnterthePeopleSoftdatabaseOperatorID[VP1]password.
Ensurethatthepasswordisbetween1and32charactersinlength.
Youmayincludethesespecialcharacters!@#$%^&:
Re-EnterthePeopleSoftdatabaseOperatorIDpassword:
17. Enter the Application Server Domain Connection password, following the guidelines in the prompt.
Note. This is an optional password. If no password is entered, the connection between Web Server and
Application Server will not be password protected.
[Optional]EnteranewApplicationServerDomainconnectionpassword.
Ensurethatthepasswordisbetween8and30charactersinlength.

Chapter 2 Deploying the PeopleSoft PeopleTools Deployment Packages
Copyright © 2022, Oracle and/or its affiliates. All Rights Reserved.
119
Youmayincludethesespecialcharacters!@#$%^&:
Re-EntertheApplicationServerDomainconnectionpassword:
18. Enter the password for the PTWEBSERVER web profile user at the following prompt:
EnteranewPeopleSoftWebProfileuser[PTWEBSERVER]password.
Ensurethatthepasswordisbetween8and32charactersinlength.
Youmayincludethesespecialcharacters!@#$%^&:
Re-EnterthePeopleSoftWebProfileuserpassword:
19. Enter the Oracle WebLogic Server Admin password, following the guidelines in the prompt.
The default Oracle WebLogic server administrator is system. The window does not display masking
characters as you type. There is no default password.
EnteranewWebLogicServerAdminuser[system]password.
Ensurethatthepasswordisbetween8and30charactersinlength
withatleastonelowercaseletterandoneuppercaseletter.Itmust⇒
also
containonenumberoroneofthesespecialcharacters!@#$%^&:
Re-EntertheWebLogicServerAdminuserpassword:
20. Enter the Integration Gateway user ID and password at the following prompt.
The default user ID is administrator.
EnterthePeopleSoftIntegrationGatewayuser[administrator]:
EnterthePeopleSoftIntegrationGatewayuser[administrator]password.
Ensurethatthepasswordisbetween8and30charactersinlength.
Youmayincludethesespecialcharacters!@#$%^&:
Re-EnterthePeopleSoftIntegrationGatewayuserpassword:
21. Enter the Integration Gateway keystore password.
You see this prompt beginning with PeopleSoft PeopleTools 8.58.04.
See the information on using the integrationGateway.properties file and configuring security in the Integration
Broker product documentation.
See PeopleTools: Integration Broker Administration, "Configuring Security and General Properties."
EnterthePeopleSoftIntegrationGatewayKeystorepassword.Ensure
thepasswordisbetween8and30charactersinlength.
Youmayincludethesespecialcharacters!@#$%^&:
Re-EnterthePeopleSoftIntegrationGatewayKeystorepassword:
22. Enter the Application Server Domain Connection string, in the format <Server_name>:<Port>.
To specify the Application Server Domain Connect string, enter the application server name and a colon,
followed by the Jolt port that the PIA domain connects to. For example, psftserver:9000.
See PeopleTools: System and Server Administration, "Configuring Jolt Failover and Load Balancing."
See PeopleTools: System and Server Administration, "Configuring SSL for Workstation Listener and Jolt
Listener.."
EntertheApplicationServerDomainConnectionsString:
23. Enter the name of the server with the Process Scheduler domain.
EntertheProcessSchedulerDomainServerName:
24. Enter y to continue with the script.

Deploying the PeopleSoft PeopleTools Deployment Packages Chapter 2
120
Copyright © 2022, Oracle and/or its affiliates. All Rights Reserved.
Areyouhappywithyouranswers?[y|n]:y
EncryptingthePasswordsintheUserData:[OK]
UpdatingthePuppetHieraYAMLFileswithUserData:[OK]
25. If you want to continue running the initialization script using the default configuration, answer y (yes) to the
following prompt, and continue with the next step.
If you want to customize the PeopleSoft environment using the Puppet YAML files, answer n (no) to stop the
script.
ThebootstrapscriptisreadytodeployandconfigurethePeopleSoft
environmentusingthedefaultconfigurationdefinedinthePuppet
HieraYAMLfiles.Youcanproceedbyanswering'y'atthefollowing
prompt.And,ifyouwanttocustomizetheenvironmentbyoverriding
thedefaultconfiguration,youcananswer'n'.Ifyouanswer'n',you
shouldfollowtheinstructionsinthePeopleSoftInstallationGuide
forcreatingthecustomizationHieraYAMLfileandrunningthePuppet
'apply'commanddirectlytocontinuewiththesetupofthePeopleSoft
environment
Doyouwanttocontinuewiththedefaultinitializationprocess?[y|n]:
26. Review the status messages as the script runs Puppet profiles to set up the PeopleSoft environment.
A message of [ OK ] indicates that the profile has been applied successfully while a message [FAILED]
indicates that the profile application failed.
Upon successful completion, the DPK setup script displays the following message:
ThePeopleSoftEnvironmentSetupProcessEnded.
The setup.log is written to the file <USER_HOME>/psft_dpk_work/psft_dpk_setup_<PID>.log, where
<USER_HOME> is the home directory for the non-root user running the script, and <PID> is a process ID.
Task 2-11: Running the DPK Setup Script to Install PS_HOME
Only
This section discusses:
•
Understanding the PS_HOME Deployment
•
Installing PS_HOME Only on Microsoft Windows
•
Installing PS_HOME Only on Linux, AIX, HP-UX, or Solaris
Understanding the PS_HOME Deployment
Use these instructions to install the PS_HOME installation folder, which includes the PeopleSoft PeopleTools
server utilities. Use this deployment, for example, to get the tools needed to carry out database creation. The
PS_HOME deployment includes the following:
• PS_HOME
installed to
BASE_DIR/
pt/ps_home8.58.xx by default.
•
The Microsoft Windows DPKs include Microsoft Visual C++ Redistributable Packages for Visual Studio,
which include required Microsoft C++ runtime libraries
•
PeopleTools utilities and scripts including:

Chapter 2 Deploying the PeopleSoft PeopleTools Deployment Packages
Copyright © 2022, Oracle and/or its affiliates. All Rights Reserved.
121
• PS_HOME/appserv/PSADMIN.exe
• PS_HOME/bin/client/winx86/pscfg.exe (Configuration Manager)
• PS_HOME/bin/client/winx86/psdmt.exe (Data Mover)
• PS_HOME/bin/client/winx86/pside.exe (Application Designer)
• PS_HOME/scripts
• Other PeopleTools utilities
• Setup utilities including:
• PS_HOME/setup/PsMpPIAInstall (PeopleSoft Pure Internet Architecture installer)
• PS_HOME/setup/PsMpDbInstall (Database installer)
• PS_HOME/setup/PsCA (Change Assistant installer)
• PS_HOME/setup/PsCIA (Change Impact Analyzer installer)
• PS_HOME/setup/PsMpWebAppDeployInstall (Web Application Deployment installer)
Task 2-11-1: Installing PS_HOME Only on Microsoft Windows
This procedure assumes you have obtained the four PeopleSoft PeopleTools DPK zip files and saved them in
DPK_INSTALL. To use the DPK setup script to install PS_HOME only:
1. Extract the first zip file (FILENAME_1of4.zip) in the same directory, DPK_INSTALL.
The extraction creates the DPK_INSTALL/setup folder and other files.
See Obtaining the PeopleSoft PeopleTools DPK for the DPK file name syntax.
2. Open a command prompt with Run as Administrator.
3. Change directory to DPK_INSTALL/setup.
4. Run the script with the options for mid-tier and deployment only.
Note. If you see an error message similar to "The application has failed to start because its side-by-side
configuration is incorrect," it indicates that your machine does not include the necessary Microsoft C++
runtime libraries. Go to the Microsoft Web site, locate the Microsoft Visual C++ redistributable package for
your system, and install as directed.
psft-dpk-setup.bat-–env_typemidtier--deploy_only--deploy_type⇒
tools_home
5. Wait while the script locates the valid PeopleSoft zip files and extracts them.
The system displays messages indicating the steps in the setup process. The success or failure of each step is
indicated by [ OK ] or [FAILED].
The script locates the valid PeopleSoft zip files and extracts them. After it completes the extraction, it deletes
the original downloaded zip files.
StartingthePeopleSoftEnvironmentSetupProcess:
ExtractingtheZipFileFILENAME_1of4.zip:[OK]
ExtractingtheZipFileFILENAME_2of4.zip:[OK]
ExtractingtheZipFileFILENAME_3of4.zip:[OK]
ExtractingtheZipFileFILENAME_4of4.zip:[OK]
6. Specify whether to install the Puppet software if necessary at the next prompt.

Deploying the PeopleSoft PeopleTools Deployment Packages Chapter 2
122
Copyright © 2022, Oracle and/or its affiliates. All Rights Reserved.
The script verifies if Puppet software is installed in the default location specified by the DPKs. If not, answer
y (yes) to install the Puppet software and n to abort the PeopleSoft environment setup process. The default
action (if nothing is entered at the prompt) is to install the software.
If there is any error during the Puppet software installation, the script aborts the setup process.
ValidatingUserArguments:[OK]
ValidatingPeopleSoftSupportedPlatform:[OK]
VerifyingifPuppetSoftwareisInstalledontheHost:
PuppetSoftwareisnotinstalledontheHost.IfthisHostis
usedtosetupaPeopleSoftenvironment,PuppetSoftwareshould
beInstalled.
DoyouwanttoInstallPuppetSoftwareonthisHost?[Y|n]:y
InstallingPuppetSoftwareontheHost:[OK]
The script verifies if the DPKs are available in DPK_INSTALL, and aborts with the message [FAILED] if they
are not.
CheckingifPeopleSoftDPKsarePresent:[OK]
7. At the following prompt, enter a location that is accessible to the host to be used as the PeopleSoft base
directory.
The base directory is used to extract the PeopleSoft DPKs as well as for deploying PeopleSoft components.
Note. When entering the path for the base directory, use forward slashes (/). For example, C:/psft. Do not
use a name for the base folder that begins with a number.
ThebasefolderisusedtoextractthePeopleSoftDPKs.Itisalso
usedtodeploythePeopleSoftcomponents.Thisfoldershouldbe
accessibleontheWindowsVM,musthavewritepermissionsandshould
haveenoughfreespace
EnterthePeopleSoftBaseFolder:[C:/psft]
Areyouhappywithyouranswer?[Y|n|q]:
The script validates if there is enough free space available under the specified base directory for the
PeopleSoft environment. The PeopleSoft environment setup is aborted if there is not enough free space.
Note. A mid-tier setup of a PeopleSoft environment requires about 25 GB of disk space.
CheckingiftheBaseFolderhasEnoughFreeSpace:[OK]
The script creates the following three sub-directories under the user provided base directory, BASE_DIR:
• BASE_DIR\dpk
The script uses this directory to extract the archives from the PeopleSoft DPKs.
• BASE_DIR\pt
The script uses this directory to deploy PeopleSoft PeopleTools.
• BASE_DIR\db
This directory is not used for this deployment.
8. Review the status messages as the script validates the files found in DPK_INSTALL and extracts the archives

Chapter 2 Deploying the PeopleSoft PeopleTools Deployment Packages
Copyright © 2022, Oracle and/or its affiliates. All Rights Reserved.
123
from the DPKs.
The script carries out validations for the mid-tier deployment. If any of the validations fail, the PeopleSoft
environment setup is aborted.
Note. The messages have been truncated for brevity.
ValidatingthePeopleSoftDPKsintheFolder:
[...]
ExtractingthePeoplesoftDPKArchivesinWindowsVM:
[...]
9. Review the status messages as the script sets up the Puppet file system.
The script sets up Puppet on the host. It then copies the PeopleSoft Puppet modules to the standard location (
BASE_DIR\dpk) and updates the YAML files to reflect the type of PeopleSoft environment setup.
SettingupPuppetontheWindowsVM:
GeneratingeYAMLHieraBackendEncryptionKeys:[OK]
UpdatingthePuppetHieraYAMLFilesintheWindowsVM:[OK]
UpdatingtheRoleinPuppetSiteFilefortheWindowsVM:[OK]
10. Specify the information for your database platform.
a. For the database platform, enter ORACLE, MSSQL (Microsoft SQL Server), or DB2ODBC (DB2 for
z/OS).
EnterthePeopleSoftdatabaseplatform[ORACLE]:
b. Enter y (yes) to indicate that the database you will connect to is a Unicode database.
Note. All PeopleSoft Update Image databases are required to be Unicode.
IsthePeopleSoftdatabaseunicode?[Y|n]:y
11. Enter y to continue with the script.
Areyouhappywithyouranswers?[y|n]:y
UpdatingthePuppetHieraYAMLFileswithUserData:[OK]
12. If you want to continue running the initialization script using the default configuration, answer y (yes) to the
following prompt, and continue with the next step.
If you want to customize the PeopleSoft environment using the Puppet YAML files, answer n (no) to stop the
script.
ThebootstrapscriptisreadytodeployandconfigurethePeopleSoft
environmentusingthedefaultconfigurationdefinedinthePuppet
HieraYAMLfiles.Youcanproceedbyanswering'y'atthefollowing
prompt.And,ifyouwanttocustomizetheenvironmentbyoverriding
thedefaultconfiguration,youcananswer'n'.Ifyouanswer'n',you
shouldfollowtheinstructionsinthePeopleSoftInstallationGuide
forcreatingthecustomizationHieraYAMLfileandrunningthePuppet
'apply'commanddirectlytocontinuewiththesetupofthePeopleSoft
environment
Doyouwanttocontinuewiththedefaultinitializationprocess?[y|n]:
13. Review the status messages as the script runs Puppet profiles to set up the PeopleSoft environment.

Deploying the PeopleSoft PeopleTools Deployment Packages Chapter 2
124
Copyright © 2022, Oracle and/or its affiliates. All Rights Reserved.
A message of [ OK ] indicates that the profile has been applied successfully while a message [FAILED]
indicates that the profile application failed.
The script stops and exits the first time a profile application fails, and displays an error message. This example
shows the error message after the step to set up the PeopleSoft OS Users environment failed:
StartingtheDefaultInitializationofPeopleSoftEnvironment:
DeployingPeopleToolsComponents:[FAILED]
TheinitializationofPeopleSoftenvironmentsetupfailed.Checkthe
logfile[C:\DPK_INSTALL\setup\psft_dpk_setup.log]fortheerrors.
Aftercorrectingtheerrors,runthefollowingscripttocontinue
withthesetupofPeopleSoftenvironemnt.
StartacmdwindowasAdministratorandrunC:\psft\psft_puppet_⇒
apply.cmd
ExitingthePeopleSoftenvironmentsetupprocess.
See "Completing the DPK Initialization with Customizations."
Upon successful completion, the DPK setup script displays the following message:
StartingtheDefaultInitializationofPeopleSoftEnvironment:
DeployingPeopleToolsComponents:[OK]
SettingupPeopleSoftOSUsersEnvironment:[OK]
ThePeopleSoftEnvironmentSetupProcessEnded.
The complete setup log is written to the file psft_dpk_setup.log in the same location as the DPK setup script.
Task 2-11-2: Installing PS_HOME Only on Linux, AIX, HP-UX, or Solaris
This procedure assumes you have obtained the four PeopleSoft PeopleTools DPK zip files and saved them in
DPK_INSTALL.
If you are installing the PeopleSoft environment as a non-root user, ensure that you fulfill the prerequisites in the
section Deploying as a Non-Root User on Linux, AIX, HP-UX, or Solaris.
To use the DPK setup script to install PS_HOME only:
1. Extract the first zip file (FILENAME_1of4.zip) in the same directory, DPK_INSTALL.
The extraction creates the DPK_INSTALL/setup folder and other files.
See Obtaining the PeopleSoft PeopleTools DPKs for the DPK file name syntax.
2. Open a terminal window and change directory to
DPK_INSTALL/
setup.
3. As a user with root access, run the script with the options for mid-tier and deployment only.
psft-dpk-setup.sh–-env_typemidtier--deploy_only--deploy_typetools_⇒
home
4. Wait while the script locates the valid PeopleSoft zip files and extracts them.
The system displays messages indicating the steps in the setup process. The success or failure of each step is
indicated by [ OK ] or [FAILED].
StartingthePeopleSoftEnvironmentSetupProcess:

Chapter 2 Deploying the PeopleSoft PeopleTools Deployment Packages
Copyright © 2022, Oracle and/or its affiliates. All Rights Reserved.
125
ExtractingtheZipFileFILENAME_1of4.zip:[OK]
ExtractingtheZipFileFILENAME_2of4.zip:[OK]
ExtractingtheZipFileFILENAME_3of4.zip:[OK]
ExtractingtheZipFileFILENAME_4of4.zip:[OK]
5. Specify whether to install the Puppet software if necessary at the next prompt.
The script verifies if Puppet software is installed in the default location specified by the DPKs. If not, answer
y (yes) to install the Puppet software and n to abort the PeopleSoft environment setup process. The default
action (if nothing is entered at the prompt) is to install the software.
If there is any error during the Puppet software installation, the script aborts the setup process.
ValidatingUserArguments:[OK]
ValidatingPeopleSoftSupportedPlatform:[OK]
VerifyingifPuppetSoftwareisInstalledontheHost:
PuppetSoftwareisnotinstalledontheHost.IfthisHostis
usedtosetupaPeopleSoftenvironment,PuppetSoftwareshould
beInstalled.
DoyouwanttoInstallPuppetSoftwareonthisHost?[Y|n]:y
InstallingPuppetSoftwareontheHost:[OK]
The script verifies if the DPKs are available in DPK_INSTALL, and aborts with the message [FAILED] if they
are not.
PreparingtheLinuxVMforPeopleSoftEnvironment:
CheckingifPeopleSoftDPKsarePresent:[OK]
6. At the following prompt, enter a location that is accessible to the host to be used as the PeopleSoft base
directory.
The base directory is used to extract the PeopleSoft DPKs as well as for deploying PeopleSoft components.
Note. When entering the path for the base directory, use forward slashes (/). For example, /cs1/psft. Do
not use a name for the base folder that begins with a number. Do not end the base directory name with a
forward slash (for example, do not enter /ds1/psft/).
ThebasefolderisusedtoextractthePeopleSoftDPKsas
wellasfordeployingPeopleSoftComponents.Thisfoldershouldbe
accessibleonthehost,haswritepermission,andhasenoughfree
spaceThebasefolderisusedtoextractthePeopleSoftDPKs.Itisalso
usedtodeploythePeopleSoftcomponents.Thisfoldershouldbe
accessibleontheLinuxVM,musthavewritepermissionsandshould
haveenoughfreespace.
.
EnterthePeopleSoftBaseFolder[/opt/oracle/psft]:
Areyouhappywithyouranswer?[Y|n|q]:
The script validates if there is enough free space available under the specified base directory for the
PeopleSoft environment. The PeopleSoft environment setup is aborted if there is not enough free space.
CheckingiftheBaseFilesystemhasEnoughFreeSpace:[OK]
The script creates the following three sub-directories under the user provided base directory,
BASE_DIR
:

Deploying the PeopleSoft PeopleTools Deployment Packages Chapter 2
126
Copyright © 2022, Oracle and/or its affiliates. All Rights Reserved.
• BASE_DIR/dpk
The script uses this directory to extract the archives from the PeopleSoft DPKs.
• BASE_DIR/pt
The script uses this directory to deploy PeopleSoft PeopleTools.
• BASE_DIR/db
This directory is not used for this deployment.
7. Review the status messages as the script validates the files found in DPK_INSTALL and extracts the archives
from the DPKs.
The script carries out validations for the mid-tier deployment. If any of the validations fail, the PeopleSoft
environment setup is aborted.
Note. The messages have been truncated for brevity.
ValidatingthePeopleSoftDPKsintheFolder:
[...]
ExtractingtheDPKArchivesintheVM:
[...]
8. Review the status messages as the script sets up the Puppet file system.
The script sets up Puppet on the host. It then copies the PeopleSoft Puppet modules to the standard location
(BASE_DIR/
dpk) and updates the YAML files to reflect the type of PeopleSoft environment setup.
SettingupPuppetontheVM:
GeneratingeYAMLHieraBackendEncryptionKeys:[OK]
UpdatingthePuppetHieraYAMLFilesintheLinuxVM:[OK]
UpdatingtheRoleinPuppetSiteFilefortheLinuxVM:[OK]
9. Specify the information for your database platform.
a. For the database platform, enter ORACLE or DB2ODBC (DB2 for z/OS).
EnterthePeopleSoftdatabaseplatform[ORACLE]:
b. Enter
y
(yes) to indicate that the database you are connecting to is a Unicode database.
Note. All PeopleSoft Update Image databases are required to be Unicode.
IsthePeopleSoftdatabaseunicode?[Y|n]:y
10. Enter y to continue with the script.
Areyouhappywithyouranswers?[y|n]:y
UpdatingthePuppetHieraYAMLFileswithUserData:[OK]
11. If you want to continue running the initialization script using the default configuration, answer y (yes) to the
following prompt, and continue with the next step.
If you want to customize the PeopleSoft environment using the Puppet YAML files, answer n (no) to stop the
script.
ThebootstrapscriptisreadytodeployandconfigurethePeopleSoft
environmentusingthedefaultconfigurationdefinedinthePuppet
HieraYAMLfiles.Youcanproceedbyanswering'y'atthefollowing
prompt.And,ifyouwanttocustomizetheenvironmentbyoverriding

Chapter 2 Deploying the PeopleSoft PeopleTools Deployment Packages
Copyright © 2022, Oracle and/or its affiliates. All Rights Reserved.
127
thedefaultconfiguration,youcananswer'n'.Ifyouanswer'n',you
shouldfollowtheinstructionsinthePeopleSoftInstallationGuide
forcreatingthecustomizationHieraYAMLfileandrunningthePuppet
'apply'commanddirectlytocontinuewiththesetupofthePeopleSoft
environment
Doyouwanttocontinuewiththedefaultinitializationprocess?[y|n]:
12. Review the status messages as the script runs Puppet profiles to set up the PeopleSoft environment.
A message of [ OK ] indicates that the profile has been applied successfully while a message [FAILED]
indicates that the profile application failed.
The script stops and exits the first time a profile application fails, and displays an error message. This example
shows the error message after the first step failed:
StartingtheDefaultInitializationofPeopleSoftEnvironment:
DeployingPeopleToolsComponents:[FAILED]
TheinitializationofPeopleSoftenvironmentsetupfailed.Checkthe
logfile[/opt/DPK_INSTALL/setup/psft_dpk_setup.log]fortheerrors.
Aftercorrectingtheerrors,runthefollowingcommandstocontinue
withthesetupofPeopleSoftenvironment.
Fromtheshell,run/opt/oracle/psft/psft_puppet_apply.sh
ExitingthePeopleSoftenvironmentsetupprocess.
See "Completing the DPK Initialization with Customizations."
Upon successful completion, the DPK setup script displays the following message:
StartingtheDefaultInitializationofPeopleSoftEnvironment:
DeployingPeopleToolsComponents:[OK]
SettingupPeopleSoftOSUsersEnvironment:[OK]
ThePeopleSoftEnvironmentSetupProcessEnded.
The complete setup log is written to the file psft_dpk_setup.log in the same location as the DPK setup script.
If you are running as a non-root user, the setup.log is written to the file <USER_HOME>/
psft_dpk_work/psft_dpk_setup_<PID>.log, where <USER_HOME> is the home directory for the user
running the script, and <PID> is a process ID
Task 2-12: Deploying the PeopleTools Client DPK
This section discusses:
•
Understanding the Standalone Mode Deployment
•
Preparing for the PeopleTools Client DPK Deployment
•
Deploying in Standalone Mode

Deploying the PeopleSoft PeopleTools Deployment Packages Chapter 2
128
Copyright © 2022, Oracle and/or its affiliates. All Rights Reserved.
Task 2-12-1: Understanding the Standalone Mode Deployment
Use the standalone mode (SA mode) deployment for the PeopleTools Client DPK when deploying the DPK alone,
without first deploying the PeopleSoft application or PeopleSoft PeopleTools DPKs. Use this method, for
example, when carrying out a PeopleTools-only upgrade, or to install Change Assistant or one of the other
utilities.
Install the PeopleTools Client DPK on a Microsoft Windows host that is certified for PeopleTools client
installation.
Use SA mode deployment for the following tasks:
• PeopleTools Upgrade
The deployment process installs a PeopleTools client PS_HOME that includes the directories needed for a
PeopleSoft PeopleTools-only upgrade, such as data, projects, and scripts directories.
•
PeopleTools Patch
The deployment process installs a PeopleTools client PS_HOME that includes the directories needed for a
PeopleSoft PeopleTools patch application, such as the PTP directory.
See "Learning About the PeopleSoft Deployment Process," Reviewing the PeopleTools Patch DPKs.
• PeopleTools Client
The deployment process installs a PeopleTools client PS_HOME. Choose the deployment type "None of the
above" for this deployment.
• Change Assistant installation
You can install Change Assistant as part of the PeopleTools Client deployment, or as a separate installation.
The deployment process installs, but does not configure Change Assistant. To use Change Assistant for a
PeopleSoft PeopleTools-only upgrade or to apply a PeopleSoft PeopleTools patch, you must configure
Change Assistant manually. See the PeopleTools upgrade or patch documentation for information.
If there is an existing Change Assistant installation, the deployment process removes or upgrades it to the
current release, and saves a configuration file with the existing setup.
• Change Impact Analyzer
You can install Change Impact Analyzer as part of the PeopleTools Client deployment, or as a separate
installation.
•
PeopleSoft Test Framework (PTF) installation
You can install PeopleSoft Test Framework as part of the PeopleTools Client deployment, or as a separate
installation.
• PeopleSoft Test Framework (PTF) configuration
If you choose to configure PTF, the deployment process prompts you for setup parameters. You can configure
PTF either at the same time that you install it or later. For example, you may choose to configure PTF
separately if you install and configure it first, and then later the middle-tier components in your environment
change. In this case, you do not need to install, but you can use the deployment process to reconfigure PTF.
• Configuration Manager
If you accept the option to configure the PeopleTools client, the information that you supply is used to
configure Configuration Manager.
• The PeopleTools Client deployment installs Microsoft Visual C++ Redistributable Packages for Visual
Studio, which include required Microsoft C++ runtime libraries.

Chapter 2 Deploying the PeopleSoft PeopleTools Deployment Packages
Copyright © 2022, Oracle and/or its affiliates. All Rights Reserved.
129
In addition to the Standalone Mode deployment described in this section, it is possible to deploy the PeopleTools
Client in Update Manager mode, if you installed using the PUM installation type.
See PeopleSoft Deployment Packages for Update Images Installation (PeopleSoft PeopleTools 8.59).
Task 2-12-2: Preparing for the PeopleTools Client DPK Deployment
To obtain and extract the PeopleTools Client DPK:
1. Go to the download location for the PeopleSoft PeopleTools DPKs, and download only the last zip file to a
location known as DPK_INSTALL on a Microsoft Windows computer.
The last zip file, for example Filename_4of4.zip, is the PeopleSoft PeopleTools client DPK.
See Obtaining the PeopleSoft PeopleTools Patch DPKs, for the filename syntax of the DPK zip files.
2. Extract the downloaded zip file, which yields another zip file.
3. Extract the resulting zip file to a local or shared directory; for example C:\tools-client.
Task 2-12-3: Deploying in Standalone Mode
This section assumes that the user running the script has administrative permission.
To deploy the PeopleTools Client DPK in SA mode:
1. Verify that the Microsoft Windows folders options are set to show known file extensions.
Hidden file extensions may interfere with the script. To show file extensions, for example:
a. Open Windows Explorer and select Tools, Folder Options.
Note. Depending upon the Microsoft Windows operating system, you may use a different method to set
the folder options.
b. On the Folder Options dialog box, select the View tab.

Deploying the PeopleSoft PeopleTools Deployment Packages Chapter 2
130
Copyright © 2022, Oracle and/or its affiliates. All Rights Reserved.
c. Verify that the check box for Hide extensions for known file types is not selected, as shown in this
example:
Folder Options dialog box: View tab
d. Click OK to close the box.
2. Open a command prompt, running as administrator, and change directory to the C:\tools_client folder.
The tools_client folder includes various sub-folders, and the following files:
• SetupPTClient.bat
The interactive script that installs the PeopleSoft PeopleTools components such as Application Designer,
Change Assistant, Change Impact Analyzer, and PeopleSoft Test Framework.
• readme.txt
3. Run the setup script with the following command:
SetupPTClient.bat-t

Chapter 2 Deploying the PeopleSoft PeopleTools Deployment Packages
Copyright © 2022, Oracle and/or its affiliates. All Rights Reserved.
131
Note. If you see an error message similar to "The application has failed to start because its side-by-side
configuration is incorrect," it indicates that your machine does not include the necessary Microsoft C++
runtime libraries. Go to the Microsoft Web site, locate the Microsoft Visual C++ redistributable package for
your system, and install as directed.
• The setup script deploys to drive C by default. To deploy to a different drive, you can use the option -d
<drive>:
SetupPTClient.bat-t-dE
This option installs all specified software (Change Assistant, Change Impact Analyzer, PeopleSoft Test
Framework), installation and temporary directories, and log files to the specified drive, E:\ in this example.
The drive can be any valid local or mapped shared drive.
• To enable logging, include the option -l in the command:
SetupPTClient.bat-t-l
4. Answer y (yes) at the following prompt to deploy the PeopleTools Client.
If you are running the script after having deployed the PeopleTools Client previously, and you want to install
Change Assistant, Change Impact Analyzer, or PeopleSoft Test Framework without deploying the
PeopleTools Client again, answer n (no), and continue with step 9.
******SetupPTClientstartedat11:42:38.91******
setloggertotrue
DoyouwanttodeployPeopleToolsclient?[Y/N]:y
5. Specify the RDBMS type for the PeopleTools Client that you want to deploy.
In this example, the RDBMS is option
1,
Oracle.
PleaseSelecttheDatabasePlatform:
1.Oracle
2.MicrosoftSQLServer
3.DB2forzOS
Enteryourchoice[1-3]:1
6. Specify the installation directory, referred to as PSHOME, for the PeopleTools Client, or press ENTER to
accept the default directory, C:\PT<release_number>_Client_<database_type>, for example
C:\PT8.58.02_Client_ORA.
PleasespecifythePSHOMEforthePeopleToolsClient
[C:\PT8.58.02_Client_ORA]:
7. Specify whether you want to supply configuration details at the following prompt.
DoyouwanttoconfigurePeopleToolsclient?[Y/N]:
If you answer n (no), you do not want to configure the PeopleTools client, continue with step 9.
If you answer y (yes), specify the information for your environment at the following prompts:
DatabaseName:HCM92
ServerName:example.com
UserId:VP1
ConnectID:people
ConnectPassword:
RetypeConnectPassword:

Deploying the PeopleSoft PeopleTools Deployment Packages Chapter 2
132
Copyright © 2022, Oracle and/or its affiliates. All Rights Reserved.
Note. When you enter the password, the script does not echo the password or any masking characters as you
type.
• Specify the database name and database server to connect to.
• The connect ID a valid database-level ID that the PeopleSoft system uses to make the initial connection to
the database.
• For User ID, specify a PeopleSoft user ID, such as VP1 or PS, that has permission to access the database
from the PeopleTools client, Application Designer, and so on.
8. Select the type of deployment at the following prompt:
See the definitions in Understanding the Standalone Mode Deployment.
PleasemakeyourselectionfortheToolsClientdeployment:
1.PeopleToolsFullUpgrade
2.PeopleToolsPatch
3.Noneoftheabove
Enteryourchoice[1-3]:
9. Specify whether you want to install Change Assistant at the following prompt:
DoyouwanttoinstallChangeAssistant?[Y/N]:
If you answer
y
(yes), specify the installation directory, or accept the default, C:\Program
Files\PeopleSoft\Change Assistant:
PleasespecifythedirectorytoinstallChangeAssistant
[C:\ProgramFiles\PeopleSoft\ChangeAssistant]:
10. Specify whether you want to install Change Impact Analyzer at the following prompt:
DoyouwanttoinstallChangeImpactAnalyzer?[Y/N]:
If you answer
y
(yes), specify the installation directory for Change Impact Analyzer, or accept the default,
C:\Program Files\PeopleSoft\Change Impact Analyzer:
PleasespecifythedirectorytoinstallChangeImpactAnalyzer
[C:\ProgramFiles\PeopleSoft\ChangeImpactAnalyzer]:
11. Specify whether you want to install PeopleSoft Test Framework at the following prompt:
DoyouwanttoinstallPeopleSoftTestFramework?[Y/N]:
If you answer y (yes), specify the installation directory for PeopleSoft Test Framework, or accept the default,
C:\Program Files\PeopleSoft\PeopleSoft Test Framework:
PleasespecifythedirectorytoinstallPeopleSoftTestFramework
[C:\ProgramFiles\PeopleSoft\PeopleSoftTestFramework]:
12. Specify whether you want to configure the PeopleSoft Test Framework at the following prompt:
DoyouwanttoconfigurePeopleSoftTestFramework?[Y/N]:
If you answer y (yes), specify the information for your environment. For information on these parameters, see
the PeopleTools Test Framework product documentation.
See PeopleTools: Test Framework, "Installing a PTF Client."
DatabaseName:HCM92
Server:Port:example.com:443

Chapter 2 Deploying the PeopleSoft PeopleTools Deployment Packages
Copyright © 2022, Oracle and/or its affiliates. All Rights Reserved.
133
NodeID:node_name
UserID:VP1
Proxy[Y/N]:y
ProxyServer:proxyserver.com
ProxyPort:5000
ProxyUser:username
ProxyPassword:*******
RetypeProxyPassword:*******
13. Review the setup steps.
The messages you see depend upon your choices.
StartingToolsClientDeployment!
DeployingPeopleTools8.58.02ClientinC:\PT8.58.02_Client_ORA
ConfiguringPeopleTools8.58.02Client
DeploymentofPeopleToolsClientComplete.
ToolsClientDeploymentEnded.
*****SetupPTClientendedat11:35:08.91******
PleasereviewC:\PeopleSoft\PTClientDeploy.logforadditional⇒
information.
14. To review the log file for the setup process, go to
%USERPROFILE%\AppData\Local\Temp\PeopleSoft\PTClientDeploy.log.
For example, if the USERPROFILE environment variable is C:\Users\username, the log file location is
C:\Users\username\AppData\Local\Temp\PeopleSoft\PTClientDeploy.log.
Note. If you used the -d <drive> option to deploy to a drive other than drive C:\, the log file is found in
<drive>:\Users\<username>\AppData\Local\Temp\PeopleSoft\PTClientDeploy.log and creates the directory if
it does not exist.
The PTClientDeploy.log file includes a record of each of the steps in the PeopleTools Client deployment
process. If any of the steps fail, a detailed error or warning message will be written to the same log file.


Copyright © 2022, Oracle and/or its affiliates. All Rights Reserved.
135
Chapter 3
Deploying the PeopleSoft PeopleTools
Deployment Packages in Silent Mode
This chapter discusses:
• Understanding Silent Mode Installation
•
Reviewing the Response File Sample for Mid-tier Installation
•
Reviewing the Response File Sample to Deploy an Application Server Domain
•
Reviewing the Response File Sample to Deploy a Process Scheduler Domain
•
Reviewing the Response File Sample to Deploy an Application Server and a Process Scheduler Domain
•
Reviewing the Response File Sample to Deploy a PIA Domain
•
Reviewing the Response File Sample to Install PS_HOME Only
•
Running the DPK Setup Script in Silent Mode for Default Initialization
•
Running the DPK Setup Script in Silent Mode with Customizations
•
Running the DPK Setup Script in Silent Mode for Default Initialization with use_alternate_puppet_install
Option
•
Running the DPK Setup Script in Silent Mode with Customizations and use_alternate_puppet_install Option
Understanding Silent Mode Installation
Use this section to perform a silent mode installation with the DPK setup script. In silent mode, you record the
answers for the script prompts in a text file, called a response file. After you start the script and specify the
response file location, no further interaction is required.
You can also run the DPK setup script in silent mode and specify a customizations file in addition to the response
file. Use the examples in the chapter "Completing the DPK Initialization with Customizations" to create a
customization file.
Note that some of the response file samples in this section include passwords. When creating the response file for
silent mode installation, enter the passwords in clear text. If you are running a customized deployment, enter the
passwords in clear text in the psft_customizations.yaml file. Do not enter encrypted passwords.
If you want to run as a non-root user on Linux, AIX, HP-UX, or Solaris, fulfill the requirements in the section
Deploying as a Non-Root User on Linux, AIX, HP-UX, or Solaris. Before you run the silent mode installation as
a non-root user, the root user must run the DPK setup prereq step.
See "Installing the PeopleSoft Homes," Deploying as a Non-Root User on Linux, AIX, HP-UX, or Solaris.
Create your response file based on the samples in this section. The response file should include the values you
would supply when running the DPK setup script interactively, and will vary depending upon the database
platform and operating system.

Deploying the PeopleSoft PeopleTools Deployment Packages in Silent
Mode
Chapter 3
136
Copyright © 2022, Oracle and/or its affiliates. All Rights Reserved.
The response files in this section include the following parameters:
• env_type — Specify midtier as the type of DPK deployment.
• deploy_only — Specify true for one of the special deployment options, such as to deploy only PS_HOME.
• deploy_type — Specify the type of deployment, as shown in the response file samples.
• db_is_unicode — Specify false if you want to install a non-Unicode database, or true to install a Unicode
environment.
The default setting is true. If you do not include the db_is_unicode parameter, the DPK setup script
installs a Unicode environment.
• psft_base_dir — Enter an accessible location for the base folder, which is used to extract the PeopleSoft
DPKs and for deploying PeopleSoft components.
The script creates the folder if it is not present.
For installation on Microsoft Windows, use forward slashes (/) for the base folder. For example, C:/psft.
Enclose any names with special characters in double quotes. Do not use a name for the base folder that begins
with a number.
For installation on Linux, AIX, HP-UX, or Solaris, use forward slashes (/) for the base directory. For example,
/cs1/psft. If the name includes any non-alphanumeric characters such as periods, enclose the name in
double quotes. Do not use a name for the base directory that begins with a number. Do not end the base
directory name with a forward slash (for example, do not enter /ds1/psft/).
• user_home_dir — On Linux, AIX, HP-UX, or Solaris, if you are performing the deployment as the root
user, enter a writable directory for the home directory for the script-created users (psadm1, psadm2, psadm3,
oracle2, and esadm1).
•
user_config_home_dir
— On Linux, AIX, HP-UX, or Solaris, if you are performing the deployment as
a non-root user, enter a writable directory for the
PS_CFG_HOME
directory.
If you do not include user_config_home_dir in the response file, it defaults to
USER_HOME/
psft.
• db_platform — Specify the database platform.
Enter ORACLE, MSSQL (Microsoft SQL Server), or DB2ODBC (DB2 for z/OS).
• db_name — Enter the PeopleSoft database name.
If the database name includes non-alphanumeric characters such as periods, enclose the name in double
quotes. For example, "HCM.92".
• db_service_name — Enter the database service name.
For the service name, enter the full name, including the domain, if the database was installed with the domain.
Use forward slashes if necessary. If the service name includes non-alphanumeric characters such as periods,
enclose the name in double quotes. For example, "HCM.92.example.com".
• db_host — Enter the name of the host where the database is installed.
• db_port — Enter the database port.
• connect_id — Enter the PeopleSoft database Connect ID.
The default is people.
•
connect_pwd
— Enter the password for the Connect ID.
Ensure the password meets the length and complexity requirements for your database platform.
See E-DPK - Password restrictions are not reflected in the DPK setup script prompts, My Oracle Support, Doc
ID 2639270.1.

Chapter 3 Deploying the PeopleSoft PeopleTools Deployment Packages in Silent
Mode
Copyright © 2022, Oracle and/or its affiliates. All Rights Reserved.
137
• opr_id — Enter the PeopleSoft operator ID, such as PS or VP1.
• opr_pwd — Enter the password for the operator ID.
Ensure that the password is between 1 and 32 characters in length. You may include these special characters
!@#$%^&.
• domain_conn_pwd — Enter the Application Server Domain Connection password.
This is an optional password. If no password is entered, the connection between Web Server and Application
Server will not be password protected.
• weblogic_admin_pwd — Enter the Oracle WebLogic Server Admin password.
The default Oracle WebLogic server administrator is system. Ensure that the password is between 8 and 30
characters in length with at least one lowercase letter, one uppercase letter and one number or one special
character (!@#$%^&).
• webprofile_user_id — Enter the web profile user name.
• webprofile_user_pwd — Enter the password for the PTWEBSERVER web profile user.
Ensure that the password is between 8 and 32 characters in length. You may include these special characters
!@#$%^&.
• gw_user_id — Enter the Integration Gateway user ID.
The default is administrator.
•
gw_user_pwd
— Enter the password for the Integration Gateway user.
Ensure that the password is between 8 and 30 characters in length. You may include these special characters
!@#$%^&.
•
gw_keystore_pwd
— Enter the Integration Gateway keystore password.
Ensure the password is between 8 and 30 characters in length. You may include these special characters
!@#$%^&.
Task 3-1: Reviewing the Response File Sample for Mid-tier
Installation
This section discusses:
•
Reviewing the Response File Sample for Mid-tier Installation on Microsoft Windows
•
Reviewing the Response File Sample for Mid-tier Installation as the Root User on Linux, AIX, HP-UX, or
Solaris
•
Reviewing the Response File Sample for Mid-tier Installation as a Non-Root User on Linux, AIX, HP-UX, or
Solaris
Task 3-1-1: Reviewing the Response File Sample for Mid-tier Installation on
Microsoft Windows
Here is a sample response file for installing mid-tier components on Microsoft Windows.
env_type=midtier
psft_base_dir=C:/psft

Deploying the PeopleSoft PeopleTools Deployment Packages in Silent
Mode
Chapter 3
138
Copyright © 2022, Oracle and/or its affiliates. All Rights Reserved.
db_platform=ORACLE
db_name=HCM92U36
db_service_name=HCM92U36
db_host=server.example.com
db_port=1521
connect_id=people
connect_pwd=password
opr_id=PS
opr_pwd=password
weblogic_admin_pwd=password
webprofile_user_id=PTWEBSERVER
webprofile_user_pwd=password
domain_conn_pwd=password
gw_user_id=administrator
gw_user_pwd=password
gw_keystore_pwd=password
Task 3-1-2: Reviewing the Response File Sample for Mid-tier Installation as
the Root User on Linux, AIX, HP-UX, or Solaris
Here is a sample response file for installing mid-tier components on Linux, AIX, HP-UX, or Solaris.
env_type=midtier
db_platform=ORACLE
psft_base_dir=/opt/oracle/psft
user_home_dir=/opt/home
db_name=HCM92U36
db_service_name=HCM92U36
db_host=server.example.com
db_port=1521
connect_id=people
connect_pwd=password
opr_id=PS
opr_pwd=password
weblogic_admin_pwd=password
webprofile_user_id=PTWEBSERVER
webprofile_user_pwd=password
domain_conn_pwd=password
gw_user_id=administrator
gw_user_pwd=password
gw_keystore_pwd=password
Task 3-1-3: Reviewing the Response File Sample for Mid-tier Installation as
a Non-Root User on Linux, AIX, HP-UX, or Solaris
Here is a sample response file for installing mid-tier components on Linux, AIX, HP-UX, or Solaris.
env_type=midtier
db_platform=ORACLE
psft_base_dir=/opt/oracle/psft
user_config_home_dir=/opt/psftuser/pscfg_pt858_silent

Chapter 3 Deploying the PeopleSoft PeopleTools Deployment Packages in Silent
Mode
Copyright © 2022, Oracle and/or its affiliates. All Rights Reserved.
139
db_name=HCM92U36
db_service_name=HCM92U36
db_host=server.example.com
db_port=1521
connect_id=people
connect_pwd=password
opr_id=PS
opr_pwd=password
weblogic_admin_pwd=password
webprofile_user_id=PTWEBSERVER
webprofile_user_pwd=password
domain_conn_pwd=password
gw_user_id=administrator
gw_user_pwd=password
gw_keystore_pwd=password
Task 3-2: Reviewing the Response File Sample to Deploy an
Application Server Domain
This section discusses:
• Reviewing the Response File Sample to Deploy an Application Server Domain on Microsoft Windows
• Reviewing the Response File Sample to Deploy an Application Server Domain on Linux, AIX, HP-UX, or
Solaris as the Root User
• Reviewing the Response File Sample to Deploy an Application Server Domain on Linux, AIX, HP-UX, or
Solaris as a Non-Root User
Task 3-2-1: Reviewing the Response File Sample to Deploy an Application
Server Domain on Microsoft Windows
Here is a sample response file for deploying an application server domain on Microsoft Windows.
env_type=midtier
psft_base_dir=C:/psft
db_platform=ORACLE
domain_type=appserver
db_name=HCM92U36
db_host=server.example.com
db_service_name=HCM92U36
db_port=1521
connect_id=people
connect_pwd=password
opr_id=PS
opr_pwd=password
domain_conn_pwd=password

Deploying the PeopleSoft PeopleTools Deployment Packages in Silent
Mode
Chapter 3
140
Copyright © 2022, Oracle and/or its affiliates. All Rights Reserved.
Task 3-2-2: Reviewing the Response File Sample to Deploy an Application
Server Domain on Linux, AIX, HP-UX, or Solaris as the Root User
Here is a sample response file for deploying an application server domain on Linux, AIX, HP-UX, or Solaris.
env_type=midtier
psft_base_dir=/opt/oracle/psft
db_platform=ORACLE
domain_type=appserver
db_name=HCM92U36
db_host=server.example.com
db_service_name=HCM92U36
db_port=1521
connect_id=people
connect_pwd=password
opr_id=PS
opr_pwd=password
domain_conn_pwd=password
Task 3-2-3: Reviewing the Response File Sample to Deploy an Application
Server Domain on Linux, AIX, HP-UX, or Solaris as a Non-Root User
Here is a sample response file for deploying an application server domain on Linux, AIX, HP-UX, or Solaris.
env_type=midtier
psft_base_dir=/opt/oracle/psft
db_platform=ORACLE
domain_type=appserver
db_name=HCM92U36
db_host=server.example.com
db_service_name=HCM92U36
db_port=1521
connect_id=people
connect_pwd=password
opr_id=PS
opr_pwd=password
domain_conn_pwd=password
Task 3-3: Reviewing the Response File Sample to Deploy a
Process Scheduler Domain
This section discusses:
• Reviewing the Response File Sample to Deploy a Process Scheduler Domain on Microsoft Windows
• Reviewing the Response File Sample to Deploy a Process Scheduler Domain on Linux, AIX, HP-UX, or
Solaris as the Root User
• Reviewing the Response File Sample to Deploy a Process Scheduler Domain on Linux, AIX, HP-UX, or
Solaris as a Non-Root User

Chapter 3 Deploying the PeopleSoft PeopleTools Deployment Packages in Silent
Mode
Copyright © 2022, Oracle and/or its affiliates. All Rights Reserved.
141
Task 3-3-1: Reviewing the Response File Sample to Deploy a Process
Scheduler Domain on Microsoft Windows
Here is a sample response file for deploying a Process Scheduler domain on Microsoft Windows.
env_type=midtier
psft_base_dir=C:/psft
db_platform=ORACLE
domain_type=prcs
db_name=HCM92U36
db_host=server.example.com
db_service_name=HCM92U36
db_port=1521
connect_id=people
connect_pwd=password
opr_id=QEDMO
opr_pwd=password
domain_conn_pwd=password
Task 3-3-2: Reviewing the Response File Sample to Deploy a Process
Scheduler Domain on Linux, AIX, HP-UX, or Solaris as the Root User
Here is a sample response file for deploying a Process Scheduler domain on Linux, AIX, HP-UX, or Solaris.
env_type=midtier
psft_base_dir=/opt/oracle/psft
db_platform=ORACLE
domain_type=prcs
db_name=HCM92U36
db_host=server.example.com
db_service_name=HCM92U36
db_port=1521
connect_id=people
connect_pwd=password
opr_id=QEDMO
opr_pwd=password
domain_conn_pwd=password
Task 3-3-3: Reviewing the Response File Sample to Deploy a Process
Scheduler Domain on Linux, AIX, HP-UX, or Solaris as a Non-Root User
Here is a sample response file for deploying a Process Scheduler domain on Linux, AIX, HP-UX, or Solaris.
env_type=midtier
psft_base_dir=/opt/oracle/psft
db_platform=ORACLE
domain_type=prcs
db_name=HCM92U36
db_host=server.example.com
db_service_name=HCM92U36

Deploying the PeopleSoft PeopleTools Deployment Packages in Silent
Mode
Chapter 3
142
Copyright © 2022, Oracle and/or its affiliates. All Rights Reserved.
db_port=1521
connect_id=people
connect_pwd=password
opr_id=QEDMO
opr_pwd=password
domain_conn_pwd=password
Task 3-4: Reviewing the Response File Sample to Deploy an
Application Server and a Process Scheduler Domain
This section discusses:
• Reviewing the Response File Sample to Deploy an Application Server and a Process Scheduler Domain on
Microsoft Windows
• Reviewing the Response File Sample to Deploy an Application Server and a Process Scheduler Domain on
Linux, AIX, HP-UX, or Solaris as the Root User
• Reviewing the Response File Sample to Deploy an Application Server and a Process Scheduler Domain on
Linux, AIX, HP-UX, or Solaris as a Non-Root User
Task 3-4-1: Reviewing the Response File Sample to Deploy an Application
Server and a Process Scheduler Domain on Microsoft Windows
Here is a sample response file for deploying an application server and a Process Scheduler domain on Microsoft
Windows.
env_type=midtier
psft_base_dir=C:/psft
db_platform=ORACLE
domain_type=appbatch
db_name=HCM92U36
db_host=server.example.com
db_service_name=HCM92U36
db_port=1521
connect_id=people
connect_pwd=password
opr_id=PS
opr_pwd=password
domain_conn_pwd=password
Task 3-4-2: Reviewing the Response File Sample to Deploy an Application
Server and a Process Scheduler Domain on Linux, AIX, HP-UX, or Solaris
as the Root User
Here is a sample response file for deploying an application server and a Process Scheduler domain on Linux,
AIX, HP-UX, or Solaris.
env_type=midtier
psft_base_dir=/opt/oracle/psft

Chapter 3 Deploying the PeopleSoft PeopleTools Deployment Packages in Silent
Mode
Copyright © 2022, Oracle and/or its affiliates. All Rights Reserved.
143
user_home_dir=/scratch/dpkbase
db_platform=ORACLE
domain_type=appbatch
db_name=HCM92U36
db_host=server.example.com
db_service_name=HCM92U36
db_port=1521
connect_id=people
connect_pwd=password
opr_id=PS
opr_pwd=password
domain_conn_pwd=password
Task 3-4-3: Reviewing the Response File Sample to Deploy an Application
Server and a Process Scheduler Domain on Linux, AIX, HP-UX, or Solaris
as a Non-Root User
Here is a sample response file for deploying an application server and a Process Scheduler domain on Linux,
AIX, HP-UX, or Solaris.
env_type=midtier
psft_base_dir=/opt/oracle/psft
user_config_home_dir=/scratch/dpkbase
db_platform=ORACLE
domain_type=appbatch
db_name=HCM92U36
db_host=server.example.com
db_service_name=HCM92U36
db_port=1521
connect_id=people
connect_pwd=password
opr_id=PS
opr_pwd=password
domain_conn_pwd=password
Task 3-5: Reviewing the Response File Sample to Deploy a PIA
Domain
This section discusses:
•
Reviewing the Response File Sample to Deploy a PIA Domain on Microsoft Windows
•
Reviewing the Response File Sample to Deploy a PIA Domain on Linux, AIX, HP-UX, or Solaris as the Root
User
•
Reviewing the Response File Sample to Deploy a PIA Domain on Linux, AIX, HP-UX, or Solaris as a Non-
Root User

Deploying the PeopleSoft PeopleTools Deployment Packages in Silent
Mode
Chapter 3
144
Copyright © 2022, Oracle and/or its affiliates. All Rights Reserved.
Task 3-5-1: Reviewing the Response File Sample to Deploy a PIA Domain
on Microsoft Windows
Here is a sample response file for deploying a PIA domain on Microsoft Windows.
env_type=midtier
psft_base_dir=C:/psft
db_platform=ORACLE
domain_type=pia
db_name=HCM92U36
db_host=server.example.com
db_service_name=HCM92U36
db_port=1521
connect_id=people
connect_pwd=password
opr_id=PS
opr_pwd=password
weblogic_admin_pwd=password
webprofile_user_id=PTWEBSERVER
webprofile_user_pwd=password
domain_conn_pwd=password
gw_user_id=administrator
gw_user_pwd=password
gw_keystore_pwd=password
pia_psserver_list=server2.example.com:9033
prcs_server_name=PRCS9722
Task 3-5-2: Reviewing the Response File Sample to Deploy a PIA Domain
on Linux, AIX, HP-UX, or Solaris as the Root User
Here is a sample response file for deploying a PIA domain on Linux, AIX, HP-UX, or Solaris.
env_type=midtier
psft_base_dir=/opt/oracle/psft
user_home_dir=/scratch/dpkbase
db_platform=ORACLE
domain_type=pia
db_name=HCM92U36
db_host=server.example.com
db_service_name=HCM92U36
db_port=1521
connect_id=people
connect_pwd=password
opr_id=PS
opr_pwd=password
weblogic_admin_pwd=password
webprofile_user_id=PTWEBSERVER
webprofile_user_pwd=password
domain_conn_pwd=password
gw_user_id=administrator
gw_user_pwd=password

Chapter 3 Deploying the PeopleSoft PeopleTools Deployment Packages in Silent
Mode
Copyright © 2022, Oracle and/or its affiliates. All Rights Reserved.
145
gw_keystore_pwd=password
pia_psserver_list=server2.example.com:9033
prcs_server_name=PRCS9152
Task 3-5-3: Reviewing the Response File Sample to Deploy a PIA Domain
on Linux, AIX, HP-UX, or Solaris as a Non-Root User
Here is a sample response file for deploying a PIA domain on Linux, AIX, HP-UX, or Solaris.
env_type=midtier
psft_base_dir=/opt/oracle/psft
user_config_home_dir=/opt/psftuser/pscfg_pt858_silent
db_platform=ORACLE
domain_type=pia
db_name=HCM92U36
db_host=server.example.com
db_service_name=HCM92U36
db_port=1521
connect_id=people
connect_pwd=password
opr_id=PS
opr_pwd=password
weblogic_admin_pwd=password
webprofile_user_id=PTWEBSERVER
webprofile_user_pwd=password
domain_conn_pwd=password
gw_user_id=administrator
gw_user_pwd=password
gw_keystore_pwd=password
pia_psserver_list=server2.example.com:9033
prcs_server_name=PRCS9152
Task 3-6: Reviewing the Response File Sample to Install
PS_HOME Only
This section discusses:
•
Reviewing the Response File Sample to Install PS_HOME Only on Microsoft Windows
•
Reviewing the Response File Sample to Install PS_HOME Only on Linux, AIX, HP-UX, or Solaris
Task 3-6-1: Reviewing the Response File Sample to Install PS_HOME Only
on Microsoft Windows
Here is a sample response file for installing only the PS_HOME installation directory, which includes the
PeopleSoft PeopleTools server utilities.
env_type=midtier
deploy_only=true
deploy_type=tools_home

Deploying the PeopleSoft PeopleTools Deployment Packages in Silent
Mode
Chapter 3
146
Copyright © 2022, Oracle and/or its affiliates. All Rights Reserved.
db_platform=ORACLE
psft_base_dir="C:\psft"
db_is_unicode=false
Task 3-6-2: Reviewing the Response File Sample to Install PS_HOME Only
on Linux, AIX, HP-UX, or Solaris
Here is a sample response file for installing only the PS_HOME installation directory, which includes the
PeopleSoft PeopleTools server utilities.
env_type=midtier
deploy_only=true
deploy_type=tools_home
db_platform=ORACLE
psft_base_dir="/opt/oracle/psft"
db_is_unicode=false
Task 3-7: Running the DPK Setup Script in Silent Mode for Default
Initialization
This procedure assumes you have obtained the required DPK zip files and saved them in DPK_INSTALL.
Note. If you want to run as a non-root user on Linux, AIX, HP-UX, or Solaris, fulfill the requirements in the
section Deploying as a Non-Root User on Linux, AIX, HP-UX, or Solaris. Before you run the silent mode
installation, the root user must run the DPK setup prereq step.
1. Prepare the response file, using the examples in this section.
2. Extract the first zip file (FILENAME_1ofn.zip).
Note. It is a good idea to extract into the same directory where you downloaded the zip files, DPK_INSTALL.
The extraction creates the DPK_INSTALL/setup folder and other files.
3. Open a command prompt with Run as Administrator.
4. Change directory to
DPK_INSTALL/
setup.
5. Run the script and supply the full path and filename for the response file.
On Microsoft Windows:
psft-dpk-setup.bat--silent--response_file=<full_path/filename.txt>
On Linux, AIX, HP-UX, or Solaris:
./psft-dpk-setup.sh--silent--response_file=<full_path/filename.txt>
6. Wait until the installation is complete.
The script displays progress messages. The complete setup log is written to the file psft_dpk_setup.log in the
same location as the DPK setup script.

Chapter 3 Deploying the PeopleSoft PeopleTools Deployment Packages in Silent
Mode
Copyright © 2022, Oracle and/or its affiliates. All Rights Reserved.
147
Task 3-8: Running the DPK Setup Script in Silent Mode with
Customizations
This procedure assumes you have obtained the required DPK zip files and saved them in DPK_INSTALL.
Note. If you want to run as a non-root user on Linux, AIX, HP-UX, or Solaris, fulfill the requirements in the
section Deploying as a Non-Root User on Linux, AIX, HP-UX, or Solaris. Before you run the silent mode
installation, the root user must run the DPK setup prereq step.
Note. Remember to enter passwords in clear text in the response file and the psft_customizations.yaml file.
1. Prepare the response text file, using the examples in this section.
2. Prepare the customization YAML file, using the instructions in this documentation.
Note. You can name the file whatever you like. For the silent mode installation, it is not necessary to use the
name psft_customizations.yaml.
See "Completing the DPK Initialization with Customizations."
3. Extract the first zip file (FILENAME_1ofn.zip).
Note. It is a good idea to extract into the same directory where you downloaded the zip files, DPK_INSTALL.
The extraction creates the DPK_INSTALL/setup folder and other files.
4. Open a command prompt with Run as Administrator.
5. Change directory to DPK_INSTALL/setup.
6. Run the script, supplying the full path and filename for both the response file and the customization file.
On Microsoft Windows:
psft-dpk-setup.bat--silent--response_file=<full_path/filename.txt>
--customization_file=<full_path/custfilename.yaml>
On Linux, AIX, HP-UX, or Solaris:
./psft-dpk-setup.sh--silent--response_file=<full_path/filename.txt>
--customization_file=<full_path/custfilename.yaml>
7. Wait until the installation is complete.
The script displays progress messages. The complete setup log is written to the file psft_dpk_setup.log in the
same location as the DPK setup script.
Task 3-9: Running the DPK Setup Script in Silent Mode for Default
Initialization with use_alternate_puppet_install Option
This procedure assumes you have obtained the required DPK zip files and saved them in DPK_INSTALL.

Deploying the PeopleSoft PeopleTools Deployment Packages in Silent
Mode
Chapter 3
148
Copyright © 2022, Oracle and/or its affiliates. All Rights Reserved.
Note. If you want to run as a non-root user on Linux, AIX, HP-UX, or Solaris, fulfill the requirements in the
section Deploying as a Non-Root User on Linux, AIX, HP-UX, or Solaris. Before you run the silent mode
installation, the root user must run the DPK setup prereq step.
Note. The --use_alternate_puppet_install option is available for AIX, HP-UX, and Solaris
beginning with PeopleSoft PeopleTools 8.58.05.
1. Prepare the response text file, using the examples in this section.
2. Extract the first zip file (FILENAME_1ofn.zip).
Note. It is a good idea to extract into the same directory where you downloaded the zip files, DPK_INSTALL.
The extraction creates the DPK_INSTALL/setup folder and other files.
3. Open a command prompt with Run as Administrator.
4. Change directory to DPK_INSTALL/setup.
5. Run the script, supplying the full path and filename for both the response file and the customization file.
On Microsoft Windows:
psft-dpk-setup.bat--silent--response_file=<full_path/filename.txt>
--use_alternate_puppet_install
On Linux, AIX, HP-UX, or Solaris:
./psft-dpk-setup.sh--silent--response_file=<full_path/filename.txt>
--use_alternate_puppet_install
6. Wait until the installation is complete.
The script displays progress messages. The complete setup log is written to the file psft_dpk_setup.log in the
same location as the DPK setup script.
Task 3-10: Running the DPK Setup Script in Silent Mode with
Customizations and use_alternate_puppet_install Option
This procedure assumes you have obtained the required DPK zip files and saved them in DPK_INSTALL.
Note. If you want to run as a non-root user on Linux, AIX, HP-UX, or Solaris, fulfill the requirements in the
section Deploying as a Non-Root User on Linux, AIX, HP-UX, or Solaris. Before you run the silent mode
installation, the root user must run the DPK setup prereq step.
Note. The --use_alternate_puppet_install option is available for AIX, HP-UX, and Solaris
beginning with PeopleSoft PeopleTools 8.58.05.
1. Prepare the response text file, using the examples in this section.
2. Prepare the customization YAML file, using the instructions in this documentation.
Note. You can name the file whatever you like. For the silent mode installation, it is not necessary to use the
name psft_customizations.yaml.
See "Completing the DPK Initialization with Customizations."
3. Extract the first zip file (FILENAME_1ofn.zip).

Chapter 3 Deploying the PeopleSoft PeopleTools Deployment Packages in Silent
Mode
Copyright © 2022, Oracle and/or its affiliates. All Rights Reserved.
149
Note. It is a good idea to extract into the same directory where you downloaded the zip files, DPK_INSTALL.
The extraction creates the DPK_INSTALL/setup folder and other files.
4. Open a command prompt with Run as Administrator.
5. Change directory to DPK_INSTALL/setup.
6. Run the script, supplying the full path and filename for both the response file and the customization file.
On Microsoft Windows:
psft-dpk-setup.bat--silent--response_file=<full_path/filename.txt>
--customization_file=<full_path/custfilename.yaml>--use_alternate_⇒
puppet_install
On Linux, AIX, HP-UX, or Solaris:
./psft-dpk-setup.sh--silent--response_file=<full_path/filename.txt>
--customization_file=<full_path/custfilename.yaml>
--use_alternate_⇒
puppet_install
7. Wait until the installation is complete.
The script displays progress messages. The complete setup log is written to the file psft_dpk_setup.log in the
same location as the DPK setup script.


Copyright © 2022, Oracle and/or its affiliates. All Rights Reserved.
151
Chapter 4
Completing the DPK Initialization with
Customizations
This chapter discusses:
• Understanding PeopleSoft Environment Customizations
•
Preparing Customization Files for Linux, AIX, HP-UX, or Solaris Users and Groups
•
Preparing the Customization File for JDK on AIX
•
Preparing the Customization File for JDK on HP-UX
•
Preparing the Customization File for PeopleSoft Domain Definitions
•
Preparing the Customization File to Create PeopleSoft Domains Without Configuration
•
Preparing the Customization File for Component Software Locations
•
Preparing the Customization File for Unicode
•
Preparing the Customization Files for the PeopleSoft Homes
•
Preparing the Customization File for Jolt SSL and WSL SSL Ports
•
Preparing the Customization File for Oracle HTTP Server
•
Preparing the Customization File for Session Cookie Names
•
Preparing the Customization File for JVM Heap Sizes
•
Preparing the Customization File for Mid-Tier Connection to a Microsoft SQL Server Database
•
Preparing the Customization File for Mid-Tier Connection to a DB2 z/OS Database
• Preparing the Customization File to Exclude Oracle Database Client Installation
• Preparing the Customization File for sysctl and ulimit Parameters on Linux, AIX, HP-UX, or Solaris
• Completing the Customized Deployment
Understanding PeopleSoft Environment Customizations
The PeopleSoft DPK setup script allows setup of a PeopleSoft environment quickly using the default data from
the packaged Hiera YAML files. This section gives examples of ways to use the YAML files for customization.
Always use the documented procedures to make changes to your environment. Doing so will allow you to retain
your customizations when removing a deployment before deploying a new patch or version.
Note. You can use the customizations in this chapter whether you use the DPK script interactively or in silent
mode. This list notes a few places where using the DPK customization is different for interactive or silent mode.
Use these guidelines when customizing your environment:

Completing the DPK Initialization with Customizations Chapter 4
152
Copyright © 2022, Oracle and/or its affiliates. All Rights Reserved.
• (Interactive mode) Do not change any of the original delivered YAML files.
This practice enables you to retain your customizations after deploying a new patch or update.
When you deploy the PeopleSoft DPKs, the YAML files associated with the deployment are installed in the
following location:
• BASE_DIR/dpk/puppet/production/data/defaults.yaml
• BASE_DIR/dpk/puppet/production/data/psft_configuration.yaml
• BASE_DIR/dpk/puppet/production/data/psft_deployment.yaml
• BASE_DIR/dpk/puppet/production/data/psft_unix_system.yaml
• (Silent mode) Do not change any of the original delivered YAML files.
This practice enables you to retain your customizations after deploying a new patch or update.
Use the YAML files in the following location as the basis for the customizations file used in silent
installation:
• DPK_INSTALL/setup/puppet/production/data/defaults.yaml
• DPK_INSTALL/setup/puppet/production/data/psft_configuration.yaml
• DPK_INSTALL/
setup/puppet/production/data/psft_deployment.yaml
• DPK_INSTALL/
setup/puppet/production/data/psft_unix_system.yaml
• (Interactive mode) Start with the DPK setup script and choose not to continue with the default initialization.
Answer no at the prompt "Do you want to continue with the default initialization process? [y|n]:" to exit the
script and bypass the default initialization process.
To set up a customized PeopleSoft environment, use the DPK setup script for the first portion of the process,
that is, to automate the tasks of extracting the DPK zip files, installing Puppet (if not installed), and copying
the Puppet modules and Hiera data YAML files from the DPK into the location where Puppet looks for these
files during the orchestration process. When you exit the script, it displays instructions on how to proceed to
complete the initialization.
• Always use the customizations for these setups:
•
Installing on an AIX operating system
•
Installing on a HP-UX operating system
• Connecting to a non-Oracle RDBMS platform.
• Always create a psft_customizations.yaml file to use for modified parameters.
• Never modify the delivered YAML files. Instead, by copying the parameters that you want to modify into
the psft_customizations.yaml file you are able to save the customization.
• Copy only the section of the delivered YAML file that includes the parameters that you need to change, as
directed by the samples in this documentation. Depending upon the specific type of customization, you
may need to copy a single line, or an entire block of text, so be sure to check this documentation.
• The DPK setup script processes the psft_customizations.yaml file before the generated YAML files, so
that the values in psft_customizations.yaml override the values in psft_configuration.yaml,
psft_deployment.yaml, and psft_unix_system.yaml.
• (Interactive mode) Note that the file must be named "psft_customizations.yaml". Be sure to use the correct
spelling.
• (Silent mode) You can name the customization YAML file whatever you like for the silent mode
installation.
•
Verify the content of the delivered YAML files with each release.

Chapter 4 Completing the DPK Initialization with Customizations
Copyright © 2022, Oracle and/or its affiliates. All Rights Reserved.
153
The YAML files may have changed since this document was published. It is important that you copy the
appropriate section of code from the YAML files you install with each new deployment, and use it as the basis
for your psft_customizations.yaml file (or the silent mode customization YAML file).
• Do not create new parameters for psft_customizations.yaml (or the silent mode customization YAML file).
The deployment recognizes only those parameters in the delivered YAML files or given in the product
documentation.
• Use a single psft_customizations.yaml file (or the silent mode customization YAML file).
You can copy the necessary sections from more than one of the delivered YAML files and include them in a
single psft_customizations.yaml file. Again, copy only those sections with the parameters you want to change.
• Use the same psft_customizations.yaml file (or the silent mode customization YAML file) for all deployments
on a given base folder.
This applies to a use case in which you carry out more than one deployment on the same BASE_DIR. For
example, you first install PS_HOME only, and use a psft_customizations.yaml file to specify a non-default
PS_HOME location. Then you later do a second deployment, with the same BASE_DIR, to install mid-tier
components, and you want to customize the location of Oracle WebLogic. In this case, use the first
psft_customizations.yaml file, including the non-default PS_HOME, append the customization for the Oracle
WebLogic location, and use it for the second deployment.
• Include the remove: false attribute to retain your customizations through the clean-up process.
To ensure that your customizations are not removed when removing a deployed environment:
•
For each segment of customization parameters in the psft_customizations.yaml file (or the silent mode
customization YAML file), include the remove: false attribute at the end of the segment.
•
If you remove the environment manually (using the psft_puppet_apply script), set the ensure attribute to
absent
in default.yaml.
If you remove the environment using the --cleanup option for the PeopleSoft DPK setup script, you do
not need to set the attribute first because it is part of the script process.
•
Remove the environment using the --cleanup option for the PeopleSoft DPK setup script, as described
in this documentation.
See "Installing the PeopleSoft Homes," Removing a Deployed PeopleSoft Environment.
•
Copy an entire section containing the parameter to be modified, and be sure to retain the indentation from the
delivered YAML file.
The hierarchy and alignment of the YAML files are very important to the correct operation. In addition to the
brief overview given here, review the information in the appendix "Using the Puppet Hiera YAML Files for
Customization."
• The YAML files include scalar type and collection type parameters.
Scalar parameters are of the form key: value; for example:
db_platform:ORACLE
Collection type parameters include a parameter name followed by one or more indented lists of
key:value
pairs. In this case, the value of the collection parameter is defined by the indented list of
values; for example:
ps_home:
db_type:"%{hiera('db_platform')}"
unicode_db:"%{hiera('unicode_db')}"
location:"%{hiera('ps_home_location')}"
• When you locate a parameter that you want to modify, be sure to locate the section heading that begins at

Completing the DPK Initialization with Customizations Chapter 4
154
Copyright © 2022, Oracle and/or its affiliates. All Rights Reserved.
the first column of the YAML file. This ensures that the deployment operation modifies the correct
parameter.
• Be sure to retain the indentation from the delivered YAML file.
Typically there is an indentation of 2 or 3 spaces for each successive subsection. This is necessary in order
for the parameters to be correctly interpreted.
Note. Be sure when copying and pasting that you retain the indentation. Depending upon the authoring or
editing tools you use, the desired indentation may be lost when you copy and paste. It is a good idea to
double-check the final psft_customizations.yaml file (or the silent mode customization YAML file),
especially for the special cases where you copy a sample from this documentation.
• When copying and modifying collection type parameters, use only spaces, not tabs, to indent the
subsections.
• (Interactive mode) Use the encrypted passwords from the generated YAML files.
The DPK setup script encrypts user-supplied passwords and includes them in the generated YAML files. If
you copy a section of a YAML file with encrypted passwords, do not replace or remove the encrypted text.
The encrypted passwords are quite long. Be sure to copy the entire string, without adding spaces, tabs, or line
feeds.
Note. For the majority of the customizations described in this documentation, you copy the encrypted
passwords from the generated YAML files. If that is not possible, see the appendix "Encrypting Passwords for
Customizations on Linux, AIX, HP-UX, or Solaris."
• (Silent mode) When creating the psft_customizations.yaml file for silent mode installation, enter the
passwords in clear text. Do not enter encrypted passwords.
• Replace the entire attribute string.
The parameters in the delivered YAML files are written with Hiera interpolation functions that act as
variables. To modify each parameter, you must replace the entire string after the colon, and enclose your new
value in double quotes. For example, in the psft_deployment.yaml file, the location for an Oracle WebLogic
installation is given by the following parameters:
weblogic_location:"%{hiera('pt_location')}/bea"
weblogic:
location:"%{hiera('weblogic_location')}"
The second Hiera function refers to the first. When
pt_location
is set as C:/psft, Oracle WebLogic will be
installed in C:/psft/bea. To change this, remove both strings of text
"%{hiera('pt_location')}/bea"
and
"%{hiera('weblogic_location')}"
, and replace
them with the full path to the new location. Retain the two-space indentation, and use a forward slash (/) for
paths on both Microsoft Windows and Linux; for example:
On Microsoft Windows:
weblogic_location:"C:/psft/weblogic"
weblogic:
location:"C:/psft/weblogic"
On Linux:
weblogic_location:"/opt/bea/weblogic"
weblogic:
location:"/opt/bea/weblogic"
•
Do not use the customizations to set up a non-Unicode environment if you are deploying the PeopleSoft

Chapter 4 Completing the DPK Initialization with Customizations
Copyright © 2022, Oracle and/or its affiliates. All Rights Reserved.
155
Update Image DPKs for use with PeopleSoft Update Manager.
The environments for the PeopleSoft Update Images are required to be Unicode.
• Verify existing installations before beginning deployment.
You have the option to use existing installations, for example for Oracle WebLogic, but you have the
responsibility to ensure that the installation is supported, complete, and correct. The deployment script does
not verify whether an installation directory includes a valid, working installation.
See Preparing the Customization File for Component Software Locations.
• Set the Puppet environment if necessary.
The process to complete the initialization using the customizations, as described in the section Completing the
Customized Deployment, runs the psft_puppet_apply script that sets necessary environment variables, and
runs the puppet apply command. If you choose to use the puppet apply command directly rather than the
script, you may get a message saying that "puppet" is not recognized. This message may indicate that the
Puppet software is not included in your system's path. In that case, you can use the commands given here to
set the Puppet environment. You should also set the Puppet environment if you need to run puppet apply
after the script execution has ended with an error.
•
On Microsoft Windows, to set the Puppet environment, run this command:
"C:\ProgramFiles\PuppetLabs\Puppet\bin\puppet_shell.bat"
• On Linux, specify the following environment variables before running the puppet apply command:
exportPUPPET_DIR=/opt/puppetlabs
exportPUPPET_BIN=${PUPPET_DIR}/bin
exportPUPPET_LIB=${PUPPET_DIR}/lib
exportPATH=${PUPPET_BIN}:$PATH
exportLD_LIBRARY_PATH=${PUPPET_LIB}:$LD_LIBRARY_PATH
•
On AIX or Solaris, specify the following environment variables before running the puppet apply
command:
exportPUPPET_DIR=/opt/oracle/puppetlabs
exportPUPPET_BIN=${PUPPET_DIR}/bin
exportPUPPET_LIB=${PUPPET_DIR}/lib
exportPATH=${PUPPET_BIN}:$PATH
exportLIBPATH=${PUPPET_LIB}:$LIBPATH
• On HP-UX, specify the following environment variables before running the puppet apply command:
exportPUPPET_DIR=/opt/oracle/puppetlabs
exportPUPPET_BIN=${PUPPET_DIR}/bin
exportPUPPET_LIB=${PUPPET_DIR}/lib
exportPATH=${PUPPET_BIN}:$PATH
exportSHLIB_PATH=${PUPPET_LIB}:$SHLIB_PATH
exportLD_LIBRARY_PATH=${PUPPET_LIB}:$LD_LIBRARY_PATH
• On AIX, HP-UX, or Solaris operating systems, instead of using the export commands above, you can use
the pspuppet.sh script to set the Puppet environment.
Use this method if the DPK setup script is interrupted, either intentionally to apply customizations, or by
an error, and you choose to run the puppet apply command, rather than the psft_puppet_apply script.
The pspuppet.sh script will set the Puppet PATH and LIBRARY environment variables. The pspuppet.sh
script is installed by the DPK setup script in /opt/oracle/puppetlabs. Source the script by entering the
following command:
./opt/oracle/puppetlabs/pspuppet.sh

Completing the DPK Initialization with Customizations Chapter 4
156
Copyright © 2022, Oracle and/or its affiliates. All Rights Reserved.
The dot, or period (".") at the beginning of the command is a source operator that ensures that the script
commands persist in the shell environment that you are deploying from. After sourcing the script, continue
with the deployment by running the puppet apply command.
• Use only the predefined web profiles.
PeopleSoft PeopleTools includes four predefined web profiles — DEV, KIOSK, PROD, and TEST. In the
delivered YAML file psft_configuration.yaml, the web profile is specified by the scalar parameter
pia_webprofile_name: PROD. If you want to specify a different value using psft_customizations.yaml,
be sure to use one of the four predefined values.
See PeopleTools: Portal Technology, "Configuring Web Profiles."
• When using the customizations for a PeopleSoft web server domain, do not use the names PIA, PIA1, PIA2,
or weblogic for the domain name.
The name of the WebLogic domain and the server and cluster names within it must be unique. The names
PIA, PIA1, and PIA2 are reserved for use by the PeopleSoft system. The name weblogic is reserved for use by
the Oracle WebLogic software. These restrictions apply to single server and multi-server domain creation.
See Preparing the Customization File for PeopleSoft Domain Definitions.
See PeopleTools: System and Server Administration, "WebLogic Domain Types."
• To specify a non-default location for the Process Scheduler Report Repository, you must create the Report
Repository directory before you begin the DPK installation.
The Report Repository is the designated server for reports that are generated from the PeopleSoft Process
Scheduler Server. In the delivered YAML file psft_configuration.yaml, the Report Repository location is
defined as a subdirectory of
PS_CFG_HOME,
as specified by this scalar parameter:
report_repository_dir:"%{hiera('ps_config_home')}/psreports"
To define a different location, create the directory first. Use the report_repository_dir parameter
with the customized location in the psft_customizations.yaml file.
See PeopleTools: Process Scheduler, "PeopleSoft Process Scheduler Architecture."
See the task Setting Up Process Scheduler to Transfer Reports and Logs to the Report Repository in the
PeopleSoft 9.2 Application Installation guide for your database platform.
See Oracle's PeopleSoft PeopleTools 8.58 Home Page, My Oracle Support, Doc ID 2602329.2.
Task 4-1: Preparing Customization Files for Linux, AIX, HP-UX, or
Solaris Users and Groups
This section discusses:
• Preparing the Customization File for a Single User and Single Group
• Preparing the Customization File for a New Single User, New Primary Group, and Existing Secondary Group
• Preparing the Customization File for Existing Users and Groups
Note. If you are running the DPK setup script as a non-root user, the customizations for users and groups in this
section are not supported.
Note. If you want to set up your environment to use existing LDAP or existing users and groups on Linux, AIX,
HP-UX, or Solaris, you must meet these requirements: 1) The user home directory should have read/write/execute
permission for the root user. 2) The user default shell should be Bash.

Chapter 4 Completing the DPK Initialization with Customizations
Copyright © 2022, Oracle and/or its affiliates. All Rights Reserved.
157
Note. To use an encrypted password with one of the customization files in this section, note that the successful
use of the encrypted password depends on the presence of the public and private keys in the BASE_DIR/
dpk/puppet directory referred to in the eyaml encrypt command. You cannot save an encrypted password and use
it with an installation with a different BASE_DIR.
Task 4-1-1: Preparing the Customization File for a Single User and Single
Group
This user customization applies to Linux, AIX, HP-UX, and Solaris OS platforms only. If you choose the default
initialization when running the DPK setup script, the Puppet framework creates local users and default groups,
which are contained in the generated psft_unix_system.yaml file. Use the sample customization file in this section
if you do not want to use the default users and groups, and instead want to set up your environment with a
different single user and single group for the whole PeopleSoft environment.
Note. Review the requirements in Understanding PeopleSoft Environment Customizations before preparing the
customization file.
This user customization applies to the following scenarios:
• New single user + new single group
• New single user + existing single group
• Existing single user + new single group
• Existing single user + existing single group
Note. After completing the initialization, the system will prompt you to provide a new password the first time you
log in. This requirement applies to both a new single user and an existing single user.
To use the customization for an existing single user, do not enter a password in the psft_customizations.yaml file.
This customization will create a single user and single group. You must specify values for two parameters that are
not included in the generated psft_unix_system.yaml file, psft_user and psft_group.
• groups/psft_group
• Use the groups/psft_group collection parameter only if you want to create a group for a single user. The
DPK process will create the group. If there is an existing group with the same name, the script will skip it.
• Specify the same value for groups/psft_group/name and for users/psft_user/gid.
Use a group name (string), not a GID (number), for both the name in the group collection parameter, and
the gid in the users collection parameter.
• Note that you must use the parameters exactly as given in this documentation. If you try to create a
different parameter name or alter the parameter, the DPK process will not recognize it.
• users/psft_user
•
Use the users/psft_user collection parameter to create a new user and add that user to the group specified
by groups/psft_group.
•
This group is the primary group for the new user.
•
Specify the same value for users/psft_user/name and for the scalar parameter psft_runtime_user_name.
•
The single user has all the roles and permissions that the default users would have.
See "Using and Maintaining the PeopleSoft Environment," Using the PeopleSoft Installation, for a list of
the default users and permissions.
• users/psft_user/home_dir

Completing the DPK Initialization with Customizations Chapter 4
158
Copyright © 2022, Oracle and/or its affiliates. All Rights Reserved.
When you run the DPK setup script, it includes a prompt for the users' home directory. That value is included
in the generated psft_unix_system.yaml file. You can accept that same value in this customization file for
users/psft_user/home_dir, or you can change it here. If you change it, the DPK process will create the new
home directory.
To prepare the customization file:
1. Create a psft_customizations.yaml using a standard editing tool, such as vi on Linux, and save it in the same
location as the psft_unix_system.yaml file.
By default, the DPK setup script installs the YAML files in BASE_DIR/dpk/puppet/production/data.
2. Use the sample below in creating the psft_customizations.yaml file, and modify the values as needed.
Note. Be sure that your final psft_customizations.yaml file includes the indentation shown here. The
indentation may be lost if you copy from this documentation and paste into the file.
In this example, the new single user newusr will be created and assigned to the primary group newgrp.
---
groups:
psft_group:
name:newgrp
remove:false
psft_runtime_user_name:newusr
users:
psft_user:
name:newusr
gid:newgrp
home_dir:/dpk_base/home/userhome
password:ENC[PKCS7,MIIBeQYJKoZIhvcNA...........]
remove:false
Important! Verify that you fulfill the following requirements:
•
Ensure that the file begins with three dashes (---).
•
For a new user, replace the password sample above with an encrypted password.
Enter the encrypted password on a single line. Do not include spaces or line feeds. See the instructions
later in this documentation to generate the encrypted password.
See "Encrypting Passwords for Customizations on Linux, AIX, HP-UX, or Solaris."
Note. Use clear text passwords for silent mode installation.
• Do not enter a password for an existing user.
3. Save the file.
4. Continue with the steps in Completing the Customized Deployment.

Chapter 4 Completing the DPK Initialization with Customizations
Copyright © 2022, Oracle and/or its affiliates. All Rights Reserved.
159
Task 4-1-2: Preparing the Customization File for a New Single User, New
Primary Group, and Existing Secondary Group
This user customization applies to Linux, AIX, HP-UX, and Solaris OS platforms only. If you choose the default
initialization when running the DPK setup script, the Puppet framework creates local users and default groups,
which are contained in the generated psft_unix_system.yaml file. Use the sample customization file in this section
if you do not want to use the default users and groups, and instead want to set up your environment with a new
single user assigned to two groups.
See "Using and Maintaining the PeopleSoft Environment," Using the PeopleSoft Installation, for a list of the
default users and permissions.
Note. After completing the initialization, the system will prompt you to provide a new password for the new user,
the first time you log in.
Note. Review the requirements in Understanding PeopleSoft Environment Customizations before preparing the
customization file.
This customization will create a new single user and a new group, the primary group. The new user is also
assigned to an existing, secondary group. You must specify values for two parameters that are not included in the
generated psft_unix_system.yaml file, psft_user and psft_group.
•
groups/psft_group
• Use the groups/psft_group collection parameter only if you want to create a new group for a single user.
The DPK process will create the group. If there is an existing group with the same name, the script will
skip it.
• Specify the same value for groups/psft_group/name and for users/psft_user/gid.
Use a group name (string), not a GID (number), for both the name in the group collection parameter, and
the gid in the users collection parameter.
• Note that you must use the parameters exactly as given in this documentation. If you try to create a
different parameter name or alter the parameter, the DPK process will not recognize it.
•
users/psft_user
•
Use the users/psft_user collection parameter to create a new user and add that user to the new group
specified by groups/psft_group/name.
• Specify the same value for users/psft_user/name and for the scalar parameter psft_runtime_user_name.
• The new group specified by users/psft_user/gid and groups/psft_group/name is the primary group for the
new user.
• The existing group specified by users/psft_user/groups is the secondary group for the new user.
• The single user has all the roles and permissions that the default users would have.
See "Using and Maintaining the PeopleSoft Environment," Using the PeopleSoft Installation, for a list of
the default users and permissions.
• users/psft_user/home_dir
When you run the DPK setup script, it includes a prompt for the users' home directory. That value is included
in the generated psft_unix_system.yaml file. You can accept that same value in this customization file for
users/psft_user/home_dir, or you can change it here. If you change it, the DPK process will create the new
home directory.
To prepare the customization file:

Completing the DPK Initialization with Customizations Chapter 4
160
Copyright © 2022, Oracle and/or its affiliates. All Rights Reserved.
1. Create a psft_customizations.yaml using a standard editing tool, such as vi on Linux, and save it in the same
location as the psft_unix_system.yaml file.
By default, the DPK setup script installs the YAML files in BASE_DIR/dpk/puppet/production/data.
2. Use the sample below in creating the psft_customizations.yaml file, and modify the values as needed.
Note. Be sure that your final psft_customizations.yaml file includes the indentation shown here. The
indentation may be lost if you copy from this documentation and paste into the file.
In this example, the new single user newusr2 will be created and assigned to the newly created primary group
primgrp and the existing secondary group secgrp.
---
groups:
psft_group:
name:primgrp
remove:false
psft_runtime_user_name:newusr2
users:
psft_user:
name:newusr2
gid:primgrp
groups:secgrp
home_dir:/dpk_base/home/userhome
password:ENC[PKCS7,MIIBeQYJKoZIhvcNA...........]
remove:false
Important! Verify that you fulfill the following requirements:
• Ensure that the file begins with three dashes (---).
• Replace the password sample above with an encrypted password.
Enter the encrypted password on a single line. Do not include spaces or line feeds. See the instructions
later in this documentation to generate the encrypted password.
See "Encrypting Passwords for Customizations on Linux, AIX, HP-UX, or Solaris."
Note. Use clear text passwords for silent mode installation.
3. Save the file.
4. Continue with the steps in Completing the Customized Deployment.
Task 4-1-3: Preparing the Customization File for Existing Users and Groups
This user customization applies to Linux, AIX, HP-UX, and Solaris OS platforms only. If you choose the default
initialization, the Puppet framework creates default local users and groups. However, your security policies may
prohibit creating these OS users. In such a scenario, you can override these default users using the customizations
file. The customizations file can refer to one or more existing users or existing groups and Puppet will use them
instead of the default users.
See "Using and Maintaining the PeopleSoft Environment," Using the PeopleSoft Installation, for a list of the
default users and permissions.

Chapter 4 Completing the DPK Initialization with Customizations
Copyright © 2022, Oracle and/or its affiliates. All Rights Reserved.
161
Note. After completing the initialization, the system will prompt you to provide a new password for the existing
user, the first time you log in.
Note. Review the requirements in Understanding PeopleSoft Environment Customizations before preparing the
customization file.
Ensure you fulfill these requirements:
• The users, groups, and GIDs that you specify in the psft_customizations.yaml file are present before you begin
the installation.
• Do not include a password in psft_customizations.yaml.
The customizations file does not specify new passwords, because it is assumed that the passwords associated
with the existing users will be used.
• When you run the DPK setup script, you must specify a user home directory in which the existing user
resides.
1. Locate the psft_unix_system.yaml file, which includes default users and groups.
By default, the DPK setup script installs the YAML files in BASE_DIR/dpk/puppet/production/data.
Note. The code examples in this topic are for illustrative purposes only. Remember to use the text from the
YAML files you install with each new deployment as the basis for your psft_customizations.yaml file.
2. If necessary, create a psft_customizations.yaml using a standard editing tool, such as vi on Linux, and save it
in the same location as the psft_unix_system.yaml file.
If this is the first entry in the psft_customizations.yaml file, ensure that there are three dashes (---) on the
first line. Do not indent the dashes.

Completing the DPK Initialization with Customizations Chapter 4
162
Copyright © 2022, Oracle and/or its affiliates. All Rights Reserved.
3. Copy the entire section for the users and groups from the psft_unix_system.yaml file into the
psft_customizations.yaml file and modify the values as needed.
Note. Be sure that your final psft_customizations.yaml file includes the indentation from the generated
YAML file. The indentation may be lost when you copy and paste.
For example:
---
psft_install_user_name:psadmx5
psft_runtime_user_name:psadmx6
psft_app_install_user_name:psadmx7
oracle_user_name:oraclex3
psft_runtime_group_name:psftrungrp
psft_app_install_group_name:psftappgrp
oracle_install_group_name:orainstgrp
oracle_runtime_group_name:orarungrp
user_home_dir:/data1/home
users:
tools_install_user:
name:"%{hiera('psft_install_user_name')}"
gid:orainstgrp
groups:"%{hiera('psft_runtime_group_name')}"
home_dir:"%{hiera('user_home_dir')}/%{hiera('psft_install_user_⇒
name')}"
psft_runtime_user:
name:"%{hiera('psft_runtime_user_name')}"
gid:orainstgrp
home_dir:"%{hiera('user_home_dir')}/%{hiera('psft_runtime_user_⇒
name')}"
app_install_user:
name:"%{hiera('psft_app_install_user_name')}"
gid:psftappgrp
home_dir:"%{hiera('user_home_dir')}/%{hiera('psft_app_install_user_⇒
name')}"
oracle_user:
name:"%{hiera('oracle_user_name')}"
gid:orainstgrp
home_dir:"%{hiera('user_home_dir')}/%{hiera('oracle_user_name')}"
es_user:
name:esuserx3
gid:users
home_dir:/data1/home/esuserx3
The following table describes the parameters in the sample psft_customizations.yaml and the default values in
psft_unix_system.yaml:

Chapter 4 Completing the DPK Initialization with Customizations
Copyright © 2022, Oracle and/or its affiliates. All Rights Reserved.
163
Attribute and Sample Value in
psft_customizations.yaml
Default Value in
psft_unix_system.yaml
Description
psft_install_user_⇒
name:psadmx5
Replaces the default user psadm1. This is the PeopleSoft PeopleTools
installation administrator, who owns
PS_HOME, but cannot write into
PS_CFG_HOME.
psft_runtime_user_⇒
name:psadmx6
Replaces the default user psadm2. This is the PeopleSoft PeopleTools
domain user who creates and
configures the Application Server
domain, Process Scheduler (batch
server) domain, and the web server
domain. This user cannot write to
PS_HOME, but has read/execute
access.
psft_app_install_user_⇒
name:psadmx7
Replaces the default user psadm3. This is the PeopleSoft application
installation administrator who owns
PS_APP_HOME.
oracle_user_name:⇒
oraclex3
Replaces the default user oracle2. This is the Oracle Database Server
owner, who owns ORACLE_HOME.
psft_runtime_group_⇒
name:psftrungrp
Replaces the default group psft.
Note. Do not use the same name for
the four group name parameters.
Ensure that the names that you specify
for these parameters in
psft_customizations.yaml are
different.
psft_app_install_⇒
group_name:psftapp⇒
grp
Replaces the default group appinst. This group is the primary group for
the app_install_user.
Note. Do not use the same name for
the four group name parameters.
Ensure that the names that you specify
for these parameters in
psft_customizations.yaml are
different.
oracle_install_group_⇒
name:orainstgrp
Replaces the default group name
oinstall.
This group is the primary group for
the oracle_user, psft_runtime_user,
and tools_install_user.
Note. Do not use the same name for
the four group name parameters.
Ensure that the names that you specify
for these parameters in
psft_customizations.yaml are
different.

Completing the DPK Initialization with Customizations Chapter 4
164
Copyright © 2022, Oracle and/or its affiliates. All Rights Reserved.
Attribute and Sample Value in
psft_customizations.yaml
Default Value in
psft_unix_system.yaml
Description
oracle_runtime_group_⇒
name:orarungrp
Replaces the default group name dba.
Note. Do not use the same name for
the four group name parameters.
Ensure that the names that you specify
for these parameters in
psft_customizations.yaml are
different.
users:
tools_install_user:
name:"%⇒
{hiera('psft_install_⇒
user_name')}"
gid:orainst⇒
grp
groups:"%⇒
{hiera('psft_runtime_⇒
group_name')}"
home_dir:"%⇒
{hiera('user_home_⇒
dir')}/%{hiera('psft_⇒
install_user_name')}"
NA
• The name for the
tools_install_user is the same as
the psft_install_user_name, as
specified by an interpolation
function.
• The orainstgrp is the primary
group for the tools_install_user.
• The tools_install_user must
belong to the psft runtime group
as a secondary group.
To satisfy this requirement, the
value for
users/tools_install_user/groups is
set to the interpolation function
"%{hiera('psft_runtime_group_na
me')}".
4. Save the file.
5. Continue with the steps in Completing the Customized Deployment.
Task 4-2: Preparing the Customization File for JDK on AIX
As mentioned in the section Reviewing Software Requirements for AIX, you must use customizations to specify
the installation location of the manually installed JDK 8.0 for the AIX DPK.
Note. Review the requirements in Understanding PeopleSoft Environment Customizations before preparing the
customization file.
1. Locate the psft_deployment.yaml file in BASE_DIR/dpk/puppet/production/data.
Note. The code examples in this topic are for illustrative purposes only. Remember to use the text from the
YAML files you install with each new deployment as the basis for your psft_customizations.yaml file.
The installation location for JDK is defined in the psft_deployment.yaml file that is installed with the
deployment.
2. If necessary, create a psft_customizations.yaml using a standard editing tool such as vi, and save it in the same
location as the psft_deployment.yaml file.
If this is the first entry in the psft_customizations.yaml file, ensure that there are three dashes (
---
) on the
first line of the file. Do not indent the dashes.

Chapter 4 Completing the DPK Initialization with Customizations
Copyright © 2022, Oracle and/or its affiliates. All Rights Reserved.
165
3. Copy the jdk_location scalar parameter, and the entire jdk collection-type section (two lines) from the
psft_deployment.yaml file into the psft_customizations.yaml file.
Be sure to set the locations to the same value. Retain the indentation as given in the delivered YAML file.
---
jdk_location:/home/java/ibm-java-ppc64-80
jdk:
location:/home/java/ibm-java-ppc64-80
remove:false
As previously mentioned, setting the optional attribute remove: false means that the parameters in this
section will not be deleted when the deployed environment is removed.
4. Save the file.
5. Continue with the steps in Completing the Customized Deployment.
Task 4-3: Preparing the Customization File for JDK on HP-UX
As mentioned in the section Reviewing Software Requirements for HP-UX, you must use customizations to
specify the installation location of the manually installed JDK 8.0 for the HP-UX DPK.
Note. Review the requirements in Understanding PeopleSoft Environment Customizations before preparing the
customization file.
1. Locate the psft_deployment.yaml file in BASE_DIR/dpk/puppet/production/data.
Note. The code examples in this topic are for illustrative purposes only. Remember to use the text from the
YAML files you install with each new deployment as the basis for your psft_customizations.yaml file.
The installation location for JDK is defined in the psft_deployment.yaml file that is installed with the
deployment.
2. If necessary, create a psft_customizations.yaml using a standard editing tool, such as vi, and save it in the
same location as the psft_deployment.yaml file.
If this is the first entry in the psft_customizations.yaml file, ensure that there are three dashes (---) on the
first line of the file. Do not indent the dashes.
3. Copy the jdk_location scalar parameter, and the entire jdk collection-type section (two lines) from the
psft_deployment.yaml file into the psft_customizations.yaml file.
Be sure to set the locations to the same value. Retain the indentation as given in the delivered YAML file.
---
jdk_location:/home/jdk/jdk1.8.0.14
jdk:
location:/home/jdk/jdk1.8.0.14
remove:false
As previously mentioned, setting the optional attribute remove: false means that the parameters in this
section will not be deleted when the deployed environment is removed.
4. Save the file.
5. Continue with the steps in Completing the Customized Deployment.

Completing the DPK Initialization with Customizations Chapter 4
166
Copyright © 2022, Oracle and/or its affiliates. All Rights Reserved.
Task 4-4: Preparing the Customization File for PeopleSoft Domain
Definitions
This section discusses:
• Preparing the psft_customizations.yaml File
• Reviewing the Domain Definitions in psft_configuration.yaml
• Reviewing the Customization File for a Single Application Server Domain
• Reviewing the Customization File for a Single Process Scheduler Domain
• Reviewing the Customization File for a Single PIA Domain
• Reviewing the Customization File for a PIA Domain on a Separate Host
•
Reviewing the Customization File for Multiple Web Sites in a Single Web Domain
•
Reviewing the Customization File for Multiple Domains
Task 4-4-1: Preparing the psft_customizations.yaml File
Use this information if you want to customize the PeopleSoft domains — the application server, Process
Scheduler, and PIA domains. For example, you may want to create multiple Application Server domains rather
than a single domain.
Note. Review the requirements in Understanding PeopleSoft Environment Customizations before preparing the
customization file.
Note. As mentioned, do not use the names PIA, PIA1, PIA2, or weblogic to create a PIA (web server) domain.
1. Locate the psft_configuration.yaml file, which was installed by the deployment, in BASE_DIR/
dpk/puppet/production/data.
Note. The code examples in this topic are for illustrative purposes only. Remember to use the text from the
YAML files you install with each new deployment as the basis for your psft_customizations.yaml file.
2. If necessary, create a psft_customizations.yaml using a standard editing tool, such as Notepad on Microsoft
Windows or vi on Linux, AIX, HP-UX, or Solaris, and save it in the same location as the
psft_configuration.yaml file.
If this is the first entry in the psft_customizations.yaml file, ensure that there are three dashes (---) on the
first line of the file. Do not indent the dashes.
3. Copy the sections that you want to customize from the psft_configuration.yaml file into the
psft_customizations.yaml file and modify the values as needed.
Be sure to retain the indentation as given in the delivered YAML file.
The following sections in this task include sample psft_customizations.yaml files.
4. Save the file.
5. Continue with the steps in Completing the Customized Deployment.

Chapter 4 Completing the DPK Initialization with Customizations
Copyright © 2022, Oracle and/or its affiliates. All Rights Reserved.
167
Task 4-4-2: Reviewing the Domain Definitions in psft_configuration.yaml
To customize the PeopleSoft domains, you begin with the psft_configuration.yaml file, which lists the attributes
pertinent to the PeopleSoft domains. Be sure to retain the indentation as given in the delivered YAML file when
you copy the sections into the psft_customizations.yaml file.
Note. The psft_configuration.yaml file includes definitions for Automated Configuration Manager (ACM) plug-
ins, which configure components such as Integration Broker and Report Distribution. Depending upon the
PeopleSoft domain being set up, certain ACM configurations will run as part of the deployment.
This sample shows a portion of a psft_configuration.yaml file, with annotations added (marked by ###) for the
purposes of this explanation. The default application server name, APPDOM, is defined in the first portion of the
file for the parameter appserver_domain_name, which is then referenced with an interpolation token
"%{hiera('appserver_domain_name')}" in the appserver_domain_list section.
The DPK setup script encrypts user-supplied passwords and includes them in the generated YAML files. The
encrypted text will be a long single line of letters and numbers. Be sure to copy the text in one unbroken line, with
no spaces or line feeds. This sample includes short strings of text beginning with "ENC" to represent encrypted
passwords.
Note. Use clear text passwords for silent mode installation.
---
db_name:FS85806C
db_user:VP1
##############################################################
#Replacethispasswordsamplewithencryptedtextfromthe#
#generatedpsft_configuration.yamlfile.#
##############################################################
db_user_pwd:ENC[xxxxxxxxxxxxxxxxxxxxxxxxxxxxxxxxxx]
db_connect_id:people
##############################################################
#Replacethispasswordsamplewithencryptedtextfromthe#
#generatedpsft_configuration.yamlfile.#
##############################################################
db_connect_pwd:ENC[xxxxxxxxxxxxxxxxxxxxxxxxxxxxxxxxxx]
domain_user:"%{hiera('psft_runtime_user_name')}"
ps_config_home:"C:/Users/%{::env_username}/psft/pt/8.58"
appserver_template:small
appserver_domain_name:APPDOM
prcs_domain_name:PRCSDOM
prcs_domain_id:"PRCS%{::rand}"
report_node_name:"%{hiera('prcs_domain_id')}"
pia_domain_name:peoplesoft
pia_site_name:ps
pia_http_port:8000
pia_https_port:8443
jolt_port:9033
wsl_port:7000
db_port:1521

Completing the DPK Initialization with Customizations Chapter 4
168
Copyright © 2022, Oracle and/or its affiliates. All Rights Reserved.
gateway_node_name:QE_LOCAL
pia_gateway_user:administrator
##############################################################
#Replacethispasswordsamplewithencryptedtextfromthe#
#generatedpsft_configuration.yamlfile.#
##############################################################
pia_gateway_user_pwd:ENC[xxxxxxxxxxxxxxxxxxxxxxxxxxxxxxxxxx]
webserver_type:weblogic
pia_webprofile_name:PROD
pia_psserver_list:"%{::fqdn}:%{hiera('jolt_port')}"
report_repository_dir:"%{hiera('ps_config_home')}/psreports"
##############################################################
#Replacethispasswordsamplewithencryptedtextfromthe#
#generatedpsft_configuration.yamlfile.#
##############################################################
domain_conn_pwd:ENC[xxxxxxxxxxxxxxxxxxxxxxxxxxxxxxxxxx]
help_uri:pt854pbh1
tns_dir:"%{hiera('db_location')}"
tns_admin_list:
"%{hiera('db_name')}":
db_host:"%{::fqdn}"
db_port:"%{hiera('db_port')}"
db_protocol:TCP
db_service_name:"%{hiera('db_name')}"
db2_server_list:
"%{hiera('db_name')}":
db2_type:"%{hiera('db_platform')}"
db2_host:"%{::fqdn}"
db2_port:"%{hiera('db_port')}"
db2_node:TCPLNX01
db2_target_db:"%{hiera('db_name')}"
mssql_server_list:
"%{hiera('db_name')}":
mss_server_name:"%{::fqdn}"
mss_odbc_name:"ODBCDriver11forSQLServer"
####################################################################
#Copytheentiresectionbeginningherefor#
#applicationservercustomization.#
####################################################################
appserver_domain_list:
"%{hiera('appserver_domain_name')}":
os_user:"%{hiera('domain_user')}"
ps_cfg_home_dir:"%{hiera('ps_config_home')}"
template_type:"%{hiera('appserver_template')}"

Chapter 4 Completing the DPK Initialization with Customizations
Copyright © 2022, Oracle and/or its affiliates. All Rights Reserved.
169
db_settings:
db_name:"%{hiera('db_name')}"
db_type:"%{hiera('db_platform')}"
db_opr_id:"%{hiera('db_user')}"
db_opr_pwd:"%{hiera('db_user_pwd')}"
db_connect_id:"%{hiera('db_connect_id')}"
db_connect_pwd:"%{hiera('db_connect_pwd')}"
config_settings:
DomainSettings/DomainID:"%{hiera('appserver_domain_name')}"
PSAPPSRV/MinInstances:2
PSAPPSRV/MaxInstances:2
PSAPPSRV/MaxFetchSize:15000
Security/DomainConnectionPwd:"%{hiera('domain_conn_pwd')}"
JOLTListener/Port:"%{hiera('jolt_port')}"
JOLTListener/Address:0.0.0.0
WorkstationListener/Port:"%{hiera('wsl_port')}"
feature_settings:
PUBSUB:"Yes"
QUICKSRV:"No"
QUERYSRV:"No"
JOLT:"Yes"
JRAD:"No"
WSL:"Yes"
DBGSRV:"No"
RENSRV:"No"
MCF:"No"
PPM:"Yes"
PSPPMSRV:"Yes"
ANALYTICSRV:"No"
SERVER_EVENTS:"Yes"
DOMAIN_GW:"No"
#####################################################################
#Endapplicationserversection.#
#####################################################################
#####################################################################
#Copytheentiresectionbeginningherefor#
#ProcessSchedulercustomization#
#####################################################################
prcs_domain_list:
"%{hiera('prcs_domain_name')}":
os_user:"%{hiera('domain_user')}"
ps_cfg_home_dir:"%{hiera('ps_config_home')}"
db_settings:
db_name:"%{hiera('db_name')}"
db_type:"%{hiera('db_platform')}"
db_opr_id:"%{hiera('db_user')}"
db_opr_pwd:"%{hiera('db_user_pwd')}"
db_connect_id:"%{hiera('db_connect_id')}"

Completing the DPK Initialization with Customizations Chapter 4
170
Copyright © 2022, Oracle and/or its affiliates. All Rights Reserved.
db_connect_pwd:"%{hiera('db_connect_pwd')}"
config_settings:
ProcessScheduler/PrcsServerName:"%{hiera('prcs_domain_id')}"
Security/DomainConnectionPwd:"%{hiera('domain_conn_pwd')}"
feature_settings:
MSTRSRV:"Yes"
APPENG:"Yes"
####################################################################
#EndProcessSchedulersection.#
####################################################################
####################################################################
#CopytheentiresectionbeginninghereforPIAcustomization.#
####################################################################
pia_domain_list:
"%{hiera('pia_domain_name')}":
os_user:"%{hiera('domain_user')}"
ps_cfg_home_dir:"%{hiera('ps_config_home')}"
gateway_user:"%{hiera('pia_gateway_user')}"
gateway_user_pwd:"%{hiera('pia_gateway_user_pwd')}"
auth_token_domain:".%{::domain}"
webserver_settings:
webserver_type:"%{hiera('webserver_type')}"
webserver_home:"%{hiera('weblogic_location')}"
webserver_admin_user:system
webserver_admin_user_pwd:ENC[xxxxxxxxxxxxxxxxxxxxxxxxxxxxxxxxxx]
##############################################################
#Replacethispasswordsamplewithencryptedtextfromthe#
#generatedpsft_configuration.yamlfile.#
##############################################################
webserver_admin_port:"%{hiera('pia_http_port')}"
webserver_http_port:"%{hiera('pia_http_port')}"
webserver_https_port:"%{hiera('pia_https_port')}"
site_list:
"%{hiera('pia_site_name')}":
appserver_connections:"%{hiera('pia_psserver_list')}"
domain_conn_pwd:"%{hiera('domain_conn_pwd')}"
webprofile_settings:
profile_name:"%{hiera('pia_webprofile_name')}"
profile_user:PTWEBSERVER
profile_user_pwd:ENC[xxxxxxxxxxxxxxxxxxxxxxxxxxxxxxxxxx]
##############################################################
#Replacethispasswordsamplewithencryptedtextfromthe#
#generatedpsft_configuration.yamlfile.#
##############################################################

Chapter 4 Completing the DPK Initialization with Customizations
Copyright © 2022, Oracle and/or its affiliates. All Rights Reserved.
171
report_repository_dir:"%{hiera('report_repository_dir')}"
####################################################################
#EndPIAsection.#
####################################################################
ohs_domain:
name:ohsdom
########################################################
#Remainingtextremovedforbrevity.#
########################################################
Task 4-4-3: Reviewing the Customization File for a Single Application
Server Domain
This sample shows a psft_customizations.yaml file for a single application server domain with the domain name
APPDOM1. Be sure to retain the indentation as given in the delivered psft_configuration.yaml file when you
copy the sections into the psft_customizations.yaml file. This sample includes annotations (marked by ###) for
the purposes of this explanation.
If you want to create PeopleSoft domains in a non-default PS_CFG_HOME location, you must specify the desired
value for the scalar parameter ps_config_home outside the appserver_domain_list section.
Note. Specify the same value for ps_config_home and for the ps_cfg_home_dir parameter in the
appserver_domain_list section. They both must reference the same location.
See Preparing the Customization File for the PS_CFG_HOME Location.
---
appserver_domain_list:
###Customapplicationserverdomainname###
"APPDOM1":
os_user:"%{hiera('domain_user')}"
template_type:"%{hiera('appserver_template')}"
###Donotchangetheps_cfg_home_dirparameter.###
ps_cfg_home_dir:"%{hiera('ps_config_home')}"
db_settings:
db_name:"%{hiera('db_name')}"
db_type:"%{hiera('db_platform')}"
db_opr_id:"%{hiera('db_user')}"
db_opr_pwd:"%{hiera('db_user_pwd')}"
db_connect_id:"%{hiera('db_connect_id')}"
db_connect_pwd:"%{hiera('db_connect_pwd')}"
config_settings:
DomainSettings/DomainID:IBUPG0
PSAPPSRV/MinInstances:3
PSAPPSRV/MaxInstances:5

Completing the DPK Initialization with Customizations Chapter 4
172
Copyright © 2022, Oracle and/or its affiliates. All Rights Reserved.
JOLTListener/Port:"%{hiera('jolt_port')}"
WorkstationListener/Port:"%{hiera('wsl_port')}"
feature_settings:
PUBSUB:"Yes"
QUICKSRV:"No"
QUERYSRV:"No"
JOLT:"Yes"
JRAD:"No"
WSL:"Yes"
DBGSRV:"No"
RENSRV:"No"
MCF:"No"
PPM:"Yes"
PSPPMSRV:"Yes"
ANALYTICSRV:"No"
SERVER_EVENTS:"Yes"
DOMAIN_GW:"No"
Task 4-4-4: Reviewing the Customization File for a Single Process
Scheduler Domain
This sample shows a psft_customizations.yaml file for a single Process Scheduler domain with the domain name
PRCSDOM1. Be sure to retain the indentation as given in the delivered psft_configuration.yaml file when you
copy the sections into the psft_customizations.yaml file. This sample includes annotations (marked by ###) for
the purposes of this explanation.
If you want to create PeopleSoft domains in a non-default PS_CFG_HOME location, you must specify the desired
value for the scalar parameter ps_config_home outside the prcs_domain_list section.
Note. Specify the same value for ps_config_home and for the ps_cfg_home_dir parameter in the
appserver_domain_list section. They both must reference the same location.
See Preparing the Customization File for the PS_CFG_HOME Location.
---
prcs_domain_list:
###CustomProcessSchedulerdomainname###
"PRCSDOM1":
os_user:"%{hiera('domain_user')}"
###Donotchangetheps_cfg_home_dirparameter.###
ps_cfg_home_dir:"%{hiera('ps_config_home')}"
db_settings:
db_name:"%{hiera('db_name')}"
db_type:"%{hiera('db_platform')}"
db_opr_id:"%{hiera('db_user')}"
db_opr_pwd:"%{hiera('db_user_pwd')}"
db_connect_id:"%{hiera('db_connect_id')}"
db_connect_pwd:"%{hiera('db_connect_pwd')}"

Chapter 4 Completing the DPK Initialization with Customizations
Copyright © 2022, Oracle and/or its affiliates. All Rights Reserved.
173
config_settings:
ProcessScheduler/PrcsServerName:"%{hiera('prcs_domain_id')}"
Security/DomainConnectionPwd:"%{hiera('domain_conn_pwd')}"
feature_settings:
MSTRSRV:"Yes"
APPENG:"Yes"
Task 4-4-5: Reviewing the Customization File for a Single PIA Domain
This sample shows a psft_customizations.yaml file for a single PIA domain with the domain name PIAHR1. Be
sure to retain the indentation as given in the delivered psft_configuration.yaml file when you copy the sections
into the psft_customizations.yaml file. This sample includes annotations (marked by ###) for the purposes of this
explanation.
Note. Do not use the reserved names PIA, PIA1, PIA2, or weblogic for the PIA (web server) domain.
If you want to create PeopleSoft domains in a non-default PS_CFG_HOME location, you must specify the desired
value for the scalar parameter ps_config_home outside the pia_domain_list section.
Note. Specify the same value for ps_config_home and for the ps_cfg_home_dir parameter in the
appserver_domain_list section. They both must reference the same location.
See Preparing the Customization File for the PS_CFG_HOME Location.
---
pia_domain_list:
##CustomPIAdomainname###
"PIAHR1":
os_user:"%{hiera('domain_user')}"
###Donotchangetheps_cfg_home_dirparameter.###
ps_cfg_home_dir:"%{hiera('ps_config_home')}"
gateway_user:"%{hiera('pia_gateway_user')}"
gateway_user_pwd:"%{hiera('pia_gateway_user_pwd')}"
auth_token_domain:".%{::domain}"
webserver_install_type:"%{hiera('webserver_install_type')}"
webserver_settings:
webserver_type:"%{hiera('webserver_type')}"
webserver_home:"%{hiera('weblogic_location')}"
webserver_admin_user:system
webserver_admin_user_pwd:ENC[xxxxxxxxxxxxxxxxxxxxxxxxxxxxxx]
webserver_admin_port:"%{hiera('pia_http_port')}"
webserver_http_port:"%{hiera('pia_http_port')}"
webserver_https_port:"%{hiera('pia_https_port')}"
site_list:
"%{hiera('pia_site_name')}":
appserver_connections:"%{hiera('pia_psserver_list')}"
domain_conn_pwd:"%{hiera('domain_conn_pwd')}"

Completing the DPK Initialization with Customizations Chapter 4
174
Copyright © 2022, Oracle and/or its affiliates. All Rights Reserved.
webprofile_settings:
profile_name:"%{hiera('pia_webprofile_name')}"
profile_user:PTWEBSERVER
profile_user_pwd:ENC[xxxxxxxxxxxxxxxxxxxxxxxxxxxxxxxx]
report_repository_dir:"%{hiera('report_repository_dir')}"
Task 4-4-6: Reviewing the Customization File for a PIA Domain on a
Separate Host
If you want to set up an environment in which the PIA domain and web server are not on the same machine as the
application server domain, you must use customizations to specify the machine where the application server is
installed. This customization is required for the Integration Broker configuration.
The generated psft_configuration.yaml includes the following parameter, which sets the host for Integration
Broker to the PIA host, which by default is the machine where the DPK setup script is run:
env.ib_appserver_host:"%{hiera('pia_host_name')}"
If you use the DPK setup script to set up a PIA domain only, and the PIA domain is not on the same machine as
your application server domain, the value for the env.ib_appserver_host parameter must be set to the
application server machine name.
See "Deploying the PeopleSoft PeopleTools Deployment Packages," Running the DPK Setup Script to Deploy a
PIA Domain.
Copy the entire component_postboot_setup_list collection type parameter section (comprised of
several lines) from psft_configuration.yaml and paste it into psft_customizations.yaml. Change the value for
env.ib_appserver_host to point to the host where the application server is set up, for example
ps_app_server1. Be sure to retain the indentation as given in the delivered YAML file when you copy the
sections into the psft_customizations.yaml file.
Note. Do not use the reserved names PIA, PIA1, PIA2, or weblogic for the PIA (web server) domain.
This sample shows a sample psft_customizations.yaml file, with annotations added (marked by ###) for the
purposes of this explanation.
---
component_postboot_setup_list:
integration_broker:
run_control_id:intbroker
os_user:"%{hiera('domain_user')}"
db_settings:
db_name:"%{hiera('db_name')}"
db_type:"%{hiera('db_platform')}"
db_opr_id:"%{hiera('db_user')}"
db_opr_pwd:"%{hiera('db_user_pwd')}"
db_connect_id:"%{hiera('db_connect_id')}"
db_connect_pwd:"%{hiera('db_connect_pwd')}"
acm_plugin_list:
PTIBActivateDomain:
domain.activate_retry_count:10
domain.activate_wait_time:10

Chapter 4 Completing the DPK Initialization with Customizations
Copyright © 2022, Oracle and/or its affiliates. All Rights Reserved.
175
PTIBConfigureGatewayNodes:
env.gateway_host:"%{hiera('pia_host_name')}"
env.gateway_port:"%{hiera('pia_http_port')}"
env.gateway_ssl_port:"%{hiera('pia_https_port')}"
env.use_ssl_gateway:false
env.default_local_node:"%{hiera('gateway_node_name')}"
env.gateway_user:"%{hiera('pia_gateway_user')}"
env.gateway_password:"%{hiera('pia_gateway_user_⇒
pwd')}"
###Customapplicationservername###
env.ib_appserver_host:ps_app_server1
env.ib_jolt_port:"%{hiera('jolt_port')}"
env.ib_node_proxy_userid:"%{hiera('db_user')}"
env.ib_node_proxy_password:"%{hiera('db_user_pwd')}"
env.tools_release:"%ToolsRelease"
env.ib_appserver_domain_password:"%{hiera('domain_conn_pwd')}"
env.ib_set_as_default_node:true
PTIBConfigureGatewayProperties:
env.gateway_keystore_password:password
PTWebServerConfigUpdate:
env.domainname:"%{hiera('pia_domain_name')}"
env.sitename:"%{hiera('pia_site_name')}"
env.piahome:"%{hiera('ps_config_home')}"
env.psserver:""
env.KeyStorePwd:""
acm_plugin_order:
-PTIBActivateDomain
-PTIBConfigureGatewayNodes
-PTIBConfigureGatewayProperties
-PTWebServerConfigUpdate
Task 4-4-7: Reviewing the Customization File for Multiple Web Sites in a
Single Web Domain
Use these guidelines to create the psft_customizations.yaml file for a single PIA (web server) domain with two or
more web sites. This sample shows the psft_customizations.yaml file for a single PIA domain, called PIAHR2,
with two web sites, hr92dev and hr92site. Be sure to also fulfill the guidelines in the section Preparing the
psft_customizations.yaml File.
Be sure to retain the indentation as given in the delivered YAML file when you copy the sections into the
psft_customizations.yaml file.
• Copy the entire pia_domain_list collection type parameter (comprised of several lines) from
psft_configuration.yaml and change the value "%{hiera('pia_domain_name')}" to the desired name
for the PIA domain, PIAHR2 in this example.
Note. Do not use the reserved names PIA, PIA1, PIA2, or weblogic for the PIA (web server) domain.
• In the
pia_domain_list
collection type parameter, to add a second web site, copy the portion defining

Completing the DPK Initialization with Customizations Chapter 4
176
Copyright © 2022, Oracle and/or its affiliates. All Rights Reserved.
the web site, and paste it below the first, default, web site definition. Copy and paste the web site portion for
as many web sites as you need, and specify different names for the each site.
• Replace the password sample here with encrypted text from the generated psft_configuration.yaml file.
Note. Use clear text passwords for silent mode installation.
Here is a sample psft_customizations.yaml file, with annotations added (marked by ###) for the purposes of this
explanation.
---
###PIAdomainwithmodifiedname###
pia_domain_list:
"PIAHR2":
os_user:"%{hiera('domain_user')}"
ps_cfg_home_dir:"%{hiera('ps_config_home')}"
gateway_user:"%{hiera('pia_gateway_user')}"
gateway_user_pwd:"%{hiera('pia_gateway_user_pwd')}"
auth_token_domain:".%{::domain}"
webserver_settings:
webserver_type:"%{hiera('webserver_type')}"
webserver_home:"%{hiera('weblogic_location')}"
webserver_admin_user:system
webserver_admin_user_pwd:ENC[xxxxxxxxxxxxxxxxxxxxxxxxxxxx]
webserver_admin_port:"50000"
webserver_http_port:"50000"
webserver_https_port:"50005"
site_list:
###Firstwebsitewithmodifiedname###
"hr92dev":
appserver_connections:"%{hiera('pia_psserver_list')}"
domain_conn_pwd:"%{hiera('domain_conn_pwd')}"
webprofile_settings:
profile_name:"%{hiera('pia_webprofile_name')}"
profile_user:PTWEBSERVER
profile_user_pwd:ENC[xxxxxxxxxxxxxxxxxxxxxxxx]
report_repository_dir:"%{hiera('report_repository_dir')}"
###Secondwebsitewithmodifiedname###
"hr92site":
appserver_connections:"%{hiera('pia_psserver_list')}"
domain_conn_pwd:"%{hiera('domain_conn_pwd')}"
webprofile_settings:
profile_name:"%{hiera('pia_webprofile_name')}"
profile_user:PTWEBSERVER
profile_user_pwd:ENC[xxxxxxxxxxxxxxxxxxxxx]
report_repository_dir:"%{hiera('report_repository_dir')}"

Chapter 4 Completing the DPK Initialization with Customizations
Copyright © 2022, Oracle and/or its affiliates. All Rights Reserved.
177
Task 4-4-8: Reviewing the Customization File for Multiple Domains
For multiple domains, duplicate the entire domain section, again maintaining the indentation from the original
psft_configuration.yaml file. This sample shows a psft_customizations.yaml file for two application server
domains, two PIA domains, and two Process Scheduler domains, with annotations added for the purposes of this
explanation. The annotations are labelled with letters referring to the text discussion, and by ### characters, such
as ###(A)###.
Follow these guidelines in creating a psft_customizations.yaml file for customized PeopleSoft domains. The
letters correspond to those in the code sample.
• (A) For more than one application server, include the pia_psserver_list entry at the top of the
psft_customizations.yaml definitions. List the application server domains that are used by the PIA domains,
using the format <application_server_host>:<Jolt port>. Separate the entries with a comma.
• (B) Copy the entire section for the domains that you want to customize.
Be sure to retain the indentation as given in the delivered YAML file when you copy the sections into the
psft_customizations.yaml file.
•
(C) Specify unique names for each domain.
• (D) Specify unique ports for each domain.
• (E) If specifying more than one application server domain, you must configure the REN server to use a unique
port by setting the attribute PSRENSRV/default_http_port to a value other than the default, 7180 in
the psft_customizations.yaml.
Note. The REN server setting is also a requirement for a traditional PeopleSoft installation when setting up
more than one application server on a single machine.
•
(F) If specifying more than one Process Scheduler domain, you must specify unique Process Scheduler server
names.
In this sample, the first Process Scheduler server uses the default value, which is defined as an interpolation
token. The second Process Scheduler server has a different name, PRCS222.
(G) In addition, the Master Scheduler Server should be enabled for the first Process Scheduler domain (
MSTRSRV: "Yes"
), and disabled for subsequent Process Scheduler domains (
MSTRSRV: "No"
).
See PeopleTools: Process Scheduler, "Understanding PeopleSoft Master Scheduler Server."
• (H) If specifying more than one PIA domain, you must specify different site names for each.
In this sample, the first PIA site name uses the default value, which is defined as an interpolation token. The
second PIA site name has a different name, ps222.
---
pia_psserver_list:"hostname.example.com:9033,hostname.example.com:9043"
###(A)###
appserver_domain_list:
"APPDOM111":###(B),(C)###
os_user:"%{hiera('domain_user')}"
template_type:"%{hiera('appserver_template')}"
ps_cfg_home_dir:"%{hiera('ps_config_home')}"
db_settings:
db_name:"%{hiera('db_name')}"

Completing the DPK Initialization with Customizations Chapter 4
178
Copyright © 2022, Oracle and/or its affiliates. All Rights Reserved.
db_type:"%{hiera('db_platform')}"
db_opr_id:"%{hiera('db_user')}"
db_opr_pwd:"%{hiera('db_user_pwd')}"
db_connect_id:"%{hiera('db_connect_id')}"
db_connect_pwd:"%{hiera('db_connect_pwd')}"
config_settings:
DomainSettings/DomainID:IBUPG0
PSAPPSRV/MinInstances:3
PSAPPSRV/MaxInstances:5
JOLTListener/Port:9033###(D)###
WorkstationListener/Port:7000###(D)###
feature_settings:
PUBSUB:"Yes"
QUICKSRV:"No"
QUERYSRV:"No"
JOLT:"Yes"
JRAD:"No"
WSL:"Yes"
DBGSRV:"No"
RENSRV:"No"
MCF:"No"
PPM:"Yes"
PSPPMSRV:"Yes"
ANALYTICSRV:"No"
SERVER_EVENTS:"Yes"
DOMAIN_GW:"No"
"APPDOM222":###(B),(C)###
os_user:"%{hiera('domain_user')}"
template_type:"%{hiera('appserver_template')}"
ps_cfg_home_dir:"%{hiera('ps_config_home')}"
db_settings:
db_name:"%{hiera('db_name')}"
db_type:"%{hiera('db_platform')}"
db_opr_id:"%{hiera('db_user')}"
db_opr_pwd:"%{hiera('db_user_pwd')}"
db_connect_id:"%{hiera('db_connect_id')}"
db_connect_pwd:"%{hiera('db_connect_pwd')}"
config_settings:
DomainSettings/DomainID:IBUPG0
PSAPPSRV/MinInstances:3
PSAPPSRV/MaxInstances:5
JOLTListener/Port:9043###(D)###
WorkstationListener/Port:7001###(D)###
PSRENSRV/default_http_port:7191###(E)###
feature_settings:
PUBSUB:"Yes"
QUICKSRV:"No"

Chapter 4 Completing the DPK Initialization with Customizations
Copyright © 2022, Oracle and/or its affiliates. All Rights Reserved.
179
QUERYSRV:"No"
JOLT:"Yes"
JRAD:"No"
WSL:"Yes"
DBGSRV:"No"
RENSRV:"No"
MCF:"No"
PPM:"Yes"
PSPPMSRV:"Yes"
ANALYTICSRV:"No"
SERVER_EVENTS:"Yes"
DOMAIN_GW:"No"
pia_domain_list:
"PIADOM111":###(B),(C)###
os_user:"%{hiera('domain_user')}"
ps_cfg_home_dir:"%{hiera('ps_config_home')}"
gateway_user:"%{hiera('pia_gateway_user')}"
gateway_user_pwd:"%{hiera('pia_gateway_user_pwd')}"
auth_token_domain:".%{::domain}"
webserver_settings:
webserver_type:"%{hiera('webserver_type')}"
webserver_home:"%{hiera('weblogic_location')}"
webserver_admin_user:system
webserver_admin_user_pwd:ENC[xxxxxxxxxxxxxxxxxxxxxxxxxxxxxxxxxx]
##############################################################
#Replacethispasswordsamplewithencryptedtextfromthe#
#generatedpsft_configuration.yamlfile.#
##############################################################
webserver_admin_port:8000###(D)###
webserver_http_port:8000###(D)###
webserver_https_port:8443###(D)###
site_list:
"%{hiera('pia_site_name')}":###(H)###
appserver_connections:"%{hiera('pia_psserver_list')}"
domain_conn_pwd:"%{hiera('domain_conn_pwd')}"
webprofile_settings:
profile_name:"%{hiera('pia_webprofile_name')}"
profile_user:PTWEBSERVER
profile_user_pwd:ENC[xxxxxxxxxxxxxxxxxxxxxxxxxxxxxxxxxx]
##############################################################
#Replacethispasswordsamplewithencryptedtextfromthe#
#generatedpsft_configuration.yamlfile.#
##############################################################
report_repository_dir:"%{hiera('report_repository_dir')}"

Completing the DPK Initialization with Customizations Chapter 4
180
Copyright © 2022, Oracle and/or its affiliates. All Rights Reserved.
"PIADOM222":###(B),(C)###
os_user:"%{hiera('domain_user')}"
ps_cfg_home_dir:"%{hiera('ps_config_home')}"
gateway_user:"%{hiera('pia_gateway_user')}"
gateway_user_pwd:"%{hiera('pia_gateway_user_pwd')}"
auth_token_domain:".%{::domain}"
webserver_settings:
webserver_type:"%{hiera('webserver_type')}"
webserver_home:"%{hiera('weblogic_location')}"
webserver_admin_user:system
webserver_admin_user_pwd:ENC[xxxxxxxxxxxxxxxxxxxxxxxxxxxxxxxxxx]
##############################################################
#Replacethispasswordsamplewithencryptedtextfromthe#
#generatedpsft_configuration.yamlfile.#
##############################################################
webserver_admin_port:8002###(D)###
webserver_http_port:8002###(D)###
webserver_https_port:8445###(D)###
site_list:
"ps222":###(H)###
appserver_connections:"%{hiera('pia_psserver_list')}"
domain_conn_pwd:"%{hiera('domain_conn_pwd')}"
webprofile_settings:
profile_name:"%{hiera('pia_webprofile_name')}"
profile_user:PTWEBSERVER
profile_user_pwd:ENC[xxxxxxxxxxxxxxxxxxxxxxxxxxxxxxxxxx]
##############################################################
#Replacethispasswordsamplewithencryptedtextfromthe#
#generatedpsft_configuration.yamlfile.#
##############################################################
report_repository_dir:"%{hiera('report_repository_dir')}"
prcs_domain_list:
"PRCSDOM111":
os_user:"%{hiera('domain_user')}"
ps_cfg_home_dir:"%{hiera('ps_config_home')}"
db_settings:
db_name:"%{hiera('db_name')}"
db_type:"%{hiera('db_platform')}"
db_opr_id:"%{hiera('db_user')}"
db_opr_pwd:"%{hiera('db_user_pwd')}"
db_connect_id:"%{hiera('db_connect_id')}"
db_connect_pwd:"%{hiera('db_connect_pwd')}"

Chapter 4 Completing the DPK Initialization with Customizations
Copyright © 2022, Oracle and/or its affiliates. All Rights Reserved.
181
config_settings:
ProcessScheduler/PrcsServerName:"%{hiera('prcs_domain_id')}"###⇒
(F)###
Security/DomainConnectionPwd:"%{hiera('domain_conn_pwd')}"
feature_settings:
MSTRSRV:"Yes"###(G)###
APPENG:"Yes"
"PRCSDOM222":
os_user:"%{hiera('domain_user')}"
ps_cfg_home_dir:"%{hiera('ps_config_home')}"
db_settings:
db_name:"%{hiera('db_name')}"
db_type:"%{hiera('db_platform')}"
db_opr_id:"%{hiera('db_user')}"
db_opr_pwd:"%{hiera('db_user_pwd')}"
db_connect_id:"%{hiera('db_connect_id')}"
db_connect_pwd:"%{hiera('db_connect_pwd')}"
config_settings:
ProcessScheduler/PrcsServerName:PRCS222###(F)###
Security/DomainConnectionPwd:"%{hiera('domain_conn_pwd')}"
feature_settings:
MSTRSRV:"No"###(G)###
APPENG:"Yes"
Task 4-5: Preparing the Customization File to Create PeopleSoft
Domains Without Configuration
The default DPK initialization includes pre-boot and post-boot processes that use Automated Configuration
Manager (ACM) plug-ins to configure and start the PeopleSoft domains. The ACM configuration, for example,
sets up Integration Broker and the report repository for the Process Scheduler.
Use this customization if you want to install the necessary software for the PeopleSoft Application Server, PIA,
and Process Scheduler servers without running the pre-boot and post-boot ACM processes. After you complete
the DPK deployment with this customization, you can complete the configuration as needed.
Note. Review the requirements in Understanding PeopleSoft Environment Customizations before preparing the
customization file.
To prepare the customization file:
1. Locate the psft_configuration.yaml file, which was installed by the deployment, in BASE_DIR/
dpk/puppet/production/data.
2. If necessary, create a psft_customizations.yaml using a standard editing tool, such as Notepad on Microsoft
Windows or vi on Linux, AIX, HP-UX, or Solaris, and save it in the same location as the generated
psft_configuration.yaml file.
If this is the first entry in the psft_customizations.yaml file, ensure that there are three dashes (---) on the

Completing the DPK Initialization with Customizations Chapter 4
182
Copyright © 2022, Oracle and/or its affiliates. All Rights Reserved.
first line of the file. Do not indent the dashes.
3. Copy the parameters below from the psft_configuration.yaml file and paste them into the
psft_customizations.yaml file.
Retain the indentation as given in the delivered YAML file.
run_preboot_config_setup:true
run_postboot_config_setup:true
4. To specify that the deployment does not run the pre-boot and post-boot ACM processes, change the values to
"false"; for example:
---
run_preboot_config_setup:false
run_postboot_config_setup:false
5. Save the file.
6. Continue with the steps in Completing the Customized Deployment.
Task 4-6: Preparing the Customization File for Component
Software Locations
Use the information in this section if you want to customize an installation location, for example to use an
existing installation of Oracle Tuxedo or Oracle WebLogic.
Note. Review the requirements in Understanding PeopleSoft Environment Customizations before preparing the
customization file.
1. Locate the psft_deployment.yaml file in BASE_DIR/dpk/puppet/production/data.
Note. The code examples in this topic are for illustrative purposes only. Remember to use the text from the
YAML files you install with each new deployment as the basis for your psft_customizations.yaml file.
The installation locations for Oracle Tuxedo, Oracle WebLogic, JDK, and Oracle database client are defined
in the psft_deployment.yaml file that is installed with the deployment.
2. If necessary, create a psft_customizations.yaml using a standard editing tool, such as Notepad on Microsoft
Windows or vi on Linux, AIX, HP-UX or Solaris, and save it in the same location as the
psft_deployment.yaml file.
If this is the first entry in the psft_customizations.yaml file, ensure that there are three dashes (---) on the
first line of the file. Do not indent the dashes.
3. Select one or more of the sections corresponding to the components that you want to customize, and copy
them to the psft_customizations.yaml file.
As previously mentioned, setting the optional attribute remove: false means that the parameters in this
section will not be deleted when the deployed environment is removed.
• For JDK, copy the jdk_location scalar parameter, and the entire jdk collection-type section
(comprised of two lines) from the psft_deployment.yaml file into the psft_customizations.yaml file. Be
sure to set the locations to the same value. Retain the indentation as given in the delivered YAML file.
---
jdk_location:C:/jdk
jdk:

Chapter 4 Completing the DPK Initialization with Customizations
Copyright © 2022, Oracle and/or its affiliates. All Rights Reserved.
183
location:C:/jdk
remove:false
• For Oracle Tuxedo, copy both the tuxedo_location scalar parameter and the entire tuxedo
collection-type section (comprised of two lines) from the psft_deployment.yaml file into the
psft_customizations.yaml file. Be sure to set the locations to the same value. Retain the indentation as
given in the delivered YAML file.
---
tuxedo_location:C:/psft/tuxedo
tuxedo:
location:C:/psft/tuxedo
remove:false
• For Oracle WebLogic, copy both the weblogic_location scalar parameter and the entire weblogic
collection-type section (comprised of two lines) from the psft_deployment.yaml file into the
psft_customizations.yaml file. Be sure to set the locations to the same value. Retain the indentation as
given in the delivered YAML file.
---
weblogic_location:C:/psft/weblogic
weblogic:
location:C:/psft/weblogic
remove:false
•
For Oracle Client, copy both the oracle_client_location scalar parameter and the entire
oracle_client collection-type section (comprised of two lines) from the psft_deployment.yaml file
into the psft_customizations.yaml file. Be sure to set the locations to the same value. Retain the
indentation as given in the delivered YAML file.
---
oracle_client_location:<Oracle_Home>
oracle_client:
location:<Oracle_Home>
For example, to specify the location of pre-existing Oracle database client software:
---
oracle_client_location:C:/oracle/product/12.1.2/dbhome_1
oracle_client:
location:C:/oracle/product/12.1.2/dbhome_1
• If you want to customize JDK, Oracle Tuxedo, and Oracle WebLogic, add all three entries to
psft_customizations.yaml; for example:
---
jdk_location:C:/jdk
jdk:
location:C:/jdk
remove:false
tuxedo_location:C:/psft/tuxedo
tuxedo:
location:C:/psft/tuxedo
remove:false

Completing the DPK Initialization with Customizations Chapter 4
184
Copyright © 2022, Oracle and/or its affiliates. All Rights Reserved.
weblogic_location:C:/psft/weblogic
weblogic:
location:C:/psft/weblogic
remove:false
4. Save the file.
5. Continue with the steps in Completing the Customized Deployment.
Task 4-7: Preparing the Customization File for Unicode
Use these instructions if you want to change the Unicode designation for your database.
Note. Do not try to set up a non-Unicode environment if you are deploying the PeopleSoft Update Image DPKs
for use with PeopleSoft Update Manager. The environments for the PeopleSoft Updates Images are required to be
Unicode.
Note. Review the requirements in Understanding PeopleSoft Environment Customizations before preparing the
customization file.
1. Locate the psft_deployment.yaml file.
Note. The code examples in this topic are for illustrative purposes only. Remember to use the text from the
YAML files you install with each new deployment as the basis for your psft_customizations.yaml file.
By default, the DPK setup script installs the YAML files in
BASE_DIR/
dpk/puppet/production/data.
The unicode_db parameter is part of the ps_home section.
ps_home:
db_type:"%{hiera('db_platform')}"
unicode_db:"%{hiera('unicode_db')}"
location:"%{hiera('ps_home_location')}"
2. If necessary, create a psft_customizations.yaml using a standard editing tool, such as Notepad on Microsoft
Windows or vi on Linux, AIX, HP-UX, or Solaris, and save it in the same location as the
psft_deployment.yaml file.
If this is the first entry in the psft_customizations.yaml file, ensure that there are three dashes (
---
) on the
first line of the file. Do not indent the dashes.
3. Copy the entire
ps_home
section from psft_deployment.yaml, maintaining the indentation, into the
psft_customizations.yaml file.
For a Unicode database, set the value for
unicode_db
to true:
---
ps_home:
db_type:"%{hiera('db_platform')}"
unicode_db:true
location:"%{hiera('ps_home_location')}"
For a non-Unicode database, set the value for unicode_db to false:
---
ps_home:
db_type:"%{hiera('db_platform')}"

Chapter 4 Completing the DPK Initialization with Customizations
Copyright © 2022, Oracle and/or its affiliates. All Rights Reserved.
185
unicode_db:false
location:"%{hiera('ps_home_location')}"
4. Save the file.
5. Continue with the steps in Completing the Customized Deployment.
Task 4-8: Preparing the Customization Files for the PeopleSoft
Homes
This section discusses:
• Preparing the Customization File for the PS_HOME Location
• Preparing the Customization File for the PS_APP_HOME Location
• Preparing the Customization File for the PS_CFG_HOME Location
• Preparing the Customization File for the PS_CUST_HOME Location
Task 4-8-1: Preparing the Customization File for the PS_HOME Location
By default, the DPK setup script creates the PS_HOME directory in BASE_DIR/pt/ps_home<release>, where
<release> is the PeopleSoft PeopleTools patch release, such as 8.58.12. Use these steps to specify a different
PS_HOME location.
Note. Review the requirements in Understanding PeopleSoft Environment Customizations before preparing the
customization file.
1. Locate the psft_deployment.yaml file in BASE_DIR/dpk/puppet/production/data.
Note. The code examples in this topic are for illustrative purposes only. Remember to use the text from the
YAML files you install with each new deployment as the basis for your psft_customizations.yaml file.
The PS_HOME installation location is specified by the
ps_home
section (comprised of four lines).
ps_home:
db_type:"%{hiera('db_platform')}"
unicode_db:"%{hiera('unicode_db')}"
location:"%{hiera('ps_home_location')}"
2. If necessary, create a psft_customizations.yaml using a standard editing tool, such as Notepad on Microsoft
Windows or vi on Linux, AIX, HP-UX, or Solaris, and save it in the same location as the
psft_deployment.yaml file.
If this is the first entry in the psft_customizations.yaml file, ensure that there are three dashes (---) on the
first line of the file. Do not indent the dashes.
3. Copy the entire section from the psft_deployment.yaml file into the psft_customizations.yaml file and modify
the location value as needed.
Retain the indentation as given in the delivered YAML file.
For example, on Linux, AIX, HP-UX, or Solaris:
---
ps_home:

Completing the DPK Initialization with Customizations Chapter 4
186
Copyright © 2022, Oracle and/or its affiliates. All Rights Reserved.
db_type:"%{hiera('db_platform')}"
unicode_db:"%{hiera('unicode_db')}"
location:"/home/psft8.58.12"
For example, on Microsoft Windows:
---
ps_home:
db_type:"%{hiera('db_platform')}"
unicode_db:"%{hiera('unicode_db')}"
location:"C:/psft8.58.12"
4. Save the file.
5. Continue with the steps in Completing the Customized Deployment.
Task 4-8-2: Preparing the Customization File for the PS_APP_HOME
Location
By default, the DPK setup script creates the PS_APP_HOME directory in BASE_DIR/pt/<Product>_app_home,
where <Product> is the abbreviation for the PeopleSoft application, such as fscm for PeopleSoft Financials and
Supply Chain Management.
Note. Review the requirements in Understanding PeopleSoft Environment Customizations before preparing the
customization file.
Here are two scenarios where you might use this customization:
• If you are performing a new installation using the PeopleSoft DPKs, and you do not want to use the default
PS_APP_HOME location created by the DPK setup script, use this customization to specify and create the
desired PS_APP_HOME directory.
• If you are performing a mid-tier deployment to connect to an existing environment, use this customization to
specify the existing PS_APP_HOME.
Use these steps to specify the PS_APP_HOME location.
1. Locate the psft_deployment.yaml file in BASE_DIR/dpk/puppet/production/data.
Note. The code examples in this topic are for illustrative purposes only. Remember to use the text from the
YAML files you install with each new deployment as the basis for your psft_customizations.yaml file.
The
PS_APP_HOME
installation location is specified by the
ps_app_home
section.
ps_apphome_location:"%{hiera('pt_location')}/hcm_app_home"
ps_app_home:
db_type:"%{hiera('db_platform')}"
include_ml_files:false
location:"%{hiera('ps_apphome_location')}"
2. If necessary, create a psft_customizations.yaml using a standard editing tool, such as Notepad on Microsoft
Windows or vi on Linux, AIX, HP-UX, or Solaris, and save it in the same location as the
psft_deployment.yaml file.
If this is the first entry in the psft_customizations.yaml file, ensure that there are three dashes (
---
) on the
first line of the file. Do not indent the dashes.
3. To override the location, copy the entire section from the psft_deployment.yaml file into the
psft_customizations.yaml file and modify the location value as needed.

Chapter 4 Completing the DPK Initialization with Customizations
Copyright © 2022, Oracle and/or its affiliates. All Rights Reserved.
187
Retain the indentation as given in the delivered YAML file.
For example, on Linux, AIX, HP-UX, or Solaris:
---
ps_apphome_location:"/home/hcm92_home"
ps_app_home:
db_type:"%{hiera('db_platform')}"
include_ml_files:false
location:"/home/hcm92_home"
For example, on Microsoft Windows:
---
ps_apphome_location:"C:/hcm92_home"
ps_app_home:
db_type:"%{hiera('db_platform')}"
include_ml_files:false
location:"C:/hcm92_home"
4. Save the file.
5. Continue with the steps in Completing the Customized Deployment.
Task 4-8-3: Preparing the Customization File for the PS_CFG_HOME
Location
By default, the DPK setup script creates the PS_CFG_HOME directory in <user_profile>/psft/pt/8.58, such as
C:/users/username/psft/pt/8.58 on Microsoft Windows, and /home/psadm2/psft/pt/8.58 on Linux, AIX, HP-UX, or
Solaris. Note that you cannot specify different PS_CFG_HOME locations for different PeopleSoft domains. The
DPK installation requires the same PS_CFG_HOME be used for all domains. Use these steps to specify the
PS_CFG_HOME location.
Note. Review the requirements in Understanding PeopleSoft Environment Customizations before preparing the
customization file.
1. Locate the psft_configuration.yaml file in BASE_DIR/dpk/puppet/production/data.
Note. The code examples in this topic are for illustrative purposes only. Remember to use the text from the
YAML files you install with each new deployment as the basis for your psft_customizations.yaml file.
The PS_CFG_HOME installation location is specified by the ps_config_home parameter.
ps_config_home:"%{hiera('user_home_dir')}/%{hiera('domain_⇒
user')}/psft/pt/8.58"
2. If necessary, create a psft_customizations.yaml using a standard editing tool, such as Notepad on Microsoft
Windows or vi on Linux, AIX, HP-UX, or Solaris, and save it in the same location as the
psft_configuration.yaml file.
If this is the first entry in the psft_customizations.yaml file, ensure that there are three dashes (---) on the
first line of the file. Do not indent the dashes.
3. Copy the entire section from the psft_configuration.yaml file into the psft_customizations.yaml file and
modify the location value as needed.
Retain the indentation as given in the delivered YAML file.
For example, on Linux, AIX, HP-UX, or Solaris:

Completing the DPK Initialization with Customizations Chapter 4
188
Copyright © 2022, Oracle and/or its affiliates. All Rights Reserved.
---
ps_config_home:"/home/pt858_config"
For example, on Microsoft Windows:
---
ps_config_home:"C:/pt858_config"
4. Save the file.
5. Continue with the steps in Completing the Customized Deployment.
Task 4-8-4: Preparing the Customization File for the PS_CUST_HOME
Location
Use the PS_CUST_HOME location for files such as COBOL and SQR that originate with your organization. The
delivered YAML files do not include a PS_CUST_HOME location. The DPK setup script creates the
PS_CUST_HOME if it does not exist.
Note. Setting a PS_CUST_HOME environment variable, which was used for non-DPK deployments, does not
work.
1. If necessary, create a psft_customizations.yaml using a standard editing tool, such as Notepad on Microsoft
Windows or vi on Linux, AIX, HP-UX, or Solaris, and save it in the same location as the
psft_configuration.yaml file.
If this is the first entry in the psft_customizations.yaml file, ensure that there are three dashes (---) on the
first line of the file. Do not indent the dashes.
2. Add the following parameters in the psft_customizations.yaml file and modify the location value as needed.
Retain the indentation as given in the delivered YAML file.
For example, on Linux, AIX, HP-UX, or Solaris:
---
ps_cust_home_location:"/home/pscusthome"
ps_cust_home:
location:"/home/pscusthome"
For example, on Microsoft Windows:
---
ps_cust_home_location:"C:/pscusthome"
ps_cust_home:
location:"C:/pscusthome"
3. Save the file.
4. Continue with the steps in Completing the Customized Deployment.
Task 4-9: Preparing the Customization File for Jolt SSL and WSL
SSL Ports
You have the option to use the Secure Socket Layers/Transport Layer Security (SSL/TSL) protocol for
Workstation Listener and Jolt Listener ports for the application server configuration. To use this protocol you
must set up an Oracle wallet for the digital certificates.

Chapter 4 Completing the DPK Initialization with Customizations
Copyright © 2022, Oracle and/or its affiliates. All Rights Reserved.
189
See PeopleTools: Security Administration, "Installing Web Server-Based Digital Certificates."
Note. Review the requirements in Understanding PeopleSoft Environment Customizations before preparing the
customization file.
1. Locate the psft_configuration.yaml file in BASE_DIR/dpk/puppet/production/data.
Note. The code examples in this topic are for illustrative purposes only. Remember to use the text from the
YAML files you install with each new deployment as the basis for your psft_customizations.yaml file.
2. If necessary, create a psft_customizations.yaml using a standard editing tool, such as Notepad on Microsoft
Windows or vi on Linux, AIX, HP-UX, or Solaris, and save it in the same location as the
psft_configuration.yaml file.
If this is the first entry in the psft_customizations.yaml file, ensure that there are three dashes (---) on the
first line of the file. Do not indent the dashes.
3. Copy the entire appserver_domain_list section from psft_configuration.yaml to
psft_customizations.yaml.
When you copy, retain the indentation as given in the delivered YAML file.
4. Add the following parameters to the psft_customizations.yaml file:
Note. These parameters are not included in the delivered psft_configuration.yaml file.
• Specify the SSL/TSL port for the Jolt listener; for example 9010.
JOLTListener/SSLPort:9010
•
Specify the SSL/TSL port for the Workstation listener, for example 7010:
WorkstationListener/SSLPort:7010
•
Specify the location of the wallet containing the certificates:
OracleWallet/SEC_PRINCIPAL_LOCATION:test/security
• Specify the wallet name, for example psft:
OracleWallet/SEC_PRINCIPAL_NAME:psft
•
Specify the wallet password:
OracleWallet/SEC_PRINCIPAL_PASSWORD:
5. Modify the psft_customizations.yaml file, including the added parameters from the previous step, with values
for your environment.
Note. Be sure to retain the indentation shown in this example.
This sample psft_customizations.yaml file shows the parameters added from step 4 in bold font:
---
appserver_domain_list:
"%{hiera('appserver_domain_name')}":
os_user:"%{hiera('domain_user')}"
ps_cfg_home_dir:"%{hiera('ps_config_home')}"
template_type:"%{hiera('appserver_template')}"

Completing the DPK Initialization with Customizations Chapter 4
190
Copyright © 2022, Oracle and/or its affiliates. All Rights Reserved.
db_settings:
db_name:"%{hiera('db_name')}"
db_type:"%{hiera('db_platform')}"
db_opr_id:"%{hiera('db_user')}"
db_opr_pwd:"%{hiera('db_user_pwd')}"
db_connect_id:"%{hiera('db_connect_id')}"
db_connect_pwd:"%{hiera('db_connect_pwd')}"
config_settings:
DomainSettings/AllowDynamicChanges:Y
DomainSettings/DomainID:"%{hiera('appserver_domain_⇒
name')}"
PSAPPSRV/MinInstances:2
PSAPPSRV/MaxInstances:2
PSAPPSRV/MaxFetchSize:15000
Security/DomainConnectionPwd:"%{hiera('domain_conn_⇒
pwd')}"
JOLTListener/Port:"%{hiera('jolt_port')}"
JOLTListener/Address:0.0.0.0
JOLT Listener/SSL Port: 9010
WorkstationListener/Port:"%{hiera('wsl_port')}"
Workstation Listener/SSL Port: 7010
Oracle Wallet/SEC_PRINCIPAL_LOCATION: test/security
Oracle Wallet/SEC_PRINCIPAL_NAME: psft
Oracle Wallet/SEC_PRINCIPAL_PASSWORD:
feature_settings:
PUBSUB:"Yes"
QUICKSRV:"No"
QUERYSRV:"No"
JOLT:"Yes"
JRAD:"No"
WSL:"Yes"
DBGSRV:"No"
RENSRV:"No"
MCF:"No"
PPM:"Yes"
PSPPMSRV:"Yes"
ANALYTICSRV:"No"
SERVER_EVENTS:"Yes"
DOMAIN_GW:"No"
6. Save the file.
7. Continue with the steps in Completing the Customized Deployment.

Chapter 4 Completing the DPK Initialization with Customizations
Copyright © 2022, Oracle and/or its affiliates. All Rights Reserved.
191
Task 4-10: Preparing the Customization File for Oracle HTTP
Server
Use the information in this section if you want to customize the installation of Oracle HTTP Server (OHS). OHS
is included as part of Oracle WebLogic, and is used as a reverse proxy server (RPS).
Note. You cannot install OHS alone. The OHS installation is part of the PeopleTools DPK deployment.
See PeopleTools: Portal Technology, "Using Reverse Proxy Servers."
See Fusion Middleware Installing and Configuring Oracle HTTP Server, Oracle Help Center,
https://docs.oracle.com/middleware/1213/core/install-ohs/toc.htm.
Note. Review the requirements in Understanding PeopleSoft Environment Customizations before preparing the
customization file.
1. Locate the psft_deployment.yaml and psft_configuration.yaml files in BASE_DIR/
dpk/puppet/production/data.
The parameter to turn OHS on, and the installation location are located in psft_deployment.yaml. The OHS
domain configuration parameters are included in psft_configuration.yaml.
Note. The code examples in this topic are for illustrative purposes only. Remember to use the text from the
YAML files you install with each new deployment as the basis for your psft_customizations.yaml file.
2. If necessary, create a psft_customizations.yaml using a standard editing tool, such as Notepad on Microsoft
Windows or vi on Linux, AIX, HP-UX, or Solaris, and save it in the same location as the
psft_deployment.yaml and psft_configuration.yaml files.
Ensure that the file begins with three dashes (---).
3. Change the value for setup_ohs to true.
This is mandatory to enable OHS. In addition, select other sections listed below, corresponding to the
components that you want to customize, and copy them to the psft_customizations.yaml file.
As previously mentioned, setting the optional attribute remove: false means that the parameters in this
section will not be deleted when the deployed environment is removed.
•
To enable OHS (mandatory), copy the
setup_ohs
scalar parameter from psft_deployment.yaml into the
psft_customizations.yaml file, and set it to true. Retain the indentation as given in the delivered YAML
file, as shown in this example:
---
setup_ohs:true
Note. If you copy only this parameter into psft_customizations.yaml, the deployment will use the default
installation location and default domain configuration.
• To change the location of the OHS installation (optional), copy the following scalar and collection
parameters from psft_deployment.yaml into the psft_customizations.yaml file. Retain the indentation as
given in the delivered YAML files.
Edit the parameters to specify the desired location. Enter the full path to the installation location. Be sure
to enter the same value for both ohs_location and the location under ohs.
---

Completing the DPK Initialization with Customizations Chapter 4
192
Copyright © 2022, Oracle and/or its affiliates. All Rights Reserved.
setup_ohs:true
ohs_location:"%{hiera('pt_location')}/bea/ohs"
ohs:
location:"%{hiera('ohs_location')}"
• To customize the OHS domain configuration (optional), copy the following collection parameters from
psft_configuration.yaml into the psft_customizations.yaml file and modify for your environment.
Retain the indentation as given in the delivered YAML file.
Replace the password sample below (for webserver_admin_user_pwd) with an encrypted
password. Enter the encrypted password on a single line. Do not include spaces or line feeds.
See "Encrypting Passwords for Customizations on Linux, AIX, HP-UX, or Solaris."
Note. Use clear text passwords for silent mode installation.
---
setup_ohs:true
ohs_domain:
name:ohsdom
os_user:"%{hiera('domain_user')}"
domain_home_dir:"%{hiera('ps_config_home')}"
pia_webserver_type:"%{hiera('webserver_type')}"
pia_webserver_host:"%{hiera('pia_host_name')}"
pia_webserver_port:"%{hiera('pia_http_port')}"
node_manager_port:7500
webserver_settings:
webserver_type:ohs
webserver_home:"%{hiera('ohs_location')}"
webserver_admin_user:system
webserver_admin_user_pwd:ENC[PKCS7,MIIBeQYJKoZ......]
webserver_admin_port:7700
webserver_http_port:7740
webserver_https_port:7743
• If you want to customize the installation location and domain configuration, copy all three entries into
psft_customizations.yaml and edit. For example, to modify the installation location and the OHS domain
name:
---
setup_ohs:true
ohs_location:"C:/psft_ohs"
ohs:
location:"C:/psft_ohs"
ohs_domain:
name:ohsdomain2
os_user:"%{hiera('domain_user')}"
domain_home_dir:"%{hiera('ps_config_home')}"
pia_webserver_type:"%{hiera('webserver_type')}"
pia_webserver_host:"%{hiera('pia_host_name')}"

Chapter 4 Completing the DPK Initialization with Customizations
Copyright © 2022, Oracle and/or its affiliates. All Rights Reserved.
193
pia_webserver_port:"%{hiera('pia_http_port')}"
node_manager_port:7500
webserver_settings:
webserver_type:ohs
webserver_home:"%{hiera('ohs_location')}"
webserver_admin_user:system
webserver_admin_user_pwd:ENC[PKCS7,MIIBeQYJKoZ........]
webserver_admin_port:7700
webserver_http_port:7740
webserver_https_port:7743
4. Save the file.
5. Continue with the steps in Completing the Customized Deployment.
Task 4-11: Preparing the Customization File for Session Cookie
Names
Use the information in this section if you want to customize session cookie names. For example, you may need to
set cookies when creating web server clusters.
See PeopleTools: Portal Technology, "Configuring Web Profiles."
See PeopleTools: System and Server Administration, "Working with Session Cookie Names."
Note. Review the requirements in Understanding PeopleSoft Environment Customizations before preparing the
customization file.
Use these guidelines in creating the psft_customizations.yaml file:
•
This customization uses parameters that are not included in the YAML files generated by the deployment.
Follow the samples given here in creating the psft_customizations.yaml file.
•
You are responsible for setting the correct values. There is no validation for the cookie names.
• Follow the legal naming conventions for http cookies.
• Set a unique name for each "setup of cluster of servers".
For example, if a set of web-servers are for an HCM production site and the cookie-name is used in
persistence criteria, then all the web-servers of that HCM site must have the same Portal cookie-name (and if
using WSRP, the same Portlet cookie name).
1. Locate the psft_configuration.yaml file in
BASE_DIR/
dpk/puppet/production/data.
Note. The code examples in this topic are for illustrative purposes only. Remember to use the text from the
YAML files you install with each new deployment as the basis for your psft_customizations.yaml file.
2. If necessary, create a psft_customizations.yaml using a standard editing tool, such as Notepad on Microsoft
Windows or vi on Linux, AIX, HP-UX, or Solaris, and save it in the same location as the
psft_deployment.yaml and psft_configuration.yaml files.
Ensure that the file begins with three dashes (---).
3. Copy the entire collection parameter section for pia_domain_list from the psft_configuration.yaml file
into the psft_customizations.yaml file.
Retain the indentation as given in the delivered YAML file.

Completing the DPK Initialization with Customizations Chapter 4
194
Copyright © 2022, Oracle and/or its affiliates. All Rights Reserved.
4. Add the parameters for portal_cookie_name and portlet_cookie_name below
webserver_https_port, and ensure that the indentation is the same as that of
webserver_https_port.
pia_domain_list:
"%{hiera('pia_domain_name')}":
os_user:"%{hiera('domain_user')}"
ps_cfg_home_dir:"%{hiera('ps_config_home')}"
gateway_user:"%{hiera('pia_gateway_user')}"
gateway_user_pwd:"%{hiera('pia_gateway_user_pwd')}"
auth_token_domain:".%{::domain}"
webserver_settings:
webserver_type:"%{hiera('webserver_type')}"
webserver_home:"%{hiera('weblogic_location')}"
webserver_admin_user:system
webserver_admin_user_pwd:ENC[PKCS7,MIIBeQY............]
webserver_admin_port:"%{hiera('pia_http_port')}"
webserver_http_port:"%{hiera('pia_http_port')}"
webserver_https_port:"%{hiera('pia_https_port')}"
portal_cookie_name: FIN-PORTAL-PSJESSIONID
portlet_cookie_name: FIN-PORTLET-PSJESSIONID
site_list:
"%{hiera('pia_site_name')}":
appserver_connections:"%{hiera('pia_psserver_list')}"
domain_conn_pwd:"%{hiera('domain_conn_pwd')}"
webprofile_settings:
profile_name:"%{hiera('pia_webprofile_name')}"
profile_user:PTWEBSERVER
profile_user_pwd:ENC[PKCS7,MIIBeQY............]
report_repository_dir:"%{hiera('report_repository_dir')}"
5. Save the file.
6. Continue with the steps in Completing the Customized Deployment.
Task 4-12: Preparing the Customization File for JVM Heap Sizes
Use the information in this section to customize the maximum and minimum JVM heap sizes, or runtime
memory, in your deployed environment. The JVM heap size is the amount of memory that a particular JRE (Java
Runtime Environment) gives to the JVM (Java Virtual Machine) that it creates. See the product documentation for
information on the default settings.
See PeopleTools: System and Server Administration, "Adjusting the JVM Heap Size."
See PeopleTools: System and Server Administration, "Tuning Performance and Monitoring Resources"
Note. Review the requirements in Understanding PeopleSoft Environment Customizations before preparing the
customization file.
Use these guidelines in creating the psft_customizations.yaml file:

Chapter 4 Completing the DPK Initialization with Customizations
Copyright © 2022, Oracle and/or its affiliates. All Rights Reserved.
195
• This customization uses parameters that are not included in the YAML files generated by the deployment.
Follow the samples given here in creating the psft_customizations.yaml file.
• You are responsible for setting the correct values. There is no validation for the java_heap_min and
java_heap_max.
• You must include the parameters for both the maximum and minimum heap size in the
psft_customizations.yaml file.
• The java_heap_max value must be greater than the java_heap_min value.
1. Locate the psft_configuration.yaml files in BASE_DIR/dpk/puppet/production/data.
Note. The code examples in this topic are for illustrative purposes only. Remember to use the text from the
YAML files you install with each new deployment as the basis for your psft_customizations.yaml file.
2. If necessary, create a psft_customizations.yaml using a standard editing tool, such as Notepad on Microsoft
Windows or vi on Linux, AIX, HP-UX, or Solaris, and save it in the same location as the
psft_deployment.yaml and psft_configuration.yaml files.
Ensure that the file begins with three dashes (---).
3. Copy the entire collection parameter section for pia_domain_list from the psft_configuration.yaml file
into the psft_customizations.yaml file.
Retain the indentation as given in the delivered YAML file.
4. Add the parameters for java_heap_min and java_heap_max below webserver_https_port, and
ensure that the indentation is the same as that of webserver_https_port.
Enter the desired size in megabytes, with no units. For example, enter
2048
for 2048 megabytes, or 2GB.
pia_domain_list:
"%{hiera('pia_domain_name')}":
os_user:"%{hiera('domain_user')}"
ps_cfg_home_dir:"%{hiera('ps_config_home')}"
gateway_user:"%{hiera('pia_gateway_user')}"
gateway_user_pwd:"%{hiera('pia_gateway_user_pwd')}"
auth_token_domain:".%{::domain}"
webserver_settings:
webserver_type:"%{hiera('webserver_type')}"
webserver_home:"%{hiera('weblogic_location')}"
webserver_admin_user:system
webserver_admin_user_pwd:ENC[PKCS7,MIIBeQY............]
webserver_admin_port:"%{hiera('pia_http_port')}"
webserver_http_port:"%{hiera('pia_http_port')}"
webserver_https_port:"%{hiera('pia_https_port')}"
java_heap_min: 2048
java_heap_max: 4096
site_list:
"%{hiera('pia_site_name')}":
appserver_connections:"%{hiera('pia_psserver_list')}"
domain_conn_pwd:"%{hiera('domain_conn_pwd')}"
webprofile_settings:
profile_name:"%{hiera('pia_webprofile_name')}"
profile_user:PTWEBSERVER

Completing the DPK Initialization with Customizations Chapter 4
196
Copyright © 2022, Oracle and/or its affiliates. All Rights Reserved.
profile_user_pwd:ENC[PKCS7,MIIBeQY............]
report_repository_dir:"%{hiera('report_repository_dir')}"
5. Save the file.
6. Continue with the steps in Completing the Customized Deployment.
Task 4-13: Preparing the Customization File for Mid-Tier
Connection to a Microsoft SQL Server Database
Use these steps to set up PeopleSoft mid-tier components to connect to a Microsoft SQL Server database. This
section assumes that:
• You installed the Microsoft SQL Server client software on the Microsoft Windows host machine.
• You know the Microsoft SQL Server client installation location, SQL Server name, and the name of the
ODBC driver required to connect to the database.
•
When running the DPK setup script, you specified MSSQL as the database platform.
Note. Review the requirements in Understanding PeopleSoft Environment Customizations before preparing the
customization file.
1. Locate the psft_configuration.yaml file, which was created by the deployment, in
BASE_DIR/
dpk/puppet/production/data.
Note. The code examples in this topic are for illustrative purposes only. Remember to use the text from the
YAML files you install with each new deployment as the basis for your psft_customizations.yaml file.
The information for Microsoft SQL Server, which you will copy and modify, is given in the
mssql_server_list section in this file:
mssql_server_list:
"%{hiera('db_name')}":
mss_server_name:"%{::fqdn}"
mss_odbc_name:"ODBCDriver13forSQLServer"
2. Locate the psft_deployment.yaml file, which was created by the deployment, in BASE_DIR/
dpk/puppet/production/data.
The database platform text, which you will copy, is specified as:
db_platform:MSSQL
3. If necessary, create a psft_customizations.yaml file using a standard editing tool, such as Notepad, and save it
in the same location as the psft_configuration.yaml file.
If this is the first entry in the psft_customizations.yaml file, ensure that there are three dashes (
---
) on the
first line of the file. Do not indent the dashes.
4. Copy the
db_platform
line from the psft_deployment.yaml file into the psft_customizations.yaml file.
Copy the entire section for
mssql_server_list
from the psft_configuration.yaml file into the
psft_customizations.yaml file and modify the values as needed.
Retain the indentation as given in the delivered YAML files.
For
mss_server_name
, specify the SQL Server name or named instance. For
mss_odbc_name
, specify
the name for the ODBC driver needed for connectivity to the Microsoft SQL Server database.

Chapter 4 Completing the DPK Initialization with Customizations
Copyright © 2022, Oracle and/or its affiliates. All Rights Reserved.
197
For example:
---
db_platform:MSSQL
mssql_server_list:
<db_name>:
mss_server_name:<server_name>
mss_odbc_name:<odbc_name>
remove:false
For example:
---
db_platform:MSSQL
mssql_server_list:
FS92DEMO:
mss_server_name:HOSTNAME\SQL2016
mss_odbc_name:"ODBCDriver13forSQLServer"
remove:false
For information on the ODBC driver, see the chapters on installing the appropriate version of Microsoft SQL
Server in the PeopleSoft 9.2 Application installation product documentation.
See Oracle's PeopleSoft PeopleTools 8.58 Home Page, Installation and Upgrade tab, My Oracle Support, Doc
ID 2602329.2.
• Microsoft SQL Server 2016 uses ODBC Driver 13 for SQL Server.
See "Installing Microsoft SQL Server 2016," Configuring the Connection to Use ODBC Driver for
Microsoft SQL Server 2016.
• Microsoft SQL Server 2017 uses ODBC Driver 17 for SQL Server.
See "Installing Microsoft SQL Server 2017," Configuring the Connection to Use ODBC Driver for
Microsoft SQL Server 2017.
•
Microsoft SQL Server 2019 uses ODBC Driver 17 for SQL Server.
See "Installing Microsoft SQL Server 2019," Configuring the Connection to Use ODBC Driver for
Microsoft SQL Server 2019
5. Save the file.
6. Continue with the steps in Completing the Customized Deployment.
Task 4-14: Preparing the Customization File for Mid-Tier
Connection to a DB2 z/OS Database
Use these steps to set up PeopleSoft mid-tier components to connect to a DB2 z/OS database. The DPK setup
script does not identify or verify the database client software on the host machine. You have the responsibility to
ensure that the installation is supported, complete, and correct.
Note. Review the requirements in Understanding PeopleSoft Environment Customizations before preparing the
customization file.
This section assumes:

Completing the DPK Initialization with Customizations Chapter 4
198
Copyright © 2022, Oracle and/or its affiliates. All Rights Reserved.
• You installed the appropriate client software for DB2 z/OS on the host machine and made a note of the DB2
client installation location.
• When running the DPK setup script, you specified DB2 z/OS (DB2ODBC) as the database platform.
• You have completed manually cataloging the database, and noted the values you used.
1. Locate the psft_configuration.yaml and psft_deployment.yaml files in BASE_DIR/
dpk/puppet/production/data.
Note. The code examples in this topic are for illustrative purposes only. Remember to use the text from the
YAML files you install with each new deployment as the basis for your psft_customizations.yaml file.
You need parameters from both files. The db_platform parameter appears in psft_deployment.yaml, and
the
db2_server_list
section appears in psft_configuration.yaml.
2. If necessary, create a psft_customizations.yaml using a standard editing tool, such as Notepad on Microsoft
Windows or vi on Linux, AIX, HP-UX, or Solaris, and save it in the same location as the
psft_configuration.yaml file.
If this is the first entry in the psft_customizations.yaml file, ensure that there are three dashes (---) on the
first line of the file. Do not indent the dashes.
3. Copy the db_platform section from psft_deployment.yaml to psft_customizations.yaml.
Retain the indentation as given in the delivered YAML files.
db_platform:DB2ODBC
4. Copy the db_name, db_user and db_user_pwd scalar parameters from psft_configuration.yaml to
psft_customizations.yaml and change for your environment.
Retain the indentation as given in the delivered YAML files.
db_name:EP92DMO
db_user:VP1
db_user_pwd:ENC[xxxxxxxxxxxxxxxxxxxxxxxxxxxxx]
5. Copy the db2_server_list section from psft_configuration.yaml to psft_customizations.yaml.
Retain the indentation as given in the delivered YAML files.
db2_server_list:
"%{hiera('db_name')}":
db2_type:"%{hiera('db_platform')}"
db2_host:"%{::fqdn}"
db2_port:"%{hiera('db_port')}"
db2_node:TCPLNX01
db2_target_db:"%{hiera('db_name')}"
6. Add the db2_client section:
db2_client:
sqllib_location:/home/ibm/sqllib
instance_user:ibm
remove:false
7. If necessary for your environment, add
db2_user_name
,
db2_user_pwd
, and
instance_user
(Linux, AIX, HP-UX, or Solaris).

Chapter 4 Completing the DPK Initialization with Customizations
Copyright © 2022, Oracle and/or its affiliates. All Rights Reserved.
199
8. Modify the psft_customizations.yaml for your environment.
For example, on Linux, AIX, HP-UX, or Solaris:
---
db_platform:DB2ODBC
db_name:EP92DMO
db_user:VP1
db_user_pwd:ENC[xxxxxxxxxxxxxxxxxxxxxxxxxxxxx]
#############################################################
#Replacethispasswordsamplewithencryptedtextfromthe#
#generatedpsft_configuration.yamlfile.#
#############################################################
db2_client:
sqllib_location:/home/ibm/sqllib
instance_user:ibm
remove:false
db2_server_list:
"EP92DMO":
db2_type:DB2ODBC
db2_host:sysb21
db2_port:5126
db2_node:TCPDS3B
db2_target_db:DB2DS3B
db2_user_name:psftuser
db2_user_pwd:password
remove:false
Note. The instance_user attribute only applies to Linux, AIX, HP-UX, and Solaris platforms. This refers
to the user name where the sqllib is installed.
On Microsoft Windows:
----
db_platform:DB2ODBC
db_name:EP92DMO
db_user:VP1
db_user_pwd:ENC[xxxxxxxxxxxxxxxxxxxxxxxxxxxxx]
#############################################################
#Replacethispasswordsamplewithencryptedtextfromthe#
#generatedpsft_configuration.yamlfile.#
#############################################################
db2_client:
sqllib_location:C:/db2105
remove:false
db2_server_list:
"EP92DMO":

Completing the DPK Initialization with Customizations Chapter 4
200
Copyright © 2022, Oracle and/or its affiliates. All Rights Reserved.
db2_type:DB2ODBC
db2_host:sysb21
db2_port:5126
db2_node:TCPDS3B
db2_target_db:DB2DS3B
db2_user_name:psftuser
db2_user_pwd:password
remove:false
Use these guidelines in completing the psft_customizations.yaml:
psft_customizations.yaml attribute and sample value Description
db_platform:DB2ODBC
and
db2_type:DB2ODBC
Specify the RDBMS for DB2 z/OS.
db_name:EP92DMO
and
db2_server_list:
"EP92DMO"
Specify the database name you supplied to the DPK setup
script.
This is the logical PeopleSoft database name, and also the
name of the ODBC system DSN. The DB2 z/OS system
uses this as the database alias.
db_user:VP1
Specify the PeopleSoft User ID (operator ID) such as VP1
or PS.
db_user_password:encryp_password
Specify the password for the PeopleSoft User. Enter
encrypted text from the psft_configuration.yaml file.
Note. Use clear text passwords for silent mode installation.
sqllib_location:C:/db2105
Specify the location of the connectivity software for the
DB2 client.
db2_host:sysb21
Specify the host name where the DB2 z/OS subsystem
resides.
db2_port:5126
Specify the TCP/IP port used by the DB2 z/OS subsystem.
db2_node:TCPDS3B
Specify the TCP/IP node name.
db2_target_db:DB2DS3B
Specify the DB2 subsystem name.
db2_user_name:psftuser
db2_user_pwd:password
Specify the PeopleSoft access ID and password.
9. Save the file.
10. Continue with the steps in Completing the Customized Deployment.
Chapter 4 Completing the DPK Initialization with Customizations
Copyright © 2022, Oracle and/or its affiliates. All Rights Reserved.
201
Task 4-15: Preparing the Customization File to Exclude Oracle
Database Client Installation
The DPK setup script command to deploy all software (psft-dpk-setup.<ext> --env_type midtier
--deploy_only --deploy_type all) includes the installation of Oracle database client. Use the
customization in this section to exclude that installation.
See "Installing the PeopleSoft Homes," Running the DPK Setup Script to Install All Software.
Note. Review the requirements in Understanding PeopleSoft Environment Customizations before preparing the
customization file.
1. If necessary, create a psft_customizations.yaml using a standard editing tool, such as Notepad on Microsoft
Windows or vi on Linux, AIX, HP-UX, or Solaris, and save it in the same location as the installed YAML
files.
If this is the first entry in the psft_customizations.yaml file, ensure that there are three dashes (---) on the
first line of the file. Do not indent the dashes.
2. Add the content below to the psft_customizations.yaml file.
Note. The line with "ensure" is indented.
---
oracle_client:
ensure:absent
3. Save the file.
4. Continue with the steps in Completing the Customized Deployment.
Task 4-16: Preparing the Customization File for sysctl and ulimit
Parameters on Linux, AIX, HP-UX, or Solaris
This section discusses:
• Preparing the Customization File to Change the setup_sysctl Parameter
• Preparing the Customization File to Overwrite the sysctl Parameters
• Preparing the Customization File to Overwrite the ulimit Parameters
Task 4-16-1: Preparing the Customization File to Change the setup_sysctl
Parameter
Use these instructions for a deployment in this situation:
• The existing sysctl parameters on your system meet the DPK requirements.
The values must be equal to or greater than the values for the parameters in the generated
psft_unix_system.yaml file.
• You do not want the DPK setup script to overwrite the sysctl parameters

Completing the DPK Initialization with Customizations Chapter 4
202
Copyright © 2022, Oracle and/or its affiliates. All Rights Reserved.
See "Prerequisites," Reviewing the System Parameters on Linux, AIX, HP-UX, or Solaris.
Note. Review the requirements in Understanding PeopleSoft Environment Customizations before preparing the
customization file.
1. Locate the psft_unix_system.yaml file, which was installed by the deployment, in BASE_DIR/
dpk/puppet/production/data.
2. If necessary, create a psft_customizations.yaml using a standard editing tool, such as vi on Linux, AIX, HP-
UX, or Solaris, and save it in the same location as the generated psft_unix_system.yaml file.
If this is the first entry in the psft_customizations.yaml file, ensure that there are three dashes (---) on the
first line of the file. Do not indent the dashes.
3. Copy the parameter below from the psft_unix_system.yaml file and paste it into the psft_customizations.yaml
file.
Retain the indentation as given in the delivered YAML file.
setup_sysctl:true
4. To specify that the deployment does not overwrite the sysctl parameters, change the value to "false"; for
example:
---
setup_sysctl:false
5. Save the file.
6. Continue with the steps in Completing the Customized Deployment.
Task 4-16-2: Preparing the Customization File to Overwrite the sysctl
Parameters
Use these instructions in this situation:
• You want to allow the DPK setup script to change the sysctl settings on your system.
• You want to specify sysctl values that are equal to or greater than the values for the parameters in the
generated psft_unix_system.yaml file.
Note. Review the requirements in Understanding PeopleSoft Environment Customizations before preparing the
customization file.
1. Locate the psft_unix_system.yaml file, which was installed by the deployment, in BASE_DIR/
dpk/puppet/production/data.
2. If necessary, create a psft_customizations.yaml using a standard editing tool, such as vi on Linux, AIX, HP-
UX, or Solaris, and save it in the same location as the generated psft_unix_system.yaml file.
If this is the first entry in the psft_customizations.yaml file, ensure that there are three dashes (
---
) on the
first line of the file. Do not indent the dashes.
3. Copy the
setup_sysctl: true
scalar parameter from the psft_unix_system.yaml file and paste it into
the psft_customizations.yaml file.
Do not change the parameter; it must be set to "true". Retain the indentation as given in the delivered YAML
file.
4. Copy the entire
sysctl:
collection type parameter (comprised of several lines) from the
psft_unix_system.yaml file and paste it into the psft_customizations.yaml file.
Retain the indentation as given in the delivered YAML file.

Chapter 4 Completing the DPK Initialization with Customizations
Copyright © 2022, Oracle and/or its affiliates. All Rights Reserved.
203
---
setup_sysctl:true
sysctl:
kernel.msgmnb:65538
kernel.msgmni:1024
kernel.msgmax:65536
kernel.shmmax:68719476736
kernel.shmall:4294967296
kernel.core_uses_pid:1
net.ipv4.tcp_keepalive_time:90
net.ipv4.tcp_timestamps:1
net.ipv4.tcp_window_scaling:1
net.ipv4.ip_local_port_range:'1000065500'
5. Change the values of the sysctl parameters in psft_customizations.yaml as needed, but the values must be
equal to or greater than those in the generated psft_unix_system.yaml file.
6. Save the file.
7. Continue with the steps in Completing the Customized Deployment.
Task 4-16-3: Preparing the Customization File to Overwrite the ulimit
Parameters
Use these instructions if you want to specify ulimit values that are equal to or greater than the values for the
parameters in the generated psft_unix_system.yaml file.
There is no parameter that you can use to specify whether the DPK setup script sets the ulimit parameters. You
can change the values, but there is no parameter to prevent the DPK setup script from changing the ulimit
parameters.
Note. Review the requirements in Understanding PeopleSoft Environment Customizations before preparing the
customization file.
1. Locate the psft_unix_system.yaml file, which was installed by the deployment, in
BASE_DIR/
dpk/puppet/production/data.
2. If necessary, create a psft_customizations.yaml using a standard editing tool, such vi on Linux, AIX, HP-UX,
or Solaris, and save it in the same location as the generated psft_unix_system.yaml file.
If this is the first entry in the psft_customizations.yaml file, ensure that there are three dashes (---) on the
first line of the file. Do not indent the dashes.
3. Copy the entire ulimit: collection type parameter (comprised of several lines) from the
psft_unix_system.yaml file and paste it into the psft_customizations.yaml file.
Retain the indentation as given in the delivered YAML file.
---
ulimit:
group:
hard.nofile:65536
soft.nofile:65536
hard.nproc:65536
soft.nproc:65536
hard.core:unlimited
soft.core:unlimited

Completing the DPK Initialization with Customizations Chapter 4
204
Copyright © 2022, Oracle and/or its affiliates. All Rights Reserved.
hard.memlock:500000
soft.memlock:500000
hard.stack:102400
soft.stack:102400
user:
hard.nofile:131072
soft.nofile:131072
hard.nproc:131072
soft.nproc:131072
hard.core:unlimited
soft.core:unlimited
hard.memlock:500000
soft.memlock:500000
4. Change the values of the ulimit parameters in psft_customizations.yaml as needed, but the values must be
equal to or greater than those in the generated psft_unix_system.yaml file.
5. Save the file.
6. Continue with the steps in Completing the Customized Deployment.
Task 4-17: Completing the Customized Deployment
Use these steps to complete the customized deployment of the PeopleSoft environment:
1. Run the DPK setup script as previously described.
See "Deploying the PeopleSoft PeopleTools Deployment Packages."
2. Answer n (no) to the following prompt:
Doyouwanttocontinuewiththedefaultinitializationprocess?[y|n]:
⇒
n
The script stops, and displays instructions for completing the initialization. Leave the command window or
terminal window open to refer to the instructions provided.
3. Prepare the psft_customizations.yaml file as previously described and save it in BASE_DIR/
dpk/puppet/production/data.
4. As directed by the message displayed when the DPK setup script exited, enter the full path and script name,
and wait until the deployment is complete.
Since the script redirects the output to a log file, you cannot follow the progress on the command window or
terminal window. The process is complete when the prompt returns.
On Microsoft Windows:
BASE_DIR\psft_puppet_apply.cmd
On Linux, AIX, HP-UX, or Solaris:
BASE_DIR/psft_puppet_apply.sh
The psft_puppet_apply.<ext> script performs these actions:
• Sets the required PATH, library path, and PYTHON path.
• Runs the puppet apply command to set up the PeopleSoft environment using the values in
psft_customizations.yaml and the generated YAML files.

Chapter 4 Completing the DPK Initialization with Customizations
Copyright © 2022, Oracle and/or its affiliates. All Rights Reserved.
205
As mentioned, the values in psft_customizations.yaml override those in the generated YAML files.
• Saves the log file as BASE_DIR/psft_dpk_setup_apply.log.
5. If you want to exclude the Puppet debug messages from the log file, run the script with the nodebug option:
Note. You must run the script as instructed by the script message. Do not copy the psft_puppet_apply script
into a different BASE_DIR to run.
On Microsoft Windows:
BASE_DIR\psft_puppet_apply.cmd--nodebug
On Linux, AIX, HP-UX, or Solaris:
BASE_DIR/psft_puppet_apply.sh--nodebug
Note that you can run the puppet apply command directly, but Oracle recommends that you use the script
provided, which sets the required environment variables to specify the locations for the Puppet software and the
YAML files. Oracle also recommends that you do not run
puppet apply –debug
.


Copyright © 2022, Oracle and/or its affiliates. All Rights Reserved.
207
Chapter 5
Using and Maintaining the PeopleSoft
Environment
This chapter discusses:
• Using the PeopleSoft Installation
•
Working with PeopleSoft Utilities and Programs for Root Deployments on Linux, AIX, HP-UX, and Solaris
•
Setting Environment Variables for the Non-Root User on Linux, AIX, HP-UX, or Solaris
•
Removing a Deployed PeopleSoft Environment
Task 5-1: Using the PeopleSoft Installation
This section discusses:
• Accessing the PeopleSoft Environment
• Reviewing the Deployment File System
• Reviewing the DPK-Created Users for Root Deployments on Linux, AIX, HP-UX, and Solaris
Task 5-1-1: Accessing the PeopleSoft Environment
To sign in to the deployed PeopleSoft environment in a browser (that is, use the PeopleSoft Pure Internet
Architecture, or PIA), use a URL with this format:
http://<host_name>:<http_port>/<PIA_site_name>/signon.html
For example, for a deployment with the default port, 8000, and default PIA site name, ps, the URL would be
http://server1.example.com:8000/ps/signon.html.
See the PeopleSoft Hosted Online Help, http://www.peoplesoftonlinehelp.com, for information on working with
the components in a PeopleSoft installation.

Using and Maintaining the PeopleSoft Environment Chapter 5
208
Copyright © 2022, Oracle and/or its affiliates. All Rights Reserved.
Task 5-1-2: Reviewing the Deployment File System
The PeopleSoft installation deployed by the PeopleSoft DPKs sets up an environment comprised of several
directories. This table lists the directories with the location, contents of the directory, and the owner.
Directory Description Default Location Access
PS_HOME PS_HOME is a secure
location for the PeopleTools
binary installation files.
<BASE_DIR>/pt/ps_home
<ptools_patch_ver>
The descriptor
<ptools_patch_ver> is the
PeopleSoft PeopleTools full
release, for example 8.58.01.
This directory can only be
written to by the PeopleSoft
administrator, psadm1
(Linux, AIX, HP-UX, or
Solaris).

Chapter 5 Using and Maintaining the PeopleSoft Environment
Copyright © 2022, Oracle and/or its affiliates. All Rights Reserved.
209
Directory Description Default Location Access
PS_CFG_HOME The PS_CFG_HOME
location holds the
configuration and log files
for the PeopleSoft
Application Server and
Process Scheduler server
domains.
• On Linux, AIX, HP-UX,
or Solaris, when
deploying as the root
user, <USER_HOME>/
psadm2/psft/pt/
<ptools_major_ver>.
You supply the location
for the USER_HOME
when you run the DPK
setup script. The default
value is /home.
• On Linux, AIX, HP-UX,
or Solaris, when
deploying as a non-root
user,
<prompted_ps_cfg_hom
e>/psft/pt/
<ptools_major_ver>
You supply the location
for
prompted_ps_cfg_home
when you run the DPK
setup script.
• On Microsoft Windows,
C:\%USERPROFILE%\
psft\pt\
<ptools_major_ver>
For example, if the
USERPROFILE
environment variable is
C:\Users\username, the
location is
C:\Users\username\psft\p
t\8.58.
The descriptor
<ptools_major_ver>
is the
PeopleSoft PeopleTools
major release without patch
numbers; for example, 8.58.
This directory is owned by
psadm2 (Linux, AIX, HP-
UX, Solaris).

Using and Maintaining the PeopleSoft Environment Chapter 5
210
Copyright © 2022, Oracle and/or its affiliates. All Rights Reserved.
Directory Description Default Location Access
Web server (PIA) installation The web server (PIA)
configuration files are
located in PS_CFG_HOME/
webserv.
• On Linux, AIX, HP-UX,
or Solaris, when
deploying as the root
user, <USER_HOME>/
psadm2/psft/pt/
<ptools_major_ver>/
webserv
You supply the location
for the USER_HOME
when you run the DPK
setup script. The default
value is /home.
• On Linux, AIX, HP-UX,
or Solaris, when
deploying as a non-root
user,
<prompted_ps_cfg_hom
e>/psft/pt/
<ptools_major_ver>/
webserv
You supply the location
for
prompted_ps_cfg_home
when you run the DPK
setup script.
• On Microsoft Windows,
C:\%USERPROFILE%\
psft\pt\
<ptools_major_ver>\
webserv
For example, if the
USERPROFILE
environment variable is
C:\Users\username, the
location is
C:\Users\username\psft\p
t\8.58\webserv.
The descriptor
<ptools_major_ver> is the
PeopleSoft PeopleTools
major release without patch
numbers; for example, 8.58.
This directory is owned by
psadm2 (Linux, AIX, HP-
UX, Solaris).
PS_APP_HOME The
PS_APP_HOME
location holds the PeopleSoft
application installation files.
BASE_DIR/
pt/
<Product>
_app_home
The descriptor
<Product>
is
an abbreviation for the
PeopleSoft application, such
as hcm for PeopleSoft
Human Capital Management
This directory can only be
written to by psadm3 (Linux,
AIX, HP-UX, or Solaris).

Chapter 5 Using and Maintaining the PeopleSoft Environment
Copyright © 2022, Oracle and/or its affiliates. All Rights Reserved.
211
Directory Description Default Location Access
ORACLE_HOME (Oracle
RDBMS software)
This directory includes the
Oracle RDBMS database
server and client connectivity
software, including the
SQL*Plus program.
The Oracle RDBMS client
installation is the 64-bit
client used by PeopleSoft
PeopleTools to connect from
the PeopleSoft Application
Server and Process Scheduler
domains to the PeopleTools
Database.
Note. The default listener
port is 1521.
BASE_DIR/db/oracle-server This directory is owned by
user oracle2 (Linux, AIX,
HP-UX, or Solaris).
Oracle WebLogic This directory includes the
installation files for the
Oracle WebLogic web
server.
Note. The configuration files
for the PIA domain are
located in PS_CFG_HOME/
webserv.
BASE_DIR/pt/bea/wlserver This directory is owned by
psadm1 (Linux, AIX, HP-
UX, or Solaris).
Oracle Tuxedo This directory includes the
installation files for Oracle
Tuxedo.
BASE_DIR/pt/bea/tuxedo This directory is owned by
psadm1 (Linux, AIX, HP-
UX, or Solaris).
PeopleSoft database files (on
Oracle RDBMS)
This directory includes the
Oracle database files and
tables for the PeopleSoft
application.
BASE_DIR/db/oradata The owner of the database
tables is oracle2 and its
group is oinstall (Linux,
AIX, HP-UX, or Solaris).
Note. This is different from
the users for the PeopleSoft
installation and
configuration.
See Also
PeopleTools: System and Server Administration, "Securing PS_HOME and PS_CFG_HOME"

Using and Maintaining the PeopleSoft Environment Chapter 5
212
Copyright © 2022, Oracle and/or its affiliates. All Rights Reserved.
Task 5-1-3: Reviewing the DPK-Created Users for Root Deployments on
Linux, AIX, HP-UX, and Solaris
When deploying on Linux, AIX, HP-UX, and Solaris as the root user, the deployed configuration includes the
default users and default passwords described in the following table.
Important! All of the passwords for the DPK-created users are set to expire immediately. On the first login of
one of the DPK-created users, the system will prompt you to provide new passwords.
In the case of the passwords that expire immediately, such as those for psadm1 and so on, if you do not log in as
the user specified in this table and change the password, the default passwords documented here remain in effect.
New passwords must include the following characteristics:
• At least 14 characters long
• At least one digit (0–9)
•
At least one special character (for example, * or #)
• At least one lowercase letter (a–z)
• At least one uppercase letter (A–Z)
User Name Default Password Home Directory Role Definition
psadm1 0radmin (the first character is
the number zero)
USER_HOME/psadm1
You supply the location for
the USER_HOME when you
run the DPK setup script.
The default value is /home.
The PeopleSoft installation
administrator who owns
PS_HOME.
This user cannot write into
PS_CFG_HOME.
psadm2 0radmin (the first character is
the number zero)
USER_HOME/psadm2
You supply the location for
the USER_HOME when you
run the DPK setup script.
The default value is /home.
The PeopleTools domain
user who creates and
configures the Application
Server domain, Process
Scheduler (batch server)
domain, and the PIA. This
user cannot write to
PS_HOME,
but has read-
execute access.
psadm3 0radmin (the first character is
the number zero)
USER_HOME/psadm3
You supply the location for
the USER_HOME when you
run the DPK setup script.
The default value is /home.
The PeopleSoft installation
administrator who owns
PS_APP_HOME.
oracle2 oracle
USER_HOME/
oracle2
You supply the location for
the
USER_HOME
when you
run the DPK setup script.
The default value is /home.
The Oracle Database Server
user name.

Chapter 5 Using and Maintaining the PeopleSoft Environment
Copyright © 2022, Oracle and/or its affiliates. All Rights Reserved.
213
User Name Default Password Home Directory Role Definition
esadm1 0radmin (the first character is
the number zero)
USER_HOME/esadm1
You supply the location for
the USER_HOME when you
run the DPK setup script.
The default value is /home.
The Elasticsearch DPK user
Note. This is not the same as
the esadmin administrator,
which is used in configuring
a search instance.
Note. The Elasticsearch DPK user, esadm1, is deployed for the Native OS for Linux, AIX, HP-UX, and Solaris
DPKs, as well as the VirtualBox DPK. However, Elasticsearch is installed and configured only as part of the
VirtualBox DPK deployment.
See Also
"Completing the DPK Initialization with Customizations," Preparing the Customization File for Linux, AIX, HP-
UX, or Solaris Users
Task 5-2: Working with PeopleSoft Utilities and Programs for Root
Deployments on Linux, AIX, HP-UX, and Solaris
When you run the DPK setup script with the default initialization, the script installs, configures and starts a single
Application Server, a single Process Scheduler, and a single PIA domain. After the root user completes the
deployment of the PeopleSoft environment using the DPK setup script DPK_INSTALL/setup/psft-dpk-setup.sh, in
order to carry out operations on the PeopleSoft environment such as stopping and starting the DPK-created
domains, or creating additional domains with PSADMIN, the root user must start a new shell session, and sign in
with the DPK-created user psadm2.
See PeopleTools: System and Server Administration for information on working with PeopleSoft domains.
The first time that you sign in as user psadm2, you are prompted to change the default password. You must start
the session again and sign in with the new password. When you first sign in, the system sources the PS_HOME/
psconfig.sh script. Sourcing the psconfig.sh script sets environment variables such as TUXDIR, PATH, and
LD_LIBRARY_PATH, which are needed to run PeopleSoft utilities and programs. Sourcing the psconfig.sh
script sets the environment variables for the current session in the current shell, so that the programs and utilities
you run in that shell inherit the environment variables.
Similarly, to carry out operations using programs owned by the DPK-created users psadm1 or psadm3, sign in to
a shell as those users.
See Reviewing the DPK-Created Users for Root Deployment on Linux, AIX, HP-UX, and Solaris.
Task 5-3: Setting Environment Variables for the Non-Root User on
Linux, AIX, HP-UX, or Solaris
This section discusses:
• Sourcing the psft_env.sh Script

Using and Maintaining the PeopleSoft Environment Chapter 5
214
Copyright © 2022, Oracle and/or its affiliates. All Rights Reserved.
• Creating a psft_env.sh Script
Task 5-3-1: Sourcing the psft_env.sh Script
When you use the DPK setup script with the default initialization, the script installs, configures and starts a single
Application Server, a single Process Scheduler, and a single PIA domain.
When a non-root user deploys the PeopleSoft environment, as part of the deployment, the DPK setup script
sources a shell script that sets environment variables, such as TUXDIR, PATH, and LD_LIBRARY_PATH,
which are needed to run PeopleSoft utilities and programs.
See PeopleTools: System and Server Administration for information on working with PeopleSoft domains.
After the non-root user completes the deployment of the PeopleSoft environment using the DPK setup script
DPK_INSTALL/setup/psft-dpk-setup.sh, in order to carry out operations on the PeopleSoft environment such as
stopping and starting the DPK-created domains, creating additional domains with PSADMIN, or running
Application Engine programs, the non-root user must source the script BASE_DIR/pt/psft_env.sh. For example,
use the following command:
sourceBASE_DIR/pt/psft_env.sh
Note. If you are performing a deployment using the deploy_only option, see the next section.
Note that it is important to source the shell script (source BASE_DIR/pt/psft_env.sh), rather than
simply running it (BASE_DIR/pt/psft_env.sh) in order for the environment variables to persist in the
current shell. See your operating system documentation for the correct command to source the script.
Sourcing the psft_env.sh script sets the environment variables for the current session in the current shell, so that
the programs and utilities you run in that shell inherit the environment variables. You must source the script and
run the PeopleSoft utilities and programs from the same BASE_DIR. That is, the environment variables apply only
to the programs in the PS_HOME installed under the BASE_DIR from which you run the script.
If your environment includes more than one deployment, be sure to source BASE_DIR/pt/psft_env.sh as needed in
separate shells for each BASE_DIR.
The psft_env.sh script points to default or user-specified installation locations as set up by the DPK setup script.
See Reviewing the Deployment File System for default locations. Here is a summary of the environment variables
set by the BASE_DIR/pt/psft_env.sh script:
•
The script sets a pseudo random number generator to avoid getting stuck in entropy collection for the default
random number generation.
•
The script sets the TUXDIR, PATH, and LD_LIBRARY_PATH environment variables to point to the Tuxedo
installation.
•
The script sets the TNS_ADMIN, ORACLE_HOME, and LD_LIBRARY_PATH environment variables to
point to the installations of the Oracle database and Oracle database client.
•
The script sets language/locale.
•
The script sets
PS_CFG_HOME.
• The script adds the PS_HOME/appserv and PS_HOME/setup directories to the PATH.
• The script sources the PS_HOME/psconfig.sh script.
The psconfig.sh script was used previously to set environment variables for non-DPK installations. Because it
is included in the BASE_DIR/pt/psft_env.sh script, you do not need to source psconfig.sh separately.

Chapter 5 Using and Maintaining the PeopleSoft Environment
Copyright © 2022, Oracle and/or its affiliates. All Rights Reserved.
215
Task 5-3-2: Creating a psft_env.sh Script
If you are running as a non-root user, the BASE_DIR/pt/psft_env.sh script will not be available if you run the DPK
setup script using one of the deploy_only options. For example:
• psft-dpk-setup.sh --env_type midtier --deploy_only
• psft-dpk-setup.sh --env_type midtier --deploy_only --deploy_type
tools_home
• psft-dpk-setup.sh --env_type midtier --deploy_only --deploy_type app_home
• psft-dpk-setup.sh --env_type midtier --deploy_only --deploy_type
app_and_tools_home
In this case, the BASE_DIR/pt/psft_env.sh file is not installed automatically. You must create and run the script to
set the required environment variables.
Use the following as a template, and make the necessary modifications for your environment.
In this example, <BASE_DIR> refers to the DPK deployment location, and <psftsuser> is the non-root user.
#Userspecificaliasesandfunctions
export_JAVA_OPTIONS=-Djava.security.egd=file:/dev/./urandom
exportTNS_ADMIN=<BASE_DIR>/db
exportORACLE_HOME=<BASE_DIR>/pt/oracle-client/12.1.0.2
exportLD_LIBRARY_PATH=$ORACLE_HOME/lib:$LD_LIBRARY_PATH
exportPATH=.:$ORACLE_HOME/bin:$ORACLE_HOME/OPatch:$ORACLE_HOME/perl/bin:⇒
$PATH
TUXDIR=<BASE_DIR>/pt/bea/tuxedo
if[-d$TUXDIR];then
exportTUXDIR=$TUXDIR/tuxedo12.2.2.0.0
exportPATH=$TUXDIR/bin:$PATH
exportLD_LIBRARY_PATH=$TUXDIR/bin:$TUXDIR/lib:$LD_LIBRARY_PATH
fi
exportPATH=<BASE_DIR>/pt/ps_home8.58.04/appserv:<BASE_DIR>/pt/ps_⇒
home8.58.04/setup:$PATH
exportLANG=C
if[-d<BASE_DIR>/pt/ps_home8.58.04];then
CWD=$PWD
cd<BASE_DIR>/pt/ps_home8.58.04&&.psconfig.sh
cd$CWD
fi
exportPS_CFG_HOME=/home/<psftuser>/pscfg_pt85804_lnx
Save the file as psft_env.sh in BASE_DIR/pt, and source it to set the environment variables. For example, use this
command:
sourceBASE_DIR/pt/psft_env.sh

Using and Maintaining the PeopleSoft Environment Chapter 5
216
Copyright © 2022, Oracle and/or its affiliates. All Rights Reserved.
Task 5-4: Removing a Deployed PeopleSoft Environment
This section discusses:
• Understanding the Removal Process
• Using the DPK Setup Script to Remove the PeopleSoft Environment on Microsoft Windows
• Using the DPK Setup Script to Remove the PeopleSoft Environment on Linux, AIX, HP-UX, or Solaris
• Using the DPK Setup Script to Remove the PeopleSoft Environment on Linux, AIX, HP-UX, or Solaris as a
Non-Root User
• Using the psft_puppet_apply.cmd Script to Remove the PeopleSoft Environment on Microsoft Windows
• Using the psft_puppet_apply.sh Script to Remove the PeopleSoft Environment on Linux, AIX, HP-UX, or
Solaris
•
Manually Removing the PeopleSoft Environment on Microsoft Windows
•
Manually Removing the PeopleSoft Environment on Linux, AIX, HP-UX, or Solaris
Understanding the Removal Process
There will be times when an existing PeopleSoft environment needs to be completely removed. For example,
applying a new PeopleSoft PeopleTools patch requires that an existing environment be cleaned up and a new one
created. The cleanup that you perform with the DPK setup script conducts an orderly shutdown and removal of all
the configured runtime domains — Application Server, Process Scheduler, and PIA domains. Additionally, it will
remove all the deployed components. You can use the PeopleSoft DPK setup script cleanup for environments
created with the default initialization or with the psft_customizations.yaml file.
Note. The Puppet software that is installed by the DPK setup script is not removed by the cleanup process.
In some cases the DPK setup script cleanup process may not remove all of the components. If that is the case, try
one of the other methods described in this section.
Task 5-4-1: Using the DPK Setup Script to Remove the PeopleSoft
Environment on Microsoft Windows
Use these steps to remove a deployed PeopleSoft environment using the PeopleSoft DPK setup script on
Microsoft Windows:
1. Open a command prompt window; for example:
• Select Start, and navigate to Accessories, Command Prompt.
• Right-click and select Run as Administrator.
2. Go to DPK_INSTALL\setup and run one of the following commands:
psft-dpk-setup.bat--cleanup
If you deployed the environment using the use_alternate_puppet_install option, use this command:
psft-dpk-setup.bat--cleanup--use_alternate_puppet_install
3. Specify the base directory (BASE_DIR) that you want to remove.

Chapter 5 Using and Maintaining the PeopleSoft Environment
Copyright © 2022, Oracle and/or its affiliates. All Rights Reserved.
217
EnterthePeopleSoftBaseFolderspecifiedduringsetup:
You see this prompt only when there is more than one deployment. For example:
• You carried out deployment A followed by deployment B.
• You removed the second deployment B. For the cleanup of deployment B, you do not see this prompt for
the BASE_DIR.
• You run the script a second time. At the prompt, specify the BASE_DIR for deployment A.
4. Wait until the process is complete.
The DPK setup script displays [OK] for each step of the process, and [FAILED] if any of the steps are not
successful.
5. Review the cleanup log file in DPK_INSTALL\setup.
6. After completing these steps, verify that the DPK installation directories (BASE_DIR/pt and BASE_DIR/db)
have been cleared.
The cleanup process does not remove the BASE_DIR/dpk directory. Do not remove it manually if you want to
use the psft_apply_puppet.sh process.
7. Verify that any services have been removed in the Microsoft Windows Services dialog box.
8. If any files or services remain, the cleanup process was not successful. Try running the process again, and if it
is still not successful, you may need to carry out advanced cleanup.
See Manually Removing the PeopleSoft Environment on Microsoft Windows.
Task 5-4-2: Using the DPK Setup Script to Remove the PeopleSoft
Environment on Linux, AIX, HP-UX, or Solaris
Use these steps to remove a deployed PeopleSoft environment using the PeopleSoft DPK setup script on Linux,
AIX, HP-UX, or Solaris:
1. Open a terminal window as a user with root permission.
2. Go to DPK_INSTALL\setup and run one of the following commands:
shpsft-dpk-setup.sh--cleanup
If you deployed the environment using the use_alternate_puppet_install option, use this command:
shpsft-dpk-setup.sh--cleanup--use_alternate_puppet_install
3. Specify the base directory (BASE_DIR) that you want to remove.
EnterthePeopleSoftBaseFolderspecifiedduringsetup:
You see this prompt only when there is more than one deployment. For example:
• You carried out deployment A followed by deployment B.
• You removed the second deployment B. For the cleanup of deployment B, you do not see this prompt for
the BASE_DIR.
• You run the script a second time. At the prompt, specify the BASE_DIR for deployment A.
4. Wait until the process is complete.
The DPK setup script displays [OK] for each step of the process, and [FAILED] if any of the steps are not
successful.
5. Review the cleanup log file.

Using and Maintaining the PeopleSoft Environment Chapter 5
218
Copyright © 2022, Oracle and/or its affiliates. All Rights Reserved.
If you deployed as root, the cleanup log file is in DPK_INSTALL/setup.
6. Verify that the DPK installation directories (BASE_DIR/pt and BASE_DIR/db) have been cleared.
The cleanup process does not remove the BASE_DIR/dpk directory. Do not remove it manually if you want to
use the psft_apply_puppet.sh process.
7. Check for leftover processes. If anything remains, the cleanup process was not successful.
8. Try running the cleanup process again, and if it is still not successful, you may need to carry out advanced
cleanup.
See Manually Removing the PeopleSoft Environment on Linux, AIX, HP-UX, or Solaris.
Task 5-4-3: Using the DPK Setup Script to Remove the PeopleSoft
Environment on Linux, AIX, HP-UX, or Solaris as a Non-Root User
If you deployed as a non-root user, after you use the ./psft-dpk-setup.sh --cleanup command, you
can find the cleanup log file in a directory of the deploying user's home directory, USER_HOME. The log file is
appended with a process ID. For example, if the home directory is /opt/userhome and the PID is 1234, the cleanup
log is /opt/userhome/psft_dpk_work/psft_dpk_setup_cleanup_1234.log.
If more than one non-root user deploys from the same DPK_INSTALL, the cleanup process will prompt for the
correct BASE_DIR.
Task 5-4-4: Using the psft_puppet_apply.cmd Script to Remove the
PeopleSoft Environment on Microsoft Windows
If the cleanup procedure using the DPK setup script was not entirely successful, the BASE_DIR folders may not
be entirely cleared, or you may have trouble when carrying out another deployment. In case of a failed
deployment, try running the psft_puppet_apply.cmd script as described here. This script sets environment
variables and then runs the puppet apply command to remove the PeopleSoft environment.
To remove the environment on Microsoft Windows:
1. Run the command psft-dpk-setup.bat --cleanup.
2. If the script fails, you should see a message similar to the following:.
TheinitializationofPeopleSoftenvironmentsetupfailed.Checkthe
logfile[C:\DPK_INSTALL\setup\psft_dpk_setup.log]fortheerrors.
Aftercorrectingtheerrors,runthefollowingcommandstocontinue
withthesetupofPeopleSoftenvironment.
StartacmdwindowasAdministratorandrunBASE_DIR\
psft_puppet_⇒
apply.cmd
Leave the command window open while you complete the next step.
3. Open the file
BASE_DIR\
dpk\puppet\production\data\defaults.yaml in a text editor, such as Notepad.
4. Change the value of the
ensure
attribute from
present
to
absent
.
Save and close the defaults file.
5. Follow the instructions from step 2 to run the psft_puppet_apply.cmd script.

Chapter 5 Using and Maintaining the PeopleSoft Environment
Copyright © 2022, Oracle and/or its affiliates. All Rights Reserved.
219
Task 5-4-5: Using the psft_puppet_apply.sh Script to Remove the
PeopleSoft Environment on Linux, AIX, HP-UX, or Solaris
If the cleanup procedure using the DPK setup script was not entirely successful, the BASE_DIR folders may not
be entirely cleared, or you may have trouble when carrying out another deployment. In case of a failed
deployment, try running the psft_puppet_apply.sh script as described here. This script sets environment variables
and then runs the puppet apply command to remove the PeopleSoft environment.
To remove the environment with the psft_puppet_apply.sh script on Linux, AIX, HP-UX, or Solaris:
1. Run the command ./psft-dpk-setup.sh --cleanup.
2. If the script fails, you should see a message similar to the following:.
TheinitializationofPeopleSoftenvironmentsetupfailed.Checkthe
logfile[/opt/DPK_INSTALL/setup/psft_dpk_setup.log]fortheerrors.
Aftercorrectingtheerrors,runthefollowingcommandstocontinue
withthesetupofPeopleSoftenvironment.
Fromtheshell,runBASE_DIR/psft_puppet_apply.sh
Leave the shell window open while you complete the next step.
3. Open the file
BASE_DIR/
dpk/puppet/production/data/defaults.yaml in a text editor, such as vi.
4. Change the value of the ensure attribute from present to absent.
Save and close the defaults.yaml file.
5. Follow the instructions from step 2 to run the psft_puppet_apply.sh script.
Task 5-4-6: Manually Removing the PeopleSoft Environment on Microsoft
Windows
This section includes advanced steps to be used only if the cleanup procedures using the DPK setup script or
psft_puppet_apply script in this section failed, or if you were not able to use the previous procedures for any
reason.
If the cleanup process on Microsoft Windows was not totally successful, the BASE_DIR folders may not be
entirely cleared, or you may have trouble when carrying out another deployment. Before carrying out the
advanced steps in this section:
1. Run the command psft-dpk-setup.bat --cleanup.
2. If the script displays a FAILED message, run it again.
3. If it succeeds, check the BASE_DIR folders to be sure everything has been deleted.
4. If the BASE_DIR folders are not clear, or if a subsequent deployment is not successful, carry out the steps
below.
For the advanced manual cleanup on Microsoft Windows, there are several steps. The steps in this section should
be performed by someone familiar with modifying the Microsoft Windows registry. Depending upon where the
cleanup process failed, some of the items mentioned in these steps may have already been removed. The user
should remove whatever remains in this order:
1. Start the Microsoft Windows Services utility.
2. Stop the services OracleServiceCDB
<Product>
(for example, OracleServiceCDBFSCM) and
OracleOraDB19cHomeTNSListener
<Listener_Name>
(for example,

Using and Maintaining the PeopleSoft Environment Chapter 5
220
Copyright © 2022, Oracle and/or its affiliates. All Rights Reserved.
OracleOraDB19cHomeTNSListenerpsft_listener) by highlighting the names, right-clicking and selecting
Stop.
Note. If your database is not on an Oracle platform, the references to the Oracle database services here are not
applicable.
Note. When you stop the service for the CDB (Oracle container database), you may see a message informing
you that it will also stop the services for the PeopleSoft application server and Process Scheduler domains that
were deployed for that database.
3. Stop the services for the PeopleSoft application server, Process Scheduler, and PeopleSoft PIA domains, if
necessary.
4. Open a command prompt, running as administrator, and remove the two database services and the PeopleSoft
domains services with the commands:
scdeleteOracleServiceCDB<Product>
scdeleteOracleOraDB19cHomeTNSListener<Listener_Name>
scdeletePsftAppServerDomain<Appserver_domain_name>Service
scdeletePsftPrcsDomain<ProcSched_domain_name>Service
scdeletePsftPIADomain<PIA_domain_name>Service
5. In the Services window, stop ORACLE ProcMGR V12.2.2.0.0_VS2017 and TListen
12.2.2.0.0_VS2017(Port3050) by highlighting the names, right-clicking and selecting Stop.
6. In the Services window, right-click each of the services in step 5, select Properties, and copy the correct
service name (rather than the alias).
7. Open a command prompt and remove the two preceding services with the command:
scdelete<service_name>
8. Open the Microsoft Windows registry; for example, select Start, Run, and enter regedit.
9. In the Registry Editor, locate the HKLM\SOFTWARE\ORACLE folder.
Select the following keys and verify that they contain references to the DPK installation locations in
BASE_DIR:
• KEY_OraDB19cHome (BASE_DIR\db by default)
• KEY_OraTux1222Home (BASE_DIR\pt\bea\tuxedo by default)
• KEY_OraWL12213Home (BASE_DIR\pt\bea by default)
10. In the Registry Editor, locate the HKLM\SOFTWARE\ORACLE\TUXEDO folder.
Select the 12.2.2.0.0_VS2017 key and verify that it contains references to the DPK installation locations in
BASE_DIR (BASE_DIR\
pt\bea\tuxedo by default).
11. In the Registry Editor, only for the keys from step 9 and 10 that reference the DPK installation locations,
right-click and select Delete.
12. Close the Registry Editor window.
13. Open the file C:\Program Files\Oracle\Inventory\ContentsXML\inventory.xml in a text editor.
14. Locate the lines that reference the DPK deployment:
Note. This sample has been formatted for readability.
<HOMENAME="OraWL12213Home"LOC="C:/psft/pt/bea"TYPE="O"IDX="16"/>

Chapter 5 Using and Maintaining the PeopleSoft Environment
Copyright © 2022, Oracle and/or its affiliates. All Rights Reserved.
221
<HOMENAME="OraTux1222Home"LOC="C:\psft\pt\bea\tuxedo"TYPE="O"
IDX="17"/>
<HOMENAME="OraDB19cHome"LOC="C:\psft\db\oracle-server\19.0.0"
TYPE="O"IDX="18"/>
15. Delete only the lines referencing the DPK deployment, and save the file.
16. Remove everything under the BASE_DIR folder (BASE_DIR\db, BASE_DIR\dpk, and BASE_DIR\pt).
Note. If you performed a customized deployment, back up the psft_customizations.yaml file and any log files,
to refer to if necessary. Save them outside of the BASE_DIR.
Note. You may get a message that some of the file names are too big for the recycle bin. Click OK to accept.
17. Remove C:\User\<username>\psft\pt\8.58 (PS_CFG_HOME).
18. If you performed a customized deployment that installed software such as Oracle Tuxedo or Oracle
WebLogic, or PS_APP_HOME or PS_CFG_HOME, in non-default locations, remove that software manually,
unless you need to retain the installations.
Note. If you want to retain the additional components, do not remove the installation locations. Be sure to use
a customized deployment and specify the location of the additional components for any subsequent
deployments.
19. Delete any user-defined System environment variables, such as PS_HOME, TUXDIR, PS_CFG_HOME,
PS_APP_HOME, ORACLE_HOME, TNS_ADMIN.
20. Completely clean up any DPK install directory that was used for previous DPKs.
If you do not delete these or move them off the machine, they may be picked up by a subsequent DPK setup
process and may cause the new DPK to fail.
21. Check the PATH environment variable, and remove the directories or path associated with the previous DPK
deployments.
22. Restart the windows machine to release any caches or processes in the memory.
Task 5-4-7: Manually Removing the PeopleSoft Environment on Linux, AIX,
HP-UX, or Solaris
This section includes advanced steps to be used only if the cleanup procedures using the DPK setup script or
psft_puppet_apply script in this section failed, or if you were not able to use the previous procedures for any
reason
If the cleanup process on Linux, AIX, HP-UX, or Solaris was not totally successful, the BASE_DIR directories
may not be entirely cleared, or you may have trouble when carrying out another deployment. Before carrying out
the advanced steps in this section:
1. Run the command
./psft-dpk-setup.sh --cleanup
.
2. If the script displays a FAILED message, run it again.
3. If it succeeds, check the
BASE_DIR
directories to be sure everything has been deleted.
4. If the
BASE_DIR
directories are not clear, or if a subsequent deployment is not successful, try the following
steps.
Here are a few things to check for the advanced manual cleanup on Linux, AIX, HP-UX, or Solaris. Depending
upon where the cleanup process failed, some of the items mentioned may have already been removed.

Using and Maintaining the PeopleSoft Environment Chapter 5
222
Copyright © 2022, Oracle and/or its affiliates. All Rights Reserved.
1. Check for left-over PeopleSoft processes.
ps-aux|more
2. Stop the processes using this command with the process ID:
kill-9<PID>
3. Check for the five PeopleSoft user IDs using these commands
idpsadm1
idpsadm2
idpsadm3
idoracle2
idesadm1
When you carry out the cleanup using the DPK setup script, it should remove the PeopleSoft users cleanly.
However, if the users' home directory was deleted by mistake before running the cleanup, the user definition
may remain. If the commands give an output, it means the user exists.
4. If there are left-over PeopleSoft users, check for running processes associated with the users with this
command:
ps-ef|grep<user_id>
5. Stop any running processes associated with the users, if necessary.
6. Delete the users, with this command:
userdel-r<user_id>
7. Remove the PeopleSoft base directory (BASE_DIR).
Note. If you performed a customized deployment, back up the psft_customizations.yaml file and any log files
to refer to if necessary. Save them outside of BASE_DIR.
8. If you performed a customized deployment that installed software such as Oracle Tuxedo or Oracle
WebLogic, PS_APP_HOME or PS_CFG_HOME, in non-default locations, remove that software manually.
Note. If you want to retain the additional components, do not remove the installation locations. Be sure to use
a customized deployment and specify the location of the additional components for any subsequent
deployments.
9. Remove any environment variables referring to the
BASE_DIR
that you removed, or to any of the customized
locations (for example, TUXDIR, WL_HOME, BEA_HOME, PS_HOME, PS_CFG_HOME,
PS_APP_HOME).
10. Check for leftover directories on AIX.
On AIX if
BASE_DIR
is on NFS, you may not be able to use the command
rm
to remove the
BASE_DIR.
If
so, check for the presence of a directory beginning with ".nfs" in
BASE_DIR/
pt/bea/oui/lib/aix_ppc64.
Remove the
BASE_DIR/
pt/bea/oui/lib/aix_ppc64/.nfs
xxx
directory manually before deleting
BASE_DIR.

Copyright © 2022, Oracle and/or its affiliates. All Rights Reserved.
223
Appendix A
Applying PeopleTools Patches Using DPKs
This appendix discusses:
• Reviewing PeopleTools Patch Application Options
• Using Scenario 1
• Using Scenario 2
• Using Scenario 3
Reviewing PeopleTools Patch Application Options
This appendix describes various use cases you may encounter when planning to apply a PeopleSoft PeopleTools
8.58.xx patch using the PeopleSoft PeopleTools deployment packages (DPKs). These use cases assume that you
want to apply the patch to an existing PeopleSoft PeopleTools 8.58 installation.
Here are some general recommendations for choosing the method to apply PeopleTools patches:
•
If there are any changes to one or more additional software components, such as Oracle WebLogic (WL),
Oracle Tuxedo (TX), or Oracle Client (OC), then consider Scenario 3.
Note. References to deploying or removing Oracle Client (OC) in this section are applicable only if your
PeopleSoft environment is installed on an Oracle Database platform. For other RDBMS, disregard the
references to Oracle Client.
• If there are no changes to any of the additional software components, Oracle WebLogic, Oracle Tuxedo, or
Oracle Client, then consider Scenario 2.
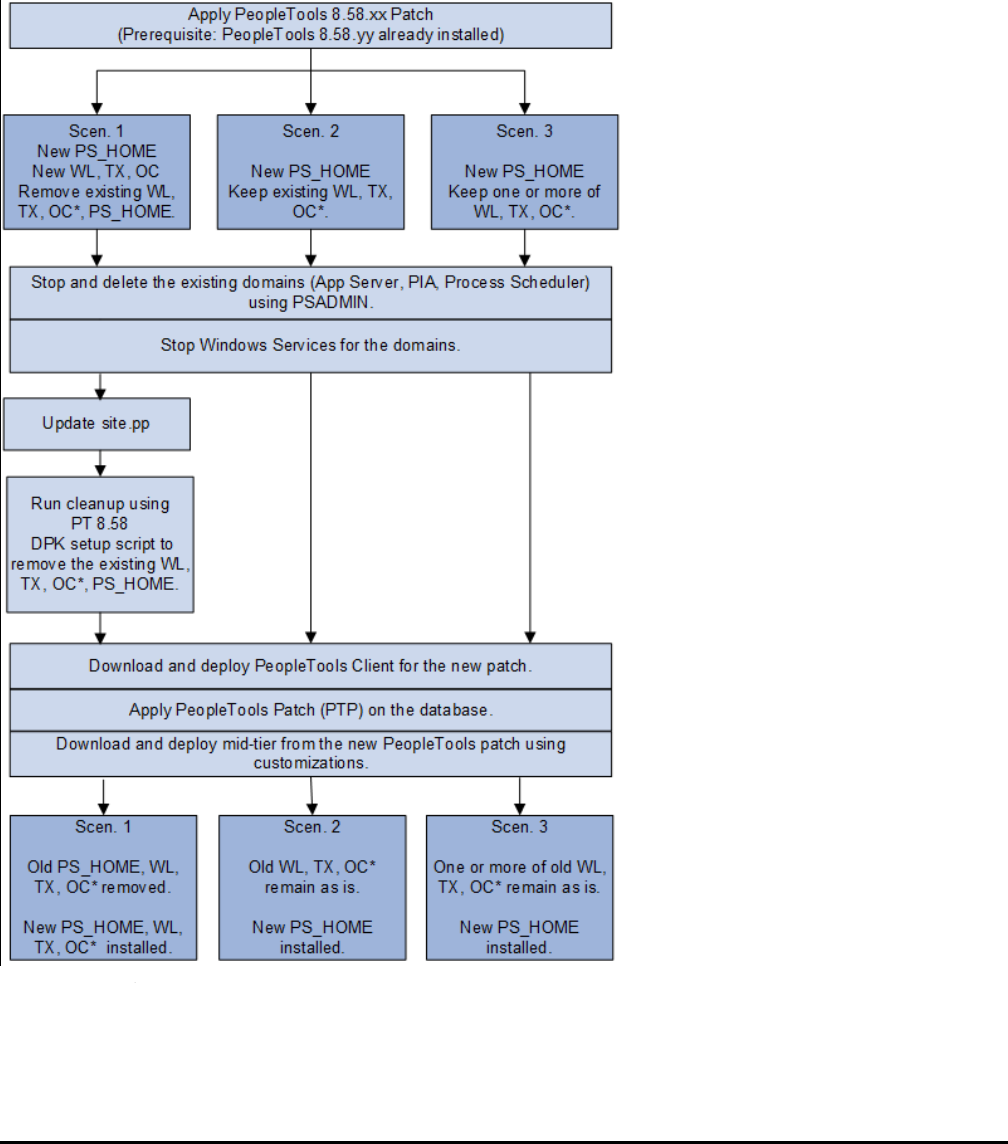
Applying PeopleTools Patches Using DPKs Appendix A
224
Copyright © 2022, Oracle and/or its affiliates. All Rights Reserved.
This graphic summarizes the three scenarios for applying PeopleTools Patch (8.58.xx) using DPKs.
Scenarios for applying PeopleTools Patches
OC* indicates that Oracle Client applies only to environments on Oracle RDBMS.
Task A-1: Using Scenario 1
This section discusses:
• Understanding Scenario 1
• Stopping and Deleting the Domains on the Initial Environment

Appendix A Applying PeopleTools Patches Using DPKs
Copyright © 2022, Oracle and/or its affiliates. All Rights Reserved.
225
• Stopping the Services for the Domains
• Updating the site.pp File
• Removing the Existing PeopleTools Components
• Downloading and Deploying the PeopleTools Client for the New Release
• Applying the PeopleTools Patch Using Change Assistant
• Deploying the New Release in Mid-Tier Mode
• Preparing psft_customizations.yaml and Completing the Deployment
• Reviewing the Results
• Verifying the Patch Application
Understanding Scenario 1
Scenario 1 assumes that:
• You need a new installation home directory, referred to here as PS_HOME_NEW, along with new
installations of Oracle WebLogic, Oracle Tuxedo, and Oracle Client.
• You want to discard the existing installation home directory, referred to here as PS_HOME_INIT as well as
the Oracle WebLogic, Oracle Tuxedo, and Oracle Client installations.
• You have a Microsoft Windows host to install the PeopleTools Client.
• This scenario applies to Linux, AIX, HP-UX, Solaris and Microsoft Windows operating systems.
• Your existing PeopleTools 8.58.<init> environment was installed using the PeopleSoft DPKs.
Task A-1-1: Stopping and Deleting the Domains on the Initial Environment
Carry out these steps on the existing PeopleTools 8.58.<init> environment (for example, 8.58.01):
If you have not already done so, stop and delete the existing domains running on the initial, existing PeopleTools
release, PeopleTools 8.58.<init> — Application Server, PIA, and Process Scheduler, using the PSADMIN utility.
See "Using and Maintaining the PeopleSoft Environment," Managing PeopleTools Domains with PSADMIN.
Task A-1-2: Stopping the Services for the Domains
On Microsoft Windows, stop the services for the Application Server, PIA, and Process Scheduler domains:
• Open the Services dialog box, for example by clicking Start and selecting Administrative Tools, Services.
• Right-click on PsftAppServerDomain<Appserver_domain_name>Service and select Stop.
• Right-click on PsftPrcsDomain
<ProcSched_domain_name>
Service and select Stop.
• Right-click on PsftPIADomain
<PIA_domain_name>
Service and select Stop.
• Select File, Exit, to close the dialog box.
Task A-1-3: Updating the site.pp File
Carry out these steps on the existing, initial PeopleTools 8.58.<init> environment (for example, 8.58.01):
1. Open the site.pp file for editing.
The site.pp file is installed with the PeopleTools DPKs, and is found in BASE_DIR/

Applying PeopleTools Patches Using DPKs Appendix A
226
Copyright © 2022, Oracle and/or its affiliates. All Rights Reserved.
dpk/puppet/production/manifests.
2. Verify that the site.pp file includes pt_tools_deployment, as shown in the sample below.
Note. There is a space after "include" in these examples.
nodedefault{
include::pt_role::pt_tools_deployment
}
Save the file and close.
Task A-1-4: Removing the Existing PeopleTools Components
Carry out these steps on the existing PeopleTools 8.58.<init> environment (for example, 8.58.01):
Remove the existing PeopleTools home directory, referred to here as PS_HOME_INIT, as well as Oracle
WebLogic, Oracle Tuxedo, Oracle Client, and JDK.
See "Using and Maintaining the PeopleSoft Environment," Removing a Deployed PeopleSoft Environment, for
details on removing the deployment components and verifying the removal.
• If you retained the downloaded DPKs in the original location, go to the download location,
DPK_INSTALL_INIT/setup and run the cleanup command.
On Microsoft Windows, open a command prompt with Run as Administrator and run:
psft-dpk-setup.bat--cleanup
On Linux, AIX, HP-UX, Solaris, open a terminal window as root and run:
./psft-dpk-setup.sh--cleanup
•
If you did not retain the downloaded DPKs, use the puppet apply command or manual methods to
remove the existing deployed components.
Note. Verify that the cleanup was complete before proceeding. For more details, refer to the section Removing a
Deployed PeopleSoft Environment.
Task A-1-5: Downloading and Deploying the PeopleTools Client for the New
Release
On the Microsoft Windows host that you have designated for the PeopleTools Client for the new PeopleTools
8.58.<new> patch; for example, PeopleTools 8.58.11:
1. Locate and download the PeopleTools 8.58.
<new>
DPKs for the new release to a directory with sufficient
disc space, referred to here as
DPK_INSTALL_NEW.
See PeopleTools Patches Home Page, My Oracle Support, Doc ID 2062712.2, for links to the most recent
patches. For earlier releases, search My Oracle Support, Patches and Updates.
2. In the downloaded DPKs, locate the DPK for the PeopleTools Client for the new PeopleTools 8.58.
<new>
patch, which is the fourth zip file
(Filename
_4of4.zip)
Copy the DPK to the Microsoft Windows Client machine.
3. To deploy the PeopleTools Client for the new 8.58.
<new>
PeopleTools patch in the Microsoft Windows

Appendix A Applying PeopleTools Patches Using DPKs
Copyright © 2022, Oracle and/or its affiliates. All Rights Reserved.
227
Client host, use the instructions for standalone deployment described in this documentation, with the
following guidelines.
See "Deploying the PeopleTools Deployment Packages," Deploying the PeopleTools Client in Standalone
Mode for detailed steps and explanations.
a. Run SetupPTClient.bat -t.
b. Answer yes when asked if you want to deploy PeopleTools client.
c. Specify an installation directory, the RDBMS, and other information for your environment.
The default installation directory is C:\PT<release_number>_Client_<database_type>, for example
C:\PT8.58.11_Client_ORA.
d. Specify the PeopleTools Patch (2) option at this prompt:
PleasemakeyourselectionfortheToolsClientdeployment:
1.PeopleToolsFullUpgrade
2.PeopleToolsPatch
3.Noneoftheabove
Enteryourchoice[1-3]:2
e. Answer y (yes) when asked if you want to install Change Assistant:
DoyouwanttoinstallChangeAssistant?[Y/N]:y
Task A-1-6: Applying the PeopleTools Patch Using Change Assistant
Use the Change Assistant (CA) you installed in the previous section to apply the new PeopleTools 8.58.<new>
patch database changes. In the current PeopleTools release you can apply all patch database changes for the patch
by installing a single PeopleTools change package (PTP) using Change Assistant. By using this new preferred
method in PeopleTools 8.58, you can avoid applying the patch manually.
The database changes for the new release patch are delivered in a change package located in the PS_HOME/PTP
directory in the Change Assistant installation; for example, C:\PT8.58.11_Client_ORA\PTP.
Here is a brief summary of the steps required to apply the change package using the Change Assistant graphical
user interface. For detailed steps and explanations, see the PeopleTools product documentation.
See PeopleTools: Change Assistant and Update Manager, "Using Change Assistant to Apply PeopleTools Patch."
1. Start Change Assistant from the desktop icon or program menu.
2. Configure the general options and target database definitions.
3. Select Tools, Change Actions.
4. Select Update Manager and click Next.
5. Select Apply a Patch to your Current PeopleTools Release and click Finish.
6. Review the Change Package Settings page and click Next.
7. Select the target database, or if the database has not been defined yet, use the Create button to create the
database.
8. Click Next.
9. Select the Change Package for the PeopleTools patch.
10. Click Next.
Change Assistant performs a PeopleTools patch version check. Review the messages and click Next. A
warning is displayed if the selected patch is at the same or a lower level than the installed PeopleTools patch.
It is not recommended to re-apply or downgrade PeopleTools patches.

Applying PeopleTools Patches Using DPKs Appendix A
228
Copyright © 2022, Oracle and/or its affiliates. All Rights Reserved.
11. The Apply Summary page is displayed; review the summary and click Finish.
12. Change Assistant will load the change package and run the PeopleTools patch job.
All steps will run unattended and when the last step is complete you will receive a message that there are no
more steps to run.
Alternatively, if you have configured a target environment and general options in Change Assistant, you can
apply the change package via the command line. To apply the PTP on the command line, use the following
command. Specify the target database name, such as HCM92U31 for <YOUR_TARGET_DB_ENV_NAME>, and
the update ID of the change package for <patchxxx>:
Changeassistant.bat-MODEUM-ACTIONPTPAPPLY-TGTENV<YOUR_TARGET_DB_ENV_⇒
NAME>-UPD<patchxxx>
See PeopleTools: Change Assistant and Update Manager, "Running Change Assistant Job from the Command
Line."
Task A-1-7: Deploying the New Release in Mid-Tier Mode
To install the PeopleTools DPKs for the new PeopleTools 8.58.<new> release; for example, PeopleTools 8.58.11:
1. Go to the directory where you downloaded the PeopleTools 8.58.<new> DPKs for the new release, referred to
here as DPK_INSTALL_NEW.
See Downloading and Deploying the PeopleTools Client for the New Release.
2. Extract the first downloaded DPK zip file, for example,
Filename
_1of4.zip, in the same directory.
The extraction creates the
DPK_INSTALL_NEW/
setup folder and other files.
3. To set up the PeopleTools mid-tier components for the new PeopleTools 8.58.
<new>
patch release:
• On Microsoft Windows, open a command prompt with Run as Administrator, go to DPK_INSTALL_NEW/
setup and run this command:
psft-dpk-setup.bat--env_typemidtier
•
On Linux, AIX, HP-UX, Solaris, open a terminal window as root, go to
DPK_INSTALL_NEW/
setup, and
run this command:
./psft-dpk-setup.sh--env_typemidtier
4. At the following prompt, enter the full path for a new directory (that is, different from that used for the
existing 8.58 installation) for the PeopleSoft base folder (referred to in this documentation as
BASE_DIR_NEW
):
Note. When entering the path for the base folder, use forward slashes (/). For example, C:/psft_new.
Enclose any names with special characters in double quotes. Do not use a name for the base folder that begins
with a number. On Linux, AIX, HP-UX, or Solaris, do not end the base directory name with a forward slash
(for example, do not enter /ds1/psft/).
Note. The script progress and validation messages are not included here. See the task Running the PeopleSoft
PeopleTools DPK Setup Script for Mid-tier Deployment for more details.
ThebasefolderisusedtoextractthePeopleSoftDPKs.Itisalso
usedtodeploythePeopleSoftcomponents.Thisfoldershouldbe
accessibleontheWindowsVM,musthavewritepermissionsandshould
haveenoughfreespace.

Appendix A Applying PeopleTools Patches Using DPKs
Copyright © 2022, Oracle and/or its affiliates. All Rights Reserved.
229
EnterthePeopleSoftBaseFolder:C:/psft_new
Areyouhappywithyouranswer?[Y|n|q]:
The deployment sets up a new installation home directory, PS_HOME_NEW and installs Oracle WebLogic,
Oracle Tuxedo, Oracle Client, and JDK under the specified PeopleSoft base folder, BASE_DIR_NEW/pt.
5. Specify the information for the database that you want to connect to.
a. For the database platform, enter ORACLE, MSSQL (Microsoft SQL Server), or DB2ODBC (DB2 for
z/OS).
EnterthePeopleSoftdatabaseplatform[ORACLE]:
b. Enter y (yes) if the database you are connecting to is a Unicode database, or n (no) for a non-Unicode
database.
IsthePeopleSoftdatabaseunicode?[Y|n]:
c. Enter the PeopleSoft database name.
If the database name includes non-alphanumeric characters such as periods, enclose the name in double
quotes. For example, "HCM.92".
EnterthePeopleSoftdatabasename[HCM92]:
d. Enter the database service name.
Note. The service name is required for Oracle RDBMS.
For the service name, enter the full name, including the domain, if the database was installed with the
domain. Use forward slashes if necessary. If the service name includes non-alphanumeric characters such
as periods, enclose the name in double quotes. For example, "HCM.92.example.com". Do not enter an IP
address.
EnterthePeopleSoftdatabaseservicename[HCM92]:
e. Enter the name of the host where the database is installed, and the port number:
Use forward slashes if necessary. If the host name includes non-alphanumeric characters such as periods,
enclose the name in double quotes. For example, "host.example.com". Do not enter an IP address.
EnterthePeopleSoftdatabasehostname:
EnterthePeopleSoftdatabaseport[1521]:1521
6. Enter the PeopleSoft Connect ID at the following prompt:
The default is people.
EnterthePeopleSoftdatabaseConnectID[people]:
7. Enter a password for the PeopleSoft Connect ID, and enter again on the next line, at the following prompt.
See E-DPK - Password restrictions are not reflected in the DPK setup script prompts, My Oracle Support, Doc
ID 2639270.1.
EnterthePeopleSoftdatabaseConnectID[people]password.
Ensurethatthepasswordmeetsthelengthandcomplexityrequirements
foryourdatabaseplatform:
Re-EnterthePeopleSoftdatabaseConnectIDpassword:
8. Enter the PeopleSoft operator ID, such as PS or VP1.
EnterthePeopleSoftdatabaseOperatorID[PS]:PS

Applying PeopleTools Patches Using DPKs Appendix A
230
Copyright © 2022, Oracle and/or its affiliates. All Rights Reserved.
9. Enter the password twice for the PeopleSoft operator ID.
EnteranewPeopleSoftdatabaseOperatorID[PS]password.
Ensurethatthepasswordisbetween1and32charactersinlength.
Youmayincludethesespecialcharacters!@#$%^&:
Re-EnterthePeopleSoftOperatorIDpassword:
10. Enter the Application Server Domain Connection password, following the guidelines in the prompt.
The window does not display masking characters as you type. There is no default password.
Note. This is an optional password. If no password is entered, the connection between Web Server and
Application Server will not be password protected.
[Optional]EnteranewApplicationServerDomainconnectionpassword.
Ensurethatthepasswordisbetween8and30charactersinlength.
Youmayincludethesespecialcharacters!@#$%^&:
Re-EntertheApplicationServerDomainconnectionpassword:
11. Enter the password for the PTWEBSERVER web profile user.
EnteranewPeopleSoftWebProfileuser[PTWEBSERVER]password.
Ensurethatthepasswordisbetween8and32charactersinlength.
Youmayincludethesespecialcharacters!@#$%^&:
Re-EnterthePeopleSoftWebProfileuserpassword:
12. Enter the Oracle WebLogic Server Admin password, following the guidelines in the prompt.
The default Oracle WebLogic server administrator is system. The window does not display masking
characters as you type. There is no default password.
EnteranewWebLogicServerAdminuser[system]password.
Ensurethatthepasswordisbetween8and30charactersinlength
withatleastonelowercaseletterandoneuppercaseletter.Itmust⇒
also
containonenumberoroneofthesespecialcharacters!@#$%^&:
Re-EntertheWebLogicServerAdminuserpassword:
13. Enter the Integration Gateway user ID and password at the following prompt.
The default user ID is administrator.
EnterthePeopleSoftIntegrationGatewayuser[administrator]:
EnterthePeopleSoftIntegrationGatewayuser[administrator]password.
Ensurethatthepasswordisbetween8and30charactersinlength.
Youmayincludethesespecialcharacters!@#$%^&:
Re-EnterthePeopleSoftIntegrationGatewayuserpassword:
14. Enter the Integration Gateway keystore password.
You see this prompt beginning with PeopleSoft PeopleTools 8.58.04.
See the information on using the integrationGateway.properties file and configuring security in the Integration
Broker product documentation.
See PeopleTools: Integration Broker Administration, "Configuring Security and General Properties."
EnterthePeopleSoftIntegrationGatewayKeystorepassword.Ensure
thepasswordisbetween8and30charactersinlength.
Youmayincludethesespecialcharacters!@#$%^&:

Appendix A Applying PeopleTools Patches Using DPKs
Copyright © 2022, Oracle and/or its affiliates. All Rights Reserved.
231
Re-EnterthePeopleSoftIntegrationGatewayKeystorepassword:
15. If you want to change any of the answers to the previous questions, enter n (no) at the following prompt, or
enter y (yes) to continue:
Areyouhappywithyouranswers?[y|n]:
16. Answer n (no) to the following prompt:
ThebootstrapscriptisreadytodeployandconfigurethePeopleSoft
environmentusingthedefaultconfigurationdefinedinthePuppet
HieraYAMLfiles.Youcanproceedbyanswering'y'atthefollowing
prompt.And,ifyouwanttocustomizetheenvironmentbyoverriding
thedefaultconfiguration,youcananswer'n'.Ifyouanswer'n',you
shouldfollowtheinstructionsinthePeopleSoftInstallationGuide
forcreatingthecustomizationHieraYAMLfileandrunningthePuppet
'apply'commanddirectlytocontinuewiththesetupofthePeopleSoft
environment.
Doyouwanttocontinuewiththedefaultinitializationprocess?[y|n]:⇒
n
YouhavedecidednottocontinuewiththedefaultPeopleSoftenvironment
setupprocess.AnycustomizationstothePeopleSoftenvironmentshould
bedoneintheHieraYAMLfile'psft_customizations.yaml'andplaceit
under[c:\psft\dpk\puppet\production\data]folder.Aftermakingthe
necessarycustomizations,runthefollowingscripttocontinuewith
thesetupofPeopleSoftenvironment.
StartacmdwindowasAdministratorandrunC:\psft\psft_puppet_⇒
apply.cmd
ExitingthePeopleSoftenvironmentsetupprocess.
The script stops.
17. Complete the instructions in the next section to prepare the psft_customizations.yaml file and complete the
initialization.
See Also
"Deploying the PeopleSoft PeopleTools Deployment Packages," Running the DPK Setup Script for Mid-tier
Deployment.
Task A-1-8: Preparing psft_customizations.yaml and Completing the
Deployment
Carry out these steps from the PeopleTools 8.58.<new> environment, installed in the previous section (for
example, 8.58.11). Create or edit a psft_customizations.yaml file, and complete the initialization using the
psft_puppet_apply script.
See "Completing the DPK Initialization with Customizations."

Applying PeopleTools Patches Using DPKs Appendix A
232
Copyright © 2022, Oracle and/or its affiliates. All Rights Reserved.
The documentation lists several types of customizations you can use for your environment. For this scenario, it is
important that you include the location for an existing PS_APP_HOME (if you have one) to be associated with
the PS_HOME in the psft_customizations.yaml file.
Here is a sample psft_customizations.yaml file that specifies the location for an existing PS_APP_HOME location
which will be associated to PS_HOME during the deployment process:
Note. Be sure to retain the spacing and indentation as shown in this sample.
---
ps_apphome_location:c:/fscm_app_home
ps_app_home:
db_type:"%{hiera('db_platform')}"
location:"%{hiera('ps_apphome_location')}"
Complete the initialization using the psft_puppet_apply script as described in the documentation.
See "Completing the DPK Initialization with Customizations."
Task A-1-9: Reviewing the Results
After completing the steps above:
• PS_HOME, Oracle WebLogic, Oracle Tuxedo, and the Oracle Client from the initial environment have been
removed.
• There are new installations of PS_HOME, Oracle WebLogic, Oracle Tuxedo, and the Oracle Client.
• The Application Server, Process Scheduler, and PIA domains have been configured.
After applying the PeopleTools patch, review the patch's readme.txt for any manual configuration instructions that
may be needed for your particular environment.
Task A-1-10: Verifying the Patch Application
Your host should have initialized successfully and started participating in your PeopleSoft environment. Many of
the steps that you should take to verify this or diagnose problems will be the same for Microsoft Windows, Linux,
AIX, HP-UX, and Solaris hosts.
1. Verify that you can sign in to PeopleSoft:
Start a browser and sign on to the PeopleSoft Application with the URL http://<hostname>:<pia_http_port>/
ps/signon.html.
2. If you do not see the log in page, verify that the environment can be reached from your machine using a utility
such as ping.
3. If your host can be pinged, verify that the PIA domain is running in the following step.
4. Verify that Application Server, Process Scheduler and PIA domains have started:
a. On Linux, AIX, HP-UX, Solaris , using an SSH client, log in as the psadm2 user.
On Microsoft Windows, open a command prompt with Run as Administrator.
b. Start the psadmin utility by typing
psadmin
at the command prompt.
When logged in as the psadm2 user the environment variables for PeopleSoft administration are set as part
of the psadm2 user's log-in profile.
c. Use the PSADMIN menus for the Application Server, Process Scheduler, and Web server (PIA) to verify
the status of each of the installed components.

Appendix A Applying PeopleTools Patches Using DPKs
Copyright © 2022, Oracle and/or its affiliates. All Rights Reserved.
233
d. If one or more of the components has not started, examine the log files for the required PeopleSoft
component to establish what has caused the component to not start.
The log files are in the default locations for each of the PeopleSoft components.
5. To verify the PS_APP_HOME location, check the value of the PS_APP_HOME environment variable.
On Linux, AIX, HP-UX, or Solaris, the environment variable is found in the .profile file for the psadm2 user.
Use the following command on Linux, AIX, HP-UX, or Solaris to check the environment variable:
exportPS_APP_HOME=/home/fscm_app_home
On Microsoft Windows, open the System Properties dialog box and click Environment Variables.
6. You can review the psprcs.cfg file to verify that the SQR section includes a path for PS_APP_HOME.
[SQR]
;=======================================================================⇒
==
;SettingsforSQRSoftware
;=======================================================================⇒
==
SQRBIN=%PS_HOME%/bin/sqr/ORA/bin
PSSQRFLAGS=-ZIF%PS_HOME%/sqr/pssqr%LANGUAGECD%.unx
PrintLog=N
EnhancedHTML=N
PSSQR=%PS_APP_HOME%/sqr:%PS_HOME%/sqr
See PeopleTools: Process Scheduler, "Using the PSADMIN for the Process Scheduler Configuration File."
Task A-2: Using Scenario 2
This section discusses:
• Understanding Scenario 2
• Stopping and Deleting the Domains on the Initial Environment
• Stopping the Services for the Domains
•
Downloading and Deploying the PeopleTools Client for the New Release
•
Applying the PeopleTools Patch Using Change Assistant
•
Deploying the New Release in Mid-tier Mode
•
Preparing psft_customizations.yaml and Completing the Deployment
•
Reviewing the Results
•
Verifying the Patch Application
Understanding Scenario 2
Scenario 2 assumes that:
• You want to install only the new patch release
PS_HOME
• You want to retain the existing installations of Oracle WebLogic, Oracle Tuxedo, and Oracle Client.
• This scenario applies to Linux, AIX, HP-UX, Solaris, and Microsoft Windows operating systems.

Applying PeopleTools Patches Using DPKs Appendix A
234
Copyright © 2022, Oracle and/or its affiliates. All Rights Reserved.
Task A-2-1: Stopping and Deleting the Domains on the Initial Environment
Carry out these steps on the existing PeopleTools 8.58.<init> environment (for example, 8.58.01):
If you have not already done so, stop and delete the existing domains running on the initial, existing PeopleTools
release, PeopleTools 8.58.<init> — Application Server, PIA, and Process Scheduler, using the PSADMIN utility.
See "Using and Maintaining the PeopleSoft Environment," Managing PeopleTools Domains with PSADMIN.
Task A-2-2: Stopping the Services for the Domains
On Microsoft Windows, stop the services for the Application Server, PIA, and Process Scheduler domains:
• Open the Services dialog box, for example by clicking Start and selecting Administrative Tools, Services.
• Right-click on PsftAppServerDomain<Appserver_domain_name>Service and select Stop.
•
Right-click on PsftPrcsDomain<ProcSched_domain_name>Service and select Stop.
•
Right-click on PsftPIADomain<PIA_domain_name>Service and select Stop.
•
Select File, Exit, to close the dialog box.
Task A-2-3: Downloading and Deploying the PeopleTools Client for the New
Release
On the Microsoft Windows host that you have designated for the PeopleTools Client for the new PeopleTools
8.58.<new> patch; for example, PeopleTools 8.58.11:
1. Locate and download the PeopleTools 8.58.
<new>
DPKs for the new release to a directory with sufficient
disc space, referred to here as
DPK_INSTALL_NEW.
See PeopleTools Patches Home Page, My Oracle Support, Doc ID 2062712.2, for links to the most recent
patches. For earlier releases, search My Oracle Support, Patches and Updates.
2. In the downloaded DPKs, locate the DPK for the PeopleTools Client for the new PeopleTools 8.58.
<new>
patch, which is the fourth zip file
(Filename
_4of4.zip)
Copy the DPK to the Microsoft Windows Client machine.
3. To deploy the PeopleTools Client for the new 8.58.<new> PeopleTools patch in the Microsoft Windows
Client host, use the instructions for standalone deployment described in this documentation, with the
following guidelines.
See "Deploying the PeopleTools Deployment Packages," Deploying the PeopleTools Client in Standalone
Mode for detailed steps and explanations.
a. Run SetupPTClient.bat -t.
b. Answer yes when asked if you want to deploy PeopleTools client.
c. Specify an installation directory, the RDBMS, and other information for your environment.
The default installation directory is C:\PT<release_number>_Client_<database_type>, for example
C:\PT8.58.11_Client_ORA.
d. Specify the PeopleTools Patch (2) option at this prompt:
PleasemakeyourselectionfortheToolsClientdeployment:
1.PeopleToolsFullUpgrade
2.PeopleToolsPatch
3.Noneoftheabove

Appendix A Applying PeopleTools Patches Using DPKs
Copyright © 2022, Oracle and/or its affiliates. All Rights Reserved.
235
Enteryourchoice[1-3]:2
e. Answer y (yes) when asked if you want to install Change Assistant:
DoyouwanttoinstallChangeAssistant?[Y/N]:y
Task A-2-4: Applying the PeopleTools Patch Using Change Assistant
Use the Change Assistant (CA) you installed in the previous section to apply the new PeopleTools 8.58.<new>
patch database changes. In the current PeopleTools release you can apply all patch database changes for the patch
by installing a single PeopleTools change package (PTP) using Change Assistant. By using this new preferred
method in PeopleTools 8.58, you can avoid applying the patch manually.
The database changes for the new release patch are delivered in a change package located in the PS_HOME/PTP
directory in the Change Assistant installation; for example, C:\PT8.58.11_Client_ORA\PTP.
Here is a brief summary of the steps required to apply the change package using the Change Assistant graphical
user interface. For detailed steps and explanations, see the PeopleTools product documentation.
See PeopleTools: Change Assistant and Update Manager, "Using Change Assistant to Apply PeopleTools Patch."
1. Start Change Assistant from the desktop icon or program menu.
2. Configure the general options and target database definitions.
3. Select Tools, Change Actions.
4. Select Update Manager and click Next.
5. Select Apply a Patch to your Current PeopleTools Release and click Finish.
6. Review the Change Package Settings page and click Next.
7. Select the target database, or if the database has not been defined yet, use the Create button to create the
database.
8. Click Next.
9. Select the Change Package for the PeopleTools patch.
10. Click Next.
Change Assistant performs a PeopleTools patch version check. Review the messages and click Next. A
warning is displayed if the selected patch is at the same or a lower level than the installed PeopleTools patch.
It is not recommended to re-apply or downgrade PeopleTools patches.
11. The Apply Summary page is displayed; review the summary and click Finish.
12. Change Assistant will load the change package and run the PeopleTools patch job.
All steps will run unattended and when the last step is complete you will receive a message that there are no
more steps to run.
Alternatively, if you have configured a target environment and general options in Change Assistant, you can
apply the change package via the command line. To apply the PTP on the command line, use the following
command, edited for your environment:
Changeassistant.bat-MODEUM-ACTIONPTPAPPLY-TGTENV<YOUR_TARGET_DB_ENV_⇒
NAME_LIKE_PT856TST>-UPD<patchxxx>
See PeopleTools: Change Assistant and Update Manager, "Running Change Assistant Job from the Command
Line."

Applying PeopleTools Patches Using DPKs Appendix A
236
Copyright © 2022, Oracle and/or its affiliates. All Rights Reserved.
Task A-2-5: Deploying the New Release in Mid-tier Mode
To install the PeopleTools DPKs for the new PeopleTools 8.58.<new> release; for example, PeopleTools 8.58.11:
1. Go to the directory where you downloaded the PeopleTools 8.58.<new> DPKs for the new release, referred to
here as DPK_INSTALL_NEW.
See Downloading and Deploying the PeopleTools Client for the New Release.
2. Extract the first downloaded DPK zip file, for example, Filename_1of4.zip, in the same directory.
The extraction creates the DPK_INSTALL_NEW/setup folder and other files.
3. To set up the PeopleTools server for the new PeopleTools 8.58.<new> patch release:
• On Microsoft Windows, open a command prompt with Run as Administrator, go to DPK_INSTALL_NEW/
setup and run this command:
psft-dpk-setup.bat--env_typemidtier
•
On Linux, AIX, HP-UX, or Solaris, open a terminal window as root, go to
DPK_INSTALL_NEW/
setup,
and run this command:
./psft-dpk-setup.sh--env_typemidtier
4. At the following prompt, enter the full path for a new directory (that is, different from that used for the
existing 8.58 installation) for the PeopleSoft base folder (referred to in this documentation as
BASE_DIR_NEW):
Note. When entering the path for the base folder, use forward slashes (/). For example, C:/psft_new.
Enclose any names with special characters in double quotes. Do not use a name for the base folder that begins
with a number. On Linux, AIX, HP-UX, or Solaris, do not end the base directory name with a forward slash
(for example, do not enter /ds1/psft/).
Note. The script progress and validation messages are not included here. See the task Running the PeopleSoft
PeopleTools DPK Setup Script for Mid-tier Deployment for more details.
ThebasefolderisusedtoextractthePeopleSoftDPKs.Itisalso
usedtodeploythePeopleSoftcomponents.Thisfoldershouldbe
accessibleontheWindowsVM,musthavewritepermissionsandshould
haveenoughfreespace.
EnterthePeopleSoftBaseFolder:C:/psft_new
Areyouhappywithyouranswer?[Y|n|q]:
The deployment sets up a new installation home directory, PS_HOME_NEW and installs Oracle WebLogic,
Oracle Tuxedo, Oracle Client, and JDK under the specified PeopleSoft base folder, BASE_DIR_NEW/pt.
5. Specify the information for the database that you want to connect to.
a. For the database platform, enter ORACLE, MSSQL (Microsoft SQL Server), or DB2ODBC (DB2 for
z/OS).
EnterthePeopleSoftdatabaseplatform[ORACLE]:
b. Enter
y
(yes) if the database you are connecting to is a Unicode database, or n (no) for a non-Unicode
database.
IsthePeopleSoftdatabaseunicode?[Y|n]:

Appendix A Applying PeopleTools Patches Using DPKs
Copyright © 2022, Oracle and/or its affiliates. All Rights Reserved.
237
c. Enter the PeopleSoft database name.
If the database name includes non-alphanumeric characters such as periods, enclose the name in double
quotes. For example, "HCM.92".
EnterthePeopleSoftdatabasename[HCM92]:
d. Enter the database service name.
Note. The service name is required for Oracle RDBMS.
For the service name, enter the full name, including the domain, if the database was installed with the
domain. Use forward slashes if necessary. If the service name includes non-alphanumeric characters such
as periods, enclose the name in double quotes. For example, "HCM.92.example.com". Do not enter an IP
address.
EnterthePeopleSoftdatabaseservicename[HCM92]:
e. Enter the name of the host where the database is installed, and the port number:
Use forward slashes if necessary. If the host name includes non-alphanumeric characters such as periods,
enclose the name in double quotes. For example, "host.example.com". Do not enter an IP address.
EnterthePeopleSoftdatabasehostname:
EnterthePeopleSoftdatabaseport[1521]:1521
6. Enter the PeopleSoft Connect ID at the following prompt:
The default is people.
EnterthePeopleSoftdatabaseConnectID[people]:
7. Enter a password for the PeopleSoft Connect ID, and enter again on the next line, at the following prompt.
See E-DPK - Password restrictions are not reflected in the DPK setup script prompts, My Oracle Support, Doc
ID 2639270.1.
EnterthePeopleSoftdatabaseConnectID[people]password.
Ensurethatthepasswordmeetsthelengthandcomplexityrequirements
foryourdatabaseplatform:
Re-EnterthePeopleSoftdatabaseConnectIDpassword:
8. Enter the PeopleSoft operator ID, such as PS or VP1.
EnterthePeopleSoftdatabaseOperatorID[PS]:
9. Enter the password twice for the PeopleSoft operator ID.
EnteranewPeopleSoftdatabaseOperatorID[PS]password.
Ensurethatthepasswordisbetween1and32charactersinlength.
Youmayincludethesespecialcharacters!@#$%^&:
Re-EnterthePeopleSoftOperatorIDpassword:
10. Enter the Application Server Domain Connection password, following the guidelines in the prompt.
The window does not display masking characters as you type. There is no default password.
Note. This is an optional password. If no password is entered, the connection between Web Server and
Application Server will not be password protected.
[Optional]EnteranewApplicationServerDomainconnectionpassword.
Ensurethatthepasswordisbetween8and30charactersinlength.

Applying PeopleTools Patches Using DPKs Appendix A
238
Copyright © 2022, Oracle and/or its affiliates. All Rights Reserved.
Youmayincludethesespecialcharacters!@#$%^&:
Re-EntertheApplicationServerDomainconnectionpassword:
11. Enter the password for the PTWEBSERVER web profile user.
EnteranewPeopleSoftWebProfileuser[PTWEBSERVER]password.
Ensurethatthepasswordisbetween8and32charactersinlength.
Youmayincludethesespecialcharacters!@#$%^&:
Re-EnterthePeopleSoftWebProfileuserpassword:
12. Enter the Oracle WebLogic Server Admin password, following the guidelines in the prompt.
The default Oracle WebLogic server administrator is system. The window does not display masking
characters as you type. There is no default password.
EnteranewWebLogicServerAdminuser[system]password.
Ensurethatthepasswordisbetween8and30charactersinlength
withatleastonelowercaseletterandoneuppercaseletter.Itmust⇒
also
containonenumberoroneofthesespecialcharacters!@#$%^&:
Re-EntertheWebLogicServerAdminuserpassword:
13. Enter the Integration Gateway user ID and password at the following prompt.
The default user ID is administrator.
EnterthePeopleSoftIntegrationGatewayuser[administrator]:
EnterthePeopleSoftIntegrationGatewayuser[administrator]password.
Ensurethatthepasswordisbetween8and30charactersinlength.
Youmayincludethesespecialcharacters!@#$%^&:
Re-EnterthePeopleSoftIntegrationGatewayuserpassword:
14. Enter the Integration Gateway keystore password.
You see this prompt beginning with PeopleSoft PeopleTools 8.58.04.
See the information on using the integrationGateway.properties file and configuring security in the Integration
Broker product documentation.
See PeopleTools: Integration Broker Administration, "Configuring Security and General Properties."
EnterthePeopleSoftIntegrationGatewayKeystorepassword.Ensure
thepasswordisbetween8and30charactersinlength.
Youmayincludethesespecialcharacters!@#$%^&:
Re-EnterthePeopleSoftIntegrationGatewayKeystorepassword:
15. If you want to change any of the answers to the previous questions, enter n (no) at the following prompt, or
enter y (yes) to continue:
Areyouhappywithyouranswers?[y|n]:
16. Answer
n
(no) to the following prompt:
ThebootstrapscriptisreadytodeployandconfigurethePeopleSoft
environmentusingthedefaultconfigurationdefinedinthePuppet
HieraYAMLfiles.Youcanproceedbyanswering'y'atthefollowing
prompt.And,ifyouwanttocustomizetheenvironmentbyoverriding
thedefaultconfiguration,youcananswer'n'.Ifyouanswer'n',you
shouldfollowtheinstructionsinthePeopleSoftInstallationGuide
forcreatingthecustomizationHieraYAMLfileandrunningthePuppet

Appendix A Applying PeopleTools Patches Using DPKs
Copyright © 2022, Oracle and/or its affiliates. All Rights Reserved.
239
'apply'commanddirectlytocontinuewiththesetupofthePeopleSoft
environment.
Doyouwanttocontinuewiththedefaultinitializationprocess?[y|n]:⇒
n
YouhavedecidednottocontinuewiththedefaultPeopleSoftenvironment
setupprocess.AnycustomizationstothePeopleSoftenvironmentshould
bedoneintheHieraYAMLfile'psft_customizations.yaml'andplaceit
under[c:\psft\dpk\puppet\production\data]folder.Aftermakingthe
necessarycustomizations,runthefollowingscripttocontinuewith
thesetupofPeopleSoftenvironment.
StartacmdwindowasAdministratorandrunC:\psft\psft_puppet_⇒
apply.cmd
ExitingthePeopleSoftenvironmentsetupprocess.
The script stops.
17. Complete the instructions in the next section to prepare the psft_customizations.yaml file and complete the
initialization.
See Also
"Deploying the PeopleSoft PeopleTools Deployment Packages," Running the DPK Setup Script for Mid-tier
Deployment.
Task A-2-6: Preparing psft_customizations.yaml and Completing the
Deployment
Carry out these steps from the PeopleTools 8.58.<new> environment, installed in the previous section (for
example, 8.58.11). Create or edit a psft_customizations.yaml file, and complete the initialization using the
psft_puppet_apply script.
See "Completing the DPK Initialization with Customizations."
The documentation lists several types of customizations you can use for your environment. For this scenario, it is
important that you include the following in the psft_customizations.yaml file:
• Location for an existing PS_APP_HOME (if you have one) to be associated with the PS_HOME.
• Existing installation locations for Oracle WebLogic, Oracle Tuxedo and Oracle Database client.
Here is a sample psft_customizations.yaml file that specifies the location for the Oracle WebLogic, Oracle
Tuxedo, and Oracle Database client. This customization also specifies an existing PS_APP_HOME location
which will be associated to PS_HOME during the deployment process.
Note. The Oracle Database client entry applies only to environments on Oracle RDBMS.
Note. . Be sure to retain the spacing and indentation as shown in this sample.
---
oracle_client_location:C:/Oracle/Oracle-Client
oracle_client:

Applying PeopleTools Patches Using DPKs Appendix A
240
Copyright © 2022, Oracle and/or its affiliates. All Rights Reserved.
location:C:/Oracle/Oracle-Client
jdk_location:C:/Oracle/JDK
jdk:
location:C:/Oracle/JDK
weblogic_location:C:/Oracle/weblogic
weblogic:
location:C:/Oracle/weblogic
tuxedo_location:C:/Oracle/weblogic/tuxedo
tuxedo:
location:C:/Oracle/weblogic/tuxedo
ps_apphome_location:c:/fscm_app_home
ps_app_home:
db_type:"%{hiera('db_platform')}"
location:"%{hiera('ps_apphome_location')}"
Complete the initialization using the psft_puppet_apply script as described in the documentation.
See "Completing the DPK Initialization with Customizations."
Task A-2-7: Reviewing the Results
After completing the steps above:
• PS_HOME_INIT, Oracle WebLogic, Oracle Tuxedo, and the Oracle Client from the initial environment
remain as is.
• The Application Server, Process Scheduler, and PIA domains are configured.
• There is new installation of PS_HOME_NEW.
After applying the PeopleTools patch, review the patch's readme.txt for any manual configuration instructions that
may be needed for your particular environment.
Task A-2-8: Verifying the Patch Application
Your host should have initialized successfully and started participating in your PeopleSoft environment. Many of
the steps that you should take to verify this or diagnose problems will be the same for Microsoft Windows, Linux,
AIX, HP-UX, and Solaris hosts.
1. Verify that you can sign in to PeopleSoft:
Start a browser and sign on to the PeopleSoft Application with the URL http://<hostname>:<pia_http_port>/
ps/signon.html.
2. If you do not see the log in page, verify that the environment can be reached from your machine using a utility
such as ping.
3. If your host can be pinged, verify that the PIA domain is running in the following step.
4. Verify that Application Server, Process Scheduler and PIA domains have started:
a. On Linux, AIX, HP-UX, or Solaris, using an SSH client, log in as the psadm2 user.
On Microsoft Windows, open a command prompt with Run as Administrator.
b. Start the psadmin utility by typing psadmin at the command prompt.

Appendix A Applying PeopleTools Patches Using DPKs
Copyright © 2022, Oracle and/or its affiliates. All Rights Reserved.
241
When logged in as the psadm2 user the environment variables for PeopleSoft administration are set as part
of the psadm2 user's log-in profile.
c. Use the PSADMIN menus for the Application Server, Process Scheduler, and Web server (PIA) to verify
the status of each of the installed components.
d. If one or more of the components has not started, examine the log files for the required PeopleSoft
component to establish what has caused the component to not start.
The log files are in the default locations for each of the PeopleSoft components.
5. To verify the PS_APP_HOME location, check the value of the PS_APP_HOME environment variable.
On Linux, AIX, HP-UX, or Solaris, the environment variable is found in the .profile file for the psadm2 user.
Use the following command on Linux, AIX, HP-UX, or Solaris to check the environment variable:
exportPS_APP_HOME=/home/fscm_app_home
On Microsoft Windows, open the System Properties dialog box and click Environment Variables.
6. You can review the psprcs.cfg file to verify that the SQR section includes a path for PS_APP_HOME.
[SQR]
;=======================================================================⇒
==
;SettingsforSQRSoftware
;=======================================================================⇒
==
SQRBIN=%PS_HOME%/bin/sqr/ORA/bin
PSSQRFLAGS=-ZIF%PS_HOME%/sqr/pssqr%LANGUAGECD%.unx
PrintLog=N
EnhancedHTML=N
PSSQR=%PS_APP_HOME%/sqr:%PS_HOME%/sqr
See PeopleTools: Process Scheduler, "Using the PSADMIN for the Process Scheduler Configuration File."
Task A-3: Using Scenario 3
This section discusses:
•
Understanding Scenario 3
•
Stopping and Deleting the Domains on the Initial Environment
•
Stopping the Services for the Domains
•
Downloading and Deploying the PeopleTools Client for the New Release
•
Applying the PeopleTools Patch Using Change Assistant
•
Deploying the New Release in Mid-tier Mode
• Preparing psft_customizations.yaml and Completing the Deployment
• Reviewing the Results
• Verifying the Patch Application
Understanding Scenario 3
Scenario 3 assumes that:

Applying PeopleTools Patches Using DPKs Appendix A
242
Copyright © 2022, Oracle and/or its affiliates. All Rights Reserved.
• You want to install only the new patch release PS_HOME
• You want to retain one or more of the existing installations of Oracle WebLogic, Oracle Tuxedo, or Oracle
Client.
• This scenario applies to Linux, AIX, HP-UX, Solaris, and Microsoft Windows operating systems.
Task A-3-1: Stopping and Deleting the Domains on the Initial Environment
Carry out these steps on the existing PeopleTools 8.58.<init> environment (for example, 8.58.01):
If you have not already done so, stop and delete the existing domains running on the initial, existing PeopleTools
release, PeopleTools 8.58.<init> — Application Server, PIA, and Process Scheduler, using the PSADMIN utility.
See "Using and Maintaining the PeopleSoft Environment," Managing PeopleTools Domains with PSADMIN.
Task A-3-2: Stopping the Services for the Domains
On Microsoft Windows, stop the services for the Application Server, PIA, and Process Scheduler domains:
•
Open the Services dialog box, for example by clicking Start and selecting Administrative Tools, Services.
• Right-click on PsftAppServerDomain<Appserver_domain_name>Service and select Stop.
• Right-click on PsftPrcsDomain<ProcSched_domain_name>Service and select Stop.
• Right-click on PsftPIADomain<PIA_domain_name>Service and select Stop.
• Select File, Exit, to close the dialog box.
Task A-3-3: Downloading and Deploying the PeopleTools Client for the New
Release
On the Microsoft Windows host that you have designated for the PeopleTools Client for the new PeopleTools
8.58.<new> patch; for example, PeopleTools 8.58.11:
1. Locate and download the PeopleTools 8.58.
<new>
DPKs for the new release to a directory with sufficient
disc space, referred to here as
DPK_INSTALL_NEW.
See PeopleTools Patches Home Page, My Oracle Support, Doc ID 2062712.2, for links to the most recent
patches. For earlier releases, search My Oracle Support, Patches and Updates.
2. In the downloaded DPKs, locate the DPK for the PeopleTools Client for the new PeopleTools 8.58.<new>
patch, which is the fourth zip file (Filename_4of4.zip)
Copy the DPK to the Microsoft Windows Client machine.
3. To deploy the PeopleTools Client for the new 8.58.<new> PeopleTools patch in the Microsoft Windows
Client host, use the instructions for standalone deployment described in this documentation, with the
following guidelines.
See "Deploying the PeopleTools Deployment Packages," Deploying the PeopleTools Client in Standalone
Mode for detailed steps and explanations.
a. Run SetupPTClient.bat -t.
b. Answer yes when asked if you want to deploy PeopleTools client.
c. Specify an installation directory, the RDBMS, and other information for your environment.
The default installation directory is C:\PT<release_number>_Client_<database_type>, for example
C:\PT8.58.11_Client_ORA.

Appendix A Applying PeopleTools Patches Using DPKs
Copyright © 2022, Oracle and/or its affiliates. All Rights Reserved.
243
d. Specify the PeopleTools Patch (2) option at this prompt:
PleasemakeyourselectionfortheToolsClientdeployment:
1.PeopleToolsFullUpgrade
2.PeopleToolsPatch
3.Noneoftheabove
Enteryourchoice[1-3]:2
e. Answer y (yes) when asked if you want to install Change Assistant:
DoyouwanttoinstallChangeAssistant?[Y/N]:y
Task A-3-4: Applying the PeopleTools Patch Using Change Assistant
Use the Change Assistant (CA) you installed in the previous section to apply the new PeopleTools 8.58.<new>
patch database changes. In the current PeopleTools release you can apply all patch database changes for the patch
by installing a single PeopleTools change package (PTP) using Change Assistant. By using this new preferred
method in PeopleTools 8.58, you can avoid applying the patch manually.
The database changes for the new release patch are delivered in a change package located in the PS_HOME/PTP
directory in the Change Assistant installation; for example, C:\PT8.58.11_Client_ORA\PTP.
Here is a brief summary of the steps required to apply the change package using the Change Assistant graphical
user interface. For detailed steps and explanations, see the PeopleTools product documentation.
See PeopleTools: Change Assistant and Update Manager, "Using Change Assistant to Apply PeopleTools Patch."
1. Start Change Assistant from the desktop icon or program menu.
2. Configure the general options and target database definitions.
3. Select Tools, Change Actions.
4. Select Update Manager and click Next.
5. Select Apply a Patch to your Current PeopleTools Release and click Finish.
6. Review the Change Package Settings page and click Next.
7. Select the target database, or if the database has not been defined yet, use the Create button to create the
database.
8. Click Next.
9. Select the Change Package for the PeopleTools patch.
10. Click Next.
Change Assistant performs a PeopleTools patch version check. Review the messages and click Next. A
warning is displayed if the selected patch is at the same or a lower level than the installed PeopleTools patch.
It is not recommended to re-apply or downgrade PeopleTools patches.
11. The Apply Summary page is displayed; review the summary and click Finish.
12. Change Assistant will load the change package and run the PeopleTools patch job.
All steps will run unattended and when the last step is complete you will receive a message that there are no
more steps to run.
Alternatively, if you have configured a target environment and general options in Change Assistant, you can
apply the change package via the command line. To apply the PTP on the command line, use the following
command. Specify the target database name, such as HCM92U31, for <YOUR_TARGET_DB_ENV_NAME>, and
the update ID of the change package for <patchxxx>.

Applying PeopleTools Patches Using DPKs Appendix A
244
Copyright © 2022, Oracle and/or its affiliates. All Rights Reserved.
Changeassistant.bat-MODEUM-ACTIONPTPAPPLY-TGTENV<YOUR_TARGET_DB_ENV_⇒
NAME>-UPD<patchxx>
See PeopleTools: Change Assistant and Update Manager, "Running Change Assistant Job from the Command
Line."
Task A-3-5: Deploying the New Release in Mid-tier Mode
To install the PeopleTools DPKs for the new PeopleTools 8.58.<new> release; for example, PeopleTools 8.58.11:
1. Go to the directory where you downloaded the PeopleTools 8.58.<new> DPKs for the new release, referred to
here as DPK_INSTALL_NEW.
See Downloading and Deploying the PeopleTools Client for the New Release.
2. Extract the first downloaded DPK zip file, for example, Filename_1of4.zip, in the same directory.
The extraction creates the DPK_INSTALL_NEW/setup folder and other files.
3. To set up the PeopleTools server for the new PeopleTools 8.58.<new> patch release:
•
On Microsoft Windows, open a command prompt with Run as Administrator, go to
DPK_INSTALL_NEW/
setup and run this command:
psft-dpk-setup.bat--env_typemidtier
• On Linux, AIX, HP-UX, or Solaris, open a terminal window as root, go to DPK_INSTALL_NEW/setup,
and run this command:
./psft-dpk-setup.sh--env_typemidtier
4. At the following prompt, enter the full path for a new directory (that is, different from that used for the
existing 8.58 installation) for the PeopleSoft base folder (referred to in this documentation as
BASE_DIR_NEW
):
Note. When entering the path for the base folder, use forward slashes (/). For example, C:/psft_new.
Enclose any names with special characters in double quotes. Do not use a name for the base folder that begins
with a number. On Linux, AIX, HP-UX, or Solaris, do not end the base directory name with a forward slash
(for example, do not enter /ds1/psft/).
Note. The script progress and validation messages are not included here. See the task Running the PeopleSoft
PeopleTools DPK Setup Script for Mid-tier Deployment for more details.
ThebasefolderisusedtoextractthePeopleSoftDPKs.Itisalso
usedtodeploythePeopleSoftcomponents.Thisfoldershouldbe
accessibleontheWindowsVM,musthavewritepermissionsandshould
haveenoughfreespace.
EnterthePeopleSoftBaseFolder:C:/psft_new
Areyouhappywithyouranswer?[Y|n|q]:
The deployment sets up a new installation home directory,
PS_HOME_NEW
and installs Oracle WebLogic,
Oracle Tuxedo, Oracle Client, and JDK under the specified PeopleSoft base folder,
BASE_DIR_NEW/
pt.
5. Specify the information for the database that you want to connect to.
a. For the database platform, enter ORACLE, MSSQL (Microsoft SQL Server), or DB2ODBC (DB2 for
z/OS).

Appendix A Applying PeopleTools Patches Using DPKs
Copyright © 2022, Oracle and/or its affiliates. All Rights Reserved.
245
EnterthePeopleSoftdatabaseplatform[ORACLE]:
b. Enter y (yes) if the database you are connecting to is a Unicode database, or n (no) for a non-Unicode
database.
IsthePeopleSoftdatabaseunicode?[Y|n]:
c. Enter the PeopleSoft database name.
If the database name includes non-alphanumeric characters such as periods, enclose the name in double
quotes. For example, "HCM.92".
EnterthePeopleSoftdatabasename[HCM92]:
d. Enter the database service name.
Note. The service name is required for Oracle RDBMS.
For the service name, enter the full name, including the domain, if the database was installed with the
domain. Use forward slashes if necessary. If the service name includes non-alphanumeric characters such
as periods, enclose the name in double quotes. For example, "HCM.92.example.com". Do not enter an IP
address.
EnterthePeopleSoftdatabaseservicename[HCM92]:
e. Enter the name of the host where the database is installed, and the port number:
Use forward slashes if necessary. If the host name includes non-alphanumeric characters such as periods,
enclose the name in double quotes. For example, "host.example.com". Do not enter an IP address.
EnterthePeopleSoftdatabasehostname:
EnterthePeopleSoftdatabaseport[1521]:1521
6. Enter the PeopleSoft Connect ID at the following prompt:
The default is people.
EnterthePeopleSoftdatabaseConnectID[people]:
7. Enter a password for the PeopleSoft Connect ID, and enter again on the next line, at the following prompt.
See E-DPK - Password restrictions are not reflected in the DPK setup script prompts, My Oracle Support, Doc
ID 2639270.1.
EnterthePeopleSoftdatabaseConnectID[people]password.
Ensurethatthepasswordmeetsthelengthandcomplexityrequirements
foryourdatabaseplatform:
Re-EnterthePeopleSoftdatabaseConnectIDpassword:
8. Enter the PeopleSoft operator ID, such as PS or VP1.
EnterthePeopleSoftdatabaseOperatorID[PS]:
9. Enter the password twice for the PeopleSoft operator ID, .
EnteranewPeopleSoftdatabaseOperatorID[PS]password.
Ensurethatthepasswordisbetween1and32charactersinlength.
Youmayincludethesespecialcharacters!@#$%^&:
Re-EnterthePeopleSoftOperatorIDpassword:
10. Enter the Application Server Domain Connection password, following the guidelines in the prompt.
The window does not display masking characters as you type. There is no default password.

Applying PeopleTools Patches Using DPKs Appendix A
246
Copyright © 2022, Oracle and/or its affiliates. All Rights Reserved.
Note. This is an optional password. If no password is entered, the connection between Web Server and
Application Server will not be password protected.
[Optional]EnteranewApplicationServerDomainconnectionpassword.
Ensurethatthepasswordisbetween8and30charactersinlength:.
Youmayincludethesespecialcharacters!@#$%^&:
Re-EntertheApplicationServerDomainconnectionpassword:
11. Enter the password for the PTWEBSERVER web profile user.
EnteranewPeopleSoftWebProfileuser[PTWEBSERVER]password.
Ensurethatthepasswordisbetween8and32charactersinlength.
Youmayincludethesespecialcharacters!@#$%^&:
Re-EnterthePeopleSoftWebProfileuserpassword:
12. Enter the Oracle WebLogic Server Admin password, following the guidelines in the prompt.
The default Oracle WebLogic server administrator is system. The window does not display masking
characters as you type. There is no default password.
EnteranewWebLogicServerAdminuser[system]password.
Ensurethatthepasswordisbetween8and30charactersinlength
withatleastonelowercaseletterandoneuppercaseletter.Itmust⇒
also
containonenumberoroneofthesespecialcharacters!@#$%^&:
Re-EntertheWebLogicServerAdminuserpassword:
13. Enter the Integration Gateway user ID and password at the following prompt.
The default user ID is administrator.
EnterthePeopleSoftIntegrationGatewayuser[administrator]:
EnterthePeopleSoftIntegrationGatewayuser[administrator]password.
Ensurethatthepasswordisbetween8and30charactersinlength.
Youmayincludethesespecialcharacters!@#$%^&:
Re-EnterthePeopleSoftIntegrationGatewayuserpassword:
14. Enter the Integration Gateway keystore password.
You see this prompt beginning with PeopleSoft PeopleTools 8.58.04.
See the information on using the integrationGateway.properties file and configuring security in the Integration
Broker product documentation.
See PeopleTools: Integration Broker Administration, "Configuring Security and General Properties."
EnterthePeopleSoftIntegrationGatewayKeystorepassword.Ensure
thepasswordisbetween8and30charactersinlength.
Youmayincludethesespecialcharacters!@#$%^&:
Re-EnterthePeopleSoftIntegrationGatewayKeystorepassword:
15. If you want to change any of the answers to the previous questions, enter n (no) at the following prompt, or
enter y (yes) to continue:
Areyouhappywithyouranswers?[y|n]:
16. Answer
n
(no) to the following prompt:
ThebootstrapscriptisreadytodeployandconfigurethePeopleSoft
environmentusingthedefaultconfigurationdefinedinthePuppet

Appendix A Applying PeopleTools Patches Using DPKs
Copyright © 2022, Oracle and/or its affiliates. All Rights Reserved.
247
HieraYAMLfiles.Youcanproceedbyanswering'y'atthefollowing
prompt.And,ifyouwanttocustomizetheenvironmentbyoverriding
thedefaultconfiguration,youcananswer'n'.Ifyouanswer'n',you
shouldfollowtheinstructionsinthePeopleSoftInstallationGuide
forcreatingthecustomizationHieraYAMLfileandrunningthePuppet
'apply'commanddirectlytocontinuewiththesetupofthePeopleSoft
environment.
Doyouwanttocontinuewiththedefaultinitializationprocess?[y|n]:⇒
n
YouhavedecidednottocontinuewiththedefaultPeopleSoftenvironment
setupprocess.AnycustomizationstothePeopleSoftenvironmentshould
bedoneintheHieraYAMLfile'psft_customizations.yaml'andplaceit
under[c:\psft\dpk\puppet\production\data]folder.Aftermakingthe
necessarycustomizations,runthefollowingscripttocontinuewith
thesetupofPeopleSoftenvironment.
StartacmdwindowasAdministratorandrunC:\psft\psft_puppet_⇒
apply.cmd
ExitingthePeopleSoftenvironmentsetupprocess.
The script stops.
17. Complete the instructions in the next section to prepare the psft_customizations.yaml file and complete the
initialization.
See Also
"Deploying the PeopleSoft PeopleTools Deployment Packages," Running the DPK Setup Script for Mid-Tier
Deployment.
Task A-3-6: Preparing psft_customizations.yaml and Completing the
Deployment
Carry out these steps from the PeopleTools 8.58.<new> environment, installed in the previous section (for
example, 8.58.11). Create or edit a psft_customizations.yaml file, and complete the initialization using the
psft_puppet_apply script.
See "Completing the DPK Initialization with Customizations."
The documentation lists several types of customizations you can use for your environment. For this scenario, it is
important that you include the following in the psft_customizations.yaml file:
• Location for an existing PS_APP_HOME (if you have one) to be associated with the PS_HOME.
• Existing installation locations for one or more of the components that you want to retain; that is, Oracle
WebLogic, Oracle Tuxedo or Oracle Database client.
Here is a sample psft_customizations.yaml file that specifies the location for Oracle WebLogic and Oracle
Tuxedo, so that these components will be retained and not redeployed. Since the Oracle Database client and JDK
are not specified, they will be deployed fresh.

Applying PeopleTools Patches Using DPKs Appendix A
248
Copyright © 2022, Oracle and/or its affiliates. All Rights Reserved.
This customization also specifies an existing PS_APP_HOME location which will be associated to PS_HOME
during the deployment process.
Note. Be sure to retain the spacing and indentation as shown in this sample.
---
weblogic_location:C:/MyCurrentWeblogicLocation/weblogic
weblogic:
location:C:/MyCurrentWeblogicLocation/weblogic
tuxedo_location:C:/MyCurrentTuxedoLocation/weblogic/tuxedo
tuxedo:
location:C:/MyCurrentTuxedoLocation/weblogic/tuxedo
ps_apphome_location:c:/MyCurrentAppHomeLocation/fscm_app_home
ps_app_home:
db_type:"%{hiera('db_platform')}"
location:"%{hiera('ps_apphome_location')}"
Complete the initialization using the psft_puppet_apply script as described in the documentation.
See "Completing the DPK Initialization with Customizations."
Task A-3-7: Reviewing the Results
After completing the steps above:
•
One or more of the Oracle WebLogic, Oracle Tuxedo, and the Oracle Client installations from the initial
environment have been retained, as specified by the psft_customizations.yaml file.
•
The Application Server, Process Scheduler, and PIA domains have been configured.
•
There is new
PS_HOME_NEW
installation in the same location as the initial
PS_HOME_INIT.
After applying the PeopleTools patch, review the patch's readme.txt for any manual configuration instructions that
may be needed for your particular environment.
Task A-3-8: Verifying the Patch Application
Your host should have initialized successfully and started participating in your PeopleSoft environment. Many of
the steps that you should take to verify this or diagnose problems will be the same for Microsoft Windows, Linux,
AIX, HP-UX, and Solaris hosts.
1. Verify that you can sign in to PeopleSoft.
Start a browser and sign on to the PeopleSoft Application with the URL http://
<hostname>
:
<pia_http_port>/
ps/signon.html.
2. If you do not see the log in page, verify that the environment can be reached from your machine using a utility
such as ping.
3. If your host can be pinged, verify that the PIA domain is running in the following step.
4. Verify that Application Server, Process Scheduler and PIA domains have started:
a. On Linux, AIX, HP-UX, or Solaris, using an SSH client, log in as the psadm2 user.
On Microsoft Windows, open a command prompt with Run as Administrator.
b. Start the psadmin utility by typing
psadmin
at the command prompt.

Appendix A Applying PeopleTools Patches Using DPKs
Copyright © 2022, Oracle and/or its affiliates. All Rights Reserved.
249
When logged in as the psadm2 user the environment variables for PeopleSoft administration are set as part
of the psadm2 user's log-in profile.
c. Use the PSADMIN menus for the Application Server, Process Scheduler, and Web server (PIA) to verify
the status of each of the installed components.
d. If one or more of the components has not started, examine the log files for the required PeopleSoft
component to establish what has caused the component to not start.
The log files are in the default locations for each of the PeopleSoft components.
5. To verify the PS_APP_HOME location, check the value of the PS_APP_HOME environment variable.
On Linux, AIX, HP-UX, or Solaris, the environment variable is found in the .profile file for the psadm2 user.
Use the following command on Linux, AIX, or Solaris to check the environment variable:
exportPS_APP_HOME=/home/fscm_app_home
On Microsoft Windows, open the System Properties dialog box and click Environment Variables.
6. You can review the psprcs.cfg file to verify that the SQR section includes a path for PS_APP_HOME.
[SQR]
;=======================================================================⇒
==
;SettingsforSQRSoftware
;=======================================================================⇒
==
SQRBIN=%PS_HOME%/bin/sqr/ORA/bin
PSSQRFLAGS=-ZIF%PS_HOME%/sqr/pssqr%LANGUAGECD%.unx
PrintLog=N
EnhancedHTML=N
PSSQR=%PS_APP_HOME%/sqr:%PS_HOME%/sqr
See PeopleTools: Process Scheduler, "Using the PSADMIN for the Process Scheduler Configuration File."


Copyright © 2022, Oracle and/or its affiliates. All Rights Reserved.
251
Appendix B
Performing a PeopleTools-Only Upgrade
Using the PeopleSoft PeopleTools DPKs
This appendix discusses:
• Understanding the PeopleTools-Only Upgrade Using the PeopleSoft PeopleTools DPKs
•
Performing the PeopleTools-Only Upgrade Using DPKs
•
Reviewing the Results of the PeopleTools-Only Upgrade Using DPKs
Understanding the PeopleTools-Only Upgrade Using the
PeopleSoft PeopleTools DPKs
Use these steps to perform a PeopleTools-only upgrade to PeopleSoft PeopleTools 8.58.xx, using the PeopleSoft
PeopleTools Deployment Packages (DPKs). The PeopleTools Client DPK is used first to deploy the PeopleTools
Client, which includes the installation of Change Assistant. Subsequently, the PeopleTools DPKs are used to
install mid-tier components and the PS_HOME for the new release.

Performing a PeopleTools-Only Upgrade Using the PeopleSoft
PeopleTools DPKs
Appendix B
252
Copyright © 2022, Oracle and/or its affiliates. All Rights Reserved.
This diagram summarizes the scenario for performing a PeopleTools-only upgrade to PeopleSoft PeopleTools
8.58.xx using DPKs:
PeopleTools-only upgrade using DPKs
This scenario assumes that:
• You want to upgrade to PeopleTools 8.58.xx.
• Your operating system is AIX, Linux, HP-UX, Microsoft Windows or Solaris.
Task B-1: Performing the PeopleTools-Only Upgrade Using DPKs
To use the DPKs to perform a PeopleTools-only upgrade:

Appendix B Performing a PeopleTools-Only Upgrade Using the PeopleSoft
PeopleTools DPKs
Copyright © 2022, Oracle and/or its affiliates. All Rights Reserved.
253
1. Stop and delete the domains for the existing (old) release.
Stop and delete the existing Application Server, PeopleSoft Pure Internet Architecture (PIA), and Process
Scheduler domains for the old release using the PSADMIN utility.
See PeopleTools System and Server Administration, "Using PSADMIN Command-Line Interface."
2. On Microsoft Windows, stop the services for the domains, as follows:
a. Open the Services dialog box, for example by clicking Start and selecting Administrative Tools, Services.
b. Right-click the PsftAppServerDomain<Appserver_domain_name>Service and select Stop.
c. Right-click the PsftPrcsDomain<ProcSched_domain_name>Service and select Stop.
d. Right-click the PsftPIADomain<PIA_domain_name>Service and select Stop.
e. Select File, Exit, to close the dialog box.
3. Deploy PeopleTools Client for 8.58.xx on Microsoft Windows host using the PeopleTools Client DPK, as
follows.
a. Download the PeopleSoft PeopleTools 8.58 DPK from My Oracle Support.
Go to the PeopleTools Patches Home Page, My Oracle Support, Doc ID 2062712.2, and locate the link for
the PeopleTools DPKs for the new release. The fourth zip file (for example, PEOPLETOOLS-WIN-
8.58.xx_4of4.zip) includes the DPK for the PeopleTools Windows Client.
b. Install the PeopleTools 8.58.xx client using the fourth DPK zip file (PeopleTools Client DPK).
See "Deploying the PeopleSoft PeopleTools Deployment Packages," Deploying the PeopleTools Client
DPK.
Note. The PeopleTools-only Upgrade change package is delivered with the PeopleTools Windows Client
DPK and the PeopleTools server DPKs.
c. During the deployment, select these options:
Choose "PeopleTools Full Upgrade."
Choose the option to install Change Assistant.
4. Upgrade the PeopleTools database running on the existing (old) release.
a. Configure the database setup in Change Assistant for the database that needs to be upgraded.
See PeopleTools Change Assistant and Update Manager, "Using Change Assistant to Upgrade
PeopleTools."
See the upgrade document Getting Started on Your PeopleTools Upgrade for your new PeopleTools
release on the PeopleTools 8.58 Upgrade Home Page.
b. Follow the PeopleTools-only upgrade instructions for upgrading the database to the new PeopleTools
release.
See the PeopleTools Upgrade Documentation for your new PeopleTools release on the PeopleTools 8.58
Upgrade Home Page.
5. Deploy PS_HOME and create new domains using the PeopleTools 8.58.xx DPK with mid-tier option.
Perform this step if you did not already do it as directed in the PeopleTools upgrade documentation.
For this upgrade process, it is required that you use the component software that is installed by the
PeopleTools DPK for Oracle Tuxedo, Oracle WebLogic, and Oracle Database Client. Do not use existing
installations of Oracle Tuxedo, Oracle WebLogic, and Oracle Database Client.

Performing a PeopleTools-Only Upgrade Using the PeopleSoft
PeopleTools DPKs
Appendix B
254
Copyright © 2022, Oracle and/or its affiliates. All Rights Reserved.
Note. If the server where you plan to deploy PS_HOME and mid-tier components is a Microsoft Windows
OS, uninstall any existing Oracle Tuxedo installations on the server.
To install the new release PS_HOME and create new domains connecting to the database upgraded to
PeopleTools 8.58.xx, run the DPK setup script with these options:
• Specify a new PeopleSoft base folder (referred to as BASE_DIR in the documentation). This will set up a
new PS_HOME for the new PeopleTools release as <BASE_DIR>/pt/ps_home<patch_release>.
• Use these script options to deploy PS_HOME and create new domains:
Linux, AIX, HP-UX, or Solaris: ./psft-dpk-setup.sh --env_type midtier
Microsoft Windows: psft-dpk-setup.bat --env_type midtier
Task B-2: Reviewing the Results of the PeopleTools-Only
Upgrade Using DPKs
After you complete the steps above:
•
The PeopleTools database is upgraded to 8.58.xx.
•
The Oracle WebLogic, Oracle Tuxedo, and Oracle Client from the PeopleTools 8.58.xx are installed.
•
The PS_HOME from the old (existing) PeopleTools release remains as is.
•
The new PeopleTools 8.58.xx PS_HOME is created.
•
New Application Server, PIA, and Process Scheduler domains are created connecting to the database
upgraded to PeopleTools 8.58.xx.

Copyright © 2022, Oracle and/or its affiliates. All Rights Reserved.
255
Appendix C
Installing PeopleSoft Change Assistant
This appendix discusses:
• Understanding PeopleSoft Change Assistant
• Using the Change Assistant Setup Script to Install, Upgrade, or Uninstall
• Configuring and Using PeopleSoft Change Assistant
• Validating Change Assistant Settings
Understanding PeopleSoft Change Assistant
Oracle's PeopleSoft Change Assistant is a standalone tool, provided with PeopleSoft PeopleTools, that enables
you to assemble and organize the steps necessary to apply patches and fixes for maintenance updates as well as
perform PeopleSoft upgrades. You use different modes of Change Assistant to carry out maintenance both for
PeopleSoft applications using the PeopleSoft Update Manager, and those using the classic patching method.
To take advantage of all of the Change Assistant features, you must install on a Microsoft Windows-based
operating system. On Linux, you can use a command-line version of Change Assistant, and run in Update
Manager mode only.
When you run the setup script for the PeopleTools Client DPK, you can choose to install Change Assistant as part
of the client installation. If you need to install, upgrade, or remove Change Assistant independently of the
PeopleTools Client DPK deployment, use the instructions in this chapter.
See "Deploying the PeopleTools Client DPK."
For the current PeopleSoft PeopleTools release, the Change Assistant installation includes the following features:
• You can run the setup.bat script located in PS_HOME\setup\PsCA to install, update, or remove Change
Assistant.
The PS_HOME/setup/PsCA directory includes setup.bat and a sample response file, resp_file.txt. The
PS_HOME/setup/PsCA folder is available in both the PeopleTools Client DPK deployment and PeopleTools
DPK server deployments.
Note. The PS_HOME\setup\PsCA directory includes scripts and files that are reserved for use by the software.
You can ignore these files, including silentInstall.bat and CA-silentInstall-response-file.txt.
• You must run from
PS_HOME/
setup/PsCA.
Do not copy the PsCA folder alone to another location and try to install.
• You can specify the installation location on the command line, in response to the script prompts, or in a text
file.
If you do not supply the installation location, the script prompts you for the necessary information. To upgrade
or remove an existing installation, you run the script with no options, and the script prompts you for the
necessary information.

Installing PeopleSoft Change Assistant Appendix C
256
Copyright © 2022, Oracle and/or its affiliates. All Rights Reserved.
• You can install multiple instances of Change Assistant from the current release on one physical machine.
Note. Multiple instances of Change Assistant can run in parallel on the same machine. However, when
configuring Change Assistant, for example to set up update or upgrade jobs, you cannot run multiple instances
against the same target database. That is, you cannot specify the same target database on different Change
Assistant instances.
See PeopleTools: Change Assistant and Update Manager, "Running Multiple Instances of Change Assistant."
• You must remove installations of Change Assistant from PeopleSoft PeopleTools 8.55 or earlier before
installing from the current release. Change Assistant from PeopleSoft PeopleTools 8.58 cannot coexist with
that from earlier releases.
• You must install each Change Assistant instance in a separate installation location.
• You can remove or upgrade each Change Assistant instance separately.
• When you remove an installation instance, you have the option to save the existing configuration information
in a group of files gathered in a zip archive. You can configure Change Assistant at a later time by importing
the zip file.
For more information on using Change Assistant for updates and for software upgrades, see the PeopleSoft
product documentation.
See Also
PeopleTools: Change Assistant and Update Manager
PeopleTools: Application Designer Lifecycle Management Guide
Task C-1: Using the Change Assistant Setup Script to Install,
Upgrade, or Uninstall
This section discusses:
• Running the Change Assistant Setup Script with Command-Line Parameters
• Running the Change Assistant Setup Script with a Response File
• Running the Change Assistant Setup Script Interactively to Install
• Running the Change Assistant Setup Script Interactively to Upgrade
• Running the Change Assistant Setup Script Interactively to Uninstall
• Using Change Assistant on Linux

Appendix C Installing PeopleSoft Change Assistant
Copyright © 2022, Oracle and/or its affiliates. All Rights Reserved.
257
Task C-1-1: Running the Change Assistant Setup Script with Command-
Line Parameters
You can use the following command-line parameters with the Change Assistant setup script.
Command-line Parameter Description
-p<installation_path>
Supply the full path for the Change Assistant installation
location.
If the location includes spaces, surround it with double
quotes, such as "C:\PS\Change Assistant".
-t<action_type>
Use one of the following value for <action_type>.
• NEW or new
Create a new Change Assistant instance.
• UPGRADE or upgrade
Upgrade an existing instance that was installed from the
current PeopleSoft PeopleTools release.
• UNINSTALL or uninstall
Remove an existing Change Assistant instance.
-bkp<backupornobackup>
Use one of these values:
• BACKUP or backup
Create a zip file containing files with configuration
information. The backup file, changeassistantcfgbak.zip,
is saved in the installation location.
• NOBACKUP or nobackup
Do not create a backup file with the configuration
information.
-lp<log_file_location>
Specify the full path where you want the log file to be saved.
To use the Change Assistant setup script with command-line options:
1. Open a command prompt and change directory to PS_HOME\setup\PsCA.
2. Enter the following command to specify the installation location for a new installation.
For <installation_path>, supply the full path to the location where you want to install Change Assistant.
setup.bat-p<installation_path>-tnew
For example:
setup.bat-p"C:\PS\ChangeAssistant"-tnew
3. If you want to specify the installation location and a location for the log file, enter the following command.
For <installation_path>, supply the full path to the location where you want to install Change Assistant. For
<log_file_location>, supply the full path to the location for the installation log file.
setup.bat-p<installation_path>-lp<log_file_location>-tnew

Installing PeopleSoft Change Assistant Appendix C
258
Copyright © 2022, Oracle and/or its affiliates. All Rights Reserved.
4. If you want to upgrade an existing installation, enter the following command:
setup.bat-tupgrade
5. If you want to remove an existing installation, and save a backup, enter the following command:
setup.bat-tuninstall-bkpbackup
See Also
Using Change Assistant on Linux
Task C-1-2: Running the Change Assistant Setup Script with a Response
File
To use the Change Assistant setup script with the installation location in a text file:
1. Open the sample response file PS_HOME\setup\PsCA\resp_file.txt for editing, for example in Notepad.
2. Modify the parameter INSTALL_PATH="C:\PS\Change Assistant" to specify the desired
installation path.
If the installation location includes spaces, enclose it in double quotes. Save the file.
3. Open a command prompt and change directory to PS_HOME\setup\PsCA.
4. Run this command:
setup.bat-fresp_file.txt
Task C-1-3: Running the Change Assistant Setup Script Interactively to
Install
To use the Change Assistant setup script interactively, run without supplying parameters.
1. Open a command prompt and change directory to
PS_HOME\
setup\PsCA.
2. Run the script with no parameters.
setup.bat
The script checks for a response file and old installations, then prompts you for the necessary information.
3. Enter
1
for New Installation:
--------------------------------
PeopleSoftChangeAssistant
--------------------------------
1)NewInstallation
2)MaintainorUpdate
q)Quit
Commandtoexecute(1-2,q):1
4. Enter an installation location, or accept the default, C:\PS\Change Assistant.
PeopleSoftwillinstallChangeAssistanttothefollowingdirectory.
DestinationFolder[C:\PS\ChangeAssistant]:
5. Wait until the script completes.

Appendix C Installing PeopleSoft Change Assistant
Copyright © 2022, Oracle and/or its affiliates. All Rights Reserved.
259
PeopleSoftChangeAssistantSuccessfullyInstalledinC:\PS\Change⇒
Assistant
Task C-1-4: Running the Change Assistant Setup Script Interactively to
Upgrade
Run the setup script with no parameters to upgrade an existing Change Assistant installation. You can only
upgrade an existing Change Assistant instance that was installed from the same, current PeopleTools release. For
example, upgrade Change Assistant based on PeopleTools 8.58.09 to Change Assistant based on PeopleTools
8.58.12.
1. Open a command prompt, and change directory to PS_HOME\setup\PsCA.
2. Run the script with no parameters:
setup.bat
3. Enter
2
for Maintain or Update.
--------------------------------
PeopleSoftChangeAssistant
--------------------------------
1)NewInstallation
2)MaintainorUpdate
q)Quit
Commandtoexecute(1-2,q):2
4. Select the instance of Change Assistant to update.
PleaseselecttheinstanceofChangeAssistant:
1)ChangeAssistant18.58.03C:\ProgramFiles\ChangeAssistant2
2)ChangeAssistant28.58.04C:\ProgramFiles\PeopleSoft\Change⇒
Assistant
3)ChangeAssistant38.58.09C:\PS\ChangeAssistant
q)Quit
Commandtoexecute(1-3,q):3
Selected
ChangeAssistant38.58.09C:\PS\ChangeAssistant
5. Enter
1
to update to the current PeopleTools patch release.
Pleaseselecttheactivity:
1)UpgradeSelectedInstance
2)UninstallSelectedInstance
q)Quit
Commandtoexecute(1-3,q):1
Selected
ChangeAssistant38.58.09C:\PS\ChangeAssistant
6. Enter 1 to upgrade without saving a configuration file.
Alternatively, if you want to retain a configuration file, enter 2 to create a zip file containing files with
configuration information. The backup file, changeassistantcfgbak.zip, is saved in the installation location.
Pleaseselecttheactivity:
1)WithoutRetainingexistingconfiguration

Installing PeopleSoft Change Assistant Appendix C
260
Copyright © 2022, Oracle and/or its affiliates. All Rights Reserved.
2)Retainingexistingconfiguration
q)Quit
Commandtoexecute(1-3,q):1
Task C-1-5: Running the Change Assistant Setup Script Interactively to
Uninstall
Run the setup script with no parameters to remove an existing Change Assistant installation.
1. Open a command prompt, and change directory to PS_HOME\setup\PsCA.
2. Run the script with no parameters:
setup.bat
3. Enter 2 for Maintain or Update.
--------------------------------
PeopleSoftChangeAssistant
--------------------------------
1)NewInstallation
2)MaintainorUpdate
q)Quit
Commandtoexecute(1-2,q):2
4. Select the instance of Change Assistant to remove.
PleaseselecttheinstanceofChangeAssistant:
1)ChangeAssistant18.58.03C:\ProgramFiles\ChangeAssistant2
2)ChangeAssistant28.58.04C:\ProgramFiles\PeopleSoft\Change⇒
Assistant
3)ChangeAssistant38.58.12C:\PS\ChangeAssistant
q)Quit
Commandtoexecute(1-3,q):2
Selected
ChangeAssistant38.58.04C:\PS\ChangeAssistant
5. Enter 2 to remove the selected instance.
Pleaseselecttheactivity:
1)UpgradeSelectedInstance
2)UninstallSelectedInstance
q)Quit
Commandtoexecute(1-3,q):2
Selected
ChangeAssistant38.58.04C:\PS\ChangeAssistant
6. Enter
1
to uninstall without saving a configuration file.
Alternatively, if you want to retain a configuration file, enter
2
to create a zip file containing files with
configuration information. The backup file, changeassistantcfgbak.zip, is saved in the installation location.
Pleaseselecttheactivity:
1)WithoutRetainingexistingconfiguration
2)Retainingexistingconfiguration
q)Quit

Appendix C Installing PeopleSoft Change Assistant
Copyright © 2022, Oracle and/or its affiliates. All Rights Reserved.
261
Commandtoexecute(1-3,q):1
Task C-1-6: Using Change Assistant on Linux
You can use a command-line version of Change Assistant on Linux for Update Manager mode only. Change
Assistant on Linux can not be used for target databases that are below PeopleTools 8.55.16.
To install Change Assistant on Linux:
1. In a terminal window, change directory to PS_HOME/setup/PsCA.
2. Verify that you are running as a user with permission for the files in PsCA.
For example, if your installation includes the default Linux users set up by the DPK, run as the psadm1 user.
See Using the PeopleSoft Installation.
3. Run the setup script and specify the installation directory.
$./setup.sh-p/ds1/changeassistant-tnew
4. Go to the installation directory, and run Change Assistant in Update Manager mode using the command-line
options in the Change Assistant product documentation.
See
PeopleTools: Change Assistant and Update Manager,
"Running Change Assistant Job from the
Command Line."
Task C-2: Configuring and Using PeopleSoft Change Assistant
This section discusses:
•
Verifying the Path Variable
•
Specifying Options
•
Scanning the Workstation
•
Exporting Jobs to XML, HTML, or Microsoft Excel Format
Task C-2-1: Verifying the Path Variable
After installing PeopleSoft Change Assistant, verify that the following values are the first entries in the PATH
environment variable:
• PS_HOME\bin\client\winx86
• PS_HOME\jre\bin
See PeopleTools: Change Assistant and Update Manager, "Setting Up Change Assistant."
Task C-2-2: Specifying Options
You can configure PeopleSoft Change Assistant modes to carry out updates, upgrades, work with upgrade
templates, or access PeopleSoft Update Manager. The mode selection determines which menu options you see
when you use PeopleSoft Change Assistant.

Installing PeopleSoft Change Assistant Appendix C
262
Copyright © 2022, Oracle and/or its affiliates. All Rights Reserved.
See Also
PeopleTools: Change Assistant and Update Manager
PeopleSoft Update Manager Home Page, My Oracle Support, Doc ID 1641843.2
Task C-2-3: Scanning the Workstation
The first time you use PeopleSoft Change Assistant, it automatically scans your workstation for applications that
it will use in order to automate the steps. For example, it automatically finds the SQL Query tool and uses it to run
SQL commands or scripts.
If you add a new application or update an existing application, PeopleSoft Change Assistant must perform a scan
of the system in order to discover the changes. To perform this scan, select Tools, Scan Configuration.
Task C-2-4: Exporting Jobs to XML, HTML, or Microsoft Excel Format
Change Assistant allows users to export jobs to XML, HTML, or Microsoft Excel file formats. Do this by
selecting File, Export Job in Change Assistant. Then, enter the desired exported filename and select the desired
file type format.
Task C-3: Validating Change Assistant Settings
After you have set up and configured PeopleSoft Change Assistant and the Environment Management
components, you should validate your PeopleSoft Change Assistant and environment settings.
PeopleSoft Change Assistant validates settings by:
• Locating valid SQL query tools required to run SQL scripts.
• Testing the Environment Management hub and ensuring that PeopleSoft Change Assistant can communicate
with it.
• Testing My Oracle Support and ensuring that PeopleSoft Change Assistant can communicate with it.
PeopleSoft Change Assistant sends a ping to My Oracle Support and then tests the connection. In order for the
validation to succeed, the machine where you have PeopleSoft Change Assistant installed must have the ping
feature enabled.
You can also print a summary of your environment, which can facilitate the diagnosis of problems by Oracle
Software Support.
To validate your environment, select Tools, Options, Validate. Click Start Validation.

Appendix C Installing PeopleSoft Change Assistant
Copyright © 2022, Oracle and/or its affiliates. All Rights Reserved.
263
If any of the steps were unable to complete successfully, open the log file to determine the cause. This example
shows a summary with both successful messages ("Done") and unsuccessful ("Failed" or "Unsuccessful
completion"):
Validating Change Assistant Settings in Your Environment
Note. If you use proxy servers, the system will ping those and prompt for proxy server user ID and password. In
this case, the validation step numbers would be different from the example.


Copyright © 2022, Oracle and/or its affiliates. All Rights Reserved.
265
Appendix D
Encrypting Passwords for Customizations
on Linux, AIX, HP-UX, or Solaris
Task D-1: Encrypting Passwords for Customization Files on
Linux, AIX, HP-UX, or Solaris
This section describes how to produce an encrypted version of a clear text password and include it in the
psft_customizations.yaml file for a customized deployment for non-default users and groups on Linux, AIX, HP-
UX, or Solaris. This section applies to installations with the Native OS for Linux, AIX, HP-UX, or Solaris DPKs.
Note. You can skip this section if you are creating psft_customizations.yaml files for silent mode installations.
Use clear text passwords with silent mode installations.
In general, when you run the DPK setup script, you supply several user IDs and passwords, such as the Connect
ID password and operator ID password. The script encrypts the passwords that you supply and includes them in
the generated YAML files in BASE_DIR/dpk/puppet/production/data. When you create a
psft_customizations.yaml file, you can copy these encrypted passwords from the generated YAML files and
include them in the psft_customizations.yaml file. However, the passwords for the Linux, AIX, HP-UX, or Solaris
users are not prompted for, and therefore the encrypted passwords are not available in any of the generated
YAML files.
Note that the successful use of the encrypted password depends on the presence of the public and private keys in
the BASE_DIR/dpk/puppet directory referred to in the eyaml encrypt command. You cannot save an encrypted
password and use it with a deployment with an installation with a different BASE_DIR
This procedure assumes that you have carried out the first portion of a customized deployment, and stopped at the
question "Do you want to continue with the default initialization?"
See "Completing the DPK Initialization with Customizations," Preparing the Customization Files for Linux, AIX,
HP-UX, or Solaris Users and Groups.
To encrypt a password:
1. Open the
BASE_DIR/
dpk/puppet/hiera.yaml file and note the full path to the public and private keys:
:pkcs7_private_key:BASE_DIR/dpk/puppet/secure/keys/private_⇒
key.pkcs7.pem
:pkcs7_public_key:BASE_DIR/dpk/puppet/secure/keys/public_key.pkcs7.pem
2. Run the following command in a terminal window, supplying the paths from the previous step:
eyamlencrypt-s"<clear_password>"--pkcs7-private-key=
<private_key_⇒
location>--pkcs7-public-key=<public_key_location>--output=string

Encrypting Passwords for Customizations on Linux, AIX, HP-UX, or
Solaris
Appendix D
266
Copyright © 2022, Oracle and/or its affiliates. All Rights Reserved.
Note. The double-quotes around the password are required. Be sure to use the correct punctuation for the
command. Note that the command uses different punctuation for the keys than the hiera.yaml file.
Note. If your password includes an exclamation mark (!) you must enclose the entire password in double
quotes surrounded by single quotes. For example, '"passw!ord"'.
Example for Linux:
/opt/puppetlabs/puppet/bin/eyamlencrypt-s"password"--pkcs7-private-⇒
key=/cs1/psft/dpk/puppet/secure/keys/private_key.pkcs7.pem--pkcs7-⇒
public-key=/cs1/psft/dpk/puppet/secure/keys/public_key.pkcs7.pem--⇒
output=string
Example for AIX, HP-UX, or Solaris:
/opt/oracle/puppetlabs/bin/eyamlencrypt-s"password"--pkcs7-private-⇒
key=/cs1/psft/dpk/puppet/secure/keys/private_key.pkcs7.pem--pkcs7-⇒
public-key=/cs1/psft/dpk/puppet/secure/keys/public_key.pkcs7.pem--⇒
output=string
3. Copy the encrypted password from the output in the terminal window.
The encrypted text will be a long single line of letters and numbers. Be sure to copy the text in one unbroken
line, with no spaces or line feeds. Here is a truncated representation of an encrypted password:
ENC[PKCS7,MIIBeQYJKoZIhvc...................]
4. Paste the encrypted password in the psft_customizations.yaml file, replacing the text password.
Again, the encrypted text must be a single line. Also, be sure to retain the indentation in the
psft_customizations.yaml file. This is a sample psft_customizations.yaml for a new single user and existing
single group:
---
psft_runtime_user_name:newusr3
users:
psft_user:
name:newusr3
gid:35000
home_dir:/dpk_base/home/userhome
password:ENC[PKCS7,MIIBeQYJKoZIhvc...................]
remove:false
5. Use the psft_customizations.yaml file for deployment with the psft_puppet_apply script.
The DPK deployment will automatically decrypt the password from the psft_customizations.yaml and use it
for deployment.

Copyright © 2022, Oracle and/or its affiliates. All Rights Reserved.
267
Appendix E
Learning About the PeopleSoft Deployment
Process
This appendix discusses:
• Understanding the PeopleSoft Deployment Framework
•
Understanding PeopleSoft Components
•
Understanding Puppet and the PeopleSoft Puppet Modules
•
Understanding the Deployment Packages Uses and Contents
•
Reviewing the PeopleSoft PeopleTools Patch DPKs
•
Reviewing the PeopleTools Client DPK
Understanding the PeopleSoft Deployment Framework
Oracle recommends that you use the PeopleSoft Deployment Packages (DPKs) to install and configure your
PeopleSoft environment. DPKs offer out-of-the-box functionality that greatly enhances the installation and
configuration of your PeopleSoft environment, which is not available with the standard VCD installation.
DPKs allow fast deployment of a PeopleSoft environment on any hardware platform — physical hardware ("bare
metal") or virtual. The DPKs allow you to skip the manual steps associated with the following:
•
Gathering the necessary installation programs
•
Installing third-party products such as Oracle Tuxedo and WebLogic and the latest patches (CPUs)
• Installing Application Home (PS_APP_HOME) (for PI DPKs)
•
Installing both PeopleTools and the PeopleTools patch binaries
•
Configuring the PeopleSoft domains
The DPKs can be installed on Oracle Linux and Red Hat Enterprise Linux, and on Microsoft Windows platforms
supported by Oracle for PeopleSoft systems.
The DPKs include a setup script that deploys a default instance of each of the PeopleSoft mid-tier domains—
PeopleSoft Pure Internet Architecture (PIA), Application Server and Process Scheduler domains. These domains
are fully functional out-of-the-box. However, it is assumed that you will need to make changes to these
deployments. These changes will be required to reflect your organizational standards, preferences, and
customizations. DPKs set up your infrastructure for you—"infrastructure as a code," which allows you to
customize the environments to produce various topologies to serve different functionality, such as test
environments, environments for performance testing or development environments, and so on. Notably, these
customizations can be retained across maintenance application (upgrades, patches, and updates).

Learning About the PeopleSoft Deployment Process Appendix E
268
Copyright © 2022, Oracle and/or its affiliates. All Rights Reserved.
The best practice for environments deployed with the DPKs is to modify the environments using the methods
provided by the PeopleSoft customizations. With the delivered customization method you have the ability to
safely modify a wide variety of installation locations, integration definitions, and other configuration settings,
while at the same time ensuring that the customizations are retained after applying software patches.
See Understanding Puppet and the PeopleSoft Modules
See the sections on customizing a PeopleSoft environment in the chapters on deploying the DPKs.
Using DPKs to create a PeopleTools middle-tier environment (Application Server, Process Scheduler, and PIA)
typically takes less than 15 minutes. This allows for dynamic scaling and quick patching. With such fast creation
of the middle-tier components, you can optimize hardware resources by creating middle-tier virtual machines
(VMs) on demand. These VMs can be removed to release the resources when not in use, yet be quickly recreated
as needed.
DPKs are integrated with PeopleSoft Automated Configuration Management (ACM) to provide PeopleSoft
application configuration using plug-ins delivered by the PeopleSoft Application. For example, for all deployed
environments, the Integration Broker and Gateway are set with ACM plug-ins.
DPKs allow for fast environment cloning. After creating an environment clone, you can use PeopleSoft ACM
plug-ins to modify the configuration settings, such as those for Integration Broker, from those used in the original
environment, to those required for the cloned environment, during the deployment of the middle-tier using
PeopleTools DPK. DPKs can be used, to easily and effectively, create a fresh clone from your existing
environments. Using database snap cloning, an environment clone can be achieved in less than 30 minutes.
Understanding PeopleSoft Components
Here are brief descriptions of some of the terms referenced in this documentation for components included in a
PeopleSoft environment. The components included for each deployment depend upon the types of DPKs
downloaded and method used to deploy them. PeopleSoft components, including PeopleSoft Pure Internet
Architecture (PIA), application server and Process Scheduler, are described in the PeopleSoft PeopleTools
product documentation.
See the PeopleTools System and Server Administration product documentation for an explanation of PeopleSoft
architecture fundamentals.
•
PeopleSoft Pure Internet Architecture (PIA)
This is the Web Server component of the PeopleSoft system.
• Application server and Process Scheduler
The application server acts as the business logic engine of the PeopleSoft system. The Process Scheduler is
responsible for processing scheduled tasks or jobs that typically do not happen during the course of a user's
browser request.
• PeopleSoft application database
This document uses the term "PeopleSoft applications" to refer to Oracle PeopleSoft products such as
PeopleSoft Customer Relationship Management (CRM), PeopleSoft Enterprise Learning Management (ELM),
PeopleSoft Financials and Supply Chain Management (FSCM), PeopleSoft Human Capital Management
(HCM), and PeopleSoft Interaction Hub.
• Mid-tier components
This documentation uses the term "mid-tier" to refer to PeopleSoft Application Server, Process Scheduler, and
PIA, and the software required to deploy them, including Oracle Tuxedo and Oracle WebLogic.
• AppBatch components
This documentation uses the term "AppBatch" to refer to the Application Server and Process Scheduler server.

Appendix E Learning About the PeopleSoft Deployment Process
Copyright © 2022, Oracle and/or its affiliates. All Rights Reserved.
269
Understanding Puppet and the PeopleSoft Puppet Modules
This section discusses:
• Understanding Puppet
• Understanding Hiera
• Understanding Puppet Modules
• Understanding How the PeopleSoft DPKs Use Puppet
• Understanding PeopleSoft Puppet Component Modules
• Understanding PeopleSoft Puppet Profiles and Roles Modules
• Understanding Puppet Third-Party Modules
Understanding Puppet
The DPKs are delivered with the PeopleSoft Puppet modules, which are initialization and management scripts
based upon the open-source Puppet software. The PeopleSoft Puppet modules can be used to customize and
control the PeopleSoft environments deployed from the DPKs. This section includes a brief introduction to
Puppet. For detailed information, see the documentation on the Puppet Labs Web site.
See Puppet Labs Documentation, http://docs.puppetlabs.com.
Puppet is a tool designed to manage the configuration of UNIX-like and Microsoft Windows systems
declaratively. The user describes system resources and their state, either using Puppet's declarative language or a
Ruby DSL (domain-specific language). This information is stored in files called "Puppet manifests." Puppet
discovers the system information and compiles the Puppet manifests into a system-specific catalog containing
resources and resource dependency, which are applied against the target systems. Any actions taken by Puppet are
then reported. Puppet consists of a custom declarative language to describe system configuration, which can be
either applied directly on the system, or compiled into a catalog and distributed to the target system with a client–
server paradigm (using a REST API), and the agent uses system-specific providers to enforce the resource
specified in the manifests. The resource abstraction layer enables administrators to describe the configuration in
high-level terms, such as users, services, and packages without the need to specify OS specific commands (such
as rpm, yum, or apt).
Puppet has been chosen by Oracle as a solution for provisioning PeopleSoft environments for the following
reasons:
• Community
Puppet has a significant presence in the configuration management marketplace and a strong user community.
This community contributes to improving and testing Puppet core functionality.
• Open source and Enterprise solutions
Puppet Open Source is sufficiently rich in features to meet the requirements of Oracle for orchestrating the
provisioning of large numbers of PeopleSoft environments in a fully automated fashion.
• Lightweight
Puppet can be run in standalone (master-less) mode and therefore does not require complex steps to get
started.
• Data and code separation
Puppet encourages clean separation of the data that describes your environment and the way in which it is
provisioned.

Learning About the PeopleSoft Deployment Process Appendix E
270
Copyright © 2022, Oracle and/or its affiliates. All Rights Reserved.
• Component modules
The creation of Application Component modules allows vendors such as Oracle to create lightweight, isolated
modules that can be independently obtained and plugged into existing Puppet environments.
• Role isolation — separation of infrastructure instructions and application instructions
This allows your system administrators to provision the OS independently of the Application steps. Puppet
facilitates this role separation and allows the administrators to focus on the operational needs of the
environments.
• OS platform support
Puppet agent can run on all supported PeopleSoft OS platforms.
• Virtualization platform support
Virtualization and cloud vendors are offering direct support for provisioning environments using Puppet. For
example, OpenStack and Amazon EC2 both document how to use Puppet in their infrastructure.
Understanding Hiera
Hiera is a feature of Puppet that allows data to be stored and subsequently queried from any number of file
formats ("back-end" structures). These structures may be in a number of different formats, the most preferable
being YAML, which is a readable properties file format with hierarchical structure support. The value of Hiera to
the PeopleSoft modules is that it allows separation of the data from the code that performs the actual system
configuration. In the context of a PeopleSoft environment, the database connectivity information and any other
custom configuration settings to be applied to the Application Server domain are placed in a Hiera data file. Any
number of domains with varying configuration settings can be represented in a Hiera data file. Hiera data files can
be associated with a particular environment such as Dev, Test or Production. A Production Hiera data file may
contain connectivity information for a single database with a number of Application Server domains. A Dev Hiera
data file on the other hand may only contain a single Application Server domain and may have specific
configuration features enabled such as the Work Station Listener process for three-tier PeopleSoft connections.
This ability to define all abstractions of the PeopleSoft environment in Hiera completely decouples the runtime
characteristics of your environment from the code that actually creates it. This is a very powerful feature.
Understanding Puppet Modules
A Puppet module can be thought of as a self-contained bundle of code that implements a related set of
functionality. Developers write custom modules and combine these with pre-built modules from the Puppet Labs
repository, Puppet Forge. Modules are how Puppet finds the classes and types it can use — it automatically loads
any class, defined type, or custom types stored in its modules. A module can be thought of as being somewhat like
an EAR file in the sense that it is a container or archive that stores a self-contained archive of functionality. A
Puppet module contains some of the following:
• Puppet source files — manifests with the .pp extension, which implement the functionality exhibited by the
module
• Test manifests that allow your module to be tested in an isolated fashion
• Library of types and providers
• Template files into which custom values may be substituted
• Metadata file that describes the version and purpose of the modules

Appendix E Learning About the PeopleSoft Deployment Process
Copyright © 2022, Oracle and/or its affiliates. All Rights Reserved.
271
Understanding How the PeopleSoft DPKs Use Puppet
The PeopleSoft DPKs use Puppet to automate the process of deploying and configuring a PeopleSoft
environment. Oracle has created custom modules and types to deploy and configure a PeopleSoft environment.
These modules make use of pre-built modules from Puppet Forge. All the PeopleSoft developed modules and
types along with the pre-built modules are packaged with PeopleTools server DPKs as well as PeopleSoft
application DPKs. In addition, the PeopleSoft and PeopleTools DPKs package Hiera YAML files with default
data values that can be used to set up a fully working PeopleSoft environment out-of-the-box.
The modules delivered with the PeopleSoft DPKs adhere to the following Puppet design patterns:
• Use Hiera as an external data store
See Understanding Hiera.
• Do not use Hiera at any point in component modules
•
Apply the Puppet Roles and Profiles pattern
See Understanding PeopleSoft Puppet Profiles and Roles Modules.
•
Ensure idempotency in component modules so that your modules create the same result regardless of the
initial state of the underlying resource
• Follow the module naming and documentation guidelines from Puppet Labs.
PeopleSoft Puppet modules are broadly divided into the following three categories. These modules are described
in more detail in the following sections.
•
Component Modules
• Atomic — building block modules that work on a single abstraction
• Low-level — contain minimal dependencies on other modules
• Profiles Modules
•
Assemble data from Hiera to be used for configuring the hosts
•
Do not operate on single artifacts such as files or users
• Roles Modules
Focus on operational responsibilities of the hosts
See Modules Fundamentals on the Puppet Labs documentation Web site,
http://docs.puppetlabs.com/puppet/latest/reference/modules_fundamentals.html.
In most cases, the Puppet software will be installed by the DPKs. In case of problems, it may be necessary for you
to install either Puppet or its dependencies directly. If so, use these guidelines:
• The DPK deployment requires open-source Puppet software.
See the Puppet Labs Web site at www.puppetlabs.com to download the software.
• Customer installation of Puppet is not supported for AIX, HP-UX, or Solaris operating systems.
If you are installing the PeopleSoft DPKs for AIX, HP-UX, or Solaris, you must use the Puppet software that
is delivered with the DPKs.

Learning About the PeopleSoft Deployment Process Appendix E
272
Copyright © 2022, Oracle and/or its affiliates. All Rights Reserved.
Understanding PeopleSoft Puppet Component Modules
Component modules are a specific sub-category of Puppet modules. They typically deal with a specific technical
abstraction. The PeopleSoft DPKs are delivered with such building-block component modules to free you from
needing to create platform-specific shell scripts to automate environment provisioning (deployment and
configuration). These scripts typically invoke the Oracle Universal Installer (OUI) for installing components like
Oracle WebLogic, Oracle Database Server or Database Client, and Oracle Tuxedo. The scripts use PeopleSoft
utilities like PSADMIN, PeopleSoft Application Engine (psae) and other low-level utilities for configuring a
PeopleSoft environment.
All the PeopleSoft Puppet component modules are implemented as custom resource types using Puppet Types and
Providers paradigm. This paradigm provides a powerful way to extend Puppet by separating the interface and
implementation of each resource managed by Puppet.
The PeopleSoft Puppet component modules are packaged as two separate modules:
• pt_deploy — This component module contains PeopleSoft custom resource types for deploying various
PeopleSoft components.
• pt_config — This component module contains PeopleSoft custom resource types for configuring various parts
of a PeopleSoft environment.
Understanding PeopleSoft Puppet Profiles and Roles Modules
Roles and Profiles are considered to be Puppet modules that contain manifests that operate at a higher level of
abstraction than the component modules which act directly on manageable system components. Understanding
the purpose of Roles and Profiles modules is crucial when taking full advantage of Puppet in your PeopleSoft
architecture. Roles and Profiles refer to an established pattern in the Puppet community for increasing the
reusability of modules. This pattern encourages the separation of how Application components are configured
from which components should be configured. The use of this pattern is fundamental to the way in which the
PeopleSoft component modules have been created.
Note that the word "roles" and "profiles" as used in the context of Puppet development have quite different
meanings than the accepted definitions.
See The Puppet Labs installation guide, https://docs.puppetlabs.com/guides/install_puppet/pre_install.html.
The primary purpose of the Roles and Profiles pattern is to isolate and abstract functionality along the separate
lines of business and technical perspectives. In such cases we want to isolate the description of an environment
from the way in which it is implemented while retaining a relationship between these abstractions. For example,
consider a PeopleSoft deployment comprised of three distinct pillars: PeopleSoft Human Capital Management
9.1, PeopleSoft Human Capital Management 9.2 and PeopleSoft Financials 9.2, all in production. There is a Dev
and Test environment for each of these PeopleSoft application pillars.
Now consider the business and technical perspectives on this system. The business managers see the systems as
being independent of one another servicing different business functions. The technical team sees them as variants
of the same tech stack, as all of the systems contain JEE servers, databases, firewalls and so on. In the PeopleSoft
DPK implementation, the business perspectives are associated with Puppet roles, and the technical perspectives
with profiles.
The Roles and Profiles pattern implemented in PeopleSoft DPKs is comprised of two separate modules:
• pt_role — This module contains pre-defined roles that can be assigned to an host.
• pt_profile — This module contains PeopleSoft classes and defined types to set up various aspects of a
PeopleSoft environment. The classes and defined types in this module interact with Hiera to access the data,
and call in the low-level custom types to deploy and configure the PeopleSoft environment.

Appendix E Learning About the PeopleSoft Deployment Process
Copyright © 2022, Oracle and/or its affiliates. All Rights Reserved.
273
Understanding Puppet Third-Party Modules
The PeopleSoft DPKs are delivered with modules made available to the Puppet community through the Puppet
Forge. These external modules are required by the PeopleSoft component modules in order to efficiently
implement their functionality. This helps the developer to write cleaner Puppet code and not have to rewrite code
that has already been implemented elsewhere. The following are external modules that are included as
dependencies by the PeopleSoft component modules:
• stdlib — provides data structure and string manipulation capabilities
• concat — allows construction of files from multiple ordered fragments of text
• easy_type — provides an easy way to build custom Puppet resource types
• sysctl — supports the modification of kernel parameters
Understanding the Deployment Packages Uses and Contents
This section discusses:
•
Understanding How Deployment Packages are Used
•
Defining the Types of Deployment Packages
Understanding How Deployment Packages are Used
The PeopleSoft DPKs are the delivery method for many PeopleSoft installation, upgrade, and maintenance
products. Depending upon the usage, you may see a variety of terms used in connection with the DPKs. Some of
the products mentioned in this documentation include:
• A DPK is a zip file which includes specific PeopleSoft functionality.
The PeopleSoft products delivered as DPKs include one or more zip files numbered sequentially. Normally
you need to extract only the first zip file to obtain documentation and scripts. The DPK setup script will
extract the rest. See the appropriate documentation for details.
• PeopleTools patches are provided to update the PeopleSoft PeopleTools software.
A PeopleTools patch is comprised of four DPKs. The PeopleTools patch DPKs are available for Linux, IBM
AIX, HP-UX, Oracle Solaris, and Microsoft Windows operating systems.
See "Applying PeopleTools Patches Using DPKs."
See PeopleSoft PeopleTools Patches Home Page, My Oracle Support, Doc ID 2062712.2.
The DPKs delivered for the PeopleTools patches can also be used to install the PeopleSoft mid-tier
components for an existing database.
• PeopleSoft Update Images (PIs) are used for applying maintenance for PeopleSoft applications (Campus
Solutions, CRM, ELM, Interaction Hub, FSCM, and HCM).
A PI is comprised of eleven or more DPKs. The PIs are available for Microsoft Windows, Linux, and for
VirtualBox.
See PeopleSoft Update Manager (PUM) Home Page, My Oracle Support, Doc ID 1641843.2.
These images can also be used for carrying out a fresh installation, with some differences in the installation
procedure. When used for fresh installation, the documentation uses the term PeopleSoft Application Images.

Learning About the PeopleSoft Deployment Process Appendix E
274
Copyright © 2022, Oracle and/or its affiliates. All Rights Reserved.
See PeopleSoft PeopleTools on the Oracle Help Center, Install and Upgrade,
https://docs.oracle.com/en/applications/peoplesoft/peopletools/index.html.
• PeopleSoft Upgrade Source Images can be used during a PeopleSoft application upgrade as a demo database.
The Upgrade Source Images are typically comprised of nine or more DPKs, and are available for Microsoft
Windows, Linux, and VirtualBox. Note that the Upgrade Source Images and the PIs are delivered on different
schedules, and are not interchangeable.
See Understanding the PeopleSoft Upgrade Source Images.
Defining the Types of Deployment Packages
Here are some of the DPKs that are available to use in installing PeopleSoft software, with references for further
information.
• DPK Setup Zip file
The first zip file that you download will include a setup folder with the scripts needed to automate the
deployment process and documentation. You follow the instructions in this documentation to extract the first
zip file to obtain the setup script to begin the installation. The subsequent zip files are extracted during the
deployment. Each zip file includes a manifest that lists the software versions included in the DPK.
• PeopleSoft PeopleTools server DPKs
Two PeopleSoft PeopleTools server DPKs are included with both the PeopleSoft PeopleTools patches, and
with the PeopleSoft application images.
•
PeopleSoft PeopleTools Client DPK
The PeopleSoft PeopleTools Client DPK for the current release is included with the PeopleTools patches. The
PeopleSoft application images include PeopleTools Client DPK for the last three releases.
•
PeopleSoft application DPKs
Three PeopleSoft application DPKs are included with the PeopleSoft application images. They include the
following features:
• PeopleSoft application installation directory (PS_APP_HOME)
• PeopleSoft Update Manager data files (PI_HOME)
• Application database (Oracle pluggable database)
• Oracle Database Client DPK
The Oracle Database Client (ODC) DPK is included with the PeopleSoft application images.
• Oracle Database Server DPK
The Oracle Database Server (ODS) DPK is included with the PeopleSoft application images. It is used for
full-tier deployments.
• Elasticsearch DPK
The Elasticsearch DPK deploys open-source software used for the PeopleSoft Search Framework. The
Elasticsearch DPKs for Linux and Microsoft Windows are posted on My Oracle Support. You can also obtain
the Elasticsearch DPKs in the PeopleSoft PeopleTools for PSFT Application products installation files from
Oracle Software Delivery Cloud.
Elasticsearch is included in the VirtualBox version of the PeopleSoft Update Images.
See PeopleTools Elasticsearch Home Page, My Oracle Support, Doc ID 2205540.2.
• PT-INFRA DPK
The PT-INFRA DPK contains supporting (third-party) software that is required for a PeopleSoft installation.

Appendix E Learning About the PeopleSoft Deployment Process
Copyright © 2022, Oracle and/or its affiliates. All Rights Reserved.
275
A separate PT-INFRA DPK for Microsoft Windows, Linux, AIX, HP-UX, or Solaris is delivered as needed to
provide security updates or other patches for one or more of the components. You can use this separate PT-
INFRA DPK in a new installation to take advantage of up-to-date patches and security updates (CPUs).
See PeopleSoft PeopleTools 8.58 Home Page, My Oracle Support, Doc ID 2602329.2.
Task E-1: Reviewing the PeopleSoft PeopleTools Patch DPKs
To apply a PeopleTools patch, including the PeopleSoft PeopleTools server and client, on Microsoft Windows
and Linux physical hardware and virtual operating systems, use the PeopleSoft PeopleTools patch DPKs. The
DPKs replace the patch delivery mechanism used in previous releases for Microsoft Windows and Linux
operating systems. For patch application on other operating systems, download the patch and follow the
instructions included in the Readme file, as in previous releases.
For more information, review the various scenarios for using the PeopleTools Patch DPKs later in this
documentation.
See "Applying PeopleTools Patches Using DPKs."
The PeopleSoft PeopleTools patch DPKs set up a mid-tier environment to connect to an existing PeopleSoft
database. You should be prepared to supply information about the existing database before applying the patch.
This table describes the usage, requirements, and results associated with using the PeopleTools Patch DPKs:
Usage
• Install PeopleSoft PeopleTools Server using the mid-tier option on Microsoft Windows or
Linux, and connect to an existing database to apply a PeopleTools patch.
• Install the PeopleSoft PeopleTools Client on a Microsoft Windows host.
Note. This usage can be part of the patch application or carried out separately.
As with a traditional installation, you may not need to perform a separate installation of
the PeopleTools Client if your environment is installed on a Microsoft Windows host. If
your environment is installed on Linux, you need to install the PeopleTools Client on a
Microsoft Windows host to set up Change Assistant.
• Install the new release for PeopleTools-only upgrade.
If you are upgrading to PeopleSoft PeopleTools 8.58 on Microsoft Windows or Linux, you
can use the PeopleTools 8.58.01 or higher patch DPK to install the new release. The
PeopleTools patch DPKs contain the upgrade documentation, upgrade template for
Change Assistant, and files. Follow the instructions in the upgrade getting started guide,
included in the DPK.
See Getting Started on Your PeopleTools Upgrade
• Install selected PeopleSoft components
You can choose to deploy only mid-tier components, or only the PS_HOME installation
directory, for example, using the PeopleTools DPKs.
See Reviewing the Options for Selective Deployment.
Requirements
• The latest PeopleTools DPKs (4 zip files)
• Database specifications for the customer target database
• Microsoft Windows or Linux hosts that are supported for PeopleTools servers, such as
database, application server, Process Scheduler.

Learning About the PeopleSoft Deployment Process Appendix E
276
Copyright © 2022, Oracle and/or its affiliates. All Rights Reserved.
PeopleTools Server
installation
• PS_HOME
• PS_CFG_HOME
Note. The PIA installation is found under PS_CFG_HOME.
• Oracle Tuxedo
• Oracle WebLogic
• Oracle database Client, if required
• Microsoft Windows DPKs include Microsoft Visual C++ Redistributable Packages for
Visual Studio, which include required Microsoft C++ runtime libraries.
• PeopleTools utilities and scripts including:
• PS_HOME/appserv/PSADMIN.exe
• PS_HOME/bin/client/winx86/pscfg.exe (Configuration Manager)
•
PS_HOME/bin/client/winx86/psdmt.exe (Data Mover)
• PS_HOME/bin/client/winx86/pside.exe (Application Designer)
• PS_HOME/scripts
• Other PeopleTools utilities
•
Setup utilities including:
• PS_HOME/setup/PsMpPIAInstall (PeopleSoft Pure Internet Architecture installer)
• PS_HOME/setup/PsMpDbInstall (Database installer)
• PS_HOME/setup/PsCA (Change Assistant installer)
• PS_HOME/setup/PsCIA (Change Impact Analyzer installer)
• PS_HOME/setup/PsMpWebAppDeployInstall (Web Application Deployment
installer)
PeopleTools Client
installation
See the next section, Reviewing the PeopleTools Client DPK.

Appendix E Learning About the PeopleSoft Deployment Process
Copyright © 2022, Oracle and/or its affiliates. All Rights Reserved.
277
Task E-2: Reviewing the PeopleTools Client DPK
One of the DPKs provided with PeopleSoft PeopleTools patches is a PeopleSoft PeopleTools Client DPK. Deploy
the PeopleTools Client DPK, for example, to use with a PeopleTools-only upgrade, or to install utilities such as
Application Designer to connect to an existing environment.
Usage
• Install the PeopleSoft PeopleTools Client on a Microsoft Windows host.
Note. As with a traditional installation, you may not need to perform a separate
installation of the PeopleTools Client if your environment is installed on a
Microsoft Windows host. If your environment is installed on Linux, you need to
install the PeopleTools Client on a Microsoft Windows host to set up Change
Assistant.
• Install Change Assistant and Change Impact Analyzer.
• Install and configure PeopleSoft Test Framework (PTF).
Requirements
The last zip file of the 4 PeopleTools DPKs.
Microsoft Windows host that is supported for the PeopleTools client.
PeopleTools Client
installation
• PS_CLIENT_HOME
• Oracle database client, if not already installed
• Microsoft Windows DPKs include Microsoft Visual C++ Redistributable Packages for
Visual Studio, which include required Microsoft C++ runtime libraries.
•
PeopleTools utilities including:
• PS_CLIENT_HOME/bin/client/winx86/pscfg.exe (Configuration Manager)
• PS_CLIENT_HOME/bin/client/winx86/psdmt.exe (Data Mover)
• PS_CLIENT_HOME/bin/client/winx86/pside.exe (Application Designer)
• PS_CLIENT_HOME/bin/sqr
•
Setup utilities including:
• PS_CLIENT_HOME/setup/PsCA (Change Assistant installer)
• PS_CLIENT_HOME/setup/PsCIA (Change Impact Analyzer installer)
• PS_CLIENT_HOME/setup/PsTestFramework (PeopleSoft Test Framework installer)
• Upgrade deployment mode files
If you select the People Tools Full Upgrade deployment type, the client setup script
installs the directories needed for a PeopleSoft PeopleTools-only upgrade, such as data,
projects, and scripts directories.
• Patch deployment mode files
If you select the People Tools Patch deployment type, the client setup script installs the
directories needed for a PeopleSoft PeopleTools patch application, such as the data, PTP,
and scripts directories.
• None of the above deployment mode files
If you select the None of the above deployment type, the client setup script installs the
basic client directories.

