
Open source Puppet 8.8.1
Puppet | Contents | ii
Contents
Puppet 8.8.1...............................................................................................................9
Release notes..............................................................................................................9
Puppet release notes........................................................................................................................................... 10
Puppet 8.8.1............................................................................................................................................ 11
Puppet 8.8.0............................................................................................................................................ 12
Puppet 8.7.0............................................................................................................................................ 12
Puppet 8.6.0............................................................................................................................................ 13
Puppet 8.5.1............................................................................................................................................ 14
Puppet 8.5.0............................................................................................................................................ 14
Puppet 8.4.0............................................................................................................................................ 15
Puppet 8.3.1............................................................................................................................................ 16
Puppet 8.3.0............................................................................................................................................ 19
Puppet 8.2.0............................................................................................................................................ 19
Puppet 8.1.0............................................................................................................................................ 21
Puppet 8.0.0............................................................................................................................................ 21
Puppet known issues...........................................................................................................................................23
Puppet Server release notes................................................................................................................................25
Puppet Server 8.6.2.................................................................................................................................25
Puppet Server 8.6.1.................................................................................................................................25
Puppet Server 8.6.0.................................................................................................................................25
Puppet Server 8.5.0.................................................................................................................................25
Puppet Server 8.4.0.................................................................................................................................26
Puppet Server 8.3.0.................................................................................................................................26
Puppet Server 8.2.1.................................................................................................................................26
Puppet Server 8.2.0.................................................................................................................................26
Puppet Server 8.1.0.................................................................................................................................27
Puppet Server 8.0.0.................................................................................................................................27
Puppet Server known Issues...............................................................................................................................27
Access CA endpoint to update CRLs.................................................................................................... 27
Cipher updates in Puppet Server 6.5......................................................................................................27
Server-side Ruby gems might need to be updated for upgrading from JRuby 1.7................................28
Potential JAVA ARGS settings..............................................................................................................28
tmp directory mounted noexec...........................................................................................................28
Puppet Server Fails to Connect to Load-Balanced Servers with Different SSL Certificates.................28
Facter release notes.............................................................................................................................................29
Facter 4.8.0............................................................................................................................................. 29
Facter 4.7.1............................................................................................................................................. 29
Facter 4.7.0............................................................................................................................................. 29
Facter 4.6.1............................................................................................................................................. 30
Facter 4.6.0............................................................................................................................................. 30
Facter 4.5.2............................................................................................................................................. 30
Facter 4.5.1............................................................................................................................................. 30
Facter 4.4.3............................................................................................................................................. 30
Facter 4.4.2............................................................................................................................................. 31
Facter known issues............................................................................................................................................43
Upgrading from Puppet 7 to Puppet 8...............................................................................................................43
Experimental features......................................................................................................................................... 46
Puppet | Contents | iii
Msgpack support.....................................................................................................................................47
Archived documentation.....................................................................................................................................47
Puppet overview......................................................................................................48
What is Puppet?..................................................................................................................................................48
Why use Puppet desired state management?.....................................................................................................49
Key concepts behind Puppet.............................................................................................................................. 50
The Puppet platform...........................................................................................................................................51
Puppet platform lifecycle................................................................................................................................... 53
Open source Puppet vs Puppet Enterprise (PE).................................................................................................56
The Puppet ecosystem........................................................................................................................................ 56
Use cases.............................................................................................................................................................57
Glossary...............................................................................................................................................................57
Navigating the documentation............................................................................................................................58
Set up Puppet..........................................................................................................60
Install Puppet...................................................................................................................................................... 60
System requirements...............................................................................................................................60
Installing Puppet..................................................................................................................................... 62
Installing and configuring agents...........................................................................................................64
Manually verify packages.......................................................................................................................73
Managing Platform versions...................................................................................................................75
Configure Puppet settings...................................................................................................................................75
Puppet settings........................................................................................................................................ 76
Key configuration settings......................................................................................................................79
Puppet's configuration files.................................................................................................................... 82
Adding file server mount points............................................................................................................ 93
Checking the values of settings..............................................................................................................94
Editing settings on the command line....................................................................................................97
Configuration Reference.........................................................................................................................98
Upgrading..........................................................................................................................................................126
Upgrade Puppet Server.........................................................................................................................127
Upgrade agents......................................................................................................................................127
Upgrade PuppetDB...............................................................................................................................129
Environments.....................................................................................................................................................130
About environments..............................................................................................................................130
Creating environments..........................................................................................................................132
Environment isolation...........................................................................................................................136
Directories and files..........................................................................................................................................137
Code and data directory (codedir)........................................................................................................138
Config directory (confdir).................................................................................................................... 139
Main manifest directory....................................................................................................................... 140
The modulepath.................................................................................................................................... 141
SSL directory (ssldir)........................................................................................................................... 143
Cache directory (vardir)........................................................................................................................144
Report reference................................................................................................................................................147
Platform components............................................................................................148
Puppet Server....................................................................................................................................................148
About Puppet Server.............................................................................................................................148
Deprecated features...............................................................................................................................150
Server and agent compatibility.............................................................................................................155
Installing Puppet Server....................................................................................................................... 156
Puppet | Contents | iv
Configuring Puppet Server...................................................................................................................157
Using and extending Puppet Server.....................................................................................................183
Developer information..........................................................................................................................212
Puppet Server HTTP API.....................................................................................................................220
API endpoints....................................................................................................................................... 258
Certificate authority and SSL...............................................................................................................275
Facter.................................................................................................................................................................296
Facter: CLI............................................................................................................................................297
Facter: Core Facts.................................................................................................................................300
Custom facts overview......................................................................................................................... 325
Writing custom facts.............................................................................................................................331
External facts........................................................................................................................................ 336
Configuring Facter with facter.conf.....................................................................................................339
PuppetDB.......................................................................................................................................................... 342
Puppet services and tools................................................................................................................................. 342
Puppet commands.................................................................................................................................343
Running Puppet commands on Windows............................................................................................345
primary Puppet server...........................................................................................................................349
Puppet agent on *nix systems..............................................................................................................351
Puppet agent on Windows....................................................................................................................354
Puppet apply......................................................................................................................................... 358
Puppet device........................................................................................................................................360
Puppet reports................................................................................................................................................... 366
Reporting...............................................................................................................................................366
Report reference....................................................................................................................................367
Writing custom report processors........................................................................................................ 368
Report format........................................................................................................................................369
Life cycle of a Puppet run............................................................................................................................... 374
Agent-server HTTPS communications.................................................................................................375
Catalog compilation..............................................................................................................................376
Static catalogs....................................................................................................................................... 379
Using Puppet code................................................................................................ 382
Classifying nodes..............................................................................................................................................383
Managing environment content with a Puppetfile...........................................................................................385
Using content from Puppet Forge....................................................................................................................391
Designing system configs (roles and profiles).................................................................................................392
The roles and profiles method..............................................................................................................392
Roles and profiles example.................................................................................................................. 395
Designing advanced profiles................................................................................................................ 398
Designing convenient roles.................................................................................................................. 415
Separating data (Hiera).....................................................................................................................................418
About Hiera...........................................................................................................................................418
Getting started with Hiera.................................................................................................................... 422
Configuring Hiera.................................................................................................................................425
Creating and editing data..................................................................................................................... 433
Looking up data with Hiera................................................................................................................. 442
Writing new data backends.................................................................................................................. 446
Debugging Hiera...................................................................................................................................454
Upgrading to Hiera 5............................................................................................................................456
Use case examples............................................................................................................................................469
Manage NTP.........................................................................................................................................469
Manage sudo.........................................................................................................................................472
Manage DNS.........................................................................................................................................475
Manage firewall rules...........................................................................................................................478
Puppet | Contents | v
Forge examples.....................................................................................................................................481
Syntax and settings...............................................................................................482
The Puppet language........................................................................................................................................ 482
Puppet language overview....................................................................................................................484
Puppet language syntax examples........................................................................................................486
The Puppet language style guide......................................................................................................... 492
Files and paths on Windows................................................................................................................516
Code comments.....................................................................................................................................517
Variables................................................................................................................................................517
Resources...............................................................................................................................................520
Resource types...................................................................................................................................... 528
Relationships and ordering...................................................................................................................675
Classes...................................................................................................................................................680
Defined resource types......................................................................................................................... 687
Bolt tasks...............................................................................................................................................690
Expressions and operators.................................................................................................................... 690
Conditional statements and expressions...............................................................................................700
Function calls........................................................................................................................................707
Built-in function reference....................................................................................................................710
Node definitions....................................................................................................................................789
Facts and built-in variables.................................................................................................................. 792
Reserved words and acceptable names................................................................................................798
Custom resources..................................................................................................................................803
Custom functions.................................................................................................................................. 834
Values, data types, and aliases.............................................................................................................854
Templates.............................................................................................................................................. 908
Advanced constructs............................................................................................................................. 924
Details of complex behaviors...............................................................................................................939
Securing sensitive data......................................................................................................................... 947
Metaparameter reference.................................................................................................................................. 949
Configuration Reference...................................................................................................................................953
Configuration settings...........................................................................................................................953
Built-in function reference................................................................................................................................983
undef values in Puppet 6...................................................................................................................983
abs........................................................................................................................................................983
alert...................................................................................................................................................984
all........................................................................................................................................................984
annotate............................................................................................................................................985
any........................................................................................................................................................986
assert_type.....................................................................................................................................987
binary_file.....................................................................................................................................988
break...................................................................................................................................................988
call..................................................................................................................................................... 989
camelcase......................................................................................................................................... 989
capitalize.......................................................................................................................................990
ceiling..............................................................................................................................................991
chomp...................................................................................................................................................991
chop..................................................................................................................................................... 991
compare..............................................................................................................................................992
contain..............................................................................................................................................993
convert_to.......................................................................................................................................993
create_resources.........................................................................................................................993
crit..................................................................................................................................................... 994
debug...................................................................................................................................................994
Puppet | Contents | vi
defined..............................................................................................................................................994
dig........................................................................................................................................................996
digest.................................................................................................................................................996
downcase............................................................................................................................................996
each..................................................................................................................................................... 997
emerg...................................................................................................................................................999
empty...................................................................................................................................................999
epp........................................................................................................................................................999
err......................................................................................................................................................1000
eyaml_lookup_key.......................................................................................................................1000
fail................................................................................................................................................... 1000
file................................................................................................................................................... 1000
filter...............................................................................................................................................1000
find_file....................................................................................................................................... 1002
find_template..............................................................................................................................1002
flatten............................................................................................................................................1003
floor.................................................................................................................................................1003
fqdn_rand....................................................................................................................................... 1004
generate..........................................................................................................................................1004
get......................................................................................................................................................1004
getvar...............................................................................................................................................1005
group_by..........................................................................................................................................1006
hiera.................................................................................................................................................1007
hiera_array...................................................................................................................................1008
hiera_hash.....................................................................................................................................1009
hiera_include..............................................................................................................................1010
hocon_data.....................................................................................................................................1011
import...............................................................................................................................................1011
include............................................................................................................................................1011
index.................................................................................................................................................1012
info................................................................................................................................................... 1013
inline_epp.....................................................................................................................................1013
inline_template.........................................................................................................................1014
join................................................................................................................................................... 1014
json_data....................................................................................................................................... 1015
keys................................................................................................................................................... 1015
length...............................................................................................................................................1015
lest................................................................................................................................................... 1015
lookup...............................................................................................................................................1016
lstrip...............................................................................................................................................1018
map......................................................................................................................................................1018
match.................................................................................................................................................1019
max......................................................................................................................................................1020
md5......................................................................................................................................................1021
min......................................................................................................................................................1022
module_directory.......................................................................................................................1023
new......................................................................................................................................................1023
next................................................................................................................................................... 1040
notice...............................................................................................................................................1040
partition....................................................................................................................................... 1041
realize............................................................................................................................................1041
reduce...............................................................................................................................................1041
regsubst..........................................................................................................................................1043
require............................................................................................................................................1044
return...............................................................................................................................................1045
reverse_each................................................................................................................................1045
Puppet | Contents | vii
round.................................................................................................................................................1046
rstrip...............................................................................................................................................1046
scanf.................................................................................................................................................1047
sha1................................................................................................................................................... 1047
sha256...............................................................................................................................................1047
shellquote.....................................................................................................................................1047
size................................................................................................................................................... 1048
slice.................................................................................................................................................1048
sort................................................................................................................................................... 1048
split.................................................................................................................................................1049
sprintf............................................................................................................................................1050
step................................................................................................................................................... 1050
strftime..........................................................................................................................................1050
strip.................................................................................................................................................1054
tag......................................................................................................................................................1055
tagged...............................................................................................................................................1055
template..........................................................................................................................................1055
then................................................................................................................................................... 1055
tree_each....................................................................................................................................... 1056
type................................................................................................................................................... 1058
unique...............................................................................................................................................1059
unwrap...............................................................................................................................................1060
upcase...............................................................................................................................................1061
values...............................................................................................................................................1062
versioncmp.....................................................................................................................................1062
warning............................................................................................................................................1062
with................................................................................................................................................... 1062
yaml_data....................................................................................................................................... 1063
Puppet Man Pages.......................................................................................................................................... 1063
Core Tools...........................................................................................................................................1063
Secondary subcommands....................................................................................................................1063
Niche subcommands........................................................................................................................... 1064
Core tools............................................................................................................................................1064
Occasionally useful.............................................................................................................................1076
Niche................................................................................................................................................... 1085
Developing modules............................................................................................1096
Modules...........................................................................................................................................................1097
Modules overview...............................................................................................................................1097
Plug-ins in modules............................................................................................................................ 1101
Module cheat sheet.............................................................................................................................1103
Installing and managing modules from the command line................................................................1104
Beginner's guide to writing modules..................................................................................................1113
Module metadata.................................................................................................................................1118
Documenting modules........................................................................................................................ 1124
Documenting modules with Puppet Strings.......................................................................................1128
Puppet Strings style guide..................................................................................................................1135
Publishing modules.............................................................................................................................1141
Contributing to Puppet modules.........................................................................................................1146
Puppet Development Kit (PDK).................................................................................................................... 1149
Puppet VSCode extension.............................................................................................................................. 1149
PowerShell DSC Resources............................................................................................................................1150
Converting DSC Resources................................................................................................................1150
Distributing arbitrary DSC resources.................................................................................................1151
Upgrading Puppet DSC modules....................................................................................................... 1152

Puppet | Welcome to Puppet® 8.8.1 | 9
Welcome to Puppet® 8.8.1
Puppet provides tools to automate the management of your infrastructure. Puppet is an open source product with a
vibrant community of users and contributors. You can get involved by fixing bugs, influencing new feature direction,
publishing your modules, and engaging with the community to share knowledge and expertise.
Important: Before you use the product and its documentation, review the Copyright and trademark notices on page
1156.
Helpful Puppet docs links Other useful links
Getting started
Puppet overview
Release notes
Puppet Forge
Glossary
Install Puppet
Install Puppet
Puppet platform
Puppet Server
PuppetDB
Facter
Puppet settings
Configuration reference
Metaparameter reference
Docs for related Puppet products
Puppet Bolt®
Puppet Enterprise®
Continuous Delivery
Puppet Development Kit
Puppet VSCode extension
Share and contribute
Puppet Forge
Puppet Community
Open source projects on GitHub
Learn more about Puppet
Blog posts about Puppet
Puppet training
Release notes
These release notes contain important information about the Puppet® 8.8 platform, including Puppet agent, Puppet
Server, Facter, and PuppetDB.
This release incorporates new features, enhancements, and resolved issues from all previous releases. If you're
upgrading from an earlier version of Puppet, check the release notes for any interim versions for details about
additional improvements in this release over your current release.
Version numbers use the format X.Y.Z, where:
• X must increase for major, backward-incompatible changes.
• Y can increase for backward-compatible new functionality or significant bug fixes.
• Z can increase for bug fixes.
The following table lists the maintained Puppet, Puppet Server, and PuppetDB versions. Developmental releases
(known as latest) are superseded by new versions about once a month. Open source releases that are associated with
Puppet Enterprise (PE) versions have projected End of Life (EOL) dates.
© 2024 Puppet, Inc., a Perforce company

Puppet | Release notes | 10
Puppet version Puppet Server
version
PuppetDB version Associated PE
version
Projected EOL date
8.8.1 8.6.2 8.7.0 2023.x Superseded by next
developmental
release.
7.32.1 7.17.2 7.19.1 2021.7.x Superseded by next
developmental
release.
6.28.0 6.20.0 6.22 2019.8.x February 2023
Important: Security and vulnerability announcements are posted at Security: Puppet's Vulnerability Submission
Process.
Important: Before you upgrade from Puppet 7 toPuppet 8, see Upgrading from Puppet 7 to Puppet 8 on page
43.
See the following pages for a full list of platform release notes in the Puppet 8 series.
• Puppet release notes on page 10
These are the new features, resolved issues, and deprecations in this version of Puppet.
• Puppet known issues on page 23
These are the known issues in this version of Puppet.
• Puppet Server release notes on page 25
These are the new features, resolved issues, and deprecations in this version of Puppet Server.
• Puppet Server known Issues on page 27
These are the known issues in this version of Puppet Server.
• PuppetDB release notes (link)
These are the new features, resolved issues, and deprecations in this version of PuppetDB.
• Facter release notes on page 29
These are the new features, resolved issues, and deprecations in this version of Facter.
• Facter 4 known issues on page 43
These are the known issues in this version of Facter.
• Upgrading from Puppet 7 to Puppet 8 on page 43
Before upgrading to Puppet 8, review the following recommendations and changes so that you can plan your upgrade
accordingly.
• Experimental features on page 46
Released versions of Puppet can include experimental features to be considered for adoption but are not yet ready for
production. These features need to be tested in the field before they can be considered safe, and therefore are turned
off by default.
• Archived documentation on page 47
Open source Puppet docs for recent end-of-life (EOL) product versions are archived in place, meaning that we
continue to host them at their original URLs, but we limit their visibility on the main docs site and no longer update
them. You can access archived-in-place docs using their original URLs, or from the links here.
Puppet release notes
These are the new features, resolved issues, and deprecations in this version of Puppet.
Important: Security and vulnerability announcements are posted at Security: Puppet's Vulnerability Submission
Process.
© 2024 Puppet, Inc., a Perforce company

Puppet | Release notes | 11
Important: Before you upgrade from Puppet 7 to Puppet 8, see Upgrading from Puppet 7 to Puppet 8 on page
43.
Puppet 8.8.1
Released July 2024. This release adds support for the following operating systems: AlmaLinux 9 (x86_64,
AARCH64), Rocky Linux 9 (x86_64, AARCH64), and Ubuntu 24.04 (x86_64, ARM). In addition, Puppet is updated
to ensure compatibility with Ruby 3.3.
GitHub releases
Additional details about release updates are available on GitHub. For more information, go to the following sites:
• Facter
• Puppet
• Puppet agent
• Puppet runtime
Enhancements
New operating systems
You can now install Puppet agent on the following new operating systems:
• AlmaLinux 9 (x86_64, AARCH64)
• Rocky Linux 9 (x86_64, AARCH64)
• Ubuntu 24.04 (x86_64, ARM)
Ruby update
Puppet is updated to ensure compatibility with Ruby 3.3.
Security
OpenSSL upgrade
Upgraded to OpenSSL 3.0.14 to address CVE-2024-4603 and CVE-2024-2511.
Resolved issues
Sensitive values returned by deferred functions are protected.
Previously, in certain circumstances, when a function of the Deferred type returned a value of the Sensitive
type, the value was displayed in clear text. The issue is resolved to help ensure that sensitive values are protected.
Windows agents now run as expected.
Previously, when a value of 0 was specified for the runinterval setting, Windows agents ran every 30 minutes.
Now, a setting of 0 causes the agents to run continuously as expected.
Resolved issue with catalog compilation.
Addressed an issue where catalog compilation would fail when running the puppet lookup command with the --
compile option when server facts were present in the catalog.
© 2024 Puppet, Inc., a Perforce company
Puppet | Release notes | 12
Resolved issue to ensure that the Puppet agent service starts automatically.
In certain circumstances, when Puppet was successfully installed or upgraded on Microsoft Windows Server 2019 or
2022, the Puppet agent service did not restart automatically as expected. This fix helps to ensure that the service starts
running without user intervention. Community member rismoney submitted the issue, which was fixed by another
community member, vibe.
Deprecated Security-Enhanced Linux (SELinux) methods are replaced.
Deprecated SELinux methods of the matchpathcon family such as Selinux.matchpathcon are replaced by
supported SELinux methods such as Selinux.selabel_lookup. This update does not require any action by
Puppet users. Community member wbclark contributed to this fix.
For performance reasons, a change related to splay limits was reverted.
In the Puppet 8.7.0 release, a defect was corrected to ensure that any splay setting updates in the Puppet configuration
file (puppet.conf) would be applied to daemonized Puppet runs. However, the fix resulted in an unexpected side
issue that caused splays to be frequently recalculated, potentially delaying Puppet startup times. The change was
reverted.
Contributors
The Puppet team appreciates all Puppet Community members who contributed content to the July 2024 releases and
extends special thanks to the following first-time contributors: @jiwonaid and @jordanbreen28.
Puppet 8.8.0
Puppet 8.8.0 was not released because of tagging issues.
Puppet 8.7.0
Released June 2024. This release introduces support for new operating systems.
GitHub releases
Additional details about release updates are available on GitHub. For more information, go to the following sites:
Facter
Puppet
Puppet Agent
Puppet Runtime
Enhancements
New operating systems
You can now install Puppet agent on the following new operating systems:
• Amazon Linux 2 (aarch64)
• Fedora 40 (x86_64)
• Red Hat Enterprise Linux 9 for Power (ppc64le)
Major version upgrade for curl
Curl is now upgraded in Puppet agent to Version 8.7.1. This version of curl is designed to enhance security and
stability.
© 2024 Puppet, Inc., a Perforce company
Puppet | Release notes | 13
Security
CVE-2024-27282
Upgraded to Ruby 3.2.4 to address CVE-2024-27282.
Contributors
The Puppet team appreciates the Puppet Community members who contributed content for recent releases and
extends special appreciation to these first-time contributors: anhpt37, Animeshz, garrettrowell, smokris, tlehman, and
yakatz.
Puppet 8.6.0
Released April 2024.
GitHub Releases
More details about what has changed in this release are available on GitHub. Visit the following links for more
information:
Facter
Puppet
Puppet Agent
Puppet Runtime
Enhancements
Option to disable catalog messages
Added a boolean Puppet setting to disable "notice" level messages specifying which server the agent requests a
catalog from and which server actually handles the request. Catalog messages are enabled by default. PUP-12023
package: pacman provider: Add purgeable feature
Added an option to the pacman provider to purge config files. This feature was contributed by community member
bastelfreak.
Update core modules
Updated all core modules. In particular, this update includes:
• Removal of concurrent-ruby as a dependency
• Support for Amazon Linux
Resolved issues
Non-literal class parameter types need to be deprecated.
Previously, non-literal class parameters caused errors due to the different default values of the strict setting.
puppet parser validate also returned non-zero exit codes. Now the issue is a language deprecation, so
a warning is generated and puppet parser validate returns 0. All language deprecation warnings can be
disabled by setting disable_warnings=deprecations in the main section of puppet.conf. PUP-12026
Package provider "pip" not fully functional with network urls on Ubuntu 22.04.
Puppet's pip package provider now supports installing python modules via network URLs, e.g. source => 'git
+https://github.com/<org>/<repo>.git'. Fix contributed by community member smokris. PUP-12027
© 2024 Puppet, Inc., a Perforce company
Puppet | Release notes | 14
Provider dnfmodule prompts user to trust gpg key when performing module list.
Added assumeyes option to dnf module list. Fix contributed by community member loopiv.
Puppet resource returns zero if it fails to make changes
Added new --fail command line flag for Puppet resource.
Remove Accept-Encoding header on redirect
Previously, Puppet copied all request headers in an HTTP redirect, including Accept-Encoding. In some cases when
HTTP compression was enabled, the response failed to decompress, then failed to parse and triggered a vague error.
This change strips the Accept-Encoding headers on redirect, allowing Ruby's built-in Net::HTTP to both compress
and decompress the traffic.
Accept UnaryMinusExpression as class parameter type
Previously, class parameters of the form Integer[-1] $param failed compilation, because the value -1 was
lexed as a UnaryMinusExpression containing a LiteralInteger. And since the LiteralEvaluator didn't implement
theliteral_UnaryMinusExpression method, the visitor called literal_XXX for each ancestor class, until
reaching literal_Object, which always raises.
This adds the literal_UnaryMinusExpression method and returns -1 times the expression it wraps.
If strict is off, the issue is ignored. If strict is warning, a warning is reported, but compilation continues. If
strict is error, compilation fails.
Security
Upgrade OpenSSL
Upgraded openssl to version 3.0.13 to address the following CVEs: CVE-2023-5678; CVE-2023-6129;
CVE-2023-6237; CVE-2024-0727. PA-6131
Vulnerabilities in curl
Backported patches for CVE-2024-2004 and CVE-2024-2398 in curl 7.88.1. PA-6291
New Digicert code-signing cert
Windows MSI are now signed with a new certificate, valid until March 2027. The Issuing CA is "DigiCert Trusted
G4 Code Signing RSA4096 SHA384 2021 CA1".
Puppet 8.5.1
Released March 2024.
Resolved issues
Using a negative value with the integer type assertion on a class causes a compilation error.
Previously, negative values caused a compilation errors when used with the integer type assertion on a class. This
has been fixed. PUP-12024
Puppet 8.5.0
Released February 2024.
© 2024 Puppet, Inc., a Perforce company

Puppet | Release notes | 15
Enhancements
Debian 12 (x86_64) support
Added support for Debian 12 (x86_64). PA-5549
Debian 12 (ARM) support
Added support for Debian 12 (ARM). PA-5747
Note: Support for Amazon Linux 2023 (ARM, x86_64), Debian 11 (ARM) and macOS 14 (ARM, x86_64) was
added in Puppet 8.4.0.
Resolved issues
Syntactically incorrect types cause nil types in
Puppet::InfoService::ClassInformationService
Previously, when a type was incorrectly specified, Puppet’s class_information_service ignored the error
and produced an empty type specification. Puppet now produces a warning and assigns a default type in the nil
case. PUP-11981.
Puppet 8.4.0
Released January 2024.
Enhancements
Bump concurrent-ruby to 1.2.2
Bumped concurrent-ruby gem to 1.2.2. PA-5960
Add logging of server hostnames when requesting configuration
Puppet agents now log server hostnames when requesting catalogs. PUP-11899
Add logging of which Puppet Server handled catalog requests
Puppet agents now log the FQDN name of the server that compiled the catalog. This is useful when there are multiple
compilers behind a load balancer. PUP-11900
Update package & service providers for Amazon Linux 2023
Updates Amazon Linux 2023's default package and service providers to DNF and SystemD, respectively. Contributed
by GitHub user vchepkov. PUP-11976
Debian 11 (ARM) support
Added support for Debian 11 (ARM).
Amazon Linux 2023 support
Added support for Amazon Linux 2023.
MacOS 14 support
Added support for MacOS 14.
© 2024 Puppet, Inc., a Perforce company
Puppet | Release notes | 16
Resolved issues
puppet-agent-7.25: selinux Bindings broken on RHEL9.1
Fixed an issue introduced in 7.25.0 that prevented Puppet from managing selinux if the system libselinux libraries
were previous to version 3.5. PA-5632
RHEL 8 FIPS agent fails to start after upgrade to Puppet 8
Fixed an issue that prevented the RHEL 8 FIPS agent from starting after upgrading to Puppet 8. PA-5786
/opt/puppetlabs/puppet/bin/openssl fails to load library dependencies on AIX
Set RPATH for openssl 1.1.1 to load dependencies from Puppetlabs libdir in order to ensure that /opt/
puppetlabs/puppet/bin/opensslloads its library dependencies that were shipped in the puppet-agent
package. PA-5925
Puppet agent on Solaris 11 x86 fails when updated to SRU >= 57
Fixed a regression that prevented the ffi gem's native extension from loading on newer versions of Solaris 11.4.
PA-5929
Puppet chooses wrong service default provider on Gentoo if systemd is used
Systemd is now the default service provider on Gentoo. Fix contributed by community member bastelfreak.
PUP-11593
Resources resource type should be marked as apply_to_all
Enables resources metatype compatibility with both hosts and devices. Contributed by GitHub user seanmil.
PUP-11666
"Total number of facts" warning not counting array elements
Puppet incorrectly counted array elements and hash keys when determining if the number of facts exceeded the total
fact count soft limit. This has been fixed. PUP-11685
Lazily deferred evaluation may not work if type implements autorequire, etc
The command parameter for an exec resource can now be deferred. PUP-11937
dnfmodule fails to enable module with ensure version and no default stream
Puppet can now manage dnfmodule packages with ensure values other than present such as ensure =>
'1.4'. Fix contributed by community member evgeni. PUP-11985
Security
Upgrade OpenSSL
Upgraded OpenSSL to 3.0.12. PA-5864
Patch Curl in puppet-runtime
Patched Curl to address CVE-2023-38546. PA-5861
Puppet 8.3.1
Released November 2023.
© 2024 Puppet, Inc., a Perforce company

Puppet | Release notes | 17
Enhancements
Ship FIPS compatible Java key store in fips agents
FIPS Puppet agent builds now include a FIPS-compatibile java keystore.
The following Certificate Authorities were also added and removed:
• create
Atos_TrustedRoot_Root_CA_ECC_TLS_2021:2.16.61.152.59.166.102.61.144.99.247.126.38.87.56.4.239.0.crt
• create
Atos_TrustedRoot_Root_CA_RSA_TLS_2021:2.16.83.213.207.230.25.147.11.251.43.5.18.216.194.42.162.164.crt
• create BJCA_Global_Root_CA1:2.16.85.111.101.227.180.217.144.106.27.9.209.108.62.192.108.32.crt
• create BJCA_Global_Root_CA2:2.16.44.23.8.125.100.42.192.254.133.24.89.6.207.180.74.235.crt
• create Certainly_Root_E1:2.16.6.37.51.177.71.3.51.39.92.249.141.154.185.191.204.248.crt
• create Certainly_Root_R1:2.17.0.142.15.249.75.144.113.104.101.51.84.244.212.68.57.183.224.crt
• create DigiCert_TLS_ECC_P384_Root_G5:2.16.9.224.147.101.172.247.217.200.185.62.28.11.4.42.46.243.crt
• create
DigiCert_TLS_RSA4096_Root_G5:2.16.8.249.180.120.168.250.126.218.106.51.55.137.222.124.207.138.crt
• delete E-Tugra_Certification_Authority:2.8.106.104.62.156.81.155.203.83.crt
• delete EC-ACC:2.16.238.43.61.235.212.33.222.20.168.98.172.4.243.221.196.1.crt
• delete Hellenic_Academic_and_Research_Institutions_RootCA_2011:2.1.0.crt
• delete Hongkong_Post_Root_CA_1:2.2.3.232.crt
• delete
Network_Solutions_Certificate_Authority:2.16.87.203.51.111.194.92.22.230.71.22.23.227.144.49.104.224.crt
• create SSL.com_TLS_ECC_Root_CA_2022:2.16.20.3.245.171.251.55.139.23.64.91.226.67.178.165.209.196.crt
• create
SSL.com_TLS_RSA_Root_CA_2022:2.16.111.190.218.173.115.189.8.64.226.139.77.190.212.247.91.145.crt
• create
Sectigo_Public_Server_Authentication_Root_E46:2.16.66.242.204.218.27.105.55.68.95.21.254.117.40.16.184.244.crt
• create
Sectigo_Public_Server_Authentication_Root_R46:2.16.117.141.253.139.174.124.7.0.250.169.37.167.225.199.173.20.crt
• create Security_Communication_ECC_RootCA1:2.9.0.214.93.155.179.120.129.46.235.crt
• create Security_Communication_RootCA3:2.9.0.225.124.55.64.253.27.254.103.crt
• delete Staat_der_Nederlanden_EV_Root_CA:2.4.0.152.150.141.crt
PA-4813
Bump augeas to 1.14.1
Updated the augeas component of Puppet agent to from 1.13.0 to 1.14.1. PA-4938
CAUTION: This update changes the PubkeyAcceptedAlgorithms setting in /etc/ssh/
sshd_config from a string to a list.
Example: the line 'set Settings/PubkeyAcceptedAlgorithms +ssh-rsa' in the following
code block:
augeas { 'sshd_allow_rsa':
incl => '/etc/ssh/sshd_config',
lens => 'Sshd.lns',
context => '/files/etc/ssh/sshd_config/Match/',
changes => [
'set Condition/Address 192.168.0.3',
'set Condition/User user',
'set Settings/PubkeyAcceptedAlgorithms +ssh-rsa',
]
© 2024 Puppet, Inc., a Perforce company

Puppet | Release notes | 18
}
must be changed to 'set Settings/PubkeyAcceptedAlgorithms/seq::*[.="ssh-rsa"]
ssh-rsa' following this update.
Add RHEL 9 (ARM64) support
Puppet now supports RHEL 9 (ARM64). PA-4998
Add Ubuntu 22.04 (ARM64) support
Puppet now supports Ubuntu 22.04 (ARM64). PA-5050
Make split() sensitive aware
The split function now accepts sensitive values and returns a Sensitive[Array]. This change was contributed
by community user cocker-cc. PUP-11429
Freeze string literals
String literals are now frozen or immutable by default. PUP-11841
Log openssl version and fips mode
Puppet agent now logs the openssl version along with ruby and Puppet versions when running in debug mode.
PUP-11930
Monkey patch {File,Dir}.exists?
Added a monkey patch in Ruby for Puppet code using older Ruby language exists? method. PUP-11945
Resolved issues
puppet ssl clean <REMOTE CERT> clears local private key and local certificate
puppet ssl clean <argument> now prints an error that <argument> is unexpected instead of deleting the
local certificate and private key. PUP-11895
100% usage of a CPU core when an exec command sends EOF
Previously, Puppet could cause excessive CPU utilization on *nix if a child process closed stdin. This has been fixed.
Fix contributed by community user bugfood. PUP-11897
string.new generates strings with unexpected encoding
A regression was introduced in Puppet 8.0.0 which caused the epp and inline_epp functions to return a binary
string. If the value was assigned to the parameter of an exported resource, then the parameter's value was converted
to base64 in PuppetDB. Any agents that collected the resource then received the base64 encoded value. This release
fixes the regression so the functions return a UTF-8 string. PUP-11932
puppet/lib/puppet/pops/time/timespan.rb:637: warning: passing a block to
String#codepoints is deprecated
Eliminated a warning when running on JRuby 9.4 and using the Timespan data type. PUP-11934
© 2024 Puppet, Inc., a Perforce company
Puppet | Release notes | 19
Correct inaccurate comment in find_file() function
Updated find_file function documentation. This fix was contributed by community member pillarsdotnet.
PUP-11940
epp and inline_epp functions return binary strings
Fixed a regression that caused the epp and inline_epp functions to return binary strings instead of UTF-8
encoded strings. This resulted in exported resources being stored as base64 in puppetdb, breaking any node that
collected those resources. Fix contributed by community member smortex. PUP-11943
Update host_autorenewal_interval Puppet setting documentation
Previously documentation implied that host_autorenewal_interval refreshes in 30 days regardless of
when it expires by default. Documentation was updated to better reflect actual behavior where implementation only
attempts to renew its client cert if the cert expires within N days from now. PUP-11944
Error when using {File,Dir}.exists? in Ruby
Added a patch for some Puppet code using older Ruby language exists? method.
Security
Upgrade OpenSSL
Upgraded OpenSSL to 3.0.11 to address CVE-2023-4807. PA-5783
Patch Curl in puppet-runtime
Patched Curl to address CVE-2023-38545. PA-5848
Deprecations and removals
Remove TrustCor CA certs
The following CA certs were removed:
• TrustCor_ECA-1:2.9.0.132.130.44.95.28.98.208.64.crt
• TrustCor_RootCert_CA-1:2.9.0.218.155.236.113.243.3.176.25.crt
• TrustCor_RootCert_CA-2:2.8.37.161.223.202.51.203.89.2.crt
PA-4809
Puppet 8.3.0
This version was never released.
Puppet 8.2.0
Released August 2023.
Enhancements
macOS 13 support
Added support for macOS 13. PA-4772
© 2024 Puppet, Inc., a Perforce company
Puppet | Release notes | 20
Upgrade hiera-eyaml to 3.4+
Upgraded the hiera-eyaml component to 3.4. PA-5633
Add agent renew REST implementation
Added a method to send a client certificate renewal request to puppetserver. PUP-11854
Add Puppet setting to configure renewal interval
Added a setting for how often a node attempts to automatically renew its client certificate. PUP-11855
Retry failed CA & CRL refreshes sooner than the next interval
Puppet now attempts to refresh its CA and CRL sooner if initial attempts fail. PUP-11869
Send auto-renew attribute in CSR
Puppet now has an auto-renew attribute. If the agent supports auto-renewal, this attribute is added to the CSR
(Certificate Signing Request) when it is generated and is used by Puppet Server to determine if auto-renewal TTL
needs to be enabled for a given agent.
Agents that either do not have the hostcert_renewal_interval setting or have it set to 0 do not support auto-
renewal and do not have the auto-renew attribute. PUP-11896
Resolved issues
ffi and nokogiri gem use the wrong architecture when cross compiling
Fixed an issue where some gems would get built using the wrong architecture when cross compiling. PA-5666
certname with .pp in the middle doesn't pick up its own manifest
Fixed an issue where manifests with .pp in their file names were not imported. PUP-11788
The --no-preprocess_deferred option breaks deferring of Sensitive file content
It is now possible to specify the content property for file resources as containing a Deferred function that
returns a Sensitive value when lazily evaluating deferred values (the default behavior in 8.x or when setting
Puppet[:preprocess_deferred] false in 7.x). For example: content => Deferred('new',
[Sensitive, "password"]). PUP-11846
"Sleeping" agents raise "attempt to read body out of block (IOError)"
Previously, the agent erroneously tried to read a response body after closing the connection when a Puppet server
requested the agent retry. Now when the agent is told to retry, the agent waits the specified sleep duration and does
not error trying to read the request body after closing the connection. PUP-11853
puppet-resource_api bug with ruby 3.2 and integer munging
Updated puppet-resource_api to enable Ruby 3.2 compatibility. PA-5641
CRL authorityKeyIdentifier is not printed in Puppet 8
Fixed a regression in Puppet 8.x which caused the agent to omit the authorityKeyIdentifier extension for its CRL.
PUP-11849
© 2024 Puppet, Inc., a Perforce company

Puppet | Release notes | 21
Security
Upgrade OpenSSL
Upgraded OpenSSL to address various vulnerabilities (CVE-2023-3817, CVE-2023-3446, CVE-2023-2975,
CVE-2023-0464). PA-5699
Bump Ruby URI component for CVE-2023-36617
Patched Ruby to address a vulnerability in the URI gem (CVE-2023-36617). PA-5638
Puppet 8.1.0
Released June 2023.
Enhancements
Refresh cached Puppet CA on Puppet client
Puppet agents will now attempt to refresh their CA certificate(s) once per day. The frequency is controlled by a new
Puppet setting: ca_refresh_interval. PUP-10639
Resolved issues
Removed dependency on private class Concurrent::RubyThreadLocalVar
The Puppet::ThreadLocal class no longer relies on concurrent-ruby's private
Concurrent::RubyThreadLocalVar class and instead uses Concurrent::ThreadLocalVar.
PUP-11723
Yumrepo target attribute does not work
Using the yumrepo resource, enables the target parameter to set the filepath for a Yum repository to an arbitrary
filepath or to an existing repository file. Thank you to community member nabertrand for this contribution. PA-5187
Security
Bump curl to 7.88.1
Upgraded the curl component from 7.86 to 7.88.1 to address several security vulnerabilities. PA-5393
Puppet 8.0.0
Released April 2023.
Enhancements
Freeze string literals
String literals are now immutable by default. PUP-11841
Strict mode enabled by default
For Puppet 8, strict mode is on by default, meaning strict defaults to error and strict_variables defaults
to true. With strict set to error, extra validation & checks are performed and fail as an error. This change could
be a breaking change if your code does not conform to strict mode.
Examples of code that does not conform to strict mode:
© 2024 Puppet, Inc., a Perforce company

Puppet | Release notes | 22
• Accessing a variable without first defining it: notice($myvar)
• Accessing a legacy fact: notice($facts['osfamily'])
• Coercing a string into a numeric: "1" + 1
To return to the previous behavior, set, strict to warning and strict_variables to false. PUP-11725
Change default value of exclude_unchanged_resources
Puppet reports no longer contain detailed information about resources already matching their desired state. Doing so
reduces the amount of data stored in PuppetDB in the most common case when nothing has changed. The previous
behavior can be enabled by setting exclude_unchanged_resources=false in puppet.conf on each agent.
PUP-11684
Drop Hiera 3 Requirement
Hiera 3 is no longer a hard dependency for Puppet. PUP-11621
Change default crl_refresh_interval to 1 day
Puppet agent now defaults to refreshing its certificate revocation list (CRL) once every 24 hours. PUP-11602
Evaluate deferred functions lazily by default
Deferred functions follow normal resource relationships and ordering, so it is now possible to install a dependency
for a deferred function and call the deferred function in a single agent run. The previous behavior can be enabled by
setting preprocess_deferred=false in puppet.conf on each agent. PUP-11526
Exclude legacy facts by default
Legacy facts are no longer collected on Puppet agent or sent to Puppet server. This saves network bandwidth and
reduces Puppetserver's memory footprint when using templates.
Since legacy facts are not available during compilation, they cannot be referenced in Puppet code, ERB/EPP
templates or Hiera configuration. The legacy_facts puppet-lint plugin can help identify and automatically correct
legacy fact usage in Puppet code. For more information visit https://github.com/puppetlabs/puppet-lint/blob/main/lib/
puppet-lint/plugins/legacy_facts/legacy_facts.rb.
Legacy facts can be re-enabled by setting include_legacy_facts=true in puppet.conf on each agent.
PUP-11430
Replace c_rehash script with native openssl implementation
Puppet agent 8 no longer bundles the c_rehash binary. Instead, users must rely on the bundled openssl binary's
subcommand rehash. Example: /opt/puppetlabs/puppet/bin/openssl rehash. PA-4265
MRI Ruby 3.2
Puppet agent vendors Ruby 3.2. Ruby 3.2 has several notable breaking changes that may affect Puppet extensions,
such as functions, custom facts, types & providers, report processors, etc. For a complete list visit: https://github.com/
puppetlabs/puppet/wiki/Puppet-8-Compatibility#ruby-32-compatibility
If Puppet is installed as a gem, then it requires Ruby 3.1 or greater.
OpenSSL 3.0
Puppet agent vendors OpenSSL 3.0. If an application compiles against Puppet's openssl, then the application must be
recompiled. For more information visit https://www.openssl.org/docs/man3.0/man7/migration_guide.html
© 2024 Puppet, Inc., a Perforce company

Puppet | Release notes | 23
Resolved issues
selinux: undefining the allocator of T_DATA class swig_runtime_data
Patch selinux ruby native extension for Ruby 3.2 compatibility. PA-4844
ruby-shadow failing in Ruby 3.2
Patch shadow ruby native extension for Ruby 3.2. PA-4843
Deprecations and removals
Remove Windows ENV patches on Ruby 3
The Puppet::Util methods for getting, setting, clearing and merging environment variables are still available,
but are deprecated and will be removed in the next major release. Puppet 8 now uses Ruby's built-in ENV class to
manage environment variables on Windows. PUP-11348
Remove extra cli option
The extra CLI option, which was previously hidden, has been entirely removed. PUP-11119
Drop openssl man pages and html docs
OpenSSL man pages and html docs are no longer included in Puppet agent. PA-4908
Drop Hiera 3 Component
This is a breaking change. The Hiera 3 gem is no longer vendored in puppet-agent packages, but may be installed
separately.
If you rely on a Hiera 3 backend (a class that extends Hiera::Backend), you must convert your backend to
Hiera 5 using the steps found at https://www.puppet.com/docs/puppet/latest/hiera_migrate.html, or manually
install the Hiera 3 gem on all Puppet Server hosts. This change does not affect Hiera 5, puppet lookup or the
hiera_include, hiera_hash, etc set of functions. PA-4646
Drop PSON support
Support for the PSON (Pure JSON) serialization format has been removed. Puppet agents may fail if binary data
is accidentally added to the catalog without using the Binary data type or binary_file function. For more
information visit https://www.puppet.com/docs/puppet/latest/lang_data_binary.html.
It is possible, but not recommended, to reenable PSON support by installing the puppet-pson gem on all agents and
server hosts and setting preferred_serialization_format=pson in puppet.conf on each agent.
Puppet known issues
These are the known issues in this version of Puppet.
Puppet lookups fail to interpolate topscope variables when an environment is specified
In Puppet 6.26 and 7.14, the lookup command fails to resolve toplevel facts in hiera configs if you're using the
--environment option. For example, if you use a toplevel variable like "nodes/%{fqdn}.yaml", Puppet
interpolates the variable as an empty string. As a workaround, use trusted facts or specify the fact value using
the "facts" hash, such as "%{facts.hostname}". This issue can be resolved by upgrading to Puppet 7.15.0.
PUP-11437
© 2024 Puppet, Inc., a Perforce company
Puppet | Release notes | 24
User and group management on macOS 10.14 and above requires Full Disk Access (FDA)
To manage users and groups with Puppet on macOS 10.14 and above, you must grant Puppet Full Disk Access
(FDA). You must also grant FDA to the parent process that triggers your Puppet run. For example:
• To run Puppet in a server-agent infrastructure, you must grant FDA to the pxp-agent.
• To run Puppet from a remote machine with SSH commands, you must grant FDA to sshd.
• To run Puppet commands from the terminal, you must grant FDA to terminal.app.
To give Puppet access, go to System Preferences > Security & Privacy > Privacy > Full Disk Access, and add the
path to the Puppet executable, along with any other parent processes you use to run. For detailed steps, see Add full
disk access for Puppet on macOS 10.14 and newer. Alternatively, set up automatic access using Privacy Preferences
Control Profiles and a Mobile Device Management Server. PA-2226, PA-2227
The puppet node clean command fails for users who have their cadir in the legacy location
In Puppet 7, the default location of the cadir has moved. If you have it in the old location, most upgrades trigger
a warning when executing commands from Puppet. It causes the puppet node clean command to fail.
PUP-10786
Hiera knockout_prefix is ineffective in hierarchies more than three levels deep
When specifying a deep merge behaviour in Hiera, the knockout_prefix identifier is effective only against
values in an adjacent array, and not in hierarchies more than three levels deep. HI-223
Specify the epoch when using version ranges with the yum package provider
When using version ranges with the yum package provider, there is a limitation which requires you to specify the
epoch as part of the version in the range, otherwise it uses the implicit epoch `0`. For more information, see the RPM
packaging guide. PUP-10298
Deferred functions can only use built-in Puppet types
Deferred functions can only use types that are built into Puppet (for example String). They cannot use types from
modules like stdlib because Puppet does not plugin-sync these types to the agent. PUP-8600
The Puppet agent installer fails when systemd is not present on Debian 9
The puppet-agent package does not include sysv init scripts for Debian 9 (Stretch) and newer. If you have
disabled or removed systemd, puppet-agent installation and Puppet agent runs can fail.
Upgrading Windows agent fails with ScriptHalted error
Registry references to nssm.exe were removed in PA-3263. Upgrading from a version without this update to a
version that contains it triggers a Windows SecureRepair sequence that fails if any of the files delivered in the
original *.msi package are missing. This is an issue when upgrading to one of the following Puppet agent versions:
5.5.21, 5.5.22, 6.17.0, 6.18.0, 6.19.0, 6.19.1, 6.20.0, 7.0.0, 7.1.0 or 7.3.0. To work around this issue, put the *.msi
file for the currently installed version in the C:\Windows\Installer folder before you upgrade. Starting with
Puppet agent 6.21.0 and 7.4.0, the nssm.exe registry value will be replaced with an empty string, instead of the
registry key being removed, to avoid triggering Windows SecureRepair. PA-3545
The Puppet agent installer fails when systemd is not present on Debian 9
In versions less than 7.4.0, the puppet-agent package does not include sysv init scripts for Debian 9 (Stretch) and
newer. If you had disabled or removed systemd, the puppet-agent installation and agent runs could fail. This is
now fixed. PA-2028
© 2024 Puppet, Inc., a Perforce company

Puppet | Release notes | 25
Puppet Server release notes
Puppet Server 8.6.2
Released July 2024 and shipped with Puppet 8.8.1.
JRuby is updated to address minor security issues. The JRuby implementation is updated from 9.4.7.0 to 9.4.8.0.
With this update, Puppet Server is shipped with Bouncy Castle 1.78.1, which addresses minor security issues.
Issues resolved to improve performance during JRuby initialization. When a JRuby instance is initialized, Puppet
compiles and applies a catalog containing resources for the configured directories. When several JRuby instances are
initialized in parallel, the catalog processes can impair performance and cause race conditions. This release resolves
issues to ensure that you can specify settings_catalog=false to successfully prevent the settings catalog
from being applied during initialization.
Puppet Server 8.6.1
Released June 2024 and shipped with Puppet 8.7.0.
In this release, Puppet Server supports machines with more than 2 TB of RAM. Additional updates were introduced
to reduce Puppet Server startup times. JRuby was upgraded to 9.4.7.0 to improve core functionality.
Puppet Server now supports machines with more than 2 TB of random-access memory (RAM). This update was
requested by Puppet Community member level-a.
Puppet Server creates JRuby instances concurrently to reduce startup times. You can specify a concurrency
level by setting a value for the jruby-puppet.instance-creation-concurrency option in the
puppetserver.conf file. The default value is 3. Puppet Server still creates one instance before other instances,
and then creates the other instances concurrently. The concurrency update is designed to reduce the time required for
starting Puppet Server and flushing JRuby instances. For more information, see puppetserver.conf.
JRuby is updated to improve core functionality. The JRuby implementation is updated from 9.4.3.0 to 9.4.7.0. The
update introduces many minor improvements in JRuby core functionality and provides additional support for Matz’s
Ruby Interpreter (Ruby MRI) 3.1.
An update is implemented to help prevent stack overflows. In previous releases, stack overflows could be
observed when too many events occurred in the certificate authority directory (cadir). In this release, a defect
related to the file-system watcher is resolved to help prevent stack overflows.
An update is implemented to prevent false warnings caused by variable shadowing. In previous releases, after
starting Puppet Server, shadowing warnings were sometimes issued. To resolve the issue, the relevant dependencies
were updated.
An update is implemented to help ensure that the Puppet::Util::Execution.execute method works as
designed. When running in Puppet Server, the method now passes the current working directory as the cwd option.
As an experimental feature to further reduce startup times, Puppet Server can now be started without
applying a settings catalog. To test this feature, create all configured paths before starting Puppet Server.
Then, disable the settings catalog by specifying settings_catalog=false in the server section of the
puppet.conf file. This experimental feature is designed to accelerate creation of JRuby instances and thus shorten
Puppet Server startup times.
Puppet Server 8.6.0
Released April 2024 and shipped with Puppet 8.6.0.
Include action collection functionality. Added action collection. This feature is only used in Puppet Enterprise.
Puppet Server 8.5.0
Released February 2024 and shipped with Puppet 8.5.0.
© 2024 Puppet, Inc., a Perforce company
Puppet | Release notes | 26
Bulk signing logging. Adjusted logging for the bulk signing endpoint.
Improved schema validation logging.
Missing gems in JRuby 9.4. Re-bundled the following gems:
• matrix (0.4.2)
• minitest (5.15.0)
• net-ftp (0.1.3)
• net-imap (0.2.3)
• net-pop (0.1.1)
• net-smtp (0.3.1)
• power_assert (2.0.1)
• prime (0.1.2)
• rake (13.0.6)
• rexml (3.2.5)
• rss (0.2.9)
• test-unit (3.5.3)
SERVER-3264
Puppet Server 8.4.0
Released January 2024 and shipped with Puppet 8.4.0.
Added bulk signing endpoint.
Update CRL issuer. Updated the issuer for the generated CRL to ensure it has the same value as the original CRL.**
Regenerate CRLs. Ensured CRLs are regenerated when nearing expiration.
Analytics service. Adjusted analytics service to explicitly stop the jobs it is running when shutting down.
Added certname as header for help debugging. PUP-11973
Rubygems. Updated rubygems shipped with puppetserver (concurrent-ruby) to fix memory leak.
Fixed dropsonde configuration option CONFDIR env variable. (SERVER-3263)
Puppet Server 8.3.0
Released November 2023 and shipped with Puppet 8.3.1.
Update puppet-infra serial in CA. Ensured infra-serial is up to date. PE-36952
Puppet Server 8.2.1
Released August 2023 and shipped independently.
ca's reverse proxy service fails to proxy new renewal endpoints. Puppet Server now supports the use of x-
client-cert headers when the requesting server is also in the infrastructure inventory list. This allows agent
requests to be proxied through the Puppet Enterprise CA. PE-36761
Puppet Server 8.2.0
Released August 2023 and shipped with Puppet 8.2.0.
Operating Systems support. Added support for RHEL 9 and Ubuntu 22.04.
Default values for certificate renewal are changed. The default value of the auto-renewal-cert-ttl and
default-auto-ttl-renewal parameters was changed from 60 to 90 days.
© 2024 Puppet, Inc., a Perforce company

Puppet | Release notes | 27
Puppet Server 8.1.0
Released June 2023 and shipped with Puppet 8.1.0.
No release notes.
Puppet Server 8.0.0
Released April 2023 and shipped with Puppet 8.0.0.
Enhancements
Upgrade JRuby to 9.4. Puppet Server vendors JRuby 9.4, which implements most of the Ruby 3.1 interface.
We recommend extension authors avoid Ruby language features added in 3.1 and later, as well as avoiding any
deprecated Ruby language features removed in Ruby 3.0, 3.1, or 3.2. SERVER-3167
Deprecations and removals
Deprecate Java 8 for Puppet Server in Platform 7. Puppet Server and PuppetDB no longer support Java 8, as
mentioned in https://groups.google.com/g/puppet-dev/c/yg0YjNwhnTg/m/URqRFzanAgAJ. Java 17 is the preferred
version to run Puppet Server and PuppetDB. Puppet Server will support Java 11 for as long as supported Operating
Systems only have Java 11 available. SERVER-2782
Puppet Server known Issues
For a list of all known issues, visit our Issue Tracker.
Access CA endpoint to update CRLs
Puppet Server 7.2.0 and 6.16.0 include the following new API endpoint: PUT /puppet-ca/v1/
certificate_revocation_list. To update this endpoint, you must update the endpoint's rule to be
type regex instead of path in the configuration file at /etc/puppetlabs/puppetserver/conf.d/
auth.conf.
Cipher updates in Puppet Server 6.5
Puppet Server 6.5 includes an upgrade to the latest release of Jetty's 9.4 series. With this update, you may see "weak
cipher" warnings about ciphers that were previously enabled by default. Puppet Server now defaults to stronger FIPS-
compliant ciphers, but you must first remove the weak ciphers.
The ciphers previously enabled by default have not been changed, but are considered weak by the updated standards.
Remove the weak ciphers by removing the cipher-suite configuration section from the webserver.conf.
After you remove the cipher-suite, Puppet Server uses the FIPS-compliant ciphers instead. This release includes
the weak ciphers for backward compatibility only.
The FIPS-compliant cipher suites, which are not considered weak, will be the default in a future version of Puppet. To
maintain backwards compatibility, Puppet Server explicitly enables all cipher suites that were available as of Puppet
Server 6.0. When you upgrade to Puppet Server 6.5.0, this affects you in in two ways:
1.
The 6.5 package updates the webserver.conf file in Puppet Server's conf.d directory.
2.
When Puppet Server starts or reloads, Jetty warns about weak cipher suites being enabled.
This update also removes the so-linger-seconds configuration setting. This setting is now ignored and a
warning is issued if it is set. See Jetty's so-linger-seconds for removal details.
Note: On some older operating systems, you might see additional warnings that newer cipher suites are
unavailable. In this case, manage the contents of the webserver.cipher-suites configuration
value to be those strong suites that available to you.
© 2024 Puppet, Inc., a Perforce company

Puppet | Release notes | 28
Server-side Ruby gems might need to be updated for upgrading from JRuby 1.7
When upgrading from Puppet Server 5 using JRuby 1.7 (9k was optional in those releases), Server-side gems that
were installed manually with the puppetserver gem command or using the puppetserver_gem package
provider might need to be updated to work with the newer JRuby. In most cases gems do not have APIs that break
when upgrading from the Ruby versions implemented between JRuby 1.7 and JRuby 9k, so there might be no
necessary updates. However, two notable exceptions are that the autosign gem should be 0.1.3 or later and yard-doc
must be 0.9 or later.
Potential JAVA ARGS settings
If you're working outside of lab environment, increase ReservedCodeCache to 512m under normal load. If you're
working with 6-12 JRuby instances (or a max-requests-per-instance value significantly less than 100k), run
with a ReservedCodeCache of 1G. Twelve or more JRuby instances in a single server might require 2G or more.
Similar caveats regarding scaling ReservedCodeCache might apply if users are managing MaxMetaspace.
tmp directory mounted noexec
In some cases (especially for RHEL 7 installations) if the /tmp directory is mounted as noexec, Puppet Server may
fail to run correctly, and you may see an error in the Puppet Server logs similar to the following:
Nov 12 17:46:12 fqdn.com java[56495]: Failed to load feature test for posix:
can't find user for 0
Nov 12 17:46:12 fqdn.com java[56495]: Cannot run on Microsoft Windows
without the win32-process, win32-dir and win32-service gems: Win32API only
supported on win32
Nov 12 17:46:12 fqdn.com java[56495]: Puppet::Error: Cannot determine basic
system flavour
This is caused by the fact that JRuby contains some embedded files which need to be copied somewhere on the
filesystem before they can be executed (see this JRuby issue). To work around this issue, you can either mount the
/tmp directory without noexec, or you can choose a different directory to use as the temporary directory for the
Puppet Server process.
Either way, you'll need to set the permissions of the directory to 1777. This allows the Puppet Server JRuby process
to write a file to /tmp and then execute it. If permissions are set incorrectly, you'll get a massive stack trace without
much useful information in it.
To use a different temporary directory, you can set the following JVM property:
-Djava.io.tmpdir=/some/other/temporary/directory
When Puppet Server is installed from packages, add this property to the JAVA_ARGS and JAVA_ARGS_CLI
variables defined in either /etc/sysconfig/puppetserver or /etc/default/puppetserver,
depending on your distribution. Invocations of the gem, ruby, and irb subcommands use the updated
JAVA_ARGS_CLI on their next invocation. The service will need to be restarted in order to re-read the JAVA_ARGS
variable.
Puppet Server Fails to Connect to Load-Balanced Servers with Different SSL
Certificates
SERVER-207: Intermittent SSL connection failures have been seen when Puppet Server tries to make SSL requests
to servers via the same virtual ip address. This has been seen when the servers present different certificates during the
SSL handshake.
© 2024 Puppet, Inc., a Perforce company

Puppet | Release notes | 29
Facter release notes
These are the new features, resolved issues, and deprecations in this version of Facter.
Facter 4.8.0
Released July 2024 and shipped with Puppet 8.8.1.
Enhancements
• Support for Microsoft Azure Linux. Operating system facts were added for users of the Microsoft Azure Linux
distribution.
• Update for the Arch Linux distribution. Operating system facts are now supported on Arch Linux. Community
member bastelfreak contributed this update.
• Support for the CRI-O container runtime. CRI-O is an implementation of the Kubernetes Container Runtime
Interface that supports Open Container Initiative-compatible runtimes. Community member lollipopman
contributed this update.
• New fact for x86_64 CPU microarchitecture levels. A fact was added to reflect the levels of x86_64 CPU
microarchitectures.
Resolved issues
AIX mountpoints now include server names. Previously, Facter excluded the server name for mountpoints on IBM
AIX. In this release, the mountpoint server names are included in the servername:/path/to/mountpoint
format as reported for other operating systems.
Facter 4.7.1
Released June 2024 and shipped with Puppet 8.7.0.
Enhancements
• Facter now accepts new versions of the ffi Ruby gem. An update was implemented to ensure that Facter will
remain compatible with new releases of ffi.
Facter 4.7.0
Released April 2024 and shipped with Puppet 8.6.0.
Enhancements
• Support for OpenBSD. Added support for OpenBSD. This addition contributed by community member
buzzdeee. FACT-3163
Resolved issues
• Re-add Ruby 2.5 support. Added support for Ruby 2.5.
• Use of cloud provider facts can result in nil dereferences. Patched the two cloud providers' access to metadata
to avoid nil dereferences.
• Evaluate confine block in case-insensitive way. Previously, when a user provided a confine block, Facter would
downcase the value when evaluating it. This change retains the existing behavior of evaluating a confine block
with a downcased fact value, while adding evaluation with the raw fact value to ensure expected behavior.
© 2024 Puppet, Inc., a Perforce company
Puppet | Release notes | 30
Facter 4.6.1
Released March 2024 and shipped with Puppet 8.5.1.
Resolved issues
• Regression in os.windows facts. In Facter 4.6.0, the value parameter was misnamed, causing incorrect
values to be returned. This has been fixed. FACT-3455
Facter 4.6.0
Released February 2024 and shipped with Puppet 8.5.0.
No release notes.
Facter 4.5.2
Released January 2023 and shipped with Puppet 8.4.0.
Enhancements
• Add ssh {384,521} ecdsa facts. Fixed a regression in Facter 4 that prevented it from reporting on 384 and 521-bit
ecdsa ssh keys.
Resolved issues
• Reported memory usage is wrong on FreeBSD. Corrected memory usage facts on FreeBSD. Community
contribution from user smortex.
• Size calculations for AIX block device and partitions. Facter on AIX incorrectly reported the total size of disks
and overcounted the partition size when logical volumes were mirrored to multiple physical volumes. This has
been fixed. Community contribution from user loopway.
• uname resolver does not handle empty results. Fixed an issue where Facter would error when uname did not
return valid output.
• Facter on Solaris 10 does not close socket descriptors, causing puppet run failures. Fixed an issue where
Facter would error when many network interfaces were present on a Solaris machine.
• Not enough os.distro.release information for Amazon Linux. The os.distro.release.full and
os.release.full facts now return all version components such as "2023.1.20230912".
• Cloud fact does not resolve on Amazon Linux 2023. Facter now correctly resolves the cloud fact to aws and
virtual fact to kvm when running on Nitro hypervisors.
Facter 4.5.1
Released November 2023 and shipped with Puppet 8.3.1.
Resolved issues
• Non-hash external fact data in YAML or JSON files causes fatal exceptions in Facter 4. Fixed an issue where
an external fact of an invalid data type caused a fatal exception in Facter. FACT-3433
• New fact error after upgrading v2021.7.5. Fixed an issue where DMI facts caused an error in Solaris non-global
zones. FACT-3435
Facter 4.4.3
Released October 2023 and shipped individually.
Resolved issues
• Required gem not included as runtime dependency A runtime dependency (sys-filesystem) was mistakenly
removed in Facter 4.4.2, which caused some filesystem-related facts to cause an error when running Facter as a
gem. This dependency has been re-added to Facter. FACT-3423
© 2024 Puppet, Inc., a Perforce company
Puppet | Release notes | 31
Facter 4.4.2
Released August 2023 and shipped with Puppet 8.2.0.
Resolved issues
• Facter 4 reports os.name as "SLES_SAP" on Suse Linux for SAP instead of just "SUSE". This along with
FACT-3422 fixed how Facter reads the /etc/os-release file. os.name and os.distro facts work on
SLES SAP operating system now. FACT-3162
• Facter fails on mountpoints fact on Solaris 10 with non-global zones which have NFS mounts. Fixed an
issue with the Solaris mountpoint resolver. FACT-3187
• Error on on Solaris non-global zone after upgrading to PE2021.7.2. Facter guards against nil when
determining the primary interface for the networking fact. FACT-3188
• Don't rescue NoMethodError. When rescuing LoadError and NameErrors, Facter logs a descriptive message
at an error level so debugging Facter will be easier and error messages will not be hidden in the debug level.
FACT-3207
Facter 4.4.1
Released June 2023 and shipped with Puppet 8.1.0.
Resolved issues
• Facter on Solaris 10 leak file descriptors, causing Puppet run failures. Facter no longer leaks file descriptors
when attempting to resolve network interfaces. FACT-3196
• Facts with regular expression matching characters in the name of the fact cause Facter 4 to crash.
Previously, regex metacharacters were not escaped when parsing names. The fix for FACT-3178 also fixed this
issue. FACT-3199
• Facter trying to resolve augeas version on Windows. Facter no longer tries to resolve the augeas fact on
Windows since augeas packages and gems are not shipped for any Windows platforms for Puppet agent packages.
FACT-3197
• facter -p --no-external-facts is unusable. Facter no longer raises when run with the -p and --
no-external-facts option. Previously, this occurred because Facter thought the --external-dir option
(which cannot be used with --no-external-facts) was also passed in.
• Facter mixes up Oracle Linux and Red Hat. os.distro.description and os.distro.id facts were
previously misreporting Oracle Linux as Red Hat Linux, fixed now. FACT-3180
• Facter ldom.domainrole.impl fails on Solaris 11, SPARC. Now, when Facter searches for a fact that
matches the user query, regex metacharacters, like dots (.), are escaped. Previously, metacharacters were not
escaped which resulted in a regex that compared fact names to the user query to resolve and return the wrong fact.
FACT-3178
• Networking facts on AIX incomplete if network device is in down state. On AIX, if the network was in down
state, Facter errored out. Now Facter correctly resolves the network information. FACT-3167
• Facter fails on the /etc/os-release that contains the #. /etc/os-release files can have comments
(#) without raising an error. Comments are allowed in these files according to: https://www.man7.org/linux/man-
pages/man5/os-release.5.html. FACT-3151
• gce.project.attributes.sshKeys is a string instead of an array. Facter 4 now correctly returns
the value of the gce.project.attributes.sshKeys fact as an array of strings as it did in Facter 3.
FACT-3136
• Processor ISA fact on Linux reports wrong data if the string contains a period. Facter no longer modifies
uname -p output when reporting the processors.isa fact on Linux platforms. FACT-3089
• Facter 4 fails to guard against recursion. Facter 3 guarded against recursive calls to facter inside external
facts; this has now been added to Facter 4. If an external fact calls out to facter without specifying the no-
external-facts, Facter warns the user and skips falling into calling facter recursively. FACT-2772
© 2024 Puppet, Inc., a Perforce company

Puppet | Release notes | 32
Facter 4.4.0
Released April 2023 and shipped with Puppet 8.0.0.
Enhancements
• Switch to require_relative. Facter now uses require_relative instead of require. FACT-3184
Facter 4.3.1
Released April 2023 and shipped with Puppet 7.24.0.
No release notes.
Facter 4.3.0
Released February 2023 and shipped with Puppet 7.23.0.
We would like to thank the following Puppet community members for their contributions to this release: smortex.
Resolved issues
• facter.resolve returns a subclass of Hash, not Hash. The facter.resolve API in Facter 4 now
returns a Hash instead of a subclass of Hash, as it did in Facter 3. FACT-3179
• Facter resolves facts multiple times when providers are confined based on facts, especially on Windows.
Facter 4 previously did not use any cache information when looking up a fact or value Facter method. This now
uses cache information when using the fact or value methods. FACT-3170
• Facter incorrectly filters IPv6 link-local unicast addresses. Facter now excludes IPv6 link-local unicast
addresses (fe80::/10) correctly. Fix contributed by smortex. FACT-3171
Deprecations and removals
• Drop Ruby 2.3-2.4 support. Dropped support for Ruby 2.3 and 2.4, which went end-of-life in 2019 and 2020
respectively. FACT-3147
Facter 4.2.13
Released October 2022 and shipped with Puppet 7.20.0.
Resolved issues
• Networking facts generating conversion error: ERROR Facter::InternalFactManager - U+FFFF
to CP850 in conversion from UTF-16LE to UTF-8 to CP850. Fixed a bug that prevented Facter from
resolving its domain fact on Windows due to invalid strings in unrelated registry values. FACT-3145
• ec2_metadata is missing on FreeBSD. Restored ec2_metadata fact to Facter 4 on FreeBSD. Contirbuted
by Puppet community member raybellis. FACT-3137
• ipaddress_* and ipaddress6_* facts missing on FreeBSD. Restored the ipaddress legacy facts on
FreeBSD. Contributed by Puppet community member smortex. FACT-3130
• custom-dir is silently skipped if it is not absolute path. Fixed a regression in Facter 4 that prevented the user
from specifying a custom directory using a relative path on the command line. Contributed by Puppet community
member smortex. FACT-3078
Facter 4.2.12
Released September 2022 and shipped with Puppet 7.19.0.
Enhancements
• Support for ERB changes introduced in Ruby 3.1. Facter now supports ERB changes introduced in Ruby 3.1.
FACT-3102
© 2024 Puppet, Inc., a Perforce company

Puppet | Release notes | 33
Resolved issues
• YAML anchors no longer function properly in Facter 4. Enabled YAML anchors in Facter 4, a feature that
was available previously in Facter 3. Additionally, testing was added to ensure Facter continues to behave as
expected when handling YAML anchors. FACT-3135
• Facter 4 Does Not Support Built-In Windows Commands. Facter 3.x special-cased echo for Windows to
allow it to run using the built-in for a Windows shell; Facter 4 upgrade neglected to include this special case. This
fix adds that special case back in. FACT-3133
Facter 4.2.11
Released August 2022 and shipped with Puppet 7.18.0.
Enhancements
• Extend cloud.provider fact to Google Compute Engine The cloud.provider fact now returns gce
when running on Google Compute Engine. Contributed by Puppet community member natemccurdy. FACT-1557
Resolved issues
• Facter does not parse UTF-8 encoded facts Fixed an issue where, in the C locale, Facter failed to parse YAML-
based external facts when the contents were UTF-8 encoded. FACT-3113
• Failed to get networking information: "\xE5" to UTF-8 in conversion from
ASCII-8BIT to UTF-8 to UTF-16LE Fixed an issue where Facter failed to collect networking
information on some Windows hosts due to encoding issues. FACT-3109
Facter 4.2.10
Released May 2022 and shipped with Puppet 7.17.0.
We would like to thank the following Puppet community members for their contributions to this release: kajinamit,
nbarrientos.
Resolved issues
• Facter fails when using cached facts in a read-only filesystem. Facter no longer errors when using cached facts
from a read-only filesystem. FACT-3116
• virt-what-1.22-1 changes virtual=kvm to virtual=redhat. Resolved issue parsing output from virt-what
on a KVM system. FACT-3115
• Windows 11 shows up as Windows 10 21H2. Corrected os.release facts for Windows 11. FACT-3090
Facter 4.2.9
This version was never released.
Facter 4.2.8
Released March 2022 and shipped with Puppet 7.15.0.
Resolved issues
• fact disks cannot get serial of disks. Updated Facter to use the full path for lsblk, so fact disks can
now show serial of disks. FACT-3100
Facter 4.2.7
Released January 2022 and shipped with Puppet 7.14.0.
No release notes.
© 2024 Puppet, Inc., a Perforce company

Puppet | Release notes | 34
Facter 4.2.6
Released December 2021 and shipped with Puppet 7.12.0.
We would like to thank the following Puppet community members for their contributions to this release: johanfleury
and smortex.
New features
• Add serial number and WWID to disk fact. Added disks serial number and WWID to the disks fact.
FACT-3083
Resolved issues
• DEBUG Facter::Resolvers::Aix::Mountpoints - Could not resolve mountpoints
when running facter mountpoints --debug on AIX. Fixes Facter AIX mountpoint resolver to add
correct data to the mountpoint fact when using NFS mountpoints. FACT-3094
• os.name value changed for OS VirtuozzoLinux. Restored Facter3's value of os.name for VirtuozzoLinux.
FACT-3087
• Facter fails if there are invalid characters in dmidecode. Replaced invalid UTF characters in dmi.rb.
FACT-3081
• Caching not working for some custom facts. When using Facter.value(:fact_name) inside a custom
fact, caching did not work properly, as it cached the value from the inner fact instead of the actual fact. Now it
correctly caches the required fact, by skipping writing the cachefile when it is not required. FACT-3079
• Inconsistent values coming from facter-ng output. Fixed Facter 4 output for yaml external facts when the
fact value is false. FACT-3077
• --log-level none throws exception. Before this release, Facter 4 did not accept none as a log level even
though it was supported as per --help output. This fix aligns the behaviour with Facter 3 by accepting none as
a log level. FACT-3074
• Facter timezone utf8 problem. This release adds a new timezone resolver specific to Windows which checks
the system codepage and uses it for encoding the timezone fact to avoid unwanted characters on non-English OS.
FACT-3068
Facter 4.2.5
Released October 2021 and shipped with Puppet 7.12.0.
We would like to thank the following Puppet community members for their contributions to this release: johanfleury
and smortex.
New features
• DisplayVersion fact for Windows. This release adds a new fact called
os.windows.display_version. This fact reads the version from the DisplayVersion registry key.
FACT-3058
• Option to show HTTP debug logs. This release adds the --http_debug option to the Facter CLI. This option
displays the HTTP debug logs. FACT-3047
Resolved issues
• Mismatched processor frequencies found on AIX. Previously, Facter added all the processors found in
the ODM query, without checking their status. Now if the status is not available, Facter skips the processor.
FACT-2955
• Facter API does not resolve custom facts that match legacy facts. Previously, custom facts with names that
partially matched core legacy facts were resolved as expected in the Facter CLI, but not when using the API. In
these cases, the Facter::FactManager did not resolve custom facts if core or external facts had results.
This release adds a new method to check if the user query matches the name of resolved facts, and then decides
whether to resolve the custom facts. FACT-3067
© 2024 Puppet, Inc., a Perforce company

Puppet | Release notes | 35
• Inconsistencies with the Facter::Core::Execution.execute timeout. This release fixes
inconsistencies with the Facter::Core::Execution.execute arguments between Facter 3 and Facter
4. The .execute method now accepts a timeout option, and warns when unsupported options are passed in.
Contributed by Puppet community members johanfleury and smortex. FACT-3073
• Windows 2022 detected as Windows 2019. The os.release.full and os.release.major facts now
correctly detect Windows 2022 and output 2022, instead of 2019. FACT-3075
Facter 4.2.4
Released September 2021 and shipped with Puppet 7.11.0.
Resolved issues
• AIX reporting "could not resolve mountpoints" error. This release fixes a faulty regex on AIX that skipped
lines with a node substring and resulted in the "could not resolve mountpoints" error. FACT-3060
• AIX reporting "odd number of arguments for hash". This release fixes a faulty regex on AIX that reported the
“odd number of arguments” error when resolving mountpoint facts. FACT-3059
• Facter Ruby API binding fails to resolve facts from environment variables. This release fixes an issue where
environment facts were not downcased before being added to the fact collection. Note that names are always
downcased internally and are case-insensitive. FACT-3057
• Facter unable to get processor speed on macOS 11 arm64. This release fixes an issue with sysctl that
resulted in Facter reporting invalid values for the processors fact. FACT-3063
Facter 4.2.3
Released August 2021 and shipped with Puppet 7.10.0.
Enhancements
• Reduced logs emitted. This release reduces the number of redundant logs emitted by Facter. FACT-3001
Resolved issues
• The pacman package provider fails in Facter >= 4.1.1. This release fixes the operatingsystem fact on
Archlinux and Manjarolinux. FACT-3043
Facter 4.2.2
Released July 2021 and shipped with Puppet 8.8.1.
Resolved issues
• Incorrect license for lib/facter/custom_facts/core/legacy_facter.rb?. The top level
LICENSE file has been changed from MIT to Apache 2.0. FACT-3053
Facter 4.2.1
Released June 2021 and shipped with Puppet 7.8.0.
Enhancements
• Add flags to the help menu. This release adds the following short flags to the help menu: -v [--version], -
p [--puppet] and -h [--help]. FACT-3044
• Facter retrieves Ec2 metadata using IMDSv2. This release improves the way Facter retrieves
ec2_metadata by using IMDSv2 instead of IMDSv1. In this release, Facter automatically uses IMDSv2 to
retrieve an AWS token to add to the X-aws-ec2-metadata-token header. FACT-3042
© 2024 Puppet, Inc., a Perforce company

Puppet | Release notes | 36
Resolved issues
• Facter 4 CLI did not accept concatenated short flags. Facter 3 allowed short flags to be combined, such as `-
jp` or -jd. In Facter 4, you must declare short flags separately, such as -j -p or -j -d. FACT-3046
• Ec2 resolver failed because of nil tokens. Facter returned failing Rspec tests if a token was nil before sending
an HTTP request. The HTTP request gathers any required data to resolve the Ec2 fact. To solve this issue, Facter
now no longer sends HTTP requests if a token is nil.FACT-3050
• Incorrect use of ffi_lib on Windows. This release fixes how ntdll.dll was loaded on Windows.
FACT-3048
Facter 4.2.0
Released June 2021 and shipped with Puppet 7.7.0.
We would like to thank the following Puppet community members for their contributions to this release: ccaviness,
b4ldr, ekohl, and lollipopman.
New features
• New os.macosx.version.patch fact. The os.macosx.version.minor fact has been split into an
additional os.macosx.version.patch fact (on macOS 11+). Contributed by Puppet community member
ccaviness. FACT-3031
• New flags key. This release adds a flags key to the networking.interfaces.*.bindings6
fact, which parses the lower 8-bit encoded flags from /proc/net/if_inet6. Note that the higher bit flags
(managetempaddr, noprefixroute, mcautojoin, stableprivacy) are not shown in the fact output.
Contributed by Puppet community member b4ldr. FACT-2907
Enhancements
• Ruby 3 added to the test matrix. This release adds support for Ruby 3 and updates the test matrix. Contributed
by Puppet community member ekohl. FACT-3029
• Facter gem on Ruby 3. You can now install the Facter gem on Ruby 3. FACT-3027
• Improved fact matching and filtering. This release improves the mechanism of fact filtering and matching by
unifying the functionality. FACT-3006
Resolved issues
• Invalid rubysitedir value when Ruby is compiled without sitedir. This release fixes an issue where
Facter reported an invalid value for the ruby.sitedir fact — if Ruby was compiled without the sitedir
option. FACT-3041
• Undefined method each_line for nil:NilClass. This release fixes a bug where multi-line commands
executed through the Facter::Util::Resolution API were not expanded correctly. FACT-3040
• Facter executes which lsblk and which blkid for each partition. This release fixes an issue where
Facter executed which lsblk and which blkid for each partition. Now these commands are executed once
per Facter run, improving performance and log readability. FACT-3035
• Facter returns TypeError on non-existent indexes. Previously, when accessing array values by indexes,
Facter raised a TypeError if a non-existent index was searched. This is now fixed and Facter no longer errors.
FACT-3030
• Facter 4 calls deprecated xen-toolstack script when resolving the xen fact. Previously, Facter called the
xen-toolstack script when resolving the xen fact. This script is deprecated, and now Facter only calls it if
multiple xen stacks are installed. Contributed by Puppet community member lollipopman. FACT-3023
• Mountpoint file error. Previously, when a mountpoint file could not be read, or was missing, Facter threw an
error, without specifying which mountpoint file had failed. The error is now silent, allowing Facter to continue
resolving facts. You can still see the error when running Facter with debug logging enabled. FACT-2928
© 2024 Puppet, Inc., a Perforce company

Puppet | Release notes | 37
Facter 4.1.1
Released April 2021 and shipped with Puppet 7.6.1.
We would like to thank the following Puppet community members for their contributions to this release: ananace.
Enhancements
• The processors fact includes sockets and threads details. This release adds the cores per
socket and threads per core information to the processors fact. FACT-2992
Resolved issues
• Facter 4 user query overwritten when Facter is called outside of setcode in a custom fact file. This release
fixes an issue where custom facts failed to resolve because nested Facter calls overwrote user queries. FACT-3025
• Facter.fact returns an object when the queried fact does not exist. When resolving facts that do not exist,
Facter now returns nil, instead of an object of the ResolvedFact type with the value nil. FACT-3024
• InfiniBand MAC addresses not resolved. Facter can now handle InfiniBand when reporting MAC addresses.
Contributed by Puppet community member ananace. FACT-3021
Facter 4.1.0
Released April 2021.
Resolved issues
• Auto promoting dotted facts to structured facts is incompatible. This release reverts the way Facter 4 treats
dots in fact names to the same behaviour as Facter 3. This means that by default, any dot in a custom or external
fact name is considered part of the fact name and not a delimiter for structured facts. This fix also adds the
force-dot-resolution global setting — which you can set to re-enable the Facter 4 behavior, converting
dotted facts to structured facts. FACT-3004
• Facter cannot autoload the provider from stdlib inside puppetserver REPL shell. Previously, Facter
failed to execute the first external command when running under JRuby. This issue only appeared when running
puppetserver from source — packaged versions were not affected. This is now fixed. FACT-2999
• Facter breaks when querying custom facts. Previously, Facter showed misleading values or errors when
querying for non-existent facts via CLI and Facter.value. This is now fixed. FACT-2998
• Domain facts cannot be resolved on travis without the FFI gem. This release fixes an issue that prevented
FQDN facts resolving in situations where FFI was not installed. FACT-2997
• Performance regression networking facts in Facter 4.x. This release fixes an issue with primary interface
detection where the default route discarded packages. FACT-2996
• The selinux fact is not properly detected by Facter 4. Facter 4 now takes the same approach as Facter 3 —
checking for both the mounted selinux filesystem and the configuration file. If either are absent, Facter does
not fill in the selinux fact. FACT-2994
• Facter 4.0.52 does not return the fqdn fact. The Linux networking resolver now loads FFI if previous tries of
getting the host information have failed. FACT-2989
• Facter takes 20+ seconds on Windows due to Azure metadata query. Previously, the cloud fact could take
over 20 seconds to resolve on Windows because Ruby was not respecting the HTTP connection timeout. Now
the fact is only resolved on HyperV machines and a new implementation in the Facter HTTP client avoids long
timeouts. FACT-2988
• Facter 4 outputs hypervisor facts differently on Amazon 7. This release changes the value of
hypervisor facts from a boolean to a string, matching the behavior of Facter 3. FACT-3007
• Facter 4 outputs hypervisors.zone.id facts differently on Solaris. This release changes the value of the
hypervisors.zone.id fact from a String to an Integer, matching the behavior of Facter 3. FACT-2987
• Facter 4 outputs mountpoints facts differently on macOS. This release fixes differences in the
mountpoints.options facts on macOS, matching the behavior of Facter 3. FACT-2984
© 2024 Puppet, Inc., a Perforce company

Puppet | Release notes | 38
• Facter 4 outputs mountpoints facts differently on Solaris. This release fixes differences in the
mountpoints fact on Solaris, matching the behavior of Facter 3. FACT-2982
• Facter 4 outputs ldom facts differently on Solaris SPARC. Facter 4 reported boolean values as strings for
Solaris LDOM facts. This is now fixed and the values are represented as boolean. FACT-2983
• Facter 4 outputs uptime facts differently on Windows. This release fixes differences in the uptime fact on
Windows, matching the behavior of Facter 3. FACT-2966
• Facter 4 outputs the processors.speed fact differently on AIX. This release fixes differences in the
processors.speed fact on AIX, matching the behavior of Facter 3. FACT-2965
• Facter 4 outputs MB facts differently to Facter 3. Facter no longer rounds values for MB facts, for example
memorysize_mb. FACT-2967
• Facter 4 outputs virtual facts differently on Amazon 6. The virtual fact is now detected as xen instead of
xenhvm on Amazon Linux 6. FACT-2986
• Facter 4 outputs the hypervisors fact differently on Amazon 7. This release fixes differences in the
hypervisors fact on Amazon 7, matching the behavior of Facter 3. FACT-3007
• Loopback IPv6 IP is not returned correctly. This release fixes the IPv6 address fact on Solaris. FACT-2981
• Facter ensures core facts are resolved before loading custom facts. This release updates the Facter.value
API to resolve facts in a similar way to Facter 3 — loading the fact_name.rb from the configured custom
directory, and then loading all core facts, external facts, environmental facts, and custom facts. FACT-2956
• VLAN interfaces are not properly discovered. VLAN interfaces with a dot in the name were not correctly
displayed in the networking fact. This is now fixed and the default networking resolver recognizes interfaces with
a dot in the name. FACT-2946
• Inconsistent handling of date types in custom facts. This release adds Date and Time as supported values for
custom facts. FACT-2930
Facter 4.0.52
Released March 2021 and shipped with Puppet 7.5.0.
We would like to thank the following Puppet community members for their contributions to this release: smokris..
New features
• Azure metadata fact. This release adds the az_metadata fact which provides information on Azure virtual
machine instances. For more information, see the Microsoft Azure instance metadata documentation. FACT-1383
• Azure identification fact. This release adds the cloud.provider fact for Azure identification on Linux and
Windows platforms. FACT-1847
Enhancements
• Dependency to lsb packages are missing The os.distro facts are now resolved without the lsb_release
on the following platforms: RHEL, Amazon, SLES. The information is read from the system in the same way.
Note that the os.distro.specification fact, which refers to lsb version, is available only if the
lsb_release has been installed. FACT-2931
• Linux networking resolver split into four classes. The Linux networking resolver was too large and has now
been split into four classes. The classes are: toSocketParser (gets data from the Ruby Socket library), DHCP
(gets all DHCP related data), RoutingTable (gets interface data from the ip route show command, if
something can not be retrieved with SocketParser) and the Linux resolver (combines the data from the other
classes). FACT-2915
Resolved issues
• Permission denied error when reading Facter cache during PE 2021 upgrade. Facter 4 no longer loads
facter.conf from the default location when running on jRuby. FACT-2959
• Facter 4 reports lsbmajdistrelease on Ubuntu differently from Facter 3. Previously, the
lsbmajdistrelease fact from Facter 4 was not showing the correct value on Ubuntu. This is now fixed and
aligns the fact's output with Facter 3. FACT-2952
© 2024 Puppet, Inc., a Perforce company

Puppet | Release notes | 39
• Root of structured core facts cannot be overridden by a custom fact. Previously, the root of structured core
facts could not be overridden by a custom fact — because the top-level fact did not exist. This release updates the
QueryParser logic to return the root fact — if present in the loaded facts list — and allows redefinition of core
facts. FACT-2950
• Facter tries to load an incompatible libsocket.so on SmartOS. Previously, Facter tried to load an
incompatible (32-bit) libsocket.so from a hardcoded path using ffi and failed to retrieve networking facts.
Now, the library name is preferred and networking facts can be retrieved on SmartOS. Contributed by Puppet
community member smokris. FACT-2947
• Puppet Server creates another certname during upgrade. Previously, when upgrading Puppet 6 to Puppet 7 on
Linux, Facter failed to retrieve the domain using JRuby because the Socket.getaddrinfo calls failed. Now,
if any of the Socket method calls fail, Facter can retrieve the information using FFI methods. FACT-2944
• The puppet facts show command logs error when stdlib is installed. This release fixes an issue where
Facter.value did not return the fact value for a legacy fact. This happened when calling a legacy fact from a
custom fact or calling other Facter API methods before calling Facter.value. FACT-2937
• Facter 4 pe-bolt-server raises access denied error if cache is enabled. When Facter is unable to delete
the cache files, it now logs a warning message instead of returning error. FACT-2961
• Facter 4 does not accept the same time units as Facter 3. This release makes the following ttls time
units available in Facter 4: ns, nanos, nanoseconds, us, micros, microseconds, ms, milis,
milliseconds, s, m, h, d. Note that singular time units are also accepted, for example, mili and
nano.FACT-2962
• The Facter.conf file does not accept singular ttls units. Previously, Facter failed if the ttls unit in the
facter.conf file was a plural ("days" and "hours"). Facter now accepts a singular noun ("day" and "hour").
Facter 4.0.51
Released February 2021.
This release includes a resolved issue and minor maintenance changes. For the latest features, see the release notes for
Facter 4.0.50.
Resolved issues
• The facter -p command is now supported. The facter -p command did not work in versions Facter
4.0.50 and earlier. FACT-2818
Facter 4.0.50
Released February 2021 and shipped with Puppet 7.4.0.
Enhancements
• Networking fact improvements for AIX. The AIX networking resolver now uses FFI to detect networking
interfaces and IPs. Previously, VLANs and secondary IPs were not displayed. FACT-2878
• Improved performance for blocking legacy facts. This release improves the performance of blocking
legacy facts by implementing a different mechanism. The new mechanism does not allow legacy groups to be
overriden by a group with the same name in fact-groups. If you add a legacy group in fact-groups, it is
ignored. The new implementation is faster for use cases involving multiple custom facts that depend on core facts.
FACT-2917
Resolved issues
• Facter::Core::Execution does not set status variables in Facter 4. This release reimplements
Open3.popen3 to use Process.wait instead of Process.detach. FACT-2934
• Facter error message — no implicit conversion of nil into String — when determining
processor speed on Linux. Facter now handles processor speed values where log10 is not set (3, 6, 9, 12).
FACT-2927
© 2024 Puppet, Inc., a Perforce company

Puppet | Release notes | 40
• Facter fails "closed" if the facter.conf file is invalid. Previously, Facter failed when an invalid config file
was provided. Facter now logs a warning message stating that the parsing of the config file failed and continues
retrieving facts with the default options. FACT-2924
• Domain on Windows does not prioritise registry. Facter now prioritises information from registry on Windows,
instead of network interface domain names. FACT-2923
• LinuxMint Tessa not recognized. Previously, the os.release fact was retrieved from the /etc/os-
release file, but Facter 3 read other release files based on operating system (OS). Now Facter retrieves
os.release from the specific release file for every OS. FACT-2921
Facter 4.0.49
Released January 2021 and shipped with Puppet Platform 7.3.0.
Resolved issues
• Aggregate facts are broken. Previously, Facter broke when trying to add a debug message for the location where
aggregate facts are resolved from. This only happened with aggregate facts that returned an array or hash without
having an aggregate block call. FACT-2919
Facter 4.0.48
Released January 2021.
Enhancements
• Rewritten tests for Linux networking resolver. This release refactors the Linux networking resolver, including
fixing the unit tests and adding new ones. FACT-2901
Resolved issues
• Facter 4.0.x does not return the domain correctly when set in the registry. Previously, Facter did not retrieve
the domain correctly on Linux and resulted in a faulty FQDN facts. Facter also failed to retrieve domain facts
when Windows did not expose the host's primary DNS suffix. This is now fixed. FACT-2882
• Legacy group blocks processors core fact. Blocking legacy facts no longer blocks processors core fact.
FACT-2911
• Facter Hocon output format. The --hocon option now functions as intended. FACT-2909
• Legacy blockdevice vendor and size facts not resolving. This release fixes blockdevice_*_size facts not
resolving on AIX, and blockdevice_*_vendor facts not resolving on Linux and Solaris. FACT-2903
• Facter detects OS family without checking or translating the information. Previously, Facter detected the OS
family by reading /etc/os-release without checking or translating the information. This is now fixed and
Facter translates the id_like field from /etc/os-release to Facter known families. FACT-2902
Facter 4.0.47
Released December 2020 and shipped with Puppet 7.1.0.
New features
• Added scope6 fact for per binding. This release adds the scope6 fact under every ipv6 address from the
interface.bindings6 fact. FACT-2843
• Support for AWS IMDSv2. This release updates the EC2 fact to use IMDSv2 to authenticate. To use v2, set the
AWS_IMDSv2 environment variable to true. Note that the token is cached for a maximum of 100 seconds.
Resolved issues
• Facter 4 does not resolve hostname facts. Previously, Facter failed when Socket.getaddrinfo was called,
which prevented retrieval of FQDN information. This is now fixed. FACT-2894
© 2024 Puppet, Inc., a Perforce company
Puppet | Release notes | 41
• Gem-based Facter 4 does not log the facts in debug mode. This release adds log messages for resolved fact
values. FACT-2883
• Gem-based Facter 4 does not return the complete FQDN. Previously, domain was not retrieved correctly
on Linux based systems and resulted in a faulty FQDN fact. This release uses Ruby Socket methods to retrieve
domain correctly. FACT-2882
• Puppet 7 treats non existent facts differently to Puppet 6. This release excludes custom facts with nil value
from to_user_output, values and to_hash Ruby Facter API's. The custom facts with nil value are still
returned by value, fact and [] API's. FACT-2881
• Facts failing on machines with VLANs. With this release, dots in legacy fact names are ignored. They are
not used as an indicator of a fact hierarchy because legacy facts cannot compose and have a flat (key - value)
structure. FACT-2870
• Facter 4 changes is_virtual fact from boolean to string. This release fixes a regression that caused the
is_virtual to be a string instead of a boolean. FACT-2869
• External facts are loaded when using puppet lookup for a different node. The load_external API
method was missing in Facter 4. This is now fixed. FACT-2859
• Facter fails when the interface name is not UTF-8. Previously, a pointer used to indicate networking
information was being released by the GC too early and the memory was overridden, resulting in inconsistent
data. The fix extends the scope of the pointer so that the memory it points to does not release prematurely.
FACT-2856
• Failure when a structured custom fact has the wrong layout. This release adds a log message when custom
fact names are incompatible and a fact hierarchy cannot be created. FACT-2851
• Cannot retrieve local facts error. This release fixes an error thrown on systems with a low file descriptor limit.
FACT-2898
• Dig method fails on Puppet $facts. The Facter 4 API method to_hash returned a different data type to
Facter 3. This release ensures the to_hash method returns a Ruby Hash instance. FACT-2897
• Facter fails when trying to retrieve ssh facts. Facter now skips reading ssh keys it does not recognise.
FACT-2896
• Missing primary interface check on all platforms. Similar to Facter 3, this release adds a final check that
detects the primary interface from the IP. Localhost IPs are excluded. FACT-2892
• Facter 4.0.46 breaks virtual flag. Facter now checks whether the /proc/lve/list file is a regular file,
instead of checking if it is executable. FACT-2891
• Facter 4.0.46 does not load external fact files in lexicographical order. This is now fixed. FACT-2874
• Secondary interfaces are not reported. Networking.interfaces now display secondary interfaces (with
or without the label) and the VLANs.MAC address is correctly displayed for bonded interfaces. If DHCP is not
found, use the dhcpcd -U <interface_name> command to search. FACT-2872
Deprecations and removals
Update rake task for generating facts and tests. The scripts used to generate facts were outdated and had never
been used. This release removes them. FACT-2298
Facter 4.0.46
Released November 2020 and shipped with Puppet 7.0.0.
New features
• Operating system hierarchy. Facter 4 introduces a hierarchy for operating systems. The hierarchy allows you to
load facts from the child and all parents. If the same fact is present in a child and a parent, the one from the child
takes precedence. FACT-2555
• Rake task for mapping fact name and fact class. To improve the visibility of which facts are loaded for an
operating system, Facter 4 has a rake task that prints all facts and the class that resolved that fact. FACT-2557
• Blocklist. Facter 4 allows you to block facts at a granular level — you can block any fact from the fact hierarchy,
for both groups of facts and individual facts. FACT-1976
© 2024 Puppet, Inc., a Perforce company
Puppet | Release notes | 42
• Block legacy facts. Legacy facts are a subtype of core facts and you can now block them, like any core fact, using
the blocklist from facter.conf. FACT-2259
• Block custom facts. Facter 4 allows you to block custom facts. You can add the fact to the blocklist from
facter.conf. FACT-2718
• Block external facts. Facter 4 allows you to block external facts. Blocking external facts is different from
blocking core and custom facts — you need to specify the name of the file from which external facts are loaded to
blocklist in facter.conf. FACT-2717
• The puppet facts show command. The facter -p and facter --puppet commands have been replaced
with puppet facts show. FACT-2719
• Group for legacy facts. The legacy group contains all the legacy facts. You can find it in lib/facter/
config.rb and can block it in facter.conf. FACT-2296
• The fact-groups group. You can define your own custom groups in facter.conf using the new fact-
groups group. The blocklist and ttls groups from facter.conf accept predefined groups, custom
groups or fact names. You must use the file name when using external facts. FACT-2331
• Define fact groups for blocking or caching. You can define new fact groups in facter.conf, and use the
group to block or cache facts. FACT-2515
• External fact caching. To cache external facts, use the filename of the external fact when setting the ttls in
facter.conf. FACT-2619
Enhancements
• CLI compatible with Facter 3. Facter 4 reimplemented the Facter 3 command line interface using thor gem.
FACT-1955
• Loaded facts based on operating system hierarchy. To improve performance, Facter 4 only loads the files and
facts that are needed for the operating system it is running on. FACT-2093
• Log class name in log messages. Improved logging in Facter 4 prints the class from which the log was generated.
FACT-2036
• Restored --timing option to native facter. The restored --timing and -t arguments allow you to see how
much time it took each fact to resolve. FACT-1380
• (Experimental). Reverted parallel resolution of facts. To improve performance, facts are resolved in parallel on
JRuby. FACT-2819
• Timeout on resolution. You can now specify the timeout attribute in custom fact options. FACT-2643
• Caching core facts . To cache core facts, add the fact group to facter.conf ttls. Fact values are stored and
retrieved on future runs. After the ttls expires, the fact is refreshed. FACT-2486
Resolved issues
• Fix Ruby 2.7 warning on Facter 4. Facter 4 now supports Ruby 2.7. FACT-2649
• Facter does not support timeout for shell calls. External commands have a timeout, and if they do not complete
in the given time, they are forced stop. The default timeout is 300 seconds. You can now specify a timeout using
the limit attribute in Facter::Core::Execution.execute. FACT-2793
• Fact names are treated as regex and can lead to caching of unwanted facts. The regex used to detect facts
has been improved to distinguish between fact groups and legacy facts. FACT-2787
• Facter uptime shows host uptime inside docker container. Previously, the kernel only reported the host uptime
inside a Docker container. You can now see the container uptime. FACT-2737
• A fact present in two groups does not get cached if the second groups has a ttls. If a fact is present in
two groups, and both of them have a ttls defined in facter.conf, the lowest ttls is takes precedence.
FACT-2786
© 2024 Puppet, Inc., a Perforce company

Puppet | Release notes | 43
Facter 4 known issues
These are the known issues in this version of Facter.
Facter 4.7.1 cannot collect Google Cloud metadata
Because of a regression, Facter 4.7.1 cannot collect or read Google Cloud metadata. A fix has been identified and is
scheduled for inclusion in the next Puppet releases. #2731
The implementation of the dot notation is not compatible with the Puppet ecosystem
The implementation of the dot notation feature is not compatible with other parts of the Puppet ecosystem, and does
not give the fact the same name as Facter 3. For example, the supported puppetlabs-lvm module creates facts for
each volume group in the form of lvm_vg_<name>_pvs. If the volume group name contains a dot, Facter converts
the fact from a legacy fact to a structured fact. To access the fact using Puppet's dotted notation, you would need
to change your Puppet manifests, Hiera lookups, and Puppet Enterprise (PE) classification rules, causing breaking
changes. As a result, Facter 4.1 reverts back to the way Facter 3 handled facts with dotted names.
If you want to re-enable the Facter 4 behaviour — that converts a dotted fact to a structured fact — add the following
setting to your manifest:
global : {
force-dot-resolution : true
}
FACT-3004
Incorrect OS description output on Debian 9
Running the facter command in Facter 4 returns incorrect output for the os.distro.description fact on
Debian 9. This facts work correctly in Facter 3 and appears differently when running the puppet facts diff
command. FACT-2985
Incorrect output of the processors.speed fact on Linux
This is issue affects non-virtualized systems — with processors that support variable frequency. FACT-2980
Upgrading from Puppet 7 to Puppet 8
Before upgrading to Puppet 8, review the following recommendations and changes so that you can plan your upgrade
accordingly.
Note that this list is not intended to be exhaustive. It highlights changes that might require action after you upgrade.
For a full list of changes, including all deprecations and removals, see the Puppet 8 release notes.
Important: Always back up your installation before performing any upgrade.
MRI Ruby 3.2
Puppet 8 vendors Ruby 3.2. Ruby 3.2 has several notable breaking changes that may affect Puppet extensions, such as
functions, custom facts, types & providers, report processors, etc.
For a complete list visit: https://github.com/puppetlabs/puppet/wiki/Puppet-8-Compatibility#ruby-32-compatibility
© 2024 Puppet, Inc., a Perforce company

Puppet | Release notes | 44
OpenSSL 3.0
Puppet agent vendors OpenSSL 3.0. If an application compiles against Puppet's openssl, then the application must be
recompiled when upgrading.
For more information visit https://www.openssl.org/docs/man3.0/man7/migration_guide.html
Hiera 3 component dropped
If you rely on a Hiera 3 backend (a class that extends Hiera::Backend), you must convert your backend to Hiera 5
using the steps found at https://www.puppet.com/docs/puppet/latest/hiera_migrate.html, or manually install the Hiera
3 gem on all Puppet Server hosts. This change does not affect Hiera 5, puppet lookup or the hiera_include,
hiera_hash, etc set of functions.
Legacy facts
Legacy facts are no longer collected on the agent or sent to Puppet server. Since legacy facts are not available during
compilation, they cannot be referenced in puppet code, ERB/EPP templates or Hiera configuration. If your puppet
code uses legacy facts, there are two ways to handle them when upgrading:
The legacy_facts puppet-lint plugin can help identify and automatically correct legacy fact usage in puppet code
(https://github.com/puppetlabs/puppet-lint/blob/main/lib/puppet-lint/plugins/legacy_facts/legacy_facts.rb).
If you need to keep legacy facts in your code, they can be re-enabled by setting include_legacy_facts=true
in puppet.conf on each agent.
The following table lists the unmapped legacy facts that cannot be automatically converted. If any of these unmapped
legacy facts are included in any Puppet code you use, you must remove the facts or manually replace them with a
close equivalent structured fact.
Unmapped legacy fact Close equivalent structured facts
memoryfree_mb
Returned a double specifying the size of the free system
memory, in mebibytes.
$facts['memory']['system'][available']
or
$facts['memory']['system']
['available_bytes']
See Facter documentation on memory.
memorysize_mb
Returned a double specifying the size of the total system
memory, in mebibytes.
$facts['memory']['system']['total']
or
$facts['memory']['system']
['total_bytes']
See Facter documentation on memory.
swapfree_mb
Returned a string specifying the size of the free swap
memory, in mebibytes.
$facts['memory']['swap']['available']
or
$facts['memory']['swap']
['available_bytes']
See Facter documentation on memory.
© 2024 Puppet, Inc., a Perforce company

Puppet | Release notes | 45
Unmapped legacy fact Close equivalent structured facts
swapsize_mb
Returned a string specifying the size of the total swap
memory, in mebibytes.
$facts['memory']['swap']['used']
or
$facts['memory']['swap']['used_bytes']
See Facter documentation on memory.
blockdevices
Returned a string containing all block devices separated
by a comma.
Can be replicated using puppetlabs/stdlib and the
following:
join(keys($facts['disks']), ',')
interfaces
Returned a string containing all interfaces separated by a
comma.
Can be replicated using puppetlabs/stdlib and the
following:
join(keys($facts['networking']
['interfaces']), ',')
zones
Returned a string containing all zone names separated by
a comma.
Can be replicated using puppetlabs/stdlib and the
following:
join(keys($facts['solaris_zones']
['zones']), ',')
sshfp_dsa
Returned a string containing both the SHA1 and
SHA256 fingerprint for the DSA algorithm.
Can be replicated using the following string:
"$facts['ssh']['dsa']['fingerprints']
['sha1'] $facts['ssh']['dsa']
['fingerprints']['sha256']"
See Facter documentation on SSH.
sshfp_ecdsa
Returned a string containing both the SHA1 and
SHA256 fingerprint for the ECDSA algorithm.
Can be replicated using the following string:
"$facts['ssh']['ecdsa']
['fingerprints']['sha1'] $facts['ssh']
['ecdsa']['fingerprints']['sha256']"
See Facter documentation on SSH.
sshfp_ed25519
Returned a string containing both the SHA1 and
SHA256 fingerprint for the Ed25519 algorithm.
Can be replicated using the following string:
"$facts['ssh']['ed25519']
['fingerprints']['sha1'] $facts['ssh']
['ed25519']['fingerprints']['sha256']"
See Facter documentation on SSH.
sshfp_rsa
Returned a string containing both the SHA1 and
SHA256 fingerprint for the RSA algorithm.
Can be replicated using the following string:
"$facts['ssh']['rsa']['fingerprints']
['sha1'] $facts['ssh']['rsa']
['fingerprints']['sha256']"
See Facter documentation on SSH.
© 2024 Puppet, Inc., a Perforce company

Puppet | Release notes | 46
Strict mode
Strict mode is now enabled by default. If Puppet code does not conform to strict mode, then catalog compilation will
fail. Examples of non-conforming code:
• Accessing a variable without first defining it: notice($myvar)
• Accessing a legacy fact: notice($facts['osfamily'])
• Coercing a string into a numeric: "1" + 1
The previous behavior can be enabled by setting strict_variables=false and strict=warning in
puppet.conf.
Experimental features
Released versions of Puppet can include experimental features to be considered for adoption but are not yet ready for
production. These features need to be tested in the field before they can be considered safe, and therefore are turned
off by default.
Experimental features can have a solid design but with an unknown performance and resource usage. Sometimes even
the design is tentative, and because of this, we need feedback from users. By shipping these features early in disabled
form, we want it to be easier for testing and giving feedback.
Risks and support
CAUTION: Experimental features are not officially supported by Puppet, and we do not recommend
that you turn them on in a production environment. They are available for testing in relatively safe scratch
environments, and are used at your own risk.
Puppet employees and community members do their best to help you in informal channels like IRC, and the puppet-
users and puppet-dev mailing lists, but we make no promises about experimental functionality.
Enabling experimental features might degrade the performance of your Puppet infrastructure, interfere with the
normal operation of your managed nodes, introduce unexpected security risks, or have other undesired effects.
This is especially relevant to Puppet Enterprise customers. If Puppet support is assisting you with a problem, we
might ask you to disable any experimental features.
Changes to experimental features
Experimental features are exempt from semantic versioning, which means that they can change at any time, and are
not limited to major or minor release boundaries.
These changes might include adding or removing functionality, changing the names of settings and other affordances,
and more.
Documentation of experimental features
The Puppet documentation contains pages for currently available experimental features. These pages are focused on
enabling a feature and running through the interesting parts of its functionality; they might lag slightly behind the
feature as implemented.
When a feature has experienced major changes across minor versions, we note the differences at the top of that
feature page.
Each feature page attempts to give some context about the status of that feature and its prospects for official release.
Giving feedback on experimental features
To help us keep improving Puppet, tell us more about your experience.
© 2024 Puppet, Inc., a Perforce company

Puppet | Release notes | 47
The best places to talk about experimental features are the puppet-users and puppet-dev mailing lists. This tells us
what’s working and what isn’t, while also helping others learn from your experience. For more information about the
Puppet mailing lists, see the community guidelines for mailing lists.
For more immediate conversations, you can use the #puppet and #puppet-dev channels on irc.freenode.net. For more
information about these channels, see the community guidelines for IRC.
• Msgpack support on page 47
Puppet agents and primary servers communicate over HTTPS, exchanging structured data in JSON.
Msgpack support
Puppet agents and primary servers communicate over HTTPS, exchanging structured data in JSON.
Msgpack is an efficient serialization protocol that behaves similarly to JSON. It provides faster and more robust
serialization for agent-server communications, without requiring many changes in our code.
Important: When msgpack is enabled, the primary Puppet server and agent communicates using msgpack instead of
JSON.
Enabling Msgpack serialization
Enabling msgpack is easy, but first, it must be installed because the gem is not included in the puppet-agent or
puppetserver packages.
1.
Install the msgpack gem on your primary server and all agent nodes.
If you are using the Puppet Enterprise test environment, make sure to use PE gem command instead of the system
gem command.
On *nix nodes, run the following command:
/opt/puppetlabs/puppet/bin/gem install msgpack
On Windows nodes, run the following command:
"C:\Program Files\Puppet Labs\Puppet\sys\ruby\bin\gem" install msgpack
On Puppet Server, run the following command and then restart the Puppet Server service:
puppetserver gem install msgpack
2.
In the [agent] or [main] section of puppet.conf on any number of agent nodes, set the
preferred_serialization_format setting to msgpack. Read about the preferred_serialization_format
setting in the Configuration Reference.
After this is configured, the primary Puppet server uses msgpack when serving any agents that have
preferred_serialization_format set to msgpack. Any agents without that setting continue to receive
JSON as normal.
Archived documentation
Open source Puppet docs for recent end-of-life (EOL) product versions are archived in place, meaning that we
continue to host them at their original URLs, but we limit their visibility on the main docs site and no longer update
them. You can access archived-in-place docs using their original URLs, or from the links here.
Open Source Puppet docs for EOL versions earlier than those listed here are archived in our open source Puppet docs
archive.
© 2024 Puppet, Inc., a Perforce company

Puppet | Puppet overview | 48
Puppet Version URL
6.28 https://puppet.com/docs/puppet/6/puppet_index.html
5.5 https://puppet.com/docs/puppet/5.5/puppet_index.html
Puppet overview
This introduction is intended for new users to Puppet. We go over what Puppet is, what problems it solves, and the
concepts and practices that are key to being successful with Puppet.
• What is Puppet? on page 48
Puppet is a tool that helps you manage and automate the configuration of servers.
• Why use Puppet desired state management? on page 49
There are many benefits to implementing a declarative configuration tool like Puppet into your environment — most
notably consistency and automation.
• Key concepts behind Puppet on page 50
Using Puppet is not just about the tool, but also about a different culture and a way of working. The following
concepts and practices are key to using and being successful with Puppet.
• The Puppet platform on page 51
Puppet is made up of several packages. Together these are called the Puppet platform, which is what you use to
manage, store and run your Puppet code. These packages include puppetserver, puppetdb, and puppet-
agent — which includes Facter and Hiera.
• Puppet platform lifecycle on page 53
The open source Puppet platform is made up of several packages: puppet-agent, puppetserver, and,
optionally, puppetdb. Understanding what versions are maintained and which versions go together is important
when upgrading and troubleshooting.
• Open source Puppet vs Puppet Enterprise (PE) on page 56
• The Puppet ecosystem on page 56
Alongside Puppet the configuration tool, there are additional Puppet tools and resources to help you use and be
successful. These make up the Puppet ecosystem
• Use cases on page 57
Puppet Forge has existing modules and code examples that assist with automating the following use cases:
• Glossary on page 57
The glossary defines terms used in Puppet documentation.
• Navigating the documentation on page 58
Puppet maintains a large amount of documentation and learning resources to help you learn Puppet. When navigating
the documentation, take note of the following.
What is Puppet?
Puppet is a tool that helps you manage and automate the configuration of servers.
When you use Puppet, you define the desired state of the systems in your infrastructure that you want to manage.
You do this by writing infrastructure code in Puppet's Domain-Specific Language (DSL) — Puppet code — which
you can use with a wide array of devices and operating systems. Puppet code is declarative, which means that you
describe the desired state of your systems, not the steps needed to get there. Puppet then automates the process of
getting these systems into that state and keeping them there. Puppet does this through Puppet server and a Puppet
agent. The Puppet server is the server that stores the code that defines your desired state. The Puppet agent translates
your code into commands and then executes it on the systems you specify, in what is called a Puppet run.
The diagram below shows how the server-agent architecture of a Puppet run works.
© 2024 Puppet, Inc., a Perforce company

Puppet | Puppet overview | 49
The server and the agent are part of the Puppet platform, which is described in The Puppet platform — along with
facts, catalogs and reports.
Why use Puppet desired state management?
There are many benefits to implementing a declarative configuration tool like Puppet into your environment — most
notably consistency and automation.
• Consistency. Troubleshooting problems with servers is a time-consuming and manually intensive process.
Without configuration management, you are unable to make assumptions about your infrastructure — such as
which version of Apache you have or whether your colleague configured the machine to follow all the manual
steps correctly. But when you use configuration management, you are able to validate that Puppet applied the
desired state you wanted. You can then assume that state has been applied, helping you to identify why your
model failed and what was incomplete, and saving you valuable time in the process. Most importantly, once you
figure it out, you can add the missing part to your model and ensure that you never have to deal with that same
problem again.
© 2024 Puppet, Inc., a Perforce company

Puppet | Puppet overview | 50
• Automation. When you manage a set of servers in your infrastructure, you want to keep them in a certain state.
If you only have to manage homogeneous 10 servers, you can do so with a script or by manually going into each
server. In this case, a tool like Puppet may not provide much extra value. But if you have 100 or 1,000 servers, a
mixed environment, or you have plans to scale your infrastructure in the future, it is difficult to do this manually.
This is where Puppet can help you — to save you time and money, to scale effectively, and to do so securely.
Check out the following video of how a DevOps engineer uses Puppet:
Key concepts behind Puppet
Using Puppet is not just about the tool, but also about a different culture and a way of working. The following
concepts and practices are key to using and being successful with Puppet.
Infrastructure-as-code
Puppet is built on the concept of infrastructure-as-code, which is the practice of treating infrastructure as if it were
code. This concept is the foundation of DevOps — the practice of combining software development and operations.
Treating infrastructure as code means that system administrators adopt practices that are traditionally associated with
software developers, such as version control, peer review, automated testing, and continuous delivery. These practices
that test code are effectively testing your infrastructure. When you get further along in your automation journey, you
can choose to write your own unit and acceptance tests — these validate that your code, your infrastructure changes,
do as you expect. To learn more about infrastructure-as-code and how it applies to Puppet, see our blog What is
infrastructure as code?.
Idempotency
A key feature of Puppet is idempotency — the ability to repeatedly apply code to guarantee a desired state on a
system, with the assurance that you will get the same result every time. Idempotency is what allows Puppet to run
continuously. It ensures that the state of the infrastructure always matches the desired state. If a system state changes
from what you describe, Puppet will bring it back to where it is meant to be. It also means that if you make a change
to your desired state, your entire infrastructure automatically updates to match. To learn more about idempotency, see
our Understanding idempotency documentation.
Agile methodology
When adopting a tool like Puppet, you will be more successful with an agile methodology in mind — working in
incremental units of work and reusing code. Trying to do too much at once is a common pitfall. The more familiar
you get with Puppet, the more you can scale, and the more you get used to agile methodology, the more you can
democratize work. When you share a common methodology, a common pipeline, and a common language (the
Puppet language) with your colleagues, your organization becomes more efficient at getting changes deployed
quickly and safely.
Git and version control
Git is a version control system that tracks changes in code. While version control is not required to use Puppet, it
is highly recommended that you store your Puppet code in a Git repository. Git is the industry standard for version
control, and using it will help your team gain the benefits of the DevOps and agile methodologies
When you develop and store your Puppet code in a Git repository, you will likely have multiple branches — feature
branches for developing and testing code and a production branch for releasing code. You test all of your code on
a feature branch before you merge it to the production branch. This process, known as Git flow, allows you to test,
track, and share code, making it easier to collaborate with colleagues. For example, if someone on your team wants
to make a change to an application's firewall requirements, they can create a pull request that shows their proposed
changes to the existing code, which everyone on your team can review before it gets pushed to production. This
process leaves far less room for errors that could cause an outage. For more information on version control, see the
GitHub guides Git flow and What is version control?.
© 2024 Puppet, Inc., a Perforce company

Puppet | Puppet overview | 51
The Puppet platform
Puppet is made up of several packages. Together these are called the Puppet platform, which is what you use to
manage, store and run your Puppet code. These packages include puppetserver, puppetdb, and puppet-
agent — which includes Facter and Hiera.
Puppet is configured in an agent-server architecture, in which a primary node (system) controls configuration
information for one or more managed agent nodes. Servers and agents communicate by HTTPS using SSL
certificates. Puppet includes a built-in certificate authority for managing certificates. Puppet Server performs the role
of the primary node and also runs an agent to configure itself.
Facter, Puppet’s inventory tool, gathers facts about an agent node such as its hostname, IP address, and operating
system. The agent sends these facts to the primary server in the form of a special Puppet code file called a manifest.
This is the information the primary server uses to compile a catalog — a JSON document describing the desired state
of a specific agent node. Each agent requests and receives its own individual catalog and then enforces that desired
state on the node it's running on. In this way, Puppet applies changes all across your infrastructure, ensuring that each
node matches the state you defined with your Puppet code. The agent sends a report back to the primary server.
You keep nearly all of your Puppet code, such as manifests, in modules. Each module manages a specific task in your
infrastructure, such as installing and configuring a piece of software. Modules contain both code and data. The data
is what allows you to customize your configuration. Using a tool called Hiera, you can separate the data from the
code and place it in a centralized location. This allows you to specify guardrails and define known parameters and
variations, so that your code is fully testable and you can validate all the edge cases of your parameters. If you have
just joined an existing team that uses Puppet, take a look at how they organize their Hiera data.
All of the data generated by Puppet (for example facts, catalogs, reports) is stored in the Puppet database
(PuppetDB). Storing data in PuppetDB allows Puppet to work faster and provides an API for other applications
to access Puppet's collected data. Once PuppetDB is full of your data, it becomes a great tool for infrastructure
discovery, compliance reporting, vulnerability assessment, and more. You perform all of these tasks with PuppetDB
queries.
The diagram below shows how the Puppet package components fit together.
© 2024 Puppet, Inc., a Perforce company

Puppet | Puppet overview | 52
© 2024 Puppet, Inc., a Perforce company

Puppet | Puppet overview | 53
Puppet platform lifecycle
The open source Puppet platform is made up of several packages: puppet-agent, puppetserver, and,
optionally, puppetdb. Understanding what versions are maintained and which versions go together is important
when upgrading and troubleshooting.
Puppet releases and lifecycle
Open source Puppet has two release tracks:
• Update track: Puppet versions that are not associated with any PE version get updated minor (or "y") releases
about once a month. Releases in this track include fixes and new features, but typically do not get patch (or "z")
releases. Each update in this track supersedes the previous minor release. Documentation for the current release
is available at Welcome to Puppet. The latest Release notes on page 9 contain a history of all updates to this
release track.
• Long-term releases: Puppet versions associated with Puppet Enterprise LTS (long-term support) releases get
patch (or "z") releases about quarterly. Each release contains bug and security fixes from several developmental
releases, but does not get new features. Versioned documentation for long-term releases is available at
puppet.com/docs/puppet/<X.Y> (for example, puppet.com/docs/puppet/7.3).
Important: To ensure that you have the most recent features, fixes, and security patches, update your Puppet version
whenever there is a new version in your release track.
The following table lists the maintained Puppet, Puppet Server, and PuppetDB versions, with links to their respective
documentation. Developmental releases (known as latest) are superseded by new versions about once a month. Open
source releases that are associated with PE versions have projected End of Life (EOL) dates.
Puppet version Puppet Server
version
PuppetDB version Associated PE
version
Projected EOL date
8.8.1 8.6.2 8.7.0 2023.x Superseded by next
developmental
release.
7.32.1 7.17.2 7.19.1 2021.7.x Superseded by next
developmental
release.
6.28.0 6.20.0 6.22 2019.8.x February 2023
Tip: To access documentation for unmaintained Puppet versions, see Archived documentation on page 47.
For information about Puppet's operating system support, see System requirements on page 60.
Puppet platform packages
The Puppet platform bundles the components required for a successful deployment. Open source Puppet is distributed
in the following packages:
Package Contents
puppet-agent
This package contains Puppet’s main code and all of the
dependencies needed to run it, including Facter, Hiera,
the PXP agent, root certificates, and bundled versions
of Ruby and OpenSSL. After the package is installed,
you have everything you need to run the Puppet agent
service and the puppet apply command.
© 2024 Puppet, Inc., a Perforce company
Puppet | Puppet overview | 54
Package Contents
puppetserver Puppet Server is a JVM-based application that, among
other things, runs instances of the primary Puppet server
application and serves catalogs to nodes running the
agent service. It has its own version number and might
be compatible with more than one Puppet version.
This package depends on puppet-agent. After it’s
installed, Puppet Server can serve catalogs to nodes
running the agent service.
puppetdb PuppetDB (optional) collects data generated by Puppet.
It enables additional features such as Exported resources
on page 935, advanced queries, and reports about your
infrastructure.
puppetdb-termini Plugins to connect your primary server to PuppetDB
The puppetserver component of the Puppet platform is available only for Linux. The puppet-agent
component is available independently for over 30 platforms and architectures, including Windows and macOS.
Restriction: As of Puppet agent 5.5.4, MCollective was deprecated. It was removed in Puppet 6.0. If you use Puppet
Enterprise, consider Puppet orchestrator. If you use open source Puppet, migrate MCollective agents and filters using
tools such as Bolt and PuppetDB’s Puppet Query Language (PQL). For details, see the Reference guide.
puppet-agent component version numbers
Each puppet-agent package contains several components. This table shows the components shipped in this
release track, and contains links to available component release notes. Agent release notes are included on the same
page as Puppet release notes.
Tip: Hiera 5 is a backward-compatible evolution of Hiera, which is built into Puppet. To provide some backward-
compatible features, Hiera 5 uses the classic Hiera 3 codebase. This means that Hiera is still shown as version 3.x in
the following table, even though this Puppet version uses Hiera 5.
puppet-
agent
Puppet Facter Hiera Resource API Ruby OpenSSL
8.8.1 8.8.1 4.8.0 None 1.9.0 3.2.4 3.0.14
8.7.0 8.7.0 4.7.1 None 1.9.0 3.2.4 3.0.13
8.6.0 8.6.0 4.7.0 None 1.9.0 3.2.3 3.0.13
8.5.1 8.5.1 4.6.1 None 1.9.0 3.2.3 3.0.12
8.5.0 8.5.0 4.6.0 None 1.9.0 3.2.3 3.0.12
8.4.0 8.4.0 4.5.2 None 1.9.0 3.2.2 3.0.12
8.3.1 8.3.1 4.5.1 None 1.9.0 3.2.2 3.0.11
8.2.0 8.2.0 4.4.2 None 1.9.0 3.2.2 3.0.10
8.1.0 8.1.0 4.4.1 None 1.8.16 3.2.2 3.0.8
8.0.0 8.0.0 4.4.0 None 1.8.16 3.2.2 3.0.8
7.32.1 7.32.1 4.8.0 3.12.0 1.9.0 2.7.8 1.1.1v
7.31.0 7.31.0 4.7.1 3.12.0 1.9.0 2.7.8 1.1.1v
7.30.0 7.30.0 4.7.0 3.12.0 1.9.0 2.7.8 1.1.1v
© 2024 Puppet, Inc., a Perforce company

Puppet | Puppet overview | 55
puppet-
agent
Puppet Facter Hiera Resource API Ruby OpenSSL
7.29.1 7.29.1 4.6.1 3.12.0 1.9.0 2.7.8 1.1.1v
7.29.0 7.29.0 4.6.0 3.12.0 1.9.0 2.7.8 1.1.1v
7.28.0 7.28.0 4.5.2 3.12.0 1.9.0 2.7.8 1.1.1v
7.27.0 7.27.0 4.5.1 3.12.0 1.9.0 2.7.8 1.1.1v
7.26.0 7.26.0 4.4.2 3.12.0 1.9.0 2.7.8 1.1.1v
7.25.0 7.25.0 4.4.1 3.12.0 1.8.16 2.7.7 1.1.1t
7.24.0 7.24.0 4.3.1 3.12.0 1.8.16 2.7.7 1.1.1t
7.23.0 7.23.0 4.3.0 3.11.0 1.8.16 2.7.7 1.1.1q
7.21.0 7.21.0 4.1.14 3.11.0 1.8.16 2.7.7 1.1.1q
7.20.0 7.20.0 4.2.13 3.10.0 1.8.16 2.7.6 1.1.1q
7.19.0 7.19.0 4.2.12 3.10.0 1.8.14 2.7.6 1.1.1q
7.18.0 7.18.0 4.2.11 3.10.0 1.8.14 2.7.6 1.1.1q
7.17.0 7.17.0 4.2.10 3.9.0 1.8.14 2.7.6 1.1.1n
7.16.0 7.16.0 4.2.8 3.8.1 1.8.14 2.7.6 1.1.1n
7.15.0 7.15.0 4.2.8 3.8.1 1.8.14 2.7.5 1.1.1l
7.14.0 7.14.0 4.2.7 3.8.0 1.8.14 2.7.5 1.1.1l
7.13.1 7.13.1 4.2.6 3.8.0 1.8.14 2.7.3 1.1.1l
7.21.1 7.21.1 4.2.5 3.7.0 1.8.14 2.7.3 1.1.1l
7.12.0 7.12.0 4.2.5 3.7.0 1.8.14 2.7.3 1.1.1l
7.11.0 7.11.0 4.2.4 3.7.0 1.8.14 2.7.3 1.1.1l
7.10.0 7.10.0 4.2.3 3.7.0 1.8.14 2.7.3 1.1.1k
7.9.0 7.9.0 4.2.2 3.7.0 1.8.14 2.7.3 1.1.1k
7.8.0 7.8.0 4.2.1 3.7.0 1.8.14 2.7.3 1.1.1k
7.7.0 7.7.0 4.2.0 3.7.0 1.8.13 2.7.0 1.1.1i
7.6.1 7.6.1 4.1.1 3.6.0 1.8.13 2.7.0 1.1.1i
7.5.0 7.5.0 4.0.52 3.6.0 1.8.13 2.7.0 1.1.1i
7.4.1 7.4.1 4.0.51 3.6.0 1.8.13 2.7.0 1.1.1i
7.4.0 7.4.0 4.0.50 3.6.0 1.8.13 2.7.0 1.1.1i
7.3.0 7.3.0 4.0.49 3.6.0 1.8.13 2.7.0 1.1.1i
7.1.0 7.1.0 4.0.47 3.6.0 1.8.13 2.7.0 1.1.1i
7.0.0 7.0.0 4.0.46 3.6.0 1.8.13 2.7.0 1.1.1g
Server and agent compatibility
Use this table to verify that you're using a compatible version of the agent for your PE or Puppet Server.
Restriction: Puppet Server 6.x is no longer developed or tested.
© 2024 Puppet, Inc., a Perforce company

Puppet | Puppet overview | 56
ServerAgent
Puppet 6.x
PE 2019.1 through 2019.8
Puppet 7.x
PE 2021.0 through 2023.2
Puppet 8.x
PE 2023.4 and later
6.x # # #
7.x # #
8.x #
Open source Puppet vs Puppet Enterprise (PE)
Puppet Enterprise (PE) is the commercial version of Puppet and is built on top of the open source Puppet platform.
Both products allow you to manage the configuration of thousands of nodes. Open source Puppet does this with
desired state management. PE provides an imperative, as well as declarative, approach to infrastructure automation.
If you have a complex or large infrastructure that is used and managed by multiple teams, PE is a more suitable
option, as it provides a graphical user interface, point-and-click code deployment strategies, continuous testing and
integration, and the ability to predict the impact of code changes before deployment.
For additional information on PE, visit the PE documentation.
The Puppet ecosystem
Alongside Puppet the configuration tool, there are additional Puppet tools and resources to help you use and be
successful. These make up the Puppet ecosystem
Install existing modules from Puppet Forge
Modules manage a specific technology in your infrastructure and serve as the basic building blocks of Puppet desired
state management. On the Puppet Forge, there is a module to manage almost any part of your infrastructure. Whether
you want to manage packages or patch operating systems, a module is already set up for you. See each module’s
README for installation instructions, usage, and code examples.
When using an existing module from the Forge, most of the Puppet code is written for you. You just need to install
the module and its dependencies and write a small amount of code (known as a profile) to tie things together. Take
a look at our Getting started with PE guide to see an example of writing a profile for an existing module. For more
information about existing modules, see the module fundamentals documentation and Puppet Forge.
Develop existing or new modules with Puppet Development Kit (PDK)
You can write your own Puppet code and modules using Puppet Development Kit (PDK), which is a framework to
successfully build, test and validate your modules. Note that most Puppet users won’t have to write full Puppet code
at all, though you can if you want to. For installation instructions and more information, see the PDK documentation.
Write Puppet code with the VSCode extension
The Puppet VSCode extension makes writing and managing Puppet code easier and ensures your code is high
quality. Its features include Puppet DSL intellisense, linting, and built-in commands. You can use the extension with
Windows, Linux, or macOS. For installation instructions and a full list of features, see the Puppet VSCode extension
documentation.
© 2024 Puppet, Inc., a Perforce company

Puppet | Puppet overview | 57
Run acceptance tests with Litmus
Litmus is a command line tool that allows you to run acceptance tests against Puppet modules for a variety of
operating systems and deployment scenarios. Acceptance tests validate that your code does what you intend it to do.
For more information, see the Litmus documentation.
Use cases
Puppet Forge has existing modules and code examples that assist with automating the following use cases:
• Base system configuration. Including registry, NTP, firewalls, services
• Manage web servers. Including apache, tomcat, IIS, nginx
• Manage database systems. Including Oracle, Microsoft SQL Server, MySQL, PostgreSQL
• Manage middleware/application systems. Including Java, WebLogic/Fusion, IBM MQ, IBM IIB, RabbitMQ,
ActiveMQ, Redis, ElasticSearch
• Source control. Including Github, Gitlab
• Monitoring. Including Splunk, Nagios, Zabbix, Sensu, Prometheus, NewRelic, Icinga, SNMP
• Patch management. OS patching on Enterprise Linux, Debian, SLES, Ubuntu, Windows
• Package management.
• Linux: Puppet integrates directly with native package managers
• Windows: Use Puppet to install software directly on Windows, or integrate with Chocolatey
• Containers and cloud native. Including Docker, Kubernetes, Terraform, OpenShift
• Networking. Including Cisco Catalyst, Cisco Nexus, F5, Palo Alto, Barracuda
• Secrets management. Including Hashicorp Vault, CyberArk Conjur, Azure Key Vault, Consul Data
See each module’s README for installation, usage, and code examples.
If you don’t see your use case listed above, have a look at the following list to see what else we might be able to help
you with:
• Continuous integration and delivery of Puppet code. Continuous Delivery offers a prescriptive workflow to
test and deploy Puppet code across environments. To harness the full power of PE, you need a robust system
for testing and deploying your Puppet code. Continuous Delivery offers prescriptive, customizable work flows
and intuitive tools for Puppet code testing, deployment, and impact analysis — so you know how code changes
will affect your infrastructure before you deploy them — helping you ship changes and additions with speed and
confidence. For more information, see Continuous Delivery.
• Incident remediation. If you need to minimize the risk of external attacks and data breaches by increasing your
visibility into the vulnerabilities across your infrastructure, take a look at Puppet Remediate. With Remediate, you
can eliminate the repetitive and error-prone steps of manual data handovers between teams. For more information,
see Puppet Remediate.
• Integrate Puppet into your existing workflows. Take a look at our integrations with other technology, including
Splunk and VMware vRA.
Glossary
The glossary defines terms used in Puppet documentation.
© 2024 Puppet, Inc., a Perforce company

Puppet | Puppet overview | 58
Navigating the documentation
Puppet maintains a large amount of documentation and learning resources to help you learn Puppet. When navigating
the documentation, take note of the following.
The search bar
The Puppet documentation search bar at the top of the page can be useful when you know exactly what you are
looking for. Unlike search engines, it has the added benefit of being able to filter by Puppet product and version. The
filter appears on the right side of the page after you search for something.
The version switcher
If you land on a documentation page from an external search engine, make sure you are looking at the correct Puppet
version. You can see what version of the documentation you are viewing by looking at the version switcher in the top
left corner.
Note that, other than the latest version, we only maintain and update the open source Puppet versions that are built
into Puppet Enterprise (PE) versions receiving long-term support. For information on which versions we currently
support, see Puppet packages and versions. If we no longer update a page, the following banner is shown across the
top.
Code examples
We have code examples throughout the docs. These are often general examples designed to help a wide audience.
To see more real-life and specific examples, take a look at the relevant module on Puppet Forge. For example, to see
what a code example for managing NTP services looks like, take a look at the NTP README. However, if you spot
a place in the documentation where you would like more examples, please let us know.
© 2024 Puppet, Inc., a Perforce company
Puppet | Puppet overview | 59
The glossary
If you come across a term that you are unfamiliar with, you will likely find a definition for it in our glossary.
We welcome your feedback!
If you don’t see what you need, if something isn't clear enough, or if you spot a mistake, please let the Puppet
documentation team know, either by using the star rating at the bottom of the page or by opening a ticket (you'll need
a Jira account). Whichever feedback method you choose, a member of the docs team reads every piece of feedback,
so the more specific you can be about the request or issue, the more quickly and easily we’ll be able to help and
update the documentation. As noted before, we can only update maintained Puppet versions. We greatly appreciate
your feedback!
© 2024 Puppet, Inc., a Perforce company

Puppet | Set up Puppet | 60
Set up Puppet
A Puppet deployment typically includes a primary Puppet server and agents, which are installed on nodes in your
environment.
• Install Puppet on page 60
Puppet can be installed and upgraded in various configurations to fit the needs of your environment.
• Configure Puppet settings on page 75
You can configure Puppet's commands and services extensively, and its settings are specified in a variety of places.
• Upgrading on page 126
To upgrade your deployment, you must upgrade both the infrastructure components and agents.
• Environments on page 130
Environments are isolated groups of agent nodes.
• Directories and files on page 137
Puppet consists of a number of directories and files, and each one has an important role ranging from Puppet code
storage and configuration files to manifests and module paths.
• Report reference on page 147
Puppet has a set of built-in report processors, which you can configure.
Install Puppet
Puppet can be installed and upgraded in various configurations to fit the needs of your environment.
• System requirements on page 60
Puppet system requirements depend on your deployment type and size. Before installing Puppet, ensure your systems
are compatible with infrastructure and agent requirements.
• Installing Puppet on page 62
To get started using Puppet, you must first complete the initial installation and setup process.
• Installing and configuring agents on page 64
You can install agents on *nix, Windows, or macOS.
• Manually verify packages on page 73
Puppet signs most of its packages, Ruby gems, and release tarballs with GNU Privacy Guard (GPG). This signature
proves that the packages originate from Puppet and have not been compromised. Security-conscious users can use
GPG to verify package signatures.
• Managing Platform versions on page 75
To receive the most up-to-date software without introducing breaking changes, pin your infrastructure to known
versions, and update the pinned version manually when you’re ready to update.
System requirements
Puppet system requirements depend on your deployment type and size. Before installing Puppet, ensure your systems
are compatible with infrastructure and agent requirements.
Restriction: Puppet primary servers must run on some variant of *nix. You can't run primary servers on Windows.
Hardware requirements
The primary server is fairly resource intensive, and must be installed on a robust, dedicated server. The agent service
has few system requirements and can run on a less powerful server.
The Puppet agent has been run and tested on a various servers. The following table lists the minimum hardware
specifications that have been successfully tested. In these tests, Intel Xeon processors were used.
© 2024 Puppet, Inc., a Perforce company

Puppet | Set up Puppet | 61
CPUs GHz GiB memory OS
1 2.4 0.5 Amazon Linux 2 AMI
1 2.5 1 Windows Server 2019
The demands on the primary server vary widely between deployments. Resource needs are affected by the number of
agents being served, how frequently agents check in, how many resources are being managed on each agent, and the
complexity of the manifests and modules in use.
The following minimum hardware requirements are based on internal testing.
Node volume Cores Heap ReservedCodeCache
Dozens 2 1 GB Not applicable
1,000 2-4 4 GB 512m
Supported agent platforms
Puppet provides official packages for various operating systems and versions. Although you are not required to use
official packages, their use helps to simplify installation and maintenance.
Packaged platforms
puppet-agent packages are available for the platforms listed in the table.
For Puppet Server system requirements, see Supported operating systems.
Operating system Tested versions Untested versions
Debian 10, 11, 11 (aarch64), 12, 12 (aarch64,
x86_64)
Fedora 36 (x86_64), 40 (x86_64)
macOS 11 Big Sur (x86_64), 12 Monterey
(x86_64), 12 (M1), 13 Ventura
(x86_64, ARM), 14 (x86_64, ARM)
Microsoft Windows 10 Enterprise, 11 Enterprise (x86_64) 8, 10
Microsoft Windows Server 2012R2, 2016, 2019, 2022 2012
Red Hat Enterprise Linux, including:
• Amazon Linux v2 x86_64 (using
RHEL 7 packages)
7 (x86_64), 8 (x86_64, aarch64,
ppc64le), 9 (x86_64, ARM64,
ppc64le)
Amazon Linux 2 (AARCH64), 2023 (x86_64,
AARCH64)
SUSE Linux Enterprise Server 12 (x86_64), 15 (x86_64)
AlmaLinux 8 (x86_64), 9 (x86_64, AARCH64)
Rocky Linux 8 (x86_64), 9 (x86_64, AARCH64)
Oracle Linux 7 (x86_64), 8 (x86_64), 8 (aarch64),
8 (ppc64le)
Scientific Linux 7 (x86_64), 8 (x86_64, aarch64,
ppc64le)
© 2024 Puppet, Inc., a Perforce company

Puppet | Set up Puppet | 62
Operating system Tested versions Untested versions
Ubuntu 18.04, 18.04 (AARCH), 20.04, 20.04
(aarch64), 22.04 (x86_64, aarch64),
24.04 (x86_64, ARM)
Dependencies
If you install the agent by using an official package, your system’s package manager ensures that dependencies are
installed. If you install the agent on a platform without a supported package, you must manually install the following
packages, libraries, and gems:
• Ruby 3.1 or later
• Facter 2.0 or later
• Optional gems such hiera-eyaml, hocon, msgpack, ruby-shadow, and so on.
Important: If you use the SELinux security module, you must grant a compliance exception for Puppet and the PXP
agent in order for those services to effectively manage configuration.
Timekeeping and name resolution
Before you install Puppet, prepare to meet the network requirements. The most important requirements include
syncing time and creating a plan for name resolution.
Timekeeping
Use NTP or an equivalent service to ensure that time is in sync between your primary server, which acts as the
certificate authority, and any agent nodes. If time drifts out of sync in your infrastructure, you might encounter issues
such as agents receiving outdated certificates. A service like NTP (available as a supported module) helps to ensure
accurate timekeeping.
Name resolution
Decide on a preferred name or set of names that agent nodes can use to contact the primary server. Ensure that the
primary server can be reached by domain name lookup by all future agent nodes.
You can simplify configuration of agent nodes by using a CNAME record to make the primary server reachable at the
hostname puppet, which is the default primary server hostname that is suggested when installing an agent node.
Firewall configuration
In the agent-server architecture, your primary server must support incoming connections on port 8140, and agent
nodes must be able to connect to the primary server on that port.
Installing Puppet
To get started using Puppet, you must first complete the initial installation and setup process.
Puppet is distributed in several packages. These include puppetserver, puppet-agent and puppetdb.
Puppet Server controls the configuration information for one or more managed agent nodes. PuppetDB is where the
data generated by Puppet is stored.
This guide walks you through the following steps in installing Puppet:
• Enabling the Puppet platform repository
• Installing Puppet Server
• Installing Puppet agent
• Installing PuppetDB (optional)
You install each of these components separately, operating on a single node. From here, you can scale up to the large
installation as your infrastructure grows, or customize configuration as needed.
© 2024 Puppet, Inc., a Perforce company

Puppet | Set up Puppet | 63
Note: The puppetserver component of the Puppet platform is available only for Linux. The puppet-agent
component is available independently for over 30 platforms and architectures, including Windows and macOS. For
more information on Puppet's packages, see Puppet platform lifecycle.
1. Enable the Puppet platform repository
Enabling the Puppet platform repository makes the components needed for installation available on your system. The
process for enabling the repository depends on your package management system, such as Yum or Apt.
Before you begin
Identify the URL of the package you want to enable based on your operating system and version. *nix platform
packages are located in Puppet.com repositories corresponding to the Yum and Apt package management systems.
Yum is used with Red Hat operating systems, such as Red Hat Enterprise Linux (RHEL) and SUSE Linux Enterprise
Server (SLES). Go to yum.puppet.com for a list of packages and corresponding URLs. The Yum package URL
naming convention is generally:
https://yum.puppet.com/<PLATFORM_NAME>-release-<OS_ABBREVIATION>-
<OS_VERSION>.noarch.rpm
For example: https://yum.puppet.com/puppet8-release-el-8.noarch.rpm.
Apt is used with Debian and Ubuntu. Go to apt.puppet.com for a list of packages and corresponding URLs. The Apt
package URL naming convention is generally:
https://apt.puppet.com/<PLATFORM_VERSION>-release-<VERSION_CODE_NAME>.deb
For example: https://apt.puppet.com/puppet8-release-focal.deb. Note that for Ubuntu releases,
the VERSION_CODE_NAME is the adjective, not the animal.
Enable the Puppet platform on Yum
Logged in as root, run the RPM tool in upgrade mode:
sudo rpm -U <PACKAGE_URL>
For example, to enable the Enterprise Linux 8 repository:
sudo rpm -Uvh https://yum.puppet.com/puppet8-release-el-8.noarch.rpm
Enable the Puppet platform on Apt
1.
Logged in as root, download the package and run the dpkg tool in install mode:
wget <PACKAGE_URL>
sudo dpkg -i <FILE_NAME>.deb
For example, to enable the Ubuntu 20.04 focal repository:
wget https://apt.puppet.com/puppet8-release-focal.deb
sudo dpkg -i puppet8-release-focal.deb
2.
Update the apt package lists:
sudo apt-get update
Certain operating systems and installation methods automatically verify package signatures. In these cases, you don’t
need to do anything to verify the package signature. These methods include:
© 2024 Puppet, Inc., a Perforce company

Puppet | Set up Puppet | 64
• If you install from the Puppet Yum and Apt repositories, the release package that enables the repository also
installs our release signing key. The Yum and Apt tools automatically verify the integrity of packages as you
install them.
• If you install a Windows agent using an .msi package, the Windows installer automatically verifies the signature
before installing the package.
If you need to manually verify packages, see Verify packages.
2. Install Puppet Server
Puppet Server is a required application that runs on the Java Virtual Machine (JVM) on the primary server.
In addition to hosting endpoints for the certificate authority service, Puppet Server also powers the catalog compiler,
which compiles configuration catalogs for agent nodes, using Puppet code and various other data sources.
In this section, you will install the puppetserver package and start the service.
Follow the steps in install Puppet Server
3. Install Puppet agent
Puppet agents translates code into commands and then executes it on the systems you specify.
In this section, you will install agents on your chosen operating system, configure them, and sign their certificates.
Follow the steps in install agents.
4. Install PuppetDB (optional)
All of the data generated by Puppet is stored in Puppet DB.
You can optionally install PuppetDB to enable extra features, including enhanced queries and reports about your
infrastructure. In this section, you will assign PuppetDB module’s classes to your servers. Follow the steps in install
PuppetDB.
Installing and configuring agents
You can install agents on *nix, Windows, or macOS.
After you install an agent, you must complete the steps in Configure agents.
Install agents
Install *nix agents
You can install *nix agents using an install script.
Before you begin
Enable the Puppet platform repository.
1.
Install the agent using the command appropriate to your environment.
• Yum:
sudo yum install puppet-agent
• Apt:
sudo apt-get install puppet-agent
Note: The Puppet repository for the APT package management system is: http://apt.puppet.com/
• Zypper:
sudo zypper install puppet-agent
© 2024 Puppet, Inc., a Perforce company

Puppet | Set up Puppet | 65
2.
Start the Puppet service:
sudo /opt/puppetlabs/bin/puppet resource service puppet ensure=running
enable=true
Install Windows agents
You can install Windows agents graphically or from the command line using an .msi package.
Install Windows agents with the .msi package
Use the Windows .msi package if you need to specify agent configuration details during installation, or if you need to
install Windows agents locally without internet access.
Before you begin
• Install Powershell. The .msi package requires PowerShell 5 or higher.
• Download the .msi package.
Install Windows agents with the installer
Use the MSI installer for a more automated installation process. The installer can configure puppet.conf, create
CSR attributes, and configure the agent to talk to your primary server.
1.
Run the installer as administrator.
2.
When prompted, provide the hostname of your primary server, for example puppet.
Install Windows agents using msiexec from the command line
Install the MSI manually from the the command line if you need to customize puppet.conf, CSR attributes, or
certain agent properties.
On the command line of the node that you want to install the agent on, run the install command:
msiexec /qn /norestart /i <PACKAGE_NAME>.msi
Tip: You can specify /l*v install.txt to log the progress of the installation to a file.
MSI properties
If you install Windows agents from the command line using the .msi package, you can optionally specify these
properties.
Important: If you set a non-default value for PUPPET_SERVER, PUPPET_CA_SERVER,
PUPPET_AGENT_CERTNAME, or PUPPET_AGENT_ENVIRONMENT, the installer replaces the existing value in
puppet.conf and re-uses the value at upgrade unless you specify a new value. Therefore, if you've customized
these properties, don't change the setting directly in puppet.conf; instead, re-run the installer and set a new value
at installation.
Property Definition Setting in pe.conf Default
INSTALLDIR Location to install Puppet
and its dependencies.
n/a
• 32-bit — C:
\Program Files
\Puppet Labs
\Puppet
• 64-bit — C:
\Program Files
\Puppet Labs
\Puppet
© 2024 Puppet, Inc., a Perforce company

Puppet | Set up Puppet | 66
Property Definition Setting in pe.conf Default
ENABLE_LONG_PATHS Long filename support.
Set to TRUE and set
HKLM:\SYSTEM
\CurrentControlSet
\Control
\FileSystem
\LongPathsEnabled to
1
n/a No value
PUPPET_SERVER Hostname where the
primary server can be
reached.
server puppet
PUPPET_CA_SERVER Hostname where the CA
server can be reached,
if you're using multiple
servers and only one of
them is acting as the CA.
ca_server Value of
PUPPET_SERVER
PUPPET_AGENT_CERTNAME
Node's certificate name,
and the name it uses when
requesting catalogs.
For best compatibility, limit
the value of certname to
lowercase letters, numbers,
periods, underscores, and
dashes.
certname Value of facter fdqn
PUPPET_AGENT_ENVIRONMENTNode's environment.
Note: If a value for
the environment
variable already exists
in puppet.conf,
specifying it during
installation does not
override that value.
environment production
© 2024 Puppet, Inc., a Perforce company

Puppet | Set up Puppet | 67
Property Definition Setting in pe.conf Default
PUPPET_AGENT_STARTUP_MODEWhether and how the agent
service is allowed to run.
Allowed values are:
• Automatic —
Agent starts up when
Windows starts and
remains running in the
background.
• Manual — Agent
can be started in the
services console or with
net start on the
command line.
• Disabled — Agent is
installed but disabled.
You must change
its startup type in
the services console
before you can start the
service.
n/a Automatic
© 2024 Puppet, Inc., a Perforce company

Puppet | Set up Puppet | 68
Property Definition Setting in pe.conf Default
PUPPET_AGENT_ACCOUNT_USER
Windows user account
the agent service uses.
This property is useful
if the agent needs to
access files on UNC
shares, because the default
LocalService account
can't access these network
resources.
The user account must
already exist, and can be
either a local or domain
user. The installer allows
domain users even if
they have not accessed
the machine before. The
installer grants Logon as
Service to the user, and
if the user isn't already a
local administrator, the
installer adds it to the
Administrators group.
If you specify
PUPPET_AGENT_ACCOUNT_USER,
you must also specify
PUPPET_AGENT_ACCOUNT_PASSWORD
and
PUPPET_AGENT_ACCOUNT_DOMAIN
unless the node is
under a gMSA. For
gMSAs, you must specify
PUPPET_AGENT_ACCOUNT_USER
(the user for
the gMSA) and
PUPPET_AGENT_ACCOUNT_DOMAIN.
Do not specify
PUPPET_AGENT_ACCOUNT_PASSWORD.
n/a LocalSystem
PUPPET_AGENT_ACCOUNT_PASSWORDPassword for the agent's
user account.
n/a No value
PUPPET_AGENT_ACCOUNT_DOMAINDomain of the agent's user
account.
n/a .
© 2024 Puppet, Inc., a Perforce company

Puppet | Set up Puppet | 69
Property Definition Setting in pe.conf Default
REINSTALLMODE A default MSI property
used to control the behavior
of file copies during
installation.
Important: If you need
to downgrade agents, use
REINSTALLMODE=amus
when calling
msiexec.exe at the
command line to prevent
removing files that the
application needs.
n/a
amus as of puppet-agent
1.10.10 and puppet-agent
5.3.4
omus in prior releases
SKIP_NSSM_REGISTRY_CLEANUP
Setting to true skips the
Non-Sucking Service
Manager (NSSM) registry
cleanup. This allows you
to install in a restrictive
User Account Control
(UAC) context, or when the
installer does not have the
necessary permissions to
read certain registry keys.
Note: This might cause a
restart of DHCP Server or
other services.
n/a No value
To install the agent with the primary server at puppet.acme.com:
msiexec /qn /norestart /i puppet.msi PUPPET_SERVER=puppet.acme.com
To install the agent to a domain user ExampleCorp\bob:
msiexec /qn /norestart /i puppet-<VERSION>.msi
PUPPET_AGENT_ACCOUNT_DOMAIN=ExampleCorp PUPPET_AGENT_ACCOUNT_USER=bob
PUPPET_AGENT_ACCOUNT_PASSWORD=password
Upgrading or downgrading between 32-bit and 64-bit Puppet on Windows
If necessary, you can upgrade or downgrade between 32-bit and 64-bit Puppet on Windows nodes.
Upgrading to 64-bit
To upgrade from 32-bit to 64-bit Puppet, simply install 64-bit Puppet. You don't need to uninstall the 32-bit version
first.
The installer specifically stores information in different areas of the registry to allow rolling back to the 32-bit agent.
Downgrading to 32-bit
If you need to replace a 64-bit version of Puppet with a 32-bit version, you must uninstall Puppet before installing the
new package.
© 2024 Puppet, Inc., a Perforce company

Puppet | Set up Puppet | 70
You can uninstall Puppet through the Add or Remove Programs interface or from the command line.
To uninstall Puppet from the command line, you must have the original MSI file or know the ProductCode of the
installed MSI:
msiexec /qn /norestart /x puppet-agent-1.3.0-x64.msi
msiexec /qn /norestart /x <PRODUCT CODE>
When you uninstall Puppet, the uninstaller removes the Puppet program directory, agent services, and all related
registry keys. It leaves the $confdir, $codedir, and $vardir intact, including any SSL keys. To completely remove
Puppet from the system, manually delete these directories.
Install macOS agents
You can install macOS agents from Finder, the command line or Homebrew.
Important: For macOS agents, the certname is derived from the name of the machine (such as My-Example-Mac).
To prevent installation issues, make sure the name of the node uses lowercases letters. If you don’t want to change
your computer’s name, you can enter the agent certname in all lowercase letters when prompted by the installer.
Add full disk access for Puppet on macOS 10.14 and newer
Beginning with macOS 10.14, you must add Puppet to the full disk access list, or allowlist, in order to run Puppet
with full permissions and for it to properly manage resources like user and group on your system.
Complete these steps before attempting to install macOS agents.
1.
Run the following command to remove the .sh extension from the wrapper.sh file:
mv /opt/puppetlabs/puppet/bin/wrapper.sh /opt/puppetlabs/puppet/bin/
wrapper
2.
Run the following commands to relink facter, hiera, and puppet with the newly renamed file:
ln -sf /opt/puppetlabs/puppet/bin/wrapper /opt/puppetlabs/bin/facter
ln -sf /opt/puppetlabs/puppet/bin/wrapper /opt/puppetlabs/bin/hiera
ln -sf /opt/puppetlabs/puppet/bin/wrapper /opt/puppetlabs/bin/puppet
3.
In your Mac Preferences, click Security & Privacy, select the Privacy tab, and click Full Disk Access in the left
column.
4.
Click the lock icon, enter your password, and click Unlock.
5.
Click the + button, then type the # (Command) + Shift + G shortcut key.
6.
Enter /opt/puppetlabs/bin, then click Go.
7.
Click on the puppet file, then click Open.
Install macOS agents from Finder
You can use Finder to install the agent on your macOS machine.
Before you begin
Download the appropriate agent tarball.
1.
Open the agent package .dmg and click the installer .pkg.
2.
Follow prompts in the installer dialog.
You must include the primary server hostname and the agent certname.
© 2024 Puppet, Inc., a Perforce company
Puppet | Set up Puppet | 71
Install macOS agents from the command line
You can use the command line to install the agent on a macOS machine.
Before you begin
Download the appropriate agent tarball.
1.
SSH into the node as a root or sudo user.
2.
Mount the disk image: sudo hdiutil mount <DMGFILE>
A line appears ending with /Volumes/puppet-agent-VERSION. This directory location is the mount point
for the virtual volume created from the disk image.
3.
Change to the directory indicated as the mount point in the previous step, for example: cd /Volumes/
puppet-agent-VERSION
4.
Install the agent package: sudo installer -pkg puppet-agent-installer.pkg -target /
5.
Verify the installation: /opt/puppetlabs/bin/puppet --version
Install macOS agents with Homebrew
You can use Homebrew to install the agent on your macOS machine.
Before you begin
Install Homebrew.
Install the latest version of the Puppet agent:
brew install --cask puppetlabs/puppet/puppet-agent
Configure agents
Once you have installed your agents, you must complete the following three configuration steps.
1. Configure your PATH to access Puppet commands
Puppet's command line interface (CLI) consists of a single Puppet command with many subcommands, for example
puppet --help.
Puppet commands are located in the bin directory — /opt/puppetlabs/bin/ on *nix and C:\Program
Files\Puppet Labs\puppet\bin on Windows. The bin directory is not in your PATH environment variable
by default. To have access to the Puppet commands, you must add the bin directory to your PATH.
Choose from the following options.
Linux: source a script for puppet-agent to install
If you are on Linux, you can source a script that puppet-agent installs. Run the following command:
source /etc/profile.d/puppet-agent.sh
*nix: Add the Puppet labs bin directory to your PATH
To add the bin directory to your PATH on *nix, run:
export PATH=/opt/puppetlabs/bin:$PATH
Alternatively, you can add this location wherever you configure your PATH, such as your .profile or .bashrc
configuration files.
© 2024 Puppet, Inc., a Perforce company

Puppet | Set up Puppet | 72
Windows: Add the Puppet labs bin directory to your PATH
To run Puppet commands on Windows, start a command prompt with administrative privileges. You can do so by
right-clicking the Start Command Prompts with Puppet program and clicking Run as administrator. Click Yes if the
system asks for UAC confirmation.
The Puppet agent .msi adds the Puppet bin directory to the system path automatically. If you are not using the
Start Command Prompts, you may need to manually add the bin directory to your PATH using one of the following
commands:
For cmd.exe, run:
set PATH=%PATH%;"C:\Program Files\Puppet Labs\Puppet\bin"
For PowerShell, run:
$env:PATH += ";C:\Program Files\Puppet Labs\Puppet\bin"
2. Configure the server setting
The server is setting, which allows you to connect the agent to the primary Puppet server, is the only mandatory
setting.
You can add configuration to agents by using the puppet config set sub-command, which edits puppet.conf
automatically, or editing /etc/puppetlabs/puppet/puppet.conf directly.
To configure the server setting, choose from one of the following options:
• On the agent node, run:
puppet config set server puppetserver.example.com --section main
• Manually edit /etc/puppetlabs/puppet/puppet.conf or C:\ProgramData\PuppetLabs
\puppet\etc\puppet.conf.
Note that the location on Windows depends on whether you are running with administrative privileges. If you are
not, it will be in home directory, not system location.
This command adds the setting server = puppetserver.example.com to the [main] section of
puppet.conf.
Note that there are other optional settings, for example, serverport, ca_server, ca_port,
report_server, report_port, which you might need for more complicated Puppet deployments, such as
when using a CA server and multiple compilers.
3. Connect the agent to the primary server and sign the certificate
Once you had added the server, you must connect the Puppet agent to the primary server so that it will check in at
regular intervals to report its state, retrieve its catalog, and update its configuration if needed.
1.
To connect the agent to the primary server, run:
puppet ssl bootstrap
Note: For Puppet 5 agents, run puppet agent --test instead.
You will see a message that looks like:
Info: Creating a new RSA SSL key for <agent node>
2.
On the primary server node, sign the certificate:
sudo puppetserver ca sign --certname <name>
© 2024 Puppet, Inc., a Perforce company

Puppet | Set up Puppet | 73
3.
On the agent node, run the agent again:
puppet ssl bootstrap
Manually verify packages
Puppet signs most of its packages, Ruby gems, and release tarballs with GNU Privacy Guard (GPG). This signature
proves that the packages originate from Puppet and have not been compromised. Security-conscious users can use
GPG to verify package signatures.
Tip:
Certain operating systems and installation methods automatically verify package signatures. In these cases, you don’t
need to do anything to verify the package signature.
• If you install from the Puppet Yum and Apt repositories, the release package that enables the repository also
installs our release signing key. The Yum and Apt tools automatically verify the integrity of packages as you
install them.
• If you install a Windows agent using an .msi package, the Windows installer automatically verifies the signature
before installing the package.
Verify a source tarball or gem
You can manually verify the signature for Puppet source tarballs or Ruby gems.
1.
Import the public key: gpg --keyserver hkp://keyserver.ubuntu.com:11371 --recv-key
4528B6CD9E61EF26
Tip: If this is your first time running the gpg tool, it might fail to import the key after creating its configuration
file and keyring. You can run the command a second time to import the key into your newly created keyring.
The gpg tool imports the key:
gpg: /home/username/.gnupg/trustdb.gpg: trustdb created
gpg: key 4528B6CD9E61EF26: public key "Puppet, Inc. Release Key (Puppet,
Inc. Release Key) <[email protected]>" imported
gpg: Total number processed: 1
gpg: imported: 1
2.
Verify the fingerprint: gpg --list-key --fingerprint 4528B6CD9E61EF26
The fingerprint of the Puppet release signing key is D681 1ED3 ADEE B844 1AF5 AA8F 4528 B6CD
9E61 EF26. Ensure the fingerprint listed matches this value.
3.
Download the tarball or gem and its corresponding .asc file from https://downloads.puppet.com/puppet/.
4.
Verify the tarball or gem, replacing <VERSION> with the Puppet version number, and <FILE TYPE> with
tar.gz for a tarball or gem for a Ruby gem: gpg --verify puppet-<VERSION>.<FILE TYPE>.asc
puppet-<VERSION>.<FILE TYPE>
The output confirms that the signature matches:
gpg: Signature made Mon 09 Nov 2020 12:19:14 PM PST using RSA key ID
9E61EF26
gpg: Good signature from "Puppet, Inc. Release Key (Puppet, Inc. Release
Key) <[email protected]>"
Tip: If you haven't set up a trust path to the key, you receive a warning that the key is not certified. If you’ve
verified the fingerprint of the key, GPG has verified the archive’s integrity; the warning simply means that GPG
can’t automatically prove the key’s ownership.
© 2024 Puppet, Inc., a Perforce company

Puppet | Set up Puppet | 74
Verify an RPM package
RPM packages include an embedded signature, which you can verify after importing the Puppet public key.
1.
Import the public key: gpg --keyserver hkp://keyserver.ubuntu.com:11371 --recv-key
4528B6CD9E61EF26
Tip: If this is your first time running the gpg tool, it might fail to import the key after creating its configuration
file and keyring. You can run the command a second time to import the key into your newly created keyring.
The gpg tool imports the key:
gpg: /home/username/.gnupg/trustdb.gpg: trustdb created
gpg: key 4528B6CD9E61EF26: public key "Puppet, Inc. Release Key (Puppet,
Inc. Release Key) <[email protected]>" imported
gpg: Total number processed: 1
gpg: imported: 1
2.
Verify the fingerprint: gpg --list-key --fingerprint 4528B6CD9E61EF26
The fingerprint of the Puppet release signing key is D681 1ED3 ADEE B844 1AF5 AA8F 4528 B6CD
9E61 EF26. Ensure the fingerprint listed matches this value.
3.
Retrieve the Puppet public key and place it in a file on your node.
4.
Use the RPM tool to import the public key, replacing <PUBLIC KEY FILE> with the path to the file containing
the public key: sudo rpm --import <PUBLIC KEY FILE>
The RPM tool doesn’t output anything if the command is successful.
5.
Use the RPM tool to check the signature of a downloaded RPM package: sudo rpm -vK
<RPM_FILE_NAME>
The embedded signature is verified and displays OK:
puppet-agent-1.5.1-1.el6.x86_64.rpm:
Header V4 RSA/SHA512 Signature, key ID EF8D349F: OK
Header SHA1 digest: OK (95b492a1fff452d029aaeb59598f1c78dbfee0c5)
V4 RSA/SHA512 Signature, key ID EF8D349F: OK
MD5 digest: OK (4878909ccdd0af24fa9909790dd63a12)
Verify a macOS puppet-agent package
puppet-agent packages for macOS are signed with a developer ID and certificate. You can verify the package
signature using the pkgutil tool or the installer.
Use one of these methods to verify the package signature:
• Download and mount the puppet-agent disk image, and then use the pkgutil tool to check the package's
signature:
/usr/bin/hdiutil attach puppet-agent-<AGENT-VERSION>-1.osx10.15.dmg
...
pkgutil --check-signature /Volumes/puppet-agent-<AGENT-
VERSION>-1.osx10.15/puppet-agent-<AGENT-VERSION>-1-installer.pkg
The tool confirms the signature and outputs fingerprints for each certificate in the chain:
Package "puppet-agent-<AGENT-VERSION>-1-installer.pkg":
Status: signed by a developer certificate issued by Apple for
distribution
Certificate Chain:
1. Developer ID Installer: PUPPET LABS, INC. (VKGLGN2B6Y)
SHA256 Fingerprint:
© 2024 Puppet, Inc., a Perforce company

Puppet | Set up Puppet | 75
F9 6D CA EF 1B D8 FF 30 1D 25 67 54 90 CF 7F C3 BF 39 91 50 A6
02
65 FA B2 19 4B 1E 2A B6 D1 9E
------------------------------------------------------------------------
2. Developer ID Certification Authority
SHA256 Fingerprint:
7A FC 9D 01 A6 2F 03 A2 DE 96 37 93 6D 4A FE 68 09 0D 2D E1 8D
03
F2 9C 88 CF B0 B1 BA 63 58 7F
------------------------------------------------------------------------
3. Apple Root CA
SHA256 Fingerprint:
B0 B1 73 0E CB C7 FF 45 05 14 2C 49 F1 29 5E 6E DA 6B CA ED 7E
2C
68 C5 BE 91 B5 A1 10 01 F0 24
• When you install the package, click the lock icon in the top right corner of the installer.
The installer displays details about the package's certificate.
Tip: Puppet Labs® is a registered trademark that you might see during installation processes.
Managing Platform versions
To receive the most up-to-date software without introducing breaking changes, pin your infrastructure to known
versions, and update the pinned version manually when you’re ready to update.
For example, if you’re using the puppetlabs/puppet_agent module to manage the installed puppet-agent
package, use this resource to pin it to version 8.0.0:
class { '::puppet_agent':
collection => 'puppet8',
package_version => '8.0.0',
}
To upgrade to newer versions within the puppet7 collection, update the package_version. If you're
upgrading from an earlier collection, simply update the collection and package_version.
Configure Puppet settings
You can configure Puppet's commands and services extensively, and its settings are specified in a variety of places.
• Puppet settings on page 76
Customize Puppet settings in the main configuration file, called puppet.conf.
• Key configuration settings on page 79
Puppet has about 200 settings, all of which are listed in the configuration reference. Most of the time, you interact
with only a couple dozen of them. This page lists the most important ones, assuming that you're okay with default
values for things like the port Puppet uses for network traffic. See the configuration reference for more details on
each.
© 2024 Puppet, Inc., a Perforce company

Puppet | Set up Puppet | 76
• Puppet's configuration files on page 82
Puppet settings can be configured in the main config file, called puppet.conf. There are several additional
configuration files, for new settings and ones that need to be in separate files with complex data structures.
• Adding file server mount points on page 93
Puppet Server includes a file server for transferring static file content to agents. If you need to serve large files that
you don't want to store in source control or distribute with a module, you can make a custom file server mount point
and let Puppet serve those files from another directory.
• Checking the values of settings on page 94
Puppet settings are highly dynamic, and their values can come from several different places. To see the actual settings
values that a Puppet service uses, run the puppet config print command.
• Editing settings on the command line on page 97
Puppet loads most of its settings from the puppet.conf config file. You can edit this file directly, or you can
change individual settings with the puppet config set command.
• Configuration Reference on page 98
Puppet settings
Customize Puppet settings in the main configuration file, called puppet.conf.
When Puppet documentation mentions “settings,” it usually means the main settings. These are the settings that are
listed in the configuration reference. They are valid in puppet.conf and available for use on the command line.
These settings configure nearly all of Puppet’s core features.
However, there are also several additional configuration files — such as auth.conf and puppetdb.conf. These
files exist for several reasons:
• The main settings support only a few types of values. Some things just can’t be configured without complex data
structures, so they needed separate files. (Authorization rules and custom CSR attributes are in this category.)
• Puppet doesn’t allow extensions to add new settings to puppet.conf. This means some settings that are
supposed to be main settings (such as the PuppetDB server) can’t be.
Puppet Server configuration
Puppet Server honors almost all settings in puppet.conf and picks them up automatically. However, for some
tasks, such as configuring the webserver or an external Certificate Authority, there are Puppet Server-specific
configuration files and settings.
For more information, see Puppet Server: Configuration.
Settings are loaded on startup
When a Puppet command or service starts up, it gets values for all of its settings. Any of these settings can change the
way that command or service behaves.
A command or service reads its settings only one time. If you need to reconfigured it, you must restart the service or
run the command again after changing the setting.
Settings on the command line
Settings specified on the command line have top priority and always override settings from the config file. When a
command or service is started, you can specify any setting as a command line option.
Settings require two hyphens and the name of the setting on the command line:
$ sudo puppet agent --test --noop --certname temporary-name.example.com
Basic settings
For most settings, you specify the option and follow it with a value. An equals sign between the two (=) is optional,
and you can optionally put values in quotes.
© 2024 Puppet, Inc., a Perforce company

Puppet | Set up Puppet | 77
All three of these are equivalent to setting certname = temporary-name.example.com in puppet.conf.
--certname=temporary-name.example.com
--certname temporary-name.example.com
--certname "temporary-name.example.com"
Boolean settings
Settings whose only valid values are true and false, use a shorter format. Specifying the option alone sets the
setting to true. Prefixing the option with no- sets it to false.
This means:
• --noop is equivalent to setting noop = true in puppet.conf.
• --no-noop is equivalent to setting noop = false in puppet.conf.
Default values
If a setting isn’t specified on the command line or in puppet.conf, it falls back to a default value. Default values
for all settings are listed in the configuration reference.
Some default values are based on other settings — when this is the case, the default is shown using the other setting
as a variable (similar to $ssldir/certs).
Configuring locale settings
Puppet supports locale-specific strings in output, and it detects your locale from your system configuration. This
provides localized strings, report messages, and log messages for the locale’s language when available.
Upon startup, Puppet looks for a set of environment variables on *nix systems, or the code page setting on Windows.
When Puppet finds one that is set, it uses that locale whether it is run from the command line or as a service.
For help setting your operating system locale or adding new locales, consult its documentation. This section covers
setting the locale for Puppet services.
Checking your locale settings on *nix and macOS
To check your current locale settings, run the locale command. This outputs the settings used by your current shell.
$ locale
LANG="en_US.UTF-8"
LC_COLLATE="en_US.UTF-8"
LC_CTYPE="en_US.UTF-8"
LC_MESSAGES="en_US.UTF-8"
LC_MONETARY="en_US.UTF-8"
LC_NUMERIC="en_US.UTF-8"
LC_TIME="en_US.UTF-8"
LC_ALL=
To see which locales are supported by your system, run locale -a, which outputs a list of available locales. Note
that Puppet might not have localized strings for every available locale.
To check the current status of environment variables that might conflict with or override your locale settings, use
the set command. For example, this command lists the set environment variables and searches for those containing
LANG or LC_:
sudo set | egrep 'LANG|LC_'
© 2024 Puppet, Inc., a Perforce company

Puppet | Set up Puppet | 78
Checking your locale settings on Windows
To check your current locale setting, run the Get-WinSystemLocale command from PowerShell.
PS C:\> Get-WinSystemLocale
LCID Name DisplayName
---- ---- -----------
1033 en-US English (United States)
To check your system’s current code page setting, run the chcp command.
Setting your locale on *nix with an environment variable
You can use environment variables to set your locale for processes started on the command line. For most Linux
distributions, set the LANG variable to your preferred locale, and the LANGUAGE variable to an empty string. On
SLES, also set the LC_ALL variable to an empty string.
For example, to set the locale to Japanese for a terminal session on SLES:
export LANG=ja_JP.UTF-8
export LANGUAGE=''
export LC_ALL=''
To set the locale for the Puppet agent service, you can add these export statements to:
• /etc/sysconfig/puppet on RHEL and its derivatives
• /etc/default/puppet on Debian, Ubuntu, and their derivatives
After updating the file, restart the Puppet service to apply the change.
Setting your locale for the Puppet agent service on macOS
To set the locale for the Puppet agent service on macOS, update the LANG setting in the /Library/
LaunchDaemons/com.puppetlabs.puppet.plist file.
<dict>
<key>LANG</key>
<string>ja_JP.UTF-8</string>
</dict>
After updating the file, restart the Puppet service to apply the change.
Setting your locale on Windows
On Windows, Puppet uses the LANG environment variable if it is set. If not, it uses the configured region, as set in the
Administrator tab of the Region control panel.
On Windows 10, you can use PowerShell to set the system locale:
Set-WinSystemLocale en-US
Disabling internationalized strings
Use the optional Boolean disable_i18n setting to disable the use of internationalized strings. You can configure
this setting in puppet.conf. If set to true, Puppet disables localized strings in log messages, reports, and parts
of the command line interface. This can improve performance when using Puppet modules, especially if environment
caching is disabled, and even if you don’t need localized strings or the modules aren’t localized. This setting is
false by default in open source Puppet.
© 2024 Puppet, Inc., a Perforce company

Puppet | Set up Puppet | 79
If you’re experiencing performance issues, configure this setting in the [server] section of the primary Puppet
server's puppet.conf file. To force unlocalized messages, which are in English by default, configure this section
in a node’s [main] or [user] sections of puppet.conf.
Key configuration settings
Puppet has about 200 settings, all of which are listed in the configuration reference. Most of the time, you interact
with only a couple dozen of them. This page lists the most important ones, assuming that you're okay with default
values for things like the port Puppet uses for network traffic. See the configuration reference for more details on
each.
There are a lot of settings that are rarely useful but still make sense, but there are also at least a hundred that are not
configurable at all. This is a Puppet design choice. Because of the way Puppet code is arranged, the settings system is
the easiest way to publish global constants that are dynamically initialized on startup. This means a lot of things have
been introduced to Puppet as configurable settings regardless of whether they needed to be configurable.
For a full list of Puppet settings, see the configuration reference.
Settings for agents (all nodes)
The following settings for agents are listed approximately in order of importance. Most of these can go in either
[main] or [agent] sections, or be specified on the command line.
Basics
• server — The primary server to request configurations from. Defaults to puppet. Change it if that’s not your
server’s name.
• ca_server and report_server — If you’re using multiple Puppet primary servers, you’ll need to
centralize the CA. One of the ways to do this is by configuring ca_server on all agents. See Scaling Puppet
Server with compile servers for more details. The report_server setting works the same way, although
whether you need to use it depends on how you’re processing reports.
• certname — The node’s certificate name, and the unique identifier it uses when requesting catalogs. Defaults to
the fully qualified domain name.
• For best compatibility, limit the value of certname to only use lowercase letters, numbers, periods,
underscores, and dashes. That is, it matches /\A[a-z0-9._-]+\Z/.
• The special value ca is reserved, and can’t be used as the certname for a normal node.
• environment — The environment to request when contacting the primary server. It’s only a request, though;
the primary server’s ENC can override this if it chooses. Defaults to production.
• sourceaddress — The address on a multihomed host to use for the agent’s communication with the primary
server.
Note: Although it’s possible to set something other than the certname as the node name (using either the
node_name_fact or node_name_value setting), we don’t generally recommend it. It allows you to re-use one
node certificate for many nodes, but it reduces security, makes it harder to reliably identify nodes, and can interfere
with other features. Setting a non-certname node name is not officially supported in Puppet Enterprise.
Run behavior
These settings affect the way Puppet applies catalogs:
• noop — If enabled, the agent won’t make any changes to the node. Instead, it looks for changes that would be
made if the catalog were applied, and report to the primary server about what it would have done. This can be
overridden per-resource with the noop metaparameter.
• priority — Allows you to make the agent share CPU resources so that other applications have access to
processing power while agent is applying a catalog.
• report — Indicates whether to send reports. Defaults to true.
• tags — Lets you limit the Puppet run to include only those resources with certain tags.
© 2024 Puppet, Inc., a Perforce company
Puppet | Set up Puppet | 80
• trace, profile, graph, and show_diff — Tools for debugging or learning more about an agent run.
Useful when combined with the --test and --debug command options.
• usecacheonfailure — Indicates whether to fall back to the last known good catalog if the primary server
fails to return a good catalog. The default behavior is usually what you want, but you might have a reason to
disable it.
• ignoreschedules — If you use schedules, this can be useful when doing an initial Puppet run to set up new
nodes.
• prerun_command and postrun_command — Commands to run on either side of a Puppet run.
• ignore_plugin_errors — If set to false, the agent aborts the run if pluginsync fails. Defaults to true.
Service behavior
These settings affect the way Puppet agent acts when running as a long-lived service:
• runinterval — How often to do a Puppet run, when running as a service.
• waitforcert — Whether to keep trying if the agent can’t initially get a certificate. The default behavior is
good, but you might have a reason to disable it.
Useful when running agent from cron
• splay and splaylimit — Together, these allow you to spread out agent runs. When running the agent as
a daemon, the services usually have been started far enough out of sync to make this a non-issue, but it’s useful
with cron agents. For example, if your agent cron job happens on the hour, you could set splay = true and
splaylimit = 60m to keep the primary server from getting briefly overworked and then left idle for the next
50 minutes.
• daemonize — Whether to daemonize. Set this to false when running the agent from cron.
• onetime — Whether to exit after finishing the current Puppet run. Set this to true when running the agent from
cron.
For more information on these settings, see the configuration reference.
Settings for primary servers
Many of these settings are also important for standalone Puppet apply nodes, because they act as their own primary
server. These settings go in the [server] section, unless you’re using Puppet apply in production, in which case
put them in the [main] section instead.
Basics
• dns_alt_names — A list of hostnames the server is allowed to use when acting as a primary server. The
hostname your agents use in their server setting must be included in either this setting or the primary server’s
certname setting. Note that this setting is only used when initially generating the primary server’s certificate —
if you need to change the DNS names, you must:
1.
Run: sudo puppetserver ca clean --certname <SERVER'S CERTNAME>
2.
Turn off the Puppet Server service.
3.
Run: sudo puppetserver ca generate --certname <SERVER'S CERTNAME> --
subject-alt-names <ALT NAME 1>,<ALT NAME 2>,...
4.
Re-start the Puppet Server service.
• environment_timeout — For better performance, you can set this to unlimited and make refreshing the
primary server a part of your standard code deployment process.
• environmentpath — Controls where Puppet finds directory environments. For more information on
environments, see Creating environments.
• basemodulepath — A list of directories containing Puppet modules that can be used in all environments. See
modulepath for details.
• reports — Which report handlers to use. For a list of available report handlers, see the report reference. You
can also write your own report handlers. Note that the report handlers might require settings of their own.
© 2024 Puppet, Inc., a Perforce company
Puppet | Set up Puppet | 81
• digest_algorithm — To accept requests from older agents when using a remote filebucket, Puppet Server
needs to specify digest_algorithm=md5.
Puppet Server related settings
Puppet Server has its own configuration files; consequently, there are several settings in puppet.conf that Puppet
Server ignores.
• puppet-admin — Settings to control which authorized clients can use the admin interface.
• jruby-puppet — Provides details on tuning JRuby for better performance.
• JAVA_ARGS — Instructions on tuning the Puppet Server memory allocation.
Extensions
These features configure add-ons and optional features:
• node_terminus and external_nodes — The ENC settings. If you’re using an ENC, set these to exec
and the path to your ENC script, respectively.
• storeconfigs and storeconfigs_backend — Used for setting up PuppetDB. See the PuppetDB docs
for details.
• catalog_terminus — This can enable the optional static compiler. If you have lots of file resources in
your manifests, the static compiler lets you sacrifice some extra CPU work on your primary server to gain faster
configuration and reduced HTTPS traffic on your agents. See the indirection reference for details.
CA settings
• ca_ttl — How long newly signed certificates are valid. Deprecated.
• autosign — Whether and how to autosign certificates. See Autosigning for detailed information.
For more information on these settings, see the configuration reference.
© 2024 Puppet, Inc., a Perforce company

Puppet | Set up Puppet | 82
Puppet's configuration files
Puppet settings can be configured in the main config file, called puppet.conf. There are several additional
configuration files, for new settings and ones that need to be in separate files with complex data structures.
• puppet.conf: The main config file on page 82
The puppet.conf file is Puppet’s main config file. It configures all of the Puppet commands and services,
including Puppet agent, the primary Puppet server, Puppet apply, and puppetserver ca. Nearly all of the settings
listed in the configuration reference can be set in puppet.conf.
• environment.conf: Per-environment settings on page 85
Environments are isolated groups of agent nodes. Any environment can contain an environment.conf file. This
file can override several settings whenever the primary server is serving nodes assigned to that environment.
• fileserver.conf: Custom fileserver mount points on page 87
The fileserver.conf file configures custom static mount points for Puppet’s file server. If custom mount points
are present, file resources can access them with their source attributes.
• puppetdb.conf: PuppetDB server locations on page 87
The puppetdb.conf file configures how Puppet connects to one or more servers. It is only used if you are using
PuppetDB and have connected your primary server to it.
• autosign.conf: Basic certificate autosigning on page 87
The autosign.conf file can allow certain certificate requests to be automatically signed. It is only valid on the
CA primary Puppet server; a primary server not serving as a CA does not use autosign.conf.
• csr_attributes.yaml: Certificate extensions on page 88
The csr_attributes.yaml file defines custom data for new certificate signing requests (CSRs).
• custom_trusted_oid_mapping.yaml: Short names for cert extension OIDs on page 90
The custom_trusted_oid_mapping.yaml file lets you set your own short names for certificate extension
object identifiers (OIDs), which can make the $trusted variable more useful.
• device.conf: Network hardware access on page 91
The puppet-device subcommand retrieves catalogs from the primary Puppet server and applies them to remote
devices. Devices to be managed by the puppet-device subcommand are configured in device.conf.
• routes.yaml: Advanced plugin routing on page 92
The routes.yaml file overrides configuration settings involving indirector termini, and allows termini to be set in
greater detail than puppet.conf allows.
puppet.conf: The main config file
The puppet.conf file is Puppet’s main config file. It configures all of the Puppet commands and services,
including Puppet agent, the primary Puppet server, Puppet apply, and puppetserver ca. Nearly all of the settings
listed in the configuration reference can be set in puppet.conf.
It resembles a standard INI file, with a few syntax extensions. Settings can go into application-specific sections, or
into a [main] section that affects all applications.
For a complete list of Puppet's settings, see the configuration reference.
Location
The puppet.conf file is always located at $confdir/puppet.conf.
Although its location is configurable with the config setting, it can be set only on the command line. For example:
puppet agent -t --config ./temporary_config.conf
The location of the confdir depends on your operating system. See the confdir documentation for details.
Examples
Example agent config:
[main]
certname = agent01.example.com
© 2024 Puppet, Inc., a Perforce company
Puppet | Set up Puppet | 83
server = puppet
runinterval = 1h
Example server config:
[main]
certname = puppetserver01.example.com
server = puppet
runinterval = 1h
strict_variables = true
[server]
dns_alt_names =
primaryserver01,primaryserver01.example.com,puppet,puppet.example.com
reports = puppetdb
storeconfigs_backend = puppetdb
storeconfigs = true
Format
The puppet.conf file consists of one or more config sections, each of which can contain any number of settings.
The file can also include comment lines at any point.
Config sections
[main]
certname = primaryserver01.example.com
A config section is a group of settings. It consists of:
• Its name, enclosed in square brackets. The [name] of the config section must be on its own line, with no leading
space.
• Any number of setting lines, which can be indented for readability.
• Any number of empty lines or comment lines
As soon as a new config section [name] appears in the file, the former config section is closed and the new one
begins. A given config section only occurs one time in the file.
Puppet uses four config sections:
• main is the global section used by all commands and services. It can be overridden by the other sections.
• server is used by the primary Puppet server service and the Puppet Server ca command.
Important: Be sure to apply settings only in main unless there is a specific case where you have to override
a setting for the server run mode. For example, when Puppet Server is configured to use an external node
classifier, you must add these settings to the server section. If those settings are added to main, then the agent
tries and fails to run the server-only script /usr/local/bin/puppet_node_classifier during its run.
• agent is used by the Puppet agent service.
• user is used by the Puppet apply command, as well as many of the less common Puppet subcommands
Puppet prefers to use settings from one of the three application-specific sections (server, agent, or user). If it
doesn’t find a setting in the application section, it uses the value from main. (If main doesn’t set one, it falls back to
the default value.)
Note: Puppet Server ignores some config settings. It honors almost all settings in puppet.conf and picks them up
automatically. However, some Puppet Server settings differ from a Ruby primary server's puppet.conf settings.
© 2024 Puppet, Inc., a Perforce company

Puppet | Set up Puppet | 84
Comment lines
# This is a comment.
Comment lines start with a hash sign (#). They can be indented with any amount of leading space.
Partial-line comments such as report = true # this enables reporting are not allowed, and the
intended comment is treated as part of the value of the setting. To be treated as a comment, the hash sign must be the
first non-space character on the line.
Setting lines
certname = primaryserver01.example.com
A setting line consists of:
• Any amount of leading space (optional).
• The name of a setting.
• An equals sign (=), which can optionally be surrounded by any number of spaces.
• A value for the setting.
Special types of values for settings
Generally, the value of a setting is a single word. However, listed below are a few special types of values.
List of words: Some settings (like reports) can accept multiple values, which are specified as a comma-separated list
(with optional spaces after commas). Example: report = http,puppetdb
Paths: Some settings (like environmentpath) take a list of directories. The directories are separated by the system
path separator character, which is colon (:) on *nix platforms and semicolon (;) on Windows.
# *nix version:
environmentpath = $codedir/special_environments:$codedir/environments
# Windows version:
environmentpath = $codedir/environments;C:\ProgramData\PuppetLabs\code
\environment
Path lists are ordered;Puppet always checks the first directory first, then moves on to the others if it doesn’t find what
it needs.
Files or directories: Settings that take a single file or directory (like ssldir) can accept an optional hash of
permissions. When starting up, Puppet enforces those permissions on the file or directory.
We do not recommend you do this because the defaults are good for most users. However, if you need to, you can
specify permissions by putting a hash like this after the path:
ssldir = $vardir/ssl {owner = service, mode = 0771}
The allowed keys in the hash areowner, group, and mode. There are only two valid values for the owner and
group keys:
• root — the root or Administrator user or group owns the file.
• service — the user or group that the Puppet service is running as owns the file. The service’s user and group
are specified by the user and group settings. On a primary server running open source Puppet, these default to
puppet; on Puppet Enterprise they default to pe-puppet.
© 2024 Puppet, Inc., a Perforce company

Puppet | Set up Puppet | 85
Interpolating variables in settings
The values of settings are available as variables within puppet.conf, and you can insert them into the values of
other settings. To reference a setting as a variable, prefix its name with a dollar sign ($):
ssldir = $vardir/ssl
Not all settings are equally useful; there’s no real point in interpolating$ssldir into basemodulepath, for
example. We recommend that you use only the following variables:
• $codedir
• $confdir
• $vardir
environment.conf: Per-environment settings
Environments are isolated groups of agent nodes. Any environment can contain an environment.conf file. This
file can override several settings whenever the primary server is serving nodes assigned to that environment.
Location
Each environment.conf file is stored in an environment. It will be at the top level of its home environment, next
to the manifests and modules directories.
For example, if your environments are in the default directory ($codedir/environments), the test
environment’s config file is located at $codedir/environments/test/environment.conf.
Example
# /etc/puppetlabs/code/environments/test/environment.conf
# Puppet Enterprise requires $basemodulepath; see note below under
"modulepath".
modulepath = site:dist:modules:$basemodulepath
# Use our custom script to get a git commit for the current state of the
code:
config_version = get_environment_commit.sh
Format
The environment.conf file uses the same INI-like format as puppet.conf, with one exception: it cannot
contain config sections like [main]. All settings in environment.conf must be outside any config section.
Relative paths in values
Most of the allowed settings accept file paths or lists of paths as their values.
If any of these paths are relative paths — that is, they start without a leading slash or drive letter — they are resolved
relative to that environment’s main directory.
For example, if you set config_version = get_environment_commit.sh in the test
environment, Puppet uses the file at /etc/puppetlabs/code/environments/test/
get_environment_commit.sh.
Interpolation in values
The settings in environment.conf can use the values of other settings as variables (such as $codedir).
Additionally, the config_version setting can use the special $environment variable, which gets replaced
with the name of the active environment.
© 2024 Puppet, Inc., a Perforce company

Puppet | Set up Puppet | 86
The most useful variables to interpolate into environment.conf settings are:
• $basemodulepath — useful for including the default module directories in the modulepath setting. We
recommend Puppet Enterprise (PE) users include this in the value of modulepath, because PE uses modules in
the basemodulepath to configure orchestration and other features.
• $environment — useful as a command line argument to your config_version script. You can interpolate
this variable only in the config_version setting.
• $codedir — useful for locating files.
Allowed settings
The environment.conf file can override these settings:
modulepath
The list of directories Puppet loads modules from.
If this setting isn’t set, the modulepath for the environment is:
<MODULES DIRECTORY FROM ENVIRONMENT>:$basemodulepath
That is, Puppet adds the environment’s modules directory to the value of the basemodulepath setting from
puppet.conf, with the environment’s modules getting priority. If the modules directory is empty of absent,
Puppet only uses modules from directories in the basemodulepath. A directory environment never uses the global
modulepath from puppet.conf.
manifest
The main manifest the primary server uses when compiling catalogs for this environment. This can be one file
or a directory of manifests to be evaluated in alphabetical order. Puppet manages this path as a directory if one
exists or if the path ends with a slash (/) or dot (.).
If this setting isn’t set, Puppet uses the environment’s manifests directory as the main manifest, even if it is
empty or absent. A directory environment never uses the global manifest from puppet.conf.
config_version
A script Puppet can run to determine the configuration version.
Puppet automatically adds a config version to every catalog it compiles, as well as to messages in reports. The
version is an arbitrary piece of data that can be used to identify catalogs and events.
You can specify an executable script that determines an environment’s config version by setting
config_version in its environment.conf file. Puppet runs this script when compiling a catalog for a node in
the environment, and use its output as the config version.
Note: If you’re using a system binary like git rev-parse, make sure to specify the absolute path to it. If
config_version is set to a relative path, Puppet looks for the binary in the environment, not in the system’s
PATH.
If this setting isn’t set, the config version is the time at which the catalog was compiled (as the number of
seconds since January 1, 1970). A directory environment never uses the global config_version from
puppet.conf.
environment_timeout
How long the primary server caches the data it loads from an environment. If present, this overrides the value of
environment_timeout from puppet.conf. Unless you have a specific reason, we recommend only setting
environment_timeout globally, in puppet.conf. We also don’t recommend using any value other than 0 or
unlimited.
For more information about configuring the environment timeout, see the timeout section of the Creating
Environments page.
© 2024 Puppet, Inc., a Perforce company
Puppet | Set up Puppet | 87
fileserver.conf: Custom fileserver mount points
The fileserver.conf file configures custom static mount points for Puppet’s file server. If custom mount points
are present, file resources can access them with their source attributes.
When to use fileserver.conf
This file is necessary only if you are creating custom mount points.
Puppet automatically serves files from the files directory of every module, and most users find this sufficient. For
more information, see Modules fundamentals. However, custom mount points are useful for things that you don’t
store in version control with your modules, like very large files and sensitive credentials.
Location
The fileserver.conf file is located at $confdir/fileserver.conf by default. Its location is
configurable with the fileserverconfig setting.
The location of the confdir depends on your operating system. See the confdir documentation for details.
Example
# Files in the /path/to/files directory are served
# at puppet:///extra_files/.
[extra_files]
path /etc/puppetlabs/puppet/extra_files
This fileserver.conf file creates a new mount point named extra_files. Authorization to extra_files
is controlled by Puppet Server. See creating custom mount points for more information.
CAUTION: Always restrict write access to mounted directories. The file server follows any symlinks in a
file server mount, including links to files that agent nodes shouldn’t access (like SSL keys). When following
symlinks, the file server can access any files readable by Puppet Server’s user account.
Format
fileserver.conf uses a one-off format that resembles an INI file without the equals (=) signs. It is a series of
mount-point stanzas, where each stanza consists of:
• A [mount_point_name] surrounded by square brackets. This becomes the name used in puppet:///
URLs for files in this mount point.
• A path <PATH> directive, where <PATH> is an absolute path on disk. This is where the mount point’s files are
stored.
puppetdb.conf: PuppetDB server locations
The puppetdb.conf file configures how Puppet connects to one or more servers. It is only used if you are using
PuppetDB and have connected your primary server to it.
This configuration file is documented in the PuppetDB docs. See Configuring a Puppet/PuppetDB connection for
details.
autosign.conf: Basic certificate autosigning
The autosign.conf file can allow certain certificate requests to be automatically signed. It is only valid on the
CA primary Puppet server; a primary server not serving as a CA does not use autosign.conf.
CAUTION: Because any host can provide any certname when requesting a certificate, basic autosigning is
insecure. Use it only when you fully trust any computer capable of connecting to the primary server.
Puppet also provides a policy-based autosigning interface using custom policy executables, which can be more
flexible and secure than the autosign.conf allowlist but more complex to configure.
© 2024 Puppet, Inc., a Perforce company

Puppet | Set up Puppet | 88
For more information, see the documentation about certificate autosigning.
Location
Puppet looks for autosign.conf at $confdir/autosign.conf by default. To change this path, configure
the autosign setting in the [server] section of puppet.conf.
The default confdir path depends on your operating system. See the confdir documentation for more information.
Note: The autosign.conf file must not be executable by the primary server user account. If the autosign
setting points to an executable file, Puppet instead treats it like a custom policy executable even if it contains a valid
autosign.conf allowlist.
Format
The autosign.conf file is a line-separated list of certnames or domain name globs. Each line represents a node
name or group of node names for which the CA primary server automatically signs certificate requests.
rebuilt.example.com
*.scratch.example.com
*.local
Domain name globs do not function as normal globs: an asterisk can only represent one or more subdomains at the
front of a certname that resembles a fully qualified domain name (FQDN). If your certnames don’t look like FQDNs,
the autosign.conf allowlist might not be effective.
Note: The autosign.conf file can safely be an empty file or not-existent, even if the autosign setting is
enabled. An empty or non-existent autosign.conf file is an empty allowlist, meaning that Puppet does not
autosign any requests. If you create autosign.conf as a non-executable file and add certnames to it, Puppet then
automatically uses the file to allow incoming requests without needing to modify puppet.conf.
To explicitly disable autosigning, set autosign = false in the [server] section of the CA primary server's
puppet.conf, which disables CA autosigning even if autosign.conf or a custom policy executable exists.
csr_attributes.yaml: Certificate extensions
The csr_attributes.yaml file defines custom data for new certificate signing requests (CSRs).
The csr_attributes.yaml file can set:
• CSR attributes (transient data used for pre-validating requests)
• Certificate extension requests (permanent data to be embedded in a signed certificate)
This file is only consulted when a new CSR is created, for example when an agent node is first attempting to join a
Puppet deployment. It cannot modify existing certificates.
For information about using this file, see CSR attributes and certificate extensions.
Location
The csr_attributes.yaml file is located at $confdir/csr_attributes.yaml by default. Its location is
configurable with the csr_attributes setting.
The location of the confdir depends on your operating system. See the confdir documentation for details.
Example
---
custom_attributes:
1.2.840.113549.1.9.7: 342thbjkt82094y0uthhor289jnqthpc2290
extension_requests:
© 2024 Puppet, Inc., a Perforce company

Puppet | Set up Puppet | 89
pp_uuid: ED803750-E3C7-44F5-BB08-41A04433FE2E
pp_image_name: my_ami_image
pp_preshared_key: 342thbjkt82094y0uthhor289jnqthpc2290
Format
The csr_attributes file must be a YAML hash containing one or both of the following keys:
• custom_attributes
• extension_requests
The value of each key must also be a hash, where:
• Each key is a valid object identifier (OID). Note that Puppet-specific OIDs can optionally be referenced by short
name instead of by numeric ID. In the example above, pp_uuid is a short name for a Puppet-specific OID.
• Each value is an object that can be cast to a string. That is, numbers are allowed but arrays are not.
Allowed OIDs for custom attributes
Custom attributes can use any public or site-specific OID, with the exception of the OIDs used for core X.509
functionality. This means you can’t re-use existing OIDs for things like subject alternative names.
One useful OID is the “challengePassword” attribute — 1.2.840.113549.1.9.7. This is a rarely-used corner
of X.509 which can be repurposed to hold a pre-shared key. The benefit of using this instead of an arbitrary OID is
that it appears by name when using OpenSSL to dump the CSR to text; OIDs that openssl req can’t recognize are
displayed as numerical strings.
Also note that the Puppet-specific OIDs listed below can also be used in CSR attributes.
Allowed OIDs for extension requests
Extension request OIDs must be under the “ppRegCertExt” (1.3.6.1.4.1.34380.1.1) or
“ppPrivCertExt” (1.3.6.1.4.1.34380.1.2) OID arcs.
Puppet provides several registered OIDs (under “ppRegCertExt”) for the most common kinds of extension
information, as well as a private OID range (“ppPrivCertExt”) for site-specific extension information. The benefits of
using the registered OIDs are:
• They can be referenced in csr_attributes.yaml using their short names instead of their numeric IDs.
• When using Puppet tools to print certificate info, they appear using their descriptive names instead of their
numeric IDs.
The private range is available for any information you want to embed into a certificate that isn’t already in wide use
elsewhere. It is completely unregulated, and its contents are expected to be different in every Puppet deployment.
The “ppRegCertExt” OID range contains the following OIDs.
Numeric ID Short name Descriptive name
1.3.6.1.4.1.34380.1.1.1 pp_uuid Puppet node UUID
1.3.6.1.4.1.34380.1.1.2 pp_instance_id Puppet node instance ID
1.3.6.1.4.1.34380.1.1.3 pp_image_name Puppet node image name
1.3.6.1.4.1.34380.1.1.4 pp_preshared_key Puppet node preshared key
1.3.6.1.4.1.34380.1.1.5 pp_cost_center Puppet node cost center name
1.3.6.1.4.1.34380.1.1.6 pp_product Puppet node product name
1.3.6.1.4.1.34380.1.1.7 pp_project Puppet node project name
1.3.6.1.4.1.34380.1.1.8 pp_application Puppet node application name
© 2024 Puppet, Inc., a Perforce company

Puppet | Set up Puppet | 90
Numeric ID Short name Descriptive name
1.3.6.1.4.1.34380.1.1.9 pp_service Puppet node service name
1.3.6.1.4.1.34380.1.1.10 pp_employee Puppet node employee name
1.3.6.1.4.1.34380.1.1.11 pp_created_by Puppet node created_by tag
1.3.6.1.4.1.34380.1.1.12 pp_environment Puppet node environment name
1.3.6.1.4.1.34380.1.1.13 pp_role Puppet node role name
1.3.6.1.4.1.34380.1.1.14 pp_software_version Puppet node software version
1.3.6.1.4.1.34380.1.1.15 pp_department Puppet node department name
1.3.6.1.4.1.34380.1.1.16 pp_cluster Puppet node cluster name
1.3.6.1.4.1.34380.1.1.17 pp_provisioner Puppet node provisioner name
1.3.6.1.4.1.34380.1.1.18 pp_region Puppet node region name
1.3.6.1.4.1.34380.1.1.19 pp_datacenter Puppet node datacenter name
1.3.6.1.4.1.34380.1.1.20 pp_zone Puppet node zone name
1.3.6.1.4.1.34380.1.1.21 pp_network Puppet node network name
1.3.6.1.4.1.34380.1.1.22 pp_securitypolicy Puppet node security policy name
1.3.6.1.4.1.34380.1.1.23 pp_cloudplatform Puppet node cloud platform name
1.3.6.1.4.1.34380.1.1.24 pp_apptier Puppet node application tier
1.3.6.1.4.1.34380.1.1.25 pp_hostname Puppet node hostname
The “ppAuthCertExt” OID range contains the following OIDs:
1.3.6.1.4.1.34380.1.3.1 pp_authorization Certificate extension authorization
1.3.6.1.4.1.34380.1.3.13 pp_auth_role Puppet node role name for
authorization. For PE internal use
only.
custom_trusted_oid_mapping.yaml: Short names for cert extension OIDs
The custom_trusted_oid_mapping.yaml file lets you set your own short names for certificate extension
object identifiers (OIDs), which can make the $trusted variable more useful.
The file must be present on each Puppet Server infrastructure node. The compiler does not add certificate extensions
to $trusted in a serverless approach such as puppet apply.
Certificate extensions
When a node requests a certificate, it can ask the CA to include some additional, permanent metadata in that cert.
Puppet agent uses the csr_attributes.yaml file to decide what extensions to request.
If the CA signs a certificate with extensions included, those extensions are available as trusted facts in the top-scope
$trusted variable. Your manifests or node classifier can then use those trusted facts to decide which nodes can
receive which configurations.
By default, the Puppet-specific registered OIDs appear as keys with convenient short names in the
$trusted[extensions] hash, and any other OIDs appear as raw numerical IDs. You can use the
custom_trusted_oid_mapping.yaml file to map other OIDs to short names, which replaces the numerical
OIDs in $trusted[extensions].
For more information, see CSR attributes and certificate extensions, Trusted facts, The csr_attributes.yaml
file.
© 2024 Puppet, Inc., a Perforce company

Puppet | Set up Puppet | 91
Limitations of OID mapping
Mapping OIDs in this file only affects the keys in the $trusted[extensions] hash. It does not affect what an
agent can request in its csr_attributes.yaml file — anything but Puppet-specific registered extensions must
still be numerical OIDs.
After setting custom OID mapping values and restarting puppetserver, you can reference variables using only the
short name.
Location
The OID mapping file is located at $confdir/custom_trusted_oid_mapping.yaml by default. Its
location is configurable with the trusted_oid_mapping_file setting.
The location of the confdir depends on your OS. See the confdir documentation for details.
Example
---
oid_mapping:
1.3.6.1.4.1.34380.1.2.1.1:
shortname: 'myshortname'
longname: 'My Long Name'
1.3.6.1.4.1.34380.1.2.1.2:
shortname: 'myothershortname'
longname: 'My Other Long Name'
Format
The custom_trusted_oid_mapping.yaml must be a YAML hash containing a single key called
oid_mapping.
The value of the oid_mapping key must be a hash whose keys are numerical OIDs. The value for each OID must
be a hash with two keys:
• shortname for the case-sensitive one-word name that is used in the $trusted[extensions] hash.
• longname for a more descriptive name (not used elsewhere).
device.conf: Network hardware access
The puppet-device subcommand retrieves catalogs from the primary Puppet server and applies them to remote
devices. Devices to be managed by the puppet-device subcommand are configured in device.conf.
For more information on Puppet device, see the Puppet device documentation.
Location
The device.conf file is located at $confdir/device.conf by default, and its location is configurable with
the deviceconfig setting.
The location of confdir depends on your operating system. See the confdir documentation for details.
Format
The device.conf file is an INI-like file, with one section per device:
[device001.example.com]
type cisco
url ssh://admin:[email protected]
debug
The section name specifies the certname of the device.
© 2024 Puppet, Inc., a Perforce company

Puppet | Set up Puppet | 92
The values for the type and url properties are specific to each type of device.
The the optional debug property specifies transport-level debugging, and is limited to telnet and ssh transports.
For Cisco devices, the url is in the following format:
scheme://user:password@hostname/query
With:
• Scheme: either ssh or telnet
• user: optional connection username, depending on the device configuration
• password: connection password
• query: optional ?enable= parameter whose value is the enable password
Note: Reserved non-alphanumeric characters in the url must be percent-encoded.
routes.yaml: Advanced plugin routing
The routes.yaml file overrides configuration settings involving indirector termini, and allows termini to be set in
greater detail than puppet.conf allows.
The routes.yaml file makes it possible to use certain extensions to Puppet, most notably PuppetDB. Usually
you edit this file only to make changes that are explicitly specified by the setup instructions for an extension you are
trying to install.
routes.yaml allows you to configure a terminus to have a cache. The cache is simply another terminus used for
quick retrieval of facts. When saving facts, Puppet always saves to the main terminus. When loading facts, Puppet
loads first from the cache. If the requested value is not present in the cache, Puppet instead loads from the main
terminus.
Location
The routes.yaml file is located at $confdir/routes.yaml by default. Its location is configurable with the
route_file setting.
The location of the confdir depends on your operating system. See the confdir documentation for details.
Example
---
server:
facts:
terminus: puppetdb
cache: yaml
Format
The routes.yaml file is a YAML hash.
Each top level key is the name of a run mode (server, agent, or user), and its value is another hash.
Each key of the second-level hash is the name of an indirection, and its value is another hash.
The only keys allowed in the third-level hash are terminus and cache. The value of each of these keys is the
name of a valid terminus for the indirection named above.
© 2024 Puppet, Inc., a Perforce company

Puppet | Set up Puppet | 93
Adding file server mount points
Puppet Server includes a file server for transferring static file content to agents. If you need to serve large files that
you don't want to store in source control or distribute with a module, you can make a custom file server mount point
and let Puppet serve those files from another directory.
In Puppet code, you can tell the file server is being used when you see a file resource that has a source =>
puppet:///... attribute specified.
To set up a mount point:
1.
Choose a directory on disk for the mount point, make sure Puppet Server can access it, and add your files to the
directory.
2.
Edit fileserver.conf on your Puppet Server node, so Puppet knows which directory to associate with the
new mount point.
3.
(Optional) Edit Puppet Server's auth.conf to allow access to the new mount point.
After the mount point is set up, Puppet code can reference the files you added to the directory at puppet:///
<MOUNT POINT>/<PATH>.
Mount points in the Puppet URI
Puppet URIs look like this: puppet://<SERVER>/<MOUNT POINT>/<PATH>.
The <SERVER> is optional, so it common practice to use puppet:/// URIs with three slashes. Usually, there is
no reason to specify the server. For Puppet agent, <SERVER> defaults to the value of the server setting. For Puppet
apply, <SERVER> defaults to a special mock server with a modules mount point.
<MOUNT POINT> is a unique identifier for some collection of files. There are different kinds of mount points:
• Custom mount points correspond to a directory that you specify.
• The task mount point works in a similar way to the modules mount point but for files that live under the
modules tasks directory, rather than the files directory.
• The special modules mount point serves files from the files directory of every module. It behaves as if
someone had copied the files directory from every module into one big directory, renaming each of them
with the name of their module. For example, the files in apache/files/... are available at puppet:///
modules/apache/....
• The special plugins mount point serves files from the lib directory of every module. It behaves as if someone
had copied the contents of every lib directory into one big directory, with no additional namespacing. Puppet
agent uses this mount point when syncing plugins before a run, but there’s no reason to use it in a file resource.
• The special pluginfacts mount point serves files from the facts.d directory of every module to support
external facts. It behaves like the plugins mount point, but with a different source directory.
• The special locales mount point serves files from the locales directory of every module to support
automatic downloading of module translations to agents. It also behaves like the plugins mount point, and also
has a different source directory.
<PATH> is the remainder of the path to the file, starting from the directory (or imaginary directory) that corresponds
to the mount point.
Creating a new mount point in fileserver.conf
The fileserver.conf file uses the following syntax to define mount points:
[<NAME OF MOUNT POINT>]
path <PATH TO DIRECTORY>
In the following example, a file at /etc/puppetlabs/puppet/installer_files/oracle.pkg would be
available in manifests as puppet:///installer_files/oracle.pkg:
[installer_files]
© 2024 Puppet, Inc., a Perforce company

Puppet | Set up Puppet | 94
path /etc/puppetlabs/puppet/installer_files
Make sure that the puppet user has the right permissions to access that directory and its contents.
CAUTION: Always restrict write access to mounted directories. The file server follows any symlinks in a
file server mount, including links to files that agent nodes cannot access (such as SSL keys). When following
symlinks, the file server can access any files readable by Puppet Server’s user account.
Controlling access to a custom mount point in auth.conf
By default, any node with a valid certificate can access the files in your new mount point. If a node can fetch a
catalog, it can fetch files. If the node can’t fetch a catalog, it can’t fetch files. This is the same behavior as the
special modules and plugins mount points. If necessary, you can restrict access to a custom mount point in
auth.conf.
To add a new auth rule to Puppet Server’s HOCON-format auth.conf file, located at /etc/puppetlabs/
puppetserver/conf.d/auth.conf. , you must meet the following requirements:
• It must match requests to all four of these prefixes:
• /puppet/v3/file_metadata/<MOUNT POINT>
• /puppet/v3/file_metadatas/<MOUNT POINT>
• /puppet/v3/file_content/<MOUNT POINT>
• /puppet/v3/file_contents/<MOUNT POINT>
• Its sort-order must be lower than 500, so that it overrides the default rule for the file server.
For example:
{
# Allow limited access to files in /etc/puppetlabs/puppet/
installer_files:
match-request: {
path: "^/puppet/v3/file_(content|metadata)s?/installer_files"
type: regex
}
allow: "*.dev.example.com"
sort-order: 400
name: "dev.example.com large installer files"
},
Related topics: Module fundamentals, fileserver.conf: Custom fileserver mount points, puppetserver.conf, auth.conf.
Checking the values of settings
Puppet settings are highly dynamic, and their values can come from several different places. To see the actual settings
values that a Puppet service uses, run the puppet config print command.
General usage
The puppet config print command loads and evaluates settings, and can imitate any of Puppet’s other
commands and services when doing so. The --section and --environment options let you control how
settings are loaded; for details, see the sections below on imitating different services.
Note: To ensure that you’re seeing the values Puppet use when running as a service, be sure to use sudo or run the
command as root or Administrator. If you run puppet config print as some other user, Puppet might
not use the system config file.
© 2024 Puppet, Inc., a Perforce company

Puppet | Set up Puppet | 95
To see the value of one setting:
sudo puppet config print <SETTING NAME> [--section <CONFIG SECTION>] [--
environment <ENVIRONMENT>]
This displays just the value of <SETTING NAME>.
To see the value of multiple settings:
sudo puppet config print <SETTING 1> <SETTING 2> [...] [--section <CONFIG
SECTION>] [--environment <ENVIRONMENT>]
This displays name = value pairs for all requested settings.
To see the value of all settings:
sudo puppet config print [--section <CONFIG SECTION>] [--environment
<ENVIRONMENT>]
This displays name = value pairs for all settings.
Config sections
The --section option specifies which section of puppet.conf to use when finding settings. It is optional, and
defaults to main. Valid sections are:
• main (default) — used by all commands and services
• server — used by the primary Puppet server service and the puppetserver ca command
• agent — used by the Puppet agent service
• user — used by the Puppet apply command and most other commands
As usual, the other sections override the main section if they contain a setting; if they don’t, the value from main is
used, or a default value if the setting isn’t present there.
Environments
The --environment option specifies which environment to use when finding settings. It is optional and defaults
to the value of the environment setting in the user section (usually production, because it’s rare to specify an
environment in user).
You can only specify environments that exist.
This option is primarily useful when looking up settings used by the primary server service, because it’s rare to use
environment config sections for Puppet apply and Puppet agent.
Imitating Puppet server and puppetserver ca
To see the settings the Puppet server service and the puppetserver ca command would use:
• Specify --section server.
• Use the --environment option to specify the environment you want settings for, or let it default to
production.
• Remember to use sudo.
• If your primary Puppet server is managed as a Rack application (for example, with Passenger), check the
config.ru file to make sure it’s using the confdir and vardir that you expect. If it’s using non-standard ones,
you need to specify them on the command line with the --confdir and --vardir options; otherwise you
might not see the correct values for settings.
© 2024 Puppet, Inc., a Perforce company

Puppet | Set up Puppet | 96
To see the effective modulepath used in the dev environment:
sudo puppet config print modulepath --section server --environment dev
This returns something like:
/etc/puppetlabs/code/environments/dev/modules:/etc/puppetlabs/code/modules:/
opt/puppetlabs/puppet/modules
To see whether PuppetDB is configured for exported resources:
sudo puppet config print storeconfigs storeconfigs_backend --section server
This returns something like:
storeconfigs = true
storeconfigs_backend = puppetdb
Imitating Puppet agent
To see the settings the Puppet agent service would use:
• Specify --section agent.
• Remember to use sudo.
• If you are seeing something unexpected, check your Puppet agent init script or cron job to make sure it is using the
standard confdir and vardir, is running as root, and isn’t overriding other settings with command line options. If
it’s doing anything unusual, you might have to set more options for the config print command.
To see whether the agent is configured to use manifest ordering when applying the catalog:
sudo puppet config print ordering --section agent
This returns something like:
manifest
Imitating puppet apply
To see the settings the Puppet apply command would use:
• Specify --section user.
• Remember to use sudo.
• If you are seeing something unexpected, check the cron job or script that is responsible for configuring the
machine with Puppet apply. Make sure it is using the standard confdir and vardir, is running as root, and isn’t
overriding other settings with command line options. If it’s doing anything unusual, you might have to set more
options for the config print command.
To see whether Puppet apply is configured to use reports:
sudo puppet config print report reports --section user
This returns something like:
report = true
reports = store,http
© 2024 Puppet, Inc., a Perforce company

Puppet | Set up Puppet | 97
Editing settings on the command line
Puppet loads most of its settings from the puppet.conf config file. You can edit this file directly, or you can
change individual settings with the puppet config set command.
Use puppet config set for:
• Fast one-off config changes,
• Scriptable config changes in provisioning tools,
If you find yourself changing many settings, edit the puppet.conf file instead, or manage it with a template.
Usage
To assign a new value to a setting, run:
sudo puppet config set <SETTING NAME> <VALUE> --section <CONFIG SECTION>
This declaratively sets the value of <SETTING NAME> to <VALUE> in the specified config section, regardless of
whether the setting already had a value.
Config sections
The --section option specifies which section of puppet.conf to modify. It is optional, and defaults to main.
Valid sections are:
• main (default) — used by all commands and services
• server — used by the primary Puppet server service and the puppetserver ca command
• agent — used by the Puppet agent service
• user — used by the puppet apply command and most other commands
When modifying the system config file, use sudo or run the command as root or Administrator.
Example
Consider the following puppet.conf file:
[main]
certname = agent01.example.com
server = server.example.com
vardir = /var/opt/lib/pe-puppet
[agent]
report = true
graph = true
pluginsync = true
[server]
dns_alt_names = server,server.example.com,puppet,puppet.example.com
If you run the following commands:
sudo puppet config set reports puppetdb --section server
sudo puppet config set ordering manifest
The puppet.conf file now looks like this:
[main]
certname = agent01.example.com
server = server.example.com
vardir = /var/opt/lib/pe-puppet
ordering = manifest
© 2024 Puppet, Inc., a Perforce company

Puppet | Set up Puppet | 98
[agent]
report = true
graph = true
pluginsync = true
[server]
dns_alt_names = server,server.example.com,server,server.example.com
reports = puppetdb
Configuration Reference
NOTE: This page was generated from the Puppet source code on 2024-08-01 18:15:53 -0700
This page is autogenerated; any changes will get overwritten
Configuration settings
• Each of these settings can be specified in puppet.conf or on the command line.
• Puppet Enterprise (PE) and open source Puppet share the configuration settings documented here. However,
PE defaults differ from open source defaults for some settings, such as node_terminus, storeconfigs,
always_retry_plugins, disable18n, environment_timeout (when Code Manager is enabled),
and the Puppet Server JRuby max-active-instances setting. To verify PE configuration defaults, check the
puppet.conf or pe-puppet-server.conf file after installation.
• When using boolean settings on the command line, use --setting and --no-setting instead of --
setting (true|false). (Using --setting false results in "Error: Could not parse application
options: needless argument".)
• Settings can be interpolated as $variables in other settings; $environment is special, in that puppet master
will interpolate each agent node's environment instead of its own.
• Multiple values should be specified as comma-separated lists; multiple directories should be separated with the
system path separator (usually a colon).
• Settings that represent time intervals should be specified in duration format: an integer immediately followed
by one of the units 'y' (years of 365 days), 'd' (days), 'h' (hours), 'm' (minutes), or 's' (seconds). The unit cannot
be combined with other units, and defaults to seconds when omitted. Examples are '3600' which is equivalent to
'1h' (one hour), and '1825d' which is equivalent to '5y' (5 years).
• If you use the splay setting, note that the period that it waits changes each time the Puppet agent is restarted.
• Settings that take a single file or directory can optionally set the owner, group, and mode for their value: rundir
= $vardir/run { owner = puppet, group = puppet, mode = 644 }
• The Puppet executables ignores any setting that isn't relevant to their function.
See the configuration guide for more details.
agent_catalog_run_lockfile
A lock file to indicate that a puppet agent catalog run is currently in progress. The file contains the pid of the process
that holds the lock on the catalog run.
• Default: $statedir/agent_catalog_run.lock
agent_disabled_lockfile
A lock file to indicate that puppet agent runs have been administratively disabled. File contains a JSON object with
state information.
• Default: $statedir/agent_disabled.lock
allow_duplicate_certs
Whether to allow a new certificate request to overwrite an existing certificate request. If true, then the old certificate
must be cleaned using puppetserver ca clean, and the new request signed using puppetserver ca
sign.
© 2024 Puppet, Inc., a Perforce company
Puppet | Set up Puppet | 99
• Default: false
allow_pson_serialization
Whether to allow PSON serialization. When unable to serialize to JSON or other formats, Puppet falls back to PSON.
This option affects the configuration management service responses of Puppet Server and the process by which the
agent saves its cached catalog. With a default value of false, this option is useful in preventing the loss of data
because rich data cannot be serialized via PSON.
• Default: false
always_retry_plugins
Affects how we cache attempts to load Puppet resource types and features. If true, then calls to
Puppet.type.<type>? Puppet.feature.<feature>? will always attempt to load the type or feature
(which can be an expensive operation) unless it has already been loaded successfully. This makes it possible for a
single agent run to, e.g., install a package that provides the underlying capabilities for a type or feature, and then
later load that type or feature during the same run (even if the type or feature had been tested earlier and had not been
available).
If this setting is set to false, then types and features will only be checked once, and if they are not available, the
negative result is cached and returned for all subsequent attempts to load the type or feature. This behavior is almost
always appropriate for the server, and can result in a significant performance improvement for types and features that
are checked frequently.
• Default: true
autoflush
Whether log files should always flush to disk.
• Default: true
autosign
Whether (and how) to autosign certificate requests. This setting is only relevant on a Puppet Server acting as a
certificate authority (CA).
Valid values are true (autosigns all certificate requests; not recommended), false (disables autosigning certificates), or
the absolute path to a file.
The file specified in this setting may be either a configuration file or a custom policy executable. Puppet will
automatically determine what it is: If the Puppet user (see the user setting) can execute the file, it will be treated as a
policy executable; otherwise, it will be treated as a config file.
If a custom policy executable is configured, the CA Puppet Server will run it every time it receives a CSR. The
executable will be passed the subject CN of the request as a command line argument, and the contents of the CSR in
PEM format on stdin. It should exit with a status of 0 if the cert should be autosigned and non-zero if the cert should
not be autosigned.
If a certificate request is not autosigned, it will persist for review. An admin user can use the puppetserver ca
sign command to manually sign it, or can delete the request.
For info on autosign configuration files, see the guide to Puppet's config files.
• Default: $confdir/autosign.conf
basemodulepath
The search path for global modules. Should be specified as a list of directories separated by the system path separator
character. (The POSIX path separator is ':', and the Windows path separator is ';'.)
These are the modules that will be used by all environments. Note that the modules directory of the active
environment will have priority over any global directories. For more info, see https://puppet.com/docs/puppet/latest/
environments_about.html
• Default: $codedir/modules:/opt/puppetlabs/puppet/modules
© 2024 Puppet, Inc., a Perforce company
Puppet | Set up Puppet | 100
binder_config
The binder configuration file. Puppet reads this file on each request to configure the bindings system. If set to nil (the
default), a $confdir/binder_config.yaml is optionally loaded. If it does not exists, a default configuration is used. If the
setting :binding_config is specified, it must reference a valid and existing yaml file.
• Default: ``
bucketdir
Where FileBucket files are stored.
• Default: $vardir/bucket
ca_fingerprint
The expected fingerprint of the CA certificate. If specified, the agent will compare the CA certificate fingerprint that
it downloads against this value and reject the CA certificate if the values do not match. This only applies during the
first download of the CA certificate.
• Default: ``
ca_name
The name to use the Certificate Authority certificate.
• Default: Puppet CA: $certname
ca_port
The port to use for the certificate authority.
• Default: $serverport
ca_refresh_interval
How often the Puppet agent refreshes its local CA certificates. By default, CA certificates are refreshed every 24
hours. If a different interval is specified, the agent refreshes its CA certificates during the next agent run if the elapsed
time since the certificates were last refreshed exceeds the specified duration.
In general, the interval should be greater than the runinterval value. Setting the ca_refresh_interval
value to 0 or an equal or lesser value than runinterval causes the CA certificates to be refreshed on every run.
If the agent downloads new CA certs, the agent uses those for subsequent network requests. If the refresh request fails
or if the CA certs are unchanged on the server, then the agent run will continue using the local CA certs it already has.
This setting can be a time interval in seconds (30 or 30s), minutes (30m), hours (6h), days (2d), or years (5y).
• Default: 1d
ca_server
The server to use for certificate authority requests. It's a separate server because it cannot and does not need to
horizontally scale.
• Default: $server
ca_ttl
The default TTL for new certificates. This setting can be a time interval in seconds (30 or 30s), minutes (30m), hours
(6h), days (2d), or years (5y).
• Default: 5y
cacert
The CA certificate.
• Default: $cadir/ca_crt.pem
© 2024 Puppet, Inc., a Perforce company
Puppet | Set up Puppet | 101
cacrl
The certificate revocation list (CRL) for the CA.
• Default: $cadir/ca_crl.pem
cadir
The root directory for the certificate authority.
• Default: /etc/puppetlabs/puppetserver/ca
cakey
The CA private key.
• Default: $cadir/ca_key.pem
capub
The CA public key.
• Default: $cadir/ca_pub.pem
catalog_cache_terminus
How to store cached catalogs. Valid values are 'json', 'msgpack' and 'yaml'. The agent application defaults to 'json'.
• Default: ``
catalog_terminus
Where to get node catalogs. This is useful to change if, for instance, you'd like to pre-compile catalogs and store them
in memcached or some other easily-accessed store.
• Default: compiler
cert_inventory
The inventory file. This is a text file to which the CA writes a complete listing of all certificates.
• Default: $cadir/inventory.txt
certdir
The certificate directory.
• Default: $ssldir/certs
certificate_revocation
Whether certificate revocation checking should be enabled, and what level of checking should be performed.
When certificate revocation is enabled, Puppet expects the contents of its CRL to be one or more PEM-encoded CRLs
concatenated together. When using a cert bundle, CRLs for all CAs in the chain of trust must be included in the crl
file. The chain should be ordered from least to most authoritative, with the first CRL listed being for the root of the
chain and the last being for the leaf CA.
When certificate_revocation is set to 'true' or 'chain', Puppet ensures that each CA in the chain of trust has not been
revoked by its issuing CA.
When certificate_revocation is set to 'leaf', Puppet verifies certs against the issuing CA's revocation list, but it does
not verify the revocation status of the issuing CA or any CA above it within the chain of trust.
When certificate_revocation is set to 'false', Puppet disables all certificate revocation checking and does not attempt to
download the CRL.
• Default: chain
© 2024 Puppet, Inc., a Perforce company
Puppet | Set up Puppet | 102
certname
The name to use when handling certificates. When a node requests a certificate from the CA Puppet Server, it uses the
value of the certname setting as its requested Subject CN.
This is the name used when managing a node's permissions in Puppet Server's auth.conf. In most cases, it is also used
as the node's name when matching node definitions and requesting data from an ENC. (This can be changed with the
node_name_value and node_name_fact settings, although you should only do so if you have a compelling
reason.)
A node's certname is available in Puppet manifests as $trusted['certname']. (See Facts and Built-In
Variables for more details.)
• For best compatibility, you should limit the value of certname to only use lowercase letters, numbers, periods,
underscores, and dashes. (That is, it should match /A[a-z0-9._-]+Z/.)
• The special value ca is reserved, and can't be used as the certname for a normal node.
Note: You must set the certname in the main section of the puppet.conf file. Setting it in a different section causes
errors.
Defaults to the node's fully qualified domain name.
• Default: the Host's fully qualified domain name, as determined by Facter
ciphers
The list of ciphersuites for TLS connections initiated by puppet. The default value is chosen to support TLS 1.0 and
up, but can be made more restrictive if needed. The ciphersuites must be specified in OpenSSL format, not IANA.
• Default: ECDHE-ECDSA-AES128-GCM-SHA256:ECDHE-RSA-AES128-GCM-SHA256:ECDHE-
ECDSA-AES256-GCM-SHA384:ECDHE-RSA-AES256-GCM-SHA384:ECDHE-ECDSA-CHACHA20-
POLY1305:ECDHE-RSA-CHACHA20-POLY1305:DHE-RSA-AES128-GCM-SHA256:DHE-RSA-
AES256-GCM-SHA384:DHE-RSA-CHACHA20-POLY1305:ECDHE-ECDSA-AES128-SHA256:ECDHE-
RSA-AES128-SHA256:ECDHE-ECDSA-AES128-SHA:ECDHE-RSA-AES128-SHA:ECDHE-
ECDSA-AES256-SHA384:ECDHE-RSA-AES256-SHA384:ECDHE-ECDSA-AES256-SHA:ECDHE-
RSA-AES256-SHA:DHE-RSA-AES128-SHA256:DHE-RSA-AES256-SHA256:AES128-GCM-
SHA256:AES256-GCM-SHA384:AES128-SHA256:AES256-SHA256
classfile
The file in which puppet agent stores a list of the classes associated with the retrieved configuration. Can be loaded in
the separate puppet executable using the --loadclasses option.
• Default: $statedir/classes.txt
client_datadir
The directory in which serialized data is stored on the client.
• Default: $vardir/client_data
clientbucketdir
Where FileBucket files are stored locally.
• Default: $vardir/clientbucket
clientyamldir
The directory in which client-side YAML data is stored.
• Default: $vardir/client_yaml
code
Code to parse directly. This is essentially only used by puppet, and should only be set if you're writing your own
Puppet executable.
© 2024 Puppet, Inc., a Perforce company
Puppet | Set up Puppet | 103
codedir
The main Puppet code directory. The default for this setting is calculated based on the user. If the process is running
as root or the user that Puppet is supposed to run as, it defaults to a system directory, but if it's running as any other
user, it defaults to being in the user's home directory.
• Default: Unix/Linux: /etc/puppetlabs/code -- Windows: C:\ProgramData\PuppetLabs
\code -- Non-root user: ~/.puppetlabs/etc/code
color
Whether to use colors when logging to the console. Valid values are ansi (equivalent to true), html, and false,
which produces no color.
• Default: ansi
confdir
The main Puppet configuration directory. The default for this setting is calculated based on the user. If the process is
running as root or the user that Puppet is supposed to run as, it defaults to a system directory, but if it's running as any
other user, it defaults to being in the user's home directory.
• Default: Unix/Linux: /etc/puppetlabs/puppet -- Windows: C:\ProgramData
\PuppetLabs\puppet\etc -- Non-root user: ~/.puppetlabs/etc/puppet
config
The configuration file for the current puppet application.
• Default: $confdir/${config_file_name}
config_file_name
The name of the puppet config file.
• Default: puppet.conf
config_version
How to determine the configuration version. By default, it will be the time that the configuration is parsed, but you
can provide a shell script to override how the version is determined. The output of this script will be added to every
log message in the reports, allowing you to correlate changes on your hosts to the source version on the server.
Setting a global value for config_version in puppet.conf is not allowed (but it can be overridden from the
commandline). Please set a per-environment value in environment.conf instead. For more info, see https://
puppet.com/docs/puppet/latest/environments_about.html
configprint
Prints the value of a specific configuration setting. If the name of a setting is provided for this, then the value is
printed and puppet exits. Comma-separate multiple values. For a list of all values, specify 'all'. This setting is
deprecated, the 'puppet config' command replaces this functionality.
crl_refresh_interval
How often the Puppet agent refreshes its local Certificate Revocation List (CRL). By default, the CRL is refreshed
every 24 hours. If a different interval is specified, the agent refreshes its CRL on the next Puppet agent run if the
elapsed time since the CRL was last refreshed exceeds the specified interval.
In general, the interval should be greater than the runinterval value. Setting the crl_refresh_interval
value to 0 or an equal or lesser value than runinterval causes the CRL to be refreshed on every run.
If the agent downloads a new CRL, the agent will use it for subsequent network requests. If the refresh request fails or
if the CRL is unchanged on the server, then the agent run will continue using the local CRL it already has.This setting
can be a time interval in seconds (30 or 30s), minutes (30m), hours (6h), days (2d), or years (5y).
• Default: 1d
© 2024 Puppet, Inc., a Perforce company
Puppet | Set up Puppet | 104
csr_attributes
An optional file containing custom attributes to add to certificate signing requests (CSRs). You should ensure that
this file does not exist on your CA Puppet Server; if it does, unwanted certificate extensions may leak into certificates
created with the puppetserver ca generate command.
If present, this file must be a YAML hash containing a custom_attributes key and/or an
extension_requests key. The value of each key must be a hash, where each key is a valid OID and each value
is an object that can be cast to a string.
Custom attributes can be used by the CA when deciding whether to sign the certificate, but are then discarded.
Attribute OIDs can be any OID value except the standard CSR attributes (i.e. attributes described in RFC 2985
section 5.4). This is useful for embedding a pre-shared key for autosigning policy executables (see the autosign
setting), often by using the 1.2.840.113549.1.9.7 ("challenge password") OID.
Extension requests will be permanently embedded in the final certificate. Extension OIDs must be in the
"ppRegCertExt" (1.3.6.1.4.1.34380.1.1), "ppPrivCertExt" (1.3.6.1.4.1.34380.1.2), or
"ppAuthCertExt" (1.3.6.1.4.1.34380.1.3) OID arcs. The ppRegCertExt arc is reserved for four of the
most common pieces of data to embed: pp_uuid (.1), pp_instance_id (.2), pp_image_name (.3), and
pp_preshared_key (.4) --- in the YAML file, these can be referred to by their short descriptive names instead
of their full OID. The ppPrivCertExt arc is unregulated, and can be used for site-specific extensions. The ppAuthCert
arc is reserved for two pieces of data to embed: pp_authorization (.1) and pp_auth_role (.13). As with
ppRegCertExt, in the YAML file, these can be referred to by their short descriptive name instead of their full OID.
• Default: $confdir/csr_attributes.yaml
csrdir
Where the CA stores certificate requests.
• Default: $cadir/requests
daemonize
Whether to send the process into the background. This defaults to true on POSIX systems, and to false on Windows
(where Puppet currently cannot daemonize).
• Default: true
data_binding_terminus
This setting has been deprecated. Use of any value other than 'hiera' should instead be configured in a version 5
hiera.yaml. Until this setting is removed, it controls which data binding terminus to use for global automatic data
binding (across all environments). By default this value is 'hiera'. A value of 'none' turns off the global binding.
• Default: hiera
default_file_terminus
The default source for files if no server is given in a uri, e.g. puppet:///file. The default of rest causes the file to be
retrieved using the server setting. When running apply the default is file_server, causing requests to be
filled locally.
• Default: rest
default_manifest
The default main manifest for directory environments. Any environment that doesn't set the manifest setting in its
environment.conf file will use this manifest.
This setting's value can be an absolute or relative path. An absolute path will make all environments default to the
same main manifest; a relative path will allow each environment to use its own manifest, and Puppet will resolve the
path relative to each environment's main directory.
In either case, the path can point to a single file or to a directory of manifests to be evaluated in alphabetical order.
• Default: ./manifests
© 2024 Puppet, Inc., a Perforce company
Puppet | Set up Puppet | 105
default_schedules
Boolean; whether to generate the default schedule resources. Setting this to false is useful for keeping external report
processors clean of skipped schedule resources.
• Default: true
deviceconfdir
The root directory of devices' $confdir.
• Default: $confdir/devices
deviceconfig
Path to the device config file for puppet device.
• Default: $confdir/device.conf
devicedir
The root directory of devices' $vardir.
• Default: $vardir/devices
diff
Which diff command to use when printing differences between files. This setting has no default value on Windows,
as standard diff is not available, but Puppet can use many third-party diff tools.
• Default: diff
diff_args
Which arguments to pass to the diff command when printing differences between files. The command to use can be
chosen with the diff setting.
• Default: -u
digest_algorithm
Which digest algorithm to use for file resources and the filebucket. Valid values are sha256, sha384, sha512, sha224,
md5. Default is sha256.
• Default: sha256
disable_i18n
If true, turns off all translations of Puppet and module log messages, which affects error, warning, and info log
messages, as well as any translations in the report and CLI.
• Default: true
disable_per_environment_manifest
Whether to disallow an environment-specific main manifest. When set to true, Puppet will use the manifest
specified in the default_manifest setting for all environments. If an environment specifies a different main
manifest in its environment.conf file, catalog requests for that environment will fail with an error.
This setting requires default_manifest to be set to an absolute path.
• Default: false
disable_warnings
A comma-separated list of warning types to suppress. If large numbers of warnings are making Puppet's logs too large
or difficult to use, you can temporarily silence them with this setting.
If you are preparing to upgrade Puppet to a new major version, you should re-enable all warnings for a while.
Valid values for this setting are:
© 2024 Puppet, Inc., a Perforce company
Puppet | Set up Puppet | 106
• deprecations --- disables deprecation warnings.
• undefined_variables --- disables warnings about non existing variables.
• undefined_resources --- disables warnings about non existing resources.
• Default: []
dns_alt_names
A comma-separated list of alternate DNS names for Puppet Server. These are extra hostnames (in addition to its
certname) that the server is allowed to use when serving agents. Puppet checks this setting when automatically
creating a certificate for Puppet agent or Puppet Server. These can be either IP or DNS, and the type should be
specified and followed with a colon. Untyped inputs will default to DNS.
In order to handle agent requests at a given hostname (like "puppet.example.com"), Puppet Server needs a certificate
that proves it's allowed to use that name; if a server shows a certificate that doesn't include its hostname, Puppet
agents will refuse to trust it. If you use a single hostname for Puppet traffic but load-balance it to multiple Puppet
Servers, each of those servers needs to include the official hostname in its list of extra names.
Note: The list of alternate names is locked in when the server's certificate is signed. If you need to change the list
later, you can't just change this setting; you also need to regenerate the certificate. For more information on that
process, see the cert regen docs.
To see all the alternate names your servers are using, log into your CA server and run puppetserver ca list
--all, then check the output for (alt names: ...). Most agent nodes should NOT have alternate names; the
only certs that should have them are Puppet Server nodes that you want other agents to trust.
document_all
Whether to document all resources when using puppet doc to generate manifest documentation.
• Default: false
environment
The environment in which Puppet is running. For clients, such as puppet agent, this determines the environment
itself, which Puppet uses to find modules and much more. For servers, such as puppet server, this provides the
default environment for nodes that Puppet knows nothing about.
When defining an environment in the [agent] section, this refers to the environment that the agent requests from
the primary server. The environment doesn't have to exist on the local filesystem because the agent fetches it from the
primary server. This definition is used when running puppet agent.
When defined in the [user] section, the environment refers to the path that Puppet uses to search for code and
modules related to its execution. This requires the environment to exist locally on the filesystem where puppet is
being executed. Puppet subcommands, including puppet module and puppet apply, use this definition.
Given that the context and effects vary depending on the config section in which the environment setting is
defined, do not set it globally.
• Default: production
environment_data_provider
The name of a registered environment data provider used when obtaining environment specific data. The three built
in and registered providers are 'none' (no data), 'function' (data obtained by calling the function 'environment::data()')
and 'hiera' (data obtained using a data provider configured using a hiera.yaml file in root of the environment). Other
environment data providers may be registered in modules on the module path. For such custom data providers see the
respective module documentation. This setting is deprecated.
• Default: ``
environment_timeout
How long the Puppet server should cache data it loads from an environment.
© 2024 Puppet, Inc., a Perforce company
Puppet | Set up Puppet | 107
A value of 0 will disable caching. This setting can also be set to unlimited, which will cache environments until
the server is restarted or told to refresh the cache. All other values will result in Puppet server evicting environments
that haven't been used within the last environment_timeout seconds.
You should change this setting once your Puppet deployment is doing non-trivial work. We chose the default value
of 0 because it lets new users update their code without any extra steps, but it lowers the performance of your Puppet
server. We recommend either:
• Setting this to unlimited and explicitly refreshing your Puppet server as part of your code deployment process.
• Setting this to a number that will keep your most actively used environments cached, but allow testing
environments to fall out of the cache and reduce memory usage. A value of 3 minutes (3m) is a reasonable value.
Once you set environment_timeout to a non-zero value, you need to tell Puppet server to read new code from
disk using the environment-cache API endpoint after you deploy new code. See the docs for the Puppet Server
administrative API.
• Default: 0
environmentpath
A search path for directory environments, as a list of directories separated by the system path separator character.
(The POSIX path separator is ':', and the Windows path separator is ';'.)
This setting must have a value set to enable directory environments. The recommended value is $codedir/
environments. For more details, see https://puppet.com/docs/puppet/latest/environments_about.html
• Default: $codedir/environments
evaltrace
Whether each resource should log when it is being evaluated. This allows you to interactively see exactly what is
being done.
• Default: false
exclude_unchanged_resources
Specifies how unchanged resources are listed in reports. When set to true, resources that have had no changes after
catalog application will not have corresponding unchanged resource status updates listed in a report.
• Default: true
external_nodes
The external node classifier (ENC) script to use for node data. Puppet combines this data with the main manifest to
produce node catalogs.
To enable this setting, set the node_terminus setting to exec.
This setting's value must be the path to an executable command that can produce node information. The command
must:
• Take the name of a node as a command-line argument.
• Return a YAML hash with up to three keys:
• classes --- A list of classes, as an array or hash.
• environment --- A string.
• parameters --- A list of top-scope variables to set, as a hash.
• For unknown nodes, exit with a non-zero exit code.
Generally, an ENC script makes requests to an external data source.
For more info, see the ENC documentation.
• Default: none
© 2024 Puppet, Inc., a Perforce company
Puppet | Set up Puppet | 108
fact_name_length_soft_limit
The soft limit for the length of a fact name.
• Default: 2560
fact_value_length_soft_limit
The soft limit for the length of a fact value.
• Default: 4096
factpath
Where Puppet should look for facts. Multiple directories should be separated by the system path separator character.
(The POSIX path separator is ':', and the Windows path separator is ';'.)
• Default: $vardir/lib/facter:$vardir/facts
facts_terminus
The node facts terminus.
• Default: facter
fileserverconfig
Where the fileserver configuration is stored.
• Default: $confdir/fileserver.conf
filetimeout
The minimum time to wait between checking for updates in configuration files. This timeout determines how
quickly Puppet checks whether a file (such as manifests or puppet.conf) has changed on disk. The default will
change in a future release to be 'unlimited', requiring a reload of the Puppet service to pick up changes to its internal
configuration. Currently we do not accept a value of 'unlimited'. To reparse files within an environment in Puppet
Server please use the environment_cache endpoint
• Default: 15s
forge_authorization
The authorization key to connect to the Puppet Forge. Leave blank for unauthorized or license based connections
• Default: ``
freeze_main
Freezes the 'main' class, disallowing any code to be added to it. This essentially means that you can't have any code
outside of a node, class, or definition other than in the site manifest.
• Default: false
genconfig
When true, causes Puppet applications to print an example config file to stdout and exit. The example will include
descriptions of each setting, and the current (or default) value of each setting, incorporating any settings overridden
on the CLI (with the exception of genconfig itself). This setting only makes sense when specified on the command
line as --genconfig.
• Default: false
genmanifest
Whether to just print a manifest to stdout and exit. Only makes sense when specified on the command line as --
genmanifest. Takes into account arguments specified on the CLI.
• Default: false
© 2024 Puppet, Inc., a Perforce company
Puppet | Set up Puppet | 109
graph
Whether to create .dot graph files, which let you visualize the dependency and containment relationships in Puppet's
catalog. You can load and view these files with tools like OmniGraffle (OS X) or graphviz (multi-platform).
Graph files are created when applying a catalog, so this setting should be used on nodes running puppet agent or
puppet apply.
The graphdir setting determines where Puppet will save graphs. Note that we don't save graphs for historical runs;
Puppet will replace the previous .dot files with new ones every time it applies a catalog.
See your graphing software's documentation for details on opening .dot files. If you're using GraphViz's dot
command, you can do a quick PNG render with dot -Tpng <DOT FILE> -o <OUTPUT FILE>.
• Default: false
graphdir
Where to save .dot-format graphs (when the graph setting is enabled).
• Default: $statedir/graphs
group
The group Puppet Server will run as. Used to ensure the agent side processes (agent, apply, etc) create files and
directories readable by Puppet Server when necessary.
• Default: puppet
hiera_config
The hiera configuration file. Puppet only reads this file on startup, so you must restart the puppet server every time
you edit it.
• Default: $confdir/hiera.yaml. However, for backwards compatibility, if a file
exists at $codedir/hiera.yaml, Puppet uses that instead.
hostcert
Where individual hosts store and look for their certificates.
• Default: $certdir/$certname.pem
hostcert_renewal_interval
How often the Puppet agent renews its client certificate. By default, the client certificate is renewed 30 days before
the certificate expires. If a different interval is specified, the agent renews its client certificate during the next agent
run, assuming that the client certificate has expired within the specified duration.
In general, the hostcert_renewal_interval value should be greater than the runinterval value. Setting
the hostcert_renewal_interval value to 0 disables automatic renewal.
If the agent downloads a new certificate, the agent will use it for subsequent network requests. If the refresh request
fails, the agent run continues to use its existing certificate. This setting can be a time interval in seconds (30 or 30s),
minutes (30m), hours (6h), days (2d), or years (5y).
• Default: 30d
hostcrl
Where the host's certificate revocation list can be found. This is distinct from the certificate authority's CRL.
• Default: $ssldir/crl.pem
hostcsr
Where individual hosts store their certificate request (CSR) while waiting for the CA to issue their certificate.
• Default: $requestdir/$certname.pem
© 2024 Puppet, Inc., a Perforce company
Puppet | Set up Puppet | 110
hostprivkey
Where individual hosts store and look for their private key.
• Default: $privatekeydir/$certname.pem
hostpubkey
Where individual hosts store and look for their public key.
• Default: $publickeydir/$certname.pem
http_connect_timeout
The maximum amount of time to wait when establishing an HTTP connection. The default value is 2 minutes. This
setting can be a time interval in seconds (30 or 30s), minutes (30m), hours (6h), days (2d), or years (5y).
• Default: 2m
http_debug
Whether to write HTTP request and responses to stderr. This should never be used in a production environment.
• Default: false
http_extra_headers
The list of extra headers that will be sent with http requests to the primary server. The header definition consists of a
name and a value separated by a colon.
• Default: []
http_keepalive_timeout
The maximum amount of time a persistent HTTP connection can remain idle in the connection pool, before
it is closed. This timeout should be shorter than the keepalive timeout used on the HTTP server, e.g. Apache
KeepAliveTimeout directive. This setting can be a time interval in seconds (30 or 30s), minutes (30m), hours (6h),
days (2d), or years (5y).
• Default: 4s
http_proxy_host
The HTTP proxy host to use for outgoing connections. The proxy will be bypassed if the server's hostname matches
the NO_PROXY environment variable or no_proxy setting. Note: You may need to use a FQDN for the server
hostname when using a proxy. Environment variable http_proxy or HTTP_PROXY will override this value.
• Default: none
http_proxy_password
The password for the user of an authenticated HTTP proxy. Requires the http_proxy_user setting.
Note that passwords must be valid when used as part of a URL. If a password contains any characters with special
meanings in URLs (as specified by RFC 3986 section 2.2), they must be URL-encoded. (For example, # would
become %23.)
• Default: none
http_proxy_port
The HTTP proxy port to use for outgoing connections
• Default: 3128
http_proxy_user
The user name for an authenticated HTTP proxy. Requires the http_proxy_host setting.
• Default: none
© 2024 Puppet, Inc., a Perforce company
Puppet | Set up Puppet | 111
http_read_timeout
The time to wait for data to be read from an HTTP connection. If nothing is read after the elapsed interval then the
connection will be closed. The default value is 10 minutes. This setting can be a time interval in seconds (30 or 30s),
minutes (30m), hours (6h), days (2d), or years (5y).
• Default: 10m
http_user_agent
The HTTP User-Agent string to send when making network requests.
• Default: Puppet/8.9.0 Ruby/3.1.1-p18 (x86_64-linux)
ignore_plugin_errors
Whether the puppet run should ignore errors during pluginsync. If the setting is false and there are errors during
pluginsync, then the agent will abort the run and submit a report containing information about the failed run.
• Default: false
ignoremissingtypes
Skip searching for classes and definitions that were missing during a prior compilation. The list of missing objects is
maintained per-environment and persists until the environment is cleared or the primary server is restarted.
• Default: false
ignoreschedules
Boolean; whether puppet agent should ignore schedules. This is useful for initial puppet agent runs.
• Default: false
include_legacy_facts
Whether to include legacy facts when requesting a catalog. This option can be set to false if all puppet manifests,
hiera.yaml, and hiera configuration layers no longer access legacy facts, such as $osfamily, and instead access
structured facts, such as $facts['os']['family'].
• Default: false
key_type
The type of private key. Valid values are rsa and ec. Default is rsa.
• Default: rsa
keylength
The bit length of keys.
• Default: 4096
lastrunfile
Where puppet agent stores the last run report summary in yaml format.
• Default: $publicdir/last_run_summary.yaml
lastrunreport
Where Puppet Agent stores the last run report, by default, in yaml format. The format of the report can be changed
by setting the cache key of the report terminus in the routes.yaml file. To avoid mismatches between content and
file extension, this setting needs to be manually updated to reflect the terminus changes.
• Default: $statedir/last_run_report.yaml
ldapattrs
The LDAP attributes to include when querying LDAP for nodes. All returned attributes are set as variables in the top-
level scope. Multiple values should be comma-separated. The value 'all' returns all attributes.
© 2024 Puppet, Inc., a Perforce company
Puppet | Set up Puppet | 112
• Default: all
ldapbase
The search base for LDAP searches. It's impossible to provide a meaningful default here, although the LDAP libraries
might have one already set. Generally, it should be the 'ou=Hosts' branch under your main directory.
ldapclassattrs
The LDAP attributes to use to define Puppet classes. Values should be comma-separated.
• Default: puppetclass
ldapparentattr
The attribute to use to define the parent node.
• Default: parentnode
ldappassword
The password to use to connect to LDAP.
ldapport
The LDAP port.
• Default: 389
ldapserver
The LDAP server.
• Default: ldap
ldapssl
Whether SSL should be used when searching for nodes. Defaults to false because SSL usually requires certificates to
be set up on the client side.
• Default: false
ldapstackedattrs
The LDAP attributes that should be stacked to arrays by adding the values in all hierarchy elements of the tree.
Values should be comma-separated.
• Default: puppetvar
ldapstring
The search string used to find an LDAP node.
• Default: (&(objectclass=puppetClient)(cn=%s))
ldaptls
Whether TLS should be used when searching for nodes. Defaults to false because TLS usually requires certificates to
be set up on the client side.
• Default: false
ldapuser
The user to use to connect to LDAP. Must be specified as a full DN.
libdir
An extra search path for Puppet. This is only useful for those files that Puppet will load on demand, and is only
guaranteed to work for those cases. In fact, the autoload mechanism is responsible for making sure this directory is in
Ruby's search path
• Default: $vardir/lib
© 2024 Puppet, Inc., a Perforce company
Puppet | Set up Puppet | 113
localcacert
Where each client stores the CA certificate.
• Default: $certdir/ca.pem
localedest
Where Puppet should store translation files that it pulls down from the central server.
• Default: $vardir/locales
localesource
From where to retrieve translation files. The standard Puppet file type is used for retrieval, so anything that is a
valid file source can be used here.
• Default: puppet:///locales
location_trusted
This will allow sending the name + password and the cookie header to all hosts that puppet may redirect to. This may
or may not introduce a security breach if puppet redirects you to a site to which you'll send your authentication info
and cookies.
• Default: false
log_level
Default logging level for messages from Puppet. Allowed values are:
• debug
• info
• notice
• warning
• err
• alert
• emerg
• crit
• Default: notice
logdest
Where to send log messages. Choose between 'syslog' (the POSIX syslog service), 'eventlog' (the Windows Event
Log), 'console', or the path to a log file. Multiple destinations can be set using a comma separated list (eg: /path/
file1,console,/path/file2)
• Default: ``
logdir
The directory in which to store log files
• Default: Unix/Linux: /var/log/puppetlabs/puppet -- Windows: C:\ProgramData
\PuppetLabs\puppet\var\log -- Non-root user: ~/.puppetlabs/var/log
manage_internal_file_permissions
Whether Puppet should manage the owner, group, and mode of files it uses internally. Note: For Windows agents, the
default is false for versions 4.10.13 and greater, versions 5.5.6 and greater, and versions 6.0 and greater.
• Default: true
manifest
The entry-point manifest for the primary server. This can be one file or a directory of manifests to be evaluated in
alphabetical order. Puppet manages this path as a directory if one exists or if the path ends with a / or .
© 2024 Puppet, Inc., a Perforce company
Puppet | Set up Puppet | 114
Setting a global value for manifest in puppet.conf is not allowed (but it can be overridden from the commandline).
Please use directory environments instead. If you need to use something other than the environment's manifests
directory as the main manifest, you can set manifest in environment.conf. For more info, see https://puppet.com/
docs/puppet/latest/environments_about.html
• Default: ``
masterport
The default port puppet subcommands use to communicate with Puppet Server. (eg puppet facts upload,
puppet agent). May be overridden by more specific settings (see ca_port, report_port).
• Default: 8140
max_deprecations
Sets the max number of logged/displayed parser validation deprecation warnings in case multiple deprecation
warnings have been detected. A value of 0 blocks the logging of deprecation warnings. The count is per manifest.
• Default: 10
max_errors
Sets the max number of logged/displayed parser validation errors in case multiple errors have been detected. A value
of 0 is the same as a value of 1; a minimum of one error is always raised. The count is per manifest.
• Default: 10
max_warnings
Sets the max number of logged/displayed parser validation warnings in case multiple warnings have been detected. A
value of 0 blocks logging of warnings. The count is per manifest.
• Default: 10
maximum_uid
The maximum allowed UID. Some platforms use negative UIDs but then ship with tools that do not know how to
handle signed ints, so the UIDs show up as huge numbers that can then not be fed back into the system. This is a
hackish way to fail in a slightly more useful way when that happens.
• Default: 4294967290
maxwaitforcert
The maximum amount of time the Puppet agent should wait for its certificate request to be signed. A value of
unlimited will cause puppet agent to ask for a signed certificate indefinitely. This setting can be a time interval in
seconds (30 or 30s), minutes (30m), hours (6h), days (2d), or years (5y).
• Default: unlimited
maxwaitforlock
The maximum amount of time the puppet agent should wait for an already running puppet agent to finish before
starting a new one. This is set by default to 1 minute. A value of unlimited will cause puppet agent to wait
indefinitely. This setting can be a time interval in seconds (30 or 30s), minutes (30m), hours (6h), days (2d), or years
(5y).
• Default: 1m
merge_dependency_warnings
Whether to merge class-level dependency failure warnings.
When a class has a failed dependency, every resource in the class generates a notice level message about the
dependency failure, and a warning level message about skipping the resource.
If true, all messages caused by a class dependency failure are merged into one message associated with the class.
• Default: false
© 2024 Puppet, Inc., a Perforce company
Puppet | Set up Puppet | 115
mkusers
Whether to create the necessary user and group that puppet agent will run as.
• Default: false
module_groups
Extra module groups to request from the Puppet Forge. This is an internal setting, and users should never change it.
• Default: ``
module_repository
The module repository
• Default: https://forgeapi.puppet.com
module_working_dir
The directory into which module tool data is stored
• Default: $vardir/puppet-module
modulepath
The search path for modules, as a list of directories separated by the system path separator character. (The POSIX
path separator is ':', and the Windows path separator is ';'.)
Setting a global value for modulepath in puppet.conf is not allowed (but it can be overridden from the
commandline). Please use directory environments instead. If you need to use something other than the default
modulepath of <ACTIVE ENVIRONMENT'S MODULES DIR>:$basemodulepath, you can set modulepath
in environment.conf. For more info, see https://puppet.com/docs/puppet/latest/environments_about.html
name
The name of the application, if we are running as one. The default is essentially $0 without the path or .rb.
• Default: ``
named_curve
The short name for the EC curve used to generate the EC private key. Valid values must be one of the curves in
OpenSSL::PKey::EC.builtin_curves. Default is prime256v1.
• Default: prime256v1
no_proxy
List of host or domain names that should not go through http_proxy_host. Environment variable no_proxy
or NO_PROXY will override this value. Names can be specified as an FQDN host.example.com, wildcard
*.example.com, dotted domain .example.com, or suffix example.com.
• Default: localhost, 127.0.0.1
node_cache_terminus
How to store cached nodes. Valid values are (none), 'json', 'msgpack', or 'yaml'.
• Default: ``
node_name_fact
The fact name used to determine the node name used for all requests the agent makes to the primary server.
WARNING: This setting is mutually exclusive with node_name_value. Changing this setting also requires changes to
Puppet Server's default auth.conf.
© 2024 Puppet, Inc., a Perforce company
Puppet | Set up Puppet | 116
node_name_value
The explicit value used for the node name for all requests the agent makes to the primary server. WARNING: This
setting is mutually exclusive with node_name_fact. Changing this setting also requires changes to Puppet Server's
default auth.conf.
• Default: $certname
node_terminus
Which node data plugin to use when compiling node catalogs.
When Puppet compiles a catalog, it combines two primary sources of info: the main manifest, and a node data plugin
(often called a "node terminus," for historical reasons). Node data plugins provide three things for a given node name:
1.
A list of classes to add to that node's catalog (and, optionally, values for their parameters).
2.
Which Puppet environment the node should use.
3.
A list of additional top-scope variables to set.
The three main node data plugins are:
• plain --- Returns no data, so that the main manifest controls all node configuration.
• exec --- Uses an external node classifier (ENC), configured by the external_nodes setting. This lets you
pull a list of Puppet classes from any external system, using a small glue script to perform the request and format
the result as YAML.
• classifier (formerly console) --- Specific to Puppet Enterprise. Uses the PE console for node data."
• Default: plain
noop
Whether to apply catalogs in noop mode, which allows Puppet to partially simulate a normal run. This setting affects
puppet agent and puppet apply.
When running in noop mode, Puppet will check whether each resource is in sync, like it does when running normally.
However, if a resource attribute is not in the desired state (as declared in the catalog), Puppet will take no action,
and will instead report the changes it would have made. These simulated changes will appear in the report sent to the
primary Puppet server, or be shown on the console if running puppet agent or puppet apply in the foreground. The
simulated changes will not send refresh events to any subscribing or notified resources, although Puppet will log that
a refresh event would have been sent.
Important note: The noop metaparameter allows you to apply individual resources in noop mode, and will override
the global value of the noop setting. This means a resource with noop => false will be changed if necessary,
even when running puppet agent with noop = true or --noop. (Conversely, a resource with noop => true
will only be simulated, even when noop mode is globally disabled.)
• Default: false
number_of_facts_soft_limit
The soft limit for the total number of facts.
• Default: 2048
onetime
Perform one configuration run and exit, rather than spawning a long-running daemon. This is useful for interactively
running puppet agent, or running puppet agent from cron.
• Default: false
passfile
Where puppet agent stores the password for its private key. Generally unused.
• Default: $privatedir/password
© 2024 Puppet, Inc., a Perforce company
Puppet | Set up Puppet | 117
path
The shell search path. Defaults to whatever is inherited from the parent process.
This setting can only be set in the [main] section of puppet.conf; it cannot be set in [server], [agent], or an
environment config section.
• Default: none
payload_soft_limit
The soft limit for the size of the payload.
• Default: 16777216
pidfile
The file containing the PID of a running process. This file is intended to be used by service management frameworks
and monitoring systems to determine if a puppet process is still in the process table.
• Default: $rundir/${run_mode}.pid
plugindest
Where Puppet should store plugins that it pulls down from the central server.
• Default: $libdir
pluginfactdest
Where Puppet should store external facts that are being handled by pluginsync
• Default: $vardir/facts.d
pluginfactsource
Where to retrieve external facts for pluginsync
• Default: puppet:///pluginfacts
pluginsignore
What files to ignore when pulling down plugins.
• Default: .svn CVS .git .hg
pluginsource
From where to retrieve plugins. The standard Puppet file type is used for retrieval, so anything that is a valid file
source can be used here.
• Default: puppet:///plugins
pluginsync
Whether plugins should be synced with the central server. This setting is deprecated.
• Default: true
postrun_command
A command to run after every agent run. If this command returns a non-zero return code, the entire Puppet run will be
considered to have failed, even though it might have performed work during the normal run.
preferred_serialization_format
The preferred means of serializing ruby instances for passing over the wire. This won't guarantee that all instances
will be serialized using this method, since not all classes can be guaranteed to support this format, but it will be used
for all classes that support it.
• Default: json
© 2024 Puppet, Inc., a Perforce company
Puppet | Set up Puppet | 118
preprocess_deferred
Whether Puppet should call deferred functions before applying the catalog. If set to true, all prerequisites required
for the deferred function must be satisfied before the Puppet run. If set to false, deferred functions follow Puppet
relationships and ordering. In this way, Puppet can install the prerequisites required for a deferred function and call
the deferred function in the same run.
• Default: false
prerun_command
A command to run before every agent run. If this command returns a non-zero return code, the entire Puppet run will
fail.
preview_outputdir
The directory where catalog previews per node are generated.
• Default: $vardir/preview
priority
The scheduling priority of the process. Valid values are 'high', 'normal', 'low', or 'idle', which are mapped to platform-
specific values. The priority can also be specified as an integer value and will be passed as is, e.g. -5. Puppet must be
running as a privileged user in order to increase scheduling priority.
• Default: ``
privatedir
Where the client stores private certificate information.
• Default: $ssldir/private
privatekeydir
The private key directory.
• Default: $ssldir/private_keys
profile
Whether to enable experimental performance profiling
• Default: false
publicdir
Where Puppet stores public files.
• Default: Unix/Linux: /opt/puppetlabs/puppet/public -- Windows: C:\ProgramData
\PuppetLabs\puppet\public -- Non-root user: ~/.puppetlabs/opt/puppet/public
publickeydir
The public key directory.
• Default: $ssldir/public_keys
puppet_trace
Whether to print the Puppet stack trace on some errors. This is a noop if trace is also set.
• Default: false
puppetdlog
The fallback log file. This is only used when the --logdest option is not specified AND Puppet is running on an
operating system where both the POSIX syslog service and the Windows Event Log are unavailable. (Currently, no
supported operating systems match that description.)
Despite the name, both puppet agent and puppet server will use this file as the fallback logging destination.
© 2024 Puppet, Inc., a Perforce company
Puppet | Set up Puppet | 119
For control over logging destinations, see the --logdest command line option in the manual pages for puppet
server, puppet agent, and puppet apply. You can see man pages by running puppet <SUBCOMMAND> --help, or
read them online at https://puppet.com/docs/puppet/latest/man/.
• Default: $logdir/puppetd.log
report
Whether to send reports after every transaction.
• Default: true
report_configured_environmentpath
Specifies how environment paths are reported. When the value of versioned_environment_dirs is true,
Puppet applies the readlink function to the environmentpath setting when constructing the environment's
modulepath. The full readlinked path is referred to as the "resolved path," and the configured path potentially
containing symlinks is the "configured path." When reporting where resources come from, users may choose between
the configured and resolved path.
When set to false, the resolved paths are reported instead of the configured paths.
• Default: true
report_include_system_store
Whether the 'http' report processor should include the system certificate store when submitting reports to HTTPS
URLs. If false, then the 'http' processor will only trust HTTPS report servers whose certificates are issued by the
puppet CA or one of its intermediate CAs. If true, the processor will additionally trust CA certificates in the system's
certificate store.
• Default: false
report_port
The port to communicate with the report_server.
• Default: $serverport
report_server
The server to send transaction reports to.
• Default: $server
reportdir
The directory in which to store reports. Each node gets a separate subdirectory in this directory. This setting is only
used when the store report processor is enabled (see the reports setting).
• Default: $vardir/reports
reports
The list of report handlers to use. When using multiple report handlers, their names should be comma-separated, with
whitespace allowed. (For example, reports = http, store.)
This setting is relevant to puppet server and puppet apply. The primary Puppet server will call these report handlers
with the reports it receives from agent nodes, and puppet apply will call them with its own report. (In all cases, the
node applying the catalog must have report = true.)
See the report reference for information on the built-in report handlers; custom report handlers can also be loaded
from modules. (Report handlers are loaded from the lib directory, at puppet/reports/NAME.rb.)
To turn off reports entirely, set this to none
• Default: store
© 2024 Puppet, Inc., a Perforce company
Puppet | Set up Puppet | 120
reporturl
The URL that reports should be forwarded to. This setting is only used when the http report processor is enabled
(see the reports setting).
• Default: http://localhost:3000/reports/upload
requestdir
Where host certificate requests are stored.
• Default: $ssldir/certificate_requests
resourcefile
The file in which puppet agent stores a list of the resources associated with the retrieved configuration.
• Default: $statedir/resources.txt
resubmit_facts
Whether to send updated facts after every transaction. By default puppet only submits facts at the beginning of the
transaction before applying a catalog. Since puppet can modify the state of the system, the value of the facts may
change after puppet finishes. Therefore, any facts stored in puppetdb may not be consistent until the agent next runs,
typically in 30 minutes. If this feature is enabled, puppet will resubmit facts after applying its catalog, ensuring facts
for the node stored in puppetdb are current. However, this will double the fact submission load on puppetdb, so it is
disabled by default.
• Default: false
rich_data
Enables having extended data in the catalog by storing them as a hash with the special key __ptype. When enabled,
resource containing values of the data types Binary, Regexp, SemVer, SemVerRange, Timespan and
Timestamp, as well as instances of types derived from Object retain their data type.
• Default: true
route_file
The YAML file containing indirector route configuration.
• Default: $confdir/routes.yaml
rundir
Where Puppet PID files are kept.
• Default: Unix/Linux: /var/run/puppetlabs -- Windows: C:\ProgramData\PuppetLabs
\puppet\var\run -- Non-root user: ~/.puppetlabs/var/run
runinterval
How often puppet agent applies the catalog. Note that a runinterval of 0 means "run continuously" rather than "never
run." This setting can be a time interval in seconds (30 or 30s), minutes (30m), hours (6h), days (2d), or years (5y).
• Default: 30m
runtimeout
The maximum amount of time an agent run is allowed to take. A Puppet agent run that exceeds this timeout will be
aborted. A value of 0 disables the timeout. Defaults to 1 hour. This setting can be a time interval in seconds (30 or
30s), minutes (30m), hours (6h), days (2d), or years (5y).
• Default: 1h
serial
Where the serial number for certificates is stored.
• Default: $cadir/serial
© 2024 Puppet, Inc., a Perforce company
Puppet | Set up Puppet | 121
server
The primary Puppet server to which the Puppet agent should connect.
• Default: puppet
server_datadir
The directory in which serialized data is stored, usually in a subdirectory.
• Default: $vardir/server_data
server_list
The list of primary Puppet servers to which the Puppet agent should connect, in the order that they will be tried.
Each value should be a fully qualified domain name, followed by an optional ':' and port number. If a port is omitted,
Puppet uses masterport for that host.
• Default: []
serverport
The default port puppet subcommands use to communicate with Puppet Server. (eg puppet facts upload,
puppet agent). May be overridden by more specific settings (see ca_port, report_port).
• Default: 8140
settings_catalog
Whether to compile and apply the settings catalog
• Default: true
show_diff
Whether to log and report a contextual diff when files are being replaced. This causes partial file contents to pass
through Puppet's normal logging and reporting system, so this setting should be used with caution if you are sending
Puppet's reports to an insecure destination. This feature currently requires the diff/lcs Ruby library.
• Default: false
signeddir
Where the CA stores signed certificates.
• Default: $cadir/signed
skip_logging_catalog_request_destination
Specifies whether to suppress the notice of which compiler supplied the catalog. A value of true suppresses the
notice.
• Default: false
skip_tags
Tags to use to filter resources. If this is set, then only resources not tagged with the specified tags will be applied.
Values must be comma-separated.
sourceaddress
The address the agent should use to initiate requests.
• Default: ``
splay
Whether to sleep for a random amount of time, ranging from immediately up to its $splaylimit, before
performing its first agent run after a service restart. After this period, the agent runs periodically on its
$runinterval.
© 2024 Puppet, Inc., a Perforce company
Puppet | Set up Puppet | 122
For example, assume a default 30-minute $runinterval, splay set to its default of false, and an agent starting
at :00 past the hour. The agent would check in every 30 minutes at :01 and :31 past the hour.
With splay enabled, it waits any amount of time up to its $splaylimit before its first run. For example, it might
randomly wait 8 minutes, then start its first run at :08 past the hour. With the $runinterval at its default 30
minutes, its next run will be at :38 past the hour.
If you restart an agent's puppet service with splay enabled, it recalculates its splay period and delays its first agent
run after restarting for this new period. If you simultaneously restart a group of puppet agents with splay enabled,
their checkins to your primary servers can be distributed more evenly.
• Default: false
splaylimit
The maximum time to delay before an agent's first run when splay is enabled. Defaults to the agent's
$runinterval. The splay interval is random and recalculated each time the agent is started or restarted. This
setting can be a time interval in seconds (30 or 30s), minutes (30m), hours (6h), days (2d), or years (5y).
• Default: $runinterval
srv_domain
The domain which will be queried to find the SRV records of servers to use.
• Default: example.com
ssl_client_header
The header containing an authenticated client's SSL DN. This header must be set by the proxy to the authenticated
client's SSL DN (e.g., /CN=puppet.puppetlabs.com). Puppet will parse out the Common Name (CN) from the
Distinguished Name (DN) and use the value of the CN field for authorization.
Note that the name of the HTTP header gets munged by the web server common gateway interface: an HTTP_ prefix
is added, dashes are converted to underscores, and all letters are uppercased. Thus, to use the X-Client-DN header,
this setting should be HTTP_X_CLIENT_DN.
• Default: HTTP_X_CLIENT_DN
ssl_client_verify_header
The header containing the status message of the client verification. This header must be set by the proxy to
'SUCCESS' if the client successfully authenticated, and anything else otherwise.
Note that the name of the HTTP header gets munged by the web server common gateway interface: an HTTP_ prefix
is added, dashes are converted to underscores, and all letters are uppercased. Thus, to use the X-Client-Verify
header, this setting should be HTTP_X_CLIENT_VERIFY.
• Default: HTTP_X_CLIENT_VERIFY
ssl_lockfile
A lock file to indicate that the ssl bootstrap process is currently in progress.
• Default: $ssldir/ssl.lock
ssl_trust_store
A file containing CA certificates in PEM format that puppet should trust when making HTTPS requests. This only
applies to https requests to non-puppet infrastructure, such as retrieving file metadata and content from https file
sources, puppet module tool and the 'http' report processor. This setting is ignored when making requests to puppet://
URLs such as catalog and report requests.
• Default: ``
ssldir
Where SSL certificates are kept.
© 2024 Puppet, Inc., a Perforce company
Puppet | Set up Puppet | 123
• Default: $confdir/ssl
statedir
The directory where Puppet state is stored. Generally, this directory can be removed without causing harm (although
it might result in spurious service restarts).
• Default: $vardir/state
statefile
Where Puppet agent and Puppet Server store state associated with the running configuration. In the case of Puppet
Server, this file reflects the state discovered through interacting with clients.
• Default: $statedir/state.yaml
statettl
How long the Puppet agent should cache when a resource was last checked or synced. This setting can be a time
interval in seconds (30 or 30s), minutes (30m), hours (6h), days (2d), or years (5y). A value of 0 or unlimited will
disable cache pruning.
This setting affects the usage of schedule resources, as the information about when a resource was last checked
(and therefore when it needs to be checked again) is stored in the statefile. The statettl needs to be large
enough to ensure that a resource will not trigger multiple times during a schedule due to its entry expiring from the
cache.
• Default: 32d
static_catalogs
Whether to compile a static catalog, which occurs only on Puppet Server when the code-id-command and code-
content-command settings are configured in its puppetserver.conf file.
• Default: true
storeconfigs
Whether to store each client's configuration, including catalogs, facts, and related data. This also enables the import
and export of resources in the Puppet language - a mechanism for exchange resources between nodes.
By default this uses the 'puppetdb' backend.
You can adjust the backend using the storeconfigs_backend setting.
• Default: false
storeconfigs_backend
Configure the backend terminus used for StoreConfigs. By default, this uses the PuppetDB store, which must be
installed and configured before turning on StoreConfigs.
• Default: puppetdb
strict
The strictness level of puppet. Allowed values are:
• off - do not perform extra validation, do not report
• warning - perform extra validation, report as warning
• error - perform extra validation, fail with error (default)
The strictness level is for both language semantics and runtime evaluation validation. In addition to controlling the
behavior with this primary server switch some individual warnings may also be controlled by the disable_warnings
setting.
No new validations will be added to a micro (x.y.z) release, but may be added in minor releases (x.y.0). In major
releases it expected that most (if not all) strictness validation become standard behavior.
© 2024 Puppet, Inc., a Perforce company
Puppet | Set up Puppet | 124
• Default: error
strict_environment_mode
Whether the agent specified environment should be considered authoritative, causing the run to fail if the retrieved
catalog does not match it.
• Default: false
strict_variables
Causes an evaluation error when referencing unknown variables. (This does not affect referencing variables that are
explicitly set to undef).
• Default: true
summarize
Whether to print a transaction summary.
• Default: false
supported_checksum_types
Checksum types supported by this agent for use in file resources of a static catalog. Values must be comma-separated.
Valid types are sha256, sha256lite, sha384, sha512, sha224, sha1, sha1lite, md5, md5lite, mtime, ctime. Default is
sha256, sha384, sha512, sha224, md5.
• Default: ["sha256", "sha384", "sha512", "sha224", "md5"]
syslogfacility
What syslog facility to use when logging to syslog. Syslog has a fixed list of valid facilities, and you must choose one
of those; you cannot just make one up.
• Default: daemon
tags
Tags to use to find resources. If this is set, then only resources tagged with the specified tags will be applied. Values
must be comma-separated.
tasks
Turns on experimental support for tasks and plans in the puppet language. This is for internal API use only. Do not
change this setting.
• Default: false
top_level_facts_soft_limit
The soft limit for the number of top level facts.
• Default: 512
trace
Whether to print stack traces on some errors. Will print internal Ruby stack trace interleaved with Puppet function
frames.
• Default: false
transactionstorefile
Transactional storage file for persisting data between transactions for the purposes of inferring information (such as
corrective_change) on new data received.
• Default: $statedir/transactionstore.yaml
© 2024 Puppet, Inc., a Perforce company
Puppet | Set up Puppet | 125
trusted_external_command
The external trusted facts script or directory to use. This setting's value can be set to the path to an executable
command that can produce external trusted facts or to a directory containing those executable commands. The
command(s) must:
• Take the name of a node as a command-line argument.
• Return a JSON hash with the external trusted facts for this node.
• For unknown or invalid nodes, exit with a non-zero exit code.
If the setting points to an executable command, then the external trusted facts will be stored in the 'external' key of
the trusted facts hash. Otherwise for each executable file in the directory, the external trusted facts will be stored in
the <basename> key of the trusted['external'] hash. For example, if the files foo.rb and bar.sh are in the
directory, then trusted['external'] will be the hash { 'foo' => <foo.rb output>, 'bar' =>
<bar.sh output> }.
• Default: ``
trusted_oid_mapping_file
File that provides mapping between custom SSL oids and user-friendly names
• Default: $confdir/custom_trusted_oid_mapping.yaml
use_cached_catalog
Whether to only use the cached catalog rather than compiling a new catalog on every run. Puppet can be run with this
enabled by default and then selectively disabled when a recompile is desired. Because a Puppet agent using cached
catalogs does not contact the primary server for a new catalog, it also does not upload facts at the beginning of the
Puppet run.
• Default: false
use_last_environment
Puppet saves both the initial and converged environment in the last_run_summary file. If they differ, and this setting
is set to true, we will use the last converged environment and skip the node request.
When set to false, we will do the node request and ignore the environment data from the last_run_summary file.
• Default: true
use_srv_records
Whether the server will search for SRV records in DNS for the current domain.
• Default: false
usecacheonfailure
Whether to use the cached configuration when the remote configuration will not compile. This option is useful for
testing new configurations, where you want to fix the broken configuration rather than reverting to a known-good
one.
• Default: true
user
The user Puppet Server will run as. Used to ensure the agent side processes (agent, apply, etc) create files and
directories readable by Puppet Server when necessary.
• Default: puppet
vardir
Where Puppet stores dynamic and growing data. The default for this setting is calculated specially, like confdir_.
• Default: Unix/Linux: /opt/puppetlabs/puppet/cache -- Windows: C:\ProgramData
\PuppetLabs\puppet\cache -- Non-root user: ~/.puppetlabs/opt/puppet/cache
© 2024 Puppet, Inc., a Perforce company

Puppet | Set up Puppet | 126
vendormoduledir
The directory containing vendored modules. These modules will be used by all environments like those in the
basemodulepath. The only difference is that modules in the basemodulepath are pluginsynced, while
vendored modules are not
• Default: /opt/puppetlabs/puppet/vendor_modules
versioned_environment_dirs
Whether or not to look for versioned environment directories, symlinked from $environmentpath/
<environment>. This is an experimental feature and should be used with caution.
• Default: false
waitforcert
How frequently puppet agent should ask for a signed certificate.
When starting for the first time, puppet agent will submit a certificate signing request (CSR) to the server named in
the ca_server setting (usually the primary Puppet server); this may be autosigned, or may need to be approved by
a human, depending on the CA server's configuration.
Puppet agent cannot apply configurations until its approved certificate is available. Since the certificate may or may
not be available immediately, puppet agent will repeatedly try to fetch it at this interval. You can turn off waiting
for certificates by specifying a time of 0, or a maximum amount of time to wait in the maxwaitforcert setting,
in which case puppet agent will exit if it cannot get a cert. This setting can be a time interval in seconds (30 or 30s),
minutes (30m), hours (6h), days (2d), or years (5y).
• Default: 2m
waitforlock
How frequently puppet agent should try running when there is an already ongoing puppet agent instance.
This argument is by default disabled (value set to 0). In this case puppet agent will immediately exit if it cannot run
at that moment. When a value other than 0 is set, this can also be used in combination with the maxwaitforlock
argument. This setting can be a time interval in seconds (30 or 30s), minutes (30m), hours (6h), days (2d), or years
(5y).
• Default: 0
write_catalog_summary
Whether to write the classfile and resourcefile after applying the catalog. It is enabled by default, except
when running puppet apply.
• Default: true
yamldir
The directory in which YAML data is stored, usually in a subdirectory.
• Default: $vardir/yaml
Upgrading
To upgrade your deployment, you must upgrade both the infrastructure components and agents.
The order in which you upgrade components is important. Always upgrade Puppet Server and PuppetDB
simultaneously, including the puppetdb-termini package on Puppet Server nodes, and always upgrade them
before you upgrade agent nodes. Do not run different major versions on your Puppet primary servers (including
Server) and PuppetDB nodes.
© 2024 Puppet, Inc., a Perforce company

Puppet | Set up Puppet | 127
Important: Any time the puppet-agent package is updated, make sure to restart the puppetserver service
afterward.
Note: These instructions cover upgrades in the versions 5, 6 and 7 series. For instructions on upgrading from version
3.8.x, see previous versions of the documentation.
• Upgrade Puppet Server on page 127
Upgrade Puppet Server to adopt features and functionality of newer versions.
• Upgrade agents on page 127
Regularly upgrade agents to keep your systems running smoothly.
• Upgrade PuppetDB on page 129
Upgrade PuppetDB to get the newest features available.
Upgrade Puppet Server
Upgrade Puppet Server to adopt features and functionality of newer versions.
Upgrading the puppetserver package effectively upgrades Puppet Server. The puppetserver package, in
turn, depends on the puppet-agent package, and your node’s package manager automatically upgrades puppet-
agent if the new version of puppetserver requires it.
Important: During an upgrade, Puppet Server doesn't perform its usual functions, including maintaining your site's
infrastructure. If you use a single primary server, plan the timing of your upgrade accordingly and avoid reconfiguring
any managed servers until your primary server is back up. If you use multiple load-balanced servers, upgrade them
individually to avoid downtime or problems synchronizing configurations.
1.
On your Puppet Server node, run the command appropriate to your package installer:
Yum:
yum update puppetserver
Apt:
apt-get update
apt-get install --only-upgrade puppetserver
2.
If you pinned Puppet packages to a specific version, remove the pins.
For yum packages locked with the versionlock plugin, edit /etc/yum/pluginconf.d/
versionlock.list to remove the lock.
On apt systems, remove .pref files from /etc/apt/preferences.d/ that pin packages, and use the apt-
mark unhold command on each held package.
3.
After upgrading the puppet-agent package, make sure to restart the puppetserver service.
Upgrade agents
Regularly upgrade agents to keep your systems running smoothly.
Before you begin
Upgrade Puppet Server.
© 2024 Puppet, Inc., a Perforce company

Puppet | Set up Puppet | 128
• Upgrade agents using the puppet_agent module on page 128
Upgrade your Puppet agents using the puppetlabs/puppet_agent module. The puppet_agent module
supports upgrading open source Puppet agents on *nix, Windows, and macOS
• Upgrade *nix agents on page 129
We recommend using the puppetlabs/puppet_agent module when upgrading between major versions of Puppet agent.
To upgrade *nix without the module, you can use the system's package manager.
• Upgrade Windows agents on page 129
To upgrade Windows agents without the puppetlabs/puppet_agent module, reinstall the agent using the installation
instructions. You don't need to uninstall the agent before reinstalling unless you’re upgrading from 32-bit Puppet to
the 64-bit version.
• Upgrade macOS agents on page 129
To upgrade macOS agents without the puppetlabs/puppet_agent module, use the puppet resource command.
Upgrade agents using the puppet_agent module
Upgrade your Puppet agents using the puppetlabs/puppet_agent module. The puppet_agent module
supports upgrading open source Puppet agents on *nix, Windows, and macOS
Before you begin
Install the puppetlabs/puppet_agent module. Read about installing modules in the following docs:
• Installing and managing modules from the command line on page 1104
• Install modules on nodes without internet on page 1107
CAUTION: Puppet 7 changed the default digest_algorithm setting to sha256. To avoid breaking
changes when upgrading, either disable remote filebuckets or make sure the agent has the same digest
algorithm as server by changing the digest_algorithm setting on the agent to sha256.
To upgrade on a Puppet Server node:
1.
Add the puppet_agent class to agents you want to upgrade.
2.
Specify the desired puppet_agent package version and any other desired parameters described in the Forge in
your site.pp file.
Note: The collection parameter is required in Open Source Puppet.
For example:
# site.pp
node default {
class { puppet_agent:
package_version => '8.0.0',
collection => 'puppet8'
}
}
This upgrades all of your Puppet Server managed nodes on the next agent run.
To upgrade on a node that is not managed by Puppet Server, you must declare the class in your manifest.
For example, an upgrade manifest for a non-standard source looks like:
# upgrade_file.pp
class { puppet_agent:
package_version => '8.0.0.224.gaf2034af',
yum_source => 'http://nightlies.puppet.com/yum',
collection => 'puppet8-nightly'
}
You then need to apply the manifest: puppet apply upgrade_file.pp
© 2024 Puppet, Inc., a Perforce company

Puppet | Set up Puppet | 129
Upgrade *nix agents
We recommend using the puppetlabs/puppet_agent module when upgrading between major versions of Puppet agent.
To upgrade *nix without the module, you can use the system's package manager.
Before upgrading to another major version, ensure that you have installed the appropriate release package for your
platform. You can find release packages for supported platforms at yum.puppet.com and apt.puppet.com. We also
provide nightly release packages at nightlies.puppet.com.
On the agent node, run the command appropriate to your system's package installer:
Yum (EL/Fedora):
yum update puppet-agent
Zypper (SLES)
zypper up puppet-agent
Apt (Debian/Ubuntu):
apt-get update
apt-get install --only-upgrade puppet-agent
Upgrade Windows agents
To upgrade Windows agents without the puppetlabs/puppet_agent module, reinstall the agent using the installation
instructions. You don't need to uninstall the agent before reinstalling unless you’re upgrading from 32-bit Puppet to
the 64-bit version.
Upgrade macOS agents
To upgrade macOS agents without the puppetlabs/puppet_agent module, use the puppet resource command.
Before you begin
Download the appropriate agent DMG.
Use the package resource provider for macOS to install the agent from a disk image:
sudo puppet resource package "<NAME>.dmg" ensure=present source=<FULL PATH
TO DMG>
Upgrade PuppetDB
Upgrade PuppetDB to get the newest features available.
1.
Follow these steps, depending on whether you want to automate upgrade or manually upgrade.
• To automate upgrade, specify the version parameter of the puppetlabs/puppetdb module’s
puppetdb::globals class.
• To manually upgrade, on the PuppetDB node, run the command appropriate to your package installer:
Yum:
yum update puppetdb
Apt:
apt-get update
apt-get install --only-upgrade puppetdb
© 2024 Puppet, Inc., a Perforce company

Puppet | Set up Puppet | 130
2.
On your primary server, upgrade the puppetdb-termini package by running the command appropriate to
your package installer:
Yum:
yum update puppetdb-termini
Apt:
apt-get update
apt-get install --only-upgrade puppetdb-termini
Environments
Environments are isolated groups of agent nodes.
• About environments on page 130
An environment is an isolated group of agent nodes that a primary server can serve with its own main manifest and
set of modules. For example, you can use environments to set up scratch nodes for testing before rolling out changes
to production, or to divide a site by types of hardware.
• Creating environments on page 132
An environment is a branch that gets turned into a directory on your primary Puppet server. Environments are turned
on by default.
• Environment isolation on page 136
Environment isolation prevents resource types from leaking between your various environments.
About environments
An environment is an isolated group of agent nodes that a primary server can serve with its own main manifest and
set of modules. For example, you can use environments to set up scratch nodes for testing before rolling out changes
to production, or to divide a site by types of hardware.
Related topics: main manifests, module paths.
Look up which environment a node is in
If you need to determine which environment a certain node is part of, look it up using the puppet node find
command.
To look up which environment a node is in, run puppet node find <node> on the Puppet Server host node,
replacing <node> with the node's exact name.
Alternatively, run puppet node find <node> --render_as json | jq .environment to render
the output as JSON and return only the environment name.
Note: The node name must exactly match the name in the node's certificate, including capitalization. By default,
a node's name is its fully qualified domain name, but the node's name can be changed by using the certname and
node_name_value settings on the node itself.
Access environment name in manifests
If you want to share code across environments, use the $environment variable in your manifests.
To get the name of the current environment:
1.
Use the $environment variable, which is set by the primary server.
© 2024 Puppet, Inc., a Perforce company
Puppet | Set up Puppet | 131
Environment scenarios
The main uses for environments fall into three categories: permanent test environments, temporary test environments,
and divided infrastructure.
Permanent test environments
In a permanent test environment, there is a stable group of test nodes where all changes must succeed before they can
be merged into the production code. The test nodes are a smaller version of the whole production infrastructure. They
are either short-lived cloud instances or longer-lived virtual machines (VMs) in a private cloud. These nodes stay in
the test environment for their whole lifespan.
Temporary test environments
In a temporary test environment, you can test a single change or group of changes by checking the changes out of
version control into the $codedir/environments directory, where it is detected as a new environment. A
temporary test environment can either have a descriptive name or use the commit ID from the version that it is based
on. Temporary environments are good for testing individual changes, especially if you need to iterate quickly while
developing them. When you’re done with a temporary environment, you can delete it. The nodes in a temporary
environment are short-lived cloud instances or VMs, which are destroyed when the environment ends.
Divided infrastructure
If parts of your infrastructure are managed by different teams that do not need to coordinate their code, you can split
them into environments.
Environments limitations
Environments have limitations, including leakage and conflicts with exported resources.
Plugins can leak between environments
Environment leakage occurs when different versions of Ruby files, such as resource types, exist in multiple
environments. When these files are loaded on the primary server, the first version loaded is treated as global.
Subsequent requests in other environments get that first loaded version. Environment leakage does not affect the
agent, as agents are only in one environment at any given time. For more information, see below for troubleshooting
environment leakage.
Exported resources can conflict or cross over
Nodes in one environment can collect resources that were exported from another environment, which causes
problems — either a compilation error due to identically titled resources, or creation and management of unintended
resources. The solution is to run separate primary servers for each environment if you use exported resources.
Troubleshoot environment leakage
Environment leakage is one of the limitations of environments.
Use one of the following methods to avoid environmental leakage:
• For resource types, you can avoid environment leaks with the the puppet generate types command as
described in environment isolation documentation. This command generates resource type metadata files to ensure
that each environment uses the right version of each type.
• This issue occurs only with the Puppet::Parser::Functions API. To fix this, rewrite functions with the
modern functions API, which is not affected by environment leakage. You can include helper code in the function
definition, but if helper code is more complex, package it as a gem and install for all environments.
• Report processors and indirector termini are still affected by this problem, so put them in your global Ruby
directories rather than in your environments. If they are in your environments, you must ensure they all have the
same content.
© 2024 Puppet, Inc., a Perforce company

Puppet | Set up Puppet | 132
Creating environments
An environment is a branch that gets turned into a directory on your primary Puppet server. Environments are turned
on by default.
Environment structure
The structure of an environment follows several conventions.
When you create an environment, you give it the following structure:
• It contains a modules directory, which becomes part of the environment’s default module path.
• It contains a manifests directory, which is the environment’s default main manifest.
• If you are using Puppet 5, it can optionally contain a hiera.yaml file.
• It can optionally contain an environment.conf file, which can locally override configuration settings,
including modulepath and manifest.
Note: Environment names can contain lowercase letters, numbers, and underscores. They must match
the following regular expression rule: \A[a-z0-9_]+\Z. If you are using Puppet 5, remove the
environment_data_provider setting.
Environment resources
An environment specifies resources that the primary server uses when compiling catalogs for agent nodes.
The modulepath, the main manifest, Hiera data, and the config version script, can all be specified in
environment.conf.
The modulepath
The modulepath is the list of directories Puppet loads modules from. By default, Puppet loads modules first from
the environment’s directory, and second from the primary server's puppet.conf file’s basemodulepath
setting, which can be multiple directories. If the modules directory is empty or absent, Puppet only uses modules from
directories in the basemodulepath.
Related topics: module path.
The main manifest
The main manifest is the starting point for compiling a catalog. Unless you say otherwise in environment.conf,
an environment uses the global default_manifest setting to determine its main manifest. The value of this
setting can be an absolute path to a manifest that all environments share, or a relative path to a file or directory inside
each environment.
The default value of default_manifest is ./manifests — the environment’s own manifests directory. If
the file or directory specified by default_manifest is empty or absent, Puppet does not fall back to any other
manifest. Instead, it behaves as if it is using a blank main manifest. If you specify a value for this setting, the global
manifest setting from puppet.conf is not be used by an environment.
Related topics: main manifest, environment.conf, default_manifest setting, puppet.conf.
Hiera data
Each environment can use its own Hiera hierarchy and provide its own data.
Related topics: Hiera config file syntax.
The config version script
Puppet automatically adds a config version to every catalog it compiles, as well as to messages in reports. The version
is an arbitrary piece of data that can be used to identify catalogs and events. By default, the config version is the time
at which the catalog was compiled (as the number of seconds since January 1, 1970).
© 2024 Puppet, Inc., a Perforce company

Puppet | Set up Puppet | 133
The environment.conf file
An environment can contain an environment.conf file, which can override values for certain settings.
The environment.conf file overrides these settings:
• modulepath
• manifest
• config_version
• environment_timeout
Related topics: environment.conf
Create an environment
Create an environment by adding a new directory of configuration data.
1.
Inside your code directory, create a directory called environments.
2.
Inside the environments directory, create a directory with the same name as your new environment.
3.
Inside that directory, create a modules directory and a manifests directory. These two directories contain
your Puppet code.
4.
Configure a modulepath:
a) Set modulepath in its environment.conf file . If you set a value for this setting, the global
modulepath setting from puppet.conf is not used by an environment.
b) Check the modulepath by specifying the environment when requesting the setting value:
$ sudo puppet config print modulepath --section server --environment
test /etc/puppetlabs/code/environments/test/modules:/etc/puppetlabs/code/
modules:/opt/puppetlabs/puppet/modules.
Note: In Puppet Enterprise (PE), every environment must include /opt/puppetlabs/puppet/modules in
its modulepath, because PE uses modules in that directory to configure its own infrastructure.
5.
Configure a main manifest:
a) Set manifest in its environment.conf file. As with the global default_manifest setting, you can
specify a relative path (to be resolved within the environment’s directory) or an absolute path.
b) Lock all environments to a single global manifest with the disable_per_environment_manifest
setting — preventing any environment setting its own main manifest.
6.
To specify an executable script that determines an environment’s config version:
a) Specify a path to the script in the config_version setting in its environment.conf file. Puppet runs
this script when compiling a catalog for a node in the environment, and uses its output as the config version.
If you specify a value here, the global config_version setting from puppet.conf is not used by an
environment.
Note: If you’re using a system binary like git rev-parse, specify the absolute path to it. If
config_version is set to a relative path, Puppet looks for the binary in the environment, not in the system’s
PATH.
Example environment.conf file:
# /etc/puppetlabs/code/environments/test/environment.conf
# Puppet Enterprise requires $basemodulepath; see note below under
"modulepath".
modulepath = site:dist:modules:$basemodulepath
# Use our custom script to get a git commit for the current state of the
code:
© 2024 Puppet, Inc., a Perforce company

Puppet | Set up Puppet | 134
config_version = get_environment_commit.sh
Related topics: Deploying environments with r10k, Code Manager control repositories,
disable_per_environment_manifest
Assign nodes to environments via an ENC
You can assign agent nodes to environments by using an external node classifier (ENC). By default, all nodes are
assigned to a default environment named production.
The interface to set the environment for a node is different for each ENC. Some ENCs cannot manage environments.
When writing an ENC:
1.
Ensure that the environment key is set in the YAML output that the ENC returns. If the environment key isn’t set
in the ENC’s YAML output, the primary server uses the environment requested by the agent.
Note: The value from the ENC is authoritative, if it exists. If the ENC doesn’t specify an environment, the node’s
config value is used.
Related topics: writing ENCs.
Assign nodes to environments via the agent's config file
You can assign agent nodes to environments by using the agent’s config file. By default, all nodes are assigned to a
default environment named production.
To configure an agent to use an environment:
1.
Open the agent's puppet.conf file in an editor.
2.
Find the environment setting in either the agent or main section.
3.
Set the value of the environment setting to the name of the environment you want the agent to be assigned to.
When that node requests a catalog from the primary server, it requests that environment. If you are using an ENC and
it specifies an environment for that node, it overrides whatever is in the config file.
Note: Nodes cannot be assigned to unconfigured environments. If a node is assigned to an environment that does not
exist — no directory of that name in any of the environment path directories — the primary server fails to compile
its catalog. The one exception to this is if the default production environment does not exist. In this case, the agent
successfully retrieves an empty catalog.
Global settings for configuring environments
The settings in the primary server's puppet.conf file configure how Puppet finds and uses environments.
environmentpath
The environmentpath setting is the list of directories where Puppet looks for environments. The default value
for environmentpath is $codedir/environments. If you have more than one directory, separate them by
colons and put them in order of precedence.
In this example, temp_environments is searched before environments:
$codedir/temp_environments:$codedir/environments
If environments with the same name exist in both paths, Puppet uses the first environment with that name that it
encounters.
Put the environmentpath setting in the main section of the puppet.conf file.
© 2024 Puppet, Inc., a Perforce company
Puppet | Set up Puppet | 135
basemodulepath
The basemodulepath setting lists directories of global modules that all environments can access by default. Some
modules can be made available to all environments. The basemodulepath setting configures the global module
directories.
By default, it includes $codedir/modules for user-accessible modules and /opt/puppetlabs/puppet/
modules for system modules.
Add additional directories containing global modules by setting your own value for basemodulepath.
Related topics: modulepath.
environment_timeout
The environment_timeout setting sets how often the primary server refreshes information about environments.
It can be overridden per-environment.
This setting defaults to 0 (caching disabled), which lowers the performance of your primary server but makes it easy
for new users to deploy updated Puppet code. After your code deployment process is mature, change this setting to
unlimited.
All code in Ruby and Puppet loaded from the environment is cached. Inputs to compilation (for example, facts and
looked up values) and the resulting catalog, are not cached.
disable_per_environment_manifest
The disable_per_environment_manifest setting lets you specify that all environments use a shared main
manifest.
When disable_per_environment_manifest is set to true, Puppet uses the same global manifest for every
environment. If an environment specifies a different manifest in environment.conf, Puppet does not compile
catalogs nodes in that environment, to avoid serving catalogs with potentially wrong contents.
If this setting is set to true, the default_manifest value must be an absolute path.
default_manifest
The default_manifest setting specifies the main manifest for any environment that doesn’t set a manifest value
in environment.conf. The default value of default_manifest is ./manifests — the environment’s
own manifests directory.
The value of this setting can be:
• An absolute path to one manifest that all environments share.
• A relative path to a file or directory inside each environment’s directory.
Related topics: default_manifest setting.
Configure the environment timeout setting
The enviroment_timeout setting determines how often the primary Puppet server caches the data it loads from
an environment. For best performance, change the settings after you have a mature code deployment process.
1.
Set environment_timeout = unlimited in puppet.conf.
2.
Change your code deployment process to refresh the primary server whenever you deploy updated code. For
example, set a postrun command in your r10k config or add a step to your continuous integration job.
• With Puppet Server, refresh environments by calling the environment-cache API endpoint. Ensure you
have write access to the puppet-admin section of the puppetserver.conf file.
• With a Rack primary server, restart the web server or the application server. Passenger lets you touch a
restart.txt file to refresh an application without restarting Apache. See the Passenger docs for details.
The environment-timeout setting can be overridden per-environment in environment.conf.
© 2024 Puppet, Inc., a Perforce company

Puppet | Set up Puppet | 136
Note: Only use the value 0 or unlimited. Most primary servers use a pool of Ruby interpreters, which all have their
own cache timers. When these timers are out of sync, agents can be served inconsistent catalogs. To avoid that
inconsistency, refresh the primary server when deploying.
Environment isolation
Environment isolation prevents resource types from leaking between your various environments.
If you use multiple environments with Puppet, you might encounter issues with multiple versions of the same
resource type leaking between your various environments on the primary server. This doesn’t happen with built-in
resource types, but it can happen with any other resource types.
This problem occurs because Ruby resource type bindings are global in the Ruby runtime. The first loaded version
of a Ruby resource type takes priority, and then subsequent requests to compile in other environments get that first-
loaded version. Environment isolation solves this issue by generating and using metadata that describes the resource
type implementation, instead of using the Ruby resource type implementation, when compiling catalogs.
Note: Other environment isolation problems, such as external helper logic issues or varying versions of required
gems, are not solved by the generated metadata approach. This fixes only resource type leaking. Resource type
leaking is a problem that affects only primary servers, not agents.
Enable environment isolation with Puppet
To use environment isolation, generate metadata files that Puppet can use instead of the default Ruby resource type
implementations.
1.
On the command line, run puppet generate types --environment <ENV_NAME> for each of your
environments. For example, to generate metadata for your production environment, run: puppet generate
types --environment production
2.
Whenever you deploy a new version of Puppet, overwrite previously generated metadata by running puppet
generate types --environment <ENV_NAME> --force
Enable environment isolation with r10k
To use environment isolation with r10k, generate types for each environment every time r10k deploys new code.
1.
To generate types with r10k, use one of the following methods:
• Modify your existing r10k hook to run the generate types command after code deployment.
• Create and use a script that first runs r10k for an environment, and then runs generate types as a post run
command.
2.
If you have enabled environment-level purging in r10k, allow the resource_types folder so that r10k does
not purge it.
Note: In Puppet Enterprise (PE), environment isolation is provided by Code Manager. Environment isolation is not
supported for r10k with PE.
Troubleshoot environment isolation
If the generate types command cannot generate certain types, if the type generated has missing or inaccurate
information, or if the generation itself has errors or fails, you get a catalog compilation error of “type not
found” or “attribute not found.”
1.
To fix catalog compilation errors:
a) Ensure that your Puppet resource types are correctly implemented. In addition to implementation errors, check
for types with title patterns that contain a proc or a lambda, as these types cannot be generated. Refactor any
problem resource types.
b) Regenerate the metadata by removing the environment’s .resource_types directory and running the
generate types command again.
c) If you continue to get catalog compilation errors, disable environment isolation to help you isolate the error.
© 2024 Puppet, Inc., a Perforce company

Puppet | Set up Puppet | 137
2.
To disable environment isolation in open source Puppet:
a) Remove the generate types command from any r10k hooks.
b) Remove the .resource_types directory.
3.
To disable environment isolation in Puppet Enterprise (PE):
a) In /etc/puppetlabs/puppetserver/conf.d/pe-puppet-server.conf, remove the pre-
commit-hook-commands setting.
b) In Hiera, set
puppet_enterprise::server::puppetserver::pre_commit_hook_commands: []
c) On the command line, run service pe-puppetserver reload
d) Delete the .resource_types directories from your staging code directory, /etc/puppetlabs/code-
staging
e) Deploy the environments.
The generate types command
When you run the generate types command, it scans the entire environment for resource type implementations,
excluding core Puppet resource types.
The generate types command accepts the following options:
• --environment <ENV_NAME>: The environment for which to generate metadata. If you do not specify this
argument, the metadata is generated for the default environment (production).
• --force: Use this flag to overwrite all previously generated metadata.
For each resource type implementation it finds, the command generates a corresponding metadata file, named
after the resource type, in the <env-root>/.resource_types directory. It also syncs the files in the
.resource_types directory so that:
• Types that have been removed in modules are removed from resource_types.
• Types that have been added are added to resource_types.
• Types that have not changed (based on timestamp) are kept as is.
• Types that have changed (based on timestamp) are overwritten with freshly generated metadata.
The generated metadata files, which have a .pp extension, exist in the code directory. If you are using Puppet
Enterprise with Code Manager and file sync, these files appear in both the staging and live code directories. The
generated files are read-only. Do not delete them, modify them, or use expressions from them in manifests.
Directories and files
Puppet consists of a number of directories and files, and each one has an important role ranging from Puppet code
storage and configuration files to manifests and module paths.
© 2024 Puppet, Inc., a Perforce company

Puppet | Set up Puppet | 138
• Code and data directory (codedir) on page 138
The codedir is the main directory for Puppet code and data. It is used by the primary Puppet server and Puppet apply,
but not by Puppet agent. It contains environments (which contain your manifests and modules) and a global modules
directory for all environments.
• Config directory (confdir) on page 139
Puppet’s confdir is the main directory for the Puppet configuration. It contains configuration files and the SSL
data.
• Main manifest directory on page 140
Puppet starts compiling a catalog either with a single manifest file or with a directory of manifests that are treated like
a single file. This starting point is called the main manifest or site manifest.
• The modulepath on page 141
The primary server service and the puppet apply command load most of their content from modules found in one
or more directories. The list of directories where Puppet looks for modules is called the modulepath. The modulepath
is set by the current node's environment.
• SSL directory (ssldir) on page 143
Puppet stores its certificate infrastructure in the SSL directory (ssldir) which has a similar structure on all Puppet
nodes, whether they are agent nodes, primary Puppet servers, or the certificate authority (CA) server.
• Cache directory (vardir) on page 144
As part of its normal operations, Puppet generates data which is stored in a cache directory called vardir. You can
mine the data in vardir for analysis, or use it to integrate other tools with Puppet.
Code and data directory (codedir)
The codedir is the main directory for Puppet code and data. It is used by the primary Puppet server and Puppet apply,
but not by Puppet agent. It contains environments (which contain your manifests and modules) and a global modules
directory for all environments.
Location
The codedir is located in one of the following locations:
• *nix: /etc/puppetlabs/code
• *nix non-root users: ~/.puppetlabs/etc/code
• Windows: %PROGRAMDATA%\PuppetLabs\code (usually C:\ProgramData\PuppetLabs\code)
When Puppet is running as root, as a Windows user with administrator privileges, or as the puppet user, it uses a
system-wide codedir. When running as a non-root user, it uses a codedir in that user's home directory.
When running Puppet commands and services as root or puppet, use the system codedir. To use the same codedir
as the Puppet agent, or the primary server, run admin commands such as puppet module with sudo.
To configure the location of the codedir, set the codedir setting in your puppet.conf file, such as:
codedir = /etc/puppetlabs/code
Important: Puppet Server doesn't use the codedir setting in puppet.conf, and instead uses the jruby-
puppet.master-code-dir setting in puppetserver.conf . When using a non-default codedir, you must
change both settings.
Interpolation of $codedir
The value of the codedir is discovered before other settings, so you can refer to it in other puppet.conf settings by
using the $codedir variable in the value. For example, the $codedir variable is used as part of the value for the
environmentpath setting:
[server]
environmentpath = $codedir/override_environments:$codedir/environments
© 2024 Puppet, Inc., a Perforce company
Puppet | Set up Puppet | 139
This allows you to avoid absolute paths in your settings and keep your Puppet-related files together.
Contents
The codedir contains environments, including manifests and modules, and a global modules directory for all
environments.
The code and data directories are:
• environments : Contains alternate versions of the modules and manifests directories, to enable code
changes to be tested on smaller sets of nodes before entering production.
• modules : The main directory for modules.
Config directory (confdir)
Puppet’s confdir is the main directory for the Puppet configuration. It contains configuration files and the SSL
data.
Location
The confdir is located in one of the following locations:
• *nix root users: /etc/puppetlabs/puppet
• Non-root users: ~/.puppetlabs/etc/puppet
• Windows: %PROGRAMDATA%\PuppetLabs\puppet\etc (usually C:\ProgramData\PuppetLabs
\puppet\etc)
When Puppet is running as root, a Windows user with administrator privileges, or the puppet user, it uses a
system-wide confdir. When running as a non-root user, it uses a confdir in that user's home directory.
When running Puppet commands and services as root or puppet, usually you want to use the system codedir. To
use the same codedir as the Puppet agent or the primary Puppet server, run admin commands with sudo.
Puppet’s confdir can’t be set in the puppet.conf, because Puppet needs the confdir to locate that config file.
Instead, run commands with the --confdir parameter to specify the confdir. If --confdir isn’t specified when a
Puppet application is started, the command uses the default confdir location.
Puppet Server uses the jruby-puppet.server-conf-dir setting in puppetserver.conf to configure its
confdir. If you are using a non-default confdir, you must specify --confdir when you run commands like puppet
module to ensure they use the same directories as Puppet Server.
Interpolation of $confdir
The value of the confdir is discovered before other settings, so you can reference it, using the $confdir variable, in
the value of any other setting in puppet.conf.
If you need to set nonstandard values for some settings, using the $confdir variable allows you to avoid absolute
paths and keep your Puppet-related files together.
Contents
The confdir contains several config files and the SSL data. You can change their locations, but unless you have
a technical reason that prevents it, use the default structure. Click the links to see documentation for the files and
directories in the codedir.
On all nodes, agent and primary server, the confdir contains the following directories and config files:
• ssl directory: contains each node’s certificate infrastructure.
• puppet.conf: Puppet’s main config file.
• csr_attributes.yaml: Optional data to be inserted into new certificate requests.
On primary server nodes, and sometimes standalone nodes that run Puppet apply, the confdir also contains:
© 2024 Puppet, Inc., a Perforce company

Puppet | Set up Puppet | 140
• auth.conf: Access control rules for the primary server's network services.
• fileserver.conf: Configuration for additional fileserver mount points.
• hiera.yaml: The global configuration for Hiera data lookup. Environments and modules can also have their
own hiera.yaml files.
Note: To provide backward compatibility for some existing Puppet 4 installations, if a hiera.yaml file
exists in the codedir, it takes precedence over hiera.yaml in the confdir. To ensure that Puppet honors the
configuration in the confdir, remove any hiera.yaml file that is present in the codedir.
• routes.yaml : Advanced configuration of indirector behavior.
On certificate authority servers, the confdir also contains:
• autosign.conf : List of pre-approved certificate requests.
On nodes that are acting as a proxy for configuring network devices, the confdir also contains:
• device.conf: Configuration for network devices managed by the puppet device command.
Main manifest directory
Puppet starts compiling a catalog either with a single manifest file or with a directory of manifests that are treated like
a single file. This starting point is called the main manifest or site manifest.
For more information about how the site manifest is used in catalog compilation, see Catalog compilation.
Specifying the manifest for Puppet apply
The puppet apply command uses the manifest you pass to it as an argument on the command line:
puppet apply /etc/puppetlabs/code/environments/production/manifests/site.pp
You can pass Puppet apply either a single .pp file or a directory of .pp files. Puppet apply uses the manifest you
pass it, not an environment's manifest.
Specifying the manifest for primary Puppet server
The primary Puppet server uses the main manifest set by the current node's environment, whether that manifest is a
single file or a directory of .pp files.
By default, the main manifest for an environment is <ENVIRONMENTS DIRECTORY>/<ENVIRONMENT>/
manifests, for example /etc/puppetlabs/code/environments/production/manifests. You can
configure the manifest per-environment, and you can also configure the default for all environments.
To determine its main manifest, an environment uses the manifest setting in environment.conf. This can be
an absolute path or a path relative to the environment’s main directory.
If the environment.confmanifest setting is absent, it uses the value of the default_manifest setting
from the puppet.conf file. The default_manifest setting defaults to ./manifests. Similar to the
environment's manifest setting, the value of default_manifest can be an absolute path or a path relative to
the environment’s main directory.
To force all environments to ignore their own manifest setting and use the default_manifest setting instead,
set disable_per_environment_manifest = true in puppet.conf.
To check which manifest your primary server uses for a given environment, run:
puppet config print manifest --section server --environment <ENVIRONMENT>
For more information, see Creating environments, and Checking values of configuration settings.
© 2024 Puppet, Inc., a Perforce company

Puppet | Set up Puppet | 141
Manifest directory behavior
When the main manifest is a directory, Puppet parses every .pp file in the directory in alphabetical order and
evaluates the combined manifest. It descends into all subdirectories of the manifest directory and loads files in depth-
first order. For example, if the manifest directory contains a directory named 01, and a file named 02.pp, it parses
the files in 01 before it parses 02.pp.
Puppet treats the directory as one manifest, so, for example, a variable assigned in the file 01_all_nodes.pp is
accessible in node_web01.pp.
Note: Puppet does not follow symlinks when the manifest setting refers to a directory.
The modulepath
The primary server service and the puppet apply command load most of their content from modules found in one
or more directories. The list of directories where Puppet looks for modules is called the modulepath. The modulepath
is set by the current node's environment.
The modulepath is an ordered list of directories, with earlier directories having priority over later ones. Use the
system path separator character to separate the directories in the modulepath list. On *nix systems, use a colon (:); on
Windows use a semi-colon (;).
For example, on *nix:
/etc/puppetlabs/code/environments/production/modules:/etc/puppetlabs/code/
modules:/opt/puppetlabs/puppet/modules
On Windows:
C:/ProgramData/PuppetLabs/code/environments/production/modules;C:/
ProgramData/PuppetLabs/code/modules
Each directory in the modulepath must contain only valid Puppet modules, and the names of those modules must
follow the modules naming rules. Dashes and periods in module names cause errors. For more information, see
Modules fundamentals.
By default, the modulepath is set by the current node's environment in environment.conf. For example, using
*nix paths:
modulepath = site:dist:modules:$basemodulepath
To see what the modulepath is for an environment, run:
sudo puppet config print modulepath --section server --environment
<ENVIRONMENT_NAME>
For more information about environments, see Environments.
Setting the modulepath and base modulepath
Each environment sets its full modulepath in the environment.conf file with the modulepath setting.
The modulepath setting can only be set in environment.conf. It configures the entire modulepath for that
environment.
The modulepath can include relative paths, such as ./modules or ./site. Puppet looks for these paths inside the
environment’s directory.
The default modulepath value for an environment is the environment’s modules directory, plus the base modulepath.
On *nix, this is ./modules:$basemodulepath.
© 2024 Puppet, Inc., a Perforce company

Puppet | Set up Puppet | 142
The base modulepath is a list of global module directories for use with all environments. You can configure it with
the basemodulepath setting in the puppet.conf file, but its default value is probably suitable. The default on
*nix:
$codedir/modules:/opt/puppetlabs/puppet/modules
On Windows:
$codedir\modules
If you want an environment to have access to the global module directories, include $basemodulepath in the
environment's modulepath setting:
modulepath = site:dist:modules:$basemodulepath
Using the --modulepath option with Puppet apply
When running Puppet apply on the command line, you can optionally specify a modulepath with the --
modulepath option, which overrides the modulepath from the current environment.
Absent, duplicate, and conflicting content from modules
Puppet uses modules it finds in every directory in the modulepath. Directories in the modulepath can be empty or
absent. This is not an error; Puppet does not attempt to load modules from those directories. If no modules are present
across the entire modulepath, or if modules are present but none of them contains a lib directory, the agent logs an
error when attempting to sync plugins from the primary server. This error is benign and doesn't prevent the rest of the
run.
If the modulepath contains multiple modules with the same name, Puppet uses the version from the directory that
comes earliest in the modulepath. Modules in directories earlier in the modulepath override those in later directories.
For most content, this earliest-module-wins behavior is on an all-or-nothing, per-module basis — all of the
manifests, files, and templates in the first-encountered version are available for use, and none of the content from any
subsequent versions is available. This behavior covers:
• Puppet code (from manifests).
• Files (from files).
• Templates (from templates).
• External facts (from facts.d).
• Ruby plugins synced to agent nodes (from lib).
CAUTION: Puppet sometimes displays unexpected behavior with Ruby plugins that are loaded directly
from modules. This includes:
• Plugins used by the primary server (custom resource types, custom functions).
• Plugins used by puppet apply.
• Plugins present in the agent’s modulepath (which is usually empty but night not be when running an agent
on a node that is also a primary server).
In this case, the plugins are handled on a per-file basis instead of per-module. If a duplicate module in an later
directory has additional plugin files that don’t exist in the first instance of the module, those extra files are
loaded, and Puppet uses a a mixture of files from both versions of the module.
If you refactor a module’s Ruby plugins, and maintain two versions of that module in your modulepath, it can
have unexpected results.
This is a byproduct of how Ruby works and is not intentional or controllable by Puppet; a fix is not expected.
© 2024 Puppet, Inc., a Perforce company

Puppet | Set up Puppet | 143
SSL directory (ssldir)
Puppet stores its certificate infrastructure in the SSL directory (ssldir) which has a similar structure on all Puppet
nodes, whether they are agent nodes, primary Puppet servers, or the certificate authority (CA) server.
Location
By default, the ssldir is a subdirectory of the confdir.
You can change its location using the ssldir setting in the puppet.conf file. See the Configuration reference for
more information.
Note: The content of the ssldir is generated, grows over time, and is relatively difficult to replace. Some third-
party Puppet packages for Linux place the ssldir in the cache directory (vardir) instead of the confdir. When a distro
changes the ssldir location, it sets ssldir in the $confdir/puppet.conf file, usually in the [main] section.
To see the location of the ssldir on one of your nodes, run: puppet config print ssldir
Contents
The ssldir contains Puppet certificates, private keys, certificate signing requests (CSRs), and other cryptographic
documents.
The ssldir on an agent or primary server contains:
• A private key: private_keys/<certname>.pem
• A signed certificate: certs/<certname>.pem
• A copy of the CA certificate: certs/ca.pem
• A copy of the certificate revocation list (CRL): crl.pem
• A copy of its sent CSR: certificate_requests/<certname>.pem
Tip: Puppet does not save its public key to disk, because the public key is derivable from its private key and is
contained in its certificate. If you need to extract the public key, use $ openssl rsa -in $(puppet config
print hostprivkey) -pubout
If these files don’t exist on a node, it's because they are generated locally or requested from the CA server.
Agent and primary server credentials are identified by certname, so an agent process and a primary server process
running on the same server can use the same credentials.
The ssldir for the Puppet CA, which runs on the CA server, contains similar credentials: private and public keys, a
certificate, and a primary server copy of the CRL. It maintains a list of all signed certificates in the deployment, a
copy of each signed certificate, and an incrementing serial number for new certificates. To keep it separated from
general Puppet credentials on the same server, all of the CA’s data is stored in the ca subdirectory.
The ssldir directory structure
All of the files and directories in the ssldir directory have corresponding Puppet settings, which can be used to
change their locations. Generally, though, don't change the default values unless you have a specific problem to work
around.
Ensure the permissions mode of the ssldir is 0771. The directory and each file in it is owned by the user that Puppet
runs as: root or Administrator on agents, and defaulting to puppet or pe-puppet on a primary server. Set up
automated management for ownership and permissions on the ssldir.
The ssldir has the following structure. See the Configuration reference for details about each puppet.conf setting
listed:
© 2024 Puppet, Inc., a Perforce company
Puppet | Set up Puppet | 144
• ca directory (on the CA server only): Contains the files used by Puppet’s certificate authority. Mode: 0755.
Setting: cadir.
• ca_crl.pem: The primary server copy of the certificate revocation list (CRL) managed by the CA. Mode:
0644. Setting: cacrl.
• ca_crt.pem: The CA’s self-signed certificate. This cannot be used as a primary server or agent certificate; it
can only be used to sign certificates. Mode: 0644. Setting: cacert.
• ca_key.pem: The CA’s private key, and one of the most security-critical files in the Puppet certificate
infrastructure. Mode: 0640. Setting: cakey.
• ca_pub.pem: The CA’s public key. Mode: 0644. Setting: capub.
• inventory.txt: A list of the certificates the CA signed, along with their serial numbers and validity
periods. Mode: 0644. Setting: cert_inventory.
• requests (directory): Contains the certificate signing requests (CSRs) that have been received but not yet
signed. The CA deletes CSRs from this directory after signing them. Mode: 0755. Setting: csrdir.
• <name>.pem: CSR files awaiting signing.
• serial: A file containing the serial number for the next certificate the CA signs. This is incremented with
each new certificate signed. Mode: 0644. Setting: serial.
• signed (directory): Contains copies of all certificates the CA has signed. Mode: 0755. Setting: signeddir.
• <name>.pem: Signed certificate files.
• certificate_requests (directory): Contains CSRs generated by this node in preparation for submission
to the CA. CSRs stay in this directory even after they have been submitted and signed. Mode: 0755. Setting:
requestdir.
• <certname>.pem: This node’s CSR. Mode: 0644. Setting: hostcsr.
• certs (directory): Contains signed certificates present on the node. This includes the node’s own certificate, and
a copy of the CA certificate for validating certificates presented by other nodes. Mode: 0755. Setting: certdir.
• <certname>.pem: This node’s certificate. Mode: 0644. Setting: hostcert.
• ca.pem: A local copy of the CA certificate. Mode: 0644. Setting: localcacert.
• crl.pem: A copy of the certificate revocation list (CRL) retrieved from the CA, for use by agents or primary
servers. Mode: 0644. Setting: hostcrl.
• private (directory): Usually, does not contain any files. Mode: 0750. Setting: privatedir.
• password: The password to a node’s private key. Usually not present. The conditions in which this file
would exist are not defined. Mode: 0640. Setting: passfile.
• private_keys (directory): Contains the node's private key and, on the CA, private keys created by the
puppetserver ca generate command. It never contains the private key for the CA certificate. Mode:
0750. Setting: privatekeydir.
• <certname>.pem: This node’s private key. Mode: 0600. Setting: hostprivkey.
• public_keys (directory): Contains public keys generated by this node in preparation for generating a CSR.
Mode: 0755. Setting: publickeydir.
• <certname>.pem: This node’s public key. Mode: 0644. Setting: hostpubkey.
Cache directory (vardir)
As part of its normal operations, Puppet generates data which is stored in a cache directory called vardir. You can
mine the data in vardir for analysis, or use it to integrate other tools with Puppet.
Location
The cache directory for Puppet Server defaults to /opt/puppetlabs/server/data/puppetserver.
The cache directory for the Puppet agent and Puppet apply can be found at one of the following locations:
• *nix systems: /opt/puppetlabs/puppet/cache.
• Non-root users: ~/.puppetlabs/opt/puppet/cache.
© 2024 Puppet, Inc., a Perforce company

Puppet | Set up Puppet | 145
• Windows: %PROGRAMDATA%\PuppetLabs\puppet\cache (usually C:\Program Data\PuppetLabs
\puppet\cache).
When Puppet is running as root, a Windows user with administrator privileges, or the puppet user, uses a system-
wide cache directory. When running as a non-root user, it uses a cache directory in the user’s home directory.
Because you usually run Puppet’s commands and services as root or puppet, the system cache directory is what you
usually want to use.
Important: To use the same directories as the agent or primary server, admin commands like puppetserver ca,
must run with sudo.
Note: When the primary server is running as a Rack application, the config.ru file must explicitly set --
vardir to the system cache directory. The example config.ru file provided with the Puppet source does this.
You can specify Puppet’s cache directory on the command line by using the --vardir option, but you can’t set it in
puppet.conf. If --vardir isn’t specified when a Puppet application is started, it uses the default cache directory
location.
To configure the Puppet Server cache directory, use the jruby-puppet.server-var-dir setting in
puppetserver.conf .
Interpolation of $vardir
The value of the vardir is discovered before other settings, so you can reference it using the $vardir variable in the
value of any other setting in puppet.conf or on the command line.
For example:
[main]
ssldir = $vardir/ssl
If you need to set nonstandard values for some settings, using the $vardir variable allows you to avoid absolute
paths and keep your Puppet-related files together.
Contents
The vardir contains several subdirectories. Most of these subdirectories contain a variable amount of generated data,
some contain notable individual files, and some directories are used only by agent or primary server processes.
To change the locations of specific vardir files and directories, edit the settings in puppet.conf. For more
information about each item below, see the Configuration reference.
Directory name Config setting Notes
bucket bucketdir
client_data client_datadir
clientbucket clientbucketdir
client_yaml clientyamldir
devices devicedir
lib/facter factpath
facts factpath
facts.d pluginfactdest
© 2024 Puppet, Inc., a Perforce company

Puppet | Set up Puppet | 146
Directory name Config setting Notes
lib libdir, plugindest Puppet uses this as a cache for
plugins (custom facts, types and
providers, functions) synced from
a primary server. Do not change its
contents. If you delete it, the plugins
are restored on the next Puppet run.
puppet-module module_working_dir
puppet-module/skeleton module_skeleton_dir
reports reportdir When the option to store reports
is enabled, a primary server stores
reports received from agents as
YAML files in this directory. You
can mine these reports for analysis.
server_data serverdatadir
state statedir See table below for more details
about the state directory contents.
yaml yamldir
The state directory contains the following files and directories:
File or directory name Config setting Notes
agent_catalog_run.lock agent_catalog_run_lockfile
agent_disabled.lock agent_disabled_lockfile
classes.txt classfile This file is useful for external
integration. It lists all of the classes
assigned to this agent node.
graphs directory graphdir When graphing is enabled, agent
nodes write a set of .dot graph
files to this directory. Use these
graphs to diagnose problems with the
catalog application, or visualizing the
configuration catalog.
last_run_summary.yaml lastrunfile
This file is stored in a public
directory and is visible to external
monitoring tools — making sure the
Puppet agent is running every 30
minutes.
last_run_report.yaml lastrunreport
resources.txt resourcefile
state.yaml statefile
© 2024 Puppet, Inc., a Perforce company

Puppet | Set up Puppet | 147
Report reference
Puppet has a set of built-in report processors, which you can configure.
By default, after applying a catalog, Puppet generates a report that includes information about the run: events, log
messages, resource statuses, metrics, and metadata. Each host sends its report as a YAML dump.
The agent sends its report to the primary server for processing, whereas agents running puppet apply process
their own reports. Either way, Puppet handles every report with a set of report processors, which are specified in the
reports setting in the agent's puppet.conf file.
By default, Puppet uses the store report processor. You can enable other report processors or disable reporting in
the reports setting.
http
Sends reports via HTTP or HTTPS. This report processor submits reports as POST requests to the address in
the reporturl setting. When you specify an HTTPS URL, the remote server must present a certificate issued
by the Puppet CA or the connection fails validation. The body of each POST request is the YAML dump of a
Puppet::Transaction::Report object, and the content type is set as application/x-yaml.
log
Sends all received logs to the local log destinations. The usual log destination is syslog.
store
Stores the yaml report in the configured reportdir. By default, this is the report processor Puppet uses. These
files collect quickly — one every half hour — so be sure to perform maintenance on them if you use this report.
© 2024 Puppet, Inc., a Perforce company

Puppet | Platform components | 148
Platform components
Puppet is made up of several packages. Together these are called the Puppet platform, which is what you use to
manage, store and run your Puppet code. These packages include puppetserver, puppetdb, and puppet-
agent — which includes Facter.
• Facter on page 296
Facter is Puppet’s cross-platform system profiling library. It discovers and reports per-node facts, which are available
in your Puppet manifests as variables.
• PuppetDB on page 342
All of the data generated by Puppet (for example facts, catalogs, reports) is stored in PuppetDB.
• Puppet services and tools on page 342
Puppet provides a number of core services and administrative tools to manage systems with or without a primary
Puppet server, and to compile configurations for Puppet agents.
• Puppet reports on page 366
Puppet creates a report about its actions and your infrastructure each time it applies a catalog during a Puppet run.
You can create and use report processors to generate insightful information or alerts from those reports.
• Life cycle of a Puppet run on page 374
Learn the details of Puppet's internals, including how primary servers and agents communicate via host-verified
HTTPS, and about the process of catalog compilation.
Puppet Server
About Puppet Server
Puppet is configured in an agent-server architecture, in which a primary server node manages the configuration
information for a fleet of agent nodes. Puppet Server acts as the primary server node. Puppet Server is a Ruby and
Clojure application that runs on the Java Virtual Machine (JVM). Puppet Server runs Ruby code for compiling Puppet
catalogs and for serving files in several JRuby interpreters. It also provides a certificate authority through Clojure.
This page describes the general requirements and the run environment for Puppet Server.
Puppet Server releases
Puppet Server and Puppet share the same major release (Puppet Server 6.x and Puppet 6.x). However, they are
versioned separately and might have different minor or patch versions (Puppet Server 6.5 versus Puppet 6.8). For a
list of the maintained versions of Puppet and Puppet Server, visit Puppet releases and lifecycles.
Controlling the Service
The Puppet Server service name is puppetserver. To start and stop the service, use commands such as service
puppetserver restart, service puppetserver status for your OS.
Puppet Server's Run Environment
Puppet Server consists of several related services. These services share state and route requests among themselves.
The services run inside a single JVM process, using the Trapperkeeper service framework.
Embedded Web Server
Puppet Server uses a Jetty-based web server embedded in the service's JVM process. No additional or unique actions
are required to configure and enable the web server. You can modify the web server's settings in webserver.conf on
page 171. You might need to edit this file if you use an external CA or run Puppet on a non-standard port.
© 2024 Puppet, Inc., a Perforce company
Puppet | Platform components | 149
Puppet API Service
Puppet Server provides APIs that are used by the Puppet agent to manage the configuration of your nodes. Visit
Puppet V3 HTTP API on page 220 for more information on the basic APIs.
Certificate Authority Service
Puppet Server includes a certificate authority (CA) service that:
• Accepts certificate signing requests (CSRs) from nodes.
• Serves certificates and a certificate revocation list (CRL) to nodes.
• Optionally accepts commands to sign or revoke certificates.
Signing and revoking certificates over the network is disabled by default. You can use the auth.conf file to allow
specific certificate owners the ability to issue commands.
The CA service uses .pem files to stores credentials. You can use the puppetserver ca command to interact
with these credentials, including listing, signing, and revoking certificates. See CA V1 HTTP API on page 222 for
more information on these APIs.
Admin API Service
Puppet Server includes an administrative API for triggering maintenance tasks. The most common task refreshes
Puppet’s environment cache, which causes all of your Puppet code to reload without the requirement to restart the
service. Consequently, you can deploy new code to long-timeout environments without executing a full restart of the
service.
For API docs, visit:
• Environment cache on page 264.
• JRuby pool on page 265.
For details about environment caching, visit:
• About environments.
JRuby Interpreters
Most of Puppet Server's work is done by Ruby code running in JRuby. JRuby is an implementation of the Ruby
interpreter that runs on the JVM. Note that you can’t use the system gem command to install Ruby Gems for the
Puppet primary server. Instead, Puppet Server includes a separate puppetserver gem command for installing any
libraries your Puppet extensions might require. Visit Using Ruby gems on page 187 for details.
If you want to test or debug code to be used by the Puppet Server, you can use the puppetserver ruby and
puppetserver irb commands to execute Ruby code in a JRuby environment.
To handle parallel requests from agent nodes, Puppet Server maintains separate JRuby interpreters. These JRuby
interpreters individually run Puppet's application code, and distribute agent requests among them. You can configure
the JRuby interpreters in the jruby-puppet section of puppetserver.conf on page 167.
Tuning Guide
You can maximize Puppet Server's performance by tuning your JRuby configuration. To learn more, visit the Puppet
Server Tuning guide on page 203.
User
If you are running Puppet Enterprise:
• Puppet Server user runs as pe-puppet.
• You must specify the user in /etc/sysconfig/pe-puppetserver.
If you are running open source Puppet:
• Puppet Server needs to run as the user puppet.
• You must specify the user in /etc/sysconfig/puppetserver.
© 2024 Puppet, Inc., a Perforce company
Puppet | Platform components | 150
All of the Puppet Server's files and directories must be readable and writable by this user. Note that Puppet Server
ignores the user and group settings from puppet.conf.
Ports
By default, Puppet's HTTPS traffic uses port 8140. The OS and firewall must allow Puppet Server's JVM process to
accept incoming connections on port 8140. If necessary, you can change the port in webserver.conf. See the
webserver.conf on page 171 page for details.
Logging
All of Puppet Server's logging is routed through the JVM Logback library. By default, it logs to /var/log/
puppetlabs/puppetserver/puppetserver.log. The default log level is 'INFO'. By default, Puppet
Server sends nothing to syslog. All log messages follow the same path, including HTTP traffic, catalog
compilation, certificate processing, and all other parts of Puppet Server's work.
Puppet Server also relies on Logback to manage, rotate, and archive Server log files. Logback archives Server logs
when they exceed 200MB. Also, when the total size of all Server logs exceeds 1GB, Logback automatically deletes
the oldest logs. Logback is heavily configurable. If you need something more specialized than a unified log file, it
may be possible to obtain. Visit Logging on page 159 for more details.
Finally, any errors that cause the logging system to die or occur before logging is set up, display in journalctl.
SSL Termination
By default, Puppet Server handles SSL termination automatically. For network configurations that require external
SSL termination (e.g. with a hardware load balancer), additional configuration is required. See the External SSL
termination on page 192 page for details. In summary, you must:
• Configure Puppet Server to use HTTP instead of HTTPS.
• Configure Puppet Server to accept SSL information via insecure HTTP headers.
• Secure your network so that Puppet Server cannot be directly reached by any untrusted clients.
• Configure your SSL terminating proxy to set the following HTTP headers:
• X-Client-Verify (mandatory).
• X-Client-DN (mandatory for client-verified requests).
• X-Client-Cert (optional; required for trusted facts).
Configuring Puppet Server
Puppet Server uses a combination of Puppet's configuration files along with its own separate configuration files,
which are located in the conf.d directory. Refer to the Config directory for a list of Puppet's configuration files. For
detailed information about Puppet Server settings and the conf.d directory, refer to the Configuring Puppet Server
on page 157 page.
Deprecated features
The following features and configuration settings are deprecated and will be removed in a future major release of
Puppet Server.
certificate-status settings
Now
If the certificate-authority.certificate-status.authorization-required setting is
false, all requests that are successfully validated by SSL (if applicable for the port settings on the server) are
permitted to use the Certificate Status HTTP API endpoints. This includes requests which do not provide an SSL
client certificate.
If the certificate-authority.certificate-status.authorization-required setting is true
or not specified and the puppet-admin.client-whitelist setting has one or more entries, only the requests
whose Common Name in the SSL client certificate subject matches one of the client-whitelist entries are
permitted to use the certificate status HTTP API endpoints.
© 2024 Puppet, Inc., a Perforce company

Puppet | Platform components | 151
For any other configuration, requests are only permitted to access the certificate status HTTP API endpoints if
allowed per the rule definitions in the trapperkeeper-authorization "auth.conf" file. See the auth.conf on
page 160 page for more information.
In a Future Major Release
The certificate-status settings will be ignored completely by Puppet Server. Requests made to the
certificate-status HTTP API will only be allowed per the trapperkeeper-authorization
"auth.conf" configuration.
Detecting and Updating
Look at the certificate-status settings in your configuration. If authorization-required is set to
false or client-whitelist has one or more entries, these settings would be used to authorize access to the
certificate status HTTP API instead of trapperkeeper-authorization.
If authorization-required is set to true or is not specified and if the client-whitelist was empty,
you could just remove the certificate-authority section from your configuration. The only behavior that
would change in Puppet Server from doing this would be that a warning message would no longer be written to the
"puppetserver.log" file at startup.
If authorization-required is set to false, you would need to create a corresponding rule in the
trapperkeeper-authorization file which would allow unauthenticated client access to the certificate status
API.
For example:
authorization: {
version: 1
rules: [
{
match-request: {
path: "/certificate_status/"
type: path
method: [ get, put, delete ]
}
allow-unauthenticated: true
sort-order: 200
name: "certificate_status"
},
{
match-request: {
path: "/certificate_statuses/"
type: path
method: get
}
allow-unauthenticated: true
sort-order: 200
name: "certificate_statuses"
},
...
]
}
If authorization-required is set to true or not set but the client-whitelist has one or more custom
entries in it, you would need to create a corresponding rule in the trapperkeeper-authorization "auth.conf"
file which would allow only specific clients access to the certificate status API.
For example, the current certificate status configuration could have:
certificate-authority:
certificate-status: {
client-whitelist: [ admin1, admin2 ]
}
© 2024 Puppet, Inc., a Perforce company

Puppet | Platform components | 152
}
Corresponding trapperkeeper-authorization rules could have:
authorization: {
version: 1
rules: [
{
match-request: {
path: "/certificate_status/"
type: path
method: [ get, put, delete ]
}
allow: [ admin1, admin2 ]
sort-order: 200
name: "certificate_status"
},
{
match-request: {
path: "/certificate_statuses/"
type: path
method: get
}
allow: [ admin1, admin2 ]
sort-order: 200
name: "certificate_statuses"
},
...
]
}
After adding the desired rules to the trapperkeeper-authorization "auth.conf" file, remove the
certificate-authority section from the "puppetserver.conf" file and restart the puppetserver service.
Context
In previous Puppet Server releases, there was no unified mechanism for controlling access to the various endpoints
that Puppet Server hosts. Puppet Server used core Puppet "auth.conf" to authorize requests handled via Ruby Puppet
and custom client whitelists for the CA and Admin endpoints. The custom client whitelists do not provide granular
enough control to meet some use cases.
trapperkeeper-authorization unifies authorization configuration across all of these endpoints into a single
file and provides more granular control.
puppet-admin Settings
Now
If the puppet-admin.authorization-required setting is false, all requests that are successfully
validated by SSL (if applicable for the port settings on the server) are permitted to use the puppet-admin HTTP
API endpoints. This includes requests which do not provide an SSL client certificate.
If the puppet-admin.authorization-required setting is true or not specified and the puppet-
admin.client-whitelist setting has one or more entries, only the requests whose Common Name in the SSL
client certificate subject matches one of the client-whitelist entries are permitted to use the puppet-admin
HTTP API endpoints.
For any other configuration, requests are only permitted to access the puppet-admin HTTP API endpoints if
allowed per the rule definitions in the trapperkeeper-authorization "auth.conf" file. See the auth.conf on
page 160 page for more information.
© 2024 Puppet, Inc., a Perforce company

Puppet | Platform components | 153
In a Future Major Release
The puppet-admin settings will be ignored completely by Puppet Server. Requests made to the puppet-admin
HTTP API will only be allowed per the trapperkeeper-authorization "auth.conf" configuration.
Detecting and Updating
Look at the puppet-admin settings in your configuration. If authorization-required is set to false or
client-whitelist has one or more entries, these settings would be used to authorize access to the puppet-
admin HTTP API instead of trapperkeeper-authorization.
If authorization-required is set to true or is not specified and if the client-whitelist was empty,
you could just remove the puppet-admin section from your configuration and restart your puppetserver service in
order for Puppet Server to start using the trapperkeeper-authorization "auth.conf" file. The only behavior
that would change in Puppet Server from doing this would be that a warning message would no longer be written to
the puppetserver.log file.
If authorization-required is set to false, you would need to create corresponding rules in the
trapperkeeper-authorization file which would allow unauthenticated client access to the "puppet-admin"
API endpoints.
For example:
authorization: {
version: 1
rules: [
{
match-request: {
path: "/puppet-admin-api/v1/environment-cache"
type: path
method: delete
}
allow-unauthenticated: true
sort-order: 200
name: "environment-cache"
},
{
match-request: {
path: "/puppet-admin-api/v1/jruby-pool"
type: path
method: delete
}
allow-unauthenticated: true
sort-order: 200
name: "jruby-pool"
},
...
]
}
If authorization-required is set to true or not set but the client-whitelist has one or more custom
entries in it, you would need to create corresponding rules in the trapperkeeper-authorization "auth.conf"
file which would allow only specific clients access to the "puppet-admin" API endpoints.
For example, the current "puppet-admin" configuration could have:
puppet-admin: {
client-whitelist: [ admin1, admin2 ]
}
Corresponding trapperkeeper-authorization rules could have:
authorization: {
© 2024 Puppet, Inc., a Perforce company

Puppet | Platform components | 154
version: 1
rules: [
{
match-request: {
path: "/puppet-admin-api/v1/environment-cache"
type: path
method: delete
}
allow: [ admin1, admin2 ]
sort-order: 200
name: "environment-cache"
},
{
match-request: {
path: "/puppet-admin-api/v1/jruby-pool"
type: path
method: delete
}
allow: [ admin1, admin2 ]
sort-order: 200
name: "jruby-pool"
},
...
]
}
After adding the desired rules to the trapperkeeper-authorization "auth.conf" file, remove the puppet-
admin section from the "puppetserver.conf" file and restart the puppetserver service.
Context
In previous Puppet Server releases, there was no unified mechanism for controlling access to the various endpoints
that Puppet Server hosts. Puppet Server used core Puppet "auth.conf" to authorize requests handled by Ruby Puppet
and custom client whitelists for the CA and Admin endpoints. The custom client allowlists do not provide granular
enough control to meet some use cases.
trapperkeeper-authorization unifies authorization configuration across all of these endpoints into a single
file and provides more granular control.
Puppet's "resource_types" API endpoint
Now
The resource_type and resource_types HTTP APIs were removed in Puppet Server 5.0.
Previously
The resource_type and resource_types Puppet HTTP API endpoints return information about classes,
defined types, and node definitions.
The Environment classes on page 266 serves as a replacement for the Puppet resource type API for classes.
Detecting and Updating
If your application calls the resource_type or resource_types HTTP API endpoints for information about
classes, point those calls to the environment_classes endpoint. The environment_classes endpoint has
different features and returns different values than resource_type; see the Environment classes on page 266
for details.
The environment_classes endpoint ignores Puppet's Ruby-based authorization methods and configuration in
favor of Puppet Server's Trapperkeeper authorization. For more information, see the Environment classes on page
266 of the environment classes API documentation.
© 2024 Puppet, Inc., a Perforce company

Puppet | Platform components | 155
Context
Users often rely on the resource_types endpoint for lists of classes and associated parameters in an
environment. For such requests, the resource_types endpoint is inefficient and can trigger problematic events,
such as manifests being parsed during a catalog request.
To fulfill these requests more efficiently and safely, Puppet Server 2.3.0 introduced the narrowly defined
environment_classes endpoint.
Puppet's node cache terminus
Now
Puppet 5.0 (and by extension, Puppet Server 5.0) no longer writes node YAML files to its cache by default.
Previously
Puppet wrote YAML to its node cache.
Detecting and Updating
To retain the Puppet 4.x behavior, add the Configuring Puppet Server on page 157 setting
node_cache_terminus = write_only_yaml. The write_only_yaml option is deprecated.
Context
This cache was used in workflows where external tooling needs a list of nodes. PuppetDB is the preferred source of
node information.
JRuby's "compat-version" setting
Now
Puppet Server 5.0 removes the jruby-puppet.compat-version setting in puppetserver.conf on page 167,
and exits the puppetserver service with an error if you start the service with that setting.
Previously
Puppet Server 2.7.x allowed you to set compat-version to 1.9 or 2.0 to choose a preferred Ruby interpreter
version.
Detecting and Updating
Launching the puppetserver service with this setting enabled will cause it to exit with an error message. The
error includes information on Configuring Puppet Server on page 157.
For Ruby language 2.x support in Puppet Server, configure Puppet Server to use JRuby 9k instead of JRuby 1.7.27.
See the "Configuring the JRuby Version" section of Configuring Puppet Server on page 157 for details.
Context
Puppet Server 5.0 updated JRuby v1.7 to v1.7.27, which in turn updated the jruby-openssl gem to v0.9.19 and
bouncycastle libraries to v1.55. JRuby 1.7.27 breaks setting jruby-puppet.compat-version to 2.0.
Server 5.0 also added optional, experimental support for JRuby 9k, which includes Ruby 2.x language support.
Server and agent compatibility
Use this table to verify that you're using a compatible version of the agent for your PE or Puppet Server.
Restriction: Puppet Server 6.x is no longer developed or tested.
ServerAgent
Puppet 6.x
PE 2019.1 through 2019.8
Puppet 7.x
PE 2021.0 through 2023.2
Puppet 8.x
PE 2023.4 and later
6.x # # #
© 2024 Puppet, Inc., a Perforce company

Puppet | Platform components | 156
ServerAgent
Puppet 6.x
PE 2019.1 through 2019.8
Puppet 7.x
PE 2021.0 through 2023.2
Puppet 8.x
PE 2023.4 and later
7.x # #
8.x #
Installing Puppet Server
Puppet Server is a required application that runs on the Java Virtual Machine (JVM). It controls the configuration
information for one or more managed agent nodes.
Before you begin
Review the supported operating systems and make sure you have a supported version of Java. Note that, unlike
Puppet Agent, Puppet Server is not supported on MacOS. If you encounter any issues with the steps below, submit
them to our Bug Tracker.
Supported operating systems
Puppet provides official packages that install Puppet Server and all of its prerequisites for the following platforms:
Operating Systems Version
Red Hat Enterprise Linux 7, 8, 9
Debian 9 (Stretch), 10 (Buster), 11 (Bullseye)
Ubuntu 16.04 (Xenial, amd64 only), 18.04 (Bionic), 20.04
(Focal), 22.04
SLES 12 SP1, 15 (x86_64)
If we don't provide a package for your system, you can run Puppet Server from source on any x86_64 Linux server
with JDK 1.8 or 11. For more details, visit Running from source on page 214.
Note: For help with non-supported operating systems, architectures, or JRE versions, join our Community
Slack.
Important: If you implement Linux hardening techniques, consider customizing your settings, including
but not limited to the following:
• SELinux: Grant exceptions for Puppet and the PXP agent to allow these services to run effectively.
• File Access Policy Daemon (fapolicyd): Grant exceptions for PE services to prevent potential
restrictions.
• umask: Ensure your operating system's default umask is set to 022 or less restrictive. A more restrictive
setting can lead to unintended failures, as Puppet users might be denied access to necessary files.
Java support
Puppet Server versions are tested against the following versions of Java:
Puppet Server Java
7.y and later 8, 11, 17
8.y and later 11, 17
The preferred version of Java is version 17. Some Java versions may work with other Puppet Server versions, but we
do not test or support those cases. Both Java 8 and 11 are considered long-term support versions and are planned to be
supported by upstream maintainers until 2022 or later.
© 2024 Puppet, Inc., a Perforce company

Puppet | Platform components | 157
Install Puppet Server
Puppet Server is configured to use 2 GB of RAM by default. If you're simply testing an installation on a Virtual
Machine, this amount of memory is not necessary. To change the memory allocation, see Running Puppet Server on a
VM.
Important: If you're upgrading, stop any existing puppetserver service by running service
<service_name> stop or systemctl stop <service_name>.
1.
Enable the Puppet package repositories, if you haven't already done so.
2.
Install the Puppet Server package by running one of the following commands:
• Red Hat operating systems: yum install puppetserver
• Debian and Ubuntu operating systems: apt-get install puppetserver
3.
Start the Puppet Server service: sudo systemctl start puppetserver
4.
Open a new shell, or use exec bash to update your PATH.
Tip: If you're installing Puppet Server on Ubuntu, use bash -l instead of exec bash.
5.
To check if you installed the Puppet Server correctly, run: puppetserver -v
Step Result: If you correctly installed Puppet Server, the command displays the correct version.
Install a Puppet Agent
After you successfully install Puppet Server, next install the following:
1.
Install a Puppet agent
2.
(Optional) Install PuppetDB, if you want to enable extra features, including enhanced queries and reports about
your infrastructure.
Running Puppet Server on a VM
By default, Puppet Server is configured to use 2GB of RAM. However, if you want to experiment with Puppet Server
on a VM, you can safely allocate as little as 512MB of memory. To change the Puppet Server memory allocation, you
can edit the init config file.
1.
Open the applicable file:
• For RHEL or CentOS, open: /etc/sysconfig/puppetserver
• For Debian or Ubuntu, open: /etc/default/puppetserver
2.
Update the following line to display the amount of memory you want to allocate to Puppet Server:
# Modify this if you'd like to change the memory allocation, enable JMX,
etc
JAVA_ARGS="-Xms2g -Xmx2g"
For example, to allocate 1GB of memory, use JAVA_ARGS="-Xms1g -Xmx1g"; for 512MB, use
JAVA_ARGS="-Xms512m -Xmx512m".
3.
Restart the puppetserver service.
Note: For more information about the recommended settings for the JVM, visit Oracle's docs on JVM Tuning.
Configuring Puppet Server
Configuring Puppet Server
Puppet Server uses a combination of Puppet's configuration files along with its own configuration files. You can refer
to a complete list of Puppet’s configuration files in the Config directory.
Puppet Server and puppet.conf settings
Puppet Server uses Puppet's configuration files, including most of the settings in puppet.conf. However, Puppet
Server treats some puppet.conf settings differently. You must be aware of these differences. You can visit
© 2024 Puppet, Inc., a Perforce company
Puppet | Platform components | 158
a complete list of these differences at Differing behavior in puppet.conf. Puppet Server automatically loads the
puppet.conf settings in the configuration file’s main and server sections. Puppet Server uses the values in the
server section but if they are not present, it uses the values in the main section.
Puppet Server honors the following puppet.conf settings:
• allow_duplicate_certs
• autosign
• cacert
• cacrl
• cakey
• ca_name
• capub
• ca_ttl
• certdir
• certname
• cert_inventory
• codedir (PE only)
• csrdir
• csr_attributes
• dns_alt_names
• hostcert
• hostcrl
• hostprivkey
• hostpubkey
• keylength
• localcacert
• manage_internal_file_permissions
• privatekeydir
• requestdir
• serial
• signeddir
• ssl_client_header
• ssl_client_verify_header
• trusted_oid_mapping_file
Configuration Files
Most of Puppet Server's configuration files and settings (with the exception of the logging config file) are in the
conf.d directory. The conf.d directory is located at /etc/puppetlabs/puppetserver/conf.d by
default. These configuration files are in the HOCON format, which retains the basic structure of JSON but is more
readable. For more information, visit the HOCON documentation.
At startup, Puppet Server reads all the .conf files in the conf.d directory. You must restart Puppet Server to
implement your changes to these files. The conf.d directory contains the following files and settings:
• global.conf on page 164
• webserver.conf on page 171
• web-routes.conf on page 171
• puppetserver.conf on page 167
• auth.conf on page 160
• ca.conf on page 163
© 2024 Puppet, Inc., a Perforce company

Puppet | Platform components | 159
Note: The product.conf file is optional and is not included by default. You can create product.conf in
the conf.d directory to configure product-related settings (such as automatic update checking and analytics data
collection).
Logging
There is a Logback configuration file that controls how Puppet Server logs. Its default location is at /etc/
puppetlabs/puppetserver/logback.xml. If you want to place it elsewhere, visit the documentation on
global.conf.
For additional information on the logback.xml file, visit Logback.xm or Logback documentation. For tips on
configuring Logstash or outputting logs in JSON, visit Advanced logging configuration
HTTP Traffic
Puppet Server logs HTTP traffic in a format similar to Apache and to a separate file that isn’t the main log file.
By default, the access log is located at /var/log/puppetlabs/puppetserver/puppetserver-
access.log.
The following information is logged for each HTTP request by default:
• remote host
• remote log name
• remote user
• date of the logging event
• URL requested
• status code of the request
• response content length
• remote IP address
• local port
• elapsed time to serve the request, in milliseconds
There is a Logback configuration file that controls Puppet Server’s logging behavior. Its default location is at /
etc/puppetlabs/puppetserver/request-logging.xml. If you want to place it elsewhere, visit the
documentation on webserver.conf
Authorization
To enable additional logging related to auth.conf, edit Puppet Server's logback.xml file. By default, only a
single message is logged when a request is denied.
To enable a one-time logging of the parsed and transformed auth.conf file, add the following to Puppet Server's
logback.xml file:
<logger name="puppetlabs.trapperkeeper.services.authorization.authorization-
service" level="DEBUG"/>
To enable rule-by-rule logging for each request as it's checked for authorization, add the following to Puppet Server's
logback.xml file:
<logger name="puppetlabs.trapperkeeper.authorization.rules" level="TRACE"/>
Service Bootstrapping
Puppet Server is built on top of our open-source Clojure application framework, Trapperkeeper.
One of the features that Trapperkeeper provides is the ability to enable or disable individual services that an
application provides. In Puppet Server, you can use this feature to enable or disable the CA service. The CA service
is enabled by default, but if you're running a multi-server environment or using an external CA, you might want to
disable the CA service on some nodes.
The service bootstrap configuration files are in two locations:
© 2024 Puppet, Inc., a Perforce company

Puppet | Platform components | 160
• /etc/puppetlabs/puppetserver/services.d/: For services that users are expected to manually
configure if necessary, such as CA-related services.
• /opt/puppetlabs/server/apps/puppetserver/config/services.d/: For services users
shouldn’t need to configure.
Any files with a .cfg extension in either of these locations are combined to form the final set of services Puppet
Server will use.
The CA-related configuration settings are set in /etc/puppetlabs/puppetserver/services.d/ca.cfg.
If services added in future versions have user-configurable settings, the configuration files will also be in this
directory. When upgrading Puppet Server with a package manager, it should not overwrite files already in this
directory.
In the ca.cfg file, find and modify these lines as directed to enable or disable the service:
# To enable the CA service, leave the following line uncommented
puppetlabs.services.ca.certificate-authority-service/certificate-authority-
service
# To disable the CA service, comment out the above line and uncomment the
line below
#puppetlabs.services.ca.certificate-authority-disabled-service/certificate-
authority-disabled-service
Adding Java JARs
Puppet Server can load any provided Java Jars upon its initial startup. When launched, Puppet Server automatically
loads any JARs placed in /opt/puppetlabs/server/data/puppetserver/jars into the classpath.
JARs placed here are not modified or removed when upgrading Puppet Server.
Puppet Server configuration files
auth.conf
Puppet Server's auth.conf file contains rules for authorizing access to Puppet Server's HTTP API endpoints. For
an overview, see Configuring Puppet Server on page 157.
The rules are defined in a file named auth.conf, and Puppet Server applies the settings when a request's endpoint
matches a rule.
Note: You can also use the puppetlabs-puppet_authorization module to manage the new
auth.conf file's authorization rules in the new HOCON format, and the puppetlabs-hocon
module to use Puppet to manage HOCON-formatted settings in general.
To configure how Puppet Server authenticates requests, use the supported HOCON auth.conf file and
authorization methods, and see the parameters and rule definitions in the HOCON Parameters section.
You can find the Puppet Server auth.conf file here.
HOCON example
Here is an example authorization section using the HOCON configuration format:
authorization: {
version: 1
rules: [
{
match-request: {
path: "^/my_path/([^/]+)$"
type: regex
method: get
}
allow: [ node1, node2, node3, {extensions:{ext_shortname1:
value1, ext_shortname2: value2}} ]
sort-order: 1
name: "user-specific my_path"
© 2024 Puppet, Inc., a Perforce company

Puppet | Platform components | 161
},
{
match-request: {
path: "/my_other_path"
type: path
}
allow-unauthenticated: true
sort-order: 2
name: "my_other_path"
},
]
}
For a more detailed example of how to use the HOCON configuration format, see Configuring The Authorization
Service.
For descriptions of each setting, see the following sections.
HOCON parameters
Use the following parameters when writing or migrating custom authorization rules using the new HOCON format.
version
The version parameter is required. In this initial release, the only supported value is 1.
allow-header-cert-info
Note: Puppet Server ignores the setting of the same name in puppetserver.conf on page 167 in favor of
this setting in the auth.conf file.
This optional authorization section parameter determines whether to enable External SSL termination on page
192 on all HTTP endpoints that Puppet Server handles, including the Puppet API, the certificate authority API, and
the Puppet Admin API. It also controls how Puppet Server derives the user's identity for authorization purposes. The
default value is false.
If this setting is true, Puppet Server ignores any presented certificate and relies completely on header data to
authorize requests.
Warning! This is very insecure; do not enable this parameter unless you've secured your network to
prevent any untrusted access to Puppet Server.
You cannot rename any of the X-Client headers when this setting is enabled, and you must specify identity
through the X-Client-Verify, X-Client-DN, and X-Client-Cert headers.
For more information, see Disable HTTPS for Puppet Server on page 192 in the Puppet Server documentation and
Configuring the Authorization Service in the trapperkeeper-authorization documentation.
rules
The required rules array of a Puppet Server's HOCON auth.conf file determines how Puppet Server responds
to a request. Each element is a map of settings pertaining to a rule, and when Puppet Server receives a request, it
evaluates that request against each rule looking for a match.
You define each rule by adding parameters to the rule's match-request section. A rules array can contain as
many rules as you need, each with a single match-request section.
If a request matches a rule in a match-request section, Puppet Server determines whether to allow or deny the
request using the rules parameters that follow the rule's match-request section:
• At least one of:
• allow
• allow-unauthenticated
• deny
• sort-order (required)
© 2024 Puppet, Inc., a Perforce company

Puppet | Platform components | 162
• name (required)
If no rule matches, Puppet Server denies the request by default and returns an HTTP 403/Forbidden response.
match-request
A match-request can take the following parameters, some of which are required:
• path and type (required): A match-request rule must have a path parameter, which returns a match
when a request's endpoint URL starts with or contains the path parameter's value. The parameter can be a literal
string or regular expression as defined in the required type parameter.
# Regular expression to match a path in a URL.
path: "^/puppet/v3/report/([^/]+)$"
type: regex
# Literal string to match the start of a URL's path.
path: "/puppet/v3/report/"
type: path
Note: While the HOCON format doesn't require you to wrap all string values with double quotation
marks, some special characters commonly used in regular expressions --- such as * --- break HOCON
parsing unless the entire value is enclosed in double quotes.
• method: If a rule contains the optional method parameter, Puppet Server applies that rule only to requests that
use its value's listed HTTP methods. This parameter's valid values are get, post, put, delete, and head,
provided either as a single value or array of values.
# Use GET and POST.
method: [get, post]
# Use PUT.
method: put
Note: While the new HOCON format does not provide a direct equivalent to the Deprecated features
on page 150 method parameter's search indirector, you can create the equivalent rule by passing
GET and POST to method and specifying endpoint paths using the path parameter.
• query-params: Use the optional query-params setting to provide the list of query parameters. Each entry is a
hash of the param name followed by a list of its values.
For example, this rule would match a request URL containing the environment=production or
environment=test query parameters:
``` hocon
query-params: {
environment: [ production, test ]
}
```
allow, allow-unauthenticated, and deny
After each rule's match-request section, it must also have an allow, allow-unauthenticated, or deny
parameter. (You can set both allow and deny parameters for a rule, though Puppet Server always prioritizes deny
over allow when a request matches both.)
If a request matches the rule, Puppet Server checks the request's authenticated "name" (see allow-header-cert-
info) against these parameters to determine what to do with the request.
• allow-unauthenticated: If this Boolean parameter is set to true, Puppet Server allows the request ---
even if it can't determine an authenticated name. This is a potentially insecure configuration --- be careful when
enabling it. A rule with this parameter set to true can't also contain the allow or deny parameters.
© 2024 Puppet, Inc., a Perforce company

Puppet | Platform components | 163
• allow: This parameter can take a single string value, an array of string values, a single map value with either an
extensions or certname key, or an array of string and map values.
The string values can contain:
• An exact domain name, such as www.example.com.
• A glob of names containing a * in the first segment, such as *.example.com or simply *.
• A regular expression surrounded by / characters, such as /example/.
• A backreference to a regular expression's capture group in the path value, if the rule also contains a type
value of regex. For example, if the path for the rule were "^/example/([^/]+)$", you can make a
backreference to the first capture group using a value like $1.domain.org.
The map values can contain:
• An extensions key that specifies an array of matching X.509 extensions. Puppet Server authenticates the
request only if each key in the map appears in the request, and each key's value exactly matches.
• A certname key equivalent to a bare string.
If the request's authenticated name matches the parameter's value, Puppet Server allows it.
Note: If you are using Puppet Server with the CA disabled, you must use OID values for the extensions.
Puppet Server will not be able to resolve short names in this mode.
• deny: This parameter can take the same types of values as the allow parameter, but refuses the request if the
authenticated name matches --- even if the rule contains an allow value that also matches.
Also, in the HOCON Puppet Server authentication method, there is no directly equivalent behavior to the
Deprecated features on page 150 auth parameter's on value.
sort-order
After each rule's match-request section, the required sort-order parameter sets the order in which Puppet
Server evaluates the rule by prioritizing it on a numeric value between 1 and 399 (to be evaluated before default
Puppet rules) or 601 to 998 (to be evaluated after Puppet), with lower-numbered values evaluated first. Puppet Server
secondarily sorts rules lexicographically by the name string value's Unicode code points.
sort-order: 1
name
After each rule's match-request section, this required parameter's unique string value identifies the rule to Puppet
Server. The name value is also written to server logs and error responses returned to unauthorized clients.
name: "my path"
Note: If multiple rules have the same name value, Puppet Server will fail to launch.
ca.conf
The ca.conf file configures settings for the Puppet Server Certificate Authority (CA) service. For an overview, see
Configuring Puppet Server on page 157.
Signing settings
The allow-subject-alt-names setting in the certificate-authority section enables you to sign
certificates with subject alternative names. It is false by default for security reasons but can be enabled if you need
to sign certificates with subject alternative names. Be aware that enabling the setting could allow agent nodes
to impersonate other nodes (including the nodes that already have signed certificates). Consequently, you must
carefully inspect any CSRs with SANs attached. puppet cert sign previously allowed this via a flag, but
puppetserver ca sign requires it to be configured in the config file.
The allow-authorization-extensions setting in the certificate-authority section also enables
you to sign certs with authorization extensions. It is false by default for security reasons, but can be enabled
© 2024 Puppet, Inc., a Perforce company

Puppet | Platform components | 164
if you know you need to sign certificates this way. puppet cert sign used to allow this via a flag, but
puppetserver ca sign requires it to be configued in the config file.
Infrastructure CRL settings
Puppet Server is able to create a separate CRL file containing only revocations of Puppet infrastructure nodes. This
behavior is turned off by default. To enable it, set certificate-authority.enable-infra-crl to true.
global.conf
The global.conf file contains global configuration settings for Puppet Server. For an overview, see Configuring
Puppet Server on page 157.
You shouldn't typically need to make changes to this file. However, you can change the logging-config path
for the logback logging configuration file if necessary. For more information about the logback file, see http://
logback.qos.ch/manual/configuration.html.
Example
global: {
logging-config: /etc/puppetlabs/puppetserver/logback.xml
}
logback.xml
Puppet Server’s logging is routed through the Java Virtual Machine's Logback library and configured in an XML file
typically named logback.xml.
Note: This document covers basic, commonly modified options for Puppet Server logs. Logback is a
powerful library with many options. For detailed information on configuring Logback, see the Logback
Configuration Manual.
For advanced logging configuration tips specific to Puppet Server, such as configuring Logstash or
outputting logs in JSON format, see Advanced logging configuration on page 177.
Puppet Server logging
By default, Puppet Server logs messages and errors to /var/log/puppetlabs/puppetserver/
puppetserver.log. The default log level is ‘INFO’, and Puppet Server sends nothing to syslog. You can
change Puppet Server's logging behavior by editing /etc/puppetlabs/puppetserver/logback.xml, and
you can specify a different Logback config file in global.conf.
You can restart the puppetserver service for changes to take effect, or enable configuration scanning to allow
changes to be recognized at runtime.
Puppet Server also relies on Logback to manage, rotate, and archive Server log files. Logback archives Server logs
when they exceed 10MB, and when the total size of all Server logs exceeds 1GB, it automatically deletes the oldest
logs.
Settings
level
To modify Puppet Server's logging level, change the level attribute of the root element. By default, the logging
level is set to info:
<root level="info">
Supported logging levels, in order from most to least information logged, are trace, debug, info, warn, and
error. For instance, to enable debug logging for Puppet Server, change info to debug:
<root level="debug">
Puppet Server profiling data is included at the debug logging level.
© 2024 Puppet, Inc., a Perforce company

Puppet | Platform components | 165
You can also change the logging level for JRuby logging from its defaults of error and info by setting the level
attribute of the jruby element. For example, to enable debug logging for JRuby, set the attribute to debug:
<jruby level="debug">
Logging location
You can change the file to which Puppet Server writes its logs in the appender section named F1. By default, the
location is set to /var/log/puppetlabs/puppetserver/puppetserver.log:
...
<appender name="F1" class="ch.qos.logback.core.FileAppender">
<file>/var/log/puppetlabs/puppetserver/puppetserver.log</file>
...
To change this to /var/log/puppetserver.log, modify the contents of the file element:
<file>/var/log/puppetserver.log</file>
The user account that owns the Puppet Server process must have write permissions to the destination path.
scan and scanPeriod
Logback supports noticing and reloading configuration changes without requiring a restart, a feature Logback
calls scanning. To enable this, set the scan and scanPeriod attributes in the <configuration> element of
logback.xml:
<configuration scan="true" scanPeriod="60 seconds">
Due to a bug in Logback, the scanPeriod must be set to a value; setting only scan="true" will not enable
configuration scanning. Scanning is enabled by default in the logback.xml configuration packaged with Puppet
Server.
Note: The HTTP request log does not currently support the scan feature. Adding the scan or scanPeriod settings
to request-logging.xml will have no effect.
HTTP request logging
Puppet Server logs HTTP traffic separately, and this logging is configured in a different Logback configuration file
located at /etc/puppetlabs/puppetserver/request-logging.xml. To specify a different Logback
configuration file, change the access-log-config setting in Puppet Server's webserver.conf on page 171 file.
The HTTP request log uses the same Logback configuration format and settings as the Puppet Server log. It also lets
you configure what it logs using patterns, which follow Logback's PatternLayout format.
metrics.conf
The metrics.conf file configures Puppet Server's Monitoring Puppet Server metrics on page 193 and v2
(Jolokia) metrics on page 259.
Settings
All settings in the file are contained in a HOCON metrics section.
• server-id: A unique identifier to be used as part of the namespace for metrics that this server produces.
• registries: A section that contains settings to control which metrics are reported, and how they're reported.
• <REGISTRY NAME>: A section named for a registry that contains its settings. In Puppet Server's case, this
section should be puppetserver.
• metrics-allowed: An array of metrics to report. See the Monitoring Puppet Server metrics on page
193 for details about individual metrics.
• reporters: Can contain jmx and graphite sections with a single Boolean enabled setting to
enable or disable each reporter type.
© 2024 Puppet, Inc., a Perforce company

Puppet | Platform components | 166
• reporters: Configures reporters that distribute metrics to external services or viewers.
• graphite: Contains settings for the Graphite reporter.
• host: A string containing the Graphite server's hostname or IP address.
• port: Contains the Graphite service's port number.
• update-interval-seconds: Sets the interval on which Puppet Server will send metrics to the
Graphite server.
Example
Puppet Server ships with a default metrics.conf file in Puppet Server's conf.d directory, similar to the below
example with additional comments.
metrics: {
server-id: localhost
registries: {
puppetserver: {
# specify metrics to allow in addition to those in the default
list
#metrics-allowed: ["compiler.compile.production"]
reporters: {
jmx: {
enabled: true
}
# enable or disable Graphite metrics reporter
#graphite: {
# enabled: true
#}
}
}
}
reporters: {
#graphite: {
# # graphite host
# host: "127.0.0.1"
# # graphite metrics port
# port: 2003
# # how often to send metrics to graphite
# update-interval-seconds: 5
#}
}
}
product.conf
The product.conf file contains settings that determine how Puppet Server interacts with Puppet, Inc., such as
automatic update checking and analytics data collection.
Settings
The product.conf file doesn't exist in a default Puppet Server installation; to configure its settings, you must
create it in Puppet Server's conf.d directory (located by default at /etc/puppetlabs/puppetserver/
conf.d). This file is a HOCON-formatted configuration file with the following settings:
© 2024 Puppet, Inc., a Perforce company

Puppet | Platform components | 167
• Settings in the product section configure update checking and analytics data collection:
• check-for-updates: If set to false, Puppet Server will not automatically check for updates, and will
not send analytics data to Puppet.
If this setting is unspecified (default) or set to true, Puppet Server checks for updates upon start or restart,
and every 24 hours thereafter, by sending the following data to Puppet:
• Product name
• Puppet Server version
• IP address
• Data collection timestamp
Puppet requests this data as one of the many ways we learn about and work with our community. The more we
know about how you use Puppet, the better we can address your needs. No personally identifiable information
is collected, and the data we collect is never used or shared outside of Puppet.
Example
# Disabling automatic update checks and corresponding analytic data
collection
product: {
check-for-updates: false
}
puppetserver.conf
The puppetserver.conf file contains settings for the Puppet Server application. For an overview, see
Configuring Puppet Server on page 157.
Settings
Note: Under most conditions, you won't change the default settings for server-conf-dir or
server-code-dir. However, if you do, also change the equivalent Puppet settings (confdir or
codedir) to ensure that commands like puppetserver ca and puppet module use the same
directories as Puppet Server. You must also specify the non-default confdir when running commands,
because that setting must be set before Puppet tries to find its config file.
• The jruby-puppet settings configure the interpreter.
Deprecation Note: Puppet Server 5.0 removed the compat-version setting, which is incompatible
with JRuby 1.7.27, and the service won't start if compat-version is set. Puppet Server 6.0 uses
JRuby 9.1 which supports Ruby 2.3.
• ruby-load-path: The location where Puppet Server expects to find Puppet, Facter, and other components.
• gem-home: The location where JRuby looks for gems. It is also used by the puppetserver gem
command line tool. If nothing is specified, JRuby uses the Puppet default:
• /opt/puppetlabs/server/data/puppetserver/jruby-gems
• gem-path: The complete "GEM_PATH" for jruby. If set, it should include the gem-home directory, as well
as any other directories that gems can be loaded from (including the vendored gems directory for gems that
ship with puppetserver). The default value is: ["/opt/puppetlabs/server/data/puppetserver/
jruby-gems", "/opt/puppetlabs/server/data/puppetserver/vendored-jruby-
gems", "/opt/puppetlabs/puppet/lib/ruby/vendor_gems"]
• instance-creation-concurrency: Optional. Specifies the number of JRuby instances that are
created concurrently when Puppet Server is started. The default value is 3, which means that a single JRuby
instance is created when Puppet Server is started, and then additional instances are created up to three at a
time. Concurrent creation helps to accelerate the Puppet Server startup process. You can set a value of 1 to
© 2024 Puppet, Inc., a Perforce company
Puppet | Platform components | 168
revert to the previous behavior of creating one JRuby instance at a time. Valid values are 1 up to the max-
active-instances value minus 1.
• environment-vars: Optional. A map of environment variables which are made visible to Ruby code
running within JRuby, for example, via the Ruby ENV class.
By default, the only environment variables whose values are set into JRuby from the shell are HOME and
PATH.
The default value for the GEM_HOME environment variable in JRuby is set from the value provided for the
jruby-puppet.gem-home key.
Any variable set from the map for the environment-vars key overrides these defaults. Avoid overriding
HOME, PATH, or GEM_HOME here because these values are already configurable via the shell or jruby-
puppet.gem-home.
• server-conf-dir: Optional. The path to the Puppet configuration directory. The default is /etc/
puppetlabs/puppet.
• server-code-dir: Optional. The path to the Puppet code directory. The default is /etc/puppetlabs/
code.
• server-var-dir: Optional. The path to the Puppet cache directory. The default is /opt/puppetlabs/
server/data/puppetserver.
• server-run-dir: Optional. The path to the run directory, where the service's PID file is stored. The
default is /var/run/puppetlabs/puppetserver.
• server-log-dir: Optional. The path to the log directory. If nothing is specified, it uses the Puppet default
/var/log/puppetlabs/puppetserver.
• max-active-instances: Optional. The maximum number of JRuby instances allowed. The default is
'num-cpus - 1', with a minimum value of 1 and a maximum value of 4. In multithreaded mode, this controls the
number of threads allowed to run concurrently through the single JRuby instance.
• max-requests-per-instance: Optional. The number of HTTP requests a given JRuby instance will
handle in its lifetime. When a JRuby instance reaches this limit, it is flushed from memory and replaced with a
fresh one. The default is 0, which disables automatic JRuby flushing.
JRuby flushing can be useful for working around buggy module code that would otherwise cause memory
leaks, but it slightly reduces performance whenever a new JRuby instance reloads all of the Puppet Ruby code.
If memory leaks from module code are not an issue in your deployment, the default value of 0 performs best.
• multithreaded: Optional, false by default. Configures Puppet Server to use a single JRuby instance to
process requests that require a JRuby, processing a number of threads up to max-active-instances at a
time. Reduces the memory footprint of the server by only requiring a single JRuby.
Note: Multithreaded mode is an experimental feature which might experience breaking changes in
future releases. Test the feature in a non-production environment before enabling it in production.
• max-queued-requests: Optional. The maximum number of requests that may be queued waiting to
borrow a JRuby from the pool. When this limit is exceeded, a 503 "Service Unavailable" response will be
returned for all new requests until the queue drops below the limit. If max-retry-delay is set to a positive
value, then the 503 responses will include a Retry-After header indicating a random sleep time after
which the client may retry the request. The default is 0, which disables the queue limit.
• max-retry-delay: Optional. Sets the upper limit for the random sleep set as a Retry-After header
on 503 responses returned when max-queued-requests is enabled. A value of 0 will cause the Retry-
After header to be omitted. Default is 1800 seconds which corresponds to the default run interval of the
Puppet daemon.
• borrow-timeout: Optional. The timeout in milliseconds, when attempting to borrow an instance from the
JRuby pool. The default is 1200000.
• environment-class-cache-enabled: Optional. Used to control whether the master service maintains
a cache in conjunction with the use of the Environment classes on page 266.
If this setting is set to true, Puppet Server maintains the cache. It also returns an Etag header for each GET
request to the API. For subsequent GET requests that use the prior Etag value in an If-None-Match header,
© 2024 Puppet, Inc., a Perforce company

Puppet | Platform components | 169
when the class information available for an environment has not changed, Puppet Server returns an HTTP 304
(Not Modified) response with no body.
If this setting is set to false or is not specified, Puppet Server doesn't maintain a cache, an Etag header is
not returned for GET requests, and the If-None-Match header for an incoming request is ignored. It therefore
parses the latest available code for an environment from disk on every incoming request.
For more information, see the Environment classes on page 266.
• compile-mode: The default value depends on JRuby versions, for 1.7 it is off, for 9k it is jit. Used to
control JRuby's "CompileMode", which may improve performance. A value of jit enables JRuby's "just-in-
time" compilation of Ruby code. A value of force causes JRuby to attempt to pre-compile all Ruby code.
• profiling-mode: Optional. Used to enable JRuby's profiler for service startup and set it to one of the
supported modes. The default value is off, but it can be set to one of api, flat, graph, html, json,
off, and service. See ruby-prof for details on what the various modes do.
• profiler-output-file: Optional. Used to set the output file to direct JRuby profiler output. Should be
a fully qualified path writable by the service user. If not set will default to a random name inside the service
working directory.
• The profiler settings configure profiling:
• enabled: If this is set to true, Puppet Server enables profiling for the Puppet Ruby code. The default is
true.
• The versioned-code settings configure commands required to use static catalogs:
• code-id-command: the path to an executable script that Puppet Server invokes to generate a code_id.
When compiling a static catalog, Puppet Server uses the output of this script as the catalog's code_id. The
code_id associates the catalog with the compile-time version of any file on page 536 that has a source
attribute with a puppet:/// URI value.
• code-content-command contains the path to an executable script that Puppet Server invokes when an
agent makes a Static file content on page 274 API request for the contents of a file on page 536 that has a
source attribute with a puppet:/// URI value.
• The dropsonde settings configure whether and how often Puppet Server submits usage telemetry:
• enabled: If this is set to true, Puppet Server submits public content usage data to Puppet development.
Defaults to false.
• interval: how long, in seconds, Puppet Server waits between telemetry submissions if enabled. Defaults to
604800 (one week).
Note: The Puppet Server process must be able to execute the code-id-command and code-
content-command scripts, and the scripts must return valid content to standard output and an
error code of 0. For more information, see the static catalogs and Static file content on page 274
documentation.
If you're using static catalogs, you must set and use both code-id-command and code-content-
command. If only one of those settings are specified, Puppet Server fails to start. If neither setting is
specified, Puppet Server defaults to generating catalogs without static features even when an agent
requests a static catalog, which the agent will process as a normal catalog.
Examples
# Configuration for the JRuby interpreters.
jruby-puppet: {
ruby-load-path: [/opt/puppetlabs/puppet/lib/ruby/vendor_ruby]
gem-home: /opt/puppetlabs/server/data/puppetserver/jruby-gems
gem-path: [/opt/puppetlabs/server/data/puppetserver/jruby-gems, /opt/
puppetlabs/server/data/puppetserver/vendored-jruby-gems]
environment-vars: { "FOO" : ${FOO}
"LANG" : "de_DE.UTF-8" }
server-conf-dir: /etc/puppetlabs/puppet
server-code-dir: /etc/puppetlabs/code
© 2024 Puppet, Inc., a Perforce company

Puppet | Platform components | 170
server-var-dir: /opt/puppetlabs/server/data/puppetserver
server-run-dir: /var/run/puppetlabs/puppetserver
server-log-dir: /var/log/puppetlabs/puppetserver
max-active-instances: 1
max-requests-per-instance: 0
}
# Settings related to HTTP client requests made by Puppet Server.
# These settings only apply to client connections using the
Puppet::Network::HttpPool
# classes. Client connections using net/http or net/https directly will not
be
# configured with these settings automatically.
http-client: {
# A list of acceptable protocols for making HTTP requests
#ssl-protocols: [TLSv1, TLSv1.1, TLSv1.2]
# A list of acceptable cipher suites for making HTTP requests. For more
info on available cipher suites, see:
# http://docs.oracle.com/javase/7/docs/technotes/guides/security/
SunProviders.html#SunJSSEProvider
#cipher-suites: [TLS_RSA_WITH_AES_256_CBC_SHA256,
# TLS_RSA_WITH_AES_256_CBC_SHA,
# TLS_RSA_WITH_AES_128_CBC_SHA256,
# TLS_RSA_WITH_AES_128_CBC_SHA]
# The amount of time, in milliseconds, that an outbound HTTP connection
# will wait for data to be available before closing the socket. If not
# defined, defaults to 20 minutes. If 0, the timeout is infinite and if
# negative, the value is undefined by the application and governed by
the
# system default behavior.
#idle-timeout-milliseconds: 1200000
# The amount of time, in milliseconds, that an outbound HTTP connection
will
# wait to connect before giving up. Defaults to 2 minutes if not set. If
0,
# the timeout is infinite and if negative, the value is undefined in the
# application and governed by the system default behavior.
#connect-timeout-milliseconds: 120000
# Whether to enable http-client metrics; defaults to 'true'.
#metrics-enabled: true
}
# Settings related to profiling the puppet Ruby code.
profiler: {
enabled: true
}
# Settings related to static catalogs. These paths are examples. There are
no default
# scripts provided with Puppet Server, and no default path for the scripts.
To use static catalog features, you must set
# the paths and provide your own scripts.
versioned-code: {
code-id-command: /opt/puppetlabs/server/apps/puppetserver/code-id-
command_script.sh
code-content-command: /opt/puppetlabs/server/apps/puppetserver/code-
content-command_script.sh
}
© 2024 Puppet, Inc., a Perforce company

Puppet | Platform components | 171
web-routes.conf
The web-routes.conf file configures the Puppet Server web-router-service, which sets mount points for
Puppet Server's web applications. You should not modify these mount points, because Puppet agents rely on Puppet
Server mounting them to specific URLs.
For an overview, see Configuring Puppet Server on page 157. To configure the webserver service, see the
webserver.conf on page 171.
Example
Here is an example of a web-routes.conf file:
# Configure the mount points for the web apps.
web-router-service: {
# These two should not be modified because the Puppet 4 agent expects
them to
# be mounted at these specific paths.
"puppetlabs.services.ca.certificate-authority-service/certificate-
authority-service": "/puppet-ca"
"puppetlabs.services.master.master-service/master-service": "/puppet"
# This controls the mount point for the Puppet administration API.
"puppetlabs.services.puppet-admin.puppet-admin-service/puppet-admin-
service": "/puppet-admin-api"
# This controls the mount point for the status API
"puppetlabs.trapperkeeper.services.status.status-service/status-
service": "/status"
# This controls the mount point for the metrics API
"puppetlabs.trapperkeeper.services.metrics.metrics-service/metrics-
webservice": "/metrics"
}
webserver.conf
The webserver.conf file configures the Puppet Server webserver service. For an overview, see Configuring
Puppet Server on page 157. To configure the mount points for the Puppet administrative API web applications, see
the web-routes.conf on page 171.
Examples
The webserver.conf file looks something like this:
# Configure the webserver.
webserver: {
# Log webserver access to a specific file.
access-log-config: /etc/puppetlabs/puppetserver/request-logging.xml
# Require a valid certificate from the client.
client-auth: need
# Listen for HTTPS traffic on all available hostnames.
ssl-host: 0.0.0.0
# Listen for HTTPS traffic on port 8140.
ssl-port: 8140
}
These are the main values for managing a Puppet Server installation. For further documentation, including a complete
list of available settings and values, see Configuring the Webserver Service.
© 2024 Puppet, Inc., a Perforce company

Puppet | Platform components | 172
By default, Puppet Server is configured to use the correct Puppet primary server and certificate authority (CA)
certificates. If you're using an external CA and providing your own certificates and keys, make sure the SSL-related
parameters in webserver.conf point to the correct file.
webserver: {
...
ssl-cert : /path/to/server.pem
ssl-key : /path/to/server.key
ssl-ca-cert : /path/to/ca_bundle.pem
ssl-cert-chain : /path/to/ca_bundle.pem
ssl-crl-path : /etc/puppetlabs/puppet/ssl/crl.pem
}
Migrating to the HOCON auth.conf format
Puppet Server 2.2.0 introduced a significant change in how it manages authentication to API endpoints. The older
Puppet auth.conf file and whitelist-based authorization method were deprecated in the same release and are
now removed in Puppet Server 7. Puppet Server's current auth.conf file format (which is different than the old
auth.conf) is illustrated below in examples.
Use the following examples and methods to convert your authorization rules when upgrading to Puppet Server 2.2.0
and newer. For detailed information about using auth.conf rules with Puppet Server, see the auth.conf on page
160.
Note: To support both Puppet 3 and Puppet 4 agents connecting to Puppet Server, see Backward
Compatibility with Puppet 3 Agents.
Managing rules with Puppet modules
You can reimplement and manage your authorization rules in the new HOCON format and auth.conf file by using
the puppetlabs-puppet_authorization Puppet module. See the module's documentation for details.
Converting rules directly
Most of the deprecated authorization rules and settings are available in the new format.
Unavailable rules, settings, or values
The following rules, settings, and values have no direct equivalent in the new HOCON format. If you require them,
you must reimplement them differently in the new format.
• on value of auth: The deprecated auth parameter's on value results in a match only when a request provides a
client certificate. There is no equivalent behavior in the HOCON format.
• allow_ip or deny_ip parameters
• method parameter's search indirector: While there is no direct equivalent to the deprecated search indirector,
you can create an equivalent HOCON rule. See below for an example.
Note: Puppet Server considers the state of a request's authentication differently depending on whether
the authorization rules use the older Puppet auth.conf or newer HOCON formats. An authorization
rule that uses the deprecated format evaluates the auth parameter as part of rule-matching process.
A HOCON authorization rule first determines whether the request matches other parameters of the
rule, and then considers the request's authentication state (using the rule's allow, deny, or allow-
authenticated values) after a successful match only.
Basic HOCON structure
The HOCON auth.conf file has some fundamental structural requirements:
© 2024 Puppet, Inc., a Perforce company

Puppet | Platform components | 173
• An authorization section, which contains:
• A version on page 161 setting.
• A rules on page 161 array of map values, each representing an authorization rule. Each rule must contain:
• A match-request on page 162 section.
• Each match-request section must contain at least one path and type.
• A numeric sort-order on page 163 value.
• If the value is between 1 and 399, the rule supersedes Puppet Server's default authorization rules.
• If the value is between 601 and 998, the rule can be overridden by Puppet Server's default authorization
rules.
• A string name on page 163 value.
• At least one of the following:
• An allow, allow-unauthenticated, and deny on page 162. The allow or deny values can contain:
• A single string, representing the request's "name" derived from the Common Name (CN) attribute
within an X.509 certificate's Subject Distinguished Name (DN). This string can be an exact name, a
glob, or a regular expression.
• A single map value containing an extension key.
• A single map value containing a certname key.
• An array of values, including string and map values.
• An allow, allow-unauthenticated, and deny on page 162 value, but if present, there cannot also be an
allow value.
For an full example of a HOCON auth.conf file, see the HOCON example on page 160.
Converting a simple rule
Let's convert this simple deprecated auth.conf authorization rule:
path /puppet/v3/environments
method find
allow *
We'll start with a skeletal, incomplete HOCON auth.conf file:
authorization: {
version: 1
rules: [
{
match-request: {
path:
type:
}
allow:
sort-order: 1
name:
},
]
}
Next, let's convert each component of the deprecated rule to the new HOCON format.
1.
Add the path to the new rule's match-request on page 162 setting in its match-request section.
...
match-request: {
path: /puppet/v3/environments
type:
© 2024 Puppet, Inc., a Perforce company

Puppet | Platform components | 174
}
allow:
sort-order: 1
name:
},
...
2.
Next, add its type to the section's match-request on page 162 setting. Because this is a literal string path, the
type is path.
...
match-request: {
path: /puppet/v3/environments
type: path
}
allow:
sort-order: 1
name:
},
...
3.
The legacy rule has a method setting, with an indirector value of find that's equivalent to the GET and POST
HTTP methods. We can implement these by adding an optional HOCON match-request on page 162 setting in
the rule's match-request section and specifying GET and POST as an array.
...
match-request: {
path: /puppet/v3/environments
type: path
method: [get, post]
}
allow:
sort-order: 1
name:
},
...
4.
Next, set the allow setting. The legacy rule used a * glob, which is also supported in HOCON.
...
match-request: {
path: /puppet/v3/environments
type: path
method: [get, post]
}
allow: "*"
sort-order: 1
name:
},
...
5.
Finally, give the rule a unique name value. Remember that the rule will appear in logs and in the body of error
responses to unauthorized clients.
...
match-request: {
path: /puppet/v3/environments
type: path
method: [get, post]
}
allow: "*"
sort-order: 1
name: "environments"
© 2024 Puppet, Inc., a Perforce company

Puppet | Platform components | 175
},
...
Our HOCON auth.conf file should now allow all authenticated clients to make GET and POST requests to the /
puppet/v3/environments endpoint, and should look like this:
authorization: {
version: 1
rules: [
{
match-request: {
path: /puppet/v3/environments
type: path
method: [get, post]
}
allow: "*"
sort-order: 1
name: "environments"
},
]
}
Converting more complex rules
Paths set by regular expressions
To convert a regular expression path, enclose it in double quotation marks and slash characters (/), and set the type
to regex.
Note: You must escape regular expressions to conform to HOCON standards, which are the same as
JSON's and differ from the deprecated format's regular expressions. For instance, the digit-matching
regular expression \d must be escaped with a second backslash, as \d.
Deprecated:
path ~ ^/puppet/v3/catalog/([^/]+)$
HOCON:
authorization: {
version: 1
rules: [
{
match-request: {
path: "^/puppet/v3/catalog/([^/]+)$"
type: regex
...
Note: You must escape regular expressions to conform to HOCON standards, which are the same as
JSON's and differ from the deprecated format's regular expressions. For instance, the digit-matching
regular expression \d must be escaped with a second backslash, as \d.
Backreferencing works the same way it does in the deprecated format.
Deprecated:
path ~ ^/puppet/v3/catalog/([^/]+)$
allow $1
HOCON:
authorization: {
version: 1
© 2024 Puppet, Inc., a Perforce company

Puppet | Platform components | 176
rules: [
{
match-request: {
path: "^/puppet/v3/catalog/([^/]+)$"
type: regex
}
allow: "$1"
...
Allowing unauthenticated requests
To have a rule match any request regardless of its authentication state, including unauthenticated requests,
a deprecated rule would assign the any value to the auth parameter. In a HOCON rule, set the allow-
unauthenticated parameter to true. This overrides the allow and deny parameters and is an insecure
configuration that should be used with caution.
Deprecated:
auth: any
HOCON:
authorization: {
version: 1
rules: [
{
match-request: {
...
}
allow-unauthenticated: true
...
Multiple method indirectors
If a deprecated rule has multiple method indirectors, combine all of the related HTTP methods to the HOCON
method array.
Deprecated:
method find, save
The deprecated find indirector corresponds to the GET and POST methods, and the save indirector corresponds to the
PUT method. In the HOCON format, simply combine these methods in an array.
HOCON:
authorization: {
version: 1
rules: [
{
match-request: {
...
method: [get, post, put]
}
...
Environment URL parameters
In deprecated rules, the environment parameter adds a comma-separated list of query parameters as a suffix to
the base URL. HOCON rules allow you to pass them as an array environment value inside the query-params
setting. Rules in both the deprecated and HOCON formats match any environment value.
© 2024 Puppet, Inc., a Perforce company

Puppet | Platform components | 177
Deprecated:
environment: production,test
HOCON:
authorization: {
version: 1
rules: [
{
match-request: {
...
query-params: {
environment: [ production, test ]
}
}
...
Note: The query-params approach above replaces environment-specific rules for both Puppet 3 and
Puppet 4. If you're supporting agents running both Puppet 3 and Puppet 4, see Backward Compatibility
with Puppet 3 Agents for more information.
Search indirector for method
There's no direct equivalent to the search indirector for the deprecated method setting. Create the equivalent rule by
passing GET and POST to method and specifying endpoint paths using the path parameter.
Deprecated:
path ~ ^/puppet/v3/file_metadata/user_files/
method search
HOCON:
authorization: {
version: 1
rules: [
{
match-request: {
path: "^/puppet/v3/file_metadatas?/user_files/"
type: regex
method: [get, post]
}
...
Advanced logging configuration
Puppet Server uses the Logback library to handle all of its logging. Logback configuration settings are stored in the
logback.xml on page 164 file, which is located at /etc/puppetlabs/puppetserver/logback.xml by
default.
You can configure Logback to log messages in JSON format, which makes it easy to send them to other logging
backends, such as Logstash.
Configuring Puppet Server for use with Logstash
There are a few steps necessary to setup your Puppet Server logging for use with Logstash. The first step is to modify
your logging configuration so that Puppet Server is logging in a JSON format. After that, you'll configure an external
tool to monitor these JSON files and send the data to Logstash (or another remote logging system).
Configuring Puppet Server to log to JSON
Before you configure Puppet Server to log to JSON, consider the following:
© 2024 Puppet, Inc., a Perforce company

Puppet | Platform components | 178
• Do you want to configure Puppet Server to only log to JSON, instead of the default plain-text logging? Or do you
want to have JSON logging in addition to the default plain-text logging?
• Do you want to set up JSON logging only for the main Puppet Server logs (puppetserver.log), or also for
the HTTP access logs (puppetserver-access.log)?
• What kind of log rotation strategy do you want to use for the new JSON log files?
The following examples show how to configure Logback for:
• logging to both JSON and plain-text
• JSON logging both the main logs and the HTTP access logs
• log rotation on the JSON log files
Adjust the example configuration settings to suit your needs.
Note: Puppet Server also relies on Logback to manage, rotate, and archive Server log files. Logback
archives Server logs when they exceed 200MB, and when the total size of all Server logs exceeds 1GB, it
automatically deletes the oldest logs.
Adding a JSON version of the main Puppet Server logs
Logback writes logs using components called appenders. The example code below uses RollingFileAppender
to rotate the log files and avoid consuming all of your storage.
1.
To configure Puppet Server to log its main logs to a second log file in JSON format, add an appender section like
the following example to your logback.xml file, at the same level in the XML as existing appenders. The order
of the appenders does not matter.
<appender name="JSON"
class="ch.qos.logback.core.rolling.RollingFileAppender">
<file>/var/log/puppetlabs/puppetserver/puppetserver.log.json</file>
<rollingPolicy
class="ch.qos.logback.core.rolling.TimeBasedRollingPolicy">
<fileNamePattern>/var/log/puppetlabs/puppetserver/
puppetserver.log.json.%d{yyyy-MM-dd}</fileNamePattern>
<maxHistory>5</maxHistory>
</rollingPolicy>
<encoder class="net.logstash.logback.encoder.LogstashEncoder"/>
</appender>
2.
Activate the appended by adding an appender-ref entry to the <root> section of logback.xml:
<root level="info">
<appender-ref ref="FILE"/>
<appender-ref ref="JSON"/>
</root>
3.
If you decide you want to log only the JSON format, comment out the other appender-ref entries.
LogstashEncoder has many configuration options, including the ability to modify the list of fields that you want
to include, or give them different field names. For more information, see the Logstash Logback Encoder Docs.
Adding a JSON version of the Puppet Server HTTP Access logs
To add JSON logging for HTTP requests:
1.
Add the following Logback appender section to the request-logging.xml file:
{% raw %}
<appender name="JSON"
class="ch.qos.logback.core.rolling.RollingFileAppender">
<file>/var/log/puppetlabs/puppetserver/puppetserver-access.log.json</
file>
© 2024 Puppet, Inc., a Perforce company

Puppet | Platform components | 179
<rollingPolicy
class="ch.qos.logback.core.rolling.TimeBasedRollingPolicy">
<fileNamePattern>/var/log/puppetlabs/puppetserver/puppetserver-
access.log.json.%d{yyyy-MM-dd}</fileNamePattern>
<maxHistory>30</maxHistory>
</rollingPolicy>
<encoder
class="net.logstash.logback.encoder.AccessEventCompositeJsonEncoder">
<providers>
<version/>
<pattern>
<pattern>
{
"@timestamp":"%date{yyyy-MM-dd'T'HH:mm:ss.SSSXXX}",
"clientip":"%remoteIP",
"auth":"%user",
"verb":"%requestMethod",
"requestprotocol":"%protocol",
"rawrequest":"%requestURL",
"response":"#asLong{%statusCode}",
"bytes":"#asLong{%bytesSent}",
"total_service_time":"#asLong{%elapsedTime}",
"request":"http://%header{Host}%requestURI",
"referrer":"%header{Referer}",
"agent":"%header{User-agent}",
"request.host":"%header{Host}",
"request.accept":"%header{Accept}",
"request.accept-encoding":"%header{Accept-
Encoding}",
"request.connection":"%header{Connection}",
"puppet.client-verify":"%header{X-Client-Verify}",
"puppet.client-dn":"%header{X-Client-DN}",
"puppet.client-cert":"%header{X-Client-Cert}",
"response.content-type":"%responseHeader{Content-
Type}",
"response.content-length":"%responseHeader{Content-
Length}",
"response.server":"%responseHeader{Server}",
"response.connection":"%responseHeader{Connection}"
}
</pattern>
</pattern>
</providers>
</encoder>
</appender>
{% endraw %}
2.
Add a corresponding appender-ref in the configuration section:
<appender-ref ref="JSON"/>
For more information about options available for the pattern section, see the Logback Logstash Encoder Docs.
Sending the JSON data to Logstash
After configuring Puppet Server to log messages in JSON format, you must also configure it to send the logs to
Logstash (or another external logging system). There are several different ways to approach this:
© 2024 Puppet, Inc., a Perforce company
Puppet | Platform components | 180
• Configure Logback to send the data to Logstash directly, from within Puppet Server. See the Logstash-Logback
encoder docs on how to send the logs by TCP or UDP. Note that TCP comes with the risk of bottlenecking Puppet
Server if your Logstash system is busy, and UDP might silently drop log messages.
• Filebeat is a tool from Elastic for shipping log data to Logstash.
• Logstash Forwarder is an earlier tool from Elastic with similar capabilities.
Differing behavior in puppet.conf
Puppet Server honors almost all settings in puppet.conf and should pick them up automatically. For more complete
information on puppet.conf settings, see our Configuration Reference on page 98 page.
Settings that differ
autoflush on page 99
Puppet Server does not use this setting. For more information on the logging implementation for Puppet Server, see
the Logging on page 159.
bindaddress
Puppet Server does not use this setting. To set the address on which the primary server listens, use either host
(unencrypted) or ssl-host (SSL encrypted) in the webserver.conf file.
ca
Puppet Server does not use this setting. Instead, Puppet Server acts as a certificate authority based on the certificate
authority service configuration in the ca.cfg file. See Service Bootstrapping on page 159 for more details.
ca_ttl
Puppet Server enforces a max ttl of 50 standard years (up to 1576800000 seconds).
cacert on page 100
If you enable Puppet Server's certificate authority service, it uses the cacert setting in puppet.conf to determine the
location of the CA certificate for such tasks as generating the CA certificate or using the CA to sign client certificates.
This is true regardless of the configuration of the ssl- settings in webserver.conf.
cacrl on page 101
If you define ssl-cert, ssl-key, ssl-ca-cert, or ssl-crl-path in webserver.conf, Puppet Server uses
the file at ssl-crl-path as the CRL for authenticating clients via SSL. If at least one of the ssl- settings in
webserver.conf is set but ssl-crl-path is not set, Puppet Server will not use a CRL to validate clients via SSL.
If none of the ssl- settings in webserver.conf are set, Puppet Server uses the CRL file defined for the hostcrl
setting---and not the file defined for the cacrl setting--in puppet.conf. At start time, Puppet Server copies the file for
the cacrl setting, if one exists, over to the location in the hostcrl setting.
Any CRL file updates from the Puppet Server certificate authority---such as revocations performed via the
certificate_status HTTP endpoint---use the cacrl setting in puppet.conf to determine the location of the
CRL. This is true regardless of the ssl- settings in webserver.conf.
capass
Puppet Server does not use this setting. Puppet Server's certificate authority does not create a capass password file
when the CA certificate and key are generated.
caprivatedir
Puppet Server does not use this setting. Puppet Server's certificate authority does not create this directory.
daemonize on page 104
Puppet Server does not use this setting.
© 2024 Puppet, Inc., a Perforce company
Puppet | Platform components | 181
hostcert on page 109
If you define ssl-cert, ssl-key, ssl-ca-cert, or ssl-crl-path in webserver.conf, Puppet Server
presents the file at ssl-cert to clients as the server certificate via SSL.
If at least one of the ssl- settings in webserver.conf is set but ssl-cert is not set, Puppet Server gives an error
and shuts down at startup. If none of the ssl- settings in webserver.conf are set, Puppet Server uses the file for the
hostcert setting in puppet.conf as the server certificate during SSL negotiation.
Regardless of the configuration of the ssl- "webserver.conf" settings, Puppet Server's certificate authority service, if
enabled, uses the hostcert "puppet.conf" setting, and not the ssl-cert setting, to determine the location of the
server host certificate to generate.
hostcrl on page 109
If you define ssl-cert, ssl-key, ssl-ca-cert, or ssl-crl-path in webserver.conf, Puppet Server uses
the file at ssl-crl-path as the CRL for authenticating clients via SSL. If at least one of the ssl- settings in
webserver.conf is set but ssl-crl-path is not set, Puppet Server will not use a CRL to validate clients via SSL.
If none of the ssl- settings in webserver.conf are set, Puppet Server uses the CRL file defined for the hostcrl
setting---and not the file defined for the cacrl setting--in puppet.conf. At start time, Puppet Server copies the file for
the cacrl setting, if one exists, over to the location in the hostcrl setting.
Any CRL file updates from the Puppet Server certificate authority---such as revocations performed via the
certificate_status HTTP endpoint---use the cacrl setting in puppet.conf to determine the location of the
CRL. This is true regardless of the ssl- settings in webserver.conf.
hostprivkey on page 110
If you define ssl-cert, ssl-key, ssl-ca-cert, or ssl-crl-path in webserver.conf, Puppet Server uses
the file at ssl-key as the server private key during SSL transactions.
If at least one of the ssl- settings in webserver.conf is set but ssl-key is not, Puppet Server gives an error and
shuts down at startup. If none of the ssl- settings in webserver.conf are set, Puppet Server uses the file for the
hostprivkey setting in puppet.conf as the server private key during SSL negotiation.
If you enable the Puppet Server certificate authority service, Puppet Server uses the hostprivkey setting in
puppet.conf to determine the location of the server host private key to generate. This is true regardless of the
configuration of the ssl- settings in webserver.conf.
http_debug
Puppet Server does not use this setting. Debugging for HTTP client code in Puppet Server is controlled through
Puppet Server's common logging mechanism. For more information on the logging implementation for Puppet Server,
see the Logging on page 159.
keylength on page 111
Puppet Server does not currently use this setting. Puppet Server's certificate authority generates 4096-bit keys in
conjunction with any SSL certificates that it generates.
localcacert on page 113
If you define ssl-cert, ssl-key, ssl-ca-cert, and/or ssl-crl-path in webserver.conf, Puppet Server
uses the file at ssl-ca-cert as the CA cert store for authenticating clients via SSL.
If at least one of the ssl- settings in webserver.conf is set but ssl-ca-cert is not set, Puppet Server gives an
error and shuts down at startup. If none of the ssl- settings in webserver.conf is set, Puppet Server uses the CA file
defined for the localcacert setting in puppet.conf for SSL authentication.
logdir on page 113
Puppet Server does not use this setting. For more information on the logging implementation for Puppet Server, see
the Logging on page 159.
© 2024 Puppet, Inc., a Perforce company
Puppet | Platform components | 182
masterhttplog
Puppet Server does not use this setting. You can configure a web server access log via the access-log-config
setting in the webserver.conf file.
masterlog
Puppet Server does not use this setting. For more information on the logging implementation for Puppet Server, see
the Logging on page 159.
masterport on page 114
Puppet Server does not use this setting. To set the port on which the primary server listens, set the port
(unencrypted) or ssl-port (SSL encrypted) setting in the webserver.conf file.
puppetdlog on page 118
Puppet Server does not use this setting. For more information on the logging implementation for Puppet Server, see
the Logging on page 159.
rails_loglevel
Puppet Server does not use this setting.
railslog
Puppet Server does not use this setting.
ssl_client_header
Puppet Server honors this setting only if the allow-header-cert-info setting in the server.conf file is set
to 'true'. For more information on this setting, see the documentation on External SSL termination on page 192.
ssl_client_verify_header
Puppet Server honors this setting only if the allow-header-cert-info setting in the server.conf file is set
to true. For more information on this setting, see the documentation on External SSL termination on page 192.
ssl_server_ca_auth
Puppet Server does not use this setting. It only considers the ssl-ca-cert setting from the webserver.conf file and
the cacert setting from the puppet.conf file. See cacert for more information.
syslogfacility on page 124
Puppet Server does not use this setting.
user on page 125
Puppet Server does not use this setting.
HttpPool-Related Server Settings
configtimeout
Puppet Server does not currently consider this setting when making HTTP requests. This pertains, for example, to any
requests that the primary server would make to the reporturl for the http report processor.
http_proxy_host
Puppet Server does not currently consider this setting when making HTTP requests. This pertains, for example, to any
requests that the primary server would make to the reporturl for the http report processor.
http_proxy_port
Puppet Server does not currently consider this setting when making HTTP requests. This pertains, for example, to any
requests that the primary server would make to the reporturl for the http report processor.
Overriding Puppet settings in Puppet Server
Currently, the jruby-puppet section of your puppetserver.conf file contains five settings (master-
conf-dir, master-code-dir, master-var-dir, master-run-dir, and master-log-dir) that allow
© 2024 Puppet, Inc., a Perforce company

Puppet | Platform components | 183
you to override settings set in your puppet.conf file. On installation, these five settings will be set to the proper
default values.
While you are free to change these settings at will, please note that any changes made to the master-conf-dir
and master-code-dir settings absolutely MUST be made to the corresponding Puppet settings (confdir and
codedir) as well to ensure that Puppet Server and the Puppet cli tools (such as puppetserver ca and puppet
module) use the same directories. The master-conf-dir and master-code-dir settings apply to Puppet
Server only, and will be ignored by the ruby code that runs when the Puppet CLI tools are run.
For example, say you have the codedir setting left unset in your puppet.conf file, and you change the
master-code-dir setting to /etc/my-puppet-code-dir. In this case, Puppet Server will read code from
/etc/my-puppet-code-dir, but the puppet module tool will think that your code is stored in /etc/
puppetlabs/code.
While it is not as critical to keep master-var-dir, master-run-dir, and master-log-dir in sync with
the vardir, rundir, and logdir Puppet settings, please note that this applies to these settings as well.
Also, please note that these configuration differences also apply to the interpolation of the confdir, codedir,
vardir, rundir, and logdir settings in your puppet.conf file. So, take the above example, wherein you
set master-code-dir to /etc/my-puppet-code-dir. Because the basemodulepath setting is by
default $codedir/modules:/opt/puppetlabs/puppet/modules, then Puppet Server would use /
etc/my-puppet-code-dir/modules:/opt/puppetlabs/puppet/modules for the value of the
basemodulepath setting, whereas the puppet module tool would use /etc/puppetlabs/code/
modules:/opt/puppetlabs/puppet/modules for the value of the basemodulepath setting.
Using and extending Puppet Server
Subcommands
We've provided several CLI commands to help with debugging and exploring Puppet Server. Most of the commands
are the same ones you would use in a Ruby environment -- such as gem, ruby, and irb -- except they run against
Puppet Server's JRuby installation and gems instead of your system Ruby.
The following subcommands are provided:
• ca
• gem
• ruby
• irb
• foreground
The format for each subcommand is:
puppetserver <subcommand> [<args>]
When running from source, the format is:
lein <subcommand> -c /path/to/puppetserver.conf [--] [<args>]
Note that if you are running from source, you need to separate flag arguments (such as --version or -e) with
--, as shown above. Otherwise, those arguments will be applied to Leiningen instead of to Puppet Server. This isn't
necessary when running from packages (i.e., puppetserver <subcommand>).
ca
Available actions
CA subcommand usage: puppetserver ca <action> [options].
The available actions:
• clean: clean files from the CA for certificates
• delete: remove expired, arbitrary, or all certs from the signed directory
© 2024 Puppet, Inc., a Perforce company

Puppet | Platform components | 184
• generate: create a new certificate signed by the CA
• setup: generate a root and intermediate signing CA for Puppet Server
• import: import the CA's key, certs, and CRLs
• list: list all certificate requests
• migrate: migrate the contents of the CA directory from its current location to /etc/puppetlabs/
puppetserver/ca. Adds a symlink at the old location for backwards compatibility.
• revoke: revoke a given certificate
• sign: sign a given certificate
• Use the --ttl flag with sign subcommand to send the ttl to the CA. The signed certificate's notAfter
value is the current time plus the ttl. The values are valid puppet.conf ttl values, for example, 1y = 1
year, 31d = 31 days.
• prune: remove duplicate entries from the CA CRL
Important: Most of these actions only work if the puppetserver service is running. Exceptions to this
requirement are:
• migrate and prune, which require you to stop the puppetserver service.
• setup and import, which require you to run the actions only once before you start your puppetserver
service, for the very first time.
Syntax
puppetserver ca <action> [options]
Most commands require a target to be specified with the --certname flag. For example:
puppetserver ca sign --certname cert.example.com
The target is a comma separated list of names that act on multiple certificates at one time.
You can supply a custom configuration file to all subcommands using the --config option. This allows you to
point the command at a custom puppet.conf, instead of the default one.
Note: These commands are available in Puppet 5, but in order to use them, you must update Puppet Server’s
auth.conf to include a rule allowing the primary server’s certname to access the certificate_status and
certificate_statuses endpoints. The same applies to upgrading in open source Puppet: if you're upgrading
from Puppet 5 to Puppet 6 and are not regenerating your CA, you must allow the primary server’s certname. See
auth.conf on page 160 for details on how to use auth.conf.
Example:
{
# Allow the CA CLI to access the certificate_status endpoint
match-request: {
path: "/puppet-ca/v1/certificate_status"
type: path
method: [get, put, delete]
}
allow: server.example.com
sort-order: 500
name: "puppetlabs cert status"
},
Signing certs with SANs or auth extensions
With the removal of puppet cert sign, it's possible for Puppet Server’s CA API to sign certificates with subject
alternative names or auth extensions, which was previously completely disallowed. This is disabled by default for
security reasons, but you can turn it on by setting allow-subject-alt-names or allow-authorization-
extensions to true in the certificate-authority section of Puppet Server’s config (usually located in
© 2024 Puppet, Inc., a Perforce company

Puppet | Platform components | 185
ca.conf). After these have been configured, you can use puppetserver ca sign --certname <name>
to sign certificates with these additions.
Note: For more details about the ca subcommand, visit Puppet Server CA commands on page 276.
gem
Installs and manages gems that are isolated from system Ruby and are accessible only to Puppet Server. This is a
simple wrapper around the standard Ruby gem, so all of the usual arguments and flags should work as expected.
Examples:
$ puppetserver gem install pry --no-ri --no-rdoc
$ lein gem -c /path/to/puppetserver.conf -- install pry --no-ri --no-rdoc
If needed, you also can use the JAVA_ARGS_CLI environment variable to pass along custom arguments to the Java
process that the gem command is run within.
Example:
$ JAVA_ARGS_CLI=-Xmx8g puppetserver gem install pry --no-ri --no-rdoc
If you prefer to have the JAVA_ARGS_CLI option persist for multiple command executions, you could set the value
in the /etc/sysconfig/puppetserver or /etc/default/puppetserver file, depending upon your OS
distribution:
JAVA_ARGS_CLI=-Xmx8g
With the value specified in the sysconfig or defaults file, subsequent commands would use the JAVA_ARGS_CLI
variable automatically:
$ puppetserver gem install pry --no-ri --no-rdoc
// Would run 'gem' with a maximum Java heap of 8g
For more information, see Using Ruby gems on page 187.
ruby
Runs code in Puppet Server's JRuby interpreter. This is a simple wrapper around the standard Ruby ruby, so all of
the usual arguments and flags should work as expected.
Useful when experimenting with gems installed via puppetserver gem and the Puppet and Puppet Server Ruby
source code.
Examples:
$ puppetserver ruby -e "require 'puppet'; puts Puppet[:certname]"
$ lein ruby -c /path/to/puppetserver.conf -- -e "require 'puppet'; puts
Puppet[:certname]"
If needed, you also can use the JAVA_ARGS_CLI environment variable to pass along custom arguments to the Java
process that the ruby command is run within.
Example:
$ JAVA_ARGS_CLI=-Xmx8g puppetserver ruby -e "require 'puppet'; puts
Puppet[:certname]"
© 2024 Puppet, Inc., a Perforce company

Puppet | Platform components | 186
If you prefer to have the JAVA_ARGS_CLI option persist for multiple command executions, you could set the value
in the /etc/sysconfig/puppetserver or /etc/default/puppetserver file, depending upon your OS
distribution:
JAVA_ARGS_CLI=-Xmx8g
With the value specified in the sysconfig or defaults file, subsequent commands would use the JAVA_ARGS_CLI
variable automatically:
$ puppetserver ruby -e "require 'puppet'; puts Puppet[:certname]"
// Would run 'ruby' with a maximum Java heap of 8g
irb
Starts an interactive REPL for the JRuby that Puppet Server uses. This is a simple wrapper around the standard Ruby
irb, so all of the usual arguments and flags should work as expected.
Like the ruby subcommand, this is useful for experimenting in an interactive environment with any installed gems
(via puppetserver gem) and the Puppet and Puppet Server Ruby source code.
Examples:
$ puppetserver irb
irb(main):001:0> require 'puppet'
=> true
irb(main):002:0> puts Puppet[:certname]
centos6-64.localdomain
=> nil
$ lein irb -c /path/to/puppetserver.conf -- --version
irb 0.9.6(09/06/30)
If needed, you also can use the JAVA_ARGS_CLI environment variable to pass along custom arguments to the Java
process that the irb command is run within.
Example:
$ JAVA_ARGS_CLI=-Xmx8g puppetserver irb
If you prefer to have the JAVA_ARGS_CLI option persist for multiple command executions, you could set the value
in the /etc/sysconfig/puppetserver or /etc/default/puppetserver file, depending upon your OS
distribution:
JAVA_ARGS_CLI=-Xmx8g
With the value specified in the sysconfig or defaults file, subsequent commands would use the JAVA_ARGS_CLI
variable automatically:
$ puppetserver irb
// Would run 'irb' with a maximum Java heap of 8g
foreground
Starts the Puppet Server, but doesn't background it; similar to starting the service and then tailing the log.
Accepts an optional --debug argument to raise the logging level to DEBUG.
Examples:
$ puppetserver foreground --debug
2014-10-25 18:04:22,158 DEBUG [main] [p.t.logging] Debug logging enabled
© 2024 Puppet, Inc., a Perforce company

Puppet | Platform components | 187
2014-10-25 18:04:22,160 DEBUG [main] [p.t.bootstrap] Loading bootstrap
config from specified path: '/etc/puppetserver/bootstrap.cfg'
2014-10-25 18:04:26,097 INFO [main] [p.s.j.jruby-puppet-service]
Initializing the JRuby service
2014-10-25 18:04:26,101 INFO [main] [p.t.s.w.jetty9-service] Initializing
web server(s).
2014-10-25 18:04:26,149 DEBUG [clojure-agent-send-pool-0] [p.s.j.jruby-
puppet-agents] Initializing JRubyPuppet instances with the following
settings:
Using Ruby gems
If you have server-side Ruby code in your modules, Puppet Server will run it via JRuby. Generally speaking, this only
affects custom parser functions, types, and report processors. For the vast majority of cases this shouldn't pose any
problems because JRuby is highly compatible with vanilla Ruby.
Puppet Server will not load gems from user specified GEM_HOME and GEM_PATH environment variables because
puppetserver unsets GEM_PATH and manages GEM_HOME.
Note: Starting with Puppet Server 2.7.1, you can set custom Java arguments for the puppetserver
gem command via the JAVA_ARGS_CLI environment variable, either temporarily on the command line
or persistently by adding it to the sysconfig/default file. The JAVA_ARGS_CLI environment variable
also controls the arguments used when running the puppetserver ruby and puppetserver irb
Subcommands on page 183. See the Server 2.7.1 release notes for details.
GEM_HOME values
Gems with packaged versions of Puppet Server
The value of GEM_HOME when starting the puppetserver process as root using a packaged version of
puppetserver is:
/opt/puppetlabs/puppet/cache/jruby-gems
This directory does not exist by default.
Gems when running Puppet Server from source
The value of GEM_HOME when starting the puppetserver process from the project root is:
./target/jruby-gems
Gems when running Puppet Server spec tests
The value of GEM_HOME when starting the puppetserver JRuby spec tests using rake spec from the project root is:
./vendor/test_gems
This directory is automatically populated by the rake spec task if it does not already exist. The directory may be
safely removed and it will be re-populated the next time rake spec is run in your working copy.
Installing and removing gems
We isolate the Ruby load paths that are accessible to Puppet Server's JRuby interpreter, so that it doesn't load any
gems or other code that you have installed on your system Ruby. If you want Puppet Server to load additional gems,
use the Puppet Server-specific gem command to install them:
$ sudo puppetserver gem install <GEM NAME> --no-document
The puppetserver gem command is simply a wrapper around the usual Ruby gem command, so all of the usual
arguments and flags should work as expected. For example, to show your locally installed gems, run:
$ puppetserver gem list
© 2024 Puppet, Inc., a Perforce company

Puppet | Platform components | 188
Or, if you're running from source:
$ lein gem -c ~/.puppetserver/puppetserver.conf list
The puppetserver gem command also respects the running user's ~/.gemrc file, which you can use to
configure upstream sources or proxy settings. For example, consider a .gemrc file containing:
---
:sources: [ 'https://rubygems-mirror.megacorp.com', 'https://rubygems.org' ]
http_proxy: "http://proxy.megacorp.com:8888"
This configures the listed :sources as the puppetserver gem command's upstream sources, and uses the listed
http_proxy, which you can confirm:
$ puppetserver gem environment | grep proxy
- "http_proxy" => "http://proxy.megacorp.com:8888"
As with the rest of Puppet Server's configuration, we recommend managing these settings with Puppet.
You can manage Puppet Server's gem dependencies with the package provider shipped in puppetlabs-
puppetserver_gem module.
Note: If you try to load a gem before it's been installed, the agent run will fail with a LoadError. If this
happens, reload the server after installing the gem to resolve the issue.
Installing gems for use with development:
When running from source, JRuby uses a GEM_HOME of ./target/jruby-gems relative to the current working
directory of the process. lein gem should be used to install gems into this location using jruby.
NOTE: ./target/jruby-gems is not used when running the JRuby spec tests, gems are instead automatically
installed into and loaded from ./vendor/test_gems. If you need to install a gem for use both during
development and testing make sure the gem is available in both directories.
As an example, the following command installs pry locally in the project. Note the use of -- to pass the following
command line arguments to the gem script.
$ lein gem --config ~/.puppetserver/puppetserver.conf -- install pry \
--no-document
Fetching: coderay-1.1.0.gem (100%)
Successfully installed coderay-1.1.0
Fetching: slop-3.6.0.gem (100%)
Successfully installed slop-3.6.0
Fetching: method_source-0.8.2.gem (100%)
Successfully installed method_source-0.8.2
Fetching: spoon-0.0.4.gem (100%)
Successfully installed spoon-0.0.4
Fetching: pry-0.10.1-java.gem (100%)
Successfully installed pry-0.10.1-java
5 gems installed
With the gem installed into the project tree pry can be invoked from inside Ruby code. For more detailed
information on pry see pry on page 213.
Gems with Native (C) Extensions
If, in your custom parser functions or report processors, you're using Ruby gems that require native (C) extensions,
you won't be able to install these gems under JRuby. In many cases, however, there are drop-in replacements
implemented in Java. For example, the popular Nokogiri gem for processing XML provides a completely compatible
Java implementation that's automatically installed if you run gem install via JRuby or Puppet Server, so you
shouldn't need to change your code at all.
© 2024 Puppet, Inc., a Perforce company

Puppet | Platform components | 189
In other cases, there may be a replacement gem available with a slightly different name; e.g., jdbc-mysql instead
of mysql. The JRuby wiki C Extension Alternatives page discusses this issue further.
If you're using a gem that won't run on JRuby and you can't find a suitable replacement, please open a ticket on our
Issue Tracker; we're definitely interested in helping provide solutions if there are common gems that are causing
trouble for users!
Intermediate CA
Puppet Server supports both a simple CA architecture, with a self-signed root cert that is also used as the CA signing
cert; and an intermediate CA architecture, with a self-signed root that issues an intermediate CA cert used for signing
incoming certificate requests. The intermediate CA architecture is preferred, because it is more secure and makes
regenerating certs easier. To generate a default intermediate CA for Puppet Server, run the puppetserver ca
setup command before starting your server for the first time.
The following diagram shows the configuration of Puppet's basic certificate infrastructure.
If you have an external certificate authority, you can create a cert chain from it, and use the puppetserver ca
import subcommand to install the chain on your server. Puppet agents starting with Puppet 6 handle an intermediate
CA setup out of the box. No need to copy files around by hand or configure CRL checking. Like setup, import
needs to be run before starting your server for the first time.
Note: The PE installer uses the puppetserver ca setup command to create a root cert and an intermediate
signing cert for Puppet Server. This means that in PE, the default CA is always an intermediate CA as of PE 2019.0.
Note: If for some reason you cannot use an intermediate CA, in Puppet Server 6 starting the server will generate
a non-intermediate CA the same as it always did before the introduction of these commands. However, we don't
recommend this, as using an intermediate CA provides more security and easier paths for CA regeneration. It is also
the default in PE, and some recommended workflows may rely on it.
© 2024 Puppet, Inc., a Perforce company

Puppet | Platform components | 190
Where to set CA configuration
All CA configuration takes place in Puppet’s config file. See the Configuration Reference on page 98 for details.
Set up Puppet as an intermediate CA with an external root
Puppet Server needs to present the full certificate chain to clients so the client can authenticate the server. You
construct the certificate chain by concatenating the CA certificates, starting with the new intermediate CA certificate
and descending to the root CA certificate.
The following diagram shows the configuration of Puppet's certificate infrastructure with an external root.
To set up Puppet as an intermediate CA with an external root:
1.
Collect the PEM-encoded certificates and CRLs for your organization's chain of trust, including the root
certificate, any intermediate certificates, and the signing certificate. (The signing certificate might be the root or
intermediate certificate.)
2.
Create a private RSA key, with no passphrase, for the Puppet CA.
3.
Create a PEM-encoded Puppet CA certificate.
a.
Create a CSR for the Puppet CA.
b.
Generate the Puppet CA certificate by signing the CSR using your external CA.
Ensure the CA constraint is set to true and the keyIdentifier is composed of the 160-bit SHA-1 hash of the
value of the bit string subjectPublicKeyfield. See RFC 5280 section 4.2.1.2 for details.
4.
Concatenate all of the certificates into a PEM-encoded certificate bundle, starting with the Puppet CA cert and
ending with your root certificate.
-----BEGIN CERTIFICATE-----
<Puppet’s CA cert>
-----END CERTIFICATE-----
-----BEGIN CERTIFICATE-----
© 2024 Puppet, Inc., a Perforce company

Puppet | Platform components | 191
<Org’s intermediate CA signing cert>
-----END CERTIFICATE-----
-----BEGIN CERTIFICATE-----
<Org’s root CA cert>
-----END CERTIFICATE-----
5.
Concatenate all of the CRLs into a PEM-encoded CRL chain, starting with any optional intermediate CA CRLs
and ending with your root certificate CRL.
-----BEGIN X509 CRL-----
<Puppet’s CA CRL>
-----END X509 CRL-----
-----BEGIN X509 CRL-----
<Org’s intermediate CA CRL>
-----END X509 CRL-----
-----BEGIN X509 CRL-----
<Org’s root CA CRL>
-----END X509 CRL-----
6.
Use the puppetserver ca import command to trigger the rest of the CA setup:
puppetserver ca import --cert-bundle ca-bundle.pem --crl-chain crls.pem --
private-key puppet_ca_key.pem
7.
optional. Validate that the CA is working by running puppet agent -t and verifying your intermediate CA with
OpenSSL.
openssl x509 -in /etc/puppetlabs/puppet/ssl/ca/signed/<HOSTNAME>.crt
-text -noout
Certificate:
Data:
Version: 3 (0x2)
Serial Number: 1 (0x1)
Signature Algorithm: sha256WithRSAEncryption
Issuer: CN=intermediate-ca
Note: If your organization's CRLs require frequent updating, you can use the certificate_revocation_list
endpoint to insert updated copies of your CRLs into the trust chain. The CA updates the matching CRLs saved
on disk if the submitted ones have a higher CRL number than their counterparts. In addition, set Puppet’s
crl_refresh_interval on all of your agents to ensure that they download the updated CRLs.
Infrastructure certificate revocation list (CRL)
The Puppet Server CA can create a CRL that contains only revocations of those nodes that agents are expected to talk
to during normal operations, for example, compilers or hosts that agents connect to as part of agent-side functions.
Puppet Server CA can distribute that CRL to agents, rather than the CRL it maintains with all node revocations.
To create a smaller CRL, manage the content of the file at $cadir/infra_inventory.txt. Provide a
newline-separated list of the certnames. When revoked, they are added to the Infra CRL. The certnames must
match existing certificates issued and maintained by the Puppet Server CA. Setting the value certificate-
authority.enable-infra-crl to true causes Puppet Server to update both its Full CRL and its Infra CRL
with the certs that match those certnames when revoked. When agents first check in, they receive a CRL that includes
only the revocations of certnames listed in the infra_inventory.txt.
The infrastructure certificate revocation list is disabled by default in open source Puppet. To toggle it, update
enable-infra-crl in the certificate-authority section of puppetserver.conf.
This feature is disabled by default because the definition of what constitutes an "infrastructure" node is site-specific
and sites with a standard, single primary server configuration have no need for the additional work. After having
enabled the feature, if you want to go back, remove the explicit setting and reload Puppet Server to turn the default
off; then, when agents first check, they receive the Full CRL as before (including any infrastructure nodes that were
revoked while the feature was enabled).
© 2024 Puppet, Inc., a Perforce company
Puppet | Platform components | 192
External SSL termination
Use the following steps to configure external SSL termination.
Disable HTTPS for Puppet Server
You'll need to turn off SSL and have Puppet Server use the HTTP protocol instead: remove the ssl-port and
ssl-host settings from the conf.d/webserver.conf file and replace them with port and host settings.
See Configuring the Webserver Service for more information on configuring the web server service.
Allow Client Cert Data From HTTP Headers
When using external SSL termination, Puppet Server expects to receive client certificate information via some HTTP
headers.
By default, reading this data from headers is disabled. To allow Puppet Server to recognize it, you'll need to set
allow-header-cert-info: true in the authorization config section of the /etc/puppetlabs/
puppetserver/conf.d/auth.conf file.
See Configuring Puppet Server on page 157 for more information on the puppetserver.conf and
auth.conf files.
Note: This assumes the default behavior of Puppet 5 and greater of using Puppet Server's hocon auth.conf rather
Puppet's older ini-style auth.conf.
WARNING: Setting allow-header-cert-info to 'true' puts Puppet Server in an incredibly
vulnerable state. Take extra caution to ensure it is absolutely not reachable by an untrusted network.
With allow-header-cert-info set to 'true', authorization code will use only the client HTTP
header values---not an SSL-layer client certificate---to determine the client subject name, authentication
status, and trusted facts. This is true even if the web server is hosting an HTTPS connection. This applies
to validation of the client via rules in the auth.conf file and any trusted facts extracted from certificate
extensions.
If the client-auth setting in the webserver config block is set to need or want, the Jetty web
server will still validate the client certificate against a certificate authority store, but it will only verify the
SSL-layer client certificate---not a certificate in an X-Client-Cert header.
Reload Puppet Server
You'll need to reload Puppet Server for the configuration changes to take effect.
Configure SSL Terminating Proxy to Set HTTP Headers
The device that terminates SSL for Puppet Server must extract information from the client's certificate and insert that
information into three HTTP headers. See the documentation for your SSL terminator for details.
The headers you'll need to set are X-Client-Verify, X-Client-DN, and X-Client-Cert.
X-Client-Verify
Mandatory. Must be either SUCCESS if the certificate was validated, or something else if not. (The convention
seems to be to use NONE for when a certificate wasn't presented, and FAILED:reason for other validation
failures.) Puppet Server uses this to authorize requests; only requests with a value of SUCCESS will be considered
authenticated.
X-Client-DN
Mandatory. Must be the Subject DN of the agent's certificate, if a certificate was presented. Puppet Server uses this to
authorize requests.
X-Client-Cert
Optional. Should contain the client's PEM-formatted (Base-64) certificate (if a certificate was presented) in a single
URI-encoded string. Note that URL encoding is not sufficient; all space characters must be encoded as %20 and not +
characters.
© 2024 Puppet, Inc., a Perforce company
Puppet | Platform components | 193
Note: Puppet Server only uses the value of this header to extract trusted facts from extensions in the client
certificate. If you aren't using trusted facts, you can choose to reduce the size of the request payload by
omitting the X-Client-Cert header.
Note: Apache's mod_proxy converts line breaks in PEM documents to spaces for some reason, and
Puppet Server can't decode the result. We're tracking this issue as SERVER-217.
Server metrics
Monitoring Puppet Server metrics
Puppet Server tracks several advanced performance and health metrics, all of which take advantage of the v1 metrics
on page 258. You can track these metrics using:
• Customizable, networked Graphite and Grafana instances
• HTTP Client Metrics on page 200
• v1 metrics on page 258 endpoints
To visualize Puppet Server metrics, either:
• Use the puppet-operational-dashboards module.
• Export them to a Graphite installation. The grafanadash module helps you set up a Graphite instance, configure
Puppet Server for exporting to it, and visualize the output with Grafana. You can later integrate this with your
Graphite installation. For more information, see Getting started with Graphite below.
The puppet-operational-dashboards module is recommended for FOSS users, because it is an easier way
to save and visualize Puppet Server metrics. The grafanadash module is still useful for users exporting to their
existing Graphite installation.
Note: The grafanadash and puppet-graphite modules referenced in this document are not
Puppet-supported modules. They are provided as testing and demonstration purposes only.
Getting started with Graphite
Graphite is a third-party monitoring application that stores real-time metrics and provides customizable ways to view
them. Puppet Server can export many metrics to Graphite, and exports a set of metrics by default that is designed to
be immediately useful to Puppet administrators.
Note: A Graphite setup is deeply customizable and can report many Puppet Server metrics on demand.
However, it requires considerable configuration and additional server resources. To retrieve metrics
through HTTP requests, see the metrics API.
To start using Graphite with Puppet Server, you must:
• Install and configure a Graphite server.
• Enable Puppet Server's Graphite support.
Grafana provides a web-based customizable dashboard that's compatible with Graphite, and the grafanadash
module installs and configures it by default.
Using the grafanadash module to quickly set up a Graphite demo server
The grafanadash Puppet module quickly installs and configures a basic test instance of Graphite with the Grafana
extension. When installed on a dedicated Puppet agent, this module provides a quick demonstration of how Graphite
and Grafana can consume and display Puppet Server metrics.
WARNING: The grafanadash module is not a Puppet-supported module. It is designed for testing and
demonstration purposes only, and tested against CentOS 6 only.
Also, install this module on a dedicated agent only. Do not install it on the node running Puppet Server,
because the module makes security policy changes that are inappropriate for a Puppet primary server:
• SELinux can cause issues with Graphite and Grafana, so the module temporarily disables SELinux. If
you reboot the machine after using the module to install Graphite, you must disable SELinux again and
restart the Apache service to use Graphite and Grafana.
© 2024 Puppet, Inc., a Perforce company

Puppet | Platform components | 194
• The module disables the iptables firewall and enables cross-origin resource sharing on Apache,
which are potential security risks.
Installing the grafanadash Puppet module
Install the grafanadash Puppet module on a *nix agent. The module's grafanadash::dev class installs and
configures a Graphite server, the Grafana extension, and a default dashboard.
1.
Install a *nix Puppet agent to serve as the Graphite server.
2.
As root on the Puppet agent node, run puppet module install puppetlabs-grafanadash.
3.
As root on the Puppet agent node, run puppet apply -e 'include grafanadash::dev'.
Running Grafana
Grafana runs as a web dashboard, and the grafanadash module configures it to use port 10000 by default. To view
Puppet metrics in Grafana, you must create a metrics dashboard, or edit and import a JSON-based dashboard that
includes Puppet metrics, such as the sample Grafana dashboard that we provide.
1.
In a web browser on a computer that can reach the Puppet agent node running Grafana, navigate to http://
<AGENT'S HOSTNAME>:10000.
There, you'll see a test screen that indicates whether Grafana can successfully connect to your Graphite server.
If Grafana is configured to use a hostname that the computer on which the browser is running cannot resolve,
click view details and then the Requests tab to determine the hostname Grafana is trying to use. Next, add
the IP address and hostname to the computer's /etc/hosts file on Linux or OS X, or C:\Windows
\system32\drivers\etc\hosts file on Windows.
2.
Download and edit our sample Grafana dashboard, sample_metrics_dashboard.json.
a. Open the sample_metrics_dashboard.json file in a text editor on the same computer you're using to
access Grafana.
b. Throughout the file, replace our sample hostname of server.example.com with your Puppet Server's
hostname. (Note: This value must be used as the metrics_server_id setting, as configured below.)
c. Save the file.
3.
In the Grafana UI, click search (the folder icon), then Import, then Browse.
4.
Navigate to and select the edited JSON file.
This loads a dashboard with nine graphs that display various metrics exported from the Puppet Server to the Graphite
server. (For details, see Using the Grafana dashboard.) However, these graphs will remain empty until you enable
Puppet Server's Graphite metrics.
Note: If you want to integrate Puppet Server's Grafana exporting with your own infrastructure,
use the grafanadash module. If you want visualization of metrics, use the puppetlabs-
puppet_operational_dashboards module.
Enabling Puppet Server's Graphite support
Configure Puppet Server's metrics.conf on page 165 file to enable and use the Graphite server.
1.
Set the enabled parameter to true in metrics.registries.puppetserver.reporters.graphite:
metrics: {
server-id: localhost
registries: {
puppetserver: {
...
reporters: {
...
# enable or disable Graphite metrics reporter
graphite: {
enabled: true
}
}
© 2024 Puppet, Inc., a Perforce company

Puppet | Platform components | 195
}
}
}
2.
Configure the Graphite host settings in metrics.reporters.graphite:
• host: The Graphite host's IP address as a string.
• port: The Graphite host's port number.
• update-interval-seconds: How frequently Puppet Server should send metrics to Graphite.
3.
Verify that metrics.registries.puppetserver.reporters.jmx.enabled is not set to false. Its
default setting is true.
Tip: In the Grafana UI, choose an appropriate time window from the drop-down menu.
Using the sample Grafana dashboard
The sample Grafana dashboard provides what we think is an interesting starting point. You can click on the title of
any graph, and then click edit to tweak the graphs as you see fit.
• Active requests: This graph serves as a "health check" for the Puppet Server. It shows a flat line that represents
the number of CPUs you have in your system, a metric that indicates the total number of HTTP requests actively
being processed by the server at any moment in time, and a rolling average of the number of active requests. If the
number of requests being processed exceeds the number of CPUs for any significant length of time, your server
might be receiving more requests than it can efficiently process.
• Request durations: This graph breaks down the average response times for different types of requests made
by Puppet agents. This indicates how expensive catalog and report requests are compared to the other types
of requests. It also provides a way to see changes in catalog compilation times when you modify your Puppet
code. A sharp curve upward for all of the types of requests indicates an overloaded server, and they should trend
downward after reducing the load on the server.
• Request ratios: This graph shows how many requests of each type that Puppet Server has handled. Under normal
circumstances, you should see about the same number of catalog, node, or report requests, because these all
happen one time per agent run. The number of file and file metadata requests correlate to how many remote file
resources are in the agents' catalogs.
• Communications with PuppetDB: This graph tracks the amount of time it takes Puppet Server to send data and
requests for common operations to, and receive responses from, PuppetDB.
• JRubies: This graph tracks how many JRubies are in use, how many are free, the mean number of free JRubies,
and the mean number of requested JRubies.
If the number of free JRubies is often less than one, or the mean number of free JRubies is less than one, Puppet
Server is requesting and consuming more JRubies than are available. This overload reduces Puppet Server's
performance. While this might simply be a symptom of an under-resourced server, it can also be caused by poorly
optimized Puppet code or bottlenecks in the server's communications with PuppetDB if it is in use.
If catalog compilation times have increased but PuppetDB performance remains the same, examine your Puppet
code for potentially unoptimized code. If PuppetDB communication times have increased, tune PuppetDB for
better performance or allocate more resources to it.
If neither catalog compilation nor PuppetDB communication times are degraded, the Puppet Server process might
be under-resourced on your server. If you have available CPU time and memory, Tuning guide on page 203
to allow it to allocate more JRubies. Otherwise, consider adding additional compilers to distribute the catalog
compilation load.
© 2024 Puppet, Inc., a Perforce company

Puppet | Platform components | 196
• JRuby Timers: This graph tracks several JRuby pool metrics.
• The borrow time represents the mean amount of time that Puppet Server uses ("borrows") each JRuby from the
pool.
• The wait time represents the total amount of time that Puppet Server waits for a free JRuby instance.
• The lock held time represents the amount of time that Puppet Server holds a lock on the pool, during which
JRubies cannot be borrowed.
• The lock wait time represents the amount of time that Puppet Server waits to acquire a lock on the pool.
These metrics help identify sources of potential JRuby allocation bottlenecks.
• Memory Usage: This graph tracks how much heap and non-heap memory that Puppet Server uses.
• Compilation: This graph breaks catalog compilation down into various phases to show how expensive each phase
is.
Example Grafana dashboard excerpt
The following example shows only the targets parameter of a dashboard to demonstrate the full names of Puppet's
exported Graphite metrics (assuming the Puppet Server instance has a domain of server.example.com) and a
way to add targets directly to an exported Grafana dashboard's JSON content.
"panels": [
{
"span": 4,
"editable": true,
"type": "graphite",
...
"targets": [
{
"target": "alias(puppetlabs.server.example.com.num-cpus,'num
cpus')"
},
{
"target": "alias(puppetlabs.server.example.com.http.active-
requests.count,'active requests')"
},
{
"target": "alias(puppetlabs.server.example.com.http.active-
histo.mean,'average')"
}
],
"aliasColors": {},
"aliasYAxis": {},
"title": "Active Requests"
}
]
See the sample Grafana dashboard for a detailed example of how a Grafana dashboard accesses these exported
Graphite metrics.
Available Graphite metrics
The following HTTP and Puppet profiler metrics are available from the Puppet Server and can be added to your
metrics reporting. Each metric is prefixed with puppetlabs.<SERVER-HOSTNAME>; for instance, the Grafana
dashboard file refers to the num-cpus metric as puppetlabs.<SERVER-HOSTNAME>.num-cpus.
Additionally, metrics might be suffixed by fields, such as count or mean, that return more specific data points. For
instance, the puppetlabs.<SERVER-HOSTNAME>.compiler.mean metric returns only the mean length of
time it takes Puppet Server to compile a catalog.
To aid with reference, metrics in the list below are segmented into three groups:
© 2024 Puppet, Inc., a Perforce company
Puppet | Platform components | 197
• Statistical metrics: Metrics that have all eight of these statistical analysis fields, in addition to the top-level
metric:
• max: Its maximum measured value.
• min: Its minimum measured value.
• mean: Its mean, or average, value.
• stddev: Its standard deviation from the mean.
• count: An incremental counter.
• p50: The value of its 50th percentile, or median.
• p75: The value of its 75th percentile.
• p95: The value of its 95th percentile.
• Counters only: Metrics that only count a value, or only have a count field.
• Other: Metrics that have unique sets of available fields.
Note: Puppet Server can export many, many metrics -- so many that enabling all of them at large
installations can overwhelm Grafana servers. To avoid this, Puppet Server exports only a subset of
its available metrics by default. This default set is designed to report the most relevant metrics for
administrators monitoring performance and stability.
To add to the default list of exported metrics, see Modifying Puppet Server's exported metrics.
Puppet Server exports each metric in the lists below by default.
Statistical metrics
Compiler metrics
• puppetlabs.<SERVER-HOSTNAME>.compiler: The time spent compiling catalogs. This metric represents
the sum of the compiler.compile, static_compile, find_facts, and find_node fields.
• puppetlabs.<SERVER-HOSTNAME>.compiler.compile: The total time spent compiling dynamic
(non-static) catalogs.
To measure specific nodes and environments, see Modifying Puppet Server's exported metrics.
• puppetlabs.<SERVER-HOSTNAME>.compiler.find_facts: The time spent parsing facts.
• puppetlabs.<SERVER-HOSTNAME>.compiler.find_node: The time spent retrieving node data. If
the Node Classifier (or another ENC) is configured, this includes the time spent communicating with it.
• puppetlabs.<SERVER-HOSTNAME>.compiler.static_compile: The time spent compiling static
catalogs.
• puppetlabs.<SERVER-HOSTNAME>.compiler.static_compile_inlining: The time spent
inlining metadata for static catalogs.
• puppetlabs.<SERVER-HOSTNAME>.compiler.static_compile_postprocessing: The time
spent post-processing static catalogs.
Function metrics
• puppetlabs.<SERVER-HOSTNAME>.functions: The amount of time during catalog compilation spent in
function calls. The functions metric can also report any of the statistical metrics fields for a single function by
specifying the function name as a field.
For example, to report the mean time spent in a function call during catalog compilation, use
puppetlabs.<SERVER-HOSTNAME>.functions.<FUNCTION-NAME>.mean.
HTTP metrics
• puppetlabs.<SERVER-HOSTNAME>.http.active-histo: A histogram of active HTTP requests over
time.
• puppetlabs.<SERVER-HOSTNAME>.http.puppet-v3-catalog-/*/-requests: The time Puppet
Server has spent handling catalog requests, including time spent waiting for an available JRuby instance.
• puppetlabs.<SERVER-HOSTNAME>.http.puppet-v3-environment_classes-/*/-requests:
The time spent handling requests to the Environment classes on page 266, which the Node Classifier uses to
refresh classes.
© 2024 Puppet, Inc., a Perforce company
Puppet | Platform components | 198
• puppetlabs.<SERVER-HOSTNAME>.http.puppet-v3-environments-requests: The time spent
handling requests to the environments API endpoint requests.
• The following metrics measure the time spent handling file-related API endpoints:
• puppetlabs.<SERVER-HOSTNAME>.http.puppet-v3-file_bucket_file-/*/-requests
• puppetlabs.<SERVER-HOSTNAME>.http.puppet-v3-file_content-/*/-requests
• puppetlabs.<SERVER-HOSTNAME>.http.puppet-v3-file_metadata-/*/-requests
• puppetlabs.<SERVER-HOSTNAME>.http.puppet-v3-file_metadatas-/*/-requests
• puppetlabs.<SERVER-HOSTNAME>.http.puppet-v3-node-/*/-requests: The time spent
handling node requests, which are sent to the Node Classifier. A bottleneck here might indicate an issue with the
Node Classifier or PuppetDB.
• puppetlabs.<SERVER-HOSTNAME>.http.puppet-v3-report-/*/-requests: The time spent
handling report requests. A bottleneck here might indicate an issue with PuppetDB.
• puppetlabs.<SERVER-HOSTNAME>.http.puppet-v3-static_file_content-/*/-requests:
The time spent handling requests to the Static file content on page 274 used by Direct Puppet with file sync.
JRuby metrics
Puppet Server uses an embedded JRuby interpreter to execute Ruby code. By default, JRuby spawns parallel
instances known as JRubies to execute Ruby code, which occurs during most Puppet Server activities. When
multithreaded is set to true, a single JRuby is used instead to process a limited number of threads in parallel.
For each of these metrics, they refer to JRuby instances by default and JRuby threads in multithreaded mode.
See Tuning guide on page 203 for details on adjusting JRuby settings.
• puppetlabs.<SERVER-HOSTNAME>.jruby.borrow-timer: The time spent with a borrowed JRuby.
• puppetlabs.<SERVER-HOSTNAME>.jruby.free-jrubies-histo: A histogram of free JRubies over
time. This metric's average value should greater than 1; if it isn't, Tuning guide on page 203 or another compile
primary server might be needed to keep up with requests.
• puppetlabs.<SERVER-HOSTNAME>.jruby.lock-held-timer: The time spent holding the JRuby
lock.
• puppetlabs.<SERVER-HOSTNAME>.jruby.lock-wait-timer: The time spent waiting to acquire the
JRuby lock.
• puppetlabs.<SERVER-HOSTNAME>.jruby.requested-jrubies-histo: A histogram of requested
JRubies over time. This increases as the number of free JRubies, or the free-jrubies-histo metric,
decreases, which can suggest that the server's capacity is being depleted.
• puppetlabs.<SERVER-HOSTNAME>.jruby.wait-timer: The time spent waiting to borrow a JRuby.
PuppetDB metrics
The following metrics measure the time that Puppet Server spends sending or receiving data from PuppetDB.
• puppetlabs.<SERVER-HOSTNAME>.puppetdb.catalog.save
• puppetlabs.<SERVER-HOSTNAME>.puppetdb.command.submit
• puppetlabs.<SERVER-HOSTNAME>.puppetdb.facts.find
• puppetlabs.<SERVER-HOSTNAME>.puppetdb.facts.search
• puppetlabs.<SERVER-HOSTNAME>.puppetdb.report.process
• puppetlabs.<SERVER-HOSTNAME>.puppetdb.resource.search
Counters only
HTTP metrics
• puppetlabs.<SERVER-HOSTNAME>.http.active-requests: The number of active HTTP requests.
© 2024 Puppet, Inc., a Perforce company
Puppet | Platform components | 199
• The following counter metrics report the percentage of each HTTP API endpoint's share of total handled HTTP
requests.
• puppetlabs.<SERVER-HOSTNAME>.http.puppet-v3-catalog-/*/-percentage
• puppetlabs.<SERVER-HOSTNAME>.http.puppet-v3-environment-/*/-percentage
• puppetlabs.<SERVER-HOSTNAME>.http.puppet-v3-environment_classes-/*/-
percentage
• puppetlabs.<SERVER-HOSTNAME>.http.puppet-v3-environments-percentage
• puppetlabs.<SERVER-HOSTNAME>.http.puppet-v3-file_bucket_file-/*/-
percentage
• puppetlabs.<SERVER-HOSTNAME>.http.puppet-v3-file_content-/*/-percentage
• puppetlabs.<SERVER-HOSTNAME>.http.puppet-v3-file_metadata-/*/-percentage
• puppetlabs.<SERVER-HOSTNAME>.http.puppet-v3-file_metadatas-/*/-percentage
• puppetlabs.<SERVER-HOSTNAME>.http.puppet-v3-node-/*/-percentage
• puppetlabs.<SERVER-HOSTNAME>.http.puppet-v3-report-/*/-percentage
• puppetlabs.<SERVER-HOSTNAME>.http.puppet-v3-resource_type-/*/-percentage
• puppetlabs.<SERVER-HOSTNAME>.http.puppet-v3-resource_types-/*/-percentage
• puppetlabs.<SERVER-HOSTNAME>.http.puppet-v3-static_file_content-/*/-
percentage
• puppetlabs.<SERVER-HOSTNAME>.http.total-requests: The total requests handled by Puppet
Server.
JRuby metrics
Note: In multithreaded mode, each of these refers to JRuby threads instead of separate JRuby instances.
• puppetlabs.<SERVER-HOSTNAME>.jruby.borrow-count: The number of successfully borrowed
JRubies.
• puppetlabs.<SERVER-HOSTNAME>.jruby.borrow-retry-count: The number of attempts to
borrow a JRuby that must be retried.
• puppetlabs.<SERVER-HOSTNAME>.jruby.borrow-timeout-count: The number of attempts to
borrow a JRuby that resulted in a timeout.
• puppetlabs.<SERVER-HOSTNAME>.jruby.request-count: The number of requested JRubies.
• puppetlabs.<SERVER-HOSTNAME>.jruby.return-count: The number of JRubies successfully
returned to the pool.
• puppetlabs.<SERVER-HOSTNAME>.jruby.num-free-jrubies: The number of free JRuby instances.
If this number is often 0, more requests are coming in than the server has available JRuby instances. To alleviate
this, increase the number of JRuby instances on the Server or add additional compile servers.
• puppetlabs.<SERVER-HOSTNAME>.jruby.num-jrubies: The total number of JRuby instances on the
server, governed by the max-active-instances setting. See Tuning guide on page 203 for details.
Other metrics
These metrics measure raw resource availability and capacity.
• puppetlabs.<SERVER-HOSTNAME>.num-cpus: The number of available CPUs on the server.
• `puppetlabs.<SERV+
• ER-HOSTNAME>.uptime`: The Puppet Server process's uptime.
© 2024 Puppet, Inc., a Perforce company
Puppet | Platform components | 200
• Total, heap, and non-heap memory that's committed (committed), initialized (init), and used (used), and the
maximum amount of memory that can be used (max).
• puppetlabs.<SERVER-HOSTNAME>.memory.total.committed
• puppetlabs.<SERVER-HOSTNAME>.memory.total.init
• puppetlabs.<SERVER-HOSTNAME>.memory.total.used
• puppetlabs.<SERVER-HOSTNAME>.memory.total.max
• puppetlabs.<SERVER-HOSTNAME>.memory.heap.committed
• puppetlabs.<SERVER-HOSTNAME>.memory.heap.init
• puppetlabs.<SERVER-HOSTNAME>.memory.heap.used
• puppetlabs.<SERVER-HOSTNAME>.memory.heap.max
• puppetlabs.<SERVER-HOSTNAME>.memory.non-heap.committed
• puppetlabs.<SERVER-HOSTNAME>.memory.non-heap.init
• puppetlabs.<SERVER-HOSTNAME>.memory.non-heap.used
• puppetlabs.<SERVER-HOSTNAME>.memory.non-heap.max
For details about HTTP client metrics, which measure performance of Puppet Server's requests to other services, see
HTTP Client Metrics on page 200.
Modifying Puppet Server's exported metrics
In addition to the above default metrics, you can also export metrics measuring specific environments and nodes.
The metrics.registries.puppetserver.metrics-allowed parameter in metrics.conf on page 165
takes an array of strings representing the metrics you want to enable.
Omit the puppetlabs.<SERVER-HOSTNAME> prefix and field suffixes (such as .count or .mean) from
metrics when adding them to this class. Instead, suffix the environment or node name as a field to the metric.
For example, to track the compilation time for the production environment, add
compiler.compile.production to the metrics-allowed list. To track
only the my.node.localdomain node in the production environment, add
compiler.compile.production.my.node.localdomain to the metrics-allowed list.
Optional metrics include:
• compiler.compile.<ENVIRONMENT> and compiler.compile.<ENVIRONMENT>.<NODE-NAME>,
and all statistical fields suffixed to these (such as compiler.compile.<ENVIRONMENT>.mean).
• compiler.compile.evaluate_resources.<RESOURCE>: Time spent evaluating a specific resource
during catalog compilation.
HTTP Client Metrics
HTTP client metrics available in Puppet Server 5 allows users to measure how long it takes for Puppet Server to make
requests to and receive responses from other services, such as PuppetDB.
Determining metrics IDs
All of these metrics are of the form puppetlabs.<SERVER ID>.http-client.experimental.with-
metric-id.<METRIC ID>.full-response.
Note: The <METRIC ID> describes what the metric measures. A metric ID is represented
in the Services endpoint on page 262 as an array of strings, and in the metric itself
the strings are joined together with periods. For instance, the metric ID of [puppetdb
resource search] is puppetdb.resource.search, so the full metric name would
be puppetlabs.<server-id>.http-client.experimental.with-metric-
id.puppetdb.resource.search.full-response.
You can configure PuppetDB to be a backend for configuration files (through the storeconfigs setting), and
you can configure Puppet Server to send reports to an external report processing service. If you configure either of
these, then during the course of handling a Puppet agent run, Puppet Server makes several calls to external services to
retrieve or store information.
© 2024 Puppet, Inc., a Perforce company

Puppet | Platform components | 201
• During handling of a /puppet/v3/node request, Puppet Server issues:
• a facts find request to PuppetDB for facts about the node, if they aren't yet cached (typically the first time
it requests facts for the node). Metric ID: [puppetdb facts find].
• During handling of a /puppet/v3/catalog request, Puppet Server issues several requests:
• a PuppetDB replace facts request, to replace the facts for the agent in PuppetDB with the facts it
received from the agent. Metric ID: [puppetdb, command, replace_facts].
• a PuppetDB resource search request, to search for resources if exported resources are used. Metric ID:
[puppetdb, resource, search].
• a PuppetDB query request, if the puppetdb_query function is used in Puppet code. Metric ID:
[puppetdb, query].
• a PuppetDB replace catalog request, to replace the catalog for the agent in PuppetDB with the newly
compiled catalog. Metric ID: [puppetdb, command, replace_catalog].
• During handling of a /puppet/v3/report request, Puppet Server issues:
• a PuppetDB store report request, to store the submitted report. Metric ID: [puppetdb command
store_report].
• a request to the configured reports_url to store the report, if the HTTP report processor is enabled.
Metric ID: [puppetdb report http].
Configuring
HTTP client metrics are enabled by default, but can be disabled by setting metrics-enabled to false in the
http-client section of puppetserver.conf on page 167.
These metrics also depend on the server-id setting in the metrics section of puppetserver.conf. This
defaults to localhost, and while localhost can collect metrics, change this setting to something unique to
avoid metric naming collisions when exporting metrics to an external tool, such as Graphite.
This data is all available via the Services endpoint on page 262 endpoint, at https://<SERVER
HOSTNAME>:8140/status/v1/services/master?level=debug. Puppet Server 5.0 adds a http-
client-metrics keyword in the map. If metrics are not enabled, or if Puppet Server has not issued any requests
yet, then this array will be empty, like so: "http-client-metrics": [].
In the sample Grafana dashboard, the External HTTP Communications graph visualizes all of these metrics,
and the tooltip describes each of them.
Example metrics output
"http-client-metrics": [
{
"aggregate": 407,
"count": 1,
"mean": 407,
"metric-id": [
"puppetdb",
"facts",
"find"
],
"metric-name": "puppetlabs.localhost.http-client.experimental.with-
metric-id.puppetdb.facts.find.full-response"
},
{
"aggregate": 66,
"count": 1,
"mean": 66,
"metric-id": [
"puppetdb",
"command",
"replace_facts"
],
© 2024 Puppet, Inc., a Perforce company

Puppet | Platform components | 202
"metric-name": "puppetlabs.localhost.http-client.experimental.with-
metric-id.puppetdb.command.replace_facts.full-response"
},
{
"aggregate": 60,
"count": 2,
"mean": 30,
"metric-id": [
"puppetdb",
"resource",
"search"
],
"metric-name": "puppetlabs.localhost.http-client.experimental.with-
metric-id.puppetdb.resource.search.full-response"
},
{
"aggregate": 53,
"count": 1,
"mean": 53,
"metric-id": [
"puppetdb",
"query"
],
"metric-name": "puppetlabs.localhost.http-client.experimental.with-
metric-id.puppetdb.query.full-response"
},
{
"aggregate": 22,
"count": 1,
"mean": 22,
"metric-id": [
"puppetdb",
"command",
"store_report"
],
"metric-name": "puppetlabs.localhost.http-client.experimental.with-
metric-id.puppetdb.command.store_report.full-response"
},
{
"aggregate": 16,
"count": 1,
"mean": 16,
"metric-id": [
"puppetdb",
"command",
"replace_catalog"
],
"metric-name": "puppetlabs.localhost.http-client.experimental.with-
metric-id.puppetdb.command.replace_catalog.full-response"
},
{
"aggregate": 2,
"count": 1,
"mean": 2,
"metric-id": [
"puppet",
"report",
"http"
],
"metric-name": "puppetlabs.localhost.http-client.experimental.with-
metric-id.puppet.report.http.full-response"
}
],
© 2024 Puppet, Inc., a Perforce company
Puppet | Platform components | 203
Tuning guide
Puppet Server provides many configuration options that can be used to tune the server for maximum performance and
hardware resource utilization. In this guide, we'll highlight some of the most important settings that you can use to get
the best performance in your environment.
Puppet Server and JRuby
Before you begin tuning your configuration, it's helpful to have a little bit of context on how Puppet Server uses
JRuby to handle incoming HTTP requests from your Puppet agents.
When Puppet Server starts up, it creates a pool of JRuby interpreters to use as workers when it needs need to
execute some of the Puppet Ruby code. You can think of these almost as individual Ruby "virtual machines" that are
controlled by Puppet Server; it's not entirely dissimilar to the way that Passenger spawns several Ruby processes to
hand off work to.
Puppet Server isolates these JRuby instances so that they will only be allowed to handle one request at a time. This
ensures that we don't encounter any concurrency issues, because the Ruby code is not thread-safe. When an HTTP
request comes in to Puppet Server, and it determines that some Ruby code will need to be executed in order to handle
the request, Puppet Server "borrows" a JRuby instance from the pool, uses it to do the work, and then "returns" it to
the pool. If there are no JRuby instances available in the pool at the time a request comes in (presumably because
all of the JRuby instances are already in use handling other requests), Puppet Server will block the request until one
becomes available.
(In the future, this approach will allow us to do some really powerful things such as creating multiple pools of
JRubies and isolating each of your Puppet environments to a single pool, to ensure that there is no pollution from one
Puppet environment to the next.)
This brings us to the two most important settings that you can use to tune your Puppet Server.
Number of JRubies
The most important setting that you can use to improve the throughput of your Puppet Server installation is the
Configuring Puppet Server on page 157 setting, which you set in Settings on page 167. The value of this setting
is used by Puppet Server to determine how many JRuby instances to create when the server starts up.
From a practical perspective, this setting basically controls how many Puppet agent runs Puppet Server can handle
concurrently. The minimum value you can get away with here is 1, and if your installation is small enough that you're
unlikely to ever have more than one Puppet agent checking in with the server at exactly the same time, this is totally
sufficient.
However, if you specify a value of 1 for this setting, and then you have two Puppet agent runs hitting the server at
the same time, the requests being made by the second agent will be effectively blocked until the server has finished
handling all of the requests from the first agent. In other words, one of Puppet Server's threads will have "borrowed"
the single JRuby instance from the pool to handle the requests from the first agent, and only when those requests are
completed will it return the JRuby instance to the pool. At that point, the next thread can "borrow" the JRuby instance
to use to handle the requests from the second agent.
Assuming you have more than one CPU core in your machine, this situation means that you won't be getting
the maximum possible throughput from your Puppet Server installation. Increasing the value from 1 to 2 would
mean that Puppet Server could now use a second CPU core to handle the requests from a second Puppet agent
simultaneously.
It follows, then, that the maximum sensible value to use for this setting will be roughly the number of CPU cores you
have in your server. Setting the value to something much higher than that won't improve performance, because even
if there are extra JRuby instances available in the pool to do work, they won't be able to actually do any work if all of
the CPU cores are already busy using JRuby instances to handle incoming agent requests.
(There are some exceptions to this rule. For example, if you have report processors that make a network connection
as part of the processing of a report, and if there is a chance that the network operation is slow and will block on I/
O for some period of time, then it might make sense to have more JRuby instances than the number of cores. The
JVM is smart enough to suspend the thread that is handling those kinds of requests and use the CPUs for other
© 2024 Puppet, Inc., a Perforce company
Puppet | Platform components | 204
work, assuming there are still JRuby instances available in the pool. In a case like this you might want to set max-
active-instances to a value higher than the number of CPUs.)
At this point you may be wondering, "What's the downside to just setting max-active-instances to a really
high value?" The answer to this question, in a nutshell, is "memory usage". This brings us to the other extremely
important setting to consider for Puppet Server.
JVM Heap Size
The JVM's "max heap size" controls the maximum amount of (heap memory that the JVM process is allowed to
request from the operating system. You can set this value via the -Xmx command-line argument at JVM startup.
(In the case of Puppet Server, you'll find this setting in the "defaults" file for Puppet Server for your operating
system; this will generally be something like /etc/sysconfig/puppetserver or /etc/defaults/
puppetserver.)
Note: The vast majority of the memory footprint of a JVM process can usually be accounted for by the heap size.
However, there is some amount of non-heap memory that will always be used, and for programs that call out to native
code at all, there may be a bit more. Generally speaking, the resident memory usage of a JVM process shouldn't
exceed the max heap size by more than 256MB or so, but exceeding the max heap size by some amount is normal.
If your application's memory usage approaches this value, the JVM will try to get more aggressive with garbage
collection to free up memory. In certain situations, you may see increased CPU activity related to this garbage
collection. If the JVM is unable to recover enough memory to keep the application running smoothly, you will
eventually encounter an OutOfMemoryError, and the process will shut down.
For Puppet Server, we also use a JVM argument, -XX:HeapDumpOnOutOfMemoryError, to cause the JVM to
dump an .hprof file to disk. This is basically a memory snapshot at the point in time where the error occurred; it
can be loaded into various profiling tools to get a better understanding of where the memory was being used.
(Note that there is another setting, "min heap size", that is controlled via the -Xms setting; Oracle recommends setting
this value to the same value that you use for -Xmx.)
The most important factor when determining the max heap size for Puppet Server is the value of max-active-
instances. Each JRuby instance needs to load up a copy of the Puppet Ruby code, and then needs some amount
of memory overhead for all of the garbage that gets generated during a Puppet catalog compilation. Also, the memory
requirements will vary based on how many Puppet modules you have in your module path, how much Hiera data you
have, etc. At this time we estimate that a reasonable ballpark figure is about 512MB of RAM per JRuby instance,
but that can vary depending on some characteristics of your Puppet codebase. For example, if you have a really high
number of modules or a great deal of Hiera data, you might find that you need more than 512MB per JRuby instance.
You'll also want to allocate a little extra heap to be used by the rest of the things going on in Puppet Server: the web
server, etc. So, a good rule of thumb might be 512MB + (max-active-instances * 512MB).
We're working on some optimizations for really small installations (for testing, demos, etc.). Puppet Server should run
fine with a value of 1 for max-active-instances and a heap size of 512MB, and we might be able to improve
that further in the future.
Tying Together max-active-instances and Heap Size
The default is num-cpus -1, with a minimum value of 1 and maximum value of 4. In general, we recommend that
you explicitly set this value to something that you think is reasonable in your environment. To encourage this, we log
a warning message at startup if you have not provided an explicit value.
Potential JAVA ARGS settings
If you’re working outside of lab environment, increase ReservedCodeCacheSize to 512m under normal load.
If you’re working with 6-12 JRuby instances (or a max-requests-per-instance value significantly less than
100k), run with a ReservedCodeCache of 1G. Twelve or more JRuby instances in a single server might require
2G or more.
Similar caveats regarding scaling ReservedCodeCacheSize might apply if users are managing
MaxMetaspace.
© 2024 Puppet, Inc., a Perforce company
Puppet | Platform components | 205
The environment_timeout setting
By default, Puppet does not cache environments, which means the environment_timeout setting defaults to 0.
This allows you to update code without any extra steps, but it lowers the performance of Puppet Server.
In a production environment, we recommend either:
• Setting the value to unlimited and refreshing Puppet Server as part of your code deployment process.
• Setting the value to a number that keeps your most actively used environments cached, but allows testing
environments to fall out of the cache and reduce memory usage. For example, a value of 3 minutes (3m).
Applying metrics to improve performance
Puppet Server produces Monitoring Puppet Server metrics on page 193 that administrators can use to identify
performance bottlenecks or capacity issues. Interpreting this data is largely up to you and depends on many factors
unique to your installation and usage, but there are some common trends in metrics that you can use to make Puppet
Server function better.
Note: This document assumes that you are already familiar with Puppet Server's Monitoring Puppet
Server metrics on page 193, which report on relevant information, and its Tuning guide on page 203,
which provides instructions for modifying relevant settings. To put it another way, this guide attempts
to explain questions about "why" Puppet Server performs the way it does for you, while your servers
are the "who", Server Monitoring Puppet Server metrics on page 193 help you track down exactly
"what" is affecting performance, and the Tuning guide on page 203 explains "how" you can improve
performance.
If you're using Puppet Enterprise (PE), consult its documentation instead of this guide for PE-specific
requirements, settings, and instructions:
• Large environment installations (LEI)
• Compilers
• Load balancing
• High availability
Measuring capacity with JRubies
Puppet Server uses JRuby, which rations server resources in the form of JRuby instances in default mode, and JRuby
threads in multithreaded mode. Puppet Server consumes these as it handles requests. A simple way of explaining
Puppet Server performance is to remember that your Server infrastructure must be capable of providing enough
JRuby instances or threads for the amount of activity it handles. Anything that reduces or limits your server's capacity
to produce JRubies also degrades Puppet Server's performance.
Several factors can limit your Server infrastructure's ability to produce JRubies.
Request-handling capacity
Note: These guidelines for interpreting metrics generally apply to both default and multithreaded mode.
However, threads are much cheaper in terms of system resources, since they do not need to duplicate all of
Puppet's runtime, so you may have more vertical scalability in multithreaded mode.
If your free JRubies are 0 or fewer, your server is receiving more requests for JRubies than it can provide, which
means it must queue those requests to wait until resources are available. Puppet Server performs best when the
average number of free JRubies is above 1, which means Server always has enough resources to immediately handle
incoming requests.
There are two indicators in Puppet Server's metrics that can help you identify a request-handling capacity issue:
• Average JRuby Wait Time: This refers to the amount of time Puppet Server has to wait for an available JRuby
to become available, and increases when each JRuby is held for a longer period of time, which reduces the overall
number of free JRubies and forces new requests to wait longer for available resources.
• Average JRuby Borrow Time: This refers to the amount of time that Puppet Server "holds" a JRuby as a
resource for a request, and increases because of other factors on the server.
© 2024 Puppet, Inc., a Perforce company
Puppet | Platform components | 206
If wait time increases but borrow time stays the same, your Server infrastructure might be serving too many agents.
This indicates that Server can easily handle requests but is receiving too many at one time to keep up.
If both wait and borrow times are increasing, something else on your server is causing requests to take longer to
process. The longer borrow times suggest that Puppet Server is struggling more than before to process requests, which
has a cascading effect on wait times. Correlate borrow time increases with other events whenever possible to isolate
what activities might cause them, such as a Puppet code change.
If you are setting up Puppet Server for the first time, start by increasing your Server infrastructure's capacity through
additional JRubies (if your server has spare CPU and memory resources) or compilers until you have more than 0 free
JRubies, and your average number of free JRubies are at least 1. After your system can handle its request volume, you
can start looking into more specific performance improvements.
Adding more JRubies
If you must add JRubies, remember that Puppet Server is tuned by default to use one fewer than your total number
of CPUs, with a maximum of 4 CPUs, for the number of available JRubies. You can change this by setting max-
active-instances in puppetserver.conf on page 167, under the jruby-puppet section. In the default
mode, increasing max-active-instances creates whole independent JRuby instances. In multithreaded mode,
this setting instead controls the number of threads that the single JRuby instance will process concurrently, and
therefore has different scaling characteristics. Tuning recommendations for this mode are under development, see
SERVER-2823.
When running in the default mode, follow these guidelines for allocating resources when adding JRubies:
Each JRuby also has a certain amount of persistent memory overhead required in order to load both Puppet's Ruby
code and your Puppet code. In other words, your available memory sets a baseline limit to how much Puppet code
you can process. Catalog compilation can consume more memory, and Puppet Server's total memory usage depends
on the number of agents being served, how frequently those agents check in, how many resources are being managed
on each agent, and the complexity of the manifests and modules in use.
With the jruby-puppet.compile-mode setting in puppetserver.conf on page 167 set to off, a JRuby
requires at least 40MB of memory under JRuby 1.7 and at least 60MB under JRuby9k in order to compile a nearly
empty catalog. This includes memory for the scripting container, Puppet's Ruby code and additional memory
overhead.
For real-world catalogs, you can generally add an absolute minimum of 15MB for each additional JRuby. We
calculated this amount by comparing a minimal catalog compilation to compiling a catalog for a basic role that
installs Tomcat and Postgres servers.
Your Puppet-managed infrastructure is probably larger and more complex than that test scenario, and every
complication adds more to each additional JRuby's memory requirements. (For instance, we recommend assuming
that Puppet Server will use at least 512MB per JRuby while under load.) You can calculate a similar value unique to
your infrastructure by measuring puppetserver memory usage during your infrastructure's catalog compilations
and comparing it to compiling a minimal catalog for a similar number of nodes.
The jruby-metrics section of the Services endpoint on page 262 endpoint also lists the requested-
instances, which shows what requests have come in that are waiting to borrow a JRuby instance. This part of the
status endpoint lists the lock's status, how many times it has been requested, and how long it has been held for. If it is
currently being held and has been held for a while, you might see requests starting to stack up in the requested-
instances section.
Adding compilers
If you don't have the additional capacity on your primary server to add more JRubies, you'll want to add another
compiler to your Server infrastructure. See Scaling Puppet Server on page 208.
HTTP request delays
If JRuby metrics appear to be stable, performance issues might originate from lag in server requests, which also have
a cascading effect on other metrics. HTTP metrics in the Services endpoint on page 262, and the requests graph in
the Monitoring Puppet Server metrics on page 193, can help you determine when and where request times have
increased.
© 2024 Puppet, Inc., a Perforce company
Puppet | Platform components | 207
HTTP metrics include the total time for the server to handle the request, including waiting for a JRuby instance to
become available. When JRuby borrow time increases, wait time also increases, so when borrow time for one type of
request increases, wait times for all requests increases.
Catalog compilation, which is graphed on the sample Grafana dashboard, most commonly increases request times,
because there are many points of potential failure or delay in a catalog compilation. Several things could cause
catalog compilation lengthen JRuby borrow times.
• A Puppet code change, such as a faulty or complex new function. The Grafana dashboard should show if functions
start taking significantly longer, and the experimental dashboard and Services endpoint on page 262 endpoint
also list the lengthiest function calls (showing the top 10 and top 40, respectively) based on aggregate execution
times.
• Adding many file resources at one time.
In cases like these, there might be more efficient ways to author your Puppet code, you might be extending Puppet to
the point where you need to add JRubies or compilers even if you aren't adding more agents.
Slowdowns in PuppetDB can also cause catalog compilations to take more time: if you use exported resources or the
puppetdb_query function and PuppetDB has a problem, catalog compilation times will increase.
Puppet Server also sends agents' facts and the compiled catalog to PuppetDB during catalog compilation. The
Services endpoint on page 262 for the master service reports metrics for these operations under HTTP Client
Metrics on page 200, and in the Grafana dashboard in the "External HTTP Communications" graph.
Puppet Server also requests facts as HTTP requests while handling a node request, and submits reports via HTTP
requests while handling of a report request. If you have an HTTP report processor set up, the Grafana dashboard
shows metrics for Http report processor, as does the Services endpoint on page 262 endpoint under
http-client-metrics in the master service, for metric ID ['puppet', 'report', 'http']. Delays in
the report processor are passed on to Puppet Server.
Memory leaks and usage
A memory leak or increased memory pressure can stress Puppet Server's available resources. In this case, the Java
VM will spend more time doing garbage collection, causing the GC time and GC CPU % metrics to increase. These
metrics are available from the Services endpoint on page 262 endpoint, as well as in the mbeans metrics available
from both the v1 metrics on page 258 or v2 (Jolokia) metrics on page 259 endpoints.
If you can't identify the source of a memory leak, setting the max-requests-per-instance setting in
puppetserver.conf on page 167 to something other than the default of 0 limits the number of requests a JRuby
handles during its lifetime and enables automatic JRuby flushing. Enabling this setting reduces overall performance,
but if you enable it and no longer see signs of persistent memory leaks, check your module code for inefficiencies or
memory-consuming bugs.
Note: In multithreaded mode, the max-requests-per-instance setting refers to the sum total
number of requests processed by the single JRuby instance, across all of its threads. While that single
JRuby is being flushed, all requests will suspend until the instance becomes available again.
Submitting usage telemetry
If enabled, Puppet Server's dropsonde tool collects usage data for public Forge content and submits collected
information to Puppet development. This data helps Puppet development to prioritize more useful module work and
to improve Forge search quality.
All data collected is fully aggregated before anyone can access it. After aggregation, it is available publicly for the
benefit of the Puppet community. You can access public data at Puppet's BigQuery public database.
You can configure dropsonde to enable or disable certain metrics according to your organization's policies or
preferences. For more information on how to do this, visit dropsonde's documentation.
© 2024 Puppet, Inc., a Perforce company

Puppet | Platform components | 208
Configuring dropsonde in puppetserver.conf
Find the following section in your puppetserver.conf on page 167 file. If the section is not present, you may add it
manually:
# settings related to submitting module metrics via Dropsonde
dropsonde: {
#enabled: false
# How long, in seconds, to wait between dropsonde submissions
# Defaults to one week.
# interval: 604800
}
To enable telemetry collection, uncomment the enabled setting and update it to true.
The interval setting defines how long, in seconds, Puppet Server waits between telemetry submissions if enabled.
The default is 604800 (one week).
Dropsonde terminal commands
The terminal command puppetserver dropsonde list lists all the loaded metrics plugins and describes
what they do.
To see exactly what data is collected in a readable format, run puppetserver dropsonde preview in the
terminal.
Note: use --format=json if you want to use this data for your own tooling.
For more information on installating and configuring dropsonde, visit its documentation.
Scaling Puppet Server
To scale Puppet Server for many thousands of nodes, you'll need to add more Puppet Server instances dedicated to
catalog compilation. These Servers are known as compilers, and are simply additional load-balanced Puppet Servers
that receive catalog requests from agents and synchronize the results with each other.
If you're using Puppet Enterprise (PE), consult its documentation instead of this guide for PE-specific
requirements, settings, and instructions:
• Large environment installations (LEI)
• Installing compilers
• High availability
• Code Manager
Planning your load-balancing strategy
The rest of your configuration depends on how you plan on distributing the agent load. Determine what your
deployment will look like before you add any compilers, but implement load balancing as the last step only after
you have the infrastructure in place to support it.
Using round-robin DNS
Leave all of your agents pointed at the same Puppet Server hostname, then configure your site's DNS to arbitrarily
route all requests directed at that hostname to the pool of available servers.
For instance, if all of your agent nodes are configured with server = puppet.example.com, configure a DNS
name such as:
# IP address of server 1:
puppet.example.com. IN A 192.0.2.50
# IP address of server 2:
puppet.example.com. IN A 198.51.100.215
For this option, configure your servers with dns_alt_names before their certificate request is made.
© 2024 Puppet, Inc., a Perforce company

Puppet | Platform components | 209
Using a hardware load balancer
You can also use a hardware load balancer or a load-balancing proxy webserver to redirect requests more
intelligently. Depending on your configuration (for instance, SSL using either raw TCP proxying or acting as its own
SSL endpoint), you might also need to use other procedures in this document.
Configuring a load balancer depends on the product, and is beyond the scope of this document.
Using DNS SRV Records
You can use DNS SRV records to assign a pool of Puppet Servers for agents to communicate with. This requires a
DNS service capable of SRV records, which includes all major DNS software.
Note: This method makes a large number of DNS requests. Request timeouts are completely under the
DNS server's control and agents cannot cancel requests early. SRV records don't interact well with static
servers set in the config file. Please keep these potential pitfalls in mind when configuring your DNS!
Configure each of your agents with a srv_domain instead of a server in puppet.conf:
[main]
use_srv_records = true
srv_domain = example.com
Agents will then lookup a SRV record at _x-puppet._tcp.example.com when they need to talk to a Puppet
server.
# Equal-weight load balancing between server-a and server-b:
_x-puppet._tcp.example.com. IN SRV 0 5 8140 server-a.example.com.
_x-puppet._tcp.example.com. IN SRV 0 5 8140 server-b.example.com.
You can also implement more complex configurations. For instance, if all devices in site A are configured with a
srv_domain of site-a.example.com, and all nodes in site B are configured to site-b.example.com,
you can configure them to prefer a server in the local site but fail over to the remote site:
# Site A has two servers - server-1 is beefier, give it 75% of the load:
_x-puppet._tcp.site-a.example.com. IN SRV 0 75 8140 server-1.site-
a.example.com.
_x-puppet._tcp.site-a.example.com. IN SRV 0 25 8140 server-2.site-
a.example.com.
_x-puppet._tcp.site-a.example.com. IN SRV 1 5 8140 server.site-
b.example.com.
# For site B, prefer the local server unless it's down, then fail back to
site A
_x-puppet._tcp.site-b.example.com. IN SRV 0 5 8140 server.site-
b.example.com.
_x-puppet._tcp.site-b.example.com. IN SRV 1 75 8140 server-1.site-
a.example.com.
_x-puppet._tcp.site-b.example.com. IN SRV 1 25 8140 server-2.site-
a.example.com.
Centralizing the Certificate Authority
Additional Puppet Servers should only share the burden of compiling and serving catalogs, which is why they're
typically referred to as "compilers". Any certificate authority functions should be delegated to a single server.
Before you centralize this functionality, ensure that the single server that you want to use as the central CA is
reachable at a unique hostname other than (or in addition to) puppet. Next, point all agent requests to the centralized
CA server, either by configuring each agent or through DNS SRV records.
© 2024 Puppet, Inc., a Perforce company

Puppet | Platform components | 210
Directing individual agents to a central CA
On every agent, set the ca_server setting in puppet.conf (in the [main] configuration block) to the hostname
of the server acting as the certificate authority. If you have a large number of existing nodes, it is easiest to do this by
managing puppet.conf with a Puppet module and a template.
Note: Set this setting before provisioning new nodes, or they won't be able to complete their initial agent
run.
Pointing DNS SRV records at a central CA
If you use SRV records for agents, you can use the _x-puppet-ca._tcp.$srv_domain DNS name to point
clients to one specific CA server, while the _x-puppet._tcp.$srv_domain DNS name handles most of their
requests to servers and can point to a set of compilers.
Creating and configuring compilers
To add a compiler to your deployment, begin by Installing Puppet Server on page 156 on it.
Before running puppet agent or starting Puppet Server on the new server:
1.
In the compiler's puppet.conf, in the [main] configuration block, set the ca_server setting to the
hostname of the server acting as the certificate authority.
2.
In the compiler's webserver.conf on page 171 file, add and set the following SSL settings:
• ssl-cert
• ssl-key
• ssl-ca-cert
• ssl-crl-path
3.
Service Bootstrapping on page 159.
If you're using the individual agent configuration method of CA centralization, set ca_server in
puppet.conf to the hostname of your CA server in the [main] config block. If an ssldir is configured,
make sure it's configured in the [main] block only.
4.
If you're using the DNS round robin method of agent load balancing, or a load balancer in TCP proxying mode,
provide compilers with certificates using DNS Subject Alternative Names.
Configure dns_alt_names in the [main] block of puppet.conf to cover every DNS name that might be
used by an agent to access this server.
dns_alt_names = puppet,puppet.example.com,puppet.site-a.example.com
If the agent has been run or the server started and already created a certificate, remove it by running sudo
puppet ssl clean. If an agent has requested a certificate from the server, delete it there to re-issue a new
one with the alt names: puppetserver ca clean server-2.example.com.
5.
Request a new certificate by running puppet agent --test --waitforcert 10.
6.
Log into the CA server and run puppetserver ca sign server-2.example.com.
Centralizing reports, inventory service, and catalog searching (storeconfigs)
If you use an HTTP report processor, point your server and all of your Puppet compilers at the same shared report
server in order to see all of your agents' reports.
If you use the inventory service or exported resources, use PuppetDB and point your server and all of your Puppet
compilers at a shared PuppetDB instance. A reasonably robust PuppetDB server can handle many Puppet compilers
and many thousands of agents.
See the PuppetDB documentation for instructions on deploying a PuppetDB server, then configure every Puppet
compiler to use it. Note that every Puppet primary server and compiler must have its own allowlist entry if you're
using HTTPS certificates for authorization.
© 2024 Puppet, Inc., a Perforce company

Puppet | Platform components | 211
Keeping manifests and modules synchronized across compilers
You must ensure that all Puppet compilers have identical copies of your manifests, modules, and external node
classifier data. Examples include:
• Using a version control system such as r10k, Git, Mercurial, or Subversion to manage and sync your manifests,
modules, and other data.
• Running an out-of-band rsync task via cron.
• Configuring puppet agent on each compiler to point to a designated model Puppet Server, then use Puppet
itself to distribute the modules.
Implementing load distribution
Now that your other compilers are ready, you can implement your agent load-balancing strategy.
Restarting Puppet Server"
Starting in version 2.3.0, you can restart Puppet Server by sending a hangup signal, also known as a HUP signal
or SIGHUP, to the running Puppet Server process. The HUP signal stops Puppet Server and reloads it gracefully,
without terminating the JVM process. This is generally much faster than completely stopping and restarting the
process. This allows you to quickly load changes in Puppet Server, including configuration changes.
There are several ways to send a HUP signal to the Puppet Server process, but the most straightforward is to run the
following kill command:
kill -HUP `pgrep -f puppet-server`
Starting in version 2.7.0, you can also reload Puppet Server by running the "reload" action via the operating system's
service framework. This is analogous to sending a hangup signal but with the benefit of having the "reload" command
pause until the server has been completely reloaded, similar to how the "restart" command pauses until the service
process has been fully restarted. Advantages to using the "reload" action as opposed to just sending a HUP signal
include:
1.
Unlike with the HUP signal approach, you do not have to determine the process ID of the puppetserver process to
be reloaded.
2.
When using the HUP signal with an automated script (or Puppet code), it is possible that any additional
commands in the script might behave improperly if performed while the server is still reloading. With the
"reload" command, though, the server should be up and using its latest configuration before any subsequent script
commands are performed.
3.
Even if the server fails to reload and shuts down --- for example, due to a configuration error --- the kill -
HUP command might still return a 0 (success) exit code. With the "reload" command, however, any configuration
change which causes the server to shut down will produce a non-0 (failure) exit code. The "reload" command,
therefore, would allow you to more reliably determine if the server failed to reload properly.
Use the following commands to perform the "reload" action for Puppet Server.
All current OS distributions:
service puppetserver reload
OS distributions which use sysvinit-style scripts:
/etc/init.d/puppetserver reload
OS distributions which use systemd service configurations:
systemctl reload puppetserver
Note: If you're using Puppet Enterprise (PE), you can reload the server from the command line by running
service pe-puppetserver reload. However if you need to change a setting, do so in console or
© 2024 Puppet, Inc., a Perforce company
Puppet | Platform components | 212
with Heira, and then the agent will reload the server when it applies the change. For more information, see
Configuring and tuning Puppet Server.
Restarting Puppet Server to pick up changes
There are three ways to trigger your Puppet Server environment to refresh and pick up changes you've made. A
request to the JRuby pool on page 265 is the quickest, but picks up only certain types of changes. A HUP signal or
service reload is also quick, and applies additional changes. Other changes require a full Puppet Server restart.
Note: Changes to Puppet Server's logback.xml on page 164 don't require a server restart. Puppet Server
recognizes and applies them automatically, though it can take a minute or so for this to happen. However,
you can restart the service to force it to recognize those changes.
Changes applied after a JRuby pool flush, HUP signal, service reload, or full Server restart
• Changes to your hiera.yaml file to change your Hiera configuration.
• Using Ruby gems on page 187 for Puppet Server by puppetserver gem.
• Changes to the Ruby code for Puppet's core dependencies, such as Puppet, Facter, and Hiera.
• Changes to Puppet modules in an environment where you've enabled environment caching. You can also achieve
this by making a request to the Environment cache on page 264.
• Changes to the CA CRL file. For example, a puppetserver ca clean
Changes applied after a HUP signal, service reload, or full Server restart
• Changes to Puppet Server Configuring Puppet Server on page 157 in its conf.d directory.
• Changes to the CA CRL file. For example, a puppetserver ca clean
Changes that require a full Server restart
• Changes to JVM arguments, such as JVM Heap Size on page 204, that are typically configured in your /etc/
sysconfig/puppetserver or /etc/default/puppetserver file.
• Changes to Service Bootstrapping on page 159 to enable or disable Puppet Server's certificate authority (CA)
service.
For these types of changes, you must restart the process by using the operating system's service framework, for
example, by using the systemctl or service commands.
Note: To ensure that the Puppet Server is running in a platform agnostic way, use the puppet
resource service puppetserver ensure=running command. This command is equivalent
to systemctl start puppetserver on systems that support it. For more information on the
resource command and managing a server’s desired state, see Man Page: puppet resource on page 1072
and Resource Type: service on page 650.
Developer information
Developer debugging
Because Puppet Server executes both Clojure and Ruby code, approaches to debugging differ depending on which
part of the application you're interested in.
Debugging Clojure Code
If you are interested in debugging the web service layer or other parts of the app that are written in Clojure, there
are lots of options available. The Clojure REPL is often the most useful tool, as it makes it very easy to interact with
individual functions and namespaces.
If you are looking for more traditional debugging capabilities, such as defining breakpoints and stepping through the
lines of your source code, there are many options. Just about any Java debugging tool will work to some degree, but
Clojure-specific tools such as CDT and debug-repl will have better integration with your Clojure source files.
For a more full-featured IDE, Cursive is a great option. It's built on IntelliJ IDEA, and provides a debug REPL that
supports all of the same debugging features that are available in Java; breakpoints, evaluating expressions in the local
scope when stopped at a breakpoint, visual navigation of the call stack across threads, etc.
© 2024 Puppet, Inc., a Perforce company

Puppet | Platform components | 213
Debugging Ruby Code
Debugging the Ruby code running in Puppet Server can be a bit trickier, because Java and Clojure debugging tools
will only take you into the JRuby interpreter source code, not into the Ruby code that it is processing. So, if you wish
to debug the Ruby code directly, you'll need to install gems and take advantage of their capabilities (not unlike how
you would debug Ruby code in the MRI interpreter).
For more info on installing gems for Puppet Server, see Using Ruby gems on page 187.
Ruby REPL incompatible with Lein REPL
Please note that a REPL running in Ruby is incompatible with lein repl because JRuby will not receive data from
standard input when running inside of lein repl. To use a ruby REPL during development run puppetserver
from source with lein run rather than lein repl:
$ lein run --config ~/.puppetserver/puppetserver.conf
The lein run command will start the server in the foreground as normal. pry or ruby-debug will display an
input prompt when the relevant statement is reached. Expect to see the normal lein run output and then the Ruby
REPL will present itself as compared to lein repl which presents a prompt early in the process lifecycle. In this
way the "ruby repl" is more of a breakpoint than a REPL in the Clojure sense.
ruby-debug
Installation
There are many gems available that provide various ways of debugging Ruby code depending on what version of
Ruby and which Ruby interpreter you're running. One of the most common gems is ruby-debug, and there is a
JRuby-compatible version available. To install it for use in Puppet Server, run:
$ sudo puppetserver gem install ruby-debug
Or, if you're running puppetserver from source:
$ lein gem -c /path/to/puppetserver.conf install ruby-debug
Usage
After installing the gem, you can trigger the debugger by adding a line like this to any of the Ruby code that is run in
Puppet Server (including the Puppet Ruby code):
require 'ruby-debug'; debugger
pry
Installation
Pry is another popular gem for introspecting Ruby code. It is compatible with JRuby. Install pry when running a
packaged version of puppetserver using:
$ sudo puppetserver gem install pry --no-ri --no-rdoc
Or, if you're running puppetserver from source:
$ lein gem -c ~/puppetserver/puppetserver.conf -- install pry \
--no-ri --no-rdoc
Usage
puppetserver should be run in the foreground to make use of the pry repl. This involves stopping the background
service and starting the server in the foreground with the puppet foreground subcommand:
$ sudo service puppetserver stop
© 2024 Puppet, Inc., a Perforce company

Puppet | Platform components | 214
$ sudo puppetserver foreground
After installing, you can add a line like this to the Ruby code:
require 'pry'; binding.pry
This will give you an advanced interactive REPL at the line of code where you've called pry.
There are many other gems that are useful for debugging, and a large percentage of them are compatible with
JRuby. If you have a favorite that is not mentioned here please let us know, and we will consider adding it to this
documentation!
Limitations
We are aware that some favorite gems/tools/features for ruby debugging don't currently work with JRuby/Puppet
Server. (For example, some things like color syntax highlighting in Pry.) It's important to us to make sure that the
Ruby developer experience is not degraded for developers working via Puppet Server rather than webrick, so, if you
run into issues like this, please file an issue on our Bug Tracker, and we will see if it's possible to add support for
things that we're missing. In many cases it might be a matter of simply submitting a patch to JRuby, or submitting
a JRuby-compatibility patch for an existing gem, and we're interested in trying to help with those sorts of things
whenever possible.
Tracing Code Events
Puppet Server can utilize JRuby's standard facilities for tracing events during code execution. For more information
on these techniques, see the Tracing code events on page 219 page.
Running from source
So you'd like to run Puppet Server from source?
The following steps will help you get Puppet Server up and running from source.
Step 0: Quick Start for Developers
# clone git repository and initialize submodules
$ git clone --recursive git://github.com/puppetlabs/puppetserver
$ cd puppetserver
# Remove any old config if you want to make sure you're using the latest
# defaults
$ rm -rf ~/.puppetserver
# Run the `dev-setup` script to initialize all required configuration
$ ./dev-setup
# Launch the clojure REPL
$ lein repl
# Run Puppet Server
dev-tools=> (go)
dev-tools=> (help)
You should now have a running server. All relevant paths ($confdir, $codedir, etc.) are configured by default
to point to directories underneath ~/.puppetlabs. These should all align with the default values that puppet
uses (for non-root users).
You can find the specific paths in the dev/puppetserver.conf file.
In another shell, you can run the agent:
# Go to the directory where you checked out puppetserver
$ cd puppetserver
# Set ruby and bin paths
$ export RUBYLIB=./ruby/puppet/lib:./ruby/facter/lib
© 2024 Puppet, Inc., a Perforce company

Puppet | Platform components | 215
$ export PATH=./ruby/puppet/bin:./ruby/facter/bin:$PATH
# Run the agent
$ puppet agent -t
To make an API request to the running server, run a command like this:
$ curl \
--cert ~/.puppetlabs/etc/puppet/ssl/certs/localhost.pem \
--key ~/.puppetlabs/etc/puppet/ssl/private_keys/localhost.pem \
--cacert ~/.puppetlabs/etc/puppet/ssl/ca/ca_crt.pem \
https://localhost:8140/puppet/v3/file_content/modules/mymodule/
script.sh?environment=production
More detailed instructions follow.
Step 1: Install Prerequisites
Use your system's package tools to ensure that the following prerequisites are installed:
• Java 11 or 17 (17 recommended)
• Latest version of Leiningen
• Git (for checking out the source code)
Step 2: Clone Git Repo and Set Up Working Tree
$ git clone --recursive git://github.com/puppetlabs/puppetserver
$ cd puppetserver
Step 3: Set up Config Files
The easiest way to do this is to just run:
$ ./dev-setup
This will set up all of the necessary configuration files and directories inside of your ~/.puppetlabs
directory. If you are interested in seeing what all of the default file paths are, you can find them in ./dev/
puppetserver.conf.
The default paths should all align with the default values that are used by puppet (for non-root users).
If you'd like to customize your environment, here are a few things you can do:
• Before running ./dev-setup, set an environment variable called MASTERHOST. If this variable is found
during dev-setup, it will configure your puppet.conf file to use this value for your certname (both for
Puppet Server and for puppet) and for the server configuration (so that your agent runs will automatically use
this hostname as their Puppet primary server).
• Create a file called dev/user.clj. This file will be automatically loaded when you run Puppet Server from the
REPL. In it, you can define a function called get-config, and use it to override the default values of various
settings from dev/puppetserver.conf. For an example of what this file should look like, see ./dev/
user.clj.sample.
You don't need to create a user.clj in most cases; the settings that I change the most frequently that would
warrant the creation of this file, though, are:
• jruby-puppet.max-active-instances: the number of JRuby instances to put into the pool. This can
usually be set to 1 for dev purposes, unless you're working on something that involves concurrency.
• jruby-puppet.splay-instance-flush: Do not attempt to splay JRuby flushing, set when testing if
using multiple JRuby instances and you need to control when they are flushed from the pool
• jruby-puppet.master-conf-dir: the puppet primary server confdir (where puppet.conf, modules,
manifests, etc. should be located).
• jruby-puppet.master-code-dir: the puppet primary server codedir
• jruby-puppet.master-var-dir: the puppet primary server vardir
© 2024 Puppet, Inc., a Perforce company

Puppet | Platform components | 216
• jruby-puppet.master-run-dir: the puppet primary server rundir
• jruby-puppet.master-log-dir: the puppet primary server logdir
Step 4a: Run the server from the clojure REPL
The preferred way of running the server for development purposes is to run it from inside the clojure REPL. The git
repo includes some files in the /dev directory that are intended to make this process easier.
When running a clojure REPL via the lein repl command-line command, lein will load the dev/dev-
tools.clj namespace by default.
Running the server inside of the clojure REPL allows you to make changes to the source code and reload the server
without having to restart the entire JVM. It can be much faster than running from the command line, when you are
doing iterative development. We are also starting to build up a library of utility functions that can be used to inspect
and modify the state of the running server; see dev/dev-tools.clj for more info.
(NOTE: many of the developers of this project are using a more full-featured IDE called Cursive Clojure, built on
the IntelliJ IDEA platform, for our daily development. It contains an integrated REPL that can be used in place of the
lein repl command-line command, and works great with all of the functions described in this document.)
To start the server from the REPL, run the following:
$ lein repl
nREPL server started on port 47631 on host 127.0.0.1
dev-tools=> (go)
dev-tools=> (help)
Then, if you make changes to the source code, all you need to do in order to restart the server with the latest changes
is:
dev-tools=> (reset)
Restarting the server this way should be significantly faster than restarting the entire JVM process.
You can also run the utility functions to inspect the state of the server, e.g.:
dev-tools=> (print-puppet-environment-states)
Have a look at dev-tools.clj if you're interested in seeing what other utility functions are available.
Step 4b: Run the server from the command line
If you prefer not to run the server interactively in the REPL, you can launch it as a normal process. To start the Puppet
Server when running from source, simply run the following:
$ lein run -c /path/to/puppetserver.conf
Step 4c: Development environment gotchas
Missing git submodules
If you get an error like the following:
Execution error (LoadError) at org.jruby.RubyKernel/require
(org/jruby/RubyKernel.java:970).
(LoadError) no such file to load -- puppet
Then you've probably forgotten to fetch the git submodules.
© 2024 Puppet, Inc., a Perforce company

Puppet | Platform components | 217
Failing tests
If you change the :webserver :ssl-port config option from the default value of 8140, tests will fail with
errors like the following:
lein test :only puppetlabs.general-puppet.general-puppet-int-test/test-
external-command-execution
ERROR in (test-external-command-execution) (SocketChannelImpl.java:-2)
Uncaught exception, not in assertion.
expected: nil
2019-02-06 14:58:50,541 WARN [async-dispatch-18] [o.e.j.s.h.ContextHandler]
Empty contextPath
actual: java.net.ConnectException: Connection refused
at sun.nio.ch.SocketChannelImpl.checkConnect (SocketChannelImpl.java:-2)
sun.nio.ch.SocketChannelImpl.finishConnect (SocketChannelImpl.java:717)
org.apache.http.impl.nio.reactor.DefaultConnectingIOReactor.processEvent
(DefaultConnectingIOReactor.java:171)
org.apache.http.impl.nio.reactor.DefaultConnectingIOReactor.processEvents
(DefaultConnectingIOReactor.java:145)
org.apache.http.impl.nio.reactor.AbstractMultiworkerIOReactor.execute
(AbstractMultiworkerIOReactor.java:348)
org.apache.http.impl.nio.conn.PoolingNHttpClientConnectionManager.execute
(PoolingNHttpClientConnectionManager.java:192)
org.apache.http.impl.nio.client.CloseableHttpAsyncClientBase$1.run
(CloseableHttpAsyncClientBase.java:64)
java.lang.Thread.run (Thread.java:844)
Changing the ssl-port variable back to 8140 makes the tests run properly.
Running the Agent
Use a command like the one below to run an agent against your running puppetserver:
puppet agent --confdir ~/.puppetlabs/etc/puppet \
--debug -t
Note that a system installed Puppet Agent is ok for use with source-based PuppetDB and Puppet Server. The --
confdir above specifies the same confdir that Puppet Server is using. Because the Puppet Agent and Puppet Server
instances are both using the same confdir, they're both using the same certificates as well. This alleviates the need to
sign certificates as a separate step.
Running the Agent inside a Docker container
You can easily run a Puppet Agent inside a Docker container, either by using the host network profile or by
accessing the Puppetserver service using the Docker host IP:
docker run -ti \
--name agent1 \
puppet/puppet-agent-ubuntu \
agent -t --server 172.17.0.1
docker run -ti \
--name agent2 \
--network host \
--add-host puppet:127.0.0.1 \
puppet/puppet-agent-ubuntu
© 2024 Puppet, Inc., a Perforce company

Puppet | Platform components | 218
To start another Puppet Agent run in a previous container you can use the docker start command:
docker start -a agent1
Running tests
• lein test to run the clojure test suite
• rake spec to run the jruby test suite
The Clojure test suite can consume a lot of transient memory. Using a larger JVM heap size when running tests can
significantly improve test run time. The default heap size is somewhat conservative: 1 GB for the minimum heap
(much lower than that as a maximum can lead to Java OutOfMemory errors during the test run) and 2 GB for the
maximum heap. While the heap size can be configured via the -Xms and -Xmx arguments for the :jvm-opts
defproject key within the project.clj file, it can also be customized for an individual user environment via
either of the following methods:
1.
An environment variable named PUPPETSERVER_HEAP_SIZE. For example, to use a heap size of 5 GiB for a
lein test run, you could run the following:
$ PUPPETSERVER_HEAP_SIZE=6G lein test
2.
A lein profiles.clj setting in the :user profile under the :puppetserver-heap-size key. For
example, to use a heap size of 5 GiB, you could add the following key to your ~/.lein/profiles.clj file:
{:user {:puppetserver-heap-size "5G"
...}}
With the :puppetserver-heap-size key defined in the profiles.clj file, any subsequent lein test
run would utilize the associated value for the key. If both the environment variable and the profiles.clj key are
defined, the value from the environment variable takes precedence. When either of these settings is defined, the value
is used as both the minimum and maximum JVM heap size.
Installing Ruby Gems for Development
The gems that are vendored with the puppetserver OS packages will be automatically installed into your dev
environment by the ./dev-setup script. If you wish to install additional gems, please see the Using Ruby gems on
page 187 document for detailed information.
Debugging
For more information about debugging both Clojure and JRuby code, please see Developer debugging on page 212
documentation.
Running PuppetDB
To run a source PuppetDB with Puppet Server, Puppet Server needs standard PuppetDB configuration and how to
find the PuppetDB terminus. First copy the dev/puppetserver.conf file to another directory. In your copy of
the config, append a new entry to the ruby-load-path list: <PDB source path>/puppet/lib. This tells
PuppetServer to load the PuppetDB terminus from the specified directory.
From here, the instructions are similar to installing PuppetDB manually via packages. The PuppetServer instance
needs configuration for connecting to PuppetDB. Instructions on this configuration are below, but the official docs for
this can be found here.
Update ~/.puppetlabs/etc/puppet/puppet.conf to include:
[server]
storeconfigs = true
storeconfigs_backend = puppetdb
reports = store,puppetdb
Create a new puppetdb config file ~/.puppetlabs/etc/puppet/puppetdb.conf that contains
[main]
© 2024 Puppet, Inc., a Perforce company

Puppet | Platform components | 219
server_urls = https://<SERVERHOST>:8081
Then create a new routes file at ~/.puppetlabs/etc/puppet/routes.yaml that contains
---
server:
facts:
terminus: puppetdb
cache: yaml
Assuming you have a PuppetDB instance up and running, start your Puppet Server instance with the new
puppetserver.conf file that you changed:
lein run -c ~/<YOUR CONFIG DIR>/puppetserver.conf
Depending on your PuppetDB configuration, you might need to change some SSL config. PuppetDB requires that the
same CA that signs it's certificate, also has signed Puppet Server's certificate. The easiest way to do this is to point
PuppetDB at the same configuration directory that Puppet Server and Puppet Agent are pointing to. Typically this
setting is specified in the jetty.ini file in the PuppetDB conf.d directory. The update would look like:
[jetty]
#...
ssl-cert = <home dir>/.puppetlabs/etc/puppet/ssl/certs/<SERVERHOST>.pem
ssl-key = <home dir>/.puppetlabs/etc/puppet/ssl/private_keys/
<SERVERHOST>.pem
ssl-ca-cert = <home dir>/.puppetlabs/etc/puppet/ssl/certs/ca.pem
After the SSL config is in place, start (or restart) PuppetDB:
lein run services -c <path to PDB config>/conf.d
Then run the Puppet Agent and you should see activity in PuppetDB and Puppet Server.
Tracing code events
The JRuby runtime supports the Ruby set_trace_func Kernel method for tracing code events, e.g., lines of code being
executed and calls to C-language routines or Ruby methods. This can likewise be used in Puppet Server for tracing.
In order to enable a more verbose level of tracing, e.g., to capture lower-level calls into C code, the
jruby.debug.fullTrace Java property must be set to "true". If you are running Puppet Server from source, this
can be done by adding the option to the project.clj file:
:jvm-opts ["-Djruby.debug.fullTrace=true"]
If you are running Puppet Server from a package, this can be done by adding the option to the puppetserver file
in /etc/sysconfig or /etc/default, depending upon your OS distribution:
JAVA_ARGS="-Xms2g -Xmx2g -Djruby.debug.fullTrace=true"
A call to the set_trace_func function can be done in one of the Ruby files in the Puppet Server code. For the
trace to be in effect for the full execution of Ruby code, one common place to put this call would be at the top of the
../src/ruby/puppetserver-lib/puppet/server/master.rb file, which configures Ruby Puppet for
running inside Puppet Server. A basic implementation might look like this:
set_trace_func proc { |event, file, line, id, binding, classname|
printf "%8s %s:%-2d %10s %8s\n", event, file, line, id, classname
}
© 2024 Puppet, Inc., a Perforce company

Puppet | Platform components | 220
Note that printf will write each trace line to stdout. If you are running Puppet Server from a package install, stdout
should be routed to the /var/log/puppetserver-daemon.log file.
Lines of output from set_trace_func look like the following:
c-call /usr/share/puppetserver/puppet-server-release.jar!/META-INF/
jruby.home/lib/ruby/shared/jopenssl19/openssl/ssl-internal.rb:30 initialize
OpenSSL::X509::Store
You could use this technique to locate any references made to specific class names from code and the active stack at
the point of each reference. For example, to locate callers of any OpenSSL classes, you could add the following to
the set_trace_func call:
set_trace_func proc { |event, file, line, id, binding, classname|
if classname.to_s =~ /OpenSSL/
printf "%8s %s:%-2d %10s %8s\n", event, file, line, id, classname
puts caller
end
}
Puppet Server HTTP API
• Puppet Server HTTP API overview on page 220
• PSON on page 222
• Schemas (JSON) on page 257
These JSON files contain schemas for the various HTTP API objects.
Puppet Server HTTP API overview
Puppet Server provides several services via HTTP API, and the Puppet agent application uses those services to
resolve a node's credentials, retrieve a configuration catalog, retrieve file data, and submit reports.
Puppet and Puppet CA APIs
Puppet Server's HTTP API is split into two separately versioned APIs:
• An API for configuration-related services
• An API for the certificate authority (CA).
All configuration endpoints are prefixed with /puppet, while all CA endpoints are prefixed with /puppet-ca.
All endpoints are explicitly versioned: the prefix is always immediately followed by a string like /v3 (a directory
separator, the letter v, and the version number of the API).
Authorization
Authorization for /puppet and /puppet-ca endpoints is controlled with auth.conf on page 160.
Puppet V3 HTTP API
The Puppet agent application uses several network services to manage systems. These services are all grouped under
the /puppet API. Other tools can access these services and use the Puppet primary server's data for other purposes.
The V3 API contains endpoints of two types: those that are based on dispatching to Puppet's internal "indirector"
framework, and those that are not (namely the environments endpoint).
Every HTTP endpoint that dispatches to the indirector follows the form /puppet/v3/:indirection/:key?
environment=:environment, where:
• :environment is the name of the environment that should be in effect for the request. Not all endpoints need
an environment, but the query parameter must always be specified.
• :indirection is the indirection to which the request is dispatched.
• :key is the "key" portion of the indirection call.
© 2024 Puppet, Inc., a Perforce company

Puppet | Platform components | 221
Using this API requires significant understanding of how Puppet's internal services are structured, but the following
documents specify what is available and how to interact with it.
Configuration management services
The Puppet agent application directly uses these servcies to manage the configuration of a node.
These endpoints accept payload formats formatted as JSON by default (MIME type of application/json),
except for File Content and File Bucket File, which always use application/octet-stream.
• Facts on page 230
• Catalog on page 223
• Node on page 229
• File Bucket File on page 231
• File Content on page 232
• File Metadata on page 234
• Report on page 240
Environments endpoint
The /puppet/v3/environments endpoint uses a different format than the configuration management and
informational services endpoints.
The endpoint accepts only payloads formatted as JSON, and responds with JSON (MIME type of application/
json).
• Environments
Puppet Server-specific endpoints
Puppet Server adds several unique endpoints of its own. They include these additional /puppet/v3/ endpoints:
• Environment classes on page 266, at /puppet/v3/environment_classes
• Environment modules on page 271, at /puppet/v3/environment_modules
• Static file content on page 274, at /puppet/v3/static_file_content
It also includes these unique APIs, with endpoints containing other URL prefixes:
• Services endpoint on page 262, at /status/v1/services
• v1 metrics on page 258, at /metrics/v1/mbeans
• v2 (Jolokia) metrics on page 259, at /metrics/v2/
• Admin API, at /puppet-admin-api/v1/:
• Environment cache on page 264, at /puppet-admin-api/v1/environment-cache
• JRuby pool on page 265, at /puppet-admin-api/v1/jruby-pool
Error responses
The environments endpoint responds to error conditions in a uniform manner and uses standard HTTP response
codes to signify those errors.
Request problem HTTP API error response code
Client submits malformed request 400 Bad Request
Unauthorized client 403 Not Authorized
Client uses an HTTP method not permitted for the
endpoint
405 Method Not Allowed
Client requests a response in a format other than JSON 406 Unacceptable
Server encounters an unexpected error while handling a
request
500 Server Error
© 2024 Puppet, Inc., a Perforce company

Puppet | Platform components | 222
Request problem HTTP API error response code
Server can't find an endpoint handler for an HTTP
request
404 Not Found
Except for HEAD requests, error responses contain a body of a uniform JSON object with the following properties:
• message: (String) A human-readable message explaining the error.
• issue_kind: (String) A unique label to identify the error class.
Puppet provides a JSON schema for error objects. Endpoints implemented by Puppet Server have a different error
schema:
{
"msg": "",
"kind": ""
}
CA V1 HTTP API
The certificate authority (CA) API contains all of the endpoints supporting Puppet's public key infrastructure (PKI)
system.
The CA V1 endpoints share the same basic format as the Puppet V3 API, because they are based on the interface of
Puppet's indirector-based CA. However, Puppet Server's CA is implemented in Clojure. Both have a different prefix
and version than the V3 API.
These endpoints follow the form /puppet-ca/v1/:indirection/:key, where:
• :indirection is the indirection to which the request is dispatched.
• :key is the "key" portion of the indirection call.
As with the Puppet V3 API, using this API requires a significant amount of understanding of how Puppet's internal
services are structured. The following documents specify what is available and how to interact with it.
SSL certificate-related services
These endpoints accept only plain-text payload formats. Historically, Puppet has used the MIME type s to mean
text/plain. In Puppet 5, it always uses text/plain, but continues to accept s as an equivalent.
• Certificate on page 243
• Certificate Request on page 245
• Certificate Status on page 247
• Certificate Revocation List on page 250
• Certificate Renew
• Bulk Certificate Sign on page 255
Serialization formats
Puppet sends messages using several serialization formats. Not all REST services support all of the formats.
• JSON
Note: PSON has been deprecated in Puppet 7 and removed in Puppet 8. You can use the
allow_pson_serialization=false setting to prevent Puppet from downgrading from JSON to
PSON.
PSON
PSON is a variant of JSON that puppet uses for serializing data to transmit across the network or store on disk.
Whereas JSON requires that the serialized form is valid unicode (usually UTF-8), PSON is 8-bit ASCII, which allows
it to represent arbitrary byte sequences in strings.
Puppet uses the MIME types "pson" and "text/pson" to refer to PSON.
© 2024 Puppet, Inc., a Perforce company

Puppet | Platform components | 223
Differences from JSON
PSON does not differ from JSON in its representation of objects, arrays, numbers, booleans, and null values. PSON
does serialize strings differently from JSON.
A PSON string is a sequence of 8-bit ASCII encoded data. It must start and end with " (ASCII 0x22) characters.
Between these characters it may contain any byte sequence. Some individual characters are represented by a sequence
of characters:
| Byte | ASCII Character | Encoded Sequence | Encoded ASCII Sequence |
| ---- | --------------- | ---------------- | ---------------------- |
| 0x22 | " | 0x5C, 0x22 | \" |
| 0x5c | \ | 0x5C, 0x5C | \\ |
| 0x08 | Backspace | 0x5C, 0x62 | \b |
| 0x09 | Horizontal Tab | 0x5C, 0x74 | \t |
| 0x0A | Line Feed | 0x5C, 0x6E | \n |
| 0x0C | Form Feed | 0x5C, 0x66 | \f |
| 0x0D | Carriage Return | 0x5C, 0x72 | \r |
In addition, any character between 0x00 and 0x1F, (except the ones listed above) must be encoded as a six byte
sequence of \u followed by four ASCII digits of the hex number of the desired character. For example the ASCII
Record Separator character (0x1E) is represented as \u001E (0x5C, 0x75, 0x30, 0x30, 0x31, 0x45).
Decoding PSON Using JSON Parsers
Many languages have JSON parsers already, which can often be used to parse PSON data. Although JSON requires
that it is encoded as unicode most parsers will produce usable output from PSON if they are instructed to interpret the
input as Latin-1 encoding.
In all these examples there is a file available called data.pson that contains the ruby structure { "data" =>
"\x07\x08\xC3\xC3" } encoded as PSON (the value is an invalid unicode sequence). In bytes the data is:
0x7b 0x22 0x64 0x61 0x74 0x61 0x22 0x3a 0x22 0x5c 0x75 0x30 0x30 0x30 0x37
0x5c 0x62 0xc3 0xc3 0x22 0x7d
Python Example:
>>> import json
>>> json.load(open("data.pson"), "latin_1")
{u'data': u'\x07\x08\xc3\xc3'}
Clojure Example:
user> (parse-string (slurp "data.pson" :encoding "ISO-8859-1"))
{"data" "^G\bÃÃ"}
Puppet v3 API
Catalog
The catalog endpoint returns a catalog for the specified node name given the provided facts.
Find
Retrieve a catalog.
POST /puppet/v3/catalog/:nodename
GET /puppet/v3/catalog/:nodename?environment=:environment
Supported HTTP Methods
POST, GET
Supported Response Formats
© 2024 Puppet, Inc., a Perforce company

Puppet | Platform components | 224
application/json, text/pson
Notes
The POST and GET methods are functionally equivalent. Both provide the 3 parameters specified below: the POST
in the request body, the GET in the query string.
Puppet originally used GET; POST was added because some web servers have a maximum URI length of 1024 bytes
(which is easily exceeded with the facts parameter).
The examples below use the POST method.
Parameters
Four parameters should be provided to the POST or GET:
• environment: the environment name.
• facts_format: must be application/json or pson.
• facts: serialized JSON or PSON of the facts hash. Since facts can contain &, which is also the HTTP query
parameter delimiter, facts are doubly-escaped.
• transaction_uuid: a transaction uuid identifying the entire transaction (shows up in the report as well).
Two optional parameters are required for static catalogs:
• static_catalog: a boolean requesting a static catalog if available; should always be true.
• checksum_type: a dot-separated list of checksum types supported by the agent, for use in file resources of a
static catalog. The order signifies preference, highest first.
Optional parameters that may be provided to the POST or GET:
• configured_environment: the environment configured on the client. May be provided to notify an ENC
that the client requested a specific environment which might differ from what the client believes is its current
environment.
• job_id: which orchestration job triggered this catalog request.
Example Response
Catalog found
POST /puppet/v3/catalog/elmo.mydomain.com
environment=env&configured_environment=canary_env&facts_format=application
%2Fjson&facts=%257B%2522name%2522%253A%2522elmo.mydomain.com%2522%252C
%2522values%2522%253A%257B%2522architecture%2522%253A%2522x86_64%2522%257D
%257D&transaction_uuid=aff261a2-1a34-4647-8c20-ff662ec11c4c
HTTP 200 OK
Content-Type: application/json
{
"tags": [
"settings",
"multi_param_class",
"class"
],
"name": "elmo.mydomain.com",
"version": 1377473054,
"code_id": null,
"catalog_uuid": "827a74c8-cf98-44da-9ff7-18c5e4bee41e",
"catalog_format": 1,
"environment": "production",
"resources": [
{
"type": "Stage",
"title": "main",
"tags": [
© 2024 Puppet, Inc., a Perforce company

Puppet | Platform components | 225
"stage"
],
"exported": false,
"parameters": {
"name": "main"
}
},
{
"type": "Class",
"title": "Settings",
"tags": [
"class",
"settings"
],
"exported": false
},
{
"type": "Class",
"title": "main",
"tags": [
"class"
],
"exported": false,
"parameters": {
"name": "main"
}
},
{
"type": "Class",
"title": "Multi_param_class",
"tags": [
"class",
"multi_param_class"
],
"line": 10,
"exported": false,
"parameters": {
"one": "hello",
"two": "world"
}
},
{
"type": "Notify",
"title": "foo",
"tags": [
"notify",
"foo",
"class",
"multi_param_class"
],
"line": 4,
"exported": false,
"parameters": {
"message": "One is hello, two is world"
}
}
],
"edges": [
{
"source": "Stage[main]",
"target": "Class[Settings]"
},
{
"source": "Stage[main]",
© 2024 Puppet, Inc., a Perforce company

Puppet | Platform components | 226
"target": "Class[main]"
},
{
"source": "Stage[main]",
"target": "Class[Multi_param_class]"
},
{
"source": "Class[Multi_param_class]",
"target": "Notify[foo]"
}
],
"classes": [
"settings",
"multi_param_class"
]
}
Static Catalog found
POST /puppet/v3/catalog/elmo.mydomain.com
environment=env&configured_environment=canary_env&facts_format=application
%2Fjson&facts=%7B%22name%22%3A%22elmo.mydomain.com
%22%2C%22values%22%3A%7B%22architecture%22%3A
%22x86_64%22%7D&transaction_uuid=aff261a2-1a34-4647-8c20-
ff662ec11c4c&static_catalog=true&checksum_type=sha256.md5
HTTP 200 OK
Content-Type: application/json
{
"tags": [
"settings",
"multi_param_class",
"class"
],
"name": "elmo.mydomain.com",
"version": 1377473054,
"code_id": "arbitrary_code_id_string",
"catalog_uuid": "827a74c8-cf98-44da-9ff7-18c5e4bee41e",
"catalog_format": 1,
"environment": "production",
"resources": [
{
"type": "Stage",
"title": "main",
"tags": [
"stage"
],
"exported": false,
"parameters": {
"name": "main"
}
},
{
"type": "Class",
"title": "Settings",
"tags": [
"class",
"settings"
],
"exported": false
},
© 2024 Puppet, Inc., a Perforce company

Puppet | Platform components | 227
{
"type": "Class",
"title": "main",
"tags": [
"class"
],
"exported": false,
"parameters": {
"name": "main"
}
},
{
"type": "Class",
"title": "Multi_param_class",
"tags": [
"class",
"multi_param_class"
],
"line": 10,
"exported": false,
"parameters": {
"one": "hello",
"two": "world"
}
},
{
"type": "Notify",
"title": "foo",
"tags": [
"notify",
"foo",
"class",
"multi_param_class"
],
"line": 4,
"exported": false,
"parameters": {
"message": "One is hello, two is world"
}
},
{
"type": "File",
"title": "/tmp/foo",
"tags": [
"file",
"class"
],
"line": 12,
"exported": false,
"parameters": {
"ensure": "file",
"source": "puppet:///modules/a_module/foo"
}
},
{
"type": "File",
"title": "/tmp/bar",
"tags": [
"file",
"class"
],
"line": 16,
"exported": false,
"parameters": {
© 2024 Puppet, Inc., a Perforce company

Puppet | Platform components | 228
"ensure": "present",
"source": "puppet:///modules/a_module/bar",
"recurse", "true"
}
],
"edges": [
{
"source": "Stage[main]",
"target": "Class[Settings]"
},
{
"source": "Stage[main]",
"target": "Class[main]"
},
{
"source": "Stage[main]",
"target": "Class[Multi_param_class]"
},
{
"source": "Class[Multi_param_class]",
"target": "Notify[foo]"
},
{
"source": "Class[Main]",
"target": "File[/tmp/foo]"
}
],
"classes": [
"settings",
"multi_param_class"
]
"metadata": {
"/tmp/foo": {
"checksum": {
"type": "sha256",
"value":
"{sha256}5891b5b522d5df086d0ff0b110fbd9d21bb4fc7163af34d08286a2e846f6be03"
},
"content_uri": "puppet:///modules/a_module/files/foo",
"destination": null,
"group": 20,
"links": "manage",
"mode": 420,
"owner": 501,
"path": "/etc/puppetlabs/code/environments/production/modules/
a_module/files/foo.txt",
"relative_path": null,
"source": "puppet:///modules/a_module/foo",
"type": "file"
}
},
"recursive_metadata": {
"/tmp/bar": {
"puppet:///modules/a_module/bar": [
{
"checksum": {
"type": "ctime",
"value": "{ctime}2016-02-19 17:38:36 -0800"
},
"content_uri": "puppet:///modules/a_module/files/bar",
"destination": null,
"group": 20,
"links": "manage",
"mode": 420,
© 2024 Puppet, Inc., a Perforce company

Puppet | Platform components | 229
"owner": 501,
"path": "/etc/puppetlabs/code/environments/production/modules/
a_module/files/bar",
"relative_path": ".",
"source": null,
"type": "directory"
},
{
"checksum": {
"type": "sha256",
"value":
"{sha256}962dbd7362c34a20baac8afd13fba734d3d51cc2944477d96ee05a730e5edcb7"
},
"content_uri": "puppet:///modules/a_module/files/bar/baz",
"destination": null,
"group": 20,
"links": "manage",
"mode": 420,
"owner": 501,
"path": "/etc/puppetlabs/code/environments/production/modules/
a_module/files/bar",
"relative_path": "baz",
"source": null,
"type": "file"
}
]
}
}
}
Schema
In the POST request body (or the GET query), the facts parameter should conform to the facts schema.
A catalog response body conforms to the catalog schema.
Node
The node endpoint is used by the puppet agent to get basic information about a node. The returned information
includes the node name and environment, and optionally any classes set by an External Node Classifier and a hash
of parameters which may include the node's facts. The returned node may have a different environment from the one
given in the request if Puppet is configured with an ENC.
Find
Retrieve data for a node
GET /puppet/v3/node/:certname?
environment=:environment&transaction_uuid=:transaction_uuid&configured_environment=:environment
Supported HTTP Methods
GET
Supported Response Formats
application/json, text/pson
Parameters
One parameter should be provided to the GET:
• transaction_uuid: a transaction uuid identifying the entire transaction (shows up in the report as well)
An optional parameter can be provided to the GET to notify a node classifier that the client requested a specific
environment, which might differ from what the client believes is its current environment:
© 2024 Puppet, Inc., a Perforce company

Puppet | Platform components | 230
• configured_environment: the environment configured on the client
Examples
> GET /puppet/v3/node/mycertname?
environment=production&transaction_uuid=aff261a2-1a34-4647-8c20-
ff662ec11c4c&configured_environment=production HTTP/1.1
> Accept: application/json, text/pson
< HTTP/1.1 200 OK
< Content-Type: application/json
< Content-Length: 4630
{
"name":"thinky.corp.puppetlabs.net",
"parameters":{
"architecture":"amd64",
"kernel":"Linux",
"blockdevices":"sda,sr0",
"clientversion":"3.3.1",
"clientnoop":"false",
"environment":"production",
...
},
"environment":"production"
}
Schema
A node response body conforms to the node schema.
Facts
The facts endpoint allows setting the facts for the specified node name.
Save
Store facts for a node. The request body should contain JSON-formatted facts.
PUT /puppet/v3/facts/:nodename?environment=:environment
Supported HTTP Methods
PUT
Supported Format(s)
application/json, text/pson
Parameters
None
Example
• Note: list of facts was shortened for readability.
• Note: JSON was formatted for readability.
PUT /puppet/v3/facts/elmo.mydomain.com?environment=:environment
Content-Type: application/json
{
"name": "elmo.mydomain.com",
"values": {
"architecture": "x86_64",
© 2024 Puppet, Inc., a Perforce company

Puppet | Platform components | 231
"kernel": "Darwin",
"domain": "local",
"macaddress": "70:11:24:8c:33:a9",
"osfamily": "Darwin",
"operatingsystem": "Darwin",
"facterversion": "1.7.2",
"fqdn": "elmo.mydomain.com",
},
"timestamp": "2013-09-09 15:49:27 -0700",
"expiration": "2013-09-09 16:19:27 -0700"
}
HTTP/1.1 200 OK
Content-Type: application/json
Schema
The representation of facts contained in a PUT body, should adhere to the facts schema.
The body of the PUT request can be generated using puppet facts find > facts.json.
File Bucket File
The file_bucket_file endpoint manages the contents of files in the file bucket. All access to files is managed
with the md5 checksum of the file contents, represented as :md5. Where used, :filename means the full absolute
path of the file on the client system. This is usually optional and used as an error check to make sure correct file is
retrieved. The environment is required in all requests but ignored, as the file bucket does not distinguish between
environments.
Find
Retrieve the contents of a file.
GET /puppet/v3/file_bucket_file/:md5?environment=:environment
GET /puppet/v3/file_bucket_file/:md5/:original_path?environment=:environment
This will return the contents of the file if it's present. If :original_path is provided then the contents will only
be sent if the file was uploaded with the same path at some point.
Head
Check if a file is present in the filebucket
HEAD /puppet/v3/file_bucket_file/:md5?environment=:environment
HEAD /puppet/v3/file_bucket_file/:md5/:original_path?
environment=:environment
This behaves identically to find, only returning headers.
Save
Save a file to the filebucket
PUT /puppet/v3/file_bucket_file/:md5?environment=:environment
PUT /puppet/v3/file_bucket_file/:md5/:original_path?environment=:environment
The body should contain the file contents. This saves the file using the md5 sum of the file contents. If
:original_path is provided, it adds the path to a list for the given file. If the md5 sum in the request is incorrect,
the file will be instead saved under the correct checksum.
Supported HTTP Methods
GET, HEAD, PUT
© 2024 Puppet, Inc., a Perforce company

Puppet | Platform components | 232
Supported Response Formats
application/octet-stream
Parameters
None
Examples
Saving a file
> PUT /puppet/v3/file_bucket_file/md5/eb61eead90e3b899c6bcbe27ac581660//
home/user/myfile.txt?environment=production HTTP/1.1
> Content-Type: application/octet-stream
> Content-Length: 24
> This is the file content
< HTTP/1.1 200 OK
Retrieving a file
> GET /puppet/v3/file_bucket_file/md5/4949e56d376cc80ce5387e8e89a75396//
home/user/myfile.txt?environment=production HTTP/1.1
> Accept: application/octet-stream
< HTTP/1.1 200 OK
< Content-Length: 24
< This is the file content
Wrong file name
> GET /puppet/v3/file_bucket_file/md5/4949e56d376cc80ce5387e8e89a75396//
home/user/wrong_name?environment=production HTTP/1.1
> Accept: application/octet-stream
< HTTP/1.1 404 Not Found
<
< Not Found: Could not find file_bucket_file
md5/4949e56d376cc80ce5387e8e89a75396/home/user/wrong_name
Schema
A file_bucket_file response body is not structured data according to any standard scheme such as json/yaml,
so no schema is applicable.
File Content
The file_content endpoint returns the contents of the specified file.
Find
Get a file.
GET /puppet/v3/file_content/:mount_point/:name
The endpoint path includes a :mount_point which can be one of the following types:
• Custom file serving mounts as specified in fileserver.conf --- see the docs on configuring mount points.
© 2024 Puppet, Inc., a Perforce company

Puppet | Platform components | 233
• modules/<MODULE> --- a semi-magical mount point which allows access to the files subdirectory of
<MODULE> --- see the docs on file serving.
• plugins --- a highly magical mount point which merges the lib directory of every module together. Used for
syncing plugins; not intended for general consumption. Per-module sub-paths can not be specified.
• pluginfacts --- a highly magical mount point which merges the facts.d directory of every module
together. Used for syncing external facts; not intended for general consumption. Per-module sub-paths can not be
specified.
• tasks/<MODULE> --- a semi-magical mount point which allows access to files in the tasks subdirectory of
<MODULE> --- see the docs on file serving.
:name is the path to the file within the :mount_point that is requested.
Supported HTTP Methods
GET
Supported Response Formats
application/octet-stream
Parameters
None
Notes
Responses
File found
GET /puppet/v3/file_content/modules/example/my_file?environment=env
Accept: application/octet-stream
HTTP/1.1 200 OK
Content-Type: application/octet-stream
Content-Length: 16
this is my file
File not found
GET /puppet/v3/file_content/modules/example/not_found?environment=env
Accept: application/octet-stream
HTTP/1.1 404 Not Found
Content-Type: text/plain
Not Found: Could not find file_content modules/example/not_found
No file name given
GET /puppet/v3/file_content?environment=env
HTTP/1.1 400 Bad Request
Content-Type: text/plain
No request key specified in /puppet/v3/file_content/
Schema
A file_content response body is not structured data according to any standard scheme such as json/pson/yaml,
so no schema is applicable.
© 2024 Puppet, Inc., a Perforce company

Puppet | Platform components | 234
File Metadata
The file_metadata endpoint returns select metadata for a single file or many files. There are find and search
variants of the endpoint; the search variant has a trailing 's' so is actually file_metadatas.
Although the term 'file' is used generically in the endpoint name and documentation, each returned item can be one of
the following three types:
• File
• Directory
• Symbolic link
The endpoint path includes a :mount which can be one of the following types:
• Custom file serving mounts as specified in fileserver.conf --- see the docs on configuring mount points.
• modules/<MODULE> --- a semi-magical mount point which allows access to the files subdirectory of
<MODULE> --- see the docs on file serving.
• plugins --- a highly magical mount point which merges the lib directory of every module together. Used for
syncing plugins; not intended for general consumption. Per-module sub-paths can not be specified.
• pluginfacts --- a highly magical mount point which merges the facts.d directory of every module
together. Used for syncing external facts; not intended for general consumption. Per-module sub-paths can not be
specified.
• tasks/<MODULE> --- a semi-magical mount point which allows access to files in the tasks subdirectory of
<MODULE> --- see the docs on file serving.
Note: PSON responses in the examples below are pretty-printed for readability.
Find
Get file metadata for a single file
GET /puppet/v3/file_metadata/:mount/path/to/file?environment=:environment
Supported HTTP Methods
GET
Supported Response Formats
application/json, text/pson
Parameters
Optional parameters to GET:
• links -- either manage (default) or follow. See examples in Search below.
• checksum_type -- the checksum type to calculate the checksum value for the result metadata; one of md5
(default), md5lite, sha256, sha256lite, mtime, ctime, and none.
• source_permissions -- whether (and how) Puppet should copy owner, group, and mode permissions; one of
• ignore (the default) will never apply the owner, group, or mode from the source when managing a file.
When creating new files without explicit permissions, the permissions they receive will depend on platform-
specific behavior. On POSIX, Puppet will use the umask of the user it is running as. On Windows, Puppet will
use the default DACL associated with the user it is running as.
• use will cause Puppet to apply the owner, group, and mode from the source to any files it is managing.
• use_when_creating will only apply the owner, group, and mode from the source when creating a file;
existing files will not have their permissions overwritten.
Example Response
File metadata found for a file
GET /puppet/v3/file_metadata/modules/example/just_a_file.txt?environment=env
© 2024 Puppet, Inc., a Perforce company

Puppet | Platform components | 235
HTTP/1.1 200 OK
Content-Type: text/pson
{
"checksum": {
"type": "md5",
"value": "{md5}d0a10f45491acc8743bc5a82b228f89e"
},
"destination": null,
"group": 20,
"links": "manage",
"mode": 420,
"owner": 501,
"path": "/etc/puppetlabs/code/modules/example/files/just_a_file.txt",
"relative_path": null,
"type": "file"
}
File metadata found for a directory
GET /puppet/v3/file_metadata/modules/example/subdirectory?environment=env
HTTP/1.1 200 OK
Content-Type: text/pson
{
"checksum": {
"type": "ctime",
"value": "{ctime}2013-10-01 13:16:10 -0700"
},
"destination": null,
"group": 20,
"links": "manage",
"mode": 493,
"owner": 501,
"path": "/etc/puppetlabs/code/modules/example/files/subdirectory",
"relative_path": null,
"type": "directory"
}
File metadata found for a link ignoring source permissions
GET /puppet/v3/file_metadata/modules/example/link_to_file.txt?
environment=env&source_permissions=ignore
HTTP/1.1 200 OK
Content-Type: text/pson
{
"checksum": {
"type": "md5",
"value": "{md5}d0a10f45491acc8743bc5a82b228f89e"
},
"destination": "/etc/puppetlabs/code/modules/example/files/
just_a_file.txt",
"group": 20,
"links": "manage",
"mode": 420,
"owner": 501,
"path": "/etc/puppetlabs/code/modules/example/files/link_to_file.txt",
"relative_path": null,
"type": "link"
© 2024 Puppet, Inc., a Perforce company

Puppet | Platform components | 236
}
File not found
GET /puppet/v3/file_metadata/modules/example/does_not_exist?environment=env
HTTP/1.1 404 Not Found
Not Found: Could not find file_metadata modules/example/does_not_exist
Search
Get a list of metadata for multiple files
GET /puppet/v3/file_metadatas/foo.txt?environment=env
Supported HTTP Methods
GET
Supported Response Formats
application/json, text/pson
Parameters
• recurse -- should always be set to yes; unfortunately the default is no, which causes a search to behave like a
find operation.
• ignore -- file or directory regex to ignore; can be repeated.
• links -- either manage (default) or follow. See examples below.
• checksum_type -- the checksum type to calculate the checksum value for the result metadata; one of md5
(default), md5lite, sha256, sha256lite, mtime, ctime, and none.
• source_permissions -- whether (and how) Puppet should copy owner, group, and mode permissions; one of
• ignore (the default) will never apply the owner, group, or mode from the source when managing a file.
When creating new files without explicit permissions, the permissions they receive will depend on platform-
specific behavior. On POSIX, Puppet will use the umask of the user it is running as. On Windows, Puppet will
use the default DACL associated with the user it is running as.
• use will cause Puppet to apply the owner, group, and mode from the source to any files it is managing.
• use_when_creating will only apply the owner, group, and mode from the source when creating a file;
existing files will not have their permissions overwritten.
Example Response
Basic search
GET /puppet/v3/file_metadatas/modules/example?environment=env&recurse=yes
HTTP 200 OK
Content-Type: text/pson
[
{
"checksum": {
"type": "ctime",
"value": "{ctime}2013-10-01 13:15:59 -0700"
},
"destination": null,
"group": 20,
"links": "manage",
"mode": 493,
"owner": 501,
"path": "/etc/puppetlabs/code/modules/example/files",
© 2024 Puppet, Inc., a Perforce company

Puppet | Platform components | 237
"relative_path": ".",
"type": "directory"
},
{
"checksum": {
"type": "md5",
"value": "{md5}d0a10f45491acc8743bc5a82b228f89e"
},
"destination": null,
"group": 20,
"links": "manage",
"mode": 420,
"owner": 501,
"path": "/etc/puppetlabs/code/modules/example/files",
"relative_path": "just_a_file.txt",
"type": "file"
},
{
"checksum": {
"type": "md5",
"value": "{md5}d0a10f45491acc8743bc5a82b228f89e"
},
"destination": "/etc/puppetlabs/code/modules/example/files/
just_a_file.txt",
"group": 20,
"links": "manage",
"mode": 493,
"owner": 501,
"path": "/etc/puppetlabs/code/modules/example/files",
"relative_path": "link_to_file.txt",
"type": "link"
},
{
"checksum": {
"type": "ctime",
"value": "{ctime}2013-10-01 13:15:59 -0700"
},
"destination": null,
"group": 20,
"links": "manage",
"mode": 493,
"owner": 501,
"path": "/etc/puppetlabs/code/modules/example/files",
"relative_path": "subdirectory",
"type": "directory"
},
{
"checksum": {
"type": "md5",
"value": "{md5}d41d8cd98f00b204e9800998ecf8427e"
},
"destination": null,
"group": 20,
"links": "manage",
"mode": 420,
"owner": 501,
"path": "/etc/puppetlabs/code/modules/example/files",
"relative_path": "subdirectory/another_file.txt",
"type": "file"
}
]
© 2024 Puppet, Inc., a Perforce company

Puppet | Platform components | 238
Search ignoring 'sub*' and links = manage
GET /puppet/v3/file_metadatas/modules/example?
environment=env&recurse=true&ignore=sub*&links=manage
HTTP 200 OK
Content-Type: text/pson
[
{
"checksum": {
"type": "ctime",
"value": "{ctime}2013-10-01 13:15:59 -0700"
},
"destination": null,
"group": 20,
"links": "manage",
"mode": 493,
"owner": 501,
"path": "/etc/puppetlabs/code/modules/example/files",
"relative_path": ".",
"type": "directory"
},
{
"checksum": {
"type": "md5",
"value": "{md5}d0a10f45491acc8743bc5a82b228f89e"
},
"destination": null,
"group": 20,
"links": "manage",
"mode": 420,
"owner": 501,
"path": "/etc/puppetlabs/code/modules/example/files",
"relative_path": "just_a_file.txt",
"type": "file"
},
{
"checksum": {
"type": "md5",
"value": "{md5}d0a10f45491acc8743bc5a82b228f89e"
},
"destination": "/etc/puppetlabs/code/modules/example/files/
just_a_file.txt",
"group": 20,
"links": "manage",
"mode": 493,
"owner": 501,
"path": "/etc/puppetlabs/code/modules/example/files",
"relative_path": "link_to_file.txt",
"type": "link"
}
]
Search ignoring "sub*" and links = follow
This example is identical to the above example, except for the links parameter. The resulting PSON, then, is identical
to the above example, except for:
• the "links" field is set to "follow" rather than "manage" in all metadata objects
© 2024 Puppet, Inc., a Perforce company

Puppet | Platform components | 239
• in the "link_to_file.txt" metadata:
• for "manage" the "destination" field is the link destination; for "follow", it's null
• for "manage" the "type" field is "link"; for "follow" it's "file"
• for "manage" the "mode", "owner" and "group" fields are the link's values; for "follow" the destination's values
GET /puppet/v3/file_metadatas/modules/example?
environment=env&recurse=true&ignore=sub*&links=follow
HTTP 200 OK
Content-Type: text/pson
[
{
"checksum": {
"type": "ctime",
"value": "{ctime}2013-10-01 13:15:59 -0700"
},
"destination": null,
"group": 20,
"links": "follow",
"mode": 493,
"owner": 501,
"path": "/etc/puppetlabs/code/modules/example/files",
"relative_path": ".",
"type": "directory"
},
{
"checksum": {
"type": "md5",
"value": "{md5}d0a10f45491acc8743bc5a82b228f89e"
},
"destination": null,
"group": 20,
"links": "follow",
"mode": 420,
"owner": 501,
"path": "/etc/puppetlabs/code/modules/example/files",
"relative_path": "just_a_file.txt",
"type": "file"
},
{
"checksum": {
"type": "md5",
"value": "{md5}d0a10f45491acc8743bc5a82b228f89e"
},
"destination": null,
"group": 20,
"links": "follow",
"mode": 420,
"owner": 501,
"path": "/etc/puppetlabs/code/modules/example/files",
"relative_path": "link_to_file.txt",
"type": "file"
}
]
Schema
The file metadata response body conforms to the file_metadata schema.
© 2024 Puppet, Inc., a Perforce company

Puppet | Platform components | 240
Sample Module
The examples above use this (faux) module:
/etc/puppetlabs/code/modules/example/
files/
just_a_file.txt
link_to_file.txt -> /etc/puppetlabs/code/modules/example/files/
just_a_file.txt
subdirectory/
another_file.txt
Report
This document describes the Puppet master's report endpoint and the schema for Report Format 6 in technical term.
Also see the documentation.
The report endpoint allows clients to send reports to the master via http or https. Once received by the master
they are processed by the report processors configured to be triggered when a report is received. As an example,
storing reports in PuppetDB is handled by one such report processor.
Save
The http(s) endpoint for sending reports to the master is:
PUT /puppet/v3/report/:nodename?environment=:environment
Supported HTTP Methods
PUT
Supported Format(s)
application/json, text/pson
Parameters
None
Content
The content of a report is typically generated by the Puppet Runtime and consists of a JSON serialization of
Puppet::Transaction::Report object which in turn contains a structure of objects with of the following
runtime types:
• Puppet::Util::Log
• Puppet::Util::Metric
• Puppet::Resource::Status
• Puppet::Transaction::Event
This JSON serialization is compliant with the endpoint's report JSON schema.
Example
Here is an example of a PUT request. (Note that the content-length is not correct as the example is formatted for
readability)
PUT /puppet/v3/report/kermit.com?environment=production HTTP/1.0
Content-Type: application/json
Content-Length: 1428
{"host"=>"kermit.com",
"time"=>"2013-09-12T03:50:59.009301000+02:00",
"configuration_version"=>1357986,
"transaction_uuid"=>"df34516e-4050-402d-a166-05b03b940749",
"code_id"=>null,
© 2024 Puppet, Inc., a Perforce company

Puppet | Platform components | 241
"job_id"=>null,
"catalog_uuid"=>"827a74c8-cf98-44da-9ff7-18c5e4bee41e",
"catalog_format"=>1,
"report_format"=>9,
"puppet_version"=>"5.0.0",
"status"=>"unchanged",
"transaction_completed"=>true,
"noop"=>false,
"noop_pending"=>false,
"environment"=>"test_environment",
"logs"=>
[{"level"=>"warning",
"message"=>"log message",
"source"=>"Puppet",
"tags"=>["warning"],
"time"=>"2013-09-12T03:50:59.009328000+02:00",
"file"=>nil,
"line"=>nil}],
"metrics"=>
{"resources"=>
{"name"=>"resources",
"label"=>"Resources",
"values"=>
[["total", "Total", 1],
["skipped", "Skipped", 0],
["failed", "Failed", 0],
["failed_to_restart", "Failed to restart", 0],
["restarted", "Restarted", 0],
["changed", "Changed", 1],
["out_of_sync", "Out of sync", 0],
["scheduled", "Scheduled", 0]]},
"time"=>
{"name"=>"time",
"label"=>"Time",
"values"=>[["timing", "Timing", 4], ["total", "Total", 4]]},
"changes"=>
{"name"=>"changes", "label"=>"Changes", "values"=>[["total", "Total",
0]]},
"events"=>
{"name"=>"events",
"label"=>"Events",
"values"=>
[["total", "Total", 0],
["failure", "Failure", 0],
["success", "Success", 0]]}},
"resource_statuses"=>
{"Notify[a resource]"=>
{"title"=>"a resource",
"file"=>nil,
"line"=>nil,
"resource"=>"Notify[a resource]",
"resource_type"=>"Notify",
"provider_used"=>nil,
"containment_path"=>["Notify[a resource]"],
"evaluation_time"=>nil,
"tags"=>["notify"],
"time"=>"2013-09-12T03:50:59.009238000+02:00",
"failed"=>false,
"changed"=>true,
"out_of_sync"=>false,
"skipped"=>false,
"change_count"=>0,
"out_of_sync_count"=>0,
"events"=>[]}},
© 2024 Puppet, Inc., a Perforce company

Puppet | Platform components | 242
"cached_catalog_status"=> "not_used"}
Schema
The sent report objects must conform to the report schema.
Puppet v4 API
Catalog API
The catalog API returns a compiled catalog for the node specified in the request, making use of provided metadata
like facts or environment if specified. If not specified, it will attempt to fetch this data from Puppet's configured
sources (usually PuppetDB or a node classifier). The returned catalog is in JSON format, ready to be parsed and
applied by an agent.
POST /puppet/v4/catalog
(Introduced in Puppet Server 6.3.0)
The input data for the catalog to be compiled is submitted as a JSON body with the following form:
{
"certname": "<node name>",
"persistence": { "facts": <true/false>, "catalog": <true/false> },
"environment": "<environment name>",
# The rest are optional:
"facts": { "values": { "<fact name>": <fact value>, ... } },
"trusted_facts": { "values": { "<fact name>": <fact value>, ... } },
"transaction_uuid": "<uuid string>",
"job_id": "<id string>",
"options": { "prefer_requested_environment": <true/false>,
"capture_logs": <true/false>,
"log_level": <err/warning/info/debug> }
}
certname (required)
The name of the node for which to compile the catalog.
persistence (required)
A hash containing two required keys, facts and catalog, which when set to true will cause the facts and reports
to be stored in PuppetDB, or discarded if set to false.
environment (required)
The name of the environment for which to compile the catalog. If prefer_requested_environemnt is true,
override the classified environment with this param. If it is false, only respect this if the classifier allows an agent-
specified environment.
facts
A hash with a required values key, containing a hash of all the facts for the node. If not provided, Puppet will
attempt to fetch facts for the node from PuppetDB.
trusted_facts
A hash with a required values key containing a hash of the trusted facts for a node. In a normal agent's catalog
request, these would be extracted from the cert, but this endpoint does not require a cert for the node whose catalog is
being compiled. If not provided, Puppet will attempt to fetch the trusted facts for the node from PuppetDB or from the
provided facts hash.
transaction_uuid
The id for tracking the catalog compilation and report submission.
job_id
© 2024 Puppet, Inc., a Perforce company

Puppet | Platform components | 243
The id of the orchestrator job that triggered this run.
options
A hash of options beyond direct input to catalogs.
prefer_requested_environment Whether to always override a node's classified environment with the one
supplied in the request. If this is true and no environment is supplied, fall back to the classified environment, or
finally, 'production'.
capture_logs Whether to return the errors and warnings that occurred during compilation alongside the catalog in
the response body.
log_level The logging level to use during the compile when capture_logs is true. Options are 'err', 'warning',
'info', and 'debug'.
Example
Use the following as a worked example of how to make a call to the Catalog API:
type_header='Content-Type: application/json'
auth_header='X-Authentication: <token>'
uri='<https://<primary> server>:8140/puppet/v4/catalog'
data='{"certname": "<certname>", "persistence": { "facts": false,
"catalog": false }, "environment": "production"}'
curl --insecure --header "$type_header" --header "$auth_header" --request
POST "$uri" --data "$data" -o <certname>-<environment>.json
Schema
The catalog response body conforms to the catalog schema.
Authorization
All requests made to the catalog API are authorized using the Trapperkeeper-based auth.conf. For more
information about the Puppet Server authorization process and configuration settings, see the auth.conf on page
160.
CA v1 API
Certificate
The certificate endpoint returns the certificate for the specified name, which might be either a standard
certname or ca.
Most of the certificate authority (CA) application programming interface (API) requires admin access. To obtain a
certificate that has admin access, use the pp_cli_auth flag. For more information, see Puppet-specific registered
IDs.
Find
Get a certificate.
GET /puppet-ca/v1/certificate/:nodename
Supported HTTP Methods
GET
Supported Response Formats
text/plain
The returned certificate is always in the .pem format.
Parameters
© 2024 Puppet, Inc., a Perforce company

Puppet | Platform components | 244
None
Responses
Certificate found
GET /puppet-ca/v1/certificate/elmo.mydomain.com
HTTP 200 OK
Content-Type: text/plain
-----BEGIN CERTIFICATE-----
MIIFujCCA6KgAwIBAgIBATANBgkqhkiG9w0BAQsFADBiMWAwXgYDVQQDDFdQdXBw
ZXQgQ0EgZ2VuZXJhdGVkIG9uIGRoY3A1MC5reWxvLmJhY2tsaW5lLnB1cHBldGxh
YnMubmV0IGF0IDIwMTMtMDYtMjQgMTY6MzA6MTcgLTA3MDAwHhcNMTMwNjIzMjMz
MDE5WhcNMTgwNjIzMjMzMDE5WjBiMWAwXgYDVQQDDFdQdXBwZXQgQ0EgZ2VuZXJh
dGVkIG9uIGRoY3A1MC5reWxvLmJhY2tsaW5lLnB1cHBldGxhYnMubmV0IGF0IDIw
MTMtMDYtMjQgMTY6MzA6MTcgLTA3MDAwggIiMA0GCSqGSIb3DQEBAQUAA4ICDwAw
ggIKAoICAQDABq1lmzccjuRmnCdXvTmdeXJGb9S8r8+I+G6fkHTa1WKDSob9PZpS
eXJtanbl0zNws9yBt1Dko2zhKDKctBRWf5CT42nDxBZPY7SaD7KaCzb07g9wfWgU
BOb/6smyl/iySEmQzzFLRgZbo5A9WLiy/UdyQim1faakevRme2Xi/l/i0TKbpu27
DhCS+E8aC8Bvaj0ph0T+TzYphTR76pP5Kps6G7Jyk/HFYrVXnY44X2PEt2mgkEXp
xHCbU+qCFMtTLMG+ZArA/noM3I/O6W5LhLSzApjut/M7UdMlpZ45PGDrsvf2R306
NcOh+zbbkhxuIaGqaxeaenYzbOlA3gXhZvYaV6EKjXNtm7BslpsvhLi0U+CWyb3C
qRkpex0MgxJgxoqViJ4TDVA+EmztOnK86+G4HGeJqTPQloYO/Td1wMT1Txh9T5Ue
Wctw/g+4o22EyJQRo+vxxzHNRIfe7EHAerMUtLT5u9MJeQb9N1iUR2ATNAN+QiB2
KEqyc9eMapK6QUZFV23Xvbdup1WCrgsWXBqyRWKV7x0sc9Wv8RMRKEFYaBeHEVXU
m0hGgF34Z8Rzphq2H1FjkLD+xbtGOjrA1Mb2De81Hfvrf18497X5UMPtsuzOt/XU
PHbbSCy+05J7VNZ/gaiGqgpHfcG5yiqCdj1LIzhFuuvm+fADPxK38wIDAQABo3sw
eTA3BglghkgBhvhCAQ0EKhYoUHVwcGV0IFJ1YnkvT3BlblNTTCBJbnRlcm5hbCBD
ZXJ0aWZpY2F0ZTAOBgNVHQ8BAf8EBAMCAQYwDwYDVR0TAQH/BAUwAwEB/zAdBgNV
HQ4EFgQUEhn/MqSDtuxg12klWosCGenxf1cwDQYJKoZIhvcNAQELBQADggIBAH1G
L3FG/keKlGqs70PxxvR1wCo4VM3K/C+5uxnzm1MHEAd96nhtwE6YSkUe+XgDiXfC
+NXS2C4TeTQAEo6grREapWDjhJvrhrgqTZmb4lTKzb91II3/VGYzG5UXxID262zy
QLoX/IBN/xDJ5ds0wF2adUbnHUssEGGljgngewH/7kjeW/L5iL+USXZnKHPSggjM
RAEjlucE/rDqDNoxhOS4K2PjseFm7krW4cZ0gNmxdrhc7OhmJ56dH92F4M9jn7Qy
EqxWB304U/aMcO3NJxTQc7AreL/pUtjtI6hxM4miHbjSh6RfNBqhzRyJvxA6gc6g
m3kumdw04KZFSs/6fPFFbI60i5K+vioB4CnUWpj+3Z+OnDEvhQJEACR1JC8A67Ih
x+GDlbHLU1BWonwZzSMJz+ABXV3dwIrOSFHI0UmDXg+cIdZ+SaL93qMjUVU4v9nu
gR9yJGMqNuzLjgfbD/KGCEEAITKBwPvCVd//OMlWVrXr7vvt+yo6STIlTJxABJDp
CSLyHUtT++CsPXsPADxgRctpIbh1eMFEivkK9Oy+W/CZYIZnARVysUpMWg7TkXqx
mSCXy9ZXLWqU/ssVhbLS9vFVa5pvxcyfiRpsFg0XZsx8mnZP6OaWcL8FjF+/NwNP
tg1+DuYTn+d54OHi/GZEnvutgrDZyrJDrrb/Czm9
-----END CERTIFICATE-----
Certificate not found
GET /puppet-ca/v1/certificate/certificate_does_not_exist
HTTP 404 Not Found
Content-Type: text/plain
Not Found: Could not find certificate certificate_does_not_exist
No Certificate name given
GET /puppet-ca/v1/certificate
HTTP/1.1 400 Bad Request
Content-Type: text/plain
No request key specified in /puppet-ca/v1/certificate
© 2024 Puppet, Inc., a Perforce company

Puppet | Platform components | 245
Primary Server is not a CA
GET /puppet-ca/v1/certificate/valid_certificate
HTTP/1.1 400 Bad Request
Content-Type: text/plain
this server is not a CA
Certificate Request
The certificate_request endpoint submits a Certificate Signing Request (CSR) to the primary server. CSRs
that have been submitted can then also be retrieved. The returned CSR is always in the .pem format.
Find
Get a submitted CSR
GET /puppet-ca/v1/certificate_request/:nodename
Accept: text/plain
Save
Submit a CSR
PUT /puppet-ca/v1/certificate_request/:nodename
Content-Type: text/plain
Note: The :nodename must match the Common Name on the submitted CSR.
Note: Although the Content-Type is sent as text/plain the content is specifically a CSR in PEM format.
Search
Note: The plural certificate_requests endpoint is a legacy feature. Puppet Server doesn't support it, and we
don't plan to add support in the future.
List submitted CSRs
GET /puppet-ca/v1/certificate_requests/:ignored_pattern
Accept: text/plain
The :ignored_pattern parameter is not used, but must still be provided.
Destroy
Delete a submitted CSR
DELETE /puppet-ca/v1/certificate_request/:nodename
Accept: text/plain
Supported HTTP Methods
The default configuration only allows requests that result in a Find and a Save. You need to modify auth.conf in order
to allow clients to use Search and Destroy actions. It is not recommended that you change the default settings.
GET, PUT, DELETE
Supported Response Formats
text/plain
The returned CSR is always in the .pem format.
Parameters
© 2024 Puppet, Inc., a Perforce company

Puppet | Platform components | 246
None
Examples
CSR found
GET /puppet-ca/v1/certificate_request/agency
HTTP/1.1 200 OK
Content-Type: text/plain
-----BEGIN CERTIFICATE REQUEST-----
MIIBnzCCAQwCAQAwYzELMAkGA1UEBhMCVUsxDzANBgNVBAgTBkxvbmRvbjEPMA0G
A1UEBxMGTG9uZG9uMSEwHwYDVQQKExhJbnRlcm5ldCBXaWRnaXRzIFB0eSBMdGQx
DzANBgNVBAMTBmFnZW5jeTCBnzANBgkqhkiG9w0BAQEFAAOBjQAwgYkCgYEAxSCr
FKUKjVGFPuQ0iGM9mZKw94sOIgGohqrHH743kPvjsId3d38Qk+H+1DbVf42bQY0W
kAVcwNDqmBnx0lOtQ0oeGnbbwlJFjhqXr8jFEljPrc9S2/IIILDf/FeYWw9lRiOV
LoU6ZfCIBfq6v4D4KX3utRbOoELNyBeT6VA1ufMCAwEAAaAAMAkGBSsOAwIPBQAD
gYEAno7O1jkR56TNMe1Cw/eyQUIaniG22+0kmoftjlcMYZ/IKCOz+HRgnDtBPf8j
O5nt0PQN8YClW7Xx2U8ZTvBXn/UEKMtCBkbF+SULiayxPgfyKy/axinfutEChnHS
ZtUMUBLlh+gGFqOuH69979SJ2QmQC6FNomTkYI7FOHD/TG0=
-----END CERTIFICATE REQUEST-----
CSR not found
GET /puppet-ca/v1/certificate_request/does_not_exist
HTTP/1.1 404 Not Found
Content-Type: text/plain
Not Found: Could not find certificate_request does_not_exist
No node name given
GET /puppet-ca/v1/certificate_request
HTTP/1.1 400 Bad Request
Content-Type: text/plain
No request key specified in /puppet-ca/v1/certificate_request
Delete a CSR that exists
DELETE /puppet-ca/v1/certificate_request/agency
Accept: text/plain
HTTP/1.1 200 OK
Content-Type: text/plain
1
Delete a CSR that does not exists
DELETE /puppet-ca/v1/certificate_request/missing
Accept: text/plain
HTTP/1.1 200 OK
Content-Type: text/plain
false
© 2024 Puppet, Inc., a Perforce company

Puppet | Platform components | 247
Retrieve all CSRs
GET /puppet-ca/v1/certificate_requests/ignored
Accept: text/plain
HTTP/1.1 200 OK
Content-Type: text/plain
-----BEGIN CERTIFICATE REQUEST-----
MIIBnzCCAQwCAQAwYzELMAkGA1UEBhMCVUsxDzANBgNVBAgTBkxvbmRvbjEPMA0G
A1UEBxMGTG9uZG9uMSEwHwYDVQQKExhJbnRlcm5ldCBXaWRnaXRzIFB0eSBMdGQx
DzANBgNVBAMTBmFnZW5jeTCBnzANBgkqhkiG9w0BAQEFAAOBjQAwgYkCgYEAxSCr
FKUKjVGFPuQ0iGM9mZKw94sOIgGohqrHH743kPvjsId3d38Qk+H+1DbVf42bQY0W
kAVcwNDqmBnx0lOtQ0oeGnbbwlJFjhqXr8jFEljPrc9S2/IIILDf/FeYWw9lRiOV
LoU6ZfCIBfq6v4D4KX3utRbOoELNyBeT6VA1ufMCAwEAAaAAMAkGBSsOAwIPBQAD
gYEAno7O1jkR56TNMe1Cw/eyQUIaniG22+0kmoftjlcMYZ/IKCOz+HRgnDtBPf8j
O5nt0PQN8YClW7Xx2U8ZTvBXn/UEKMtCBkbF+SULiayxPgfyKy/axinfutEChnHS
ZtUMUBLlh+gGFqOuH69979SJ2QmQC6FNomTkYI7FOHD/TG0=
-----END CERTIFICATE REQUEST-----
---
-----BEGIN CERTIFICATE REQUEST-----
MIIBnjCCAQsCAQAwYjELMAkGA1UEBhMCVUsxDzANBgNVBAgTBkxvbmRvbjEPMA0G
A1UEBxMGTG9uZG9uMSEwHwYDVQQKExhJbnRlcm5ldCBXaWRnaXRzIFB0eSBMdGQx
DjAMBgNVBAMTBWFnZW50MIGfMA0GCSqGSIb3DQEBAQUAA4GNADCBiQKBgQC1tucK
enT1CkDPgsCU/0e2cbzRsiKF8yHH7+ntF6Q3d9ZCaZWJ00mj0+YmiYrnum+KAikE
45Iaf9vaUV3CPsDVrUPOI8kYehiv868ZhP3nxblE6iuNBK+Fdv9GN/vKQrmL5iRE
bIrOM3/lxpS7SpidGdA6EIVlS3604bwLY4xHNQIDAQABoAAwCQYFKw4DAg8FAAOB
gQAXH0YFuidPqB6P2MyPEEGZ3rzozINBx/oXvGptXI60Zy5mgH6iAkrZfi57pEzP
jFoO2JRaFxTJC1FVpc4zR1K6sq4h3fIMwqppJRX+5wJNKyhU61eY2gR2O/rAJzw4
wcUKf9JhoE7/p1cUulIIIq7t/ibCvf0LYSFwGqTwGqN2TQ==
-----END CERTIFICATE REQUEST-----
The CSR PEMs are separated by "\n---\n"
Certificate Status
The certificate status endpoint allows a client to read or alter the status of a certificate or pending certificate
request.
Note: /puppet-ca/v1 API requires certificate-based authentication. The certificate used must have the
pp_cli_auth extension. This extension is on the server's certificate by default so curl (and puppetserver ca CLI)
calls from the same host as the CA are designed to work out of the box. Using curl from a different host requires
issuing a special certificate.
The following is an example of how to interact with this API:
curl -G --cert $(puppet config print hostcert) --key $(puppet config
print hostprivkey) --cacert $(puppet config print cacert) https://<PE
Server>:8140/puppet-ca/v1/certificate_status/<Node>
Find
GET /puppet-ca/v1/certificate_status/:certname
Accept: application/json, text/pson
Retrieve information about the specified certificate. Similar to puppetserver ca list --certname
<certname>.
Search
GET /puppet-ca/v1/certificate_statuses/:any_key?state=:state
© 2024 Puppet, Inc., a Perforce company

Puppet | Platform components | 248
Accept: application/json, text/pson
Retrieve information about all known certificates. Similar to puppetserver ca list --all. A key is
required but is ignored.
Parameters
• state (optional): The certificate state by which to filter search results. Valid states are 'requested', 'signed', and
'revoked'.
Save
PUT /puppet-ca/v1/certificate_status/:certname
Content-Type: text/pson
Change the status of the specified certificate. The desired state is sent in the body of the PUT request as a one-item
PSON hash; the two allowed complete hashes are:
• {"desired_state":"signed"} (for signing a certificate signing request, similar to puppetserver ca
sign). To set the validity period of the signed certificate, specify the cert_ttl key in the body of the request,
with an integer value. By default, this key specifies the number of seconds, but you can specify another time unit.
See Configuration settings on page 98 for a list of Puppet's accepted time unit markers.
• {"desired_state":"revoked"} (for revoking a certificate, similar to puppetserver ca revoke).
Note that revoking a certificate does not clean up other info about the host; see the DELETE request for more
information.
Delete
DELETE /puppet-ca/v1/certificate_status/:hostname
Accept: application/json, text/pson
Cause the certificate authority to discard all SSL information regarding a host (including any certificates, certificate
requests, and keys). This does not revoke the certificate if one is present; if you wish to emulate the behavior of
puppet cert --clean, you must PUT a desired_state of revoked before deleting the host’s SSL
information.
Note: the Certificate Clean on page 254 API can be used to accomplish both revoking and cleaning in
one request.
If the deletion was successful, it returns a string listing the deleted classes like
"Deleted for myhost: Puppet::SSL::Certificate, Puppet::SSL::Key"
Otherwise it returns
"Nothing was deleted"
Supported HTTP Methods
This endpoint is disabled in the default configuration. It is recommended to be careful with this endpoint, as it can
allow control over the certificates used by the puppet primary server.
GET, PUT, DELETE
Supported Response Formats
application/json, text/pson, pson
Examples
Certificate information
GET /puppet-ca/v1/certificate_status/mycertname
© 2024 Puppet, Inc., a Perforce company

Puppet | Platform components | 249
HTTP/1.1 200 OK
Content-Type: text/pson
{
"name":"mycertname",
"state":"signed",
"fingerprint":"A6:44:08:A6:38:62:88:5B:32:97:20:49:8A:4A:4A:AD:65:C3:3E:A2:4C:30:72:73:02:C5:F3:D4:0E:B7:FC:2F",
"fingerprints":{
"default":"A6:44:08:A6:38:62:88:5B:32:97:20:49:8A:4A:4A:AD:65:C3:3E:A2:4C:30:72:73:02:C5:F3:D4:0E:B7:FC:2F",
"SHA1":"77:E6:5A:7E:DD:83:78:DC:F8:51:E3:8B:12:71:F4:57:F1:C2:34:AE",
"SHA256":"A6:44:08:A6:38:62:88:5B:32:97:20:49:8A:4A:4A:AD:65:C3:3E:A2:4C:30:72:73:02:C5:F3:D4:0E:B7:FC:2F",
"SHA512":"CA:A0:8C:B9:FE:9D:C2:72:18:57:08:E9:4B:11:B7:BC:4E:F7:52:C8:9C:76:03:45:B4:B6:C5:D2:DC:E8:79:43:D7:71:1F:5C:97:FA:B2:F3:ED:AE:19:BD:A9:3B:DB:9F:A5:B4:8D:57:3F:40:34:29:50:AA:AA:0A:93:D8:D7:54"
},
"dns_alt_names":["DNS:puppet","DNS:mycertname"]
}
Search unsigned certs (CSRs)
GET /puppet-ca/v1/certificate_statuses/ignored?state=requested
HTTP/1.1 200 OK
Content-Type: text/pson
[
{
"name":"mycertname1",
"state":"requested",
"fingerprint":"A6:44:08:A6:38:62:88:5B:32:97:20:49:8A:4A:4A:AD:65:C3:3E:A2:4C:30:72:73:02:C5:F3:D4:0E:B7:FC:2F",
"fingerprints":{
"default":"A6:44:08:A6:38:62:88:5B:32:97:20:49:8A:4A:4A:AD:65:C3:3E:A2:4C:30:72:73:02:C5:F3:D4:0E:B7:FC:2F",
"SHA1":"77:E6:5A:7E:DD:83:78:DC:F8:51:E3:8B:12:71:F4:57:F1:C2:34:AE",
"SHA256":"A6:44:08:A6:38:62:88:5B:32:97:20:49:8A:4A:4A:AD:65:C3:3E:A2:4C:30:72:73:02:C5:F3:D4:0E:B7:FC:2F",
"SHA512":"CA:A0:8C:B9:FE:9D:C2:72:18:57:08:E9:4B:11:B7:BC:4E:F7:52:C8:9C:76:03:45:B4:B6:C5:D2:DC:E8:79:43:D7:71:1F:5C:97:FA:B2:F3:ED:AE:19:BD:A9:3B:DB:9F:A5:B4:8D:57:3F:40:34:29:50:AA:AA:0A:93:D8:D7:54"
},
"dns_alt_names":[]
},
{
"name":"mycertname2",
"state":"requested",
"fingerprint":"A6:44:08:A6:38:62:88:5B:32:97:20:49:8A:4A:4A:AD:65:C3:3E:A2:4C:30:72:73:02:C5:F3:D4:0E:B7:FC:2F",
"fingerprints":{
"default":"A6:44:08:A6:38:62:88:5B:32:97:20:49:8A:4A:4A:AD:65:C3:3E:A2:4C:30:72:73:02:C5:F3:D4:0E:B7:FC:2F",
"SHA1":"77:E6:5A:7E:DD:83:78:DC:F8:51:E3:8B:12:71:F4:57:F1:C2:34:AE",
"SHA256":"A6:44:08:A6:38:62:88:5B:32:97:20:49:8A:4A:4A:AD:65:C3:3E:A2:4C:30:72:73:02:C5:F3:D4:0E:B7:FC:2F",
"SHA512":"CA:A0:8C:B9:FE:9D:C2:72:18:57:08:E9:4B:11:B7:BC:4E:F7:52:C8:9C:76:03:45:B4:B6:C5:D2:DC:E8:79:43:D7:71:1F:5C:97:FA:B2:F3:ED:AE:19:BD:A9:3B:DB:9F:A5:B4:8D:57:3F:40:34:29:50:AA:AA:0A:93:D8:D7:54"
},
"dns_alt_names":[]
}
© 2024 Puppet, Inc., a Perforce company

Puppet | Platform components | 250
]
Revoking a certificate
PUT /puppet-ca/v1/certificate_status/mycertname HTTP/1.1
Content-Type: text/pson
Content-Length: 27
{"desired_state":"revoked"}
This has no meaningful return value.
Deleting the certificate information
DELETE /puppet-ca/v1/certificate_status/mycertname HTTP/1.1
Gets the response:
"Deleted for mycertname: Puppet::SSL::Certificate, Puppet::SSL::Key"
Certificate Revocation List
The certificate_revocation_list endpoint retrieves a Certificate Revocation List (CRL) from the primary
server. The returned CRL is always in the .pem format.
Find
Get the submitted CRL
GET /puppet-ca/v1/certificate_revocation_list/ca
Accept: text/plain
Supported HTTP Methods
GET
Supported Response Formats
text/plain
The returned CRL is always in the .pem format.
Parameters
None
Examples
Because the returned CRL always looks similar to the human eye, the successful examples are each followed by an
openssl decoding of the CRL PEM file.
Empty revocation list
GET /puppet-ca/v1/certificate_revocation_list/ca
HTTP/1.1 200 OK
Content-Type: text/plain
-----BEGIN X509 CRL-----
MIICdzBhAgEBMA0GCSqGSIb3DQEBBQUAMB8xHTAbBgNVBAMMFFB1cHBldCBDQTog
bG9jYWxob3N0Fw0xMzA3MTYyMDQ4NDJaFw0xODA3MTUyMDQ4NDNaoA4wDDAKBgNV
HRQEAwIBADANBgkqhkiG9w0BAQUFAAOCAgEAqyBJOy3dtCOcrb0Fu7ZOOiDQnarg
IzXUV/ug1dauPEVyURLNNr+CJrr89QZnU/71lqgpWTN/J47mO/lffMSPjmINE+ng
XzOffm0qCG2+gNyaOBOdEmQTLdHPIXvcm7T+wEqc7XFW2tjEdpEubZgweruU/+DB
RX6/PhFbalQ0bKcMeFLzLAD4mmtBaQCJISmUUFWx1pyCS6pgBtQ1bNy3PJPN2PNW
© 2024 Puppet, Inc., a Perforce company

Puppet | Platform components | 251
YpDf3DNZ16vrAJ4a4SzXLXCoONw0MGxZcS6/hctJ75Vz+dTMrArKwckytWgQS/5e
c/1/wlMZn4xlho+EcIPMPfCB5hW1qzGU2WjUakTVxzF4goamnfFuKbHKEoXVOo9C
3dEQ9un4Uyd1xHxj8WvQck79In5/S2l9hdqp4eud4BaYB6tNRKxlUntSCvCNriR2
wrDNsMuQ5+KJReG51vM0OzzKmlScgIHaqbVeNFZI9X6TpsO2bLEZX2xyqKw4xrre
OIEZRoJrmX3VQ/4u9hj14Qbt72/khYo6z/Fckc5zVD+dW4fjP2ztVTSPzBqIK3+H
zAgewYW6cJ6Aan8GSl3IfRqj6WlOubWj8Gr1U0dOE7SkBX6w/X61uqsHrOyg/E/Z
0Wcz/V+W5iZxa4Spm0x4sfpNzf/bNmjTe4M2MXyn/hXx5MdHf/HZdhOs/lzwKUGL
kEwcy38d6hYtUjs=
-----END X509 CRL-----
> openssl crl -inform PEM -in empty.crl -text -noout
Certificate Revocation List (CRL):
Version 2 (0x1)
Signature Algorithm: sha1WithRSAEncryption
Issuer: /CN=Puppet CA: localhost
Last Update: Jul 16 20:48:42 2013 GMT
Next Update: Jul 15 20:48:43 2018 GMT
CRL extensions:
X509v3 CRL Number:
0
No Revoked Certificates.
Signature Algorithm: sha1WithRSAEncryption
ab:20:49:3b:2d:dd:b4:23:9c:ad:bd:05:bb:b6:4e:3a:20:d0:
9d:aa:e0:23:35:d4:57:fb:a0:d5:d6:ae:3c:45:72:51:12:cd:
36:bf:82:26:ba:fc:f5:06:67:53:fe:f5:96:a8:29:59:33:7f:
27:8e:e6:3b:f9:5f:7c:c4:8f:8e:62:0d:13:e9:e0:5f:33:9f:
7e:6d:2a:08:6d:be:80:dc:9a:38:13:9d:12:64:13:2d:d1:cf:
21:7b:dc:9b:b4:fe:c0:4a:9c:ed:71:56:da:d8:c4:76:91:2e:
6d:98:30:7a:bb:94:ff:e0:c1:45:7e:bf:3e:11:5b:6a:54:34:
6c:a7:0c:78:52:f3:2c:00:f8:9a:6b:41:69:00:89:21:29:94:
50:55:b1:d6:9c:82:4b:aa:60:06:d4:35:6c:dc:b7:3c:93:cd:
d8:f3:56:62:90:df:dc:33:59:d7:ab:eb:00:9e:1a:e1:2c:d7:
2d:70:a8:38:dc:34:30:6c:59:71:2e:bf:85:cb:49:ef:95:73:
f9:d4:cc:ac:0a:ca:c1:c9:32:b5:68:10:4b:fe:5e:73:fd:7f:
c2:53:19:9f:8c:65:86:8f:84:70:83:cc:3d:f0:81:e6:15:b5:
ab:31:94:d9:68:d4:6a:44:d5:c7:31:78:82:86:a6:9d:f1:6e:
29:b1:ca:12:85:d5:3a:8f:42:dd:d1:10:f6:e9:f8:53:27:75:
c4:7c:63:f1:6b:d0:72:4e:fd:22:7e:7f:4b:69:7d:85:da:a9:
e1:eb:9d:e0:16:98:07:ab:4d:44:ac:65:52:7b:52:0a:f0:8d:
ae:24:76:c2:b0:cd:b0:cb:90:e7:e2:89:45:e1:b9:d6:f3:34:
3b:3c:ca:9a:54:9c:80:81:da:a9:b5:5e:34:56:48:f5:7e:93:
a6:c3:b6:6c:b1:19:5f:6c:72:a8:ac:38:c6:ba:de:38:81:19:
46:82:6b:99:7d:d5:43:fe:2e:f6:18:f5:e1:06:ed:ef:6f:e4:
85:8a:3a:cf:f1:5c:91:ce:73:54:3f:9d:5b:87:e3:3f:6c:ed:
55:34:8f:cc:1a:88:2b:7f:87:cc:08:1e:c1:85:ba:70:9e:80:
6a:7f:06:4a:5d:c8:7d:1a:a3:e9:69:4e:b9:b5:a3:f0:6a:f5:
53:47:4e:13:b4:a4:05:7e:b0:fd:7e:b5:ba:ab:07:ac:ec:a0:
fc:4f:d9:d1:67:33:fd:5f:96:e6:26:71:6b:84:a9:9b:4c:78:
b1:fa:4d:cd:ff:db:36:68:d3:7b:83:36:31:7c:a7:fe:15:f1:
e4:c7:47:7f:f1:d9:76:13:ac:fe:5c:f0:29:41:8b:90:4c:1c:
cb:7f:1d:ea:16:2d:52:3b
One-item revocation list
GET /puppet-ca/v1/certificate_revocation_list/ca
HTTP/1.1 200 OK
Content-Type: text/plain
-----BEGIN X509 CRL-----
MIICnDCBhQIBATANBgkqhkiG9w0BAQUFADAfMR0wGwYDVQQDDBRQdXBwZXQgQ0E6
IGxvY2FsaG9zdBcNMTMxMDA3MTk0ODQwWhcNMTgxMDA2MTk0ODQxWjAiMCACAQUX
DTEzMTAwNzE5NDg0MVowDDAKBgNVHRUEAwoBAaAOMAwwCgYDVR0UBAMCAQEwDQYJ
© 2024 Puppet, Inc., a Perforce company

Puppet | Platform components | 252
KoZIhvcNAQEFBQADggIBALrh49WNdmrJOPCRntD1nxCObmqZgl8ZwTv7TO9VkmCG
Ksvo8zR2aTIOH9VUKqWrE0squhtFJXl8dxL4PR1RiLbmhO7dp+NHdu8ejTQpoOTp
h69xbQFT3oHcIdn2cBGrLJQcZgXsiswT0KJ8nuw6eDO93yXDrguSUdou99M99wTw
2nn1kUQKW9b0vUI7t2ADF5U8/DES+1IrvBq2IEHmg4+ekZRCxeJMuqd1R13gymcJ
osSPbRgIjCli6zD3aK4Nq5OMMpVLV/VVPwyQb4GwW4Wj5iyNAp8d/EAqtZ21ZHUi
nvuXmRtUWHJwfi40D5T2GQXxuUjB4pnh8cFq7f89iUvqoCwFo7nRIacrrweNFMYD
GxVJVMfz4PkP66ckIPQ5Uuey92dg5p2w4b2cp8NstxMdgcc3KAF483ItKA8uIDuU
1dbzw1v2k5qUjoImueHwKolbLmPyYmvFp7hbnV+WpFbvGjyIfW3BMankDEv4ig0L
MCw6n2GKv1hSWM6Mrk8Ja1yYOFLsjI0RoVCZsf1iNiRT28haldXVTPyNtct9mGAv
6az5W/nyixIPrrHubTx28zhmuHZx6y3hQMCLmuYOT+e7F/eFsYXVEjuJjxjr33uA
O/ii4EkTls1gzvonOtoBoGElzQAogrZI3HXCwFYvU2whLKr9cwv5bpRkUfPCMQ4n
-----END X509 CRL-----
> openssl crl -inform PEM -in 1revoked.crl -text -noout
Certificate Revocation List (CRL):
Version 2 (0x1)
Signature Algorithm: sha1WithRSAEncryption
Issuer: /CN=Puppet CA: localhost
Last Update: Oct 7 19:48:40 2013 GMT
Next Update: Oct 6 19:48:41 2018 GMT
CRL extensions:
X509v3 CRL Number:
1
Revoked Certificates:
Serial Number: 05
Revocation Date: Oct 7 19:48:41 2013 GMT
CRL entry extensions:
X509v3 CRL Reason Code:
Key Compromise
Signature Algorithm: sha1WithRSAEncryption
ba:e1:e3:d5:8d:76:6a:c9:38:f0:91:9e:d0:f5:9f:10:8e:6e:
6a:99:82:5f:19:c1:3b:fb:4c:ef:55:92:60:86:2a:cb:e8:f3:
34:76:69:32:0e:1f:d5:54:2a:a5:ab:13:4b:2a:ba:1b:45:25:
79:7c:77:12:f8:3d:1d:51:88:b6:e6:84:ee:dd:a7:e3:47:76:
ef:1e:8d:34:29:a0:e4:e9:87:af:71:6d:01:53:de:81:dc:21:
d9:f6:70:11:ab:2c:94:1c:66:05:ec:8a:cc:13:d0:a2:7c:9e:
ec:3a:78:33:bd:df:25:c3:ae:0b:92:51:da:2e:f7:d3:3d:f7:
04:f0:da:79:f5:91:44:0a:5b:d6:f4:bd:42:3b:b7:60:03:17:
95:3c:fc:31:12:fb:52:2b:bc:1a:b6:20:41:e6:83:8f:9e:91:
94:42:c5:e2:4c:ba:a7:75:47:5d:e0:ca:67:09:a2:c4:8f:6d:
18:08:8c:29:62:eb:30:f7:68:ae:0d:ab:93:8c:32:95:4b:57:
f5:55:3f:0c:90:6f:81:b0:5b:85:a3:e6:2c:8d:02:9f:1d:fc:
40:2a:b5:9d:b5:64:75:22:9e:fb:97:99:1b:54:58:72:70:7e:
2e:34:0f:94:f6:19:05:f1:b9:48:c1:e2:99:e1:f1:c1:6a:ed:
ff:3d:89:4b:ea:a0:2c:05:a3:b9:d1:21:a7:2b:af:07:8d:14:
c6:03:1b:15:49:54:c7:f3:e0:f9:0f:eb:a7:24:20:f4:39:52:
e7:b2:f7:67:60:e6:9d:b0:e1:bd:9c:a7:c3:6c:b7:13:1d:81:
c7:37:28:01:78:f3:72:2d:28:0f:2e:20:3b:94:d5:d6:f3:c3:
5b:f6:93:9a:94:8e:82:26:b9:e1:f0:2a:89:5b:2e:63:f2:62:
6b:c5:a7:b8:5b:9d:5f:96:a4:56:ef:1a:3c:88:7d:6d:c1:31:
a9:e4:0c:4b:f8:8a:0d:0b:30:2c:3a:9f:61:8a:bf:58:52:58:
ce:8c:ae:4f:09:6b:5c:98:38:52:ec:8c:8d:11:a1:50:99:b1:
fd:62:36:24:53:db:c8:5a:95:d5:d5:4c:fc:8d:b5:cb:7d:98:
60:2f:e9:ac:f9:5b:f9:f2:8b:12:0f:ae:b1:ee:6d:3c:76:f3:
38:66:b8:76:71:eb:2d:e1:40:c0:8b:9a:e6:0e:4f:e7:bb:17:
f7:85:b1:85:d5:12:3b:89:8f:18:eb:df:7b:80:3b:f8:a2:e0:
49:13:96:cd:60:ce:fa:27:3a:da:01:a0:61:25:cd:00:28:82:
b6:48:dc:75:c2:c0:56:2f:53:6c:21:2c:aa:fd:73:0b:f9:6e:
94:64:51:f3:c2:31:0e:27
No node name given
GET /puppet-ca/v1/certificate_revocation_list
© 2024 Puppet, Inc., a Perforce company

Puppet | Platform components | 253
HTTP/1.1 400 Bad Request
Content-Type: text/plain
No request key specified in /puppet-ca/v1/certificate_revocation_list
Update upstream CRLs
If your organization's CRLs require frequent updating, you can use the following endpoint to insert updated copies of
your CRLs into the trust chain:
PUT /puppet-ca/v1/certificate_revocation_list
accept: text/plain
This endpoint accepts a list of CRL PEMs as a body and updates the matching CRLs saved on disk if the submitted
ones have a higher CRL number than their counterparts. Note that it cannot be used to replace the leaf CRL (the one
used to track certificates revoked by the Puppet Intermediate CA certificate), only CRLs further up the chain, which
correspond to certs belonging to your organization's PKI. If an updated version of the Puppet leaf CRL is submitted in
the body, it is ignored.
Note: If you are using curl to submit to this endpoint, use the data-binary flag for the body, instead of the
data flag. The data-binary flag preserves newlines in the request body, which is required for the CRLs to be
parsed correctly.
Supported HTTP Methods
PUT
Supported Response Formats
text/plain
Parameters
No parameters, only the body which contains the contents of the CRL update
Example
PUT /puppet-ca/v1/certificate_revocation_list
BODY
-----BEGIN X509 CRL-----
MIIBizB1AgEBMA0GCSqGSIb3DQEBCwUAMBIxEDAOBgNVBAMTB1Jvb3QgQ0EXDTIx
MDUxMzE3MTAyOFoXDTI2MDUxMzE3MTAyOFqgLzAtMB8GA1UdIwQYMBaAFIAc7NI2
Jesrcny7yh8B2fzCEte7MAoGA1UdFAQDAgEBMA0GCSqGSIb3DQEBCwUAA4IBAQAn
j87vWjd9qr9BZq2rf92Ku/owQlAJTHwIPAKmmUyzMF+Aw0P2nlF7FPDiOaXXGm9x
KWwstCaefp4jbru+pD5cH/UFSCyLBuUlfzqtMvF4SL7/CjGZa4W3WW4a+fqlv/HI
U8Wxjqa00LBV77rqJm54z2QUlqgCPD/7r2Pqy5rrfrZTGGy58727whtSsV5sAWOw
kxzRogsSm23Uh4//lmEx0BYJYTaz+HdWaEckpJU1S3DfBBrh5Rv2AG/OjsRfUvgC
tB0SGdKL0EM8KG4GxbeXTvq8HuTKUp2HaWvGWpdojyxqwwiAtNaOHt76qpBkRe3f
igWihATMaKzytX4xXk1C
-----END X509 CRL-----
HTTP/1.1 200 OK
Content-Type: text/plain
Successfully updated CRLs
PUT /puppet/ca/v1/certificate_revocation_list
BODY
----BEGIN X509 CRL-----
Invalid CRL Content
----END X509 CRL------
© 2024 Puppet, Inc., a Perforce company

Puppet | Platform components | 254
HTTP/1.1 400 Bad Request
Content-Type: text/plain
No valid CRLs submitted
Expirations
The expirations endpoint returns the "not-after" date for all certificates in the CA bundle, and the "next-update"
date of all CRLs in the chain. This endpoint requires authentication.
Find
Get the expiration dates of your certificates and CRLs.
GET /puppet-ca/v1/expirations
Supported HTTP Methods
GET
Supported Response Formats
text/plain
Parameters
None
Examples
Expiration dates found
GET /puppet-ca/v1/expirations/mycertname
HTTP/1.1 200 OK
Content-Type: text/plain
"ca-certs":{"Puppet Enterprise CA generated at +2021-08-12
21:46:20 +0000":"2036-08-08T21:47:15UTC","Puppet Root CA:
ca0627ba3b3ed9":"2036-08-08T21:47:13UTC"},
"crls":{"Puppet Enterprise CA generated at +2021-08-12
21:46:20 +0000":"2027-06-16T22:40:32UTC","Puppet Root CA:
ca0627ba3b3ed9":"2036-08-08T21:47:13UTC"}
Certificate Clean
The certificate clean endpoint of the CA API allows you to revoke and delete a list of certificates with a
single request.
PUT /puppet-ca/v1/clean
Content-Type: application/json
The request body takes one required key — certnames. This includes the list of certificates for the endpoint to
clean. Each certificate in the list is revoked, and the associated certificate file deleted from the CA.
If a certname does not have an associated signed cert on the CA, the response body calls this out, but the request does
not error.
Example
In the following example, both certs are revoked and their files deleted.
PUT /puppet-ca/v1/clean
Content-Type: application/json
Content-Length: 58
© 2024 Puppet, Inc., a Perforce company

Puppet | Platform components | 255
{"certnames":["agent1.example.net","agent2.example.net"]}
HTTP/1.1 200 OK
Context-Type: text/plain
Successfully cleaned all certificates.
In the following example, the missing certificate is skipped, and the other is revoked and deleted.
PUT /puppet-ca/v1/clean
Content-Type: application/json
Content-Length: 58
{"certnames":["missing.example.net","agent1.example.net"]}
HTTP/1.1 200 OK
Context-Type: text/plain
The following certs do not exist and cannot be revoked:
["missing.example.net"]
Bulk Certificate Sign
POST /puppet-ca/v1/sign
The sign endpoint of the CA API allows you to request the signing of CSRs that match the certnames included in
the payload.
The certnames must be in an array nested under a certnames key and be valid certnames. The usual checks for
subject-alt-names allowed, authorization-extensions allowed, invalid extensions and valid signature are made.
POST /puppet-ca/v1/sign
Content-Type: application/json
{
"certnames": [
"one.example.com",
"two.example.com"
]
}
Supported HTTP Methods
POST
Supported Response Formats
application/json
Parameters
None
Responses
Certificates signed
POST /puppet-ca/v1/sign
{
"certnames": [
"one.example.com",
"two.example.com"
]
}
HTTP 200 OK
© 2024 Puppet, Inc., a Perforce company

Puppet | Platform components | 256
Content-Type: application/json
{
"signed": [
"one.example.com",
"two.example.com"
],
"no-csr": [],
"signing-errors": []
}
Certname schema error
POST /puppet-ca/v1/sign
Content-Type: application/json
{
"certnames": [
1,
2
]
}
HTTP 422 Unprocessable Entity
{
"kind": "schema-violation",
"msg": ""
"details": {},
}
No CSRs for supplied certnames
POST /puppet-ca/v1/sign
Content-Type: application/json
{
"certnames": [
"nocsrone.example.com",
"nocsrtwo.example.com"
]
}
HTTP 200 OK
Content-Type: application/json
{
"signed": [],
"no-csr": [
"nocsrone.example.com",
"nocsrtwo.example.com"
],
"signing-errors": []
}
Signing errors for supplied certnames
POST /puppet-ca/v1/sign
Content-Type: application/json
{
"certnames": [
© 2024 Puppet, Inc., a Perforce company

Puppet | Platform components | 257
"badextension.example.com",
"invalidsignature.example.com"
]
}
HTTP 200 OK
Content-Type: application/json
{
"signed": [],
"no-csr": [],
"signing-errors": [
"badextension.example.com",
"invalidsignature.example.com"
]
}
POST /puppet-ca/v1/sign/all
The sign/all endpoint of the CA API allows you to request the signing of all outstanding CSRs.
POST /puppet-ca/v1/sign/all
Content-Type: application/json
{}
Supported HTTP Methods
POST
Supported Response Formats
application/json
Parameters
None
Responses
POST /puppet-ca/v1/sign/all
Content-Type: application/json
{}
HTTP 200 OK
Content-Type: application/json
{
"signed": [
"one.example.com",
"two.example.com"
],
"no-csr": [],
"signing-errors": [
"badextension.example.com",
"invalidsignature.example.com"
]
}
Schemas (JSON)
These JSON files contain schemas for the various HTTP API objects.
Use these links to open the JSON files in your browser:
© 2024 Puppet, Inc., a Perforce company

Puppet | Platform components | 258
• catalog.json
• environments.json
• error.json
• facts.json
• file_metadata.json
• host.json
• json-meta-schema.json
• node.json
• report.json
• status.json
You can also use curl commands to download these files. For example, this command downloads the
catalog.json file:
curl https://puppet.com/docs/puppet/latest/schemas/catalog.json -L --output
catalog.json
API endpoints
Metrics API endpoints
v1 metrics
By default, Puppet Server enables two optional web APIs for Java Management Extension (JMX) metrics, namely
managed beans (MBeans). For the newer Jolokia-based metrics API, see v2 (Jolokia) metrics on page 259.
The metrics v1 API was introduced in Puppet Enterprise 2016.4 and is now open sourced. It is still enabled but is
deprecated.
Note: The metrics described here are returned only when passing the level=debug URL parameter,
and the structure of the returned data might change, or the endpoint might be removed, in future versions.
GET /metrics/v1/mbeans
The GET /metrics/v1/mbeans endpoint lists available MBeans.
Response keys
• The key is the name of a valid MBean.
• The value is a URI to use when requesting that MBean's attributes.
POST /metrics/v1/mbeans
The POST /metrics/v1/mbeans endpoint retrieves requested MBean metrics.
Query parameters
The query doesn't require any parameters, but the request body must contain a JSON object whose values are metric
names, or a JSON array of metric names, or a JSON string containing a single metric's name.
For a list of metric names, make a GET request to /metrics/v1/mbeans.
Response keys
The response format, though always JSON, depends on the request format:
• Requests with a JSON object return a JSON object where the values of the original object are transformed into the
Mbeans' attributes for the metric names.
• Requests with a JSON array return a JSON array where the items of the original array are transformed into the
Mbeans' attributes for the metric names.
• Requests with a JSON string return a JSON object of the Mbean's attributes for the given metric name.
© 2024 Puppet, Inc., a Perforce company

Puppet | Platform components | 259
GET /metrics/v1/mbeans/<name>
The GET /metrics/v1/mbeans/<name> endpoint reports on a single metric.
Query parameters
The query doesn't require any parameters, but the endpoint itself must correspond to one of the metrics returned by a
GET request to /metrics/v1/mbeans.
Response keys
The endpoint's responses contain a JSON object mapping strings to values. The keys and values returned in the
response vary based on the specified metric.
Example
Use curl from localhost to request data on MBean memory usage:
curl 'http://localhost:8080/metrics/v1/mbeans/java.lang:type=Memory'
The response should contain a JSON object representing the data:
{
"ObjectPendingFinalizationCount" : 0,
"HeapMemoryUsage" : {
"committed" : 807403520,
"init" : 268435456,
"max" : 3817865216,
"used" : 129257096
},
"NonHeapMemoryUsage" : {
"committed" : 85590016,
"init" : 24576000,
"max" : 184549376,
"used" : 85364904
},
"Verbose" : false,
"ObjectName" : "java.lang:type=Memory"
}
v2 (Jolokia) metrics
By default, Puppet Server enables two optional web APIs for Java Management Extension (JMX) metrics, namely
managed beans (MBeans). For the older metrics API, see v1 metrics on page 258.
Jolokia endpoints
The v2 metrics endpoint uses the Jolokia library, an extensive open-source metrics library with its own
documentation.
The documentation below provides only the information you need to use the metrics as configured by default for
Puppet Server, but Jolokia offers more features than are described below. Consult the Jolokia documentation for more
information.
For security reasons, we enable only the read-access Jolokia interface by default:
• read
• list
• version
• search
Configuring Jolokia
To change the security access policy, create the /etc/puppetlabs/puppetserver/jolokia-
access.xml file with contents that follow the Jolokia access policy and uncomment the metrics.metrics-
© 2024 Puppet, Inc., a Perforce company

Puppet | Platform components | 260
webservice.jolokia.servlet-init-params.policyLocation parameter before restarting
puppetserver.
The metrics.metrics-webservice.jolokia.servlet-init-params table within the metrics.conf on
page 165 file provides more configuration options. See Jolokia's agent initialization documentation for all of the
available options.
Disabling the endpoints
To disable the v2 endpoints, set the metrics.metrics-webservice.jolokia.enabled parameter in
metrics.conf to false.
Usage
You can query the metrics v2 API using GET or POST requests.
GET /metrics/v2/
(Introduced in Puppet Server 5)
This endpoint requires an operation, and depending on the operation can accept or might require an additional query:
GET /metrics/v2/<OPERATION>/<QUERY>
Response
A successful request returns a JSON document.
Examples
To list all valid mbeans querying the metrics endpoint
GET /metrics/v2/list
Which should return a response similar to
{
"request": {
"type": "list"
},
"value": {
"java.util.logging": {
"type=Logging": {
"op": {
"getLoggerLevel": {
...
},
...
},
"attr": {
"LoggerNames": {
"rw": false,
"type": "[Ljava.lang.String;",
"desc": "LoggerNames"
},
"ObjectName": {
"rw": false,
"type": "javax.management.ObjectName",
"desc": "ObjectName"
}
},
"desc": "Information on the management interface of the MBean"
}
},
...
© 2024 Puppet, Inc., a Perforce company

Puppet | Platform components | 261
}
}
So, from the example above we could query for the registered logger names with this HTTP call:
GET /metrics/v2/read/java.util.logging:type=Logging/LoggerNames
Which would return the JSON document
{
"request": {
"mbean": "java.util.logging:type=Logging",
"attribute": "LoggerNames",
"type": "read"
},
"value": [
"javax.management.snmp",
"global",
"javax.management.notification",
"javax.management.modelmbean",
"javax.management.timer",
"javax.management",
"javax.management.mlet",
"javax.management.mbeanserver",
"javax.management.snmp.daemon",
"javax.management.relation",
"javax.management.monitor",
"javax.management.misc",
""
],
"timestamp": 1497977258,
"status": 200
}
The MBean names can then be created by joining the the first two keys of the value table with a colon (the domain
and prop list in Jolokia parlance). Querying the MBeans is achieved via the read operation. The read
operation has as its GET signature:
GET /metrics/v2/read/<MBEAN NAMES>/<ATTRIBUTES>/<OPTIONAL INNER PATH FILTER>
POST /metrics/v2/<OPERATION>
You can also submit a POST request with the query as a JSON document in the body of the POST.
Filtering
The new Jolokia-based metrics API also provides globbing (wildcard selection) and response filtering features.
Example
You can combine both of these features to query garbage collection data, but return only the collection counts and
times.
GET metrics/v2/read/java.lang:name=*,type=GarbageCollector/
CollectionCount,CollectionTime
This returns a JSON response:
{
"request": {
"mbean": "java.lang:name=*,type=GarbageCollector",
"attribute": [
"CollectionCount",
© 2024 Puppet, Inc., a Perforce company

Puppet | Platform components | 262
"CollectionTime"
],
"type": "read"
},
"value": {
"java.lang:name=PS Scavenge,type=GarbageCollector": {
"CollectionTime": 1314,
"CollectionCount": 27
},
"java.lang:name=PS MarkSweep,type=GarbageCollector": {
"CollectionTime": 580,
"CollectionCount": 5
}
},
"timestamp": 1497977710,
"status": 200
}
Refer to the Jolokia protocol documentation for more advanced usage.
Status API endpoints
Services endpoint
The services endpoint of Puppet Server's Status API provides information about services running on Puppet
Server. As of Puppet Server 2.6.0, the endpoint provides information about memory usage similar to the data
produced by the Java MemoryMXBean, as well as basic data on the pupppetserver process's state and uptime.
See the Java MemoryMXBean documentation for help interpreting the memory information.
Note: This is an experimental feature provided for troubleshooting purposes. In future releases, the
services endpoint's response payload might change without warning.
For information about HTTP client metrics, which are served from the status endpoint, see HTTP Client
Metrics on page 200.
GET /status/v1/services
(Introduced in Puppet Server 2.6.0)
Supported HTTP methods
GET
Supported formats
JSON
Query parameters
• level (optional): The response includes status information for all registered services at the requested level of
detail. Default: info. Valid values:
• critical: Returns the minimum amount of status information for each service. This level returns data
quickly and is suitable for frequently updating uses, such as health checks for a load balancer.
• info: Returns more info than the critical level for each service. The specific data depends on the
implementation details of the services loaded in the application, but generally includes enough human-readable
data to provide a quick impression of each service's health and status.
• debug: This level returns status information about a service in enough detail to be suitable for debugging
issues with the puppetserver process. Depending on the service, this level can be significantly more
expensive than lower levels, reduce the process's performance, and generate large amounts of data. This
level is suitable for producing aggregate metrics about the performance or resource usage of Puppet Server's
subsystems.
The information returned for any service at each increasing level of detail includes the data from lower levels. In
other words, the info level returns the same data structure as the critical level, and might provide additional
© 2024 Puppet, Inc., a Perforce company

Puppet | Platform components | 263
data in the status field depending on the service. Likewise, the debug level returns the same data structure as
info, and might also add additional information in the status field.
Response
The services endpoint's response includes information for each service about which the Status service is aware.
Each service's state value is one of the following:
• running, if and only if all services are running
• error if any service reports an error
• starting if any service reports that it is starting, and no service reports an error or that it is stopping
• stopping if any service reports that it is stopping and no service reports an error
• unknown if any service reports an unknown state and no services report an error
Requests to this endpoint return one of the following status codes:
• 200 when all services are in running state.
• 404 when a requested service is not found.
• 503 when the service state is unknown, error, starting, or stopping
Example request and response for a debug-level GET request
GET /status/v1/services?level=debug
HTTP/1.1 200 OK
Content-Type: application/json
{
"status-service": {
"detail_level": "debug",
"service_status_version": 1,
"service_version": "0.3.5",
"state": "running",
"status": {
"experimental": {
"jvm-metrics": {
"heap-memory": {
"committed": 1049100288,
"init": 268435456,
"max": 1908932608,
"used": 216512656
},
"non-heap-memory": {
"committed": 256466944,
"init": 2555904,
"max": -1,
"used": 173201432
},
"start-time-ms": 1472496731281,
"up-time-ms": 538974
}
}
}
}
}
Authorization
Requests to the services endpoint are authorized by the auth.conf on page 160 as of Puppet Server 5.3.0. For
more information about the supported Puppet Server authorization processes and configuration settings, see the
auth.conf on page 160.
© 2024 Puppet, Inc., a Perforce company

Puppet | Platform components | 264
One may also restrict access to the status service by changing the client-auth setting to required for the
webserver. See Configuring the Webserver Service for more information on the client-auth setting.
Simple endpoint
The simple endpoint of Puppet Server's Status API provides a simple indication of whether Puppet Server is
running on a server. It's designed for load balancers that don't support any kind of JSON parsing or parameter setting
and returns a simple string body (either the state of the server or a simple error message) and a status code relevant to
the result.
The content type for this endpoint is text/plain; charset=utf-8.
GET /status/v1/simple
(Introduced in Puppet Server 2.6.0)
Supported HTTP methods
GET
Supported formats
Plain text
Query parameters
None
Response
The simple endpoint's response consists of a single word describing Puppet Server's status:
• running, if and only if the Puppet Server service is running
• error, if the service reports an error
• unknown, if the service reports an unknown state, but doesn't report an error
Requests to this endpoint return one of the following status codes:
• 200 if and only if the Puppet Server service reports a status of running
• 503 if the service's status is unknown or error
Example request and response for a GET request
GET /status/v1/simple
HTTP/1.1 200 OK
Content-Type: application/json
running
Authorization
Requests to the simple endpoint are authorized by the auth.conf on page 160 as of Puppet Server 5.3.0. For more
information about the supported Puppet Server authorization processes and configuration settings, see the auth.conf
on page 160.
One may also restrict access to the status service by changing the client-auth setting to required for the
webserver. See Configuring the Webserver Service for more information on the client-auth setting.
Administrative API endpoints
Environment cache
When using directory environments, Puppet Server caches the data it loads from disk for each environment. It
provides an endpoint for clearing this cache:
DELETE /puppet-admin-api/v1/environment-cache
To trigger a complete invalidation of the data in this cache, make an HTTP request to this endpoint.
© 2024 Puppet, Inc., a Perforce company

Puppet | Platform components | 265
Query Parameters
(Introduced in Puppet Server 1.1/2.1)
This endpoint accepts an optional query parameter, environment, whose value may be set to the name of a
specific Puppet environment. If this parameter is provided, only the specified environment will be flushed from the
cache, as opposed to all environments.
Response
A successful request to this endpoint will return an HTTP 204: No Content. The response body will be empty.
Example
$ curl -i --cert <PATH TO CERT> --key <PATH TO KEY> --cacert <PATH TO PUPPET
CA CERT> -X DELETE https://localhost:8140/puppet-admin-api/v1/environment-
cache
HTTP/1.1 204 No Content
$ curl -i --cert <PATH TO CERT> --key <PATH TO KEY> --cacert <PATH TO PUPPET
CA CERT> -X DELETE https://localhost:8140/puppet-admin-api/v1/environment-
cache?environment=production
HTTP/1.1 204 No Content
Relevant Configuration
Access to this endpoint is controlled via Puppet Server's auth.conf file.
JRuby pool
Puppet Server contains a pool of JRuby instances, and provides an API endpoint for flushing it:
DELETE /puppet-admin-api/v1/jruby-pool
This will remove all of the existing JRuby interpreters from the pool, allowing the memory occupied by these
interpreters to be reclaimed by the JVM's garbage collector. The pool will then be refilled with new JRuby instances,
each of which will load the latest Ruby code and related resources from disk.
If you're developing new Ruby plugins that run in Puppet Server (functions, resource types, report handlers), you may
need to force Puppet to re-load its plugins when a new version is ready to test. Killing the JRuby instances will do
this, and it's faster than restarting the entire JVM process.
Furthermore, if you are using multiple environments, this could be useful if you want to make sure that your JRuby
instances are cleaned up and don't have conflicts based on common code that appears in multiple environments.
Note that this operation is computationally expensive, and as such Puppet Server will be unable to fulfill any
incoming requests until the first of the new interpreters has been initialized, which may take several seconds.
Response
A successful request to this endpoint will return an HTTP 204: No Content. The response body will be empty.
Example
$ curl -i --cert <PATH TO CERT> --key <PATH TO KEY> --cacert <PATH TO PUPPET
CA CERT> -X DELETE https://localhost:8140/puppet-admin-api/v1/jruby-pool
HTTP/1.1 204 No Content
GET /puppet-admin-api/v1/jruby-pool/thread-dump
Retrieve a Ruby thread dump for each JRuby instance registered to the pool. The thread dump provides a
backtrace through the Ruby code that each instance is executing and is useful for diagnosing instances that have
stalled or are otherwise unresponsive. Backtraces are generated using the JRuby JMX interface and require the
jruby.management.enabled property to be set to true in the JVM running Puppet Server.
Response
© 2024 Puppet, Inc., a Perforce company

Puppet | Platform components | 266
A successful request to this endpoint will return a HTTP 200: Ok status code. The response body will be a JSON
document containing a map that associates each JRuby instance ID with a map containing a thread-dump entry
that has a string value with the Ruby backtrace.
A HTTP 500: Internal Server Error status code will be returned if an exception occurs while retrieving
the thread dump for a JRuby instance, or if the jruby.management.enabled property is not set to true. The
response body in this case is also JSON, but the failed instances will be associated with a map containing a error
entry with a value describing the issue.
Example
$ curl -si --cert <PATH TO CERT> --key <PATH TO KEY> --cacert <PATH TO
PUPPET CA CERT> -X GET https://localhost:8140/puppet-admin-api/v1/jruby-
pool/thread-dump
HTTP/1.1 200 OK
{"1":{"thread-dump":"All threads known to Ruby instance 1960016402\n
\n ..."}}
# Error returned when jruby.management.enabled is not configured
$ curl -si --cert <PATH TO CERT> --key <PATH TO KEY> --cacert <PATH TO
PUPPET CA CERT> -X GET https://localhost:8140/puppet-admin-api/v1/jruby-
pool/thread-dump
HTTP/1.1 500 Server Error
{"1":{"error":"JRuby management interface not enabled. Add '-
Djruby.management.enabled=true' to JAVA_ARGS to enable thread dumps."}}
Relevant Configuration
Access to this endpoint is controlled via Puppet Server's auth.conf file.
Server-specific Puppet API endpoints
Environment classes
The environment classes API serves as a replacement for the Puppet resource type API for classes, which was
removed in Puppet 5.
Changes in the environment classes API
Compared to the resource type API, the environment classes API covers different things, returns new or different
information, and omits some information.
Covers classes only
The environment classes API covers only classes, whereas the resource type API covers classes, node definitions, and
defined types.
Changes class information caching behavior
Queries to the resource type API use cached class information per the configuration of the
environment_timeout setting, as set in the corresponding environment's environment.conf file. The
environment classes API does not use the value of environment_timeout with respect to the data that it
caches. Instead, only when the environment-class-cache-enabled setting in the jruby-puppet
configuration section is set to true, the environment classes API uses HTTP Etags to represent specific versions of
the class information. And it uses the Puppet Server Environment cache on page 264 as an explicit mechanism for
marking an Etag as expired. See the Headers and caching behavior section for more information about caching and
invalidation of entries.
Uses typed values
The environment classes API includes a type, if defined for a class parameter. For example, if the class parameter
were defined as String $some_str, the type parameter would hold a value of String.
Provides default literal values
© 2024 Puppet, Inc., a Perforce company
Puppet | Platform components | 267
For values that can be presented in pure JSON, the environment classes API provides a default_literal form
of a class parameter's default value. For example, if an Integer type class parameter were defined in the manifest
as having a default value of 3, the default_literal element for the parameter will contain a JSON Number type
of 3.
Lacks filters
The environment classes API does not provide a way to filter the list of classes returned via use of a search string. The
environment classes API returns information for all classes found within an environment's manifest files.
Includes filenames
Unlike the resource type API in Puppet 4, the environment classes API does include the filename in which each class
was found. The resource type API in Puppet 3 does include the filename, but the resource type API under Puppet 4
does not.
Lacks line numbers
The environment classes API does not include the line number at which a class is found in the file.
Lacks documentation strings (vs. Puppet 3)
Unlike the resource type API in Puppet 3, the environment classes API does not include any doc strings for a class
entry. Note that doc strings are also not returned for class entries in the Puppet 4 resource type API.
Returns file entries for manifests with no classes
The environment classes API returns a file entry for manifests that exist in the environment but in which no classes
were found. The resource type API omits entries for files which do not contain any classes.
Uses application/json Content-Type
The Content-Type in the response to an environment classes API query is application/json, whereas the
resource type API uses a Content-Type of text/pson.
Includes successfully parsed classes, even if some return errors, and returns error messages
The environment classes API includes information for every class that can successfully be parsed. For any errors
which occur when parsing individual manifest files, the response includes an entry for the corresponding manifest
file, along with an error and detail string about the failure.
In comparison, if an error is encountered when parsing a manifest, the resource type API omits information from the
manifest entirely. It includes class information from other manifests that it successfully parsed, assuming none of the
parsing errors were found in one of the files associated with the environment's manifest setting. If one or more
classes is returned but errors were encountered parsing other manifests, the response from the resource type API call
doesn't include any explicit indication that a parsing error was encountered.
GET /puppet/v3/environment_classes?environment=:environment
(Introduced in Puppet Server 2.3.0.)
Making a request with no query parameters is not supported and returns an HTTP 400 (Bad Request) response.
Supported HTTP Methods
GET
Supported Formats
JSON
Query Parameters
Provide one parameter to the GET request:
• environment: Only the classes and parameter information pertaining to the specified environment will be
returned for the call.
Responses
© 2024 Puppet, Inc., a Perforce company

Puppet | Platform components | 268
GET request with results
GET /puppet/v3/environment_classes?environment=env
HTTP/1.1 200 OK
Etag: b02ede6ecc432b134217a1cc681c406288ef9224
Content-Type: application/json
{
"files": [
{
"path": "/etc/puppetlabs/code/environments/env/manifests/site.pp",
"classes": []
},
{
"path": "/etc/puppetlabs/code/environments/env/modules/mymodule/
manifests/init.pp",
"classes": [
{
"name": "mymodule",
"params": [
{
"default_literal": "this is a string",
"default_source": "\"this is a string\"",
"name": "a_string",
"type": "String"
},
{
"default_literal": 3,
"default_source": "3",
"name": "an_integer",
"type": "Integer"
}
]
}
]
},
{
"error": "Syntax error at '=>' at /etc/puppetlabs/code/environments/
env/modules/mymodule/manifests/other.pp:20:19",
"path": "/etc/puppetlabs/code/environments/env/modules/mymodule/
manifests/other.pp"
}
],
"name": "env"
}
GET request with Etag roundtripped from a previous GET request
If you send the Etag value that was returned from the previous request to the server in a follow-up request, and the
underlying environment cache has not been invalidated, the server will return an HTTP 304 (Not Modified) response.
See the Headers and Caching Behavior section for more information about caching and invalidation of entries.
GET /puppet/v3/environment_classes?environment=env
If-None-Match: b02ede6ecc432b134217a1cc681c406288ef9224
HTTP/1.1 304 Not Modified
Etag: b02ede6ecc432b134217a1cc681c406288ef9224
© 2024 Puppet, Inc., a Perforce company

Puppet | Platform components | 269
If the environment cache has been updated from what was used to calculate the original Etag, the server will return a
response with the full set of environment class information:
GET /puppet/v3/environment_classes?environment=env
If-None-Match: b02ede6ecc432b134217a1cc681c406288ef9224
HTTP/1.1 200 OK
Etag: 2f4f83096265b9741c5304b3055f866df0336762
Content-Type: application/json
{
"files": [
{
"path": "/etc/puppetlabs/code/environments/env/manifests/site.pp",
"classes": []
},
{
"path": "/etc/puppetlabs/code/environments/env/modules/mymodule/
manifests/init.pp",
"classes": [
{
"name": "mymodule",
"params": [
{
"default_literal": "this is a string",
"default_source": "\"this is a string\"",
"name": "a_string",
"type": "String"
},
{
"default_literal": 3,
"default_source": "3",
"name": "an_integer",
"type": "Integer"
},
{
"default_literal": {
"one": "foo",
"two": "hello"
},
"default_source": "{ \"one\" => \"foo\", \"two\" => \"hello
\" }",
"name": "a_hash",
"type": "Hash"
}
]
}
]
}
],
"name": "env"
}
Environment does not exist
If you send a request with an environment parameter that doesn't correspond to the name of a directory environment
on the server, the server returns an HTTP 404 (Not Found) error:
GET /puppet/v3/environment_classes?environment=doesnotexist
HTTP/1.1 404 Not Found
© 2024 Puppet, Inc., a Perforce company

Puppet | Platform components | 270
Could not find environment 'doesnotexist'
No environment given
GET /puppet/v3/environment_classes
HTTP/1.1 400 Bad Request
You must specify an environment parameter.
Environment parameter specified with no value
GET /puppet/v3/environment_classes?environment=
HTTP/1.1 400 Bad Request
The environment must be purely alphanumeric, not ''
Environment includes non-alphanumeric characters
If the environment parameter in your request includes any characters that are not A-Z, a-z, 0-9, or _ (underscore),
the server returns an HTTP 400 (Bad Request) error:
GET /puppet/v3/environment_classes?environment=bog|us
HTTP/1.1 400 Bad Request
The environment must be purely alphanumeric, not 'bog|us'
Schema
An environment classes response body conforms to the environment classes schema.
Headers and Caching Behavior
If the environment-class-cache-enabled setting in the jruby-puppet configuration section is set to
true, the environment classes API caches the response data. This can provide a significant performance benefit by
reducing the amount of data that needs to be provided in a response when the underlying Puppet code on disk remains
unchanged from one request to the next. Use of the cache does, however, require that cache entries are invalidated
after Puppet code has been updated.
To avoid invalidated cache entries, you can omit the environment-class-cache-enabled setting from a
node's configuration or set it to false. In this case, the server discovers and parses manifests for every incoming
request. This can significantly increase bandwidth overhead for repeated requests, particularly when there are few
changes to the underlying Puppet code. However, this approach ensures that the latest available data is returned to
every request.
Behaviors when the environment class cache is enabled
When the environment-class-cache-enabled setting is set to true, the response to a query to the
environment_classes endpoint includes an HTTP Etag header. The value for the Etag header is a hash that
represents the state of the latest class information available for the requested environment. For example:
ETag: 31d64b8038258202b4f5eb508d7dab79c46327bb
A client can (but is not required to) provide the Etag value back to the server in a subsequent
environment_classes request. The client would provide the tag value as the value for an If-None-Match HTTP
header:
If-None-Match: 31d64b8038258202b4f5eb508d7dab79c46327bb
© 2024 Puppet, Inc., a Perforce company

Puppet | Platform components | 271
If the latest state of code available on the server matches that of the value in the If-None-Match header, the
server returns an HTTP 304 (Not Modified) response with no response body. If the server has newer code available
than what is captured by the If-None-Match header value, or if no If-None-Match header is provided in the
request, the server parses manifests again. Assuming the resulting payload is different than a previous request's, the
server provides a different Etag value and new class information in the response payload.
If the client sends an Accept-Encoding: gzip HTTP header for the request and the server provides a gzip-
encoded response body, the server might append the characters --gzip to the end of the Etag. For example, the
HTTP response headers could include:
Content-Encoding: gzip
ETag: e84bbce5482243b3eb3a190e5c90e535cf4f20de--gzip
The server accepts both forms of an Etag (with or without the trailing --gzip characters) as the same value when
validating it in a request's If-None-Match header against its cache.
It is best, however, for clients to use the Etag without parsing its content. A client expecting an HTTP 304 (Not
Modified) response if the cache has not been updated since the prior request should provide the exact value returned
in the Etag header from one request, to the server in an If-None-Match header in a subsequent request for the
environment's class information.
Clearing class information cache entries
After updating an environment's manifests, you must clear the server's class information cache entries, so the server
can parse the latest manifests and reflect class changes to the class information in queries to the environment classes
endpoint. To clear cache entries on the server, do one of the following:
• Call the Environment cache on page 264.
For best performance, call this endpoint with a query parameter that specifies the environment whose cache
should be flushed.
• Restart Puppet Server.
Each environment's cache is held in memory for the Puppet Server process and is effectively flushed whenever
Puppet Server is restarted, whether with a Restarting Puppet Server" on page 211 or a full JVM restart.
Authorization
All requests made to the environment classes API are authorized using the Trapperkeeper-based auth.conf on page
160.
For more information about the Puppet Server authorization process and configuration settings, see the auth.conf on
page 160.
Environment modules
The environment modules API will return information about what modules are installed for the requested
environment.
GET /puppet/v3/environment_modules
Supported HTTP Methods
GET
Supported Formats
JSON
Responses
GET request with results
GET /puppet/v3/environment_modules
HTTP/1.1 200 OK
Content-Type: application/json
© 2024 Puppet, Inc., a Perforce company

Puppet | Platform components | 272
[{
"modules": [
{
"name": "puppetlabs/ntp",
"version": "6.0.0"
},
{
"name": "puppetlabs/stdlib",
"version": "4.14.0"
}
],
"name": "env"
},
{
"modules": [
{
"name": "puppetlabs/stdlib",
"version": "4.14.0"
},
{
"name": "puppetlabs/azure",
"version": "1.1.0"
}
],
"name": "production"
}]
GET /puppet/v3/environment_modules?environment=:environment
Supported HTTP Methods
GET
Supported Formats
JSON
Query Parameters
Provide one parameter to the GET request:
• environment: Request information about modules pertaining to the specified environment only.
Responses
GET request with results
GET /puppet/v3/environment_modules?environment=env
HTTP/1.1 200 OK
Content-Type: application/json
{
"modules": [
{
"name": "puppetlabs/ntp",
"version": "6.0.0"
},
{
"name": "puppetlabs/stdlib",
"version": "4.14.0"
}
],
"name": "env"
}
© 2024 Puppet, Inc., a Perforce company

Puppet | Platform components | 273
Environment does not exist
If you send a request with an environment parameter that doesn't correspond to the name of a directory environment
on the server, the server returns an HTTP 404 (Not Found) error:
GET /puppet/v3/environment_modules?environment=doesnotexist
HTTP/1.1 404 Not Found
Could not find environment 'doesnotexist'
No environment given
GET /puppet/v3/environment_modules
HTTP/1.1 400 Bad Request
An environment parameter must be specified
Environment parameter specified with no value
GET /puppet/v3/environment_modules?environment=
HTTP/1.1 400 Bad Request
The environment must be purely alphanumeric, not ''
Environment includes non-alphanumeric characters
If the environment parameter in your request includes any characters that are not A-Z, a-z, 0-9, or _ (underscore),
the server returns an HTTP 400 (Bad Request) error:
GET /puppet/v3/environment_modules?environment=bog|us
HTTP/1.1 400 Bad Request
The environment must be purely alphanumeric, not 'bog|us'
No metadata.json file
If your modules do not have a metadata.json file, puppetserver will not be able to determine the version of your
module. In this case, puppetserver will return a null value for version in the response body.
Schema
An environment modules response body conforms to the environment modules schema.
Validating your json
If you have a response body that you'd like to validate against the environment_modules.json schema, you can do so
using the ruby library json-schema.
First, install the ruby gem to be used:
gem install json-schema
Next, given a json file, you can validate its schema.
Here is a basic json file called example.json:
{
"modules": [
{
© 2024 Puppet, Inc., a Perforce company

Puppet | Platform components | 274
"name": "puppetlabs/ntp",
"version": "6.0.0"
},
{
"name": "puppetlabs/stdlib",
"version": "4.16.0"
}
],
"name": "production"
}
Run this command from the root dir of the puppetserver project (or update the path to the json schema file in the
command below):
ruby -rjson-schema -e "puts JSON::Validator.validate!('./documentation/
puppet-api/v3/environment_modules.json','example.json')"
If the json is a valid schema, the command should output true. Otherwise, the library will print a schema validation
error detailing which key or keys validate the schema.
If you have a response that is the entire list of environment modules (i.e. the environment_modules endpoint), you
will need to use this command to validate the json schema:
ruby -rjson-schema -e "puts JSON::Validator.validate!('./documentation/
puppet-api/v3/environment_modules.json','all.json', :list=>true)"
Authorization
All requests made to the environment modules API are authorized using the Trapperkeeper-based auth.conf on page
160.
For more information about the Puppet Server authorization process and configuration settings, see the auth.conf on
page 160.
Static file content
The static_file_content endpoint returns the standard output of a code-content-command script,
which should output the contents of a specific version of a file on page 536 that has a source attribute with a
puppet:/// URI value. That source must be a file from the files or tasks directory of a module in a specific
environment.
Puppet Agent uses this endpoint only when applying a static catalog.
GET /puppet/v3/static_file_content/<FILE-PATH>
(Introduced in Puppet Server 2.3.0)
To retrieve a specific version of a file at a given environment and path, make an HTTP request to this endpoint with
the required parameters.
The <FILE-PATH> segment of the endpoint is required. The path corresponds to the requested file's path on the
Server relative to the given environment's root directory, and must point to a file in the */*/files/**, */*/
lib/**, */*/scripts/**, or */*/tasks/** glob. For example, Puppet Server sources module files located
by default in /etc/puppetlabs/code/environments/<ENVIRONMENT>/modules/<MODULENAME>/
files/**, and interpolates the metadata from these files into static catalogs for file resources.
Query parameters
You must also pass two parameters in the GET request:
• code_id: a unique string provided by the catalog that identifies which version of the file to return.
• environment: the environment that contains the desired file.
Response
© 2024 Puppet, Inc., a Perforce company

Puppet | Platform components | 275
A successful request to this endpoint returns an HTTP 200 response code and application/octet-stream
Content-Type header, and the contents of the specified file's requested version in the response body. An unsuccessful
request returns an error response code with a text/plain Content-Type header:
• 400: returned when any of the parameters are not provided.
• 403: returned when requesting a file that is not within a module's files or tasks directory.
• 500: returned when code-content-command is not configured on the server, or when a requested file or
version is not present in a repository.
Example response
Consider a server localhost, with a versioned file located at /modules/example/files/data.txt
in the production environment. The version is identified by a code_id of urn:puppet:code-
id:1:67eb71417fbd736a619c8b5f9bfc0056ea8c53ca;production, and that version of the file
contains Puppet test.
If you run this command:
curl -i -k 'https://localhost:8140/puppet/v3/static_file_content/
modules/example/files/data.txt?code_id=urn:puppet:code-
id:1:67eb71417fbd736a619c8b5f9bfc0056ea8c53ca;production&environment=production'
Puppet Server returns:
HTTP/1.1 200 OK
Date: Wed, 2 Mar 2016 23:44:08 GMT
X-Puppet-Version: 4.4.0
Content-Length: 4
Server: Jetty(9.2.10.v20150310)
Puppet test
Notes
When requesting a file from this endpoint, Puppet Server passes the values of the file-path, code_id, and
environment parameters as arguments to the code-content-command script. If the script returns an exit code
of 0, Puppet Server returns the script's standard output, which should be the contents of the requested version of the
file.
This endpoint returns an error (status 500) if the code-content-command setting is not configured on Puppet
Server.
Note: The code-content-command and code-id-command scripts are not provided in a default
installation or upgrade. For more information about these scripts, see the static catalog documentation.
Authorization
All requests made to the static file content API are authorized using the Trapperkeeper-based auth.conf.
For more information about the Puppet Server authorization process and configuration settings, see the auth.conf
documentation.
Certificate authority and SSL
Puppet can use its built-in certificate authority (CA) and public key infrastructure (PKI) tools or use an existing
external CA for all of its secure socket layer (SSL) communications.
Puppet uses certificates to verify the the identity of nodes. These certificates are issued by the certificate authority
(CA) service of a Puppet primary server. When a node checks into the Puppet v for the first time, it requests a
certificate. The Puppet primary server examines this request, and if it seems safe, creates a certificate for the node.
When the agent node picks up this certificate, it knows it can trust the Puppet primary server, and it can now identify
itself later when requesting a catalog.
© 2024 Puppet, Inc., a Perforce company

Puppet | Platform components | 276
After installing the Puppet Server, before starting it for the first time, use the puppetserver ca setup
command to create a default intermediate CA. For more complex use cases, see the Intermediate and External CA
documentation.
Note: For backward compatibility, starting Puppet Server before running puppetserver ca setup creates
the old single-cert CA. This configuration is not recommended, so if you are using Puppet 6, use the setup command
instead.
Puppet provides two command line tools for performing SSL tasks:
• puppetserver ca signs certificate requests and revokes certificates.
• puppet ssl performs agent-side tasks, such as submitting a certificate request or downloading a node
certificate.
What's changed in Puppet 6
Puppet 6 removes the puppet cert command and its associated certificate-related faces. In Puppet 6 you must use
the new subcommands listed above instead.
Puppet 6 also introduces full support for intermediate CAs, the recommended architecture. This requires changes on
both the server and the agent, so using it requires both the server and the agent to be updated to Puppet 6.
• Puppet Server CA commands on page 276
Puppet Server has a puppetserver ca command that performs certificate authority (CA) tasks like signing
and revoking certificates. Most of its actions are performed by making HTTP requests to Puppet Server’s CA API,
specifically the certificate_status endpoint. You must have Puppet Server running in order to sign or revoke
certificates.
• Intermediate CA on page 189
• Autosigning certificate requests on page 280
Before Puppet agent nodes can retrieve their configuration catalogs, they require a signed certificate from the local
Puppet certificate authority (CA). When using Puppet’s built-in CA instead of an external CA, agents submit a
certificate signing request (CSR) to the CA to retrieve a signed certificate after it's available.
• CSR attributes and certificate extensions on page 284
When Puppet agent nodes request their certificates, the certificate signing request (CSR) usually contains only their
certname and the necessary cryptographic information. Agents can also embed additional data in their CSR, useful for
policy-based autosigning and for adding new trusted facts.
• Regenerating certificates in a Puppet deployment on page 289
In some cases, you might need to regenerate the certificates and security credentials (private and public keys) that are
generated by Puppet’s built-in PKI systems.
• External CA on page 292
This information describes the supported and tested configurations for external CAs in this version of Puppet. If you
have an external CA use case that isn’t listed here, contact Puppet so we can learn more about it.
• External SSL termination on page 192
Puppet Server CA commands
Puppet Server has a puppetserver ca command that performs certificate authority (CA) tasks like signing
and revoking certificates. Most of its actions are performed by making HTTP requests to Puppet Server’s CA API,
specifically the certificate_status endpoint. You must have Puppet Server running in order to sign or revoke
certificates.
CA subcommands
If you have yet to review the actions for the puppetserver ca command, visit Subcommands. Some actions have
additional options. Run puppetserver ca help for details.
© 2024 Puppet, Inc., a Perforce company

Puppet | Platform components | 277
The puppetserver-ca CLI tool is shipped as a gem alongside Puppet Server. You can update the gem between
releases for bug fixes and improvements. To update the gem, run:
/opt/puppetlabs/puppet/bin/gem install -i /opt/puppetlabs/puppet/lib/ruby/
vendor_gems puppetserver-ca
API authentication
Access to the certificate_status API endpoint is tightly restricted for security purposes because the endpoint
lets you sign or revoke certificates. To access the certificate_status and certificate_statuses
endpoints, you must add a special extension to each endpoint's allowlist in the auth.conf entries. If other CSRs
request this extension, Puppet Server refuses to sign them because the extension is reserved (even if allow-
authorization-extensions is set to true).
If you need a certificate with this extension, you can generate it offline by doing the following:
1.
Stop Puppet Server.
Note:
• Although this particular use of the generate command requires you to stop puppetserver service, all
other uses of this command require the service to be running.
• If the tool cannot determine the status of the server, but you know the server is offline, you can use the --
force option to run the command without checking server status.
2.
Run puppetserver ca generate --ca-client --certname <name>
API authentication is required for regenerating the primary server's certificate. For details on certificate regeneration,
visit Regenerating certificates in a Puppet deployment.
Upgrading
To use the Puppet CA commands, you must update Puppet Server's auth.conf to include a rule that allows the
primary server's certname to access the certificate_status and certicate_statuses endpoints.
The following example displays how to allow the CA commands to access the certificate_status endpoint:
{
match-request: {
path: "/puppet-ca/v1/certificate_status"
type: path
method: [get, put, delete]
}
allow: primaryserver.example.com
sort-order: 500
name: "puppetlabs cert status"
},
For more information about upgrading your auth.conf file, visit auth.conf.
Signing certificates with subject alternative names or auth extensions
Puppet Server's CA API can sign certificates with subject alternative names (SANs) or auth extensions. These options
are disabled by default for security purposes. To enable these options, in the certificate-authority section
of Puppet Server's configuration (usually located in ca.conf), set allow-subject-alt-names or allow-
authorization-extensions to true. After configuration, you can use puppetserver ca sign --
certname <name> to sign certificates with these additions.
© 2024 Puppet, Inc., a Perforce company

Puppet | Platform components | 278
Intermediate CA
Puppet Server supports both a simple CA architecture, with a self-signed root cert that is also used as the CA signing
cert; and an intermediate CA architecture, with a self-signed root that issues an intermediate CA cert used for signing
incoming certificate requests. The intermediate CA architecture is preferred, because it is more secure and makes
regenerating certs easier. To generate a default intermediate CA for Puppet Server, run the puppetserver ca
setup command before starting your server for the first time.
The following diagram shows the configuration of Puppet's basic certificate infrastructure.
If you have an external certificate authority, you can create a cert chain from it, and use the puppetserver ca
import subcommand to install the chain on your server. Puppet agents starting with Puppet 6 handle an intermediate
CA setup out of the box. No need to copy files around by hand or configure CRL checking. Like setup, import
needs to be run before starting your server for the first time.
Note: The PE installer uses the puppetserver ca setup command to create a root cert and an intermediate
signing cert for Puppet Server. This means that in PE, the default CA is always an intermediate CA as of PE 2019.0.
Note: If for some reason you cannot use an intermediate CA, in Puppet Server 6 starting the server will generate
a non-intermediate CA the same as it always did before the introduction of these commands. However, we don't
recommend this, as using an intermediate CA provides more security and easier paths for CA regeneration. It is also
the default in PE, and some recommended workflows may rely on it.
Where to set CA configuration
All CA configuration takes place in Puppet’s config file. See the Configuration Reference on page 98 for details.
Set up Puppet as an intermediate CA with an external root
Puppet Server needs to present the full certificate chain to clients so the client can authenticate the server. You
construct the certificate chain by concatenating the CA certificates, starting with the new intermediate CA certificate
and descending to the root CA certificate.
© 2024 Puppet, Inc., a Perforce company

Puppet | Platform components | 279
The following diagram shows the configuration of Puppet's certificate infrastructure with an external root.
To set up Puppet as an intermediate CA with an external root:
1.
Collect the PEM-encoded certificates and CRLs for your organization's chain of trust, including the root
certificate, any intermediate certificates, and the signing certificate. (The signing certificate might be the root or
intermediate certificate.)
2.
Create a private RSA key, with no passphrase, for the Puppet CA.
3.
Create a PEM-encoded Puppet CA certificate.
a.
Create a CSR for the Puppet CA.
b.
Generate the Puppet CA certificate by signing the CSR using your external CA.
Ensure the CA constraint is set to true and the keyIdentifier is composed of the 160-bit SHA-1 hash of the
value of the bit string subjectPublicKeyfield. See RFC 5280 section 4.2.1.2 for details.
4.
Concatenate all of the certificates into a PEM-encoded certificate bundle, starting with the Puppet CA cert and
ending with your root certificate.
-----BEGIN CERTIFICATE-----
<Puppet’s CA cert>
-----END CERTIFICATE-----
-----BEGIN CERTIFICATE-----
<Org’s intermediate CA signing cert>
-----END CERTIFICATE-----
-----BEGIN CERTIFICATE-----
<Org’s root CA cert>
-----END CERTIFICATE-----
© 2024 Puppet, Inc., a Perforce company

Puppet | Platform components | 280
5.
Concatenate all of the CRLs into a PEM-encoded CRL chain, starting with any optional intermediate CA CRLs
and ending with your root certificate CRL.
-----BEGIN X509 CRL-----
<Puppet’s CA CRL>
-----END X509 CRL-----
-----BEGIN X509 CRL-----
<Org’s intermediate CA CRL>
-----END X509 CRL-----
-----BEGIN X509 CRL-----
<Org’s root CA CRL>
-----END X509 CRL-----
6.
Use the puppetserver ca import command to trigger the rest of the CA setup:
puppetserver ca import --cert-bundle ca-bundle.pem --crl-chain crls.pem --
private-key puppet_ca_key.pem
7.
optional. Validate that the CA is working by running puppet agent -t and verifying your intermediate CA with
OpenSSL.
openssl x509 -in /etc/puppetlabs/puppet/ssl/ca/signed/<HOSTNAME>.crt
-text -noout
Certificate:
Data:
Version: 3 (0x2)
Serial Number: 1 (0x1)
Signature Algorithm: sha256WithRSAEncryption
Issuer: CN=intermediate-ca
Note: If your organization's CRLs require frequent updating, you can use the certificate_revocation_list
endpoint to insert updated copies of your CRLs into the trust chain. The CA updates the matching CRLs saved
on disk if the submitted ones have a higher CRL number than their counterparts. In addition, set Puppet’s
crl_refresh_interval on all of your agents to ensure that they download the updated CRLs.
Autosigning certificate requests
Before Puppet agent nodes can retrieve their configuration catalogs, they require a signed certificate from the local
Puppet certificate authority (CA). When using Puppet’s built-in CA instead of an external CA, agents submit a
certificate signing request (CSR) to the CA to retrieve a signed certificate after it's available.
By default, these CSRs must be manually signed by an admin user, using either the puppetserver ca command
or the Node requests page in the Puppet Enterprise console.
Alternatively, to speed up the process of bringing new agent nodes into the deployment, you can configure the CA to
automatically sign certain CSRs.
CAUTION: Autosigning CSRs changes the nature of your deployment’s security, and you should
understand the implications before configuring it. Each type of autosigning has its own security impact.
Disabling autosigning
By default, the autosign setting in the [server] section of the CA’s puppet.conf file is set to $confdir/
autosign.conf. The basic autosigning functionality is enabled upon installation.
Depending on your installation method, there might not be an allowlist at that location after the Puppet Server is
running:
• Open source Puppet: autosign.conf doesn’t exist by default.
• Monolithic Puppet Enterprise (PE) installations: All required services run on one server, and autosign.conf
exists on the primary server, but by default it's empty because the primary server doesn’t need to add other servers
to an allowlist.
© 2024 Puppet, Inc., a Perforce company

Puppet | Platform components | 281
• Split PE installations: Services like PuppetDB can run on different servers, the autosign.conf exists on the
CA server and contains an allowlist of other required hosts.
If the autosign.conf file is empty or doesn’t exist, the allowlist is effectively empty. The CA Puppet primary
server doesn’t autosign any certificates until the the autosign setting’s path is configured, or until the default
autosign.conf file is a non-executable allowlist file. This file must contain correctly formatted content or a
custom policy executable that the Puppet user has permission to run.
To explicitly disable autosigning, set autosign = false in the [server] section of the CA Puppet primary
server’s puppet.conf. This disables CA autosigning even if the autosign.conf file or a custom policy
executable exists.
For more information about the autosign setting in puppet.conf, see the configuration reference.
Naïve autosigning
Naïve autosigning causes the CA to autosign all CSRs.
To enable naïve autosigning, set autosign = true in the [server] section of the CA Puppet primary server’s
puppet.conf.
CAUTION: For security reasons, never use naïve autosigning in a production deployment. Naïve
autosigning is suitable only for temporary test deployments that are incapable of serving catalogs containing
sensitive information.
Basic autosigning (autosign.conf)
In basic autosigning, the CA uses a config file containing an allowlist of certificate names and domain name globs.
When a CSR arrives, the requested certificate name is checked against the allowlist file. If the name is present, or
covered by one of the domain name globs, the certificate is autosigned. If not, it's left for a manual review.
Enabling basic autosigning
The autosign.conf allowlist file’s location and contents are described in its documentation.
Puppet looks for autosign.conf at the path configured in the [autosign setting] within the [server]
section of puppet.conf. The default path is $confdir/autosign.conf, and the default confdir path
depends on your operating system. For more information, see the confdir documentation.
If the autosign.conf file pointed to by the autosign setting is a file that the Puppet user can execute, Puppet
instead attempts to run it as a custom policy executable, even if it contains a valid autosign.conf allowlist.
Note: In open source Puppet, no autosign.conf file exists by default. In Puppet Enterprise, the file exists by
default but might be empty. In both cases, the basic autosigning feature is technically enabled by default but doesn’t
autosign any certificates because the allowlist is effectively empty.
The CA Puppet primary server therefore doesn’t autosign any certificates until the autosign.conf file contains a
properly formatted allowlist or is a custom policy executable that the Puppet user has permission to run, or until the
autosign setting is pointed at an allowlist file with properly formatted content or a custom policy executable that
the Puppet user has permission to run.
Security implications of basic autosigning
Basic autosigning is insecure because any host can provide any certname when requesting a certificate. Use it only
when you fully trust any computer capable of connecting to the Puppet primary server.
With basic autosigning enabled, an attacker who guesses an unused certname allowed by autosign.conf can
obtain a signed agent certificate from the Puppet primary server. The attacker could then obtain a configuration
catalog, which can contain sensitive information depending on your deployment’s Puppet code and node
classification.
© 2024 Puppet, Inc., a Perforce company
Puppet | Platform components | 282
Policy-based autosigning
In policy-based autosigning, the CA runs an external policy executable every time it receives a CSR. This executable
examines the CSR and tells the CA whether the certificate is approved for autosigning. If the executable approves, the
certificate is autosigned; if not, it's left for manual review.
Enabling policy-based autosigning
To enable policy-based autosigning, set autosign = <policy executable file> in the [server]
section of the CA Puppet primary server’s puppet.conf.
The policy executable file must be executable by the same user as the Puppet primary server. If not, it is treated as a
certname allowlist file.
Custom policy executables
A custom policy executable can be written in any programming language; it just has to be executable in a *nix-like
environment. The Puppet primary server passes it the certname of the request (as a command line argument) and the
PEM-encoded CSR (on stdin), and expects a 0 (approved) or non-zero (rejected) exit code.
After it has the CSR, a policy executable can extract information from it and decide whether to approve the certificate
for autosigning. This is useful when you are provisioning your nodes and are embedding additional information in the
CSR.
If you aren’t embedding additional data, the CSR contains only the node’s certname and public key. This can still
provide more flexibility and security than autosign.conf, as the executable can do things like query your
provisioning system, CMDB, or cloud provider to make sure a node with that name was recently added.
Security implications of policy-based autosigning
Depending on how you manage the information the policy executable is using, policy-based autosigning can be fast
and extremely secure.
For example:
• If you embed a unique pre-shared key on each node you provision, and provide your policy executable with
a database of these keys, your autosigning security is as good as your handling of the keys. As long as it’s
impractical for an attacker to acquire a PSK, it's impractical for them to acquire a signed certificate.
• If nodes running on a cloud service embed their instance UUIDs in their CSRs, and your executable queries the
cloud provider’s API to check that a node's UUID exists in your account, your autosigning security is as good
as the security of the cloud provider’s API. If an attacker can impersonate a legit user to the API and get a list of
node UUIDs, or if they can create a rogue node in your account, they can acquire a signed certificate.
When designing your CSR data and signing policy, you must think things through carefully. If you can arrange
reasonable end-to-end security for secret data on your nodes, you can configure a secure autosigning system.
Policy executable API
The API for policy executables is as follows.
© 2024 Puppet, Inc., a Perforce company

Puppet | Platform components | 283
Run environment
• The executable runs one time for each incoming
CSR.
• It is executed by the Puppet primary server process
and runs as the same user as the Puppet primary
server.
• The Puppet primary server process is blocked until
the executable finishes running. We expect policy
executables to finish in a timely fashion; if they
do not, it’s possible for them to tie up all available
Puppet primary server threads and deny service
to other agents. If an executable needs to perform
network requests or other potentially expensive
operations, the author is in charge of implementing
any necessary timeouts, possibly bailing and exiting
non-zero in the event of failure.
Arguments
• The executable must allow a single command
line argument. This argument is the Subject CN
(certname) of the incoming CSR.
• No other command line arguments should be
provided.
• The Puppet primary server should never fail to
provide this argument.
Stdin
• The executable receives the entirety of the incoming
CSR on its stdin stream. The CSR is encoded in pem
format.
• The stdin stream contains nothing but the complete
CSR.
• The Puppet primary server should never fail to
provide the CSR on stdin.
Exit status
• The executable must exit with a status of 0 if the
certificate should be autosigned; it must exit with a
non-zero status if it should not be autosigned.
• The Puppet primary server treats all non-zero exit
statuses as equivalent.
© 2024 Puppet, Inc., a Perforce company

Puppet | Platform components | 284
Stdout and stderr
• Anything the executable emits on stdout or stderr is
copied to the Puppet Server log output at the debug
log level. Puppet otherwise ignores the executable’s
output; only the exit code is considered significant.
CSR attributes and certificate extensions
When Puppet agent nodes request their certificates, the certificate signing request (CSR) usually contains only their
certname and the necessary cryptographic information. Agents can also embed additional data in their CSR, useful for
policy-based autosigning and for adding new trusted facts.
Embedding additional data into CSRs is useful when:
• Large numbers of nodes are regularly created and destroyed as part of an elastic scaling system.
• You are willing to build custom tooling to make certificate autosigning more secure and useful.
It might also be useful in deployments where Puppet is used to deploy private keys or other sensitive information, and
you want extra control over nodes that receive this data.
If your deployment doesn’t match one of these descriptions, you might not need this feature.
Timing: When data can be added to CSRs and certificates
When Puppet agent starts the process of requesting a catalog, it checks whether it has a valid signed certificate. If
it does not, it generates a key pair, crafts a CSR, and submits it to the certificate authority (CA) Puppet Server. For
detailed information, see agent/server HTTPS traffic.
For practical purposes, a certificate is locked and immutable as soon as it is signed. For data to persist in the
certificate, it has to be added to the CSR before the CA signs the certificate.
This means any desired extra data must be present before Puppet agent attempts to request its catalog for the first
time.
Populate any extra data when provisioning the node. If you make an error, see the Troubleshooting section below for
information about recovering from failed data embedding.
Data location and format
Extra data for the CSR is read from the csr_attributes.yaml file in Puppet's confdir. The location of this
file can be changed with the csr_attributes configuration setting.
The csr_attributes.yaml file must contain a YAML hash with one or both of the following keys:
• custom_attributes
• extension_requests
The value of each key must also be a hash, where:
• Each key is a valid object identifier (OID) — Puppet-specific OIDscan optionally be referenced by short name
instead of by numeric ID.
• Each value is an object that can be cast to a string — numbers are allowed but arrays are not.
For information about how each hash is used and recommended OIDs for each hash, see the sections below.
Custom attributes (transient CSR data)
Custom attributes are pieces of data that are embedded only in the CSR. The CA can use them when deciding whether
to sign the certificate, but they are discarded after that and aren’t transferred to the final certificate.
Default behavior
The puppetserver ca list command doesn’t display custom attributes for pending CSRs, and basic
autosigning (autosign.conf) doesn’t check them before signing.
© 2024 Puppet, Inc., a Perforce company

Puppet | Platform components | 285
Configurable behavior
If you use policy-based autosigning your policy executable receives the complete CSR in PEM format. The
executable can extract and inspect the custom attributes, and use them to decide whether to sign the certificate.
The simplest method is to embed a pre-shared key of some kind in the custom attributes. A policy executable can
compare it to a list of known keys and autosign certificates for any pre-authorized nodes.
A more complex use might be to embed an instance-specific ID and write a policy executable that can check it against
a list of your recently requested instances on a public cloud, like EC2 or GCE.
Manually checking for custom attributes in CSRs
You can check for custom attributes by using OpenSSL to dump a CSR in pem format to text format, by running this
command:
openssl req -noout -text -in <name>.pem
In the output, look for the Attributes section which appears below the Subject Public Key Info block:
Attributes:
challengePassword :342thbjkt82094y0uthhor289jnqthpc2290
Recommended OIDs for attributes
Custom attributes can use any public or site-specific OID, with the exception of the OIDs used for core X.509
functionality. This means you can’t re-use existing OIDs for things like subject alternative names.
One useful OID is the challengePassword attribute — 1.2.840.113549.1.9.7. This is a rarely-used
corner of X.509 that can easily be repurposed to hold a pre-shared key. The benefit of using this instead of an
arbitrary OID is that it appears by name when using OpenSSL to dump the CSR to text; OIDs that openssl req
can’t recognize are displayed as numerical strings.
You can also use the Puppet-specific OIDs.
Extension requests (permanent certificate data)
Extension requests are pieces of data that are transferred as extensions to the final certificate, when the CA signs the
CSR. They persist as trusted, immutable data, that cannot be altered after the certificate is signed.
They can also be used by the CA when deciding whether or not to sign the certificate.
Default behavior
When signing a certificate, Puppet’s CA tools transfer any extension requests into the final certificate.
You can access certificate extensions in manifests as $trusted["extensions"]["<EXTENSION OID>"].
Select OIDs in the ppRegCertExt and ppAuthCertExt ranges. See the Puppet-specific Registered IDs. By default, any
other OIDs appear as plain dotted numbers, but you can use the custom_trusted_oid_mapping.yaml
file to assign short names to any other OIDs you use at your site. If you do, those OIDs appear in $trusted as their
short names, instead of their full numerical OID.
For more information about $trusted, see Facts and built-in variables.
The visibility of extensions is limited:
• The puppetserver ca list command does not display custom attributes for any pending CSRs, and basic
autosigning (autosign.conf) doesn’t check them before signing. Either use policy-based autosigning or
inspect CSRs manually with the openssl command (see below).
Puppet’s authorization system (auth.conf) does not use certificate extensions, but Puppet Server’s authorization
system, which is based on trapperkeeper-authorization, can use extensions in the ppAuthCertExt
OID range, and requires them for requests to write access rules.
© 2024 Puppet, Inc., a Perforce company

Puppet | Platform components | 286
Configurable behavior
If you use policy-based autosigning, your policy executable receives the complete CSR in pem format. The
executable can extract and inspect the extension requests, and use them when deciding whether to sign the certificate.
Manually checking for extensions in CSRs and certificates
You can check for extension requests in a CSR by running the OpenSSL command to dump a CSR in pem format to
text format:
openssl req -noout -text -in <name>.pem
In the output, look for a section called Requested Extensions, which appears below the Subject Public
Key Info and Attributes blocks:
Requested Extensions:
pp_uuid:
.$ED803750-E3C7-44F5-BB08-41A04433FE2E
1.3.6.1.4.1.34380.1.1.3:
..my_ami_image
1.3.6.1.4.1.34380.1.1.4:
.$342thbjkt82094y0uthhor289jnqthpc2290
Note: Every extension is preceded by any combination of two characters (.$ and .. in the example above) that
contain ASN.1 encoding information. Because OpenSSL is unaware of Puppet’s custom extensions OIDs, it’s unable
to properly display the values.
Any Puppet-specific OIDs (see below) appear as numeric strings when using OpenSSL.
You can check for extensions in a signed certificate by running:
/opt/puppetlabs/puppet/bin/openssl x509 -noout -text -in $(puppet config
print signeddir)/<certname>.pem
In the output, look for the X509v3 extensions section. Any of the Puppet-specific registered OIDs appear as
their descriptive names:
X509v3 extensions:
Netscape Comment:
Puppet Ruby/OpenSSL Internal Certificate
X509v3 Subject Key Identifier:
47:BC:D5:14:33:F2:ED:85:B9:52:FD:A2:EA:E4:CC:00:7F:7F:19:7E
Puppet Node UUID:
ED803750-E3C7-44F5-BB08-41A04433FE2E
X509v3 Extended Key Usage: critical
TLS Web Server Authentication, TLS Web Client Authentication
X509v3 Basic Constraints: critical
CA:FALSE
Puppet Node Preshared Key:
342thbjkt82094y0uthhor289jnqthpc2290
X509v3 Key Usage: critical
Digital Signature, Key Encipherment
Puppet Node Image Name:
my_ami_image
Recommended OIDs for extensions
Extension request OIDs must be under the ppRegCertExt (1.3.6.1.4.1.34380.1.1), ppPrivCertExt
(1.3.6.1.4.1.34380.1.2), or ppAuthCertExt (1.3.6.1.4.1.34380.1.3) OID arcs.
© 2024 Puppet, Inc., a Perforce company

Puppet | Platform components | 287
Puppet provides several registered OIDs (under ppRegCertExt) for the most common kinds of extension
information, a private OID range (ppPrivCertExt) for site-specific extension information, and an OID range for
safe authorization to Puppet Server (ppAuthCertExt).
There are several benefits to using the registered OIDs:
• You can reference them in the csr_attributes.yaml file with their short names instead of their numeric
IDs.
• You can access them in $trusted[extensions] with their short names instead of their numeric IDs.
• When using Puppet tools to print certificate info, they appear using their descriptive names instead of their
numeric IDs.
The private range is available for any information you want to embed into a certificate that isn’t widely used already.
It is completely unregulated, and its contents are expected to be different in every Puppet deployment.
You can use the custom_trusted_oid_mapping.yaml file to set short names for any private extension OIDs you use.
Note that this enables only the short names in the $trusted[extensions] hash.
Puppet-specific registered IDs
Granting administrative access to endpoints
Most of the endpoints require admin access. To grant admin access to the Puppet certificate authority API, on the
primary Puppet server, run the following command with the –ca-client flag:
puppetserver ca generate
By running this command, you generate a certificate with the pp_cli_auth extension, which grants admin access
to the Puppet certificate authority API.
ppRegCertExt
The ppRegCertExt OID range contains the following OIDs as reserved names to use as values when signing
trusted certificates:
Numeric ID Short name Descriptive name
1.3.6.1.4.1.34380.1.1.26 pp_owner Puppet node owner
1.3.6.1.4.1.34380.1.1.1 pp_uuid Puppet node UUID
1.3.6.1.4.1.34380.1.1.2 pp_instance_id Puppet node instance ID
1.3.6.1.4.1.34380.1.1.3 pp_image_name Puppet node image name
1.3.6.1.4.1.34380.1.1.4 pp_preshared_key Puppet node preshared key
1.3.6.1.4.1.34380.1.1.5 pp_cost_center Puppet node cost center name
1.3.6.1.4.1.34380.1.1.6 pp_product Puppet node product name
1.3.6.1.4.1.34380.1.1.7 pp_project Puppet node project name
1.3.6.1.4.1.34380.1.1.8 pp_application Puppet node application name
1.3.6.1.4.1.34380.1.1.9 pp_service Puppet node service name
1.3.6.1.4.1.34380.1.1.10 pp_employee Puppet node employee name
1.3.6.1.4.1.34380.1.1.11 pp_created_by Puppet node created_by tag
1.3.6.1.4.1.34380.1.1.12 pp_environment Puppet node environment name
1.3.6.1.4.1.34380.1.1.13 pp_role Puppet node role name
1.3.6.1.4.1.34380.1.1.14 pp_software_version Puppet node software version
© 2024 Puppet, Inc., a Perforce company

Puppet | Platform components | 288
Numeric ID Short name Descriptive name
1.3.6.1.4.1.34380.1.1.15 pp_department Puppet node department name
1.3.6.1.4.1.34380.1.1.16 pp_cluster Puppet node cluster name
1.3.6.1.4.1.34380.1.1.17 pp_provisioner Puppet node provisioner name
1.3.6.1.4.1.34380.1.1.18 pp_region Puppet node region name
1.3.6.1.4.1.34380.1.1.19 pp_datacenter Puppet node datacenter name
1.3.6.1.4.1.34380.1.1.20 pp_zone Puppet node zone name
1.3.6.1.4.1.34380.1.1.21 pp_network Puppet node network name
1.3.6.1.4.1.34380.1.1.22 pp_securitypolicy Puppet node security policy name
1.3.6.1.4.1.34380.1.1.23 pp_cloudplatform Puppet node cloud platform name
1.3.6.1.4.1.34380.1.1.24 pp_apptier Puppet node application tier
1.3.6.1.4.1.34380.1.1.25 pp_hostname Puppet node hostname
ppAuthCertExt
The ppAuthCertExt OID range contains the following OIDs:
Numeric ID Short name Descriptive name
1.3.6.1.4.1.34380.1.3.1 pp_authorization Certificate extension authorization
1.3.6.1.4.1.34380.1.3.13 pp_auth_role Puppet node role name for
authorization. For PE internal use
only.
Cloud provider attributes and extensions population example
To populate the csr_attributes.yaml file when you provision a node, use an automated script such as cloud-
init.
For example, when provisioning a new node from the AWS EC2 dashboard, enter the following script into the
Configure Instance Details —> Advanced Details section:
#!/bin/sh
if [ ! -d /etc/puppetlabs/puppet ]; then
mkdir /etc/puppetlabs/puppet
fi
cat > /etc/puppetlabs/puppet/csr_attributes.yaml << YAML
custom_attributes:
1.2.840.113549.1.9.7: mySuperAwesomePassword
extension_requests:
pp_instance_id: $(curl -s http://169.254.169.254/latest/meta-data/
instance-id)
pp_image_name: $(curl -s http://169.254.169.254/latest/meta-data/ami-
id)
YAML
This populates the attributes file with the AWS instance ID, image name, and a pre-shared key to use with policy-
based autosigning.
© 2024 Puppet, Inc., a Perforce company

Puppet | Platform components | 289
Troubleshooting
Recovering from failed data embedding
When testing this feature for the first time, you might not embed the right information in a CSR, or certificate, and
might want to start over for your test nodes. This is not really a problem after your provisioning system is changed to
populate the data, but it can easily happen when doing things manually.
To start over, do the following.
On the test node:
• Turn off Puppet agent, if it’s running.
• If using Puppet version 6.0.3 or greater, run puppet ssl clean. If not, delete the following files:
• $ssldir/certificate_requests/<name>.pem
• $ssldir/certs/<name>.pem
On the CA primary Puppet server:
• Check whether a signed certificate exists. Use puppetserver ca list --all to see the complete list. If it
exists, revoke and delete it with puppetserver ca clean --certname <name>.
After you’ve done that, you can start over.
Regenerating certificates in a Puppet deployment
In some cases, you might need to regenerate the certificates and security credentials (private and public keys) that are
generated by Puppet’s built-in PKI systems.
For example, you might have a Puppet primary server you need to move to a different network in your infrastructure,
or you might have experienced a security vulnerability that makes existing credentials untrustworthy.
Tip: There are other, more automated ways of doing this. We recommend using Bolt to regenerate certs when
needed. See the Bolt documentation for more information. There is also a supported ca_extend module, which you
can use to extend the expiry date of a certificate authority (CA).
Important: The information on this page describes the steps for regenerating certs in an open source Puppet
deployment. If you use Puppet Enterprise do not use the information on this page, as it leaves you with an incomplete
replacement and non-functional deployment. Instead, PE customers must refer to one of the following pages:
• Regenerating certificatesPE deployments
If your goal is to... Do this...
Regenerate an agent’s certificate
Clear and regenerate certs for Puppet agents
Fix a compromised or damaged certificate authority
Regenerate the CA and all certificates
Completely regenerate all Puppet deployment certificates
Regenerate the CA and all certificates
Add DNS alt-names or other certificate extensions to
your existing Puppet primary server
Regenerate the agent certificate of your Puppet primary
server and add DNS alt-names or other certificates
© 2024 Puppet, Inc., a Perforce company

Puppet | Platform components | 290
Regenerate the agent certificate of your Puppet primary server and add DNS alt-names or other
certificate extensions
This option preserves the primary server/agent relationship and lets you add DNS alt-names or certificate extensions
to your existing primary server.
1.
Revoke the Puppet primary server’s certificate and clean the CA files pertaining to it. Note that the agents won’t
be able to connect to the primary server until all of the following steps are finished.
puppetserver ca clean --certname <CERTNAME_OF_YOUR_SERVER>
2.
Remove the agent-specific copy of the public key, private key, and certificate-signing request pertaining to the
certificate:
puppet ssl clean
3.
Stop the Puppet primary server service:
puppet resource service puppetserver ensure=stopped
Note: The CA and server run in the same primary server so this also stops the CA.
4.
After you’ve stopped the primary server and CA service, create a certificate signed by the CA and add DNS alt
names (comma separated):
puppetserver ca generate --certname <CERTNAME> --subject-alt-names <DNS
ALT NAMES> --ca-client
Note:
• If you don’t want to add DNS alt names to your primary server, omit the --subject-alt-names <DNS
ALT NAMES> option from the command above.
• Although this particular use of the generate command requires you to stop puppetserver service, all
other uses of this command require the service to be running.
• If the tool cannot determine the status of the server, but you know the server is offline, you can use the --
force option to run the command without checking server status.
5.
Restart the Puppet primary server service:
puppet resource service puppetserver ensure=running
Regenerate the CA and all certificates
CAUTION: This process destroys the certificate authority and all other certificates. It is meant for use in
the event of a total compromise of your site, or some other unusual circumstance. If you want to preserve the
primary server/agent relationship, regenerate the agent certificate of your Puppet primary server. If you just
need to replace a few agent certificates, clear and regenerate certs for Puppet agents.
Step 1: Clear and regenerate certs on your primary Puppet server
On the primary server hosting the CA:
1.
Back up the SSL directory, which is in /etc/puppetlabs/puppet/ssl/. If something goes wrong, you
can restore this directory so your deployment can stay functional. However, if you needed to regenerate your certs
for security reasons and couldn’t, get some assistance as soon as possible so you can keep your site secure.
2.
Stop the agent service:
sudo puppet resource service puppet ensure=stopped
© 2024 Puppet, Inc., a Perforce company

Puppet | Platform components | 291
3.
Stop the primary server service.
For Puppet Server, run:
sudo puppet resource service puppetserver ensure=stopped
4.
Delete the SSL directory:
sudo rm -r /etc/puppetlabs/puppet/ssl
5.
Regenerate the CA and primary server's cert:
sudo puppetserver ca setup
You will see this message: Notice: Signed certificate request for ca.
6.
Start the primary server service by running:
sudo puppet resource service puppetserver ensure=running
7.
Start the Puppet agent service by running this command:
sudo puppet resource service puppet ensure=running
At this point:
• You have a new CA certificate and key.
• Your primary server has a certificate from the new CA, and it can field new certificate requests.
• The primary server rejects any requests for configuration catalogs from nodes that haven’t replaced their
certificates. At this point, it is all of them except itself.
• When using any extensions that rely on Puppet certificates, like PuppetDB, the primary server won’t be able to
communicate with them. Consequently, it might not be able to serve catalogs, even to agents that do have new
certificates.
Step 2: Clear and regenerate certs for any extension
You might be using an extension, like PuppetDB or MCollective, to enhance Puppet. These extensions probably use
certificates from Puppet’s CA in order to communicate securely with the primary Puppet server. For each extension
like this, you’ll need to regenerate the certificates it uses.
Many tools have scripts or documentation to help you set up SSL, and you can often just re-run the setup instructions.
PuppetDB
We recommend PuppetDB users first follow the instructions in Step 3: Clear and regenerate certs for agents, below,
because PuppetDB re-uses Puppet agents’ certificates. After that, restart the PuppetDB service. See Redo SSL setup
after changing certificates for more information.
Step 3: Clear and regenerate certs for Puppet agents
To replace the certs on agents, you’ll need to log into each agent node and do the following steps.
1.
Stop the agent service. On *nix:
sudo puppet resource service puppet ensure=stopped
On Windows, with Administrator privileges:
puppet resource service puppet ensure=stopped
2.
Locate Puppet’s SSL directory and delete its contents.
The SSL directory can be determined by running puppet config print ssldir --section agent
© 2024 Puppet, Inc., a Perforce company

Puppet | Platform components | 292
3.
Restart the agent service. On *nix:
sudo puppet resource service puppet ensure=running
On Windows, with Administrator privileges:
puppet resource service puppet ensure=running
When the agent starts, it generates keys and requests a new certificate from the CA primary server.
4.
If you are not using autosigning, log in to the CA primary server and sign each agent node’s certificate request.
To view pending requests, run:
sudo puppetserver ca list
To sign requests, run:
sudo puppetserver ca sign --certname <NAME>
After an agent node’s new certificate is signed, it's retrieved within a few minutes and a Puppet run starts.
After you have regenerated all agents’ certificates, everything will be fully functional under the new CA.
Note: You can achieve the same results by turning these steps into Bolt tasks or plans. See the Bolt documentation
for more information.
External CA
This information describes the supported and tested configurations for external CAs in this version of Puppet. If you
have an external CA use case that isn’t listed here, contact Puppet so we can learn more about it.
Supported external CA configurations
This version of Puppet supports some external CA configurations, however not every possible configuration is
supported.
We fully support the following setup options:
• Single CA which directly issues SSL certificates.
• Puppet Server functioning as an intermediate CA.
Fully supported by Puppet means:
• If issues arise that are considered bugs, we'll fix them as soon as possible.
• If issues arise in any other external CA setup that are considered feature requests, we’ll consider whether to
expand our support.
Option 1: Puppet Server functioning as an intermediate CA
Puppet Server can operate as an intermediate CA to an external root CA.
See Using Puppet Server as an intermediate certificate authority.
© 2024 Puppet, Inc., a Perforce company

Puppet | Platform components | 293
Option 2: Single CA
When Puppet uses its internal CA, it defaults to a single CA configuration. A single externally issued CA can also be
used in a similar manner.
This is an all or nothing configuration rather than a mix-and-match. When using an external CA, the built-in Puppet
CA service must be disabled and cannot be used to issue SSL certificates.
Note: Puppet cannot automatically distribute certificates in this configuration.
Puppet Server
Configure Puppet Server in three steps:
• Disable the internal CA service.
• Ensure that the certname does not change.
• Put certificates and keys in place on disk.
1.
Edit the Puppet Server/etc/puppetlabs/puppetserver/services.d/ca.cfg file:
a) To disable the internal CA, comment out puppetlabs.services.ca.certificate-
authority-service/certificate-authority-service and uncomment
puppetlabs.services.ca.certificate-authority-disabled-service/certificate-
authority-disabled-service.
2.
Set a static value for the certname setting in puppet.conf:
[server]
certname = puppetserver.example.com
Setting a static value prevents any confusion if the machine's hostname changes. The value must match the
certname you’ll use to issue the server's certificate, and it must not be blank.
© 2024 Puppet, Inc., a Perforce company

Puppet | Platform components | 294
3.
Put the credentials from your external CA on disk in the correct locations. These locations must match what’s
configured in your webserver.conf file.
If you haven’t changed those settings, run the following commands to find the default locations.
Credential File location
Server SSL certificate puppet config print hostcert --
section server
Server SSL certificate private key puppet config print hostprivkey --
section server
Root CA certificate puppet config print localcacert --
section server
Root certificate revocation list puppet config print hostcrl --section
server
If you’ve put the credentials in the correct locations, you don't need to change any additional settings.
Puppet agent
You don’t need to change any settings. Put the external credentials into the correct filesystem locations. You can run
the following commands to find the appropriate locations.
Credential File location
Agent SSL certificate puppet config print hostcert --section
agent
Agent SSL certificate private key puppet config print hostprivkey --
section agent
Root CA certificate puppet config print localcacert --
section agent
Root certificate revocation list puppet config print hostcrl --section
agent
General notes and requirements
PEM encoding of credentials is mandatory
Puppet expects its SSL credentials to be in .pem format.
Normal Puppet certificate requirements still apply
Any Puppet Server certificate must contain the DNS name, either as the Subject Common Name (CN) or as a Subject
Alternative Name (SAN), that agent nodes use to attempt contact with the server.
Client DN authentication
Puppet Server is hosted by a Jetty web server; therefore. For client authentication purposes, Puppet Server can extract
the distinguished name (DN) from a client certificate provided during SSL negotiation with the Jetty web server.
The use of an X-Client-DN request header is supported for cases where SSL termination of client requests needs
to be done on an external server. See External SSL Termination with Puppet Server for details.
Web server configuration
Use the webserver.conf file for Puppet Server to configure Jetty. Several ssl- settings can be added to the
webserver.conf file to enable the web server to use the correct SSL configuration:
© 2024 Puppet, Inc., a Perforce company

Puppet | Platform components | 295
• ssl-cert: The value of puppet server --configprint hostcert. Equivalent to the
‘SSLCertificateFile’ Apache config setting.
• ssl-key: The value of puppet server --configprint hostprivkey. Equivalent to the
‘SSLCertificateKeyFile’ Apache config setting.
• ssl-ca-cert: The value of puppet server --configprint localcacert. Equivalent to the
‘SSLCACertificateFile’ Apache config setting.
• ssl-cert-chain: Equivalent to the ‘SSLCertificateChainFile’ Apache config setting. Optional.
• ssl-crl-path: The path to the CRL file to use. Optional.
An example webserver.conf file might look something like this:
webserver: {
client-auth : want
ssl-host : 0.0.0.0
ssl-port : 8140
ssl-cert : /path/to/server.pem
ssl-key : /path/to/server.key
ssl-ca-cert : /path/to/ca_bundle.pem
ssl-cert-chain : /path/to/ca_bundle.pem
ssl-crl-path : /etc/puppetlabs/puppet/ssl/crl.pem
}
For more information on these settings, seeConfiguring the Web Server Service.
Restart required
After the above changes are made to Puppet Server’s configuration files, you’ll have to restart the Puppet Server
service for the new settings to take effect.
External SSL termination
Use the following steps to configure external SSL termination.
Disable HTTPS for Puppet Server
You'll need to turn off SSL and have Puppet Server use the HTTP protocol instead: remove the ssl-port and
ssl-host settings from the conf.d/webserver.conf file and replace them with port and host settings.
See Configuring the Webserver Service for more information on configuring the web server service.
Allow Client Cert Data From HTTP Headers
When using external SSL termination, Puppet Server expects to receive client certificate information via some HTTP
headers.
By default, reading this data from headers is disabled. To allow Puppet Server to recognize it, you'll need to set
allow-header-cert-info: true in the authorization config section of the /etc/puppetlabs/
puppetserver/conf.d/auth.conf file.
See Configuring Puppet Server on page 157 for more information on the puppetserver.conf and
auth.conf files.
Note: This assumes the default behavior of Puppet 5 and greater of using Puppet Server's hocon auth.conf rather
Puppet's older ini-style auth.conf.
WARNING: Setting allow-header-cert-info to 'true' puts Puppet Server in an incredibly
vulnerable state. Take extra caution to ensure it is absolutely not reachable by an untrusted network.
With allow-header-cert-info set to 'true', authorization code will use only the client HTTP
header values---not an SSL-layer client certificate---to determine the client subject name, authentication
status, and trusted facts. This is true even if the web server is hosting an HTTPS connection. This applies
to validation of the client via rules in the auth.conf file and any trusted facts extracted from certificate
extensions.
© 2024 Puppet, Inc., a Perforce company

Puppet | Platform components | 296
If the client-auth setting in the webserver config block is set to need or want, the Jetty web
server will still validate the client certificate against a certificate authority store, but it will only verify the
SSL-layer client certificate---not a certificate in an X-Client-Cert header.
Reload Puppet Server
You'll need to reload Puppet Server for the configuration changes to take effect.
Configure SSL Terminating Proxy to Set HTTP Headers
The device that terminates SSL for Puppet Server must extract information from the client's certificate and insert that
information into three HTTP headers. See the documentation for your SSL terminator for details.
The headers you'll need to set are X-Client-Verify, X-Client-DN, and X-Client-Cert.
X-Client-Verify
Mandatory. Must be either SUCCESS if the certificate was validated, or something else if not. (The convention
seems to be to use NONE for when a certificate wasn't presented, and FAILED:reason for other validation
failures.) Puppet Server uses this to authorize requests; only requests with a value of SUCCESS will be considered
authenticated.
X-Client-DN
Mandatory. Must be the Subject DN of the agent's certificate, if a certificate was presented. Puppet Server uses this to
authorize requests.
X-Client-Cert
Optional. Should contain the client's PEM-formatted (Base-64) certificate (if a certificate was presented) in a single
URI-encoded string. Note that URL encoding is not sufficient; all space characters must be encoded as %20 and not +
characters.
Note: Puppet Server only uses the value of this header to extract trusted facts from extensions in the client
certificate. If you aren't using trusted facts, you can choose to reduce the size of the request payload by
omitting the X-Client-Cert header.
Note: Apache's mod_proxy converts line breaks in PEM documents to spaces for some reason, and
Puppet Server can't decode the result. We're tracking this issue as SERVER-217.
Facter
Facter is Puppet’s cross-platform system profiling library. It discovers and reports per-node facts, which are available
in your Puppet manifests as variables.
Facter is published as a gem to https://rubygems.org/. If you've already got Ruby installed, you can install Facter by
running:
gem install facter
• Facter: CLI on page 297
• Facter: Core Facts on page 300
© 2024 Puppet, Inc., a Perforce company

Puppet | Platform components | 297
• Custom facts overview on page 325
You can add custom facts by writing snippets of Ruby code on the primary Puppet server. Puppet then uses plug-ins
in modules to distribute the facts to the client.
• Writing custom facts on page 331
A typical fact in Facter is an collection of several elements, and is written either as a simple value (“flat” fact) or as
structured data (“structured” fact). This page shows you how to write and format facts correctly.
• External facts on page 336
External facts provide a way to use arbitrary executables or scripts as facts, or set facts statically with structured data.
With this information, you can write a custom fact in Perl, C, or a one-line text file.
• Configuring Facter with facter.conf on page 339
The facter.conf file is a configuration file that allows you to cache and block fact groups and facts, and manage
how Facter interacts with your system. There are four sections: facts, global, cli and fact-groups. All
sections are optional and can be listed in any order within the file.
Facter: CLI
NOTE: This page was generated from the Puppet source code on 2022-02-07 10:06:49 -0800
SYNOPSIS
facter [options] [query] [query] [...]
DESCRIPTION
Collect and display facts about the current system. The library behind Facter is easy to extend, making Facter an easy
way to collect information about a system.
If no queries are given, then all facts will be returned.
Many of the command line options can also be set via the HOCON config file. This file can also be used to block or
cache certain fact groups.
OPTIONS
• --color:
Enable color output.
• --no-color:
Disable color output.
• -c, --config:
The location of the config file.
• --custom-dir:
A directory to use for custom facts.
• -d, --debug:
Enable debug output.
• --external-dir:
A directory to use for external facts.
• --hocon:
Output in Hocon format.
• -j, --json:
Output in JSON format.
• -l, --log-level:
Set logging level. Supported levels are: none, trace, debug, info, warn, error, and fatal.
© 2024 Puppet, Inc., a Perforce company
Puppet | Platform components | 298
• --no-block:
Disable fact blocking.
• --no-cache:
Disable loading and refreshing facts from the cache
• --no-custom-facts:
Disable custom facts.
• --no-external-facts:
Disable external facts.
• --no-ruby:
Disable loading Ruby, facts requiring Ruby, and custom facts.
• --trace:
Enable backtraces for custom facts.
• --verbose:
Enable verbose (info) output.
• --show-legacy:
Show legacy facts when querying all facts.
• -y, --yaml:
Output in YAML format.
• --strict:
Enable more aggressive error reporting.
• -t, --timing:
Show how much time it took to resolve each fact
• --sequential:
Resolve facts sequentially
• --http-debug:
Whether to write HTTP request and responses to stderr. This should never be used in production.
• -p, --puppet:
Load the Puppet libraries, thus allowing Facter to load Puppet-specific facts.
• --version, -v:
Print the version
• --list-block-groups:
List block groups
• --list-cache-groups:
List cache groups
• --help, -h:
Help for all arguments
FILES
/etc/puppetlabs/facter/facter.conf
A HOCON config file that can be used to specify directories for custom and external facts, set various command line
options, and specify facts to block. See example below for details, or visit the GitHub README.
© 2024 Puppet, Inc., a Perforce company

Puppet | Platform components | 299
EXAMPLES
Display all facts:
$ facter
disks => {
sda => {
model => "Virtual disk",
size => "8.00 GiB",
size_bytes => 8589934592,
vendor => "ExampleVendor"
}
}
dmi => {
bios => {
release_date => "06/23/2013",
vendor => "Example Vendor",
version => "6.00"
}
}
[...]
Display a single structured fact:
$ facter processors
{
count => 2,
isa => "x86_64",
models => [
"Intel(R) Xeon(R) CPU E5-2680 v2 @ 2.80GHz",
"Intel(R) Xeon(R) CPU E5-2680 v2 @ 2.80GHz"
],
physicalcount => 2
}
Display a single fact nested within a structured fact:
$ facter processors.isa
x86_64
Display a single legacy fact. Note that non-structured facts existing in previous versions of Facter are still available,
but are not displayed by default due to redundancy with newer structured facts:
$ facter processorcount
2
Format facts as JSON:
$ facter --json os.name os.release.major processors.isa
{
"os.name": "Ubuntu",
"os.release.major": "14.04",
"processors.isa": "x86_64"
}
An example config file.
# always loaded (CLI and as Ruby module)
global : {
external-dir : "~/external/facts",
custom-dir : [
© 2024 Puppet, Inc., a Perforce company

Puppet | Platform components | 300
"~/custom/facts",
"~/custom/facts/more-facts"
],
no-external-facts : false,
no-custom-facts : false,
no-ruby : false
}
# loaded when running from the command line
cli : {
debug : false,
trace : true,
verbose : false,
log-level : "info"
}
# always loaded, fact-specific configuration
facts : {
# for valid blocklist entries, use --list-block-groups
blocklist : [ "file system", "EC2" ],
# for valid time-to-live entries, use --list-cache-groups
ttls : [ { "timezone" : 30 days } ]
}
Facter: Core Facts
NOTE: This page was generated from the Puppet source code on 2022-02-07 10:06:14 -0800
This is a list of all of the built-in facts that ship with Facter, which includes both legacy facts and newer structured
facts.
Not all of them apply to every system, and your site might also use Custom facts overview on page 325 delivered
via Puppet modules. To see the full list of structured facts and values on a given system (including plugin facts), run
puppet facts at the command line. If you are using Puppet Enterprise, you can view all of the facts for any node
on the node's page in the console.
You can access facts in your Puppet manifests as $facts[fact_name]. For more information, see Facts and
built-in variables on page 792
Legacy Facts Note: As of Facter 3, legacy facts such as architecture are hidden by default to reduce
noise in Facter's default command-line output. These older facts are now part of more useful structured
facts; for example, architecture is now part of the os fact and accessible as os.architecture.
You can still use these legacy facts in Puppet manifests ($architecture), request them on the
command line (facter architecture), and view them alongside structured facts (facter --
show-legacy). Legacy facts are excluded by default.
Modern Facts
aio_agent_version
Type: string
Purpose:
Return the version of the puppet-agent package that installed facter.
augeas
Type: map
Purpose:
Return information about augeas.
Elements:
• version (string) --- The version of augparse.
© 2024 Puppet, Inc., a Perforce company
Puppet | Platform components | 301
az_metadata
Type: map
Purpose:
Return the Microsoft Azure instance metadata. Please see the Microsoft Azure instance metadata documentation for
the contents of this fact.
cloud
Type: map
Purpose:
Information about the cloud instance of the node. This is currently populated on nodes running in Amazon AWS,
Google GCP, and Microsoft Azure.
Elements:
• provider (string) --- The cloud provider for the node.
disks
Type: map
Purpose:
Return the disk (block) devices attached to the system.
Elements:
• <devicename> (map) --- Represents a disk or block device.
• model (string) --- The model of the disk or block device.
• product (string) --- The product name of the disk or block device.
• serial_number (string) --- The serial number of the disk or block device.
• size (string) --- The display size of the disk or block device, such as "1 GiB".
• size_bytes (integer) --- The size of the disk or block device, in bytes.
• vendor (string) --- The vendor of the disk or block device.
• type (string) --- The type of disk or block device (sshd or hdd). This fact is available only on Linux.
dmi
Type: map
Purpose:
Return the system management information.
Elements:
• bios (map) --- The system BIOS information.
• release_date (string) --- The release date of the system BIOS.
• vendor (string) --- The vendor of the system BIOS.
• version (string) --- The version of the system BIOS.
• board (map) --- The system board information.
• asset_tag (string) --- The asset tag of the system board.
• manufacturer (string) --- The manufacturer of the system board.
• product (string) --- The product name of the system board.
• serial_number (string) --- The serial number of the system board.
• chassis (map) --- The system chassis information.
• asset_tag (string) --- The asset tag of the system chassis.
• type (string) --- The type of the system chassis.
© 2024 Puppet, Inc., a Perforce company
Puppet | Platform components | 302
• manufacturer (string) --- The system manufacturer.
• product (map) --- The system product information.
• name (string) --- The product name of the system.
• serial_number (string) --- The product serial number of the system.
• uuid (string) --- The product unique identifier of the system.
ec2_metadata
Type: map
Purpose:
Return the Amazon Elastic Compute Cloud (EC2) instance metadata. Please see the EC2 instance metadata
documentation for the contents of this fact.
ec2_userdata
Type: string
Purpose:
Return the Amazon Elastic Compute Cloud (EC2) instance user data. Please see the EC2 instance user data
documentation for the contents of this fact.
env_windows_installdir
Type: string
Purpose:
Return the path of the directory in which Puppet was installed.
facterversion
Type: string
Purpose:
Return the version of facter.
filesystems
Type: string
Purpose:
Return the usable file systems for block or disk devices.
fips_enabled
Type: boolean
Purpose:
Return whether the platform is in FIPS mode
Details:
Only available on Windows and Redhat linux family
gce
Type: map
Purpose:
Return the Google Compute Engine (GCE) metadata. Please see the GCE metadata documentation for the contents of
this fact.
© 2024 Puppet, Inc., a Perforce company
Puppet | Platform components | 303
hypervisors
Type: map
Purpose:
Experimental fact: Return the names of any detected hypervisors and any collected metadata about them.
identity
Type: map
Purpose:
Return the identity information of the user running facter.
Elements:
• gid (integer) --- The group identifier of the user running facter.
• group (string) --- The group name of the user running facter.
• uid (integer) --- The user identifier of the user running facter.
• user (string) --- The user name of the user running facter.
• privileged (boolean) --- True if facter is running as a privileged process or false if not.
is_virtual
Type: boolean
Purpose:
Return whether or not the host is a virtual machine.
kernel
Type: string
Purpose:
Return the kernel's name.
kernelmajversion
Type: string
Purpose:
Return the kernel's major version.
kernelrelease
Type: string
Purpose:
Return the kernel's release.
kernelversion
Type: string
Purpose:
Return the kernel's version.
ldom
Type: map
Purpose:
Return Solaris LDom information from the virtinfo utility.
© 2024 Puppet, Inc., a Perforce company
Puppet | Platform components | 304
load_averages
Type: map
Purpose:
Return the load average over the last 1, 5 and 15 minutes.
Elements:
• 1m (double) --- The system load average over the last minute.
• 5m (double) --- The system load average over the last 5 minutes.
• 15m (double) --- The system load average over the last 15 minutes.
memory
Type: map
Purpose:
Return the system memory information.
Elements:
• swap (map) --- Represents information about swap memory.
• available (string) --- The display size of the available amount of swap memory, such as "1 GiB".
• available_bytes (integer) --- The size of the available amount of swap memory, in bytes.
• capacity (string) --- The capacity percentage (0% is empty, 100% is full).
• encrypted (boolean) --- True if the swap is encrypted or false if not.
• total (string) --- The display size of the total amount of swap memory, such as "1 GiB".
• total_bytes (integer) --- The size of the total amount of swap memory, in bytes.
• used (string) --- The display size of the used amount of swap memory, such as "1 GiB".
• used_bytes (integer) --- The size of the used amount of swap memory, in bytes.
• system (map) --- Represents information about system memory.
• available (string) --- The display size of the available amount of system memory, such as "1 GiB".
• available_bytes (integer) --- The size of the available amount of system memory, in bytes.
• capacity (string) --- The capacity percentage (0% is empty, 100% is full).
• total (string) --- The display size of the total amount of system memory, such as "1 GiB".
• total_bytes (integer) --- The size of the total amount of system memory, in bytes.
• used (string) --- The display size of the used amount of system memory, such as "1 GiB".
• used_bytes (integer) --- The size of the used amount of system memory, in bytes.
mountpoints
Type: map
Purpose:
Return the current mount points of the system.
Elements:
© 2024 Puppet, Inc., a Perforce company
Puppet | Platform components | 305
• <mountpoint> (map) --- Represents a mount point.
• available (string) --- The display size of the available space, such as "1 GiB".
• available_bytes (integer) --- The size of the available space, in bytes.
• capacity (string) --- The capacity percentage (0% is empty, 100% is full).
• device (string) --- The name of the mounted device.
• filesystem (string) --- The file system of the mounted device.
• options (array) --- The mount options.
• size (string) --- The display size of the total space, such as "1 GiB".
• size_bytes (integer) --- The size of the total space, in bytes.
• used (string) --- The display size of the used space, such as "1 GiB".
• used_bytes (integer) --- The size of the used space, in bytes.
networking
Type: map
Purpose:
Return the networking information for the system.
Elements:
• dhcp (ip) --- The address of the DHCP server for the default interface.
• domain (string) --- The domain name of the system.
• fqdn (string) --- The fully-qualified domain name of the system.
• hostname (string) --- The host name of the system.
• interfaces (map) --- The network interfaces of the system.
• <interface> (map) --- Represents a network interface.
• bindings (array) --- The array of IPv4 address bindings for the interface.
• bindings6 (array) --- The array of IPv6 address bindings for the interface.
• dhcp (ip) --- The DHCP server for the network interface.
• ip (ip) --- The IPv4 address for the network interface.
• ip6 (ip6) --- The IPv6 address for the network interface.
• mac (mac) --- The MAC address for the network interface.
• mtu (integer) --- The Maximum Transmission Unit (MTU) for the network interface.
• netmask (ip) --- The IPv4 netmask for the network interface.
• netmask6 (ip6) --- The IPv6 netmask for the network interface.
• network (ip) --- The IPv4 network for the network interface.
• network6 (ip6) --- The IPv6 network for the network interface.
• scope6 (string) --- The IPv6 scope for the network interface.
• ip (ip) --- The IPv4 address of the default network interface.
• ip6 (ip6) --- The IPv6 address of the default network interface.
• mac (mac) --- The MAC address of the default network interface.
• mtu (integer) --- The Maximum Transmission Unit (MTU) of the default network interface.
• netmask (ip) --- The IPv4 netmask of the default network interface.
• netmask6 (ip6) --- The IPv6 netmask of the default network interface.
• network (ip) --- The IPv4 network of the default network interface.
• network6 (ip6) --- The IPv6 network of the default network interface.
• primary (string) --- The name of the primary interface.
• scope6 (string) --- The IPv6 scope of the default network interface.
os
Type: map
© 2024 Puppet, Inc., a Perforce company
Puppet | Platform components | 306
Purpose:
Return information about the host operating system.
Elements:
• architecture (string) --- The operating system's hardware architecture.
• distro (map) --- Represents information about a Linux distribution.
• codename (string) --- The code name of the Linux distribution.
• description (string) --- The description of the Linux distribution.
• id (string) --- The identifier of the Linux distribution.
• release (map) --- Represents information about a Linux distribution release.
• full (string) --- The full release of the Linux distribution.
• major (string) --- The major release of the Linux distribution.
• minor (string) --- The minor release of the Linux distribution.
• specification (string) --- The Linux Standard Base (LSB) release specification.
• family (string) --- The operating system family.
• hardware (string) --- The operating system's hardware model.
• macosx (map) --- Represents information about Mac OSX.
• build (string) --- The Mac OSX build version.
• product (string) --- The Mac OSX product name.
• version (map) --- Represents information about the Mac OSX version.
• full (string) --- The full Mac OSX version number.
• major (string) --- The major Mac OSX version number.
• minor (string) --- The minor Mac OSX version number.
• patch (string) --- The patch Mac OSX version number.
• name (string) --- The operating system's name.
• release (map) --- Represents the operating system's release.
• full (string) --- The full operating system release.
• major (string) --- The major release of the operating system.
• minor (string) --- The minor release of the operating system.
• patchlevel (string) --- The patchlevel of the operating system.
• branch (string) --- The branch the operating system was cut from.
• selinux (map) --- Represents information about Security-Enhanced Linux (SELinux).
• config_mode (string) --- The configured SELinux mode.
• config_policy (string) --- The configured SELinux policy.
• current_mode (string) --- The current SELinux mode.
• enabled (boolean) --- True if SELinux is enabled or false if not.
• enforced (boolean) --- True if SELinux policy is enforced or false if not.
• policy_version (string) --- The version of the SELinux policy.
• windows (map) --- Represents information about Windows.
• edition_id (string) --- Specify the edition variant. (ServerStandard|Professional|Enterprise)
• installation_type (string) --- Specify the installation type. (Server|Server Core|Client)
• product_name (string) --- Specify the textual product name.
• release_id (string) --- Windows Build Version of the form YYMM.
• system32 (string) --- The path to the System32 directory.
partitions
Type: map
Purpose:
© 2024 Puppet, Inc., a Perforce company
Puppet | Platform components | 307
Return the disk partitions of the system.
Elements:
• <partition> (map) --- Represents a disk partition.
• filesystem (string) --- The file system of the partition.
• label (string) --- The label of the partition.
• mount (string) --- The mount point of the partition (if mounted).
• partlabel (string) --- The label of a GPT partition.
• partuuid (string) --- The unique identifier of a GPT partition.
• size (string) --- The display size of the partition, such as "1 GiB".
• size_bytes (integer) --- The size of the partition, in bytes.
• uuid (string) --- The unique identifier of a partition.
• backing_file (string) --- The path to the file backing the partition.
path
Type: string
Purpose:
Return the PATH environment variable.
processors
Type: map
Purpose:
Return information about the system's processors.
Elements:
• count (integer) --- The count of logical processors.
• isa (string) --- The processor instruction set architecture.
• models (array) --- The processor model strings (one for each logical processor).
• physicalcount (integer) --- The count of physical processors.
• speed (string) --- The speed of the processors, such as "2.0 GHz".
• cores (integer) --- The number of cores per processor socket.
• threads (integer) --- The number of threads per processor core.
ruby
Type: map
Purpose:
Return information about the Ruby loaded by facter.
Elements:
• platform (string) --- The platform Ruby was built for.
• sitedir (string) --- The path to Ruby's site library directory.
• version (string) --- The version of Ruby.
solaris_zones
Type: map
Purpose:
Return information about Solaris zones.
Elements:
• current (string) --- The name of the current Solaris zone.
© 2024 Puppet, Inc., a Perforce company
Puppet | Platform components | 308
• zones (map) --- Represents the Solaris zones.
• <zonename> (map) --- Represents a Solaris zone.
• brand (string) --- The brand of the Solaris zone.
• id (string) --- The id of the Solaris zone.
• ip_type (string) --- The IP type of the Solaris zone.
• path (string) --- The path of the Solaris zone.
• status (string) --- The status of the Solaris zone.
• uuid (string) --- The unique identifier of the Solaris zone.
ssh
Type: map
Purpose:
Return SSH public keys and fingerprints.
Elements:
• dsa (map) --- Represents the public key and fingerprints for the DSA algorithm.
• fingerprints (map) --- Represents fingerprint information.
• sha1 (string) --- The SHA1 fingerprint of the public key.
• sha256 (string) --- The SHA256 fingerprint of the public key.
• key (string) --- The DSA public key.
• type (string) --- The exact type of the key, i.e. "ssh-dss".
• ecdsa (map) --- Represents the public key and fingerprints for the ECDSA algorithm.
• fingerprints (map) --- Represents fingerprint information.
• sha1 (string) --- The SHA1 fingerprint of the public key.
• sha256 (string) --- The SHA256 fingerprint of the public key.
• key (string) --- The ECDSA public key.
• type (string) --- The exact type of the key, e.g. "ecdsa-sha2-nistp256".
• ed25519 (map) --- Represents the public key and fingerprints for the Ed25519 algorithm.
• fingerprints (map) --- Represents fingerprint information.
• sha1 (string) --- The SHA1 fingerprint of the public key.
• sha256 (string) --- The SHA256 fingerprint of the public key.
• key (string) --- The Ed25519 public key.
• type (string) --- The exact type of the key, i.e. "ssh-ed25519".
• rsa (map) --- Represents the public key and fingerprints for the RSA algorithm.
• fingerprints (map) --- Represents fingerprint information.
• sha1 (string) --- The SHA1 fingerprint of the public key.
• sha256 (string) --- The SHA256 fingerprint of the public key.
• key (string) --- The RSA public key.
• type (string) --- The exact type of the key, i.e. "ssh-rsa".
system_profiler
Type: map
Purpose:
Return information from the Mac OSX system profiler.
Elements:
• boot_mode (string) --- The boot mode.
© 2024 Puppet, Inc., a Perforce company
Puppet | Platform components | 309
• boot_rom_version (string) --- The boot ROM version.
• boot_volume (string) --- The boot volume.
• computer_name (string) --- The name of the computer.
• cores (string) --- The total number of processor cores.
• hardware_uuid (string) --- The hardware unique identifier.
• kernel_version (string) --- The version of the kernel.
• l2_cache_per_core (string) --- The size of the processor per-core L2 cache.
• l3_cache (string) --- The size of the processor L3 cache.
• memory (string) --- The size of the system memory.
• model_identifier (string) --- The identifier of the computer model.
• model_name (string) --- The name of the computer model.
• processor_name (string) --- The model name of the processor.
• processor_speed (string) --- The speed of the processor.
• processors (string) --- The total number of processors.
• secure_virtual_memory (string) --- Whether or not secure virtual memory is enabled.
• serial_number (string) --- The serial number of the computer.
• smc_version (string) --- The System Management Controller (SMC) version.
• system_version (string) --- The operating system version.
• uptime (string) --- The uptime of the system.
• username (string) --- The name of the user running facter.
system_uptime
Type: map
Purpose:
Return the system uptime information.
Elements:
• days (integer) --- The number of complete days the system has been up.
• hours (integer) --- The number of complete hours the system has been up.
• seconds (integer) --- The number of total seconds the system has been up.
• uptime (string) --- The full uptime string.
timezone
Type: string
Purpose:
Return the system timezone.
virtual
Type: string
Purpose:
Return the hypervisor name for virtual machines or "physical" for physical machines.
xen
Type: map
Purpose:
Return metadata for the Xen hypervisor.
Elements:
• domains (array) --- list of strings identifying active Xen domains.
© 2024 Puppet, Inc., a Perforce company
Puppet | Platform components | 310
zfs_featurenumbers
Type: string
Purpose:
Return the comma-delimited feature numbers for ZFS.
zfs_version
Type: string
Purpose:
Return the version for ZFS.
zpool_featureflags
Type: string
Purpose:
Return the comma-delimited feature flags for ZFS storage pools.
zpool_featurenumbers
Type: string
Purpose:
Return the comma-delimited feature numbers for ZFS storage pools.
zpool_version
Type: string
Purpose:
Return the version for ZFS storage pools.
nim_type
Type: string
Purpose:
Tells if the node is master or standalone inside an AIX Nim environment.
Details:
Is Available only on AIX.
Legacy Facts
architecture
This legacy fact is hidden by default in Facter's command-line output.
Type: string
Purpose:
Return the operating system's hardware architecture.
augeasversion
This legacy fact is hidden by default in Facter's command-line output.
Type: string
Purpose:
Return the version of augeas.
© 2024 Puppet, Inc., a Perforce company
Puppet | Platform components | 311
blockdevices
This legacy fact is hidden by default in Facter's command-line output.
Type: string
Purpose:
Return a comma-separated list of block devices.
blockdevice_<devicename>_model
This legacy fact is hidden by default in Facter's command-line output.
Type: string
Purpose:
Return the model name of block devices attached to the system.
blockdevice_<devicename>_size
This legacy fact is hidden by default in Facter's command-line output.
Type: integer
Purpose:
Return the size of a block device in bytes.
blockdevice_<devicename>_vendor
This legacy fact is hidden by default in Facter's command-line output.
Type: string
Purpose:
Return the vendor name of block devices attached to the system.
bios_release_date
This legacy fact is hidden by default in Facter's command-line output.
Type: string
Purpose:
Return the release date of the system BIOS.
bios_vendor
This legacy fact is hidden by default in Facter's command-line output.
Type: string
Purpose:
Return the vendor of the system BIOS.
bios_version
This legacy fact is hidden by default in Facter's command-line output.
Type: string
Purpose:
Return the version of the system BIOS.
boardassettag
This legacy fact is hidden by default in Facter's command-line output.
Type: string
© 2024 Puppet, Inc., a Perforce company
Puppet | Platform components | 312
Purpose:
Return the system board asset tag.
boardmanufacturer
This legacy fact is hidden by default in Facter's command-line output.
Type: string
Purpose:
Return the system board manufacturer.
boardproductname
This legacy fact is hidden by default in Facter's command-line output.
Type: string
Purpose:
Return the system board product name.
boardserialnumber
This legacy fact is hidden by default in Facter's command-line output.
Type: string
Purpose:
Return the system board serial number.
chassisassettag
This legacy fact is hidden by default in Facter's command-line output.
Type: string
Purpose:
Return the system chassis asset tag.
chassistype
This legacy fact is hidden by default in Facter's command-line output.
Type: string
Purpose:
Return the system chassis type.
dhcp_servers
This legacy fact is hidden by default in Facter's command-line output.
Type: map
Purpose:
Return the DHCP servers for the system.
Elements:
• <interface> (ip) --- The DHCP server for the interface.
• system (ip) --- The DHCP server for the default interface.
domain
This legacy fact is hidden by default in Facter's command-line output.
Type: string
© 2024 Puppet, Inc., a Perforce company
Puppet | Platform components | 313
Purpose:
Return the network domain of the system.
fqdn
This legacy fact is hidden by default in Facter's command-line output.
Type: string
Purpose:
Return the fully qualified domain name (FQDN) of the system.
gid
This legacy fact is hidden by default in Facter's command-line output.
Type: string
Purpose:
Return the group identifier (GID) of the user running facter.
hardwareisa
This legacy fact is hidden by default in Facter's command-line output.
Type: string
Purpose:
Return the hardware instruction set architecture (ISA).
hardwaremodel
This legacy fact is hidden by default in Facter's command-line output.
Type: string
Purpose:
Return the operating system's hardware model.
hostname
This legacy fact is hidden by default in Facter's command-line output.
Type: string
Purpose:
Return the host name of the system.
id
This legacy fact is hidden by default in Facter's command-line output.
Type: string
Purpose:
Return the user identifier (UID) of the user running facter.
interfaces
This legacy fact is hidden by default in Facter's command-line output.
Type: string
Purpose:
Return the comma-separated list of network interface names.
© 2024 Puppet, Inc., a Perforce company
Puppet | Platform components | 314
ipaddress
This legacy fact is hidden by default in Facter's command-line output.
Type: ip
Purpose:
Return the IPv4 address for the default network interface.
ipaddress6
This legacy fact is hidden by default in Facter's command-line output.
Type: ip6
Purpose:
Return the IPv6 address for the default network interface.
ipaddress6_<interface>
This legacy fact is hidden by default in Facter's command-line output.
Type: ip6
Purpose:
Return the IPv6 address for a network interface.
ipaddress_<interface>
This legacy fact is hidden by default in Facter's command-line output.
Type: ip
Purpose:
Return the IPv4 address for a network interface.
ldom_<name>
This legacy fact is hidden by default in Facter's command-line output.
Type: string
Purpose:
Return Solaris LDom information.
lsbdistcodename
This legacy fact is hidden by default in Facter's command-line output.
Type: string
Purpose:
Return the Linux Standard Base (LSB) distribution code name.
lsbdistdescription
This legacy fact is hidden by default in Facter's command-line output.
Type: string
Purpose:
Return the Linux Standard Base (LSB) distribution description.
lsbdistid
This legacy fact is hidden by default in Facter's command-line output.
Type: string
© 2024 Puppet, Inc., a Perforce company
Puppet | Platform components | 315
Purpose:
Return the Linux Standard Base (LSB) distribution identifier.
lsbdistrelease
This legacy fact is hidden by default in Facter's command-line output.
Type: string
Purpose:
Return the Linux Standard Base (LSB) distribution release.
lsbmajdistrelease
This legacy fact is hidden by default in Facter's command-line output.
Type: string
Purpose:
Return the Linux Standard Base (LSB) major distribution release.
lsbminordistrelease
This legacy fact is hidden by default in Facter's command-line output.
Type: string
Purpose:
Return the Linux Standard Base (LSB) minor distribution release.
lsbrelease
This legacy fact is hidden by default in Facter's command-line output.
Type: string
Purpose:
Return the Linux Standard Base (LSB) release.
macaddress
This legacy fact is hidden by default in Facter's command-line output.
Type: mac
Purpose:
Return the MAC address for the default network interface.
macaddress_<interface>
This legacy fact is hidden by default in Facter's command-line output.
Type: mac
Purpose:
Return the MAC address for a network interface.
macosx_buildversion
This legacy fact is hidden by default in Facter's command-line output.
Type: string
Purpose:
Return the Mac OSX build version.
© 2024 Puppet, Inc., a Perforce company
Puppet | Platform components | 316
macosx_productname
This legacy fact is hidden by default in Facter's command-line output.
Type: string
Purpose:
Return the Mac OSX product name.
macosx_productversion
This legacy fact is hidden by default in Facter's command-line output.
Type: string
Purpose:
Return the Mac OSX product version.
macosx_productversion_major
This legacy fact is hidden by default in Facter's command-line output.
Type: string
Purpose:
Return the Mac OSX product major version.
macosx_productversion_minor
This legacy fact is hidden by default in Facter's command-line output.
Type: string
Purpose:
Return the Mac OSX product minor version.
macosx_productversion_patch
This legacy fact is hidden by default in Facter's command-line output.
Type: string
Purpose:
Return the Mac OSX product patch version.
manufacturer
This legacy fact is hidden by default in Facter's command-line output.
Type: string
Purpose:
Return the system manufacturer.
memoryfree
This legacy fact is hidden by default in Facter's command-line output.
Type: string
Purpose:
Return the display size of the free system memory, such as "1 GiB".
memoryfree_mb
This legacy fact is hidden by default in Facter's command-line output.
Type: double
© 2024 Puppet, Inc., a Perforce company
Puppet | Platform components | 317
Purpose:
Return the size of the free system memory, in mebibytes.
memorysize
This legacy fact is hidden by default in Facter's command-line output.
Type: string
Purpose:
Return the display size of the total system memory, such as "1 GiB".
memorysize_mb
This legacy fact is hidden by default in Facter's command-line output.
Type: double
Purpose:
Return the size of the total system memory, in mebibytes.
mtu_<interface>
This legacy fact is hidden by default in Facter's command-line output.
Type: integer
Purpose:
Return the Maximum Transmission Unit (MTU) for a network interface.
netmask
This legacy fact is hidden by default in Facter's command-line output.
Type: ip
Purpose:
Return the IPv4 netmask for the default network interface.
netmask6
This legacy fact is hidden by default in Facter's command-line output.
Type: ip6
Purpose:
Return the IPv6 netmask for the default network interface.
netmask6_<interface>
This legacy fact is hidden by default in Facter's command-line output.
Type: ip6
Purpose:
Return the IPv6 netmask for a network interface.
netmask_<interface>
This legacy fact is hidden by default in Facter's command-line output.
Type: ip
Purpose:
Return the IPv4 netmask for a network interface.
© 2024 Puppet, Inc., a Perforce company
Puppet | Platform components | 318
network
This legacy fact is hidden by default in Facter's command-line output.
Type: ip
Purpose:
Return the IPv4 network for the default network interface.
network6
This legacy fact is hidden by default in Facter's command-line output.
Type: ip6
Purpose:
Return the IPv6 network for the default network interface.
network6_<interface>
This legacy fact is hidden by default in Facter's command-line output.
Type: ip6
Purpose:
Return the IPv6 network for a network interface.
network_<interface>
This legacy fact is hidden by default in Facter's command-line output.
Type: ip
Purpose:
Return the IPv4 network for a network interface.
operatingsystem
This legacy fact is hidden by default in Facter's command-line output.
Type: string
Purpose:
Return the name of the operating system.
operatingsystemmajrelease
This legacy fact is hidden by default in Facter's command-line output.
Type: string
Purpose:
Return the major release of the operating system.
operatingsystemrelease
This legacy fact is hidden by default in Facter's command-line output.
Type: string
Purpose:
Return the release of the operating system.
osfamily
This legacy fact is hidden by default in Facter's command-line output.
Type: string
© 2024 Puppet, Inc., a Perforce company
Puppet | Platform components | 319
Purpose:
Return the family of the operating system.
physicalprocessorcount
This legacy fact is hidden by default in Facter's command-line output.
Type: integer
Purpose:
Return the count of physical processors.
processor<N>
This legacy fact is hidden by default in Facter's command-line output.
Type: string
Purpose:
Return the model string of processor N.
processorcount
This legacy fact is hidden by default in Facter's command-line output.
Type: integer
Purpose:
Return the count of logical processors.
productname
This legacy fact is hidden by default in Facter's command-line output.
Type: string
Purpose:
Return the system product name.
rubyplatform
This legacy fact is hidden by default in Facter's command-line output.
Type: string
Purpose:
Return the platform Ruby was built for.
rubysitedir
This legacy fact is hidden by default in Facter's command-line output.
Type: string
Purpose:
Return the path to Ruby's site library directory.
rubyversion
This legacy fact is hidden by default in Facter's command-line output.
Type: string
Purpose:
Return the version of Ruby.
© 2024 Puppet, Inc., a Perforce company
Puppet | Platform components | 320
scope6
This legacy fact is hidden by default in Facter's command-line output.
Type: string
Purpose:
Return the IPv6 scope for the default network interface.
scope6_<interface>
This legacy fact is hidden by default in Facter's command-line output.
Type: string
Purpose:
Return the IPv6 scope for the default network interface.
selinux
This legacy fact is hidden by default in Facter's command-line output.
Type: boolean
Purpose:
Return whether Security-Enhanced Linux (SELinux) is enabled.
selinux_config_mode
This legacy fact is hidden by default in Facter's command-line output.
Type: string
Purpose:
Return the configured Security-Enhanced Linux (SELinux) mode.
selinux_config_policy
This legacy fact is hidden by default in Facter's command-line output.
Type: string
Purpose:
Return the configured Security-Enhanced Linux (SELinux) policy.
selinux_current_mode
This legacy fact is hidden by default in Facter's command-line output.
Type: string
Purpose:
Return the current Security-Enhanced Linux (SELinux) mode.
selinux_enforced
This legacy fact is hidden by default in Facter's command-line output.
Type: boolean
Purpose:
Return whether Security-Enhanced Linux (SELinux) is enforced.
selinux_policyversion
This legacy fact is hidden by default in Facter's command-line output.
Type: string
© 2024 Puppet, Inc., a Perforce company
Puppet | Platform components | 321
Purpose:
Return the Security-Enhanced Linux (SELinux) policy version.
serialnumber
This legacy fact is hidden by default in Facter's command-line output.
Type: string
Purpose:
Return the system product serial number.
sp_<name>
This legacy fact is hidden by default in Facter's command-line output.
Type: string
Purpose:
Return Mac OSX system profiler information.
ssh<algorithm>key
This legacy fact is hidden by default in Facter's command-line output.
Type: string
Purpose:
Return the SSH public key for the algorithm.
sshfp_<algorithm>
This legacy fact is hidden by default in Facter's command-line output.
Type: string
Purpose:
Return the SSH fingerprints for the algorithm's public key.
swapencrypted
This legacy fact is hidden by default in Facter's command-line output.
Type: boolean
Purpose:
Return whether or not the swap is encrypted.
swapfree
This legacy fact is hidden by default in Facter's command-line output.
Type: string
Purpose:
Return the display size of the free swap memory, such as "1 GiB".
swapfree_mb
This legacy fact is hidden by default in Facter's command-line output.
Type: double
Purpose:
Return the size of the free swap memory, in mebibytes.
© 2024 Puppet, Inc., a Perforce company
Puppet | Platform components | 322
swapsize
This legacy fact is hidden by default in Facter's command-line output.
Type: string
Purpose:
Return the display size of the total swap memory, such as "1 GiB".
swapsize_mb
This legacy fact is hidden by default in Facter's command-line output.
Type: double
Purpose:
Return the size of the total swap memory, in mebibytes.
windows_edition_id
This legacy fact is hidden by default in Facter's command-line output.
Type: string
Purpose:
Return the type of Windows edition, Server or Desktop Edition variant.
windows_installation_type
This legacy fact is hidden by default in Facter's command-line output.
Type: string
Purpose:
Return Windows installation type (Server|Server Core|Client).
windows_product_name
This legacy fact is hidden by default in Facter's command-line output.
Type: string
Purpose:
Return Windows textual product name.
windows_release_id
This legacy fact is hidden by default in Facter's command-line output.
Type: string
Purpose:
Return Windows Build Version of the form YYMM.
system32
This legacy fact is hidden by default in Facter's command-line output.
Type: string
Purpose:
Return the path to the System32 directory on Windows.
uptime
This legacy fact is hidden by default in Facter's command-line output.
Type: string
© 2024 Puppet, Inc., a Perforce company
Puppet | Platform components | 323
Purpose:
Return the system uptime.
uptime_days
This legacy fact is hidden by default in Facter's command-line output.
Type: integer
Purpose:
Return the system uptime days.
uptime_hours
This legacy fact is hidden by default in Facter's command-line output.
Type: integer
Purpose:
Return the system uptime hours.
uptime_seconds
This legacy fact is hidden by default in Facter's command-line output.
Type: integer
Purpose:
Return the system uptime seconds.
uuid
This legacy fact is hidden by default in Facter's command-line output.
Type: string
Purpose:
Return the system product unique identifier.
xendomains
This legacy fact is hidden by default in Facter's command-line output.
Type: string
Purpose:
Return a list of comma-separated active Xen domain names.
zone_<name>_brand
This legacy fact is hidden by default in Facter's command-line output.
Type: string
Purpose:
Return the brand for the Solaris zone.
zone_<name>_iptype
This legacy fact is hidden by default in Facter's command-line output.
Type: string
Purpose:
Return the IP type for the Solaris zone.
© 2024 Puppet, Inc., a Perforce company
Puppet | Platform components | 324
zone_<name>_name
This legacy fact is hidden by default in Facter's command-line output.
Type: string
Purpose:
Return the name for the Solaris zone.
zone_<name>_uuid
This legacy fact is hidden by default in Facter's command-line output.
Type: string
Purpose:
Return the unique identifier for the Solaris zone.
zone_<name>_id
This legacy fact is hidden by default in Facter's command-line output.
Type: string
Purpose:
Return the zone identifier for the Solaris zone.
zone_<name>_path
This legacy fact is hidden by default in Facter's command-line output.
Type: string
Purpose:
Return the zone path for the Solaris zone.
zone_<name>_status
This legacy fact is hidden by default in Facter's command-line output.
Type: string
Purpose:
Return the zone state for the Solaris zone.
zonename
This legacy fact is hidden by default in Facter's command-line output.
Type: string
Purpose:
Return the name of the current Solaris zone.
zones
This legacy fact is hidden by default in Facter's command-line output.
Type: integer
Purpose:
Return the count of Solaris zones.
© 2024 Puppet, Inc., a Perforce company

Puppet | Platform components | 325
Custom facts overview
You can add custom facts by writing snippets of Ruby code on the primary Puppet server. Puppet then uses plug-ins
in modules to distribute the facts to the client.
For information on how to add custom facts to modules, see Module plug-in types.
Related information
External facts on page 336
External facts provide a way to use arbitrary executables or scripts as facts, or set facts statically with structured data.
With this information, you can write a custom fact in Perl, C, or a one-line text file.
Plug-ins in modules on page 1101
Puppet supports several kinds of plug-ins, which are distributed in modules. These plug-ins enable features such as
custom facts and functions for managing your nodes. Modules that you download from the Forge can include these
kinds of plug-ins, and you can also develop your own.
Adding custom facts to Facter
Sometimes you need to be able to write conditional expressions based on site-specific data that just isn’t available via
Facter, or perhaps you’d like to include it in a template.
Because you can’t include arbitrary Ruby code in your manifests, the best solution is to add a new fact to Facter.
These additional facts can then be distributed to Puppet clients and are available for use in manifests and templates,
just like any other fact is.
Note: Facter 4 implements the same custom facts API as Facter 3. Any custom fact that requires one of the Ruby
files previously stored in lib/facter/util fails with an error.
Structured and flat facts
A typical fact extracts a piece of information about a system and returns it as either as a simple value (“flat” fact) or
data organized as a hash or array (“structured” fact). There are several types of facts classified by how they collect
information, including:
• Core facts, which are built into Facter and are common to almost all systems.
• Custom facts, which run Ruby code to produce a value.
• External facts, which return values from pre-defined static data, or the result of an executable script or program.
All fact types can produce flat or structured values.
Related information
Facter release notes on page 29
These are the new features, resolved issues, and deprecations in this version of Facter.
External facts on page 336
External facts provide a way to use arbitrary executables or scripts as facts, or set facts statically with structured data.
With this information, you can write a custom fact in Perl, C, or a one-line text file.
Loading custom facts
Facter offers multiple methods of loading facts.
These include:
• $LOAD\_PATH, or the Ruby library load path.
• The --custom-dir command line option.
• The environment variable FACTERLIB.
You can use these methods to do things like test files locally before distributing them, or you can arrange to have a
specific set of facts available on certain machines.
© 2024 Puppet, Inc., a Perforce company

Puppet | Platform components | 326
Using the Ruby load path
Facter searches all directories in the Ruby $LOAD_PATH variable for subdirectories named Facter, and loads all
Ruby files in those directories. If you had a directory in your $LOAD_PATH like ~/lib/ruby, set up like this:
#~/lib/ruby
### facter
### rackspace.rb
### system_load.rb
### users.rb
Facter loads facter/system_load.rb, facter/users.rb, and facter/rackspace.rb.
Using the --custom-dir command line option
Facter can take multiple --custom-dir options on the command line that specifies a single directory to search for
custom facts. Facter attempts to load all Ruby files in the specified directories. This allows you to do something like
this:
$ ls my_facts
system_load.rb
$ ls my_other_facts
users.rb
$ facter --custom-dir=./my_facts --custom-dir=./my_other_facts system_load
users
system_load => 0.25
users => thomas,pat
Using the FACTERLIB environment variable
Facter also checks the environment variable FACTERLIB for a delimited (semicolon for Windows and colon for
all other platforms) set of directories, and tries to load all Ruby files in those directories. This allows you to do
something like this:
$ ls my_facts
system_load.rb
$ ls my_other_facts
users.rb
$ export FACTERLIB="./my_facts:./my_other_facts"
$ facter system_load users
system_load => 0.25
users => thomas,pat
Note: Facter 4 replaces facter -p with puppet facts show. The puppet facts show command is the
default action for Puppet facts. Facter also accepts puppet facts.
Two parts of every fact
Most facts have at least two elements.
1.
A call to Facter.add('fact_name'), which determines the name of the fact.
2.
A setcode statement for simple resolutions, which is evaluated to determine the fact’s value.
Facts can get a lot more complicated than that, but those two together are the most common implementation of a
custom fact.
© 2024 Puppet, Inc., a Perforce company

Puppet | Platform components | 327
Executing shell commands in facts
Puppet gets information about a system from Facter, and the most common way for Facter to get that information is
by executing shell commands.
You can then parse and manipulate the output from those commands using standard Ruby code. The Facter API gives
you a few ways to execute shell commands:
• To run a command and use the output verbatim, as your fact’s value, you can pass the command into setcode
directly. For example: setcode 'uname --hardware-platform'
• If your fact is more complicated than that, you can call Facter::Core::Execution.execute('uname
--hardware-platform') from within the setcode do ... end block. Whatever the setcode
statement returns is used as the fact’s value.
• Your shell command is also a Ruby string, so you need to escape special characters if you want to pass them
through.
Note: Not everything that works in the terminal works in a fact. You can use the pipe (|) and similar operators as
you normally would, but Bash-specific syntax like if statements do not work. The best way to handle this limitation
is to write your conditional logic in Ruby.
Example
To get the output of uname --hardware-platform to single out a specific type of workstation, you create a
custom fact.
1.
Start by giving the fact a name, in this case, hardware_platform.
2.
Create the fact in a file called hardware_platform.rb on the primary Puppet server:
# hardware_platform.rb
Facter.add('hardware_platform') do
setcode do
Facter::Core::Execution.execute('/bin/uname --hardware-platform')
end
end
3.
Use the instructions in the Plug-ins in modules docs to copy the new fact to a module and distribute it. During
your next Puppet run, the value of the new fact is available to use in your manifests and templates.
Using other facts
You can write a fact that uses other facts by accessing Facter.value('somefact'). If the fact fails to resolve
or is not present, Facter returns nil.
For example:
Facter.add('osfamily') do
setcode do
distid = Facter.value('lsbdistid')
case distid
when /RedHatEnterprise|CentOS|Fedora/
'redhat'
when 'ubuntu'
'debian'
else
distid
end
end
end
© 2024 Puppet, Inc., a Perforce company

Puppet | Platform components | 328
Note: Facter does not support case-sensitive facts. Queries are always downcased in calls to Facter.value or
Facter.fact, for example, Facter.value('OS') and Facter.value('os') return the same value.
Facter also downcases custom or external facts with uppercase or mixed-case names.
Configuring facts
Facts have properties that you can use to customize how they are evaluated.
Confining facts
One of the more commonly used properties is the confine statement, which restricts the fact to run only on systems
that match another given fact.
For example:
Facter.add('powerstates') do
confine kernel: 'Linux'
setcode do
Facter::Core::Execution.execute('cat /sys/power/states')
end
end
This fact uses sysfs on Linux to get a list of the power states that are available on the given system. Because this
is available only on Linux systems, we use the confine statement to ensure that this fact isn’t needlessly run on
systems that don’t support this type of enumeration.
To confine structured facts like ['os']['family'], you can use Facter.value: You can also use a Ruby
block:
confine 'os' do |os|
os['family'] == 'RedHat'
end
Fact precedence
A single fact can have multiple resolutions, each of which is a different way of determining the value of the fact. It’s
common to have different resolutions for different operating systems, for example. To add a new resolution to a fact,
you add the fact again with a different setcode statement.
When a fact has more than one resolution, the first resolution that returns a value other than nil sets the fact’s value.
The way that Facter decides the issue of resolution precedence is the weight property. After Facter rules out any
resolutions that are excluded because of confine statements, the resolution with the highest weight is evaluated
first. If that resolution returns nil, Facter moves on to the next resolution (by descending weight) until it gets a value
for the fact.
By default, the weight of a resolution is the number of confine statements it has, so that more specific resolutions
take priority over less specific resolutions. External facts have a weight of 1000 — to override them, set a weight
above 1000.
# Check to see if this server has been marked as a postgres server
Facter.add('role') do
has_weight 100
setcode do
if File.exist? '/etc/postgres_server'
'postgres_server'
end
end
end
# Guess if this is a server by the presence of the pg_create binary
Facter.add('role') do
© 2024 Puppet, Inc., a Perforce company

Puppet | Platform components | 329
has_weight 50
setcode do
if File.exist? '/usr/sbin/pg_create'
'postgres_server'
end
end
end
# If this server doesn't look like a server, it must be a desktop
Facter.add('role') do
setcode do
'desktop'
end
end
Execution timeouts
Facter 4 supports timeouts on resolutions. If the timeout is exceeded, Facter prints an error message.
Facter.add('foo', {timeout: 0.2}) do
setcode do
Facter::Core::Execution.execute("sleep 1")
end
End
You can also pass a timeout to Facter::Core::Execution#execute:.
Facter.add('sleep') do
setcode do
begin
Facter::Core::Execution.execute('sleep 10', options = {:timeout => 5})
'did not timeout!'
rescue Facter::Core::Execution::ExecutionFailure
Facter.warn("Sleep fact timed out!")
end
end
end
When Facter runs as standalone, using Facter.warn ensures that the message is printed to STDERR. When Facter
is called as part of a catalog application, using Facter.warn prints the message to Puppet’s log. If an exception is
not caught, Facter automatically logs it as an error.
Structured facts
Structured facts take the form of either a hash or an array.
To create a structured fact, return a hash or an array from the setcode statement.
You can see some relevant examples in the Writing structured facts section of the Custom facts overview.
Facter 4 introduced a new way to aggregate facts using dot notation. For more information, see Writing aggregate
resolutions.
Related information
Writing custom facts on page 331
© 2024 Puppet, Inc., a Perforce company

Puppet | Platform components | 330
A typical fact in Facter is an collection of several elements, and is written either as a simple value (“flat” fact) or as
structured data (“structured” fact). This page shows you how to write and format facts correctly.
Aggregate resolutions
If your fact combines the output of multiple commands, use aggregate resolutions. An aggregate resolution is split
into chunks, each one responsible for resolving one piece of the fact. After all of the chunks have been resolved
separately, they’re combined into a single flat or structured fact and returned.
Aggregate resolutions have several key differences compared to simple resolutions, beginning with the fact
declaration. To introduce an aggregate resolution, add the :type => :aggregate parameter:
Facter.add('fact_name', :type => :aggregate) do
#chunks go here
#aggregate block goes here
end
Each step in the resolution then gets its own named chunk statement:
chunk(:one) do
'Chunk one returns this. '
end
chunk(:two) do
'Chunk two returns this. '
end
Aggregate resolutions never have a setcode statement. Instead, they have an optional aggregate block that
combines the chunks. Whatever value the aggregate block returns is the fact’s value. Here’s an example that just
combines the strings from the two chunks above:
aggregate do |chunks|
result = ''
chunks.each_value do |str|
result += str
end
# Result: "Chunk one returns this. Chunk two returns this."
result
end
If the chunk blocks all return arrays or hashes, you can omit the aggregate block. If you do, Facter merges all of
your data into one array or hash and uses that as the fact’s value.
For more examples of aggregate resolutions, visit Writing facts with aggregate resolutions on page 334.
Related information
Writing custom facts on page 331
A typical fact in Facter is an collection of several elements, and is written either as a simple value (“flat” fact) or as
structured data (“structured” fact). This page shows you how to write and format facts correctly.
Viewing fact values
If your Puppet primary servers are configured to use PuppetDB, you can view and search all of the facts for any node,
including custom facts.
See the PuppetDB docs for more info.
© 2024 Puppet, Inc., a Perforce company

Puppet | Platform components | 331
Environment facts
Environment facts allow you to override core facts and add custom facts.
To access a fact set with environment variables, you can use the CLI or the Ruby API (Facter.value or
Facter.fact methods). Use the environment variable prefixed with FACTER_, for example:
$ facter virtual
physical
$ FACTER_virtual=virtualbox facter virtual
virtualbox
Note that environment facts are downcased before they are added to the fact collection, for example,
FACTER_EXAMPLE and FACTER_example resolve to a single fact named example.
Writing custom facts
A typical fact in Facter is an collection of several elements, and is written either as a simple value (“flat” fact) or as
structured data (“structured” fact). This page shows you how to write and format facts correctly.
Important: You must be able to distinguish facts from resolutions. A fact is a piece of information about a given
node, while a resolution is a way of determining the value of an applicable fact. The following is a structure of a fact:
Facter.add(:my_custom_fact) do
<resolution>
end
A single fact can have multiple resolutions. A resolution details how, when and in which order to obtain the value for
a fact. It is common to have different resolutions for different operating systems. To add a new resolution to a fact,
you add the fact again but with a different setcode statement.
You need some familiarity with Ruby to understand most of these examples. For an introduction, see out the Custom
facts overview. For information on how to add custom facts to modules, see Module plug-in types.
Writing facts with simple resolutions
Most facts are resolved all at the same time, without any need to merge data from different sources. In that case, the
resolution is simple. Both flat and structured facts can have simple resolutions.
Main components of simple resolutions
Simple facts are typically made up of the following parts:
1.
A call to Facter.add(:fact_name):
• This introduces a new fact or a new resolution for an existing fact with the same name.
• The name can be either a symbol or a string.
• The rest of the fact is wrapped in the add call’s do ... end block.
2.
Zero or more confine statements:
• Determine whether the resolution is suitable (and therefore is evaluated).
• Can either match against the value of another fact or evaluate a Ruby block.
• If given a symbol or string representing a fact name, a block is required and the block receives the fact’s value
as an argument.
• If given a hash, the keys are expected to be fact names. The values of the hash are either the expected fact
values or an array of values to compare against.
• If given a block, the confine is suitable if the block returns a value other than nil or false.
© 2024 Puppet, Inc., a Perforce company

Puppet | Platform components | 332
3.
An optional has_weight statement:
• When multiple resolutions are available for a fact, resolutions are evaluated from highest weight value to
lowest.
• Must be an integer greater than 0.
• Defaults to the number of confine statements for the resolution.
4.
A setcode statement that determines the value of the fact:
• Can take either a string or a block.
• If given a string, Facter executes it as a shell command. If the command succeeds, the output of the command
is the value of the fact. If the command fails, the next suitable resolution is evaluated.
• If given a block, the block’s return value is the value of the fact unless the block returns nil. If nil is
returned, the next suitable resolution is evaluated.
• Can execute shell commands within a setcode block, using the Facter::Core::Execution.exec
function.
• If multiple setcode statements are evaluated for a single resolution, only the last setcode block is used.
Note: Set all code inside the sections outlined above — there must not be any code outside setcodeand
confine blocks other than an optional has_weight statement in a custom fact.
How to format facts
The format of a fact is important because of the way that Facter evaluates them — by reading all the fact definitions.
If formatted incorrectly, Facter can execute code too early. You need to use the setcode correctly. Below is a good
example and a bad example of a fact, showing you where to place the setcode.
Note: In Facter versions prior to 4.7.0, a bug causes fact values inside confine blocks to be downcased, which
prevents the following examples from working as expected. This bug has been fixed in Facter 4.7.0. For more
information, visit Facter 4.7.0 on page 29.
Good:
Facter.add('phi') do
confine owner: "BTO"
confine :kernel do |value|
value == "Linux"
end
setcode do
bar=Facter.value('theta')
bar + 1
end
end
In this example, the bar=Facter.value('theta') call is guarded by setcode, which means it is not
executed unless or until it is appropriate to do so. Facter loads all Facter.add blocks first, use any OS or confine/
weight information to decide which facts to evaluate, and once it chooses, it selectively executes setcode blocks for
each fact that it needs.
Bad:
Facter.add('phi') do
confine owner: "BTO"
confine :kernel do |value|
value == "Linux"
end
bar = Facter.value('theta')
© 2024 Puppet, Inc., a Perforce company

Puppet | Platform components | 333
setcode do
bar + 1
end
end
In this example, the Facter.value('theta') call is outside of the guarded setcode block and in the
unguarded part of the Facter.add block. This means that the statement always executes, on every system,
regardless of confine, weight, or which resolution of phi is appropriate. Any code with possible side-effects, or code
pertaining to figuring out the value of a fact, must be kept inside the setcode block. The only code left outside
setcode is code that helps Facter choose which resolution of a fact to use.
Examples
The following example shows a minimal fact that relies on a single shell command:
Facter.add(:rubypath) do
setcode 'which ruby'
end
The following example shows different resolutions for different operating systems:
Facter.add(:rubypath) do
setcode 'which ruby'
end
Facter.add(:rubypath) do
confine 'os' do |os_fact|
os_fact['family'] == "Windows"
end
# Windows uses 'where' instead of 'which'
setcode 'where ruby'
end
The following example shows a more complex fact, confined to Linux with a block:
Facter.add(:jruby_installed) do
confine :kernel do |value|
value == "Linux"
end
setcode do
# If jruby is present, return true. Otherwise, return false.
Facter::Core::Execution.which('jruby') != nil
end
end
Writing structured facts
Structured facts can take the form of hashes or arrays.
You don’t have to do anything special to mark the fact as structured — if your fact returns a hash or array, Facter
recognizes it as a structured fact. Structured facts can have simple or aggregate resolutions.
Example: Returning an array of network interfaces
Facter.add(:interfaces_array) do
setcode do
interfaces = Facter.value(:interfaces)
# the 'interfaces' fact returns a single comma-delimited string, such as
"lo0,eth0,eth1"
# this splits the value into an array of interface names
© 2024 Puppet, Inc., a Perforce company

Puppet | Platform components | 334
interfaces.split(',')
end
end
Example: Returning a hash of network interfaces to IP addresses
Facter.add(:interfaces_hash) do
setcode do
interfaces_hash = {}
Facter.value(:interfaces_array).each do |interface|
ipaddress = Facter.value("ipaddress_#{interface}")
if ipaddress
interfaces_hash[interface] = ipaddress
end
end
interfaces_hash
end
end
Writing facts with aggregate resolutions
Aggregate resolutions allow you to split up the resolution of a fact into separate chunks.
By default, Facter merges hashes with hashes or arrays with arrays, resulting in a structured fact, but you can also
aggregate the chunks into a flat fact using concatenation, addition, or any other function that you can express in Ruby
code.
Main components of aggregate resolutions
Aggregate resolutions have two key differences compared to simple resolutions: the presence of chunk statements
and the lack of a setcode statement. The aggregate block is optional, and without it Facter merges hashes with
hashes or arrays with arrays.
1.
A call to Facter.add(:fact_name, :type => :aggregate):
• Introduces a new fact or a new resolution for an existing fact with the same name.
• The name can be either a symbol or a string.
• The :type => :aggregate parameter is required for aggregate resolutions.
• The rest of the fact is wrapped in the add call’s do ... end block.
2.
Zero or more confine statements:
• Determine whether the resolution is suitable and (therefore is evaluated).
• They can either match against the value of another fact or evaluate a Ruby block.
• If given a symbol or string representing a fact name, a block is required and the block receives the fact’s value
as an argument.
• If given a hash, the keys are expected to be fact names. The values of the hash are either the expected fact
values or an array of values to compare against.
• If given a block, the confine is suitable if the block returns a value other than nil or false.
3.
An optional has_weight statement:
• Evaluates multiple resolutions for a fact from highest weight value to lowest.
• Must be an integer greater than 0.
• Defaults to the number of confine statements for the resolution.
4.
One or more calls to chunk, each containing:
• A name (as the argument to chunk).
• A block of code, which is responsible for resolving the chunk to a value. The block’s return value is the value
of the chunk; it can be any type, but is typically a hash or array.
© 2024 Puppet, Inc., a Perforce company

Puppet | Platform components | 335
5.
An optional aggregate block:
• If absent, Facter automatically merges hashes with hashes or arrays with arrays.
• To merge the chunks in any other way, you need to make a call to aggregate, which takes a block of code.
• The block is passed one argument (chunks, in the example), which is a hash of chunk name to chunk value
for all the chunks in the resolution.
Example: Building a structured fact progressively
This example builds a new fact, networking_primary_sha, by progressively merging two chunks. One chunk
encodes each networking interface’s MAC address as an encoded base64 value, and the other determines if each
interface is the system’s primary interface.
require 'digest'
require 'base64'
Facter.add(:networking_primary_sha, :type => :aggregate) do
chunk(:sha256) do
interfaces = {}
Facter.value(:networking)['interfaces'].each do |interface, values|
if values['mac']
hash = Digest::SHA256.digest(values['mac'])
encoded = Base64.encode64(hash)
interfaces[interface] = {:mac_sha256 => encoded.strip}
end
end
interfaces
end
chunk(:primary?) do
interfaces = {}
Facter.value(:networking)['interfaces'].each do |interface, values|
interfaces[interface] = {:primary? => (interface ==
Facter.value(:networking)['primary'])}
end
interfaces
end
# Facter merges the return values for the two chunks
# automatically, so there's no aggregate statement.
end
The fact’s output is organized by network interface into hashes, each containing the two chunks:
{
bridge0 => {
mac_sha256 => "bfgEFV7m1V04HYU6UqzoNoVmnPIEKWRSUOU650j0Wkk=",
primary? => false
},
en0 => {
mac_sha256 => "6Fd3Ws2z+aIl8vNmClCbzxiO2TddyFBChMlIU+QB28c=",
primary? => true
},
...
}
© 2024 Puppet, Inc., a Perforce company

Puppet | Platform components | 336
Example: Building a flat fact progressively with addition
Facter.add(:total_free_memory_mb, :type => :aggregate) do
chunk(:physical_memory) do
Facter.value(:memoryfree_mb)
end
chunk(:virtual_memory) do
Facter.value(:swapfree_mb)
end
aggregate do |chunks|
# The return value for this block determines the value of the fact.
sum = 0
chunks.each_value do |i|
sum += i
end
sum
end
end
Related information
Facter 4 known issues on page 43
These are the known issues in this version of Facter.
External facts
External facts provide a way to use arbitrary executables or scripts as facts, or set facts statically with structured data.
With this information, you can write a custom fact in Perl, C, or a one-line text file.
Executable facts on Unix
Executable facts on Unix work by dropping an executable file into the standard external fact path. A shebang (#!) is
always required for executable facts on Unix. If the shebang is missing, the execution of the fact fails.
An example external fact written in Python:
#!/usr/bin/env python
data = {"key1" : "value1", "key2" : "value2" }
for k in data:
print "%s=%s" % (k,data[k])
You must ensure that the script has its execute bit set:
chmod +x /etc/facter/facts.d/my_fact_script.py
For Facter to parse the output, the script should return key-value pairs, JSON, or YAML.
Custom executable external facts can return data in YAML or JSON format, and Facter parses it into a structured fact.
If the returned value is not YAML, Facter falls back to parsing it as a key-value pair.
By using the key-value pairs on STDOUT format, a single script can return multiple facts:
key1=value1
key2=value2
key3=value3
© 2024 Puppet, Inc., a Perforce company

Puppet | Platform components | 337
Executable facts on Windows
Executable facts on Windows work by dropping an executable file into the external fact path. The external facts
interface expects Windows scripts to end with a known extension. Line endings can be either LF or CRLF. The
following extensions are supported:
• .com and .exe: binary executables
• .bat and .cmd: batch scripts
• .ps1: PowerShell scripts
The script should return key-value pairs, JSON, or YAML.
Custom executable external facts can return data in YAML or JSON format, and Facter parses it into a structured fact.
If the returned value is not YAML, Facter falls back to parsing it as a key-value pair.
By using the key-value pairs on STDOUT format, a single script can return multiple facts:
key1=value1
key2=value2
key3=value3
Using this format, a single script can return multiple facts in one return.
For batch scripts, the file encoding for the .bat or .cmd files must be ANSI or UTF8 without BOM.
Here is a sample batch script which outputs facts using the required format:
@echo off
echo key1=val1
echo key2=val2
echo key3=val3
REM Invalid - echo 'key4=val4'
REM Invalid - echo "key5=val5"
For PowerShell scripts, the encoding used with .ps1 files is flexible. PowerShell determines the encoding of the file
at run time.
Here is a sample PowerShell script which outputs facts using the required format:
Write-Host "key1=val1"
Write-Host 'key2=val2'
Write-Host key3=val3
Save and execute this PowerShell script on the command line.
Executable fact locations
Distribute external executable facts with pluginsync. To add external executable facts to your Puppet modules, place
them in <MODULEPATH>/<MODULE>/facts.d/.
If you’re not using pluginsync, then external facts must go in a standard directory. The location of this directory
varies depending on your operating system, whether your deployment uses Puppet Enterprise or open source releases,
and whether you are running as root or Administrator. When calling Facter from the command line, you can specify
the external facts directory with the --external-dir option.
Note: These directories don’t necessarily exist by default; you might need to create them. If you create the directory,
make sure to restrict access so that only administrators can write to the directory.
In a module (recommended):
<MODULEPATH>/<MODULE>/facts.d/
© 2024 Puppet, Inc., a Perforce company

Puppet | Platform components | 338
On Unix, Linux, or Mac OS X, there are three directories:
/opt/puppetlabs/facter/facts.d/
/etc/puppetlabs/facter/facts.d/
/etc/facter/facts.d/
On Windows:
C:\ProgramData\PuppetLabs\facter\facts.d\
When running as a non-root or non-Administrator user:
<HOME DIRECTORY>/.facter/facts.d/
Note: You can use custom facts as a non-root user only if you have first configured non-root user access and
previously run Puppet agent as that same user.
Structured data facts
Facter can parse structured data files stored in the external facts directory and set facts based on their contents.
Structured data files must use one of the supported data types and must have the correct file extension. Facter
supports the following extensions and data types:
• .yaml: YAML data, in the following format:
---
key1: val1
key2: val2
key3: val3
• .json: JSON data, in the following format:
{ "key1": "val1", "key2": "val2", "key3": "val3" }
• .txt: Key-value pairs, of the String data type, in the following format:
key1=value1
key2=value2
key3=value3
As with executable facts, structured data files can set multiple facts at one time.
{
"datacenter":
{
"location": "bfs",
"workload": "Web Development Pipeline",
"contact": "Blackbird"
},
"provision":
{
"birth": "2017-01-01 14:23:34",
"user": "alex"
}
}
You can also compose multiple external facts in a structured fact using the dot notation. For example:
my_org.my_group.my_fact1 = fact1_value
© 2024 Puppet, Inc., a Perforce company

Puppet | Platform components | 339
my_org.my_group.my_fact2 = fact2_value
Structured data facts on Windows
All of the above types are supported on Windows with the following notes:
• The line endings can be either LF or CRLF.
• The file encoding must be either ANSI or UTF8 without BOM.
Troubleshooting
If your external fact is not appearing in Facter’s output, running Facter in debug mode can reveal why and tell you
which file is causing the problem:
# puppet facts --debug
One possible cause is a fact that returns invalid characters. For example if you used a hyphen instead of an equals sign
in your script test.sh:
#!/bin/bash
echo "key1-value1"
Running puppet facts --debug yields the following message:
...
Debug: Facter: resolving facts from executable file "/tmp/test.sh".
Debug: Facter: executing command: /tmp/test.sh
Debug: Facter: key1-value1
Debug: Facter: ignoring line in output: key1-value1
Debug: Facter: process exited with status code 0.
Debug: Facter: completed resolving facts from executable file "/tmp/
test.sh".
...
If you find that an external fact does not match what you have configured in your facts.d directory, make sure you
have not defined the same fact using the external facts capabilities found in the stdlib module.
Drawbacks
While external facts provide a mostly-equal way to create variables for Puppet, they have a few drawbacks:
• An external fact cannot internally reference another fact. However, due to parse order, you can reference an
external fact from a Ruby fact.
• External executable facts are forked instead of executed within the same process.
Related information
Custom facts overview on page 325
You can add custom facts by writing snippets of Ruby code on the primary Puppet server. Puppet then uses plug-ins
in modules to distribute the facts to the client.
Configuring Facter with facter.conf
The facter.conf file is a configuration file that allows you to cache and block fact groups and facts, and manage
how Facter interacts with your system. There are four sections: facts, global, cli and fact-groups. All
sections are optional and can be listed in any order within the file.
When you run Facter from the Ruby API, only the facts section and limited global settings are loaded.
© 2024 Puppet, Inc., a Perforce company

Puppet | Platform components | 340
Example facter.conf file:
facts : {
blocklist : [ "file system", "EC2", "os.architecture" ],
ttls : [
{ "timezone" : 30 days },
]
}
global : {
external-dir : [ "path1", "path2" ],
custom-dir : [ "custom/path" ],
no-exernal-facts : false,
no-custom-facts : false,
no-ruby : false
}
cli : {
debug : false,
trace : true,
verbose : false,
log-level : "warn"
}
fact-groups : {
custom-group-name : ["os.name", "ssh"],
}
Note: The facter.conf file is in hocon format. Use // or # for comments.
Location
Facter does not create the facter.conf file automatically, so you must create it manually, or use a module to
manage it. Facter loads the file by default from /etc/puppetlabs/facter/facter.conf on *nix systems
and C:\ProgramData\PuppetLabs\facter\etc\facter.conf on Windows. Or you can specify a
different default with the --config command line option:
facter --config path/to/my/config/file/facter.conf
facts
This section of facter.conf contains settings that affect fact groups. A fact group contains one or more individual
facts. When you block or cache a fact group, all the facts from that group are affected. You can cache any type of fact,
including custom and external.
The settings in this section are:
• blocklist — Prevents all facts within the listed groups from being resolved when Facter runs. Use the --
list-block-group command line option to list valid groups.
• ttls — Caches the key-value pairs of groups and their duration to be cached. Use the --list-cache-group
command line option to list valid groups.
• Cached facts are stored as JSON in /opt/puppetlabs/facter/cache/cached_facts on *nix and
C:\ProgramData\PuppetLabs\facter\cache\cached_facts on Windows.
Caching and blocking facts is useful when Facter is taking a long time and slowing down your code. When a system
has a lot of something — for example, mount points or disks — Facter can take a long time to collect the facts from
each one. When this is a problem, you can speed up Facter’s collection by either blocking facts you’re uninterested in
(blocklist), or caching ones you don’t need retrieved frequently (ttls).
© 2024 Puppet, Inc., a Perforce company

Puppet | Platform components | 341
To see a list of valid group names, from the command line, run facter --list-block-groups or facter
--list-cache-groups. The output shows the fact group at the top level, with all facts in that group nested
below:
$ facter --list-block-groups
EC2
- ec2_metadata
- ec2_userdata
file system
- mountpoints
- filesystems
- partitions
If you want to block any of these groups, add the group name to the facts section of facter.conf, with the
blocklist setting:
facts : {
blocklist : [ "file system" ],
}
Here, the file system group has been added, so the mountpoints, filesystems, and partitions facts
are now prevented from loading.
You can also specify fact names with the blocklist and ttls settings. For example:
facts : {
blocklist : [ "my_external_fact.txt", "my_executable_fact.sh" ],
}
ttls : [
{ "timezone" : 30 days },
{ "networking.hostname" : 6 hours },
]
global
The global section of facter.conf contains settings to control how Facter interacts with its external elements
on your system.
Setting Effect Default
external-dir A list of directories to search for
external facts.
custom-dir A list of directories to search for
custom facts.
no-external* If true, prevents Facter from
searching for external facts.
false
no-custom* If true, prevents Facter from
searching for custom facts.
false
no-ruby* If true, prevents Facter from
loading its Ruby functionality.
false
*Not available when you run Facter from the Ruby API.
© 2024 Puppet, Inc., a Perforce company

Puppet | Platform components | 342
cli
The cli section of facter.conf contains settings that affect Facter’s command line output. All of these settings
are ignored when you run Facter from the Ruby API.
Setting Effect Default
debug If true, Facter outputs debug
messages.
false
trace If true, Facter prints stacktraces
from errors arising in your custom
facts.
false
verbose If true, Facter outputs its most
detailed messages.
false
log-level Sets the minimum level of message
severity that gets logged. Valid
options: "none", "fatal",
"error", "warn", "info",
"debug", "trace".
"warn"
fact-groups
The fact-groups group lets you define your own custom groups in facter.conf. A group can contain any
type of fact, except external facts. For aggregated facts, you can specify the root fact using the dot notation. You can
use these defined groups for blocking (blocklist) or caching (ttls).
fact-groups : {
custom-group-name : ["networking.hostname", "ssh"],
}
PuppetDB
All of the data generated by Puppet (for example facts, catalogs, reports) is stored in PuppetDB.
Storing data in PuppetDB allows Puppet to work faster and provides an API for other applications to access Puppet's
collected data. Once PuppetDB is full of your data, it becomes a great tool for infrastructure discovery, compliance
reporting, vulnerability assessment, and more. You perform all of these tasks with PuppetDB queries.
See the PuppetDB docs for more information.
Puppet services and tools
Puppet provides a number of core services and administrative tools to manage systems with or without a primary
Puppet server, and to compile configurations for Puppet agents.
© 2024 Puppet, Inc., a Perforce company
Puppet | Platform components | 343
• Puppet commands on page 343
Puppet’s command line interface (CLI) consists of a single puppet command with many subcommands.
• Running Puppet commands on Windows on page 345
Puppet was originally designed to run on *nix systems, so its commands generally act the way *nix admins expect.
Because Windows systems work differently, there are a few extra things to keep in mind when using Puppet
commands.
• Puppet agent on *nix systems on page 351
Puppet agent is the application that manages the configurations on your nodes. It requires a Puppet primary server to
fetch configuration catalogs from.
• Puppet agent on Windows on page 354
Puppet agent is the application that manages configurations on your nodes. It requires a Puppet primary server to
fetch configuration catalogs.
• Puppet apply on page 358
Puppet apply is an application that compiles and manages configurations on nodes. It acts like a self-contained
combination of the Puppet primary server and Puppet agent applications.
• Puppet device on page 360
With Puppet device, you can manage network devices, such as routers, switches, firewalls, and Internet of Things
(IOT) devices, without installing a Puppet agent on them. Devices that cannot run Puppet applications require a
Puppet agent to act as a proxy. The proxy manages certificates, collects facts, retrieves and applies catalogs, and
stores reports on behalf of a device.
Puppet commands
Puppet’s command line interface (CLI) consists of a single puppet command with many subcommands.
Puppet Server and Puppet’s companion utilities Facter and Hiera , have their own CLI.
Puppet agent
Puppet agent is a core service that manages systems, with the help of a Puppet primary server. It requests a
configuration catalog from a Puppet primary server server, then ensures that all resources in that catalog are in their
desired state.
For more information, see:
• Overview of Puppet’s architecture
• Puppet Agent on *nix systems
• Puppet Agent on Windows systems
• Puppet Agent’s man page
Puppet Server
Using Puppet code and various other data sources, Puppet Server compiles configurations for any number of Puppet
agents.
Puppet Server is a core service and has its own subcommand, puppetserver, which isn’t prefaced by the usual
puppet subcommand.
For more information, see:
• Overview of Puppet’s architecture
• Puppet Server
• Puppet Server subcommands
Puppet apply
Puppet apply is a core command that manages systems without contacting a Puppet primary server. Using Puppet
modules and various other data sources, it compiles its own configuration catalog, and then immediately applies the
catalog.
© 2024 Puppet, Inc., a Perforce company
Puppet | Platform components | 344
For more information, see:
• Overview of Puppet’s architecture
• Puppet apply
• Puppet apply’s man page
Puppet ssl
Puppet ssl is a command for managing SSL keys and certificates for Puppet SSL clients needing to communicate with
your Puppetinfrastructure.
Puppet ssl usage: puppet ssl <action> [--certname <name>]
Possible actions:
• submit request: Generate a certificate signing request (CSR) and submit it to the CA. If a private and public
key pair already exist, they are used to generate the CSR. Otherwise, a new key pair is generated. If a CSR has
already been submitted with the given certname, then the operation fails.
• download_cert: Download a certificate for this host. If the current private key matches the downloaded
certificate, then the certificate is saved and used for subsequent requests. If there is already an existing certificate,
it is overwritten.
• verify: Verify that the private key and certificate are present and match. Verify the certificate is issued by a
trusted CA, and check the revocation status
• bootstrap: Perform all of the steps necessary to request and download a client certificate. If autosigning is
disabled, then puppet will wait every waitforcert seconds for its certificate to be signed. To only attempt
once and never wait, specify a time of 0. Since waitforcert is a Puppet setting, it can be specified as a time
interval, such as 30s, 5m, 1h.
For more information, see the SSL man page.
Puppet module
Puppet module is a multi-purpose administrative tool for working with Puppet modules. It can install and upgrade
new modules from the Puppet Forge, help generate new modules, and package modules for public release.
For more information, see:
• Module fundamentals
• Installing modules
• Publishing modules on the Puppet Forge
• Puppet Module’s man page
Puppet resource
Puppet resource is an administrative tool that lets you inspect and manipulate resources on a system. It can work with
any resource type Puppet knows about. For more information, see Puppet Resource’s man page.
Puppet config
Puppet config is an administrative tool that lets you view and change Puppet settings.
For more information, see:
• About Puppet’s settings
• Checking values of settings
• Editing settings on the command line
• Short list of important settings
• Puppet Config’s man page
© 2024 Puppet, Inc., a Perforce company
Puppet | Platform components | 345
Puppet parser
Puppet parser lets you validate Puppet code to make sure it contains no syntax errors. It can be a useful part of your
continuous integration toolchain. For more information, see Puppet Parser’s man page.
Puppet help and Puppet man
Puppet help and Puppet man can display online help for Puppet’s other subcommands.
For more information, see:
• Puppet help’s man page
Full list of subcommands
For a full list of Puppet subcommands, see Puppet’s subcommands.
Running Puppet commands on Windows
Puppet was originally designed to run on *nix systems, so its commands generally act the way *nix admins expect.
Because Windows systems work differently, there are a few extra things to keep in mind when using Puppet
commands.
Supported commands
Not all Puppet commands work on Windows. Notably, Windows nodes can’t run the puppet server or
puppetserver ca commands.
The following commands are designed for use on Windows:
• puppet agent
• puppet apply
• puppet module
• puppet resource
• puppet config
• puppet lookup
• puppet help
Running Puppet's commands
The installer adds Puppet commands to the PATH. After installing, you can run them from any command prompt
(cmd.exe) or PowerShell prompt.
Open a new command prompt after installing. Any processes that were already running before you ran the installer do
not pick up the changed PATH value.
Running with administrator privileges
You usually want to run Puppet’s commands with administrator privileges.
Puppet has two privilege modes:
• Run with limited privileges, only manage certain resource types, and use a user-specific confdir and codedir
• Run with administrator privileges, manage the whole system, and use the system confdir and codedir
On *nix systems, Puppet defaults to running with limited privileges, when not run by root, but can have its
privileges raised with the standard sudo command.
Windows systems don’t use sudo, so escalating privileges works differently.
Newer versions of Windows manage security with User Account Control (UAC), which was added in Windows
2008 and Windows Vista. With UAC, most programs run by administrators still have limited privileges. To get
administrator privileges, the process has to request those privileges when it starts.
© 2024 Puppet, Inc., a Perforce company

Puppet | Platform components | 346
To run Puppet's commands in adminstrator mode, you must first start a Powershell command prompt with
administrator privileges.
Right-click the Start (or apps screen tile) -> Run as administrator:
Click Yes to allow the command prompt to run with elevated privaleges:
The title bar on the comand prompt window begins with Administrator. This means Puppet commands that run from
that window can manage the whole system.
© 2024 Puppet, Inc., a Perforce company
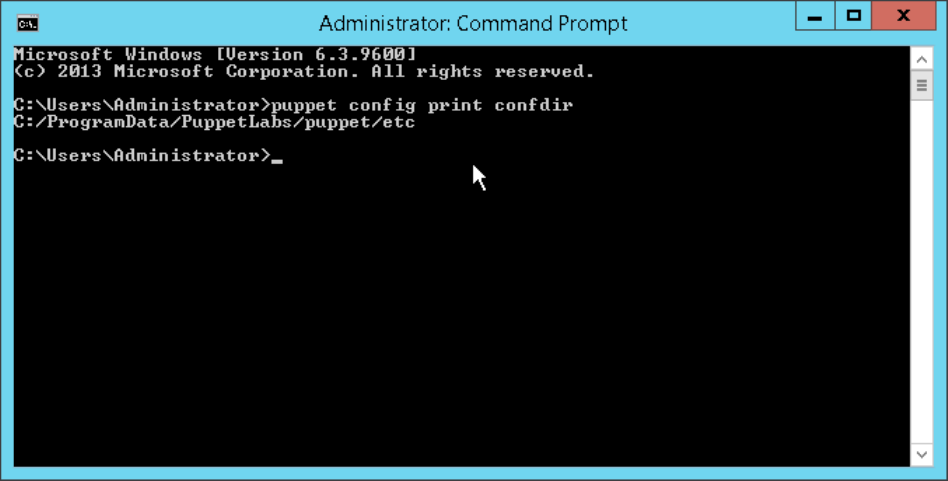
Puppet | Platform components | 347
© 2024 Puppet, Inc., a Perforce company

Puppet | Platform components | 348
The Puppet Start menu items
Puppet’s installer adds a folder of shortcut items to the Start Menu.
These items aren’t necessary for working with Puppet, because Puppet agent runs a normal Windows service and the
Puppet commands work from any command or PowerShell prompt. They’re provided solely as conveniences.
The Start menu items do the following:
Run Facter
This shortcut requests UAC elevation and, using the CLI, runs Facter with administrator privileges.
© 2024 Puppet, Inc., a Perforce company

Puppet | Platform components | 349
Run Puppet agent
This shortcut requests UAC elevation and, using the CLI, performs a single Puppet agent command with
administrator privileges.
Start Command Prompt with Puppet
This shortcut starts a normal command prompt with the working directory set to Puppet's program directory.
The CLI window icon is also set to the Puppet logo. This shortcut was particularly useful in previous versions of
Puppet, before Puppet's commands were added to the PATH at installation time.
Note: This shortcut does not automatically request UAC elevation; just like with a normal command prompt,
you'll need to right-click the icon and choose Run as administrator.
Configuration settings
Configuration settings can be viewed and modified using the CLI.
To get configuration settings, run: puppet agent --configprint <SETTING>
To set configuration settings, run: puppet config set <SETTING VALUE> --section <SECTION>
When running Puppet commands on Windows, note the following:
• The location of puppet.conf depends on whether the process is running as an administrator or not.
• Specifying file owner, group, or mode for file-based settings is not supported on Windows.
• The puppet.conf configuration file supports Windows-style CRLF line endings as well as *nix-style LF line
endings. It does not support Byte Order Mark (BOM). The file encoding must either be UTF-8 or the current
Windows encoding, for example, Windows-1252 code page.
• Common configuration settings are certname, server, and runinterval.
• You must restart the Puppet agent service after making any changes to Puppet’s runinterval config file
setting.
primary Puppet server
About Puppet Server
Puppet is configured in an agent-server architecture, in which a primary server node manages the configuration
information for a fleet of agent nodes. Puppet Server acts as the primary server node. Puppet Server is a Ruby and
Clojure application that runs on the Java Virtual Machine (JVM). Puppet Server runs Ruby code for compiling Puppet
catalogs and for serving files in several JRuby interpreters. It also provides a certificate authority through Clojure.
This page describes the general requirements and the run environment for Puppet Server.
Puppet Server releases
Puppet Server and Puppet share the same major release (Puppet Server 6.x and Puppet 6.x). However, they are
versioned separately and might have different minor or patch versions (Puppet Server 6.5 versus Puppet 6.8). For a
list of the maintained versions of Puppet and Puppet Server, visit Puppet releases and lifecycles.
Controlling the Service
The Puppet Server service name is puppetserver. To start and stop the service, use commands such as service
puppetserver restart, service puppetserver status for your OS.
Puppet Server's Run Environment
Puppet Server consists of several related services. These services share state and route requests among themselves.
The services run inside a single JVM process, using the Trapperkeeper service framework.
Embedded Web Server
Puppet Server uses a Jetty-based web server embedded in the service's JVM process. No additional or unique actions
are required to configure and enable the web server. You can modify the web server's settings in webserver.conf on
page 171. You might need to edit this file if you use an external CA or run Puppet on a non-standard port.
© 2024 Puppet, Inc., a Perforce company
Puppet | Platform components | 350
Puppet API Service
Puppet Server provides APIs that are used by the Puppet agent to manage the configuration of your nodes. Visit
Puppet V3 HTTP API on page 220 for more information on the basic APIs.
Certificate Authority Service
Puppet Server includes a certificate authority (CA) service that:
• Accepts certificate signing requests (CSRs) from nodes.
• Serves certificates and a certificate revocation list (CRL) to nodes.
• Optionally accepts commands to sign or revoke certificates.
Signing and revoking certificates over the network is disabled by default. You can use the auth.conf file to allow
specific certificate owners the ability to issue commands.
The CA service uses .pem files to stores credentials. You can use the puppetserver ca command to interact
with these credentials, including listing, signing, and revoking certificates. See CA V1 HTTP API on page 222 for
more information on these APIs.
Admin API Service
Puppet Server includes an administrative API for triggering maintenance tasks. The most common task refreshes
Puppet’s environment cache, which causes all of your Puppet code to reload without the requirement to restart the
service. Consequently, you can deploy new code to long-timeout environments without executing a full restart of the
service.
For API docs, visit:
• Environment cache on page 264.
• JRuby pool on page 265.
For details about environment caching, visit:
• About environments.
JRuby Interpreters
Most of Puppet Server's work is done by Ruby code running in JRuby. JRuby is an implementation of the Ruby
interpreter that runs on the JVM. Note that you can’t use the system gem command to install Ruby Gems for the
Puppet primary server. Instead, Puppet Server includes a separate puppetserver gem command for installing any
libraries your Puppet extensions might require. Visit Using Ruby gems on page 187 for details.
If you want to test or debug code to be used by the Puppet Server, you can use the puppetserver ruby and
puppetserver irb commands to execute Ruby code in a JRuby environment.
To handle parallel requests from agent nodes, Puppet Server maintains separate JRuby interpreters. These JRuby
interpreters individually run Puppet's application code, and distribute agent requests among them. You can configure
the JRuby interpreters in the jruby-puppet section of puppetserver.conf on page 167.
Tuning Guide
You can maximize Puppet Server's performance by tuning your JRuby configuration. To learn more, visit the Puppet
Server Tuning guide on page 203.
User
If you are running Puppet Enterprise:
• Puppet Server user runs as pe-puppet.
• You must specify the user in /etc/sysconfig/pe-puppetserver.
If you are running open source Puppet:
• Puppet Server needs to run as the user puppet.
• You must specify the user in /etc/sysconfig/puppetserver.
© 2024 Puppet, Inc., a Perforce company
Puppet | Platform components | 351
All of the Puppet Server's files and directories must be readable and writable by this user. Note that Puppet Server
ignores the user and group settings from puppet.conf.
Ports
By default, Puppet's HTTPS traffic uses port 8140. The OS and firewall must allow Puppet Server's JVM process to
accept incoming connections on port 8140. If necessary, you can change the port in webserver.conf. See the
webserver.conf on page 171 page for details.
Logging
All of Puppet Server's logging is routed through the JVM Logback library. By default, it logs to /var/log/
puppetlabs/puppetserver/puppetserver.log. The default log level is 'INFO'. By default, Puppet
Server sends nothing to syslog. All log messages follow the same path, including HTTP traffic, catalog
compilation, certificate processing, and all other parts of Puppet Server's work.
Puppet Server also relies on Logback to manage, rotate, and archive Server log files. Logback archives Server logs
when they exceed 200MB. Also, when the total size of all Server logs exceeds 1GB, Logback automatically deletes
the oldest logs. Logback is heavily configurable. If you need something more specialized than a unified log file, it
may be possible to obtain. Visit Logging on page 159 for more details.
Finally, any errors that cause the logging system to die or occur before logging is set up, display in journalctl.
SSL Termination
By default, Puppet Server handles SSL termination automatically. For network configurations that require external
SSL termination (e.g. with a hardware load balancer), additional configuration is required. See the External SSL
termination on page 192 page for details. In summary, you must:
• Configure Puppet Server to use HTTP instead of HTTPS.
• Configure Puppet Server to accept SSL information via insecure HTTP headers.
• Secure your network so that Puppet Server cannot be directly reached by any untrusted clients.
• Configure your SSL terminating proxy to set the following HTTP headers:
• X-Client-Verify (mandatory).
• X-Client-DN (mandatory for client-verified requests).
• X-Client-Cert (optional; required for trusted facts).
Configuring Puppet Server
Puppet Server uses a combination of Puppet's configuration files along with its own separate configuration files,
which are located in the conf.d directory. Refer to the Config directory for a list of Puppet's configuration files. For
detailed information about Puppet Server settings and the conf.d directory, refer to the Configuring Puppet Server
on page 157 page.
Puppet agent on *nix systems
Puppet agent is the application that manages the configurations on your nodes. It requires a Puppet primary server to
fetch configuration catalogs from.
Depending on your infrastructure and needs, you can manage systems with Puppet agent as a service, as a cron job, or
on demand.
For more information about running the puppet agent command, see the puppet agent man page.
Puppet agent's run environment
Puppet agent runs as a specific user, (usually root) and initiates outbound connections on port 8140.
Ports
Puppet’s HTTPS traffic uses port 8140. Your operating system and firewall must allow Puppet agent to initiate
outbound connections on this port.
© 2024 Puppet, Inc., a Perforce company

Puppet | Platform components | 352
If you want to use a non-default port, you have to change the serverport setting on all agent nodes, and ensure that
you change your primary Puppet server’s port as well.
User
Puppet agent runs as root, which lets it manage the configuration of the entire system.
Puppet agent can also run as a non-root user, as long as it is started by that user. However, this restricts the resources
that Puppet agent can manage, and requires you to run Puppet agent as a cron job instead of a service.
If you need to install packages into a directory controlled by a non-root user, use an exec to unzip a tarball or use a
recursive file resource to copy a directory into place.
When running without root permissions, most of Puppet’s resource providers cannot use sudo to elevate
permissions. This means Puppet can only manage resources that its user can modify without using sudo.
Out of the core resource types listed in the resource type reference, only the following types are available to non-root
agents:
Resource type Details
augeas
cron Only non-root cron jobs can be viewed or set.
exec Cannot run as another user or group.
file Only if the non-root user has read/write privileges.
notify
schedule
service For services that don’t require root. You can also use the
start, stop, and status attributes to specify how
non-root users can control the service.
ssh_authorized_key
ssh_key
Manage systems with Puppet agent
In a standard Puppet configuration, each node periodically does configuration runs to revert unwanted changes and to
pick up recent updates.
On *nix nodes, there are three main ways to do this:
Run Puppet agent as a service.
The easiest method. The Puppet agent daemon does configuration runs at a set interval, which can be configured.
Make a cron job that runs Puppet agent.
Requires more manual configuration, but a good choice if you want to reduce the number of persistent processes
on your systems.
Only run Puppet agent on demand.
You can also deploy MCollective to run on demand on many nodes.
Choose whichever one works best for your infrastructure and culture.
Run Puppet agent as a service
The puppet agent command can start a long-lived daemon process that does configuration runs at a set interval.
Note: If you are running Puppet agent as a non-root user, use a cron job instead.
© 2024 Puppet, Inc., a Perforce company

Puppet | Platform components | 353
1.
Start the service.
The best method is with Puppet agent’s init script / service configuration. When you install Puppet with packages,
included is an init script or service configuration for controlling Puppet agent, usually with the service name
puppet (for both open source and Puppet Enterprise).
In open source Puppet, enable the service by running this command:
sudo puppet resource service puppet ensure=running enable=true
You can also run the sudo puppet agent command with no additional options which causes the Puppet
agent to start running and daemonize, however you won’t have an interface for restarting or stopping it. To stop
the daemon, use the process ID from the agent’s pidfile :
sudo kill $(puppet config print pidfile --section agent)
2.
(Optional) Configure the run interval.
The Puppet agent service defaults to doing a configuration run every 30 minutes. You can configure this with the
runinterval setting in puppet.conf :
# /etc/puppetlabs/puppet/puppet.conf
[agent]
runinterval = 2h
If you don’t need frequent configuration runs, a longer run interval lets your primary Puppet server handle many
more agent nodes.
Run Puppet agent as a cron job
Run Puppet agent as a cron job when running as a non-root user.
If the onetime setting is set to true, the Puppet agent command does one configuration run and then quits.
If the daemonize setting is set to false, the command stays in the foreground until the run is finished. If set to
true, it does the run in the background.
This behavior is good for building a cron job that does configuration runs. You can use the splay and
splaylimit settings to keep the primaryPuppet server from getting overwhelmed, because the system time is
probably synchronized across all of your agent nodes.
To set up a cron job, run the puppet resource command:
sudo puppet resource cron puppet-agent ensure=present user=root minute=30
command='/opt/puppetlabs/bin/puppet agent --onetime --no-daemonize --splay
--splaylimit 60'
The above example runs Puppet one time every hour.
Run Puppet agent on demand
Some sites prefer to run Puppet agent on-demand, and others use scheduled runs along with the occasional on-
demand run.
You can start Puppet agent runs while logged in to the target system, or remotely with Bolt or MCollective.
Run Puppet agent on one machine, using SSH to log into it:
ssh [email protected] sudo puppet agent --test
To run remotely on multiple machines, you need some form of orchestration or parallel execution tool, such as Bolt or
MCollective with the puppet agent plugin.
© 2024 Puppet, Inc., a Perforce company

Puppet | Platform components | 354
Note: As of Puppet agent 5.5.4, MCollective is deprecated and will be removed in a future version of Puppet agent.
If you use open source Puppet, migrate MCollective agents and filters using tools like Bolt and PuppetDB’s Puppet
Query Language.
Disable and re-enable Puppet runs
Whether you’re troubleshooting errors, working in a maintenance window, or developing in a sandbox environment,
you might need to temporarily disable the Puppet agent from running.
1.
To disable the agent, run:
sudo puppet agent --disable "<MESSAGE>"
2.
To enable the agent, run:
sudo puppet agent --enable
Configuring Puppet agent
The Puppet agent comes with a default configuration that you might want to change.
Configure Puppet agent with puppet.conf using the [agent] section, the [main] section, or both. For information
on settings relevant to Puppet agent, see important settings.
Logging for Puppet agent on *nix systems
When running as a service, Puppet agent logs messages to syslog. Your syslog configuration determines where these
messages are saved, but the default location is /var/log/messages on Linux, and /var/log/system.log
on Mac OS X.
You can adjust how verbose the logs are with the log_level setting, which defaults to notice.
When running in the foreground with the --verbose, --debug, or --test options, Puppet agent logs directly to
the terminal instead of to syslog.
When started with the --logdest <FILE> option, Puppet agent logs to the file specified by <FILE>.
Reporting for Puppet agent on *nix systems
In addition to local logging, Puppet agent submits a report to the primary Puppet server after each run. This can be
disabled by setting report = false in puppet.conf.)
Puppet agent on Windows
Puppet agent is the application that manages configurations on your nodes. It requires a Puppet primary server to
fetch configuration catalogs.
For more information about invoking the Puppet agent command, see the >puppet agent man page.
Puppet agent's run environment
Puppet agent runs as a specific user, by default LocalSystem, and initiates outbound connections on port 8140.
Ports
By default, Puppet’s HTTPS traffic uses port 8140. Your operating system and firewall must allow Puppet agent to
initiate outbound connections on this port.
If you want to use a non-default port, change the serverport setting on all agent nodes, and ensure that you
change your Puppet primary server’s port as well.
© 2024 Puppet, Inc., a Perforce company

Puppet | Platform components | 355
User
Puppet agent runs as the LocalSystem user, which lets it manage the configuration of the entire system, but
prevents it from accessing files on UNC shares.
Puppet agent can also run as a different user. You can change the user in the Service Control Manager (SCM). To
start the SCM, click Start -> Run… and then enter Services.msc.
You can also specify a different user when installing Puppet. To do this, install using the CLI and specify the
required MSI properties: PUPPET_AGENT_ACCOUNT_USER,PUPPET_AGENT_ACCOUNT_PASSWORD, and
PUPPET_AGENT_ACCOUNT_DOMAIN.
Puppet agent’s user can be a local or domain user. If this user isn’t already a local administrator, the Puppet installer
adds it to the Administrators group. The installer also grants Logon as Service to the user.
Managing systems with Puppet agent
In a normal Puppet configuration, every node periodically does configuration runs to revert unwanted changes and to
pick up recent updates.
On Windows nodes, there are two main ways to do this:
Run Puppet as a service.
The easiest method. The Puppet agent service does configuration runs at a set interval, which can be configured.
Run Puppet agent on demand.
You can also use Bolt or deployMCollective to run on demand on many nodes.
Because the Windows version of the Puppet agent service is much simpler than the *nix version, there’s no real
performance to be gained by running Puppet as a scheduled task. If you want scheduled configuration runs, use the
Windows service.
Running Puppet agent as a service
The Puppet installer configures Puppet agent to run as a Windows service and starts it. No further action is needed.
Puppet agent does configuration runs at a set interval.
Configuring the run interval
The Puppet agent service defaults to doing a configuration run every 30 minutes. If you don’t need frequent
configuration runs, a longer run interval lets your Puppet primary servers handle many more agent nodes.
You can configure this with the runinterval setting in puppet.conf:
# C:\ProgramData\PuppetLabs\puppet\etc\puppet.conf
[agent]
runinterval = 2h
After you change the run interval, the next run happens on the previous schedule, and subsequent runs happen on the
new schedule.
Configuring the service start up type
The Puppet agent service defaults to starting automatically. If you want to start it manually or disable it, you can
configure this during installation.
To do this, install using the CLI and specify the PUPPET_AGENT_STARTUP_MODE MSI property.
You can also configure this after installation with the Service Control Manager (SCM). To start the SCM, click Start
-> Run... and enter Services.msc.
You can also configure agent service with the sc.exe command. To prevent the service from starting on boot, run
the following command from the Command Prompt (cmd.exe):
sc config puppet start= demand
© 2024 Puppet, Inc., a Perforce company

Puppet | Platform components | 356
Important: The space after start= is mandatory and must be run in cmd.exe. This command won’t work from
PowerShell.
To stop and restart the service, run the following commands:
sc stop puppet
sc start puppet
To change the arguments used when triggering a Puppet agent run, add flags to the command:
sc start puppet --debug --logdest eventlog
This example changes the level of detail that gets written to the Event Log.
Running Puppet agent on demand
Some sites prefer to run Puppet agent on demand, and others occasionally need to do an on-demand run.
You can start Puppet agent runs while logged in to the target system, or remotely with Bolt or MCollective.
While logged in to the target system
On Windows, log in as an administrator, and start the configuration run by selecting Start -> Run Puppet Agent.
If Windows prompts for User Account Control confirmation, click Yes. The status result of the run is shown in a
command prompt window.
Running other Puppet commands
To run other Puppet-related commands, start a command prompt with administrative privileges. You can do so by
right-clicking the Command Prompt or Start Command Prompts with Puppet program and clicking Run as
administrator. Click Yes if the system asks for UAC confirmation.
Remotely
Open source Puppet users can use Bolt to run tasks and commands on remote systems.
Alternatively, you can install MCollective and the puppet agent plugin to get similar capabilities, but Puppet doesn't
provide standalone MCollective packages for Windows.
Important: As of Puppet agent 5.5.4, MCollective is deprecated and will be removed in a future version of
Puppet agent. If you use Puppet Enterprise, consider migrating from MCollective to Puppet orchestrator. If you use
open source Puppet, migrate MCollective agents and filters using tools like Bolt and the PuppetDB Puppet Query
Language.
Disabling and re-enabling Puppet runs
Whether you’re troubleshooting errors, working in a maintenance window, or developing in a sandbox environment,
you might need to temporarily disable the Puppet agent from running.
1.
Start a command prompt with Run as administrator.
2.
To disable the agent, run:
puppet agent --disable "<MESSAGE>"
3.
To enable the agent, run:
puppet agent --enable
© 2024 Puppet, Inc., a Perforce company

Puppet | Platform components | 357
Configuring Puppet agent on Windows
The Puppet agent comes with a default configuration that you might want to change.
Configure Puppet agent with puppet.conf, using the [agent] section, the [main] section, or both. For more
information on which settings are relevant to Puppet agent, see important settings.
Logging for Puppet agent on Windows systems
When running as a service, Puppet agent logs messages to the Windows Event Log. You can view its logs by
browsing the Event Viewer. Click Control Panel -> System and Security -> Administrative Tools -> Event
Viewer.
By default, Puppet logs to the Application event log. However, you can configure Puppet to log to a separate
Puppet log instead.
To enable the Puppet log, create the requisite registry key by opening a command prompt and running one of the
following commands:
Bash:
reg add HKLM\System\CurrentControlSet\Services\EventLog\Puppet
\Puppet /v EventMessageFile /t REG_EXPAND_SZ /d "%SystemRoot%
\System32\EventCreate.exe"
PowerShell and the New-EventLog cmdlet:
if ([System.Diagnostics.Eventlog]::SourceExists("puppet")) { Remove-EventLog
-Source 'puppet' } & New-EventLog -Source puppet -LogName Puppet
Note that for agents older than 5.5.17 on the 5.5.x stream, 6.4.4 on the 6.4.x stream and 6.8.0 on the primary server
stream, use the same Bash command listed above, but the following PowerShell command instead:
if ([System.Diagnostics.Eventlog]::SourceExists("puppet")) { Remove-EventLog
-Source 'puppet' } & New-EventLog -Source puppet -LogName Puppet -
MessageResource "%SystemRoot%\System32\EventCreate.exe"
After you add the registry key, you need to reboot your machine for the logging to be redirected.
Note: If you are using an older version of Puppet, double check that you have the most up to date path to
EventCreate.exe.
For existing agents, these commands can be placed in an exec resource to configure agents going forward.
Note: Any previously recorded event log messages are not moved; only new messages are recorded in the newly
created Puppet log.
You can adjust how verbose the logs are with the log_level setting, which defaults to notice.
When running in the foreground with the --verbose, --debug, or --test options, Puppet agent logs directly to
the terminal.
When started with the --logdest <FILE> option, Puppet agent logs to the file specified by <FILE>. Note that
there are no file size checks for the --logdest <FILE> option.
Reporting for Puppet agent on Windows systems
In addition to local logging, Puppet agent submits a report to the primary server after each run. This can be disabled
by setting report = false in puppet.conf.
© 2024 Puppet, Inc., a Perforce company

Puppet | Platform components | 358
Setting Puppet agent CPU priority
When CPU usage is high, lower the priority of the Puppet agent service by using the process priority setting, a cross
platform configuration option. Process priority can also be set in the primary server configuration.
Puppet apply
Puppet apply is an application that compiles and manages configurations on nodes. It acts like a self-contained
combination of the Puppet primary server and Puppet agent applications.
For details about invoking the puppet apply command, see the puppet apply man page.
Supported platforms
Puppet apply runs similarly on *nix and Windows systems. Not all operating systems can manage the same resources
with Puppet; some resource types are OS-specific, and others have OS-specific features. For more information, see
the resource type reference.
Puppet apply's run environment
Unlike Puppet agent, Puppet apply never runs as a daemon or service. It runs as a single task in the foreground, which
compiles a catalog, applies it, files a report, and exits.
By default, it never initiates outbound network connections, although it can be configured to do so, and it never
accepts inbound network connections.
Main manifest
Like the primary Puppet server application, Puppet apply uses its settings (such as basemodulepath) and the
configured environments to locate the Puppet code and configuration data it uses when compiling a catalog.
The one exception is the main manifest. Puppet apply always requires a single command line argument, which acts as
its main manifest. It ignores the main manifest from its environment.
Alternatively, you can write a main manifest directly using the command line, with the -e option. For more
information, see the puppet apply man page.
User
Puppet apply runs as whichever user executed the Puppet apply command.
To manage a complete system, run Puppet apply as:
• root on *nix systems.
• Either LocalService or a member of the Administrators group on Windows systems.
Puppet apply can also run as a non-root user. When running without root permissions, most of Puppet’s resource
providers cannot use sudo to elevate permissions. This means Puppet can only manage resources that its user can
modify without using sudo.
Of the core resource types listed in the resource type reference, the following are available to non-root agents:
Resource type Details
augeas
cron Only non-root cron jobs can be viewed or set.
exec Cannot run as another user or group.
file Only if the non-root user has read/write privileges.
notify
schedule
© 2024 Puppet, Inc., a Perforce company

Puppet | Platform components | 359
Resource type Details
service For services that don’t require root. You can also use
the start, stop, and status attributes to specify
how non-root users can control the service. For more
information, see tips and examples for the service
type.
ssh_authorized_key
ssh_key
To install packages into a directory controlled by a non-root user, you can either use an exec to unzip a tarball or use
a recursive file resource to copy a directory into place.
Network access
By default, Puppet apply does not communicate over the network. It uses its local collection of modules for any file
sources, and does not submit reports to a central server.
Depending on your system and the resources you are managing, it might download packages from your configured
package repositories or access files on UNC shares.
If you have configured an external node classifier (ENC), your ENC script might create an outbound HTTP
connection. Additionally, if you’ve configured the HTTP report processor, Puppet agent sends reports via HTTP or
HTTPS.
If you have configured PuppetDB, Puppet apply creates outbound HTTPS connections to PuppetDB.
Logging
Puppet apply logs directly to the terminal, which is good for interactive use, but less so when running as a scheduled
task or cron job.
You can adjust how verbose the logs are with the log_level setting, which defaults to notice. Setting it to
info is equivalent to running with the --verbose option, and setting it to debug is equivalent to --debug. You
can also make logs quieter by setting it to warning or lower.
When started with the --logdest syslog option, Puppet apply logs to the *nix syslog service. Your syslog
configuration dictates where these messages are saved, but the default location is /var/log/messages on Linux,
and /var/log/system.logon Mac OS X.
When started with the --logdest eventlog option, it logs to the Windows Event Log. You can view its logs
by browsing the Event Viewer. Click Control Panel -> System and Security -> Administrative Tools -> Event
Viewer.
When started with the --logdest <FILE> option, it logs to the file specified by <FILE>.
Reporting
In addition to local logging, Puppet apply processes a report using its configured report handlers, like a primary
Puppet server does. Using the reports setting, you can enable different reports. For more information, see the list
of available reports. For information about reporting, see the reporting documentation.
To disable reporting and avoid taking up disk space with the store report handler, you can set report = false
in puppet.conf.
Managing systems with Puppet apply
In a typical site, every node periodically does a Puppet run, to revert unwanted changes and to pick up recent updates.
Puppet apply doesn’t run as a service, so you must manually create a scheduled task or cron job if you want it to run
on a regular basis, instead of using Puppet agent.
© 2024 Puppet, Inc., a Perforce company

Puppet | Platform components | 360
On *nix, you can use the puppet resource command to set up a cron job.
This example runs Puppet one time per hour, with Puppet Enterprise paths:
sudo puppet resource cron puppet-apply ensure=present user=root minute=60
command='/opt/puppetlabs/bin/puppet apply /etc/puppetlabs/puppet/manifests
--logdest syslog'
Configuring Puppet apply
Configure Puppet apply in the puppet.conf file, using the [user] section, the [main] section, or both.
For information on which settings are relevant to puppet apply, see important settings.
Puppet device
With Puppet device, you can manage network devices, such as routers, switches, firewalls, and Internet of Things
(IOT) devices, without installing a Puppet agent on them. Devices that cannot run Puppet applications require a
Puppet agent to act as a proxy. The proxy manages certificates, collects facts, retrieves and applies catalogs, and
stores reports on behalf of a device.
Puppet device runs on both *nix and Windows. The Puppet device application combines some of the functionality of
the Puppet apply and Puppet resource applications. For details about running the Puppet device application, see the
puppet device man page.
Note: If you are writing a module for a remote resource, we recommend using transports instead of devices.
Transports have extended functionality and can be used with other workflows, such as with Bolt . For more
information on transports and how to port your existing code, see Resource API Transports.
The Puppet device model
In a typical deployment model, a Puppet agent is installed on each system managed by Puppet. However, not all
systems can have agents installed on them.
For these devices, you can configure a Puppet agent on another system which connects to the API or CLI of the
device, and acts as a proxy between the device and the primaryPuppet server.
In the diagram below, Puppet device is on a proxy Puppet agent (agent.example.com) and is being used to manage an
F5 load balancer (f5.example.com) and a Cisco switch (cisco.example.com).
© 2024 Puppet, Inc., a Perforce company

Puppet | Platform components | 361
© 2024 Puppet, Inc., a Perforce company

Puppet | Platform components | 362
Puppet device’s run environment
Puppet device runs as a single process in the foreground that manages devices, rather than as a daemon or service like
a Puppet agent.
User
The puppet device command runs with the privileges of the user who runs it.
Run Puppet device as:
• Root on *nix
• Either LocalService or a member of the Administrators group on Windows
Logging
By default, Puppet device outputs directly to the terminal, which is valuable for interactive use. When you run it as a
cron job or scheduled task, use the logdest option to direct the output to a file.
On *nix, run Puppet device with the --logdest syslog option to log to the *nix syslog service:
puppet device --verbose --logdest syslog
Your syslog configuration determines where these messages are saved, but the default location is /var/log/
messages on Linux, and /var/log/system.log on Mac OS X. For example, to view these logs on Linux, run:
tail /var/log/messages
On Windows, run Puppet device with the --logdest eventlog option, which logs to the Windows Event Log,
for example:
puppet device --verbose --logdest eventlog
To view these logs on Windows, click Control Panel # System and Security # Administrative Tools # Event
Viewer.
To specify a particular file to send Puppet device log messages to, use the --logdest <FILE> option, which
logs to the file specified by <FILE>, for example:
puppet device --verbose --logdest /var/log/puppetlabs/puppet/device.log
You can increase the logging level with the --debug and --verbose options.
In addition to local logging, Puppet device submits reports to the primary Puppet server after each run. These reports
contain standard data from the Puppet run, including any corrective changes.
Network access
Puppet device creates outbound network connections to the devices it manages. It requires network connectivity to the
devices via their API or CLI. It never accepts inbound network connections.
Installing device modules
You need to install the device module for each device you want to manage on the primary Puppet server.
For example, to install the f5 and cisco_ios device modules on the primary server, run the following commands:
$ sudo puppet module install f5-f5
$ sudo puppet module install puppetlabs-cisco_ios
© 2024 Puppet, Inc., a Perforce company

Puppet | Platform components | 363
Configuring Puppet device on the proxy Puppet agent
You can specify multiple devices in device.conf, which is configurable with the deviceconfig setting on the
proxy agent.
For example, to configure an F5 and a Cisco IOS device, add the following lines to the device.conf file:
[f5.example.com]
type f5
url https://username:[email protected]
[cisco.example.com]
type cisco_ios
url file:///etc/puppetlabs/puppet/devices/cisco.example.com.yaml
The string in the square brackets is the device’s certificate name — usually the hostname or FQDN. The certificate
name is how Puppet identifies the device.
For the url, specify the device’s connection string. The connection string varies by device module. In the first
example above, the F5 device connection credentials are included in the url device.conf file, because that is
how the F5 module stores credentials. However, the Cisco IOS module uses the Puppet Resource API, which stores
that information in a separate credentials file. So, Cisco IOS devices would also have a /etc/puppetlabs/
puppet/devices/<device cert name>.conf file similar to the following content:
{
"address": "cisco.example.com"
"port": 22
"username": "username"
"password": "password"
"enable_password": "password"
}
}
For more information, see device.conf.
Classify the proxy Puppet agent for the device
Some device modules require the proxy Puppet agent to be classified with the base class of the device module to
install or configure resources required by the module. Refer to the specific device module README for details.
To classify proxy Puppet agent:
1.
Classify the agent with the base class of the device module, for each device it manages in the manifest. For
example:
node 'agent.example.com' {
include cisco_ios
include f5
}
2.
Apply the classification by running puppet agent -t on the proxy Puppet agent.
Classify the device
Classify the device with resources to manage its configuration.
The examples below manage DNS settings on an F5 and a Cisco IOS device.
© 2024 Puppet, Inc., a Perforce company

Puppet | Platform components | 364
1.
In the site.pp manifest, declare DNS resources for the devices. For example:
node 'f5.example.com' {
f5_dns{ '/Common/dns':
name_servers => ['4.2.2.2.', '8.8.8.8"],
same => ['localhost",' example.com'],
}
}
node 'cisco.example.com' {
network_dns { 'default':
servers => [4.2.2.2', '8.8.8.8'],
search => ['localhost",'example.com'],
}
}
2.
Apply the manifest by running puppet device -v on the proxy Puppet agent.
Note: Resources vary by device module. Refer to the specific device module README for details.
Get and set data using Puppet device
The traditional Puppet apply and Puppet resource applications cannot target device resources: running puppet
resource --target <DEVICE> does not return data from the target device. Instead, use Puppet device to get
data from devices, and to set data on devices. The following are optional parameters.
Get device data with the resource parameter
Syntax:
puppet device --resource <RESOURCE> --target <DEVICE>
Use the resource parameter to retrieve resources from the target device. For example, to return the DNS values for
example F5 and Cisco IOS devices:
sudo puppet device --resource f5_dns --target f5.example.com
sudo puppet device --resource network_dns --target cisco.example.com
Set device data with the apply parameter
Syntax:
puppet device --verbose --apply <FILE> --target <DEVICE>
Use the --apply parameter to set a local manifest to manage resources on a remote device. For example, to apply a
Puppet manifest to the F5 and Cisco devices:
sudo puppet device --verbose --apply manifest.pp --target f5.example.com
sudo puppet device --verbose --apply manifest.pp --target cisco.example.com
View device facts with the facts parameter
Syntax:
puppet device --verbose --facts --target <DEVICE>
Use the --facts parameter to display the facts of a remote target. For example, to display facts on a device:
sudo puppet device --verbose --facts --target f5.example.com
© 2024 Puppet, Inc., a Perforce company

Puppet | Platform components | 365
Managing devices using Puppet device
Running the puppet device or puppet-device command (without --resource or --apply options)
tells the proxy agent to retrieve catalogs from the primary server and apply them to the remote devices listed in the
device.conf file.
To run Puppet device on demand and for all of the devices in device.conf , run:
sudo puppet device --verbose
To run Puppet device for only one of the multiple devices in the device.conf file, specify a --target option:
$ sudo puppet device -verbose --target f5.example.com
To run Puppet device on a specific group of devices, as opposed to all devices in the device.conf file,
create a separate configuration file containing the devices you want to manage, and specify the file with the --
deviceconfig option:
$ sudo puppet device --verbose --deviceconfig /path/to/custom-device.conf
To set up a cron job to run Puppet device on a recurring schedule, run:
$ sudo puppet resource cron puppet-device ensure=present user=root minute=30
command='/opt/puppetlabs/bin/puppet device --verbose --logdest syslog'
Example
Follow the steps below to run Puppet device in a production environment, using cisco_ios as an example.
1.
Install the module on the primary Puppet server: sudo puppet module install puppetlabs-
cisco_ios.
2.
Include the module on the proxy Puppet agent by adding the following line to the primary server’s site.pp file:
include cisco_ios
3.
Edit device.conf on the proxy Puppet agent:
[cisco.example.com]
type cisco_ios
url file:///etc/puppetlabs/puppet/devices/cisco.example.com.yaml
4.
Create the cisco.example.com credentials file required by modules that use the Puppet Resource API:
{
"address": "cisco.example.com"
"port": 22
"username": "username"
"password": "password"
"enable_password": "password"
}
5.
Request a certificate on the proxy Puppet agent: sudo puppet device --verbose --waitforcert 0
--target cisco.example.com
6.
Sign the certificate on the primary server: sudo puppetserver ca sign cisco.example.com
7.
Run puppet device on the proxy Puppet agent to test the credentials: sudo puppet device --target
cisco.example.com
© 2024 Puppet, Inc., a Perforce company

Puppet | Platform components | 366
Automating device management using the puppetlabs device_manager module
The puppetlabs-device_manager module manages the configuration files used by the Puppet device
application, applies the base class of configured device modules, and provides additional resources for scheduling and
orchestrating Puppet device runs on proxy Puppet agents.
For more information, see the module README.
Troubleshooting Puppet device
These options are useful for troubleshooting Puppet device command results.
--debug or -d Enables debugging
--trace or -t Enables stack tracing if Ruby fails
--verbose or -v Enables detailed reporting
Puppet reports
Puppet creates a report about its actions and your infrastructure each time it applies a catalog during a Puppet run.
You can create and use report processors to generate insightful information or alerts from those reports.
• Reporting on page 366
In a client-server configuration, an agent sends its report to the primary server for processing. In a standalone
configuration, the puppet apply command processes the node’s own reports. In both configurations, report
processor plugins handle received reports. If you enable multiple report processors, Puppet runs all of them for each
report.
• Report reference on page 147
Puppet has a set of built-in report processors, which you can configure.
• Writing custom report processors on page 368
Create and use report processors to generate insightful information or alerts from Puppet reports. You can write your
own report processor in Ruby and include it in a Puppet module. Puppet uses the processor to send report data to the
service in the format you defined.
• Report format on page 369
Puppet 8.8.1 generates report format 12.
Reporting
In a client-server configuration, an agent sends its report to the primary server for processing. In a standalone
configuration, the puppet apply command processes the node’s own reports. In both configurations, report
processor plugins handle received reports. If you enable multiple report processors, Puppet runs all of them for each
report.
Each processor typically does one of two things with the report:
• It sends some of the report data to another service, such as PuppetDB, that can collate it.
• It triggers alerts on another service if the data matches a specified condition, such as a failed run.
That external service can then provide a way to view the processed report.
Report data
Puppet report processors handle these points of data:
• Metadata about the node, its environment and Puppet version, and the catalog used in the run.
• The status of every resource.
• Actions, also called events, taken during the run.
• Log messages generated during the run.
• Metrics about the run, such as its duration and how many resources were in a given state.
© 2024 Puppet, Inc., a Perforce company
Puppet | Platform components | 367
That external service can then provide a way to view the processed report.
Configuring reporting
An agent sends reports to the primary server by default. You can turn off reporting by changing the report setting
in an agent’s puppet.conf file.
On primary servers and on nodes running Puppet apply, you can configure enabled report processors as a comma-
separated list in the reports setting. The default reports value is 'store', which stores reports in the
configured reportdir.
To turn off reports entirely, set reports to 'none'.
For details about configuration settings in Puppet, see the Configuration reference.
Accessing reports
There are multiple ways to access Puppet report data:
• In Puppet Enterprise (PE), view run logs and event reports on the Reports page. See Infrastructure reports.
• In PuppetDB, with its report processor enabled, interface with third-party tools such as Puppetboard or
PuppetExplorer.
• Use one of the built-in report processors. For example, the http processor sends YAML dumps of reports
through POST requests to a designated URL; the log processor saves received logs to a local log file.
• Use a report processor from a module, such as tagmail.
• Query PuppetDB for stored report data and build your own tools to display it. For details about the types of data
that PuppetDB collects and the API endpoints it uses, see the API documentation for the endpoints events,
event-counts, and aggregate-event-counts.
• Write a custom report processor.
Related information
puppet.conf: The main config file on page 82
The puppet.conf file is Puppet’s main config file. It configures all of the Puppet commands and services,
including Puppet agent, the primary Puppet server, Puppet apply, and puppetserver ca. Nearly all of the settings
listed in the configuration reference can be set in puppet.conf.
Writing custom report processors on page 368
Create and use report processors to generate insightful information or alerts from Puppet reports. You can write your
own report processor in Ruby and include it in a Puppet module. Puppet uses the processor to send report data to the
service in the format you defined.
Report format on page 369
Puppet 8.8.1 generates report format 12.
Report reference
Puppet has a set of built-in report processors, which you can configure.
By default, after applying a catalog, Puppet generates a report that includes information about the run: events, log
messages, resource statuses, metrics, and metadata. Each host sends its report as a YAML dump.
The agent sends its report to the primary server for processing, whereas agents running puppet apply process
their own reports. Either way, Puppet handles every report with a set of report processors, which are specified in the
reports setting in the agent's puppet.conf file.
By default, Puppet uses the store report processor. You can enable other report processors or disable reporting in
the reports setting.
http
Sends reports via HTTP or HTTPS. This report processor submits reports as POST requests to the address in
the reporturl setting. When you specify an HTTPS URL, the remote server must present a certificate issued
© 2024 Puppet, Inc., a Perforce company

Puppet | Platform components | 368
by the Puppet CA or the connection fails validation. The body of each POST request is the YAML dump of a
Puppet::Transaction::Report object, and the content type is set as application/x-yaml.
log
Sends all received logs to the local log destinations. The usual log destination is syslog.
store
Stores the yaml report in the configured reportdir. By default, this is the report processor Puppet uses. These
files collect quickly — one every half hour — so be sure to perform maintenance on them if you use this report.
Writing custom report processors
Create and use report processors to generate insightful information or alerts from Puppet reports. You can write your
own report processor in Ruby and include it in a Puppet module. Puppet uses the processor to send report data to the
service in the format you defined.
A report processor must follow these rules:
• The processor name must be a valid Ruby symbol that starts with a letter and contains only alphanumeric
characters.
• The processor must be in its own Ruby file, <PROCESSOR_NAME>.rb, and stored inside the Puppet module
directory lib/puppet/reports/
• The processor code must start with require 'puppet'
• The processor code must call the method Puppet::Reports.register_report(:NAME) This method
takes the name of the report as a symbol, and a mandatory block of code with no arguments that contains:
• A Markdown-formatted string describing the processor, passed to the desc(<DESCRIPTION>) method.
• An implementation of a method named process that contains the report processor's main functionality.
Puppet lets the process method access a self object, which will be a Puppet::Transaction::Report
object describing a Puppet run.
The processor can access report data by calling accessor methods on self, and it can forward that data to any service
you configure in the report processor. It can also call self.to_yaml to dump the entire report to YAML. Note that
the YAML output isn't a safe, well-defined data format — it's a serialized object.
Example report processor
To use this report processor, include it in the comma-separated list of processors in the Puppet primary server's
reports setting in puppet.conf: reports = store,myreport.
# Located in /etc/puppetlabs/puppet/modules/myreport/lib/puppet/reports/
myreport.rb.
require 'puppet'
# If necessary, require any other Ruby libraries for this report here.
Puppet::Reports.register_report(:myreport) do
desc "Process reports via the fictional my_cool_cmdb API."
# Declare and configure any settings here. We'll pretend this connects to
our API.
my_api = MY_COOL_CMD
# Define and configure the report processor.
def process
# Do something that sets up the API we're sending the report to here.
# For instance, let's check on the node's status using the report object
(self):
if self.status != nil then
status = self.status
© 2024 Puppet, Inc., a Perforce company

Puppet | Platform components | 369
else
status = 'undefined'
end
# Next, let's do something if the status equals 'failed'.
if status == 'failed' then
# Finally, dump the report object to YAML and post it using the API
object:
my_api.post(self.to_yaml)
end
end
end
To use this report processor, include it in the comma-separated list of processors in the Puppet primary server's
reports setting in puppet.conf:
reports = store,myreport
For more examples using this API, see the built-in reports' source code or one of these custom reports created by a
member of the Puppet community:
• Report failed runs to Jabber/XMPP
• Send metrics to a Ganglia server via gmetric
These community reports aren't provided or supported by Puppet, Inc.
Related information
Report format on page 369
Puppet 8.8.1 generates report format 12.
Report format
Puppet 8.8.1 generates report format 12.
Puppet::Transaction::Report
Property Type Description
host string The host that generated this report.
time datetime When the Puppet run began.
logs array Zero or more
Puppet::Util::Log objects.
metrics hash Maps from string (metric category) to
Puppet::Util::Metric.
resource_statuses hash Maps from resource name to
Puppet::Resource::Status
configuration_version string or integer The configuration version of
the Puppet run. This is a string
for user-specified versioning
schemes. Otherwise it is an integer
representing seconds since the Unix
epoch.
transaction_uuid string A UUID covering the transaction.
The query parameters for the catalog
retrieval include the same UUID.
© 2024 Puppet, Inc., a Perforce company

Puppet | Platform components | 370
Property Type Description
code_id string The ID of the code input to the
compiler.
job_id string, or null The ID of the job in which this
transaction occurred.
catalog_uuid string A primary server generated catalog
UUID, useful for connecting a single
catalog to multiple reports.
server_used string The name of the primary server used
to compile the catalog. If failover
occurred, this holds the first primary
server successfully contacted. If
this run had no primary server (for
example, a puppet apply run),
this field is blank.
report_format string or integer "12" or 12
puppet_version string The version of the Puppet agent.
status string The transaction status: failed,
changed, or unchanged.
transaction_completed Boolean Whether the transaction completed.
For instance, if the transaction
had an unrescued exception,
transaction_completed =
false.
noop Boolean Whether the Puppet run was in no-
operation mode when it ran.
noop_pending Boolean Whether there are changes that were
not applied because of no-operation
mode.
environment string The environment that was used for
the Puppet run.
corrective_change Boolean True if a change or no-operation
event in this report was caused by
an unexpected change to the system
between Puppet runs.
cached_catalog_status string The status of the cached catalog
used in the run: not_used,
explicitly_requested, or
on_failure.
Puppet::Util::Log
Property Type Description
file string The path and filename of the
manifest file that triggered the log
message. This property is not always
present.
© 2024 Puppet, Inc., a Perforce company

Puppet | Platform components | 371
Property Type Description
line integer The manifest file's line number that
triggered the log message. This
property is not always present.
level symbol The severity level of the message
:debug, :info, :notice,
:warning, :err, :alert,
:emerg, :crit.
message string The text of the message.
source string The origin of the log message. This
could be a resource, a property of a
resource, or the string "Puppet".
tags array Each array element is a string.
time datetime The time at which the message was
sent.
Puppet::Util::Metric
A Puppet::Util::Metric object represents all the metrics in a single category.
Property Type Description
name string Specifies the name of the metric
category. This is the same as
the key associated with this
metric in the metrics hash of the
Puppet::Transaction::Report.
label string The name of the metric formatted
as a title. Underscores are replaced
with spaces and the first word is
capitalized.
values array All the metric values within this
category. Each value is in the form
[name, label, value], where
name is the particular metric as a
string, label is the metric name
formatted as a title, and value is
the metric quantity as an integer or a
float.
The metrics that appear in a report are part of a fixed set and arranged in the following categories:
time
Includes a metric for every resource type for which there is at least one resource in the catalog, plus two
additional metrics: config_retrieval and total. Each value in the time category is a float.
In an inspect report, there is an additional inspect metric.
resources
Includes the metrics failed, out_of_sync, changed, and total. Each value in the resources
category is an integer.
© 2024 Puppet, Inc., a Perforce company

Puppet | Platform components | 372
events
Includes up to five metrics: success, failure, audit, noop, and total. total is always present; the
others are present when their values are non-zero. Each value in the events category is an integer.
changes
Includes one metric, total. Its value is an integer.
Note: Failed reports contain no metrics.
Puppet::Resource::Status
A Puppet::Resource::Status object represents the status of a single resource.
Property Type Description
resource_type string The resource type, capitalized.
title title The resource title.
resource string The resource name, in the
form Type[title]. This
is always the same as the
key that corresponds to this
Puppet::Resource::Status
object in the
resource_statuses hash.
Deprecated.
provider_used string The name of the provider used by the
resource.
file string The path and filename of the
manifest file that declared the
resource.
line integer The line number in the manifest file
that declared the resource.
evaluation_time float The amount of time, in seconds,
taken to evaluate the resource. Not
present in inspect reports.
change_count integer The number of properties that
changed. Always 0 in inspect reports.
out_of_sync_count integer The number of properties that were
out of sync. Always 0 in inspect
reports.
tags array The strings with which the resource
is tagged.
time datetime The time at which the resource was
evaluated.
events array The
Puppet::Transaction::Event
objects for the resource.
out_of_sync Boolean True when out_of_sync_count
> 0, otherwise false. Deprecated.
© 2024 Puppet, Inc., a Perforce company

Puppet | Platform components | 373
Property Type Description
changed Boolean True when change_count > 0,
otherwise false. Deprecated.
skipped Boolean True when the resource was skipped,
otherwise false.
failed Boolean True when Puppet experienced an
error while evaluating this resource,
otherwise false. Deprecated.
failed_to_restart Boolean True when Puppet experienced an
error while trying to restart this
resource, for example, when a
Service resource has been notified
from another resource.
containment_path array An array of strings; each element
represents a container (type or class)
that, together, make up the path of
the resource in the catalog.
Puppet::Transaction::Event
A Puppet::Transaction::Event object represents a single event for a single resource.
Property Type Description
audited Boolean True when this property is being audited, otherwise false. True in inspect
reports.
property string The property for which the event occurred. This value is missing if the
provider errored out before it could be determined.
previous_value string, array,
or hash
The value of the property before the change (if any) was applied. This value
is missing if the provider errored out before it could be determined.
desired_value string, array,
or hash
The value specified in the manifest. Absent in inspect reports. This value is
missing if the provider errored out before it could be determined.
historical_value string, array,
or hash
The audited value from a previous run of Puppet, if known. Otherwise nil.
Absent in inspect reports. This value is missing if the provider errored out
before it could be determined.
message string The log message generated by this event.
name symbol The name of the event. Absent in inspect reports.
© 2024 Puppet, Inc., a Perforce company

Puppet | Platform components | 374
Property Type Description
status string The event status:
• success: Property was out of sync and was successfully changed to
be in sync.
• failure: Property was out of sync and couldn’t be changed to be in
sync due to an error.
• noop: Property was out of sync but wasn’t changed because the run
was in no-operation mode.
• audit: Property was in sync and was being audited. Inspect reports are
always in audit status.
redacted Boolean Whether this event has been redacted.
time datetime The time at which the property was evaluated.
corrective_changeBoolean True if this event was caused by an unexpected change to the system
between Puppet runs.
Changes since report format 8
Most of report format 12 is backwards compatible with formats 9-11, but includes the following changes:
• Version 8: transaction_completed was added to Puppet::Transaction::Report
• Version 9: provider_used was added to Puppet::Resource::Status
• Version 10: failed_to_restart was added to Puppet::Resource::Status
• Version 11: server_used was added to Puppet::Transaction::Report
• Version 12: master_used was removed from Puppet::Transaction::Report
Note that version 12 only exists in Puppet 7. For more information, see the report schema.
Life cycle of a Puppet run
Learn the details of Puppet's internals, including how primary servers and agents communicate via host-verified
HTTPS, and about the process of catalog compilation.
• Agent-server HTTPS communications on page 375
The Puppet agent and primary server communicate via mutually authenticated HTTPS using client certificates.
• Catalog compilation on page 376
When configuring a node, the agent uses a document called a catalog, which it downloads from the primary server.
For each resource under management, the catalog describes its desired state and can specify ordered dependency
information.
• Static catalogs on page 379
A static catalog includes additional metadata that identifies the desired state of a node’s file resources that have
source attributes pointing to puppet:/// locations. This metadata can refer to a specific version of the file,
rather than the latest version, and can confirm that the agent is applying the appropriate version of the file resource
for the catalog. As most of the metadata is provided in the catalog, Puppet agents make fewer requests to the primary
server.
© 2024 Puppet, Inc., a Perforce company

Puppet | Platform components | 375
Agent-server HTTPS communications
The Puppet agent and primary server communicate via mutually authenticated HTTPS using client certificates.
Access to each endpoint is controlled by auth.conf settings. For more information, see Puppet Server
configuration files: auth.conf.
Persistent HTTP and HTTPS connections and Keep-Alive
When acting as an HTTPS client, Puppet reuses connections by sending Connection: Keep-Alive in HTTP
requests. This reduces transport layer security (TLS) overhead, improving performance for runs with dozens of
HTTPS requests.
You can configure the Keep-Alive duration using the http_keepalive_timeout setting, but it must be
shorter than the maximum keepalive allowed by the primary server's web server.
Puppet caches HTTP connections and verified HTTPS connections. If you specify a custom HTTP connection class,
Puppet does not cache the connection.
Puppet always requests that a connection is kept open, but the server can choose to close the connection by sending
Connection: close in the HTTP response. If that occurs, Puppet does not cache the connection and starts a new
connection for its next request.
For more information about the http_keepalive_timeout setting, see the Configuration reference.
For an example of a server disabling persistent connections, see the Apache documentation on KeepAlive.
The process of Agent-side checks and HTTPS requests during a single Puppet run.
1.
Check for keys and certificates:
a.
The agent downloads the CA (Certification Authority) bundle.
b.
If certificate revocation is enabled, the agent loads or downloads the Certificate Revocation List (CRL) bundle
using the previous CA bundle to verify the connection.
c.
The agent loads or generates a private key. If the agent needs a certificate, it generates a Certificate Signing
Request (CSR), including any dns_alt_names and csr_attributes, and submits the request using
PUT /puppet-ca/v1/certificate_request/:certname.
d.
The agent attempts to download the signed certificate using GET /puppet-ca/v1/
certificate/:certname.
• If there is a conflict that must be resolved on the Puppet server, such as cleaning the old CSR or certificate,
the agent sleeps for waitforcert seconds, or exits with 1 if waiting is not allowed, such as when
running puppet agent -t.
Tip: This can happen if the agent's SSL directory is deleted, as the Puppet server still has the valid,
unrevoked certificate.
• If the downloaded certificate fails verification, such as it does not match its private key, then Puppet
discards the certificate. The agent sleeps for waitforcert seconds, or exits with 1 if waiting is not
allowed, such as when running puppet agent -t.
2.
Request a node object and switch environments:
• Do a GET request to /puppet/v3/node/<NAME> .
• If the request is successful, read the environment from the node object. If the node object has an
environment, use that environment instead of the one in the agent’s config file in all subsequent requests
during this run.
• If the request is unsuccessful, or if the node object had no environment set, use the environment from the
agent’s config file.
© 2024 Puppet, Inc., a Perforce company

Puppet | Platform components | 376
3.
If pluginsync is enabled on the agent, fetch plugins from a file server mountpoint that scans the lib directory
of every module:
• Do a GET request to /puppet/v3/file_metadatas/plugins with recurse=true and
links=manage.
• Check whether any of the discovered plugins need to be downloaded. If so, do a GET request to /puppet/
v3/file_content/plugins/<FILE> for each one.
4.
Request catalog while submitting facts:
• Do a POST request to /puppet/v3/catalog/<NAME>, where the post data is all of the node’s facts
encoded as JSON. Receive a compiled catalog in return.
Note: Submitting facts isn't logically bound to requesting a catalog. For more information about facts, see
Language: Facts and built-in variables.
5.
Make file source requests while applying the catalog:
File resources can specify file contents as either a content or source attribute. Content attributes go into the
catalog, and the agent needs no additional data. Source attributes put only references into the catalog and might
require additional HTTPS requests.
• If you are using the normal compiler, then for each file source, the agent makes a GET request to /puppet/
v3/file_metadata/<SOMETHING> and compares the metadata to the state of the file on disk.
• If it is in sync, it continues on to the next file source.
• If it is out of sync, it does a GET request to /puppet/v3/file_content/<SOMETHING> for the
content.
• If you are using the static compiler, all file metadata is embedded in the catalog. For each file source, the agent
compares the embedded metadata to the state of the file on disk.
• If it is in sync, it continues on to the next file source.
• If it is out of sync, it does a GET request to /puppet/v3/file_bucket_file/md5/<CHECKSUM>
for the content.
Note: Using a static compiler is more efficient with network traffic than using the normal (dynamic)
compiler. Using the dynamic compiler is less efficient during catalog compilation. Large amounts of files,
especially recursive directories, amplifies either issue.
6.
If report is enabled on the agent, submit the report:
• Do a PUT request to /puppet/v3/report/<NAME>. The content of the PUT should be a Puppet report
object in YAML format.
Catalog compilation
When configuring a node, the agent uses a document called a catalog, which it downloads from the primary server.
For each resource under management, the catalog describes its desired state and can specify ordered dependency
information.
Puppet manifests are concise because they can express variation between nodes with conditional logic, templates, and
functions. Puppet resolves these on the primary server and gives the agent a specific catalog.
This allows Puppet to:
• Separate privileges, because each node receives only its own resources.
• Reduce the agent’s CPU and memory consumption.
• Simulate changes by running the agent in no-op mode, checking the agent's current state and reporting what would
have changed without making any changes.
• Query PuppetDB for information about managed resources on any node.
© 2024 Puppet, Inc., a Perforce company

Puppet | Platform components | 377
Note: The puppet apply command compiles the catalog on its own node and then applies it, so it plays the role
of both primary server and agent. To compile a catalog on the primary server for testing, run puppet catalog
compile on the puppetserver with access to your environments, modules, manifests, and Hiera data.
For more information about PuppetDB queries, see PuppetDB API.
Puppet compiles a catalog using three sources of configuration information:
• Agent-provided data
• External data
• Manifests and modules, including associated templates and file sources
These sources are used by both agent-server deployments and by stand-alone puppet apply nodes.
Agent-provided data
When an agent requests a catalog, it sends four pieces of information to the primary server:
• The node's name, which is almost always the same as the node's certname and is embedded in the request URL.
For example, /puppet/v3/catalog/web01.example.com?environment=production.
• The node's certificate, which contains its certname and sometimes additional information that can be used for
policy-based autosigning and adding new trusted facts. This is the one item not used by puppet apply.
• The node's facts.
• The node's requested environment, which is embedded in the request URL. For example, /puppet/v3/
catalog/web01.example.com?environment=production. Before requesting a catalog, the agent
requests its environment from the primary server. If the primary server doesn't provide an environment, the
environment information in the agent's config file is used.
For more information about additional data in certs see SSL configuration: CSR attributes and certificate extensions
External data
Puppet uses two main kinds of external data during catalog compilation:
• Data from an external node classifier (ENC) or other node terminus, which is available before compilation starts.
This data is in the form of a node object and can contain any of the following:
• Classes
• Class configuration parameters
• Top-scope variables for the node
• Environment information, which overrides the environment information in the agent's configuration
• Data from other sources, which can be invoked by the main manifest or by classes or defined types in modules.
This kind of data includes:
• Exported resources queried from PuppetDB.
• The results of functions, which can access data sources including Hiera or an external configuration
management database.
For more information about ENCs, see Writing external node classifiers
Manifests and modules
Manifests and modules are at the center of a Puppet deployment, including the main manifest, modules downloaded
from the Forge , and modules written specifically for your site.
For more information about manifests and modules, see The main manifest directory and Module fundamentals.
© 2024 Puppet, Inc., a Perforce company

Puppet | Platform components | 378
The catalog compilation process
This simplified description doesn’t delve into the internals of the parser, model, and the evaluator. Some items are
presented out of order for the sake of clarity. This process begins after the catalog request has been received.
Note: For practical purposes, treat puppet apply nodes as a combined agent and primary server.
1.
Retrieve the node object.
• After the primary server has received the agent-provided information for this request, it asks its configured
node terminus for a node object.
• By default, the primary server uses the plain node terminus, which returns a blank node object. In this case,
only manifests and agent-provided information are used in compilation.
• The next most common node terminus is the exec node terminus, which requests data from an ENC. This
can return classes, variables, an environment, or a combination of the three, depending on how the ENC is
designed.
• You can also write a custom node terminus that retrieves classes, variables, and environments from an external
system.
2.
Set variables from the node object, from facts, and from the certificate.
• All of these variables are available for use by any manifest or template during subsequent stages of
compilation.
• The node’s facts are set as top-scope variables.
• The node’s facts are set in the protected $facts hash, and certain data from the node’s certificate is set in the
protected $trusted hash.
• Any variables provided by the primary server are set.
3.
Evaluate the main manifest.
• Puppet parses the main manifest. The node’s environment can specify a main manifest; if it doesn’t, the
primary server uses the main manifest from the agent's config file.
• If there are node definitions in the manifest, Puppet must find one that matches the node’s name. If at least one
node definition is present and Puppet cannot find a match, it fails compilation.
• Code outside of node definitions is evaluated. Resources in the code are added to the are added to the node's
catalog, and any classes declared in the code are loaded and declared.
Note: Classes are usually classes are defined in modules, although the main manifest can also contain class
definitions.
• If a matching node definition is found, the code in it is evaluated at node scope, overriding any top-scope
variables. Resources in the code are added to the are added to the node's catalog, and any classes declared in
the code are loaded and declared.
4.
Load and evaluate classes from modules
• If classes were declared in the main manifest and their definitions were not present, Puppet loads the manifests
containing them from its collection of modules. It follows the normal manifest naming conventions to find
the files it should load. The set of locations Puppet loads modules from is called the modulepath. The primary
server serves each environment with its own modulepath. When a class is loaded, the Puppet code in it is
evaluated, and any resources in it are added to the catalog. If it was declared at node scope, it has access to
node-scope variables; otherwise, it has access to only top-scope variables. Classes can also declare other
classes; if they do, Puppet loads and evaluates those in the same way.
5.
Evaluate classes from the node object
• Puppet loads from modules and evaluate any classes that were specified by the node object. Resources from
those classes are added to the catalog. If a matching node definition was found when the main manifest
was evaluated, these classes are evaluated at node scope, which means that they can access any node-scope
variables set by the main manifest. If no node definitions were present in the main manifest, they are evaluated
at top scope.
© 2024 Puppet, Inc., a Perforce company
Puppet | Platform components | 379
Related information
Classifying nodes on page 383
You can classify nodes using an external node classifier (ENC), which is a script or application that tells Puppet
which classes a node must have. It can replace or work in concert with the node definitions in the main site manifest
(site.pp).
Scope on page 941
A scope is a specific area of code that is partially isolated from other areas of code.
Node definitions on page 789
A node definition, also known as a node statement, is a block of Puppet code that is included only in matching nodes'
catalogs. This allows you to assign specific configurations to specific nodes.
The modulepath on page 141
The primary server service and the puppet apply command load most of their content from modules found in one
or more directories. The list of directories where Puppet looks for modules is called the modulepath. The modulepath
is set by the current node's environment.
Exported resources on page 935
An exported resource declaration specifies a desired state for a resource, and publishes the resource for use by other
nodes. It does not manage the resource on the target system. Any node, including the node that exports it, can collect
the exported resource and manage its own copy of it.
Static catalogs
A static catalog includes additional metadata that identifies the desired state of a node’s file resources that have
source attributes pointing to puppet:/// locations. This metadata can refer to a specific version of the file,
rather than the latest version, and can confirm that the agent is applying the appropriate version of the file resource
for the catalog. As most of the metadata is provided in the catalog, Puppet agents make fewer requests to the primary
server.
When to use static catalogs
When a primary server compiles a non-static catalog, the catalog does not specify a particular version of its file
resources. When the agent applies the catalog, it always retrieves the latest version of that file resource, or uses a
previously retrieved version if it matches the latest version’s contents. Note that this potential problem affects file
resources that use the source attribute. File resources that use the content attribute are not affected, and their behavior
does not change in static catalogs.
When a Puppet manifest depends on a file whose contents change more frequently than the Puppet agent receives new
catalogs — for example, if the agent is caching catalogs or cannot reach a primary server over the network — a node
might apply a version of the referenced file that does not match the instructions in the catalog.
As a result, the agent’s Puppet runs might produce different results each time the agent applies the same catalog. This
can cause problems because Puppet expects a catalog to produce the same results each time it is applied, regardless of
any code or file content updates on the primary server.
Additionally, each time a Puppet agent applies a non-static cached catalog that contains file resources sourced from
puppet:/// locations, the agent requests file metadata from the primary server, even though nothing changed in
the cached catalog. This causes the primary server to perform unnecessary resource-intensive checksum calculations
for each such file resource.
Static catalogs avoid these problems by including metadata that refers to a specific version of the resource’s file. This
prevents a newer version from being incorrectly applied, and avoids having the agent request the metadata on each
Puppet run.
This type of catalog is called static because it contains all of the information that an agent needs to determine whether
the node’s configuration matches the instructions and static state of file resources at the point in time when the catalog
was compiled.
© 2024 Puppet, Inc., a Perforce company

Puppet | Platform components | 380
Static catalog features
A static catalog includes file metadata in its own section and associates it with the catalog's file resources.
In a non-static catalog, the Puppet agent requests metadata and content for the file from Puppet Server. The server
generates a checksum for the file and provides that file as it currently exists on the primary server.
With static catalogs enabled, the primary server generates metadata for each file resource sourced from a
puppet:/// location and adds it to the static catalog, and adds a code_id to the catalog that associates such file
resources with the version of their files as they exist at compilation time. For example:
file { '/etc/application/config.conf':
ensure => file,
source => 'puppet:///modules/module_name/config.conf'
}
Inlined metadata is part of a FileMetadata object in the static catalog that is divided into two new sections:
metadata for metadata associated with individual files, and recursive_metadata for metadata associated
with many files. To use the appropriate version of the file content for the catalog, Puppet Server also adds a
code_id parameter to the catalog. The value of code_id is a unique string that Puppet Server uses to retrieve the
version of file resources in an environment at the time when the catalog was compiled.
When applying a file resource from a static catalog, an agent first checks the catalog for that file’s metadata. If it finds
some, Puppet uses the metadata to call the static_file_content API endpoint on Puppet Server and retrieves
the file’s contents, also called the code_content. If the catalog does not contain metadata for the resource, Puppet
requests the file resource’s metadata from the primary server, compares it to the local file if it exists, and requests the
resource’s file from the primary server in its current state — if the local file doesn’t exist or differs from the primary
server's version.
Configuring code_id and the static_file_content endpoint
When requesting the file’s content via the static catalog’s metadata, the Puppet agent passes the file’s path, the
catalog’s code_id, and the requested environment to Puppet Server's static_file_content API endpoint.
The endpoint returns the appropriate version of the file’s contents as the code_content.
If static catalogs are enabled but Puppet Server's static catalog settings are not configured, the code_id
parameter defaults to a null value and the agent uses the file_content API endpoint, which always
returns the latest content. To populate the code_id with a more useful identifier and have the agent use the
static_file_content endpoint to retrieve a specific version of the file’s content, you must specify scripts or
commands that provide Puppet with the appropriate results.
Puppet Server locates these commands using the code-id-command and code-content-command
settings in the puppetserver.conf file. Puppet Server runs the code-id-command each time it compiles
a static catalog, and it runs the code-content-command each time an agent requests file contents from the
static_file_content endpoint.
The Puppet Server process must be able to execute these scripts. Puppet Server also validates their output and checks
their exit codes. Environment names can contain only alphanumeric characters and underscores (_). The code_id
can contain only alphanumeric characters, dashes (-), underscores (_), semicolons (;), and colons (:). If either
command returns a non-zero exit code, Puppet Server logs an error and returns the error message and a 500 response
code to the API request.
Puppet Server validates the standard output of each of these scripts, and if the output’s acceptable, it adds the results
to the catalog as their respective parameters’ values. You can use any versioning or synchronization tools, as long as
you write scripts that produce a valid string for the code_id and code content using the catalog’s code_id and
file’s environment.
The following examples demonstrate how Puppet Server passes arguments to the code-id-command and code-
content-command scripts and how Puppet Server uses the results to return a specific version of a file resource.
© 2024 Puppet, Inc., a Perforce company

Puppet | Platform components | 381
For files in an environment managed by Git, you would use something like the following code-id-command
script, with the environment name passed in as the first command-line argument:
#!/bin/bash
set -e
if [[ -z "$1" ]]; then
echo Expected an environment >&2
exit 1
fi
cd /etc/puppetlabs/code/environments/"$1" && git rev-parse HEAD
As long as the script’s exit code is zero, Puppet Server uses the script’s standard output as the catalog’s code_id.
With a code-content-command script, Puppet Server passes the environment name as the first command-line
argument, the code_id as the second argument, and the path to the file resource from its content_uri as the
third argument:
#!/bin/bash
set -e
if [[ $# < 3 ]]; then
echo Expected environment, code-id, file-path >&2
exit 1
fi
cd /etc/puppetlabs/code/environments/"$1" && git show "$2":"$3"
The script’s standard output becomes the file’s code_content, provided the script returns a non-zero exit code.
Enabling or disabling static catalogs
The global static_catalogs setting is enabled by default. However, the default configuration does not include
the code-id-command and code-content-command scripts or settings needed to produce static catalogs, and
even when configured to produce static catalogs Puppet Server does not inline metadata for all types of file resources.
Note that Puppet Server does not produce static catalogs for an agent under the following circumstances:
• If the static_catalogs setting is false in:
• The Puppet Server’s puppet.conf file.
• The environment.conf file for the environment under which the agent is requesting a catalog.
• The agent’s puppet.conf file.
• If the Server’s code-id-command and code-content-command settings and scripts are not configured, or
if the code-id-command returns an empty string.
Additionally, Puppet Server only inlines metadata for file resources if all of the following conditions are true:
• It contains a source parameter with a Puppet URI, such as source => 'puppet:///path/to/file'.
• It contains a source parameter that uses the built-in modules mount point.
• The file it sources is inside the following glob, relative to the environment’s root directory: */*/files/**.
For example, Puppet Server inlines metadata into static catalogs for file resources sourcing module files located
by default in /etc/puppetlabs/code/environments/<ENVIRONMENT>/modules/<MODULE
NAME>/files/**.
Related information
Catalog compilation on page 376
When configuring a node, the agent uses a document called a catalog, which it downloads from the primary server.
For each resource under management, the catalog describes its desired state and can specify ordered dependency
information.
Catalog on page 223
File Metadata on page 234
File Content on page 232
© 2024 Puppet, Inc., a Perforce company

Puppet | Using Puppet code | 382
puppet.conf: The main config file on page 82
The puppet.conf file is Puppet’s main config file. It configures all of the Puppet commands and services,
including Puppet agent, the primary Puppet server, Puppet apply, and puppetserver ca. Nearly all of the settings
listed in the configuration reference can be set in puppet.conf.
environment.conf: Per-environment settings on page 85
Environments are isolated groups of agent nodes. Any environment can contain an environment.conf file. This
file can override several settings whenever the primary server is serving nodes assigned to that environment.
Using Puppet code
Define the desired state of your infrastructure using Puppet code.
Puppet code is stored in modules. If you are new to Puppet or want to save time, use the pre-built and tested modules
on the Puppet Forge — a repository of thousands of modules made by Puppet developers and the Puppet community.
Modules manage specific tasks in your infrastructure, such as installing and configuring a piece of software. Modules
contain both code and data. The data is what allows you to customize your configuration. Using a tool called Hiera,
you can separate the data from the code and place it in a centralized location. This allows you to specify guardrails
and define known parameters and variations, so that your code is fully testable and you can validate all the edge cases
of your parameters.
If you are an advanced user and want to write your own Puppet code, refer to the Puppet language and modules
documentation.
• Classifying nodes on page 383
You can classify nodes using an external node classifier (ENC), which is a script or application that tells Puppet
which classes a node must have. It can replace or work in concert with the node definitions in the main site manifest
(site.pp).
• Managing environment content with a Puppetfile on page 385
A Puppetfile specifies detailed information about each environment's Puppet code and data.
• Using content from Puppet Forge on page 391
Puppet Forge is a collection of modules and how-to guides developed by Puppet and its community.
• Designing system configs (roles and profiles) on page 392
Your typical goal with Puppet is to build complete system configurations, which manage all of the software, services,
and configuration that you care about on a given system. The roles and profiles method can help keep complexity
under control and make your code more reusable, reconfigurable, and refactorable.
• Separating data (Hiera) on page 418
Hiera is a built-in key-value configuration data lookup system, used for separating data from Puppet code.
• Use case examples on page 469
Try out some common configuration tasks to see how you can use Puppet to manage your IT infrastructure.
Related information
The Puppet language on page 482
You'll use Puppet's declarative language to describe the desired state of your system.
Modules on page 1097
© 2024 Puppet, Inc., a Perforce company

Puppet | Using Puppet code | 383
Modules manage a specific technology in your infrastructure and serve as the basic building blocks of Puppet desired
state management.
Classifying nodes
You can classify nodes using an external node classifier (ENC), which is a script or application that tells Puppet
which classes a node must have. It can replace or work in concert with the node definitions in the main site manifest
(site.pp).
The external_nodes script receives the name of the node to classify as its first argument, which is usually the
node's fully qualified domain name. For more information, see the Configuration reference.
Depending on the external data sources you use in your infrastructure, building an external node classifier can be a
valuable way to extend Puppet.
Note: You can use an ENC instead of or in combination with node definitions.
External node classifiers
An external node classifier is an executable that Puppet Server or puppet apply can call; it doesn’t have to
be written in Ruby. Its only argument is the name of the node to be classified, and it returns a YAML document
describing the node.
Inside the ENC, you can reference any data source you want, including PuppetDB. From Puppet’s perspective, the
ENC submits a node name and gets back a hash of information.
External node classifiers can co-exist with standard node definitions in site.pp; the classes declared in each source
are merged together.
Merging classes from multiple sources
Every node always gets a node object from the configured node terminus. The node object might be empty, or it
might contain classes, parameters, and an environment. The node terminus setting, node_terminus, takes effect
where the catalog is compiled, on Puppet Server when using an agent-server configuration, and on the node itself
when using puppet apply. The default node terminus is plain, which returns an empty node object, leaving
node configuration to the main manifest. The exec terminus calls an ENC script to determine what goes in the node
object. Every node might also get a node definition from the main manifest.
When compiling a node's catalog, Puppet includes all of the following:
• Classes specified in the node object it received from the node terminus.
• Classes or resources that are in the site manifest but outside any node definitions.
• Classes or resources in the most specific node definition in site.pp that matches the current node (if site.pp
contains any node definitions). The following notes apply:
• If site.pp contains at least one node definition, it must have a node definition that matches the current node;
compilation fails if a match can’t be found.
• If the node name resembles a dot-separated fully qualified domain name, Puppet makes multiple attempts to
match a node definition, removing the right-most part of the name each time. Thus, Puppet would first try
agent1.example.com, then agent1.example, then agent1. This behavior isn’t mimicked when
calling an ENC, which is invoked only once with the agent’s full node name.
• If no matching node definition can be found with the node’s name, Puppet tries one last time with a node name
of default; most users include a node default {} statement in their site.pp file. This behavior isn’t
mimicked when calling an ENC.
© 2024 Puppet, Inc., a Perforce company

Puppet | Using Puppet code | 384
Comparing ENCs and node definitions
If you're trying to decide whether to use an ENC or main manifest node definitions (or both), consider the following:
• The YAML returned by an ENC isn’t an exact equivalent of a node definition in site.pp — it can’t declare
individual resources, declare relationships, or do conditional logic. An ENC can only declare classes, assign top-
scope variables, and set an environment. So, an ENC is most effective if you’ve done a good job of separating
your configurations out into classes and modules.
• ENCs can set an environment for a node, overriding whatever environment the node requested.
• Unlike regular node definitions, where a node can match a less specific definition if an exactly matching definition
isn’t found (depending on Puppet’s strict_hostname_checking setting), an ENC is called only once, with
the node’s full name.
Connect an ENC
Configure two settings to have Puppet Server connect to an external node classifier.
In the primary server's puppet.conf file:
1.
Set the node_terminus setting to exec.
2.
Set the external_nodes setting to the path to the ENC executable.
For example:
[server]
node_terminus = exec
external_nodes = /usr/local/bin/puppet_node_classifier
ENC output format
An ENC must return either nothing or a YAML hash to standard out. The hash must contain at least one of classes
or parameters, or it can contain both. It can also optionally contain an environment key.
ENCs exit with an exit code of 0 when functioning normally, and can exit with a non-zero exit code if you want
Puppet to behave as though the requested node was not found.
If an ENC returns nothing or exits with a non-zero exit code, the catalog compilation fails with a “could not find
node” error, and the node is unable to retrieve configurations.
For information about the YAML format, see yaml.org.
Classes
If present, the value of classes must be either an array of class names or a hash whose keys are class names. That
is, the following are equivalent:
classes:
- common
- puppet
- dns
- ntp
classes:
common:
puppet:
dns:
ntp:
If you're specifying parameterized classes, use the hash key syntax, not the array syntax. The value for a
parameterized class is a hash of the class’s parameters and values. Each value can be a string, number, array, or hash.
© 2024 Puppet, Inc., a Perforce company

Puppet | Using Puppet code | 385
Put string values in quotation marks, because YAML parsers sometimes treat certain unquoted strings (such as on) as
Booleans. Non-parameterized classes can have empty values.
classes:
common:
puppet:
ntp:
ntpserver: 0.pool.ntp.org
aptsetup:
additional_apt_repos:
- deb localrepo.example.com/ubuntu lucid production
- deb localrepo.example.com/ubuntu lucid vendor
Parameters
If present, the value of the parameters key must be a hash of valid variable names and associated values; these are
exposed to the compiler as top-scope variables. Each value can be a string, number, array, or hash.
parameters:
ntp_servers:
- 0.pool.ntp.org
- ntp.example.com
mail_server: mail.example.com
iburst: true
Environment
If present, the value of environment must be a string representing the desired environment for this node. This is
the only environment used by the node in its requests for catalogs and files.
environment: production
Complete example
---
classes:
common:
puppet:
ntp:
ntpserver: 0.pool.ntp.org
aptsetup:
additional_apt_repos:
- deb localrepo.example.com/ubuntu lucid production
- deb localrepo.example.com/ubuntu lucid vendor
parameters:
ntp_servers:
- 0.pool.ntp.org
- ntp.example.com
mail_server: mail.example.com
iburst: true
environment: production
Managing environment content with a Puppetfile
A Puppetfile specifies detailed information about each environment's Puppet code and data.
The Puppetfile also specifies where to locate each environment's Puppet code and data, where to install it, and
whether to update it. r10k uses a Puppetfile to install and manage your environments' content.
© 2024 Puppet, Inc., a Perforce company

Puppet | Using Puppet code | 386
The Puppetfile
Your control repository's branches represent environments, and each environment might have different modules or
data. To manage each environment's content, you need a Puppetfile. In the Puppetfile, you specify which modules and
data you want in each environment.
A Puppetfile is a formatted text file that specifies the modules and data you want in your control repository (where
each branch of the control repo represents an environment). The Puppetfile can specify desired module versions,
how to load modules and data, and where to place modules and data in the environment. In your Puppetfile you can
declare:
• Modules from the Forge.
• Modules from Git repositories.
• Data and other non-module content (such as Hiera data) from Git repositories.
You can declare as much or as little of this content as needed for each environment. In the Puppetfile, each module
or repository is specified by a mod directive, along with the name of the content and other information code
management needs to correctly install and maintain the declared modules and data.
CAUTION: Please avoid adding executable code to your Puppetfile. This practice is not supported and may
not work in current or future versions of Puppet.
Managing modules with a Puppetfile
Almost all Puppet manifests are kept in modules, which are collections of Puppet code and data that have a specific
directory structure. In open source Puppet, you only use the Puppetfile to install and manage modules.
To learn more about modules in general, refer to the Modules overview in the Puppet documentation.
By default, r10k installs module content in a modules directory in the same directory the Puppetfile is in. For
example, with the default settings, declaring the puppetlabs-apache module in your Puppetfile installs the
apache module into the ./modules/apache directory. However, you can Change the module installation
directory on page 391.
Important: Code management purges any content in your control repo's module directory that is not listed in your
Puppetfile. For this reason, if you use r10k, you must not use the puppet module command to install or manage
modules. Instead, you must declare modules in each environment's Puppetfile. Code management uses the Puppetfile
to install, update, and manage your modules. If you use puppet module install to install a module to the live
code directory, code management deletes the module when it is not found in the Puppetfile.
Declaring your own modules
If you develop your own modules that you maintain in source control, you can declare them in your Puppetfile, just
like you would declare any module from a Git repository. If your modules aren't maintained in source control, you'll
need to move them to source control so you can declare then in your Puppetfile and allow code management to install
and manage your module in your environments.
Related information
• Declare Git repositories in the Puppetfile on page 388
Deploying module code
When you change your Puppetfile to install or update a module (or when you update a module that you wrote that
you've declared in your Puppetfile), you must trigger r10k to deploy the new or updated code to your environments.
© 2024 Puppet, Inc., a Perforce company

Puppet | Using Puppet code | 387
Create a Puppetfile
The Puppetfile manages an environment's content. When you create a Puppetfile, use the mod directive to declare an
environment's content.
Before you begin
You must be managing environments with a control repository. These steps assume you have set up a control
repository that has the production branch as the default branch.
These steps explain how to create an initial Puppetfile in your production environment (which is usually the
default environment). This initial Puppetfile becomes a template for your other environments. When you add an
evnironment (by creating a branch based on the default branch), the new environment inherits a copy of the default
environment's Puppetfile, which you can then modify on the new branch to declare the new environment's content.
1.
On your production branch, in the root directory, create a text file named Puppetfile.
2.
Open the new Puppetfile in a text editor, such as VS Code.
3.
Declare the production environment's content in the Puppetfile.
Use a mod directive to specify each module or repository. Additionally, you need to define the name of the
content and any other information code management needs to correctly install and maintain the declared modules
and data. For information and examples of Puppetfile declarations, refer to:
• Declare Forge modules in the Puppetfile on page 387
• Declare Git repositories in the Puppetfile on page 388
Tip: Puppet has a VS Code extension that supports syntax highlighting for the Puppet language.
4.
Optional: If you want code management to install modules somewhere other than the default directory (./
modules), use the moduledir directive to Change the module installation directory on page 391.
5.
Save and commit your changes.
If you already have multiple branches (environments) in your control repo, you might need to copy the Puppetfile
to the other branches, and then edit each copy according to each environment's module and data requirements.
When you add an evnironment, the new branch automatically gets a copy of the Puppetfile that you can then edit
accordingly for the new environment.
Creating a Puppetfile is a requirement for r10k.
Declare Forge modules in the Puppetfile
When you declare a Forge module in your Puppetfile, you can specify a particular version to track and whether you
want code management to automatically update the module.
Important:
The Puppetfile does not automatically resolve dependencies for Forge modules. When you declare a module in your
Puppetfile, you must also declare any required dependent modules.
Forge module symlinks are not supported. When you install modules with r10k, by declaring them in your
Puppetfile, symlinks are not installed.
If you have Puppetfiles you used before you started using code management, these files might contain a forge
setting that provides legacy compatibility with librarian-puppet. However, this setting is non-operational for
r10k. If you need to configure how Forge modules are downloaded, you must specify forge_settings in Hiera.
© 2024 Puppet, Inc., a Perforce company

Puppet | Using Puppet code | 388
1.
In your Puppetfile, use the mod directive to specify Forge modules you want to install. Specify the module's full
name as a string. For example, this declaration is for the apache module:
mod 'puppetlabs/apache'
Tip: This basic declaration installs the current version of the module that is available during the next
code deployment, but it doesn't update the module on future runs. If you want to keep the module updated
automatically, you need to specify :latest, as described in the next step.
2.
Optional: Specify whether you want to maintain a specific version of the module or if you want r10k to
automatically update the module when a new version is available.
• To continuously keep the module current with the newest version, specify :latest after the module name.
For example:
mod 'puppetlabs/ntp', :latest
• To install a specific version, and maintain that version, specify the desired version number, as a string, after
the module name. For example:
mod 'puppetlabs/stdlib', '0.10.0'
• To install whichever version is current during the next code deployment, and stay with that version, do not
specify any options after the module name. For example:
mod 'puppetlabs/apache'
3.
Save and commit your changes.
Edit the Puppetfile any time you need to install a module or update a module that is not automatically updated.
With r10k, you must not use the puppet module command to install or manage modules. Because r10k uses the
Puppetfile to install, update, and manage your modules, if you use puppet module install to install a module
to the live code directory, r10k deletes the module based on the Puppetfile contents.
Declare Git repositories in the Puppetfile
You can declare your own modules, modules that aren't from the Forge, data, or other non-module content that you
want to install from Git repositories.
1.
To specify environment content from a Git repository, use the mod directive and specify the content name as a
string. Then and use :git to specify the repository location, and :branch to reference a branch. For example:
mod 'apache',
:git => 'https://github.com/puppetlabs/puppetlabs-apache'
:branch => '<BRANCH_NAME>'
2.
Optional: Specify additional options or alternative configurations, if needed:
• For non-module content, you must Specify installation paths for repositories on page 389.
Important: Content is installed in the modules directory and treated as a module, unless you use the
:install_path option. You must use :install_path for non-module content to keep your data
separate from your modules.
• If the content requires SSH authentication, read about how to Declare module or data content with SSH private
key authentication on page 389.
• By default, content from Git repositories stays updated with the repository's main branch, but you can Keep
repository content at a specific version on page 389 and Declare content from a relative control repo branch
on page 390.
3.
Save and commit your changes.
© 2024 Puppet, Inc., a Perforce company

Puppet | Using Puppet code | 389
Specify installation paths for repositories
You can set individual installation paths for any Git repositories you declare in a Puppetfile.
The :install_path option allows you to separate non-module content in your directory structure or to set
specific installation paths for individual modules. When you set this option for a specific repository, it overrides the
moduledir setting (which is either the default modules directory or a custom path if you Change the module
installation directory on page 391).
In your Puppetfile, under the Git repository's mod directive, use the :install_path option to declare the location
where you want to install the content. The path must a string and it must be relative to the Puppetfile's location. To
install in the root directory, specify an empty value.
Content is installed into a subdirectory named after to the content's mod directive. For example, this declaration
installs site data content from a Git repository into the ./hieradata directory:
mod 'site_data',
:git => '[email protected]:site_data.git',
:install_path => 'hieradata'
The final file path for this content is ./hieradata/site_data.
As another example, this declaration installs site data content from a different Git repository into a site_data
directory at the root:
mod 'site_data_2',
:git => '[email protected]:site_data_2.git',
:install_path => ''
The final file path for this content is ./site_data.
Declare module or data content with SSH private key authentication
To declare content protected by SSH private keys, declare the content as a Git repository, and then configure the
private key setting in your code management tool.
1.
Declare the Git repository in your Puppetfile, using the Git repo's SSH URL. For example:
mod 'myco/privatemod',
:git => '[email protected]:myco/privatemod.git'
Note: If modifying the Puppetfile triggers a code deployment, expect the code deployment to fail. You must
complete the next step to get a successful code deployment.
2.
Configure the private key settings by modifying the following r10k parameters in Hiera:
• To set a key for all Git operations, use the private key setting under git-settings.
• To set a private key for an individual remote repository, set the private key in the repositories hash in
git-settings for each specific remote.
After completing both steps, you might need to manually trigger a code deployment.
Keep repository content at a specific version
By default, content from Git repositories stays updated with the repository's main branch, but you can configure the
Puppetfile to maintain repository content at a specific version.
To specify a particular repository version you want to track, use one of the following options in the Git repository's
declaration in your Puppetfile. Setting one of these options maintains the repository at the specified version and
deploys any updates made to that particular version.
• ref: Specifies the Git reference to check out. This option can reference either a tag, a commit, or a branch.
• tag: Specifies a certain tag associated with the repo. For example:
mod 'apache',
© 2024 Puppet, Inc., a Perforce company

Puppet | Using Puppet code | 390
:git => 'https://github.com/puppetlabs/puppetlabs-apache',
:tag => '0.9.0'
• commit: Specifies a certain commit in the repo. For example:
mod 'apache',
:git => 'https://github.com/puppetlabs/puppetlabs-apache',
:commit => '8df51aa'
• branch: Specifies a certain branch of the Git repo or Declare content from a relative control repo branch on page
390. For example:
mod 'apache',
:git => 'https://github.com/puppetlabs/puppetlabs-apache',
:branch => 'proxy_match'
In addition to one of the above options, you can also Set a default branch for content deployment on page 390.
Declare content from a relative control repo branch
If you declare a Git repository to track a specific branch, you can also specify the :control_branch option,
which allows you to deploy content from a control repo branch relative to the location of the Puppetfile.
Before you begin
The :control_branch option is a modification of the :branch option, which you can use to Keep repository
content at a specific version on page 389.
Normally, :branch tracks a specifically-named repository branch, such as testing, or a specific feature
branch. If you specify :branch => :control_branch, it locates and tracks a branch in the Git repository that
has the same name as the control repo branch where the Puppetfile is located.
For example, if your Puppetfile is in the production branch, content from the Git repo's production branch is
deployed. Similarly, if you copy this Puppetfile to your testing branch, the tracking from that branch follows the
Git repo's testing branch.
Important: With :control_branch, when you create new branches, you don't have to edit the inherited
Puppetfile as extensively, because the tracked branches remain relative. However, your Git repository branch names
must match your control repo's branch names for the :control_branch option to work successfully. You might
want to Set a default branch for content deployment on page 390 as a backup in case no matching branch is found.
Here is an example of a declaration using :control_branch:
mod 'hieradata',
:git => '[email protected]:organization/hieradata.git',
:branch => :control_branch
Set a default branch for content deployment
You can specify a default branch that code management can use if it can't deploy the specified ref, tag, commit,
or branch.
Before you begin
You can't use :default_branch by itself. This option can only be used in conjunction with :ref, :tag,
:commit, or :branch, which are used to Keep repository content at a specific version on page 389.
In the Puppetfile, in the content declaration, set the :default_branch option to the branch you want to deploy if
your specified option fails. For example, this declaration tracks the :control_branch and uses the main branch
as a backup if no matching branch is found.
mod 'hieradata',
:git => '[email protected]:organization/hieradata.git',
© 2024 Puppet, Inc., a Perforce company

Puppet | Using Puppet code | 391
:branch => :control_branch,
:default_branch => 'main'
Tip: Specifying a :default_branch is recommended when you Declare content from a relative control repo
branch on page 390, in case code management can't find a matching branch.
If r10k can't parse the default branch specification or no such named branch exists, it logs an error and does not
deploy or update the content.
Change the module installation directory
If needed, you can change the directory where r10k installs modules declared in your Puppetfile.
By default, r10k installs module content in a modules directory in the same directory the Puppetfile is in, such as:
./modules/<MODULE_NAME>
To change the module installation path, at the top of your Puppetfile before any module declarations, add the
moduledir directive, and specify the path to the desired module installation directory relative to the Puppetfile's
location. For example:
moduledir 'thirdparty'
Important: This directive applies to all content declared in the Puppetfile.
If you need to change the installation paths for only some modules or data, declare those content sources as Git
repositories, and use the install_path option to Specify installation paths for repositories on page 389. This
option overrides the moduledir directive.
Using content from Puppet Forge
Puppet Forge is a collection of modules and how-to guides developed by Puppet and its community.
Modules manage a specific technology in your infrastructure and serve as the basic building blocks of Puppet desired
state management. On the Puppet Forge, there is a module to manage almost any part of your infrastructure. Whether
you want to manage packages or patch operating systems, a module is already set up for you. See each module’s
README for installation instructions, usage, and code examples.
When using an existing module from the Forge, most of the Puppet code is written for you. You just need to install
the module and its dependencies and write a small amount of code (known as a profile) to tie things together. Take
a look at our Getting started with PE guide to see an example of writing a profile for an existing module. For more
information about existing modules, see the module fundamentals documentation and Puppet Forge.
© 2024 Puppet, Inc., a Perforce company

Puppet | Using Puppet code | 392
Designing system configs (roles and profiles)
Your typical goal with Puppet is to build complete system configurations, which manage all of the software, services,
and configuration that you care about on a given system. The roles and profiles method can help keep complexity
under control and make your code more reusable, reconfigurable, and refactorable.
• The roles and profiles method on page 392
The roles and profiles method is the most reliable way to build reusable, configurable, and refactorable system
configurations.
• Roles and profiles example on page 395
This example demonstrates a complete roles and profiles workflow. Use it to understand the roles and profiles method
as a whole. Additional examples show how to design advanced configurations by refactoring this example code to a
higher level of complexity.
• Designing advanced profiles on page 398
In this advanced example, we iteratively refactor our basic roles and profiles example to handle real-world concerns.
The final result is — with only minor differences — the Jenkins profile we use in production here at Puppet.
• Designing convenient roles on page 415
There are several approaches to building roles, and you must decide which ones are most convenient for you and your
team.
The roles and profiles method
The roles and profiles method is the most reliable way to build reusable, configurable, and refactorable system
configurations.
It's not a straightforward recipe: you must think hard about the nature of your infrastructure and your team. It's
also not a final state: expect to refine your configurations over time. Instead, it's an approach to designing your
infrastructure's interface — sealing away incidental complexity, surfacing the significant complexity, and making
sure your data behaves predictably.
Building configurations without roles and profiles
Without roles and profiles, people typically build system configurations in their node classifier or main manifest,
using Hiera to handle tricky inheritance problems. A standard approach is to create a group of similar nodes and
assign classes to it, then create child groups with extra classes for nodes that have additional needs. Another common
pattern is to put everything in Hiera, using a very large hierarchy that reflects every variation in the infrastructure.
If this works for you, then it works! You might not need roles and profiles. But most people find direct building gets
difficult to understand and maintain over time.
Configuring roles and profiles
Roles and profiles are two extra layers of indirection between your node classifier and your component modules.
The roles and profiles method separates your code into three levels:
• Component modules — Normal modules that manage one particular technology, for example puppetlabs/apache.
• Profiles — Wrapper classes that use multiple component modules to configure a layered technology stack.
• Roles — Wrapper classes that use multiple profiles to build a complete system configuration.
These extra layers of indirection might seem like they add complexity, but they give you a space to build practical,
business-specific interfaces to the configuration you care most about. A better interface makes hierarchical data easier
to use, makes system configurations easier to read, and makes refactoring easier.
© 2024 Puppet, Inc., a Perforce company

Puppet | Using Puppet code | 393
© 2024 Puppet, Inc., a Perforce company

Puppet | Using Puppet code | 394
In short, from top to bottom:
• Your node classifier assigns one role class to a group of nodes. The role manages a whole system configuration,
so no other classes are needed. The node classifier does not configure the role in any way.
• That role class declares some profile classes with include, and does nothing else. For example:
class role::jenkins::primaryserver {
include profile::base
include profile::server
include profile::jenkins::primaryserver
}
• Each profile configures a layered technology stack, using multiple component modules and the built-in resource
types. (In the diagram, profile::jenkins::primaryserver uses puppet/jenkins, puppetlabs/apt, a
home-built backup module, and some package and file resources.)
• Profiles can take configuration data from the console, Hiera, or Puppet lookup. (In the diagram, three different
hierarchy levels contribute data.)
• Classes from component modules are always declared via a profile, and never assigned directly to a node.
• If a component class has parameters, you specify them in the profile; never use Hiera or Puppet lookup to
override component class params.
Rules for profile classes
There are rules for writing profile classes.
• Make sure you can safely include any profile multiple times — don't use resource-like declarations on them.
• Profiles can include other profiles.
• Profiles own all the class parameters for their component classes. If the profile omits one, that means you
definitely want the default value; the component class shouldn't use a value from Hiera data. If you need to set a
class parameter that was omitted previously, refactor the profile.
• There are three ways a profile can get the information it needs to configure component classes:
• If your business always uses the same value for a given parameter, hardcode it.
• If you can't hardcode it, try to compute it based on information you already have.
• Finally, if you can't compute it, look it up in your data. To reduce lookups, identify cases where multiple
parameters can be derived from the answer to a single question.
This is a game of trade-offs. Hardcoded parameters are the easiest to read, and also the least flexible. Putting
values in your Hiera data is very flexible, but can be very difficult to read: you might have to look through a lot of
files (or run a lot of lookup commands) to see what the profile is actually doing. Using conditional logic to derive
a value is a middle-ground. Aim for the most readable option you can get away with.
Rules for role classes
There are rules for writing role classes.
• The only thing roles should do is declare profile classes with include. Don't declare any component classes or
normal resources in a role.
Optionally, roles can use conditional logic to decide which profiles to use.
• Roles should not have any class parameters of their own.
• Roles should not set class parameters for any profiles. (Those are all handled by data lookup.)
• The name of a role should be based on your business's conversational name for the type of node it manages.
This means that if you regularly call a machine a "Jenkins primary server," it makes sense to write a role named
role::jenkins::primaryserver. But if you call it a "web server," you shouldn't use a name like
role::nginx — go with something like role::web instead.
© 2024 Puppet, Inc., a Perforce company

Puppet | Using Puppet code | 395
Methods for data lookup
Profiles usually require some amount of configuration, and they must use data lookup to get it.
This profile uses the automatic class parameter lookup to request data.
# Example Hiera data
profile::jenkins::jenkins_port: 8000
profile::jenkins::java_dist: jre
profile::jenkins::java_version: '8'
# Example manifest
class profile::jenkins (
Integer $jenkins_port,
String $java_dist,
String $java_version
) {
# ...
This profile omits the parameters and uses the lookup function:
class profile::jenkins {
$jenkins_port = lookup('profile::jenkins::jenkins_port', {value_type =>
String, default_value => '9091'})
$java_dist = lookup('profile::jenkins::java_dist', {value_type =>
String, default_value => 'jdk'})
$java_version = lookup('profile::jenkins::java_version', {value_type =>
String, default_value => 'latest'})
# ...
In general, class parameters are preferable to lookups. They integrate better with tools like Puppet strings, and
they're a reliable and well-known place to look for configuration. But using lookup is a fine approach if you aren't
comfortable with automatic parameter lookup. Some people prefer the full lookup key to be written in the profile, so
they can globally grep for it.
Roles and profiles example
This example demonstrates a complete roles and profiles workflow. Use it to understand the roles and profiles method
as a whole. Additional examples show how to design advanced configurations by refactoring this example code to a
higher level of complexity.
Configure Jenkins controller servers with roles and profiles
Jenkins is a continuous integration (CI) application that runs on the JVM. The Jenkins controller server provides a
web front-end, and also runs CI tasks at scheduled times or in reaction to events.
In this example, we manage the configuration of Jenkins controller servers.
Set up your prerequisites
If you're new to using roles and profiles, do some additional setup before writing any new code.
1.
Create two modules: one named role, and one named profile.
If you deploy your code with Code Manager or r10k, put these two modules in your control repository instead of
declaring them in your Puppetfile, because Code Manager and r10k reserve the modules directory for their own
use.
a.
Make a new directory in the repo named site.
b.
Edit the environment.conf file to add site to the modulepath. (For example: modulepath =
site:modules:$basemodulepath).
c.
Put the role and profile modules in the site directory.
2.
Make sure Hiera or Puppet lookup is set up and working, with a hierarchy that works well for you.
© 2024 Puppet, Inc., a Perforce company

Puppet | Using Puppet code | 396
Choose component modules
For our example, we want to manage Jenkins itself using the puppet/jenkins module.
Jenkins requires Java, and the puppet/jenkins module can manage it automatically. But we want finer control
over Java, so we're going to disable that. So, we need a Java module, and puppetlabs/java is a good choice.
That's enough to start with. We can refactor and expand when we have those working.
To learn more about these modules, see puppet/jenkins and puppetlabs/java.
Write a profile
From a Puppet perspective, a profile is just a normal class stored in the profile module.
Make a new class called profile::jenkins::controller, located at .../profile/manifests/
jenkins/controller.pp, and fill it with Puppet code.
# /etc/puppetlabs/code/environments/production/site/profile/manifests/
jenkins/controller.pp
class profile::jenkins::controller (
String $jenkins_port = '9091',
String $java_dist = 'jdk',
String $java_version = 'latest',
) {
class { 'jenkins':
configure_firewall => true,
install_java => false,
port => $jenkins_port,
config_hash => {
'HTTP_PORT' => { 'value' => $jenkins_port },
'JENKINS_PORT' => { 'value' => $jenkins_port },
},
}
class { 'java':
distribution => $java_dist,
version => $java_version,
before => Class['jenkins'],
}
}
This is pretty simple, but is already benefiting us: our interface for configuring Jenkins has gone from 30 or so
parameters on the Jenkins class (and many more on the Java class) down to three. Notice that we’ve hardcoded the
configure_firewall and install_java parameters, and have reused the value of $jenkins_port in
three places.
Related information
Rules for profile classes on page 394
There are rules for writing profile classes.
Methods for data lookup on page 395
Profiles usually require some amount of configuration, and they must use data lookup to get it.
Set data for the profile
Let’s assume the following:
• We use some custom facts:
• group: The group this node belongs to. (This is usually either a department of our business, or a large-scale
function shared by many nodes.)
• stage: The deployment stage of this node (dev, test, or prod).
© 2024 Puppet, Inc., a Perforce company

Puppet | Using Puppet code | 397
• We have a five-layer hierarchy:
• console_data for data defined in the console.
• nodes/%{trusted.certname} for per-node overrides.
• groups/%{facts.group}/%{facts.stage} for setting stage-specific data within a group.
• groups/%{facts.group} for setting group-specific data.
• common for global fallback data.
• We have a few one-off Jenkins controllers, but most of them belong to the ci group.
• Our quality engineering department wants controllers in the ci group to use the Oracle JDK, but one-off
machines can just use the platform’s default Java.
• QE also wants their prod controllers to listen on port 80.
Set appropriate values in the data, using either Hiera or configuration data in the console.
# /etc/puppetlabs/code/environments/production/data/nodes/ci-
controller01.example.com.yaml
# --Nothing. We don't need any per-node values right now.
# /etc/puppetlabs/code/environments/production/data/groups/ci/prod.yaml
profile::jenkins::controller::jenkins_port: '80'
# /etc/puppetlabs/code/environments/production/data/groups/ci.yaml
profile::jenkins::controller::java_dist: 'oracle-jdk8'
profile::jenkins::controller::java_version: '8u92'
# /etc/puppetlabs/code/environments/production/data/common.yaml
# --Nothing. Just use the default parameter values.
Write a role
To write roles, we consider the machines we’ll be managing and decide what else they need in addition to that Jenkins
profile.
Our Jenkins controllers don’t serve any other purpose. But we have some profiles (code not shown) that we expect
every machine in our fleet to have:
• profile::base must be assigned to every machine, including workstations. It manages basic policies, and
uses some conditional logic to include OS-specific profiles as needed.
• profile::server must be assigned to every machine that provides a service over the network. It makes sure
ops can log into the machine, and configures things like timekeeping, firewalls, logging, and monitoring.
So a role to manage one of our Jenkins controllers should include those classes as well.
class role::jenkins::controller {
include profile::base
include profile::server
include profile::jenkins::controller
}
Related information
Rules for role classes on page 394
There are rules for writing role classes.
Assign the role to nodes
Finally, we assign role::jenkins::controller to every node that acts as a Jenkins controller.
Puppet has several ways to assign classes to nodes, so use whichever tool you feel best fits your team. Your main
choices are:
• The console node classifier, which lets you group nodes based on their facts and assign classes to those groups.
• The main manifest which can use node statements or conditional logic to assign classes.
© 2024 Puppet, Inc., a Perforce company

Puppet | Using Puppet code | 398
• Hiera or Puppet lookup — Use the lookup function to do a unique array merge on a special classes key, and
pass the resulting array to the include function.
# /etc/puppetlabs/code/environments/production/manifests/site.pp
lookup('classes', {merge => unique}).include
To learn more about how to assign custom facts to individual nodes, visit https://puppet.com/docs/puppet/8/
fact_overview.html.
Designing advanced profiles
In this advanced example, we iteratively refactor our basic roles and profiles example to handle real-world concerns.
The final result is — with only minor differences — the Jenkins profile we use in production here at Puppet.
Along the way, we explain our choices and point out some of the common trade-offs you encounter as you design
your own profiles.
Here's the basic Jenkins profile we're starting with:
# /etc/puppetlabs/code/environments/production/site/profile/manifests/
jenkins/controller.pp
class profile::jenkins::controller (
String $jenkins_port = '9091',
String $java_dist = 'jdk',
String $java_version = 'latest',
) {
class { 'jenkins':
configure_firewall => true,
install_java => false,
port => $jenkins_port,
config_hash => {
'HTTP_PORT' => { 'value' => $jenkins_port },
'JENKINS_PORT' => { 'value' => $jenkins_port },
},
}
class { 'java':
distribution => $java_dist,
version => $java_version,
before => Class['jenkins'],
}
}
Related information
Rules for profile classes on page 394
There are rules for writing profile classes.
First refactor: Split out Java
We want to manage Jenkins controllers and Jenkins agent nodes. We won't cover agent profiles in detail, but the first
issue we encountered is that they also need Java.
We could copy and paste the Java class declaration; it's small, so keeping multiple copies up-to-date might not be too
burdensome. But instead, we decided to break Java out into a separate profile. This way we can manage it one time,
then include the Java profile in both the agent and controller profiles.
Note: This is a common trade-off. Keeping a chunk of code in only one place (often called the DRY — "don't
repeat yourself" — principle) makes it more maintainable and less vulnerable to rot. But it has a cost: your individual
profile classes become less readable, and you must view more files to see what a profile actually does. To reduce that
readability cost, try to break code out in units that make inherent sense. In this case, the Java profile's job is simple
© 2024 Puppet, Inc., a Perforce company

Puppet | Using Puppet code | 399
enough to guess by its name — your colleagues don't have to read its code to know that it manages Java 8. Comments
can also help.
First, decide how configurable Java needs to be on Jenkins machines. After looking at our past usage, we realized that
we use only two options: either we install Oracle's Java 8 distribution, or we default to OpenJDK 7, which the Jenkins
module manages. This means we can:
• Make our new Java profile really simple: hardcode Java 8 and take no configuration.
• Replace the two Java parameters from profile::jenkins::controller with one Boolean parameter
(whether to let Jenkins handle Java).
Note: This is rule 4 in action. We reduce our profile's configuration surface by combining multiple questions into
one.
Here's the new parameter list:
class profile::jenkins::controller (
String $jenkins_port = '9091',
Boolean $install_jenkins_java = true,
) { # ...
And here's how we choose which Java to use:
class { 'jenkins':
configure_firewall => true,
install_java => $install_jenkins_java, # <--- here
port => $jenkins_port,
config_hash => {
'HTTP_PORT' => { 'value' => $jenkins_port },
'JENKINS_PORT' => { 'value' => $jenkins_port },
},
}
# When not using the jenkins module's java version, install java8.
unless $install_jenkins_java { include profile::jenkins::usage::java8 }
And our new Java profile:
::jenkins::usage::java8
# Sets up java8 for Jenkins on Debian
#
class profile::jenkins::usage::java8 {
motd::register { 'Java usage profile (profile::jenkins::usage::java8)': }
# OpenJDK 7 is already managed by the Jenkins module.
# ::jenkins::install_java or ::jenkins::agent::install_java should be
false to use this profile
# this can be set through the class parameter $install_jenkins_java
case $::osfamily {
'debian': {
class { 'java':
distribution => 'oracle-jdk8',
version => '8u92',
}
package { 'tzdata-java':
ensure => latest,
}
}
default: {
© 2024 Puppet, Inc., a Perforce company

Puppet | Using Puppet code | 400
notify { "profile::jenkins::usage::java8 cannot set up JDK on
${::osfamily}": }
Diff of first refactor
@@ -1,13 +1,12 @@
# /etc/puppetlabs/code/environments/production/site/profile/manifests/
jenkins/controller.pp
class profile::jenkins::controller (
- String $jenkins_port = '9091',
- String $java_dist = 'jdk',
- String $java_version = 'latest',
+ String $jenkins_port = '9091',
+ Boolean $install_jenkins_java = true,
) {
class { 'jenkins':
configure_firewall => true,
- install_java => false,
+ install_java => $install_jenkins_java,
port => $jenkins_port,
config_hash => {
'HTTP_PORT' => { 'value' => $jenkins_port },
@@ -15,9 +14,6 @@ class profile::jenkins::controller (
},
}
- class { 'java':
- distribution => $java_dist,
- version => $java_version,
- before => Class['jenkins'],
- }
+ # When not using the jenkins module's java version, install java8.
+ unless $install_jenkins_java { include profile::jenkins::usage::java8 }
}
Second refactor: Manage the heap
At Puppet, we manage the Java heap size for the Jenkins app. Production servers didn't have enough memory for
heavy use.
The Jenkins module has a jenkins::sysconfig defined type for managing system properties, so let's use it:
# Manage the heap size on the controller, in MB.
if($::memorysize_mb =~ Number and $::memorysize_mb > 8192)
{
# anything over 8GB we should keep max 4GB for OS and others
$heap = sprintf('%.0f', $::memorysize_mb - 4096)
} else {
# This is calculated as 50% of the total memory.
$heap = sprintf('%.0f', $::memorysize_mb * 0.5)
}
# Set java params, like heap min and max sizes. See
# https://wiki.jenkins-ci.org/display/JENKINS/Features+controlled+by
+system+properties
jenkins::sysconfig { 'JAVA_ARGS':
value => "-Xms${heap}m -Xmx${heap}m -Djava.awt.headless=true
-XX:+UseConcMarkSweepGC -XX:+CMSClassUnloadingEnabled -
Dhudson.model.DirectoryBrowserSupport.CSP=\\\"default-src 'self'; img-src
'self'; style-src 'self';\\\"",
}
© 2024 Puppet, Inc., a Perforce company

Puppet | Using Puppet code | 401
Note: Rule 4 again — we couldn't hardcode this, because we have some smaller Jenkins controllers that can't spare
the extra memory. But because our production controllers are always on more powerful machines, we can calculate
the heap based on the machine's memory size, which we can access as a fact. This lets us avoid extra configuration.
Diff of second refactor
@@ -16,4 +16,20 @@ class profile::jenkins::controller (
# When not using the jenkins module's java version, install java8.
unless $install_jenkins_java { include profile::jenkins::usage::java8 }
+
+ # Manage the heap size on the controller, in MB.
+ if($::memorysize_mb =~ Number and $::memorysize_mb > 8192)
+ {
+ # anything over 8GB we should keep max 4GB for OS and others
+ $heap = sprintf('%.0f', $::memorysize_mb - 4096)
+ } else {
+ # This is calculated as 50% of the total memory.
+ $heap = sprintf('%.0f', $::memorysize_mb * 0.5)
+ }
+ # Set java params, like heap min and max sizes. See
+ # https://wiki.jenkins-ci.org/display/JENKINS/Features+controlled+by
+system+properties
+ jenkins::sysconfig { 'JAVA_ARGS':
+ value => "-Xms${heap}m -Xmx${heap}m -Djava.awt.headless=true
-XX:+UseConcMarkSweepGC -XX:+CMSClassUnloadingEnabled -
Dhudson.model.DirectoryBrowserSupport.CSP=\\\"default-src 'self'; img-src
'self'; style-src 'self';\\\"",
+ }
+
}
Third refactor: Pin the version
We dislike surprise upgrades, so we pin Jenkins to a specific version. We do this with a direct package URL instead
of by adding Jenkins to our internal package repositories. Your organization might choose to do it differently.
First, we add a parameter to control upgrades. Now we can set a new value in .../data/groups/ci/
dev.yaml while leaving .../data/groups/ci.yaml alone — our dev machines get the new Jenkins version
first, and we can ensure everything works as expected before upgrading our prod machines.
class profile::jenkins::controller (
Variant[String[1], Boolean] $direct_download = 'http://pkg.jenkins-ci.org/
debian-stable/binary/jenkins_1.642.2_all.deb',
# ...
) { # ...
Then, we set the necessary parameters in the Jenkins class:
class { 'jenkins':
lts => true, # <-- here
repo => true, # <-- here
direct_download => $direct_download, # <-- here
version => 'latest', # <-- here
service_enable => true,
service_ensure => running,
configure_firewall => true,
install_java => $install_jenkins_java,
port => $jenkins_port,
config_hash => {
'HTTP_PORT' => { 'value' => $jenkins_port },
© 2024 Puppet, Inc., a Perforce company

Puppet | Using Puppet code | 402
'JENKINS_PORT' => { 'value' => $jenkins_port },
},
}
This was a good time to explicitly manage the Jenkins service, so we did that as well.
Diff of third refactor
@@ -1,10 +1,17 @@
# /etc/puppetlabs/code/environments/production/site/profile/manifests/
jenkins/controller.pp
class profile::jenkins::controller (
- String $jenkins_port = '9091',
- Boolean $install_jenkins_java = true,
+ String $jenkins_port = '9091',
+ Variant[String[1], Boolean] $direct_download = 'http://pkg.jenkins-
ci.org/debian-stable/binary/jenkins_1.642.2_all.deb',
+ Boolean $install_jenkins_java = true,
) {
class { 'jenkins':
+ lts => true,
+ repo => true,
+ direct_download => $direct_download,
+ version => 'latest',
+ service_enable => true,
+ service_ensure => running,
configure_firewall => true,
install_java => $install_jenkins_java,
port => $jenkins_port,
Fourth refactor: Manually manage the user account
We manage a lot of user accounts in our infrastructure, so we handle them in a unified way. The
profile::server class pulls in virtual::users, which has a lot of virtual resources we can selectively
realize depending on who needs to log into a given machine.
Note: This has a cost — it's action at a distance, and you need to read more files to see which users are enabled for
a given profile. But we decided the benefit was worth it: because all user accounts are written in one or two files, it's
easy to see all the users that might exist, and ensure that they're managed consistently.
We're accepting difficulty in one place (where we can comfortably handle it) to banish difficulty in another place
(where we worry it would get out of hand). Making this choice required that we know our colleagues and their
comfort zones, and that we know the limitations of our existing code base and supporting services.
So, for this example, we change the Jenkins profile to work the same way; we manage the jenkins user alongside
the rest of our user accounts. While we're doing that, we also manage a few directories that can be problematic
depending on how Jenkins is packaged.
Some values we need are used by Jenkins agents as well as controllers, so we're going to store them in a params
class, which is a class that sets shared variables and manages no resources. This is a heavyweight solution, so wait
until it provides real value before using it. In our case, we had a lot of OS-specific agent profiles (not shown in these
examples), and they made a params class worthwhile.
Note: Just as before, "don't repeat yourself" is in tension with "keep it readable." Find the balance that works for you.
# We rely on virtual resources that are ultimately declared by
profile::server.
include profile::server
© 2024 Puppet, Inc., a Perforce company

Puppet | Using Puppet code | 403
# Some default values that vary by OS:
include profile::jenkins::params
$jenkins_owner = $profile::jenkins::params::jenkins_owner
$jenkins_group = $profile::jenkins::params::jenkins_group
$controller_config_dir =
$profile::jenkins::params::controller_config_dir
file { '/var/run/jenkins': ensure => 'directory' }
# Because our account::user class manages the '${controller_config_dir}'
directory
# as the 'jenkins' user's homedir (as it should), we need to manage
# `${controller_config_dir}/plugins` here to prevent the upstream
# rtyler-jenkins module from trying to manage the homedir as the config
# dir. For more info, see the upstream module's `manifests/plugin.pp`
# manifest.
file { "${controller_config_dir}/plugins":
ensure => directory,
owner => $jenkins_owner,
group => $jenkins_group,
mode => '0755',
require => [Group[$jenkins_group], User[$jenkins_owner]],
}
Account::User <| tag == 'jenkins' |>
class { 'jenkins':
lts => true,
repo => true,
direct_download => $direct_download,
version => 'latest',
service_enable => true,
service_ensure => running,
configure_firewall => true,
install_java => $install_jenkins_java,
manage_user => false, # <-- here
manage_group => false, # <-- here
manage_datadirs => false, # <-- here
port => $jenkins_port,
config_hash => {
'HTTP_PORT' => { 'value' => $jenkins_port },
'JENKINS_PORT' => { 'value' => $jenkins_port },
},
}
Three things to notice in the code above:
• We manage users with a homegrown account::user defined type, which declares a user resource plus a few
other things.
• We use an Account::User resource collector to realize the Jenkins user. This relies on profile::server
being declared.
• We set the Jenkins class's manage_user, manage_group, and manage_datadirs parameters to false.
• We're now explicitly managing the plugins directory and the run directory.
Diff of fourth refactor
@@ -5,6 +5,33 @@ class profile::jenkins::controller (
Boolean $install_jenkins_java = true,
) {
+ # We rely on virtual resources that are ultimately declared by
profile::server.
© 2024 Puppet, Inc., a Perforce company

Puppet | Using Puppet code | 404
+ include profile::server
+
+ # Some default values that vary by OS:
+ include profile::jenkins::params
+ $jenkins_owner = $profile::jenkins::params::jenkins_owner
+ $jenkins_group = $profile::jenkins::params::jenkins_group
+ $controller_config_dir =
$profile::jenkins::params::controller_config_dir
+
+ file { '/var/run/jenkins': ensure => 'directory' }
+
+ # Because our account::user class manages the '${controller_config_dir}'
directory
+ # as the 'jenkins' user's homedir (as it should), we need to manage
+ # `${controller_config_dir}/plugins` here to prevent the upstream
+ # rtyler-jenkins module from trying to manage the homedir as the config
+ # dir. For more info, see the upstream module's `manifests/plugin.pp`
+ # manifest.
+ file { "${controller_config_dir}/plugins":
+ ensure => directory,
+ owner => $jenkins_owner,
+ group => $jenkins_group,
+ mode => '0755',
+ require => [Group[$jenkins_group], User[$jenkins_owner]],
+ }
+
+ Account::User <| tag == 'jenkins' |>
+
class { 'jenkins':
lts => true,
repo => true,
@@ -14,6 +41,9 @@ class profile::jenkins::controller (
service_ensure => running,
configure_firewall => true,
install_java => $install_jenkins_java,
+ manage_user => false,
+ manage_group => false,
+ manage_datadirs => false,
port => $jenkins_port,
config_hash => {
'HTTP_PORT' => { 'value' => $jenkins_port },
Fifth refactor: Manage more dependencies
Jenkins always needs Git installed (because we use Git for source control at Puppet), and it needs SSH keys to access
private Git repos and run commands on Jenkins agent nodes. We also have a standard list of Jenkins plugins we use,
so we manage those too.
Managing Git is pretty easy:
package { 'git':
ensure => present,
}
SSH keys are less easy, because they are sensitive content. We can't check them into version control with the rest of
our Puppet code, so we put them in a custom mount point on one specific Puppet server.
Because this server is different from our normal Puppet servers, we made a rule about accessing it: you must look
up the hostname from data instead of hardcoding it. This lets us change it in only one place if the secure server ever
moves.
$secure_server = lookup('puppetlabs::ssl::secure_server')
© 2024 Puppet, Inc., a Perforce company

Puppet | Using Puppet code | 405
file { "${controller_config_dir}/.ssh":
ensure => directory,
owner => $jenkins_owner,
group => $jenkins_group,
mode => '0700',
}
file { "${controller_config_dir}/.ssh/id_rsa":
ensure => file,
owner => $jenkins_owner,
group => $jenkins_group,
mode => '0600',
source => "puppet://${secure_server}/secure/delivery/id_rsa-jenkins",
}
file { "${controller_config_dir}/.ssh/id_rsa.pub":
ensure => file,
owner => $jenkins_owner,
group => $jenkins_group,
mode => '0640',
source => "puppet://${secure_server}/secure/delivery/id_rsa-
jenkins.pub",
}
Plugins are also a bit tricky, because we have a few Jenkins controllers where we want to manually configure plugins.
So we put the base list in a separate profile, and use a parameter to control whether we use it.
class profile::jenkins::controller (
Boolean $manage_plugins = false,
# ...
) {
# ...
if $manage_plugins {
include profile::jenkins::controller::plugins
}
In the plugins profile, we can use the jenkins::plugin resource type provided by the Jenkins module.
# /etc/puppetlabs/code/environments/production/site/profile/manifests/
jenkins/controller/plugins.pp
class profile::jenkins::controller::plugins {
jenkins::plugin { 'audit2db': }
jenkins::plugin { 'credentials': }
jenkins::plugin { 'jquery': }
jenkins::plugin { 'job-import-plugin': }
jenkins::plugin { 'ldap': }
jenkins::plugin { 'mailer': }
jenkins::plugin { 'metadata': }
# ... and so on.
}
Diff of fifth refactor
@@ -1,6 +1,7 @@
# /etc/puppetlabs/code/environments/production/site/profile/manifests/
jenkins/controller.pp
class profile::jenkins::controller (
String $jenkins_port = '9091',
+ Boolean $manage_plugins = false,
Variant[String[1], Boolean] $direct_download = 'http://pkg.jenkins-
ci.org/debian-stable/binary/jenkins_1.642.2_all.deb',
© 2024 Puppet, Inc., a Perforce company

Puppet | Using Puppet code | 406
Boolean $install_jenkins_java = true,
) {
@@ -14,6 +15,20 @@ class profile::jenkins::controller (
$jenkins_group = $profile::jenkins::params::jenkins_group
$controller_config_dir =
$profile::jenkins::params::controller_config_dir
+ if $manage_plugins {
+ # About 40 jenkins::plugin resources:
+ include profile::jenkins::controller::plugins
+ }
+
+ # Sensitive info (like SSH keys) isn't checked into version control like
the
+ # rest of our modules; instead, it's served from a custom mount point on
a
+ # designated server.
+ $secure_server = lookup('puppetlabs::ssl::secure_server')
+
+ package { 'git':
+ ensure => present,
+ }
+
file { '/var/run/jenkins': ensure => 'directory' }
# Because our account::user class manages the '${controller_config_dir}'
directory
@@ -69,4 +84,29 @@ class profile::jenkins::controller (
value => "-Xms${heap}m -Xmx${heap}m -Djava.awt.headless=true
-XX:+UseConcMarkSweepGC -XX:+CMSClassUnloadingEnabled -
Dhudson.model.DirectoryBrowserSupport.CSP=\\\"default-src 'self'; img-src
'self'; style-src 'self';\\\"",
}
+ # Deploy the SSH keys that Jenkins needs to manage its agent machines and
+ # access Git repos.
+ file { "${controller_config_dir}/.ssh":
+ ensure => directory,
+ owner => $jenkins_owner,
+ group => $jenkins_group,
+ mode => '0700',
+ }
+
+ file { "${controller_config_dir}/.ssh/id_rsa":
+ ensure => file,
+ owner => $jenkins_owner,
+ group => $jenkins_group,
+ mode => '0600',
+ source => "puppet://${secure_server}/secure/delivery/id_rsa-jenkins",
+ }
+
+ file { "${controller_config_dir}/.ssh/id_rsa.pub":
+ ensure => file,
+ owner => $jenkins_owner,
+ group => $jenkins_group,
+ mode => '0640',
+ source => "puppet://${secure_server}/secure/delivery/id_rsa-
jenkins.pub",
+ }
+
}
© 2024 Puppet, Inc., a Perforce company

Puppet | Using Puppet code | 407
Sixth refactor: Manage logging and backups
Backing up is usually a good idea.
We can use our homegrown backup module, which provides a backup::job resource type
(profile::server takes care of its prerequisites). But we should make backups optional, so people don't
accidentally post junk to our backup server if they're setting up an ephemeral Jenkins instance to test something.
class profile::jenkins::controller (
Boolean $backups_enabled = false,
# ...
) {
# ...
if $backups_enabled {
backup::job { "jenkins-data-${::hostname}":
files => $controller_config_dir,
}
}
}
Also, our teams gave us some conflicting requests for Jenkins logs:
• Some people want it to use syslog, like most other services.
• Others want a distinct log file so syslog doesn't get spammed, and they want the file to rotate more quickly than it
does by default.
That implies a new parameter. We can make one called $jenkins_logs_to_syslog and default it to undef. If
you set it to a standard syslog facility (like daemon.info), Jenkins logs there instead of its own file.
We use jenkins::sysconfig and our homegrown logrotate::job to do the work:
class profile::jenkins::controller (
Optional[String[1]] $jenkins_logs_to_syslog = undef,
# ...
) {
# ...
if $jenkins_logs_to_syslog {
jenkins::sysconfig { 'JENKINS_LOG':
value => "$jenkins_logs_to_syslog",
}
}
# ...
logrotate::job { 'jenkins':
log => '/var/log/jenkins/jenkins.log',
options => [
'daily',
'copytruncate',
'missingok',
'rotate 7',
'compress',
'delaycompress',
'notifempty'
],
}
}
Diff of sixth refactor
@@ -1,8 +1,10 @@
# /etc/puppetlabs/code/environments/production/site/profile/manifests/
jenkins/controller.pp
class profile::jenkins::controller (
String $jenkins_port = '9091',
© 2024 Puppet, Inc., a Perforce company

Puppet | Using Puppet code | 408
+ Boolean $backups_enabled = false,
Boolean $manage_plugins = false,
Variant[String[1], Boolean] $direct_download = 'http://pkg.jenkins-
ci.org/debian-stable/binary/jenkins_1.642.2_all.deb',
+ Optional[String[1]] $jenkins_logs_to_syslog = undef,
Boolean $install_jenkins_java = true,
) {
@@ -84,6 +86,15 @@ class profile::jenkins::controller (
value => "-Xms${heap}m -Xmx${heap}m -Djava.awt.headless=true
-XX:+UseConcMarkSweepGC -XX:+CMSClassUnloadingEnabled -
Dhudson.model.DirectoryBrowserSupport.CSP=\\\"default-src 'self'; img-src
'self'; style-src 'self';\\\"",
}
+ # Forward jenkins controller logs to syslog.
+ # When set to facility.level the jenkins_log uses that value instead of a
+ # separate log file, for example daemon.info
+ if $jenkins_logs_to_syslog {
+ jenkins::sysconfig { 'JENKINS_LOG':
+ value => "$jenkins_logs_to_syslog",
+ }
+ }
+
# Deploy the SSH keys that Jenkins needs to manage its agent machines and
# access Git repos.
file { "${controller_config_dir}/.ssh":
@@ -109,4 +120,29 @@ class profile::jenkins::controller (
source => "puppet://${secure_server}/secure/delivery/id_rsa-
jenkins.pub",
}
+ # Back up Jenkins' data.
+ if $backups_enabled {
+ backup::job { "jenkins-data-${::hostname}":
+ files => $controller_config_dir,
+ }
+ }
+
+ # (QENG-1829) Logrotate rules:
+ # Jenkins' default logrotate config retains too much data: by default, it
+ # rotates jenkins.log weekly and retains the last 52 weeks of logs.
+ # Considering we almost never look at the logs, let's rotate them daily
+ # and discard after 7 days to reduce disk usage.
+ logrotate::job { 'jenkins':
+ log => '/var/log/jenkins/jenkins.log',
+ options => [
+ 'daily',
+ 'copytruncate',
+ 'missingok',
+ 'rotate 7',
+ 'compress',
+ 'delaycompress',
+ 'notifempty'
+ ],
+ }
+
}
© 2024 Puppet, Inc., a Perforce company

Puppet | Using Puppet code | 409
Seventh refactor: Use a reverse proxy for HTTPS
We want the Jenkins web interface to use HTTPS, which we can accomplish with an Nginx reverse proxy. We also
want to standardize the ports: the Jenkins app always binds to its default port, and the proxy always serves over 443
for HTTPS and 80 for HTTP.
If we want to keep vanilla HTTP available, we can provide an $ssl parameter. If set to false (the default), you can
access Jenkins via both HTTP and HTTPS. We can also add a $site_alias parameter, so the proxy can listen on
a hostname other than the node's main FQDN.
class profile::jenkins::controller (
Boolean $ssl = false,
Optional[String[1]] $site_alias = undef,
# IMPORTANT: notice that $jenkins_port is removed.
# ...
Set configure_firewall => false in the Jenkins class:
class { 'jenkins':
lts => true,
repo => true,
direct_download => $direct_download,
version => 'latest',
service_enable => true,
service_ensure => running,
configure_firewall => false, # <-- here
install_java => $install_jenkins_java,
manage_user => false,
manage_group => false,
manage_datadirs => false,
# IMPORTANT: notice that port and config_hash are removed.
}
We need to deploy SSL certificates where Nginx can reach them. Because we serve a lot of things over HTTPS, we
already had a profile for that:
# Deploy the SSL certificate/chain/key for sites on this domain.
include profile::ssl::delivery_wildcard
This is also a good time to add some info for the message of the day, handled by puppetlabs/motd:
motd::register { 'Jenkins CI controller (profile::jenkins::controller)': }
if $site_alias {
motd::register { 'jenkins-site-alias':
content => @("END"),
profile::jenkins::controller::proxy
Jenkins site alias: ${site_alias}
|-END
order => 25,
}
}
The bulk of the work is handled by a new profile called profile::jenkins::controller::proxy. We're
omitting the code for brevity; in summary, what it does is:
• Include profile::nginx.
• Use resource types from the jfryman/nginx to set up a vhost, and to force a redirect to HTTPS if we haven't
enabled vanilla HTTP.
• Set up logstash forwarding for access and error logs.
• Include profile::fw::https to manage firewall rules, if necessary.
© 2024 Puppet, Inc., a Perforce company
Puppet | Using Puppet code | 410
Then, we declare that profile in our main profile:
class { 'profile::jenkins::controller::proxy':
site_alias => $site_alias,
require_ssl => $ssl,
}
Important:
We are now breaking rule 1, the most important rule of the roles and profiles method. Why?
Because profile::jenkins::controller::proxy is a "private" profile that belongs solely to
profile::jenkins::controller. It will never be declared by any role or any other profile.
This is the only exception to rule 1: if you're separating out code for the sole purpose of readability --- that is, if you
could paste the private profile's contents into the main profile for the exact same effect --- you can use a resource-like
declaration on the private profile. This lets you consolidate your data lookups and make the private profile's inputs
more visible, while keeping the main profile a little cleaner. If you do this, you must make sure to document that the
private profile is private.
If there is any chance that this code might be reused by another profile, obey rule 1.
Diff of seventh refactor
@@ -1,8 +1,9 @@
# /etc/puppetlabs/code/environments/production/site/profile/manifests/
jenkins/controller.pp
class profile::jenkins::controller (
- String $jenkins_port = '9091',
Boolean $backups_enabled = false,
Boolean $manage_plugins = false,
+ Boolean $ssl = false,
+ Optional[String[1]] $site_alias = undef,
Variant[String[1], Boolean] $direct_download = 'http://pkg.jenkins-
ci.org/debian-stable/binary/jenkins_1.642.2_all.deb',
Optional[String[1]] $jenkins_logs_to_syslog = undef,
Boolean $install_jenkins_java = true,
@@ -11,6 +12,9 @@ class profile::jenkins::controller (
# We rely on virtual resources that are ultimately declared by
profile::server.
include profile::server
+ # Deploy the SSL certificate/chain/key for sites on this domain.
+ include profile::ssl::delivery_wildcard
+
# Some default values that vary by OS:
include profile::jenkins::params
$jenkins_owner = $profile::jenkins::params::jenkins_owner
@@ -22,6 +26,31 @@ class profile::jenkins::controller (
include profile::jenkins::controller::plugins
}
+ motd::register { 'Jenkins CI controller
(profile::jenkins::controller)': }
+
+ # This adds the site_alias to the message of the day for convenience when
+ # logging into a server via FQDN. Because of the way motd::register
works, we
+ # need a sort of funny formatting to put it at the end (order => 25) and
to
+ # list a class so there isn't a random "--" at the end of the message.
© 2024 Puppet, Inc., a Perforce company

Puppet | Using Puppet code | 411
+ if $site_alias {
+ motd::register { 'jenkins-site-alias':
+ content => @("END"),
+ profile::jenkins::controller::proxy
+
+ Jenkins site alias: ${site_alias}
+ |-END
+ order => 25,
+ }
+ }
+
+ # This is a "private" profile that sets up an Nginx proxy -- it's only
ever
+ # declared in this class, and it would work identically pasted inline.
+ # But because it's long, this class reads more cleanly with it separated
out.
+ class { 'profile::jenkins::controller::proxy':
+ site_alias => $site_alias,
+ require_ssl => $ssl,
+ }
+
# Sensitive info (like SSH keys) isn't checked into version control like
the
# rest of our modules; instead, it's served from a custom mount point on
a
# designated server.
@@ -56,16 +85,11 @@ class profile::jenkins::controller (
version => 'latest',
service_enable => true,
service_ensure => running,
- configure_firewall => true,
+ configure_firewall => false,
install_java => $install_jenkins_java,
manage_user => false,
manage_group => false,
manage_datadirs => false,
- port => $jenkins_port,
- config_hash => {
- 'HTTP_PORT' => { 'value' => $jenkins_port },
- 'JENKINS_PORT' => { 'value' => $jenkins_port },
- },
}
# When not using the jenkins module's java version, install java8.
The final profile code
After all of this refactoring (and a few more minor adjustments), here’s the final code for
profile::jenkins::controller.
# /etc/puppetlabs/code/environments/production/site/profile/manifests/
jenkins/controller.pp
# Class: profile::jenkins::controller
#
# Install a Jenkins controller that meets Puppet's internal needs.
#
class profile::jenkins::controller (
Boolean $backups_enabled = false,
Boolean $manage_plugins = false,
Boolean $ssl = false,
Optional[String[1]] $site_alias = undef,
Variant[String[1], Boolean] $direct_download = 'http://pkg.jenkins-ci.org/
debian-stable/binary/jenkins_1.642.2_all.deb',
© 2024 Puppet, Inc., a Perforce company

Puppet | Using Puppet code | 412
Optional[String[1]] $jenkins_logs_to_syslog = undef,
Boolean $install_jenkins_java = true,
) {
# We rely on virtual resources that are ultimately declared by
profile::server.
include profile::server
# Deploy the SSL certificate/chain/key for sites on this domain.
include profile::ssl::delivery_wildcard
# Some default values that vary by OS:
include profile::jenkins::params
$jenkins_owner = $profile::jenkins::params::jenkins_owner
$jenkins_group = $profile::jenkins::params::jenkins_group
$controller_config_dir =
$profile::jenkins::params::controller_config_dir
if $manage_plugins {
# About 40 jenkins::plugin resources:
include profile::jenkins::controller::plugins
}
motd::register { 'Jenkins CI controller (profile::jenkins::controller)': }
# This adds the site_alias to the message of the day for convenience when
# logging into a server via FQDN. Because of the way motd::register works,
we
# need a sort of funny formatting to put it at the end (order => 25) and
to
# list a class so there isn't a random "--" at the end of the message.
if $site_alias {
motd::register { 'jenkins-site-alias':
content => @("END"),
profile::jenkins::controller::proxy
Jenkins site alias: ${site_alias}
|-END
order => 25,
}
}
# This is a "private" profile that sets up an Nginx proxy -- it's only
ever
# declared in this class, and it would work identically pasted inline.
# But because it's long, this class reads more cleanly with it separated
out.
class { 'profile::jenkins::controller::proxy':
site_alias => $site_alias,
require_ssl => $ssl,
}
# Sensitive info (like SSH keys) isn't checked into version control like
the
# rest of our modules; instead, it's served from a custom mount point on a
# designated server.
$secure_server = lookup('puppetlabs::ssl::secure_server')
# Dependencies:
# - Pull in apt if we're on Debian.
# - Pull in the 'git' package, used by Jenkins for Git polling.
# - Manage the 'run' directory (fix for busted Jenkins packaging).
if $::osfamily == 'Debian' { include apt }
© 2024 Puppet, Inc., a Perforce company

Puppet | Using Puppet code | 413
package { 'git':
ensure => present,
}
file { '/var/run/jenkins': ensure => 'directory' }
# Because our account::user class manages the '${controller_config_dir}'
directory
# as the 'jenkins' user's homedir (as it should), we need to manage
# `${controller_config_dir}/plugins` here to prevent the upstream
# rtyler-jenkins module from trying to manage the homedir as the config
# dir. For more info, see the upstream module's `manifests/plugin.pp`
# manifest.
file { "${controller_config_dir}/plugins":
ensure => directory,
owner => $jenkins_owner,
group => $jenkins_group,
mode => '0755',
require => [Group[$jenkins_group], User[$jenkins_owner]],
}
Account::User <| tag == 'jenkins' |>
class { 'jenkins':
lts => true,
repo => true,
direct_download => $direct_download,
version => 'latest',
service_enable => true,
service_ensure => running,
configure_firewall => false,
install_java => $install_jenkins_java,
manage_user => false,
manage_group => false,
manage_datadirs => false,
}
# When not using the jenkins module's java version, install java8.
unless $install_jenkins_java { include profile::jenkins::usage::java8 }
# Manage the heap size on the controller, in MB.
if($::memorysize_mb =~ Number and $::memorysize_mb > 8192)
{
# anything over 8GB we should keep max 4GB for OS and others
$heap = sprintf('%.0f', $::memorysize_mb - 4096)
} else {
# This is calculated as 50% of the total memory.
$heap = sprintf('%.0f', $::memorysize_mb * 0.5)
}
# Set java params, like heap min and max sizes. See
# https://wiki.jenkins-ci.org/display/JENKINS/Features+controlled+by
+system+properties
jenkins::sysconfig { 'JAVA_ARGS':
value => "-Xms${heap}m -Xmx${heap}m -Djava.awt.headless=true
-XX:+UseConcMarkSweepGC -XX:+CMSClassUnloadingEnabled -
Dhudson.model.DirectoryBrowserSupport.CSP=\\\"default-src 'self'; img-src
'self'; style-src 'self';\\\"",
}
# Forward jenkins controller logs to syslog.
# When set to facility.level the jenkins_log uses that value instead of a
# separate log file, for example daemon.info
if $jenkins_logs_to_syslog {
jenkins::sysconfig { 'JENKINS_LOG':
© 2024 Puppet, Inc., a Perforce company

Puppet | Using Puppet code | 414
value => "$jenkins_logs_to_syslog",
}
}
# Deploy the SSH keys that Jenkins needs to manage its agent machines and
# access Git repos.
file { "${controller_config_dir}/.ssh":
ensure => directory,
owner => $jenkins_owner,
group => $jenkins_group,
mode => '0700',
}
file { "${controller_config_dir}/.ssh/id_rsa":
ensure => file,
owner => $jenkins_owner,
group => $jenkins_group,
mode => '0600',
source => "puppet://${secure_server}/secure/delivery/id_rsa-jenkins",
}
file { "${controller_config_dir}/.ssh/id_rsa.pub":
ensure => file,
owner => $jenkins_owner,
group => $jenkins_group,
mode => '0640',
source => "puppet://${secure_server}/secure/delivery/id_rsa-
jenkins.pub",
}
# Back up Jenkins' data.
if $backups_enabled {
backup::job { "jenkins-data-${::hostname}":
files => $controller_config_dir,
}
}
# (QENG-1829) Logrotate rules:
# Jenkins' default logrotate config retains too much data: by default, it
# rotates jenkins.log weekly and retains the last 52 weeks of logs.
# Considering we almost never look at the logs, let's rotate them daily
# and discard after 7 days to reduce disk usage.
logrotate::job { 'jenkins':
log => '/var/log/jenkins/jenkins.log',
options => [
'daily',
'copytruncate',
'missingok',
'rotate 7',
'compress',
'delaycompress',
'notifempty'
],
}
}
© 2024 Puppet, Inc., a Perforce company

Puppet | Using Puppet code | 415
Designing convenient roles
There are several approaches to building roles, and you must decide which ones are most convenient for you and your
team.
High-quality roles strike a balance between readability and maintainability. For most people, the benefit of seeing the
entire role in a single file outweighs the maintenance cost of repetition. Later, if you find the repetition burdensome,
you can change your approach to reduce it. This might involve combining several similar roles into a more complex
role, creating sub-roles that other roles can include, or pushing more complexity into your profiles.
So, begin with granular roles and deviate from them only in small, carefully considered steps.
Here's the basic Jenkins role we're starting with:
class role::jenkins::controller {
include profile::base
include profile::server
include profile::jenkins::controller
}
Related information
Rules for role classes on page 394
There are rules for writing role classes.
First approach: Granular roles
The simplest approach is to make one role per type of node, period. For example, the Puppet Release Engineering
(RE) team manages some additional resources on their Jenkins controllers.
With granular roles, we'd have at least two Jenkins controller roles. A basic one:
class role::jenkins::controller {
include profile::base
include profile::server
include profile::jenkins::controller
}
...and an RE-specific one:
class role::jenkins::controller::release {
include profile::base
include profile::server
include profile::jenkins::controller
include profile::jenkins::controller::release
}
The benefits of this setup are:
• Readability — By looking at a single class, you can immediately see which profiles make up each type of node.
• Simplicity — Each role is just a linear list of profiles.
Some drawbacks are:
• Role bloat — If you have a lot of only-slightly-different nodes, you quickly have a large number of roles.
• Repetition — The two roles above are almost identical, with one difference. If they're two separate roles, it's
harder to see how they're related to each other, and updating them can be more annoying.
Second approach: Conditional logic
Alternatively, you can use conditional logic to handle differences between closely-related kinds of nodes.
class role::jenkins::controller::release {
include profile::base
include profile::server
© 2024 Puppet, Inc., a Perforce company

Puppet | Using Puppet code | 416
include profile::jenkins::controller
if $facts['group'] == 'release' {
include profile::jenkins::controller::release
}
}
The benefits of this approach are:
• You have fewer roles, and they're easy to maintain.
The drawbacks are:
• Reduced readability...maybe. Conditional logic isn't usually hard to read, especially in a simple case like this, but
you might feel tempted to add a bunch of new custom facts to accommodate complex roles. This can make roles
much harder to read, because a reader must also know what those facts mean.
In short, be careful of turning your node classification system inside-out. You might have a better time if you
separate the roles and assign them with your node classifier.
Third approach: Nested roles
Another way of reducing repetition is to let roles include other roles.
class role::jenkins::controller {
# Parent role:
include role::server
# Unique classes:
include profile::jenkins::controller
}
class role::jenkins::controller::release {
# Parent role:
include role::jenkins::controller
# Unique classes:
include profile::jenkins::controller::release
}
In this example, we reduce boilerplate by having role::jenkins::controller include role::server.
When role::jenkins::controller::release includes role::jenkins::controller, it
automatically gets role::server as well. With this approach, any given role only needs to:
• Include the "parent" role that it most resembles.
• Include the small handful of classes that differentiate it from its parent.
The benefits of this approach are:
• You have fewer roles, and they're easy to maintain.
• Increased visibility in your node classifier.
The drawbacks are:
• Reduced readability: You have to open more files to see the real content of a role. This isn't much of a problem if
you go only one level deep, but it can get cumbersome around three or four.
Fourth approach: Multiple roles per node
In general, we recommend that you assign only one role to a node. In an infrastructure where nodes usually provide
one primary service, that's the best way to work.
However, if your nodes tend to provide more than one primary service, it can make sense to assign multiple roles.
For example, say you have a large application that is usually composed of an application server, a database server,
and a web server. To enable lighter-weight testing during development, you've decided to provide an "all-in-one"
node type to your developers. You could do this by creating a new role::our_application::monolithic
class, which includes all of the profiles that compose the three normal roles, but you might find it simpler to use your
© 2024 Puppet, Inc., a Perforce company

Puppet | Using Puppet code | 417
node classifier to assign all three roles (role::our_application::app, role::our_application::db,
and role::our_application::web) to those all-in-one machines.
The benefit of this approach are:
• You have fewer roles, and they're easy to maintain.
The drawbacks are:
• There's no actual "role" that describes your multi-purpose nodes; instead, the source of truth for what's on them
is spread out between your roles and your node classifier, and you must cross-reference to understand their
configurations. This reduces readability.
• The normal and all-in-one versions of a complex application are likely to have other subtle differences you need
to account for, which might mean making your "normal" roles more complex. It's possible that making a separate
role for this kind of node would reduce your overall complexity, even though it increases the number of roles and
adds repetition.
Fifth approach: Super profiles
Because profiles can already include other profiles, you can decide to enforce an additional rule at your business: all
profiles must include any other profiles needed to manage a complete node that provides that service.
For example, our profile::jenkins::controller class could include both profile::server
and profile::base, and you could manage a Jenkins controller server by directly assigning
profile::jenkins::controller in your node classifier. In other words, a "main" profile would do all the
work that a role usually does, and the roles layer would no longer be necessary.
The benefits of this approach are:
• The chain of dependencies for a complex service can be more clear this way.
• Depending on how you conceptualize code, this can be easier in a lot of ways!
The drawbacks are:
• Loss of flexibility. This reduces the number of ways in which your roles can be combined, and reduces your
ability to use alternate implementations of dependencies for nodes with different requirements.
• Reduced readability, on a much grander scale. Like with nested roles, you lose the advantage of a clean,
straightforward list of what a node consists of. Unlike nested roles, you also lose the clear division between "top-
level" complete system configurations (roles) and "mid-level" groupings of technologies (profiles). Not every
profile makes sense as an entire system, so you some way to keep track of which profiles are the top-level ones.
Some people really find continuous hierarchies easier to reason about than sharply divided layers. If everyone in
your organization is on the same page about this, a "profiles and profiles" approach might make sense. But we
strongly caution you against it unless you're very sure; for most people, a true roles and profiles approach works
better. Try the well-traveled path first.
Sixth approach: Building roles in the node classifier
Instead of building roles with the Puppet language and then assigning them to nodes with your node classifier, you
might find your classifier flexible enough to build roles directly.
For example, you might create a "Jenkins controllers" group in the console and assign it the profile::base,
profile::server, and profile::jenkins::controller classes, doing much the same job as our basic
role::jenkins::controller class.
Important:
If you're doing this, make sure you don't set parameters for profiles in the classifier. Continue to use Hiera / Puppet
lookup to configure profiles.
This is because profiles are allowed to include other profiles, which interacts badly with the resource-like behavior
that node classifiers use to set class parameters.
The benefits of this approach are:
© 2024 Puppet, Inc., a Perforce company

Puppet | Using Puppet code | 418
• Your node classifier becomes much more powerful, and can be a central point of collaboration for managing
nodes.
• Increased readability: A node's page in the console displays the full content of its role, without having to cross-
reference with manifests in your role module.
The drawbacks are:
• Loss of flexibility. The Puppet language's conditional logic is often more flexible and convenient than most node
classifiers, including the console.
• Your roles are no longer in the same code repository as your profiles, and it's more difficult to make them follow
the same code promotion processes.
Separating data (Hiera)
Hiera is a built-in key-value configuration data lookup system, used for separating data from Puppet code.
• About Hiera on page 418
Puppet’s strength is in reusable code. Code that serves many needs must be configurable: put site-specific information
in external configuration data files, rather than in the code itself.
• Getting started with Hiera on page 422
This page introduces the basic concepts and tasks to get you started with Hiera, including how to create a hiera.yaml
config file and write data. It is the foundation for understanding the more advanced topics described in the rest of the
Hiera documentation.
• Configuring Hiera on page 425
The Hiera configuration file is called hiera.yaml. It configures the hierarchy for a given layer of data.
• Creating and editing data on page 433
Important aspects of using Hiera are merge behavior and interpolation.
• Looking up data with Hiera on page 442
• Writing new data backends on page 446
You can extend Hiera to look up values in data sources, for example, a PostgreSQL database table, a custom web app,
or a new kind of structured data file.
• Debugging Hiera on page 454
When debugging Hiera, puppet lookup can help identify exactly what Hiera was doing when it raised an error, or
how it decided to look up a key and where it got its value.
• Upgrading to Hiera 5 on page 456
Upgrading to Hiera 5 offers some major advantages. A real environment data layer means changes to your hierarchy
are now routine and testable, using multiple backends in your hierarchy is easier and you can make a custom backend.
About Hiera
Puppet’s strength is in reusable code. Code that serves many needs must be configurable: put site-specific information
in external configuration data files, rather than in the code itself.
Puppet uses Hiera to do two things:
• Store the configuration data in key-value pairs
• Look up what data a particular module needs for a given node during catalog compilation
This is done via:
• Automatic Parameter Lookup for classes included in the catalog
• Explicit lookup calls
Hiera’s hierarchical lookups follow a “defaults, with overrides” pattern, meaning you specify common data one time,
and override it in situations where the default won’t work. Hiera uses Puppet’s facts to specify data sources, so you
can structure your overrides to suit your infrastructure. While using facts for this purpose is common, data-sources
can also be defined without the use of facts.
© 2024 Puppet, Inc., a Perforce company

Puppet | Using Puppet code | 419
Puppet 5 comes with support for JSON, YAML, and EYAML files.
Related topics: Automatic Parameter Lookup.
Hiera hierarchies
Hiera looks up data by following a hierarchy — an ordered list of data sources.
Hierarchies are configured in a hiera.yaml configuration file. Each level of the hierarchy tells Hiera how to access
some kind of data source. A hierarchy is usually organized like this:
---
version: 5
defaults: # Used for any hierarchy level that omits these keys.
datadir: data # This path is relative to hiera.yaml's directory.
data_hash: yaml_data # Use the built-in YAML backend.
hierarchy:
- name: "Per-node data" # Human-readable name.
path: "nodes/%{trusted.certname}.yaml" # File path, relative to
datadir.
# ^^^ IMPORTANT: include the file
extension!
- name: "Per-datacenter business group data" # Uses custom facts.
path: "location/%{facts.whereami}/%{facts.group}.yaml"
- name: "Global business group data"
path: "groups/%{facts.group}.yaml"
- name: "Per-datacenter secret data (encrypted)"
lookup_key: eyaml_lookup_key # Uses non-default backend.
path: "secrets/%{facts.whereami}.eyaml"
options:
pkcs7_private_key: /etc/puppetlabs/puppet/eyaml/private_key.pkcs7.pem
pkcs7_public_key: /etc/puppetlabs/puppet/eyaml/public_key.pkcs7.pem
- name: "Per-OS defaults"
path: "os/%{facts.os.family}.yaml"
- name: "Common data"
path: "common.yaml"
In this example, every level configures the path to a YAML file on disk.
Hierarchies interpolate variables
Most levels of a hierarchy interpolate variables into their configuration:
path: "os/%{facts.os.family}.yaml"
The percent-and-braces %{variable} syntax is a Hiera interpolation token. It is similar to the Puppet language’s
${expression} interpolation tokens. Wherever you use an interpolation token, Hiera determines the variable’s
value and inserts it into the hierarchy.
The facts.os.family uses the Hiera special key.subkey notation for accessing elements of hashes and
arrays. It is equivalent to $facts['os']['family'] in the Puppet language but the 'dot' notation produces an
empty string instead of raising an error if parts of the data is missing. Make sure that an empty interpolation does not
end up matching an unintended path.
You can only interpolate values into certain parts of the config file. For more info, see the hiera.yaml format
reference.
With node-specific variables, each node gets a customized set of paths to data. The hierarchy is always the same.
© 2024 Puppet, Inc., a Perforce company

Puppet | Using Puppet code | 420
Hiera searches the hierarchy in order
After Hiera replaces the variables to make a list of concrete data sources, it checks those data sources in the order they
were written.
Generally, if a data source doesn’t exist, or doesn’t specify a value for the current key, Hiera skips it and moves on to
the next source, until it finds one that exists — then it uses it. Note that this is the default merge strategy, but does not
always apply, for example, Hiera can use data from all data sources and merge the result.
Earlier data sources have priority over later ones. In the example above, the node-specific data has the highest
priority, and can override data from any other level. Business group data is separated into local and global sources,
with the local one overriding the global one. Common data used by all nodes always goes last.
That’s how Hiera’s “defaults, with overrides” approach to data works — you specify common data at lower levels of
the hierarchy, and override it at higher levels for groups of nodes with special needs.
Layered hierarchies
Hiera uses layers of data with a hiera.yaml for each layer.
Each layer can configure its own independent hierarchy. Before a lookup, Hiera combines them into a single super-
hierarchy: global # environment # module.
Note: There is a fourth layer - default_hierarchy - that can be used in a module’s hiera.yaml. It only
comes into effect when there is no data for a key in any of the other regular hierarchies
Assume the example above is an environment hierarchy (in the production environment). If we also had the following
global hierarchy:
---
version: 5
hierarchy:
- name: "Data exported from our old self-service config tool"
path: "selfserve/%{trusted.certname}.json"
data_hash: json_data
datadir: data
And the NTP module had the following hierarchy for default data:
---
version: 5
hierarchy:
- name: "OS values"
path: "os/%{facts.os.name}.yaml"
- name: "Common values"
path: "common.yaml"
defaults:
data_hash: yaml_data
datadir: data
Then in a lookup for the ntp::servers key, thrush.example.com would use the following combined
hierarchy:
• <CODEDIR>/data/selfserve/thrush.example.com.json
• <CODEDIR>/environments/production/data/nodes/thrush.example.com.yaml
• <CODEDIR>/environments/production/data/location/belfast/ops.yaml
• <CODEDIR>/environments/production/data/groups/ops.yaml
• <CODEDIR>/environments/production/data/os/Debian.yaml
• <CODEDIR>/environments/production/data/common.yaml
• <CODEDIR>/environments/production/modules/ntp/data/os/Ubuntu.yaml
• <CODEDIR>/environments/production/modules/ntp/data/common.yaml
© 2024 Puppet, Inc., a Perforce company

Puppet | Using Puppet code | 421
The combined hierarchy works the same way as a layer hierarchy. Hiera skips empty data sources, and either returns
the first found value or merges all found values.
Note: By default, datadir refers to the directory named ‘data’ next to the hiera.yaml.
Tips for making a good hierarchy
• Make a short hierarchy. Data files are easier to work with.
• Use the roles and profiles method to manage less data in Hiera. Sorting hundreds of class parameters is easier than
sorting thousands.
• If the built-in facts don’t provide an easy way to represent differences in your infrastructure, make custom facts.
For example, create a custom datacenter fact that is based on information particular to your network layout so that
each datacenter is uniquely identifiable.
• Give each environment – production, test, development – its own hierarchy.
Related topics: codedir, confdir.
Hiera configuration layers
Hiera uses three independent layers of configuration. Each layer has its own hierarchy, and they’re linked into one
super-hierarchy before doing a lookup.
The three layers are searched in the following order: global # environment # module. Hiera searches every data source
in the global layer’s hierarchy before checking any source in the environment layer.
The global layer
The configuration file for the global layer is located, by default, in $confdir/hiera.yaml. You can change the
location by changing the hiera_config setting in puppet.conf.
Hiera has one global hierarchy. Because it goes before the environment layer, it’s useful for temporary overrides, for
example, when your ops team needs to bypass its normal change processes.
The global layer is the only place where legacy Hiera 3 backends can be used - it’s an important piece of the
transition period when you migrate you backends to support Hiera 5. It supports the following config formats:
hiera.yaml v5, hiera.yaml v3 (deprecated).
Other than the above use cases, try to avoid the global layer. Specify all normal data in the environment layer.
The environment layer
The configuration file for the environment layer is located, by default, in <ENVIRONMENT DIR>/hiera.yaml.
The environment layer is where most of your Hiera data hierarchy definition happens. Every Puppet environment has
its own hierarchy configuration, which applies to nodes in that environment. Supported config formats include: v5, v3
(deprecated).
The module layer
The configuration file for a module layer is located, by default, in a module's <MODULE>/hiera.yaml.
The module layer sets default values and merge behavior for a module’s class parameters. It is a convenient
alternative to the params.pp pattern.
Note: To get the exact same behaviour as params.pp, use the default_hierarchy, as those bindings are
excluded from merges. When placed in the regular hierarchy in the module’s hierarchy the bindings are merged when
a merge lookup is performed.
It comes last in Hiera’s lookup order, so environment data set by a user overrides the default data set by the module’s
author.
© 2024 Puppet, Inc., a Perforce company

Puppet | Using Puppet code | 422
Every module can have its own hierarchy configuration. You can only bind data for keys in the module’s namespace.
For example:
Lookup key Relevant module hierarchy
ntp::servers ntp
jenkins::port jenkins
secure_server (none)
Hiera uses the ntp module’s hierarchy when looking up ntp::servers, but uses the jenkins module’s
hierarchy when looking up jenkins::port. Hiera never checks the module for a key beginning with
jenkins::.
When you use the lookup function for keys that don’t have a namespace (for example, secure_server), the
module layer is not consulted.
The three-layer system means that each environment has its own hierarchy, and so do modules. You can make
hierarchy changes on an environment-by-environment basis. Module data is also customizable.
Getting started with Hiera
This page introduces the basic concepts and tasks to get you started with Hiera, including how to create a hiera.yaml
config file and write data. It is the foundation for understanding the more advanced topics described in the rest of the
Hiera documentation.
Related information
Hiera configuration layers on page 421
Hiera uses three independent layers of configuration. Each layer has its own hierarchy, and they’re linked into one
super-hierarchy before doing a lookup.
Merge behaviors on page 433
There are four merge behaviors to choose from: first, unique, hash, and deep.
Create a hiera.yaml config file
The Hiera config file is called hiera.yaml. Each environment should have its own hiera.yaml file.
In the main directory of one of your environments, create a new file called hiera.yaml. Paste the following
contents into it:
# <ENVIRONMENT>/hiera.yaml
---
version: 5
hierarchy:
- name: "Per-node data" # Human-readable name.
path: "nodes/%{trusted.certname}.yaml" # File path, relative to
datadir.
# ^^^ IMPORTANT: include the file
extension!
- name: "Per-OS defaults"
path: "os/%{facts.os.family}.yaml"
- name: "Common data"
path: "common.yaml"
This file is in a format called YAML, which is used extensively throughout Hiera.
For more information on YAML, see YAML Cookbook.
Related information
Config file syntax on page 426
© 2024 Puppet, Inc., a Perforce company

Puppet | Using Puppet code | 423
The hiera.yaml file is a YAML file, containing a hash with up to four top-level keys.
The hierarchy
The hiera.yaml file configures a hierarchy: an ordered list of data sources.
Hiera searches these data sources in the order they are written. Higher-priority sources override lower-priority ones.
Most hierarchy levels use variables to locate a data source, so that different nodes get different data.
This is the core concept of Hiera: a defaults-with-overrides pattern for data lookup, using a node-specific list of data
sources.
Related information
Interpolation on page 438
In Hiera you can insert, or interpolate, the value of a variable into a string, using the syntax %{variable}.
Hiera hierarchies on page 419
Hiera looks up data by following a hierarchy — an ordered list of data sources.
Write data: Create a test class
A test class writes the data it receives to a temporary file — on the agent when applying the catalog.
Hiera is used with Puppet code, so the first step is to create a Puppet class for testing.
1.
If you do not already use the roles and profiles method, create a module named profile. Profiles are wrapper
classes that use multiple component modules to configure a layered technology stack. See The roles and profile
method for more information.
2.
Use Puppet Development Kit ( PDK) to create a class called hiera_test.pp in your profile module.
3.
Add the following code you your hiera_test.pp file:
# /etc/puppetlabs/code/environments/production/modules/profile/manifests/
hiera_test.pp
class profile::hiera_test (
Boolean $ssl,
Boolean $backups_enabled,
Optional[String[1]] $site_alias = undef,
) {
file { '/tmp/hiera_test.txt':
ensure => file,
content => @("END"),
Data from profile::hiera_test
-----
profile::hiera_test::ssl: ${ssl}
profile::hiera_test::backups_enabled: ${backups_enabled}
profile::hiera_test::site_alias: ${site_alias}
|END
owner => root,
mode => '0644',
}
}
The test class uses class parameters to request configuration data. Puppet looks up class parameters in Hiera, using
<CLASS NAME>::<PARAMETER NAME> as the lookup key.
4.
Make a manifest that includes the class:
# site.pp
include profile::hiera_test
5.
Compile the catalog and observe that this fails because there are required values.
© 2024 Puppet, Inc., a Perforce company

Puppet | Using Puppet code | 424
6.
To provide values for the missing class parameters, set these keys in your Hiera data. Depending on where in your
hierarchy you want to set the parameters, you can add them to your common data, os data, or per-node data.
Parameter Hiera key
$ssl profile::hiera_test::ssl
$backups_enabled profile::hiera_test::backups_enabled
$site_alias profile::hiera_test::site_alias
7.
Compile again and observe that the parameters are now automatically looked up.
Related information
The Puppet lookup function on page 442
The lookup function uses Hiera to retrieve a value for a given key.
Write data: Set values in common data
Set values in your common data — the level at the bottom of your hierarchy.
This hierarchy level uses the YAML backend for data, which means the data goes into a YAML file. To know where
to put that file, combine the following pieces of information:
• The current environment’s directory.
• The data directory, which is a subdirectory of the environment. By default, it's <ENVIRONMENT>/data.
• The file path specified by the hierarchy level.
In this case, /etc/puppetlabs/code/environments/production/ + data/ + common.yaml.
Open that YAML file in an editor, and set values for two of the class’s parameters.
# /etc/puppetlabs/code/environments/production/data/common.yaml
---
profile::hiera_test::ssl: false
profile::hiera_test::backups_enabled: true
The third parameter, $site_alias, has a default value defined in code, so you can omit it from the data.
Write data: Set per-operating system data
The second level of the hierarchy uses the os fact to locate its data file. This means it can use different data files
depending on the operating system of the current node.
For this example, suppose that your developers use MacBook laptops, which have an OS family of Darwin. If a
developer is running an app instance on their laptop, it should not send data to your production backup server, so set
$backups_enabled to false.
If you do not run Puppet on any Mac laptops, choose an OS family that is meaningful to your infrastructure.
1.
Locate the data file, by replacing %{facts.os.family} with the value you are targeting:
/etc/puppetlabs/code/environments/production/data/ + os/ + Darwin + .yaml
2.
Add the following contents:
# /etc/puppetlabs/code/environments/production/data/os/Darwin.yaml
---
profile::hiera_test::backups_enabled: false
3.
Compile to observe that the override takes effect.
Related topics: the os fact.
© 2024 Puppet, Inc., a Perforce company

Puppet | Using Puppet code | 425
Write data: Set per-node data
The highest level of the example hierarchy uses the value of $trusted['certname'] to locate its data file, so
you can set data by name for each individual node.
This example supposes you have a server named jenkins-prod-03.example.com, and configures it to use
SSL and to serve this application at the hostname ci.example.com. To try this out, choose the name of a real
server that you can run Puppet on.
1.
To locate the data file, replace %{trusted.certname}with the node name you’re targeting:
/etc/puppetlabs/code/environments/production/data/ + nodes/ + jenkins-
prod-03.example.com + .yaml
2.
Open that file in an editor and add the following contents:
# /etc/puppetlabs/code/environments/production/data/nodes/jenkins-
prod-03.example.com.yaml
---
profile::hiera_test::ssl: true
profile::hiera_test::site_alias: ci.example.com
3.
Compile to observe that the override takes effect.
Related topics: $trusted[‘certname’].
Testing Hiera data on the command line
As you set Hiera data or rearrange your hierarchy, it is important to double-check the data a node receives.
The puppet lookup command helps test data interactively. For example:
puppet lookup profile::hiera_test::backups_enabled --environment production
--node jenkins-prod-03.example.com
This returns the value true.
To use the puppet lookup command effectively:
• Run the command on a Puppet Server node, or on another node that has access to a full copy of your Puppet code
and configuration.
• The node you are testing against should have contacted the server at least one time as this makes the facts for that
node available to the lookup command (otherwise you need to supply the facts yourself on the command line).
• Make sure the command uses the global confdir and codedir, so it has access to your live data. If you’re not
running puppet lookup as root user, specify --codedir and --confdir on the command line.
• If you use PuppetDB, you can use any node’s facts in a lookup by specifying --node <NAME>. Hiera can
automatically get that node’s real facts and use them to resolve data.
• If you do not use PuppetDB, or if you want to test for a set of facts that don't exist, provide facts in a YAML or
JSON file and specify that file as part of the command with --facts <FILE>. To get a file full of facts, rather
than creating one from scratch, run facter -p --json > facts.json on a node that is similar to the
node you want to examine, copy the facts.json file to your Puppet Server node, and edit it as needed.
• Puppet Development Kit comes with predefined fact sets for a variety of platforms. You can use those if you
want to test against platforms you do not have, or if you want "typical facts" for a kind of platform.
• If you are not getting the values you expect, try re-running the command with --explain. The --explain
flag makes Hiera output a full explanation of which data sources it searched and what it found in them.
Related topics: The puppet lookup command, confdir, codedir.
Configuring Hiera
The Hiera configuration file is called hiera.yaml. It configures the hierarchy for a given layer of data.
Related information
Hiera configuration layers on page 421
© 2024 Puppet, Inc., a Perforce company

Puppet | Using Puppet code | 426
Hiera uses three independent layers of configuration. Each layer has its own hierarchy, and they’re linked into one
super-hierarchy before doing a lookup.
Hiera hierarchies on page 419
Hiera looks up data by following a hierarchy — an ordered list of data sources.
Location of hiera.yaml files
There are several hiera.yaml files in a typical deployment. Hiera uses three layers of configuration, and the
module and environment layers typically have multiple instances.
The configuration file locations for each layer:
Layer Location Example
Global $confdir/hiera.yaml /etc/puppetlabs/puppet/
hiera.yaml C:\ProgramData
\PuppetLabs\puppet\etc
\hiera.yaml
Environment <ENVIRONMENT>/hiera.yaml /etc/puppetlabs/code/
environments/production/
hiera.yaml C:\ProgramData
\PuppetLabs\code
\environments\production
\hiera.yaml
Module <MODULE>/hiera.yaml /etc/puppetlabs/code/
environments/production/
modules/ntp/hiera.yaml C:
\ProgramData\PuppetLabs
\code\environments
\production\modules\ntp
\hiera.yaml
Note: To change the location for the global layer’s hiera.yaml set the hiera_config setting in your
puppet.conf file.
Hiera searches for data in the following order: global # environment # module. For more information, see Hiera
configuration layers.
Related topics: codedir, Environments, Modules fundamentals.
Config file syntax
The hiera.yaml file is a YAML file, containing a hash with up to four top-level keys.
The following keys are in a hiera.yaml file:
• version - Required. Must be the number 5, with no quotes.
• defaults - A hash, which can set a default datadir, backend, and options for hierarchy levels.
• hierarchy - An array of hashes, which configures the levels of the hierarchy.
• default_hierarchy - An array of hashes, which sets a default hierarchy to be used only if the normal
hierarchy entries do not result in a value. Only allowed in a module's hiera.yaml.
version: 5
defaults: # Used for any hierarchy level that omits these keys.
datadir: data # This path is relative to hiera.yaml's directory.
data_hash: yaml_data # Use the built-in YAML backend.
hierarchy:
- name: "Per-node data" # Human-readable name.
© 2024 Puppet, Inc., a Perforce company

Puppet | Using Puppet code | 427
path: "nodes/%{trusted.certname}.yaml" # File path, relative to
datadir.
# ^^^ IMPORTANT: include the file
extension!
- name: "Per-datacenter business group data" # Uses custom facts.
path: "location/%{facts.whereami}/%{facts.group}.yaml"
- name: "Global business group data"
path: "groups/%{facts.group}.yaml"
- name: "Per-datacenter secret data (encrypted)"
lookup_key: eyaml_lookup_key # Uses non-default backend.
path: "secrets/nodes/%{trusted.certname}.eyaml"
options:
pkcs7_private_key: /etc/puppetlabs/puppet/eyaml/private_key.pkcs7.pem
pkcs7_public_key: /etc/puppetlabs/puppet/eyaml/public_key.pkcs7.pem
- name: "Per-OS defaults"
path: "os/%{facts.os.family}.yaml"
- name: "Common data"
path: "common.yaml"
Note: When writing in Hiera YAML files, do not use hard tabs for indentation.
The default configuration
If you omit the hierarchy or defaults keys, Hiera uses the following default values.
version: 5
hierarchy:
- name: Common
path: common.yaml
defaults:
data_hash: yaml_data
datadir: data
These defaults are only used if the file is present and specifies version: 5. If hiera.yaml is absent, it disables
Hiera for that layer. If it specifies a different version, different defaults apply.
The defaults key
The defaults key sets default values for the lookup function and datadir keys, which lets you omit those
keys in your hierarchy levels. The value of defaults must be a hash, which can have up to three keys: datadir,
options, and one of the mutually exclusive lookup function keys.
datadir: a default value for datadir, used for any file-based hierarchy level that doesn't specify its own. If not
given, the datadir is the directory data in the same directory as the hiera.yaml configuration file.
options: a default value for options, used for any hierarchy level that does not specify its own.
The lookup function keys: used for any hierarchy level that doesn't specify its own. This must be one of:
• data_hash - produces a hash of key-value pairs (typically from a data file)
• lookup_key - produces values key by key (typically for a custom data provider)
• data_dig - produces values key by key (for a more advanced data provider)
• hiera3_backend - a data provider that calls out to a legacy Hiera 3 backend (global layer only).
For the built-in data providers — YAML, JSON, and HOCON — the key is always data_hash and the value is one
of yaml_data, json_data, or hocon_data. To set a custom data provider as the default, see the data provider
© 2024 Puppet, Inc., a Perforce company

Puppet | Using Puppet code | 428
documentation. Whichever key you use, the value must be the name of the custom Puppet function that implements
the lookup function.
The hierarchy key
The hierarchy key configures the levels of the hierarchy. The value of hierarchy must be an array of hashes.
Indent the hash's keys by four spaces, so they line up with the first key. Put an empty line between hashes, to visually
distinguish them. For example:
hierarchy:
- name: "Per-node data"
path: "nodes/%{trusted.certname}.yaml"
- name: "Per-datacenter business group data"
path: "location/%{facts.whereami}/%{facts.group}.yaml"
The default_hierarchy key
The default_hierarchy key is a top-level key. It is initiated when, and only when, the lookup in the
regular hierarchy does not find a value. Within this default hierarchy, the normal merging rules apply. The
default_hierarchy is not permitted in environment or global layers.
If lookup_options is used, the values found in the regular hierarchy have no effect on the values found in the
default_hierarchy, and vice versa. A merge parameter, given in a call to lookup, is only used in the regular
hierarchy. It does not affect how a value in the default hierarchy is assembled. The only way to influence that, is to
use lookup_options, found in the default hierarchy.
For more information about the YAML file, see YAML.
Related information
Hiera hierarchies on page 419
Hiera looks up data by following a hierarchy — an ordered list of data sources.
Configuring a hierarchy level: built-in backends
Hiera has three built-in backends: YAML, JSON, and HOCON. All of these use files as data sources.
You can use any combination of these backends in a hierarchy, and can also combine them with custom backends.
But if most of your data is in one file format, set default values for the datadir and data_hash keys.
Each YAML/JSON/HOCON hierarchy level needs the following keys:
• name — A name for this level, shown in debug messages and --explain output.
• path, paths, glob, globs, or mapped_paths (choose one) — The data files to use for this hierarchy level.
• These paths are relative to the datadir, they support variable interpolation, and they require a file extension.
See “Specifying file paths” for more details.
• mapped_paths does not support glob expansion.
• data_hash — Which backend to use. Can be omitted if you set a default. The value must be one of the
following:
• yaml_data for YAML.
• json_data for JSON.
• hocon_data for HOCON.
© 2024 Puppet, Inc., a Perforce company
Puppet | Using Puppet code | 429
• datadir — The directory where data files are kept. Can be omitted if you set a default.
• This path is relative to hiera.yaml's directory: if the config file is at /etc/puppetlabs/code/
environments/production/hiera.yaml and the datadir is set to data, the full path to the data
directory is /etc/puppetlabs/code/environments/production/data.
• In the global layer, you can optionally set the datadir to an absolute path; in the other layers, it must always
be relative.
• datadir supports variable interpolation.
For more information on built-in backends, see YAML, JSON, HOCON.
Related information
Interpolate a Puppet variable on page 439
The most common thing to interpolate is the value of a Puppet top scope variable.
Specifying file paths
Options for specifying a file path.
Key Data type Expected value
path String One file path.
paths Array Any number of file paths. This acts
like a sub-hierarchy: if multiple files
exist, Hiera searches all of them, in
the order in which they're written.
glob String One shell-like glob pattern, which
might match any number of
files. If multiple files are found,
Hiera searches all of them in
alphanumerical order.
globs Array Any number of shell-like glob
patterns. If multiple files are found,
Hiera searches all of them in
alphanumerical order (ignoring the
order of the globs).
mapped_paths Array or Hash A fact that is a collection (array or
hash) of values. Hiera expands these
values to produce an array of paths.
Note: You can only use one of these keys in a given hierarchy level.
Explicit file extensions are required, for example, common.yaml, not common.
File paths are relative to the datadir: if the full datadir is /etc/puppetlabs/code/environments/
production/data and the file path is set to "nodes/%{trusted.certname}.yaml", the full path to the
file is /etc/puppetlabs/code/environments/production/data/nodes/<NODE NAME>.yaml.
Note: Hierarchy levels should interpolate variables into the path.
Globs are implemented with Ruby's Dir.glob method:
• One asterisk (*) matches a run of characters.
• Two asterisks (**) matches any depth of nested directories.
• A question mark (?) matches one character.
• Comma-separated lists in curly braces ({one,two}) match any option in the list.
• Sets of characters in square brackets ([abcd]) match any character in the set.
© 2024 Puppet, Inc., a Perforce company

Puppet | Using Puppet code | 430
• A backslash (\) escapes special characters.
Example:
- name: "Domain or network segment"
glob: "network/**/{%{facts.networking.domain},
%{facts.networking.interfaces.en0.bindings.0.network}}.yaml"
The mapped_paths key must contain three string elements, in the following order:
• A scope variable that points to a collection of strings.
• The variable name that is mapped to each element of the collection.
• A template where that variable can be used in interpolation expressions.
For example, a fact named $services contains the array ["a", "b", "c"]. The following configuration
has the same results as if paths had been specified to be [service/a/common.yaml, service/b/
common.yaml, service/c/common.yaml].
- name: Example
mapped_paths: [services, tmp, "service/%{tmp}/common.yaml"]
Related information
Interpolation on page 438
In Hiera you can insert, or interpolate, the value of a variable into a string, using the syntax %{variable}.
The hierarchy on page 423
The hiera.yaml file configures a hierarchy: an ordered list of data sources.
Configuring a hierarchy level: hiera-eyaml
Hiera 5 ( Puppet 4.9.3 and later) includes a native interface for the Hiera eyaml extension, which keeps data encrypted
on disk but lets Puppet read it during catalog compilation.
To learn how to create keys and edit encrypted files, see the Hiera eyaml documentation.
Within hiera.yaml, the eyaml backend resembles the standard built-in backends, with a few differences: it uses
lookup_key instead of data_hash, and requires an options key to locate decryption keys. Note that the eyaml
backend can read regular yaml files as well as yaml files with encrypted data.
Important: To use the eyaml backend, you must have the hiera-eyaml gem installed where Puppet can use it.
It's included in Puppet Server since version 5.2.0, so you just need to make it available for command line usage. To
enable eyaml on the command line and with puppet apply, use sudo /opt/puppetlabs/puppet/bin/
gem install hiera-eyaml.
Each eyaml hierarchy level needs the following keys:
• name — A name for this level, shown in debug messages and --explain output.
• lookup_key — Which backend to use. The value must be eyaml_lookup_key. Use this instead of the
data_hash setting.
• path, paths, mapped_paths, glob, or globs (choose one) — The data files to use for this hierarchy level.
These paths are relative to the datadir, they support variable interpolation, and they require a file extension. In this
case, you'll usually use .eyaml. They work the same way they do for the standard backends.
• datadir — The directory where data files are kept. Can be omitted if you set a default. Works the same way it
does for the standard backends.
© 2024 Puppet, Inc., a Perforce company

Puppet | Using Puppet code | 431
• options — A hash of options specific to hiera-eyaml, mostly used to configure decryption. For the default
encryption method, this hash must have the following keys:
• pkcs7_private_key — The location of the PKCS7 private key to use.
• pkcs7_public_key — The location of the PKCS7 public key to use.
• If you use an alternate encryption plugin, search the plugin's docs for the encryption options. Set an
encrypt_method option, plus some plugin-specific options to replace the pkcs7 ones.
• You can use normal strings as keys in this hash; you don't need to use symbols.
The file path key and the options key both support variable interpolation.
An example hierarchy level:
hierarchy:
- name: "Per-datacenter secret data (encrypted)"
lookup_key: eyaml_lookup_key
path: "secrets/%{facts.whereami}.eyaml"
options:
pkcs7_private_key: /etc/puppetlabs/puppet/eyaml/private_key.pkcs7.pem
pkcs7_public_key: /etc/puppetlabs/puppet/eyaml/public_key.pkcs7.pem
Related information
Interpolation on page 438
In Hiera you can insert, or interpolate, the value of a variable into a string, using the syntax %{variable}.
Configuring a hierarchy level: legacy Hiera 3 backends
If you rely on custom data backends designed for Hiera 3, you can use them in your global hierarchy. They are not
supported at the environment or module layers.
Note: This feature is a temporary measure to let you start using new features while waiting for backend updates.
Each legacy hierarchy level needs the following keys:
• name — A name for this level, shown in debug messages and --explain output.
• path or paths (choose one) — The data files to use for this hierarchy level.
• For file-based backends, include the file extension, even though you would have omitted it in the v3
hiera.yaml file.
• For non-file backends, don't use a file extension.
• hiera3_backend — The legacy backend to use. This is the same name you'd use in the v3 config file's
:backends key.
• datadir — The directory where data files are kept. Set this only if your backend required a :datadir setting
in its backend-specific options.
• This path is relative to hiera.yaml's directory: if the config file is at /etc/puppetlabs/code/
environments/production/hiera.yaml and the datadir is set to data, the full path to the data
directory is /etc/puppetlabs/code/environments/production/data. Note that Hiera v3 uses
'hieradata' instead of 'data'.
• In the global layer, you can optionally set the datadir to an absolute path.
• options — A hash, with any backend-specific options (other than datadir) required by your backend. In the
v3 config, this would have been in a top-level key named after the backend. You can use normal strings as keys.
Hiera converts them to symbols for the backend.
The following example shows roughly equivalent v3 and v5 hiera.yaml files using legacy backends:
# hiera.yaml v3
---
:backends:
- mongodb
- xml
© 2024 Puppet, Inc., a Perforce company

Puppet | Using Puppet code | 432
:mongodb:
:connections:
:dbname: hdata
:collection: config
:host: localhost
:xml:
:datadir: /some/other/dir
:hierarchy:
- "%{trusted.certname}"
- "common"
# hiera.yaml v5
---
version: 5
hierarchy:
- name: MongoDB
hiera3_backend: mongodb
paths:
- "%{trusted.certname}"
- common
options:
connections:
dbname: hdata
collection: config
host: localhost
- name: Data in XML
hiera3_backend: xml
datadir: /some/other/dir
paths:
- "%{trusted.certname}.xml"
- common.xml
Configuring a hierarchy level: general format
Hiera supports custom backends.
Each hierarchy level is represented by a hash which needs the following keys:
• name — A name for this level, shown in debug messages and --explain output.
• A backend key, which must be one of:
• data_hash
• lookup_key
• data_dig — a more specialized form of lookup_key, suitable when the backend is for a database.
data_dig resolves dot separated keys, whereas lookup_key does not.
• hiera3_backend (global layer only)
• A path or URI key — only if required by the backend. These keys support variable interpolation. The following
path/URI keys are available:
• path
• paths
• mapped_paths
• glob
• globs
• uri
• uris - these paths or URIs work the same way they do for the built-in backends. Hiera handles the work of
locating files, so any backend that supports path automatically supports paths, glob, and globs. uri
© 2024 Puppet, Inc., a Perforce company
Puppet | Using Puppet code | 433
(string) and uris (array) can represent any kind of data source. Hiera does not ensure URIs are resolvable
before calling the backend, and does not need to understand any given URI schema. A backend can omit the
path/URI key, and rely wholly on the options key to locate its data.
• datadir — The directory where data files are kept: the path is relative to hiera.yaml's directory. Only required if
the backend uses the path(s) and glob(s) keys, and can be omitted if you set a default.
• options — A hash of extra options for the backend; for example, database credentials or the location of a
decryption key. All values in the options hash support variable interpolation.
Whichever key you use, the value must be the name of a function that implements the backend API. Note that the
choice here is made by the implementer of the particular backend, not the user.
For more information, see custom Puppet function.
Related information
Custom backends overview on page 447
A backend is a custom Puppet function that accepts a particular set of arguments and whose return value obeys a
particular format. The function can do whatever is necessary to locate its data.
Interpolation on page 438
In Hiera you can insert, or interpolate, the value of a variable into a string, using the syntax %{variable}.
Creating and editing data
Important aspects of using Hiera are merge behavior and interpolation.
Set the merge behavior for a lookup
When you look up a key in Hiera, it is common for multiple data sources to have different values for it. By default,
Hiera returns the first value it finds, but it can also continue searching and merge all the found values together.
1.
You can set the merge behavior for a lookup in two ways:
• At lookup time. This works with the lookup function, but does not support automatic class parameter lookup.
• In Hiera data, with the lookup_options key. This works for both manual and automatic lookups. It also
lets module authors set default behavior that users can override.
2.
With both of these methods, specify a merge behavior as either a string, for example, 'first' or a hash, for
example {'strategy' => 'first'}. The hash syntax is useful for deep merges (where extra options are
available), but it also works with the other merge types.
Related information
The Puppet lookup function on page 442
The lookup function uses Hiera to retrieve a value for a given key.
Merge behaviors
There are four merge behaviors to choose from: first, unique, hash, and deep.
When specifying a merge behavior, use one of the following identifiers:
• 'first', {'strategy' => 'first'}, or nothing.
• 'unique' or {'strategy' => 'unique'}.
• 'hash' or {'strategy' => 'hash'}.
• 'deep' or {'strategy' => 'deep', <OPTION> => <VALUE>, ...}. Valid options:
• 'knockout_prefix' - String; disabled by default.
• 'sort_merged_arrays' - Boolean; default is false
• 'merge_hash_arrays' - Boolean; default is false
First
A first-found lookup doesn’t merge anything: it returns the first value found for the key, and ignores the rest. This is
Hiera’s default behavior.
© 2024 Puppet, Inc., a Perforce company

Puppet | Using Puppet code | 434
Specify this merge behavior with one of these:
• 'first'
• {'strategy' => 'first'}
• lookup($key)
• Nothing (because it’s the default)
Unique
A unique merge (also called an array merge) combines any number of array and scalar (string, number, boolean)
values to return a merged, flattened array with all matching values for a key. All duplicate values are removed. The
lookup fails if any of the values are hashes. The result is ordered from highest priority to lowest.
Specify this merge behavior with one of these:
• 'unique'
• lookup($key, { 'merge' => 'unique' })
• {'strategy' => 'unique'}
Hash
A hash merge combines the keys and values of any number of hashes to return a merged hash of all matching values
for a key. Every match must be a hash and the lookup fails if any of the values aren’t hashes.
If multiple source hashes have a given key, Hiera uses the value from the highest priority data source: it won’t
recursively merge the values.
Hashes in Puppet preserve the order in which their keys are written. When merging hashes, Hiera starts with the
lowest priority data source. For each higher priority source, it appends new keys at the end of the hash and updates
existing keys in place.
# web01.example.com.yaml
mykey:
d: "per-node value"
b: "per-node override"
# common.yaml
mykey:
a: "common value"
b: "default value"
c: "other common value"
`lookup('mykey', {merge => 'hash'})
Returns the following:
{
a => "common value",
b => "per-node override", # Using value from the higher-priority source,
but
# preserving the order of the lower-priority
source.
c => "other common value",
d => "per-node value",
}
Specify this merge behavior with one of these:
• 'hash'
• lookup($key, { 'merge' => 'hash' })
• {'strategy' => 'hash'}
© 2024 Puppet, Inc., a Perforce company

Puppet | Using Puppet code | 435
Deep
A deep merge combines the keys and values of any number of hashes to return a merged hash. It contains an array of
class names and can be used as a lightweight External Node Classifier (ENC).
If the same key exists in multiple source hashes, Hiera recursively merges them:
• Hash values are merged with another deep merge.
• Array values are merged. This differs from the unique merge. The result is ordered from lowest priority to highest,
which is the reverse of the unique merge’s ordering. The result is not flattened, so it can contain nested arrays. The
merge_hash_arrays and sort_merged_arrays options can make further changes to the result.
• Scalar (String, Number, Boolean) values use the highest priority value, like in a first-found lookup.
Specify this merge behavior with one of these:
• 'deep'
• include(lookup($key, { 'merge' => 'deep' }))
• {'strategy' => 'deep', <OPTION> => <VALUE>, ...} — Adjust the merge behavior with these
additional options:
• 'knockout_prefix' (String) - Use with a string prefix to indicate a value to remove from the final result.
Note that this option is disabled by default due to a known issue that causes it to be ineffective in hierarchies
more than three levels deep. For more information, see Puppet known issues.
• 'sort_merged_arrays' (Boolean) - Whether to sort all arrays that are merged together. Defaults to
false.
• 'merge_hash_arrays' (Boolean) - Whether to deep-merge hashes within arrays, by position. For
example, [ {a => high}, {b => high} ] and [ {c => low}, {d => low} ] would be
merged as [ {c => low, a => high}, {d => low, b => high} ]. Defaults to false.
Note: Unlike a hash merge, a deep merge can also accept arrays as the root values. It merges them with its normal
array merging behavior, which differs from a unique merge as described above. This does not apply to the deprecated
Hiera 3 hiera_hash function, which can be configured to do deep merges but can’t accept arrays.
Set merge behavior at lookup time
Use merge behaviour at lookup time to override preconfigured merge behavior for a key.
Use the lookup function or the puppet lookup command to provide a merge behavior as an argument or flag.
Function example:
# Merge several arrays of class names into one array:
lookup('classes', {merge => 'unique'})
Command line example:
$ puppet lookup classes --merge unique --environment production --explain
Note: Each of the deprecated hiera_* functions is locked to one particular merge behavior. (For example, Hiera
only merges first-found, and hiera_array only performs a unique merge.)
Set lookup_options to refine the result of a lookup
You can set lookup_options to further refine the result of a lookup, including defining merge behavior and using
the convert_to key to get automatic type conversion.
The lookup_options format
The value of lookup_options is a hash. It follows this format:
lookup_options:
© 2024 Puppet, Inc., a Perforce company

Puppet | Using Puppet code | 436
<NAME or REGEXP>:
merge: <MERGE BEHAVIOR>
Each key is either the full name of a lookup key (like ntp::servers) or a regular expression (like '^profile::
(.*)::users$'). In a module’s data, you can configure lookup keys only within that module’s namespace: the ntp
module can set options for ntp::servers, but the apache module can’t.
Each value is a hash with either a merge key, a convert_to key, or both. A merge behavior can be a string or a
hash, and the type for type conversion is either a Puppet type, or an array with a type and additional arguments.
lookup_options is a reserved key in Hiera. You can’t put other kinds of data in it, and you can’t look it up
directly.
Location for setting lookup_options
You can set lookup_options metadata keys in Hiera data sources, including module data, which controls the
default merge behavior for other keys in your data. Hiera uses a key’s configured merge behavior in any lookup that
doesn’t explicitly override it.
Note: Set lookup_options in the data sources of your backend; don’t put it in the hiera.yaml file. For
example, you can set lookup_options in common.yaml.
Defining Merge Behavior with lookup_options
In your Hiera data source, set the lookup_options key to configure merge behavior:
# <ENVIRONMENT>/data/common.yaml
lookup_options:
ntp::servers: # Name of key
merge: unique # Merge behavior as a string
"^profile::(.*)::users$": # Regexp: `$users` parameter of any profile
class
merge: # Merge behavior as a hash
strategy: deep
merge_hash_arrays: true
Hiera uses the configured merge behaviors for these keys.
Note: The lookup_options settings have no effect if you are using the deprecated hiera_* functions, which
define for themselves how they do the lookup. To take advantage of lookup_options, use the lookup function or
Automatic Parameter Lookup (APL).
Overriding merge behavior
When Hiera is given lookup options, a hash merge is performed. Higher priority sources override lower priority
lookup options for individual keys. You can configure a default merge behavior for a given key in a module and let
users of that module specify overrides in the environment layer.
As an example, the following configuration defines lookup_options for several keys in a module. One of the
keys is overridden at the environment level – the others retain their configuration:
# <MYMODULE>/data/common.yaml
lookup_options:
mymodule::key1:
merge:
strategy: deep
merge_hash_arrays: true
mymodule::key2:
merge: deep
mymodule::key3:
© 2024 Puppet, Inc., a Perforce company

Puppet | Using Puppet code | 437
merge: deep
# <ENVIRONMENT>/data/common.yaml
lookup_options:
mymodule::key1:
merge: deep # this overrides the merge_hash_arrays true
Overriding merge behavior in a call to lookup()
When you specify a merge behavior as an argument to the lookup function, it overrides the configured merge
behavior. For example, with the configuration above:
lookup('mymodule::key1', 'strategy' => 'first')
The lookup of 'mymodule::key1' uses strategy 'first' instead of strategy 'deep' in the
lookup_options configuration.
Make Hiera return data by casting to a specific data type
To convert values from Hiera backends to rich data values, not representable in YAML or JSON, use the
lookup_options key convert_to, which accepts either a type name or an array of type name and arguments.
When you use convert_to, you get automatic type checking. For example, if you specify a convert_to using
type "Enum['red', 'blue', 'green']" and the looked-up value is not one of those strings, it raises an
error. You can use this to assert the type when there is not enough type checking in the Puppet code that is doing the
lookup.
For types that have a single-value constructor, such as Integer, String, Sensitive, or Timestamp, specify the data type
in string form.
For example, to turn a String value into an Integer:
mymodule::mykey: "42"
lookup_options:
mymodule::mykey:
convert_to: "Integer"
To make a value Sensitive:
mymodule::mykey: 42
lookup_options:
mymodule::mykey:
convert_to: "Sensitive"
If the constructor requires arguments, specify type and the arguments in an array. You can also specify it this way
when a data type constructor takes optional arguments.
For example, to convert a string ("042") to an Integer with explicit decimal (base 10) interpretation of the string:
mymodule::mykey: "042"
lookup_options:
mymodule::mykey:
convert_to:
- "Integer"
- 10
The default would interpret the leading 0 to mean an octal value (octal 042 is decimal 34):
To turn a non-Array value into an Array:
mymodule::mykey: 42
© 2024 Puppet, Inc., a Perforce company

Puppet | Using Puppet code | 438
lookup_options:
mymodule::mykey:
convert_to:
- "Array"
- true
Related information
Automatic lookup of class parameters on page 442
Puppet looks up the values for class parameters in Hiera, using the fully qualified name of the parameter
(myclass::parameter_one) as a lookup key.
Use a regular expression in lookup_options
You can use regular expressions in lookup_options to configure merge behavior for many lookup keys at the
same time.
A regular expression key such as '^profile::(.*)::users$' sets the merge
behavior for profile::server::users, profile::postgresql::users,
profile::jenkins::server::users. Regular expression lookup options use Puppet’s regular expression
support, which is based on Ruby’s regular expressions.
To use a regular expression in lookup_options:
1.
Write the pattern as a quoted string. Do not use the Puppet language’s forward-slash (/.../) regular expression
delimiters.
2.
Begin the pattern with the start-of-line metacharacter (^, also called a carat). If ^ isn’t the first character, Hiera
treats it as a literal key name instead of a regular expression.
3.
If this data source is in a module, follow ^ with the module’s namespace: its full name, plus the :: namespace
separator. For example, all regular expression lookup options in the ntp module must start with ^ntp::.
Starting with anything else results in an error.
The merge behavior you set for that pattern applies to all lookup keys that match it. In cases where multiple lookup
options could apply to the same key, Hiera resolves the conflict. For example, if there’s a literal (not regular
expression) option available, Hiera uses it. Otherwise, Hiera uses the first regular expression that matches the lookup
key, using the order in which they appear in the module code.
Note: lookup_options are assembled with a hash merge, which puts keys from lower priority data sources
before those from higher priority sources. To override a module’s regular expression configured merge behavior, use
the exact same regular expression string in your environment data, so that it replaces the module’s value. A slightly
different regular expression won’t work because the lower-priority regular expression goes first.
Interpolation
In Hiera you can insert, or interpolate, the value of a variable into a string, using the syntax %{variable}.
Hiera uses interpolation in two places:
• Hierarchies: you can interpolate variables into the path, paths, glob, globs, uri, uris, datadir,
mapped_paths, and options of a hierarchy level. This lets each node get a customized version of the
hierarchy.
• Data: you can use interpolation to avoid repetition. This takes one of two forms:
• If some value always involves the value of a fact (for example, if you need to specify a mail server and
you have one predictably-named mail server per domain), reference the fact directly instead of manually
transcribing it.
• If multiple keys need to share the same value, write it out for one of them and reuse it for the rest with the
lookup or alias interpolation functions. This makes it easier to keep data up to date, as you only need to
change a given value in one place.
© 2024 Puppet, Inc., a Perforce company

Puppet | Using Puppet code | 439
Interpolation token syntax
Interpolation tokens consist of the following:
• A percent sign (%)
• An opening curly brace ({)
• One of:
• A variable name, optionally using key.subkey notation to access a specific member of a hash or array.
• An interpolation function and its argument.
• A closing curly brace (}).
For example, %{trusted.certname} or %{alias("users")}.
Hiera interpolates values of Puppet data types and converts them to strings. Note that the exception to this is when
using an alias. If the alias is the only thing present, then its value is not converted.
In YAML files, any string containing an interpolation token must be enclosed in quotation marks.
Note: Unlike the Puppet interpolation tokens, you can’t interpolate an arbitrary expression.
Related topics: Puppet’s data types, Puppet’s rules for interpolating non-string values.
Interpolate a Puppet variable
The most common thing to interpolate is the value of a Puppet top scope variable.
The facts hash, trusted hash, and server_facts hash are the most useful variables to Hiera and behave
predictably.
Note: If you have a hierarchy level that needs to reference the name of a node, get the node’s name by using
trusted.certname. To reference a node’s environment, use server_facts.environment.
Avoid using local variables, namespaced variables from classes (unless the class has already been evaluated), and
Hiera-specific pseudo-variables (pseudo-variables are not supported in Hiera 5).
If you are using Hiera 3 pseudo-variables, see Puppet variables passed to Hiera.
Puppet makes facts available in two ways: grouped together in the facts hash ( $facts['networking']), and
individually as top-scope variables ( $networking).
When you use individual fact variables, specify the (empty) top-scope namespace for them, like this:
• %{::networking}
Not like this:
• %{networking}
Note: The individual fact names aren’t protected the way $facts is, and local scopes can set unrelated variables
with the same names. In most of Puppet, you don’t have to worry about unknown scopes overriding your variables,
but in Hiera you do.
To interpolate a Puppet variable:
Use the name of the variable, omitting the leading dollar sign ($). Use the Hiera key.subkey notation to access a
member of a data structure. For example, to interpolate the value of $facts['networking']['domain']
write: smtpserver: "mail.%{facts.networking.domain}"
For more information, see facts, environments.
Related information
Access hash and array elements using a key.subkey notation on page 445
© 2024 Puppet, Inc., a Perforce company

Puppet | Using Puppet code | 440
Access hash and array members in Hiera using a key.subkey notation.
Interpolation functions
In Hiera data sources, you can use interpolation functions to insert non-variable values. These aren’t the same as
Puppet functions; they’re only available in Hiera interpolation tokens.
Note: You cannot use interpolation functions in hiera.yaml. They’re only for use in data sources.
There are five interpolation functions:
• lookup - looks up a key using Hiera, and interpolates the value into a string
• hiera - a synonym for lookup
• alias - looks up a key using Hiera, and uses the value as a replacement for the enclosing string. The result has
the same data type as what the aliased key has - no conversion to string takes place if the value is exactly one alias
• literal - a way to write a literal percent sign (%) without accidentally interpolating something
• scope - an alternate way to interpolate a variable. Not generally useful
The lookup and hiera function
The lookup and hiera interpolation functions look up a key and return the resulting value. The result of the
lookup must be a string; any other result causes an error. The hiera interpolation functions look up a key and return
the resulting value. The result of the lookup must be a string; any other result causes an error.
This is useful in the Hiera data sources. If you need to use the same value for multiple keys, you can assign the literal
value to one key, then call lookup to reuse the value elsewhere. You can edit the value in one place to change it
everywhere it’s used.
For example, suppose your WordPress profile needs a database server, and you’re already configuring that hostname
in data because the MySQL profile needs it. You could write:
# in location/pdx.yaml:
profile::mysql::public_hostname: db-server-01.pdx.example.com
# in location/bfs.yaml:
profile::mysql::public_hostname: db-server-06.belfast.example.com
# in common.yaml:
profile::wordpress::database_server:
"%{lookup('profile::mysql::public_hostname')}"
The value of profile::wordpress::database_server is always the same as
profile::mysql::public_hostname. Even though you wrote the WordPress parameter in the
common.yaml data, it’s location-specific, as the value it references was set in your per-location data files.
The value referenced by the lookup function can contain another call to lookup; if you accidentally make an infinite
loop, Hiera detects it and fails.
Note: The lookup and hiera interpolation functions aren’t the same as the Puppet functions of the same names.
They only take a single argument.
The alias function
The alias function lets you reuse Hash, Array, Boolean, Integer or String values.
When you interpolate alias in a string, Hiera replaces that entire string with the aliased value, using its original data
type. For example:
original:
- 'one'
- 'two'
© 2024 Puppet, Inc., a Perforce company

Puppet | Using Puppet code | 441
aliased: "%{alias('original')}"
A lookup of original and a lookup of aliased would both return the value ['one', 'two'].
When you use the alias function, its interpolation token must be the only text in that string. For example, the
following would be an error:
aliased: "%{alias('original')} - 'three'"
Note: A lookup resulting in an interpolation of `alias` referencing a non-existant key returns an empty string, not a
Hiera "not found" condition.
The literal function
The literal interpolation function lets you escape a literal percent sign (%) in Hiera data, to avoid triggering
interpolation where it isn’t wanted.
This is useful when dealing with Apache config files, for example, which might include text such as
%{SERVER_NAME}. For example:
server_name_string: "%{literal('%SERVER_NAME')}"
The value of server_name_string would be %SERVER_NAME, and Hiera would not attempt to interpolate a
variable named SERVER_NAME.
The scope function
The scope interpolation function interpolates variables.
It works identically to variable interpolation. The functions argument is the name of a variable.
The following two values would be identical:
smtpserver: "mail.%{facts.domain}"
smtpserver: "mail.%{scope('facts.domain')}"
Using interpolation functions
To use an interpolation function to insert non-variable values, write:
1.
The name of the function.
2.
An opening parenthesis.
3.
One argument to the function, enclosed in single or double quotation marks.
4.
Use the opposite of what the enclosing string uses: if it uses single quotation marks, use double quotation marks.
5.
A closing parenthesis.
For example:
wordpress::database_server: "%{lookup('instances::mysql::public_hostname')}"
Note: There must be no spaces between these elements.
© 2024 Puppet, Inc., a Perforce company

Puppet | Using Puppet code | 442
Looking up data with Hiera
Automatic lookup of class parameters
Puppet looks up the values for class parameters in Hiera, using the fully qualified name of the parameter
(myclass::parameter_one) as a lookup key.
Most classes need configuration, and you can specify them as parameters to a class as this looks up the needed data
if not directly given when the class is included in a catalog. There are several ways Puppet sets values for class
parameters, in this order:
1.
If you're doing a resource-like declaration, Puppet uses parameters that are explicitly set (if explicitly setting
undef, a looked up value or default is used).
2.
Puppet uses Hiera, using <CLASS NAME>::<PARAMETER NAME> as the lookup key. For example, it looks up
ntp::servers for the ntp class's $servers parameter.
3.
If a parameter still has no value, Puppet uses the default value from the parameter's default value expression in the
class's definition.
4.
If any parameters have no value and no default, Puppet fails compilation with an error.
For example, you can set servers for the NTP class like this:
# /etc/puppetlabs/code/production/data/nodes/web01.example.com.yaml
---
ntp::servers:
- time.example.com
- 0.pool.ntp.org
The best way to manage this is to use the roles and profiles method, which allows you to store a smaller amount of
more meaningful data in Hiera.
Note: Automatic lookup of class parameters uses the "first" merge method by default. You cannot change the
default. If you want to get deep merges on keys, use the lookup_options feature.
This feature is often referred to as Automatic Parameter Lookup (APL).
The Puppet lookup function
The lookup function uses Hiera to retrieve a value for a given key.
By default, the lookup function returns the first value found and fails compilation if no values are available. You
can also configure the lookup function to merge multiple values into one.
When looking up a key, Hiera searches up to four hierarchy layers of data, in the following order:
1.
Global hierarchy.
2.
The current environment's hierarchy.
3.
The indicated module's hierarchy, if the key is of the form <MODULE NAME>::<SOMETHING>.
4.
If not found and the module's hierarchy has a default_hierarchy entry in its hiera.yaml — the lookup
is repeated if steps 1-3 did not produce a value.
Note: Hiera checks the global layer before the environment layer. If no global hiera.yaml file has been
configured, Hiera defaults are used. If you do not want it to use the defaults, you can create an empty hiera.yaml
file in /etc/puppetlabs/puppet/hiera.yaml.
Default global hiera.yaml is installed at /etc/puppetlabs/puppet/hiera.yaml.
Arguments
You must provide the key's name. The other arguments are optional.
You can combine these arguments in the following ways:
• lookup( <NAME>, [<VALUE TYPE>], [<MERGE BEHAVIOR>], [<DEFAULT VALUE>] )
© 2024 Puppet, Inc., a Perforce company

Puppet | Using Puppet code | 443
• lookup( [<NAME>], <OPTIONS HASH> )
• lookup( as above ) |$key| { <VALUE> } # lambda returns a default value
Arguments in [square brackets] are optional.
Note: Giving a hash of options containing default_value at the same time as giving a lambda means that the
lambda wins. The rationale for allowing this is that you might be using the same hash of options multiple times, and
you might want to override the production of the default value. A default_values_hash wins over the lambda
if it has a value for the looked up key.
Arguments accepted by lookup:
• <NAME> (String or Array) - The name of the key to look up. This can also be an array of keys. If Hiera doesn't
find anything for the first key, it tries with the subsequent ones, only resorting to a default value if none of them
succeed.
• <VALUE TYPE> (data Type) - A data type that must match the retrieved value; if not, the lookup (and catalog
compilation) fails. Defaults to Data which accepts any normal value.
• <MERGE BEHAVIOR> (String or Hash; see Merge behaviors) - Whether and how to combine multiple values. If
present, this overrides any merge behavior specified in the data sources. Defaults to no value; Hiera uses merge
behavior from the data sources if present, otherwise it does a first-found lookup.
• <DEFAULT VALUE> (any normal value) - If present, lookup returns this when it can't find a normal value.
Default values are never merged with found values. Like a normal value, the default must match the value type.
Defaults to no value; if Hiera can't find a normal value, the lookup (and compilation) fails.
• <OPTIONS HASH> (Hash) - Alternate way to set the arguments above, plus some less common additional
options. If you pass an options hash, you can't combine it with any regular arguments (except <NAME>). An
options hash can have the following keys:
• 'name' - Same as <NAME> (argument 1). You can pass this as an argument or in the hash, but not both.
• 'value_type' - Same as <VALUE TYPE>.
• 'merge' - Same as <MERGE BEHAVIOR>.
• 'default_value' - Same as <DEFAULT VALUE> .
• 'default_values_hash' (Hash) - A hash of lookup keys and default values. If Hiera can't find
a normal value, it checks this hash for the requested key before giving up. You can combine this with
default_value or a lambda, which is used if the key isn't present in this hash. Defaults to an empty hash.
• 'override' (Hash) - A hash of lookup keys and override values. Puppet checks for the requested key in the
overrides hash first. If found, it returns that value as the final value, ignoring merge behavior. Defaults to an
empty hash.
• lookup - can take a lambda, which must accept a single parameter. This is yet another way to set a default
value for the lookup; if no results are found, Puppet passes the requested key to the lambda and use its result as
the default value.
Merge behaviors
Hiera uses a hierarchy of data sources, and a given key can have values in multiple sources. Hiera can either return
the first value it finds, or continue to search and merge all the values together. When Hiera searches, it first searches
the global layer, then the environment layer, and finally the module layer — where it only searches in modules that
have a matching namespace. By default (unless you use one of the merge strategies) it is priority/"first found wins", in
which case the search ends as soon as a value is found.
Note: Data sources can use the lookup_options metadata key to request a specific merge behavior for a key.
The lookup function uses that requested behavior unless you specify one.
Examples:
Default values for a lookup:
© 2024 Puppet, Inc., a Perforce company

Puppet | Using Puppet code | 444
(Still works, but deprecated)
hiera('some::key', 'the default value')
(Recommended)
lookup('some::key', undef, undef, 'the default value')
Look up a key and returning the first value found:
lookup('ntp::service_name')
A unique merge lookup of class names, then adding all of those classes to the catalog:
lookup('classes', Array[String], 'unique').include
A deep hash merge lookup of user data, but letting higher priority sources remove values by prefixing them with:
lookup( { 'name' => 'users',
'merge' => {
'strategy' => 'deep',
'knockout_prefix' => '--',
},
})
The puppet lookup command
The puppet lookup command is the command line interface (CLI) for Puppet's lookup function.
The puppet lookup command lets you do Hiera lookups from the command line. You must run it on a node that
has a copy of your Hiera data. You can log into a Puppet Server node and run puppet lookup with sudo.
The most common version of this command is:
puppet lookup <KEY> --node <NAME> --environment <ENV> --explain
The puppet lookup command searches your Hiera data and returns a value for the requested lookup key, so you
can test and explore your data. It replaces the hiera command. Hiera relies on a node's facts to locate the relevant
data sources. By default, puppet lookup uses facts from the node you run the command on, but you can get data
for any other node with the --node NAME option. If possible, the lookup command uses the requested node's real
stored facts from PuppetDB. If PuppetDB is not configured or you want to provide other fact values, pass facts from a
JSON or YAML file with the --facts FILE option.
Note: The puppet lookup command replaces the hiera command.
Examples
To look up key_name using the Puppet Server node’s facts:
$ puppet lookup key_name
To look up key_name with agent.local's facts:
$ puppet lookup --node agent.local key_name
© 2024 Puppet, Inc., a Perforce company

Puppet | Using Puppet code | 445
To get the first value found for key_name_one and key_name_two with agent.local's facts while merging
values and knocking out the prefix 'example' while merging:
puppet lookup --node agent.local --merge deep --knock-out-prefix example
key_name_one key_name_two
To lookup key_name with agent.local's facts, and return a default value of 0 if nothing is found:
puppet lookup --node agent.local --default 0 key_name
To see an explanation of how the value for key_name is found, using agent.local facts:
puppet lookup --node agent.local --explain key_name
Options
The puppet lookup command has the following command options:
• --help: Print a usage message.
• --explain: Explain the details of how the lookup was performed and where the final value came from, or the
reason no value was found. Useful when debugging Hiera data. If --explain isn't specified, lookup exits with 0
if a value was found and 1 if not. With --explain, lookup always exits with 0 unless there is a major error. You
can provide multiple lookup keys to this command, but it only returns a value for the first found key, omitting the
rest.
• --node <NODE-NAME>: Specify which node to look up data for; defaults to the node where the command is
run. The purpose of Hiera is to provide different values for different nodes; use specific node facts to explore your
data. If the node where you're running this command is configured to talk to PuppetDB, the command uses the
requested node's most recent facts. Otherwise, override facts with the '--facts' option.
• --facts <FILE>: Specify a JSON or YAML file that contains key-value mappings to override the facts for
this lookup. Any facts not specified in this file maintain their original value.
• --environment <ENV>: Specify an environment. Different environments can have different Hiera data.
• --merge first/unique/hash/deep: Specify the merge behavior, overriding any merge behavior from
the data's lookup_options.
• --knock-out-prefix <PREFIX-STRING>: Used with 'deep' merge. Specifies a prefix to indicate a value
should be removed from the final result.
• --sort-merged-arrays: Used with 'deep' merge. When this flag is used, all merged arrays are sorted.
• --merge-hash-arrays: Used with the 'deep' merge strategy. When this flag is used, hashes within arrays are
deep-merged with their counterparts by position.
• --explain-options: Explain whether a lookup_options hash affects this lookup, and how that hash was
assembled. (lookup_options is how Hiera configures merge behavior in data.)
• --default <VALUE>: A value to return if Hiera can't find a value in data. Useful for emulating a call to the
`lookup function that includes a default.
• --type <TYPESTRING>: Assert that the value has the specified type. Useful for emulating a call to the
lookup function that includes a data type.
• --compile: Perform a full catalog compilation prior to the lookup. If your hierarchy and data only use the
$facts, $trusted, and $server_facts variables, you don't need this option. If your Hiera configuration
uses arbitrary variables set by a Puppet manifest, you need this to get accurate data. The lookup command
doesn't cause catalog compilation unless this flag is given.
• --render-as s/json/yaml/binary/msgpack: Specify the output format of the results; s means plain
text. The default when producing a value is yaml and the default when producing an explanation is s.
Access hash and array elements using a key.subkey notation
Access hash and array members in Hiera using a key.subkey notation.
You can access hash and array elements when doing the following things:
© 2024 Puppet, Inc., a Perforce company

Puppet | Using Puppet code | 446
• Interpolating variables into hiera.yaml or a data file. Many of the most commonly used variables, for example
facts and trusted, are deeply nested data structures.
• Using the lookup function or the puppet lookup command. If the value of lookup('some_key') is a
hash or array, look up a single member of it by using lookup('some_key.subkey').
• Using interpolation functions that do Hiera lookups, for example lookup and alias.
To access a single member of an array or hash:
Use the name of the value followed by a period (.) and a subkey.
• If the value is an array, the subkey must be an integer, for example: users.0 returns the first entry in the users
array.
• If the value is a hash, the subkey must be the name of a key in that hash, for example, facts.os.
• To access values in nested data structures, you can chain subkeys together. For example, because the value of
facts.system_uptime is a hash, you can access its hours key with facts.system_uptime.hours.
Example:
To look up the value of home in this data:
accounts::users:
ubuntu:
home: '/var/local/home/ubuntu'
You would use the following lookup command:
lookup('accounts::users.ubuntu.home')
Hiera dotted notation
The Hiera dotted notation does not support arbitrary expressions for subkeys; only literal keys are valid.
A hash can include literal dots in the text of a key. For example, the value of $trusted['extensions']
is a hash containing any certificate extensions for a node, but some of its keys can be raw OID strings like
'1.3.6.1.4.1.34380.1.2.1'. You can access those values in Hiera with the key.subkey notation, but you
must put quotation marks — single or double — around the affected subkey. If the entire compound key is quoted
(for example, as required by the lookup interpolation function), use the other kind of quote for the subkey, and escape
quotes (as needed by your data file format) to ensure that you don't prematurely terminate the whole string.
For example:
aliased_key: "%{lookup('other_key.\"dotted.subkey\"')}"
# Or:
aliased_key: "%{lookup(\"other_key.'dotted.subkey'\")}"
Note: Using extra quotes prevents digging into dotted keys. For example, if the lookup key contains a dot (.) then
the entire key must be enclosed within single quotes within double quotes, for example, lookup("'has.dot'").
Writing new data backends
You can extend Hiera to look up values in data sources, for example, a PostgreSQL database table, a custom web app,
or a new kind of structured data file.
To teach Hiera how to talk to other data sources, write a custom backend.
Important: Writing a custom backend is an advanced topic. Before proceeding, make sure you really need it. It is
also worth asking the puppet-dev mailing list or Slack channel to see whether there is one you can re-use, rather than
starting from scratch.
© 2024 Puppet, Inc., a Perforce company
Puppet | Using Puppet code | 447
Custom backends overview
A backend is a custom Puppet function that accepts a particular set of arguments and whose return value obeys a
particular format. The function can do whatever is necessary to locate its data.
A backend function uses the modern Ruby functions API or the Puppet language. This means you can use different
versions of a Hiera backend in different environments, and you can distribute Hiera backends in Puppet modules.
Different types of data have different performance characteristics. To make sure Hiera performs well with every type
of data source, it supports three types of backends: data_hash, lookup_key, and data_dig.
data_hash
For data sources where it’s inexpensive, performance-wise, to read the entire contents at one time, like simple files on
disk. We suggest using the data_hash backend type if:
• The cache is alive for the duration of one compilation
• The data is small
• The data can be retrieved all at one time
• Most of the data gets used
• The data is static
For more information, see data_hash backends.
lookup_key
For data sources where looking up a key is relatively expensive, performance-wise, like an HTTPS API. We suggest
using the lookup_key backend type if:
• The data set is big, but only a small portion is used
• The result can vary during the compilation
The hiera-eyaml backend is a lookup_key function, because decryption tends to affect performance; as a
given node uses only a subset of the available secrets, it makes sense to decrypt only on-demand.
For more information, see lookup_key backends.
data_dig
For data sources that can access arbitrary elements of hash or array values before passing anything back to Hiera, like
a database.
For more information, see data_dig backends.
The RichDataKey and RichData types
To simplify backend function signatures, you can use two extra data type aliases: RichDataKey and RichData.
These are only available to backend functions called by Hiera; normal functions and Puppet code can not use them.
For more information, see custom Puppet functions, the modern Ruby functions API.
data_hash backends
A data_hash backend function reads an entire data source at one time, and returns its contents as a hash.
The built-in YAML, JSON, and HOCON backends are all data_hash functions. You can view their source on
GitHub:
• yaml_data.rb
• json_data.rb
• hocon_data.rb
© 2024 Puppet, Inc., a Perforce company

Puppet | Using Puppet code | 448
Arguments
Hiera calls a data_hash function with two arguments:
• A hash of options
• The options hash contains a path when the entry in hiera.yaml is using path, paths, glob, globs,
or mapped_paths, and the backend receives one call per path to an existing file. When the entry in
hiera.yaml is using uri or uris, the options hash has a uri key, and the backend function is called one
time per given uri. When uri or uris are used, Hiera does not perform an existence check. It is up to the
function to type the options parameter as wanted.
• A Puppet::LookupContext object
Return type
The function must either call the context object’s not_found method, or return a hash of lookup keys and their
associated values. The hash can be empty.
Puppet language example signature:
function mymodule::hiera_backend(
Hash $options,
Puppet::LookupContext $context,
)
Ruby example signature:
dispatch :hiera_backend do
param 'Hash', :options
param 'Puppet::LookupContext', :context
end
The returned hash can include the lookup_options key to configure merge behavior for other keys. See
Configuring merge behavior in Hiera data for more information. Values in the returned hash can include Hiera
interpolation tokens like %{variable} or %{lookup('key')}; Hiera interpolates values as needed. This is
a significant difference between data_hash and the other two backend types; lookup_key and data_dig
functions have to explicitly handle interpolation.
Related information
Merge behaviors on page 433
There are four merge behaviors to choose from: first, unique, hash, and deep.
lookup_key backends
A lookup_key backend function looks up a single key and returns its value. For example, the built-in
hiera_eyaml backend is a lookup_key function.
You can view its source on Git at eyaml_lookup_key.rb.
Arguments
Hiera calls a lookup_key function with three arguments:
• A key to look up.
• A hash of options.
• A Puppet::LookupContext object.
Return type
The function must either call the context object’s not_found method, or return a value for the requested key. It can
return undef as a value.
© 2024 Puppet, Inc., a Perforce company

Puppet | Using Puppet code | 449
Puppet language example signature:
function mymodule::hiera_backend(
Variant[String, Numeric] $key,
Hash $options,
Puppet::LookupContext $context,
)
Ruby example signature:
dispatch :hiera_backend do
param 'Variant[String, Numeric]', :key
param 'Hash', :options
param 'Puppet::LookupContext', :context
end
A lookup_key function can return a hash for the the lookup_options key to configure merge behavior for
other keys. See Configuring merge behavior in Hiera data for more information. To support Hiera interpolation
tokens, for example, %{variable} or %{lookup('key')} in your data, call context.interpolate on
your values before returning them.
Related information
Interpolation on page 438
In Hiera you can insert, or interpolate, the value of a variable into a string, using the syntax %{variable}.
Hiera calling conventions for backend functions on page 450
Hiera uses the following conventions when calling backend functions.
data_dig backends
A data_dig backend function is similar to a lookup_key function, but instead of looking up a single key, it
looks up a single sequence of keys and subkeys.
Hiera lets you look up individual members of hash and array values using key.subkey notation. Use data_dig
types in cases where:
• Lookups are relatively expensive.
• The data source knows how to extract elements from hash and array values.
• Users are likely to pass key.subkey requests to the lookup function to access subsets of large data structures.
Arguments
Hiera calls a data_dig function with three arguments:
• An array of lookup key segments, made by splitting the requested lookup key on the dot (.) subkey separator.
For example, a lookup for users.dbadmin.uid results in ['users', 'dbadmin', 'uid']. Positive
base-10 integer subkeys (for accessing array members) are converted to Integer objects, but other number subkeys
remain as strings.
• A hash of options.
• A Puppet::LookupContext object.
Return type
The function must either call the context object’s not_found method, or return a value for the requested sequence
of key segments. Note that returning undef (nil in Ruby) means that the key was found but that the value for that key
was specified to be undef. Puppet language example signature:
function mymodule::hiera_backend(
Array[Variant[String, Numeric]] $segments,
Hash $options,
Puppet::LookupContext $context,
© 2024 Puppet, Inc., a Perforce company

Puppet | Using Puppet code | 450
)
Ruby example signature:
dispatch :hiera_backend do
param 'Array[Variant[String, Numeric]]', :segments
param 'Hash', :options
param 'Puppet::LookupContext', :context
end
A data_dig function can return a hash for the the lookup_options key to configure merge behavior for other
keys. See Configuring merge behavior in Hiera data for more info.
To support Hiera interpolation tokens like %{variable} or %{lookup('key')} in your data, call
context.interpolate on your values before returning them.
Related information
Merge behaviors on page 433
There are four merge behaviors to choose from: first, unique, hash, and deep.
Access hash and array elements using a key.subkey notation on page 445
Access hash and array members in Hiera using a key.subkey notation.
Hiera calling conventions for backend functions
Hiera uses the following conventions when calling backend functions.
Hiera calls data_hash one time per data source, calls lookup_key functions one time per data source for every
unique key lookup, and calls data_dig functions one time per data source for every unique sequence of key
segments.
However, a given hierarchy level can refer to multiple data sources with the path, paths, uri, uris, glob, and
globs settings. Hiera handles each hierarchy level as follows:
• If the path, paths, glob, or globs settings are used, Hiera determines which files exist and calls the function
one time for each. If no files were found, the function is not be called.
• If the uri or uris settings are used, Hiera calls the function one time per URI.
• If none of those settings are used, Hiera calls the function one time.
Hiera can call a function again for a given data source, if the inputs change. For example, if hiera.yaml
interpolates a local variable in a file path, Hiera calls the function again for scopes where that variable has a different
value. This has a significant performance impact, so you must interpolate only facts, trusted facts, and server facts in
the hierarchy.
The options hash
Hierarchy levels are configured in the hiera.yaml file. When calling a backend function, Hiera passes a modified
version of that configuration as a hash.
The options hash can contain (depending on whether path, glob, uri, ormapped_paths have been set) the
following keys:
• path - The absolute path to a file on disk. It is present only if path, paths, glob, globs, or
mapped_paths is present in the hierarchy. Hiera never calls the function unless the file is present.
• uri - A uri that your function can use to locate a data source. It is present only if uri or uris is present in the
hierarchy. Hiera does not verify the URI before passing it to the function.
• Every key from the hierarchy level’s options setting. List any options your backend requires or accepts. The
path and uri keys are reserved.
Note: If your backend uses data files, use the context object’s cached_file_data method to read them.
© 2024 Puppet, Inc., a Perforce company

Puppet | Using Puppet code | 451
For example, the following hierarchy level in hiera.yaml results in several different options hashes, depending on
such things as the current node’s facts and whether the files exist:
- name: "Secret data: per-node, per-datacenter, common"
lookup_key: eyaml_lookup_key # eyaml backend
datadir: data
paths:
- "secrets/nodes/%{trusted.certname}.eyaml"
- "secrets/location/%{facts.whereami}.eyaml"
- "common.eyaml"
options:
pkcs7_private_key: /etc/puppetlabs/puppet/eyaml/private_key.pkcs7.pem
pkcs7_public_key: /etc/puppetlabs/puppet/eyaml/public_key.pkcs7.pem
The various hashes would all be similar to this:
{
'path' => '/etc/puppetlabs/code/environments/production/data/secrets/
nodes/web01.example.com.eyaml',
'pkcs7_private_key' => '/etc/puppetlabs/puppet/eyaml/
private_key.pkcs7.pem',
'pkcs7_public_key' => '/etc/puppetlabs/puppet/eyaml/public_key.pkcs7.pem'
}
In your function’s signature, you can validate the options hash by using the Struct data type to restrict its contents. In
particular, note you can disable all of the path, paths, glob, and globs settings for your backend by disallowing
the path key in the options hash.
For more information, see the Struct data type.
Related information
Merge behaviors on page 433
There are four merge behaviors to choose from: first, unique, hash, and deep.
Configuring a hierarchy level: hiera-eyaml on page 430
Hiera 5 ( Puppet 4.9.3 and later) includes a native interface for the Hiera eyaml extension, which keeps data encrypted
on disk but lets Puppet read it during catalog compilation.
Interpolation on page 438
In Hiera you can insert, or interpolate, the value of a variable into a string, using the syntax %{variable}.
The Puppet::LookupContext object and methods
To support caching and other backends needs, Hiera provides a Puppet::LookupContext object.
In Ruby functions, the context object is a normal Ruby object of class Puppet::LookupContext, and you can
call methods with standard Ruby syntax, for example context.not_found.
In Puppet language functions, the context object appears as the special data type Puppet::LookupContext,
that has methods attached.You can call the context’s methods using Puppet’s chained function call syntax with the
method name instead of a normal function call syntax, for example, $context.not_found. For methods that take
a block, use Puppet’s lambda syntax (parameters outside block) instead of Ruby’s block syntax (parameters inside
block).
not_found()
Tells Hiera to halt this lookup and move on to the next data source. Call this method when your function cannot find a
matching key or a given lookup. This method returns no value.
For data_hash backends, return an empty hash. The empty hash results in not_found, and prevents further calls
to the provider. Missing data sources are not an issue when using path, paths, glob, or globs, but are important
for backends that locate their own data sources.
© 2024 Puppet, Inc., a Perforce company
Puppet | Using Puppet code | 452
For lookup_key and data_dig backends, use not_found when a requested key is not present in the data
source or the data source does not exist. Do not return undef or nil for missing keys, as these are legal values that
can be set in data.
interpolate(value)
Returns the provided value, but with any Hiera interpolation tokens (%{variable} or %{lookup('key')})
replaced by their value. This lets you opt-in to allowing Hiera-style interpolation in your backend’s data sources. It
works recursively on arrays and hashes. Hashes can interpolate into both keys and values.
In data_hash backends, support for interpolation is built in, and you do not need to call this method.
In lookup_key and data_dig backends, call this method if you want to support interpolation.
environment_name()
Returns the name of the environment, regardless of layer.
module_name()
Returns the name of the module whose hiera.yaml called the function. Returns undef (in Puppet) or nil (in
Ruby) if the function was called by the global or environment layer.
cache(key, value)
Caches a value, in a per-data-source private cache. It also returns the cached value.
On future lookups in this data source, you can retrieve values by calling cached_value(key). Cached values are
immutable, but you can replace the value for an existing key. Cache keys can be anything valid as a key for a Ruby
hash, including nil.
For example, on its first invocation for a given YAML file, the built-in eyaml_lookup_key backend reads the
whole file and caches it, and then decrypts only the specific value that was requested. On subsequent lookups into that
file, it gets the encrypted value from the cache instead of reading the file from disk again. It also caches decrypted
values so that it won’t have to decrypt again if the same key is looked up repeatedly.
The cache is useful for storing session keys or connection objects for backends that access a network service.
Each Puppet::LookupContext cache lasts for the duration of the current catalog compilation. A node can’t
access values cached for a previous node.
Hiera creates a separate cache for each combination of inputs for a function call, including inputs like name that are
configured in hiera.yaml but not passed to the function. Each hierarchy level has its own cache, and hierarchy
levels that use multiple paths have a separate cache for each path.
If any inputs to a function change, for example, a path interpolates a local variable whose value changes between
lookups, Hiera uses a fresh cache.
cache_all(hash)
Caches all the key-value pairs from a given hash. Returns undef (in Puppet) or nil (in Ruby).
cached_value(key)
Returns a previously cached value from the per-data-source private cache. Returns undef or nil if no value with
this name has been cached.
cache_has_key(key)
Checks whether the cache has a value for a given key yet. Returns true or false.
© 2024 Puppet, Inc., a Perforce company

Puppet | Using Puppet code | 453
cached_entries()
Returns everything in the per-data-source cache as an iterable object. The returned object is
not a hash. If you want a hash, use Hash($context.all_cached()) in the Puppet language or
Hash[context.all_cached()] in Ruby.
cached_file_data(path)
Puppet syntax:
cached_file_data(path) |content| { ... }
Ruby syntax:
cached_file_data(path) {|content| ...}
For best performance, use this method to read files in Hiera backends.
cached_file_data(path) {|content| ...} returns the content of the specified file as a string. If an
optional block is provided, it passes the content to the block and returns the block’s return value. For example, the
built-in JSON backend uses a block to parse JSON and return a hash:
context.cached_file_data(path) do |content|
begin
JSON.parse(content)
rescue JSON::ParserError => ex
# Filename not included in message, so we add it here.
raise Puppet::DataBinding::LookupError, "Unable to parse (#{path}):
#{ex.message}"
end
end
On repeated access to a given file, Hiera checks whether the file has changed on disk. If it hasn’t, Hiera uses cached
data instead of reading and parsing the file again.
This method does not use the same per-data-source caches as cache(key, value) and similar methods.
It uses a separate cache that lasts across multiple catalog compilations, and is tied to Puppet Server’s environment
cache.
Because the cache can outlive a given node’s catalog compilation, do not do any node-specific pre-processing (like
calling context.interpolate) in this method’s block.
explain() { ‘message’ }
Puppet syntax:
explain() || { 'message' }
Ruby syntax:
explain() { 'message' }
In both Puppet and Ruby, the provided block must take zero arguments.
explain() { 'message' } adds a message, which appears in debug messages or when using puppet lookup --
explain. The block provided to this function must return a string.
The explain method is useful for complex lookups where a function tries several different things before arriving at the
value. The built-in backends do not use the explain method, and they still have relatively verbose explanations. This
method is for when you need to provide even more detail.
Hiera never executes the explain block unless explain is enabled.
© 2024 Puppet, Inc., a Perforce company

Puppet | Using Puppet code | 454
Debugging Hiera
When debugging Hiera, puppet lookup can help identify exactly what Hiera was doing when it raised an error, or
how it decided to look up a key and where it got its value.
Use these examples to guide you in debugging Hiera with the puppet lookup command.
Syntax errors
Consider the following error message.
SERVER: Evaluation Error: Error while evaluating a Resource Statement,
Lookup of key 'pe_console_prune::ensure_prune_cron' failed: DataBinding
'hiera': (<unknown>): mapping values are not allowed here at line 2 column
68 on node master.inf.puppetlabs.demo
1.
To debug this, run the following command on the primary node:
puppet lookup pe_console_prune::ensure_prune_cron
Note that all the rest of the errors and logging around the error are cleared.
2.
To get more information, add the --debug flag:
puppet lookup --debug pe_console_prune::ensure_prune_cron
3.
Look at the last few lines of output from the puppet lookup command:
...
Debug: hiera(): [eyaml_backend]: Hiera eYAML backend starting
...
Debug: hiera(): Hiera YAML backend starting
Debug: hiera(): Looking up lookup_options in YAML backend
Debug: hiera(): Looking for data source nodes/
master.inf.puppetlabs.demo
Debug: hiera(): Cannot find datafile /etc/puppetlabs/code/environments/
production/hieradata/nodes/master.inf.puppetlabs.demo.yaml, skipping
Debug: hiera(): Looking for data source environment/production
Debug: hiera(): Looking for data source datacenter/infrastructure
Debug: hiera(): Looking for data source virtual/virtualbox
Debug: hiera(): Looking for data source common
Error: Could not run: Evaluation Error: Error while evaluating a Resource
Statement, Lookup of key 'pe_console_prune::ensure_prune_cron' failed:
DataBinding 'hiera': (<unknown>): mapping values are not allowed in this
context at line 2 column 68
In this example, the last thing Hiera was doing when it threw the error was looking for the common datasource in the
YAML backend. That is, it was reading common.yaml. Therefore, the syntax error must be in common.yaml.
Unexpected values
Sometimes Hiera does not throw an error, but still fails to return the value you expect.
For example, if you think your node is configured to use au.pool.ntp.org but it is actually configured with
us.pool.ntp.org, there is no error message but something is wrong.
The lookup command accepts a --node flag to set the node context for performing the lookup. If --node isn’t
passed, the default is the context of the node on which the command runs.
© 2024 Puppet, Inc., a Perforce company

Puppet | Using Puppet code | 455
1.
To determine why one of your secondary nodes is getting a particular value for the ntp::servers parameter,
use lookup and the --node flag to inspect the process:
[root@master ~]# puppet lookup --node centos7a.pdx.puppetlabs.local --
debug ntp::servers
...
Debug: hiera(): Looking up ntp::servers in YAML backend
Debug: hiera(): Looking for data source nodes/centos7a.pdx.puppetlabs.demo
Debug: hiera(): Cannot find datafile /etc/puppetlabs/code/environments/
production/hieradata/nodes/centos7a.pdx.puppetlabs.demo.yaml, skipping
Debug: hiera(): Looking for data source environment/production
Debug: hiera(): Looking for data source datacenter/portland
Debug: hiera(): Found ntp::servers in datacenter/portland
---
- 0.us.pool.ntp.org
- 1.us.pool.ntp.org
- 2.us.pool.ntp.org
- 3.us.pool.ntp.org
Here you can see how Hiera walks through the fully evaluated version of the hierarchy for the target node. The
original hierarchy is full of variables for interpolation:
hierarchy:
- name: "YAML hierarchy"
paths:
- "nodes/%{trusted.certname}.yaml"
- "environment/%{environment}.yaml"
- "datacenter/%{facts.datacenter}.yaml"
- "virtual/%{facts.virtual}.yaml"
- 'common.yaml'
2.
In the lookup debug output, you can see that for this node, environment/%{environment} evaluates to
environment/production, but Hiera does not find any data there for ntp:servers. And so on, down the
hierarchy. This visibility gives you what you need to think through the lookup process step by step, and confirm
with each iteration whether or not everything is working correctly.
Common errors
In addition to knowing how to use the puppet lookup command, knowing some common errors can be useful in
debugging Hiera.
1.
Error:
Error: Could not run: (<unknown>): mapping values are not allowed in this
context at line 2 column 8
Error: Could not run: (<unknown>): did not find expected '-' indicator
while parsing a block collection at line 1 column 1
Cause:
The opening --- could be malformed. If it gets converted into a unicode character, such as —, or if there is a
space at the start of the line ---, or in between the three dashes - --, you might get an error like this.
2.
Error:
Error: Could not run: (<unknown>): mapping values are not allowed in this
context at line 3 column 10
Cause:
This can be caused by using tabs for indentation instead of spaces. In general, avoid tab characters in yaml files.
© 2024 Puppet, Inc., a Perforce company

Puppet | Using Puppet code | 456
3.
Error:
Error: Could not run: Hiera type mismatch: expected Hash and got String
Error: Could not run: Hiera type mismatch: expected Hash and got Array
Error: Could not run: Hiera type mismatch: expected Array and got Hash
These types of errors often happen when you use hiera_array() or hiera_hash(), but one or more of the
found values are of a data type incompatible with that lookup.
Upgrading to Hiera 5
Upgrading to Hiera 5 offers some major advantages. A real environment data layer means changes to your hierarchy
are now routine and testable, using multiple backends in your hierarchy is easier and you can make a custom backend.
Note: If you’re already a Hiera user, you can use your current code with Hiera 5 without any changes to it. Hiera 5 is
fully backward-compatible with Hiera 3. You can even start using some Hiera 5 features—like module data—without
upgrading anything.
Hiera 5 uses the same built-in data formats as Hiera 3. You don't need to do mass edits of any data files.
Updating your code to take advantage of Hiera 5 features involves the following tasks:
Task Benefit
Enable the environment layer, by giving each
environment its own hiera.yaml file.
Note: Enabling the environment layer takes the most
work, but yields the biggest benefits. Focus on that first,
then do the rest at your own pace.
Future hierarchy changes are cheap and testable. The
legacy Hiera functions (hiera, hiera_array,
hiera_hash, and hiera_include) gain full Hiera
5 powers in any migrated environment, only if there is a
hiera.yaml in the environment root.
Convert your global hiera.yaml file to the version 5
format.
You can use new Hiera 5 backends at the global layer.
Convert any experimental (version 4) hiera.yaml
files to version 5.
Future-proof any environments or modules where you
used the experimental version of Puppet lookup.
In Puppet code, replace legacy Hiera functions
(hiera, hiera_array, hiera_hash, and
hiera_include) with lookup().
Future-proof your Puppet code.
Use Hiera for default data in modules. Simplify your modules with an elegant alternative to the
"params.pp" pattern.
Considerations for hiera-eyaml users
Upgrade now. In Puppet 4.9.3, we added a built-in hiera-eyaml backend for Hiera 5. (It still requires that the hiera-
eyaml gem be installed.) See the usage instructions in the hiera.yaml (v5) syntax reference. This means you can
move your existing encrypted YAML data into the environment layer at the same time you move your other data.
Considerations for custom backend users
Wait for updated backends. You can keep using custom Hiera 3 backends with Hiera 5, but they'll make upgrading
more complex, because you can't move legacy data to the environment layer until there's a Hiera 5 backend for it. If
an updated version of the backend is coming out soon, wait.
If you're using an off-the-shelf custom backend, check its website or contact its developer. If you developed your
backend in-house, read the documentation about writing Hiera 5 backends.
© 2024 Puppet, Inc., a Perforce company

Puppet | Using Puppet code | 457
Considerations for custom data_binding_terminus users
Upgrade now, and replace it with a Hiera 5 backend as soon as possible. There's a deprecated
data_binding_terminus setting in the puppet.conf file, which changes the behavior of automatic class
parameter lookup. It can be set to hiera (normal), none (deprecated; disables auto-lookup), or the name of a
custom plug-in.
With a custom data_binding_terminus, automatic lookup results are different from function-based lookups
for the same keys. If you're one of the few who use this feature, you've already had to design your Puppet code to
avoid that problem, so it's safe to upgrade your configuration to Hiera 5. But because we've deprecated that extension
point, you have to replace your custom terminus with a Hiera 5 backend.
If you're using an off-the-shelf plug-in, such as Jerakia, check its website or contact its developer. If you developed
your plug-in in-house, read the documentation about writing Hiera 5 backends.
After you have a Hiera 5 backend, integrate it into your hierarchies and delete the data_binding_terminus
setting.
Related information
The Puppet lookup function on page 442
The lookup function uses Hiera to retrieve a value for a given key.
Config file syntax on page 426
The hiera.yaml file is a YAML file, containing a hash with up to four top-level keys.
Writing new data backends on page 446
You can extend Hiera to look up values in data sources, for example, a PostgreSQL database table, a custom web app,
or a new kind of structured data file.
Hiera configuration layers on page 421
Hiera uses three independent layers of configuration. Each layer has its own hierarchy, and they’re linked into one
super-hierarchy before doing a lookup.
Enable the environment layer for existing Hiera data
A key feature in Hiera 5 is per-environment hierarchy configuration. Because you probably store data in each
environment, local hiera.yaml files are more logical and convenient than a single global hierarchy.
You can enable the environment layer gradually. In migrated environments, the legacy Hiera functions switch to
Hiera 5 mode — they can access environment and module data without requiring any code changes.
Note: Before migrating environment data to Hiera 5, read the introduction to migrating Hiera configurations. In
particular, be aware that if you rely on custom Hiera 3 backends, we recommend you upgrade them for Hiera 5 or
prepare for some extra work during migration. If your only custom backend is hiera-eyaml, continue upgrading
— Puppet 4.9.3 and higher include a Hiera 5 eyaml backend. See the usage instructions in the hiera.yaml (v5)
syntax reference.
In each environment:
1.
Check your code for Hiera function calls with "hierarchy override arguments" (as shown later), which cause
errors.
2.
Add a local hiera.yaml file.
3.
Update your custom backends if you have them.
© 2024 Puppet, Inc., a Perforce company

Puppet | Using Puppet code | 458
4.
Rename the data directory to exclude this environment from the global layer. Unmigrated environments still rely
on the global layer, which gets checked before the environment layer. If you want to maintain both migrated
and unmigrated environments during the migration process, choose a different data directory name for migrated
environments. The new name 'data' is a good choice because it is also the new default (unless you are already
using 'data', in which case choose a different name and set datadir in hiera.yaml). This process has no
particular time limit and doesn't involve any downtime. After all of your environments are migrated, you can
phase out or greatly reduce the global hierarchy.
Important: The environment layer does not support Hiera 3 backends. If any of your data uses a custom backend
that has not been ported to Hiera 5, omit those hierarchy levels from the environment config and continue to use
the global layer for that data. Because the global layer is checked before the environment layer, it's possible to run
into situations where you cannot migrate data to the environment layer yet. For example, if your old :backends
setting was [custom_backend, yaml], you can do a partial migration, because the custom data was
all going before the YAML data anyway. But if :backends was [yaml, custom_backend], and you
frequently use YAML data to override the custom data, you can't migrate until you have a Hiera 5 version of that
custom backend. If you run into a situation like this, get an upgraded backend before enabling the environment
layer.
5.
Check your Puppet code for classic Hiera functions (hiera, hiera_array, hiera_hash, and
hiera_include) that are passing the optional hierarchy override argument, and remove the argument.
In Hiera 5, the hierarchy override argument is an error.
A quick way to find instances of using this argument is to search for calls with two or more commas. Search your
codebase using the following regular expression:
hiera(_array|_hash|_include)?\(([^,\)]*,){2,}[^\)]*\)
This results in some false positives, but helps find the errors before you run the code.
Alternatively, continue to the next step and fix errors as they come up. If you use environments for code testing
and promotion, you’re probably migrating a temporary branch of your control repo first, then pointing some
canary nodes at it to make sure everything works as expected. If you think you’ve never used hierarchy override
arguments, you’ll be verifying that assumption when you run your canary nodes. If you do find any errors, you
can fix them before merging your branch to production, the same way you would with any work-in-progress code.
Note: If your environments are similar to each other, you might only need to check for the hierarchy override
argument in function calls in one environment. If you find none, likely the others won’t have many either.
6.
Choose a new data directory name to use in the next two steps. The default data directory name in Hiera 3 was
<ENVIRONMENT>/hieradata, and the default in Hiera 5 is <ENVIRONMENT>/data. If you used the old
default, use the new default. If you were already using data, choose something different.
7.
Add a Hiera 5 hiera.yaml file to the environment.
Each environment needs a Hiera config file that works with its existing data. If this is the first environment you’re
migrating, see converting a version 3 hiera.yaml to version 5. Make sure to reference the new datadir
name. If you’ve already migrated at least one environment, copy the hiera.yaml file from a migrated
environment and make changes to it if necessary.
Save the resulting file as <ENVIRONMENT>/hiera.yaml. For example, /etc/puppetlabs/code/
environments/production/hiera.yaml.
8.
If any of your data relies on custom backends that have been ported to Hiera 5, install them in the environment.
Hiera 5 backends are distributed as Puppet modules, so each environment can use its own version of them.
© 2024 Puppet, Inc., a Perforce company

Puppet | Using Puppet code | 459
9.
If you use only file-based Hiera 5 backends, move the environment’s data directory by renaming it from its old
name (hieradata) to its new name (data). If you use custom file-based Hiera 3 backends, the global layer still
needs access to their data, so you need to sort the files: Hiera 5 data moves to the new data directory, and Hiera 3
data stays in the old data directory. When you have Hiera 5 versions of your custom backends, you can move the
remaining files to the new datadir. If you use non-file backends that don’t have a data directory:
a) Decide that the global hierarchy is the right place for configuring this data, and leave it there permanently.
b) Do something equivalent to moving the datadir; for example, make a new database table for migrated data
and move values into place as you migrate environments.
c) Allow the global and environment layers to use duplicated configuration for this data until the migration is
done.
10.
Repeat these steps for each environment. If you manage your code by mapping environments to branches in a
control repo, you can migrate most of your environments using your version control system’s merging tools.
11.
After you have migrated the environments that have active node populations, delete the parts of your global
hierarchy that you transferred into environment hierarchies.
For more information on mapping environments to branches, see control repo.
Related information
Enable the environment layer for existing Hiera data on page 457
A key feature in Hiera 5 is per-environment hierarchy configuration. Because you probably store data in each
environment, local hiera.yaml files are more logical and convenient than a single global hierarchy.
Configuring a hierarchy level: legacy Hiera 3 backends on page 431
If you rely on custom data backends designed for Hiera 3, you can use them in your global hierarchy. They are not
supported at the environment or module layers.
Config file syntax on page 426
The hiera.yaml file is a YAML file, containing a hash with up to four top-level keys.
Custom backends overview on page 447
A backend is a custom Puppet function that accepts a particular set of arguments and whose return value obeys a
particular format. The function can do whatever is necessary to locate its data.
Convert a version 3 hiera.yaml to version 5
Hiera 5 supports three versions of the hiera.yaml file: version 3, version 4, and version 5. If you've been using
Hiera 3, your existing configuration is a version 3 hiera.yaml file at the global layer.
There are two migration tasks that involve translating a version 3 config to a version 5:
• Creating new v5 hiera.yaml files for environments.
• Updating your global configuration to support Hiera 5 backends.
These are essentially the same process, although the global hierarchy has a few special capabilities.
Consider this example hiera.yaml version 3 file:
:backends:
- mongodb
- eyaml
- yaml
:yaml:
:datadir: "/etc/puppetlabs/code/environments/%{environment}/hieradata"
:mongodb:
:connections:
:dbname: hdata
:collection: config
:host: localhost
:eyaml:
:datadir: "/etc/puppetlabs/code/environments/%{environment}/hieradata"
:pkcs7_private_key: /etc/puppetlabs/puppet/eyaml/private_key.pkcs7.pem
:pkcs7_public_key: /etc/puppetlabs/puppet/eyaml/public_key.pkcs7.pem
:hierarchy:
© 2024 Puppet, Inc., a Perforce company

Puppet | Using Puppet code | 460
- "nodes/%{trusted.certname}"
- "location/%{facts.whereami}/%{facts.group}"
- "groups/%{facts.group}"
- "os/%{facts.os.family}"
- "common"
:logger: console
:merge_behavior: native
:deep_merge_options: {}
To convert this version 3 file to version 5:
1.
Use strings instead of symbols for keys.
Hiera 3 required you to use Ruby symbols as keys. Symbols are short strings that start with a colon, for example,
:hierarchy. The version 5 config format lets you use regular strings as keys, although symbols won’t (yet)
cause errors. You can remove the leading colons on keys.
2.
Remove settings that aren’t used anymore. In this example, remove everything except the :hierarchy setting:
a) Delete the following settings completely, which are no longer needed:
• :logger
• :merge_behavior
• :deep_merge_options
For information on how Hiera 5 supports deep hash merging, see Merging data from multiple sources.
b) Delete the following settings, but paste them into a temporary file for later reference:
• :backends
• Any backend-specific setting sections, like :yaml or :mongodb
3.
Add a version key, with a value of 5:
version: 5
hierarchy:
# ...
4.
Set a default backend and data directory.
If you use one backend for the majority of your data, for example YAML or JSON, set a defaults key, with
values for datadir and one of the backend keys.
The names of the backends have changed for Hiera 5, and the backend setting itself has been split into three
settings:
Hiera 3 backend Hiera 5 backend setting
yaml data_hash: yaml_data
json data_hash: json_data
eyaml lookup_key: eyaml_lookup_key
© 2024 Puppet, Inc., a Perforce company

Puppet | Using Puppet code | 461
5.
Translate the hierarchy.
The version 5 and version 3 hierarchies work differently:
• In version 3, hierarchy levels don’t have a backend assigned to them, and Hiera loops through the entire
hierarchy for each backend.
• In version 5, each hierarchy level has one designated backend, as well as its own independent configuration for
that backend.
Consult the previous values for the :backends key and any backend-specific settings.
In the example above, we used yaml, eyaml, and mongodb backends. Your business only uses Mongo for per-
node data, and uses eyaml for per-group data. The rest of the hierarchy is irrelevant to these backends. You need
one Mongo level and one eyaml level, but still want all five levels in YAML. This means Hiera consults multiple
backends for per-node and per-group data. You want the YAML version of per-node data to be authoritative,
so put it before the Mongo version. The eyaml data does not overlap with the unencrypted per-group data, so it
doesn’t matter where you put it. Put it before the YAML levels. When you translate your hierarchy, you have to
make the same kinds of investigations and decisions.
6.
Remove hierarchy levels that use calling_module, calling_class, and calling_class_path,
which were allowed pseudo-variables in Hiera 3. Anything you were doing with these variables is better
accomplished by using the module data layer, or by using the glob pattern (if the reason for using them was to
enable splitting up data into multiple files, and not knowing in advance what they names of those would be)
Hiera.yaml version 5 does not support these. Remove hierarchy levels that interpolate them.
7.
Translate built-in backends to the version 5 config, where the hierarchy is written as an array of hashes. For
hierarchy levels that use the built-in backends, for example YAML and JSON, use the data_hash key to set
the backend. See Configuring a hierarchy level in the hiera.yaml v5 reference for more information.
Set the following keys:
• name - A human-readable name.
• path or paths - The path you used in your version 3 hiera.yaml hierarchy, but with a file extension
appended.
• data_hash - The backend to use yaml_data for YAML, json_data for JSON.
• datadir - The data directory. In version 5, it’s relative to the hiera.yaml file’s directory.
If you have set default values for data_hash and datadir, you can omit them.
version: 5
defaults:
datadir: data
data_hash: yaml_data
hierarchy:
- name: "Per-node data (yaml version)"
path: "nodes/%{trusted.certname}.yaml" # Add file extension.
# Omitting datadir and data_hash to use defaults.
- name: "Other YAML hierarchy levels"
paths: # Can specify an array of paths instead of one.
- "location/%{facts.whereami}/%{facts.group}.yaml"
- "groups/%{facts.group}.yaml"
- "os/%{facts.os.family}.yaml"
- "common.yaml"
© 2024 Puppet, Inc., a Perforce company

Puppet | Using Puppet code | 462
8.
Translate hiera-eyaml backends, which work in a similar way to the other built-in backends.
The differences are:
• The hiera-eyaml gem has to be installed, and you need a different backend setting. Instead of
data_hash: yaml, use lookup_key: eyaml_lookup_key. Each hierarchy level needs an
options key with paths to the public and private keys. You cannot set a global default for this.
- name: "Per-group secrets"
path: "groups/%{facts.group}.eyaml"
lookup_key: eyaml_lookup_key
options:
pkcs7_private_key: /etc/puppetlabs/puppet/eyaml/
private_key.pkcs7.pem
pkcs7_public_key: /etc/puppetlabs/puppet/eyaml/
public_key.pkcs7.pem
9.
Translate custom Hiera 3 backends.
Check to see if the backend’s author has published a Hiera 5 update for it. If so, use that; see its documentation for
details on how to configure hierarchy levels for it.
If there is no update, use the version 3 backend in a version 5 hierarchy at the global layer — it does not work in
the environment layer. Find a Hiera 5 compatible replacement, or write Hiera 5 backends yourself.
For details on how to configure a legacy backend, see Configuring a hierarchy level (legacy Hiera 3 backends) in
the hiera.yaml (version 5) reference.
When configuring a legacy backend, use the previous value for its backend-specific settings. In the example, the
version 3 config had the following settings for MongoDB:
:mongodb:
:connections:
:dbname: hdata
:collection: config
:host: localhost
So, write the following for a per-node MongoDB hierarchy level:
- name: "Per-node data (MongoDB version)"
path: "nodes/%{trusted.certname}" # No file extension
hiera3_backend: mongodb
options: # Use old backend-specific options, changing keys to plain
strings
connections:
dbname: hdata
collection: config
host: localhost
After following these steps, you’ve translated the example configuration into the following v5 config:
version: 5
defaults:
datadir: data
data_hash: yaml_data
hierarchy:
- name: "Per-node data (yaml version)"
path: "nodes/%{trusted.certname}.yaml" # Add file extension
# Omitting datadir and data_hash to use defaults.
- name: "Per-node data (MongoDB version)"
path: "nodes/%{trusted.certname}" # No file extension
hiera3_backend: mongodb
© 2024 Puppet, Inc., a Perforce company

Puppet | Using Puppet code | 463
options: # Use old backend-specific options, changing keys to plain
strings
connections:
dbname: hdata
collection: config
host: localhost
- name: "Per-group secrets"
path: "groups/%{facts.group}.eyaml"
lookup_key: eyaml_lookup_key
options:
pkcs7_private_key: /etc/puppetlabs/puppet/eyaml/private_key.pkcs7.pem
pkcs7_public_key: /etc/puppetlabs/puppet/eyaml/public_key.pkcs7.pem
- name: "Other YAML hierarchy levels"
paths: # Can specify an array of paths instead of a single one.
- "location/%{facts.whereami}/%{facts.group}.yaml"
- "groups/%{facts.group}.yaml"
- "os/%{facts.os.family}.yaml"
- "common.yaml"
Related information
Hiera configuration layers on page 421
Hiera uses three independent layers of configuration. Each layer has its own hierarchy, and they’re linked into one
super-hierarchy before doing a lookup.
Custom backends overview on page 447
A backend is a custom Puppet function that accepts a particular set of arguments and whose return value obeys a
particular format. The function can do whatever is necessary to locate its data.
Configuring a hierarchy level: general format on page 432
Hiera supports custom backends.
Configuring a hierarchy level: hiera-eyaml on page 430
Hiera 5 ( Puppet 4.9.3 and later) includes a native interface for the Hiera eyaml extension, which keeps data encrypted
on disk but lets Puppet read it during catalog compilation.
Convert an experimental (version 4) hiera.yaml to version 5
If you used the experimental version of Puppet lookup ( Hiera 5's predecessor), you might have some version
4 hiera.yaml files in your environments and modules. Hiera 5 can use these, but you need to convert them,
especially if you want to use any backends other than YAML or JSON. Version 4 and version 5 formats are similar.
Consider this example of a version 4 hiera.yaml file:
# /etc/puppetlabs/code/environments/production/hiera.yaml
---
version: 4
datadir: data
hierarchy:
- name: "Nodes"
backend: yaml
path: "nodes/%{trusted.certname}"
- name: "Exported JSON nodes"
backend: json
paths:
- "nodes/%{trusted.certname}"
- "insecure_nodes/%{facts.networking.fqdn}"
- name: "virtual/%{facts.virtual}"
backend: yaml
- name: "common"
© 2024 Puppet, Inc., a Perforce company

Puppet | Using Puppet code | 464
backend: yaml
To convert to version 5, make the following changes:
1.
Change the value of the version key to 5.
2.
Add a file extension to every file path — use "common.yaml", not "common".
3.
If any hierarchy levels are missing a path, add one. In version 5, path no longer defaults to the value of name
4.
If there is a top-level datadir key, change it to a defaults key. Set a default backend. For example:
defaults:
datadir: data
data_hash: yaml_data
5.
In each hierarchy level, delete the backend key and replace it with a data_hash key. (If you set a default
backend in the defaults key, you can omit it here.)
v4 backend v5 equivalent
backend: yaml data_hash: yaml_data
backend: json data_hash: json_data
6.
Delete the environment_data_provider and data_provider settings, which enabled Puppet lookup
for an environment or module.
You’ll find these settings in the following locations:
• environment_data_provider in puppet.conf.
• environment_data_provider in environment.conf.
• data_provider in a module’s metadata.json.
After being converted to version 5, the example looks like this:
# /etc/puppetlabs/code/environments/production/hiera.yaml
---
version: 5
defaults:
datadir: data # Datadir has moved into `defaults`.
data_hash: yaml_data # Default backend: New feature in v5.
hierarchy:
- name: "Nodes" # Can omit `backend` if using the default.
path: "nodes/%{trusted.certname}.yaml" # Add file extension!
- name: "Exported JSON nodes"
data_hash: json_data # Specifying a non-default backend.
paths:
- "nodes/%{trusted.certname}.json"
- "insecure_nodes/%{facts.networking.fqdn}.json"
- name: "Virtualization platform"
path: "virtual/%{facts.virtual}.yaml" # Name and path are now
separated.
- name: "common"
path: "common.yaml"
For full syntax details, see the hiera.yaml version 5 reference.
Related information
Config file syntax on page 426
The hiera.yaml file is a YAML file, containing a hash with up to four top-level keys.
Custom backends overview on page 447
© 2024 Puppet, Inc., a Perforce company

Puppet | Using Puppet code | 465
A backend is a custom Puppet function that accepts a particular set of arguments and whose return value obeys a
particular format. The function can do whatever is necessary to locate its data.
Convert experimental data provider functions to a Hiera 5 data_hash backend
Puppet lookup had experimental custom backend support, where you could set data_provider = function
and create a function with a name that returned a hash. If you used that, you can convert your function to a Hiera 5
data_hash backend.
1.
Your original function took no arguments. Change its signature to accept two arguments: a Hash and a
Puppet::LookupContext object. You do not have to do anything with these - just add them. For more
information, see the documentation for data hash backends.
2.
Delete the data_provider setting, which enabled Puppet lookup for a module. You can find this setting in a
module’s metadata.json.
3.
Create a version 5 hiera.yaml file for the affected environment or module, and add a hierarchy level as
follows:
- name: <ARBITRARY NAME>
data_hash: <NAME OF YOUR FUNCTION>
It does not need a path, datadir, or any other options.
Updated classic Hiera function calls
The hiera, hiera_array, hiera_hash, and hiera_include functions are all deprecated. The lookup
function is a complete replacement for all of these.
Hiera function Equivalent lookup call
hiera('secure_server') lookup('secure_server')
hiera_array('ntp::servers') lookup('ntp::servers', {merge =>
unique})
hiera_hash('users') lookup('users', {merge => hash}) or
lookup('users', {merge => deep})
hiera_include('classes') lookup('classes', {merge =>
unique}).include
To prepare for deprecations in future Puppet versions, it's best to revise your Puppet modules to replace the hiera_*
functions with lookup. However, you can adopt all of Hiera 5's new features in other modules without updating
these function calls. While you're revising, consider refactoring code to use automatic class parameter lookup instead
of manual lookup calls. Because automatic lookups can now do unique and hash merges, the use of manual lookup
in the form of hiera_array and hiera_hash are not as important as they used to be. Instead of changing those
manual Hiera calls to be calls to the lookup function, use Automatic Parameter Lookup (API).
Related information
The Puppet lookup function on page 442
The lookup function uses Hiera to retrieve a value for a given key.
Merge behaviors on page 433
© 2024 Puppet, Inc., a Perforce company

Puppet | Using Puppet code | 466
There are four merge behaviors to choose from: first, unique, hash, and deep.
Adding Hiera data to a module
Modules need default values for their class parameters. Before, the preferred way to do this was the “params.pp”
pattern. With Hiera 5, you can use the “data in modules” approach instead. The following example shows how to
replace params.pp with the new approach.
Note: The params.pp pattern is still valid, and the features it relies on remain in Puppet. But if you want to use
Hiera data instead, you now have that option.
Note: You must fully qualify Hiera variables for modules in your YAML file. See Module data with YAML data
files on page 468.
Module data with the params.pp pattern
The params.pp pattern takes advantage of the Puppet class inheritance behavior.
One class in your module does nothing but set variables for the other classes. This class is called
<MODULE>::params. This class uses Puppet code to construct values; it uses conditional logic based on the target
operating system. The rest of the classes in the module inherit from the params class. In their parameter lists, you can
use the params class's variables as default values.
When using params.pp pattern, the values set in the params.pp defined class cannot be used in lookup merges
and Automatic Parameter Lookup (APL) - when using this pattern these are only used for defaults when there are no
values found in Hiera.
An example params class:
# ntp/manifests/params.pp
class ntp::params {
$autoupdate = false,
$default_service_name = 'ntpd',
case $facts['os']['family'] {
'Debian': {
$service_name = 'ntp'
}
'RedHat': {
$service_name = $default_service_name
}
}
}
A class that inherits from the params class and uses it to set default parameter values:
class ntp (
$autoupdate = $ntp::params::autoupdate,
$service_name = $ntp::params::service_name,
) inherits ntp::params {
...
}
Module data with a one-off custom Hiera backend
With Hiera 5's custom backend system, you can convert and existing params class to a hash-based Hiera backend.
To create a Hiera backend, create a function written in the Puppet language that returns a hash.
Using the params class as a starting point:
# ntp/functions/params.pp
function ntp::params(
Hash $options, # We ignore both of these arguments, but
© 2024 Puppet, Inc., a Perforce company

Puppet | Using Puppet code | 467
Puppet::LookupContext $context, # the function still needs to accept them.
) {
$base_params = {
'ntp::autoupdate' => false,
# Keys have to start with the module's namespace, which in this case
is `ntp::`.
'ntp::service_name' => 'ntpd',
# Use key names that work with automatic class parameter lookup. This
# key corresponds to the `ntp` class's `$service_name` parameter.
}
$os_params = case $facts['os']['family'] {
'Debian': {
{ 'ntp::service_name' => 'ntp' }
}
default: {
{}
}
}
# Merge the hashes, overriding the service name if this platform uses a
non-standard one:
$base_params + $os_params
}
Note: The hash merge operator (+) is useful in these functions.
After you have a function, tell Hiera to use it by adding it to the module layer hiera.yaml. A simple backend
like this one doesn’t require path, datadir, or options keys. You have a choice of adding it to the
default_hierarch if you want the exact same behaviour as with the earlier params.pp pattern, and use
the regular hierarchy if you want the values to be merged with values of higher priority when a merging
lookup is specified. You can split up the key-values so that some are in the hierarchy, and some in the
default_hierarchy, depending on whether it makes sense to merge a value or not.
Here we add it to the regular hierarchy:
# ntp/hiera.yaml
---
version: 5
hierarchy:
- name: "NTP class parameter defaults"
data_hash: "ntp::params"
# We only need one hierarchy level, because one function provides all the
data.
With Hiera-based defaults, you can simplify your module’s main classes:
• They do not need to inherit from any other class.
• You do not need to explicitly set a default value with the = operator.
• Instead APL comes into effect for each parameter without a given value. In the example, the function
ntp::params is called to get the default params, and those can then be either overridden or merged, just as with
all values in Hiera.
# ntp/manifests/init.pp
class ntp (
# default values are in ntp/functions/params.pp
$autoupdate,
$service_name,
) {
...
}
© 2024 Puppet, Inc., a Perforce company

Puppet | Using Puppet code | 468
Module data with YAML data files
You can also manage your module's default data with basic Hiera YAML files,
Set up a hierarchy in your module layer hiera.yaml file:
# ntp/hiera.yaml
---
version: 5
defaults:
datadir: data
data_hash: yaml_data
hierarchy:
- name: "OS family"
path: "os/%{facts.os.family}.yaml"
- name: "common"
path: "common.yaml"
Then, put the necessary data files in the data directory:
# ntp/data/common.yaml
---
ntp::autoupdate: false
ntp::service_name: ntpd
# ntp/data/os/Debian.yaml
ntp::service_name: ntp
You can also use any other Hiera backend to provide your module’s data. If you want to use a custom backend that is
distributed as a separate module, you can mark that module as a dependency.
For more information, see class inheritance, conditional logic, write functions in the Puppet language, hash merge
operator.
Related information
The Puppet lookup function on page 442
The lookup function uses Hiera to retrieve a value for a given key.
Hiera configuration layers on page 421
© 2024 Puppet, Inc., a Perforce company

Puppet | Using Puppet code | 469
Hiera uses three independent layers of configuration. Each layer has its own hierarchy, and they’re linked into one
super-hierarchy before doing a lookup.
Use case examples
Try out some common configuration tasks to see how you can use Puppet to manage your IT infrastructure.
• Manage an NTP service on page 469
Network Time Protocol (NTP) is one of the most crucial, yet easiest, services to configure and manage with Puppet,
to properly synchronize time across all your nodes. Follow this guide to get started managing a NTP service using the
Puppet ntp module.
• Manage sudo privileges on page 472
Managing sudo on your agents allows you to control which system users have access to elevated privileges. This
guide helps you get started managing sudo privileges across your nodes, using a module from the Puppet Forge in
conjunction with a simple module you write.
• Manage a DNS nameserver file on page 475
A nameserver ensures that the human-readable URLs you type in your browser (for example, example.com)
resolve to IP addresses that computers can read. This guide helps you get started managing a simple Domain Name
System (DNS) nameserver file with Puppet.
• Manage firewall rules on page 478
With a firewall, admins define firewall rules, which sets a policy for things like application ports (TCP/UDP),
network ports, IP addresses, and accept-deny statements. This guide helps you get started managing firewall rules
with Puppet.
• Forge examples on page 481
Puppet Forge is a collection of modules and how-to guides developed by Puppet and its community.
Manage an NTP service
Network Time Protocol (NTP) is one of the most crucial, yet easiest, services to configure and manage with Puppet,
to properly synchronize time across all your nodes. Follow this guide to get started managing a NTP service using the
Puppet ntp module.
Before you begin
Ensure you’ve already installed Puppet, and at least one *nix agent. Also, log in as root or Administrator on your
nodes.
The clocks on your servers are not inherently accurate. They need to synchronize with something to let them know
what the right time is. NTP is a protocol that synchronizes the clocks of computers over a network. NTP uses
Coordinated Universal Time (UTC) to synchronize computer clock times to within a millisecond.
Your entire datacenter, from the network to the applications, depends on accurate time for security services,
certificate validation, and file sharing across Puppet agents. If the time is wrong, your Puppet primary server might
mistakenly issue agent certificates from the distant past or future, which other agents treat as expired.
Using the Puppet NTP module, you can:
• Ensure time is correctly synced across all the servers in your infrastructure.
• Ensure time is correctly synced across your configuration management tools.
• Roll out updates quickly if you need to change or specify your own internal NTP server pool.
This guide walks you through the following steps in setting up NTP configuration management:
• Installing the puppetlabs-ntp module.
• Adding classes to the default node in your main manifest.
• Viewing the status of your NTP service.
• Using multiple nodes in the main manifest to configure NTP for different permissions.
© 2024 Puppet, Inc., a Perforce company

Puppet | Using Puppet code | 470
Note: You can add the NTP service to as many agents as needed. For simplicity, this guide describes adding it to
only one.
1.
The first step is installing the puppetlabs-ntp module. The puppetlabs-ntp module is part of
the supported modules program; these modules are supported, tested, and maintained by Puppet. For more
information on puppetlabs-ntp, see the README. To install it, run:
puppet module install puppetlabs-ntp
The resulting output is similar to this:
Preparing to install into /etc/puppetlabs/puppet/modules ...
Notice: Downloading from http://forgeapi.puppetlabs.com ...
Notice: Installing -- do not interrupt ...
/etc/puppetlabs/puppet/environments/production/modules
### puppetlabs-ntp (v3.1.2)
That’s it! You’ve just installed the puppetlabs-ntp module.
2.
The next step is adding classes from the NTP module to the main manifest.
The NTP module contains several classes. Classes are named chunks of Puppet code and are the primary means
by which Puppet configures nodes. The NTP module contains the following classes:
• ntp: the main class, which includes all other NTP classes, including the classes in this list.
• ntp::install: handles the installation packages.
• ntp::config: handles the configuration file.
• ntp::service: handles the service.
You’re going to add the ntp class to the default node in your main manifest. Depending on your needs or
infrastructure, you might have a different group that you’ll assign NTP to, but you would take similar steps.
a) From the command line on the primary server, navigate to the directory that contains the main manifest:
cd /etc/puppetlabs/code/environments/production/manifests
b) Use your text editor to open site.pp.
c) Add the following Puppet code to site.pp:
node default {
class { 'ntp':
servers => ['nist-time-server.eoni.com','nist1-
lv.ustiming.org','ntp-nist.ldsbc.edu']
}
}
Note: If your site.pp file already has a default node in it, add just the class and servers lines to it.
Note: For additional time server options, see the list at https://www.ntppool.org/.
d) On your agent, start a Puppet run:
puppet agent -t
Your Puppet-managed node is now configured to use NTP.
© 2024 Puppet, Inc., a Perforce company

Puppet | Using Puppet code | 471
3.
To check if the NTP service is running, run:
puppet resource service ntpd
On Ubuntu operating systems, the service is ntp instead of ntpd.
The result looks like this:
service { 'ntpd':
ensure => 'running',
enable => 'true',
}
4.
If you want to configure the NTP service to run differently on different nodes, you can set up NTP on nodes other
than default in the site.pp file.
In previous steps, you’ve been configuring the default node.
In the example below, two NTP servers (kermit and grover) are configured to talk to outside time servers.
The other NTP servers (snuffie, bigbird, and hooper) use those two primary servers to sync their time.
One of the primary NTP servers, kermit, is very cautiously configured — it can’t afford outages, so it’s not
allowed to automatically update its NTP server package without testing. The other servers are more permissively
configured.
The site.pp looks like this:
node "kermit.example.com" {
class { "ntp":
servers => [ '0.us.pool.ntp.org
iburst','1.us.pool.ntp.org iburst','2.us.pool.ntp.org
iburst','3.us.pool.ntp.org iburst'],
autoupdate => false,
restrict => [],
service_enable => true,
}
}
node "grover.example.com" {
class { "ntp":
servers => [ 'kermit.example.com','0.us.pool.ntp.org
iburst','1.us.pool.ntp.org iburst','2.us.pool.ntp.org iburst'],
autoupdate => true,
restrict => [],
service_enable => true,
}
}
node "snuffie.example.com", "bigbird.example.com", "hooper.example.com" {
class { "ntp":
servers => [ 'grover.example.com', 'kermit.example.com'],
autoupdate => true,
enable => true,
}
}
In this way, it is possible to configure NTP on multiple nodes to suit your needs.
For more information about working with the puppetlabs-ntp module, check out our How to Manage NTP
webinar.
Puppet offers many opportunities for learning and training, from formal certification courses to guided online lessons.
See the Learning Puppet page for more information.
© 2024 Puppet, Inc., a Perforce company

Puppet | Using Puppet code | 472
Manage sudo privileges
Managing sudo on your agents allows you to control which system users have access to elevated privileges. This
guide helps you get started managing sudo privileges across your nodes, using a module from the Puppet Forge in
conjunction with a simple module you write.
Before you begin
Before starting this walk-through, complete the previous exercises.
Ensure you’ve already installed Puppet, and at least one *nix agent. Also, log in as root or Administrator on your
nodes.
Using this guide, you learn how to:
• Install the saz-sudo module as the foundation for managing sudo privileges.
• Write a module that contains a class called privileges to manage a resource that sets privileges for certain
users.
• Add classes from the privileges and sudo modules to your agents.
Note: You can add the sudo and privileges classes to as many agents as needed. For simplicity, this guide
describes only one.
1.
Start by installing the saz-sudo module. It's available on the Forge, and is one of many modules written by a
member of the Puppet user community. You can learn more about the module at forge.puppet.com/saz/sudo. To
install the saz-sudo module, run the following command on the primary server:
puppet module install saz-sudo
The resulting output is similar to this:
Preparing to install into /etc/puppetlabs/code/environments/production/
modules …
Notice: Downloading from http://forgeapi.puppetlabs.com ...
Notice: Installing -- do not interrupt ...
/etc/puppetlabs/puppet/modules
### saz-sudo (v2.3.6)
### puppetlabs-stdlib (3.2.2) [/opt/puppet/share/puppet/modules]
That’s it! You’ve installed the saz-sudo module.
© 2024 Puppet, Inc., a Perforce company

Puppet | Using Puppet code | 473
2.
Next, you'll create a module that contains the privileges class.
Like in the DNS exercise, this is a small module with just one class. You'll create the privileges module
directory, its manifests subdirectory, and an init.pp manifest file that contains the privileges class.
a) From the command line on the primary server, navigate to the modules directory:
cd /etc/puppetlabs/code/environments/production/modules
b) Create the module directory and its manifests directory:
mkdir -p privileges/manifests
c) In the manifests directory, use your text editor to create the init.pp file, and edit it so it contains the
following Puppet code:
class privileges {
sudo::conf { 'admins':
ensure => present,
content => '%admin ALL=(ALL) ALL',
}
}
The sudo::conf 'admins' line creates a sudoers rule that ensures that members of the admins group
have the ability to run any command using sudo. This resource creates a configuration fragment file to define
this rule in /etc/sudoers.d/. It's called something like 10_admins.
d) Save and exit the file.
That’s it! You’ve created a module that contains a class that, after it's applied, ensures that your agents have
the correct sudo privileges set for the root user and the admins and wheel groups.
© 2024 Puppet, Inc., a Perforce company

Puppet | Using Puppet code | 474
3.
Next, add the privileges and sudo classes to default nodes.
a) From the command line on the primary server, navigate to the main manifest:
cd /etc/puppetlabs/code/environments/production/manifests
b) Open site.pp with your text editor and add the following Puppet code to the default node:
class { 'sudo': }
sudo::conf { 'web':
content => "web ALL=(ALL) NOPASSWD: ALL",
}
class { 'privileges': }
sudo::conf { 'jargyle':
priority => 60,
content => "jargyle ALL=(ALL) NOPASSWD: ALL",
}
The sudo::conf ‘web’ line creates a sudoers rule to ensure that members of the web group can run
any command using sudo. This resource creates a configuration fragment file to define this rule in /etc/
sudoers.d/.
The sudo::conf ‘jargyle’ line creates a sudoers rule to ensure that the user jargyle can run
any command using sudo. This resource creates a configuration fragment to define this rule in /etc/
sudoers.d/. It's called something like 60_jargyle.
c) Save and exit the file.
d) On your primary server, ensure that there are no errors:
puppet parser validate site.pp
The parser returns nothing if there are no errors.
e) From the command line on your agent, run Puppet: puppet agent -t
That’s it! You have successfully applied sudo and privileges classes to nodes.
f) To confirm it worked, run the following command on an agent:
sudo -l -U jargyle
The results resemble the following:
Matching Defaults entries for jargyle on this host:
!visiblepw, always_set_home, env_reset, env_keep="COLORS DISPLAY
HOSTNAME HISTSIZE
INPUTRC KDEDIR LS_COLORS", env_keep+="MAIL PS1 PS2 QTDIR USERNAME LANG
LC_ADDRESS
LC_CTYPE", env_keep+="LC_COLLATE LC_IDENTIFICATION LC_MEASUREMENT
LC_MESSAGES",
env_keep+="LC_MONETARY LC_NAME LC_NUMERIC LC_PAPER LC_TELEPHONE",
env_keep+="LC_TIME
LC_ALL LANGUAGE LINGUAS _XKB_CHARSET XAUTHORITY",
secure_path=/usr/local/bin\:/sbin\:/bin\:/usr/sbin\:/usr/bin
User jargyle may run the following commands on this host:
(ALL) NOPASSWD: ALL
For more information about working with Puppet and sudo users, see our Module of The Week: saz/sudo - Manage
sudo configuration blog post.
Puppet offers many opportunities for learning and training, from formal certification courses to guided online lessons.
See the Learning Puppet page for more information.
© 2024 Puppet, Inc., a Perforce company

Puppet | Using Puppet code | 475
Manage a DNS nameserver file
A nameserver ensures that the human-readable URLs you type in your browser (for example, example.com)
resolve to IP addresses that computers can read. This guide helps you get started managing a simple Domain Name
System (DNS) nameserver file with Puppet.
Before you begin
Before starting this walk-through, complete the previous exercise of setting up NTP management. Log in as root or
Administrator on your nodes.
Sysadmins typically need to manage a nameserver file for internal resources that aren’t published in public
nameservers. For example, suppose you have several employee-maintained servers in your infrastructure, and the
DNS network assigned to those servers use Google’s public nameserver located at 8.8.8.8. However, there are
several resources behind your company’s firewall that your employees need to access on a regular basis. In this case,
you’d build a private nameserver (for example at 10.16.22.10), and use Puppet to ensure all the servers in your
infrastructure have access to it.
In this exercise, you learn how to:
• Write a module that contains a class called resolver to manage a nameserver file called /etc/
resolv.conf.
• Enforce the desired state of that class from the command line of your Puppet agent.
Note: You can add the DNS nameserver class to as many agents as needed. For simplicity, this guide describes
adding it to only one.
© 2024 Puppet, Inc., a Perforce company

Puppet | Using Puppet code | 476
1.
The first step is creating the resolver module and a template.
While some modules are large and complex, this module module contains just one class and one template
By default, Puppet keeps modules in an environment’s modulepath, which for the production environment
defaults to /etc/puppetlabs/code/environments/production/modules. This directory contains
modules that Puppet installs, those that you download from the Forge, and those you write yourself.
Note: Puppet creates another module directory: /opt/puppetlabs/puppet/modules. Don’t modify or
add anything in this directory.
For thorough information about creating and using modules, see Modules fundamentals, the Beginner’s guide to
modules, and the Puppet Forge .
Modules are directory trees. For this task, you’ll create a directory for the resolver module, a subdirectory for
its templates, and a template file that Puppet uses to create the /etc/resolv.conf file that manages DNS.
a) From the command line on the Puppet primary server, navigate to the modules directory:
cd /etc/puppetlabs/code/environments/production/modules
b) Create the module directory and its templates directory:
mkdir -p resolver/templates
c) Use your text editor to create a file called resolv.conf.erb inside the resolver/templates
directory.
d) Edit the resolv.conf.erb file to add the following Ruby code:
# Resolv.conf generated by Puppet
<% [@nameservers].flatten.each do |ns| -%>
nameserver <%= ns %>
<% end -%>
This Ruby code is a template for populating /etc/resolv.conf correctly, no matter what changes are
manually made to /etc/resolv.conf, as you see in a later step.
e) Save and exit the file.
That’s it! You’ve created a Ruby template to populate /etc/resolv.conf.
© 2024 Puppet, Inc., a Perforce company

Puppet | Using Puppet code | 477
2.
Add managing the resolv.conf file to your main manifest.
a) On the primary server, open /etc/resolv.conf with your text editor, and copy the IP address of your
primary server’s nameserver. In this example, the nameserver is 10.0.2.3.
b) Navigate to the main manifest:
cd /etc/puppetlabs/code/environments/production/manifests
c) Use your text editor to open the site.pp file and add the following Puppet code to the default node, making
the nameservers value match the one you found in /etc/resolv.conf:
$nameservers = ['10.0.2.3']
file { '/etc/resolv.conf':
ensure => file,
owner => 'root',
group => 'root',
mode => '0644',
content => template('resolver/resolv.conf.erb'),
}
d) From the command line on your agent, run Puppet: puppet agent -t
To see the results in the resolve.conf file, run:
cat /etc/resolv.conf
The file contains the nameserver you added to your main manifest.
That’s it! You’ve written and applied a module that contains a class that ensures your agents resolve to your
internal nameserver.
Note the following about your new class:
• It ensures the creation of the file /etc/resolv.conf.
• The content of /etc/resolv.conf is modified and managed by the template, resolv.conf.erb.
3.
Finally, let’s take a look at how Puppet ensures the desired state of the resolver class on your agents. In the
previous task, you set the nameserver IP address. Now, simulate a scenario where a member of your team changes
the contents of /etc/resolv.conf to use a different nameserver and, as a result, can no longer access any
internal resources:
a) On the agent to which you applied the resolver class, edit /etc/resolv.conf to contain any
nameserver IP address other than the one you want to use.
b) Save and exit the file.
c) Now, fix the mistake you've introduced. From the command line on your agent, run: puppet agent -t
--onetime
To see the resulting contents of the managed file, run:
cat /etc/resolv.conf
Puppet has enforced the desired state of the agent node by changing the nameserver value back to what you
specified in site.pp on the primary server.
For more information about working with Puppet and DNS, see our Dealing with Name Resolution Issues blog post.
Puppet offers many opportunities for learning and training, from formal certification courses to guided online lessons.
See the Learning Puppet page for more information.
© 2024 Puppet, Inc., a Perforce company

Puppet | Using Puppet code | 478
Manage firewall rules
With a firewall, admins define firewall rules, which sets a policy for things like application ports (TCP/UDP),
network ports, IP addresses, and accept-deny statements. This guide helps you get started managing firewall rules
with Puppet.
Before you begin
Before starting this walk-through, complete the previous exercises in the common configuration tasks.
Ensure you’ve already installed Puppet, and at least one *nix agent. Also, log in as root or Administrator on your
nodes.
Firewall rules are applied with a top-to-bottom approach. For example, when a service, say SSH, attempts to
access resources on the other side of a firewall, the firewall applies a list of rules to determine if or how SSH
communications are handled. If a rule allowing SSH access can’t be found, the firewall denies access to that SSH
attempt.
To best way to manage firewall rules with Puppet is to divide them into pre and post groups to ensure Puppet
checks them in the correct order.
Using this guide, you learn how to:
• Install the puppetlabs-firewall module.
• Write a module to define the firewall rules for your Puppet managed infrastructure.
• Add the firewall module to the main manifest.
• Enforce the desired state using the my_firewall class.
1.
The first step is installing the puppetlabs-firewall module from the Puppet Forge. The module introduces
the firewall resource, which is used to manage and configure firewall rules. For more information about the
puppetlabs-firewall module, see its README. To install the module, on the primary server, run:
puppet module install puppetlabs-firewall
The resulting output is similar to this:
Preparing to install into /etc/puppetlabs/puppet/environments/production/
modules ...
Notice: Downloading from https://forgeapi.puppetlabs.com ...
Notice: Installing -- do not interrupt ...
/etc/puppetlabs/puppet/environments/production/modules
### puppetlabs-firewall (v1.6.0)
That's it! You’ve just installed the firewall module.
© 2024 Puppet, Inc., a Perforce company

Puppet | Using Puppet code | 479
2.
Next, you'll write the my_firewall module, which contains three classes. You'll create the my_firewall
module directory, its manifests subdirectory, a pre.pp manifest file and a post.pp manifest file.
a) From the command line on the primary server, navigate to the modules directory:
cd /etc/puppetlabs/code/environments/production/modules
b) Create the module directory and its manifests directory:
mkdir -p my_firewall/manifests
c) From the manifests directory, use your text editor to create pre.pp.
d) The pre rules are rules that the firewall applies when a service requests access. It is run before any other rules.
Edit pre.pp so it contains the following Puppet code:
class my_firewall::pre {
Firewall {
require => undef,
}
firewall { '000 accept all icmp':
proto => 'icmp',
action => 'accept',
}
firewall { '001 accept all to lo interface':
proto => 'all',
iniface => 'lo',
action => 'accept',
}
firewall { '002 reject local traffic not on loopback interface':
iniface => '! lo',
proto => 'all',
destination => '127.0.0.1/8',
action => 'reject',
}
firewall { '003 accept related established rules':
proto => 'all',
state => ['RELATED', 'ESTABLISHED'],
action => 'accept',
}
}
These default rules allow basic networking to ensure that existing connections are not closed.
e) Save and exit the file.
f) From the manifests directory, use your text editor to create post.pp.
g) The post rules tell the firewall to drop requests that haven’t met the rules defined by pre.pp or in site.pp.
Edit post.pp so it contains the following Puppet code:
class my_firewall::post {
firewall { '999 drop all':
proto => 'all',
action => 'drop',
before => undef,
}
}
h) Save and exit the file.
That’s it! You’ve written a module that contains a class that, after it's applied, ensures your firewall has rules
in it that are managed by Puppet.
© 2024 Puppet, Inc., a Perforce company

Puppet | Using Puppet code | 480
3.
Now you'll add the firewall module to the main manifest so that Puppet is managing firewall configuration on
nodes.
a) On the primary server, navigate to the main manifest:
cd /etc/puppetlabs/code/environments/production/manifests
b) Use your text editor to open site.pp.
c) Add the following Puppet code to your site.pp file:
resources { 'firewall':
purge => true,
}
This clears any existing rules and make sure that only rules defined in Puppet exist on the machine.
d) Add the following Puppet code to your site.pp file:
Firewall {
before => Class['my_firewall::post'],
require => Class['my_firewall::pre'],
}
class { ['my_firewall::pre', 'my_firewall::post']: }
These settings ensure that the pre and post classes are run in the correct order to avoid locking you out of your
node during the first Puppet run, and declaring my_firewall::pre and my_firewall::post satisfies
the specified dependencies.
e) Add the firewall class to your site.pp to ensure the correct packages are installed:
class { 'firewall': }
f) To apply the configuration, on the agent, run Puppet: puppet agent -t
That's it! Puppet is now managing the firewall configuration on the agent.
g) To check your firewall configuration, on the agent, run: iptables --list
The resulting output is similar to this:
Chain INPUT (policy ACCEPT)
target prot opt source destination
ACCEPT icmp -- anywhere anywhere /* 000
accept all icmp */
ACCEPT all -- anywhere anywhere /* 001
accept all to lo interface */
REJECT all -- anywhere loopback/8 /* 002
reject local traffic not on loopback interface */ reject-with icmp-
port-unreachable
ACCEPT all -- anywhere anywhere /* 003
accept related established rules */ state RELATED,ESTABLISHED
DROP all -- anywhere anywhere /* 999 drop
all */
Chain FORWARD (policy ACCEPT)
target prot opt source destination
Chain OUTPUT (policy ACCEPT)
target prot opt source destination
© 2024 Puppet, Inc., a Perforce company

Puppet | Using Puppet code | 481
4.
Finally, let’s take a look at how Puppet ensures the desired state of the my_firewall class on your agents. In
the previous step, you applied the firewall rules. Now, simulate a scenario where a member of your team changes
the contents the iptables to allow connections on a random port that was not specified in my_firewall:
a) On an agent where you applied the my_firewall class, run:
iptables --list
Note that the rules from the my_firewall class have been applied.
b) From the command line, add a rule to allow connections to port 8449 by running:
iptables -I INPUT -m state --state NEW -m tcp -p tcp --dport 8449 -j
ACCEPT
c) Run iptables --list again and see that this new rule is now listed.
d) Run Puppet on that agent:
puppet agent -t --onetime
e) Run iptables --list on that node one more time, and notice that Puppet has enforced the desired state
you specified for the firewall rules
That’s it! Puppet has enforced the desired state of your agent.
You can learn more about the Puppet firewall module by visiting the Forge .
Puppet offers many opportunities for learning and training, from formal certification courses to guided online lessons.
See the Learning Puppet page for more information.
Forge examples
Puppet Forge is a collection of modules and how-to guides developed by Puppet and its community.
The Forge has existing modules and code examples that assist with automating the following use cases:
• Base system configuration
• Including registry, NTP, firewalls, services
• Manage web servers
• Including apache, tomcat, IIS, nginx
• Manage database systems
• Including Oracle, Microsoft SQL Server, MySQL, PostgreSQL
• Manage middleware/application systems
• Including Java, WebLogic/Fusion, IBM MQ, IBM IIB, RabbitMQ, ActiveMQ, Redis, ElasticSearch
• Source control
• Including Github, Gitlab
• Monitoring
• Including Splunk, Nagios, Zabbix, Sensu, Prometheus, NewRelic, Icinga, SNMP
• Patch management
• OS patching on Enterprise Linux, Debian, SLES, Ubuntu, Windows
• Package management
• Linux: Puppet integrates directly with native package managers
• Windows: Use Puppet to install software directly on Windows, or integrate with Chocolatey
• Containers and cloud native
• Including Docker, Kubernetes, Terraform, OpenShift
© 2024 Puppet, Inc., a Perforce company

Puppet | Syntax and settings | 482
• Networking
• Including Cisco Catalyst, Cisco Nexus, F5, Palo Alto, Barracuda
• Secrets management
• Including Hashicorp Vault, CyberArk Conjur, Azure Key Vault, Consul Data
See each module’s README for installation, usage, and code examples.
Syntax and settings
When using Puppet, refer to Puppet syntax and references, including configuration settings, functions, and
metaparameters.
• The Puppet language on page 482
You'll use Puppet's declarative language to describe the desired state of your system.
• Metaparameter reference on page 949
Metaparameters are attributes that work with any resource type, including custom types and defined types. They
change the way Puppet handles resources.
• Configuration Reference on page 98
• Built-in function reference on page 710
• Puppet Man Pages on page 1063
The Puppet language
You'll use Puppet's declarative language to describe the desired state of your system.
You'll describe the desired state of your system in files called manifests. Manifests describe how your network and
operating system resources, such as files, packages, and services, should be configured. Puppet then compiles those
manifests into catalogs, and applies each catalog to its corresponding node to ensure the node is configured correctly,
across your infrastructure.
Several parts of the Puppet language depend on evaluation order. For example, variables must be set before they are
referenced. Throughout the language reference, we call out areas where the order of statements matters.
If you are new to Puppet, start with the Puppet language overview.
© 2024 Puppet, Inc., a Perforce company
Puppet | Syntax and settings | 483
• Puppet language overview on page 484
The following overview covers some of the key components of the Puppet language, including catalogs, resources,
classes and manifests.
• Puppet language syntax examples on page 486
A quick reference of syntax examples for the Puppet language.
• The Puppet language style guide on page 492
This style guide promotes consistent formatting in the Puppet language, giving you a common pattern, design, and
style to follow when developing modules. This consistency in code and module structure makes it easier to update
and maintain the code.
• Files and paths on Windows on page 516
Puppet and Windows handle directory separators and line endings in files somewhat differently, so you must be
aware of the differences when you are writing manifests to manage Windows systems.
• Code comments on page 517
To add comments to your Puppet code, use shell-style or hash comments.
• Variables on page 517
Variables store values so that those values can be accessed in code later.
• Resources on page 520
Resources are the fundamental unit for modeling system configurations. Each resource describes the desired state
for some aspect of a system, like a specific service or package. When Puppet applies a catalog to the target system, it
manages every resource in the catalog, ensuring the actual state matches the desired state.
• Resource types on page 528
Every resource (file, user, service, package, and so on) is associated with a resource type within the Puppet language.
The resource type defines the kind of configuration it manages. This section provides information about the resource
types that are built into Puppet.
• Relationships and ordering on page 675
Resources are included and applied in the order they are defined in their manifest, but only if the resource has no
implicit relationship with another resource, as this can affect the declared order. To manage a group of resources
in a specific order, explicitly declare such relationships with relationship metaparameters, chaining arrows, and the
require function.
• Classes on page 680
Classes are named blocks of Puppet code that are stored in modules and applied later when they are invoked by name.
You can add classes to a node’s catalog by either declaring them in your manifests or assigning them from an external
node classifier (ENC). Classes generally configure large or medium-sized chunks of functionality, such as all of the
packages, configuration files, and services needed to run an application.
• Defined resource types on page 687
Defined resource types, sometimes called defined types or defines, are blocks of Puppet code that can be evaluated
multiple times with different parameters.
• Bolt tasks on page 690
Bolt tasks are single actions that you can run on target nodes in your infrastructure, allowing you to make as-
needed changes to remote systems. You can run tasks with the Puppet Enterprise (PE) orchestrator or with Puppet’s
standalone task runner, Bolt.
• Expressions and operators on page 690
Expressions are statements that resolve to values. You can use expressions almost anywhere a value is required.
Expressions can be compounded with other expressions, and the entire combined expression resolves to a single
value.
• Conditional statements and expressions on page 700
Conditional statements let your Puppet code behave differently in different situations. They are most helpful when
combined with facts or with data retrieved from an external source. Puppet supports if and unless statements, case
statements, and selectors.
• Function calls on page 707
Functions are plug-ins, written in Ruby, that you can call during catalog compilation. A call to any function is an
expression that resolves to a value. Most functions accept one or more values as arguments, and return a resulting
value.
• Built-in function reference on page 710
© 2024 Puppet, Inc., a Perforce company
Puppet | Syntax and settings | 484
• Node definitions on page 789
A node definition, also known as a node statement, is a block of Puppet code that is included only in matching nodes'
catalogs. This allows you to assign specific configurations to specific nodes.
• Facts and built-in variables on page 792
Before requesting a catalog for a managed node, or compiling one with puppet apply, Puppet collects system
information, called facts, by using the Facter tool. The facts are assigned as values to variables that you can use
anywhere in your manifests. Puppet also sets some additional special variables, called built-in variables, which
behave a lot like facts.
• Reserved words and acceptable names on page 798
You can use only certain characters for naming variables, modules, classes, defined types, and other custom
constructs. Additionally, some words in the Puppet language are reserved and cannot be used as bare word strings or
names.
• Custom resources on page 803
A resource is the basic unit that is managed by Puppet. Each resource has a set of attributes describing its state. Some
attributes can be changed throughout the lifetime of the resource, whereas others are only reported back but cannot be
changed, and some can only be set one time during initial creation.
• Custom functions on page 834
Use the Puppet language, or the Ruby API to create custom functions.
• Values, data types, and aliases on page 854
Most of the things you can do with the Puppet language involve some form of data. An individual piece of data is
called a value, and every value has a data type, which determines what kind of information that value can contain and
how you can interact with it.
• Templates on page 908
Templates are written in a specialized templating language that generates text from data. Use templates to manage the
content of your Puppet configuration files via the content attribute of the file resource type.
• Advanced constructs on page 924
Advanced Puppet language constructs help you write simpler and more effective Puppet code by reducing
complexity.
• Details of complex behaviors on page 939
Within Puppet language there are complex behavior patterns regarding classes, defined types, and specific areas of
code called scopes.
• Securing sensitive data in Puppet on page 947
Puppet’s catalog contains sensitive information in clear text. Puppet uses the Sensitive data type to mark your
sensitive data — for example secrets, passwords and private keys — with a flag that hides the value from certain parts
of Puppet, such as reports. However, you can still see this information in plain text files in the cached catalog and
other administrative functions.
Related information
Puppet language overview on page 484
The following overview covers some of the key components of the Puppet language, including catalogs, resources,
classes and manifests.
Puppet language syntax examples on page 486
A quick reference of syntax examples for the Puppet language.
The Puppet language style guide on page 492
This style guide promotes consistent formatting in the Puppet language, giving you a common pattern, design, and
style to follow when developing modules. This consistency in code and module structure makes it easier to update
and maintain the code.
Puppet language overview
The following overview covers some of the key components of the Puppet language, including catalogs, resources,
classes and manifests.
The following video gives you an overview of the Puppet language:
© 2024 Puppet, Inc., a Perforce company

Puppet | Syntax and settings | 485
Catalogs
To configure nodes, the primary Puppet server compiles configuration information into a catalog, which describes the
desired state of a specific agent node. Each agent requests and receives its own individual catalog.
The catalog describes the desired state for every resource managed on a single given node. Whereas a manifest can
contain conditional logic to describe specific resource configuration for multiple nodes, a catalog is a static document
that describes all of the resources and and dependencies for only one node.
To create a catalog for a given agent, the primary server compiles:
• Data from the agent, such as facts or certificates.
• External data, such as values from functions or classification information from the PE console.
• Manifests, which can contain conditional logic to describe the desired state of resources for many nodes.
The primary server resolves all of these elements and compiles a specific catalog for each individual agent. After the
agent receives its catalog, it applies any changes needed to bring the agent to the state described in the catalog.
Tip: When you run the puppet apply command on a node, it compiles the catalog locally and applies it
immediately on the node where you ran the command.
Agents cache their most recent catalog. If they request a catalog and the primary server fails to compile one, they fall
back to their cached catalog. For detailed information on the catalog compilation process, see the catalog compilation
system page.
Resources and classes
A resource describes some aspect of a system, such as a specific service or package. You can group resources
together in classes, which generally configure larger chunks of functionality, such as all of the packages,
configuration files, and services needed to run an application.
The Puppet language is structured around resource declaration. When you declare a resource, you tell Puppet the
desired state for that resource, so that Puppet can add it to the catalog and manage it. Every other part of the Puppet
language exists to add flexibility and convenience to the way you declare resources.
Just as you declare a single resource, you can declare a class to manage many resources at once. Whereas a resource
declaration might manage the state of a single file or package, a class declaration can manage everything needed to
configure an entire service or application, including packages, configuration files, service daemons, and maintenance
tasks. In turn, small classes that manage a few resources can be combined into larger classes that describe entire
custom system roles, such as "database server" or "web application worker."
To add a class's resources to the catalog, either declare the class in a manifest or classify your nodes. Node
classification allows you to assign a different set of classes to each node, based on the node's role in your
infrastructure. You can classify nodes with node definitions or by using node-specific data from outside your
manifests, such as that from an external node classifier or Hiera.
The following video gives you an overview of resources:
The following video gives you an overview of classes:
Manifests
Resources are declared in manifests, Puppet language files that describe how the resources must be configured.
Manifests are a basic building block of Puppet and are kept in a specific file structure called a module. You can write
your own manifests and modules or download them from Puppet or other Puppet users.
Manifests can contain conditional logic and declare resources for multiple agents. The primary server evaluates the
contents of all the relevant manifests, resolves any logic, and compiles catalogs. Each catalog defines state for one
specific node.
Manifests:
• Are text files with a .pp extension.
• Must use UTF-8 encoding.
© 2024 Puppet, Inc., a Perforce company

Puppet | Syntax and settings | 486
• Can use Unix (LF) or Windows (CRLF) line breaks.
When compiling the catalog, the primary server always evaluates the main manifest first. This manifest, also known
as the site manifest, defines global system configurations, such as LDAP configuration, DNS servers, or other
configurations that apply to every node. The main manifest can be either a single manifest, usually named site.pp,
or a directory containing several manifests, which Puppet treats as a single file. For more details about the main
manifest, see the main manifest page.
The simplest Puppet deployment consists of a single main manifest file with a few resources. As you're ready, you
can add complexity progressively, by grouping resources into modules and classifying your nodes more granularly.
Manifest example
This short manifest manages NTP. It includes:
• A case statement that sets the name of the NTP service, depending on which operating system is installed on the
agent.
• A package resource that installs the NTP package on the agent.
• A service resource that enables and runs the NTP service. This resource also applies the NTP configuration
settings from ntp.conf to the service.
• A file resource that creates the ntp.conf file on the agent in /etc/ntp.conf. This resource also requires
that the ntp package is installed on the agent. The contents of the ntp.conf file will be taken from the
specified source file, which is contained in the ntp module.
case $operatingsystem {
centos, redhat: { $service_name = 'ntpd' }
debian, ubuntu: { $service_name = 'ntp' }
}
package { 'ntp':
ensure => installed,
}
service { 'ntp':
name => $service_name,
ensure => running,
enable => true,
subscribe => File['ntp.conf'],
}
file { 'ntp.conf':
path => '/etc/ntp.conf',
ensure => file,
require => Package['ntp'],
source => "puppet:///modules/ntp/ntp.conf",
# This source file would be located on the primary Puppet server at
# /etc/puppetlabs/code/modules/ntp/files/ntp.conf
}
Puppet language syntax examples
A quick reference of syntax examples for the Puppet language.
Resource examples
Resource declaration
This example resource declaration includes:
• file: The resource type.
• ntp.conf: The resource title.
© 2024 Puppet, Inc., a Perforce company

Puppet | Syntax and settings | 487
• path: An attribute.
• '/etc/ntp.conf': The value of an attribute; in this case, a string.
• template('ntp/ntp.conf'): A function call that returns a value; in this case, the template function,
with the name of a template in a module as its argument.
file { 'ntp.conf':
path => '/etc/ntp.conf',
ensure => file,
content => template('ntp/ntp.conf'),
owner => 'root',
mode => '0644',
}
For details about resources and resource declaration syntax, see Resources on page 520.
Resource relationship metaparameters
Two resource declarations establishing relationships with the before and subscribe metaparameters, which
accept resource references.
The first declaration ensures that the ntp package is installed before the ntp.conf file is created. The second
declaration ensures that the ntpd service is notified of any changes to the ntp.conf file.
package { 'ntp':
ensure => installed,
before => File['ntp.conf'],
}
service { 'ntpd':
ensure => running,
subscribe => File['ntp.conf'],
}
For details about relationships usage and syntax, see Relationships and ordering on page 675. For details about
resource references, see Resource and class references on page 889.
Resource relationship chaining arrows
Chaining arrows forming relationships between three resources, using resource references.In this example, the ntp
package must be installed before the ntp.conf file is created; after the file is created, the ntpd service is notified.
Package['ntp'] -> File['ntp.conf'] ~> Service['ntpd']
For details about relationships usage and syntax, see Relationships and ordering on page 675. For details about
resource references, see Resource and class references on page 889.
Exported resource declaration
An exported resource declaration.
@@nagios_service { "check_zfs${hostname}":
use => 'generic-service',
host_name => "$fqdn",
check_command => 'check_nrpe_1arg!check_zfs',
service_description => "check_zfs${hostname}",
target => '/etc/nagios3/conf.d/nagios_service.cfg',
notify => Service[$nagios::params::nagios_service],
}
For information about declaring and collecting exported resources, see Exported resources.
© 2024 Puppet, Inc., a Perforce company

Puppet | Syntax and settings | 488
Resource collector
A resource collector, sometimes called the "spaceship operator." Resource collectors select a group of resources by
searching the attributes of each resource in the catalog.
User <| groups == 'admin' |>
For details about resource collector usage and syntax, see Resource collectors.
Exported resource collector
An exported resource collector, which works with exported resources, which are available for use by other nodes.
Concat::Fragment <<| tag == "bacula-storage-dir-${bacula_director}" |>>
For details about resource collector usage and syntax, see Resource collectors. For information about declaring and
collecting exported resources, see Exported resources.
Resource default for the exec type
A resource default statement set default attribute values for a given resource type. This example specifies defaults for
the exec resource type attributes path, environment, logoutput, and timeout.
Exec {
path => '/usr/bin:/bin:/usr/sbin:/sbin',
environment => 'RUBYLIB=/opt/puppetlabs/puppet/lib/ruby/site_ruby/2.1.0/',
logoutput => true,
timeout => 180,
}
For details about default statement usage and syntax, see Resource defaults.
Virtual resource
A virtual resource, which is declared in the catalog but isn't applied to a system unless it is explicitly realized.
@user { 'deploy':
uid => 2004,
comment => 'Deployment User',
group => www-data,
groups => ["enterprise"],
tag => [deploy, web],
}
For details about virtual resource usage and syntax, see Virtual resources.
Defined resource type examples
Defined resource type definition
Defining a type creates a new defined resource type. The name of this defined type has two namespace segments,
comprising the name of the module containing the defined type, apache, and the name of the defined type itself,
vhost.
define apache::vhost ($port, $docroot, $servername = $title, $vhost_name =
'*') {
include apache
include apache::params
$vhost_dir = $apache::params::vhost_dir
file { "${vhost_dir}/${servername}.conf":
© 2024 Puppet, Inc., a Perforce company

Puppet | Syntax and settings | 489
content => template('apache/vhost-default.conf.erb'),
owner => 'www',
group => 'www',
mode => '644',
require => Package['httpd'],
notify => Service['httpd'],
}
For details about defined type usage and syntax, see Defined resource types on page 687.
Defined type resource declaration
Declarations of an instance, or resource, of a defined type are similar to other resource declarations. This example
declares a instance of the apache::vhost defined type, with a title of "homepages" and the port and docroot
attributes specified.
apache::vhost { 'homepages':
port => 8081,
docroot => '/var/www-testhost',
}
For details about defined type usage and syntax, see Defined resource types on page 687.
Defined type resource reference
A resource reference to an instance of the apache::vhost defined resource. Every namespace segment in a
resource reference must be capitalized.
Apache::Vhost['homepages']
For details about defined type usage and syntax, see Defined resource types on page 687. For details about
resource references, see Resource and class references on page 889.
Class examples
Class definition
A class definition, which makes a class available for later use.
class ntp {
package {'ntp':
...
}
...
}
For details about class usage and syntax, see Classes on page 680.
Class declaration
Declaring the ntp class in three different ways:
• the include function
• the require function
• the resource-like syntax
Declaring a class causes the resources in it to be managed.
© 2024 Puppet, Inc., a Perforce company

Puppet | Syntax and settings | 490
The include function is the standard way to declare classes:
include ntp
The require function declares the class and makes it a dependency of the code container where it is declared:
require ntp
The resource-like syntax declares the class and applies resource-like behavior. Resource-like class declarations
require that you declare a given class only one time.
class {'ntp':}
For details about class usage and syntax, see Classes on page 680.
Variable examples
Variable assigned an array value
A variable being assigned a set of values as an array.
$package_list = ['ntp', 'apache2', 'vim-nox', 'wget']
For details about assigning values to variables, see Variables on page 517.
Variable assigned a hash value
A variable being assigned a set of values as a hash.
$myhash = { key => { subkey => 'b' } }
For details about assigning values to variables, see Variables on page 517.
Interpolated variable
A built-in variable provided by the primary server being interpolated into a double-quoted string.
...
content => "Managed by puppet server version ${serverversion}"
For details about built-in variables usage and syntax, see Facts and built-in variables on page 792. For information
about strings and interpolation, see Strings on page 896.
Conditional statement examples
if statement, using expressions and facts
An if statement, whose conditions are expressions that use facts provided by the agent.
if $is_virtual {
warning( 'Tried to include class ntp on virtual machine; this node might
be misclassified.' )
}
elsif $operatingsystem == 'Darwin' {
warning( 'This NTP module does not yet work on our Mac laptops.' )
else {
include ntp
}
© 2024 Puppet, Inc., a Perforce company

Puppet | Syntax and settings | 491
For details about if statements, see Conditional statements and expressions on page 700.
if statement, with in expression
An if statement using an in expression.
if 'www' in $hostname {
...
}
For details about if statements, see Conditional statements and expressions on page 700.
Case statement
A case statement.
case $operatingsystem {
'RedHat', 'CentOS': { include role::redhat }
/^(Debian|Ubuntu)$/:{ include role::debian }
default: { include role::generic }
}
For details about case statements, see Conditional statements and expressions on page 700.
Selector statement
A selector statement being used to set the value of the $rootgroup variable.
$rootgroup = $osfamily ? {
'RedHat' => 'wheel',
/(Debian|Ubuntu)/ => 'wheel',
default => 'root',
}
For details about selector statements, see Conditional statements and expressions on page 700.
Node examples
Node definition
A node definition or node statement is a block of Puppet code that is included only in matching nodes’ catalogs. This
allows you to assign specific configurations to specific nodes.
node 'www1.example.com' {
include common
include apache
include squid
}
Node names in node definitions can also be given as regular expressions.
node /^www\d+$/ {
include common
}
For details about node definition usage and syntax, see Node definitions on page 789.
© 2024 Puppet, Inc., a Perforce company

Puppet | Syntax and settings | 492
The Puppet language style guide
This style guide promotes consistent formatting in the Puppet language, giving you a common pattern, design, and
style to follow when developing modules. This consistency in code and module structure makes it easier to update
and maintain the code.
This style guide applies to Puppet 4 and later. Puppet 3 is no longer supported, but we include some Puppet 3
guidelines in case you're maintaining older code.
Tip: Use puppet-lint and metadata-json-lint to check your module for compliance with the style guide.
No style guide can cover every circumstance you might run into when developing Puppet code. When you need to
make a judgement call, keep in mind a few general principles.
Readability matters
If you have to choose between two equal alternatives, pick the more readable one. This is subjective, but if you
can read your own code three months from now, it's a great start. In particular, code that generates readable diffs
is highly preferred.
Scoping and simplicity are key
When in doubt, err on the side of simplicity. A module should contain related resources that enable it to
accomplish a task. If you describe the function of your module and you find yourself using the word "and,"
consider splitting the module. Have one goal, with all your classes and parameters focused on achieving it.
Your module is a piece of software
At least, we recommend that you treat it that way. When it comes to making decisions, choose the option that is
easier to maintain in the long term.
These guidelines apply to Puppet code, for example, code in Puppet modules or classes. To reduce repetitive
phrasing, we don't include the word 'Puppet' in every description, but you can assume it.
For information about the specific meaning of terms like 'must,' 'must not,' 'required,' 'should,' 'should not,'
'recommend,' 'may,' and 'optional,' see RFC 2119.
Module design practices
Consistent module design practices makes module contributions easier.
Spacing, indentation, and whitespace
Module manifests should follow best practices for spacing, indentation, and whitespace.
Manifests:
• Must use two-space soft tabs.
• Must not use literal tab characters.
• Must not contain trailing whitespace.
• Must include trailing commas after all resource attributes and parameter definitions.
• Must end the last line with a new line.
© 2024 Puppet, Inc., a Perforce company

Puppet | Syntax and settings | 493
• Must use one space between the resource type and opening brace, one space between the opening brace and the
title, and no spaces between the title and colon.
Good:
file { '/tmp/sample':
Bad: Space between title and colon:
file { '/tmp/sample' :
Bad: No spaces:
file{'/tmp/sample':
Bad: Too many spaces:
file { '/tmp/sample':
• Should not exceed a 140-character line width, except where such a limit would be impractical.
• Should leave one empty line between resources, except when using dependency chains.
• May align hash rockets (=>) within blocks of attributes, one space after the longest resource key, arranging hashes
for maximum readability first.
Arrays and hashes
To increase readability of arrays and hashes, it is almost always beneficial to break up the elements on separate lines.
Use a single line only if that results in overall better readability of the construct where it appears, such as when it is
very short. When breaking arrays and hashes, they should have:
• Each element on its own line.
• Each new element line indented one level.
• First and last lines used only for the syntax of that data type.
Good: Array with multiple elements on multiple lines:
service { 'sshd':
require => [
Package['openssh-server'],
File['/etc/ssh/sshd_config'],
],
}
Good: Hash with multiple elements on multiple lines:
$myhash = {
key => 'some value',
other_key => 'some other value',
}
Bad: Array with multiple elements on same line:
service { 'sshd':
require => [ Package['openssh-server'], File['/etc/ssh/sshd_config'], ],
}
© 2024 Puppet, Inc., a Perforce company

Puppet | Syntax and settings | 494
Bad: Hash with multiple elements on same line:
$myhash = { key => 'some value', other_key => 'some other value', }
Bad: Array with multiple elements on different lines, but syntax and element share a line:
service { 'sshd':
require => [ Package['openssh-server'],
File['/etc/ssh/sshd_config'],
],
}
Bad: Hash with multiple elements on different lines, but syntax and element share a line:
$myhash = { key => 'some value',
other_key => 'some other value',
}
Bad: Array with an indention of elements past two spaces:
service { 'sshd':
require => [
Package['openssh-server'],
File['/etc/ssh/sshd_config'],
],
}
Quoting
As long you are consistent, strings may be enclosed in single or double quotes, depending on your preference.
Regardless of your preferred quoting style, all variables MUST be enclosed in braces when interpolated in a string.
For example:
Good:
"/etc/${file}.conf"
"${facts['operatingsystem']} is not supported by ${module_name}"
Bad:
"/etc/$file.conf"
Option 1: Prefer single quotes
Modules that adopt this string quoting style MUST enclose all strings in single quotes, except as listed below.
For example:
Good:
owner => 'root'
Bad:
owner => "root"
A string MUST be enclosed in double quotes if it:
© 2024 Puppet, Inc., a Perforce company

Puppet | Syntax and settings | 495
• Contains variable interpolations.
• Good:
"/etc/${file}.conf"
• Bad:
'/etc/${file}.conf'
• Contains escaped characters not supported by single-quoted strings.
• Good:
content => "nameserver 8.8.8.8\n"
• Bad:
content => 'nameserver 8.8.8.8\n'
A string SHOULD be enclosed in double quotes if it:
• Contains single quotes.
• Good:
warning("Class['apache'] parameter purge_vdir is deprecated in favor of
purge_configs")
• Bad:
warning('Class[\'apache\'] parameter purge_vdir is deprecated in favor
of purge_configs')
Option 2: Prefer double quotes
Modules that adopt this string quoting style MUST enclose all strings in double quotes, except as listed below.
For example:
Good:
owner => "root"
Bad:
owner => 'root'
A string SHOULD be enclosed in single quotes if it does not contain variable interpolations AND it:
• Contains double quotes.
• Good:
warning('Class["apache"] parameter purge_vdir is deprecated in favor of
purge_configs')
• Bad:
warning("Class[\"apache\"] parameter purge_vdir is deprecated in favor
of purge_configs")
© 2024 Puppet, Inc., a Perforce company

Puppet | Syntax and settings | 496
• Contains literal backslash characters that are not intended to be part of an escape sequence.
• Good:
path => 'c:\windows\system32'
• Bad:
path => "c:\\windows\\system32"
If a string is a value from an enumerable set of options, such as present and absent, it SHOULD NOT be
enclosed in quotes at all.
For example:
Good:
ensure => present
Bad:
ensure => "present"
Escape characters
Use backslash (\) as an escape character.
For both single- and double-quoted strings, escape the backslash to remove this special meaning: \\ This means that
for every backslash you want to include in the resulting string, use two backslashes. As an example, to include two
literal backslashes in the string, you would use four backslashes in total.
Do not rely on unrecognized escaped characters as a method for including the backslash and the character following
it.
Unicode character escapes using fewer than 4 hex digits, as in \u040, results in a backslash followed by the string
u040. (This also causes a warning for the unrecognized escape.) To use a number of hex digits not equal to 4, use the
longer u{digits} format.
Comments
Comments must be hash comments (# This is a comment). Comments should explain the why, not the how,
of your code.
Do not use /* */ comments in Puppet code.
Good:
# Configures NTP
file { '/etc/ntp.conf': ... }
Bad:
/* Creates file /etc/ntp.conf */
file { '/etc/ntp.conf': ... }
Note: Include documentation comments for Puppet Strings for each of your classes, defined types, functions, and
resource types and providers. If used, documentation comments precede the name of the element. For documentation
recommendations, see the Modules section of this guide.
© 2024 Puppet, Inc., a Perforce company

Puppet | Syntax and settings | 497
Functions
Avoid the inline_template() and inline_epp() functions for templates of more than one line, because
these functions don’t permit template validation. Instead, use the template() and epp() functions to read a
template from the module. This method allows for syntax validation.
You should avoid using calls to Hiera functions in modules meant for public consumption, because not all users have
implemented Hiera. Instead, we recommend using parameters that can be overridden with Hiera.
Improving readability when chaining functions
In most cases, especially if blocks are short, we recommend keeping functions on the same line. If you have a
particularly long chain of operations or block that you find difficult to read, you can break it up on multiples lines to
improve readability. As long as your formatting is consistent throughout the chain, it is up to your own judgment.
For example, this:
$foodgroups.fruit.vegetables
Is better than this:
$foodgroups
.fruit
.vegetables
But, this:
$foods = {
"avocado" => "fruit",
"eggplant" => "vegetable",
"strawberry" => "fruit",
"raspberry" => "fruit",
}
$berries = $foods.filter |$name, $kind| {
# Choose only fruits
$kind == "fruit"
}.map |$name, $kind| {
# Return array of capitalized fruits
String($name, "%c")
}.filter |$fruit| {
# Only keep fruits named "berry"
$fruit =~ /berry$/
}
Is better than this:
$foods = {
"avocado" => "fruit",
"eggplant" => "vegetable",
"strawberry" => "fruit",
"raspberry" => "fruit",
}
$berries = $foods.filter |$name, $kind| { $kind == "fruit" }.map |$name,
$kind| { String($name, "%c") }.filter |$fruit| { $fruit =~ /berry$/ }
Related information
Modules on page 513
© 2024 Puppet, Inc., a Perforce company

Puppet | Syntax and settings | 498
Develop your module using consistent code and module structures to make it easier to update and maintain.
Resources
Resources are the fundamental unit for modeling system configurations. Resource declarations have a lot of possible
features, so your code's readability is crucial.
Resource names
All resource names or titles must be quoted. If you are using an array of titles you must quote each title in the array,
but cannot quote the array itself.
Good:
package { 'openssh': ensure => present }
Bad:
package { openssh: ensure => present }
These quoting requirements do not apply to expressions that evaluate to strings.
Arrow alignment
To align hash rockets (=>) in a resource's attribute/value list or in a nested block, place the hash rocket one space
ahead of the longest attribute name. Indent the nested block by two spaces, and place each attribute on a separate line.
Declare very short or single purpose resource declarations on a single line.
Good:
exec { 'hambone':
path => '/usr/bin',
cwd => '/tmp',
}
exec { 'test':
subscribe => File['/etc/test'],
refreshonly => true,
}
myresource { 'test':
ensure => present,
myhash => {
'myhash_key1' => 'value1',
'key2' => 'value2',
},
}
notify { 'warning': message => 'This is an example warning' }
Bad:
exec { 'hambone':
path => '/usr/bin',
cwd => '/tmp',
}
file { "/path/to/my-filename.txt":
ensure => file, mode => $mode, owner => $owner, group => $group,
source => 'puppet:///modules/my-module/productions/my-filename.txt'
}
© 2024 Puppet, Inc., a Perforce company

Puppet | Syntax and settings | 499
Attribute ordering
If a resource declaration includes an ensure attribute, it should be the first attribute specified so that a user can
quickly see if the resource is being created or deleted.
Good:
file { '/tmp/readme.txt':
ensure => file,
owner => '0',
group => '0',
mode => '0644',
}
When using the special attribute * (asterisk or splat character) in addition to other attributes, splat should be ordered
last so that it is easy to see. You may not include multiple splats in the same body.
Good:
$file_ownership = {
'owner' => 'root',
'group' => 'wheel',
'mode' => '0644',
}
file { '/etc/passwd':
ensure => file,
* => $file_ownership,
}
Resource arrangement
Within a manifest, resources should be grouped by logical relationship to each other, rather than by resource type.
Good:
file { '/tmp/dir':
ensure => directory,
}
file { '/tmp/dir/a':
content => 'a',
}
file { '/tmp/dir2':
ensure => directory,
}
file { '/tmp/dir2/b':
content => 'b',
}
Bad:
file { '/tmp/dir':
ensure => directory,
}
file { '/tmp/dir2':
ensure => directory,
}
© 2024 Puppet, Inc., a Perforce company

Puppet | Syntax and settings | 500
file { '/tmp/dir/a':
content => 'a',
}
file { '/tmp/dir2/b':
content => 'b',
}
Use semicolon-separated multiple resource bodies only in conjunction with a local default body.
Good:
$defaults = { < hash of defaults > }
file {
default:
* => $defaults,;
'/tmp/testfile':
content => 'content of the test file',
}
Good: Repeated pattern with defaults:
$defaults = { < hash of defaults > }
file {
default:
* => $defaults,;
'/tmp/motd':
content => 'message of the day',;
'/tmp/motd_tomorrow':
content => 'tomorrows message of the day',;
}
Bad: Unrelated resources grouped:
file {
'/tmp/testfile':
owner => 'admin',
mode => '0644',
contents => 'this is the content',;
'/opt/myapp':
owner => 'myapp-admin',
mode => '0644',
source => 'puppet://<someurl>',;
# etc
}
You cannot set any attribute more than one time for a given resource; if you try, Puppet raises a compilation error.
This means:
• If you use a hash to set attributes for a resource, you cannot set a different, explicit value for any of those
attributes. For example, if mode is present in the hash, you can’t also set mode => "0644" in that resource
body.
• You can’t use the * attribute multiple times in one resource body, because * itself acts like an attribute.
© 2024 Puppet, Inc., a Perforce company

Puppet | Syntax and settings | 501
• To use some attributes from a hash and override others, either use a hash to set per-expression defaults, or use the
+ (merging) operator to combine attributes from two hashes (with the right-hand hash overriding the left-hand
one).
Symbolic links
Declare symbolic links with an ensure value of ensure => link. To inform the user that you are creating a link,
specify a value for the target attribute.
Good:
file { '/var/log/syslog':
ensure => link,
target => '/var/log/messages',
}
Bad:
file { '/var/log/syslog':
ensure => '/var/log/messages',
}
File modes
• POSIX numeric notation must be represented as 4 digits.
• POSIX symbolic notation must be a string.
• You should not use file mode with Windows; instead use the acl module.
• You should use numeric notation whenever possible.
• The file mode attribute should always be a quoted string or (unquoted) variable, never an integer.
Good:
file { '/var/log/syslog':
ensure => file,
mode => '0644',
}
Bad:
file { '/var/log/syslog':
ensure => present,
mode => 644,
}
Multiple resources
Multiple resources declared in a single block should be used only when there is also a default set of options for the
resource type.
Good:
file {
default:
ensure => 'file',
mode => '0666',;
'/owner':
user => 'owner',;
'/staff':
© 2024 Puppet, Inc., a Perforce company

Puppet | Syntax and settings | 502
user => 'staff',;
}
Good: Give the defaults a name if used several times:
$our_default_file_attributes = {
'ensure' => 'file',
'mode' => '0666',
}
file {
default:
* => $our_default_file_attributes,;
'/owner':
user => 'owner',;
'/staff':
user => 'staff',;
}
Good: Spell out 'magic' iteration:
['/owner', '/staff'].each |$path| {
file { $path:
ensure => 'file',
}
}
Good: Spell out 'magic' iteration:
$array_of_paths.each |$path| {
file { $path:
ensure => 'file',
}
}
Bad:
file {
'/owner':
ensure => 'file',
user => owner,
mode => '0666',;
'/staff':
ensure => 'file',
user => staff,
mode => '0774',;
}
file { ['/owner', '/staff']:
ensure => 'file',
}
file { $array_of_paths:
ensure => 'file',
}
© 2024 Puppet, Inc., a Perforce company

Puppet | Syntax and settings | 503
Legacy style defaults
Avoid legacy style defaults. If you do use them, they should occur only at top scope in your site manifest. This is
because resource defaults propagate through dynamic scope, which can have unpredictable effects far away from
where the default was declared.
Acceptable: site.pp:
Package {
provider => 'zypper',
}
Bad: /etc/puppetlabs/puppet/modules/apache/manifests/init.pp:
File {
owner => 'nobody',
group => 'nogroup',
mode => '0600',
}
concat { $config_file_path:
notify => Class['Apache::Service'],
require => Package['httpd'],
}
Attribute alignment
Resource attributes must be uniformly indented in two spaces from the title.
Good:
file { '/owner':
ensure => 'file',
owner => 'root',
}
Bad: Too many levels of indentation:
file { '/owner':
ensure => 'file',
owner => 'root',
}
Bad: No indentation:
file { '/owner':
ensure => 'file',
owner => 'root',
}
Bad: Improper and non-uniform indentation:
file { '/owner':
ensure => 'file',
owner => 'root',
}
Bad: Indented the wrong direction:
file { '/owner':
ensure => 'file',
© 2024 Puppet, Inc., a Perforce company

Puppet | Syntax and settings | 504
owner => 'root',
}
For multiple bodies, each title should be on its own line, and be indented. You may align all arrows across the bodies,
but arrow alignment is not required if alignment per body is more readable.
file {
default:
* => $local_defaults,;
'/owner':
ensure => 'file',
owner => 'root',
}
Defined resource types
Because defined resource types can have multiple instances, resource names must have a unique variable to avoid
duplicate declarations.
Good: Template uses $listen_addr_port:
define apache::listen {
$listen_addr_port = $name
concat::fragment { "Listen ${listen_addr_port}":
ensure => present,
target => $::apache::ports_file,
content => template('apache/listen.erb'),
}
}
Bad: Template uses $name:
define apache::listen {
concat::fragment { 'Listen port':
ensure => present,
target => $::apache::ports_file,
content => template('apache/listen.erb'),
}
}
Classes and defined types
Classes and defined types should follow scope and organization guidelines.
Separate files
Put all classes and resource type definitions (defined types) as separate files in the manifests directory of the
module. Each file in the manifest directory should contain nothing other than the class or resource type definition.
Good: etc/puppetlabs/puppet/modules/apache/manifests/init.pp:
class apache { }
Good: etc/puppetlabs/puppet/modules/apache/manifests/ssl.pp:
class apache::ssl { }
© 2024 Puppet, Inc., a Perforce company

Puppet | Syntax and settings | 505
Good: etc/puppetlabs/puppet/modules/apache/manifests/virtual_host.pp:
define apache::virtual_host () { }
Separating classes and defined types into separate files is functionally identical to declaring them in init.pp, but
has the benefit of highlighting the structure of the module and making the function and structure more legible.
When a resource or include statement is placed outside of a class, node definition, or defined type, it is included in all
catalogs. This can have undesired effects and is not always easy to detect.
Good: manifests/init.pp:
# class ntp
class ntp {
ntp::install
}
# end of file
Bad: manifests/init.pp:
class ntp {
#...
}
ntp::install
Internal organization of classes and defined types
Structure classes and defined types to accomplish one task.
Documentation comments for Puppet Strings should be included for each class or defined type. If used,
documentation comments must precede the name of the element. For complete documentation recommendations, see
the Modules section.
Put the lines of code in the following order:
1.
First line: Name of class or type.
2.
Following lines, if applicable: Define parameters. Parameters should be typed.
3.
Next lines: Includes and validation come after parameters are defined. Includes may come before or after
validation, but should be grouped separately, with all includes and requires in one group and all validations in
another. Validations should validate any parameters and fail catalog compilation if any parameters are invalid. See
puppetlabs-ntp for an example.
4.
Next lines, if applicable: Should declare local variables and perform variable munging.
5.
Next lines: Should declare resource defaults.
6.
Next lines: Should override resources if necessary.
The following example follows the recommended style.
In init.pp:
• The myservice class installs packages, ensures the state of myservice, and creates a tempfile with given
content. If the tempfile contains digits, they are filtered out.
• @param service_ensure the wanted state of services.
• @param package_list the list of packages to install, at least one must be given, or an error of unsupported
OS is raised.
• @param tempfile_contents the text to be included in the tempfile, all digits are filtered out if present.
class myservice (
Enum['running', 'stopped'] $service_ensure,
String $tempfile_contents,
Optional[Array[String[1]]] $package_list = undef,
© 2024 Puppet, Inc., a Perforce company

Puppet | Syntax and settings | 506
) {
• Rather than just saying that there was a type mismatch for $package_list, this example includes an additional
assertion with an improved error message. The list can be "not given", or have an empty list of packages to install.
An assertion is made that the list is an array of at least one String, and that the String is at least one character long.
assert_type(Array[String[1], 1], $package_list) |$expected, $actual| {
fail("Module ${module_name} does not support ${facts['os']['name']} as
the list of packages is of type ${actual}")
}
package { $package_list:
ensure => present,
}
file { "/tmp/${variable}":
ensure => present,
contents => regsubst($tempfile_contents, '\d', '', 'G'),
owner => '0',
group => '0',
mode => '0644',
}
service { 'myservice':
ensure => $service_ensure,
hasstatus => true,
}
Package[$package_list] -> Service['myservice']
}
In hiera.yaml: The default values can be merged if you want to extend with additional packages. If not, use
default_hierarchy instead of hierarchy.
---
version: 5
defaults:
data_hash: yaml_data
hierarchy:
- name: 'Per Operating System'
path: "os/%{os.name}.yaml"
- name: 'Common'
path: 'common.yaml'
In data/common.yaml:
myservice::service_ensure: running
In data/os/centos.yaml:
myservice::package_list:
- 'myservice-centos-package'
Public and private
Split your module into public and private classes and defined types where possible. Public classes or defined types
should contain the parts of the module meant to be configured or customized by the user, while private classes should
contain things you do not expect the user to change via parameters. Separating into public and private classes or
defined types helps build reusable and readable code.
© 2024 Puppet, Inc., a Perforce company

Puppet | Syntax and settings | 507
Help indicate to the user which classes are which by making sure all public classes have complete comments and
denoting public and private classes in your documentation. Use the documentation tags “@api private” and “@api
public” to make this clear. For complete documentation recommendations, see the Modules section.
Chaining arrow syntax
Most of the time, use relationship metaparameters rather than chaining arrows. When you have many interdependent
or order-specific items, chaining syntax may be used. A chain operator should appear on the same line as its right-
hand operand. Chaining arrows must be used left to right.
Good: Points left to right:
Package['httpd'] -> Service['httpd']
Good: On the line of the right-hand operand:
Package['httpd']
-> Service['httpd']
Bad: Arrows are not all pointing to the right:
Service['httpd'] <- Package['httpd']
Bad: Must be on the right-hand operand's line:
Package['httpd'] ->
Service['httpd']
Nested classes or defined types
Don't define classes and defined resource types within other classes or defined types. Declare them as close to node
scope as possible. If you have a class or defined type which requires another class or defined type, put graceful
failures in place if those required classes or defined types are not declared elsewhere.
Bad:
class apache {
class ssl { ... }
}
Bad:
class apache {
define config() { ... }
}
Display order of parameters
In parameterized class and defined resource type definitions, you can list required parameters before optional
parameters (that is, parameters with defaults). Required parameters are parameters that are not set to anything,
including undef. For example, parameters such as passwords or IP addresses might not have reasonable default
values.
You can also group related parameters, order them alphabetically, or in the order you encounter them in the code.
How you order parameters is personal preference.
Note that treating a parameter like a namevar and defaulting it to $title or $name does not make it a required
parameter. It should still be listed following the order recommended here.
© 2024 Puppet, Inc., a Perforce company

Puppet | Syntax and settings | 508
Good:
class dhcp (
$dnsdomain,
$nameservers,
$default_lease_time = 3600,
$max_lease_time = 86400,
) {}
Bad:
class ntp (
$options = "iburst",
$servers,
$multicast = false,
) {}
Parameter defaults
Adding default values to the parameters in classes and defined types makes your module easier to use. Use Hiera
data in your module to set parameter defaults. See Defining classes on page 680 for details about setting parameter
defaults with Hiera data. In simple cases, you can also specify the default values directly in the class or defined type.
Be sure to declare the data type of parameters, as this provides automatic type assertions.
Good: Parameter defaults set in the class with references to Hiera data:
class my_module (
String $source,
String $config,
) {
# body of class
}
A hiera.yaml in the root of the module sets the hierarchy for assigning defaults:
---
version: 5
default_hierarchy:
- name: 'defaults'
path: 'defaults.yaml'
data_hash: yaml_data
And the file data/defaults.yaml specifies the actual default values:
my_module::source: 'default source value'
my_module::config: 'default config value'
This example places the values in the defaults hierarchy, which means that the defaults are not merged into overriding
values. To merge the defaults into those values, change the default_hierarchy to hierarchy.
If you are maintaining old code created prior to Puppet 4.9, you might encounter the use of a params.pp pattern.
This pattern makes maintenance and troubleshooting difficult — refactor such code to use the Hiera data-in-modules
pattern instead. See Adding Hiera data to a module on page 466 for a detailed example showing how to replace
params.pp with data.
Bad: params.pp
class my_module (
String $source = $my_module::params::source,
String $config = $my_module::params::config,
© 2024 Puppet, Inc., a Perforce company

Puppet | Syntax and settings | 509
) inherits my_module::params {
# body of class
}
Exported resources
Exported resources should be opt-in rather than opt-out. Your module should not be written to use exported resources
to function by default unless it is expressly required.
When using exported resources, name the property collect_exported.
Exported resources should be exported and collected selectively using a search expression, ideally allowing user-
defined tags as parameters so tags can be used to selectively collect by environment or custom fact.
Good:
define haproxy::frontend (
$ports = undef,
$ipaddress = [$::ipaddress],
$bind = undef,
$mode = undef,
$collect_exported = false,
$options = {
'option' => [
'tcplog',
],
},
) {
# body of define
}
Parameter indentation and alignment
Parameters to classes or defined types must be uniformly indented in two spaces from the title. The equals sign should
be aligned.
Good:
class profile::myclass (
$var1 = 'default',
$var2 = 'something else',
$another = 'another default value',
) {
}
Good:
class ntp (
Boolean $broadcastclient = false,
Optional[Stdlib::Absolutepath] $config_dir = undef,
Enum['running', 'stopped'] $service_ensure = 'running',
String $package_ensure = 'present',
# ...
) {
# ...
}
Bad: Too many level of indentation:
class profile::myclass (
$var1 = 'default',
© 2024 Puppet, Inc., a Perforce company

Puppet | Syntax and settings | 510
$var2 = 'something else',
$another = 'another default value',
) {
}
Bad: No indentation:
class profile::myclass (
$var1 = 'default',
$var2 = 'something else',
$another = 'another default value',
) {
}
Bad: Misaligned equals sign:
class profile::myclass (
$var1 = 'default',
$var2 = 'something else',
$another = 'another default value',
) {
}
Class inheritance
In addition to scope and organization, there are some additional guidelines for handling classes in your module.
Don't use class inheritance; use data binding instead of params.pp pattern. Inheritance is used only for
params.pp, which is not recommended in Puppet 4.
If you use inheritance for maintaining older modules, do not use it across module namespaces. To satisfy cross-
module dependencies in a more portable way, include statements or relationship declarations. Only use class
inheritance for myclass::params parameter defaults. Accomplish other use cases by adding parameters or
conditional logic.
Good:
class ssh { ... }
class ssh::client inherits ssh { ... }
class ssh::server inherits ssh { ... }
Bad:
class ssh inherits server { ... }
class ssh::client inherits workstation { ... }
class wordpress inherits apache { ... }
Public modules
When declaring classes in publicly available modules, use include, contain, or require rather than class
resource declaration. This avoids duplicate class declarations and vendor lock-in.
© 2024 Puppet, Inc., a Perforce company

Puppet | Syntax and settings | 511
Type signatures
We recommend always using type signatures for class and defined type parameters. Keep the parameters and = signs
aligned.
When dealing with very long type signatures, you can define type aliases and use short definitions. Good naming of
aliases can also serve as documentation, making your code easier to read and understand. Or, if necessary, you can
turn the 140 line character limit off. For more information on type signatures, see the Type data type.
Related information
Modules on page 513
Develop your module using consistent code and module structures to make it easier to update and maintain.
Variables
Reference variables in a clear, unambiguous way that is consistent with the Puppet style.
Referencing facts
When referencing facts, prefer the $facts hash to plain top-scope variables (such as $::operatingsystem).
Although plain top-scope variables are easier to write, the $facts hash is clearer, easier to read, and distinguishes
facts from other top-scope variables.
Namespacing variables
When referencing top-scope variables other than facts, explicitly specify absolute namespaces for clarity and
improved readability. This includes top-scope variables set by the node classifier and in the main manifest.
This is not necessary for:
• the $facts hash.
• the $trusted hash.
• the $server_facts hash.
These special variable names are protected; because you cannot create local variables with these names, they always
refer to top-scope variables.
Good:
$facts['operatingsystem']
Bad:
$::operatingsystem
Very bad:
$operatingsystem
Variable format
When defining variables you must only use numbers, lowercase letters, and underscores. Do not use upper-case letters
within a word, such as “CamelCase”, as it introduces inconsistency in style. You must not use dashes, as they are not
syntactically valid.
Good:
$server_facts
$total_number_of_entries
$error_count123
© 2024 Puppet, Inc., a Perforce company

Puppet | Syntax and settings | 512
Bad:
$serverFacts
$totalNumberOfEntries
$error-count123
Conditionals
Conditional statements should follow Puppet code guidelines.
Simple resource declarations
Avoid mixing conditionals with resource declarations. When you use conditionals for data assignment, separate
conditional code from the resource declarations.
Good:
$file_mode = $facts['operatingsystem'] ? {
'debian' => '0007',
'redhat' => '0776',
default => '0700',
}
file { '/tmp/readme.txt':
ensure => file,
content => "Hello World\n",
mode => $file_mode,
}
Bad:
file { '/tmp/readme.txt':
ensure => file,
content => "Hello World\n",
mode => $facts['operatingsystem'] ? {
'debian' => '0777',
'redhat' => '0776',
default => '0700',
}
}
Defaults for case statements and selectors
Case statements must have default cases. If you want the default case to be "do nothing," you must include it as an
explicit default: {} for clarity's sake.
Case and selector values must be enclosed in quotation marks.
Selectors should omit default selections only if you explicitly want catalog compilation to fail when no value
matches.
Good:
case $facts['operatingsystem'] {
'centos': {
$version = '1.2.3'
}
'ubuntu': {
$version = '3.2.1'
}
default: {
fail("Module ${module_name} is not supported on ${::operatingsystem}")
}
© 2024 Puppet, Inc., a Perforce company

Puppet | Syntax and settings | 513
}
When setting the default case, keep in mind that the default case should cause the catalog compilation to fail if the
resulting behavior cannot be predicted on the platforms the module was built to be used on.
Conditional statement alignment
When using if/else statements, align in the following way:
if $something {
$var = 'hour'
} elsif $something_else {
$var = 'minute'
} else {
$var = 'second'
}
For more information on if/else statements, see Conditional statements and expressions.
Modules
Develop your module using consistent code and module structures to make it easier to update and maintain.
Versioning
Your module must be versioned, and have metadata defined in the metadata.json file.
We recommend semantic versioning.
Semantic versioning, or SemVer, means that in a version number given as x.y.z:
• An increase in 'x' indicates major changes: backwards incompatible changes or a complete rewrite.
• An increase in 'y' indicates minor changes: the non-breaking addition of new features.
• An increase in 'z' indicates a patch: non-breaking bug fixes.
Module metadata
Every module must have metadata defined in the metadata.json file.
Your metadata should follow the following format:
{
"name": "examplecorp-mymodule",
"version": "0.1.0",
"author": "Pat",
"license": "Apache-2.0",
"summary": "A module for a thing",
"source": "https://github.com/examplecorp/examplecorp-mymodule",
"project_page": "https://github.com/examplecorp/examplecorp-mymodule",
"issues_url": "https://github.com/examplecorp/examplecorp-mymodules/
issues",
"tags": ["things", "stuff"],
"operatingsystem_support": [
{
"operatingsystem":"RedHat",
"operatingsystemrelease": [
"5.0",
"6.0"
]
},
{
"operatingsystem": "Ubuntu",
"operatingsystemrelease": [
© 2024 Puppet, Inc., a Perforce company

Puppet | Syntax and settings | 514
"12.04",
"10.04"
]
}
],
"dependencies": [
{ "name": "puppetlabs/stdlib", "version_requirement": ">= 3.2.0
<5.0.0" },
{ "name": "puppetlabs/firewall", "version_requirement": ">= 0.4.0
<5.0.0" },
]
}
For additional information regarding the metadata.json format, see Adding module metadata in metadata.json.
Dependencies
Hard dependencies must be declared explicitly in your module’s metadata.json file.
Soft dependencies should be called out in the README.md, and must not be enforced as a hard requirement in your
metadata.json. A soft dependency is a dependency that is only required in a specific set of use cases. For an example,
see the rabbitmq module.
Your hard dependency declarations should not be unbounded.
README
Your module should have a README in .md (or .markdown) format. READMEs help users of your module get
the full benefit of your work.
The Puppet README template offers a basic format you can use. If you create modules with Puppet Development
Kit or the puppet module generate command, the generated README includes the template. Using
the .md/.markdown format allows your README to be parsed and displayed by Puppet Strings, GitHub, and the
Puppet Forge.
You can find thorough, detailed information on writing a great README in Documenting modules on page 1124,
but in general your README should:
• Summarize what your module does.
• Note any setup requirements or limitations, such as "This module requires the puppetlabs-apache module
and only works on Ubuntu."
• Note any part of a user’s system the module might impact (for example, “This module overwrites everything in
animportantfile.conf.”).
• Describe how to customize and configure the module.
• Include usage examples and code samples for the common use cases for your module.
Documenting Puppet code
Use Puppet Strings code comments to document your Puppet classes, defined types, functions, and resource
types and providers. Strings processes the README and comments from your code into HTML or JSON format
documentation. This allows you and your users to generate detailed documentation for your module.
Include comments for each element (classes, functions, defined types, parameters, and so on) in your module. If used,
comments must precede the code for that element. Comments should contain the following information, arranged in
this order:
• A description giving an overview of what the element does.
• Any additional information about valid values that is not clear from the data type. For example, if the data type is
[String], but the value must specifically be a path.
• The default value, if any, for that element,
© 2024 Puppet, Inc., a Perforce company

Puppet | Syntax and settings | 515
Multiline descriptions must be uniformly indented by at least one space:
# @param config_epp Specifies a file to act as a EPP template for the config
file.
# Valid options: a path (absolute, or relative to the module path). Example
value:
# 'ntp/ntp.conf.epp'. A validation error is thrown if you supply both this
param **and**
# the `config_template` param.
If you use Strings to document your module, include information about Strings in the Reference section of your
README so that your users know how to generate the documentation. See Puppet Strings documentation for details
on usage, installation, and correctly writing documentation comments.
If you do not include Strings code comments, you should include a Reference section in your README with a
complete list of all classes, types, providers, defined types, and parameters that the user can configure. Include a brief
description, the valid options, and the default values (if any).
For example, this is a parameter for the ntp module’s ntp class: package_ensure:
Data type: String.
Whether to install the NTP package, and what version to install. Values:
'present', 'latest', or a specific version number.
Default value: 'present'.
For more details and examples, see the module documentation guide.
CHANGELOG
Your module should include a change log file called CHANGELOG.md or .markdown. Your change log should:
• Have entries for each release.
• List bugfixes and features included in the release.
• Specifically call out backwards-incompatible changes.
Examples
In the /examples directory, include example manifests that demonstrate major use cases for your module.
modulepath/apache/examples/{usecase}.pp
The example manifest should provide a clear example of how to declare the class or defined resource type. It
should also declare any classes required by the corresponding class to ensure puppet apply works in a limited,
standalone manner.
Testing
You can use these community tools to test your code and style:
• puppet-lint tests your code for adherence to the style guidelines.
• metadata-json-lint tests your metadata.json for adherence to the style guidelines.
• voxpupuli-puppet-lint-plugins tests your code against linter configurations that the Puppet community, Vox
Pupuli, uses. Vox Pupuli also maintains a list of notable plugins; however, we have not tested or reviewed all of
these plugins.
• For testing your module, we recommend the Puppet Development Kit (PDK), which can help you generate basic
spec tests. Use rspec-puppet for more advanced testing.
© 2024 Puppet, Inc., a Perforce company

Puppet | Syntax and settings | 516
Files and paths on Windows
Puppet and Windows handle directory separators and line endings in files somewhat differently, so you must be
aware of the differences when you are writing manifests to manage Windows systems.
Directory separators in file paths
Several resource types (including file, exec, and package) take file paths as values for various attributes.
The Puppet language uses the backslash (\) as an escape character in quoted strings. However, Windows also uses
the backslash to separate directories in file paths, such as C:\Program Files\PuppetLabs. Additionally,
Windows file system APIs accept both backslashes and forward slashes in file paths, but some Windows programs
accept only backslashes.
Generally, if Puppet itself is interpreting the file path, or if the file path is meant for the primary server, use forward
slashes. If the file path is being passed directly to a Windows program, use backslashes. The following table lists
common directory path uses and what kind of slashes are required by each.
File path usage Slash type
Template paths, such as template('my_module/
content.erb').
Forward slash (/)
puppet:/// URLs. Forward slash (/)
The path attribute or title of a file resource. Forward slash (/) or backslash (\)
The source attribute of a package resource. Forward slash (/) or backslash (\)
Local paths in a file resource's source attribute. Forward slash (/) or backslash (\)
The command of an exec resource. However, some
executables, such as cmd.exe, require backslashes.
Forward slash (/) or backslash (\)
Any file paths included in the command of a
scheduled_task resource.
Backslash (\)
Any file paths included in the install_options of a
package resource.
Backslash (\)
Any file paths used for Windows PowerShell DSC
resources. For these resources, single quote strings
whenever possible.
Backslash (\)
Line endings in files
Windows uses CRLF line endings instead of *nix's LF line endings. Be aware of the following issues:
• If you specify the contents of a file with the content attribute, Puppet writes the content in binary mode. To
create files with CRLF line endings, specify the \r\n escape sequence as part of the content.
• When downloading a file to a Windows node with the source attribute, Puppet transfers the file in binary mode,
leaving the original newlines untouched.
• If you are using version control, such as Git, ensure that it is configured to use CRLF line endings.
• Non-file resource types that make partial edits to a system file, such as the host resource type, which
manages the %windir%\system32\drivers\etc\hosts file, manage their files in text mode and
automatically translate between Windows and *nix line endings.
Note: When writing your own resource types, you can get this behavior by using the flat file type.
Related information
Templates on page 908
© 2024 Puppet, Inc., a Perforce company

Puppet | Syntax and settings | 517
Templates are written in a specialized templating language that generates text from data. Use templates to manage the
content of your Puppet configuration files via the content attribute of the file resource type.
Strings on page 896
Strings are unstructured text fragments of any length. They’re a common and useful data type.
Code comments
To add comments to your Puppet code, use shell-style or hash comments.
Hash comments begin with a hash symbol (#) and continue to the end of a line. You can start comments either at the
beginning of a line or partway through a line that began with code.
# This is a comment
file {'/etc/ntp.conf': # This is another comment
ensure => file,
owner => root,
}
Variables
Variables store values so that those values can be accessed in code later.
After you've assigned a variable a value, you cannot reassign it. Variables depend on order of evaluation: you must
assign a variable a value before it can be resolved.
The following video gives you an overview of variables:
Note: Puppet contains built-in variables that you can use in your manifests. For a list of these, see the page on facts
and built-in variables.
Assigning variables
Prefix variable names with a dollar sign ($). Assign values to variables with the equal sign (=) assignment operator.
Variables accept values of any data type. You can assign literal values, or you can assign any statement that resolves
to a normal value, including expressions, functions, and other variables. The variable then contains the value that the
statement resolves to, rather than a reference to the statement.
$content = "some content\n"
Assign variables using their short name within their own scope. You cannot assign values in one scope from another
scope. For example, you can assign a value to the apache::params class's $vhostdir variable only from
within the apache::params class.
You can assign multiple variables at the same time from an array or hash.
To assign multiple variables from an array, you must specify an equal number of variables and values. If the number
of variables and values do not match, the operation fails. You can also use nested arrays. For example, all of the
variable assignments shown below are valid.
[$a, $b, $c] = [1,2,3] # $a = 1, $b = 2, $c = 3
[$a, [$b, $c]] = [1,[2,3]] # $a = 1, $b = 2, $c = 3
[$a, $b] = [1, [2]] # $a = 1, $b = [2]
[$a, [$b]] = [1, [2]] # $a = 1, $b = 2
When you assign multiple variables with a hash, list the variables in an array on the left side of the assignment
operator, and list the hash on the right. Hash keys must match their corresponding variable name. This example
assigns a value of 10 to the $a variable and a value of 20 to the $b variable.
[$a, $b] = {a => 10, b => 20} # $a = 10, $b = 20
© 2024 Puppet, Inc., a Perforce company

Puppet | Syntax and settings | 518
You can include extra key-value pairs in the hash, but all variables to the left of the operator must have a
corresponding key in the hash:
[$a, $c] = {a => 5, b => 10, c => 15, d => 22} # $a = 5, $c = 15
Puppet allows a given variable to be assigned a value only one time within a given scope. This is a little different
from most programming languages. You cannot change the value of a variable, but you can assign a different value to
the same variable name in a new scope:
# scope-example.pp
# Run with puppet apply --certname www1.example.com scope-example.pp
$myvar = "Top scope value"
node 'www1.example.com' {
$myvar = "Node scope value"
notice( "from www1: $myvar" )
include myclass
}
node 'db1.example.com' {
notice( "from db1: $myvar" )
include myclass
}
class myclass {
$myvar = "Local scope value"
notice( "from myclass: $myvar" )
}
Resolution
You can use the name of a variable in any place where a value of the variable's data type would be accepted,
including expressions, functions, and resource attributes. Puppet replaces the name of the variable with its value. By
default, unassigned variables have a value of undef. See the section about unassigned variables and strict mode for
more details.
In these examples, the content parameter value resolves to whatever value has been assigned to the $content
variable. The $address_array variable resolves to an array of the values assigned to the $address1,
$address2, and $address3 variables:
file {'/tmp/testing':
ensure => file,
content => $content,
}
$address_array = [$address1, $address2, $address3]
Interpolation
Puppet can resolve variables that are included in double-quoted strings; this is called interpolation. Inside a double-
quoted string, surround the name of the variable (the portion after the $) with curly braces, such as ${var_name}.
This syntax is optional, but it helps to avoid ambiguity and allows variables to be placed directly next to non-
whitespace characters. These optional curly braces are permitted only inside strings.
For example, the curly braces make it easier to quickly identify the variable $homedir.
$rule = "Allow * from $ipaddress"
file { "${homedir}/.vim":
ensure => directory,
...
}
© 2024 Puppet, Inc., a Perforce company

Puppet | Syntax and settings | 519
Scope
The area of code where a given variable is visible is dictated by its scope. Variables in a given scope are available
only within that scope and its child scopes, and any local scope can locally override the variables it receives from its
parents. See the section on scope for complete details.
You can access out-of-scope variables from named scopes by using their qualified names, which include
namespaces representing the variable's scope. The scope is where the variable is defined and assigned a value. For
example, the qualified name of this $vhost variable shows that the variable is found and assigned a value in the
apache::params class:
$vhostdir = $apache::params::vhostdir
Variables can be assigned outside of any class, type, or node definition. These top scope variables have an empty
string as their first namespace segment, so that the qualified name of a top scope variable begins with a double colon,
such as $::osfamily.
Unassigned variables and strict mode
By default, you cannot access variables that have never had values assigned to them. Such variables can be a problem,
because their value would be undef and an unassigned variable is often an accident or a typo. To stop unassigned
variable usage from returning an error, enable strict mode by setting strict_variables = false in the
puppet.conf file on your primary server and on any nodes that run puppet apply. For details about this
setting, see the configuration page.
Related information
Expressions and operators on page 690
Expressions are statements that resolve to values. You can use expressions almost anywhere a value is required.
Expressions can be compounded with other expressions, and the entire combined expression resolves to a single
value.
Function calls on page 707
Functions are plug-ins, written in Ruby, that you can call during catalog compilation. A call to any function is an
expression that resolves to a value. Most functions accept one or more values as arguments, and return a resulting
value.
Naming variables
Some variable names are reserved; for detailed information, see the reserved name page.
Variable names
Variable names are case-sensitive and must begin with a dollar sign ($). Most variable names must start with a
lowercase letter or an underscore. The exception is regex capture variables, which are named with only numbers.
Variable names can include:
• Uppercase and lowercase letters
• Numbers
• Underscores ( _ ). If the first character is an underscore, access that variable only from its own local scope.
Qualified variable names are prefixed with the name of their scope and the double colon (::) namespace
separator. For example, the $vhostdir variable from the apache::params class would be
$apache::params::vhostdir.
Optionally, the name of the very first namespace can be empty, representing the top namespace. The main reason
to namespace this way is to indicate to anyone reading your code that you're accessing a top-scope variable, such as
$::is_virtual.
© 2024 Puppet, Inc., a Perforce company

Puppet | Syntax and settings | 520
You can also use a regular expression for variable names. Short variable names match the following regular
expression:
\A\$[a-z0-9_][a-zA-Z0-9_]*\Z
Qualified variable names match the following regular expression:
\A\$([a-z][a-z0-9_]*)?(::[a-z][a-z0-9_]*)*::[a-z0-9_][a-zA-Z0-9_]*\Z
Resources
Resources are the fundamental unit for modeling system configurations. Each resource describes the desired state
for some aspect of a system, like a specific service or package. When Puppet applies a catalog to the target system, it
manages every resource in the catalog, ensuring the actual state matches the desired state.
The following video gives you an overview of resources:
Resources contained in classes and defined types share the relationships of those classes and defined types. Resources
are not subject to scope: a resource in any area of code can be referenced from any other area of code.
A resource declaration adds a resource to the catalog and tells Puppet to manage that resource's state.
When Puppet applies the compiled catalog, it:
1.
Reads the actual state of the resource on the target system.
2.
Compares the actual state to the desired state.
3.
If necessary, changes the system to enforce the desired state.
4.
Logs any changes made to the resource. These changes appear in Puppet agent's log and in the run report, which is
sent to the primary server and forwarded to any specified report processors.
If the catalog doesn't contain a particular resource, Puppet does nothing with whatever that resource described. If you
remove a package resource from your manifests, Puppet doesn't uninstall the package; instead, it just ignores it. To
remove a package, manage it as a resource and set ensure => absent.
You can delay adding resources to the catalog. For example, classes and defined types can contain groups of
resources. These resources are managed only if you add that class or defined resource to the catalog. Virtual resources
are added to the catalog only after they are realized.
Resource declarations
At minimum, every resource declaration has a resource type, a title, and a set of attributes:
<TYPE> { '<TITLE>': <ATTRIBUTE> => <VALUE>, }
The resource title and attributes are called the resource body. A resource declaration can have one resource body or
multiple resource bodies of the same resource type.
Resource declarations are expressions in the Puppet language — they always have a side effect of adding a resource
to the catalog, but they also resolve to a value. The value of a resource declaration is an array of resource references,
with one reference for each resource the expression describes.
A resource declaration has extremely low precedence; in fact, it's even lower than the variable assignment operator
(=). This means that if you use a resource declaration for its value, you must surround it with parentheses to associate
it with the expression that uses the value.
If a resource declaration includes more than one resource body, it declares multiple resources of that resource type.
The resource body is a title and a set of attributes; each body must be separated from the next one with a semicolon.
Each resource in a declaration is almost completely independent of the others, and they can have completely different
values for their attributes. The only connections between resources that share an expression are:
• They all have the same resource type.
© 2024 Puppet, Inc., a Perforce company

Puppet | Syntax and settings | 521
• They can all draw from the same pool of default values, if a resource body with the title default is present.
Resource uniqueness
Each resource must be unique; Puppet does not allow you to declare the same resource twice. This is to prevent
multiple conflicting values from being declared for the same attribute. Puppet uses the resource title and the
name attribute or namevar to identify duplicate resources — if either the title or the name is duplicated within a
given resource type, catalog compilation fails. See the page about resource syntax for details about resource titles and
namevars. To provide the same resource for multiple classes, use a class or a virtual resource to add it to the catalog
in multiple places without duplicating it. See classes and virtual resources for more information.
Relationships and ordering
By default, Puppet applies unrelated resources in the order in which they're written in the manifest. If a resource
must be applied before or after some other resource, declare a relationship between them to show that their order
isn't coincidental. You can also make changes in one resource cause a refresh of some other resource. See the
Relationships and ordering page for more information.
Otherwise, you can customize the default order in which Puppet applies resources with the ordering setting. See the
configuration page for details about this setting.
Resource types
Every resource is associated with a resource type, which determines the kind of configuration it manages. Puppet has
built-in resource types such as file, service, and package. See the resource type reference for a complete list
and information about the built-in resource types.
You can also add new resource types to Puppet:
• Defined types are lightweight resource types written in the Puppet language.
• Custom resource types are written in Ruby and have the same capabilities as Puppet's built-in types.
Title
A resource's title is a string that uniquely identifies the resource to Puppet. In a resource declaration, the title is the
identifier after the first curly brace and before the colon. For example, in this file resource declaration, the title is /
etc/passwd:
file { '/etc/passwd':
owner => 'root',
group => 'root',
}
Titles must be unique per resource type. You can have both a package and a service titled "ntp," but you can only
have one service titled "ntp." Duplicate titles cause compilation to fail.
The title of a resource differs from the namevar of the resource. Whereas the title identifies the resource to Puppet
itself, the namevar identifies the resource to the target system and is usually specified by the resource's name
attribute. The resource title doesn't have to match the namevar, but you'll often want it to: the value of the namevar
attribute defaults to the title, so using the name in the title can save you some typing.
If a resource type has multiple namevars, the type specifies whether and how the title maps to those namevars. For
example, the package type uses the provider attribute to help determine uniqueness, but that attribute has no
special relationship with the title. See each type's documentation for details about how it maps title to namevars.
Attributes
Attributes describe the desired state of the resource; each attribute handles some aspect of the resource. For example,
the file type has a mode attribute that specifies the permissions for the file.
© 2024 Puppet, Inc., a Perforce company

Puppet | Syntax and settings | 522
Each resource type has its own set of available attributes; see the resource type reference for a complete list. Most
resource types have a handful of crucial attributes and a larger number of optional ones. Attributes accept certain data
types, such as strings, numbers, hashes, or arrays. Each attribute that you declare must have a value. Most attributes
are optional, which means they have a default value, so you do not have to assign a value. If an attribute has no
default, it is considered required, and you must assign it a value.
Most resource types contain an ensure attribute. This attribute generally manages the most basic state of the
resource on the target system, such as whether a file exists, whether a service is running or stopped, or whether a
package is installed or uninstalled. The values accepted for the ensure attribute vary by resource type. Most accept
present and absent, but there are variations. Check the reference for each resource type you are working with.
Tip: Resource and type attributes are sometimes referred to as parameters. Puppet also has properties, which are
slightly different from parameters: properties correspond to something measurable on the target system, whereas
parameters change how Puppet manages a resource. A property always represents a concrete state on the target
system. When talking about resource declarations in Puppet, parameter is a synonym for attribute.
Namevars and name
Every resource on a target system must have a unique identity; you cannot have two services, for example, with the
same name. This identifying attribute in Puppet is known as the namevar.
Each resource type has an attribute that is designated to serve as the namevar. For most resource types, this is the
name attribute, but some types use other attributes, such as the file type, which uses path, the file's location
on disk, for its namevar. If a type's namevar is an attribute other than name, this is listed in the type reference
documentation.
Most types have only one namevar. With a single namevar, the value must be unique per resource type. There are a
few rare exceptions to this rule, such as the exec type, where the namevar is a command. However, some resource
types, such as package, have multiple namevar attributes that create a composite namevar. For example, both
the yum provider and the gem provider have mysql packages, so both the name and the command attributes are
namevars, and Puppet uses both to identify the resource.
The namevar differs from the resource's title, which identifies a resource to Puppet's compiler rather than to the target
system. In practice, however, a resource's namevar and the title are often the same, because the namevar usually
defaults to the title. If you don't specify a value for a resource's namevar when you declare the resource, Puppet uses
the resource's title.
You might want to specify different a namevar that is different from the title when you want a consistently titled
resource to manage something that has different names on different platforms. For example, the NTP service might be
ntpd on Red Hat systems, but ntp on Debian and Ubuntu. You might title the service "ntp," but set its namevar ---
the name attribute --- according to the operating system. Other resources can then form relationships to the resource
without the title changing.
Metaparameters
Some attributes in Puppet can be used with every resource type. These are called metaparameters. These don't map
directly to system state. Instead, metaparameters affect Puppet's behavior, usually specifying the way in which
resources relate to each other.
The most commonly used metaparameters are for specifying order relationships between resources. See the
documentation on relationships and ordering for details about those metaparameters. See the full list of available
metaparameters in the metaparameter reference.
Resource syntax
You can accomplish a lot with just a few resource declaration features, or you can create more complex declarations
that do more.
Basic syntax
The simplified form of a resource declaration includes:
© 2024 Puppet, Inc., a Perforce company

Puppet | Syntax and settings | 523
• The resource type, which is a lowercase word with no quotes, such as file.
• An opening curly brace {.
• The title, which is a string.
• A colon (:).
• Optionally, any number of attribute and value pairs, each of which consists of:
• An attribute name, which is a lowercase word with no quotes.
• A => (called an arrow, "fat comma," or "hash rocket").
• A value, which can have any [data type][datatype].
• A trailing comma.
• A closing curly brace (}).
You can use any amount of whitespace in the Puppet language.
This example declares a file resource with the title /etc/passwd. This declaration's ensure attribute ensures that
the specified file is created, if it does not already exist on the node. The rest of the declaration sets values for the file's
owner, group, and mode attributes.
file { '/etc/passwd':
ensure => file,
owner => 'root',
group => 'root',
mode => '0600',
}
Complete syntax
By creating more complex resource declarations, you can:
• Describe many resources at once.
• Set a group of attributes from a hash with the * attribute.
• Set default attributes.
• Specify an abstract resource type.
• Amend or override attributes after a resource is already declared.
The complete generalized form of a resource declaration expression is:
• The resource type, which can be one of:
• A lowercase word with no quotes, such as file.
• A resource type data type, such as File, Resource[File], or Resource['file']. It must have a type
but not a resource reference.
• An opening curly brace ({).
© 2024 Puppet, Inc., a Perforce company

Puppet | Syntax and settings | 524
• One or more resource bodies, separated with semicolons (;). Each resource body consists of:
• A title, which can be one of:
• A string.
• An array of strings, which declares multiple resources.
• The special value default, which sets default attribute values for other resource bodies in the same
expression.
• A colon (:).
• Optionally, any number of attribute and value pairs, separated with commas (,). Each attribute/value pair
consists of:
• An attribute name, which can be one of:
• A lowercase word with no quotes.
• The special attribute *, called a "splat," which takes a hash and sets other attributes.
• A =>, called an arrow, a "fat comma," or a "hash rocket".
• A value, which can have any data type.
• Optionally, a trailing comma after the last attribute/value pair.
• Optionally, a trailing semicolon after the last resource body.
• A closing curly brace (})
<TYPE>
{ default: * => <HASH OF ATTRIBUTE/VALUE PAIRS>, <ATTRIBUTE> =>
<VALUE>, ;
'<TITLE>': * => <HASH OF ATTRIBUTE/VALUE PAIRS>,
<ATTRIBUTE> => <VALUE>, ;
'<NEXT TITLE>': ... ;
['<TITLE'>, '<TITLE>', '<TITLE>']: ... ;
}
Resource declaration default attributes
If a resource declaration includes a resource body with a title of default, Puppet doesn't create a new resource
named "default." Instead, every other resource in that declaration uses attribute values from the default body if it
doesn't have an explicit value for one of those attributes. This is also known as "per-expression defaults."
Resource declaration defaults are useful because it lets you set many attributes at once, but you can still override
some of them.
This example declares several different files, all using the default values set in the default
resource body. However, the mode value for the the files in the last array (['ssh_config',
'ssh_host_dsa_key.pub'....) is set explicitly instead of using the default.
file {
default:
ensure => file,
owner => "root",
group => "wheel",
mode => "0600",
;
['ssh_host_dsa_key', 'ssh_host_key', 'ssh_host_rsa_key']:
# use all defaults
;
['ssh_config', 'ssh_host_dsa_key.pub', 'ssh_host_key.pub',
'ssh_host_rsa_key.pub', 'sshd_config']:
# override mode
mode => "0644",
;
}
© 2024 Puppet, Inc., a Perforce company

Puppet | Syntax and settings | 525
The position of the default body in a resource declaration doesn't matter; resources above and below it all use the
default attributes if applicable.You can only have one default resource body per resource declaration.
Setting attributes from a hash
You can set attributes for a resource by using the splat attribute, which uses the splat or asterisk character *, in the
resource body.
The value of the splat (*) attribute must be a hash where:
• Each key is the name of a valid attribute for that resource type, as a string.
• Each value is a valid value for the attribute it's assigned to.
This sets values for that resource's attributes, using every attribute and value listed in the hash.
For example, the splat attribute in this declaration sets the owner, group, and mode settings for the file resource.
$file_ownership = {
"owner" => "root",
"group" => "wheel",
"mode" => "0644",
}
file { "/etc/passwd":
ensure => file,
* => $file_ownership,
}
You cannot set any attribute more than once for a given resource; if you try, Puppet raises a compilation error. This
means that:
• If you use a hash to set attributes for a resource, you cannot set a different, explicit value for any of those
attributes. For example, if mode is present in the hash, you can't also set mode => "0644" in that resource
body.
• You can't use the * attribute multiple times in one resource body, since the splat itself is an attribute.
To use some attributes from a hash and override others, either use a hash to set per-expression defaults, as described
in the Resource declaration default attributes section (above), or use the merging operator, + to combine attributes
from two hashes, with the right-hand hash overriding the left-hand one.
Abstract resource types
Because a resource declaration can accept a resource type data type as its resource type , you can use a
Resource[<TYPE>] value to specify a non-literal resource type, where the <TYPE> portion can be read from a
variable. That is, the following three examples are equivalent to each other:
file { "/tmp/foo": ensure => file, }
File { "/tmp/foo": ensure => file, }
Resource[File] { "/tmp/foo": ensure => file, }
$mytype = File
Resource[$mytype] { "/tmp/foo": ensure => file, }
$mytypename = "file"
Resource[$mytypename] { "/tmp/foo": ensure => file, }
This lets you declare resources without knowing in advance what type of resources they'll be, which can enable
transformations of data into resources.
© 2024 Puppet, Inc., a Perforce company

Puppet | Syntax and settings | 526
Arrays of titles
If you specify an array of strings as the title of a resource body, Puppet creates multiple resources with the same set of
attributes. This is useful when you have many resources that are nearly identical.
For example:
$rc_dirs = [
'/etc/rc.d', '/etc/rc.d/init.d','/etc/rc.d/rc0.d',
'/etc/rc.d/rc1.d', '/etc/rc.d/rc2.d', '/etc/rc.d/rc3.d',
'/etc/rc.d/rc4.d', '/etc/rc.d/rc5.d', '/etc/rc.d/rc6.d',
]
file { $rc_dirs:
ensure => directory,
owner => 'root',
group => 'root',
mode => '0755',
}
If you do this, you must let the namevar attributes of these resources default to their titles. You can't specify an
explicit value for the namevar, because it applies to all of the resources.
Adding or modifying attributes
Although you cannot declare the same resource twice, you can add attributes to a resource that has already been
declared. In certain circumstances, you can also override attributes. You can amend attributes with either a resource
reference, a collector, or from a hash using the splat (*) attribute.
To amend attributes with the splat attribute, see the Setting attributes from a hash section (above).
To amend attributes with a resource reference, add a resource reference attribute block to the resource that's already
declared. Normally, you can only use resource reference blocks to add previously unmanaged attributes to a resource;
it cannot override already-specified attributes. The general form of a resource reference attribute block is:
• A resource reference to the resource in question
• An opening curly brace
• Any number of attribute => value pairs
• A closing curly brace
For example, this resource reference attribute block amends values for the owner, group, and mode attributes:
file {'/etc/passwd':
ensure => file,
}
File['/etc/passwd'] {
owner => 'root',
group => 'root',
mode => '0640',
}
You can also amend attributes with a collector.
The general form of a collector attribute block is:
• A resource collector that matches any number of resources
• An opening curly brace
• Any number of attribute => value (or attribute +> value) pairs
• A closing curly brace
© 2024 Puppet, Inc., a Perforce company

Puppet | Syntax and settings | 527
For resource attributes that accept multiple values in an array, such as the relationship metaparameters, you can add
to the existing values instead of replacing them by using the "plusignment" (+>) keyword instead of the usual hash
rocket (=>). For details, see appending to attributes in the classes documentation.
This example amends the owner, group, and mode attributes of any resources that match the collector:
class base::linux {
file {'/etc/passwd':
ensure => file,
}
...}
include base::linux
File <| tag == 'base::linux' |> {
owner => 'root',
group => 'root',
mode => '0640',
}
CAUTION: Be very careful when amending attributes with a collector. Test with --noop to see what
changes your code would make.
• It can override other attributes you've already specified, regardless of class inheritance.
• It can affect large numbers of resources at one time.
• It implicitly realizes any virtual resources the collector matches.
• Because it ignores class inheritance, it can override the same attribute more than one time, which results in
an evaluation order race where the last override wins.
Local resource defaults
Because resource default statements are subject to dynamic scope, you can't always tell what areas of code will be
affected. Generally, do not include classic resource default statements anywhere other than in your site manifest
(site.pp). See the resource defaults documentation for details. Whenever possible, use resource declaration
defaults, also known as per-expression defaults.
However, resource default statements can be powerful, allowing you to set important defaults, such as file
permissions, across resources. Setting local resource defaults is a way to protect your classes and defined types from
accidentally inheriting defaults from classic resource default statements.
To set local resource defaults, define your defaults in a variable and re-use them in multiple places, by combining
resource declaration defaults and setting attributes from a hash.
This example defines defaults in a $file_defaults variable, and then includes the variable in a resource
declaration default with a hash.
class mymodule::params {
$file_defaults = {
mode => "0644",
owner => "root",
group => "root",
}
# ...
}
class mymodule inherits mymodule::params {
file { default: *=> $mymodule::params::file_defaults;
"/etc/myconfig":
ensure => file,
;
© 2024 Puppet, Inc., a Perforce company

Puppet | Syntax and settings | 528
}
}
Resource types
Every resource (file, user, service, package, and so on) is associated with a resource type within the Puppet language.
The resource type defines the kind of configuration it manages. This section provides information about the resource
types that are built into Puppet.
• Resource Type Reference (Single-Page) on page 528
• Built-in types on page 592
This page provides a reference guide for Puppet's built-in types: package, file, service, notify, exec,
user, and group.
• Optional resource types for Windows on page 596
In addition to the resource types included with Puppet, you can install custom resource types as modules from the
Forge. This is especially useful when managing Windows systems, because there are several important Windows-
specific resource types that are developed as modules rather than as part of core Puppet.
• Resource Type: exec on page 597
• Using exec on Windows on page 603
Puppet uses the same exec resource type on both *nix and Windows systems, and there are a few Windows-specific
best practices and tips to keep in mind.
• Resource Type: file on page 604
• Using file on Windows on page 616
Use Puppet's built-in file resource type to manage files and directories on Windows, including ownership, group,
permissions, and content, with the following Windows-specific notes and tips.
• Resource Type: filebucket on page 618
• Resource Type: group on page 619
• Using user and group on Windows on page 624
Use the built-in user and group resource types to manage user and group accounts on Windows.
• Resource types overview on page 625
• Resource Type: notify on page 628
• Resource Type: package on page 628
• Using package on Windows on page 644
The built-in package resource type handles many different packaging systems on many operating systems, so not
all features are relevant everywhere. This page offers guidance and tips for working with package on Windows.
• Resource Type: resources on page 646
• Resource Type: schedule on page 647
• Resource Type: service on page 650
• Using service on page 659
Puppet can manage services on nearly all operating systems.This page offers operating system-specific advice and
best practices for working with service.
• Resource Type: stage on page 661
• Resource Type: tidy on page 662
• Resource Type: user on page 664
Resource Type Reference (Single-Page)
NOTE: This page was generated from the Puppet source code on 2024-08-01 18:15:55 -0700
About resource types
Built-in types and custom types
This is the documentation for Puppet's built-in resource types and providers. Additional resource types are distributed
in Puppet modules.
© 2024 Puppet, Inc., a Perforce company

Puppet | Syntax and settings | 529
You can find and install modules by browsing the Puppet Forge. See each module's documentation for information on
how to use its custom resource types. For more information about creating custom types, see Custom resources.
As of Puppet 6.0, some resource types were removed from Puppet and repackaged as individual modules.
These supported type modules are still included in the puppet-agent package, so you don't have to
download them from the Forge. See the complete list of affected types in the supported type modules
section.
Declaring resources
To manage resources on a target system, declare them in Puppet manifests. For more details, see the resources page of
the Puppet language reference.
You can also browse and manage resources interactively using the puppet resource subcommand; run puppet
resource --help for more information.
Namevars and titles
All types have a special attribute called the namevar. This is the attribute used to uniquely identify a resource on the
target system.
Each resource has a specific namevar attribute, which is listed on this page in each resource's reference. If you don't
specify a value for the namevar, its value defaults to the resource's title.
Example of a title as a default namevar:
file { '/etc/passwd':
owner => 'root',
group => 'root',
mode => '0644',
}
In this code, /etc/passwd is the title of the file resource.
The file type's namevar is path. Because we didn't provide a path value in this example, the value defaults to the
title, /etc/passwd.
Example of a namevar:
file { 'passwords':
path => '/etc/passwd',
owner => 'root',
group => 'root',
mode => '0644',
This example is functionally similar to the previous example. Its path namevar attribute has an explicitly set value
separate from the title, so its name is still /etc/passwd.
Other Puppet code can refer to this resource as File['/etc/passwd'] to declare relationships.
Attributes, parameters, properties
The attributes (sometimes called parameters) of a resource determine its desired state. They either directly modify
the system (internally, these are called "properties") or they affect how the resource behaves (for instance, adding a
search path for exec resources or controlling directory recursion on file resources).
Providers
Providers implement the same resource type on different kinds of systems. They usually do this by calling out to
external commands.
Although Puppet automatically selects an appropriate default provider, you can override the default with the
provider attribute. (For example, package resources on Red Hat systems default to the yum provider, but you
can specify provider => gem to install Ruby libraries with the gem command.)
© 2024 Puppet, Inc., a Perforce company
Puppet | Syntax and settings | 530
Providers often specify binaries that they require. Fully qualified binary paths indicate that the binary must exist at
that specific path, and unqualified paths indicate that Puppet searches for the binary using the shell path.
Features
Features are abilities that some providers might not support. Generally, a feature corresponds to some allowed values
for a resource attribute.
This is often the case with the ensure attribute. In most types, Puppet doesn't create new resources when omitting
ensure but still modifies existing resources to match specifications in the manifest. However, in some types this
isn't always the case, or additional values provide more granular control. For example, if a package provider
supports the purgeable feature, you can specify ensure => purged to delete configuration files installed by
the package.
Resource types define the set of features they can use, and providers can declare which features they provide.
Puppet 6.0 type changes
In Puppet 6.0, we removed some of Puppet's built-in types and moved them into individual modules.
Supported type modules in puppet-agent
The following types are included in supported modules on the Forge. However, they are also included in the
puppet-agent package, so you do not have to install them separately. See each module's README for detailed
information about that type.
• augeas
• cron
• host
• mount
• scheduled_task
• selboolean
• selmodule
• ssh_authorized_key
• sshkey
• yumrepo
• zfs
• zone
• zpool
Type modules available on the Forge
The following types are contained in modules that are maintained, but are not repackaged into Puppet agent. If you
need to use them, you must install the modules separately.
• k5login
• mailalias
• maillist
Deprecated types
The following types were deprecated with Puppet 6.0.0. They are available in modules, but are not updated. If you
need to use them, you must install the modules separately.
• computer
• interface (Use the updated cisco_ios module instead.
• macauthorization
• mcx
• The Nagios types
• router (Use the updated cisco_ios module instead.
• vlan (Use the updated cisco_ios module instead.
© 2024 Puppet, Inc., a Perforce company

Puppet | Syntax and settings | 531
Puppet core types
For a list of core Puppet types, see the core types cheat sheet.
exec
• Attributes
• Providers
Description
Executes external commands.
Any command in an exec resource must be able to run multiple times without causing harm --- that is, it must be
idempotent. There are three main ways for an exec to be idempotent:
• The command itself is already idempotent. (For example, apt-get update.)
• The exec has an onlyif, unless, or creates attribute, which prevents Puppet from running the command
unless some condition is met. The onlyif and unless commands of an exec are used in the process of
determining whether the exec is already in sync, therefore they must be run during a noop Puppet run.
• The exec has refreshonly => true, which allows Puppet to run the command only when some other
resource is changed. (See the notes on refreshing below.)
The state managed by an exec resource represents whether the specified command needs to be executed during the
catalog run. The target state is always that the command does not need to be executed. If the initial state is that the
command does need to be executed, then successfully executing the command transitions it to the target state.
The unless, onlyif, and creates properties check the initial state of the resource. If one or more of these
properties is specified, the exec might not need to run. If the exec does not need to run, then the system is already in
the target state. In such cases, the exec is considered successful without actually executing its command.
A caution: There's a widespread tendency to use collections of execs to manage resources that aren't covered by an
existing resource type. This works fine for simple tasks, but once your exec pile gets complex enough that you really
have to think to understand what's happening, you should consider developing a custom resource type instead, as it is
much more predictable and maintainable.
Duplication: Even though command is the namevar, Puppet allows multiple exec resources with the same
command value.
Refresh: exec resources can respond to refresh events (via notify, subscribe, or the ~> arrow). The refresh
behavior of execs is non-standard, and can be affected by the refresh and refreshonly attributes:
• If refreshonly is set to true, the exec runs only when it receives an event. This is the most reliable way to use
refresh with execs.
• If the exec has already run and then receives an event, it runs its command up to two times. If an onlyif,
unless, or creates condition is no longer met after the first run, the second run does not occur.
• If the exec has already run, has a refresh command, and receives an event, it runs its normal command. Then,
if any onlyif, unless, or creates conditions are still met, the exec runs its refresh command.
• If the exec has an onlyif, unless, or creates attribute that prevents it from running, and it then receives an
event, it still will not run.
• If the exec has noop => true, would otherwise have run, and receives an event from a non-noop resource, it
runs once. However, if it has a refresh command, it runs that instead of its normal command.
In short: If there's a possibility of your exec receiving refresh events, it is extremely important to make sure the run
conditions are restricted.
Autorequires: If Puppet is managing an exec's cwd or the executable file used in an exec's command, the exec
resource autorequires those files. If Puppet is managing the user that an exec should run as, the exec resource
autorequires that user.
Attributes
exec { 'resource title':
© 2024 Puppet, Inc., a Perforce company

Puppet | Syntax and settings | 532
command => # (namevar) The actual command to execute. Must either
be...
creates => # A file to look for before running the command...
cwd => # The directory from which to run the command. If
environment => # An array of any additional environment variables
group => # The group to run the command as. This seems to...
logoutput => # Whether to log command output in addition to...
onlyif => # A test command that checks the state of the...
path => # The search path used for command execution...
provider => # The specific backend to use for this `exec...
refresh => # An alternate command to run when the `exec...
refreshonly => # The command should only be run as a refresh...
returns => # The expected exit code(s). An error will be...
timeout => # The maximum time the command should take. If...
tries => # The number of times execution of the command...
try_sleep => # The time to sleep in seconds between...
umask => # Sets the umask to be used while executing this...
unless => # A test command that checks the state of the...
user => # The user to run the command as. > **Note:*...
# ...plus any applicable metaparameters.
}
command
(Namevar: If omitted, this attribute's value defaults to the resource's title.)
The actual command to execute. Must either be fully qualified or a search path for the command must be provided. If
the command succeeds, any output produced will be logged at the instance's normal log level (usually notice), but
if the command fails (meaning its return code does not match the specified code) then any output is logged at the err
log level.
Multiple exec resources can use the same command value; Puppet only uses the resource title to ensure execs are
unique.
On *nix platforms, the command can be specified as an array of strings and Puppet will invoke it using the more
secure method of parameterized system calls. For example, rather than executing the malicious injected code, this
command will echo it out:
command => ['/bin/echo', 'hello world; rm -rf /']
(# Back to exec attributes)
creates
A file to look for before running the command. The command will only run if the file doesn't exist.
This parameter doesn't cause Puppet to create a file; it is only useful if the command itself creates a file.
exec { 'tar -xf /Volumes/nfs02/important.tar':
cwd => '/var/tmp',
creates => '/var/tmp/myfile',
path => ['/usr/bin', '/usr/sbin',],
}
In this example, myfile is assumed to be a file inside important.tar. If it is ever deleted, the exec will bring it
back by re-extracting the tarball. If important.tar does not actually contain myfile, the exec will keep running
every time Puppet runs.
This parameter can also take an array of files, and the command will not run if any of these files exist. Consider this
example:
creates => ['/tmp/file1', '/tmp/file2'],
© 2024 Puppet, Inc., a Perforce company

Puppet | Syntax and settings | 533
The command is only run if both files don't exist.
(# Back to exec attributes)
cwd
The directory from which to run the command. If this directory does not exist, the command will fail.
(# Back to exec attributes)
environment
An array of any additional environment variables you want to set for a command, such as [ 'HOME=/root',
Multiple environment variables should be specified as an array.
(# Back to exec attributes)
group
The group to run the command as. This seems to work quite haphazardly on different platforms -- it is a platform
issue not a Ruby or Puppet one, since the same variety exists when running commands as different users in the shell.
(# Back to exec attributes)
logoutput
Whether to log command output in addition to logging the exit code. Defaults to on_failure, which only logs the
output when the command has an exit code that does not match any value specified by the returns attribute. As
with any resource type, the log level can be controlled with the loglevel metaparameter.
Valid values are true, false, on_failure.
(# Back to exec attributes)
onlyif
A test command that checks the state of the target system and restricts when the exec can run. If present, Puppet
runs this test command first, and only runs the main command if the test has an exit code of 0 (success). For example:
exec { 'logrotate':
path => '/usr/bin:/usr/sbin:/bin',
provider => shell,
onlyif => 'test `du /var/log/messages | cut -f1` -gt 100000',
}
This would run logrotate only if that test returns true.
Note that this test command runs with the same provider, path, user, cwd, and group as the main command.
If the path isn't set, you must fully qualify the command's name.
Since this command is used in the process of determining whether the exec is already in sync, it must be run during
a noop Puppet run.
This parameter can also take an array of commands. For example:
onlyif => ['test -f /tmp/file1', 'test -f /tmp/file2'],
or an array of arrays. For example:
onlyif => [['test', '-f', '/tmp/file1'], 'test -f /tmp/file2']
This exec would only run if every command in the array has an exit code of 0 (success).
(# Back to exec attributes)
path
© 2024 Puppet, Inc., a Perforce company

Puppet | Syntax and settings | 534
The search path used for command execution. Commands must be fully qualified if no path is specified. Paths can be
specified as an array or as a ':' separated list.
(# Back to exec attributes)
provider
The specific backend to use for this exec resource. You will seldom need to specify this --- Puppet will usually
discover the appropriate provider for your platform.
Available providers are:
• posix
• shell
• windows
(# Back to exec attributes)
refresh
An alternate command to run when the exec receives a refresh event from another resource. By default, Puppet runs
the main command again. For more details, see the notes about refresh behavior above, in the description for this
resource type.
Note that this alternate command runs with the same provider, path, user, and group as the main command. If
the path isn't set, you must fully qualify the command's name.
(# Back to exec attributes)
refreshonly
The command should only be run as a refresh mechanism for when a dependent object is changed. It only makes
sense to use this option when this command depends on some other object; it is useful for triggering an action:
# Pull down the main aliases file
file { '/etc/aliases':
source => 'puppet://server/module/aliases',
}
# Rebuild the database, but only when the file changes
exec { newaliases:
path => ['/usr/bin', '/usr/sbin'],
subscribe => File['/etc/aliases'],
refreshonly => true,
}
Note that only subscribe and notify can trigger actions, not require, so it only makes sense to use
refreshonly with subscribe or notify.
Valid values are true, false.
(# Back to exec attributes)
returns
(Property: This attribute represents concrete state on the target system.)
The expected exit code(s). An error will be returned if the executed command has some other exit code. Can be
specified as an array of acceptable exit codes or a single value.
On POSIX systems, exit codes are always integers between 0 and 255.
On Windows, most exit codes should be integers between 0 and 2147483647.
Larger exit codes on Windows can behave inconsistently across different tools. The Win32 APIs define exit codes
as 32-bit unsigned integers, but both the cmd.exe shell and the .NET runtime cast them to signed integers. This
means some tools will report negative numbers for exit codes above 2147483647. (For example, cmd.exe reports
© 2024 Puppet, Inc., a Perforce company

Puppet | Syntax and settings | 535
4294967295 as -1.) Since Puppet uses the plain Win32 APIs, it will report the very large number instead of the
negative number, which might not be what you expect if you got the exit code from a cmd.exe session.
Microsoft recommends against using negative/very large exit codes, and you should avoid them when possible. To
convert a negative exit code to the positive one Puppet will use, add it to 4294967296.
(# Back to exec attributes)
timeout
The maximum time the command should take. If the command takes longer than the timeout, the command is
considered to have failed and will be stopped. The timeout is specified in seconds. The default timeout is 300 seconds
and you can set it to 0 to disable the timeout.
(# Back to exec attributes)
tries
The number of times execution of the command should be tried. This many attempts will be made to execute the
command until an acceptable return code is returned. Note that the timeout parameter applies to each try rather than to
the complete set of tries.
(# Back to exec attributes)
try_sleep
The time to sleep in seconds between 'tries'.
(# Back to exec attributes)
umask
Sets the umask to be used while executing this command
(# Back to exec attributes)
unless
A test command that checks the state of the target system and restricts when the exec can run. If present, Puppet
runs this test command first, then runs the main command unless the test has an exit code of 0 (success). For example:
exec { '/bin/echo root >> /usr/lib/cron/cron.allow':
path => '/usr/bin:/usr/sbin:/bin',
unless => 'grep ^root$ /usr/lib/cron/cron.allow 2>/dev/null',
}
This would add root to the cron.allow file (on Solaris) unless grep determines it's already there.
Note that this test command runs with the same provider, path, user, cwd, and group as the main command.
If the path isn't set, you must fully qualify the command's name.
Since this command is used in the process of determining whether the exec is already in sync, it must be run during
a noop Puppet run.
This parameter can also take an array of commands. For example:
unless => ['test -f /tmp/file1', 'test -f /tmp/file2'],
or an array of arrays. For example:
unless => [['test', '-f', '/tmp/file1'], 'test -f /tmp/file2']
This exec would only run if every command in the array has a non-zero exit code.
(# Back to exec attributes)
user
© 2024 Puppet, Inc., a Perforce company

Puppet | Syntax and settings | 536
The user to run the command as.
Note: Puppet cannot execute commands as other users on Windows.
Note that if you use this attribute, any error output is not captured due to a bug within Ruby. If you use Puppet to
create this user, the exec automatically requires the user, as long as it is specified by name.
The $HOME environment variable is not automatically set when using this attribute.
(# Back to exec attributes)
Providers
posix
Executes external binaries by invoking Ruby's Kernel.exec. When the command is a string, it will be executed
directly, without a shell, if it follows these rules:
• no meta characters
• no shell reserved word and no special built-in
When the command is an Array of Strings, passed as [cmdname, arg1, ...] it will be executed directly(the
first element is taken as a command name and the rest are passed as parameters to command with no shell expansion)
This is a safer and more predictable way to execute most commands, but prevents the use of globbing and shell built-
ins (including control logic like "for" and "if" statements).
If the use of globbing and shell built-ins is desired, please check the shell provider
• Default for feature == posix.
shell
Passes the provided command through /bin/sh; only available on POSIX systems. This allows the use of shell
globbing and built-ins, and does not require that the path to a command be fully-qualified. Although this can be more
convenient than the posix provider, it also means that you need to be more careful with escaping; as ever, with great
power comes etc. etc.
This provider closely resembles the behavior of the exec type in Puppet 0.25.x.
windows
Execute external binaries on Windows systems. As with the posix provider, this provider directly calls the
command with the arguments given, without passing it through a shell or performing any interpolation. To use shell
built-ins --- that is, to emulate the shell provider on Windows --- a command must explicitly invoke the shell:
exec {'echo foo':
command => 'cmd.exe /c echo "foo"',
}
If no extension is specified for a command, Windows will use the PATHEXT environment variable to locate the
executable.
Note on PowerShell scripts: PowerShell's default restricted execution policy doesn't allow it to run saved
scripts. To run PowerShell scripts, specify the remotesigned execution policy as part of the command:
exec { 'test':
path => 'C:/Windows/System32/WindowsPowerShell/v1.0',
command => 'powershell -executionpolicy remotesigned -file C:/test.ps1',
}
• Default for os.name == windows.
file
• Attributes
• Providers
© 2024 Puppet, Inc., a Perforce company

Puppet | Syntax and settings | 537
• Provider Features
Description
Manages files, including their content, ownership, and permissions.
The file type can manage normal files, directories, and symlinks; the type should be specified in the ensure
attribute.
File contents can be managed directly with the content attribute, or downloaded from a remote source using the
source attribute; the latter can also be used to recursively serve directories (when the recurse attribute is set to
true or local). On Windows, note that file contents are managed in binary mode; Puppet never automatically
translates line endings.
Autorequires: If Puppet is managing the user or group that owns a file, the file resource will autorequire them. If
Puppet is managing any parent directories of a file, the file resource autorequires them.
Warning: Enabling recurse on directories containing large numbers of files slows agent runs. To manage
file attributes for many files, consider using alternative methods such as the chmod_r, chown_r, or
recursive_file_permissions modules from the Forge.
Attributes
file { 'resource title':
path => # (namevar) The path to the file to manage.
Must be fully...
ensure => # Whether the file should exist, and if so
what...
backup => # Whether (and how) file content should be
backed...
checksum => # The checksum type to use when determining...
checksum_value => # The checksum of the source contents. Only
md5...
content => # The desired contents of a file, as a
string...
ctime => # A read-only state to check the file ctime.
On...
force => # Perform the file operation even if it will...
group => # Which group should own the file. Argument
can...
ignore => # A parameter which omits action on files
matching
links => # How to handle links during file actions.
During
max_files => # In case the resource is a directory and
the...
mode => # The desired permissions mode for the file,
in...
mtime => # A read-only state to check the file mtime.
On...
owner => # The user to whom the file should belong....
provider => # The specific backend to use for this `file...
purge => # Whether unmanaged files should be purged.
This...
recurse => # Whether to recursively manage the _contents_
of...
recurselimit => # How far Puppet should descend into...
replace => # Whether to replace a file or symlink that...
selinux_ignore_defaults => # If this is set, Puppet will not call the
SELinux
selrange => # What the SELinux range component of the
context...
selrole => # What the SELinux role component of the
context...
© 2024 Puppet, Inc., a Perforce company

Puppet | Syntax and settings | 538
seltype => # What the SELinux type component of the
context...
seluser => # What the SELinux user component of the
context...
show_diff => # Whether to display differences when the
file...
source => # A source file, which will be copied into
place...
source_permissions => # Whether (and how) Puppet should copy owner...
sourceselect => # Whether to copy all valid sources, or just
the...
staging_location => # When rendering a file first render it to
this...
target => # The target for creating a link. Currently...
type => # A read-only state to check the file...
validate_cmd => # A command for validating the file's syntax...
validate_replacement => # The replacement string in a `validate_cmd`
that...
# ...plus any applicable metaparameters.
}
path
(Namevar: If omitted, this attribute's value defaults to the resource's title.)
The path to the file to manage. Must be fully qualified.
On Windows, the path should include the drive letter and should use / as the separator character (rather than \).
(# Back to file attributes)
ensure
(Property: This attribute represents concrete state on the target system.)
Whether the file should exist, and if so what kind of file it should be. Possible values are present, absent, file,
directory, and link.
• present accepts any form of file existence, and creates a normal file if the file is missing. (The file will have no
content unless the content or source attribute is used.)
• absent ensures the file doesn't exist, and deletes it if necessary.
• file ensures it's a normal file, and enables use of the content or source attribute.
• directory ensures it's a directory, and enables use of the source, recurse, recurselimit, ignore,
and purge attributes.
• link ensures the file is a symlink, and requires that you also set the target attribute. Symlinks are supported
on all Posix systems and on Windows Vista / 2008 and higher. On Windows, managing symlinks requires Puppet
agent's user account to have the "Create Symbolic Links" privilege; this can be configured in the "User Rights
Assignment" section in the Windows policy editor. By default, Puppet agent runs as the Administrator account,
which has this privilege.
Puppet avoids destroying directories unless the force attribute is set to true. This means that if a file is currently
a directory, setting ensure to anything but directory or present will cause Puppet to skip managing the
resource and log either a notice or an error.
There is one other non-standard value for ensure. If you specify the path to another file as the ensure value, it is
equivalent to specifying link and using that path as the target:
# Equivalent resources:
file { '/etc/inetd.conf':
ensure => '/etc/inet/inetd.conf',
}
file { '/etc/inetd.conf':
© 2024 Puppet, Inc., a Perforce company

Puppet | Syntax and settings | 539
ensure => link,
target => '/etc/inet/inetd.conf',
}
However, we recommend using link and target explicitly, since this behavior can be harder to read and is
deprecated as of Puppet 4.3.0.
Valid values are absent (also called false), file, present, directory, link. Values can match /./.
(# Back to file attributes)
backup
Whether (and how) file content should be backed up before being replaced. This attribute works best as a resource
default in the site manifest (File { backup => main }), so it can affect all file resources.
• If set to false, file content won't be backed up.
• If set to a string beginning with ., such as .puppet-bak, Puppet will use copy the file in the same directory
with that value as the extension of the backup. (A value of true is a synonym for .puppet-bak.)
• If set to any other string, Puppet will try to back up to a filebucket with that title. Puppet automatically creates
a local filebucket named puppet if one doesn't already exist. See the filebucket resource type for more
details.
Default value: false
Backing up to a local filebucket isn't particularly useful. If you want to make organized use of backups, you will
generally want to use the primary Puppet server's filebucket service. This requires declaring a filebucket resource and
a resource default for the backup attribute in site.pp:
# /etc/puppetlabs/puppet/manifests/site.pp
filebucket { 'main':
path => false, # This is required for remote filebuckets.
server => 'puppet.example.com', # Optional; defaults to the configured
primary Puppet server.
}
File { backup => main, }
If you are using multiple primary servers, you will want to centralize the contents of the filebucket. Either configure
your load balancer to direct all filebucket traffic to a single primary server, or use something like an out-of-band rsync
task to synchronize the content on all primary servers.
Note: Enabling and using the backup option, and by extension the filebucket resource, requires appropriate
planning and management to ensure that sufficient disk space is available for the file backups. Generally,
you can implement this using one of the following two options:
• Use a find command and crontab entry to retain only the last X days of file backups. For example:
find /opt/puppetlabs/server/data/puppetserver/bucket -type f -mtime +45 -
atime +45 -print0 | xargs -0 rm
• Restrict the directory to a maximum size after which the oldest items are removed.
(# Back to file attributes)
checksum
The checksum type to use when determining whether to replace a file's contents.
The default checksum type is sha256.
Valid values are sha256, sha256lite, md5, md5lite, sha1, sha1lite, sha512, sha384, sha224,
mtime, ctime, none.
(# Back to file attributes)
© 2024 Puppet, Inc., a Perforce company

Puppet | Syntax and settings | 540
checksum_value
(Property: This attribute represents concrete state on the target system.)
The checksum of the source contents. Only md5, sha256, sha224, sha384 and sha512 are supported when specifying
this parameter. If this parameter is set, source_permissions will be assumed to be false, and ownership and
permissions will not be read from source.
(# Back to file attributes)
content
(Property: This attribute represents concrete state on the target system.)
The desired contents of a file, as a string. This attribute is mutually exclusive with source and target.
Newlines and tabs can be specified in double-quoted strings using standard escaped syntax --- \n for a newline, and \t
for a tab.
With very small files, you can construct content strings directly in the manifest...
define resolve($nameserver1, $nameserver2, $domain, $search) {
$str = "search ${search}
domain ${domain}
nameserver ${nameserver1}
nameserver ${nameserver2}
"
file { '/etc/resolv.conf':
content => $str,
}
}
...but for larger files, this attribute is more useful when combined with the template or file function.
(# Back to file attributes)
ctime
(Property: This attribute represents concrete state on the target system.)
A read-only state to check the file ctime. On most modern *nix-like systems, this is the time of the most recent
change to the owner, group, permissions, or content of the file.
(# Back to file attributes)
force
Perform the file operation even if it will destroy one or more directories. You must use force in order to:
• purge subdirectories
• Replace directories with files or links
• Remove a directory when ensure => absent
Valid values are true, false, yes, no.
(# Back to file attributes)
group
(Property: This attribute represents concrete state on the target system.)
Which group should own the file. Argument can be either a group name or a group ID.
On Windows, a user (such as "Administrator") can be set as a file's group and a group (such as "Administrators") can
be set as a file's owner; however, a file's owner and group shouldn't be the same. (If the owner is also the group, files
with modes like "0640" will cause log churn, as they will always appear out of sync.)
(# Back to file attributes)
© 2024 Puppet, Inc., a Perforce company
Puppet | Syntax and settings | 541
ignore
A parameter which omits action on files matching specified patterns during recursion. Uses Ruby's builtin globbing
engine, so shell metacharacters such as [a-z]* are fully supported. Matches that would descend into the directory
structure are ignored, such as */*.
(# Back to file attributes)
links
How to handle links during file actions. During file copying, follow will copy the target file instead of the link and
manage will copy the link itself. When not copying, manage will manage the link, and follow will manage the
file to which the link points.
Valid values are follow, manage.
(# Back to file attributes)
max_files
In case the resource is a directory and the recursion is enabled, puppet will generate a new resource for each file file
found, possible leading to an excessive number of resources generated without any control.
Setting max_files will check the number of file resources that will eventually be created and will raise a resource
argument error if the limit will be exceeded.
Use value 0 to log a warning instead of raising an error.
Use value -1 to disable errors and warnings due to max files.
Values can match /^[0-9]+$/, /^-1$/.
(# Back to file attributes)
mode
(Property: This attribute represents concrete state on the target system.)
The desired permissions mode for the file, in symbolic or numeric notation. This value must be specified as a string;
do not use un-quoted numbers to represent file modes.
If the mode is omitted (or explicitly set to undef), Puppet does not enforce permissions on existing files and creates
new files with permissions of 0644.
The file type uses traditional Unix permission schemes and translates them to equivalent permissions for systems
which represent permissions differently, including Windows. For detailed ACL controls on Windows, you can leave
mode unmanaged and use the puppetlabs/acl module.
Numeric modes should use the standard octal notation of <SETUID/SETGID/
STICKY><OWNER><GROUP><OTHER> (for example, "0644").
• Each of the "owner," "group," and "other" digits should be a sum of the permissions for that class of users, where
read = 4, write = 2, and execute/search = 1.
• The setuid/setgid/sticky digit is also a sum, where setuid = 4, setgid = 2, and sticky = 1.
• The setuid/setgid/sticky digit is optional. If it is absent, Puppet will clear any existing setuid/setgid/sticky
permissions. (So to make your intent clear, you should use at least four digits for numeric modes.)
• When specifying numeric permissions for directories, Puppet sets the search permission wherever the read
permission is set.
Symbolic modes should be represented as a string of comma-separated permission clauses, in the form
<WHO><OP><PERM>:
• "Who" should be any combination of u (user), g (group), and o (other), or a (all)
• "Op" should be = (set exact permissions), + (add select permissions), or - (remove select permissions)
© 2024 Puppet, Inc., a Perforce company
Puppet | Syntax and settings | 542
• "Perm" should be one or more of:
• r (read)
• w (write)
• x (execute/search)
• t (sticky)
• s (setuid/setgid)
• X (execute/search if directory or if any one user can execute)
• u (user's current permissions)
• g (group's current permissions)
• o (other's current permissions)
Thus, mode "0664" could be represented symbolically as either a=r,ug+w or ug=rw,o=r. However, symbolic
modes are more expressive than numeric modes: a mode only affects the specified bits, so mode => 'ug+w' will
set the user and group write bits, without affecting any other bits.
See the manual page for GNU or BSD chmod for more details on numeric and symbolic modes.
On Windows, permissions are translated as follows:
• Owner and group names are mapped to Windows SIDs
• The "other" class of users maps to the "Everyone" SID
• The read/write/execute permissions map to the FILE_GENERIC_READ, FILE_GENERIC_WRITE, and
FILE_GENERIC_EXECUTE access rights; a file's owner always has the FULL_CONTROL right
• "Other" users can't have any permissions a file's group lacks, and its group can't have any permissions its owner
lacks; that is, "0644" is an acceptable mode, but "0464" is not.
(# Back to file attributes)
mtime
(Property: This attribute represents concrete state on the target system.)
A read-only state to check the file mtime. On *nix-like systems, this is the time of the most recent change to the
content of the file.
(# Back to file attributes)
owner
(Property: This attribute represents concrete state on the target system.)
The user to whom the file should belong. Argument can be a user name or a user ID.
On Windows, a group (such as "Administrators") can be set as a file's owner and a user (such as "Administrator") can
be set as a file's group; however, a file's owner and group shouldn't be the same. (If the owner is also the group, files
with modes like "0640" will cause log churn, as they will always appear out of sync.)
(# Back to file attributes)
provider
The specific backend to use for this file resource. You will seldom need to specify this --- Puppet will usually
discover the appropriate provider for your platform.
Available providers are:
• posix
• windows
(# Back to file attributes)
purge
Whether unmanaged files should be purged. This option only makes sense when ensure => directory and
recurse => true.
© 2024 Puppet, Inc., a Perforce company
Puppet | Syntax and settings | 543
• When recursively duplicating an entire directory with the source attribute, purge => true will
automatically purge any files that are not in the source directory.
• When managing files in a directory as individual resources, setting purge => true will purge any files that
aren't being specifically managed.
If you have a filebucket configured, the purged files will be uploaded, but if you do not, this will destroy data.
Unless force => true is set, purging will not delete directories, although it will delete the files they contain.
If recurselimit is set and you aren't using force => true, purging will obey the recursion limit; files in any
subdirectories deeper than the limit will be treated as unmanaged and left alone.
Valid values are true, false, yes, no.
(# Back to file attributes)
recurse
Whether to recursively manage the contents of a directory. This attribute is only used when ensure =>
directory is set. The allowed values are:
• false --- The default behavior. The contents of the directory will not be automatically managed.
• remote --- If the source attribute is set, Puppet will automatically manage the contents of the source directory
(or directories), ensuring that equivalent files and directories exist on the target system and that their contents
match.
Using remote will disable the purge attribute, but results in faster catalog application than recurse =>
true.
The source attribute is mandatory when recurse => remote.
• true --- If the source attribute is set, this behaves similarly to recurse => remote, automatically
managing files from the source directory.
This also enables the purge attribute, which can delete unmanaged files from a directory. See the description of
purge for more details.
The source attribute is not mandatory when using recurse => true, so you can enable purging in
directories where all files are managed individually.
By default, setting recurse to remote or true will manage all subdirectories. You can use the recurselimit
attribute to limit the recursion depth.
Valid values are true, false, remote.
(# Back to file attributes)
recurselimit
How far Puppet should descend into subdirectories, when using ensure => directory and either recurse
=> true or recurse => remote. The recursion limit affects which files will be copied from the source
directory, as well as which files can be purged when purge => true.
Setting recurselimit => 0 is the same as setting recurse => false --- Puppet will manage the directory,
but all of its contents will be treated as unmanaged.
Setting recurselimit => 1 will manage files and directories that are directly inside the directory, but will not
manage the contents of any subdirectories.
Setting recurselimit => 2 will manage the direct contents of the directory, as well as the contents of the first
level of subdirectories.
This pattern continues for each incremental value of recurselimit.
Values can match /^[0-9]+$/.
(# Back to file attributes)
replace
© 2024 Puppet, Inc., a Perforce company
Puppet | Syntax and settings | 544
Whether to replace a file or symlink that already exists on the local system but whose content doesn't match what
the source or content attribute specifies. Setting this to false allows file resources to initialize files without
overwriting future changes. Note that this only affects content; Puppet will still manage ownership and permissions.
Valid values are true, false, yes, no.
(# Back to file attributes)
selinux_ignore_defaults
If this is set, Puppet will not call the SELinux function selabel_lookup to supply defaults for the SELinux attributes
(seluser, selrole, seltype, and selrange). In general, you should leave this set at its default and only set it to true when
you need Puppet to not try to fix SELinux labels automatically.
Valid values are true, false.
(# Back to file attributes)
selrange
(Property: This attribute represents concrete state on the target system.)
What the SELinux range component of the context of the file should be. Any valid SELinux range component is
accepted. For example s0 or SystemHigh. If not specified, it defaults to the value returned by selabel_lookup for
the file, if any exists. Only valid on systems with SELinux support enabled and that have support for MCS (Multi-
Category Security).
(# Back to file attributes)
selrole
(Property: This attribute represents concrete state on the target system.)
What the SELinux role component of the context of the file should be. Any valid SELinux role component is
accepted. For example role_r. If not specified, it defaults to the value returned by selabel_lookup for the file, if any
exists. Only valid on systems with SELinux support enabled.
(# Back to file attributes)
seltype
(Property: This attribute represents concrete state on the target system.)
What the SELinux type component of the context of the file should be. Any valid SELinux type component is
accepted. For example tmp_t. If not specified, it defaults to the value returned by selabel_lookup for the file, if any
exists. Only valid on systems with SELinux support enabled.
(# Back to file attributes)
seluser
(Property: This attribute represents concrete state on the target system.)
What the SELinux user component of the context of the file should be. Any valid SELinux user component is
accepted. For example user_u. If not specified, it defaults to the value returned by selabel_lookup for the file, if any
exists. Only valid on systems with SELinux support enabled.
(# Back to file attributes)
show_diff
Whether to display differences when the file changes, defaulting to true. This parameter is useful for files that may
contain passwords or other secret data, which might otherwise be included in Puppet reports or other insecure outputs.
If the global show_diff setting is false, then no diffs will be shown even if this parameter is true.
Valid values are true, false, yes, no.
(# Back to file attributes)
© 2024 Puppet, Inc., a Perforce company

Puppet | Syntax and settings | 545
source
A source file, which will be copied into place on the local system. This attribute is mutually exclusive with content
and target. Allowed values are:
• puppet: URIs, which point to files in modules or Puppet file server mount points.
• Fully qualified paths to locally available files (including files on NFS shares or Windows mapped drives).
• file: URIs, which behave the same as local file paths.
• http(s): URIs, which point to files served by common web servers.
The normal form of a puppet: URI is:
puppet:///modules/<MODULE NAME>/<FILE PATH>
This will fetch a file from a module on the Puppet master (or from a local module when using Puppet apply).
Given a modulepath of /etc/puppetlabs/code/modules, the example above would resolve to /etc/
puppetlabs/code/modules/<MODULE NAME>/files/<FILE PATH>.
Unlike content, the source attribute can be used to recursively copy directories if the recurse attribute is set
to true or remote. If a source directory contains symlinks, use the links attribute to specify whether to recreate
links or follow them.
HTTP URIs cannot be used to recursively synchronize whole directory trees. You cannot use
source_permissions values other than ignore because HTTP servers do not transfer any metadata that
translates to ownership or permission details.
Puppet determines if file content is synchronized by computing a checksum for the local file and comparing it against
the checksum_value parameter. If the checksum_value parameter is not specified for puppet and file
sources, Puppet computes a checksum based on its Puppet[:digest_algorithm]. For http(s) sources,
Puppet uses the first HTTP header it recognizes out of the following list: X-Checksum-Sha256, X-Checksum-
Sha1, X-Checksum-Md5 or Content-MD5. If the server response does not include one of these headers, Puppet
defaults to using the Last-Modified header. Puppet updates the local file if the header is newer than the modified
time (mtime) of the local file.
HTTP URIs can include a user information component so that Puppet can retrieve file metadata
and content from HTTP servers that require HTTP Basic authentication. For example https://
<user>:<pass>@<server>:<port>/path/to/file.
When connecting to HTTPS servers, Puppet trusts CA certificates in the puppet-agent certificate
bundle and the Puppet CA. You can configure Puppet to trust additional CA certificates using the
Puppet[:ssl_trust_store] setting.
Multiple source values can be specified as an array, and Puppet will use the first source that exists. This can be
used to serve different files to different system types:
file { '/etc/nfs.conf':
source => [
"puppet:///modules/nfs/conf.${host}",
"puppet:///modules/nfs/conf.${os['name']}",
'puppet:///modules/nfs/conf'
]
}
Alternately, when serving directories recursively, multiple sources can be combined by setting the sourceselect
attribute to all.
(# Back to file attributes)
source_permissions
Whether (and how) Puppet should copy owner, group, and mode permissions from the source to file resources
when the permissions are not explicitly specified. (In all cases, explicit permissions will take precedence.) Valid
values are use, use_when_creating, and ignore:
© 2024 Puppet, Inc., a Perforce company

Puppet | Syntax and settings | 546
• ignore (the default) will never apply the owner, group, or mode from the source when managing a file. When
creating new files without explicit permissions, the permissions they receive will depend on platform-specific
behavior. On POSIX, Puppet will use the umask of the user it is running as. On Windows, Puppet will use the
default DACL associated with the user it is running as.
• use will cause Puppet to apply the owner, group, and mode from the source to any files it is managing.
• use_when_creating will only apply the owner, group, and mode from the source when creating a file;
existing files will not have their permissions overwritten.
Valid values are use, use_when_creating, ignore.
(# Back to file attributes)
sourceselect
Whether to copy all valid sources, or just the first one. This parameter only affects recursive directory copies; by
default, the first valid source is the only one used, but if this parameter is set to all, then all valid sources will have
all of their contents copied to the local system. If a given file exists in more than one source, the version from the
earliest source in the list will be used.
Valid values are first, all.
(# Back to file attributes)
staging_location
When rendering a file first render it to this location. The default location is the same path as the desired location with
a unique filename. This parameter is useful in conjuction with validate_cmd to test a file before moving the file to
it's final location. WARNING: File replacement is only guaranteed to be atomic if the staging location is on the same
filesystem as the final location.
(# Back to file attributes)
target
(Property: This attribute represents concrete state on the target system.)
The target for creating a link. Currently, symlinks are the only type supported. This attribute is mutually exclusive
with source and content.
Symlink targets can be relative, as well as absolute:
# (Useful on Solaris)
file { '/etc/inetd.conf':
ensure => link,
target => 'inet/inetd.conf',
}
Directories of symlinks can be served recursively by instead using the source attribute, setting ensure to
directory, and setting the links attribute to manage.
Valid values are notlink. Values can match /./.
(# Back to file attributes)
type
(Property: This attribute represents concrete state on the target system.)
A read-only state to check the file type.
(# Back to file attributes)
validate_cmd
A command for validating the file's syntax before replacing it. If Puppet would need to rewrite a file due to new
source or content, it will check the new content's validity first. If validation fails, the file resource will fail.
© 2024 Puppet, Inc., a Perforce company

Puppet | Syntax and settings | 547
This command must have a fully qualified path, and should contain a percent (%) token where it would expect an
input file. It must exit 0 if the syntax is correct, and non-zero otherwise. The command will be run on the target
system while applying the catalog, not on the primary Puppet server.
Example:
file { '/etc/apache2/apache2.conf':
content => 'example',
validate_cmd => '/usr/sbin/apache2 -t -f %',
}
This would replace apache2.conf only if the test returned true.
Note that if a validation command requires a % as part of its text, you can specify a different placeholder token with
the validate_replacement attribute.
(# Back to file attributes)
validate_replacement
The replacement string in a validate_cmd that will be replaced with an input file name.
(# Back to file attributes)
Providers
posix
Uses POSIX functionality to manage file ownership and permissions.
• Supported features: manages_symlinks.
windows
Uses Microsoft Windows functionality to manage file ownership and permissions.
• Supported features: manages_symlinks.
Provider Features
Available features:
• manages_symlinks --- The provider can manage symbolic links.
Provider support:
• posix - manages symlinks
• windows - manages symlinks
filebucket
• Attributes
Description
A repository for storing and retrieving file content by cryptographic checksum. Can be local to each agent node, or
centralized on a primary Puppet server. All puppet servers provide a filebucket service that agent nodes can access via
HTTP, but you must declare a filebucket resource before any agents will do so.
Filebuckets are used for the following features:
• Content backups. If the file type's backup attribute is set to the name of a filebucket, Puppet will back up the
old content whenever it rewrites a file; see the documentation for the file type for more details. These backups
can be used for manual recovery of content, but are more commonly used to display changes and differences in a
tool like Puppet Dashboard.
To use a central filebucket for backups, you will usually want to declare a filebucket resource and a resource default
for the backup attribute in site.pp:
# /etc/puppetlabs/puppet/manifests/site.pp
© 2024 Puppet, Inc., a Perforce company

Puppet | Syntax and settings | 548
filebucket { 'main':
path => false, # This is required for remote filebuckets.
server => 'puppet.example.com', # Optional; defaults to the configured
primary server.
}
File { backup => main, }
Puppet Servers automatically provide the filebucket service, so this will work in a default configuration. If you have
a heavily restricted Puppet Server auth.conf file, you may need to allow access to the file_bucket_file
endpoint.
Attributes
filebucket { 'resource title':
name => # (namevar) The name of the...
path => # The path to the _local_ filebucket; defaults to...
port => # The port on which the remote server is...
server => # The server providing the remote filebucket...
# ...plus any applicable metaparameters.
}
name
(Namevar: If omitted, this attribute's value defaults to the resource's title.)
The name of the filebucket.
(# Back to filebucket attributes)
path
The path to the local filebucket; defaults to the value of the clientbucketdir setting. To use a remote filebucket,
you must set this attribute to false.
(# Back to filebucket attributes)
port
The port on which the remote server is listening.
This setting is only consulted if the path attribute is set to false.
If this attribute is not specified, the first entry in the server_list configuration setting is used, followed by the
value of the serverport setting if server_list is not set.
(# Back to filebucket attributes)
server
The server providing the remote filebucket service.
This setting is only consulted if the path attribute is set to false.
If this attribute is not specified, the first entry in the server_list configuration setting is used, followed by the
value of the server setting if server_list is not set.
(# Back to filebucket attributes)
group
• Attributes
• Providers
• Provider Features
© 2024 Puppet, Inc., a Perforce company

Puppet | Syntax and settings | 549
Description
Manage groups. On most platforms this can only create groups. Group membership must be managed on individual
users.
On some platforms such as OS X, group membership is managed as an attribute of the group, not the user record.
Providers must have the feature 'manages_members' to manage the 'members' property of a group record.
Attributes
group { 'resource title':
name => # (namevar) The group name. While naming
limitations vary by
ensure => # Create or remove the group. Valid values are...
allowdupe => # Whether to allow duplicate GIDs. Valid
values...
attribute_membership => # AIX only. Configures the behavior of the...
attributes => # Specify group AIX attributes, as an array of...
auth_membership => # Configures the behavior of the `members...
forcelocal => # Forces the management of local accounts when...
gid => # The group ID. Must be specified numerically....
ia_load_module => # The name of the I&A module to use to manage
this
members => # The members of the group. For platforms or...
provider => # The specific backend to use for this `group...
system => # Whether the group is a system group with
lower...
# ...plus any applicable metaparameters.
}
name
(Namevar: If omitted, this attribute's value defaults to the resource's title.)
The group name. While naming limitations vary by operating system, it is advisable to restrict names to the lowest
common denominator, which is a maximum of 8 characters beginning with a letter.
Note that Puppet considers group names to be case-sensitive, regardless of the platform's own rules; be sure to always
use the same case when referring to a given group.
(# Back to group attributes)
ensure
(Property: This attribute represents concrete state on the target system.)
Create or remove the group.
Valid values are present, absent.
(# Back to group attributes)
allowdupe
Whether to allow duplicate GIDs.
Valid values are true, false, yes, no.
(# Back to group attributes)
attribute_membership
AIX only. Configures the behavior of the attributes parameter.
• minimum (default) --- The provided list of attributes is partial, and Puppet ignores any attributes that aren't listed
there.
• inclusive --- The provided list of attributes is comprehensive, and Puppet purges any attributes that aren't
listed there.
© 2024 Puppet, Inc., a Perforce company
Puppet | Syntax and settings | 550
Valid values are inclusive, minimum.
(# Back to group attributes)
attributes
(Property: This attribute represents concrete state on the target system.)
Specify group AIX attributes, as an array of 'key=value' strings. This parameter's behavior can be configured
with attribute_membership.
Requires features manages_aix_lam.
(# Back to group attributes)
auth_membership
Configures the behavior of the members parameter.
• false (default) --- The provided list of group members is partial, and Puppet ignores any members that aren't
listed there.
• true --- The provided list of of group members is comprehensive, and Puppet purges any members that aren't
listed there.
Valid values are true, false, yes, no.
(# Back to group attributes)
forcelocal
Forces the management of local accounts when accounts are also being managed by some other Name Switch Service
(NSS). For AIX, refer to the ia_load_module parameter.
This option relies on your operating system's implementation of luser* commands, such as luseradd ,
lgroupadd, and lusermod. The forcelocal option could behave unpredictably in some circumstances. If the
tools it depends on are not available, it might have no effect at all.
Valid values are true, false, yes, no.
Requires features manages_local_users_and_groups.
(# Back to group attributes)
gid
(Property: This attribute represents concrete state on the target system.)
The group ID. Must be specified numerically. If no group ID is specified when creating a new group, then one will be
chosen automatically according to local system standards. This will likely result in the same group having different
GIDs on different systems, which is not recommended.
On Windows, this property is read-only and will return the group's security identifier (SID).
(# Back to group attributes)
ia_load_module
The name of the I&A module to use to manage this group. This should be set to files if managing local groups.
Requires features manages_aix_lam.
(# Back to group attributes)
members
(Property: This attribute represents concrete state on the target system.)
The members of the group. For platforms or directory services where group membership is stored in the group
objects, not the users. This parameter's behavior can be configured with auth_membership.
Requires features manages_members.
© 2024 Puppet, Inc., a Perforce company
Puppet | Syntax and settings | 551
(# Back to group attributes)
provider
The specific backend to use for this group resource. You will seldom need to specify this --- Puppet will usually
discover the appropriate provider for your platform.
Available providers are:
• aix
• directoryservice
• groupadd
• ldap
• pw
• windows_adsi
(# Back to group attributes)
system
Whether the group is a system group with lower GID.
Valid values are true, false, yes, no.
(# Back to group attributes)
Providers
aix
Group management for AIX.
• Required binaries: /usr/bin/chgroup, /usr/bin/mkgroup, /usr/sbin/lsgroup, /usr/sbin/
rmgroup.
• Default for os.name == aix.
• Supported features: manages_aix_lam, manages_local_users_and_groups, manages_members.
directoryservice
Group management using DirectoryService on OS X.
• Required binaries: /usr/bin/dscl.
• Default for os.name == darwin.
• Supported features: manages_members.
groupadd
Group management via groupadd and its ilk. The default for most platforms.
To use the forcelocal parameter, you need to install the libuser package (providing /usr/sbin/
lgroupadd and /usr/sbin/luseradd).
• Required binaries: groupadd, groupdel, groupmod, lgroupadd, lgroupdel, lgroupmod, usermod.
• Supported features: system_groups.
ldap
Group management via LDAP.
This provider requires that you have valid values for all of the LDAP-related settings in puppet.conf, including
ldapbase. You will almost definitely need settings for ldapuser and ldappassword in order for your clients
to write to LDAP.
Note that this provider will automatically generate a GID for you if you do not specify one, but it is a potentially
expensive operation, as it iterates across all existing groups to pick the appropriate next one.
pw
© 2024 Puppet, Inc., a Perforce company

Puppet | Syntax and settings | 552
Group management via pw on FreeBSD and DragonFly BSD.
• Required binaries: pw.
• Default for os.name == freebsd, dragonfly.
• Supported features: manages_members.
windows_adsi
Local group management for Windows. Group members can be both users and groups. Additionally, local groups can
contain domain users.
• Default for os.name == windows.
• Supported features: manages_members.
Provider Features
Available features:
• manages_aix_lam --- The provider can manage AIX Loadable Authentication Module (LAM) system.
• manages_local_users_and_groups --- Allows local groups to be managed on systems that also use some
other remote Name Switch Service (NSS) method of managing accounts.
• manages_members --- For directories where membership is an attribute of groups not users.
• system_groups --- The provider allows you to create system groups with lower GIDs.
Provider support:
• aix - manages aix lam, manages local users and groups, manages members
• directoryservice - manages members
• groupadd - system groups, libuser
• ldap - No supported Provider features
• pw - manages members
• windows_adsi - manages members
notify
• Attributes
Description
Sends an arbitrary message, specified as a string, to the agent run-time log. It's important to note that the notify
resource type is not idempotent. As a result, notifications are shown as a change on every Puppet run.
Attributes
notify { 'resource title':
name => # (namevar) An arbitrary tag for your own reference; the...
message => # The message to be sent to the log. Note that the
withpath => # Whether to show the full object path. Valid...
# ...plus any applicable metaparameters.
}
name
(Namevar: If omitted, this attribute's value defaults to the resource's title.)
An arbitrary tag for your own reference; the name of the message.
(# Back to notify attributes)
message
(Property: This attribute represents concrete state on the target system.)
The message to be sent to the log. Note that the value specified must be a string.
(# Back to notify attributes)
© 2024 Puppet, Inc., a Perforce company

Puppet | Syntax and settings | 553
withpath
Whether to show the full object path.
Valid values are true, false.
(# Back to notify attributes)
package
• Attributes
• Providers
• Provider Features
Description
Manage packages. There is a basic dichotomy in package support right now: Some package types (such as yum and
apt) can retrieve their own package files, while others (such as rpm and sun) cannot. For those package formats that
cannot retrieve their own files, you can use the source parameter to point to the correct file.
Puppet will automatically guess the packaging format that you are using based on the platform you are on, but you
can override it using the provider parameter; each provider defines what it requires in order to function, and you
must meet those requirements to use a given provider.
You can declare multiple package resources with the same name as long as they have unique titles, and specify
different providers and commands.
Note that you must use the title to make a reference to a package resource; Package[<NAME>] is not a synonym
for Package[<TITLE>] like it is for many other resource types.
Autorequires: If Puppet is managing the files specified as a package's adminfile, responsefile, or source,
the package resource will autorequire those files.
Attributes
package { 'resource title':
name => # (namevar) The package name. This is the name
that the...
provider => # (namevar) The specific backend to use for this
`package...
command => # (namevar) The targeted command to use when
managing a...
ensure => # What state the package should be in. On...
adminfile => # A file containing package defaults for...
allow_virtual => # Specifies if virtual package names are
allowed...
allowcdrom => # Tells apt to allow cdrom sources in the...
category => # A read-only parameter set by the...
configfiles => # Whether to keep or replace modified config
files
description => # A read-only parameter set by the...
enable_only => # Tells `dnf module` to only enable a specific...
flavor => # OpenBSD and DNF modules support 'flavors',
which
install_only => # It should be set for packages that should
only...
install_options => # An array of additional options to pass when...
instance => # A read-only parameter set by the...
mark => # Set to hold to tell Debian apt/Solaris pkg to...
package_settings => # Settings that can change the contents or...
platform => # A read-only parameter set by the...
reinstall_on_refresh => # Whether this resource should respond to
refresh...
responsefile => # A file containing any necessary answers to...
root => # A read-only parameter set by the...
© 2024 Puppet, Inc., a Perforce company

Puppet | Syntax and settings | 554
source => # Where to find the package file. This is
mostly...
status => # A read-only parameter set by the...
uninstall_options => # An array of additional options to pass when...
vendor => # A read-only parameter set by the...
# ...plus any applicable metaparameters.
}
name
(Namevar: If omitted, this attribute's value defaults to the resource's title.)
The package name. This is the name that the packaging system uses internally, which is sometimes (especially on
Solaris) a name that is basically useless to humans. If a package goes by several names, you can use a single title and
then set the name conditionally:
# In the 'openssl' class
$ssl = $os['name'] ? {
solaris => SMCossl,
default => openssl
}
package { 'openssl':
ensure => installed,
name => $ssl,
}
...
$ssh = $os['name'] ? {
solaris => SMCossh,
default => openssh
}
package { 'openssh':
ensure => installed,
name => $ssh,
require => Package['openssl'],
}
(# Back to package attributes)
provider
(Secondary namevar: This resource type allows you to manage multiple resources with the same name as long as
their providers are different.)
The specific backend to use for this package resource. You will seldom need to specify this --- Puppet will usually
discover the appropriate provider for your platform.
Available providers are:
• aix
• appdmg
• apple
• apt
• aptitude
• aptrpm
• blastwave
• dnf
• dnfmodule
• dpkg
© 2024 Puppet, Inc., a Perforce company
Puppet | Syntax and settings | 555
• fink
• freebsd
• gem
• hpux
• macports
• nim
• openbsd
• opkg
• pacman
• pip2
• pip3
• pip
• pkg
• pkgdmg
• pkgin
• pkgng
• pkgutil
• portage
• ports
• portupgrade
• puppet_gem
• puppetserver_gem
• rpm
• rug
• sun
• sunfreeware
• tdnf
• up2date
• urpmi
• windows
• xbps
• yum
• zypper
(# Back to package attributes)
command
(Namevar: If omitted, this attribute's value defaults to the resource's title.)
The targeted command to use when managing a package:
package { 'mysql': provider => gem, }
package { 'mysql-opt': name => 'mysql', provider => gem, command => '/opt/ruby/bin/gem', }
Each provider defines a package management command and uses the first instance of the command found in the
PATH.
Providers supporting the targetable feature allow you to specify the absolute path of the package management
command. Specifying the absolute path is useful when multiple instances of the command are installed, or the
command is not in the PATH.
Requires features targetable.
(# Back to package attributes)
ensure
© 2024 Puppet, Inc., a Perforce company
Puppet | Syntax and settings | 556
(Property: This attribute represents concrete state on the target system.)
What state the package should be in. On packaging systems that can retrieve new packages on their own, you can
choose which package to retrieve by specifying a version number or latest as the ensure value. On packaging
systems that manage configuration files separately from "normal" system files, you can uninstall config files by
specifying purged as the ensure value. This defaults to installed.
Version numbers must match the full version to install, including release if the provider uses a release moniker.
For example, to install the bash package from the rpm bash-4.1.2-29.el6.x86_64.rpm, use the string
'4.1.2-29.el6'.
On supported providers, version ranges can also be ensured. For example, inequalities: <2.0.0, or intersections:
>1.0.0 <2.0.0.
Valid values are present (also called installed), absent, purged, disabled, latest. Values can match
/./.
(# Back to package attributes)
adminfile
A file containing package defaults for installing packages.
This attribute is only used on Solaris. Its value should be a path to a local file stored on the target system. Solaris's
package tools expect either an absolute file path or a relative path to a file in /var/sadm/install/admin.
The value of adminfile will be passed directly to the pkgadd or pkgrm command with the -a <ADMINFILE>
option.
(# Back to package attributes)
allow_virtual
Specifies if virtual package names are allowed for install and uninstall.
Valid values are true, false, yes, no.
Requires features virtual_packages.
(# Back to package attributes)
allowcdrom
Tells apt to allow cdrom sources in the sources.list file. Normally apt will bail if you try this.
Valid values are true, false.
(# Back to package attributes)
category
A read-only parameter set by the package.
(# Back to package attributes)
configfiles
Whether to keep or replace modified config files when installing or upgrading a package. This only affects the apt
and dpkg providers.
Valid values are keep, replace.
(# Back to package attributes)
description
A read-only parameter set by the package.
(# Back to package attributes)
enable_only
© 2024 Puppet, Inc., a Perforce company

Puppet | Syntax and settings | 557
Tells dnf module to only enable a specific module, instead of installing its default profile.
Modules with no default profile will be enabled automatically without the use of this parameter.
Conflicts with the flavor property, which selects a profile to install.
Valid values are true, false, yes, no.
(# Back to package attributes)
flavor
(Property: This attribute represents concrete state on the target system.)
OpenBSD and DNF modules support 'flavors', which are further specifications for which type of package you want.
Requires features supports_flavors.
(# Back to package attributes)
install_only
It should be set for packages that should only ever be installed, never updated. Kernels in particular fall into this
category.
Valid values are true, false, yes, no.
Requires features install_only.
(# Back to package attributes)
install_options
An array of additional options to pass when installing a package. These options are package-specific, and should be
documented by the software vendor. One commonly implemented option is INSTALLDIR:
package { 'mysql':
ensure => installed,
source => 'N:/packages/mysql-5.5.16-winx64.msi',
install_options => [ '/S', { 'INSTALLDIR' => 'C:\mysql-5.5' } ],
}
Each option in the array can either be a string or a hash, where each key and value pair are interpreted in a provider
specific way. Each option will automatically be quoted when passed to the install command.
With Windows packages, note that file paths in an install option must use backslashes. (Since install options are
passed directly to the installation command, forward slashes won't be automatically converted like they are in file
resources.) Note also that backslashes in double-quoted strings must be escaped and backslashes in single-quoted
strings can be escaped.
Requires features install_options.
(# Back to package attributes)
instance
A read-only parameter set by the package.
(# Back to package attributes)
mark
(Property: This attribute represents concrete state on the target system.)
Set to hold to tell Debian apt/Solaris pkg to hold the package version
Valid values are: hold/none Default is "none". Mark can be specified with or without ensure, if ensure is missing
will default to "present".
Mark cannot be specified together with "purged", or "absent" values for ensure.
© 2024 Puppet, Inc., a Perforce company

Puppet | Syntax and settings | 558
Valid values are hold, none.
Requires features holdable.
(# Back to package attributes)
package_settings
(Property: This attribute represents concrete state on the target system.)
Settings that can change the contents or configuration of a package.
The formatting and effects of package_settings are provider-specific; any provider that implements them must explain
how to use them in its documentation. (Our general expectation is that if a package is installed but its settings are out
of sync, the provider should re-install that package with the desired settings.)
An example of how package_settings could be used is FreeBSD's port build options --- a future version of the
provider could accept a hash of options, and would reinstall the port if the installed version lacked the correct settings.
package { 'www/apache22':
package_settings => { 'SUEXEC' => false }
}
Again, check the documentation of your platform's package provider to see the actual usage.
Requires features package_settings.
(# Back to package attributes)
platform
A read-only parameter set by the package.
(# Back to package attributes)
reinstall_on_refresh
Whether this resource should respond to refresh events (via subscribe, notify, or the ~> arrow) by reinstalling
the package. Only works for providers that support the reinstallable feature.
This is useful for source-based distributions, where you may want to recompile a package if the build options change.
If you use this, be careful of notifying classes when you want to restart services. If the class also contains a
refreshable package, doing so could cause unnecessary re-installs.
Valid values are true, false.
(# Back to package attributes)
responsefile
A file containing any necessary answers to questions asked by the package. This is currently used on Solaris and
Debian. The value will be validated according to system rules, but it should generally be a fully qualified path.
(# Back to package attributes)
root
A read-only parameter set by the package.
(# Back to package attributes)
source
Where to find the package file. This is mostly used by providers that don't automatically download packages from a
central repository. (For example: the yum provider ignores this attribute, apt provider uses it if present and the rpm
and dpkg providers require it.)
© 2024 Puppet, Inc., a Perforce company

Puppet | Syntax and settings | 559
Different providers accept different values for source. Most providers accept paths to local files stored on the target
system. Some providers may also accept URLs or network drive paths. Puppet will not automatically retrieve source
files for you, and usually just passes the value of source to the package installation command.
You can use a file resource if you need to manually copy package files to the target system.
(# Back to package attributes)
status
A read-only parameter set by the package.
(# Back to package attributes)
uninstall_options
An array of additional options to pass when uninstalling a package. These options are package-specific, and should be
documented by the software vendor. For example:
package { 'VMware Tools':
ensure => absent,
uninstall_options => [ { 'REMOVE' => 'Sync,VSS' } ],
}
Each option in the array can either be a string or a hash, where each key and value pair are interpreted in a provider
specific way. Each option will automatically be quoted when passed to the uninstall command.
On Windows, this is the only place in Puppet where backslash separators should be used. Note that backslashes in
double-quoted strings must be double-escaped and backslashes in single-quoted strings may be double-escaped.
Requires features uninstall_options.
(# Back to package attributes)
vendor
A read-only parameter set by the package.
(# Back to package attributes)
Providers
aix
Installation from an AIX software directory, using the AIX installp command. The source parameter is
required for this provider, and should be set to the absolute path (on the puppet agent machine) of a directory
containing one or more BFF package files.
The installp command will generate a table of contents file (named .toc) in this directory, and the name
parameter (or resource title) that you specify for your package resource must match a package name that exists in
the .toc file.
Note that package downgrades are not supported; if your resource specifies a specific version number and there is
already a newer version of the package installed on the machine, the resource will fail with an error message.
• Required binaries: /usr/bin/lslpp, /usr/sbin/installp.
• Default for os.name == aix.
• Supported features: installable, uninstallable, upgradeable, versionable.
appdmg
Package management which copies application bundles to a target.
• Required binaries: /usr/bin/curl, /usr/bin/ditto, /usr/bin/hdiutil.
• Supported features: installable.
apple
© 2024 Puppet, Inc., a Perforce company
Puppet | Syntax and settings | 560
Package management based on OS X's built-in packaging system. This is essentially the simplest and least functional
package system in existence -- it only supports installation; no deletion or upgrades. The provider will automatically
add the .pkg extension, so leave that off when specifying the package name.
• Required binaries: /usr/sbin/installer.
• Supported features: installable.
apt
Package management via apt-get.
This provider supports the install_options attribute, which allows command-line flags to be passed to apt-get.
These options should be specified as an array where each element is either a string or a hash.
• Required binaries: /usr/bin/apt-cache, /usr/bin/apt-get, /usr/bin/apt-mark, /usr/bin/
debconf-set-selections.
• Default for os.family == debian.
• Supported features: holdable, install_options, installable, purgeable, uninstallable,
upgradeable, version_ranges, versionable, virtual_packages.
aptitude
Package management via aptitude.
• Required binaries: /usr/bin/apt-cache, /usr/bin/aptitude.
• Supported features: holdable, installable, purgeable, uninstallable, upgradeable,
versionable.
aptrpm
Package management via apt-get ported to rpm.
• Required binaries: apt-cache, apt-get, rpm.
• Supported features: installable, purgeable, uninstallable, upgradeable, versionable.
blastwave
Package management using Blastwave.org's pkg-get command on Solaris.
• Required binaries: pkg-get.
• Supported features: installable, uninstallable, upgradeable.
dnf
Support via dnf.
Using this provider's uninstallable feature will not remove dependent packages. To remove dependent packages
with this provider use the purgeable feature, but note this feature is destructive and should be used with the utmost
care.
This provider supports the install_options attribute, which allows command-line flags to be passed to dnf.
These options should be specified as an array where each element is either a string or a hash.
• Required binaries: dnf, rpm.
• Default for os.name == fedora. Default for os.family == redhat. Default for os.name == amazon
and os.release.major == 2023.
• Supported features: install_only, install_options, installable, purgeable,
uninstallable, upgradeable, version_ranges, versionable, virtual_packages.
dnfmodule
• Required binaries: /usr/bin/dnf.
• Supported features: disableable, installable, purgeable, supports_flavors,
uninstallable, upgradeable, versionable.
dpkg
© 2024 Puppet, Inc., a Perforce company
Puppet | Syntax and settings | 561
Package management via dpkg. Because this only uses dpkg and not apt, you must specify the source of any
packages you want to manage.
• Required binaries: /usr/bin/dpkg-deb, /usr/bin/dpkg-query, /usr/bin/dpkg.
• Supported features: holdable, installable, purgeable, uninstallable, upgradeable,
virtual_packages.
fink
Package management via fink.
• Required binaries: /sw/bin/apt-cache, /sw/bin/apt-get, /sw/bin/dpkg-query, /sw/bin/
fink.
• Supported features: holdable, installable, purgeable, uninstallable, upgradeable,
versionable.
freebsd
The specific form of package management on FreeBSD. This is an extremely quirky packaging system, in that it
freely mixes between ports and packages. Apparently all of the tools are written in Ruby, so there are plans to rewrite
this support to directly use those libraries.
• Required binaries: /usr/sbin/pkg_add, /usr/sbin/pkg_delete, /usr/sbin/pkg_info.
• Supported features: installable, purgeable, uninstallable, upgradeable.
gem
Ruby Gem support. If a URL is passed via source, then that URL is appended to the list of remote gem repositories;
to ensure that only the specified source is used, also pass --clear-sources via install_options. If source
is present but is not a valid URL, it will be interpreted as the path to a local gem file. If source is not present, the gem
will be installed from the default gem repositories. Note that to modify this for Windows, it has to be a valid URL.
This provider supports the install_options and uninstall_options attributes, which allow command-line
flags to be passed to the gem command. These options should be specified as an array where each element is either a
string or a hash.
• Required binaries: gem.
• Supported features: install_options, installable, targetable, uninstall_options,
uninstallable, upgradeable, version_ranges, versionable.
hpux
HP-UX's packaging system.
• Required binaries: /usr/sbin/swinstall, /usr/sbin/swlist, /usr/sbin/swremove.
• Default for os.name == hp-ux.
• Supported features: installable, uninstallable.
macports
Package management using MacPorts on OS X.
Supports MacPorts versions and revisions, but not variants. Variant preferences may be specified using the MacPorts
variants.conf file.
When specifying a version in the Puppet DSL, only specify the version, not the revision. Revisions are only used
internally for ensuring the latest version/revision of a port.
• Required binaries: /opt/local/bin/port.
• Supported features: installable, uninstallable, upgradeable, versionable.
nim
Installation from an AIX NIM LPP source. The source parameter is required for this provider, and should specify
the name of a NIM lpp_source resource that is visible to the puppet agent machine. This provider supports the
management of both BFF/installp and RPM packages.
© 2024 Puppet, Inc., a Perforce company
Puppet | Syntax and settings | 562
Note that package downgrades are not supported; if your resource specifies a specific version number and there is
already a newer version of the package installed on the machine, the resource will fail with an error message.
• Required binaries: /usr/bin/lslpp, /usr/sbin/nimclient, rpm.
• Supported features: installable, uninstallable, upgradeable, versionable.
openbsd
OpenBSD's form of pkg_add support.
This provider supports the install_options and uninstall_options attributes, which allow command-line
flags to be passed to pkg_add and pkg_delete. These options should be specified as an array where each element is
either a string or a hash.
• Required binaries: pkg_add, pkg_delete, pkg_info.
• Default for os.name == openbsd.
• Supported features: install_options, installable, purgeable, supports_flavors,
uninstall_options, uninstallable, upgradeable, versionable.
opkg
Opkg packaging support. Common on OpenWrt and OpenEmbedded platforms
• Required binaries: opkg.
• Default for os.name == openwrt.
• Supported features: installable, uninstallable, upgradeable.
pacman
Support for the Package Manager Utility (pacman) used in Archlinux.
This provider supports the install_options attribute, which allows command-line flags to be passed to pacman.
These options should be specified as an array where each element is either a string or a hash.
• Required binaries: /usr/bin/pacman.
• Default for os.name == archlinux, manjarolinux, artix.
• Supported features: install_options, installable, purgeable, uninstall_options,
uninstallable, upgradeable, virtual_packages.
pip
Python packages via pip.
This provider supports the install_options attribute, which allows command-line flags to be passed to pip.
These options should be specified as an array where each element is either a string or a hash.
• Supported features: install_options, installable, targetable, uninstallable,
upgradeable, version_ranges, versionable.
pip2
Python packages via pip2.
This provider supports the install_options attribute, which allows command-line flags to be passed to pip2.
These options should be specified as an array where each element is either a string or a hash.
• Supported features: install_options, installable, targetable, uninstallable,
upgradeable, versionable.
pip3
Python packages via pip3.
This provider supports the install_options attribute, which allows command-line flags to be passed to pip3.
These options should be specified as an array where each element is either a string or a hash.
© 2024 Puppet, Inc., a Perforce company
Puppet | Syntax and settings | 563
• Supported features: install_options, installable, targetable, uninstallable,
upgradeable, versionable.
pkg
OpenSolaris image packaging system. See pkg(5) for more information.
This provider supports the install_options attribute, which allows command-line flags to be passed to pkg.
These options should be specified as an array where each element is either a string or a hash.
• Required binaries: /usr/bin/pkg.
• Default for kernelrelease == 5.11, 5.12 and os.family == solaris.
• Supported features: holdable, install_options, installable, uninstallable, upgradeable,
versionable.
pkgdmg
Package management based on Apple's Installer.app and DiskUtility.app.
This provider works by checking the contents of a DMG image for Apple pkg or mpkg files. Any number of pkg or
mpkg files may exist in the root directory of the DMG file system, and Puppet will install all of them. Subdirectories
are not checked for packages.
This provider can also accept plain .pkg (but not .mpkg) files in addition to .dmg files.
Notes:
• The source attribute is mandatory. It must be either a local disk path or an HTTP, HTTPS, or FTP URL to the
package.
• The name of the resource must be the filename (without path) of the DMG file.
• When installing the packages from a DMG, this provider writes a file to disk at /var/
db/.puppet_pkgdmg_installed_NAME. If that file is present, Puppet assumes all packages from that
DMG are already installed.
• This provider is not versionable and uses DMG filenames to determine whether a package has been installed.
Thus, to install new a version of a package, you must create a new DMG with a different filename.
• Required binaries: /usr/bin/curl, /usr/bin/hdiutil, /usr/sbin/installer.
• Default for os.name == darwin.
• Supported features: installable.
pkgin
Package management using pkgin, a binary package manager for pkgsrc.
• Required binaries: pkgin.
• Default for os.name == smartos, netbsd.
• Supported features: installable, uninstallable, upgradeable, versionable.
pkgng
A PkgNG provider for FreeBSD and DragonFly.
• Required binaries: /usr/local/sbin/pkg.
• Default for os.name == freebsd, dragonfly.
• Supported features: install_options, installable, uninstallable, upgradeable,
versionable.
pkgutil
Package management using Peter Bonivart's pkgutil command on Solaris.
• Required binaries: pkgutil.
• Supported features: installable, uninstallable, upgradeable.
portage
© 2024 Puppet, Inc., a Perforce company
Puppet | Syntax and settings | 564
Provides packaging support for Gentoo's portage system.
This provider supports the install_options and uninstall_options attributes, which allows command-
line flags to be passed to emerge. These options should be specified as an array where each element is either a string
or a hash.
• Required binaries: /usr/bin/eix-update, /usr/bin/eix, /usr/bin/emerge, /usr/bin/qatom.
• Default for os.family == gentoo.
• Supported features: install_options, installable, purgeable, reinstallable,
uninstall_options, uninstallable, upgradeable, versionable, virtual_packages.
ports
Support for FreeBSD's ports. Note that this, too, mixes packages and ports.
• Required binaries: /usr/local/sbin/pkg_deinstall, /usr/local/sbin/portupgrade, /usr/
local/sbin/portversion, /usr/sbin/pkg_info.
• Supported features: installable, purgeable, uninstallable, upgradeable.
portupgrade
Support for FreeBSD's ports using the portupgrade ports management software. Use the port's full origin as the
resource name. eg (ports-mgmt/portupgrade) for the portupgrade port.
• Required binaries: /usr/local/sbin/pkg_deinstall, /usr/local/sbin/portinstall, /usr/
local/sbin/portupgrade, /usr/local/sbin/portversion, /usr/sbin/pkg_info.
• Supported features: installable, uninstallable, upgradeable.
puppet_gem
Puppet Ruby Gem support. This provider is useful for managing gems needed by the ruby provided in the puppet-
agent package.
• Required binaries: /opt/puppetlabs/puppet/bin/gem.
• Supported features: install_options, installable, uninstall_options, uninstallable,
upgradeable, versionable.
puppetserver_gem
Puppet Server Ruby Gem support. If a URL is passed via source, then that URL is appended to the list of remote
gem repositories which by default contains rubygems.org; To ensure that only the specified source is used also
pass --clear-sources in via install_options; if a source is present but is not a valid URL, it will be
interpreted as the path to a local gem file. If source is not present at all, the gem will be installed from the default gem
repositories.
• Required binaries: /opt/puppetlabs/bin/puppetserver.
• Supported features: install_options, installable, uninstall_options, uninstallable,
upgradeable, versionable.
rpm
RPM packaging support; should work anywhere with a working rpm binary.
This provider supports the install_options and uninstall_options attributes, which allow command-
line flags to be passed to rpm. These options should be specified as an array where each element is either a string or a
hash.
• Required binaries: rpm.
• Supported features: install_only, install_options, installable, uninstall_options,
uninstallable, upgradeable, versionable, virtual_packages.
rug
Support for suse rug package manager.
• Required binaries: /usr/bin/rug, rpm.
© 2024 Puppet, Inc., a Perforce company
Puppet | Syntax and settings | 565
• Supported features: installable, uninstallable, upgradeable, versionable.
sun
Sun's packaging system. Requires that you specify the source for the packages you're managing.
This provider supports the install_options attribute, which allows command-line flags to be passed to pkgadd.
These options should be specified as an array where each element is either a string or a hash.
• Required binaries: /usr/bin/pkginfo, /usr/sbin/pkgadd, /usr/sbin/pkgrm.
• Default for os.family == solaris.
• Supported features: install_options, installable, uninstallable, upgradeable.
sunfreeware
Package management using sunfreeware.com's pkg-get command on Solaris. At this point, support is exactly the
same as blastwave support and has not actually been tested.
• Required binaries: pkg-get.
• Supported features: installable, uninstallable, upgradeable.
tdnf
Support via tdnf.
This provider supports the install_options attribute, which allows command-line flags to be passed to tdnf.
These options should be spcified as a string (e.g. '--flag'), a hash (e.g. {'--flag' => 'value'}), or an array where each
element is either a string or a hash.
• Required binaries: rpm, tdnf.
• Default for os.name == PhotonOS.
• Supported features: install_options, installable, purgeable, uninstallable, upgradeable,
versionable, virtual_packages.
up2date
Support for Red Hat's proprietary up2date package update mechanism.
• Required binaries: /usr/sbin/up2date-nox.
• Default for os.distro.release.full == 2.1, 3, 4 and os.family == redhat.
• Supported features: installable, uninstallable, upgradeable.
urpmi
Support via urpmi.
• Required binaries: rpm, urpme, urpmi, urpmq.
• Default for os.name == mandriva, mandrake.
• Supported features: installable, purgeable, uninstallable, upgradeable, versionable.
windows
Windows package management.
This provider supports either MSI or self-extracting executable installers.
This provider requires a source attribute when installing the package. It accepts paths to local files, mapped drives,
or UNC paths.
This provider supports the install_options and uninstall_options attributes, which allow command-line
flags to be passed to the installer. These options should be specified as an array where each element is either a string
or a hash.
If the executable requires special arguments to perform a silent install or uninstall, then the appropriate arguments
should be specified using the install_options or uninstall_options attributes, respectively. Puppet will
automatically quote any option that contains spaces.
© 2024 Puppet, Inc., a Perforce company
Puppet | Syntax and settings | 566
• Default for os.name == windows.
• Supported features: install_options, installable, uninstall_options, uninstallable,
versionable.
xbps
Support for the Package Manager Utility (xbps) used in VoidLinux.
This provider supports the install_options attribute, which allows command-line flags to be passed to xbps-
install. These options should be specified as an array where each element is either a string or a hash.
• Required binaries: /usr/bin/xbps-install, /usr/bin/xbps-pkgdb, /usr/bin/xbps-query, /
usr/bin/xbps-remove.
• Default for os.name == void.
• Supported features: holdable, install_options, installable, uninstall_options,
uninstallable, upgradeable, virtual_packages.
yum
Support via yum.
Using this provider's uninstallable feature will not remove dependent packages. To remove dependent packages
with this provider use the purgeable feature, but note this feature is destructive and should be used with the utmost
care.
This provider supports the install_options attribute, which allows command-line flags to be passed to yum.
These options should be specified as an array where each element is either a string or a hash.
• Required binaries: rpm, yum.
• Default for os.name == amazon. Default for os.family == redhat and os.release.major == 4,
5, 6, 7.
• Supported features: install_only, install_options, installable, purgeable,
uninstallable, upgradeable, version_ranges, versionable, virtual_packages.
zypper
Support for SuSE zypper package manager. Found in SLES10sp2+ and SLES11.
This provider supports the install_options attribute, which allows command-line flags to be passed to zypper.
These options should be specified as an array where each element is either a string or a hash.
• Required binaries: /usr/bin/zypper.
• Default for os.name == suse, sles, sled, opensuse.
• Supported features: install_options, installable, uninstallable, upgradeable,
versionable, virtual_packages.
Provider Features
Available features:
• disableable --- The provider can disable packages. This feature is used by specifying disabled as the
desired value for the package.
• holdable --- The provider is capable of placing packages on hold such that they are not automatically upgraded
as a result of other package dependencies unless explicit action is taken by a user or another package.
• install_only --- The provider accepts options to only install packages never update (kernels, etc.)
• install_options --- The provider accepts options to be passed to the installer command.
• installable --- The provider can install packages.
• package_settings --- The provider accepts package_settings to be ensured for the given package. The
meaning and format of these settings is provider-specific.
• purgeable --- The provider can purge packages. This generally means that all traces of the package are
removed, including existing configuration files. This feature is thus destructive and should be used with the utmost
care.
© 2024 Puppet, Inc., a Perforce company
Puppet | Syntax and settings | 567
• reinstallable --- The provider can reinstall packages.
• supports_flavors --- The provider accepts flavors, which are specific variants of packages.
• targetable --- The provider accepts a targeted package management command.
• uninstall_options --- The provider accepts options to be passed to the uninstaller command.
• uninstallable --- The provider can uninstall packages.
• upgradeable --- The provider can upgrade to the latest version of a package. This feature is used by specifying
latest as the desired value for the package.
• version_ranges --- The provider can ensure version ranges.
• versionable --- The provider is capable of interrogating the package database for installed version(s), and can
select which out of a set of available versions of a package to install if asked.
• virtual_packages --- The provider accepts virtual package names for install and uninstall.
Provider support:
• aix - installable, uninstallable, upgradeable, versionable
• appdmg - installable
• apple - installable
• apt - holdable, install options, installable, purgeable, uninstallable, upgradeable, version ranges, versionable,
virtual packages
• aptitude - holdable, installable, purgeable, uninstallable, upgradeable, versionable
• aptrpm - installable, purgeable, uninstallable, upgradeable, versionable
• blastwave - installable, uninstallable, upgradeable
• dnf - install only, install options, installable, purgeable, uninstallable, upgradeable, version ranges, versionable,
virtual packages
• dnfmodule - disableable, installable, purgeable, supports flavors, uninstallable, upgradeable, versionable
• dpkg - holdable, installable, purgeable, uninstallable, upgradeable, virtual packages
• fink - holdable, installable, purgeable, uninstallable, upgradeable, versionable
• freebsd - installable, purgeable, uninstallable, upgradeable
• gem - install options, installable, targetable, uninstall options, uninstallable, upgradeable, version ranges,
versionable
• hpux - installable, uninstallable
• macports - installable, uninstallable, upgradeable, versionable
• nim - installable, uninstallable, upgradeable, versionable
• openbsd - install options, installable, purgeable, supports flavors, uninstall options, uninstallable, upgradeable,
versionable
• opkg - installable, uninstallable, upgradeable
• pacman - install options, installable, purgeable, uninstall options, uninstallable, upgradeable, virtual packages
• pip - install options, installable, targetable, uninstallable, upgradeable, version ranges, versionable
• pip2 - install options, installable, targetable, uninstallable, upgradeable, versionable
• pip3 - install options, installable, targetable, uninstallable, upgradeable, versionable
• pkg - holdable, install options, installable, uninstallable, upgradeable, versionable
• pkgdmg - installable
• pkgin - installable, uninstallable, upgradeable, versionable
• pkgng - install options, installable, uninstallable, upgradeable, versionable
• pkgutil - installable, uninstallable, upgradeable
• portage - install options, installable, purgeable, reinstallable, uninstall options, uninstallable, upgradeable,
versionable, virtual packages
• ports - installable, purgeable, uninstallable, upgradeable
• portupgrade - installable, uninstallable, upgradeable
• puppet_gem - install options, installable, uninstall options, uninstallable, upgradeable, versionable
• puppetserver_gem - install options, installable, uninstall options, uninstallable, upgradeable, versionable
© 2024 Puppet, Inc., a Perforce company

Puppet | Syntax and settings | 568
• rpm - install only, install options, installable, uninstall options, uninstallable, upgradeable, versionable, virtual
packages
• rug - installable, uninstallable, upgradeable, versionable
• sun - install options, installable, uninstallable, upgradeable
• sunfreeware - installable, uninstallable, upgradeable
• tdnf - install options, installable, purgeable, uninstallable, upgradeable, versionable, virtual packages
• up2date - installable, uninstallable, upgradeable
• urpmi - installable, purgeable, uninstallable, upgradeable, versionable
• windows - install options, installable, uninstall options, uninstallable, versionable
• xbps - holdable, install options, installable, uninstall options, uninstallable, upgradeable, virtual packages
• yum - install only, install options, installable, purgeable, uninstallable, upgradeable, version ranges, versionable,
virtual packages
• zypper - install options, installable, uninstallable, upgradeable, versionable, virtual packages
resources
• Attributes
Description
This is a metatype that can manage other resource types. Any metaparams specified here will be passed on to any
generated resources, so you can purge unmanaged resources but set noop to true so the purging is only logged and
does not actually happen.
Attributes
resources { 'resource title':
name => # (namevar) The name of the type to be...
purge => # Whether to purge unmanaged resources. When set...
unless_system_user => # This keeps system users from being purged. By...
unless_uid => # This keeps specific uids or ranges of uids from...
# ...plus any applicable metaparameters.
}
name
(Namevar: If omitted, this attribute's value defaults to the resource's title.)
The name of the type to be managed.
(# Back to resources attributes)
purge
Whether to purge unmanaged resources. When set to true, this will delete any resource that is not specified in your
configuration and is not autorequired by any managed resources. Note: The ssh_authorized_key resource type
can't be purged this way; instead, see the purge_ssh_keys attribute of the user type.
Valid values are true, false, yes, no.
(# Back to resources attributes)
unless_system_user
This keeps system users from being purged. By default, it does not purge users whose UIDs are less than the
minimum UID for the system (typically 500 or 1000), but you can specify a different UID as the inclusive limit.
Valid values are true, false. Values can match /^\d+$/.
(# Back to resources attributes)
unless_uid
This keeps specific uids or ranges of uids from being purged when purge is true. Accepts integers, integer strings, and
arrays of integers or integer strings. To specify a range of uids, consider using the range() function from stdlib.
© 2024 Puppet, Inc., a Perforce company

Puppet | Syntax and settings | 569
(# Back to resources attributes)
schedule
• Attributes
Description
Define schedules for Puppet. Resources can be limited to a schedule by using the schedule metaparameter.
Currently, schedules can only be used to stop a resource from being applied; they cannot cause a resource to be
applied when it otherwise wouldn't be, and they cannot accurately specify a time when a resource should run.
Every time Puppet applies its configuration, it will apply the set of resources whose schedule does not eliminate them
from running right then, but there is currently no system in place to guarantee that a given resource runs at a given
time. If you specify a very restrictive schedule and Puppet happens to run at a time within that schedule, then the
resources will get applied; otherwise, that work may never get done.
Thus, it is advisable to use wider scheduling (for example, over a couple of hours) combined with periods and
repetitions. For instance, if you wanted to restrict certain resources to only running once, between the hours of two
and 4 AM, then you would use this schedule:
schedule { 'maint':
range => '2 - 4',
period => daily,
repeat => 1,
}
With this schedule, the first time that Puppet runs between 2 and 4 AM, all resources with this schedule will get
applied, but they won't get applied again between 2 and 4 because they will have already run once that day, and they
won't get applied outside that schedule because they will be outside the scheduled range.
Puppet automatically creates a schedule for each of the valid periods with the same name as that period (such as
hourly and daily). Additionally, a schedule named puppet is created and used as the default, with the following
attributes:
schedule { 'puppet':
period => hourly,
repeat => 2,
}
This will cause resources to be applied every 30 minutes by default.
The statettl setting on the agent affects the ability of a schedule to determine if a resource has already been
checked. If the statettl is set lower than the span of the associated schedule resource, then a resource could be
checked & applied multiple times in the schedule as the information about when the resource was last checked will
have expired from the cache.
Attributes
schedule { 'resource title':
name => # (namevar) The name of the schedule. This name is used...
period => # The period of repetition for resources on this...
periodmatch => # Whether periods should be matched by a numeric...
range => # The earliest and latest that a resource can be...
repeat => # How often a given resource may be applied in...
weekday => # The days of the week in which the schedule...
# ...plus any applicable metaparameters.
}
name
(Namevar: If omitted, this attribute's value defaults to the resource's title.)
© 2024 Puppet, Inc., a Perforce company

Puppet | Syntax and settings | 570
The name of the schedule. This name is used when assigning the schedule to a resource with the schedule
metaparameter:
schedule { 'everyday':
period => daily,
range => '2 - 4',
}
exec { '/usr/bin/apt-get update':
schedule => 'everyday',
}
(# Back to schedule attributes)
period
The period of repetition for resources on this schedule. The default is for resources to get applied every time Puppet
runs.
Note that the period defines how often a given resource will get applied but not when; if you would like to restrict
the hours that a given resource can be applied (for instance, only at night during a maintenance window), then use the
range attribute.
If the provided periods are not sufficient, you can provide a value to the repeat attribute, which will cause Puppet to
schedule the affected resources evenly in the period the specified number of times. Take this schedule:
schedule { 'veryoften':
period => hourly,
repeat => 6,
}
This can cause Puppet to apply that resource up to every 10 minutes.
At the moment, Puppet cannot guarantee that level of repetition; that is, the resource can applied up to every 10
minutes, but internal factors might prevent it from actually running that often (for instance, if a Puppet run is still in
progress when the next run is scheduled to start, that next run will be suppressed).
See the periodmatch attribute for tuning whether to match times by their distance apart or by their specific value.
Tip: You can use period => never, to prevent a resource from being applied in the given range.
This is useful if you need to create a blackout window to perform sensitive operations without interruption.
Valid values are hourly, daily, weekly, monthly, never.
(# Back to schedule attributes)
periodmatch
Whether periods should be matched by a numeric value (for instance, whether two times are in the same hour) or by
their chronological distance apart (whether two times are 60 minutes apart).
Valid values are number, distance.
(# Back to schedule attributes)
range
The earliest and latest that a resource can be applied. This is always a hyphen-separated range within a 24 hour
period, and hours must be specified in numbers between 0 and 23, inclusive. Minutes and seconds can optionally be
provided, using the normal colon as a separator. For instance:
schedule { 'maintenance':
range => '1:30 - 4:30',
}
© 2024 Puppet, Inc., a Perforce company

Puppet | Syntax and settings | 571
This is mostly useful for restricting certain resources to being applied in maintenance windows or during off-peak
hours. Multiple ranges can be applied in array context. As a convenience when specifying ranges, you can cross
midnight (for example, range => "22:00 - 04:00").
(# Back to schedule attributes)
repeat
How often a given resource may be applied in this schedule's period. Must be an integer.
(# Back to schedule attributes)
weekday
The days of the week in which the schedule should be valid. You may specify the full day name 'Tuesday', the three
character abbreviation 'Tue', or a number (as a string or as an integer) corresponding to the day of the week where 0 is
Sunday, 1 is Monday, and so on. Multiple days can be specified as an array. If not specified, the day of the week will
not be considered in the schedule.
If you are also using a range match that spans across midnight then this parameter will match the day that it was at the
start of the range, not necessarily the day that it is when it matches. For example, consider this schedule:
schedule { 'maintenance_window':
range => '22:00 - 04:00',
weekday => 'Saturday',
}
This will match at 11 PM on Saturday and 2 AM on Sunday, but not at 2 AM on Saturday.
(# Back to schedule attributes)
service
• Attributes
• Providers
• Provider Features
Description
Manage running services. Service support unfortunately varies widely by platform --- some platforms have very little
if any concept of a running service, and some have a very codified and powerful concept. Puppet's service support is
usually capable of doing the right thing, but the more information you can provide, the better behaviour you will get.
Puppet 2.7 and newer expect init scripts to have a working status command. If this isn't the case for any of your
services' init scripts, you will need to set hasstatus to false and possibly specify a custom status command in the
status attribute. As a last resort, Puppet will attempt to search the process table by calling whatever command is
listed in the ps fact. The default search pattern is the name of the service, but you can specify it with the pattern
attribute.
Refresh: service resources can respond to refresh events (via notify, subscribe, or the ~> arrow). If a
service receives an event from another resource, Puppet will restart the service it manages. The actual command
used to restart the service depends on the platform and can be configured:
• If you set hasrestart to true, Puppet will use the init script's restart command.
• You can provide an explicit command for restarting with the restart attribute.
• If you do neither, the service's stop and start commands will be used.
Attributes
service { 'resource title':
name => # (namevar) The name of the service to run. This name
is...
ensure => # Whether a service should be running. Default...
binary => # The path to the daemon. This is only used for...
control => # The control variable used to manage services...
© 2024 Puppet, Inc., a Perforce company

Puppet | Syntax and settings | 572
enable => # Whether a service should be enabled to start at...
flags => # Specify a string of flags to pass to the startup
hasrestart => # Specify that an init script has a `restart...
hasstatus => # Declare whether the service's init script has a...
logonaccount => # Specify an account for service logon Requires
logonpassword => # Specify a password for service logon. Default...
manifest => # Specify a command to config a service, or a path
path => # The search path for finding init scripts....
pattern => # The pattern to search for in the process table...
provider => # The specific backend to use for this `service...
restart => # Specify a *restart* command manually. If left...
start => # Specify a *start* command manually. Most...
status => # Specify a *status* command manually. This...
stop => # Specify a *stop* command...
timeout => # Specify an optional minimum timeout (in seconds)
# ...plus any applicable metaparameters.
}
name
(Namevar: If omitted, this attribute's value defaults to the resource's title.)
The name of the service to run.
This name is used to find the service; on platforms where services have short system names and long display names,
this should be the short name. (To take an example from Windows, you would use "wuauserv" rather than "Automatic
Updates.")
(# Back to service attributes)
ensure
(Property: This attribute represents concrete state on the target system.)
Whether a service should be running. Default values depend on the platform.
Valid values are stopped (also called false), running (also called true).
(# Back to service attributes)
binary
The path to the daemon. This is only used for systems that do not support init scripts. This binary will be used to start
the service if no start parameter is provided.
(# Back to service attributes)
control
The control variable used to manage services (originally for HP-UX). Defaults to the upcased service name plus
START replacing dots with underscores, for those providers that support the controllable feature.
(# Back to service attributes)
enable
(Property: This attribute represents concrete state on the target system.)
Whether a service should be enabled to start at boot. This property behaves differently depending on the platform;
wherever possible, it relies on local tools to enable or disable a given service. Default values depend on the platform.
If you don't specify a value for the enable attribute, Puppet leaves that aspect of the service alone and your
operating system determines the behavior.
Valid values are true, false, manual, mask, delayed.
Requires features enableable.
(# Back to service attributes)
© 2024 Puppet, Inc., a Perforce company
Puppet | Syntax and settings | 573
flags
(Property: This attribute represents concrete state on the target system.)
Specify a string of flags to pass to the startup script.
Requires features flaggable.
(# Back to service attributes)
hasrestart
Specify that an init script has a restart command. If this is false and you do not specify a command in the
restart attribute, the init script's stop and start commands will be used.
Valid values are true, false.
(# Back to service attributes)
hasstatus
Declare whether the service's init script has a functional status command. This attribute's default value changed in
Puppet 2.7.0.
The init script's status command must return 0 if the service is running and a nonzero value otherwise. Ideally, these
exit codes should conform to the LSB's specification for init script status actions, but Puppet only considers the
difference between 0 and nonzero to be relevant.
If a service's init script does not support any kind of status command, you should set hasstatus to false and either
provide a specific command using the status attribute or expect that Puppet will look for the service name in the
process table. Be aware that 'virtual' init scripts (like 'network' under Red Hat systems) will respond poorly to refresh
events from other resources if you override the default behavior without providing a status command.
Valid values are true, false.
(# Back to service attributes)
logonaccount
(Property: This attribute represents concrete state on the target system.)
Specify an account for service logon
Requires features manages_logon_credentials.
(# Back to service attributes)
logonpassword
Specify a password for service logon. Default value is an empty string (when logonaccount is specified).
Requires features manages_logon_credentials.
(# Back to service attributes)
manifest
Specify a command to config a service, or a path to a manifest to do so.
(# Back to service attributes)
path
The search path for finding init scripts. Multiple values should be separated by colons or provided as an array.
(# Back to service attributes)
pattern
The pattern to search for in the process table. This is used for stopping services on platforms that do not support
init scripts, and is also used for determining service status on those service whose init scripts do not include a status
command.
© 2024 Puppet, Inc., a Perforce company
Puppet | Syntax and settings | 574
Defaults to the name of the service. The pattern can be a simple string or any legal Ruby pattern, including regular
expressions (which should be quoted without enclosing slashes).
(# Back to service attributes)
provider
The specific backend to use for this service resource. You will seldom need to specify this --- Puppet will usually
discover the appropriate provider for your platform.
Available providers are:
• base
• bsd
• daemontools
• debian
• freebsd
• gentoo
• init
• launchd
• openbsd
• openrc
• openwrt
• rcng
• redhat
• runit
• service
• smf
• src
• systemd
• upstart
• windows
(# Back to service attributes)
restart
Specify a restart command manually. If left unspecified, the service will be stopped and then started.
(# Back to service attributes)
start
Specify a start command manually. Most service subsystems support a start command, so this will not need to be
specified.
(# Back to service attributes)
status
Specify a status command manually. This command must return 0 if the service is running and a nonzero value
otherwise. Ideally, these exit codes should conform to the LSB's specification for init script status actions, but Puppet
only considers the difference between 0 and nonzero to be relevant.
If left unspecified, the status of the service will be determined automatically, usually by looking for the service in the
process table.
(# Back to service attributes)
stop
Specify a stop command manually.
© 2024 Puppet, Inc., a Perforce company

Puppet | Syntax and settings | 575
(# Back to service attributes)
timeout
Specify an optional minimum timeout (in seconds) for puppet to wait when syncing service properties
Requires features configurable_timeout.
(# Back to service attributes)
Providers
base
The simplest form of Unix service support.
You have to specify enough about your service for this to work; the minimum you can specify is a binary for starting
the process, and this same binary will be searched for in the process table to stop the service. As with init-style
services, it is preferable to specify start, stop, and status commands.
• Required binaries: kill.
• Supported features: refreshable.
bsd
Generic BSD form of init-style service management with rc.d.
Uses rc.conf.d for service enabling and disabling.
• Supported features: enableable, refreshable.
daemontools
Daemontools service management.
This provider manages daemons supervised by D.J. Bernstein daemontools. When detecting the service directory it
will check, in order of preference:
• /service
• /etc/service
• /var/lib/svscan
The daemon directory should be in one of the following locations:
• /var/lib/service
• /etc
...or this can be overridden in the resource's attributes:
service { 'myservice':
provider => 'daemontools',
path => '/path/to/daemons',
}
This provider supports out of the box:
• start/stop (mapped to enable/disable)
• enable/disable
• restart
• status
If a service has ensure => "running", it will link /path/to/daemon to /path/to/service, which will automatically
enable the service.
If a service has ensure => "stopped", it will only shut down the service, not remove the /path/to/
service link.
• Required binaries: /usr/bin/svc, /usr/bin/svstat.
© 2024 Puppet, Inc., a Perforce company
Puppet | Syntax and settings | 576
• Supported features: enableable, refreshable.
debian
Debian's form of init-style management.
The only differences from init are support for enabling and disabling services via update-rc.d and the ability to
determine enabled status via invoke-rc.d.
• Required binaries: /usr/sbin/invoke-rc.d, /usr/sbin/service, /usr/sbin/update-rc.d.
• Default for os.name == cumuluslinux and os.release.major == 1, 2. Default for os.name ==
debian and os.release.major == 5, 6, 7. Default for os.name == devuan.
• Supported features: enableable, refreshable.
freebsd
Provider for FreeBSD and DragonFly BSD. Uses the rcvar argument of init scripts and parses/edits rc files.
• Default for os.name == freebsd, dragonfly.
• Supported features: enableable, refreshable.
gentoo
Gentoo's form of init-style service management.
Uses rc-update for service enabling and disabling.
• Required binaries: /sbin/rc-update.
• Supported features: enableable, refreshable.
init
Standard init-style service management.
• Supported features: refreshable.
launchd
This provider manages jobs with launchd, which is the default service framework for Mac OS X (and may be
available for use on other platforms).
For more information, see the launchd man page:
• https://developer.apple.com/legacy/library/documentation/Darwin/Reference/ManPages/man8/launchd.8.html
This provider reads plists out of the following directories:
• /System/Library/LaunchDaemons
• /System/Library/LaunchAgents
• /Library/LaunchDaemons
• /Library/LaunchAgents
...and builds up a list of services based upon each plist's "Label" entry.
This provider supports:
• ensure => running/stopped,
• enable => true/false
• status
• restart
Here is how the Puppet states correspond to launchd states:
• stopped --- job unloaded
• started --- job loaded
• enabled --- 'Disable' removed from job plist file
• disabled --- 'Disable' added to job plist file
© 2024 Puppet, Inc., a Perforce company
Puppet | Syntax and settings | 577
Note that this allows you to do something launchctl can't do, which is to be in a state of "stopped/enabled" or
"running/disabled".
Note that this provider does not support overriding 'restart'
• Required binaries: /bin/launchctl.
• Default for os.name == darwin.
• Supported features: enableable, refreshable.
openbsd
Provider for OpenBSD's rc.d daemon control scripts
• Required binaries: /usr/sbin/rcctl.
• Default for os.name == openbsd.
• Supported features: enableable, flaggable, refreshable.
openrc
Support for Gentoo's OpenRC initskripts
Uses rc-update, rc-status and rc-service to manage services.
• Required binaries: /bin/rc-status, /sbin/rc-service, /sbin/rc-update.
• Default for os.name == gentoo. Default for os.name == funtoo.
• Supported features: enableable, refreshable.
openwrt
Support for OpenWrt flavored init scripts.
Uses /etc/init.d/service_name enable, disable, and enabled.
• Default for os.name == openwrt.
• Supported features: enableable, refreshable.
rcng
RCng service management with rc.d
• Default for os.name == netbsd, cargos.
• Supported features: enableable, refreshable.
redhat
Red Hat's (and probably many others') form of init-style service management. Uses chkconfig for service
enabling and disabling.
• Required binaries: /sbin/chkconfig, /sbin/service.
• Default for os.name == amazon and os.release.major == 2017, 2018. Default for os.name
== redhat and os.release.major == 4, 5, 6. Default for os.family == suse and
os.release.major == 10, 11.
• Supported features: enableable, refreshable.
runit
Runit service management.
This provider manages daemons running supervised by Runit. When detecting the service directory it will check, in
order of preference:
• /service
• /etc/service
• /var/service
The daemon directory should be in one of the following locations:
© 2024 Puppet, Inc., a Perforce company

Puppet | Syntax and settings | 578
• /etc/sv
• /var/lib/service
or this can be overridden in the service resource parameters:
service { 'myservice':
provider => 'runit',
path => '/path/to/daemons',
}
This provider supports out of the box:
• start/stop
• enable/disable
• restart
• status
• Required binaries: /usr/bin/sv.
• Supported features: enableable, refreshable.
service
The simplest form of service support.
• Supported features: refreshable.
smf
Support for Sun's new Service Management Framework.
When managing the enable property, this provider will try to preserve the previous ensure state per the enableable
semantics. On Solaris, enabling a service starts it up while disabling a service stops it. Thus, there's a chance for this
provider to execute two operations when managing the enable property. For example, if enable is set to true and the
ensure state is stopped, this provider will manage the service using two operations: one to enable the service which
will start it up, and another to stop the service (without affecting its enabled status).
By specifying manifest => "/path/to/service.xml", the SMF manifest will be imported if it does not
exist.
• Required binaries: /usr/bin/svcs, /usr/sbin/svcadm, /usr/sbin/svccfg.
• Default for os.family == solaris.
• Supported features: enableable, refreshable.
src
Support for AIX's System Resource controller.
Services are started/stopped based on the stopsrc and startsrc commands, and some services can be refreshed
with refresh command.
Enabling and disabling services is not supported, as it requires modifications to /etc/inittab. Starting and
stopping groups of subsystems is not yet supported.
• Required binaries: /usr/bin/lssrc, /usr/bin/refresh, /usr/bin/startsrc, /usr/bin/
stopsrc, /usr/sbin/chitab, /usr/sbin/lsitab, /usr/sbin/mkitab, /usr/sbin/rmitab.
• Default for os.name == aix.
• Supported features: enableable, refreshable.
systemd
Manages systemd services using systemctl.
Because systemd defaults to assuming the .service unit type, the suffix may be omitted. Other unit types (such
as .path) may be managed by providing the proper suffix.
• Required binaries: systemctl.
© 2024 Puppet, Inc., a Perforce company
Puppet | Syntax and settings | 579
• Default for os.family == archlinux. Default for os.family == redhat. Default for os.family ==
redhat and os.name == fedora. Default for os.family == suse. Default for os.family == coreos.
Default for os.family == gentoo. Default for os.name == amazon and os.release.major == 2,
2023. Default for os.name == debian. Default for os.name == LinuxMint. Default for os.name ==
ubuntu. Default for os.name == cumuluslinux and os.release.major == 3, 4.
• Supported features: enableable, maskable, refreshable.
upstart
Ubuntu service management with upstart.
This provider manages upstart jobs on Ubuntu. For upstart documentation, see http://upstart.ubuntu.com/.
• Required binaries: /sbin/initctl, /sbin/restart, /sbin/start, /sbin/status, /sbin/stop.
• Default for os.name == ubuntu and os.release.major == 10.04, 12.04, 14.04, 14.10.
Default for os.name == LinuxMint and os.release.major == 10, 11, 12, 13, 14, 15, 16,
17.
• Supported features: enableable, refreshable.
windows
Support for Windows Service Control Manager (SCM). This provider can start, stop, enable, and disable services, and
the SCM provides working status methods for all services.
Control of service groups (dependencies) is not yet supported, nor is running services as a specific user.
• Default for os.name == windows.
• Supported features: configurable_timeout, delayed_startable, enableable,
manages_logon_credentials, manual_startable, refreshable.
Provider Features
Available features:
• configurable_timeout --- The provider can specify a minumum timeout for syncing service properties
• controllable --- The provider uses a control variable.
• delayed_startable --- The provider can set service to delayed start
• enableable --- The provider can enable and disable the service.
• flaggable --- The provider can pass flags to the service.
• manages_logon_credentials --- The provider can specify the logon credentials used for a service
• manual_startable --- The provider can set service to manual start
• maskable --- The provider can 'mask' the service.
• refreshable --- The provider can restart the service.
Provider support:
• base - refreshable
• bsd - enableable, refreshable
• daemontools - enableable, refreshable
• debian - enableable, refreshable
• freebsd - enableable, refreshable
• gentoo - enableable, refreshable
• init - refreshable
• launchd - enableable, refreshable
• openbsd - enableable, flaggable, refreshable
• openrc - enableable, refreshable
• openwrt - enableable, refreshable
• rcng - enableable, refreshable
• redhat - enableable, refreshable
© 2024 Puppet, Inc., a Perforce company

Puppet | Syntax and settings | 580
• runit - enableable, refreshable
• service - refreshable
• smf - enableable, refreshable
• src - enableable, refreshable
• systemd - enableable, maskable, refreshable
• upstart - enableable, refreshable
• windows - configurable timeout, delayed startable, enableable, manages logon credentials, manual startable,
refreshable
stage
• Attributes
Description
A resource type for creating new run stages. Once a stage is available, classes can be assigned to it by declaring them
with the resource-like syntax and using the stage metaparameter.
Note that new stages are not useful unless you also declare their order in relation to the default main stage.
A complete run stage example:
stage { 'pre':
before => Stage['main'],
}
class { 'apt-updates':
stage => 'pre',
}
Individual resources cannot be assigned to run stages; you can only set stages for classes.
Attributes
stage { 'resource title':
name => # (namevar) The name of the stage. Use this as the value for
# ...plus any applicable metaparameters.
}
name
(Namevar: If omitted, this attribute's value defaults to the resource's title.)
The name of the stage. Use this as the value for the stage metaparameter when assigning classes to this stage.
(# Back to stage attributes)
tidy
• Attributes
Description
Remove unwanted files based on specific criteria. Multiple criteria are OR'd together, so a file that is too large but is
not old enough will still get tidied. Ignores managed resources.
If you don't specify either age or size, then all files will be removed.
This resource type works by generating a file resource for every file that should be deleted and then letting that
resource perform the actual deletion.
Attributes
tidy { 'resource title':
path => # (namevar) The path to the file or directory to manage....
© 2024 Puppet, Inc., a Perforce company

Puppet | Syntax and settings | 581
age => # Tidy files whose age is equal to or greater than
backup => # Whether tidied files should be backed up. Any...
matches => # One or more (shell type) file glob patterns...
max_files => # In case the resource is a directory and the...
recurse => # If target is a directory, recursively descend...
rmdirs => # Tidy directories in addition to files; that is...
size => # Tidy files whose size is equal to or greater...
type => # Set the mechanism for determining age. Valid...
# ...plus any applicable metaparameters.
}
path
(Namevar: If omitted, this attribute's value defaults to the resource's title.)
The path to the file or directory to manage. Must be fully qualified.
(# Back to tidy attributes)
age
Tidy files whose age is equal to or greater than the specified time. You can choose seconds, minutes, hours, days, or
weeks by specifying the first letter of any of those words (for example, '1w' represents one week).
Specifying 0 will remove all files.
(# Back to tidy attributes)
backup
Whether tidied files should be backed up. Any values are passed directly to the file resources used for actual file
deletion, so consult the file type's backup documentation to determine valid values.
(# Back to tidy attributes)
matches
One or more (shell type) file glob patterns, which restrict the list of files to be tidied to those whose basenames match
at least one of the patterns specified. Multiple patterns can be specified using an array.
Example:
tidy { '/tmp':
age => '1w',
recurse => 1,
matches => [ '[0-9]pub*.tmp', '*.temp', 'tmpfile?' ],
}
This removes files from /tmp if they are one week old or older, are not in a subdirectory and match one of the shell
globs given.
Note that the patterns are matched against the basename of each file -- that is, your glob patterns should not have any
'/' characters in them, since you are only specifying against the last bit of the file.
Finally, note that you must now specify a non-zero/non-false value for recurse if matches is used, as matches only
apply to files found by recursion (there's no reason to use static patterns match against a statically determined path).
Requiring explicit recursion clears up a common source of confusion.
(# Back to tidy attributes)
max_files
In case the resource is a directory and the recursion is enabled, puppet will generate a new resource for each file file
found, possible leading to an excessive number of resources generated without any control.
Setting max_files will check the number of file resources that will eventually be created and will raise a resource
argument error if the limit will be exceeded.
© 2024 Puppet, Inc., a Perforce company

Puppet | Syntax and settings | 582
Use value 0 to disable the check. In this case, a warning is logged if the number of files exceeds 1000.
Values can match /^[0-9]+$/.
(# Back to tidy attributes)
recurse
If target is a directory, recursively descend into the directory looking for files to tidy.
Valid values are true, false, inf. Values can match /^[0-9]+$/.
(# Back to tidy attributes)
rmdirs
Tidy directories in addition to files; that is, remove directories whose age is older than the specified criteria. This will
only remove empty directories, so all contained files must also be tidied before a directory gets removed.
Valid values are true, false, yes, no.
(# Back to tidy attributes)
size
Tidy files whose size is equal to or greater than the specified size. Unqualified values are in kilobytes, but b, k, m,
g, and t can be appended to specify bytes, kilobytes, megabytes, gigabytes, and terabytes, respectively. Only the first
character is significant, so the full word can also be used.
(# Back to tidy attributes)
type
Set the mechanism for determining age.
Valid values are atime, mtime, ctime.
(# Back to tidy attributes)
user
• Attributes
• Providers
• Provider Features
Description
Manage users. This type is mostly built to manage system users, so it is lacking some features useful for managing
normal users.
This resource type uses the prescribed native tools for creating groups and generally uses POSIX APIs for retrieving
information about them. It does not directly modify /etc/passwd or anything.
Autorequires: If Puppet is managing the user's primary group (as provided in the gid attribute) or any group listed
in the groups attribute then the user resource will autorequire that group. If Puppet is managing any role accounts
corresponding to the user's roles, the user resource will autorequire those role accounts.
Attributes
user { 'resource title':
name => # (namevar) The user name. While naming
limitations vary by...
ensure => # The basic state that the object should be in....
allowdupe => # Whether to allow duplicate UIDs. Valid
values...
attribute_membership => # Whether specified attribute value pairs
should...
attributes => # Specify AIX attributes for the user in an
array...
© 2024 Puppet, Inc., a Perforce company

Puppet | Syntax and settings | 583
auth_membership => # Whether specified auths should be considered
the
auths => # The auths the user has. Multiple auths
should...
comment => # A description of the user. Generally the
user's
expiry => # The expiry date for this user. Provide as
either
forcelocal => # Forces the management of local accounts when...
gid => # The user's primary group. Can be specified...
groups => # The groups to which the user belongs. The...
home => # The home directory of the user. The
directory...
ia_load_module => # The name of the I&A module to use to manage
this
iterations => # This is the number of iterations of a chained...
key_membership => # Whether specified key/value pairs should be...
keys => # Specify user attributes in an array of key ...
loginclass => # The name of login class to which the user...
managehome => # Whether to manage the home directory when
Puppet
membership => # If `minimum` is specified, Puppet will ensure...
password => # The user's password, in whatever encrypted...
password_max_age => # The maximum number of days a password may be...
password_min_age => # The minimum number of days a password must be...
password_warn_days => # The number of days before a password is going
to
profile_membership => # Whether specified roles should be treated as
the
profiles => # The profiles the user has. Multiple profiles...
project => # The name of the project associated with a user.
provider => # The specific backend to use for this `user...
purge_ssh_keys => # Whether to purge authorized SSH keys for this...
role_membership => # Whether specified roles should be considered
the
roles => # The roles the user has. Multiple roles
should...
salt => # This is the 32-byte salt used to generate the...
shell => # The user's login shell. The shell must exist...
system => # Whether the user is a system user, according
to...
uid => # The user ID; must be specified numerically.
If...
# ...plus any applicable metaparameters.
}
name
(Namevar: If omitted, this attribute's value defaults to the resource's title.)
The user name. While naming limitations vary by operating system, it is advisable to restrict names to the lowest
common denominator, which is a maximum of 8 characters beginning with a letter.
Note that Puppet considers user names to be case-sensitive, regardless of the platform's own rules; be sure to always
use the same case when referring to a given user.
(# Back to user attributes)
ensure
(Property: This attribute represents concrete state on the target system.)
The basic state that the object should be in.
© 2024 Puppet, Inc., a Perforce company

Puppet | Syntax and settings | 584
Valid values are present, absent, role.
(# Back to user attributes)
allowdupe
Whether to allow duplicate UIDs.
Valid values are true, false, yes, no.
(# Back to user attributes)
attribute_membership
Whether specified attribute value pairs should be treated as the complete list (inclusive) or the minimum list
(minimum) of attribute/value pairs for the user.
Valid values are inclusive, minimum.
(# Back to user attributes)
attributes
(Property: This attribute represents concrete state on the target system.)
Specify AIX attributes for the user in an array or hash of attribute = value pairs.
For example:
['minage=0', 'maxage=5', 'SYSTEM=compat']
or
attributes => { 'minage' => '0', 'maxage' => '5', 'SYSTEM' => 'compat' }
Requires features manages_aix_lam.
(# Back to user attributes)
auth_membership
Whether specified auths should be considered the complete list (inclusive) or the minimum list (minimum) of
auths the user has. This setting is specific to managing Solaris authorizations.
Valid values are inclusive, minimum.
(# Back to user attributes)
auths
(Property: This attribute represents concrete state on the target system.)
The auths the user has. Multiple auths should be specified as an array.
Requires features manages_solaris_rbac.
(# Back to user attributes)
comment
(Property: This attribute represents concrete state on the target system.)
A description of the user. Generally the user's full name.
(# Back to user attributes)
expiry
(Property: This attribute represents concrete state on the target system.)
© 2024 Puppet, Inc., a Perforce company
Puppet | Syntax and settings | 585
The expiry date for this user. Provide as either the special value absent to ensure that the account never expires, or
as a zero-padded YYYY-MM-DD format -- for example, 2010-02-19.
Valid values are absent. Values can match /^\d{4}-\d{2}-\d{2}$/.
Requires features manages_expiry.
(# Back to user attributes)
forcelocal
Forces the management of local accounts when accounts are also being managed by some other Name Service Switch
(NSS). For AIX, refer to the ia_load_module parameter.
This option relies on your operating system's implementation of luser* commands, such as luseradd , and
lgroupadd, lusermod. The forcelocal option could behave unpredictably in some circumstances. If the tools
it depends on are not available, it might have no effect at all.
Valid values are true, false, yes, no.
Requires features manages_local_users_and_groups.
(# Back to user attributes)
gid
(Property: This attribute represents concrete state on the target system.)
The user's primary group. Can be specified numerically or by name.
This attribute is not supported on Windows systems; use the groups attribute instead. (On Windows, designating a
primary group is only meaningful for domain accounts, which Puppet does not currently manage.)
(# Back to user attributes)
groups
(Property: This attribute represents concrete state on the target system.)
The groups to which the user belongs. The primary group should not be listed, and groups should be identified by
name rather than by GID. Multiple groups should be specified as an array.
(# Back to user attributes)
home
(Property: This attribute represents concrete state on the target system.)
The home directory of the user. The directory must be created separately and is not currently checked for existence.
(# Back to user attributes)
ia_load_module
The name of the I&A module to use to manage this user. This should be set to files if managing local users.
Requires features manages_aix_lam.
(# Back to user attributes)
iterations
(Property: This attribute represents concrete state on the target system.)
This is the number of iterations of a chained computation of the PBKDF2 password hash. This parameter is used in
OS X, and is required for managing passwords on OS X 10.8 and newer.
Requires features manages_password_salt.
(# Back to user attributes)
key_membership
© 2024 Puppet, Inc., a Perforce company
Puppet | Syntax and settings | 586
Whether specified key/value pairs should be considered the complete list (inclusive) or the minimum list
(minimum) of the user's attributes.
Valid values are inclusive, minimum.
(# Back to user attributes)
keys
(Property: This attribute represents concrete state on the target system.)
Specify user attributes in an array of key = value pairs.
Requires features manages_solaris_rbac.
(# Back to user attributes)
loginclass
(Property: This attribute represents concrete state on the target system.)
The name of login class to which the user belongs.
Requires features manages_loginclass.
(# Back to user attributes)
managehome
Whether to manage the home directory when Puppet creates or removes the user. This creates the home directory if
Puppet also creates the user account, and deletes the home directory if Puppet also removes the user account.
This parameter has no effect unless Puppet is also creating or removing the user in the resource at the same time. For
instance, Puppet creates a home directory for a managed user if ensure => present and the user does not exist
at the time of the Puppet run. If the home directory is then deleted manually, Puppet will not recreate it on the next
run.
Note that on Windows, this manages creation/deletion of the user profile instead of the home directory. The user
profile is stored in the C:\Users<username> directory.
Valid values are true, false, yes, no.
(# Back to user attributes)
membership
If minimum is specified, Puppet will ensure that the user is a member of all specified groups, but will not remove any
other groups that the user is a part of.
If inclusive is specified, Puppet will ensure that the user is a member of only specified groups.
Valid values are inclusive, minimum.
(# Back to user attributes)
password
(Property: This attribute represents concrete state on the target system.)
The user's password, in whatever encrypted format the local system requires. Consult your operating system's
documentation for acceptable password encryption formats and requirements.
• Mac OS X 10.5 and 10.6, and some older Linux distributions, use salted SHA1 hashes. You can use Puppet's
built-in sha1 function to generate a salted SHA1 hash from a password.
• Mac OS X 10.7 (Lion), and many recent Linux distributions, use salted SHA512 hashes. The Puppet Labs stdlib
module contains a str2saltedsha512 function which can generate password hashes for these operating
systems.
• OS X 10.8 and higher use salted SHA512 PBKDF2 hashes. When managing passwords on these systems, the
salt and iterations attributes need to be specified as well as the password.
© 2024 Puppet, Inc., a Perforce company

Puppet | Syntax and settings | 587
• macOS 10.15 and later require the salt to be 32 bytes. Because Puppet's user resource requires the value to be hex
encoded, the length of the salt's string must be 64.
• Windows passwords can be managed only in cleartext, because there is no Windows API for setting the password
hash.
Enclose any value that includes a dollar sign ($) in single quotes (') to avoid accidental variable interpolation.
To redact passwords from reports to PuppetDB, use the Sensitive data type. For example, this resource protects
the password:
user { 'foo':
ensure => present,
password => Sensitive("my secret password")
}
This results in the password being redacted from the report, as in the previous_value, desired_value, and
message fields below.
events:
- !ruby/object:Puppet::Transaction::Event
audited: false
property: password
previous_value: "[redacted]"
desired_value: "[redacted]"
historical_value:
message: changed [redacted] to [redacted]
name: :password_changed
status: success
time: 2017-05-17 16:06:02.934398293 -07:00
redacted: true
corrective_change: false
corrective_change: false
Requires features manages_passwords.
(# Back to user attributes)
password_max_age
(Property: This attribute represents concrete state on the target system.)
The maximum number of days a password may be used before it must be changed.
Requires features manages_password_age.
(# Back to user attributes)
password_min_age
(Property: This attribute represents concrete state on the target system.)
The minimum number of days a password must be used before it may be changed.
Requires features manages_password_age.
(# Back to user attributes)
password_warn_days
(Property: This attribute represents concrete state on the target system.)
The number of days before a password is going to expire (see the maximum password age) during which the user
should be warned.
Requires features manages_password_age.
(# Back to user attributes)
© 2024 Puppet, Inc., a Perforce company
Puppet | Syntax and settings | 588
profile_membership
Whether specified roles should be treated as the complete list (inclusive) or the minimum list (minimum) of
roles of which the user is a member.
Valid values are inclusive, minimum.
(# Back to user attributes)
profiles
(Property: This attribute represents concrete state on the target system.)
The profiles the user has. Multiple profiles should be specified as an array.
Requires features manages_solaris_rbac.
(# Back to user attributes)
project
(Property: This attribute represents concrete state on the target system.)
The name of the project associated with a user.
Requires features manages_solaris_rbac.
(# Back to user attributes)
provider
The specific backend to use for this user resource. You will seldom need to specify this --- Puppet will usually
discover the appropriate provider for your platform.
Available providers are:
• aix
• directoryservice
• hpuxuseradd
• ldap
• openbsd
• pw
• user_role_add
• useradd
• windows_adsi
(# Back to user attributes)
purge_ssh_keys
Whether to purge authorized SSH keys for this user if they are not managed with the ssh_authorized_key
resource type. This parameter is a noop if the ssh_authorized_key type is not available.
Allowed values are:
• false (default) --- don't purge SSH keys for this user.
• true --- look for keys in the .ssh/authorized_keys file in the user's home directory. Purge any keys that
aren't managed as ssh_authorized_key resources.
• An array of file paths --- look for keys in all of the files listed. Purge any keys that aren't managed as
ssh_authorized_key resources. If any of these paths starts with ~ or %h, that token will be replaced with the
user's home directory.
Valid values are true, false.
(# Back to user attributes)
role_membership
© 2024 Puppet, Inc., a Perforce company
Puppet | Syntax and settings | 589
Whether specified roles should be considered the complete list (inclusive) or the minimum list (minimum) of
roles the user has.
Valid values are inclusive, minimum.
(# Back to user attributes)
roles
(Property: This attribute represents concrete state on the target system.)
The roles the user has. Multiple roles should be specified as an array.
Requires features manages_roles.
(# Back to user attributes)
salt
(Property: This attribute represents concrete state on the target system.)
This is the 32-byte salt used to generate the PBKDF2 password used in OS X. This field is required for managing
passwords on OS X >= 10.8.
Requires features manages_password_salt.
(# Back to user attributes)
shell
(Property: This attribute represents concrete state on the target system.)
The user's login shell. The shell must exist and be executable.
This attribute cannot be managed on Windows systems.
Requires features manages_shell.
(# Back to user attributes)
system
Whether the user is a system user, according to the OS's criteria; on most platforms, a UID less than or equal to 500
indicates a system user. This parameter is only used when the resource is created and will not affect the UID when the
user is present.
Valid values are true, false, yes, no.
(# Back to user attributes)
uid
(Property: This attribute represents concrete state on the target system.)
The user ID; must be specified numerically. If no user ID is specified when creating a new user, then one will be
chosen automatically. This will likely result in the same user having different UIDs on different systems, which is
not recommended. This is especially noteworthy when managing the same user on both Darwin and other platforms,
since Puppet does UID generation on Darwin, but the underlying tools do so on other platforms.
On Windows, this property is read-only and will return the user's security identifier (SID).
(# Back to user attributes)
Providers
aix
User management for AIX.
• Required binaries: /bin/chpasswd, /usr/bin/chuser, /usr/bin/mkuser, /usr/sbin/lsuser, /
usr/sbin/rmuser.
• Default for os.name == aix.
© 2024 Puppet, Inc., a Perforce company
Puppet | Syntax and settings | 590
• Supported features: manages_aix_lam, manages_expiry, manages_homedir,
manages_local_users_and_groups, manages_password_age, manages_passwords,
manages_shell.
directoryservice
User management on OS X.
• Required binaries: /usr/bin/dscacheutil, /usr/bin/dscl, /usr/bin/dsimport, /usr/bin/
uuidgen.
• Default for os.name == darwin.
• Supported features: manages_password_salt, manages_passwords, manages_shell.
hpuxuseradd
User management for HP-UX. This provider uses the undocumented -F switch to HP-UX's special usermod
binary to work around the fact that its standard usermod cannot make changes while the user is logged in. New
functionality provides for changing trusted computing passwords and resetting password expirations under trusted
computing.
• Required binaries: /usr/sam/lbin/useradd.sam, /usr/sam/lbin/userdel.sam, /usr/sam/
lbin/usermod.sam.
• Default for os.name == hp-ux.
• Supported features: allows_duplicates, manages_homedir, manages_passwords.
ldap
User management via LDAP.
This provider requires that you have valid values for all of the LDAP-related settings in puppet.conf, including
ldapbase. You will almost definitely need settings for ldapuser and ldappassword in order for your clients
to write to LDAP.
Note that this provider will automatically generate a UID for you if you do not specify one, but it is a potentially
expensive operation, as it iterates across all existing users to pick the appropriate next one.
• Supported features: manages_passwords, manages_shell.
openbsd
User management via useradd and its ilk for OpenBSD. Note that you will need to install Ruby's shadow password
library (package known as ruby-shadow) if you wish to manage user passwords.
• Required binaries: passwd, useradd, userdel, usermod.
• Default for os.name == openbsd.
• Supported features: manages_expiry, manages_homedir, manages_shell, system_users.
pw
User management via pw on FreeBSD and DragonFly BSD.
• Required binaries: pw.
• Default for os.name == freebsd, dragonfly.
• Supported features: allows_duplicates, manages_expiry, manages_homedir,
manages_passwords, manages_shell.
user_role_add
User and role management on Solaris, via useradd and roleadd.
• Required binaries: passwd, roleadd, roledel, rolemod, useradd, userdel, usermod.
• Default for os.family == solaris.
• Supported features: allows_duplicates, manages_homedir, manages_password_age,
manages_passwords, manages_roles, manages_shell, manages_solaris_rbac.
© 2024 Puppet, Inc., a Perforce company
Puppet | Syntax and settings | 591
useradd
User management via useradd and its ilk. Note that you will need to install Ruby's shadow password library (often
known as ruby-libshadow) if you wish to manage user passwords.
To use the forcelocal parameter, you need to install the libuser package (providing /usr/sbin/
lgroupadd and /usr/sbin/luseradd).
• Required binaries: chage, chpasswd, lchage, luseradd, luserdel, lusermod, useradd, userdel,
usermod.
• Supported features: allows_duplicates, manages_expiry, manages_homedir, manages_shell,
system_users.
windows_adsi
Local user management for Windows.
• Default for os.name == windows.
• Supported features: manages_homedir, manages_passwords, manages_roles.
Provider Features
Available features:
• allows_duplicates --- The provider supports duplicate users with the same UID.
• manages_aix_lam --- The provider can manage AIX Loadable Authentication Module (LAM) system.
• manages_expiry --- The provider can manage the expiry date for a user.
• manages_homedir --- The provider can create and remove home directories.
• manages_local_users_and_groups --- Allows local users to be managed on systems that also use some
other remote Name Service Switch (NSS) method of managing accounts.
• manages_loginclass --- The provider can manage the login class for a user.
• manages_password_age --- The provider can set age requirements and restrictions for passwords.
• manages_password_salt --- The provider can set a password salt. This is for providers that implement
PBKDF2 passwords with salt properties.
• manages_passwords --- The provider can modify user passwords, by accepting a password hash.
• manages_roles --- The provider can manage roles
• manages_shell --- The provider allows for setting shell and validates if possible
• manages_solaris_rbac --- The provider can manage normal users
• system_users --- The provider allows you to create system users with lower UIDs.
Provider support:
• aix - manages aix lam, manages expiry, manages homedir, manages local users and groups, manages password
age, manages passwords, manages shell
• directoryservice - manages password salt, manages passwords, manages shell
• hpuxuseradd - allows duplicates, manages homedir, manages passwords
• ldap - manages passwords, manages shell
• openbsd - manages expiry, manages homedir, manages shell, system users, manages passwords, manages
loginclass
• pw - allows duplicates, manages expiry, manages homedir, manages passwords, manages shell
• user_role_add - allows duplicates, manages homedir, manages password age, manages passwords, manages
roles, manages shell, manages solaris rbac
• useradd - allows duplicates, manages expiry, manages homedir, manages shell, system users, manages
passwords, manages password age, libuser
• windows_adsi - manages homedir, manages passwords, manages roles
© 2024 Puppet, Inc., a Perforce company

Puppet | Syntax and settings | 592
Built-in types
This page provides a reference guide for Puppet's built-in types: package, file, service, notify, exec,
user, and group.
For detailed information about built-in types, see the Resource type reference.
For information on all core types, including supported types in the puppet-agent package, see the Resource types
index.
The trifecta: package, file, and service
Package, file, service: Learn it, live it, love it. Even if this is the only Puppet you know, you can get a lot done.
package { 'openssh-server':
ensure => installed,
}
file { '/etc/ssh/sshd_config':
source => 'puppet:///modules/sshd/sshd_config',
owner => 'root',
group => 'root',
mode => '0640',
notify => Service['sshd'], # sshd restarts whenever you edit this file.
require => Package['openssh-server'],
}
service { 'sshd':
ensure => running,
enable => true,
}
package
Manages software packages.
Attribute Description Notes
name The name of the package, as known
to your packaging system.
Defaults to title.
ensure Whether the package should be
installed, and what version to use.
Allowed values:
• present
• latest (implies present)
• Any version string (implies
present)
• absent
• purged
CAUTION: purged
ensures absent, and
deletes configuration
files and dependencies,
including those that other
packages depend on.
Provider-dependent.
© 2024 Puppet, Inc., a Perforce company

Puppet | Syntax and settings | 593
Attribute Description Notes
source Where to obtain the package, if your
system’s packaging tools don’t use a
repository.
provider Which packaging system to use (such
as Yum or Rubygems), if a system
has more than one available.
file
Manages files, directories, and symlinks.
Attribute Description Notes
ensure Whether the file should exist, and
what it should be.
Allowed values:
• file
• directory
• link (symlink)
• present (anything)
• absent
path The full path to the file on disk. Defaults to title.
owner By name or UID.
group By name or GID.
mode Must be specified exactly. Does the
right thing for directories.
For normal files:
source Where to download contents for the file. Usually a
puppet:/// URL.
content The file’s desired contents, as a string. Most useful when
paired with templates, but you can also use the output of
the file function.
For directories:
source Where to download contents for the directory, when
recurse => true.
recurse Whether to recursively manage files in the directory.
purge Whether unmanaged files in the directory should be
deleted, when recurse => true.
For symlinks:
target The symlink target. (Required when ensure =>
link.)
© 2024 Puppet, Inc., a Perforce company

Puppet | Syntax and settings | 594
Other notable attributes:
• backup
• checksum
• force
• ignore
• links
• recurselimit
• replace
service
Manages services running on the node. As with packages, some platforms have better tools than others, so read the
relevant documentation before you begin.
You can make services restart whenever a file changes with the subscribe or notify metaparameters. For more
info, see Relationships and ordering.
Attribute Description Notes
name The name of the service to run. Defaults to title.
ensure The desired status of the service. Allowed values:
• running (or true)
• stopped (or false)
enable Whether the service should start on
boot. Doesn’t work on all systems.
hasrestart Whether to use the init script’s restart
command instead of stop+start.
Defaults to false.
hasstatus Whether to use the init script’s status
command.
Defaults to true.
Other notable attributes:
If a service has a bad init script, you can work around it and manage almost anything using the status, start,
stop, restart, pattern, and binary attributes.
Other built-in types
Beyond package, file, and service, these core types are among the most useful and commonly used.
notify
Logs an arbitrary message, at the notice log level. This appears in the POSIX syslog or Windows Event Log on the
agent node and is also logged in reports.
notify { "This message is getting logged on the agent node.": }
Attribute Description Notes
message The message to log. Defaults to title.
© 2024 Puppet, Inc., a Perforce company

Puppet | Syntax and settings | 595
exec
Executes an arbitrary command on the agent node. When using execs, you must either make sure the command can be
safely run multiple times, or specify that it runs only under certain conditions.
Important attributes Description Notes
command The command to run. If this isn’t a
fully-qualified path, use the path
attribute.
Defaults to title.
path Where to look for executables, as a
colon-separated list or an array.
returns Which exit codes indicate success. Defaults to 0.
environment An array of environment
variables to set (for example,
['MYVAR=somevalue',
'OTHERVAR=othervalue']).
The following attributes limit when a command runs.
creates A file to look for before running the
command. The command only runs if
the file doesn’t exist.
refreshonly If true, the command runs only
if a resource it subscribes to (or
a resource which notifies it) has
changed.
onlyif A command or array of commands; if
any have a non-zero return value, the
command won’t run.
unless The opposite of onlyif.
Other notable attributes: cwd, group, logoutput, timeout, tries, try_sleep, user
user
Manages user accounts; mostly used for system users.
user { "jane":
ensure => present,
uid => '507',
gid => 'admin',
shell => '/bin/zsh',
home => '/home/jane',
managehome => true,
}
Important Attributes Description Notes
name The name of the user. Defaults to title.
© 2024 Puppet, Inc., a Perforce company

Puppet | Syntax and settings | 596
Important Attributes Description Notes
ensure Whether the user should exist. Allowed values:
• present
• absent
• role
uid The user ID. Must be specified
numerically; chosen automatically if
omitted.
Read-only on Windows.
gid The user’s primary group. Can be
specified numerically or by name.
Not used on Windows; use groups
instead.
groups An array of other groups to which the
user belongs.
Don’t include the group specified as
the gid.
home The user’s home directory.
managehome Whether to manage the home
directory when managing the user.
If you don’t set this to true, you’ll
need to create the user’s home
directory manually.
shell The user’s login shell.
Other notable attributes: comment, expiry, membership, password, password_max_age,
password_min_age, purge_ssh_keys, salt
group
Manages groups.
Important attributes Description Notes
name The name of the group. Defaults to title.
ensure Whether the group should exist. Allowed values:
• present
• absent
gid The group ID; must be specified
numerically, and is chosen
automatically if omitted.
Read-only on Windows.
members Users and groups that are members of
the group.
Only applicable to certain operating
systems; see the full type reference
for details.
Optional resource types for Windows
In addition to the resource types included with Puppet, you can install custom resource types as modules from the
Forge. This is especially useful when managing Windows systems, because there are several important Windows-
specific resource types that are developed as modules rather than as part of core Puppet.
If you’re doing heavy management of Windows systems, the following modules might be helpful:
© 2024 Puppet, Inc., a Perforce company

Puppet | Syntax and settings | 597
• puppetlabs/acl: A resource type for managing access control lists (ACLs) on Windows.
• puppetlabs/registry: A resource type for managing arbitrary registry keys.
• puppetlabs/reboot: A resource type for managing conditional reboots, which can be necessary for installing certain
software.
• puppetlabs/dism: A resource type for enabling and disabling Windows features (on Windows 7 or 2008 R2 and
newer).
• puppetlabs/powershell: An alternative exec provider that can directly execute PowerShell commands.
Other resource types created by community members are also available on the Forge. The best way to find new
resource types is by searching for “Windows” on the Forge and exploring the results.
Remember: Plugins from the Forge might not have the same amount of quality assurance and test coverage as the
core resource types included in Puppet.
Resource Type: exec
NOTE: This page was generated from the Puppet source code on 2024-08-01 18:16:06 -0700
exec
• Attributes
• Providers
Description
Executes external commands.
Any command in an exec resource must be able to run multiple times without causing harm --- that is, it must be
idempotent. There are three main ways for an exec to be idempotent:
• The command itself is already idempotent. (For example, apt-get update.)
• The exec has an onlyif, unless, or creates attribute, which prevents Puppet from running the command
unless some condition is met. The onlyif and unless commands of an exec are used in the process of
determining whether the exec is already in sync, therefore they must be run during a noop Puppet run.
• The exec has refreshonly => true, which allows Puppet to run the command only when some other
resource is changed. (See the notes on refreshing below.)
The state managed by an exec resource represents whether the specified command needs to be executed during the
catalog run. The target state is always that the command does not need to be executed. If the initial state is that the
command does need to be executed, then successfully executing the command transitions it to the target state.
The unless, onlyif, and creates properties check the initial state of the resource. If one or more of these
properties is specified, the exec might not need to run. If the exec does not need to run, then the system is already in
the target state. In such cases, the exec is considered successful without actually executing its command.
A caution: There's a widespread tendency to use collections of execs to manage resources that aren't covered by an
existing resource type. This works fine for simple tasks, but once your exec pile gets complex enough that you really
have to think to understand what's happening, you should consider developing a custom resource type instead, as it is
much more predictable and maintainable.
Duplication: Even though command is the namevar, Puppet allows multiple exec resources with the same
command value.
Refresh: exec resources can respond to refresh events (via notify, subscribe, or the ~> arrow). The refresh
behavior of execs is non-standard, and can be affected by the refresh and refreshonly attributes:
• If refreshonly is set to true, the exec runs only when it receives an event. This is the most reliable way to use
refresh with execs.
• If the exec has already run and then receives an event, it runs its command up to two times. If an onlyif,
unless, or creates condition is no longer met after the first run, the second run does not occur.
• If the exec has already run, has a refresh command, and receives an event, it runs its normal command. Then,
if any onlyif, unless, or creates conditions are still met, the exec runs its refresh command.
© 2024 Puppet, Inc., a Perforce company

Puppet | Syntax and settings | 598
• If the exec has an onlyif, unless, or creates attribute that prevents it from running, and it then receives an
event, it still will not run.
• If the exec has noop => true, would otherwise have run, and receives an event from a non-noop resource, it
runs once. However, if it has a refresh command, it runs that instead of its normal command.
In short: If there's a possibility of your exec receiving refresh events, it is extremely important to make sure the run
conditions are restricted.
Autorequires: If Puppet is managing an exec's cwd or the executable file used in an exec's command, the exec
resource autorequires those files. If Puppet is managing the user that an exec should run as, the exec resource
autorequires that user.
Attributes
exec { 'resource title':
command => # (namevar) The actual command to execute. Must either
be...
creates => # A file to look for before running the command...
cwd => # The directory from which to run the command. If
environment => # An array of any additional environment variables
group => # The group to run the command as. This seems to...
logoutput => # Whether to log command output in addition to...
onlyif => # A test command that checks the state of the...
path => # The search path used for command execution...
provider => # The specific backend to use for this `exec...
refresh => # An alternate command to run when the `exec...
refreshonly => # The command should only be run as a refresh...
returns => # The expected exit code(s). An error will be...
timeout => # The maximum time the command should take. If...
tries => # The number of times execution of the command...
try_sleep => # The time to sleep in seconds between 'tries'....
umask => # Sets the umask to be used while executing this...
unless => # A test command that checks the state of the...
user => # The user to run the command as. > **Note:*...
# ...plus any applicable metaparameters.
}
command
(Namevar: If omitted, this attribute's value defaults to the resource's title.)
The actual command to execute. Must either be fully qualified or a search path for the command must be provided. If
the command succeeds, any output produced will be logged at the instance's normal log level (usually notice), but
if the command fails (meaning its return code does not match the specified code) then any output is logged at the err
log level.
Multiple exec resources can use the same command value; Puppet only uses the resource title to ensure execs are
unique.
On *nix platforms, the command can be specified as an array of strings and Puppet will invoke it using the more
secure method of parameterized system calls. For example, rather than executing the malicious injected code, this
command will echo it out:
command => ['/bin/echo', 'hello world; rm -rf /']
(# Back to exec attributes)
creates
A file to look for before running the command. The command will only run if the file doesn't exist.
This parameter doesn't cause Puppet to create a file; it is only useful if the command itself creates a file.
exec { 'tar -xf /Volumes/nfs02/important.tar':
© 2024 Puppet, Inc., a Perforce company

Puppet | Syntax and settings | 599
cwd => '/var/tmp',
creates => '/var/tmp/myfile',
path => ['/usr/bin', '/usr/sbin',],
}
In this example, myfile is assumed to be a file inside important.tar. If it is ever deleted, the exec will bring it
back by re-extracting the tarball. If important.tar does not actually contain myfile, the exec will keep running
every time Puppet runs.
This parameter can also take an array of files, and the command will not run if any of these files exist. Consider this
example:
creates => ['/tmp/file1', '/tmp/file2'],
The command is only run if both files don't exist.
(# Back to exec attributes)
cwd
The directory from which to run the command. If this directory does not exist, the command will fail.
(# Back to exec attributes)
environment
An array of any additional environment variables you want to set for a command, such as [ 'HOME=/root',
Multiple environment variables should be specified as an array.
(# Back to exec attributes)
group
The group to run the command as. This seems to work quite haphazardly on different platforms -- it is a platform
issue not a Ruby or Puppet one, since the same variety exists when running commands as different users in the shell.
(# Back to exec attributes)
logoutput
Whether to log command output in addition to logging the exit code. Defaults to on_failure, which only logs the
output when the command has an exit code that does not match any value specified by the returns attribute. As
with any resource type, the log level can be controlled with the loglevel metaparameter.
Default: on_failure
Allowed values:
• true
• false
• on_failure
(# Back to exec attributes)
onlyif
A test command that checks the state of the target system and restricts when the exec can run. If present, Puppet
runs this test command first, and only runs the main command if the test has an exit code of 0 (success). For example:
exec { 'logrotate':
path => '/usr/bin:/usr/sbin:/bin',
provider => shell,
onlyif => 'test `du /var/log/messages | cut -f1` -gt 100000',
}
© 2024 Puppet, Inc., a Perforce company

Puppet | Syntax and settings | 600
This would run logrotate only if that test returns true.
Note that this test command runs with the same provider, path, user, cwd, and group as the main command.
If the path isn't set, you must fully qualify the command's name.
Since this command is used in the process of determining whether the exec is already in sync, it must be run during
a noop Puppet run.
This parameter can also take an array of commands. For example:
onlyif => ['test -f /tmp/file1', 'test -f /tmp/file2'],
or an array of arrays. For example:
onlyif => [['test', '-f', '/tmp/file1'], 'test -f /tmp/file2']
This exec would only run if every command in the array has an exit code of 0 (success).
(# Back to exec attributes)
path
The search path used for command execution. Commands must be fully qualified if no path is specified. Paths can be
specified as an array or as a '
(# Back to exec attributes)
provider
The specific backend to use for this exec resource. You will seldom need to specify this --- Puppet will usually
discover the appropriate provider for your platform.
Available providers are:
• posix
• shell
• windows
(# Back to exec attributes)
refresh
An alternate command to run when the exec receives a refresh event from another resource. By default, Puppet runs
the main command again. For more details, see the notes about refresh behavior above, in the description for this
resource type.
Note that this alternate command runs with the same provider, path, user, and group as the main command. If
the path isn't set, you must fully qualify the command's name.
(# Back to exec attributes)
refreshonly
The command should only be run as a refresh mechanism for when a dependent object is changed. It only makes
sense to use this option when this command depends on some other object; it is useful for triggering an action:
# Pull down the main aliases file
file { '/etc/aliases':
source => 'puppet://server/module/aliases',
}
# Rebuild the database, but only when the file changes
exec { newaliases:
path => ['/usr/bin', '/usr/sbin'],
subscribe => File['/etc/aliases'],
refreshonly => true,
© 2024 Puppet, Inc., a Perforce company

Puppet | Syntax and settings | 601
}
Note that only subscribe and notify can trigger actions, not require, so it only makes sense to use
refreshonly with subscribe or notify.
Allowed values:
• true
• false
(# Back to exec attributes)
returns
(Property: This attribute represents concrete state on the target system.)
The expected exit code(s). An error will be returned if the executed command has some other exit code. Can be
specified as an array of acceptable exit codes or a single value.
On POSIX systems, exit codes are always integers between 0 and 255.
On Windows, most exit codes should be integers between 0 and 2147483647.
Larger exit codes on Windows can behave inconsistently across different tools. The Win32 APIs define exit codes
as 32-bit unsigned integers, but both the cmd.exe shell and the .NET runtime cast them to signed integers. This
means some tools will report negative numbers for exit codes above 2147483647. (For example, cmd.exe reports
4294967295 as -1.) Since Puppet uses the plain Win32 APIs, it will report the very large number instead of the
negative number, which might not be what you expect if you got the exit code from a cmd.exe session.
Microsoft recommends against using negative/very large exit codes, and you should avoid them when possible. To
convert a negative exit code to the positive one Puppet will use, add it to 4294967296.
Default: 0
(# Back to exec attributes)
timeout
The maximum time the command should take. If the command takes longer than the timeout, the command is
considered to have failed and will be stopped. The timeout is specified in seconds. The default timeout is 300 seconds
and you can set it to 0 to disable the timeout.
Default: 300
(# Back to exec attributes)
tries
The number of times execution of the command should be tried. This many attempts will be made to execute the
command until an acceptable return code is returned. Note that the timeout parameter applies to each try rather than to
the complete set of tries.
Default: 1
(# Back to exec attributes)
try_sleep
The time to sleep in seconds between 'tries'.
Default: 0
(# Back to exec attributes)
umask
Sets the umask to be used while executing this command
(# Back to exec attributes)
© 2024 Puppet, Inc., a Perforce company

Puppet | Syntax and settings | 602
unless
A test command that checks the state of the target system and restricts when the exec can run. If present, Puppet
runs this test command first, then runs the main command unless the test has an exit code of 0 (success). For example:
exec { '/bin/echo root >> /usr/lib/cron/cron.allow':
path => '/usr/bin:/usr/sbin:/bin',
unless => 'grep ^root$ /usr/lib/cron/cron.allow 2>/dev/null',
}
This would add root to the cron.allow file (on Solaris) unless grep determines it's already there.
Note that this test command runs with the same provider, path, user, cwd, and group as the main command.
If the path isn't set, you must fully qualify the command's name.
Since this command is used in the process of determining whether the exec is already in sync, it must be run during
a noop Puppet run.
This parameter can also take an array of commands. For example:
unless => ['test -f /tmp/file1', 'test -f /tmp/file2'],
or an array of arrays. For example:
unless => [['test', '-f', '/tmp/file1'], 'test -f /tmp/file2']
This exec would only run if every command in the array has a non-zero exit code.
(# Back to exec attributes)
user
The user to run the command as.
Note: Puppet cannot execute commands as other users on Windows.
Note that if you use this attribute, any error output is not captured due to a bug within Ruby. If you use Puppet to
create this user, the exec automatically requires the user, as long as it is specified by name.
The $HOME environment variable is not automatically set when using this attribute.
(# Back to exec attributes)
Providers
posix
Executes external binaries by invoking Ruby's Kernel.exec. When the command is a string, it will be executed
directly, without a shell, if it follows these rules:
• no meta characters
• no shell reserved word and no special built-in
When the command is an Array of Strings, passed as [cmdname, arg1, ...] it will be executed directly(the
first element is taken as a command name and the rest are passed as parameters to command with no shell expansion)
This is a safer and more predictable way to execute most commands, but prevents the use of globbing and shell built-
ins (including control logic like "for" and "if" statements).
If the use of globbing and shell built-ins is desired, please check the shell provider
• Confined to: feature == posix
• Default for: ["feature", "posix"] ==
• Supported features: umask
shell
© 2024 Puppet, Inc., a Perforce company

Puppet | Syntax and settings | 603
Passes the provided command through /bin/sh; only available on POSIX systems. This allows the use of shell
globbing and built-ins, and does not require that the path to a command be fully-qualified. Although this can be more
convenient than the posix provider, it also means that you need to be more careful with escaping; as ever, with great
power comes etc. etc.
This provider closely resembles the behavior of the exec type in Puppet 0.25.x.
• Confined to: feature == posix
windows
Execute external binaries on Windows systems. As with the posix provider, this provider directly calls the
command with the arguments given, without passing it through a shell or performing any interpolation. To use shell
built-ins --- that is, to emulate the shell provider on Windows --- a command must explicitly invoke the shell:
exec {'echo foo':
command => 'cmd.exe /c echo "foo"',
}
If no extension is specified for a command, Windows will use the PATHEXT environment variable to locate the
executable.
Note on PowerShell scripts: PowerShell's default restricted execution policy doesn't allow it to run saved
scripts. To run PowerShell scripts, specify the remotesigned execution policy as part of the command:
exec { 'test':
path => 'C:/Windows/System32/WindowsPowerShell/v1.0',
command => 'powershell -executionpolicy remotesigned -file C:/test.ps1',
}
• Confined to: os.name == windows
• Default for: ["os.name", "windows"] ==
Using exec on Windows
Puppet uses the same exec resource type on both *nix and Windows systems, and there are a few Windows-specific
best practices and tips to keep in mind.
Puppet can run binary files (such as exe, com, or bat), and can log the child process output and exit status. To
ensure the resource is idempotent, specify one of the creates, onlyif, or unless attributes.
Command extensions
If a file extension for the command is not specified (for example, ruby instead of ruby.exe), Puppet will use the
PATHEXT environment variable to resolve the appropriate binary. PATHEXT is a Windows-specific variable that lists
the valid file extensions for executables.
Exit codes
On Windows, most exit codes are integers between 0 and 2147483647.
Larger exit codes on Windows behave inconsistently across different tools. The Win32 APIs define exit codes as 32-
bit unsigned integers, but both the cmd.exe shell and the .NET runtime cast them to signed integers. This means some
tools will report negative numbers for exit codes above 2147483647. For example, cmd.exe reports 4294967295 as
-1.
Because Puppet uses the GetExitCodeProcess Win32 API, it reports the very large number instead of the negative
number, which might not be what you expect if you got the exit code from a cmd.exe session.
Microsoft recommends against using negative or very large exit codes, so avoid them.
Tip: To convert a negative exit code to the positive one Puppet will use, subtract it from 4294967296.
© 2024 Puppet, Inc., a Perforce company

Puppet | Syntax and settings | 604
Shell built-ins
Puppet does not support a shell provider for Windows, so if you want to execute shell built-ins (such as echo), you
must provide a complete cmd.exe invocation as the command. For example, command => 'cmd.exe /c
echo "hello"'.
When using cmd.exe and specifying a file path in the command line, be sure to use backslashes. For example,
'cmd.exe /c type c:\path\to\file.txt'. If you use forward slashes, cmd.exe returns an error.
Optional PowerShell exec provider
An optional PowerShell exec provider is available as a plug-in and is helpful if you need to run PowerShell
commands from within Puppet. To use it, install puppetlabs/powershell.
Inline PowerShell scripts
If you choose to execute PowerShell scripts using the default Puppet exec provider on Windows, you must specify
the remotesigned execution policy as part of the powershell.exe invocation:
exec { 'test':
command => 'C:\Windows\System32\WindowsPowerShell\v1.0\powershell.exe -
executionpolicy remotesigned -file C:\test.ps1',
}
Resource Type: file
NOTE: This page was generated from the Puppet source code on 2024-08-01 18:16:06 -0700
file
• Attributes
• Providers
• Provider Features
Description
Manages files, including their content, ownership, and permissions.
The file type can manage normal files, directories, and symlinks; the type should be specified in the ensure
attribute.
File contents can be managed directly with the content attribute, or downloaded from a remote source using the
source attribute; the latter can also be used to recursively serve directories (when the recurse attribute is set to
true or local). On Windows, note that file contents are managed in binary mode; Puppet never automatically
translates line endings.
Autorequires: If Puppet is managing the user or group that owns a file, the file resource will autorequire them. If
Puppet is managing any parent directories of a file, the file resource autorequires them.
Warning: Enabling recurse on directories containing large numbers of files slows agent runs. To manage
file attributes for many files, consider using alternative methods such as the chmod_r, chown_r, or
recursive_file_permissions modules from the Forge.
Attributes
file { 'resource title':
path => # (namevar) The path to the file to manage.
Must be fully...
ensure => # Whether the file should exist, and if so
what...
backup => # Whether (and how) file content should be
backed...
checksum => # The checksum type to use when determining...
© 2024 Puppet, Inc., a Perforce company

Puppet | Syntax and settings | 605
checksum_value => # The checksum of the source contents. Only
md5...
content => # The desired contents of a file, as a
string...
ctime => # A read-only state to check the file ctime.
On...
force => # Perform the file operation even if it will...
group => # Which group should own the file. Argument
can...
ignore => # A parameter which omits action on files
matching
links => # How to handle links during file actions.
During
max_files => # In case the resource is a directory and
the...
mode => # The desired permissions mode for the file,
in...
mtime => # A read-only state to check the file mtime.
On...
owner => # The user to whom the file should belong....
provider => # The specific backend to use for this `file...
purge => # Whether unmanaged files should be purged.
This...
recurse => # Whether to recursively manage the _contents_
of...
recurselimit => # How far Puppet should descend into...
replace => # Whether to replace a file or symlink that...
selinux_ignore_defaults => # If this is set, Puppet will not call the
SELinux
selrange => # What the SELinux range component of the
context...
selrole => # What the SELinux role component of the
context...
seltype => # What the SELinux type component of the
context...
seluser => # What the SELinux user component of the
context...
show_diff => # Whether to display differences when the
file...
source => # A source file, which will be copied into
place...
source_permissions => # Whether (and how) Puppet should copy owner...
sourceselect => # Whether to copy all valid sources, or just
the...
staging_location => # When rendering a file first render it to
this...
target => # The target for creating a link. Currently...
type => # A read-only state to check the file...
validate_cmd => # A command for validating the file's syntax...
validate_replacement => # The replacement string in a `validate_cmd`
that...
# ...plus any applicable metaparameters.
}
path
(Namevar: If omitted, this attribute's value defaults to the resource's title.)
The path to the file to manage. Must be fully qualified.
On Windows, the path should include the drive letter and should use / as the separator character (rather than \).
(# Back to file attributes)
ensure
© 2024 Puppet, Inc., a Perforce company

Puppet | Syntax and settings | 606
(Property: This attribute represents concrete state on the target system.)
Whether the file should exist, and if so what kind of file it should be. Possible values are present, absent, file,
directory, and link.
• present accepts any form of file existence, and creates a normal file if the file is missing. (The file will have no
content unless the content or source attribute is used.)
• absent ensures the file doesn't exist, and deletes it if necessary.
• file ensures it's a normal file, and enables use of the content or source attribute.
• directory ensures it's a directory, and enables use of the source, recurse, recurselimit, ignore,
and purge attributes.
• link ensures the file is a symlink, and requires that you also set the target attribute. Symlinks are supported
on all Posix systems and on Windows Vista / 2008 and higher. On Windows, managing symlinks requires Puppet
agent's user account to have the "Create Symbolic Links" privilege; this can be configured in the "User Rights
Assignment" section in the Windows policy editor. By default, Puppet agent runs as the Administrator account,
which has this privilege.
Puppet avoids destroying directories unless the force attribute is set to true. This means that if a file is currently
a directory, setting ensure to anything but directory or present will cause Puppet to skip managing the
resource and log either a notice or an error.
There is one other non-standard value for ensure. If you specify the path to another file as the ensure value, it is
equivalent to specifying link and using that path as the target:
# Equivalent resources:
file { '/etc/inetd.conf':
ensure => '/etc/inet/inetd.conf',
}
file { '/etc/inetd.conf':
ensure => link,
target => '/etc/inet/inetd.conf',
}
However, we recommend using link and target explicitly, since this behavior can be harder to read and is
deprecated as of Puppet 4.3.0.
Allowed values:
• absent
• false
• file
• present
• directory
• link
• /./
(# Back to file attributes)
backup
Whether (and how) file content should be backed up before being replaced. This attribute works best as a resource
default in the site manifest (File { backup => main }), so it can affect all file resources.
• If set to false, file content won't be backed up.
• If set to a string beginning with ., such as .puppet-bak, Puppet will use copy the file in the same directory
with that value as the extension of the backup. (A value of true is a synonym for .puppet-bak.)
• If set to any other string, Puppet will try to back up to a filebucket with that title. Puppet automatically creates
a local filebucket named puppet if one doesn't already exist. See the filebucket resource type for more
details.
© 2024 Puppet, Inc., a Perforce company

Puppet | Syntax and settings | 607
Default value: false
Backing up to a local filebucket isn't particularly useful. If you want to make organized use of backups, you will
generally want to use the primary Puppet server's filebucket service. This requires declaring a filebucket resource and
a resource default for the backup attribute in site.pp:
# /etc/puppetlabs/puppet/manifests/site.pp
filebucket { 'main':
path => false, # This is required for remote filebuckets.
server => 'puppet.example.com', # Optional; defaults to the configured
primary Puppet server.
}
File { backup => main, }
If you are using multiple primary servers, you will want to centralize the contents of the filebucket. Either configure
your load balancer to direct all filebucket traffic to a single primary server, or use something like an out-of-band rsync
task to synchronize the content on all primary servers.
Note: Enabling and using the backup option, and by extension the filebucket resource, requires appropriate
planning and management to ensure that sufficient disk space is available for the file backups. Generally,
you can implement this using one of the following two options:
• Use a find command and crontab entry to retain only the last X days of file backups. For example:
find /opt/puppetlabs/server/data/puppetserver/bucket -type f -mtime +45 -
atime +45 -print0 | xargs -0 rm
• Restrict the directory to a maximum size after which the oldest items are removed.
Default: false
(# Back to file attributes)
checksum
The checksum type to use when determining whether to replace a file's contents.
The default checksum type is sha256.
Allowed values:
• sha256
• sha256lite
• md5
• md5lite
• sha1
• sha1lite
• sha512
• sha384
• sha224
• mtime
• ctime
• none
(# Back to file attributes)
checksum_value
(Property: This attribute represents concrete state on the target system.)
© 2024 Puppet, Inc., a Perforce company

Puppet | Syntax and settings | 608
The checksum of the source contents. Only md5, sha256, sha224, sha384 and sha512 are supported when specifying
this parameter. If this parameter is set, source_permissions will be assumed to be false, and ownership and
permissions will not be read from source.
(# Back to file attributes)
content
(Property: This attribute represents concrete state on the target system.)
The desired contents of a file, as a string. This attribute is mutually exclusive with source and target.
Newlines and tabs can be specified in double-quoted strings using standard escaped syntax --- \n for a newline, and \t
for a tab.
With very small files, you can construct content strings directly in the manifest...
define resolve($nameserver1, $nameserver2, $domain, $search) {
$str = "search ${search}
domain ${domain}
nameserver ${nameserver1}
nameserver ${nameserver2}
"
file { '/etc/resolv.conf':
content => $str,
}
}
...but for larger files, this attribute is more useful when combined with the template or file function.
(# Back to file attributes)
ctime
(Property: This attribute represents concrete state on the target system.)
A read-only state to check the file ctime. On most modern *nix-like systems, this is the time of the most recent
change to the owner, group, permissions, or content of the file.
(# Back to file attributes)
force
Perform the file operation even if it will destroy one or more directories. You must use force in order to:
• purge subdirectories
• Replace directories with files or links
• Remove a directory when ensure => absent
Default: false
Allowed values:
• true
• false
• yes
• no
(# Back to file attributes)
group
(Property: This attribute represents concrete state on the target system.)
Which group should own the file. Argument can be either a group name or a group ID.
© 2024 Puppet, Inc., a Perforce company
Puppet | Syntax and settings | 609
On Windows, a user (such as "Administrator") can be set as a file's group and a group (such as "Administrators") can
be set as a file's owner; however, a file's owner and group shouldn't be the same. (If the owner is also the group, files
with modes like "0640" will cause log churn, as they will always appear out of sync.)
(# Back to file attributes)
ignore
A parameter which omits action on files matching specified patterns during recursion. Uses Ruby's builtin globbing
engine, so shell metacharacters such as [a-z]* are fully supported. Matches that would descend into the directory
structure are ignored, such as */*.
(# Back to file attributes)
links
How to handle links during file actions. During file copying, follow will copy the target file instead of the link and
manage will copy the link itself. When not copying, manage will manage the link, and follow will manage the
file to which the link points.
Default: manage
Allowed values:
• follow
• manage
(# Back to file attributes)
max_files
In case the resource is a directory and the recursion is enabled, puppet will generate a new resource for each file file
found, possible leading to an excessive number of resources generated without any control.
Setting max_files will check the number of file resources that will eventually be created and will raise a resource
argument error if the limit will be exceeded.
Use value 0 to log a warning instead of raising an error.
Use value -1 to disable errors and warnings due to max files.
Default: 0
Allowed values:
• /^[0-9]+$/
• /^-1$/
(# Back to file attributes)
mode
(Property: This attribute represents concrete state on the target system.)
The desired permissions mode for the file, in symbolic or numeric notation. This value must be specified as a string;
do not use un-quoted numbers to represent file modes.
If the mode is omitted (or explicitly set to undef), Puppet does not enforce permissions on existing files and creates
new files with permissions of 0644.
The file type uses traditional Unix permission schemes and translates them to equivalent permissions for systems
which represent permissions differently, including Windows. For detailed ACL controls on Windows, you can leave
mode unmanaged and use the puppetlabs/acl module.
Numeric modes should use the standard octal notation of <SETUID/SETGID/
STICKY><OWNER><GROUP><OTHER> (for example, "0644").
• Each of the "owner," "group," and "other" digits should be a sum of the permissions for that class of users, where
read = 4, write = 2, and execute/search = 1.
© 2024 Puppet, Inc., a Perforce company
Puppet | Syntax and settings | 610
• The setuid/setgid/sticky digit is also a sum, where setuid = 4, setgid = 2, and sticky = 1.
• The setuid/setgid/sticky digit is optional. If it is absent, Puppet will clear any existing setuid/setgid/sticky
permissions. (So to make your intent clear, you should use at least four digits for numeric modes.)
• When specifying numeric permissions for directories, Puppet sets the search permission wherever the read
permission is set.
Symbolic modes should be represented as a string of comma-separated permission clauses, in the form
<WHO><OP><PERM>:
• "Who" should be any combination of u (user), g (group), and o (other), or a (all)
• "Op" should be = (set exact permissions), + (add select permissions), or - (remove select permissions)
• "Perm" should be one or more of:
• r (read)
• w (write)
• x (execute/search)
• t (sticky)
• s (setuid/setgid)
• X (execute/search if directory or if any one user can execute)
• u (user's current permissions)
• g (group's current permissions)
• o (other's current permissions)
Thus, mode "0664" could be represented symbolically as either a=r,ug+w or ug=rw,o=r. However, symbolic
modes are more expressive than numeric modes: a mode only affects the specified bits, so mode => 'ug+w' will
set the user and group write bits, without affecting any other bits.
See the manual page for GNU or BSD chmod for more details on numeric and symbolic modes.
On Windows, permissions are translated as follows:
• Owner and group names are mapped to Windows SIDs
• The "other" class of users maps to the "Everyone" SID
• The read/write/execute permissions map to the FILE_GENERIC_READ, FILE_GENERIC_WRITE, and
FILE_GENERIC_EXECUTE access rights; a file's owner always has the FULL_CONTROL right
• "Other" users can't have any permissions a file's group lacks, and its group can't have any permissions its owner
lacks; that is, "0644" is an acceptable mode, but "0464" is not.
(# Back to file attributes)
mtime
(Property: This attribute represents concrete state on the target system.)
A read-only state to check the file mtime. On *nix-like systems, this is the time of the most recent change to the
content of the file.
(# Back to file attributes)
owner
(Property: This attribute represents concrete state on the target system.)
The user to whom the file should belong. Argument can be a user name or a user ID.
On Windows, a group (such as "Administrators") can be set as a file's owner and a user (such as "Administrator") can
be set as a file's group; however, a file's owner and group shouldn't be the same. (If the owner is also the group, files
with modes like "0640" will cause log churn, as they will always appear out of sync.)
(# Back to file attributes)
provider
© 2024 Puppet, Inc., a Perforce company
Puppet | Syntax and settings | 611
The specific backend to use for this file resource. You will seldom need to specify this --- Puppet will usually
discover the appropriate provider for your platform.
Available providers are:
• posix
• windows
(# Back to file attributes)
purge
Whether unmanaged files should be purged. This option only makes sense when ensure => directory and
recurse => true.
• When recursively duplicating an entire directory with the source attribute, purge => true will
automatically purge any files that are not in the source directory.
• When managing files in a directory as individual resources, setting purge => true will purge any files that
aren't being specifically managed.
If you have a filebucket configured, the purged files will be uploaded, but if you do not, this will destroy data.
Unless force => true is set, purging will not delete directories, although it will delete the files they contain.
If recurselimit is set and you aren't using force => true, purging will obey the recursion limit; files in any
subdirectories deeper than the limit will be treated as unmanaged and left alone.
Default: false
Allowed values:
• true
• false
• yes
• no
(# Back to file attributes)
recurse
Whether to recursively manage the contents of a directory. This attribute is only used when ensure =>
directory is set. The allowed values are:
• false --- The default behavior. The contents of the directory will not be automatically managed.
• remote --- If the source attribute is set, Puppet will automatically manage the contents of the source directory
(or directories), ensuring that equivalent files and directories exist on the target system and that their contents
match.
Using remote will disable the purge attribute, but results in faster catalog application than recurse =>
true.
The source attribute is mandatory when recurse => remote.
• true --- If the source attribute is set, this behaves similarly to recurse => remote, automatically
managing files from the source directory.
This also enables the purge attribute, which can delete unmanaged files from a directory. See the description of
purge for more details.
The source attribute is not mandatory when using recurse => true, so you can enable purging in
directories where all files are managed individually.
By default, setting recurse to remote or true will manage all subdirectories. You can use the recurselimit
attribute to limit the recursion depth.
Allowed values:
• true
© 2024 Puppet, Inc., a Perforce company
Puppet | Syntax and settings | 612
• false
• remote
(# Back to file attributes)
recurselimit
How far Puppet should descend into subdirectories, when using ensure => directory and either recurse
=> true or recurse => remote. The recursion limit affects which files will be copied from the source
directory, as well as which files can be purged when purge => true.
Setting recurselimit => 0 is the same as setting recurse => false --- Puppet will manage the directory,
but all of its contents will be treated as unmanaged.
Setting recurselimit => 1 will manage files and directories that are directly inside the directory, but will not
manage the contents of any subdirectories.
Setting recurselimit => 2 will manage the direct contents of the directory, as well as the contents of the first
level of subdirectories.
This pattern continues for each incremental value of recurselimit.
Allowed values:
• /^[0-9]+$/
(# Back to file attributes)
replace
Whether to replace a file or symlink that already exists on the local system but whose content doesn't match what
the source or content attribute specifies. Setting this to false allows file resources to initialize files without
overwriting future changes. Note that this only affects content; Puppet will still manage ownership and permissions.
Default: true
Allowed values:
• true
• false
• yes
• no
(# Back to file attributes)
selinux_ignore_defaults
If this is set, Puppet will not call the SELinux function selabel_lookup to supply defaults for the SELinux attributes
(seluser, selrole, seltype, and selrange). In general, you should leave this set at its default and only set it to true when
you need Puppet to not try to fix SELinux labels automatically.
Default: false
Allowed values:
• true
• false
(# Back to file attributes)
selrange
(Property: This attribute represents concrete state on the target system.)
What the SELinux range component of the context of the file should be. Any valid SELinux range component is
accepted. For example s0 or SystemHigh. If not specified, it defaults to the value returned by selabel_lookup for
the file, if any exists. Only valid on systems with SELinux support enabled and that have support for MCS (Multi-
Category Security).
© 2024 Puppet, Inc., a Perforce company
Puppet | Syntax and settings | 613
(# Back to file attributes)
selrole
(Property: This attribute represents concrete state on the target system.)
What the SELinux role component of the context of the file should be. Any valid SELinux role component is
accepted. For example role_r. If not specified, it defaults to the value returned by selabel_lookup for the file, if any
exists. Only valid on systems with SELinux support enabled.
(# Back to file attributes)
seltype
(Property: This attribute represents concrete state on the target system.)
What the SELinux type component of the context of the file should be. Any valid SELinux type component is
accepted. For example tmp_t. If not specified, it defaults to the value returned by selabel_lookup for the file, if any
exists. Only valid on systems with SELinux support enabled.
(# Back to file attributes)
seluser
(Property: This attribute represents concrete state on the target system.)
What the SELinux user component of the context of the file should be. Any valid SELinux user component is
accepted. For example user_u. If not specified, it defaults to the value returned by selabel_lookup for the file, if any
exists. Only valid on systems with SELinux support enabled.
(# Back to file attributes)
show_diff
Whether to display differences when the file changes, defaulting to true. This parameter is useful for files that may
contain passwords or other secret data, which might otherwise be included in Puppet reports or other insecure outputs.
If the global show_diff setting is false, then no diffs will be shown even if this parameter is true.
Default: true
Allowed values:
• true
• false
• yes
• no
(# Back to file attributes)
source
A source file, which will be copied into place on the local system. This attribute is mutually exclusive with content
and target. Allowed values are:
• puppet: URIs, which point to files in modules or Puppet file server mount points.
• Fully qualified paths to locally available files (including files on NFS shares or Windows mapped drives).
• file: URIs, which behave the same as local file paths.
• http(s): URIs, which point to files served by common web servers.
The normal form of a puppet: URI is:
puppet:///modules/<MODULE NAME>/<FILE PATH>
This will fetch a file from a module on the Puppet master (or from a local module when using Puppet apply).
Given a modulepath of /etc/puppetlabs/code/modules, the example above would resolve to /etc/
puppetlabs/code/modules/<MODULE NAME>/files/<FILE PATH>.
© 2024 Puppet, Inc., a Perforce company

Puppet | Syntax and settings | 614
Unlike content, the source attribute can be used to recursively copy directories if the recurse attribute is set
to true or remote. If a source directory contains symlinks, use the links attribute to specify whether to recreate
links or follow them.
HTTP URIs cannot be used to recursively synchronize whole directory trees. You cannot use
source_permissions values other than ignore because HTTP servers do not transfer any metadata that
translates to ownership or permission details.
Puppet determines if file content is synchronized by computing a checksum for the local file and comparing it against
the checksum_value parameter. If the checksum_value parameter is not specified for puppet and file
sources, Puppet computes a checksum based on its Puppet[:digest_algorithm]. For http(s) sources,
Puppet uses the first HTTP header it recognizes out of the following list: X-Checksum-Sha256, X-Checksum-
Sha1, X-Checksum-Md5 or Content-MD5. If the server response does not include one of these headers, Puppet
defaults to using the Last-Modified header. Puppet updates the local file if the header is newer than the modified
time (mtime) of the local file.
HTTP URIs can include a user information component so that Puppet can retrieve file metadata
and content from HTTP servers that require HTTP Basic authentication. For example https://
<user>:<pass>@<server>:<port>/path/to/file.
When connecting to HTTPS servers, Puppet trusts CA certificates in the puppet-agent certificate
bundle and the Puppet CA. You can configure Puppet to trust additional CA certificates using the
Puppet[:ssl_trust_store] setting.
Multiple source values can be specified as an array, and Puppet will use the first source that exists. This can be
used to serve different files to different system types:
file { '/etc/nfs.conf':
source => [
"puppet:///modules/nfs/conf.${host}",
"puppet:///modules/nfs/conf.${os['name']}",
'puppet:///modules/nfs/conf'
]
}
Alternately, when serving directories recursively, multiple sources can be combined by setting the sourceselect
attribute to all.
(# Back to file attributes)
source_permissions
Whether (and how) Puppet should copy owner, group, and mode permissions from the source to file resources
when the permissions are not explicitly specified. (In all cases, explicit permissions will take precedence.) Valid
values are use, use_when_creating, and ignore:
• ignore (the default) will never apply the owner, group, or mode from the source when managing a file. When
creating new files without explicit permissions, the permissions they receive will depend on platform-specific
behavior. On POSIX, Puppet will use the umask of the user it is running as. On Windows, Puppet will use the
default DACL associated with the user it is running as.
• use will cause Puppet to apply the owner, group, and mode from the source to any files it is managing.
• use_when_creating will only apply the owner, group, and mode from the source when creating a file;
existing files will not have their permissions overwritten.
Default: ignore
Allowed values:
• use
• use_when_creating
• ignore
(# Back to file attributes)
© 2024 Puppet, Inc., a Perforce company

Puppet | Syntax and settings | 615
sourceselect
Whether to copy all valid sources, or just the first one. This parameter only affects recursive directory copies; by
default, the first valid source is the only one used, but if this parameter is set to all, then all valid sources will have
all of their contents copied to the local system. If a given file exists in more than one source, the version from the
earliest source in the list will be used.
Default: first
Allowed values:
• first
• all
(# Back to file attributes)
staging_location
When rendering a file first render it to this location. The default location is the same path as the desired location with
a unique filename. This parameter is useful in conjuction with validate_cmd to test a file before moving the file to
it's final location. WARNING: File replacement is only guaranteed to be atomic if the staging location is on the same
filesystem as the final location.
(# Back to file attributes)
target
(Property: This attribute represents concrete state on the target system.)
The target for creating a link. Currently, symlinks are the only type supported. This attribute is mutually exclusive
with source and content.
Symlink targets can be relative, as well as absolute:
# (Useful on Solaris)
file { '/etc/inetd.conf':
ensure => link,
target => 'inet/inetd.conf',
}
Directories of symlinks can be served recursively by instead using the source attribute, setting ensure to
directory, and setting the links attribute to manage.
Allowed values:
• notlink
• /./
(# Back to file attributes)
type
(Property: This attribute represents concrete state on the target system.)
A read-only state to check the file type.
(# Back to file attributes)
validate_cmd
A command for validating the file's syntax before replacing it. If Puppet would need to rewrite a file due to new
source or content, it will check the new content's validity first. If validation fails, the file resource will fail.
This command must have a fully qualified path, and should contain a percent (%) token where it would expect an
input file. It must exit 0 if the syntax is correct, and non-zero otherwise. The command will be run on the target
system while applying the catalog, not on the primary Puppet server.
© 2024 Puppet, Inc., a Perforce company

Puppet | Syntax and settings | 616
Example:
file { '/etc/apache2/apache2.conf':
content => 'example',
validate_cmd => '/usr/sbin/apache2 -t -f %',
}
This would replace apache2.conf only if the test returned true.
Note that if a validation command requires a % as part of its text, you can specify a different placeholder token with
the validate_replacement attribute.
(# Back to file attributes)
validate_replacement
The replacement string in a validate_cmd that will be replaced with an input file name.
Default: %
(# Back to file attributes)
Providers
posix
Uses POSIX functionality to manage file ownership and permissions.
• Confined to: feature == posix
• Supported features: manages_symlinks
windows
Uses Microsoft Windows functionality to manage file ownership and permissions.
• Confined to: os.name == windows
Provider Features
Available features:
• manages_symlinks --- The provider can manage symbolic links.
Provider support:
• posix - manages symlinks
• windows - No supported Provider features
Using file on Windows
Use Puppet's built-in file resource type to manage files and directories on Windows, including ownership, group,
permissions, and content, with the following Windows-specific notes and tips.
file { 'c:/mysql/my.ini':
ensure => 'file',
mode => '0660',
owner => 'mysql',
group => 'Administrators',
source => 'N:/software/mysql/my.ini',
}
Take care with backslashes in file paths
The issue of backslashes and forward-slashes in file paths can get complicated. See Handling file paths on Windows
for more information.
© 2024 Puppet, Inc., a Perforce company
Puppet | Syntax and settings | 617
Be consistent with capitalization in file names
If you refer to a file resource in multiple places in a manifest (such as when creating relationships between resources),
be consistent with the capitalization of the file name. If you use my.ini in one place, don’t use MY.INI in another
place.
Windows NTFS filesystems are case-insensitive (albeit case-preserving); Puppet is case-sensitive. Windows itself
won’t be confused by inconsistent case, but Puppet will think you’re referring to different files.
Make sure the Puppet user account has appropriate permissions
To manage files properly, Puppet needs the following Windows privileges:
• Create symbolic links
• Back up files and directories
• Restore files and directories
When Puppet runs as a service, make sure its user account is a member of the local Administrators group. When
you use thePUPPET_AGENT_ACCOUNT_USER parameter with the MSI installer, the user will automatically be
added to the Administrators group.
Before running Puppet interactively (on Windows Vista or 2008 and later versions), start the command prompt
window with elevated privileges by right-clicking on the start menu and choosing “Run as Administrator.”
Managing file permissions: the mode attribute and the acl module
The permissions models used by *nix and Windows are quite different. When you use the mode attribute, the file
type manages them both like *nix permissions, and translates the mode to roughly equivalent access controls on
Windows. This makes basic controls fairly simple, but doesn’t work for managing complex access rules.
If you need fine-grained Windows access controls, use the puppetlabs/acl module, which provides an optional
acl resource type that manages permissions in a Windows-centric way. Leave mode unspecified and add an acl
resource. See the acl module’s documentation for details.
How *nix modes map to Windows permissions
*nix permissions are expressed as either a quoted octal number (such as "755"), or a string of symbolic modes,
(such as "u=rwx,g=rx,o=rx"). See the reference for the file type’s mode attribute for more details about the
syntax.
These mode expressions generally manage three kinds of permission — read, write, execute — for three kinds of user
— owner, group, other. They translate to Windows permissions as follows:
• The read, write, and execute permissions are interpreted as the FILE_GENERIC_READ,
FILE_GENERIC_WRITE, and FILE_GENERIC_EXECUTE access rights, respectively.
• The Everyone SID is used to represent users other than the owner and group.
• Directories on Windows can have the sticky bit, which makes it so users can delete files only if they own the
containing directory.
• The owner of a file can be a group (for example, owner => 'Administrators') and the group of a file can
be a user (for example, group => 'Administrator').
• While it's possible for the owner and group to be the same, this is strongly discouraged. Doing so can cause
problems when the mode gives different permissions to the owner and group (such as 0750).
• The group can’t have higher permissions than the owner. Other users can’t have higher permissions than the
owner or group. In other words, 0640 and 0755 are supported, but 0460 is not.
Extra behavior when managing permissions with mode
When you manage permissions with the mode attribute, it has the following side effects:
• The owner of a file or directory always has the FULL_CONTROL access right.
© 2024 Puppet, Inc., a Perforce company

Puppet | Syntax and settings | 618
• The security descriptor is always set to protected. This prevents the file from inheriting more permissive access
controls from the directory that contains it.
File sources
The source attribute of a file can be a Puppet URL, a local path, a UNC path, or a path to a file on a mapped drive.
Handling line endings
Windows usually uses CRLF line endings, rather than the LF line endings used by *nix. In most cases, Puppet does
not automatically convert line endings when managing files on Windows.
If a file resource uses the content or source attributes, Puppet writes the file in binary mode, using the line
endings that are present in the content. If the manifest, template, or source file is saved with CRLF line endings,
Puppet uses those endings in the destination file.
Non-file resource types that make partial edits to a system file (most notably the host resource type, which
manages the %windir%\system32\drivers\etc\hosts file) manage their files in text mode, and
automatically translate between Windows and *nix line endings.
Note: When writing your own resource types, you can get this same behavior by using the flat file type.
Resource Type: filebucket
NOTE: This page was generated from the Puppet source code on 2024-08-01 18:16:06 -0700
filebucket
• Attributes
Description
A repository for storing and retrieving file content by cryptographic checksum. Can be local to each agent node, or
centralized on a primary Puppet server. All puppet servers provide a filebucket service that agent nodes can access via
HTTP, but you must declare a filebucket resource before any agents will do so.
Filebuckets are used for the following features:
• Content backups. If the file type's backup attribute is set to the name of a filebucket, Puppet will back up the
old content whenever it rewrites a file; see the documentation for the file type for more details. These backups
can be used for manual recovery of content, but are more commonly used to display changes and differences in a
tool like Puppet Dashboard.
To use a central filebucket for backups, you will usually want to declare a filebucket resource and a resource default
for the backup attribute in site.pp:
# /etc/puppetlabs/puppet/manifests/site.pp
filebucket { 'main':
path => false, # This is required for remote filebuckets.
server => 'puppet.example.com', # Optional; defaults to the configured
primary server.
}
File { backup => main, }
Puppet Servers automatically provide the filebucket service, so this will work in a default configuration. If you have
a heavily restricted Puppet Server auth.conf file, you may need to allow access to the file_bucket_file
endpoint.
Attributes
filebucket { 'resource title':
name => # (namevar) The name of the...
© 2024 Puppet, Inc., a Perforce company

Puppet | Syntax and settings | 619
path => # The path to the _local_ filebucket; defaults to...
port => # The port on which the remote server is...
server => # The server providing the remote filebucket...
# ...plus any applicable metaparameters.
}
name
(Namevar: If omitted, this attribute's value defaults to the resource's title.)
The name of the filebucket.
(# Back to filebucket attributes)
path
The path to the local filebucket; defaults to the value of the clientbucketdir setting. To use a remote filebucket,
you must set this attribute to false.
(# Back to filebucket attributes)
port
The port on which the remote server is listening.
This setting is only consulted if the path attribute is set to false.
If this attribute is not specified, the first entry in the server_list configuration setting is used, followed by the
value of the serverport setting if server_list is not set.
(# Back to filebucket attributes)
server
The server providing the remote filebucket service.
This setting is only consulted if the path attribute is set to false.
If this attribute is not specified, the first entry in the server_list configuration setting is used, followed by the
value of the server setting if server_list is not set.
(# Back to filebucket attributes)
Resource Type: group
NOTE: This page was generated from the Puppet source code on 2024-08-01 18:16:06 -0700
group
• Attributes
• Providers
• Provider Features
Description
Manage groups. On most platforms this can only create groups. Group membership must be managed on individual
users.
On some platforms such as OS X, group membership is managed as an attribute of the group, not the user record.
Providers must have the feature 'manages_members' to manage the 'members' property of a group record.
Attributes
group { 'resource title':
name => # (namevar) The group name. While naming
limitations vary by
ensure => # Create or remove the group. Default: `present`
allowdupe => # Whether to allow duplicate GIDs. Default...
© 2024 Puppet, Inc., a Perforce company

Puppet | Syntax and settings | 620
attribute_membership => # AIX only. Configures the behavior of the...
attributes => # Specify group AIX attributes, as an array of...
auth_membership => # Configures the behavior of the `members...
forcelocal => # Forces the management of local accounts when...
gid => # The group ID. Must be specified numerically....
ia_load_module => # The name of the I&A module to use to manage
this
members => # The members of the group. For platforms or...
provider => # The specific backend to use for this `group...
system => # Whether the group is a system group with
lower...
# ...plus any applicable metaparameters.
}
name
(Namevar: If omitted, this attribute's value defaults to the resource's title.)
The group name. While naming limitations vary by operating system, it is advisable to restrict names to the lowest
common denominator, which is a maximum of 8 characters beginning with a letter.
Note that Puppet considers group names to be case-sensitive, regardless of the platform's own rules; be sure to always
use the same case when referring to a given group.
(# Back to group attributes)
ensure
(Property: This attribute represents concrete state on the target system.)
Create or remove the group.
Default: present
Allowed values:
• present
• absent
(# Back to group attributes)
allowdupe
Whether to allow duplicate GIDs.
Default: false
Allowed values:
• true
• false
• yes
• no
(# Back to group attributes)
attribute_membership
AIX only. Configures the behavior of the attributes parameter.
• minimum (default) --- The provided list of attributes is partial, and Puppet ignores any attributes that aren't listed
there.
• inclusive --- The provided list of attributes is comprehensive, and Puppet purges any attributes that aren't
listed there.
Default: minimum
Allowed values:
© 2024 Puppet, Inc., a Perforce company
Puppet | Syntax and settings | 621
• inclusive
• minimum
(# Back to group attributes)
attributes
(Property: This attribute represents concrete state on the target system.)
Specify group AIX attributes, as an array of 'key=value' strings. This parameter's behavior can be configured
with attribute_membership.
Requires features manages_aix_lam.
(# Back to group attributes)
auth_membership
Configures the behavior of the members parameter.
• false (default) --- The provided list of group members is partial, and Puppet ignores any members that aren't
listed there.
• true --- The provided list of of group members is comprehensive, and Puppet purges any members that aren't
listed there.
Default: false
Allowed values:
• true
• false
• yes
• no
(# Back to group attributes)
forcelocal
Forces the management of local accounts when accounts are also being managed by some other Name Switch Service
(NSS). For AIX, refer to the ia_load_module parameter.
This option relies on your operating system's implementation of luser* commands, such as luseradd ,
lgroupadd, and lusermod. The forcelocal option could behave unpredictably in some circumstances. If the
tools it depends on are not available, it might have no effect at all.
Default: false
Allowed values:
• true
• false
• yes
• no
Requires features manages_local_users_and_groups.
(# Back to group attributes)
gid
(Property: This attribute represents concrete state on the target system.)
The group ID. Must be specified numerically. If no group ID is specified when creating a new group, then one will be
chosen automatically according to local system standards. This will likely result in the same group having different
GIDs on different systems, which is not recommended.
On Windows, this property is read-only and will return the group's security identifier (SID).
© 2024 Puppet, Inc., a Perforce company
Puppet | Syntax and settings | 622
(# Back to group attributes)
ia_load_module
The name of the I&A module to use to manage this group. This should be set to files if managing local groups.
Requires features manages_aix_lam.
(# Back to group attributes)
members
(Property: This attribute represents concrete state on the target system.)
The members of the group. For platforms or directory services where group membership is stored in the group
objects, not the users. This parameter's behavior can be configured with auth_membership.
Requires features manages_members.
(# Back to group attributes)
provider
The specific backend to use for this group resource. You will seldom need to specify this --- Puppet will usually
discover the appropriate provider for your platform.
Available providers are:
• aix
• directoryservice
• groupadd
• ldap
• pw
• windows_adsi
(# Back to group attributes)
system
Whether the group is a system group with lower GID.
Default: false
Allowed values:
• true
• false
• yes
• no
(# Back to group attributes)
Providers
aix
Group management for AIX.
• Required binaries: /usr/bin/chgroup, /usr/bin/mkgroup, /usr/sbin/lsgroup, /usr/sbin/
rmgroup
• Confined to: os.name == aix
• Default for: ["os.name", "aix"] ==
• Supported features: manages_aix_lam, manages_local_users_and_groups, manages_members
directoryservice
Group management using DirectoryService on OS X.
• Required binaries: /usr/bin/dscl
© 2024 Puppet, Inc., a Perforce company
Puppet | Syntax and settings | 623
• Confined to: os.name == darwin
• Default for: ["os.name", "darwin"] ==
• Supported features: manages_members
groupadd
Group management via groupadd and its ilk. The default for most platforms.
To use the forcelocal parameter, you need to install the libuser package (providing /usr/sbin/
lgroupadd and /usr/sbin/luseradd).
• Required binaries: groupadd, groupdel, groupmod
ldap
Group management via LDAP.
This provider requires that you have valid values for all of the LDAP-related settings in puppet.conf, including
ldapbase. You will almost definitely need settings for ldapuser and ldappassword in order for your clients
to write to LDAP.
Note that this provider will automatically generate a GID for you if you do not specify one, but it is a potentially
expensive operation, as it iterates across all existing groups to pick the appropriate next one.
• Confined to: feature == ldap, false == (Puppet[:ldapuser] == "")
pw
Group management via pw on FreeBSD and DragonFly BSD.
• Required binaries: pw
• Confined to: os.name == [:freebsd, :dragonfly]
• Default for: ["os.name", "[:freebsd, :dragonfly]"] ==
• Supported features: manages_members
windows_adsi
Local group management for Windows. Group members can be both users and groups. Additionally, local groups can
contain domain users.
• Confined to: os.name == windows
• Default for: ["os.name", "windows"] ==
• Supported features: manages_members
Provider Features
Available features:
• manages_aix_lam --- The provider can manage AIX Loadable Authentication Module (LAM) system.
• manages_local_users_and_groups --- Allows local groups to be managed on systems that also use some
other remote Name Switch Service (NSS) method of managing accounts.
• manages_members --- For directories where membership is an attribute of groups not users.
• system_groups --- The provider allows you to create system groups with lower GIDs.
Provider support:
• aix - manages aix lam, manages members, manages local users and groups
• directoryservice - manages members
• groupadd - No supported Provider features
• ldap - No supported Provider features
• pw - manages members
• windows_adsi - manages members
© 2024 Puppet, Inc., a Perforce company

Puppet | Syntax and settings | 624
Using user and group on Windows
Use the built-in user and group resource types to manage user and group accounts on Windows.
Managing local user and group resources
Puppet uses the user and group resource types to manage local accounts. You can’t write a Puppet resource that
describes a domain user or group. However, a local group resource can manage which domain accounts belong to
the local group.
Managing group membership with Puppet
Windows manages group membership by specifying the groups to which a user belongs, or by specifying the
members of a group. Puppet supports both of these methods.
When Puppet is managing a local user, you can list the groups that the user belongs to. These groups can be a local
group account (such as Administrators) or a domain group account.
When Puppet is managing a local group, you can list the members that belong to the group. Each member can be
a local account (such as Administrator) or a domain account, where each account can be a user or a group
account.
When managing a user, Puppet makes sure that the user belongs to all of the groups listed in the manifest. If the user
belongs to a group not specified in the manifest, Puppet does not remove the user from the group.
If you want to ensure that a user belongs to only the groups listed in the manifest, and no others, specify the
membership attribute for the user. If set to inclusive, Puppet removes the user from any group not listed in the
manifest.
Similarly, when managing a group, Puppet makes sure all of the members listed in the manifest are added to the
group. Existing members of the group who are not listed in the manifest are ignored.
To ensure that a group contains only the members listed in the manifest, and no others, specify the
auth_membership attribute for the group. When this attribute is present and set to true, Puppet removes any
members of the group not listed in the manifest.
Allowed user attributes on Windows
When managing Windows user accounts, you can use the following user resource type attributes:
Attribute Usage notes
name
ensure
comment
groups You cannot use the gid attribute with Windows.
home
managehome
membership
password Passwords must be specified in cleartext, because
Windows does not have an API for setting the password
hash.
auth_membership
uid Read-only. Available for inspecting a user by running
puppet resource user <NAME>. The uid value
will be the user’s SID (see below).
© 2024 Puppet, Inc., a Perforce company

Puppet | Syntax and settings | 625
Allowed group attributes on Windows
When managing Windows group accounts, you can use the following group resource type attributes:
Attribute Usage notes
name
ensure
members
auth_membership
gid Read-only. Available for inspecting a group by running
puppet resource group <NAME>. The gid
value will be the group’s SID (see below).
Names and security identifiers (SIDs)
On Windows, user and group account names can take multiple forms, such as:
• Administrators
• <host>\Administrators
• BUILTIN\Administrators
• S-1-5-32-544
The S-1-5-32-544 name form is called a security identifier (SID). Puppet treats all these forms equally: when
comparing two account names, it transforms account names into their canonical SID form and compares the SIDs.
When you refer to a user or group in multiple places in a manifest (such as when creating relationships between
resources), be consistent with how you capitalize the name. Names are case-sensitive in Puppet manifests, but case-
insensitive on Windows. It’s important that the cases match, however, because autorequire will attempt to match
users with fully qualified names (such as User[BUILTIN\Administrators]) in addition to SIDs (such as
User[S-1-5-32-544]). It might not match in cases where domain accounts and local accounts have the same
name, such as Domain\Bob versus LOCAL\Bob.
Note: When listed for reporting or by puppet resource, groups always return the fully qualified form when
describing a user, such as BUILTIN\Administrators. These fully qualified names might not look the same as in
the names specified in the manifest.
Resource types overview
NOTE: This page was generated from the Puppet source code on 2024-08-01 18:16:06 -0700
List of resource types
• Resource Type: exec on page 597
• Resource Type: file on page 604
• Resource Type: filebucket on page 618
• Resource Type: group on page 619
• Resource Type: notify on page 628
• Resource Type: package on page 628
• Resource Type: resources on page 646
• Resource Type: schedule on page 647
• Resource Type: service on page 650
• Resource Type: stage on page 661
• Resource Type: tidy on page 662
• Resource Type: user on page 664
© 2024 Puppet, Inc., a Perforce company

Puppet | Syntax and settings | 626
About resource types
Built-in types and custom types
This is the documentation for Puppet's built-in resource types and providers. Additional resource types are distributed
in Puppet modules.
You can find and install modules by browsing the Puppet Forge. See each module's documentation for information on
how to use its custom resource types. For more information about creating custom types, see Custom resources.
As of Puppet 6.0, some resource types were removed from Puppet and repackaged as individual modules.
These supported type modules are still included in the puppet-agent package, so you don't have to
download them from the Forge. See the complete list of affected types in the supported type modules
section.
Declaring resources
To manage resources on a target system, declare them in Puppet manifests. For more details, see the resources page of
the Puppet language reference.
You can also browse and manage resources interactively using the puppet resource subcommand; run puppet
resource --help for more information.
Namevars and titles
All types have a special attribute called the namevar. This is the attribute used to uniquely identify a resource on the
target system.
Each resource has a specific namevar attribute, which is listed on this page in each resource's reference. If you don't
specify a value for the namevar, its value defaults to the resource's title.
Example of a title as a default namevar:
file { '/etc/passwd':
owner => 'root',
group => 'root',
mode => '0644',
}
In this code, /etc/passwd is the title of the file resource.
The file type's namevar is path. Because we didn't provide a path value in this example, the value defaults to the
title, /etc/passwd.
Example of a namevar:
file { 'passwords':
path => '/etc/passwd',
owner => 'root',
group => 'root',
mode => '0644',
This example is functionally similar to the previous example. Its path namevar attribute has an explicitly set value
separate from the title, so its name is still /etc/passwd.
Other Puppet code can refer to this resource as File['/etc/passwd'] to declare relationships.
Attributes, parameters, properties
The attributes (sometimes called parameters) of a resource determine its desired state. They either directly modify
the system (internally, these are called "properties") or they affect how the resource behaves (for instance, adding a
search path for exec resources or controlling directory recursion on file resources).
Providers
Providers implement the same resource type on different kinds of systems. They usually do this by calling out to
external commands.
© 2024 Puppet, Inc., a Perforce company
Puppet | Syntax and settings | 627
Although Puppet automatically selects an appropriate default provider, you can override the default with the
provider attribute. (For example, package resources on Red Hat systems default to the yum provider, but you
can specify provider => gem to install Ruby libraries with the gem command.)
Providers often specify binaries that they require. Fully qualified binary paths indicate that the binary must exist at
that specific path, and unqualified paths indicate that Puppet searches for the binary using the shell path.
Features
Features are abilities that some providers might not support. Generally, a feature corresponds to some allowed values
for a resource attribute.
This is often the case with the ensure attribute. In most types, Puppet doesn't create new resources when omitting
ensure but still modifies existing resources to match specifications in the manifest. However, in some types this
isn't always the case, or additional values provide more granular control. For example, if a package provider
supports the purgeable feature, you can specify ensure => purged to delete configuration files installed by
the package.
Resource types define the set of features they can use, and providers can declare which features they provide.
Puppet 6.0 type changes
In Puppet 6.0, we removed some of Puppet's built-in types and moved them into individual modules.
Supported type modules in puppet-agent
The following types are included in supported modules on the Forge. However, they are also included in the
puppet-agent package, so you do not have to install them separately. See each module's README for detailed
information about that type.
• augeas
• cron
• host
• mount
• scheduled_task
• selboolean
• selmodule
• ssh_authorized_key
• sshkey
• yumrepo
• zfs
• zone
• zpool
Type modules available on the Forge
The following types are contained in modules that are maintained, but are not repackaged into Puppet agent. If you
need to use them, you must install the modules separately.
• k5login
• mailalias
• maillist
Deprecated types
The following types were deprecated with Puppet 6.0.0. They are available in modules, but are not updated. If you
need to use them, you must install the modules separately.
• computer
• interface (Use the updated cisco_ios module instead.
• macauthorization
• mcx
© 2024 Puppet, Inc., a Perforce company

Puppet | Syntax and settings | 628
• The Nagios types
• router (Use the updated cisco_ios module instead.
• vlan (Use the updated cisco_ios module instead.
Puppet core types
For a list of core Puppet types, see the core types cheat sheet.
Resource Type: notify
NOTE: This page was generated from the Puppet source code on 2024-08-01 18:16:06 -0700
notify
• Attributes
Description
Sends an arbitrary message, specified as a string, to the agent run-time log. It's important to note that the notify
resource type is not idempotent. As a result, notifications are shown as a change on every Puppet run.
Attributes
notify { 'resource title':
name => # (namevar) An arbitrary tag for your own reference; the...
message => # The message to be sent to the log. Note that the
withpath => # Whether to show the full object path. Default...
# ...plus any applicable metaparameters.
}
name
(Namevar: If omitted, this attribute's value defaults to the resource's title.)
An arbitrary tag for your own reference; the name of the message.
(# Back to notify attributes)
message
(Property: This attribute represents concrete state on the target system.)
The message to be sent to the log. Note that the value specified must be a string.
(# Back to notify attributes)
withpath
Whether to show the full object path.
Default: false
Allowed values:
• true
• false
(# Back to notify attributes)
Resource Type: package
NOTE: This page was generated from the Puppet source code on 2024-08-01 18:16:06 -0700
package
• Attributes
• Providers
• Provider Features
© 2024 Puppet, Inc., a Perforce company

Puppet | Syntax and settings | 629
Description
Manage packages. There is a basic dichotomy in package support right now: Some package types (such as yum and
apt) can retrieve their own package files, while others (such as rpm and sun) cannot. For those package formats that
cannot retrieve their own files, you can use the source parameter to point to the correct file.
Puppet will automatically guess the packaging format that you are using based on the platform you are on, but you
can override it using the provider parameter; each provider defines what it requires in order to function, and you
must meet those requirements to use a given provider.
You can declare multiple package resources with the same name as long as they have unique titles, and specify
different providers and commands.
Note that you must use the title to make a reference to a package resource; Package[<NAME>] is not a synonym
for Package[<TITLE>] like it is for many other resource types.
Autorequires: If Puppet is managing the files specified as a package's adminfile, responsefile, or source,
the package resource will autorequire those files.
Attributes
package { 'resource title':
command => # (namevar) The targeted command to use when
managing a...
name => # (namevar) The package name. This is the name
that the...
ensure => # What state the package should be in. On...
adminfile => # A file containing package defaults for...
allow_virtual => # Specifies if virtual package names are
allowed...
allowcdrom => # Tells apt to allow cdrom sources in the...
category => # A read-only parameter set by the...
configfiles => # Whether to keep or replace modified config
files
description => # A read-only parameter set by the...
enable_only => # Tells `dnf module` to only enable a specific...
flavor => # OpenBSD and DNF modules support 'flavors',
which
install_only => # It should be set for packages that should
only...
install_options => # An array of additional options to pass when...
instance => # A read-only parameter set by the...
mark => # Set to hold to tell Debian apt/Solaris pkg to...
package_settings => # Settings that can change the contents or...
platform => # A read-only parameter set by the...
provider => # The specific backend to use for this `package...
reinstall_on_refresh => # Whether this resource should respond to
refresh...
responsefile => # A file containing any necessary answers to...
root => # A read-only parameter set by the...
source => # Where to find the package file. This is
mostly...
status => # A read-only parameter set by the...
uninstall_options => # An array of additional options to pass when...
vendor => # A read-only parameter set by the...
# ...plus any applicable metaparameters.
}
command
(Namevar: If omitted, this attribute's value defaults to the resource's title.)
The targeted command to use when managing a package:
package { 'mysql': provider => gem, }
© 2024 Puppet, Inc., a Perforce company

Puppet | Syntax and settings | 630
package { 'mysql-opt': name => 'mysql', provider => gem, command => '/opt/ruby/bin/gem', }
Each provider defines a package management command and uses the first instance of the command found in the
PATH.
Providers supporting the targetable feature allow you to specify the absolute path of the package management
command. Specifying the absolute path is useful when multiple instances of the command are installed, or the
command is not in the PATH.
Default: default
Requires features targetable.
(# Back to package attributes)
name
(Namevar: If omitted, this attribute's value defaults to the resource's title.)
The package name. This is the name that the packaging system uses internally, which is sometimes (especially on
Solaris) a name that is basically useless to humans. If a package goes by several names, you can use a single title and
then set the name conditionally:
# In the 'openssl' class
$ssl = $os['name'] ? {
solaris => SMCossl,
default => openssl
}
package { 'openssl':
ensure => installed,
name => $ssl,
}
...
$ssh = $os['name'] ? {
solaris => SMCossh,
default => openssh
}
package { 'openssh':
ensure => installed,
name => $ssh,
require => Package['openssl'],
}
(# Back to package attributes)
ensure
(Property: This attribute represents concrete state on the target system.)
What state the package should be in. On packaging systems that can retrieve new packages on their own, you can
choose which package to retrieve by specifying a version number or latest as the ensure value. On packaging
systems that manage configuration files separately from "normal" system files, you can uninstall config files by
specifying purged as the ensure value. This defaults to installed.
Version numbers must match the full version to install, including release if the provider uses a release moniker.
For example, to install the bash package from the rpm bash-4.1.2-29.el6.x86_64.rpm, use the string
'4.1.2-29.el6'.
On supported providers, version ranges can also be ensured. For example, inequalities: <2.0.0, or intersections:
>1.0.0 <2.0.0.
Default: installed
© 2024 Puppet, Inc., a Perforce company
Puppet | Syntax and settings | 631
Allowed values:
• present
• absent
• purged
• disabled
• installed
• latest
• /./
(# Back to package attributes)
adminfile
A file containing package defaults for installing packages.
This attribute is only used on Solaris. Its value should be a path to a local file stored on the target system. Solaris's
package tools expect either an absolute file path or a relative path to a file in /var/sadm/install/admin.
The value of adminfile will be passed directly to the pkgadd or pkgrm command with the -a <ADMINFILE>
option.
(# Back to package attributes)
allow_virtual
Specifies if virtual package names are allowed for install and uninstall.
Allowed values:
• true
• false
• yes
• no
Requires features virtual_packages.
(# Back to package attributes)
allowcdrom
Tells apt to allow cdrom sources in the sources.list file. Normally apt will bail if you try this.
Allowed values:
• true
• false
(# Back to package attributes)
category
A read-only parameter set by the package.
(# Back to package attributes)
configfiles
Whether to keep or replace modified config files when installing or upgrading a package. This only affects the apt
and dpkg providers.
Default: keep
Allowed values:
• keep
• replace
© 2024 Puppet, Inc., a Perforce company

Puppet | Syntax and settings | 632
(# Back to package attributes)
description
A read-only parameter set by the package.
(# Back to package attributes)
enable_only
Tells dnf module to only enable a specific module, instead of installing its default profile.
Modules with no default profile will be enabled automatically without the use of this parameter.
Conflicts with the flavor property, which selects a profile to install.
Default: false
Allowed values:
• true
• false
• yes
• no
(# Back to package attributes)
flavor
(Property: This attribute represents concrete state on the target system.)
OpenBSD and DNF modules support 'flavors', which are further specifications for which type of package you want.
Requires features supports_flavors.
(# Back to package attributes)
install_only
It should be set for packages that should only ever be installed, never updated. Kernels in particular fall into this
category.
Default: false
Allowed values:
• true
• false
• yes
• no
Requires features install_only.
(# Back to package attributes)
install_options
An array of additional options to pass when installing a package. These options are package-specific, and should be
documented by the software vendor. One commonly implemented option is INSTALLDIR:
package { 'mysql':
ensure => installed,
source => 'N:/packages/mysql-5.5.16-winx64.msi',
install_options => [ '/S', { 'INSTALLDIR' => 'C:\\mysql-5.5' } ],
}
Each option in the array can either be a string or a hash, where each key and value pair are interpreted in a provider
specific way. Each option will automatically be quoted when passed to the install command.
© 2024 Puppet, Inc., a Perforce company

Puppet | Syntax and settings | 633
With Windows packages, note that file paths in an install option must use backslashes. (Since install options are
passed directly to the installation command, forward slashes won't be automatically converted like they are in file
resources.) Note also that backslashes in double-quoted strings must be escaped and backslashes in single-quoted
strings can be escaped.
Requires features install_options.
(# Back to package attributes)
instance
A read-only parameter set by the package.
(# Back to package attributes)
mark
(Property: This attribute represents concrete state on the target system.)
Set to hold to tell Debian apt/Solaris pkg to hold the package version
#{mark_doc} Default is "none". Mark can be specified with or without ensure, if ensure is missing will default to
"present".
Mark cannot be specified together with "purged", or "absent" values for ensure.
Allowed values:
• hold
• none
Requires features holdable.
(# Back to package attributes)
package_settings
(Property: This attribute represents concrete state on the target system.)
Settings that can change the contents or configuration of a package.
The formatting and effects of package_settings are provider-specific; any provider that implements them must explain
how to use them in its documentation. (Our general expectation is that if a package is installed but its settings are out
of sync, the provider should re-install that package with the desired settings.)
An example of how package_settings could be used is FreeBSD's port build options --- a future version of the
provider could accept a hash of options, and would reinstall the port if the installed version lacked the correct settings.
package { 'www/apache22':
package_settings => { 'SUEXEC' => false }
}
Again, check the documentation of your platform's package provider to see the actual usage.
Requires features package_settings.
(# Back to package attributes)
platform
A read-only parameter set by the package.
(# Back to package attributes)
provider
The specific backend to use for this package resource. You will seldom need to specify this --- Puppet will usually
discover the appropriate provider for your platform.
Available providers are:
© 2024 Puppet, Inc., a Perforce company
Puppet | Syntax and settings | 634
• aix
• appdmg
• apple
• apt
• aptitude
• aptrpm
• blastwave
• dnf
• dnfmodule
• dpkg
• fink
• freebsd
• gem
• hpux
• macports
• nim
• openbsd
• opkg
• pacman
• pip2
• pip3
• pip
• pkg
• pkgdmg
• pkgin
• pkgng
• pkgutil
• portage
• ports
• portupgrade
• puppet_gem
• puppetserver_gem
• rpm
• rug
• sun
• sunfreeware
• tdnf
• up2date
• urpmi
• windows
• xbps
• yum
• zypper
(# Back to package attributes)
reinstall_on_refresh
Whether this resource should respond to refresh events (via subscribe, notify, or the ~> arrow) by reinstalling
the package. Only works for providers that support the reinstallable feature.
This is useful for source-based distributions, where you may want to recompile a package if the build options change.
© 2024 Puppet, Inc., a Perforce company

Puppet | Syntax and settings | 635
If you use this, be careful of notifying classes when you want to restart services. If the class also contains a
refreshable package, doing so could cause unnecessary re-installs.
Default: false
Allowed values:
• true
• false
(# Back to package attributes)
responsefile
A file containing any necessary answers to questions asked by the package. This is currently used on Solaris and
Debian. The value will be validated according to system rules, but it should generally be a fully qualified path.
(# Back to package attributes)
root
A read-only parameter set by the package.
(# Back to package attributes)
source
Where to find the package file. This is mostly used by providers that don't automatically download packages from a
central repository. (For example: the yum provider ignores this attribute, apt provider uses it if present and the rpm
and dpkg providers require it.)
Different providers accept different values for source. Most providers accept paths to local files stored on the target
system. Some providers may also accept URLs or network drive paths. Puppet will not automatically retrieve source
files for you, and usually just passes the value of source to the package installation command.
You can use a file resource if you need to manually copy package files to the target system.
(# Back to package attributes)
status
A read-only parameter set by the package.
(# Back to package attributes)
uninstall_options
An array of additional options to pass when uninstalling a package. These options are package-specific, and should be
documented by the software vendor. For example:
package { 'VMware Tools':
ensure => absent,
uninstall_options => [ { 'REMOVE' => 'Sync,VSS' } ],
}
Each option in the array can either be a string or a hash, where each key and value pair are interpreted in a provider
specific way. Each option will automatically be quoted when passed to the uninstall command.
On Windows, this is the only place in Puppet where backslash separators should be used. Note that backslashes in
double-quoted strings must be double-escaped and backslashes in single-quoted strings may be double-escaped.
Requires features uninstall_options.
(# Back to package attributes)
vendor
A read-only parameter set by the package.
© 2024 Puppet, Inc., a Perforce company
Puppet | Syntax and settings | 636
(# Back to package attributes)
Providers
aix
Installation from an AIX software directory, using the AIX installp command. The source parameter is
required for this provider, and should be set to the absolute path (on the puppet agent machine) of a directory
containing one or more BFF package files.
The installp command will generate a table of contents file (named .toc) in this directory, and the name
parameter (or resource title) that you specify for your package resource must match a package name that exists in
the .toc file.
Note that package downgrades are not supported; if your resource specifies a specific version number and there is
already a newer version of the package installed on the machine, the resource will fail with an error message.
• Required binaries: /usr/bin/lslpp, /usr/sbin/installp
• Confined to: os.name == [:aix]
• Default for: ["os.name", "aix"] ==
• Supported features: versionable
appdmg
Package management which copies application bundles to a target.
• Required binaries: /usr/bin/curl, /usr/bin/ditto, /usr/bin/hdiutil
• Confined to: os.name == darwin, feature == cfpropertylist
apple
Package management based on OS X's built-in packaging system. This is essentially the simplest and least functional
package system in existence -- it only supports installation; no deletion or upgrades. The provider will automatically
add the .pkg extension, so leave that off when specifying the package name.
• Required binaries: /usr/sbin/installer
• Confined to: os.name == darwin
apt
Package management via apt-get.
This provider supports the install_options attribute, which allows command-line flags to be passed to apt-get.
These options should be specified as an array where each element is either a string or a hash.
• Required binaries: /usr/bin/apt-cache, /usr/bin/apt-get, /usr/bin/apt-mark, /usr/bin/
debconf-set-selections
• Default for: ["os.family", "debian"] ==
• Supported features: install_options, version_ranges, versionable, virtual_packages
aptitude
Package management via aptitude.
• Required binaries: /usr/bin/apt-cache, /usr/bin/aptitude
• Supported features: versionable
aptrpm
Package management via apt-get ported to rpm.
• Required binaries: apt-cache, apt-get, rpm
• Supported features: versionable
blastwave
Package management using Blastwave.org's pkg-get command on Solaris.
© 2024 Puppet, Inc., a Perforce company
Puppet | Syntax and settings | 637
• Required binaries: pkgget
• Confined to: os.family == solaris
dnf
Support via dnf.
Using this provider's uninstallable feature will not remove dependent packages. To remove dependent packages
with this provider use the purgeable feature, but note this feature is destructive and should be used with the utmost
care.
This provider supports the install_options attribute, which allows command-line flags to be passed to dnf.
These options should be specified as an array where each element is either a string or a hash.
• Required binaries: dnf, rpm
• Default for: ["os.name", "fedora"] == , ["os.family", "redhat"] == , ["os.name",
"amazon"] == ["os.release.major", "["2023"]"]
• Supported features: install_only, install_options, version_ranges, versionable,
virtual_packages
dnfmodule
• Required binaries: /usr/bin/dnf
• Supported features: disableable, installable, supports_flavors, uninstallable,
versionable
dpkg
Package management via dpkg. Because this only uses dpkg and not apt, you must specify the source of any
packages you want to manage.
• Required binaries: /usr/bin/dpkg, /usr/bin/dpkg-deb, /usr/bin/dpkg-query
• Supported features: holdable, virtual_packages
fink
Package management via fink.
• Required binaries: /sw/bin/apt-cache, /sw/bin/apt-get, /sw/bin/dpkg-query, /sw/bin/
fink
• Supported features: versionable
freebsd
The specific form of package management on FreeBSD. This is an extremely quirky packaging system, in that it
freely mixes between ports and packages. Apparently all of the tools are written in Ruby, so there are plans to rewrite
this support to directly use those libraries.
• Required binaries: /usr/sbin/pkg_add, /usr/sbin/pkg_delete, /usr/sbin/pkg_info
• Confined to: os.name == freebsd
gem
Ruby Gem support. If a URL is passed via source, then that URL is appended to the list of remote gem repositories;
to ensure that only the specified source is used, also pass --clear-sources via install_options. If source
is present but is not a valid URL, it will be interpreted as the path to a local gem file. If source is not present, the gem
will be installed from the default gem repositories. Note that to modify this for Windows, it has to be a valid URL.
This provider supports the install_options and uninstall_options attributes, which allow command-line
flags to be passed to the gem command. These options should be specified as an array where each element is either a
string or a hash.
• Supported features: install_options, targetable, uninstall_options, version_ranges,
versionable
hpux
© 2024 Puppet, Inc., a Perforce company
Puppet | Syntax and settings | 638
HP-UX's packaging system.
• Required binaries: /usr/sbin/swinstall, /usr/sbin/swlist, /usr/sbin/swremove
• Confined to: os.name == hp-ux
• Default for: ["os.name", "hp-ux"] ==
macports
Package management using MacPorts on OS X.
Supports MacPorts versions and revisions, but not variants. Variant preferences may be specified using the MacPorts
variants.conf file.
When specifying a version in the Puppet DSL, only specify the version, not the revision. Revisions are only used
internally for ensuring the latest version/revision of a port.
• Confined to: os.name == darwin
• Supported features: installable, uninstallable, upgradeable, versionable
nim
Installation from an AIX NIM LPP source. The source parameter is required for this provider, and should specify
the name of a NIM lpp_source resource that is visible to the puppet agent machine. This provider supports the
management of both BFF/installp and RPM packages.
Note that package downgrades are not supported; if your resource specifies a specific version number and there is
already a newer version of the package installed on the machine, the resource will fail with an error message.
• Required binaries: /usr/bin/lslpp, /usr/sbin/nimclient, rpm
• Confined to: exists == /etc/niminfo
• Supported features: versionable
openbsd
OpenBSD's form of pkg_add support.
This provider supports the install_options and uninstall_options attributes, which allow command-line
flags to be passed to pkg_add and pkg_delete. These options should be specified as an array where each element is
either a string or a hash.
• Required binaries: pkg_add, pkg_delete, pkg_info
• Confined to: os.name == openbsd
• Default for: ["os.name", "openbsd"] ==
• Supported features: install_options, supports_flavors, uninstall_options, upgradeable,
versionable
opkg
Opkg packaging support. Common on OpenWrt and OpenEmbedded platforms
• Required binaries: opkg
• Confined to: os.name == openwrt
• Default for: ["os.name", "openwrt"] ==
pacman
Support for the Package Manager Utility (pacman) used in Archlinux.
This provider supports the install_options attribute, which allows command-line flags to be passed to pacman.
These options should be specified as an array where each element is either a string or a hash.
• Required binaries: /usr/bin/pacman
• Confined to: os.name == [:archlinux, :manjarolinux, :artix]
• Default for: ["os.name", "[:archlinux, :manjarolinux, :artix]"] ==
© 2024 Puppet, Inc., a Perforce company
Puppet | Syntax and settings | 639
• Supported features: install_options, purgeable, uninstall_options, upgradeable,
virtual_packages
pip
Python packages via pip.
This provider supports the install_options attribute, which allows command-line flags to be passed to pip.
These options should be specified as an array where each element is either a string or a hash.
• Supported features: install_options, installable, targetable, uninstallable,
upgradeable, version_ranges, versionable
pip2
Python packages via pip2.
This provider supports the install_options attribute, which allows command-line flags to be passed to pip2.
These options should be specified as an array where each element is either a string or a hash.
• Supported features: install_options, installable, targetable, uninstallable,
upgradeable, versionable
pip3
Python packages via pip3.
This provider supports the install_options attribute, which allows command-line flags to be passed to pip3.
These options should be specified as an array where each element is either a string or a hash.
• Supported features: install_options, installable, targetable, uninstallable,
upgradeable, versionable
pkg
OpenSolaris image packaging system. See pkg(5) for more information.
This provider supports the install_options attribute, which allows command-line flags to be passed to pkg.
These options should be specified as an array where each element is either a string or a hash.
• Required binaries: /usr/bin/pkg
• Confined to: os.family == solaris
• Default for: ["os.family", "solaris"] == ["kernelrelease", "['5.11', '5.12']"]
• Supported features: holdable, install_options, upgradable, versionable
pkgdmg
Package management based on Apple's Installer.app and DiskUtility.app.
This provider works by checking the contents of a DMG image for Apple pkg or mpkg files. Any number of pkg or
mpkg files may exist in the root directory of the DMG file system, and Puppet will install all of them. Subdirectories
are not checked for packages.
This provider can also accept plain .pkg (but not .mpkg) files in addition to .dmg files.
Notes:
• The source attribute is mandatory. It must be either a local disk path or an HTTP, HTTPS, or FTP URL to the
package.
• The name of the resource must be the filename (without path) of the DMG file.
• When installing the packages from a DMG, this provider writes a file to disk at /var/
db/.puppet_pkgdmg_installed_NAME. If that file is present, Puppet assumes all packages from that
DMG are already installed.
• This provider is not versionable and uses DMG filenames to determine whether a package has been installed.
Thus, to install new a version of a package, you must create a new DMG with a different filename.
• Required binaries: /usr/bin/curl, /usr/bin/hdiutil, /usr/sbin/installer
© 2024 Puppet, Inc., a Perforce company
Puppet | Syntax and settings | 640
• Confined to: os.name == darwin, feature == cfpropertylist
• Default for: ["os.name", "darwin"] ==
pkgin
Package management using pkgin, a binary package manager for pkgsrc.
• Required binaries: pkgin
• Default for: ["os.name", "[:smartos, :netbsd]"] ==
• Supported features: installable, uninstallable, upgradeable, versionable
pkgng
A PkgNG provider for FreeBSD and DragonFly.
• Required binaries: /usr/local/sbin/pkg
• Confined to: os.name == [:freebsd, :dragonfly]
• Default for: ["os.name", "[:freebsd, :dragonfly]"] ==
• Supported features: install_options, upgradeable, versionable
pkgutil
Package management using Peter Bonivart's pkgutil command on Solaris.
• Confined to: os.family == solaris
portage
Provides packaging support for Gentoo's portage system.
This provider supports the install_options and uninstall_options attributes, which allows command-
line flags to be passed to emerge. These options should be specified as an array where each element is either a string
or a hash.
• Confined to: os.family == gentoo
• Default for: ["os.family", "gentoo"] ==
• Supported features: install_options, purgeable, reinstallable, uninstall_options,
versionable, virtual_packages
ports
Support for FreeBSD's ports. Note that this, too, mixes packages and ports.
• Required binaries: /usr/local/sbin/pkg_deinstall, /usr/local/sbin/portupgrade, /usr/
local/sbin/portversion, /usr/sbin/pkg_info
portupgrade
Support for FreeBSD's ports using the portupgrade ports management software. Use the port's full origin as the
resource name. eg (ports-mgmt/portupgrade) for the portupgrade port.
• Required binaries: /usr/local/sbin/pkg_deinstall, /usr/local/sbin/portinstall, /usr/
local/sbin/portupgrade, /usr/local/sbin/portversion, /usr/sbin/pkg_info
puppet_gem
Puppet Ruby Gem support. This provider is useful for managing gems needed by the ruby provided in the puppet-
agent package.
• Required binaries: Puppet.run_mode.gem_cmd
• Confined to: true == Puppet.runtime[:facter].value(:aio_agent_version)
• Supported features: install_options, uninstall_options, versionable
puppetserver_gem
Puppet Server Ruby Gem support. If a URL is passed via source, then that URL is appended to the list of remote
gem repositories which by default contains rubygems.org; To ensure that only the specified source is used also
© 2024 Puppet, Inc., a Perforce company
Puppet | Syntax and settings | 641
pass --clear-sources in via install_options; if a source is present but is not a valid URL, it will be
interpreted as the path to a local gem file. If source is not present at all, the gem will be installed from the default gem
repositories.
• Confined to: feature == hocon, fips_enabled == false
• Supported features: install_options, uninstall_options, versionable
rpm
RPM packaging support; should work anywhere with a working rpm binary.
This provider supports the install_options and uninstall_options attributes, which allow command-
line flags to be passed to rpm. These options should be specified as an array where each element is either a string or a
hash.
• Required binaries: rpm
• Supported features: install_only, install_options, uninstall_options, versionable,
virtual_packages
rug
Support for suse rug package manager.
• Required binaries: /usr/bin/rug, rpm
• Confined to: os.name == [:suse, :sles]
• Supported features: versionable
sun
Sun's packaging system. Requires that you specify the source for the packages you're managing.
This provider supports the install_options attribute, which allows command-line flags to be passed to pkgadd.
These options should be specified as an array where each element is either a string or a hash.
• Required binaries: /usr/bin/pkginfo, /usr/sbin/pkgadd, /usr/sbin/pkgrm
• Confined to: os.family == solaris
• Default for: ["os.family", "solaris"] ==
• Supported features: install_options
sunfreeware
Package management using sunfreeware.com's pkg-get command on Solaris. At this point, support is exactly the
same as blastwave support and has not actually been tested.
• Required binaries: pkg-get
• Confined to: os.family == solaris
tdnf
Support via tdnf.
This provider supports the install_options attribute, which allows command-line flags to be passed to tdnf.
These options should be spcified as a string (e.g. '--flag'), a hash (e.g. {'--flag' => 'value'}), or an array where each
element is either a string or a hash.
• Required binaries: rpm, tdnf
• Default for: ["os.name", "PhotonOS"] ==
• Supported features: install_options, versionable, virtual_packages
up2date
Support for Red Hat's proprietary up2date package update mechanism.
• Required binaries: /usr/sbin/up2date-nox
• Confined to: os.family == redhat
© 2024 Puppet, Inc., a Perforce company
Puppet | Syntax and settings | 642
• Default for: ["os.family", "redhat"] == ["os.distro.release.full", "["2.1", "3",
"4"]"]
urpmi
Support via urpmi.
• Required binaries: rpm, urpme, urpmi, urpmq
• Default for: ["os.name", "[:mandriva, :mandrake]"] ==
• Supported features: versionable
windows
Windows package management.
This provider supports either MSI or self-extracting executable installers.
This provider requires a source attribute when installing the package. It accepts paths to local files, mapped drives,
or UNC paths.
This provider supports the install_options and uninstall_options attributes, which allow command-line
flags to be passed to the installer. These options should be specified as an array where each element is either a string
or a hash.
If the executable requires special arguments to perform a silent install or uninstall, then the appropriate arguments
should be specified using the install_options or uninstall_options attributes, respectively. Puppet will
automatically quote any option that contains spaces.
• Confined to: os.name == windows
• Default for: ["os.name", "windows"] ==
• Supported features: install_options, installable, uninstall_options, uninstallable,
versionable
xbps
Support for the Package Manager Utility (xbps) used in VoidLinux.
This provider supports the install_options attribute, which allows command-line flags to be passed to xbps-
install. These options should be specified as an array where each element is either a string or a hash.
• Required binaries: /usr/bin/xbps-install, /usr/bin/xbps-pkgdb, /usr/bin/xbps-query, /
usr/bin/xbps-remove
• Confined to: os.name == void
• Default for: ["os.name", "void"] ==
• Supported features: holdable, install_options, uninstall_options, upgradeable,
virtual_packages
yum
Support via yum.
Using this provider's uninstallable feature will not remove dependent packages. To remove dependent packages
with this provider use the purgeable feature, but note this feature is destructive and should be used with the utmost
care.
This provider supports the install_options attribute, which allows command-line flags to be passed to yum.
These options should be specified as an array where each element is either a string or a hash.
• Required binaries: rpm, yum
• Default for: ["os.name", "amazon"] == , ["os.family", "redhat"] ==
["os.release.major", "(4..7).to_a"]
• Supported features: install_only, install_options, version_ranges, versionable,
virtual_packages
zypper
© 2024 Puppet, Inc., a Perforce company
Puppet | Syntax and settings | 643
Support for SuSE zypper package manager. Found in SLES10sp2+ and SLES11.
This provider supports the install_options attribute, which allows command-line flags to be passed to zypper.
These options should be specified as an array where each element is either a string or a hash.
• Required binaries: /usr/bin/zypper
• Confined to: os.name == [:suse, :sles, :sled, :opensuse]
• Default for: ["os.name", "[:suse, :sles, :sled, :opensuse]"] ==
• Supported features: install_options, versionable, virtual_packages
Provider Features
Available features:
• disableable --- The provider can disable packages. This feature is used by specifying disabled as the
desired value for the package.
• holdable --- The provider is capable of placing packages on hold such that they are not automatically upgraded
as a result of other package dependencies unless explicit action is taken by a user or another package.
• install_only --- The provider accepts options to only install packages never update (kernels, etc.)
• install_options --- The provider accepts options to be passed to the installer command.
• installable --- The provider can install packages.
• package_settings --- The provider accepts package_settings to be ensured for the given package. The
meaning and format of these settings is provider-specific.
• purgeable --- The provider can purge packages. This generally means that all traces of the package are
removed, including existing configuration files. This feature is thus destructive and should be used with the utmost
care.
• reinstallable --- The provider can reinstall packages.
• supports_flavors --- The provider accepts flavors, which are specific variants of packages.
• targetable --- The provider accepts a targeted package management command.
• uninstall_options --- The provider accepts options to be passed to the uninstaller command.
• uninstallable --- The provider can uninstall packages.
• upgradeable --- The provider can upgrade to the latest version of a package. This feature is used by specifying
latest as the desired value for the package.
• version_ranges --- The provider can ensure version ranges.
• versionable --- The provider is capable of interrogating the package database for installed version(s), and can
select which out of a set of available versions of a package to install if asked.
• virtual_packages --- The provider accepts virtual package names for install and uninstall.
Provider support:
• aix - versionable
• appdmg - No supported Provider features
• apple - No supported Provider features
• apt - versionable, install options, virtual packages, version ranges
• aptitude - versionable
• aptrpm - versionable
• blastwave - No supported Provider features
• dnf - install options, versionable, virtual packages, install only, version ranges
• dnfmodule - installable, uninstallable, versionable, supports flavors, disableable
• dpkg - holdable, virtual packages
• fink - versionable
• freebsd - No supported Provider features
• gem - versionable, install options, uninstall options, targetable, version ranges
• hpux - No supported Provider features
• macports - installable, uninstallable, upgradeable, versionable
© 2024 Puppet, Inc., a Perforce company

Puppet | Syntax and settings | 644
• nim - versionable
• openbsd - versionable, install options, uninstall options, upgradeable, supports flavors
• opkg - No supported Provider features
• pacman - install options, uninstall options, upgradeable, virtual packages, purgeable
• pip - installable, uninstallable, upgradeable, versionable, version ranges, install options, targetable
• pip2 - installable, uninstallable, upgradeable, versionable, install options, targetable
• pip3 - installable, uninstallable, upgradeable, versionable, install options, targetable
• pkg - versionable, upgradable, holdable, install options
• pkgdmg - No supported Provider features
• pkgin - installable, uninstallable, upgradeable, versionable
• pkgng - versionable, upgradeable, install options
• pkgutil - No supported Provider features
• portage - install options, purgeable, reinstallable, uninstall options, versionable, virtual packages
• ports - No supported Provider features
• portupgrade - No supported Provider features
• puppet_gem - versionable, install options, uninstall options
• puppetserver_gem - versionable, install options, uninstall options
• rpm - versionable, install options, uninstall options, virtual packages, install only
• rug - versionable
• sun - install options
• sunfreeware - No supported Provider features
• tdnf - install options, versionable, virtual packages
• up2date - No supported Provider features
• urpmi - versionable
• windows - installable, uninstallable, install options, uninstall options, versionable
• xbps - install options, uninstall options, upgradeable, holdable, virtual packages
• yum - install options, versionable, virtual packages, install only, version ranges
• zypper - versionable, install options, virtual packages
Using package on Windows
The built-in package resource type handles many different packaging systems on many operating systems, so not
all features are relevant everywhere. This page offers guidance and tips for working with package on Windows.
package { 'mysql':
ensure => '5.5.16',
source => 'N:\packages\mysql-5.5.16-winx64.msi',
install_options => ['INSTALLDIR=C:\mysql-5.5'],
}
package { "Git version 1.8.4-preview20130916":
ensure => present,
source => 'C:\code\puppetlabs\temp\windowsexample\Git-1.8.4-
preview20130916.exe',
install_options => ['/VERYSILENT']
}
Supported package types: MSI and EXE
Puppet can install and remove MSI packages and executable installers on Windows. Both package types use the
default windows package provider.
Alternatively, a Chocolatey package provider is available on the Forge.
© 2024 Puppet, Inc., a Perforce company

Puppet | Syntax and settings | 645
The source attribute is required
When managing packages using the windows package provider, you must specify a package file using the source
attribute.
The source can be a local file or a file on a mapped network drive. For MSI installers, you can use a UNC path.
Puppet URLs are not supported for the package type’s source attribute, but you can use file resources to copy
packages to the local system. The source attribute accepts both forward- and backslashes.
The package name must be the DisplayName
The title (or name) of the package must match the value of the package’s DisplayName property in the registry,
which is also the value displayed in the Add/Remove Programs or Programs and Features control panels.
If the provided name and the installed name don’t match, Puppet assumes the package is not installed and tries to
install it again.
To determine a package's DisplayName:
1.
Install the package on an example system.
2.
Run puppet resource package to see a list of installed packages.
3.
Copy the name of the package from the list.
Some packages (Git is a notable example) change their display names with every newly released version. See the
section below on handling package versions and upgrades.
Install and uninstall options
The Windows package provider also supports package-specific install_options (such as install directory) and
uninstall_options. These options vary across packages, so see the documentation for the specific package
you’re installing. Options are specified as an array of strings or hashes.
MSI properties can be specified as an array of strings following the property=key pattern; use one string per
property. Command line flags to executable installers can be specified as an array of strings, with one string per flag.
For file path arguments within the install_options attribute (such as INSTALLDIR), use backslashes (\), not
forward slashes. Escape your backslashes appropriately. For more info, see Handling file paths on Windows.
If you pass a string argument that includes spaces to the install_options attribute, you must split the string on
every space. For example, to make Puppet install a self-extracting executable package as:
./installer.exe /s /v"MANAGEMENT_SERVER=1.1.1.1 /l*v! c:\temp\log.txt /qn"
the proper syntax would be:
install_options => [ '/s',
"/v\"MANAGEMENT_SERVER=${management_server}",
'/l*v!',
"${install_log}",
'/qn',
'"'
],
For more information, visit Install options with quotes or spaces.
Use the hash notation for file path arguments because they might contain spaces. For example:
install_options => [ { 'INSTALLDIR' => ${packagedir} } ]
Handling versions and upgrades
Setting ensure => latest (which requires the upgradeable feature) doesn’t work on Windows, because
Windows doesn’t have central package repositories like on most *nix systems.
There are two ways to handle package versions and upgrades on Windows.
© 2024 Puppet, Inc., a Perforce company

Puppet | Syntax and settings | 646
Packages with real versions
Many packages on Windows have version metadata. To tell whether a package has usable version metadata, install it
on a test system and use puppet resource package to inspect it.
To upgrade these packages, replace the source file and set ensure => '<VERSION>'. For example:
package { 'mysql':
ensure => '5.5.16',
source => 'N:\packages\mysql-5.5.16-winx64.msi',
install_options => ['INSTALLDIR=C:\mysql-5.5'],
}
The next time Puppet runs, it will notice that the versions don’t match and will install the new package. This makes
the installed version match the new version, so Puppet won’t attempt to re-install the package until you change the
version in the manifest again.
The version you use in ensure must exactly match the version string that the package reports when you inspect it
with puppet resource. If it doesn’t match, Puppet will repeatedly try to install it.
Packages that include version info in their DisplayName
Some packages don’t embed version metadata; instead, they change their DisplayName property with each release.
The Git packages are a notable example.
To upgrade these packages, replace the source file and update the resource’s title or name to the new
DisplayName. For example:
package { "Git version 1.8.4-preview20130916":
ensure => installed,
source => 'C:\code\puppetlabs\temp\windowsexample\Git-1.8.4-
preview20130916.exe',
install_options => ['/VERYSILENT']
}
The next time Puppet runs, it will notice that the names don’t match and will install the new package. This makes the
installed name match the new name, so Puppet won’t attempt to re-install the package until you change the name in
the manifest again.
The name you use in the title must exactly match the name that the package reports when you inspect it with puppet
resource. If it doesn’t match, Puppet will repeatedly try to install it.
Resource Type: resources
NOTE: This page was generated from the Puppet source code on 2024-08-01 18:16:06 -0700
resources
• Attributes
Description
This is a metatype that can manage other resource types. Any metaparams specified here will be passed on to any
generated resources, so you can purge unmanaged resources but set noop to true so the purging is only logged and
does not actually happen.
Attributes
resources { 'resource title':
name => # (namevar) The name of the type to be...
purge => # Whether to purge unmanaged resources. When set...
unless_system_user => # This keeps system users from being purged. By...
unless_uid => # This keeps specific uids or ranges of uids from...
# ...plus any applicable metaparameters.
© 2024 Puppet, Inc., a Perforce company

Puppet | Syntax and settings | 647
}
name
(Namevar: If omitted, this attribute's value defaults to the resource's title.)
The name of the type to be managed.
(# Back to resources attributes)
purge
Whether to purge unmanaged resources. When set to true, this will delete any resource that is not specified in your
configuration and is not autorequired by any managed resources. Note: The ssh_authorized_key resource type
can't be purged this way; instead, see the purge_ssh_keys attribute of the user type.
Default: false
Allowed values:
• true
• false
• yes
• no
(# Back to resources attributes)
unless_system_user
This keeps system users from being purged. By default, it does not purge users whose UIDs are less than the
minimum UID for the system (typically 500 or 1000), but you can specify a different UID as the inclusive limit.
Allowed values:
• true
• false
• /^\d+$/
(# Back to resources attributes)
unless_uid
This keeps specific uids or ranges of uids from being purged when purge is true. Accepts integers, integer strings, and
arrays of integers or integer strings. To specify a range of uids, consider using the range() function from stdlib.
(# Back to resources attributes)
Resource Type: schedule
NOTE: This page was generated from the Puppet source code on 2024-08-01 18:16:06 -0700
schedule
• Attributes
Description
Define schedules for Puppet. Resources can be limited to a schedule by using the schedule metaparameter.
Currently, schedules can only be used to stop a resource from being applied; they cannot cause a resource to be
applied when it otherwise wouldn't be, and they cannot accurately specify a time when a resource should run.
Every time Puppet applies its configuration, it will apply the set of resources whose schedule does not eliminate them
from running right then, but there is currently no system in place to guarantee that a given resource runs at a given
time. If you specify a very restrictive schedule and Puppet happens to run at a time within that schedule, then the
resources will get applied; otherwise, that work may never get done.
© 2024 Puppet, Inc., a Perforce company

Puppet | Syntax and settings | 648
Thus, it is advisable to use wider scheduling (for example, over a couple of hours) combined with periods and
repetitions. For instance, if you wanted to restrict certain resources to only running once, between the hours of two
and 4 AM, then you would use this schedule:
schedule { 'maint':
range => '2 - 4',
period => daily,
repeat => 1,
}
With this schedule, the first time that Puppet runs between 2 and 4 AM, all resources with this schedule will get
applied, but they won't get applied again between 2 and 4 because they will have already run once that day, and they
won't get applied outside that schedule because they will be outside the scheduled range.
Puppet automatically creates a schedule for each of the valid periods with the same name as that period (such as
hourly and daily). Additionally, a schedule named puppet is created and used as the default, with the following
attributes:
schedule { 'puppet':
period => hourly,
repeat => 2,
}
This will cause resources to be applied every 30 minutes by default.
The statettl setting on the agent affects the ability of a schedule to determine if a resource has already been
checked. If the statettl is set lower than the span of the associated schedule resource, then a resource could be
checked & applied multiple times in the schedule as the information about when the resource was last checked will
have expired from the cache.
Attributes
schedule { 'resource title':
name => # (namevar) The name of the schedule. This name is used...
period => # The period of repetition for resources on this...
periodmatch => # Whether periods should be matched by a numeric...
range => # The earliest and latest that a resource can be...
repeat => # How often a given resource may be applied in...
weekday => # The days of the week in which the schedule...
# ...plus any applicable metaparameters.
}
name
(Namevar: If omitted, this attribute's value defaults to the resource's title.)
The name of the schedule. This name is used when assigning the schedule to a resource with the schedule
metaparameter:
schedule { 'everyday':
period => daily,
range => '2 - 4',
}
exec { '/usr/bin/apt-get update':
schedule => 'everyday',
}
(# Back to schedule attributes)
period
© 2024 Puppet, Inc., a Perforce company

Puppet | Syntax and settings | 649
The period of repetition for resources on this schedule. The default is for resources to get applied every time Puppet
runs.
Note that the period defines how often a given resource will get applied but not when; if you would like to restrict
the hours that a given resource can be applied (for instance, only at night during a maintenance window), then use the
range attribute.
If the provided periods are not sufficient, you can provide a value to the repeat attribute, which will cause Puppet to
schedule the affected resources evenly in the period the specified number of times. Take this schedule:
schedule { 'veryoften':
period => hourly,
repeat => 6,
}
This can cause Puppet to apply that resource up to every 10 minutes.
At the moment, Puppet cannot guarantee that level of repetition; that is, the resource can applied up to every 10
minutes, but internal factors might prevent it from actually running that often (for instance, if a Puppet run is still in
progress when the next run is scheduled to start, that next run will be suppressed).
See the periodmatch attribute for tuning whether to match times by their distance apart or by their specific value.
Tip: You can use period => never, to prevent a resource from being applied in the given range.
This is useful if you need to create a blackout window to perform sensitive operations without interruption.
Allowed values:
• hourly
• daily
• weekly
• monthly
• never
(# Back to schedule attributes)
periodmatch
Whether periods should be matched by a numeric value (for instance, whether two times are in the same hour) or by
their chronological distance apart (whether two times are 60 minutes apart).
Default: distance
Allowed values:
• number
• distance
(# Back to schedule attributes)
range
The earliest and latest that a resource can be applied. This is always a hyphen-separated range within a 24 hour
period, and hours must be specified in numbers between 0 and 23, inclusive. Minutes and seconds can optionally be
provided, using the normal colon as a separator. For instance:
schedule { 'maintenance':
range => '1:30 - 4:30',
}
This is mostly useful for restricting certain resources to being applied in maintenance windows or during off-peak
hours. Multiple ranges can be applied in array context. As a convenience when specifying ranges, you can cross
midnight (for example, range => "22:00 - 04:00").
(# Back to schedule attributes)
© 2024 Puppet, Inc., a Perforce company

Puppet | Syntax and settings | 650
repeat
How often a given resource may be applied in this schedule's period. Must be an integer.
Default: 1
(# Back to schedule attributes)
weekday
The days of the week in which the schedule should be valid. You may specify the full day name 'Tuesday', the three
character abbreviation 'Tue', or a number (as a string or as an integer) corresponding to the day of the week where 0 is
Sunday, 1 is Monday, and so on. Multiple days can be specified as an array. If not specified, the day of the week will
not be considered in the schedule.
If you are also using a range match that spans across midnight then this parameter will match the day that it was at the
start of the range, not necessarily the day that it is when it matches. For example, consider this schedule:
schedule { 'maintenance_window':
range => '22:00 - 04:00',
weekday => 'Saturday',
}
This will match at 11 PM on Saturday and 2 AM on Sunday, but not at 2 AM on Saturday.
(# Back to schedule attributes)
Resource Type: service
NOTE: This page was generated from the Puppet source code on 2024-08-01 18:16:06 -0700
service
• Attributes
• Providers
• Provider Features
Description
Manage running services. Service support unfortunately varies widely by platform --- some platforms have very little
if any concept of a running service, and some have a very codified and powerful concept. Puppet's service support is
usually capable of doing the right thing, but the more information you can provide, the better behaviour you will get.
Puppet 2.7 and newer expect init scripts to have a working status command. If this isn't the case for any of your
services' init scripts, you will need to set hasstatus to false and possibly specify a custom status command in the
status attribute. As a last resort, Puppet will attempt to search the process table by calling whatever command is
listed in the ps fact. The default search pattern is the name of the service, but you can specify it with the pattern
attribute.
Refresh: service resources can respond to refresh events (via notify, subscribe, or the ~> arrow). If a
service receives an event from another resource, Puppet will restart the service it manages. The actual command
used to restart the service depends on the platform and can be configured:
• If you set hasrestart to true, Puppet will use the init script's restart command.
• You can provide an explicit command for restarting with the restart attribute.
• If you do neither, the service's stop and start commands will be used.
Attributes
service { 'resource title':
name => # (namevar) The name of the service to run. This name
is...
ensure => # Whether a service should be running. Default...
binary => # The path to the daemon. This is only used for...
control => # The control variable used to manage services...
© 2024 Puppet, Inc., a Perforce company

Puppet | Syntax and settings | 651
enable => # Whether a service should be enabled to start at...
flags => # Specify a string of flags to pass to the startup
hasrestart => # Specify that an init script has a `restart...
hasstatus => # Declare whether the service's init script has a...
logonaccount => # Specify an account for service...
logonpassword => # Specify a password for service logon. Default...
manifest => # Specify a command to config a service, or a path
path => # The search path for finding init scripts....
pattern => # The pattern to search for in the process table...
provider => # The specific backend to use for this `service...
restart => # Specify a *restart* command manually. If left...
start => # Specify a *start* command manually. Most...
status => # Specify a *status* command manually. This...
stop => # Specify a *stop* command...
timeout => # Specify an optional minimum timeout (in seconds)
# ...plus any applicable metaparameters.
}
name
(Namevar: If omitted, this attribute's value defaults to the resource's title.)
The name of the service to run.
This name is used to find the service; on platforms where services have short system names and long display names,
this should be the short name. (To take an example from Windows, you would use "wuauserv" rather than "Automatic
Updates.")
(# Back to service attributes)
ensure
(Property: This attribute represents concrete state on the target system.)
Whether a service should be running. Default values depend on the platform.
Allowed values:
• stopped
• running
• false
• true
(# Back to service attributes)
binary
The path to the daemon. This is only used for systems that do not support init scripts. This binary will be used to start
the service if no start parameter is provided.
(# Back to service attributes)
control
The control variable used to manage services (originally for HP-UX). Defaults to the upcased service name plus
START replacing dots with underscores, for those providers that support the controllable feature.
(# Back to service attributes)
enable
(Property: This attribute represents concrete state on the target system.)
Whether a service should be enabled to start at boot. This property behaves differently depending on the platform;
wherever possible, it relies on local tools to enable or disable a given service. Default values depend on the platform.
If you don't specify a value for the enable attribute, Puppet leaves that aspect of the service alone and your
operating system determines the behavior.
© 2024 Puppet, Inc., a Perforce company
Puppet | Syntax and settings | 652
Allowed values:
• true
• false
• manual
• mask
• delayed
Requires features enableable.
(# Back to service attributes)
flags
(Property: This attribute represents concrete state on the target system.)
Specify a string of flags to pass to the startup script.
Requires features flaggable.
(# Back to service attributes)
hasrestart
Specify that an init script has a restart command. If this is false and you do not specify a command in the
restart attribute, the init script's stop and start commands will be used.
Allowed values:
• true
• false
(# Back to service attributes)
hasstatus
Declare whether the service's init script has a functional status command. This attribute's default value changed in
Puppet 2.7.0.
The init script's status command must return 0 if the service is running and a nonzero value otherwise. Ideally, these
exit codes should conform to the LSB's specification for init script status actions, but Puppet only considers the
difference between 0 and nonzero to be relevant.
If a service's init script does not support any kind of status command, you should set hasstatus to false and either
provide a specific command using the status attribute or expect that Puppet will look for the service name in the
process table. Be aware that 'virtual' init scripts (like 'network' under Red Hat systems) will respond poorly to refresh
events from other resources if you override the default behavior without providing a status command.
Default: true
Allowed values:
• true
• false
(# Back to service attributes)
logonaccount
(Property: This attribute represents concrete state on the target system.)
Specify an account for service logon
Requires features manages_logon_credentials.
(# Back to service attributes)
logonpassword
© 2024 Puppet, Inc., a Perforce company
Puppet | Syntax and settings | 653
Specify a password for service logon. Default value is an empty string (when logonaccount is specified).
Requires features manages_logon_credentials.
(# Back to service attributes)
manifest
Specify a command to config a service, or a path to a manifest to do so.
(# Back to service attributes)
path
The search path for finding init scripts. Multiple values should be separated by colons or provided as an array.
(# Back to service attributes)
pattern
The pattern to search for in the process table. This is used for stopping services on platforms that do not support
init scripts, and is also used for determining service status on those service whose init scripts do not include a status
command.
Defaults to the name of the service. The pattern can be a simple string or any legal Ruby pattern, including regular
expressions (which should be quoted without enclosing slashes).
(# Back to service attributes)
provider
The specific backend to use for this service resource. You will seldom need to specify this --- Puppet will usually
discover the appropriate provider for your platform.
Available providers are:
• base
• bsd
• daemontools
• debian
• freebsd
• gentoo
• init
• launchd
• openbsd
• openrc
• openwrt
• rcng
• redhat
• runit
• service
• smf
• src
• systemd
• upstart
• windows
(# Back to service attributes)
restart
Specify a restart command manually. If left unspecified, the service will be stopped and then started.
(# Back to service attributes)
© 2024 Puppet, Inc., a Perforce company

Puppet | Syntax and settings | 654
start
Specify a start command manually. Most service subsystems support a start command, so this will not need to be
specified.
(# Back to service attributes)
status
Specify a status command manually. This command must return 0 if the service is running and a nonzero value
otherwise. Ideally, these exit codes should conform to the LSB's specification for init script status actions, but Puppet
only considers the difference between 0 and nonzero to be relevant.
If left unspecified, the status of the service will be determined automatically, usually by looking for the service in the
process table.
(# Back to service attributes)
stop
Specify a stop command manually.
(# Back to service attributes)
timeout
Specify an optional minimum timeout (in seconds) for puppet to wait when syncing service properties
Requires features configurable_timeout.
(# Back to service attributes)
Providers
base
The simplest form of Unix service support.
You have to specify enough about your service for this to work; the minimum you can specify is a binary for starting
the process, and this same binary will be searched for in the process table to stop the service. As with init-style
services, it is preferable to specify start, stop, and status commands.
• Required binaries: kill
bsd
Generic BSD form of init-style service management with rc.d.
Uses rc.conf.d for service enabling and disabling.
• Confined to: os.name == [:freebsd, :dragonfly]
daemontools
Daemontools service management.
This provider manages daemons supervised by D.J. Bernstein daemontools. When detecting the service directory it
will check, in order of preference:
• /service
• /etc/service
• /var/lib/svscan
The daemon directory should be in one of the following locations:
• /var/lib/service
• /etc
...or this can be overridden in the resource's attributes:
service { 'myservice':
© 2024 Puppet, Inc., a Perforce company

Puppet | Syntax and settings | 655
provider => 'daemontools',
path => '/path/to/daemons',
}
This provider supports out of the box:
• start/stop (mapped to enable/disable)
• enable/disable
• restart
• status
If a service has ensure => "running", it will link /path/to/daemon to /path/to/service, which will automatically
enable the service.
If a service has ensure => "stopped", it will only shut down the service, not remove the /path/to/
service link.
• Required binaries: /usr/bin/svc, /usr/bin/svstat
debian
Debian's form of init-style management.
The only differences from init are support for enabling and disabling services via update-rc.d and the ability to
determine enabled status via invoke-rc.d.
• Required binaries: /usr/sbin/invoke-rc.d, /usr/sbin/service, /usr/sbin/update-rc.d
• Confined to: false == Puppet::FileSystem.exist?('/proc/1/comm') &&
Puppet::FileSystem.read('/proc/1/comm').include?('systemd')
• Default for: ["os.name", "cumuluslinux"] == ["os.release.major", "%w[1 2]"],
["os.name", "debian"] == ["os.release.major", "%w[5 6 7]"], ["os.name",
"devuan"] ==
freebsd
Provider for FreeBSD and DragonFly BSD. Uses the rcvar argument of init scripts and parses/edits rc files.
• Confined to: os.name == [:freebsd, :dragonfly]
• Default for: ["os.name", "[:freebsd, :dragonfly]"] ==
gentoo
Gentoo's form of init-style service management.
Uses rc-update for service enabling and disabling.
• Required binaries: /sbin/rc-update
• Confined to: os.name == gentoo
init
Standard init-style service management.
• Confined to: false == Puppet.runtime[:facter].value('os.family') == 'RedHat'
launchd
This provider manages jobs with launchd, which is the default service framework for Mac OS X (and may be
available for use on other platforms).
For more information, see the launchd man page:
• https://developer.apple.com/legacy/library/documentation/Darwin/Reference/ManPages/man8/launchd.8.html
This provider reads plists out of the following directories:
• /System/Library/LaunchDaemons
© 2024 Puppet, Inc., a Perforce company
Puppet | Syntax and settings | 656
• /System/Library/LaunchAgents
• /Library/LaunchDaemons
• /Library/LaunchAgents
...and builds up a list of services based upon each plist's "Label" entry.
This provider supports:
• ensure => running/stopped,
• enable => true/false
• status
• restart
Here is how the Puppet states correspond to launchd states:
• stopped --- job unloaded
• started --- job loaded
• enabled --- 'Disable' removed from job plist file
• disabled --- 'Disable' added to job plist file
Note that this allows you to do something launchctl can't do, which is to be in a state of "stopped/enabled" or
"running/disabled".
Note that this provider does not support overriding 'restart'
• Required binaries: /bin/launchctl
• Confined to: os.name == darwin, feature == cfpropertylist
• Default for: ["os.name", "darwin"] ==
• Supported features: enableable, refreshable
openbsd
Provider for OpenBSD's rc.d daemon control scripts
• Required binaries: /usr/sbin/rcctl
• Confined to: os.name == openbsd
• Default for: ["os.name", "openbsd"] ==
• Supported features: flaggable
openrc
Support for Gentoo's OpenRC initskripts
Uses rc-update, rc-status and rc-service to manage services.
• Required binaries: /sbin/rc-service, /sbin/rc-update
• Default for: ["os.name", "gentoo"] == , ["os.name", "funtoo"] ==
openwrt
Support for OpenWrt flavored init scripts.
Uses /etc/init.d/service_name enable, disable, and enabled.
• Confined to: os.name == openwrt
• Default for: ["os.name", "openwrt"] ==
• Supported features: enableable
rcng
RCng service management with rc.d
• Confined to: os.name == [:netbsd, :cargos]
• Default for: ["os.name", "[:netbsd, :cargos]"] ==
© 2024 Puppet, Inc., a Perforce company

Puppet | Syntax and settings | 657
redhat
Red Hat's (and probably many others') form of init-style service management. Uses chkconfig for service
enabling and disabling.
• Required binaries: /sbin/chkconfig, /sbin/service
• Default for: ["os.name", "amazon"] == ["os.release.major", "%w[2017 2018]"],
["os.name", "redhat"] == ["os.release.major", "(4..6).to_a"], ["os.family",
"suse"] == ["os.release.major", "%w[10 11]"]
runit
Runit service management.
This provider manages daemons running supervised by Runit. When detecting the service directory it will check, in
order of preference:
• /service
• /etc/service
• /var/service
The daemon directory should be in one of the following locations:
• /etc/sv
• /var/lib/service
or this can be overridden in the service resource parameters:
service { 'myservice':
provider => 'runit',
path => '/path/to/daemons',
}
This provider supports out of the box:
• start/stop
• enable/disable
• restart
• status
• Required binaries: /usr/bin/sv
service
The simplest form of service support.
smf
Support for Sun's new Service Management Framework.
When managing the enable property, this provider will try to preserve the previous ensure state per the enableable
semantics. On Solaris, enabling a service starts it up while disabling a service stops it. Thus, there's a chance for this
provider to execute two operations when managing the enable property. For example, if enable is set to true and the
ensure state is stopped, this provider will manage the service using two operations: one to enable the service which
will start it up, and another to stop the service (without affecting its enabled status).
By specifying manifest => "/path/to/service.xml", the SMF manifest will be imported if it does not
exist.
• Required binaries: /usr/bin/svcs, /usr/sbin/svcadm, /usr/sbin/svccfg
• Confined to: os.family == solaris
• Default for: ["os.family", "solaris"] ==
• Supported features: refreshable
src
© 2024 Puppet, Inc., a Perforce company
Puppet | Syntax and settings | 658
Support for AIX's System Resource controller.
Services are started/stopped based on the stopsrc and startsrc commands, and some services can be refreshed
with refresh command.
Enabling and disabling services is not supported, as it requires modifications to /etc/inittab. Starting and
stopping groups of subsystems is not yet supported.
• Confined to: os.name == aix
• Default for: ["os.name", "aix"] ==
• Supported features: refreshable
systemd
Manages systemd services using systemctl.
Because systemd defaults to assuming the .service unit type, the suffix may be omitted. Other unit types (such
as .path) may be managed by providing the proper suffix.
• Required binaries: systemctl
• Confined to: true == Puppet::FileSystem.exist?('/proc/1/comm') &&
Puppet::FileSystem.read('/proc/1/comm').include?('systemd')
• Default for: ["os.family", "[:archlinux]"] == , ["os.family", "redhat"] == ,
["os.family", "redhat"] == ["os.name", "fedora"], ["os.family", "suse"]
== , ["os.family", "coreos"] == , ["os.family", "gentoo"] == , ["os.name",
"amazon"] == ["os.release.major", "%w[2 2023]"], ["os.name", "debian"]
== , ["os.name", "LinuxMint"] == , ["os.name", "ubuntu"] == , ["os.name",
"cumuluslinux"] == ["os.release.major", "%w[3 4]"]
upstart
Ubuntu service management with upstart.
This provider manages upstart jobs on Ubuntu. For upstart documentation, see http://upstart.ubuntu.com/.
• Required binaries: /sbin/initctl, /sbin/restart, /sbin/start, /sbin/status, /sbin/stop
• Confined to: any == [ Puppet.runtime[:facter].value('os.name') ==
'Ubuntu', (Puppet.runtime[:facter].value('os.family') == 'RedHat'
and Puppet.runtime[:facter].value('os.release.full') =~ /
^6./), (Puppet.runtime[:facter].value('os.name') == 'Amazon' and
Puppet.runtime[:facter].value('os.release.major') =~ /\d{4}/),
Puppet.runtime[:facter].value('os.name') == 'LinuxMint' ], true == ->
{ has_initctl? }
• Default for: ["os.name", "ubuntu"] == ["os.release.major", "["10.04", "12.04",
"14.04", "14.10"]"], ["os.name", "LinuxMint"] == ["os.release.major", "%w[10
11 12 13 14 15 16 17]"]
• Supported features: enableable
windows
Support for Windows Service Control Manager (SCM). This provider can start, stop, enable, and disable services, and
the SCM provides working status methods for all services.
Control of service groups (dependencies) is not yet supported, nor is running services as a specific user.
• Confined to: os.name == windows
• Default for: ["os.name", "windows"] ==
• Supported features: configurable_timeout, manages_logon_credentials, refreshable
Provider Features
Available features:
• configurable_timeout --- The provider can specify a minumum timeout for syncing service properties
© 2024 Puppet, Inc., a Perforce company

Puppet | Syntax and settings | 659
• controllable --- The provider uses a control variable.
• delayed_startable --- The provider can set service to delayed start
• enableable --- The provider can enable and disable the service.
• flaggable --- The provider can pass flags to the service.
• manages_logon_credentials --- The provider can specify the logon credentials used for a service
• manual_startable --- The provider can set service to manual start
• maskable --- The provider can 'mask' the service.
• refreshable --- The provider can restart the service.
Provider support:
• base - No supported Provider features
• bsd - No supported Provider features
• daemontools - No supported Provider features
• debian - No supported Provider features
• freebsd - No supported Provider features
• gentoo - No supported Provider features
• init - No supported Provider features
• launchd - enableable, refreshable
• openbsd - flaggable
• openrc - No supported Provider features
• openwrt - enableable
• rcng - No supported Provider features
• redhat - No supported Provider features
• runit - No supported Provider features
• service - No supported Provider features
• smf - refreshable
• src - refreshable
• systemd - No supported Provider features
• upstart - enableable
• windows - refreshable, configurable timeout, manages logon credentials
Using service
Puppet can manage services on nearly all operating systems.This page offers operating system-specific advice and
best practices for working with service.
Using service on *nix systems
If your *nix operating system has a good system for managing services, and all the services you care about have
working init scripts or service configs, you can write small service resources with just the ensure and enable
attributes.
For example:
service { 'apache2':
ensure => running,
enable => true,
}
Note: Some *nix operating systems don't support the enable attribute.
Defective init script
On platforms that use SysV-style init scripts, Puppet assumes the script has working start, stop, and status
commands. See descriptions below.
© 2024 Puppet, Inc., a Perforce company

Puppet | Syntax and settings | 660
If the status command is missing, set hasstatus => false for that service. This makes Puppet search the
process table for the service’s name to check whether it’s running.
In some rare cases — such as virtual services like the Red Hat network — a service won’t have a matching entry in
the process table. If a service acts like this and is also missing a status command, set hasstatus => false and
also specify either status or pattern attribute.
No init script or service config
If some of your services lack init scripts, Puppet can compensate, as in the following example:
service { "apache2":
ensure => running,
start => "/usr/sbin/apachectl start",
stop => "/usr/sbin/apachectl stop",
pattern => "/usr/sbin/httpd",
}
In addition to specifing ensure, specify also how to start the service, how to stop it, how to check whether it’s
running, and optionally how to restart it.
Start
Use either start or binary to specify a start command. The difference is that binary also gives you default
behavior for stop and status.
Stop
If you specified binary, Puppet defaults to finding that same executable in the process table and killing it.
To stop the service some other way, use the stop attribute to specify the appropriate command.
Status
If you specified binary, Puppet checks for that executable in the process table. If it doesn’t find it, it reports
that the service isn’t running.
If there’s a better way to check the service’s status, or if the start command is just a script and a different
process implements the service itself, use either status (a command that exits 0 if the service is running and
nonzero otherwise) or pattern (a pattern to search the process table for).
Restart
If a service needs to be reloaded, Puppet defaults to stopping it and starting it again. If you have a safer command
for restarting a service, you can optionally specify it in the restart attribute.
Using service on macOS
macOS handles services much like most *nix-based systems. The main difference is that enable and ensure are
much more closely linked — running services are always enabled, and stopped ones are always disabled.
For best results, either leave enable blank or make sure it’s set to true whenever ensure => running.
The launchd plists that configure your services must be in one of the following directories:
• /System/Library/LaunchDaemons
• /System/Library/LaunchAgents
• /Library/LaunchDaemons
• /Library/LaunchAgents
You can also specify start and stop commands to assemble your own services, much like on *nix systems.
© 2024 Puppet, Inc., a Perforce company

Puppet | Syntax and settings | 661
Using service on Windows
On Windows, Puppet can start, stop, enable, disable, list, query, and configure services. It expects that all services run
with the built-in Service Control Manager (SCM) system. It does not support configuring service dependencies, the
account to run as, or desktop interaction.
When writing service resources for Windows, remember the following:
• Use the short service name (such as wuauserv) in Puppet, not the display name (such as Automatic
Updates).
• Set enable => true to assign a service the Automatic startup type.
• Set enable => manual to assign the Manual startup type.
For example, here is a complete service resource:
service { 'mysql':
ensure => 'running',
enable => true,
}
Puppet 7 adds support for managing the logon user and password to the Windows service provider. For example:
service { 'name-of-service':
ensure => 'running',
enable => 'true',
logonaccount => 'domain\\user',
logonpassword => $password,
}
Note that the logonpassword is a sensitive variable.
Managing systemd services
In addition to the default values for the ensure and enable attributes, you can mask systemd services by setting
enable => mask.
Note that static services can not be enabled by design, and services of type indirect can not be enabled due to
a limitation in the implementation of systemd. When restarting services, Puppet checks whether any unit files were
modified and runs daemon-reload when required.
Resource Type: stage
NOTE: This page was generated from the Puppet source code on 2024-08-01 18:16:06 -0700
stage
• Attributes
Description
A resource type for creating new run stages. Once a stage is available, classes can be assigned to it by declaring them
with the resource-like syntax and using the stage metaparameter.
Note that new stages are not useful unless you also declare their order in relation to the default main stage.
A complete run stage example:
stage { 'pre':
before => Stage['main'],
}
class { 'apt-updates':
stage => 'pre',
}
Individual resources cannot be assigned to run stages; you can only set stages for classes.
© 2024 Puppet, Inc., a Perforce company

Puppet | Syntax and settings | 662
Attributes
stage { 'resource title':
name => # (namevar) The name of the stage. Use this as the value for
# ...plus any applicable metaparameters.
}
name
(Namevar: If omitted, this attribute's value defaults to the resource's title.)
The name of the stage. Use this as the value for the stage metaparameter when assigning classes to this stage.
(# Back to stage attributes)
Resource Type: tidy
NOTE: This page was generated from the Puppet source code on 2024-08-01 18:16:06 -0700
tidy
• Attributes
Description
Remove unwanted files based on specific criteria. Multiple criteria are OR'd together, so a file that is too large but is
not old enough will still get tidied. Ignores managed resources.
If you don't specify either age or size, then all files will be removed.
This resource type works by generating a file resource for every file that should be deleted and then letting that
resource perform the actual deletion.
Attributes
tidy { 'resource title':
path => # (namevar) The path to the file or directory to manage....
age => # Tidy files whose age is equal to or greater than
backup => # Whether tidied files should be backed up. Any...
matches => # One or more (shell type) file glob patterns...
max_files => # In case the resource is a directory and the...
recurse => # If target is a directory, recursively descend...
rmdirs => # Tidy directories in addition to files; that is...
size => # Tidy files whose size is equal to or greater...
type => # Set the mechanism for determining age. Default:
# ...plus any applicable metaparameters.
}
path
(Namevar: If omitted, this attribute's value defaults to the resource's title.)
The path to the file or directory to manage. Must be fully qualified.
(# Back to tidy attributes)
age
Tidy files whose age is equal to or greater than the specified time. You can choose seconds, minutes, hours, days, or
weeks by specifying the first letter of any of those words (for example, '1w' represents one week).
Specifying 0 will remove all files.
(# Back to tidy attributes)
backup
© 2024 Puppet, Inc., a Perforce company

Puppet | Syntax and settings | 663
Whether tidied files should be backed up. Any values are passed directly to the file resources used for actual file
deletion, so consult the file type's backup documentation to determine valid values.
(# Back to tidy attributes)
matches
One or more (shell type) file glob patterns, which restrict the list of files to be tidied to those whose basenames match
at least one of the patterns specified. Multiple patterns can be specified using an array.
Example:
tidy { '/tmp':
age => '1w',
recurse => 1,
matches => [ '[0-9]pub*.tmp', '*.temp', 'tmpfile?' ],
}
This removes files from /tmp if they are one week old or older, are not in a subdirectory and match one of the shell
globs given.
Note that the patterns are matched against the basename of each file -- that is, your glob patterns should not have any
'/' characters in them, since you are only specifying against the last bit of the file.
Finally, note that you must now specify a non-zero/non-false value for recurse if matches is used, as matches only
apply to files found by recursion (there's no reason to use static patterns match against a statically determined path).
Requiring explicit recursion clears up a common source of confusion.
(# Back to tidy attributes)
max_files
In case the resource is a directory and the recursion is enabled, puppet will generate a new resource for each file file
found, possible leading to an excessive number of resources generated without any control.
Setting max_files will check the number of file resources that will eventually be created and will raise a resource
argument error if the limit will be exceeded.
Use value 0 to disable the check. In this case, a warning is logged if the number of files exceeds 1000.
Default: 0
Allowed values:
• /^[0-9]+$/
(# Back to tidy attributes)
recurse
If target is a directory, recursively descend into the directory looking for files to tidy.
Allowed values:
• true
• false
• inf
• /^[0-9]+$/
(# Back to tidy attributes)
rmdirs
Tidy directories in addition to files; that is, remove directories whose age is older than the specified criteria. This will
only remove empty directories, so all contained files must also be tidied before a directory gets removed.
Allowed values:
© 2024 Puppet, Inc., a Perforce company

Puppet | Syntax and settings | 664
• true
• false
• yes
• no
(# Back to tidy attributes)
size
Tidy files whose size is equal to or greater than the specified size. Unqualified values are in kilobytes, but b, k, m,
g, and t can be appended to specify bytes, kilobytes, megabytes, gigabytes, and terabytes, respectively. Only the first
character is significant, so the full word can also be used.
(# Back to tidy attributes)
type
Set the mechanism for determining age.
Default: atime
Allowed values:
• atime
• mtime
• ctime
(# Back to tidy attributes)
Resource Type: user
NOTE: This page was generated from the Puppet source code on 2024-08-01 18:16:06 -0700
user
• Attributes
• Providers
• Provider Features
Description
Manage users. This type is mostly built to manage system users, so it is lacking some features useful for managing
normal users.
This resource type uses the prescribed native tools for creating groups and generally uses POSIX APIs for retrieving
information about them. It does not directly modify /etc/passwd or anything.
Autorequires: If Puppet is managing the user's primary group (as provided in the gid attribute) or any group listed
in the groups attribute then the user resource will autorequire that group. If Puppet is managing any role accounts
corresponding to the user's roles, the user resource will autorequire those role accounts.
Attributes
user { 'resource title':
name => # (namevar) The user name. While naming
limitations vary by...
ensure => # The basic state that the object should be in....
allowdupe => # Whether to allow duplicate UIDs. Default...
attribute_membership => # Whether specified attribute value pairs
should...
attributes => # Specify AIX attributes for the user in an
array...
auth_membership => # Whether specified auths should be considered
the
auths => # The auths the user has. Multiple auths
should...
© 2024 Puppet, Inc., a Perforce company

Puppet | Syntax and settings | 665
comment => # A description of the user. Generally the
user's
expiry => # The expiry date for this user. Provide as
either
forcelocal => # Forces the management of local accounts when...
gid => # The user's primary group. Can be specified...
groups => # The groups to which the user belongs. The...
home => # The home directory of the user. The
directory...
ia_load_module => # The name of the I&A module to use to manage
this
iterations => # This is the number of iterations of a chained...
key_membership => # Whether specified key/value pairs should be...
keys => # Specify user attributes in an array of key ...
loginclass => # The name of login class to which the user...
managehome => # Whether to manage the home directory when
Puppet
membership => # If `minimum` is specified, Puppet will ensure...
password => # The user's password, in whatever encrypted...
password_max_age => # The maximum number of days a password may be...
password_min_age => # The minimum number of days a password must be...
password_warn_days => # The number of days before a password is going
to
profile_membership => # Whether specified roles should be treated as
the
profiles => # The profiles the user has. Multiple profiles...
project => # The name of the project associated with a...
provider => # The specific backend to use for this `user...
purge_ssh_keys => # Whether to purge authorized SSH keys for this...
role_membership => # Whether specified roles should be considered
the
roles => # The roles the user has. Multiple roles
should...
salt => # This is the 32-byte salt used to generate the...
shell => # The user's login shell. The shell must exist...
system => # Whether the user is a system user, according
to...
uid => # The user ID; must be specified numerically.
If...
# ...plus any applicable metaparameters.
}
name
(Namevar: If omitted, this attribute's value defaults to the resource's title.)
The user name. While naming limitations vary by operating system, it is advisable to restrict names to the lowest
common denominator, which is a maximum of 8 characters beginning with a letter.
Note that Puppet considers user names to be case-sensitive, regardless of the platform's own rules; be sure to always
use the same case when referring to a given user.
(# Back to user attributes)
ensure
(Property: This attribute represents concrete state on the target system.)
The basic state that the object should be in.
Allowed values:
• present
• absent
• role
© 2024 Puppet, Inc., a Perforce company

Puppet | Syntax and settings | 666
(# Back to user attributes)
allowdupe
Whether to allow duplicate UIDs.
Default: false
Allowed values:
• true
• false
• yes
• no
(# Back to user attributes)
attribute_membership
Whether specified attribute value pairs should be treated as the complete list (inclusive) or the minimum list
(minimum) of attribute/value pairs for the user.
Default: minimum
Allowed values:
• inclusive
• minimum
(# Back to user attributes)
attributes
(Property: This attribute represents concrete state on the target system.)
Specify AIX attributes for the user in an array or hash of attribute = value pairs.
For example:
['minage=0', 'maxage=5', 'SYSTEM=compat']
or
attributes => { 'minage' => '0', 'maxage' => '5', 'SYSTEM' => 'compat' }
Requires features manages_aix_lam.
(# Back to user attributes)
auth_membership
Whether specified auths should be considered the complete list (inclusive) or the minimum list (minimum) of
auths the user has. This setting is specific to managing Solaris authorizations.
Default: minimum
Allowed values:
• inclusive
• minimum
(# Back to user attributes)
auths
(Property: This attribute represents concrete state on the target system.)
The auths the user has. Multiple auths should be specified as an array.
© 2024 Puppet, Inc., a Perforce company
Puppet | Syntax and settings | 667
Requires features manages_solaris_rbac.
(# Back to user attributes)
comment
(Property: This attribute represents concrete state on the target system.)
A description of the user. Generally the user's full name.
(# Back to user attributes)
expiry
(Property: This attribute represents concrete state on the target system.)
The expiry date for this user. Provide as either the special value absent to ensure that the account never expires, or
as a zero-padded YYYY-MM-DD format -- for example, 2010-02-19.
Allowed values:
• absent
• /^\d{4}-\d{2}-\d{2}$/
Requires features manages_expiry.
(# Back to user attributes)
forcelocal
Forces the management of local accounts when accounts are also being managed by some other Name Service Switch
(NSS). For AIX, refer to the ia_load_module parameter.
This option relies on your operating system's implementation of luser* commands, such as luseradd , and
lgroupadd, lusermod. The forcelocal option could behave unpredictably in some circumstances. If the tools
it depends on are not available, it might have no effect at all.
Default: false
Allowed values:
• true
• false
• yes
• no
Requires features manages_local_users_and_groups.
(# Back to user attributes)
gid
(Property: This attribute represents concrete state on the target system.)
The user's primary group. Can be specified numerically or by name.
This attribute is not supported on Windows systems; use the groups attribute instead. (On Windows, designating a
primary group is only meaningful for domain accounts, which Puppet does not currently manage.)
(# Back to user attributes)
groups
(Property: This attribute represents concrete state on the target system.)
The groups to which the user belongs. The primary group should not be listed, and groups should be identified by
name rather than by GID. Multiple groups should be specified as an array.
(# Back to user attributes)
© 2024 Puppet, Inc., a Perforce company
Puppet | Syntax and settings | 668
home
(Property: This attribute represents concrete state on the target system.)
The home directory of the user. The directory must be created separately and is not currently checked for existence.
(# Back to user attributes)
ia_load_module
The name of the I&A module to use to manage this user. This should be set to files if managing local users.
Requires features manages_aix_lam.
(# Back to user attributes)
iterations
(Property: This attribute represents concrete state on the target system.)
This is the number of iterations of a chained computation of the PBKDF2 password hash. This parameter is used in
OS X, and is required for managing passwords on OS X 10.8 and newer.
Requires features manages_password_salt.
(# Back to user attributes)
key_membership
Whether specified key/value pairs should be considered the complete list (inclusive) or the minimum list
(minimum) of the user's attributes.
Default: minimum
Allowed values:
• inclusive
• minimum
(# Back to user attributes)
keys
(Property: This attribute represents concrete state on the target system.)
Specify user attributes in an array of key = value pairs.
Requires features manages_solaris_rbac.
(# Back to user attributes)
loginclass
(Property: This attribute represents concrete state on the target system.)
The name of login class to which the user belongs.
Requires features manages_loginclass.
(# Back to user attributes)
managehome
Whether to manage the home directory when Puppet creates or removes the user. This creates the home directory if
Puppet also creates the user account, and deletes the home directory if Puppet also removes the user account.
This parameter has no effect unless Puppet is also creating or removing the user in the resource at the same time. For
instance, Puppet creates a home directory for a managed user if ensure => present and the user does not exist
at the time of the Puppet run. If the home directory is then deleted manually, Puppet will not recreate it on the next
run.
© 2024 Puppet, Inc., a Perforce company

Puppet | Syntax and settings | 669
Note that on Windows, this manages creation/deletion of the user profile instead of the home directory. The user
profile is stored in the C:\Users\<username> directory.
Default: false
Allowed values:
• true
• false
• yes
• no
(# Back to user attributes)
membership
If minimum is specified, Puppet will ensure that the user is a member of all specified groups, but will not remove any
other groups that the user is a part of.
If inclusive is specified, Puppet will ensure that the user is a member of only specified groups.
Default: minimum
Allowed values:
• inclusive
• minimum
(# Back to user attributes)
password
(Property: This attribute represents concrete state on the target system.)
The user's password, in whatever encrypted format the local system requires. Consult your operating system's
documentation for acceptable password encryption formats and requirements.
• Mac OS X 10.5 and 10.6, and some older Linux distributions, use salted SHA1 hashes. You can use Puppet's
built-in sha1 function to generate a salted SHA1 hash from a password.
• Mac OS X 10.7 (Lion), and many recent Linux distributions, use salted SHA512 hashes. The Puppet Labs stdlib
module contains a str2saltedsha512 function which can generate password hashes for these operating
systems.
• OS X 10.8 and higher use salted SHA512 PBKDF2 hashes. When managing passwords on these systems, the
salt and iterations attributes need to be specified as well as the password.
• macOS 10.15 and later require the salt to be 32 bytes. Because Puppet's user resource requires the value to be hex
encoded, the length of the salt's string must be 64.
• Windows passwords can be managed only in cleartext, because there is no Windows API for setting the password
hash.
Enclose any value that includes a dollar sign ($) in single quotes (') to avoid accidental variable interpolation.
To redact passwords from reports to PuppetDB, use the Sensitive data type. For example, this resource protects
the password:
user { 'foo':
ensure => present,
password => Sensitive("my secret password")
}
This results in the password being redacted from the report, as in the previous_value, desired_value, and
message fields below.
events:
- !ruby/object:Puppet::Transaction::Event
© 2024 Puppet, Inc., a Perforce company

Puppet | Syntax and settings | 670
audited: false
property: password
previous_value: "[redacted]"
desired_value: "[redacted]"
historical_value:
message: changed [redacted] to [redacted]
name: :password_changed
status: success
time: 2017-05-17 16:06:02.934398293 -07:00
redacted: true
corrective_change: false
corrective_change: false
Requires features manages_passwords.
(# Back to user attributes)
password_max_age
(Property: This attribute represents concrete state on the target system.)
The maximum number of days a password may be used before it must be changed.
Requires features manages_password_age.
(# Back to user attributes)
password_min_age
(Property: This attribute represents concrete state on the target system.)
The minimum number of days a password must be used before it may be changed.
Requires features manages_password_age.
(# Back to user attributes)
password_warn_days
(Property: This attribute represents concrete state on the target system.)
The number of days before a password is going to expire (see the maximum password age) during which the user
should be warned.
Requires features manages_password_age.
(# Back to user attributes)
profile_membership
Whether specified roles should be treated as the complete list (inclusive) or the minimum list (minimum) of
roles of which the user is a member.
Default: minimum
Allowed values:
• inclusive
• minimum
(# Back to user attributes)
profiles
(Property: This attribute represents concrete state on the target system.)
The profiles the user has. Multiple profiles should be specified as an array.
Requires features manages_solaris_rbac.
(# Back to user attributes)
© 2024 Puppet, Inc., a Perforce company
Puppet | Syntax and settings | 671
project
(Property: This attribute represents concrete state on the target system.)
The name of the project associated with a user.
Requires features manages_solaris_rbac.
(# Back to user attributes)
provider
The specific backend to use for this user resource. You will seldom need to specify this --- Puppet will usually
discover the appropriate provider for your platform.
Available providers are:
• aix
• directoryservice
• hpuxuseradd
• ldap
• openbsd
• pw
• user_role_add
• useradd
• windows_adsi
(# Back to user attributes)
purge_ssh_keys
Whether to purge authorized SSH keys for this user if they are not managed with the ssh_authorized_key
resource type. This parameter is a noop if the ssh_authorized_key type is not available.
Allowed values are:
• false (default) --- don't purge SSH keys for this user.
• true --- look for keys in the .ssh/authorized_keys file in the user's home directory. Purge any keys that
aren't managed as ssh_authorized_key resources.
• An array of file paths --- look for keys in all of the files listed. Purge any keys that aren't managed as
ssh_authorized_key resources. If any of these paths starts with ~ or %h, that token will be replaced with the
user's home directory.
Default: false
Allowed values:
• true
• false
(# Back to user attributes)
role_membership
Whether specified roles should be considered the complete list (inclusive) or the minimum list (minimum) of
roles the user has.
Default: minimum
Allowed values:
• inclusive
• minimum
(# Back to user attributes)
roles
© 2024 Puppet, Inc., a Perforce company
Puppet | Syntax and settings | 672
(Property: This attribute represents concrete state on the target system.)
The roles the user has. Multiple roles should be specified as an array.
Requires features manages_roles.
(# Back to user attributes)
salt
(Property: This attribute represents concrete state on the target system.)
This is the 32-byte salt used to generate the PBKDF2 password used in OS X. This field is required for managing
passwords on OS X >= 10.8.
Requires features manages_password_salt.
(# Back to user attributes)
shell
(Property: This attribute represents concrete state on the target system.)
The user's login shell. The shell must exist and be executable.
This attribute cannot be managed on Windows systems.
Requires features manages_shell.
(# Back to user attributes)
system
Whether the user is a system user, according to the OS's criteria; on most platforms, a UID less than or equal to 500
indicates a system user. This parameter is only used when the resource is created and will not affect the UID when the
user is present.
Default: false
Allowed values:
• true
• false
• yes
• no
(# Back to user attributes)
uid
(Property: This attribute represents concrete state on the target system.)
The user ID; must be specified numerically. If no user ID is specified when creating a new user, then one will be
chosen automatically. This will likely result in the same user having different UIDs on different systems, which is
not recommended. This is especially noteworthy when managing the same user on both Darwin and other platforms,
since Puppet does UID generation on Darwin, but the underlying tools do so on other platforms.
On Windows, this property is read-only and will return the user's security identifier (SID).
(# Back to user attributes)
Providers
aix
User management for AIX.
• Required binaries: /bin/chpasswd, /usr/bin/chuser, /usr/bin/mkuser, /usr/sbin/lsuser, /
usr/sbin/rmuser
• Confined to: os.name == aix
© 2024 Puppet, Inc., a Perforce company
Puppet | Syntax and settings | 673
• Default for: ["os.name", "aix"] ==
• Supported features: manages_aix_lam, manages_expiry, manages_homedir,
manages_local_users_and_groups, manages_password_age, manages_passwords,
manages_shell
directoryservice
User management on OS X.
• Required binaries: /usr/bin/dscacheutil, /usr/bin/dscl, /usr/bin/dsimport, /usr/bin/
uuidgen
• Confined to: os.name == darwin, feature == cfpropertylist
• Default for: ["os.name", "darwin"] ==
• Supported features: manages_password_salt, manages_passwords, manages_shell
hpuxuseradd
User management for HP-UX. This provider uses the undocumented -F switch to HP-UX's special usermod
binary to work around the fact that its standard usermod cannot make changes while the user is logged in. New
functionality provides for changing trusted computing passwords and resetting password expirations under trusted
computing.
• Required binaries: /usr/sam/lbin/useradd.sam, /usr/sam/lbin/userdel.sam, /usr/sam/
lbin/usermod.sam
• Confined to: os.name == hp-ux
• Default for: ["os.name", "hp-ux"] ==
• Supported features: allows_duplicates, manages_homedir, manages_passwords
ldap
User management via LDAP.
This provider requires that you have valid values for all of the LDAP-related settings in puppet.conf, including
ldapbase. You will almost definitely need settings for ldapuser and ldappassword in order for your clients
to write to LDAP.
Note that this provider will automatically generate a UID for you if you do not specify one, but it is a potentially
expensive operation, as it iterates across all existing users to pick the appropriate next one.
• Confined to: feature == ldap, false == (Puppet[:ldapuser] == "")
• Supported features: manages_passwords, manages_shell
openbsd
User management via useradd and its ilk for OpenBSD. Note that you will need to install Ruby's shadow password
library (package known as ruby-shadow) if you wish to manage user passwords.
• Required binaries: passwd, useradd, userdel, usermod
• Confined to: os.name == openbsd
• Default for: ["os.name", "openbsd"] ==
• Supported features: manages_expiry, manages_homedir, manages_shell, system_users
pw
User management via pw on FreeBSD and DragonFly BSD.
• Required binaries: pw
• Confined to: os.name == [:freebsd, :dragonfly]
• Default for: ["os.name", "[:freebsd, :dragonfly]"] ==
• Supported features: allows_duplicates, manages_expiry, manages_homedir,
manages_passwords, manages_shell
user_role_add
© 2024 Puppet, Inc., a Perforce company
Puppet | Syntax and settings | 674
User and role management on Solaris, via useradd and roleadd.
• Required binaries: passwd, roleadd, roledel, rolemod, useradd, userdel, usermod
• Default for: ["os.family", "solaris"] ==
• Supported features: allows_duplicates, manages_homedir, manages_password_age,
manages_passwords, manages_roles, manages_shell, manages_solaris_rbac
useradd
User management via useradd and its ilk. Note that you will need to install Ruby's shadow password library (often
known as ruby-libshadow) if you wish to manage user passwords.
To use the forcelocal parameter, you need to install the libuser package (providing /usr/sbin/
lgroupadd and /usr/sbin/luseradd).
• Required binaries: chage, chpasswd, useradd, userdel, usermod
• Supported features: allows_duplicates, manages_expiry, manages_homedir, manages_shell
windows_adsi
Local user management for Windows.
• Confined to: os.name == windows
• Default for: ["os.name", "windows"] ==
• Supported features: manages_homedir, manages_passwords, manages_roles
Provider Features
Available features:
• allows_duplicates --- The provider supports duplicate users with the same UID.
• manages_aix_lam --- The provider can manage AIX Loadable Authentication Module (LAM) system.
• manages_expiry --- The provider can manage the expiry date for a user.
• manages_homedir --- The provider can create and remove home directories.
• manages_local_users_and_groups --- Allows local users to be managed on systems that also use some
other remote Name Service Switch (NSS) method of managing accounts.
• manages_loginclass --- The provider can manage the login class for a user.
• manages_password_age --- The provider can set age requirements and restrictions for passwords.
• manages_password_salt --- The provider can set a password salt. This is for providers that implement
PBKDF2 passwords with salt properties.
• manages_passwords --- The provider can modify user passwords, by accepting a password hash.
• manages_roles --- The provider can manage roles
• manages_shell --- The provider allows for setting shell and validates if possible
• manages_solaris_rbac --- The provider can manage normal users
• system_users --- The provider allows you to create system users with lower UIDs.
Provider support:
• aix - manages aix lam, manages homedir, manages passwords, manages shell, manages expiry, manages
password age, manages local users and groups
• directoryservice - manages passwords, manages password salt, manages shell
• hpuxuseradd - manages homedir, allows duplicates, manages passwords
• ldap - manages passwords, manages shell
• openbsd - manages homedir, manages expiry, system users, manages shell
• pw - manages homedir, allows duplicates, manages passwords, manages expiry, manages shell
• user_role_add - manages homedir, allows duplicates, manages solaris rbac, manages roles, manages passwords,
manages password age, manages shell
• useradd - manages homedir, allows duplicates, manages expiry, manages shell
• windows_adsi - manages homedir, manages passwords, manages roles
© 2024 Puppet, Inc., a Perforce company
Puppet | Syntax and settings | 675
Relationships and ordering
Resources are included and applied in the order they are defined in their manifest, but only if the resource has no
implicit relationship with another resource, as this can affect the declared order. To manage a group of resources
in a specific order, explicitly declare such relationships with relationship metaparameters, chaining arrows, and the
require function.
To override Puppet's default manifest ordering, declare an explicit relationship between resources. All relationships
cause Puppet to manage specific resources before other resources. Relationships are not limited by evaluation-order;
you can declare a relationship with a resource before that resource has been declared.
Refreshing and notification
Some resource types can refresh when one of their dependencies changes. For example, some services must restart
when their configuration files change, so service resources can refresh by restarting the service.
The built-in resource types that can refresh are service, exec, and package. For specific details about these
types, see the resource reference.
To specify that a resource must refresh when a related resource changes, create a notifying relationship with the
subscribe or notify metaparameters or the notification chaining arrow (~>). When a resources changes, it sends
a refresh event to any resources that subscribe to it. Those resources that are subscribed receive the refresh event.
When receiving refresh events:
• If a resource gets a refresh event during a run, and its resource type has a refresh action, it performs that action.
• If a resource gets a refresh event, but its resource type cannot refresh, nothing happens.
• If a class or defined resource gets a refresh event, every resource it contains also gets a refresh event.
• A resource can perform its refresh action up to once per run. If it receives multiple refresh events, they're
combined, and the resource refreshes only once.
When sending refresh events:
• If a resource is not in its desired state, and Puppet makes changes to it during a run, it sends a refresh event to any
subscribed resources.
• If a resource performs its refresh action during a run, it sends a refresh event to any subscribed resources.
• If Puppet changes or refreshes any resource in a class or defined resource, that class or defined resource sends a
refresh event to any subscribed resources.
If non-operational (no-op) mode is enabled:
• The resource does not refresh when it receives a refresh event. Instead, Puppet logs a message stating what would
have happened.
• The resource does not send refresh events to subscribed resources. Instead, Puppet logs messages stating what
would have happened to any resources further down the subscription chain.
Automatic relationships
Certain resource types can have automatic relationships with other resources, using autorequire, autonotify,
autobefore, or autosubscribe. This creates an ordering relationship without you explicitly stating one.
Puppet establishes automatic relationships between types and resources when it applies a catalog. It searches the
catalog for any resources that match certain rules and processes them in the correct order, sending refresh events
if necessary. If any explicit relationship, such as those created by chaining arrows, conflicts with an automatic
relationship, the explicit relationship take precedence.
Missing dependencies
If one of the resources in a relationship is never declared, compilation fails with one of the following errors:
• Could not find dependency <OTHER RESOURCE> for <RESOURCE>
• Could not find resource '<OTHER RESOURCE>' for relationship on '<RESOURCE>
© 2024 Puppet, Inc., a Perforce company

Puppet | Syntax and settings | 676
Failed dependencies
If Puppet fails to apply the prior resource in a relationship, it skips the subsequent resource and log the following
messages:
notice: <RESOURCE>: Dependency <OTHER RESOURCE> has failures: true warning:
<RESOURCE>: Skipping because of failed dependencies
It then continues to apply any unrelated resources. Any resources that depend on the skipped resource are also
skipped. This helps prevent an inconsistent system state, rather than attempting to apply a resource that might have
broken prerequisites.
Dependency cycles
If two or more resources require each other in a loop, Puppet compiles the catalog but won’t be able to apply it.
Puppet logs an error like the following, and attempts to help identify the cycle:
err: Could not apply complete catalog: Found 1 dependency cycle:
(<RESOURCE> => <OTHER RESOURCE> => <RESOURCE>)
Try the '--graph' option and opening the resulting '.dot' file in
OmniGraffle or GraphViz
To locate the directory containing the graph files, run puppet agent --configprint graphdir.
Related information
Containment on page 939
Containment is what controls the order in which the various parts of your Puppet code are executed. Containment is
the relationship that resources have to classes and defined types, determining what has to happen before other things
can happen.
Relationship metaparameters
You can use certain metaparameters to establish relationships by setting any of them as an attribute in any resource.
The following video gives you an overview of metaparameters:
Set the value of any relationship metaparameter to either a resource reference or an array of references that point to
one or more target resources:
• before: Applies a resource before the target resource.
• require: Applies a resource after the target resource.
• notify: Applies a resource before the target resource. The target resource refreshes if the notifying resource
changes.
• subscribe: Applies a resource after the target resource. The subscribing resource refreshes if the target
resource changes.
If two resources need to happen in order, you can either put a before attribute in the prior one or a require attribute in
the subsequent one; either approach creates the same relationship. The same is true of notify and subscribe.
The two examples below create the same ordering relationship, ensuring that the openssh-server package is
managed before the sshd_config file:
package { 'openssh-server':
ensure => present,
before => File['/etc/ssh/sshd_config'],
}
file { '/etc/ssh/sshd_config':
ensure => file,
© 2024 Puppet, Inc., a Perforce company

Puppet | Syntax and settings | 677
mode => '0600',
source => 'puppet:///modules/sshd/sshd_config',
require => Package['openssh-server'],
}
The two examples below create the same notifying relationship, so that if Puppet changes the sshd_config file, it
sends a notification to the sshd service:
file { '/etc/ssh/sshd_config':
ensure => file,
mode => '0600',
source => 'puppet:///modules/sshd/sshd_config',
notify => Service['sshd'],
}
service { 'sshd':
ensure => running,
enable => true,
subscribe => File['/etc/ssh/sshd_config'],
}
Because an array of resource references can contain resources of differing types, these two examples also create
the same ordering relationship. In both examples, Puppet manages the openssh-server package and the
sshd_config file before it manages the sshd service.
service { 'sshd':
ensure => running,
require => [
Package['openssh-server'],
File['/etc/ssh/sshd_config'],
],
}
package { 'openssh-server':
ensure => present,
before => Service['sshd'],
}
file { '/etc/ssh/sshd_config':
ensure => file,
mode => '0600',
source => 'puppet:///modules/sshd/sshd_config',
before => Service['sshd'],
}
Related information
Resources on page 520
Resources are the fundamental unit for modeling system configurations. Each resource describes the desired state
for some aspect of a system, like a specific service or package. When Puppet applies a catalog to the target system, it
manages every resource in the catalog, ensuring the actual state matches the desired state.
Resource and class references on page 889
Resource references identify a specific Puppet resource by its type and title. Several attributes, such as the
relationship metaparameters, require resource references.
The Array data type on page 872
© 2024 Puppet, Inc., a Perforce company

Puppet | Syntax and settings | 678
The data type of arrays is Array. By default, Array matches arrays of any length, provided all values in the array
match the abstract data type Data. You can use parameters to restrict which values Array matches.
Chaining arrows
You can create relationships between resources or groups of resources using the -> and ~> operators.
The ordering arrow is a hyphen and a greater-than sign (->). It applies the resource on the left before the resource on
the right.
The notifying arrow is a tilde and a greater-than sign (~>). It applies the resource on the left first. If the left-hand
resource changes, the right-hand resource refreshes.
In this example, Puppet applies configuration to the ntp.conf file resource and notifies the ntpd service resource
if there are any changes.
File['/etc/ntp.conf'] ~> Service['ntpd']
Note: When possible, use relationship metaparameters, not chaining arrows. Metaparameters are more explicit and
easier to maintain. See the Puppet language style guide for information on when and how to use chaining arrows.
Operands
The chaining arrows accept the following kinds of operands on either side of the arrow:
• Resource references, including multi-resource references.
• Arrays of resource references.
• Resource declarations.
• Resource collectors.
You can link operands to apply a series of relationships and notifications. In this example, Puppet applies
configuration to the package, notifies the file resource if there are changes, and then, if there are resulting changes to
the file resouce, Puppet notifies the service resource:
Package['ntp'] -> File['/etc/ntp.conf'] ~> Service['ntpd']
Resource declarations can be chained. That means you can use chaining arrows to make Puppet apply a section of
code in the order that it is written. This example applies configuration to the package, the file, and the service, in that
order, with each related resource notifying the next of any changes:
# first:
package { 'openssh-server':
ensure => present,
} # and then:
-> file { '/etc/ssh/sshd_config':
ensure => file,
mode => '0600',
source => 'puppet:///modules/sshd/sshd_config',
} # and then:
~> service { 'sshd':
ensure => running,
enable => true,
}
Collectors can also be chained, so you can create relationships between many resources at one time. This example
applies all Yum repository resources before applying any package resources, which protects any packages that rely on
custom repositorie :
Yumrepo <| |> -> Package <| |>
© 2024 Puppet, Inc., a Perforce company
Puppet | Syntax and settings | 679
Capturing resource references for generated resources
In Puppet, the value of a resource declaration is a reference to the resource it creates.
This is useful if you're automatically creating resources whose titles you can't predict: use the iteration functions to
declare several resources at once or use an array of strings as a resource title. If you assign the resulting resource
references to a variable, you can then use them in chaining statements without ever knowing the final title of the
affected resources.
For example:
• The map function iterates over its arguments and returns an array of values, with each value produced by the
last expression in the block. If that last expression is a resource declaration, map produces an array of resource
references, which you could then use as an operand for a chaining arrow.
• For a resource declaration whose title is an array, the value is itself an array of resource references that you can
assign to a variable and use in a chaining statement.
Cautions when chaining resource collectors
Chains can create dependency cycles.
Chained collectors can cause huge dependency cycles; be careful when using them. They can also be dangerous
when used with virtual resources, which are implicitly realized by collectors.
Chains can break.
Although you can usually chain many resources or collectors together (File['one'] -> File['two'] -
> File['three']), the chain can break if it includes a collector whose search expression doesn't match any
resources.
Implicit properties aren't searchable.
Collectors can search only on attributes present in the manifests; they cannot see properties that are automatically
set or are read from the target system. For example, the chain Yumrepo <| |> -> Package <|
provider == yum |>, creates only relationships with packages whose provider attribute is explicitly set
to yum in the manifests. It would not affect packages that didn't specify a provider but use Yum because it's the
operating system's default provider.
Reversed forms
Both chaining arrows have a reversed form (<- and <~). As implied by their shape, these forms operate in reverse,
causing the resource on their right to be applied before the resource on their left. Avoid these reversed forms, as they
are confusing and difficult to notice.
Related information
Resource and class references on page 889
Resource references identify a specific Puppet resource by its type and title. Several attributes, such as the
relationship metaparameters, require resource references.
Resources on page 520
Resources are the fundamental unit for modeling system configurations. Each resource describes the desired state
for some aspect of a system, like a specific service or package. When Puppet applies a catalog to the target system, it
manages every resource in the catalog, ensuring the actual state matches the desired state.
Resource collectors on page 931
Resource collectors select a group of resources by searching the attributes of each resource in the catalog, even
resources which haven’t yet been declared at the time the collector is written. Collectors realize virtual resources, are
used in chaining statements, and override resource attributes. Collectors have an irregular syntax that enables them to
function as a statement and a value.
Lambdas on page 928
© 2024 Puppet, Inc., a Perforce company

Puppet | Syntax and settings | 680
Lambdas are blocks of Puppet code passed to functions. When a function receives a lambda, it provides values for the
lambda’s parameters and evaluates its code. If you use other programming languages, think of lambdas as anonymous
functions that are passed to other functions.
Virtual resources on page 933
A virtual resource declaration specifies a desired state for a resource without enforcing that state. Puppet manages the
resource by realizing it elsewhere in your manifests. This divides the work done by a normal resource declaration into
two steps. Although virtual resources are declared one time, they can be realized any number of times, similar to a
class.
The require function
Use the require function to declare a class and make it a dependency of the surrounding container.
For example:
class wordpress {
require apache
require mysql
...
}
The above example causes every resource in the apache and mysql classes to be applied before any of the
resources in the wordpress class.
Unlike the relationship metaparameters and chaining arrows, the require function does not have a reciprocal form
or a notifying form. However, you can create more complex behavior by combining include and chaining arrows
inside a class definition. This example notifies and restarts every service in the apache::ssl class if any of the
SSL certificates on the node change:
class apache::ssl {
include site::certificates
Class['site::certificates'] ~> Class['apache::ssl']
}
Classes
Classes are named blocks of Puppet code that are stored in modules and applied later when they are invoked by name.
You can add classes to a node’s catalog by either declaring them in your manifests or assigning them from an external
node classifier (ENC). Classes generally configure large or medium-sized chunks of functionality, such as all of the
packages, configuration files, and services needed to run an application.
The following video gives you an overview of classes:
Defining classes
Defining a class makes it available for later use. It doesn't add any resources to the catalog — to do that, you must
declare the class or assign it from an external node classifier (ENC).
Create a class by writing a class definition in a manifest (.pp) file. Store class manifests in the manifests/
directory of a module. Define only one class in a manifest, and give the manifest file the same name as the class.
Puppet automatically loads any classes that are present in a valid module. See module fundamentals to learn more
about module structure and usage.
A class contains all of its resources. This means any relationships formed with the class as a whole is extended to
every resource in the class. Every resource in a class gets automatically tagged with the class’s name and each of its
namespace segments.
Classes can contain other classes, but you must use the contain function to explicitly specify when a class is
contained. For more information, see the documentation about containing classes. A contained class is automatically
tagged with the name of its container.
© 2024 Puppet, Inc., a Perforce company

Puppet | Syntax and settings | 681
Tip: Unlike many parts of Puppet code, class definitions aren't expressions, so you can't use them where a value is
expected.
The general form of a class definition is:
• The class keyword.
• The name of the class.
• An optional parameter list, which consists of:
• An opening parenthesis.
• A comma-separated list of parameters, such asString $myparam = "value". Each parameter consists
of:
• An optional data type, which restricts the allowed values for the parameter. If not specified, the data type
defaults to Any.
• A variable name to represent the parameter, including the dollar sign ($) prefix
• An optional equals sign (=) and default value, which must match the data type, if one was specified.
• An optional trailing comma after the last parameter.
• A closing parenthesis.
• Optionally, the inherits keyword followed by a single class name.
• An opening curly brace.
• A block of arbitrary Puppet code, which generally contains at least one resource declaration.
• A closing curly brace.
For example, this class definition specifies no parameters:
class base::linux {
file { '/etc/passwd':
owner => 'root',
group => 'root',
mode => '0644',
}
file { '/etc/shadow':
owner => 'root',
group => 'root',
mode => '0440',
}
}
This class definition creates a version parameter ($version) that accepts a String data type with a default value of
'latest'. It also includes file content from an embedded Ruby (ERB) template from the apache module.
class apache (String $version = 'latest') {
package {'httpd':
ensure => $version, # Using the version parameter from above
before => File['/etc/httpd.conf'],
}
file {'/etc/httpd.conf':
ensure => file,
owner => 'httpd',
content => template('apache/httpd.conf.erb'), # Template from a module
}
service {'httpd':
ensure => running,
enable => true,
subscribe => File['/etc/httpd.conf'],
}
}
© 2024 Puppet, Inc., a Perforce company
Puppet | Syntax and settings | 682
Class parameters and variables
Parameters allow a class to request external data. If a class needs to use data other than facts for configuration, use a
parameter for that data.
You can use class parameters as normal variables inside the class definition. The values of these variables are set
based on user input when the class is declared, rather than with normal assignment statements.
Supply default values for parameters whenever possible. If a class parameter lacks a default value, the parameter is
considered required and the user must set a value, either in external data or as an override.
If you set a data type for each parameter, Puppet checks the parameter's value at runtime to make sure that it is the
correct data type, and raises an error if the value is illegal. If you do not provide a data type for a parameter, the
parameter accepts values of any data type.
The variables $title and $name are both set to the class name automatically, so you can't use them as parameters.
Setting class parameter defaults with Hiera data
To set class parameter defaults with Hiera data in your modules, set up a hierarchy in your module's hiera.yaml
file and include the referenced data files in the data directory.
For example, this hiera.yaml file, located in the root directory of the ntp module, uses the operating system
fact to determine which class defaults to apply to the target system. Puppet first looks for a data file that matches the
operating system of the target system: path: "os/%{facts.os.family}.yaml". If no matching path is
found, Puppet uses defaults from the "common" data file instead.
# ntp/hiera.yaml
---
version: 5
defaults:
datadir: data
data_hash: yaml_data
hierarchy:
- name: "OS family"
path: "os/%{facts.os.family}.yaml"
- name: "common"
path: "common.yaml"
The files in the example below specify the default values are located in the data directory:
• Debian.yaml specifies the defaults for systems that return an operating system fact of Debian.
• common.yaml specifies the defaults for all other systems.
# ntp/data/common.yaml
---
ntp::autoupdate: false
ntp::service_name: ntpd
# ntp/data/os/Debian.yaml
ntp::service_name: ntp
Tip:
If you are maintaining older modules, you might encounter cases where class parameter defaults are set with a
parameter class, such as params.pp, and class inheritance. Update such modules to use Hiera data instead. Class
inheritance can have unpredictable effects and makes troubleshooting difficult. For details about updating existing
params classes to Hiera data, see data in modules.
Related information
Variables on page 517
© 2024 Puppet, Inc., a Perforce company

Puppet | Syntax and settings | 683
Variables store values so that those values can be accessed in code later.
Resources on page 520
Resources are the fundamental unit for modeling system configurations. Each resource describes the desired state
for some aspect of a system, like a specific service or package. When Puppet applies a catalog to the target system, it
manages every resource in the catalog, ensuring the actual state matches the desired state.
Tags on page 937
Tags are useful for collecting resources, analyzing reports, and restricting catalog runs. Resources, classes, and
defined type instances can have multiple tags associated with them, and they receive some tags automatically.
Scope on page 941
A scope is a specific area of code that is partially isolated from other areas of code.
Values, data types, and aliases on page 854
Most of the things you can do with the Puppet language involve some form of data. An individual piece of data is
called a value, and every value has a data type, which determines what kind of information that value can contain and
how you can interact with it.
Namespaces and autoloading on page 946
Class and defined type names can be broken up into segments called namespaces which enable the autoloader to find
the class or defined type in your modules.
Declaring classes
Declaring a class in a Puppet manifest adds all of its resources to the catalog.
You can declare classes in node definitions, at top scope in the site manifest, and in other classes or defined types.
Classes are singletons — although a given class can behave very differently depending on how its parameters are set,
the resources in it are evaluated only once per compilation. You can also assign classes to nodes with an external node
classifier (ENC) .
Puppet has two main ways to declare classes: include-like and resource-like. Include-like declarations are the most
common; they are flexible and idempotent, so you can safely repeat them without causing errors. Resource-like
declarations are mostly useful if you want to pass parameters to the class but can't or don't use Hiera. Most ENCs
assign classes with include-like behavior, but others assign them with resource-like behavior. See the ENC interface
documentation or the documentation of your specific ENC for details.
CAUTION: Do not mix include-like and resource-like declarations for a given class. If you declare or assign
a class using both styles, it can cause compilation failures.
Include-like declarations
Include-like resource declarations allow you to declare a class multiple times — but no matter how many times
you add the class, it is added to the catalog only once. This allows classes or defined types to manage their own
dependencies and allows you create overlapping role classes, in which a given node can have more than one role.
Include-like behavior relies on external data and defaults for class parameter values, which allows the external data
source to act like cascading configuration files for all of your classes.
You can declare a class with this behavior with one of three functions: include, require, and contain.
When a class is declared with an include-like declaration, Puppet takes the following actions, in order, for each of the
class parameters:
1.
Requests a value from the external data source, using the key <class name>::<parameter name>. For
example, to get the apache class's version parameter, Puppet searches for apache::version.
2.
Uses the default value, if one exists.
3.
Fails compilation with an error, if no value is found.
© 2024 Puppet, Inc., a Perforce company

Puppet | Syntax and settings | 684
The include function
The include function is the most common way to declare classes. Declaring a class with this function includes the
class in the catalog.
Tip: The include function refers only to inclusion in the catalog. You can include a class in another class's
definition, but doing so does not mean one class contains the other; it only means the included class will be added to
the catalog. If you want one class to contain another, use the contain function instead.
This function uses include-like behavior, so you can make multiple declarations and Puppet relies on external data for
parameters.
The include function accepts one of the following:
• A single class name, such as apache.
• A single class reference, such as Class['apache'].
• A comma-separated list of class names or class references.
• An array of class names or class references.
This single class name declaration declares the class only once and has no additional effect:
include base::linux
This example declares a single class with a class reference:
include Class['base::linux']
This example declares two classes in a list:
include base::linux, apache
This example declares two classes in an array:
$my_classes = ['base::linux', 'apache']
include $my_classes
The require function
The require function declares one or more classes, then causes them to become a dependency of the surrounding
container. This function uses include-like behavior, so you can make multiple declarations, and Puppet relies on
external data for parameters.
Tip: The require function is used to declare classes and defined types. Do not confuse it with the require
metaparameter, which is used to establish relationships between resources.
The require function accepts one of the following:
• A single class name, such as apache.
• A single class reference, such as Class['apache'].
• A comma-separated list of class names or class references.
• An array of class names or class references.
In this example, Puppet ensures that every resource in the apache class is applied before any resource in any
apache::vhost instance:
define apache::vhost (Integer $port, String $docroot, String $servername,
String $vhost_name) {
require apache
© 2024 Puppet, Inc., a Perforce company

Puppet | Syntax and settings | 685
...
}
The contain function
The contain function is used inside another class definition to declare one or more classes and contain those
classes in the surrounding class. This enforces ordering of classes. When you contain a class in another class, the
relationships of the containing class extend to the contained class as well. For details about containment, see the
documentation on containing classes.
This function uses include-like behavior, so you can make multiple declarations, and Puppet relies on external data
for parameters.
The contain function accepts one of the following:
• A single class name, such as apache.
• A single class reference, such as Class['apache'].
• A comma-separated list of class names or class references.
• An array of class names or class references.
In this example class declaration, the ntp class contains the ntp::service class. Any resource that forms a
relationship with the ntp class also has the same relationship to the ntp::service class.
class ntp {
file { '/etc/ntp.conf':
...
require => Package['ntp'],
notify => Class['ntp::service'],
}
contain ntp::service
package { 'ntp':
...
}
}
For example, if a resource has a before relationship with the ntp class, that resource will also be applied before the
ntp::service class. Similarly, any resource that forms a require relationship with ntp will be applied after
ntp::service.
The hiera_include function
The legacy Hiera function hiera_include has been deprecated. In Hiera 5 and later, instead of using
hiera_include use lookup with the include function. For example: use lookup('classes', {merge
=> unique}).include instead of hiera_include('classes').
Resource-like declarations
Resource-like class declarations require that you declare a given class only once. They allow you to override class
parameters at compile time — for any parameters you don't override, Puppet falls back to external data.
Resource-like declarations must be unique to avoid conflicting parameter values. Repeated overrides cause catalog
compilation to be unreliable and dependent on order evaluation. This is because overridden values from the class
declaration:
• Always take precedence.
• Are computed at compile time.
• Do not have a built-in hierarchy for resolving conflicts.
When a class is declared with a resource-like declaration, Puppet takes the following actions, in order, for each of the
class parameters:
© 2024 Puppet, Inc., a Perforce company

Puppet | Syntax and settings | 686
1.
Uses the override value from the declaration, if present.
2.
Requests a value from the external data source, using the key <class name>::<parameter name>. For
example, to get the apache class's version parameter, Puppet searches for apache::version.
3.
Uses the default value.
4.
Fails compilation with an error, if no value is found.
Resource-like declarations look like normal resource declarations, using the class pseudo-resource type. You can
provide a value for any class parameter by specifying it as a resource attribute.
You can also specify a value for any metaparameter. In such cases, every resource contained in the class will also
have that metaparameter. However:
• Any resource can specifically override metaparameter values received from its container.
• Metaparameters that can take more than one value, such as the relationships metaparameters, merge the values
from the container and any resource-specific values.
• You cannot apply the noop metaparameter to resource-like class declarations.
For example, this resource-like declaration declares a class with no parameters:
class {'base::linux':}
This declaration declares a class and specifies the version parameter:
class {'apache':
version => '2.2.21',
}
Related information
Node definitions on page 789
A node definition, also known as a node statement, is a block of Puppet code that is included only in matching nodes'
catalogs. This allows you to assign specific configurations to specific nodes.
Main manifest directory on page 140
Puppet starts compiling a catalog either with a single manifest file or with a directory of manifests that are treated like
a single file. This starting point is called the main manifest or site manifest.
Defined resource types on page 687
Defined resource types, sometimes called defined types or defines, are blocks of Puppet code that can be evaluated
multiple times with different parameters.
Relationships and ordering on page 675
Resources are included and applied in the order they are defined in their manifest, but only if the resource has no
implicit relationship with another resource, as this can affect the declared order. To manage a group of resources
in a specific order, explicitly declare such relationships with relationship metaparameters, chaining arrows, and the
require function.
Containment on page 939
Containment is what controls the order in which the various parts of your Puppet code are executed. Containment is
the relationship that resources have to classes and defined types, determining what has to happen before other things
can happen.
Resources on page 520
Resources are the fundamental unit for modeling system configurations. Each resource describes the desired state
for some aspect of a system, like a specific service or package. When Puppet applies a catalog to the target system, it
manages every resource in the catalog, ensuring the actual state matches the desired state.
Classifying nodes on page 383
© 2024 Puppet, Inc., a Perforce company

Puppet | Syntax and settings | 687
You can classify nodes using an external node classifier (ENC), which is a script or application that tells Puppet
which classes a node must have. It can replace or work in concert with the node definitions in the main site manifest
(site.pp).
Defined resource types
Defined resource types, sometimes called defined types or defines, are blocks of Puppet code that can be evaluated
multiple times with different parameters.
Create a defined resource type by writing a define statement in a manifest (.pp) file. You can declare a resource of
a defined type in the same way you would declare a resource of a built-in type.
Store defined resource type manifests in the manifests/ directory of a module. Define only one defined type in a
manifest, and give the manifest file the same name as the defined type. Puppet automatically loads any defined types
that are present in a valid module. See module fundamentals to learn more about module structure and usage.
If a defined type is present and loadable, you can declare resources of that defined type anywhere in your manifests.
Declaring a new resource of the defined type causes Puppet to re-evaluate the block of code in the definition, using
different values for the parameters.
Every instance of a defined type contains all of its unique resources. This means that any relationships formed
between the instance and another resource are extended to every resource that makes up the instance. See the topics
about containment and relationships for more information.
Tip: Unlike many parts of Puppet code, define statements aren't expressions, so you can't use them where a value is
expected.
Defining types
The general form of a define statement is:
• The define keyword.
• The name of the defined type.
• An optional parameter list, which consists of:
• An opening parenthesis.
• A comma-separated list of parameters, such as: String $myparam = "default value". Each
parameter consists of:
• An optional data type, which restricts the allowed values for the parameter. If no data type is specified,
values of any data type are permitted.
• A variable name to represent the parameter, including the $ prefix, such as $parameter.
• An optional equals = sign and default value, which must match the data type, if one was specified. If no
default value is specified, the parameter is considered required and the user must specify a value.
• An optional trailing comma after the last parameter.
• A closing parenthesis.
• An opening curly brace.
• A block of arbitrary Puppet code, which generally contains at least one resource declaration
• A closing curly brace
The definition does not cause the code in the block to be added to the catalog; it only makes it available. To add the
code to the catalog, you must declare one or more resources of the defined type.
This example creates a new resource type called apache::vhost:
# /etc/puppetlabs/puppet/modules/apache/manifests/vhost.pp
define apache::vhost (
Integer $port,
String[1] $docroot,
String[1] $servername = $title,
String $vhost_name = '*',
© 2024 Puppet, Inc., a Perforce company

Puppet | Syntax and settings | 688
) {
include apache # contains package['httpd'] and service['httpd']
include apache::params # contains common config settings
$vhost_dir = $apache::params::vhost_dir
# the template used below can access all of the parameters and variable
from above.
file { "${vhost_dir}/${servername}.conf":
ensure => file,
owner => 'www',
group => 'www',
mode => '0644',
content => template('apache/vhost-default.conf.erb'),
require => Package['httpd'],
notify => Service['httpd'],
}
}
Declaring defined type resources
You can declare instances of a defined type—usually just called resources—the same way you declare any other
resource: with a resource type, a title, and a set of attribute-value pairs. The parameters you added when defining the
type, such as $port, become resource attributes, such as port, when you declare resources of the defined type.
Parameters that have a default value are considered optional parameters: if you don't specify them in the resource
declaration, the default value is used. Parameters without defaults are required parameters, and you must specify a
value for them when you declare the resource.
To declare a resource of the apache::vhost defined type from the example above:
apache::vhost {'homepages':
port => 8081,
docroot => '/var/www-testhost',
}
If a defined type is present and loadable, you can declare resources of that defined type anywhere in your manifests.
Declaring a new resource of the defined type causes Puppet to re-evaluate the block of code in the definition, using
the new declaration's values for the parameters.
Just as with a normal resource type, you can declare resource defaults for a defined type. In this example, every
apache::vhost resource defaults to port 80 unless specifically overridden:
# /etc/puppetlabs/puppet/manifests/site.pp
Apache::Vhost {
port => 80,
}
You can include any metaparameter in the declaration of a defined type instance. If you do:
• Every resource contained in the resource declaration also has that metaparameter. Metaparameters that can accept
more than one value, such as the relationship metaparameters, merge the values from the container and any
specific values from the individual resource.
• The value of the metaparameter can be used as a variable in the definition, as though it were a normal parameter.
For example, in an instance declared with require => Class['ntp'], the local value of $require
would be Class['ntp'].
Naming
Defined type names can consist of one or more namespace segments, which indicate the defined type's location in a
module. Each segment must adhere to the naming and reserved names guidelines.
© 2024 Puppet, Inc., a Perforce company

Puppet | Syntax and settings | 689
Each namespace segment must be capitalized when writing a resource reference, collector, or resource default. For
example, a reference to the apache::vhost resource would be Apache::Vhost['homepages'].
Because you can declare multiple instances of a defined type in your manifests, every resource in the definition must
be different in every instance. Duplicate resource instances result in compilation failures with a "duplicate resource
declaration" error. To make resources different across instances, include the value of $title or another parameter in
the resource's title and name.
Because $title is unique per instance, this ensures the resources are unique as well. For example, this segment of a
file declaration makes resources unique by adding the vhost_dir and servername attributes to the resource title:
file { "${vhost_dir}/${servername}.conf":
Parameters and attributes
When you create a defined type, you can precede each parameter in the define statement with an optional data type.
If you include a data type, Puppet checks the resource parameter's value at runtime to make sure that it has the right
data type; if the value is illegal, Puppet raises an error. If you don't specify a data type in the definition statement, the
parameter accepts values of any data type.
You can use the parameters of a defined type as local variables inside the definition. Rather than the usual assignment
statement, each instance of the defined type uses its parameter attributes to set the value of the variable. In this
example declaration, the value of the port parameter, 8081, becomes the value assigned to the $port variable.
Likewise, the path for the docroot parameter becomes the value for the $docroot variable.
apache::vhost {'homepages':
port => 8081,
docroot => '/var/www-testhost',
}
Note:
The $title and $name variables are both set to the defined type's name automatically, so they cannot be used as
parameters.
$title and $name
The $title and $name attributes are always available to a defined type and are not explicitly added to the
definition. These attributes are both set to the defined type's name automatically:
• $title is always set to the title of the instance. Because it is always unique for each instance, it is useful for
making sure that contained resources are unique.
• $name defaults to the value of $title. You can specify a different value when you declare an instance of the
defined type, but this is rarely useful.
Because the values of $title and $name are already available inside the defined type's parameter list, you can
use $title as all or part of the default value for another attribute. In this example, $title is used as the value of
$servername to ensure the server name is always unique:
define apache::vhost (
Integer $port,
String[1] $docroot,
String $servername = $title,
String[1] $vhost_name = '*',
) { # ...
Related information
Resources on page 520
© 2024 Puppet, Inc., a Perforce company
Puppet | Syntax and settings | 690
Resources are the fundamental unit for modeling system configurations. Each resource describes the desired state
for some aspect of a system, like a specific service or package. When Puppet applies a catalog to the target system, it
manages every resource in the catalog, ensuring the actual state matches the desired state.
Resource default statements on page 930
Resource default statements enable you to set default attribute values for a given resource type. Resource declarations
within the area of effect that omits those attributes inherit the default values.
Containment on page 939
Containment is what controls the order in which the various parts of your Puppet code are executed. Containment is
the relationship that resources have to classes and defined types, determining what has to happen before other things
can happen.
Namespaces and autoloading on page 946
Class and defined type names can be broken up into segments called namespaces which enable the autoloader to find
the class or defined type in your modules.
Values, data types, and aliases on page 854
Most of the things you can do with the Puppet language involve some form of data. An individual piece of data is
called a value, and every value has a data type, which determines what kind of information that value can contain and
how you can interact with it.
Bolt tasks
Bolt tasks are single actions that you can run on target nodes in your infrastructure, allowing you to make as-
needed changes to remote systems. You can run tasks with the Puppet Enterprise (PE) orchestrator or with Puppet’s
standalone task runner, Bolt.
Sometimes you need to do arbitrary tasks in your infrastructure that aren’t about enforcing the state of machines. You
might need to restart a service, run a troubleshooting script, or get a list of the network connections to a given node.
Tasks allow you to do actions like these with either the PE orchestrator or with Bolt, a standalone task runner. The
orchestrator uses PE's built-in communication protocol, SSH, or WinRM to connect to the targets. Bolt connects to
the targets with SSH or WinRM, without requiring any existing Puppet installation on the target. Bolt can also run
plans, which chain multiple tasks together for more complex actions.
You can write tasks, which are a lot like scripts, in any programming language that can run on the target nodes, such
as Bash, Python, or Ruby. Tasks are packaged within modules, so you can reuse, download, and share tasks on the
Forge. Metadata for each task describes the task, validates input, and controls how the task runner executes the task.
For more information, see the Bolt documentation on Tasks. If you're a Puppet Enterprise user, see Running tasks and
Using Bolt with orchestrator.
Expressions and operators
Expressions are statements that resolve to values. You can use expressions almost anywhere a value is required.
Expressions can be compounded with other expressions, and the entire combined expression resolves to a single
value.
In the Puppet language, nearly everything is an expression, including literal values, references to variables, resource
declarations, function calls, and more. In other words, almost all statements in the language resolve to a value and can
be used anywhere that value would be expected.
Most of this page is about expressions that are constructed with operators. Operators take input values and operate on
them (for example, mathematically) to result in some other value. Other kinds of expressions (for example, function
calls) are described in more detail on other pages.
Some expressions have side effects and are used in Puppet primarily for their side effects, rather than for their result
value. For example:
• Resource declaration: Adds a resource to the catalog.
• Variable assignment: Creates a variable and assigns it a value.
• Chaining statement: Forms a relationship between two or more resources.
© 2024 Puppet, Inc., a Perforce company

Puppet | Syntax and settings | 691
Your code won't usually do anything with the value these expressions produce, but sometimes the value is useful for
things like forming relationships to resources whose names can't be predicted until run time.
Important: The following statements are not typical expressions. They don't resolve to usable values and can only
be used in certain contexts:
• Class definitions
• Defined types
• Node definitions
• Resource collectors
• Lambdas
Expressions can be used almost everywhere, including:
• The operand of another expression.
• The condition of an if statement.
• The control expression of a case statement or selector statement.
• The assignment value of a variable.
• The argument or arguments of a function call.
• The title of a resource.
• An entry in an array
• A key or value of a hash.
Expressions cannot be used:
• Where a literal name of a class or defined type is expected (for example, in class or define statements).
• As the name of a variable (the name of the variable must be a literal name).
• Where a literal resource type or name of a resource type is expected (for example, in the type position of a
resource declaration).
You can surround an expression by parentheses to control the order of evaluation in compound expressions (for
example, 10+10/5 is 12, and (10+10)/5 is 4), or to make your code clearer.
For formal descriptions of expressions constructed with operators and other elements of the Puppet language, see the
Puppet language specification.
Operator expressions
There are two kinds of operators:
• Infix operators, also called binary operators, appear between two operands:
• $a = 1
• 5 < 9
• $operatingsystem != 'RedHat'
• Prefix operators, also called unary operators, appear immediately before a single operand:
• *$interfaces
• !$is_virtual
Operands in an expression can be any other expression — anything that resolves to a value of the expected data type
is allowed. Each operator has its own rules, described in the sections below, for the data types of its operands.
When you create compound expressions by using other expressions as operands, use parentheses for clarity and
readability:
(90 < 7) and ('RedHat' == 'RedHat') # resolves to false
(90 < 7) or ('RedHat' in ['Linux', 'RedHat']) # resolves to true
© 2024 Puppet, Inc., a Perforce company

Puppet | Syntax and settings | 692
Order of operations
Compound expressions are evaluated in a standard order of operations. Expressions wrapped in parentheses are
evaluated first, starting from the innermost expression:
# This example resolves to 30, not 23:
notice( (7+8)*2 )
For the sake of clarity, use parentheses in all but the simplest compound expressions.
The precedence of operators, from highest to lowest, is:
Precedence Operator
1 ! (unary: not)
2 - (unary: numeric negation)
3 * (unary: array splat)
4 in
5 =~ and !~ (regex or data type match or non-match)
6 *, /, % (multiplication, division, and modulo)
7 + and - (addition/array concatenation and subtraction/
array deletion)
8 << and >> (left shift and right shift)
9 == and != (equal and not equal)
10 >=, <=, >, and < (greater or equal, less or equal, greater
than, and less than)
11 and
12 or
13 = (assignment)
Related information
Values, data types, and aliases on page 854
Most of the things you can do with the Puppet language involve some form of data. An individual piece of data is
called a value, and every value has a data type, which determines what kind of information that value can contain and
how you can interact with it.
Variables on page 517
Variables store values so that those values can be accessed in code later.
Resources on page 520
Resources are the fundamental unit for modeling system configurations. Each resource describes the desired state
for some aspect of a system, like a specific service or package. When Puppet applies a catalog to the target system, it
manages every resource in the catalog, ensuring the actual state matches the desired state.
Function calls on page 707
Functions are plug-ins, written in Ruby, that you can call during catalog compilation. A call to any function is an
expression that resolves to a value. Most functions accept one or more values as arguments, and return a resulting
value.
Conditional statements and expressions on page 700
© 2024 Puppet, Inc., a Perforce company

Puppet | Syntax and settings | 693
Conditional statements let your Puppet code behave differently in different situations. They are most helpful when
combined with facts or with data retrieved from an external source. Puppet supports if and unless statements, case
statements, and selectors.
Comparison operators
Comparison operators take operands of several data types, and resolve to Boolean values.
Comparisons of numbers convert the operands to and from floating point and integer values, such that 1.0 == 1 is
true. However, keep in mind that floating point values created by division are inexact, so mathematically equal values
can be slightly unequal when turned into floating point values.
You can compare any two values with equals == or not equals !=, but only strings, numbers, and data types that
require values to have a defined order can be compared with the less than or greater than operators.
Note: Comparisons of string values are case insensitive for characters in the US ASCII range. Characters outside this
range are case sensitive.
Characters are compared based on their encoding. For characters in the US ASCII range, punctuation comes before
digits, digits are in the order 0, 1, 2, ... 9, and letters are in alphabetical order. For characters outside US ASCII,
ordering is defined by their UTF-8 character code, which might not always place them in alphabetical order for a
given locale.
== (equality)
Resolves to true if the operands are equal. Accepts the following data types as operands:
• Numbers: Tests simple equality.
• Strings: Tests whether two strings are identical, ignoring case as described in the Note, above.
• Arrays and hashes: Tests whether two arrays or hashes are identical.
• Booleans: Tests whether two Booleans are the same value.
• Data types: Tests whether two data types would match the exact same set of values.
Values are considered equal only if they have the same data type. Notably, this means that 1 == "1" is false, and
"true" == true is false.
!= (non-equality)
Resolves to false if the operands are equal. So, $x != $y is the same as !($x == $y). It has the same
behavior and restrictions, but opposite result, as equality ==, above.
< (less than)
Resolves to true if the left operand is smaller than the right operand. Accepts numbers, strings, and data types; both
operands must be the same type. When acting on data types, a less-than comparison is true if the left operand is a
subset of the right operand.
> (greater than)
Resolves to true if the left operand is larger than the right operand. Accepts numbers, strings, and data types; both
operands must be the same type. When acting on data types, a greater-than comparison is true if the left operand is
a superset of the right operand.
<= (less than or equal to)
Resolves to true if the left operand is smaller than or equal to the right operand. Accepts numbers, strings, and data
types; both operands must be the same type. When acting on data types, a less-than-or-equal-to comparison is true
if the left operand is the same as the right operand or is a subset of it.
© 2024 Puppet, Inc., a Perforce company

Puppet | Syntax and settings | 694
>= (greater than or equal to)
Resolves to true if the left operand is larger than or equal to the right operand. Accepts numbers, strings, and data
types; both operands must be the same type. When acting on data types, a greater-than-or-equal-to comparison is
true if the left operand is the same as the right operand or is a superset of it.
=~ (regex or data type match)
Resolves to true if the left operand matches the right operand. Matching means different things, depending on what
the right operand is.
This operator is non-transitive with regard to data types. The right operand must be one of:
• A regular expression (regex), such as /^[<>=]{7}/.
• A stringified regular expression — that is, a string that represents a regular expression, such as "^[<>=]{7}".
• A data type, such as Integer[1,10].
If the right operand is a regular expression or a stringified regular expression, the left operand must be a string, and
the expression resolves to true if the string matches the regular expression.
If the right operand is a data type, the left operand can be any value. The expression resolves to true if the left
operand has the specified data type. For example, 5 =~ Integer and 5 =~ Integer[1,10] are both true.
!~ (regex or data type non-match)
Resolves to false if the left operand matches the right operand. So, $x !~ $y is the same as !($x =~ $y). It
has the same behavior and restrictions, but opposite result, as regex match =~, above.
in
Resolves to true if the right operand contains the left operand. The exact definition of "contains" here depends on
the data type of the right operand. See table below.
This operator is non-transitive with regard to data types. It accepts:
• A string, regular expression, or data type as the left operand.
• A string, array, or hash as the right operand.
Expression How in expression is evaluated
String in String Tests whether the left operand is a substring of the right,
ignoring case:
'eat' in 'eaten' # resolves to true
'Eat' in 'eaten' # resolves to true
String in Array Tests whether one of the members of the array is
identical to the left operand, ignoring case:
'eat' in ['eat', 'ate', 'eating'] #
resolves to true
'Eat' in ['eat', 'ate', 'eating'] #
resolves to true
© 2024 Puppet, Inc., a Perforce company

Puppet | Syntax and settings | 695
Expression How in expression is evaluated
String in Hash Tests whether the hash has a key identical to the left
operand, ignoring case:
'eat' in { 'eat' => 'present tense',
'ate' => 'past tense'} # resolves
to true
'eat' in { 'present' => 'eat',
'past' => 'ate' } # resolves to
false
Regex in String Tests whether the right operand matches the regular
expression:
# note the case-insensitive option ?
i
/(?i:EAT)/ in 'eatery' # resolves to
true
Regex in Array Tests whether one of the members of the array matches
the regular expression:
/(?i:EAT)/ in ['eat', 'ate',
'eating'] # resolves to true
Regex in Hash Tests whether the hash has a key that matches the regular
expression:
/(?i:EAT)/ in { 'eat' => 'present
tense', 'ate' => 'past tense'} #
resolves to true
/(?i:EAT)/ in { 'present' => 'eat',
'past' => 'ate' } # resolves to
false
Data type in Array Tests whether one of the members of the array matches
the data type:
# looking for integers between 100
and 199
Integer[100, 199] in [1, 2, 125] #
resolves to true
Integer[100, 199] in [1, 2, 25] #
resolves to false
Data type in anything else Always false.
© 2024 Puppet, Inc., a Perforce company

Puppet | Syntax and settings | 696
Related information
Booleans on page 874
Booleans are one-bit values, representing true or false. The condition of an if statement expects an expression that
resolves to a Boolean value. All of Puppet's comparison operators resolve to Boolean values, as do many functions.
Numbers on page 884
Numbers in the Puppet language are normal integers and floating point numbers.
Strings on page 896
Strings are unstructured text fragments of any length. They’re a common and useful data type.
Arrays on page 870
Arrays are ordered lists of values. Resource attributes which accept multiple values (including the relationship
metaparameters) generally expect those values in an array. Many functions also take arrays, including the iteration
functions.
Hashes on page 881
Hashes map keys to values, maintaining the order of the entries according to insertion order.
Data type syntax on page 875
Each value in the Puppet language has a data type, like “string.” There is also a set of values whose data type is “data
type.” These values represent the other data types. For example, the value String represents the data type of strings.
The value that represents the data type of these values is Type.
Regular expressions on page 887
A regular expression (sometimes shortened to “regex” or “regexp”) is a pattern that can match some set of strings,
and optionally capture parts of those strings for further use.
Boolean operators
Boolean expressions resolve to boolean values. They are most useful when creating compound expressions.
A boolean operator takes boolean operands. If you pass in another type, it will be converted to boolean; see the
section Automatic conversion to boolean in the data type documentation.
and
Resolves to true if both operands are true, otherwise resolves to false.
or
Resolves to true if either operand is true.
! (not)
Takes one operand. Resolves to true if the operand is false, and false if the operand is true.
$my_value = true
notice ( !$my_value ) # Resolves to false
Related information
Booleans on page 874
© 2024 Puppet, Inc., a Perforce company

Puppet | Syntax and settings | 697
Booleans are one-bit values, representing true or false. The condition of an if statement expects an expression that
resolves to a Boolean value. All of Puppet's comparison operators resolve to Boolean values, as do many functions.
Arithmetic operators
Arithmetic expressions resolve to numeric values. Except for the unary negative -, arithmetic operators take two
numeric operands. If an operand is a string, it's converted to numeric form. The operation fails if a string can't be
converted.
+ (addition)
Resolves to the sum of the two operands.
- (subtraction and negation)
When used with two operands, resolves to the difference of the two operands, left minus right. When used with one
operand, returns the value of subtracting that operand from zero.
/ (division)
Resolves to the quotient of the two operands, the left divided by the right.
* (multiplication)
Resolves to the product of the two operands. The asterisk is also used as a unary splat operator for arrays (see below).
% (modulo)
Resolves to the remainder of dividing the left operand by the right operand:
5 % 2 # resolves to 1
32 % 7 # resolves to 4
<< (left shift)
Left bitwise shift: shifts the left operand by the number of places specified by the right operand. This is equivalent to
rounding both operands down to the nearest integer, and multiplying the left operand by 2 to the power of the right
operand:
4 << 3 # resolves to 32: 4 times two cubed
>> (right shift)
Right bitwise shift: shifts the left operand by the number of places specified by the right operand. This is equivalent
to rounding each operand down to the nearest integer, and dividing the left operand by 2 to the power of the right
operand:
16 << 3 # resolves to 2: 16 divided by two cubed
Related information
Numbers on page 884
© 2024 Puppet, Inc., a Perforce company

Puppet | Syntax and settings | 698
Numbers in the Puppet language are normal integers and floating point numbers.
Array operators
Array operators take arrays as operands, and, with the exception of * (unary splat), they resolve to array values.
* (splat)
The unary splat operator * accepts a single array value. If you pass it a scalar value, it converts the value to a single-
element array first. The splat operator "unfolds" an array, resolving to a comma-separated list values representing the
array elements. It's useful in places where a comma-separated list of values is valid, including:
• The arguments of a function call.
• The cases of a case statement.
• The cases of a selector statement.
If you use it in other contexts, it resolves to the array that was passed in.
For example:
$a = ['vim', 'emacs']
myfunc($a) # Calls myfunc with a single argument, the array containing
'vim' and 'emacs'
:
# myfunc(['vim','emacs'])
myfunc(*$a) # Calls myfunc with two arguments, 'vim' and 'emacs':
# myfunc('vim','emacs')
Another example:
$a = ['vim', 'emacs']
$x = 'vim'
notice case $x {
$a : { 'an array with both vim and emacs' }
*$a : { 'vim or emacs' }
default : { 'no match' }
}
<< (append)
Resolves to an array containing the elements in the left operand, with the right operand as its final element.
The left operand must be an array, and the right operand can be any data type. Appending adds only a single element
to an array. To add multiple elements from one array to another, use the concatenation operator +.
Examples:
[1, 2, 3] << 4 # resolves to [1, 2, 3, 4] [1, 2, 3] << [4, 5] # resolves to
[1, 2, 3, [4, 5]]
The append operator does not change its operands; it creates a new value.
+ (concatenation)
Resolves to an array containing the elements in the left operand followed by the elements in the right operand.
Both operands must be arrays. If the left operand isn't an array, Puppet interprets + as arithmetic addition. If the right
operand is a scalar value, it is converted to a single-element array first.
Hash values are converted to arrays instead of wrapped, so you must wrap them yourself.
© 2024 Puppet, Inc., a Perforce company

Puppet | Syntax and settings | 699
Examples:
[1, 2, 3] + 1 # resolves to [1, 2, 3, 1]
[1, 2, 3] + [1] # resolves to [1, 2, 3, 1]
[1, 2, 3] + [[1]] # resolves to [1, 2, 3, [1]]
The concatenation operator does not change its operands; it creates a new value.
- (removal)
Resolves to an array containing the elements in the left operand, with every occurrence of elements in the right
operand removed.
Both operands must be arrays. If the left operand isn't an array, Puppet interprets - as arithmetic subtraction. If the
right operand is a scalar value, it is converted to a single-element array first.
Hash values aren't automatically wrapped in arrays, so you must always wrap them yourself.
Examples:
[1, 2, 3, 4, 5, 1, 1] - 1 # resolves to [2, 3, 4, 5]
[1, 2, 3, 4, 5, 1, 1] - [1] # resolves to [2, 3, 4, 5]
[1, 2, 3, [1, 2]] - [1, 2] # resolves to [3, [1, 2]]
[1, 2, 3, [1, 2]] - [[1, 2]] # resolves to [1, 2, 3]
The removal operator does not change its operands; it creates a new value.
Related information
Arrays on page 870
Arrays are ordered lists of values. Resource attributes which accept multiple values (including the relationship
metaparameters) generally expect those values in an array. Many functions also take arrays, including the iteration
functions.
Hash operators
Hash operators accept hashes as their left operand, and hashes or specific kinds of arrays as their right operand. The
expressions resolve to hash values.
+ (merging)
Resolves to a hash containing the keys and values in the left operand and the keys and values in the right operand. If
a key is present in both operands, the final hash uses the value from the right. It does not merge hashes recursively; it
only merges top-level keys.
The right operand can be one of the following:
• A hash
• An array with an even number of elements. Each pair is converted in order to a key-value hash pair.
Examples:
{a => 10, b => 20} + {b => 30} # resolves to {a => 10, b => 30}
{a => 10, b => 20} + {c => 30} # resolves to {a => 10, b => 30, c => 30}
{a => 10, b => 20} + [c, 30] # resolves to {a => 10, b => 30, c => 30}
{a => 10, b => 20} + 30 # gives an error
{a => 10, b => 20} + [30] # gives an error
The merging operator does not change its operands; it creates a new value.
- (removal)
Resolves to a hash containing the keys and values in the left operand, minus any keys that are also present in the right
operand.
© 2024 Puppet, Inc., a Perforce company

Puppet | Syntax and settings | 700
The right operand can be one of the following:
• A hash. The keys present in this hash will be absent in the final hash, regardless of whether that key has the same
values in both operands. The key, not the value, determines whether it's removed.
• An array of keys.
• A single key.
Examples:
{a => first, b => second, c => 17} - {c => 17, a => "something else"} #
resolves to {b => second}
{a => first, b => second, c => 17} - {a => a, d => d} #
resolves to {b => second, c => 17}
{a => first, b => second, c => 17} - [c, a] #
resolves to {b => second}
{a => first, b => second, c => 17} - c #
resolves to {a => first, b => second}
The removal operator does not change its operands; it creates a new value.
Related information
Hashes on page 881
Hashes map keys to values, maintaining the order of the entries according to insertion order.
Assignment operator
Puppet has one assignment operator, =.
= (assignment)
The assignment operator sets the variable on the left side to the value on the right side. The expression resolves to
the value of the right hand side. Variables can be set only one time, after which, attempts to set the variable to a new
value cause an error.
Related information
Variables on page 517
Variables store values so that those values can be accessed in code later.
Conditional statements and expressions
Conditional statements let your Puppet code behave differently in different situations. They are most helpful when
combined with facts or with data retrieved from an external source. Puppet supports if and unless statements, case
statements, and selectors.
Examples
An if statement evaluates the given condition and, if the condition resolves to true, executes the given code. This
example includes an elsif condition, and gives a warning if you try to include the ntp class on a virtual machine
or on machine running macOS:
if $facts['is_virtual'] {
warning('Tried to include class ntp on virtual machine; this node might be
misclassified.')
} elsif $facts['os']['family'] == 'Darwin' {
warning('This NTP module does not yet work on our Mac laptops.')
} else {
include ntp
}
© 2024 Puppet, Inc., a Perforce company

Puppet | Syntax and settings | 701
An unless statement takes a Boolean condition and an arbitrary block of Puppet code, evaluates the condition, and
if the condition is false, execute the code block. This statement sets $maxclient to 500 unless the system memory
is above the specified parameter.
unless $facts['memory']['system']['totalbytes'] > 1073741824 {
$maxclient = 500
}
A case statement evaluates a list of cases against a control expression, and executes the first code block where the
case value matches the control expression. This example declares a role class on a node, but which role class it
declares depends on what operating system the node runs:
case $facts['os']['name'] {
'RedHat', 'CentOS': {
include role::redhat
}
/^(Debian|Ubuntu)$/: {
include role::debian
}
default: {
include role::generic
}
}
A selector statement is similar to a case statement, but instead of executing code, it returns a value. This example
returns the value 'wheel' for the specified operating systems, but the value 'root' for all other operating systems:
$rootgroup = $facts['os']['family'] ? {
'RedHat' => 'wheel',
/(Debian|Ubuntu)/ => 'wheel',
default => 'root',
}
file { '/etc/passwd':
ensure => file,
owner => 'root',
group => $rootgroup,
}
if statements
An "if" statement takes a Boolean condition and an arbitrary block of Puppet code, and executes the code block only
if the condition is true. Optionally, an if statement can include elsif and else clauses.
Behavior
Puppet's if statements behave much like those in any other language. The if condition is evaluated first and, if it
is true, the if code block is executed. If it is false, each elsif condition (if present) is tested in order, and if all
conditions fail, the else code block (if present) is executed. If none of the conditions in the statement match and
there is no else block, Puppet does nothing and moves on. If statements executes a maximum of one code block.
In addition to executing the code in a block, an if statement also produces a value, so the if statement can be used
wherever a value is allowed.The value of an if expression is the value of the last expression in the executed block, or
undef if no block was executed.
Syntax
An if statement consists of:
• The if keyword.
• A condition (any expression resolving to a Boolean value).
© 2024 Puppet, Inc., a Perforce company

Puppet | Syntax and settings | 702
• A pair of curly braces containing any Puppet code.
• Optionally: any number of elsif clauses, which are processed in order.
• Optionally: the else keyword and a pair of curly braces containing Puppet code.
An elsif clause consists of:
• The elsif keyword.
• A condition.
• A pair of curly braces containing any Puppet code.
if $facts['is_virtual'] {
# Our NTP module is not supported on virtual machines:
warning('Tried to include class ntp on virtual machine; this node might be
misclassified.')
} elsif $facts['os']['name'] == 'Darwin' {
warning('This NTP module does not yet work on our Mac laptops.')
} else {
# Normal node, include the class.
include ntp
}
Conditions
The condition of an if statement can be any expression that resolves to a Boolean value. This includes:
• Variables
• Expressions, including arbitrarily nested and and or expressions
• Functions that return values
Expressions that resolve to non-Boolean values are automatically converted to Booleans. For more information, see
the Booleans documentation.
Regex capture variables
If you use the regular expression match operator in a condition, any captures from parentheses in the pattern are
available inside the associated code block as numbered variables (for example, $1, $2), and the entire match is
available as $0. This example captures any digits from a hostname such as www01 and www02, and stores them in
the $1 variable:
if $trusted['certname'] =~ /^www(\d+)\./ {
notice("Welcome to web server number $1.")
}
Regex capture variables are different from other variables in a couple of ways:
• The values of the numbered variables do not persist outside the code block associated with the pattern that set
them.
• In nested conditionals, each conditional has its own set of values for the set of numbered variables. At the end of
an interior statement, the numbered variables are reset to their previous values for the remainder of the outside
statement. This causes conditional statements to act like local scopes, but only with regard to the numbered
variables.
Related information
Scope on page 941
A scope is a specific area of code that is partially isolated from other areas of code.
Booleans on page 874
© 2024 Puppet, Inc., a Perforce company

Puppet | Syntax and settings | 703
Booleans are one-bit values, representing true or false. The condition of an if statement expects an expression that
resolves to a Boolean value. All of Puppet's comparison operators resolve to Boolean values, as do many functions.
unless statements
"Unless" statements work like reversed if statements. They take a Boolean condition and an arbitrary block of
Puppet code, evaluate the condition, and if it is false, execute the code block. They cannot include elsif clauses.
Behavior
The condition is evaluated first and, if it is false, the code block is executed. If the condition is true, Puppet does
nothing and moves on.
In addition to executing the code in a block, an unless statement is also an expression that produces a value, and it
can be used wherever a value is allowed. The value of an unless expression is the value of the last expression in the
executed block. If no block was executed, the value is undef.
Syntax
The general form of an unless statement is:
• The unless keyword.
• A condition (any expression resolving to a Boolean value).
• A pair of curly braces containing any Puppet code.
• Optionally: the else keyword and a pair of curly braces containing Puppet code.
You cannot include an elsif clause in an unless statement. If you do, compilation fails with a syntax error.
unless $facts['memory']['system']['totalbytes'] > 1073741824 {
$maxclient = 500
}
Conditions
The condition of an unless statement can be any expression that resolves to a Boolean value. This includes:
• Variables.
• Expressions, including arbitrarily nested and and or expressions.
• Functions that return values.
Expressions that resolve to non-Boolean values are automatically converted to Booleans. For more information, see
the Booleans documentation.
Regex capture variables
Although unless statements receive regex capture variables like if statements, you wouldn't usually use one,
because the code in the statement is executed only if the condition doesn't match anything. It generally makes more
sense to use an if statement.
case statements
Like if statements, case statements choose one of several blocks of arbitrary Puppet code to execute. They take
a control expression and a list of cases and code blocks, and execute the first block whose case value matches the
control expression.
Behavior
Puppet compares the control expression to each of the cases, in the order they are listed (except for the top-most
level default case, which always goes last). It executes the block of code associated with the first matching case, and
ignores the remainder of the statement.Case statements execute a maximum of one code block. If none of the cases
match, Puppet does nothing and moves on.
In addition to executing the code in a block, a case statement is also an expression that produces a value, and can be
used wherever a value is allowed. The value of a case expression is the value of the last expression in the executed
block. If no block was executed, the value is undef.
© 2024 Puppet, Inc., a Perforce company

Puppet | Syntax and settings | 704
The control expression of a case statement can be any expression that resolves to a value. This includes:
• Variables.
• Expressions.
• Functions that return values.
Syntax
The general form of a case statement is:
• The case keyword.
• A control expression, which is any expression resolving to a value.
• An opening curly brace.
• Any number of possible matches, which consist of:
• A case or comma-separated list of cases.
• A colon.
• A pair of curly braces containing any arbitrary Puppet code.
• A closing curly brace case.
case $facts['os']['name'] {
'RedHat', 'CentOS': { include role::redhat } # Apply the redhat class
/^(Debian|Ubuntu)$/: { include role::debian } # Apply the debian class
default: { include role::generic } # Apply the generic class
}
Case matching
A case can be any expression that resolves to a value, for example, literal values, variables and function calls. You
can use a comma-separated list of cases to associate multiple cases with the same block of code. To use values from a
variable as cases, use the * splat operator to convert an array of values into a comma-separated list of values.
Depending on the data type of a case's value, Puppet uses one of following behaviors to test whether the case
matches:
• Most data types, for example, strings and Booleans, are compared to the control value with the == equality
operator, which is case-insensitive when comparing strings.
• Regular expressions are compared to the control value with the =~ matching operator, which is case-sensitive.
Regex cases only match strings.
• Data types, such as Integer, are compared to the control value with the =~ matching operator. This tests
whether the control value is an instance of that data type.
• Arrays are recursively compared to the control value. First, Puppet checks whether the control and array are the
same length, then each corresponding element is compared using these same case matching rules.
• Hashes compare each key-value pair. To match, the control value and the case must have the same keys, and each
corresponding value is compared using these same case matching rules.
• The special value default matches anything, and unless nested inside an array or hash, is always tested last
regardless of its position in the list.
Regex capture variables
If you use regular expression cases, any captures from parentheses in the pattern are available inside the associated
code block as numbered variables (for example, $1, $2), and the entire match is available as $0:
case $trusted['hostname'] {
/www(\d+)/: { notice("Welcome to web server number ${1}"); include
role::web }
default: { include role::generic }
}
This example captures any digits from a hostname such as www01 and www02 and store them in the $1 variable.
© 2024 Puppet, Inc., a Perforce company

Puppet | Syntax and settings | 705
Regex capture variables are different from other variables in a couple of ways:
• The values of the numbered variables do not persist outside the code block associated with the pattern that set
them.
• In nested conditionals, each conditional has its own set of values for the set of numbered variables. At the end of
an interior statement, the numbered variables are reset to their previous values for the remainder of the outside
statement. This causes conditional statements to act like local scopes, but only with regard to the numbered
variables.
Best practices
Case statements must have a default case:
• If the rest of your cases are meant to be comprehensive, putting a fail('message') call in the default case
makes your code more robust by protecting against mysterious failures due to behavior changes elsewhere in your
manifests.
• If your cases aren't comprehensive and you want nodes that match none to do nothing, write a default case with an
empty code block (default: {}). This makes your intention obvious to the next person who maintains your
code.
Related information
Values, data types, and aliases on page 854
Most of the things you can do with the Puppet language involve some form of data. An individual piece of data is
called a value, and every value has a data type, which determines what kind of information that value can contain and
how you can interact with it.
Regular expressions on page 887
A regular expression (sometimes shortened to “regex” or “regexp”) is a pattern that can match some set of strings,
and optionally capture parts of those strings for further use.
Scope lookup rules on page 945
The scope lookup rules determine when a local scope becomes the parent of another local scope.
Selector expressions
Selector expressions are similar to case statements, but instead of executing code, they return a value.
Behavior
The entire selector expression is treated as a single value.Puppet compares the control expression to each of the cases,
in the order they are listed (except for the default case, which always goes last). When it finds a matching case, it
treats that value as the value of the expression and ignore the remainder of the expression. If none of the cases match,
Puppet fails compilation with an error, unless a default case is also provided.
The control expression of a selector can be any expression that resolves to a value. This includes:
• Variables.
• Expressions.
• Functions that return values
Selectors can be used wherever a value is expected. This includes:
• Variable assignments
• Resource attributes
• Function arguments
• Resource titles
• A value in another selector
• Expressions
Tip: For readability sake, use selectors only in variable assignments.
Syntax
© 2024 Puppet, Inc., a Perforce company

Puppet | Syntax and settings | 706
Selectors resemble a cross between a case statement and the ternary operator found in other languages. The general
form of a selector is:
• A control expression, which is any expression resolving to a value.
• The ? (question mark) keyword.
• An opening curly brace.
• Any number of possible matches, each of which consists of:
• A case.
• The => (hash rocket) keyword.
• A value, which can be any expression resolving to a value.
• A trailing comma.
• A closing curly brace.
In this example, the value of $rootgroup is determined using the value of $facts['os']['family']:
$rootgroup = $facts['os']['family'] ? {
'Redhat' => 'wheel',
/(Debian|Ubuntu)/ => 'wheel',
default => 'root',
}
file { '/etc/passwd':
ensure => file,
owner => 'root',
group => $rootgroup,
}
Case matching
In selector statements, you cannot use lists of cases. If the control expression is a string and you need more than one
case associated with a single value, use a regular expression. Otherwise, use a case statement instead of a selector,
because case statements do allow lists of cases. For more information, see Case statements.
Regex capture variables
If you use regular expression cases, any captures from parentheses in the pattern are available inside the associated
value as numbered variables ($1, $2), and the entire match is available as $0:
puppet
$system = $facts['os']['name'] ? {
/(RedHat|Debian)/ => "our system is ${1}",
default => "our system is unknown",
}
Regex capture variables are different from other variables in a couple of ways:
• The values of the numbered variables do not persist outside the value associated with the pattern that set them.
• In nested conditionals, each conditional has its own set of values for the set of numbered variables. At the end of
an interior statement, the numbered variables are reset to their previous values for the remainder of the outside
statement. This causes conditional statements to act like local scopes, but only with regard to the numbered
variables.
Related information
Values, data types, and aliases on page 854
Most of the things you can do with the Puppet language involve some form of data. An individual piece of data is
called a value, and every value has a data type, which determines what kind of information that value can contain and
how you can interact with it.
Regular expressions on page 887
© 2024 Puppet, Inc., a Perforce company
Puppet | Syntax and settings | 707
A regular expression (sometimes shortened to “regex” or “regexp”) is a pattern that can match some set of strings,
and optionally capture parts of those strings for further use.
Scope on page 941
A scope is a specific area of code that is partially isolated from other areas of code.
Function calls
Functions are plug-ins, written in Ruby, that you can call during catalog compilation. A call to any function is an
expression that resolves to a value. Most functions accept one or more values as arguments, and return a resulting
value.
The Ruby code in the function can do any number of things to produce the final value, including:
• Evaluate templates.
• Do mathematical calculations.
• Look up values from an external source.
• Cause side effects that modify the catalog.
• Evaluate a provided block of Puppet code, possibly using the function's arguments to modify that code or control
how it runs.
Puppet includes several built-in functions. More functions are available in modules, such as puppetlabs-
stdlib, on the Forge. You can also write custom functions and put them in your own modules.
An entire function call—including the name, arguments, and lambda—constitutes an expression. It resolves to a
single value, and can be used anywhere a value of that type is accepted. A function call might also have an effect,
such as adding a class to the catalog. You can also use function calls on their own, which causes their effects to occur
while their value is ignored.
All functions run during catalog compilation, which means they can access code and data only from the primary
Puppet server. To make changes to an agent node, you must use a resource; to collect data from an agent node, you
must use a custom fact.
Each function defines how many arguments it takes, what data types it expects those arguments to be, what values it
returns, and any effects it has. For details about any functions built into Puppet, see the function reference. For details
about a function included in a module, see that module's documentation.
Statement functions
Statement functions are a group of built-in functions that are used only for their effects, rather than for any values.
Puppet recognizes only its built-in statements; it doesn't allow adding new statement functions as plugins. The major
difference between statement functions and other functions is that you can omit parentheses when calling a statement
function with at least one argument, such as include apache.
Statement functions return a value like any other function, but they always return a value of undef. The built-in
statement functions are:
Catalog statements
include: Includes the specified classes in a catalog.
require: Includes the specified classes in the catalog and adds them as a dependency of the current class or
defined resource
contain: Includes the specified classes in the catalog and contains them in the current class.
tag: Adds the specified tag or tags to the containing class or defined resource.
Logging statements
debug: Logs message at the debug level.
info: Logs message at the info level.
© 2024 Puppet, Inc., a Perforce company

Puppet | Syntax and settings | 708
notice: Logs message at the notice level.
warning: Logs message at the warning level
err: Logs message at the error level.
Failure statements
fail: Logs the error message and terminates compilation.
Related information
Custom functions overview on page 834
Puppet includes many built-in functions, and more are available in modules on the Forge. You can also write your
own custom functions.
Functions syntax
Like any expression, a function call can be used anywhere the value it returns would be allowed. Function calls can
also stand on their own, to cause their side effects, but ignore their returned value.
There are two ways to call functions in the Puppet language: prefix calls as in template("ntp/
ntp.conf.erb"), and chained calls as in "ntp/ntp.conf.erb".template. There's also a modified form
of prefix call that can only be used with certain functions.
The two function call styles have exactly the same capabilities, so you can choose whichever one is more readable. In
general:
• For functions that take many arguments, prefix calls are easier to read.
• For functions that take one normal argument and a lambda, chained calls are easier to read.
• For a series of functions where each takes the last one's result as its argument, chained calls are easier to read,
especially if at least one of those functions accepts a lambda.
Most functions have short, one-word names. The modern function API also allows qualified function names like
mymodule::myfunction. Functions must always be called with their full names; you can't shorten a qualified
function name.
Prefix function calls
You call a function in the prefix style by writing its name and providing a list of arguments in parentheses. The
general form of a prefix function call is:
function_name(argument, argument, ...) |$parameter, $parameter, ...| { code
block }
• The full name of the function, as an unquoted word.
• An opening parenthesis (. Parentheses are optional when you're calling a built-in statement function with at least
one argument, as in include apache. They're mandatory in all other cases.
• Zero or more arguments, separated by commas. Arguments can be any expression that resolves to a value. See
each function's docs for the number of its arguments and their data types. Use the splat array operator * to convert
an array into a comma-separated list of arguments.
• A closing parenthesis ) if an opening parenthesis was used.
• Optionally, a lambda (code block), if the function accepts one.
In the following example, template, include, and each are all functions. The template function is used for
its return value, include adds a class to the catalog, and each runs a block of code several times with different
values.
file {"/etc/ntp.conf":
ensure => file,
content => template("ntp/ntp.conf.erb"), # function call; resolves to a
string
}
© 2024 Puppet, Inc., a Perforce company

Puppet | Syntax and settings | 709
include apache # function call; modifies catalog
$binaries = [
"facter",
"hiera",
"mco",
"puppet",
"puppetserver",
]
# function call with lambda; runs block of code several times
each($binaries) |$binary| {
file {"/usr/bin/$binary":
ensure => link,
target => "/opt/puppetlabs/bin/$binary",
}
}
Chained function calls
Alternatively, you call a function in the chained style by writing its first argument, a period, and the name of the
function. The general form of a chained function call is:
argument.function_name(argument, ...) |$parameter, $parameter, ...| { code
block }
• The first argument of the function, which can be any expression that resolves to a value.
• A period .
• The full name of the function, as an unquoted word.
• Optionally, parentheses containing a comma-separated list of additional arguments, starting with the second
argument (because you already passed in the first argument). Use the splat array operator * to convert an array to
a comma-separated list of arguments.
• Optionally, a lambda (code block), if the function accepts one.
In the following example, template, include, and each are all functions. The template function is used for
its return value, include adds a class to the catalog, and each runs a block of code several times with different
values.
puppet
file {"/etc/ntp.conf":
ensure => file,
content => "ntp/ntp.conf.erb".template, # function call; resolves to a
string
}
apache.include # function call; modifies catalog
$binaries = [
"facter",
"hiera",
"mco",
"puppet",
"puppetserver",
]
# function call with lambda; runs block of code several times
$binaries.each |$binary| {
file {"/usr/bin/$binary":
ensure => link,
target => "/opt/puppetlabs/bin/$binary",
}
© 2024 Puppet, Inc., a Perforce company

Puppet | Syntax and settings | 710
}
Related information
Lambdas on page 928
Lambdas are blocks of Puppet code passed to functions. When a function receives a lambda, it provides values for the
lambda’s parameters and evaluates its code. If you use other programming languages, think of lambdas as anonymous
functions that are passed to other functions.
Expressions and operators on page 690
Expressions are statements that resolve to values. You can use expressions almost anywhere a value is required.
Expressions can be compounded with other expressions, and the entire combined expression resolves to a single
value.
Values, data types, and aliases on page 854
Most of the things you can do with the Puppet language involve some form of data. An individual piece of data is
called a value, and every value has a data type, which determines what kind of information that value can contain and
how you can interact with it.
Array operators on page 698
Array operators take arrays as operands, and, with the exception of * (unary splat), they resolve to array values.
Built-in function reference
NOTE: This page was generated from the Puppet source code on 2024-08-01 18:16:06 -0700
This page is a list of Puppet's built-in functions, with descriptions of what they do and how to use them.
Functions are plugins you can call during catalog compilation. A call to any function is an expression that resolves to
a value. For more information on how to call functions, see Function calls on page 707
Many of these function descriptions include auto-detected signatures, which are short reminders of the function's
allowed arguments. These signatures aren't identical to the syntax you use to call the function; instead, they resemble
a parameter list from a Puppet Classes on page 680, Defined resource types on page 687, Writing custom
functions in the Puppet language on page 835, or Lambdas on page 928. The syntax of a signature is:
<FUNCTION NAME>(<DATA TYPE> <ARGUMENT NAME>, ...)
The <DATA TYPE> is a Data type syntax on page 875, like String or Optional[Array[String]]. The
<ARGUMENT NAME> is a descriptive name chosen by the function's author to indicate what the argument is used for.
• Any arguments with an Optional data type can be omitted from the function call.
• Arguments that start with an asterisk (like *$values) can be repeated any number of times.
• Arguments that start with an ampersand (like &$block) aren't normal arguments; they represent a code block,
provided with Lambdas on page 928
undef values in Puppet 6
In Puppet 6, many Puppet types were moved out of the Puppet codebase, and into modules on the Puppet Forge.
The new functions handle undef values more strictly than their stdlib counterparts. In Puppet 6, code that relies on
undef values being implicitly treated as other types will return an evaluation error. For more information on which
types were moved into modules, see the Puppet 6 release notes.
abs
Returns the absolute value of a Numeric value, for example -34.56 becomes 34.56. Takes a single Integer or
Float value as an argument.
Deprecated behavior
For backwards compatibility reasons this function also works when given a number in String format such that it
first attempts to covert it to either a Float or an Integer and then taking the absolute value of the result. Only
strings representing a number in decimal format is supported - an error is raised if value is not decimal (using base
© 2024 Puppet, Inc., a Perforce company

Puppet | Syntax and settings | 711
10). Leading 0 chars in the string are ignored. A floating point value in string form can use some forms of scientific
notation but not all.
Callers should convert strings to Numeric before calling this function to have full control over the conversion.
abs(Numeric($str_val))
It is worth noting that Numeric can convert to absolute value directly as in the following examples:
Numeric($strval, true) # Converts to absolute Integer or Float
Integer($strval, 10, true) # Converts to absolute Integer using base 10
(decimal)
Integer($strval, 16, true) # Converts to absolute Integer using base 16
(hex)
Float($strval, true) # Converts to absolute Float
Signature 1
abs(Numeric $val)
Signature 2
abs(String $val)
alert
Logs a message on the server at level alert.
alert(Any *$values)
Parameters
• *values --- The values to log.
Return type(s): Undef.
all
Runs a lambda repeatedly using each value in a data structure until the lambda returns a non "truthy" value which
makes the function return false, or if the end of the iteration is reached, true is returned.
This function takes two mandatory arguments, in this order:
1.
An array, hash, or other iterable object that the function will iterate over.
2.
A lambda, which the function calls for each element in the first argument. It can request one or two parameters.
$data.all |$parameter| { <PUPPET CODE BLOCK> }
or
all($data) |$parameter| { <PUPPET CODE BLOCK> }
# For the array $data, run a lambda that checks that all values are
multiples of 10
$data = [10, 20, 30]
notice $data.all |$item| { $item % 10 == 0 }
Would notice true.
When the first argument is a Hash, Puppet passes each key and value pair to the lambda as an array in the form
[key, value].
# For the hash $data, run a lambda using each item as a key-value array
$data = { 'a_0'=> 10, 'b_1' => 20 }
notice $data.all |$item| { $item[1] % 10 == 0 }
© 2024 Puppet, Inc., a Perforce company

Puppet | Syntax and settings | 712
Would notice true if all values in the hash are multiples of 10.
When the lambda accepts two arguments, the first argument gets the index in an array or the key from a hash, and the
second argument the value.
# Check that all values are a multiple of 10 and keys start with 'abc'
$data = {abc_123 => 10, abc_42 => 20, abc_blue => 30}
notice $data.all |$key, $value| { $value % 10 == 0 and $key =~ /^abc/ }
Would notice true.
For an general examples that demonstrates iteration, see the Puppet iteration documentation.
Signature 1
all(Hash[Any, Any] $hash, Callable[2,2] &$block)
Signature 2
all(Hash[Any, Any] $hash, Callable[1,1] &$block)
Signature 3
all(Iterable $enumerable, Callable[2,2] &$block)
Signature 4
all(Iterable $enumerable, Callable[1,1] &$block)
annotate
Handles annotations on objects. The function can be used in four different ways.
With two arguments, an Annotation type and an object, the function returns the annotation for the object of the
given type, or undef if no such annotation exists.
$annotation = Mod::NickNameAdapter.annotate(o)
$annotation = annotate(Mod::NickNameAdapter.annotate, o)
With three arguments, an Annotation type, an object, and a block, the function returns the annotation for the
object of the given type, or annotates it with a new annotation initialized from the hash returned by the given block
when no such annotation exists. The block will not be called when an annotation of the given type is already present.
$annotation = Mod::NickNameAdapter.annotate(o) || { { 'nick_name' =>
'Buddy' } }
$annotation = annotate(Mod::NickNameAdapter.annotate, o) || { { 'nick_name'
=> 'Buddy' } }
With three arguments, an Annotation type, an object, and an Hash, the function will annotate the given object
with a new annotation of the given type that is initialized from the given hash. An existing annotation of the given
type is discarded.
$annotation = Mod::NickNameAdapter.annotate(o, { 'nick_name' => 'Buddy' })
$annotation = annotate(Mod::NickNameAdapter.annotate, o, { 'nick_name' =>
'Buddy' })
With three arguments, an Annotation type, an object, and an the string clear, the function will clear the
annotation of the given type in the given object. The old annotation is returned if it existed.
$annotation = Mod::NickNameAdapter.annotate(o, clear)
© 2024 Puppet, Inc., a Perforce company

Puppet | Syntax and settings | 713
$annotation = annotate(Mod::NickNameAdapter.annotate, o, clear)
With three arguments, the type Pcore, an object, and a Hash of hashes keyed by Annotation types, the function
will annotate the given object with all types used as keys in the given hash. Each annotation is initialized with the
nested hash for the respective type. The annotated object is returned.
$person = Pcore.annotate(Mod::Person({'name' => 'William'}), {
Mod::NickNameAdapter >= { 'nick_name' => 'Bill' },
Mod::HobbiesAdapter => { 'hobbies' => ['Ham Radio', 'Philatelist'] }
})
Signature 1
annotate(Type[Annotation] $type, Any $value, Optional[Callable[0, 0]] &$block)
Signature 2
annotate(Type[Annotation] $type, Any $value,
Variant[Enum[clear],Hash[Pcore::MemberName,Any]] $annotation_hash)
Signature 3
annotate(Type[Pcore] $type, Any $value, Hash[Type[Annotation],
Hash[Pcore::MemberName,Any]] $annotations)
any
Runs a lambda repeatedly using each value in a data structure until the lambda returns a "truthy" value which makes
the function return true, or if the end of the iteration is reached, false is returned.
This function takes two mandatory arguments, in this order:
1.
An array, hash, or other iterable object that the function will iterate over.
2.
A lambda, which the function calls for each element in the first argument. It can request one or two parameters.
$data.any |$parameter| { <PUPPET CODE BLOCK> }
or
any($data) |$parameter| { <PUPPET CODE BLOCK> }
# For the array $data, run a lambda that checks if an unknown hash contains
those keys
$data = ["routers", "servers", "workstations"]
$looked_up = lookup('somekey', Hash)
notice $data.any |$item| { $looked_up[$item] }
Would notice true if the looked up hash had a value that is neither false nor undef for at least one of the
keys. That is, it is equivalent to the expression $looked_up[routers] || $looked_up[servers] ||
$looked_up[workstations].
When the first argument is a Hash, Puppet passes each key and value pair to the lambda as an array in the form
[key, value].
# For the hash $data, run a lambda using each item as a key-value array.
$data = {"rtr" => "Router", "svr" => "Server", "wks" => "Workstation"}
$looked_up = lookup('somekey', Hash)
notice $data.any |$item| { $looked_up[$item[0]] }
Would notice true if the looked up hash had a value for one of the wanted key that is neither false nor undef.
© 2024 Puppet, Inc., a Perforce company

Puppet | Syntax and settings | 714
When the lambda accepts two arguments, the first argument gets the index in an array or the key from a hash, and the
second argument the value.
# Check if there is an even numbered index that has a non String value
$data = [key1, 1, 2, 2]
notice $data.any |$index, $value| { $index % 2 == 0 and $value !~ String }
Would notice true as the index 2 is even and not a String
For an general examples that demonstrates iteration, see the Puppet iteration documentation.
Signature 1
any(Hash[Any, Any] $hash, Callable[2,2] &$block)
Signature 2
any(Hash[Any, Any] $hash, Callable[1,1] &$block)
Signature 3
any(Iterable $enumerable, Callable[2,2] &$block)
Signature 4
any(Iterable $enumerable, Callable[1,1] &$block)
assert_type
Returns the given value if it is of the given data type, or otherwise either raises an error or executes an optional two-
parameter lambda.
The function takes two mandatory arguments, in this order:
1.
The expected data type.
2.
A value to compare against the expected data type.
$raw_username = 'Amy Berry'
# Assert that $raw_username is a non-empty string and assign it to
$valid_username.
$valid_username = assert_type(String[1], $raw_username)
# $valid_username contains "Amy Berry".
# If $raw_username was an empty string or a different data type, the Puppet
run would
# fail with an "Expected type does not match actual" error.
You can use an optional lambda to provide enhanced feedback. The lambda takes two mandatory parameters, in this
order:
1.
The expected data type as described in the function's first argument.
2.
The actual data type of the value.
$raw_username = 'Amy Berry'
# Assert that $raw_username is a non-empty string and assign it to
$valid_username.
# If it isn't, output a warning describing the problem and use a default
value.
$valid_username = assert_type(String[1], $raw_username) |$expected, $actual|
{
warning( "The username should be \'${expected}\', not \'${actual}\'. Using
'anonymous'." )
'anonymous'
© 2024 Puppet, Inc., a Perforce company

Puppet | Syntax and settings | 715
}
# $valid_username contains "Amy Berry".
# If $raw_username was an empty string, the Puppet run would set
$valid_username to
# "anonymous" and output a warning: "The username should be 'String[1,
default]', not
# 'String[0, 0]'. Using 'anonymous'."
For more information about data types, see the documentation.
Signature 1
assert_type(Type $type, Any $value, Optional[Callable[Type, Type]] &$block)
Signature 2
assert_type(String $type_string, Any $value, Optional[Callable[Type, Type]] &
$block)
binary_file
Loads a binary file from a module or file system and returns its contents as a Binary. The argument to this function
should be a <MODULE NAME>/<FILE> reference, which will load <FILE> from a module's files directory.
(For example, the reference mysql/mysqltuner.pl will load the file <MODULES DIRECTORY>/mysql/
files/mysqltuner.pl.)
This function also accepts an absolute file path that allows reading binary file content from anywhere on disk.
An error is raised if the given file does not exists.
To search for the existence of files, use the find_file() function.
• since 4.8.0
binary_file(String $path)
break
Breaks an innermost iteration as if it encountered an end of input. This function does not return to the caller.
The signal produced to stop the iteration bubbles up through the call stack until either terminating the innermost
iteration or raising an error if the end of the call stack is reached.
The break() function does not accept an argument.
$data = [1,2,3]
notice $data.map |$x| { if $x == 3 { break() } $x*10 }
Would notice the value [10, 20]
function break_if_even($x) {
if $x % 2 == 0 { break() }
}
$data = [1,2,3]
notice $data.map |$x| { break_if_even($x); $x*10 }
Would notice the value [10]
• Also see functions next and return
break()
call
Calls an arbitrary Puppet function by name.
© 2024 Puppet, Inc., a Perforce company

Puppet | Syntax and settings | 716
This function takes one mandatory argument and one or more optional arguments:
1.
A string corresponding to a function name.
2.
Any number of arguments to be passed to the called function.
3.
An optional lambda, if the function being called supports it.
This function can also be used to resolve a Deferred given as the only argument to the function (does not accept
arguments nor a block).
$a = 'notice'
call($a, 'message')
$a = 'each'
$b = [1,2,3]
call($a, $b) |$item| {
notify { $item: }
}
The call function can be used to call either Ruby functions or Puppet language functions.
When used with Deferred values, the deferred value can either describe a function call, or a dig into a variable.
$d = Deferred('join', [[1,2,3], ':']) # A future call to join that joins the
arguments 1,2,3 with ':'
notice($d.call())
Would notice the string "1:2:3".
$d = Deferred('$facts', ['processors', 'count'])
notice($d.call())
Would notice the value of $facts['processors']['count'] at the time when the call is made.
• Deferred values supported since Puppet 6.0
Signature 1
call(String $function_name, Any *$arguments, Optional[Callable] &$block)
Signature 2
call(Deferred $deferred)
camelcase
Creates a Camel Case version of a String
This function is compatible with the stdlib function with the same name.
The function does the following:
• For a String the conversion replaces all combinations of *_<char>* with an upcased version of the character
following the _. This is done using Ruby system locale which handles some, but not all special international up-
casing rules (for example German double-s ß is upcased to "Ss").
• For an Iterable[Variant[String, Numeric]] (for example an Array) each value is capitalized and
the conversion is not recursive.
• If the value is Numeric it is simply returned (this is for backwards compatibility).
• An error is raised for all other data types.
• The result will not contain any underscore characters.
© 2024 Puppet, Inc., a Perforce company

Puppet | Syntax and settings | 717
Please note: This function relies directly on Ruby's String implementation and as such may not be entirely UTF8
compatible. To ensure best compatibility please use this function with Ruby 2.4.0 or greater - https://bugs.ruby-
lang.org/issues/10085.
'hello_friend'.camelcase()
camelcase('hello_friend')
Would both result in "HelloFriend"
['abc_def', 'bcd_xyz'].camelcase()
camelcase(['abc_def', 'bcd_xyz'])
Would both result in ['AbcDef', 'BcdXyz']
Signature 1
camelcase(Numeric $arg)
Signature 2
camelcase(String $arg)
Signature 3
camelcase(Iterable[Variant[String, Numeric]] $arg)
capitalize
Capitalizes the first character of a String, or the first character of every String in an Iterable value (such as an Array).
This function is compatible with the stdlib function with the same name.
The function does the following:
• For a String, a string is returned in which the first character is uppercase. This is done using Ruby system
locale which handles some, but not all special international up-casing rules (for example German double-s ß is
capitalized to "Ss").
• For an Iterable[Variant[String, Numeric]] (for example an Array) each value is capitalized and
the conversion is not recursive.
• If the value is Numeric it is simply returned (this is for backwards compatibility).
• An error is raised for all other data types.
Please note: This function relies directly on Ruby's String implementation and as such may not be entirely UTF8
compatible. To ensure best compatibility please use this function with Ruby 2.4.0 or greater - https://bugs.ruby-
lang.org/issues/10085.
'hello'.capitalize()
capitalize('hello')
Would both result in "Hello"
['abc', 'bcd'].capitalize()
capitalize(['abc', 'bcd'])
Would both result in ['Abc', 'Bcd']
Signature 1
capitalize(Numeric $arg)
Signature 2
capitalize(String $arg)
Signature 3
© 2024 Puppet, Inc., a Perforce company

Puppet | Syntax and settings | 718
capitalize(Iterable[Variant[String, Numeric]] $arg)
ceiling
Returns the smallest Integer greater or equal to the argument. Takes a single numeric value as an argument.
This function is backwards compatible with the same function in stdlib and accepts a Numeric value. A String
that can be converted to a floating point number can also be used in this version - but this is deprecated.
In general convert string input to Numeric before calling this function to have full control over how the conversion
is done.
Signature 1
ceiling(Numeric $val)
Signature 2
ceiling(String $val)
chomp
Returns a new string with the record separator character(s) removed. The record separator is the line ending
characters \r and \n.
This function is compatible with the stdlib function with the same name.
The function does the following:
• For a String the conversion removes \r\n, \n or \r from the end of a string.
• For an Iterable[Variant[String, Numeric]] (for example an Array) each value is processed and
the conversion is not recursive.
• If the value is Numeric it is simply returned (this is for backwards compatibility).
• An error is raised for all other data types.
"hello\r\n".chomp()
chomp("hello\r\n")
Would both result in "hello"
["hello\r\n", "hi\r\n"].chomp()
chomp(["hello\r\n", "hi\r\n"])
Would both result in ['hello', 'hi']
Signature 1
chomp(Numeric $arg)
Signature 2
chomp(String $arg)
Signature 3
chomp(Iterable[Variant[String, Numeric]] $arg)
chop
Returns a new string with the last character removed. If the string ends with \r\n, both characters are removed.
Applying chop to an empty string returns an empty string. If you wish to merely remove record separators then you
should use the chomp function.
This function is compatible with the stdlib function with the same name.
The function does the following:
© 2024 Puppet, Inc., a Perforce company

Puppet | Syntax and settings | 719
• For a String the conversion removes the last character, or if it ends with \r\n` it removes both. If String is empty
an empty string is returned.
• For an Iterable[Variant[String, Numeric]] (for example an Array) each value is processed and
the conversion is not recursive.
• If the value is Numeric it is simply returned (this is for backwards compatibility).
• An error is raised for all other data types.
"hello\r\n".chop()
chop("hello\r\n")
Would both result in "hello"
"hello".chop()
chop("hello")
Would both result in "hell"
["hello\r\n", "hi\r\n"].chop()
chop(["hello\r\n", "hi\r\n"])
Would both result in ['hello', 'hi']
Signature 1
chop(Numeric $arg)
Signature 2
chop(String $arg)
Signature 3
chop(Iterable[Variant[String, Numeric]] $arg)
compare
Compares two values and returns -1, 0 or 1 if first value is smaller, equal or larger than the second value. The
compare function accepts arguments of the data types String, Numeric, Timespan, Timestamp, and Semver,
such that:
• two of the same data type can be compared
• Timespan and Timestamp can be compared with each other and with Numeric
When comparing two String values the comparison can be made to consider case by passing a third (optional)
boolean false value - the default is true which ignores case as the comparison operators in the Puppet Language.
Signature 1
compare(Numeric $a, Numeric $b)
Signature 2
compare(String $a, String $b, Optional[Boolean] $ignore_case)
Signature 3
compare(Semver $a, Semver $b)
Signature 4
compare(Numeric $a, Variant[Timespan, Timestamp] $b)
Signature 5
compare(Timestamp $a, Variant[Timestamp, Numeric] $b)
© 2024 Puppet, Inc., a Perforce company

Puppet | Syntax and settings | 720
Signature 6
compare(Timespan $a, Variant[Timespan, Numeric] $b)
contain
Makes one or more classes be contained inside the current class. If any of these classes are undeclared, they will be
declared as if there were declared with the include function. Accepts a class name, an array of class names, or a
comma-separated list of class names.
A contained class will not be applied before the containing class is begun, and will be finished before the containing
class is finished.
You must use the class's full name; relative names are not allowed. In addition to names in string form, you may
also directly use Class and Resource Type-values that are produced by evaluating resource and relationship
expressions.
The function returns an array of references to the classes that were contained thus allowing the function call to
contain to directly continue.
• Since 4.0.0 support for Class and Resource Type-values, absolute names
• Since 4.7.0 a value of type Array[Type[Class[n]]] is returned with all the contained classes
contain(Any *$names)
convert_to
The convert_to(value, type) is a convenience function that does the same as new(type, value). The
difference in the argument ordering allows it to be used in chained style for improved readability "left to right".
When the function is given a lambda, it is called with the converted value, and the function returns what the lambda
returns, otherwise the converted value.
# The harder to read variant:
# Using new operator - that is "calling the type" with operator ()
Hash(Array("abc").map |$i,$v| { [$i, $v] })
# The easier to read variant:
# using 'convert_to'
"abc".convert_to(Array).map |$i,$v| { [$i, $v] }.convert_to(Hash)
convert_to(Any $value, Type $type, Optional[Any] *$args,
Optional[Callable[1,1]] &$block)
create_resources
Converts a hash into a set of resources and adds them to the catalog.
Note: Use this function selectively. It's generally better to write resources in Puppet, as resources created with
create_resource are difficult to read and troubleshoot.
This function takes two mandatory arguments: a resource type, and a hash describing a set of resources. The hash
should be in the form {title => {parameters} }:
# A hash of user resources:
$myusers = {
'nick' => { uid => '1330',
gid => allstaff,
groups => ['developers', 'operations', 'release'], },
'dan' => { uid => '1308',
gid => allstaff,
groups => ['developers', 'prosvc', 'release'], },
}
© 2024 Puppet, Inc., a Perforce company

Puppet | Syntax and settings | 721
create_resources(user, $myusers)
A third, optional parameter may be given, also as a hash:
$defaults = {
'ensure' => present,
'provider' => 'ldap',
}
create_resources(user, $myusers, $defaults)
The values given on the third argument are added to the parameters of each resource present in the set given on the
second argument. If a parameter is present on both the second and third arguments, the one on the second argument
takes precedence.
This function can be used to create defined resources and classes, as well as native resources.
Virtual and Exported resources may be created by prefixing the type name with @ or @@ respectively. For example,
the $myusers hash may be exported in the following manner:
create_resources("@@user", $myusers)
The $myusers may be declared as virtual resources using:
create_resources("@user", $myusers)
Note that create_resources filters out parameter values that are undef so that normal data binding and Puppet
default value expressions are considered (in that order) for the final value of a parameter (just as when setting a
parameter to undef in a Puppet language resource declaration).
create_resources()
crit
Logs a message on the server at level crit.
crit(Any *$values)
Parameters
• *values --- The values to log.
Return type(s): Undef.
debug
Logs a message on the server at level debug.
debug(Any *$values)
Parameters
• *values --- The values to log.
Return type(s): Undef.
defined
Determines whether a given class or resource type is defined and returns a Boolean value. You can also use
defined to determine whether a specific resource is defined, or whether a variable has a value (including undef,
as opposed to the variable never being declared or assigned).
This function takes at least one string argument, which can be a class name, type name, resource reference, or variable
reference of the form '$name'. (Note that the $ sign is included in the string which must be in single quotes to
prevent the $ character to be interpreted as interpolation.
© 2024 Puppet, Inc., a Perforce company

Puppet | Syntax and settings | 722
The defined function checks both native and defined types, including types provided by modules. Types and
classes are matched by their names. The function matches resource declarations by using resource references.
# Matching resource types
defined("file")
defined("customtype")
# Matching defines and classes
defined("foo")
defined("foo::bar")
# Matching variables (note the single quotes)
defined('$name')
# Matching declared resources
defined(File['/tmp/file'])
Puppet depends on the configuration's evaluation order when checking whether a resource is declared.
# Assign values to $is_defined_before and $is_defined_after using identical
`defined`
# functions.
$is_defined_before = defined(File['/tmp/file'])
file { "/tmp/file":
ensure => present,
}
$is_defined_after = defined(File['/tmp/file'])
# $is_defined_before returns false, but $is_defined_after returns true.
This order requirement only refers to evaluation order. The order of resources in the configuration graph (e.g. with
before or require) does not affect the defined function's behavior.
Warning: Avoid relying on the result of the defined function in modules, as you might not be able to
guarantee the evaluation order well enough to produce consistent results. This can cause other code that
relies on the function's result to behave inconsistently or fail.
If you pass more than one argument to defined, the function returns true if any of the arguments are defined. You
can also match resources by type, allowing you to match conditions of different levels of specificity, such as whether
a specific resource is of a specific data type.
file { "/tmp/file1":
ensure => file,
}
$tmp_file = file { "/tmp/file2":
ensure => file,
}
# Each of these statements return `true` ...
defined(File['/tmp/file1'])
defined(File['/tmp/file1'],File['/tmp/file2'])
defined(File['/tmp/file1'],File['/tmp/file2'],File['/tmp/file3'])
# ... but this returns `false`.
defined(File['/tmp/file3'])
# Each of these statements returns `true` ...
defined(Type[Resource['file','/tmp/file2']])
defined(Resource['file','/tmp/file2'])
© 2024 Puppet, Inc., a Perforce company

Puppet | Syntax and settings | 723
defined(File['/tmp/file2'])
defined('$tmp_file')
# ... but each of these returns `false`.
defined(Type[Resource['exec','/tmp/file2']])
defined(Resource['exec','/tmp/file2'])
defined(File['/tmp/file3'])
defined('$tmp_file2')
defined(Variant[String, Type[CatalogEntry], Type[Type[CatalogEntry]]] *$vals)
dig
Returns a value for a sequence of given keys/indexes into a structure, such as an array or hash.
This function is used to "dig into" a complex data structure by using a sequence of keys / indexes to access a value
from which the next key/index is accessed recursively.
The first encountered undef value or key stops the "dig" and undef is returned.
An error is raised if an attempt is made to "dig" into something other than an undef (which immediately returns
undef), an Array or a Hash.
$data = {a => { b => [{x => 10, y => 20}, {x => 100, y => 200}]}}
notice $data.dig('a', 'b', 1, 'x')
Would notice the value 100.
This is roughly equivalent to $data['a']['b'][1]['x']. However, a standard index will return an error
and cause catalog compilation failure if any parent of the final key ('x') is undef. The dig function will return
undef, rather than failing catalog compilation. This allows you to check if data exists in a structure without
mandating that it always exists.
dig(Optional[Collection] $data, Any *$arg)
digest
Returns a hash value from a provided string using the digest_algorithm setting from the Puppet config file.
digest()
downcase
Converts a String, Array or Hash (recursively) into lower case.
This function is compatible with the stdlib function with the same name.
The function does the following:
• For a String, its lower case version is returned. This is done using Ruby system locale which handles some, but
not all special international up-casing rules (for example German double-s ß is upcased to "SS", whereas upper
case double-s is downcased to ß).
• For Array and Hash the conversion to lower case is recursive and each key and value must be convertible by
this function.
• When a Hash is converted, some keys could result in the same key - in those cases, the latest key-value wins. For
example if keys "aBC", and "abC" where both present, after downcase there would only be one key "abc".
• If the value is Numeric it is simply returned (this is for backwards compatibility).
• An error is raised for all other data types.
Please note: This function relies directly on Ruby's String implementation and as such may not be entirely UTF8
compatible. To ensure best compatibility please use this function with Ruby 2.4.0 or greater - https://bugs.ruby-
lang.org/issues/10085.
'HELLO'.downcase()
© 2024 Puppet, Inc., a Perforce company

Puppet | Syntax and settings | 724
downcase('HEllO')
Would both result in "hello"
['A', 'B'].downcase()
downcase(['A', 'B'])
Would both result in ['a', 'b']
{'A' => 'HEllO', 'B' => 'GOODBYE'}.downcase()
Would result in {'a' => 'hello', 'b' => 'goodbye'}
['A', 'B', ['C', ['D']], {'X' => 'Y'}].downcase
Would result in ['a', 'b', ['c', ['d']], {'x' => 'y'}]
Signature 1
downcase(Numeric $arg)
Signature 2
downcase(String $arg)
Signature 3
downcase(Array[StringData] $arg)
Signature 4
downcase(Hash[StringData, StringData] $arg)
each
Runs a lambda repeatedly using each value in a data structure, then returns the values unchanged.
This function takes two mandatory arguments, in this order:
1.
An array, hash, or other iterable object that the function will iterate over.
2.
A lambda, which the function calls for each element in the first argument. It can request one or two parameters.
$data.each |$parameter| { <PUPPET CODE BLOCK> }
or
each($data) |$parameter| { <PUPPET CODE BLOCK> }
When the first argument ($data in the above example) is an array, Puppet passes each value in turn to the lambda,
then returns the original values.
# For the array $data, run a lambda that creates a resource for each item.
$data = ["routers", "servers", "workstations"]
$data.each |$item| {
notify { $item:
message => $item
}
}
# Puppet creates one resource for each of the three items in $data. Each
resource is
# named after the item's value and uses the item's value in a parameter.
© 2024 Puppet, Inc., a Perforce company

Puppet | Syntax and settings | 725
When the first argument is a hash, Puppet passes each key and value pair to the lambda as an array in the form
[key, value] and returns the original hash.
# For the hash $data, run a lambda using each item as a key-value array that
creates a
# resource for each item.
$data = {"rtr" => "Router", "svr" => "Server", "wks" => "Workstation"}
$data.each |$items| {
notify { $items[0]:
message => $items[1]
}
}
# Puppet creates one resource for each of the three items in $data, each
named after the
# item's key and containing a parameter using the item's value.
When the first argument is an array and the lambda has two parameters, Puppet passes the array's indexes
(enumerated from 0) in the first parameter and its values in the second parameter.
# For the array $data, run a lambda using each item's index and value that
creates a
# resource for each item.
$data = ["routers", "servers", "workstations"]
$data.each |$index, $value| {
notify { $value:
message => $index
}
}
# Puppet creates one resource for each of the three items in $data, each
named after the
# item's value and containing a parameter using the item's index.
When the first argument is a hash, Puppet passes its keys to the first parameter and its values to the second parameter.
# For the hash $data, run a lambda using each item's key and value to create
a resource
# for each item.
$data = {"rtr" => "Router", "svr" => "Server", "wks" => "Workstation"}
$data.each |$key, $value| {
notify { $key:
message => $value
}
}
# Puppet creates one resource for each of the three items in $data, each
named after the
# item's key and containing a parameter using the item's value.
For an example that demonstrates how to create multiple file resources using each, see the Puppet iteration
documentation.
Signature 1
each(Hash[Any, Any] $hash, Callable[2,2] &$block)
Signature 2
each(Hash[Any, Any] $hash, Callable[1,1] &$block)
Signature 3
each(Iterable $enumerable, Callable[2,2] &$block)
Signature 4
© 2024 Puppet, Inc., a Perforce company

Puppet | Syntax and settings | 726
each(Iterable $enumerable, Callable[1,1] &$block)
emerg
Logs a message on the server at level emerg.
emerg(Any *$values)
Parameters
• *values --- The values to log.
Return type(s): Undef.
empty
Returns true if the given argument is an empty collection of values.
This function can answer if one of the following is empty:
• Array, Hash - having zero entries
• String, Binary - having zero length
For backwards compatibility with the stdlib function with the same name the following data types are also accepted
by the function instead of raising an error. Using these is deprecated and will raise a warning:
• Numeric - false is returned for all Numeric values.
• Undef - true is returned for all Undef values.
notice([].empty)
notice(empty([]))
# would both notice 'true'
Signature 1
empty(Collection $coll)
Signature 2
empty(Sensitive[String] $str)
Signature 3
empty(String $str)
Signature 4
empty(Numeric $num)
Signature 5
empty(Binary $bin)
Signature 6
empty(Undef $x)
epp
Evaluates an Embedded Puppet (EPP) template file and returns the rendered text result as a String.
epp('<MODULE NAME>/<TEMPLATE FILE>', <PARAMETER HASH>)
The first argument to this function should be a <MODULE NAME>/<TEMPLATE FILE> reference, which loads
<TEMPLATE FILE> from <MODULE NAME>'s templates directory. In most cases, the last argument is optional;
if used, it should be a hash that contains parameters to pass to the template.
• See the template documentation for general template usage information.
• See the EPP syntax documentation for examples of EPP.
© 2024 Puppet, Inc., a Perforce company
Puppet | Syntax and settings | 727
For example, to call the apache module's templates/vhost/_docroot.epp template and pass the docroot
and virtual_docroot parameters, call the epp function like this:
epp('apache/vhost/_docroot.epp', { 'docroot' => '/var/www/html',
'virtual_docroot' => '/var/www/example' })
This function can also accept an absolute path, which can load a template file from anywhere on disk.
Puppet produces a syntax error if you pass more parameters than are declared in the template's parameter tag. When
passing parameters to a template that contains a parameter tag, use the same names as the tag's declared parameters.
Parameters are required only if they are declared in the called template's parameter tag without default values. Puppet
produces an error if the epp function fails to pass any required parameter.
epp(String $path, Optional[Hash[Pattern[/^\w+$/], Any]] $parameters)
err
Logs a message on the server at level err.
err(Any *$values)
Parameters
• *values --- The values to log.
Return type(s): Undef.
eyaml_lookup_key
The eyaml_lookup_key is a hiera 5 lookup_key data provider function. See the configuration guide
documentation for how to use this function.
eyaml_lookup_key(String[1] $key, Hash[String[1],Any] $options,
Puppet::LookupContext $context)
fail
Fail with a parse error. Any parameters will be stringified, concatenated, and passed to the exception-handler.
fail()
file
Loads a file from a module and returns its contents as a string.
The argument to this function should be a <MODULE NAME>/<FILE> reference, which will load <FILE> from a
module's files directory. (For example, the reference mysql/mysqltuner.pl will load the file <MODULES
DIRECTORY>/mysql/files/mysqltuner.pl.)
This function can also accept:
• An absolute path, which can load a file from anywhere on disk.
• Multiple arguments, which will return the contents of the first file found, skipping any files that don't exist.
file()
filter
Applies a lambda to every value in a data structure and returns an array or hash containing any elements for which the
lambda evaluates to a truthy value (not false or undef).
This function takes two mandatory arguments, in this order:
1.
An array, hash, or other iterable object that the function will iterate over.
2.
A lambda, which the function calls for each element in the first argument. It can request one or two parameters.
$filtered_data = $data.filter |$parameter| { <PUPPET CODE BLOCK> }
© 2024 Puppet, Inc., a Perforce company

Puppet | Syntax and settings | 728
or
$filtered_data = filter($data) |$parameter| { <PUPPET CODE BLOCK> }
When the first argument ($data in the above example) is an array, Puppet passes each value in turn to the lambda
and returns an array containing the results.
# For the array $data, return an array containing the values that end with
"berry"
$data = ["orange", "blueberry", "raspberry"]
$filtered_data = $data.filter |$items| { $items =~ /berry$/ }
# $filtered_data = [blueberry, raspberry]
When the first argument is a hash, Puppet passes each key and value pair to the lambda as an array in the form
[key, value] and returns a hash containing the results.
# For the hash $data, return a hash containing all values of keys that end
with "berry"
$data = { "orange" => 0, "blueberry" => 1, "raspberry" => 2 }
$filtered_data = $data.filter |$items| { $items[0] =~ /berry$/ }
# $filtered_data = {blueberry => 1, raspberry => 2}
When the first argument is an array and the lambda has two parameters, Puppet passes the array's indexes
(enumerated from 0) in the first parameter and its values in the second parameter.
# For the array $data, return an array of all keys that both end with
"berry" and have
# an even-numbered index
$data = ["orange", "blueberry", "raspberry"]
$filtered_data = $data.filter |$indexes, $values| { $indexes % 2 == 0 and
$values =~ /berry$/ }
# $filtered_data = [raspberry]
When the first argument is a hash, Puppet passes its keys to the first parameter and its values to the second parameter.
# For the hash $data, return a hash of all keys that both end with "berry"
and have
# values less than or equal to 1
$data = { "orange" => 0, "blueberry" => 1, "raspberry" => 2 }
$filtered_data = $data.filter |$keys, $values| { $keys =~ /berry$/ and
$values <= 1 }
# $filtered_data = {blueberry => 1}
Signature 1
filter(Hash[Any, Any] $hash, Callable[2,2] &$block)
Signature 2
filter(Hash[Any, Any] $hash, Callable[1,1] &$block)
Signature 3
filter(Iterable $enumerable, Callable[2,2] &$block)
Signature 4
filter(Iterable $enumerable, Callable[1,1] &$block)
find_file
Finds an existing file from a module and returns its path.
© 2024 Puppet, Inc., a Perforce company

Puppet | Syntax and settings | 729
This function accepts an argument that is a String as a <MODULE NAME>/<FILE> reference, which searches for
<FILE> relative to a module's files directory. (For example, the reference mysql/mysqltuner.pl will search
for the file <MODULES DIRECTORY>/mysql/files/mysqltuner.pl.)
If this function is run via puppet agent, it checks for file existence on the Puppet Primary server. If run via puppet
apply, it checks on the local host. In both cases, the check is performed before any resources are changed.
This function can also accept:
• An absolute String path, which checks for the existence of a file from anywhere on disk.
• Multiple String arguments, which returns the path of the first file found, skipping nonexistent files.
• An array of string paths, which returns the path of the first file found from the given paths in the array, skipping
nonexistent files.
The function returns undef if none of the given paths were found.
Signature 1
find_file(String *$paths)
Signature 2
find_file(Array[String] *$paths_array)
find_template
Finds an existing template from a module and returns its path.
This function accepts an argument that is a String as a <MODULE NAME>/<TEMPLATE> reference, which searches
for <TEMPLATE> relative to a module's templates directory on the primary server. (For example, the reference
mymod/secret.conf.epp will search for the file <MODULES DIRECTORY>/mymod/templates/
secret.conf.epp.)
The primary use case is for agent-side template rendering with late-bound variables resolved, such as from secret
stores inaccessible to the primary server, such as
$variables = {
'password' => Deferred('vault_lookup::lookup',
['secret/mymod', 'https://vault.example.com:8200']),
}
# compile the template source into the catalog
file { '/etc/secrets.conf':
ensure => file,
content => Deferred('inline_epp',
[find_template('mymod/secret.conf.epp').file, $variables]),
}
This function can also accept:
• An absolute String path, which checks for the existence of a template from anywhere on disk.
• Multiple String arguments, which returns the path of the first template found, skipping nonexistent files.
• An array of string paths, which returns the path of the first template found from the given paths in the array,
skipping nonexistent files.
The function returns undef if none of the given paths were found.
Signature 1
find_template(String *$paths)
Signature 2
find_template(Array[String] *$paths_array)
© 2024 Puppet, Inc., a Perforce company

Puppet | Syntax and settings | 730
flatten
Returns a flat Array produced from its possibly deeply nested given arguments.
One or more arguments of any data type can be given to this function. The result is always a flat array representation
where any nested arrays are recursively flattened.
flatten(['a', ['b', ['c']]])
# Would return: ['a','b','c']
To flatten other kinds of iterables (for example hashes, or intermediate results like from a reverse_each) first
convert the result to an array using Array($x), or $x.convert_to(Array). See the new function for details
and options when performing a conversion.
$hsh = { a => 1, b => 2}
# -- without conversion
$hsh.flatten()
# Would return [{a => 1, b => 2}]
# -- with conversion
$hsh.convert_to(Array).flatten()
# Would return [a,1,b,2]
flatten(Array($hsh))
# Would also return [a,1,b,2]
$a1 = [1, [2, 3]]
$a2 = [[4,[5,6]]
$x = 7
flatten($a1, $a2, $x)
# would return [1,2,3,4,5,6,7]
flatten(42)
# Would return [42]
flatten([42])
# Would also return [42]
flatten(Any *$args)
floor
Returns the largest Integer less or equal to the argument. Takes a single numeric value as an argument.
This function is backwards compatible with the same function in stdlib and accepts a Numeric value. A String
that can be converted to a floating point number can also be used in this version - but this is deprecated.
In general convert string input to Numeric before calling this function to have full control over how the conversion
is done.
Signature 1
floor(Numeric $val)
Signature 2
floor(String $val)
fqdn_rand
Usage: fqdn_rand(MAX, [SEED], [DOWNCASE]). MAX is required and must be a positive integer; SEED is
optional and may be any number or string; DOWNCASE is optional and should be a boolean true or false.
© 2024 Puppet, Inc., a Perforce company

Puppet | Syntax and settings | 731
Generates a random Integer number greater than or equal to 0 and less than MAX, combining the $fqdn fact and the
value of SEED for repeatable randomness. (That is, each node will get a different random number from this function,
but a given node's result will be the same every time unless its hostname changes.) If DOWNCASE is true, then the
fqdn fact will be downcased when computing the value so that the result is not sensitive to the case of the fqdn
fact.
This function is usually used for spacing out runs of resource-intensive cron tasks that run on many nodes, which
could cause a thundering herd or degrade other services if they all fire at once. Adding a SEED can be useful
when you have more than one such task and need several unrelated random numbers per node. (For example,
fqdn_rand(30), fqdn_rand(30, 'expensive job 1'), and fqdn_rand(30, 'expensive job
2') will produce totally different numbers.)
fqdn_rand()
generate
Calls an external command on the Puppet master and returns the results of the command. Any arguments are passed
to the external command as arguments. If the generator does not exit with return code of 0, the generator is considered
to have failed and a parse error is thrown. Generators can only have file separators, alphanumerics, dashes, and
periods in them. This function will attempt to protect you from malicious generator calls (e.g., those with '..' in them),
but it can never be entirely safe. No subshell is used to execute generators, so all shell metacharacters are passed
directly to the generator, and all metacharacters are returned by the function. Consider cleaning white space from any
string generated.
generate()
get
Digs into a value with dot notation to get a value from within a structure.
To dig into a given value, call the function with (at least) two arguments:
• The first argument must be an Array, or Hash. Value can also be undef (which also makes the result undef
unless a default value is given).
• The second argument must be a dot notation navigation string.
• The optional third argument can be any type of value and it is used as the default value if the function would
otherwise return undef.
• An optional lambda for error handling taking one Error argument.
Dot notation navigation string - The dot string consists of period . separated segments where each segment is either
the index into an array or the value of a hash key. If a wanted key contains a period it must be quoted to avoid it being
taken as a segment separator. Quoting can be done with either single quotes ' or double quotes ". If a segment is a
decimal number it is converted to an Integer index. This conversion can be prevented by quoting the value.
#get($facts, 'os.family')
$facts.get('os.family')
Would both result in the value of $facts['os']['family']
get([1,2,[{'name' =>'waldo'}]], '2.0.name')
Would result in 'waldo'
get([1,2,[{'name' =>'waldo'}]], '2.1.name', 'not waldo')
Would result in 'not waldo'
$x = [1, 2, { 'readme.md' => "This is a readme."}]
© 2024 Puppet, Inc., a Perforce company

Puppet | Syntax and settings | 732
$x.get('2."readme.md"')
$x = [1, 2, { '10' => "ten"}]
$x.get('2."0"')
Error Handling - There are two types of common errors that can be handled by giving the function a code block
to execute. (A third kind or error; when the navigation string has syntax errors (for example an empty segment or
unbalanced quotes) will always raise an error).
The given block will be given an instance of the Error data type, and it has methods to extract msg, issue_code,
kind, and details.
The msg will be a preformatted message describing the error. This is the error message that would have surfaced if
there was no block to handle the error.
The kind is the string 'SLICE_ERROR' for both kinds of errors, and the issue_code is either
the string 'EXPECTED_INTEGER_INDEX' for an attempt to index into an array with a String, or
'EXPECTED_COLLECTION' for an attempt to index into something that is not a Collection.
The details is a Hash that for both issue codes contain the entry 'walked_path' which is an Array with each
key in the progression of the dig up to the place where the error occurred.
For an EXPECTED_INTEGER_INDEX-issue the detail 'index_type' is set to the data type of the index value
and for an 'EXPECTED_COLLECTION'-issue the detail 'value_type' is set to the type of the value.
The logic in the error handling block can inspect the details, and either call fail() with a custom error message or
produce the wanted value.
If the block produces undef it will not be replaced with a given default value.
$x = 'blue'
$x.get('0.color', 'green') |$error| { undef } # result is undef
$y = ['blue']
$y.get('color', 'green') |$error| { undef } # result is undef
$x = [1, 2, ['blue']]
$x.get('2.color') |$error| {
notice("Walked path is ${error.details['walked_path']}")
}
Would notice Walked path is [2, color]
Also see:
• getvar() that takes the first segment to be the name of a variable and then delegates to this function.
• dig() function which is similar but uses an array of navigation values instead of a dot notation string.
get(Any $value, String $dotted_string, Optional[Any] $default_value,
Optional[Callable[1,1]] &$block)
getvar
Digs into a variable with dot notation to get a value from a structure.
To get the value from a variable (that may or may not exist), call the function with one or two arguments:
• The first argument must be a string, and must start with a variable name without leading $, for example
get('facts'). The variable name can be followed by a dot notation navigation string to dig out a value in the
array or hash value of the variable.
• The optional second argument can be any type of value and it is used as the default value if the function would
otherwise return undef.
• An optional lambda for error handling taking one Error argument.
© 2024 Puppet, Inc., a Perforce company

Puppet | Syntax and settings | 733
Dot notation navigation string - The dot string consists of period . separated segments where each segment is either
the index into an array or the value of a hash key. If a wanted key contains a period it must be quoted to avoid it being
taken as a segment separator. Quoting can be done with either single quotes ' or double quotes ". If a segment is a
decimal number it is converted to an Integer index. This conversion can be prevented by quoting the value.
getvar('facts') # results in the value of $facts
getvar('facts.os.family') # results in the value of $facts['os']['family']
$x = [1,2,[{'name' =>'waldo'}]]
getvar('x.2.1.name', 'not waldo')
# results in 'not waldo'
For further examples and how to perform error handling, see the get() function which this function delegates to
after having resolved the variable value.
getvar(Pattern[/\A(?:::)?(?:[a-z]\w*::)*[a-z_]\w*(?:.|\Z)/] $get_string,
Optional[Any] $default_value, Optional[Callable[1,1]] &$block)
group_by
Groups the collection by result of the block. Returns a hash where the keys are the evaluated result from the block and
the values are arrays of elements in the collection that correspond to the key.
Signature 1
group_by(Collection $collection, Callable[1,1] &$block)
Parameters
• collection --- A collection of things to group.
Return type(s): Hash.
Examples
Group array of strings by length, results in e.g. { 1 => [a, b], 2 => [ab] }
[a, b, ab].group_by |$s| { $s.length }
Group array of strings by length and index, results in e.g. {1 => ['a'], 2 => ['b', 'ab']}
[a, b, ab].group_by |$i, $s| { $i%2 + $s.length }
Group hash iterating by key-value pair, results in e.g. { 2 => [['a', [1, 2]]], 1 => [['b', [1]]] }
{ a => [1, 2], b => [1] }.group_by |$kv| { $kv[1].length }
Group hash iterating by key and value, results in e.g. { 2 => [['a', [1, 2]]], 1 => [['b', [1]]] }
{ a => [1, 2], b => [1] }.group_by |$k, $v| { $v.length }
Signature 2
group_by(Array $array, Callable[2,2] &$block)
Signature 3
group_by(Collection $collection, Callable[2,2] &$block)
© 2024 Puppet, Inc., a Perforce company

Puppet | Syntax and settings | 734
hiera
Performs a standard priority lookup of the hierarchy and returns the most specific value for a given key. The returned
value can be any type of data.
This function is deprecated in favor of the lookup function. While this function continues to work, it does not
support:
• lookup_options stored in the data
• lookup across global, environment, and module layers
The function takes up to three arguments, in this order:
1.
A string key that Hiera searches for in the hierarchy. Required.
2.
An optional default value to return if Hiera doesn't find anything matching the key.
• If this argument isn't provided and this function results in a lookup failure, Puppet fails with a compilation
error.
3.
The optional name of an arbitrary hierarchy level to insert at the top of the hierarchy. This lets you temporarily
modify the hierarchy for a single lookup.
• If Hiera doesn't find a matching key in the overriding hierarchy level, it continues searching the rest of the
hierarchy.
The hiera function does not find all matches throughout a hierarchy, instead returning the first specific value
starting at the top of the hierarchy. To search throughout a hierarchy, use the hiera_array or hiera_hash
functions.
# Assuming hiera.yaml
# :hierarchy:
# - web01.example.com
# - common
# Assuming web01.example.com.yaml:
# users:
# - "Amy Barry"
# - "Carrie Douglas"
# Assuming common.yaml:
users:
admins:
- "Edith Franklin"
- "Ginny Hamilton"
regular:
- "Iris Jackson"
- "Kelly Lambert"
# Assuming we are not web01.example.com:
$users = hiera('users', undef)
# $users contains {admins => ["Edith Franklin", "Ginny Hamilton"],
# regular => ["Iris Jackson", "Kelly Lambert"]}
You can optionally generate the default value with a lambda that takes one parameter.
# Assuming the same Hiera data as the previous example:
$users = hiera('users') | $key | { "Key \'${key}\' not found" }
# $users contains {admins => ["Edith Franklin", "Ginny Hamilton"],
# regular => ["Iris Jackson", "Kelly Lambert"]}
# If hiera couldn't match its key, it would return the lambda result,
© 2024 Puppet, Inc., a Perforce company

Puppet | Syntax and settings | 735
# "Key 'users' not found".
The returned value's data type depends on the types of the results. In the example above, Hiera matches the 'users' key
and returns it as a hash.
See the 'Using the lookup function' documentation for how to perform lookup of data. Also see the 'Using the
deprecated hiera functions' documentation for more information about the Hiera 3 functions.
hiera()
hiera_array
Finds all matches of a key throughout the hierarchy and returns them as a single flattened array of unique values.
If any of the matched values are arrays, they're flattened and included in the results. This is called an array merge
lookup.
This function is deprecated in favor of the lookup function. While this function continues to work, it does not
support:
• lookup_options stored in the data
• lookup across global, environment, and module layers
The hiera_array function takes up to three arguments, in this order:
1.
A string key that Hiera searches for in the hierarchy. Required.
2.
An optional default value to return if Hiera doesn't find anything matching the key.
• If this argument isn't provided and this function results in a lookup failure, Puppet fails with a compilation
error.
3.
The optional name of an arbitrary hierarchy level to insert at the top of the hierarchy. This lets you temporarily
modify the hierarchy for a single lookup.
• If Hiera doesn't find a matching key in the overriding hierarchy level, it continues searching the rest of the
hierarchy.
# Assuming hiera.yaml
# :hierarchy:
# - web01.example.com
# - common
# Assuming common.yaml:
# users:
# - 'cdouglas = regular'
# - 'efranklin = regular'
# Assuming web01.example.com.yaml:
# users: 'abarry = admin'
$allusers = hiera_array('users', undef)
# $allusers contains ["cdouglas = regular", "efranklin = regular", "abarry =
admin"].
You can optionally generate the default value with a lambda that takes one parameter.
# Assuming the same Hiera data as the previous example:
$allusers = hiera_array('users') | $key | { "Key \'${key}\' not found" }
# $allusers contains ["cdouglas = regular", "efranklin = regular", "abarry =
admin"].
# If hiera_array couldn't match its key, it would return the lambda result,
© 2024 Puppet, Inc., a Perforce company

Puppet | Syntax and settings | 736
# "Key 'users' not found".
hiera_array expects that all values returned will be strings or arrays. If any matched value is a hash, Puppet raises
a type mismatch error.
See the 'Using the lookup function' documentation for how to perform lookup of data. Also see the 'Using the
deprecated hiera functions' documentation for more information about the Hiera 3 functions.
hiera_array()
hiera_hash
Finds all matches of a key throughout the hierarchy and returns them in a merged hash.
This function is deprecated in favor of the lookup function. While this function continues to work, it does not
support:
• lookup_options stored in the data
• lookup across global, environment, and module layers
If any of the matched hashes share keys, the final hash uses the value from the highest priority match. This is called a
hash merge lookup.
The merge strategy is determined by Hiera's :merge_behavior setting.
The hiera_hash function takes up to three arguments, in this order:
1.
A string key that Hiera searches for in the hierarchy. Required.
2.
An optional default value to return if Hiera doesn't find anything matching the key.
• If this argument isn't provided and this function results in a lookup failure, Puppet fails with a compilation
error.
3.
The optional name of an arbitrary hierarchy level to insert at the top of the hierarchy. This lets you temporarily
modify the hierarchy for a single lookup.
• If Hiera doesn't find a matching key in the overriding hierarchy level, it continues searching the rest of the
hierarchy.
# Assuming hiera.yaml
# :hierarchy:
# - web01.example.com
# - common
# Assuming common.yaml:
# users:
# regular:
# 'cdouglas': 'Carrie Douglas'
# Assuming web01.example.com.yaml:
# users:
# administrators:
# 'aberry': 'Amy Berry'
# Assuming we are not web01.example.com:
$allusers = hiera_hash('users', undef)
# $allusers contains {regular => {"cdouglas" => "Carrie Douglas"},
# administrators => {"aberry" => "Amy Berry"}}
You can optionally generate the default value with a lambda that takes one parameter.
# Assuming the same Hiera data as the previous example:
© 2024 Puppet, Inc., a Perforce company

Puppet | Syntax and settings | 737
$allusers = hiera_hash('users') | $key | { "Key \'${key}\' not found" }
# $allusers contains {regular => {"cdouglas" => "Carrie Douglas"},
# administrators => {"aberry" => "Amy Berry"}}
# If hiera_hash couldn't match its key, it would return the lambda result,
# "Key 'users' not found".
hiera_hash expects that all values returned will be hashes. If any of the values found in the data sources are
strings or arrays, Puppet raises a type mismatch error.
See the 'Using the lookup function' documentation for how to perform lookup of data. Also see the 'Using the
deprecated hiera functions' documentation for more information about the Hiera 3 functions.
hiera_hash()
hiera_include
Assigns classes to a node using an array merge lookup that retrieves the value for a user-specified key from Hiera's
data.
This function is deprecated in favor of the lookup function in combination with include. While this function
continues to work, it does not support:
• lookup_options stored in the data
• lookup across global, environment, and module layers
# In site.pp, outside of any node definitions and below any top-scope
variables:
lookup('classes', Array[String], 'unique').include
The hiera_include function requires:
• A string key name to use for classes.
• A call to this function (i.e. hiera_include('classes')) in your environment's sites.pp manifest,
outside of any node definitions and below any top-scope variables that Hiera uses in lookups.
• classes keys in the appropriate Hiera data sources, with an array for each classes key and each value of the
array containing the name of a class.
The function takes up to three arguments, in this order:
1.
A string key that Hiera searches for in the hierarchy. Required.
2.
An optional default value to return if Hiera doesn't find anything matching the key.
• If this argument isn't provided and this function results in a lookup failure, Puppet fails with a compilation
error.
3.
The optional name of an arbitrary hierarchy level to insert at the top of the hierarchy. This lets you temporarily
modify the hierarchy for a single lookup.
• If Hiera doesn't find a matching key in the overriding hierarchy level, it continues searching the rest of the
hierarchy.
The function uses an array merge lookup to retrieve the classes array, so every node gets every class from the
hierarchy.
# Assuming hiera.yaml
# :hierarchy:
# - web01.example.com
# - common
# Assuming web01.example.com.yaml:
# classes:
# - apache::mod::php
© 2024 Puppet, Inc., a Perforce company

Puppet | Syntax and settings | 738
# Assuming common.yaml:
# classes:
# - apache
# In site.pp, outside of any node definitions and below any top-scope
variables:
hiera_include('classes', undef)
# Puppet assigns the apache and apache::mod::php classes to the
web01.example.com node.
You can optionally generate the default value with a lambda that takes one parameter.
# Assuming the same Hiera data as the previous example:
# In site.pp, outside of any node definitions and below any top-scope
variables:
hiera_include('classes') | $key | {"Key \'${key}\' not found" }
# Puppet assigns the apache and apache::mod::php classes to the
web01.example.com node.
# If hiera_include couldn't match its key, it would return the lambda
result,
# "Key 'classes' not found".
See the 'Using the lookup function' documentation for how to perform lookup of data. Also see the 'Using the
deprecated hiera functions' documentation for more information about the Hiera 3 functions.
hiera_include()
hocon_data
The hocon_data is a hiera 5 data_hash data provider function. See the configuration guide documentation for
how to use this function.
Note that this function is not supported without a hocon library being present.
hocon_data(Struct[{path=>String[1]}] $options, Puppet::LookupContext $context)
import
The import function raises an error when called to inform the user that import is no longer supported.
import(Any *$args)
include
Declares one or more classes, causing the resources in them to be evaluated and added to the catalog. Accepts a class
name, an array of class names, or a comma-separated list of class names.
The include function can be used multiple times on the same class and will only declare a given class once. If a
class declared with include has any parameters, Puppet will automatically look up values for them in Hiera, using
<class name>::<parameter name> as the lookup key.
Contrast this behavior with resource-like class declarations (class {'name': parameter => 'value',}),
which must be used in only one place per class and can directly set parameters. You should avoid using both
include and resource-like declarations with the same class.
The include function does not cause classes to be contained in the class where they are declared. For that, see the
contain function. It also does not create a dependency relationship between the declared class and the surrounding
class; for that, see the require function.
You must use the class's full name; relative names are not allowed. In addition to names in string form, you may also
directly use Class and Resource Type-values that are produced by the resource and relationship expressions.
© 2024 Puppet, Inc., a Perforce company

Puppet | Syntax and settings | 739
• Since < 3.0.0
• Since 4.0.0 support for class and resource type values, absolute names
• Since 4.7.0 returns an Array[Type[Class]] of all included classes
include(Any *$names)
index
Returns the index (or key in a hash) to a first-found value in an Iterable value.
When called with a lambda the lambda is called repeatedly using each value in a data structure until the lambda
returns a "truthy" value which makes the function return the index or key, or if the end of the iteration is reached,
undef is returned.
This function can be called in two different ways; with a value to be searched for, or with a lambda that determines if
an entry in the iterable matches.
When called with a lambda the function takes two mandatory arguments, in this order:
1.
An array, hash, string, or other iterable object that the function will iterate over.
2.
A lambda, which the function calls for each element in the first argument. It can request one (value) or two (index/
key, value) parameters.
$data.index |$parameter| { <PUPPET CODE BLOCK> }
or
index($data) |$parameter| { <PUPPET CODE BLOCK> }
$data = ["routers", "servers", "workstations"]
notice $data.index |$value| { $value == 'servers' } # notices 1
notice $data.index |$value| { $value == 'hosts' } # notices undef
$data = {types => ["routers", "servers", "workstations"], colors => ['red',
'blue', 'green']}
notice $data.index |$value| { 'servers' in $value } # notices 'types'
notice $data.index |$value| { 'red' in $value } # notices 'colors'
Note that the lambda gets the value and not an array with [key, value] as in other iterative functions.
Using a lambda that accepts two values works the same way. The lambda gets the index/key as the first parameter and
the value as the second parameter.
# Find the first even numbered index that has a non String value
$data = [key1, 1, 3, 5]
notice $data.index |$idx, $value| { $idx % 2 == 0 and $value !~ String } #
notices 2
When called on a String, the lambda is given each character as a value. What is typically wanted is to find a
sequence of characters which is achieved by calling the function with a value to search for instead of giving a lambda.
# Find first occurrence of 'ah'
$data = "blablahbleh"
notice $data.index('ah') # notices 5
# Find first occurrence of 'la' or 'le'
$data = "blablahbleh"
notice $data.index(/l(a|e)/ # notices 1
When searching in a String with a given value that is neither String nor Regexp the answer is always undef.
When searching in any other iterable, the value is matched against each value in the iteration using strict Ruby ==
© 2024 Puppet, Inc., a Perforce company

Puppet | Syntax and settings | 740
semantics. If Puppet Language semantics are wanted (where string compare is case insensitive) use a lambda and the
== operator in Puppet.
$data = ['routers', 'servers', 'WORKstations']
notice $data.index('servers') # notices 1
notice $data.index('workstations') # notices undef (not matching case)
For an general examples that demonstrates iteration, see the Puppet iteration documentation.
Signature 1
index(Hash[Any, Any] $hash, Callable[2,2] &$block)
Signature 2
index(Hash[Any, Any] $hash, Callable[1,1] &$block)
Signature 3
index(Iterable $enumerable, Callable[2,2] &$block)
Signature 4
index(Iterable $enumerable, Callable[1,1] &$block)
Signature 5
index(String $str, Variant[String,Regexp] $match)
Signature 6
index(Iterable $enumerable, Any $match)
info
Logs a message on the server at level info.
info(Any *$values)
Parameters
• *values --- The values to log.
Return type(s): Undef.
inline_epp
Evaluates an Embedded Puppet (EPP) template string and returns the rendered text result as a String.
inline_epp('<EPP TEMPLATE STRING>', <PARAMETER HASH>)
The first argument to this function should be a string containing an EPP template. In most cases, the last argument is
optional; if used, it should be a hash that contains parameters to pass to the template.
• See the template documentation for general template usage information.
• See the EPP syntax documentation for examples of EPP.
For example, to evaluate an inline EPP template and pass it the docroot and virtual_docroot parameters, call
the inline_epp function like this:
inline_epp('docroot: <%= $docroot %> Virtual docroot: <%= $virtual_docroot
%>', { 'docroot' => '/var/www/html', 'virtual_docroot' => '/var/www/
example' })
Puppet produces a syntax error if you pass more parameters than are declared in the template's parameter tag. When
passing parameters to a template that contains a parameter tag, use the same names as the tag's declared parameters.
Parameters are required only if they are declared in the called template's parameter tag without default values. Puppet
produces an error if the inline_epp function fails to pass any required parameter.
© 2024 Puppet, Inc., a Perforce company

Puppet | Syntax and settings | 741
An inline EPP template should be written as a single-quoted string or heredoc. A double-quoted string is subject to
expression interpolation before the string is parsed as an EPP template.
For example, to evaluate an inline EPP template using a heredoc, call the inline_epp function like this:
# Outputs 'Hello given argument planet!'
inline_epp(@(END), { x => 'given argument' })
<%- | $x, $y = planet | -%>
Hello <%= $x %> <%= $y %>!
END
inline_epp(String $template, Optional[Hash[Pattern[/^\w+$/], Any]]
$parameters)
inline_template
Evaluate a template string and return its value. See the templating docs for more information. Note that if multiple
template strings are specified, their output is all concatenated and returned as the output of the function.
inline_template()
join
Joins the values of an Array into a string with elements separated by a delimiter.
Supports up to two arguments
• values - first argument is required and must be an an Array
• delimiter - second arguments is the delimiter between elements, must be a String if given, and defaults to an
empty string.
join(['a','b','c'], ",")
# Would result in: "a,b,c"
Note that array is flattened before elements are joined, but flattening does not extend to arrays nested in hashes or
other objects.
$a = [1,2, undef, 'hello', [x,y,z], {a => 2, b => [3, 4]}]
notice join($a, ', ')
# would result in noticing:
# 1, 2, , hello, x, y, z, {"a"=>2, "b"=>[3, 4]}
For joining iterators and other containers of elements a conversion must first be made to an Array. The reason for
this is that there are many options how such a conversion should be made.
[1,2,3].reverse_each.convert_to(Array).join(', ')
# would result in: "3, 2, 1"
{a => 1, b => 2}.convert_to(Array).join(', ')
# would result in "a, 1, b, 2"
For more detailed control over the formatting (including indentations and line breaks, delimiters around arrays
and hash entries, between key/values in hash entries, and individual formatting of values in the array) see the new
function for String and its formatting options for Array and Hash.
join(Array $arg, Optional[String] $delimiter)
json_data
The json_data is a hiera 5 data_hash data provider function. See the configuration guide documentation for
how to use this function.
© 2024 Puppet, Inc., a Perforce company

Puppet | Syntax and settings | 742
json_data(Struct[{path=>String[1]}] $options, Puppet::LookupContext $context)
keys
Returns the keys of a hash as an Array
$hsh = {"apples" => 3, "oranges" => 4 }
$hsh.keys()
keys($hsh)
# both results in the array ["apples", "oranges"]
• Note that a hash in the puppet language accepts any data value (including undef) unless it is constrained with a
Hash data type that narrows the allowed data types.
• For an empty hash, an empty array is returned.
• The order of the keys is the same as the order in the hash (typically the order in which they were added).
keys(Hash $hsh)
length
Returns the length of an Array, Hash, String, or Binary value.
The returned value is a positive integer indicating the number of elements in the container; counting (possibly
multibyte) characters for a String, bytes in a Binary, number of elements in an Array, and number of key-value
associations in a Hash.
"roses".length() # 5
length("violets") # 7
[10, 20].length # 2
{a => 1, b => 3}.length # 2
Signature 1
length(Collection $arg)
Signature 2
length(String $arg)
Signature 3
length(Binary $arg)
lest
Calls a lambda without arguments if the value given to lest is undef. Returns the result of calling the lambda if the
argument is undef, otherwise the given argument.
The lest function is useful in a chain of then calls, or in general as a guard against undef values. The function
can be used to call fail, or to return a default value.
These two expressions are equivalent:
if $x == undef { do_things() }
lest($x) || { do_things() }
$data = {a => [ b, c ] }
notice $data.dig(a, b, c)
.then |$x| { $x * 2 }
.lest || { fail("no value for $data[a][b][c]" }
Would fail the operation because $data[a][b][c] results in undef (there is no b key in a).
© 2024 Puppet, Inc., a Perforce company

Puppet | Syntax and settings | 743
In contrast - this example:
$data = {a => { b => { c => 10 } } }
notice $data.dig(a, b, c)
.then |$x| { $x * 2 }
.lest || { fail("no value for $data[a][b][c]" }
Would notice the value 20
lest(Any $arg, Callable[0,0] &$block)
lookup
Uses the Puppet lookup system to retrieve a value for a given key. By default, this returns the first value found
(and fails compilation if no values are available), but you can configure it to merge multiple values into one, fail
gracefully, and more.
When looking up a key, Puppet will search up to three tiers of data, in the following order:
1.
Hiera.
2.
The current environment's data provider.
3.
The indicated module's data provider, if the key is of the form <MODULE NAME>::<SOMETHING>.
Arguments
You must provide the name of a key to look up, and can optionally provide other arguments. You can combine these
arguments in the following ways:
• lookup( <NAME>, [<VALUE TYPE>], [<MERGE BEHAVIOR>], [<DEFAULT VALUE>] )
• lookup( [<NAME>], <OPTIONS HASH> )
• lookup( as above ) |$key| { # lambda returns a default value }
Arguments in [square brackets] are optional.
The arguments accepted by lookup are as follows:
1.
<NAME> (string or array) --- The name of the key to look up.
• This can also be an array of keys. If Puppet doesn't find anything for the first key, it will try again with the
subsequent ones, only resorting to a default value if none of them succeed.
2.
<VALUE TYPE> (data type) --- A data type that must match the retrieved value; if not, the lookup (and catalog
compilation) will fail. Defaults to Data (accepts any normal value).
3.
<MERGE BEHAVIOR> (string or hash; see "Merge Behaviors" below) --- Whether (and how) to combine
multiple values. If present, this overrides any merge behavior specified in the data sources. Defaults to no value;
Puppet will use merge behavior from the data sources if present, and will otherwise do a first-found lookup.
4.
<DEFAULT VALUE> (any normal value) --- If present, lookup returns this when it can't find a normal value.
Default values are never merged with found values. Like a normal value, the default must match the value type.
Defaults to no value; if Puppet can't find a normal value, the lookup (and compilation) will fail.
5.
<OPTIONS HASH> (hash) --- Alternate way to set the arguments above, plus some less-common extra options. If
you pass an options hash, you can't combine it with any regular arguments (except <NAME>). An options hash can
have the following keys:
• 'name' --- Same as <NAME> (argument 1). You can pass this as an argument or in the hash, but not both.
• 'value_type' --- Same as <VALUE TYPE> (argument 2).
• 'merge' --- Same as <MERGE BEHAVIOR> (argument 3).
• 'default_value' --- Same as <DEFAULT VALUE> (argument 4).
• 'default_values_hash' (hash) --- A hash of lookup keys and default values. If Puppet can't find
a normal value, it will check this hash for the requested key before giving up. You can combine this with
© 2024 Puppet, Inc., a Perforce company
Puppet | Syntax and settings | 744
default_value or a lambda, which will be used if the key isn't present in this hash. Defaults to an empty
hash.
• 'override' (hash) --- A hash of lookup keys and override values. Puppet will check for the requested key
in the overrides hash first; if found, it returns that value as the final value, ignoring merge behavior. Defaults
to an empty hash.
Finally, lookup can take a lambda, which must accept a single parameter. This is yet another way to set a default
value for the lookup; if no results are found, Puppet will pass the requested key to the lambda and use its result as the
default value.
Merge Behaviors
Puppet lookup uses a hierarchy of data sources, and a given key might have values in multiple sources. By default,
Puppet returns the first value it finds, but it can also continue searching and merge all the values together.
Note: Data sources can use the special lookup_options metadata key to request a specific merge
behavior for a key. The lookup function will use that requested behavior unless you explicitly specify
one.
The valid merge behaviors are:
• 'first' --- Returns the first value found, with no merging. Puppet lookup's default behavior.
• 'unique' (called "array merge" in classic Hiera) --- Combines any number of arrays and scalar values to return
a merged, flattened array with all duplicate values removed. The lookup will fail if any hash values are found.
• 'hash' --- Combines the keys and values of any number of hashes to return a merged hash. If the same
key exists in multiple source hashes, Puppet will use the value from the highest-priority data source; it won't
recursively merge the values.
• 'deep' --- Combines the keys and values of any number of hashes to return a merged hash. If the same key
exists in multiple source hashes, Puppet will recursively merge hash or array values (with duplicate values
removed from arrays). For conflicting scalar values, the highest-priority value will win.
• {'strategy' => 'first'}, {'strategy' => 'unique'}, or {'strategy' => 'hash'} ---
Same as the string versions of these merge behaviors.
• {'strategy' => 'deep', <DEEP OPTION> => <VALUE>, ...} --- Same as 'deep', but can
adjust the merge with additional options. The available options are:
• 'knockout_prefix' (string) --- A string prefix to indicate a value should be removed from the final
result. If a value is exactly equal to the prefix, it will knockout the entire element. Defaults to undef, which
disables this feature.
• 'sort_merged_arrays' (boolean) --- Whether to sort all arrays that are merged together. Defaults to
false.
• 'merge_hash_arrays' (boolean) --- Whether to merge hashes within arrays. Defaults to false.
Signature 1
lookup(NameType $name, Optional[ValueType] $value_type, Optional[MergeType]
$merge)
Signature 2
lookup(NameType $name, Optional[ValueType] $value_type, Optional[MergeType]
$merge, DefaultValueType $default_value)
Signature 3
lookup(NameType $name, Optional[ValueType] $value_type, Optional[MergeType]
$merge, BlockType &$block)
Signature 4
lookup(OptionsWithName $options_hash, Optional[BlockType] &$block)
Signature 5
© 2024 Puppet, Inc., a Perforce company

Puppet | Syntax and settings | 745
lookup(Variant[String,Array[String]] $name, OptionsWithoutName $options_hash,
Optional[BlockType] &$block)
lstrip
Strips leading spaces from a String
This function is compatible with the stdlib function with the same name.
The function does the following:
• For a String the conversion removes all leading ASCII white space characters such as space, tab, newline,
and return. It does not remove other space-like characters like hard space (Unicode U+00A0). (Tip, /
^[[:space:]]/ regular expression matches all space-like characters).
• For an Iterable[Variant[String, Numeric]] (for example an Array) each value is processed and
the conversion is not recursive.
• If the value is Numeric it is simply returned (this is for backwards compatibility).
• An error is raised for all other data types.
"\n\thello ".lstrip()
lstrip("\n\thello ")
Would both result in "hello"
["\n\thello ", "\n\thi "].lstrip()
lstrip(["\n\thello ", "\n\thi "])
Would both result in ['hello', 'hi']
Signature 1
lstrip(Numeric $arg)
Signature 2
lstrip(String $arg)
Signature 3
lstrip(Iterable[Variant[String, Numeric]] $arg)
map
Applies a lambda to every value in a data structure and returns an array containing the results.
This function takes two mandatory arguments, in this order:
1.
An array, hash, or other iterable object that the function will iterate over.
2.
A lambda, which the function calls for each element in the first argument. It can request one or two parameters.
$transformed_data = $data.map |$parameter| { <PUPPET CODE BLOCK> }
or
$transformed_data = map($data) |$parameter| { <PUPPET CODE BLOCK> }
When the first argument ($data in the above example) is an array, Puppet passes each value in turn to the lambda.
# For the array $data, return an array containing each value multiplied by
10
$data = [1,2,3]
$transformed_data = $data.map |$items| { $items * 10 }
# $transformed_data contains [10,20,30]
© 2024 Puppet, Inc., a Perforce company

Puppet | Syntax and settings | 746
When the first argument is a hash, Puppet passes each key and value pair to the lambda as an array in the form
[key, value].
# For the hash $data, return an array containing the keys
$data = {'a'=>1,'b'=>2,'c'=>3}
$transformed_data = $data.map |$items| { $items[0] }
# $transformed_data contains ['a','b','c']
When the first argument is an array and the lambda has two parameters, Puppet passes the array's indexes
(enumerated from 0) in the first parameter and its values in the second parameter.
# For the array $data, return an array containing the indexes
$data = [1,2,3]
$transformed_data = $data.map |$index,$value| { $index }
# $transformed_data contains [0,1,2]
When the first argument is a hash, Puppet passes its keys to the first parameter and its values to the second parameter.
# For the hash $data, return an array containing each value
$data = {'a'=>1,'b'=>2,'c'=>3}
$transformed_data = $data.map |$key,$value| { $value }
# $transformed_data contains [1,2,3]
Signature 1
map(Hash[Any, Any] $hash, Callable[2,2] &$block)
Signature 2
map(Hash[Any, Any] $hash, Callable[1,1] &$block)
Signature 3
map(Iterable $enumerable, Callable[2,2] &$block)
Signature 4
map(Iterable $enumerable, Callable[1,1] &$block)
match
Matches a regular expression against a string and returns an array containing the match and any matched capturing
groups.
The first argument is a string or array of strings. The second argument is either a regular expression, regular
expression represented as a string, or Regex or Pattern data type that the function matches against the first argument.
The returned array contains the entire match at index 0, and each captured group at subsequent index values. If the
value or expression being matched is an array, the function returns an array with mapped match results.
If the function doesn't find a match, it returns 'undef'.
$matches = "abc123".match(/[a-z]+[1-9]+/)
# $matches contains [abc123]
$matches = "abc123".match(/([a-z]+)([1-9]+)/)
# $matches contains [abc123, abc, 123]
$matches = ["abc123","def456"].match(/([a-z]+)([1-9]+)/)
# $matches contains [[abc123, abc, 123], [def456, def, 456]]
Signature 1
© 2024 Puppet, Inc., a Perforce company

Puppet | Syntax and settings | 747
match(String $string, Variant[Any, Type] $pattern)
Signature 2
match(Array[String] $string, Variant[Any, Type] $pattern)
max
Returns the highest value among a variable number of arguments. Takes at least one argument.
This function is (with one exception) compatible with the stdlib function with the same name and performs
deprecated type conversion before comparison as follows:
• If a value converted to String is an optionally '-' prefixed, string of digits, one optional decimal point, followed by
optional decimal digits - then the comparison is performed on the values converted to floating point.
• If a value is not considered convertible to float, it is converted to a String and the comparison is a lexical
compare where min is the lexicographical later value.
• A lexicographical compare is performed in a system locale - international characters may therefore not appear in
what a user thinks is the correct order.
• The conversion rules apply to values in pairs - the rule must hold for both values - a value may therefore be
compared using different rules depending on the "other value".
• The returned result found to be the "highest" is the original unconverted value.
The above rules have been deprecated in Puppet 6.0.0 as they produce strange results when given values of mixed
data types. In general, either convert values to be all String or all Numeric values before calling the function,
or call the function with a lambda that performs type conversion and comparison. This because one simply cannot
compare Boolean with Regexp and with any arbitrary Array, Hash or Object and getting a meaningful result.
The one change in the function's behavior is when the function is given a single array argument. The stdlib
implementation would return that array as the result where it now instead returns the max value from that array.
notice(max(1)) # would notice 1
notice(max(1,2)) # would notice 2
notice(max("1", 2)) # would notice 2
notice(max("0777", 512)) # would notice "0777", since "0777" is not
converted from octal form
notice(max(0777, 512)) # would notice 512, since 0777 is decimal 511
notice(max('aa', 'ab')) # would notice 'ab'
notice(max(['a'], ['b'])) # would notice ['b'], since "['b']" is after
"['a']"
$x = [1,2,3,4]
notice(max(*$x)) # would notice 4
$x = [1,2,3,4]
notice(max($x)) # would notice 4
notice($x.max) # would notice 4
This example shows that a single array argument is used as the set of values as opposed to being a single returned
value.
When calling with a lambda, it must accept two variables and it must return one of -1, 0, or 1 depending on if first
argument is before/lower than, equal to, or higher/after the second argument.
notice(max("2", "10", "100") |$a, $b| { compare($a, $b) })
Would notice "2" as higher since it is lexicographically higher/after the other values. Without the lambda the stdlib
compatible (deprecated) behavior would have been to return "100" since number conversion kicks in.
Signature 1
© 2024 Puppet, Inc., a Perforce company
Puppet | Syntax and settings | 748
max(Numeric *$values)
Signature 2
max(String *$values)
Signature 3
max(Semver *$values)
Signature 4
max(Timespan *$values)
Signature 5
max(Timestamp *$values)
Signature 6
max(Array[Numeric] $values, Optional[Callable[2,2]] &$block)
Signature 7
max(Array[String] $values, Optional[Callable[2,2]] &$block)
Signature 8
max(Array[Semver] $values, Optional[Callable[2,2]] &$block)
Signature 9
max(Array[Timespan] $values, Optional[Callable[2,2]] &$block)
Signature 10
max(Array[Timestamp] $values, Optional[Callable[2,2]] &$block)
Signature 11
max(Array $values, Optional[Callable[2,2]] &$block)
Signature 12
max(Any *$values, Callable[2,2] &$block)
Signature 13
max(Any *$values)
md5
Returns a MD5 hash value from a provided string.
md5()
min
Returns the lowest value among a variable number of arguments. Takes at least one argument.
This function is (with one exception) compatible with the stdlib function with the same name and performs
deprecated type conversion before comparison as follows:
• If a value converted to String is an optionally '-' prefixed, string of digits, one optional decimal point, followed by
optional decimal digits - then the comparison is performed on the values converted to floating point.
• If a value is not considered convertible to float, it is converted to a String and the comparison is a lexical
compare where min is the lexicographical earlier value.
• A lexicographical compare is performed in a system locale - international characters may therefore not appear in
what a user thinks is the correct order.
• The conversion rules apply to values in pairs - the rule must hold for both values - a value may therefore be
compared using different rules depending on the "other value".
© 2024 Puppet, Inc., a Perforce company

Puppet | Syntax and settings | 749
• The returned result found to be the "lowest" is the original unconverted value.
The above rules have been deprecated in Puppet 6.0.0 as they produce strange results when given values of mixed
data types. In general, either convert values to be all String or all Numeric values before calling the function,
or call the function with a lambda that performs type conversion and comparison. This because one simply cannot
compare Boolean with Regexp and with any arbitrary Array, Hash or Object and getting a meaningful result.
The one change in the function's behavior is when the function is given a single array argument. The stdlib
implementation would return that array as the result where it now instead returns the max value from that array.
notice(min(1)) # would notice 1
notice(min(1,2)) # would notice 1
notice(min("1", 2)) # would notice 1
notice(min("0777", 512)) # would notice 512, since "0777" is not converted
from octal form
notice(min(0777, 512)) # would notice 511, since 0777 is decimal 511
notice(min('aa', 'ab')) # would notice 'aa'
notice(min(['a'], ['b'])) # would notice ['a'], since "['a']" is before
"['b']"
$x = [1,2,3,4]
notice(min(*$x)) # would notice 1
$x = [1,2,3,4]
notice(min($x)) # would notice 1
notice($x.min) # would notice 1
This example shows that a single array argument is used as the set of values as opposed to being a single returned
value.
When calling with a lambda, it must accept two variables and it must return one of -1, 0, or 1 depending on if first
argument is before/lower than, equal to, or higher/after the second argument.
notice(min("2", "10", "100") |$a, $b| { compare($a, $b) })
Would notice "10" as lower since it is lexicographically lower/before the other values. Without the lambda the stdlib
compatible (deprecated) behavior would have been to return "2" since number conversion kicks in.
Signature 1
min(Numeric *$values)
Signature 2
min(String *$values)
Signature 3
min(Semver *$values)
Signature 4
min(Timespan *$values)
Signature 5
min(Timestamp *$values)
Signature 6
min(Array[Numeric] $values, Optional[Callable[2,2]] &$block)
Signature 7
min(Array[Semver] $values, Optional[Callable[2,2]] &$block)
© 2024 Puppet, Inc., a Perforce company

Puppet | Syntax and settings | 750
Signature 8
min(Array[Timespan] $values, Optional[Callable[2,2]] &$block)
Signature 9
min(Array[Timestamp] $values, Optional[Callable[2,2]] &$block)
Signature 10
min(Array[String] $values, Optional[Callable[2,2]] &$block)
Signature 11
min(Array $values, Optional[Callable[2,2]] &$block)
Signature 12
min(Any *$values, Callable[2,2] &$block)
Signature 13
min(Any *$values)
module_directory
Finds an existing module and returns the path to its root directory.
The argument to this function should be a module name String For example, the reference mysql will search for the
directory <MODULES DIRECTORY>/mysql and return the first found on the modulepath.
This function can also accept:
• Multiple String arguments, which will return the path of the first module found, skipping non existing modules.
• An array of module names, which will return the path of the first module found from the given names in the array,
skipping non existing modules.
The function returns undef if none of the given modules were found
Signature 1
module_directory(String *$names)
Signature 2
module_directory(Array[String] *$names)
new
Creates a new instance/object of a given data type.
This function makes it possible to create new instances of concrete data types. If a block is given it is called with the
just created instance as an argument.
Calling this function is equivalent to directly calling the data type:
$a = Integer.new("42")
$b = Integer("42")
These would both convert the string "42" to the decimal value 42.
$a = Integer.new("42", 8)
$b = Integer({from => "42", radix => 8})
This would convert the octal (radix 8) number "42" in string form to the decimal value 34.
The new function supports two ways of giving the arguments:
• by name (using a hash with property to value mapping)
© 2024 Puppet, Inc., a Perforce company

Puppet | Syntax and settings | 751
• by position (as regular arguments)
Note that it is not possible to create new instances of some abstract data types (for example Variant). The data type
Optional[T] is an exception as it will create an instance of T or undef if the value to convert is undef.
The arguments that can be given is determined by the data type.
An assertion is always made that the produced value complies with the given type constraints.
Integer[0].new("-100")
Would fail with an assertion error (since value is less than 0).
The following sections show the arguments and conversion rules per data type built into the Puppet Type System.
Conversion to Optional[T] and NotUndef[T]
Conversion to these data types is the same as a conversion to the type argument T. In the case of Optional[T] it
is accepted that the argument to convert may be undef. It is however not acceptable to give other arguments (than
undef) that cannot be converted to T.
Conversion to Integer
A new Integer can be created from Integer, Float, Boolean, and String values. For conversion from
String it is possible to specify the radix (base).
type Radix = Variant[Default, Integer[2,2], Integer[8,8], Integer[10,10],
Integer[16,16]]
function Integer.new(
String $value,
Radix $radix = 10,
Boolean $abs = false
)
function Integer.new(
Variant[Numeric, Boolean] $value,
Boolean $abs = false
)
• When converting from String the default radix is 10.
• If radix is not specified an attempt is made to detect the radix from the start of the string:
• 0b or 0B is taken as radix 2.
• 0x or 0X is taken as radix 16.
• 0 as radix 8.
• All others are decimal.
• Conversion from String accepts an optional sign in the string.
• For hexadecimal (radix 16) conversion an optional leading "0x", or "0X" is accepted.
• For octal (radix 8) an optional leading "0" is accepted.
• For binary (radix 2) an optional leading "0b" or "0B" is accepted.
• When radix is set to default, the conversion is based on the leading. characters in the string. A leading "0"
for radix 8, a leading "0x", or "0X" for radix 16, and leading "0b" or "0B" for binary.
• Conversion from Boolean results in 0 for false and 1 for true.
• Conversion from Integer, Float, and Boolean ignores the radix.
• Float value fractions are truncated (no rounding).
• When abs is set to true, the result will be an absolute integer.
$a_number = Integer("0xFF", 16) # results in 255
$a_number = Integer("010") # results in 8
$a_number = Integer("010", 10) # results in 10
© 2024 Puppet, Inc., a Perforce company

Puppet | Syntax and settings | 752
$a_number = Integer(true) # results in 1
$a_number = Integer(-38, 10, true) # results in 38
Conversion to Float
A new Float can be created from Integer, Float, Boolean, and String values. For conversion from
String both float and integer formats are supported.
function Float.new(
Variant[Numeric, Boolean, String] $value,
Boolean $abs = true
)
• For an integer, the floating point fraction of .0 is added to the value.
• A Boolean true is converted to 1.0, and a false to 0.0.
• In String format, integer prefixes for hex and binary are understood (but not octal since floating point in string
format may start with a '0').
• When abs is set to true, the result will be an absolute floating point value.
Conversion to Numeric
A new Integer or Float can be created from Integer, Float, Boolean and String values.
function Numeric.new(
Variant[Numeric, Boolean, String] $value,
Boolean $abs = true
)
• If the value has a decimal period, or if given in scientific notation (e/E), the result is a Float, otherwise the value
is an Integer. The conversion from String always uses a radix based on the prefix of the string.
• Conversion from Boolean results in 0 for false and 1 for true.
• When abs is set to true, the result will be an absolute Floator Integer value.
$a_number = Numeric(true) # results in 1
$a_number = Numeric("0xFF") # results in 255
$a_number = Numeric("010") # results in 8
$a_number = Numeric("3.14") # results in 3.14 (a float)
$a_number = Numeric(-42.3, true) # results in 42.3
$a_number = Numeric(-42, true) # results in 42
Conversion to Timespan
A new Timespan can be created from Integer, Float, String, and Hash values. Several variants of the
constructor are provided.
Timespan from seconds
When a Float is used, the decimal part represents fractions of a second.
function Timespan.new(
Variant[Float, Integer] $value
)
Timespan from days, hours, minutes, seconds, and fractions of a second
© 2024 Puppet, Inc., a Perforce company

Puppet | Syntax and settings | 753
The arguments can be passed separately in which case the first four, days, hours, minutes, and seconds are mandatory
and the rest are optional. All values may overflow and/or be negative. The internal 128-bit nano-second integer is
calculated as:
(((((days * 24 + hours) * 60 + minutes) * 60 + seconds) * 1000 +
milliseconds) * 1000 + microseconds) * 1000 + nanoseconds
function Timespan.new(
Integer $days, Integer $hours, Integer $minutes, Integer $seconds,
Integer $milliseconds = 0, Integer $microseconds = 0, Integer $nanoseconds
= 0
)
or, all arguments can be passed as a Hash, in which case all entries are optional:
function Timespan.new(
Struct[{
Optional[negative] => Boolean,
Optional[days] => Integer,
Optional[hours] => Integer,
Optional[minutes] => Integer,
Optional[seconds] => Integer,
Optional[milliseconds] => Integer,
Optional[microseconds] => Integer,
Optional[nanoseconds] => Integer
}] $hash
)
Timespan from String and format directive patterns
The first argument is parsed using the format optionally passed as a string or array of strings. When an array is used,
an attempt will be made to parse the string using the first entry and then with each entry in succession until parsing
succeeds. If the second argument is omitted, an array of default formats will be used.
An exception is raised when no format was able to parse the given string.
function Timespan.new(
String $string, Variant[String[2],Array[String[2], 1]] $format = <default
format>)
)
the arguments may also be passed as a Hash:
function Timespan.new(
Struct[{
string => String[1],
Optional[format] => Variant[String[2],Array[String[2], 1]]
}] $hash
)
The directive consists of a percent (%) character, zero or more flags, optional minimum field width and a conversion
specifier as follows:
%[Flags][Width]Conversion
Flags:
Flag Meaning
- Don't pad numerical output
© 2024 Puppet, Inc., a Perforce company

Puppet | Syntax and settings | 754
Flag Meaning
_ Use spaces for padding
0 Use zeros for padding
Format directives:
Format Meaning
D Number of Days
H Hour of the day, 24-hour clock
M Minute of the hour (00..59)
S Second of the minute (00..59)
L Millisecond of the second (000..999)
N Fractional seconds digits
The format directive that represents the highest magnitude in the format will be allowed to overflow. I.e. if no "%D"
is used but a "%H" is present, then the hours may be more than 23.
The default array contains the following patterns:
['%D-%H:%M:%S', '%D-%H:%M', '%H:%M:%S', '%H:%M']
Examples - Converting to Timespan
$duration = Timespan(13.5) # 13 seconds and 500 milliseconds
$duration = Timespan({days=>4}) # 4 days
$duration = Timespan(4, 0, 0, 2) # 4 days and 2 seconds
$duration = Timespan('13:20') # 13 hours and 20 minutes (using default
pattern)
$duration = Timespan('10:03.5', '%M:%S.%L') # 10 minutes, 3 seconds, and 5
milli-seconds
$duration = Timespan('10:03.5', '%M:%S.%N') # 10 minutes, 3 seconds, and 5
nano-seconds
Conversion to Timestamp
A new Timestamp can be created from Integer, Float, String, and Hash values. Several variants of the
constructor are provided.
Timestamp from seconds since epoch (1970-01-01 00:00:00 UTC)
When a Float is used, the decimal part represents fractions of a second.
function Timestamp.new(
Variant[Float, Integer] $value
)
Timestamp from String and patterns consisting of format directives
The first argument is parsed using the format optionally passed as a string or array of strings. When an array is used,
an attempt will be made to parse the string using the first entry and then with each entry in succession until parsing
succeeds. If the second argument is omitted, an array of default formats will be used.
A third optional timezone argument can be provided. The first argument will then be parsed as if it represents a local
time in that timezone. The timezone can be any timezone that is recognized when using the '%z' or '%Z' formats,
or the word 'current', in which case the current timezone of the evaluating process will be used. The timezone
argument is case insensitive.
© 2024 Puppet, Inc., a Perforce company

Puppet | Syntax and settings | 755
The default timezone, when no argument is provided, or when using the keyword default, is 'UTC'.
It is illegal to provide a timezone argument other than default in combination with a format that contains '%z' or
'%Z' since that would introduce an ambiguity as to which timezone to use. The one extracted from the string, or the
one provided as an argument.
An exception is raised when no format was able to parse the given string.
function Timestamp.new(
String $string,
Variant[String[2],Array[String[2], 1]] $format = <default format>,
String $timezone = default)
)
the arguments may also be passed as a Hash:
function Timestamp.new(
Struct[{
string => String[1],
Optional[format] => Variant[String[2],Array[String[2], 1]],
Optional[timezone] => String[1]
}] $hash
)
The directive consists of a percent (%) character, zero or more flags, optional minimum field width and a conversion
specifier as follows:
%[Flags][Width]Conversion
Flags:
Flag Meaning
- Don't pad numerical output
_ Use spaces for padding
0 Use zeros for padding
# Change names to upper-case or change case of am/pm
^ Use uppercase
: Use colons for %z
Format directives (names and padding can be altered using flags):
Date (Year, Month, Day):
Format Meaning
Y Year with century, zero-padded to at least 4 digits
C year / 100 (rounded down such as 20 in 2009)
y year % 100 (00..99)
m Month of the year, zero-padded (01..12)
B The full month name ("January")
b The abbreviated month name ("Jan")
h Equivalent to %b
d Day of the month, zero-padded (01..31)
© 2024 Puppet, Inc., a Perforce company

Puppet | Syntax and settings | 756
Format Meaning
e Day of the month, blank-padded (1..31)
j Day of the year (001..366)
Time (Hour, Minute, Second, Subsecond):
Format Meaning
H Hour of the day, 24-hour clock, zero-padded (00..23)
k Hour of the day, 24-hour clock, blank-padded (0..23)
I Hour of the day, 12-hour clock, zero-padded (01..12)
l Hour of the day, 12-hour clock, blank-padded (1..12)
P Meridian indicator, lowercase ("am" or "pm")
p Meridian indicator, uppercase ("AM" or "PM")
M Minute of the hour (00..59)
S Second of the minute (00..60)
L Millisecond of the second (000..999). Digits under
millisecond are truncated to not produce 1000
N Fractional seconds digits, default is 9 digits
(nanosecond). Digits under a specified width are
truncated to avoid carry up
Time (Hour, Minute, Second, Subsecond):
Format Meaning
z Time zone as hour and minute offset from UTC (e.g.
+0900)
:z hour and minute offset from UTC with a colon (e.g.
+09:00)
::z hour, minute and second offset from UTC (e.g.
+09:00:00)
Z Abbreviated time zone name or similar information. (OS
dependent)
Weekday:
Format Meaning
A The full weekday name ("Sunday")
a The abbreviated name ("Sun")
u Day of the week (Monday is 1, 1..7)
w Day of the week (Sunday is 0, 0..6)
ISO 8601 week-based year and week number:
The first week of YYYY starts with a Monday and includes YYYY-01-04. The days in the year before the first week
are in the last week of the previous year.
© 2024 Puppet, Inc., a Perforce company

Puppet | Syntax and settings | 757
Format Meaning
G The week-based year
g The last 2 digits of the week-based year (00..99)
V Week number of the week-based year (01..53)
Week number:
The first week of YYYY that starts with a Sunday or Monday (according to %U or %W). The days in the year before
the first week are in week 0.
Format Meaning
U Week number of the year. The week starts with Sunday.
(00..53)
W Week number of the year. The week starts with Monday.
(00..53)
Seconds since the Epoch:
| Format | Meaning | | s | Number of seconds since 1970-01-01 00:00:00 UTC. |
Literal string:
Format Meaning
n Newline character (\n)
t Tab character (\t)
% Literal % character
Combination:
Format Meaning
c date and time (%a %b %e %T %Y)
D Date (%m/%d/%y)
F The ISO 8601 date format (%Y-%m-%d)
v VMS date (%e-%^b-%4Y)
x Same as %D
X Same as %T
r 12-hour time (%I:%M:%S %p)
R 24-hour time (%H:%M)
T 24-hour time (%H:%M:%S)
The default array contains the following patterns:
When a timezone argument (other than default) is explicitly provided:
['%FT%T.L', '%FT%T', '%F']
otherwise:
['%FT%T.%L %Z', '%FT%T %Z', '%F %Z', '%FT%T.L', '%FT%T', '%F']
© 2024 Puppet, Inc., a Perforce company

Puppet | Syntax and settings | 758
Examples - Converting to Timestamp
$ts = Timestamp(1473150899) # 2016-09-06
08:34:59 UTC
$ts = Timestamp({string=>'2015', format=>'%Y'}) # 2015-01-01
00:00:00.000 UTC
$ts = Timestamp('Wed Aug 24 12:13:14 2016', '%c') # 2016-08-24
12:13:14 UTC
$ts = Timestamp('Wed Aug 24 12:13:14 2016 PDT', '%c %Z') # 2016-08-24
19:13:14.000 UTC
$ts = Timestamp('2016-08-24 12:13:14', '%F %T', 'PST') # 2016-08-24
20:13:14.000 UTC
$ts = Timestamp('2016-08-24T12:13:14', default, 'PST') # 2016-08-24
20:13:14.000 UTC
Conversion to Type
A new Type can be created from its String representation.
$t = Type.new('Integer[10]')
Conversion to String
Conversion to String is the most comprehensive conversion as there are many use cases where a string
representation is wanted. The defaults for the many options have been chosen with care to be the most basic "value in
textual form" representation. The more advanced forms of formatting are intended to enable writing special purposes
formatting functions in the Puppet language.
A new string can be created from all other data types. The process is performed in several steps - first the data type
of the given value is inferred, then the resulting data type is used to find the most significant format specified for that
data type. And finally, the found format is used to convert the given value.
The mapping from data type to format is referred to as the format map. This map allows different formatting
depending on type.
$format_map = {
Integer[default, 0] => "%d",
Integer[1, default] => "%#x"
}
String("-1", $format_map) # produces '-1'
String("10", $format_map) # produces '0xa'
A format is specified on the form:
%[Flags][Width][.Precision]Format
Width is the number of characters into which the value should be fitted. This allocated space is padded if value is
shorter. By default it is space padded, and the flag 0 will cause padding with 0 for numerical formats.
Precision is the number of fractional digits to show for floating point, and the maximum characters included in a
string format.
Note that all data type supports the formats s and p with the meaning "default string representation" and "default
programmatic string representation" (which for example means that a String is quoted in 'p' format).
Signatures of String conversion
type Format = Pattern[/^%([\s\+\-#0\[\{<\(\|]*)([1-9][0-9]*)?(?:\.([0-9]+))?
([a-zA-Z])/]
type ContainerFormat = Struct[{
format => Optional[String],
separator => Optional[String],
separator2 => Optional[String],
© 2024 Puppet, Inc., a Perforce company

Puppet | Syntax and settings | 759
string_formats => Hash[Type, Format]
}]
type TypeMap = Hash[Type, Variant[Format, ContainerFormat]]
type Formats = Variant[Default, String[1], TypeMap]
function String.new(
Any $value,
Formats $string_formats
)
Where:
• separator is the string used to separate entries in an array, or hash (extra space should not be included at the
end), defaults to ","
• separator2 is the separator between key and value in a hash entry (space padding should be included as
wanted), defaults to " => ".
• string_formats is a data type to format map for values contained in arrays and hashes - defaults to {Any
=> "%p"}. Note that these nested formats are not applicable to data types that are containers; they are always
formatted as per the top level format specification.
$str = String(10) # produces '10'
$str = String([10]) # produces '["10"]'
$str = String(10, "%#x") # produces '0xa'
$str = String([10], "%(a") # produces '("10")'
$formats = {
Array => {
format => '%(a',
string_formats => { Integer => '%#x' }
}
}
$str = String([1,2,3], $formats) # produces '(0x1, 0x2, 0x3)'
The given formats are merged with the default formats, and matching of values to convert against format is based on
the specificity of the mapped type; for example, different formats can be used for short and long arrays.
Integer to String
Format Integer Formats
d Decimal, negative values produces leading -.
x X Hexadecimal in lower or upper case. Uses ..f/..F for
negative values unless + is also used. A # adds prefix
0x/0X.
o Octal. Uses ..0 for negative values unless + is also
used. A # adds prefix 0.
b B Binary with prefix b or B. Uses ..1/..1 for negative
values unless + is also used.
c Numeric value representing a Unicode value, result is a
one unicode character string, quoted if alternative flag #
is used
s Same as d, or d in quotes if alternative flag # is used.
p Same as d.
© 2024 Puppet, Inc., a Perforce company

Puppet | Syntax and settings | 760
Format Integer Formats
eEfgGaA Converts integer to float and formats using the floating
point rules.
Defaults to d.
Float to String
Format Float formats
f Floating point in non exponential notation.
e E Exponential notation with e or E.
g G Conditional exponential with e or E if exponent < -4 or
>= the precision.
a A Hexadecimal exponential form, using x/X as prefix and
p/P before exponent.
s Converted to string using format p, then applying string
formatting rule, alternate form `#`` quotes result.
p Same as f format with minimum significant number of
fractional digits, prec has no effect.
dxXobBc Converts float to integer and formats using the integer
rules.
Defaults to p.
String to String
Format String
s Unquoted string, verbatim output of control chars.
p Programmatic representation - strings are quoted, interior
quotes and control chars are escaped. Selects single or
double quotes based on content, or uses double quotes if
alternative flag # is used.
C Each :: name segment capitalized, quoted if alternative
flag # is used.
c Capitalized string, quoted if alternative flag # is used.
d Downcased string, quoted if alternative flag # is used.
u Upcased string, quoted if alternative flag # is used.
t Trims leading and trailing whitespace from the string,
quoted if alternative flag # is used.
Defaults to s at top level and p inside array or hash.
Boolean to String
Format Boolean Formats
t T String 'true'/'false' or 'True'/'False',
first char if alternate form is used (i.e. 't'/'f' or
'T'/'F').
© 2024 Puppet, Inc., a Perforce company

Puppet | Syntax and settings | 761
Format Boolean Formats
y Y String 'yes'/'no', 'Yes'/'No', 'y'/'n' or
'Y'/'N' if alternative flag # is used.
dxXobB Numeric value 0/1 in accordance with the given format
which must be valid integer format.
eEfgGaA Numeric value 0.0/1.0 in accordance with the given
float format and flags.
s String 'true' / 'false'.
p String 'true' / 'false'.
Regexp to String
Format Regexp Formats
s No delimiters, quoted if alternative flag # is used.
p Delimiters / /.
Undef to String
Format Undef formats
s Empty string, or quoted empty string if alternative flag #
is used.
p String 'undef', or quoted '"undef"' if alternative
flag # is used.
n String 'nil', or 'null' if alternative flag # is used.
dxXobB String 'NaN'.
eEfgGaA String 'NaN'.
v String 'n/a'.
V String 'N/A'.
u String 'undef', or 'undefined' if alternative #
flag is used.
Default value to String
Format Default formats
d D String 'default' or 'Default', alternative form #
causes value to be quoted.
s Same as d.
p Same as d.
Binary value to String
Format Default formats
s binary as unquoted UTF-8 characters (errors if byte
sequence is invalid UTF-8). Alternate form escapes non
ascii bytes.
© 2024 Puppet, Inc., a Perforce company

Puppet | Syntax and settings | 762
Format Default formats
p 'Binary("<base64strict>")'
b '<base64>' - base64 string with newlines inserted
B '<base64strict>' - base64 strict string (without
newlines inserted)
u '<base64urlsafe>' - base64 urlsafe string
t 'Binary' - outputs the name of the type only
T 'BINARY' - output the name of the type in all caps only
• The alternate form flag # will quote the binary or base64 text output.
• The format %#s allows invalid UTF-8 characters and outputs all non ascii bytes as hex escaped characters on the
form \xHH where H is a hex digit.
• The width and precision values are applied to the text part only in %p format.
Array & Tuple to String
Format Array/Tuple Formats
a Formats with [ ] delimiters and ,, alternate form #
indents nested arrays/hashes.
s Same as a.
p Same as a.
See "Flags" <[({| for formatting of delimiters, and "Additional parameters for containers; Array and Hash" for
more information about options.
The alternate form flag # will cause indentation of nested array or hash containers. If width is also set it is taken as
the maximum allowed length of a sequence of elements (not including delimiters). If this max length is exceeded,
each element will be indented.
Hash & Struct to String
Format Hash/Struct Formats
h Formats with { } delimiters, , element separator and
=> inner element separator unless overridden by flags.
s Same as h.
p Same as h.
a Converts the hash to an array of [k,v] tuples and
formats it using array rule(s).
See "Flags" <[({| for formatting of delimiters, and "Additional parameters for containers; Array and Hash" for
more information about options.
The alternate form flag # will format each hash key/value entry indented on a separate line.
Type to String
Format Array/Tuple Formats
s The same as p, quoted if alternative flag # is used.
p Outputs the type in string form as specified by the
Puppet Language.
© 2024 Puppet, Inc., a Perforce company

Puppet | Syntax and settings | 763
Flags
Flag Effect
(space) A space instead of + for numeric output (- is shown), for
containers skips delimiters.
# Alternate format; prefix 0x/0x, 0 (octal) and 0b/0B
for binary, Floats force decimal '.'. For g/G keep trailing
0.
+ Show sign +/- depending on value's sign, changes x, X,
o, b, B format to not use 2's complement form.
- Left justify the value in the given width.
0 Pad with 0 instead of space for widths larger than value.
<[({| Defines an enclosing pair <> [] () {} or | |
when used with a container type.
Conversion to Boolean
Accepts a single value as argument:
• Float 0.0 is false, all other float values are true
• Integer 0 is false, all other integer values are true
• Strings
• true if 'true', 'yes', 'y' (case independent compare)
• false if 'false', 'no', 'n' (case independent compare)
• Boolean is already boolean and is simply returned
Conversion to Array and Tuple
When given a single value as argument:
• A non empty Hash is converted to an array matching Array[Tuple[Any,Any], 1].
• An empty Hash becomes an empty array.
• An Array is simply returned.
• An Iterable[T] is turned into an array of T instances.
• A Binary is converted to an Array[Integer[0,255]] of byte values
When given a second Boolean argument:
• if true, a value that is not already an array is returned as a one element array.
• if false, (the default), converts the first argument as shown above.
$arr = Array($value, true)
Conversion to a Tuple works exactly as conversion to an Array, only that the constructed array is asserted against
the given tuple type.
Conversion to Hash and Struct
Accepts a single value as argument:
• An empty Array becomes an empty Hash
• An Array matching Array[Tuple[Any,Any], 1] is converted to a hash where each tuple describes a key/
value entry
• An Array with an even number of entries is interpreted as [key1, val1, key2, val2, ...]
• An Iterable is turned into an Array and then converted to hash as per the array rules
• A Hash is simply returned
© 2024 Puppet, Inc., a Perforce company

Puppet | Syntax and settings | 764
Alternatively, a tree can be constructed by giving two values; an array of tuples on the form [path, value]
(where the path is the path from the root of a tree, and value the value at that position in the tree), and either
the option 'tree' (do not convert arrays to hashes except the top level), or 'hash_tree' (convert all arrays to
hashes).
The tree/hash_tree forms of Hash creation are suited for transforming the result of an iteration using tree_each
and subsequent filtering or mapping.
Mapping an arbitrary structure in a way that keeps the structure, but where some values are replaced can be done by
using the tree_each function, mapping, and then constructing a new Hash from the result:
# A hash tree with 'water' at different locations
$h = { a => { b => { x => 'water'}}, b => { y => 'water'} }
# a helper function that turns water into wine
function make_wine($x) { if $x == 'water' { 'wine' } else { $x } }
# create a flattened tree with water turned into wine
$flat_tree = $h.tree_each.map |$entry| { [$entry[0], make_wine($entry[1])] }
# create a new Hash and log it
notice Hash($flat_tree, 'hash_tree')
Would notice the hash {a => {b => {x => wine}}, b => {y => wine}}
Conversion to a Struct works exactly as conversion to a Hash, only that the constructed hash is asserted against
the given struct type.
Conversion to a Regexp
A String can be converted into a Regexp
Example: Converting a String into a Regexp
$s = '[a-z]+\.com'
$r = Regexp($s)
if('foo.com' =~ $r) {
...
}
Creating a SemVer
A SemVer object represents a single Semantic Version. It can be created from a String, individual values for its parts,
or a hash specifying the value per part. See the specification at semver.org for the meaning of the SemVer's parts.
The signatures are:
type PositiveInteger = Integer[0,default]
type SemVerQualifier = Pattern[/\A(?<part>[0-9A-Za-z-]+)(?:\.\g<part>)*\Z/]
type SemVerString = String[1]
type SemVerHash =Struct[{
major => PositiveInteger,
minor => PositiveInteger,
patch => PositiveInteger,
Optional[prerelease] => SemVerQualifier,
Optional[build] => SemVerQualifier
}]
function SemVer.new(SemVerString $str)
function SemVer.new(
PositiveInteger $major
PositiveInteger $minor
PositiveInteger $patch
Optional[SemVerQualifier] $prerelease = undef
Optional[SemVerQualifier] $build = undef
)
© 2024 Puppet, Inc., a Perforce company

Puppet | Syntax and settings | 765
function SemVer.new(SemVerHash $hash_args)
# As a type, SemVer can describe disjunct ranges which versions can be
# matched against - here the type is constructed with two
# SemVerRange objects.
#
$t = SemVer[
SemVerRange('>=1.0.0 <2.0.0'),
SemVerRange('>=3.0.0 <4.0.0')
]
notice(SemVer('1.2.3') =~ $t) # true
notice(SemVer('2.3.4') =~ $t) # false
notice(SemVer('3.4.5') =~ $t) # true
Creating a SemVerRange
A SemVerRange object represents a range of SemVer. It can be created from a String, or from two SemVer
instances, where either end can be given as a literal default to indicate infinity. The string format of a
SemVerRange is specified by the Semantic Version Range Grammar.
Use of the comparator sets described in the grammar (joining with ||) is not supported.
The signatures are:
type SemVerRangeString = String[1]
type SemVerRangeHash = Struct[{
min => Variant[Default, SemVer],
Optional[max] => Variant[Default, SemVer],
Optional[exclude_max] => Boolean
}]
function SemVerRange.new(
SemVerRangeString $semver_range_string
)
function SemVerRange.new(
Variant[Default,SemVer] $min
Variant[Default,SemVer] $max
Optional[Boolean] $exclude_max = undef
)
function SemVerRange.new(
SemVerRangeHash $semver_range_hash
)
For examples of SemVerRange use see "Creating a SemVer"
Creating a Binary
A Binary object represents a sequence of bytes and it can be created from a String in Base64 format, an Array
containing byte values. A Binary can also be created from a Hash containing the value to convert to a Binary.
The signatures are:
type ByteInteger = Integer[0,255]
type Base64Format = Enum["%b", "%u", "%B", "%s"]
type StringHash = Struct[{value => String, "format" =>
Optional[Base64Format]}]
type ArrayHash = Struct[{value => Array[ByteInteger]}]
type BinaryArgsHash = Variant[StringHash, ArrayHash]
function Binary.new(
© 2024 Puppet, Inc., a Perforce company

Puppet | Syntax and settings | 766
String $base64_str,
Optional[Base64Format] $format
)
function Binary.new(
Array[ByteInteger] $byte_array
}
# Same as for String, or for Array, but where arguments are given in a Hash.
function Binary.new(BinaryArgsHash $hash_args)
The formats have the following meaning:
format explanation
B The data is in base64 strict encoding
u The data is in URL safe base64 encoding
b The data is in base64 encoding, padding as required by
base64 strict, is added by default
s The data is a puppet string. The string must be valid
UTF-8, or convertible to UTF-8 or an error is raised.
r (Ruby Raw) the byte sequence in the given string is used
verbatim irrespective of possible encoding errors
• The default format is %B.
• Note that the format %r should be used sparingly, or not at all. It exists for backwards compatibility reasons when
someone receiving a string from some function and that string should be treated as Binary. Such code should be
changed to return a Binary instead of a String.
# create the binary content "abc"
$a = Binary('YWJj')
# create the binary content from content in a module's file
$b = binary_file('mymodule/mypicture.jpg')
• Since 4.5.0
• Binary type since 4.8.0
Creating an instance of a Type using the Init type
The type Init[T] describes a value that can be used when instantiating a type. When used as the first argument in
a call to new, it will dispatch the call to its contained type and optionally augment the parameter list with additional
arguments.
# The following declaration
$x = Init[Integer].new('128')
# is exactly the same as
$x = Integer.new('128')
or, with base 16 and using implicit new
# The following declaration
$x = Init[Integer,16]('80')
# is exactly the same as
$x = Integer('80', 16)
$fmt = Init[String,'%#x']
© 2024 Puppet, Inc., a Perforce company

Puppet | Syntax and settings | 767
notice($fmt(256)) # will notice '0x100'
new(Type $type, Any *$args, Optional[Callable] &$block)
next
Makes iteration continue with the next value, optionally with a given value for this iteration. If a value is not given it
defaults to undef
$data = ['a','b','c']
$data.each |Integer $index, String $value| {
if $index == 1 {
next()
}
notice ("${index} = ${value}")
}
Would notice:
Notice: Scope(Class[main]): 0 = a
Notice: Scope(Class[main]): 2 = c
next(Optional[Any] $value)
notice
Logs a message on the server at level notice.
notice(Any *$values)
Parameters
• *values --- The values to log.
Return type(s): Undef.
partition
Returns two arrays, the first containing the elements of enum for which the block evaluates to true, the second
containing the rest.
Signature 1
partition(Collection $collection, Callable[1,1] &$block)
Parameters
• collection --- A collection of things to partition.
Return type(s): Tuple[Array, Array].
Examples
Partition array of empty strings, results in e.g. [[''], [b, c]]
['', b, c].partition |$s| { $s.empty }
Partition array of strings using index, results in e.g. [['', 'ab'], ['b']]
['', b, ab].partition |$i, $s| { $i == 2 or $s.empty }
Partition hash of strings by key-value pair, results in e.g. [[['b', []]], [['a', [1, 2]]]]
{ a => [1, 2], b => [] }.partition |$kv| { $kv[1].empty }
© 2024 Puppet, Inc., a Perforce company

Puppet | Syntax and settings | 768
Partition hash of strings by key and value, results in e.g. [[['b', []]], [['a', [1, 2]]]]
{ a => [1, 2], b => [] }.partition |$k, $v| { $v.empty }
Signature 2
partition(Array $array, Callable[2,2] &$block)
Signature 3
partition(Collection $collection, Callable[2,2] &$block)
realize
Make a virtual object real. This is useful when you want to know the name of the virtual object and don't want to
bother with a full collection. It is slightly faster than a collection, and, of course, is a bit shorter. You must pass the
object using a reference; e.g.: realize User[luke].
realize()
reduce
Applies a lambda to every value in a data structure from the first argument, carrying over the returned value of each
iteration, and returns the result of the lambda's final iteration. This lets you create a new value or data structure by
combining values from the first argument's data structure.
This function takes two mandatory arguments, in this order:
1.
An array, hash, or other iterable object that the function will iterate over.
2.
A lambda, which the function calls for each element in the first argument. It takes two mandatory parameters:
a.
A memo value that is overwritten after each iteration with the iteration's result.
b.
A second value that is overwritten after each iteration with the next value in the function's first argument.
$data.reduce |$memo, $value| { ... }
or
reduce($data) |$memo, $value| { ... }
You can also pass an optional "start memo" value as an argument, such as start below:
$data.reduce(start) |$memo, $value| { ... }
or
reduce($data, start) |$memo, $value| { ... }
When the first argument ($data in the above example) is an array, Puppet passes each of the data structure's values
in turn to the lambda's parameters. When the first argument is a hash, Puppet converts each of the hash's values to an
array in the form [key, value].
If you pass a start memo value, Puppet executes the lambda with the provided memo value and the data structure's
first value. Otherwise, Puppet passes the structure's first two values to the lambda.
Puppet calls the lambda for each of the data structure's remaining values. For each call, it passes the result of the
previous call as the first parameter ($memo in the above examples) and the next value from the data structure as the
second parameter ($value).
# Reduce the array $data, returning the sum of all values in the array.
$data = [1, 2, 3]
$sum = $data.reduce |$memo, $value| { $memo + $value }
# $sum contains 6
# Reduce the array $data, returning the sum of a start memo value and all
values in the
# array.
© 2024 Puppet, Inc., a Perforce company

Puppet | Syntax and settings | 769
$data = [1, 2, 3]
$sum = $data.reduce(4) |$memo, $value| { $memo + $value }
# $sum contains 10
# Reduce the hash $data, returning the sum of all values and concatenated
string of all
# keys.
$data = {a => 1, b => 2, c => 3}
$combine = $data.reduce |$memo, $value| {
$string = "${memo[0]}${value[0]}"
$number = $memo[1] + $value[1]
[$string, $number]
}
# $combine contains [abc, 6]
# Reduce the array $data, returning the sum of all values in the array and
starting
# with $memo set to an arbitrary value instead of $data's first value.
$data = [1, 2, 3]
$sum = $data.reduce(4) |$memo, $value| { $memo + $value }
# At the start of the lambda's first iteration, $memo contains 4 and $value
contains 1.
# After all iterations, $sum contains 10.
# Reduce the hash $data, returning the sum of all values and concatenated
string of
# all keys, and starting with $memo set to an arbitrary array instead of
$data's first
# key-value pair.
$data = {a => 1, b => 2, c => 3}
$combine = $data.reduce( [d, 4] ) |$memo, $value| {
$string = "${memo[0]}${value[0]}"
$number = $memo[1] + $value[1]
[$string, $number]
}
# At the start of the lambda's first iteration, $memo contains [d, 4] and
$value
# contains [a, 1].
# $combine contains [dabc, 10]
# Reduce a hash of hashes $data, merging defaults into the inner hashes.
$data = {
'connection1' => {
'username' => 'user1',
'password' => 'pass1',
},
'connection_name2' => {
'username' => 'user2',
'password' => 'pass2',
},
}
$defaults = {
'maxActive' => '20',
'maxWait' => '10000',
'username' => 'defaultuser',
'password' => 'defaultpass',
}
$merged = $data.reduce( {} ) |$memo, $x| {
$memo + { $x[0] => $defaults + $data[$x[0]] }
}
© 2024 Puppet, Inc., a Perforce company

Puppet | Syntax and settings | 770
# At the start of the lambda's first iteration, $memo is set to {}, and $x
is set to
# the first [key, value] tuple. The key in $data is, therefore, given by
$x[0]. In
# subsequent rounds, $memo retains the value returned by the expression,
i.e.
# $memo + { $x[0] => $defaults + $data[$x[0]] }.
Signature 1
reduce(Iterable $enumerable, Callable[2,2] &$block)
Signature 2
reduce(Iterable $enumerable, Any $memo, Callable[2,2] &$block)
regsubst
Performs regexp replacement on a string or array of strings.
Signature 1
regsubst(Variant[Array[String],String] $target, String $pattern,
Variant[String,Hash[String,String]] $replacement, Optional[Optional[Pattern[/
^[GEIM]*$/]]] $flags, Optional[Enum['N','E','S','U']] $encoding)
Parameters
• target --- The string or array of strings to operate on. If an array, the replacement will be performed on each of
the elements in the array, and the return value will be an array.
• pattern --- The regular expression matching the target string. If you want it anchored at the start and or end of
the string, you must do that with ^ and $ yourself.
• replacement --- Replacement string. Can contain backreferences to what was matched using \0 (whole match),
\1 (first set of parentheses), and so on. If the second argument is a Hash, and the matched text is one of its keys,
the corresponding value is the replacement string.
• flags --- Optional. String of single letter flags for how the regexp is interpreted (E, I, and M cannot be used if
pattern is a precompiled regexp):
• E Extended regexps
• I Ignore case in regexps
• M Multiline regexps
• G Global replacement; all occurrences of the regexp in each target string will be replaced. Without this, only
the first occurrence will be replaced.
• encoding --- Deprecated and ignored parameter, included only for compatibility.
Return type(s): Array[String], String. The result of the substitution. Result type is the same as for the target
parameter.
Examples
Get the third octet from the node's IP address:
$i3 = regsubst($ipaddress,'^(\\d+)\\.(\\d+)\\.(\\d+)\\.(\\d+)$','\\3')
Signature 2
regsubst(Variant[Array[String],String] $target, Variant[Regexp,Type[Regexp]]
$pattern, Variant[String,Hash[String,String]] $replacement, Optional[Pattern[/
^G?$/]] $flags)
Parameters
• target --- The string or array of strings to operate on. If an array, the replacement will be performed on each of
the elements in the array, and the return value will be an array.
© 2024 Puppet, Inc., a Perforce company

Puppet | Syntax and settings | 771
• pattern --- The regular expression matching the target string. If you want it anchored at the start and or end of
the string, you must do that with ^ and $ yourself.
• replacement --- Replacement string. Can contain backreferences to what was matched using \0 (whole match),
\1 (first set of parentheses), and so on. If the second argument is a Hash, and the matched text is one of its keys,
the corresponding value is the replacement string.
• flags --- Optional. String of single letter flags for how the regexp is interpreted (E, I, and M cannot be used if
pattern is a precompiled regexp):
• E Extended regexps
• I Ignore case in regexps
• M Multiline regexps
• G Global replacement; all occurrences of the regexp in each target string will be replaced. Without this, only
the first occurrence will be replaced.
Return type(s): Array[String], String. The result of the substitution. Result type is the same as for the target
parameter.
Examples
Put angle brackets around each octet in the node's IP address:
$x = regsubst($ipaddress, /([0-9]+)/, '<\\1>', 'G')
require
Requires the specified classes. Evaluate one or more classes, adding the required class as a dependency.
The relationship metaparameters work well for specifying relationships between individual resources, but they can be
clumsy for specifying relationships between classes. This function is a superset of the include function, adding a
class relationship so that the requiring class depends on the required class.
Warning: using require in place of include can lead to unwanted dependency cycles.
For instance, the following manifest, with require instead of include, would produce a nasty dependence cycle,
because notify imposes a before between File[/foo] and Service[foo]:
class myservice {
service { foo: ensure => running }
}
class otherstuff {
include myservice
file { '/foo': notify => Service[foo] }
}
Note that this function only works with clients 0.25 and later, and it will fail if used with earlier clients.
You must use the class's full name; relative names are not allowed. In addition to names in string form, you may also
directly use Class and Resource Type values that are produced when evaluating resource and relationship expressions.
• Since 4.0.0 Class and Resource types, absolute names
• Since 4.7.0 Returns an Array[Type[Class]] with references to the required classes
require(Any *$names)
return
Makes iteration continue with the next value, optionally with a given value for this iteration. If a value is not given it
defaults to undef
return(Optional[Any] $value)
© 2024 Puppet, Inc., a Perforce company

Puppet | Syntax and settings | 772
reverse_each
Reverses the order of the elements of something that is iterable and optionally runs a lambda for each element.
This function takes one to two arguments:
1.
An Iterable that the function will iterate over.
2.
An optional lambda, which the function calls for each element in the first argument. It must request one
parameter.
$data.reverse_each |$parameter| { <PUPPET CODE BLOCK> }
or
$reverse_data = $data.reverse_each
or
reverse_each($data) |$parameter| { <PUPPET CODE BLOCK> }
or
$reverse_data = reverse_each($data)
When no second argument is present, Puppet returns an Iterable that represents the reverse order of its first
argument. This allows methods on Iterable to be chained.
When a lambda is given as the second argument, Puppet iterates the first argument in reverse order and passes each
value in turn to the lambda, then returns undef.
# Puppet will log a notice for each of the three items
# in $data in reverse order.
$data = [1,2,3]
$data.reverse_each |$item| { notice($item) }
When no second argument is present, Puppet returns a new Iterable which allows it to be directly chained into
another function that takes an Iterable as an argument.
# For the array $data, return an array containing each
# value multiplied by 10 in reverse order
$data = [1,2,3]
$transformed_data = $data.reverse_each.map |$item| { $item * 10 }
# $transformed_data is set to [30,20,10]
# For the array $data, return an array containing each
# value multiplied by 10 in reverse order
$data = [1,2,3]
$transformed_data = map(reverse_each($data)) |$item| { $item * 10 }
# $transformed_data is set to [30,20,10]
Signature 1
reverse_each(Iterable $iterable)
Signature 2
reverse_each(Iterable $iterable, Callable[1,1] &$block)
© 2024 Puppet, Inc., a Perforce company

Puppet | Syntax and settings | 773
round
Returns an Integer value rounded to the nearest value. Takes a single Numeric value as an argument.
notice(round(2.9)) # would notice 3
notice(round(2.1)) # would notice 2
notice(round(-2.9)) # would notice -3
round(Numeric $val)
rstrip
Strips trailing spaces from a String
This function is compatible with the stdlib function with the same name.
The function does the following:
• For a String the conversion removes all trailing ASCII white space characters such as space, tab, newline,
and return. It does not remove other space-like characters like hard space (Unicode U+00A0). (Tip, /
^[[:space:]]/ regular expression matches all space-like characters).
• For an Iterable[Variant[String, Numeric]] (for example an Array) each value is processed and
the conversion is not recursive.
• If the value is Numeric it is simply returned (this is for backwards compatibility).
• An error is raised for all other data types.
" hello\n\t".rstrip()
rstrip(" hello\n\t")
Would both result in "hello"
[" hello\n\t", " hi\n\t"].rstrip()
rstrip([" hello\n\t", " hi\n\t"])
Would both result in ['hello', 'hi']
Signature 1
rstrip(Numeric $arg)
Signature 2
rstrip(String $arg)
Signature 3
rstrip(Iterable[Variant[String, Numeric]] $arg)
scanf
Scans a string and returns an array of one or more converted values based on the given format string. See the
documentation of Ruby's String#scanf method for details about the supported formats (which are similar but not
identical to the formats used in Puppet's sprintf function.)
This function takes two mandatory arguments: the first is the string to convert, and the second is the format string.
The result of the scan is an array, with each successfully scanned and transformed value. The scanning stops if a scan
is unsuccessful, and the scanned result up to that point is returned. If there was no successful scan, the result is an
empty array.
"42".scanf("%i")
You can also optionally pass a lambda to scanf, to do additional validation or processing.
"42".scanf("%i") |$x| {
unless $x[0] =~ Integer {
© 2024 Puppet, Inc., a Perforce company

Puppet | Syntax and settings | 774
fail "Expected a well formed integer value, got '$x[0]'"
}
$x[0]
}
scanf(String $data, String $format, Optional[Callable] &$block)
sha1
Returns a SHA1 hash value from a provided string.
sha1()
sha256
Returns a SHA256 hash value from a provided string.
sha256()
shellquote
Quote and concatenate arguments for use in Bourne shell.
Each argument is quoted separately, and then all are concatenated with spaces. If an argument is an array, the
elements of that array is interpolated within the rest of the arguments; this makes it possible to have an array of
arguments and pass that array to shellquote instead of having to specify each argument individually in the call.
shellquote()
size
The same as length() - returns the size of an Array, Hash, String, or Binary value.
size(Variant[Collection, String, Binary] $arg)
slice
Slices an array or hash into pieces of a given size.
This function takes two mandatory arguments: the first should be an array or hash, and the second specifies the
number of elements to include in each slice.
When the first argument is a hash, each key value pair is counted as one. For example, a slice size of 2 will produce
an array of two arrays with key, and value.
$a.slice(2) |$entry| { notice "first ${$entry[0]}, second
${$entry[1]}" }
$a.slice(2) |$first, $second| { notice "first ${first}, second ${second}" }
The function produces a concatenated result of the slices.
slice([1,2,3,4,5,6], 2) # produces [[1,2], [3,4], [5,6]]
slice(Integer[1,6], 2) # produces [[1,2], [3,4], [5,6]]
slice(4,2) # produces [[0,1], [2,3]]
slice('hello',2) # produces [[h, e], [l, l], [o]]
$a.slice($n) |$x| { ... }
slice($a) |$x| { ... }
The lambda should have either one parameter (receiving an array with the slice), or the same number of parameters as
specified by the slice size (each parameter receiving its part of the slice). If there are fewer remaining elements than
© 2024 Puppet, Inc., a Perforce company

Puppet | Syntax and settings | 775
the slice size for the last slice, it will contain the remaining elements. If the lambda has multiple parameters, excess
parameters are set to undef for an array, or to empty arrays for a hash.
$a.slice(2) |$first, $second| { ... }
Signature 1
slice(Hash[Any, Any] $hash, Integer[1, default] $slice_size,
Optional[Callable] &$block)
Signature 2
slice(Iterable $enumerable, Integer[1, default] $slice_size,
Optional[Callable] &$block)
sort
Sorts an Array numerically or lexicographically or the characters of a String lexicographically. Please note:
This function is based on Ruby String comparison and as such may not be entirely UTF8 compatible. To ensure
compatibility please use this function with Ruby 2.4.0 or greater - https://bugs.ruby-lang.org/issues/10085.
This function is compatible with the function sort() in stdlib.
• Comparison of characters in a string always uses a system locale and may not be what is expected for a particular
locale
• Sorting is based on Ruby's <=> operator unless a lambda is given that performs the comparison.
• comparison of strings is case dependent (use lambda with compare($a,$b) to ignore case)
• comparison of mixed data types raises an error (if there is the need to sort mixed data types use a lambda)
Also see the compare() function for information about comparable data types in general.
notice(sort("xadb")) # notices 'abdx'
notice(sort([3,6,2])) # notices [2, 3, 6]
notice(sort([3,6,2]) |$a,$b| { compare($a, $b) }) # notices [2, 3, 6]
notice(sort([3,6,2]) |$a,$b| { compare($b, $a) }) # notices [6, 3, 2]
notice(sort(['A','b','C'])) # notices
['A', 'C', 'b']
notice(sort(['A','b','C']) |$a,$b| { compare($a, $b) }) # notices
['A', 'b', 'C']
notice(sort(['A','b','C']) |$a,$b| { compare($a, $b, true) }) # notices
['A', 'b', 'C']
notice(sort(['A','b','C']) |$a,$b| { compare($a, $b, false) }) # notices
['A','C', 'b']
notice(sort(['b', 3, 'a', 2]) |$a, $b| {
case [$a, $b] {
[String, Numeric] : { 1 }
[Numeric, String] : { -1 }
default: { compare($a, $b) }
}
})
Would notice [2,3,'a','b']
Signature 1
sort(String $string_value, Optional[Callable[2,2]] &$block)
© 2024 Puppet, Inc., a Perforce company

Puppet | Syntax and settings | 776
Signature 2
sort(Array $array_value, Optional[Callable[2,2]] &$block)
split
Splits a string into an array using a given pattern. The pattern can be a string, regexp or regexp type.
$string = 'v1.v2:v3.v4'
$array_var1 = split($string, /:/)
$array_var2 = split($string, '[.]')
$array_var3 = split($string, Regexp['[.:]'])
#`$array_var1` now holds the result `['v1.v2', 'v3.v4']`,
# while `$array_var2` holds `['v1', 'v2:v3', 'v4']`, and
# `$array_var3` holds `['v1', 'v2', 'v3', 'v4']`.
Note that in the second example, we split on a literal string that contains a regexp meta-character (.), which must be
escaped. A simple way to do that for a single character is to enclose it in square brackets; a backslash will also escape
a single character.
Signature 1
split(String $str, String $pattern)
Signature 2
split(String $str, Regexp $pattern)
Signature 3
split(String $str, Type[Regexp] $pattern)
Signature 4
split(Sensitive[String] $sensitive, String $pattern)
Signature 5
split(Sensitive[String] $sensitive, Regexp $pattern)
Signature 6
split(Sensitive[String] $sensitive, Type[Regexp] $pattern)
sprintf
Perform printf-style formatting of text.
The first parameter is format string describing how the rest of the parameters should be formatted. See the
documentation for the Kernel::sprintf function in Ruby for details.
To use named format arguments, provide a hash containing the target string values as the argument to be formatted.
For example:
notice sprintf(\"%<x>s : %<y>d\", { 'x' => 'value is', 'y' => 42 })
This statement produces a notice of value is : 42.
sprintf()
© 2024 Puppet, Inc., a Perforce company

Puppet | Syntax and settings | 777
step
When no block is given, Puppet returns a new Iterable which allows it to be directly chained into another function
that takes an Iterable as an argument.
# For the array $data, return an array, set to the first element and each
5th successor element, in reverse
# order multiplied by 10
$data = Integer[0,20]
$transformed_data = $data.step(5).map |$item| { $item * 10 }
$transformed_data contains [0,50,100,150,200]
# For the array $data, return an array, set to the first and each 5th
# successor, in reverse order, multiplied by 10
$data = Integer[0,20]
$transformed_data = map(step($data, 5)) |$item| { $item * 10 }
$transformed_data contains [0,50,100,150,200]
Signature 1
step(Iterable $iterable, Integer[1] $step)
Signature 2
step(Iterable $iterable, Integer[1] $step, Callable[1,1] &$block)
strftime
Formats timestamp or timespan according to the directives in the given format string. The directives begins with a
percent (%) character. Any text not listed as a directive will be passed through to the output string.
A third optional timezone argument can be provided. The first argument will then be formatted to represent a local
time in that timezone. The timezone can be any timezone that is recognized when using the '%z' or '%Z' formats, or
the word 'current', in which case the current timezone of the evaluating process will be used. The timezone argument
is case insensitive.
The default timezone, when no argument is provided, or when using the keyword default, is 'UTC'.
The directive consists of a percent (%) character, zero or more flags, optional minimum field width and a conversion
specifier as follows:
%[Flags][Width]Conversion
Flags that controls padding
Flag Meaning
- Don't pad numerical output
_ Use spaces for padding
0 Use zeros for padding
Timestamp specific flags
Flag Meaning
# Change case
^ Use uppercase
: Use colons for %z
© 2024 Puppet, Inc., a Perforce company

Puppet | Syntax and settings | 778
Format directives applicable to Timestamp (names and padding can be altered using flags):
Date (Year, Month, Day):
Format Meaning
Y Year with century, zero-padded to at least 4 digits
C year / 100 (rounded down such as 20 in 2009)
y year % 100 (00..99)
m Month of the year, zero-padded (01..12)
B The full month name ("January")
b The abbreviated month name ("Jan")
h Equivalent to %b
d Day of the month, zero-padded (01..31)
e Day of the month, blank-padded ( 1..31)
j Day of the year (001..366)
Time (Hour, Minute, Second, Subsecond):
Format Meaning
H Hour of the day, 24-hour clock, zero-padded (00..23)
k Hour of the day, 24-hour clock, blank-padded ( 0..23)
I Hour of the day, 12-hour clock, zero-padded (01..12)
l Hour of the day, 12-hour clock, blank-padded ( 1..12)
P Meridian indicator, lowercase ("am" or "pm")
p Meridian indicator, uppercase ("AM" or "PM")
M Minute of the hour (00..59)
S Second of the minute (00..60)
L Millisecond of the second (000..999). Digits under
millisecond are truncated to not produce 1000
N Fractional seconds digits, default is 9 digits
(nanosecond). Digits under a specified width are
truncated to avoid carry up
Time (Hour, Minute, Second, Subsecond):
Format Meaning
z Time zone as hour and minute offset from UTC (e.g.
+0900)
:z hour and minute offset from UTC with a colon (e.g.
+09:00)
::z hour, minute and second offset from UTC (e.g.
+09:00:00)
Z Abbreviated time zone name or similar information. (OS
dependent)
© 2024 Puppet, Inc., a Perforce company

Puppet | Syntax and settings | 779
Weekday:
Format Meaning
A The full weekday name ("Sunday")
a The abbreviated name ("Sun")
u Day of the week (Monday is 1, 1..7)
w Day of the week (Sunday is 0, 0..6)
ISO 8601 week-based year and week number:
The first week of YYYY starts with a Monday and includes YYYY-01-04. The days in the year before the first week
are in the last week of the previous year.
Format Meaning
G The week-based year
g The last 2 digits of the week-based year (00..99)
V Week number of the week-based year (01..53)
Week number:
The first week of YYYY that starts with a Sunday or Monday (according to %U or %W). The days in the year before
the first week are in week 0.
Format Meaning
U Week number of the year. The week starts with Sunday.
(00..53)
W Week number of the year. The week starts with Monday.
(00..53)
Seconds since the Epoch:
Format Meaning
s Number of seconds since 1970-01-01 00:00:00 UTC.
Literal string:
Format Meaning
n Newline character (\n)
t Tab character (\t)
% Literal "%" character
Combination:
Format Meaning
c date and time (%a %b %e %T %Y)
D Date (%m/%d/%y)
F The ISO 8601 date format (%Y-%m-%d)
v VMS date (%e-%^b-%4Y)
© 2024 Puppet, Inc., a Perforce company

Puppet | Syntax and settings | 780
Format Meaning
x Same as %D
X Same as %T
r 12-hour time (%I:%M:%S %p)
R 24-hour time (%H:%M)
T 24-hour time (%H:%M:%S)
$timestamp = Timestamp('2016-08-24T12:13:14')
# Notice the timestamp using a format that notices the ISO 8601 date format
notice($timestamp.strftime('%F')) # outputs '2016-08-24'
# Notice the timestamp using a format that notices weekday, month, day, time
(as UTC), and year
notice($timestamp.strftime('%c')) # outputs 'Wed Aug 24 12:13:14 2016'
# Notice the timestamp using a specific timezone
notice($timestamp.strftime('%F %T %z', 'PST')) # outputs '2016-08-24
04:13:14 -0800'
# Notice the timestamp using timezone that is current for the evaluating
process
notice($timestamp.strftime('%F %T', 'current')) # outputs the timestamp
using the timezone for the current process
Format directives applicable to Timespan:
Format Meaning
D Number of Days
H Hour of the day, 24-hour clock
M Minute of the hour (00..59)
S Second of the minute (00..59)
L Millisecond of the second (000..999). Digits under
millisecond are truncated to not produce 1000.
N Fractional seconds digits, default is 9 digits
(nanosecond). Digits under a specified length are
truncated to avoid carry up
The format directive that represents the highest magnitude in the format will be allowed to overflow. I.e. if no "%D"
is used but a "%H" is present, then the hours will be more than 23 in case the timespan reflects more than a day.
$duration = Timespan({ hours => 3, minutes => 20, seconds => 30 })
# Notice the duration using a format that outputs
<hours>:<minutes>:<seconds>
notice($duration.strftime('%H:%M:%S')) # outputs '03:20:30'
# Notice the duration using a format that outputs <minutes>:<seconds>
notice($duration.strftime('%M:%S')) # outputs '200:30'
• Since 4.8.0
Signature 1
© 2024 Puppet, Inc., a Perforce company

Puppet | Syntax and settings | 781
strftime(Timespan $time_object, String $format)
Signature 2
strftime(Timestamp $time_object, String $format, Optional[String] $timezone)
Signature 3
strftime(String $format, Optional[String] $timezone)
strip
Strips leading and trailing spaces from a String
This function is compatible with the stdlib function with the same name.
The function does the following:
• For a String the conversion removes all leading and trailing ASCII white space characters such as space, tab,
newline, and return. It does not remove other space-like characters like hard space (Unicode U+00A0). (Tip, /
^[[:space:]]/ regular expression matches all space-like characters).
• For an Iterable[Variant[String, Numeric]] (for example an Array) each value is processed and
the conversion is not recursive.
• If the value is Numeric it is simply returned (this is for backwards compatibility).
• An error is raised for all other data types.
" hello\n\t".strip()
strip(" hello\n\t")
Would both result in "hello"
[" hello\n\t", " hi\n\t"].strip()
strip([" hello\n\t", " hi\n\t"])
Would both result in ['hello', 'hi']
Signature 1
strip(Numeric $arg)
Signature 2
strip(String $arg)
Signature 3
strip(Iterable[Variant[String, Numeric]] $arg)
tag
Add the specified tags to the containing class or definition. All contained objects will then acquire that tag, also.
tag()
tagged
A boolean function that tells you whether the current container is tagged with the specified tags. The tags are ANDed,
so that all of the specified tags must be included for the function to return true.
tagged()
template
Loads an ERB template from a module, evaluates it, and returns the resulting value as a string.
© 2024 Puppet, Inc., a Perforce company

Puppet | Syntax and settings | 782
The argument to this function should be a <MODULE NAME>/<TEMPLATE FILE> reference, which will
load <TEMPLATE FILE> from a module's templates directory. (For example, the reference apache/
vhost.conf.erb will load the file <MODULES DIRECTORY>/apache/templates/vhost.conf.erb.)
This function can also accept:
• An absolute path, which can load a template file from anywhere on disk.
• Multiple arguments, which will evaluate all of the specified templates and return their outputs concatenated into a
single string.
template()
then
Calls a lambda with the given argument unless the argument is undef. Returns undef if the argument is undef,
and otherwise the result of giving the argument to the lambda.
This is useful to process a sequence of operations where an intermediate result may be undef (which makes the
entire sequence undef). The then function is especially useful with the function dig which performs in a similar
way "digging out" a value in a complex structure.
$data = {a => { b => [{x => 10, y => 20}, {x => 100, y => 200}]}}
notice $data.dig(a, b, 1, x).then |$x| { $x * 2 }
Would notice the value 200
Contrast this with:
$data = {a => { b => [{x => 10, y => 20}, {not_x => 100, why => 200}]}}
notice $data.dig(a, b, 1, x).then |$x| { $x * 2 }
Which would notice undef since the last lookup of 'x' results in undef which is returned (without calling the
lambda given to the then function).
As a result there is no need for conditional logic or a temporary (non local) variable as the result is now either the
wanted value (x) multiplied by 2 or undef.
Calls to then can be chained. In the next example, a structure is using an offset based on using 1 as the index to the
first element (instead of 0 which is used in the language). We are not sure if user input actually contains an index at
all, or if it is outside the range of available names.args.
# Names to choose from
$names = ['Ringo', 'Paul', 'George', 'John']
# Structure where 'beatle 2' is wanted (but where the number refers
# to 'Paul' because input comes from a source using 1 for the first
# element).
$data = ['singer', { beatle => 2 }]
$picked = assert_type(String,
# the data we are interested in is the second in the array,
# a hash, where we want the value of the key 'beatle'
$data.dig(1, 'beatle')
# and we want the index in $names before the given index
.then |$x| { $names[$x-1] }
# so we can construct a string with that beatle's name
.then |$x| { "Picked Beatle '${x}'" }
)
notice $picked
Would notice "Picked Beatle 'Paul'", and would raise an error if the result was not a String.
• Since 4.5.0
© 2024 Puppet, Inc., a Perforce company

Puppet | Syntax and settings | 783
then(Any $arg, Callable[1,1] &$block)
tree_each
Runs a lambda recursively and repeatedly using values from a data structure, then returns the unchanged data
structure, or if a lambda is not given, returns an Iterator for the tree.
This function takes one mandatory argument, one optional, and an optional block in this order:
1.
An Array, Hash, Iterator, or Object that the function will iterate over.
2.
An optional hash with the options:
• include_containers => Optional[Boolean] # default true - if containers should be given to the
lambda
• include_values => Optional[Boolean] # default true - if non containers should be given to the
lambda
• include_root => Optional[Boolean] # default true - if the root container should be given to the
lambda
• container_type => Optional[Type[Variant[Array, Hash, Object]]] # a type that
determines what a container is - can only be set to a type that matches the default Variant[Array,
Hash, Object].
• order => Enum[depth_first, breadth_first] # default ´depth_first`, the order in which elements
are visited
• include_refs => Optional[Boolean] # default false, if attributes in objects marked as bing of
reference kind should be included.
3.
An optional lambda, which the function calls for each element in the first argument. It must accept one or two
arguments; either $path, and $value, or just $value.
$data.tree_each |$path, $value| { <PUPPET CODE BLOCK> } $data.tree_each |
$value| { <PUPPET CODE BLOCK> }
or
tree_each($data) |$path, $value| { <PUPPET CODE BLOCK> } tree_each($data) |
$value| { <PUPPET CODE BLOCK> }
The parameter $path is always given as an Array containing the path that when applied to the tree as
$data.dig(*$path) yields the $value. The $value` is the value at that path.
For Array values, the path will contain Integer entries with the array index, and for Hash values, the path will
contain the hash key, which may be Any value. For Object containers, the entry is the name of the attribute (a
String).
The tree is walked in either depth-first order, or in breadth-first order under the control of the order option, yielding
each Array, Hash, Object, and each entry/attribute. The default is depth_first which means that children are
processed before siblings. An order of breadth_first means that siblings are processed before children.
[1, [2, 3], 4]
If containers are skipped, results in:
• depth_first order 1, 2, 3, 4
• breadth_first order 1, 4,2, 3
If containers and root are included, results in:
• depth_first order [1, [2, 3], 4], 1, [2, 3], 2, 3, 4
• breadth_first order [1, [2, 3], 4], 1, [2, 3], 4, 2, 3
Typical use of the tree_each function include:
• a more efficient way to iterate over a tree than first using flatten on an array as that requires a new (potentially
very large) array to be created
© 2024 Puppet, Inc., a Perforce company

Puppet | Syntax and settings | 784
• when a tree needs to be transformed and 'pretty printed' in a template
• avoiding having to write a special recursive function when tree contains hashes (flatten does not work on hashes)
$data = [1, 2, [3, [4, 5]]]
$data.tree_each({include_containers => false}) |$v| { notice "$v" }
This would call the lambda 5 times with with the following values in sequence: 1, 2, 3, 4, 5
$data = [1, 2, [3, [4, 5]]]
$data.tree_each |$v| { notice "$v" }
This would call the lambda 7 times with the following values in sequence: 1, 2, [3, [4, 5]], 3, [4, 5], 4, 5
$data = [1, 2, [3, [4, 5]]]
$data.tree_each({include_values => false, include_root => false}) |$v|
{ notice "$v" }
This would call the lambda 2 times with the following values in sequence: [3, [4, 5]], [4, 5]
Any Puppet Type system data type can be used to filter what is considered to be a container, but it must be a narrower
type than one of the default Array, Hash, Object types - for example it is not possible to make a String be a
container type.
$data = [1, {a => 'hello', b => [100, 200]}, [3, [4, 5]]]
$data.tree_each({container_type => Array, include_containers => false} |$v|
{ notice "$v" }
Would call the lambda 5 times with 1, {a => 'hello', b => [100, 200]}, 3, 4, 5
Chaining When calling tree_each without a lambda the function produces an Iterator that can be chained into
another iteration. Thus it is easy to use one of:
• reverse_each - get "leaves before root"
• filter - prune the tree
• map - transform each element
Note than when chaining, the value passed on is a Tuple with [path, value].
# A tree of some complexity (here very simple for readability)
$tree = [
{ name => 'user1', status => 'inactive', id => '10'},
{ name => 'user2', status => 'active', id => '20'}
]
notice $tree.tree_each.filter |$v| {
$value = $v[1]
$value =~ Hash and $value[status] == active
}
Would notice [[[1], {name => user2, status => active, id => 20}]], which can then be
processed further as each filtered result appears as a Tuple with [path, value].
For general examples that demonstrates iteration see the Puppet iteration documentation.
Signature 1
tree_each(Variant[Iterator, Array, Hash, Object] $tree, Optional[OptionsType]
$options, Callable[2,2] &$block)
Signature 2
tree_each(Variant[Iterator, Array, Hash, Object] $tree, Optional[OptionsType]
$options, Callable[1,1] &$block)
© 2024 Puppet, Inc., a Perforce company

Puppet | Syntax and settings | 785
Signature 3
tree_each(Variant[Iterator, Array, Hash, Object] $tree, Optional[OptionsType]
$options)
type
Returns the data type of a given value with a given degree of generality.
type InferenceFidelity = Enum[generalized, reduced, detailed]
function type(Any $value, InferenceFidelity $fidelity = 'detailed') #
returns Type
notice type(42) =~ Type[Integer]
Would notice true.
By default, the best possible inference is made where all details are retained. This is good when the type is used for
further type calculations but is overwhelmingly rich in information if it is used in a error message.
The optional argument $fidelity may be given as (from lowest to highest fidelity):
• generalized - reduces to common type and drops size constraints
• reduced - reduces to common type in collections
• detailed - (default) all details about inferred types is retained
notice type([3.14, 42], 'generalized')
notice type([3.14, 42], 'reduced'')
notice type([3.14, 42], 'detailed')
notice type([3.14, 42])
Would notice the four values:
1.
Array[Numeric]
2.
Array[Numeric, 2, 2]
3.
Tuple[Float[3.14], Integer[42,42]]]
4.
Tuple[Float[3.14], Integer[42,42]]]
Signature 1
type(Any $value, Optional[Enum[detailed]] $inference_method)
Signature 2
type(Any $value, Enum[reduced] $inference_method)
Signature 3
type(Any $value, Enum[generalized] $inference_method)
unique
Produces a unique set of values from an Iterable argument.
• If the argument is a String, the unique set of characters are returned as a new String.
• If the argument is a Hash, the resulting hash associates a set of keys with a set of unique values.
• For all other types of Iterable (Array, Iterator) the result is an Array with a unique set of entries.
• Comparison of all String values are case sensitive.
• An optional code block can be given - if present it is given each candidate value and its return is used instead of
the given value. This enables transformation of the value before comparison. The result of the lambda is only used
for comparison.
© 2024 Puppet, Inc., a Perforce company

Puppet | Syntax and settings | 786
• The optional code block when used with a hash is given each value (not the keys).
# will produce 'abc'
"abcaabb".unique
# will produce ['a', 'b', 'c']
['a', 'b', 'c', 'a', 'a', 'b'].unique
# will produce { ['a', 'b'] => [10], ['c'] => [20]}
{'a' => 10, 'b' => 10, 'c' => 20}.unique
# will produce { 'a' => 10, 'c' => 20 } (use first key with first value)
Hash.new({'a' => 10, 'b' => 10, 'c' => 20}.unique.map |$k, $v| { [ $k[0] ,
$v[0]] })
# will produce { 'b' => 10, 'c' => 20 } (use last key with first value)
Hash.new({'a' => 10, 'b' => 10, 'c' => 20}.unique.map |$k, $v| { [ $k[-1] ,
$v[0]] })
# will produce [3, 2, 1]
[1,2,2,3,3].reverse_each.unique
# will produce [['sam', 'smith'], ['sue', 'smith']]
[['sam', 'smith'], ['sam', 'brown'], ['sue', 'smith']].unique |$x| { $x[0] }
# will produce [['sam', 'smith'], ['sam', 'brown']]
[['sam', 'smith'], ['sam', 'brown'], ['sue', 'smith']].unique |$x| { $x[1] }
# will produce ['aBc', 'bbb'] (using a lambda to make comparison using
downcased (%d) strings)
['aBc', 'AbC', 'bbb'].unique |$x| { String($x,'%d') }
# will produce {[a] => [10], [b, c, d, e] => [11, 12, 100]}
{a => 10, b => 11, c => 12, d => 100, e => 11}.unique |$v| { if $v > 10
{ big } else { $v } }
Note that for Hash the result is slightly different than for the other data types. For those the result contains the
first-found unique value, but for Hash it contains associations from a set of keys to the set of values clustered
by the equality lambda (or the default value equality if no lambda was given). This makes the unique function
more versatile for hashes in general, while requiring that the simple computation of "hash's unique set of values" is
performed as $hsh.map |$k, $v| { $v }.unique. (Generally, it's meaningless to compute the unique set
of hash keys because they are unique by definition. However, the situation can change if the hash keys are processed
with a different lambda for equality. For this unique computation, first map the hash to an array of its keys.) If the
more advanced clustering is wanted for one of the other data types, simply transform it into a Hash as shown in the
following example.
# Array ['a', 'b', 'c'] to Hash with index results in
# {0 => 'a', 1 => 'b', 2 => 'c'}
Hash(['a', 'b', 'c'].map |$i, $v| { [$i, $v]})
# String "abc" to Hash with index results in
# {0 => 'a', 1 => 'b', 2 => 'c'}
Hash(Array("abc").map |$i,$v| { [$i, $v]})
"abc".to(Array).map |$i,$v| { [$i, $v]}.to(Hash)
Signature 1
unique(String $string, Optional[Callable[String]] &$block)
© 2024 Puppet, Inc., a Perforce company

Puppet | Syntax and settings | 787
Signature 2
unique(Hash $hash, Optional[Callable[Any]] &$block)
Signature 3
unique(Array $array, Optional[Callable[Any]] &$block)
Signature 4
unique(Iterable $iterable, Optional[Callable[Any]] &$block)
unwrap
Unwraps a Sensitive value and returns the wrapped object. Returns the Value itself, if it is not Sensitive.
$plaintext = 'hunter2'
$pw = Sensitive.new($plaintext)
notice("Wrapped object is $pw") #=> Prints "Wrapped object is Sensitive
[value redacted]"
$unwrapped = $pw.unwrap
notice("Unwrapped object is $unwrapped") #=> Prints "Unwrapped object is
hunter2"
You can optionally pass a block to unwrap in order to limit the scope where the unwrapped value is visible.
$pw = Sensitive.new('hunter2')
notice("Wrapped object is $pw") #=> Prints "Wrapped object is Sensitive
[value redacted]"
$pw.unwrap |$unwrapped| {
$conf = inline_template("password: ${unwrapped}\n")
Sensitive.new($conf)
} #=> Returns a new Sensitive object containing an interpolated config file
# $unwrapped is now out of scope
Signature 1
unwrap(Sensitive $arg, Optional[Callable] &$block)
Signature 2
unwrap(Any $arg, Optional[Callable] &$block)
upcase
Converts a String, Array or Hash (recursively) into upper case.
This function is compatible with the stdlib function with the same name.
The function does the following:
• For a String, its upper case version is returned. This is done using Ruby system locale which handles some, but
not all special international up-casing rules (for example German double-s ß is upcased to "SS", whereas upper
case double-s is downcased to ß).
• For Array and Hash the conversion to upper case is recursive and each key and value must be convertible by
this function.
• When a Hash is converted, some keys could result in the same key - in those cases, the latest key-value wins. For
example if keys "aBC", and "abC" where both present, after upcase there would only be one key "ABC".
• If the value is Numeric it is simply returned (this is for backwards compatibility).
• An error is raised for all other data types.
© 2024 Puppet, Inc., a Perforce company

Puppet | Syntax and settings | 788
Please note: This function relies directly on Ruby's String implementation and as such may not be entirely UTF8
compatible. To ensure best compatibility please use this function with Ruby 2.4.0 or greater - https://bugs.ruby-
lang.org/issues/10085.
'hello'.upcase()
upcase('hello')
Would both result in "HELLO"
['a', 'b'].upcase()
upcase(['a', 'b'])
Would both result in ['A', 'B']
{'a' => 'hello', 'b' => 'goodbye'}.upcase()
Would result in {'A' => 'HELLO', 'B' => 'GOODBYE'}
['a', 'b', ['c', ['d']], {'x' => 'y'}].upcase
Would result in ['A', 'B', ['C', ['D']], {'X' => 'Y'}]
Signature 1
upcase(Numeric $arg)
Signature 2
upcase(String $arg)
Signature 3
upcase(Array[StringData] $arg)
Signature 4
upcase(Hash[StringData, StringData] $arg)
values
Returns the values of a hash as an Array
$hsh = {"apples" => 3, "oranges" => 4 }
$hsh.values()
values($hsh)
# both results in the array [3, 4]
• Note that a hash in the puppet language accepts any data value (including undef) unless it is constrained with a
Hash data type that narrows the allowed data types.
• For an empty hash, an empty array is returned.
• The order of the values is the same as the order in the hash (typically the order in which they were added).
values(Hash $hsh)
versioncmp
Compares two version numbers.
Prototype:
$result = versioncmp(a, b)
Where a and b are arbitrary version strings.
© 2024 Puppet, Inc., a Perforce company

Puppet | Syntax and settings | 789
Optional parameter ignore_trailing_zeroes is used to ignore unnecessary trailing version numbers like .0 or .0.00
This function returns:
• 1 if version a is greater than version b
• 0 if the versions are equal
• -1 if version a is less than version b
This function uses the same version comparison algorithm used by Puppet's package type.
versioncmp(String $a, String $b, Optional[Boolean] $ignore_trailing_zeroes)
warning
Logs a message on the server at level warning.
warning(Any *$values)
Parameters
• *values --- The values to log.
Return type(s): Undef.
with
Calls a lambda with the given arguments and returns the result.
Since a lambda's scope is local to the lambda, you can use the with function to create private blocks of code within a
class using variables whose values cannot be accessed outside of the lambda.
# Concatenate three strings into a single string formatted as a list.
$fruit = with("apples", "oranges", "bananas") |$x, $y, $z| {
"${x}, ${y}, and ${z}"
}
$check_var = $x
# $fruit contains "apples, oranges, and bananas"
# $check_var is undefined, as the value of $x is local to the lambda.
with(Any *$arg, Callable &$block)
yaml_data
The yaml_data is a hiera 5 data_hash data provider function. See the configuration guide documentation for
how to use this function.
yaml_data(Struct[{path=>String[1]}] $options, Puppet::LookupContext $context)
Node definitions
A node definition, also known as a node statement, is a block of Puppet code that is included only in matching nodes'
catalogs. This allows you to assign specific configurations to specific nodes.
Put node definitions in the main manifest, which can be a single site.pp file, or a directory containing many files.
If the main manifest contains at least one node definition, it must have one for every node. Compilation for a node
fails if a node definition for it cannot be found. Either specify no node definitions, or use the default node
definition, as described below, to avoid this situation.
Puppet code that is outside any node definition is compiled for every node. That is, a given node gets both the code
that is in its node definition and the code that is outside any node definition.
Node definitions create an anonymous scope that can override variables and defaults from top scope.
© 2024 Puppet, Inc., a Perforce company

Puppet | Syntax and settings | 790
Tip: Although node definitions can contain almost any Puppet code, we recommend that you use them only to
set variables and declare classes. Avoid putting resource declarations, collectors, conditional statements, chaining
relationships, and functions in node definitions; all of these belong in classes or defined types.
Node definitions are an optional feature of Puppet. You can use them instead of or in combination with an external
node classifier (ENC). Alternatively, you can use conditional statements with facts to classify nodes. Unlike more
general conditional structures, node definitions match nodes only by name. By default, the name of a node is its
certname, which defaults to the node's fully qualified domain name.
Although you can use node definitions in conjunction with an ENC, it's simpler to choose one method or the other. If
you do use them together, Puppet merges their data as follows:
• Variables from an ENC are set at top scope and can be overridden by variables in a node definition.
• Classes from an ENC are declared at node scope, so they are affected by any variables set in the node definition.
Syntax
Node definitions look like class definitions. The general form of a node definition is:
• The node keyword.
• The node definition name: a quoted string, a regular expression, or default.
• An opening curly brace.
• Any mixture of class declarations, variables, resource declarations, collectors, conditional statements, chaining
relationships, and functions.
• A closing curly brace.
In the following example, only www1.example.com receives the apache and squid classes, and only
db1.example.com receives the mysql class:
# <ENVIRONMENTS DIRECTORY>/<ENVIRONMENT>/manifests/site.pp
node 'www1.example.com' {
include common
include apache
include squid
}
node 'db1.example.com' {
include common
include mysql
}
A node definition name must be one of the following:
• A quoted string containing only letters, numbers, underscores (_), hyphens (-), and periods (.).
• A regular expression.
• The bare word default. If no other node definition matches a given node, the default node definition will be
used for that node.
You can use a comma-separated list of names to match a group of nodes with a single node definition:
node 'www1.example.com', 'www2.example.com', 'www3.example.com' {
include common
include apache, squid
}
If you use a regular expression for a node definition name, it also has the potential to match multiple nodes. For
example, the following node definition matches www1, www13, and any other node whose name consists of www and
one or more digits:
node /^www\d+$/ {
include common
© 2024 Puppet, Inc., a Perforce company

Puppet | Syntax and settings | 791
}
The following example of a regex node definition name matches one.example.com and two.example.com,
but no other nodes:
node /^(one|two)\.example\.com$/ {
include common
}
Important: Make sure all of your node definition name regexes match non-overlapping sets of node names. If a
node’s name matches more than one regex, Puppet makes no guarantee about which matching definition it will get.
You can use regex capture variables by enclosing parts of your regex node definition name in parentheses (), and
then referencing them in order as $1, $2 and so on, as variables within the body of the node definition. For example:
node /^www(\d+)$/ {
$wwwnumber = $1 #assigns the value of the (\d+) from a regex match to the
variable $wwwnumber
}
Matching
A given node gets the contents of only one node definition, even if multiple node definitions could match its name.
Puppet does the following checks, in this order, until it finds one that matches:
1.
If there is a node definition with the node's exact name, Puppet uses it.
2.
If there is a regular expression node definition that matches the node's name, Puppet uses it. If more than one
regex node matches, Puppet uses one of them, but we can't predict which. Make your node definition name
regexes non-overlapping to avoid this problem.
3.
By default, the primary server's strict_hostname_checking is set to true, which means the nodes are
always matched by the certname.
If strict_hostname_checking is set to false and the node's name looks like a fully qualified domain
name (it has multiple period-separated groups of letters, numbers, underscores, and dashes), Puppet chops off the
final group and starts again at step 1. This is also true for fqdn. If the fqdn fact is not found, it will combine the
hostname and domain facts.
4.
Puppet uses the default node.
For example, when compiling a catalog for a node with certname www01.example.com, with fuzzy checking,
Puppet looks for a node definition with the following name, in this order:
• www01.example.com
• A regex that matches www01.example.com
• www01.example
• A regex that matches www01.example
• www01
• A regex that matches www01
• default
If it doesn't find one, catalog compilation fails. It's a good idea to always have a default node definition.
Related information
Variables on page 517
Variables store values so that those values can be accessed in code later.
Conditional statements and expressions on page 700
© 2024 Puppet, Inc., a Perforce company

Puppet | Syntax and settings | 792
Conditional statements let your Puppet code behave differently in different situations. They are most helpful when
combined with facts or with data retrieved from an external source. Puppet supports if and unless statements, case
statements, and selectors.
Key configuration settings on page 79
Puppet has about 200 settings, all of which are listed in the configuration reference. Most of the time, you interact
with only a couple dozen of them. This page lists the most important ones, assuming that you're okay with default
values for things like the port Puppet uses for network traffic. See the configuration reference for more details on
each.
Main manifest directory on page 140
Puppet starts compiling a catalog either with a single manifest file or with a directory of manifests that are treated like
a single file. This starting point is called the main manifest or site manifest.
Scope on page 941
A scope is a specific area of code that is partially isolated from other areas of code.
Facts and built-in variables
Before requesting a catalog for a managed node, or compiling one with puppet apply, Puppet collects system
information, called facts, by using the Facter tool. The facts are assigned as values to variables that you can use
anywhere in your manifests. Puppet also sets some additional special variables, called built-in variables, which
behave a lot like facts.
Puppet code can access the following facts when compiling a catalog:
• Core facts from Facter.
• Custom facts and external facts that are present in your modules.
To see the fact values for a node, run facter -p on the command line, or browse facts on node detail pages in the
Puppet Enterprise console. You can also use the PuppetDB API to explore or build tools to search and report on your
infrastructure's facts.
Puppet honors fact values of of any data type. It does not convert Boolean, numeric, or structured facts to strings.
• Accessing facts from Puppet code on page 792
When you write Puppet code, you can access facts with the $facts['fact_name'] hash.
• Built-in variables on page 793
In addition to Facter's core facts and custom facts, Puppet creates several variables for a node to facilitate managing
it. These variables are called trusted facts, server facts, agent facts, server variables, and compiler variables.
Accessing facts from Puppet code
When you write Puppet code, you can access facts with the $facts['fact_name'] hash.
Using the $facts['fact_name'] hash syntax
Alternatively, facts are structured in a $facts hash, and your manifest code can access them as
$facts['fact_name']. The variable name $facts is reserved, so local scopes cannot re-use it. Structured
facts show up as a nested structure inside the $facts namespace, and can be accessed using Puppet's normal hash
access syntax.
For example:
if $facts['os']['family'] == 'RedHat' {
# ...
}
Accessing facts using this syntax makes for more readable and maintainable code, by making facts visibly distinct
from other variables. It eliminates confusion that is possible when you use a local variable whose name happens to
match that of a common fact.
© 2024 Puppet, Inc., a Perforce company
Puppet | Syntax and settings | 793
Because of ambiguity with function invocation, the dot-separated access syntax that is available in Facter commands
is not available with the $facts hash access syntax. However, you can instead use the get function built into core
Puppet. For more information, see README.
Improving performance by blocking or caching built-in facts
If Facter is slowing down your code, you can configure Facter to block or cache built-in facts. When a system
has a lot of something — for example, mount points or disks — Facter can take a long time to collect the facts
from each one. When this is a problem, you can speed up Facter’s collection by configuring these settings in the
facter.conf file:
• blocklist for blocking built-in facts you’re uninterested in.
• ttls for caching built-in facts you don’t need retrieved frequently.
Related information
Scope on page 941
A scope is a specific area of code that is partially isolated from other areas of code.
Variables on page 517
Variables store values so that those values can be accessed in code later.
Hashes on page 881
Hashes map keys to values, maintaining the order of the entries according to insertion order.
Configuring Facter with facter.conf on page 339
The facter.conf file is a configuration file that allows you to cache and block fact groups and facts, and manage
how Facter interacts with your system. There are four sections: facts, global, cli and fact-groups. All
sections are optional and can be listed in any order within the file.
Built-in variables
In addition to Facter's core facts and custom facts, Puppet creates several variables for a node to facilitate managing
it. These variables are called trusted facts, server facts, agent facts, server variables, and compiler variables.
Trusted facts
Normal facts are self-reported by the node, and nothing guarantees their accuracy. Trusted facts are extracted from the
node's certificate, which can prove that the certificate authority checked and approved them, making them useful for
deciding whether a given node can receive the sensitive data in its catalog.
Trusted facts is a hash that contains trusted data from the node's certificate. You can access the data using the syntax
$trusted['fact_name']. The variable name $trusted is reserved, so local scopes cannot reuse it.
© 2024 Puppet, Inc., a Perforce company

Puppet | Syntax and settings | 794
Keys in the $trusted hash Possible values
authenticated An indication of whether the catalog request was
authenticated, as well as how it was authenticated. The
value will be one of these:
• remote for authenticated remote requests, as with
agent-server Puppet configurations.
• local for all local requests, as with standalone
Puppet apply nodes.
• false for unauthenticated remote requests,
possible if your auth.conf configuration allows
unauthenticated catalog requests.
certname The node’s subject certificate name, as listed in its
certificate. When first requesting its certificate, the node
requests a subject certificate name matching the value of
its certname setting.
• If authenticated is remote, the value is the
subject certificate name extracted from the node’s
certificate.
• If authenticated is local, the value is read
directly from the certname setting.
• If authenticated is false, the value will be an
empty string.
domain The node’s domain, as derived from its validated
certificate name. The value can be empty if the
certificate name doesn’t contain a fully qualified domain
name.
extensions A hash containing any custom extensions present in
the node’s certificate. The keys of the hash are the
extension OIDs. OIDs in the ppRegCertExt range appear
using their short names, and other OIDs appear as
plain dotted numbers. If no extensions are present, or
authenticated is local or false, this is an
empty hash.
hostname The node’s hostname, as derived from its validated
certificate name
© 2024 Puppet, Inc., a Perforce company

Puppet | Syntax and settings | 795
A typical $trusted hash looks something like this:
{
'authenticated' => 'remote',
'certname' => 'web01.example.com',
'domain' => 'example.com',
'extensions' => {
'pp_uuid' => 'ED803750-
E3C7-44F5-BB08-41A04433FE2E',
'pp_image_name' => 'storefront_production'
'1.3.6.1.4.1.34380.1.2.1' => 'ssl-termination'
},
'hostname' => 'web01'
}
Here is some example Puppet code using a certificate extension:
if $trusted['extensions']['pp_image_name'] == 'storefront_production' {
include private::storefront::private_keys
}
Here's an example of a hiera.yaml file using certificate extensions in a hierarchy:
---
version: 5
hierarchy:
- name: "Certname"
path: "nodes/%{trusted.certname}.yaml"
- name: "Original VM image name"
path: "images/%{trusted.extensions.pp_image_name}.yaml"
- name: "Machine role (custom certificate extension)"
path: "role/%{trusted.extensions.'1.3.6.1.4.1.34380.1.2.1'}.yaml"
- name: "Common data"
path: "common.yaml"
Server facts
The $server_facts variable provides a hash of server-side facts that cannot be overwritten by client side facts.
This is important because it enables you to get trusted server facts that could otherwise be overwritten by client-side
facts.
For example, the primary Puppet server sets the global $::environment variable to contain the name of the
node's environment. However, if a node provides a fact with the name environment, that fact's value overrides the
server-set environment fact. The same happens with other server-set global variables, like $::servername and
$::serverip. As a result, modules can't reliably use these variables for whatever their intended purpose was.
A warning is issued any time a node parameter is overwritten.
Here is an example $server_facts hash:
{
serverversion => "4.1.0",
servername => "v85ix8blah.delivery.example.com",
serverip => "192.0.2.10",
environment => "production",
}
Agent facts
Puppet agent and Puppet apply both add several extra pieces of info to their facts before requesting or compiling a
catalog. Like other facts, these are available as either top-scope variables or elements in the $facts hash.
© 2024 Puppet, Inc., a Perforce company

Puppet | Syntax and settings | 796
Agent facts Values
$clientcert The node’s certname setting. This is self-
reported; for the verified certificate name,
use$trusted['certname'].
$clientversion The current version of Puppet agent.
$puppetversion The current version of Puppet on the node.
$clientnoop The value of the node’s noop setting (true or false) at
the time of the run.
$agent_specified_environment The value of the node’s environment setting. If the
primary server’s node classifier specified an environment
for the node, $agent_specified_environment
and $environment can have different values. If
no value was set for the environment setting (in
puppet.conf or with --environment), the value
of $agent_specified_environmentis undef.
That is, it doesn't default to production like the
setting does.
Server variables
Several variables are set by the compiling Puppet server. These are most useful when managing Puppet with Puppet,
for example, managing the puppet.conf file with a template. Server variables are not available in the $facts
hash.
Server variables Values
$environment (also available topuppet apply) The agent node’s environment. Note that nodes can
accidentally or purposefully override this with a custom
fact; the $server_facts['environment']
variable always contains the correct environment, and
can’t be overridden.
$servername The compiling server’s fully-qualified domain name
(FQDN). Note that this information is gathered from the
compiling server by Facter, rather than read from the
config files. Even if the compiling server’s certname is
set to something other than its FQDN, this variable still
contains the server’s FQDN.
$serverip The compiling server’s IP address.
$serverversion The current version of Puppet on the compiling server.
$settings::<SETTING_NAME>(also available to
puppet apply)
The value of any of the compiling server’s configuration
settings. This is implemented as a special namespace
and these variables must be referred to by their
qualified names. Other than $environment and
$clientnoop, the agent node’s settings are not
available in manifests. If you wish to expose them to the
compiling server, you must create a custom fact.
© 2024 Puppet, Inc., a Perforce company

Puppet | Syntax and settings | 797
Server variables Values
$settings::all_local Contains all variables in the $settingsnamespace
as a hash of <SETTING_NAME> =>
<SETTING_VALUE>. This helps you reference settings
that might be missing, because a direct reference
to such a missing setting raises an error when --
strict_variablesis enabled.
Compiler variables
Compiler variables are set in every local scope by the compiler during compilation. They are mostly used when
implementing complex defined types. Compiler variables are not available in the $facts hash.
By default, compiler variables have a value of undef (undefined). If you reference an undefined compiler variable,
and you have specified the strict_variables=true setting, an error message flags the undefined variable.
Compiler variables Values
$module_name The name of the module that contains the current class or
defined type.
$caller_module_name The name of the module in which the specific instance of
the surrounding defined type was declared. This is useful
when creating versatile defined types that will be reused
by several modules.
Related information
CSR attributes and certificate extensions on page 284
When Puppet agent nodes request their certificates, the certificate signing request (CSR) usually contains only their
certname and the necessary cryptographic information. Agents can also embed additional data in their CSR, useful for
policy-based autosigning and for adding new trusted facts.
Configuring Hiera on page 425
The Hiera configuration file is called hiera.yaml. It configures the hierarchy for a given layer of data.
About environments on page 130
An environment is an isolated group of agent nodes that a primary server can serve with its own main manifest and
set of modules. For example, you can use environments to set up scratch nodes for testing before rolling out changes
to production, or to divide a site by types of hardware.
Puppet settings on page 76
Customize Puppet settings in the main configuration file, called puppet.conf.
Writing custom facts on page 331
A typical fact in Facter is an collection of several elements, and is written either as a simple value (“flat” fact) or as
structured data (“structured” fact). This page shows you how to write and format facts correctly.
Scope on page 941
A scope is a specific area of code that is partially isolated from other areas of code.
Defined resource types on page 687
© 2024 Puppet, Inc., a Perforce company

Puppet | Syntax and settings | 798
Defined resource types, sometimes called defined types or defines, are blocks of Puppet code that can be evaluated
multiple times with different parameters.
Reserved words and acceptable names
You can use only certain characters for naming variables, modules, classes, defined types, and other custom
constructs. Additionally, some words in the Puppet language are reserved and cannot be used as bare word strings or
names.
Reserved words
Reserved words cannot be used as:
• Bare word strings—to use these words as strings, you must enclose them in quotes.
• Names for custom functions.
• Names for classes.
• Names for custom resource types or defined resource types.
In addition, do not:
• Use the name of any existing resource type or function as the name of a function.
• Use the name of any existing resource type as the name of a defined type.
• Use the name of any existing data type (such as integer) as the name of a defined type.
Table 1:
Reserved word Description
and Expression operator
application Language keyword
attr Reserved for future use
case Language keyword
component Reserved
consumes Language keyword
default Language keyword
define Language keyword
elsif Language keyword
environment Reserved for symbolic namespace use
false Boolean value
function Language keyword
if Language keyword
import Former language keyword
in Expression operator
inherits Language keyword
node Language keyword
or Expression operator
private Reserved for future use
© 2024 Puppet, Inc., a Perforce company

Puppet | Syntax and settings | 799
Reserved word Description
produces Language keyword
regexp Reserved
site Language keyword
true Boolean value
type Language keyword
undef Special value
unit Reserved
unless Language keyword
Reserved class names
Puppet automatically creates two names that must not be used as class names elsewhere:
• main: Puppet creates a main class, which contains any resources not contained by any other class.
• settings: Puppet creates a settings namespace, which contains variables with the settings available to the
primary server.
Additionally, the names of data types can't be used as class names:
• any, Any
• array, Array
• binary, Binary
• boolean, Boolean
• catalogentry, catalogEntry, CatalogEntry
• class, Class
• collection, Collection
• callable, Callable
• data, Data
• default, Default
• deferred, Deferred
• enum, Enum
• float, Float
• hash, Hash
• integer, Integer
• notundef, NotUndef
• numeric, Numeric
• optional, Optional
• pattern, Pattern
• resource, Resource
• regexp, Regexp
• runtime, Runtime
• scalar, Scalar
• semver, SemVer
• semVerRange, SemVerRange
• sensitive, Sensitive
• string, String
• struct, Struct
• timespan, Timespan
© 2024 Puppet, Inc., a Perforce company

Puppet | Syntax and settings | 800
• timestamp, TImestamp
• tuple, Tuple
• type, Type
• undef, Undef
• variant, Variant
Reserved variable names
The following variable names are reserved. Unless otherwise noted, you can't assign values to them or use them as
parameters in classes or defined types.
Table 2:
Reserved variable name Description
$0, $1, and every other variable name consisting only of
digits
These are regex capture variables automatically set by
regular expression used in conditional statements. Their
values do not persist oustide their associated code block
or selector value. Assigning these variables causes an
error.
Top-scope Puppet built-in variables and facts Built-in variables and facts are reserved at top scope, but
you can safely reuse them at node or local scope. See
built-in variables and facts for a list of these variables
and facts.
$facts Reserved for facts and cannot be reassigned at local
scopes.
$trusted Reserved for facts and cannot be reassigned at local
scopes.
$server_facts If enabled, this variable is reserved for trusted server
facts and cannot be reassigned at local scopes.
title Reserved for the title of a class or defined type.
name Reserved for the name of a class or defined type.
Related information
Facts and built-in variables on page 792
Before requesting a catalog for a managed node, or compiling one with puppet apply, Puppet collects system
information, called facts, by using the Facter tool. The facts are assigned as values to variables that you can use
anywhere in your manifests. Puppet also sets some additional special variables, called built-in variables, which
behave a lot like facts.
Scope on page 941
A scope is a specific area of code that is partially isolated from other areas of code.
Acceptable characters in names
Puppet limits the characters you can use when naming language constructs.
CAUTION: In some cases, names containing unsupported characters might still work. Such cases are bugs
and could cease to work at any time. Removal of these bug cases is not limited to major releases.
Classes and defined resource type names
The names of classes and defined resource types can consist of one or more namespace segments. Each namespace
segment:
© 2024 Puppet, Inc., a Perforce company
Puppet | Syntax and settings | 801
• Must begin with a lowercase letter.
• Can include lowercase letters.
• Can include digits.
• Can include underscores.
Important: The filename of a class (the loadable path) must be all lowercase — even if class name is mixed or
camel case.
When you follow these rules, each namespace segment matches the following regular expression:
\A[a-z][a-z0-9_]*\Z
The one exception is the top namespace, whose name is the empty string.
Multiple namespace segments are joined together in a class or defined type name with the double colon namespace
separator: ::. Class names with multiple namespaces must match the following regular expression:
\A([a-z][a-z0-9_]*)?(::[a-z][a-z0-9_]*)*\Z
Some words and class names are reserved and cannot be used as class or defined type names. Additionally, the
filename init.pp is reserved for the class named after any given module, so you cannot use the name <MODULE
NAME>::init for a class or defined type.
Variable names
Variable names are case-sensitive and must begin with a dollar sign ($). Most variable names must start with a
lowercase letter or an underscore. The exception is regex capture variables, which are named with only numbers.
Variable names can include:
• Uppercase and lowercase letters
• Numbers
• Underscores ( _ ). If the first character is an underscore, access that variable only from its own local scope.
Qualified variable names are prefixed with the name of their scope and the double colon (::) namespace
separator. For example, the $vhostdir variable from the apache::params class would be
$apache::params::vhostdir.
Optionally, the name of the very first namespace can be empty, representing the top namespace. The main reason
to namespace this way is to indicate to anyone reading your code that you're accessing a top-scope variable, such as
$::is_virtual.
You can also use a regular expression for variable names. Short variable names match the following regular
expression:
\A\$[a-z0-9_][a-zA-Z0-9_]*\Z
Qualified variable names match the following regular expression:
\A\$([a-z][a-z0-9_]*)?(::[a-z][a-z0-9_]*)*::[a-z0-9_][a-zA-Z0-9_]*\Z
Module names
Module names obey the same rules as individual namespace segments, just as in a class or defined type name. That is,
each namespace segment:
• Must begin with a lowercase letter.
• Can include lowercase letters.
• Can include digits.
© 2024 Puppet, Inc., a Perforce company

Puppet | Syntax and settings | 802
• Can include underscores.
When you follow these rules, each namespace segment matches the following regular expression:
\A[a-z][a-z0-9_]*\Z
Reserved words and class names cannot be used as module names.
Parameter names
Parameter names begin with a dollar sign prefix ($). The parameter name after the prefix:
• Must begin with a lowercase letter.
• Can include lowercase letters.
• Can include digits.
• Can include underscores.
When you follow these rules, a parameter name matches the following regular expression:
\A\$[a-z][a-z0-9_]*\Z
Tag names
Tag names must begin with:
• A lowercase letter, or
• An number, or
• An underscore.
Tag names can include:
• Lowercase letters
• Uppercase letters
• Digits
• Underscores
• Colons
• Periods
• Hyphens
When you follow these rules, a tag name matches the following regular expression:
\A[[:alnum:]_][[:alnum:]_:.-]*\Z
Resource names
Resource titles can contain any characters whatsoever and are case-sensitive. Resource names, or the namevar
attribute, might be limited by the system being managed. For example, most operating systems have limits on the
characters permitted in the name of a user account. You are generally responsible for knowing the name limits on the
platforms you manage.
Node names
Node names can contain:
• Letters
• Digits
• Periods
• Underscores
• Dashes
© 2024 Puppet, Inc., a Perforce company

Puppet | Syntax and settings | 803
That is, node names match the regular expression:
/\A[a-z0-9._-]+\Z/
Environment names
Environment names can contain:
• Lowercase letters
• Numbers
• Underscores
That is, environment names match the regular expression:
\A[a-z0-9_]+\Z
Custom resources
A resource is the basic unit that is managed by Puppet. Each resource has a set of attributes describing its state. Some
attributes can be changed throughout the lifetime of the resource, whereas others are only reported back but cannot be
changed, and some can only be set one time during initial creation.
A custom resource allows you to interact with something external. Three common use cases for this are:
• Parsing a file
• Running a command line tool
• Communicating with an API
To gather information about a resource and to enact changes on it, Puppet requires a provider to implement
interactions. The provider can have parameters that influence its operation. To describe all these parts to the
infrastructure and the consumers, the resource type defines all the metadata, including the list of the attributes. The
provider contains the code to get and set the system state.
If you are starting from scratch, or want a simple method for writing types and providers, use the Resource API. Built
on top of Puppet core, the Resource API makes the type and provider development easier, cheaper, safer, faster, and
better. If you need to maintain existing code, need multiple providers, or need access to the catalog, use the old low-
level types and providers method.
• Develop types and providers with the Resource API on page 803
The recommended method to create custom types and providers is to use the Resource API, which is built on top of
Puppet core. It is easier, faster, and safer than the old types and providers method.
• Low-level method for developing types and providers on page 821
You can define custom resource types for managing your infrastructure by defining types and providers. This original
method has largely been replaced by the Resource API method, but you might already have a setup that uses this low-
level method, or your situation might fall into one of the Resource API limitations.
Develop types and providers with the Resource API
The recommended method to create custom types and providers is to use the Resource API, which is built on top of
Puppet core. It is easier, faster, and safer than the old types and providers method.
To get started developing types and providers with the Resource API:
1.
Download Puppet Development Kit (PDK) appropriate to your operating system and architecture.
2.
Create a new module with PDK, or work with an existing PDK-enabled module. To create a new module, run
pdk new module <MODULE_NAME> from the command line, specifying the name of the module. Respond to
the dialog questions.
© 2024 Puppet, Inc., a Perforce company

Puppet | Syntax and settings | 804
3.
To add the puppet-resource_api gem and enable modern rspec-style mocking, open the .sync.yml file
in your editor, and add the following content:
# .sync.yml
---
Gemfile:
optional:
':development':
- gem: 'puppet-resource_api'
spec/spec_helper.rb:
mock_with: ':rspec'
4.
Apply these changes by running pdk update
5.
To create the required files for a new type and provider in the module, run: pdk new provider
<provider_name>
You will get the following response:
$ pdk new provider foo
pdk (INFO): Creating '.../example/lib/puppet/type/foo.rb'from template.
pdk (INFO): Creating '.../example/lib/puppet/provider/foo/foo.rb' from
template.
pdk (INFO): Creating '.../example/spec/unit/puppet/provider/foo/
foo_spec.rb' from template.
$
The three generated files are the type (resource definition), the provider (resource implementation), and the unit
tests. The default template contains an example that demonstrates the basic workings of the Resource API. This
allows the unit tests to run immediately after creating the provider, which looks like this:
$ pdk test unit
[#] Preparing to run the unit tests.
[#] Running unit tests.
Evaluated 4 tests in 0.012065973 seconds: 0 failures, 0 pending.
[#] Cleaning up after running unit tests.
$
Writing the type and provider
Write a type to describe the resource and define its metadata, and a provider to gather information about the resource
and implement changes.
Writing the type
The type contains the shape of your resources. The template provides the necessary name and ensure attributes.
You can modify their description and the name's type to match your resource. Add more attributes as you need.
# lib/puppet/type/yum.rb
require 'puppet/resource_api'
Puppet::ResourceApi.register_type(
name: 'yum',
docs: <<-EOS,
This type provides Puppet with the capabilities to manage ...
EOS
attributes: {
ensure: {
type: 'Enum[present, absent]',
desc: 'Whether this apt key should be present or absent on the
target system.',
default: 'present',
},
© 2024 Puppet, Inc., a Perforce company

Puppet | Syntax and settings | 805
name: {
type: 'String',
desc: 'The name of the resource you want to manage.',
behaviour: :namevar,
},
},
)
The following keys are available for defining attributes:
• type: the Puppet 4 data type allowed in this attribute. You can use all data types matching Scalar and Data.
• desc: a string describing this attribute. This is used in creating the automated API docs with puppet-strings.
• default: a default value used by the runtime environment; when the caller does not specify a value for this
attribute.
• behaviour / behavior: how the attribute behaves. Available values include:
• namevar: marks an attribute as part of the primary key or identity of the resource. A given set of namevar
values must distinctively identify an instance.
• init_only: this attribute can only be set during the creation of the resource. Its value is reported going
forward, but trying to change it later leads to an error. For example, the base image for a VM or the UID of a
user.
• read_only: values for this attribute are returned by get(), but set() is not able to change them. Values
for this should never be specified in a manifest. For example, the checksum of a file, or the MAC address of a
network interface.
• parameter: values for this attributes are not returned by get(). You can use this attribute to influence how
the provider behaves. For example, you can influence the managehome attribute when creating a user.
Writing the provider
The provider is the most important part of your new resource, as it reads and enforces state. When you generate a
provider with the pdk new provider command, PDK generates a provider file like this generated yum.rb file
require 'puppet/resource_api/simple_provider'
# Implementation for the yum type using the Resource API.
class Puppet::Provider::Yum::Yum < Puppet::ResourceApi::SimpleProvider
def get(_context)
[
{
name: 'foo',
ensure: 'present',
},
{
name: 'bar',
ensure: 'present',
},
]
end
def create(context, name, should)
context.notice("Creating '#{name}' with #{should.inspect}")
end
def update(context, name, should)
context.notice("Updating '#{name}' with #{should.inspect}")
end
def delete(context, name)
context.notice("Deleting '#{name}'")
end
end
© 2024 Puppet, Inc., a Perforce company

Puppet | Syntax and settings | 806
The optional initialize method can be used to set up state that is available throughout the execution of the
catalog. This is most often used for establishing a connection when talking to a service, such as when you are
managing a database.
The get(context) method returns a list of hashes describing the resources that are on the target system. The basic
example would return an empty list. For example, these resources could be returned from this:
[
{
name: 'a',
ensure: 'present',
},
{
name: 'b',
ensure: 'present',
},
]
The create, update, and delete methods are called by the SimpleProvider base class to change the
system as requested by the catalog. The name argument is the name of the resource that is being processed. should
contains the attribute hash — in the same format as get returns — with the values in the catalog.
When adding Ruby code to a module, follow these guidelines:
• For small sized blocks of code, put the code in the provider.
• For medium sized blocks of code, put the code into a separate file in lib/puppet_x/$forgeuser/
$modulename.rb. puppet_x is optional, but it helps keep the file name unique and reduces the risk of a file
overwriting code from an unknown dependency.
• For large sized blocks of code, put the code in a separate gem.
Unit testing
The generated unit tests in spec/unit/puppet/provider/<PROVIDER_NAME>_spec.rb are evaluated
when you run pdk test unit.
Resource API reference
Use this information to understand how the Resource API works: how the resource is defined in the type, how
resource management is implemented in the provider, and some of the known limitations of the Resource API.
Resource definition: the type
A type is a definition of a resource that Puppet can manage. The definition contains the resource’s configurable
properties and the parameters used to access it.
To make the resource known to the Puppet ecosystem, its definition, or type needs to be registered with Puppet. For
example:
Puppet::ResourceApi.register_type(
name: 'apt_key',
desc: <<-EOS,
This type provides Puppet with the capabilities to manage GPG keys
needed
by apt to perform package validation. Apt has it's own GPG keyring that
can
be manipulated through the `apt-key` command.
apt_key { '6F6B15509CF8E59E6E469F327F438280EF8D349F':
source => 'http://apt.puppet.com/pubkey.gpg'
}
© 2024 Puppet, Inc., a Perforce company

Puppet | Syntax and settings | 807
**Autorequires**:
If Puppet is given the location of a key file which looks like an
absolute
path this type will autorequire that file.
EOS
attributes: {
ensure: {
type: 'Enum[present, absent]',
desc: 'Whether this apt key should be present or absent on the target
system.'
},
id: {
type: 'Variant[Pattern[/\A(0x)?[0-9a-fA-F]{8}\Z/], Pattern[/
\A(0x)?[0-9a-fA-F]{16}\Z/], Pattern[/\A(0x)?[0-9a-fA-F]{40}\Z/]]',
behaviour: :namevar,
desc: 'The ID of the key you want to manage.',
},
source: {
type: 'String',
desc: 'Where to retrieve the key from, can be a HTTP(s) URL, or a
local file. Files get automatically required.',
},
# ...
created: {
type: 'String',
behaviour: :read_only,
desc: 'Date the key was created, in ISO format.',
},
},
autorequire: {
file: '$source', # evaluates to the value of the `source` attribute
package: 'apt',
},
)
The Puppet::ResourceApi.register_type(options) function takes the following keyword arguments:
• name: the name of the resource type.
• desc: a doc string that describes the overall working of the resource type, provides examples, and explains
prerequisites and known issues.
• attributes: a hash mapping attribute names to their details. Each attribute is described by a hash containing
the Puppet 4 data type, a desc string, a default value, and the behavior of the attribute: namevar,
read_only, init_only, or a parameter.
• type: the Puppet 4 data type allowed in this attribute.
• desc: a string describing this attribute. This is used in creating the automated API docs with puppet-strings.
• default: a default value that the runtime environment uses when you don't specify a value.
• behavior/behaviour: how the attribute behaves. Currently available values:
• namevar: marks an attribute as part of the "primary key" or "identity" of the resource. A given set of
namevar values needs to distinctively identify an instance.
• init_only: this attribute can only be set when creating the resource. Its value is reported going forward,
but trying to change it later leads to an error. For example, the base image for a VM or the UID of a user.
• read_only: values for this attribute are returned by get(), but set() is not able to change them.
Values for this should never be specified in a manifest. For example, the checksum of a file, or the MAC
address of a network interface.
• parameter: these attributes influence how the provider behaves, and cannot be read from the target
system. For example, the target file on inifile, or the credentials to access an API.
© 2024 Puppet, Inc., a Perforce company

Puppet | Syntax and settings | 808
• autorequire, autobefore, autosubscribe, and autonotify: a hash mapping resource types to titles.
The titles must either be constants, or, if the value starts with a dollar sign, a reference to the value of an attribute.
If the specified resources exist in the catalog, Puppet creates the relationships that are requested here.
• features: a list of API feature names, specifying which optional parts of this spec the provider supports.
Currently defined features: canonicalize, simple_get_filter, and supports_noop. See provider
types for details.
Composite namevars (title_patterns)
Each resource being managed must be identified by a unique title. Usually this is straightforward and a single
attribute can be used to act as an identifier. But sometimes you need a composite of two attributes to uniquely identify
the resource you want to manage.
If multiple attributes are defined with the namevar behavior, the type specifies title_patterns that tell the
Resource API how to get at the attributes from the title. If title_patterns is not specified, a default pattern is
applied and matches against the first declared namevar.
Note: The order of the title_patterns is important. Declare the most specific pattern first and end with the
most generic.
Each title pattern contains:
• pattern, which is a Ruby regular expression containing named captures. The names of the captures must be that
of the namevar attributes.
• desc, a short description of what the pattern matches for.
For example:
Puppet::ResourceApi.register_type(
name: 'software',
docs: <<-DOC,
This type provides Puppet with the capabilities to manage ...
DOC
title_patterns: [
{
pattern: %r{^(?<package>.*[^-])-(?<manager>.*)$},
desc: 'Where the package and the manager are provided with a hyphen
seperator',
},
{
pattern: %r{^(?<package>.*)$},
desc: 'Where only the package is provided',
},
],
attributes: {
ensure: {
type: 'Enum[present, absent]',
desc: 'Whether this resource should be present or absent on the
target system.',
default: 'present',
},
package: {
type: 'String',
desc: 'The name of the package you want to manage.',
behaviour: :namevar,
},
manager: {
type: 'String',
desc: 'The system used to install the package.',
behaviour: :namevar,
},
},
© 2024 Puppet, Inc., a Perforce company

Puppet | Syntax and settings | 809
)
These match the first title pattern:
software { php-yum:
ensure=>'present'
}
software { php-gem:
ensure=>'absent'
}
This matches the second title pattern:
software { php:
manager='yum'
ensure=>'present'
}
Resource implementation: the provider
To make changes, a resource requires an implementation, or provider. It is the code used to retrieve, update and delete
the resources of a certain type.
The two fundamental operations to manage resources are reading and writing system state. These operations are
implemented as get and set. The implementation itself is a Ruby class in the Puppet::Provider namespace,
named after the type using CamelCase.
Note: Due to the way Puppet autoload works, this is in a file called puppet/provider/<type_name>/
<type_name>.rb. The class also has the CamelCased type name twice.
At runtime, the current and intended system states a specific resource. These are represented as Ruby hashes of the
resource's attributes and applicable operational parameters:
class Puppet::Provider::AptKey::AptKey
def get(context)
[
{
name: 'name',
ensure: 'present',
created: '2017-01-01',
# ...
},
# ...
]
end
def set(context, changes)
changes.each do |name, change|
is = change.has_key? :is ? change[:is] : get_single(name)
should = change[:should]
# ...
end
end
end
The get method reports the current state of the managed resources. It returns an enumerable of all existing resources.
Each resource is a hash with attribute names as keys, and their respective values as values. It is an error to return
values not matching the type specified in the resource type. If a requested resource is not listed in the result, it is
considered to not exist on the system. If the get method raises an exception, the provider is marked as unavailable
during the current run, and all resources of this type fails in the current transaction. The exception message is
reported.
© 2024 Puppet, Inc., a Perforce company

Puppet | Syntax and settings | 810
The set method updates resources to a new state. The changes parameter gets passed a hash of change requests,
keyed by the resource's name. Each value is another hash with the optional :is and :should keys. At least one of
the two must be specified. The values are of the same shape as those returned by get. After the set, all resources
are in the state defined by the :should values.
A missing :should entry indicates that a resource will be removed from the system. Even a type implementing the
ensure => [present, absent] attribute pattern must react correctly on a missing :should entry. An :is
key might contain the last available system state from a prior get call. If the :is value is nil, the resources were
not found by get. If there is no :is key, the runtime did not have a cached state available.
The set method should always return nil. Signaling progress through the logging utilities described below. If the
set method throws an exception, all resources that should change in this call and haven't already been marked with a
definite state, are marked as failed. The runtime only calls the set method if there are changes to be made, especially
when resources are marked with noop => true (either locally or through a global flag). The runtime does not pass
them to set. See supports_noop for changing this behavior if required.
Both methods take a context parameter which provides utilties from the runtime environment, and is described in
more detail there.
Implementing simple providers
In many cases, the resource type follows the conventional patterns of Puppet, and does not gain from the complexities
around batch-processing changes. For those cases, the SimpleProvider class supplies a proven foundation that
reduces the amount of code necessary to get going.
SimpleProvider requires that your type follows these common conventions:
• name is the name of your namevar attribute.
• ensure attribute is present and has the Enum[absent, present] type.
To start using SimpleProvider, inherit from the class like this:
require 'puppet/resource_api/simple_provider'
# Implementation for the wordarray type using the Resource API.
class Puppet::Provider::AptKey::AptKey < Puppet::ResourceApi::SimpleProvider
# ...
Next, instead of the set method, the provider needs to implement the create, update or delete methods:
• create(context, name, should): Called to create a resource.
• context: provides utilities from the runtime environment.
• name: the name of the new resource.
• should: a hash of the attributes for the new instance.
• update(context, name, should): Called to update a resource.
• context: provides utilties from the runtime environment.
• name: the name of the resource to change.
• should: a hash of the desired state of the attributes.
• delete(context, name): Called to delete a resource.
• context: provides utilities from the runtime environment.
• name: the name of the resource that to be deleted.
The SimpleProvider does basic logging and error handling.
Provider features
There are some use cases where an implementation provides a better experience than the default runtime environment
provides. To avoid burdening the simplest providers with that additional complexity, these cases are hidden behind
feature flags. To enable the special handling, the resource definition has a feature key to list all features implemented
by the provider.
© 2024 Puppet, Inc., a Perforce company

Puppet | Syntax and settings | 811
canonicalize
Allows the provider to accept a wide range of formats for values without confusing the user.
Puppet::ResourceApi.register_type(
name: 'apt_key',
features: [ 'canonicalize' ],
)
class Puppet::Provider::AptKey::AptKey
def canonicalize(context, resources)
resources.each do |r|
r[:name] = if r[:name].start_with?('0x')
r[:name][2..-1].upcase
else
r[:name].upcase
end
end
end
The runtime environment needs to compare user input from the manifest (the desired state) with values returned
from get (the actual state), to determine whether or not changes need to be affected. In simple cases, a provider
only accepts values from the manifest in the same format as get returns. No extra work is required, as a value
comparison is enough. This places a high burden on the user to provide values in an unnaturally constrained format.
In the example, the apt_key name is a hexadecimal number that can be written with, and without, the '0x' prefix,
and the casing of the digits is irrelevant. A value comparison on the strings causes false positives if the user inputs
format that does not match. There is no hexadecimal type in the Puppet language. To address this, the provider can
specify the canonicalize feature and implement the canonicalize method.
The canonicalize method transforms its resources argument into the standard format required by the rest
of the provider. The resources argument to canonicalize is an enumerable of resource hashes matching
the structure returned by get. It returns all passed values in the same structure with the required transformations
applied. It is free to reuse or recreate the data structures passed in as arguments. The runtime environment must use
canonicalize before comparing user input values with values returned from get. The runtime environment
always passes canonicalized values into set. If the runtime environment requires the original values for later
processing, it protects itself from modifications to the objects passed into canonicalize, for example by creating
a deep copy of the objects.
The context parameter is the same passed to get and set, which provides utilities from the runtime environment,
and is described in more detail there.
Note: When the provider implements canonicalization, it aims to always log the canonicalized values. As a result of
get and set producing and consuming canonically formatted values, it is not expected to present extra cost.
A side effect of these rules is that the canonicalization of the get method's return value must not change the
processed values. Runtime environments may have strict or development modes that check this property.
For example, in the Puppet Discovery runtime environment it is bound to the strict setting, and follows the
established practices:
# puppet resource --strict=error apt_key ensure=present
> runtime exception
# puppet resource --strict=warning apt_key ensure=present
> warning logged but values changed
# puppet resource --strict=off apt_key ensure=present
> values changed
© 2024 Puppet, Inc., a Perforce company

Puppet | Syntax and settings | 812
simple_get_filter
Allows for more efficient querying of the system state when only specific parts are required.
Puppet::ResourceApi.register_type(
name: 'apt_key',
features: [ 'simple_get_filter' ],
)
class Puppet::Provider::AptKey::AptKey
def get(context, names = nil)
[
{
name: 'name',
# ...
},
]
end
Some resources are very expensive to enumerate. The provider can implement simple_get_filter to signal
extended capabilities of the get method to address this. The provider's get method is called with an array of
resource names, or nil. The get method must at least return the resources mentioned in the names array, but
may return more. If the names parameter is nil, all existing resources should be returned. The names parameter
defaults to nil to allow simple runtimes to ignore this feature.
The runtime environment calls get with a minimal set of names, and keeps track of additional instances returned to
avoid double querying. To gain the most benefits from batching implementations, the runtime minimizes the number
of calls into get.
supports_noop
When a resource is marked with noop => true, either locally or through a global flag, the standard runtime
produces the default change report with a noop flag set. In some cases, an implementation provides additional
information, for example commands that would get executed, or require additional evaluation before determining
the effective changes, such as exec's onlyif attribute. The resource type specifies the supports_noop feature
to have set called for all resources, even those flagged with noop. When the noop parameter is set to true, the
provider must not change the system state, but only report what it would change. The noop parameter should default
to false to allow simple runtimes to ignore this feature.
Puppet::ResourceApi.register_type(
name: 'apt_key',
features: [ 'supports_noop' ],
)
class Puppet::Provider::AptKey::AptKey
def set(context, changes, noop: false)
changes.each do |name, change|
is = change.has_key? :is ? change[:is] : get_single(name)
should = change[:should]
# ...
do_something unless noop
end
end
end
© 2024 Puppet, Inc., a Perforce company

Puppet | Syntax and settings | 813
remote_resource
Declaring this feature restricts the resource from being run locally. It is expected to execute all external interactions
through the context.transport instance. The way that an instance is set up is runtime specific. Use puppet/
resource_api/transport/wrapper as the base class for all devices:
# lib/puppet/type/nx9k_vlan.rb
Puppet::ResourceApi.register_type(
name: 'nx9k_vlan',
features: [ 'remote_resource' ],
# ...
)
# lib/puppet/util/network_device/nexus/device.rb
require 'puppet'
require 'puppet/resource_api/transport/wrapper'
# force registering the transport schema
require 'puppet/transport/schema/device_type'
module Puppet::Util::NetworkDevice::Nexus
class Device < Puppet::ResourceApi::Transport::Wrapper
def initialize(url_or_config, _options = {})
super('nexus', url_or_config)
end
end
end
# lib/puppet/provider/nx9k_vlan/nx9k_vlan.rb
class Puppet::Provider::Nx9k_vlan::Nx9k_vlan
def set(context, changes, noop: false)
changes.each do |name, change|
is = change.has_key? :is ? change[:is] : get_single(name)
should = change[:should]
# ...
context.transport.do_something unless noop
end
end
end
Runtime environment
The primary runtime environment for the provider is the Puppet agent, a long-running daemon process. The
provider can also be used in the puppet apply command, a self contained version of the agent, or the puppet
resource command, a short-lived command line interface (CLI) process for listing or managing a single resource
type. Other callers that want to access the provider must imitate these environments.
The primary life cycle of resource management in each of these tools is the transaction, a single set of changes, for
example a catalog or a CLI invocation. The provider's class is instantiated one time for each transaction. Within that
class the provider defines any number of helper methods to support itself. To allow for a transaction to set up the
prerequisites for a provider and be used immediately, the provider is instantiated as late as possible. A transaction
usually calls get one time, and may call set any number of times to make changes.
The object instance that hosts the get and set methods can be used to cache ephemeral state during execution. The
provider should not try to cache state outside of its instances. In many cases, such caching won't help as the hosting
process only manages a single transaction. In long-running runtime environments like the agent, the benefit of the
caching needs to be balanced with the cost of the cache at rest, and the lifetime of cache entries, which are only useful
when they are longer than the regular runinterval.
The runtime environment has the following utilities to provide a uniform experience for its users.
© 2024 Puppet, Inc., a Perforce company

Puppet | Syntax and settings | 814
Logging and reporting utilities
The provider needs to signal changes, successes, and failures to the runtime environment. The context is the
primary way to do this. It provides a structured logging interface for all provider actions. Using this information, the
runtime environments can do automatic processing, emit human readable progress information, and provide status
messages for operators.
To provide feedback about the overall operation of the provider, the context has the usual set of loglevel methods
that take a string, and pass that up to the runtime environments logging infrastructure. For example:
context.warning("Unexpected state detected, continuing in degraded mode.")
Results in the following message:
Warning: apt_key: Unexpected state detected, continuing in degraded mode.
Other common messages include:
• debug: Detailed messages to understand everything that is happening at runtime, shown on request.
• info: Regular progress and status messages, especially useful before long-running operations, or before
operations that can fail, to provide context for interactive users.
• notice: Indicates state changes and other events of notice from the regular operations of the provider.
• warning: Signals error conditions that do not (yet) prohibit execution of the main part of the provider; for
example, deprecation warnings, temporary errors.
• err: Signals error conditions that have caused normal operations to fail.
• critical, alert, emerg: Should not be used by resource providers.
In simple cases, a provider passes off work to an external tool, logs the details there, and then reports back to Puppet
acknowledging these changes. This is called resource status signaling, and looks like this:
@apt_key_cmd.run(context, action, key_id)
context.processed(key_id, is, should)
It reports all changes from is to should, using default messages.
Providers that want to have more control over the logging throughout the processing can use the more specific
created(title), updated(title), deleted(title), unchanged(title) methods. To report the
change of an attribute, the context provides a attribute_changed(title, attribute, old_value,
new_value, message) method.
Most of those messages are expected to be relative to a specific resource instance, and a specific operation on that
instance. To enable detailed logging without repeating key arguments, and to provide consistent error logging, the
context provides logging context methods to capture the current action and resource instance:
context.updating(title) do
if apt_key_not_found(title)
context.warning('Original key not found')
end
# Update the key by calling CLI tool
apt_key(...)
context.attribute_changed('content', nil, content_hash,
message: "Replaced with content hash #{content_hash}")
end
This results in the following messages:
Debug: Apt_key[F1D2D2F9]: Started updating
Warning: Apt_key[F1D2D2F9]: Updating: Original key not found
Debug: Apt_key[F1D2D2F9]: Executing 'apt-key ...'
© 2024 Puppet, Inc., a Perforce company

Puppet | Syntax and settings | 815
Debug: Apt_key[F1D2D2F9]: Successfully executed 'apt-key ...'
Notice: Apt_key[F1D2D2F9]: Updating content: Replaced with content hash
E242ED3B
Notice: Apt_key[F1D2D2F9]: Successfully updated
In the case of an exception escaping the block, the error is logged appropriately:
Debug: Apt_keyF1D2D2F9]: Started updating
Warning: Apt_key[F1D2D2F9]: Updating: Original key not found
Error: Apt_key[F1D2D2F9]: Updating failed: Something went wrong
Logging contexts process all exceptions. A StandardError is assumed to be regular failures in handling
resources, and are consumed after logging. Everything else is assumed to be a fatal application-level issue, and
is passed up the stack, ending execution. See the Ruby documentation for details on which exceptions are not a
StandardError.
The equivalent long-hand form of manual error handling:
context.updating(title)
begin
unless title_got_passed_to_set(title)
raise Puppet::DevError, 'Managing resource outside of requested set:
%{title}')
end
if apt_key_not_found(title)
context.warning('Original key not found')
end
# Update the key by calling CLI tool
result = @apt_key_cmd.run(...)
if result.exitstatus != 0
context.error(title, "Failed executing apt-key #{...}")
else
context.attribute_changed(title, 'content', nil, content_hash,
message: "Replaced with content hash #{content_hash}")
end
context.changed(title)
rescue Exception => e
context.error(title, e, message: 'Updating failed')
raise unless e.is_a? StandardError
end
This example is only for demonstration purposes. In the normal course of operations, providers should always use the
utility functions.
The following methods are available:
• Block functions: these functions provide logging and timing around a provider's core actions. If the the passed
&block returns, the action is recorded as successful. To signal a failure, the block should raise an exception
explaining the problem:
• creating(titles, message: 'Creating', &block)
• updating(titles, message: 'Updating', &block)
• deleting(titles, message: 'Deleting', &block)
• processing(title, is, should, message: 'Processing', &block): generic processing
of a resource, produces default change messages for the difference between is: and should:.
• failing(titles, message: 'Failing', &block): unlikely to be used often, but provided for
completeness. It always records a failure.
© 2024 Puppet, Inc., a Perforce company

Puppet | Syntax and settings | 816
• Action functions:
• created(titles, message: 'Created')
• updated(titles, message: 'Updated')
• deleted(titles, message: 'Deleted')
• processed(title, is, should): the resource has been processed. It produces default logging for the
resource and each attribute
• failed(titles, message:): the resource has not been updated successfully
• Attribute Change notifications:
• attribute_changed(title, attribute, is, should, message: nil): notify the runtime
environment that a specific attribute for a specific resource has changed. is and should are the original and
the new value of the attribute. Either can be nil.
• Plain messages:
• debug(message)
• debug(titles, message:)
• info(message)
• info(titles, message:)
• notice(message)
• notice(titles, message:)
• warning(message)
• warning(titles, message:)
• err(message)
• err(titles, message:)
titles can be a single identifier for a resource or an array of values, if the following block batch processes multiple
resources in one pass. If that processing is not atomic, providers should instead use the non-block forms of logging,
and provide accurate status reporting on the individual parts of update operations.
A single set() execution may only log messages for instances that have been passed, as part of the changes to
process. Logging for instances not requested to be changed causes an exception - the runtime environment is not
prepared for other resources to change.
The provider is free to call different logging methods for different resources in any order it needs to. The only
ordering restriction is for all calls specifying the same title. For example, the attribute_changed needs
logged before that resource's action logging, and the context needs to be opened before any other logging for this
resource.
Type definition
The provider can gain insight into the type definition through these context.type utility methods:
• attributes: returns a hash containing the type attributes and it's properties.
• ensurable?: returns true if the type contains the ensure attribute.
• feature?(feature): returns true if the type supports a given provider feature.
For example:
# example from simple_provider.rb
def set(context, changes)
changes.each do |name, change|
is = if context.type.feature?('simple_get_filter')
change.key?(:is) ? change[:is] : (get(context, [name]) || []).find
{ |r| r[:name] == name }
else
change.key?(:is) ? change[:is] : (get(context) || []).find { |r|
r[:name] == name }
© 2024 Puppet, Inc., a Perforce company

Puppet | Syntax and settings | 817
end
...
end
Resource API transports
A transport connects providers to remote resources, such as a device, cloud infrastructure, or a REST API.
The transport class contains the code for managing connections and processing information to and from the remote
resource. The transport schema, similar to a resource type, describes the structure of the data that is passed for it to
make a connection.
Transport implementation methods
When you are writing a transport class to manage remote resources, use the following methods as appropriate:
• initialize(context, connection_info)
• The connection_info contains a hash that matches the schema. After you run the initialize method, the
provider assumes that you have defined your transport in such as way as to ensure that it’s ready for processing
requests. The transport will report connection errors by throwing an exception, for example, if the network
is unreachable or the credentials are rejected. In some cases, for example when the target is a REST API, no
processing happens during initialization.
• verify(context)
• Use this method to check whether the transport can connect to the remote target. If the connection fails, the
transport will raise an exception.
• facts(context)
• Use this method to access the target and the facts hash which contains a subset of default facts from Facter,
and more specific facts appropriate for the target.
• close(context)
• Use this method to close the connection. Calling this method releases the transport so that you can't use it
any more and frees up cache and operating system resources, such as open connections. For implementation
quality, the library will ignore exceptions that are thrown.
Note: The context is the primary way to signal changes, successes, and failures to the runtime environment. For
more information, see Runtime environment.
An example of a transport class:
# lib/puppet/transport/device_type.rb
module Puppet::Transport
# The main connection class to a Device endpoint
class DeviceType
def initialize(context, connection_info)
# Add additional validation for connection_info
# and pre-load a connection if it is useful for your target
end
def verify(context)
# Test that transport can talk to the remote target
end
def facts(context)
# Access target, return a Facter facts hash
end
def close(context)
# Close connection, free up resources
end
© 2024 Puppet, Inc., a Perforce company

Puppet | Syntax and settings | 818
end
end
An example of a corresponding schema:
# lib/puppet/transport/device_type.rb
Puppet::ResourceAPI.register_transport(
name: 'device_type', # points at class Puppet::Transport::DeviceType
desc: 'Connects to a device_type',
connection_info: {
host: {
type: 'String',
desc: 'The host to connect to.',
},
user: {
type: 'String',
desc: 'The user.',
},
password: {
type: 'String',
sensitive: true,
desc: 'The password to connect.',
},
enable_password: {
type: 'String',
sensitive: true,
desc: 'The password escalate to enable access.',
},
port: {
type: 'Integer',
desc: 'The port to connect to.',
},
},
)
If the following attributes apply to your target, use these names for consistency across transports:
• uri: use to specify which URL to connect to.
• host: use to specify an IP or address to connect to.
• protocol: use to specify which protocol the transport uses, for example http, https, ssh or tcp.
• user: the user you want the transport to connect as.
• port: the port you want the transport to connect to.
Do not use the following keywords in when writing the connection_info:
• name
• path
• query
• run-on
• remote-transport
• remote-*
• implementations
To ensure that the data the schema passes to the implementation is handled securely, set password attributes to
sensitive: true. Attributes marked with the sensitive flag allow a user interface based on this schema to
make appropriate presentation choices, such as obscuring the password field. Values that you’ve marked sensitive
are passed to the transport wrapped in the type Puppet::Pops::Types::PSensitiveType::Sensitive.
This keeps the value from being logged or saved inadvertently while it is being transmitted between
components. To access the sensitive value within the transport, use the unwrap method, for example,
connection_info[:password].unwrap.
© 2024 Puppet, Inc., a Perforce company

Puppet | Syntax and settings | 819
Errors and retry handling in transport implementation
The Resource API does not put many constraints on when and how a transport can fail. The remote resource you are
connecting to will have it's own device specific connection and error handling capabilities. Be aware of the following
issues that may arise:
• Your initial connection might fail. To retry making the connection, verify whether you have network problems or
whether there has been a service restart of the target that you are trying to connect to. As part of the retry logic, the
transport avoids passing these issues to other parts of your system and waits up to 30 seconds for a single target to
recover. When you execute a retry, the transport logs transient problems at the notice level.
• After you make your connection and have run the initialize method, the transport might apply deeper validation to
the passed connection information — like mutual exclusivity of optional values, for example, password or key
— and throw an ArgumentError. The transport then tries to establish a connection to the remote target. If this
fails due to unrecoverable errors, it throws another exception.
• The verify and facts methods, like initialize, throw exceptions only when unrecoverable errors are
encountered, or when the retry logic times out.
Port your existing device code to transports
If you have old code that uses Device, port it by updating your code with the following replacements as appropriate:
• Move the device class to Puppet::Transport
• Change Util::NetworkDevice::NAME::Device to ResourceApi::Transport::NAME
• Change the initialization to accept and process a connection_info hash.
• When accessing the connection_info in your new transport, change all string keys to symbols, for example,
name to :name.
• Add context as the first argument to your initialize and facts method.
• Change puppet/util/network_device/NAME/device to puppet/transport/NAME
• Replace calls to Puppet logging with calls to the context logger
Note: If you can't port your code at this time, your providers can still access your Device through
context.device, but you won't be able to make use of the functionality in Bolt plans.
After porting your code, you will have a transport class and a shim Device class that connects your transport in a
way that Puppet understands. Specify the transport name in the super call to make the connection:
# lib/puppet/type/nx9k_vlan.rb
Puppet::ResourceApi.register_type(
name: 'nx9k_vlan',
features: [ 'remote_resource' ],
# ...
)
# lib/puppet/util/network_device/nexus/device.rb
require 'puppet/resource_api/transport/wrapper'
# force registering the transport
require 'puppet/transport/schema/nexus'
module Puppet::Util::NetworkDevice::Nexus
class Device < Puppet::ResourceApi::Transport::Wrapper
def initialize(url_or_config, _options = {})
super('nexus', url_or_config)
end
end
end
Note: Agent versions 6.0 to 6.3 are incompatible with this way of executing remote content. These versions will not
be supported after support for PE 2019.0 ends.
© 2024 Puppet, Inc., a Perforce company

Puppet | Syntax and settings | 820
Resource API limitations
This Resource API is not a full replacement for the original low-level types and providers method. Here is a list of
the current limitations. If they apply to your situation, the low-level types and providers method might be a better
solution. The goal of the new Resource API is not to be a replacement of the prior one, but to be a simplified way to
get the same results for the majority of use cases.
You can't have multiple providers for the same type
The low-level type and provider method allows multiple providers for the same resource type. This allows the
creation of abstract resource types, such as packages, which can span multiple operating systems. Automatic selection
of an OS-appropriate provider means less work for the user, as they don't have to address whether the package needs
to be managed using apt or yum in their code .
Allowing multiple providers means more complexity and more work for the type or provider developer, including:
• attribute sprawl
• disparate feature sets between the different providers for the same abstract type
• complexity in implementation of both the type and provider pieces stemming from the two issues above
The Resource API does not implement support for multiple providers.
If you want support for multiple providers for a given type, your options are:
• Use the older, more complex type and provider method, or
• Implement multiple similar types using the Resource API, and select the platform-appropriate type in Puppet
code. For example:
define package (
Ensure $ensure,
Enum[apt, rpm] $provider, # have a hiera 5 dynamic binding to a function
choosing a sensible default for the current system
Optional[String] $source = undef,
Optional[String] $version = undef,
Optional[Hash] $options = { },
) {
case $provider {
apt: {
package_apt { $title:
ensure => $ensure,
source => $source,
version => $version,
* => $options,
}
}
rpm: {
package_rpm { $title:
ensure => $ensure,
source => $source,
* => $options,
}
if defined($version) { fail("RPM doesn't support \$version") }
# ...
}
}
}
Only built-in Puppet 4 data types are available
Currently, only built-in Puppet 4 data types are usable. This is because the type information is required on the agent,
but Puppet has not made it available yet. Even after that is implemented, modules have to wait until the functionality
is widely available before being able to rely on it.
© 2024 Puppet, Inc., a Perforce company
Puppet | Syntax and settings | 821
There is no catalog access
There is no way to access the catalog from the provider. Several existing types rely on this to implement advanced
functionality. Some of these use cases would be better off being implemented as "external" catalog transformations,
instead of munging the catalog from within the compilation process.
No logging for unmanaged instances
Previously, the provider could provide log messages for resource instances that were not passed into the set call. In
the current implementation, these causes an error.
Automatic relationships constrained to consts and attribute values
The Puppet 3 type API allows arbitrary code execution for calculating automatic relationship targets. The Resource
API is more restrained, but allows understanding the type's needs by inspecting the metadata.
Low-level method for developing types and providers
You can define custom resource types for managing your infrastructure by defining types and providers. This original
method has largely been replaced by the Resource API method, but you might already have a setup that uses this low-
level method, or your situation might fall into one of the Resource API limitations.
Using this types and providers method, you can add new resource types to Puppet. This section describes what types
and providers are, how they interact, and how to develop them.
Low-level Puppet types and providers development is done in Ruby. Previous experience with Ruby is helpful.
Alternatively, opt for the more straightforward Resource API method for developing types and providers.
The internals of how types are created have changed over Puppet’s lifetime, and this documentation describes
effective development methods, skipping over all the things you can but probably shouldn’t do.
When making a new resource type, you create two things:
• The type definition, which is a model of the resource type. It defines what parameters are available, handles input
validation, and determines what features a provider can (or should) provide.
• One or more providers for that type. The provider implements the type by translating its capabilities into specific
operations on a system. For example, the package type has yum and apt providers which implement package
resources on Red Hat-like and Debian-like systems, respectively.
Deploying types and providers
To use new types and providers:
1.
The type and providers must be present in a module on the primary server. Like other types of plug-in (such as
custom functions and custom facts), they go in the module’s lib directory:
• Type files: lib/puppet/type/<TYPE NAME>.rb
• Provider files: lib/puppet/provider/<TYPE NAME>/<PROVIDER NAME>.rb
2.
If you are using an agent-server deployment, each agent node must have its pluginsync setting in
puppet.conf set to true, which is the default. In serverless Puppet, using puppet apply, the
pluginsync setting is not required, but the module that contains the type and providers must be present on each
node.
© 2024 Puppet, Inc., a Perforce company

Puppet | Syntax and settings | 822
• Type development on page 822
When you define a resource type, focus on what the resource can do, not how it does it.
• Provider development on page 828
Providers are back-ends that support specific implementations of a given resource type, particularly for different
platforms. Not all resource types have or need providers, but any resource type concerned about portability will likely
need them.
• Creating resources on page 832
You can write resource types and providers in the Puppet language. The following example shows you how to create
resources in Puppet using the low-level types and provider method.
Related information
Plug-ins in modules on page 1101
Puppet supports several kinds of plug-ins, which are distributed in modules. These plug-ins enable features such as
custom facts and functions for managing your nodes. Modules that you download from the Forge can include these
kinds of plug-ins, and you can also develop your own.
Custom resources on page 803
A resource is the basic unit that is managed by Puppet. Each resource has a set of attributes describing its state. Some
attributes can be changed throughout the lifetime of the resource, whereas others are only reported back but cannot be
changed, and some can only be set one time during initial creation.
Resource API limitations on page 820
This Resource API is not a full replacement for the original low-level types and providers method. Here is a list of
the current limitations. If they apply to your situation, the low-level types and providers method might be a better
solution. The goal of the new Resource API is not to be a replacement of the prior one, but to be a simplified way to
get the same results for the majority of use cases.
Type development
When you define a resource type, focus on what the resource can do, not how it does it.
Note: Unless you are maintaining existing type and provider code, or the Resource API limitations affect you, use
the Resource API to create custom resource types, instead of this method.
Creating types
Types are created by calling the newtype method on the Puppet::Type class:
# lib/puppet/type/database.rb
Puppet::Type.newtype(:database) do
@doc = "Create a new database."
# ... the code ...
end
The name of the type is the only required argument to newtype. The name must be a Ruby symbol, and the name of
the file containing the type must match the type's name.
The newtype method also requires a block of code, specified with either curly braces ({ ... }) or the do ...
end syntax. The code block implements the type, and contains all of the properties and parameters. The block will
not be passed any arguments.
You can optionally specify a self-refresh option for the type by putting :self_refresh => true after the
name. Doing so causes resources of this type to refresh (as if they had received an event through a notify-subscribe
relationship) whenever a change is made to the resource. A notable use of this option is in the core mount type.
© 2024 Puppet, Inc., a Perforce company

Puppet | Syntax and settings | 823
Documenting types
Write a description for the custom resource type in the type's @doc instance variable. The description can be
extracted by the puppet doc --reference type command, which generates a complete type reference which
includes your new type, and by the puppet describe command, which outputs information about specific types.
Write the description as a string in standard Markdown format. When the Puppet tools extract the string, they strip the
greatest common amount of leading whitespace from the front of each line, excluding the first line. For example:
Puppet::Type.newtype(:database) do
@doc = %q{Creates a new database. Depending
on the provider, this might create relational
databases or NoSQL document stores.
Example:
database {'mydatabase':
ensure => present,
owner => root,
}
}
end
In this example, any whitespace would be trimmed from the first line (in this case, it’s zero spaces), then the greatest
common amount would be trimmed from remaining lines. Three lines have four leading spaces, two lines have six,
and two lines have eight, so four leading spaces would be trimmed from each line. This leaves the example code
block indented by four spaces, and thus doesn’t break the Markdown formatting.
Properties and parameters
The bulk of a type definition consists of properties and parameters, which become the resource attributes available
when declaring a resource of the new type.
The difference between a property and a parameter is subtle but important:
• Properties correspond to something measurable on the target system. For example, the UID and GID of a user
account are properties, because their current state can be queried or changed. In practical terms, setting a value for
a property causes a method to be called on the provider.
• Parameters change how Puppet manages a resource, but do not necessarily map directly to something measurable.
For example, the user type’s managehome attribute is a parameter — its value affects what Puppet does, but
the question of whether Puppet is managing a home directory isn’t an innate property of the user account.
Additionally, there are a few special attributes called metaparameters, which are supported by all resource types.
These don’t need to be handled when creating new types; they’re implemented elsewhere.
A type definition typically has multiple properties, and must have at least one parameter.
Properties
A custom type's properties are at the heart of defining how the resource works. In most cases, it’s the properties that
interact with your resource’s providers.
If you define a property named owner, then when you are retrieving the state of your resource, then the owner
property calls the owner method on the provider. In turn, when you are setting the state (because the resource is out
of sync), then the owner property calls the owner= method to set the state on disk.
There’s one common exception to this: The ensure property is special because it’s used to create and destroy
resources. You can set this property up on your resource type just by calling the ensurable method in your type
definition:
Puppet::Type.newtype(:database) do
ensurable
...
end
© 2024 Puppet, Inc., a Perforce company

Puppet | Syntax and settings | 824
This property uses three methods on the provider: create, destroy, and exists?. The last method, somewhat
obviously, is a Boolean to determine if the resource exists. If a resource’s ensure property is out of sync, then no
other properties are checked or modified.
You can modify how ensure behaves, such as by adding other valid values and determining what methods get
called as a result; see types like package for examples.
The rest of the properties are defined a lot like you define the types, with the newproperty method, which should
be called on the type:
Puppet::Type.newtype(:database) do
ensurable
newproperty(:owner) do
desc "The owner of the database."
...
end
end
Note the call to desc; this sets the documentation string for this property, and for Puppet types that get distributed
with Puppet, it is extracted as part of the Type reference.
When Puppet was first developed, there would typically be a lot of code in this property definition. Now, however,
you only define valid values or set up validation and munging. If you specify valid values, then Puppet only accepts
those values, and automatically handles accepting either strings or symbols. In most cases, you only define allowed
values for ensure, but it works for other properties, too:
newproperty(:enable) do
newvalue(:true)
newvalue(:false)
end
You can attach code to the value definitions (this code would be called instead of the property= method), but it’s
normally unnecessary.
For most properties, though, it is sufficient to set up validation:
newproperty(:owner) do
validate do |value|
unless value =~ /^\w+/
raise ArgumentError, "%s is not a valid user name" % value
end
end
end
Note that the order in which you define your properties can be important: Puppet keeps track of the definition order,
and it always checks and fixes properties in the order they are defined.
Customizing behavior
By default, if a property is assigned multiple values in an array:
• It is considered in sync if any of those values matches the current value.
• If none of those values match, the first one is used when syncing the property.
If, instead, the property should only be in sync if all values match the current value (for example, a list of times in a
cron job), declare this:
newproperty(:minute, :array_matching => :all) do # :array_matching defaults
to :first
...
end
© 2024 Puppet, Inc., a Perforce company

Puppet | Syntax and settings | 825
You can also customize how information about your property gets logged. You can create an is_to_s method
to change how the current values are described, should_to_s to change how the desired values are logged, and
change_to_s to change the overall log message for changes. See current types for examples.
Handling property values
When a resource is created with a list of desired values, those values are stored in each property in its @should
instance variable. You can retrieve those values directly by calling should on your resource (although note that
when :array_matching is set to :first you get the first value in the array; otherwise you get the whole array):
myval = should(:color)
When you’re not sure (or don’t care) whether you’re dealing with a property or parameter, it’s best to use value:
myvalue = value(:color)
Parameters
Parameters are defined the same way as properties. The difference between them is that parameters never result in
methods being called on providers.
To define a new parameter, call the newparam method. This method takes the name of the parameter (as a symbol)
as its argument, as well as a block of code. You can and should provide documentation for each parameter by calling
the desc method inside its block. Tools that generate docs from this description trim leading whitespace from
multiline strings, as described for type descriptions.
newparam(:name) do
desc "The name of the database."
end
Namevar
Every type must have at least one mandatory parameter: the namevar. This parameter uniquely identifies each
resource of the type on the target system — for example, the path of a file on disk, the name of a user account, or the
name of a package.
If the user doesn’t specify a value for the namevar when declaring a resource, its value defaults to the title of the
resource.
There are three ways to designate a namevar. Every type must have exactly one parameter that meets exactly one of
these criteria:
1.
Create a parameter whose name is :name. Because most types just use :name as the namevar, it gets special
treatment and automatically becomes the namevar.
newparam(:name) do
desc "The name of the database."
end
2.
Provide the :namevar => true option as an additional argument to the newparam call. This allows you to
use a namevar with a different, more descriptive name, such as the file type’s path parameter.
newparam(:path, :namevar => true) do
...
end
3.
Call the isnamevar method (which takes no arguments) inside the parameter’s code block. This allows you to
use a namevar with a different, more descriptive name. There is no practical difference between this and option 2.
newparam(:path) do
isnamevar
© 2024 Puppet, Inc., a Perforce company

Puppet | Syntax and settings | 826
...
end
Specifying allowed values
If your parameter has a fixed list of valid values, you can declare them all at the same time:
newparam(:color) do
newvalues(:red, :green, :blue, :purple)
end
You can specify regular expressions in addition to literal values; matches against regex always happen after equality
comparisons against literal values, and those matches are not converted to symbols. For instance, given the following
definition:
newparam(:color) do
desc "Your color, and stuff."
newvalues(:blue, :red, /.+/)
end
If you provide blue as the value, then your parameter is set to :blue, but if you provide green, then it is set to
"green".
Validation and munging
If your parameter does not have a defined list of values, or you need to convert the values in some way, you can use
the validate and munge hooks:
newparam(:color) do
desc "Your color, and stuff."
newvalues(:blue, :red, /.+/)
validate do |value|
if value == "green"
raise ArgumentError,
"Everyone knows green databases don't have enough RAM"
else
super(value)
end
end
munge do |value|
case value
when :mauve, :violet # are these colors really any different?
:purple
else
super(value)
end
end
end
The default validate method looks for values defined using newvalues and if there are any values defined
it accepts only those values (this is how allowed values are validated). The default munge method converts any
values that are specifically allowed into symbols. If you override either of these methods, note that you lose this value
handling and symbol conversion, which you’ll have to call super for.
Values are always validated before they’re munged.
© 2024 Puppet, Inc., a Perforce company

Puppet | Syntax and settings | 827
Lastly, validation and munging only happen when a value is assigned. They have no role to play at all during use of a
given value, only during assignment.
Boolean parameters
Boolean parameters are common. To avoid repetition, some utilities are available:
require 'puppet/parameter/boolean'
# ...
newparam(:force, :boolean => true, :parent => Puppet::Parameter::Boolean)
There are two parts here. The :parent => Puppet::Parameter::Boolean part configures the parameter
to accept lots of names for true and false, to make things easy for your users. The :boolean => true creates a
boolean method on the type class to return the value of the parameter. In this example, the method would be named
force?.
Automatic relationships
Use automatic relationships to define the ordering of resources.
By default, Puppet includes and processes resources in the order they are defined in their manifest. However, there are
times when resources need to be applied in a different order. The Puppet language provides ways to express explicit
ordering such as relationship metaparameters (require, before, etc), chaining arrows and the require and
contain functions.
Sometimes there is natural relationship between your custom type and other resource types. For example, ssh
authorized keys can only be managed after you create the home directory and you can only manage files after you
create their parent directories. You can add explicit relationships for these, but doing so can be restrictive for others
who may want to use your custom type. Automatic relationships provide a way to define implicit ordering. For
example, to automatically add a require relationship from your custom type to a configuration file that it depends
on, add the following to your custom type:
autorequire(:file) do
['/path/to/file']
end
The Ruby symbol :file refers to the type of resource you want to require, and the array contains resource title(s)
with which to create the require relationship(s). The effect is nearly equivalent to using an explicit require
relationship:
custom { <CUSTOM RESOURCE>:
ensure => present,
require => File['/path/to/file']
}
An important difference between automatic and explicit relationships is that automatic relationships do not require the
other resources to exist, while explicit relationships do.
Agent-side pre-run resource validation
A resource can have prerequisites on the target, without which it cannot be synced. In some cases, if the absence of
these prerequisites would be catastrophic, you might want to halt the catalog run if you detect a missing prerequisite.
In this situation, define a method in your type named pre_run_check. This method can do any check you want. It
should take no arguments, and should raise a Puppet::Error if the catalog run should be halted.
If a type has a pre_run_check method, Puppet agent and puppet apply runs the check for every resource of
the type before attempting to apply the catalog. It collects any errors raised, and presents all of them before halting the
catalog run.
As a trivial example, here’s a pre-run check that fails randomly, about one time out of six:
Puppet::Type.newtype(:thing) do
© 2024 Puppet, Inc., a Perforce company

Puppet | Syntax and settings | 828
newparam :name, :namevar => true
def pre_run_check
if(rand(6) == 0)
raise Puppet::Error, "Puppet roulette failed, no catalog for you!"
end
end
end
How types and providers interact
The type definition declares the features that a provider must have and what’s required to make them work. Providers
can either be tested for whether they suffice, or they can declare that they have the features. Because a type's
properties call getter and setter methods on the providers, the providers must define getters and setters for each
property (except ensure).
Additionally, individual properties and parameters in the type can declare that they require one or more specific
features, and Puppet throws an error if those parameters are used with providers missing those features:
newtype(:coloring) do
feature :paint, "The ability to paint.", :methods => [:paint]
feature :draw, "The ability to draw."
newparam(:color, :required_features => %w{paint}) do
...
end
end
The first argument to the feature method is the name of the feature, the second argument is its description, and
after that is a hash of options that help Puppet determine whether the feature is available. The only option currently
supported is specifying one or more methods that must be defined on the provider. If no methods are specified, then
the provider needs to specifically declare that it has that feature:
Puppet::Type.type(:coloring).provide(:drawer) do
has_feature :draw
end
The provider can specify multiple available features at the same time with has_features.
When you define features on your type, Puppet automatically defines the following class methods on the provider:
• feature?: Passed a feature name, returns true if the feature is available or false otherwise.
• features: Returns a list of all supported features on the provider.
• satisfies?: Passed a list of feature, returns true if they are all available, false otherwise.
Additionally, each feature gets a separate Boolean method, so the above example would result in a paint? method
on the provider.
Related information
Provider development on page 828
Providers are back-ends that support specific implementations of a given resource type, particularly for different
platforms. Not all resource types have or need providers, but any resource type concerned about portability will likely
need them.
Provider development
Providers are back-ends that support specific implementations of a given resource type, particularly for different
platforms. Not all resource types have or need providers, but any resource type concerned about portability will likely
need them.
For instance, there are more than 20 package providers, including providers for package formats like dpkg and rpm
along with high-level package managers like apt and yum. A provider’s main job is to wrap client-side tools, usually
by just calling out to those tools with the right information.
© 2024 Puppet, Inc., a Perforce company

Puppet | Syntax and settings | 829
The examples on this page use the apt and dpkg package providers, and the examples used are current as of 0.23.0.
Note: Unless you are maintaining existing type and provider code, or the Resource API limitations affect you, use
the Resource API to create custom resource types, instead of this method.
Declaring providers
Providers are always associated with a single resource type, so they are created by calling the provide method on
that resource type.
The provide method takes three arguments plus a block:
• The first argument must be the name of the provider, as a :symbol.
• The optional :parent argument should be the name of a parent class.
• The optional :source argument should be a symbol.
• The block takes no arguments, and implements the behavior of the provider.
There are several kinds of parent classes you can use:
Base provider
A provider can inherit from a base provider, which is never used alone and only exists for other providers to
inherit from. Use the full name of the class. For example, all package providers have a common parent class:
Puppet::Type.type(:package).provide(:dpkg, :parent =>
Puppet::Provider::Package) do
desc "..."
...
end
Note the call to the desc method; this sets the documentation for this provider, and should include everything
necessary for someone to use this provider.
Another provider of the same resource type
Providers can also specify another provider as their parent. If it’s a provider for the same resource type, you can
use the name of that provider as a symbol.
Puppet::Type.type(:package).provide(:apt, :parent => :dpkg, :source
=> :dpkg) do
...
end
Note that we’re also specifying that this provider uses the dpkg source; this tells Puppet to deduplicate
packages from dpkg and apt, so the same package does not show up in an instance list from each provider type.
Puppet defaults to creating a new source for each provider type, so you have to specify when a provider subclass
shares a source with its parent class.
A provider of any resource type
Providers can also specify a provider of any resource type as their parent. Use the
Puppet::Type.type(<NAME>).provider(<NAME>) methods to locate the provider.
# my_module/lib/puppet/provider/glance_api_config/ini_setting.rb
Puppet::Type.type(:glance_api_config).provide(
:ini_setting,
# set ini_setting as the parent provider
:parent => Puppet::Type.type(:ini_setting).provider(:ruby)
) do
# implement section as the first part of the namevar
def section
resource[:name].split('/', 2).first
end
def setting
# implement setting as the second part of the namevar
© 2024 Puppet, Inc., a Perforce company

Puppet | Syntax and settings | 830
resource[:name].split('/', 2).last
end
# hard code the file path (this allows purging)
def self.file_path
'/etc/glance/glance-api.conf'
end
end
Suitability
The first question to ask about a new provider is where it will be functional, which Puppet calls suitable. Unsuitable
providers cannot be used to do any work. The suitability test is late-binding, meaning that you can have a resource in
your configuration that makes a provider suitable.
If you start puppetd or puppet in debug mode, you’ll see the results of failed provider suitability tests for the
resource types you’re using.
Puppet providers include some helpful class-level methods you can use to both document and declare how to
determine whether a given provider is suitable. The primary method is commands, which does two things for you:
it declares that this provider requires the named binary, and it sets up class and instance methods with the name
provided that call the specified binary. The binary can be fully qualified, in which case that specific path is required,
or it can be unqualified, in which case Puppet finds the binary in the shell path and uses that. If the binary cannot be
found, then the provider is considered unsuitable. For example, here is the header for the dpkg provider (as of 0.23.0):
commands :dpkg => "/usr/bin/dpkg"
commands :dpkg_deb => "/usr/bin/dpkg-deb"
commands :dpkgquery => "/usr/bin/dpkg-query"
In addition to looking for binaries, Puppet can compare Facter facts, test for the existence of a file, check for a feature
such as a library, or test whether a given value is true or false. For file existence, truth, or false, call the confine
class method with exists, true, or false as the name of the test and your test as the value:
confine :exists => "/etc/debian_release"
confine :true => /^10\.[0-4]/.match(product_version)
confine :false => (Puppet[:ldapuser] == "")
To test Facter values, use the name of the fact:
confine :operatingsystem => [:debian, :centos]
confine :puppetversion => "0.23.0"
Case doesn’t matter in the tests, nor does it matter whether the values are strings or symbols. It also doesn’t matter
whether you specify an array or a single value — Puppet does an OR on the list of values.
To test a feature, as defined in lib/puppet/feature/*.rb, supply the name of the feature. This is preferable
to using a confine :true statement that calls Puppet.features because the expression is evaluated only one
time. Puppet enables the provider if the feature becomes available during a run (for example, if a package is installed
during the run).
confine :feature => :posix
confine :feature => :rrd
You can create custom features. They live in lib/puppet/feature/*.rb and an example can be found
here. These features can be shipped in a similar manner as types and providers are shipped within modules and are
pluginsynced.
Using custom features you can delay resource evaluation until the provider becomes suitable. This is a way of
informing Puppet that your provider depends on a file being created by Puppet, or a certain fact being set to some
value, or it not being set at all.
© 2024 Puppet, Inc., a Perforce company

Puppet | Syntax and settings | 831
Default providers
Providers are generally meant to be hidden from the users, allowing them to focus on resource specification rather
than implementation details, so Puppet does what it can to choose an appropriate default provider for each resource
type.
This is generally done by a single provider declaring that it is the default for a given set of facts, using the defaultfor
class method. For instance, this is the apt provider’s declaration:
defaultfor :operatingsystem => :debian
The same fact-matching functionality as confinement is used.
Alternatively, you can supply a regular expression (regex) value to match against a fact value. This is useful, for
example, for providers that should only be default for a specific range of operating system versions:
defaultfor :operatingsystemmajrelease => /^[5-7]$/
How providers interact with resources
Providers do nothing on their own; all of their action is triggered through an associated resource (or, in special cases,
from the transaction). Because of this, resource types are essentially free to define their own provider interface if
necessary, and providers were initially developed without a clear resource-provider API (mostly because it wasn’t
clear whether such an API was necessary or what it would look like). At this point, however, there is a default
interface between the resource type and the provider.
This interface consists entirely of getter and setter methods. When the resource is retrieving its current state, it iterates
across all of its properties and calls the getter method on the provider for that property. For instance, when a user
resource is having its state retrieved and its uid and shell properties are being managed, then the resource calls
uid and shell on the provider to figure out what the current state of each of those properties is. This method call is
in the retrieve method in Puppet::Property.
When a resource is being modified, it calls the equivalent setter method for each property on the provider.
Again using our user example, if the uid was in sync but the shell was not, then the resource would call
shell=(value) with the new shell value.
The transaction is responsible for storing these returned values and deciding which value to send, and it does its
work through a PropertyChange instance. It calls sync on each of the properties, which in turn call the setter by
default.
You can override that interface as necessary for your resource type.
All providers must define an instances class method that returns a list of provider instances, one for each existing
instance of that provider. For example, the dpkg provider should return a provider instance for every package in the
dpkg database.
Provider methods
By default, you have to define all of your getter and setter methods. For simple cases, this is sufficient — you
just implement the code that does the work for that property. For the more complicated aspects of provider
implementation, Puppet has prefetching, resource methods, and flushing.
Prefetching
First, Puppet transactions prefetch provider information by calling prefetch on each used provider type. This calls
the instances method in turn, which returns a list of provider instances with the current resource state already
retrieved and stored in a @property_hash instance variable. The prefetch method then tries to find any matching
resources, and assigns the retrieved providers to found resources. This way you can get information on all of the
resources you’re managing in just a few method calls, instead of having to call all of the getter methods for every
property being managed. Note that it also means that providers are often getting replaced, so you cannot maintain
state in a provider.
© 2024 Puppet, Inc., a Perforce company

Puppet | Syntax and settings | 832
Resource methods
For providers that directly modify the system when a setter method is called, there’s no substitute for defining them
manually. But for resources that get flushed to disk in one step, such as the ParsedFile providers, there is a
mk_resource_methods class method that creates a getter and setter for each property on the resource. These
methods retrieve and set the appropriate value in the @property_hash variable.
Flushing
Many providers model files or parts of files, so it makes sense to save up all of the writes and do them in one run.
Providers that need this functionality can define a flush instance method to do this. The transaction calls this method
after all values are synced (which means that the provider should have them all in its @property_hash variable)
but before refresh is called on the resource (if appropriate).
Creating resources
You can write resource types and providers in the Puppet language. The following example shows you how to create
resources in Puppet using the low-level types and provider method.
Note: The Puppet Resource API is a simpler and faster way to build types and providers.
Puppet’s property support has a helper method called ensurable that handles modeling creation and destruction;
it creates an ensure property and adds absent and present values for it, which require three methods on the
provider, create, destroy, and exists?.
The following example is a resource called file. The resource contains the type name (file), a documentation
string, a parameter for the name of the file, and used the ensurable method to say that the file is both createable and
destroyable.
Puppet::Type.newtype(:file) do
@doc = "Manage a file (the simple version)."
ensurable
newparam(:name) do
desc "The full path to the file."
end
end
The following example is a provider. The provider contains the docs, the provider name, and the three methods that
the ensure property requires. Note that it uses a desc instead of @doc = to specify the documentation. It also uses
Ruby’s built-in file abilities to create an empty file, remove the file, or test whether the file exists.
Puppet::Type.type(:file).provide(:posix) do
desc "Normal Unix-like POSIX support for file management."
def create
File.open(@resource[:name], "w") { |f| f.puts "" } # Create an empty
file
end
def destroy
File.unlink(@resource[:name])
end
def exists?
File.exists?(@resource[:name])
end
end
© 2024 Puppet, Inc., a Perforce company

Puppet | Syntax and settings | 833
To manage the file mode, add the following code to your resource:
newproperty(:mode) do
desc "Manage the file's mode."
defaultto "640"
end
Note that the default value is specified, and it is a string instead of an integer (file modes are in octal). You can pass a
lambda to defaultto instead of a value, if you don’t have a simple value.
To understand modes, add the following code to the provider:
def create
File.open(@resource[:name], "w") { |f| f.puts "" } # Create an empty
file
# Make sure the mode is correct
should_mode = @resource.should(:mode)
unless self.mode == should_mode
self.mode = should_mode
end
end
# Return the mode as an octal string, not as an integer.
def mode
if File.exists?(@resource[:name])
"%o" % (File.stat(@resource[:name]).mode & 007777)
else
:absent
end
end
# Set the file mode, converting from a string to an integer.
def mode=(value)
File.chmod(Integer("0" + value), @resource[:name])
end
The getter method returns the value, but does not attempt to modify the resource itself. When the setter gets passed,
the value it is supposed to set — it does not attempt to figure out the appropriate value to use.
Note that the ensure property, when created by the ensurable method, behaves differently because it uses
methods for creation and destruction of the file, compared to normal properties that use getter and setter methods.
When you create a resource, Puppet expects the create method to make any other necessary changes. This is
because resources are already configured when created, so Puppet does not need to test them manually.
The absent and present values are defined by looking in the property.rb file:
newvalue(:present) do
if @resource.provider and @resource.provider.respond_to?(:create)
@resource.provider.create
else
@resource.create
end
nil # return nil so the event is autogenerated
end
newvalue(:absent) do
if @resource.provider and @resource.provider.respond_to?(:destroy)
@resource.provider.destroy
else
@resource.destroy
end
nil # return nil so the event is autogenerated
© 2024 Puppet, Inc., a Perforce company

Puppet | Syntax and settings | 834
end
Related information
Develop types and providers with the Resource API on page 803
The recommended method to create custom types and providers is to use the Resource API, which is built on top of
Puppet core. It is easier, faster, and safer than the old types and providers method.
Custom functions
Use the Puppet language, or the Ruby API to create custom functions.
For built-in Puppet functions, see the Functions reference.
• Custom functions overview on page 834
Puppet includes many built-in functions, and more are available in modules on the Forge. You can also write your
own custom functions.
• Writing custom functions in the Puppet language on page 835
You can write simple custom functions in the Puppet language, to transform data and construct values. A function can
optionally take one or more parameters as arguments. A function returns a calculated value from its final expression.
• Writing custom functions in Ruby on page 839
You can write powerful and flexible functions using Ruby.
• Deferring a function on page 851
Deferring a function allows you to run code on the agent during a Puppet run.
Custom functions overview
Puppet includes many built-in functions, and more are available in modules on the Forge. You can also write your
own custom functions.
Functions are plugins used during catalog compilation. When a Puppet manifest calls a function, that function runs
and returns a value. Most functions only produce values, but functions can also:
• Cause side effects that modify a catalog. For example, the include function adds classes to a catalog.
• Evaluate a provided block of Puppet code, using arguments to determine how that code runs.
Functions usually take one or more arguments, which determine the return value and the behavior of any side effects.
If you need to manipulate data or communicate with third-party services during catalog compilation, and if the built-
in functions, or functions from Forge modules, aren’t sufficient, you can write custom functions for Puppet.
Custom functions work just like Puppet’s built-in functions: you can call them during catalog compilation to produce
a value or cause side effects. You can use your custom functions locally, and you can share them with other users.
To make a custom function available to Puppet, you must put it in a module or an environment, in the specific
locations where Puppet expects to find functions.
Puppet offers two interfaces for writing custom functions:
Interface Description
The Puppet language To write functions in the Puppet language, you don't
need to know any Ruby. However, it’s less powerful
than the Ruby API. Puppet functions can have only one
signature per function, and can’t take a lambda (a block
of Puppet code) as an argument.
The Ruby functions API The more powerful and flexible way to write functions.
This method requires some knowledge of Ruby. You can
use Ruby to write iterative functions.
© 2024 Puppet, Inc., a Perforce company

Puppet | Syntax and settings | 835
Guidelines for writing custom functions
Whenever possible, avoid causing side effects. Side effects are any change other than producing a value, such as
modifying the catalog by adding classes or resources to it.
In Ruby functions, it’s possible to change the values of existing variables. Never do this, because Puppet relies on
those variables staying the same.
Documenting functions
For information about documenting your functions, see Puppet Strings .
Related topics: Function calls, Catalog compilation, Environments, Modules, Puppet Forge, Iterative functions.
Writing custom functions in the Puppet language
You can write simple custom functions in the Puppet language, to transform data and construct values. A function can
optionally take one or more parameters as arguments. A function returns a calculated value from its final expression.
Note: While many functions can be written in the Puppet language, it doesn’t support all of the same features as pure
Ruby. For information about writing Ruby functions, which can perform more complex work, see Writing functions
in Ruby. For information about iterative functions, which can be invoked by, but not written exclusively with, Puppet
code, see Writing iterative functions.
Syntax of functions
function <MODULE NAME>::<NAME>(<PARAMETER LIST>) >> <RETURN TYPE> {
... body of function ...
final expression, which is the returned value of the function
}
The general form of a function written in Puppet language is:
• The keyword function.
• The namespace of the function. This must match the name of the module the function is contained in.
• The namespace separator, a double colon ::
• The name of the function.
• An optional parameter list, which consists of:
• An opening parenthesis (
• A comma-separated list of parameters (for example, String $myparam = "default value"). Each
parameter consists of:
• An optional data type, which restricts the allowed values for the parameter (defaults to Any).
• A variable name to represent the parameter, including the $ prefix.
• An optional equals sign = and default value, which must match the data type, if one was specified.
• An optional trailing comma after the last parameter.
• A closing parenthesis )
• An optional return type, which consists of:
• Two greater-than signs >>
• A data type that matches every value the function could return.
• An opening curly brace {
• A block of Puppet code, ending with an expression whose value is returned.
• A closing curly brace }
For example:
function apache::bool2http(Variant[String, Boolean] $arg) >> String {
case $arg {
© 2024 Puppet, Inc., a Perforce company

Puppet | Syntax and settings | 836
false, undef, /(?i:false)/ : { 'Off' }
true, /(?i:true)/ : { 'On' }
default : { "$arg" }
}
}
Order and optional parameters
Puppet passes arguments by parameter position. This means that the order of parameters is important. Parameter
names do not affect the order in which they are passed.
If a parameter has a default value, then it’s optional to pass a value for it when you're calling the function. If the caller
doesn’t pass in an argument for that parameter, the function uses the default value. However, because parameters are
passed by position, when you write the function, you must list optional parameters after all required parameters. If
you put a required parameter after an optional one, it causes an evaluation error.
Variables in default parameters values
If you reference a variable as a default value for a parameter, Puppet starts looking for that variable at top scope.
For example, if you use $fqdn as a variable, but then call the function from a class that overrides $fqdn, the
parameter’s default value is the value from top scope, not the value from the class. You can reference qualified
variable names in a function default value, but compilation fails if that class isn't declared by the time the function is
called.
The extra arguments parameter
You can specify that a function's last parameter is an extra arguments parameter. The extra arguments parameter
collects an unlimited number of extra arguments into an array. This is useful when you don’t know in advance how
many arguments the caller provides.
To specify that the parameter must collect extra arguments, start its name with an asterisk *, for example *$others.
The asterisk is valid only for the last parameter.
Tip: An extra argument's parameter is always optional.
The value of an extra argument’s parameter is an array, containing every argument in excess of the earlier parameters.
You can give it a default value, which has some automatic array wrapping for convenience:
• If the provided default is a non-array value, the real default is a single-element array containing that value.
• If the provided default is an array, the real default is that array.
If there are no extra arguments and there is no default value, it's an empty array.
An extra arguments parameter can also have a data type. Puppet uses this data type to validate the elements of
the array. That is, if you specify a data type of String, the real data type of the extra arguments parameter is
Array[String].
Return types
Between the parameter list and the function body, you can use >> and a data type to specify the type of the values the
function returns. For example, this function only returns strings:
function apache::bool2http(Variant[String, Boolean] $arg) >> String {
...
}
The return type serves two purposes:
• Documentation. Puppet Strings includes information about the return value of a function.
© 2024 Puppet, Inc., a Perforce company

Puppet | Syntax and settings | 837
• Insurance. If something goes wrong and your function returns the wrong type (such as undef when a string is
expected), it fails early with an informative error instead of allowing compilation to continue with an incorrect
value.
The function body
In the function body, put the code required to compute the return value you want, given the arguments passed in.
Avoid declaring resources in the body of your function. If you want to create resources based on inputs, use defined
types instead.
The final expression in the function body determines the value that the function returns when called. Most conditional
expressions in the Puppet language have values that work in a similar way, so you can use an if statement or a
case statement as the final expression to give different values based on different numbers or types of inputs. In the
following example, the case statement serves as both the body of the function, and its final expression.
function apache::bool2http(Variant[String, Boolean] $arg) >> String {
case $arg {
false, undef, /(?i:false)/ : { 'Off' }
true, /(?i:true)/ : { 'On' }
default : { "$arg" }
}
}
Locations
Store the functions you write in a module's functions folder, which is a top-level directory (a sibling of
manifests and lib). Define only one function per file, and name the file to match the name of the function being
defined. Puppet is automatically aware of functions in a valid module and autoloads them by name.
Avoid storing functions in the main manifest. Functions in the main manifest override any function of the same name
in all modules (except built-in functions).
Names
Give your function a name that clearly reveals what it does. For more information about names, including restrictions
and reserved words, see Puppet naming conventions.
Related topics: Arrays, Classes, Data types, Conditional expressions, Defined types, Namespaces and autoloading,
Variables.
Calling a function
A call to a custom function behaves the same as a call to any built-in Puppet function, and resolves to the function's
returned value.
After a function is written and available in a module where the autoloader can find it, you can call that function, either
from a Puppet manifest that lists the containing module as a dependency, or from your main manifest.
Any arguments you pass to the function are mapped to the parameters defined in the function’s definition. You must
pass arguments for the mandatory parameters, but you can choose whether you want to pass in arguments for optional
parameters.
Functions are autoloaded and are available to other modules unless those modules have specified dependencies.
If a module has a list of dependencies in its metadata.json file, only custom functions from those specific
dependencies are loaded.
Related topics: namespaces and autoloading, module metadata, main manifest directory
© 2024 Puppet, Inc., a Perforce company

Puppet | Syntax and settings | 838
Complex example of a function
The following code example is a re-written version of a Ruby function from the postgresql module into Puppet
code. This function translates the IPv4 and IPv6 Access Control Lists (ACLs) format into a resource suitable for
create_resources. In this case, the filename would be acls_to_resource_hash.pp, and it would be
saved in a folder named functions in the top-level directory of the postgresql module.
function postgresql::acls_to_resource_hash(Array $acls, String $id, Integer
$offset) {
$func_name = "postgresql::acls_to_resources_hash()"
# The final hash is constructed as an array of individual hashes
# (using the map function), the result of that
# gets merged at the end (using reduce).
#
$resources = $acls.map |$index, $acl| {
$parts = $acl.split('\s+')
unless $parts =~ Array[Data, 4] {
fail("${func_name}: acl line $index does not have enough parts")
}
# build each entry in the final hash
$resource = { "postgresql class generated rule ${id} ${index}" =>
# The first part is the same for all entries
{
'type' => $parts[0],
'database' => $parts[1],
'user' => $parts[2],
'order' => sprintf("'%03d'", $offset + $index)
}
# The rest depends on if first part is 'local',
# the length of the parts, and the value in $parts[4].
# Using a deep matching case expression is a good way
# to untangle if-then-else spaghetti.
#
# The conditional part is merged with the common part
# using '+' and the case expression results in a hash
#
+
case [$parts[0], $parts, $parts[4]] {
['local', Array[Data, 5], default] : {
{ 'auth_method' => $parts[3],
'auth_option' => $parts[4, -1].join(" ")
}
}
['local', default, default] : {
{ 'auth_method' => $parts[3] }
}
[default, Array[Data, 7], /^\d/] : {
{ 'address' => "${parts[3]} ${parts[4]}",
'auth_method' => $parts[5],
'auth_option' => $parts[6, -1].join(" ")
}
}
[default, default, /^\d/] : {
{ 'address' => "${parts[3]} ${parts[4]}",
'auth_method' => $parts[5]
}
© 2024 Puppet, Inc., a Perforce company

Puppet | Syntax and settings | 839
}
[default, Array[Data, 6], default] : {
{ 'address' => $parts[3],
'auth_method' => $parts[4],
'auth_option' => $parts[5, -1].join(" ")
}
}
[default, default, default] : {
{ 'address' => $parts[3],
'auth_method' => $parts[4]
}
}
}
}
$resource
}
# Merge the individual resource hashes into one
$resources.reduce({}) |$result, $resource| { $result + $resource }
}
Writing custom functions in Ruby
You can write powerful and flexible functions using Ruby.
• Custom functions in Ruby overview on page 839
Get started with an overview of Ruby custom functions.
• Ruby function signatures on page 841
Functions can specify how many arguments they expect, and a data type for each argument. The rule set for a
function’s arguments is called a signature.
• Using special features in implementation methods on page 845
For the most part, implementation methods are normal Ruby. However, there are some special features available for
accessing Puppet variables, working with provided blocks of Puppet code, and calling other functions.
• Iterative functions on page 847
You can use iterative types to write efficient iterative functions, or to chain together the iterative functions built into
Puppet.
• Refactoring legacy 3.x functions on page 849
If you have Ruby functions written with the legacy 3.x API, refactor them to ensure that they work correctly with
current versions of Puppet.
Custom functions in Ruby overview
Get started with an overview of Ruby custom functions.
Syntax of Ruby functions
To write a new function in Ruby, use the Puppet::Functions.create_function method. You don’t need
to require any Puppet libraries. Puppet handle libraries automatically when it loads the function.
Puppet::Functions.create_function(:<FUNCTION NAME>) do
dispatch :<METHOD NAME> do
param '<DATA TYPE>', :<ARGUMENT NAME (displayed in docs/errors)>
...
end
def <METHOD NAME>(<ARGUMENT NAME (for local use)>, ...)
<IMPLEMENTATION>
end
end
The create_function method requires:
© 2024 Puppet, Inc., a Perforce company

Puppet | Syntax and settings | 840
• A function name.
• A block of code (which takes no arguments). This block contains:
• One or more signatures to configure the function’s arguments.
• An implementation method for each signature. The return value of the implementation method is the return
value of the function.
For example:
# /etc/puppetlabs/code/environments/production/modules/mymodule/lib/puppet/
functions/mymodule/upcase.rb
Puppet::Functions.create_function(:'mymodule::upcase') do
dispatch :up do
param 'String', :some_string
end
def up(some_string)
some_string.upcase
end
end
Location
Place a Ruby function in its own file, in the lib/puppet/functions directory of either a module or an
environment. The filename must match the name of the function, and have the .rb extension. For namespaced
functions, each segment prior to the final one must be a subdirectory of functions, and the final segment must be
the filename.
Function name File location
upcase <MODULES DIR>/mymodule/lib/puppet/
functions/upcase.rb
upcase /etc/puppetlabs/code/environments/
production/lib/puppet/functions/
upcase.rb
mymodule::upcase <MODULES DIR>/mymodule/lib/puppet/
functions/mymodule/upcase.rb
environment::upcase /etc/puppetlabs/code/environments/
production/lib/puppet/functions/
environment/upcase.rb
Functions are autoloaded and made available to other modules unless those modules specify dependencies. After
a function is written and available (in a module where the autoloader can find it), you can call that function in any
Puppet manifest that lists the containing module as a dependency, and also from your main manifest. If a module has
a list of dependencies in its metadata.json file, it loads custom functions only from those specific dependencies.
Names
Function names are similar to class names. They consist of one or more segments. Each segment must start with a
lowercase letter, and can include:
• Lowercase letters
• Numbers
• Underscores
If a name has multiple segments, separate them with a double-colon (::) namespace separator.
Match each segment with this regular expression:
© 2024 Puppet, Inc., a Perforce company
Puppet | Syntax and settings | 841
\A[a-z][a-z0-9_]*\Z
Match the full name with this regular expression:
\A([a-z][a-z0-9_]*)(::[a-z][a-z0-9_]*)*\Z
Function names can be either global or namespaced:
• Global names have only one segment (str2bool), and can be used in any module or environment. Global names
are shorter, but they’re not guaranteed to be unique — if you use a function name that is already in use by another
module, Puppet might load the wrong module when you call it.
• Namespaced names have multiple segments (stdlib::str2bool), and are guaranteed to be unique. The first
segment is dictated by the function’s location:
• In an environment, use environment (environment::str2bool).
• In a module, use the module’s name (stdlib::str2bool for a function stored in the stdlib module).
Most functions have two name segments, although it’s legal to use more.
Examples of legal function names:
• num2bool (a function that could come from anywhere)
• postgresql::acls_to_resource_hash (a function in the postgresql module)
• environment::hash_from_api_call (a function in an environment)
Examples of illegal function names:
• 6_pack (must start with a letter)
• _hash_from_api_call (must start with a letter)
• Find-Resource (can only contain lowercase letters, numbers, and underscores)
Passing names to create_function as symbols
When you call the Puppet::Functions.create_function method, pass the function’s name to it as a Ruby
symbol.
To turn a function name into a symbol:
• If the name is global, prefix it with a colon (:str2bool).
• If it’s namespaced: put the name in quotation marks, and prefix the full quoted string with a colon
(:'stdlib::str2bool').
Related topics: Puppet modules, Environments, Main manifest, Module metadata, Ruby symbols.
Ruby function signatures
Functions can specify how many arguments they expect, and a data type for each argument. The rule set for a
function’s arguments is called a signature.
Because Puppet functions support more advanced argument checking than Ruby does, the Ruby functions API uses a
lightweight domain-specific language (DSL) to specify signatures.
Ruby functions can have multiple signatures. Using multiple signatures is an easy way to have a function behave
differently when passed by different types or quantities of arguments. Instead of writing complex logic to decide what
to do, you can write separate implementations and let Puppet select the correct signature.
If a function has multiple signatures, Puppet uses its data type system to check each signature in order, comparing
the allowed arguments to the arguments that were actually passed. As soon as Puppet finds a signature that can
accept the provided arguments, it calls the associated implementation method, passing the arguments to that method.
When the method finishes running and returns a value, Puppet uses that as the function’s return value. If none of the
function’s signatures match the provided arguments, Puppet fails compilation and logs an error message describing
the mismatch between the provided and expected arguments.
© 2024 Puppet, Inc., a Perforce company

Puppet | Syntax and settings | 842
Conversion of Puppet and Ruby data types
When function arguments are passed to a Ruby method, they’re converted to Ruby objects. Similarly, when the
Puppet manifest regains control, it converts the method’s return value into a Puppet data type.
Puppet converts data types between the Puppet language and Ruby as follows:
Puppet Ruby
Boolean Boolean
Undef NilClass (value nil)
String String
Number subtype of Numeric
Array Array
Hash Hash
Default Symbol (value :default)
Regexp Regexp
Resource reference Puppet::Pops::Types::PResourceType, or
Puppet::Pops::Types::PHostClassType
Lambda (code block) Puppet::Pops::Evaluator::Closure
Data type (Type) A type class under
Puppet::Pops::Types. For example,
Puppet::Pops::Types::PIntegerType
Tip: When writing iterative functions, use iterative types instead of Puppet types.
Writing signatures with dispatch
To write a signature, use the dispatch method.
The dispatch method takes:
• The name of an implementation method, provided as a Ruby symbol. The corresponding method must be defined
somewhere in the create_function block, usually after all the signatures.
• A block of code which only contains calls to the parameter and return methods.
# A signature that takes a single string argument
dispatch :camelcase do
param 'String', :input_string
return_type 'String' # optional
end
Using parameter methods
In the code block of a dispatch statement, you can specify arguments with special parameter methods. All of these
methods take two arguments:
• The allowed data type for the argument, as a string. Types are specified using Puppet’s data type syntax.
• A user-facing name for the argument, as a symbol. This name is only used in documentation and error messages;
it doesn’t have to match the argument names in the implementation method.
The order in which you call these methods is important: the function’s first argument goes first, followed by the
second, and so on. The following parameter methods are available:
© 2024 Puppet, Inc., a Perforce company

Puppet | Syntax and settings | 843
Model name Description
param or required_param
A mandatory argument. You can use any number of
these.
Position: All mandatory arguments must come first.
optional_param
An argument that can be omitted. You can use any
number of these. When there are multiple optional
arguments, users can only pass latter ones if they also
provide values for the prior ones. This also applies to
repeated arguments.
Position: Must come after any required arguments.
repeated_param or
optional_repeated_param
A repeatable argument, which can receive zero or
more values. A signature can only use one repeatable
argument.
Position: Must come after any non-repeating arguments.
required_repeated_param
A repeatable argument, which must receive one or
more values. A signature can only use one repeatable
argument.
Position: Must come after any non-repeating arguments.
block_param or required_block_param
A mandatory lambda (block of Puppet code). A signature
can only use one block.
Position: Must come after all other arguments.
optional_block_param
An optional lambda. A signature can only use one block.
Position: Must come after all other arguments.
When specifying a repeatable argument, note that:
• In your implementation method, the repeatable argument appears as an array, which contains all the provided
values that weren’t assigned to earlier, non-repeatable arguments.
• The specified data type is matched against each value for the repeatable argument, not the
repeatable argument as a whole. For example, if you want to accept any number of numbers, specify
repeated_param 'Numeric', :values_to_average, not repeated_param
'Array[Numeric]', :values_to_average.
For lambdas, note that:
• The data type for a block argument is Callable, or a Variant that only contains Callables.
• The Callable type can optionally specify the type and quantity of parameters that the lambda accepts. For
example, Callable[String, String] matches any lambda that can be called with a pair of strings.
Matching arguments with implementation methods
The implementation method that corresponds to a signature must be able to accept any combination of arguments that
the signature might allow.
If the signature has optional arguments, the corresponding method arguments need default values. Otherwise, the
function fails if the arguments are omitted. For example:
dispatch :epp do
required_param 'String', :template_file
optional_param 'Hash', :parameters_hash
end
© 2024 Puppet, Inc., a Perforce company

Puppet | Syntax and settings | 844
def epp(template_file, parameters_hash = {})
# Note that parameters_hash defaults to an empty hash.
end
If the signature has a repeatable argument, the method must use a splat parameter (*args) as its final argument. For
example:
dispatch :average do
required_repeated_param 'Numeric', :values_to_average
end
def average(*values)
# Inside the method, the `values` variable is an array of numbers.
end
Using the return_type method
After specifying a signature’s arguments, you can use the return_type method to specify the data type of its
return value. This method takes one argument: a Puppet data type, specified as a string.
dispatch :camelcase do
param 'String', :input_string
return_type 'String'
end
The return type serves two purposes: documentation, and insurance.
• Puppet Strings can include information about the return value of a function.
• If something goes wrong and your function returns the wrong type (like nil when a string is expected), it fails
early with an informative error instead of allowing compilation to continue with an incorrect value.
Specifying aliases using local_types
If you're using complicated abstract data types to validate arguments, and you're using these data types in multiple
signatures, they can become difficult to work with and maintain. In these cases, you can specify short aliases for your
complex data types and use the aliases in your signatures.
To specify aliases, use the local_types method:
• You must call local_types only one time, before any signatures.
• The local_types method takes a lambda, which only contains calls to the type method.
• The type method takes a single string argument, in the form '<NAME> = <TYPE>'.
• Capitalize the name, camel case word (PartColor), similar to a Ruby class name or the existing Puppet data
types.
• The type is a valid Puppet data type.
Example:
local_types do
type 'PartColor = Enum[blue, red, green, mauve, teal, white, pine]'
type 'Part = Enum[cubicle_wall, chair, wall, desk, carpet]'
type 'PartToColorMap = Hash[Part, PartColor]'
end
dispatch :define_colors do
param 'PartToColorMap', :part_color_map
end
def define_colors(part_color_map)
© 2024 Puppet, Inc., a Perforce company

Puppet | Syntax and settings | 845
# etc
end
Using automatic signatures
If your function only needs one signature, and you’re willing to skip the API’s data type checking, you can use an
automatic signature. Be aware that there are some drawbacks to using automatic signatures.
Although functions with automatic signatures are simpler to write, they give worse error messages when called
incorrectly. You'll get a useful error if you call the function with the wrong number of arguments, but if you
give the wrong type of argument, you’ll get something unhelpful. For example, if you pass the function above a
number instead of a string, it reports Error: Evaluation Error: Error while evaluating a
Function Call, undefined method 'split' for 5:Fixnum at /Users/nick/Desktop/
test2.pp:7:8 on node magpie.lan.
If it's possible that your function will be used by anyone other than yourself, support your users by writing a signature
with dispatch.
To use an automatic signature:
• Do not write a dispatch block.
• Define one implementation method whose name matches the final namespace segment of the function’s name.
Puppet::Functions.create_function(:'stdlib::camelcase') do
def camelcase(str)
str.split('_').map{|e| e.capitalize}.join
end
end
In this case, because the last segment of stdlib::camelcase is camelcase, we must define a method named
camelcase.
Related topics: Ruby symbols, Abstract data types.
Using special features in implementation methods
For the most part, implementation methods are normal Ruby. However, there are some special features available for
accessing Puppet variables, working with provided blocks of Puppet code, and calling other functions.
Accessing Puppet variables
We recommend that most functions only use the arguments they are passed. However, you also have the option of
accessing globally-reachable Puppet variables. The main use case for this is accessing facts, trusted data, or server
data.
Remember: Functions cannot access local variables in the scope from which they were called. They can only access
global variables or fully-qualified class variables.
To access variables, use the special closure_scope method, which takes no arguments and returns a
Puppet::Parser::Scope object.
Use #[](varname) to call on a scope object, which returns the value of the specified variable. Make sure to
exclude the $ from the variable name. For example:
Puppet::Functions.create_function(:'mymodule::fqdn_rand') do
dispatch :fqdn do
# no arguments
end
def fqdn()
scope = closure_scope
fqdn = scope['facts']['networking']['fqdn']
© 2024 Puppet, Inc., a Perforce company

Puppet | Syntax and settings | 846
# ...
end
end
Working with lambdas (code blocks)
If their signatures allow it, functions can accept lambdas (blocks of Puppet code). If a function has a lambda, it
generally needs to execute it. To do this, use Ruby’s normal block calling conventions.
Convention Description
block_given?
If your signature specified an optional code block, your
implementation method can check for its presence with
the block_given? method. This is true if a block
was provided, false if not.
yield()
When you know a block was provided, you can execute
it any number of times with the yield() method.
The arguments to yield are passed as arguments to the
lambda. If your signature specified the number and type
of arguments the lambda expects, you can call it with
confidence. The return value of the yield call is the
return value of the provided lambda.
If you need to introspect a provided lambda, or pass it on to some other method, an implementation method can
capture it as a Proc by specifying an extra argument with an ampersand (&) flag. This works the same way as
capturing a Ruby block as a Proc. After you capture the block, you can execute it with #call instead of yield.
You can also use any other Proc instance methods to examine it.
def implementation(arg1, arg2, *splat_arg, &block)
# Now the `block` variable has the provided lambda, as a Proc.
block.call(arg1, arg2, splat_arg)
end
Calling other functions
If you want to call another Puppet function (like include) from inside a function, use the special
call_function(name, *args, &block) method.
# Flatten an array of arrays of strings, then pass it to include:
def include_nested(array_of_arrays)
call_function('include', *array_of_arrays.flatten)
end
• The first argument must be the name of the function to call, as a string.
• The next arguments can be any data type that the called function accepts. They are passed as arguments to the
called function.
• The last argument can be a Ruby Proc, or a Puppet lambda previously captured as a Proc. You can also provide
a block of Ruby code using the normal block syntax.
def my_function1(a, b, &block)
# passing given Proc
call_function('my_other_function', a, b, &block)
end
© 2024 Puppet, Inc., a Perforce company

Puppet | Syntax and settings | 847
def my_function2(a, b)
# using a Ruby block
call_function('my_other_function', a, b) { |x| ... }
end
Related topics: Proc , yield , block_given? , Puppet variables, Lambdas, Facts and built-in variables.
Iterative functions
You can use iterative types to write efficient iterative functions, or to chain together the iterative functions built into
Puppet.
Iterative functions include Iterable and Iterator types, as well as other types you can iterate over, such as
arrays and hashes. For example, an Array[Integer] is also an Iterable[Integer].
Tip: Iterable and Iterator types are used internally by Puppet to efficiently chain the results of its built-in
iterative functions. You can’t write iterative functions solely in the Puppet language. For help writing less complex
functions in Puppet code, see Writing functions in Puppet.
Iterable and Iterator type design
The Iterable type represents all things an iterative function can iterate over. Before this type was introduced in
Puppet 4.4, if you wanted to design working iterative functions, you'd have to write code that accommodated all
relevant types, such as Array, Hash, Integer, and Type[Integer].
Signatures of iterative functions accept an Iterable type argument. This means that you no longer have to design
iterative functions to check against every type. This behavior does not affect how the Puppet code that invokes
these functions works, but does change the errors you see if you try to iterate over a value that does not have the
Iterable type.
The Iterator type, which is a subtype of Iterable, is a special algorithm-based Iterable not backed by
a concrete data type. When asked to produce a value, an Iterator produces the next value from its input, and
then either yields a transformation of this value, or takes its input and yields each value from a formula based on
that value. For example, the step function produces consecutive values but does not need to first produce an array
containing all of the values.
Writing iterative functions
Remember: You can’t write iterative functions solely in the Puppet language.
When writing iterative functions, use the Iterable type instead of the more specific, individual types. The
Iterable type has a type parameter that describes the type that is yielded in each iteration. For example, an
Array[Integer] is also an Iterable[Integer].
When writing a function that returns an Iterator, declare the return type as Iterable. This is the most flexible
way to handle an Iterator.
For best practices on implementing iterative functions, examine existing iterative functions in Puppet and read
the Ruby documentation for the helper classes these functions use. See the implementations of each and map for
functions that always produce a new result, and reverse_each and step for new iterative functions that return an
Iterable when called without a block.
For example, this is the Ruby code for the step function:
Puppet::Functions.create_function(:step) do
dispatch :step do
param 'Iterable', :iterable
param 'Integer[1]', :step
end
dispatch :step_block do
param 'Iterable', :iterable
© 2024 Puppet, Inc., a Perforce company

Puppet | Syntax and settings | 848
param 'Integer[1]', :step
block_param 'Callable[1,1]', :block
end
def step(iterable, step)
# produces an Iterable
Puppet::Pops::Types::Iterable.asserted_iterable(self,
iterable).step(step)
end
def step_block(iterable, step, &block)
Puppet::Pops::Types::Iterable.asserted_iterable(self,
iterable).step(step, &block)
nil
end
end
Efficiently chaining iterative functions
Iterative functions are often used in chains, where the result of one function is used as the next function’s parameter.
A typical example is a map/reduce function, where values are first modified, and then an aggregate value is
computed. For example, this use of reverse_each and reduce:
[1,2,3].reverse_each.reduce |$result, $x| { $result - $x }
The reverse_each function iterates over the Array to reverse the order of its values from [1,2,3] to
[3,2,1]. The reduce function iterates over the Array, subtracting each value from the previous value. The
$result is 0, because 3 - 2 - 1 = 0.
Iterable types allow functions like these to execute more efficiently in a chain of calls, because they eliminate each
function’s need to create an intermediate copy of the mapped values in the appropriate type. In the above example, the
mapped values would be the array [3,2,1] produced by the reverse_each function. The first time the reduce
function is called, it receives the values 3 and 2 — the value 1 has not yet been computed. In the next iteration,
reduce receives the value 1, and the chain ends because there are no more values in the array.
Limitations and workarounds
When you use it last in a chain, you can assign a value of Iterator[T] (where T is a data type) to a variable and
pass it on. However, you cannot assign an Iterator to a parameter value. It's also not possible to call legacy 3.x
functions with an Iterator.
If you assign an Iterator to a resource attribute, you get an error. This is because the Iterator type is a special
algorithm-based Iterable that is not backed by a concrete data type. In addition, parameters in resources are
serialized, and Puppet cannot serialize a temporary algorithmic result.
For example, if you used the following Puppet code:
notify { 'example1':
message => [1,2,3].reverse_each,
}
You would recieve the following error:
Error while evaluating a '=>' expression, Use of an Iterator is not
supported here
Puppet needs a concrete data type for serialization, but the result of [1,2,3].reverse_each is only a temporary
Iterator value. To convert the Iterator-typed value to an Array, map the value.
© 2024 Puppet, Inc., a Perforce company

Puppet | Syntax and settings | 849
This example results in an array by chaining the map function:
notify { 'mapped_iterator':
message => [1,2,3].reverse_each.map |$x| { $x },
}
You can also use the splat operator * to convert the value into an array.
notify { 'mapped_iterator':
message => *[1,2,3].reverse_each,
}
Both of these examples result in a notice containing [3,2,1]. If you use * in a context where it also unfolds, the
result is the same as unfolding an array: each value of the array becomes a separate value, which results in separate
arguments in a function call.
Related topics: step functions, each functions, reduce functions, map functions, reverse_each functions.
Refactoring legacy 3.x functions
If you have Ruby functions written with the legacy 3.x API, refactor them to ensure that they work correctly with
current versions of Puppet.
Refactoring legacy functions improves functionality and prevents errors. At minimum, refactor any extra methods in
your 3.x functions, because these no longer work in Puppet.
Extra methods
Legacy functions that contain methods defined inside the function body or outside of the function return an error,
such as:
raise SecurityError, _("Illegal method definition of method '%{method_name}'
on line %{line}' in legacy function") % { method_name: mname, line: mline }
To fix these errors, refactor your 3.x functions to the 4.x function API, where defining multiple methods is permitted.
For example, the legacy function below has been refactored into the modern API, with the following changes:
• Documentation for the function is now a comment before the call to create_function.
• The default dispatcher dispatches all given arguments to a method with the same name as the function.
• The extra_method has not been moved, but is legal in the modern API.
• Not visible in the code sample, the function has been moved from lib/puppet/parser/functions to
lib/puppet/functions.
3.x API function:
module Puppet::Parser::Functions
newfunction(:sample, :type => :rvalue, :doc => <<-EOS
The function's documentation
EOS
) do |arguments|
"the returned value"
end
def extra_method()
end
end
4.x API function:
# The function's documentation
Puppet::Functions.create_function(:sample) do
© 2024 Puppet, Inc., a Perforce company

Puppet | Syntax and settings | 850
def sample(*arguments)
"the returned value"
end
def extra_method()
end
end
Function call forms
Change all function calls from the form function_*** to use the method call_function(name, args).
The function_*** form applies only to functions implemented in the 3.x API, so function with calls in that form
can not call any function that has moved to the 4.x API.
For example, a 3.x function:
function_sprintf("%s", "example")
The refactored 4.x function:
call_function('sprintf', "%s", "example")
:rvalue specification
The 3.x API differentiated between functions returning a value (:type => :rvalue) and functions that did not
return a value (:type => :statement). In the 4.x API, there is no such distinction. If you are refactoring a
function where :rvalue => true, you do not need to make any changes. If you are refactoring a function where
:rvalue => false, make sure the function returns nil.
Data values
The 4.x function API allows certain data values, such as Regexp, Timespan, and Timestamp. However, the 3.x
API transformed these and similar data values into strings.
Review the logic in your refactored function with this in mind: instead of checking for empty strings, the function
checks for nil. The function uses neither empty strings nor the :undef symbol in returned values to denote
undef; again, use nil instead.
For String, Integer, Float, Array, Hash, and Boolean values, you do not need to make changes to your
3.x functions.
Documentation
The 4.x API supports Markdown and Puppet Strings documentation tags to document functions, including individual
parameters and returned values. See the Strings documentation page for details about the correct format and style for
documentation comments.
Namespacing
Namespace your function to the module in which it is defined, and update manifests that use it.
The function name is in the format module_name::function_name. For example, if the module name is
mymodule:
# The function's documentation
Puppet::Functions.create_function(:'mymodule::sample') do
def sample(*arguments)
"the returned value"
© 2024 Puppet, Inc., a Perforce company

Puppet | Syntax and settings | 851
end
def extra_method()
end
end
The default dispatch uses the last part of the name when dispatching to a method in the function, so you only have to
change the module namespace in the function's full name. You must also move the file containing the function to the
correct location for 4.x API functions, mymodule/lib/puppet/functions.
Deferring a function
Deferring a function allows you to run code on the agent during a Puppet run.
Tip: Check out our tutorial on Updating Puppet modules for deferred functions. In addition to providing general
information about deferred functions, this tutorial explains how to handle cases where a downstream user passes in a
deferred function.
• Deferred functions overview on page 851
Defer a function to retrieve a value on the agent.
• Using a template with Deferred values on page 853
Templates are rendered on the primary server during catalog compilation. However, this does not work with deferred
functions because their values aren't known at compile time. Instead, you need to defer the template rendering.
• Write a deferred function to store secrets on page 853
Use the Deferred type to create a function that you add to a module to redact sensitive information.
• Integrations with secret stores on page 854
The Forge already hosts some community modules that provide integrations with secret stores.
Deferred functions overview
Defer a function to retrieve a value on the agent.
The Deferred type instructs agents to execute a function locally to retrieve a data value at the time of catalog
application. When compiling catalogs, functions are normally executed on the primary server, with results entered
into the catalog directly. The complete and fully resolved catalog is then sent to the agent for application. You can
choose to defer the function call until the agent applies the catalog, meaning the agent calls the function on the agent
instead of on the primary server. This way, agents can use a function to fetch data directly, rather than having the
primary server act as an intermediary.
The two most common reasons for deferring functions are:
• To retrieve a value on the agent that the primary server doesn’t have access to, including sensitive information like
passwords from a secrets store.
• To use as a placeholder to describe intent and make your desired state as descriptive as possible.
Deferred function example
The following example shows a file with a template on the agent that defers two functions — the Vault password
lookup and the epp template compilation.
The password lookup is deferred to run on the agent so that the primary server does not need to know the secret, and
the epp() function is deferred to render the template after the password value is available.
$variables = {
'password' => Deferred('vault_lookup::lookup',
["secret/test", 'https://vault.docker:8200']),
}
# compile the template source into the catalog
file { '/etc/secrets.conf':
ensure => file,
content => Deferred('inline_epp',
© 2024 Puppet, Inc., a Perforce company

Puppet | Syntax and settings | 852
['PASSWORD=<%= $password.unwrap %>', $variables]),
}
The Deferred object initialization signature returns an object that you can assign to a variable, pass to a function, or
use like any other Puppet object. For example:
Deferred( <name of function to invoke>, [ array, of, arguments] )
This object compiles directly into the catalog and its function is invoked as the first part of enforcing a catalog. It is
replaced by whatever it returns, similar to string interpolation. The catalog looks like the JSON hash below.
The password key is replaced with the results of the vault_lookup::lookup invocation, and then the content
key is replaced with the results of the inline_epp invocation. Puppet can then manage the contents of the file
without the primary server ever knowing the secret.
$ jq '.resources[] | select(.type == "File" and .title == "/etc/
secrets.conf")' catalog.json
{
"type": "File",
"title": "/etc/secrets.conf",
"parameters": {
"ensure": "file",
"owner": "root",
"group": "root",
"mode": "0600",
"content": {
"__ptype": "Deferred",
"name": "inline_epp",
"arguments": [
"PASSWORD=$password\n",
{
"password": {
"__ptype": "Deferred",
"name": "vault_lookup::lookup",
"arguments": ["secret/test", "https://vault.docker:8200"]
}
}
]
},
"backup": false
}
}
Note:
When using deferred functions, take note of the following:
• If an agent is applying a cached catalog, the Deferred function is still called at application time, and the value
returned at that time is the value that is used.
• It is the responsibility of the function to handle edge cases such as providing default or cached values in cases
where a remote store is unavailable.
• Deferred supports only the Puppet function API for Ruby.
• If a function called on the agent side does not return Sensitive, you can wrap the value
returned by Deferred in a Sensitive type if a sensitive value is desired. For example: $d =
Sensitive(Deferred("myupcase", ["example value"]))
• Deferred functions can only use types that are built into Puppet (for example String). They cannot use types
from modules like stdlib because Puppet does not plugin-sync these types to the agent.
• Do not use the Deferred object as a variable in a string. When compiled, these variables are interpolated, so the
stringified version of the object would be passed to the agent, instead of the object itself.
© 2024 Puppet, Inc., a Perforce company

Puppet | Syntax and settings | 853
Using a template with Deferred values
Templates are rendered on the primary server during catalog compilation. However, this does not work with deferred
functions because their values aren't known at compile time. Instead, you need to defer the template rendering.
To defer the template rendering, you need to compile the template source into the catalog, and then render the string
using the stdlib::deferrable_epp() function. The template source must be in the files directory of your
module for it to be accessible to the file() function.
Note: All variables used by the template, including facts or other variables in scope, must be explicitly passed as the
$variables parameter. This is because the agent does not have access to the full scope used by the server to render
templates normally.
$variables = {
'password' => Deferred('vault_lookup::lookup',
["secret/test", 'https://vault.docker:8200']),
}
# compile the template source into the catalog
file { '/etc/secrets.conf':
ensure => file,
content => stdlib::deferrable_epp('mymodule/secrets.conf.epp',
$variables)
}
Note: You cannot defer .erb style templates like this because of the way they use scope. Use .epp templates
instead.
Write a deferred function to store secrets
Use the Deferred type to create a function that you add to a module to redact sensitive information.
These instructions use Puppet Development Kit (PDK), our recommended tool for creating modules. The steps are
also based on RHEL 7 OS.
1.
Install PDK using the command appropriate to your system.
You might have to restart your command-line interface for pdk commands to be in your path.
2.
From a working directory, run the following commands. You can accept the default answers to the questions for
the steps.
a) pdk new module mymodule
b) cd mymodule
c) pdk new class mymodule
d) mkdir -p lib/puppet/functions
© 2024 Puppet, Inc., a Perforce company

Puppet | Syntax and settings | 854
3.
Paste this code into manifests/init.pp.
# This is a simple example of calling a function at catalog apply time.
#
# @summary Demonstrates calling a Deferred function that is housed with
this module in lib/puppet/functions/myupcase.rb
#
# @example
# puppet apply manifests/init.pp
class mymodule {
$d = Deferred("mymodule::myupcase", ["mysecret"])
notify { example :
message => $d
}
}
class { 'mymodule': }
4.
Paste this code into lib/puppet/functions/mymodule/myupcase.rb
Puppet::Functions.create_function(:'mymodule::myupcase') do
dispatch :up do
param 'String', :some_string
end
def up(some_string)
Puppet::Pops::Types::PSensitiveType::Sensitive.new(some_string.upcase)
end
end
5.
Run /opt/puppetlabs/bin/puppet apply manifests/init.pp. This outputs a notice.
The use of Sensitive in the up function tells the agent not to store the cleartext value in logs or reports. On the
command line and in the Puppet Enterprise console, sensitive data appears as [redacted].
Note: The workflow using Deferred functions is the same module adoption workflow that you already use for
other modules; you can package functions in a module that are synced down to agents. In most cases, you add the
new module to your Puppetfile.
Integrations with secret stores
The Forge already hosts some community modules that provide integrations with secret stores.
Modules with secret store integrations:
• Azure Key Vault: works on the primary server.
• Cyberark Conjur: works on the primary server.
• Hashicorp Vault: works on the agent.
• Consul Data: works on both the agent and the primary server.
Values, data types, and aliases
Most of the things you can do with the Puppet language involve some form of data. An individual piece of data is
called a value, and every value has a data type, which determines what kind of information that value can contain and
how you can interact with it.
Strings are the most common and useful data type, but you’ll also work with others, including numbers, arrays, and
some Puppet-specific data types like resource references.
Note that once created, Puppet's values are immutable — they cannot be modified in any way.
For information on type conversion, see Typecasting.
© 2024 Puppet, Inc., a Perforce company
Puppet | Syntax and settings | 855
Literal data types as values
Although you’ll mostly interact with values of the various data types, Puppet also includes values like String that
represent data types.
You can use these special values to examine a piece of data or enforce rules. Usually, they act like patterns, similar
to a regular expression: given a value and a data type, you can test whether the value matches the data type, and then
either adjust your code’s behavior accordingly, or raise an error if something has gone wrong.
The pages in this section provide details about using each of the data types as a value. For information about the
syntax and behavior of literal data types, see Data type syntax. For information about special abstract data types,
which you can use to do more sophisticated or permissive type checking, see Abstract data types.
Puppet's data types
See the following pages to learn more about the syntax, parameters, and usage for each of the data types.
© 2024 Puppet, Inc., a Perforce company
Puppet | Syntax and settings | 856
• Abstract data types on page 860
If you’re using data types to match or restrict values and need more flexibility than what the core data types (such as
String or Array) allow, you can use one of the abstract data types to construct a data type that suits your needs
and matches the values you want.
• Arrays on page 870
Arrays are ordered lists of values. Resource attributes which accept multiple values (including the relationship
metaparameters) generally expect those values in an array. Many functions also take arrays, including the iteration
functions.
• Binary on page 873
A Binary object represents a sequence of bytes and it can be created from a String in Base64 format, a verbatim
String, or an Array containing byte values. A Binary can also be created from a Hash containing the value to
convert to a Binary.
• Booleans on page 874
Booleans are one-bit values, representing true or false. The condition of an if statement expects an expression that
resolves to a Boolean value. All of Puppet's comparison operators resolve to Boolean values, as do many functions.
• Data type syntax on page 875
Each value in the Puppet language has a data type, like “string.” There is also a set of values whose data type is “data
type.” These values represent the other data types. For example, the value String represents the data type of strings.
The value that represents the data type of these values is Type.
• Default on page 879
Puppet’s default value acts like a keyword in a few specific usages. Less commonly, it can also be used as a value.
• Error data type on page 881
An Error object contains a non-empty message. It can also contain additional context about why the error occurred.
• Hashes on page 881
Hashes map keys to values, maintaining the order of the entries according to insertion order.
• Numbers on page 884
Numbers in the Puppet language are normal integers and floating point numbers.
• Regular expressions on page 887
A regular expression (sometimes shortened to “regex” or “regexp”) is a pattern that can match some set of strings,
and optionally capture parts of those strings for further use.
• Resource and class references on page 889
Resource references identify a specific Puppet resource by its type and title. Several attributes, such as the
relationship metaparameters, require resource references.
• Resource types on page 891
Resource types are a special family of data types that behave differently from other data types. They are subtypes of
the fairly abstract Resource data type. Resource references are a useful subset of this data type family.
• Sensitive on page 895
Sensitive types in the Puppet language are strings marked as sensitive. The value is displayed in plain text in the
catalog and manifest, but is redacted from logs and reports. Because the value is maintained as plain text, use it only
as an aid to ensure that sensitive values are not inadvertently disclosed.
• Strings on page 896
Strings are unstructured text fragments of any length. They’re a common and useful data type.
• Time-related data types on page 905
A Timespan defines the length of a duration of time, and a Timestamp defines a point in time. For example,
“two hours” is a duration that can be represented as a Timespan, while “three o'clock in the afternoon UTC on 8
November, 2018” is a point in time that can be represented as a Timestamp. Both types can use nanosecond values
if it is available on the platform.
• Undef on page 907
Puppet's undef value is roughly equivalent to nil in Ruby. It represents the absence of a value. If the
strict_variables setting isn’t enabled, variables which have never been declared have a value of undef.
Type aliases
Type aliases allow you to create reusable and descriptive data types and resource types.
By using type aliases, you can:
© 2024 Puppet, Inc., a Perforce company

Puppet | Syntax and settings | 857
• Give a type a descriptive name, such as IPv6Addr, instead of creating or using a complex pattern-based type.
• Shorten and move complex type expressions.
• Improve code quality by reusing existing types instead of inventing new types.
• Test type definitions separately from manifests.
Type aliases are transparent, which means they are fully equivalent to the types of which they are aliases. For
example, in the following code, the notice returns true because MyType is an alias of the Integer type:
type MyModule::MyType = Integer
notice MyModule::MyType == Integer
Note: The internal types TypeReference and TypeAlias are never values in Puppet code .
Creating type aliases
Use the following syntax to create a type alias:
type <MODULE NAME>::<ALIAS NAME> = <TYPE DEFINITION>
The <MODULE NAME> must be named after the module that contains the type alias, and both the <MODULE NAME>
and <ALIAS NAME> begin with a capital letter and must not be a reserved word.
For example, you can create a type alias named MyType that is equivalent to the Integer data type:
type MyModule::MyType = Integer
You can then declare a parameter using the alias as though it were a unique data type:
MyModule::MyType $example = 10
To make your code easier to maintain and troubleshoot, store type aliases as .pp files in your module's types
directory, which is a top-level directory and sibling of the manifests and lib directories. Define only one alias
per file, and name the file after the type alias name converted to lowercase. For example, MyType is expected to be
loaded from a file named mytype.pp.
You can create recursive type aliases, which can refer to the alias being declared or to other types, thereby defining
complex, descriptive type definitions without using the Any type. For example:
type MyModule::Tree = Array[Variant[Data, Tree]]
This Tree type alias is defined as a being built out of Arrays that contain Data, or a Tree:
[1,2 [3], [4, [5, 6], [[[[1,2,3]]]]]]
You can also create aliases to resource types:
type MyModule::MyFile = File
When defining an alias to a resource type, use its short form (for example, File) instead of its long form
(Resource[File]).
Related information
Data type syntax on page 875
Each value in the Puppet language has a data type, like “string.” There is also a set of values whose data type is “data
type.” These values represent the other data types. For example, the value String represents the data type of strings.
The value that represents the data type of these values is Type.
Resources on page 520
© 2024 Puppet, Inc., a Perforce company

Puppet | Syntax and settings | 858
Resources are the fundamental unit for modeling system configurations. Each resource describes the desired state
for some aspect of a system, like a specific service or package. When Puppet applies a catalog to the target system, it
manages every resource in the catalog, ensuring the actual state matches the desired state.
Typecasting
Typecasting is a method for converting data from one data type to another. In many cases, you can explicitly typecast
into the type you need, but the Puppet language also provides shortcuts for common data conversions, as well as
support for more complex conversions.
Creating a new typed variable
When there's an unambiguous translation between one data type and another, you can typecast into the type you need:
$temp = Float("98.6") # Cast into a float variable; 98.6
$count = Integer("42") # Cast into an integer variable; 42
$bool = Boolean("false") # Cast into a boolean false
$string = String(100) # Cast into the string "100"
You can also typecast between number formats, such as turning a hex number string into an integer:
$intval = Integer("0xFF") # Cast into an integer variable; 255
Invoking the data type directly is a shortcut for calling the .new() function. For more information, including the
conversion rules and options available, see the function reference for new().
Automatic coercions
Important: Automatic coercion is not allowed when strict is set to error, which is the default setting in Puppet
8. In Puppet 8, automatic coercion causes catalog to fail. Example:
puppet apply -e 'notice("2" + "2")'
Error: Evaluation Error: The string '2' was automatically coerced to the
numerical value 2 (line: 1, column: 8) on node localhost
Instead, explicitly typecast String values to Integer values in Puppet code. Example:
puppet apply -e 'notice(Integer("2") + Integer("2"))'
Notice: Scope(Class[main]): 4
To achieve the old behavior, set strict=warning in puppet.conf on the puppetserver node.
When you use strings in arithmetic, Puppet assumes that you did so intentionally and coerces them to the proper
types. For example:
$result = "2" + "2" # Cast into an integer variable; 4
$multiple = 4 * "25" # Cast into an integer variable; 100
$float = "2.75" * 2 # Cast into a float variable; 5.5
$identity = "1024" + 0 # Cast into integer variable; 1024 (direct
conversion)
When you interpolate variables into a string, Puppet converts them to their string representation using the most
obvious method. If you need an explicit conversion, you can manually typecast. For example:
$var = 1
notice("The truth value of ${var} is ${Boolean($var)}") # Outputs "The truth
value of 1 is true"
© 2024 Puppet, Inc., a Perforce company

Puppet | Syntax and settings | 859
Extracting a Number from a String fragment
To convert a string that contains non-numeric characters into a number, for example 32º or 9,000, you must parse
the string. You can parse a string using the scanf function.
For example:
$input = "It is 32º outside!"
$format = "It is %iº outside!"
scanf($input, $format) # returns array of matches; [32]
$input = "The melting point of iron is 2,800°F".delete(",")
$format = "The melting point of iron is %i°F"
scanf($input, $format) # returns array of matches; [2800]
Here are more example format conversions:
Conversion Description of match
%d, %u Optionally signed decimal integer
%i Optionally signed integer with auto-detected base
%o Optionally signed octal integer
%x, %X Optionally signed hexadecimal integer
%s String, or a sequence of non-white-space characters
%c A single character
%% A % character
Converting to a Boolean
You can cast case-insensitive strings of true/false, yes/no, non-zero/0, and integers of non-zero/0:
$value = Boolean('true') # true
$value = Boolean('Yes') # true
$value = Boolean('FALSE') # false
$value = Boolean('1') # true
$value = Boolean(0) # false
$value = Boolean(127) # true
Converting data structures
Converting a hash to an array creates a multi-dimensional array by flattening each key-value pair into a two-element
array as an element of another array. Converting an array to a hash interleaves alternating elements as keys and
values.
$an_array = Array({a => 10, b => 20}) # results in [[a, 10],[b, 20]]
$a_hash = Hash([1,2,3,4]) # results in {1=>2, 3=>4}
$a_hash = Hash([[1,2],[3,4]]) # results in {1=>2, 3=>4}
The Array conversion also takes a second argument to "force" an array conversion. This slightly changes the
semantics of the operation by creating a single-element array out of the first argument if it's not already.
$an_array = Array(1, true) # results in [1]
$an_array = Array([1], true) # results in [1]
$an_array = Array(1) # Raises a type error, cannot convert
directly
$an_array = Array({1 => 2}, true) # results in [{1 => 2}]
$an_array = Array({1 => 2}} # results in [[1, 2]]
© 2024 Puppet, Inc., a Perforce company

Puppet | Syntax and settings | 860
Abstract data types
If you’re using data types to match or restrict values and need more flexibility than what the core data types (such as
String or Array) allow, you can use one of the abstract data types to construct a data type that suits your needs
and matches the values you want.
Each of Puppet's core data types has a corresponding value that represents that data type, which can be used to match
values of that type in several contexts. Each of those core data types only match a particular set of values. They let
you further restrict the values they’ll match, but only in limited ways, and there’s no way to expand the set of values
they’ll match. If you need to do this, use the corresponding abstract data type.
Related information
Data type syntax on page 875
Each value in the Puppet language has a data type, like “string.” There is also a set of values whose data type is “data
type.” These values represent the other data types. For example, the value String represents the data type of strings.
The value that represents the data type of these values is Type.
Values, data types, and aliases on page 854
Most of the things you can do with the Puppet language involve some form of data. An individual piece of data is
called a value, and every value has a data type, which determines what kind of information that value can contain and
how you can interact with it.
Flexible data types
These abstract data types can match values with a variety of concrete data types. Some of them are similar to a
concrete type but offer alternate ways to restrict them (for example, Enum), and some of them let you combine types
and match a union of what they would individually match (for example, Variant and Optional).
The Optional data type
The Optional data type wraps one other data type, and results in a data type that matches anything that type would
match plus undef. This is useful for matching values that are allowed to be absent. It takes one required parameter.
The full signature for Optional is:
Optional[<DATA TYPE>]
Position Parameter Data type Default value Description
1 Data type Type or String none (you must
specify a value)
The data type to add
undef to.
If you specify a string "my string" as the parameter, it's equivalent to using Optional[Enum["my
string"]] — it matches only that exact string value or undef.
Optional[<DATA TYPE>] is equivalent to Variant[ <DATA TYPE>, Undef ].
Examples:
Optional[String]
Matches any string or undef.
Optional[Array[Integer[0, 10]]]
Matches an array of integers between 0 and 10, or undef.
Optional["present"]
Matches the exact string "present" or undef.
The NotUndef data type
The NotUndef type matches any value except undef. It can also wrap one other data type, resulting in a type that
matches anything the original type would match except undef. It accepts one optional parameter.
© 2024 Puppet, Inc., a Perforce company

Puppet | Syntax and settings | 861
The full signature for NotUndef is:
NotUndef[<DATA TYPE>]
Position Parameter Data type Default value Description
1 Data type Type or String Any The data type to
subtract undef
from.
If you specify a string as a parameter for NotUndef, it's equivalent to writing NotUndef[Enum["my
string"]] — it matches only that exact string value. This doesn’t actually subtract anything, because the Enum
wouldn’t have matched undef anyway, but it's a convenient notation for mandatory keys in Struct schema hashes.
The Variant data type
The Variant data type combines any number of other data types, and results in a type that matches the union of
what any of those data types would match. It takes any number of parameters, and requires at least one.
The full signature for Variant is:
Variant[ <DATA TYPE>, (<DATA TYPE, ...) ]
Position Parameter Data type Default value Description
1 and up Data type Type none (required) A data type to add
to the resulting
compound data type.
You must provide at
least one data type
parameter, and can
provide any number
of additional ones.
Examples:
Variant[Integer, Float]
Matches any integer or floating point number (equivalent to Numeric).
Variant[Enum['true', 'false'], Boolean]
matches 'true', 'false', true, or false.
The Pattern data type
The Pattern data type only matches strings, but it provides an alternate way to restrict which strings it matches. It
takes any number of regular expressions, and results in a data type that matches any strings that would match any of
those regular expressions. It takes any number of parameters, and requires at least one.
The full signature for Pattern is:
Pattern[ <REGULAR EXPRESSION>, (<REGULAR EXPRESSION>, ...) ]
© 2024 Puppet, Inc., a Perforce company

Puppet | Syntax and settings | 862
Position Parameter Data type Default value Description
1 and up Regular expression Regexp none (required) A regular expression
describing a set
of strings that the
resulting data type
matches. You must
provide at least one
regular expression
parameter, and can
provide any number
of additional ones.
You can use capture groups in the regular expressions, but they won’t cause any variables, like $1, to be set.
Examples:
Pattern[/\A[a-z].*/]
Matches any string that begins with a lowercase letter.
Pattern[/\A[a-z].*/, /\ANone\Z/]
Matches the above or the exact string None.
The Enum data type
The Enum data type only matches strings, but it provides an alternate way to restrict which strings it matches. It takes
any number of strings, and results in a data type that matches any string values that exactly match one of those strings.
Unlike the == operator, this matching is case-sensitive. It takes any number of parameters, and requires at least one.
The full signature for Enum is:
Enum[ <OPTION>, (<OPTION>, ...) ]
Position Parameter Data type Default value Description
1 and up Option String none (required) One of the literal
string values that the
resulting data type
matches. You must
provide at least one
option parameter,
and can provide any
number of additional
ones.
Examples:
Enum['stopped', 'running']
Matches the strings 'stopped' and 'running', and no other values.
Enum['true', 'false']
Matches the strings 'true' and 'false', and no other values. Does not match the boolean values true or
false (without quotes).
The Tuple data type
The Tuple type only matches arrays, but it lets you specify different data types for every element of the array, in
order. It takes any number of parameters, and requires at least one.
© 2024 Puppet, Inc., a Perforce company
Puppet | Syntax and settings | 863
The full signature for Tuple is:
Tuple[ <CONTENT TYPE>, (<CONTENT TYPE>, ..., <MIN SIZE>, <MAX SIZE>) ]
Position Parameter Data type Default value Description
1 and up Content type Type none (required) What kind of values
the array contains at
the given position.
You must provide at
least one content type
parameter, and can
provide any number
of additional ones.
-2 (second-last) Minimum size Integer number of content
types
The minimum
number of elements
in the array. If this
is smaller than the
number of content
types you provided,
any elements beyond
the minimum are
optional; however,
if present, they
must still match the
provided content
types. This parameter
accepts the value
default, but this
won’t use the default
value; instead, it
means 0 (all elements
optional).
© 2024 Puppet, Inc., a Perforce company

Puppet | Syntax and settings | 864
Position Parameter Data type Default value Description
-1 (last) Maximum size Integer number of content
types
The maximum
number of elements
in the array. You
cannot specify a
maximum without
also specifying a
minimum. If the
maximum is larger
than the number
of content types
you provided, it
means the array
can contain any
number of additional
elements, which all
must match the last
content type. This
parameter accepts
the value default,
but this won’t use the
default value; instead,
it means infinity (any
number of elements
matching the final
content type).
Don't set the
maximum smaller
than the number of
content types you
provide.
Examples:
Tuple[String, Integer]
Matches a two-element array containing a string followed by an integer, like ["hi", 2].
Tuple[String, Integer, 1]
Matches the above or a one-element array containing only a string.
Tuple[String, Integer, 1, 4]
Matches an array containing one string followed by zero to three integers.
Tuple[String, Integer, 1, default]
Matches an array containing one string followed by any number of integers.
The Struct data type
The Struct type only matches hashes, but it lets you specify:
• The name of every allowed key.
• Whether each key is required or optional.
• The allowed data type for each of those keys’ values.
It takes one mandatory parameter.
© 2024 Puppet, Inc., a Perforce company

Puppet | Syntax and settings | 865
The full signature for Struct is:
Struct[<SCHEMA HASH>]
Position Parameter Data type Default value Description
1 Schema hash Hash[Variant[String,
Optional,
NotUndef],
Type]
none (required) A hash that has all
of the allowed keys
and data types for the
struct.
A Struct’s schema hash must have the same keys as the hashes it matches. Each value must be a data type that
matches the allowed values for that key.
The keys in a schema hash are usually strings. They can also be an Optional or NotUndef type with the key’s
name as their parameter.
If a key is a string, Puppet uses the value’s type to determine whether it’s optional — because accessing a missing key
resolves to the value undef, the key is optional if the value type accepts undef (like Optional[Array]).
Note that this doesn’t distinguish between an explicit value of undef and an absent key. If you want to be more
explicit, you can use Optional['my_key'] to indicate that a key can be absent, and NotUndef['my_key']
to make it mandatory. If you use one of these, a value type that accepts undef is only used to decide about explicit
undef values, not missing keys.
The following example Struct matches hashes like {mode => 'read', path => '/etc/fstab'}. Both
the mode and path keys are mandatory; mode’s value must be one of 'read', 'write', or 'update', and
path must be a string of at least one character:
Struct[{mode => Enum[read, write, update],
path => String[1]}]
The following data type would match the same values as the previous example, but the path key is optional. If
present, path must match String[1] or Undef:
Struct[{mode => Enum[read, write, update],
path => Optional[String[1]]}]
In the following data type, the owner key can be absent, but if it’s present, it must be a string; a value of undef isn’t
allowed:
Struct[{mode => Enum[read, write, update],
path => Optional[String[1]],
Optional[owner] => String[1]}]
In the following data type, the owner key is mandatory, but it allows an explicit undef value:
Struct[{mode => Enum[read, write, update],
path => Optional[String[1]],
NotUndef[owner] => Optional[String[1]]}]
The SemVer data type
A SemVer instance defines a single semantic version or range of versions. For example, "1.2.3" or ">= 1.0.0 <
2.0.0".
It consists of the following five segments:
• Major version (required)
• Minor version (required)
© 2024 Puppet, Inc., a Perforce company

Puppet | Syntax and settings | 866
• Patch version (required)
• Prerelease tag (optional)
• Build tag (optional)
You can create an instance of SemVer from a String, individual values, or a hash of individual values.
The signatures are:
type PositiveInteger = Integer[0,default]
type SemVerQualifier = Pattern[/\A(?<part>[0-9A-Za-z-]+)(?:\.\g<part>)*\Z/]
type SemVerString = String[1]
type SemVerHash = Struct[{
major =>PositiveInteger,
minor =>PositiveInteger,
patch =>PositiveInteger,
Optional[prerelease] =>SemVerQualifier,
Optional[build] =>SemVerQualifier
}]
function SemVer.new(SemVerString $str)
function SemVer.new(
PositiveInteger $major
PositiveInteger $minor
PositiveInteger $patch
Optional[SemVerQualifier] $prerelease = undef
Optional[SemVerQualifier] $build = undef
)
function SemVer.new(SemVerHash $hash_args)
Examples:
SemVer.new("1.2.3")
Creates a SemVer instance from a string
SemVer.new(1, 2, 3, "rc4", "5"
Creates a SemVer instance from a list of arguments
SemVer.new(major => 1, minor => 2, patch => 3, prerelease => "rc4", build
=>"5")
Creates a SemVer instance from a hash
You can parameterize the SemVer type to restrict which values the type matches. The values are defined by one or
more Strings or SemVerRanges.
The full signatures are:
SemVer[<String>]
The <String> specifies a semantic version string — representing a single version or range of versions. A SemVer
instance matches the parameterized type, if the instance is within the range defined by the type. For example:
$t = SemVer['> 1.0.0 < 2.0.0']
notice(SemVer('1.2.3') =~ $t) # true
notice(SemVer('2.3.4') =~ $t) # false
SemVer[ <SemVerRange>, ( <SemVerRange>, ... ) ]
The SemVer type is accompanied by the SemVerRange type, which you can define to restrict matches to a
contiguous version range. For example:
$t = SemVer[SemVerRange('>=1.0.0 <2.0.0')]
© 2024 Puppet, Inc., a Perforce company

Puppet | Syntax and settings | 867
notice(SemVer('1.2.3') =~ $t) # true
notice(SemVer('2.3.4') =~ $t) # false
When you define a parameterized SemVer type using multiple ranges, and the instance is enclosed in at least one of
the ranges, the SemVer instance matches the type.
$t = SemVer[SemVerRange('>=1.0.0 <2.0.0'), SemVerRange('>=3.0.0 <4.0.0')]
notice(SemVer('1.2.3') =~ $t) # true
notice(SemVer('2.5.0') =~ $t) # false
notice(SemVer('3.0.0') =~ $t) # true
If any of the ranges are adjacent or overlap, they get normalized (merged). For example, the following are equal:
SemVer['>=1.0.0 <4.0.0']
SemVer[SemVerRange('>=1.0.0 <3.0.0'), SemVerRange('>=2.0.0 <4.0.0')] #
overlap
SemVer[SemVerRange('>=1.0.0 <2.0.0'), SemVerRange('>=2.0.0 <4.0.0')] #
adjacent
The SemVerRange data type
An instance of SemVerRange represents a contiguous semantic version range. The string format of a
SemVerRange is specified by the SemVer Range Grammar. The SemVerRange type does not support the logical
or operator (||).
You can create an instance of SemVerRange (SemVerRange.new) from a String, individual values, or a hash of
individual values. The signatures are:
type SemVerRangeString = String[1]
type SemVerRangeHash = Struct[{
min => Variant[default, SemVer],
Optional[max] => Variant[default, SemVer],
Optional[exclude_max] => Boolean
}]
function SemVerRange.new(SemVerRangeString $semver_range_string)
function SemVerRange.new(
Variant[default,SemVer] $min
Variant[default,SemVer] $max
Optional[Boolean] $exclude_max = undef
}
function SemVerRange.new(SemVerRangeHash $semver_range_hash)
Examples:
SemVerRange.new(">1.0.0"))
Creates a SemVerRange from a String
SemVerRange.new(SemVer.new("1.0.0"), SemVer.new("2.0.0"), true)
Creates a SemVerRange instance from a list of arguments.
SemVerRange.new(min => SemVer.new("1.0.0"), max => SemVer.new("2.0.0"),
exclude_max => true)
Creates a SemVerRange instance from a hash.
By default, the range includes the maximum value so that the following examples are equal:
SemVerRange.new(">= 1.0.0 <= 2.0.0")
SemVerRange.new(SemVer.new("1.0.0"), SemVer.new("2.0.0"))
© 2024 Puppet, Inc., a Perforce company

Puppet | Syntax and settings | 868
The maximum value can be excluded so that the following examples are equal:
SemVerRange.new(">= 1.0.0 < 2.0.0")
SemVerRange.new(SemVer.new("1.0.0"), SemVer.new("2.0.0"), true)
Unlike the SemVer type, you cannot paramatize the SemVerRange type, as it represents all semantic version
ranges.
Parent types
These abstract data types are the parents of multiple other types, and match values that would match any of their sub-
types. They’re useful when you have very loose restrictions but not no restrictions.
The Scalar data type
The Scalar data type matches all values of the following concrete data types:
• Numbers (both integers and floats)
• Strings
• Booleans
• Regular expressions
It doesn’t match undef, default, resource references, arrays, or hashes. It takes no parameters.
Scalar is equivalent to Variant[Integer, Float, String, Boolean, Regexp].
The ScalarData data type
The ScalarData data type represents a restricted set of "value" data types that have concrete direct representation
in JSON.
ScalarData is an alias for Variant[Integer, Float, String, Boolean].
The Data data type
The Data data type matches any value that would match Scalar, but it also matches:
• undef
• Arrays that only contain values that also match Data
• Hashes whose keys match Scalar and whose values also match Data
It doesn't match default or resource references. It takes no parameters.
Data is especially useful because it represents the subset of types that can be directly represented in almost all
serialization format, such as JSON.
The Collection data type
The Collection type matches any array or hash, regardless of what kinds of values or keys it contains. It only
partially overlaps with Data— there are values, such as an array of resource references, that match Collection
but do not match Data.
Collection is equivalent to Variant[Array[Any], Hash[Any, Any]].
The CatalogEntry data type
The CatalogEntry data type is the parent type of Resource and Class. Like those types, the Puppet language
contains no values that it ever matches. However, the type Type[CatalogEntry] matches any class reference or
resource reference. It takes no parameters.
The Any data type
The Any data type matches any value of any data type.
© 2024 Puppet, Inc., a Perforce company

Puppet | Syntax and settings | 869
The Iterable data type
The Iterable data type represents all data types that can be iterated; in other words, all data types where the
value is some kind of container of individual values. The Iterable type is abstract in that it does not specify if it
represents a concrete data type (such as Array) that has storage in memory, of if it is an algorithmic construct like a
transformation function (such as the step function).
The Iterator data type
The Iterator data type is an Iterable that does not have a concrete backing data type holding a copy of the
values it will produce when iterated over. It represents an algorithmic transformation of some source (which in turn
can be algorithmic).
An Iterator may not be assigned to an attribute of a resource, and it may not be used as an argument to version
3.x functions. To create a concrete value an Iterator must be "rolled out" by using a function at the end of a chain
that produces a concrete value.
The RichData data type
The RichData data type represents the abstract notion of "serializeable" and includes all the types in the
type system except Runtime, Callable, Iterator, and Iterable. It is expressed as an alias of
Variant[Default, Object, Scalar, SemVerRange, Type, Undef, Array[RichData],
Hash[RichData, RichData]].
Other types
These types aren’t quite like the others.
The Callable data type
The Callable data type matches callable lambdas provided as function arguments.
There is no way to interact with Callable values in the Puppet language, but Ruby functions written to the function
API (Puppet::Functions) can use Callable to inspect the lambda provided to the function.
The full signature for Callable is:
Callable[ (<DATA TYPE>, ...,) <MIN COUNT>, <MAX COUNT>, <BLOCK TYPE> ]
All of these parameters are optional.
Position Parameter Data type Default value Description
1 to n Data type Type none Any number of data
types, representing
the data type of each
argument the lambda
accepts.
-3 (third last) Minimum count Integer 0 The minimum
number of arguments
the lambda accepts.
This parameter
accepts the value
default, which
uses its default value
0.
© 2024 Puppet, Inc., a Perforce company

Puppet | Syntax and settings | 870
Position Parameter Data type Default value Description
-2 (second last) Maximum count Integer infinity The maximum
number of arguments
the lambda accepts.
This parameter
accepts the value
default, which
uses its default value,
infinity.
-1 (last) Block type Type[Callable] none The block_type
of the lambda.
Arrays
Arrays are ordered lists of values. Resource attributes which accept multiple values (including the relationship
metaparameters) generally expect those values in an array. Many functions also take arrays, including the iteration
functions.
Arrays are written as comma-separated lists of values surrounded by square brackets, []. An optional trailing comma
is allowed between the final value and the closing square bracket.
[ 'one', 'two', 'three' ]
# Equivalent:
[ 'one', 'two', 'three', ]
The values in an array can be any data type.
Array values are immutable — they cannot be changed once they are created.
Accessing items in an array
You can access items in an array by their numerical index, counting from zero. Square brackets are used for
accessing. For example:
$my_array = [ 'one', 'two', 'three' ]
notice( $my_array[1] )
This manifest would log two as a notice. The value of $my_array[0] would be one, because indexes count from
zero.
The opening square bracket must not be preceded by white space:
$my_array = [ 'one', 'two', 'three', 'four', 'five' ]
notice( $my_array[2] ) # ok
notice( $my_array [2] ) # syntax error
Nested arrays and hashes can be accessed by chaining indexes:
$my_array = [ 'one', {'second' => 'two', 'third' => 'three'} ]
notice( $my_array[1]['third'] )
This manifest would log three as a notice. $my_array[1] is a hash, and we access a key named 'third'.
Arrays support negative indexes, counting backward from the last element, with -1 being the last element of the
array:
$my_array = [ 'one', 'two', 'three', 'four', 'five' ]
notice( $my_array[2] )
notice( $my_array[-2] )
© 2024 Puppet, Inc., a Perforce company

Puppet | Syntax and settings | 871
The first notice would log three, and the second notice would log four.
If you try to access an element beyond the bounds of the array, its value is undef:
$my_array = [ 'one', 'two', 'three', 'four', 'five' ]
$cool_value = $my_array[6] # value is undef
When testing with a regular expression whether an Array[<TYPE>] data type matches a given array, empty arrays
match if the type accepts zero-length arrays.
$my_array = []
if $my_array =~ Array[String] {
notice( 'my_array' )
}
This manifest would log my_array as a notice, because the expression matches the empty array.
Accessing sections of an array
You can access sections of an array by numerical index. Like accessing individual items, accessing sections uses
square brackets, but it uses two indexes, separated by a comma. For example: $array[3,10].
The result of an array section is always another array.
The first number of the index is the start position. Positive numbers count forward from the start of the array, starting
at zero. Negative numbers count backward from the end of the array, starting at -1.
The second number of the index is the stop position. Positive numbers are lengths, counting forward from the start
position. Negative numbers are absolute positions, counting backward from the end of the array starting at -1.
For example:
$my_array = [ 'one', 'two', 'three', 'four', 'five' ]
notice( $my_array[2,1] ) # evaluates to ['three']
notice( $my_array[2,2] ) # evaluates to ['three', 'four']
notice( $my_array[2,-1] ) # evaluates to ['three', 'four', 'five']
notice( $my_array[-2,1] ) # evaluates to ['four']
Array operators
You can use operators with arrays to create new arrays:
• append with <<
• concatenate with +
• remove elements with -
or to convert arrays to comma-separated lists with * (splat). See the Array operators section of Expressions for more
information.
Additional functions for arrays
The puppetlabs-stdlib module contains useful functions for working with arrays, including:
delete member sort
delete_at prefix unique
flatten range validate_array
grep reverse values_at
hash shuffle zip
© 2024 Puppet, Inc., a Perforce company

Puppet | Syntax and settings | 872
is_array size
Related information
Regular expressions on page 887
A regular expression (sometimes shortened to “regex” or “regexp”) is a pattern that can match some set of strings,
and optionally capture parts of those strings for further use.
Undef on page 907
Puppet's undef value is roughly equivalent to nil in Ruby. It represents the absence of a value. If the
strict_variables setting isn’t enabled, variables which have never been declared have a value of undef.
The Array data type
The data type of arrays is Array. By default, Array matches arrays of any length, provided all values in the array
match the abstract data type Data. You can use parameters to restrict which values Array matches.
Parameters
The full signature for Array is:
Array[<CONTENT TYPE>, <MIN SIZE>, <MAX SIZE>]
These parameters are optional. They must be listed in order; if you need to specify a later parameter, you must also
specify values for any prior ones.
Position Parameter Data type Default value Description
1 Content type Type Data The kind of values
the array contains.
You can specify
only one data type
per array, and every
value in the array
must match that type.
Use an abstract type
to allow multiple data
types. If the order
of elements matters,
use the Tuple type
instead of Array.
2 Minimum size Integer 0 The minimum
number of elements
in the array. This
parameter accepts
the special value
default, which
uses its default value.
3 Maximum size Integer infinite The maximum
number of elements
in the array. This
parameter accepts
the special value
default, which
uses its default value.
Examples:
© 2024 Puppet, Inc., a Perforce company

Puppet | Syntax and settings | 873
Array
Matches an array of any length. All elements in the array must match Data.
Array[String]
Matches an array of any size that contains only strings.
Array[Integer, 6]
Matches an array containing at least six integers.
Array[Float, 6, 12]
Matches an array containing at least six and at most 12 floating-point numbers.
Array[Variant[String, Integer]]
Matches an array of any size that contains only strings or integers, or both.
Array[Any, 2]
Matches an array containing at least two elements, allowing any data type (including Type and Resource).
The abstract Tuple data type lets you specify data types for every element in an array, in order. Abstract types, such
as Variant and Enum, are useful when specifying content types for arrays that include multiple kinds of data.
Related information
Abstract data types on page 860
If you’re using data types to match or restrict values and need more flexibility than what the core data types (such as
String or Array) allow, you can use one of the abstract data types to construct a data type that suits your needs
and matches the values you want.
Binary
A Binary object represents a sequence of bytes and it can be created from a String in Base64 format, a verbatim
String, or an Array containing byte values. A Binary can also be created from a Hash containing the value to
convert to a Binary.
Binary algebra
• A Binary can only be assigned a Binary value
• A Binary has no type parameters
Binary.new
The signatures are:
type ByteInteger = Integer[0,255]
type Base64Format = Enum["%b", "%u", "%B", "%s"]
type StringHash = Struct[{value => String, "format" =>
Optional[Base64Format]}]
type ArrayHash = Struct[{value => Array[ByteInteger]}]
type BinaryArgsHash = Variant[StringHash, ArrayHash]
function Binary.new(
String $base64_str,
Optional[Base64Format] $format
)
function Binary.new(
Array[ByteInteger] $byte_array
}
# Same as for String, or for Array, but where arguments are given in a
Hash.
© 2024 Puppet, Inc., a Perforce company

Puppet | Syntax and settings | 874
function Binary.new(BinaryArgsHash $hash_args)
The format codes represent the following data encoding formats:
Format Explanation
%b The data is in base64 encoding. Padding required by base64 strict encoding is added by
default.
%u The data is in URL-safe base64 encoding.
%B The data is in base64 strict encoding.
%s The data is a Puppet string. If the string is not valid UTF-8 or convertible to UTF-8, Puppet
raises an error.
%r The data is raw Ruby. The byte sequence in the given string is used verbatim irrespective of
possible encoding errors.
• The default format code is %B.
• Avoid using the raw Ruby format %r. It exists for backward compatibility when a string received from some
function should be treated as Binary. Such code should be changed to return a Binary instead of a String. This
format will be deprecated in a future version of the specification when enough time has been given to migrate
existing use of Ruby "binary strings", or Ruby strings that do not report accurate encoding.
Example: Creating Binary-typed content
# create the binary content "abc" from base64 encoded string
$a = Binary('YWJj')
# create the binary content from content in a module's file
$b = binary_file('mymodule/mypicture.jpg')
Booleans
Booleans are one-bit values, representing true or false. The condition of an if statement expects an expression that
resolves to a Boolean value. All of Puppet's comparison operators resolve to Boolean values, as do many functions.
The Boolean data type has two possible values: true and false. Literal Booleans must be one of these two bare
words (that is, not in quotation marks).
Automatic conversion to Boolean
If a non-Boolean value is used where a Boolean is required:
• The undef value is converted to Boolean false.
• All other values are converted to Boolean true.
Notably, this means the string values "" (a zero-length string) and "false" (in quotation marks) both resolve to
true.
To convert values to Booleans with more permissive rules (for example, 0 to false, or "false" to false), use
the str2bool and num2bool functions in the puppetlabs-stdlib module.
The Boolean data type
The data type of Boolean values is Boolean.
It matches only the values true or false.
It can accept parameters of either [true] or [false] to restrict accepted data to the parameter-specified value.
For example: Boolean[true] $b
© 2024 Puppet, Inc., a Perforce company

Puppet | Syntax and settings | 875
You can use abstract types to match values that might be Boolean or might have some other value. For example,
Optional[Boolean] matches true, false, or undef. Variant[Boolean, Enum["true",
"false"]] matches stringified Booleans as well as true Booleans.
Related information
Data type syntax on page 875
Each value in the Puppet language has a data type, like “string.” There is also a set of values whose data type is “data
type.” These values represent the other data types. For example, the value String represents the data type of strings.
The value that represents the data type of these values is Type.
Abstract data types on page 860
If you’re using data types to match or restrict values and need more flexibility than what the core data types (such as
String or Array) allow, you can use one of the abstract data types to construct a data type that suits your needs
and matches the values you want.
Data type syntax
Each value in the Puppet language has a data type, like “string.” There is also a set of values whose data type is “data
type.” These values represent the other data types. For example, the value String represents the data type of strings.
The value that represents the data type of these values is Type.
You can use these special values to examine a piece of data or enforce rules. For example, you can test whether
something is a string with the expression $possible_string =~ String, or specify that a class parameter
requires string values with class myclass (String $string_parameter = "default value")
{ ... }.
Syntax
Data types are written as unquoted upper-case words, like String.
Data types sometimes take parameters, which make them more specific. For example, String[8] is the data type
of strings with a minimum of eight characters.
Each known data type defines how many parameters it accepts, what values those parameters take, and the order
in which they must be given. Some of the abstract types require parameters, and most types have some optional
parameters available.
The general form of a data type is:
• An upper-case word matching one of the known data types.
• Sometimes, a set of parameters, which consists of:
• An opening square bracket [ after the type’s name. There can’t be any space between the name and the
bracket.
• A comma-separated list of values or expressions. Arbitrary whitespace is allowed, but you can’t have a trailing
comma after the final value.
• A closing square bracket ].
The following example uses an abstract data type Variant, which takes any number of data types as parameters.
One of the parameters provided in the example is another abstract data type Enum, which takes any number of strings
as parameters:
Variant[Boolean, Enum['true', 'false', 'running', 'stopped']]
Note: When parameters are required, you must specify them. The only situation when you can leave out required
parameters is if you’re referring to the type itself. For example, Type[Variant] is legal, even though Variant
has required parameters.
© 2024 Puppet, Inc., a Perforce company

Puppet | Syntax and settings | 876
Usage
Data types are useful in parameter lists, match (=~) expressions, case statements, and selector expressions. There are
also a few less common uses for them.
Specify data types in your Puppet code whenever you can, aligning them in columns. Type your class parameters
wherever possible, and be specific when using a type. For example, use an Enum for input validation, instead of using
a String and checking the contents of the string in the code. You have the option to specify String[1] instead
of String, because you might want to enforce non-empty strings. Specify data types as deeply as possible, without
affecting readability. If readability becomes a problem, consider creating a custom data type alias.
Parameter lists
Classes, defined types, and lambdas all let you specify parameters, which let your code request data from a user or
some other source. Generally, your code expects each parameter to be a specific kind of data. You can enforce that
expectation by putting a data type before that parameter’s name in the parameter list. At evaluation time, Puppet
raises an error if a parameter receives an illegal value.
For example, consider the following class. If you tried to set $autoupdate to a string like "true", Puppet would
raise an error, because it expects a Boolean value:
class ntp (
Boolean $service_manage = true,
Boolean $autoupdate = false,
String $package_ensure = 'present',
# ...
) {
# ...
}
Abstract data types let you write more sophisticated and flexible restrictions. For example, this
$puppetdb_service_statusparameter accepts values of true, false, "true", "false",
"running", and "stopped", and raises an error for any other value:
class puppetdb::server (
Variant[Boolean, Enum['true', 'false', 'running', 'stopped']]
$puppetdb_service_status = $puppetdb::params::puppetdb_service_status,
) inherits puppetdb::params {
# ...
}
Cases
Case statements and selector expressions allow data types as their cases. Puppet chooses a data type case if the control
expression resolves to a value of that data type. For example:
$enable_real = $enable ? {
Boolean => $enable,
String => str2bool($enable),
Numeric => num2bool($enable),
default => fail('Illegal value for $enable parameter'),
}
Match expressions
The match operators =~ and !~ accept a data type on the right operand, and test whether the left operand is a value of
that data type.
For example, 5 =~ Integer and 5 =~ Integer[1,10] both resolve to true.
© 2024 Puppet, Inc., a Perforce company

Puppet | Syntax and settings | 877
Less common uses
The built-in function assert_type takes a value and a data type, and raises errors if your code encounters an
illegal value. Think of it as shorthand for an if statement with a non-match (!~) expression and a fail() function
call.
You can also provide data types as both operands for the comparison operators ==, !=, <, >, <=, and >=, to test
whether two data types are equal, whether one is a subset of another, and so on.
Obtaining data types
The built-in function type returns the type of any value. For example, type(3) returns Integer[3,3].
List of Puppet data types
The following data types are available in the Puppet language.
For details on each data type, see the linked documentation or the specification document.
Data type Purpose Type category
Any The parent type of all types. Abstract
Array The data type of arrays. Data
Binary A type representing a sequence of
bytes.
Data
Boolean The data type of Boolean values. Data, Scalar
Callable Something that can be called (such as
a function or lambda).
Platform
CatalogEntry The parent type of all types that are
included in a Puppet catalog.
Abstract
Class A special data type used to declare
classes.
Catalog
Collection A parent type of Array and Hash. Abstract
Data A parent type of all data directly
representable as JSON.
Abstract
Default The "default value" type. Platform
Deferred A type describing a call to be
resolved in the future.
Platform
Enum An enumeration of strings. Abstract
Error A type used to communicate when a
function has produced an error.
Float The data type of floating point
numbers.
Data, Scalar
Hash The data type of hashes. Data
Init A type used to accept values that
are compatible of some other type's
"new".
Integer The data type of integers. Data, Scalar
Iterable A type that represents all types that
allow iteration.
Abstract
© 2024 Puppet, Inc., a Perforce company

Puppet | Syntax and settings | 878
Data type Purpose Type category
Iterator A special kind of lazy Iterable
suitable for chaining.
Abstract
NotUndef A type that represents all types not
assignable from the Undef type.
Abstract
Numeric The parent type of all numeric data
types.
Abstract
Object Experimental. Can be a simple object
only having attributes, or a more
complex object also supporting
callable methods.
Optional Either Undef or a specific type. Abstract
Pattern An enumeration of regular expression
patterns.
Abstract
Regexp The data type of regular expressions. Scalar
Resource A special data type used to declare
resources.
Catalog
RichData A parent type of all data types
except the non serializeable
types Callable, Iterator,
Iterable, and Runtime.
Abstract
Runtime The type of runtime (non Puppet)
types.
Platform
Scalar Represents the abstract notion of
"value".
Abstract
ScalarData A parent type of all single valued
data types that are directly
representable in JSON.
Abstract
SemVer A type representing semantic
versions.
Scalar
SemVerRange A range of SemVer versions. Abstract
Sensitive A type that represents a data type that
has "clear text" restrictions.
Platform
String The data type of strings. Data, Scalar
Struct A Hash where each entry is
individually named and typed.
Abstract
Timespan A type representing a duration of
time.
Scalar
Timestamp A type representing a specific point
in time
Scalar
Tuple An Array where each slot is typed
individually
Abstract
Type The type of types. Platform
© 2024 Puppet, Inc., a Perforce company

Puppet | Syntax and settings | 879
Data type Purpose Type category
Typeset Experimental. Represents a collection
of Object-based data types.
Undef The "no value" type. Data, Platform
URI A type representing a Uniform
Resource Identifier
Data
Variant One of a selection of types. Abstract
The Type data type
The data type of literal data type values is Type. By default, Type matches any value that represents a data
type, such as Integer, Integer[0,800], String, or Enum["running", "stopped"]. You can use
parameters to restrict which values Type matches.
Parameters
The full signature for Type is:
Type[<ANY DATA TYPE>]
This parameter is optional.
Position Parameter Data type Default Description
1 Any data type Type Any A data type, which
causes the resulting
Type object to only
match against that
type or types that
are more specific
subtypes of that type.
Examples:
Type
Matches any data type, such as Integer, String, Any, or Type.
Type[String]
Matches the data type String, as well as any of its more specific subtypes like String[3] or
Enum["running", "stopped"].
Type[Resource]
Matches any Resource data type — that is, any resource reference.
Default
Puppet’s default value acts like a keyword in a few specific usages. Less commonly, it can also be used as a value.
Syntax
The only value in the default data type is the bare word default.
Usage with cases and selectors
In case statements and selector expressions, you can use default as a case. Puppet attempts to match a default
case last, after it has tried to match against every other case.
© 2024 Puppet, Inc., a Perforce company

Puppet | Syntax and settings | 880
Usage with per-block resource defaults
You can use default as the title in a resource declaration to invoke a particular behavior. Instead of creating a
resource and adding it to the catalog, the default resource sets fallback attributes that can be used by any other
resource in the same resource expression.
In the following example, all of the resources in the block inherits attributes from default unless they specifically
override them:
file {
default:
ensure => file,
mode => '0600',
owner => 'root',
group => 'root',
;
'/etc/ssh_host_dsa_key':
;
'/etc/ssh_host_key':
;
'/etc/ssh_host_dsa_key.pub':
mode => '0644',
;
'/etc/ssh_host_key.pub':
mode => '0644',
;
}
Usage as parameters of data types
Several data types take parameters that have default values. In some cases, like minimum and maximum sizes, the
default value can be difficult or impossible to refer to using the available literal values in the Puppet language. For
example, the default value of the String type’s maximum length parameter is infinity, which can’t be represented in
the Puppet language.
These parameters let you provide a value of default to indicate that you want the default value.
Other default usage
You can use the value default anywhere you aren’t prohibited from using it. In these cases, it generally won’t have
any special meaning.
There are a few reasons you might want to do this. A prime example is if you are writing a class or defined resource
type and want to give users the option to specifically request a parameter’s default value. Some people have used
undef to do this, but that’s no good when dealing with parameters where undef would, itself, be a meaningful
value. Others have used a value like the string "UNSET", but this can be messy.
Using default in this scenario lets you distinguish among:
• A chosen “real” value.
• A chosen value of undef .
• Explicitly declining to choose a value, represented by default .
In other other words, default can be useful when you need a truly meaningless value.
The Default data type
The data type of default is Default. It matches only the value default, and takes no parameters.
Example:
© 2024 Puppet, Inc., a Perforce company

Puppet | Syntax and settings | 881
Variant[String, Default, Undef]
Matches undef, default, or any string.
Related information
Data type syntax on page 875
Each value in the Puppet language has a data type, like “string.” There is also a set of values whose data type is “data
type.” These values represent the other data types. For example, the value String represents the data type of strings.
The value that represents the data type of these values is Type.
Abstract data types on page 860
If you’re using data types to match or restrict values and need more flexibility than what the core data types (such as
String or Array) allow, you can use one of the abstract data types to construct a data type that suits your needs
and matches the values you want.
Error data type
An Error object contains a non-empty message. It can also contain additional context about why the error occurred.
Parameters
The full signature for Error is:
Error[<MESSAGE>, <KIND>, <DETAILS>, <ISSUE CODE>]
The following table shows the available parameters. Note that the message parameter is required and the others are
optional.
Position Parameter Data type Default value Description
1 Message String[1] The error message of length greater
than 0.
2 Kind Optional[String[1]] undef The kind or category of error.
3 Details Optional[Hash[String[1],Data]]undef Additional details about the error.
4 Issue code Optional[String[1]] undef A unique code identifying the issue
which can be used to translate error
messages into different locales.
Accessing values
The Error object implements methods for retrieving additional information. For example:
notice($err.msg)
notice($err.kind)
notice($err.issue_code)
notice($err.details)
Hashes
Hashes map keys to values, maintaining the order of the entries according to insertion order.
Syntax
Hashes are written as a pair of curly braces {} containing any number of key-value pairs. A key is separated from its
value by an arrow (sometimes called a fat comma or hash rocket) =>, and adjacent pairs are separated by commas. An
optional trailing comma is allowed between the final value and the closing curly brace.
{ key1 => 'val1', key2 => 'val2' }
# Equivalent:
© 2024 Puppet, Inc., a Perforce company

Puppet | Syntax and settings | 882
{ key1 => 'val1', key2 => 'val2', }
Hash keys can be any data type, but generally, you should use only strings. Put quotation marks around keys that are
strings. Don't assign a hash with non-string keys to a resource attribute or class parameter, because Puppet cannot
serialize non-string hash keys into the catalog.
{ 'key1' => ['val1','val2'],
'key2' => { 'key3' => 'val3', },
'key4' => true,
'key5' => 12345,
}
Accessing values
Access hash members with their key inside square brackets:
$myhash = { key => "some value",
other_key => "some other value" }
notice( $myhash[key] )
This example manifest would log some value as a notice.
If you try to access a nonexistent key from a hash, its value is undef:
$cool_value = $myhash[absent_key] # Value is undef
Nested arrays and hashes can be accessed by chaining indexes:
$main_site = { port => { http => 80,
https => 443 },
vhost_name => 'docs.puppetlabs.com',
server_name => { mirror0 => 'warbler.example.com',
mirror1 => 'egret.example.com' }
}
notice ( $main_site[port][https] )
This example manifest would log 443 as a notice.
Merging hashes
When hashes are merged (using the addition (+) operator), the keys in the constructed hash have the same order as in
the original hashes, with the left hash keys ordered first, followed by any keys that appeared only in the hash on the
right side of the merge.
Where a key exists in both hashes, the merged hash uses the value of the key in the hash to the right of the addition
operator (+). For example:
$values = {'a' => 'a', 'b' => 'b'}
$overrides = {'a' => 'overridden'}
$result = $values + $overrides
notice($result)
-> {'a' => 'overridden', 'b' => 'b'}
© 2024 Puppet, Inc., a Perforce company

Puppet | Syntax and settings | 883
The Hash data type
The data type of hashes is Hash. By default, Hash matches hashes of any size, as long as their keys match the
abstract type Scalar and their values match the abstract type Data. You can use parameters to restrict which values
Hash matches.
Parameters
The full signature for Hash is:
Hash[<KEY TYPE>, <VALUE TYPE>, <MIN SIZE>, <MAX SIZE>]
These parameters are optional. You must specify both key type and value type if you’re going to specify one of them.
The parameters must be listed in order; if you need to specify a later parameter, you must also specify values for any
prior ones.
Position Parameter Data type Default value Description
1 Key type Type Scalar What kinds of values
can be used as keys.
If you specify a key
type, a value type is
mandatory.
2 Value type Type Data What kinds of values
can be used as values.
3 Minimum size Integer 0 The minimum
number of key-value
pairs in the hash. This
parameter accepts
the special value
default, which
uses its default value.
4 Maximum size Integer infinite The maximum
number of key-value
pairs in the hash. This
parameter accepts
the special value
default, which
uses its default value.
Examples:
Hash
Matches a hash of any length; all keys must match Scalar and any values must match Data.
Hash[Integer, String]
Matches a hash that uses integers for keys and strings for values.
Hash[Integer, String, 1]
Same as previous, and requires a non-empty hash.
Hash[Integer, String, 1, 8]
Same as previous, and with a maximum size of eight key-value pairs.
The abstract Struct data type lets you specify the exact keys allowed in a hash, as well as what value types are
allowed for each key.
Other abstract types, particularly Variant and Enum, are useful when specifying a value type for hashes that
include multiple kinds of data.
© 2024 Puppet, Inc., a Perforce company

Puppet | Syntax and settings | 884
Related information
Data type syntax on page 875
Each value in the Puppet language has a data type, like “string.” There is also a set of values whose data type is “data
type.” These values represent the other data types. For example, the value String represents the data type of strings.
The value that represents the data type of these values is Type.
Abstract data types on page 860
If you’re using data types to match or restrict values and need more flexibility than what the core data types (such as
String or Array) allow, you can use one of the abstract data types to construct a data type that suits your needs
and matches the values you want.
Numbers
Numbers in the Puppet language are normal integers and floating point numbers.
You can work with numbers using arithmetic operators.
Numbers are written without quotation marks, and can consist only of:
• Digits.
• An optional negative sign (-). This is actually the unary negation operator rather than part of the number. Explicit
positive signs (+) aren’t allowed.
• An optional decimal point, which results in a floating point value.
• An optional e or E for scientific notation of floating point values.
• An 0 prefix for octal base, or 0x or 0X prefix hexidecimal base.
Integers
Integers are numbers without decimal points.
If you divide two integers, the result is not a float. Instead, Puppet truncates the remainder. For example:
$my_number = 2 / 3 # evaluates to 0
$your_number = 5 / 3 # evaluates to 1
Floating point numbers
Floating point numbers (“floats”) are numbers that include a fractional value after a decimal point, including a
fractional value of zero, as in 2.0.
If an expression includes both integer and float values, the result is a float:
$some_number = 8 * -7.992 # evaluates to -63.936
$another_number = $some_number / 4 # evaluates to -15.984
Floating point numbers between -1 and 1 cannot start with a bare decimal point. They must have a zero before the
decimal point:
$product = 8 * .12 # syntax error
$product = 8 * 0.12 # OK
You can express floating point numbers in scientific notation: append e or E, plus an exponent, and the preceding
number is multiplied by 10 to the power of that exponent. Numbers in scientific notation are always floats:
$product = 8 * 3e5 # evaluates to 2400000.0
Octal and hexadecimal integers
Integer values can be expressed in decimal notation (base 10), octal notation (base 8), and hexadecimal notation (base
16).
© 2024 Puppet, Inc., a Perforce company

Puppet | Syntax and settings | 885
Decimal (base 10) integers (other than 0) must not start with a 0.
Octal (base 8) integers have a prefix of 0 (zero), followed by octal digits 0 to 7.
Hexadecimal (base 16) integers have a prefix of 0x or 0X, followed by hexadecimal digits 0 to 9, a to f, or A to F.
Floats can't be expressed in octal or hexadecimal.
Examples:
# octal
$value = 0777 # evaluates to decimal 511
$value = 0789 # Error, invalid octal
$value = 0777.3 # Error, invalid octal
# hexadecimal
$value = 0x777 # evaluates to decimal 1911
$value = 0xdef # evaluates to decimal 3567
$value = 0Xdef # same as above
$value = 0xDEF # same as above
$value = 0xLMN # Error, invalid hex
Converting numbers to strings
Numbers are automatically converted to strings when interpolated into a string. The automatic conversion uses
decimal (base 10) notation.
You can also cast a number into a string directly, by declaring a new String object.
Examples:
$from_integer = String(342)
$from_float = String(3.14159)
To convert numbers to non-decimal string representations, use the sprintf function.
Converting strings to numbers
Arithmetic operators in an expression automatically convert strings to numbers, but in all other contexts (for example,
resource attributes or function arguments), Puppet won’t automatically convert strings to numbers.
To convert a string to a number, cast the type by declaring a new Numeric object.
Examples:
$integer_var = Integer('342')
$float_var = Float('3.14159')
$numeric_var = Numeric('5280')
For more information about casting, see the function documentation for converting to Integer and converting to Float.
To extract numbers from strings, use the scanf function. This function handles surrounding non-numerical text.
The Integer data type
The data type of integers is Integer. By default, Integer matches whole numbers of any size, within the limits of
available memory. You can use parameters to restrict which values Integer matches.
Parameters
The full signature for Integer is:
Integer[<MIN VALUE>, <MAX VALUE>]
These parameters are optional. They must be listed in order; if you need to specify a later parameter, you must also
specify values for any prior ones.
© 2024 Puppet, Inc., a Perforce company

Puppet | Syntax and settings | 886
Position Parameter Data type Default Description
1 Minimum value Integer negative infinity The minimum value
for the integer. This
parameter accepts
the special value
default, which
uses its default value.
2 Maximum value Integer infinity The maximum value
for the integer. This
parameter accepts
the special value
default, which
uses its default value.
Practically speaking, the integer size limit is the range of a 64-bit signed integer (#9,223,372,036,854,775,808 to
9,223,372,036,854,775,807), which is the maximum size that can roundtrip safely between the components in the
Puppet ecosystem.
Examples:
Integer
Matches any integer.
Integer[0]
Matches any integer greater than or equal to 0.
Integer[default, 0]
Matches any integer less than or equal to 0.
Integer[2, 8]
Matches any integer from 2 to 8, inclusive.
The Float data type
The data type of floating point numbers is Float. By default, Float matches floating point numbers within the
limitations of Ruby's Float class. Practically speaking, this means a 64-bit double precision floating point value. You
can use parameters to restrict which values Float matches.
Parameters
The full signature for Float is:
Float[<MIN VALUE>, <MAX VALUE>]
These parameters are optional. They must be listed in order; if you need to specify a later parameter, you must also
specify values for any prior ones.
Position Parameter Data type Default Description
1 Minimum value Float negative infinity The minimum value
for the float. This
parameter accepts
the special value
default, which
uses its default value.
© 2024 Puppet, Inc., a Perforce company

Puppet | Syntax and settings | 887
Position Parameter Data type Default Description
2 Maximum value Float infinity The maximum value
for the float. This
parameter accepts
the special value
default, which
uses its default value.
Examples:
Float
Matches any floating point number.
Float[1.6]
Matches any floating point number greater than or equal to 1.6.
Float[1.6, 3.501]
Matches any floating point number from 1.6 to 3.501, inclusive.
For more information about Float see Ruby's Float class docs.
The Numeric data type
The data type of all numbers, both integer and floating point, is Numeric. It matches any integer or floating point
number, and takes no parameters.
Numeric is equivalent to Variant[Integer, Float]. If you need to set size limits but still accept both
integers and floats, you can use the abstract type Variant to construct an appropriate data type. For example:
Variant[Integer[-3,3], Float[-3.0,3.0]]
Related information
Data type syntax on page 875
Each value in the Puppet language has a data type, like “string.” There is also a set of values whose data type is “data
type.” These values represent the other data types. For example, the value String represents the data type of strings.
The value that represents the data type of these values is Type.
Abstract data types on page 860
If you’re using data types to match or restrict values and need more flexibility than what the core data types (such as
String or Array) allow, you can use one of the abstract data types to construct a data type that suits your needs
and matches the values you want.
Regular expressions
A regular expression (sometimes shortened to “regex” or “regexp”) is a pattern that can match some set of strings,
and optionally capture parts of those strings for further use.
You can use regular expression values with the =~ and !~ match operators, case statements and selectors, node
definitions, and functions like regsubst for editing strings, or match for capturing and extracting substrings.
Regular expressions act like any other value, and can be assigned to variables and used in function arguments.
Syntax
Regular expressions are written as patterns enclosed within forward slashes. Unlike in Ruby, you cannot specify
options or encodings after the final slash, like /node .*/m.
if $host =~ /^www(\d+)\./ {
notify { "Welcome web server #$1": }
}
© 2024 Puppet, Inc., a Perforce company

Puppet | Syntax and settings | 888
Puppet uses Ruby’s standard regular expression implementation to match patterns. Other forms of regular expression
quoting, like Ruby’s %r{^www(\d+)\.}, are not allowed. You cannot interpolate variables or expressions into
regex values.
If you are matching against a string that contains newlines, use \A and \z instead of ^ and $, which match the
beginning and end of a line. This is a common mistake that can cause your regexp to unintentionally match multiline
text.
Some places in the language accept both real regex values and stringified regexes — that is, the same pattern quoted
as a string instead of surrounded by slashes.
Regular expression options
Regular expresions in Puppet cannot have options or encodings appended after the final slash. However, you can turn
options on or off for portions of the expression using the (?<ENABLED OPTION>:<SUBPATTERN>) and (?-
<DISABLED OPTION>:<SUBPATTERN>) notation. The following example enables the i option while disabling
the m and x options:
$packages = $operatingsystem ? {
/(?i-mx:ubuntu|debian)/ => 'apache2',
/(?i-mx:centos|fedora|redhat)/ => 'httpd',
}
The following options are available:
i
Ignore case.
m
Treat a new line as a character matched by .
x
Ignore whitespace and comments in the pattern.
Regular expression capture variables
Within conditional statements and node definitions, substrings withing parentheses () in a regular expression are
available as numbered variables inside the associated code section. The first is $1, the second is $2, and so on. The
entire match is available as $0.
These are not normal variables, and have some special behaviors:
• The values of the numbered variables do not persist outside the code block associated with the pattern that set
them.
• You can’t manually assign values to a variable with only digits in its name; they can only be set by pattern
matching.
• In nested conditionals, each conditional has its own set of values for the set of numbered variables. At the end of
an interior statement, the numbered variables are reset to their previous values for the remainder of the outside
statement. This causes conditional statements to act like local scopes, but only with regard to the numbered
variables.
© 2024 Puppet, Inc., a Perforce company

Puppet | Syntax and settings | 889
The Regexp data type
The data type of regular expressions is Regexp. By default, Regexp matches any regular expression value. If you
are looking for a type that matches strings which match arbitrary regular expressions, see the Pattern type. You can
use parameters to restrict which values Regexp matches.
Parameters
The full signature for Regexp is:
Regexp[<SPECIFIC REGULAR EXPRESSION>]
The parameter is optional.
Position Parameter Data type Default value Description
1 Specific regular
expression
Regexp none If specified, this
results in a data
type that only
matches one specific
regular expression
value. Specifying
a parameter here
doesn’t have a
practical use.
Examples:
Regexp
Matches any regular expression.
Regexp[/<regex>/]
Matches the regular expression /<regex>/ only.
Regexp matches only literal regular expression values. Don't confuse it with the abstract Pattern data type, which
uses a regular expression to match a limited set of String values.
Related information
Data type syntax on page 875
Each value in the Puppet language has a data type, like “string.” There is also a set of values whose data type is “data
type.” These values represent the other data types. For example, the value String represents the data type of strings.
The value that represents the data type of these values is Type.
Abstract data types on page 860
If you’re using data types to match or restrict values and need more flexibility than what the core data types (such as
String or Array) allow, you can use one of the abstract data types to construct a data type that suits your needs
and matches the values you want.
Resource and class references
Resource references identify a specific Puppet resource by its type and title. Several attributes, such as the
relationship metaparameters, require resource references.
The general form of a resource reference is:
• The resource type, capitalized. If the resource type includes a namespace separator ::, then each segment must be
capitalized.
• An opening square bracket [.
• The title of the resource as a string, or a comma-separated list of titles.
• A closing square bracket ].
© 2024 Puppet, Inc., a Perforce company

Puppet | Syntax and settings | 890
For example, here is a reference to a file resource:
subscribe => File['/etc/ntp.conf'],
Here is a type with a multi-segment name:
before => Concat::Fragment['apache_port_header'],
Unlike variables, resource references are not evaluation-order dependent, and can be used before the resource itself is
declared.
Class references
Class references work the same as resource references, but use the pseudo-resource type Class instead of some
other resource type name:
require => Class['ntp::install'],
Multi-resource references
Resource reference expressions with an array of titles or comma-separated list of titles refer to multiple resources
of the same type. They evaluate to an array of single-title resource references. For example, here is a multi-resource
reference:
require => File['/etc/apache2/httpd.conf', '/etc/apache2/magic', '/etc/
apache2/mime.types'],
And here is an equivalent multi-resource reference:
$my_files = ['/etc/apache2/httpd.conf', '/etc/apache2/magic', '/etc/apache2/
mime.types']
require => File[$my_files]
Multi-resource references can be used wherever an array of references can be used. They can go on either side of a
chaining arrow or receive a block of additional attributes.
Accessing attribute values
You can use a resource reference to access the values of a resource’s attributes. To access a value, use square brackets
and the name of an attribute (as a string). This works much like accessing hash values.
file { "/etc/first.conf":
ensure => file,
mode => "0644",
owner => "root",
}
file { "/etc/second.conf":
ensure => file,
mode => File["/etc/first.conf"]["mode"],
owner => File["/etc/first.conf"]["owner"],
}
The resource whose values you’re accessing must exist.
Like referencing variables, attribute access depends on evaluation order: Puppet must evaluate the resource you’re
accessing before you try to access it. If it hasn’t been evaluated yet, Puppet raises an evaluation error.
You can only access attributes that are valid for that resource type. If you try to access a nonexistent attribute, Puppet
raises an evaluation error.
© 2024 Puppet, Inc., a Perforce company

Puppet | Syntax and settings | 891
Puppet can read the values of only those attributes that are explicitly set in the resource’s declaration. It can’t read the
values of properties that would have to be read from the target system. It also can’t read the values of attributes that
default to some predictable value. For example, in the code above, you wouldn’t be able to access the value of the
path attribute, even though it defaults to the resource’s title.
Like with hash access, the value of an attribute whose value was never set is undef.
Resource references as data types
If you’ve read the Data type syntax page, or perused the lower sections of the other data type pages, you might
have noticed that resource references use the same syntax as values that represent data types. Internally, they’re
implemented the same way, and each resource reference is actually a data type.
For most users, this doesn’t matter at all. Treat resource references as a special case with a coincidentally similar
syntax, and it’ll make your life generally easier. But if you’re interested in the details, see Resource types.
To restrict values for a class or defined type parameter so that users must provide your code a resource reference, do
one of the following.
• To allow a resource reference of any resource type, use a data type of:
Type[Resource]
• To allow resource references and class references, use a data type of:
Type[Catalogentry]
• To allow a resource reference of a specific resource type — in this example, file — use one of the following:
Type[File] # Capitalized resource type name
Type[Resource["file"]] # Resource data type, with type name in parameter
as a string
Type[Resource[File]] # Resource data type, with capitalized resource
type name
Any of these three options allow any File['<TITLE>'] resource reference, while rejecting ones like
Service[<TITLE>].
Resource types
Resource types are a special family of data types that behave differently from other data types. They are subtypes of
the fairly abstract Resource data type. Resource references are a useful subset of this data type family.
In the Puppet language, there are never any values whose data type is one of these resource types. That is, you
can never create an expression where $my_value =~ Resource evaluates to true. For example, a resource
declaration — an expression whose value you might expect would be a resource — executes a side effect and then
produces a resource reference as its value. A resource reference is a data type in this family of data types, rather than
a value that has one of these data types.
In almost all situations, if one of these resource type data types is involved, it makes more sense to treat it as a special
language keyword than to treat it as part of a hierarchy of data types. It does have a place in that hierarchy; it’s just
complicated, and you don’t need to know it to do things in the Puppet language.
For that reason, the information on this page is provided for the sake of technical completeness, but learning it isn't
critical to your ability to use Puppet successfully.
Basics
Puppet automatically creates new known data type values for every resource type it knows about, including custom
resource types and defined types.
These one-off data types share the name of the resource type they correspond to, with the first letter of every
namespace segment capitalized. For example, the file type creates a data type called File.
© 2024 Puppet, Inc., a Perforce company

Puppet | Syntax and settings | 892
Additionally, there is a parent Resource data type. All of these one-off data types are more-specific subtypes of
Resource.
Usage of resource types without a title
A resource data type can be used in the following places:
• The resource type slot of a resource declaration.
• The resource type slot of a resource default statement.
For example:
# A resource declaration using a resource data type:
File { "/etc/ntp.conf":
mode => "0644",
owner => "root",
group => "root",
}
# Equivalent to the above:
Resource["file"] { "/etc/ntp.conf":
mode => "0644",
owner => "root",
group => "root",
}
# A resource default:
File {
mode => "0644",
owner => "root",
group => "root",
}
Usage of resource types with a title
If a resource data type includes a title, it acts as a resource reference, which are useful in several places. For more
information, see Resource and class references on page 889.
The <SOME ARBITRARY RESOURCE TYPE> data type
For each resource type mytype known to Puppet, there is a data type, Mytype. It matches no values that can be
produced in the Puppet language. You can use parameters to restrict which values Mytype matches, but it still
matches no values.
Parameters
The full signature for a resource-type-corresponding data type Mytype is:
Mytype[<RESOURCE TITLE>]
This parameter is optional.
Position Parameter Data type Default value Description
1 Resource title String nothing The title of some
specific resource of
this type. If provided,
this turns this data
type into a usable
resource reference.
Examples:
© 2024 Puppet, Inc., a Perforce company
Puppet | Syntax and settings | 893
File
The data type corresponding to the file resource type.
File['/tmp/filename.ext']
A resource reference to the file resource whose title is /tmp/filename.ext.
Type[File]
The data type that matches any resource references to file resources. This is useful for, for example, restricting
the values of class or defined type parameters.
The Resource data type
There is also a general Resource data type, which all <SOME ARBITRARY RESOURCE TYPE> data types are
more-specific subtypes of. Like the Mytype-style data types, it matches no values that can be produced in the Puppet
language. You can use parameters to restrict which values Resource matches, but it still matches no values.
This is useful in the following uncommon circumstances:
• You need to interact with a resource type before you know its name. For example, you can do some clever
business with the iteration functions to re-implement the create_resources function in the Puppet language,
where your lambda receives arguments telling it to create resources of some resource type at runtime.
• Someone has somehow created a resource type whose name is invalid in the Puppet language, possibly by
conflicting with a reserved word — you can use a Resource value to refer to that resource type in resource
declarations and resource default statements, and to create resource references.
Parameters
The full signature for Resource is:
Resource[<RESOURCE TYPE>, <RESOURCE TITLE>...]
All of these parameters are optional. They must be listed in order; if you need to specify a later parameter, you must
specify values for any prior ones.
Position Parameter Data type Default value Description
1 Resource type String or
Resource
nothing A resource type,
either as a string or a
Resource data type
value. If provided,
this turns this data
type into a resource-
specific data type.
Resource[Mytype]
and
Resource["mytype"]
are identical to the
data type Mytype.
© 2024 Puppet, Inc., a Perforce company

Puppet | Syntax and settings | 894
Position Parameter Data type Default value Description
2 and higher Resource title String nothing The title of some
specific resource
of this type. If
provided, this turns
this data type into
a usable resource
reference or array of
resource references.
Resource[Mytype,
"mytitle"] and
Resource["mytype",
"mytitle"]
are identical to
the data type
Mytype["mytitle"].
Examples:
Resource[File]
The data type corresponding to the file resource type.
Resource[File, '/tmp/filename.ext']
A resource reference to the file resource whose title is /tmp/filename.ext.
Resource["file", '/tmp/filename.ext']
A resource reference to the file resource whose title is /tmp/filename.ext.
Resource[File, '/tmp/filename.ext', '/tmp/bar']
Equivalent to [ File['/tmp/filename.ext'], File['/tmp/bar'] ].
Type[Resource[File]]
A synonym for the data type that matches any resource references to file resources. This is useful for, for
example, restricting the values of class or defined type parameters.
Type[Resource["file"]]
Another synonym for the data type that matches any resource references to file resources. This is useful for, for
example, restricting the values of class or defined type parameters.
The Class data type
The Class data type is roughly equivalent to the set of Mytype data types, except it is for classes. Like the
Mytype-style data types, it matches no values that can be produced in the Puppet language. You can use parameters
to restrict which values Class matches, but it will matches no values.
Parameters
The full signature for Class is:
Class[<CLASS NAME>]
This parameter is optional.
© 2024 Puppet, Inc., a Perforce company

Puppet | Syntax and settings | 895
Position Parameter Data type Default value Description
1 Class name String nothing The name of a class.
If provided, this
turns this data type
into a usable class
reference.
Examples:
Class["apache"]
A class reference to class apache.
Type[Class]
The data type that matches any class references. This is useful for, for example, restricting the values of class or
defined type parameters.
Related data types
The abstract Catalogentry data type is the supertype of Resource and Class. You can use
Type[Catalogentry] as the data type for a class or defined type parameter that can accept both class references
and resource references.
Related information
Resource and class references on page 889
Resource references identify a specific Puppet resource by its type and title. Several attributes, such as the
relationship metaparameters, require resource references.
Data type syntax on page 875
Each value in the Puppet language has a data type, like “string.” There is also a set of values whose data type is “data
type.” These values represent the other data types. For example, the value String represents the data type of strings.
The value that represents the data type of these values is Type.
Abstract data types on page 860
If you’re using data types to match or restrict values and need more flexibility than what the core data types (such as
String or Array) allow, you can use one of the abstract data types to construct a data type that suits your needs
and matches the values you want.
Sensitive
Sensitive types in the Puppet language are strings marked as sensitive. The value is displayed in plain text in the
catalog and manifest, but is redacted from logs and reports. Because the value is maintained as plain text, use it only
as an aid to ensure that sensitive values are not inadvertently disclosed.
The Sensitive type can be written as Sensitive.new(val), or the short form Sensitive(val).
Parameters
The full signature for Sensitive is:
Sensitive.new([<STRING VALUE>])
The Sensitive type is parameterized, but the parameterized type (the type of the value it contains) only retains the
basic type. Sensitive information about the length or details about the contained data value can otherwise be leaked.
It is therefore not possible to have detailed data types and expect that the data type match. For example,
Sensitive[Enum[red, blue, green]] fails if a value of Sensitive('red') is given. When a
sensitive type is used, the type parameter must be generic; in this example a Sensitive[String] instead would
match Sensitive('red').
Consider, for example, if you assign a sensitive value and call notice:
$secret = Sensitive('myPassword')
© 2024 Puppet, Inc., a Perforce company

Puppet | Syntax and settings | 896
notice($secret)
The example manifest would log the following notice:
Notice: Scope(Class[main]): Sensitive [value redacted]
To gain access to the original data, use the unwrap function:
$secret = Sensitive('myPassword')
$processed = $secret.unwrap
notice $processed
Use Sensitive and unwrap only as an aid for logs and reports. The data is not encrypted.
Note: Sensitive puts no limit on the wrapped data and can wrap other types, but they do not fully reveal the type of
that data when type checking because it reveals too much detail.
Strings
Strings are unstructured text fragments of any length. They’re a common and useful data type.
Strings can interpolate other values, and can use escape sequences to represent characters that are inconvenient or
impossible to write literally. You can access substrings of a string by numerical index.
There are four ways to write literal strings in the Puppet language:
• Bare words
• Single-quoted strings
• Double-quoted strings
• Heredocs
Each of these have slightly different behavior around syntax, interpolation features, and escape sequences.
Bare words
Puppet treats certain bare words — that is, runs of alphanumeric characters without surrounding quotation marks
— as single-word strings. Bare word strings are most commonly used with resource attributes that accept a limited
number of one-word values.
To be treated as a string, a bare word must:
• Begin with a lower case letter;
• Contain only letters, digits, hyphens (-), and underscores (_); and
• Not be a reserved word.
For example, in the following code, running is a bare word string:
service { "ntp":
ensure => running, # bare word string
}
Unquoted words that begin with upper case letters are interpreted as data types or resource references, not strings.
Bare word strings can’t interpolate values and can’t use escape sequences.
Single-quoted strings
Multi-word strings can be surrounded by single quotation marks, 'like this'.
For example:
if $autoupdate {
notice('autoupdate parameter has been deprecated and replaced with
package_ensure. Set this to latest for the same behavior as autoupdate =>
true.')
© 2024 Puppet, Inc., a Perforce company

Puppet | Syntax and settings | 897
}
Line breaks within the string are interpreted as literal line breaks.
Single-quoted strings can’t interpolate values.
Escape sequences
The following escape sequences are available in single-quoted strings:
Sequence Result
\\ Single backslash
\' Literal single quotation mark
Within single quotation marks, if a backslash is followed by any character other than another backslash or a single
quotation mark, Puppet treats it as a literal backslash.
To include a literal double backslash use a quadruple backslash.
To include a backslash at the very end of a single-quoted string, use a double backslash instead of a single backslash.
For example: path => 'C:\Program Files(x86)\\'
Tip: A good habit is to always use two backslashes where you want the result to be one backslash. For example,
path => 'C:\\Program Files(x86)\\'
Double-quoted strings
Strings can be surrounded by double quotation marks, "like this".
Line breaks within the string are interpreted as literal line breaks. You can also insert line breaks with \n (Unix-style)
or \r\n (Windows-style).
Double-quoted strings can interpolate values. See Interpolation information below.
Escape sequences
The following escape sequences are available in double-quoted strings:
Sequence Result
\\ Single backslash
\n New line
\r Carriage return
\t Tab
\s Space
\$ Literal dollar sign (to prevent interpolation)
\uXXXX Unicode character number XXXX (a four-digit
hexadecimal number)
\u{XXXXXX} Unicode character XXXXXX (a hexadecimal number
between two and six digits)
\" Literal double quotation mark
\' Literal single quotation mark
© 2024 Puppet, Inc., a Perforce company

Puppet | Syntax and settings | 898
Within double quotation marks, if a backslash is followed by any character other than those listed above (that is, a
character that is not a recognized escape sequence), Puppet logs a warning: Warning: Unrecognized escape
sequence, and treats it as a literal backslash.
Tip: A good habit is to always use two backslashes where you want the result to be one backslash.
Heredocs
Heredocs let you quote strings with more control over escaping, interpolation, and formatting. They’re especially
good for long strings with complicated content.
Example
$gitconfig = @("GITCONFIG"/L)
[user]
name = ${displayname}
email = ${email}
[color]
ui = true
[alias]
lg = "log --pretty=format:'%C(yellow)%h%C(reset) %s \
%C(cyan)%cr%C(reset) %C(blue)%an%C(reset) %C(green)%d%C(reset)' --graph"
wdiff = diff --word-diff=color --ignore-space-at-eol \
--word-diff-regex='[[:alnum:]]+|[^[:space:][:alnum:]]+'
[merge]
defaultToUpstream = true
[push]
default = upstream
| GITCONFIG
file { "${homedir}/.gitconfig":
ensure => file,
content => $gitconfig,
}
Syntax
To write a heredoc, you place a heredoc tag in a line of code. This tag acts as a literal string value, but the content of
that string is read from the lines that follow it. The string ends when an end marker is reached.
The general form of a heredoc string is:
© 2024 Puppet, Inc., a Perforce company

Puppet | Syntax and settings | 899
heredoc tag
@("ENDTEXT"/<X>)
You can use a heredoc tag in Puppet code, anywhere
a string value is accepted. In the above example, the
heredoc tag @("GITCONFIG"/L) completes the line
of Puppet code: $gitconfig = .
A heredoc tag starts with @( and ends with ).
Between those characters, the heredoc tag contains end
text (see below) — text that is used to mark the end of
the string. You can optionally surround this end text
with double quotation marks to enable interpolation
(see below). In the above example, the end text is
GITCONFIG.
It also optionally contains escape switches (see below),
which start with a slash /. In the above example, the
heredoc tag has the escape switch /L.
the string
This is the
text that makes
up my string.
The content of the string starts on the next line, and can
run over multiple lines. If you specified escape switches
in the heredoc tag, the string can contain the enabled
escape sequences.
In the above example, the string starts with [user]
and ends with default = upstream. It uses the
escape sequence \ to add cosmetic line breaks, because
the heredoc tag contained the /L escape switch.
end marker
| - ENDTEXT
On a line of its own, the end marker consists of:
• Optional indentation and a pipe character (|) to
indicate how much indentation is stripped from the
lines of the string (see below).
• An optional hyphen character (-), with any amount
of space around it, to trim the final line break from
the string (see below).
• The end text, repeating the same end text used in the
heredoc tag, always without quotation marks.
In the above example, the end marker is |
GITCONFIG.
If a line of code includes more than one heredoc tag, Puppet reads all of those heredocs in order: the first one begins
on the following line and continue until its end marker, the second one begins on the line immediately after the first
© 2024 Puppet, Inc., a Perforce company

Puppet | Syntax and settings | 900
end marker, and so on. Puppet won’t start evaluating additional lines of Puppet code until it reaches the end marker
for the final heredoc tag from the original line.
End text
The heredoc tag contains piece of text called the end text. When Puppet reaches a line that contains only that end text
(plus optional formatting control), the string ends.
Both occurrences of the end text must match exactly, with the same capitalization and internal spacing.
End text can be any run of text that doesn’t include line breaks, colons, slashes, or parentheses. It can include spaces,
and can be mixed case. The following are all valid end text:
• EOT
• ...end...end...
• Verse 8 of The Raven
Tip: To help with code readability, make your end text stand out from the content of the heredoc string, for example,
by making it all uppercase.
Enabling interpolation
By default, heredocs do not allow you to interpolate values into the string content. You can enable interpolation by
double-quoting the end text in the opening heredoc tag. That is:
• An opening tag like @(EOT) won’t allow interpolation.
• An opening tag like @("EOT") allows interpolation.
Note: If you enable interpolation, but the string has a dollar character ($) that you want to be literal, not interpolated,
you must enable the literal dollar sign escape switch (/$) in the heredoc tag: @("EOT"/$). Then use the escape
sequence \$ to specify the literal dollar sign in the string. See the information on enabling escape sequences, below,
for more details.
Enabling escape sequences
By default, heredocs have no escape sequences and every character is literal (except interpolated expressions, if
enabled). To enable escape sequences, add switches to the heredoc tag.
To enable individual escape sequences, add a slash (/) and one or more switches. For example, to enable an escape
sequence for dollar signs (\$) and new lines (\n), add /$n to the heredoc tag :
@("EOT"/$n)
To enable all escape sequences, add a slash and no switches:
@("EOT"/)
Use the following switches to enable escape sequences:
Switch to put in the heredoc tag Escape sequence to use in the
heredoc string
Result in the string value
(automatic) \\ Single backslash. This switch is
enabled when any other escape
sequence is enabled.
n \n New line
r \r Carriage return
© 2024 Puppet, Inc., a Perforce company

Puppet | Syntax and settings | 901
Switch to put in the heredoc tag Escape sequence to use in the
heredoc string
Result in the string value
t \t Tab
s \s Space
$ \$ Literal dollar sign (to prevent
interpolation)
u \uXXXX or \u{XXXXXX} Unicode character number XXXX
(a four-digit hexadecimal number)
or XXXXXX (a two- to six-digit
hexadecimal number)
L \<New line or carriage
return>
Nothing. This lets you put line breaks
in the heredoc source code that does
not appear in the string value.
Note: A backslash that isn't part of an escape sequence is treated as a literal backslash. Unlike in double-quoted
strings, this does not log a warning.
Tip: If a heredoc has escapes enabled, and includes several literal backslashes in a row, make sure each literal
backslash is represented by the \\ escape sequence. So, for example, If you want the result to include a double
backslash, use four backslashes.
Enabling syntax checking
To enable syntax checking of heredoc text, add the name of the syntax to the heredoc tag. For example:
@(END:pp)
@(END:epp)
@(END:json)
If Puppet has a syntax checker for the given syntax, it validates the heredoc text, but only if the heredoc is static text
and does not contain any interpolations. If Puppet has no checker available for the given syntax, it silently ignores the
syntax tag.
Syntax checking in heredocs is useful for validating syntax earlier, avoiding later failure.
By default, heredocs are treated as text unless otherwise specified in the heredoc tag.
Stripping indentation
To make your code easier to read, you can indent the content of a heredoc to separate it from the surrounding code.
To strip this indentation from the resulting string value, put the same amount of indentation in front of the end marker
and use a pipe character (|) to indicate the position of the first “real” character on each line.
$mytext = @(EOT)
This block of text is
visibly separated from
everything around it.
| EOT
If a line has less indentation than you’ve indicated with the pipe, Puppet strips any spaces it can without deleting non-
space characters.
If a line has more indentation than you’ve indicated with the pipe, the excess spaces are included in the final string
value.
© 2024 Puppet, Inc., a Perforce company

Puppet | Syntax and settings | 902
Important: Indentation can include tab characters, but Puppet won’t convert tabs to spaces, so make sure you use the
exact same sequence of space and tab characters on each line.
Suppressing literal line breaks
If you enable the L escape switch, you can end a line with a backslash (\) to exclude the following line break from
the string value. This lets you break up long lines in your source code without adding unwanted literal line breaks to
the resulting string value.
For example, Puppet would read this as a single line:
lg = "log --pretty=format:'%C(yellow)%h%C(reset) %s \
%C(cyan)%cr%C(reset) %C(blue)%an%C(reset) %C(green)%d%C(reset)' --graph"
Suppressing the final line break
By default, heredocs end with a trailing line break, but you can exclude this line break from the final string. To
suppress it, add a hyphen (-) to the end marker, before the end text, but after the indentation pipe if you used one.
This works even if you don’t have the L escape switch enabled.
For example, Puppet would read this as a string with no line break at the end:
$mytext = @("EOT")
This is too inconvenient for ${double} or ${single} quotes, but must be
one line.
|-EOT
Interpolation
Interpolation allows strings to contain expressions, which can be replaced with their values. You can interpolate
any expression that resolves to a value, except for statement-style function calls. You can interpolate expressions in
double-quoted strings, and in heredocs with interpolation enabled.
To interpolate an expression, start with a dollar sign and wrap the expression in curly braces, as in: "String
content ${<EXPRESSION>} more content".
The dollar sign doesn’t have to have a space in front of it. It can be placed directly after any other character, or at the
beginning of the string.
An interpolated expression can include quote marks that would end the string if they occurred outside the
interpolation token. For example: "<VirtualHost *:${hiera("http_port")}>".
Preventing interpolation
If you want a string to include a literal sequence that looks like an interpolation token, but you don't want Puppet to
try to evaluate it, use a quoting syntax that disables interpolation (single quotes or a non-interpolating heredoc), or
escape the dollar sign with \$.
Short forms for variable interpolation
The most common thing to interpolate into a string is the value of a variable. To make this easier, Puppet has some
shorter forms of the interpolation syntax:
$myvariable
A variable reference (without curly braces) can be replaced with that variable’s value. This also works with
qualified variable names like $myclass::myvariable.
Because this syntax doesn’t have an explicit stopping point (like a closing curly brace), Puppet assumes the
variable name is everything between the dollar sign and the first character that couldn’t legally be part of a
variable name. (Or the end of the string, if that comes first.)
© 2024 Puppet, Inc., a Perforce company

Puppet | Syntax and settings | 903
This means you can’t use this style of interpolation when a value must run up against some other word-like text.
And even in some cases where you can use this style, the following style can be clearer.
${myvariable}
A dollar sign followed by a variable name in curly braces can be replaced with that variable’s value. This also
works with qualified variable names like ${myclass::myvariable}.
With this syntax, you can follow a variable name with any combination of chained function calls or hash access /
array access / substring access expressions. For example:
"Using interface ${::interfaces.split(',')[3]} for broadcast"
However, this doesn’t work if the variable’s name overlaps with a language keyword. For example, if you had a
variable called $inherits, you would have to use normal-style interpolation:
"Inheriting ${$inherits.upcase}."
Conversion of interpolated values
Puppet converts the value of any interpolated expression to a string using these rules:
Data type Conversion
String The contents of the string, with any quoting syntax
removed.
Undef An empty string.
Boolean The string 'true' or 'false'.
Number The number in decimal notation (base 10). For floats, the
value can vary on different platforms. Use the sprintf
function for more precise formatting.
Array A pair of square brackets ([ and ]) containing the
array’s elements, separated by a comma and a space (,
), with no trailing comma. Each element is converted to a
string using these rules.
Hash A pair of curly braces ({ and }) containing a <KEY> =>
<VALUE> string for each key-value pair, separated by a
comma and a space (, ), with no trailing comma. Each
key and value is converted to a string using these rules.
Regular expression A stringified regular expression.
Resource reference or data type The value as a string.
Line breaks
Quoted strings can continue over multiple lines, and line breaks are preserved as a literal part of the string. Heredocs
let you suppress these line breaks if you use the L escape switch.
Puppet does not attempt to convert line breaks, so whatever type of line break is used in the file (LF for *nix or CRLF
for Windows) is preserved. Use escape sequences to insert specific types of line breaks into strings:
• To insert a CRLF in a manifest file that uses *nix line endings, use the \r\n escape sequences in a double-quoted
string, or a heredoc with those escapes enabled.
• To insert an LF in a manifest that uses Windows line endings, use the \n escape sequence in a double-quoted
string, or a heredoc with that escape enabled.
© 2024 Puppet, Inc., a Perforce company

Puppet | Syntax and settings | 904
Encoding
Puppet treats strings as sequences of bytes. It does not recognize encodings or translate between them, and non-
printing characters are preserved.
However, all strings must be valid UTF-8. Future versions of Puppet might impose restrictions on string encoding,
and using only UTF-8 protects you in this event. Also, PuppetDB removes invalid UTF-8 characters when storing
catalogs.
Accessing substrings
Access substrings of a string by specifying a numerical index inside square brackets. The index consists of one
integer, optionally followed by a comma and a second integer, for example $string[3] or $string[3,10].
The first number of the index is the start position. Positive numbers count from the start of the string, starting at 0.
Negative numbers count back from the end of the string, starting at -1.
The second number of the index is the stop position. Positive numbers are lengths, counting forward from the start
position. Negative numbers are absolute positions, counting back from the end of the string (starting at -1). If the
second number is omitted, it defaults to 1 (resolving to a single character).
Examples:
$mystring = 'abcdef'
notice( $mystring[0] ) # resolves to 'a'
notice( $mystring[0,2] ) # resolves to 'ab'
notice( $mystring[1,2] ) # resolves to 'bc'
notice( $mystring[1,-2] ) # resolves to 'bcde'
notice( $mystring[-3,2] ) # resolves to 'de'
Text outside the actual range of the string is treated as an infinite amount of empty string:
$mystring = 'abcdef'
notice( $mystring[10] ) # resolves to ''
notice( $mystring[3,10] ) # resolves to 'def'
notice( $mystring[-10,2] ) # resolves to ''
notice( $mystring[-10,6] ) # resolves to 'ab'
The String data type
The data type of strings is String. By default, String matches strings of any length. You can use parameters to
restrict which values String matches.
Parameters
The full signature for String is:
String[<MIN LENGTH>, <MAX LENGTH>]
These parameters are optional. They must be listed in order; if you need to specify a later parameter, you must also
specify values for any prior ones.
Position Parameter Data type Default value Description
1 Minimum length Integer 0 The minimum
number of (Unicode)
characters in the
string. This parameter
accepts the special
value default,
which uses its default
value.
© 2024 Puppet, Inc., a Perforce company

Puppet | Syntax and settings | 905
Position Parameter Data type Default value Description
2 Maximum length Integer infinite The maximum
number of (Unicode)
characters in the
string. This parameter
accepts the special
value default,
which uses its default
value.
Examples:
String
Matches a string of any length.
String[6]
Matches a string with at least six characters.
String[6,8]
Matches a string with at least six and at most eight characters.
Related information
Data type syntax on page 875
Each value in the Puppet language has a data type, like “string.” There is also a set of values whose data type is “data
type.” These values represent the other data types. For example, the value String represents the data type of strings.
The value that represents the data type of these values is Type.
Abstract data types on page 860
If you’re using data types to match or restrict values and need more flexibility than what the core data types (such as
String or Array) allow, you can use one of the abstract data types to construct a data type that suits your needs
and matches the values you want.
Time-related data types
A Timespan defines the length of a duration of time, and a Timestamp defines a point in time. For example,
“two hours” is a duration that can be represented as a Timespan, while “three o'clock in the afternoon UTC on 8
November, 2018” is a point in time that can be represented as a Timestamp. Both types can use nanosecond values
if it is available on the platform.
The Timespan data type
A Timespan value represents a duration of time. The Timespan data type matches a specified range of durations
and includes all values within the given range. The default represents a positive or negative infinite duration. A
Timespan value can be specified with strings or numbers in various forms. The type takes up to two parameters.
Parameters
The full signature for Timespan is:
Timespan[ (<TIMESPAN START OR LENGTH>, (<TIMESPAN END>)) ]
© 2024 Puppet, Inc., a Perforce company

Puppet | Syntax and settings | 906
Position Parameter Data type Default value Description
1 Timespan start or
length
String, Float,
Integer, or
default
default (negative
infinity in a span)
If only one parameter
is passed, it is
the length of the
timespan. If two
parameters are
passed, this is the
start or from value
in a time range.
2 Timespan end String, Float,
Integer, or
default
default (positive
infinity) or none
if only one value
passed.
The end or to value
in a time range.
Timespan values are interpreted depending on their format:
• A String in the format D-HH:MM:SS represents a duration of D days, HH hours, MM minutes, and SS seconds.
• An Integer or Float represents a duration in seconds.
A Timespan defined as a range (two parameters) matches any Timespan durations that can fit within that range.
If either end of a range is defined as default (infinity), it is an open range, while any other range is a closed range.
The range is inclusive.
In other words, Timespan[2] matches a duration of two seconds, but Timespan[0, 2] can match any
Timespan from zero to two seconds, inclusive.
The Timespan type is not enumerable.
For information about converting values of other types to Timespan using the new function, or for converting a
Timespan to a String using strftime, see the function reference documentation.
Examples:
Timespan[2]
Matches a Timespan value of 2 seconds.
Timespan[77.3]
Matches a Timespan value of 1 minute, 17 seconds, and 300 milliseconds (77.3 seconds).
Timespan['1-00:00:00', '2-00:00:00']
Matches a closed range of Timespan values between 1 and 2 days.
The Timestamp data type
A Timestamp value represents a specific point in time. The Timestamp data type can be one single point or any
point within a given range, depending on the number of specified parameters. Timestamp values that include a
default parameter represents an infinite range of either positive or negative Timestamps. A Timestamp value
can be specified with strings or numbers in various forms.
Parameters
The full signature for Timestamp is:
Timestamp[ (<TIMESTAMP VALUE>, (<RANGE LIMIT>)) ]
The type takes up to two parameters, and defaults to an infinite range to the past and future. A Timestamp with one
parameter represents a single point in time, while two parameters represent a range of Timestamps, with the first
parameter being the from value and the second being the to value.
© 2024 Puppet, Inc., a Perforce company

Puppet | Syntax and settings | 907
Position Parameter Data type Default value Description
1 Timestamp value String, Float,
Integer, or
default
default (negative
infinity in a range)
Point in time if
passed alone, or
from value in a
range if passed with a
second parameter.
2 Range limit String, Float,
Integer, or
default
default (positive
infinity), or none
if only one value is
passed
The to value in a
range.
A Timestamp that is defined as a single point in time (one parameter) matches exactly that point.
A Timestamp that is defined as a range (two parameters) matches any point in time within that range. If either end
of a range is defined as default (infinity), it is an open range, while any other range is a closed range. The range is
inclusive.
So, Timestamp['2000-01-01T00:00:00.000'] matches 0:00 UTC on 1 January, 2000, while
Timestamp['2000-01-01T00:00:00.000', '2001-01-01T00:00:00.000] matches Timestamp
values from that point in time to a point in time one year later, inclusive.
Timestamp values are interpreted depending on their format.
For information about converting values of other types to Timestamp using the new function, or for converting a
Timespan to a String using the strftime function, see the function reference documentation.
Examples:
Timestamp['2000-01-01T00:00:00.000', default]
Matches an open range of Timestamps from the start of the 21st century to an infinite point in the future.
Timestamp['2012-10-10']
Matches the exact Timestamp 2012-10-10T00:00:00.0 UTC.
Timestamp[default, 1433116800]
Matches an open range of Timestamps from an infinite point in the past to 2015-06-01T00:00:00 UTC, here
expressed as seconds since the Unix epoch.
Timestamp['2010-01-01', '2015-12-31T23:59:59.999999999']
Matches a closed range of Timestamps between the start of 2010 and the end of 2015.
Undef
Puppet's undef value is roughly equivalent to nil in Ruby. It represents the absence of a value. If the
strict_variables setting isn’t enabled, variables which have never been declared have a value of undef.
The undef value is useful for testing whether a variable has been set. Also, you can use it to un-set resource
attributes that have inherited values from a resource default, causing the attribute to be unmanaged.
The only value in the Undef data type is the bare word undef.
Conversion
When used as a boolean, undef is false.
When interpolated into a string, undef is converted to the empty string.
The Undef data type
The data type of undef is Undef. It matches only the value undef, and takes no parameters.
Several abstract data types can match the undef value:
© 2024 Puppet, Inc., a Perforce company
Puppet | Syntax and settings | 908
• The Data type matches undef in addition to several other data types.
• The Any type matches any value, including undef.
• The Optional type wraps one other data type, and returns a type that matches undef in addition to that type.
• The Variant type can accept the Undef type as a parameter, which makes the resulting data type match
undef.
• The NotUndef type matches any value except undef.
Related information
Data type syntax on page 875
Each value in the Puppet language has a data type, like “string.” There is also a set of values whose data type is “data
type.” These values represent the other data types. For example, the value String represents the data type of strings.
The value that represents the data type of these values is Type.
Abstract data types on page 860
If you’re using data types to match or restrict values and need more flexibility than what the core data types (such as
String or Array) allow, you can use one of the abstract data types to construct a data type that suits your needs
and matches the values you want.
Templates
Templates are written in a specialized templating language that generates text from data. Use templates to manage the
content of your Puppet configuration files via the content attribute of the file resource type.
Templating languages
Puppet supports two templating languages:
• Embedded Puppet (EPP) uses Puppet expressions in special tags. EPP works with Puppet 4.0 and later, and with
Puppet 3.5 through 3.8 with future parser enabled.
• Embedded Ruby (ERB) uses Ruby code in tags, and requires some Ruby knowledge. ERB works with all Puppet
versions.
When to use a template
Templates are more powerful than normal strings, and less powerful than modeling individual settings as resources.
Whether to use a template is mainly a question of the complexity of the work you're performing.
When you're managing simple config files, a template generally isn't necessary because strings in the Puppet language
allow you to interpolate variables and expressions into text. For short and simple config files, you can often use a
heredoc and interpolate a few variables, or do something like ${ $my_array.join(', ') }.
Use a template if you’re doing complex transformations (especially iterating over collections) or working with very
large config files.
Some situations, however, are too complex for a template to be effective. For example, using several modules that
each need to manage parts of the same config file is impractical with either templates or interpolated strings. For
shared configuration like this, model each setting in the file as an individual resource, with either a custom resource
type or an Augeas, concat, or file_line resource. This approach is similar to how core resource types like
ssh_authorized_key and mount work.
© 2024 Puppet, Inc., a Perforce company

Puppet | Syntax and settings | 909
• Creating templates using Embedded Puppet on page 909
Embedded Puppet (EPP) is a templating language based on the Puppet language. You can use EPP in Puppet 4 and
higher, and with Puppet 3.5 through 3.8 with the future parser enabled. Puppet evaluates EPP templates with the epp
and inline_epp functions.
• Creating templates using Embedded Ruby on page 916
Embedded Ruby (ERB) is a templating language based on Ruby. Puppet evaluates ERB templates with the
template and inline_template functions.
Creating templates using Embedded Puppet
Embedded Puppet (EPP) is a templating language based on the Puppet language. You can use EPP in Puppet 4 and
higher, and with Puppet 3.5 through 3.8 with the future parser enabled. Puppet evaluates EPP templates with the epp
and inline_epp functions.
EPP structure and syntax
An EPP template looks like a plain-text document interspersed with tags containing Puppet expressions. When
evaluated, these tagged expressions can modify text in the template. You can use Puppet variables in an EPP template
to customize its output.
The following example shows parameter tags (<% |), non-printing expression tags (<%), expression-printing tags (<
%=), and comment tags (<%#). A hyphen in a tag (-) strips leading or trailing whitespace when printing the evaluated
template:
<%- | Boolean $keys_enable,
String $keys_file,
Array $keys_trusted,
String $keys_requestkey,
String $keys_controlkey
| -%>
<% if $keys_enable { -%>
<%# Printing the keys file, trusted key, request key, and control key: -%>
keys <%= $keys_file %>
<% unless $keys_trusted =~ Array[Data,0,0] { -%>
trustedkey <%= $keys_trusted.join(' ') %>
<% } -%>
<% if $keys_requestkey =~ String[1] { -%>
requestkey <%= $keys_requestkey %>
<% } -%>
<% if $keys_controlkey =~ String[1] { -%>
controlkey <%= $keys_controlkey %>
<% } -%>
<% } -%>
EPP tags
Embedded Puppet (EPP) has two tags for Puppet code expressions, optional tags for parameters and comments, and a
way to escape tag delimiters.
The following table provides an overview of the main tag types used with EPP. See the sections below for additional
detail about each tag, including instructions on trimming white space and escaping special characters.
I want to ... EPP tag syntax
Insert the value of a single expression. <%= EXPRESSION %>
Execute an expression without inserting a value. <% EXPRESSION %>
Declare the template’s parameters. <% | PARAMETERS | %>
Add a comment. <%# COMMENT %>
© 2024 Puppet, Inc., a Perforce company

Puppet | Syntax and settings | 910
Text outside a tag is treated as literal text, but is subject to any tagged Puppet code surrounding it. For example, text
surrounded by a tagged if statement only appears in the output if the condition is true.
Expression-printing tags
An expression-printing tag inserts the value of a single Puppet expression into the output.
Opening tag <%=
Closing tag %>
Closing tag with trailing white space and line break
trimming
-%>
An expression-printing tag must contain any single Puppet expression that resolves to a value, including plain
variables, function calls, and arithmetic expressions. If the value isn’t a string, Puppet automatically converts it to a
string based on the rules for value interpolation in double-quoted strings.
All facts are available in EPP templates. For example, to insert the value of the fqdn and hostname facts in an EPP
template for an Apache config file:
ServerName <%= $facts[fqdn] %>
ServerAlias <%= $facts[hostname] %>
Non-printing tags
A non-printing tag executes the code it contains, but doesn’t insert a value into the output.
Opening tag <%
Opening tag with indentation trimming <%-
Closing tag %>
Closing tag with trailing white space and line break
trimming
-%>
Non-printing tags that contain iterative and conditional expressions can affect the untagged text they surround.
For example, to insert text only if a certain variable was set, write:
<% if $broadcastclient == true { -%>
broadcastclient
<% } -%>
Expressions in non-printing tags don’t have to resolve to a value or be a complete statement, but the tag must close at
a place where it would be legal to write another expression. For example, this doesn't work:
<%# Syntax error: %>
<% $servers.each -%>
# some server
<% |$server| { %> server <%= server %>
<% } -%>
You must keep |$server| { inside the first tag, because you can’t insert an arbitrary statement between a function
call and its required block.
Parameter tags
A parameter tag declares which parameters the template accepts. Each parameter can be typed and can have a default
value.
© 2024 Puppet, Inc., a Perforce company

Puppet | Syntax and settings | 911
Opening tag with indentation trimming <%- |
Closing tag with trailing white space and line break
trimming
| -%>
Example tag:
<%- | Boolean $keys_enable = false, String $keys_file = '' | -%>
The parameter tag is optional; if used, it must be the first content in a template. Always close the parameter tag with a
right-trimmed delimiter (-%>) to avoid outputting a blank line. Literal text, line breaks, and non-comment tags cannot
precede the template’s parameter tag. (Comment tags that precede a parameter tag must use the right-trimming tag to
trim trailing white space.)
The parameter tag’s pair of pipe characters (|) contains a comma-separated list of parameters. Each parameter
follows this format:
Boolean $keys_enable = false
• An optional data type, which restricts the allowed values for the parameter (defaults to Any)
• A variable name
• An optional equals (=) sign and default value, which must match the data type, if one was specified
Parameters with default values are optional, and can be omitted when the template is evaluated. If you want
to use a default value of undef, make sure to also specify a data type that allows undef. For example,
Optional[String] accepts undef as well as any string.
Comment tags
A comment tag’s contents do not appear in the template's output.
Opening tag <%#
Closing tag %>
Closing tag with space trimming -%>
Example tag:
<%# This is a comment. %>
Literal tag delimiters
If you need the template’s final output to contain a literal <% or %>, you can escape the characters as <%% or %%>.
The first literal tag is taken, and the rest of the line is treated as a literal. This means that <%% Test %%> in an EPP
template would turn out as <% Test %%>, not <% Test %>.
Accessing EPP variables
Embedded Puppet (EPP) templates can access variables with the $variable syntax used in Puppet.
A template works like a defined type:
• It has its own anonymous local scope.
• The parent scope is set to node scope (or top scope if there’s no node definition).
• When you call the template (with the epp or inline_epp functions), you can use parameters to set variables in
its local scope.
• Unlike Embedded Ruby (ERB) templates, EPP templates cannot directly access variables in the calling class
without namespacing. Fully qualify variables or pass them in as parameters.
© 2024 Puppet, Inc., a Perforce company

Puppet | Syntax and settings | 912
EPP templates can use short names to access global variables (like $os or $trusted) and their own local variables,
but must use qualified names (like $ntp::tinker) to access variables from any class. The exception to this rule is
inline_epp.
Special scope rule for inline_epp
If you evaluate a template with the inline_epp function, and if the template has no parameters, either passed or
declared, you can access variables from the calling class in the template by using the variables’ short names. This
exceptional behavior is only allowed if all of the above conditions are true.
Should I use a parameter or a class variable?
Templates have two ways to use data:
• Directly access class variables, such as $ntp::tinker
• Use parameters passed at call time
Use class variables when a template is closely tied to the class that uses it, you don’t expect it to be used anywhere
else, and you need to use a lot of variables.
Use parameters when a template is used in several different places and you want to keep it flexible. Remember that
declaring parameters with a tag makes a template’s data requirements visible at a glance.
EPP parameters
When you pass parameters when you call a template, the parameters become local variables inside the template. To
use a parameter in this way, pass a hash as the last argument of the epp or inline_epp functions.
For example, calling this:
epp('example/example.epp', { 'logfile' => "/var/log/ntp.log" })
to evaluate this template:
<%- | Optional[String] $logfile = undef | -%>
<%# (Declare the $logfile parameter as optional) -%>
<% unless $logfile =~ Undef { -%>
logfile <%= $logfile %>
<% } -%>
The keys of the hash match the variable names you’ll be using in the template, minus the leading $ sign. Parameters
must follow the normal rules for local variable names.
If the template uses a parameter tag, it must be the first content in a template and you can only pass the parameters it
declares. Passing any additional parameters is a syntax error. However, if a template omits the parameter tag, you can
pass it any parameters.
If a template’s parameter tag includes any parameters without default values, they are mandatory. You must pass
values for them when calling the template.
Sensitive data
Puppet (version 6.20 and later) can interpolate sensitive values. In your EPP template, you can access the sensitive
variable without unwrapping. For example:
host=<%= $db_host %>
password=<%= $db_password %>
© 2024 Puppet, Inc., a Perforce company

Puppet | Syntax and settings | 913
The rendered output is automatically sensitive and used as the file content:
db_password= Sensitive('secure_test')
host = examplehost
file { '/etc/service.conf':
ensure => file,
content => epp('<module>/service.conf.epp')
}
Note: ERB templates do not support interpolation of sensitive values — you have to manually unwrap and re-wrap
these.
Example EPP template
The following example is an EPP translation of the ntp.conf.erb template from the puppetlabs-ntp
module.
# ntp.conf: Managed by puppet.
#
<% if $ntp::tinker == true and ($ntp::panic or $ntp::stepout) { -%>
# Enable next tinker options:
# panic - keep ntpd from panicking in the event of a large clock skew
# when a VM guest is suspended and resumed;
# stepout - allow ntpd change offset faster
tinker<% if $ntp::panic { %> panic <%= $ntp::panic %><% } %><% if
$ntp::stepout { -%> stepout <%= $ntp::stepout %><% } %>
<% } -%>
<% if $ntp::disable_monitor == true { -%>
disable monitor
<% } -%>
<% if $ntp::disable_auth == true { -%>
disable auth
<% } -%>
<% if $ntp::restrict =~ Array[Data,1] { -%>
# Permit time synchronization with our time source, but do not
# permit the source to query or modify the service on this system.
<% $ntp::restrict.flatten.each |$restrict| { -%>
restrict <%= $restrict %>
<% } -%>
<% } -%>
<% if $ntp::interfaces =~ Array[Data,1] { -%>
# Ignore wildcard interface and only listen on the following specified
# interfaces
interface ignore wildcard
<% $ntp::interfaces.flatten.each |$interface| { -%>
interface listen <%= $interface %>
<% } -%>
<% } -%>
<% if $ntp::broadcastclient == true { -%>
broadcastclient
<% } -%>
# Set up servers for ntpd with next options:
# server - IP address or DNS name of upstream NTP server
# iburst - allow send sync packages faster if upstream unavailable
# prefer - select preferrable server
# minpoll - set minimal update frequency
© 2024 Puppet, Inc., a Perforce company

Puppet | Syntax and settings | 914
# maxpoll - set maximal update frequency
<% [$ntp::servers].flatten.each |$server| { -%>
server <%= $server %><% if $ntp::iburst_enable == true { %> iburst<% } %><%
if $server in $ntp::preferred_servers { %> prefer<% } %><% if $ntp::minpoll
{ %> minpoll <%= $ntp::minpoll %><% } %><% if $ntp::maxpoll { %> maxpoll <
%= $ntp::maxpoll %><% } %>
<% } -%>
<% if $ntp::udlc { -%>
# Undisciplined Local Clock. This is a fake driver intended for backup
# and when no outside source of synchronized time is available.
server 127.127.1.0
fudge 127.127.1.0 stratum <%= $ntp::udlc_stratum %>
restrict 127.127.1.0
<% } -%>
# Driftfile.
driftfile <%= $ntp::driftfile %>
<% unless $ntp::logfile =~ Undef { -%>
# Logfile
logfile <%= $ntp::logfile %>
<% } -%>
<% unless $ntp::peers =~ Array[Data,0,0] { -%>
# Peers
<% [$ntp::peers].flatten.each |$peer| { -%>
peer <%= $peer %>
<% } -%>
<% } -%>
<% if $ntp::keys_enable { -%>
keys <%= $ntp::keys_file %>
<% unless $ntp::keys_trusted =~ Array[Data,0,0] { -%>
trustedkey <%= $ntp::keys_trusted.join(' ') %>
<% } -%>
<% if $ntp::keys_requestkey =~ String[1] { -%>
requestkey <%= $ntp::keys_requestkey %>
<% } -%>
<% if $ntp::keys_controlkey =~ String[1] { -%>
controlkey <%= $ntp::keys_controlkey %>
<% } -%>
<% } -%>
<% [$ntp::fudge].flatten.each |$entry| { -%>
fudge <%= $entry %>
<% } -%>
<% unless $ntp::leapfile =~ Undef { -%>
# Leapfile
leapfile <%= $ntp::leapfile %>
<% } -%>
To call this template from a manifest (assuming that the template file is located in the templates directory of the
puppetlabs-ntp module), add the following code to the manifest:
# epp(<FILE REFERENCE>, [<PARAMETER HASH>])
file { '/etc/ntp.conf':
ensure => file,
content => epp('ntp/ntp.conf.epp'),
# Loads /etc/puppetlabs/code/environments/production/modules/ntp/
templates/ntp.conf.epp
© 2024 Puppet, Inc., a Perforce company

Puppet | Syntax and settings | 915
}
Validating and previewing EPP templates
Before deploying a template, validate its syntax and render its output to make sure the template is producing the
results you expect. Use the puppet epp compand-line tool for validating and rendering Embedded Puppet (EPP)
templates.
EPP validation
To validate your template, run: puppet epp validate <TEMPLATE NAME>
The puppet epp command includes an action that checks EPP code for syntax problems. The <TEMPLATE
NAME> can be a file reference or can refer to a <MODULE NAME>/<TEMPLATE FILENAME> as the epp function.
If a file reference can also refer to a module, Puppet validates the module’s template instead.
You can also pipe EPP code directly to the validator: cat example.epp | puppet epp validate
The command is silent on a successful validation. It reports and halts on the first error it encounters. For information
on how to modify this default behavior, see the command’s man page.
EPP rendering
To render your template, run: puppet epp render <TEMPLATE NAME>
You can render EPP from the command line with puppet epp render. If Puppet can evaluate the template, it
outputs the result.
If your template relies on specific parameters or values to function, you can simulate those values by passing a hash to
the --values option. For example:
puppet epp render example.epp --values '{x => 10, y => 20}'
You can also render inline EPP by using the -e flag or piping EPP code to puppet epp render, and even
simulate facts using YAML. For details, see the command’s man page.
Evaluating EPP templates
After you have an EPP template, you can pass it to a function that evaluates it and returns a final string. The actual
template can be either a separate file or a string value.
Evaluating EPP templates that are in a template file
Put template files in the templates directory of a module. EPP files use the .epp extension.
To use a EPP template file, evaluate it with the epp function. For example:
# epp(<FILE REFERENCE>, [<PARAMETER HASH>])
file { '/etc/ntp.conf':
ensure => file,
content => epp('ntp/ntp.conf.epp', {'service_name' => 'xntpd',
'iburst_enable' => true}),
# Loads /etc/puppetlabs/code/environments/production/modules/ntp/
templates/ntp.conf.epp
}
The first argument to the function is the file reference: a string in the form '<MODULE>/<FILE>', which loads
<FILE> from <MODULE>’s templates directory. For example, the file reference ntp/ntp.conf.epp loads the
<MODULES DIRECTORY>/ntp/templates/ntp.conf.epp file.
Some EPP templates declare parameters, and you can provide values for them by passing a parameter hash to the
epp function.
© 2024 Puppet, Inc., a Perforce company

Puppet | Syntax and settings | 916
The keys of the hash must be valid local variable names (minus the $). Inside the template, Puppet creates
variables with those names and assign their values from the hash. For example, with a parameter hash of
{'service_name' => 'xntpd', 'iburst_enable' => true}, an EPP template would receive
variables called $service_name and $iburst_enable.
When structuring your parameter hash, remember:
• If a template declares any mandatory parameters, you must set values for them with a parameter hash.
• If a template declares any optional parameters, you can choose to provide values or let them use their defaults.
• If a template declares no parameters, you can pass any number of parameters with any names; otherwise, you can
only choose from the parameters requested by the template.
Evaluating EPP template strings
If you have a string value that contains template content, you can evaluate it with the inline_epp function.
In older versions of Puppet, inline templates were mostly used to get around limitations — tiny Ruby fragments were
useful for transforming and manipulating data before Puppet had iteration functions like map or puppetlabs/stdlib
functions like chomp and keys.
In modern versions of Puppet, inline templates are usable in some of the same situations template files are. Because
the heredoc syntax makes it easy to write large and complicated strings in a manifest, you can use inline_epp to
reduce the number of files needed for a simple module that manages a small config file.
For example:
$ntp_conf_template = @(END)
...template content goes here...
END
# inline_epp(<TEMPLATE STRING>, [<PARAMETER HASH>])
file { '/etc/ntp.conf':
ensure => file,
content => inline_epp($ntp_conf_template, {'service_name' => 'xntpd',
'iburst_enable' => true}),
}
Some EPP templates declare parameters, and you can provide values for them by passing a parameter hash to the
epp function.
The keys of the hash must be valid local variable names (minus the $). Inside the template, Puppet creates
variables with those names and assign their values from the hash. For example, with a parameter hash of
{'service_name' => 'xntpd', 'iburst_enable' => true}, an EPP template would receive
variables called $service_name and $iburst_enable.
When structuring your parameter hash, remember:
• If a template declares any mandatory parameters, you must set values for them with a parameter hash.
• If a template declares any optional parameters, you can choose to provide values or let them use their defaults.
• If a template declares no parameters, you can pass any number of parameters with any names; otherwise, you can
only choose from the parameters requested by the template.
Creating templates using Embedded Ruby
Embedded Ruby (ERB) is a templating language based on Ruby. Puppet evaluates ERB templates with the
template and inline_template functions.
If you’ve used ERB in other projects, it might have had different features enabled. This page describes how ERB
works with Puppet .
© 2024 Puppet, Inc., a Perforce company

Puppet | Syntax and settings | 917
Note: Puppet has a parallel templating system called Embedded Puppet (EPP), which has similar functionality to
ERB, but is based on the Puppet language. EPP is the preferred and safer method because it isolates environments.
See EPP and environment isolation for more information.
ERB structure and syntax
An ERB template looks like a plain-text document interspersed with tags containing Ruby code. When evaluated, this
tagged code can modify text in the template.
Puppet passes data to templates via special objects and variables, which you can use in the tagged Ruby code to
control the templates' output. The following example shows non-printing tags (<%), expression-printing tags (<%=),
and comment tags (<%#). A hyphen in a tag (-) strips leading or trailing whitespace when printing the evaluated
template:
<% if @keys_enable -%>
<%# Printing the keys file, trusted key, request key, and control key: -%>
keys <%= @keys_file %>
<% unless @keys_trusted.empty? -%>
trustedkey <%= @keys_trusted.join(' ') %>
<% end -%>
<% if @keys_requestkey != '' -%>
requestkey <%= @keys_requestkey %>
<% end -%>
<% if @keys_controlkey != '' -%>
controlkey <%= @keys_controlkey %>
<% end -%>
<% end -%>
ERB tags
Embedded Ruby (ERB) has two tags for Ruby code expressions, a tag for comments, and a way to escape tag
delimiters.
The following table provides an overview of the main tag types used with ERB. See the sections below for additional
detail about each tag, including instructions on trimming whitespace and escaping special characters.
I want to ... ERB tag syntax
Insert the value of a single expression. <%= EXPRESSION %>
Execute an expression without inserting a value. <% EXPRESSION %>
Add a comment. <%# COMMENT %>
Text outside a tag is treated as literal text, but is subject to any tagged Ruby code surrounding it. For example, text
surrounded by a tagged if statement only appears in the output if the condition is true.
Expression-printing tags
An expression-printing tag inserts the value into the output.
Opening tag <%=
Closing tag %>
Closing tag with trailing whitespace and line break
trimming
-%>
Example tag:
<%= @networking['fqdn'] %>
© 2024 Puppet, Inc., a Perforce company

Puppet | Syntax and settings | 918
It must contain a snippet of Ruby code that resolves to a value; if the value isn’t a string, it is automatically converted
to a string using its to_s method.
For example, to insert the value of the fqdn and hostname facts in an ERB template for an Apache config file:
ServerName <%= @networking['fqdn'] %>
ServerAlias <%= @networking['hostname'] %>
Non-printing tags
A non-printing tag executes the code it contains, but doesn’t insert a value into the output.
Opening tag <%
Opening tag with indentation trimming <%-
Closing tag %>
Closing tag with trailing whitespace and line break
trimming
-%>
Non-printing tags that contain iterative and conditional expressions can affect the untagged text they surround.
For example, to insert text only if a certain variable was set, write:
<% if @broadcastclient == true -%>
broadcastclient
<% end -%>
Expressions in non-printing tags don’t have to resolve to a value or be a complete statement, but the tag must close at
a place where it would be legal to write another expression. For example, this doesn't work:
<%# Syntax error: %>
<% @servers['each'] -%>
# some server
<% do |server| %>server <%= server %>
<% end -%>
You must keep do |server| inside the first tag, because you can’t insert an arbitrary statement between a function
call and its required block.
Comment tags
A comment tag’s contents do not appear in the template's output.
Opening tag <%#
Closing tag %>
Closing tag with line break trimming -%>
Example tag:
<%# This is a comment. %>
Literal tag delimiters
If you need the template’s final output to contain a literal <% or %>, you can escape the characters as <%% or %%>.
The first literal tag is taken, and the rest of the line is treated as a literal. This means that <%% Test %%> in an ERB
template would turn out as <% Test %%>, not <% Test %>.
© 2024 Puppet, Inc., a Perforce company

Puppet | Syntax and settings | 919
Accessing Puppet variables
ERB templates can access Puppet variables. This is the main source of data for templates.
An ERB template has its own local scope, and its parent scope is set to the class or defined type that evaluates the
template. This means a template can use short names for variables from that class or type, but it can’t insert new
variables into it.
There are two ways to access variables in an ERB template:
• @variable
• scope['variable'] and its older equivalent, scope.lookupvar('variable')
@variable
All variables in the current scope (including global variables) are passed to templates as Ruby instance variables,
which begin with “at” signs (@). If you can access a variable by its short name in the surrounding manifest, you can
access it in the template by replacing its $ sign with an @, so that $os becomes @os, and $trusted becomes
@trusted.
This is the most legible way to access variables, but it doesn’t support variables from other scopes. For that, you need
to use the scope object.
scope['variable'] or scope.lookupvar('variable')
Puppet also passes templates an object called scope, which can access all variables (including out-of-scope
variables) with a hash-style access expression. For example, to access $ntp::tinker you would use
scope['ntp::tinker'].
Another way to use the scope object is to call its lookupvar method and pass the variable’s name as its argument,
as in scope.lookupvar('ntp::tinker'). This is exactly equivalent to the above, if slightly less convenient.
This usage predates the hash-style indexing added in Puppet 3.0.
Puppet data types in Ruby
Puppet's data types are converted to Ruby classes as follows:
Puppet type Ruby class
Boolean Boolean
String String
Number Subtype of Numeric
Array Array
Hash Hash
Default Symbol (value :default)
Regexp Regexp
Resource reference Puppet::Pops::Types::PResourceType or
Puppet::Pops::Types::PHostClassType
Lambda (code block) Puppet::Pops::Evaluator::Closure
Data type (type) A type class under Puppet::Pops::Types, such as
Puppet::Pops::Types::PIntegerType
© 2024 Puppet, Inc., a Perforce company
Puppet | Syntax and settings | 920
Puppet type Ruby class
Undef NilClass (value nil)
Note: If a Puppet variable was never defined, its value is
undef, which means its value in a template is nil.
Using Ruby in ERB templates
To manipulate and print data in ERB templates, you’ll need to know some Ruby. A full introductory Ruby tutorial is
outside the scope of these docs, but this page provides an overview of Ruby basics commonly used in ERB templates.
Using if statements
The if ... end statement in Ruby lets you write conditional text. Put the control statements in non-printing tags,
and the conditional text between the tags:
<% if <CONDITION> %> text goes here <% end %>
For example:
<% if @broadcast != "NONE" %>broadcast <%= @broadcast %><% end %>
The general format of an if statement is:
if <CONDITION>
... code ...
elsif <CONDITION>
... other code ...
end
Using iteration
Ruby lets you iterate over arrays and hashes with the each method. This method takes a block of code and executes
it one time for each element in the array or hash. In a template, untagged text is treated as part of the code that gets
repeated. You can think of literal text as an instruction, telling the evaluator to insert that text into the final output.
To write a block of code in Ruby, use either do |arguments| ... end or {|arguments| ... }. Note
that this is different from Puppet lambdas — but they work similarly.
<% @values['each'] do |val| -%>
Some stuff with <%= val %>
<% end -%>
If $values was set to ['one', 'two'], this example would produce:
Some stuff with one
Some stuff with two
This example also trims line breaks for the non-printing tags, so they won’t appear as blank lines in the output.
Manipulating data
Your templates generally use data from Puppet variables. These values almost always be strings, numbers, arrays, and
hashes.
These become the equivalent Ruby objects when you access them from an ERB template.
© 2024 Puppet, Inc., a Perforce company

Puppet | Syntax and settings | 921
For information about the ways you can transform these objects, see the Ruby documentation for strings, integers,
arrays, and hashes.
Also, note that the special undef value in Puppet becomes the special nil value in Ruby in ERB templates.
Calling Puppet functions from ERB templates
You can use Puppet functions inside ERB templates by calling the scope.call_function(<NAME>,
<ARGS>) method.
This method takes two arguments:
• The name of the function, as a string.
• All arguments to the function, as an array. This must be an array even for one argument or zero arguments.
For example, to evaluate one template inside another:
<%= scope.call_function('template', ["my_module/template2.erb"]) %>
To log a warning using the Puppet logging system, so that the warning appears in reports:
<%= scope.call_function('warning', ["Template was missing some data; this
config file might be malformed."]) %>
Note:
scope.call_function was added in Puppet 4.2.
Previous versions of Puppet created a function_<NAME> method on the scope object for each function. These
could be called with an arguments array, such as <%= scope.function_template(["my_module/
template2.erb"]) %>.
While this method still works in Puppet 4.2 and later versions, the auto-generated methods don’t support the modern
function APIs, which are now used by the majority of built-in functions.
Example ERB template
The following example is taken from the puppetlabs-ntp module.
# ntp.conf: Managed by puppet.
#
<% if @tinker == true and (@panic or @stepout) -%>
# Enable next tinker options:
# panic - keep ntpd from panicking in the event of a large clock skew
# when a VM guest is suspended and resumed;
# stepout - allow ntpd change offset faster
tinker<% if @panic -%> panic <%= @panic %><% end %><% if @stepout -%>
stepout <%= @stepout %><% end %>
<% end -%>
<% if @disable_monitor == true -%>
disable monitor
<% end -%>
<% if @disable_auth == true -%>
disable auth
<% end -%>
<% if @restrict != [] -%>
# Permit time synchronization with our time source, but do not
# permit the source to query or modify the service on this system.
<% @restrict.flatten.each do |restrict| -%>
restrict <%= restrict %>
<% end -%>
<% end -%>
© 2024 Puppet, Inc., a Perforce company

Puppet | Syntax and settings | 922
<% if @interfaces != [] -%>
# Ignore wildcard interface and only listen on the following specified
# interfaces
interface ignore wildcard
<% @interfaces.flatten.each do |interface| -%>
interface listen <%= interface %>
<% end -%>
<% end -%>
<% if @broadcastclient == true -%>
broadcastclient
<% end -%>
# Set up servers for ntpd with next options:
# server - IP address or DNS name of upstream NTP server
# iburst - allow send sync packages faster if upstream unavailable
# prefer - select preferrable server
# minpoll - set minimal update frequency
# maxpoll - set maximal update frequency
<% [@servers].flatten.each do |server| -%>
server <%= server %><% if @iburst_enable == true -%> iburst<% end %><% if
@preferred_servers.include?(server) -%> prefer<% end %><% if @minpoll -%>
minpoll <%= @minpoll %><% end %><% if @maxpoll -%> maxpoll <%= @maxpoll %><
% end %>
<% end -%>
<% if @udlc -%>
# Undisciplined Local Clock. This is a fake driver intended for backup
# and when no outside source of synchronized time is available.
server 127.127.1.0
fudge 127.127.1.0 stratum <%= @udlc_stratum %>
restrict 127.127.1.0
<% end -%>
# Driftfile.
driftfile <%= @driftfile %>
<% unless @logfile.nil? -%>
# Logfile
logfile <%= @logfile %>
<% end -%>
<% unless @peers.empty? -%>
# Peers
<% [@peers].flatten.each do |peer| -%>
peer <%= peer %>
<% end -%>
<% end -%>
<% if @keys_enable -%>
keys <%= @keys_file %>
<% unless @keys_trusted.empty? -%>
trustedkey <%= @keys_trusted.join(' ') %>
<% end -%>
<% if @keys_requestkey != '' -%>
requestkey <%= @keys_requestkey %>
<% end -%>
<% if @keys_controlkey != '' -%>
controlkey <%= @keys_controlkey %>
<% end -%>
<% end -%>
<% [@fudge].flatten.each do |entry| -%>
© 2024 Puppet, Inc., a Perforce company

Puppet | Syntax and settings | 923
fudge <%= entry %>
<% end -%>
<% unless @leapfile.nil? -%>
# Leapfile
leapfile <%= @leapfile %>
<% end -%>
Validating ERB templates
Before deploying a template, validate its syntax and render its output to make sure the template is producing the
results you expect. Use the Ruby erb command to check Embedded Ruby (ERB) syntax.
ERB validation
To validate your ERB template, pipe the output from the erb command into ruby:
erb -P -x -T '-' example.erb | ruby -c
The -P switch ignores lines that start with ‘%’, the -x switch outputs the template’s Ruby script, and -T '-' sets
the trim mode to be consistent with Puppet’s behavior. This output gets piped into Ruby’s syntax checker (-c).
If you need to validate many templates quickly, you can implement this command as a shell function in your shell’s
login script, such as .bashrc, .zshrc, or .profile:
validate_erb() {
erb -P -x -T '-' $1 | ruby -c
}
You can then run validate_erb example.erb to validate an ERB template.
Evaluating ERB templates
After you have an ERB template, you can pass it to a function that evaluates it and returns a final string. The actual
template can be either a separate file or a string value.
Evaluating ERB templates that are in a template file
Put template files in the templates directory of a module. ERB files use the .erb extension.
To use a ERB template file, evaluate it with the template function. For example:
# template(<FILE REFERENCE>, [<ADDITIONAL FILES>, ...])
file { '/etc/ntp.conf':
ensure => file,
content => template('ntp/ntp.conf.erb'),
# Loads /etc/puppetlabs/code/environments/production/modules/ntp/
templates/ntp.conf.erb
}
The first argument to the function is the file reference: a string in the form '<MODULE>/<FILE>',
which loads <FILE> from <MODULE>’s templates directory. For example, the file reference activemq/
amq/activemq.xml.erb loads the <MODULES DIRECTORY>/activemq/templates/amq/
activemq.xml.erb file.
The template function can take any number of additional template files, and concatenate their outputs together to
produce the final string.
Evaluating ERB template strings
If you have a string value that contains template content, you can evaluate it with the inline_template function.
© 2024 Puppet, Inc., a Perforce company

Puppet | Syntax and settings | 924
In older versions of Puppet, inline templates were mostly used to get around limitations — tiny Ruby fragments were
useful for transforming and manipulating data before Puppet had iteration functions like map or puppetlabs/stdlib
functions like chomp and keys.
In modern versions of Puppet, inline templates are usable in some of the same situations template files are. Because
the heredoc syntax makes it easy to write large and complicated strings in a manifest, you can use inline_erb to
reduce the number of files needed for a simple module that manages a small config file.
For example:
$ntp_conf_template = @(END)
...template content goes here...
END
# inline_template(<TEMPLATE STRING>, [<ADDITIONAL STRINGS>, ...])
file { '/etc/ntp.conf':
ensure => file,
content => inline_template($ntp_conf_template),
}
The inline_template function can take any number of additional template strings, and concatenate their outputs
together to produce the final value.
Advanced constructs
Advanced Puppet language constructs help you write simpler and more effective Puppet code by reducing
complexity.
• Iteration and loops on page 925
Use iteration and loops to write more succinct code, and use data more effectively.
• Lambdas on page 928
Lambdas are blocks of Puppet code passed to functions. When a function receives a lambda, it provides values for the
lambda’s parameters and evaluates its code. If you use other programming languages, think of lambdas as anonymous
functions that are passed to other functions.
• Resource default statements on page 930
Resource default statements enable you to set default attribute values for a given resource type. Resource declarations
within the area of effect that omits those attributes inherit the default values.
• Resource collectors on page 931
Resource collectors select a group of resources by searching the attributes of each resource in the catalog, even
resources which haven’t yet been declared at the time the collector is written. Collectors realize virtual resources, are
used in chaining statements, and override resource attributes. Collectors have an irregular syntax that enables them to
function as a statement and a value.
• Virtual resources on page 933
A virtual resource declaration specifies a desired state for a resource without enforcing that state. Puppet manages the
resource by realizing it elsewhere in your manifests. This divides the work done by a normal resource declaration into
two steps. Although virtual resources are declared one time, they can be realized any number of times, similar to a
class.
© 2024 Puppet, Inc., a Perforce company

Puppet | Syntax and settings | 925
• Exported resources on page 935
An exported resource declaration specifies a desired state for a resource, and publishes the resource for use by other
nodes. It does not manage the resource on the target system. Any node, including the node that exports it, can collect
the exported resource and manage its own copy of it.
• Tags on page 937
Tags are useful for collecting resources, analyzing reports, and restricting catalog runs. Resources, classes, and
defined type instances can have multiple tags associated with them, and they receive some tags automatically.
• Run stages on page 938
Run stages are an additional way to order resources. Groups of classes run before or after everything else, without
having to explicitly create relationships with other classes. The run stage feature has two parts: a stage resource
type, and a stage metaparameter, which assigns a class to a named run stage.
Iteration and loops
Use iteration and loops to write more succinct code, and use data more effectively.
Iteration functions
Instead of using loop keywords, the Puppet language uses iterative functions that accept blocks of code called
lambdas.
Tip: Iteration functions take an array or a hash as their main argument, and iterate over its values.
Iterative functions accept a block of code and run it in a specific way:
• each - Repeats a block of code a number of times, using a collection of values to provide different parameters
each time.
• slice - Repeats a block of code a number of times, using groups of values from a collection as parameters.
• filter - Uses a block of code to transform a data structure by removing non-matching elements.
• map - Uses a block of code to transform every value in a data structure.
• reduce - Uses a block of code to create a new value, or data structure, by combining values from a provided data
structure.
• with - Evaluates a block of code one time, isolating it in its own local scope. It doesn’t iterate, but has a family
resemblance to the iteration functions.
See the slice and reduce documentation for information on how these functions handle parameters differently.
The each, filter, and map functions accept a lambda with either one or two parameters. Depending on the
number of parameters, and the type of data structure you’re iterating over, the values passed into a lambda vary:
Collection type Single parameter Two parameters
Array <VALUE> <INDEX>, <VALUE>
Hash [<KEY>, <VALUE>] (two-element
array)
<KEY>, <VALUE>
Arrays:
This example:
['a','b','c'].each |Integer $index, String $value| { notice("${index} =
${value}") }
Results in:
Notice: Scope(Class[main]): 0 = a
Notice: Scope(Class[main]): 1 = b
Notice: Scope(Class[main]): 2 = c
© 2024 Puppet, Inc., a Perforce company

Puppet | Syntax and settings | 926
2D Arrays:
This example:
$a = [['1', '2'], ['3', '4']]
$a.each |$array| {
$array.each |$int| {
notice($int)
}
}
Results in:
Notice: Scope(Class[main]): 1
Notice: Scope(Class[main]): 2
Notice: Scope(Class[main]): 3
Notice: Scope(Class[main]): 4
Hashes:
This example:
$pets = {
'pet1' => 'dog',
'pet2' => 'cat',
'pet3' => 'goldfish'}
$pets.each |$key, $value| {notice($value)}
Results in:
Notice: Scope(Class[main]): dog
Notice: Scope(Class[main]): cat
Notice: Scope(Class[main]): goldfish
Hashes preserve the order in which their keys and values were written. When iterating over a hash’s members, the
loops occur in the order that they are written. When interpolating a hash into a string, the resulting string is also
constructed in the same order.
Declaring resources
The focus of the Puppet language is declaring resources, so most people want to use iteration to declare many similar
resources at the same time. In this example, there is an array of command names to be used in each symlink’s path
and target. The each function makes this succinct.
$binaries = ['facter', 'hiera', 'mco', 'puppet', 'puppetserver']
$binaries.each |String $binary| {
file {"/usr/bin/${binary}":
ensure => link,
target => "/opt/puppetlabs/bin/${binary}",
}
}
Iteration with defined resource types
In previous versions of Puppet, iteration functions did not exist and lambdas weren’t supported. By writing defined
resource types and using arrays as resource titles you could achieve a clunkier form of iteration.
© 2024 Puppet, Inc., a Perforce company

Puppet | Syntax and settings | 927
Similar to the declaring resources example, include an unique defined resource type in the symlink.pp file:
define puppet::binary::symlink ($binary = $title) {
file {"/usr/bin/${binary}":
ensure => link,
target => "/opt/puppetlabs/bin/${binary}",
}
}
Use the defined type for the iteration somewhere ele in your manifest file:
$binaries = ['facter', 'hiera', 'mco', 'puppet', 'puppetserver']
puppet::binary::symlink { $binaries: }
The main problems with this approach are:
• The block of code doing the work was separated from the place where you used it, which makes a simple task
complicated.
• Every type of thing to iterate over would require its own one-off defined type.
The current Puppet style of iteration is much improved, but you might encounter code that uses this old style, and
might have to use it to target older versions of Puppet.
Using iteration to transform data
To transform data into more useful forms, use iteration. For example:
This returns [1,3]:
$filtered_array = [1,20,3].filter |$value| { $value < 10 }
This returns 6:
$sum = reduce([1,2,3]) |$result, $value| { $result + $value }
This returns {"key1"=>"first value", "key2"=>"second value", "key3"=>"third value"}:
$hash_as_array = ['key1', 'first value',
'key2', 'second value',
'key3', 'third value']
$real_hash = $hash_as_array.slice(2).reduce( {} ) |Hash $memo, Array $pair|
{
$memo + $pair
}
Breaking out of the a loop
You can break out of a loop or skip the next iteration using the break() or next() functions respectively.
© 2024 Puppet, Inc., a Perforce company

Puppet | Syntax and settings | 928
Lambdas
Lambdas are blocks of Puppet code passed to functions. When a function receives a lambda, it provides values for the
lambda’s parameters and evaluates its code. If you use other programming languages, think of lambdas as anonymous
functions that are passed to other functions.
Location
Lambdas are used only in function calls. They cannot be assigned to variables, and are not valid anywhere else in the
Puppet language. While any function accepts a lambda, only some functions do anything with them. For information
on useful lambda-accepting functions, see Iteration and loops.
Syntax
Lambdas consist of a list of parameters surrounded by pipe (|) characters, followed by a block of arbitrary Puppet
code in curly braces. They must be used as part of a function call.
$binaries = ['facter', 'hiera', 'mco', 'puppet', 'puppetserver']
# function call with lambda:
$binaries.each |String $binary| {
file {"/usr/bin/${binary}":
ensure => link,
target => "/opt/puppetlabs/bin/${binary}",
}
}
The general form of a lambda is:
• A mandatory parameter list, which can be empty. This consists of:
• An opening pipe character (|).
• A comma-separated list of zero or more parameters (for example, String $myparam = "default
value"). Each parameter consists of:
• An optional data type, which restricts the values it allows (defaults to Any).
• A variable name to represent the parameter, including the $ prefix.
• An optional equals (=) sign and default value.
• A closing pipe character (|).
• Optionally, another comma and an extra arguments parameter (for example, String *$others =
["default one", "default two"]), which consists of:
• An optional data type, which restricts the values allowed for extra arguments (defaults to Any).
• An asterisk character (*).
• A variable name to represent the parameter, including the $ prefix.
• An optional equals (=) sign and default value, which can be one value that matches the specified data type,
or an array of values that all match the data type.
• An optional trailing comma after the last parameter.
• A closing pipe character (|).
• An opening curly brace.
• A block of arbitrary Puppet code.
• A closing curly brace.
Parameters and variables
When functions call the lambda it sets values for the list of parameters that a lambda contains. and each parameter can
be used as a variable.
Functions pass lambda parameters by position, similar to passing arguments in a function call. Each function decides
how many parameters, and in what order, it passes to a lambda. See the function’s documentation for details.
© 2024 Puppet, Inc., a Perforce company

Puppet | Syntax and settings | 929
Important: The order of parameters is important and there are no restrictions on naming — unlike class or defined
type parameters, where the names are the main interface for users.
Within the parameter list, the data type preceding a parameter is optional. To ensure the correct data is included,
Puppet checks the parameter value at runtime, and raises an error when the value is illegal. When no data type is
provided, values of any data type are accepted by the parameter.
When a parameter contains a default value, it’s optional — the lambda uses the default value when the caller doesn’t
provide a value for that parameter.
Important: Parameters are passed by position. Optional parameters must be poistioned after the required parameters,
otherwise it causes an evaluation error. When you have multiple optional parameters, the later ones only receive
values if all of the prior ones do.
The final parameter of a lambda can be a special extra arguments parameter, which collects an unlimited number
of extra arguments into an array. This is useful when you don’t know in advance how many arguments the caller
provides.
To specify that the last parameter collects extra arguments, write an asterisk (*) in front of its name in the parameter
list (like *$others). An extra arguments parameter is always optional. You can’t put an asterisk (*) in front of
any parameter except the last one. The value of an extra arguments parameter is always an array, containing every
argument in excess of the earlier parameters. If there are no extra arguments and no default value, it will be an empty
array.
An extra arguments parameter can contain a default value, which has automatic array wrapping for convenience:
• When the provided default is a non-array value, the real default is a single-element array containing that value.
• When the provided default is an array, the real default is that array.
An extra arguments parameter can also contain a data type. Puppet uses this data type to validate the elements of
the array. When you specify a data type of String, the final data type of the extra arguments parameter will be
Array[String].
Behavior
Similar to a defined type, a lambda delays evaluation of the Puppet code it contains and makes it available for later.
Unlike defined types, lambdas are not directly invoked by a user. The user provides a lambda to some other piece of
code (a function), and that code decides:
• Whether (and when) to call/evaluate the lambda.
• How many times to call it.
• What values its parameters must have.
• What to do with any values it produces.
Some functions call a single lambda multiple times and provide different parameter values each time. For information
on how a particular function uses its lambda, see its documentation. In this version of the Puppet language, calling a
lambda is to pass it to a function that calls it.
You must use unique resource declarations in the body of a lambda, duplicate resources cause compilation failures.
This means that when a function calls its lambda multiple times, any resource titles in the lambda must include a
parameter value that changes with every call.
In this example, we use the $binary parameter in the title of the lambda’s file resource:
file {"/usr/bin/$binary":
ensure => link,
target => "/opt/puppetlabs/bin/$binary",
}
© 2024 Puppet, Inc., a Perforce company

Puppet | Syntax and settings | 930
When the each function is called, the array we pass has no repeated values to ensure unique file resources.
However, if we are working with an array that came from less reliable external data, we could use the unique
function from stdlib to protect against duplicates. This uniqueness requirement is similar to defined types, which
are also blocks of Puppet code that are evaluated multiple times.
Each time a lambda is called it produces the value of the last expression in the code block. The function that calls
the lambda has access to this value, but not every function does anything with it. Some functions return it, some
transform it, some ignore it, and some use it to do something else entirely.
For example:
• The with function calls its lambda one time and returns the resulting value.
• The map function calls its lambda multiple times and returns an array of every resulting value.
• The each function throws away its lambda's values and returns a copy of its main argument.
Every lambda creates its own local scope which is anonymous, and contains variables which can not be accessed
by qualified names from any other scope. The parent scope of a lambda is the local scope in which that lambda is
written. When a lambda is written inside a class definition, its code block accesses local variables from that class,
as well as variables from that class’s ancestor scopes, and from the top scope. Lambdas can contain other lambdas,
which makes the outer lambda the parent scope of the inner one.
A lambda is a value with the Callable data type, and functions using the modern function API
(Puppet::Functions) use that data type to validate any lambda values it receives. However, the Puppet language
doesn’t provide any way to store or interact with Callable values except as lambdas provided to a function.
Resource default statements
Resource default statements enable you to set default attribute values for a given resource type. Resource declarations
within the area of effect that omits those attributes inherit the default values.
Syntax
Exec {
path => '/usr/bin:/bin:/usr/sbin:/sbin',
environment => 'RUBYLIB=/opt/puppetlabs/puppet/lib/ruby/site_ruby/2.1.0/',
logoutput => true,
timeout => 180,
}
The general form of resource defaults is:
• The capitalized resource type name. If the resource type name has a namespace separator (::), every segment
must be capitalized, for example Concat::Fragment.
• An opening curly brace.
• Any number of attribute and value pairs.
• A closing curly brace.
You can specify defaults for any resource type in Puppet, including defined types.
Behavior
Within the area of effect, each resource type that omits a given attribute uses that attribute’s default value.
Important: Attributes set explicitly in a resource declaration override any default value.
Resource defaults are evaluation order dependent. Defaults are assigned to a created resource when a resource
expression is evaluated; that is, when it is declared for inclusion in the catalog. Puppet uses the default values that are
in effect for the type at evaluation.
© 2024 Puppet, Inc., a Perforce company

Puppet | Syntax and settings | 931
Puppet uses dynamic scoping for resource defaults, even though it no longer uses dynamic variable lookup. This
means that when you use a resource default statement in a class, it could affect any classes or defined types that class
declares. Therefore, they should not be set outside of site.pp. Use per-resource default attributes when possible.
Resource defaults declared in the local scope override any defaults received from parent scopes. Overriding of
resource defaults is per attribute, not per block of attributes. This means local and parent resource defaults that don’t
conflict with each other are merged together.
Resource collectors
Resource collectors select a group of resources by searching the attributes of each resource in the catalog, even
resources which haven’t yet been declared at the time the collector is written. Collectors realize virtual resources, are
used in chaining statements, and override resource attributes. Collectors have an irregular syntax that enables them to
function as a statement and a value.
Syntax
User <| title == 'luke' |> # Collect a single user resource whose title is
'luke'
User <| groups == 'admin' |> # Collect any user resource whose list of
supplemental groups includes 'admin'
Yumrepo['custom_packages'] -> Package <| tag == 'custom' |> # Creates an
order relationship with several package resources
The general form of a resource collector is:
• A capitalized resource type name. This cannot be Class, and there is no way to collect classes.
• <|- An opening angle bracket (less-than sign) and pipe character.
• Optionally, a search expression.
• |> - A pipe character and closing angle bracket (greater-than sign)
Note: Exported resource collectors have a slightly different syntax; see below.
Using a special expression syntax, collectors search the values of resource titles and attributes. This resembles the
normal syntax for Puppet expressions, but is not the same.
Note: Collectors can search only on attributes that are present in the manifests, and cannot read the state of the
target system. For example, the collector Package <| provider == yum |> collects only packages whose
provider attribute is explicitly set to yum in the manifests. It does not match packages that would default to the
yum provider based on the state of the target system.
A collector with an empty search expression matches every resource of the specified resource type.
Use parentheses to improve readability, and to modify the priority and grouping of and and or operators. You can
create complex expressions using four operators.
== (equality search)
This operator is non-symmetric:
• The left operand (attribute) is a string, and must be the name of a resource attribute or the word title
(which searches on the resource’s title). If the resource attribute name is a reserved word (for example, site,
unit, or application), it must be in quotes.
• The right operand (search key) must be a string, boolean, number, resource reference, or undef. The behavior
of arrays and hashes in the right operand is undefined in this version of Puppet.
For a given resource, this operator matches if the value of the attribute (or one of the value’s members, if the
value is an array) is identical to the search key.
!= (non-equality search)
This operator is non-symmetric:
© 2024 Puppet, Inc., a Perforce company

Puppet | Syntax and settings | 932
• The left operand (attribute) is a string, and must be the name of a resource attribute or the word title
(which searches on the resource’s title). If the resource attribute name is a reserved word (for example, site,
unit, or application), it must be in quotes.
• The right operand (search key) must be a string, boolean, number, resource reference, or undef. The behavior
of arrays and hashes in the right operand is undefined in this version of Puppet.
For a given resource, this operator matches if the value of the attribute is not identical to the search key.
Note: This operator always matches if the attribute’s value is an array.
and
Both operands must be valid search expressions. For a given resource, this operator matches if both of the
operands match for that resource. This operator has higher priority than or.
or
Both operands must be valid search expressions. For a given resource, this operator matches if either of the
operands match for that resource. This operator has lower priority than and.
Location
Use resource collectors in a collector attribute block for amending resource attributes, or as the operand of a chaining
statement, or as independent statements.
Collectors cannot be used in the following contexts:
• As the value of a resource attribute
• As the argument of a function
• Within an array or hash
• As the operand of an expression other than a chaining statement
Tip: Resource collector expressions does not produce a directly assignable value. However, the
query_resources function of the puppetdb_query module returns an array of resources. For more
information, see PuppetDB query tools.
Behavior
A resource collector realizes any virtual resources matching its search expression. Empty search expressions match
every resource of the specified resource type.
Note: A collector also collects and realizes any exported resources from the current node. When you use exported
resources that you don’t want realized, exclude them from the collector’s search expression.
Collectors function as a value in two places:
• In a chaining statement, a collector acts as a proxy for every resource (virtual or not) that matches its search
expression.
• When given a block of attributes and values, a collector sets and overrides those attributes for every resource
(virtual or not) matching its search expression.
Note: Collectors used as values also realize any matching virtual resources. When you use virtualized resources, be
careful when chaining collectors or using them for overrides.
Exported resource collectors
An exported resource collector uses a modified syntax that realizes exported resources and imports resources
published by other nodes.
© 2024 Puppet, Inc., a Perforce company

Puppet | Syntax and settings | 933
To use exported resource collectors, enable catalog storage and searching (storeconfigs). See Exported
resources for more details. To enable exported resources, follow the installation instructions and Puppet configuration
instructions in the PuppetDB docs.
Like normal collectors, use exported resource collectors with attribute blocks and chaining statements.
Note: The search for exported resources also searches the catalog being compiled, to avoid having to perform an
additional run before finding them in the store of exported resources.
Exported resource collectors are identical to collectors, except that their angle brackets are doubled.
Nagios_service <<| |>> # realize all exported nagios_service resources
The general form of an exported resource collector is:
• The resource type name, capitalized.
• <<| — Two opening angle brackets (less-than signs) and a pipe character.
• Optionally, a search expression.
• |>> — A pipe character and two closing angle brackets (greater-than signs).
Virtual resources
A virtual resource declaration specifies a desired state for a resource without enforcing that state. Puppet manages the
resource by realizing it elsewhere in your manifests. This divides the work done by a normal resource declaration into
two steps. Although virtual resources are declared one time, they can be realized any number of times, similar to a
class.
Purpose
Virtual resources are useful for:
• Resources whose management depends on at least one of multiple conditions being met.
• Overlapping sets of resources required by any number of classes.
• Resources which are managed only if multiple cross-class conditions are met.
Because they both offer a safe way to add a resource to the catalog in multiple locations, virtual resources can be used
in some of the same situations as classes. The features that distinguish virtual resources are:
• Searchability via resource collectors, which helps to realize overlapping clumps of virtual resources.
• Flatness, such that you can declare a virtual resource and realize it a few lines later without having to clutter your
modules with many single-resource classes.
Syntax
Virtual resources are used in two steps: declaring and realizing. In this example, the apache class declares a virtual
resource, and both the wordpress and freight classes realize it. The resource is managed on any node that has
the wordpress or freight classes applied to it.
Declare: modules/apache/manifests/init.pp
@a2mod { 'rewrite':
ensure => present,
} # note: The a2mod resource type is from the puppetlabs-apache module.
Realize: modules/wordpress/manifests/init.pp
realize A2mod['rewrite']
© 2024 Puppet, Inc., a Perforce company

Puppet | Syntax and settings | 934
Realize again: modules/freight/manifests/init.pp
realize A2mod['rewrite']
To declare a virtual resource, prepend @ (the “at” sign) to the resource type of a normal resource declaration:
@user {'deploy':
uid => 2004,
comment => 'Deployment User',
groups => ["enterprise"],
tag => [deploy, web],
}
To realize one or more virtual resources by title, use the realize function, which accepts one or more resource
references:
realize(User['deploy'], User['zleslie'])
Note: The realize function can be used multiple times on the same virtual resource and the resource is managed
only one time.
A resource collector realizes any virtual resources that match its search expression:
User <| tag == web |>
If multiple resource collectors match a given virtual resource, Puppet manages only that resource one time.
Note: A collector also collects and realizes any exported resources from the current node. If you use exported
resources that you don’t want realized, take care to exclude them from the collector’s search expression. Also, a
collector used in an override block or a chaining statement also realizes any matching virtual resources.
Behavior
A virtual resource declaration does not manage the state of a resource. Instead, it makes a virtual resource available to
resource collectors and the realize function. When a resource is realized, Puppet manages its state.
Unrealized virtual resources are included in the catalog, but are marked inactive.
Note: Virtual resources do not depend on evaluation order. You can realize a virtual resource before the resource has
been declared.
CAUTION: The realize function causes a compilation failure when attempting to realize a virtual
resource that has not been declared. Resource collectors fail silently when they do not match any resources.
When a virtual resource is contained in a class, it cannot be realized unless the class is declared at some point during
the compilation. A common pattern is to declare a class full of virtual resources and then use a collector to choose the
set of resources you need:
include virtual::users
User <| groups == admin or group == wheel |>
Note: You can declare virtual resources of defined resource types. This causes every resource contained in the
defined resource to behave virtually — they are not managed unless their virtual container is realized.
Virtual resources are evaluated in the run stage in which they are declared, not the run stage in which they are
realized.
© 2024 Puppet, Inc., a Perforce company

Puppet | Syntax and settings | 935
Exported resources
An exported resource declaration specifies a desired state for a resource, and publishes the resource for use by other
nodes. It does not manage the resource on the target system. Any node, including the node that exports it, can collect
the exported resource and manage its own copy of it.
Purpose
Exported resources enable the Puppet compiler to share information among nodes by combining information from
multiple nodes’ catalogs. This helps manage things that rely on nodes knowing the states or activity of other nodes.
Note: Exported resources rely on the compiler accessing the information, and can not use information that’s never
sent to the compiler, such as the contents of arbitrary files on a node.
The common use cases are monitoring and backups. A class that manages a service like PostgreSQL, exports
a nagios_service resource which describes how to monitor the service, including information such as
its hostname and port. The Nagios server collects every nagios_service resource, and automatically starts
monitoring the Postgres server.
Note: Exported resources require catalog storage and searching (storeconfigs) enabled on your primary Puppet
server. Both the catalog storage and the searching, among other features, are provided by PuppetDB. To enable
exported resources, see:
• Install PuppetDB on a server at your site
• Connect your Puppet server to PuppetDB
Syntax
Using exported resources requires two steps: declaring and collecting. In the following examples, every node with the
ssh class exports its own SSH host key and then collects the SSH host key of every node (including its own). This
causes every node in the site to trust SSH connections from every other node.
class ssh {
# Declare:
@@sshkey { $::hostname:
type => dsa,
key => $::sshdsakey,
}
# Collect:
Sshkey <<| |>>
}
To declare an exported resource, prepend @@ to the resource type of a standard resource declaration:
@@nagios_service { "check_zfs${::hostname}":
use => 'generic-service',
host_name => $::facts['networking']['fqdn'],
check_command => 'check_nrpe_1arg!check_zfs',
service_description => "check_zfs${::hostname}",
target => '/etc/nagios3/conf.d/nagios_service.cfg',
notify => Service[$nagios::params::nagios_service],
}
To collect exported resources, use an exported resource collector. Collect all exported nagios_service resources:
Nagios_service <<| |>>
© 2024 Puppet, Inc., a Perforce company

Puppet | Syntax and settings | 936
This example, taken from puppetlabs-bacula, which uses the puppetlabs-concat module, collects exported file
fragments for building a Bacula config file:
Concat::Fragment <<| tag == "bacula-storage-dir-${bacula_director}" |>>
Tip: It's difficult to predict the title of an exported resource, because any node could be exporting it. It’s best to
search on a more general attribute, and this is one of the main use cases for tags.
For more information on the collector syntax and search expressions, see Exported resource collectors.
Behavior
When catalog storage and searching (storeconfigs) are enabled, the primary server sends a copy of every
compiled catalog to PuppetDB. PuppetDB retains the recent catalog for every node and provides the server with a
search interface to each catalog.
Declaring an exported resource adds the resource to the catalog marked with an exported flag. Unless it was collected,
this prevents the agent from managing the resource. When PuppetDB receives the catalog, it takes note of this flag.
Collecting an exported resource causes the primary server to send a search query to PuppetDB. PuppetDB responds
with every exported resource that matches the search expression, and the server adds those resources to the catalog.
An exported resource becomes available to other nodes as soon as PuppetDB finishes storing the catalog that contains
it. This is a multi-step process and might not happen immediately. The primary server must have compiled a given
node’s catalog at least one time before its resources become available. When the primary server submits a catalog to
PuppetDB, it is added to a queue and stored as soon as possible. Depending on the PuppetDB server’s workload, there
might be a delay between a node’s catalog being compiled and its resources becoming available.
Normally, exported resource types include their default attribute values. However, defined types are evaluated for the
catalog after the resource is collected, so their default values are not exported. To make sure a defined type's values
are exported, set them explicitly.
To remove stale exported resources, expire or deactive the node that exported them. This ensures that any resources
exported by that node stop appearing in the catalogs served to the remaining agent nodes. For details, see the
documentation for deactivating or expiring nodes.
CAUTION: Each exported resource must be globally unique across every single node. If two nodes export
resources with the same title or same name/namevar, the compilation fails when you attempt to collect both.
Some pre-1.0 versions of PuppetDB do not fail in this case. To ensure uniqueness, every resource you export
must include a substring unique to the node exporting it into its title and name/namevar. The most expedient
way is to use the hostname or fqdn facts.
Restriction: Exported resource collectors do not collect normal or virtual resources. They cannot retrieve non-
exported resources from other nodes’ catalogs.
The following example shows Puppet native types for managing Nagios configuration files. These types become
powerful when you export and collect them.
For example, to create a class for Apache that adds a service definition on your Nagios host, automatically monitoring
the web server:
/etc/puppetlabs/puppet/modules/nagios/manifests/target/apache.pp:
class nagios::target::apache {
@@nagios_host { $::facts['networking']['fqdn']:
ensure => present,
alias => $::hostname,
address => $::ipaddress,
use => 'generic-host',
}
@@nagios_service { "check_ping_${::hostname}":
© 2024 Puppet, Inc., a Perforce company

Puppet | Syntax and settings | 937
check_command => 'check_ping!100.0,20%!500.0,60%',
use => 'generic-service',
host_name => $::facts['networking']['fqdn'],
notification_period => '24x7',
service_description => "${::hostname}_check_ping"
}
}
/etc/puppetlabs/puppet/modules/nagios/manifests/monitor.pp:
class nagios::monitor {
package { [ 'nagios', 'nagios-plugins' ]: ensure => installed, }
service { 'nagios':
ensure => running,
enable => true,
#subscribe => File[$nagios_cfgdir],
require => Package['nagios'],
}
Collect resources and populate /etc/nagios/nagios_*.cfg:
Nagios_host <<||>>
Nagios_service <<||>>
Tags
Tags are useful for collecting resources, analyzing reports, and restricting catalog runs. Resources, classes, and
defined type instances can have multiple tags associated with them, and they receive some tags automatically.
Tag names
For information about the characters allowed in tag names, see reserved words and acceptable names.
Assigning tags to resources
Every resource automatically receives the following tags:
• Its resource type.
• The full name of the class or defined type in which the resource was declared.
• Every namespace segment of the resource’s class or defined type.
For example, a file resource in class apache::ssl is automatically assigned the tags file, apache::ssl,
apache, and ssl. Do not manually assign tags with names that are the same as these automatically assigned tags.
Tip: Class tags are useful when setting up the tagmail module or testing refactored manifests.
Similar to relationships and most metaparameters, tags are passed along by containment. This means a resource
receives all of the tags from the class and/or defined type that contains it. In the case of nested containment (a class
that declares a defined resource, or a defined type that declares other defined resources), a resource receives tags from
all of its containers.
The tag metaparameter accepts a single tag or an array, and these are added to the tags the resource already has. A
tag can also be used with normal resources, defined resources, and classes (when using the resource-like declaration
syntax).
Because containment applies to tags, the example below assigns the us_mirror1 and us_mirror2 tags to every
resource contained by Apache::Vhost['docs.puppetlabs.com'].
To add multiple tags, use the tag metaparameter in a resource declaration:
apache::vhost {'docs.puppetlabs.com':
port => 80,
© 2024 Puppet, Inc., a Perforce company

Puppet | Syntax and settings | 938
tag => ['us_mirror1', 'us_mirror2'],
}
To assign tags to the surrounding container and all of the resources it contains, use the tag function inside a class
definition or defined type. The example below assigns the us_mirror1 and us_mirror2 tags to all of the defined
resources being declared in the class role::public_web, as well as to all of the resources each of them contains.
class role::public_web {
tag 'us_mirror1', 'us_mirror2'
apache::vhost {'docs.puppetlabs.com':
port => 80,
}
ssh::allowgroup {'www-data': }
@@nagios::website {'docs.puppetlabs.com': }
}
Using tags
Tip: Tags are useful when used as an attribute in the search expression of a resource collector for realizing virtual
and exported resources.
Puppet agent and Puppet apply use the tags setting to apply a subset of the node’s catalog. This is useful when
refactoring modules, and enables you to apply a single class on a test node.
The tags setting can be set in puppet.conf to restrict the catalog, or on the command line to temporarily restrict
it. The value of the tags setting must be a comma-separated list of tags, with no spaces between tags:
$ sudo puppet agent --test --tags apache,us_mirror1
The tagmail module sends emails to arbitrary email addresses whenever resources with certain tags are changed.
Resource tags are available to custom report handlers and out-of-band report processors: Each
Puppet::Resource::Status object and Puppet::Util::Log object has a tags key whose value is an
array containing every tag for the resource in question.
For more information, see:
• Processing reports
• Report format
Run stages
Run stages are an additional way to order resources. Groups of classes run before or after everything else, without
having to explicitly create relationships with other classes. The run stage feature has two parts: a stage resource
type, and a stage metaparameter, which assigns a class to a named run stage.
Default main stage
By default there is only one stage, named main. All resources are automatically associated with this stage unless
explicitly assigned to a different one. If you do not use run stages, every resource is in the main stage.
Custom stages
Additional stages are declared as normal resources. Each additional stage must have an order relationship with
another stage, such as Stage['main']. As with normal resources, these relationships are specified with
metaparameters or with chaining arrows.
© 2024 Puppet, Inc., a Perforce company

Puppet | Syntax and settings | 939
In this example, all classes assigned to the first stage are applied before the classes associated with the main
stage, and both of those stages are applied before the last stage.
stage { 'first':
before => Stage['main'],
}
stage { 'last': }
Stage['main'] -> Stage['last']
Assigning classes to stages
After stages have been declared, use the stage metaparameter to assign a class to a custom stage.
This example ensures that the apt-keys class happens before all other classes, which is useful if most of your
package resources rely on those keys.
class { 'apt-keys':
stage => first,
}
Limitations
Run stages have these limitations:
• To assign a class to a stage, you must use the resource-like class declaration syntax and supply the stage explicitly.
You cannot assign classes to stages with the include function, or by relying on automatic parameter lookup
from hiera while using resource-like class declarations.
• You cannot subscribe to or notify resources across a stage boundary.
• Classes that contain other classes, with either the contain function or the anchor pattern, can sometimes behave
badly if declared with a run stage. If the contained class is declared only by its container, it works fine, but if it's
declared anywhere outside its container, it often creates a dependency cycle that prevents the involved classes
being applied.
CAUTION: Due to these limitations, use stages with the simplest of classes, and only when absolutely
necessary. A valid use case is mass dependencies like package repositories.
Details of complex behaviors
Within Puppet language there are complex behavior patterns regarding classes, defined types, and specific areas of
code called scopes.
• Containment on page 939
Containment is what controls the order in which the various parts of your Puppet code are executed. Containment is
the relationship that resources have to classes and defined types, determining what has to happen before other things
can happen.
• Scope on page 941
A scope is a specific area of code that is partially isolated from other areas of code.
• Namespaces and autoloading on page 946
Class and defined type names can be broken up into segments called namespaces which enable the autoloader to find
the class or defined type in your modules.
Containment
Containment is what controls the order in which the various parts of your Puppet code are executed. Containment is
the relationship that resources have to classes and defined types, determining what has to happen before other things
can happen.
Classes and defined type instances contain the resources they declare. Contained resources are not applied before the
container begins, and they finish before the container finishes.
© 2024 Puppet, Inc., a Perforce company

Puppet | Syntax and settings | 940
This means that if any resource or class forms a relationship with the container, it forms the same relationship with
every resource inside the container.
Consider this example:
class ntp {
file { '/etc/ntp.conf':
...
require => Package['ntp'],
notify => Service['ntp'],
}
service { 'ntp':
...
}
package { 'ntp':
...
}
}
include ntp
exec {'/usr/local/bin/update_custom_timestamps.sh':
require => Class['ntp'],
}
Here, exec['/usr/local/bin/update_custom_timestamps.sh'] would happen after every resource
in the ntp class, including the package, file, and service.
Containment allows you to notify and subscribe to classes and defined resource types as though they were a single
resource.
Containment of resources
Resources of both native and defined resource types are automatically contained by the class or defined type in which
they are declared.
Containment of classes
Unlike with resources, Puppet does not automatically contain classes when they are declared inside another class
(by using the include function or resource-like declaration). But in certain situations, having classes contain other
classes can be useful, especially in larger modules where you want to improve code readability by moving chunks of
implementation into separate files.
You can declare a class in any number of places in the code, allowing classes to announce their needs without
worrying about whether other code also needs the same classes at the same time. Puppet includes the declared class
only one time, regardless of how many times it's declared (that is, the include function is idempotent). Usually, this
is fine, and code shouldn't attempt to strictly contain the class. However, there are ways to explicitly set more strict
containment relationships of contained classes when it is called for.
When you're deciding whether to set up explicit containment relationships for declared classes, follow these
guidelines:
• include: When you need to declare a class and nothing in it is required for the enforcement of the current class
you're working on, use the include function. It ensures that the named class is included. It sets no ordering
relationships. Use include as your default choice for declaring classes. Use the other functions only if they meet
specific criteria.
• require: When resources from another class should be enforced before the current class you're working on can
be enforced properly, use the require function to declare classes. It ensures that the named class is included. It
sets relationships so that everything in the named class is enforced before the current class.
• contain: When you are writing a class in which users should be able to set relationships, use the contain
function to declare classes. It ensures that the named class is included. It sets relationships so that any
relationships specified on the current class also apply to the class you're containing.
© 2024 Puppet, Inc., a Perforce company

Puppet | Syntax and settings | 941
The require function
The require function is useful when the class you're writing needs another class to be successfully enforced before
it can be enforced properly.
For example, suppose you're writing classes to install two apps, both of which are distributed by the Chocolatey
package manager, for which you've created a class called chocolatey. Both classes require that Chocolatey
be properly managed before they can each proceed. Instead of using include, which won't ensure Chocolatey's
resources are managed before it installs each app, use require.
class myapp::install {
# works just like include, but also creates a relationship
# Class['chocolatey'] -> Class['myapp::install']
require chocolatey
package { 'myapp':
ensure => present,
}
}
class my_other_app::install {
require chocolatey
package { 'my_other_app':
ensure => present,
}
}
The contain function
Use the contain function to declare that a class is contained. This is useful for when you're writing a class in
which other users should be able to express relationships. Any classes contained in your class will have containment
relationships with any other classes that declare your class. The contain function uses include-like behavior,
containing a class within a surrounding class.
For example, suppose you have three classes that an app package (myapp::install), creating its configuration
file (myapp::config), and managing its service (myapp::service). Using the contain function explicitly
tells Puppet that the internal classes should be contained within the class that declares them. The contain function
works like include, but also adds class relationships that ensure that relationships made on the parent class also
propagate inside, just like they do with resources.
class myapp {
# Using the contain function ensures that relationships on myapp also
apply to these classes
contain myapp::install
contain myapp::config
contain myapp::service
Class['myapp::install'] -> Class['myapp::config'] ~>
Class['myapp::service']
}
Although it may be tempting to use contain everywhere, it's better to use include unless there's an explicit
reason why it won't work.
Scope
A scope is a specific area of code that is partially isolated from other areas of code.
Scopes limit the reach of:
• Variables.
• Resource defaults.
Scopes do not limit the reach of:
© 2024 Puppet, Inc., a Perforce company

Puppet | Syntax and settings | 942
• Resource titles, which are all global.
• Resource references, which can refer to a resource declared in any scope.
A particular scope has access to its own contents, and also receives additional contents from its parent scope, node
scope, and top scope. The rules for how Puppet determines a local scope’s parent are described in scope lookup rules.
In the diagram above:
• Top scope can access variables and defaults only from its own scope.
• Node scope can access variables and defaults from its own scope and top scope.
• Each of the example::parent, example::other, and example::four classes can access variables and
defaults from their own scope, node scope, and top scope.
• The example::child class can access variables and defaults from its own scope, the example::parent
scope, node scope, and top scope.
Top scope
Code that is outside any class definition, type definition, or node definition exists at top scope. Variables and defaults
declared at top scope are available everywhere.
# site.pp
$variable = "Hi!"
class example {
notify {"Message from elsewhere: $variable":}
}
© 2024 Puppet, Inc., a Perforce company

Puppet | Syntax and settings | 943
include example
$ puppet apply site.pp
notice: Message from elsewhere: Hi!
Node scope
Code inside a node definition exists at node scope. Only one node scope can exist at a time because only one node
definition can match a given node.
Variables and defaults declared at node scope are available everywhere except top scope.
Note: Classes and resources declared at top scope bypass node scope entirely, and so cannot access variables or
defaults from node scope.
In this example, node scope can access top scope variables, but not vice-versa.
# site.pp
$top_variable = "Available!"
node 'puppet.example.com' {
$variable = "Hi!"
notify {"Message from here: $variable":}
notify {"Top scope: $top_variable":}
}
notify {"Message from top scope: $variable":}
$ puppet apply site.pp
notice: Message from here: Hi!
notice: Top scope: Available!
notice: Message from top scope:
Local scopes
Code inside a class definition, defined type, or lambda exists in a local scope.
Variables and defaults declared in a local scope are only available in that scope and its children. There are two
different sets of rules for when scopes are considered related. For more information, see scope lookup rules.
In this example, a local scope can see out into node and top scope, but outer scopes cannot see in:
# /etc/puppetlabs/code/modules/scope_example/manifests/init.pp
class scope_example {
$variable = "Hi!"
notify {"Message from here: $variable":}
notify {"Node scope: $node_variable Top scope: $top_variable":}
}
# /etc/puppetlabs/code/environments/production/manifests/site.pp
$top_variable = "Available!"
node 'puppet.example.com' {
$node_variable = "Available!"
include scope_example
notify {"Message from node scope: $variable":}
}
notify {"Message from top scope: $variable":}
$ puppet apply site.pp
notice: Message from here: Hi!
notice: Node scope: Available! Top scope: Available!
notice: Message from node scope:
© 2024 Puppet, Inc., a Perforce company

Puppet | Syntax and settings | 944
notice: Message from top scope:
Overriding received values
Variables and defaults declared at node scope can override those received from top scope. Those declared at local
scope can override those received from node and top scope, as well as any parent scopes. If multiple variables with
the same name are available, Puppet uses the most local one.
# /etc/puppetlabs/code/modules/scope_example/manifests/init.pp
class scope_example {
$variable = "Hi, I'm local!"
notify {"Message from here: $variable":}
}
# /etc/puppetlabs/code/environments/production/manifests/site.pp
$variable = "Hi, I'm top!"
node 'puppet.example.com' {
$variable = "Hi, I'm node!"
include scope_example
}
$ puppet apply site.pp
notice: Message from here: Hi, I'm local!
Resource defaults are processed by attribute rather than as a block. Thus, defaults that declare different attributes are
merged, and only the attributes that conflict are overridden.
In this example, /tmp/example would be a directory owned by the puppet user, and would combine the defaults
from top and local scope:
# /etc/puppetlabs/code/modules/scope_example/manifests/init.pp
class scope_example {
File { ensure => directory, }
file {'/tmp/example':}
}
# /etc/puppetlabs/code/environments/production/manifests/site.pp
File {
ensure => file,
owner => 'puppet',
}
include scope_example
Scope of external node classifier data
Variables provided by an ENC are set at the top scope. However, all of the classes assigned by an ENC are declared
at the node scope.
This results the most expected behavior: variables from an ENC are available everywhere, and classes can use node-
specific variables.
Note: This means compilation fails if a site manifest tries to set a variable that was already set at top scope by an
ENC.
Node scope only exists if there is at least one node definition in the main manifest. If no node definitions exist, then
ENC classes get declared at top scope.
© 2024 Puppet, Inc., a Perforce company

Puppet | Syntax and settings | 945
Named scopes and anonymous scopes
A class definition creates a named scope, whose name is the same as the class’s name. Top scope is also a named
scope; its name is the empty string.
Node scope and the local scopes created by lambdas and defined resources are anonymous and cannot be directly
referenced.
Accessing out-of-scope variables
Variables declared in named scopes can be referenced directly from anywhere, including scopes that otherwise would
not have access to them, by using their qualified global name.
Qualified variable names are formatted using the double-colon namespace separator between segments:
$<NAME OF SCOPE>::<NAME OF VARIABLE>
In the following example, the variable $local_copy is set to the value of the $confdir variable from the
apache::params class:
include apache::params
$local_copy = $apache::params::confdir
Note:
A class must be declared to access its variables; just having the class available in your modules is insufficient.
This means the availability of out-of-scope variables is evaluation-order dependent. Make sure you only access
out-of-scope variables if the class accessing them can guarantee that the other class is already declared, usually by
explicitly declaring it with include before trying to read its variables.
Because the top scope’s name is the empty string, $::my_variable refers to the top-scope value of
$my_variable, even if $my_variable has a different value in local scope.
Variables declared in anonymous scopes can only be accessed normally and do not have qualified global names.
Scope lookup rules
The scope lookup rules determine when a local scope becomes the parent of another local scope.
There are two sets of scope lookup rules: static scope and dynamic scope. Puppet uses:
• Static scope for variables.
• Dynamic scope for resource defaults.
Static scope
In static scope, which Puppet uses for looking up variables, parent scopes are assigned in the following ways:
• Classes can receive parent scopes by class inheritance, using the inherits keyword. A derived class receives
the contents of its base class in addition to the contents of node and top scope.
• A lambda’s parent scope is the local scope in which the lambda is written. It can access variables in that scope by
their short names.
All other local scopes have no parents — they receive their own contents, the contents of node scope (if applicable),
and top scope.
Note: Static scope has the following characteristics:
• Scope contents are predictable and do not depend on evaluation order.
© 2024 Puppet, Inc., a Perforce company

Puppet | Syntax and settings | 946
• Scope contents can be determined simply by looking at the relevant class definition; the place where a class or
defined type is declared has no effect. The only exception is node definitions — if a class is declared outside a
node, it does not receive the contents of node scope.
Dynamic scope
In dynamic scope, which Puppet uses for looking up resource defaults, parent scopes are assigned by both inheritance
and declaration, with preference given to inheritance. The full list of rules is:
• Each scope has only one parent, but can have an unlimited chain of grandparents, and receives the merged
contents of all of them, with nearer ancestors overriding more distant ones.
• The parent of a derived class is its base class.
• The parent of any other class or defined resource is the first scope in which it was declared.
• When you declare a derived class whose base class hasn’t already been declared, the base class is immediately
declared in the current scope, and its parent assigned accordingly. This effectively “inserts” the base class between
the derived class and the current scope. If the base class has already been declared elsewhere, its existing parent
scope is not changed.
Note: Dynamic scope has the following characteristics:
• A scope’s parent cannot be identified by looking at the definition of a class — you must examine every place
where the class or resource might have been declared.
• In some cases, you can only determine a scope’s contents by executing the code.
• Because classes can be declared multiple times with the include function, the contents of a given scope are
evaluation-order dependent.
Namespaces and autoloading
Class and defined type names can be broken up into segments called namespaces which enable the autoloader to find
the class or defined type in your modules.
Syntax
Puppet class and defined type names can consist of any number of namespace segments separated by the double colon
(::) namespace separator, analogous to the slash (/) in a file path.
class apache { ... }
class apache::mod { ... }
class apache::mod::passenger { ... }
define apache::vhost { ... }
Autoloader behavior
When a class or defined resource is declared, Puppet uses its full name to find the class or defined type in your
modules. Every class and defined type must be in its own file in the module’s manifests directory, and each file
must have the .pp file extension.
Names map to file locations as follows:
• The first segment in a name, excluding the empty top namespace, identifies the module. If this is the only
segment, the file name is init.pp.
• The last segment identifies the file name, minus the .pp extension.
• Any segments between the first and last are subdirectories under the manifests directory.
As a result, every class or defined type name maps directly to a file path within Puppet’s modulepath :
© 2024 Puppet, Inc., a Perforce company

Puppet | Syntax and settings | 947
Name File path
apache <MODULE DIRECTORY>/apache/manifests/
init.pp
apache::mod <MODULE DIRECTORY>/apache/manifests/
mod.pp
apache::mod::passenger <MODULE DIRECTORY>/apache/manifests/
mod/passenger.pp
Note: The init.pp file always contains a class or defined type with the same name as the module, and any other
.pp file contains a class or defined type with at least two namespace segments. For example, apache.pp would
contain a class named apache::apache. This means you can’t name a class <MODULE NAME>::init.
Nested definitions and missing files
If a class or defined type is defined inside another class or defined type definition, its name goes under the outer
definition’s namespace.
This causes its real name to be something other than the name it was defined with. For example, in the following
code, the interior class's real name is first::second:
class first {
class second {
...
}
}
However, searching your code for that real name returns nothing. Also, it causes class first::second to be
defined in the wrong file. Avoid structuring your code like this.
If the manifest file that corresponds to a name doesn’t exist, Puppet continues to look for the requested class or
defined type. It does this by removing the final segment of the name and trying to load the corresponding file,
continuing to fall back until it reaches the module’s init.pp file.
Puppet loads the first file it finds like this, and raises an error if that file doesn’t contain the requested class or defined
type.
This behavior allows you to put a class or defined type in the wrong file and still have it work. But structuring things
this way is not recommended.
Securing sensitive data in Puppet
Puppet’s catalog contains sensitive information in clear text. Puppet uses the Sensitive data type to mark your
sensitive data — for example secrets, passwords and private keys — with a flag that hides the value from certain parts
of Puppet, such as reports. However, you can still see this information in plain text files in the cached catalog and
other administrative functions.
There are several methods you can use to keep your sensitive data secure in all parts of Puppet — depending on what
you want to secure — using one or a combination of the methods outlined below.
Securing sensitive data on-disk and in your repository with hiera-eyaml
The hiera-eyaml gem — a backend for Hiera — can protect your sensitive data on-disk and in your repository.
It works by encrypting the sensitive data in plain text YAML files, without securing your entire code base. This
means that you can allow other people access to the code, without access to the sensitive data in that code. To encrypt
sensitive data with hiera-yaml, run through the following steps:
© 2024 Puppet, Inc., a Perforce company

Puppet | Syntax and settings | 948
Install hiera-eyaml:
puppetserver gem install hiera-eyaml
Use the -l parameter to pass a label for the encrypted value:
eyaml encrypt -l 'some_easy_to_use_label' -s 'yourSecretString'
Add the encrypted value to the class parameter in your Hiera configuration:
mymodule::mykey: >
ENC[PKCS7,...
...
...]
During catalog compilation, puppetserver automatically decrypts the secret using hiera-eyaml and injects
the decrypted secret into the catalog.
For more information on using hiera-eyaml, and other hiera-eyaml use cases, see the hiera-eyaml README.
Securing sensitive data in the catalog with lookup_options
If you have class parameters that accept passwords, you need to declare the class parameter as Sensitive. For
example, to define the mykey as Sensitive, you would add the following code to your manifest:
class mymodule (
Sensitive[String[1]] mykey
) { .. }
Note: Sensitive[String[1]] means it's a sensitive string with a length of 1 or greater — not empty.
If you use hiera-eyaml, you need Puppet to convert the values returned to a sensitive value that your class
recognizes. Using Hiera’s lookup_options, you can use the convert_to key, to cast a parameter to the
Sensitive type, to ensure that unsecured values are not returned when searched for with automatic parameter
lookup. For example:
mymodule::mykey: 42
lookup_options:
mymodule::mykey:
convert_to: "Sensitive"
You can also specify a regex instead of a literal parameter name, and Puppet automatically converts the matching
parameters to Sensitive. For example:
lookup_options:
'^profile::.+::sensitive_\w+$':
convert_to: 'Sensitive'
Securing sensitive data in the cached catalog with the node_encrypt module
While the previous two methods secure your data in most parts of Puppet, your data is still exposed in the cached
catalog. The node_encrypt module encrypts data on puppetserver before it goes into the catalog, and it is
only decrypted on the agent when needed, for example, to manage configuration files.
For example:
file { '/etc/secretfile.cfg':
ensure => file,
content => lookup('secret_key').node_encrypt::secret
© 2024 Puppet, Inc., a Perforce company

Puppet | Syntax and settings | 949
}
For more information, see the node_encrypt module on the Forge.
Securing sensitive data in EPP templates
Puppet (version 6.20 and later) can render an Embedded Puppet (EPP) template containing a Sensitive value,
without unwrapping it. For example:
host=<%= $db_host %>
password=<%= $db_password %>
The rendered output is automatically sensitive and used as the file content:
db_password= Sensitive('secure_test')
host = examplehost
file { '/etc/service.conf':
ensure => file,
content => epp('<module>/service.conf.erb')
}
Note: Embedded Ruby (ERB) templates do not support interpolation of sensitive values — you have to manually
unwrap and re-wrap these.
Writing deferred functions to retrieve secrets
Deferred functions allow you to retrieve sensitive information on the agent at runtime. This means that the primary
server does not require access to secrets and allows you to manage secrets with a dedicated secret server and policies
consistent with the rest of your infrastructure.
Using the deferred type, you can create a function to integrate with any secret storage you have access to. The
deferred type allows you to call this function during catalog enforcement to lookup secrets — using information
known only to the agent. The secret is not in plain text during compilation, and therefore not in the catalog. When the
function returns the looked up value, it adds a flag to indicate that the information is sensitive. Puppet then redacts the
sensitive information from its reports.
Note: There are several modules on Puppet Forge that integrate with external secret servers.
Related information
Sensitive on page 895
Sensitive types in the Puppet language are strings marked as sensitive. The value is displayed in plain text in the
catalog and manifest, but is redacted from logs and reports. Because the value is maintained as plain text, use it only
as an aid to ensure that sensitive values are not inadvertently disclosed.
Write a deferred function to store secrets on page 853
Use the Deferred type to create a function that you add to a module to redact sensitive information.
Integrations with secret stores on page 854
The Forge already hosts some community modules that provide integrations with secret stores.
Metaparameter reference
Metaparameters are attributes that work with any resource type, including custom types and defined types. They
change the way Puppet handles resources.
With metaparameters, you can change how Puppet handles specific resources. For example, you can:
© 2024 Puppet, Inc., a Perforce company

Puppet | Syntax and settings | 950
• Add metadata to a resource with the alias or tag metaparameters.
• Set limits on when the resource should be applied, by using relationship metaparameters like notify or
require.
• Prevent Puppet from making changes, by setting the noop metaparameter.
• Change logging verbosity with the loglevel metaparameter.
alias
Creates an alias for the resource. You can explicitly specify the alias metaparameter, but it's usually safer to give the
resource the alias value as the title and provide the full namevar value explicitly.
For example, this sample gives the title as sshdconfig, which acts as the alias. The namevar value is the path,
which is set to '/etc/ssh/sshd_config'.
file { 'sshdconfig':
path => '/etc/ssh/sshd_config',
source => '...'
}
service { 'sshd':
subscribe => File['sshdconfig'],
}
Aliases generally work only for creating relationships; anything else that refers to an existing resource (such as
amending or overriding resource attributes in an inherited class) must use the resource's exact title. For example, the
following code will not work, because there's no way for Puppet to know that the two stanzas should affect the same
file.
file { '/etc/ssh/sshd_config':
owner => root,
group => root,
alias => 'sshdconfig',
}
File['sshdconfig'] {
mode => '0644',
}
audit
Marks a subset of this resource's unmanaged attributes for auditing. Accepts an attribute name, an array of attribute
names, or the value all.
When audit is set for an attribute, when Puppet applies the catalog, it checks whether that attribute of the resource
has been modified, comparing its current value to the previous run. Any change is then logged alongside any actions
Puppet performed while applying the catalog.
before
Specifies one or more resources that depend on this resource, expressed as resource references. Specify multiple
resources as an array of references. When specified, before causes the resource to be applied before the dependent
resources. This is one of the four relationship metaparameters, along with require, notify, and subscribe.
For more information about creating relationships between resources, see Relationships and ordering on page 675.
For details about resource references, see Resource and class references on page 889.
© 2024 Puppet, Inc., a Perforce company

Puppet | Syntax and settings | 951
loglevel
Sets the level at which information is logged. The log levels have the biggest impact when logs are sent to syslog,
which is the default log. Any of the log levels are valid values for this metaparameter. The order of the log levels, in
decreasing priority, is:
• emerg
• alert
• crit
• err
• warning
• notice
• info
• verbose
• debug
noop
Whether to apply this resource in non-operational, or "no-op" mode. When applying a resource in noop mode,
Puppet checks whether the resource is in the desired state as declared in the catalog. If the resource is not in the
desired state, Puppet takes no action, but reports the changes it would have made. These simulated changes appear in
the report sent to the primary server or are displayed be shown on the console if running puppet agent or puppet apply
in the foreground. The simulated changes do not send refresh events to any subscribing or notified resources, although
Puppet logs that a refresh event would have been sent. Valid values are true or false.
Note: The noop setting allows you to globally enable or disable noop mode, but it does not override the noop
metaparameter on individual resources. That is, the value of a global noop setting affects only resources that do not
have an explicit value set for their noop attribute.
notify
Specifies one or more resources that depend on this resource, expressed as resource references. Specify multiple
resources as an array of references.
When this attribute is set, this resource is applied before the notified resources. If Puppet makes changes to this
resource, it causes all of the notified resources to refresh. Refresh behavior varies by resource type: for example,
services restart and mounts unmount and re-mount. Not all types can refresh.
This is one of the four relationship metaparameters, along with before, require, and subscribe. For more
information about creating relationships between resources, see Relationships and ordering on page 675. For
details about resource references, see Resource and class references on page 889.
require
Specifies one or more resources that this resource depends on, expressed as resource references. Specify multiple
resources as an array of references.
When this attribute is set, the required resources are applied before this resource.
This is one of the four relationship metaparameters, along with before, notify, and subscribe. For more
information about creating relationships between resources, see Relationships and ordering on page 675. For
details about resource references, see Resource and class references on page 889.
schedule
A schedule to govern when Puppet is allowed to manage this resource. The value of this metaparameter must be the
name of a schedule resource. This means you must first declare a schedule resource, then refer to it by name.
© 2024 Puppet, Inc., a Perforce company

Puppet | Syntax and settings | 952
For example:
schedule { 'everyday':
period => daily,
range => "2-4"
}
exec { "/usr/bin/apt-get update":
schedule => 'everyday'
}
You can declare the schedule resource anywhere in your manifests, as long as it ends up in the final compiled catalog.
See the schedule type for more information.
stage
Which run stage this class should reside in. To assign a class to a different stage, you must:
• Declare the new stage as a stage resource See the stage type for details.
• Declare an order relationship between the new stage and the main stage.
• Use the resource-like syntax to declare the class, and set the stage metaparameter to the name of the desired
stage.
Important: This metaparameter can only be used on classes, and only when declaring them with the resource-
like syntax. It cannot be used on normal resources or on classes declared with include. By default, all classes are
declared in the main stage.
For example:
stage { 'pre':
before => Stage['main'],
}
class { 'apt-updates':
stage => 'pre',
}
subscribe
Specifies one or more resources that depend on this resource, expressed as resource references. Specify multiple
resources as an array of references.
When this attribute is present, the subscribed resources are applied before this resource. If Puppet makes changes
to any of the subscribed resources, it causes this resource to refresh. Refresh behavior varies by resource type: for
example, services restart and mounts unmount and re-mount. Not all types can refresh.
This is one of the four relationship metaparameters, along with before, require, and notify. For more
information about creating relationships between resources, see Relationships and ordering on page 675. For
details about resource references, see Resource and class references on page 889.
tag
Add the specified tags to the associated resource. Although all resources are automatically tagged with as much
information as possible, such as with each class and definition containing the resource, it can be useful to add your
own tags to a given resource. Multiple tags can be specified as an array:
file {'/etc/hosts':
ensure => file,
source => 'puppet:///modules/site/hosts',
mode => '0644',
© 2024 Puppet, Inc., a Perforce company

Puppet | Syntax and settings | 953
tag => ['bootstrap', 'minimumrun', 'mediumrun'],
}
Tags are useful for things like applying a subset of a host's configuration with the tags configuration setting, such
as with puppet agent --test --tags bootstrap. See the configuration reference for more information
about the tags setting
Configuration Reference
NOTE: This page was generated from the Puppet source code on 2024-08-01 18:15:53 -0700
This page is autogenerated; any changes will get overwritten
Configuration settings
• Each of these settings can be specified in puppet.conf or on the command line.
• Puppet Enterprise (PE) and open source Puppet share the configuration settings documented here. However,
PE defaults differ from open source defaults for some settings, such as node_terminus, storeconfigs,
always_retry_plugins, disable18n, environment_timeout (when Code Manager is enabled),
and the Puppet Server JRuby max-active-instances setting. To verify PE configuration defaults, check the
puppet.conf or pe-puppet-server.conf file after installation.
• When using boolean settings on the command line, use --setting and --no-setting instead of --
setting (true|false). (Using --setting false results in "Error: Could not parse application
options: needless argument".)
• Settings can be interpolated as $variables in other settings; $environment is special, in that puppet master
will interpolate each agent node's environment instead of its own.
• Multiple values should be specified as comma-separated lists; multiple directories should be separated with the
system path separator (usually a colon).
• Settings that represent time intervals should be specified in duration format: an integer immediately followed
by one of the units 'y' (years of 365 days), 'd' (days), 'h' (hours), 'm' (minutes), or 's' (seconds). The unit cannot
be combined with other units, and defaults to seconds when omitted. Examples are '3600' which is equivalent to
'1h' (one hour), and '1825d' which is equivalent to '5y' (5 years).
• If you use the splay setting, note that the period that it waits changes each time the Puppet agent is restarted.
• Settings that take a single file or directory can optionally set the owner, group, and mode for their value: rundir
= $vardir/run { owner = puppet, group = puppet, mode = 644 }
• The Puppet executables ignores any setting that isn't relevant to their function.
See the configuration guide for more details.
agent_catalog_run_lockfile
A lock file to indicate that a puppet agent catalog run is currently in progress. The file contains the pid of the process
that holds the lock on the catalog run.
• Default: $statedir/agent_catalog_run.lock
agent_disabled_lockfile
A lock file to indicate that puppet agent runs have been administratively disabled. File contains a JSON object with
state information.
• Default: $statedir/agent_disabled.lock
allow_duplicate_certs
Whether to allow a new certificate request to overwrite an existing certificate request. If true, then the old certificate
must be cleaned using puppetserver ca clean, and the new request signed using puppetserver ca
sign.
© 2024 Puppet, Inc., a Perforce company
Puppet | Syntax and settings | 954
• Default: false
allow_pson_serialization
Whether to allow PSON serialization. When unable to serialize to JSON or other formats, Puppet falls back to PSON.
This option affects the configuration management service responses of Puppet Server and the process by which the
agent saves its cached catalog. With a default value of false, this option is useful in preventing the loss of data
because rich data cannot be serialized via PSON.
• Default: false
always_retry_plugins
Affects how we cache attempts to load Puppet resource types and features. If true, then calls to
Puppet.type.<type>? Puppet.feature.<feature>? will always attempt to load the type or feature
(which can be an expensive operation) unless it has already been loaded successfully. This makes it possible for a
single agent run to, e.g., install a package that provides the underlying capabilities for a type or feature, and then
later load that type or feature during the same run (even if the type or feature had been tested earlier and had not been
available).
If this setting is set to false, then types and features will only be checked once, and if they are not available, the
negative result is cached and returned for all subsequent attempts to load the type or feature. This behavior is almost
always appropriate for the server, and can result in a significant performance improvement for types and features that
are checked frequently.
• Default: true
autoflush
Whether log files should always flush to disk.
• Default: true
autosign
Whether (and how) to autosign certificate requests. This setting is only relevant on a Puppet Server acting as a
certificate authority (CA).
Valid values are true (autosigns all certificate requests; not recommended), false (disables autosigning certificates), or
the absolute path to a file.
The file specified in this setting may be either a configuration file or a custom policy executable. Puppet will
automatically determine what it is: If the Puppet user (see the user setting) can execute the file, it will be treated as a
policy executable; otherwise, it will be treated as a config file.
If a custom policy executable is configured, the CA Puppet Server will run it every time it receives a CSR. The
executable will be passed the subject CN of the request as a command line argument, and the contents of the CSR in
PEM format on stdin. It should exit with a status of 0 if the cert should be autosigned and non-zero if the cert should
not be autosigned.
If a certificate request is not autosigned, it will persist for review. An admin user can use the puppetserver ca
sign command to manually sign it, or can delete the request.
For info on autosign configuration files, see the guide to Puppet's config files.
• Default: $confdir/autosign.conf
basemodulepath
The search path for global modules. Should be specified as a list of directories separated by the system path separator
character. (The POSIX path separator is ':', and the Windows path separator is ';'.)
These are the modules that will be used by all environments. Note that the modules directory of the active
environment will have priority over any global directories. For more info, see https://puppet.com/docs/puppet/latest/
environments_about.html
© 2024 Puppet, Inc., a Perforce company
Puppet | Syntax and settings | 955
• Default: $codedir/modules:/opt/puppetlabs/puppet/modules
binder_config
The binder configuration file. Puppet reads this file on each request to configure the bindings system. If set to nil (the
default), a $confdir/binder_config.yaml is optionally loaded. If it does not exists, a default configuration is used. If the
setting :binding_config is specified, it must reference a valid and existing yaml file.
• Default: ``
bucketdir
Where FileBucket files are stored.
• Default: $vardir/bucket
ca_fingerprint
The expected fingerprint of the CA certificate. If specified, the agent will compare the CA certificate fingerprint that
it downloads against this value and reject the CA certificate if the values do not match. This only applies during the
first download of the CA certificate.
• Default: ``
ca_name
The name to use the Certificate Authority certificate.
• Default: Puppet CA: $certname
ca_port
The port to use for the certificate authority.
• Default: $serverport
ca_refresh_interval
How often the Puppet agent refreshes its local CA certificates. By default, CA certificates are refreshed every 24
hours. If a different interval is specified, the agent refreshes its CA certificates during the next agent run if the elapsed
time since the certificates were last refreshed exceeds the specified duration.
In general, the interval should be greater than the runinterval value. Setting the ca_refresh_interval
value to 0 or an equal or lesser value than runinterval causes the CA certificates to be refreshed on every run.
If the agent downloads new CA certs, the agent uses those for subsequent network requests. If the refresh request fails
or if the CA certs are unchanged on the server, then the agent run will continue using the local CA certs it already has.
This setting can be a time interval in seconds (30 or 30s), minutes (30m), hours (6h), days (2d), or years (5y).
• Default: 1d
ca_server
The server to use for certificate authority requests. It's a separate server because it cannot and does not need to
horizontally scale.
• Default: $server
ca_ttl
The default TTL for new certificates. This setting can be a time interval in seconds (30 or 30s), minutes (30m), hours
(6h), days (2d), or years (5y).
• Default: 5y
© 2024 Puppet, Inc., a Perforce company
Puppet | Syntax and settings | 956
cacert
The CA certificate.
• Default: $cadir/ca_crt.pem
cacrl
The certificate revocation list (CRL) for the CA.
• Default: $cadir/ca_crl.pem
cadir
The root directory for the certificate authority.
• Default: /etc/puppetlabs/puppetserver/ca
cakey
The CA private key.
• Default: $cadir/ca_key.pem
capub
The CA public key.
• Default: $cadir/ca_pub.pem
catalog_cache_terminus
How to store cached catalogs. Valid values are 'json', 'msgpack' and 'yaml'. The agent application defaults to 'json'.
• Default: ``
catalog_terminus
Where to get node catalogs. This is useful to change if, for instance, you'd like to pre-compile catalogs and store them
in memcached or some other easily-accessed store.
• Default: compiler
cert_inventory
The inventory file. This is a text file to which the CA writes a complete listing of all certificates.
• Default: $cadir/inventory.txt
certdir
The certificate directory.
• Default: $ssldir/certs
certificate_revocation
Whether certificate revocation checking should be enabled, and what level of checking should be performed.
When certificate revocation is enabled, Puppet expects the contents of its CRL to be one or more PEM-encoded CRLs
concatenated together. When using a cert bundle, CRLs for all CAs in the chain of trust must be included in the crl
file. The chain should be ordered from least to most authoritative, with the first CRL listed being for the root of the
chain and the last being for the leaf CA.
When certificate_revocation is set to 'true' or 'chain', Puppet ensures that each CA in the chain of trust has not been
revoked by its issuing CA.
When certificate_revocation is set to 'leaf', Puppet verifies certs against the issuing CA's revocation list, but it does
not verify the revocation status of the issuing CA or any CA above it within the chain of trust.
© 2024 Puppet, Inc., a Perforce company
Puppet | Syntax and settings | 957
When certificate_revocation is set to 'false', Puppet disables all certificate revocation checking and does not attempt to
download the CRL.
• Default: chain
certname
The name to use when handling certificates. When a node requests a certificate from the CA Puppet Server, it uses the
value of the certname setting as its requested Subject CN.
This is the name used when managing a node's permissions in Puppet Server's auth.conf. In most cases, it is also used
as the node's name when matching node definitions and requesting data from an ENC. (This can be changed with the
node_name_value and node_name_fact settings, although you should only do so if you have a compelling
reason.)
A node's certname is available in Puppet manifests as $trusted['certname']. (See Facts and Built-In
Variables for more details.)
• For best compatibility, you should limit the value of certname to only use lowercase letters, numbers, periods,
underscores, and dashes. (That is, it should match /A[a-z0-9._-]+Z/.)
• The special value ca is reserved, and can't be used as the certname for a normal node.
Note: You must set the certname in the main section of the puppet.conf file. Setting it in a different section causes
errors.
Defaults to the node's fully qualified domain name.
• Default: the Host's fully qualified domain name, as determined by Facter
ciphers
The list of ciphersuites for TLS connections initiated by puppet. The default value is chosen to support TLS 1.0 and
up, but can be made more restrictive if needed. The ciphersuites must be specified in OpenSSL format, not IANA.
• Default: ECDHE-ECDSA-AES128-GCM-SHA256:ECDHE-RSA-AES128-GCM-SHA256:ECDHE-
ECDSA-AES256-GCM-SHA384:ECDHE-RSA-AES256-GCM-SHA384:ECDHE-ECDSA-CHACHA20-
POLY1305:ECDHE-RSA-CHACHA20-POLY1305:DHE-RSA-AES128-GCM-SHA256:DHE-RSA-
AES256-GCM-SHA384:DHE-RSA-CHACHA20-POLY1305:ECDHE-ECDSA-AES128-SHA256:ECDHE-
RSA-AES128-SHA256:ECDHE-ECDSA-AES128-SHA:ECDHE-RSA-AES128-SHA:ECDHE-
ECDSA-AES256-SHA384:ECDHE-RSA-AES256-SHA384:ECDHE-ECDSA-AES256-SHA:ECDHE-
RSA-AES256-SHA:DHE-RSA-AES128-SHA256:DHE-RSA-AES256-SHA256:AES128-GCM-
SHA256:AES256-GCM-SHA384:AES128-SHA256:AES256-SHA256
classfile
The file in which puppet agent stores a list of the classes associated with the retrieved configuration. Can be loaded in
the separate puppet executable using the --loadclasses option.
• Default: $statedir/classes.txt
client_datadir
The directory in which serialized data is stored on the client.
• Default: $vardir/client_data
clientbucketdir
Where FileBucket files are stored locally.
• Default: $vardir/clientbucket
clientyamldir
The directory in which client-side YAML data is stored.
© 2024 Puppet, Inc., a Perforce company
Puppet | Syntax and settings | 958
• Default: $vardir/client_yaml
code
Code to parse directly. This is essentially only used by puppet, and should only be set if you're writing your own
Puppet executable.
codedir
The main Puppet code directory. The default for this setting is calculated based on the user. If the process is running
as root or the user that Puppet is supposed to run as, it defaults to a system directory, but if it's running as any other
user, it defaults to being in the user's home directory.
• Default: Unix/Linux: /etc/puppetlabs/code -- Windows: C:\ProgramData\PuppetLabs
\code -- Non-root user: ~/.puppetlabs/etc/code
color
Whether to use colors when logging to the console. Valid values are ansi (equivalent to true), html, and false,
which produces no color.
• Default: ansi
confdir
The main Puppet configuration directory. The default for this setting is calculated based on the user. If the process is
running as root or the user that Puppet is supposed to run as, it defaults to a system directory, but if it's running as any
other user, it defaults to being in the user's home directory.
• Default: Unix/Linux: /etc/puppetlabs/puppet -- Windows: C:\ProgramData
\PuppetLabs\puppet\etc -- Non-root user: ~/.puppetlabs/etc/puppet
config
The configuration file for the current puppet application.
• Default: $confdir/${config_file_name}
config_file_name
The name of the puppet config file.
• Default: puppet.conf
config_version
How to determine the configuration version. By default, it will be the time that the configuration is parsed, but you
can provide a shell script to override how the version is determined. The output of this script will be added to every
log message in the reports, allowing you to correlate changes on your hosts to the source version on the server.
Setting a global value for config_version in puppet.conf is not allowed (but it can be overridden from the
commandline). Please set a per-environment value in environment.conf instead. For more info, see https://
puppet.com/docs/puppet/latest/environments_about.html
configprint
Prints the value of a specific configuration setting. If the name of a setting is provided for this, then the value is
printed and puppet exits. Comma-separate multiple values. For a list of all values, specify 'all'. This setting is
deprecated, the 'puppet config' command replaces this functionality.
crl_refresh_interval
How often the Puppet agent refreshes its local Certificate Revocation List (CRL). By default, the CRL is refreshed
every 24 hours. If a different interval is specified, the agent refreshes its CRL on the next Puppet agent run if the
elapsed time since the CRL was last refreshed exceeds the specified interval.
© 2024 Puppet, Inc., a Perforce company
Puppet | Syntax and settings | 959
In general, the interval should be greater than the runinterval value. Setting the crl_refresh_interval
value to 0 or an equal or lesser value than runinterval causes the CRL to be refreshed on every run.
If the agent downloads a new CRL, the agent will use it for subsequent network requests. If the refresh request fails or
if the CRL is unchanged on the server, then the agent run will continue using the local CRL it already has.This setting
can be a time interval in seconds (30 or 30s), minutes (30m), hours (6h), days (2d), or years (5y).
• Default: 1d
csr_attributes
An optional file containing custom attributes to add to certificate signing requests (CSRs). You should ensure that
this file does not exist on your CA Puppet Server; if it does, unwanted certificate extensions may leak into certificates
created with the puppetserver ca generate command.
If present, this file must be a YAML hash containing a custom_attributes key and/or an
extension_requests key. The value of each key must be a hash, where each key is a valid OID and each value
is an object that can be cast to a string.
Custom attributes can be used by the CA when deciding whether to sign the certificate, but are then discarded.
Attribute OIDs can be any OID value except the standard CSR attributes (i.e. attributes described in RFC 2985
section 5.4). This is useful for embedding a pre-shared key for autosigning policy executables (see the autosign
setting), often by using the 1.2.840.113549.1.9.7 ("challenge password") OID.
Extension requests will be permanently embedded in the final certificate. Extension OIDs must be in the
"ppRegCertExt" (1.3.6.1.4.1.34380.1.1), "ppPrivCertExt" (1.3.6.1.4.1.34380.1.2), or
"ppAuthCertExt" (1.3.6.1.4.1.34380.1.3) OID arcs. The ppRegCertExt arc is reserved for four of the
most common pieces of data to embed: pp_uuid (.1), pp_instance_id (.2), pp_image_name (.3), and
pp_preshared_key (.4) --- in the YAML file, these can be referred to by their short descriptive names instead
of their full OID. The ppPrivCertExt arc is unregulated, and can be used for site-specific extensions. The ppAuthCert
arc is reserved for two pieces of data to embed: pp_authorization (.1) and pp_auth_role (.13). As with
ppRegCertExt, in the YAML file, these can be referred to by their short descriptive name instead of their full OID.
• Default: $confdir/csr_attributes.yaml
csrdir
Where the CA stores certificate requests.
• Default: $cadir/requests
daemonize
Whether to send the process into the background. This defaults to true on POSIX systems, and to false on Windows
(where Puppet currently cannot daemonize).
• Default: true
data_binding_terminus
This setting has been deprecated. Use of any value other than 'hiera' should instead be configured in a version 5
hiera.yaml. Until this setting is removed, it controls which data binding terminus to use for global automatic data
binding (across all environments). By default this value is 'hiera'. A value of 'none' turns off the global binding.
• Default: hiera
default_file_terminus
The default source for files if no server is given in a uri, e.g. puppet:///file. The default of rest causes the file to be
retrieved using the server setting. When running apply the default is file_server, causing requests to be
filled locally.
• Default: rest
© 2024 Puppet, Inc., a Perforce company
Puppet | Syntax and settings | 960
default_manifest
The default main manifest for directory environments. Any environment that doesn't set the manifest setting in its
environment.conf file will use this manifest.
This setting's value can be an absolute or relative path. An absolute path will make all environments default to the
same main manifest; a relative path will allow each environment to use its own manifest, and Puppet will resolve the
path relative to each environment's main directory.
In either case, the path can point to a single file or to a directory of manifests to be evaluated in alphabetical order.
• Default: ./manifests
default_schedules
Boolean; whether to generate the default schedule resources. Setting this to false is useful for keeping external report
processors clean of skipped schedule resources.
• Default: true
deviceconfdir
The root directory of devices' $confdir.
• Default: $confdir/devices
deviceconfig
Path to the device config file for puppet device.
• Default: $confdir/device.conf
devicedir
The root directory of devices' $vardir.
• Default: $vardir/devices
diff
Which diff command to use when printing differences between files. This setting has no default value on Windows,
as standard diff is not available, but Puppet can use many third-party diff tools.
• Default: diff
diff_args
Which arguments to pass to the diff command when printing differences between files. The command to use can be
chosen with the diff setting.
• Default: -u
digest_algorithm
Which digest algorithm to use for file resources and the filebucket. Valid values are sha256, sha384, sha512, sha224,
md5. Default is sha256.
• Default: sha256
disable_i18n
If true, turns off all translations of Puppet and module log messages, which affects error, warning, and info log
messages, as well as any translations in the report and CLI.
• Default: true
© 2024 Puppet, Inc., a Perforce company
Puppet | Syntax and settings | 961
disable_per_environment_manifest
Whether to disallow an environment-specific main manifest. When set to true, Puppet will use the manifest
specified in the default_manifest setting for all environments. If an environment specifies a different main
manifest in its environment.conf file, catalog requests for that environment will fail with an error.
This setting requires default_manifest to be set to an absolute path.
• Default: false
disable_warnings
A comma-separated list of warning types to suppress. If large numbers of warnings are making Puppet's logs too large
or difficult to use, you can temporarily silence them with this setting.
If you are preparing to upgrade Puppet to a new major version, you should re-enable all warnings for a while.
Valid values for this setting are:
• deprecations --- disables deprecation warnings.
• undefined_variables --- disables warnings about non existing variables.
• undefined_resources --- disables warnings about non existing resources.
• Default: []
dns_alt_names
A comma-separated list of alternate DNS names for Puppet Server. These are extra hostnames (in addition to its
certname) that the server is allowed to use when serving agents. Puppet checks this setting when automatically
creating a certificate for Puppet agent or Puppet Server. These can be either IP or DNS, and the type should be
specified and followed with a colon. Untyped inputs will default to DNS.
In order to handle agent requests at a given hostname (like "puppet.example.com"), Puppet Server needs a certificate
that proves it's allowed to use that name; if a server shows a certificate that doesn't include its hostname, Puppet
agents will refuse to trust it. If you use a single hostname for Puppet traffic but load-balance it to multiple Puppet
Servers, each of those servers needs to include the official hostname in its list of extra names.
Note: The list of alternate names is locked in when the server's certificate is signed. If you need to change the list
later, you can't just change this setting; you also need to regenerate the certificate. For more information on that
process, see the cert regen docs.
To see all the alternate names your servers are using, log into your CA server and run puppetserver ca list
--all, then check the output for (alt names: ...). Most agent nodes should NOT have alternate names; the
only certs that should have them are Puppet Server nodes that you want other agents to trust.
document_all
Whether to document all resources when using puppet doc to generate manifest documentation.
• Default: false
environment
The environment in which Puppet is running. For clients, such as puppet agent, this determines the environment
itself, which Puppet uses to find modules and much more. For servers, such as puppet server, this provides the
default environment for nodes that Puppet knows nothing about.
When defining an environment in the [agent] section, this refers to the environment that the agent requests from
the primary server. The environment doesn't have to exist on the local filesystem because the agent fetches it from the
primary server. This definition is used when running puppet agent.
When defined in the [user] section, the environment refers to the path that Puppet uses to search for code and
modules related to its execution. This requires the environment to exist locally on the filesystem where puppet is
being executed. Puppet subcommands, including puppet module and puppet apply, use this definition.
© 2024 Puppet, Inc., a Perforce company
Puppet | Syntax and settings | 962
Given that the context and effects vary depending on the config section in which the environment setting is
defined, do not set it globally.
• Default: production
environment_data_provider
The name of a registered environment data provider used when obtaining environment specific data. The three built
in and registered providers are 'none' (no data), 'function' (data obtained by calling the function 'environment::data()')
and 'hiera' (data obtained using a data provider configured using a hiera.yaml file in root of the environment). Other
environment data providers may be registered in modules on the module path. For such custom data providers see the
respective module documentation. This setting is deprecated.
• Default: ``
environment_timeout
How long the Puppet server should cache data it loads from an environment.
A value of 0 will disable caching. This setting can also be set to unlimited, which will cache environments until
the server is restarted or told to refresh the cache. All other values will result in Puppet server evicting environments
that haven't been used within the last environment_timeout seconds.
You should change this setting once your Puppet deployment is doing non-trivial work. We chose the default value
of 0 because it lets new users update their code without any extra steps, but it lowers the performance of your Puppet
server. We recommend either:
• Setting this to unlimited and explicitly refreshing your Puppet server as part of your code deployment process.
• Setting this to a number that will keep your most actively used environments cached, but allow testing
environments to fall out of the cache and reduce memory usage. A value of 3 minutes (3m) is a reasonable value.
Once you set environment_timeout to a non-zero value, you need to tell Puppet server to read new code from
disk using the environment-cache API endpoint after you deploy new code. See the docs for the Puppet Server
administrative API.
• Default: 0
environmentpath
A search path for directory environments, as a list of directories separated by the system path separator character.
(The POSIX path separator is ':', and the Windows path separator is ';'.)
This setting must have a value set to enable directory environments. The recommended value is $codedir/
environments. For more details, see https://puppet.com/docs/puppet/latest/environments_about.html
• Default: $codedir/environments
evaltrace
Whether each resource should log when it is being evaluated. This allows you to interactively see exactly what is
being done.
• Default: false
exclude_unchanged_resources
Specifies how unchanged resources are listed in reports. When set to true, resources that have had no changes after
catalog application will not have corresponding unchanged resource status updates listed in a report.
• Default: true
external_nodes
The external node classifier (ENC) script to use for node data. Puppet combines this data with the main manifest to
produce node catalogs.
© 2024 Puppet, Inc., a Perforce company
Puppet | Syntax and settings | 963
To enable this setting, set the node_terminus setting to exec.
This setting's value must be the path to an executable command that can produce node information. The command
must:
• Take the name of a node as a command-line argument.
• Return a YAML hash with up to three keys:
• classes --- A list of classes, as an array or hash.
• environment --- A string.
• parameters --- A list of top-scope variables to set, as a hash.
• For unknown nodes, exit with a non-zero exit code.
Generally, an ENC script makes requests to an external data source.
For more info, see the ENC documentation.
• Default: none
fact_name_length_soft_limit
The soft limit for the length of a fact name.
• Default: 2560
fact_value_length_soft_limit
The soft limit for the length of a fact value.
• Default: 4096
factpath
Where Puppet should look for facts. Multiple directories should be separated by the system path separator character.
(The POSIX path separator is ':', and the Windows path separator is ';'.)
• Default: $vardir/lib/facter:$vardir/facts
facts_terminus
The node facts terminus.
• Default: facter
fileserverconfig
Where the fileserver configuration is stored.
• Default: $confdir/fileserver.conf
filetimeout
The minimum time to wait between checking for updates in configuration files. This timeout determines how
quickly Puppet checks whether a file (such as manifests or puppet.conf) has changed on disk. The default will
change in a future release to be 'unlimited', requiring a reload of the Puppet service to pick up changes to its internal
configuration. Currently we do not accept a value of 'unlimited'. To reparse files within an environment in Puppet
Server please use the environment_cache endpoint
• Default: 15s
forge_authorization
The authorization key to connect to the Puppet Forge. Leave blank for unauthorized or license based connections
• Default: ``
© 2024 Puppet, Inc., a Perforce company
Puppet | Syntax and settings | 964
freeze_main
Freezes the 'main' class, disallowing any code to be added to it. This essentially means that you can't have any code
outside of a node, class, or definition other than in the site manifest.
• Default: false
genconfig
When true, causes Puppet applications to print an example config file to stdout and exit. The example will include
descriptions of each setting, and the current (or default) value of each setting, incorporating any settings overridden
on the CLI (with the exception of genconfig itself). This setting only makes sense when specified on the command
line as --genconfig.
• Default: false
genmanifest
Whether to just print a manifest to stdout and exit. Only makes sense when specified on the command line as --
genmanifest. Takes into account arguments specified on the CLI.
• Default: false
graph
Whether to create .dot graph files, which let you visualize the dependency and containment relationships in Puppet's
catalog. You can load and view these files with tools like OmniGraffle (OS X) or graphviz (multi-platform).
Graph files are created when applying a catalog, so this setting should be used on nodes running puppet agent or
puppet apply.
The graphdir setting determines where Puppet will save graphs. Note that we don't save graphs for historical runs;
Puppet will replace the previous .dot files with new ones every time it applies a catalog.
See your graphing software's documentation for details on opening .dot files. If you're using GraphViz's dot
command, you can do a quick PNG render with dot -Tpng <DOT FILE> -o <OUTPUT FILE>.
• Default: false
graphdir
Where to save .dot-format graphs (when the graph setting is enabled).
• Default: $statedir/graphs
group
The group Puppet Server will run as. Used to ensure the agent side processes (agent, apply, etc) create files and
directories readable by Puppet Server when necessary.
• Default: puppet
hiera_config
The hiera configuration file. Puppet only reads this file on startup, so you must restart the puppet server every time
you edit it.
• Default: $confdir/hiera.yaml. However, for backwards compatibility, if a file
exists at $codedir/hiera.yaml, Puppet uses that instead.
hostcert
Where individual hosts store and look for their certificates.
• Default: $certdir/$certname.pem
© 2024 Puppet, Inc., a Perforce company
Puppet | Syntax and settings | 965
hostcert_renewal_interval
How often the Puppet agent renews its client certificate. By default, the client certificate is renewed 30 days before
the certificate expires. If a different interval is specified, the agent renews its client certificate during the next agent
run, assuming that the client certificate has expired within the specified duration.
In general, the hostcert_renewal_interval value should be greater than the runinterval value. Setting
the hostcert_renewal_interval value to 0 disables automatic renewal.
If the agent downloads a new certificate, the agent will use it for subsequent network requests. If the refresh request
fails, the agent run continues to use its existing certificate. This setting can be a time interval in seconds (30 or 30s),
minutes (30m), hours (6h), days (2d), or years (5y).
• Default: 30d
hostcrl
Where the host's certificate revocation list can be found. This is distinct from the certificate authority's CRL.
• Default: $ssldir/crl.pem
hostcsr
Where individual hosts store their certificate request (CSR) while waiting for the CA to issue their certificate.
• Default: $requestdir/$certname.pem
hostprivkey
Where individual hosts store and look for their private key.
• Default: $privatekeydir/$certname.pem
hostpubkey
Where individual hosts store and look for their public key.
• Default: $publickeydir/$certname.pem
http_connect_timeout
The maximum amount of time to wait when establishing an HTTP connection. The default value is 2 minutes. This
setting can be a time interval in seconds (30 or 30s), minutes (30m), hours (6h), days (2d), or years (5y).
• Default: 2m
http_debug
Whether to write HTTP request and responses to stderr. This should never be used in a production environment.
• Default: false
http_extra_headers
The list of extra headers that will be sent with http requests to the primary server. The header definition consists of a
name and a value separated by a colon.
• Default: []
http_keepalive_timeout
The maximum amount of time a persistent HTTP connection can remain idle in the connection pool, before
it is closed. This timeout should be shorter than the keepalive timeout used on the HTTP server, e.g. Apache
KeepAliveTimeout directive. This setting can be a time interval in seconds (30 or 30s), minutes (30m), hours (6h),
days (2d), or years (5y).
• Default: 4s
© 2024 Puppet, Inc., a Perforce company
Puppet | Syntax and settings | 966
http_proxy_host
The HTTP proxy host to use for outgoing connections. The proxy will be bypassed if the server's hostname matches
the NO_PROXY environment variable or no_proxy setting. Note: You may need to use a FQDN for the server
hostname when using a proxy. Environment variable http_proxy or HTTP_PROXY will override this value.
• Default: none
http_proxy_password
The password for the user of an authenticated HTTP proxy. Requires the http_proxy_user setting.
Note that passwords must be valid when used as part of a URL. If a password contains any characters with special
meanings in URLs (as specified by RFC 3986 section 2.2), they must be URL-encoded. (For example, # would
become %23.)
• Default: none
http_proxy_port
The HTTP proxy port to use for outgoing connections
• Default: 3128
http_proxy_user
The user name for an authenticated HTTP proxy. Requires the http_proxy_host setting.
• Default: none
http_read_timeout
The time to wait for data to be read from an HTTP connection. If nothing is read after the elapsed interval then the
connection will be closed. The default value is 10 minutes. This setting can be a time interval in seconds (30 or 30s),
minutes (30m), hours (6h), days (2d), or years (5y).
• Default: 10m
http_user_agent
The HTTP User-Agent string to send when making network requests.
• Default: Puppet/8.9.0 Ruby/3.1.1-p18 (x86_64-linux)
ignore_plugin_errors
Whether the puppet run should ignore errors during pluginsync. If the setting is false and there are errors during
pluginsync, then the agent will abort the run and submit a report containing information about the failed run.
• Default: false
ignoremissingtypes
Skip searching for classes and definitions that were missing during a prior compilation. The list of missing objects is
maintained per-environment and persists until the environment is cleared or the primary server is restarted.
• Default: false
ignoreschedules
Boolean; whether puppet agent should ignore schedules. This is useful for initial puppet agent runs.
• Default: false
© 2024 Puppet, Inc., a Perforce company
Puppet | Syntax and settings | 967
include_legacy_facts
Whether to include legacy facts when requesting a catalog. This option can be set to false if all puppet manifests,
hiera.yaml, and hiera configuration layers no longer access legacy facts, such as $osfamily, and instead access
structured facts, such as $facts['os']['family'].
• Default: false
key_type
The type of private key. Valid values are rsa and ec. Default is rsa.
• Default: rsa
keylength
The bit length of keys.
• Default: 4096
lastrunfile
Where puppet agent stores the last run report summary in yaml format.
• Default: $publicdir/last_run_summary.yaml
lastrunreport
Where Puppet Agent stores the last run report, by default, in yaml format. The format of the report can be changed
by setting the cache key of the report terminus in the routes.yaml file. To avoid mismatches between content and
file extension, this setting needs to be manually updated to reflect the terminus changes.
• Default: $statedir/last_run_report.yaml
ldapattrs
The LDAP attributes to include when querying LDAP for nodes. All returned attributes are set as variables in the top-
level scope. Multiple values should be comma-separated. The value 'all' returns all attributes.
• Default: all
ldapbase
The search base for LDAP searches. It's impossible to provide a meaningful default here, although the LDAP libraries
might have one already set. Generally, it should be the 'ou=Hosts' branch under your main directory.
ldapclassattrs
The LDAP attributes to use to define Puppet classes. Values should be comma-separated.
• Default: puppetclass
ldapparentattr
The attribute to use to define the parent node.
• Default: parentnode
ldappassword
The password to use to connect to LDAP.
ldapport
The LDAP port.
• Default: 389
© 2024 Puppet, Inc., a Perforce company
Puppet | Syntax and settings | 968
ldapserver
The LDAP server.
• Default: ldap
ldapssl
Whether SSL should be used when searching for nodes. Defaults to false because SSL usually requires certificates to
be set up on the client side.
• Default: false
ldapstackedattrs
The LDAP attributes that should be stacked to arrays by adding the values in all hierarchy elements of the tree.
Values should be comma-separated.
• Default: puppetvar
ldapstring
The search string used to find an LDAP node.
• Default: (&(objectclass=puppetClient)(cn=%s))
ldaptls
Whether TLS should be used when searching for nodes. Defaults to false because TLS usually requires certificates to
be set up on the client side.
• Default: false
ldapuser
The user to use to connect to LDAP. Must be specified as a full DN.
libdir
An extra search path for Puppet. This is only useful for those files that Puppet will load on demand, and is only
guaranteed to work for those cases. In fact, the autoload mechanism is responsible for making sure this directory is in
Ruby's search path
• Default: $vardir/lib
localcacert
Where each client stores the CA certificate.
• Default: $certdir/ca.pem
localedest
Where Puppet should store translation files that it pulls down from the central server.
• Default: $vardir/locales
localesource
From where to retrieve translation files. The standard Puppet file type is used for retrieval, so anything that is a
valid file source can be used here.
• Default: puppet:///locales
© 2024 Puppet, Inc., a Perforce company
Puppet | Syntax and settings | 969
location_trusted
This will allow sending the name + password and the cookie header to all hosts that puppet may redirect to. This may
or may not introduce a security breach if puppet redirects you to a site to which you'll send your authentication info
and cookies.
• Default: false
log_level
Default logging level for messages from Puppet. Allowed values are:
• debug
• info
• notice
• warning
• err
• alert
• emerg
• crit
• Default: notice
logdest
Where to send log messages. Choose between 'syslog' (the POSIX syslog service), 'eventlog' (the Windows Event
Log), 'console', or the path to a log file. Multiple destinations can be set using a comma separated list (eg: /path/
file1,console,/path/file2)
• Default: ``
logdir
The directory in which to store log files
• Default: Unix/Linux: /var/log/puppetlabs/puppet -- Windows: C:\ProgramData
\PuppetLabs\puppet\var\log -- Non-root user: ~/.puppetlabs/var/log
manage_internal_file_permissions
Whether Puppet should manage the owner, group, and mode of files it uses internally. Note: For Windows agents, the
default is false for versions 4.10.13 and greater, versions 5.5.6 and greater, and versions 6.0 and greater.
• Default: true
manifest
The entry-point manifest for the primary server. This can be one file or a directory of manifests to be evaluated in
alphabetical order. Puppet manages this path as a directory if one exists or if the path ends with a / or .
Setting a global value for manifest in puppet.conf is not allowed (but it can be overridden from the commandline).
Please use directory environments instead. If you need to use something other than the environment's manifests
directory as the main manifest, you can set manifest in environment.conf. For more info, see https://puppet.com/
docs/puppet/latest/environments_about.html
• Default: ``
masterport
The default port puppet subcommands use to communicate with Puppet Server. (eg puppet facts upload,
puppet agent). May be overridden by more specific settings (see ca_port, report_port).
• Default: 8140
© 2024 Puppet, Inc., a Perforce company
Puppet | Syntax and settings | 970
max_deprecations
Sets the max number of logged/displayed parser validation deprecation warnings in case multiple deprecation
warnings have been detected. A value of 0 blocks the logging of deprecation warnings. The count is per manifest.
• Default: 10
max_errors
Sets the max number of logged/displayed parser validation errors in case multiple errors have been detected. A value
of 0 is the same as a value of 1; a minimum of one error is always raised. The count is per manifest.
• Default: 10
max_warnings
Sets the max number of logged/displayed parser validation warnings in case multiple warnings have been detected. A
value of 0 blocks logging of warnings. The count is per manifest.
• Default: 10
maximum_uid
The maximum allowed UID. Some platforms use negative UIDs but then ship with tools that do not know how to
handle signed ints, so the UIDs show up as huge numbers that can then not be fed back into the system. This is a
hackish way to fail in a slightly more useful way when that happens.
• Default: 4294967290
maxwaitforcert
The maximum amount of time the Puppet agent should wait for its certificate request to be signed. A value of
unlimited will cause puppet agent to ask for a signed certificate indefinitely. This setting can be a time interval in
seconds (30 or 30s), minutes (30m), hours (6h), days (2d), or years (5y).
• Default: unlimited
maxwaitforlock
The maximum amount of time the puppet agent should wait for an already running puppet agent to finish before
starting a new one. This is set by default to 1 minute. A value of unlimited will cause puppet agent to wait
indefinitely. This setting can be a time interval in seconds (30 or 30s), minutes (30m), hours (6h), days (2d), or years
(5y).
• Default: 1m
merge_dependency_warnings
Whether to merge class-level dependency failure warnings.
When a class has a failed dependency, every resource in the class generates a notice level message about the
dependency failure, and a warning level message about skipping the resource.
If true, all messages caused by a class dependency failure are merged into one message associated with the class.
• Default: false
mkusers
Whether to create the necessary user and group that puppet agent will run as.
• Default: false
module_groups
Extra module groups to request from the Puppet Forge. This is an internal setting, and users should never change it.
© 2024 Puppet, Inc., a Perforce company
Puppet | Syntax and settings | 971
• Default: ``
module_repository
The module repository
• Default: https://forgeapi.puppet.com
module_working_dir
The directory into which module tool data is stored
• Default: $vardir/puppet-module
modulepath
The search path for modules, as a list of directories separated by the system path separator character. (The POSIX
path separator is ':', and the Windows path separator is ';'.)
Setting a global value for modulepath in puppet.conf is not allowed (but it can be overridden from the
commandline). Please use directory environments instead. If you need to use something other than the default
modulepath of <ACTIVE ENVIRONMENT'S MODULES DIR>:$basemodulepath, you can set modulepath
in environment.conf. For more info, see https://puppet.com/docs/puppet/latest/environments_about.html
name
The name of the application, if we are running as one. The default is essentially $0 without the path or .rb.
• Default: ``
named_curve
The short name for the EC curve used to generate the EC private key. Valid values must be one of the curves in
OpenSSL::PKey::EC.builtin_curves. Default is prime256v1.
• Default: prime256v1
no_proxy
List of host or domain names that should not go through http_proxy_host. Environment variable no_proxy
or NO_PROXY will override this value. Names can be specified as an FQDN host.example.com, wildcard
*.example.com, dotted domain .example.com, or suffix example.com.
• Default: localhost, 127.0.0.1
node_cache_terminus
How to store cached nodes. Valid values are (none), 'json', 'msgpack', or 'yaml'.
• Default: ``
node_name_fact
The fact name used to determine the node name used for all requests the agent makes to the primary server.
WARNING: This setting is mutually exclusive with node_name_value. Changing this setting also requires changes to
Puppet Server's default auth.conf.
node_name_value
The explicit value used for the node name for all requests the agent makes to the primary server. WARNING: This
setting is mutually exclusive with node_name_fact. Changing this setting also requires changes to Puppet Server's
default auth.conf.
• Default: $certname
© 2024 Puppet, Inc., a Perforce company
Puppet | Syntax and settings | 972
node_terminus
Which node data plugin to use when compiling node catalogs.
When Puppet compiles a catalog, it combines two primary sources of info: the main manifest, and a node data plugin
(often called a "node terminus," for historical reasons). Node data plugins provide three things for a given node name:
1.
A list of classes to add to that node's catalog (and, optionally, values for their parameters).
2.
Which Puppet environment the node should use.
3.
A list of additional top-scope variables to set.
The three main node data plugins are:
• plain --- Returns no data, so that the main manifest controls all node configuration.
• exec --- Uses an external node classifier (ENC), configured by the external_nodes setting. This lets you
pull a list of Puppet classes from any external system, using a small glue script to perform the request and format
the result as YAML.
• classifier (formerly console) --- Specific to Puppet Enterprise. Uses the PE console for node data."
• Default: plain
noop
Whether to apply catalogs in noop mode, which allows Puppet to partially simulate a normal run. This setting affects
puppet agent and puppet apply.
When running in noop mode, Puppet will check whether each resource is in sync, like it does when running normally.
However, if a resource attribute is not in the desired state (as declared in the catalog), Puppet will take no action,
and will instead report the changes it would have made. These simulated changes will appear in the report sent to the
primary Puppet server, or be shown on the console if running puppet agent or puppet apply in the foreground. The
simulated changes will not send refresh events to any subscribing or notified resources, although Puppet will log that
a refresh event would have been sent.
Important note: The noop metaparameter allows you to apply individual resources in noop mode, and will override
the global value of the noop setting. This means a resource with noop => false will be changed if necessary,
even when running puppet agent with noop = true or --noop. (Conversely, a resource with noop => true
will only be simulated, even when noop mode is globally disabled.)
• Default: false
number_of_facts_soft_limit
The soft limit for the total number of facts.
• Default: 2048
onetime
Perform one configuration run and exit, rather than spawning a long-running daemon. This is useful for interactively
running puppet agent, or running puppet agent from cron.
• Default: false
passfile
Where puppet agent stores the password for its private key. Generally unused.
• Default: $privatedir/password
path
The shell search path. Defaults to whatever is inherited from the parent process.
This setting can only be set in the [main] section of puppet.conf; it cannot be set in [server], [agent], or an
environment config section.
© 2024 Puppet, Inc., a Perforce company
Puppet | Syntax and settings | 973
• Default: none
payload_soft_limit
The soft limit for the size of the payload.
• Default: 16777216
pidfile
The file containing the PID of a running process. This file is intended to be used by service management frameworks
and monitoring systems to determine if a puppet process is still in the process table.
• Default: $rundir/${run_mode}.pid
plugindest
Where Puppet should store plugins that it pulls down from the central server.
• Default: $libdir
pluginfactdest
Where Puppet should store external facts that are being handled by pluginsync
• Default: $vardir/facts.d
pluginfactsource
Where to retrieve external facts for pluginsync
• Default: puppet:///pluginfacts
pluginsignore
What files to ignore when pulling down plugins.
• Default: .svn CVS .git .hg
pluginsource
From where to retrieve plugins. The standard Puppet file type is used for retrieval, so anything that is a valid file
source can be used here.
• Default: puppet:///plugins
pluginsync
Whether plugins should be synced with the central server. This setting is deprecated.
• Default: true
postrun_command
A command to run after every agent run. If this command returns a non-zero return code, the entire Puppet run will be
considered to have failed, even though it might have performed work during the normal run.
preferred_serialization_format
The preferred means of serializing ruby instances for passing over the wire. This won't guarantee that all instances
will be serialized using this method, since not all classes can be guaranteed to support this format, but it will be used
for all classes that support it.
• Default: json
© 2024 Puppet, Inc., a Perforce company
Puppet | Syntax and settings | 974
preprocess_deferred
Whether Puppet should call deferred functions before applying the catalog. If set to true, all prerequisites required
for the deferred function must be satisfied before the Puppet run. If set to false, deferred functions follow Puppet
relationships and ordering. In this way, Puppet can install the prerequisites required for a deferred function and call
the deferred function in the same run.
• Default: false
prerun_command
A command to run before every agent run. If this command returns a non-zero return code, the entire Puppet run will
fail.
preview_outputdir
The directory where catalog previews per node are generated.
• Default: $vardir/preview
priority
The scheduling priority of the process. Valid values are 'high', 'normal', 'low', or 'idle', which are mapped to platform-
specific values. The priority can also be specified as an integer value and will be passed as is, e.g. -5. Puppet must be
running as a privileged user in order to increase scheduling priority.
• Default: ``
privatedir
Where the client stores private certificate information.
• Default: $ssldir/private
privatekeydir
The private key directory.
• Default: $ssldir/private_keys
profile
Whether to enable experimental performance profiling
• Default: false
publicdir
Where Puppet stores public files.
• Default: Unix/Linux: /opt/puppetlabs/puppet/public -- Windows: C:\ProgramData
\PuppetLabs\puppet\public -- Non-root user: ~/.puppetlabs/opt/puppet/public
publickeydir
The public key directory.
• Default: $ssldir/public_keys
puppet_trace
Whether to print the Puppet stack trace on some errors. This is a noop if trace is also set.
• Default: false
© 2024 Puppet, Inc., a Perforce company
Puppet | Syntax and settings | 975
puppetdlog
The fallback log file. This is only used when the --logdest option is not specified AND Puppet is running on an
operating system where both the POSIX syslog service and the Windows Event Log are unavailable. (Currently, no
supported operating systems match that description.)
Despite the name, both puppet agent and puppet server will use this file as the fallback logging destination.
For control over logging destinations, see the --logdest command line option in the manual pages for puppet
server, puppet agent, and puppet apply. You can see man pages by running puppet <SUBCOMMAND> --help, or
read them online at https://puppet.com/docs/puppet/latest/man/.
• Default: $logdir/puppetd.log
report
Whether to send reports after every transaction.
• Default: true
report_configured_environmentpath
Specifies how environment paths are reported. When the value of versioned_environment_dirs is true,
Puppet applies the readlink function to the environmentpath setting when constructing the environment's
modulepath. The full readlinked path is referred to as the "resolved path," and the configured path potentially
containing symlinks is the "configured path." When reporting where resources come from, users may choose between
the configured and resolved path.
When set to false, the resolved paths are reported instead of the configured paths.
• Default: true
report_include_system_store
Whether the 'http' report processor should include the system certificate store when submitting reports to HTTPS
URLs. If false, then the 'http' processor will only trust HTTPS report servers whose certificates are issued by the
puppet CA or one of its intermediate CAs. If true, the processor will additionally trust CA certificates in the system's
certificate store.
• Default: false
report_port
The port to communicate with the report_server.
• Default: $serverport
report_server
The server to send transaction reports to.
• Default: $server
reportdir
The directory in which to store reports. Each node gets a separate subdirectory in this directory. This setting is only
used when the store report processor is enabled (see the reports setting).
• Default: $vardir/reports
reports
The list of report handlers to use. When using multiple report handlers, their names should be comma-separated, with
whitespace allowed. (For example, reports = http, store.)
© 2024 Puppet, Inc., a Perforce company
Puppet | Syntax and settings | 976
This setting is relevant to puppet server and puppet apply. The primary Puppet server will call these report handlers
with the reports it receives from agent nodes, and puppet apply will call them with its own report. (In all cases, the
node applying the catalog must have report = true.)
See the report reference for information on the built-in report handlers; custom report handlers can also be loaded
from modules. (Report handlers are loaded from the lib directory, at puppet/reports/NAME.rb.)
To turn off reports entirely, set this to none
• Default: store
reporturl
The URL that reports should be forwarded to. This setting is only used when the http report processor is enabled
(see the reports setting).
• Default: http://localhost:3000/reports/upload
requestdir
Where host certificate requests are stored.
• Default: $ssldir/certificate_requests
resourcefile
The file in which puppet agent stores a list of the resources associated with the retrieved configuration.
• Default: $statedir/resources.txt
resubmit_facts
Whether to send updated facts after every transaction. By default puppet only submits facts at the beginning of the
transaction before applying a catalog. Since puppet can modify the state of the system, the value of the facts may
change after puppet finishes. Therefore, any facts stored in puppetdb may not be consistent until the agent next runs,
typically in 30 minutes. If this feature is enabled, puppet will resubmit facts after applying its catalog, ensuring facts
for the node stored in puppetdb are current. However, this will double the fact submission load on puppetdb, so it is
disabled by default.
• Default: false
rich_data
Enables having extended data in the catalog by storing them as a hash with the special key __ptype. When enabled,
resource containing values of the data types Binary, Regexp, SemVer, SemVerRange, Timespan and
Timestamp, as well as instances of types derived from Object retain their data type.
• Default: true
route_file
The YAML file containing indirector route configuration.
• Default: $confdir/routes.yaml
rundir
Where Puppet PID files are kept.
• Default: Unix/Linux: /var/run/puppetlabs -- Windows: C:\ProgramData\PuppetLabs
\puppet\var\run -- Non-root user: ~/.puppetlabs/var/run
runinterval
How often puppet agent applies the catalog. Note that a runinterval of 0 means "run continuously" rather than "never
run." This setting can be a time interval in seconds (30 or 30s), minutes (30m), hours (6h), days (2d), or years (5y).
© 2024 Puppet, Inc., a Perforce company
Puppet | Syntax and settings | 977
• Default: 30m
runtimeout
The maximum amount of time an agent run is allowed to take. A Puppet agent run that exceeds this timeout will be
aborted. A value of 0 disables the timeout. Defaults to 1 hour. This setting can be a time interval in seconds (30 or
30s), minutes (30m), hours (6h), days (2d), or years (5y).
• Default: 1h
serial
Where the serial number for certificates is stored.
• Default: $cadir/serial
server
The primary Puppet server to which the Puppet agent should connect.
• Default: puppet
server_datadir
The directory in which serialized data is stored, usually in a subdirectory.
• Default: $vardir/server_data
server_list
The list of primary Puppet servers to which the Puppet agent should connect, in the order that they will be tried.
Each value should be a fully qualified domain name, followed by an optional ':' and port number. If a port is omitted,
Puppet uses masterport for that host.
• Default: []
serverport
The default port puppet subcommands use to communicate with Puppet Server. (eg puppet facts upload,
puppet agent). May be overridden by more specific settings (see ca_port, report_port).
• Default: 8140
settings_catalog
Whether to compile and apply the settings catalog
• Default: true
show_diff
Whether to log and report a contextual diff when files are being replaced. This causes partial file contents to pass
through Puppet's normal logging and reporting system, so this setting should be used with caution if you are sending
Puppet's reports to an insecure destination. This feature currently requires the diff/lcs Ruby library.
• Default: false
signeddir
Where the CA stores signed certificates.
• Default: $cadir/signed
skip_logging_catalog_request_destination
Specifies whether to suppress the notice of which compiler supplied the catalog. A value of true suppresses the
notice.
© 2024 Puppet, Inc., a Perforce company
Puppet | Syntax and settings | 978
• Default: false
skip_tags
Tags to use to filter resources. If this is set, then only resources not tagged with the specified tags will be applied.
Values must be comma-separated.
sourceaddress
The address the agent should use to initiate requests.
• Default: ``
splay
Whether to sleep for a random amount of time, ranging from immediately up to its $splaylimit, before
performing its first agent run after a service restart. After this period, the agent runs periodically on its
$runinterval.
For example, assume a default 30-minute $runinterval, splay set to its default of false, and an agent starting
at :00 past the hour. The agent would check in every 30 minutes at :01 and :31 past the hour.
With splay enabled, it waits any amount of time up to its $splaylimit before its first run. For example, it might
randomly wait 8 minutes, then start its first run at :08 past the hour. With the $runinterval at its default 30
minutes, its next run will be at :38 past the hour.
If you restart an agent's puppet service with splay enabled, it recalculates its splay period and delays its first agent
run after restarting for this new period. If you simultaneously restart a group of puppet agents with splay enabled,
their checkins to your primary servers can be distributed more evenly.
• Default: false
splaylimit
The maximum time to delay before an agent's first run when splay is enabled. Defaults to the agent's
$runinterval. The splay interval is random and recalculated each time the agent is started or restarted. This
setting can be a time interval in seconds (30 or 30s), minutes (30m), hours (6h), days (2d), or years (5y).
• Default: $runinterval
srv_domain
The domain which will be queried to find the SRV records of servers to use.
• Default: example.com
ssl_client_header
The header containing an authenticated client's SSL DN. This header must be set by the proxy to the authenticated
client's SSL DN (e.g., /CN=puppet.puppetlabs.com). Puppet will parse out the Common Name (CN) from the
Distinguished Name (DN) and use the value of the CN field for authorization.
Note that the name of the HTTP header gets munged by the web server common gateway interface: an HTTP_ prefix
is added, dashes are converted to underscores, and all letters are uppercased. Thus, to use the X-Client-DN header,
this setting should be HTTP_X_CLIENT_DN.
• Default: HTTP_X_CLIENT_DN
ssl_client_verify_header
The header containing the status message of the client verification. This header must be set by the proxy to
'SUCCESS' if the client successfully authenticated, and anything else otherwise.
Note that the name of the HTTP header gets munged by the web server common gateway interface: an HTTP_ prefix
is added, dashes are converted to underscores, and all letters are uppercased. Thus, to use the X-Client-Verify
header, this setting should be HTTP_X_CLIENT_VERIFY.
© 2024 Puppet, Inc., a Perforce company
Puppet | Syntax and settings | 979
• Default: HTTP_X_CLIENT_VERIFY
ssl_lockfile
A lock file to indicate that the ssl bootstrap process is currently in progress.
• Default: $ssldir/ssl.lock
ssl_trust_store
A file containing CA certificates in PEM format that puppet should trust when making HTTPS requests. This only
applies to https requests to non-puppet infrastructure, such as retrieving file metadata and content from https file
sources, puppet module tool and the 'http' report processor. This setting is ignored when making requests to puppet://
URLs such as catalog and report requests.
• Default: ``
ssldir
Where SSL certificates are kept.
• Default: $confdir/ssl
statedir
The directory where Puppet state is stored. Generally, this directory can be removed without causing harm (although
it might result in spurious service restarts).
• Default: $vardir/state
statefile
Where Puppet agent and Puppet Server store state associated with the running configuration. In the case of Puppet
Server, this file reflects the state discovered through interacting with clients.
• Default: $statedir/state.yaml
statettl
How long the Puppet agent should cache when a resource was last checked or synced. This setting can be a time
interval in seconds (30 or 30s), minutes (30m), hours (6h), days (2d), or years (5y). A value of 0 or unlimited will
disable cache pruning.
This setting affects the usage of schedule resources, as the information about when a resource was last checked
(and therefore when it needs to be checked again) is stored in the statefile. The statettl needs to be large
enough to ensure that a resource will not trigger multiple times during a schedule due to its entry expiring from the
cache.
• Default: 32d
static_catalogs
Whether to compile a static catalog, which occurs only on Puppet Server when the code-id-command and code-
content-command settings are configured in its puppetserver.conf file.
• Default: true
storeconfigs
Whether to store each client's configuration, including catalogs, facts, and related data. This also enables the import
and export of resources in the Puppet language - a mechanism for exchange resources between nodes.
By default this uses the 'puppetdb' backend.
You can adjust the backend using the storeconfigs_backend setting.
• Default: false
© 2024 Puppet, Inc., a Perforce company
Puppet | Syntax and settings | 980
storeconfigs_backend
Configure the backend terminus used for StoreConfigs. By default, this uses the PuppetDB store, which must be
installed and configured before turning on StoreConfigs.
• Default: puppetdb
strict
The strictness level of puppet. Allowed values are:
• off - do not perform extra validation, do not report
• warning - perform extra validation, report as warning
• error - perform extra validation, fail with error (default)
The strictness level is for both language semantics and runtime evaluation validation. In addition to controlling the
behavior with this primary server switch some individual warnings may also be controlled by the disable_warnings
setting.
No new validations will be added to a micro (x.y.z) release, but may be added in minor releases (x.y.0). In major
releases it expected that most (if not all) strictness validation become standard behavior.
• Default: error
strict_environment_mode
Whether the agent specified environment should be considered authoritative, causing the run to fail if the retrieved
catalog does not match it.
• Default: false
strict_variables
Causes an evaluation error when referencing unknown variables. (This does not affect referencing variables that are
explicitly set to undef).
• Default: true
summarize
Whether to print a transaction summary.
• Default: false
supported_checksum_types
Checksum types supported by this agent for use in file resources of a static catalog. Values must be comma-separated.
Valid types are sha256, sha256lite, sha384, sha512, sha224, sha1, sha1lite, md5, md5lite, mtime, ctime. Default is
sha256, sha384, sha512, sha224, md5.
• Default: ["sha256", "sha384", "sha512", "sha224", "md5"]
syslogfacility
What syslog facility to use when logging to syslog. Syslog has a fixed list of valid facilities, and you must choose one
of those; you cannot just make one up.
• Default: daemon
tags
Tags to use to find resources. If this is set, then only resources tagged with the specified tags will be applied. Values
must be comma-separated.
© 2024 Puppet, Inc., a Perforce company
Puppet | Syntax and settings | 981
tasks
Turns on experimental support for tasks and plans in the puppet language. This is for internal API use only. Do not
change this setting.
• Default: false
top_level_facts_soft_limit
The soft limit for the number of top level facts.
• Default: 512
trace
Whether to print stack traces on some errors. Will print internal Ruby stack trace interleaved with Puppet function
frames.
• Default: false
transactionstorefile
Transactional storage file for persisting data between transactions for the purposes of inferring information (such as
corrective_change) on new data received.
• Default: $statedir/transactionstore.yaml
trusted_external_command
The external trusted facts script or directory to use. This setting's value can be set to the path to an executable
command that can produce external trusted facts or to a directory containing those executable commands. The
command(s) must:
• Take the name of a node as a command-line argument.
• Return a JSON hash with the external trusted facts for this node.
• For unknown or invalid nodes, exit with a non-zero exit code.
If the setting points to an executable command, then the external trusted facts will be stored in the 'external' key of
the trusted facts hash. Otherwise for each executable file in the directory, the external trusted facts will be stored in
the <basename> key of the trusted['external'] hash. For example, if the files foo.rb and bar.sh are in the
directory, then trusted['external'] will be the hash { 'foo' => <foo.rb output>, 'bar' =>
<bar.sh output> }.
• Default: ``
trusted_oid_mapping_file
File that provides mapping between custom SSL oids and user-friendly names
• Default: $confdir/custom_trusted_oid_mapping.yaml
use_cached_catalog
Whether to only use the cached catalog rather than compiling a new catalog on every run. Puppet can be run with this
enabled by default and then selectively disabled when a recompile is desired. Because a Puppet agent using cached
catalogs does not contact the primary server for a new catalog, it also does not upload facts at the beginning of the
Puppet run.
• Default: false
use_last_environment
Puppet saves both the initial and converged environment in the last_run_summary file. If they differ, and this setting
is set to true, we will use the last converged environment and skip the node request.
When set to false, we will do the node request and ignore the environment data from the last_run_summary file.
© 2024 Puppet, Inc., a Perforce company
Puppet | Syntax and settings | 982
• Default: true
use_srv_records
Whether the server will search for SRV records in DNS for the current domain.
• Default: false
usecacheonfailure
Whether to use the cached configuration when the remote configuration will not compile. This option is useful for
testing new configurations, where you want to fix the broken configuration rather than reverting to a known-good
one.
• Default: true
user
The user Puppet Server will run as. Used to ensure the agent side processes (agent, apply, etc) create files and
directories readable by Puppet Server when necessary.
• Default: puppet
vardir
Where Puppet stores dynamic and growing data. The default for this setting is calculated specially, like confdir_.
• Default: Unix/Linux: /opt/puppetlabs/puppet/cache -- Windows: C:\ProgramData
\PuppetLabs\puppet\cache -- Non-root user: ~/.puppetlabs/opt/puppet/cache
vendormoduledir
The directory containing vendored modules. These modules will be used by all environments like those in the
basemodulepath. The only difference is that modules in the basemodulepath are pluginsynced, while
vendored modules are not
• Default: /opt/puppetlabs/puppet/vendor_modules
versioned_environment_dirs
Whether or not to look for versioned environment directories, symlinked from $environmentpath/
<environment>. This is an experimental feature and should be used with caution.
• Default: false
waitforcert
How frequently puppet agent should ask for a signed certificate.
When starting for the first time, puppet agent will submit a certificate signing request (CSR) to the server named in
the ca_server setting (usually the primary Puppet server); this may be autosigned, or may need to be approved by
a human, depending on the CA server's configuration.
Puppet agent cannot apply configurations until its approved certificate is available. Since the certificate may or may
not be available immediately, puppet agent will repeatedly try to fetch it at this interval. You can turn off waiting
for certificates by specifying a time of 0, or a maximum amount of time to wait in the maxwaitforcert setting,
in which case puppet agent will exit if it cannot get a cert. This setting can be a time interval in seconds (30 or 30s),
minutes (30m), hours (6h), days (2d), or years (5y).
• Default: 2m
waitforlock
How frequently puppet agent should try running when there is an already ongoing puppet agent instance.
© 2024 Puppet, Inc., a Perforce company

Puppet | Syntax and settings | 983
This argument is by default disabled (value set to 0). In this case puppet agent will immediately exit if it cannot run
at that moment. When a value other than 0 is set, this can also be used in combination with the maxwaitforlock
argument. This setting can be a time interval in seconds (30 or 30s), minutes (30m), hours (6h), days (2d), or years
(5y).
• Default: 0
write_catalog_summary
Whether to write the classfile and resourcefile after applying the catalog. It is enabled by default, except
when running puppet apply.
• Default: true
yamldir
The directory in which YAML data is stored, usually in a subdirectory.
• Default: $vardir/yaml
Built-in function reference
NOTE: This page was generated from the Puppet source code on 2024-08-01 18:16:06 -0700
This page is a list of Puppet's built-in functions, with descriptions of what they do and how to use them.
Functions are plugins you can call during catalog compilation. A call to any function is an expression that resolves to
a value. For more information on how to call functions, see Function calls on page 707
Many of these function descriptions include auto-detected signatures, which are short reminders of the function's
allowed arguments. These signatures aren't identical to the syntax you use to call the function; instead, they resemble
a parameter list from a Puppet Classes on page 680, Defined resource types on page 687, Writing custom
functions in the Puppet language on page 835, or Lambdas on page 928. The syntax of a signature is:
<FUNCTION NAME>(<DATA TYPE> <ARGUMENT NAME>, ...)
The <DATA TYPE> is a Data type syntax on page 875, like String or Optional[Array[String]]. The
<ARGUMENT NAME> is a descriptive name chosen by the function's author to indicate what the argument is used for.
• Any arguments with an Optional data type can be omitted from the function call.
• Arguments that start with an asterisk (like *$values) can be repeated any number of times.
• Arguments that start with an ampersand (like &$block) aren't normal arguments; they represent a code block,
provided with Lambdas on page 928
undef values in Puppet 6
In Puppet 6, many Puppet types were moved out of the Puppet codebase, and into modules on the Puppet Forge.
The new functions handle undef values more strictly than their stdlib counterparts. In Puppet 6, code that relies on
undef values being implicitly treated as other types will return an evaluation error. For more information on which
types were moved into modules, see the Puppet 6 release notes.
abs
Returns the absolute value of a Numeric value, for example -34.56 becomes 34.56. Takes a single Integer or
Float value as an argument.
Deprecated behavior
For backwards compatibility reasons this function also works when given a number in String format such that it
first attempts to covert it to either a Float or an Integer and then taking the absolute value of the result. Only
strings representing a number in decimal format is supported - an error is raised if value is not decimal (using base
© 2024 Puppet, Inc., a Perforce company

Puppet | Syntax and settings | 984
10). Leading 0 chars in the string are ignored. A floating point value in string form can use some forms of scientific
notation but not all.
Callers should convert strings to Numeric before calling this function to have full control over the conversion.
abs(Numeric($str_val))
It is worth noting that Numeric can convert to absolute value directly as in the following examples:
Numeric($strval, true) # Converts to absolute Integer or Float
Integer($strval, 10, true) # Converts to absolute Integer using base 10
(decimal)
Integer($strval, 16, true) # Converts to absolute Integer using base 16
(hex)
Float($strval, true) # Converts to absolute Float
Signature 1
abs(Numeric $val)
Signature 2
abs(String $val)
alert
Logs a message on the server at level alert.
alert(Any *$values)
Parameters
• *values --- The values to log.
Return type(s): Undef.
all
Runs a lambda repeatedly using each value in a data structure until the lambda returns a non "truthy" value which
makes the function return false, or if the end of the iteration is reached, true is returned.
This function takes two mandatory arguments, in this order:
1.
An array, hash, or other iterable object that the function will iterate over.
2.
A lambda, which the function calls for each element in the first argument. It can request one or two parameters.
$data.all |$parameter| { <PUPPET CODE BLOCK> }
or
all($data) |$parameter| { <PUPPET CODE BLOCK> }
# For the array $data, run a lambda that checks that all values are
multiples of 10
$data = [10, 20, 30]
notice $data.all |$item| { $item % 10 == 0 }
Would notice true.
When the first argument is a Hash, Puppet passes each key and value pair to the lambda as an array in the form
[key, value].
# For the hash $data, run a lambda using each item as a key-value array
$data = { 'a_0'=> 10, 'b_1' => 20 }
© 2024 Puppet, Inc., a Perforce company

Puppet | Syntax and settings | 985
notice $data.all |$item| { $item[1] % 10 == 0 }
Would notice true if all values in the hash are multiples of 10.
When the lambda accepts two arguments, the first argument gets the index in an array or the key from a hash, and the
second argument the value.
# Check that all values are a multiple of 10 and keys start with 'abc'
$data = {abc_123 => 10, abc_42 => 20, abc_blue => 30}
notice $data.all |$key, $value| { $value % 10 == 0 and $key =~ /^abc/ }
Would notice true.
For an general examples that demonstrates iteration, see the Puppet iteration documentation.
Signature 1
all(Hash[Any, Any] $hash, Callable[2,2] &$block)
Signature 2
all(Hash[Any, Any] $hash, Callable[1,1] &$block)
Signature 3
all(Iterable $enumerable, Callable[2,2] &$block)
Signature 4
all(Iterable $enumerable, Callable[1,1] &$block)
annotate
Handles annotations on objects. The function can be used in four different ways.
With two arguments, an Annotation type and an object, the function returns the annotation for the object of the
given type, or undef if no such annotation exists.
$annotation = Mod::NickNameAdapter.annotate(o)
$annotation = annotate(Mod::NickNameAdapter.annotate, o)
With three arguments, an Annotation type, an object, and a block, the function returns the annotation for the
object of the given type, or annotates it with a new annotation initialized from the hash returned by the given block
when no such annotation exists. The block will not be called when an annotation of the given type is already present.
$annotation = Mod::NickNameAdapter.annotate(o) || { { 'nick_name' =>
'Buddy' } }
$annotation = annotate(Mod::NickNameAdapter.annotate, o) || { { 'nick_name'
=> 'Buddy' } }
With three arguments, an Annotation type, an object, and an Hash, the function will annotate the given object
with a new annotation of the given type that is initialized from the given hash. An existing annotation of the given
type is discarded.
$annotation = Mod::NickNameAdapter.annotate(o, { 'nick_name' => 'Buddy' })
$annotation = annotate(Mod::NickNameAdapter.annotate, o, { 'nick_name' =>
'Buddy' })
© 2024 Puppet, Inc., a Perforce company

Puppet | Syntax and settings | 986
With three arguments, an Annotation type, an object, and an the string clear, the function will clear the
annotation of the given type in the given object. The old annotation is returned if it existed.
$annotation = Mod::NickNameAdapter.annotate(o, clear)
$annotation = annotate(Mod::NickNameAdapter.annotate, o, clear)
With three arguments, the type Pcore, an object, and a Hash of hashes keyed by Annotation types, the function
will annotate the given object with all types used as keys in the given hash. Each annotation is initialized with the
nested hash for the respective type. The annotated object is returned.
$person = Pcore.annotate(Mod::Person({'name' => 'William'}), {
Mod::NickNameAdapter >= { 'nick_name' => 'Bill' },
Mod::HobbiesAdapter => { 'hobbies' => ['Ham Radio', 'Philatelist'] }
})
Signature 1
annotate(Type[Annotation] $type, Any $value, Optional[Callable[0, 0]] &$block)
Signature 2
annotate(Type[Annotation] $type, Any $value,
Variant[Enum[clear],Hash[Pcore::MemberName,Any]] $annotation_hash)
Signature 3
annotate(Type[Pcore] $type, Any $value, Hash[Type[Annotation],
Hash[Pcore::MemberName,Any]] $annotations)
any
Runs a lambda repeatedly using each value in a data structure until the lambda returns a "truthy" value which makes
the function return true, or if the end of the iteration is reached, false is returned.
This function takes two mandatory arguments, in this order:
1.
An array, hash, or other iterable object that the function will iterate over.
2.
A lambda, which the function calls for each element in the first argument. It can request one or two parameters.
$data.any |$parameter| { <PUPPET CODE BLOCK> }
or
any($data) |$parameter| { <PUPPET CODE BLOCK> }
# For the array $data, run a lambda that checks if an unknown hash contains
those keys
$data = ["routers", "servers", "workstations"]
$looked_up = lookup('somekey', Hash)
notice $data.any |$item| { $looked_up[$item] }
Would notice true if the looked up hash had a value that is neither false nor undef for at least one of the
keys. That is, it is equivalent to the expression $looked_up[routers] || $looked_up[servers] ||
$looked_up[workstations].
When the first argument is a Hash, Puppet passes each key and value pair to the lambda as an array in the form
[key, value].
# For the hash $data, run a lambda using each item as a key-value array.
$data = {"rtr" => "Router", "svr" => "Server", "wks" => "Workstation"}
$looked_up = lookup('somekey', Hash)
notice $data.any |$item| { $looked_up[$item[0]] }
© 2024 Puppet, Inc., a Perforce company

Puppet | Syntax and settings | 987
Would notice true if the looked up hash had a value for one of the wanted key that is neither false nor undef.
When the lambda accepts two arguments, the first argument gets the index in an array or the key from a hash, and the
second argument the value.
# Check if there is an even numbered index that has a non String value
$data = [key1, 1, 2, 2]
notice $data.any |$index, $value| { $index % 2 == 0 and $value !~ String }
Would notice true as the index 2 is even and not a String
For an general examples that demonstrates iteration, see the Puppet iteration documentation.
Signature 1
any(Hash[Any, Any] $hash, Callable[2,2] &$block)
Signature 2
any(Hash[Any, Any] $hash, Callable[1,1] &$block)
Signature 3
any(Iterable $enumerable, Callable[2,2] &$block)
Signature 4
any(Iterable $enumerable, Callable[1,1] &$block)
assert_type
Returns the given value if it is of the given data type, or otherwise either raises an error or executes an optional two-
parameter lambda.
The function takes two mandatory arguments, in this order:
1.
The expected data type.
2.
A value to compare against the expected data type.
$raw_username = 'Amy Berry'
# Assert that $raw_username is a non-empty string and assign it to
$valid_username.
$valid_username = assert_type(String[1], $raw_username)
# $valid_username contains "Amy Berry".
# If $raw_username was an empty string or a different data type, the Puppet
run would
# fail with an "Expected type does not match actual" error.
You can use an optional lambda to provide enhanced feedback. The lambda takes two mandatory parameters, in this
order:
1.
The expected data type as described in the function's first argument.
2.
The actual data type of the value.
$raw_username = 'Amy Berry'
# Assert that $raw_username is a non-empty string and assign it to
$valid_username.
# If it isn't, output a warning describing the problem and use a default
value.
$valid_username = assert_type(String[1], $raw_username) |$expected, $actual|
{
© 2024 Puppet, Inc., a Perforce company

Puppet | Syntax and settings | 988
warning( "The username should be \'${expected}\', not \'${actual}\'. Using
'anonymous'." )
'anonymous'
}
# $valid_username contains "Amy Berry".
# If $raw_username was an empty string, the Puppet run would set
$valid_username to
# "anonymous" and output a warning: "The username should be 'String[1,
default]', not
# 'String[0, 0]'. Using 'anonymous'."
For more information about data types, see the documentation.
Signature 1
assert_type(Type $type, Any $value, Optional[Callable[Type, Type]] &$block)
Signature 2
assert_type(String $type_string, Any $value, Optional[Callable[Type, Type]] &
$block)
binary_file
Loads a binary file from a module or file system and returns its contents as a Binary. The argument to this function
should be a <MODULE NAME>/<FILE> reference, which will load <FILE> from a module's files directory.
(For example, the reference mysql/mysqltuner.pl will load the file <MODULES DIRECTORY>/mysql/
files/mysqltuner.pl.)
This function also accepts an absolute file path that allows reading binary file content from anywhere on disk.
An error is raised if the given file does not exists.
To search for the existence of files, use the find_file() function.
• since 4.8.0
binary_file(String $path)
break
Breaks an innermost iteration as if it encountered an end of input. This function does not return to the caller.
The signal produced to stop the iteration bubbles up through the call stack until either terminating the innermost
iteration or raising an error if the end of the call stack is reached.
The break() function does not accept an argument.
$data = [1,2,3]
notice $data.map |$x| { if $x == 3 { break() } $x*10 }
Would notice the value [10, 20]
function break_if_even($x) {
if $x % 2 == 0 { break() }
}
$data = [1,2,3]
notice $data.map |$x| { break_if_even($x); $x*10 }
Would notice the value [10]
• Also see functions next and return
break()
© 2024 Puppet, Inc., a Perforce company

Puppet | Syntax and settings | 989
call
Calls an arbitrary Puppet function by name.
This function takes one mandatory argument and one or more optional arguments:
1.
A string corresponding to a function name.
2.
Any number of arguments to be passed to the called function.
3.
An optional lambda, if the function being called supports it.
This function can also be used to resolve a Deferred given as the only argument to the function (does not accept
arguments nor a block).
$a = 'notice'
call($a, 'message')
$a = 'each'
$b = [1,2,3]
call($a, $b) |$item| {
notify { $item: }
}
The call function can be used to call either Ruby functions or Puppet language functions.
When used with Deferred values, the deferred value can either describe a function call, or a dig into a variable.
$d = Deferred('join', [[1,2,3], ':']) # A future call to join that joins the
arguments 1,2,3 with ':'
notice($d.call())
Would notice the string "1:2:3".
$d = Deferred('$facts', ['processors', 'count'])
notice($d.call())
Would notice the value of $facts['processors']['count'] at the time when the call is made.
• Deferred values supported since Puppet 6.0
Signature 1
call(String $function_name, Any *$arguments, Optional[Callable] &$block)
Signature 2
call(Deferred $deferred)
camelcase
Creates a Camel Case version of a String
This function is compatible with the stdlib function with the same name.
The function does the following:
• For a String the conversion replaces all combinations of *_<char>* with an upcased version of the character
following the _. This is done using Ruby system locale which handles some, but not all special international up-
casing rules (for example German double-s ß is upcased to "Ss").
• For an Iterable[Variant[String, Numeric]] (for example an Array) each value is capitalized and
the conversion is not recursive.
• If the value is Numeric it is simply returned (this is for backwards compatibility).
• An error is raised for all other data types.
• The result will not contain any underscore characters.
© 2024 Puppet, Inc., a Perforce company

Puppet | Syntax and settings | 990
Please note: This function relies directly on Ruby's String implementation and as such may not be entirely UTF8
compatible. To ensure best compatibility please use this function with Ruby 2.4.0 or greater - https://bugs.ruby-
lang.org/issues/10085.
'hello_friend'.camelcase()
camelcase('hello_friend')
Would both result in "HelloFriend"
['abc_def', 'bcd_xyz'].camelcase()
camelcase(['abc_def', 'bcd_xyz'])
Would both result in ['AbcDef', 'BcdXyz']
Signature 1
camelcase(Numeric $arg)
Signature 2
camelcase(String $arg)
Signature 3
camelcase(Iterable[Variant[String, Numeric]] $arg)
capitalize
Capitalizes the first character of a String, or the first character of every String in an Iterable value (such as an Array).
This function is compatible with the stdlib function with the same name.
The function does the following:
• For a String, a string is returned in which the first character is uppercase. This is done using Ruby system
locale which handles some, but not all special international up-casing rules (for example German double-s ß is
capitalized to "Ss").
• For an Iterable[Variant[String, Numeric]] (for example an Array) each value is capitalized and
the conversion is not recursive.
• If the value is Numeric it is simply returned (this is for backwards compatibility).
• An error is raised for all other data types.
Please note: This function relies directly on Ruby's String implementation and as such may not be entirely UTF8
compatible. To ensure best compatibility please use this function with Ruby 2.4.0 or greater - https://bugs.ruby-
lang.org/issues/10085.
'hello'.capitalize()
capitalize('hello')
Would both result in "Hello"
['abc', 'bcd'].capitalize()
capitalize(['abc', 'bcd'])
Would both result in ['Abc', 'Bcd']
Signature 1
capitalize(Numeric $arg)
Signature 2
capitalize(String $arg)
© 2024 Puppet, Inc., a Perforce company

Puppet | Syntax and settings | 991
Signature 3
capitalize(Iterable[Variant[String, Numeric]] $arg)
ceiling
Returns the smallest Integer greater or equal to the argument. Takes a single numeric value as an argument.
This function is backwards compatible with the same function in stdlib and accepts a Numeric value. A String
that can be converted to a floating point number can also be used in this version - but this is deprecated.
In general convert string input to Numeric before calling this function to have full control over how the conversion
is done.
Signature 1
ceiling(Numeric $val)
Signature 2
ceiling(String $val)
chomp
Returns a new string with the record separator character(s) removed. The record separator is the line ending
characters \r and \n.
This function is compatible with the stdlib function with the same name.
The function does the following:
• For a String the conversion removes \r\n, \n or \r from the end of a string.
• For an Iterable[Variant[String, Numeric]] (for example an Array) each value is processed and
the conversion is not recursive.
• If the value is Numeric it is simply returned (this is for backwards compatibility).
• An error is raised for all other data types.
"hello\r\n".chomp()
chomp("hello\r\n")
Would both result in "hello"
["hello\r\n", "hi\r\n"].chomp()
chomp(["hello\r\n", "hi\r\n"])
Would both result in ['hello', 'hi']
Signature 1
chomp(Numeric $arg)
Signature 2
chomp(String $arg)
Signature 3
chomp(Iterable[Variant[String, Numeric]] $arg)
chop
Returns a new string with the last character removed. If the string ends with \r\n, both characters are removed.
Applying chop to an empty string returns an empty string. If you wish to merely remove record separators then you
should use the chomp function.
This function is compatible with the stdlib function with the same name.
© 2024 Puppet, Inc., a Perforce company

Puppet | Syntax and settings | 992
The function does the following:
• For a String the conversion removes the last character, or if it ends with \r\n` it removes both. If String is empty
an empty string is returned.
• For an Iterable[Variant[String, Numeric]] (for example an Array) each value is processed and
the conversion is not recursive.
• If the value is Numeric it is simply returned (this is for backwards compatibility).
• An error is raised for all other data types.
"hello\r\n".chop()
chop("hello\r\n")
Would both result in "hello"
"hello".chop()
chop("hello")
Would both result in "hell"
["hello\r\n", "hi\r\n"].chop()
chop(["hello\r\n", "hi\r\n"])
Would both result in ['hello', 'hi']
Signature 1
chop(Numeric $arg)
Signature 2
chop(String $arg)
Signature 3
chop(Iterable[Variant[String, Numeric]] $arg)
compare
Compares two values and returns -1, 0 or 1 if first value is smaller, equal or larger than the second value. The
compare function accepts arguments of the data types String, Numeric, Timespan, Timestamp, and Semver,
such that:
• two of the same data type can be compared
• Timespan and Timestamp can be compared with each other and with Numeric
When comparing two String values the comparison can be made to consider case by passing a third (optional)
boolean false value - the default is true which ignores case as the comparison operators in the Puppet Language.
Signature 1
compare(Numeric $a, Numeric $b)
Signature 2
compare(String $a, String $b, Optional[Boolean] $ignore_case)
Signature 3
compare(Semver $a, Semver $b)
Signature 4
compare(Numeric $a, Variant[Timespan, Timestamp] $b)
Signature 5
© 2024 Puppet, Inc., a Perforce company

Puppet | Syntax and settings | 993
compare(Timestamp $a, Variant[Timestamp, Numeric] $b)
Signature 6
compare(Timespan $a, Variant[Timespan, Numeric] $b)
contain
Makes one or more classes be contained inside the current class. If any of these classes are undeclared, they will be
declared as if there were declared with the include function. Accepts a class name, an array of class names, or a
comma-separated list of class names.
A contained class will not be applied before the containing class is begun, and will be finished before the containing
class is finished.
You must use the class's full name; relative names are not allowed. In addition to names in string form, you may
also directly use Class and Resource Type-values that are produced by evaluating resource and relationship
expressions.
The function returns an array of references to the classes that were contained thus allowing the function call to
contain to directly continue.
• Since 4.0.0 support for Class and Resource Type-values, absolute names
• Since 4.7.0 a value of type Array[Type[Class[n]]] is returned with all the contained classes
contain(Any *$names)
convert_to
The convert_to(value, type) is a convenience function that does the same as new(type, value). The
difference in the argument ordering allows it to be used in chained style for improved readability "left to right".
When the function is given a lambda, it is called with the converted value, and the function returns what the lambda
returns, otherwise the converted value.
# The harder to read variant:
# Using new operator - that is "calling the type" with operator ()
Hash(Array("abc").map |$i,$v| { [$i, $v] })
# The easier to read variant:
# using 'convert_to'
"abc".convert_to(Array).map |$i,$v| { [$i, $v] }.convert_to(Hash)
convert_to(Any $value, Type $type, Optional[Any] *$args,
Optional[Callable[1,1]] &$block)
create_resources
Converts a hash into a set of resources and adds them to the catalog.
Note: Use this function selectively. It's generally better to write resources in Puppet, as resources created with
create_resource are difficult to read and troubleshoot.
This function takes two mandatory arguments: a resource type, and a hash describing a set of resources. The hash
should be in the form {title => {parameters} }:
# A hash of user resources:
$myusers = {
'nick' => { uid => '1330',
gid => allstaff,
groups => ['developers', 'operations', 'release'], },
'dan' => { uid => '1308',
gid => allstaff,
groups => ['developers', 'prosvc', 'release'], },
© 2024 Puppet, Inc., a Perforce company

Puppet | Syntax and settings | 994
}
create_resources(user, $myusers)
A third, optional parameter may be given, also as a hash:
$defaults = {
'ensure' => present,
'provider' => 'ldap',
}
create_resources(user, $myusers, $defaults)
The values given on the third argument are added to the parameters of each resource present in the set given on the
second argument. If a parameter is present on both the second and third arguments, the one on the second argument
takes precedence.
This function can be used to create defined resources and classes, as well as native resources.
Virtual and Exported resources may be created by prefixing the type name with @ or @@ respectively. For example,
the $myusers hash may be exported in the following manner:
create_resources("@@user", $myusers)
The $myusers may be declared as virtual resources using:
create_resources("@user", $myusers)
Note that create_resources filters out parameter values that are undef so that normal data binding and Puppet
default value expressions are considered (in that order) for the final value of a parameter (just as when setting a
parameter to undef in a Puppet language resource declaration).
create_resources()
crit
Logs a message on the server at level crit.
crit(Any *$values)
Parameters
• *values --- The values to log.
Return type(s): Undef.
debug
Logs a message on the server at level debug.
debug(Any *$values)
Parameters
• *values --- The values to log.
Return type(s): Undef.
defined
Determines whether a given class or resource type is defined and returns a Boolean value. You can also use
defined to determine whether a specific resource is defined, or whether a variable has a value (including undef,
as opposed to the variable never being declared or assigned).
© 2024 Puppet, Inc., a Perforce company

Puppet | Syntax and settings | 995
This function takes at least one string argument, which can be a class name, type name, resource reference, or variable
reference of the form '$name'. (Note that the $ sign is included in the string which must be in single quotes to
prevent the $ character to be interpreted as interpolation.
The defined function checks both native and defined types, including types provided by modules. Types and
classes are matched by their names. The function matches resource declarations by using resource references.
# Matching resource types
defined("file")
defined("customtype")
# Matching defines and classes
defined("foo")
defined("foo::bar")
# Matching variables (note the single quotes)
defined('$name')
# Matching declared resources
defined(File['/tmp/file'])
Puppet depends on the configuration's evaluation order when checking whether a resource is declared.
# Assign values to $is_defined_before and $is_defined_after using identical
`defined`
# functions.
$is_defined_before = defined(File['/tmp/file'])
file { "/tmp/file":
ensure => present,
}
$is_defined_after = defined(File['/tmp/file'])
# $is_defined_before returns false, but $is_defined_after returns true.
This order requirement only refers to evaluation order. The order of resources in the configuration graph (e.g. with
before or require) does not affect the defined function's behavior.
Warning: Avoid relying on the result of the defined function in modules, as you might not be able to
guarantee the evaluation order well enough to produce consistent results. This can cause other code that
relies on the function's result to behave inconsistently or fail.
If you pass more than one argument to defined, the function returns true if any of the arguments are defined. You
can also match resources by type, allowing you to match conditions of different levels of specificity, such as whether
a specific resource is of a specific data type.
file { "/tmp/file1":
ensure => file,
}
$tmp_file = file { "/tmp/file2":
ensure => file,
}
# Each of these statements return `true` ...
defined(File['/tmp/file1'])
defined(File['/tmp/file1'],File['/tmp/file2'])
defined(File['/tmp/file1'],File['/tmp/file2'],File['/tmp/file3'])
# ... but this returns `false`.
defined(File['/tmp/file3'])
© 2024 Puppet, Inc., a Perforce company

Puppet | Syntax and settings | 996
# Each of these statements returns `true` ...
defined(Type[Resource['file','/tmp/file2']])
defined(Resource['file','/tmp/file2'])
defined(File['/tmp/file2'])
defined('$tmp_file')
# ... but each of these returns `false`.
defined(Type[Resource['exec','/tmp/file2']])
defined(Resource['exec','/tmp/file2'])
defined(File['/tmp/file3'])
defined('$tmp_file2')
defined(Variant[String, Type[CatalogEntry], Type[Type[CatalogEntry]]] *$vals)
dig
Returns a value for a sequence of given keys/indexes into a structure, such as an array or hash.
This function is used to "dig into" a complex data structure by using a sequence of keys / indexes to access a value
from which the next key/index is accessed recursively.
The first encountered undef value or key stops the "dig" and undef is returned.
An error is raised if an attempt is made to "dig" into something other than an undef (which immediately returns
undef), an Array or a Hash.
$data = {a => { b => [{x => 10, y => 20}, {x => 100, y => 200}]}}
notice $data.dig('a', 'b', 1, 'x')
Would notice the value 100.
This is roughly equivalent to $data['a']['b'][1]['x']. However, a standard index will return an error
and cause catalog compilation failure if any parent of the final key ('x') is undef. The dig function will return
undef, rather than failing catalog compilation. This allows you to check if data exists in a structure without
mandating that it always exists.
dig(Optional[Collection] $data, Any *$arg)
digest
Returns a hash value from a provided string using the digest_algorithm setting from the Puppet config file.
digest()
downcase
Converts a String, Array or Hash (recursively) into lower case.
This function is compatible with the stdlib function with the same name.
The function does the following:
• For a String, its lower case version is returned. This is done using Ruby system locale which handles some, but
not all special international up-casing rules (for example German double-s ß is upcased to "SS", whereas upper
case double-s is downcased to ß).
• For Array and Hash the conversion to lower case is recursive and each key and value must be convertible by
this function.
• When a Hash is converted, some keys could result in the same key - in those cases, the latest key-value wins. For
example if keys "aBC", and "abC" where both present, after downcase there would only be one key "abc".
• If the value is Numeric it is simply returned (this is for backwards compatibility).
• An error is raised for all other data types.
© 2024 Puppet, Inc., a Perforce company

Puppet | Syntax and settings | 997
Please note: This function relies directly on Ruby's String implementation and as such may not be entirely UTF8
compatible. To ensure best compatibility please use this function with Ruby 2.4.0 or greater - https://bugs.ruby-
lang.org/issues/10085.
'HELLO'.downcase()
downcase('HEllO')
Would both result in "hello"
['A', 'B'].downcase()
downcase(['A', 'B'])
Would both result in ['a', 'b']
{'A' => 'HEllO', 'B' => 'GOODBYE'}.downcase()
Would result in {'a' => 'hello', 'b' => 'goodbye'}
['A', 'B', ['C', ['D']], {'X' => 'Y'}].downcase
Would result in ['a', 'b', ['c', ['d']], {'x' => 'y'}]
Signature 1
downcase(Numeric $arg)
Signature 2
downcase(String $arg)
Signature 3
downcase(Array[StringData] $arg)
Signature 4
downcase(Hash[StringData, StringData] $arg)
each
Runs a lambda repeatedly using each value in a data structure, then returns the values unchanged.
This function takes two mandatory arguments, in this order:
1.
An array, hash, or other iterable object that the function will iterate over.
2.
A lambda, which the function calls for each element in the first argument. It can request one or two parameters.
$data.each |$parameter| { <PUPPET CODE BLOCK> }
or
each($data) |$parameter| { <PUPPET CODE BLOCK> }
When the first argument ($data in the above example) is an array, Puppet passes each value in turn to the lambda,
then returns the original values.
# For the array $data, run a lambda that creates a resource for each item.
$data = ["routers", "servers", "workstations"]
$data.each |$item| {
notify { $item:
message => $item
}
}
# Puppet creates one resource for each of the three items in $data. Each
resource is
© 2024 Puppet, Inc., a Perforce company

Puppet | Syntax and settings | 998
# named after the item's value and uses the item's value in a parameter.
When the first argument is a hash, Puppet passes each key and value pair to the lambda as an array in the form
[key, value] and returns the original hash.
# For the hash $data, run a lambda using each item as a key-value array that
creates a
# resource for each item.
$data = {"rtr" => "Router", "svr" => "Server", "wks" => "Workstation"}
$data.each |$items| {
notify { $items[0]:
message => $items[1]
}
}
# Puppet creates one resource for each of the three items in $data, each
named after the
# item's key and containing a parameter using the item's value.
When the first argument is an array and the lambda has two parameters, Puppet passes the array's indexes
(enumerated from 0) in the first parameter and its values in the second parameter.
# For the array $data, run a lambda using each item's index and value that
creates a
# resource for each item.
$data = ["routers", "servers", "workstations"]
$data.each |$index, $value| {
notify { $value:
message => $index
}
}
# Puppet creates one resource for each of the three items in $data, each
named after the
# item's value and containing a parameter using the item's index.
When the first argument is a hash, Puppet passes its keys to the first parameter and its values to the second parameter.
# For the hash $data, run a lambda using each item's key and value to create
a resource
# for each item.
$data = {"rtr" => "Router", "svr" => "Server", "wks" => "Workstation"}
$data.each |$key, $value| {
notify { $key:
message => $value
}
}
# Puppet creates one resource for each of the three items in $data, each
named after the
# item's key and containing a parameter using the item's value.
For an example that demonstrates how to create multiple file resources using each, see the Puppet iteration
documentation.
Signature 1
each(Hash[Any, Any] $hash, Callable[2,2] &$block)
Signature 2
each(Hash[Any, Any] $hash, Callable[1,1] &$block)
Signature 3
each(Iterable $enumerable, Callable[2,2] &$block)
© 2024 Puppet, Inc., a Perforce company

Puppet | Syntax and settings | 999
Signature 4
each(Iterable $enumerable, Callable[1,1] &$block)
emerg
Logs a message on the server at level emerg.
emerg(Any *$values)
Parameters
• *values --- The values to log.
Return type(s): Undef.
empty
Returns true if the given argument is an empty collection of values.
This function can answer if one of the following is empty:
• Array, Hash - having zero entries
• String, Binary - having zero length
For backwards compatibility with the stdlib function with the same name the following data types are also accepted
by the function instead of raising an error. Using these is deprecated and will raise a warning:
• Numeric - false is returned for all Numeric values.
• Undef - true is returned for all Undef values.
notice([].empty)
notice(empty([]))
# would both notice 'true'
Signature 1
empty(Collection $coll)
Signature 2
empty(Sensitive[String] $str)
Signature 3
empty(String $str)
Signature 4
empty(Numeric $num)
Signature 5
empty(Binary $bin)
Signature 6
empty(Undef $x)
epp
Evaluates an Embedded Puppet (EPP) template file and returns the rendered text result as a String.
epp('<MODULE NAME>/<TEMPLATE FILE>', <PARAMETER HASH>)
The first argument to this function should be a <MODULE NAME>/<TEMPLATE FILE> reference, which loads
<TEMPLATE FILE> from <MODULE NAME>'s templates directory. In most cases, the last argument is optional;
if used, it should be a hash that contains parameters to pass to the template.
© 2024 Puppet, Inc., a Perforce company
Puppet | Syntax and settings | 1000
• See the template documentation for general template usage information.
• See the EPP syntax documentation for examples of EPP.
For example, to call the apache module's templates/vhost/_docroot.epp template and pass the docroot
and virtual_docroot parameters, call the epp function like this:
epp('apache/vhost/_docroot.epp', { 'docroot' => '/var/www/html',
'virtual_docroot' => '/var/www/example' })
This function can also accept an absolute path, which can load a template file from anywhere on disk.
Puppet produces a syntax error if you pass more parameters than are declared in the template's parameter tag. When
passing parameters to a template that contains a parameter tag, use the same names as the tag's declared parameters.
Parameters are required only if they are declared in the called template's parameter tag without default values. Puppet
produces an error if the epp function fails to pass any required parameter.
epp(String $path, Optional[Hash[Pattern[/^\w+$/], Any]] $parameters)
err
Logs a message on the server at level err.
err(Any *$values)
Parameters
• *values --- The values to log.
Return type(s): Undef.
eyaml_lookup_key
The eyaml_lookup_key is a hiera 5 lookup_key data provider function. See the configuration guide
documentation for how to use this function.
eyaml_lookup_key(String[1] $key, Hash[String[1],Any] $options,
Puppet::LookupContext $context)
fail
Fail with a parse error. Any parameters will be stringified, concatenated, and passed to the exception-handler.
fail()
file
Loads a file from a module and returns its contents as a string.
The argument to this function should be a <MODULE NAME>/<FILE> reference, which will load <FILE> from a
module's files directory. (For example, the reference mysql/mysqltuner.pl will load the file <MODULES
DIRECTORY>/mysql/files/mysqltuner.pl.)
This function can also accept:
• An absolute path, which can load a file from anywhere on disk.
• Multiple arguments, which will return the contents of the first file found, skipping any files that don't exist.
file()
filter
Applies a lambda to every value in a data structure and returns an array or hash containing any elements for which the
lambda evaluates to a truthy value (not false or undef).
© 2024 Puppet, Inc., a Perforce company

Puppet | Syntax and settings | 1001
This function takes two mandatory arguments, in this order:
1.
An array, hash, or other iterable object that the function will iterate over.
2.
A lambda, which the function calls for each element in the first argument. It can request one or two parameters.
$filtered_data = $data.filter |$parameter| { <PUPPET CODE BLOCK> }
or
$filtered_data = filter($data) |$parameter| { <PUPPET CODE BLOCK> }
When the first argument ($data in the above example) is an array, Puppet passes each value in turn to the lambda
and returns an array containing the results.
# For the array $data, return an array containing the values that end with
"berry"
$data = ["orange", "blueberry", "raspberry"]
$filtered_data = $data.filter |$items| { $items =~ /berry$/ }
# $filtered_data = [blueberry, raspberry]
When the first argument is a hash, Puppet passes each key and value pair to the lambda as an array in the form
[key, value] and returns a hash containing the results.
# For the hash $data, return a hash containing all values of keys that end
with "berry"
$data = { "orange" => 0, "blueberry" => 1, "raspberry" => 2 }
$filtered_data = $data.filter |$items| { $items[0] =~ /berry$/ }
# $filtered_data = {blueberry => 1, raspberry => 2}
When the first argument is an array and the lambda has two parameters, Puppet passes the array's indexes
(enumerated from 0) in the first parameter and its values in the second parameter.
# For the array $data, return an array of all keys that both end with
"berry" and have
# an even-numbered index
$data = ["orange", "blueberry", "raspberry"]
$filtered_data = $data.filter |$indexes, $values| { $indexes % 2 == 0 and
$values =~ /berry$/ }
# $filtered_data = [raspberry]
When the first argument is a hash, Puppet passes its keys to the first parameter and its values to the second parameter.
# For the hash $data, return a hash of all keys that both end with "berry"
and have
# values less than or equal to 1
$data = { "orange" => 0, "blueberry" => 1, "raspberry" => 2 }
$filtered_data = $data.filter |$keys, $values| { $keys =~ /berry$/ and
$values <= 1 }
# $filtered_data = {blueberry => 1}
Signature 1
filter(Hash[Any, Any] $hash, Callable[2,2] &$block)
Signature 2
filter(Hash[Any, Any] $hash, Callable[1,1] &$block)
Signature 3
filter(Iterable $enumerable, Callable[2,2] &$block)
Signature 4
filter(Iterable $enumerable, Callable[1,1] &$block)
© 2024 Puppet, Inc., a Perforce company

Puppet | Syntax and settings | 1002
find_file
Finds an existing file from a module and returns its path.
This function accepts an argument that is a String as a <MODULE NAME>/<FILE> reference, which searches for
<FILE> relative to a module's files directory. (For example, the reference mysql/mysqltuner.pl will search
for the file <MODULES DIRECTORY>/mysql/files/mysqltuner.pl.)
If this function is run via puppet agent, it checks for file existence on the Puppet Primary server. If run via puppet
apply, it checks on the local host. In both cases, the check is performed before any resources are changed.
This function can also accept:
• An absolute String path, which checks for the existence of a file from anywhere on disk.
• Multiple String arguments, which returns the path of the first file found, skipping nonexistent files.
• An array of string paths, which returns the path of the first file found from the given paths in the array, skipping
nonexistent files.
The function returns undef if none of the given paths were found.
Signature 1
find_file(String *$paths)
Signature 2
find_file(Array[String] *$paths_array)
find_template
Finds an existing template from a module and returns its path.
This function accepts an argument that is a String as a <MODULE NAME>/<TEMPLATE> reference, which searches
for <TEMPLATE> relative to a module's templates directory on the primary server. (For example, the reference
mymod/secret.conf.epp will search for the file <MODULES DIRECTORY>/mymod/templates/
secret.conf.epp.)
The primary use case is for agent-side template rendering with late-bound variables resolved, such as from secret
stores inaccessible to the primary server, such as
$variables = {
'password' => Deferred('vault_lookup::lookup',
['secret/mymod', 'https://vault.example.com:8200']),
}
# compile the template source into the catalog
file { '/etc/secrets.conf':
ensure => file,
content => Deferred('inline_epp',
[find_template('mymod/secret.conf.epp').file, $variables]),
}
This function can also accept:
• An absolute String path, which checks for the existence of a template from anywhere on disk.
• Multiple String arguments, which returns the path of the first template found, skipping nonexistent files.
• An array of string paths, which returns the path of the first template found from the given paths in the array,
skipping nonexistent files.
The function returns undef if none of the given paths were found.
Signature 1
find_template(String *$paths)
© 2024 Puppet, Inc., a Perforce company

Puppet | Syntax and settings | 1003
Signature 2
find_template(Array[String] *$paths_array)
flatten
Returns a flat Array produced from its possibly deeply nested given arguments.
One or more arguments of any data type can be given to this function. The result is always a flat array representation
where any nested arrays are recursively flattened.
flatten(['a', ['b', ['c']]])
# Would return: ['a','b','c']
To flatten other kinds of iterables (for example hashes, or intermediate results like from a reverse_each) first
convert the result to an array using Array($x), or $x.convert_to(Array). See the new function for details
and options when performing a conversion.
$hsh = { a => 1, b => 2}
# -- without conversion
$hsh.flatten()
# Would return [{a => 1, b => 2}]
# -- with conversion
$hsh.convert_to(Array).flatten()
# Would return [a,1,b,2]
flatten(Array($hsh))
# Would also return [a,1,b,2]
$a1 = [1, [2, 3]]
$a2 = [[4,[5,6]]
$x = 7
flatten($a1, $a2, $x)
# would return [1,2,3,4,5,6,7]
flatten(42)
# Would return [42]
flatten([42])
# Would also return [42]
flatten(Any *$args)
floor
Returns the largest Integer less or equal to the argument. Takes a single numeric value as an argument.
This function is backwards compatible with the same function in stdlib and accepts a Numeric value. A String
that can be converted to a floating point number can also be used in this version - but this is deprecated.
In general convert string input to Numeric before calling this function to have full control over how the conversion
is done.
Signature 1
floor(Numeric $val)
Signature 2
floor(String $val)
© 2024 Puppet, Inc., a Perforce company

Puppet | Syntax and settings | 1004
fqdn_rand
Usage: fqdn_rand(MAX, [SEED], [DOWNCASE]). MAX is required and must be a positive integer; SEED is
optional and may be any number or string; DOWNCASE is optional and should be a boolean true or false.
Generates a random Integer number greater than or equal to 0 and less than MAX, combining the $fqdn fact and the
value of SEED for repeatable randomness. (That is, each node will get a different random number from this function,
but a given node's result will be the same every time unless its hostname changes.) If DOWNCASE is true, then the
fqdn fact will be downcased when computing the value so that the result is not sensitive to the case of the fqdn
fact.
This function is usually used for spacing out runs of resource-intensive cron tasks that run on many nodes, which
could cause a thundering herd or degrade other services if they all fire at once. Adding a SEED can be useful
when you have more than one such task and need several unrelated random numbers per node. (For example,
fqdn_rand(30), fqdn_rand(30, 'expensive job 1'), and fqdn_rand(30, 'expensive job
2') will produce totally different numbers.)
fqdn_rand()
generate
Calls an external command on the Puppet master and returns the results of the command. Any arguments are passed
to the external command as arguments. If the generator does not exit with return code of 0, the generator is considered
to have failed and a parse error is thrown. Generators can only have file separators, alphanumerics, dashes, and
periods in them. This function will attempt to protect you from malicious generator calls (e.g., those with '..' in them),
but it can never be entirely safe. No subshell is used to execute generators, so all shell metacharacters are passed
directly to the generator, and all metacharacters are returned by the function. Consider cleaning white space from any
string generated.
generate()
get
Digs into a value with dot notation to get a value from within a structure.
To dig into a given value, call the function with (at least) two arguments:
• The first argument must be an Array, or Hash. Value can also be undef (which also makes the result undef
unless a default value is given).
• The second argument must be a dot notation navigation string.
• The optional third argument can be any type of value and it is used as the default value if the function would
otherwise return undef.
• An optional lambda for error handling taking one Error argument.
Dot notation navigation string - The dot string consists of period . separated segments where each segment is either
the index into an array or the value of a hash key. If a wanted key contains a period it must be quoted to avoid it being
taken as a segment separator. Quoting can be done with either single quotes ' or double quotes ". If a segment is a
decimal number it is converted to an Integer index. This conversion can be prevented by quoting the value.
#get($facts, 'os.family')
$facts.get('os.family')
Would both result in the value of $facts['os']['family']
get([1,2,[{'name' =>'waldo'}]], '2.0.name')
Would result in 'waldo'
get([1,2,[{'name' =>'waldo'}]], '2.1.name', 'not waldo')
© 2024 Puppet, Inc., a Perforce company

Puppet | Syntax and settings | 1005
Would result in 'not waldo'
$x = [1, 2, { 'readme.md' => "This is a readme."}]
$x.get('2."readme.md"')
$x = [1, 2, { '10' => "ten"}]
$x.get('2."0"')
Error Handling - There are two types of common errors that can be handled by giving the function a code block
to execute. (A third kind or error; when the navigation string has syntax errors (for example an empty segment or
unbalanced quotes) will always raise an error).
The given block will be given an instance of the Error data type, and it has methods to extract msg, issue_code,
kind, and details.
The msg will be a preformatted message describing the error. This is the error message that would have surfaced if
there was no block to handle the error.
The kind is the string 'SLICE_ERROR' for both kinds of errors, and the issue_code is either
the string 'EXPECTED_INTEGER_INDEX' for an attempt to index into an array with a String, or
'EXPECTED_COLLECTION' for an attempt to index into something that is not a Collection.
The details is a Hash that for both issue codes contain the entry 'walked_path' which is an Array with each
key in the progression of the dig up to the place where the error occurred.
For an EXPECTED_INTEGER_INDEX-issue the detail 'index_type' is set to the data type of the index value
and for an 'EXPECTED_COLLECTION'-issue the detail 'value_type' is set to the type of the value.
The logic in the error handling block can inspect the details, and either call fail() with a custom error message or
produce the wanted value.
If the block produces undef it will not be replaced with a given default value.
$x = 'blue'
$x.get('0.color', 'green') |$error| { undef } # result is undef
$y = ['blue']
$y.get('color', 'green') |$error| { undef } # result is undef
$x = [1, 2, ['blue']]
$x.get('2.color') |$error| {
notice("Walked path is ${error.details['walked_path']}")
}
Would notice Walked path is [2, color]
Also see:
• getvar() that takes the first segment to be the name of a variable and then delegates to this function.
• dig() function which is similar but uses an array of navigation values instead of a dot notation string.
get(Any $value, String $dotted_string, Optional[Any] $default_value,
Optional[Callable[1,1]] &$block)
getvar
Digs into a variable with dot notation to get a value from a structure.
To get the value from a variable (that may or may not exist), call the function with one or two arguments:
• The first argument must be a string, and must start with a variable name without leading $, for example
get('facts'). The variable name can be followed by a dot notation navigation string to dig out a value in the
array or hash value of the variable.
© 2024 Puppet, Inc., a Perforce company

Puppet | Syntax and settings | 1006
• The optional second argument can be any type of value and it is used as the default value if the function would
otherwise return undef.
• An optional lambda for error handling taking one Error argument.
Dot notation navigation string - The dot string consists of period . separated segments where each segment is either
the index into an array or the value of a hash key. If a wanted key contains a period it must be quoted to avoid it being
taken as a segment separator. Quoting can be done with either single quotes ' or double quotes ". If a segment is a
decimal number it is converted to an Integer index. This conversion can be prevented by quoting the value.
getvar('facts') # results in the value of $facts
getvar('facts.os.family') # results in the value of $facts['os']['family']
$x = [1,2,[{'name' =>'waldo'}]]
getvar('x.2.1.name', 'not waldo')
# results in 'not waldo'
For further examples and how to perform error handling, see the get() function which this function delegates to
after having resolved the variable value.
getvar(Pattern[/\A(?:::)?(?:[a-z]\w*::)*[a-z_]\w*(?:.|\Z)/] $get_string,
Optional[Any] $default_value, Optional[Callable[1,1]] &$block)
group_by
Groups the collection by result of the block. Returns a hash where the keys are the evaluated result from the block and
the values are arrays of elements in the collection that correspond to the key.
Signature 1
group_by(Collection $collection, Callable[1,1] &$block)
Parameters
• collection --- A collection of things to group.
Return type(s): Hash.
Examples
Group array of strings by length, results in e.g. { 1 => [a, b], 2 => [ab] }
[a, b, ab].group_by |$s| { $s.length }
Group array of strings by length and index, results in e.g. {1 => ['a'], 2 => ['b', 'ab']}
[a, b, ab].group_by |$i, $s| { $i%2 + $s.length }
Group hash iterating by key-value pair, results in e.g. { 2 => [['a', [1, 2]]], 1 => [['b', [1]]] }
{ a => [1, 2], b => [1] }.group_by |$kv| { $kv[1].length }
Group hash iterating by key and value, results in e.g. { 2 => [['a', [1, 2]]], 1 => [['b', [1]]] }
{ a => [1, 2], b => [1] }.group_by |$k, $v| { $v.length }
Signature 2
group_by(Array $array, Callable[2,2] &$block)
Signature 3
© 2024 Puppet, Inc., a Perforce company

Puppet | Syntax and settings | 1007
group_by(Collection $collection, Callable[2,2] &$block)
hiera
Performs a standard priority lookup of the hierarchy and returns the most specific value for a given key. The returned
value can be any type of data.
This function is deprecated in favor of the lookup function. While this function continues to work, it does not
support:
• lookup_options stored in the data
• lookup across global, environment, and module layers
The function takes up to three arguments, in this order:
1.
A string key that Hiera searches for in the hierarchy. Required.
2.
An optional default value to return if Hiera doesn't find anything matching the key.
• If this argument isn't provided and this function results in a lookup failure, Puppet fails with a compilation
error.
3.
The optional name of an arbitrary hierarchy level to insert at the top of the hierarchy. This lets you temporarily
modify the hierarchy for a single lookup.
• If Hiera doesn't find a matching key in the overriding hierarchy level, it continues searching the rest of the
hierarchy.
The hiera function does not find all matches throughout a hierarchy, instead returning the first specific value
starting at the top of the hierarchy. To search throughout a hierarchy, use the hiera_array or hiera_hash
functions.
# Assuming hiera.yaml
# :hierarchy:
# - web01.example.com
# - common
# Assuming web01.example.com.yaml:
# users:
# - "Amy Barry"
# - "Carrie Douglas"
# Assuming common.yaml:
users:
admins:
- "Edith Franklin"
- "Ginny Hamilton"
regular:
- "Iris Jackson"
- "Kelly Lambert"
# Assuming we are not web01.example.com:
$users = hiera('users', undef)
# $users contains {admins => ["Edith Franklin", "Ginny Hamilton"],
# regular => ["Iris Jackson", "Kelly Lambert"]}
You can optionally generate the default value with a lambda that takes one parameter.
# Assuming the same Hiera data as the previous example:
$users = hiera('users') | $key | { "Key \'${key}\' not found" }
© 2024 Puppet, Inc., a Perforce company

Puppet | Syntax and settings | 1008
# $users contains {admins => ["Edith Franklin", "Ginny Hamilton"],
# regular => ["Iris Jackson", "Kelly Lambert"]}
# If hiera couldn't match its key, it would return the lambda result,
# "Key 'users' not found".
The returned value's data type depends on the types of the results. In the example above, Hiera matches the 'users' key
and returns it as a hash.
See the 'Using the lookup function' documentation for how to perform lookup of data. Also see the 'Using the
deprecated hiera functions' documentation for more information about the Hiera 3 functions.
hiera()
hiera_array
Finds all matches of a key throughout the hierarchy and returns them as a single flattened array of unique values.
If any of the matched values are arrays, they're flattened and included in the results. This is called an array merge
lookup.
This function is deprecated in favor of the lookup function. While this function continues to work, it does not
support:
• lookup_options stored in the data
• lookup across global, environment, and module layers
The hiera_array function takes up to three arguments, in this order:
1.
A string key that Hiera searches for in the hierarchy. Required.
2.
An optional default value to return if Hiera doesn't find anything matching the key.
• If this argument isn't provided and this function results in a lookup failure, Puppet fails with a compilation
error.
3.
The optional name of an arbitrary hierarchy level to insert at the top of the hierarchy. This lets you temporarily
modify the hierarchy for a single lookup.
• If Hiera doesn't find a matching key in the overriding hierarchy level, it continues searching the rest of the
hierarchy.
# Assuming hiera.yaml
# :hierarchy:
# - web01.example.com
# - common
# Assuming common.yaml:
# users:
# - 'cdouglas = regular'
# - 'efranklin = regular'
# Assuming web01.example.com.yaml:
# users: 'abarry = admin'
$allusers = hiera_array('users', undef)
# $allusers contains ["cdouglas = regular", "efranklin = regular", "abarry =
admin"].
You can optionally generate the default value with a lambda that takes one parameter.
# Assuming the same Hiera data as the previous example:
$allusers = hiera_array('users') | $key | { "Key \'${key}\' not found" }
© 2024 Puppet, Inc., a Perforce company

Puppet | Syntax and settings | 1009
# $allusers contains ["cdouglas = regular", "efranklin = regular", "abarry =
admin"].
# If hiera_array couldn't match its key, it would return the lambda result,
# "Key 'users' not found".
hiera_array expects that all values returned will be strings or arrays. If any matched value is a hash, Puppet raises
a type mismatch error.
See the 'Using the lookup function' documentation for how to perform lookup of data. Also see the 'Using the
deprecated hiera functions' documentation for more information about the Hiera 3 functions.
hiera_array()
hiera_hash
Finds all matches of a key throughout the hierarchy and returns them in a merged hash.
This function is deprecated in favor of the lookup function. While this function continues to work, it does not
support:
• lookup_options stored in the data
• lookup across global, environment, and module layers
If any of the matched hashes share keys, the final hash uses the value from the highest priority match. This is called a
hash merge lookup.
The merge strategy is determined by Hiera's :merge_behavior setting.
The hiera_hash function takes up to three arguments, in this order:
1.
A string key that Hiera searches for in the hierarchy. Required.
2.
An optional default value to return if Hiera doesn't find anything matching the key.
• If this argument isn't provided and this function results in a lookup failure, Puppet fails with a compilation
error.
3.
The optional name of an arbitrary hierarchy level to insert at the top of the hierarchy. This lets you temporarily
modify the hierarchy for a single lookup.
• If Hiera doesn't find a matching key in the overriding hierarchy level, it continues searching the rest of the
hierarchy.
# Assuming hiera.yaml
# :hierarchy:
# - web01.example.com
# - common
# Assuming common.yaml:
# users:
# regular:
# 'cdouglas': 'Carrie Douglas'
# Assuming web01.example.com.yaml:
# users:
# administrators:
# 'aberry': 'Amy Berry'
# Assuming we are not web01.example.com:
$allusers = hiera_hash('users', undef)
# $allusers contains {regular => {"cdouglas" => "Carrie Douglas"},
# administrators => {"aberry" => "Amy Berry"}}
© 2024 Puppet, Inc., a Perforce company

Puppet | Syntax and settings | 1010
You can optionally generate the default value with a lambda that takes one parameter.
# Assuming the same Hiera data as the previous example:
$allusers = hiera_hash('users') | $key | { "Key \'${key}\' not found" }
# $allusers contains {regular => {"cdouglas" => "Carrie Douglas"},
# administrators => {"aberry" => "Amy Berry"}}
# If hiera_hash couldn't match its key, it would return the lambda result,
# "Key 'users' not found".
hiera_hash expects that all values returned will be hashes. If any of the values found in the data sources are
strings or arrays, Puppet raises a type mismatch error.
See the 'Using the lookup function' documentation for how to perform lookup of data. Also see the 'Using the
deprecated hiera functions' documentation for more information about the Hiera 3 functions.
hiera_hash()
hiera_include
Assigns classes to a node using an array merge lookup that retrieves the value for a user-specified key from Hiera's
data.
This function is deprecated in favor of the lookup function in combination with include. While this function
continues to work, it does not support:
• lookup_options stored in the data
• lookup across global, environment, and module layers
# In site.pp, outside of any node definitions and below any top-scope
variables:
lookup('classes', Array[String], 'unique').include
The hiera_include function requires:
• A string key name to use for classes.
• A call to this function (i.e. hiera_include('classes')) in your environment's sites.pp manifest,
outside of any node definitions and below any top-scope variables that Hiera uses in lookups.
• classes keys in the appropriate Hiera data sources, with an array for each classes key and each value of the
array containing the name of a class.
The function takes up to three arguments, in this order:
1.
A string key that Hiera searches for in the hierarchy. Required.
2.
An optional default value to return if Hiera doesn't find anything matching the key.
• If this argument isn't provided and this function results in a lookup failure, Puppet fails with a compilation
error.
3.
The optional name of an arbitrary hierarchy level to insert at the top of the hierarchy. This lets you temporarily
modify the hierarchy for a single lookup.
• If Hiera doesn't find a matching key in the overriding hierarchy level, it continues searching the rest of the
hierarchy.
The function uses an array merge lookup to retrieve the classes array, so every node gets every class from the
hierarchy.
# Assuming hiera.yaml
# :hierarchy:
# - web01.example.com
# - common
© 2024 Puppet, Inc., a Perforce company

Puppet | Syntax and settings | 1011
# Assuming web01.example.com.yaml:
# classes:
# - apache::mod::php
# Assuming common.yaml:
# classes:
# - apache
# In site.pp, outside of any node definitions and below any top-scope
variables:
hiera_include('classes', undef)
# Puppet assigns the apache and apache::mod::php classes to the
web01.example.com node.
You can optionally generate the default value with a lambda that takes one parameter.
# Assuming the same Hiera data as the previous example:
# In site.pp, outside of any node definitions and below any top-scope
variables:
hiera_include('classes') | $key | {"Key \'${key}\' not found" }
# Puppet assigns the apache and apache::mod::php classes to the
web01.example.com node.
# If hiera_include couldn't match its key, it would return the lambda
result,
# "Key 'classes' not found".
See the 'Using the lookup function' documentation for how to perform lookup of data. Also see the 'Using the
deprecated hiera functions' documentation for more information about the Hiera 3 functions.
hiera_include()
hocon_data
The hocon_data is a hiera 5 data_hash data provider function. See the configuration guide documentation for
how to use this function.
Note that this function is not supported without a hocon library being present.
hocon_data(Struct[{path=>String[1]}] $options, Puppet::LookupContext $context)
import
The import function raises an error when called to inform the user that import is no longer supported.
import(Any *$args)
include
Declares one or more classes, causing the resources in them to be evaluated and added to the catalog. Accepts a class
name, an array of class names, or a comma-separated list of class names.
The include function can be used multiple times on the same class and will only declare a given class once. If a
class declared with include has any parameters, Puppet will automatically look up values for them in Hiera, using
<class name>::<parameter name> as the lookup key.
Contrast this behavior with resource-like class declarations (class {'name': parameter => 'value',}),
which must be used in only one place per class and can directly set parameters. You should avoid using both
include and resource-like declarations with the same class.
© 2024 Puppet, Inc., a Perforce company

Puppet | Syntax and settings | 1012
The include function does not cause classes to be contained in the class where they are declared. For that, see the
contain function. It also does not create a dependency relationship between the declared class and the surrounding
class; for that, see the require function.
You must use the class's full name; relative names are not allowed. In addition to names in string form, you may also
directly use Class and Resource Type-values that are produced by the resource and relationship expressions.
• Since < 3.0.0
• Since 4.0.0 support for class and resource type values, absolute names
• Since 4.7.0 returns an Array[Type[Class]] of all included classes
include(Any *$names)
index
Returns the index (or key in a hash) to a first-found value in an Iterable value.
When called with a lambda the lambda is called repeatedly using each value in a data structure until the lambda
returns a "truthy" value which makes the function return the index or key, or if the end of the iteration is reached,
undef is returned.
This function can be called in two different ways; with a value to be searched for, or with a lambda that determines if
an entry in the iterable matches.
When called with a lambda the function takes two mandatory arguments, in this order:
1.
An array, hash, string, or other iterable object that the function will iterate over.
2.
A lambda, which the function calls for each element in the first argument. It can request one (value) or two (index/
key, value) parameters.
$data.index |$parameter| { <PUPPET CODE BLOCK> }
or
index($data) |$parameter| { <PUPPET CODE BLOCK> }
$data = ["routers", "servers", "workstations"]
notice $data.index |$value| { $value == 'servers' } # notices 1
notice $data.index |$value| { $value == 'hosts' } # notices undef
$data = {types => ["routers", "servers", "workstations"], colors => ['red',
'blue', 'green']}
notice $data.index |$value| { 'servers' in $value } # notices 'types'
notice $data.index |$value| { 'red' in $value } # notices 'colors'
Note that the lambda gets the value and not an array with [key, value] as in other iterative functions.
Using a lambda that accepts two values works the same way. The lambda gets the index/key as the first parameter and
the value as the second parameter.
# Find the first even numbered index that has a non String value
$data = [key1, 1, 3, 5]
notice $data.index |$idx, $value| { $idx % 2 == 0 and $value !~ String } #
notices 2
When called on a String, the lambda is given each character as a value. What is typically wanted is to find a
sequence of characters which is achieved by calling the function with a value to search for instead of giving a lambda.
# Find first occurrence of 'ah'
$data = "blablahbleh"
© 2024 Puppet, Inc., a Perforce company

Puppet | Syntax and settings | 1013
notice $data.index('ah') # notices 5
# Find first occurrence of 'la' or 'le'
$data = "blablahbleh"
notice $data.index(/l(a|e)/ # notices 1
When searching in a String with a given value that is neither String nor Regexp the answer is always undef.
When searching in any other iterable, the value is matched against each value in the iteration using strict Ruby ==
semantics. If Puppet Language semantics are wanted (where string compare is case insensitive) use a lambda and the
== operator in Puppet.
$data = ['routers', 'servers', 'WORKstations']
notice $data.index('servers') # notices 1
notice $data.index('workstations') # notices undef (not matching case)
For an general examples that demonstrates iteration, see the Puppet iteration documentation.
Signature 1
index(Hash[Any, Any] $hash, Callable[2,2] &$block)
Signature 2
index(Hash[Any, Any] $hash, Callable[1,1] &$block)
Signature 3
index(Iterable $enumerable, Callable[2,2] &$block)
Signature 4
index(Iterable $enumerable, Callable[1,1] &$block)
Signature 5
index(String $str, Variant[String,Regexp] $match)
Signature 6
index(Iterable $enumerable, Any $match)
info
Logs a message on the server at level info.
info(Any *$values)
Parameters
• *values --- The values to log.
Return type(s): Undef.
inline_epp
Evaluates an Embedded Puppet (EPP) template string and returns the rendered text result as a String.
inline_epp('<EPP TEMPLATE STRING>', <PARAMETER HASH>)
The first argument to this function should be a string containing an EPP template. In most cases, the last argument is
optional; if used, it should be a hash that contains parameters to pass to the template.
• See the template documentation for general template usage information.
• See the EPP syntax documentation for examples of EPP.
For example, to evaluate an inline EPP template and pass it the docroot and virtual_docroot parameters, call
the inline_epp function like this:
© 2024 Puppet, Inc., a Perforce company

Puppet | Syntax and settings | 1014
inline_epp('docroot: <%= $docroot %> Virtual docroot: <%= $virtual_docroot
%>', { 'docroot' => '/var/www/html', 'virtual_docroot' => '/var/www/
example' })
Puppet produces a syntax error if you pass more parameters than are declared in the template's parameter tag. When
passing parameters to a template that contains a parameter tag, use the same names as the tag's declared parameters.
Parameters are required only if they are declared in the called template's parameter tag without default values. Puppet
produces an error if the inline_epp function fails to pass any required parameter.
An inline EPP template should be written as a single-quoted string or heredoc. A double-quoted string is subject to
expression interpolation before the string is parsed as an EPP template.
For example, to evaluate an inline EPP template using a heredoc, call the inline_epp function like this:
# Outputs 'Hello given argument planet!'
inline_epp(@(END), { x => 'given argument' })
<%- | $x, $y = planet | -%>
Hello <%= $x %> <%= $y %>!
END
inline_epp(String $template, Optional[Hash[Pattern[/^\w+$/], Any]]
$parameters)
inline_template
Evaluate a template string and return its value. See the templating docs for more information. Note that if multiple
template strings are specified, their output is all concatenated and returned as the output of the function.
inline_template()
join
Joins the values of an Array into a string with elements separated by a delimiter.
Supports up to two arguments
• values - first argument is required and must be an an Array
• delimiter - second arguments is the delimiter between elements, must be a String if given, and defaults to an
empty string.
join(['a','b','c'], ",")
# Would result in: "a,b,c"
Note that array is flattened before elements are joined, but flattening does not extend to arrays nested in hashes or
other objects.
$a = [1,2, undef, 'hello', [x,y,z], {a => 2, b => [3, 4]}]
notice join($a, ', ')
# would result in noticing:
# 1, 2, , hello, x, y, z, {"a"=>2, "b"=>[3, 4]}
For joining iterators and other containers of elements a conversion must first be made to an Array. The reason for
this is that there are many options how such a conversion should be made.
[1,2,3].reverse_each.convert_to(Array).join(', ')
# would result in: "3, 2, 1"
{a => 1, b => 2}.convert_to(Array).join(', ')
# would result in "a, 1, b, 2"
© 2024 Puppet, Inc., a Perforce company

Puppet | Syntax and settings | 1015
For more detailed control over the formatting (including indentations and line breaks, delimiters around arrays
and hash entries, between key/values in hash entries, and individual formatting of values in the array) see the new
function for String and its formatting options for Array and Hash.
join(Array $arg, Optional[String] $delimiter)
json_data
The json_data is a hiera 5 data_hash data provider function. See the configuration guide documentation for
how to use this function.
json_data(Struct[{path=>String[1]}] $options, Puppet::LookupContext $context)
keys
Returns the keys of a hash as an Array
$hsh = {"apples" => 3, "oranges" => 4 }
$hsh.keys()
keys($hsh)
# both results in the array ["apples", "oranges"]
• Note that a hash in the puppet language accepts any data value (including undef) unless it is constrained with a
Hash data type that narrows the allowed data types.
• For an empty hash, an empty array is returned.
• The order of the keys is the same as the order in the hash (typically the order in which they were added).
keys(Hash $hsh)
length
Returns the length of an Array, Hash, String, or Binary value.
The returned value is a positive integer indicating the number of elements in the container; counting (possibly
multibyte) characters for a String, bytes in a Binary, number of elements in an Array, and number of key-value
associations in a Hash.
"roses".length() # 5
length("violets") # 7
[10, 20].length # 2
{a => 1, b => 3}.length # 2
Signature 1
length(Collection $arg)
Signature 2
length(String $arg)
Signature 3
length(Binary $arg)
lest
Calls a lambda without arguments if the value given to lest is undef. Returns the result of calling the lambda if the
argument is undef, otherwise the given argument.
The lest function is useful in a chain of then calls, or in general as a guard against undef values. The function
can be used to call fail, or to return a default value.
© 2024 Puppet, Inc., a Perforce company

Puppet | Syntax and settings | 1016
These two expressions are equivalent:
if $x == undef { do_things() }
lest($x) || { do_things() }
$data = {a => [ b, c ] }
notice $data.dig(a, b, c)
.then |$x| { $x * 2 }
.lest || { fail("no value for $data[a][b][c]" }
Would fail the operation because $data[a][b][c] results in undef (there is no b key in a).
In contrast - this example:
$data = {a => { b => { c => 10 } } }
notice $data.dig(a, b, c)
.then |$x| { $x * 2 }
.lest || { fail("no value for $data[a][b][c]" }
Would notice the value 20
lest(Any $arg, Callable[0,0] &$block)
lookup
Uses the Puppet lookup system to retrieve a value for a given key. By default, this returns the first value found
(and fails compilation if no values are available), but you can configure it to merge multiple values into one, fail
gracefully, and more.
When looking up a key, Puppet will search up to three tiers of data, in the following order:
1.
Hiera.
2.
The current environment's data provider.
3.
The indicated module's data provider, if the key is of the form <MODULE NAME>::<SOMETHING>.
Arguments
You must provide the name of a key to look up, and can optionally provide other arguments. You can combine these
arguments in the following ways:
• lookup( <NAME>, [<VALUE TYPE>], [<MERGE BEHAVIOR>], [<DEFAULT VALUE>] )
• lookup( [<NAME>], <OPTIONS HASH> )
• lookup( as above ) |$key| { # lambda returns a default value }
Arguments in [square brackets] are optional.
The arguments accepted by lookup are as follows:
1.
<NAME> (string or array) --- The name of the key to look up.
• This can also be an array of keys. If Puppet doesn't find anything for the first key, it will try again with the
subsequent ones, only resorting to a default value if none of them succeed.
2.
<VALUE TYPE> (data type) --- A data type that must match the retrieved value; if not, the lookup (and catalog
compilation) will fail. Defaults to Data (accepts any normal value).
3.
<MERGE BEHAVIOR> (string or hash; see "Merge Behaviors" below) --- Whether (and how) to combine
multiple values. If present, this overrides any merge behavior specified in the data sources. Defaults to no value;
Puppet will use merge behavior from the data sources if present, and will otherwise do a first-found lookup.
4.
<DEFAULT VALUE> (any normal value) --- If present, lookup returns this when it can't find a normal value.
Default values are never merged with found values. Like a normal value, the default must match the value type.
Defaults to no value; if Puppet can't find a normal value, the lookup (and compilation) will fail.
© 2024 Puppet, Inc., a Perforce company
Puppet | Syntax and settings | 1017
5.
<OPTIONS HASH> (hash) --- Alternate way to set the arguments above, plus some less-common extra options. If
you pass an options hash, you can't combine it with any regular arguments (except <NAME>). An options hash can
have the following keys:
• 'name' --- Same as <NAME> (argument 1). You can pass this as an argument or in the hash, but not both.
• 'value_type' --- Same as <VALUE TYPE> (argument 2).
• 'merge' --- Same as <MERGE BEHAVIOR> (argument 3).
• 'default_value' --- Same as <DEFAULT VALUE> (argument 4).
• 'default_values_hash' (hash) --- A hash of lookup keys and default values. If Puppet can't find
a normal value, it will check this hash for the requested key before giving up. You can combine this with
default_value or a lambda, which will be used if the key isn't present in this hash. Defaults to an empty
hash.
• 'override' (hash) --- A hash of lookup keys and override values. Puppet will check for the requested key
in the overrides hash first; if found, it returns that value as the final value, ignoring merge behavior. Defaults
to an empty hash.
Finally, lookup can take a lambda, which must accept a single parameter. This is yet another way to set a default
value for the lookup; if no results are found, Puppet will pass the requested key to the lambda and use its result as the
default value.
Merge Behaviors
Puppet lookup uses a hierarchy of data sources, and a given key might have values in multiple sources. By default,
Puppet returns the first value it finds, but it can also continue searching and merge all the values together.
Note: Data sources can use the special lookup_options metadata key to request a specific merge
behavior for a key. The lookup function will use that requested behavior unless you explicitly specify
one.
The valid merge behaviors are:
• 'first' --- Returns the first value found, with no merging. Puppet lookup's default behavior.
• 'unique' (called "array merge" in classic Hiera) --- Combines any number of arrays and scalar values to return
a merged, flattened array with all duplicate values removed. The lookup will fail if any hash values are found.
• 'hash' --- Combines the keys and values of any number of hashes to return a merged hash. If the same
key exists in multiple source hashes, Puppet will use the value from the highest-priority data source; it won't
recursively merge the values.
• 'deep' --- Combines the keys and values of any number of hashes to return a merged hash. If the same key
exists in multiple source hashes, Puppet will recursively merge hash or array values (with duplicate values
removed from arrays). For conflicting scalar values, the highest-priority value will win.
• {'strategy' => 'first'}, {'strategy' => 'unique'}, or {'strategy' => 'hash'} ---
Same as the string versions of these merge behaviors.
• {'strategy' => 'deep', <DEEP OPTION> => <VALUE>, ...} --- Same as 'deep', but can
adjust the merge with additional options. The available options are:
• 'knockout_prefix' (string) --- A string prefix to indicate a value should be removed from the final
result. If a value is exactly equal to the prefix, it will knockout the entire element. Defaults to undef, which
disables this feature.
• 'sort_merged_arrays' (boolean) --- Whether to sort all arrays that are merged together. Defaults to
false.
• 'merge_hash_arrays' (boolean) --- Whether to merge hashes within arrays. Defaults to false.
Signature 1
lookup(NameType $name, Optional[ValueType] $value_type, Optional[MergeType]
$merge)
Signature 2
© 2024 Puppet, Inc., a Perforce company

Puppet | Syntax and settings | 1018
lookup(NameType $name, Optional[ValueType] $value_type, Optional[MergeType]
$merge, DefaultValueType $default_value)
Signature 3
lookup(NameType $name, Optional[ValueType] $value_type, Optional[MergeType]
$merge, BlockType &$block)
Signature 4
lookup(OptionsWithName $options_hash, Optional[BlockType] &$block)
Signature 5
lookup(Variant[String,Array[String]] $name, OptionsWithoutName $options_hash,
Optional[BlockType] &$block)
lstrip
Strips leading spaces from a String
This function is compatible with the stdlib function with the same name.
The function does the following:
• For a String the conversion removes all leading ASCII white space characters such as space, tab, newline,
and return. It does not remove other space-like characters like hard space (Unicode U+00A0). (Tip, /
^[[:space:]]/ regular expression matches all space-like characters).
• For an Iterable[Variant[String, Numeric]] (for example an Array) each value is processed and
the conversion is not recursive.
• If the value is Numeric it is simply returned (this is for backwards compatibility).
• An error is raised for all other data types.
"\n\thello ".lstrip()
lstrip("\n\thello ")
Would both result in "hello"
["\n\thello ", "\n\thi "].lstrip()
lstrip(["\n\thello ", "\n\thi "])
Would both result in ['hello', 'hi']
Signature 1
lstrip(Numeric $arg)
Signature 2
lstrip(String $arg)
Signature 3
lstrip(Iterable[Variant[String, Numeric]] $arg)
map
Applies a lambda to every value in a data structure and returns an array containing the results.
This function takes two mandatory arguments, in this order:
1.
An array, hash, or other iterable object that the function will iterate over.
2.
A lambda, which the function calls for each element in the first argument. It can request one or two parameters.
$transformed_data = $data.map |$parameter| { <PUPPET CODE BLOCK> }
© 2024 Puppet, Inc., a Perforce company

Puppet | Syntax and settings | 1019
or
$transformed_data = map($data) |$parameter| { <PUPPET CODE BLOCK> }
When the first argument ($data in the above example) is an array, Puppet passes each value in turn to the lambda.
# For the array $data, return an array containing each value multiplied by
10
$data = [1,2,3]
$transformed_data = $data.map |$items| { $items * 10 }
# $transformed_data contains [10,20,30]
When the first argument is a hash, Puppet passes each key and value pair to the lambda as an array in the form
[key, value].
# For the hash $data, return an array containing the keys
$data = {'a'=>1,'b'=>2,'c'=>3}
$transformed_data = $data.map |$items| { $items[0] }
# $transformed_data contains ['a','b','c']
When the first argument is an array and the lambda has two parameters, Puppet passes the array's indexes
(enumerated from 0) in the first parameter and its values in the second parameter.
# For the array $data, return an array containing the indexes
$data = [1,2,3]
$transformed_data = $data.map |$index,$value| { $index }
# $transformed_data contains [0,1,2]
When the first argument is a hash, Puppet passes its keys to the first parameter and its values to the second parameter.
# For the hash $data, return an array containing each value
$data = {'a'=>1,'b'=>2,'c'=>3}
$transformed_data = $data.map |$key,$value| { $value }
# $transformed_data contains [1,2,3]
Signature 1
map(Hash[Any, Any] $hash, Callable[2,2] &$block)
Signature 2
map(Hash[Any, Any] $hash, Callable[1,1] &$block)
Signature 3
map(Iterable $enumerable, Callable[2,2] &$block)
Signature 4
map(Iterable $enumerable, Callable[1,1] &$block)
match
Matches a regular expression against a string and returns an array containing the match and any matched capturing
groups.
The first argument is a string or array of strings. The second argument is either a regular expression, regular
expression represented as a string, or Regex or Pattern data type that the function matches against the first argument.
The returned array contains the entire match at index 0, and each captured group at subsequent index values. If the
value or expression being matched is an array, the function returns an array with mapped match results.
© 2024 Puppet, Inc., a Perforce company

Puppet | Syntax and settings | 1020
If the function doesn't find a match, it returns 'undef'.
$matches = "abc123".match(/[a-z]+[1-9]+/)
# $matches contains [abc123]
$matches = "abc123".match(/([a-z]+)([1-9]+)/)
# $matches contains [abc123, abc, 123]
$matches = ["abc123","def456"].match(/([a-z]+)([1-9]+)/)
# $matches contains [[abc123, abc, 123], [def456, def, 456]]
Signature 1
match(String $string, Variant[Any, Type] $pattern)
Signature 2
match(Array[String] $string, Variant[Any, Type] $pattern)
max
Returns the highest value among a variable number of arguments. Takes at least one argument.
This function is (with one exception) compatible with the stdlib function with the same name and performs
deprecated type conversion before comparison as follows:
• If a value converted to String is an optionally '-' prefixed, string of digits, one optional decimal point, followed by
optional decimal digits - then the comparison is performed on the values converted to floating point.
• If a value is not considered convertible to float, it is converted to a String and the comparison is a lexical
compare where min is the lexicographical later value.
• A lexicographical compare is performed in a system locale - international characters may therefore not appear in
what a user thinks is the correct order.
• The conversion rules apply to values in pairs - the rule must hold for both values - a value may therefore be
compared using different rules depending on the "other value".
• The returned result found to be the "highest" is the original unconverted value.
The above rules have been deprecated in Puppet 6.0.0 as they produce strange results when given values of mixed
data types. In general, either convert values to be all String or all Numeric values before calling the function,
or call the function with a lambda that performs type conversion and comparison. This because one simply cannot
compare Boolean with Regexp and with any arbitrary Array, Hash or Object and getting a meaningful result.
The one change in the function's behavior is when the function is given a single array argument. The stdlib
implementation would return that array as the result where it now instead returns the max value from that array.
notice(max(1)) # would notice 1
notice(max(1,2)) # would notice 2
notice(max("1", 2)) # would notice 2
notice(max("0777", 512)) # would notice "0777", since "0777" is not
converted from octal form
notice(max(0777, 512)) # would notice 512, since 0777 is decimal 511
notice(max('aa', 'ab')) # would notice 'ab'
notice(max(['a'], ['b'])) # would notice ['b'], since "['b']" is after
"['a']"
$x = [1,2,3,4]
notice(max(*$x)) # would notice 4
$x = [1,2,3,4]
notice(max($x)) # would notice 4
© 2024 Puppet, Inc., a Perforce company

Puppet | Syntax and settings | 1021
notice($x.max) # would notice 4
This example shows that a single array argument is used as the set of values as opposed to being a single returned
value.
When calling with a lambda, it must accept two variables and it must return one of -1, 0, or 1 depending on if first
argument is before/lower than, equal to, or higher/after the second argument.
notice(max("2", "10", "100") |$a, $b| { compare($a, $b) })
Would notice "2" as higher since it is lexicographically higher/after the other values. Without the lambda the stdlib
compatible (deprecated) behavior would have been to return "100" since number conversion kicks in.
Signature 1
max(Numeric *$values)
Signature 2
max(String *$values)
Signature 3
max(Semver *$values)
Signature 4
max(Timespan *$values)
Signature 5
max(Timestamp *$values)
Signature 6
max(Array[Numeric] $values, Optional[Callable[2,2]] &$block)
Signature 7
max(Array[String] $values, Optional[Callable[2,2]] &$block)
Signature 8
max(Array[Semver] $values, Optional[Callable[2,2]] &$block)
Signature 9
max(Array[Timespan] $values, Optional[Callable[2,2]] &$block)
Signature 10
max(Array[Timestamp] $values, Optional[Callable[2,2]] &$block)
Signature 11
max(Array $values, Optional[Callable[2,2]] &$block)
Signature 12
max(Any *$values, Callable[2,2] &$block)
Signature 13
max(Any *$values)
md5
Returns a MD5 hash value from a provided string.
md5()
© 2024 Puppet, Inc., a Perforce company

Puppet | Syntax and settings | 1022
min
Returns the lowest value among a variable number of arguments. Takes at least one argument.
This function is (with one exception) compatible with the stdlib function with the same name and performs
deprecated type conversion before comparison as follows:
• If a value converted to String is an optionally '-' prefixed, string of digits, one optional decimal point, followed by
optional decimal digits - then the comparison is performed on the values converted to floating point.
• If a value is not considered convertible to float, it is converted to a String and the comparison is a lexical
compare where min is the lexicographical earlier value.
• A lexicographical compare is performed in a system locale - international characters may therefore not appear in
what a user thinks is the correct order.
• The conversion rules apply to values in pairs - the rule must hold for both values - a value may therefore be
compared using different rules depending on the "other value".
• The returned result found to be the "lowest" is the original unconverted value.
The above rules have been deprecated in Puppet 6.0.0 as they produce strange results when given values of mixed
data types. In general, either convert values to be all String or all Numeric values before calling the function,
or call the function with a lambda that performs type conversion and comparison. This because one simply cannot
compare Boolean with Regexp and with any arbitrary Array, Hash or Object and getting a meaningful result.
The one change in the function's behavior is when the function is given a single array argument. The stdlib
implementation would return that array as the result where it now instead returns the max value from that array.
notice(min(1)) # would notice 1
notice(min(1,2)) # would notice 1
notice(min("1", 2)) # would notice 1
notice(min("0777", 512)) # would notice 512, since "0777" is not converted
from octal form
notice(min(0777, 512)) # would notice 511, since 0777 is decimal 511
notice(min('aa', 'ab')) # would notice 'aa'
notice(min(['a'], ['b'])) # would notice ['a'], since "['a']" is before
"['b']"
$x = [1,2,3,4]
notice(min(*$x)) # would notice 1
$x = [1,2,3,4]
notice(min($x)) # would notice 1
notice($x.min) # would notice 1
This example shows that a single array argument is used as the set of values as opposed to being a single returned
value.
When calling with a lambda, it must accept two variables and it must return one of -1, 0, or 1 depending on if first
argument is before/lower than, equal to, or higher/after the second argument.
notice(min("2", "10", "100") |$a, $b| { compare($a, $b) })
Would notice "10" as lower since it is lexicographically lower/before the other values. Without the lambda the stdlib
compatible (deprecated) behavior would have been to return "2" since number conversion kicks in.
Signature 1
min(Numeric *$values)
Signature 2
min(String *$values)
Signature 3
© 2024 Puppet, Inc., a Perforce company
Puppet | Syntax and settings | 1023
min(Semver *$values)
Signature 4
min(Timespan *$values)
Signature 5
min(Timestamp *$values)
Signature 6
min(Array[Numeric] $values, Optional[Callable[2,2]] &$block)
Signature 7
min(Array[Semver] $values, Optional[Callable[2,2]] &$block)
Signature 8
min(Array[Timespan] $values, Optional[Callable[2,2]] &$block)
Signature 9
min(Array[Timestamp] $values, Optional[Callable[2,2]] &$block)
Signature 10
min(Array[String] $values, Optional[Callable[2,2]] &$block)
Signature 11
min(Array $values, Optional[Callable[2,2]] &$block)
Signature 12
min(Any *$values, Callable[2,2] &$block)
Signature 13
min(Any *$values)
module_directory
Finds an existing module and returns the path to its root directory.
The argument to this function should be a module name String For example, the reference mysql will search for the
directory <MODULES DIRECTORY>/mysql and return the first found on the modulepath.
This function can also accept:
• Multiple String arguments, which will return the path of the first module found, skipping non existing modules.
• An array of module names, which will return the path of the first module found from the given names in the array,
skipping non existing modules.
The function returns undef if none of the given modules were found
Signature 1
module_directory(String *$names)
Signature 2
module_directory(Array[String] *$names)
new
Creates a new instance/object of a given data type.
This function makes it possible to create new instances of concrete data types. If a block is given it is called with the
just created instance as an argument.
© 2024 Puppet, Inc., a Perforce company

Puppet | Syntax and settings | 1024
Calling this function is equivalent to directly calling the data type:
$a = Integer.new("42")
$b = Integer("42")
These would both convert the string "42" to the decimal value 42.
$a = Integer.new("42", 8)
$b = Integer({from => "42", radix => 8})
This would convert the octal (radix 8) number "42" in string form to the decimal value 34.
The new function supports two ways of giving the arguments:
• by name (using a hash with property to value mapping)
• by position (as regular arguments)
Note that it is not possible to create new instances of some abstract data types (for example Variant). The data type
Optional[T] is an exception as it will create an instance of T or undef if the value to convert is undef.
The arguments that can be given is determined by the data type.
An assertion is always made that the produced value complies with the given type constraints.
Integer[0].new("-100")
Would fail with an assertion error (since value is less than 0).
The following sections show the arguments and conversion rules per data type built into the Puppet Type System.
Conversion to Optional[T] and NotUndef[T]
Conversion to these data types is the same as a conversion to the type argument T. In the case of Optional[T] it
is accepted that the argument to convert may be undef. It is however not acceptable to give other arguments (than
undef) that cannot be converted to T.
Conversion to Integer
A new Integer can be created from Integer, Float, Boolean, and String values. For conversion from
String it is possible to specify the radix (base).
type Radix = Variant[Default, Integer[2,2], Integer[8,8], Integer[10,10],
Integer[16,16]]
function Integer.new(
String $value,
Radix $radix = 10,
Boolean $abs = false
)
function Integer.new(
Variant[Numeric, Boolean] $value,
Boolean $abs = false
)
• When converting from String the default radix is 10.
• If radix is not specified an attempt is made to detect the radix from the start of the string:
• 0b or 0B is taken as radix 2.
• 0x or 0X is taken as radix 16.
• 0 as radix 8.
• All others are decimal.
© 2024 Puppet, Inc., a Perforce company

Puppet | Syntax and settings | 1025
• Conversion from String accepts an optional sign in the string.
• For hexadecimal (radix 16) conversion an optional leading "0x", or "0X" is accepted.
• For octal (radix 8) an optional leading "0" is accepted.
• For binary (radix 2) an optional leading "0b" or "0B" is accepted.
• When radix is set to default, the conversion is based on the leading. characters in the string. A leading "0"
for radix 8, a leading "0x", or "0X" for radix 16, and leading "0b" or "0B" for binary.
• Conversion from Boolean results in 0 for false and 1 for true.
• Conversion from Integer, Float, and Boolean ignores the radix.
• Float value fractions are truncated (no rounding).
• When abs is set to true, the result will be an absolute integer.
$a_number = Integer("0xFF", 16) # results in 255
$a_number = Integer("010") # results in 8
$a_number = Integer("010", 10) # results in 10
$a_number = Integer(true) # results in 1
$a_number = Integer(-38, 10, true) # results in 38
Conversion to Float
A new Float can be created from Integer, Float, Boolean, and String values. For conversion from
String both float and integer formats are supported.
function Float.new(
Variant[Numeric, Boolean, String] $value,
Boolean $abs = true
)
• For an integer, the floating point fraction of .0 is added to the value.
• A Boolean true is converted to 1.0, and a false to 0.0.
• In String format, integer prefixes for hex and binary are understood (but not octal since floating point in string
format may start with a '0').
• When abs is set to true, the result will be an absolute floating point value.
Conversion to Numeric
A new Integer or Float can be created from Integer, Float, Boolean and String values.
function Numeric.new(
Variant[Numeric, Boolean, String] $value,
Boolean $abs = true
)
• If the value has a decimal period, or if given in scientific notation (e/E), the result is a Float, otherwise the value
is an Integer. The conversion from String always uses a radix based on the prefix of the string.
• Conversion from Boolean results in 0 for false and 1 for true.
• When abs is set to true, the result will be an absolute Floator Integer value.
$a_number = Numeric(true) # results in 1
$a_number = Numeric("0xFF") # results in 255
$a_number = Numeric("010") # results in 8
$a_number = Numeric("3.14") # results in 3.14 (a float)
$a_number = Numeric(-42.3, true) # results in 42.3
$a_number = Numeric(-42, true) # results in 42
Conversion to Timespan
A new Timespan can be created from Integer, Float, String, and Hash values. Several variants of the
constructor are provided.
© 2024 Puppet, Inc., a Perforce company

Puppet | Syntax and settings | 1026
Timespan from seconds
When a Float is used, the decimal part represents fractions of a second.
function Timespan.new(
Variant[Float, Integer] $value
)
Timespan from days, hours, minutes, seconds, and fractions of a second
The arguments can be passed separately in which case the first four, days, hours, minutes, and seconds are mandatory
and the rest are optional. All values may overflow and/or be negative. The internal 128-bit nano-second integer is
calculated as:
(((((days * 24 + hours) * 60 + minutes) * 60 + seconds) * 1000 +
milliseconds) * 1000 + microseconds) * 1000 + nanoseconds
function Timespan.new(
Integer $days, Integer $hours, Integer $minutes, Integer $seconds,
Integer $milliseconds = 0, Integer $microseconds = 0, Integer $nanoseconds
= 0
)
or, all arguments can be passed as a Hash, in which case all entries are optional:
function Timespan.new(
Struct[{
Optional[negative] => Boolean,
Optional[days] => Integer,
Optional[hours] => Integer,
Optional[minutes] => Integer,
Optional[seconds] => Integer,
Optional[milliseconds] => Integer,
Optional[microseconds] => Integer,
Optional[nanoseconds] => Integer
}] $hash
)
Timespan from String and format directive patterns
The first argument is parsed using the format optionally passed as a string or array of strings. When an array is used,
an attempt will be made to parse the string using the first entry and then with each entry in succession until parsing
succeeds. If the second argument is omitted, an array of default formats will be used.
An exception is raised when no format was able to parse the given string.
function Timespan.new(
String $string, Variant[String[2],Array[String[2], 1]] $format = <default
format>)
)
the arguments may also be passed as a Hash:
function Timespan.new(
Struct[{
string => String[1],
Optional[format] => Variant[String[2],Array[String[2], 1]]
}] $hash
)
© 2024 Puppet, Inc., a Perforce company

Puppet | Syntax and settings | 1027
The directive consists of a percent (%) character, zero or more flags, optional minimum field width and a conversion
specifier as follows:
%[Flags][Width]Conversion
Flags:
Flag Meaning
- Don't pad numerical output
_ Use spaces for padding
0 Use zeros for padding
Format directives:
Format Meaning
D Number of Days
H Hour of the day, 24-hour clock
M Minute of the hour (00..59)
S Second of the minute (00..59)
L Millisecond of the second (000..999)
N Fractional seconds digits
The format directive that represents the highest magnitude in the format will be allowed to overflow. I.e. if no "%D"
is used but a "%H" is present, then the hours may be more than 23.
The default array contains the following patterns:
['%D-%H:%M:%S', '%D-%H:%M', '%H:%M:%S', '%H:%M']
Examples - Converting to Timespan
$duration = Timespan(13.5) # 13 seconds and 500 milliseconds
$duration = Timespan({days=>4}) # 4 days
$duration = Timespan(4, 0, 0, 2) # 4 days and 2 seconds
$duration = Timespan('13:20') # 13 hours and 20 minutes (using default
pattern)
$duration = Timespan('10:03.5', '%M:%S.%L') # 10 minutes, 3 seconds, and 5
milli-seconds
$duration = Timespan('10:03.5', '%M:%S.%N') # 10 minutes, 3 seconds, and 5
nano-seconds
Conversion to Timestamp
A new Timestamp can be created from Integer, Float, String, and Hash values. Several variants of the
constructor are provided.
Timestamp from seconds since epoch (1970-01-01 00:00:00 UTC)
When a Float is used, the decimal part represents fractions of a second.
function Timestamp.new(
Variant[Float, Integer] $value
)
Timestamp from String and patterns consisting of format directives
© 2024 Puppet, Inc., a Perforce company

Puppet | Syntax and settings | 1028
The first argument is parsed using the format optionally passed as a string or array of strings. When an array is used,
an attempt will be made to parse the string using the first entry and then with each entry in succession until parsing
succeeds. If the second argument is omitted, an array of default formats will be used.
A third optional timezone argument can be provided. The first argument will then be parsed as if it represents a local
time in that timezone. The timezone can be any timezone that is recognized when using the '%z' or '%Z' formats,
or the word 'current', in which case the current timezone of the evaluating process will be used. The timezone
argument is case insensitive.
The default timezone, when no argument is provided, or when using the keyword default, is 'UTC'.
It is illegal to provide a timezone argument other than default in combination with a format that contains '%z' or
'%Z' since that would introduce an ambiguity as to which timezone to use. The one extracted from the string, or the
one provided as an argument.
An exception is raised when no format was able to parse the given string.
function Timestamp.new(
String $string,
Variant[String[2],Array[String[2], 1]] $format = <default format>,
String $timezone = default)
)
the arguments may also be passed as a Hash:
function Timestamp.new(
Struct[{
string => String[1],
Optional[format] => Variant[String[2],Array[String[2], 1]],
Optional[timezone] => String[1]
}] $hash
)
The directive consists of a percent (%) character, zero or more flags, optional minimum field width and a conversion
specifier as follows:
%[Flags][Width]Conversion
Flags:
Flag Meaning
- Don't pad numerical output
_ Use spaces for padding
0 Use zeros for padding
# Change names to upper-case or change case of am/pm
^ Use uppercase
: Use colons for %z
Format directives (names and padding can be altered using flags):
Date (Year, Month, Day):
Format Meaning
Y Year with century, zero-padded to at least 4 digits
C year / 100 (rounded down such as 20 in 2009)
© 2024 Puppet, Inc., a Perforce company

Puppet | Syntax and settings | 1029
Format Meaning
y year % 100 (00..99)
m Month of the year, zero-padded (01..12)
B The full month name ("January")
b The abbreviated month name ("Jan")
h Equivalent to %b
d Day of the month, zero-padded (01..31)
e Day of the month, blank-padded (1..31)
j Day of the year (001..366)
Time (Hour, Minute, Second, Subsecond):
Format Meaning
H Hour of the day, 24-hour clock, zero-padded (00..23)
k Hour of the day, 24-hour clock, blank-padded (0..23)
I Hour of the day, 12-hour clock, zero-padded (01..12)
l Hour of the day, 12-hour clock, blank-padded (1..12)
P Meridian indicator, lowercase ("am" or "pm")
p Meridian indicator, uppercase ("AM" or "PM")
M Minute of the hour (00..59)
S Second of the minute (00..60)
L Millisecond of the second (000..999). Digits under
millisecond are truncated to not produce 1000
N Fractional seconds digits, default is 9 digits
(nanosecond). Digits under a specified width are
truncated to avoid carry up
Time (Hour, Minute, Second, Subsecond):
Format Meaning
z Time zone as hour and minute offset from UTC (e.g.
+0900)
:z hour and minute offset from UTC with a colon (e.g.
+09:00)
::z hour, minute and second offset from UTC (e.g.
+09:00:00)
Z Abbreviated time zone name or similar information. (OS
dependent)
Weekday:
Format Meaning
A The full weekday name ("Sunday")
© 2024 Puppet, Inc., a Perforce company

Puppet | Syntax and settings | 1030
Format Meaning
a The abbreviated name ("Sun")
u Day of the week (Monday is 1, 1..7)
w Day of the week (Sunday is 0, 0..6)
ISO 8601 week-based year and week number:
The first week of YYYY starts with a Monday and includes YYYY-01-04. The days in the year before the first week
are in the last week of the previous year.
Format Meaning
G The week-based year
g The last 2 digits of the week-based year (00..99)
V Week number of the week-based year (01..53)
Week number:
The first week of YYYY that starts with a Sunday or Monday (according to %U or %W). The days in the year before
the first week are in week 0.
Format Meaning
U Week number of the year. The week starts with Sunday.
(00..53)
W Week number of the year. The week starts with Monday.
(00..53)
Seconds since the Epoch:
| Format | Meaning | | s | Number of seconds since 1970-01-01 00:00:00 UTC. |
Literal string:
Format Meaning
n Newline character (\n)
t Tab character (\t)
% Literal % character
Combination:
Format Meaning
c date and time (%a %b %e %T %Y)
D Date (%m/%d/%y)
F The ISO 8601 date format (%Y-%m-%d)
v VMS date (%e-%^b-%4Y)
x Same as %D
X Same as %T
r 12-hour time (%I:%M:%S %p)
R 24-hour time (%H:%M)
© 2024 Puppet, Inc., a Perforce company

Puppet | Syntax and settings | 1031
Format Meaning
T 24-hour time (%H:%M:%S)
The default array contains the following patterns:
When a timezone argument (other than default) is explicitly provided:
['%FT%T.L', '%FT%T', '%F']
otherwise:
['%FT%T.%L %Z', '%FT%T %Z', '%F %Z', '%FT%T.L', '%FT%T', '%F']
Examples - Converting to Timestamp
$ts = Timestamp(1473150899) # 2016-09-06
08:34:59 UTC
$ts = Timestamp({string=>'2015', format=>'%Y'}) # 2015-01-01
00:00:00.000 UTC
$ts = Timestamp('Wed Aug 24 12:13:14 2016', '%c') # 2016-08-24
12:13:14 UTC
$ts = Timestamp('Wed Aug 24 12:13:14 2016 PDT', '%c %Z') # 2016-08-24
19:13:14.000 UTC
$ts = Timestamp('2016-08-24 12:13:14', '%F %T', 'PST') # 2016-08-24
20:13:14.000 UTC
$ts = Timestamp('2016-08-24T12:13:14', default, 'PST') # 2016-08-24
20:13:14.000 UTC
Conversion to Type
A new Type can be created from its String representation.
$t = Type.new('Integer[10]')
Conversion to String
Conversion to String is the most comprehensive conversion as there are many use cases where a string
representation is wanted. The defaults for the many options have been chosen with care to be the most basic "value in
textual form" representation. The more advanced forms of formatting are intended to enable writing special purposes
formatting functions in the Puppet language.
A new string can be created from all other data types. The process is performed in several steps - first the data type
of the given value is inferred, then the resulting data type is used to find the most significant format specified for that
data type. And finally, the found format is used to convert the given value.
The mapping from data type to format is referred to as the format map. This map allows different formatting
depending on type.
$format_map = {
Integer[default, 0] => "%d",
Integer[1, default] => "%#x"
}
String("-1", $format_map) # produces '-1'
String("10", $format_map) # produces '0xa'
A format is specified on the form:
%[Flags][Width][.Precision]Format
© 2024 Puppet, Inc., a Perforce company

Puppet | Syntax and settings | 1032
Width is the number of characters into which the value should be fitted. This allocated space is padded if value is
shorter. By default it is space padded, and the flag 0 will cause padding with 0 for numerical formats.
Precision is the number of fractional digits to show for floating point, and the maximum characters included in a
string format.
Note that all data type supports the formats s and p with the meaning "default string representation" and "default
programmatic string representation" (which for example means that a String is quoted in 'p' format).
Signatures of String conversion
type Format = Pattern[/^%([\s\+\-#0\[\{<\(\|]*)([1-9][0-9]*)?(?:\.([0-9]+))?
([a-zA-Z])/]
type ContainerFormat = Struct[{
format => Optional[String],
separator => Optional[String],
separator2 => Optional[String],
string_formats => Hash[Type, Format]
}]
type TypeMap = Hash[Type, Variant[Format, ContainerFormat]]
type Formats = Variant[Default, String[1], TypeMap]
function String.new(
Any $value,
Formats $string_formats
)
Where:
• separator is the string used to separate entries in an array, or hash (extra space should not be included at the
end), defaults to ","
• separator2 is the separator between key and value in a hash entry (space padding should be included as
wanted), defaults to " => ".
• string_formats is a data type to format map for values contained in arrays and hashes - defaults to {Any
=> "%p"}. Note that these nested formats are not applicable to data types that are containers; they are always
formatted as per the top level format specification.
$str = String(10) # produces '10'
$str = String([10]) # produces '["10"]'
$str = String(10, "%#x") # produces '0xa'
$str = String([10], "%(a") # produces '("10")'
$formats = {
Array => {
format => '%(a',
string_formats => { Integer => '%#x' }
}
}
$str = String([1,2,3], $formats) # produces '(0x1, 0x2, 0x3)'
The given formats are merged with the default formats, and matching of values to convert against format is based on
the specificity of the mapped type; for example, different formats can be used for short and long arrays.
Integer to String
Format Integer Formats
d Decimal, negative values produces leading -.
© 2024 Puppet, Inc., a Perforce company

Puppet | Syntax and settings | 1033
Format Integer Formats
x X Hexadecimal in lower or upper case. Uses ..f/..F for
negative values unless + is also used. A # adds prefix
0x/0X.
o Octal. Uses ..0 for negative values unless + is also
used. A # adds prefix 0.
b B Binary with prefix b or B. Uses ..1/..1 for negative
values unless + is also used.
c Numeric value representing a Unicode value, result is a
one unicode character string, quoted if alternative flag #
is used
s Same as d, or d in quotes if alternative flag # is used.
p Same as d.
eEfgGaA Converts integer to float and formats using the floating
point rules.
Defaults to d.
Float to String
Format Float formats
f Floating point in non exponential notation.
e E Exponential notation with e or E.
g G Conditional exponential with e or E if exponent < -4 or
>= the precision.
a A Hexadecimal exponential form, using x/X as prefix and
p/P before exponent.
s Converted to string using format p, then applying string
formatting rule, alternate form `#`` quotes result.
p Same as f format with minimum significant number of
fractional digits, prec has no effect.
dxXobBc Converts float to integer and formats using the integer
rules.
Defaults to p.
String to String
Format String
s Unquoted string, verbatim output of control chars.
p Programmatic representation - strings are quoted, interior
quotes and control chars are escaped. Selects single or
double quotes based on content, or uses double quotes if
alternative flag # is used.
C Each :: name segment capitalized, quoted if alternative
flag # is used.
c Capitalized string, quoted if alternative flag # is used.
© 2024 Puppet, Inc., a Perforce company

Puppet | Syntax and settings | 1034
Format String
d Downcased string, quoted if alternative flag # is used.
u Upcased string, quoted if alternative flag # is used.
t Trims leading and trailing whitespace from the string,
quoted if alternative flag # is used.
Defaults to s at top level and p inside array or hash.
Boolean to String
Format Boolean Formats
t T String 'true'/'false' or 'True'/'False',
first char if alternate form is used (i.e. 't'/'f' or
'T'/'F').
y Y String 'yes'/'no', 'Yes'/'No', 'y'/'n' or
'Y'/'N' if alternative flag # is used.
dxXobB Numeric value 0/1 in accordance with the given format
which must be valid integer format.
eEfgGaA Numeric value 0.0/1.0 in accordance with the given
float format and flags.
s String 'true' / 'false'.
p String 'true' / 'false'.
Regexp to String
Format Regexp Formats
s No delimiters, quoted if alternative flag # is used.
p Delimiters / /.
Undef to String
Format Undef formats
s Empty string, or quoted empty string if alternative flag #
is used.
p String 'undef', or quoted '"undef"' if alternative
flag # is used.
n String 'nil', or 'null' if alternative flag # is used.
dxXobB String 'NaN'.
eEfgGaA String 'NaN'.
v String 'n/a'.
V String 'N/A'.
u String 'undef', or 'undefined' if alternative #
flag is used.
Default value to String
© 2024 Puppet, Inc., a Perforce company

Puppet | Syntax and settings | 1035
Format Default formats
d D String 'default' or 'Default', alternative form #
causes value to be quoted.
s Same as d.
p Same as d.
Binary value to String
Format Default formats
s binary as unquoted UTF-8 characters (errors if byte
sequence is invalid UTF-8). Alternate form escapes non
ascii bytes.
p 'Binary("<base64strict>")'
b '<base64>' - base64 string with newlines inserted
B '<base64strict>' - base64 strict string (without
newlines inserted)
u '<base64urlsafe>' - base64 urlsafe string
t 'Binary' - outputs the name of the type only
T 'BINARY' - output the name of the type in all caps only
• The alternate form flag # will quote the binary or base64 text output.
• The format %#s allows invalid UTF-8 characters and outputs all non ascii bytes as hex escaped characters on the
form \xHH where H is a hex digit.
• The width and precision values are applied to the text part only in %p format.
Array & Tuple to String
Format Array/Tuple Formats
a Formats with [ ] delimiters and ,, alternate form #
indents nested arrays/hashes.
s Same as a.
p Same as a.
See "Flags" <[({| for formatting of delimiters, and "Additional parameters for containers; Array and Hash" for
more information about options.
The alternate form flag # will cause indentation of nested array or hash containers. If width is also set it is taken as
the maximum allowed length of a sequence of elements (not including delimiters). If this max length is exceeded,
each element will be indented.
Hash & Struct to String
Format Hash/Struct Formats
h Formats with { } delimiters, , element separator and
=> inner element separator unless overridden by flags.
s Same as h.
p Same as h.
© 2024 Puppet, Inc., a Perforce company

Puppet | Syntax and settings | 1036
Format Hash/Struct Formats
a Converts the hash to an array of [k,v] tuples and
formats it using array rule(s).
See "Flags" <[({| for formatting of delimiters, and "Additional parameters for containers; Array and Hash" for
more information about options.
The alternate form flag # will format each hash key/value entry indented on a separate line.
Type to String
Format Array/Tuple Formats
s The same as p, quoted if alternative flag # is used.
p Outputs the type in string form as specified by the
Puppet Language.
Flags
Flag Effect
(space) A space instead of + for numeric output (- is shown), for
containers skips delimiters.
# Alternate format; prefix 0x/0x, 0 (octal) and 0b/0B
for binary, Floats force decimal '.'. For g/G keep trailing
0.
+ Show sign +/- depending on value's sign, changes x, X,
o, b, B format to not use 2's complement form.
- Left justify the value in the given width.
0 Pad with 0 instead of space for widths larger than value.
<[({| Defines an enclosing pair <> [] () {} or | |
when used with a container type.
Conversion to Boolean
Accepts a single value as argument:
• Float 0.0 is false, all other float values are true
• Integer 0 is false, all other integer values are true
• Strings
• true if 'true', 'yes', 'y' (case independent compare)
• false if 'false', 'no', 'n' (case independent compare)
• Boolean is already boolean and is simply returned
Conversion to Array and Tuple
When given a single value as argument:
• A non empty Hash is converted to an array matching Array[Tuple[Any,Any], 1].
• An empty Hash becomes an empty array.
• An Array is simply returned.
• An Iterable[T] is turned into an array of T instances.
• A Binary is converted to an Array[Integer[0,255]] of byte values
When given a second Boolean argument:
© 2024 Puppet, Inc., a Perforce company

Puppet | Syntax and settings | 1037
• if true, a value that is not already an array is returned as a one element array.
• if false, (the default), converts the first argument as shown above.
$arr = Array($value, true)
Conversion to a Tuple works exactly as conversion to an Array, only that the constructed array is asserted against
the given tuple type.
Conversion to Hash and Struct
Accepts a single value as argument:
• An empty Array becomes an empty Hash
• An Array matching Array[Tuple[Any,Any], 1] is converted to a hash where each tuple describes a key/
value entry
• An Array with an even number of entries is interpreted as [key1, val1, key2, val2, ...]
• An Iterable is turned into an Array and then converted to hash as per the array rules
• A Hash is simply returned
Alternatively, a tree can be constructed by giving two values; an array of tuples on the form [path, value]
(where the path is the path from the root of a tree, and value the value at that position in the tree), and either
the option 'tree' (do not convert arrays to hashes except the top level), or 'hash_tree' (convert all arrays to
hashes).
The tree/hash_tree forms of Hash creation are suited for transforming the result of an iteration using tree_each
and subsequent filtering or mapping.
Mapping an arbitrary structure in a way that keeps the structure, but where some values are replaced can be done by
using the tree_each function, mapping, and then constructing a new Hash from the result:
# A hash tree with 'water' at different locations
$h = { a => { b => { x => 'water'}}, b => { y => 'water'} }
# a helper function that turns water into wine
function make_wine($x) { if $x == 'water' { 'wine' } else { $x } }
# create a flattened tree with water turned into wine
$flat_tree = $h.tree_each.map |$entry| { [$entry[0], make_wine($entry[1])] }
# create a new Hash and log it
notice Hash($flat_tree, 'hash_tree')
Would notice the hash {a => {b => {x => wine}}, b => {y => wine}}
Conversion to a Struct works exactly as conversion to a Hash, only that the constructed hash is asserted against
the given struct type.
Conversion to a Regexp
A String can be converted into a Regexp
Example: Converting a String into a Regexp
$s = '[a-z]+\.com'
$r = Regexp($s)
if('foo.com' =~ $r) {
...
}
Creating a SemVer
A SemVer object represents a single Semantic Version. It can be created from a String, individual values for its parts,
or a hash specifying the value per part. See the specification at semver.org for the meaning of the SemVer's parts.
© 2024 Puppet, Inc., a Perforce company

Puppet | Syntax and settings | 1038
The signatures are:
type PositiveInteger = Integer[0,default]
type SemVerQualifier = Pattern[/\A(?<part>[0-9A-Za-z-]+)(?:\.\g<part>)*\Z/]
type SemVerString = String[1]
type SemVerHash =Struct[{
major => PositiveInteger,
minor => PositiveInteger,
patch => PositiveInteger,
Optional[prerelease] => SemVerQualifier,
Optional[build] => SemVerQualifier
}]
function SemVer.new(SemVerString $str)
function SemVer.new(
PositiveInteger $major
PositiveInteger $minor
PositiveInteger $patch
Optional[SemVerQualifier] $prerelease = undef
Optional[SemVerQualifier] $build = undef
)
function SemVer.new(SemVerHash $hash_args)
# As a type, SemVer can describe disjunct ranges which versions can be
# matched against - here the type is constructed with two
# SemVerRange objects.
#
$t = SemVer[
SemVerRange('>=1.0.0 <2.0.0'),
SemVerRange('>=3.0.0 <4.0.0')
]
notice(SemVer('1.2.3') =~ $t) # true
notice(SemVer('2.3.4') =~ $t) # false
notice(SemVer('3.4.5') =~ $t) # true
Creating a SemVerRange
A SemVerRange object represents a range of SemVer. It can be created from a String, or from two SemVer
instances, where either end can be given as a literal default to indicate infinity. The string format of a
SemVerRange is specified by the Semantic Version Range Grammar.
Use of the comparator sets described in the grammar (joining with ||) is not supported.
The signatures are:
type SemVerRangeString = String[1]
type SemVerRangeHash = Struct[{
min => Variant[Default, SemVer],
Optional[max] => Variant[Default, SemVer],
Optional[exclude_max] => Boolean
}]
function SemVerRange.new(
SemVerRangeString $semver_range_string
)
function SemVerRange.new(
Variant[Default,SemVer] $min
Variant[Default,SemVer] $max
Optional[Boolean] $exclude_max = undef
© 2024 Puppet, Inc., a Perforce company

Puppet | Syntax and settings | 1039
)
function SemVerRange.new(
SemVerRangeHash $semver_range_hash
)
For examples of SemVerRange use see "Creating a SemVer"
Creating a Binary
A Binary object represents a sequence of bytes and it can be created from a String in Base64 format, an Array
containing byte values. A Binary can also be created from a Hash containing the value to convert to a Binary.
The signatures are:
type ByteInteger = Integer[0,255]
type Base64Format = Enum["%b", "%u", "%B", "%s"]
type StringHash = Struct[{value => String, "format" =>
Optional[Base64Format]}]
type ArrayHash = Struct[{value => Array[ByteInteger]}]
type BinaryArgsHash = Variant[StringHash, ArrayHash]
function Binary.new(
String $base64_str,
Optional[Base64Format] $format
)
function Binary.new(
Array[ByteInteger] $byte_array
}
# Same as for String, or for Array, but where arguments are given in a Hash.
function Binary.new(BinaryArgsHash $hash_args)
The formats have the following meaning:
format explanation
B The data is in base64 strict encoding
u The data is in URL safe base64 encoding
b The data is in base64 encoding, padding as required by
base64 strict, is added by default
s The data is a puppet string. The string must be valid
UTF-8, or convertible to UTF-8 or an error is raised.
r (Ruby Raw) the byte sequence in the given string is used
verbatim irrespective of possible encoding errors
• The default format is %B.
• Note that the format %r should be used sparingly, or not at all. It exists for backwards compatibility reasons when
someone receiving a string from some function and that string should be treated as Binary. Such code should be
changed to return a Binary instead of a String.
# create the binary content "abc"
$a = Binary('YWJj')
# create the binary content from content in a module's file
$b = binary_file('mymodule/mypicture.jpg')
© 2024 Puppet, Inc., a Perforce company

Puppet | Syntax and settings | 1040
• Since 4.5.0
• Binary type since 4.8.0
Creating an instance of a Type using the Init type
The type Init[T] describes a value that can be used when instantiating a type. When used as the first argument in
a call to new, it will dispatch the call to its contained type and optionally augment the parameter list with additional
arguments.
# The following declaration
$x = Init[Integer].new('128')
# is exactly the same as
$x = Integer.new('128')
or, with base 16 and using implicit new
# The following declaration
$x = Init[Integer,16]('80')
# is exactly the same as
$x = Integer('80', 16)
$fmt = Init[String,'%#x']
notice($fmt(256)) # will notice '0x100'
new(Type $type, Any *$args, Optional[Callable] &$block)
next
Makes iteration continue with the next value, optionally with a given value for this iteration. If a value is not given it
defaults to undef
$data = ['a','b','c']
$data.each |Integer $index, String $value| {
if $index == 1 {
next()
}
notice ("${index} = ${value}")
}
Would notice:
Notice: Scope(Class[main]): 0 = a
Notice: Scope(Class[main]): 2 = c
next(Optional[Any] $value)
notice
Logs a message on the server at level notice.
notice(Any *$values)
Parameters
• *values --- The values to log.
Return type(s): Undef.
© 2024 Puppet, Inc., a Perforce company

Puppet | Syntax and settings | 1041
partition
Returns two arrays, the first containing the elements of enum for which the block evaluates to true, the second
containing the rest.
Signature 1
partition(Collection $collection, Callable[1,1] &$block)
Parameters
• collection --- A collection of things to partition.
Return type(s): Tuple[Array, Array].
Examples
Partition array of empty strings, results in e.g. [[''], [b, c]]
['', b, c].partition |$s| { $s.empty }
Partition array of strings using index, results in e.g. [['', 'ab'], ['b']]
['', b, ab].partition |$i, $s| { $i == 2 or $s.empty }
Partition hash of strings by key-value pair, results in e.g. [[['b', []]], [['a', [1, 2]]]]
{ a => [1, 2], b => [] }.partition |$kv| { $kv[1].empty }
Partition hash of strings by key and value, results in e.g. [[['b', []]], [['a', [1, 2]]]]
{ a => [1, 2], b => [] }.partition |$k, $v| { $v.empty }
Signature 2
partition(Array $array, Callable[2,2] &$block)
Signature 3
partition(Collection $collection, Callable[2,2] &$block)
realize
Make a virtual object real. This is useful when you want to know the name of the virtual object and don't want to
bother with a full collection. It is slightly faster than a collection, and, of course, is a bit shorter. You must pass the
object using a reference; e.g.: realize User[luke].
realize()
reduce
Applies a lambda to every value in a data structure from the first argument, carrying over the returned value of each
iteration, and returns the result of the lambda's final iteration. This lets you create a new value or data structure by
combining values from the first argument's data structure.
This function takes two mandatory arguments, in this order:
1.
An array, hash, or other iterable object that the function will iterate over.
2.
A lambda, which the function calls for each element in the first argument. It takes two mandatory parameters:
a.
A memo value that is overwritten after each iteration with the iteration's result.
b.
A second value that is overwritten after each iteration with the next value in the function's first argument.
$data.reduce |$memo, $value| { ... }
© 2024 Puppet, Inc., a Perforce company

Puppet | Syntax and settings | 1042
or
reduce($data) |$memo, $value| { ... }
You can also pass an optional "start memo" value as an argument, such as start below:
$data.reduce(start) |$memo, $value| { ... }
or
reduce($data, start) |$memo, $value| { ... }
When the first argument ($data in the above example) is an array, Puppet passes each of the data structure's values
in turn to the lambda's parameters. When the first argument is a hash, Puppet converts each of the hash's values to an
array in the form [key, value].
If you pass a start memo value, Puppet executes the lambda with the provided memo value and the data structure's
first value. Otherwise, Puppet passes the structure's first two values to the lambda.
Puppet calls the lambda for each of the data structure's remaining values. For each call, it passes the result of the
previous call as the first parameter ($memo in the above examples) and the next value from the data structure as the
second parameter ($value).
# Reduce the array $data, returning the sum of all values in the array.
$data = [1, 2, 3]
$sum = $data.reduce |$memo, $value| { $memo + $value }
# $sum contains 6
# Reduce the array $data, returning the sum of a start memo value and all
values in the
# array.
$data = [1, 2, 3]
$sum = $data.reduce(4) |$memo, $value| { $memo + $value }
# $sum contains 10
# Reduce the hash $data, returning the sum of all values and concatenated
string of all
# keys.
$data = {a => 1, b => 2, c => 3}
$combine = $data.reduce |$memo, $value| {
$string = "${memo[0]}${value[0]}"
$number = $memo[1] + $value[1]
[$string, $number]
}
# $combine contains [abc, 6]
# Reduce the array $data, returning the sum of all values in the array and
starting
# with $memo set to an arbitrary value instead of $data's first value.
$data = [1, 2, 3]
$sum = $data.reduce(4) |$memo, $value| { $memo + $value }
# At the start of the lambda's first iteration, $memo contains 4 and $value
contains 1.
# After all iterations, $sum contains 10.
# Reduce the hash $data, returning the sum of all values and concatenated
string of
# all keys, and starting with $memo set to an arbitrary array instead of
$data's first
# key-value pair.
$data = {a => 1, b => 2, c => 3}
$combine = $data.reduce( [d, 4] ) |$memo, $value| {
$string = "${memo[0]}${value[0]}"
$number = $memo[1] + $value[1]
© 2024 Puppet, Inc., a Perforce company

Puppet | Syntax and settings | 1043
[$string, $number]
}
# At the start of the lambda's first iteration, $memo contains [d, 4] and
$value
# contains [a, 1].
# $combine contains [dabc, 10]
# Reduce a hash of hashes $data, merging defaults into the inner hashes.
$data = {
'connection1' => {
'username' => 'user1',
'password' => 'pass1',
},
'connection_name2' => {
'username' => 'user2',
'password' => 'pass2',
},
}
$defaults = {
'maxActive' => '20',
'maxWait' => '10000',
'username' => 'defaultuser',
'password' => 'defaultpass',
}
$merged = $data.reduce( {} ) |$memo, $x| {
$memo + { $x[0] => $defaults + $data[$x[0]] }
}
# At the start of the lambda's first iteration, $memo is set to {}, and $x
is set to
# the first [key, value] tuple. The key in $data is, therefore, given by
$x[0]. In
# subsequent rounds, $memo retains the value returned by the expression,
i.e.
# $memo + { $x[0] => $defaults + $data[$x[0]] }.
Signature 1
reduce(Iterable $enumerable, Callable[2,2] &$block)
Signature 2
reduce(Iterable $enumerable, Any $memo, Callable[2,2] &$block)
regsubst
Performs regexp replacement on a string or array of strings.
Signature 1
regsubst(Variant[Array[String],String] $target, String $pattern,
Variant[String,Hash[String,String]] $replacement, Optional[Optional[Pattern[/
^[GEIM]*$/]]] $flags, Optional[Enum['N','E','S','U']] $encoding)
Parameters
• target --- The string or array of strings to operate on. If an array, the replacement will be performed on each of
the elements in the array, and the return value will be an array.
• pattern --- The regular expression matching the target string. If you want it anchored at the start and or end of
the string, you must do that with ^ and $ yourself.
© 2024 Puppet, Inc., a Perforce company

Puppet | Syntax and settings | 1044
• replacement --- Replacement string. Can contain backreferences to what was matched using \0 (whole match),
\1 (first set of parentheses), and so on. If the second argument is a Hash, and the matched text is one of its keys,
the corresponding value is the replacement string.
• flags --- Optional. String of single letter flags for how the regexp is interpreted (E, I, and M cannot be used if
pattern is a precompiled regexp):
• E Extended regexps
• I Ignore case in regexps
• M Multiline regexps
• G Global replacement; all occurrences of the regexp in each target string will be replaced. Without this, only
the first occurrence will be replaced.
• encoding --- Deprecated and ignored parameter, included only for compatibility.
Return type(s): Array[String], String. The result of the substitution. Result type is the same as for the target
parameter.
Examples
Get the third octet from the node's IP address:
$i3 = regsubst($ipaddress,'^(\\d+)\\.(\\d+)\\.(\\d+)\\.(\\d+)$','\\3')
Signature 2
regsubst(Variant[Array[String],String] $target, Variant[Regexp,Type[Regexp]]
$pattern, Variant[String,Hash[String,String]] $replacement, Optional[Pattern[/
^G?$/]] $flags)
Parameters
• target --- The string or array of strings to operate on. If an array, the replacement will be performed on each of
the elements in the array, and the return value will be an array.
• pattern --- The regular expression matching the target string. If you want it anchored at the start and or end of
the string, you must do that with ^ and $ yourself.
• replacement --- Replacement string. Can contain backreferences to what was matched using \0 (whole match),
\1 (first set of parentheses), and so on. If the second argument is a Hash, and the matched text is one of its keys,
the corresponding value is the replacement string.
• flags --- Optional. String of single letter flags for how the regexp is interpreted (E, I, and M cannot be used if
pattern is a precompiled regexp):
• E Extended regexps
• I Ignore case in regexps
• M Multiline regexps
• G Global replacement; all occurrences of the regexp in each target string will be replaced. Without this, only
the first occurrence will be replaced.
Return type(s): Array[String], String. The result of the substitution. Result type is the same as for the target
parameter.
Examples
Put angle brackets around each octet in the node's IP address:
$x = regsubst($ipaddress, /([0-9]+)/, '<\\1>', 'G')
require
Requires the specified classes. Evaluate one or more classes, adding the required class as a dependency.
© 2024 Puppet, Inc., a Perforce company

Puppet | Syntax and settings | 1045
The relationship metaparameters work well for specifying relationships between individual resources, but they can be
clumsy for specifying relationships between classes. This function is a superset of the include function, adding a
class relationship so that the requiring class depends on the required class.
Warning: using require in place of include can lead to unwanted dependency cycles.
For instance, the following manifest, with require instead of include, would produce a nasty dependence cycle,
because notify imposes a before between File[/foo] and Service[foo]:
class myservice {
service { foo: ensure => running }
}
class otherstuff {
include myservice
file { '/foo': notify => Service[foo] }
}
Note that this function only works with clients 0.25 and later, and it will fail if used with earlier clients.
You must use the class's full name; relative names are not allowed. In addition to names in string form, you may also
directly use Class and Resource Type values that are produced when evaluating resource and relationship expressions.
• Since 4.0.0 Class and Resource types, absolute names
• Since 4.7.0 Returns an Array[Type[Class]] with references to the required classes
require(Any *$names)
return
Makes iteration continue with the next value, optionally with a given value for this iteration. If a value is not given it
defaults to undef
return(Optional[Any] $value)
reverse_each
Reverses the order of the elements of something that is iterable and optionally runs a lambda for each element.
This function takes one to two arguments:
1.
An Iterable that the function will iterate over.
2.
An optional lambda, which the function calls for each element in the first argument. It must request one
parameter.
$data.reverse_each |$parameter| { <PUPPET CODE BLOCK> }
or
$reverse_data = $data.reverse_each
or
reverse_each($data) |$parameter| { <PUPPET CODE BLOCK> }
or
$reverse_data = reverse_each($data)
When no second argument is present, Puppet returns an Iterable that represents the reverse order of its first
argument. This allows methods on Iterable to be chained.
© 2024 Puppet, Inc., a Perforce company

Puppet | Syntax and settings | 1046
When a lambda is given as the second argument, Puppet iterates the first argument in reverse order and passes each
value in turn to the lambda, then returns undef.
# Puppet will log a notice for each of the three items
# in $data in reverse order.
$data = [1,2,3]
$data.reverse_each |$item| { notice($item) }
When no second argument is present, Puppet returns a new Iterable which allows it to be directly chained into
another function that takes an Iterable as an argument.
# For the array $data, return an array containing each
# value multiplied by 10 in reverse order
$data = [1,2,3]
$transformed_data = $data.reverse_each.map |$item| { $item * 10 }
# $transformed_data is set to [30,20,10]
# For the array $data, return an array containing each
# value multiplied by 10 in reverse order
$data = [1,2,3]
$transformed_data = map(reverse_each($data)) |$item| { $item * 10 }
# $transformed_data is set to [30,20,10]
Signature 1
reverse_each(Iterable $iterable)
Signature 2
reverse_each(Iterable $iterable, Callable[1,1] &$block)
round
Returns an Integer value rounded to the nearest value. Takes a single Numeric value as an argument.
notice(round(2.9)) # would notice 3
notice(round(2.1)) # would notice 2
notice(round(-2.9)) # would notice -3
round(Numeric $val)
rstrip
Strips trailing spaces from a String
This function is compatible with the stdlib function with the same name.
The function does the following:
• For a String the conversion removes all trailing ASCII white space characters such as space, tab, newline,
and return. It does not remove other space-like characters like hard space (Unicode U+00A0). (Tip, /
^[[:space:]]/ regular expression matches all space-like characters).
• For an Iterable[Variant[String, Numeric]] (for example an Array) each value is processed and
the conversion is not recursive.
• If the value is Numeric it is simply returned (this is for backwards compatibility).
• An error is raised for all other data types.
" hello\n\t".rstrip()
rstrip(" hello\n\t")
© 2024 Puppet, Inc., a Perforce company

Puppet | Syntax and settings | 1047
Would both result in "hello"
[" hello\n\t", " hi\n\t"].rstrip()
rstrip([" hello\n\t", " hi\n\t"])
Would both result in ['hello', 'hi']
Signature 1
rstrip(Numeric $arg)
Signature 2
rstrip(String $arg)
Signature 3
rstrip(Iterable[Variant[String, Numeric]] $arg)
scanf
Scans a string and returns an array of one or more converted values based on the given format string. See the
documentation of Ruby's String#scanf method for details about the supported formats (which are similar but not
identical to the formats used in Puppet's sprintf function.)
This function takes two mandatory arguments: the first is the string to convert, and the second is the format string.
The result of the scan is an array, with each successfully scanned and transformed value. The scanning stops if a scan
is unsuccessful, and the scanned result up to that point is returned. If there was no successful scan, the result is an
empty array.
"42".scanf("%i")
You can also optionally pass a lambda to scanf, to do additional validation or processing.
"42".scanf("%i") |$x| {
unless $x[0] =~ Integer {
fail "Expected a well formed integer value, got '$x[0]'"
}
$x[0]
}
scanf(String $data, String $format, Optional[Callable] &$block)
sha1
Returns a SHA1 hash value from a provided string.
sha1()
sha256
Returns a SHA256 hash value from a provided string.
sha256()
shellquote
Quote and concatenate arguments for use in Bourne shell.
Each argument is quoted separately, and then all are concatenated with spaces. If an argument is an array, the
elements of that array is interpolated within the rest of the arguments; this makes it possible to have an array of
arguments and pass that array to shellquote instead of having to specify each argument individually in the call.
shellquote()
© 2024 Puppet, Inc., a Perforce company

Puppet | Syntax and settings | 1048
size
The same as length() - returns the size of an Array, Hash, String, or Binary value.
size(Variant[Collection, String, Binary] $arg)
slice
Slices an array or hash into pieces of a given size.
This function takes two mandatory arguments: the first should be an array or hash, and the second specifies the
number of elements to include in each slice.
When the first argument is a hash, each key value pair is counted as one. For example, a slice size of 2 will produce
an array of two arrays with key, and value.
$a.slice(2) |$entry| { notice "first ${$entry[0]}, second
${$entry[1]}" }
$a.slice(2) |$first, $second| { notice "first ${first}, second ${second}" }
The function produces a concatenated result of the slices.
slice([1,2,3,4,5,6], 2) # produces [[1,2], [3,4], [5,6]]
slice(Integer[1,6], 2) # produces [[1,2], [3,4], [5,6]]
slice(4,2) # produces [[0,1], [2,3]]
slice('hello',2) # produces [[h, e], [l, l], [o]]
$a.slice($n) |$x| { ... }
slice($a) |$x| { ... }
The lambda should have either one parameter (receiving an array with the slice), or the same number of parameters as
specified by the slice size (each parameter receiving its part of the slice). If there are fewer remaining elements than
the slice size for the last slice, it will contain the remaining elements. If the lambda has multiple parameters, excess
parameters are set to undef for an array, or to empty arrays for a hash.
$a.slice(2) |$first, $second| { ... }
Signature 1
slice(Hash[Any, Any] $hash, Integer[1, default] $slice_size,
Optional[Callable] &$block)
Signature 2
slice(Iterable $enumerable, Integer[1, default] $slice_size,
Optional[Callable] &$block)
sort
Sorts an Array numerically or lexicographically or the characters of a String lexicographically. Please note:
This function is based on Ruby String comparison and as such may not be entirely UTF8 compatible. To ensure
compatibility please use this function with Ruby 2.4.0 or greater - https://bugs.ruby-lang.org/issues/10085.
This function is compatible with the function sort() in stdlib.
• Comparison of characters in a string always uses a system locale and may not be what is expected for a particular
locale
• Sorting is based on Ruby's <=> operator unless a lambda is given that performs the comparison.
• comparison of strings is case dependent (use lambda with compare($a,$b) to ignore case)
• comparison of mixed data types raises an error (if there is the need to sort mixed data types use a lambda)
© 2024 Puppet, Inc., a Perforce company

Puppet | Syntax and settings | 1049
Also see the compare() function for information about comparable data types in general.
notice(sort("xadb")) # notices 'abdx'
notice(sort([3,6,2])) # notices [2, 3, 6]
notice(sort([3,6,2]) |$a,$b| { compare($a, $b) }) # notices [2, 3, 6]
notice(sort([3,6,2]) |$a,$b| { compare($b, $a) }) # notices [6, 3, 2]
notice(sort(['A','b','C'])) # notices
['A', 'C', 'b']
notice(sort(['A','b','C']) |$a,$b| { compare($a, $b) }) # notices
['A', 'b', 'C']
notice(sort(['A','b','C']) |$a,$b| { compare($a, $b, true) }) # notices
['A', 'b', 'C']
notice(sort(['A','b','C']) |$a,$b| { compare($a, $b, false) }) # notices
['A','C', 'b']
notice(sort(['b', 3, 'a', 2]) |$a, $b| {
case [$a, $b] {
[String, Numeric] : { 1 }
[Numeric, String] : { -1 }
default: { compare($a, $b) }
}
})
Would notice [2,3,'a','b']
Signature 1
sort(String $string_value, Optional[Callable[2,2]] &$block)
Signature 2
sort(Array $array_value, Optional[Callable[2,2]] &$block)
split
Splits a string into an array using a given pattern. The pattern can be a string, regexp or regexp type.
$string = 'v1.v2:v3.v4'
$array_var1 = split($string, /:/)
$array_var2 = split($string, '[.]')
$array_var3 = split($string, Regexp['[.:]'])
#`$array_var1` now holds the result `['v1.v2', 'v3.v4']`,
# while `$array_var2` holds `['v1', 'v2:v3', 'v4']`, and
# `$array_var3` holds `['v1', 'v2', 'v3', 'v4']`.
Note that in the second example, we split on a literal string that contains a regexp meta-character (.), which must be
escaped. A simple way to do that for a single character is to enclose it in square brackets; a backslash will also escape
a single character.
Signature 1
split(String $str, String $pattern)
Signature 2
split(String $str, Regexp $pattern)
Signature 3
© 2024 Puppet, Inc., a Perforce company

Puppet | Syntax and settings | 1050
split(String $str, Type[Regexp] $pattern)
Signature 4
split(Sensitive[String] $sensitive, String $pattern)
Signature 5
split(Sensitive[String] $sensitive, Regexp $pattern)
Signature 6
split(Sensitive[String] $sensitive, Type[Regexp] $pattern)
sprintf
Perform printf-style formatting of text.
The first parameter is format string describing how the rest of the parameters should be formatted. See the
documentation for the Kernel::sprintf function in Ruby for details.
To use named format arguments, provide a hash containing the target string values as the argument to be formatted.
For example:
notice sprintf(\"%<x>s : %<y>d\", { 'x' => 'value is', 'y' => 42 })
This statement produces a notice of value is : 42.
sprintf()
step
When no block is given, Puppet returns a new Iterable which allows it to be directly chained into another function
that takes an Iterable as an argument.
# For the array $data, return an array, set to the first element and each
5th successor element, in reverse
# order multiplied by 10
$data = Integer[0,20]
$transformed_data = $data.step(5).map |$item| { $item * 10 }
$transformed_data contains [0,50,100,150,200]
# For the array $data, return an array, set to the first and each 5th
# successor, in reverse order, multiplied by 10
$data = Integer[0,20]
$transformed_data = map(step($data, 5)) |$item| { $item * 10 }
$transformed_data contains [0,50,100,150,200]
Signature 1
step(Iterable $iterable, Integer[1] $step)
Signature 2
step(Iterable $iterable, Integer[1] $step, Callable[1,1] &$block)
strftime
Formats timestamp or timespan according to the directives in the given format string. The directives begins with a
percent (%) character. Any text not listed as a directive will be passed through to the output string.
A third optional timezone argument can be provided. The first argument will then be formatted to represent a local
time in that timezone. The timezone can be any timezone that is recognized when using the '%z' or '%Z' formats, or
© 2024 Puppet, Inc., a Perforce company

Puppet | Syntax and settings | 1051
the word 'current', in which case the current timezone of the evaluating process will be used. The timezone argument
is case insensitive.
The default timezone, when no argument is provided, or when using the keyword default, is 'UTC'.
The directive consists of a percent (%) character, zero or more flags, optional minimum field width and a conversion
specifier as follows:
%[Flags][Width]Conversion
Flags that controls padding
Flag Meaning
- Don't pad numerical output
_ Use spaces for padding
0 Use zeros for padding
Timestamp specific flags
Flag Meaning
# Change case
^ Use uppercase
: Use colons for %z
Format directives applicable to Timestamp (names and padding can be altered using flags):
Date (Year, Month, Day):
Format Meaning
Y Year with century, zero-padded to at least 4 digits
C year / 100 (rounded down such as 20 in 2009)
y year % 100 (00..99)
m Month of the year, zero-padded (01..12)
B The full month name ("January")
b The abbreviated month name ("Jan")
h Equivalent to %b
d Day of the month, zero-padded (01..31)
e Day of the month, blank-padded ( 1..31)
j Day of the year (001..366)
Time (Hour, Minute, Second, Subsecond):
Format Meaning
H Hour of the day, 24-hour clock, zero-padded (00..23)
k Hour of the day, 24-hour clock, blank-padded ( 0..23)
I Hour of the day, 12-hour clock, zero-padded (01..12)
l Hour of the day, 12-hour clock, blank-padded ( 1..12)
© 2024 Puppet, Inc., a Perforce company

Puppet | Syntax and settings | 1052
Format Meaning
P Meridian indicator, lowercase ("am" or "pm")
p Meridian indicator, uppercase ("AM" or "PM")
M Minute of the hour (00..59)
S Second of the minute (00..60)
L Millisecond of the second (000..999). Digits under
millisecond are truncated to not produce 1000
N Fractional seconds digits, default is 9 digits
(nanosecond). Digits under a specified width are
truncated to avoid carry up
Time (Hour, Minute, Second, Subsecond):
Format Meaning
z Time zone as hour and minute offset from UTC (e.g.
+0900)
:z hour and minute offset from UTC with a colon (e.g.
+09:00)
::z hour, minute and second offset from UTC (e.g.
+09:00:00)
Z Abbreviated time zone name or similar information. (OS
dependent)
Weekday:
Format Meaning
A The full weekday name ("Sunday")
a The abbreviated name ("Sun")
u Day of the week (Monday is 1, 1..7)
w Day of the week (Sunday is 0, 0..6)
ISO 8601 week-based year and week number:
The first week of YYYY starts with a Monday and includes YYYY-01-04. The days in the year before the first week
are in the last week of the previous year.
Format Meaning
G The week-based year
g The last 2 digits of the week-based year (00..99)
V Week number of the week-based year (01..53)
Week number:
The first week of YYYY that starts with a Sunday or Monday (according to %U or %W). The days in the year before
the first week are in week 0.
© 2024 Puppet, Inc., a Perforce company

Puppet | Syntax and settings | 1053
Format Meaning
U Week number of the year. The week starts with Sunday.
(00..53)
W Week number of the year. The week starts with Monday.
(00..53)
Seconds since the Epoch:
Format Meaning
s Number of seconds since 1970-01-01 00:00:00 UTC.
Literal string:
Format Meaning
n Newline character (\n)
t Tab character (\t)
% Literal "%" character
Combination:
Format Meaning
c date and time (%a %b %e %T %Y)
D Date (%m/%d/%y)
F The ISO 8601 date format (%Y-%m-%d)
v VMS date (%e-%^b-%4Y)
x Same as %D
X Same as %T
r 12-hour time (%I:%M:%S %p)
R 24-hour time (%H:%M)
T 24-hour time (%H:%M:%S)
$timestamp = Timestamp('2016-08-24T12:13:14')
# Notice the timestamp using a format that notices the ISO 8601 date format
notice($timestamp.strftime('%F')) # outputs '2016-08-24'
# Notice the timestamp using a format that notices weekday, month, day, time
(as UTC), and year
notice($timestamp.strftime('%c')) # outputs 'Wed Aug 24 12:13:14 2016'
# Notice the timestamp using a specific timezone
notice($timestamp.strftime('%F %T %z', 'PST')) # outputs '2016-08-24
04:13:14 -0800'
# Notice the timestamp using timezone that is current for the evaluating
process
notice($timestamp.strftime('%F %T', 'current')) # outputs the timestamp
using the timezone for the current process
© 2024 Puppet, Inc., a Perforce company

Puppet | Syntax and settings | 1054
Format directives applicable to Timespan:
Format Meaning
D Number of Days
H Hour of the day, 24-hour clock
M Minute of the hour (00..59)
S Second of the minute (00..59)
L Millisecond of the second (000..999). Digits under
millisecond are truncated to not produce 1000.
N Fractional seconds digits, default is 9 digits
(nanosecond). Digits under a specified length are
truncated to avoid carry up
The format directive that represents the highest magnitude in the format will be allowed to overflow. I.e. if no "%D"
is used but a "%H" is present, then the hours will be more than 23 in case the timespan reflects more than a day.
$duration = Timespan({ hours => 3, minutes => 20, seconds => 30 })
# Notice the duration using a format that outputs
<hours>:<minutes>:<seconds>
notice($duration.strftime('%H:%M:%S')) # outputs '03:20:30'
# Notice the duration using a format that outputs <minutes>:<seconds>
notice($duration.strftime('%M:%S')) # outputs '200:30'
• Since 4.8.0
Signature 1
strftime(Timespan $time_object, String $format)
Signature 2
strftime(Timestamp $time_object, String $format, Optional[String] $timezone)
Signature 3
strftime(String $format, Optional[String] $timezone)
strip
Strips leading and trailing spaces from a String
This function is compatible with the stdlib function with the same name.
The function does the following:
• For a String the conversion removes all leading and trailing ASCII white space characters such as space, tab,
newline, and return. It does not remove other space-like characters like hard space (Unicode U+00A0). (Tip, /
^[[:space:]]/ regular expression matches all space-like characters).
• For an Iterable[Variant[String, Numeric]] (for example an Array) each value is processed and
the conversion is not recursive.
• If the value is Numeric it is simply returned (this is for backwards compatibility).
• An error is raised for all other data types.
" hello\n\t".strip()
strip(" hello\n\t")
© 2024 Puppet, Inc., a Perforce company

Puppet | Syntax and settings | 1055
Would both result in "hello"
[" hello\n\t", " hi\n\t"].strip()
strip([" hello\n\t", " hi\n\t"])
Would both result in ['hello', 'hi']
Signature 1
strip(Numeric $arg)
Signature 2
strip(String $arg)
Signature 3
strip(Iterable[Variant[String, Numeric]] $arg)
tag
Add the specified tags to the containing class or definition. All contained objects will then acquire that tag, also.
tag()
tagged
A boolean function that tells you whether the current container is tagged with the specified tags. The tags are ANDed,
so that all of the specified tags must be included for the function to return true.
tagged()
template
Loads an ERB template from a module, evaluates it, and returns the resulting value as a string.
The argument to this function should be a <MODULE NAME>/<TEMPLATE FILE> reference, which will
load <TEMPLATE FILE> from a module's templates directory. (For example, the reference apache/
vhost.conf.erb will load the file <MODULES DIRECTORY>/apache/templates/vhost.conf.erb.)
This function can also accept:
• An absolute path, which can load a template file from anywhere on disk.
• Multiple arguments, which will evaluate all of the specified templates and return their outputs concatenated into a
single string.
template()
then
Calls a lambda with the given argument unless the argument is undef. Returns undef if the argument is undef,
and otherwise the result of giving the argument to the lambda.
This is useful to process a sequence of operations where an intermediate result may be undef (which makes the
entire sequence undef). The then function is especially useful with the function dig which performs in a similar
way "digging out" a value in a complex structure.
$data = {a => { b => [{x => 10, y => 20}, {x => 100, y => 200}]}}
notice $data.dig(a, b, 1, x).then |$x| { $x * 2 }
Would notice the value 200
Contrast this with:
$data = {a => { b => [{x => 10, y => 20}, {not_x => 100, why => 200}]}}
© 2024 Puppet, Inc., a Perforce company

Puppet | Syntax and settings | 1056
notice $data.dig(a, b, 1, x).then |$x| { $x * 2 }
Which would notice undef since the last lookup of 'x' results in undef which is returned (without calling the
lambda given to the then function).
As a result there is no need for conditional logic or a temporary (non local) variable as the result is now either the
wanted value (x) multiplied by 2 or undef.
Calls to then can be chained. In the next example, a structure is using an offset based on using 1 as the index to the
first element (instead of 0 which is used in the language). We are not sure if user input actually contains an index at
all, or if it is outside the range of available names.args.
# Names to choose from
$names = ['Ringo', 'Paul', 'George', 'John']
# Structure where 'beatle 2' is wanted (but where the number refers
# to 'Paul' because input comes from a source using 1 for the first
# element).
$data = ['singer', { beatle => 2 }]
$picked = assert_type(String,
# the data we are interested in is the second in the array,
# a hash, where we want the value of the key 'beatle'
$data.dig(1, 'beatle')
# and we want the index in $names before the given index
.then |$x| { $names[$x-1] }
# so we can construct a string with that beatle's name
.then |$x| { "Picked Beatle '${x}'" }
)
notice $picked
Would notice "Picked Beatle 'Paul'", and would raise an error if the result was not a String.
• Since 4.5.0
then(Any $arg, Callable[1,1] &$block)
tree_each
Runs a lambda recursively and repeatedly using values from a data structure, then returns the unchanged data
structure, or if a lambda is not given, returns an Iterator for the tree.
This function takes one mandatory argument, one optional, and an optional block in this order:
1.
An Array, Hash, Iterator, or Object that the function will iterate over.
2.
An optional hash with the options:
• include_containers => Optional[Boolean] # default true - if containers should be given to the
lambda
• include_values => Optional[Boolean] # default true - if non containers should be given to the
lambda
• include_root => Optional[Boolean] # default true - if the root container should be given to the
lambda
• container_type => Optional[Type[Variant[Array, Hash, Object]]] # a type that
determines what a container is - can only be set to a type that matches the default Variant[Array,
Hash, Object].
• order => Enum[depth_first, breadth_first] # default ´depth_first`, the order in which elements
are visited
• include_refs => Optional[Boolean] # default false, if attributes in objects marked as bing of
reference kind should be included.
© 2024 Puppet, Inc., a Perforce company

Puppet | Syntax and settings | 1057
3.
An optional lambda, which the function calls for each element in the first argument. It must accept one or two
arguments; either $path, and $value, or just $value.
$data.tree_each |$path, $value| { <PUPPET CODE BLOCK> } $data.tree_each |
$value| { <PUPPET CODE BLOCK> }
or
tree_each($data) |$path, $value| { <PUPPET CODE BLOCK> } tree_each($data) |
$value| { <PUPPET CODE BLOCK> }
The parameter $path is always given as an Array containing the path that when applied to the tree as
$data.dig(*$path) yields the $value. The $value` is the value at that path.
For Array values, the path will contain Integer entries with the array index, and for Hash values, the path will
contain the hash key, which may be Any value. For Object containers, the entry is the name of the attribute (a
String).
The tree is walked in either depth-first order, or in breadth-first order under the control of the order option, yielding
each Array, Hash, Object, and each entry/attribute. The default is depth_first which means that children are
processed before siblings. An order of breadth_first means that siblings are processed before children.
[1, [2, 3], 4]
If containers are skipped, results in:
• depth_first order 1, 2, 3, 4
• breadth_first order 1, 4,2, 3
If containers and root are included, results in:
• depth_first order [1, [2, 3], 4], 1, [2, 3], 2, 3, 4
• breadth_first order [1, [2, 3], 4], 1, [2, 3], 4, 2, 3
Typical use of the tree_each function include:
• a more efficient way to iterate over a tree than first using flatten on an array as that requires a new (potentially
very large) array to be created
• when a tree needs to be transformed and 'pretty printed' in a template
• avoiding having to write a special recursive function when tree contains hashes (flatten does not work on hashes)
$data = [1, 2, [3, [4, 5]]]
$data.tree_each({include_containers => false}) |$v| { notice "$v" }
This would call the lambda 5 times with with the following values in sequence: 1, 2, 3, 4, 5
$data = [1, 2, [3, [4, 5]]]
$data.tree_each |$v| { notice "$v" }
This would call the lambda 7 times with the following values in sequence: 1, 2, [3, [4, 5]], 3, [4, 5], 4, 5
$data = [1, 2, [3, [4, 5]]]
$data.tree_each({include_values => false, include_root => false}) |$v|
{ notice "$v" }
This would call the lambda 2 times with the following values in sequence: [3, [4, 5]], [4, 5]
Any Puppet Type system data type can be used to filter what is considered to be a container, but it must be a narrower
type than one of the default Array, Hash, Object types - for example it is not possible to make a String be a
container type.
$data = [1, {a => 'hello', b => [100, 200]}, [3, [4, 5]]]
© 2024 Puppet, Inc., a Perforce company

Puppet | Syntax and settings | 1058
$data.tree_each({container_type => Array, include_containers => false} |$v|
{ notice "$v" }
Would call the lambda 5 times with 1, {a => 'hello', b => [100, 200]}, 3, 4, 5
Chaining When calling tree_each without a lambda the function produces an Iterator that can be chained into
another iteration. Thus it is easy to use one of:
• reverse_each - get "leaves before root"
• filter - prune the tree
• map - transform each element
Note than when chaining, the value passed on is a Tuple with [path, value].
# A tree of some complexity (here very simple for readability)
$tree = [
{ name => 'user1', status => 'inactive', id => '10'},
{ name => 'user2', status => 'active', id => '20'}
]
notice $tree.tree_each.filter |$v| {
$value = $v[1]
$value =~ Hash and $value[status] == active
}
Would notice [[[1], {name => user2, status => active, id => 20}]], which can then be
processed further as each filtered result appears as a Tuple with [path, value].
For general examples that demonstrates iteration see the Puppet iteration documentation.
Signature 1
tree_each(Variant[Iterator, Array, Hash, Object] $tree, Optional[OptionsType]
$options, Callable[2,2] &$block)
Signature 2
tree_each(Variant[Iterator, Array, Hash, Object] $tree, Optional[OptionsType]
$options, Callable[1,1] &$block)
Signature 3
tree_each(Variant[Iterator, Array, Hash, Object] $tree, Optional[OptionsType]
$options)
type
Returns the data type of a given value with a given degree of generality.
type InferenceFidelity = Enum[generalized, reduced, detailed]
function type(Any $value, InferenceFidelity $fidelity = 'detailed') #
returns Type
notice type(42) =~ Type[Integer]
Would notice true.
By default, the best possible inference is made where all details are retained. This is good when the type is used for
further type calculations but is overwhelmingly rich in information if it is used in a error message.
The optional argument $fidelity may be given as (from lowest to highest fidelity):
• generalized - reduces to common type and drops size constraints
• reduced - reduces to common type in collections
© 2024 Puppet, Inc., a Perforce company

Puppet | Syntax and settings | 1059
• detailed - (default) all details about inferred types is retained
notice type([3.14, 42], 'generalized')
notice type([3.14, 42], 'reduced'')
notice type([3.14, 42], 'detailed')
notice type([3.14, 42])
Would notice the four values:
1.
Array[Numeric]
2.
Array[Numeric, 2, 2]
3.
Tuple[Float[3.14], Integer[42,42]]]
4.
Tuple[Float[3.14], Integer[42,42]]]
Signature 1
type(Any $value, Optional[Enum[detailed]] $inference_method)
Signature 2
type(Any $value, Enum[reduced] $inference_method)
Signature 3
type(Any $value, Enum[generalized] $inference_method)
unique
Produces a unique set of values from an Iterable argument.
• If the argument is a String, the unique set of characters are returned as a new String.
• If the argument is a Hash, the resulting hash associates a set of keys with a set of unique values.
• For all other types of Iterable (Array, Iterator) the result is an Array with a unique set of entries.
• Comparison of all String values are case sensitive.
• An optional code block can be given - if present it is given each candidate value and its return is used instead of
the given value. This enables transformation of the value before comparison. The result of the lambda is only used
for comparison.
• The optional code block when used with a hash is given each value (not the keys).
# will produce 'abc'
"abcaabb".unique
# will produce ['a', 'b', 'c']
['a', 'b', 'c', 'a', 'a', 'b'].unique
# will produce { ['a', 'b'] => [10], ['c'] => [20]}
{'a' => 10, 'b' => 10, 'c' => 20}.unique
# will produce { 'a' => 10, 'c' => 20 } (use first key with first value)
Hash.new({'a' => 10, 'b' => 10, 'c' => 20}.unique.map |$k, $v| { [ $k[0] ,
$v[0]] })
# will produce { 'b' => 10, 'c' => 20 } (use last key with first value)
Hash.new({'a' => 10, 'b' => 10, 'c' => 20}.unique.map |$k, $v| { [ $k[-1] ,
$v[0]] })
# will produce [3, 2, 1]
[1,2,2,3,3].reverse_each.unique
# will produce [['sam', 'smith'], ['sue', 'smith']]
© 2024 Puppet, Inc., a Perforce company

Puppet | Syntax and settings | 1060
[['sam', 'smith'], ['sam', 'brown'], ['sue', 'smith']].unique |$x| { $x[0] }
# will produce [['sam', 'smith'], ['sam', 'brown']]
[['sam', 'smith'], ['sam', 'brown'], ['sue', 'smith']].unique |$x| { $x[1] }
# will produce ['aBc', 'bbb'] (using a lambda to make comparison using
downcased (%d) strings)
['aBc', 'AbC', 'bbb'].unique |$x| { String($x,'%d') }
# will produce {[a] => [10], [b, c, d, e] => [11, 12, 100]}
{a => 10, b => 11, c => 12, d => 100, e => 11}.unique |$v| { if $v > 10
{ big } else { $v } }
Note that for Hash the result is slightly different than for the other data types. For those the result contains the
first-found unique value, but for Hash it contains associations from a set of keys to the set of values clustered
by the equality lambda (or the default value equality if no lambda was given). This makes the unique function
more versatile for hashes in general, while requiring that the simple computation of "hash's unique set of values" is
performed as $hsh.map |$k, $v| { $v }.unique. (Generally, it's meaningless to compute the unique set
of hash keys because they are unique by definition. However, the situation can change if the hash keys are processed
with a different lambda for equality. For this unique computation, first map the hash to an array of its keys.) If the
more advanced clustering is wanted for one of the other data types, simply transform it into a Hash as shown in the
following example.
# Array ['a', 'b', 'c'] to Hash with index results in
# {0 => 'a', 1 => 'b', 2 => 'c'}
Hash(['a', 'b', 'c'].map |$i, $v| { [$i, $v]})
# String "abc" to Hash with index results in
# {0 => 'a', 1 => 'b', 2 => 'c'}
Hash(Array("abc").map |$i,$v| { [$i, $v]})
"abc".to(Array).map |$i,$v| { [$i, $v]}.to(Hash)
Signature 1
unique(String $string, Optional[Callable[String]] &$block)
Signature 2
unique(Hash $hash, Optional[Callable[Any]] &$block)
Signature 3
unique(Array $array, Optional[Callable[Any]] &$block)
Signature 4
unique(Iterable $iterable, Optional[Callable[Any]] &$block)
unwrap
Unwraps a Sensitive value and returns the wrapped object. Returns the Value itself, if it is not Sensitive.
$plaintext = 'hunter2'
$pw = Sensitive.new($plaintext)
notice("Wrapped object is $pw") #=> Prints "Wrapped object is Sensitive
[value redacted]"
$unwrapped = $pw.unwrap
notice("Unwrapped object is $unwrapped") #=> Prints "Unwrapped object is
hunter2"
You can optionally pass a block to unwrap in order to limit the scope where the unwrapped value is visible.
$pw = Sensitive.new('hunter2')
© 2024 Puppet, Inc., a Perforce company

Puppet | Syntax and settings | 1061
notice("Wrapped object is $pw") #=> Prints "Wrapped object is Sensitive
[value redacted]"
$pw.unwrap |$unwrapped| {
$conf = inline_template("password: ${unwrapped}\n")
Sensitive.new($conf)
} #=> Returns a new Sensitive object containing an interpolated config file
# $unwrapped is now out of scope
Signature 1
unwrap(Sensitive $arg, Optional[Callable] &$block)
Signature 2
unwrap(Any $arg, Optional[Callable] &$block)
upcase
Converts a String, Array or Hash (recursively) into upper case.
This function is compatible with the stdlib function with the same name.
The function does the following:
• For a String, its upper case version is returned. This is done using Ruby system locale which handles some, but
not all special international up-casing rules (for example German double-s ß is upcased to "SS", whereas upper
case double-s is downcased to ß).
• For Array and Hash the conversion to upper case is recursive and each key and value must be convertible by
this function.
• When a Hash is converted, some keys could result in the same key - in those cases, the latest key-value wins. For
example if keys "aBC", and "abC" where both present, after upcase there would only be one key "ABC".
• If the value is Numeric it is simply returned (this is for backwards compatibility).
• An error is raised for all other data types.
Please note: This function relies directly on Ruby's String implementation and as such may not be entirely UTF8
compatible. To ensure best compatibility please use this function with Ruby 2.4.0 or greater - https://bugs.ruby-
lang.org/issues/10085.
'hello'.upcase()
upcase('hello')
Would both result in "HELLO"
['a', 'b'].upcase()
upcase(['a', 'b'])
Would both result in ['A', 'B']
{'a' => 'hello', 'b' => 'goodbye'}.upcase()
Would result in {'A' => 'HELLO', 'B' => 'GOODBYE'}
['a', 'b', ['c', ['d']], {'x' => 'y'}].upcase
Would result in ['A', 'B', ['C', ['D']], {'X' => 'Y'}]
Signature 1
upcase(Numeric $arg)
Signature 2
upcase(String $arg)
© 2024 Puppet, Inc., a Perforce company

Puppet | Syntax and settings | 1062
Signature 3
upcase(Array[StringData] $arg)
Signature 4
upcase(Hash[StringData, StringData] $arg)
values
Returns the values of a hash as an Array
$hsh = {"apples" => 3, "oranges" => 4 }
$hsh.values()
values($hsh)
# both results in the array [3, 4]
• Note that a hash in the puppet language accepts any data value (including undef) unless it is constrained with a
Hash data type that narrows the allowed data types.
• For an empty hash, an empty array is returned.
• The order of the values is the same as the order in the hash (typically the order in which they were added).
values(Hash $hsh)
versioncmp
Compares two version numbers.
Prototype:
$result = versioncmp(a, b)
Where a and b are arbitrary version strings.
Optional parameter ignore_trailing_zeroes is used to ignore unnecessary trailing version numbers like .0 or .0.00
This function returns:
• 1 if version a is greater than version b
• 0 if the versions are equal
• -1 if version a is less than version b
This function uses the same version comparison algorithm used by Puppet's package type.
versioncmp(String $a, String $b, Optional[Boolean] $ignore_trailing_zeroes)
warning
Logs a message on the server at level warning.
warning(Any *$values)
Parameters
• *values --- The values to log.
Return type(s): Undef.
with
Calls a lambda with the given arguments and returns the result.
© 2024 Puppet, Inc., a Perforce company

Puppet | Syntax and settings | 1063
Since a lambda's scope is local to the lambda, you can use the with function to create private blocks of code within a
class using variables whose values cannot be accessed outside of the lambda.
# Concatenate three strings into a single string formatted as a list.
$fruit = with("apples", "oranges", "bananas") |$x, $y, $z| {
"${x}, ${y}, and ${z}"
}
$check_var = $x
# $fruit contains "apples, oranges, and bananas"
# $check_var is undefined, as the value of $x is local to the lambda.
with(Any *$arg, Callable &$block)
yaml_data
The yaml_data is a hiera 5 data_hash data provider function. See the configuration guide documentation for
how to use this function.
yaml_data(Struct[{path=>String[1]}] $options, Puppet::LookupContext $context)
Puppet Man Pages
NOTE: This page was generated from the Puppet source code on 2024-08-01 18:15:52 -0700
Puppet's command line tools consist of a single puppet binary with many subcommands. The following
subcommands are available in this version of Puppet:
Core Tools
These subcommands form the core of Puppet's tool set, and every user should understand what they do.
• Man Page: puppet agent on page 1064
• Man Page: puppet apply on page 1067
• Man Page: puppet lookup on page 1074
• Man Page: puppet module on page 1068
• Man Page: puppet resource on page 1072
Note: The puppet cert command is available only in Puppet versions prior to 6.0. For 6.0 and later,
use the puppetserver certcommand.
Secondary subcommands
Many or most users need to use these subcommands at some point, but they aren't needed for daily use the way the
core tools are.
• Man Page: puppet config on page 1076
• Man Page: puppet describe on page 1078
• Man Page: puppet device on page 1078
• Man Page: puppet doc on page 1080
• puppet epp
• puppet generate
• Man Page: puppet help on page 1081
• Man Page: puppet node on page 1082
• Man Page: puppet parser on page 1084
• puppet plugin
• puppet script
• puppet ssl
© 2024 Puppet, Inc., a Perforce company
Puppet | Syntax and settings | 1064
Niche subcommands
Most users can ignore these subcommands. They're only useful for certain niche workflows, and most of them are
interfaces to Puppet's internal subsystems.
• Man Page: puppet catalog on page 1085
• Man Page: puppet facts on page 1089
• Man Page: puppet filebucket on page 1091
• Man Page: puppet report on page 1094
Core tools
Man Page: puppet agent
NOTE: This page was generated from the Puppet source code on 2024-08-01 18:15:52 -0700
NAME
puppet-agent - The puppet agent daemon
SYNOPSIS
Retrieves the client configuration from the Puppet master and applies it to the local host.
This service may be run as a daemon, run periodically using cron (or something similar), or run interactively for
testing purposes.
USAGE
puppet agent [--certname NAME] [-D|--daemonize|--no-daemonize] [-d|--debug] [--detailed-exitcodes] [--digest
DIGEST] [--disable [MESSAGE]] [--enable] [--fingerprint] [-h|--help] [-l|--logdest syslog|eventlog|ABS FILEPATH|
console] [--serverport PORT] [--noop] [-o|--onetime] [--sourceaddress IP_ADDRESS] [-t|--test] [-v|--verbose] [-V|--
version] [-w|--waitforcert SECONDS]
DESCRIPTION
This is the main puppet client. Its job is to retrieve the local machine's configuration from a remote server and
apply it. In order to successfully communicate with the remote server, the client must have a certificate signed by
a certificate authority that the server trusts; the recommended method for this, at the moment, is to run a certificate
authority as part of the puppet server (which is the default). The client will connect and request a signed certificate,
and will continue connecting until it receives one.
Once the client has a signed certificate, it will retrieve its configuration and apply it.
USAGE NOTES
'puppet agent' does its best to find a compromise between interactive use and daemon use. If you run it with no
arguments and no configuration, it goes into the background, attempts to get a signed certificate, and retrieves and
applies its configuration every 30 minutes.
Some flags are meant specifically for interactive use --- in particular, 'test', 'tags' and 'fingerprint' are useful.
'--test' runs once in the foreground with verbose logging, then exits. It also exits if it can't get a valid catalog. --test
includes the '--detailed-exitcodes' option by default and exits with one of the following exit codes:
• 0: The run succeeded with no changes or failures; the system was already in the desired state.
• 1: The run failed, or wasn't attempted due to another run already in progress.
• 2: The run succeeded, and some resources were changed.
• 4: The run succeeded, and some resources failed.
• 6: The run succeeded, and included both changes and failures.
'--tags' allows you to specify what portions of a configuration you want to apply. Puppet elements are tagged with
all of the class or definition names that contain them, and you can use the 'tags' flag to specify one of these names,
causing only configuration elements contained within that class or definition to be applied. This is very useful when
© 2024 Puppet, Inc., a Perforce company
Puppet | Syntax and settings | 1065
you are testing new configurations --- for instance, if you are just starting to manage 'ntpd', you would put all of the
new elements into an 'ntpd' class, and call puppet with '--tags ntpd', which would only apply that small portion of the
configuration during your testing, rather than applying the whole thing.
'--fingerprint' is a one-time flag. In this mode 'puppet agent' runs once and displays on the console (and in the log)
the current certificate (or certificate request) fingerprint. Providing the '--digest' option allows you to use a different
digest algorithm to generate the fingerprint. The main use is to verify that before signing a certificate request on the
master, the certificate request the master received is the same as the one the client sent (to prevent against man-in-the-
middle attacks when signing certificates).
'--skip_tags' is a flag used to filter resources. If this is set, then only resources not tagged with the specified tags will
be applied. Values must be comma-separated.
OPTIONS
Note that any Puppet setting that's valid in the configuration file is also a valid long argument. For example, 'server' is
a valid setting, so you can specify '--server servername' as an argument. Boolean settings accept a '--no-' prefix to turn
off a behavior, translating into '--setting' and '--no-setting' pairs, such as --daemonize and --no-daemonize.
See the configuration file documentation at https://puppet.com/docs/puppet/latest/configuration.html for the full list of
acceptable settings. A commented list of all settings can also be generated by running puppet agent with '--genconfig'.
• --certname: Set the certname (unique ID) of the client. The master reads this unique identifying string, which is
usually set to the node's fully-qualified domain name, to determine which configurations the node will receive.
Use this option to debug setup problems or implement unusual node identification schemes. (This is a Puppet
setting, and can go in puppet.conf.)
• --daemonize: Send the process into the background. This is the default. (This is a Puppet setting, and can go in
puppet.conf. Note the special 'no-' prefix for boolean settings on the command line.)
• --no-daemonize: Do not send the process into the background. (This is a Puppet setting, and can go in puppet.conf.
Note the special 'no-' prefix for boolean settings on the command line.)
• --debug: Enable full debugging.
• --detailed-exitcodes: Provide extra information about the run via exit codes; works only if '--test' or '--onetime' is
also specified. If enabled, 'puppet agent' uses the following exit codes:
0: The run succeeded with no changes or failures; the system was already in the desired state.
1: The run failed, or wasn't attempted due to another run already in progress.
2: The run succeeded, and some resources were changed.
4: The run succeeded, and some resources failed.
6: The run succeeded, and included both changes and failures.
• --digest: Change the certificate fingerprinting digest algorithm. The default is SHA256. Valid values depends on
the version of OpenSSL installed, but will likely contain MD5, MD2, SHA1 and SHA256.
• --disable: Disable working on the local system. This puts a lock file in place, causing 'puppet agent' not to work
on the system until the lock file is removed. This is useful if you are testing a configuration and do not want the
central configuration to override the local state until everything is tested and committed.
Disable can also take an optional message that will be reported by the 'puppet agent' at the next disabled run.
'puppet agent' uses the same lock file while it is running, so no more than one 'puppet agent' process is working at
a time.
'puppet agent' exits after executing this.
• --enable: Enable working on the local system. This removes any lock file, causing 'puppet agent' to start managing
the local system again However, it continues to use its normal scheduling, so it might not start for another half
hour.
'puppet agent' exits after executing this.
• --evaltrace: Logs each resource as it is being evaluated. This allows you to interactively see exactly what is being
done. (This is a Puppet setting, and can go in puppet.conf. Note the special 'no-' prefix for boolean settings on the
command line.)
© 2024 Puppet, Inc., a Perforce company

Puppet | Syntax and settings | 1066
• --fingerprint: Display the current certificate or certificate signing request fingerprint and then exit. Use the '--
digest' option to change the digest algorithm used.
• --help: Print this help message
• --job-id: Attach the specified job id to the catalog request and the report used for this agent run. This option only
works when '--onetime' is used. When using Puppet Enterprise this flag should not be used as the orchestrator sets
the job-id for you and it must be unique.
• --logdest: Where to send log messages. Choose between 'syslog' (the POSIX syslog service), 'eventlog' (the
Windows Event Log), 'console', or the path to a log file. If debugging or verbosity is enabled, this defaults to
'console'. Otherwise, it defaults to 'syslog' on POSIX systems and 'eventlog' on Windows. Multiple destinations
can be set using a comma separated list (eg: /path/file1,console,/path/file2)"
A path ending with '.json' will receive structured output in JSON format. The log file will not have an ending
']' automatically written to it due to the appending nature of logging. It must be appended manually to make the
content valid JSON.
A path ending with '.jsonl' will receive structured output in JSON Lines format.
• --masterport: The port on which to contact the Puppet Server. (This is a Puppet setting, and can go in puppet.conf.
Deprecated in favor of the 'serverport' setting.)
• --noop: Use 'noop' mode where the daemon runs in a no-op or dry-run mode. This is useful for seeing what
changes Puppet would make without actually executing the changes. (This is a Puppet setting, and can go in
puppet.conf. Note the special 'no-' prefix for boolean settings on the command line.)
• --onetime: Run the configuration once. Runs a single (normally daemonized) Puppet run. Useful for interactively
running puppet agent when used in conjunction with the --no-daemonize option. (This is a Puppet setting, and can
go in puppet.conf. Note the special 'no-' prefix for boolean settings on the command line.)
• --serverport: The port on which to contact the Puppet Server. (This is a Puppet setting, and can go in puppet.conf.)
• --sourceaddress: Set the source IP address for transactions. This defaults to automatically selected. (This is a
Puppet setting, and can go in puppet.conf.)
• --test: Enable the most common options used for testing. These are 'onetime', 'verbose', 'no-daemonize', 'no-
usecacheonfailure', 'detailed-exitcodes', 'no-splay', and 'show_diff'.
• --trace Prints stack traces on some errors. (This is a Puppet setting, and can go in puppet.conf. Note the special
'no-' prefix for boolean settings on the command line.)
• --verbose: Turn on verbose reporting.
• --version: Print the puppet version number and exit.
• --waitforcert: This option only matters for daemons that do not yet have certificates and it is enabled by default,
with a value of 120 (seconds). This causes 'puppet agent' to connect to the server every 2 minutes and ask it to sign
a certificate request. This is useful for the initial setup of a puppet client. You can turn off waiting for certificates
by specifying a time of 0. (This is a Puppet setting, and can go in puppet.conf.)
• --write_catalog_summary After compiling the catalog saves the resource list and classes list to the node in the
state directory named classes.txt and resources.txt (This is a Puppet setting, and can go in puppet.conf.)
EXAMPLE
$ puppet agent --server puppet.domain.com
DIAGNOSTICS
Puppet agent accepts the following signals:
SIGHUP
Restart the puppet agent daemon.
SIGINT and SIGTERM
Shut down the puppet agent daemon.
SIGUSR1
Immediately retrieve and apply configurations from the puppet master.
© 2024 Puppet, Inc., a Perforce company
Puppet | Syntax and settings | 1067
SIGUSR2
Close file descriptors for log files and reopen them. Used with logrotate.
AUTHOR
Luke Kanies
COPYRIGHT
Copyright (c) 2011 Puppet Inc., LLC Licensed under the Apache 2.0 License
Man Page: puppet apply
NOTE: This page was generated from the Puppet source code on 2024-08-01 18:15:52 -0700
NAME
puppet-apply - Apply Puppet manifests locally
SYNOPSIS
Applies a standalone Puppet manifest to the local system.
USAGE
puppet apply [-h|--help] [-V|--version] [-d|--debug] [-v|--verbose] [-e|--execute] [--detailed-exitcodes] [-L|--
loadclasses] [-l|--logdest syslog|eventlog|ABS FILEPATH|console] [--noop] [--catalog catalog] [--write-catalog-
summary] file
DESCRIPTION
This is the standalone puppet execution tool; use it to apply individual manifests.
When provided with a modulepath, via command line or config file, puppet apply can effectively mimic the catalog
that would be served by puppet master with access to the same modules, although there are some subtle differences.
When combined with scheduling and an automated system for pushing manifests, this can be used to implement a
serverless Puppet site.
Most users should use 'puppet agent' and 'puppet master' for site-wide manifests.
OPTIONS
Any setting that's valid in the configuration file is a valid long argument for puppet apply. For example, 'tags' is a
valid setting, so you can specify '--tags class,tag' as an argument.
See the configuration file documentation at https://puppet.com/docs/puppet/latest/configuration.html for the full list
of acceptable parameters. You can generate a commented list of all configuration options by running puppet with '--
genconfig'.
• --debug: Enable full debugging.
• --detailed-exitcodes: Provide extra information about the run via exit codes. If enabled, 'puppet apply' will use the
following exit codes:
0: The run succeeded with no changes or failures; the system was already in the desired state.
1: The run failed.
2: The run succeeded, and some resources were changed.
4: The run succeeded, and some resources failed.
6: The run succeeded, and included both changes and failures.
• --help: Print this help message
• --loadclasses: Load any stored classes. 'puppet agent' caches configured classes (usually at /etc/puppetlabs/puppet/
classes.txt), and setting this option causes all of those classes to be set in your puppet manifest.
© 2024 Puppet, Inc., a Perforce company

Puppet | Syntax and settings | 1068
• --logdest: Where to send log messages. Choose between 'syslog' (the POSIX syslog service), 'eventlog' (the
Windows Event Log), 'console', or the path to a log file. Defaults to 'console'. Multiple destinations can be set
using a comma separated list (eg: /path/file1,console,/path/file2)"
A path ending with '.json' will receive structured output in JSON format. The log file will not have an ending
']' automatically written to it due to the appending nature of logging. It must be appended manually to make the
content valid JSON.
A path ending with '.jsonl' will receive structured output in JSON Lines format.
• --noop: Use 'noop' mode where Puppet runs in a no-op or dry-run mode. This is useful for seeing what changes
Puppet will make without actually executing the changes.
• --execute: Execute a specific piece of Puppet code
• --test: Enable the most common options used for testing. These are 'verbose', 'detailed-exitcodes' and 'show_diff'.
• --verbose: Print extra information.
• --catalog: Apply a JSON catalog (such as one generated with 'puppet master --compile'). You can either specify a
JSON file or pipe in JSON from standard input.
• --write-catalog-summary After compiling the catalog saves the resource list and classes list to the node in the state
directory named classes.txt and resources.txt
EXAMPLE
$ puppet apply -e 'notify { "hello world": }'
$ puppet apply -l /tmp/manifest.log manifest.pp
$ puppet apply --modulepath=/root/dev/modules -e "include ntpd::server"
$ puppet apply --catalog catalog.json
AUTHOR
Luke Kanies
COPYRIGHT
Copyright (c) 2011 Puppet Inc., LLC Licensed under the Apache 2.0 License
Man Page: puppet module
NOTE: This page was generated from the Puppet source code on 2024-08-01 18:15:52 -0700
NAME
puppet-module - Creates, installs and searches for modules on the Puppet Forge.
SYNOPSIS
puppet module action [--environment production ] [--modulepath ]
DESCRIPTION
This subcommand can find, install, and manage modules from the Puppet Forge, a repository of user-contributed
Puppet code. It can also generate empty modules, and prepare locally developed modules for release on the Forge.
OPTIONS
Note that any setting that's valid in the configuration file is also a valid long argument, although it may or may not
be relevant to the present action. For example, server and run_mode are valid settings, so you can specify --server
<servername>, or --run_mode <runmode> as an argument.
See the configuration file documentation at https://puppet.com/docs/puppet/latest/configuration.html for the full list
of acceptable parameters. A commented list of all configuration options can also be generated by running puppet with
--genconfig.
© 2024 Puppet, Inc., a Perforce company
Puppet | Syntax and settings | 1069
--render-as FORMAT
The format in which to render output. The most common formats are json, s (string), yaml, and console, but
other options such as dot are sometimes available.
--verbose
Whether to log verbosely.
--debug
Whether to log debug information.
--environment production
The environment in which Puppet is running. For clients, such as puppet agent, this determines the environment
itself, which Puppet uses to find modules and much more. For servers, such as puppet server, this provides the
default environment for nodes that Puppet knows nothing about.
When defining an environment in the [agent] section, this refers to the environment that the agent requests from
the primary server. The environment doesn't have to exist on the local filesystem because the agent fetches it
from the primary server. This definition is used when running puppet agent.
When defined in the [user] section, the environment refers to the path that Puppet uses to search for code and
modules related to its execution. This requires the environment to exist locally on the filesystem where puppet is
being executed. Puppet subcommands, including puppet module and puppet apply, use this definition.
Given that the context and effects vary depending on the config section https://puppet.com/docs/puppet/latest/
config_file_main.html##config-sections in which the environment setting is defined, do not set it globally.
--modulepath
The search path for modules, as a list of directories separated by the system path separator character. (The POSIX
path separator is ':', and the Windows path separator is ';'.)
Setting a global value for modulepath in puppet.conf is not allowed (but it can be overridden from the
commandline). Please use directory environments instead. If you need to use something other than the default
modulepath of <ACTIVE ENVIRONMENT'S MODULES DIR>:$basemodulepath, you can set modulepath
in environment.conf. For more info, see https://puppet.com/docs/puppet/latest/environments_about.html
ACTIONS
changes - Show modified files of an installed module.
SYNOPSIS
puppet module changes path
DESCRIPTION
Shows any files in a module that have been modified since it was installed. This action compares the files on disk
to the md5 checksums included in the module's checksums.json or, if that is missing, in metadata.json.
RETURNS
Array of strings representing paths of modified files.
install - Install a module from the Puppet Forge or a release archive.
SYNOPSIS
puppet module install [--force | -f] [--target-dir DIR | -i DIR] [--ignore-dependencies] [--version VER | -v VER]
name
DESCRIPTION
Installs a module from the Puppet Forge or from a release archive file. Note: Module install uses MD5
checksums, which are prohibited on FIPS enabled systems.
© 2024 Puppet, Inc., a Perforce company
Puppet | Syntax and settings | 1070
The specified module will be installed into the directory specified with the --target-dir option, which defaults to
the first directory in the modulepath.
OPTIONS --force | -f - Force overwrite of existing module, if any. Implies --ignore-dependencies.
--ignore-dependencies - Do not attempt to install dependencies. Implied by --force.
--target-dir DIR | -i DIR - The directory into which modules are installed; defaults to the first directory in the
modulepath.
Specifying this option will change the installation directory, and will use the existing modulepath when checking
for dependencies. If you wish to check a different set of directories for dependencies, you must also use the --
environment or --modulepath options.
--version VER | -v VER - Module version to install; can be an exact version or a requirement string, eg '>= 1.0.3'.
Defaults to latest version.
RETURNS
Pathname object representing the path to the installed module.
list - List installed modules
SYNOPSIS
puppet module list [--tree]
DESCRIPTION
Lists the installed puppet modules. By default, this action scans the modulepath from puppet.conf's [main] block;
use the --modulepath option to change which directories are scanned.
The output of this action includes information from the module's metadata, including version numbers and unmet
module dependencies.
OPTIONS --tree - Whether to show dependencies as a tree view
RETURNS
hash of paths to module objects
uninstall - Uninstall a puppet module.
SYNOPSIS
puppet module uninstall [--force | -f] [--ignore-changes | -c] [--version=] name
DESCRIPTION
Uninstalls a puppet module from the modulepath (or a specific target directory). Note: Module uninstall uses
MD5 checksums, which are prohibited on FIPS enabled systems.
OPTIONS --force | -f - Force the uninstall of an installed module even if there are local changes or the possibility
of causing broken dependencies.
--ignore-changes | -c - Uninstall an installed module even if there are local changes to it. (Implied by --force.)
--version= - The version of the module to uninstall. When using this option, a module matching the specified
version must be installed or else an error is raised.
RETURNS
Hash of module objects representing uninstalled modules and related errors.
upgrade - Upgrade a puppet module.
SYNOPSIS
puppet module upgrade [--force | -f] [--ignore-dependencies] [--ignore-changes | -c] [--version=] name
DESCRIPTION
© 2024 Puppet, Inc., a Perforce company
Puppet | Syntax and settings | 1071
Upgrades a puppet module. Note: Module upgrade uses MD5 checksums, which are prohibited on FIPS enabled
systems.
OPTIONS --force | -f - Force the upgrade of an installed module even if there are local changes or the possibility
of causing broken dependencies. Implies --ignore-dependencies.
--ignore-changes | -c - Upgrade an installed module even if there are local changes to it. (Implied by --force.)
--ignore-dependencies - Do not attempt to install dependencies. Implied by --force.
--version= - The version of the module to upgrade to.
RETURNS
Hash
EXAMPLES
changes
Show modified files of an installed module:
$ puppet module changes /etc/puppetlabs/code/modules/vcsrepo/ warning: 1 files modified lib/puppet/provider/
vcsrepo.rb
install
Install a module:
$ puppet module install puppetlabs-vcsrepo Preparing to install into /etc/puppetlabs/code/modules ... Downloading
from https://forgeapi.puppet.com ... Installing -- do not interrupt ... /etc/puppetlabs/code/modules ### puppetlabs-
vcsrepo (v0.0.4)
Install a module to a specific environment:
$ puppet module install puppetlabs-vcsrepo --environment development Preparing to install into /etc/puppetlabs/
code/environments/development/modules ... Downloading from https://forgeapi.puppet.com ... Installing -- do not
interrupt ... /etc/puppetlabs/code/environments/development/modules ### puppetlabs-vcsrepo (v0.0.4)
Install a specific module version:
$ puppet module install puppetlabs-vcsrepo -v 0.0.4 Preparing to install into /etc/puppetlabs/modules ... Downloading
from https://forgeapi.puppet.com ... Installing -- do not interrupt ... /etc/puppetlabs/code/modules ### puppetlabs-
vcsrepo (v0.0.4)
Install a module into a specific directory:
$ puppet module install puppetlabs-vcsrepo --target-dir=/opt/puppetlabs/puppet/modules Preparing to install into /opt/
puppetlabs/puppet/modules ... Downloading from https://forgeapi.puppet.com ... Installing -- do not interrupt ... /opt/
puppetlabs/puppet/modules ### puppetlabs-vcsrepo (v0.0.4)
Install a module into a specific directory and check for dependencies in other directories:
$ puppet module install puppetlabs-vcsrepo --target-dir=/opt/puppetlabs/puppet/modules --modulepath /etc/
puppetlabs/code/modules Preparing to install into /opt/puppetlabs/puppet/modules ... Downloading from https://
forgeapi.puppet.com ... Installing -- do not interrupt ... /opt/puppetlabs/puppet/modules ### puppetlabs-vcsrepo
(v0.0.4)
Install a module from a release archive:
$ puppet module install puppetlabs-vcsrepo-0.0.4.tar.gz Preparing to install into /etc/puppetlabs/code/modules ...
Downloading from https://forgeapi.puppet.com ... Installing -- do not interrupt ... /etc/puppetlabs/code/modules ###
puppetlabs-vcsrepo (v0.0.4)
Install a module from a release archive and ignore dependencies:
$ puppet module install puppetlabs-vcsrepo-0.0.4.tar.gz --ignore-dependencies Preparing to install into /etc/
puppetlabs/code/modules ... Installing -- do not interrupt ... /etc/puppetlabs/code/modules ### puppetlabs-vcsrepo
(v0.0.4)
© 2024 Puppet, Inc., a Perforce company
Puppet | Syntax and settings | 1072
list
List installed modules:
$ puppet module list /etc/puppetlabs/code/modules ### bodepd-create_resources (v0.0.1) ### puppetlabs-bacula
(v0.0.2) ### puppetlabs-mysql (v0.0.1) ### puppetlabs-sqlite (v0.0.1) ### puppetlabs-stdlib (v2.2.1) /opt/puppetlabs/
puppet/modules (no modules installed)
List installed modules in a tree view:
$ puppet module list --tree /etc/puppetlabs/code/modules ### puppetlabs-bacula (v0.0.2) ### puppetlabs-stdlib
(v2.2.1) ### puppetlabs-mysql (v0.0.1) # ### bodepd-create_resources (v0.0.1) ### puppetlabs-sqlite (v0.0.1) /opt/
puppetlabs/puppet/modules (no modules installed)
List installed modules from a specified environment:
$ puppet module list --environment production /etc/puppetlabs/code/modules ### bodepd-create_resources (v0.0.1)
### puppetlabs-bacula (v0.0.2) ### puppetlabs-mysql (v0.0.1) ### puppetlabs-sqlite (v0.0.1) ### puppetlabs-stdlib
(v2.2.1) /opt/puppetlabs/puppet/modules (no modules installed)
List installed modules from a specified modulepath:
$ puppet module list --modulepath /opt/puppetlabs/puppet/modules /opt/puppetlabs/puppet/modules (no modules
installed)
uninstall
Uninstall a module:
$ puppet module uninstall puppetlabs-ssh Removed /etc/puppetlabs/code/modules/ssh (v1.0.0)
Uninstall a module from a specific directory:
$ puppet module uninstall puppetlabs-ssh --modulepath /opt/puppetlabs/puppet/modules Removed /opt/puppetlabs/
puppet/modules/ssh (v1.0.0)
Uninstall a module from a specific environment:
$ puppet module uninstall puppetlabs-ssh --environment development Removed /etc/puppetlabs/code/environments/
development/modules/ssh (v1.0.0)
Uninstall a specific version of a module:
$ puppet module uninstall puppetlabs-ssh --version 2.0.0 Removed /etc/puppetlabs/code/modules/ssh (v2.0.0)
upgrade
upgrade an installed module to the latest version
$ puppet module upgrade puppetlabs-apache /etc/puppetlabs/puppet/modules ### puppetlabs-apache (v1.0.0 ->
v2.4.0)
upgrade an installed module to a specific version
$ puppet module upgrade puppetlabs-apache --version 2.1.0 /etc/puppetlabs/puppet/modules ### puppetlabs-apache
(v1.0.0 -> v2.1.0)
upgrade an installed module for a specific environment
$ puppet module upgrade puppetlabs-apache --environment test /etc/puppetlabs/code/environments/test/modules ###
puppetlabs-apache (v1.0.0 -> v2.4.0)
COPYRIGHT AND LICENSE
Copyright 2012 by Puppet Inc. Apache 2 license; see COPYING
Man Page: puppet resource
NOTE: This page was generated from the Puppet source code on 2024-08-01 18:15:52 -0700
© 2024 Puppet, Inc., a Perforce company
Puppet | Syntax and settings | 1073
NAME
puppet-resource - The resource abstraction layer shell
SYNOPSIS
Uses the Puppet RAL to directly interact with the system.
USAGE
puppet resource [-h|--help] [-d|--debug] [-v|--verbose] [-e|--edit] [-p|--param parameter] [-t|--types] [-y|--to_yaml]
type [name] [attribute=value ...]
DESCRIPTION
This command provides simple facilities for converting current system state into Puppet code, along with some ability
to modify the current state using Puppet's RAL.
By default, you must at least provide a type to list, in which case puppet resource will tell you everything it knows
about all resources of that type. You can optionally specify an instance name, and puppet resource will only describe
that single instance.
If given a type, a name, and a series of attribute=value pairs, puppet resource will modify the state of the specified
resource. Alternately, if given a type, a name, and the '--edit' flag, puppet resource will write its output to a file, open
that file in an editor, and then apply the saved file as a Puppet transaction.
OPTIONS
Note that any setting that's valid in the configuration file is also a valid long argument. For example, 'ssldir' is a valid
setting, so you can specify '--ssldir directory' as an argument.
See the configuration file documentation at https://puppet.com/docs/puppet/latest/configuration.html for the full list of
acceptable parameters. A commented list of all configuration options can also be generated by running puppet with '--
genconfig'.
--debug
Enable full debugging.
--edit
Write the results of the query to a file, open the file in an editor, and read the file back in as an executable Puppet
manifest.
--help
Print this help message.
--param
Add more parameters to be outputted from queries.
--types
List all available types.
--verbose
Print extra information.
--to_yaml
Output found resources in yaml format, suitable to use with Hiera and create_resources.
--fail
Fails and returns an exit code of 1 if the resource could not be modified.
© 2024 Puppet, Inc., a Perforce company

Puppet | Syntax and settings | 1074
EXAMPLE
This example uses puppet resource to return a Puppet configuration for the user luke:
$ puppet resource user luke
user { 'luke':
home => '/home/luke',
uid => '100',
ensure => 'present',
comment => 'Luke Kanies,,,',
gid => '1000',
shell => '/bin/bash',
groups => ['sysadmin','audio','video','puppet']
}
AUTHOR
Luke Kanies
COPYRIGHT
Copyright (c) 2011 Puppet Inc., LLC Licensed under the Apache 2.0 License
Man Page: puppet lookup
NOTE: This page was generated from the Puppet source code on 2024-08-01 18:15:52 -0700
NAME
puppet-lookup - Interactive Hiera lookup
SYNOPSIS
Does Hiera lookups from the command line.
Since this command needs access to your Hiera data, make sure to run it on a node that has a copy of that data. This
usually means logging into a Puppet Server node and running 'puppet lookup' with sudo.
The most common version of this command is:
'puppet lookup KEY --node NAME --environment ENV --explain'
USAGE
puppet lookup [--help] [--type TYPESTRING] [--merge first|unique|hash|deep] [--knock-out-prefix PREFIX-STRING]
[--sort-merged-arrays] [--merge-hash-arrays] [--explain] [--environment ENV] [--default VALUE] [--node NODE-
NAME] [--facts FILE] [--compile] [--render-as s|json|yaml|binary|msgpack] keys
DESCRIPTION
The lookup command is a CLI for Puppet's 'lookup()' function. It searches your Hiera data and returns a value for
the requested lookup key, so you can test and explore your data. It is a modern replacement for the 'hiera' command.
Lookup uses the setting for global hiera.yaml from puppet's config, and the environment to find the environment level
hiera.yaml as well as the resulting modulepath for the environment (for hiera.yaml files in modules). Hiera usually
relies on a node's facts to locate the relevant data sources. By default, 'puppet lookup' uses facts from the node you
run the command on, but you can get data for any other node with the '--node NAME' option. If possible, the lookup
command will use the requested node's real stored facts from PuppetDB; if PuppetDB isn't configured or you want to
provide arbitrary fact values, you can pass alternate facts as a JSON or YAML file with '--facts FILE'.
If you're debugging your Hiera data and want to see where values are coming from, use the '--explain' option.
If '--explain' isn't specified, lookup exits with 0 if a value was found and 1 otherwise. With '--explain', lookup always
exits with 0 unless there is a major error.
You can provide multiple lookup keys to this command, but it only returns a value for the first found key, omitting
the rest.
© 2024 Puppet, Inc., a Perforce company
Puppet | Syntax and settings | 1075
For more details about how Hiera works, see the Hiera documentation: https://puppet.com/docs/puppet/latest/
hiera_intro.html
OPTIONS
• --help: Print this help message.
• --explain Explain the details of how the lookup was performed and where the final value came from (or the reason
no value was found).
• --node NODE-NAME Specify which node to look up data for; defaults to the node where the command is run.
Since Hiera's purpose is to provide different values for different nodes (usually based on their facts), you'll usually
want to use some specific node's facts to explore your data. If the node where you're running this command is
configured to talk to PuppetDB, the command will use the requested node's most recent facts. Otherwise, you can
override facts with the '--facts' option.
• --facts FILE Specify a .json or .yaml file of key => value mappings to override the facts for this lookup. Any facts
not specified in this file maintain their original value.
• --environment ENV Like with most Puppet commands, you can specify an environment on the command line.
This is important for lookup because different environments can have different Hiera data. This environment will
be always be the one used regardless of any other factors.
• --merge first|unique|hash|deep: Specify the merge behavior, overriding any merge behavior from the data's
lookup_options. 'first' returns the first value found. 'unique' appends everything to a merged, deduplicated array.
'hash' performs a simple hash merge by overwriting keys of lower lookup priority. 'deep' performs a deep merge
on values of Array and Hash type. There are additional options that can be used with 'deep'.
• --knock-out-prefix PREFIX-STRING Can be used with the 'deep' merge strategy. Specifies a prefix to indicate a
value should be removed from the final result.
• --sort-merged-arrays Can be used with the 'deep' merge strategy. When this flag is used, all merged arrays are
sorted.
• --merge-hash-arrays Can be used with the 'deep' merge strategy. When this flag is used, hashes WITHIN arrays
are deep-merged with their counterparts by position.
• --explain-options Explain whether a lookup_options hash affects this lookup, and how that hash was assembled.
(lookup_options is how Hiera configures merge behavior in data.)
• --default VALUE A value to return if Hiera can't find a value in data. For emulating calls to the 'lookup()' function
that include a default.
• --type TYPESTRING: Assert that the value has the specified type. For emulating calls to the 'lookup()' function
that include a data type.
• --compile Perform a full catalog compilation prior to the lookup. If your hierarchy and data only use the
$facts, $trusted, and $server_facts variables, you don't need this option; however, if your Hiera configuration
uses arbitrary variables set by a Puppet manifest, you might need this option to get accurate data. No catalog
compilation takes place unless this flag is given.
• --render-as s|json|yaml|binary|msgpack Specify the output format of the results; "s" means plain text. The default
when producing a value is yaml and the default when producing an explanation is s.
EXAMPLE
To look up 'key_name' using the Puppet Server node's facts: $ puppet lookup key_name
To look up 'key_name' using the Puppet Server node's arbitrary variables from a manifest, and classify the node if
applicable: $ puppet lookup key_name --compile
To look up 'key_name' using the Puppet Server node's facts, overridden by facts given in a file: $ puppet lookup
key_name --facts fact_file.yaml
To look up 'key_name' with agent.local's facts: $ puppet lookup --node agent.local key_name
To get the first value found for 'key_name_one' and 'key_name_two' with agent.local's facts while merging values and
knocking out the prefix 'foo' while merging: $ puppet lookup --node agent.local --merge deep --knock-out-prefix foo
key_name_one key_name_two
To lookup 'key_name' with agent.local's facts, and return a default value of 'bar' if nothing was found: $ puppet
lookup --node agent.local --default bar key_name
© 2024 Puppet, Inc., a Perforce company
Puppet | Syntax and settings | 1076
To see an explanation of how the value for 'key_name' would be found, using agent.local's facts: $ puppet lookup --
node agent.local --explain key_name
COPYRIGHT
Copyright (c) 2015 Puppet Inc., LLC Licensed under the Apache 2.0 License
Occasionally useful
Man Page: puppet config
NOTE: This page was generated from the Puppet source code on 2024-08-01 18:15:52 -0700
NAME
puppet-config - Interact with Puppet's settings.
SYNOPSIS
puppet config action [--section SECTION_NAME]
DESCRIPTION
This subcommand can inspect and modify settings from Puppet's 'puppet.conf' configuration file. For documentation
about individual settings, see https://puppet.com/docs/puppet/latest/configuration.html.
OPTIONS
Note that any setting that's valid in the configuration file is also a valid long argument, although it may or may not
be relevant to the present action. For example, server and run_mode are valid settings, so you can specify --server
<servername>, or --run_mode <runmode> as an argument.
See the configuration file documentation at https://puppet.com/docs/puppet/latest/configuration.html for the full list
of acceptable parameters. A commented list of all configuration options can also be generated by running puppet with
--genconfig.
--render-as FORMAT
The format in which to render output. The most common formats are json, s (string), yaml, and console, but
other options such as dot are sometimes available.
--verbose
Whether to log verbosely.
--debug
Whether to log debug information.
--section SECTION_NAME
The section of the puppet.conf configuration file to interact with.
The three most commonly used sections are 'main', 'server', and 'agent'. 'Main' is the default, and is used by all
Puppet applications. Other sections can override 'main' values for specific applications --- the 'server' section
affects Puppet Server, and the 'agent' section affects puppet agent.
Less commonly used is the 'user' section, which affects puppet apply. Any other section will be treated as the
name of a legacy environment (a deprecated feature), and can only include the 'manifest' and 'modulepath'
settings.
ACTIONS
delete - Delete a Puppet setting.
SYNOPSIS
puppet config delete [--section SECTION_NAME] setting
DESCRIPTION
© 2024 Puppet, Inc., a Perforce company
Puppet | Syntax and settings | 1077
Deletes a setting from the specified section. (The default is the section 'main').
NOTES
By default, this action deletes the configuration setting from the 'main' configuration domain. Use the '--section'
flags to delete settings from other configuration domains.
print - Examine Puppet's current settings.
SYNOPSIS
puppet config print [--section SECTION_NAME] all | setting [setting ...]
DESCRIPTION
Prints the value of a single setting or a list of settings.
This action is a replacement interface to the information available with puppet <subcommand> --configprint.
NOTES
By default, this action reads the general configuration in the 'main' section. Use the '--section' and '--environment'
flags to examine other configuration domains.
set - Set Puppet's settings.
SYNOPSIS
puppet config set [--section SECTION_NAME] [setting_name] [setting_value]
DESCRIPTION
Updates values in the puppet.conf configuration file.
NOTES
By default, this action manipulates the configuration in the 'main' section. Use the '--section' flag to manipulate
other configuration domains.
EXAMPLES
delete
Delete the setting 'setting_name' from the 'main' configuration domain:
$ puppet config delete setting_name
Delete the setting 'setting_name' from the 'server' configuration domain:
$ puppet config delete setting_name --section server
print
Get puppet's runfile directory:
$ puppet config print rundir
Get a list of important directories from the server's config:
$ puppet config print all --section server | grep -E "(path|dir)"
set
Set puppet's runfile directory:
$ puppet config set rundir /var/run/puppetlabs
Set the vardir for only the agent:
$ puppet config set vardir /opt/puppetlabs/puppet/cache --section agent
COPYRIGHT AND LICENSE
Copyright 2011 by Puppet Inc. Apache 2 license; see COPYING
© 2024 Puppet, Inc., a Perforce company

Puppet | Syntax and settings | 1078
Man Page: puppet describe
NOTE: This page was generated from the Puppet source code on 2024-08-01 18:15:52 -0700
NAME
puppet-describe - Display help about resource types
SYNOPSIS
Prints help about Puppet resource types, providers, and metaparameters.
USAGE
puppet describe [-h|--help] [-s|--short] [-p|--providers] [-l|--list] [-m|--meta]
OPTIONS
--help
Print this help text
--providers
Describe providers in detail for each type
--list
List all types
--meta
List all metaparameters
--short
List only parameters without detail
EXAMPLE
$ puppet describe --list
$ puppet describe file --providers
$ puppet describe user -s -m
AUTHOR
David Lutterkort
COPYRIGHT
Copyright (c) 2011 Puppet Inc., LLC Licensed under the Apache 2.0 License
Man Page: puppet device
NOTE: This page was generated from the Puppet source code on 2024-08-01 18:15:52 -0700
NAME
puppet-device - Manage remote network devices
SYNOPSIS
Retrieves catalogs from the Puppet master and applies them to remote devices.
This subcommand can be run manually; or periodically using cron, a scheduled task, or a similar tool.
USAGE
puppet device [-h|--help] [-v|--verbose] [-d|--debug] [-l|--logdest syslog|file|console] [--detailed-exitcodes] [--
deviceconfig file] [-w|--waitforcert seconds] [--libdir directory] [-a|--apply file] [-f|--facts] [-r|--resource type [name]]
[-t|--target device] [--user=user] [-V|--version]
© 2024 Puppet, Inc., a Perforce company
Puppet | Syntax and settings | 1079
DESCRIPTION
Devices require a proxy Puppet agent to request certificates, collect facts, retrieve and apply catalogs, and store
reports.
USAGE NOTES
Devices managed by the puppet-device subcommand on a Puppet agent are configured in device.conf, which is
located at $confdir/device.conf by default, and is configurable with the $deviceconfig setting.
The device.conf file is an INI-like file, with one section per device:
[DEVICE_CERTNAME] type TYPE url URL debug
The section name specifies the certname of the device.
The values for the type and url properties are specific to each type of device.
The optional debug property specifies transport-level debugging, and is limited to telnet and ssh transports.
See https://puppet.com/docs/puppet/latest/config_file_device.html for details.
OPTIONS
Note that any setting that's valid in the configuration file is also a valid long argument. For example, 'server' is a valid
configuration parameter, so you can specify '--server servername' as an argument.
--help, -h
Print this help message
--verbose, -v
Turn on verbose reporting.
--debug, -d
Enable full debugging.
--logdest, -l
Where to send log messages. Choose between 'syslog' (the POSIX syslog service), 'console', or the path to a log
file. If debugging or verbosity is enabled, this defaults to 'console'. Otherwise, it defaults to 'syslog'. Multiple
destinations can be set using a comma separated list (eg: /path/file1,console,/path/file2)"
A path ending with '.json' will receive structured output in JSON format. The log file will not have an ending
']' automatically written to it due to the appending nature of logging. It must be appended manually to make the
content valid JSON.
--detailed-exitcodes
Provide transaction information via exit codes. If this is enabled, an exit code of '1' means at least one device had
a compile failure, an exit code of '2' means at least one device had resource changes, and an exit code of '4' means
at least one device had resource failures. Exit codes of '3', '5', '6', or '7' means that a bitwise combination of the
preceding exit codes happened.
--deviceconfig
Path to the device config file for puppet device. Default: $confdir/device.conf
--waitforcert, -w
This option only matters for targets that do not yet have certificates and it is enabled by default, with a value
of 120 (seconds). This causes +puppet device+ to poll the server every 2 minutes and ask it to sign a certificate
request. This is useful for the initial setup of a target. You can turn off waiting for certificates by specifying a
time of 0.
© 2024 Puppet, Inc., a Perforce company

Puppet | Syntax and settings | 1080
--libdir
Override the per-device libdir with a local directory. Specifying a libdir also disables pluginsync. This is useful
for testing.
A path ending with '.jsonl' will receive structured output in JSON Lines format.
--apply
Apply a manifest against a remote target. Target must be specified.
--facts
Displays the facts of a remote target. Target must be specified.
--resource
Displays a resource state as Puppet code, roughly equivalent to puppet resource. Can be filtered by title.
Requires --target be specified.
--target
Target a specific device/certificate in the device.conf. Doing so will perform a device run against only that
device/certificate.
--to_yaml
Output found resources in yaml format, suitable to use with Hiera and create_resources.
--user
The user to run as.
EXAMPLE
$ puppet device --target remotehost --verbose
AUTHOR
Brice Figureau
COPYRIGHT
Copyright (c) 2011-2018 Puppet Inc., LLC Licensed under the Apache 2.0 License
Man Page: puppet doc
NOTE: This page was generated from the Puppet source code on 2024-08-01 18:15:52 -0700
NAME
puppet-doc - Generate Puppet references
SYNOPSIS
Generates a reference for all Puppet types. Largely meant for internal Puppet Inc. use. (Deprecated)
USAGE
puppet doc [-h|--help] [-l|--list] [-r|--reference reference-name]
DESCRIPTION
This deprecated command generates a Markdown document to stdout describing all installed Puppet types or all
allowable arguments to puppet executables. It is largely meant for internal use and is used to generate the reference
document available on the Puppet Inc. web site.
For Puppet module documentation (and all other use cases) this command has been superseded by the "puppet-
strings" module - see https://github.com/puppetlabs/puppetlabs-strings for more information.
© 2024 Puppet, Inc., a Perforce company

Puppet | Syntax and settings | 1081
This command (puppet-doc) will be removed once the puppetlabs internal documentation processing pipeline is
completely based on puppet-strings.
OPTIONS
--help
Print this help message
--reference
Build a particular reference. Get a list of references by running 'puppet doc --list'.
EXAMPLE
$ puppet doc -r type > /tmp/type_reference.markdown
AUTHOR
Luke Kanies
COPYRIGHT
Copyright (c) 2011 Puppet Inc., LLC Licensed under the Apache 2.0 License
Man Page: puppet help
NOTE: This page was generated from the Puppet source code on 2024-08-01 18:15:52 -0700
NAME
puppet-help - Display Puppet help.
SYNOPSIS
puppet help action
OPTIONS
Note that any setting that's valid in the configuration file is also a valid long argument, although it may or may not
be relevant to the present action. For example, server and run_mode are valid settings, so you can specify --server
<servername>, or --run_mode <runmode> as an argument.
See the configuration file documentation at https://puppet.com/docs/puppet/latest/configuration.html for the full list
of acceptable parameters. A commented list of all configuration options can also be generated by running puppet with
--genconfig.
--render-as FORMAT
The format in which to render output. The most common formats are json, s (string), yaml, and console, but
other options such as dot are sometimes available.
--verbose
Whether to log verbosely.
--debug
Whether to log debug information.
ACTIONS
help - Display help about Puppet subcommands and their actions.
SYNOPSIS
puppet help [--version VERSION] [--ronn] [subcommand] [action]
DESCRIPTION
Display help about Puppet subcommands and their actions.
© 2024 Puppet, Inc., a Perforce company
Puppet | Syntax and settings | 1082
OPTIONS --ronn - Whether to render the help text in ronn format.
--version VERSION - The version of the subcommand for which to show help.
RETURNS
Short help text for the specified subcommand or action.
EXAMPLES
help
Get help for an action:
$ puppet help
COPYRIGHT AND LICENSE
Copyright 2011 by Puppet Inc. Apache 2 license; see COPYING
Man Page: puppet node
NOTE: This page was generated from the Puppet source code on 2024-08-01 18:15:52 -0700
NAME
puppet-node - View and manage node definitions.
SYNOPSIS
puppet node action [--terminus _TERMINUS]
DESCRIPTION
This subcommand interacts with node objects, which are used by Puppet to build a catalog. A node object consists of
the node's facts, environment, node parameters (exposed in the parser as top-scope variables), and classes.
OPTIONS
Note that any setting that's valid in the configuration file is also a valid long argument, although it may or may not
be relevant to the present action. For example, server and run_mode are valid settings, so you can specify --server
<servername>, or --run_mode <runmode> as an argument.
See the configuration file documentation at https://puppet.com/docs/puppet/latest/configuration.html for the full list
of acceptable parameters. A commented list of all configuration options can also be generated by running puppet with
--genconfig.
--render-as FORMAT
The format in which to render output. The most common formats are json, s (string), yaml, and console, but
other options such as dot are sometimes available.
--verbose
Whether to log verbosely.
--debug
Whether to log debug information.
--terminus _TERMINUS
Indirector faces expose indirected subsystems of Puppet. These subsystems are each able to retrieve and alter a
specific type of data (with the familiar actions of find, search, save, and destroy) from an arbitrary number of
pluggable backends. In Puppet parlance, these backends are called terminuses.
Almost all indirected subsystems have a rest terminus that interacts with the puppet master's data. Most of them
have additional terminuses for various local data models, which are in turn used by the indirected subsystem on
the puppet master whenever it receives a remote request.
© 2024 Puppet, Inc., a Perforce company
Puppet | Syntax and settings | 1083
The terminus for an action is often determined by context, but occasionally needs to be set explicitly. See the
"Notes" section of this face's manpage for more details.
ACTIONS
clean - Clean up signed certs, cached facts, node objects, and reports for a node stored by the puppetmaster
SYNOPSIS
puppet node clean [--terminus _TERMINUS] host1 [host2 ...]
DESCRIPTION
Cleans up the following information a puppet master knows about a node:
Signed certificates - ($vardir/ssl/ca/signed/node.domain.pem)
Cached facts - ($vardir/yaml/facts/node.domain.yaml)
Cached node objects - ($vardir/yaml/node/node.domain.yaml)
Reports - ($vardir/reports/node.domain)
NOTE: this action now cleans up certs via Puppet Server's CA API. A running server is required for certs to be
cleaned.
find - Retrieve a node object.
SYNOPSIS
puppet node find [--terminus _TERMINUS] host
DESCRIPTION
Retrieve a node object.
RETURNS
A hash containing the node's classes, environment, expiration, name, parameters (its facts, combined with any
ENC-set parameters), and time. When used from the Ruby API: a Puppet::Node object.
RENDERING ISSUES: Rendering as string and json are currently broken; node objects can only be rendered as
yaml.
info - Print the default terminus class for this face.
SYNOPSIS
puppet node info [--terminus _TERMINUS]
DESCRIPTION
Prints the default terminus class for this subcommand. Note that different run modes may have different default
termini; when in doubt, specify the run mode with the '--run_mode' option.
EXAMPLES
find
Retrieve an "empty" (no classes, no ENC-imposed parameters, and an environment of "production") node:
$ puppet node find somenode.puppetlabs.lan --terminus plain --render-as yaml
Retrieve a node using the Puppet Server's configured ENC:
$ puppet node find somenode.puppetlabs.lan --terminus exec --run_mode server --render-as yaml
Retrieve the same node from the Puppet Server:
$ puppet node find somenode.puppetlabs.lan --terminus rest --render-as yaml
© 2024 Puppet, Inc., a Perforce company
Puppet | Syntax and settings | 1084
NOTES
This subcommand is an indirector face, which exposes find, search, save, and destroy actions for an indirected
subsystem of Puppet. Valid termini for this face include:
• exec
• json
• memory
• msgpack
• plain
• rest
• store_configs
• yaml
COPYRIGHT AND LICENSE
Copyright 2011 by Puppet Inc. Apache 2 license; see COPYING
Man Page: puppet parser
NOTE: This page was generated from the Puppet source code on 2024-08-01 18:15:52 -0700
NAME
puppet-parser - Interact directly with the parser.
SYNOPSIS
puppet parser action
OPTIONS
Note that any setting that's valid in the configuration file is also a valid long argument, although it may or may not
be relevant to the present action. For example, server and run_mode are valid settings, so you can specify --server
<servername>, or --run_mode <runmode> as an argument.
See the configuration file documentation at https://puppet.com/docs/puppet/latest/configuration.html for the full list
of acceptable parameters. A commented list of all configuration options can also be generated by running puppet with
--genconfig.
--render-as FORMAT
The format in which to render output. The most common formats are json, s (string), yaml, and console, but
other options such as dot are sometimes available.
--verbose
Whether to log verbosely.
--debug
Whether to log debug information.
ACTIONS
• dump - Outputs a dump of the internal parse tree for debugging: SYNOPSIS
puppet parser dump [--e source] [--[no-]validate] [--format old, pn, or json] [--pretty] [--format old|pn|json] [--
pretty] { -e source | [templates ...] }
DESCRIPTION
This action parses and validates the Puppet DSL syntax without compiling a catalog or syncing any resources.
The output format can be controlled using the --format old|pn|json where:
• 'old' is the default, but now deprecated format which is not API.
• 'pn' is the Puppet Extended S-Expression Notation.
© 2024 Puppet, Inc., a Perforce company
Puppet | Syntax and settings | 1085
• 'json' outputs the same graph as 'pn' but with JSON syntax.
The output will be "pretty printed" when the option --pretty is given together with --format 'pn' or 'json'. This
option has no effect on the 'old' format.
The command accepts one or more manifests (.pp) files, or an -e followed by the puppet source text. If no
arguments are given, the stdin is read (unless it is attached to a terminal)
The output format of the dumped tree is intended for debugging purposes and is not API, it may change from time
to time.
OPTIONS --e <source> - dump one source expression given on the command line.
--format <old, pn, or json> - Get result in 'old' (deprecated format), 'pn' (new format), or 'json' (new format in
JSON).
--pretty - Pretty print output. Only applicable together with --format pn or json
--[no-]validate - Whether or not to validate the parsed result, if no-validate only syntax errors are reported
RETURNS
A dump of the resulting AST model unless there are syntax or validation errors.
• validate - Validate the syntax of one or more Puppet manifests.: SYNOPSIS
puppet parser validate [manifest] [manifest ...]
DESCRIPTION
This action validates Puppet DSL syntax without compiling a catalog or syncing any resources. If no manifest
files are provided, it will validate the default site manifest.
When validating multiple issues per file are reported up to the settings of max_error, and max_warnings. The
processing stops after having reported issues for the first encountered file with errors.
RETURNS
Nothing, or the first syntax error encountered.
EXAMPLES
validate
Validate the default site manifest at /etc/puppetlabs/puppet/manifests/site.pp:
$ puppet parser validate
Validate two arbitrary manifest files:
$ puppet parser validate init.pp vhost.pp
Validate from STDIN:
$ cat init.pp | puppet parser validate
COPYRIGHT AND LICENSE
Copyright 2014 by Puppet Inc. Apache 2 license; see COPYING
Niche
Man Page: puppet catalog
NOTE: This page was generated from the Puppet source code on 2024-08-01 18:15:52 -0700
NAME
puppet-catalog - Compile, save, view, and convert catalogs.
© 2024 Puppet, Inc., a Perforce company
Puppet | Syntax and settings | 1086
SYNOPSIS
puppet catalog action [--terminus _TERMINUS]
DESCRIPTION
This subcommand deals with catalogs, which are compiled per-node artifacts generated from a set of Puppet
manifests. By default, it interacts with the compiling subsystem and compiles a catalog using the default manifest and
certname, but you can change the source of the catalog with the --terminus option. You can also choose to print any
catalog in 'dot' format (for easy graph viewing with OmniGraffle or Graphviz) with '--render-as dot'.
OPTIONS
Note that any setting that's valid in the configuration file is also a valid long argument, although it may or may not
be relevant to the present action. For example, server and run_mode are valid settings, so you can specify --server
<servername>, or --run_mode <runmode> as an argument.
See the configuration file documentation at https://puppet.com/docs/puppet/latest/configuration.html for the full list
of acceptable parameters. A commented list of all configuration options can also be generated by running puppet with
--genconfig.
--render-as FORMAT
The format in which to render output. The most common formats are json, s (string), yaml, and console, but
other options such as dot are sometimes available.
--verbose
Whether to log verbosely.
--debug
Whether to log debug information.
--terminus _TERMINUS
Indirector faces expose indirected subsystems of Puppet. These subsystems are each able to retrieve and alter a
specific type of data (with the familiar actions of find, search, save, and destroy) from an arbitrary number of
pluggable backends. In Puppet parlance, these backends are called terminuses.
Almost all indirected subsystems have a rest terminus that interacts with the puppet master's data. Most of them
have additional terminuses for various local data models, which are in turn used by the indirected subsystem on
the puppet master whenever it receives a remote request.
The terminus for an action is often determined by context, but occasionally needs to be set explicitly. See the
"Notes" section of this face's manpage for more details.
ACTIONS
apply - Find and apply a catalog.
SYNOPSIS
puppet catalog apply [--terminus _TERMINUS]
DESCRIPTION
Finds and applies a catalog. This action takes no arguments, but the source of the catalog can be managed with
the --terminus option.
RETURNS
Nothing. When used from the Ruby API, returns a Puppet::Transaction::Report object.
compile - Compile a catalog.
SYNOPSIS
puppet catalog compile [--terminus _TERMINUS]
© 2024 Puppet, Inc., a Perforce company
Puppet | Syntax and settings | 1087
DESCRIPTION
Compiles a catalog locally for a node, requiring access to modules, node classifier, etc.
RETURNS
A serialized catalog.
download - Download this node's catalog from the puppet master server.
SYNOPSIS
puppet catalog download [--terminus _TERMINUS]
DESCRIPTION
Retrieves a catalog from the puppet master and saves it to the local yaml cache. This action always contacts the
puppet master and will ignore alternate termini.
The saved catalog can be used in any subsequent catalog action by specifying '--terminus yaml' for that action.
RETURNS
Nothing.
NOTES
When used from the Ruby API, this action has a side effect of leaving
Puppet::Resource::Catalog.indirection.terminus_class set to yaml. The terminus must be explicitly re-set for
subsequent catalog actions.
find - Retrieve the catalog for the node from which the command is run.
SYNOPSIS
puppet catalog find [--terminus _TERMINUS] certname
DESCRIPTION
Retrieve the catalog for the node from which the command is run.
RETURNS
A serialized catalog. When used from the Ruby API, returns a Puppet::Resource::Catalog object.
info - Print the default terminus class for this face.
SYNOPSIS
puppet catalog info [--terminus _TERMINUS]
DESCRIPTION
Prints the default terminus class for this subcommand. Note that different run modes may have different default
termini; when in doubt, specify the run mode with the '--run_mode' option.
save - API only: create or overwrite an object.
SYNOPSIS
puppet catalog save [--terminus _TERMINUS] key
DESCRIPTION
API only: create or overwrite an object. As the Faces framework does not currently accept data from STDIN,
save actions cannot currently be invoked from the command line.
select - Retrieve a catalog and filter it for resources of a given type.
SYNOPSIS
puppet catalog select [--terminus _TERMINUS] host resource_type
© 2024 Puppet, Inc., a Perforce company

Puppet | Syntax and settings | 1088
DESCRIPTION
Retrieves a catalog for the specified host, then searches it for all resources of the requested type.
RETURNS
A list of resource references ("Type[title]"). When used from the API, returns an array of Puppet::Resource
objects excised from a catalog.
NOTES
By default, this action will retrieve a catalog from Puppet's compiler subsystem; you must call the action with --
terminus rest if you wish to retrieve a catalog from the puppet master.
FORMATTING ISSUES: This action cannot currently render useful yaml; instead, it returns an entire catalog.
Use json instead.
EXAMPLES
apply
Apply the locally cached catalog:
$ puppet catalog apply --terminus yaml
Retrieve a catalog from the master and apply it, in one step:
$ puppet catalog apply --terminus rest
API example:
## ... Puppet::Face[:catalog, '0.0.1'].download
## (Termini are singletons; catalog.download has a side effect of ##
setting the catalog terminus to yaml) report = Puppet::Face[:catalog,
'0.0.1'].apply
## ...
compile
Compile catalog for node 'mynode':
$ puppet catalog compile mynode --codedir ...
download
Retrieve and store a catalog:
$ puppet catalog download
API example:
Puppet::Face[:plugin, '0.0.1'].download
Puppet::Face[:facts, '0.0.1'].upload
Puppet::Face[:catalog, '0.0.1'].download
## ...
select
Ask the puppet master for a list of managed file resources for a node:
$ puppet catalog select --terminus rest somenode.magpie.lan file
NOTES
This subcommand is an indirector face, which exposes find, search, save, and destroy actions for an indirected
subsystem of Puppet. Valid termini for this face include:
• compiler
• json
© 2024 Puppet, Inc., a Perforce company
Puppet | Syntax and settings | 1089
• msgpack
• rest
• store_configs
• yaml
COPYRIGHT AND LICENSE
Copyright 2011 by Puppet Inc. Apache 2 license; see COPYING
Man Page: puppet facts
NOTE: This page was generated from the Puppet source code on 2024-08-01 18:15:52 -0700
NAME
puppet-facts - Retrieve and store facts.
SYNOPSIS
puppet facts action [--terminus _TERMINUS]
DESCRIPTION
This subcommand manages facts, which are collections of normalized system information used by Puppet. It can read
facts directly from the local system (with the default facter terminus).
OPTIONS
Note that any setting that's valid in the configuration file is also a valid long argument, although it may or may not
be relevant to the present action. For example, server and run_mode are valid settings, so you can specify --server
<servername>, or --run_mode <runmode> as an argument.
See the configuration file documentation at https://puppet.com/docs/puppet/latest/configuration.html for the full list
of acceptable parameters. A commented list of all configuration options can also be generated by running puppet with
--genconfig.
--render-as FORMAT
The format in which to render output. The most common formats are json, s (string), yaml, and console, but
other options such as dot are sometimes available.
--verbose
Whether to log verbosely.
--debug
Whether to log debug information.
--terminus _TERMINUS
Indirector faces expose indirected subsystems of Puppet. These subsystems are each able to retrieve and alter a
specific type of data (with the familiar actions of find, search, save, and destroy) from an arbitrary number of
pluggable backends. In Puppet parlance, these backends are called terminuses.
Almost all indirected subsystems have a rest terminus that interacts with the puppet master's data. Most of them
have additional terminuses for various local data models, which are in turn used by the indirected subsystem on
the puppet master whenever it receives a remote request.
The terminus for an action is often determined by context, but occasionally needs to be set explicitly. See the
"Notes" section of this face's manpage for more details.
ACTIONS
find - Retrieve a node's facts.
SYNOPSIS
puppet facts find [--terminus _TERMINUS] [node_certname]
© 2024 Puppet, Inc., a Perforce company
Puppet | Syntax and settings | 1090
DESCRIPTION
Retrieve a node's facts.
RETURNS
A hash containing some metadata and (under the "values" key) the set of facts for the requested node. When used
from the Ruby API: A Puppet::Node::Facts object.
RENDERING ISSUES: Facts cannot currently be rendered as a string; use yaml or json.
NOTES
When using the facter terminus, the host argument is ignored.
info - Print the default terminus class for this face.
SYNOPSIS
puppet facts info [--terminus _TERMINUS]
DESCRIPTION
Prints the default terminus class for this subcommand. Note that different run modes may have different default
termini; when in doubt, specify the run mode with the '--run_mode' option.
save - API only: create or overwrite an object.
SYNOPSIS
puppet facts save [--terminus _TERMINUS] key
DESCRIPTION
API only: create or overwrite an object. As the Faces framework does not currently accept data from STDIN,
save actions cannot currently be invoked from the command line.
show - Retrieve current node's facts.
SYNOPSIS
puppet facts [--terminus _TERMINUS] [--config-file path] [--custom-dir path] [--external-dir path] [--no-block]
[--no-cache] [--show-legacy] [--value-only] [--timing] [facts]
DESCRIPTION
Reads facts from the local system using facter terminus. A query can be provided to retrieve just a specific fact
or a set of facts.
OPTIONS --config-file <path> - The location of the config file for Facter.
--custom-dir <path> - The path to a directory that contains custom facts.
--external-dir <path> - The path to a directory that contains external facts.
--no-block - Disable fact blocking mechanism.
--no-cache - Disable fact caching mechanism.
--show-legacy - Show legacy facts when querying all facts.
--timing - Show how much time it took to resolve each fact.
--value-only - Show only the value when the action is called with a single query
RETURNS
The output of facter with added puppet specific facts.
NOTES
© 2024 Puppet, Inc., a Perforce company
Puppet | Syntax and settings | 1091
upload - Upload local facts to the puppet master.
SYNOPSIS
puppet facts upload [--terminus _TERMINUS]
DESCRIPTION
Reads facts from the local system using the facter terminus, then saves the returned facts using the rest terminus.
RETURNS
Nothing.
NOTES
This action requires that the Puppet Server's auth.conf file allow PUT or save access to the /puppet/v3/facts API
endpoint.
For details on configuring Puppet Server's auth.conf, see:
https://puppet.com/docs/puppetserver/latest/config_file_auth.html
EXAMPLES
find
Get facts from the local system:
$ puppet facts find
show
retrieve facts:
$ puppet facts show os
upload
Upload facts:
$ puppet facts upload
NOTES
This subcommand is an indirector face, which exposes find, search, save, and destroy actions for an indirected
subsystem of Puppet. Valid termini for this face include:
• facter
• json
• memory
• network_device
• rest
• store_configs
• yaml
COPYRIGHT AND LICENSE
Copyright 2011 by Puppet Inc. Apache 2 license; see COPYING
Man Page: puppet filebucket
NOTE: This page was generated from the Puppet source code on 2024-08-01 18:15:52 -0700
NAME
puppet-filebucket - Store and retrieve files in a filebucket
© 2024 Puppet, Inc., a Perforce company

Puppet | Syntax and settings | 1092
SYNOPSIS
A stand-alone Puppet filebucket client.
USAGE
puppet filebucket mode [-h|--help] [-V|--version] [-d|--debug] [-v|--verbose] [-l|--local] [-r|--remote] [-s|--server
server] [-f|--fromdate date] [-t|--todate date] [-b|--bucket directory] file file ...
Puppet filebucket can operate in three modes, with only one mode per call:
backup: Send one or more files to the specified file bucket. Each sent file is printed with its resulting sha256 sum.
get: Return the text associated with an sha256 sum. The text is printed to stdout, and only one file can be retrieved at a
time.
restore: Given a file path and an sha256 sum, store the content associated with the sum into the specified file path.
You can specify an entirely new path to this argument; you are not restricted to restoring the content to its original
location.
diff: Print a diff in unified format between two checksums in the filebucket or between a checksum and its matching
file.
list: List all files in the current local filebucket. Listing remote filebuckets is not allowed.
DESCRIPTION
This is a stand-alone filebucket client for sending files to a local or central filebucket.
Note that 'filebucket' defaults to using a network-based filebucket available on the server named 'puppet'. To use this,
you'll have to be running as a user with valid Puppet certificates. Alternatively, you can use your local file bucket by
specifying '--local', or by specifying '--bucket' with a local path.
find /opt/puppetlabs/server/data/puppetserver/bucket -type f -mtime +45 -
atime +45 -print0 | xargs -0 rm
• Restrict the directory to a maximum size after which the oldest items are removed.
OPTIONS
Note that any setting that's valid in the configuration file is also a valid long argument. For example, 'ssldir' is a valid
setting, so you can specify '--ssldir directory' as an argument.
See the configuration file documentation at https://puppet.com/docs/puppet/latest/configuration.html for the full list of
acceptable parameters. A commented list of all configuration options can also be generated by running puppet with '--
genconfig'.
--bucket
Specify a local filebucket path. This overrides the default path set in '$clientbucketdir'.
--debug
Enable full debugging.
--fromdate
(list only) Select bucket files from 'fromdate'.
--help
Print this help message.
--local
Use the local filebucket. This uses the default configuration information and the bucket located at the
'$clientbucketdir' setting by default. If '--bucket' is set, puppet uses that path instead.
© 2024 Puppet, Inc., a Perforce company

Puppet | Syntax and settings | 1093
--remote
Use a remote filebucket. This uses the default configuration information and the bucket located at the '$bucketdir'
setting by default.
--server_list
A list of comma separated servers; only the first entry is used for file storage. This setting takes precidence over
server.
--server
The server to use for file storage. This setting is only used if server_list is not set.
--todate
(list only) Select bucket files until 'todate'.
--verbose
Print extra information.
--version
Print version information.
EXAMPLES
### Backup a file to the filebucket, then restore it to a temporary
directory $ puppet filebucket backup /etc/passwd
/etc/passwd: 429b225650b912a2ee067b0a4cf1e949
$ puppet filebucket restore /tmp/passwd 429b225650b912a2ee067b0a4cf1e949
### Diff between two files in the filebucket $ puppet filebucket -l diff
d43a6ecaa892a1962398ac9170ea9bf2 7ae322f5791217e031dc60188f4521ef
1a2
> again
### Diff between the file in the filebucket and a local file $ puppet
filebucket -l diff d43a6ecaa892a1962398ac9170ea9bf2 /tmp/testFile
1a2
> again
### Backup a file to the filebucket and observe that it keeps each backup
separate $ puppet filebucket -l list
d43a6ecaa892a1962398ac9170ea9bf2 2015-05-11 09:27:56 /tmp/TestFile
$ echo again >> /tmp/TestFile
$ puppet filebucket -l backup /tmp/TestFile
/tmp/TestFile: 7ae322f5791217e031dc60188f4521ef
$ puppet filebucket -l list
d43a6ecaa892a1962398ac9170ea9bf2 2015-05-11 09:27:56 /tmp/TestFile
7ae322f5791217e031dc60188f4521ef 2015-05-11 09:52:15 /tmp/TestFile
### List files in a filebucket within date ranges $ puppet filebucket -l
-f 2015-01-01 -t 2015-01-11 list
<Empty Output>
$ puppet filebucket -l -f 2015-05-10 list
d43a6ecaa892a1962398ac9170ea9bf2 2015-05-11 09:27:56 /tmp/TestFile
7ae322f5791217e031dc60188f4521ef 2015-05-11 09:52:15 /tmp/TestFile
$ puppet filebucket -l -f "2015-05-11 09:30:00" list
7ae322f5791217e031dc60188f4521ef 2015-05-11 09:52:15 /tmp/TestFile
© 2024 Puppet, Inc., a Perforce company

Puppet | Syntax and settings | 1094
$ puppet filebucket -l -t "2015-05-11 09:30:00" list
d43a6ecaa892a1962398ac9170ea9bf2 2015-05-11 09:27:56 /tmp/TestFile
### Manage files in a specific local filebucket $ puppet filebucket -b /
tmp/TestBucket backup /tmp/TestFile2
/tmp/TestFile2: d41d8cd98f00b204e9800998ecf8427e
$ puppet filebucket -b /tmp/TestBucket list
d41d8cd98f00b204e9800998ecf8427e 2015-05-11 09:33:22 /tmp/TestFile2
### From a Puppet Server, list files in the server bucketdir $ puppet
filebucket -b $(puppet config print bucketdir --section server) list
d43a6ecaa892a1962398ac9170ea9bf2 2015-05-11 09:27:56 /tmp/TestFile
7ae322f5791217e031dc60188f4521ef 2015-05-11 09:52:15 /tmp/TestFile
AUTHOR
Luke Kanies
COPYRIGHT
Copyright (c) 2011 Puppet Inc., LLC Licensed under the Apache 2.0 License
Man Page: puppet report
NOTE: This page was generated from the Puppet source code on 2024-08-01 18:15:52 -0700
NAME
puppet-report - Create, display, and submit reports.
SYNOPSIS
puppet report action [--terminus _TERMINUS]
OPTIONS
Note that any setting that's valid in the configuration file is also a valid long argument, although it may or may not
be relevant to the present action. For example, server and run_mode are valid settings, so you can specify --server
<servername>, or --run_mode <runmode> as an argument.
See the configuration file documentation at https://puppet.com/docs/puppet/latest/configuration.html for the full list
of acceptable parameters. A commented list of all configuration options can also be generated by running puppet with
--genconfig.
--render-as FORMAT
The format in which to render output. The most common formats are json, s (string), yaml, and console, but
other options such as dot are sometimes available.
--verbose
Whether to log verbosely.
--debug
Whether to log debug information.
--terminus _TERMINUS
Indirector faces expose indirected subsystems of Puppet. These subsystems are each able to retrieve and alter a
specific type of data (with the familiar actions of find, search, save, and destroy) from an arbitrary number of
pluggable backends. In Puppet parlance, these backends are called terminuses.
Almost all indirected subsystems have a rest terminus that interacts with the puppet master's data. Most of them
have additional terminuses for various local data models, which are in turn used by the indirected subsystem on
the puppet master whenever it receives a remote request.
© 2024 Puppet, Inc., a Perforce company
Puppet | Syntax and settings | 1095
The terminus for an action is often determined by context, but occasionally needs to be set explicitly. See the
"Notes" section of this face's manpage for more details.
ACTIONS
info - Print the default terminus class for this face.
SYNOPSIS
puppet report info [--terminus _TERMINUS]
DESCRIPTION
Prints the default terminus class for this subcommand. Note that different run modes may have different default
termini; when in doubt, specify the run mode with the '--run_mode' option.
save - API only: submit a report.
SYNOPSIS
puppet report save [--terminus _TERMINUS] report
DESCRIPTION
API only: create or overwrite an object. As the Faces framework does not currently accept data from STDIN,
save actions cannot currently be invoked from the command line.
RETURNS
Nothing.
submit - API only: submit a report with error handling.
SYNOPSIS
puppet report submit [--terminus _TERMINUS] report
DESCRIPTION
API only: Submits a report to the puppet master. This action is essentially a shortcut and wrapper for the save
action with the rest terminus, and provides additional details in the event of a failure.
EXAMPLES
save
From the implementation of puppet report submit (API example):
begin Puppet::Transaction::Report.indirection.terminus_class = :rest Puppet::Face[:report, "0.0.1"].save(report)
Puppet.notice "Uploaded report for ##{report.name}" rescue => detailPuppet.log_exception(detail, "Could not send
report: ##{detail}") end submit
API example:report = Puppet::Face[:catalog, '0.0.1'].apply Puppet::Face[:report, '0.0.1'].submit(report) return report
NOTES
This subcommand is an indirector face, which exposes find, search, save, and destroy actions for an indirected
subsystem of Puppet. Valid termini for this face include:
• json
• msgpack
• processor
• rest
• yaml
COPYRIGHT AND LICENSE
Copyright 2011 by Puppet Inc. Apache 2 license; see COPYING
© 2024 Puppet, Inc., a Perforce company

Puppet | Developing modules | 1096
Developing modules
If you are an advanced Puppet user, you can develop your own modules using Puppet Development Kit (PDK).
If you are new to Puppet or want to save time, use the pre-built and tested modules on the Puppet Forge.
• Modules on page 1097
Modules manage a specific technology in your infrastructure and serve as the basic building blocks of Puppet desired
state management.
• Puppet Development Kit (PDK) on page 1149
You can write your own Puppet code and modules using Puppet Development Kit (PDK), which is a framework to
successfully build, test and validate your modules.
• Puppet VSCode extension on page 1149
Puppet has an extension for Visual Studio Code (VSCode) — Microsoft’s cross-platform source-code editor.
• PowerShell DSC Resources on page 1150
Desired State Configuration (DSC) is a configuration framework in PowerShell that enables you to manage your
infrastructure with configuration as code.
• Ruby API for developing extensions
© 2024 Puppet, Inc., a Perforce company

Puppet | Developing modules | 1097
Modules
Modules manage a specific technology in your infrastructure and serve as the basic building blocks of Puppet desired
state management.
Helpful modules docs links Other useful places
Understanding Puppet modules
Modules overview
Plug-ins in modules
Modules cheatsheet
Managing modules
Installing modules
Upgrading modules
Uninstalling modules
puppet-module command reference
Writing modules
Beginner's guide to modules
Module metadata
Publishing modules
Documenting modules
Writing module documentation
Puppet Strings
Puppet Strings style guide
Publishing modules
On the Forge
Contributing to modules
Contributing to Puppet modules
Reviewing community pull requests
Modules on the Puppet Forge
The Forge module repository
Puppet approved modules
Puppet supported modules
module quality scoring
Modules in Code Manager
Managing modules with the Puppetfile
Puppet language reference
Classes
Defined types
Puppet tasks and plans
Developing and testing modules
Puppet Development Kit (PDK)
Developing types and providers
Puppet Resource API
Community resources
Puppet Community Slack
puppet-users email group
Modules overview
You'll keep nearly all of your Puppet code in modules. Each module manages a specific task in your infrastructure,
such as installing and configuring a piece of software. Modules serve as the basic building blocks of Puppet and are
reusable and shareable.
Modules contain Puppet classes, defined types, tasks, task plans, functions, resource types and providers, and plug-
ins such as custom types or facts. Modules must be installed in the Puppet modulepath. Puppet loads all content from
every module in the modulepath, making this code available for use.
You can download and install modules from the Puppet Forge. The Forge contains thousands of modules written by
Puppet developers and the open source community for a wide variety of use cases. Expect to write at least a few of
your own modules to meet specific needs in your infrastructure.
If you're using Code Manager or r10k, you'll manage modules with a Puppetfile. For smaller, manually managed
infrastructures or proof of concept projects, you can install and manage modules with the puppet module
command. See the related topic about installing modules for details.
The following video gives you an overview of modules:
© 2024 Puppet, Inc., a Perforce company
Puppet | Developing modules | 1098
Module structure
Modules have a specific directory structure that allows Puppet to find and load classes, defined types, facts, custom
types and providers, functions, and tasks.
Each module subdirectory has a specific function, and not all directories are required. Use the following directory
structure:
data/
Contains data files specifying parameter defaults.
examples/
Contains examples showing how to declare the module's classes and defined types.
init.pp: The main class of the module.
example.pp: Provide examples for major use cases.
facts.d/
Contains external facts, which are an alternative to Ruby-based custom facts. These are synced to all agent nodes,
so they can submit values for those facts to the primary Puppet server.
files/
Contains static files, which managed nodes can download.
service.conf
This file's source => URL is puppet:///modules/my_module/service.conf. Its
contents can also be accessed with the file function, such as content => file('my_module/
service.conf').
functions/
Contains custom functions written in the Puppet language.
lib/
Contains plug-ins, such as custom facts and custom resource types. These are used by both the primary Puppet
server and the Puppet agent, and they are synced to all agent nodes in the environment on each Puppet run.
facter/
Contains custom facts, written in Ruby.
puppet/
Contains custom functions, resource types, and resource providers:
puppet/functions/: Contains functions written in Ruby for the modern Puppet::Functions API.
puppet/parser/functions/: Contains functions written in Ruby for the legacy
Puppet::Parser::Functions API.
puppet/provider/: Contains custom resource providers written in the Puppet language.
puppet/type/: Contains custom resource types written in the Puppet language.
locales/
Contains files relating to module localization into languages other than English.
manifests/
Contains all of the manifests in the module.
init.pp
The init.pp class, if used, is the main class of the module. This class's name must match the module's
name.
other_class.pp
Classes and defined types are named with the namespace of the module and the name of the class or defined
type. For example, this class is named my_module::other_class.
© 2024 Puppet, Inc., a Perforce company
Puppet | Developing modules | 1099
implementation/
You can group related classes and defined types in subdirectories of the manifests/ directory. The name of this
subdirectory is reflected in the names of the classes and types it contains. Classes and defined types are named
with the namespace of the module, any subdirectories, and the name of the class or defined type.
implementation/my_defined_type.pp: This defined type is named
my_module::implementation::my_defined_type.
implementation/class.pp: This defined type is named
my_module::implementation::class.
plans/
Contains Puppet task plans, which are sets of tasks that can be combined with other logic. Plans are written in the
Puppet language.
readmes/
The module's README localized into languages other than English.
spec/
Contains spec tests for any plug-ins in the lib directory.
tasks/
Contains Puppet tasks, which can be written in any programming language that can be read by the target node.
templates/
Contains templates, which the module's manifests can use to generate content or variable values.
component.erb
A manifest can render this template with template('my_module/component.erb').
component.epp
A manifest can render this template with epp('my_module/component.epp').
types/
Contains resource type aliases.
Module names
Module names must match the expression: [a-z][a-z0-9_]*. In other words, they can contain only lowercase
letters, numbers, and underscores, and begin with a lowercase letter.
These restrictions are similar to those that apply to class names, with the added restriction that module names cannot
contain the namespace separator (::), because modules cannot be nested. Certain module names are disallowed; see
the list of reserved words and names.
Manifests
Manifests, contained in the module's manifests/ folder, each contain one class or defined type.
The init.pp manifest is the main class of a module and, unlike other classes or defined types, it is referred to only
by the name of the module itself. For example, the class in init.pp in the puppetlabs-motd module is the
motd class. You cannot name a class init.
All other classes or defined types names are composed of name segments, separated from each other by a namespace
separator, ::
• The module short name, followed by the namespace separator.
• Any manifests/ subdirectories that the class or defined type is contained in, followed by a namespace
separato.
• The manifest file name, without the extension.
© 2024 Puppet, Inc., a Perforce company

Puppet | Developing modules | 1100
For example, each module class or defined type would have the following names based on their module name and
location within the manifests/ directory:
Module name Filepath to class or defined type Class or defined type name
username-my_module my_module/manifests/
init.pp
my_module
username-my_module my_module/manifests/
other_class.pp
my_module::other_class
puppetlabs-apache apache/manifests/
security/rule_link.pp
apache::security::rule_link
puppetlabs-apache apache/manifests/fastcgi/
server.pp
apache::fastcgi::server
Files in modules
You can serve files from a module's files/ directory to agent nodes.
Download files to the agent by setting the file resource's source attribute to the puppet:/// URL for the file.
Alternately, you can access module files with the file function.
To download the file with a URL, use the following format for the puppet:/// URL:
puppet:///<MODULE_DIRECTORY>/<MODULE_NAME>/<FILE_NAME>
For example, given a file located in my_module/files/service.conf, the URL is:
puppet:///modules/my_module/service.conf
To access files with the file function, pass the reference <MODULE NAME>/<FILE NAME> to the function,
which returns the content of the requested file from the module's files/ directory. Puppet URLs work for both
puppet agent and puppet apply; in either case they retrieve the file from a module.
To learn more about the file function, see the function reference.
Templates in modules
You can use ERB or EPP templates in your module to manage the content of configuration files. Templates combine
code, data, and literal text to produce a string output, which can be used as the content attribute of a file resource or
as a variable value. Templates are contained in the module's templates/ directory.
For ERB templates, which use Ruby, use the template function. For EPP templates, which use the Puppet
language, use the epp function. See the page about templates for detailed information.
The template and epp functions look up templates identified by module and template name, passed as a string in
parentheses: function('module_name/template_name.extension'). For example:
template('my_module/component.erb')
epp('my_module/component.epp')
Writing modules
Every Puppet user can expect to write at least some of their own modules. You must give your modules a specific
directory structure and include correctly formatted metadata. Puppet Development Kit (PDK) provides tools for
writing, validating, and testing modules.
PDK creates a complete module structure, class, defined type, and task templates, and configures a module testing
framework. To test your modules, use PDK commands to run unit tests and to validate your module's metadata,
© 2024 Puppet, Inc., a Perforce company

Puppet | Developing modules | 1101
syntax, and style. You can download and install PDK on any development machine; no Puppet installation is
required. See the PDK documentation to get started.
For help getting started writing modules, see our beginner's guide to writing modules. For details on best practices
and code style, see the Puppet Language style guide.
Related information
Beginner's guide to writing modules on page 1113
Create great Puppet modules by following best practices and guidelines.
Documenting modules on page 1124
Document any module you write, whether your module is for internal use only or for publication on the Forge.
Complete, clear documentation helps your module users understand what your module can do and how to use it.
The Puppet language style guide on page 492
This style guide promotes consistent formatting in the Puppet language, giving you a common pattern, design, and
style to follow when developing modules. This consistency in code and module structure makes it easier to update
and maintain the code.
Plug-ins in modules
Puppet supports several kinds of plug-ins, which are distributed in modules. These plug-ins enable features such as
custom facts and functions for managing your nodes. Modules that you download from the Forge can include these
kinds of plug-ins, and you can also develop your own.
When you install a module that contains plug-ins, they are automatically enabled. At the start of every Puppet run,
Puppet Server loads all the plug-ins available in the environment's modulepath. Agents download those plug-ins, so
module plug-ins are available for use on the first Puppet run after you install them in an environment.
Plug-ins are available whether or not a node uses classes or defined types from a given module. In other words, even
if you don't declare any classes from the stdlib module, nodes still use the stdlib custom facts. There is no way
to exclude plug-ins in an environment in which they are installed.
If the agent and primary server are both running Puppet 5.3.4 or newer, the agent also downloads any non-English
translations included in the module.
Puppet supports several kinds of plug-ins. Puppet looks for each plug-in in a different subdirectory of the module. If
you are adding plug-ins to a module, be sure to place them in the correct module subdirectory. In all cases, you must
name files and additional subdirectories according to the plug-in type's loading requirements.
Important:
Environments aren't completely isolated for certain kinds of plug-ins. If you are using custom resource types or
legacy custom functions, you can encounter conflicts if your environments contain differing versions of a given plug-
in.In such cases, Puppet loads the first version it encounters of the plug-in, and then continues to use that version for
all environments.
To avoid plug-in conflicts for resource types, use the puppet generate types command as described in the
environment isolation documentation. To fix issues with legacy custom functions, rewrite them with the modern API,
which is not affected by this issue.
© 2024 Puppet, Inc., a Perforce company

Puppet | Developing modules | 1102
Module plug-in types
Modules can contain different types of plug-ins, each in a specific subdirectory.
Plug-in Description Used by Module subdirectory
Custom facts Written in Ruby, facts can
provide a specified piece of
information about system
state. For information about
writing custom facts, see
the Facter custom facts
documentation.
Agents only. lib/facter
External facts External facts provide
a way to use arbitrary
executables or scripts as
facts, or set facts statically
with structured data. For
information about external
facts, see the Facter custom
facts documentation.
Agents only. facts.d
Puppet functions Functions written in Puppet
to return calculated values.
For more information, see
the topic about writing
custom functions in Puppet.
Puppet Server only. functions
Ruby functions Functions written in
Ruby to return calculated
values. Modern Ruby
functions are written for the
Puppet::Functions
API.
Puppet Server only. lib/puppet/
functions
Resource API The Resource API is built
on top of Puppet core
and is useful for creating
custom types and providers.
For more information
about the Resource API,
visit Develop types
and providers with the
Resource API on page
803.
Puppet Server and agents. lib/puppet/
type, lib/puppet/
provider, lib/
puppet/transport,
lib/puppet/util
Resource types Written in Puppet to add
new resource types to
Puppet. For information
about developing resource
types, see custom types
documentation.
Puppet Server and agents. lib/puppet/type
Resource providers Written in Puppet to add
new resource providers to
Puppet. For information
about developing resource
providers, see the custom
providers documentation.
Puppet Server and agents. lib/puppet/
provider
© 2024 Puppet, Inc., a Perforce company

Puppet | Developing modules | 1103
Plug-in Description Used by Module subdirectory
Augeas lenses Augeas provides a way
to modify config files. To
learn more about using
Augeas with Puppet, see
the Forge for Augeas tips
and tricks.
Agents only. lib/augeas/lenses
Module cheat sheet
A quick reference to Puppet module terms and concepts. For detailed explanations of Puppet module structure, terms,
and concepts, see the related topics about modules.
manifests/
The manifests/ directory holds the module's Puppet code.
Each .pp file contains one and only one class or defined type. The filename, without the extension, is part of the full
class or defined type name.
The init.pp manifest is unique: it contains a class or defined type that is called by the module name. For example:
apache/manifests/init.pp:
class apache {
...
}
Other classes and defined types are named with a modulename::filename convention. If a manifest is in a
subdirectory of manifests/ , the subdirectory is included as a segment of the name.
For example:
apache/manifests/vhost.pp:
define apache::vhost
($port, $docroot)
{
...
}
apache/manifests/config/ssl.pp:
class apache::config::ssl {
...
}
files/
You can download files in a module's files/ directory to any node. Files in this directory are served at
puppet:///modules/modulename/filename.
Use the source attribute to download file contents from the server, specifying the file with a puppet:/// URL.
For example, to fetch apache/files/httpd.conf :
file {'/etc/apache2/httpd.conf':
ensure => file,
source => 'puppet:///modules/apache/httpd.conf',
© 2024 Puppet, Inc., a Perforce company

Puppet | Developing modules | 1104
You can also fetch files from subdirectories of files/. For example, to fetch apache/files/extra/ssl.
file {'/etc/apache2/httpd-ssl.conf':
ensure => file,
source => 'puppet:///modules/apache/extra/ssl',
}
lib/
The lib/ directory contains different types of Puppet plug-ins, which add features to Puppet and Facter. Each type
of plug-in has its own subdirectory. For example:
The lib/types directory contains custom resource types:
apache/lib/puppet/type/apache_setting.rb
The lib/puppet/functions directory contains custom functions:
apache/lib/puppet/functions/apache/bool2httpd.rb
The lib/facter directory contains custom facts:
apache/lib/facter/apache_confdir.rb
templates/
The templates/ directory holds ERB and EPP templates.
Templates output strings that can be used in files. To use template output for a file, set the content attribute to the
template function, specifying the template in a <modulename>/<filename>.<extension> format.
For example, to use the apache/templates/vhost.erb template output as file contents:
file {'/etc/apache2/sites-enabled/wordpress.conf':
ensure => file,
content => template('apache/vhost.erb'),
}
Related information
Modules overview on page 1097
You'll keep nearly all of your Puppet code in modules. Each module manages a specific task in your infrastructure,
such as installing and configuring a piece of software. Modules serve as the basic building blocks of Puppet and are
reusable and shareable.
Plug-ins in modules on page 1101
Puppet supports several kinds of plug-ins, which are distributed in modules. These plug-ins enable features such as
custom facts and functions for managing your nodes. Modules that you download from the Forge can include these
kinds of plug-ins, and you can also develop your own.
Installing and managing modules from the command line
Install, upgrade, and uninstall Forge modules from the command line with the puppet module command.
The puppet module command provides an interface for managing modules from the Forge. Its interface is similar
to other common package managers, such as gem, apt-get, or yum. You can install, upgrade, uninstall, list, and
search for modules with this command.
Restriction: If you are using Code Manager or r10k, do not install, update, or uninstall modules with the puppet
module command. With code management, you must install modules with a Puppetfile. Code management purges
modules that were installed with the puppet module command. See the Puppetfile documentation for instructions.
© 2024 Puppet, Inc., a Perforce company

Puppet | Developing modules | 1105
Setting up puppet module behind a proxy
To use the puppet module command behind a proxy, set the proxy's IP address and port by running the following
two commands:
export http_proxy=http://<PROXY IP>:<PROXY PORT>
export https_proxy=http://<PROXY IP>:<PROXY PORT>
For instance, for an proxy at 192.168.0.10 on port 8080, run:
export http_proxy=http://192.168.0.10:8080
export https_proxy=http://192.168.0.10:8080
Alternatively, you can set these two proxy settings in the puppet.conf file, by setting http_proxy_host and
http_proxy_port in the user section of puppet.conf. For more information, see the Puppet configuration
reference.
Important: Set these two proxy settings only in the [user] section of the puppet.conf file. Setting them in
other sections can cause problems.
Finding Forge modules
Visit the Forge website to search for and browse modules. Each module on the Forge has its own page with the
module's quality score, community rating, and documentation.
Some modules are Puppet supported or Puppet approved. Approved modules are often developed by Puppet
community members and pass our specific quality and usability requirements. We recommend these modules, but
they are not supported as part of a Puppet Enterprise license agreement. Puppet supported modules have been tested
with PE and are fully supported. To learn more, see the Puppet Approved Modules and Puppet Supported Modules
pages.
If there are no supported or approved modules that meet your needs, you can evaluate available modules by
compatibility, documentation, last release date, number of downloads, and the module's Forge quality score.
Note: It is no longer possible to search for modules on the command line. The puppet module search
command was deprecated in Puppet 6.16.0.
Related information
Finding and downloading deleted modules on page 1105
You can still search for and download a specific release of a module on the Forge, even if the release has been
deleted.
Finding and downloading deleted modules
You can still search for and download a specific release of a module on the Forge, even if the release has been
deleted.
Normally, deleted modules do not appear in Forge search results. To include deleted modules in your search on the
Forge website, check Show deprecated modules in the search filter panel.
To download a deleted release of a specific module, select the release from the Select another release drop-down
list on the module's page. The release is marked in this menu as deleted. If you select the deleted release, a warning
banner appears on the page with the reason for deletion. To download the deleted release anyway, click Download or
install it with the puppet module install command.
© 2024 Puppet, Inc., a Perforce company

Puppet | Developing modules | 1106
Installing modules from the command line
The puppet module install command installs a module and all of its dependencies. You can install modules
from the Forge, a module repository, or a release tarball.
By default, this command installs modules into the first directory in the Puppet modulepath, which defaults to
$codedir/environments/production/modules. For example, to install the puppetlabs-apache
module, run:
puppet module install puppetlabs-apache
You can customize the module version, installation directory, or environment, get debugging information, or ignore
dependencies by passing options with the puppet module install command.
Note: If any installed module has an invalid version number, Puppet issues a warning:
Warning: module (/Users/youtheuser/.puppet/modules/module) has an invalid
version number (0.1). The version has been set to 0.0.0. If you are the
maintainer for this module, please update the
metadata.json with a valid Semantic Version (http://semver.org).
Despite the warning, Puppet still downloads your module and does not permanently change the module's metadata.
The version is changed only in memory during the run of the program, so that Puppet can calculate dependencies.
Restriction: For Premium Content offerings, you must log in to the Forge to access the module.
Installing modules from the Forge by using an internet connection
To install a module from the Forge by using an internet connection, run the puppet module install command
with the long name of the module. The long name of a module is formatted as <username>-<modulename>. For
example, to install puppetlabs-apache, run:
puppet module install puppetlabs-apache
Installing modules from the Forge in an air-gapped environment
You can install a module in an air-gapped environment in which the host server does not have internet access. In
the following instructions, Security Compliance Enforcement (SCE) for Linux is used as an example. However, the
general process applies to all Puppet modules.
1.
If the module is a Premium Content offering (like the SCE modules), log in to Puppet Forge to gain access to the
module.
2.
In Puppet Forge, locate the module and download the release tarball. In the Installation Method list, click Direct
download and Download.
3.
Copy the downloaded tarball to the appropriate location. The location will be either the primary Puppet server and
each compiler, or the source repository that hosts your control repository.
© 2024 Puppet, Inc., a Perforce company

Puppet | Developing modules | 1107
4.
Install the Puppet module by using one of the following methods:
• Direct installation using the puppet module install command. You can install the module either into
your Puppet environment or your control repository. Run a command that is similar to the following example,
but specify the file, directory, and module that you require:
puppet module install ./puppetlabs-cem_linux-1.6.1.tar.gz --ignore-
dependencies --modulepath </path/to/your/modules>
• Manual installation using a tar command. Run a command that is similar to the following example, but
specify the file, directory, and module that you require:
tar zxvf puppetlabs-cem_linux-1.6.1.tar.gz && mv puppetlabs-cem_linux </
path/to/your/modules>/cem_linux
5.
For any module dependencies, repeat steps through 1-4.
6.
If you installed the module to your control repository, commit and push the changes.
Installing from another module repository
You can install modules from other repositories that mimic the Forge interface. You can change the module
repository for one installation, or you can change your default repository.
To change the module repository for a single module installation, specify the base URL of the repository on the
command line with the --module_repository option. For example:
puppet module install --module_repository http://dev-forge.example.com
puppetlabs-apache
To change the default module repository, edit the module_repository setting in the puppet.conf to the
base URL of the repository you want to use. The default value for the module_repository is the Forge URL,
https://forgeapi.puppetlabs.com. See the module_repository setting in the puppet.conf
configuration documentation.
Installing from a release tarball
To install a module from a release tarball, specify the path to the tarball instead of the module name.
If you cannot connect to the Forge, or you are installing modules that have not yet been published to the Forge, use
the --ignore-dependencies option and manually install any dependencies. For example:
puppet module install ~/puppetlabs-apache-0.10.0.tar.gz --ignore-
dependencies
Installing and upgrading Puppet Enterprise-only modules
Some Puppet modules are available only to PE users. Generally, you manage these modules in the same way you
would manage other modules. You can use these modules with licensed PE nodes, a PE 10-node trial license, or with
Bolt for a limited evaluation period. See your module's license for complete details.
Install modules on nodes without internet
To manually install a module on a node with no internet, download the module on a connected machine, and then
move a module package to the unconnected node. If the module is a PE-only module, the download machine must
have a valid PE license.
Before you begin
Make sure you have PDK installed. You'll use PDK to build a module package that you can move to your
unconnected node. For installation instructions, see the PDK install docs.
© 2024 Puppet, Inc., a Perforce company

Puppet | Developing modules | 1108
Tip: On machines with no internet access, you must install any module dependencies manually. Check your
dependencies at the beginning of this process, so that you can move all of the necessary modules to the unconnected
node at one time.
1.
On a node with internet access, run puppet module install puppetlabs-<MODULE>
2.
Change into the module's directory by running cd <MODULE_NAME>
3.
Build a package from the installed module by running pdk build
4.
Move the *.tar.gz to the machine on which you want to install the module.
5.
Install the tar.gz package with the puppet module install command. For example:
puppet module install puppetlabs-pe_module-0.1.0.tar.gz
6.
Manually install the module's dependencies. Without internet access, puppet module install cannot
install dependencies automatically.
Uninstalling modules
Completely remove installed modules with the puppet module uninstall command.
This command uninstalls modules from the modulepath specified in the puppet.conf file. To remove a module,
run the uninstall command with the full name of the module. For example:
puppet module uninstall puppetlabs-apache
By default, the command exits and returns an error if you try to uninstall a module that other modules depend on or
if the module's files have been modified after it was installed. You can forcibly uninstall dependencies or changed
modules with command line options.
For example, to uninstall a module that other modules depend on, run:
puppet module uninstall --force
See the puppet module command reference for a complete list of options.
puppet module command reference
The puppet module command manages modules with several actions and options.
puppet module actions
Action Description Arguments Example
build Deprecated. Prepares a
local module for release
on the Forge by building
a ready-to-upload archive
file. Will be removed in a
future release; use Puppet
Development Kit instead.
A valid directory path to a
module.
puppet module
build modules/
apache
changes Compares the files on disk
to the md5 checksums and
returns an array of paths of
modified files.
A valid directory path to a
module.
puppet module
changes /etc/code/
modules/stdlib
install Installs a module. The full name
<username-
module_name> of the
module to uninstall.
puppet module
install
puppetlabs-apache
© 2024 Puppet, Inc., a Perforce company

Puppet | Developing modules | 1109
Action Description Arguments Example
list Lists the modules installed
in the modulepath specified
in the [main] block in the
puppet.conf file.
None. puppet module list
search Deprecated. Visit the
Forge to search for
modules. This command
searched the Forge for
modules matching search
values.
Deprecated. Deprecated
uninstall Uninstalls a module. The full name
<username-
module_name> of the
module to uninstall.
puppet module
uninstall
puppetlabs-apache
upgrade Upgrades a module to the
most recent release or to
the specified version. Does
not upgrade dependencies.
The full name
<username-
module_name> of the
module to upgrade.
puppet module
upgrade
puppetlabs-apache
--version 0.0.3
puppet module install action
Installs a module from the Forge or another specified release archive.
Usage:
puppet module install [--debug] [--environment] [--force | -f] [--ignore-
dependencies]
[--module_repository <REPOSITORY_URL>] [--strict-semver]
[--target-dir <DIRECTORY/PATH> | -i <DIRECTORY/PATH>] [--version <x.x.x> |
-v <x.x.x>]
<full_module_name>
For example:
puppet module install --environment testing --ignore-dependencies
--version 1.0.0-pre1 --strict-semver false puppetlabs-apache
Option Description Value Default
--debug, -d Displays additional
information about what
the puppet module
command is doing.
None. If not specified, additional
information is not
displayed.
--environment Installs the module into the
specified environment.
An environment name. By default, installs the
module into the default
environment specified in
the puppet.conf file.
© 2024 Puppet, Inc., a Perforce company

Puppet | Developing modules | 1110
Option Description Value Default
--force, -f Installs the module
regardless of dependency
tree, checksum changes,
or whether the module
is already installed. By
default, installs the module
in the default modulepath,
even if the module is
already installed in another
directory. Does not install
dependencies.
None. If not specified, puppet
module install exits
and returns information if
it encounters installation
errors or conflicts.
--ignore-
dependencies
Does not install any
modules required by this
module.
None. If not specified, the
puppet module
install action installs
the module and its
dependencies.
--
module_repository
Specifies a module
repository.
A valid URL for a module
repository.
If not specified, installs
modules from the module
repository specified in from
the puppet.conf file.
By default, this is the URL
for the Forge.
--strict-semver Whether to exclude pre-
release versions. A value of
false allows installation of
pre-release versions.
true, false Defaults to true,
excluding pre-release
versions.
--target-dir, -i Specifies a directory to
install modules.
A valid directory path. By default, installs
modules into $codedir/
environments/
production/modules
--version, -v Specifies the module
version to install.
A semantic version
number, such as 1.2.1
or a string specifying
a requirement, such as
">=1.0.3".
If not specified, installs
the most recent version
available on the Forge.
puppet module list action
Lists the Puppet modules installed in the modulepath specified in the puppet.conf file's [main] block. Use the
--modulepath option to change which directories are scanned.
Usage:
puppet module list [--tree] [--strict-semver]
For example:
puppet module list --tree --modulepath etc/testing/modules
© 2024 Puppet, Inc., a Perforce company

Puppet | Developing modules | 1111
Option Description Value Default
--modulepath Specifies another
modulepath to scan for
modules.
A valid directory path. By default, scans the
default modulepath from
the [main] block in the
puppet.conf file.
--strict-semver Whether to exclude pre-
release versions. A value of
false allows uninstallation
of pre-release versions.
true, false Defaults to true,
excluding pre-release
versions.
--tree Displays the module
list as a tree showing
dependencies.
None. By default, puppet
module list lists
installed modules but does
not show dependency
relationships.
puppet module uninstall action
Uninstalls a module from the default modulepath.
Usage:
puppet module uninstall [--force | -f] [--ignore-changes | -c] [--strict-
semver] [--version=] <full_module_name>
For example:
puppet module uninstall --ignore-changes --version 0.0.2 puppetlabs-apache
Option Description Value Default
--force, -f Uninstalls the module
regardless of dependency
tree or checksum changes.
None. By default, puppet
module uninstall
exits and returns an error
if it encounters changes,
namespace errors, or
dependencies.
--ignore-changes Does not use the checksum
and uninstalls regardless of
modified files.
None. By default, if the puppet
module uninstall
action finds modified files
in the module, it exits and
returns an error.
--strict-semver Whether to exclude pre-
release versions. A value of
false allows uninstallation
of pre-release versions.
true, false Defaults to true,
excluding pre-release
versions.
--version, -v Specifies the module
version to uninstall.
A semantic version
number, such as 1.2.1
or a string specifying
a requirement, such as
">=1.0.3"..
By default, puppet
module uninstall
uninstalls the version
installed in the modulepath.
© 2024 Puppet, Inc., a Perforce company

Puppet | Developing modules | 1112
puppet module upgrade action
This command upgrades modules to the most recent released version of the module. This includes upgrades to the
most recent major version.
Usage:
puppet module upgrade [--force | -f] [--ignore-changes | -c] [--ignore-
dependencies]
[--strict-semver] [--version=] <full_module_name>
For example:
puppet module upgrade --force --version 2.1.2 puppetlabs-apache
Option Description Value Default
--force, -f Upgrades the module
regardless of dependency
tree or checksum changes.
None. By default, puppet
module upgrade exits
and returns an error if
it encounters changes,
namespace errors, or
dependencies.
--ignore-changes Does not use the checksum
and upgrades regardless of
modified files.
None. By default, if the puppet
module upgrade action
finds modified files in the
module, it exits and returns
an error.
--ignore-
dependencies
Does not attempt to install
any missing modules
required by this module.
None. If not specified, the
puppet module
upgrade action
installs missing module
dependencies.
--strict-semver Whether version ranges
must exclude pre-release
versions.
true, false Defaults to true,
excluding pre-release
versions.
--version, -v Specifies the module
version to uninstall.
A semantic version
number, such as 1.2.1
or a string specifying
a requirement, such as
">=1.0.3".
By default, puppet
module uninstall
uninstalls the version
installed in the modulepath.
PE-only module troubleshooting
If you get an error when installing a PE-only module, check for common issues.
When installing or upgrading a PE-only module, you might get the following error:
Error: Request to Puppet Forge failed.
The server being queried was https://forgeapi.puppetlabs.com/v3/releases?
module=puppetlabs-f5&module_groups=base+pe_only
The HTTP response we received was '403 Forbidden'
The message we received said 'You must have a valid Puppet Enterprise
license on this
node in order to download puppetlabs-f5. If you have a Puppet Enterprise
license,
please see https://docs.puppetlabs.com/pe/latest/
modules_installing.html#puppet-enterprise-modules
© 2024 Puppet, Inc., a Perforce company

Puppet | Developing modules | 1113
for more information.'
If you aren't a PE user, you won't be able to use this module unless you purchase a PE license. If you are a PE user,
check the following:
1.
Are you logged in as the root user? If not, log in as root and try again.
2.
Does the node you're on have a valid PE license? If not, switch to a node that has a valid license on it.
3.
Are you running a version of PE that supports this module? If not, you might need to upgrade.
4.
Does the node you are installing on have access to the internet? If not, switch to a node that has access to the
internet.
Beginner's guide to writing modules
Create great Puppet modules by following best practices and guidelines.
This guide is intended to provide an approachable introduction to module best practices. Before you begin, we
recommend that you are familiar enough with Puppet that you have a basic understanding of the language, you know
what constitutes a class, and you understand the basic module structure.
Defining your module
Before you begin writing your module, define what it will do. Defining the range of your module's work helps you
create concise modules that are easy to work with. A good module has only one area of responsibility. For example,
the module addresses installing MySQL, but it doesn't install other programs or services that require MySQL.
Ideally, a module manages a single piece of software from installation through setup, configuration, and service
management. When you plan your module, consider what task your module will accomplish and what functions it
requires in your Puppet environment. Many users have 200 or more modules in an environment, so simple is better.
For more complex needs, create multiple modules. Having many small, focused modules promotes code reuse and
turns modules into building blocks.
For example, the puppetlabs-puppetdb module deals solely with the the setup, configuration, and management
of PuppetDB. However, PuppetDB stores its data in a PostgreSQL database. Instead of trying to manage PostgreSQL
with the puppetdb module, we included the puppetlabs-postgresql module as a dependency. This way, the
puppetdb module can use the postgresql module's classes and resources to build out the right configuration.
Class design
A good module is made up of small, self-contained classes that each do only one thing. Classes within a module are
similar to functions in programming, using parameters to perform related steps that create a coherent whole.
In general, files must have the same named as the class or definition that it contains, and classes must be named after
their function. The one exception to this rule is the main class of a module, which is defined in the init.pp file, but
is called by the same name as the module. Generally, a module includes:
• The <MODULE> class: The main class of the module shares the name of the module and is defined in the
init.pp file.
• The install class: Contains all of the resources related to installing the software that the module manages.
• The config class: Contains resources related to configuring the installed software.
• The service class: Contains service resources, as well as anything else related to the running state of the
software.
For more information and an example of this structure and the code contained in classes, see the topic about module
classes.
Parameters
Parameters form the public API of your module. They are the most important interface you expose, so be sure to
balance to the number and variety of parameters so that users can customize their interactions with the module.
© 2024 Puppet, Inc., a Perforce company

Puppet | Developing modules | 1114
Name your parameters in a consistent thing_property pattern, such as package_ensure. Consistency in
names helps users understand your parameters and aids in troubleshooting and collaborative development. If you
have a parameter that manages the entire installation of a package, you can use the package_manage convention.
The package_manage pattern allows you to wrap all of the resources in an if $package_manage {} test, as
shown in this ntp example:
class ntp::install {
if $ntp::package_manage {
package { $ntp::package_name:
ensure => $ntp::package_ensure,
}
}
}
To make sure users can customize your module as needed, add parameters. Do not hardcode data in your module,
because this makes it inflexible and harder to use in even slightly different circumstances. For the same reason, avoid
adding parameters that allow users to override templates. When you allow template overrides, users can override your
template with a custom template containing additional hardcoded parameters. Instead, it's better to add flexible, user
configurable parameters as needed.
For an example of a module that offers many parameters to increase flexibility, see the puppetlabs-apache module.
Ordering
Base all order-related dependencies (such as require and before) on classes rather than resources. Class-
based ordering allows you to isolate the implementation details of each class. For example, rather than specifiying
require for several packages, you can use one class dependency. This allows you to make adjustments to the
module::install class only, instead of adjusting multiple class manifests:
file { 'configuration':
ensure => present,
require => Class['module::install'],
}
Containment
Ensure that your main classes explicitly contain any subordinate classes they declare. Classes do not automatically
contain the classes they declare, because classes can be declared in several places via include and similar
functions. If your classes contain the subordinate classes, it makes it easier for other modules to form ordering
relationships with your module.
To contain classes, use the contain function. For example, the puppetlabs-ntp module uses containment in
the main ntp class:
contain ntp::install
contain ntp::config
contain ntp::service
Class['ntp::install']
-> Class['ntp::config']
~> Class['ntp::service']
For more information about containment, see the containment documentation.
Dependencies
If your module's functionality depends on another module, list these dependencies in the module and include them
directly in the module's main class with an include statement. This ensures that the dependency is included in the
© 2024 Puppet, Inc., a Perforce company
Puppet | Developing modules | 1115
catalog. List the dependency to the module's metadata.json file and the .fixtures.yml file used for RSpec
unit testing.
Testing modules
Test your module to make sure that it works in a variety of conditions and that its options and parameters work
together. PDK includes tools for validating and running unit tests on your module, including RSpec, RSpec Puppet,
and Puppet Spec Helper.
Write unit tests to verify that your module works as intended in a variety of circumstances. For example, to ensure
that the module works in different operating systems, write tests that call the osfamily fact to verify that the
package and service exist in the catalog for each operating system your module supports.
To learn more about how to write unit tests, see the RSpec testing tutorial. For more information on testing tools, see
the tools list below.
rspec-puppet
Extends the RSpec testing framework to understand and work with Puppet catalogs, the artifact it specializes in
testing. This allows you to write tests that verify that your module works as intended. This tool is included in
PDK.
For example, you can call facts, such as osfamily, with RSpec, iterating over a list of operating systems to
make sure that the package and service exist in the catalog for every operating system your module supports.
To learn more about rspec-puppet use and unit testing, see the rspec-puppet page.
puppetlabs_spec_helper
Automates some of the tasks required to test modules. This is especially useful in conjunction with rspec-
puppet, because puppetlabs_spec_helper provides default Rake tasks that allow you to standardize
testing across modules. It also provides some code to connect rspec-puppet with modules. This tool is
included in PDK.
To learn more, see the puppetlabs_spec_helper project.
litmus
Allows you to provision test platforms such as containers/images, install a Puppet agent, install a module and run
tests against your systems. For more information, see the puppet_litmus documentation.
Documenting your module
Document your module's use cases, usage examples, and parameter details with README.md and REFERENCE.md
files. In the README, explain why and how users would use your module, and provide usage examples. Use Puppet
Strings to create the REFERENCE, which is a detailed list of information about your module's classes, defined types,
functions, tasks, task plans, and resource types and providers. For more about writing your README and creating the
REFERENCE, see our module documentation guide and the Strings documentation.
Versioning your module
Whenever you make changes to your module, update the version number. Version your module semantically to help
users understand the level of changes in your updated module. To learn more about the specific rules of semantic
versioning, see the semantic versioning specification.
After you've decided on the new version number, adjust the version number in the metadata.json file. This
allows you to create a list of dependencies in the `metadata.json` file of your modules with specific versions of
dependent modules, which ensures your module isn't used with an old dependency that won't work. Versioning also
enables workflow management by allowing you to easily use different versions of modules in different environments.
© 2024 Puppet, Inc., a Perforce company

Puppet | Developing modules | 1116
Releasing your module
Publish your modules on the Forge to share your modules with other Puppet users. Sharing modules allows other
users to not only download and use your module to solve their infrastructure problems, but also to contribute their
own improvements to your modules. Sharing modules fosters community among Puppet users, and helps improve
the quality of modules available to everyone. To learn how to publish your modules to the Forge, see the module
publishing documentation.
Module classes
A typical module contains a main module class, as well as classes for managing installation, configuration, and the
running state of the managed software. The puppetlabs-ntp module provides examples of the classes in such a
module structure.
module
The main class of any module shares the name of the module, but the file itself is named init.pp. This class is
the module's main interface point with Puppet. If possible, make the main class the only parameterized class in your
module. Limiting the parameterized classes to only the main class means that you only have to include a single
class to control usage of the entire module. This class provides sensible defaults so that a user can get going by just
declaring the main class with include module.
For instance, the main ntp class in the puppetlabs-ntp module is the only parameterized class in the module:
class ntp (
Boolean $broadcastclient,
Stdlib::Absolutepath $config,
Optional[Stdlib::Absolutepath] $config_dir,
String $config_file_mode,
Optional[String] $config_epp,
Optional[String] $config_template,
Boolean $disable_auth,
Boolean $disable_dhclient,
Boolean $disable_kernel,
Boolean $disable_monitor,
Optional[Array[String]] $fudge,
Stdlib::Absolutepath $driftfile,
...
module::install
The install class must be located in the install.pp file. It contains all of the resources related to getting the
software that the module manages onto the node. The install class must be named module::install. In the
puppetlabs-ntp module, this class is private, which means users do not interact with the class directly.
class ntp::install {
if $ntp::package_manage {
package { $ntp::package_name:
ensure => $ntp::package_ensure,
}
}
}
module::config
Place the resources related to configuring the installed software in a config class. The config class must be named
module::config and must be located in the config.pp file. In the puppetlabs-ntp module, this class is
private, which means users do not interact with the class directly.
class ntp::config {
© 2024 Puppet, Inc., a Perforce company

Puppet | Developing modules | 1117
# The servers-netconfig file overrides NTP config on SLES 12, interfering
with our configuration.
if $facts['operatingsystem'] == 'SLES' and
$facts['operatingsystemmajrelease'] == '12' {
file { '/var/run/ntp/servers-netconfig':
ensure => 'absent'
}
}
if $ntp::keys_enable {
case $ntp::config_dir {
'/', '/etc', undef: {}
default: {
file { $ntp::config_dir:
ensure => directory,
owner => 0,
group => 0,
mode => '0775',
recurse => false,
}
}
}
file { $ntp::keys_file:
ensure => file,
owner => 0,
group => 0,
mode => '0644',
content => epp('ntp/keys.epp'),
}
}
...
module::service
Put the remaining service resources, and anything else related to the running state of the software in the service
class. The service class must be named module::service and must be located in the service.pp file. In the
puppetlabs-ntp module, this class is private, which means users do not interact with the class directly.
class ntp::service {
if ! ($ntp::service_ensure in [ 'running', 'stopped' ]) {
fail('service_ensure parameter must be running or stopped')
}
if $ntp::service_manage == true {
service { 'ntp':
ensure => $ntp::service_ensure,
enable => $ntp::service_enable,
name => $ntp::service_name,
provider => $ntp::service_provider,
hasstatus => true,
hasrestart => true,
}
}
}
© 2024 Puppet, Inc., a Perforce company

Puppet | Developing modules | 1118
Module metadata
When you author a module, it must contain certain metadata in a metadata.json file, which contains important
information that Puppet, the Forge, and your module's users rely on.
The metadata.json file is located in the module's main directory, outside any subdirectories. If you created
your module with Puppet Development Kit (PDK), the metadata.json file is already created and contains the
information you provided during the module creation interview. If you skipped the interview, the module metadata is
populated with PDK default values. You can manually edit the values in the metadata.json file as needed.
The Forge requires modules to contain the metadata.json file. The Forge uses the metadata to create
the module's information page and to provide important information to users installing the module. The
metadata.json file uses standard JSON syntax and contains a single JSON object, mapping keys to values.
metadata.json example
{
"name": "puppetlabs-ntp",
"version": "10.1.0",
"author": "puppetlabs",
"summary": "Installs, configures, and manages the NTP service.",
"license": "Apache-2.0",
"source": "https://github.com/puppetlabs/puppetlabs-ntp",
"project_page": "https://github.com/puppetlabs/puppetlabs-ntp",
"issues_url": "https://github.com/puppetlabs/puppetlabs-ntp/issues",
"dependencies": [
{
"name": "puppetlabs/stdlib",
"version_requirement": ">= 4.13.1 < 10.0.0"
}
],
"operatingsystem_support": [
{
"operatingsystem": "RedHat",
"operatingsystemrelease": [
"7"
]
},
{
"operatingsystem": "CentOS",
"operatingsystemrelease": [
"7"
]
},
{
"operatingsystem": "OracleLinux",
"operatingsystemrelease": [
"7"
]
},
{
"operatingsystem": "Scientific",
"operatingsystemrelease": [
"7"
]
},
{
"operatingsystem": "SLES",
"operatingsystemrelease": [
"12",
"15"
]
},
{
© 2024 Puppet, Inc., a Perforce company

Puppet | Developing modules | 1119
"operatingsystem": "Debian",
"operatingsystemrelease": [
"10",
"11"
]
},
{
"operatingsystem": "Ubuntu",
"operatingsystemrelease": [
"18.04",
"20.04",
"22.04"
]
},
{
"operatingsystem": "Solaris",
"operatingsystemrelease": [
"11"
]
},
{
"operatingsystem": "AIX",
"operatingsystemrelease": [
"7.1"
]
}
],
"requirements": [
{
"name": "puppet",
"version_requirement": ">= 7.0.0 < 9.0.0"
}
],
"description": "NTP Module for Debian, Ubuntu, CentOS, RHEL, OEL, Fedora,
FreeBSD, ArchLinux, Amazon Linux and Gentoo.",
"template-url": "https://github.com/puppetlabs/pdk-templates.git#main",
"template-ref": "heads/main-0-g4fb29e7",
"pdk-version": "3.0.0"
}
Specifying dependencies
If your module depends on functionality from another module, specify this in the "dependencies" key of the
metadata.json file. The "dependencies" key accepts an array of hashes. This key is required, but if your
module has no dependencies, you can pass an empty array.
Dependencies are not added to the metadata during module creation, so you must edit your metadata.json file
to include dependency information. For information about how to format dependency versions, see the related topic
about version specifiers in module metadata.
The hash for each dependency must contain the "name" and "version_requirement" keys. For example:
"dependencies": [
{ "name": "puppetlabs/stdlib", "version_requirement": ">= 3.2.0 <
5.0.0" },
{ "name": "puppetlabs/firewall", "version_requirement": ">= 0.0.4" },
{ "name": "puppetlabs/apt", "version_requirement": ">= 1.1.0 < 2.0.0" },
{ "name": "puppetlabs/concat", "version_requirement": ">= 1.0.0 < 2.0.0" }
]
© 2024 Puppet, Inc., a Perforce company

Puppet | Developing modules | 1120
When installing modules with the puppet module install command, Puppet installs any missing
dependencies. When installing modules with Code Manager and the Puppetfile, dependencies are not automatically
installed, so they must be explicitly specified in the Puppetfile.
Specifying Puppet version requirements
The requirements key specifies external requirements for the module, particularly the Puppet version required.
Although you can express any requirement here, the Forge module pages and search function support only the
"puppet" value, which specifies the Puppet version.
The "requirements" key accepts an array of hashes with the following keys:
• "name": The name of the requirement.
• "version_requirement": A semantic version range, including lower and upper version bounds.
For example, this key specifies that the module works with any Puppet version of 5.5.0 or greater, but not with Puppet
6 or later:
"requirements": [
{"name": "puppet”, “version_requirement”: ">= 5.5.0 < 6.0.0"}
]
Important: The Forge requires both lower and upper bounds for the Puppet version requirement. If you upload a
module that does not specify an upper bound, the Forge adds an upper bound of the next major version. For example,
if you upload a module that specifies a lower bound of 5.5.0 and no upper bound, the Forge applies an upper bound of
< 6.0.0 .
For Puppet Enterprise versions, specify the core Puppet version included in that version of PE. For example, PE
2017.1 contained Puppet 4.9. Do not express requirements for Puppet versions earlier than 3.0, because those versions
do not follow semantic versioning. For information about formatting version requirements, see the related topic about
version specifiers in module metadata.
Specifying operating system compatibility
Specify the operating system your module is compatible with in the operatingsystem_support key. This key
accepts an array of hashes, where each hash contains operatingsystem and operatingsystemrelease
keys. The Forge uses these keys for search filtering and to display versions on module pages.
• The operatingsystem key accepts a string. The Forge uses this value for search filters.
• The operatingsystemrelease accepts an array of strings. The Forge displays these versions on module
pages, and you can format them in whatever way makes sense for the operating system in question.
For example:
"operatingsystem_support": [
{
"operatingsystem":"RedHat",
"operatingsystemrelease":[ "5.0", "6.0" ]
},
{
"operatingsystem": "Ubuntu",
"operatingsystemrelease": [
"12.04",
"10.04"
]
}
]
© 2024 Puppet, Inc., a Perforce company
Puppet | Developing modules | 1121
Specifying versions
Your module metadata specifies your own module's version as well as the versions for your module's dependencies
and requirements. Version your module semantically; for details about semantic versioning (also known as SemVer),
see the Semantic Versioning specification. This helps others know what to expect from your module when you make
changes.
When you specify versions for a module dependencies or requirements, you can specify multiple versions.
If your module is compatible with only one major or minor version, use the semantic major and minor version
shorthand, such as 1.x or 1.2.1. If your module is compatible with multiple major versions, you can set a supported
version range.
For example, 1.x indicates that your module is compatible with any minor update of version 1, but is not compatible
with version 2 or larger. Specifying a version range such as >= 1.0.0 < 3.0.0 indicates the the module is compatible
with any version that greater than or equal to 1.0.0 and less than 3.0.0.
Always set an upper version boundary in your version range. If your module is compatible with the most recent
released versions of a dependencies, set the upper bound to exclude the next, unreleased major version. Without this
upper bound, users might run into compatibility issues across major version boundaries, where incompatible changes
occur.
For example, to accept minor updates to a dependency but avoid breaking changes, specify a major version. This
example accepts any minor version of puppetlabs-stdlib version 4:
"dependencies": [
{ "name": "puppetlabs/stdlib", "version_requirement": "4.x" },
]
In the example below, the current version of puppetlabs-stdlib is 4.8.0, and version 5.0.0 is not yet released.
Because 5.0.0 might have breaking changes, the upper bound of the version dependency is set to that major version.
"dependencies": [
{ "name": "puppetlabs/stdlib", "version_requirement": ">= 3.2.0 < 5.0.0" }
]
The version specifiers allowed in module dependencies are:
Format Description
1.2.3 A specific version.
1.x A semantic major version. This example includes 1.0.1
but not 2.0.1.
1.2.x A semantic major and minor version. This example
includes 1.2.3 but not 1.3.0.
> 1.2.3 Greater than the specified version.
< 1.2.3 Less than the specified version.
>= 1.2.3 Greater than or equal to the specified version.
<= 1.2.3 Less than or equal to the specified version.
>= 1.0.0 < 2.0.0 Range of versions; both conditions must be satisfied.
This example includes version 1.0.1 but not version
2.0.1.
Note: You cannot mix semantic versioning shorthand (such as .x) with syntax for greater than or less than
versioning. For example, you could not specify ">= 3.2.x < 4.x"
© 2024 Puppet, Inc., a Perforce company

Puppet | Developing modules | 1122
Note: Specification of minor versions is for semantic purposes only. Underlying tools, such as facterdb and rspec,
only recognize major versions.
Adding tags
Optionally, you can add tags to your metadata to help users find your module in Forge searches. Generally, include
four to six tags for any given module.
Pass tags as an array, like ["msyql", "database", "monitoring"].Tags cannot contain whitespace.
Certain tags are prohibited, such as profanity or tags resembling the $::operatingsystem fact (such as
"redhat", "rhel", "debian", " windows", or "osx"). Use of prohibited tags lowers your module's quality
score on the Forge.
Available metadata.json keys
Required and optional metadata.json keys specify metadata for your module.
Key Required? Value Example
"name" Required. The full name of your
module, including your
Forge username, in the
format username-
module.
"puppetlabs-
stdlib"
"version" Required. The current version of your
module. This must follow
semantic versioning. For
details, see the Semantic
Versioning specification.
"1.2.1"
"author" Required. The person who gets credit
for creating the module. If
absent, this key defaults to
the username portion of the
name key.
"puppetlabs"
"license" Required. The license under which
your module is made
available. License metadata
must match an identifier
provided by SPDX. For a
complete list, see the SPDX
license list.
"Apache-2.0"
"summary" Required. A one-line description of
your module.
"Standard library
of resources for
Puppet modules."
© 2024 Puppet, Inc., a Perforce company

Puppet | Developing modules | 1123
Key Required? Value Example
"source" Required. The source repository for
your module.
"https://
github.com/
puppetlabs/
puppetlabs-stdlib"
"dependencies" Required. An array of other
modules that your module
depends on to function.
If the module has no
dependencies, pass an
empty array. See the related
topic about specifying
dependencies for more
details.
"dependencies":
[
{
"name":
"puppetlabs/
stdlib",
"version_requirement":
">= 4.13.1 <
6.0.0"
}
],
"requirements" Optional. A list of external
requirements for your
module, given as an array
of hashes.
"requirements":
[
{
"name":
"puppet",
"version_requirement":
">= 4.7.0 <
6.0.0"
}
],
"project_page" Optional. A link to your module's
website, to be included on
the module's Forge page.
"https://
github.com/
puppetlabs/
puppetlabs-stdlib"
"issues_url" Optional. A link to your module's
issue tracker.
"https://
tickets.puppetlabs.com/
browse/MODULES"
"operatingsystem_support"Optional. An array of hashes listing
the operating systems that
your module is compatible
with. See the topic about
specifying operating
compatibility for details.
{
"operatingsystem":
"RedHat",
"operatingsystemrelease":
[
"5",
"6",
"7"
]
}
"tags" Optional. An array of four to six key
words to help people find
your module.
["msyql",
"database",
"monitoring",
"reporting"]
© 2024 Puppet, Inc., a Perforce company

Puppet | Developing modules | 1124
Documenting modules
Document any module you write, whether your module is for internal use only or for publication on the Forge.
Complete, clear documentation helps your module users understand what your module can do and how to use it.
Write your module usage documentation in Markdown, in a README based on our module README template. Use
Puppet Strings to generate reference information for your module's classes, defined types, functions, tasks, task plans,
and resource types and providers.
Use clear and consistent language in your Module documentation. It should be easy to read both on the web and in the
terminal. Whether you are writing your README or code comments for Puppet Strings docs generation, following
some basic formatting guidelines and best writing practices can help make your module documentation great.
Documentation best practices
If you want your documentation to really shine, a few best practices can help make your documentation clear and
readable.
• Use the second person; that is, write directly to the person reading your document. For example, “If you’re
installing the cat module on Windows....”
• Use the imperative; that is, directly tell the user what they must do. For example, "Secure your dog door before
installing the cat module."
• Use the active voice whenever possible. For example, "Install the cat and bird modules on separate instances"
rather than "The cat and bird modules should be installed on separate instances."
• Use the present tense, almost always. Events that regularly occur should be present tense: "This parameter
sets your cat to 'purebred'. The purebred cat alerts you for breakfast at 6 a.m." Use future tense only when you
are specifically referring to something that takes place at a time in the future, such as "The `tail` parameter is
deprecated and will be removed in a future version. Use `manx` instead."
• Avoid subjective words. For example, don't write "It's quick and easy to teach an old cat new tricks." Subjective
words like "quick" and "easy" can frustrate and even alienate a reader who finds teaching a cat difficult or time-
consuming.
• Lists, whether ordered or unordered, make things clearer for the reader. When you're writing about steps
that happen in a sequence, use an ordered list (1, 2, 3…). If order doesn’t matter, like in a list of options or
requirements, use an unordered (bulleted) list.
Related information
Documenting modules with Puppet Strings on page 1128
Produce complete, user-friendly module documentation by using Puppet Strings. Strings uses tags and code
comments, along with the source code, to generate documentation for a module's classes, defined types, functions,
tasks, plans, and resource types and providers.
Puppet Strings style guide on page 1135
To document your module with Puppet Strings, add descriptive tags and comments to your module code. Write
consistent, clear code comments, and include at least basic information about each element of your module (such as
classes or defined types).
Writing the module README
In your README, include basic module information and extended usage examples for the most common use cases.
Your README tells users what your module does and how they can use it. Include reference information as a
separate REFERENCE.md file in the module's root directory.
Important: The Reference section of the README is deprecated.Puppet Strings generates a REFERENCE.md file
containing all the reference information for your module, including a complete list of your module's classes, defined
types, functions, resource types and providers, Puppet tasks and plans, along with parameters for each. See the topic
about creating reference documentation for details.
Write your README in Markdown and use the .md or .markdown extension for the file. If you used Puppet
Development Kit (PDK), you already have a copy of the README template in .md format in your module. For more
information about Markdown usage, see the Commonmark reference.
© 2024 Puppet, Inc., a Perforce company

Puppet | Developing modules | 1125
Use the following sections in your README:
Description
What the module does and why it is useful.
Setup
Prerequisites for module use and getting started information.
Usage
Instructions and examples for common use cases or advanced configuration options.
Reference
If the module contains facts or type aliases, include them in a short supplementary reference section. All other
reference information, such as classes and their parameters, are in the REFERENCE.md file generated by Strings.
Limitations
OS compatibility and known issues.
Development
Guide for contributing to the module.
Table of contents
The table of contents helps your users find their way around your module README.
Start with the module name as a Level 1 heading at the top of the module, followed by "Table of Contents" as
a Level 4 heading. Under the table of contents heading, include a numbered list of top-level sections, with any
necessary subsections in a bulleted list below the section heading. Link each section to its corresponding heading in
the README.
# modulename
#### Table of Contents
1. [Module Description - What the module does and why it is useful](#module-
description)
1. [Setup - The basics of getting started with [modulename]](#setup)
* [What [modulename] affects](#what-[modulename]-affects)
* [Setup requirements](#setup-requirements)
* [Beginning with [modulename]](#beginning-with-[modulename])
1. [Usage - Configuration options and additional functionality](#usage)
1. [Limitations - OS compatibility, etc.](#limitations)
1. [Development - Guide for contributing to the module](#development)
Module description
In your module description, briefly tell users why they might want to use your module. Explain what your module
does and what kind of problems users can solve with it.
The short description helps the user decide if your module is what they want. What are the most common use cases
for your module? Does your module just install software? Does it install and configure it? Give your user information
about what to expect from the module.
## Module description
The `cat` module installs, configures, and maintains your cat in both
apartment and residential house settings.
The cat module automates the installation of a cat to your apartment or
house, and then provides options for configuring the cat to fit your
environment's needs. After it's installed and configured, the cat module
© 2024 Puppet, Inc., a Perforce company

Puppet | Developing modules | 1126
automates maintenance of your cat through a series of resource types and
providers.
Setup section
In the setup section, detail how your user can successfully get your module functioning. Include requirements, steps
to get started, and any other information users might need to know before they start using your module.
Module installation instructions are covered both on the module's Forge page and in the Puppet docs, so don't reiterate
them here. In this section, include the following subsections, as applicable:
What <modulename> affects
Include this section only if:
• The module alters, overwrites, or otherwise touches files, packages, services, or operations other than the
named software; OR
• The module's general performance can overwrite, purge, or otherwise remove entries, files, or directories in a
user's environment. For example:
## Setup
### What cat affects
* Your dog door might be overwritten if not secured before
installation.
Setup requiremements
Include this section only if the module requires additional software or some tweak to a user's environment. For
instance, the puppetlabs-firewall module uses Ruby-based providers which required pluginsync to
be enabled.
Beginning with <modulename>
Always include this section to explain the minimum steps required to get the module up and running in a user's
environment. You can use basic proof of concept use cases here; it doesn't have to be something you would run in
production. For simple modules, "Declare the main `::cat` class" is enough.
Usage section
Include examples for common use cases in the usage section. Provide usage information and code examples to show
your users how to use your module to solve problems.
If there are many use cases for your module, include three to five examples of the most important or common tasks
a user can accomplish. The usage section is a good place to include more complex examples that involve different
types, classes, and functions working together. For example, the usage section for the puppetlabs-apache
module includes an example for setting up a virtual host with SSL, which involves several classes.
## Usage
You can manage all interaction with your cat through the main `cat`
class. With the default options, the module installs a basic cat with no
optimizations.
### I just want cat, what's the minimum I need?
```
include '::cat'
```
### I want to configure my lasers
© 2024 Puppet, Inc., a Perforce company

Puppet | Developing modules | 1127
Use the following to configure your lasers for a random-pattern, 20-minute
playtime at 3 a.m. local time.
```
class { 'cat':
laser => {
pattern => 'random',
duration => '20',
start_time => '0300',
}
}
```
Limitations section
In the limitations section, list any incompatibilities, known issues, or other warnings.
## Limitations
This module cannot be used with the smallchild module.
Development section
In the development section, tell other users the ground rules for contributing to your project and explain how they
should submit their work.
Creating reference documentation
List reference information --- a complete list of classes, defined types, functions, resource types and providers, tasks,
and plans --- in a separate REFERENCE.md file in the root directory of your module.
Use Puppet Strings to generate this documentation based on your comments and module code. If you aren't yet using
Strings to generate documentation, you can manually create a REFERENCE.md file.
Tip: Previously, we recommended that module authors include reference information in the README itself.
However, the reference section often became quite long and difficult to maintain. Moving reference information to a
separate file keeps the README more readable, and using Strings to generate this file makes it easier to maintain.
The Forge displays information from a module's REFERENCE.md file in a reference tab on the module's detail page,
so the information remains easily accessible to users. To create a REFERENCE.md file for your module, add Strings
comments to the code for each of your classes, defined types, functions, task plans, and resource types and providers,
and then run Strings to generate documentation in Markdown. You can create a REFERENCE.md file manually, but
remember that if you then generate a REFERENCE.md with Strings, it overwrites any existing REFERENCE.md file.
For details on adding comments to your code, see the Strings style guide. For instructions on how to install and use
Strings, see the topics about Puppet Strings.
Manually writing reference documentation
If you aren't using Strings yet to generate your reference documentation, you can manually create a REFERENCE.md
file listing each of your classes, defined types, resource types and providers, functions, and facts, along with any
parameters.
To manually document reference information, start your reference document with a small table of contents that first
lists the classes, defined types, and resource types of your module. If your module contains both public and private
classes or defined types, list the public and the private separately. Include a brief description of what these items do in
your module.
## Reference
### Classes
© 2024 Puppet, Inc., a Perforce company

Puppet | Developing modules | 1128
#### Public classes
*[`pet::cat`](#petcat): Installs and configures a cat in your environment.
#### Private classes
*[`pet::cat::install`]: Handles the cat packages.
*[`pet::cat::configure`]: Handles the configuration file.
After this table of contents, list the parameters, providers, or features for each element (class, defined type, function,
and so on) of your module. Be sure to include valid or acceptable values and any defaults that apply. Each element in
this list must include:
• The data type, if applicable.
• A description of what the element does.
• Valid values, if the data type doesn't make it obvious.
• Default value, if any.
### `pet::cat`
#### Parameters
##### `purr`
Data type: Boolean.
Enables purring in your cat.
Default: `true`.
##### `meow`
Enables vocalization in your cat. Valid options: 'string'.
Default: 'medium-loud'.
#### `laser`
Specifies the type, duration, and timing of your cat's laser show.
Default: `undef`.
Valid options: A hash with the following keys:
* `pattern` - accepts 'random', 'line', or a string mapped to a custom
laser_program, defaults to 'random'.
* `duration` - accepts an integer in seconds, defaults to '5'.
* `frequency` - accepts an integer, defaults to 1.
* `start_time` - accepts an integer specifying the 24-hr formatted start
time for the program.
Documenting modules with Puppet Strings
Produce complete, user-friendly module documentation by using Puppet Strings. Strings uses tags and code
comments, along with the source code, to generate documentation for a module's classes, defined types, functions,
tasks, plans, and resource types and providers.
If you are a module author, add descriptive tags and comments with the code for each element (class, defined type,
function, or plan) in your module. Strings extracts information from the module's Puppet and Ruby code, such as
data types and attribute defaults. Whenever you update code, update your documentation comments at the same time.
© 2024 Puppet, Inc., a Perforce company

Puppet | Developing modules | 1129
Both module users and authors can generate module documentation with Strings. Even if the module contains no code
comments, Strings generates minimal documentation based on the information it can extract from the code.
Strings outputs documentation in HTML, JSON, or Markdown formats.
• HTML output, which you can read in any web browser, includes the module README and reference
documentation for all classes, defined types, functions, tasks, task plans, and resource types.
• JSON output includes the reference documentation only, and writes it to either STDOUT or to a file.
• Markdown output includes the reference documentation only, and writes the information to a REFERENCE.md
file.
Puppet Strings is based on the YARD Ruby documentation tool. To learn more about YARD, see the YARD
documentation.
Related information
Documenting modules on page 1124
Document any module you write, whether your module is for internal use only or for publication on the Forge.
Complete, clear documentation helps your module users understand what your module can do and how to use it.
Puppet Strings style guide on page 1135
To document your module with Puppet Strings, add descriptive tags and comments to your module code. Write
consistent, clear code comments, and include at least basic information about each element of your module (such as
classes or defined types).
Install Puppet Strings
Before you can generate module documentation, you must install the Puppet Strings gem.
Before you begin
Puppet Strings requires:
• Ruby 2.1.9 or newer.
• Puppet 4.0 or newer.
• The yard Ruby gem.
1.
If you don't have the yard gem installed yet, install it by running gem install yard
2.
Install the puppet-strings gem by running gem install puppet-strings
Generating documentation with strings
Generate documentation in HTML, JSON, or Markdown by running Puppet Strings.
Strings creates reference documentation based on the code and comments in all Puppet and Ruby source files in the
following module subdirectories:
• manifests/
• functions/
• lib/
• types/
• tasks/
• plans/
By default, Strings outputs HTML of the reference information and the module README to the module's doc/
directory. You can open and read the generated HTML documentation in any browser. If you specify JSON or
Markdown output, documentation includes the reference information only. Strings writes Markdown output to
a REFERENCE.md file and sends JSON output to STDOUT , but you can specify a custom file destination for
Markdown and JSON output.
Generate and view documentation in HTML
To generate HTML documentation for a Puppet module, run Strings from that module's directory.
1.
Change directory into the module by running cd /modules/<MODULE_NAME>
© 2024 Puppet, Inc., a Perforce company

Puppet | Developing modules | 1130
2.
Generate documentation with the puppet strings command:
a) To generate the documentation for the entire module, run puppet strings
b) To generate the documentation for specific files or directories in a module, run the puppet strings
generate subcommand, and specify the files or directories as a space-separated list.
For example:
puppet strings generate first.pp second.pp
puppet strings generate 'modules/apache/lib/**/*.rb' 'modules/apache/
manifests/**/*.pp' 'modules/apache/functions/**/*.pp'
Strings outputs HTML to the doc/ directory in the module. To view the generated HTML documentation for a
module, open the index.html file in the module's doc/ folder. To view HTML documentation for all of your
local modules, run puppet strings server from any directory. This command serves documentation for
all modules in the module path at http://localhost:8808. To learn more about the modulepath, see the
modulepath documentation.
Generate and view documentation in Markdown
To generate reference documentation in Markdown, specify the markdown format when you run Puppet Strings.
The reference documentation includes descriptions, usage details, and parameter information for classes, defined
types, functions, tasks, plans, and resource types and providers.
Strings generates Markdown output as a REFERENCE.md file in the main module directory, but you can specify a
different filename or location with command line options.
1.
Change directory into the module: cd /modules/<MODULE_NAME>
2.
Run the command: puppet strings generate --format markdown . To specify a different file, use
the --out option and specify the path and filename:
puppet strings generate --format markdown --out docs/INFO.md
View the Markdown file by opening it in a text editor or Markdown viewer.
Generate documentation in JSON
To generate reference documentation as JSON output to a file or to standard output, specify the json format when
you run Strings.
Generate JSON output if you want to use the documentation in a custom application that reads JSON. By default,
Strings prints JSON output to STDOUT. For details about Strings JSON output, see the Strings JSON schema.
1.
Change directory into the module: cd /modules/<MODULE_NAME>
2.
Run the command: puppet strings generate --format json . To generate JSON documentation to
a file instead, use the --out option and specify a filename:
puppet strings generate --format json --out documentation.json
Publish module documentation to GitHub Pages
To make your module documentation available on GitHub Pages, generate and publish HTML documentation with a
Strings Rake task.
The strings:gh_pages:update Rake task is available in the puppet-strings/tasks directory. This
Rake task keeps the gh-pages branch up to date with your current code, performing the following actions:
1.
Creates a doc directory in the root of your project, if it doesn't already exist.
2.
Creates a gh-pages branch of the current repository, if it doesn't already exist.
3.
Checks out the gh-pages branch of the current repository.
4.
Generates Strings HTML documentation.
© 2024 Puppet, Inc., a Perforce company

Puppet | Developing modules | 1131
5.
Commits the documentation file and pushes it to the gh-pages branch with the --force flag.
To learn more about publishing on GitHub Pages, see the GitHub Pages documentation.
1.
If this is the first time you are running this task, you must first update your Gemfile and Rakefile.
a) Add the following to your Gemfile to use puppet-strings: ruby gem 'puppet-strings'
b) Add the following to your Rakefile to use the puppet-strings tasks: ruby require 'puppet-
strings/tasks'
2.
To generate, push, and publish your module's Strings documentation, run strings:gh_pages:update
The documentation is published after the task pushes the updated documentation to GitHub Pages.
Puppet Strings command reference
Modify the behavior of Puppet Strings by specifying command actions and options.
puppet strings command
Generates module documentation based on code and code comments. By default, running puppet strings
generates HTML documentation for a module into a ./doc/ directory within that module.
To pass options or arguments, such as specifying Markdown or JSON output, use the generate action.
Usage:
puppet strings [--generate] [--server]
Action Description
generate Generates documentation with any specified parameters,
including format and output location.
server Serves documentation locally at http://
localhost:8808 for all modules in the modulepath.
For information about the modulepath, see the
modulepath documentation.
puppet strings generate action
Generates documentation with any specified parameters, including format and output location.
Usage:
puppet strings generate [--format <FORMAT>][--out <DESTINATION>]
[<ARGUMENTS>]
For example:
puppet strings generate --format markdown --out docs/info.md
puppet strings generate manifest1.pp manifest2.pp
Option Description Values Default
--format Specifies a format for
documentation.
Markdown, JSON If not specified, outputs
HTML documentation.
© 2024 Puppet, Inc., a Perforce company

Puppet | Developing modules | 1132
Option Description Values Default
--out Specifies an output location
for documentation.
A valid directory location
and filename.
If not specified, outputs to
default locations depending
on format:
• HTML: ./doc/
• Markdown: main
module directory)
• JSON: STDOUT
Filenames or directory
paths
Outputs documentation
for only specified files or
directories.
Valid filenames or
directory paths
If not specified, outputs
documentation for the
entire module.
--debug, -d Logs debug information. None. If not specified, does not
log debug information.
--help Displays help
documentation for the
command.
None. If specified, returns help
information.
--markup <FORMAT> The markup format to use
for documentation
• "markdown"
• "textile"
• "rdoc"
• "ruby"
• "text"
• "html"
• "none"
If no --format is
specified, outputs HTML.
--verbose, -v Logs verbosely. None. If not specified, logs basic
information.
puppet strings server action
Serves documentation locally at http://localhost:8808 for all modules in the module path.
Usage:
puppet strings server [--markup <FORMAT>][[module_name]...][--modulepath
<PATH>]
For example:
puppet strings server --modulepath path/to/modules
puppet strings server concat
© 2024 Puppet, Inc., a Perforce company

Puppet | Developing modules | 1133
Option Description Values Default
--markup <FORMAT> The markup format to use
for documentation
• "markdown"
• "textile"
• "rdoc"
• "ruby"
• "text"
• "html"
• "none"
If no --format is
specified, outputs HTML.
--debug, -d Logs debug information. None. If not specified, does not
log debug information.
--help Displays help
documentation for the
command.
None. If specified, returns help
information.
Module name Generates documentation
for the named module only.
A valid module name. If not specified, generates
documentation for all
modules in the modulepath.
--modulepath Puppet option for setting
the modulepath.
A valid path. Defaults to the module
path specified in the
puppet.conf file.
--verbose, -v Logs verbosely. None. If not specified, logs basic
information.
Available Strings tags
@author
List the author or authors of a class, module, or method.
# @author Foo Bar
class MyClass; end
@api
Describes the resource as belonging to the private or public API. To mark a module element, such as a class, as
private, specify as private:
# @api private
@example
Shows an example snippet of code for an object. The first line is an optional title, and any subsequent lines are
automatically formatted as a code snippet. Use for specific examples of a given component. Use one example tag
per example.
@param
Documents a parameter with a given name, type and optional description.
@!puppet.type.param
Documents dynamic type parameters. See the documenting resource types in the Strings style guide for detailed
information.
© 2024 Puppet, Inc., a Perforce company

Puppet | Developing modules | 1134
@!puppet.type.property
Documents dynamic type properties. See the documenting resource types in the Strings style guide for detailed
information.
@option
Used with a @param tag to defines what optional parameters the user can pass in an options hash to the method.
For example:
# @param [Hash] opts
# List of options
# @option opts [String] :option1
# option 1 in the hash
# @option opts [Array] :option2
# option 2 in the hash
@raise
Documents any exceptions that can be raised by the given component. For example:
# @raise PuppetError this error is raised if x
@return
Describes the return value (and type or types) of a method. You can list multiple return tags for a method if the
method has distinct return cases. In this case, begin each case with "if". For example:
# An example 4.x function.
Puppet::Functions.create_function(:example) do
# @param first The first parameter.
# @param second The second parameter.
# @return [String] If second argument is less than 10, the name of
one item.
# @return [Array] If second argument is greater than 10, a list of
item names.
# @example Calling the function.
# example('hi', 10)
dispatch :example do
param 'String', :first
param 'Integer', :second
end
# ...
end
@see
Adds "see also" references. Accepts URLs or other code objects with an optional description at the end. The
URL or object is automatically linked by YARD and does not need markup formatting. Appears in the generated
documentation as a "See Also" section. Use one tag per reference, such as a website or related method.
@since
Lists the version in which the object was first added. Strings does not verify that the specified version exists. You
are responsible for providing accurate information.
@summary
A description of the documented item, of 140 characters or fewer.
© 2024 Puppet, Inc., a Perforce company
Puppet | Developing modules | 1135
Puppet Strings style guide
To document your module with Puppet Strings, add descriptive tags and comments to your module code. Write
consistent, clear code comments, and include at least basic information about each element of your module (such as
classes or defined types).
Strings uses YARD-style tags and comments, along with the structure of the module code, to generate complete
reference information for your module. Whenever you update your code, update your documentation comments at the
same time.
This style guide applies to:
• Puppet Strings version 2.0 or later
• Puppet 4.0 or later
For information about the specific meaning of the terms 'must,' 'must not,' 'required,' 'should,' 'should not,'
'recommend,' 'may,' and 'optional,' see RFC 2119.
The module README
In your module README, include basic module information and extended usage examples for common use cases.
The README tells users what your module does and how to use it. Strings generates reference documentation, so
typically, there is no need to include a reference section in your README. Strings generates information for type
aliases or facts.
Include the following sections in the README:
Module description
What the module does and why it is useful.
Setup
Prerequisites for module use and getting started information.
Usage
Instructions and examples for common use cases or advanced configuration options.
Reference
Only if the module contains facts or type aliases, include a short Reference section. Other reference information
is handled by Strings, so don't repeat it in the README.
Limitations
Operating system compatibility and known issues.
Development
Guidelines for contributing to the module
Comment style guidelines
Strings documentation comments inside module code follow these rules and guidelines:
• Place an element's documentation comment immediately before the code for that element. Do not put a blank line
between the comment and its corresponding code.
• Each comment tag (such as @example) may have more than one line of comments. Indent additional lines with
two spaces.
• Keep each comment line to no more than 140 characters, to improve readability.
• Separate comment sections (such as @summary, @example, or the @param list) with a blank comment line
(that is, a # with no additional content), to improve readability.
• Untagged comments for a given element are output in an overview section that precedes all tagged information for
that code element.
• If an element, such as a class or parameter, is deprecated, indicate it in the description for that element with
Deprecated in bold.
© 2024 Puppet, Inc., a Perforce company

Puppet | Developing modules | 1136
Classes and defined types
Document each class and defined type, along with its parameters, with comments before the code. List the class and
defined type information in the following order:
1.
A @summary tag, a space, and then a summary describing the class or defined type.
2.
Other tags such as @see, @note, or @api private.
3.
Usage examples, each consisting of:
a.
An @example tag with a description of a usage example on the same line.
b.
A code example showing how the class or defined type is used. Place this example directly under the
@example tag and description, indented two spaces.
4.
One @param tag for each parameter in the class or defined type. See the parameters section for formatting
guidelines.
Parameters
Add parameter information as part of any class, defined type, or function that accepts parameters. Include the
parameter information in the following order:
1.
The @param tag, a space, and then the name of the parameter.
2.
A description of what the parameter does. This may be either on the same line as the @param tag or on the next
line, indented with two spaces.
3.
Additional information about valid values that is not clear from the data type. For example, if the data type is
[String], but the value must specifically be a path, say so here.
4.
Other information about the parameter, such as warnings or special behavior. For example:
# @param noselect_servers
# Specifies one or more peers to not sync with. Puppet appends
'noselect' to each matching item in the `servers` array.
Example class
# @summary configures the Apache PHP module
#
# @example Basic usage
# class { 'apache::mod::php':
# package_name => 'mod_php5',
# source => '/etc/php/custom_config.conf',
# php_version => '7',
# }
#
# @see http://php.net/manual/en/security.apache.php
#
# @param package_name
# Names the package that installs mod_php
# @param package_ensure
# Defines ensure for the PHP module package
# @param path
# Defines the path to the mod_php shared object (.so) file.
# @param extensions
# Defines an array of extensions to associate with PHP.
# @param content
# Adds arbitrary content to php.conf.
# @param template
# Defines the path to the php.conf template Puppet uses to generate the
configuration file.
# @param source
# Defines the path to the default configuration. Values include a
puppet:/// path.
© 2024 Puppet, Inc., a Perforce company

Puppet | Developing modules | 1137
# @param root_group
# Names a group with root access
# @param php_version
# Names the PHP version Apache is using.
#
class apache::mod::php (
$package_name = undef,
$package_ensure = 'present',
$path = undef,
Array $extensions = ['.php'],
$content = undef,
$template = 'apache/mod/php.conf.erb',
$source = undef,
$root_group = $::apache::params::root_group,
$php_version = $::apache::params::php_version,
)
{
…
}
Example defined type
# @summary
# Create and configure a MySQL database.
#
# @example Create a database
# mysql::db { 'mydb':
# user => 'myuser',
# password => 'mypass',
# host => 'localhost',
# grant => ['SELECT', 'UPDATE'],
# }
#
# @param name
# The name of the database to create. (dbname)
# @param user
# The user for the database you're creating.
# @param password
# The password for $user for the database you're creating.
# @param dbname
# The name of the database to create.
# @param charset
# The character set for the database.
# @param collate
# The collation for the database.
# @param host
# The host to use as part of user@host for grants.
# @param grant
# The privileges to be granted for user@host on the database.
# @param sql
# The path to the sqlfile you want to execute. This can be single file
specified as string, or it can be an array of strings.
# @param enforce_sql
# Specifies whether to execute the sqlfiles on every run. If set to false,
sqlfiles runs only one time.
# @param ensure
# Specifies whether to create the database. Valid values are 'present',
'absent'. Defaults to 'present'.
# @param import_timeout
# Timeout, in seconds, for loading the sqlfiles. Defaults to 300.
# @param import_cat_cmd
© 2024 Puppet, Inc., a Perforce company

Puppet | Developing modules | 1138
# Command to read the sqlfile for importing the database. Useful for
compressed sqlfiles. For example, you can use 'zcat' for .gz files.
Functions
For custom Ruby functions, place documentation strings immediately before each dispatch call. For functions written
in Puppet, place documentation strings immediately before the function name.
Include the following information for each function:
1.
An untagged docstring describing what the function does.
2.
One @param tag for each parameter in the function. See the parameters section for formatting guidelines.
3.
A @return tag with the data type and a description of the returned value.
4.
Optionally, a usage example, consisting of:
a.
An @example tag with a description of a usage example on the same line.
b.
A code example showing how the function is used. Place this example directly under the @example tag and
description, indented two spaces.
Example Ruby function with one potential return type
# An example 4.x function.
Puppet::Functions.create_function(:example) do
# @param first The first parameter.
# @param second The second parameter.
# @return [String] Returns a string.
# @example Calling the function
# example('hi', 10)
dispatch :example do
param 'String', :first
param 'Integer', :second
end
# ...
end
Example Ruby function with multiple potential return types
If the function has more than one potential return type, specify a @return tag for each. Begin each tag string with
"if" to differentiate between cases.
# An example 4.x function.
Puppet::Functions.create_function(:example) do
# @param first The first parameter.
# @param second The second parameter.
# @return [String] If second argument is less than 10, the name of one
item.
# @return [Array] If second argument is greater than 10, a list of item
names.
# @example Calling the function.
# example('hi', 10)
dispatch :example do
param 'String', :first
param 'Integer', :second
end
# ...
end
© 2024 Puppet, Inc., a Perforce company

Puppet | Developing modules | 1139
Puppet function example
# @param name the name to say hello to.
# @return [String] Returns a string.
# @example Calling the function.
# example(‘world’)
function example(String $name) {
“hello, $name”
}
Resource types
Add descriptions to the type and its attributes by passing either a here document (or "heredoc") or a short string to the
desc method.
Strings automatically detects much of the information for types, including the parameters and properties, collectively
known as attributes. To document the resource type itself, pass a heredoc to the desc method immediately after
the type definition. Using a heredoc allows you to use multiple lines and Strings comment tags for your type
documentation. For details about heredocs in Puppet, see the topic about heredocs in the language reference.
For attributes, where a short description is usually enough, pass a string to desc in the attribute. As with the @param
tag, keep descriptions to 140 or fewer characters. If you need a longer description for an attribute, pass a heredoc to
desc in the attribute itself.
You do not need to add tags for other method calls. Every other method call present in a resource type is
automatically included and documented by Strings, and each attribute is updated accordingly in the final
documentation. This includes method calls such as defaultto, newvalue, and namevar. If your type
dynamically generates attributes, document those attributes with the @!puppet.type.param and @!
puppet.type.property tags before the type definition. You may not use any other tags before the resource type
definition.
Document the resource type description in the following order:
1.
Directly under the type definition, indented two spaces, the desc method, with a heredoc including a descriptive
delimiting keyword, such as DESC.
2.
A @summary tag with a summary describing the type.
3.
Optionally, usage examples, each consisting of:
a.
An @example tag with a description of a usage example on the same line.
b.
Code example showing how the type is used. Place this example directly under the @example tag and
description, indented two spaces.
For types created with the resource API, follow the guidelines for standard resource types, but pass the heredoc or
documentation string to a desc key in the data structure. You can include tags and multiple lines with the heredoc.
Strings extracts the heredoc information along with other information from this data structure.
Example resource API type
The heredoc and documentation strings that Strings uses are called out in bold in this code example:
Puppet::ResourceApi.register_type(
name: 'apt_key',
docs: <<-EOS,
@summary Fancy new type.
@example Fancy new example.
apt_key { '6F6B15509CF8E59E6E469F327F438280EF8D349F':
source => 'http://apt.puppet.com/pubkey.gpg'
}
This type provides Puppet with the capabilities to
© 2024 Puppet, Inc., a Perforce company

Puppet | Developing modules | 1140
manage GPG keys needed by apt to perform package validation. Apt has its own
GPG keyring that can be manipulated through the `apt-key` command.
**Autorequires**:
If Puppet is given the location of a key file which looks like an absolute
path this type will autorequire that file.
EOS
attributes: {
ensure: {
type: 'Enum[present, absent]',
desc: 'Whether this apt key should be present or absent on the target
system.'**
},
id: {
type: 'Variant[Pattern[/\A(0x)?[0-9a-fA-F]{8}\Z/], Pattern[/
\A(0x)?[0-9a-fA-F]{16}\Z/], Pattern[/\A(0x)?[0-9a-fA-F]{40}\Z/]]',
behaviour: :namevar,
desc: 'The ID of the key you want to manage.',**
},
# ...
created: {
type: 'String',
behavior: :read_only,
desc: 'Date the key was created, in ISO format.',**
},
},
autorequires: {
file: '$source', # will evaluate to the value of the `source`
attribute
package: 'apt',
},
)
Puppet tasks and plans
Strings documents Puppet tasks automatically, taking all information from the task metadata. Document task plans
just as you would a class or defined type, with tags and descriptions in the plan file.
List the plan information in the following order:
1.
A @summary tag, a space, and then a summary describing the plan.
2.
Other tags such as @see, @note, or @api private.
3.
Usage examples, each consisting of:
a.
An @example tag with a description of a usage example on the same line.
b.
Code example showing how the plan is used. Place this example directly under the @example tag and
description, indented two spaces.
4.
One @param tag for each parameter in the plan. See the parameters section for formatting guidelines. For
example:
# @summary A simple plan.
#
# @param param1
# First parameter description.
# @param param2
# Second parameter description.
# @param param3
# Third parameter description.
plan mymodule::my_plan(String $param1, $param2, Integer $param3 = 1) {
run_task('mymodule::lb_remove', $param1, target => $param2)
}
© 2024 Puppet, Inc., a Perforce company

Puppet | Developing modules | 1141
Publishing modules
To share your module with other Puppet users, get contributions to your modules, and maintain your module releases,
publish your module on the Puppet Forge. The Forge is a community repository of modules, written and contributed
by open source Puppet and Puppet Enterprise users.
To publish your module, you'll:
1.
Create a Forge account, if you don't already have one.
2.
Prepare your module for packaging.
3.
Add module metadata in the metadata.json file.
4.
Build an uploadable tarball of your module.
5.
Upload your module using the Forge web interface.
Naming your module
Your module has two names: a short name, like "mysql", and a long name that includes your Forge username, like
"puppetlabs-mysql". When you upload your module to the Forge, use the module's long name.
Your module's short name is the same as that module's directory on your disk. This name must consist of letters,
numbers, and underscores only; it can't contain dashes or periods.
The long name is composed of your Forge username and the short name of your module. For example, the
"puppetlabs" user maintains a "mysql" module, which is located in a ./modules/mysql directory and is known to
the Forge as "puppetlabs-mysql".
In your module's metadata.json file, always use the long name of your module. This helps disambiguate
modules that might have common short names, such as "mysql" or "apache." If you created your module with
Puppet Development Kit (PDK), and you provided your Forge username to PDK, the metadata.json file already
contains the correct long name for the module. Otherwise, edit your module's metadata with the correct long name.
Tip: Although the Forge expects to receive modules named username-module, its web interface presents them
as username/module. Always use the username-module style in your metadata files and when issuing
commands.
Related information
Module metadata on page 1118
When you author a module, it must contain certain metadata in a metadata.json file, which contains important
information that Puppet, the Forge, and your module's users rely on.
Create a Forge account
To publish your modules to the Forge, you must first create a Forge account.
1.
In your web browser, navigate to the Forge website and click Sign Up.
2.
Fill in the fields on the sign-up form. The username you pick becomes part of your module long name, such as
"bobcat-apache".
3.
Check your email for a verification email from the Forge, and then follow the instructions in the email to verify
your email address.
After you have verified your email address, you can publish modules to the Forge.
Prepare your module for publishing
Before you build your module package for publishing, make sure it's ready to be packaged.
Exclude unnecessary files from your package, remove or ignore any symlinks your module contains, and make sure
your metadata.json file contains the correct information.
Tip: To publish your module to the Forge, your README, license file, changelog, and metadata.json must be
UTF-8 encoded. If you used Puppet Development Kit (or the deprecated puppet module generate command)
to create your module, these files are already UTF-8 encoded.
© 2024 Puppet, Inc., a Perforce company

Puppet | Developing modules | 1142
Excluding files from the package
To exclude certain files from your module build, include them in either an ignore file. Ignore files are useful for
excluding files that are not needed to run the module, such as temporary files or files generated by spec tests. The
ignore file must be in the root directory. You can use .pdkignore, .gitignore, or.pmtignore files in your
module.
If you are building your module with PDK, your module package contains a .pdkignore file that already includes
a list of commonly ignored files. To add or remove files to this list, define them in the module's .sync.yml file. For
more information about customizing your module's configuration with .sync.yml, see the PDK documentation.
If you are building your module with the puppet module build command, create a .pmtignore file and in it,
list the files you want to exclude from the module package.
To prevent files, such as those in temporary directories, from ever being checked into your module's Git repo, list the
files in a .gitignore file.
For example, a typical ignore file might look like this:
import/
/spec/fixtures/
.tmp
*.lock
*.local
.rbenv-gemsets
.ruby-version
build/
docs/
tests/
log/
junit/
tmp/
Removing symlinks from your module
Symlinks in modules are unsupported. If your module contains symlinks, either remove them or ignore them before
you build your module.
If you try to build a module package that contains symlinks, you receive the following error:
Warning: Symlinks in modules are unsupported. Please investigate symlink
manifests/my-module.pp->manifests/init.pp.
Error: Found symlinks. Symlinks in modules are not allowed, please remove
them.
Error: Try 'puppet help module build' for usage
Verifying metadata
To publish your module on the Forge, it must contain required metadata in a metadata.json file. If you
created your module with PDK or the deprecated puppet module generate command, you'll already have
a metadata.json file. Open the file in any text editor, and make any necessary edits. For details on writing or
editing the metadata.json file, see the related topic about module metadata.
Build a module package
To upload your module to the Forge, first build an uploadable module package with Puppet Development Kit.
PDK builds a .tar.gz package with the naming convention <USERNAME>-<MODULE_SHORT_NAME>-
<VERSION>.tar.gz. in the module's pkg/ subdirectory. For complete details about this task, see the PDK topic
about building module packages.
1.
Change into the module directory by running cd <MODULE_DIRECTORY>
2.
Build the package by running pdk build
© 2024 Puppet, Inc., a Perforce company

Puppet | Developing modules | 1143
3.
Answer the question prompts as needed. You can use default answers to optional questions by pressing Enter at
the prompt.
4.
At the confirmation prompt, confirm or cancel package creation.
Upload a module to the Forge
To publish a new module release to the Forge, upload the module tarball using the web interface.
The module package must be a compiled tar.gz package of 10MB or less.
1.
In your web browser, navigate to the Forge and log in.
2.
Click Publish in the upper right hand corner of the screen.
3.
On the upload page, click Choose File and use the file browser to locate and select the release tarball. Then click
Upload Release.
After a successful upload, your browser loads the new release page for your module. If there were any errors on your
upload, they appear on the same screen. Your module's README, Changelog, and License files are displayed on
your module's Forge page.
Publish modules to the Forge with Travis CI
You can automatically publish new versions of your module to the Forge using Travis CI.
1.
If this is your first time using Travis CI for automatic publishing, you must first enable Travis CI to publish to the
Forge.
a) Enable Travis CI for the module repository.
b) Generate a Travis-encrypted Forge password string. For instructions, see the Travis CI encryption keys docs.
c) Create a .travis.yml file in the module's repository base. Include a deployment section that includes your
Forge username and the encrypted Forge password, such as:
deploy:
provider: puppetforge
user: <FORGE_USER>
password:
secure: "<ENCRYPTED_FORGE_PASSWORD>"
on:
tags: true
# all_branches is required to use tags
all_branches: true
2.
To publish to the Forge with Travis CI, update, tag, and push your repository.
a) Update the version number in the module's metadata.json file and commit the change to the module
repository.
b) Tag the module repo with the desired version number. For more information about how to do this, see Git docs
on basic tagging.
c) Push the commit and tag to your Git repository. Travis CI builds and publish the module.
Publish modules to the Forge with Github Actions and Puppet Development Kit
You can also manually publish new versions of your module to the Forge using Puppet Development Kit, or automate
publishing with PDK using Github Actions.
1.
When creating a Github Action to publish to the Forge, ensure that you have access to the Forge API and have
your API token on hand.
© 2024 Puppet, Inc., a Perforce company

Puppet | Developing modules | 1144
2.
Set up your Github Action to build a release of your module when triggered and publish it using the PDK
release publish command.
a) Example:
# This is a generic workflow for releasing a Puppet module.
# It requires that the caller sets `secrets: inherit` to ensure
# that secrets are visible from steps in this workflow.
name: "Module Release"
on:
workflow_call:
jobs:
release:
name: "Release"
runs-on: "ubuntu-latest"
if: github.repository_owner == 'puppetlabs'
steps:
- name: "Checkout"
uses: "actions/checkout@v4"
with:
ref: "${{ github.ref }}"
clean: true
fetch-depth: 0
- name: "Get version"
id: "get_version"
run: |
echo "version=$(jq --raw-output .version metadata.json)" >>
$GITHUB_OUTPUT
- name: "PDK build"
uses: "docker://puppet/pdk:3.0.0.0"
with:
args: "build"
- name: "Generate release notes"
run: |
export GH_HOST=github.com
gh extension install chelnak/gh-changelog
gh changelog get --latest > OUTPUT.md
env:
GH_TOKEN: ${{ secrets.GITHUB_TOKEN }}
- name: "Create release"
run: |
gh release create v${{ steps.get_version.outputs.version }} --
title v${{ steps.get_version.outputs.version }} -F OUTPUT.md
env:
GITHUB_TOKEN: ${{ secrets.GITHUB_TOKEN }}
- name: "Publish module"
uses: "docker://puppet/pdk:3.0.0.0"
with:
args: 'release publish --forge-token
${{ secrets.FORGE_API_KEY }} --force'
3.
For more information on Github Actions, visit the Github Actions documentation.
4.
For more information on the PDK release command, visit PDK release command.
© 2024 Puppet, Inc., a Perforce company
Puppet | Developing modules | 1145
Deprecate a module on the Forge
To let your module users know that you are no longer maintaining your module, deprecate your module on the Forge.
File a ticket in the FORGE project on the Puppet JIRA site. The ticket must include:
• The full name of the module to be deprecated, such as puppetlabs-apache.
• The reason for the deprecation. The reason is publicly displayed on the Forge.
• A recommended alternative module or workaround.
Using the Forge API
Use the Forge API to create, delete, and understand your modules.
Create a module release
Use the /v3/releases endpoint in the Forge API to create and publish a new module or a release of an existing
module.
Download a module release
Use the /v3/files/{filename} endpoint in the Forge API to download the tarball for an existing module.
Fetch information about a module release
Use the /v3/releases/{release_slug} endpoint in the Forge API to fetch information about your module,
identified by the module's slug value.
Delete a module release
Use the /v3/releases/{release_slug} endpoint in the Forge API to soft delete a release of your module,
identified by the module's slug value. A deleted release is still downloadable from the /v3/files endpoint, but
not available in Puppet Forge.
More information about the Forge API
For more detailed information about the Forge API, including parameters, responses, and example code, see the Forge
API documentation.
Upgrading modules to Puppet 8
When upgrading officially supported Puppet modules, the work happens in three main stages: preliminary work,
dependency update, and testing.
Preliminary work
The goal of the preliminary work stage is to get the modules ready for the jump to the new versions. Do this by
removing deprecated code constructs and updating code accordingly. The biggest changes in Puppet 8 are in the Ruby
layer, so the most common required changes are:
• Assigning datatypes to class parameters
• Replacing legacy facts with structured facts
• General lint cleanup of top scope facts/variables
• Cleaning up code to work with strict mode
You can use puppet-lint to highlight areas of concern. This means that a clean pdk validate run shows you
what code must be corrected. However, first ensure that your modules don't have exceptions in place suppressing
these warnings.
For some examples of the preliminary work stage, see the following pull requests:
• (CONT-359) Syntax update by LukasAud · Pull Request #1532 · puppetlabs/puppetlabs-mysql
© 2024 Puppet, Inc., a Perforce company
Puppet | Developing modules | 1146
• (CONT-362) Syntax update by LukasAud · Pull Request #273 · puppetlabs/puppetlabs-registry
• (Maint) Addressing Selinux legacy facts by LukasAud · Pull Request #2428 · puppetlabs/puppetlabs-apache
Dependency update
In the dependency update stage, update the various metadata.json and Gemfile files to ensure that the various modules
have correct expectations. This process is partially performed using the pdk update command. However, you must
still ensure that certain dependencies are correct manually.
For an example of the dependency update stage, see the following pull request:
• (CONT-850) Puppet 8 support / Drop Puppet 6 by LukasAud · Pull Request #441 · puppetlabs/puppetlabs-
accounts
Testing
In the final stage, run a series of manual and automated test runs to ensure that the module works as expected with
all the updates applied. Testing infrastructure may vary depending on your specific modules, but one option is to run
the Puppet Development Kit's comprehensive test suite against a large set of containers, representing all supported
operating systems and Puppet versions.
Assuming the module has comprehensive testing coverage, passing tests indicates a successful Puppet 8 update.
Third party Forge modules
If you choose to validate third-party modules from the Forge, we recommend trusting the upstream author to do the
update and validation.
Go to the Forge page for each module listed in your puppetfile and validate that it claims Puppet 8 compatibility.
If it does not, then add a comment to that line of your puppetfile so that you know which modules to check next
time you look at it. After you're finished, if there are any modules marked as not Puppet 8 compatible, just save the
file and come back to it in a week or a month and try again.
More information
If you would like more information on the module upgrade process, including recommendations, tips and tricks, visit
https://dev.to/puppet/updating-modules-to-puppet-8-58h3.
Contributing to Puppet modules
Contribute to Puppet modules to help add new functionality, fix bugs, or make other improvements.
Your contributions help us serve a greater spectrum of platforms, hardware, software, and deployment configurations.
We appreciate all kinds of user contributions, including:
• Bug reports.
• Feature requests.
• Participation in our community discussion group or chat.
• Code changes, such as bug fixes or new functionality.
• Documentation changes, such as corrections or new usage examples.
• Reviewing pull requests.
To make bug reports or feature requests, raise an issue in the Puppet github repo. If you are requesting a feature,
describe the use case for it and the goal of the feature. If you are filing a bug report, clearly describe the problem and
the steps to reproduce it.
Participating in community discussions is a great way to get involved. Join the community conversations in the
puppet-users discussion group or our community Slack chat:
• To join the discussion group, see the puppet-users Google group.
• To join our community chat, see the Puppet Community Slack.
© 2024 Puppet, Inc., a Perforce company

Puppet | Developing modules | 1147
We ask everyone participating in Puppet communities to abide by our code of conduct. See our community guidelines
page for details.
Contributing changes to module repositories
To contribute bug fixes, new features, expanded functionality, or documentation to Puppet modules, submit a pull
request to our module repositories on GitHub.
When working on Puppet modules, follow this basic workflow:
1.
Discuss your change with the Puppet community.
2.
Fork the repository on GitHub.
3.
Make changes on a topic branch of your fork, documenting and testing your changes.
4.
Submit changes as a pull request to the Puppet repository.
5.
Respond to any questions or feedback on your pull request.
Before submitting a pull request
• To submit code changes, you must have a GitHub account. If you don't already have an account, sign up on
GitHub.
• Know what Git best practices we use and expect.
• Sign the Contributor License Agreement when it comments on your pull request.
Discussing your change with the community
We love when people submit code changes to our projects, and we appreciate bug and typo fixes as much as we
appreciate major features.
If you are proposing a significant or complex change to a Puppet module, we encourage you to discuss potential
changes and their impact with the Puppet community.
To propose and discuss a change, send a message to the puppet-users discussion group or bring it up in the Puppet
Community Slack #forge-modules channel.
Forking the repository and creating a topic branch
Fork the repository you want to make changes to, and create a topic branch for your work.
Give your topic branch a name that describes the work you're contributing. Always base the topic branch on the
repository's primary server branch, unless one of our module developers specifically asks you to base it on a different
branch.
Remember: Never work directly on the primary server branch or any other core branch.
Making changes
When you make changes to a Puppet module, make changes that are compatible with all currently supported versions
of Puppet. Do not break users' existing installations or configurations with your changes. For a list of supported
versions, see the Puppet platform lifecycle page.
To add new classes, defined types, or tasks to a module, use Puppet Development Kit (PDK). PDK creates manifests
and test templates, validates, and runs unit tests on your changes.
If you make a backward-incompatible change, you must include a deprecation warning for the old functionality, as
well as documentation that tells users how to migrate to the new functionality. If you aren't sure how to proceed, ask
for help in the puppet-users group or the community Slack chat.
Documenting changes
When you add documentation to modules, follow our documentation style and formatting guidelines. These
guidelines help make our docs clear and easier to translate into other languages.
© 2024 Puppet, Inc., a Perforce company

Puppet | Developing modules | 1148
If you make code changes to modules, you must document your changes. We can't merge undocumented changes.
To provide usage examples, add them to the README's usage section. Include information about what the user can
accomplish with each usage example.
Add reference information, such as class descriptions and parameters, as Puppet Strings-compatible code comments,
so that we can generate complete documentation before we release the new version of the module. Do not manually
edit generated REFERENCE.md files; any changes you make are overwritten when we generate a new file. For
complete information about writing good module documentation, see Documenting modules.
In Puppet module documentation, adhere to the following conventions:
• Lowercase module names, such as apache. This helps differentiate the module from the software the module
is managing. When talking about the software being managed, capitalize names as they would normally be
capitalized, such as Apache.
• Set string values in single quotes, to make it clear that they are strings. For example, 'string' or 'C:/user/
documents/example.txt'.
• Set the values true, false, and undef in backticks, such as `true`.
• Set data types in backticks, such as `Boolean`.
• Set filenames, settings, directories, classes, types, defined types, functions, and similar code elements in backticks,
unless the user passes them as a string value. If the user passes the value as a string, use quotes to make that clear.
• Do not use any special marking for integer values, such as 1024.
• Use empty lines between new lines to help with readability.
Testing your changes
Before you submit a pull request, make sure that you have added tests for your changes.
If you create new classes or defined types, PDK creates basic tests templates for you. Use PDK to validate and run
unit tests on the module, to ensure that your changes don't accidentally break anything.
If you need further help writing tests or getting tests to work, ask for help in the puppet-user discussion group, in our
community Slack chat, or if you created a JIRA ticket regarding your change, in the ticket.
If you don't know how to write tests for your changes, clearly say so in your pull request. We don't necessarily reject
pull requests without tests, but someone needs to add the tests before we can merge your contribution.
Committing your changes
As you add code, commit your work for one function at a time. Ensure the code for each commit does only one thing.
This makes it easier to remove one commit and accept another, if necessary. We would rather see too many commits
than too few.
In your commit message, provide:
1.
A brief description of the behavior before your changes.
2.
Why that behavior was a problem.
3.
How your changes fix the problem.
For example, this commit message is for adding to the CONTRIBUTING document:
Make the example in CONTRIBUTING concrete
Without this patch applied, there is no example commit message in the
CONTRIBUTING document. The contributor is left to imagine what the commit
message should look. This patch adds a more specific example.
Submitting changes
Submit your changes as a pull request to the puppetlabs organization repository on GitHub.
© 2024 Puppet, Inc., a Perforce company

Puppet | Developing modules | 1149
Push your changes to the topic branch in your fork of the repository. Submit a pull request to the puppetlabs
repository for the module.
Someone with the permissions to merge and commit to the Puppet repository (a committer) checks whether the pull
request meets the following requirements:
• It is on its own correctly named branch.
• It contains only commits relevant to the specific issue.
• It has clear commit messages that describe the problem and the solution.
• It is appropriately and clearly documented.
Responding to feedback
Be sure to respond to any questions or feedback you receive from the Puppet modules team on your pull request.
Puppet community members might also make comments or suggestions that you want to consider.
When making changes to your pull request, push your commits to the same topic branch you used for your pull
request. When you push changes to the branch, it automatically updates your pull request. After the team has
approved your request, someone from the modules team merges it, and your changes are included in the next release
of the module.
If you do not respond to the modules team's requests, your pull request might be rejected or closed. To address such
comments or questions later, create a new pull request.
Related information
Puppet platform lifecycle on page 53
The open source Puppet platform is made up of several packages: puppet-agent, puppetserver, and,
optionally, puppetdb. Understanding what versions are maintained and which versions go together is important
when upgrading and troubleshooting.
Reviewing community pull requests
As a Puppet community member, you can offer feedback on someone else's contributed code.
When reviewing pull requests, any of the following contributions are helpful:
• Review the code for any obvious problems.
• Provide feedback based on personal experience on the subject.
• Test relevant examples on an untested platform.
• Look at potential side effects of the change.
• Examine discrepancies between the original issue and the pull request.
Add your comments and questions to the pull request, pointing out any specific lines that need attention. Be sure to
respond to any questions the contributor has about your comments.
Puppet Development Kit (PDK)
You can write your own Puppet code and modules using Puppet Development Kit (PDK), which is a framework to
successfully build, test and validate your modules.
Note that most Puppet users won’t have to write full Puppet code at all, though you can if you want to. For
installation instructions and more information, see the PDK documentation.
Puppet VSCode extension
Puppet has an extension for Visual Studio Code (VSCode) — Microsoft’s cross-platform source-code editor.
The Puppet VSCode extension makes writing and managing Puppet code easier and ensures your code is high
quality. Its features include Puppet DSL intellisense, linting, and built-in commands. You can use the extension with
© 2024 Puppet, Inc., a Perforce company

Puppet | Developing modules | 1150
Windows, Linux, or macOS. For installation instructions and a full list of features, see the Puppet VSCode extension
documentation.
PowerShell DSC Resources
Desired State Configuration (DSC) is a configuration framework in PowerShell that enables you to manage your
infrastructure with configuration as code.
DSC resources are similar to Puppet resources — they let you specify the desired state of an item on a node you
managed. These resources can be small, such as xInternetExplorerHomePage, or large, such as xExchange. The
PowerShell Gallery is a repository for finding and sharing DSC resources — similar to Puppet Forge.
Managing DSC resources with Puppet
Puppet allows you to manage DSC resources directly by installing them from Puppet Forge. Once you have added
the DSC module to your Puppetfile and deployed it to your code base, you can declare the DSC resources. For
example, if you deploy the dsc-xinternetexplorerhomepage module, you declare the resources in your Puppet code
like this:
dsc_xinternetexplorerhomepage { 'homepage':
dsc_ensure => 'Present',
dsc_startpage => 'https://puppet.com',
}
The dsc-xexchange module allows you to manage an entire MS Exchange server using resource types and parameters
for configuration.
You can find all of the PowerShell DSC modules on the Forge. Install them and use them like you would any other
Puppet module. You can find the parameter documentation on the References tab of each module's Forge page (or via
puppet describe). If the module author did not fully document the DSC resource, the Forge might only include a list
of parameters and valid data types. For more information, you can click the Project URL link at the top of the module
page to see the documentation source repository. Note that each parameter of the original DSC resource starts with
dsc_ when used with Puppet.
Puppet’s support policy for PowerShell DSC modules
The PowerShell DSC modules are different from other modules on the Forge. DSC Modules are auto-generated and
mostly consist of vendored code that is not owned by Puppet. While the modules are approved for use with Puppet,
Puppet does not support the vendored DSC content inside the module.
• Convert private DSC Resources to a Puppet module on page 1150
If you have private DSC resources, you can convert them to a Puppet module.
• Distributing arbitrary DSC resources on page 1151
You can use the puppetlabs-dsc_lite module to manage target nodes with arbitrary DSC resources.
• Upgrading Puppet DSC modules on page 1152
The Puppet.dsc PowerShell module is the third Puppet DSC module. The puppetlabs-dsc module is
now deprecated and the puppetlabs-dsc_lite module is for advanced use cases only. To upgrade to the
Puppet.dsc module, follow the upgrading instructions below.
• Troubleshooting DSC Resources on page 1154
Use this guide to troubleshoot issues with Puppet code containing DSC resources.
Convert private DSC Resources to a Puppet module
If you have private DSC resources, you can convert them to a Puppet module.
Some PowerShell modules contain internal business logic and are not published to the PowerShell gallery. Follow
this guide to convert your private DSC Resources to a Puppet module, using the Puppet.dsc PowerShell module.
© 2024 Puppet, Inc., a Perforce company

Puppet | Developing modules | 1151
Before you begin: If you do not already have a PSRepository set up, you can set up a NuGet server to host a feed, or
you can register a local folder to use as the source.
1.
Run the following command to install the Puppet.dsc PowerShell module:
PS C:\Users\Administrator> Install-Module -Name Puppet.Dsc
This command provides the New-PuppetDscModule function that builds Puppet modules out of PowerShell
resources.
The Puppet.Dsc module retrieves the source PowerShell module from a PSRepository feed. In most cases, this
is the standard PowerShell Gallery, but it can use any feed you specify.
The following example points a PSRespository to a development environment where maintained PowerShell
modules are stored. PowerShell can use either a local or shared folder as the source.
# Make sure you specify the correct parameters
PS> Register-PSRepository -Name YourRepository -SourceLocation 'C:\Users
\YourName\Projects\PowershellModules' -ScriptSourceLocation 'C:\Users
\YourName\Projects\PowershellModules' -InstallationPolicy Trusted
2.
Run the following command to build a Puppet module using your private PSRepository feed:
# Make sure to specify the correct parameters
PS> New-PuppetDscModule -PowerShellModuleName YourPowerShellModule
-PowerShellModuleVersion 2.2.3 -Repository YourRepository
The Puppet.Dsc module generates to the import folder. Use Puppet Development Kit (PDK) to build a
module tarball and distribute it — in the same way that you distribute other private Puppet modules. For more
information, see the PDK documentation.
Distributing arbitrary DSC resources
You can use the puppetlabs-dsc_lite module to manage target nodes with arbitrary DSC resources.
CAUTION: The puppetlabs-dsc_lite requires previous experience with DSC and PowerShell. It is
an alternative approach to Puppet's other DSC modules, providing more flexibility for advanced users.
The puppetlabs-dsc_lite module contains a lightweight dsc type — a streamlined and minimal
representation of a DSC Resource declaration in Puppet syntax. While it does not contain any DSC resource, it knows
how to invoke ones that already exists on the managed node.
You can use a DSC Resource by supplying the same properties you would set in a DSC configuration script — inside
the properties parameter. For most use cases, the properties parameter accepts the same structure as the
PowerShell syntax, with the substitution of Puppet syntax for arrays, hashes, and other data structures.
You can use the following PowerShell command to identify the available parameters:
PS> Get-DscResource WindowsFeature | Select-Object -ExpandProperty
Properties
Using the puppetlabs-dsc_lite module, you can specify a version of the DSC Resource to use for each
resource declaration. For example, you might want to specify a version if your target node has multiple versions
installed, or if you need to use multiple versions in a single Puppet run.
To specify a version of a DSC Resource, you can use a similar syntax to a DSC configuration script — using a hash
containing the name and version of the DSC Resource module. For example:
dsc {'iis_server':
resource_name => 'WindowsFeature',
module => {
© 2024 Puppet, Inc., a Perforce company

Puppet | Developing modules | 1152
name => 'PSDesiredStateConfiguration',
version => '1.1'
},
properties => {
ensure => 'present',
name => 'Web-Server',
}
}
For more information, see the the puppetlabs-dsc_lite module's documentation.
Upgrading Puppet DSC modules
The Puppet.dsc PowerShell module is the third Puppet DSC module. The puppetlabs-dsc module is
now deprecated and the puppetlabs-dsc_lite module is for advanced use cases only. To upgrade to the
Puppet.dsc module, follow the upgrading instructions below.
Upgrade from the puppetlabs-dsc module
To upgrade from the puppetlabs-dsc module, do the following:
1.
Remove the puppetlabs-dsc module from your Puppetfile.
2.
Replace the puppetlabs-dsc module with declarations for each of the modules you want.
3.
Optional: To avoid any future code changes, pin the DSC modules to the versions that shipped in the latest release
of puppetlabs-dsc. Note that a benefit of the new module is that you do not need to include every DSC
resource.
© 2024 Puppet, Inc., a Perforce company

Puppet | Developing modules | 1153
4.
Choose only the resources you need from the following list and declare them in your Puppetfile:
mod 'dsc-xdefender', '0.2.0-0-0'
mod 'dsc-xdhcpserver', '2.0.0-0-0'
mod 'dsc-xdisk', '1.0.0-0-0'
mod 'dsc-xdismfeature', '1.3.0-0-0'
mod 'dsc-xdnsserver', '1.11.0-0-0'
mod 'dsc-xexchange', '1.27.0-0-0'
mod 'dsc-xfailovercluster', '1.12.0-0-0'
mod 'ddsc-xhyper_v', '3.16.0-0-0'
mod 'dsc-xinternetexplorerhomepage', '1.0.0-0-0'
mod 'dsc-xjea', '0.2.16-6-0'
mod 'dsc-xmysql', '2.1.0-0-0'
mod 'dsc-xpendingreboot', '0.4.0-0-0'
mod 'dsc-xphp', '1.2.0-0-0'
mod 'dsc-xpowershellexecutionpolicy', '3.1.0-0-0'
mod 'dsc-xpsdesiredstateconfiguration', '8.5.0-0-0'
mod 'dsc-xremotedesktopadmin', '1.1.0-0-0'
mod 'dsc-xremotedesktopsessionhost', '1.8.0-0-0'
mod 'dsc-xrobocopy', '2.0.0-0-0'
mod 'dsc-xscdpm', '1.2.0-0-0'
mod 'dsc-xscom', '1.3.3-0-0'
mod 'dsc-xscsma', '2.0.0-0-0'
mod 'dsc-xscspf', '1.3.1-0-0'
mod 'dsc-xscsr', '1.3.0-0-0'
mod 'dsc-xscvmm', '1.2.4-0-0'
mod 'dsc-xsmbshare', '2.1.0-0-0'
mod 'dsc-xsqlps', '1.4.0-0-0'
mod 'dsc-xtimezone', '1.8.0-0-0'
mod 'dsc-xwebadministration', '2.5.0-0-0'
mod 'dsc-xwebdeploy', '1.2.0-0-0'
mod 'dsc-xwindowseventforwarding', '1.0.0-0-0'
mod 'dsc-xwindowsrestore', '1.0.0-0-0'
mod 'dsc-xwindowsupdate', '2.7.0-0`0'
mod 'dsc-xwineventlog', '1.2.0-0-0'
mod 'dsc-xwordpress', '1.1.0-0-0'
Note: The underlying DSC versions are likely to have changed — you can update the modules to the latest
versions one at a time, while testing each change. No code changes are required, except for DSC updates.
Upgrade from the puppetlabs-dsc_lite module
To upgrade from the puppetlabs-dsc_lite module, do the following:
© 2024 Puppet, Inc., a Perforce company

Puppet | Developing modules | 1154
1.
Refactor your code base to declare the proper resources — dsc_<name of resource>. For example, change
the following code:
dsc {'Download WebContent Zip':
resource_name => 'XRemoteFile',
module => 'PSDesiredStateConfiguration',
properties => {
ensure => 'present',
destinationpath => $zipfile,
uri => $zipuri,
}
}
To look like this:
dsc_xremotefile {'Download WebContent Zip':
dsc_ensure => 'present',
dsc_destinationpath => $zipfile,
dsc_uri => $zipuri,
}
2.
As you refactor each resource, add the required Puppet modules to your Puppetfile.
3.
After you remove the DSC Resources, remove the puppetlabs-dsc_lite module and turn off any
automation that you are using to distribute DSC Resources.
4.
Test your code base.
Note: The puppetlabs-dsc_lite module can coexist with the new DSC module.
Troubleshooting DSC Resources
Use this guide to troubleshoot issues with Puppet code containing DSC resources.
The resource appears to change on each Puppet run
Some DSC resources do not properly validate their own parameters. For example, a resource might accept an integer
value, but then retrieve the saved value from the system as a string. When this happens, Puppet cannot tell that the
resource is in the desired state and enforces the resource each time it runs.
To resolve this issue, you need to instruct the resource to do resource level validation. Instead of checking each
parameter of the resource for desired state, Puppet manages the entire resource as one unit and lets the PowerShell
DSC resource identify whether it needs to be updated or not. You do not get log messages about which parameter was
corrected, just that the entire resource was changed.
Here is an example of a resource that has this issue:
dsc_securityoption { 'Enforce Anonymous SID Translation':
dsc_name => 'Enforce Anonymous SID Translation',
dsc_network_access_allow_anonymous_sid_name_translation => 'Disabled',
}
For this to apply correctly, you need to specify the validation_mode parameter:
# This idempotently applies
dsc_psrepository { 'PowerShell Gallery':
validation_mode => 'resource',
dsc_name => 'Enforce Anonymous SID Translation',
dsc_network_access_allow_anonymous_sid_name_translation => 'Disabled',
}
© 2024 Puppet, Inc., a Perforce company

Puppet | Developing modules | 1155
Error message about a missing PowerShell file
The maximum length of a path accepted by the Windows API is MAX_PATH or 260 characters. There are some
PowerShell DSC resources that include file paths of this length. Once they are vendored in Puppet modules, the paths
exceed MAX_PATH and Puppet runs fail with an error, for example:
PS> puppet agent -t
PS C:\Users\Administrator> puppet agent -t
Info: Using configured environment 'production'
Info: Retrieving pluginfacts
Info: Retrieving plugin
Info: Loading facts
Error: dsc_xrdserver: The term 'Get-RDServer' is not recognized as the name
of a cmdlet, function, script file, or operable program. Check the spelling
of the name, or if a path was included, verify that the path is correct and
try again.
Info: Caching catalog for dynamic-trouble.delivery.puppetlabs.net
Info: Applying configuration version '1623366685'
Error: dsc_xrdserver: The term 'Get-RDServer' is not recognized as the name
of a cmdlet, function, script file, or operable program. Check the spelling
of the name, or if a path was included, verify that the path is correct and
try again.
Error: /Stage[main]/Main/Node[default]/Dsc_xrdserver[test]: Could not
evaluate: undefined method `[]' for nil:NilClass
Notice: Applied catalog in 0.95 seconds
The dsc_xrdserver resource exists, but the PowerShell script it runs cannot create the Get-RDServer cmdlet
because one or more files exceeded the path length and were never written to disk.
In Windows 10 and Windows Server 2016 (version 1607 and later), you can enable long path support with a registry
key. The long paths are supported by versions 6.23 and 7.8 and later. To enable long path support, update your
Windows agents and apply the following Puppet code:
registry::value { 'LongPathsEnabled':
key => 'HKLM\SYSTEM\CurrentControlSet\Control\FileSystem',
type => dword,
data => '1',
}
Your Puppet run has data type conversion errors
Sometimes a PowerShell DSC Resource uses the wrong data type for parameters. The DSC resource still works with
DSC because that system does not validate data types like Puppet can. If you pass the wrong data type to the resource,
you might see the following errors:
Error: dsc_psrepository: Convert property 'name' value from type 'SINT64' to
type 'STRING' failed
Error: Parameter dsc_name failed on Dsc_psrepository[Foo]:
dsc_psrepository.dsc_name expects a String value, got Integer
These errors mean that a string was expected. To resolve this issue, update your code to declare the correct data
type or enum value. If this still results in Puppet data type errors, you need to file a bug to the maintainers of the
PowerShell DSC resource to correct the data type annotations. When the module has been updated and published to
the PowerShell Gallery, it is automatically updated in Puppet Forge the following day.
© 2024 Puppet, Inc., a Perforce company

Puppet | Copyright and trademark notices | 1156
PowerShell invocation errors
When a DSC invocation goes wrong, Puppet shows the error PowerShell DSC returned. How explicit the error
message is depends on the underlying DSC implementation for that resource in PowerShell. It could look something
like:
Error: dsc_psrepository[{:name=>"Bar", :dsc_name=>"Bar"}]: Creating:
PowerShell DSC resource MSFT_PSRepository failed to execute Set-
TargetResource functionality with error message: The running command stopped
because the preference variable "ErrorActionPreference" or common parameter
is set to Stop: The repository could not be registered because there exists
a registered repository with Name 'Foo' and SourceLocation 'C:\Foo'. To
register another repository with Name 'Bar', please unregister the existing
repository using the Unregister-PSRepository cmdlet.
In this example, the error is explicit — the specified source location is already being used with another
PSRepository. To clear this error, you need to either change the source location or remove the other
PSRepository.
Resolving these kind of errors can require extra troubleshooting.
Access the debug log
If you cannot troubleshoot your issue, file a support ticket and provide the debug log with your ticket.
To access the debug log, add --debug to the end of the Puppet run command:
PS C:\Users\administrator> puppet agent -t --debug | Out-File -FilePath
debug.log
Save the debug log as a text file and attach it to your support ticket.
The log tells you what Puppet is doing, which values are being passed to PowerShell, what the outcome of the run
was, and provides you with the full text of the PowerShell script being executed (with sensitive information redacted).
Note: The code being run is a PowerShell script. This means you can use the log to debug issues the same way you
would with any other PowerShell script.
Copyright and trademark notices
© 2024 Puppet, Inc., a Perforce company. All rights reserved.
Puppet and other identified trademarks are the property of Puppet, Inc., Perforce Software, Inc., or an affiliate. Such
trademarks are claimed and/or registered in the U.S. and other countries and regions. All third-party trademarks
are the property of their respective holders. References to third-party trademarks do not imply endorsement or
sponsorship of any products or services by the trademark holder. Contact Puppet, Inc., for further details.
© 2024 Puppet, Inc., a Perforce company
