
White Paper
© 2018 Cisco and/or its affiliates. All rights reserved. This document is Cisco Public Information. Page 1 of 45
Puppet Managed Cisco UCS
Infrastructure with Docker
Enterprise Edition for Container
Management

White Paper
© 2018 Cisco and/or its affiliates. All rights reserved. This document is Cisco Public Information. Page 2 of 45
Contents
About this document!
Introduction!
Target audience!
Purpose of this document!
Business needs!
Solution overview!
Technology overview!
Overview of Puppet architecture!
Overview of Puppet Enterprise!
Network requirements!
DTR ports used!
Puppet and Razor environment!
Solution design!
Cisco UCS and Docker network deployment!
Initial setup!
Puppet Agent installation and configuration!
Cisco UCS server deployment!
Puppet Enterprise and Razor server installation!
Install the Razor server!
Create Razor tags and Razor policies for Docker nodes!
Install Cisco UCS modules for Puppet!
Prepare Hiera data for Cisco UCS and Docker server provisioning!
Classes used in ucsm_dockerdc!
Configure data used by nodes that interface with Cisco UCS Manager!
Run Puppet!
Verify the Puppet and Cisco UCS Manager configuration!
Docker Enterprise Edition deployment!
Docker Trusted Registry deployment!
Puppet classes for Docker UCP and DTR deployment!
Puppet Enterprise setup for Cisco UCS and Docker Enterprise Edition!
Get setup instructions for Docker Enterprise Edition for CentOS!
Install docker_ee_cvd modules in Puppet Enterprise!
Node classification!
UCP-Ctrl: UCP controller master group!
UCP-Replica: UCP controller replica group!
UCP-Node: UCP node group!
DDC-DTR: UCP DTR master group!
DTR-Replica: UCP DTR replica group!
Verify UCP and DTR nodes!
Data input files!
Parameterized classes used in this design!
Puppet modules and classes for Docker deployment!
Docker!
Docker DDC!


White Paper
© 2018 Cisco and/or its affiliates. All rights reserved. This document is Cisco Public Information. Page 4 of 45
About this document
Cisco, Puppet, and Docker have joined together to offer the Cisco UCS® Infrastructure with Docker Enterprise Edition for Container
Management solution using Puppet Enterprise. This solution enables enterprises to modernize traditional applications and build
microservices architecture using the Docker platform with Cisco UCS Integrated Infrastructure. The combination of Docker
container technology and Cisco UCS server hardware enables a highly scalable, resilient, and elastic application deployment
environment with the simplicity of an on-premises cloud-like experience.
Cisco Unified Computing System™ (Cisco UCS) servers adapt to meet rapidly changing business requirements, including just-in-
time deployment of new computing resources to meet requirements and improve business outcomes. With Cisco UCS, you can
tune your environment to support the unique needs of each application while powering all your server workloads on a centrally
managed, highly scalable system. Cisco UCS brings the flexibility of nonvirtualized and virtualized systems in a way that no other
server architecture can, lowering costs and improving your return on investment (ROI).
Docker is an efficient platform for developers and IT operations teams to use to build, ship, and run distributed applications
anywhere. With microservices architecture shaping the next generation of IT, enterprises with large investments in monolithic
applications are finding ways to adopt Docker as a strategy for modernizing their application architectures and keeping the
organization competitive and cost effective. Containerization provides the agility, control, and portability that developers and IT
operations teams require to build and deploy applications across any infrastructure.
Puppet's consistent approach to automation, from core operating environments through the software that runs on top, gives you
the tools you need to safely and rapidly adopt containers, or any other new IT technology, while staying aligned with your existing
physical, virtual, and cloud infrastructure. The results will help you deliver great software faster, more reliably, and more securely.
This document describes how to design and implement infrastructure as code to deploy Cisco UCS infrastructure with Docker
Enterprise Edition for container management using Puppet modules for Cisco UCS and Puppet modules for Docker.
Introduction
This solution describes how to install, provision, configure, and deploy production-ready application containers using Docker
Enterprise Edition (Docker EE) on Cisco UCS B-Series Blade Servers and C-Series Rack Servers.
Docker EE provides native container management tools, including Docker Engine, Docker Trusted Registry (DTR), and Docker
Universal Control Plane (UCP). It can be deployed in an on-premises or cloud environment. It is connected to the existing
infrastructure and systems, such as storage, Microsoft Active Directory (AD), and Lightweight Directory Access Protocol (LDAP)
services.
Cisco UCS infrastructure provides the converged platform for the computing, network, and storage resources and the entire
hardware lifecycle management through a single management control plane. The solution demonstrates:
●
Quick and easy installation of Cisco UCS Integrated Infrastructure, Docker Enterprise Edition, and application containers
●
Application container management through Docker Enterprise Edition on computing nodes regardless of form factors by
using Cisco UCS Manager
●
Creation and configuration of network and storage resources across the complete infrastructure for application containers
●
High-availability testing inducing node and container engine failures
●
Scalability for networks, subnets, storage access, containers, and computing and infrastructure nodes
●
Performance reducing the amount of time needed to bring up containers with DTR integration in the stack
The combination of Cisco UCS and Docker Enterprise Edition allows organizations to build and deploy containerized applications on
an open, highly available and scalable platform using existing hardware investments to provide an end-to-end secure platform to
meet service-level agreements (SLAs).

White Paper
© 2018 Cisco and/or its affiliates. All rights reserved. This document is Cisco Public Information. Page 5 of 45
Target audience
The audience for this document includes sales engineers, field consultants, professional services, IT managers, partner engineers,
IT architects, and customers who want to take advantage of an infrastructure that is built to deliver IT efficiency and enable IT
innovation. The reader of this document is expected to have the training and background needed to install and configure Red Hat
Enterprise Linux (RHEL), Cisco UCS, and Cisco Nexus® switches. The reader is also expected to have a high-level understanding
of Docker container components and the use of Puppet Enterprise to implement infrastructure-as-code solutions. External
references are provided where applicable, and the reader should be familiar with these documents.
Readers are also expected to be familiar with the infrastructure, network, and security policies of the customer installation.
Purpose of this document
This document highlights the benefits of using Puppet Enterprise and Cisco UCS infrastructure with Docker Enterprise Edition to
efficiently deploy, scale, and manage a production-ready application container environment for enterprise customers. The goal of
this document is to demonstrate the value that a Puppet automation solution along with Cisco UCS brings to the data center, such
as single-point hardware lifecycle management and highly available converged computing and network infrastructure for
application container deployments using Docker Enterprise Edition.
Business needs
Revolutions in technology have created new opportunities and challenges for businesses in today’s digital world. Many startups
and smaller competitors are using disruptive innovations such as microservices architecture to quickly develop and deploy
applications and services to rapidly adapt to changing markets and meet customer needs. These innovations also provide a path
for modernizing traditional business-critical applications, providing agility, flexibility, and portability to reduce operation and
management costs while improving performance and security.
To keep up with new technologies or stay a step ahead, enterprises will have to overcome a number of challenges to accelerate
product development, add value, and compete better at lower cost. This solution addresses the following main challenges:
●
Deploy rapidly: The Puppet and Cisco UCS Manager infrastructure-as-code solution enables quick and error-free
deployment without downtime or glitches.
●
Accelerate the transition from development to production deployments: Because they are portable, containers help ensure
that your development environment with its OS, libraries, and services and applications is easily moved to your test and
development environments without problems.
●
Add capacity to scale operations: As the business workload expands, infrastructure and applications need to expand too.
Automating the installation, deployment, and management of your servers, network, storage, software platforms, and
applications using Puppet Enterprise and Cisco UCS Manager allows your organization to scale out operations easily.
●
Continuously track the environment and maintain the desired state: When you deploy Puppet, with the Puppet master as the
central server for your automation manifests, you immediately gain the capability to manage dozens, hundreds, or even
thousands of nodes. The Puppet agent maintains a secure connection between each node and the master, which
automates the provisioning, configuration, deployment, and ongoing management of your infrastructure and the applications
that run on it.

White Paper
© 2018 Cisco and/or its affiliates. All rights reserved. This document is Cisco Public Information. Page 6 of 45
Solution overview
Docker Enterprise Edition is integrated and validated on Cisco UCS Integrated Infrastructure. This solution is implemented on Cisco
UCS B-Series and C-Series servers and Cisco Nexus switches. The architecture covers high-level installation, configuration, and
provisioning processes. Cisco UCS blade and rack servers are provisioned through service profiles, and OS installation is
performed manually. OS configuration and Docker Enterprise Edition installation is automated through built-in Docker tools and
Puppet. The end-to-end stack is tested for correctness (recommended software stack), performance, scalability, high availability,
and security. The containers are deployed and managed by Docker UCP. This guide provides step-by-step instructions for setting
up the complete stack. It also provides solution validation test results.
Using the centralized management of Cisco UCS Manager, this solution provides unified, embedded, policy-based management to
programmatically control server, network, and storage resources. This capability allows you to efficiently manage the scale-up and
scale-out infrastructure.
Furthermore, Cisco Nexus unified fabric is a holistic network architecture that includes switching, security, and services that are
designed for physical, virtual, and cloud environments. It uniquely integrates with servers, storage, and orchestration platforms for
more efficient operations and greater scalability.
Cisco has partnered with Docker to provide a container management solution to accelerate IT transformation by enabling fast, easy
deployments with greater flexibility of choice, business agility, efficiency, and lower risk.
Cisco, Docker, and Puppet have partnered to provide a solution to automate the solution deployment for production environment
using Puppet Enterprise. Puppet can integrate with Cisco UCS, Cisco Nexus switches, and Docker. Puppet has developed a
Docker Enterprise Edition module that helps in setting up Docker UCP and DTR clusters.
This guide describes how, using Puppet, Cisco UCS servers and Docker Enterprise Edition components are installed and
configured.
Technology overview
This solution design is based on an earlier Cisco Validated Design titled “Cisco UCS Infrastructure with Docker Enterprise Edition
for Container Management,” available at
http://www.cisco.com/c/en/us/td/docs/unified_computing/ucs/UCS_CVDs/ucs_docker.html.
A brief description of the solution is also available in the white paper at
https://www.cisco.com/c/en/us/products/collateral/servers-unified-computing/ucs-b-series-blade-servers/whitepaper_c11-
739330.html.
This design uses Puppet Enterprise to automate solution deployment. The following Puppet modules are used in this design:
●
Cisco UCS Manager’s Puppet module
●
Puppet’s Cisco NX-OS Software puppet module
●
Puppet’s Docker Enterprise Edition puppet module
Overview of Puppet architecture
Puppet usually uses an agent-master (client-server) architecture to configure systems, using the Puppet agent and Puppet
master function. It can also run in a self-contained system with the Puppet apply application. This document uses the agent-
master architecture.
Puppet usually runs in an agent-master architecture, in which a Puppet server controls important configuration information, and
managed agent nodes request only their own configuration catalogs.

White Paper
© 2018 Cisco and/or its affiliates. All rights reserved. This document is Cisco Public Information. Page 7 of 45
In this architecture, managed nodes run the Puppet agent application, usually as a background service. One or more servers
function as the Puppet master, usually in the form of a Puppet server.
Periodically, the Puppet agent sends data to the Puppet master and requests a catalog. The master compiles and returns that
node’s catalog, using several sources of information to which it has access.
After it receives a catalog, the Puppet agent applies the catalog by checking each resource that the catalog describes. If it finds
any resources that are not in their desired state, it makes any changes necessary to correct them. (Or, in no-op mode, it reports
the changes that would have been needed.)
After applying the catalog, the agent submits a report to the Puppet master.
Overview of Puppet Enterprise
Puppet Enterprise makes it easy to automate the provisioning, configuration, and ongoing management of machines and the
software running on them.
Figure 1. Typical Puppet Enterprise installation
The master of masters (MoM), or Puppet master, is the central component in Puppet Enterprise. Puppet code is compiled to create
agent catalogs, and SSL certificates are signed and verified in the Puppet master. Puppet Enterprise can be installed in two ways:
monolithic or split. In a monolithic installation, all services are hosted in one node. In a split installation, the Puppet master (or
MoM), Puppet Enterprise console, and PuppetDB are each hosted on a separate node.
The Puppet master contains the Puppet server, the catalog compiler, and an instance of file sync. The Puppet server also hosts
endpoints for the certificate authority service.
Catalog compilers compile the catalog for a Puppet Enterprise managed node. The catalog describes the desired state of each
resource on the node.
The file sync service keeps the Puppet code synchronized across all masters.

White Paper
© 2018 Cisco and/or its affiliates. All rights reserved. This document is Cisco Public Information. Page 8 of 45
The certificate authority service accepts certificate signing requests (CSRs) from nodes, serves certificates, and provides a
certificate revocation list (CRL) to nodes.
The console service GUI is the web-based user interface for managing your systems. Users can browse resources in nodes,
analyze events, browse inventory data, group and classify nodes, and configure the Puppet classes in the node catalogs.
Role-based access control (RBAC) service is used to manage user permissions. OpenLDAP and Active Directory are supported for
external authentication.
Activity service logs events for user roles, users, and user groups.
Node classifier service is used to assign Puppet classes to a group of nodes. Rules can be defined to identify the nodes in a group,
or nodes can be pinned to a group.
PuppetDB collects data generated throughout Puppet infrastructure. It enables advanced Puppet features such as exported
resources. It is the database from which the various components and services in Puppet Enterprise access data. PuppetDB uses
PostgreSQL.
Code manager service supports the management and deployment of Puppet code.
Orchestration service drives Puppet application orchestration and Puppet orchestrator. Puppet application orchestration provides
Puppet language extensions and command-line tools to configure and manage multiservice and multinode applications.
For more information about Puppet Enterprise, see Puppet’s documentation at https://docs.puppet.com/pe/latest/index.html.
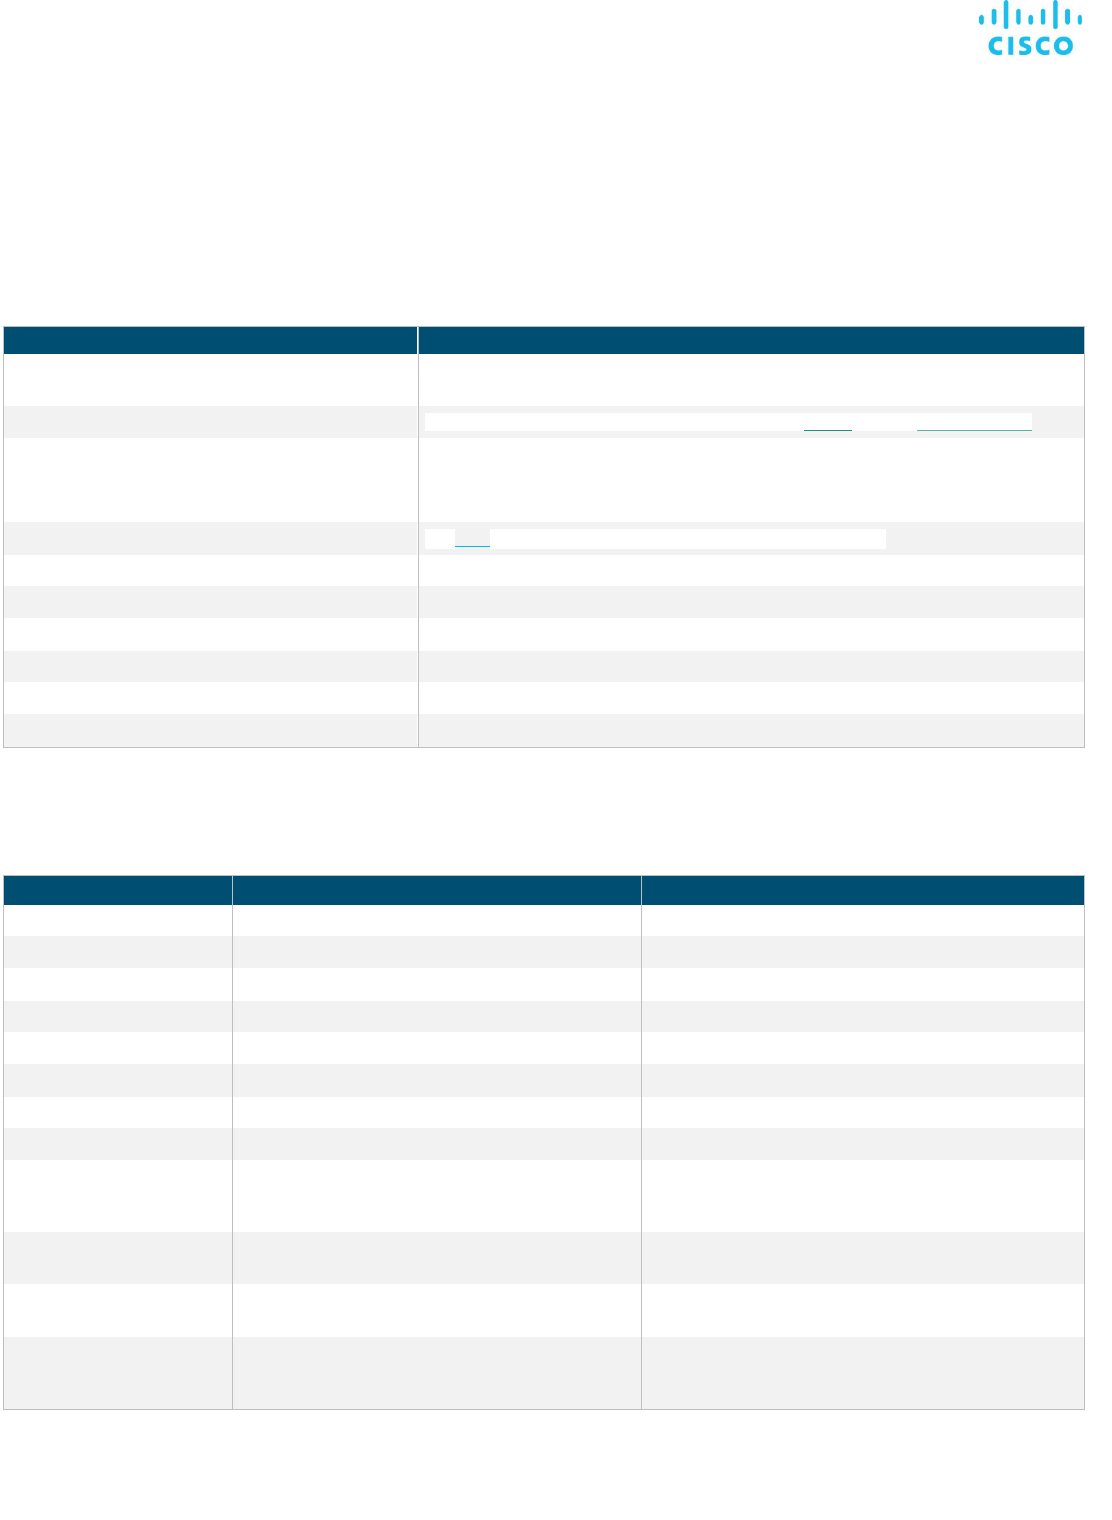
Network requirements
When installing the UCP controller or worker on a host, make sure that the ports listed in Table 1 are open.
Table 1. Ports required for Docker UCP
Host
Direction
Port
Purpose
Controller and worker
In
TCP 443
UCP web UI and API access
Controller
In
TCP 2376
Port for Docker swarm manager (backward compatibility)
Controller and worker
In
TCP 2377 (configurable)
Port for communication between swarm nodes
Controller and worker
In and out
TCP, UDP 4789
Port for overlay networking
Controller and worker
In, out
TCP, UDP 7946
Port for gossip-based clustering
Controller and worker
In
TCP 12376
Port for a TLS proxy that provides access to UCP, Docker Engine, and
Docker swarm
Controller
In
TCP 12379
Port for internal node configuration, cluster configuration, and high
availability
Controller
In
TCP 12380
Port for internal node configuration, cluster configuration, and high
availability
Controller
In
TCP 12381
Port for the certificate authority
Controller
In
TCP 12382
Port for the UCP certificate authority
Controller
In
TCP 12383
Port for the authentication storage back end
Controller
In
TCP 12384
Port for the authentication storage back end for replication across
controllers
Controller
In
TCP 12385
Port for the authentication service API
Controller
In
TCP 12386
Port for the authentication worker
Controller
In
TCP 12387
Port for the metrics service

White Paper
© 2018 Cisco and/or its affiliates. All rights reserved. This document is Cisco Public Information. Page 9 of 45
Also, make sure the networks you’re using allow the UCP components to communicate before they time out. Table 2 shows the
requirements.
Table 2. Timeout settings
Component
Timeout (ms)
Configurable
Raft consensus between manager nodes
3000
No
Gossip protocol for overlay networking
5000
No
Etcd
500
Yes
rethinkDB
10,000
No
Standalone swarm
90,000
No
DTR ports used
When installing DTR on a node, make sure that the ports listed in Table 3 are open on that node.
Table 3. Ports required for DTR
Direction
Port
Purpose
In
80 (TCP)
Web applications and API client access to DTR
In
443 (TCP)
Web applications and API client access to DTR
Puppet and Razor environment
For a complete list of supported platforms and system requirements for Puppet Enterprise, go to
https://docs.puppet.com/pe/2016.5/sys_req_hw.html.
To download Puppet Enterprise, go to https://puppet.com/download-puppet-enterprise.
This design is validated using the hardware and software components listed in Table 4.
Table 4. Hardware and software components
Layer
Device
Image
Puppet server
Virtual machine:
●
CPU: 2 cores
●
RAM: 4 GB
●
1 network interface card (NIC): 100 Mbps
●
Operating system: CentOS 7 (7.3.1611)
●
Puppet Enterprise: Release 2016.5.2
●
Puppet agent: Release 4.8.2
●
Hiera: Release 3.2.2
●
Facter: Release 3.5.1
●
PuppetDB: Release 4.2.5
●
Ruby: Release 2.1.9
●
Cisco’s Puppet module: Release 1.5.0
Spine and leaf switches
●
Cisco Nexus 9000 Series: Cisco Nexus 9272Q
Switch chassis
●
BIOS: Release 07.57
●
NX-OS: Release 7.0(3)I5(1)
●
NX-OS image file: bootflash:///nxos.7.0.3.I5.0.236.bin
●
NX-OS: Release 7.0(3)I5(1)
●
Puppet agent: Release 4.8.0
●
Hiera: Release 3.2.2
●
Facter: Release 3.5.0
●
Ruby: Release 2.1.9
●
Gems required: cisco_node_utils (1.5.0)

White Paper
© 2018 Cisco and/or its affiliates. All rights reserved. This document is Cisco Public Information. Page 10 of 45
To install Cisco’s Puppet module (ciscopuppet) on the Puppet server, use this command:
puppet module install puppetlabs-ciscopuppet --version 1.4.1
To install the cisco_node_utils gem on all switches, use this command:
gem install cisco_node_utils
Solution design
This section presents the steps for deploying the Cisco UCS and Docker solution.
Cisco UCS and Docker network deployment
Use the following steps to bring up the switch and make it ready for use with Puppet.
Initial setup
To set up the initial configuration for the first Cisco Nexus switch, complete the following steps:
1. Connect to the serial or console port of the switch.
Enter the configuration method: console
Abort Auto Provisioning and continue with normal setup? (yes/no[n]: y
---- System Admin Account Setup ----
Do you want to enforce secure password standard (yes/no[y] :
Enter the password for "admin":
Confirm the password for "admin":
---- Basic System Configuration Dialog VDC: 1 ----
This setup utility will guide you through the basic configuration of the system. Setup
configures only enough connectivity for management of the system.
Please register Cisco Nexus9000 Family devices promptly with your supplier. Failure to register
may affect response times for initial service calls. Nexus9000 devices must be registered to
receive entitled support services.
Press Enter at anytime to skip a dialog. Use ctrl-c at anytime to skip the remaining dialogs.
Would you like to enter the basic configuration dialog (yes/no): y
Create another login account (yes/no) [n]: n
Configure read-only SNMP community string (yes/no) [n]:
Configure read-write SNMP community string (yes/no) [n]:
Enter the switch name: Docker-N9K-A
Continue with Out-of-band (mgmt0) management configuration? (yes/no) [y]:
Mgmt0 IPv4 address: 10.65.121.54
Mgmt0 IPv4 netmask: 255.255.255.0 Configure the default gateway? (yes/no) [y]:
IPv4 address of the default gateway: 192.168.155.1
Configure advanced IP options? (yes/no) [n]:
Enable the telnet service? (yes/no) [n]:
Enable the ssh service? (yes/no) [y]:
Type of ssh key you would like to generate (dsa/rsa) [rsa]:
Number of rsa key bits <1024-2048> [1024]: 2048
Configure the ntp server? (yes/no) [n]: y
NTP server IPv4 address: 10.65.121.54
Configure default interface layer (L3/L2) [L2]:
Configure default switchport interface state (shut/noshut) [noshut]:
Configure CoPP system profile (strict/moderate/lenient/dense/skip) [strict]:
2. Review the settings displayed on the console. If they are correct, answer yes to apply and save the configuration.
3. Wait for the login prompt to make sure that the configuration has been saved prior to proceeding.
The values shown in boldface are examples only. You should replace these values with values appropriate to your network.

White Paper
© 2018 Cisco and/or its affiliates. All rights reserved. This document is Cisco Public Information. Page 11 of 45
Repeat the same steps for the second switch. Use the following values for second switch:
●
Nexus B Hostname: Docker-N9K-B
●
Nexus B mgmt0 IP address: 10.65.121.55
●
Nexus B mgmt0 Netmask: 255.255.255.0
●
Nexus B mgmt0 Default Gateway: 192.168.155.1
Puppet Agent installation and configuration
Follow the steps shown here to install the Puppet agent on Cisco Nexus 9000 Series Switches.
```
Assumption made: NXOS is installed and running on all switches.
```
1. Log in to the Cisco Nexus 9000 Series Switch through Secure Shell (SSH).
2. Enable the Bash shell as follows:
n9kswitch# configure terminal
n9kswitch# feature bash-shell
3. Synchronize with the Network Time Protocol (NTP) server.
n9kswitch# ntp server [ntp-server-address] use-vrf management
n9kswitch# exit
4. Run the Bash shell, enter sudo user mode, and specify proxy settings.
n9kswitch# run bash
n9kswitch# sudo su -
root@n9kswitch# ip netns exec management bash
5. Define proxy server variables to allow network access to yum.puppetlabs.com.
root@n9kswitch# export http_proxy=http://proxy.yourdomain.com:<port>
root@n9kswitch# export https_proxy=https://proxy.yourdomain.com:<port>
6. Import the Puppet GNU Privacy Guard (GPG) keys.
root@n9kswitch# rpm --import http://yum.puppetlabs.com/RPM-GPG-KEY-puppetlabs
root@n9kswitch# rpm --import http://yum.puppetlabs.com/RPM-GPG-KEY-reductive
root@n9kswitch# rpm --import http://yum.puppetlabs.com/RPM-GPG-KEY-puppet
7. Install the RPM.
root@n9kswitch# yum install http://yum.puppetlabs.com/puppetlabs-release-pc1-cisco-wrlinux-
5.noarch.rpm
root@n9kswitch# yum install puppet
8. Create the following soft links and update the PATH variables:
root@n9kswitch# sudo ln -s /opt/puppetlabs/bin/puppet /usr/local/bin/puppet
root@n9kswitch# sudo ln -s /opt/puppetlabs/bin/facter /usr/local/bin/facter
root@n9kswitch# sudo ln -s /opt/puppetlabs/bin/hiera /usr/local/bin/hiera

White Paper
© 2018 Cisco and/or its affiliates. All rights reserved. This document is Cisco Public Information. Page 12 of 45
root@n9kswitch# sudo ln -s /opt/puppetlabs/bin/mco /usr/local/bin/mco
root@n9kswitch# export
PATH=$PATH:/opt/puppetlabs/puppet/bin:/opt/puppetlabs/puppet/lib:/opt/puppetlabs/puppet/bin/gem
9. Configure /etc/puppetlabs/puppet/puppet.conf. Add your Puppet server name to the configuration file. Optionally, you can use
certname to specify the agent node ID. This setting is needed only if the host name has not been set.
!!!"
#$%&'("
""""")*+,*+"""-"$./0//*1$%)1*+!$.23$/%'.!23$"
"""""2*+1'%$*"-"14&)5'36*!$.23$/%'.!23$"
!!!"
10. Install the cisco_node_utils gem.
+3317'89):&124;"<*$"&')1%=="2&)235'36*501&=)"
11. Start Puppet service and run the Puppet agent. Running the puppet agent command (with no arguments) will start the
Puppet agent process with the default run interval of 30 minutes. Use the -t option to run the Puppet agent in test mode,
which runs the agent a single time and then stops.
+3317'89):&124;")*+,&2*"/0//*1")1%+1"
+3317'89):&124;"/0//*1"%<*'1">1"
12. Sign the certificate of the Puppet agent on the master node.
/0//*1"2*+1"=&)1">>%=="
/0//*1"2*+1")&<'"?14&)5'36*!$.23$/%'.!23$?
Table 5 lists the classes used to build the switch configuration to deploy the Cisco UCS and Docker solution.
Table 5. Classes used in the solution
Class
Explanation
ucs::switch_config::
install_prerequisite_puppet_modules
Uses the package cisco_node_utils to install gem and Cisco Nexus switch modules
ucs::switch_config:: enable_features
Enables features required for this deployment: Unidirectional Link Detection (UDLD), LACP, vPC,
and interface VLAN
ucs::switch_config:: stp_global_parameters
Configures spanning tree network, Bridge Protocol Data Unit (BPDU) filter (bpdufilter), and
BPDU guard (bdpduguard) parameters
ucs::switch_config:: Vlan
Creates the necessary VLANs
ucs::switch_config:: peer_links
Creates the peer links for use in vPC
ucs::switch_config:: vpc_domain
Creates the VPC domain, peer keepalive configuration, role priority, delay restore, peer gateway,
autorecovery, and IP Address Resolution Protocol (ARP) synchronize features for the vPC domain
ucs::switch_config:: host_interface
Configures host interfaces connecting to the Cisco UCS fabric interconnect
ucs::switch_config:: portchannel
Creates the port-channel configuration
ucs::switch_config::interface_portchannel
Configures port-channel interface parameters

White Paper
© 2018 Cisco and/or its affiliates. All rights reserved. This document is Cisco Public Information. Page 13 of 45
Cisco UCS server deployment
The Cisco Puppet module for Cisco UCS Manager allows administrators to automate all aspects of Cisco UCS management,
including server, network, storage, and hypervisor management. The majority of the Cisco UCS Manager Puppet module work is
on the Cisco UCS Manager’s management information tree (MIT), performing create, modify, and delete actions on the managed
objects (MOs) in the tree. The resources and capabilities provided by this Puppet module will grow with contributions from Cisco,
Puppet, and the open-source community.
A chassis with five servers is used. A Cisco Nexus 9000 Series top-of-the-rack (ToR) switch is used to connect to the data center
network. The chassis is connected to the Cisco Nexus 9000 Series ToR switch through fabric interconnects.
Figure 2 shows the Cisco UCS environment and Puppet Enterprise and Razor servers in the lab topology. The lab topology uses
the Cisco UCS 5108 Blade Server Chassis. This chassis is six rack units (6RU) high and can house up to 8 half-width Cisco UCS
B-Series Blade Servers. This chassis houses the UCP controller, UCP controller replica, DTR, DTR replica, and UCP node.
Figure 2. Lab topology for Cisco UCS and Docker deployment
Puppet Enterprise and Razor server installation
A virtual machine running CentOS 7 was chosen to serve as the Puppet master. On this virtual machine, Puppet Enterprise was
installed.
The steps for installing Puppet Enterprise on the virtual machine and node are as follows:
1. Go to the Puppet Enterprise product page. Sign up and download the Puppet Enterprise installer package for your virtual
machine and node.
2. After the download is complete, run the installer inside the package and follow the prompts for the installation.
3. When the installation process is successful, check verify that the status of all Puppet Enterprises services are active before
proceeding further. Use the following command to check the status of the services:
).)1*$21=")1%10)"/*>/0//*1@"

White Paper
© 2018 Cisco and/or its affiliates. All rights reserved. This document is Cisco Public Information. Page 14 of 45
4. Set firewall rules to allow the following ports.
●
sudo su
●
ufw status
●
ufw enable
●
ufw allow 22
●
ufw allow 8140
●
ufw allow 4433
●
ufw allow 8143
●
ufw allow 8140
●
ufw allow 8081
●
ufw allow 4433
●
ufw status
The Razor server is required to install the OS and Puppet agent on all Puppet Enterprise managed Cisco UCS servers.
Refer to https://communities.cisco.com/docs/DOC-68023for more information about how to set up Puppet Enterprise and Razor
for programmatic provisioning of Cisco UCS.
Install the Razor server
Razor is a Puppet managed node and must have a Puppet agent that can connect to the Puppet master. All razor components can
be automatically installed by Puppet.
1. Enter the following command to install the Puppet agent on Razor (<puppet server> is the fully qualified domain name
(FQDN) of the Puppet Enterprise server):
curl -k https://<puppet server>:8140/packages/current/install.bash | sudo bash
2. After the Puppet agent is installed, you can use the Puppet Enterprise console (on the Puppet master) to add needed
components to the Razor node:
●
In the Puppet Enterprise console, choose Nodes > Classification and then click Add Group.
●
Specify options for the new node group:
◦ Parent name: Select All Nodes.
◦ Group name: Enter Razor.
◦ Environment: Select Production.
◦ Environment group: Don’t select this option.
●
Click Add.
●
Click the Razor group.
●
From the Rules tab, in the Certname area, in the Node Name field, enter razor.
●
Click Pin Node.
●
Click Commit 1 Change.
3. Install the client: gem install pe-razor-client.
4. Point the Razor client to the server:
razor -u https://$<RAZOR_HOSTNAME>:$<HTTPS_PORT>/api
RAZOR_HOSTNAME is the host name of the server on which Razor is installed, and HTTPS_PORT is the desired HTTPS port.

White Paper
© 2018 Cisco and/or its affiliates. All rights reserved. This document is Cisco Public Information. Page 15 of 45
Create Razor tags and Razor policies for Docker nodes
Razor tags are used to match node facts with named tags that can be used when creating Razor policies. In this task, you will
create tags that match portions of service profile template names (available to Razor in dmi_oem_string_3).
After tags are created, they can be used by Razor policies that specify the OS to install, the broker to use for ongoing configuration
management (Puppet Enterprise in this lab), and the host name to set for each node. Node host names (and other facts) can be
used in subsequent node classifications within Puppet.
For this solution you will create razor tags and set up policies for the DTR, UCP controller, and UCP worker node. Note that the
create-policy examples shown here use node host names specific to the Cisco UCS 3.1 demo environment in the Cisco demo
cloud (dcloud.cisco.com). Visit https://dcloud-cms.cisco.com/demo/cisco-ucs-3-1-v1 for more information about the Puppet and
Razor demo environment. Replace dcloud.cisco.com in host names for your environment.
Also note that the demo cloud environment differs slightly from the example configuration in the Cisco Validated Design. See the
readme file at https://forge.puppet.com/ciscoucs/ucsm_dockerdc for additional information about customizing the Cisco UCS
Manager configuration provided by the ucsm_dockerdc module.
1. For DTR nodes, match any service profile template names with a DTR substring, set up a policy to install CentOS 7, and set a
specific host name as follows:
●
razor create-tag --name Docker-DTR --rule '["like", ["str", ["fact", "dmi_oem_string_3",
"empty"]], ".*DTR.*"]'
●
razor create-policy --name Docker-DTR --repo centos7 --broker pe-ucs --tag Docker-DTR --
hostname 'DDC-DTR-${id}.dcloud.cisco.com' --root-password password
2. For Docker UCP control nodes, create tags that match any service profile template names with a UCP-Ctrl substring and again
install CentOS 7 with a specific host name as follows:
●
razor create-tag --name Docker-UCP-Ctrl --rule '["like", ["str", ["fact", "dmi_oem_string_3",
"empty"]], ".*UCP-Ctrl.*"]'
●
razor create-policy --name Docker-UCP-Ctrl --repo centos7 --broker pe-ucs --tag Docker-UCP-
Ctrl --hostname 'UCP-Ctrl-${id}.dcloud.cisco.com' --root-password password
3. For Docker UCP worker nodes, create tags that match any service profile template names with a UCP-Node substring and
again install CentOS 7 with a specific host name as follows:
●
razor create-tag --name Docker-UCP-Node --rule '["like", ["str", ["fact", "dmi_oem_string_3",
"empty"]], ".*UCP-Node.*"]'
●
razor create-policy --name Docker-UCP-Node --repo centos7 --broker pe-ucs --tag Docker-UCP-
Node --hostname 'UCP-Node-${id}.dcloud.cisco.com' --root-password password
With the Razor tags and policies in place, you are ready to install and use Puppet modules to automate all aspects of Cisco UCS
Manager configuration. After Cisco UCS Manager service profiles are deployed, the Razor policies you set her will install the OS on
each node, and the nodes will automatically be brought under ongoing configuration management by Puppet.
Install Cisco UCS modules for Puppet
Install Cisco UCS Puppet modules from the Puppet forge. The ciscoucs-ucsm_dockerdc module should be installed to bring up
the Cisco UCS and Docker Enterprise Edition topology.
1. Open a terminal session on the puppet1 server and log in.
2. Install the Cisco UCS Manager Docker Enterprise Edition module from the Puppet forge.
puppet module install ciscoucs-ucsm_dockerdc

White Paper
© 2018 Cisco and/or its affiliates. All rights reserved. This document is Cisco Public Information. Page 16 of 45
Visit https://forge.puppet.com/ciscoucs/ucsm_dockerdc to read more about on the latest Cisco UCS Manager (ucsm) module.
Note that the ucsm_dockerdc module will automatically install the Cisco UCS Manager Puppet module and other dependencies
such as the Cisco UCS Manager Python software development kit (SDK). Visit https://forge.puppet.com/ciscoucs/ucsm to read
more about the latest ucsm module.
The ucsm and ucsm_dockerdc modules will be used to automate all aspects of Cisco UCS Manager configuration for a Docker
cluster deployment.
Cisco UCS Manager does not run a Puppet agent, so an existing Puppet agent under Puppet management is used to communicate
with Cisco UCS Manager. This reference design based on the Cisco demo cloud environment uses the puppet1 server itself as the
node that communicates with Cisco UCS Manager.
Prepare Hiera data for Cisco UCS and Docker server provisioning
The Hiera data needed to provision Cisco UCS servers is available in
/etc/puppetlabs/code/environments/production/modules/ucsm_dockerdc/data/ucsm_dockerdc/ puppet1.dcloud.cisco.com.yaml.
You can view this data and modify it to suit the environment you are deploying. The data provided here is an example.
---
# login information
ucsm_dockerdc::login_info:
ip: 198.18.0.10
username: ucs-dCloud\demouser
password: C1sco12345
#vlan configuration data
ucsm_dockerdc::vlans::vlan_list:
- name: UCS_Data_10
id: "10"
native: "false"
#mac address pool
ucsm_dockerdc::macs::mac_list:
- name: Docker
start: 00:25:B5:00:66:00
end: 00:25:B5:00:67:F3
For example, parameters and values provided in the login information section are used to log in to Cisco UCS Manager to
configure various profiles. Other parameters are used in configuring the BIOS policy, boot policy, disk group policy, MAC address
pool, server pools (for the UCP controller, UCP worker nodes, and DTR nodes), storage profile, universally unique ID (UUID) pool,
virtual network interface card (vNIC) templates, and service profile templates (for the UCP controller, UCP worker nodes, and DTR
nodes).

White Paper
© 2018 Cisco and/or its affiliates. All rights reserved. This document is Cisco Public Information. Page 17 of 45
Classes used in ucsm_dockerdc
Table 6 shows the classes used to configure Cisco UCS Manager profiles to deploy Cisco UCS servers.
Details can be viewed in /etc/puppetlabs/code/environments/production/modules/ucsm_dockerdc/
manifests/profile/ucsm_config.pp.
Table 6. Classes for configuring Cisco UCS Manager profiles
Class
Explanation
ucsm_dockerdc::vlans
Configures a VLAN on the Cisco UCS server with a given IP address
ucsm_dockerdc::macs
Creates a MAC address pool; MAC addresses in this pool will be used for traffic through fabric
interconnects
ucsm_dockerdc::vnic_templates
Creates vNIC templates for Cisco UCS hosts
Creates 2 vNICs: one through Fabric Interface A and the other through Fabric Interface B; all host traffic is
carried through these interfaces
ucsm_dockerdc::bios_policy
Creates BIOS policy for Cisco UCS hosts
ucsm_dockerdc::boot_policy
Creates boot policy and assigns boot Logical Unit Numbers (LUNs)
ucsm_dockerdc::uuids
Creates UUID pools for the Cisco UCS Manager environment
ucsm_dockerdc::server_pools
Creates server pools for use in Docker UCP controllers, DTRs, and UCP nodes
ucsm_dockerdc::disk_group_policy
Creates disk group policy for use in storage profiles
ucsm_dockerdc::storage_profile
Creates a storage profile; storage profiles provide a systematic way to automate the steps for provisioning
disk groups, RAID levels, LUNs, boot drives, hot spares, and other related resources
ucsm_dockerdc::service_profile_templates
Creates 3 service profile templates: one for DTR nodes, one for UCP controller nodes, and one for UCP
nodes; individual service profiles will be instantiated from the 3 templates
Configure data used by nodes that interface with Cisco UCS Manager
The puppet1.dcloud.cisco.com.yaml file contents must be placed in Hiera’s lookup path so the data can be used in Puppet code
with Puppet variable lookups. In this example, you will place the puppet1.dcloud.cisco.com.yaml file contents in the Hiera lookup
path for puppet1.dcloud.cisco.com (the Puppet master server). The puppet1 node will be used to interface with the Cisco UCS
Manager domain (the puppet1 Puppet agent will use the ucsm_dockerdc and ucsm Puppet modules to configure the Cisco UCS
domain).
The puppet1.dcloud.cisco.com.yaml file can be customized as needed and placed in any node’s Hiera lookup path for other
Puppet environments. In the dCloud environment, the default Hiera data lookup location is
/etc/puppetlabs/code/environments/production/hieradata/nodes..
1. Create the nodes directory (if it does not already exist):
mkdir -p /etc/puppetlabs/code/environments/production/hieradata/nodes
2. Append the ucsm_dockerdc module data to the production Hiera lookup path (the following command is a single line):
cat data/ucsm_dockerdc/puppet1.dcloud.cisco.com.yaml >>
/etc/puppetlabs/code/environments/production/hieradata/nodes/puppet1.dcloud.cisco.com.yaml
You should append the data only one time to avoid placing extra data in the puppet1.dcloud.cisco.com.yaml file. If you want to
edit the settings, make all subsequent data updates directly in the production file:
/etc/puppetlabs/code/environments/production/hieradata/nodes/puppet1.dcloud.cisco.com.yaml.
The dCloud environment provides Puppet Enterprise, and you can use the Puppet Enterprise console to add the
ucsm_dockerdc classes for configuring the Cisco UCS Manager domain.
3. Log in to the Puppet Enterprise console and create a node group for the Cisco UCS Manager domain to manage:

White Paper
© 2018 Cisco and/or its affiliates. All rights reserved. This document is Cisco Public Information. Page 18 of 45
4. Click Nodes.
5. Click Classification.
6. Click “Add group.”
7. Enter UCSM1 for the group name and optionally enter a description (for example, UCSM Domain 1). Then click Add.

White Paper
© 2018 Cisco and/or its affiliates. All rights reserved. This document is Cisco Public Information. Page 19 of 45
8. Click “Add membership rules, classes, and variables.”
9. In the “Pin specific nodes to the group” section, select puppet.example.com as the node name, click “Pin node,” and click
“Commit change.”

White Paper
© 2018 Cisco and/or its affiliates. All rights reserved. This document is Cisco Public Information. Page 20 of 45
10. Click the Classes tab.
11. In the “Add new class” text box, type ucsm and select the ucsm_dockerdc::profile::ucsm_config class.
Note that there are several other classes that can be selected to configure different Cisco UCS Manager pools, policies, and
profiles. The ucsm_dockerdc::profile::ucsm_config class implements the complete configuration of the Cisco UCS Manager
domain following the Cisco Validated Design with Docker.

White Paper
© 2018 Cisco and/or its affiliates. All rights reserved. This document is Cisco Public Information. Page 21 of 45
12. Click “Add class” and then click “Commit 1 change.”
Run Puppet
Now run Puppet.
1. Click the “Matching nodes” tab and click puppet1.example.cisco.com to view the node group and classes currently assigned
to puppet1.
2. Click Run Puppet. Then click Run to run the Puppet agent, which will also perform Cisco UCS Manager configuration using the
ucsm_dockerdc::profile::ucsm_config class.

White Paper
© 2018 Cisco and/or its affiliates. All rights reserved. This document is Cisco Public Information. Page 22 of 45
Verify the Puppet and Cisco UCS Manager configuration
After successfully running Puppet using either Puppet apply from or the Puppet Enterprise console, you can verify service profile
template creation in the Cisco UCS Manager web user interface (198.18.0.10).
1. In Microsoft Windows Remote Desktop, click the Cisco UCS Manager bookmark.
2. Launch Cisco UCS Manager and log in with username demouser, password C1sco12345, and domain example.
3. Navigate to Servers >Service Profiles, and after a few minutes you should see the DDC-DTR, UCP-Ctrl, and UCP-Node
service profiles with the association state Associated.
4. Double-click one of the service profiles and open an HTML5 Kernel-based Virtual Machine (KVM) console from the General
tab.

White Paper
© 2018 Cisco and/or its affiliates. All rights reserved. This document is Cisco Public Information. Page 23 of 45
The KVM console should show various stages of service profile boot and OS installation processes performed by the Razor
preboot execution environment (PXE) server.
After the OS installation is complete on all nodes (the process should take approximately 20 minutes), you can verify that the
nodes are visible in Puppet Enterprise.
5. Log in to the Puppet Enterprise console.
6. Click Nodes.

White Paper
© 2018 Cisco and/or its affiliates. All rights reserved. This document is Cisco Public Information. Page 24 of 45
You should see the DTR, UCP-Ctrl, and UCP-Nodes now under management by Puppet.
The Docker cluster nodes can now be further classified within Puppet and have classes added as needed to manage all aspects of
the intended workload.
Docker Enterprise Edition deployment
Docker UCP uses the clustering and orchestration functions provided by Docker. A swarm is a collection of nodes that are in the
same Docker cluster. Nodes in a Docker swarm operate in one of two modes: manager or worker. UCP is a containerized
application that runs on Docker EE.
All nodes run the UCP agent. The UCP agent monitors the node to help ensure that all services required in the node for the mode
in which it is configured are running.
Manager nodes run all UCP services, including the web user interface and data stores that persist the state of UCP.
In the UCP worker node, UCP proxy runs in addition to the UCP agent. The UCP proxy service helps ensure that only authorized
users and other UCP services can run Docker commands in that node.
Docker Trusted Registry deployment
DTR is the enterprise-class image storage solution from Docker. You install it behind your firewall so that you can securely store
and manage the Docker images that you use in your applications. DTR is highly available through the use of multiple replicas of all
containers and metadata, so if a server fails, DTR continues to operate and your storage can be repaired. To achieve DTR shared
storage high availability for the image repository for the DTR cluster nodes, this solution uses a Network File System (NFS) shared
volume configuration.
Follow these steps to install Docker UCP:
1. Verify and prepare the system. Configure firewall rules to allow ports as required for DTR.
2. Install Docker Engine. Release 1.13 is required.
3. Install UCP and add this node as a worker node to the cluster.
White Paper
© 2018 Cisco and/or its affiliates. All rights reserved. This document is Cisco Public Information. Page 25 of 45
4. Install DTR.
5. Add DTR replicas to the cluster as needed.
Puppet classes for Docker UCP and DTR deployment
Table 7 shows the Puppet classes used for UCP and DTR.
Table 7. Puppet classes for Docker UCP and DTR
Class
Explanation
firewalld
The module manages firewalld (the Docker firewall) itself and provides types for managing
firewalld zones, ports, and rules.
docker
Puppet module for installing, configuring, and managing Docker from the official repository
docker_ee_cvd::docker::engine
Use docker repo enable for all nodes.
Open firewall ports related to the Docker module on all nodes
Install and start NTP service for all nodes.
docker_ddc::ucp
The UCP module helps set up a UCP controller and join nodes to it.
docker_ee_cvd::docker::role::ucp::controller::master
UCP manager master node installation
docker_ee_cvd::docker::role::ucp::controller::replica
UCP manager replica node installation
docker_ee_cvd::docker::role::ucp::worker
UCP worker node installation
docker_ddc::dtr
DTR installation from repository
docker_ee_cvd::docker::role::ucp::dtr::master
DTR installation and configuration as DTR master
docker_ee_cvd::docker::role::ucp::dtr::replica
DTR installation and configuration as DTR replica
Table 8 shows the parameters required by Puppet classes for provisioning UCP and DTR nodes.
Table 8. Parameters required for Docker UCP and DTR nodes
Parameter
Value
Description
$ucp_username
'admin'
UCP credentials: username
$ucp_password
'puppetlabs'
UCP credentials: password
$ucp_controller_port
'19002'
Controller port to be set
$ucp_version
'2.2.5'
UCP Version to be used
$dtr_version
'2.4.1'
DTR version to be used
$docker_socket_path
'/var/run/docker.sock'
Socket path
$license_file
'/etc/docker/subscription.lic'
License file path
$external_ca
false
External certificate authority
$package_source_location
'https://storebits.docker.com/ee/centos/sub-
4ad5c2c8-5962-49d2-bb65-
93aa9249c3d8/7/x86_64/17.06.2-ee-6 /'
URL from which the Docker EE packages can be
downloaded
$package_key_source
https://storebits.docker.com/ee/m/sub-
4fc3291d-85c6-4f54-8cd0-cc3cdcd9ae5a
Key for download (register with Docker to get
the location and key details)
$package_repos
'https://storebits.docker.com/ee/centos/sub-
4ad5c2c8-5962-49d2-bb65-93aa9249c3d8/gpg'
$local_client
'17.06.2-ee-6 '
Should always be set to True; otherwise, Puppet
agent will try to reinstall Docker Engine on
periodic runs

White Paper
© 2018 Cisco and/or its affiliates. All rights reserved. This document is Cisco Public Information. Page 26 of 45
Puppet Enterprise setup for Cisco UCS and Docker Enterprise Edition
This section describes the setup required in Puppet Enterprise to implement the Cisco UCS and Docker Enterprise Edition solution.
This solution uses Docker EE ‘17.06.2-ee-6 ’ for the validation process.
Before you start deployment of Docker Enterprise Edition nodes, you should have a Docker ID and the credentials needed to log in
to the Docker store and get Docker EE for CentOS.
Get setup instructions for Docker Enterprise Edition for CentOS
See the detailed instructions on the Docker EE installation page: https://docs.docker.com/engine/installation/linux/docker-
ee/centos/.
Log in to the Docker store at https://store.docker.com/my-content and get the package location and keys. You will need to enter
this information in the parameter section of the docker_ee_cvd manifest.
Install docker_ee_cvd modules in Puppet Enterprise
Install the Docker EE modules.
●
Use the following Puppet forge link to install the Docker module:
https://forge.puppet.com/puppetlabs/docker
The GitHub link is https://github.com/puppetlabs/puppetlabs-docker.
Release 1.0.0 and later is supported.
●
Use the following Puppet forge link to install the Docker Enterprise Edition module:
https://forge.puppet.com/puppetlabs/docker_ddc
The GitHub link is https://github.com/puppetlabs/puppetlabs-docker_ddc.
Release 1.0.0 and later is supported.
●
Use the following Puppet forge link to install the firewall module:
https://forge.puppet.com/crayfishx/firewalld
White Paper
© 2018 Cisco and/or its affiliates. All rights reserved. This document is Cisco Public Information. Page 27 of 45
●
Use the following link to clone docker_ee_cvd modules used to orchestrate the provisioning of Docker EE components:
git clone https://github.com/CiscoUcs/puppet-docker_ee_cvd docker_ee_cvd
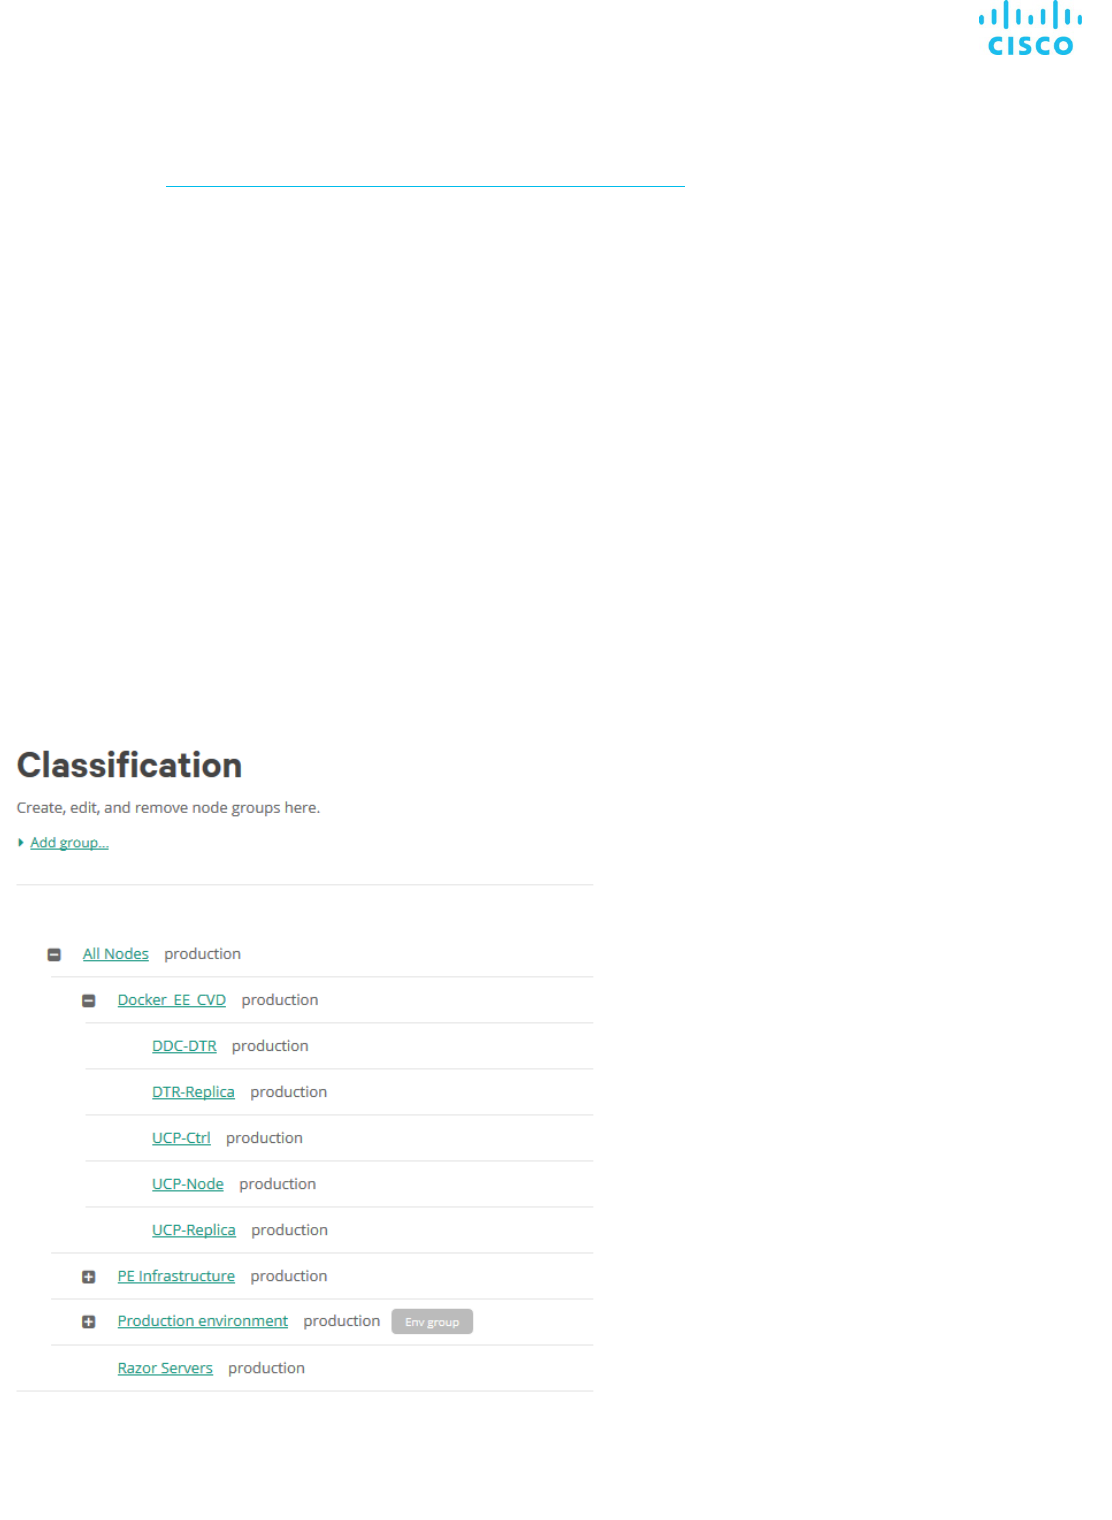
Node classification
Puppet Enterprise allows you to configure your nodes by assigning classes, parameters, and variables to them. This process is
called classification. In Docker Enterprise Edition, the nodes perform different roles, but a set of nodes uses the same classes in
their configuration. For example, all Docker Enterprise Edition nodes use the docker_ee_cvd::docker::engine class to install
Docker Engine. Hence, the process is easy if you build node groups and define all the classes that each group uses to configure
the nodes associated with the node group. You can either associate nodes with these groups or create rules to dynamically
identify and add the nodes to a group. You can build a hierarchy of node groups with parent and child relationships.
In the Docker Enterprise Edition example presented here, you define the following node groups:
●
Docker_EE_CVD: This parent group contains all the Cisco UCS nodes belonging to Docker Enterprise Edition.
●
UCP-Ctrl: This node group represents the nodes that are configured as the UCP controller master.
●
UCP-Replica: To make the UCP controller highly available, you can deploy multiple controller nodes. This group represents
UCP controller replica nodes.
●
DDC-DTR: This node group represents the DTR nodes.
●
DTR-Replica: For high availability, if multiple DTRs are added to the clusters, they belong to this node group.
●
UCP-Node: This group represents UCP worker nodes.

White Paper
© 2018 Cisco and/or its affiliates. All rights reserved. This document is Cisco Public Information. Page 28 of 45
UCP-Ctrl: UCP controller master group
In this solution you will add a node named ucp-ctrl-10 by pinning it to the UCP Ctrl group.
The next step is to assign classes and variables for this group.
The class docker_ee_cvd::docker::role::ucp::controller::master installs and configures the following:
●
Docker Engine
●
Docker UCP, which is configured as a controller
For the default parameters required by this class, see docker_ee_cvd/manifests/docker/params.pp.

White Paper
© 2018 Cisco and/or its affiliates. All rights reserved. This document is Cisco Public Information. Page 29 of 45
The values should be modified for the environment you deploy. You will need to log in with your Docker ID and credentials to get
the Docker source location and key. The parameters $package_source_location and $package_key_source are obtained
from your Docker subscription. See the section “Get setup instructions for Docker Enterprise Edition for CentOS”
You can override values in the params.pp file in the Puppet Enterprise console while assigning a class to the node group.
To bring up nodes in Cisco UCS and Docker Enterprise Edition cluster, first install and configure the UCP controller master. The
UCP controller master generates custom facts, which are required and used to deploy other Docker EE nodes, such as controller
replicas, worker nodes, DTR, and DTR replicas. To generate these custom facts, an additional configuration for the Docker EE UCP
controller master is required.
The UCP controller master generates the following custom facts:
ucp_controller_port
19002
ucp_fingerprint
9E:4E:12:83:89:94:6E:93:AD:F0:54:C3:AC:A8:6C:FF:F2:2E:B7:4F:29:E7:29:D5:A5:DA:19:FE:48:9D:AB:BC
ucp_manager_token
SWMTKN-1-37h1sesi3jfctoetz4x69nqf91uy3f9hdx1ddc6brqk7o1yhtl-c14j7cdug5c2eqkjs530ml9pu
ucp_version
2.2.5
ucp_worker_token
SWMTKN-1-37h1sesi3jfctoetz4x69nqf91uy3f9hdx1ddc6brqk7o1yhtl-7pg0q5x65e23wet4hl0ig1emf
Note: After Puppet has completed its configuration processing to install the Docker EE UCP controller master, you'll need to run the
configuration one more time. Normally, and in the vast majority of situations, you will not need to do this, but in this case an
additional set of files is installed in the form of custom facts. These are used in the second run of Puppet to compute additional
metadata, which is subsequently used by a number of other components in the next steps. Note, though, that Puppet should not
be making additional changes to your system in this second run of the configuration agent because Puppet enforced the desired
state in the first run. You should make changes only if the configuration has drifted from this desired state.
After the node is successfully configured, a configuration run report will be available in the Puppet Enterprise inventory for this
node. You can also view the list of Puppet classes used to configure the node.

White Paper
© 2018 Cisco and/or its affiliates. All rights reserved. This document is Cisco Public Information. Page 30 of 45

White Paper
© 2018 Cisco and/or its affiliates. All rights reserved. This document is Cisco Public Information. Page 31 of 45
UCP-Replica: UCP controller replica group
The node named ucp-ctrl-11 is deployed as a UCP controller replica. This node is pinned to the UCP controller replica group.
The class docker_ee_cvd::docker::role::ucp::controller::replica is assigned to this group.
The Puppet class docker_ee_cvd::docker::role::ucp::controller::replica configures the following:
●
Docker Engine
●
Docker UCP, which is configured as a controller and added to the controller master to form a cluster

White Paper
© 2018 Cisco and/or its affiliates. All rights reserved. This document is Cisco Public Information. Page 32 of 45
The parameters ucp_username and ucp_password are inherited from the parameter class
docker_ee_cvd::docker::params. In addition, the following facts are retrieved from PuppetDB:
●
$replica_address: IP address of the node, retrieved from Puppet Enterprise facts available for this node from the
infrastructure configuration
●
$ucp_controller_node: Controller master to which this node should be added
●
$ucp_version: Custom fact generated by the controller master node to indicate the version of Docker that is loaded
●
$ucp_ipaddress: IP address of the UCP controller master
●
$ucp_controller_port: Custom fact from the UCP controller master that identifies the port assigned to the UCP controller
master
●
$ucp_manager_token: Token to be used to join the UCP cluster as a controller replica
●
$ucp_fingerprint: Fingerprint of the certificate used in the UCP controller master
After the node is configured and running, you can view a report in Puppet Enterprise.

White Paper
© 2018 Cisco and/or its affiliates. All rights reserved. This document is Cisco Public Information. Page 33 of 45
The Puppet classes used in deploying this node are shown here.
UCP-Node: UCP node group
The node named ucp-node-10 is deployed as a UCP worker node. This node is pinned to the UCP node group.
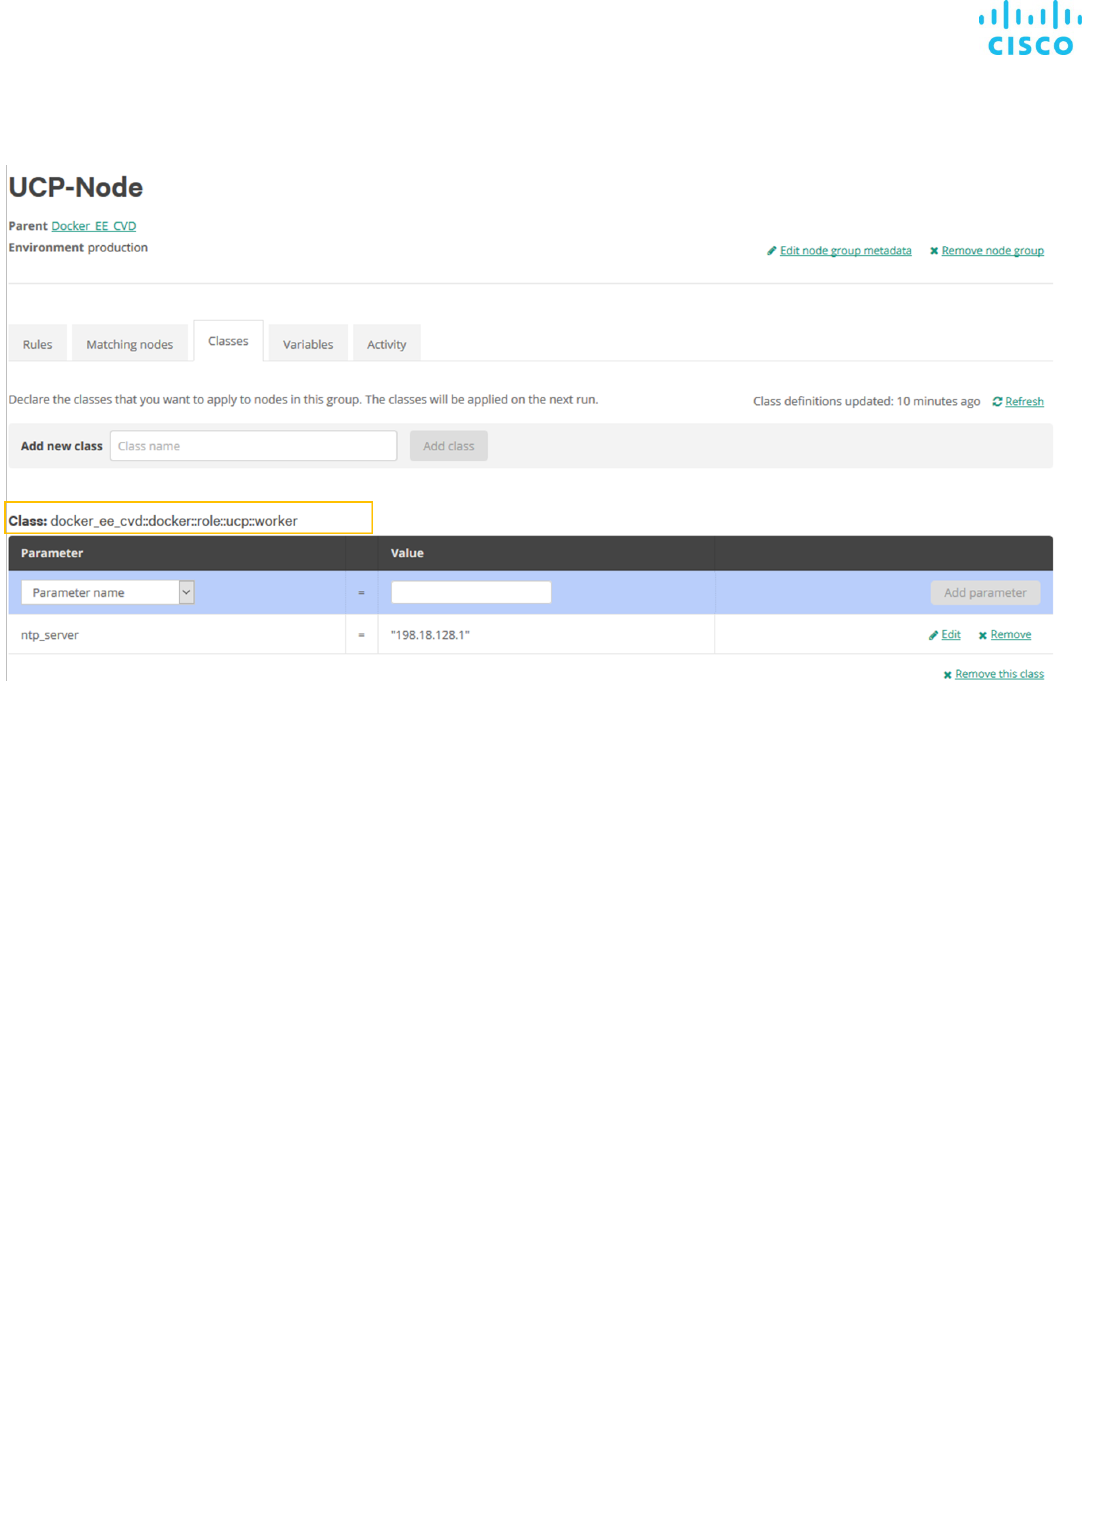
White Paper
© 2018 Cisco and/or its affiliates. All rights reserved. This document is Cisco Public Information. Page 34 of 45
The class docker_ee_cvd::docker::role::ucp::worker is assigned to this group.
The Puppet class docker_ee_cvd::docker::role::ucp::worker configures the following:
●
Docker Engine
●
Docker UCP, which is configured as a worker node
The following parameters are used to configure this node:
●
$worker_address: IP address of the node, retrieved from the Puppet Enterprise facts available for this node from the
infrastructure configuration
●
$ucp_controller_node: Controller master to which this node should be added
●
$ucp_version: Custom fact generated by the controller master node to indicate the version of Docker that is loaded
●
$ucp_ipaddress: IP address of the UCP controller master
●
$ucp_controller_port: Custom fact from the UCP controller master identifying the port assigned to the UCP controller
master
●
$ucp_worker_token: Token to be used to join the UCP cluster as a worker node
●
$ucp_fingerprint: Fingerprint of the certificate used in the UCP controller master

White Paper
© 2018 Cisco and/or its affiliates. All rights reserved. This document is Cisco Public Information. Page 35 of 45
After the node is configured and running, you can view a report of the processing in Puppet Enterprise.
The Puppet classes used in deploying this node are shown here.

White Paper
© 2018 Cisco and/or its affiliates. All rights reserved. This document is Cisco Public Information. Page 36 of 45
DDC-DTR: UCP DTR master group
The node named ddc-dtr-10 is deployed as the DTR master. This node is pinned to the UCP DTR master node group.
The class docker ee_cvd::docker::role::ucp::dtr::master is assigned to this group.
The class docker ee_cvd::docker::role::ucp::dtr::master configures the following:
●
Docker Engine
●
Docker UCP, which is installed and configured with a worker node role; the DTR application runs on a UCP worker node
●
DTR, which is installed and configured as a master

White Paper
© 2018 Cisco and/or its affiliates. All rights reserved. This document is Cisco Public Information. Page 37 of 45
The following parameters are required to configure the DTR master:
●
$dtr_version: Application version to be used
●
$ucp_username: Server credentials
●
$ucp_password: Server credentials
Note: The preceding values are inherited from docker_ee_cvd::docker::params.
●
$dtr_node_ip: IP address of the node retrieved from Puppet Enterprise facts created by the infrastructure configuration
●
$dtr_node_hostname: Host name of the node retrieved from Puppet Enterprise facts created by the infrastructure
configuration
●
$ucp_ipaddress: Custom facts retrieved from the UCP controller master using a PuppetDB query to get the IP address of
the UCP controller master
●
$ucp_controller_port: Custom facts retrieved from the UCP controller master using a PuppetDB query to get the port
assigned to the UCP controller master
After the node is configured and running, you can view a report of the processing in Puppet Enterprise.

White Paper
© 2018 Cisco and/or its affiliates. All rights reserved. This document is Cisco Public Information. Page 38 of 45
The Puppet classes used in deploying this node are shown here.
The DTR master generates custom facts for use in deploying DTR replicas.
dtr_replica_id 554869c17b2f
dtr_version 2.4.1
DTR-Replica: UCP DTR replica group
The node named ddc-dtr-11 is deployed as a DTR replica. This node is pinned to the UCP DTR replica group.

White Paper
© 2018 Cisco and/or its affiliates. All rights reserved. This document is Cisco Public Information. Page 39 of 45
The class docker_ee_cvd::docker::role::ucp::dtr::replica is assigned to this group.
The Puppet class docker_ee_cvd::docker::role::ucp::dtr::replica configures the following:
●
Docker Engine
●
Docker UCP, which is installed and configured as a worker node
●
DTR, which is installed and configured as a replica to form a DTR cluster
The following parameters are used in this configuration:
●
$ucp_username: Username credentials of the server on which the DTR replica is to be installed
●
$ucp-password: Password credentials of the server on which the DTR replica is to be installed
Note: The preceding parameter values are inherited from docker_ee_cbd::docker::params.
●
$dtr_node_ip:IP address of the DTR replica node, retrieved from Puppet Enterprise facts configured during infrastructure
deployment
●
$dtr_node_hostname: Host name of the DTR replica node, retrieved from Puppet Enterprise facts configured during
infrastructure deployment
●
$ucp_ipaddress: Custom facts retrieved from the UCP controller master using a PuppetDB query to get the IP address of
the UCP controller master
●
$ucp_controller_port: Custom facts retrieved from the UCP controller master using a PuppetDB query to get the port
assigned to the UCP controller master

White Paper
© 2018 Cisco and/or its affiliates. All rights reserved. This document is Cisco Public Information. Page 40 of 45
●
$dtr_replica_id: Custom facts retrieved from the DTR master using a PuppetDB query to get the replica ID to be used to join
the DTR cluster
●
$dtr_version: Custom facts retrieved from the DTR master using a PuppetDB query to get the version of the DTR software
After the node is configured and running, you can view a report of the processing in Puppet Enterprise.
The Puppet classes used in deploying this node are shown here.

White Paper
© 2018 Cisco and/or its affiliates. All rights reserved. This document is Cisco Public Information. Page 41 of 45
Verify UCP and DTR nodes
After the deployment is complete, you can verify that the nodes are installed and configured successfully.
1. Navigate to the UCP controller GUI and verify that the login screen is displayed.
2. View the dashboard.

White Paper
© 2018 Cisco and/or its affiliates. All rights reserved. This document is Cisco Public Information. Page 42 of 45
3. Log in to DTR.
Data input files
You can view the data input files for reference. Go to evpn_vxlan/examples/hieradata/ref.
Parameterized classes used in this design
This section summarizes the parameterized classes used in this design.
Puppet modules and classes for Docker deployment
Puppet requires the following five existing modules:
●
Docker
●
Docker_DDC
●
Firewalld
Docker
Use the following Puppet forge link to install the Docker module:
https://forge.puppet.com/puppetlabs/docker
The GitHub link is https://github.com/puppetlabs/puppetlabs-docker.
Version 1.0.0 and later is supported.

White Paper
© 2018 Cisco and/or its affiliates. All rights reserved. This document is Cisco Public Information. Page 43 of 45
Docker DDC
Use the following Puppet forge link to install the Docker Enterprise Edition module:
https://forge.puppet.com/puppetlabs/docker_ddc
The GitHub link is https://github.com/puppetlabs/puppetlabs-docker_ddc.
Version 1.0.0 and later is supported.
Firewall
Use the following Puppet forge link to install the firewall module:
https://forge.puppet.com/crayfishx/firewalld
docker-ee-cvd module
The docker_ee_cvd module is not published in Puppet forge, so clone the module in
[/etc/puppetlabs/code/environment/production/module] location.
The GitHub location is https://github.com/pramurthy/docker_ee_cvd.
Default parameters
The default parameters are defined in docker_ee_cvd/manifests/docker/params.pp.
class docker_ee_cvd::docker::params inherits docker_ddc::params {
class docker_ee_cvd::docker::params inherits docker_ddc::params {
# UCP-related parameters
$ucp_username = 'admin'
$ucp_password = 'puppetlabs'
$ucp_controller_port = '19002'
$ucp_version = '2.2.5'
$dtr_version = '2.4.1'
# DTR-related parameters
$dtr_version = '2.4.1'
# Additional parameters
$docker_socket_path = '/var/run/docker.sock'
$license_file = '/etc/docker/subscription.lic'
$external_ca = false
# Docker Engine–related parameters
…

White Paper
© 2018 Cisco and/or its affiliates. All rights reserved. This document is Cisco Public Information. Page 44 of 45
Docker EE exported resource
The Docker Engine resource is exported in the UCP controller class. It is used by other nodes in the cluster.
The resource is defined in docker_ee_cvd::docker::engine.
define docker_ee_cvd::docker::engine(
$package_source_location,
$package_key_source,
$package_repos = $title,
)
Docker UCP controller
UCP is the enterprise-class cluster management solution from Docker. You install it on your premises or in your virtual private
cloud. It helps you manage your Docker cluster and applications from a single place.
class docker_ee_cvd::docker::role::ucp::controller::master(
$ucp_username = $docker_ee_cvd::docker::params::ucp_username,
$ucp_password = $docker_ee_cvd::docker::params::ucp_password,
$ucp_controller_port = $docker_ee_cvd::docker::params::ucp_controller_port,
$ucp_version = $docker_ee_cvd::docker::params::ucp_version,
$docker_socket_path = $docker_ee_cvd::docker::params::docker_socket_path,
$license_file = $docker_ee_cvd::docker::params::license_file,
$external_ca = $docker_ee_cvd::docker::params::external_ca,
$package_key_source = $docker_ee_cvd::docker::params::package_key_source,
$package_repos = $docker_ee_cvd::docker::params::package_repos,
$package_source_location = $docker_ee_cvd::docker::params::package_source_location,)
inherits docker_ee_cvd::docker::params
Input parameters
The input parameters are as follows:
[ucp_username]: UCP administrator username
Default value: admin
[ucp_ password]: UCP administrator password
Default value: puppetlabs
[ucp_ controller_port]: Port for the web GUI and API
Default value: 19002
[ucp_ version]: UCP version
Default value: 2.2.5

White Paper
© 2018 Cisco and/or its affiliates. All rights reserved. This document is Cisco Public Information. Page 45 of 45
Custom facts
After the UCP controller additional facts are populated, they will be used by other nodes in cluster.
●
UCP version
●
UCP controller port
●
UCP fingerprint
●
UCP manager token
●
UCP worker token
For more information
For additional information, see:
●
https://www.cisco.com/c/en/us/td/docs/unified_computing/ucs/UCS_CVDs/ucs_docker.html
●
https://docs.docker.com/enterprise/
●
https://forge.puppet.com/puppetlabs/docker
●
https://forge.puppet.com/puppetlabs/docker_ddc
Printed in USA C11-740103-00 02/18
