
MANUAL
Release 02.2024
PowerView Command Reference

PowerView Command Reference | 2
©
1989-2024 Lauterbach
PowerView Command Reference
TRACE32 Online Help
TRACE32 Directory
TRACE32 Index
TRACE32 Documents ......................................................................................................................
PowerView User Interface ............................................................................................................
PowerView Command Reference .............................................................................................1
History ...................................................................................................................................... 14
AREA ........................................................................................................................................ 16
AREA Message windows 16
AREA.CLEAR Clear area 17
AREA.CLOSE Close output file 17
AREA.Create Create or modify message area 18
AREA.Delete Delete message area 18
AREA.List Display a detailed list off all message areas 19
AREA.OPEN Open output file 21
AREA.PIPE Redirect area to stdout 22
AREA.RESet Reset areas 22
AREA.SAVE Save AREA window contents to file 22
AREA.Select Select area 23
AREA.STDERR Redirect area to stderr 24
AREA.STDOUT Redirect area to stdout 24
AREA.view Display message area in AREA window 25
AutoSTOre ............................................................................................................................... 27
AutoSTOre Save and restore settings (history, GUI, etc.) automatically 27
BITMAPEDIT ............................................................................................................................ 29
BITMAPEDIT Bitmap editor for user-defined icons 29
ChDir ......................................................................................................................................... 30
ChDir Change directory 30
ClipSTOre ................................................................................................................................. 31
ClipSTOre Store settings to clipboard 31
CmdPOS ................................................................................................................................... 32
CmdPOS Controls the position of TRACE32 in MWI window mode 32
CommandLineKEYS ................................................................................................................ 34
CommandLineKEYS Special characters 34
ComPare ................................................................................................................................... 35

PowerView Command Reference | 3
©
1989-2024 Lauterbach
ComPare Compare files 35
COPY ........................................................................................................................................ 37
COPY Copy files 37
DATE ......................................................................................................................................... 38
DATE Display date and time 38
DEL ........................................................................................................................................... 39
DEL Delete file 39
DIALOG .................................................................................................................................... 40
DIALOG Custom dialogs 40
Dialog Definition Programming Commands 40
BAR Progress bar 41
BOX Define a decorative border 42
BUTTON Raised button with an icon and text 43
CHECKBOX Define a checkbox 45
CHOOSEBOX Define a choose box 46
CLOSE Catch window close 48
COMBOBOX Define a combo box 49
DEFBUTTON Define the default button 50
DEFCOMBOBOX Define a default combo box 50
DEFEDIT Define a default edit control 50
DEFHOTCOMBOBOX Define a default hot combo box 50
DEFHOTEDIT Define a default hot edit control 50
DEFMEDIT Define a default multiline edit control 51
DLISTBOX Define a draggable list box 51
DYNAMIC Dynamic, single-line area 52
DYNCOMBOBOX Define a dynamic combo box 53
DYNDEFCOMBOBOX Define a default dynamic combo box 53
DYNDEFHOTCOMBOBOX Define a dynamic default hot combo box 53
DYNHOTCOMBOBOX Define a dynamic hot combo box 53
DYNLTEXT Dynamic single-line text area in bold and large font size 54
DYNPULLDOWN Define a dynamic pull-down list 55
DYNTEXT Dynamic, single-line text area in regular font size 57
EDIT Define an edit control 58
HEADER Define window header 59
HELP Define a help icon 60
HOTEDIT Define a hot edit control 61
HOTCOMBOBOX Define a hot combo box 62
ICON New icon in top left corner of dialog 62
INFOTEXT Define a multiline info text box on a dialog 63
INIT Initialize dialog 64
LINE Define a decorative horizontal line 66
LISTBOX Define a list box 67

PowerView Command Reference | 4
©
1989-2024 Lauterbach
LTEXT Static, single-line text area in bold and large font size 68
LEDIT Define an edit control in bold and large font 69
MEDIT Define a multiline edit control 69
MLISTBOX Define a multiline list box 69
NAME Internal dialog name 70
POS Define position and size 71
POSX Define position and size on the x-axis 73
POSY Define position and size on the y-axis 73
PULLDOWN Define a static pull-down list 74
SPACE Apply previous height to next dialog element 75
STATIC Place an icon in a dialog 75
SUBROUTINE Define subroutine for usage in dialog command blocks 76
TEXT Static, single-line text area in regular font size 77
TEXTBUTTON Flat button with text only 78
TREEBUTTON Implements a +/- toggle button 79
UPDATE Executes commands periodically 80
VLINE Decorative vertical line 81
DIALOG.AREA Adds an output area to a custom dialog 82
DIALOG.DIR Display a folder picker dialog 83
DIALOG.Disable Disable dialog elements 84
DIALOG.Enable Enable dialog elements 85
DIALOG.END Close the dialog window 85
DIALOG.EXecute Execute a dialog button 85
DIALOG.File Pass file name from OS file dialog to PRACTICE script 86
DIALOG.File.open Display an OS file-open dialog 87
DIALOG.File.SAVE Display an OS file-save dialog 88
DIALOG.File.SELECT Display an OS file-select dialog 89
DIALOG.MESSAGE Create dialog box with an information icon 90
DIALOG.NOYES Create dialog box with NO and YES buttons 90
DIALOG.OK Create dialog box with an exclamation mark 91
DIALOG.Program Interactive programming 92
DIALOG.ReProgram Dialog programming 94
DIALOG.SELect Programmatically focus on this dialog 94
DIALOG.Set Modify the value of a dialog element 95
DIALOG.SetDIR Browse for folder 97
DIALOG.SetFile Pass file name from OS file dialog to custom dialog 98
DIALOG.SetFile.open OS file-open dialog > file name > EDIT element 98
DIALOG.SetFile.SAVE OS file-save dialog > file name > EDIT element 100
DIALOG.SetFile.SELECT OS file-select dialog > file name > EDIT element 100
DIALOG.STORAGE Stored macros in the dialog context 101
DIALOG.STORAGE.define Define macros stored in the dialog context 101
DIALOG.STORAGE.LOAD Load macros stored in the dialog context 102
DIALOG.STORAGE.SAVE Update macros stored in the dialog context 102

PowerView Command Reference | 5
©
1989-2024 Lauterbach
DIALOG.view Show dialog window 102
DIALOG.YESNO Create dialog box with YES and NO buttons 104
DIR ............................................................................................................................................ 105
DIR List subdirectories and files 105
DUMP ........................................................................................................................................ 107
DUMP Binary file dump 107
EDIT .......................................................................................................................................... 109
EDIT TRACE32 editor 109
Overview EDIT 109
EDIT.CLOSE Close a text file 110
EDIT.ENCoding Change the file encoding 111
EDIT.EXTern Use specified external ASCII editor to edit file 112
EDIT.file Edit file 113
EDIT.Find Perform find, replace and goto operations in TRACE32 editors 116
EDIT.FORMAT Format file contents an editor window 118
EDIT.Goto Go to specified line 119
EDIT.InsertText Insert text 120
EDIT.List List editor files 120
EDIT.LOAD Load text files 121
EDIT.OPEN Use TRACE32 editor to edit file 122
EDIT.QUIT Discard modifications 123
EDIT.REDO Redo the previously undone edit/edits 123
EDIT.Replace Open dialog window on the Replace tab 124
EDIT.REVERT Revert file 124
EDIT.SAVE Save a text file 125
EDIT.SELect Select text/code in an editor window 126
EDIT.UNDO Undo the last edit/edits 127
ERROR ..................................................................................................................................... 128
ERROR.RESet Reset PRACTICE error 128
EVAL ......................................................................................................................................... 129
Eval Evaluate expression 129
FIND .......................................................................................................................................... 131
FIND Search in file 131
FramePOS ................................................................................................................................ 132
FramePOS Controls the position of TRACE32 in MDI window mode 132
HELP ......................................................................................................................................... 135
HELP Online help 135
HELP.Bookmark Show help bookmark list 136
HELP.Bookmark.ADD Files on bookmark list 137
HELP.Bookmark.ADD.file Add file to bookmark list 137
HELP.Bookmark.ADD.Find Add file to bookmark list 138

PowerView Command Reference | 6
©
1989-2024 Lauterbach
HELP.Bookmark.ADD.Index Add file to bookmark list 139
HELP.Bookmark.DELete Delete from bookmark list 139
HELP.Bookmark.show Show help bookmark list 140
HELP.checkUPDATE Automatic update check for new help-files 140
HELP.command Command related support 140
HELP.FILTER Filters for online help 141
HELP.FILTER.Add Add a filter to the help filter list 142
HELP.FILTER.Delete Delete filter from help filter list 142
HELP.FILTER.List List all help filters 143
HELP.FILTER.RESet Reset help filter system 143
HELP.FILTER.set Activate/deactivate help filters for online help 144
HELP.Find Perform a full-text search in online help 144
HELP.Index Search in indexed terms, commands, and functions 147
HELP.OPEN Open PDF documentation for command or function 149
HELP.PDF Open PDF file 150
HELP.PICK Context-sensitive help 150
HELP.PRinT Print help files 151
HELP.PRinT.PRinTSel Print selected files 151
HELP.PRinT.SELect Select files to print 151
HELP.PRinT.show Show print help files 152
HELP.PRinT.UNSELect Unselect all print files 152
HELP.Topics Show the structure of the online help system 153
HELP.TREE Display command tree 154
HISTory ..................................................................................................................................... 155
HISTory Command history of last executed commands 155
HISTory.eXecute Execute command history 156
HISTory.SAVE Store command history log 156
HISTory.Set History settings 157
HISTory.SIZE Command history and file history 158
HISTory.SIZE.cmd Define log size of command history 158
HISTory.SIZE.FILE Define number of recently used files in 'File' menu 159
HISTory.type Display command history log of last executed commands 159
IFCONFIG ................................................................................................................................. 160
IFCONFIG Ethernet or USB communication 160
IFCONFIG.PROfile Display operation profiles 160
IFCONFIG.state Interface configuration 162
IFCONFIG.TEST Test interface function and speed 164
InterCom ................................................................................................................................... 165
InterCom Data exchange between different TRACE32 PowerView instances 165
InterCom.ENable User-defined InterCom name, auto-assigned port number 166
InterCom.Evaluate Evaluate function via InterCom system 168
InterCom.execute Execute command via InterCom system 169

PowerView Command Reference | 7
©
1989-2024 Lauterbach
InterCom.executeNoWait Execute command via InterCom system 171
InterCom.NAME Assign user-defined InterCom name 171
InterCom.PING Test InterCom system 173
InterCom.PipeCLOSE Close named pipe 173
InterCom.PipeOPEN Open named pipe 174
InterCom.PipeREAD Read from named pipe 174
InterCom.PipeWRITE Write to named pipe 175
InterCom.PORT Assign user-defined InterCom UDP port number 175
InterCom.WAIT Wait for remote InterCom system 177
LICENSE ................................................................................................................................... 178
LICENSE Manage TRACE32 licenses 178
LICENSE.List Display all license information 178
LICENSE.REQuest Request a license 179
LICENSE.state Display the currently used maintenance contract 180
LICENSE.UPDATE Update the maintenance contract 181
LOG ........................................................................................................................................... 182
LOG Log TRACE32 commands and PRACTICE script calls 182
LOG.CLOSE Close command log 183
LOG.DO Log calls of PRACTICE scripts 183
LOG.OFF Switch off command log 184
LOG.ON Switch on command log 185
LOG.OPEN Open command log file 185
LOG.toAREA Log commands by writing them to an AREA window 187
LOG.type Display command log 191
LS .............................................................................................................................................. 191
LS Display directory 191
MENU ........................................................................................................................................ 192
MENU Customize the user interface TRACE32 PowerView 192
MENU.AddMenu Add one standard menu item 192
MENU.AddTool Add a button to the main toolbar 193
MENU.Delete Delete nested menu 194
MENU.Delete.NAME Delete specified menu 194
MENU.PENDing Menu files waiting for compilation 195
MENU.PENDing.List List menu files waiting for compilation 195
MENU.PENDing.RESet Clear list of pending menu files 195
MENU.Program Interactive programming 196
MENU.ReProgram Menu programming 197
MENU.RESet Default configuration 200
Programming Commands 201
ADD Add definition to existing menu 201
ADDHERE Define hook 201
AFTER Place a new menu item or separator after the named menu item 202

PowerView Command Reference | 8
©
1989-2024 Lauterbach
BEFORE Place a new menu item or separator before the named menu item 202
BUTTONS Add user-defined local buttons to a window 203
DEFAULT Define default item 204
DELETE Delete a certain item 204
ELSE Conditional compile 204
ENABLE Conditional enable 205
HELP Define a help item 206
IF Conditional compile 206
MENU Menu definition 207
MENUITEM Item definition 209
NAME Define an internal menu name 209
PERMENU Menu or submenu created from peripheral file (*.per) 210
POPUP Popup definition 211
REPLACE Replace the following item 212
SEPARATOR Separator definition 212
SUBROUTINE Define menu subroutine 213
TEAROFF Define tearoff menu 214
TOOLBAR Toolbar definition 214
TOOLITEM Item definition 214
WAIT Wait with menu file compilation until system is ready 217
WIDTH Increase/decrease button width 218
MKDIR ....................................................................................................................................... 219
MKDIR Create new directory 219
MKTEMP Create file or directory with unique name 220
MV ............................................................................................................................................. 223
MV Rename file 223
OS ............................................................................................................................................. 224
OS Execute host commands 224
Overview OS 224
OS.Area Re-route host command output to AREA window 227
OS.Command Execute a host command 228
OS.Hidden Execute a host command in silent mode 230
OS.OPEN Open file in default application 231
OS.screen Call up the shell or execute host command 233
OS.SetENV Set operating system environment variables 234
OS.Window Re-route host command output to the OS.Window 235
PACK ........................................................................................................................................ 236
PACK Compress files (with LZW algorithm) 236
PATCH ...................................................................................................................................... 237
PATCH Binary file patching 237
PATH ......................................................................................................................................... 238

PowerView Command Reference | 9
©
1989-2024 Lauterbach
PATH Define search paths for files used by TRACE32 commands 238
PATH Search path 239
PATH.Delete Delete search path 239
PATH.DOWN Define search path at end of list 240
PATH.List List search path 241
PATH.RESet Reset search path 241
PATH.Set Define search path 242
PATH.UP Define search path at top of list 243
PRinTer ..................................................................................................................................... 244
PRinTer Print and export window contents 244
PRinTer.Area Re-route printer output to AREA window in specified format 245
PRinTer.ClipBoard Re-route printer output to clipboard in specified format 246
PRinTer.CLOSE Close file after multiple printer outputs 246
PRinTer.CONFIG Print-out configuration 247
PRinTer.CONFIG.HEADER Print window title 247
PRinTer.CONFIG.OFFSET Specify print-out borders 247
PRinTer.CONFIG.SIZE Specify print-out size 248
PRinTer.EXPORT Export formatted printer output to file 249
PRinTer.FILE Re-route printer output to a file in specified file format 253
PRinTer.FileType Select file format 256
PRinTer.HardCopy Make a hardcopy of the screen 257
PRinTer.OFFSET Specify print-out borders 257
PRinTer.OPEN Re-route multiple printer outputs to the same file 258
PRinTer.PRINT Print to opened printer file 260
PRinTer.select Select printer 261
PRinTer.SIZE Specify print-out size 262
PWD .......................................................................................................................................... 263
PWD Change directory 263
PYthon ...................................................................................................................................... 264
PYthon.EDIT Open Python script in editor 264
PYthon.INSTALL Install RCL module and Python interpreter 264
PYthon.RUN Run Python script in dedicated window 265
QUIT .......................................................................................................................................... 266
QUIT Return to operating system 266
REN ........................................................................................................................................... 267
REN Rename file 267
RM, RMDIR ............................................................................................................................... 268
RM Delete file 268
RMDIR Remove directory 268
SCreenShot .............................................................................................................................. 269
SCreenShot Save a screenshot of a window to a file 269

PowerView Command Reference | 10
©
1989-2024 Lauterbach
SETUP ...................................................................................................................................... 271
SETUP Setup commands 271
SETUP.ASCIITEXT Configure ASCII text display 272
SETUP.BAKfile Enable backup file creation 274
SETUP.COLOR Change colors 275
SETUP.DEVNAME Set logical device name 276
SETUP.EDITEXT Define an external editor 277
SETUP.EDITOR TRACE32 editor configuration 279
SETUP.EDITOR.AutoSuggest Show input suggestions while typing 280
SETUP.EDITOR.BAKfile Make backup copy when file is saved 281
SETUP.EDITOR.HighLight Control syntax highlighting 281
SETUP.EDITOR.Indentation Select indentation method 282
SETUP.EDITOR.IndentSize Set indentation size 283
SETUP.EDITOR.IndentWithTabs Use tabulator for indentation 284
SETUP.EDITOR.Mode Show visible whitespace or ASCII view 284
SETUP.EDITOR.SaveChangesPrompt Save file if edit window closed 285
SETUP.EDITOR.SmartBackspace Backspace maintains indentation 286
SETUP.EDITOR.SmartCursor Control cursor movement 286
SETUP.EDITOR.SmartFormat Automatic formatting 287
SETUP.EDITOR.state Show editor configuration dialog 288
SETUP.EDITOR.TabSize Set tabulator size 289
SETUP.EDITOR.TrailingWhitespace Remove trailing whitespace 289
SETUP.EDITOR.TYPE Set editor implementation 290
SETUP.EXTension Set default file name extensions 291
SETUP.FASTRESPONSE Optimize for fast response times 291
SETUP.FILETYPE File type configuration 292
SETUP.FILETYPE.DropCoMmanD Set command for dropped files 292
SETUP.FILETYPE.ENCoding Set encoding mode 293
SETUP.FILETYPE.EXTension Set default file name extensions 295
SETUP.HOLDDIR Configure working directory 298
SETUP.ICONS Display icons in popup menus 298
SETUP.InterComACKTIMEOUT Sets the InterCom acknowledge timeout 299
SETUP.PDEBUG PRACTICE debug configuration settings dialog 300
SETUP.PDEBUG.BlockClose Block window closing commands 301
SETUP.PDEBUG.BlockPosition Block window positioning commands 301
SETUP.PDEBUG.MacroRESet Reset PRACTICE macros after ending script 301
SETUP.PDEBUG.RESet Reset settings to default values 302
SETUP.PDEBUG.ScriptParams Set PRACTICE debug script parameters 302
SETUP.PDEBUG.TermScripts Terminate all pending PRACTICE scripts 302
SETUP.PDEBUG.WindowExternal Open debug window as external window 303
SETUP.PDEBUG.WindowOnTop Keep debug window on top 303
SETUP.PDFViewer Context-sensitive help via your favorite PDF viewer 304
SETUP.PDFViewer.EXEcutable Path and executable of your PDF viewer 305

PowerView Command Reference | 11
©
1989-2024 Lauterbach
SETUP.PDFViewer.OPEN Open a PDF of the help system 305
SETUP.PDFViewer.PRinT Print PDF via HELP window 306
SETUP.PDFViewer.RESet Reset the settings in SETUP.PDFViewer dialog 306
SETUP.PDFViewer.TEMPorary Help configuration for demo purposes 307
SETUP.PDFViewer.TEMPorary.EXEcutable PDF viewer for demo purposes 307
SETUP.PDFViewer.TEMPorary.OPEN Open a PDF of the help system 307
SETUP.PDFViewer.TEMPorary.PRinT Print PDF via HELP window 308
SETUP.PDFViewer.TEMPorary.RESet Reset demo-help configuration 308
SETUP.PYthon.EXEcutable Defines path to python interpreter 308
SETUP.QUITDO Define quit PRACTICE script file 309
SETUP.RADIX Radix mode 310
SETUP.RANDOM Set seed for RANDOM() function 311
SETUP.ReDraw Update whole screen 311
SETUP.RESOLVEDIR Resolve symbolic links 312
SETUP.SOUND Set sound generator mode 312
SETUP.STOPMESSAGE Print message when STOP command is executed 312
SETUP.STOre Configure output of the STOre commands 314
SETUP.TabSize Configure tab width 315
SETUP.TIMEFORM Select scientific time format 316
SETUP.UpdateRATE Update rate for windows 317
SETUP.WARNSTOP Configure PRACTICE stops 317
SETUP.XSLTSTYLESHEET Reference to XSLT stylesheet for XML files 318
SHA1SUM ................................................................................................................................. 319
SHA1SUM Calculate SHA1 checksum of a file 319
SILENT ...................................................................................................................................... 320
SILENT Suppress informational messages in AREA window 320
SOFTKEYS ............................................................................................................................... 321
SOFTKEYS Toggle the buttons on the softkey bar 321
STATUSBAR ............................................................................................................................ 322
STATUSBAR Toggle state line 322
STOre ........................................................................................................................................ 323
STOre Store settings as PRACTICE script 323
SUBTITLE ................................................................................................................................. 324
SUBTITLE Define a window subtitle for AMP debugging 324
TAR ........................................................................................................................................... 326
TAR Pack files into an archive 326
TIMEOUT .................................................................................................................................. 328
TIMEOUT Specify timeout for TRACE32 command 328
TITLE ........................................................................................................................................ 329
TITLE Define a main window title for a TRACE32 PowerView GUI 329

PowerView Command Reference | 12
©
1989-2024 Lauterbach
TOOLBAR ................................................................................................................................. 330
TOOLBAR Toggle toolbar 330
TYPE ......................................................................................................................................... 331
TYPE Display text file 331
UNARchive ............................................................................................................................... 332
UNARchive Linux and Microsoft libraries 332
UNARchive.extract Extract files from Linux library and Microsoft library 332
UNARchive.Show Extract files from library and list them in window 333
UNARchive.Table Display table of contents of library 333
UNPACK ................................................................................................................................... 334
UNPACK Expand files (with LZW algorithm) 334
UNZIP ........................................................................................................................................ 335
UNZIP Expand GZIP archive file (with DEFLATE algorithm) 335
VERSION .................................................................................................................................. 336
VERSION TRACE32 version information 336
VERSION.ENVironment Display environment settings 336
VERSION.HARDWARE Display hardware versions 337
VERSION.SOFTWARE Display software versions 337
VERSION.ThirdPartyLicenses Display third party license information 338
VERSION.view Display window with version info 339
WELCOME ................................................................................................................................ 340
WELCOME Welcome to TRACE32 340
WELCOME.CONFIG Configure search paths for PRACTICE demo scripts 340
WELCOME.CONFIG.ADDDIR Add a new script search path 341
WELCOME.CONFIG.FILTER Set the script search filter 341
WELCOME.CONFIG.ReMoveDIR Remove a script search path 341
WELCOME.CONFIG.RESet Reset the script search configuration 341
WELCOME.CONFIG.state Open the welcome config window 342
WELCOME.SCRIPTS Open the script search window 343
WELCOME.STARTUP Open the welcome window if not disabled 343
WELCOME.view Open the welcome window 344
Window ..................................................................................................................................... 345
Win Window handling (size, position, font size, etc.) 345
WinBack Generate background window 346
WinCLEAR Erase windows 346
WinDEFaultSIZE Apply a user-defined default size to windows 348
WinDuplicate Allows to open an existing window again 349
WinExt Generate external window 350
WinFIND Search for text in window 350
WinFreeze Generate frozen window 352
WinLarge Generate window with large font 353

PowerView Command Reference | 13
©
1989-2024 Lauterbach
WinMid Generate window with regular font 354
WinOverlay Pile up windows on top of each other 354
WinPAGE Window pages 355
WinPAGE.Create Create and select page 355
WinPAGE.Delete Delete page 356
WinPAGE.List Display an overview of all pages and their windows 357
WinPAGE.REName Rename page 358
WinPAGE.RESet Reset window system 358
WinPAGE.select Select page 358
WinPAN Specify a window cut-out 359
WinPOS Define window dimensions and window name 360
WinPrint Print address or record range of a window 363
WinPRT Hardcopy of window 364
WinResist Generate a resistant window 365
WinRESIZE New size for window 366
WinSmall Generate window with small font 367
WinTABS Specify widths of re-sizable columns 367
WinTOP Bring window to top 368
WinTrans Generate transparent window 369
ZERO ........................................................................................................................................ 370
ZERO.offset Set time reference 370
ZERO.RESet Reset to original value 371
ZIP ............................................................................................................................................. 371
ZIP Compress files to GZIP archive (with DEFLATE algorithm) 371
Appendix A - Help Filters ........................................................................................................ 372

PowerView Command Reference | 14
©
1989-2024 Lauterbach
PowerView Command Reference
Version 04-Mar-2024
History
24-Aug-2023 Updated command HELP.Index.
13-Jul-2023 New command CommandLineKEYS.
26-Jun-2023 ENCoding ANSI is replaced by WINCP using EDIT.ENCoding and
SETUP.FILETYPE.ENCoding commands.
04-Jan-2023 New command DIALOG.NOYES.
15-Sept-2022 Added second parameter to SETUP.ASCIITEXT.
04-Aug-2022 New command EDIT.ENCoding.
03-Jun-2022 Marked SETUP.DropCoMmanD command as deprecated and replaced by new command
SETUP.FILETYPE.DropCoMmanD.
26-May-2022 New command group: SETUP.FILETYPE:
New commands SETUP.FILETYPE.ENCoding and SETUP.FILETYPE.EXTension.
Command SETUP.EXTension was renamed to SETUP.FILETYPE.EXTension.
27-Apr-2022 New command PRinTer.CONFIG.HEADER.
Command PRinTer.OFFSET was renamed to PRinTer.CONFIG.OFFSET.
Command PRinTer.SIZE was renamed to PRinTer.CONFIG.SIZE.
28-Mar-2022 New commands: SETUP.PDEBUG.BlockClose, SETUP.PDEBUG.BlockPosition,
SETUP.PDEBUG.MacroRESet, and SETUP.PDEBUG.RESet.
28-Mar-2022 New commands: SETUP.PDEBUG.ScriptParams, SETUP.PDEBUG.TermScripts,
SETUP.PDEBUG.WindowExternal, and SETUP.PDEBUG.WindowOnTop.
17-Mar-2022 New command: SETUP.PDEBUG.
31-Jan-2022 Added debugger time absolute to AREA.view window.
10-Jan-2022 New command: EDIT.InsertText.
03-Jan-2022 New option /PDEBUG for the command HISTory.Set.
Dec-2021 New command group DIALOG.STORAGE.
New dialog programming commands: INIT and SUBROUTINE.


PowerView Command Reference | 16
©
1989-2024 Lauterbach
AREA
AREA Message windows
Message areas are the IN/OUT windows for error texts or print commands. They work like a standard
scrolling terminal. All asynchronous error messages, which appear in the message line, are written to the
default message area (named A000), which can be displayed in the AREA.view A000 window.
The name of an AREA window is case sensitive, i.e. A000 and a000 are not the same!
If several error messages appear in rapid succession, they can be redisplayed by using the AREA.view
command (short form: AREA).
PRACTICE messages can be send to an AREA window with the PRINT command. Interactive keyboard
input on an AREA window can be made with the ENTER command.
Multiple AREA windows may be opened and selected by name. This allows very complex display
configurations.
How to save the whole content of a long AREA window? Use the AREA.SAVE command or take a look at
this example:
See also
■ AREA.CLEAR ■ AREA.CLOSE ■ AREA.Create ■ AREA.Delete
■ AREA.List ■ AREA.OPEN ■ AREA.PIPE ■ AREA.RESet
■ AREA.SAVE ■ AREA.Select ■ AREA.STDERR ■ AREA.STDOUT
WinPOS ,,,,,, myAreaWin ;define a window name for an AREA window
AREA.view A000 ;and display the default message area A000
;in that AREA window
PRinTer.EXPORT.ASCIIE C:\area.txt ;define file format and name
WinPAN 0 -999. myAreaWin ;scroll back to the first line of
;the area window (for windows with
;fewer than 1000. lines)
WinPRT myAreaWin /ALL ;/ALL prints all lines from the
;visible top of the window to the end

PowerView Command Reference | 17
©
1989-2024 Lauterbach
■ AREA.view ■ ENTER ■ LOG.toAREA ■ SILENT
❏ AREA.EXIST() ❏ AREA.NAME() ❏ AREA.SELECTed()
▲ ’AREA Functions’ in ’PowerView Function Reference’
▲ ’Message Windows’ in ’PowerView User’s Guide’
AREA.CLEAR Clear area
Clears the contents from an AREA window. The <area_name> is case sensitive! Alternatively, right-click
the AREA window you want, and then select Clear from the popup menu.
Without an <area_name>, the default area A000 will be cleared.
See also
■ AREA.CLOSE ■ AREA ■ AREA.Delete ■ AREA.OPEN
■ AREA.RESet ■ PRINT
▲ ’Message Windows’ in ’PowerView User’s Guide’
▲ ’Release Information’ in ’Legacy Release History’
AREA.CLOSE Close output file
The output to a file is stopped and the file is closed.
Example: For an example, see AREA.OPEN.
See also
■ AREA.CLEAR ■ AREA.Create ■ AREA ■ AREA.OPEN
■ AREA.RESet ■ AREA.Select
▲ ’Message Windows’ in ’PowerView User’s Guide’
Format: AREA.CLEAR [<area_name>]
Format: AREA.CLOSE [<area_name>]
<area_name> Without an <area_name>, all AREA output files will be closed.

PowerView Command Reference | 18
©
1989-2024 Lauterbach
AREA.Create Create or modify message area
Creates a new message area or modifies the number of columns and lines of an existing one. You may
create up to 19 additional message areas.
Example:
See also
■ AREA.CLOSE ■ AREA ■ AREA.Select ■ PRINT
▲ ’Message Windows’ in ’PowerView User’s Guide’
▲ ’Release Information’ in ’Legacy Release History’
▲ ’I/O Commands’ in ’Training Script Language PRACTICE’
AREA.Delete Delete message area
Deletes the specified message area, which has previously been created with AREA.Create, and closes the
associated AREA window. You cannot delete the default message area A000.
• If there is no message area of the given name, then AREA.Delete will not show any error.
• If there are multiple AREA windows for the same message area name, then the message area
with the specified name will be deleted and all window copies will be closed. For an example, see
below.
Format: AREA.Create [<area_name> [<columns>] [<lines>]]
<area_name> The AREA name must not contain the following characters:
* \ / ' " ; , &
The AREA name is case sensitive.
without
<area_name>
If you omit the name for the new message area, TRACE32 will use a unique
name in the form Axxx, where x will be replace by a decimal digit.
AREA.Create A000 60. 100. ; change number of columns and lines of
; the default area
AREA.RESet
AREA.Create XMESSAGE 20. 20.
AREA.view XMESSAGE
AREA.Select XMESSAGE
PRINT "Test"
AREA.Select A000
; init area system
; create new area named "XMESSAGE"
; open window for area "XMESSAGE"
; select area for PRINT and ENTER
; print string constant
; select standard area
Format: AREA.Delete <area_name>

PowerView Command Reference | 19
©
1989-2024 Lauterbach
Example: This script is for demo purposes only. To try this script, simply copy it to a test.cmm file, and
then step through it in TRACE32 (See “How to...”).
See also
■ AREA ■ AREA.CLEAR
▲ ’Release Information’ in ’Legacy Release History’
AREA.List Display a detailed list off all message areas
[Example]
Opens the AREA.List window, displaying all AREA window names, i.e. the default name A000 and all
user-defined names. To add user-defined names to the list, use the AREA.Create command.
Right-click the name of an AREA window to open the Message Area popup menu:
• View brings a window with this window name to the front.
• Select highlights a row in yellow and bold to indicate the active AREA window. Information can
now be printed to this AREA window, e.g. with the commands PRINT and ENTER. Additionally,
the same information can be streamed to a file with the Stream to file option.
AREA.Create ephone ;create the message areas 'ephone'
AREA.Create testlog ;and 'testlog'
AREA.view ephone ;display the AREA windows for the
AREA.view testlog ;message areas 'ephone' and 'testlog'
Area.view testlog ;open two window copies for 'testlog'
Area.View testlog ;by typing the AREA.view command in
;a different camel casing
AREA.Delete testlog ;delete the message area 'testlog and
;close all three associated AREA windows
Format: AREA.List
A Yellow and bold indicate the active AREA window.
A

PowerView Command Reference | 20
©
1989-2024 Lauterbach
• Delete removes the selected message area and closes the associated AREA window. If there
are multiple windows for the same message area name, then all window copies will be closed as
well. For an example, see AREA.Delete.
• Stream to file displays the AREA.OPEN window, where you can create or browse for a streaming
file. You can open a streaming file for each AREA window, but streaming is possible to only one
file at a time, i.e. to the file of the active AREA window.
• Close stream to file closes the associated streaming file.
Double-clicking an entry selects and opens this AREA window.
Example:
See also
■ AREA ■ AREA.OPEN
▲ ’Release Information’ in ’Legacy Release History’
WinExt.AREA.List ;overview of existing AREA windows
AREA.Create ephone ;create the AREA window names 'ephone'
AREA.Create testlog ;and 'testlog'
AREA.view testlog ;open the AREA window named 'testlog'
AREA.Select testlog ;and select it for screen output
AREA.OPEN testlog ~~~\testlog.txt ;additionally stream the screen output
;to the file 'testlog.txt'

PowerView Command Reference | 21
©
1989-2024 Lauterbach
AREA.OPEN Open output file
The outputs to the AREA window are saved in a file. The file can be closed with the AREA.CLOSE
command.
Examples:
See also
■ AREA ■ AREA.CLEAR ■ AREA.CLOSE ■ AREA.List
■ AREA.SAVE ■ AREA.Select
▲ ’Message Windows’ in ’PowerView User’s Guide’
▲ ’Release Information’ in ’Legacy Release History’
Format: AREA.OPEN [<area_name>] <file> /<option>
<option>: Create | Append | NoFileCache
<area_name>
• Specify a user-defined <area_name>. Area names are created
with the AREA.Create command.
•If the <area_name> is omitted, then AREA.OPEN refers to the
default message AREA window named A000.
<file> If the file with the specified <file> already exists, the file will be overwritten by
default (same effect as option /Create).
<option> The options are only available if you specify an <area_name>, else the
message line displays an error message.
Append Appends the output to an existing file (if the file does not exist, a new file will
be created).
NoFileCache Disables the file buffer cache and writes each line to the file immediately.
This can be useful to get a complete log file of the AREA window output
even if TRACE32 is killed by the operation system.
AREA.OPEN A000 protocol.lst
DO test
...
AREA.CLOSE A000
; area will be saved in 'protocol.lst'
; all messages will be saved
AREA.OPEN A000 ~~~\file.txt /Append

PowerView Command Reference | 22
©
1989-2024 Lauterbach
AREA.PIPE Redirect area to stdout
Redirects AREA to named pipe.
See also
■ AREA
AREA.RESet Reset areas
All additionally created areas are removed from the area system, and the message AREA A000 is set to the
default size (one page). All print outputs and error messages are routed to this AREA window.
AREA.RESet closes all open AREA windows, which have been created with AREA.Create. However, the
window displaying the default message area A000 is not closed by AREA.RESet.
See also
■ AREA ■ AREA.CLEAR ■ AREA.CLOSE
▲ ’Message Windows’ in ’PowerView User’s Guide’
▲ ’I/O Commands’ in ’Training Script Language PRACTICE’
AREA.SAVE Save AREA window contents to file
Saves the complete and current contents of the specified AREA window to file. Alternatively, right-click in the
AREA window, and then select Save from the popup menu.
Format: AREA.PIPE [<pipe> | <area_name> [<file>]]
Format: AREA.RESet
Format: AREA.SAVE [<area_name>] <file>
<area_name> Specify the name of the AREA window you want to save.
If <area_name> is omitted, then the contents of the default AREA window
A000 are saved.
<file> Path and file name. If the file with the specified name already exists, the file
will be overwritten.
Use an asterisk if you want to open a dialog-save window.

PowerView Command Reference | 23
©
1989-2024 Lauterbach
Example:
The path prefix ~~~ expands to the temporary directory of TRACE32.
See also
■ AREA ■ AREA.OPEN ■ PRINT
▲ ’Message Windows’ in ’PowerView User’s Guide’
AREA.Select Select area
Selects an output area for the PRINT command, when running under PRACTICE. Internal system and error
messages are not affected by this command, they are always displayed in the AREA A000.
Example:
See also
■ AREA ■ AREA.CLOSE ■ AREA.Create ■ AREA.OPEN
■ PRINT
▲ ’Message Windows’ in ’PowerView User’s Guide’
▲ ’I/O Commands’ in ’Training Script Language PRACTICE’
AREA.SAVE ~~~\areawin.txt ;save the contents of the default
;AREA window A000
Format: AREA.Select [<area_name>]
AREA.RESet
AREA.Create XMESSAGE 20. 20.
AREA.view XMESSAGE
AREA.Select XMESSAGE
PRINT "Test"
AREA.Select A000
; init area system
; create new area named "XMESSAGE"
; display window for area "XMESSAGE"
; select area for PRINT and ENTER
; print string constant
; select standard area


PowerView Command Reference | 25
©
1989-2024 Lauterbach
AREA.view Display message area in AREA window
Displays a message area in an AREA.view window. If no argument is used, the default message area A000
will be displayed in the AREA.view window.
Example 1:
Starting from TRACE32 release 02.2022, AREA windows include the debugger time absolute (see ZERO
command). The debugger time absolute is started with the first SYStem.Up.
Format: AREA.view [<area_name>]
; initialize the area system
AREA.RESet
; display the default message area A000 in an AREA window
AREA.view
; create a new, user-defined message area named 'XMESSAGE'
AREA.Create XMESSAGE 20. 20.
; display the new message area 'XMESSAGE' in a second AREA window
AREA.view XMESSAGE
; select the message area 'XMESSAGE' for a PRINT operation
AREA.Select XMESSAGE
; print a string constant to the message area 'XMESSAGE' (see AREA win.)
PRINT "Test"
; select the default message area A000
AREA.Select A000
PRINT "Name of this message area: " AREA.SELECTed()


PowerView Command Reference | 27
©
1989-2024 Lauterbach
AutoSTOre
AutoSTOre Save and restore settings (history, GUI, etc.) automatically
[Example]
Restores settings from the previous TRACE32 session and stores specified settings automatically at the end
of a TRACE32 session.
When AutoSTOre is executed, the following happens:
• AutoSTOre calls the PRACTICE script specified by <file>. The script is executed as if it was
executed by the DO command.
• AutoSTOre registers the specified items to be stored when the TRACE32 session ends. The
settings will be stored to the PRACTICE script specified by <file>.
The AutoSTOre command should be used only once per TRACE32 session. Usually it is used within the
PRACTICE script file autostore.cmm (which you should not edit), but you can also use it again in the
PRACTICE script files system-settings.cmm (in the TRACE32 system directory) or user-settings.cmm (in
the user settings directory, on Windows %APPDATA%\TRACE32 or ~/.trace32 otherwise).
Alternatively, you can save settings manually with the STOre command and restore them with the DO
command. Therefore you might want to use SETUP.QUITDO to execute STOre at the end of a TRACE32
session.
The AutoSTOre command is available also in other systems, like analyzers, with more system specific
options.
Format: AutoSTOre <file> [<item> …] [/<option>]
<item>: ALL | HISTory | Win | WinPAGE
<device_specific_settings>
<option>: NoDate
<file> or , User-defined path and file name.
If a comma is used instead, TRACE32 saves the file in the temporary
directory of TRACE32. See example.
The auto-generated file name consists of the return value of the OS.ID()
function and the string store.cmm.
<item>, <option>,
and
<device_specific_
settings>
For a detailed description of <item>, <option>, and
<device_specific_settings>, refer to the STOre command.

PowerView Command Reference | 28
©
1989-2024 Lauterbach
Example: Restore settings saved by AutoSTOre in the previous TRACE32 session and register the saving
of the following items when TRACE32 gets closed: Command history (HISTORY), the address and trace
bookmarks (BOOKMARK) and the help bookmarks (HELP).
See also
■ ClipSTOre ■ SETUP.STOre ■ STOre
▲ ’Window System’ in ’PowerView User’s Guide’
HELP Store the help settings and the help bookmarks.
HISTory Store the command history.
PBREAK Store the breakpoints created for PRACTICE scripts (*.cmm).
Win Store the entire window configuration (all pages).
WinPAGE Store the current window page.
… All other keywords refer to the commands of the same name.
AutoSTOre , HISTory BookMark HELP

PowerView Command Reference | 29
©
1989-2024 Lauterbach
BITMAPEDIT
BITMAPEDIT Bitmap editor for user-defined icons
Allows you to edit bitmaps embedded in the following TRACE32 file types: PRACTICE (*.cmm), menu
(*.men), or dialog (*.dlg) files. Bitmaps can be included in three different formats and two variants. The
bitmap editor can only be used to modify bitmaps. Insert the placeholder [ ] for the bitmap before you
open the file in the BITMAPEDIT editor. For step-by-step procedures, see “Icons” in PowerView User’s
Guide, page 113 (ide_user.pdf).
The bitmaps can be placed in one string or into multiple lines. The multiple line format is only suitable for
TOOLITEM commands in menu definition files. The string format can be placed in toolbar buttons, dialog
buttons, window buttons and menu items. The brackets can contain either a reference to a predefined
bitmap (which cannot be edited with the bitmap editor) or the data for a colored bitmap. The bitmap can have
three different formats:
• NATIVE: In the plain format each character corresponds to one pixel in the bitmap. The character
defines the color of the pixel.
• RLE: The compressed format adds a simple run-length compression to this format to save space.
Both formats (plain and compressed) can also be edited with a regular text editor.
• SIGNATURE: The signature format provides the best compression, but the bitmap can only be edited
by this bitmap editor.
Format: BITMAPEDIT [<file>]
MENUITEM "[ ]New Menu" …
MENUITEM "[ ]Second New Menu"
; The square brackets will later
; contain the bitmap.
MENU.ReProgram
(
ADD
TOOLBAR
(
TOOLITEM "newbutton" "cmd"
[
]
)
)
;…
ENDDO
; e.g. file addmybutton.cmm in
; directory ~~/demo/menu/
; The square brackets will later
; contain the bitmap.
B::BITMAPEDIT addmybutton.cmm ; Opens a window for defining and
; modifying the bitmap.

PowerView Command Reference | 30
©
1989-2024 Lauterbach
ChDir
ChDir Change directory
Changes or displays the current working directory. On Windows environments the drive may be selected too.
When used as a command prefix, the directory is changed to the path used in the command line (implicit
change).
Examples:
See also
■ DO ■ MKDIR ■ PWD ❏ OS.DIR()
▲ ’File and Folder Operations’ in ’PowerView User’s Guide’
▲ ’Release Information’ in ’Legacy Release History’
Format: ChDir [<path>]
Format: ChDir.DO <file> [<parlist>]
ChDir \t32 ; change directory
ChDir a: ; change drive
ChDir a:\t32 ; change drive and directory
ChDir.DO c:\sample\x ; change to c:\sample and execute the
; file 'x'
ChDir.DO * ; use the file browser to choose a
; new directory
; and execute a PRACTICE script there
ChDir.Data.LOAD.Elf *
NOTE: If ChDir is used in front of a command, like ChDir.DO <file>, then the search
paths defined with PATH are omitted.

PowerView Command Reference | 31
©
1989-2024 Lauterbach
ClipSTOre
ClipSTOre Store settings to clipboard
Stores settings to the clipboard. Press Ctrl+V to paste the clipboard contents into a file, e.g. a PRACTICE
script file (*.cmm). The ClipSTOre command is available also in other systems, like analyzers, with more
system specific options.
Example 1: Copies the current settings of the SYStem.state window to the clipboard.
Example 2: Copies the current settings of the SYStem.state window and the command history to the
clipboard.
See also
■ AutoSTOre ■ PEDIT ■ SETUP.STOre ■ STOre
▲ ’Window System’ in ’PowerView User’s Guide’
Format: ClipSTOre [%<format>] [<item> …]
<format>: sYmbol | NosYmbol
<item>: HISTory | Win | WinPAGE | …
<device_specific_settings>
<item>, <format> For a detailed description of <item> and <format>, refer to the STOre
command.
HELP Store the help settings and the help bookmarks.
HISTory Store the command history.
PBREAK Store the breakpoints created for PRACTICE scripts (*.cmm).
Win Store the entire window configuration (all pages).
WinPAGE Store the current window page.
… All other keywords refer to the commands of the same name.
ClipSTOre SYStem
ClipSTOre SYStem HISTory

PowerView Command Reference | 32
©
1989-2024 Lauterbach
CmdPOS
CmdPOS Controls the position of TRACE32 in MWI window mode
[Examples]
Controls the position and size of the TRACE32 main window if TRACE32 is configured to work in MWI
window mode (Multiple Window Interface). Use the optional <colorindex> parameter to set the toolbar
and/or MWI background color to one of the available eight colors that can be assigned to cores and windows
for multicore debugging.
In MWI window mode, the TRACE32 windows and dialog boxes float freely outside the TRACE32 main
window.
• For more information about the user interface, see “Graphical User Interface - Window Modes”
in PowerView User’s Guide, page 12 (ide_user.pdf).
• For an overview of the eight colors for cores, open the SETUP.COLOR window.
Format: CmdPOS <left> <up> <hsize> <vsize> [<item>] [<colormode>]
<item>: Normal | Iconic | Maximized
<colormode>: Auto | DEFault | <colorindex>
<left> x-coordinate as a floating point or integer or percentage value.
<up> y-coordinate as a floating point or integer or percentage value.
<hsize> Horizontal main window size in cursor width or percentage (only valid for
Normal)
<vsize> Vertical main window size in cursor height or percentage (only valid for
Normal)
Normal The TRACE32 main window is positioned at the given x- and
y-coordinate with the chosen horizontal and vertical size.
Iconic The TRACE32 main window is minimized and an icon is shown on the
taskbar. Position and size values can be set but will have no effect.
The work area is hidden.
The other TRACE32
windows float outside
the main window.

PowerView Command Reference | 33
©
1989-2024 Lauterbach
Examples:
See also
■ FramePOS ■ SETUP.COLOR ■ CORE.SHOWACTIVE
▲ ’PowerView - Screen Display’ in ’PowerView User’s Guide’
▲ ’Commands’ in ’PowerView User’s Guide’
▲ ’Release Information’ in ’Legacy Release History’
Maximized The TRACE32 main window is maximized and fills the whole desktop.
Position and size values can be set but will have no effect.
Auto Automatically select background color for the toolbar and MWI
background according to the current CORE variable within the
configuration file (config.t32). If CORE is not set, then the default coloring
is used.
DEFault Set default colors for toolbar and MWI background.
<colorindex> Integer number between 0 and 7 to select a fixed background color for
toolbar and MWI background.
CmdPOS 10. 10. 70. 30. normal ; Shows the TRACE32 main window
; including the work area
CmdPOS , , , 0. , normal ; Hides the work area but shows the
; menubar, toolbar and command line
CmdPOS , , , , Iconic ; Minimized TRACE32 to an icon on
; the taskbar
CmdPOS , , , , Auto ; CORE dependent toolbar color

PowerView Command Reference | 34
©
1989-2024 Lauterbach
CommandLineKEYS
CommandLineKEYS Special characters
[build 160740 - DVD 09/2023]
Opens a window to assist typing special characters into the command line.
Format: CommandLineKEYS

PowerView Command Reference | 35
©
1989-2024 Lauterbach
ComPare
ComPare Compare files
Compares two files on a byte-by-byte level. The ComPare command stops at the first difference. The
different bytes are displayed, together with the position counted in bytes, in lines and columns. The result will
be found in the FOUND() function. By comparing test results to reference files, complex system tests will
become very simple.
Format: ComPare <file1> <file2> [/<option>]
<option>: Case | IgnoreSpace | IgnoreCRLF
Case Observe case sensitivity, i.e. upper and lower case characters are not the
same.
IgnoreSpace Ignore any differences in white-spaces when comparing files. That means
that the following characters are ignored: blank, tab, line-feed, carriage-return.
The first found difference is reported for the first file parameter <file1>.
If using this option the printed line and column result is influenced by the
order of the given file parameters.
IgnoreCRLF Ignore any differences in the line endings. That means that the following
characters are ignored: line-feed, carriage-return.
The first found difference is reported for the first file parameter <file1>.
If using this option the printed line and column result is influenced by the
order of the given file parameters.
NOTE: The options can be combined since TRACE32 build. 130739 (R.2021.02).

PowerView Command Reference | 36
©
1989-2024 Lauterbach
Examples:
See also
■ FIND ■ TYPE ❏ FOUND() ❏ TRACK.COLUMN()
❏ TRACK.LINE()
▲ ’File and Folder Operations’ in ’PowerView User’s Guide’
▲ ’Release Information’ in ’Legacy Release History’
ComPare mcc.c mcc.bak
PRINT "Comparing files..."
OPEN #1 C:\testfiles\test.log /Append
ComPare &file_name flash.dump
IF FOUND()
WRITE #1 "the files are different"
ELSE
WRITE #1 "the files are identical"
// &verifyResult=FOUND()
// WRITE #1 "&verifyResult"
CLOSE #1
The first difference is displayed in the
message line and in the AREA window.

PowerView Command Reference | 37
©
1989-2024 Lauterbach
COPY
COPY Copy files
Duplicates one file. No query will be made if the destination file already exists.
Examples:
Format: COPY <source> <destination>
COPY ~~~/per68302.t32 per68302.per
COPY text1.txt text1.old
PowerView Command Reference | 38
©
1989-2024 Lauterbach
DATE
For architectures that do not have the CLOCK command group, CLOCK is an alias for DATE.
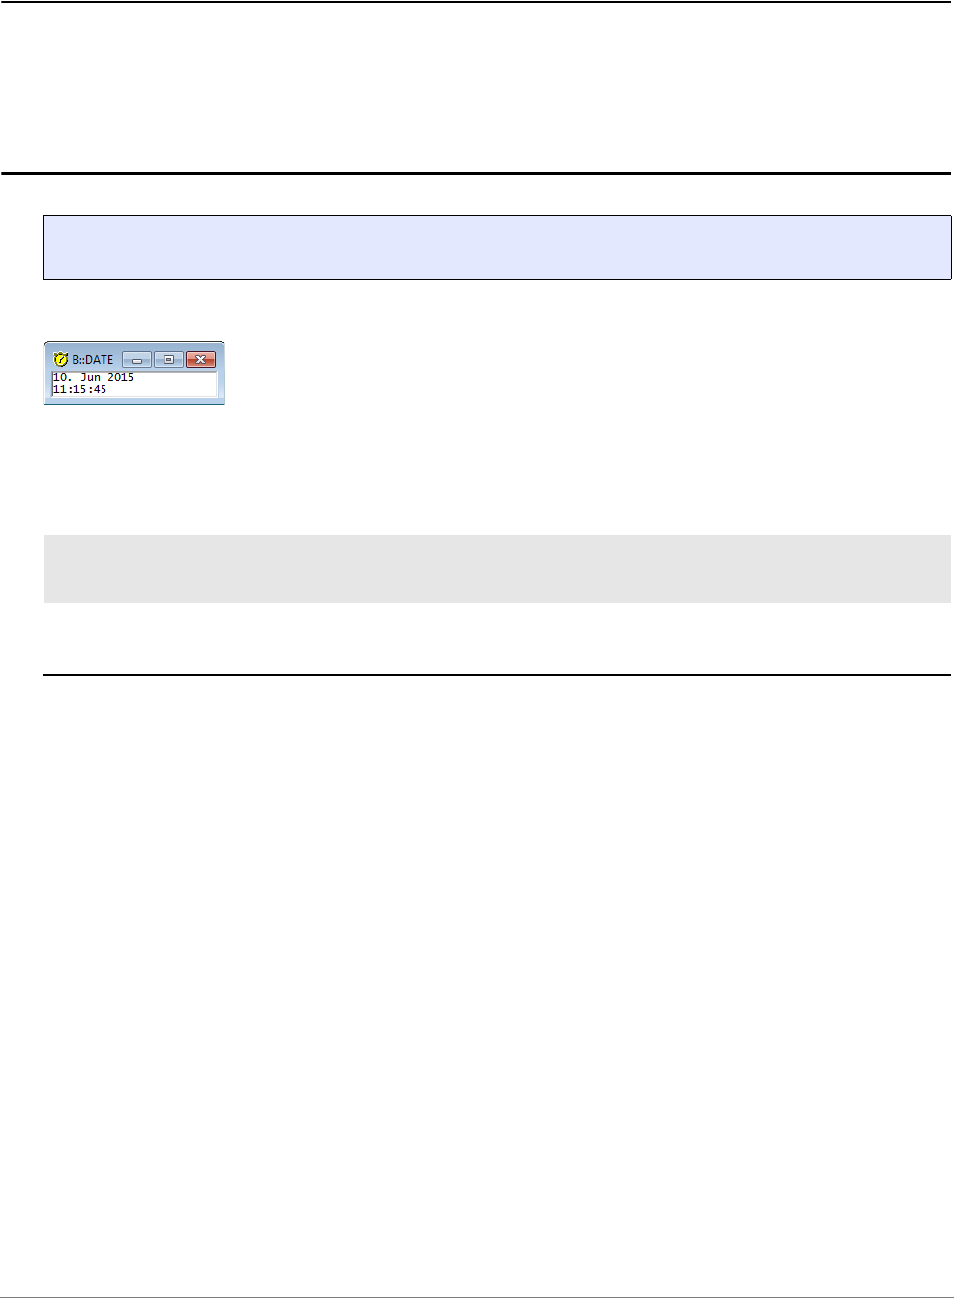
DATE Display date and time
Opens a window with the current system time and date. Useful for documentary purposes in screenshots.
The date and time values are returned by the functions DATE.DATE() and DATE.TIME().
Example:
See also
■ CLOCK ❏ CONVert.TIMEMSTOINT() ❏ CONVert.TIMESTOINT() ❏ CONVert.TIMEUSTOINT()
❏ DATE.DATE() ❏ DATE.TIME()
▲ ’DATE Functions’ in ’PowerView Function Reference’
Format: DATE
DATE ;display date and time in DATE window
PRINT DATE.DATE() " " DATE.TIME() ;print date and time to message line

PowerView Command Reference | 39
©
1989-2024 Lauterbach
DEL
DEL Delete file
This command removes one file. Wildcard characters within the file name will open the browser for selecting
one file.
Example:
See also
■ RM
▲ ’File and Folder Operations’ in ’PowerView User’s Guide’
Format: DEL <file>
DEL "c:/t32/test.bak"

PowerView Command Reference | 40
©
1989-2024 Lauterbach
DIALOG
DIALOG Custom dialogs
The DIALOG command group and its dialog elements, such as buttons and edit boxes, are used to create
and display custom dialog boxes. They are normally used to increase the flexibility of PRACTICE script files
by providing user selectable actions or requesting information from the user, e.g. actual firmware file name
for the flash process.
For information about dialog syntax, file types, built-in icons, return values, and PRACTICE macros inside
dialog definitions, see “Dialog Programming” in PowerView User’s Guide, page 79 (ide_user.pdf).
For reference information, screen shots, and source code examples of the various dialog elements, see
“Dialog Definition Programming Commands” in this manual.
See also
■ DIALOG.AREA ■ DIALOG.DIR ■ DIALOG.Disable ■ DIALOG.Enable
■ DIALOG.END ■ DIALOG.EXecute ■ DIALOG.File ■ DIALOG.MESSAGE
■ DIALOG.NOYES ■ DIALOG.OK ■ DIALOG.Program ■ DIALOG.ReProgram
■ DIALOG.SELect ■ DIALOG.Set ■ DIALOG.SetDIR ■ DIALOG.SetFile
■ DIALOG.STORAGE ■ DIALOG.view ■ DIALOG.YESNO ■ END
▲ ’DIALOG Functions’ in ’PowerView Function Reference’
▲ ’Release Information’ in ’Legacy Release History’
Dialog Definition Programming Commands
The syntax of a definition file is line oriented. Blanks and empty lines can be inserted to structure the script.
Comment lines start with a semicolon.
Commands which define a dialog element can have a label in front of the command. This label can be used
to access the value of the dialog element.
The initial position and size of a custom dialog box on the screen can be governed with the WinPOS
command.
The position and size of buttons, drop-down lists, etc. on a custom dialog box can be governed with POS,
POSX, and POSY.
NOTE: Examples of dialog definitions reside in the directories:
• ~~/demo/practice/dialogs
and
• ~~/demo/analyzer/trigger

PowerView Command Reference | 41
©
1989-2024 Lauterbach
BAR Progress bar
Defines a progress bar. The length of the progress bar is governed by the <width> of POS. The length of the
blue indicator is measured in percentage (%) and can be modified using DIALOG.Set.
Example 1: To reproduce the screenshot above, use this script.
Example 2: An advanced demo script is included in your TRACE32 installation. To access the script, run
this command:
B::CD.PEDIT ~~/demo/practice/dialogs/dialog_update.cmm
Format: BAR
LOCAL &IndicatorLength
DIALOG.view
(
HEADER "Progress BAR Demo"
;define position (x, y) and horizontal width of the EDIT field
POS 1. 1. 4.5
myLabel: EDIT "0" ""
;define descriptional TEXT field
POS 6. 1. 11.
TEXT "to 100 [%]"
;define action button
POS 17. 1. 5.
DEFBUTTON "Show"
(
;this action is executed when the 'Show' button is pressed
&IndicatorLength=DIALOG.STRing(myLabel)+"."
DIALOG.Set myProgressBar &IndicatorLength
)
;define progress bar with a width of 40. units
POS 1. 4. 40. 1.
myProgressBar: BAR
)
STOP
DIALOG.END
ENDDO
Progress bar
Blue indicator

PowerView Command Reference | 42
©
1989-2024 Lauterbach
BOX Define a decorative border
Defines a box around other items. It has no effect on input in the window. Position and size are governed by
POS.
Example: To reproduce the screenshot above, use this script.
Format: BOX ["<text>"]
DIALOG.view
(
HEADER "BOX Demo"
POS 1. 1. 12. 5.
BOX "Options:"
POS 2. 2. 10. 1.
Option1: CHECKBOX "Option1" ""
Option2: CHECKBOX "Option2" ""
Option3: CHECKBOX "Option3" ""
POS 20. 6. 5.
DEFBUTTON "OK" "CONTinue"
)
STOP
DIALOG.END
ENDDO
BOX "Options:"

PowerView Command Reference | 43
©
1989-2024 Lauterbach
BUTTON Raised button with an icon and text
Defines a raised button that can display an icon and text. The button can execute a command when clicked.
If the command string is omitted, the next line must begin with an open bracket to include a PRACTICE
script.
Examples
• The position and size of buttons, drop-down lists, etc. on a custom dialog box can be governed
with POS, POSX, and POSY. POS is used in the following two examples.
• The third example uses POSY to place the toggle button to the right of the label “Toggle On/Off”.
Example 1:
Format: BUTTON "<text>" [<command>]
DIALOG.view
(
HEADER "BUTTON Demo 1"
POS 1. 1. 10. ,
LAB: EDIT "" ""
POS 12. 1. 10. ,
BUTTON "[:edit]Browse..."
(
DIALOG.SetFile LAB ~~/demo/practice/dialogs/*.cmm
)
POS 30. 3. 5. ,
DEFBUTTON "OK" "CONTinue"
)
STOP
DIALOG.END
ENDDO
VLINE

PowerView Command Reference | 44
©
1989-2024 Lauterbach
Example 2:
Example 3 shows how to implement a toggle button using the two keywords "ON" and "OFF" in the
DIALOG.Set command.
WinResist.DIALOG.view
(
HEADER "Button Demo 2"
; x y w height
POS 23. 1. 1. 3.
VLINE ""
; height
POS 25. 1. 10. 1.
BUTTON "[:edit]Browse..."
(
;your code, see also DIALOG.SetFile
)
; height
POS 25. 3. 10. ,
DEFBUTTON "OK" "CONTinue"
)
STOP
DIALOG.END
ENDDO
NOTE: Regarding source code and screenshot of example 2:
• VLINE has a height of 3. units. To prevent the BUTTON from receiving the
same height, we need to set the height of POS to 1.
•The comma for POS and DEFBUTTON means that the value of the previ-
ous POS argument is used, i.e. height=1.
DIALOG
(
HEADER "BUTTON Demo 3"
POS 1. 0.
TEXT "Toggle On/Off"
POSX 5. 10. 1.
btn: BUTTON "[:colorlime]On,[:colorred]Off"
(
LOCAL &tmp
ENTRY &tmp
IF "&tmp"=="ON"
DIALOG.Set btn "OFF"
ELSE
DIALOG.Set btn "ON"
)
)
STOP
DIALOG.END
ENDDO

PowerView Command Reference | 45
©
1989-2024 Lauterbach
CHECKBOX Define a checkbox
Defines a check box item. A check box can have two states: ON or OFF. The <command> is executed when
the check box state is changed. If the command string is omitted the next line must begin with an open
bracket to include a PRACTICE script. The ON or OFF state is passed as parameter to this script.
Here, selecting the check box formats 16 as a hex value; clearing the check box formats the hex value as 16
again.
Example 1:
Example 2: An advanced demo script is included in your TRACE32 installation. To access the script, run
this command:
B::CD.PSTEP ~~/demo/practice/dialogs/dialog_checkbox.cmm
Format: CHECKBOX "<text>" [<command>]
DIALOG.view
(
HEADER "CHECKBOX demo"
POS 1. 1. 5.
cbHEX: CHECKBOX "HEX" "GOTO cbStatus"
POS 8. 1. 10.
VAL: EDIT "16" ""
POS 29. 3. 5.
DEFBUTTON "OK" "CONTinue"
)
; Opens the dialog with the checkbox selected
DIALOG.Set cbHEX ; Omit line to start with the checkbox cleared
DIALOG.Disable VAL ; Make the EDIT text box read-only.
; Respond to the status of the checkbox
cbStatus:
IF DIALOG.BOOLEAN(cbHEX)
DIALOG.Set VAL FORMAT.HEX(8,16.)
ELSE
DIALOG.Set VAL FORMAT.DECIMAL(8,16.)
STOP
DIALOG.END
ENDDO
PowerView Command Reference | 46
©
1989-2024 Lauterbach
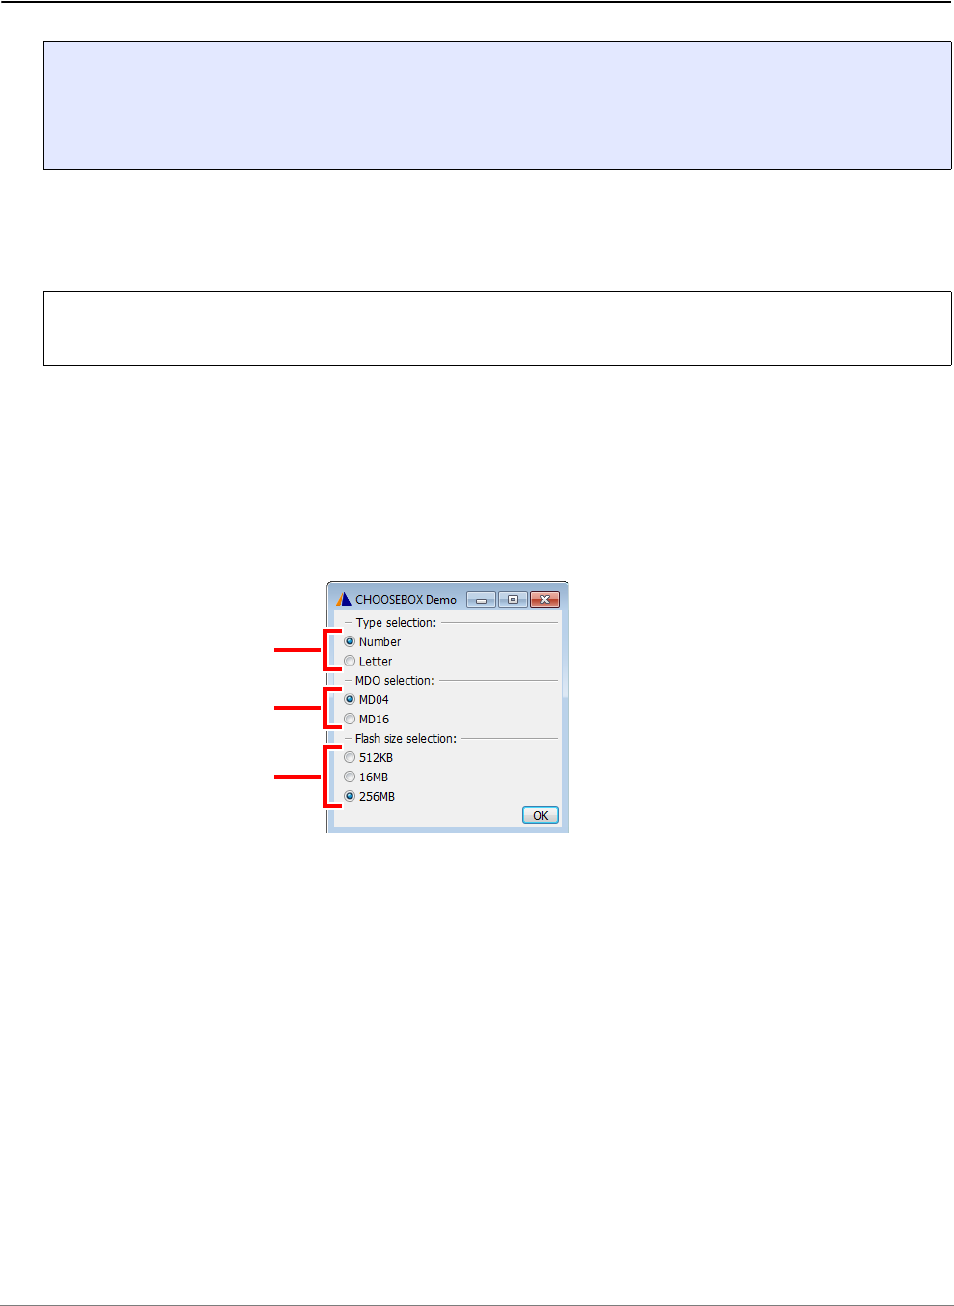
CHOOSEBOX Define a choose box
Defines a choose box item (radio button type). Normally a choose box is an element of a set/group of
buttons, from which only one button can be active at any time.
The differentiation which choose box item belongs to which group will be done only by the group name
independent of the definition order of all choose box items.
The optional command is executed when the choose box is activated. If the command string is omitted, the
next line must begin with an open bracket to include a PRACTICE script.
Example 1: For the source code of this screenshot, refer to the script on the next page.
Example 2: Another demo script is included in your TRACE32 installation. To access the script, run this
command:
B::CD.PSTEP ~~/demo/practice/dialogs/dialog_choosebox.cmm
Format: <label> CHOOSEBOX "<text>" [<command>]
<label>: <group_name>.<subname>:
NOTE: All choose boxes of one group must share the same label prolog / group name
(e.g. “mdo.”).
<group_name> A
<group_name> mdo
<group_name> flashsize

PowerView Command Reference | 47
©
1989-2024 Lauterbach
Example:
LOCAL &count &mdo_type &flashsize_selection
&count=""
&mdo_type=""
DIALOG.view
(
HEADER "CHOOSEBOX Demo"
POS 1. 0. 28.
LINE "Type selection:"
A.C: CHOOSEBOX "Number" ""
A.T: CHOOSEBOX "Letter" ""
LINE "MDO selection:"
mdo.aaaa: CHOOSEBOX "MD04"
(
&mdo_type="MD04"
PRINT "MDO type 04 selected"
)
mdo.cccc: CHOOSEBOX "MD16"
(
&mdo_type="MD16"
PRINT "MDO type 16 selected"
)
LINE "Flash size selection:"
flashsize.1: CHOOSEBOX "512KB" "&flashsize_selection=""512kb"""
flashsize.2: CHOOSEBOX " 16MB" "&flashsize_selection=""16mb"""
flashsize.3: CHOOSEBOX "256MB" "&flashsize_selection=""256mb"""
POS 24. 10. 5.
DEFBUTTON "OK" "CONTinue"
)
STOP
AREA
AREA.CLEAR
; --------- check result of choosebox group "A" ---------
IF DIALOG.BOOLEAN(A.C)
&count=1.
ELSE IF DIALOG.BOOLEAN(A.T)
&count=0.
ELSE
PRINT "- no Type selected"
; --------- check result of choosebox group "mdo" ---------
IF "&mdo_type"==""
PRINT "- no MDO type selected"
ELSE
(
PRINT "- MDO type selected: &mdo_type"
IF POWERNEXUS()
SYStem.Option.NEXUS &mdo_type
)
; --------- check result of choosebox group "flashsize" ---------
PRINT "&flashsize_selection"
DIALOG.END
ENDDO

PowerView Command Reference | 48
©
1989-2024 Lauterbach
CLOSE Catch window close
Executes a command when the user tries to close the dialog window. If the command string is omitted, the
next line must begin with an open bracket to include a PRACTICE script. The dialog window is NOT closed
when this command is present. Closing the window with the DIALOG.END command is still possible.
Example:
Format: CLOSE [<command>]
LOCAL &label
DIALOG.view
(
POS 1. 1. 10.
LAB: EDIT "" ""
POS 1. 3. 5.
DEFBUTTON "OK" "JUMPTO okclose"
CLOSE "JUMPTO winclose"
)
STOP
okclose:
&label=DIALOG.STRing(LAB)
winclose:
DIALOG.END
ENDDO

PowerView Command Reference | 49
©
1989-2024 Lauterbach
COMBOBOX Define a combo box
Defines a combobox item. A combobox provides a list of pre-defined items like a PULLDOWN, but
additionally lets the user enter a value/string which is not pre-defined. You can set the current list item using
the DIALOG.Set command. Use DIALOG.STRing() to retrieve the active list item.
Example:
The demo script for the above example is included in your TRACE32 installation. To access the script, run
this command:
B::PSTEP ~~/demo/practice/dialogs/dialog_combobox.cmm
Format: COMBOBOX "<list_items>" [<command>]
DIALOG.STRing()
COMBOBOX
DIALOG.Set

PowerView Command Reference | 50
©
1989-2024 Lauterbach
DEFBUTTON Define the default button
Defines a BUTTON item which has the input focus when the dialog is opened. Only one element of a dialog
can have the default input focus.
DEFCOMBOBOX Define a default combo box
Defines a COMBOBOX control which has the input focus when the dialog is opened. Only one element of a
dialog can have the default input focus.
DEFEDIT Define a default edit control
Defines an EDIT control which has the input focus when the dialog is opened. Only one element of a dialog
can have the default input focus.
DEFHOTCOMBOBOX Define a default hot combo box
Defines a HOTCOMBOBOX control which has the input focus when the dialog is opened. Only one element
of a dialog can have the default input focus.
DEFHOTEDIT Define a default hot edit control
Defines a HOTEDIT control which has the input focus when the dialog is opened. Only one element of a
dialog can have the default input focus.
Format: DEFBUTTON "<text>" [<command>]
Format: DEFCOMBOBOX "<list_items>" [<command>]
Format: DEFEDIT "<initial_text>" [<command>]
Format: DEFHOTCOMBOBOX "<list_items>" [<command>]
Format: DEFHOTEDIT "<initial_text>" [<command>]

PowerView Command Reference | 51
©
1989-2024 Lauterbach
DEFMEDIT Define a default multiline edit control
Defines an MEDIT control which has the input focus when the dialog is opened. Only one element of a
dialog can have the default input focus.
DLISTBOX Define a draggable list box
Defines a LISTBOX control where the list items can be rearranged by drag and drop.
Example:
The demo script for the above dialog is included in your TRACE32 installation. To access the script, run this
command:
B::PSTEP ~~/demo/practice/dialogs/dialog_dlistbox.cmm
Format: DEFMEDIT"<initial_text>" [<command>]
Format: DLISTBOX"<list_items>" [<command>]
DLISTBOX
Click and drag
a list item.
DIALOG.STRing2() returns the current
sequence of list items.
DIALOG.STRing() returns the selected list item.

PowerView Command Reference | 52
©
1989-2024 Lauterbach
DYNAMIC Dynamic, single-line area
Defines a single-line area that can be dynamically modified using DIALOG.Set while the dialog is open.
Example 1: To reproduce the screenshots above, use this script.
Example 2: An advanced demo script is included in your TRACE32 installation. To access the script, run
this command:
B::CD.PSTEP ~~/demo/practice/event_controlled_program/dialog_dynamic.cmm
Format: DYNAMIC "<initial_text>"
LOCAL &switch
&switch=0
DIALOG.view
(
HEADER "DYNAMIC Demo"
POS 20. 1.
myIcon: DYNAMIC "[:stop]"
POS 1. 1.
DEFBUTTON "Toggle icon"
(
IF &switch==0
(
DIALOG.Set myIcon "[:colorlime]"
&switch=1
)
ELSE
(
DIALOG.Set myIcon "[:stop]"
&switch=0
)
)
)
STOP
DIALOG.END
[:stop] icon [:colorlime] icon

PowerView Command Reference | 53
©
1989-2024 Lauterbach
DYNCOMBOBOX Define a dynamic combo box
Defines a dynamic combo box which does not have the input focus when the dialog is opened.
DYNDEFCOMBOBOX Define a default dynamic combo box
Defines a DYNCOMBOBOX control which has the input focus when the dialog is opened. Only one element
of a dialog can have the default input focus.
DYNDEFHOTCOMBOBOX Define a dynamic default hot combo box
Defines a DYNHOTCOMBOBOX control which has the input focus when the dialog is opened. Only one
element of a dialog can have the default input focus.
DYNHOTCOMBOBOX Define a dynamic hot combo box
Defines a dynamic hot combo box which does not have the input focus when the dialog is opened.
Format: DYNCOMBOBOX "<list_items>" [<command>]
Format: DYNDEFCOMBOBOX "<list_items>" [<command>]
Format: DYNDEFHOTCOMBOBOX "<list_items>" [<command>]
Format: DYNHOTCOMBOBOX "<list_items>" [<command>]

PowerView Command Reference | 54
©
1989-2024 Lauterbach
DYNLTEXT Dynamic single-line text area in bold and large font size
Defines a single-line text area in bold and large font size. This text area can be dynamically modified using
DIALOG.Set while the dialog is open. This is useful, for example, if you want to toggle the display of text you
want to emphasize.
Example: To reproduce the screenshots above, use this script.
Format: DYNLTEXT "<initial_text>"
DIALOG.view
(
HEADER "DYNLTEXT Demo"
POS 9. 1. 22.
myMsg: DYNLTEXT ""
POS 21. 3. 9.
StartBTN: DEFBUTTON "Start"
(
DIALOG.Set myMsg "Test started"
DIALOG.Disable StartBTN
DIALOG.Enable StopBTN
)
POS 1. , ,
StopBTN: BUTTON "Stop"
(
DIALOG.Set myMsg "Test stopped"
DIALOG.Enable StartBTN
DIALOG.Disable StopBTN
)
)
STOP
DIALOG.END
ENDDO

PowerView Command Reference | 55
©
1989-2024 Lauterbach
DYNPULLDOWN Define a dynamic pull-down list
[Example]
Defines a pull-down list that can be dynamically modified using DIALOG.Set while the dialog is open.
Example: The dialog opens with an empty pull-down list. Clicking the first button loads the list items into the
pull-down list. Result: “b” appears as the first item in the pull-down list. In addition, the second button is now
activated.
Clicking the second button replaces the previous list items with new ones. Result: “7” appears as the first list
item.
The list item that is displayed first (here, “b” and then “7”) is in both cases defined by DIALOG.Set, and
not by DYNPULLDOWN. To reproduce this example, see source code below.
Format: DYNPULLDOWN "<list_items>" [<command>]
<list_items> The different list items of a pull-down list are defined in the first argument,
separated by commas. The selected item is passed as a parameter to the
script. Retrieve the currently selected list item with the DIALOG.STRing()
function.
<command> The command is executed when a list item is selected. If the command
string is omitted, the next line must begin with an open bracket to include a
PRACTICE script. For an example, see PULLDOWN.

PowerView Command Reference | 56
©
1989-2024 Lauterbach
Source code for the above example:
The <list_items> can be controlled by external data sources (e.g. register contents, etc.) and displayed on
screen as members of a dynamic pull-down list using DIALOG.Set. However, this is only possible if the
string to be displayed really is and remains a member of <list_items>. If it is not the case (due to misspelling,
other name, etc.), a blank space will be displayed instead. There is no error message.
DIALOG.view
(
HEADER "DYNPULLDOWN Demo"
POS 31. 2. 7.
; the pull-down list is initialized with three empty lines,
; one comma for each line
myEntries: DYNPULLDOWN ",,," ""
POS 1. 1. 25.
BTN1: DEFBUTTON "1. Load pull-down list entries"
( ; "b" is the value that is displayed first.
DIALOG.Set myEntries "b" "a,b,c,"+CLOCK.TIME()
DIALOG.Enable BTN2
)
POS 1. 3. 25.
BTN2: BUTTON "2. Modify pull-down list entries"
( ; "7" is the value that is displayed first.
DIALOG.Set myEntries "7" "1,2,3,4,5,6,7,"+CLOCK.TIME()
)
)
DIALOG.Disable BTN2 ;Deactivate the 2nd button temporarily
STOP
DIALOG.END
ENDDO

PowerView Command Reference | 57
©
1989-2024 Lauterbach
DYNTEXT Dynamic, single-line text area in regular font size
Defines a dynamic, single-line text area in regular font size. This text area can be dynamically modified using
DIALOG.Set while the dialog is open. This is useful, for example, for text that needs to be refreshed while
the dialog is open.
Example: To reproduce the screenshots above, use this script.
Format: DYNTEXT "<initial_text>"
DIALOG.view
(
HEADER "DYNTEXT Demo"
POS 1. 1. 22.
myMsg: DYNTEXT "Click Start."
POS 21. 3. 9.
StopBTN: BUTTON "Stop"
(
DIALOG.Set myMsg "Click Start."
DIALOG.Enable StartBTN
DIALOG.Disable StopBTN
)
POS 1. , ,
StartBTN: DEFBUTTON "Start"
(
DIALOG.Set myMsg "Click Stop."
DIALOG.Disable StartBTN
DIALOG.Enable StopBTN
)
)
DIALOG.Disable StopBTN
STOP
DIALOG.END
ENDDO
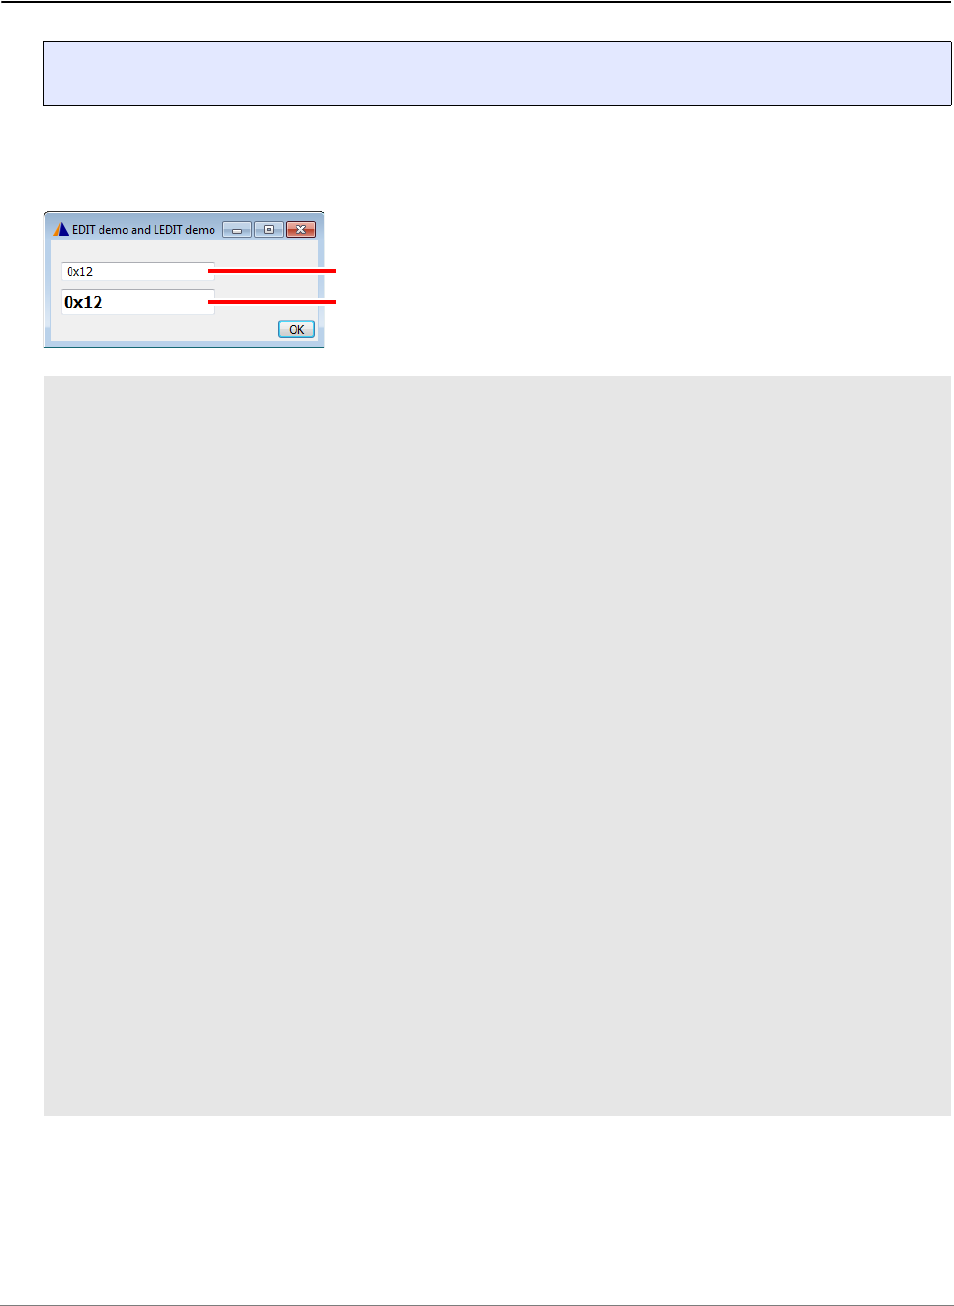
PowerView Command Reference | 58
©
1989-2024 Lauterbach
EDIT Define an edit control
Defines an EDIT control. The <command> is executed only after the text has been modified and the EDIT
control has been left. If the command string is omitted, the next line must begin with an open bracket to
include a PRACTICE script. The string of the EDIT control is passed as a parameter to the script.
A more complex demo script is included in your TRACE32 installation. To access the script, run this
command:
B::CD.PSTEP ~~/demo/practice/dialogs/dialog_edit.cmm
The HOTEDIT control executes the <command> for each character while you are typing.
Format: EDIT "<initial_text>" [<command>]
LOCAL &Val1 ;initialize a PRACTICE macro
DIALOG.view
(
HEADER "EDIT demo and LEDIT demo"
POS 1. 1. 20.
;the Data.dump window opens when the cursor leaves the EDIT control
;after data entry
myInput: EDIT "0x12" "Data.dump"
POS 1. 2.5 20.
myInputB: LEDIT "0x12"
( ;get the user input when the cursor leaves the LEDIT control
&Val1=DIALOG.STRing(myInputB)
)
POS 29. 4. 5.
DEFBUTTON "OK"
(
CONTinue
DIALOG.END
;if "&Val1" is not empty, then show the user input in a message box
IF "&Val1"!=""
DIALOG.MESSAGE "You have just entered: &Val1"
)
)
STOP
PRINT "&Val1" ;print the user input to the message line
ENDDO
EDIT control
LEDIT control (bold and large font)

PowerView Command Reference | 59
©
1989-2024 Lauterbach
HEADER Define window header
Defines the header line of a dialog. You can also customize the icon in the top left corner using ICON.
Example 1: Dialog with a static header line.
Example 2: To implement a variable header line, remember to use the ampersand character & as shown
below.
Format: HEADER "<text>"
DIALOG.view
(
HEADER "HEADER Demo"
POS 30. 3. 5.
DEFBUTTON "OK" "CONTinue"
)
STOP
DIALOG.END
ENDDO
LOCAL &header_text ;declare local PRACTICE macro
&header_text="HEADER Demo 2" ;assign parameter value to macro
DIALOG.view
(& ;note that the ampersand (&) character is required here.
HEADER "&header_text"
POS 30. 3. 5.
DEFBUTTON "OK" "CONTinue"
)
STOP
DIALOG.END
ENDDO

PowerView Command Reference | 60
©
1989-2024 Lauterbach
HELP Define a help icon
Format: HELP <name>

PowerView Command Reference | 61
©
1989-2024 Lauterbach
HOTEDIT Define a hot edit control
Defines an EDIT control. While a normal EDIT control executes <command> when the control loses input
focus, HOTEDIT executes <command> whenever the text in the control changes.
In the following example, HOTEDIT is used to validate user input. Without input, the OK button and the icon
are grayed out. If the input is valid, the OK button is activated and the icon turns green. If the input is invalid
(e.g. a disallowed character), a red icon prompts users to correct their inputs before they can proceed.
A more complex demo script is included in your TRACE32 installation. To access the script, run this
command: B::CD.PSTEP ~~/demo/practice/dialogs/dialog_hotedit.cmm
Format: HOTEDIT "<initial_text>" [<command>]
DIALOG.view
(
HEADER "HOTEDIT Demo"
POS 1. 0. 29. 1.
TEXT "Enter string:"
myHEDT: HOTEDIT ""
(;for each keystroke execute <command>:
PRIVATE &Input
&Input=DIALOG.STRing(myHEDT)
DIALOG.Disable btnOK
;check the input for the following disallowed characters
IF STRing.FIND("&Input", "\/:*?<>|äöü"" ,")==TRUE()
DIALOG.Set myIcon "[:colorred]"
ELSE IF "&Input"==""
DIALOG.Set myIcon "[:colorgrey]"
ELSE
(;enable the OK button if the input is valid
DIALOG.Set myIcon "[:colorlime]"
DIALOG.Enable btnOK
)
)
myIcon: DYNAMIC "[:colorgrey]"
btnOK: DEFBUTTON "OK" "CONTinue"
)
DIALOG.Disable btnOK ;disable the OK button
STOP ;wait for the user’s response to the dialog
&retVal=DIALOG.STRing(myHEDT);get the string and then
DIALOG.END ;close the dialog
DIALOG.OK "Result: &retVal" ;display the string
Two disallowed characters: blank and ?

PowerView Command Reference | 62
©
1989-2024 Lauterbach
HOTCOMBOBOX Define a hot combo box
Defines a COMBOBOX control. While a normal COMBOBOX control executes <command> when the
control loses input focus, HOTCOMBOBOX executes <command> whenever the control’s text or selection
changes.
ICON New icon in top left corner of dialog
Replaces the default icon in the top left corner of a dialog with a different icon. To display icons from the
TRACE32 icon library in a dialog, observe the rules shown in [A] and [B]:
Example:
For more information about icons, type at the TRACE32 command line: Help.Index "icons"
Format: HOTCOMBOBOX "<list_items>" [<command>]
Format: ICON "<built_in_icon_name>" | "<user_defined_icon>"
A To show an icon in the header, use ICON.
B To show icons below the header, use STATIC or DYNAMIC.
DIALOG.view
(
; (A) icon in header: omit brackets
ICON "[:achartnest]"
HEADER "ICON demo"
; (B) icon below header: include brackets
POS 27. 1. 2.
STATIC "[:ddraw]"
POS 30. 3. 5.
DEFBUTTON "OK" "CONTinue"
)
STOP
DIALOG.END
ENDDO
B
A

PowerView Command Reference | 63
©
1989-2024 Lauterbach
INFOTEXT Define a multiline info text box on a dialog
[Example]
Defines a multiline info text box for messages you want to display on a dialog. Unlike DIALOG.AREA, an
INFOTEXT can be placed anywhere on the dialog. The display of an INFOTEXT box can be formatted with
the options listed above.
The message text is write-protected and cannot be directly edited by users. However, the message text can
be dynamically modified using DIALOG.Set while the dialog is open. This is useful, for example, if you want
to provide embedded user assistance on a dialog.
Format: INFOTEXT "<msg_text>" [<background>] [<border_style>] [<font>]
[<scrollbar>] [<padding>]
<back
ground>:
GRay | WHite | LightGray | DarkGray | STicker
<border_
style>:
NoBorder | SImple | SUnken | RAised
<font>: Variable1 | Fixed1 | Fixed2 | Fixed3 | Fixed4
<scrollbar>: HScroll
<padding>: 0 ... 7
<msg_text> Max. length 2048 characters.
Default settings If you omit all formatting options, then INFOTEXT is formatted with GRay,
NoBorder, Variable1, and 0 by default.
HScroll
•If HScroll is included, the INFOTEXT box displays a horizontal
scrollbar, and the automatic word wrap is turned off.
•If HScroll is omitted, the horizontal scrollbar is hidden, and the
automatic word wrap is turned on.
Your message text automatically adjusts to the width of the
INFOTEXT box.
LTEXT or DYNLTEXT
INFOTEXT

PowerView Command Reference | 64
©
1989-2024 Lauterbach
Example:
INIT Initialize dialog
[build 142541 - DVD 02/2022]
Executes a command or command block when the dialog window is opened. If the command string is
omitted, the next line must begin with an open bracket to include a PRACTICE script. Use this block to
initialize dialog elements, or to set up and initialize dialog storage macros.
(all other formatting
options)
A demo script is included in your TRACE32 installation. The script provides
an interactive demo of all formatting options. To view the formatting effects,
click the radio options in the demo dialog. To access the demo script, run this
command:
CD.PSTEP ~~/demo/practice/dialogs/dialog_infotext.cmm
LOCAL &addTxt ;declare local macro
&addTxt="<Your information for script users>"+CONVert.CHAR(10.)
&addTxt="&addTxt"+"1. ..."+CONVert.CHAR(10.) ;adds a line feed
&addTxt="&addTxt"+"2. ..."+CONVert.CHAR(10.)
&addTxt="&addTxt"+"3. ..."+CONVert.CHAR(10.)
&addTxt="&addTxt"+"4. ..."
DIALOG.view
(&+
; '&+' allows you to pass the local macro to a
; dialog block that is embedded in a *.cmm file
HEADER "INFOTEXT Demo"
; x y width height
POS 0.5 0.25 2. 1.
STATIC "[:stop]"
POSX 1. 27.
LTEXT "Pre-conditions for ... :"
POSY 0.5 , 4.25
myLabel: INFOTEXT "&addTxt" STicker SImple Variable1 7.
)
STOP
DIALOG.END
Format: INIT ["<command>"]

PowerView Command Reference | 65
©
1989-2024 Lauterbach
Example:
DIALOG.view
(
cb1: CHECKBOX "Option" ""
INIT
(
;checkbox cb1 is checked when dialog opens
DIALOG.Set cb1 TRUE()
)
)

PowerView Command Reference | 66
©
1989-2024 Lauterbach
LINE Define a decorative horizontal line
Defines an decorative line. It has no effect on input in the window.
Example:
Format: LINE "<text>"
DIALOG.view
(
HEADER "LINE Demo"
POS 1. 1. 20.
LINE "Options:"
POS 2. 2.25 10. 1.
Option1: CHECKBOX "Option 1" ""
Option2: CHECKBOX "Option 2" ""
POS 29. 5. 5.
DEFBUTTON "OK" "CONTinue"
)
STOP
DIALOG.END
ENDDO

PowerView Command Reference | 67
©
1989-2024 Lauterbach
LISTBOX Define a list box
Defines a listbox control. The control allows to select one of the items in the list. Set the current selection
using the DIALOG.Set command. Retrieve the current selection with the DIALOG.STRing() function.
Example:
The demo script for the above example is included in your TRACE32 installation. To access the script, run
this command:
B::CD.PSTEP ~~/demo/practice/dialogs/dialog_listbox.cmm
Format: LISTBOX "<list_items>" [<command>]
DIALOG.Set
MLISTBOX
LISTBOX
DIALOG.STRing()

PowerView Command Reference | 68
©
1989-2024 Lauterbach
LTEXT Static, single-line text area in bold and large font size
Defines a static, single-line text area in bold and large font size. This is useful, for example, if you want to
format text as a heading or alert users to important things.
Example: To reproduce the screenshot above, use this script.
Format: LTEXT "<text>"
DIALOG.view
(
HEADER "LTEXT Demo"
POS 1. 1. 2.
STATIC "[:stop]"
POS 4. 1. 29.
LTEXT "Before you proceed:"
POS 4. 2.25
TEXT "1. ..."
TEXT "2. ..."
POS 29. 5. 5.
DEFBUTTON "OK" "CONTinue"
)
STOP
DIALOG.END
ENDDO

PowerView Command Reference | 69
©
1989-2024 Lauterbach
LEDIT Define an edit control in bold and large font
Defines an edit control in which the user input is formatted in bold and large font. For an illustration of LEDIT
and EDIT, see EDIT.
MEDIT Define a multiline edit control
Defines a multiline edit control. Compared to the normal EDIT control, MEDIT is capable of holding multiple
lines of text. Set the edit text using DIALOG.Set. Retrieve the current text with the DIALOG.STRing()
function.
Example:
The demo script for the above example is included in your TRACE32 installation. To access the script, run
this command:
B::CD.PSTEP ~~/demo/practice/dialogs/dialog_edit.cmm
MLISTBOX Define a multiline list box
Defines a multiline LISTBOX control. The control allows to select one or more items at the same time of the
items in the list. Set the selected items using DIALOG.Set. Retrieve the current selection with the
DIALOG.STRing() function. The selected items are transferred in a comma-separated string.
Example: An advanced demo script is included in your TRACE32 installation. To access the script, run this
command:
B::CD.PSTEP ~~/demo/practice/dialogs/dialog_listbox.cmm
Format: LEDIT "<initial_text>" [<command>]
Format: MEDIT "<initial_text>" [<command>]
Format: MLISTBOX "<list_items>" [<command>]
DIALOG.Set
MEDIT
DIALOG.STRing()
EDIT

PowerView Command Reference | 70
©
1989-2024 Lauterbach
NAME Internal dialog name
Defines an internal name for a dialog. Empty names are not allowed. The internal name is not displayed on
the GUI. Internal names can be used to manipulate dialogs programmatically. For example, you can
programmatically check and respond to the status of a dialog (open or close). The dialog name can also be
used to bring a particular dialog to the front when it is hidden behind a lot of other open dialogs and
windows.
Using the NAME element in a dialog will overwrite a previous name defined with the command WinPOS.
Example: The Toggle 2nd dialog button opens and closes the small dialog based on the return value of the
WINDOW.NAME() function. If you comment or leave out the line DIALOG.SELect myDlg2 then the large
dialog is closed.
Format: NAME "<text>"
DIALOG.view
(
NAME "myDlg"
HEADER "NAME Demo"
POS 1. 4. 29.
DEFBUTTON "Toggle 2nd dialog"
(
IF WINDOW.EXIST("myDlg2")==FALSE()
GOSUB NextDialog
ELSE
DIALOG.SELect myDlg2
DIALOG.END
)
)
STOP
DIALOG.END
ENDDO
;------------------------------------
NextDialog:
DIALOG
(
NAME "myDlg2"
HEADER "NAME Demo 2"
)
STOP
DIALOG.END
ENDDO

PowerView Command Reference | 71
©
1989-2024 Lauterbach
POS Define position and size
Defines the size and position of the next dialog element in units. Buttons in normal dialog windows have a
width of 9. units and a height of 1. unit. Without POS, the vertical position of a dialog element is advanced
by 1. unit, and the default size is 9. x 1. units.
The horizontal size and position can be selected in half units: (0.0 - 0.5 - 1.0 - 1.5 - 2.0 - ...). The vertical
size and position can be selected in half and quarter units: (0.0 - 0.25 - 0.5 - 0.75 - ...).
Example: The following script is for demo purposes only. It illustrates how POS can be used to determine
the positions and sizes of several BUTTON dialog elements in a very large custom dialog.
Format: POS <x> <y> <width> <height>
NOTE: POS has no effect on the size of the dialog or window itself. POS determines
only the size and position of the next dialog element, e.g. a BUTTON or an EDIT
control.
1 POS unit is not equal to 1 WinPOS unit.
<x> Max. <x> is 16383.5 units.
<y> Max. <y> is 8191.75 units.
<width> Max. <width> of an element is 16383.5 units.
<height> Max. <height> of an element is 8191.75 units.
, Value of the previous POS argument is used.
<no_argument> Value of the previous POS argument is used, starting from right to left.
In this example, the <height> and <width> of the previous POS are used
for the unspecified <height> and <width>:
; <x> <y> <width> <height>
POS 3. 7.

PowerView Command Reference | 72
©
1989-2024 Lauterbach
By executing an optional WinPOS command before the dialog block, you can limit the initial size of very
large custom dialogs; scrollbars are added automatically.
To try this script, simply copy it to a test.cmm file, and then run it in TRACE32 (See “How to...”).
WinPOS , , 67. 8. ;limit the initial size of this large custom dialog
DIALOG.view
(
HEADER "POS Demo"
;No POS command => default width is 9. and default height is 1. unit
BUTTON "[:t32]" "PRINT ""This is a demo."" "
;No POS command => next element is advanced by 1. unit on the y-axis
BUTTON "[:config]" ""
; <x> <y> <button_width> <button_height>
POS 25. 3. , 2.
BUTTON "[:colors]" ""
; <x> <y> <button_width> <no_argument>
POS 500. 100. 10.
BUTTON "OK" "CONTinue"
)
y=3.
x=25.
width=9.
height=2.
x and y, height and width are POS units.
The initial width of this dialog is 67. WinPOS units.
The initial height of this dialog is
8. WinPOS units.

PowerView Command Reference | 73
©
1989-2024 Lauterbach
POSX Define position and size on the x-axis
Defines the position and size (width and height) of one dialog element or a block of dialog elements on the
x-axis relative to the absolute position of the previous POS command. For parameter descriptions, see POS.
Example:
POSY Define position and size on the y-axis
Defines the position and size (width and height) of one dialog element or a block of dialog elements on the
y-axis relative to the absolute position of the previous POS command. For parameter descriptions, see POS.
Format: POSX <increment> <width> <height>
DIALOG.view
(
HEADER "POSX and POSY Demo"
; <x> <y> <w> <h>
POS 4. 1. 24. 1.
myBox1: EDIT "A1" ""
myBox2: EDIT "A2" ""
POSY 0.5 , ,
myBox3: EDIT "A3" ""
POSX 3. 4. 1.
POSY -2.5
myBox4: EDIT "B1" ""
; <no_arguments>
POSY 1.5
myBox5: EDIT "B3" ""
POSX 1. 6. 1.
DEFBUTTON "OK" "CONTinue"
)
STOP
DIALOG.MESSAGE DIALOG.STRing(myBox1) ;get value of EDIT box by label
DIALOG.END
Format: POSY <increment> <width> <height>
By modifying just the two <x> and <y> values of
POS in the source code below, you can move the
entire block up/down, left/right.

PowerView Command Reference | 74
©
1989-2024 Lauterbach
PULLDOWN Define a static pull-down list
Defines a static pull-down list.
Example 1:
Example 2: A more complex demo script is included in your TRACE32 installation. To access the script, run
this command:
B::CD.PSTEP ~~/demo/practice/dialogs/dialog_pulldown.cmm
Format: PULLDOWN "<list_items>" [<command>]
<list_items> A pull-down list can have different list items. The list items are defined in the
first argument, separated by commas. The selected item is passed as
parameter to the PRACTICE script. You can retrieve the currently selected
item with the DIALOG.STRing() function.
<command> The command is executed when a list item is selected. If the command string
is omitted the next line must begin with an open bracket to include a
PRACTICE script.
DIALOG.view
(
HEADER "PULLDOWN Demo"
POS 1. 1. 12.
BASE: EDIT "" ""
POS 14. 1. 5.
UNIT: PULLDOWN "ks,ms,us"
(
IF DIALOG.STRing(UNIT)=="ks"
DIALOG.Set BASE "1000.s"
IF DIALOG.STRing(UNIT)=="ms"
DIALOG.Set BASE "1/1000. s"
IF DIALOG.STRing(UNIT)=="us"
DIALOG.Set BASE "1/1000000. s"
)
POS 30. 3. 5.
DEFBUTTON "OK" "CONTinue"
)
STOP
DIALOG.END
ENDDO

PowerView Command Reference | 75
©
1989-2024 Lauterbach
SPACE Apply previous height to next dialog element
Applies the <height> of the previous POS, POSX, or POSY command to the next dialog element.
STATIC Place an icon in a dialog
Defines a static, single-line area. STATIC is typically used to place an icon in a dialog. See also ICON.
It is recommended that you use TEXT if you want to display text next to the icon. Assigning icon and text
directly to STATIC is possible, too. But this approach makes it difficult to position the element.
Example:
For more information about icons, type at the TRACE32 command line: Help.Index "icons"
Format: SPACE
Format: STATIC "<built_in_icon_name>" | "<user_defined_icon>"
DIALOG.view
(
HEADER "STATIC Demo"
; x y width height
POS 2. 0.5 2. ,
STATIC "[:aprochart]"
STATIC "[:aprofile]"
STATIC "[:pperf]"
STATIC "[:profile]"
POS 6 , 6.
TEXT "Profile"
POS 30. 4. 5.
DEFBUTTON "OK" "CONTinue"
)
STOP
DIALOG.END
ENDDO

PowerView Command Reference | 76
©
1989-2024 Lauterbach
SUBROUTINE Define subroutine for usage in dialog command blocks
[build 142541 - DVD 02/2022]
Defines a subroutine of the DIALOG window. The subroutine is available for usage in all command blocks of
the DIALOG program. The SUBROUTINE keyword must be succeeded by a command block.
Example:
Format: SUBROUTINE
DIALOG.view
(
BUTTON "Add 1" "GOSUB Calc 1"
BUTTON "Subtract 1" "GOSUB Calc -1"
nu: EDIT "0" ""
INIT
(
DIALOG.STORAGE.define &value
&value=0
DIALOG.Disable nu
)
SUBROUTINE Calc
(
LOCAL &diff
ENTRY &diff
&value=&value+&diff
DIALOG.Set nu FORMAT.DECIMAL(1.,&value)
)
)
ENDDO

PowerView Command Reference | 77
©
1989-2024 Lauterbach
TEXT Static, single-line text area in regular font size
Defines a static, single-line text area in regular font size. TEXT can be used to display a user-defined name
for a control, here for an EDIT text box.
In addition, you can use TEXT to specify the initial width for any dialog. Simply combine TEXT and POS to
create an empty line, see source code below.
Example:
Alternatively, you can set the initial dialog width by moving, for example, the OK button to the right of the
dialog as far as required. For information about the maximum values of width and height, see POS.
Format: TEXT "<text>"
DIALOG.view
(
HEADER "TEXT Demo"
; define width of dialog by printing an empty text: width is 29. units
; x y w h
POS 0. 0. 29. 1.
TEXT ""
POS 1. 1.
TEXT "any string:"
POS 1. 2. 10.
myLabel: EDIT "" ""
POS 1. 4. 5.
DEFBUTTON "OK" "CONTinue"
)
STOP
DIALOG.END
ENDDO
POS 30. 3. 5.
DEFBUTTON "OK" "CONTinue"
width is 29. units
User-defined GUI label for
the EDIT control below.

PowerView Command Reference | 78
©
1989-2024 Lauterbach
TEXTBUTTON Flat button with text only
Defines a flat button with text only. The result is comparable to a clickable area where the borders are not
visible. The button can execute a command when clicked. If the command string is omitted, the next line
must begin with an open bracket to include a PRACTICE script.
Example:
Format: TEXTBUTTON "<text>" [<command>]
DIALOG.view
(
HEADER "TEXTBUTTON Demo"
POS 1. 1. 10.
myLabel: EDIT "" ""
POS 12. 1. 10.
TEXTBUTTON "Browse..."
(
DIALOG.SetFile myLabel ~~/demo/practice/dialogs/*.cmm
)
POS 30. 3. 5.
DEFBUTTON "OK" "CONTinue"
)
STOP
DIALOG.END
ENDDO
Flat button with text only

PowerView Command Reference | 79
©
1989-2024 Lauterbach
TREEBUTTON Implements a +/- toggle button
Implements a +/- toggle button on a dialog. Clicking the button toggles between a [+] icon and a [-] icon. The
+/- toggle button can execute a command when clicked. If the command string is omitted, the next line must
begin with an open bracket to include a PRACTICE script. You can increase the clickable area, by using
TREEBUTTON together with TEXTBUTTON.
In the example below, clicking the +/- toggle button expands and collapses the lower part of a dialog: This
dialog part could, for example, be used for (a) making advanced options available or (b) a brief description of
a script or (c) quick access to the source code of the script or (d) quick access to the location of the script.
Example:
Format: TREEBUTTON "" [<command>]
LOCAL &expand
&expand=0
DIALOG.view
(
NAME "myDemoDlg"
HEADER "TREEBUTTON demo"
POS 1. 1. 1.
treeBTN: TREEBUTTON ""
(
IF &expand==0
(
DIALOG.Set treeBTN "ON"
&expand=1
WinRESIZE 35. 3. myDemoDlg
)
ELSE
(
DIALOG.Set treeBTN "OFF"
&expand=0
WinRESIZE 35. 2. myDemoDlg
)
)
POS 1. 2. 25.
DYNTEXT "CPU Family License: "+LICENSE.FAMILY(LICENSE.getINDEX())
)
WinRESIZE 35. 2. myDemoDlg ;Initial dialog size, collapsed
STOP
DIALOG.END
ENDDO
ExpandCollapse

PowerView Command Reference | 80
©
1989-2024 Lauterbach
UPDATE Executes commands periodically
Executes commands periodically. The default update interval is one second. The <update_interval> cannot
be interrupted. It is recommended that you comment out the UPDATE line before debugging such a
PRACTICE script.
Example 1: Here, the DIALOG.Set command is parametrized with the DATE.Time() function to implement
a timer on a dialog.
Example 2: A more complex demo script is included in your TRACE32 installation. To access the script, run
this command:
B::CD.PEDIT ~~/demo/practice/dialogs/dialog_update.cmm
Remember that the <update_interval> of UPDATE cannot be interrupted.
An alternative to UPDATE is ON TIME. To access the demo script, run this command:
B::CD.PSTEP ~~/demo/practice/event_controlled_program/dialog_ontime.cmm
ON TIME can be interrupted.
Format: UPDATE ["<command_string>"] [<update_interval>]
DIALOG.view
(
NAME "myDlg"
HEADER "UPDATE Demo"
; Defines the position of the next GUI control.
; x y w h
POS 0. 0. 29.
; This GUI control is a text box that can be updated dynamically,
; i.e. while the dialog is open.
; Display the current time in this text box.
; Assign the label myTimer to the dynamic text box.
myTimer: DYNTEXT DATE.TIME()
; Loop to update the text box labeled myTimer.
; The text box is updated as long as the dialog is open.
UPDATE "DIALOG.Set myTimer DATE.TIME()" 1.0s
)
STOP
DIALOG.END
ENDDO
1 second 1 second

PowerView Command Reference | 81
©
1989-2024 Lauterbach
VLINE Decorative vertical line
Define a decorative vertical line. It has no effect on input in the window.
Example:
Format: VLINE ""
DIALOG.view
(
HEADER "VLINE Demo"
POS 1. 1. 10. 1.
TEXT "any string 1:"
myLabelA: EDIT "" ""
; x y w height
POS 12. 1. , 3.
VLINE ""
POS 14.25 1. 10. 1.
TEXT "any string 2:"
myLabelB: EDIT "" ""
POS 30. 4. 5. ,
DEFBUTTON "OK" "CONTinue"
)
STOP
DIALOG.END
ENDDO

PowerView Command Reference | 82
©
1989-2024 Lauterbach
DIALOG.AREA Adds an output area to a custom dialog
Adds a named output AREA at the bottom of custom dialogs.
Example 1 - Source code for the above screenshots (*.cmm and *.dlg file) : The named AREA is
created by a *.cmm file. The DIALOG.AREA command in the *.cmm file calls the *.dlg file containing the
actual dialog definition.
Format: DIALOG.AREA [<area_name> [<file>]]
;*.cmm file:
;copy and paste this block in a *.cmm file which calls the *.dlg file:
AREA.Create myMsg ;create a named area that is invisible
AREA.Select myMsg ;select this area for output
DIALOG.AREA myMsg ~~/mytest.dlg ;call the *.dlg file
;*.dlg file:
;copy and paste this block in the *.dlg file called by the *.cmm file:
HEADER "DIALOG.AREA Demo"
StartBTN: DEFBUTTON "Start"
(
PRINT "Started at: "+DATE.TIME()
;...<your_code>
)
;move button 6 units on the x axis
POSX 6.
StopBTN: BUTTON "Stop"
(
PRINT " Stopped at: "+DATE.TIME()
;...<your_code>
)
CLOSE
( ;select default AREA A000 for output again and close the dialog
AREA.Select A000
DIALOG.END
)
Output AREA
Custom dialog

PowerView Command Reference | 83
©
1989-2024 Lauterbach
Example 2 - a single *.cmm file: The entire DIALOG.AREA block is embedded in the same *.cmm file,
where the named AREA is created. This demo script is included in your TRACE32 installation. To access
the script, run this command:
B::CD.PSTEP ~~/demo/practice/dialogs/dialog_area.cmm
See also
■ DIALOG ■ DIALOG.view
▲ ’Dialog Programming’ in ’PowerView User’s Guide’
DIALOG.DIR Display a folder picker dialog
Creates a dialog box to choose a directory name. The directory must exist. The directory name can contain
wildcard characters.The result of the selection is returned like the result value of a subroutine.
Example:
In case of spaces in the selected directory name or its path ENTRY %LINE &directoryname needs to be
used.
See also
■ DIALOG ■ DIALOG.SetDIR ■ DIALOG.view
▲ ’Dialog Programming’ in ’PowerView User’s Guide’
Format: DIALOG.DIR <directory_name>
LOCAL &directoryname
DIALOG.DIR c:\t32 ;use c:\t32 as start folder
;select the folder you want in the folder picker dialog
ENTRY %LINE &directoryname ;%LINE is recommended since the
;return value may contain spaces
;<your_code>
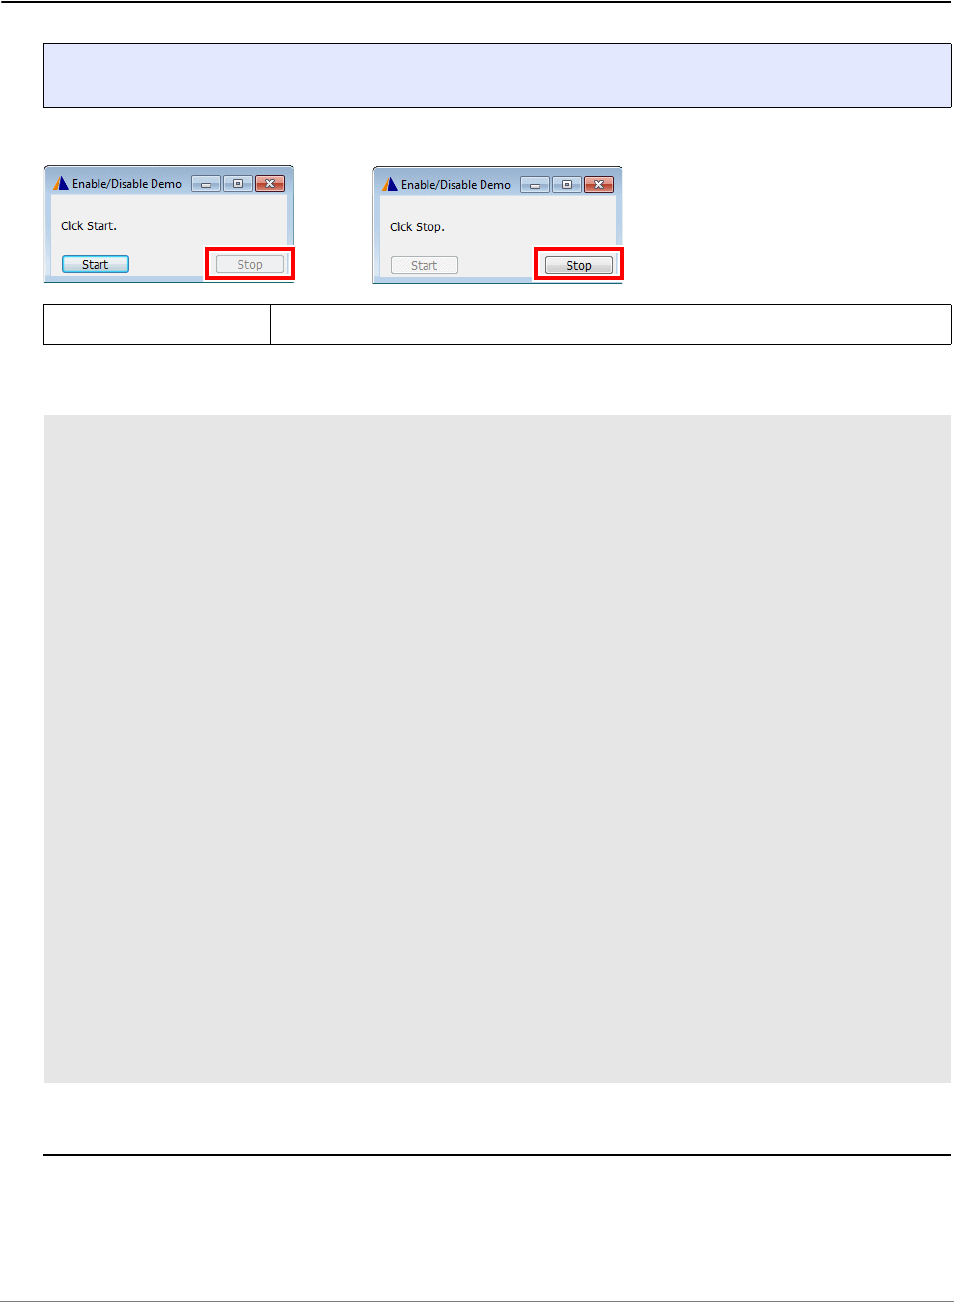
PowerView Command Reference | 84
©
1989-2024 Lauterbach
DIALOG.Disable Disable dialog elements
Disables dialog elements. Disabled elements are shaded out and cannot be executed.
Example:
See also
■ DIALOG ■ DIALOG.Enable ■ DIALOG.Set ■ DIALOG.view
▲ ’Dialog Programming’ in ’PowerView User’s Guide’
Format: DIALOG.Disable <label>
<label> User-defined label identifying a dialog element.
DIALOG.view
(
HEADER "Enable/Disable Demo"
POS 1. 1. 22.
myMsg: DYNTEXT "Click Start."
POS 21. 3. 9.
StopBTN: BUTTON "Stop"
(
DIALOG.Set myMsg "Click Start."
DIALOG.Enable StartBTN
DIALOG.Disable StopBTN
)
POS 1. , ,
StartBTN: DEFBUTTON "Start"
(
DIALOG.Set myMsg "Click Stop."
DIALOG.Disable StartBTN
DIALOG.Enable StopBTN
)
)
DIALOG.Disable StopBTN
STOP
DIALOG.END
ENDDO

PowerView Command Reference | 85
©
1989-2024 Lauterbach
DIALOG.Enable Enable dialog elements
Enables dialog elements. Disabled elements are shaded out and cannot be executed. For an example with
screenshot and source code, see DIALOG.Disable.
See also
■ DIALOG ■ DIALOG.Disable ■ DIALOG.Set ■ DIALOG.view
▲ ’Dialog Programming’ in ’PowerView User’s Guide’
DIALOG.END Close the dialog window
Closes the currently active dialog window.
See also
■ DIALOG ■ DIALOG.view
▲ ’Dialog Programming’ in ’PowerView User’s Guide’
DIALOG.EXecute Execute a dialog button
Executes the command of a button. This can be useful when the commands one button should be included
in the sequence executed by another button.
See also
■ DIALOG ■ DIALOG.view
▲ ’Dialog Programming’ in ’PowerView User’s Guide’
Format: DIALOG.Enable <label>
<label> User-defined label identifying a dialog element.
Format: DIALOG.END
Format: DIALOG.EXecute <label>
<label> User-defined label identifying a dialog element.

PowerView Command Reference | 86
©
1989-2024 Lauterbach
DIALOG.File Pass file name from OS file dialog to PRACTICE script
Using the DIALOG.File command group, you can incorporate three different types of OS file dialogs in your
PRACTICE scripts (*.cmm). This allows users of your script to pick a file via a dialog.
The execution of a script stops when a file dialog is called and waits for the user input. After users have
opened, saved, or selected the file they want, the file name is passed to the PRACTICE script and script
execution continues right away.
The table below provides an overview of the differences between the three dialog types.
See also
■ DIALOG.File.open ■ DIALOG.File.SAVE ■ DIALOG.File.SELECT ■ DIALOG
■ DIALOG.SetFile ■ DIALOG.view
▲ ’Dialog Programming’ in ’PowerView User’s Guide’
Dialog Type: File open
DIALOG.File.open
File save
DIALOG.File.SAVE
File select
DIALOG.File.SELECT
Default button Open Save OK
Existing file
was chosen
accept
ask user
if file should be replaced
accept
Non-existing
file was
chosen
reject
(file must exist)
accept accept
Command
Examples
DIALOG.File.open
Data.Load.Elf *
DIALOG.File.SAVE
STOre * WIN
DIALOG.File.SELECT
Trace.SAVE ► Browse...
NOTE: If you want the user input to be passed to your own custom dialogs, then use
the commands of the DIALOG.SetFile command group.

PowerView Command Reference | 87
©
1989-2024 Lauterbach
DIALOG.File.open Display an OS file-open dialog
Creates a dialog box for choosing a file name. The file name usually contains a wildcard character. The file
selection is returned like the return value of a subroutine.
• Assumes read access to the file.
• The file chosen by the user always exists. (The file-open dialog will refuse to close if the user
enters the name of a non-existing file.)
Example: This script opens an OS file-open dialog with the title Open my text file. After you have selected
a *.txt file, the dialog closes, and the script reads and prints the first line of the *.txt file it to the TRACE32
message line. To try this script, copy it to a test.cmm file, and then run it in TRACE32 (See “How to...”).
In case of spaces in the selected file name or its path ENTRY %LINE &filename needs to be used.
See also
■ DIALOG.File ■ DIALOG.SetFile.open
Format: DIALOG.File.open <file>
PRIVATE &filename &string
WinPOS ,,,,,,,, "Open my text file" ;window title of file-open dialog
DIALOG.File.open "*.txt"
ENTRY %LINE &filename ;%LINE is recommended since the
;return value may contain spaces
IF "&filename"!="" ;if the user has not clicked Cancel
(
OPEN #1 "&filename" /Read
READ #1 %LINE &string
CLOSE #1
PRINT "The files first line says: &string"
)
NOTE: For TRACE32 PowerView older than 2016/03 just write DIALOG.File instead of
DIALOG.File.open. For those older versions you must use a wildcard in the file
name.

PowerView Command Reference | 88
©
1989-2024 Lauterbach
DIALOG.File.SAVE Display an OS file-save dialog
Creates a dialog box for choosing a file name. The file name usually contains a wildcard character. The file
selection is returned like the return value of a subroutine.
• Assumes write access to the file.
• The file chosen by the user does not need to exist.
• The dialog box will show a warning if the user selects an existing file.
Example: This script opens an OS file-save dialog with the title Save my text file. After you have entered a
file name and clicked Save, the dialog closes and the *.txt file is created. The script now writes “Hello World”
to the newly-created *.txt file. To try this script, copy it to a test.cmm file, and then run it in TRACE32 (See
“How to...”).
In case of spaces in the selected file name or its path ENTRY %LINE &filename needs to be used.
See also
■ DIALOG.File ■ DIALOG.SetFile.SAVE
Format: DIALOG.File.SAVE <file>
DIALOG.FileW <file> (deprecated)
PRIVATE &filename
WinPOS ,,,,,,,, "Save my text file" ;window title of file-save dialog
DIALOG.File.SAVE "~~~/*.txt"
ENTRY %LINE &filename ;%LINE is recommended because the
;return value may contain spaces
IF "&filename"!="" ;if the user has not clicked Cancel
(
OPEN #1 "&filename" /Create
WRITE #1 "Hello World"
CLOSE #1
)
NOTE: For PowerView older than 2016/03 use DIALOG.FileW instead of
DIALOG.File.SAVE. For those older versions you must use a wildcard in the file
name.

PowerView Command Reference | 89
©
1989-2024 Lauterbach
DIALOG.File.SELECT Display an OS file-select dialog
[build 72519 - DVD 09/2016]
Creates a dialog box for choosing a file name. The file name usually contains a wildcard character. The file
selection is returned like the return value of a subroutine.
• Assumes proper access rights to the file.
• The file chosen by the user does not need to exist.
• Use DIALOG.File.SELECT if you do not intend to open the file or write to it immediately.
To try this script, copy it to a test.cmm file, and then run it in TRACE32 (See “How to...”).
In case of spaces in the selected filename or its path, ENTRY %LINE &file name needs to be used.
See also
■ DIALOG.File ■ DIALOG.SetFile.SELECT
Format: DIALOG.File.SELECT <file>
PRIVATE &filename
WinPOS ,,,,,,,, "Check Read Permission" ;window title of file select
DIALOG.File.SELECT "*.elf" ;dialog
ENTRY %LINE &filename ;%LINE is recommended since the
;return value may contain spaces
IF OS.FILE.ACCESS("&filename","cw")
PRINT "You may open '&filename'"
ELSE
PRINT %ERROR "Sorry, you may not open '&filename'"

PowerView Command Reference | 90
©
1989-2024 Lauterbach
DIALOG.MESSAGE Create dialog box with an information icon
Creates a standard dialog box with an information icon and an OK button.
Example:
For information about line breaks and the line continuation character, see DIALOG.OK.
See also
■ DIALOG ■ DIALOG.OK ■ DIALOG.view ■ DIALOG.YESNO
❏ FORMAT.Decimal()
▲ ’Dialog Programming’ in ’PowerView User’s Guide’
▲ ’Release Information’ in ’Legacy Release History’
DIALOG.NOYES Create dialog box with NO and YES buttons
Similarly to the DIALOG.YESNO command, however the default button is No.
See also
■ DIALOG ■ DIALOG.view ■ DIALOG.YESNO
Format: DIALOG.MESSAGE <message>
; your code here
l_error:
DIALOG.MESSAGE "FLASH programming error occurred"
l_end:
ENDDO
Format: DIALOG.NOYES <message>

PowerView Command Reference | 91
©
1989-2024 Lauterbach
DIALOG.OK Create dialog box with an exclamation mark
Creates a standard dialog box with an exclamation mark icon and an OK button.
To create a line break in the message of a dialog box, use for example: +CONVert.CHAR(0x0D)+
A backslash \ is used as a line continuation character. It allows you to continue with the message text in the
next line of the script file. Only the first line may be indented, the other lines must start in the first column.
As the above example shows, the line continuation character \ and the empty-space line break can be
combined, too.
See also
■ DIALOG ■ DIALOG.MESSAGE ■ DIALOG.view ■ DIALOG.YESNO
❏ FORMAT.Decimal()
Format: DIALOG.OK <message>
DIALOG.OK "Hello"+CONVert.CHAR(0x0D)+"World!" ; is carriage return
; ’\r’
DIALOG.OK "Hello"+CONVert.CHAR(0x0A)+"World!" ; is line feed ’\n’
DIALOG.OK "Hello"+CONVert.CHAR(0x0D0A)+"World!" ; is carriage return
; + line feed ’\r\n’
DIALOG.OK "Hello" "World!" ; an empty space also creates a line break
DIALOG.OK "Please switch ON the TRACE32 debugger first"\
+CONVert.CHAR(0x0d)+
"and then switch ON the target board."
DIALOG.OK "Please switch ON the hardware \
in this sequence:" \
"1. Switch ON the TRACE32 debugger." \
"2. Switch ON the target board."

PowerView Command Reference | 92
©
1989-2024 Lauterbach
▲ ’Dialog Programming’ in ’PowerView User’s Guide’
▲ ’I/O Commands’ in ’Training Script Language PRACTICE’
DIALOG.Program Interactive programming
Opens the DIALOG.Program editor window, where you can create and edit dialog definition files for your
own dialogs.
Format: DIALOG.Program [<file>] [<line>] [/<option>]
<option>: AutoSave | NoSave

PowerView Command Reference | 93
©
1989-2024 Lauterbach
The editor provides syntax highlighting, configurable auto-indentation, and an online syntax check. The input
is guided by softkeys. The syntax for the dialog definition file is described in the introduction to the DIALOG
command group. You can view your dialogs with the DIALOG.view command.
See also
■ DIALOG ■ DIALOG.ReProgram ■ DIALOG.view ■ SETUP.EDITOR
▲ ’Dialog Programming’ in ’PowerView User’s Guide’
▲ ’Text Editors’ in ’PowerView User’s Guide’
▲ ’Release Information’ in ’Legacy Release History’
Buttons common to all TRACE32 editors:
A For button descriptions, see EDIT.file.
Buttons specific to this editor:
B Compile performs a syntax check and, if an error is found, displays an error message.
C Compile+Show performs a syntax check and, if the code is error free, displays the dialog.
D Commands for dialog programming. For descriptions and examples, refer to the DIALOG command
group.
<file> The default extension for <file> is *.dlg.
<line>, <option> For description of the arguments, see EDIT.file.
A B C
D

PowerView Command Reference | 94
©
1989-2024 Lauterbach
DIALOG.ReProgram Dialog programming
Without parameter the default file name in the actual working directory is used (t32.dlg). Without parameter
in a PRACTICE script, the definition is embedded in the block following the command. With parameter the
corresponding file is compiled. The file should not have any errors, when using this command.
See also
■ DIALOG ■ DIALOG.Program ■ DIALOG.view
▲ ’Dialog Programming’ in ’PowerView User’s Guide’
▲ ’Release Information’ in ’Legacy Release History’
DIALOG.SELect Programmatically focus on this dialog
Places the programmatic focus on the named dialog. For an example, see NAME. To bring the dialog to the
front from a user’s point of view, use WinTOP.
See also
■ DIALOG ■ DIALOG.view
▲ ’Dialog Programming’ in ’PowerView User’s Guide’
Format: DIALOG.ReProgram [<file>]
DIALOG.ReProgram mydialog.dlg ; opens dialog window
;<your_code>…
Format: DIALOG.Select [<name>]

PowerView Command Reference | 95
©
1989-2024 Lauterbach
DIALOG.Set Modify the value of a dialog element
Dynamically changes the value or state of a dialog element while the dialog remains open.
Example 1: Here, selecting the check box formats 16 as a hex value; clearing the check box formats the hex
value as 16 again.
To run, simply copy and paste the entire example into the TRACE32 command line:
Format: DIALOG.Set <label> <value>
<label> User-defined label identifying a dialog element.
<value> The value you want to dynamically assign to the dialog element.
Typ e:
• Boolean, e.g. TRUE(), FALSE(), <logical_expressions>
• String, e.g. "Lauterbach GmbH", function return values, or empty
string "".
DIALOG
(
HEADER "DIALOG.Set demo"
POS 1. 1. 5.
HEX: CHECKBOX "HEX"
(
IF DIALOG.BOOLEAN(HEX)
DIALOG.Set VAL FORMAT.HEX(8,16.)
ELSE
DIALOG.Set VAL FORMAT.DECIMAL(8,16.)
)
POS 8. 1. 10.
VAL: EDIT "16" ""
POS 29. 3. 5.
DEFBUTTON "OK" "CONTinue"
)
DIALOG.Disable VAL
STOP
DIALOG.END
ENDDO

PowerView Command Reference | 96
©
1989-2024 Lauterbach
Example 2: This script shows how you can set and toggle the state of CHECKBOX and CHOOSEBOX
using DIALOG.Set. Simply copy the script to a test.cmm file, and then step through the script (See “How
to...”).
Example 3: To run, simply copy and paste the PRACTICE script example into the TRACE32 command line.
See also
■ DIALOG ■ DIALOG.Disable ■ DIALOG.Enable ■ DIALOG.view
▲ ’Dialog Programming’ in ’PowerView User’s Guide’
DIALOG.view ;examples for boolean elements
(
HEADER "DIALOG.Set demo"
POS 0.5 0.5 27.
CHECK: CHECKBOX "Checkbox Example" ""
CHOOSE.1: CHOOSEBOX "First Choosebox" ""
CHOOSE.2: CHOOSEBOX "Second Choosebox" ""
)
;e.g. assign a state to a boolean element, e.g. a CHECKBOX
DIALOG.Set CHECK TRUE()
DIALOG.Set CHECK FALSE()
DIALOG.Set CHECK "ON"
DIALOG.Set CHECK "OFF"
;e.g. using the result value of a boolean expression
DIALOG.Set CHECK VERSION.BUILD()>75234.
;e.g. select a CHOOSEBOX
DIALOG.Set CHOOSE.2 ;now "Second Choosebox" is selected
DIALOG.Set CHOOSE.1 ;now "First Choosebox" is selected and
;"Second Choosebox" is de-selected
DIALOG.view ;examples for string elements
(
HEADER "DIALOG.Set demo"
POS 0.5 0.5 27.
myVAL: EDIT "Example String" ""
btnA: BUTTON "Modify A" "GOTO StringA"
btnB: BUTTON "Modify B" "GOTO StringB"
)
STOP
StringA: ;e.g. assign a string
DIALOG.Set myVAL "New Example String"
STOP
StringB: ;e.g. using the result value of a boolean expression
DIALOG.Set myVAL "TRACE32 Build "+FORMAT.DECIMAL(0.,VERSION.BUILD())
STOP
ENDDO

PowerView Command Reference | 97
©
1989-2024 Lauterbach
DIALOG.SetDIR Browse for folder
Sets a <folder_path> to the EDIT box. The <label> is the same user-defined label that is assigned to the
EDIT box.
If the path contains wildcard characters, e.g. an asterisk *, a Browse to Folder dialog opens where you can
browse for the folder you want.
Example: To run, simply copy and paste the PRACTICE script example into the TRACE32 command line.
See also
■ DIALOG.SetFile ■ DIALOG ■ DIALOG.DIR ■ DIALOG.view
▲ ’Dialog Programming’ in ’PowerView User’s Guide’
Format: DIALOG.SetDIR <label> <folder_path>
DIALOG.view
(
POS 1. 1. 20.
myLAB: EDIT "" ""
POS 11. 2. 10.
BUTTON "[:coloryellow]Folder"
(
DIALOG.SetDIR myLAB ~~/demo/
)
DEFBUTTON "OK" "CONTinue"
)
STOP
&retVal=DIALOG.STRing(myLAB) ;get the string from the EDIT box
DIALOG.END ;and then close the dialog
IF "&retVal"!="" ;if the user has selected a directory or
DIALOG.OK "&retVal" ;entered a path in the EDIT box
ENDDO

PowerView Command Reference | 98
©
1989-2024 Lauterbach
DIALOG.SetFile Pass file name from OS file dialog to custom dialog
The DIALOG.SetFile commands are used to pick a file via an OS file dialog. The file name is then assigned
to an EDIT or DEFEDIT control of a custom dialog opened with the DIALOG.view command.
The execution of your script-based workflow stops when an OS file dialog is opened. After users have
opened, saved, or selected the file they want, the commands after the DIALOG.SetFile command are
executed (if there are any).
However, DIALOG.SetFile is usually used within the command (or command block) executed when clicking
a BUTTON of a custom dialog. In this case, there are usually no commands to execute after
DIALOG.SetFile.
The table below provides an overview of the differences between the three OS dialog types.
See also
■ DIALOG.SetFile.open ■ DIALOG.SetFile.SAVE ■ DIALOG.SetFile.SELECT ■ DIALOG.SetDIR
■ DIALOG ■ DIALOG.File ■ DIALOG.view
▲ ’Dialog Programming’ in ’PowerView User’s Guide’
DIALOG.SetFile.open OS file-open dialog > file name > EDIT element
[Example]
Creates a dialog box for choosing a file name and assigns that file name to an EDIT dialog element that has
the specified <label>. The file name usually contains a wildcard character.
• Assumes read access to the file.
• The file chosen by the user always exists. (The file-open dialog will refuse to close if the user
selects a non-existing file.)
Dialog Type: File open
DIALOG.SetFile.open
File save
DIALOG.SetFile.SAVE
File select
DIALOG.SetFile.SELECT
Default button Open Save OK
Existing file
was chosen
accept
ask user
if file should be replaced
accept
Non-existing
file was
chosen
reject
(file must exist)
accept accept
Format: DIALOG.SetFile.open <label> <file>

PowerView Command Reference | 99
©
1989-2024 Lauterbach
Example:
To run, simply copy and paste the PRACTICE script example into the TRACE32 command line.
See also
■ DIALOG.SetFile ■ DIALOG.File.open
DIALOG.view
(
POS 1. 1. 40.
myLAB: EDIT "" ""
POS 20. 2. 10.
BUTTON "[:coloryellow]File..."
( ;window title of file-open dialog
WinPOS , , , , , , , , "Open File"
;display the file-open dialog, set file type filter to *.cmm
DIALOG.SetFile.open myLAB "~~/demo/*.cmm"
)
POSX 1.
DEFBUTTON "[:edit]Edit"
(
PRIVATE &file
&file=DIALOG.STRing(myLAB)
;clicking Edit opens the file in the TRACE32 built-in editor
PEDIT "&file"
)
)
ENDDO

PowerView Command Reference | 100
©
1989-2024 Lauterbach
DIALOG.SetFile.SAVE OS file-save dialog > file name > EDIT element
Creates an OS file-save dialog for choosing a file name and assigns that file name to an EDIT dialog
element that has the specified <label>. The file name usually contains a wildcard character.
• Assumes write access to the file.
• The file chosen by the user does not need to exist.
• The dialog box will show a warning if the user selects an existing file.
For an example, see DIALOG.SetFile.open.
See also
■ DIALOG.SetFile ■ DIALOG.File.SAVE
DIALOG.SetFile.SELECT OS file-select dialog > file name > EDIT element
[build 72519 - DVD 09/2016]
Opens an OS file-select dialog for choosing a file name and assigns that file name to an EDIT dialog
element that has the specified <label>. The file name usually contains a wildcard character.
• Assumes proper access rights to the file.
• The file chosen by the user does not need to exist.
• Use DIALOG.File.SELECT if you do not intend to open the file or write to it immediately.
For an example, see DIALOG.SetFile.open.
See also
■ DIALOG.SetFile ■ DIALOG.File.SELECT
Format: DIALOG.SetFile.SAVE <label> <file>
DIALOG.SetFileW <label> <file> (deprecated)
Format: DIALOG.SetFile.SELECT <label> <file>

PowerView Command Reference | 101
©
1989-2024 Lauterbach
DIALOG.STORAGE Stored macros in the dialog context
[build 142541 - DVD 02/2022]
See also
■ DIALOG ■ DIALOG.view
DIALOG.STORAGE.define Define macros stored in the dialog context
[build 142541 - DVD 02/2022]
Defines the macros that will be available in the context of all dialog command blocks. This macros can be
used to store data that is not stored in one of the dialog elements. Use in the INIT block of the dialog
program. It is not allowed to use the command DIALOG.STORAGE.define in subroutines, even the
subroutine is called from the INIT block.
Example: The macro &starttime is defined to be part of the dialog context. It can be read and written in any
of the dialog’s command blocks.
Format: DIALOG.STORAGE.define <macro> [<macro> ...]
DIALOG.view
(
POS 0. 0. 40.
STATIC "PLEASE READ:"
STATIC "Important Information"
BUTTON "Close" "GOSUB OnBtnClose"
INIT
(
;define macro &starttime to be part of dialog context
DIALOG.STORAGE.define &starttime
&starttime=OS.TIMER()
)
SUBROUTINE OnBtnClose
(
LOCAL &time
;macro &starttime is available in this subroutine
&time=(OS.TIMER()-&starttime)/1000.
PRINT "The dialog was opened for &time seconds"
DIALOG.END
)
)
ENDDO

PowerView Command Reference | 102
©
1989-2024 Lauterbach
DIALOG.STORAGE.LOAD Load macros stored in the dialog context
[build 142541 - DVD 02/2022]
Loads the macros stored in the context of the current dialog to the current PRACTICE stack. Used internally
by PowerView in DIALOG programming. Do not use in your scripts.
DIALOG.STORAGE.SAVE Update macros stored in the dialog context
[build 142541 - DVD 02/2022]
Updates the macros stored in the context of the current dialog with the values of the macros on the current
PRACTICE stack. Used internally by PowerView in DIALOG programming. Do not use in your scripts.
DIALOG.view Show dialog window
Compiles and shows a dialog window. Without parameters the dialog definition follows the command in
round brackets.
Format: DIALOG.STORAGE.LOAD
Format: DIALOG.STORAGE.SAVE
Format: DIALOG.view [<file>]
<file> The default extension for <file> is *.dlg. If no file name is given,
DIALOG.view refers to the file t32.dlg in the current directory.

PowerView Command Reference | 103
©
1989-2024 Lauterbach
Example: The PRACTICE script file calls the dialog file, which contains an embedded PRACTICE script.
See also
■ DIALOG ■ DIALOG.AREA ■ DIALOG.DIR ■ DIALOG.Disable
■ DIALOG.Enable ■ DIALOG.END ■ DIALOG.EXecute ■ DIALOG.File
■ DIALOG.MESSAGE ■ DIALOG.NOYES ■ DIALOG.OK ■ DIALOG.Program
■ DIALOG.ReProgram ■ DIALOG.SELect ■ DIALOG.Set ■ DIALOG.SetDIR
■ DIALOG.SetFile ■ DIALOG.STORAGE ■ DIALOG.YESNO
▲ ’Dialog Programming’ in ’PowerView User’s Guide’
PRACTICE script file (*.cmm)
;content of *.cmm
DIALOG.view getfile.dlg
Dialog file (*.dlg)
;content of getfile.dlg
POS 1. 1. 10.
LAB: EDIT "" ""
POS 11. 1. 5.
BUTTON "File"
( ;embedded PRACTICE script
DIALOG.SetFile LAB *.cmm
)
POS 1. 3. 5.
DEFBUTTON "OK" "DIALOG.END"
CLOSE "DIALOG.END"

PowerView Command Reference | 104
©
1989-2024 Lauterbach
DIALOG.YESNO Create dialog box with YES and NO buttons
Creates a standard dialog box with a question mark icon and the buttons Yes and No. The result is returned
like the result value of a subroutine.
Example:
For information about line breaks and the line continuation character, see DIALOG.OK.
See also
■ DIALOG ■ DIALOG.MESSAGE ■ DIALOG.NOYES ■ DIALOG.OK
■ DIALOG.view ❏ FORMAT.Decimal()
▲ ’Dialog Programming’ in ’PowerView User’s Guide’
▲ ’Release Information’ in ’Legacy Release History’
▲ ’I/O Commands’ in ’Training Script Language PRACTICE’
Format: DIALOG.YESNO <message>
NOTE: The DIALOG.YESNO command is very useful if it is combined with
SETUP.QUITDO.
With SETUP.QUITDO you can define a PRACTICE script which will be executed
before TRACE32 quits.
LOCAL &result
DIALOG.YESNO "Program FLASH memory?"
ENTRY &result
IF &result==FALSE()
ENDDO
PRINT "User clicked Yes."
;... <your_code>

PowerView Command Reference | 105
©
1989-2024 Lauterbach
DIR
DIR List subdirectories and files
[Examples]
Opens a DIR window, listing the contents of the specified directory or the contents matching the search
criterion. You can use the asterisk character (*) as a wildcard.
Left-click a file to display additional information in the TRACE32 message line (path, size, and date-
timestamp).
Right-click a file to open the File popup menu:
• DUMP creates a binary file dump.
• TYPE opens the file as read-only.
• EDIT opens the file in the built-in TRACE32 editor, unless you have configured an external editor
with SETUP.EDITEXT.
• DO starts a PRACTICE script (*.cmm).
• PSTEP lets you step through a PRACTICE script.
Format: DIR [<path>] [/PATH] | [/Recursive <depth>]
A You can drag and drop files into the TRACE32 command line in order to execute the file, e.g. a
PRACTICE script file (*.cmm). This is useful for executing PRACTICE script files that expect TRACE32
command line arguments.
PATH The PAT H option displays all directories of the search path, which is defined
by the PATH command.
Recursive <depth> Depth of recursion. Starting at <path>, this option includes the
subdirectories and their files in the listing.
If <depth> is not specified or set to 0, then all subdirectories and files are
included in the listing.
A

PowerView Command Reference | 106
©
1989-2024 Lauterbach
• PEDIT opens the file in the PRACTICE script editor.
• Open folder opens the file explorer and selects the file - useful when you want to place a
PRACTICE script file under version control in a version manager such as SVN.
Double-clicking directory names printed in bold opens the selected directory in a new DIR window.
Examples
Example 1:
Example 2: The path prefix ~~ expands to the system directory of TRACE32.
See also
■ LS ■ OS.Hidden ■ PWD ■ SETUP.EDITEXT
▲ ’File and Folder Operations’ in ’PowerView User’s Guide’
▲ ’Release Information’ in ’Legacy Release History’
DIR *.c ; show all '.c' files
;List all cmm files under the specified path and include the next two
;directory levels in the listing
DIR ~~/demo/arm/compiler/*.cmm /Recursive 2

PowerView Command Reference | 107
©
1989-2024 Lauterbach
DUMP
DUMP Binary file dump
[Examples]
Displays a binary file in hex and ASCII format. Without arguments the command displays the last file that
gave an error during download.
Format: DUMP [<file> [<offset>]] [<option> …]
<option>: NoHex | NoAscii | COLumns <columns> | Track
A Scroll to file offset.
B File size in bytes.
C A small black arrow indicates the content at the file offset.
D File offset entered in the command line.1
E Current selection.
F Right-click for popup menu.
G Offset of current selection in decimal and hex.
<offset> File offset can be specified in decimal or hex.
NoHex Hex display is switched off.
NoAscii ASCII display is switched off.
G
F
E
C
D
B
A

PowerView Command Reference | 108
©
1989-2024 Lauterbach
Example 1:
Example 2:
See also
■ PATC H ■ TYPE ■ Data.dump
▲ ’File and Folder Operations’ in ’PowerView User’s Guide’
COLumns
<columns>
WIDTH (deprecated)
Determines how many <columns> are displayed in the window.
• To use the TRACE32 default setting, omit option and parameter.
When you now resize the window width, the number of columns
adjusts to the window width.
• COLumns without the <columns> parameter: The number of col-
umns remains fixed when you resize the window width.
Track With Track enabled, the DUMP window tracks the selections you are
making in the TYPE window.
Prerequisite: The same file is open in both windows.
;display file in hex and ASCII, start at file offset 1000 (hex)
DUMP mcc.abs 0x1000
Data.LOAD.Ieee mcc.abs
;let’s now assume that the following error is displayed in the TRACE32
;message line: ERROR ENTRY NEAR OFFSET 1234. IN FILE mcc.abs
;display the file which caused the error

PowerView Command Reference | 109
©
1989-2024 Lauterbach
EDIT
EDIT TRACE32 editor
See also
■ EDIT.CLOSE ■ EDIT.ENCoding ■ EDIT.EXTern ■ EDIT.file
■ EDIT.Find ■ EDIT.FORMAT ■ EDIT.Goto ■ EDIT.InsertText
■ EDIT.List ■ EDIT.LOAD ■ EDIT.OPEN ■ EDIT.QUIT
■ EDIT.REDO ■ EDIT.Replace ■ EDIT.REVERT ■ EDIT.SAVE
■ EDIT.SELect ■ EDIT.UNDO ■ PATC H ■ SETUP.EDITEXT
■ SETUP.EDITOR
▲ ’File and Folder Operations’ in ’PowerView User’s Guide’
▲ ’Text Editors’ in ’PowerView User’s Guide’
▲ ’Text Editors’ in ’PowerView User’s Guide’
▲ ’Release Information’ in ’Legacy Release History’
Overview EDIT
Using the commands in the EDIT command group, you can perform the basic editing operations that are
common to all TRACE32 editors, such as multiple undo/redo, find, replace, and goto operations.
For information about the editor feature highlights and a list of the editors for the various TRACE32-specific
file types, please refer to “PowerView User’s Guide” (ide_user.pdf).
The commands EDIT.file and EDIT.OPEN are specific to the general-purpose editor. We recommend that
you use these two EDIT.* commands only if you want to create and edit text files, e.g. *.txt, *.log, *.dat, etc.
NOTE: Always use the editor pertaining to the respective TRACE32 file type. A special-
purpose editor additionally provides commands that are specific to the file type you
want to edit.
For example, use the PRACTICE script editor PEDIT to create and edit PRACTICE
scripts (*.cmm).
As opposed to the general-purpose editor EDIT, the special-purpose editor
PEDIT additionally allows you to debug and execute your script.

PowerView Command Reference | 110
©
1989-2024 Lauterbach
What is the difference between the commands...?
What is the difference between the commands ...?
What is the difference between the commands ...?
EDIT.CLOSE Close a text file
Saves the <file> and removes it from the editor buffer. This command includes the commands EDIT.SAVE
and EDIT.QUIT.
If no file name is defined, all files in the editor buffer will be saved and closed.
EDIT.file EDIT.OPEN
• Opens the file in the general-purpose
editor of TRACE32.
- or-
• Opens the file in an external editor
provided you have configured an external
editor for use in TRACE32 with
SETUP.EDITEXT.
• Always opens the file in the general-
purpose editor of TRACE32.
• Regardless of whether you have
configured an external editor.
EDIT.CLOSE EDIT.QUIT
• Saves the file.
• Removes the file from the editor buffer.
• Discards unsaved changes.
• Removes the file from the editor buffer.
EDIT.LOAD EDIT.REVERT
Reloads a file from the host system.
• Affects only the file specified by name.
- or -
• Affects all files if no file name is specified.
Reverts all changes performed since the last
load or save operation.
• Affects only the active editor window and
the file displayed in that window.
• You cannot specify a file name at all.
Format: EDIT.CLOSE [<file>]
NOTE: For a comparison of the commands EDIT.CLOSE and EDIT.QUIT, refer to the
introduction to the EDIT command group.

PowerView Command Reference | 111
©
1989-2024 Lauterbach
Examples:
See also
■ EDIT ■ EDIT.file ■ EDIT.QUIT
EDIT.ENCoding Change the file encoding
[build 150073 - DVD 09/2022]
Allows to define the file encoding of the currently edited file. The new encoding becomes active when the file
is saved.
See also
■ EDIT ■ EDIT.file
EDIT.CLOSE test.txt ; close one file
EDIT.CLOSE ; close all files opened by an EDIT command
Format: EDIT.ENCoding <encoding>
<encoding>: WINCP | UTF-8 | UTF-8-BOM
WINCP The file will be saved encoded in the Windows code-page for non-
unicode programs. This option is only available for Windows.
UTF-8 The file will be saved in UTF-8 encoding. If PowerView saves or modifies
the file, it will add the UTF-8 BOM at the beginning of the file, only if the
original file also included a BOM.
UTF-8-BOM The file will be saved in UTF-8 encoding. If PowerView saves or modifies
a file, it will add the UTF-8 BOM at the beginning of the file.

PowerView Command Reference | 112
©
1989-2024 Lauterbach
EDIT.EXTern Use specified external ASCII editor to edit file
Opens a file in an external editor - but only on condition you have configured an external editor with the
command SETUP.EDITEXT OFF.
Examples:
See also
■ EDIT ■ EDIT.file ■ SETUP.EDITEXT
Format: EDIT.EXTern <file> [<line>]
NOTE: Alternatively, you can configure an external editor with SETUP.EDITEXT ON. In
this case, you need to use the EDIT.file command to open the file in the external
editor.
EDIT.EXTern my.txt ; opens the file my.txt at line 1
EDIT.EXTern main.c 123. ; opens the file main.c at line 123

PowerView Command Reference | 113
©
1989-2024 Lauterbach
EDIT.file Edit file
Depending on your TRACE32 configuration, EDIT.file opens the specified file either in the general-purpose
editor of TRACE32 or in an external editor. The external editor is called if you have configured an external
editor with the command SETUP.EDITEXT ON.
The general-purpose editor is primarily used to create and edit text files, e.g. *.txt, *.log, *.dat, etc.
Format: EDIT.file [<file>] [<line>] [/<option>]
<option>: AutoSave | NoSave
Buttons common to all TRACE32 editors:
A You can configure the editor settings, such as auto-indentation with spaces or tabs, using command
group SETUP.EDITOR.
B Save file / Save file with a new name (EDIT.SAVE).
C Close window. A message box prompts you to save unsaved changes. The file is removed from the
editor buffer.
D Open the EDIT.Find dialog for find, replace, and goto operations.
E Undo (EDIT.UNDO). Redo (EDIT.REDO). Toggle Show All (SETUP.EDITOR.Mode switch).
NOTE: For a comparison of the commands EDIT.file and EDIT.OPEN, refer to the
introduction to the EDIT command group.
(no option) Regular file-open operation.
For an explanation of why the options AutoSave and NoSave are now
deactivated and how you can re-activate them, see below.
<line> The insertion point is placed into the specified line.
A
C D EB

PowerView Command Reference | 114
©
1989-2024 Lauterbach
Why are the softkey buttons for the options AutoSave and NoSave deactivated?
TRACE32 grays out the softkeys of both options AutoSave and NoSave in the following scenario:
• You are closing the editor window of a file via the x button. In your next step, you want to re-open
the window and include one of the two options - while the file is still in the editor buffer. This
would result in a conflicting option settings for the file in question. To prevent that, TRACE32
deactivates both options.
• By clicking the x button of an editor window, you are closing only the editor window. The file itself
remains in the editor buffer until you remove the file from the editor buffer. To view the files in the
editor buffer, use the EDIT.List window.
How do I remove a file from the editor buffer?
Click the Quit button in the editor window. This removes the file from the editor buffer + closes the editor
window. Alternatively, use the command EDIT.QUIT <file> or EDIT.CLOSE <file> to remove the file from the
editor buffer.
This reactivates the options AutoSave or NoSave. You can now (re-)open the same file and apply one of the
options - if you want to.
AutoSave Opens a file which is saved automatically as soon as you click outside
the editor window.
NoSave Opens a file in the TRACE32 read-only mode. This means:
• The file cannot be saved to disk because the Save button in the
TRACE32 editor window is disabled.
• However, you can edit and save the file in an external editor while
the same file is still open in a TRACE32 editor.
• You can load the file you have modified in the external editor back
into the TRACE32 editor window:
1. Click inside the TRACE32 editor window.
2. Confirm with Yes when TRACE32 displays a message box,
prompting you to reload the modified file; else click No.

PowerView Command Reference | 115
©
1989-2024 Lauterbach
Examples
Example 1: This script line performs a regular file-open operation for the specified file. The softkey buttons
of the options AutoSave and NoSave are deactivated.
For information about why the options are deactivated in a regular file-open operation, see EDIT.file.
Example 2: The file that is opened in this script is saved automatically whenever you click outside the editor
window.
See also
■ EDIT ■ EDIT.CLOSE ■ EDIT.ENCoding ■ EDIT.EXTern
■ EDIT.Find ■ EDIT.FORMAT ■ EDIT.Goto ■ EDIT.InsertText
■ EDIT.List ■ EDIT.LOAD ■ EDIT.OPEN ■ EDIT.QUIT
■ EDIT.REDO ■ EDIT.Replace ■ EDIT.REVERT ■ EDIT.SAVE
■ EDIT.SELect ■ EDIT.UNDO ■ PEDIT ■ SETUP.EDITEXT
■ SETUP.EDITOR ■ TYPE
EDIT.file ~~/my-todos.txt
;to re-activate the softkey buttons for the options AutoSave and NoSave,
;you need to remove the file from the editor buffer like this:
EDIT.CLOSE ~~/my-todos.txt
;let’s open the file with the AutoSave option.
EDIT.file ~~/my-todos.txt /AutoSave

PowerView Command Reference | 116
©
1989-2024 Lauterbach
EDIT.Find Perform find, replace and goto operations in TRACE32 editors
This command is only available if SETUP.EDITOR.TYPE is set to PowerView. [Example]
With arguments: The command performs a find, replace or goto operation in the selected TRACE32 editor
window.
Without arguments: The command opens the EDIT.Find dialog window, which is available in all TRACE32
editors.
If you have opened multiple editor windows, you need to control in which editor window you want to perform
the find, replace or goto operation. To do this, you can:
• Click inside the editor window you want, and then execute the command.
• Work with user-defined window names. For more information, see WinPOS and WinTOP.
• Use the HANDLE option.
Format: EDIT.Find [<string> [/<option>]]
<option>: Case | Word | REGEX <expression> | Replace <string> | ReplaceAll <string>
| FOCUS | HANDLE <handle>
FOCUS With FOCUS: After the find, replace or goto operation, the focus is placed
on the editor window and is clearly visible to the user:
Without FOCUS: The window caption remains dimmed.
HANDLE File handle. The numerical value of the file handle identifies the editor
window and the file in which you want to perform a find, replace or goto
operation.
You can find the file handle in the handle column of the EDIT.List window.

PowerView Command Reference | 117
©
1989-2024 Lauterbach
Example:
See also
■ EDIT ■ EDIT.file ■ EDIT.Goto ■ EDIT.Replace
;open a file in the PEDIT window. This window has the focus because we
;have just opened it.
PEDIT ~~~/my_script.cmm
;for demo purposes, let's correct the camel casing of the ENDDO command
EDIT.Find "enddo" /Case /Word /ReplaceAll "ENDDO" /FOCUS

PowerView Command Reference | 118
©
1989-2024 Lauterbach
EDIT.FORMAT Format file contents an editor window
This command is only available if SETUP.EDITOR.TYPE is set to PowerView.
Formats the file contents as per the format settings in the SETUP.EDITOR.state window. Without
arguments, the entire file is formatted. Alternatively, right-click a selection in an editor window, and then
select Format Selection from the popup menu.
Available for PEDIT, MENU.Program and PER.Program.
Following options are available:
Format: EDIT.FORMAT [<line> | <range>] /<options>
<range>: <start_line>--<end_line>
<options>: CamelCase | NoIndent
<line> Formats the entire file starting at the specified <line>.
<range> Formats only the specified range of <start_line>--<end_line>.
Beautify
CamelCase
(obsolete)
Convert all PRACTICE commands, functions, keywords and options into
their official camel-cased form. See example below.
NoIndent Do not change indentation, intended for use with option /Beautify to keep
non-standard indentation.

PowerView Command Reference | 119
©
1989-2024 Lauterbach
Example for EDIT.FORMAT /Beautify, before and after
See also
■ EDIT ■ EDIT.file ■ SETUP.EDITOR
EDIT.Goto Go to specified line
This command is only available if SETUP.EDITOR.TYPE is set to PowerView.
With arguments: The command performs a goto operation to the specified line in a TRACE32 editor
window.
Without arguments: The command opens the dialog window for find, replace and goto operations, bringing
the Goto tab to the front.
See also
■ EDIT ■ EDIT.file ■ EDIT.Find ■ EDIT.Replace
Format: EDIT.Goto [<line> <column> [/<option>]]
<option>: FOCUS | HANDLE
<option> For a description of the options, see EDIT.Find.

PowerView Command Reference | 120
©
1989-2024 Lauterbach
EDIT.InsertText Insert text
[build 137983 - DVD 02/2022]
This command is used to insert text into a document opened in the editor.
See also
■ EDIT ■ EDIT.file
EDIT.List List editor files
Lists all editor files that are in the editor buffer of TRACE32. Double-clicking a file name in this list opens the
file for editing in the respective editor window; see command column.
See also
■ EDIT ■ EDIT.file
Format: EDIT.InsertText <string> [/<option>]
<option>: FOCUS | NewLine | HANDLE <handle>
PowerView editor The text is inserted at the current cursor position. If there is a text
selection, then the selected text is replaces with the text specified
with this command.
Native editor The text is inserted at the end of the document.
<option> For a description of the options, see EDIT.Find.
NewLine Adds a new line after the inserted text.
Format: EDIT.List
A The AutoSave option saves a file automatically as soon as you click outside the editor window. For
more information about how to use the option and its counterpart NoSave, see EDIT.file.
A

PowerView Command Reference | 121
©
1989-2024 Lauterbach
EDIT.LOAD Load text files
Reloads a file from the host system. The temporary work copy of the file is rejected. If no file name is
defined, all files opened by the editor will be reloaded from the host system.
Example:
See also
■ EDIT ■ EDIT.file ■ EDIT.REVERT ■ EDIT.SAVE
Format: EDIT.LOAD [<file>]
NOTE: For a comparison of the commands EDIT.LOAD and EDIT.REVERT, refer to the
introduction to the EDIT command group.
EDIT test.txt
;…
;…
;…
EDIT.LOAD test.txt
; open file with editor
; edit file
; reload original file

PowerView Command Reference | 122
©
1989-2024 Lauterbach
EDIT.OPEN Use TRACE32 editor to edit file
Always opens the specified file in the general-purpose editor of TRACE32 - regardless of whether you have
configured an external editor with the command SETUP.EDITEXT ON <cmdline>.
Examples:
See also
■ EDIT ■ EDIT.file ■ SETUP.EDITEXT ■ SETUP.EDITOR
Format: EDIT.OPEN [<file>] [<line>] [/<option>]
<option>: AutoSave | NoSave
A For descriptions of the buttons that are common to all TRACE32 editors, see EDIT.file.
<line>, <option> For description of the arguments, see EDIT.file.
NOTE: For a comparison of the commands EDIT.OPEN and EDIT.file, refer to the
introduction to the EDIT command group.
; open file config.t32 for editing
EDIT.OPEN config.t32
; cursor is placed into line 50.
EDIT.OPEN C:\T32_MPC\menp4xxx.men 50.
; "*" allows to use the file browser to select the file
EDIT.OPEN *.c
A

PowerView Command Reference | 123
©
1989-2024 Lauterbach
EDIT.QUIT Discard modifications
Removes the specified file from the editor buffer. All unsaved changes of the files are discarded.
If no file name is defined, all opened files within the editor buffer will be removed from the editor buffer.
Examples:
See also
■ EDIT ■ EDIT.CLOSE ■ EDIT.file
EDIT.REDO Redo the previously undone edit/edits
This command is only available if SETUP.EDITOR.TYPE is set to PowerView.
Redoes the previously undone edit in a TRACE32 editor.
See also
■ EDIT ■ EDIT.file ■ EDIT.UNDO
Format: EDIT.QUIT [<file>]
NOTE: For a comparison of the commands EDIT.CLOSE and EDIT.QUIT, refer to the
introduction to the EDIT command group.
EDIT.QUIT test.txt ; don't save file test.txt
EDIT.QUIT ; ignore all changes in all text files
Format: EDIT.REDO [ALL | <count>]
<option>: FOCUS | HANDLE
ALL Redoes all previously undone edits.
<count> Specify the number of redo operations.
<option> For a description of the options, see EDIT.Find.

PowerView Command Reference | 124
©
1989-2024 Lauterbach
EDIT.Replace Open dialog window on the Replace tab
This command is only available if SETUP.EDITOR.TYPE is set to PowerView.
Opens the dialog window for find, replace and goto operations, bringing the Replace tab to the front.
See also
■ EDIT ■ EDIT.file ■ EDIT.Find ■ EDIT.Goto
EDIT.REVERT Revert file
This command is only available if SETUP.EDITOR.TYPE is set to PowerView.
Reverts a file by loading the last saved file version from the host system back into the active editor window.
See also
■ EDIT ■ EDIT.file ■ EDIT.LOAD
Format: EDIT.Replace
Format: EDIT.REVERT [/<option>]
<option>: FOCUS | HANDLE
<option> For a description of the options, see EDIT.Find.
NOTE: For a comparison of the commands EDIT.LOAD and EDIT.REVERT, refer to the
introduction to the EDIT command group.
PowerView Command Reference | 125
©
1989-2024 Lauterbach
EDIT.SAVE Save a text file
After the file has been saved, it remains in the editor buffer for further editing. If no file name is defined, all
open editor files will be saved.
Examples:
See also
■ EDIT ■ EDIT.file ■ EDIT.LOAD
Format: EDIT.SAVE [<file> [<save_as>]]
EDIT test.txt
…
EDIT.SAVE test.txt
…
EDIT.CLOSE test.txt
EDIT.SAVE test1.txt test2.txt
; open the file
; save the file
; save and close file
; save file test1.txt to test2.txt
EDIT.SAVE ; save all files
EDIT test.txt /AutoSave ; open file with the AutoSave option
NOTE: You can activate the automatic save for a file by opening it with the AutoSave
option. For more information about how to use the option and its counterpart
NoSave, see EDIT.file.

PowerView Command Reference | 126
©
1989-2024 Lauterbach
EDIT.SELect Select text/code in an editor window
This command is only available if SETUP.EDITOR.TYPE is set to PowerView.
Selects text/code in an editor window.
Examples:
See also
■ EDIT ■ EDIT.file
Format: EDIT.SELect <start> [<end>] [/<option>]
<start>: <line> [<column>]
<end>: <line> [<column>]
<option>: FOCUS | HANDLE
<option> For a description of the options, see EDIT.Find.
EDIT.SELect 9. /FOCUS ;select entire line 9
EDIT.SELect 9. 3. /FOCUS ;select line 9 starting in column 3
EDIT.SELect 9. 4. 12. /FOCUS ;select from line 9, column 3
;up to and including line 12
EDIT.SELect 20. ,, 25. ,, /FOCUS ;select line 20 up to and including
;line 25.

PowerView Command Reference | 127
©
1989-2024 Lauterbach
EDIT.UNDO Undo the last edit/edits
This command is only available if SETUP.EDITOR.TYPE is set to PowerView.
Undoes the last edit in a TRACE32 editor.
See also
■ EDIT ■ EDIT.file ■ EDIT.REDO
Format: EDIT.UNDO [ALL | <count>] [/<option>]
<option>: FOCUS | HANDLE
ALL Undoes all edits.
<count> Specify how many edits you want to undo.
<option> For a description of the options, see EDIT.Find.
PowerView Command Reference | 128
©
1989-2024 Lauterbach
ERROR
ERROR.RESet Reset PRACTICE error
The information structure of PRACTICE which contains data of the last occurred error will be cleared.
Example:
See also
❏ ERROR.ADDRESS() ❏ ERROR.ID() ❏ ERROR.OCCURRED()
▲ ’ERROR Functions’ in ’PowerView Function Reference’
Format: ERROR.RESet
ERROR.RESet ; clear PRACTICE error structure
l_system_up:
SYStem.Up
IF ERROR.OCCURRED()
(
; check for target power fail
IF ERROR.ID()=="#emu_errpwrf"
(
; PRINT "Please power up the target board!"
DIALOG.OK "Please power up the target board!"
GOTO l_system_up
)
ELSE IF ERROR.ID()!=""
(
PRINT "other error occurred: " ERROR.ID()
ENDDO
)
)

PowerView Command Reference | 129
©
1989-2024 Lauterbach
EVAL
Eval Evaluate expression
Evaluates an expression. The result can be returned with the EVAL() functions.
Example 1: To try this script, copy it to a test.cmm file, and then run it in TRACE32 (See “How to...”).
Format: Eval <expression>
SETUP.RADIX Hex ;set the default interpretation of numbers that
;do not have the prefix 0x or postfix . to hex
AREA.view ;open an AREA window
PRINT "NOTE: For a HEX value, start with the prefix 0x"
PRINT " For an integer, append the postfix . (a period)"
RePeaT ;run the user prompt in the AREA window
( ;as an endless loop
ON ERROR CONTinue
PRINT "val=" ;your text for the user prompt
ENTER &a ;generate a user prompt in the AREA window
;and wait for the user input
Eval &a ;evaluate the user input with the Eval command
IF EVAL.TYPE()==0x0004
PRINT " You have entered the hex value 0x" %Hex &a
ELSE IF EVAL.TYPE()==0x0008
PRINT " You have entered the integer " %Decimal &a "."
ELSE
PRINT " You have entered '&a'"
)
A Without the prefix ‘0x’ or the postfix ‘.’ the user input is interpreted as a hex value, see code line
SETUP.RADIX Hex in the above example.
A

PowerView Command Reference | 130
©
1989-2024 Lauterbach
Example 2:
Example 3:
See also
■ Var.Eval ❏ EVAL() ❏ EVAL.ADDRESS() ❏ EVAL.BOOLEAN()
❏ EVAL.FLOAT() ❏ EVAL.PARAM() ❏ EVAL.STRing() ❏ EVAL.TIme()
❏ EVAL.TYPE()
▲ ’Release Information’ in ’Legacy Release History’
Eval Register(pc)==1000
IF (EVAL()!=0)
; evaluate expression
…
; use in other command
ENTRY &delayvalue
Eval &delayvalue
IF EVAL.TYPE()!=0x400
GOSUB err_no_timevalue
; evaluate user input value
…
; time value entered?

PowerView Command Reference | 131
©
1989-2024 Lauterbach
FIND
FIND Search in file
Searches in a file for the occurrence of a string or bytes.
Example 1:
Example 2: This script searches for a string in a file and, if the string is found, opens the file in the TYPE
window.
See also
■ ComPare ■ TYPE ■ WinFIND ■ Data.Find
■ Data.GOTO ■ Data.GREP ❏ FOUND() ❏ TRACK.COLUMN()
❏ TRACK.LINE()
▲ ’FOUND Functions’ in ’PowerView Function Reference’
▲ ’File and Folder Operations’ in ’PowerView User’s Guide’
Format: FIND <file> [<offset> | <range>] [<items>] [/<options>]
<options>: Back
NoFind
NoCase
FIND test.c , "main(" ;search for the string "main(" in whole file
LOCAL &file
&file="~~/demo/arm/compiler/gnu/src/sieve.c"
FIND &file , "main(" ;search for the string "main(" in whole file
IF FOUND()==TRUE()
( ;if found, open file in TYPE window and
;scroll to the line where the string was found
TYPE &file TRACK.LINE() /LineNumbers
)

PowerView Command Reference | 132
©
1989-2024 Lauterbach
FramePOS
FramePOS Controls the position of TRACE32 in MDI window mode
[Examples]
Controls the position and size of the TRACE32 main window if TRACE32 is configured to work in MDI
window mode (Multiple Document Interface). In MDI mode, the TRACE32 windows and dialog boxes float
freely inside the TRACE32 main window. Use the optional <colormode> parameter to set the toolbar and/or
MDI background color to one of the available eight colors that can be assigned to cores and windows for
multicore debugging.
For more information about the user interface, see “Graphical User Interface - Window Modes” in
PowerView User’s Guide, page 12 (ide_user.pdf).
Format: FramePOS <left> <up> <hsize> <vsize> [<state>] [<colormode>]
<state>: Normal | Iconic | Maximized | Top
<colormode>: Auto | DEFault | <colorindex>
<left> x-coordinate as a floating point or integer or percentage value.
<up> y-coordinate as a floating point or integer or percentage value.
<hsize> Horizontal frame size in cursor width or percentage (only valid for
“Normal” state)
<vsize> Vertical frame size in cursor height or percentage (only valid for “Normal”
state)
Normal The TRACE32 application is positioned at the given x- and y-coordinate
with the chosen horizontal and vertical size.
Iconic The TRACE32 application is minimized and an icon is shown in the task
bar. Position and size values can be set but will have no effect.
Maximized The TRACE32 application is maximized and fills the whole desktop.
Position and size values can be set but have no effect.

PowerView Command Reference | 133
©
1989-2024 Lauterbach
CORE parameter in config file:
Top The TRACE32 window is activated and positioned above all other top-
level windows.
NOTE: This state is currently only available under Microsoft Windows OS.
A change of z-order resulting in a loss of input focus of a window can be
prohibited by other applications. This is shown to the user as a colored
flashing icon in the Windows Explorer taskbar.
Auto Color TRACE32 instance (MDI parent window) dependent on the
CORE=<number> parameter in the config file.
If the CORE parameter is not used, no coloring is done.
This option is recommended for AMP systems.
DEFault Set default colors for toolbar and MDI background.
<colorindex> TRACE32 instance (MDI parent window) is colored as defined for the
Cores 0 to 7 in the SETUP.COLOR window (see screenshot below).
PBI=
USB
CORE=2

PowerView Command Reference | 134
©
1989-2024 Lauterbach
Examples:
See also
■ CmdPOS ■ SETUP.COLOR ■ WinExt ■ CORE.SHOWACTIVE
▲ ’PowerView - Screen Display’ in ’PowerView User’s Guide’
▲ ’Commands’ in ’PowerView User’s Guide’
▲ ’Release Information’ in ’Legacy Release History’
FramePOS ,,,, Auto ; color TRACE32 instance dependent
; on the CORE parameter in the
; config file
; CORE=2 -> color of Core 1
FramePOS ,,,, 1. ; color TRACE32 instance as
; specified for Core 1.
FramePOS 12.286 2.4167 90. 70. ; Position and size of the TRACE32
; main window specified by fixed
; values
FramePOS 33% 0% 33% 75% ; Position and size of the TRACE32
; main window specified by
; percentage
FramePOS , , , , Auto ; color TRACE32 instance (MDI
; parent window) dependent on
; the CORE=<number> parameter in
; the config file
; recommended for AMP systems

PowerView Command Reference | 135
©
1989-2024 Lauterbach
HELP
HELP Online help
The TRACE32 help system is divided in two parts:
•The HELP window is used to navigate through the help files and to search for any topic.
• An external PDF viewer displays the selected topics.
You can configure the TRACE32 help system with a few mouse-clicks to display the PDF help files in
your favorite PDF viewer; see “Configure the Help System” in PowerView User’s Guide, page 90
(ide_user.pdf).
The HELP window can be accessed by pressing F1, using the Help menu, or by typing the HELP command
at the TRACE32 command line.
See also
■ HELP.Bookmark ■ HELP.checkUPDATE ■ HELP.command ■ HELP.FILTER
■ HELP.Find ■ HELP.Index ■ HELP.OPEN ■ HELP.PDF
■ HELP.PICK ■ HELP.PRinT ■ HELP.Topics ■ HELP.TREE
■ SETUP.PDFViewer
▲ ’HELP System’ in ’PowerView User’s Guide’
▲ ’Release Information’ in ’Legacy Release History’

PowerView Command Reference | 136
©
1989-2024 Lauterbach
HELP.Bookmark Show help bookmark list
Opens the bookmark page of the online help and shows the current bookmarks. A double-click will show the
bookmarked file at the right place.
See also
■ HELP.Bookmark.ADD ■ HELP.Bookmark.DELete ■ HELP.Bookmark.show ■ HELP
Format: HELP.Bookmark
NOTE: Unsaved help bookmarks are only available during the current TRACE32
session.
If you want to re-use your help bookmarks in future sessions, remember to store
your help bookmarks.
The best way to accomplish this that is to modify your PRACTICE start-up script
(*.cmm), so that help bookmarks are stored automatically.
See “Store and Load Help Bookmarks Automatically” in PowerView User’s
Guide, page 93 (ide_user.pdf).

PowerView Command Reference | 137
©
1989-2024 Lauterbach
HELP.Bookmark.ADD Files on bookmark list
See also
■ HELP.Bookmark.ADD.file ■ HELP.Bookmark.ADD.Find ■ HELP.Bookmark.ADD.Index ■ HELP.Bookmark
■ HELP.Bookmark.show
HELP.Bookmark.ADD.file Add file to bookmark list
Adds a new PDF file to the help bookmark list. When closing the TRACE32 software, all bookmarks will be
stored automatically. To store the bookmarks manually, use the STOre command.
Examples:
See also
■ HELP.Bookmark.ADD
▲ ’Release Information’ in ’Legacy Release History’
Format: HELP.Bookmark.ADD.file <file> [<description> <title> /<option>]
<option>: Page <page_number>
<page> Set the bookmark at this page number.
<description> This description will be displayed in the bookmark list
<title> This title will be displayed in the bookmark list
; Add the file “CPUdata.pdf” to the bookmark list - a double click will
; open this file
HELP.Bookmark.ADD.file CPUdata.pdf
; Additionally, the description will be displayed in the bookmark list
HELP.Bookmark.ADD.file CPUdata.pdf "Contains CPU info."
; Additionally, the description and the file title will be displayed in
; the bookmark list
HELP.Bookmark.ADD.file CPUdata.pdf "Contains CPU info." "Data of CPU"
; A double click will open the; file “CPUdata.pdf” on page 10
HELP.Bookmark.ADD.file CPUdata.pdf "" "" /Page 10

PowerView Command Reference | 138
©
1989-2024 Lauterbach
HELP.Bookmark.ADD.Find Add file to bookmark list
Adds a new PDF file to the help bookmark list. With the Find option, a find text can be added, and the
bookmark will be set on the first occurrence of the find string.
For example, use the heading text of the desired page you want see.
See also
■ HELP.Bookmark.ADD
▲ ’Release Information’ in ’Legacy Release History’
Format: HELP.Bookmark.ADD.Find <file> <find> [<description> <title> /<option>]
<option>: Page <page_number>
Page Start searching for the find text on this page.
<description> This description will be displayed in the bookmark list.
<title> This title will be displayed in the bookmark list.
HELP.Bookmark.ADD CPUdata.pdf
"Register Values"
; Add CPUdata.pdf to the bookmark
; list.
; On a double click, find the first
; occurrence of the string “Register
; Values” in document and go there
HELP.Bookmark.ADD CPUdata.pdf
"Register Values" /Page 5
; Additionally, start the search on
; page 5 - because the “Register
; Values” is first found in the list
; of contents.
; Now the search starts on
; page 5 and will find the right
; heading!

PowerView Command Reference | 139
©
1989-2024 Lauterbach
HELP.Bookmark.ADD.Index Add file to bookmark list
Adds a new PDF file to the help bookmark list. To specify the exact position in the file, you can use “named
destinations” as described in the PDF specification. Add a bookmark on a named destination with this
command:
Example:
See also
■ HELP.Bookmark.ADD
▲ ’Release Information’ in ’Legacy Release History’
HELP.Bookmark.DELete Delete from bookmark list
t
Deletes a bookmark from the list of bookmarks, <value> is the position in the bookmark list (counting starts
with 0).
See also
■ HELP.Bookmark ■ HELP.Bookmark.show
Format: HELP.Bookmark.ADD.Index <file> <index> [<description> <title>]
HELP.Bookmark.ADD.Index
CPUdata.pdf "g154634"
; Add a bookmark on the named
; destination “g154634” in the file
; “CPUdata.pdf”
HELP.Bookmark.ADD CPUdata.pdf
"g154634" "Chapter 17: Registers"
"Data of CPU"
; Additionally, the description and
; the file title will be displayed
; in the bookmark list
Format: HELP.Bookmark.DELete <value>

PowerView Command Reference | 140
©
1989-2024 Lauterbach
HELP.Bookmark.show Show help bookmark list
Opens the bookmark page of the online help and shows the current bookmarks.
See also
■ HELP.Bookmark ■ HELP.Bookmark.ADD ■ HELP.Bookmark.DELete
HELP.checkUPDATE Automatic update check for new help-files
With HELP.checkUPDATE ON an automatic update check for new help files is performed.
See also
■ HELP
HELP.command Command related support
The command HELP without an argument displays the table of contents. An argument can be a command,
or a prompt name.
Example:
Alternatively, you can get help on a command even quicker by entering the command name and a trailing
blank, and then pressing the «HELP» key (F1 on WINDOWS).
See also
■ HELP
Format: HELP.Bookmark.show
Format: HELP.checkUPDATE ON | OFF
Format: HELP.command [<command_name> | <system_name>]
HELP ;Displays the table of contents
HELP Register ;Displays information about the Register command

PowerView Command Reference | 141
©
1989-2024 Lauterbach
HELP.FILTER Filters for online help
The online help presents only the information/manuals relevant to the current setup by default.
TRACE32 uses help filters for this purpose. Most filters are set automatically, depending on the connected
TRACE32 hardware, the selected CPU and other settings. Some help filters have to be set by the command
HELP.FILTER.ADD. These include manuals for integration with third-party tools, OS Awareness manuals
and other TRACE32 debug extensions.
The command HELP.FILTER.List provides a list of all active help filters.
You can activate/deactivate the help filters, add or delete help filters using the commands listed in the See
also block below. The help filters are listed in “Appendix A - Help Filters”, page 371.
See also
■ HELP.FILTER.Add ■ HELP.FILTER.Delete ■ HELP.FILTER.List ■ HELP.FILTER.RESet
■ HELP.FILTER.set ■ HELP
▲ ’Appendix A - Help Filters’ in ’PowerView Command Reference’
▲ ’HELP System’ in ’PowerView User’s Guide’

PowerView Command Reference | 142
©
1989-2024 Lauterbach
HELP.FILTER.Add Add a filter to the help filter list
Adds filter <help_filter> to the help filter list. Adding the filter causes the accompanying manual to appear in
the online help.
Example:
See also
■ HELP.FILTER ■ HELP.FILTER.set
HELP.FILTER.Delete Delete filter from help filter list
Deletes the help filter <help_filter> from the help filter list. Removing the filter results in the accompanying
manual no longer being displayed in the online help.
Example:
See also
■ HELP.FILTER ■ HELP.FILTER.set
▲ ’Release Information’ in ’Legacy Release History’
Format: HELP.FILTER.Add <help_filter>
; show Linux debugging manuals in the online help
HELP.FILTER.Add rtoslinux
; show manuals that provide details about the integration for Simulink
; in the online help
HELP.FILTER.Add intsimulink
Format: HELP.FILTER.Delete <help_filter>
;Active help filters: bdmarm;rtoslinux
HELP.FILTER.Delete rtoslinux
;Remaining help filter: bdmarm;

PowerView Command Reference | 143
©
1989-2024 Lauterbach
HELP.FILTER.List List all help filters
List all active help filters.
See also
■ HELP.FILTER ■ HELP.FILTER.set
HELP.FILTER.RESet Reset help filter system
Deletes all help filters and unchecks the check box only manuals relevant to current setup. All TRACE32
manuals are displayed.
See also
■ HELP.FILTER ■ HELP.FILTER.set
Format: HELP.FILTER.List
Format: HELP.FILTER.RESet

PowerView Command Reference | 144
©
1989-2024 Lauterbach
HELP.FILTER.set Activate/deactivate help filters for online help
HELP.FILTER.set without argument toggles the help filter
Example:
See also
■ HELP.FILTER ■ HELP.FILTER.Add ■ HELP.FILTER.Delete ■ HELP.FILTER.List
■ HELP.FILTER.RESet
HELP.Find Perform a full-text search in online help
The command HELP.Find without an argument opens the HELP window on the Find tab. You can use one
or more keywords to perform a full-text search.
Format: HELP.FILTER.set [ON | OFF]
ON
(default)
Activates the help filters, i.e. the check box only manuals relevant to
current setup is checked. The online help presents only the
information/manuals relevant to the current setup.
OFF Deactivates the help filters, i.e. the check box only manuals relevant to
current setup is unchecked. All TRACE32 manuals are displayed.
HELP.FILTER.set OFF ; deactivate all help filters
Format: HELP.Find <string> [/<options>]
<options>: Case | Similar

PowerView Command Reference | 145
©
1989-2024 Lauterbach
Please be aware, that online help presents only the information/manuals relevant to the current setup by
default. If you want to perform your search through all document uncheck first the check box only manuals
relevant to current setup first.
The search can be customized by the following options:
The Find string can be modified using the following operators:
Here are some examples of how to use the search options:
Case
(GUI: case sensitive)
Case sensitive search.
Similar
(GUI: similar terms)
Search takes into account different spellings.
text general find text
“text” ’text’ find exact the string inside “text“ or ’text’
-text find only files without text
HELP.Find ; Open help find window
HELP.Find "data" ; Find the string “data”
HELP.Find "MMU" /Case ; Find the string “MMU” but not “mmu”

PowerView Command Reference | 146
©
1989-2024 Lauterbach
The colors of the find results have the following meaning:
See also
■ HELP
▲ ’Release Information’ in ’Legacy Release History’
black text Result is normal text.
blue text Result is a command.
bold blue text Result is a heading.
cyan Result is in a table.
grey Result is an example.

PowerView Command Reference | 147
©
1989-2024 Lauterbach
HELP.Index Search in indexed terms, commands, and functions
Opens the HELP.Index window, displaying a complete alphabetic list of the TRACE32 commands,
functions, and other indexed terms.
Please be aware, that online help presents only the information/manuals relevant to the current setup by
default. If you want to perform your search through all document uncheck first the check box only manuals
relevant to current setup first.
The help index contains the full and short forms of the commands and functions. For more information about
short and full forms, see “Long Form and Short Form of Commands and Functions” in PowerView
User’s Guide, page 29 (ide_user.pdf).
The colors of the index entry show the type:
Format: HELP.Index [<string>] [All | Command | Function | Short]
All Show the complete index list.
Command Show only commands in the index list.
Function Show only functions in the index list.
Short Show only a keyword index file (no commands, no functions). The Short
option refers to the keyword index only radio button.
blue text command
cyan text function
black other types

PowerView Command Reference | 148
©
1989-2024 Lauterbach
To find help via the Help window:
1. Choose Help menu > Index.
2. Type the short form in Find Index box, and then press Enter.
3. In the Help window, double-click the index entry to open the pdf file in a PDF viewer, e.g. Acrobat
Reader. Double-clicking takes you right to the description of the selected index entry.
See also
■ HELP
▲ ’HELP System’ in ’PowerView User’s Guide’


PowerView Command Reference | 150
©
1989-2024 Lauterbach
HELP.PDF Open PDF file
Opens a PDF file in a PDF viewer.
Example:
The path prefix ~~ expands to the system directory of TRACE32, by default C:\T32. In a default installation,
the pdf files of the online help reside in the ~~\pdf folder.
See also
■ HELP
▲ ’HELP System’ in ’PowerView User’s Guide’
HELP.PICK Context-sensitive help
Offers a help cursor to get help on buttons, dialog boxes etc. The same command is also available by
clicking this button on the TRACE32 main toolbar.
See also
■ HELP
▲ ’HELP System’ in ’PowerView User’s Guide’
Format: HELP.PDF <file>
HELP.PDF ~~\pdf\ide_ref.pdf ;Open the IDE Reference Guide of TRACE32
Format: HELP.PICK

PowerView Command Reference | 151
©
1989-2024 Lauterbach
HELP.PRinT Print help files
See also
■ HELP.PRinT.PRinTSel ■ HELP.PRinT.SELect ■ HELP.PRinT.show ■ HELP.PRinT.UNSELect
■ HELP
HELP.PRinT.PRinTSel Print selected files
Prints all selected files - options see HELP.PRinT.show
See also
■ HELP.PRinT
HELP.PRinT.SELect Select files to print
Selects the file number <value> to add it to the print list. If value is not set, all files are selected.
See also
■ HELP.PRinT
Format: HELP.PRinT.PRinTSel [/No DiaLoG | /DiaLoG]
Format: HELP.PRinT.SELect [<value>]

PowerView Command Reference | 152
©
1989-2024 Lauterbach
HELP.PRinT.show Show print help files
Opens the print-page of the online help and shows a list of files to print.
See also
■ HELP.PRinT
HELP.PRinT.UNSELect Unselect all print files
Removes the file number <value> from the print list. If value is not set, unselect all files.
See also
■ HELP.PRinT
Format: HELP.PRinT.show [/NoDiaLoG | /DiaLoG]
NoDiaLoG If set, disable the Acrobat Reader print dialog and print all selected files
immediately.
DiaLoG Shows the Acrobat Reader print dialog to change printer options like
number of pages, page format.
Format: HELP.PRinT.UNSELect [<value>]

PowerView Command Reference | 153
©
1989-2024 Lauterbach
HELP.Topics Show the structure of the online help system
Shows the structure of the online help system..
The online help structure lists all help pdfs. Please be aware, that online help presents only the
information/manuals relevant to the current setup by default. If you want a list of all pdfs uncheck first the
check box only manuals relevant to current setup first.
See also
■ HELP
▲ ’HELP System’ in ’PowerView User’s Guide’
Format: HELP.Topics [/Close | /Open]
Close Close all open tree branches.
Open Open all tree branches.

PowerView Command Reference | 154
©
1989-2024 Lauterbach
HELP.TREE Display command tree
Lists all available commands for your hardware configuration in alphabetical order.
The command tree is a complete reference of all softkeys, and is in the same hierarchical order as the
softkeys. For example, the Register command has the subcommands: Register.COPY, Register.Up,...
These subcommands can be seen:
• In the command tree when you click the tree symbol
• In the command tree when you type Register in the Find Command field.
• In the softkey line when you click the Register softkey button.
• In the softkey line when you type “Register.” in the command line.
Examples:
See also
■ HELP
▲ ’PowerView - Screen Display’ in ’PowerView User’s Guide’
Format: HELP.TREE <command> [/OPEN | /CLOSE]
A To search for a specific command, type some letters in the Find Command input field.
B The list automatically scrolls to the first command matching your input.
C Double-clicking the desired command opens the appropriate help file in a PDF viewer.
Close Close all open tree branches.
Open Open all tree branches.
HELP.TREE "Register" ; opens the HELP.TREE window, showing the
; Register command and its subcommands
HELP.TREE /Open ; open all help tree branches
HELP.TREE /Close ; close all help tree branches
C
B
A

PowerView Command Reference | 155
©
1989-2024 Lauterbach
HISTory
HISTory Command history of last executed commands
The last executed commands you have typed at the TRACE32 command line are stored in a history
buffer, which can be displayed in the HISTory.type window. The history buffer also records command inputs
that contain syntax errors and are thus not executed.
Direct commands, or those commands executed under PRACTICE are not recorded in the history. They can
be recorded by the LOG command group.
To recall the last executed commands from the history buffer, you have the following options:
• Press the up-arrow key in the command line to recall the most recent command in the command line.
Press the up-arrow key repeatedly to recall older history entries.
• Press the down-arrow key to return to the most recent command in the history buffer.
• Type any string in the TRACE32 command line, and then press the up-arrow key or down-arrow key
to perform a search in the history for lines matching the keyword.
•Use the HISTory.type window.
Example: Let’s assume you have typed list at the command line and are pressing the up-arrow key. Only
history entries containing the search item list will be suggested in the command line. In the HISTory.type
window, the current match for list will additionally be highlighted [A].
See also
■ HISTory.eXecute ■ HISTory.SAVE ■ HISTory.Set ■ HISTory.SIZE
■ HISTory.type ■ LOG
▲ ’Create a PRACTICE Script’ in ’Training Script Language PRACTICE’
A

PowerView Command Reference | 156
©
1989-2024 Lauterbach
HISTory.eXecute Execute command history
Executes all commands in the history list.
See also
■ HISTory ■ HISTory.SAVE ■ HISTory.type
▲ ’Commands’ in ’PowerView User’s Guide’
HISTory.SAVE Store command history log
Saves only the commands from the history file to the specified file. The resulting file has the format of a
PRACTICE script.
Example:
The path prefix ~~ expands to the system directory of TRACE32, by default c:\t32.
You can consider this script as your first draft toward your final script. The next step is then to edit the draft
version of your script by adding program flow controls, such as IF ... ELSE, WHILE loop, RePeaT loop, etc.
See also
■ HISTory.Set ■ HISTory.SIZE ■ HISTory ■ HISTory.eXecute
■ HISTory.type
▲ ’Commands’ in ’PowerView User’s Guide’
▲ ’Create a PRACTICE Script’ in ’Training Script Language PRACTICE’
Format: HISTory.eXecute
Format: HISTory.SAVE [<file>]
;save the commands from the history to this PRACTICE script file
HISTory.SAVE ~~/myCommandHistory.cmm
;open the file in the PRACTICE script editor of TRACE32
PEDIT ~~/myCommandHistory.cmm

PowerView Command Reference | 157
©
1989-2024 Lauterbach
HISTory.Set History settings
Stores entries into the parameter history. This command is usually only used by the STOre HISTory
command.
See also
■ HISTory.SAVE ■ HISTory ■ HISTory.type
▲ ’Commands’ in ’PowerView User’s Guide’
Format: HISTory.Set <item> <string> [<string> <string>]
<item>: CMD | FILE | HLL | ADDRESS | RANGE | TraceFIND | WelcomeScripts |
PDEBUG
CMD <string> Adds an entry to the TRACE32 command history (which can be viewed
with the command HISTory.type)
FILE <str1> <str2>
<str3>
Adds an entry to the list of recently used files in the FILE menu.
• <str1> is the name of the icon shown left of the entry.
• <str2> is the name of the command to be executed when clicking
on the entry.
• <str3> is the working directory in which the command is executed.
HLL <string> Adds an entry to the list of recently used HLL expressions e.g. in the
Var.Break.Set window.
ADDRESS <string> Adds an entry to the list of recently used addresses e.g. in the Break.Set
window.
You can also cycle through the list of recently used addresses by
pressing the softkey button <address> in connection with a command.
RANGE <string> Adds an entry to the list of recently used address ranges e.g. in the
Break.Set window.
You can also cycle through the list of recently used address ranges by
pressing the softkey button <range> in connection with a command.
TraceFIND <string> Adds an entry to the list of recently searched items in the expert search
of a trace recording.
WelcomeScripts
<string>
Adds an entry to the list of recently searched items in the Search for
scripts window (see WELCOME.SCRIPTS).
PDEBUG Allows automated storage of PRACTICE debug script parameters in
history list (see SETUP.PDEBUG.ScriptParams).

PowerView Command Reference | 158
©
1989-2024 Lauterbach
HISTory.SIZE Command history and file history
Using the HISTore.SIZE command group, you can define the (a) number of commands that can be stored in
the command history as well as (b) the number of recently used files that can be displayed in the File menu.
See also
■ HISTory.SIZE.cmd ■ HISTory.SIZE.FILE ■ HISTory.SAVE ■ HISTory
■ HISTory.type
▲ ’Commands’ in ’PowerView User’s Guide’
▲ ’Create a PRACTICE Script’ in ’Training Script Language PRACTICE’
HISTory.SIZE.cmd Define log size of command history
When defining the log size of the command history, all former entries to the history are erased. Without
selecting a size, the history log is erased only. Due to time constraints, the command history log is always
stored in operating memory. Therefore, its size should be minimized (10. to 100.). The size is the number
of lines with a maximum length of 100 character. Due to an optimized storage the effective number of history
lines which can be used, is higher (smaller lines results in a longer history).
Examples:
See also
■ HISTory.SIZE
Format: HISTory.SIZE.cmd [<size>]
HISTory.SIZE [<size>] (deprecated)
HISTory.type ; view command history
HISTory.SIZE.cmd ; clear history and set default size
HISTory.SIZE.cmd 100. ; define history with 100 entries

PowerView Command Reference | 159
©
1989-2024 Lauterbach
HISTory.SIZE.FILE Define number of recently used files in "File" menu
Defines the number of recently used files that are listed in the file history of the File menu.
Increasing the size will not erase the existing file history. Decreasing the size will only erase the oldest
entries which no longer fit inside the new size of the file history size.
See also
■ HISTory.SIZE
HISTory.type Display command history log of last executed commands
Displays the command history buffer in the HISTory.type window. The highlighted bar indicates the current
read position.
• Left-clicking a line copies the selected command to the TRACE32 command line. The command
is not executed unless you press Enter.
• Right-clicking opens the popup menu, see below.
• Double-clicking a line immediately executes the selected command.
See also
■ HISTory ■ HISTory.eXecute ■ HISTory.SAVE ■ HISTory.Set
■ HISTory.SIZE
▲ ’Commands’ in ’PowerView User’s Guide’
Format: HISTory.SIZE.FILE <size>
<size> Default size is 10. Maximum size is 30.
Format: HISTory.type
A Displays the online help for the selected command.
A

PowerView Command Reference | 160
©
1989-2024 Lauterbach
IFCONFIG
IFCONFIG Ethernet or USB communication
Using the IFCONFIG command group, you can configure and test the Ethernet or USB communication
between the TRACE32 PowerView GUI and the power debug interface of the Lauterbach hardware. In
addition, the usage of resources can be visualized.
You can accomplish these task via the TRACE32 command line or via the IFCONFIG.state window.
See also
■ IFCONFIG.PROfile ■ IFCONFIG.state
■ IFCONFIG.TEST ❏ IFCONFIG.DEVICENAME()
❏ IFCONFIG.ETHernetADDRESS() ❏ IFCONFIG.IPADDRESS()
❏ IFTEST.LATENCY()
▲ ’IFCONFIG and IFTEST Functions’ in ’PowerView Function Reference’
▲ ’Starting a TRACE32 PowerView Instance’ in ’Training Basic Debugging’
▲ ’Starting a TRACE32 PowerView Instance’ in ’Training Basic SMP Debugging’
▲ ’Starting a TRACE32 PowerView Instance’ in ’Training Basic SMP Debugging for Intel® x86/x64’
IFCONFIG.PROfile Display operation profiles
Display a time profile about the usage of resources.
Window with time profile about the usage of resources.
Format: IFCONFIG.PROfile /<option>
PROfile.[<item>] (deprecated)
<option>: SEND | RECV | COL | ERROR | RETRY | RESYNC | KBYTE
FILECACHEMISSES | FILECACHEHITS | DPACKETS | RCLPACKETS |
MAINTHREAD | STREAMIN | STREAMCOM | STREAMBUFFER |
STREAMOUT | STREAMFILE | STREAMTHREAD | SIMINST

PowerView Command Reference | 161
©
1989-2024 Lauterbach
So,i
See also
■ IFCONFIG ■ IFCONFIG.state ■ IFCONFIG.TEST
▲ ’Interface’ in ’PowerView User’s Guide’
COL Collisions when sending packets on Ethernet.
DPACKETS Debug access packets.
ERROR Communication errors.
FILECACHEHITS File cache hits. (CHITS)
FILECACHEMISSES File cache misses. (CMISSES)
KBYTE Communication utilization in KBytes, all packets received and sent.
MAINTHREAD Main thread utilization.
RCLPACKETS Remote control packets.
RECV Received packets (including Multicast/Broadcast).
RESYNC Resyncs after communication fails.
RETRY Retransmitted packets.
SEND Sent packets.
SIMINST Simulator performance.
STREAMBUFFER Trace streaming buffer fill state.
STREAMCOM Trace streaming communication rate.
STREAMFILE Trace streaming file output rate.
STREAMIN Trace streaming target input rate.
STREAMOUT Trace streaming processing rate.
STREAMTHREAD Trace streaming processing thread utilization.

PowerView Command Reference | 162
©
1989-2024 Lauterbach
IFCONFIG.state Interface configuration
Opens the IFCONFIG.state dialog used for configuring Ethernet / USB connections.
The easiest way to set the device name for an Ethernet configuration is to start with a USB connection.
Changing an existing TRACE32 USB configuration to a TRACE32 Ethernet configuration involves these
main steps:
• Assign a host name to the TRACE32 device.
• Modify the configuration file for Ethernet.
• Power off the device, disconnect USB, re-connect it via an Ethernet cable, and power up again.
Functions can be used in PRACTICE scripts to return individual values from the dialog. For more
information, refer to the
❏ functions() listed in the See also block below.
Format: IFCONFIG.state
ip address IP address for the debug interface. In order to change the field, you need
to disable the options RARP, BOOTP or DHCP.
Starting with the PowerDebug X50, the network mask needs to be speci-
fied in CIDR notation to allow routed access to the PowerDebug device.
For example, to specify the IP address 198.51.100.42 with a subnet
mask of 255.255.255.192, enter 198.51.100.42/26 into this field.
gateway Gateway, also known as default route.
ethernet address Displays the ethernet address of the debug interface (read-only)

PowerView Command Reference | 163
©
1989-2024 Lauterbach
See also
■ IFCONFIG ■ IFCONFIG.PROfile
■ IFCONFIG.TEST ❏ HOSTID()
❏ HOSTIP() ❏ IFCONFIG.DEVICENAME()
❏ IFCONFIG.ETHernetADDRESS() ❏ IFCONFIG.IPADDRESS()
❏ IFTEST.LATENCY()
▲ ’IFCONFIG and IFTEST Functions’ in ’PowerView Function Reference’
▲ ’Interface’ in ’PowerView User’s Guide’
device name The device name is used to address a certain debug module.
If the debug module is connected via USB, the device name can be used
to address a specific debug module if multiple debug modules are con-
nected to the PC. A firmware update may be required to enable this fea-
ture.
If the debug module is connected via Ethernet, the device name is used
to retrieve the IP address via DHCP.
Set default device
name
Click to set the device name back to the default device name. The default
device name is the serial number of the debug module.
RARP Use the Reverse Address Resolution Protocol (RARP) to retrieve the IP
address. This option is greyed out if not supported by the sued PowerDe-
bug module.
BOOTP Use the Bootstrap Protocol (BOOTP) to retrieve the IP address. This
option is greyed out if not supported by the sued PowerDebug module.
DHCP Use the Dynamic Host Configuration Protocol (DHCP) to retrieve the IP
address corresponding to the device name (see above).
full duplex Enable full duplex for the ethernet port.
licence key Licence key to unlock ethernet support for workstations
(not any longer required since 07/2011 for workstations and 04/2006 for
PC based TRACE32 software).
statistics Displays a live chart in a IFCONFIG.PROfile window.
TEST Tests the interface function and speed, see IFCONFIG.TEST.
Save to device Saves the device name to the internal memory of the TRACE32 device
(e.g. PowerDebug / PowerTrace device).

PowerView Command Reference | 164
©
1989-2024 Lauterbach
IFCONFIG.TEST Test interface function and speed
Measures the performance of upload, download, and latency of the connection to the debug interface. The
result is displayed in the message bar and in the AREA.view window.
This test only tests and measures the connection between host and debug interface. It is not directly related
to the upload / download performance from / to the target, but a slow connection to the host will effect the
max. possible upload / download performance to the target.
Example:
See also
■ IFCONFIG ■ IFCONFIG.PROfile ■ IFCONFIG.state ❏ IFTEST.DOWNLOAD()
❏ IFTEST.LATENCY() ❏ IFTEST.UPLOAD()
▲ ’Interface’ in ’PowerView User’s Guide’
Format: IFCONFIG.TEST [default | Read | Write | ReadWrite [/<option>]]
IFTEST (deprecated)
<option>: Download | Upload | Warp [<warp>] | Latency
Download Download speed from host to TRACE32
Upload Upload speed from TRACE32 to host
Warp [<warp>] High-speed trace upload (for PowerTrace and CombiProbe). TRACE32
automatically determines the optimal warp speed.
Latency Round-trip time for a small packet, similar to a ping
AREA.view ;open an AREA window. The test results will be
;displayed in this window
IFCONFIG.TEST ;run the test. The AREA window will be updated
;with the test results
IFCONFIG.state ;alternatively, open the IFCONFIG.state window and
;click the TEST button

PowerView Command Reference | 165
©
1989-2024 Lauterbach
InterCom
InterCom Data exchange between different TRACE32 PowerView instances
The InterCom system allows the exchange of data between different TRACE32 systems. The exchange is
based on UDP. The destination system is defined by a port number of a UDP port used by this TRACE32
system. This requires an entry in the 'config.t32' file of any participating TRACE32 system:
A good way to familiarize yourself with the InterCom command group is to start with the example given in
InterCom.ENable.
See also
■ InterCom.ENable ■ InterCom.Evaluate
■ InterCom.execute ■ InterCom.executeNoWait
■ InterCom.NAME ■ InterCom.PING
■ InterCom.PipeCLOSE ■ InterCom.PipeOPEN
■ InterCom.PipeREAD ■ InterCom.PipeWRITE
■ InterCom.PORT ■ InterCom.WAIT
■ SETUP.InterComACKTIMEOUT ■ SYnch
■ TargetSystem ❏ InterCom.PING()
❏ InterCom.PODPORT() ❏ InterCom.PODPORTNUMBER()
❏ InterCom.PORT()
▲ ’InterCom Functions’ in ’PowerView Function Reference’
▲ ’InterCom’ in ’PowerView User’s Guide’
IC=NETASSIST
PORT=20001
NAME=firstInstance
...
NOTE: If multiple TRACE32 systems are used on one host, the port numbers must differ!

PowerView Command Reference | 166
©
1989-2024 Lauterbach
InterCom.ENable User-defined InterCom name, auto-assigned port number
[Example]
Assigns a user-defined InterCom name to the current TRACE32 PowerView instance, and TRACE32
automatically chooses and assigns the next free InterCom UDP port number.
If the InterCom name was already set in the config file, this command overrides the initial InterCom name
from the config file.
To view or return the current InterCom name and UDP port number, open the TargetSystem.state window
or use the functions InterCom.NAME() and InterCom.PORT().
Format: InterCom.ENable <intercom_name> [/<option>]
<option>: INSTance <instance> | UseCore <core>
NOTE: To assign a user-defined InterCom name and a user-defined UDP port number,
use the commands InterCom.NAME and InterCom.PORT.
INSTance
<instance>
Changes the InterCom name of a remote TRACE32 instance specified
by <instance>.
Alternatively, double-click the desired InterCom name in the ic name
column of the TargetSystem.state window. For an illustrated example,
see InterCom.NAME.
UseCore <core> Changes the InterCom name of that instance where the
UseCore <core> index matches the CORE=<core> index in the config
file.

PowerView Command Reference | 167
©
1989-2024 Lauterbach
Example: The TRACE32 PowerView instance named firstInst starts another instance named
secondInst for the purpose of debugging two cores of an AMP system.
See also
■ InterCom ■ InterCom.execute ■ SUBTITLE ■ TITLE
■ SYnch.Connect ■ TargetSystem.NewInstance
▲ ’Release Information’ in ’Legacy Release History’
;shut down previous debug session
InterCom.execute ALL WinCLEAR
InterCom.execute ALL SYStem.Down
;assign the user-defined InterCom name 'firstInst' to the instance
;executing this PRACTICE script
InterCom.ENable firstInst
;select the 1st CortexA9MPCore core of OMAP4430 for this instance
SYStem.CPU OMAP4430
CORE.ASSIGN 1.
SYStem.CONFIG.CORE 1. 1.
;open a 2nd TRACE32 PowerView instance and assign the user-defined
;InterCom name 'secondInst'
TargetSystem.NewInstance secondInst /ONCE
;select the 2nd CortexA9MPCore core of OMAP4430 for the 2nd instance
InterCom.execute secondInst SYStem.CPU OMAP4430
InterCom.execute secondInst CORE.ASSIGN 2.
InterCom.execute secondInst SYStem.CONFIG.CORE 2. 1.
;display a status overview of the AMP system
TargetSystem.state DEFault /Global /UseICName
;connect to the AMP system
SYStem.Up
InterCom.execute OTHERS SYStem.Up
;<your_code> ... e.g. load your application program with
;InterCom.execute <instance_name> Data.LOAD...
InterCom.execute ALL Go

PowerView Command Reference | 168
©
1989-2024 Lauterbach
InterCom.Evaluate Evaluate function via InterCom system
Retrieves the result of a function executed on the remote system. Once retrieved, the result can be
accessed by using the (local) EVAL() function. If no function is specified, the result of the remote EVAL()
function will be retrieved.
Example: This script reads the value of the register DEC of the TRACE32 PowerView instance named
secondInstance
See also
■ InterCom ■ InterCom.execute ❏ EVAL()
▲ ’InterCom’ in ’PowerView User’s Guide’
▲ ’Release Information’ in ’Legacy Release History’
Format: InterCom.Evaluate <instance> [<function>]
<instances>: <intercom_name> | SELF | ALL | OTHERS | [<host>:]<port>
<instance> For parameter descriptions, see InterCom.execute.
Group names, such as cluster1.*, are not allowed!
InterCom.Evaluate secondInstance Register(DEC)
&remote_register_value=EVAL()
PRINT "DEC=" EVAL()
PowerView Command Reference | 169
©
1989-2024 Lauterbach
InterCom.execute Execute command via InterCom system
[Examples]
Executes TRACE32 commands on the remote system. The commands will be executed immediately. The
local system will wait until the remote system has completed the command.
The following arguments work only in AMP debug scenarios:
Format: InterCom.execute <instances> <command>
<instances>: <intercom_name> | SELF | ALL | OTHERS | <name_pattern> |
[<host>:]<port>
<host>:<port> Name of the host and the port number.
InterCom.execute localhost:<port_number> <command> can execute a
command on any TRACE32 instance, even on a TRACE32 instance that is
connected to another debugger hardware.
Examples:
InterCom.execute 10000 PRINT "Hello world!"
InterCom.execute 127.0.0.1:10000 PRINT "Hello world!"
InterCom.execute localhost:10000 PRINT "Hello world"
InterCom.execute ste1:10000 PRINT "Hello world!"
<intercom_name> InterCom name of a TRACE32 instance. Names can be assigned to
TRACE32 instances with the InterCom.NAME command.
<name_pattern> The InterCom.execute command supports the use of the wildcards * and
? in InterCom names. See example 3.
ALL All known TRACE32 instances.
OTHERS ALL except SELF.
SELF This TRACE32 instance.
NOTE: When executing a PRACTICE script (*.cmm) on the remote TRACE32
PowerView instance using
InterCom.execute <…> DO <file>
the local TRACE32 PowerView instance will wait until the DO command has
invoked the script, but not until the script has terminated.
For waiting until the script terminated, use InterCom.WAIT.

PowerView Command Reference | 170
©
1989-2024 Lauterbach
Example 1: This script shuts down the previous AMP debug session.
Example 2: In this script, two commands are executed on the remote TRACE32 PowerView instance.
Example 3: This script executes the SYStem.Attach command on all TRACE32 PowerView instances
whose InterCom names start with cluster1.
See also
■ InterCom ■ InterCom.ENable ■ InterCom.Evaluate ■ InterCom.executeNoWait
■ InterCom.NAME ■ InterCom.PING ■ InterCom.PipeCLOSE ■ InterCom.PipeOPEN
■ InterCom.PipeREAD ■ InterCom.PipeWRITE ■ InterCom.PORT ■ InterCom.WAIT
▲ ’InterCom’ in ’PowerView User’s Guide’
▲ ’Release Information’ in ’Legacy Release History’
InterCom.execute ALL WinCLEAR ;close all windows of the previous AMP
;debug session
InterCom.execute ALL SYStem.Down
InterCom.execute localhost:20002 Register.RESet
InterCom.execute localhost:20002 Go.direct
InterCom.execute cluster1.* SYStem.Attach

PowerView Command Reference | 171
©
1989-2024 Lauterbach
InterCom.executeNoWait Execute command via InterCom system
Executes TRACE32 commands on the remote TRACE32 PowerView instance. The commands will be
executed immediately, and the local system will not wait until the remote TRACE32 PowerView instance has
completed the command.
Use InterCom.executeNoWait if you don’t need to wait locally until the command has completed, or if the
command takes a long time to complete.
Example: Execute commands on the remote TRACE32 PowerView instance named secondInstance
See also
■ InterCom ■ InterCom.execute
▲ ’Release Information’ in ’Legacy Release History’
InterCom.NAME Assign user-defined InterCom name
[Example]
Assigns a user-defined InterCom name to the current TRACE32 PowerView instance. If the InterCom name
was already set in the config file, this command overrides the initial InterCom name from the config file.
To view or return the current InterCom name, open the TargetSystem.state window or use the
InterCom.NAME() function.
Format: InterCom.executeNoWait <instances> <command>
<instances>: <intercom_name> | SELF | ALL | OTHERS | <name_pattern> |
[<host>:]<port>
<instances> For parameter descriptions, see InterCom.execute.
InterCom.executeNoWait secondInstance Data.LOAD.Elf bigfile.elf
Format: InterCom.NAME <intercom_name> [/<option>]
<option>: INSTance <instance> | UseCore <core>
NOTE: InterCom.NAME <intercom_name> does not change the current InterCom
UDP port number, in contrast to InterCom.ENable <intercom_name>.

PowerView Command Reference | 172
©
1989-2024 Lauterbach
Example: The following example is for demo purposes only. It shows how to assign a new InterCom
name to a TRACE32 instance. See also screenshot below.
See also
■ InterCom ■ InterCom.execute ■ SUBTITLE ■ TITLE
■ SYnch.Connect ❏ InterCom.NAME()
▲ ’Release Information’ in ’Legacy Release History’
<option> For a description of the options, see InterCom.ENable.
;assigns the name ’firstInst’ to the current TRACE32 PowerView instance
InterCom.NAME firstInst
;returns: firstInst
PRINT InterCom.NAME()
;displays the name in the ’ic name’ column
TargetSystem.state INSTance InterComName DEFault
A You can rename an instance by double-clicking a name in the ic name column.
B Double-clicking inserts the command InterCom.NAME into the TRACE32 command line. Simply
enter a new name before the /Instance option, e.g. secondInst.
A
B

PowerView Command Reference | 173
©
1989-2024 Lauterbach
InterCom.PING Test InterCom system
Sends one test message through the InterCom system to another TRACE32 PowerView instance. If
everything works, the other instance will display the message 'PING received' and the sending TRACE32
PowerView instance will display the message 'PING response received'.
Example: This script checks the connection of the TRACE32 system with the InterCom UDP port 20002 on
host node 'ste':
See also
■ InterCom ■ InterCom.execute ❏ InterCom.PING()
▲ ’InterCom’ in ’PowerView User’s Guide’
InterCom.PipeCLOSE Close named pipe
Closes the named pipe.
See also
■ InterCom ■ InterCom.execute
▲ ’InterCom’ in ’PowerView User’s Guide’
Format: InterCom.PING <intercom_name> | [<host>:]<port> [/<option>]
<option>: Large
<host>:<port> For description and examples, see InterCom.execute.
<intercom_name> InterCom name of a TRACE32 instance. Names can be assigned to
TRACE32 instances with the InterCom.NAME command.
Large Sends a large data packet to test the throughput.
InterCom.PING ste:20002
Format: InterCom.PipeCLOSE #<file_number>

PowerView Command Reference | 174
©
1989-2024 Lauterbach
InterCom.PipeOPEN Open named pipe
Opens or creates a named pipe. Named pipes allow to exchange data between different applications. The
usage depends on the host OS.
Example:
See also
■ InterCom ■ InterCom.execute
▲ ’InterCom’ in ’PowerView User’s Guide’
InterCom.PipeREAD Read from named pipe
Gets input from a named pipe. Similar to the PRACTICE READ command. If the pipe has no data ready the
command returns empty strings.
See also
■ InterCom ■ InterCom.execute
▲ ’InterCom’ in ’PowerView User’s Guide’
Format: InterCom.PipeOPEN #<file_number> <file> [/<option>]
<option>: Read | Write | Create
;Opens a pipe for listening on Windows
;NOTE: The directory name is fixed for Windows hosts!
InterCom.PipeOPEN #1 \\.\pipe\mypipe /Read /Create
Format: InterCom.PipeREAD #<file_number> <macro>

PowerView Command Reference | 175
©
1989-2024 Lauterbach
InterCom.PipeWRITE Write to named pipe
Writes data to a named pipe. Similar to the PRACTICE WRITE command.
See also
■ InterCom ■ InterCom.execute
▲ ’InterCom’ in ’PowerView User’s Guide’
InterCom.PORT Assign user-defined InterCom UDP port number
Assigns a user-defined InterCom UDP port number to the current TRACE32 PowerView instance. If the
InterCom UDP port number was already set in the config file, this command overrides the initial port number
from the config file.
To view or return the current InterCom UDP port number, open the TargetSystem.state window or use the
InterCom.PORT() function.
Example: This script is for demo purposes only. It shows how to assign a new InterCom UDP port
number to a TRACE32 instance. See also screenshot below.
Format: InterCom.PipeWRITE #<file_number> <arglist>
Format: InterCom.PORT <port_number> | 0. [/<option>]
<option>: INSTance <instance> | UseCore <core>
0. Removes the InterCom UDP port for the currently selected TRACE32
instance.
<option> For a description of the options, see InterCom.ENable.
<port_number> Parameter Type: Decimal value.
;assigns port number 10000. to the current TRACE32 PowerView instance
InterCom.PORT 10000.
;returns: 10000.
PRINT InterCom.PORT()
;displays the port number in the ’ic port’ column
TargetSystem.state DEFault InterComPort

PowerView Command Reference | 176
©
1989-2024 Lauterbach
See also
■ InterCom ■ InterCom.execute ❏ InterCom.PORT()
A You can assign a new port number by double-clicking a port number in the ic port column.
B Double-clicking inserts the command InterCom.PORT into the TRACE32 command line. Simply
enter a new port number before the /Instance option, e.g. 20000.
A
B

PowerView Command Reference | 177
©
1989-2024 Lauterbach
InterCom.WAIT Wait for remote InterCom system
The command InterCom.WAIT has two main applications:
• Wait until the remote system is responsive and available.
• Wait until the remote system finished executing a running script i.e. until the PRACTICE
interpreter becomes “idle”.
Example 1: Start a second TRACE32 system and wait until it can be controlled via InterCom:
Example 2:
See also
■ InterCom ■ InterCom.execute
▲ ’Release Information’ in ’Legacy Release History’
Format: InterCom.WAIT <instances> [<condition> | <time>]
<instances>: <intercom_name> | SELF | ALL | OTHERS | <name_pattern> |
[<host>:]<port>
NOTE: InterCom.WAIT does not work from the TRACE32 command line.
When a PRACTICE script is interrupted, e.g. by an input dialog, it is considered
to be idle and causes the InterCom.WAIT command to return.
<instance> For parameter descriptions, see InterCom.execute.
<condition> PRACTICE functions that return the boolean values TRUE or FALSE as
well as PRACTICE functions returning 0 and !=0.
For more information about the permissible return values, see:
• TRUE() and FALSE()
• Return Value Type: Decimal value.
<time> Parameter Type: Time value.
DO start_trace32_b.cmm ; start debugger that listens on port 10001
InterCom.WAIT localhost:10001
InterCom.WAIT ALL !RUN() ;wait till all instances have stopped
InterCom.executeNoWait ALL Data.LOAD.Elf big.elf /NoCODE
InterCom.WAIT ALL

PowerView Command Reference | 178
©
1989-2024 Lauterbach
LICENSE
LICENSE Manage TRACE32 licenses
Using the LICENSE command group, you can list the serial numbers and maintenance contracts of your
debugging product and update your maintenance license.
See also
■ LICENSE.List ■ LICENSE.REQuest ■ LICENSE.state ■ LICENSE.UPDATE
■ VERSION ❏ LICENSE.DATE() ❏ LICENSE.GRANTED() ❏ LICENSE.MULTICORE()
▲ ’LICENSE Functions’ in ’PowerView Function Reference’
▲ ’Release Information’ in ’Legacy Release History’
▲ ’Do you have a valid Software License Key?’ in ’Software Updates’
LICENSE.List Display all license information
Opens a window which shows all serial numbers and corresponding maintenance contracts of your
debugging product.
If you are using a In-Circuit Debugger, the window shows also the feature keys stored in your Debug Cable,
Nexus Adapter or Preprocessor.
Example 1: LICENSE.List window for a setup with a debug cable and preprocessor:
Format: LICENSE.List
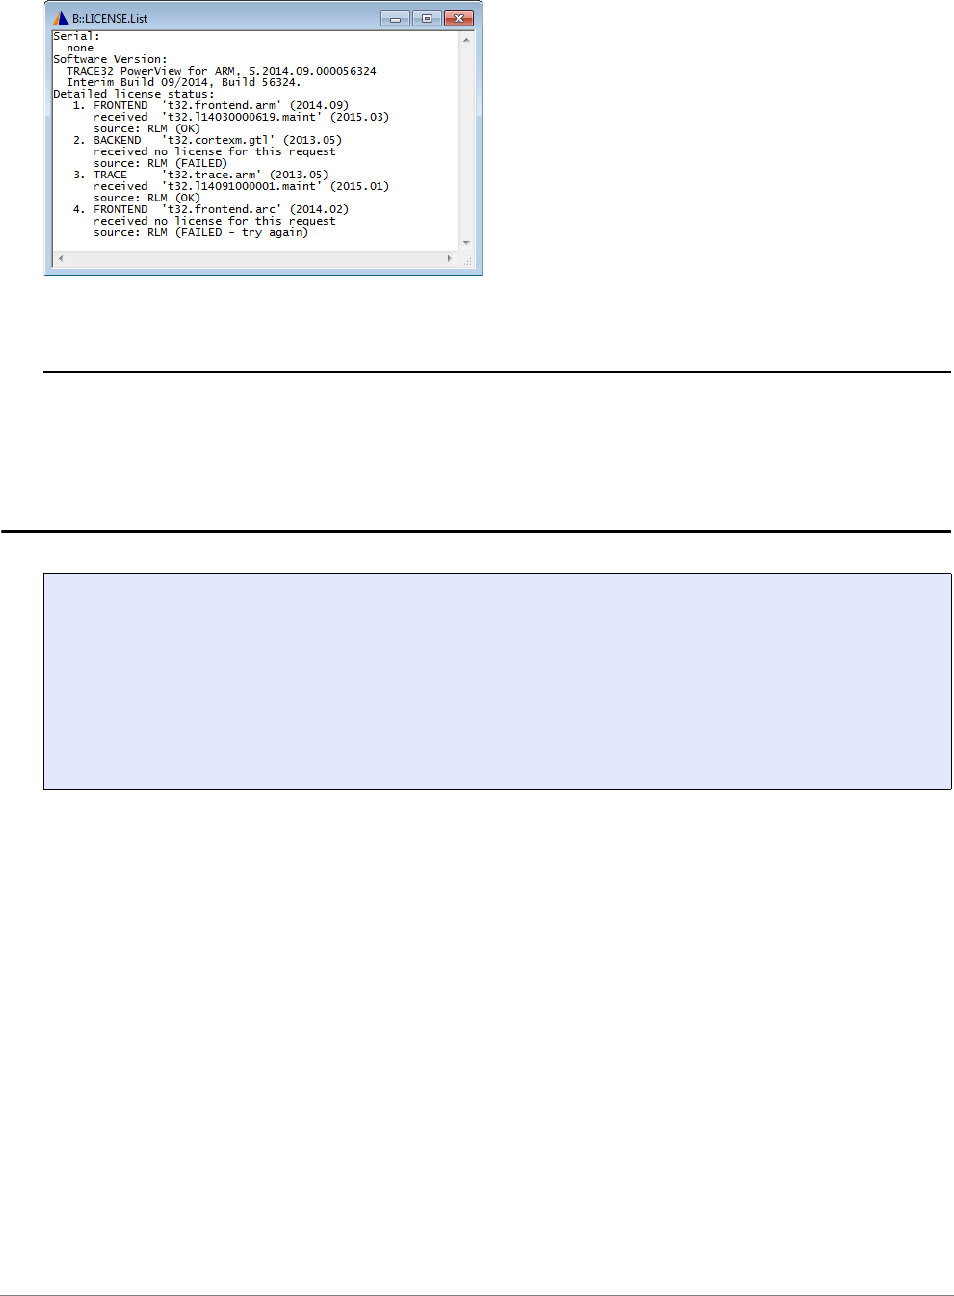
PowerView Command Reference | 179
©
1989-2024 Lauterbach
Example 2: LICENSE.List window for a software-only setup using LICENSE.REQuest:
See also
■ LICENSE
▲ ’Release Information’ in ’Legacy Release History’
LICENSE.REQuest Request a license
Requests a specific license from TRACE32. If the requested license is not yet available to TRACE32, then
the license is checked out from an RLM server. The checked-out license is then blocked for the duration of
the TRACE32 session.
You can view the licenses used by TRACE32 in the LICENSE.List window. To check the state of the license
in a PRACTICE script (*.cmm), use the function LICENSE.GRANTED().
Format 1: LICENSE.REQuest.plain <product> [<version>]
Format 2: LICENSE.REQuest.<sub_cmd>
<sub_cmd>: FRONTEND | INTEGRATION | MULTICORE | SIMULATOR |
BACKEND | TRACE | plain
BACKEND Requests a license for the currently selected backend.
FRONTEND Requests a frontend license for the current architecture and version.
INTEGRATION Requests a license for the currently selected third party integration.
MULTICORE Requests a multicore license for the current software version.
SIMULATOR Requests a frontend license for the current architecture and version.
TRACE Requests a trace license for the current architecture and version.

PowerView Command Reference | 180
©
1989-2024 Lauterbach
Please note that it is possible to request and check out Lauterbach licenses (if the license server has them)
that are not required to run the current TRACE32 version. This is convenient for testing, e.g. to make sure a
particular license is available on the license server.
See also
■ LICENSE ❏ LICENSE.GRANTED()
LICENSE.state Display the currently used maintenance contract
Shows the state of the currently used maintenance contract. You can also update your maintenance license
via this window.
See also
■ LICENSE
plain License request for a particular <product> and <version>.
<product> License product name as a string, e.g. as given in a lauterbach-*.lic file.
For example: “t32.trace.x86”
<version> License version as a string, e.g. as given in a lauterbach-*.lic file.
For example: “2013.05”
If the version string is empty, e.g. “”, then TRACE32 will try to auto-fill in
the version string, based on the product type.
Format: LICENSE.state
NOTE: This window shows the build-date up to which you may use TRACE32. It
does not show which CPU architectures you have licensed.
Use LICENSE.List or VERSION.view to show which CPU architectures you
can use with your debug system.

PowerView Command Reference | 181
©
1989-2024 Lauterbach
LICENSE.UPDATE Update the maintenance contract
Updates the maintenance contract(s) inside your plugged Debug Cable or Nexus Adapter.
If the license is not intended for a Debug Cable or Nexus Adapter or if the option FILE is used, the license in
your license file (usually license.t32) is updated.
Examples:
See also
■ LICENSE
▲ ’Release Information’ in ’Legacy Release History’
Format: LICENSE.UPDATE [<license_file> | <maintenance> [/FILE]]
; example for <license_file>
; updates all maintenance contracts in currently used Debug Cable/
; Nexus Adapter from data in given file
LICENSE.UPDATE license095970.t32
; example for <maintenance>
; stores given maintenance contract to currently used Debug Cable/
; Nexus Adapter
LICENSE.UPDATE C09110125362 12/2011 9a090df28631ac9c
LICENSE.UPDATE "C09110125362 12/2011 9a090df28631ac9c"
; stores currently used maintenance contract to Debug Cable/Nexus Adapter
LICENSE.UPDATE

PowerView Command Reference | 182
©
1989-2024 Lauterbach
LOG
LOG Log TRACE32 commands and PRACTICE script calls
Using the LOG command group, you can trace all executed TRACE32 commands and the call hierarchy of
PRACTICE scripts (*.cmm). Operations activated by the mouse will be changed to line-oriented commands.
Commands and PRACTICE script calls are stored in log files which have either a default or a user-defined
log file name. Commands can additionally be logged by printing them to an AREA window and recording
them in a command log file at the same time.
Regardless of which output you choose, the trace information is recorded line by line in the command line
format.
Command Log File
Every new LOG.OPEN command generates a new command log file, overwriting the old one. The size of
the command log file is unlimited. Once the command log file has been activated, command execution
(especially in the case of PRACTICE) will slow down due to the recording.
Log File for PRACTICE Script Calls
The call hierarchy of PRACTICE scripts can be logged automatically or manually. In either case, the log
mechanism is based on the LOG.DO command.
• The automatic log mechanism is useful for logging the call hierarchy of scripts that are executed
automatically on start-up of TRACE32. For more information, refer to “Logging the Call
Hierarchy of PRACTICE Scripts” in PRACTICE Script Language User’s Guide, page 17
(practice_user.pdf).
• After the start-up of TRACE32, you can manually log the calls of PRACTICE script files using the
LOG.DO command.
AREA Window
The size of an AREA window is by default limited to about 100 lines. However, you can increase the number
of lines with the AREA.Create command. To route command log entries to the AREA window, use the
command LOG.toAREA.
See also
■ LOG.CLOSE ■ LOG.DO ■ LOG.OFF ■ LOG.ON
■ LOG.OPEN ■ LOG.toAREA ■ LOG.type ■ HISTory
■ SYStem.LOG
▲ ’Logging Commands’ in ’PowerView User’s Guide’
▲ ’Logging the Call Hierarchy of PRACTICE Scripts’ in ’PRACTICE Script Language User’s Guide’

PowerView Command Reference | 183
©
1989-2024 Lauterbach
LOG.CLOSE Close command log
The activated command log file is closed.
Example:
See also
■ LOG ■ LOG.OPEN ■ LOG.type
▲ ’Logging Commands’ in ’PowerView User’s Guide’
▲ ’Create a PRACTICE Script’ in ’Training Script Language PRACTICE’
LOG.DO Log calls of PRACTICE scripts
Logs the calls of PRACTICE scripts (*.cmm) to a file. Whenever a PRACTICE script is called by DO, RUN,
PSTEP or AutoSTOre or via an event in a DIALOG or PER file, a line is appended to the log file.
Logging will stop when:
• The last PRACTICE script ends (PMACRO window does not show any active scripts).
• The command ENDDO is executed while no script is active.
• The command LOG.DO is executed without a file name.
• The command END is executed.
Example:
Format: LOG.CLOSE
LOG.OPEN
;…
LOG.CLOSE
; opens file 't32.log'
; close file and terminate logging function
Format: LOG.DO [<file>]
LOG.DO "~~~/myScriptNesting.log" ; start log in temporary directory
DO myScript.cmm ; start PRACTICE script
; log ends when PRACTICE stack becomes empty

PowerView Command Reference | 184
©
1989-2024 Lauterbach
Possible output in myScriptNesting.log:
See also
■ LOG ■ LOG.type ❏ LOG.DO.FILE()
▲ ’Logging Commands’ in ’PowerView User’s Guide’
▲ ’Logging the Call Hierarchy of PRACTICE Scripts’ in ’PRACTICE Script Language User’s Guide’
▲ ’Release Information’ in ’Legacy Release History’
LOG.OFF Switch off command log
The commands are no longer logged. However, the command log remains operational. It can be reactivated
by the LOG.ON command.
Example:
See also
■ LOG.ON ■ LOG ■ LOG.type
▲ ’Logging Commands’ in ’PowerView User’s Guide’
▲ ’Create a PRACTICE Script’ in ’Training Script Language PRACTICE’
// LOG.DO, Started via command line, TRACE32 for ARM, GUI ID: myt32
DO C:\T32\tmp\myScript.cmm
DO C:\T32\tmp\two.cmm 123 // from line 5.
ChDir.DO C:\T32\tmp\three.cmm a b c // from line 2.
DO C:\T32\tmp\three.cmm d e f // from line 3.
ON CoMmanD MYBLUBB DO C:\T32\tmp\three.cmm blubber // from line 6.
ON TIME 2000.ms DO C:\T32\tmp\four.cmm // from line 20.
RUN C:\T32\tmp\three.cmm 456
ENDDO
Format: LOG.OFF
LOG.OPEN
;…
LOG.OFF
;…
LOG.ON
;…
LOG.CLOSE
; opens file 't32.log' and commands are logged
; temporarily switch off log function -> commands are
; not logged
; switch on log function -> commands are logged
; close file 't32.log' and terminate log function

PowerView Command Reference | 185
©
1989-2024 Lauterbach
LOG.ON Switch on command log
All commands are logged. This command can be used after the log has been turned off with the command
LOG.OFF.
Example:
See also
■ LOG.OFF ■ LOG ■ LOG.type
▲ ’Logging Commands’ in ’PowerView User’s Guide’
▲ ’Create a PRACTICE Script’ in ’Training Script Language PRACTICE’
LOG.OPEN Open command log file
A new command log file will be generated. Only one LOG command can be activated at one time. Nesting
of files is not possible. If no file name is defined, the file 't32.log' will be used.
Format: LOG.ON
LOG.OPEN
;…
LOG.OFF
;…
LOG.ON
;…
LOG.CLOSE
; opens file 't32.log' and commands are logged
; temporarily switch off log function -> commands are
; not logged
; switch on log function -> commands are logged
; close file 't32.log' and terminate log function
Format: LOG.OPEN [<file>] [/<option>]
<option>: TimeStamp
TimeStamp Adds global timestamps to log.

PowerView Command Reference | 186
©
1989-2024 Lauterbach
Example:
See also
■ LOG ■ LOG.CLOSE ■ LOG.type
▲ ’Logging Commands’ in ’PowerView User’s Guide’
▲ ’Create a PRACTICE Script’ in ’Training Script Language PRACTICE’
LOG.OPEN
;…
;…
LOG.CLOSE
; opens file 't32.log'
; close file 't32.log' and terminate log function

PowerView Command Reference | 187
©
1989-2024 Lauterbach
LOG.toAREA Log commands by writing them to an AREA window
[Examples]
Writes log entries about commands to the default AREA window A000 or a user-defined AREA window
before they are executed. After pre-processing, the PRACTICE macros are replaced by their contents and
comments are stripped before logging.
If an error occurs during the actual execution of the command, the error message is printed directly below
the command that has just been executed.
In contrast to the LOG.OPEN command, the executed commands are not recorded in a command log file
but printed to the AREA window. However, if you want to additionally record the log entries in a *.txt file, then
use the AREA.OPEN command, as shown in example 2.
Format: LOG.toAREA ON | OFF ["<prefix>"] [/<option>]
<option>: ALL
IndentCalls
AREA <name>
COLOR <color>
<color>: NORMAL | BLACK | MAROON | GREEN | OLIVE | NAVY | PURPLE
TEAL | SILVER | GREY | RED | LIME | YELLOW | BLUE | FUCHSIA
AQUA | WHITE
<prefix> User-defined prefix text. Each line in the log output of the AREA window can
start with a <prefix>.
ALL With ALL:
• All commands executed by a PRACTICE script (*.cmm) are displayed
in the AREA window.
• Commands you enter on the TRACE32 command line are also shown.
Without ALL (default):
• Only commands from the PRACTICE script being executed are dis-
played in the AREA window.
• However, the following commands are exceptions; they are not shown:
ON, GLOBALON, GOSUB, RETURN, GOTO, JUMPTO, DO, END,
ENDDO, IF, ELSE, REPEAT, WHILE, Var.IF, Var.WHILE, GLOBAL,
LOCAL, PRIVATE, ENTRY, PARAMETERS, RETURNVALUES.
AREA <name> Specifies the AREA window to which the log entries are written. By default,
the log entries are written to the AREA window A000.
Alternatively, specify a user-defined AREA name you have created with the
AREA.Create command.
COLOR <color> Prints the command log entries in color to the AREA window.

PowerView Command Reference | 188
©
1989-2024 Lauterbach
Example 1
In case of an error, an error message is printed in red below the command that has caused the error.
IndentCalls The lines of sub-scripts called with DO and sub-routines called with GOSUB
are indented.
The calls themselves are also displayed in the AREA window. When using
IndentCalls, the commands DO and GOSUB are shown irrespective of
whether the ALL option is used or not.
The commands are indented with a single plus symbol for every hierarchic
level opened by GOSUB or DO.
The plus symbol is used instead of a space to allow you to see the hierarchic
level of every command more easily. This is especially useful if there are lots
of other messages in the AREA window in between the log messages.
AREA.view A000 ;display the default AREA window.
LOG.toAREA ON /ALL /COLOR.GREEN ;log commands by writing them
;to the AREA window.
ChDir.DO ~~\my-test-script-012.cmm ;for demo purposes, let's call
;a non-existing file to cause
;an error.
SYSem.state ;for demo purposes, a typo in the
;command SYStem.state to cause
;an error.
LOG.toAREA OFF ;terminate the log.
A The commands that have caused the errors. The error messages are printed directly below.
A

PowerView Command Reference | 189
©
1989-2024 Lauterbach
Example 2
The log entries are printed to the default AREA window A000 and are at the same time stored in a *.txt file
using the AREA.OPEN command.
AREA.view A000 ;display the default AREA window.
AREA.OPEN A000 ~~\my-log.txt ;save output that will be shown
;in the AREA window to a file.
LOG.toAREA ON /ALL /COLOR.GREEN ;log commands by printing them
;to the AREA window.
;two commands for demo purposes:
Data.Set VM:0x0 "Hello World!" 0 ;set two zero-terminated strings
Data.Set VM:0x30 "Hello Universe!" 0 ;to the TRACE32 virtual memory.
LOG.toAREA OFF ;terminate the log.
AREA.CLOSE A000 ;close the output file.
EDIT.OPEN ~~\my-log.txt ;open the file in an EDIT window.

PowerView Command Reference | 190
©
1989-2024 Lauterbach
Example 3
A user-defined AREA window is created for command logging, and all lines are preceded by a user-defined
prefix.
For information about how to save the contents of the AREA window as an *.html file, see PRinTer.FILE.
See also
■ LOG ■ LOG.type ■ AREA
▲ ’Message Windows’ in ’PowerView User’s Guide’
▲ ’Logging Commands’ in ’PowerView User’s Guide’
;create a user-defined AREA window named myLogAREA for command logging
AREA.Create myLogAREA
AREA.view myLogAREA
;optionally, select the default AREA window A000 if you want to prevent
;the result of any PRINT command from showing up in myLogAREA
AREA.Select A000
;log commands by printing them to myLogAREA, and format them in green
LOG.toAREA ON "user-defined prefix - " /AREA myLogAREA /COLOR.GREEN
;these commands are logged to myLogAREA
List.auto
Break.List
Trace.List
PRINT Register(PP)
;deactivate the logging function
LOG.toAREA OFF
A The return value of PRINT Register(PP) does not show up in the command log because
AREA.Select A000 routes the return value to the default AREA window A000.
B The return value of PRINT Register(PP) shows up in the command log if AREA.Select A000
is omitted from the above example script.
BA

PowerView Command Reference | 191
©
1989-2024 Lauterbach
LOG.type Display command log
Displays the current command log file.
See also
■ LOG ■ LOG.CLOSE ■ LOG.DO ■ LOG.OFF
■ LOG.ON ■ LOG.OPEN ■ LOG.toAREA
▲ ’Logging Commands’ in ’PowerView User’s Guide’
LS
LS Display directory
For a description of the LS command, see DIR.
See also
■ DIR
▲ ’File and Folder Operations’ in ’PowerView User’s Guide’
▲ ’Release Information’ in ’Legacy Release History’
Format: LOG.type
A User ID assigned to ID= in the config.t32 file as well as the creation date and time of the command log
file.
B This commented-out line indicates that command logging was temporarily suspended by LOG.OFF
and resumed later on by LOG.ON.
C Diagonal lines indicate that the command log file has been closed with LOG.CLOSE.
Format: LS [<path>] [/PATH] [/Recursive]
B
A
C

PowerView Command Reference | 192
©
1989-2024 Lauterbach
MENU
MENU Customize the user interface TRACE32 PowerView
The MENU command group allows to customize the following elements of the user interface:
• Main menu bar
• Accelerators, see MENU.AddMenu or MENUITEM
• Main toolbar
• Local popup menus
• Local buttons
The default configuration for the menu and toolbar is loaded from the t32.men file. This file must be present
in the TRACE32 system directory. Additional items can be added to this menu by the ADD dialog statement
without modifying this file.
See also
■ MENU.AddMenu ■ MENU.AddTool ■ MENU.Delete ■ MENU.PENDing
■ MENU.Program ■ MENU.ReProgram ■ MENU.RESet
▲ ’Icons’ in ’PowerView User’s Guide’
MENU.AddMenu Add one standard menu item
Adds a menu to the main menu bar. By default, this menu is named User. This command can be used to
quickly add one item for temporary use. If more (or more complex) items need to be added, it is
recommended to use the Menu.Program or Menu.ReProgram command. The parameters are the same
as described for the MENUITEM statement.
The menu can be removed using MENU.Delete.NAME USER.ADDMENU.
See also
■ MENU.AddTool ■ MENU ■ MENU.RESet
▲ ’PowerView - Screen Display’ in ’PowerView User’s Guide’
▲ ’Release Information’ in ’Legacy Release History’
▲ ’TRACE32 PowerView’ in ’Training Basic Debugging’
▲ ’TRACE32 PowerView’ in ’Training Basic SMP Debugging’
Format: MENU.AddMenu <name> <command>
MENU.AddMenu "In Byte,ALT+F10" "Data.In io:0x100"

PowerView Command Reference | 193
©
1989-2024 Lauterbach
MENU.AddTool Add a button to the main toolbar
Adds a button to the main toolbar. This command is useful to quickly add one button for temporary use. This
means, the button is only available for the current TRACE32 session. If more (or more complex) items need
to be added it is recommended to use the MENU.Program or MENU.ReProgram command. The
parameters are the same as described for the TOOLITEM statement.
Example: Four temporary buttons are added to the main toolbar.
The button can be removed using MENU.Delete.NAME USER.ADDTOOL.
See also
■ MENU.AddMenu ■ MENU ■ MENU.Delete ■ MENU.RESet
▲ ’PowerView - Screen Display’ in ’PowerView User’s Guide’
▲ ’Release Information’ in ’Legacy Release History’
▲ ’TRACE32 PowerView’ in ’Training Basic Debugging’
▲ ’TRACE32 PowerView’ in ’Training Basic SMP Debugging’
Format: MENU.AddTool <tooltip_text> <image> <command>
<image>: ":<predefined_image>"
"<shorttext>[,<color>[,:<predefined_image>]]"
<color>: r | R | g | G | b | B | …
<shorttext> Max. two letters, case-sensitive, i.e. “sT” is displayed as “sT” on the
button.
<color> To receive an overview of the supported colors, choose Misc menu >
Tools > Edit bitmap template.
<predefined_image> To receive an overview of the built-in icons, choose Misc menu > Tools >
Display internal icon library.
;icon only
MENU.AddTool "List functions" "[:aview]" "Help.Index , /Function"
;button with red text
MENU.AddTool "Open Data.List window" "DL,R" "Data.List /Track"
;button with white text against background icon. Icon name is :reg
MENU.AddTool "Register window" "R,W,:reg" "Register.view /SpotLight"
;button with black text
MENU.AddTool "Input Byte" "IB,B" "Data.In io:0x100"

PowerView Command Reference | 194
©
1989-2024 Lauterbach
MENU.Delete Delete nested menu
Deletes a previously added menu from the TRACE32 menu definition.
See also
■ MENU ■ MENU.AddTool
MENU.Delete.NAME Delete specified menu
[build 136824 - DVD 09/2021]
Deletes a menu specified by name.
Format: MENU.Delete <file>
Format: MENU.Delete.NAME <name>

PowerView Command Reference | 195
©
1989-2024 Lauterbach
MENU.PENDing Menu files waiting for compilation
See also
■ MENU.PENDing.List ■ MENU.PENDing.RESet ■ MENU
MENU.PENDing.List List menu files waiting for compilation
Shows a list of menu files whose compilation is pending due to a WAIT command in the menu file (*.men).
As soon as the WAIT <condition> for a menu file is met, the file is compiled, added to the TRACE32 menu
bar, and the menu file is removed from this list.
See also
■ MENU.PENDing
MENU.PENDing.RESet Clear list of pending menu files
Clears all menu files (*.men) from the list of pending menu files. See MENU.PENDing.List.
See also
■ MENU.PENDing
Format: MENU.PENDing.List
A Gray: CPU-specific menu file. It is called automatically when you select a CPU with SYStem.CPU.
If the menu file (*.men) contains a WAIT <condition>, the menu file is automatically added to the
MENU.PENDing.List window. The list entry is automatically removed if the condition is met or when
you select another CPU.
B Black: Any other menu file that is called with MENU.ReProgram and contains a WAIT <condition>.
C Example of a WAIT <condition>: The menu is compiled and displayed as soon as the target is up and
regular memory can be accessed.
Format: MENU.PENDing.RESet
B
A
C

PowerView Command Reference | 196
©
1989-2024 Lauterbach
MENU.Program Interactive programming
Opens the MENU.Program editor window, where you can create menu or toolbar definition files. Using the
editor, you can modify the built-in TRACE32 menus, create your own menus, and add new buttons to the
TRACE32 toolbar.
The editor provides syntax highlighting, configurable auto-indentation, and an online syntax check. The input
is guided by softkeys. The syntax for the definition file is described in section “Programming Commands”.
See also
■ MENU ■ MENU.ReProgram ■ SETUP.EDITOR
▲ ’PowerView - Screen Display’ in ’PowerView User’s Guide’
▲ ’Text Editors’ in ’PowerView User’s Guide’
▲ ’Release Information’ in ’Legacy Release History’
▲ ’Customizable GUI Elements’ in ’Training Menu Programming’
Format: MENU.Program [<file>] [<line>] [/<option>]
<option>: AutoSave | NoSave
Buttons common to all TRACE32 editors:
A For button descriptions, see EDIT.file.
Buttons specific to this editor:
B Compile performs a syntax check and, if an error is found, displays an error message.
If the menu definition file (*.men) is error free, then the user interface is modified as defined in the
*.men file.
In this example, the View menu is modified: A user-defined menu item called Set PC to main is added
below the Dump menu item.
C Commands for menu programming. For descriptions and examples, refer to the MENU command
group as well as to the training manual listed in the See also block below.
<file> The default extension for <file> is *.men.
<line>, <option> For description of the arguments, see EDIT.file.
A
C
B
B

PowerView Command Reference | 197
©
1989-2024 Lauterbach
MENU.ReProgram Menu programming
Format 1: If you enter the command at the cmdline without parameter, then the default menu file t32.men in
the system directory is executed.
With parameter, the corresponding file is compiled and executed. You receive an error message if the file
contains any errors.
Format 2: If the command is used in a PRACTICE script (*.cmm) without the <file> parameter, a menu or
main toolbar definition is embedded in the PRACTICE script. The definition block must be enclosed in
parentheses and follow the command MENU.ReProgram as shown in example 2.
Example 1 - Format 1: The menu or toolbar definition is stored in a separate *.men file. It is executed by a
PRACTICE script (*.cmm) with MENU.ReProgram <file>.men:
Format 1: MENU.ReProgram [<file>] [/NAME “<string>”]
Format 2: MENU.ReProgram
(
<menu_definition> | <main_toolbar_definition>
)
/NAME <string> See “NAME Define an internal menu name”, page 209
;your code
MENU.ReProgram ~~/mymenu.men ;add or modify menu or main toolbar
;using a *.men file
;your code

PowerView Command Reference | 198
©
1989-2024 Lauterbach
Example 2 - Format 2: The menu definition is embedded in a PRACTICE script (*.cmm).
Example 3 - Format 2: The definition of a user-defined main toolbar button is embedded in a PRACTICE
script (*.cmm).
;your code
MENU.ReProgram ;embedded menu definition (...) here
(
ADD
MENU
( ; <menu_name>
POPUP "MyMenu"
( ; <icon><item_name> <command>
MENUITEM "[:reg]MyMenuItem" "Register.view /SpotLight"
MENUITEM "[:syslog]System Log" "SYStem.LOG.state"
)
)
)
;your code
;your code
;embedded toolbar button definition (...) here
MENU.ReProgram
(
ADD
TOOLBAR
( ; <tooltip> <icon> <command>
TOOLITEM "MyToolbarButton" "[:colors]" "Register.view /SpotLight"
)
)
;your code

PowerView Command Reference | 199
©
1989-2024 Lauterbach
Example 4 - Format 2: The opening block delimiter (&+ allows you to pass a PRACTICE macro to the user-
defined main toolbar button, which is embedded in a PRACTICE script (*.cmm).
For more information about passing PRACTICE macros to embedded script blocks, see “Switching
PRACTICE Macro Expansion ON or OFF” in PRACTICE Script Language User’s Guide, page 11
(practice_user.pdf).
See also
■ MENU ■ MENU.Program
▲ ’PowerView - Screen Display’ in ’PowerView User’s Guide’
▲ ’Release Information’ in ’Legacy Release History’
LOCAL &myPath
&myPath=OS.ENV(SystemDrive)+"/SVN/demo"
MENU.ReProgram
(&+
ADD
TOOLBAR
( ; <tooltip> <icon> <command>
TOOLITEM "" "[:folder]" "OS.OPEN ""&myPath"""
)
)

PowerView Command Reference | 200
©
1989-2024 Lauterbach
MENU.RESet Default configuration
Restores the default configuration of the menus and the main toolbar.
See also
■ MENU ■ MENU.AddMenu ■ MENU.AddTool
▲ ’PowerView - Screen Display’ in ’PowerView User’s Guide’
▲ ’TRACE32 PowerView’ in ’Training Basic Debugging’
▲ ’TRACE32 PowerView’ in ’Training Basic Debugging’
▲ ’TRACE32 PowerView’ in ’Training Basic SMP Debugging’
▲ ’TRACE32 PowerView’ in ’Training Basic SMP Debugging’
Format: MENU.RESet

PowerView Command Reference | 201
©
1989-2024 Lauterbach
Programming Commands
The syntax of a definition file is line oriented. Blanks and empty lines can be inserted to structure the script.
Comment lines start with a semicolon. Examples of definitions reside in the directory ~~/demo/menu.
ADD Add definition to existing menu
The menu definition is added to the existing menu definition. Without this command, the new definition
replaces the old one. This command can be used on the top-level of the script only. It is valid for the whole
file.
Behavior of subsequent ADDs after the first ADD:
ADDHERE Define hook
When items are added to an existing menu, they are usually added to the end of the menu. The ADDHERE
command allows to choose a different insertion point for additional items.
Format: ADD
Scenario Result
Usage of a different menu file or
different PRACTICE script
The existing menu is retained and the new menu items are
added.
Definition is embedded in the same
PRACTICE script file (*.cmm)
Executing the embedded block again:
MENU.Program
(
...
)
replaces the last embedded block with the new one.
Definition is in the same menu file
(*.men)
Executing MENU.Program <my_men_file> with the same path
and name replaces the previous menu definition with the new
menu definition.
Format: ADDHERE

PowerView Command Reference | 202
©
1989-2024 Lauterbach
AFTER Place a new menu item or separator after the named menu item
BEFORE Place a new menu item or separator before the named menu item
For an example, see menu command AFTER.
Format: AFTER "<menu_item_name>"
MENU.ReProgram ;embed menu definition in a PRACTICE script file (*.cmm)
(
ADD
MENU
( ;in the View menu...
POPUP "&View"
( ;... place two new menu items after the menu item "Registers"
AFTER "Registers"
MENUITEM "[:syslog]System Log" "WinResist.WinExt.SYStem.LOG.state"
AFTER "Registers"
MENUITEM "[:config]Interface Config." "WinResist.IFCONFIG.state"
;... place a separator after the menu item "Registers"
AFTER "Registers"
SEPARATOR
;... place a separator before the menu item "Dump..."
BEFORE "Dump..."
SEPARATOR
)
)
)
A Two new menu items and a separator have been inserted by the menu command AFTER.
B A new separator has been inserted by the menu command BEFORE.
Format: BEFORE "<menu_item_name>"
B
A

PowerView Command Reference | 203
©
1989-2024 Lauterbach
BUTTONS Add user-defined local buttons to a window
Adds one or more user-defined local buttons to a window. The BUTTONS command can be used on the
top-level of the script only. User-defined local buttons cannot be added to all windows.
The <window> parameter must be the short form of a command that opens a window, e.g. F. for
Frame.view or R. for Register.view. Simply omit all lower-case letters to get the command short form.
You can include icons in user-defined local buttons and adjust the local button width with WIDTH. If a
button text is longer than the permissible number of characters in a button, the button text starts to shrink or
is cut off.
• With an icon, the max. width of a button text is 6 characters, if you do not use WIDTH.
• Without an icon, the max. width of a button text is 9 characters, if you do not use WIDTH.
This script adds two user-defined local buttons to the Register.view window, as shown above, for opening
the List.auto and BookMark.List window. You can now easily navigate between the current position of the
program counter (PC) and your bookmarks - if you have created any bookmarks.
Format: BUTTONS <window>
MENU.ReProgram
(
ADD
BUTTONS "R."
(
;1st button
MENUITEM "[:list]List at PC"
(;determine whether the named window is already open
IF WINdow.EXIST("myList")==FALSE()
(;apply a user-defined name to the window
WinPOS 0. 0. , , , , , myList
List.auto /MarkPC /Track
)
Data.GOTO Register(PC) ;go to the program counter (PC)
)
;2nd button
MENUITEM "[:bookmark]BookMrk" "Bookmark.List"
)
)
;let's make the modified window float above the other windows
WinExt.Register.view /SpotLight /Stack ;and open the window
Two user-defined local buttons
in the Register.view window

PowerView Command Reference | 204
©
1989-2024 Lauterbach
DEFAULT Define default item
Marks the next item as the default item of a menu. On some hosts, this item can be selected by double
clicking on the popup menu which contains the default button.
DELETE Delete a certain item
The user given name string will be searched inside the specified popup menu and deleted if a corresponding
menu item is found.
For deleting a TOOLBAR button the <tooltip_text> of the TOOLITEM definition is used instead.
ELSE Conditional compile
Used together with the IF statement to define a block that is only compiled when the IF condition is false.
Format: DEFAULT
Format: DELETE <name>
ADD
MENU
(
POPUP "&OSE Delta"
(
DELETE "Enable OSEDelta awareness"
DEFAULT
MENUITEM "Display &Processes" "TASK.DProc"
…
)
)
ADD
TOOLBAR
( ;previous definition of MyToolbarButton
;TOOLITEM "MyToolbarButton" "[:colors]" "Register.view /SpotLight"
DELETE "MyToolbarButton"
)
Format: ELSE

PowerView Command Reference | 205
©
1989-2024 Lauterbach
ENABLE Conditional enable
Enables the next MENUITEM within a MENU block only if the condition is TRUE. Otherwise the MENUITEM
is shaded out and cannot be selected.
Example: A menu definition is embedded in a PRACTICE script with MENU.ReProgram. The first menu
item is always active, because it is used without ENABLE. The second menu item is used together with
ENABLE and two conditions. As a result, the second menu item is only active if the two conditions are true.
Format: ENABLE <condition>
LOCAL &path &exe ;declare two PRACTICE macros
&path="~~/demo/arm/compiler/arm" ;path to PRACTICE demo scripts
&exe=OS.PresentExecutableFile() ;get path and file name of TRACE32
;executable
&exe=OS.FILE.NAME(&exe) ;return just the file name
MENU.ReProgram ;embeds a menu definition in a PRACTICE script
(& ;'&' activates the PRACTICE macro expansion
ADD
MENU
( ;this menu block creates a user-defined menu with two menu items
POPUP "MyMenu"
( ;this menu item is always enabled
MENUITEM "Browse..." "ChDir.PSTEP ~~/demo/*.cmm"
;this menu item is enabled if TRACE32 runs as an instruction
;set simulator and the TRACE32 executable is t32marm.exe
ENABLE (INTERFACE.SIM()==TRUE())&&("&exe"=="t32marm.exe")
MENUITEM "Start Demo" "ChDir.DO &path/arm9.cmm"
)
)
)
A Both conditions are TRUE. As a result, the second menu item is active.
B One of the two conditions is FALSE. As a result, the second menu item is grayed out and inactive.
A B

PowerView Command Reference | 206
©
1989-2024 Lauterbach
HELP Define a help item
IF Conditional compile
The following block is compiled only when the condition is true. The block may be followed by an ELSE
statement. The condition is evaluated when the menu is compiled.
Format: HELP <name>
Format: IF <condition>
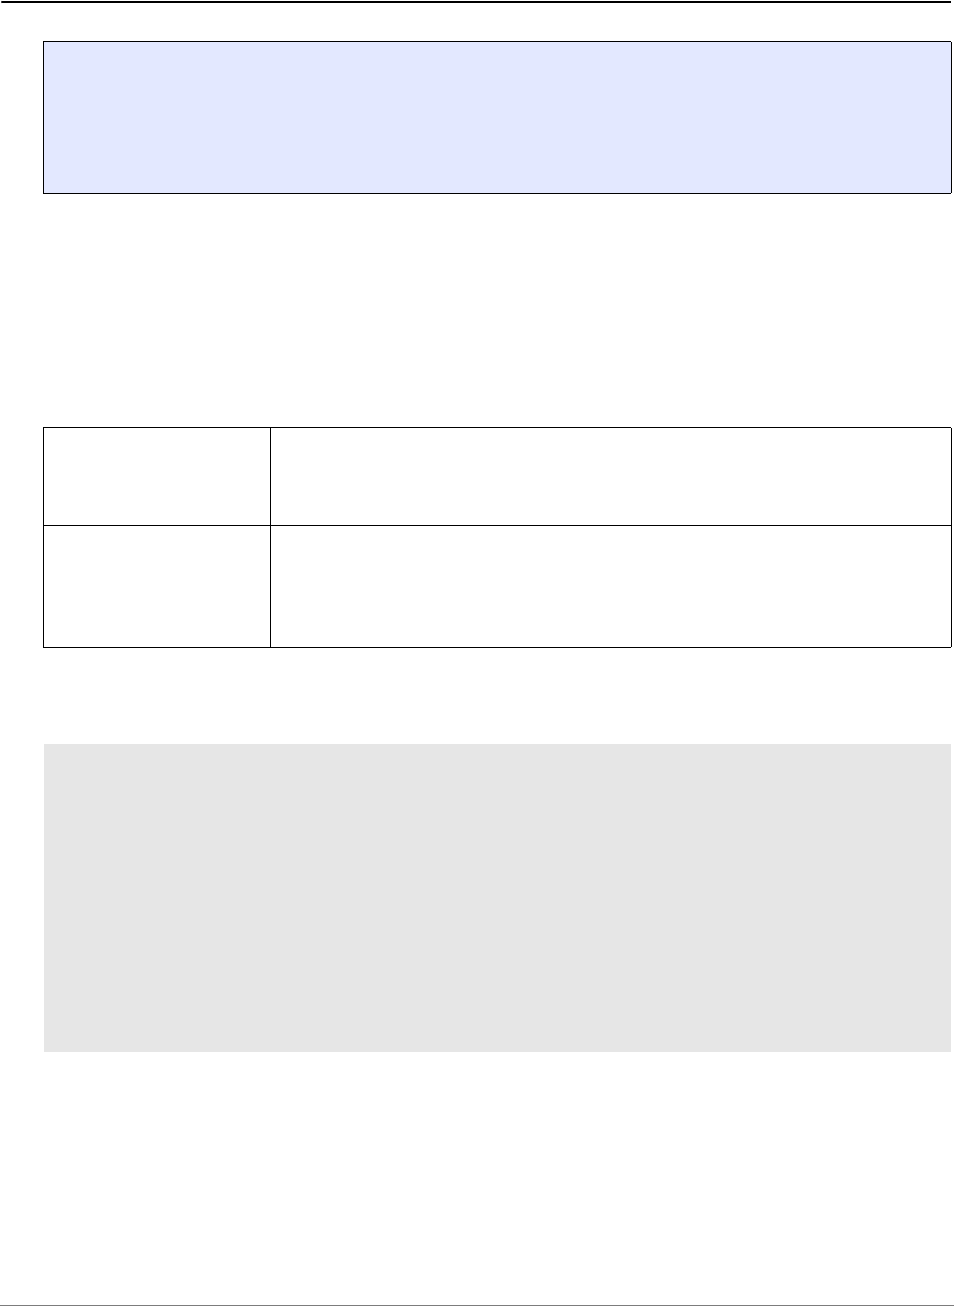
PowerView Command Reference | 207
©
1989-2024 Lauterbach
MENU Menu definition
The following block contains the definition of a menu.
• Without parameters, a new menu is added to the main menu bar.
• With parameters, the menu can be a local popup menu in a specific window or a special local
popup.
This command can be used on the top-level of the script only.
Example 1: The MENU command is used without parameter to add a new menu called MyPopup to the
main menu bar.
Format: MENU [<menu_type>]
<menu_
type>:
<cmd> | <special_name>
<cmd> Short form of a command. For information about command short forms, see
“Long Form and Short Form of Commands and Functions”
(ide_user.pdf).
<special_name> "DATA" | "VAR"
DATA: adds a local popup to all Data windows (e.g. Data.dump,
List.auto).
VAR: adds a local popup to all Var windows (e.g. Var.View, Var.Watch)
MENU.ReProgram ;embed menu definition in a PRACTICE script file (*.cmm)
(
ADD
;add a menu to the main menu bar
MENU
(
POPUP "MyPopup"
(
MENUITEM "MyItem" "HELP.Index"
)
)
)

PowerView Command Reference | 208
©
1989-2024 Lauterbach
Example 2: The MENU command takes a command short form as an argument to add a local popup menu
to a specific window, here to the List.auto window. The command short form of List.auto is L.
MENU.ReProgram ;embed menu definition in a PRACTICE script file (*.cmm)
(
ADD
MENU "L."
(
SEPARATOR
POPUP "MyPopup"
(
MENUITEM "MarkPC" "List.auto Register(PC) /MarkPC /Track"
DEFAULT
MENUITEM "Bookmark List" "WinExt.BookMark.List"
)
)
)
A Local popup menu.
B Menu items on the new local popup menu.
A
B

PowerView Command Reference | 209
©
1989-2024 Lauterbach
MENUITEM Item definition
Defines an item in a menu, popup menu or a local button. The name of a menu can optionally contain a
hotkey, and a mnemonic or an accelerator.
• The hotkey is the character that can be used to select the item. It must be a character of the
name and is marked by prepending a "&" to the character.
• The mnemonic can be an abbreviation of the menu entry, e.g. EBU for External Bus Unit. The
menu name and its mnemonic are separated by the semicolon character ";". The mnemonic is
displayed right-aligned and has no special meaning.
• The accelerator is the name of a special key or combination, which can be used to activate the
menu directly without browsing through the menu (e.g. F10 or ALT-X). The accelerator is
separated from the menu name by a comma and displayed right-aligned.
The concurrent use of accelerators and mnemonics is not supported and results in undefined behavior.
The instruction for the menu can either be included as additional parameter, or as an embedded script after
the MENUITEM definition.
NAME Define an internal menu name
Defines an internal name for a menu. The internal name is not displayed on the GUI. Internal names can be
used to check if a specific menu is loaded using MENU.EXIST(<name>) or to delete menus using
MENU.Delete.NAME <name>.
The NAME must be set on top-level before the ADD command.
Format: MENUITEM <name> [<command>]
Format: NAME <name>
<name> The MENU name must only contain the following characters:
[a-z | A-Z | 0-9 | _]
The MENU name is case-insensitive.

PowerView Command Reference | 210
©
1989-2024 Lauterbach
PERMENU Menu or submenu created from peripheral file (*.per)
[Examples]
Creates a menu or submenu structure which represents the TREE elements of the stated peripheral <file>
(*.per). Clicking one of these elements will open a new PER.view window showing the selected item.
To update the PERMENU entries after changing the contents of the peripheral file:
• Case 1: <file> is an empty string.
Execute PER.ReProgram to update the PERMENU entries.
• Case 2: <file> is not empty.
Execute PER.ReProgram, and then MENU.RESet to update the PERMENU entries.
Example 1: The TRACE32 built-in CPU menu is extended by a submenu called Peripherals. Using the
PERMENU command, the new submenu is populated with the tree elements defined in the CPU specific
default peripheral file (*.per).
Menu blocks, such as the one shown above, can be stored in the following menu files (*.men):
• In the CPU specific menu file (men*.men): As a result, tree elements defined in the CPU specific
default peripheral file (*.per) are automatically added to a menu or submenu when you select a CPU
with SYStem.CPU.
• In an extra menu file (*.men): The resulting menu or submenu is only available if you execute the
menu file with the command MENU.ReProgram <file>.men
Format: PERMENU <file> <name> [<level>]
<file> Peripheral file from which the menu or submenu will be created. Can be
empty ("") to reference the CPU specific default peripheral file (*.per).
<name> The name of the root entry of the menu or submenu. If empty (""), the
name will be extracted from the <file> name.
<level> Maximum cascading level.
Range 1 .. 255.
ADD
MENU
(
POPUP "&CPU"
(
PERMENU "" "Peripherals"
;...
)
)

PowerView Command Reference | 211
©
1989-2024 Lauterbach
Example 2: Custom peripheral file
POPUP Popup definition
Defines a new popup menu. The popup can be part of a main menu or of another popup menu. The
definition follows the command, embedded in round brackets.
ADD
MENU
(
POPUP "&CPU"
(
PERMENU "perMyPerfile.per" "My Peripherals"
;...
)
)
Format: POPUP <name>

PowerView Command Reference | 212
©
1989-2024 Lauterbach
REPLACE Replace the following item
The following menu item will replace an existing item with the same name. Otherwise the menu item will be
added to the menu, even when the names are the same. The names are compared without menu labels and
without accelerators. This allows also to change the labels of accelerators of the default menu.
SEPARATOR Separator definition
Inserts a separator in a menu or toolbar.
Format: REPLACE
ADD
MENU
(
POPUP "File"
(
REPLACE
MENUITEM "Load…" "Data.LOAD.Ieee * e: /Puzzled /ZP2"
…
)
POPUP "Run"
(
; change the accelerator for step over call
REPLACE
MENUITEM "Step Over Call,F8" "Step.Over"
)
…
)
Format: SEPARATOR

PowerView Command Reference | 213
©
1989-2024 Lauterbach
SUBROUTINE Define menu subroutine
Defines a PRACTICE subroutine. The subroutine can be called by all MENUITEM and TOOLITEM items
that are defined in the same menu file or menu block. Subroutines can be used to consolidate functions that
are used by multiple menu items or used by menu items and toolbar items together. The subroutine is not
accessible from outside the menu program in which it was defined.
Format: SUBROUTINE
ADD
MENU
(
POPUP "MemoryActions"
(
MENUITEM "Init" "GOSUB InitMemory"
MENUITEM "Erase" "GOSUB EraseMemory"
MENUITEM "Show Memory" "Data.dump 0--0xFFF"
)
)
TOOLBAR
(
TOOLITEM "Init" "IN" "GOSUB InitMemory"
TOOLITEM "Erase" "ER" "GOSUB EraseMemory"
)
SUBROUTINE AccessCheck
(
IF !SYStem.Up()||STATE.RUN()
(
DIALOG.OK "Error: Can not access memory"
END ;end script execution
)
)
SUBROUTINE EraseMemory
(
GOSUB AccessCheck
Data.Set 0--0xFFF 0xFF
)
SUBROUTINE InitMemory
(
GOSUB AccessCheck
Data.Set 0--0xFFF 0x00
)

PowerView Command Reference | 214
©
1989-2024 Lauterbach
TEAROFF Define tearoff menu
Marks the next popup menu as tearoff menu. Tearoff menus can be disconnected from the menu and placed
anywhere on the screen. Tearoff functionality may not be available on all hosts.
TOOLBAR Toolbar definition
The following block contains the definition of the main toolbar. This command can be used on the top-level of
the script only. This example shows how to add a button to the main toolbar.
TOOLITEM Item definition
Defines a button in the main toolbar. The tooltip text is displayed when the mouse is moved above the
button. The toolbar image defines the layout of the button. It can contain a short text, a fixed image, the
combination of both, or a user-defined image. A user-defined image can either be embedded in square
brackets in the string or included after the TOOLITEM command embedded in square brackets. The
instruction for the button can either be included as additional parameter, or as an embedded script after the
TOOLITEM definition (round brackets).
The following colors can be used for the image and bitmap definition:
Format: TEAROFF
Format: TOOLBAR
ADD
TOOLBAR
(
TOOLITEM "Switch Operation Mode" "MD,X" "Mode"
)
Format: TOOLITEM <tooltip_text> [<image>] [<command>]
<image>: ":<predefined_image>"
"<text>[,<color>[,<predefined_image>]]"
"[<bitmap_image>]"
r, R dark red / light red
g, G dark green / light green

PowerView Command Reference | 215
©
1989-2024 Lauterbach
b, B dark blue / light blue
m, M dark magenta / light magenta
y, Y dark yellow / light yellow
c, C dark cyan / light cyan
x, X dark grey / black
w, W light grey / white
@ foreground color
(blank) light grey (background color)
s foreground shadow
S foreground highlight

PowerView Command Reference | 216
©
1989-2024 Lauterbach
The names of the predefined images can be found in ~~/demo/menu/t32icon.h. The images can also be
used as a template for new bitmaps. Just copy the desired string contents. The bitmaps can be viewed or
modified with the BITMAPEDIT command.
MENU.ReProgram
(
ADD
TOOLBAR
(
TOOLITEM "Switch Operation Mode" "MD,X" "Mode"
TOOLITEM "Dump File" ":Dump" "DUMP *"
TOOLITEM "Load Binary File" "LF" "Data.LOAD.Binary *"
TOOLITEM "Map and Load IEEE File" "LF,R"
(
MAP.RESet
MAP.DEFault 0--0xffff
Data.LOAD.Ieee *.x
)
TOOLITEM "Edit .c File" ".c,R,:edit" "EDIT *.c"
TOOLITEM "Reload File" "DO reload"
[
XX
XXX
XXXX
XXXXXXXX
XXXXXXXXX
XX XXXX
XX XXX
XX XX
XX
XX
XX XX
XXX XXX
XXXXXXXXXX
XXXXXX
]
)
)

PowerView Command Reference | 217
©
1989-2024 Lauterbach
WAIT Wait with menu file compilation until system is ready
[build 107321 - DVD 09/2019
The WAIT command is available for all architectures and menu files, but it should only be used when
required (i.e. IF with target-dependent values). Most architectures will probably not require WAIT. But if there
is a need to use WAIT, then the recommendation is to use WAIT at the beginning of a menu file (*.men file).
You can view the list of menu files waiting for compilation with the command MENU.PENDing.List.
There are four ways to use the WAIT command, see examples 1 to 4.
Example 1: Wait with compilation until the target is up and regular memory can be accessed (this usually
means that the target is stopped).
Example 2: Wait with compilation until the target is up and the given memory address can be accessed.
Example 3: Wait with compilation until the target is up and the expression can be evaluated (the result does
not matter).
Example 4: Wait with compilation until the target is up and the boolean expression evaluates to true.
Format WAIT [<condition>]
<condition>: <address> | <expression> | <boolean_expression>
<address> Target address which has to be accessible; see example 2.
<expression> TRACE32 expression which can be evaluated; see example 3.
<boolean_
expression>
Boolean expression which has to be true; see example 4.
WAIT
WAIT ETM:0
WAIT Data.Long(D:0)
WAIT Data.Long(D:0)!=0
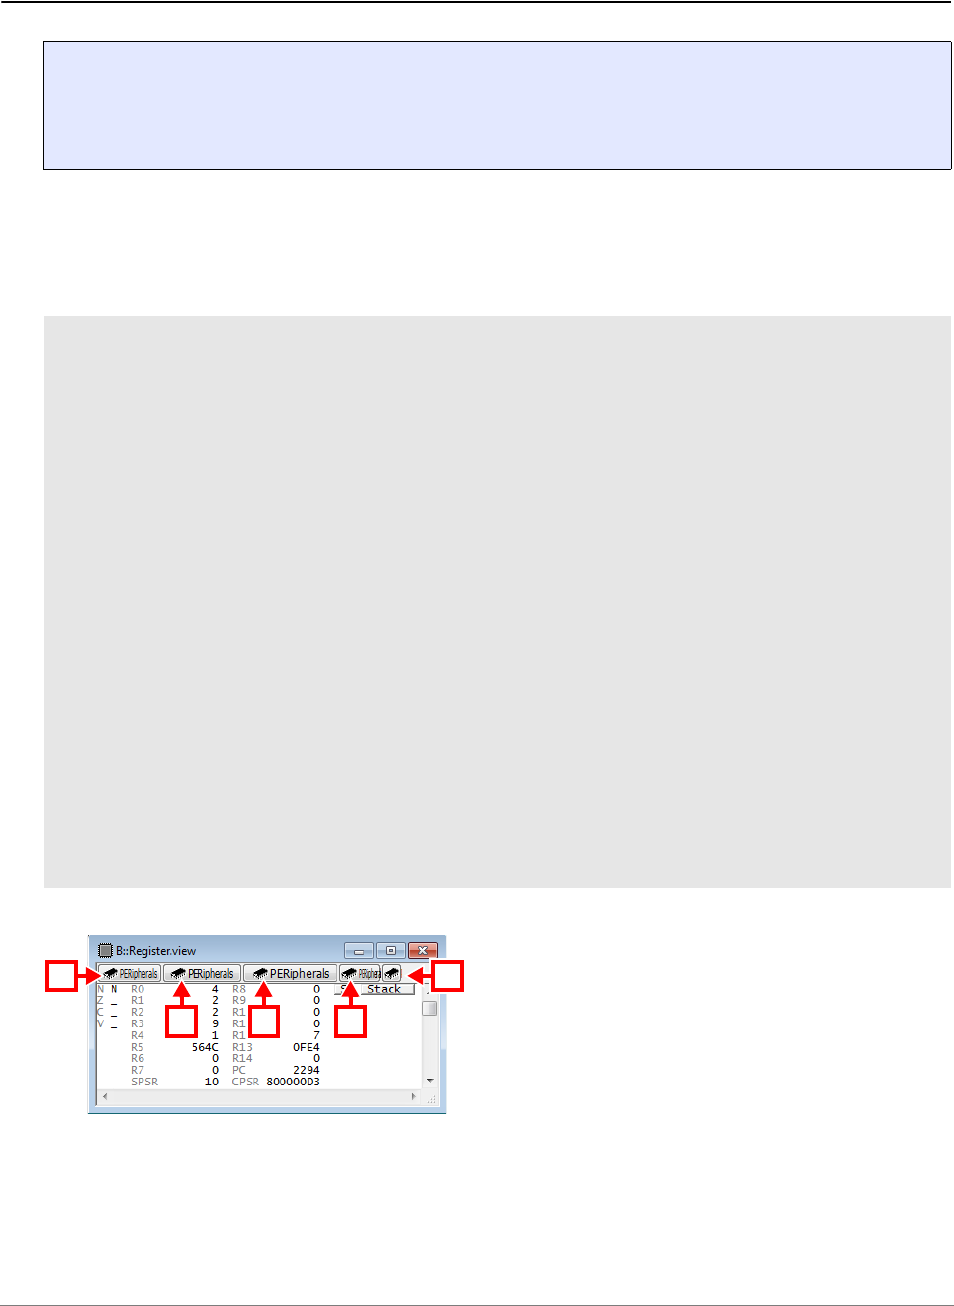
PowerView Command Reference | 218
©
1989-2024 Lauterbach
WIDTH Increase/decrease button width
Sets the width of the next button that is defined with MENUITEM inside the group BUTTONS.
Example: The same PERipherals button is added five times to the Register.view window to illustrate the
various button width settings. To try this script, simply copy and paste it into the TRACE32 command line.
Format: WIDTH <arg>
<arg>: NORMAL | WIDER | WIDEST | SMALLER | SMALLEST
MENU.ReProgram
(
ADD
BUTTONS "R."
(
WIDTH NORMAL
MENUITEM "[:chip]PERipherals" "PER.view"
WIDTH WIDER
MENUITEM "[:chip]PERipherals" "PER.view"
WIDTH WIDEST
MENUITEM "[:chip]PERipherals" "PER.view"
WIDTH SMALLER
MENUITEM "[:chip]PERipherals" "PER.view"
WIDTH SMALLEST
MENUITEM "[:chip]PERipherals" "PER.view"
)
)
Register.view
A NORMAL B WIDER C WIDEST
D SMALLER E SMALLEST
A E
B C D

PowerView Command Reference | 219
©
1989-2024 Lauterbach
MKDIR
MKDIR Create new directory
This built-in TRACE32 command MKDIR creates a new subdirectory.
Example 1:
Example 2: The following example creates a folder only if it does not exist. In addition, the TRACE32
command OS.Command executes the host command start on the host operating system (OS) level: The
Windows Explorer is started and the newly created folder is selected in Windows Explorer.
TRACE32 expands the PRACTICE macro &folder before it is passed to the host shell.
For more information about how to execute host commands on the host shell from within TRACE32, refer to
the OS command group.
See also
■ MKTEMP ■ ChDir ■ RMDIR
▲ ’File and Folder Operations’ in ’PowerView User’s Guide’
Format: MKDIR <path>
MKDIR sub1
ChDir sub1
ChDir ..
; create directory
; change to directory
; go back
LOCAL &folder
&folder="c:\temp2"
;if the folder does not exist,
IF OS.DIR(&folder)==FALSE()
(
;then create it
MKDIR &folder
)
;open the folder in Windows Explorer
OS.OPEN "&folder"

PowerView Command Reference | 220
©
1989-2024 Lauterbach
MKTEMP Create file or directory with unique name
[Examples]
Creates a new empty file or directory, based on a <template> name. The name of the created file is printed
to the AREA window. Use the pre-command SILENT to suppress the output to the AREA window and the
TRACE32 message line.
The following table shows the difference between the command MKTEMP and the PRACTICE function
OS.TMPFILE().
Format: MKTEMP [&<macro>],["<template>"] [/<option>]
<option>: Directory | DryRun | ID7
<macro> The name of the created file or directory is stored in the given PRACTICE
<macro> name.
<template> The template on which the name of the new file or directory is based.
The template will be expanded by 12 decimal digits to create a unique file
name. These extra characters are added in one of the following positions
in the name:
• The first asterisk (*)
• Before the last dot (if there is no asterisk)
• At the end of the file name (if there is neither an asterisk nor a dot)
The first 11 decimal digits are the UNIX timestamp.
If the command is called without a <template>, the ID of the PowerView
GUI plus an underscore will be used as <template>. The file extension is
“.tmp”. Default template: OS.ID()+“_*.tmp”
By default, the file is created in the temporary directory of TRACE32. But
if the <template> contains a directory part, that directory is used.
If the directory part is not an absolute path, then the directory relative to
the working directory is used.
An error is shown if the directory specified by the directory part does not
exist.
Directory Create a directory instead of a file.
DryRun Just get a file name but don’t create the actual file.
The use of this option is potentially unsafe if competing executables
happen to suggest the same file name at the same time and if one
executable later on creates a file based on this name.
ID7 The UNIX timestamp as a 7-digit alphanumeric string.

PowerView Command Reference | 221
©
1989-2024 Lauterbach
MKTEMP command vs. OS.TEMP() function:
Examples
Example 1: This script line creates a file with the extension *.tmp in the temporary directory of TRACE32.
The file name consists of the ID of the PowerView GUI where the script line is executed plus 12 decimal
digits to create a unique file name.
Result:
Example 2: This script creates a temporary file without a specific extension in the working directory of
TRACE32. Path and file name are assigned the PRACTICE macro &tmpfile. Based on the PRACTICE
macro &tmpfile, the temporary file is deleted later on with the RM command.
MKTEMP &file &tempfilename=OS.TMPFILE()
• Creates a file or a folder.
• You can specify file name, extension, and
the folder name, or let TRACE32 make
the decision for you.
• Suggests a file name, but does not create
the file.
• The file name never has an extension.
• The file name is concatenated with the
name of the temporary directory of
TRACE32.
MKTEMP ;path and name of the new file are printed to
;the AREA window and TRACE32 message line
A Temporary directory of TRACE32.
See also PRACTICE function OS.PresentTemporaryDirectory().
B ID of the PowerView GUI. See also OS.ID().
C The first 11 of the 12 decimal digits are the UNIX timestamp.
MKTEMP &tmpfile ".\*" ;the path prefix .\ expands to the working
;directory of TRACE32
;your code
RM &tmpfile
A B C

PowerView Command Reference | 222
©
1989-2024 Lauterbach
Example 3: In this script, MKTEMP creates the new subfolder logs_ with a 7-digit alphanumeric suffix in
the working directory of TRACE32 (.\). Using the OPEN command, a new file with a user-defined name is
created in the subfolder, and then the current local date is inserted into the new file.
Result:
See also
■ MKDIR ■ APPEND ■ RM ■ RMDIR
■ WRITE ❏ OS.TMPFILE()
;create new subfolder and assign folder path to PRACTICE macro &folder
MKTEMP &folder ".\logs_*" /Directory /ID7
;create a file with a user-defined file name and then write the current
;local date to the file
OPEN #1 &folder\mytest.dat /Create
WRITE #1 FORMAT.UnixTime("d.m.Y",DATE.UnixTime(),DATE.utcOffset())
;your code
CLOSE #1
;let's display the result in the TRACE32 editor
EDIT.OPEN &folder\mytest.dat


PowerView Command Reference | 224
©
1989-2024 Lauterbach
OS
OS Execute host commands
See also
■ OS.Area ■ OS.Command
■ OS.Hidden ■ OS.OPEN
■ OS.screen ■ OS.SetENV
■ OS.Window ❏ OS.ENV()
❏ OS.FILE.NAME() ❏ OS.PresentSystemDirectory()
▲ ’OS Functions’ in ’PowerView Function Reference’
Overview OS
The OS commands allow the execution of host commands within TRACE32 on the system shell of the
underlying host operating system.
The OS commands OS.Area and OS.Window and OS.Hidden read back the output of a host command
from a temporary file in order to display the output in TRACE32 PowerView. Therefore, the TRACE32
configuration variables SYS= or TMP= in the config.t32 file have to point to a read and writable directory.
Comparison of the OS Commands
Comparison of the OS Commands to their Windows and Linux Counterparts
OS Command Output Blocking / Non-Blocking
OS.screen No output in TRACE32. Non-Blocking
OS.Area Output in AREA window. Blocking
OS.Window Output in a TRACE32 window of
the same name.
Blocking
OS.Hidden No output at all. Blocking
OS.Command Output in system shell Dependent on shell
OS.OPEN No output in TRACE32. Non-Blocking
This OS command
... corresponds to this…
Windows Command
Linux Command
OS.screen <cmd> <cmd> sh -c <cmd> &

PowerView Command Reference | 225
©
1989-2024 Lauterbach
Blocking and Non-Blocking OS Commands
The purpose of blocking OS commands is to prevent forks in PRACTICE scripts (*.cmm). Whereas
non-blocking OS commands allow forks in PRACTICE scripts.
What is the difference between the commands ...?
Both commands are useful for displaying the output of a host command in TRACE32, e.g. a directory
listing of the host command dir.
OS.Area <cmd> cmd /c <cmd> > "tmpfile" &&
type "tmpfile" && del "tmpfile"
sh -c <cmd> > "tmpfile" &&
cat "tmpfile" && rm "tmpfile"
OS.Window <cmd> cmd /c <cmd> > "tmpfile" &&
cmd /c notepad "tmpfile" &&
del "tmpfile"
sh -c <cmd> > "tmpfile" &&
emacs "tmpfile" &&
rm "tmpfile"
OS.Hidden <cmd> cmd /c <cmd> > NUL sh -c <cmd> > /dev/null
OS.Command <cmd> cmd /c <cmd> sh -c <cmd>
OS.OPEN cmd /c start "" "<string>" xdg-open "<string>"
Blocking Non-Blocking
OS.Area, OS.Window, and OS.Hidden
These OS commands block the execution of the
TRACE32 application and wait for the host
command to finish. Once the host command has
finished, PRACTICE script execution continues.
Use a blocking OS command if you want the
PRACTICE script to process the output of the
host command.
OS.screen and OS.OPEN do not block
PRACTICE script execution. Consequently, the
PRACTICE script and the host command will
run in parallel.
OS.Command: The behavior depends on the
system shell.
• On Windows: always non-blocking.
• On Linux/Unix, append an ampersand '&'
to the host command to get a
non-blocking behavior.
OS.Window OS.Area
Executes the host command and re-routes all
outputs of this host command to a TRACE32
window called OS.Window.
The window opens automatically, any further
user interaction is not necessary.
Redirects the host command output to the active
TRACE32 message area.
It is up to you to decide when you want to view
the output by executing the AREA.view
command at the TRACE32 command line.
This OS command
... corresponds to this…
Windows Command
Linux Command

PowerView Command Reference | 226
©
1989-2024 Lauterbach
What is the difference between the commands ...?
OS.screen OS.Command
Opens just the command prompt window of the
host shell, where you can execute a host
command.
OS.screen is not running in a system shell on
Windows.
Opens a system shell and starts the host
command within this shell.
OS.Command allows you to redirect the output
of the host command with the redirection symbol
(>).
NOTE: The Windows dir and the TRACE32 DIR command are not identical.

PowerView Command Reference | 227
©
1989-2024 Lauterbach
OS.Area Re-route host command output to AREA window
[About Blocking and Non-blocking OS Commands]
Executes a command on the host operating system (OS) level. Outputs of this host command are re-routed
to the AREA window.
Example: The Windows dir command is executed from within TRACE32, and the output can then be
viewed in the AREA window of TRACE32.
TRACE32 commands are formatted in bold. Windows commands are formatted in regular font.
See also
■ OS ■ OS.screen ❏ OS.ENV() ❏ OS.FIRSTFILE()
❏ OS.NEXTFILE()
▲ ’Host Commands’ in ’PowerView User’s Guide’
Format: OS.Area <cmdline>
Outputs of the operating system may be viewed only. Running under DOS, most
terminal-oriented programs do not use the operating system! During program
execution nothing is displayed on the terminal. Therefore interactive program
entries cannot be carried out. The host interface of the TRACE32 remains in
active mode during execution. Executing the command without parameters will
start the shell invisible to the user.
;open an AREA window
AREA.view
;in the AREA window, list the file names of all PRACTICE scripts (*.cmm)
;that start with ‘dia’ and reside in the system directory of TRACE32.
OS.Area DIR /b C:\T32\dia*.cmm
;list time stamps and file sizes of all *.cmm files starting with ‘dia’
OS.Area DIR C:\T32\dia*.cmm

PowerView Command Reference | 228
©
1989-2024 Lauterbach
OS.Command Execute a host command
[About Blocking and Non-blocking OS Commands]
If the command contains an argument, it will immediately be executed by the shell of the host. A single
OS.Command can also pass multiple host commands to the host. In addition, PRACTICE macros can be
used in the <cmdline> passed from TRACE32 to the host. This allows you to combine PRACTICE, the
Lauterbach script language for TRACE32, with the script language of the host. You can run the resulting
PRACTICE script from within TRACE32.
If OS.Command does not contain any argument, it opens just a system shell.
Example 1 - Copy files (Windows)
The copy command of the host copies files starting with ‘ide’ from folder A to folder B. The folders A
and B are specified by two PRACTICE macros and two PRACTICE functions. After a successful copy
operation, the start command of the host opens Windows Explorer, directly in the destination folder B.
TRACE32 commands and functions are formatted in bold. Host commands are formatted in regular font.
The conditional processing symbols && of the operating system are formatted in red.
To try this script, simply copy it to a test.cmm file, and then run it in TRACE32 (See “How to...”).
For more information about conditional processing symbols, refer to the Windows Command-Line
Reference.
Format: OS.Command [<cmdline>]
LOCAL &sFld &dFld ;declare TRACE32 PRACTICE macros
;initialize the PRACTICE macros using two PRACTICE functions
&sFld=OS.PresentHELPDirectory() ;source A: the pdf online help
;directory of TRACE32
&dFld=OS.PresentTemporaryDirectory() ;destination B: the temporary
;directory of TRACE32
;copy the files, then open Windows Explorer in the destination folder
OS.Command copy &sFld\ide*.pdf &dFld && start explorer.exe &dFld

PowerView Command Reference | 229
©
1989-2024 Lauterbach
Example 2
The environment variables are written to a txt file, which is then opened in an editor.
Windows:
Linux: Depending on your Linux installation, the environment variable for your TEMP folder might have a
different name. You can list your Linux environment variables within TRACE32 by using the OS.Window
command.
See also
■ OS ■ OS.screen ❏ OS.ENV()
▲ ’Host Commands’ in ’PowerView User’s Guide’
;write environment variables to txt file
OS.Command set > %temp%\environment_variables.txt
;open txt file in an editor
OS.Command start notepad.exe %temp%\environment_variables.txt
;write environment variables to txt file
OS.Command env > $TMPDIR/env.txt
;open txt file in an editor
OS.Command emacs $TMPDIR/env.txt &

PowerView Command Reference | 230
©
1989-2024 Lauterbach
OS.Hidden Execute a host command in silent mode
[About Blocking and Non-blocking OS Commands]
Is similar to the OS.Window command. However, the outputs of the operating system level are discarded.
This is suitable for commands that do not require data inputs and whose outputs are not of interest to the
user.
Example 1:
Example 2:
The TRACE32 command is formatted in bold. Host commands are formatted in regular font.
See also
■ OS ■ OS.screen ■ OS.Window ■ DIR
❏ OS.ENV()
▲ ’Host Commands’ in ’PowerView User’s Guide’
Format: OS.Hidden <cmdline>
;opens Windows Explorer and selects the file arm9.cmm
;useful when you want to place a PRACTICE script file under version
;control in a version manager such as SVN
LOCAL &file
&file=OS.FILE.ABSPATH(~~/demo/arm/compiler/arm/arm9.cmm)
OS.Hidden explorer.exe /select, &file
;opens a hidden shell command window and starts a batch file
;with two parameters
OS.Hidden cmd.exe /C ""D:\my test.bat" "D:\Path To
Scripthome\myScript.py" "--signal COMMAND { \"path\" :
\"MySpecialCommandName\" }""

PowerView Command Reference | 231
©
1989-2024 Lauterbach
OS.OPEN Open file in default application
[About Blocking and Non-blocking OS Commands]
Opens a file, folder, or URL in the default application of the operating system. That is, for a file, OS.OPEN
performs the same operation as a double-click on a file in the file explorer of the operating system.
Example 1: This script line opens the TRACE32 demo folder in the file explorer of the operating system.
Example 2: This script line opens the Lauterbach website in the default web browser of your operating
system.
Example 3: This script exports two *.csv files from TRACE32 and opens the two files in one and the
same Excel instance.
See also
■ OS ■ OS.screen
Format: OS.OPEN <file> | <path> | "<url>"
NOTE: If you are using OS.OPEN in a PRACTICE script to open a URL you must
enclose the URL in double-quotes. Otherwise the two slashes after the schema
of a URL will be handled as the beginning of a comment by the PRACTICE
interpreter.
OS.OPEN c:\t32\demo
OS.OPEN "https://www.lauterbach.com"
;set the working directory to c:\t32
PWD c:\t32
;export the function nesting to a *.csv file in the working directory
Trace.EXPORT.CSVFunc func.csv
;export the variables 'flags' and 'ast' to a *.csv file in the working
;directory
Var.EXPORT variables.csv %Type %Location %Index flags ast
;start only one instance of the default application associated with the
;file type *.csv, e.g. Excel
OS.OPEN func.csv
;the second file will also open in that instance, i.e. another Excel
;instance will not be started
OS.OPEN variables.csv

PowerView Command Reference | 232
©
1989-2024 Lauterbach
▲ ’Host Commands’ in ’PowerView User’s Guide’
▲ ’Release Information’ in ’Legacy Release History’

PowerView Command Reference | 233
©
1989-2024 Lauterbach
OS.screen Call up the shell or execute host command
[About Blocking and Non-blocking OS Commands]
If the OS.screen command contains an argument, it will immediately be executed by the shell of the host.
If OS.screen does not contain any argument, it opens just a system shell. Returning to the TRACE32
system is then dependent on the host. In the case of the Windows shell, the EXIT command is used; in the
case of UNIX, CTRL-D will be the standard function key. Before program execution the host interface is
deactivated and the terminal and keyboard operating modes are initialized.
In the examples below, the TRACE32 commands are formatted in bold. Host commands are formatted in
regular font. The Windows host command cmd /C (or cmd.exe /C) is highlighted in red to emphasize its
importance for the OS.screen command.
Example 1
This example shows how to call up the command shell of the host from within TRACE32, run a few host
commands, and then return to TRACE32.
Example 2 - Start another application from the TRACE32 command line
Format: OS.screen [<cmdline>]
TRACE32 Command Line Command Shell of the Host
;Call up the command shell
OS.screen
rem Change from a network drive to the
rem system directory of TRACE32
J:\>cd /d C:\T32
rem List all PRACTICE script files
rem residing in C:\T32
C:\T32>dir *.cmm
rem Close the command shell
C:\T32>exit
;Continue your TRACE32 session
;...
;NOTE: omit the Windows "start" command in case of the OS.screen command
OS.screen notepad.exe

PowerView Command Reference | 234
©
1989-2024 Lauterbach
Example 3 - Write file names to a txt file (Windows)
The PER files of TRACE32 reside in the system directory of TRACE32, which is C:\T32 by default for
Windows. In this example, all *.per file names are written to a txt file. The resulting txt file is saved to your
TEMP folder. The exact folder path depends on the parameter assigned to the environment variable
%temp% of your host.
Example 4 - Write a string to a txt file (Windows)
The TRACE32 commands Data.WRITESTRING and WRITE can also be used to write strings to a file.
Example 5 - Print the path of the Windows environment variable %temp% to the command shell
See also
■ OS ■ OS.Area ■ OS.Command ■ OS.Hidden
■ OS.OPEN ■ OS.SetENV ■ OS.Window ❏ OS.ENV()
▲ ’Host Commands’ in ’PowerView User’s Guide’
▲ ’Release Information’ in ’Legacy Release History’
OS.SetENV Set operating system environment variables
[build 135727 - DVD 09/2021]
While starting an external executable, then it might need to set environment variables, which are evaluated
by the external executable.
See also
■ OS ■ OS.screen
;list the *.per files
OS.screen cmd /C dir /b C:\t32\*.per > %temp%\perfilenames_only.txt
OS.screen cmd.exe /C echo Hello World! > %temp%\file1.txt
OS.screen cmd /C echo %temp% && pause
;produces the same result as OS.screen above, but display the path of
;the environment variable %temp% in the OS.Window of TRACE32
OS.Window echo %temp%
Format: OS.SetENV <name> <value>

PowerView Command Reference | 235
©
1989-2024 Lauterbach
OS.Window Re-route host command output to the OS.Window
[About Blocking and Non-blocking OS Commands]
A TRACE32 window will be generated and then the host command will be executed. All outputs of this host
command are re-routed to the TRACE32 window.
To illustrate the OS.Window command, the examples below show how to create a directory listing, a tree
structure of a directory, and how to list the environment variables of the host within TRACE32.
TRACE32 commands are formatted in bold. Host commands are formatted in regular font.
Example 1 - Directory listing, tree structure, and environment variables (Windows)
Example 2 - Directory listing and environment variables (Linux)
See also
■ OS ■ OS.Hidden ■ OS.screen ❏ OS.ENV()
▲ ’Host Commands’ in ’PowerView User’s Guide’
Format: OS.Window <cmdline>
Outputs of the operating system may be viewed only. While running under DOS,
most terminal-oriented programs do not use the operating system! During
program execution nothing is displayed on the terminal. Therefore interactive
program entries cannot be carried out. The host interface of the TRACE32
remains in active mode during execution.
;display a listing of the TRACE32 system directory in a TRACE32 window
OS.Window dir c:\t32
;display a tree structure of the demo folder in a TRACE32 window
OS.Window tree c:\t32\demo /f /a
;display the environment variables of the host in a TRACE32 window
OS.Window set
;display a listing of the TRACE32 system directory in a TRACE32 window
OS.Window ls -l /home/user/t32
;display the environment variables of the host in a TRACE32 window
OS.Window env

PowerView Command Reference | 236
©
1989-2024 Lauterbach
PACK
PACK Compress files (with LZW algorithm)
The source file is compressed to about 10-60% of the original file size by a Lempel-Ziv-Welch algorithm. The
source and destination file names must be different. The PACK command can be used to compress the data
files of the analyzer ('.ad' files), or the boot files generated by the dynamic linker (boot00.t32 etc.). If only one
argument is supplied, the source file is packed. When opening files, TRACE32 recognizes all packed files
automatically.
Examples:
See also
■ UNPACK ■ UNZIP ■ ZIP
▲ ’File and Folder Operations’ in ’PowerView User’s Guide’
Format: PACK <source> [<destination>]
E::PACK ref1.ad ref1.pak
E::Analyzer.LOAD ref1.pak
; pack analyzer file
; un-packing is done automatically
::PACK \t32\boot00.t32 ; pack boot file


PowerView Command Reference | 238
©
1989-2024 Lauterbach
PATH
PATH Define search paths for files used by TRACE32 commands
The command group PATH defines or modifies the search path for files which are used by the TRACE32
commands listed below.
Please be aware of the following:
• The search paths are only used for file names without a path specification.
The files will be searched first in the working directory.
• No recursive search will be done.
• The directory names are case-sensitive.
• This command cannot be used to search for the source files for HLL debugging.
• If ChDir is used with the command, the search paths are deactivated.
E.g. the command CO.DO my_script.cmm will only find the script if it is located in the current
working directory.
Searching is enabled for the following commands:
See also
■ PATH.Delete ■ PAT H. D OW N ■ PAT H . Li s t ■ PATH.RESet
■ PATH . S e t ■ PATH . U P ❏ PATH . N U M B E R ( ) ❏ PAT H . PAT H ( )
▲ ’PATH Functions’ in ’PowerView Function Reference’
Commands
DO, RUN, PEDIT, PSTEP
PER.Program, PER.ReProgram, PER.view
Analyzer.Program, Analyzer.ReProgram
Break.Program, Break.ReProgram
Data.Program, Data.ReProgram
DIALOG.Program, DIALOG.ReProgram, DIALOG.view
Integrator.Program, Integrator.ReProgram
MENU.Program, MENU.ReProgram
PATTERN.Program, PATTERN.ReProgram
PERF.Program, PERF.ReProgram
Probe.Program, Probe.ReProgram
Trace.FindProgram, Trace.FindReProgram

PowerView Command Reference | 239
©
1989-2024 Lauterbach
PATH Search path
Defines or modifies the search path for files. This search path is used for some frequent used file formats.
The files will be searched first in the current or specified directory.
A PATH command without any parameter removes all previous defined search directory entries.
This command cannot be used to specify source file search paths for HLL debugging.
Please use command group sYmbol.SourcePATH instead.
PATH.Delete Delete search path
Delete one or more search path entries.
The directory names are treated case-sensitive - even under Windows.
See also
■ PATH
▲ ’Release Information’ in ’Legacy Release History’
Format: PATH [+ | -] [<path> …] (deprecated)
PATH \t32\exam\cmm \use\me\mycmm ; define two search directories
PATH + ..\cmm ; add one more directory
PATH - \use\me\mycmm ; delete a certain directory
PATH ; delete all directory entries
Format: PATH.Delete <directory> ...
PATH.Delete W:\t32\exam\cmm W:\use\mycmm ; delete 2 search
; directories
PATH.Delete ..\cmm ; delete one directory
PATH.Set W:\mycmms
PATH.Delete w:\Mycmms
PATH.Delete W:\mycmms
; define one directory
; given directory isn’t
; found
; delete one directory
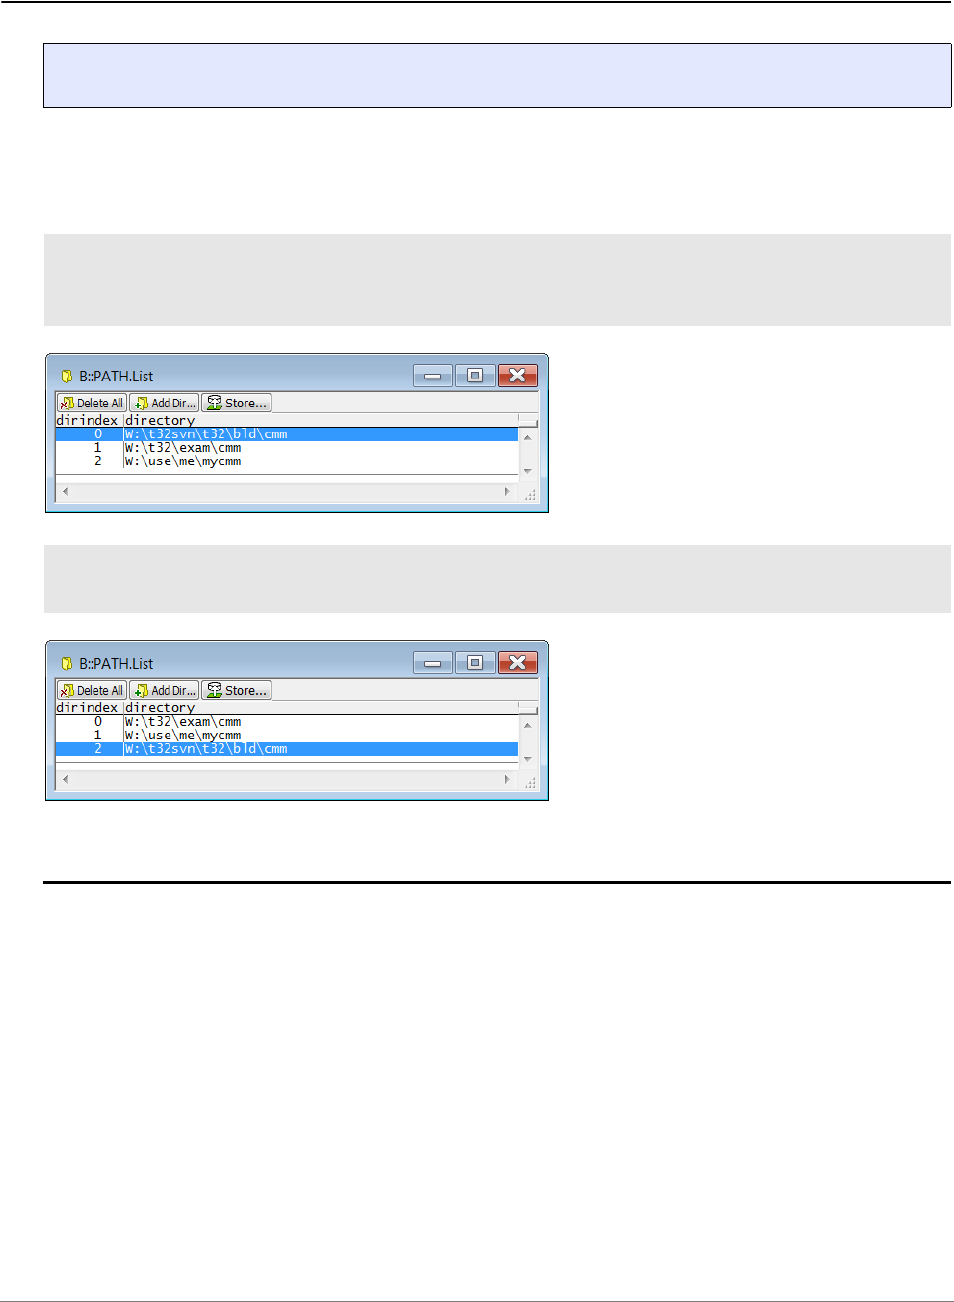
PowerView Command Reference | 240
©
1989-2024 Lauterbach
PATH.DOWN Define search path at end of list
Defines an additional directory entry at the end of the search path order. The files will be searched first in the
current or specified directory. An existing entry with the same directory name will be deleted automatically to
avoid duplicate entries.
See also
■ PATH
▲ ’Release Information’ in ’Legacy Release History’
Format: PATH .DOWN <directory>
PATH.Set ..\cmm ; define three search
PATH.Set \t32\exam\cmm \use\me\mycmm ; directories
; directory order:
PATH.DOWN ..\cmm ; move a directory at the end
; new directory order:

PowerView Command Reference | 241
©
1989-2024 Lauterbach
PATH.List List search path
Displays the defined search path directory entries. The directory index represents the search order after the
current or specified directory.
The actual search path settings are saved with command STOre in combination with the keyword PATH .
See also
■ PATH ❏ PATH.NUMBER() ❏ PAT H . PAT H ( )
▲ ’Release Information’ in ’Legacy Release History’
PATH.RESet Reset search path
Deletes all search path entries.
See also
■ PATH
▲ ’Release Information’ in ’Legacy Release History’
Format: PATH.List
Format: PATH.RESet

PowerView Command Reference | 242
©
1989-2024 Lauterbach
PATH.Set Define search path
Defines the search path for some frequent used file formats (e.g. PRACTICE scripts).
The files will be searched first in the working directory and then in all defined search path directories.
e.g. DO abc.cmm
If a file name contains a certain specified directory a search will be restricted exactly to this directory.
e.g. DO C:\t32\abc.cmm
DO .\abc.cmm
DO your\abc.cmm
The actual search path settings can be saved with command STOre in combination with the keyword PATH .
This command cannot be used to specify source file search paths for HLL debugging.
Please use command group sYmbol.SourcePATH instead.
See also
■ PATH
▲ ’File and Folder Operations’ in ’PowerView User’s Guide’
▲ ’Release Information’ in ’Legacy Release History’
Format: PATH .Set <directory> ...
PATH.Set \t32\exam\cmm \use\me\mycmm ; define two search
; directories
PATH.Set ..\cmm ; add one more directory

PowerView Command Reference | 243
©
1989-2024 Lauterbach
PATH.UP Define search path at top of list
Defines an additional directory entry at the beginning of the search path. The files will be searched first in the
current or specified directory.
An existing entry with the same directory name will be deleted automatically to avoid duplicate entries.
See also
■ PATH
▲ ’Release Information’ in ’Legacy Release History’
Format: PATH .UP <directory>
PATH.Set W:\t32\exam\cmm \use\me\mycmm ; define search directories
; directory order:
PATH.UP ..\cmm ; add a directory at the top
; directory order now:

PowerView Command Reference | 244
©
1989-2024 Lauterbach
PRinTer
PRinTer Print and export window contents
Using the PRinTer command group, you can send every window or the complete screen from TRACE32 to:
• The default printer
• The clipboard
•A file
• The default AREA window A000
You can define the format, e.g. font, font size, file type ASCII, enhanced ASCII, XHTML, XML, and HTML for
each output medium. When printing to file, you can specify path and file name or browse for an existing file.
You can configure printouts via the TRACE32 command line, a PRACTICE script (*.cmm), or via the
PRinTer.select window:
For PRACTICE script examples, see:
• PRinTer.FILE
• PRinTer.OPEN
• PRinTer.HardCopy
• PRinTer.Area
See also
■ PRinTer.Area ■ PRinTer.ClipBoard ■ PRinTer.CLOSE ■ PRinTer.CONFIG
■ PRinTer.EXPORT ■ PRinTer.FILE ■ PRinTer.FileType ■ PRinTer.HardCopy
■ PRinTer.OFFSET ■ PRinTer.OPEN ■ PRinTer.PRINT ■ PRinTer.select
■ PRinTer.SIZE ■ PRINT ■ WinPrint ■ WinPRT
▲ ’PRINTER Function’ in ’PowerView Function Reference’
▲ ’Printer Operations’ in ’PowerView User’s Guide’
A For descriptions of the commands in the PRinTer.select window, please refer to the PRinTer.*
commands in this chapter. Example: For information about the FILE option, see PRinTer.FILE.
A

PowerView Command Reference | 245
©
1989-2024 Lauterbach
PRinTer.Area Re-route printer output to AREA window in specified format
Re-directs the printer output to the currently selected AREA window. To specify the window you want to print
to the AREA window, use one of the following commands:
• WinPrint.<command>
• WinPRT
• PRinTer.HardCopy
To select an AREA window to which you want to re-route the printer output, use the AREA.Select
command.
Example:
See also
■ PRinTer ■ PRinTer.select
Format: PRinTer.Area [<format>]
<format>: ASCIIE
<format> If the parameter <format> is omitted, the format used to print to clipboard
stays unchanged.
ASCIIE Enhanced ASCII format, underlines are displayed, graphic characters are
converted and displayed as ASCII characters where feasible.
Register.view ;optional step: let's display the window we want
;to print
AREA.Select A000 ;select and display the default AREA window
AREA.view A000
PRinTer.Area ;instruct TRACE32 to re-route the printer output
;to the selected AREA window
WinPrint.Register.view ;print the window
Printed to the
selected
AREA window

PowerView Command Reference | 246
©
1989-2024 Lauterbach
PRinTer.ClipBoard Re-route printer output to clipboard in specified format
Re-directs the printer output to the clipboard. To specify which window you want to print to the clipboard, use
WinPrint.<command>. For an example, see PRinTer.HardCopy.
See also
■ PRinTer ■ PRinTer.select
▲ ’Window System’ in ’PowerView User’s Guide’
PRinTer.CLOSE Close file after multiple printer outputs
The file, opened by the PRinTer.OPEN command, is closed. Alternatively, click the close file button in the
PRinTer.select window.
See also
■ PRinTer ■ PRinTer.OPEN ■ PRinTer.select
▲ ’Window System’ in ’PowerView User’s Guide’
▲ ’Printer Operations’ in ’PowerView User’s Guide’
Format: PRinTer.ClipBoard [<format>]
PRinTer.ClipType (deprecated)
<format>: ASCIIE | CSV | XHTML
<format> If the parameter <format> is omitted, the format used to print to clipboard
stays unchanged.
ASCIIE Enhanced ASCII file, underlines are displayed, graphic characters are
displayed as ASCII characters.
CSV Comma-separated value.
XHTML
XML (deprecated)
XML-formatted file with HTML tags.
Format: PRinTer.CLOSE

PowerView Command Reference | 247
©
1989-2024 Lauterbach
PRinTer.CONFIG Print-out configuration
See also
■ PRinTer.CONFIG.HEADER ■ PRinTer.CONFIG.OFFSET ■ PRinTer.CONFIG.SIZE ■ PRinTer
■ PRinTer.select
PRinTer.CONFIG.HEADER Print window title
[build 147215 - DVD 09/2022]
The window title is printed as first line of the output.
Default: ON
See also
■ PRinTer.CONFIG
PRinTer.CONFIG.OFFSET Specify print-out borders
This command is used to adjust the position of the print-out on the paper. It is very useful to leave a white
margin on the left side of the page. The size of the print-out must be changed accordingly.
Example:
See also
■ PRinTer.CONFIG
Format: PRinTer.CONFIG.HEADER [ON | OFF]
Format: PRinTer.CONFIG.OFFSET [<columns>] [<lines>]
PRinTer.select LJL
PRinTer.CONFIG.OFFSET 12.
PRinTer.CONFIG.SIZE 80.
WinPrint.HELP Data.dump
; choose printer
; leave space for perforation
; adjust printout size, make it smaller
; print chapter of manual

PowerView Command Reference | 248
©
1989-2024 Lauterbach
PRinTer.CONFIG.SIZE Specify print-out size
Adjusts the size of the print-out to the parameters of the printer. If a file is selected as output, the lines value
can be set to zero, to switch to a non-paged file structure. A column value of zero causes a packed file, i.e.
trailing blanks are cut.
Example:
See also
■ PRinTer.CONFIG
▲ ’Printer Operations’ in ’PowerView User’s Guide’
Format: PRinTer.CONFIG.SIZE [<columns>] [<lines>]
PRinTer.CONFIG.SIZE 70. 50. ; make printer-output smaller
PRinTer.CONFIG.OFFSET 10. 5. ; shift output to get space for headers
PRinTer.FILE list1 ; redirect output to file
PRinTer.SIZE 0. 0. ; output without paging and without
; trailing blanks

PowerView Command Reference | 249
©
1989-2024 Lauterbach
PRinTer.EXPORT Export formatted printer output to file
[Format 1] [Format 2] [Options] [Examples]
Defines an output file and sets the output format to the specified <file_format>. To actually export a
TRACE32 window, use the WinPrint pre-command. It re-directs the window contents to the output file in the
format specified with PRinTer.EXPORT.<file_format>.
The output file is opened when executing a print function, and closed immediately after it.
Format 1:
Format 1: PRinTer.EXPORT.<file_format> [<file>] [/Append]
<file_format>: ASCIIE | CSV | XHTML
Format 2: default [<file>] [/Append] (deprecated)
ASCIIE Sets the output format to Enhanced ASCII. Additionally, TRACE32 appends
the extension *.txt if you have not specified any extension.
You can change the default extension with the command
SETUP.EXTension TEXT.
Underlines are displayed, graphic characters are displayed as ASCII
characters.
See example 1.
CSV Sets the output format to CSV (Comma-Separated Values). Additionally,
TRACE32 appends the extension *.csv if you have not specified any
extension.
You can change the default extension with the command
SETUP.EXTension CSV.
Use the CSV format if you want to import the exported data to other
applications.
XHTML Sets the output format to HTML. Additionally, TRACE32 appends the
extension *.html if you have not specified any extension.
You can change the default extension with the command
SETUP.EXTension XHTML.
You can set the file extension to *.xml or *.html or *.xhtml depending
on how you want the browser to interpret the file.
See example 2.
NOTE: PRinTer.EXPORT.<file_format> and PRinTer.FILE are rather similar. The
minimal difference between the two commands is:
• PRinTer.EXPORT.<file_format> automatically adds the file name exten-
sion for the selected format in case you have omitted the extension.
• PRinTer.FILE supports more (but uncommon) file formats.

PowerView Command Reference | 250
©
1989-2024 Lauterbach
Format 2:
Options for Format 1 and Format 2:
Examples
Example 1: The file name extension omitted by the user is added automatically by TRACE32. Using the
Append option, three windows are printed to the same file.
default (deprecated) Sets the output format to CSV (Comma-Separated Values), but does not
append the file name extension *.csv automatically. As a result, the exported
files do not have an extension - unless you explicitly specify the extension.
See example 3.
NOTE: If <file> is omitted, the default file name t32.lst is used.
<file> In order to simplify multiple file generation, a decimal number contained in the
file name (e.g. exam01.csv) is incremented automatically after each print to
that file.
If <file> is omitted, the printer output gets redirected to the previously
chosen output file name (incremented if the file name contained a decimal
number). And PRinTer.EXPORT.<file_format> will only append the
extension.
Append Use the option Append, to append new data to the existing file.
Without Append, contents are overwritten if the file already exists.
;TRACE32 automatically completes the file name with the extension .txt
PRinTer.EXPORT.ASCIIE "~~~\line_tree_var" /Append
;print the first window to the specified file
WinPrint.Trace.STATistic.Line
;append the next two windows to the same file
WinPrint.Trace.STATistic.TREE
WinPrint.Trace.STATistic.Var
;right-click the file in the DIR window to open the file
DIR "~~~\line_tree_var.txt"

PowerView Command Reference | 251
©
1989-2024 Lauterbach
Example 2:
;in the *.xml file, insert the tag <?xml-stylesheet ...href="..."?>
;with the specified *.xsl file as href="..." attribute
SETUP.XSLTSTYLESHEET "file:///c:/myfiles/mywinprint.xsl"
;export the Register.view and Var.Watch window to the same file
PRinTer.EXPORT.XHTML "c:\t32\win_export.xml" /Append
WinPrint.Register.view
WinPrint.Var.Watch %SpotLight flags ast
;display the file on a browser tab:
OS.Command start firefox "c:\t32\win_export.xml"
;view the XML source code on another browser tab:
WAIT 2.s
OS.Command start firefox "view-source:file:///c:/t32/win_export.xml"
A The reference to your XSLT stylesheet is only included if the XSLT stylesheet is explicitly specified
with the SETUP.XSLTSTYLESHEET command. The *.xsl file is not created by TRACE32.
B Basic formatting provided by TRACE32.
C The line with the *.css file name is included for your convenience to allow a user-definable
formatting. The *.css file is not created by TRACE32.
A
B
C

PowerView Command Reference | 252
©
1989-2024 Lauterbach
Example 3 - regarding the deprecated command PRinTer.EXPORT.default: An output file name with a
decimal number is defined. In the next block, three windows are printed to separate files. For each print
operation, the decimal number in the file name is incremented.
See also
■ PRinTer ■ PRinTer.FILE ■ PRinTer.select ■ WinPrint
■ Var.EXPORT
▲ ’Printer Operations’ in ’PowerView User’s Guide’
▲ ’Release Information’ in ’Legacy Release History’
PRinTer.EXPORT.default "~~~\test-5.csv" ;start with this file name
WinPrint.Trace.STATistic.Line ;print to test-5.csv
WinPrint.Trace.STATistic.TREE ;print to test-6.csv
WinPrint.Trace.STATistic.Var ;print to test-7.csv
DIR "~~~\test-*.csv" ;list the files in the TRACE32
;DIR window.
;right-click to open a file

PowerView Command Reference | 253
©
1989-2024 Lauterbach
PRinTer.FILE Re-route printer output to a file in specified file format
[Examples]
Re-directs the printer output to a file, which is opened when executing a print function, and closed
immediately after it. You can specify the file format together with the file name.
To specify which window you want to print to file, use WinPrint.<command>, as shown in the PRACTICE
script examples below.
Format: PRinTer.FILE [<file>] [<format>] [/Append]
<format>: ASCII | ASCIIP | ASCIIE | CSV | PSxxx | PCLxxx |XHTML
<file> In order to simplify multiple file generation, a decimal number contained in the
file name (e.g. exam00.lst) is incremented automatically.
If <file> is omitted, the printer output is redirected to the previously chosen
output file name (incremented if the file name contained a decimal
number).
<format> If <format> is omitted, the format used to print to file stays unchanged.
Append Use the option Append to append new data to the existing file.
Without Append, file contents are overwritten if the file already exists.
ASCII Pure ASCII file format. All non-ASCII characters are displayed as an '*'.
The output is packed without paging.
ASCIIP Same as ASCII, but paged output format with fixed line length.
ASCIIE Enhanced ASCII file, underlines are displayed, graphic characters are
displayed as ASCII characters.
CSV Comma-separated value.
PSxxx POSTSCRIPT output format. Different resolutions, orientations and fonts
are available. The output styles are defined in the prolog file for postscript.
The prolog file ('t32pro.ps') is searched on the current directory and the
system directory. For more information, see below.
PCLPxx Printer Command Language output format. Different resolutions and
orientations are available.
XHTML
XML (deprecated)
XML-formatted file with HTML tags.
NOTE: In the PRinTer.FILE command, where you specify the file name,
set the file extension to *.xml or *.html or *.xhtml depending on how
you want the browser to interpret the file. See example 2 and example 3.

PowerView Command Reference | 254
©
1989-2024 Lauterbach
Example 1
Data.dump windows are printed to separate files in ASCIIE format.
Example 2
List.Mix windows are printed to separate files in HTML format.
PRinTer.FILE ~~~/exam00.lst ASCIIE ; choose output file name and format
WinPrint.Data.dump 0x100--0x1ff ; print window to exam00.lst
WinPrint.Data.dump 0x200--0x2ff ; print window to exam01.lst
WinPrint.Data.dump 0x300--0x3ff ; print window to exam02.lst
PRinTer.FILE , PSPS12 ; print window to exam03.lst in
WinPrint.Data.dump 0x400--0x4ff ; POSTSCRIPT format
PRinTer.FILE ~~~/file01.html XHTML ;choose output file name and format
WinPrint.List.Mix func7--func17 ;print window to file01.html
WinPrint.List.Mix func18--func25 ;print window to file02.html
;display the files on two tabs in a browser:
OS.Command start firefox c:\temp\file01.html c:\temp\file02.html
;view the source on a third browser tab:
WAIT 2.s
OS.Command start firefox "view-source:file:///c:/temp/file01.html"
A Basic formatting provided by TRACE32.
B The line with the *.css file name is included for your convenience to allow a user-definable
formatting. The *.css file is not created by TRACE32.
A
B

PowerView Command Reference | 255
©
1989-2024 Lauterbach
Example 3
List.Mix windows are exported to separate XML files, and each XML file contains a reference to a user-
defined XSLT stylesheet.
;in the *.xml file, insert the tag <?xml-stylesheet ...href="..."?>
;with the specified *.xsl file as href="..." attribute
SETUP.XSLTSTYLESHEET "file:///c:/myfiles/mywinprint.xsl"
PRinTer.FILE c:\t32\file01.xml XHTML ;choose output file name and format
WinPrint.List.Mix func7--func17 ;print window to file01.xml
WinPrint.List.Mix func18--func25 ;print window to file02.xml
;display the files on two tabs in a browser:
OS.Command start firefox c:\t32\file01.xml c:\t32\file02.xml
;view the source on the third browser tab:
WAIT 2.s
OS.Command start firefox "view-source:file:///c:/t32/file01.xml"
A The reference to your XSLT stylesheet is only included if the XSLT stylesheet is explicitly specified
with the SETUP.XSLTSTYLESHEET command. The *.xsl file is not created by TRACE32.
A

PowerView Command Reference | 256
©
1989-2024 Lauterbach
POSTSCRIPT
The style of POSTSCRIPT outputs can be widely varied by modifying the prolog file 't32pro.ps'. This file is
prepended to all POSTSCRIPT outputs send to a file or to a printer. The file also contains the definitions of
printout formats made available to TRACE32. New printer formats, extra page headers or other fonts can be
added by modifying this file. The produced POSTSCRIPT files can use as encapsulated postscript files to
include them in documentations produced by desktop publishing software.
For information on POSTSCRIPT:
• Adobe Systems Inc.
Postscript Language Reference Manual, Second Edition
Addison Wesley 1991,
ISBN 0-201-18127-4
• Adobe Systems Inc.
Postscript Language Tutorial and Cookbook,
Addison Wesly 1985
ISBN 0-201-10179-3
Emphasizes examples to illustrate the many capabilities of the PostScript language. Should give
enough information to make your own prologue.
See also
■ PRinTer ■ PRinTer.EXPORT ■ PRinTer.OPEN ■ PRinTer.select
■ SETUP.XSLTSTYLESHEET ■ WinPrint
▲ ’Printer Operations’ in ’PowerView User’s Guide’
▲ ’Window System’ in ’PowerView User’s Guide’
▲ ’Release Information’ in ’Legacy Release History’
PRinTer.FileType Select file format
Deprecated command. Set file format with the commands PRinTer.FILE or PRinTer.OPEN or
PRinTer.EXPORT instead.
See also
■ PRinTer ■ PRinTer.select
▲ ’Release Information’ in ’Legacy Release History’
Format: PRinTer.FileType [<format>] (deprecated)

PowerView Command Reference | 257
©
1989-2024 Lauterbach
PRinTer.HardCopy Make a hardcopy of the screen
Prints the full screen layout.
The following example is for demo purposes only. It provides an overview of how to use the
PRinTer.HardCopy command to send a window from TRACE32 to:
• The default printer
• The clipboard
•A file
Example: To try this script, copy it to a test.cmm file, and then run it in TRACE32 (See “How to...”).
See also
■ PRinTer ■ PRinTer.select ■ WinPRT
▲ ’Printer Operations’ in ’PowerView User’s Guide’
▲ ’Window System’ in ’PowerView User’s Guide’
PRinTer.OFFSET Specify print-out borders
Deprecated. See PRinTer.CONFIG.OFFSET
See also
■ PRinTer ■ PRinTer.select ■ WinPrint
▲ ’Printer Operations’ in ’PowerView User’s Guide’
Format: PRinTer.HardCopy
;Let's open and print a window and a dialog for demo purposes
Register.view ;open the Register.view window
PRinTer.select ;open the PRinTer dialog with the current
;TRACE32 printer settings
;output to printer
PRinTer WINC12 ;select printer, font and size: Windows Courier 10pt
PRinTer.HardCopy ;send hardcopy to your printer (or click Cancel)
;output to clipboard
PRinTer.ClipBoard ASCIIE ;select the clipboard with format ASCIIE
PRinTer.HardCopy ;send hardcopy to your clipboard
;output to file
PRinTer.FILE C:\temp\t32.lst ASCIIE ;specify file path and format
PRinTer.HardCopy ;send hardcopy to specified file

PowerView Command Reference | 258
©
1989-2024 Lauterbach
PRinTer.OPEN Re-route multiple printer outputs to the same file
[Examples]
Redirects all printer output generated with the WinPrint pre-command to the same file. You can specify the
file format together with the file name.
Use PRinTer.CLOSE to close the file and end the output redirection.
Format: PRinTer.OPEN [<file>] [<format>] [/Append]
<file> If <file> is omitted, the default file name t32.lst is used.
If the specified file already exists, it will be overwritten by default.
<format> If <format> is omitted, the format used to print to file stays unchanged.
For a list of available file formats, see command PRinTer.FILE.
Append Use the option Append to append new data to the existing file.
Without Append, file contents are overwritten if the file already exists.
NOTE: Only one file can be open at a time. The message line displays an error if you
run the PRinTer.OPEN command again without having closed the open file.
In case of an error, open the PRinTer.select window, and then click the close file
button, or run the PRinTer.CLOSE command.

PowerView Command Reference | 259
©
1989-2024 Lauterbach
Example 1
The following example is for demo purposes only. The contents of the List window and the
sYmbol.Browse.Function window are printed to file. Then the file is opened in TRACE32.
Example 2
Some commands require some processing time before the result is complete, like Trace.STATistic or
Trace.Chart. The command SCREEN.WAIT will ensure that processing of the window has completed
before script execution continues.
The path prefix ~~~ expands to the temporary directory of TRACE32.
See also
■ PRinTer ■ PRinTer.CLOSE ■ PRinTer.FILE ■ PRinTer.select
■ SCREEN.WAIT ■ WinPrint
▲ ’Window System’ in ’PowerView User’s Guide’
▲ ’Printer Operations’ in ’PowerView User’s Guide’
PRinTer.select
PRinTer.OPEN "~~~/myfile.txt" ASCIIE ;create and open a file for
;writing in ASCIIE file format
WinPrint.List main ;WinPrint.* prints the contents of
WinPrint.sYmbol.Browse.Function ;the two windows to file
PRinTer.CLOSE ;close the file
TYPE ~~~/myfile.txt ;show the resulting file
LOCAL &cmd
&cmd="Trace.STATistic.sYmbol" ;assign a command to a macro
&cmd ;issue the command to open window
SCREEN.WAIT ;wait until processing completed
PRinTer.OPEN "~~~/myfile.txt" ASCIIE ;create and open a file for
;writing in ASCIIE file format
WinPrint.&cmd ;WinPrint.* prints the contents of
;the completed window to the file
PRinTer.CLOSE ;close the file
TYPE "~~~/myfile.txt" ;show the resulting file

PowerView Command Reference | 260
©
1989-2024 Lauterbach
PRinTer.PRINT Print to opened printer file
Writes the specified data to the file selected with PRinTer.OPEN. Use the PRinTer.PRINT command to
store additional information to the printed windows.
Example: A timestamp is printed at the beginning of the file, and then two windows are printed to file.
See also
■ PRinTer ■ PRinTer.select
Format: PRinTer.PRINT [<format>] <data>
<format>: ASCII | BINary | Decimal | Hex | String
PRinTer.OPEN "~~~/myfile.txt" ASCIIE ;create and open a file for
;writing in ASCIIE file format
PRinTer.PRINT ""
PRinTer.PRINT " Time: "+DATE.TIME() ;print timestamp to file
PRinTer.PRINT ""
WinPrint.Register ;WinPrint.* prints the contents of
WinPrint.List ;these two windows to file
PRinTer.CLOSE ;close the file
TYPE "~~~/myfile.txt" ;show the resulting file

PowerView Command Reference | 261
©
1989-2024 Lauterbach
PRinTer.select Select printer
Selects a physical printer or opens the PRinTer.select window, where you can configure all printing options.
• With argument: If the command is used with the <printer> parameter, all further printing is re-
directed to the specified physical printer.
• Without argument: If the command is used without the <printer> parameter, the PRinTer.select
window is displayed. In this window, you can choose whether you want to send the printout to a
printer, to the clipboard, to a file, or to an AREA window. You can define the format, e.g. font, font
size, ASCII, enhanced ASCII for each output medium. You can specify path and file name or
browse for an existing file.
To specify which TRACE32 window you want to send to the printer or to the clipboard or to file, use
WinPrint, as shown in the PRinTer.FILE example. Printers must be configured in the host system to appear
in the printer drop-down list of the PRinTer.select window.
See also
■ PRinTer ■ PRinTer.Area ■ PRinTer.ClipBoard ■ PRinTer.CLOSE
■ PRinTer.CONFIG ■ PRinTer.EXPORT ■ PRinTer.FILE ■ PRinTer.FileType
■ PRinTer.HardCopy ■ PRinTer.OFFSET ■ PRinTer.OPEN ■ PRinTer.PRINT
■ PRinTer.SIZE
▲ ’Window System’ in ’PowerView User’s Guide’
▲ ’Printer Operations’ in ’PowerView User’s Guide’
Format: PRinTer.select [<printer>]
A For descriptions of the commands in the PRinTer.select window, please refer to the PRinTer.*
commands in this chapter. Example: For information about FILE, see PRinTer.FILE.
B When is the close file button visible?
• It becomes visible after a file has been opened with PRinTer.OPEN. The button remains visi-
ble until you close the file again (a) by clicking the close file button or (b) by running the
PRinTer.CLOSE command.
• It is hidden if a file is opened with PRinTer.FILE because TRACE32 automatically closes that
file again after the print operation.
C If you select a list entry with a file name extension, then the extension is automatically appended to
the file name. In all other cases, you can define your own extension or omit the extension.
B
C
A


PowerView Command Reference | 263
©
1989-2024 Lauterbach
PWD
PWD Change directory
If used without <path>, PWD displays the current working directory in the TRACE32 message line.
If used with <path>, PWD changes the working directory as specified in <path> and displays the new
working directory in the TRACE32 message line.
On Windows environments, the drive may be selected too. When used as a command prefix, the directory is
changed to the path used in the command line (implicit change).
Example 1:
Example 2:
See also
■ ChDir ■ DIR
❏ OS.DIR() ❏ OS.PresentWorkingDirectory()
▲ ’Commands’ in ’PowerView User’s Guide’
▲ ’File and Folder Operations’ in ’PowerView User’s Guide’
Format: PWD [<path>]
PWD /t32 ; change directory
;set the working directory to c:\t32
PWD c:\t32
;export the function nesting to a *.csv file in the working directory
Trace.EXPORT.CSVFunc func.csv
;export the variables 'flags' and 'ast' to a *.csv file in the working
;directory
Var.EXPORT variables.csv %Type %Location %Index flags ast
;start a new Excel instance and open the two *.csv files in the new
;Excel instance
OS.Command start excel.exe func.csv variables.csv

PowerView Command Reference | 264
©
1989-2024 Lauterbach
PYthon
The PYthon command group allows you to execute Python code directly from TRACE32 PowerView GUI. If
you have multiple Python interpreter installed SETUP.PYthon.EXEcutable can be used to configure which
one is used.
Python scripts can be executed using the PYthon.RUN command. Your python script can then control the
debugger using the Python RCL Module.
Please refer to ~~/demo/api/python/rcl/doc/html/index.html on how to install and use the
Python RCL module. The source for the Python RCL module can be found in
~~/demo/api/python/rcl/dist. You can either install it manually or use PYthon.INSTALL command.
You can also execute your Python scripts directly, for instance from your Python IDE or from command line
and control the debugger from outside of PowerView.
PYthon.EDIT Open Python script in editor
Opens given script in Python editor window.
PYthon.INSTALL Install RCL module and Python interpreter
Installs the RCL module and the Python interpreter configured by SETUP.PYthon.EXEcutable. While
installing script execution is blocked. The result of the installation process is written into the area window.
Example:
Format: PYthon.EDIT <filename>
Format: PYthon.INSTALL <module_name>
PYthon.INSTALL RCL

PowerView Command Reference | 265
©
1989-2024 Lauterbach
PYthon.RUN Run Python script in dedicated window
Executes Python script with given parameter. Output and input of the script are redirected to dedicated
window. Python version (min. 3.6) and the presence of the of the Python RCL module will be verified on the
first run. Path to the Python interpreter can be defined using SETUP.PYthon.EXEcutable.
PYthon.RUN opens dedicated terminal window for input and output of the Python script or reuses existing
one if already open. Please check in case of troubles both the Python terminal and AREA window for error,
warning and info messages.
Format: PYthon.RUN <scriptname> <par1> <par2> ....

PowerView Command Reference | 266
©
1989-2024 Lauterbach
QUIT
QUIT Return to operating system
Closes TRACE32.
After executing QUIT, all settings and memory contents are lost! If a continuation of the same setting is
wanted, the saving via the STOre command will be necessary.
With SETUP.QUITDO you can define a PRACTICE script (*.cmm) which will be executed before TRACE32
quits.
Example for Unix/Cygwin to use the <os_return> value in a script:
Example for Windows to use the <os_return> value in a batch file:
See also
■ SETUP.QUITDO
▲ ’Program End’ in ’PowerView User’s Guide’
Format: QUIT [<os_return>]
./t32marm
echo $?
start "" /wait t32marm.exe
echo %ERRORLEVEL%


PowerView Command Reference | 268
©
1989-2024 Lauterbach
RM, RMDIR
RM Delete file
Removes a file.
Example:
See also
■ DEL ■ MKTEMP
▲ ’File and Folder Operations’ in ’PowerView User’s Guide’
RMDIR Remove directory
Removes a sub-directory. The directory must be empty.
See also
■ MKDIR ■ MKTEMP
▲ ’File and Folder Operations’ in ’PowerView User’s Guide’
Format: RM <file>
<file> Wildcard characters within the file name will open the browser for selecting a
file.
RM c:\t32\test.bak
Format: RMDIR <path>

PowerView Command Reference | 269
©
1989-2024 Lauterbach
SCreenShot
SCreenShot Save a screenshot of a window to a file
[Examples]
Captures a screenshot of the whole user interface or a single window and saves the captured image with a
selected image format to a file. The default image type is the BMP format. If the file name contains any
wildcards, a file-save dialog opens. File names containing any space characters must be enclosed in
quotation marks.
Format: SCreenShot [<file> [<imageformat> [<window_name> | /ACTive] ] ]
<image
format>:
BMP | TIFF | PNG | JPG | GIF
NOTE: This command is only available if running PowerView on
• Microsoft Windows
• Linux with Qt-Screendriver
•macOS
Depending on the used OS version, some image formats may not be available.
<imageformat>
• BMP: Windows Bitmap format (default, lossless, uncompressed).
• PNG: Portable Network Graphics format (lossless, compressed).
• JPG: JPEG File Interchange format (lossy, compressed).
• TIFF: Tagged Image File Format (lossless, uncompressed). Taking
a screenshot in TIFF format is only suported on Microsoft Win-
dows.
• GIF: Graphics Interchange Format (lossy, compressed, 256 col-
ors). Taking a screenshot in GIF format is only suported on Micro-
soft Windows. Screenshots saved in GIF format are stored with a
256 color lookup table and are dithered to this fixed palette. This
reduces the image quality. For higher quality images choose one of
the other available formats.
<window_name>
• Use the WinPOS command to assign a name to built-in windows
or built-in window-style dialogs.
• Use NAME to assign a name to a custom dialog.
• Window names are case-sensitive. That is, the window names
w001 and W001 are not the same.
ACTive Captures a screenshot of the topmost window in the z-order. You can
bring a window to the top of the z-order by using the WinTOP command
or by clicking inside the desired window. Windows having the window
pre-command WinExt are not captured.

PowerView Command Reference | 270
©
1989-2024 Lauterbach
Example 1:
Example 2:
Example 3:
; Capture a screenshot of the main window and save in JPEG format:
SCreenShot "~~~/screenshot.jpeg" JPG
; Capture a screenshot of window named W001 and save in GIF format:
WinPOS ,,,,,,W001
SYStem.state
WAIT 200.ms
SCreenShot "~~~/screenshot.gif" GIF W001
; Open the SYStem.CONFIG window and capture a screenshot of it:
WinPOS ,,,,,,myWin
SYStem.CONFIG
SCreenShot "~~~/screenshot.png" PNG myWin

PowerView Command Reference | 271
©
1989-2024 Lauterbach
SETUP
SETUP Setup commands
Using the SETUP command group, many window system and user interface parameters can be modified,
and rarely-used system functions can be executed.
For additional SETUP commands, refer to the SETUP commands in ”General Commands Reference
Guide S” (general_ref_s.pdf).
See also
■ SETUP.ASCIITEXT ■ SETUP.BAKfile
■ SETUP.COLOR ■ SETUP.DEVNAME
■ SETUP.EDITEXT ■ SETUP.EDITOR
■ SETUP.EXTension ■ SETUP.FASTRESPONSE
■ SETUP.FILETYPE ■ SETUP.HOLDDIR
■ SETUP.ICONS ■ SETUP.InterComACKTIMEOUT
■ SETUP.PDEBUG ■ SETUP.PDFViewer
■ SETUP.QUITDO ■ SETUP.RADIX
■ SETUP.RANDOM ■ SETUP.ReDraw
■ SETUP.RESOLVEDIR ■ SETUP.SOUND
■ SETUP.STOPMESSAGE ■ SETUP.STOre
■ SETUP.TabSize ■ SETUP.TIMEFORM
■ SETUP.UpdateRATE ■ SETUP.WARNSTOP
■ SETUP.XSLTSTYLESHEET
▲ ’SETUP’ in ’General Commands Reference Guide S’

PowerView Command Reference | 272
©
1989-2024 Lauterbach
SETUP.ASCIITEXT Configure ASCII text display
Configures the display mode for all non-standard characters in dump windows.
Format: SETUP.ASCIITEXT [<mode1>] [<mode2>]
<mode1>: FULL8 | FULL7 | PART 8 | PART7 | UTF- 8
<mode2>: SPACE | BLANK | SWAP
FULL8 All 8 bits are used for display. Non-standard characters are displayed in
graphic mode.
FULL7 Only 7 bits are used for display. Non-standard characters are displayed in
graphic mode.
PART8 All 8 bits are used for display. Non-standard characters are not displayed.
PART7 Only 7 bits are used for display. Non-standard characters are not
displayed.
UTF-8 Support for UTF-8 characters in the Data.dump and Var.View windows.
SPACE Display space character as '_' in ascii dump window. (Default)
BLANK Display space character as BLANK (0x20) and not as '_' in ascii dump
window.
SWAP Display with reverse character-order of each two adjacent characters.


PowerView Command Reference | 274
©
1989-2024 Lauterbach
SETUP.BAKfile Enable backup file creation
If ON (default) and the debugger is about to overwrite an existing file (due to e.g. Data.SAVE, Trace.SAVE),
the debugger will make a backup of the existing file by renaming the file extension.
See also
■ SETUP
▲ ’System Setup and Configuration’ in ’PowerView User’s Guide’
Format: SETUP.BAKfile [ON | OFF]
NOTE: The default file extension of the backup file is .BAK
The backup file extension can be changed using SETUP.EXT BAK.
This command does not affect the backup file creation for files opened in the
editor. See SETUP.EDITOR BAKfile on how to control backup file creation for
files opened in the editor.

PowerView Command Reference | 275
©
1989-2024 Lauterbach
SETUP.COLOR Change colors
If the command is entered without parameters, the SETUP.COLOR window is opened.
For all host operating systems, the color depth for each color channel is 8 bit.Values go from 0(darkest) to
255 (lightest color).
Format: SETUP.COLOR [<object> <red> <green> <blue>]
A <object> identifier column. B Click change to modify a color.
C Scroll down to view the colors that can be applied to TRACE32 windows in multicore debug
sessions. For example, if green stands for core 1, then information from core 1 will be displayed in
windows with a green window background.
D Button functions
Set default colors: Set all colors to default values
Reset colors: Reset colors to the colors currently saved in config.t32 or preferences
Save permanently: Save colors to user preferences
Store to script: Generates a script to reproduce the currently selected color settings
SETUP.COLOR 40. 0xff 0x14 0x93 ; Change the Info Message
; Background (40.) to DeepPink
A B
C
D
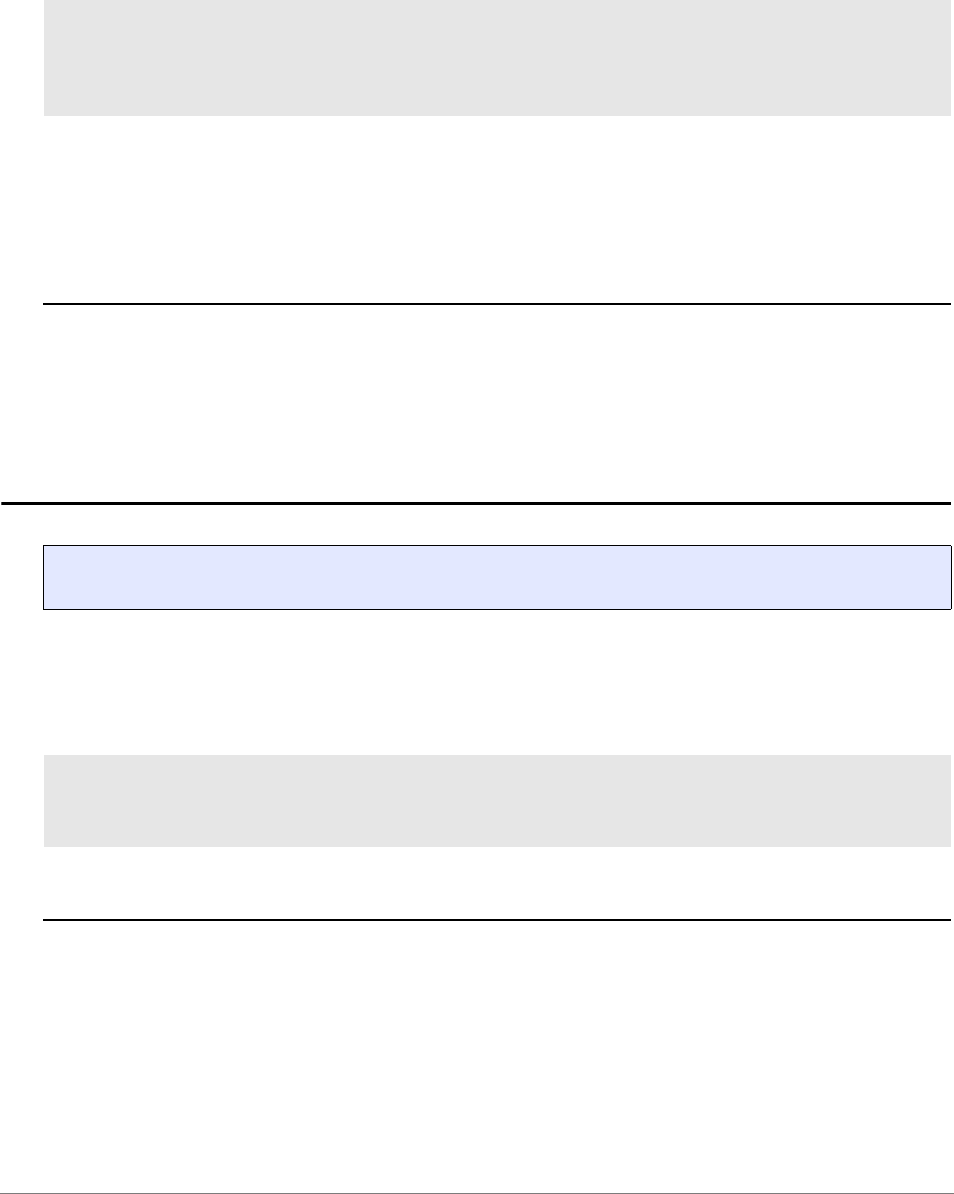
PowerView Command Reference | 276
©
1989-2024 Lauterbach
Backwards compatibility mode for CDE/Motiv: In addition to the 8 bit depth per color channel, when the
CDE/Motif screen driver is used, SETUP.COLOR also supports 16 bits per color channel. Values exceeding
0xFF are automatically scaled down. The compatibility mode exists to for PowerView versions before build
136645. Usage is not recommended for new installations. E.g. DeepPink (FF 14 93) results as below
command:
For Unix derivates the X11 color values, see http://en.wikipedia.org/wiki/web_colors
See example script ~~/demo/practice/colors/presentation.cmm
See also
■ SETUP ■ CmdPOS ■ FramePOS ■ CORE.SHOWACTIVE
■ sYmbol.ColorDef ■ sYmbol.List.ColorDef
▲ ’PowerView - Screen Display’ in ’PowerView User’s Guide’
▲ ’System Setup and Configuration’ in ’PowerView User’s Guide’
SETUP.DEVNAME Set logical device name
Defines an new device name for the selected device. This command is used when more than one device is
used in a debug environment, e.g. multicore debugging.
Example:
See also
■ SETUP
▲ ’System Setup and Configuration’ in ’PowerView User’s Guide’
;CDE/Motiv only:
SETUP.COLOR 40. 0xff00 0x1400 0x9300
;any host OS and screen driver:
SETUP.COLOR 40. 0xff 0x14 0x93
; Change the Info Message
; Background (40.) to DeepPink
; (RGB values: FF 14 93)
Format: SETUP.DEVNAME [<sysname>]
B::SETUP.DEVNAME JTAG1
JTAG1::
JTAG1::Data.List main
; sets new name
; from now the device name is "JTAG1"
; next command

PowerView Command Reference | 277
©
1989-2024 Lauterbach
SETUP.EDITEXT Define an external editor
Replaces the TRACE32 built-in editor call with an external editor call.
Example 1: This script shows how to configure TextPad (or JEDIT or UltraEdit) as an external editor for
TRACE32 PowerView with the ON setting:
Format: SETUP.EDITEXT ON | OFF [<cmdline>]
ON The EDIT.file command starts your external editor - instead of the
TRACE32 editor. See example 1.
OFF The external editor is only started when you execute the EDIT.EXTern
command. See example 2.
<cmdline> This string contains the command that TRACE32 sends to your OS to
start the external editor. In this string, the following replacements will be
made:
• * will be replaced by the actual file name.
• # will be replaced by the actual line number.
;configure TextPad as an external editor
SETUP.EDITEXT ON "C:\Program Files\TextPad 5\TextPad.exe ""* (#)"""
;configure JEDIT as an external editor
;SETUP.EDITEXT ON "C:\eclipse\jedit5.0.0\jedit.exe ""*"" +line:#"
;configure UltraEdit as an external editor
;SETUP.EDITEXT ON "C:\IDM\UltraEdit\uedit32.exe ""*"""
;PRACTICE script file opens in the external editor
EDIT.file ~~~/my-script.cmm

PowerView Command Reference | 278
©
1989-2024 Lauterbach
Example 2: This script shows how to configure TextPad as an external editor for TRACE32 PowerView with
the OFF setting:
See also
■ SETUP.EDITOR ■ SETUP ■ DIR ■ EDIT
■ EDIT.EXTern ■ EDIT.file ■ EDIT.OPEN
▲ ’Text Editors’ in ’PowerView User’s Guide’
▲ ’System Setup and Configuration’ in ’PowerView User’s Guide’
▲ ’File and Folder Operations’ in ’PowerView User’s Guide’
▲ ’Release Information’ in ’Legacy Release History’
;configure an external editor
SETUP.EDITEXT OFF "C:\Program Files\TextPad 5\TextPad.exe ""* (#)"""
;Text file opens in the built-in TRACE32 editor as usual
EDIT.file ~~~/mylog.txt
;Text file now opens in the external editor
EDIT.EXTern ~~~/mylog.txt

PowerView Command Reference | 279
©
1989-2024 Lauterbach
SETUP.EDITOR TRACE32 editor configuration
The SETUP.EDITOR command group allows you configure the format settings for and the behavior of the
TRACE32 editors.
To make your configuration settings, use the TRACE32 command line, a PRACTICE script (*.cmm), or the
SETUP.EDITOR.state dialog window:
For a description of the commands on the dialog window, see SETUP.EDITOR.state.
See also
■ SETUP.EDITOR.AutoSuggest ■ SETUP.EDITOR.BAKfile
■ SETUP.EDITOR.HighLight ■ SETUP.EDITOR.Indentation
■ SETUP.EDITOR.IndentSize ■ SETUP.EDITOR.IndentWithTabs
■ SETUP.EDITOR.Mode ■ SETUP.EDITOR.SaveChangesPrompt
■ SETUP.EDITOR.SmartBackspace ■ SETUP.EDITOR.SmartCursor
■ SETUP.EDITOR.SmartFormat ■ SETUP.EDITOR.state
■ SETUP.EDITOR.TabSize ■ SETUP.EDITOR.TrailingWhitespace
■ SETUP.EDITOR.TYPE ■ SETUP.EDITEXT
■ SETUP ■ DIALOG.Program
■ EDIT ■ EDIT.file
■ EDIT.FORMAT ■ EDIT.OPEN
■ MENU.Program ■ PEDIT
A All settings are only available if the TYPE <editor_feature_set> is set to PowerView.
B When you change the TYPE setting from PowerView to Native, most of the settings are
deactivated. For more information, see SETUP.EDITOR.TYPE <editor_feature_set>.
A
B

PowerView Command Reference | 280
©
1989-2024 Lauterbach
■ Analyzer.Program ■ Data.PROGRAM
■ Integrator.Program ■ PER.Program
▲ ’System Setup and Configuration’ in ’PowerView User’s Guide’
SETUP.EDITOR.AutoSuggest Show input suggestions while typing
This command is only available if SETUP.EDITOR.TYPE is set to PowerView.
Defines when the PowerView editor shows input suggestions or auto completion candidates.
Input suggestions / auto completion are currently supported for the PRACTICE editor PEDIT and supports
commands, command parameters, keywords, file paths and PRACTICE macros.
Format: SETUP.EDITOR.AutoSuggest [ON | OFF | <mode>]
<mode> DefaultSelection [ON | OFF]
SpacebarInsertion [ON | OFF]
OFF Show only in explicit user request (CTRL+SPACEBAR)
ON Show every time a user inputs text.

PowerView Command Reference | 281
©
1989-2024 Lauterbach
Enhanced modes are available for more efficient (though also more intrusive) use of the auto suggestion
feature:
See also
■ SETUP.EDITOR ■ SETUP.EDITOR.state
SETUP.EDITOR.BAKfile Make backup copy when file is saved
Defines if the TRACE32 editor should make a backup copy if an existing file before saving the new file.
Note: In order to configure if other commands (e.g. Data.SAVE, Trace.SAVE) should make backups before
overwriting existing files, see SETUP.BAKfile.
See also
■ SETUP.EDITOR ■ SETUP.EDITOR.state
SETUP.EDITOR.HighLight Control syntax highlighting
This command is only available if SETUP.EDITOR.TYPE is set to PowerView.
Default: ON for each <item>.
DefaultSelection If OFF (default), the auto completion box appears without a preselection
and the best matching item is only selected after (CTRL+SPACEBAR) is
pressed. If ON, the auto completion box will always appear with an item
selected (implicit CTRL+SPACEBAR after every input)
SpacebarInsertion If OFF, insertion is triggered by RETURN, and on any character which is
not a letter or number (exceptions exist depending on type of value, e.g.
debug symbol, path etc.).
If ON, SPACEBAR will trigger insertion of the selected item in addition to
the inputs that trigger insertion when this option is OFF.
Format: SETUP.EDITOR.BAKfile [ON | OFF]
Format: SETUP.EDITOR.HighLight <item> ON | OFF
<item>: Block | BraceMatching | CursorLine | Keywords | Selection

PowerView Command Reference | 282
©
1989-2024 Lauterbach
Switches the syntax highlighting for the selected <item> ON or OFF.
See also
■ SETUP.EDITOR ■ SETUP.EDITOR.state
SETUP.EDITOR.Indentation Select indentation method
This command is only available if SETUP.EDITOR.TYPE is set to PowerView.
This command defines how the PowerView editor indents new lines when the user presses the RETURN
key.
Settings can be applied to either all file types together or for several file types individually. The table below
lists all available file types that support individual settings:
Block Lines with matching block delimiters are highlighted in yellow as soon as
the insertion point is located in either line.
BraceMatching When you place the insertion point to the left of a brace, the matching
brace in the same line is highlighted.
Example:
IF (&sel&((0x1)))==0x0
CursorLine Highlights the entire line where you have placed the insertion point.
Keywords Highlights commands, functions, strings, comments, etc.
Selection In addition to the current selection, all other occurrences matching the
current selection are highlighted in yellow.
Format: SETUP.EDITOR.Indentation [<filetype>] <mode>
<filetype>: all | PRACTICE | C | PYTHON | ASM | TRIG | TEXT
<mode>: OFF | Keep | Auto
all Settings are valid to all available file types and overwrite individual
settings.
PRACTICE Settings are valid for the PRACTICE editor PEDIT, and for the TRACE32
peripheral view and menu program editors PER.Program and
MENU.Program
C Settings are valid for the text editor in the case a C / C++ source file is
opened in the EDIT window.

PowerView Command Reference | 283
©
1989-2024 Lauterbach
Supported indentation modes:
See also
■ SETUP.EDITOR ■ SETUP.EDITOR.state
SETUP.EDITOR.IndentSize Set indentation size
This command is only available if SETUP.EDITOR.TYPE is set to PowerView.
This command defines the indentation size used by the PowerView editor.
See also
■ SETUP.EDITOR ■ SETUP.EDITOR.state ■ SETUP.TabSize
PYTHON Settings are valid for the Python editor PY.EDIT.
ASM Settings are valid for the TRACE32 assembler editor Data.Program
TRIG Settings are valid for the TRACE32 trigger program editors:
Integrator.Program, Probe.Program, Break.Program
TEXT Settings are valid for all other file types opened in EDIT windows.
OFF New lines begin at the first character, no whitespace is inserted.
Keep New lines are inserted exactly like the previous line.
Auto Context-sensitive indentation and de-indentation.
Supported for PEDIT, PY.EDIT, MENU.Program, PER.Program
Format: SETUP.EDITOR.IndentSize <filetype> <size>
<filetype>: all | PRACTICE | C | PYTHON | ASM | TRIG | TEXT
(see SETUP.EDITOR file type table)
<size>: DEFault | 1..8
DEFault Use value set by SETUP.TabSize. Default of SETUP.TabSize is 8.
1..8 The indentation size is set according to the specified value.

PowerView Command Reference | 284
©
1989-2024 Lauterbach
SETUP.EDITOR.IndentWithTabs Use tabulator for indentation
This command is only available if SETUP.EDITOR.TYPE is set to PowerView.
This command defines if the PowerView editor uses tabs for indentation.
See also
■ SETUP.EDITOR ■ SETUP.EDITOR.state
SETUP.EDITOR.Mode Show visible whitespace or ASCII view
This command is only available if SETUP.EDITOR.TYPE is set to PowerView.
This command defines how the PowerView editor shows the text document.
See also
■ SETUP.EDITOR ■ SETUP.EDITOR.state
Format: SETUP.EDITOR.IndentWithTabs <filetype> ON | OFF
<filetype>: all | PRACTICE | C | PYTHON | ASM | TRIG | TEXT
(see SETUP.EDITOR file type table)
ON The editor uses tabs or mixed tab/blank for indentation (depending on
SETUP.EDITOR.TabSize and SETUP.EDITOR.IndentSize)
OFF The editor uses only blanks for indentation according to
SETUP.EDITOR.IndentSize
Format: SETUP.EDITOR.Mode Normal | VisibleSpaces | ASCII
Normal The editor shows any whitespace as blank screen
VisibleSpaces The editor shows visible blanks and tabs.
ASCII The editor shows all non-printable characters (like ASCII column of e.g.
the Data.dump window).

PowerView Command Reference | 285
©
1989-2024 Lauterbach
SETUP.EDITOR.SaveChangesPrompt Save file if edit window closed
Defines when PowerView asks if a file that is opened and modified in the TRACE32 editor should be saved.
See also
■ SETUP.EDITOR ■ SETUP.EDITOR.state
Format: SETUP.EDITOR.SaveChangesPrompt [OnT32Quit | OnEditClose]
OnT32Quit PowerView asks if the file should be saved when TRACE32 PowerView is
quit.
OnEditClose PowerView asks if the file should be saved when the edit window is
closed.

PowerView Command Reference | 286
©
1989-2024 Lauterbach
SETUP.EDITOR.SmartBackspace Backspace maintains indentation
This command is only available if SETUP.EDITOR.TYPE is set to PowerView.
Default: OFF.
Controls the effect of the Backspace key if the cursor os at the first non-whitespace character of the current
line.
See also
■ SETUP.EDITOR ■ SETUP.EDITOR.state
SETUP.EDITOR.SmartCursor Control cursor movement
This command is only available if SETUP.EDITOR.TYPE is set to PowerView.
Default: OFF.
Controls how the editor sets the cursor column during vertical cursor movement (cursor up/down).
See also
■ SETUP.EDITOR ■ SETUP.EDITOR.state
Format: SETUP.EDITOR.SmartBackspace ON | OFF
OFF Backspace deletes a single character left of the cursor.
ON If the cursor is at the first non-whitespace character of a line, the
backspace key will remove one indentation depth of whitespace. Useful
for blank-only indentation schemed like commonly used for Python.
Format: SETUP.EDITOR.SmartCursor ON | OFF
OFF The new cursor column is the same column as before vertical cursor
movement (standard behavior of most editors).
ON The new cursor column is the column the cursor was located before text
was inserted or removed before vertical cursor movement (TextPad(R)-
like behavior).

PowerView Command Reference | 287
©
1989-2024 Lauterbach
SETUP.EDITOR.SmartFormat Automatic formatting
This command is only available if SETUP.EDITOR.TYPE is set to PowerView.
If this setting is ON (default), automatic formatting will occur on the following occasions:
• Paste event: The pasted block will be formatted so that it matches the preceding indentation.
• Block close input event: When a block closing character is entered, the closed block will be
formatted according to preceding indentation.
The automatic formatting can be undone by pressing CTRL-Z once, while pressing CTRL-Z twice will unsi
the original action as well.
See also
■ SETUP.EDITOR ■ SETUP.EDITOR.state
Format: SETUP.EDITOR.SmartFormat ON | OFF

PowerView Command Reference | 288
©
1989-2024 Lauterbach
SETUP.EDITOR.state Show editor configuration dialog
Opens the configuration dialog window for the TRACE32 editors.
[]
TRACE32 supports two editors, the fully integrated PowerView editor and an OS / UI framework native editor
as fallback. Most configuration options are only available for the PowerView editor. The desired editor can be
set using the command SETUP.EDITOR.TYPE.
See also
■ SETUP.EDITOR ■ SETUP.EDITOR.AutoSuggest
■ SETUP.EDITOR.BAKfile ■ SETUP.EDITOR.HighLight
■ SETUP.EDITOR.Indentation ■ SETUP.EDITOR.IndentSize
■ SETUP.EDITOR.IndentWithTabs ■ SETUP.EDITOR.Mode
■ SETUP.EDITOR.SaveChangesPrompt ■ SETUP.EDITOR.SmartBackspace
■ SETUP.EDITOR.SmartCursor ■ SETUP.EDITOR.SmartFormat
■ SETUP.EDITOR.TabSize ■ SETUP.EDITOR.TrailingWhitespace
■ SETUP.EDITOR.TYPE
Format: SETUP.EDITOR.state
NOTE: Use the ClipSTOre or STOre command to obtain the current
SETUP.EDITOR.state settings in the form of a PRACTICE script.
By copying and pasting the resulting script into your user-settings.cmm or
system-settings.cmm, you can re-use your preferred settings in future
TRACE32 sessions.
For more information about the files user-settings.cmm and
system-settings.cmm, refer to “Automatic Start-up Scripts” in PRACTICE
Script Language User’s Guide, page 15 (practice_user.pdf).

PowerView Command Reference | 289
©
1989-2024 Lauterbach
SETUP.EDITOR.TabSize Set tabulator size
This command is only available if SETUP.EDITOR.TYPE is set to PowerView.
This command defines the tabulator size used by the PowerView editor.
See also
■ SETUP.EDITOR ■ SETUP.EDITOR.state
SETUP.EDITOR.TrailingWhitespace Remove trailing whitespace
This command is only available if SETUP.EDITOR.TYPE is set to PowerView.
This command defined if and how the PowerView editor will remove trailing whitespace. If enabled, trailing
whitespace is removed every time a file is saved.
See also
■ SETUP.EDITOR ■ SETUP.EDITOR.state
Format: SETUP.EDITOR.TabSize <filetype> <size>
<filetype>: all | PRACTICE | C | PYTHON | ASM | TRIG | TEXT
(see SETUP.EDITOR file type table)
<size>: DEFault | 1..8
DEFault Use value set by SETUP.TabSize. Default of SETUP.TabSize is 8.
1..8 The tabulator size is set according to the specified value.
Format: SETUP.EDITOR.TrailingWhitespace Keep | Strip | StripChangedLine
Keep The editor does not remove trailing whitespace.
Strip The editor removes any trailing whitespace.
StripChangedLine The editor removes trailing whitespace in every line that has been
modified since the file was loaded in the editor.
PowerView Command Reference | 290
©
1989-2024 Lauterbach
SETUP.EDITOR.TYPE Set editor implementation
This command defines which editor implementation is used. Default: PowerView.
See also
■ SETUP.EDITOR ■ SETUP.EDITOR.state
Format: SETUP.EDITOR.TYPE <type>
<type>: PowerView | Native
PowerView Fully integrated editor with
- true syntax highlighting for all TRACE32 programming languages
- context sensitive help
- automatic suggestions and completion of commands, keywords, file
paths, PRACTICE macros and debug symbols
- automatic indentation and command formatting
Native Standard edit container as provided by operating system or UI
framework. Not recommended.

PowerView Command Reference | 291
©
1989-2024 Lauterbach
SETUP.EXTension Set default file name extensions
See also
■ SETUP
▲ ’System Setup and Configuration’ in ’PowerView User’s Guide’
SETUP.FASTRESPONSE Optimize for fast response times
Configures TRACE32 PowerView for fast response times while streaming trace data. For RTS and
Analyzer.Mode STREAM
By default (OFF), the debugger gives priority to streaming and processing the trace data to gain maximum
transfer bandwidth. This is the recommended setting for most use cases.
If it is required to get a short reaction time on e.g. breakpoint hit notifications, only then set this option to ON.
See also
■ SETUP
Format: SETUP.EXTension <file_type> [<extension_def> [<extension_2>]]
(deprecated)
Use SETUP.FILETYPE.EXTension instead.
Format: SETUP.FASTRESPONSE [ON | OFF]

PowerView Command Reference | 292
©
1989-2024 Lauterbach
SETUP.FILETYPE File type configuration
See also
■ SETUP.FILETYPE.ENCoding ■ SETUP.FILETYPE.EXTension ■ SETUP
SETUP.FILETYPE.DropCoMmanD Set command for dropped files
[build 148462 - DVD 09/2022]
When you drag a file from an application other than TRACE32 and drop it into the TRACE32 command line,
a default command is automatically prepended in the command line in order to open, execute, or load the
file. The default command used depends on the file extension.
SETUP.FILETYPE.DropCoMmanD allows to change the <command> which is used when a file of a
certain type is dropped into the TRACE32 command line.
Format: SETUP.FILETYPE.DropCoMmanD <type> [<command>]
SETUP.DropCoMmanD <type> [<command>] (deprecated)
<type>: OTHER | ASM | ELF | EXE | MENU | PER | PRACTICE
<command> By default, TRACE32 automatically appends an asterisk to the parameter
<command> if you omit the asterisk. This asterisk will be replaced with the
name of the file you drop into the command line.
Compare example 1 and 2.
To restore the default command, omit the <command> and specify just the
<type>.
See example 3.
ASM (*.asm) Assembler programs (Default command: TYPE)
ELF (*.elf) Files in the executable and linking format.
(Default command: Data.LOAD.Elf)
EXE (*.exe) Windows executables (Default command: Data.LOAD.eXe)
MENU (*.men) Menu files (Default command: MENU.Program)
OTHER A file with an extension unknown to TRACE32.
(Default command: Data.LOAD)
PER (*.per) Peripheral files (Default command: PER)
PRACTICE (*.cmm) PRACTICE scripts (Default command: CD.DO)

PowerView Command Reference | 293
©
1989-2024 Lauterbach
Example 1: This script line changes the default command for PRACTICE scripts from CD.DO to CD.RUN
when they are dropped into the command line:
Example 2: This script line changes the command for ELF files when they are dropped into the command
line, so that they are loaded with the option /CYGDRIVE by default:
Example 3:
SETUP.FILETYPE.ENCoding Set encoding mode
[build 148217 - DVD 09/2022]
This command allows to define the file encoding for several text file types.
SETUP.DropCoMmanD PRACTICE "ChDir.RUN"
SETUP.DropCoMmanD ELF "Data.LOAD.Elf * /CYGDRIVE"
;change the default command "MENU.Program" to "MENU.ReProgram"
SETUP.DropCoMmanD MENU "MENU.ReProgram"
;when you now drag&drop a menu file (*.men) into the TRACE32 command
;line, the file name is prepended with "MENU.ReProgram"
;let’s restore "MENU.Program" as the default command for drag&drop
SETUP.DropCoMmanD MENU
Format: SETUP.FILETYPE.ENCoding <filetype> <encoding>
<filetype>: SOURCE | PRACTICE.script | PRACTICE.ENCRYPTed
<encoding>: AUTODETECT | WINCP | UTF-8 | UTF-8-BOM
Before: After:

PowerView Command Reference | 294
©
1989-2024 Lauterbach
Default for Windows is AUTODETECT. For other operating systems, the default is UTF-8.
See also
■ SETUP.FILETYPE
<encoding> Description
AUTODETECT Automatically detects if the file text is encoded in UTF-8 or the Windows
code-page for non-unicode programs. This option is only available for
Windows.
WINCP Files are expected in the Windows code-page for non-unicode programs.
This option is only available for Windows.
UTF-8 Files are expected to be in UTF-8 encoding. If PowerView saves or
modifies the file, it will add the UTF-8 BOM at the beginning of the file,
only if the original file also included a BOM.
UTF-8-BOM Files are expected to be in UTF-8 encoding. If PowerView saves or
modifies a file, it will add the UTF-8 BOM at the beginning of the file.

PowerView Command Reference | 295
©
1989-2024 Lauterbach
SETUP.FILETYPE.EXTension Set default file name extensions
[build 148217 - DVD 09/2022]
This command allows to change the default file type associations in TRACE32 PowerView. The file type
association is done using the file extension (suffix).
If SETUP.EXTension is called with <file_type> only (no extensions), the currently associated extensions are
displayed in the status line.
Each command in TRACE32 PowerView that loads or saves files has a file type associated to it. The file
type is used for several actions:
• If a LOAD, OPEN, SAVE or similar command is entered with a file name that has no extension,
TRACE32 PowerView will add the default extension automatically.
• If a file is moved to the PowerView command line using drag&drop, the command line will contain
the dropped file, preceded by the command that is associated to either the default or second
extension.
• If a LOAD, OPEN, SAVE or similar command is entered with wildcard(s), the file selection dialog
will contain the associated extensions in the file filter box.
Format: SETUP.FILETYPE.EXTension <file_type> [<extension_def> [<extension_2>]]
<file_type>: AL | ALTERA | AP | ASM | BAK | BNK | BSDL | COV | CSV | DIALOG |
ELF | LOG | LUA | MENU | ORTI | OS | PATP RO G |
PER | PERF.Data | PERF.program | PRACTICE | PRT |
STOre | TAPROG | TEXT | XHTML
<file_type> The file type for which the extension is to be set. See table below for a list
of supported file types, description and default extensions.
<extension_def> Default extension for the specified tile type. Used as default extension for
all LOAD, OPEN, SAVE or similar operations, drag&drop command
association and file filters in file selection dialogs.
<extension_2> Secondary extension. Only used for drag&drop command association
and file filters in file selection dialogs.

PowerView Command Reference | 296
©
1989-2024 Lauterbach
This table lists the file types and their extensions:
<file_type> <extension_def>
<extension_2>
Description
AL .ad Extension for the A.LOAD and A.SAVE commands.
ALTERA .rbf Extension for FPGA images in Raw Binary Format
used by the JTAG.PROGRAM.Altera command.
ASM .asm Extension for the Data.PROGRAM and Data.AssWin
command.
BAK .bak Extension for all backup files. (See also command
SETUP.BAKfile)
BSDL .bsdl Extension for boundary scan description files.
COV .acd Extension for the coverage database.
CSV .csv Extension for CSV formatted files.
DIALOG .dlg Extension for dialog description files.
ELF .elf
.axf
Extension for executable and linking format files.
LOG .log Extension for log-files crated e.g. via LOG.OPEN,
LOG.DO, HISTory.SAVE, or SYStem.LOG.OPEN.
LUA .lua Extension for LUA scripts used by command
LUA.LOAD
MENU .men Extension for TRACE32 menu description files used by
MENU.Program.
ORTI .orti
.ort
Extension for the OSEK run-time interface used by
TASK.ORTI.
OS () Extension for TYPE and EDIT commands.
PER .per Extension for all PER commands.
PERF.Data .perf Extension for Performance Analyzer Results used by
the command PERF.SAVE and PERF.LOAD
commands.
PERF.program .ps Extension for Performance Analyzer Programs used by
the commands PERF.Program and
PERF.ReProgram.
PRACTICE .cmm Extension for the DO, RUN and PEDIT commands.
PRACTICE.
ENCRYPTion
.cmmx
.cmm
Extension for the DODECRYPT command.
PRT .lst Extension for the PRinTer.OPEN and PRinTer.FILE
commands.
STOre .cmm Extension for the STOre and AutoSTOre command.

PowerView Command Reference | 297
©
1989-2024 Lauterbach
See also
■ SETUP.FILETYPE
TAPROG .tap Extension for the Probe.Program or
Probe.ReProgram and Integrator.Program or
Integrator.ReProgram commands.
TEXT .txt Extension for plain text files.
XHTML .html
.htm
Extension for files formatted in the extensible hypertext
markup language.
<file_type> <extension_def>
<extension_2>
Description

PowerView Command Reference | 298
©
1989-2024 Lauterbach
SETUP.HOLDDIR Configure working directory
Default: OFF.
When switched to OFF, the working directory of the TRACE32 system can change, if an operating system
command will be executed. Otherwise the working directory can be changed by the command ChDir only.
See also
■ SETUP
▲ ’System Setup and Configuration’ in ’PowerView User’s Guide’
SETUP.ICONS Display icons in popup menus
Default: ON.
SETUP.ICONS without argument toggles the icons in the popup menus.
See also
■ SETUP ■ SOFTKEYS ■ STATUSBAR ■ SUBTITLE
■ TITLE ■ TOOLBAR
▲ ’System Setup and Configuration’ in ’PowerView User’s Guide’
Format: SETUP.HOLDDIR [ON | OFF]
Format: SETUP.ICONS [ON | OFF]
ON Displays the icons in the popup menus (also referred to as context menus).
OFF Switches the icons off.

PowerView Command Reference | 299
©
1989-2024 Lauterbach
SETUP.InterComACKTIMEOUT Sets the InterCom acknowledge timeout
Using this command, you can increase the default InterCom acknowledge timeout from 500 milliseconds to
a maximum of 5 seconds.
Example:
See also
■ SETUP ■ InterCom
Format: SETUP.InterComACKTIMEOUT <time> | <value>
<time> You can specify the time in milliseconds or in seconds.
The minimum is 500.ms
The maximum is 5.s
<value> Without time specification (i.e. without .ms or .s), the value is interpreted
to mean milliseconds.
SETUP.InterComACKTIMEOUT 5.s ; Increase timeout to maximum

PowerView Command Reference | 300
©
1989-2024 Lauterbach
SETUP.PDEBUG PRACTICE debug configuration settings dialog
[build 142827 - DVD 09/2022]
Opens the PRACTICE debug configuration dialog to configure the script parameters and several
preconditions a script is started with. The debug configuration settings will only be in effect while a script is
started directly out of the PRACTICE editor PEDIT by using the debug toolbar button.
.
See also
■ SETUP
Format: SETUP.PDEBUG
SETUP.PDEBUG.state (as an alias)
A Enter the parameters a script is started with.
Enter the parameters the same way as the script would be started with a DO command. Press
ENTER to finish the input or press the Ok button to finish input and instantly close the dialog.
Alternatively set the parameters with the command SETUP.PDEBUG.ScriptParams.
B Show a dropdown list of previously used script parameters.
All entered parameters are recorded in a history list which is reloaded at program start and stored
at program termination (see HISTory.Set)
C Use the clear button to delete the script parameters input field
D Set debug options.
Terminate all pending PRACTICE scripts. Explained in SETUP.PDEBUG.TermScripts
Reset global macros after terminating scripts. Explained in SETUP.PDEBUG.MacroRESet
Block window positioning commands. Explained in SETUP.PDEBUG.BlockPosition
Block window closing commands. Explained in SETUP.PDEBUG.BlockClose
E Set debug window options.
Open debug window as external window as explained in SETUP.PDEBUG.WindowExternal
Keep debug window on top as explained in SETUP.PDEBUG.WindowOnTop
F Use the Reset button to reset all settings to default.
The script parameters are cleared and all settings are reverted to their default values working for
most usecases. Alternatively reset all settings with the command SETUP.PDEBUG.RESet
A
B
C
D
E
F

PowerView Command Reference | 301
©
1989-2024 Lauterbach
SETUP.PDEBUG.BlockClose Block window closing commands
[build 142827 - DVD 09/2022]
When debugging a script from within the PRACTICE editor, this command allows to toggle how the
execution mode of all window closing commands of a debugged PRACTICE script is handled.
The default state is OFF. If set to ON, the WinPAGE.RESet and WinCLEAR window close commands are
ignored in a debugged script.
SETUP.PDEBUG.BlockPosition Block window positioning commands
[build 142827 - DVD 09/2022]
When debugging a script from within the PRACTICE editor, this command allows to toggle how the
execution mode of positioning commands of a debugged PRACTICE script is handled.
The default state is OFF. If set to ON, the FramePOS, CmdPOS and WinPOS window positioning
commands are ignored in a debugged script.
SETUP.PDEBUG.MacroRESet Reset PRACTICE macros after ending script
[build 142827 - DVD 09/2022]
When debugging a script from within the PRACTICE editor, this command allows to toggle how the cleanup
of all PRACTICE macros and global handlers is handled.
The default state is OFF. If set to ON, all global macros and global handlers are cleaned up after the stack is
flushed and before the script starts.
This has the same effect as executing the PMACRO.RESet command on an empty PRACTICE stack.
Format: SETUP.PDEBUG.BlockClose [ON | OFF]
Format: SETUP.PDEBUG.BlockPosition [ON | OFF]
Format: SETUP.PDEBUG.MacroRESet [ON | OFF]
NOTE: The setting only takes effect if SETUP.PDEBUG.TermScripts is enabled (ON).
This is because global macros and handlers are only properly cleared when the
PRACTICE stack is empty.

PowerView Command Reference | 302
©
1989-2024 Lauterbach
SETUP.PDEBUG.RESet Reset settings to default values
[build 142827 - DVD 09/2022]
This command resets all parameters modified by SETUP.PDEBUG to their default values, which will work
for most use cases.
SETUP.PDEBUG.ScriptParams Set PRACTICE debug script parameters
[build 142827 - DVD 09/2022]
This command sets the script parameters for a PRACTICE script when it is started from the PRACTICE
editor via the Debug or the Do button.
The default parameter list is empty. Set the parameter list as if the script is started with the DO command.
Clear the parameter list by running the command with an empty parameter list.
SETUP.PDEBUG.TermScripts Terminate all pending PRACTICE scripts
[build 142827 - DVD 09/2022]
When debugging a script from within the PRACTICE editor, this command allows to toggle how the cleanup
of the PRACTICE stack is handled.
The default state is ON. If set to ON, the complete PRACTICE stack will be cleaned up before the script is
started. Global defined macros will be kept.
This has the same effect as executing the END command.
Format: SETUP.PDEBUG.RESet
Format: SETUP.PDEBUG.ScriptParams [<parameter_list>]
NOTE: Any input issued to the command is stored in a history list that is displayed in
the script parameter drop-down list of the SETUP.PDEBUG.state dialog box.
The script parameters are stored at program termination and loaded at program
start if the command "AutoSTOre , HISTory" is placed in the autostart.cmm
script file.
Format: SETUP.PDEBUG.TermScripts [ON | OFF]

PowerView Command Reference | 303
©
1989-2024 Lauterbach
SETUP.PDEBUG.WindowExternal Open debug window as external window
[build 142827 - DVD 09/2022]
When debugging a script within the PRACTICE editor, use this command to toggle how the PLIST debug
window is opened
The default state is ON. If set to ON, the editor opens the PLIST debugging window with the prefix
commands WinResist and WinExt.
If set to OFF, the PLIST window will be opened depending on the currently used graphical user interface
window mode (“Graphical User Interface - Window Modes” in PowerView User’s Guide, page 12
(ide_user.pdf)).
SETUP.PDEBUG.WindowOnTop Keep debug window on top
[build 142827 - DVD 09/2022]
When debugging a script within the PRACTICE editor, this command allows to toggle how the order of
overlapping windows (z-order) is handled by the MDI user interface.
The default state is OFF. When set to ON and the debug window is opened, the PLIST debug window is kept
on top of all other MDI windows.
Format: SETUP.PDEBUG.WindowExternal [ON | OFF]
Format: SETUP.PDEBUG.WindowOnTop [ON | OFF]
NOTE: The command is only effective if TRACE32 runs on the MS Windows operating
system.
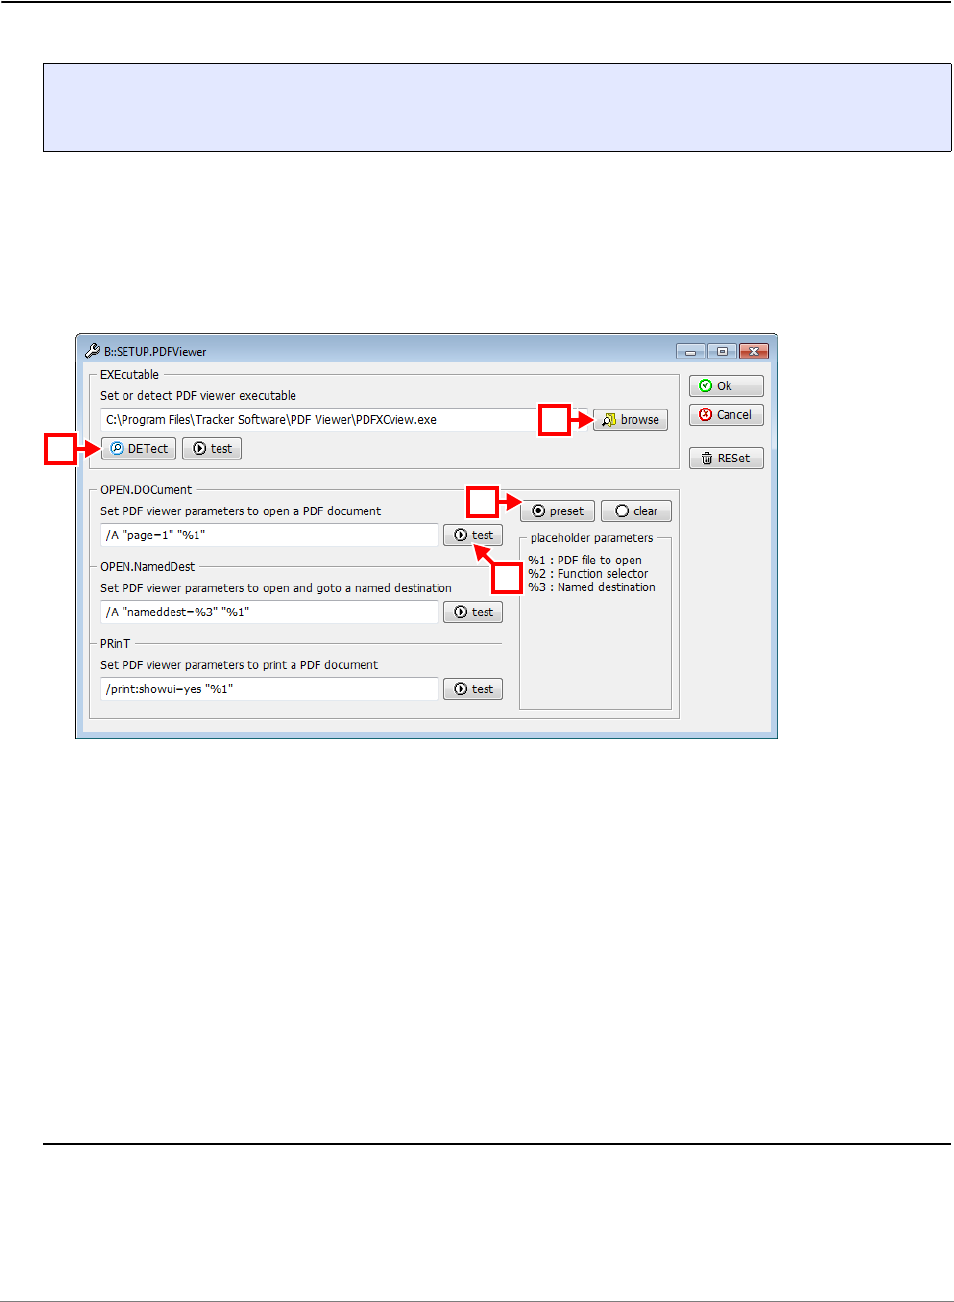
PowerView Command Reference | 304
©
1989-2024 Lauterbach
SETUP.PDFViewer Context-sensitive help via your favorite PDF viewer
[build 68795 - DVD 02/2016] [Step-by-Step Procedure] [Recommendations]
Opens the SETUP.PDFViewer dialog window, where you can configure TRACE32 to context-sensitively
display the *.pdf files of the help system in your favorite PDF viewer.
Configuration takes only a few mouse-clicks. In addition, you do not need to re-start TRACE32 because
your settings take immediate effect. Your settings are stored in the TRACE32 user preferences and re-read
on the next start-up of TRACE32.
TRACE32 provides pre-configured parameters for well-known PDF viewers on Windows and Linux in order
to reduce the configuration effort for users to a few mouse-clicks.
See also
■ SETUP.PDFViewer.EXEcutable ■ SETUP.PDFViewer.OPEN
■ SETUP.PDFViewer.PRinT ■ SETUP.PDFViewer.RESet
■ SETUP.PDFViewer.TEMPorary ■ SETUP
■ HELP
▲ ’Release Information’ in ’Legacy Release History’
Format: SETUP.PDFViewer
SETUP.PDFViewer.state (as an alias)
A Click the DETect button to detect your default PDF viewer.
The remaining input boxes are automatically populated with the command line parameters for the
selected PDF viewer. (The command line parameters are pre-configured in TRACE32.)
B Alternatively, click browse to browse for the PDF viewer you want use. Then click the preset button.
The remaining input boxes are automatically populated with the command line parameters for the
selected PDF viewer. (The command line parameters are pre-configured in TRACE32.)
C The test buttons allow you to immediately test the configuration suggested by the SETUP.PDFViewer
dialog window.
A
C
B
B

PowerView Command Reference | 305
©
1989-2024 Lauterbach
SETUP.PDFViewer.EXEcutable Path and executable of your PDF viewer
Sets up the PDF executable which is called to open the PDF files of the TRACE32 help system.
This command is only used for scripting and corresponds to the EXEcutable input box in the
SETUP.PDFViewer dialog window.
See also
■ SETUP.PDFViewer
SETUP.PDFViewer.OPEN Open a PDF of the help system
F
See also
■ SETUP.PDFViewer
Format: SETUP.PDFViewer.EXEcutable <executable>
Format: SETUP.PDFViewer.OPEN.<sub_cmd>
<sub_cmd>: DOCument | NamedDest
DOCument Set up the command line parameters for the executable to open a PDF on
the first page.
This command is only used for scripting and corresponds to the
OPEN.DOCument input box in the SETUP.PDFViewer dialog window.
NamedDest Set up the command line parameters for the executalbe to open a PDF at a
named destination.
This command is only used for scripting and corresponds to the
OPEN.NamedDest input box in the SETUP.PDFViewer dialog window.
This location is used for testing the NamedDest configuration.
If your PDF-Viewer opens up here, your configuration is correct.

PowerView Command Reference | 306
©
1989-2024 Lauterbach
SETUP.PDFViewer.PRinT Print PDF via HELP window
Sets up the command line parameters for the executable to open a PDF file and start printing it.
This command is only used for scripting and corresponds to the PRinT input box in the SETUP.PDFViewer
dialog window.
See also
■ SETUP.PDFViewer
SETUP.PDFViewer.RESet Reset the settings in SETUP.PDFViewer dialog
Resets the settings in the SETUP.PDFViewer dialog window. However, the settings continue to remain
active for the current TRACE32 session. As soon as the TRACE32 session is closed, the settings are also
cleaned from the TRACE32 user preferences.
This command is only used for scripting and corresponds to the RESet button in the SETUP.PDFViewer
dialog window.
See also
■ SETUP.PDFViewer
Format: SETUP.PDFViewer.PRinT
Format: SETUP.PDFViewer.RESet
NOTE: As long as no PDF viewer is configured for the TRACE32 help system,
TRACE32 tries to access the PDF files through one of the two methods from
the previous releases. See “Previous TRACE32 Releases” in PowerView
User’s Guide, page 89 (ide_user.pdf).

PowerView Command Reference | 307
©
1989-2024 Lauterbach
SETUP.PDFViewer.TEMPorary Help configuration for demo purposes
The SETUP.PDFViewer.TEMPorary command group is only used for internal and support purposes.
See also
■ SETUP.PDFViewer.TEMPorary.EXEcutable ■ SETUP.PDFViewer.TEMPorary.OPEN
■ SETUP.PDFViewer.TEMPorary.PRinT ■ SETUP.PDFViewer.TEMPorary.RESet
■ SETUP.PDFViewer
SETUP.PDFViewer.TEMPorary.EXEcutable PDF viewer for demo purposes
Same meaning as SETUP.PDFViewer.EXEcutable but nothing is stored in the user preferences.
See also
■ SETUP.PDFViewer.TEMPorary
SETUP.PDFViewer.TEMPorary.OPEN Open a PDF of the help system
F
See also
■ SETUP.PDFViewer.TEMPorary
Format: SETUP.PDFViewer.TEMPorary.EXEcutable
Format: SETUP.PDFViewer.TEMPorary.OPEN.<sub_cmd>
<sub_cmd>: DOCument | NamedDest
DOCument Open PDF on the first page; same meaning as
SETUP.PDFViewer.OPEN.DOCument but nothing is stored in the user
preferences.
NamedDest Jump to named destination in PDF; same meaning as
SETUP.PDFViewer.OPEN.NamedDest but nothing is stored in the user
preferences.

PowerView Command Reference | 308
©
1989-2024 Lauterbach
SETUP.PDFViewer.TEMPorary.PRinT Print PDF via HELP window
Same meaning as SETUP.PDFViewer.PRinT but nothing is stored in the user preferences.
See also
■ SETUP.PDFViewer.TEMPorary
SETUP.PDFViewer.TEMPorary.RESet Reset demo-help configuration
Same meaning as SETUP.PDFViewer.RESet but nothing is stored in the user preferences.
See also
■ SETUP.PDFViewer.TEMPorary
SETUP.PYthon.EXEcutable Defines path to python interpreter
Defines name of Python interpreter executable, which will be used by PYthon command group. The
existence of executable and version of Python is not verified immediately on setting but on the next
PYthon.RUN call. TRACE32 requires Python version 3.6 or higher. If you want to use the default setting
(which is platform dependent - python.exe for Windows based OS and python for other OS), use an
empty string instead of the filepath.
Examples:
Format: SETUP.PDFViewer.TEMPorary.PRinT
Format: SETUP.PDFViewer.TEMPorary.RESet
Format: SETUP.PYthon.EXEcutable <filepath>
SETUP.PYthon.EXEcutable "/usr/bin/python"
SETUP.PYthon.EXEcutable "c:/p/bin/python.exe"
SETUP.PYthon.EXEcutable "python.exe"
SETUP.PYthon.EXEcutable ""

PowerView Command Reference | 309
©
1989-2024 Lauterbach
SETUP.QUITDO Define quit PRACTICE script file
Registers a PRACTICE script <file> (*.cmm) that is called when leaving the TRACE32 system.
The SETUP.QUITDO command is typically included in a start-up script.
Example: When you start TRACE32, the start-up script start.cmm calls the windows.cmm to restore the
window positions of the previous session and registers the close.cmm. When you close TRACE32, the
close.cmm automatically stores the window positions in the windows.cmm for re-use in the next session.
See also
■ SETUP ■ SETUP.RESOLVEDIR ■ STOre ■ QUIT
■ STOre
▲ ’System Setup and Configuration’ in ’PowerView User’s Guide’
Format: SETUP.QUITDO [<file>]
<file> Full path to the PRACTICE script to be executed when TRACE32 is closed.
The directory search paths defined with PATH.Set aren’t considered.
The script must end with a QUIT command to really quit the TRACE32
system. The <file> can be used to automatically save session settings.
NOTE: We recommend to execute the command DO ~~/windows.cmm only after the
start-up procedure in your start-up script has run to completion. For example,
load the ELF file before opening windows that refer to symbols.
;(a) start.cmm
;<your_start_up_procedure>
DO ~~/windows.cmm ;restore the window positions of the previous session
;instruct TRACE32 to automatically execute the script "close.cmm" when
;you close TRACE32, see (b) close.cmm below
SETUP.QUITDO ~~/close.cmm
ENDDO
;(b) close.cmm
DIALOG.YESNO "Save the window positions for the next session?"
LOCAL &answer
ENTRY &answer
IF &answer==TRUE()
STOre ~~/windows.cmm Win ;save the window positions in a file
;residing in the TRACE32 system directory
QUIT

PowerView Command Reference | 310
©
1989-2024 Lauterbach
SETUP.RADIX Radix mode
The radix mode (number base) is specified by this option. Numbers without type prefix like “0X” or “0Y”
respectively postfix “.” are interpreted in the selected number base.
The preferred location for a different radix mode (not the default hex mode) is the user’s own start-up script.
Example: By entering SETUP.RADIX. at the command line without executing the command, you can
display the currently used RADIX mode in the TRACE32 message line.
See also
■ SETUP ❏ RADIX()
Format: SETUP.RADIX.<mode>
RADIX.<mode> (deprecated)
<mode>: Decimal
Hex
Decimal Number base is decimal.
Hex (default) Number base is hex - default.
SETUP.RADIX.

PowerView Command Reference | 311
©
1989-2024 Lauterbach
SETUP.RANDOM Set seed for RANDOM() function
Sets a seed value for the internal pseudo random number generator. <seed> is an unsigned 64-bit number.
If <seed> is skipped, the current system timer is used to define an arbitrary seed number. The seed value
affects the pseudo random number sequence delivered by the PRACTICE functions RANDOM() and
RANDOM.RANGE(). Note that some other TRACE32 functions which need random values are also
affected by this seed value.
See also
■ SETUP ❏ RANDOM() ❏ RANDOM.RANGE()
SETUP.ReDraw Update whole screen
Usually only some parts of the screen are updated. This command can be used for updating, whenever a
background program has overwritten the screen (e.g. messages from network drivers).
See also
■ SETUP
▲ ’System Setup and Configuration’ in ’PowerView User’s Guide’
Format: SETUP.RANDOM [<seed>]
Format: SETUP.ReDraw

PowerView Command Reference | 312
©
1989-2024 Lauterbach
SETUP.RESOLVEDIR Resolve symbolic links
Default: OFF.
See also
■ SETUP ■ SETUP.QUITDO
SETUP.SOUND Set sound generator mode
See also
■ SETUP ■ BEEP
▲ ’System Setup and Configuration’ in ’PowerView User’s Guide’
SETUP.STOPMESSAGE Print message when STOP command is executed
Default: OFF.
Format: SETUP.RESOLVEDIR [ON | OFF]
OFF Symbolic links are not resolved when cahnging the current working
directory with ChDir.
ON Symbolic links are resolved when cahnging the current working directory
with ChDir.
Format: SETUP.SOUND [ON | ERROR | OFF]
OFF Sound generator switched off.
ERROR Sound generator active for input errors and program execution errors.
ON Sound generator is active too when mouse is used (click sound).
Format: SETUP.STOPMESSAGE [ON | OFF]


PowerView Command Reference | 314
©
1989-2024 Lauterbach
SETUP.STOre Configure output of the STOre commands
Configures the output of the commands STOre, ClipSTOre, and AutoSTOre, which list the current
TRACE32 settings in the format of a PRACTICE script (*.cmm).
Example:
See also
■ SETUP ■ STOre ■ AutoSTOre ■ ClipSTOre
■ AutoSTOre ■ ClipSTOre ■ STOre
Format: SETUP.STOre.<sub_cmd>
<sub_cmd>: INDENTation TAB | <spaces>
SYMBOLIC [ON | OFF]
RESet
INDENTation
Default: 1 space.
Sets the type of indentation inside the generated output: One tab or
number of <spaces>.
SYMBOLIC
Default: ON.
Saves breakpoints, markers, and groups as addresses or as symbol
names.
• ON: Stores the symbol name, but not the address of the symbol.
• OFF: Stores the address, but not the symbol name.
RESet Resets the user-defined settings to the TRACE32 default settings.
Break.Set func2 ;for demo purposes, let’s set a breakpoint
;on the symbol func2
SETUP.STOre.INDENTation 4. ;let’s indent with 4 spaces
SETUP.STOre.SYMBOLIC OFF ;OFF: store only the address of the symbol
;ON: store only the symbol name
STOre ~~~\my-store.cmm Break Analyzer
PEDIT ~~~\my-store.cmm
A Indentation: 4 spaces
B Only the address, here R:0x1064 of func2, is stored (SYMBOLIC OFF).
B
A

PowerView Command Reference | 315
©
1989-2024 Lauterbach
SETUP.TabSize Configure tab width
Selects the number of spaces generated by a TAB character. The default is 8. Useful in conjunction with
source level debuggers, if the TAB count defines the block nesting level and the TAB expansion value is not
8 (like on DOS).
See also
■ SETUP ■ SETUP.EDITOR.IndentSize
▲ ’System Setup and Configuration’ in ’PowerView User’s Guide’
Format: SETUP.TabSize [<width>]
tabsize = 2
tabsize = 8

PowerView Command Reference | 316
©
1989-2024 Lauterbach
SETUP.TIMEFORM Select scientific time format
Time values are displayed by TRACE32 in an easily readable format. If this option is activated, time values
are displayed in an scientific floating point format. This format is easier to process by external tools.
See also
■ SETUP
▲ ’System Setup and Configuration’ in ’PowerView User’s Guide’
Format: SETUP.TIMEFORM [ON | OFF]
default (OFF) scientific (ON)
12.345us 12.34e-6
12.345ms 12.34e-3
12.345s 12.345
12.345ks 12.345e3

PowerView Command Reference | 317
©
1989-2024 Lauterbach
SETUP.UpdateRATE Update rate for windows
Format 1 applies to PowerDebug modules: The information of the visible windows is updated 10 times/s
by default. This update is done for all windows if the program execution is stopped or for all windows with
run-time/dualport access while the CPU is executing the program.
The defined update rate is not guaranteed:
• The update rate is lower e.g. if the host system is busy.
• Immediate updates are done when the mouse is moved.
See also
■ SETUP ■ SYStem.POLLING
▲ ’System Setup and Configuration’ in ’PowerView User’s Guide’
SETUP.WARNSTOP Configure PRACTICE stops
If enabled, PRACTICE scripts (*.cmm) will stop on warnings. Otherwise only errors stop PRACTICE scripts,
warnings don’t stop.
See also
■ SETUP
▲ ’System Setup and Configuration’ in ’PowerView User’s Guide’
Format 1: SETUP.UpdateRATE <time> | <value>
SETUP.UpdateRATE 500.ms ; update the window information all 500 ms
SETUP.UpdateRATE 3. ; update the window information 3 times/s
Format: SETUP.WARNSTOP [ON | OFF]

PowerView Command Reference | 318
©
1989-2024 Lauterbach
SETUP.XSLTSTYLESHEET Reference to XSLT stylesheet for XML files
Use this command if you want to configure which of your XSLT stylesheets is used for the transformation of
XML files in a web browser after they have been exported by TRACE32.
Examples of TRACE32 commands that create XML export files are the commands of the List.EXPORT and
COVerage.EXPORT command group or the PRinTer command group.
Without parameter: Resets the XSLT stylesheet to the default (t32transform.xsl).
With parameter: Inserts the tag <?xml-stylesheet ...href="..."?> in the XML file during file
export from TRACE32 and sets the attribute href="..." to the specified <xsl_file>.
• The command does not check if the <xsl_file> is a valid URL or not.
• To reference an absolute path to a stylesheet, the path must be in URL syntax; for example, if the
path of the XSLT stylesheet is c:\users\john\foo.xsl, you have to write:
• If path and file name contain spaces, replace each space with %23. Example: \john doe\
must be specified as \john%23doe\
Example: For an example, please see PRinTer.FILE. In contrast to the other XML export commands,
PRinTer.FILE will only emit the tag <?xml-stylesheet ...href="..."?> if a stylesheet was
explicitly specified with SETUP.XSLTSTYLESHEET.
See also
■ SETUP ■ PRinTer.FILE ■ COVerage.EXPORT
Format: SETUP.XSLTSTYLESHEET ["<xsl_file>"]
NOTE: The *.xsl file itself is not created by TRACE32.
The SETUP.XSLTSTYLESHEET command only creates a reference to your
XSLT stylesheet.
SETUP.XSLTSTYLESHEET "file:///c:/users/john/foo.xsl"

PowerView Command Reference | 319
©
1989-2024 Lauterbach
SHA1SUM
SHA1SUM Calculate SHA1 checksum of a file
Calculates a 160-bit checksum for the given files using the Secure Hash Algorithm (SHA-1). The result is
displayed in the AREA window. Use the pre-command SILENT to suppress the output to the AREA window.
The result is also available via the PRACTICE function FILE.SUM().
See also
❏ FILE.SUM()
▲ ’Release Information’ in ’Legacy Release History’
Format: SHA1SUM <file> [/<options>]
<option>: EolToLf
<file> Name of the file for which a checksum is calculated.
EolToLf For calculating the checksum, this option treats the pair of bytes 0x0D
and 0x0A (Carriage Return + Line Feed) as a single 0x0A (Line Feed).

PowerView Command Reference | 320
©
1989-2024 Lauterbach
SILENT
SILENT Suppress informational messages in AREA window
Pre-command for suppressing informational messages in the default AREA window A000. The SILENT
pre-command has no effect on error and warning messages. These messages are always printed to the
default AREA window A000.
Example: For demo purposes, the same two commands are executed with and without the SILENT pre-
command. The result is shown in the AREA window below.
See also
■ AREA
Format: SILENT.<command>
<command> Examples of commands where the SILENT pre-command suppresses
informational messages in the default AREA window A000:
• Data.Find, Trace.Find, and FIND
• Data.LOAD.*, PWD, ChDir
• TargetSystem.NewInstance
• SYStem.Option commands that are manually toggled at the
TRACE32 command line by omitting the keywords ON / OFF, e.g.
SYStem.Option.MMUSPACES
AREA.view A000
PRINT %COLOR.RED "With the pre-command SILENT:"
SILENT.Data.LOAD.Elf "~~/demo/arm/compiler/gnu/sieve.elf" /RelPATH
SILENT.Data.Find D:0x0--0xFFFF 0xE9 /RelPATH
PRINT "" ;print an empty line
PRINT %COLOR.BLUE "Without SILENT, informational messages are printed:"
Data.LOAD.Elf "~~/demo/arm/compiler/gnu/sieve.elf" /RelPATH
Data.Find D:0x0--0xFFFF 0xE9

PowerView Command Reference | 321
©
1989-2024 Lauterbach
SOFTKEYS
SOFTKEYS Toggle the buttons on the softkey bar
The SOFTKEYS command without argument toggles the buttons on the softkey bar.
See also
■ SETUP.ICONS ■ STATUSBAR ■ SUBTITLE ■ TITLE
■ TOOLBAR
Format: SOFTKEYS [ON | OFF]
ON Activates the buttons on the softkey bar.
OFF Deactivates the buttons on the softkey bar.

PowerView Command Reference | 322
©
1989-2024 Lauterbach
STATUSBAR
STATUSBAR Toggle state line
The STATUSBAR command without argument toggles the TRACE32 state line.
See also
■ SETUP.ICONS ■ SOFTKEYS ■ SUBTITLE ■ TITLE
■ TOOLBAR
Format: STATUSBAR [ON | OFF]
ON Displays the state line.
OFF Hides the state line.

PowerView Command Reference | 323
©
1989-2024 Lauterbach
STOre
STOre Store settings as PRACTICE script
Stores the settings in the format of a PRACTICE script (*.cmm). They can be executed by using the DO
command. The command is available also in other systems, like analyzers, with more system specific
options.
See also
■ SETUP.QUITDO ■ SETUP.STOre ■ AutoSTOre ■ ClipSTOre
■ DO
▲ ’Window System’ in ’PowerView User’s Guide’
▲ ’Release Information’ in ’Legacy Release History’
▲ ’Breakpoint Handling’ in ’Training Basic Debugging’
▲ ’Breakpoint Handling’ in ’Training Basic SMP Debugging’
Format: STOre <file> [[%<format>]<item> …] [/<option>]
<format>: sYmbol | NosYmbol
<item>: ALL | HISTory | Win | WinPAGE | …
<device_specific_settings>
<option>: NoDate
<format>, <option> For a detailed description of <format> and <option>, refer to the STOre
command in general_ref_s.pdf.
HELP Store help settings and bookmarks.
HISTory Store command history to file.
PBREAK Store the breakpoints created for PRACTICE scripts (*.cmm).
Win Store entire window configuration (all pages).
WinPAGE Store current window page.
… All other keywords refer to the commands of the same name.
PowerView Command Reference | 324
©
1989-2024 Lauterbach
SUBTITLE
SUBTITLE Define a window subtitle for AMP debugging
Allows to automatically add text to the header of each window. This takes effect only for the windows opened
after the subtitle definition. A SUBTITLE command without any parameter will delete a previous setting.
The most common field of application is in AMP (asymmetric multiprocessing) debugging. The SUBTITLE
command helps you to easily distinguish between different TRACE32 PowerView GUIs of a multicore target.
Example: Let’s assume you want to append the flag ; main cluster to the TRACE32 main window and
all other windows of the first TRACE32 PowerView GUI. To accomplish this, include these two lines in your
PRACTICE start-up script (*.cmm) for the first TRACE32 PowerView instance:
To flag the main window and all other windows of the second TRACE32 PowerView GUI with
; secondary cluster, include these two lines in your PRACTICE start-up (*.cmm) for the second
TRACE32 PowerView instance:
Format: SUBTITLE [[%<formats>] <your_text>]…
<format>: Ascii
Binary
Decimal
Hex
String
;maincluster.cmm
;... your code
TITLE "TRACE32 PowerView ; main cluster"
SUBTITLE %String " ; main cluster"
;... your code
;secondarycluster.cmm
;... your code
TITLE "TRACE32 PowerView ; secondary cluster"
SUBTITLE %String " ; secondary cluster"
;... your code

PowerView Command Reference | 325
©
1989-2024 Lauterbach
See also
■ SETUP.ICONS ■ SOFTKEYS ■ STATUSBAR ■ InterCom.ENable
■ InterCom.NAME ■ TITLE ■ TOOLBAR
▲ ’Release Information’ in ’Legacy Release History’
A First TRACE32 PowerView instance
B Second TRACE32 PowerView instance
C In this example, the two TRACE32 PowerView instances were started in the FDI window mode. For
this mode you need the following setting in the configuration file (config.t32):
SCREEN=
FDI
Alternatively, you can select the FDI window mode from the WindowMode drop-down list in the
T32Start application; see “Default Advanced Settings” in T32Start, page 13 (app_t32start.pdf).
B
A
C
PowerView Command Reference | 326
©
1989-2024 Lauterbach
TAR
TAR Pack files into an archive
Packs the selected files without compression into a tape archive formatted archive. The files are selected
from the directory path given by the <file_selector>.
By default, the given directory from the <file_selector> and all its subdirectories are scanned recursively
down. All selected files from this directory tree are then stored into the archive.
Example 1:
Example 2:
Format: TAR <archive_name> <file_selector> [/<options>]
<option>: NoRecursion
ListOnly
<archive_name> File name of the archive to be created.
<file_selector> The file selector may contain a directory and a file name with wildcard
characters to select appropriate files.
NoRecursion Switch off subdirectory tree scanning. Store only files from the given
directory of the <file_selector>.
ListOnly The files are not packed into an archive but just listed in the default AREA
window A000.
The size of an AREA window is by default limited to about 100 lines.
However, you can increase the number of lines with the AREA.Create
command.
;store all PRACTICE script files (*.cmm) from the TRACE32 demo
;directory and all its subdirectories. The archive "scripts.tar" is
;created within the home directory of the user.
TAR ~/scripts.tar ~~/demo/*.cmm
;list all *.c files from the TRACE32 demo directory and all its
;subdirectories in the default AREA.view window
TAR ~/archive.tar ~~/demo/*.c /ListOnly
;display the file listing
AREA.view

PowerView Command Reference | 327
©
1989-2024 Lauterbach
Example 3:
The host command is printed in blue.
;to compress the *.tar archive to a zipped tape archive file (.tar.gz),
;use the ZIP command afterwards
TAR ~/arm.tar ~~/demo/arm/*.cmm
ZIP ~/arm.tar ~/arm.tar.gz
;optional: start Windows Explorer and select the file
OS.Command start explorer.exe /select, %USERPROFILE%\arm.tar.gz

PowerView Command Reference | 328
©
1989-2024 Lauterbach
TIMEOUT
TIMEOUT Specify timeout for TRACE32 command
Terminates a <command> after the specified <period> has elapsed. The TIMEOUT command has same
effect as clicking the STOP button on the TRACE32 main toolbar after a defined time.
Example:
See also
■ SCREEN.WAIT ■ WAIT ❏ TIMEOUT()
Format: TIMEOUT <period> <command>
<period> Parameter Type: Time value.
;your start-up script
TIMEOUT 500.ms Data.COPY D:0--0x3ffffff VM:0 /Byte /Verify
IF TIMEOUT()==TRUE()
(
PRINT %WARNING "'Data.COPY D:0--0x3ffffff VM:0' canceled after 500.ms"
)

PowerView Command Reference | 329
©
1989-2024 Lauterbach
TITLE
TITLE Define a main window title for a TRACE32 PowerView GUI
The command defines the header of the TRACE32 main window. Running the TITLE command without any
parameter will delete the previous setting - the header will be empty.
The most common field of application is to distinguish between different TRACE32 PowerView GUIs of a
multicore or multi -CPU target.
Example:
See also
■ TOOLBAR ■ InterCom.ENable ■ InterCom.NAME ■ SETUP.ICONS
■ SOFTKEYS ■ STATUSBAR ■ SUBTITLE ❏ TITLE()
Format: TITLE [[%<formats>] "<your_text>"]…
<format>: Ascii
Binary
Decimal
Hex
String
TITLE %String "TRACE32 Debugger for CPU0"
TITLE %String "TRACE32 for MPC5676R"

PowerView Command Reference | 330
©
1989-2024 Lauterbach
TOOLBAR
TOOLBAR Toggle toolbar
The TOOLBAR command without argument toggles the TRACE32 main toolbar.
See also
■ TITLE ■ SETUP.ICONS ■ SOFTKEYS ■ STATUSBAR
■ SUBTITLE
▲ ’PowerView - Screen Display’ in ’PowerView User’s Guide’
Format: TOOLBAR [ON | OFF]
ON Displays the toolbar.
OFF Hides the toolbar.

PowerView Command Reference | 331
©
1989-2024 Lauterbach
TYPE
TYPE Display text file
The file will be opened only, if the generated window is active. When exiting from the window, it will be frozen
automatically. In the tracking mode the file is always open.
Example:
See also
■ ComPare ■ DUMP ■ EDIT.file ■ FIND
■ PATC H ❏ TRACK.COLUMN() ❏ TRACK.LINE()
▲ ’File and Folder Operations’ in ’PowerView User’s Guide’
Format: TYPE <file> [<line>] [/<options>]
<options>: Track
LineNumbers
;display file and scroll to line 7
;display line numbers
TYPE ~~/demo/arm/compiler/arm/arm.c 7. /LineNumbers
A Scroll to this line number.
B Current selection.
C Right-click for popup menu.
EDIT opens the file in the TRACE32 editor. To configure an external editor, use SETUP.EDITEXT.
D Offset of current selection in decimal and hex as well as in line and column number.
D
C
B
A

PowerView Command Reference | 332
©
1989-2024 Lauterbach
UNARchive
UNARchive Linux and Microsoft libraries
Using the UNARchive commands, you can extract files from Linux libraries (.a) and Microsoft libraries (.lib)
to a directory. UNARchive.Table and UNARchive.Show help to determine the contents of the library and to
check the result of the extract operation.
See also
■ UNARchive.extract ■ UNARchive.Show ■ UNARchive.Table ■ UNPACK
■ UNZIP
▲ ’File and Folder Operations’ in ’PowerView User’s Guide’
▲ ’Release Information’ in ’Legacy Release History’
UNARchive.extract Extract files from Linux library and Microsoft library
Extracts all files of a library into a given directory on disc. If the directory is not given, then the temporary
directory of TRACE32 is used instead.
See also
■ UNARchive
UNARchive.Table displays the files in the
library.
UNARchive.Show displays the result of the
extract operation.
Format: UNARchive.extract <library_name> [<directory>]

PowerView Command Reference | 333
©
1989-2024 Lauterbach
UNARchive.Show Extract files from library and list them in window
Same behavior as the UNARchive command, but additionally lists the names of all extracted files in the
UNARchive.Show window.
See also
■ UNARchive
UNARchive.Table Display table of contents of library
Displays the table of contents of the library in the UNARchive.Table window without extracting the library
files to disc.
See also
■ UNARchive
Format: UNARchive.Show <library_name> [<directory>]
Format: UNARchive.Table <library_name>

PowerView Command Reference | 334
©
1989-2024 Lauterbach
UNPACK
UNPACK Expand files (with LZW algorithm)
The compressed file in expanded back to the original file format. The source must be a file in LZW encoding,
generated by the PAC K command. The source and the destination file names must be different. If only one
argument is supplied, the resulting file will have the same name as the source file.
Example:
See also
■ UNARchive ■ UNZIP ■ PAC K ■ ZIP
▲ ’File and Folder Operations’ in ’PowerView User’s Guide’
Format: UNPACK <source> [<destination>]
PACK mcc.abs mcc.pak
;…
UNPACK mcc.pak mcc.abs
; compress object file
; restore original file

PowerView Command Reference | 335
©
1989-2024 Lauterbach
UNZIP
UNZIP Expand GZIP archive file (with DEFLATE algorithm)
Unzips a file that was compressed to a GZIP archive. The source and the destination file names must be
different. If only one argument is supplied, the resulting file will have the same name as the source file.
Example:
See also
■ UNARchive ■ UNPACK ■ PACK ■ ZIP
▲ ’File and Folder Operations’ in ’PowerView User’s Guide’
Format: UNZIP <source> [<destination>]
UNZIP \t32\man.t32 ; un-pack online manual

PowerView Command Reference | 336
©
1989-2024 Lauterbach
VERSION
VERSION TRACE32 version information
Using the VERSION command group, you can display version information about the TRACE32 hardware
modules and software as well as the TRACE32 environment settings.
See also
■ VERSION.ENVironment ■ VERSION.HARDWARE
■ VERSION.SOFTWARE ■ VERSION.ThirdPartyLicenses
■ VERSION.view ■ LICENSE
▲ ’VERSION Functions’ in ’General Function Reference’
VERSION.ENVironment Display environment settings
Displays the currently used environment settings of the TRACE32 software in the VERSION.ENVironment
window. This includes e.g. the currently started executable, TRACE32 system directory, TRACE32
configuration file, etc.
PRACTICE functions can be used in PRACTICE scripts (*.cmm) to return individual values from the window.
For more information, refer to the
❏ functions() listed below.
See also
■ VERSION ■ VERSION.view
❏ OS.ID() ❏ OS.PresentConfigurationFile()
❏ OS.PresentExecutableDirectory() ❏ OS.PresentExecutableFile()
❏ OS.PresentHELPDirectory() ❏ OS.PresentHomeDirectory()
❏ OS.PresentSystemDirectory() ❏ OS.PresentTemporaryDirectory()
❏ OS.PresentWorkingDirectory() ❏ OS.VERSION()
❏ VERSION.ENVironment()
Format: VERSION.ENVironment

PowerView Command Reference | 337
©
1989-2024 Lauterbach
VERSION.HARDWARE Display hardware versions
Displays the serial numbers and revision information of the TRACE32 hardware modules in the
VERSION.HARDWARE window.
PRACTICE functions can be used in PRACTICE scripts (*.cmm) to return individual values from the window.
For more information, refer to the
❏ functions() listed below.
See also
■ VERSION ■ VERSION.view ❏ CABLE.NAME() ❏ ID.PREPROcessor()
❏ SYStem.USEMASK() ❏ VERSION.SERIAL.CABLE() ❏ VERSION.SERIAL.DEBUG()
▲ ’VERSION Functions’ in ’General Function Reference’
▲ ’Version Management and Licensing’ in ’PowerView User’s Guide’
VERSION.SOFTWARE Display software versions
Displays the versions of the TRACE32 software modules in the VERSION.SOFTWARE window.
PRACTICE functions can be used in PRACTICE scripts (*.cmm) to return individual values from the window.
For more information, refer to the
❏ functions() listed below.
See also
■ VERSION ■ VERSION.view ❏ OS.PresentExecutableFile() ❏ VERSION.BUILD()
❏ VERSION.BUILD.BASE() ❏ VERSION.SOFTWARE()
▲ ’Version Management and Licensing’ in ’PowerView User’s Guide’
▲ ’Appendix - About the TRACE32 Software Version Numbers’ in ’PowerView User’s Guide’
Format: VERSION.HARDWARE
Format: VERSION.SOFTWARE

PowerView Command Reference | 338
©
1989-2024 Lauterbach
VERSION.ThirdPartyLicenses Display third party license information
[build 137205 - DVD 09/2021]
Displays the versions of the TRACE32 3rd party components and their licenses terms in the
VERSION.ThirdPartyLicenses window.
See also
■ VERSION ■ VERSION.view
Format: VERSION.ThirdPartyLicenses

PowerView Command Reference | 339
©
1989-2024 Lauterbach
VERSION.view Display window with version info
Displays the versions of the TRACE32 modules (hardware and software) and TRACE32 hardware serial
numbers in the VERSION.view window.
See also
■ VERSION ■ VERSION.ENVironment
■ VERSION.HARDWARE ■ VERSION.SOFTWARE
■ VERSION.ThirdPartyLicenses
▲ ’Version Management and Licensing’ in ’PowerView User’s Guide’
▲ ’Appendix - About the TRACE32 Software Version Numbers’ in ’PowerView User’s Guide’
Format: VERSION.view

PowerView Command Reference | 340
©
1989-2024 Lauterbach
WELCOME
WELCOME Welcome to TRACE32
The WELCOME command group provides quick access to important manuals and allows you to search for
PRACTICE demo scripts (*.cmm).
We recommend that you familiarize yourself with the WELCOME command group by starting with the
description of the Welcome to TRACE32! dialog, see WELCOME.view.
See also
■ WELCOME.CONFIG ■ WELCOME.SCRIPTS ■ WELCOME.STARTUP ■ WELCOME.view
WELCOME.CONFIG Configure search paths for PRACTICE demo scripts
Using the WELCOME.CONFIG command group, you can add and remove the paths where the
WELCOME.SCRIPTS window searches for PRACTICE demo scripts (*.cmm). In addition you can set a
filter to limit the search to file names that match the filter criterion. The search directories are automatically
re-scanned after you have modified the search paths or the filter. You can abort the re-scan at any time.
We recommend that you use the WELCOME.CONFIG.state window for configuration.
Any changes you have made to the default search directories and the default filter can be reset.
See also
■ WELCOME.CONFIG.ADDDIR ■ WELCOME.CONFIG.FILTER
■ WELCOME.CONFIG.ReMoveDIR ■ WELCOME.CONFIG.RESet
■ WELCOME.CONFIG.state ■ WELCOME
■ WELCOME.view

PowerView Command Reference | 341
©
1989-2024 Lauterbach
WELCOME.CONFIG.ADDDIR Add a new script search path
See also
■ WELCOME.CONFIG
WELCOME.CONFIG.FILTER Set the script search filter
Default: *.cmm
See also
■ WELCOME.CONFIG
WELCOME.CONFIG.ReMoveDIR Remove a script search path
See also
■ WELCOME.CONFIG
WELCOME.CONFIG.RESet Reset the script search configuration
See also
■ WELCOME.CONFIG
Format: WELCOME.CONFIG.ADDDIR <path>
Format: WELCOME.CONFIG.FILTER "<filter>"
Format: WELCOME.CONFIG.ReMoveDIR <path>
Format: WELCOME.CONFIG.RESet

PowerView Command Reference | 342
©
1989-2024 Lauterbach
WELCOME.CONFIG.state Open the welcome config window
Opens the script search configuration window, listing the directories where the WELCOME.SCRIPTS
window searches for PRACTICE demo scripts (*cmm).
When you initially open the window, you will see the search directories that apply to the TRACE32
executable (t32m<architecture>.exe) you have started.
To reset the search directories, run the WELCOME.CONFIG.RESet command.
See also
■ WELCOME.CONFIG
Format: WELCOME.CONFIG.state
WELCOME.CONFIG.ADDDIR
WELCOME.CONFIG.ReMoveDIR
WELCOME.CONFIG.FILTER

PowerView Command Reference | 343
©
1989-2024 Lauterbach
WELCOME.SCRIPTS Open the script search window
[Step-by-Step Procedure]
Displays the Search for scripts window, where you can search and browse for PRACTICE scripts (*.cmm)
in the TRACE32 demo folder. For a step-by-step procedure of how to search for, preview, and execute
PRACTICE demo scripts, see “Demo Scripts in the TRACE32 Demo Folder” in PRACTICE Script
Language User’s Guide, page 24 (practice_user.pdf).
See also
■ WELCOME ■ WELCOME.view
▲ ’Release Information’ in ’Legacy Release History’
WELCOME.STARTUP Open the welcome window if not disabled
Displays the Welcome to TRACE32! window unless it was disabled by the user; see check box in the
Welcome to TRACE32 window (WELCOME.view).
See also
■ WELCOME ■ WELCOME.view
▲ ’Release Information’ in ’Legacy Release History’
Format: WELCOME.SCRIPTS
Format: WELCOME.STARTUP

PowerView Command Reference | 344
©
1989-2024 Lauterbach
WELCOME.view Open the welcome window
Displays the Welcome to TRACE32! window. Using this command, the dialog window pops up even if it
was disabled by the user, see [C].
See also
■ WELCOME ■ WELCOME.CONFIG ■ WELCOME.SCRIPTS ■ WELCOME.STARTUP
▲ ’Release Information’ in ’Legacy Release History’
Format: WELCOME.view
A Explains what to observe before you can start debugging.
B Manuals you should read. The list is dynamic, i.e. it adjusts to the TRACE32 executable
(t32m<architecture>.exe) you are using.
C Activates/deactivates this window. Your setting is stored in the TRACE32 user preferences.
D Opens the HELP window.
E Opens the Search for scripts window (see WELCOME.SCRIPTS command).
C
B
A
D E

PowerView Command Reference | 345
©
1989-2024 Lauterbach
Window
Win Window handling (size, position, font size, etc.)
There are two types of commands in the Win command group:
1. Window commands
Examples of window commands are WinPOS, which determines size, position, and name of the
next window, or WinCLEAR, which closes a named window.
2. Window pre-commands
Examples of window pre-commands are WinLarge.<window>, which increases the font size for a
particular window, and WinFreeze.<window>, which creates a frozen window.
The following examples are for demo purposes only. To try a script, simply copy it to a test.cmm file,
and then step through the script (See “How to...”).
Example 1: The window command WinPOS determines size, position, and name of the next window.
Example 2: Window pre-commands are used to open a window in large font size and a frozen window.
See also
■ WinBack ■ WinCLEAR ■ WinDEFaultSIZE ■ WinDuplicate
■ WinExt ■ WinFIND ■ WinFreeze ■ WinLarge
■ WinMid ■ WinOverlay ■ WinPAGE ■ WinPAGE.Create
■ WinPAGE.Delete ■ WinPAGE.List ■ WinPAGE.REName ■ WinPAGE.RESet
■ WinPAGE.select ■ WinPAN ■ WinPOS ■ WinPrint
■ WinPRT ■ WinResist ■ WinRESIZE ■ WinSmall
■ WinTABS ■ WinTOP ■ WinTrans ❏ WINdow.EXIST()
❏ WINdow.POSition() ❏ WINPAGE.EXIST()
▲ ’WINdow Functions’ in ’PowerView Function Reference’
; <x> <y> <width> <height> <optional_parameters> <name>
WinPOS 0. 0. 130. 36. , , , myWin01
List.auto ;open the List window displaying the source listing
WinLarge.Register.view ;open the Register window in large font size
WinFreeze.Register.view ;open the Register window as a frozen window
PowerView Command Reference | 346
©
1989-2024 Lauterbach
WinBack Generate background window
Pre-command for creating a background window, i.e., the window is pushed into the background after
operations.
See also
■ Win ■ WinFreeze ■ WinResist ❏ WINDOW.NAME()
▲ ’Window System’ in ’PowerView User’s Guide’
WinCLEAR Erase windows
[Example]
If no parameters are set, all windows of one page are erased. If multiple window names are specified, only
those windows will be cleared.
Resistant windows cannot be cleared by this command. That is, windows with the pre-command
WinResist.<window> or WR.<window> are not cleared.
Format: WinBack.<command>
Format: WinCLEAR [WinTOP | {<window_name>} | <page_name>]
WinTOP
(or TOP as an alias)
Deletes the uppermost window.
<window_name> Window names are case-sensitive. They are created with the WinPOS
command.
<page_name> Page names are case-sensitive. They are created with the
WinPAGE.Create command.

PowerView Command Reference | 347
©
1989-2024 Lauterbach
Example:
See also
■ Win ■ WinPAGE.RESet ■ WinResist ❏ WINDOW.NAME()
❏ WINPAGE.EXIST()
▲ ’Window System’ in ’PowerView User’s Guide’
▲ ’I/O Commands’ in ’Training Script Language PRACTICE’
WinPOS , , , , , , W1 ;open window 1 and name it W1
Register.view
WinPOS , , , , , , W2 ;open window 2 and name it W2
PER.view
WinPOS , , , , , , W3 ;open window 3 and name it W3
List.Mix
WinPOS , , , , , , myTraceWin ;open window 4 and name it myTraceWin
Trace.List
WinCLEAR TOP ;clear only the uppermost window
;i.e. window myTraceWin in this example
WinCLEAR W1 W3 ;clear only the windows named W1 and W3
;the remaining window is W2

PowerView Command Reference | 348
©
1989-2024 Lauterbach
WinDEFaultSIZE Apply a user-defined default size to windows
Applies a user-defined default size (width and height) to TRACE32 windows that are used to output data.
The WinDEFaultSIZE command has no effect on dialog-style windows, such as the SYStem.state or
Break.Set window, which are used to configure data.
Your settings are applied to all windows that are opened after executing the WinDEFaultSIZE command.
Windows that are already open are not resized. The user-defined default size is valid for the current
TRACE32 session or until you specify a new default size.
TRACE32 ignores any user-defined setting (width or height or both) that exceeds the built-in minimum or
maximum size for a particular window. A warning is displayed in the TRACE32 state line if the user-defined
setting exceeds the desktop size.
Example: This script is just intended to illustrate the effects of the various window-sizing commands on
TRACE32 windows. To try this script, simply copy it to a test.cmm file, and then step through the
script (See “How to...”).
See also
■ Win ■ WinPOS ■ WinRESIZE
▲ ’Release Information’ in ’Legacy Release History’
Format: WinDEFaultSIZE [<hsize> | <vsize>]
<hsize> Applies a user-defined default width to windows.
<vsize> Applies a user-defined default height to windows.
no parameters Restores the TRACE32 settings for window default sizes.
NOTE: You can display the current user-defined default size in the
TRACE32 state line by just typing the command and appending a blank.
WinDEFaultSIZE 100. 10. ;Defines the user-defined window default size
;The user-defined default size is applied to the next two windows
Trace.CHART
Data.List
;Overrides the user-defined default size - but only for the next window
WinPOS , , 70. 15. , , , myWin01 ;myWin01 is a user-defined window name
Trace.List
;The user-defined window default size takes effect again
AREA.view
WinRESIZE 120. 20. myWin01 ;Resize the window named myWin01
;WinDEFaultSIZE has no effect on dialog-style windows, such as:
SYStem.state

PowerView Command Reference | 349
©
1989-2024 Lauterbach
WinDuplicate Allows to open an existing window again
Allows to open another window with exactly the same command than an already existing window,
because sometimes it is useful to open two or more windows with the same command line and arguments.
Usually if you execute a command to open a window, PowerView will check if a window with exactly the
same command line already exists. If a such a window exists, it bring this window in the foreground instead
of opening a new window. This happens only if the command line is identical in its complete notation,
considering case sensitivity and all of the commands arguments.
If you execute WinDuplicate before opening a new window you will get a new window, no matter if an
identical window already exists or not. However, some special windows can exist in PowerView only once
and those windows will not be created again, even when using WinDuplicate.
You can see the command line, which was used to open any of the existing windows, in the window
WinPAGE.List. The command line of an existing window is usually also its window title (unless this was
changed with the WinPOS command).
Example: This script will open two SYStem.CONFIG windows with the same window title.
See also
■ Win
Format: WinDuplicate
;Open a first configuration window
SYStem.CONFIG
;Open an area window
AREA
;Start duplicating a window
WinDuplicate
;Open a second configuration window with the same title.
SYStem.CONFIG

PowerView Command Reference | 350
©
1989-2024 Lauterbach
WinExt Generate external window
Pre-command for creating an external window, i.e., the window is handled independently of the TRACE32
main window. It’s useful in an MDI configuration to move a window out of the main window.
Example:
The position and size of TRACE32 on start-up can be defined in the SCREEN= section of the configuration
file. For more information, refer to “Screen/Windows” (installation.pdf).
See also
■ Win ■ FramePOS
▲ ’Window System’ in ’PowerView User’s Guide’
WinFIND Search for text in window
[Example]
Searches for text in the uppermost window or in the window that has the specified window name. The
function FOUND() returns TRUE if the search string was found. As an alternative to the WinFIND
command, click the window you want, and then press Ctrl+F or choose Edit menu > Find.
As of build no. 86141 (July 2017), the behavior of the command has changed: It now displays an error
message in the TRACE32 message line if the specified <window_name> does not exist.
Format: WinExt.<command>
NOTE: Using the WinExt pre-command, you can detach an individual window from the
TRACE32 main window - even if TRACE32 is in MDI window mode.
;In MDI mode, you cannot detach a window from the TRACE32 main window
SYStem.state
;However, by prepending the WinExt pre-command, you can detach the
;window from the TRACE32 main window
WinExt.SYStem.state
Format: WinFIND [[<lines>] "<string>"] [WinTOP | <window_name>] [/<option>]
<option>: Back
Case

PowerView Command Reference | 351
©
1989-2024 Lauterbach
Example:
See also
■ Win ■ FIND ■ Data.Find ■ Data.GOTO
■ Data.GREP ❏ FOUND() ❏ WINDOW.NAME()
▲ ’Window System’ in ’PowerView User’s Guide’
WinTOP
(or TOP as an alias)
Performs a search operation in the uppermost window.
<window_name> Window names are case-sensitive. They are created with the WinPOS
command.
Back This option is used to search backward.
Case This option is used to compare case-sensitive, otherwise lower and
upper-case characters are not distinguished.
; find the string "Shell>" in the terminal window
WinPOS 4. 4. 80. 25. 0. 0. MyTerm
TERM.METHOD COM COM1 115200. 8 NONE 1STOP NONE
TERM.view
WinFIND "Shell>" MyTerm
IF FOUND()
PRINT "EFI Shell"

PowerView Command Reference | 352
©
1989-2024 Lauterbach
WinFreeze Generate frozen window
Pre-command for generating a frozen window. Note that frozen window are not updated to the current state.
You can also choose Freeze from the window manager menu (left mouse) to freeze or unfreeze the window
contents.
Example:
See also
■ Win ■ WinBack ■ WinResist ❏ WINDOW.NAME()
▲ ’Window System’ in ’PowerView User’s Guide’
Format: WinFreeze.<command>
A Diagonal lines indicate that the window contents are frozen.
B Click the top left icon to open the window manager menu.
WinFreeze.Register.view ;Open the Register window as a frozen window
A
B

PowerView Command Reference | 353
©
1989-2024 Lauterbach
WinLarge Generate window with large font
Pre-command for generating a window with large font. Switching to large font is very useful in
presentations before large audiences.
Example:
See also
■ Win ■ WinMid ■ WinSmall ❏ WINDOW.NAME()
▲ ’Window System’ in ’PowerView User’s Guide’
Format: WinLarge.<command>
WinPOS , , , , , , WinL ;user-defined window name
WinLarge.Register.view ;large font
WinPOS , , , , , , WinM
WinMid.Register.view ;regular font (default)
WinPOS , , , , , , WinS
WinSmall.Register.view ;small font
Large Regular
(default)
Small

PowerView Command Reference | 354
©
1989-2024 Lauterbach
WinMid Generate window with regular font
Pre-command for generating a window with regular font. This pre-command is included for backward
compatibility.
See also
■ Win ■ WinLarge ■ WinSmall ❏ WINDOW.NAME()
▲ ’Window System’ in ’PowerView User’s Guide’
WinOverlay Pile up windows on top of each other
Superimposes the next window on the active window.
This behavior is used in a List or Data.GREP window to open a new List window on top of and with nearly
the same size as the active window. Press Esc to return to the previous window, or drag the new window to
a new position to make the previous window visible again.
Double-clicking a function or variable name in an HLL listing executes the WinOverlay command by default.
Example: The Data.List and List.auto windows display the same type of content and can thus be exactly
superimposed in terms of position and size.
See also
■ Win ■ Data.GREP ■ List ■ SETUP.LISTCLICK
▲ ’Window System’ in ’PowerView User’s Guide’
Format: WinMid.<command>
Format: WinOverlay.<command>
NOTE:
• Window sizes may vary for windows that do not display the same type of
content.
• The double-click behavior within a List or Data.GREP window can be
changed by the SETUP.LISTCLICK command.
Data.List ;active window
WinOverlay.List.auto func2 ;next window is superimposed on Data.List,
;displaying a listing for the function func2

PowerView Command Reference | 355
©
1989-2024 Lauterbach
WinPAGE Window pages
The WinPAGE command group is used to create and manage window pages. A window page is a collection
of windows displayed on the screen. The pages allow you to quickly switch between different window
collections.
See also
■ Win ■ WinPAGE.Create ■ WinPAGE.Delete ■ WinPAGE.List
■ WinPAGE.REName ■ WinPAGE.RESet ■ WinPAGE.select ❏ WINPAGE.EXIST()
▲ ’PowerView - Screen Display’ in ’PowerView User’s Guide’
▲ ’Window System’ in ’PowerView User’s Guide’
WinPAGE.Create Create and select page
[Example]
Creates a new page and selects the new page. If no parameters are set, the new page is assigned an auto-
incremented default window page name P000, P001, etc.
NOTE: Page names are case-sensitive.
Format: WinPAGE.Create [<page_name> [/NoSELect]] | [ , /NoSELect]
<page_name>
• If the page name does not exist, then a new page with that name is
created and selected.
• If the page name corresponds to the name of an existing page,
then this page is selected.
Page names are case-sensitive.
, Auto-increments the name of the next page; additionally you can use
NoSELect.
NoSELect A new page is created in the background, but not selected. The current
page continues to remain the active page.
Right-click the toolbar to create a
new page or switch to another page.
Alternatively, use WinPAGE.List.

PowerView Command Reference | 356
©
1989-2024 Lauterbach
Example:
See also
■ WinPAGE ■ WinPAGE.List ■ Win ❏ WINPAGE.EXIST()
▲ ’Window System’ in ’PowerView User’s Guide’
WinPAGE.Delete Delete page
Removes one page from the page list including all windows within it.
Example:
See also
■ WinPAGE ■ WinPAGE.List ■ Win ❏ WINPAGE.EXIST()
▲ ’Window System’ in ’PowerView User’s Guide’
WinPAGE.Create ANALYZER
Analyzer.List
WinPAGE.select P000
; create a page for Analyzer windows
; create an Analyzer window on this page
; select the default page
Format: WinPAGE.Delete <page_name>
<page_name> Page names are case-sensitive.
WinPAGE.Delete P000 ; delete the first page

PowerView Command Reference | 357
©
1989-2024 Lauterbach
WinPAGE.List Display an overview of all pages and their windows
Opens the WinPAGE.List window, listing all pages and their windows by name.
Left, right, and double-clicking inside the WinPAGE.List window executes these actions:
• Single-clicking any text line selects a page and all windows on that page.
• Double-clicking an empty line creates a new page with an auto-incremented page name, P000,
P001, P002, etc. Alternatively, right-click an empty line, and then select New Page.
• Right-clicking any text line opens the Pages popup menu:
- Rename inserts the WinPAGE.REName commnd in the command line. Alternatively, double-
click the page you want. You can now rename the selected page via the command line.
- Delete deletes the selected page and all windows on that page right away.
- Show and Hide toggle the window list of an individual page or of all pages.
- Show always corresponds to the option ShowAlways.
See also
■ WinPAGE ■ WinPAGE.Create ■ WinPAGE.Delete ■ WinPAGE.REName
■ WinPAGE.RESet ■ WinPAGE.select ■ Win ❏ WINPAGE.EXIST()
▲ ’Window System’ in ’PowerView User’s Guide’
Format: WinPAGE.List [/ShowAlways]
AP000 and P001 are examples of default page names.
B Three windows on page P001. Default window names are auto-incremented W001, W002, etc.
To assign a user-defined name to a window, run WinPOS and then open the window.
C ANALYZE and EDIT are examples of user-defined page names. To create a new page with a user-
defined page name, use WinPAGE.Create <page_name>.
ShowAlways Expands all +/- buttons in the WinPAGE.List window and keeps them
expanded. Use this option if you want to see at a glance on which page
the individual windows are located.
WinResist.WinPAGE.List ; open a resistant window to navigate
; between pages
A
C
B

PowerView Command Reference | 358
©
1989-2024 Lauterbach
WinPAGE.REName Rename page
Renames an existing page. Page names are case-sensitive.
Example:
See also
■ WinPAGE ■ WinPAGE.List ■ Win ❏ WINPAGE.EXIST()
WinPAGE.RESet Reset window system
All pages and windows are removed, including resistant windows. That is, windows with the pre-command
WinResist.<window> or WR.<window> are also removed.
See also
■ WinPAGE ■ WinPAGE.List ■ Win ■ WinCLEAR
▲ ’Window System’ in ’PowerView User’s Guide’
WinPAGE.select Select page
If no parameters are set, the next page will be selected. Page names are case-sensitive.
See also
■ WinPAGE ■ WinPAGE.List ■ Win ❏ WINPAGE.EXIST()
▲ ’Window System’ in ’PowerView User’s Guide’
Format: WinPAGE.REName <old_pagename> <new_pagename>
WinPAGE.REName PI ANALYZER ; renames page PI to ANALYZER
Format: WinPAGE.RESet
Format: WinPAGE.select [<page_name>]

PowerView Command Reference | 359
©
1989-2024 Lauterbach
WinPAN Specify a window cut-out
This command is used to scroll or pan a window. If no window name is defined, the uppermost window will
be modified. This allows to scroll a window by using PRACTICE. Usually, you pan and scroll a window with
the mouse.
As of build no. 86141 (July 2017), the behavior of the command has changed: It now displays an error
message in the TRACE32 message line if the specified <window_name> does not exist.
See also
■ WinPOS ■ Win ❏ WINDOW.NAME()
▲ ’Window System’ in ’PowerView User’s Guide’
Format: WinPAN [<x>] [<y>] [WinTOP | <window_name>]
<x> Use positive values to pan to the right; negative values to pan to the left.
<y> Use positive values to scroll down; negative values to scroll up.
WinTOP
(or TOP as an alias)
Scrolls or pans the uppermost window.
<window_name> Window names are case-sensitive. They are created with the WinPOS
command.

PowerView Command Reference | 360
©
1989-2024 Lauterbach
WinPOS Define window dimensions and window name
[Examples] [Script in Demo Folder]
Determines the coordinates for the next window opened by a command. The window position can be
specified as an integer value, floating point value or in percent of the total screen size. <header> allows to
replace the default window header, which is the name of the command that generated the window, by a
user-defined one.
Format: WinPOS [<pos>] [<size>] [<scale>] [<window_name>] [<state>] [<header>]
<state>: Normal | Iconic | Maximized
NOTE: As of build 72592, the syntax of the WinPOS command was changed. If your
script stops at a WinPOS command with percentage values, please check the
syntax. The PRACTICE script below uses a WinPOS switch to illustrate the
syntax change.
IF (VERSION.BUILD.BASE()>72592.)
(
;as of build 72592, 3 commas are required as separators
;after percentage values
WinPOS 50% 0% 50% 100% ,,, myWinName
)
ELSE
(
;before build 72592, only 2 commas were required
WinPOS 50% 0% 50% 100% ,, myWinName
)
<pos>
• <left> = x-coordinate as a floating point or integer or percentage
value.
• <up> = y-coordinate as a floating point or integer or percentage
value.
<size>
• <hsize> = width of a window as an integer or percentage value
(range: 0% to 100%).
• <vsize> = height of a window as an integer or percentage value
(range: 0% to 100%).
<scale>
• <hscale> = width of the scale area of a window.
• <vscale> = height of the scale area of a window.
<window_name> The <window_name> argument can be used to assign a user-defined name
to a window. Usually WinPOS commands will be generated by a STOre
command. Window names are case-sensitive.
<header> Specify the user-defined window caption as a quoted string.

PowerView Command Reference | 361
©
1989-2024 Lauterbach
Examples
WinPOS ,,,,,, myName
Trace.List ;open a Trace.List window named myName
;changes the <up> position of the window that is opened next
WinPOS , 20% ,,,,, myName2
WinPOS , 20. ,,,,, myName2
WinPOS , 200.0e-1 ,,,,, myName2
WinPOS , 20.0 ,,,,, myName2
WinPOS , 0x14 ,,,,, myName2
; <window_name> <state> <header>
WinPOS 1. 1. 103. 20. 2. 0. myWin Normal "Intermixed Source/Assembly"
Data.ListMix
WinPOS 1. 1. 20. 20. 2. ,, DUMP
Data.dump 0x1000
WinPOS 1. 10.
TYPE ~~~\test.txt
; PRACTICE script generated by the STOre Win command
WinCLEAR
WinPOS 0.0 0.0 120. 36. 16. 1. W000
WinTABS 10. 10. 25. 62.
Data.List
WinPOS 0.0 40.5 58. 36. 5. 0. W001
Var.Frame /Locals /Caller
WinPOS 62.0 40.5 58. 36. 0. 0. W002
Var.Watch %SpotLight flags ast
;the individual arguments can optionally be comma-separated
WinPOS 10. , 20. , 30 , 40. , 1. , 2. , myName3
Frame.view

PowerView Command Reference | 362
©
1989-2024 Lauterbach
Script in Demo Folder
Due to the WinPOS syntax change, you may encounter compatibility problems in PRACTICE scripts that (a)
make heavy use of WinPOS commands and (b) need to be compatible with old and new TRACE32
software.
As of build 77665, TRACE32 provides a solution in the form of a PRACTICE helper script that allows you to
bypass potential WinPOS compatibility problems. To preview the PRACTICE helper script, run this
command:
B::CD.PSTEP ~~/demo/practice/winpos.cmm
If you encounter WinPOS compatibility problems, we recommend the following solution:
1. Include the PRACTICE helper script in your own PRACTICE scripts (*.cmm), see ON CMD ... in
the example below.
2. Rename all WinPOS commands to WinPOS2.
3. Separate all existing WinPOS2 arguments with commas (without spaces, see WinPOS2 below).
4. Replace each omitted WinPOS2 argument with a comma, too.
See also
■ WinPAN ■ Win ■ WinDEFaultSIZE ■ WinRESIZE
■ WinTABS ■ WinTOP ❏ WINdow.EXIST() ❏ WINDOW.NAME()
▲ ’Window System’ in ’PowerView User’s Guide’
▲ ’Release Information’ in ’Legacy Release History’
▲ ’I/O Commands’ in ’Training Script Language PRACTICE’
;register the user-defined WinPOS2 command
ON CMD WinPOS2 DO "~~/demo/practice/winpos.cmm"
WinPOS2 0%,0%,50%,50%,,,myListWindow
List.auto
WinPOS2 50%,0%,,,,,myRegisterWindow
Register.view /SpotLight

PowerView Command Reference | 363
©
1989-2024 Lauterbach
WinPrint Print address or record range of a window
The WinPrint pre-command is used to generate a hardcopy or a file from one command. The numbers of
columns and lines in the window are adapted to the possibilities of the printer. Printer selection can be
executed by the PRinTer command.
Thus, the output can also be re-routed to a file. In the case of some commands, extended parameters are
possible for printing more than one page.
Example 1:
Example 2: For an example of how to print the contents of TRACE32 windows to file in XML format, see
PRinTer.FILE.
See also
■ WinPRT ■ Win ■ PRINT ■ PRinTer
■ PRinTer.EXPORT ■ PRinTer.FILE ■ PRinTer.OFFSET ■ PRinTer.OPEN
❏ WINDOW.NAME()
▲ ’Printer Operations’ in ’PowerView User’s Guide’
▲ ’Window System’ in ’PowerView User’s Guide’
▲ ’Window System’ in ’PowerView User’s Guide’
▲ ’Release Information’ in ’Legacy Release History’
Format: WinPrint.<command>
WinPrint.Data.dump 0--0xfff
WinPrint.Analyzer.List (-1000.)--100. Address Data sYmbol

PowerView Command Reference | 364
©
1989-2024 Lauterbach
WinPRT Hardcopy of window
Prints the uppermost window or the window that has the specified name. It is the same command as Print in
the window manager menu. WinPRT is used to make multi-page printouts of windows where the print range
can be specified only in the form of lines.
If the print range can be specified as an address, symbol or record range, use the WinPrint.<window>
command.
As of build no. 86141 (July 2017), the behavior of the command has changed: It now displays an error
message in the TRACE32 message line if the specified <window_name> does not exist.
Example: In this script, the first 80 lines of a PER.view window are printed to file.
See also
■ WinPrint ■ Win ■ PRinTer ■ PRinTer.HardCopy
❏ WINDOW.NAME()
▲ ’Printer Operations’ in ’PowerView User’s Guide’
▲ ’Window System’ in ’PowerView User’s Guide’
Format: WinPRT [WinTOP | <window_name>]
WinTOP, TOP Prints the uppermost window. TOP is an alias.
<window_name> Window names are case-sensitive. They are created with the WinPOS
command.
;define a) the width and b) the height of the PER.view window:
;a) set the width to the size of the longest line, here 200 characters
;b) set the height to 10 lines so that we can print in steps of 10 lines
WinPOS 0. 0. 200. 10. 0. 0. myWIN
PER.view , "*" ;open the window and expand all subtrees
SCREEN.WAIT
LOCAL &page
&page=0.
WHILE &page<8.
(
WinPRT myWIN ;print the lines displayed in the window
;named myWIN
WinPAN 0. 10. myWIN ;scroll down 10 lines in the window
SCREEN.WAIT
&page=&page+1.
)

PowerView Command Reference | 365
©
1989-2024 Lauterbach
WinResist Generate a resistant window
This pre-command is used to create a resistant window. This window cannot be cleared by the command
WinCLEAR. The window is displayed on all window pages and usually used for editing PRACTICE files.
Resistant windows can be deleted manually by the mouse-based window functions or by the command
WinPAGE.RESet.
Example:
See also
■ Win ■ WinBack ■ WinCLEAR ■ WinFreeze
▲ ’Window System’ in ’PowerView User’s Guide’
Format: WinResist.<command>
WinResist.PEDIT test.cmm ;open PRACTICE script in a resistant window

PowerView Command Reference | 366
©
1989-2024 Lauterbach
WinRESIZE New size for window
Resizes the uppermost window or the window that has the specified <window_name>.
As of build no. 86141 (July 2017), the behavior of the command has changed: It now displays an error
message in the TRACE32 message line if the specified <window_name> does not exist.
Example: In this script, the command WinPOS is used to open a window with a user-defined size and
name. If the named window is already open, WinRESIZE is used to re-apply the user-defined size. In
addition, the named window is displayed on top of all other windows.
See also
■ Win ■ WinDEFaultSIZE ■ WinPOS ■ WinTOP
❏ WINdow.EXIST()
▲ ’Window System’ in ’PowerView User’s Guide’
Format: WinRESIZE [<width>] [<height>] [WinTOP | <window_name>]
WinTOP
(or TOP as an alias)
Resizes the uppermost window.
<window_name> Window names are case-sensitive. Use WinPOS to assign a user-defined
name and an initial size to a window.
;determine whether the named window is already open
IF WINdow.EXIST("myWin01")==FALSE()
( ;apply a user-defined size (height, width) and name to the window
WinPOS , , 120. 20. , , , myWin01
Group.List ;Open the window
)
ELSE
( ;resize the named window by re-applying the initial size
WinRESIZE 120. 20. myWin01
)
;bring the named window to the top of the display hierarchy
WinTOP myWin01

PowerView Command Reference | 367
©
1989-2024 Lauterbach
WinSmall Generate window with small font
Pre-command for generating a window with small font. For an example, see WinLarge.
See also
■ Win ■ WinLarge ■ WinMid
▲ ’Window System’ in ’PowerView User’s Guide’
WinTABS Specify widths of re-sizable columns
TRACE32 PowerView windows may contain fixed columns and re-sizable columns. If the mouse is
positioned on the border of re-sizable column, the cursor changes to a re-size cursor (see screenshot
below).
The command WinTABS is used the specify the width of re-sizable columns for the next window that will be
opened.
Examples:
See also
■ Win ■ WinPOS
▲ ’Window System’ in ’PowerView User’s Guide’
Format: WinSmall.<command>
Format: WinTABS <col1_width> [ <col2_width>…]
WinTABS 20. 5. 20. 40. ;specify the width of the columns code, label,
;mnemonic, and comment in a List.Mix window
List.Mix
WinTABS 50. 20. ;specify the width of the columns tree and
;InternalBAR.Log in a Trace.STATistic.TREE
;window
Trace.STATistic.TREE

PowerView Command Reference | 368
©
1989-2024 Lauterbach
WinTOP Bring window to top
Brings the named window to the top of the display hierarchy. You can now see that focus is on the window. If
the named window is not on the current window page, then the page of the window is selected and the
window is moved to the top of the display hierarchy. To check whether a window with given window name
exists, use the PRACTICE function WINdow.EXIST().
Example: In this script, a custom dialog with the user-defined name my_dialog is brought to the top of the
display hierarchy, provided the dialog already exists. Else a new dialog with the window name my_dialog
is created.
See also
■ Win ■ WinPOS ■ WinRESIZE ❏ WINdow.EXIST()
▲ ’Window System’ in ’PowerView User’s Guide’
Format: WinTOP [<window_name>]
<window_name> Window names are case-sensitive. A window name is created by using the
WinPOS command followed by the command that opens the actual window.
IF WINdow.EXIST(my_dialog) ;if the window name exists,
( ;bring the window to the top
WinTOP my_dialog
)
ELSE
( ;if the window name does not exist,
WinPOS ,,,,,, my_dialog ;assign the window name to this
DIALOG.view ;custom dialog
(
HEADER "MyDialog"
POS 0. 0. 30. 1.
TEXT "A named dialog window"
BUTTON "Close" "DIALOG.End"
)
)
ENDDO

PowerView Command Reference | 369
©
1989-2024 Lauterbach
WinTrans Generate transparent window
Pre-command for generating a transparent window. These kinds of external windows will allow windows in
the background to shimmer through.
Prerequisites:
• Windows 2000 and later.
• Available for the TRACE32 window modes FDI and MTI.
• If the TRACE32 window mode is MDI, then the WinTrans pre-command can only be used
together with the WinExt pre-command.
Example:
See also
■ Win
▲ ’Window System’ in ’PowerView User’s Guide’
Format: WinTrans.<command>
WinExt.WinTrans.Register.view ; open a transparent Register.view window
; while TRACE32 is in MDI window mode

PowerView Command Reference | 370
©
1989-2024 Lauterbach
ZERO
See also
■ ZERO.offset ■ ZERO.RESet
ZERO.offset Set time reference
If the optional argument is given, sets the global reference time. The global time is used to correlate different
analyzers within one TRACE32 system, e.g. state analyzer and port analyzer. Usually this function will be
used like the reference cursor function. Every analyzer has one reference cursor, but the absolute reference
time is unique to the whole system.
With the /FILE option, sets the zero point for traces loaded with the <trace>.FILE command.
Without an argument, opens a window showing the current time values.
Examples:
See also
■ ZERO.RESet
Format: ZERO.offset [<time>] [/FILE]
ZERO 100.s ; move zero reference point by 100 s
;display a trace listing with the ti.zero column as the first column
Trace.List TIme.ZERO DEFault /Track
;set the zero reference point to record no. -10000.
ZERO.offset Trace.RECORD.TIME(-10000.)
;go to the zero reference point in the trace listing
Trace.GOTO 0.s
ZERO.offset 5.0s
ZERO.offset 7.0s /FILE
ZERO.offset ; shows the following window

PowerView Command Reference | 371
©
1989-2024 Lauterbach
ZERO.RESet Reset to original value
Resets the offset to the global reference time.
See also
■ ZERO.offset
ZIP
ZIP Compress files to GZIP archive (with DEFLATE algorithm)
Compresses the source file to a GZIP archive.
Example:
See also
■ PACK ■ UNPACK ■ UNZIP
▲ ’File and Folder Operations’ in ’PowerView User’s Guide’
Format: ZERO.RESet
Format: ZIP <source> [<destination>]
ZIP ref1.ad ; pack file

PowerView Command Reference | 372
©
1989-2024 Lauterbach
Appendix A - Help Filters
The following help filters are available for the HELP.FILTER command group:
• Help Filters for TRACE32 Hardware/Software
• Help Filters for OS Awareness Manuals
• Help Filters for Third-Party Integrations
• Help Filters for UEFI Debuggers
• Help Filters for Debug Back-Ends
Help Filters for TRACE32 Hardware/Software
Filter TRACE32 Hardware/Software
bdm* TRACE32 debugger
e.g. bdmarm, bdmsh4
esi TRACE32 ERPOM simulator
gdb* TRACE32 GDB Front-end
e.g gdbarm, gdbi386
icr* TRACE32 real-time trace
e.g. icretm, icrsh4
icrstm TRACE32 CombiProbe
mon* TRACE32 ROM monitor
e.g. mon68k, mon166
nat386 Windows native process debugger
nexus* TRACE32 NEXUS debugger
e.g. nexusppc, nexusmac
pdg* TRACE32 pdg Front-end
e.g pdgarm
pi PowerIntegrator
pp PowerProbe
sim* TRACE32 Instruction Set Simulator or TRACE32 Front-end
e.g. simarm, simppc
stg Stimuli generator
time TRACE32 timing analyzer
tp Trigger probe

PowerView Command Reference | 373
©
1989-2024 Lauterbach
Help Filters for OS Awareness Manuals
Filter OS Awareness
rtos* All OS Awareness Manuals.
The asterisk can be replaced with the suffixes listed below.
rtosamx AMX
rtosartk ARTK
rtosartx166 ARTX-166
rtosbios DSP/BIOS
rtoschibios ChibiOS/RT
rtoschorus Chorus Classic and Chorus Micro
rtoscmicro Cmicro
rtoscmx CMX and CMX-TINY+
rtosecos eCos
rtosembos embOS
rtosepoc Symbian OS EKA1
rtosfamos FAMOS
rtosfreertos FreeRTOS
rtoshi7000 HI7000
rtoshios HIOS
rtoslinux Linux
rtoslynxos LynxOS
rtosmqx MQX
rtosmtos MTOS-UX
rtosnetbsd NetBSD
rtosnorti NORTi
rtosnucleus Nucleus PLUS
rtosokl4 OKL4
rtosorti OSEK/ORTI
rtosorti OSEK/ORTI
rtosos21 OS21
rtosos9 OS-9
rtososeb OSE Epsilon

PowerView Command Reference | 374
©
1989-2024 Lauterbach
rtososec OSE Classic
rtososeck OSEck
rtososed OSE Delta
rtososee OSE Epsilon
rtospikeos PikeOS
rtosprkernel PrKERNEL
rtospsos pSOS+
rtospxros PXROS
rtosqnx QNX
rtosquadros RTXC Quadros
rtosrealos REALOS
rtosrt7700 RTOS/7700
rtosrtc RealTimeCraft
rtosrtems RTEMS
rtosrtx166 RTX166 and RTX166 tiny
rtosrtx51 RTX51and RTX51 tiny
rtosrtxarm RTX-ARM
rtosrtxc RTXC
rtosrubus Rubus OS
rtossciopta Sciopta
rtossmx SMX
rtossymbian2 Symbian OS EKA2
rtossysbios SYS/BIOS
rtosthreadx ThreadX
rtosuc3cmp MicroC3/Compact
rtosuc3std MicroC3/Standard
rtosuclinux uClinux
rtosucos, rtosucos3 MicroC/OS-II
MicroC/OS-III
rtosuiplus uiPLUS
rtosuitron uITRON
Filter OS Awareness

PowerView Command Reference | 375
©
1989-2024 Lauterbach
Help Filters for Third-Party Integrations
rtosvdk VDK
rtosvrt VRTX32/68K, VRTX80, VRTXmc/68K, VRTXsa
rtosvrtx VRTX32/68K, VRTX80, VRTXmc/68K, VRTXsa
rtosvxworks Vx Works
rtoswince Windows CE
rtoswindows Windows Standard
rtoszeos ZeOS
Filter Third-Party Tool
intcodeblock CodeBlocks
intcw CodeWright
inteasy EasyCase
inteclipse Eclipse
intexdi2 Windows CE Platform Builder
intlabview LabView
intose OSE Illuminator
intrhapsody Rhapsody in MicroC
intrhapsodycpp Rhapsody in C/C++
intsimulink Simulink
inttornado Tornado I
intxtools X-Tools and X32
Filter OS Awareness

PowerView Command Reference | 376
©
1989-2024 Lauterbach
Help Filters for UEFI Debuggers
Help Filters for Debug Back-Ends
Filter UEFI Debuggers
uefibldk UEFI Awareness for BLDK
uefih2o UEFI Awareness for H2O
uefitiano UEFI Awareness for TianoCore
Filter Debug Back-Ends
back* Debug Back-Ends
backgtl GTL Debug Back-End
backxcp XCP Debug Back-End
