
Manage data
Qlik Sense
®
February 2024
Copyright © 1993-2024 QlikTech International AB. All rights reserved.
HELP.QLIK.COM
© 2024 QlikTech International AB. All rights reserved. All company and/or product names may be trade names,
trademarks and/or registered trademarks of the respective owners with which they are associated.

Manage data - Qlik Sense, February 2024 3
1 About this document 10
2 Managing data 11
3 Loading and managing data with Data Manager 12
3.1 Previewing a data table 12
3.2 Adding a new data table 12
3.3 Editing a data table 13
3.4 Deleting a data table 13
3.5 Managing data table associations 13
3.6 Applying changes and reloading data 14
3.7 Undo and Redo actions in Data manager 15
3.8 Viewing table transformation details in Data manager 15
3.9 Interaction between Data manager and the data load script 15
3.10 Concatenating tables in Data manager 16
3.11 Adding data to the app 16
In-App 17
File locations 17
Data connections 17
Data content 17
Attach files to this app 18
Connect to a new data source 18
Add data 18
Which data sources are available to me? 18
Adding data from an existing data source 18
Adding data from a new data source 20
Attaching data files and adding the data to the app 22
Adding data manually 25
Selecting data fields 26
Filtering data from files 32
Filtering data from data connectors 33
3.12 Editing a table 34
Renaming a table 35
Renaming a field 35
Managing associations to other tables 35
Changing field type and display format 35
Hiding fields from analysis 36
Assessing table field data before loading data 36
Replacing field values in a table 36
Setting field values as null in a table 36
Setting a custom order for field values 37
Splitting a field in a table 37
Grouping measure data into ranges 37
Viewing field transformation details 37
Unpivoting crosstab data 37
Updating a table from the data source 38
Adding a calculated field 38
Sorting a table 38
Undo and redo actions 38
Contents

Manage data - Qlik Sense, February 2024 4
Associating data in the table editor 39
Using calculated fields 41
Changing field types 54
Hiding fields from analysis 55
Assessing table field data before loading data 56
Replacing field values in a table 58
Setting field values as null in a table 60
Customizing the order of dimension values 61
Splitting a field in a table 62
Grouping measure data into ranges 64
Unpivoting crosstab data in the data manager 67
3.13 Concatenating tables in Data manager 69
Automatically concatenating tables 70
Forcing concatenation between tables 70
Splitting concatenated tables 72
3.14 Joining tables in Data manager 73
Join operators 74
Joining tables 76
Splitting joined tables 78
3.15 Viewing table and field transformation details in Data manager 79
Viewing table details 79
Viewing field details 79
3.16 Step-by-step - Combining tables using forced concatenation 80
Concatenation at a glance 80
Walkthrough - Forced concatenation 80
A step further - adding a new table and concatenating the data fields 87
3.17 Synchronizing scripted tables in Data manager 89
Synchronizing scripted tables 90
Removing managed scripted tables 90
3.18 Managing data associations 90
Associating tables using the Recommended associations panel 91
Associating tables manually 93
Breaking associations 94
Editing associations 94
Previewing data 95
Synthetic keys 95
Limitations 95
Applying changes and reloading data 96
4 Loading and transforming data with scripting 97
4.1 Interaction between Data manager and the data load script 97
4.2 Using the data load editor 98
Toolbar 98
Data connections 98
Text editor 98
Sections 99
Output 99
Connect to data sources in the data load editor 99
Contents

Manage data - Qlik Sense, February 2024 5
Select data in the data load editor 102
Edit the data load script 109
Organizing the script code 112
Debug the data load script 113
Saving the load script 116
Run the script to load data 116
Keyboard shortcuts in the Data load editor 116
4.3 Understanding script syntax and data structures 118
Extract, transform, and load 118
Data loading statements 119
Execution of the script 119
Fields 120
Logical tables 125
Data types 136
Dollar-sign expansions 139
Using quotation marks in the script 151
Wild cards in the data 155
NULL value handling 156
4.4 Guidelines for data and fields 159
Guidelines for amount of loaded data 159
Upper limits for data tables and fields 159
Recommended limit for load script sections 159
Descriptions for number and time formats 159
4.5 Working with QVD files 163
Purpose of QVD files 164
Creating QVD files 164
Reading data from QVD files 164
QVD format 165
4.6 Configuring analytic connections in Qlik Sense Desktop 165
Qlik open source SSE repositories 166
Description of the elements 166
5 Managing data security with Section Access 167
5.1 Sections in the load script 167
Section Access system fields 167
5.2 Managing user access to an app 169
5.3 Managing user access to specific data in an app 170
Managing access to row-level data 170
Managing access to column-level data 171
Managing access to user groups 172
5.4 Using impersonation to reload data 173
5.5 Managing user access in a multi-cloud environment 173
5.6 Using Section Access and Insight Advisor Chat 174
5.7 Using QVDs with Section Access 175
5.8 Guidelines and tips for using Section Access 176
6 Managing big data with on-demand apps 177
6.1 On-demand app components 177
6.2 Constructing on-demand apps 178
Contents

Manage data - Qlik Sense, February 2024 6
6.3 Publishing on-demand apps 179
6.4 Advantages of on-demand apps 179
6.5 Limitations 180
6.6 Creating an on-demand selection app 180
6.7 Creating an on-demand template app 181
Structure of a template app 181
Single Sign-On (SSO) 182
Reload nodes for template apps 183
Binding expressions in on-demand template apps 183
6.8 Building an on-demand app 190
7 Managing data with dynamic views 193
7.1 Dynamic views overview 193
Dynamic views 194
Dynamic view template apps 195
Dynamic charts 195
7.2 Dynamic views limitations 195
7.3 Streams and dynamics views 196
7.4 Creating dynamic views and charts 196
Creating dynamic views 196
Adding dynamic charts to sheets 197
Editing dynamic views 197
7.5 Using dynamic views and charts 198
Selections in dynamic views 198
Viewing dynamic view details 200
Refreshing dynamic views 203
8 Connecting to data sources 204
8.1 Create a connection 204
8.2 Data connection types 204
Attached files 204
Database connectors 204
Essbase 205
Local or network files 205
ODBC connections through DSN 205
Qlik Web Connectors 205
REST 206
Salesforce 207
SAP 207
Web files 207
Web Storage Provider Connectors 207
Third-party connectors 207
8.3 Where is the data connection stored? 207
8.4 Loading data from files 208
File formats 208
Connection types 208
How do I load data from files? 208
Loading files from local and network file folders 209
Contents

Manage data - Qlik Sense, February 2024 7
Loading files from web resources 209
Loading data from Microsoft Excel spreadsheets 210
Working with Apache Parquet files 213
8.5 Loading data from databases 213
Loading data from an ODBC database 214
ODBC 215
Loading data from ODBC data sources 215
OLE DB 218
Logic in databases 220
8.6 Accessing large data sets with Direct Discovery 220
Differences between Direct Discovery and in-memory data 221
Direct Discovery field types 227
Data sources supported in Direct Discovery 228
Limitations when using Direct Discovery 229
Multi-table support in Direct Discovery 231
Using subqueries with Direct Discovery 233
Logging Direct Discovery access 235
9 Viewing and transforming the data model 236
9.1 Moving tables 236
9.2 Resizing tables 237
9.3 Data model performance 237
9.4 Previewing tables and fields in the data model viewer 240
Showing a preview of a table 241
Showing a preview of a field 241
9.5 Creating a master dimension from the data model viewer 242
9.6 Creating a master measure from the data model viewer 242
10 Best practices for data modeling 243
10.1 Turning data columns into rows 243
10.2 Turning data rows into fields 243
10.3 Loading data that is organized in hierarchical levels, for example an organization scheme 244
10.4 Loading only new or updated records from a large database 245
10.5 Combining data from two tables with a common field 245
10.6 Matching a discrete value to an interval 245
10.7 Handling inconsistent field values 246
10.8 Handling inconsistent field value capitalization 247
10.9 Loading geospatial data to visualize data with a map 248
10.10 Loading new and updated records with incremental load 248
Append only 249
Insert only (no update or delete) 249
Insert and update (no delete) 249
Insert, update and delete 250
10.11 Combining tables with Join and Keep 251
Joins within a SQL SELECT statement 251
Join 252
Keep 252
Inner 252
Contents

Manage data - Qlik Sense, February 2024 8
Left 253
Right 255
10.12 Using mapping as an alternative to joining 256
10.13 Working with crosstables in the data load script 257
Unpivoting a crosstab with one qualifying column 258
Unpivoting a crosstab with two qualifying columns 259
10.14 Generic databases 260
10.15 Matching intervals to discrete data 262
Intervalmatch example 262
Using the extended intervalmatch syntax to resolve slowly changing dimension problems 263
10.16 Creating a date interval from a single date 265
10.17 Loading hierarchy data 268
10.18 Loading your own map data 269
Supported name data for fields in a map visualization 269
Loading point and area data from a KML file 270
Loading map data with data profiling 270
Loading and formatting point data 271
10.19 Data cleansing 273
Mapping tables 273
Using a mapping table 274
11 Customizing logical models for Insight Advisor 276
11.1 Building logical models for Insight Advisor with Business logic 276
Understanding logical models 277
Customizing logical models 278
Enabling custom business logic 278
Resetting business logic 279
Disabling business logic 279
Defining fields and groups 279
Setting logical model scope with packages 284
Creating drill-down analysis with hierarchies 285
Applying behaviors to logical models 286
Defining analysis periods with calendar periods 289
11.2 Creating vocabularies for Insight Advisor 296
Limitations 296
Adding synonyms to Insight Advisor 297
Adding custom analyses to Insight Advisor 298
Adding example questions to Insight Advisor 303
11.3 Tutorial – Customizing how Insight Advisor interprets data 304
What you will learn 304
Who should complete this tutorial 304
What you need to do before you start 304
Lessons in this tutorial 304
Further reading and resources 305
What is Insight Advisor and business logic? 305
Enabling a custom logical model 308
Customizing fields and groups 309
Configuring your packages 315
Contents

Manage data - Qlik Sense, February 2024 9
Reviewing your hierarchies 316
Configuring your calendar periods 318
Configuring your behaviors 323
Creating vocabularies 325
12 Troubleshooting - Loading data 328
12.1 Attaching a file by dropping it in Add data does not work 328
12.2 Character set problems with non-ANSI encoded data files 328
12.3 Circular references warning when loading data 328
12.4 Columns are not lining up as expected when selecting data from a fixed record file 329
12.5 Connector is not working 329
The connector is not properly installed 329
The connector is not adapted for Qlik Sense 329
12.6 Data connection stops working after SQL Server is restarted 330
12.7 Data load editor does not display the script 330
12.8 Data load script is executed without error, but data is not loaded 331
A statement is not terminated with a semicolon 331
Single quote character inside a string 331
12.9 Data manager does not show tables in app that contains data 331
12.10 Data manager work flows are broken for all users creating apps on a server 332
12.11 Data selection problems with an OLE DB data source 332
12.12 Date fields are not recognized as date fields in sheet view 332
Data profiling was disabled when the table was added 332
Date format was not recognized 333
12.13 Error message "Invalid path" when attaching a file 333
12.14 Errors when loading an app converted from a QlikView document 333
Absolute file path references are used in the script 333
Unsupported functions or statements are used in the script 334
12.15 MicrosoftExcel: Loading data from files in data manager or data load editor fails 334
12.16 MicrosoftExcel: Problems connecting to and loading data from files through ODBC 334
12.17 Running out of disk space 334
12.18 Synthetic keys warning when loading data 335
12.19 Tables with common fields are not automatically associated by field name 335
Contents

1 About this document
1 About this document
This document describes how to add and manage data, how to build a data load script for more advanced
data models, how to view the resulting data model in the data model viewer, and presents best practices for
data modeling in Qlik Sense.
For detailed reference regarding script functions and chart functions, see the Script syntax and chart
functions.
This document is derived from the online help for Qlik Sense. It is intended for those who want to read parts
of the help offline or print pages easily, and does not include any additional information compared with the
online help.
You find the online help, additional guides and much more at help.qlik.com/sense.
Manage data - Qlik Sense, February 2024 10

2 Managing data
2 Managing data
When you have created a Qlik Sense app, the first step is to add some data that you can explore and analyze.
This section describes how to add and manage data, how to build a data load script for more advanced data
models, how to view the resulting data model in the data model viewer, and presents best practices for data
modeling in Qlik Sense.
There are two ways to add data to the app.
l
Data manager
You can add data from your own data sources, or from other sources such as Qlik DataMarket, without
learning a script language. Data selections can be edited, and you can get assistance with creating data
associations in your data model.
l
Data load editor
You can build a data model with ETL (Extract, Transform & Load) processes using the Qlik Sense data
load script language. The script language is powerful and enables you to perform complex
transformations and creating a scalable data model.
You can convert a data model built in Data manager into a data load script, which can be
developed further in Data load editor, but it is not possible to convert a data load script to a Data
manager data model. The Data manager data model and data tables defined in the data load
script can still co-exist, but this can make it harder to troubleshoot problems with the data model.
Manage data - Qlik Sense, February 2024 11

3 Loading and managing data with Data Manager
3 Loading and managing data with Data Manager
Add and manage data from the Data manager so that you can use the data in your app.
There are two views in data manager:
l
Associations
You can create and edit association between tables.
l
Tables
You get an overview of all data tables in the app, whether you added them using Add data, or loaded
them with the data load script. Each table is displayed with the table name, the number of data fields,
and the name of the data source.
3.1 Previewing a data table
You can preview a table to see which columns it contains, and a sample set of the data.
Do the following:
l
Select the data table you want to preview.
A preview of the table data set is displayed.
3.2 Adding a new data table
You can quickly add a data table to your app. Open the Data manager and then click . You can also click
Add data in the .You are also prompted to add data when you create a new app.
You can add data from the following data sources:
Data source Description
In-App Select from data sources that are available in your app. These can be files that you have
attached to your app.
You can also create a data source and manually add data to it using Manual entry.
File locations Select from files on a network drive, for example a drive that has defined by your
administrator.
Data
connections
Select from existing data connections that have been defined by you or an administrator.
Data sources
Manage data - Qlik Sense, February 2024 12

3 Loading and managing data with Data Manager
3.3 Editing a data table
You can edit all the data tables that you have added with Add data. You can rename the table and fields in the
data table, and update the fields from the data source. It is also possible to add a calculated field and adjust
date and time formats.
Do the following:
1.
Click on the data table you want to edit.
The data table editor opens, and you can perform the edits and transformations you want to do.
2. Click Close to return.
The table is now marked Pending update, and the changes will be applied to the app data the next time you
reload data.
You can only edit data tables added with Add data. If you click on a table that was loaded using
the load script, the data load editor opens. For more information, see Using the data load editor
(page 98).
3.4 Deleting a data table
You can only delete data tables added with Add data. Data tables that were loaded using the load script can
only be removed by editing the script in the data load editor.
Do the following:
l
Click on the data table you want to delete.
The table is now marked Pending delete and will be removed the next time you reload data.
You can undo and redo your delete actions by clicking and .
If you have used fields from the data table in a visualization, removing the data table will result in
an error being shown in the app.
3.5 Managing data table associations
When you add several tables that need to be associated, the perfect situation is that the tables associate with
key fields that have identical names in the different tables. If that is the case, you can add them to Qlik Sense
with the data profiling disabled option of Add data, and the result will be a data structure with the tables
associated correctly.
If you have less than ideal data sources, there are a number of possible association problems.
Manage data - Qlik Sense, February 2024 13

3 Loading and managing data with Data Manager
l
If you have loaded two fields containing the same data but with a different field name from two
different tables, it's probably a good idea to name the fields identically to relate the tables.
l
If you have loaded two fields containing different data but with identical field names from two
different tables, you need to rename at least one of the fields to load them as separate fields.
l
If you have loaded two tables containing more than one common field.
If you want to associate your data, we recommend that you use the Add data option with data profiling
enabled. This is the default option. You can verify this setting by clicking beside the Add data button in the
lower right corner of the Add Data page.
Qlik Sense performs data profiling of the data you want to load to assist you in fixing the table association.
Existing bad associations and potential good associations are highlighted, and you get assistance with
selecting fields to associate, based on analysis of the data.
You can manage table associations in two different ways:
l
In the Associations view of data manager.
You can create associations based on Insight Advisor recommendations, or create custom associations
based on one or more fields.
l
Using the Associate option in the table editor.
You can create custom associations and composite key associations based on several fields.
If you disable data profiling when adding data, Qlik Sense will associate tables based on common
field names automatically.
3.6 Applying changes and reloading data
Changes that you have made in the Data manager will not be available in the app until you have reloaded
data. When you reload data, the changes are applied and any new data that you have added is loaded from
the external data sources. Data that you loaded previously is not reloaded.
You can reload all the data from the external data sources by using the button in the Data manager
footer.
The button reloads all the data for the selected table. It does not reload all the data for all the tables in the
app.
If the data in Data manager is out of sync with the app data, the Load data button is green. In the
Associations view, all new or updated tables are indicated with *, and deleted tables are a lighter color of
gray. In the Tables view, all new, updated, or deleted tables are highlighted in blue and display an icon that
shows the status of the table:
Manage data - Qlik Sense, February 2024 14

3 Loading and managing data with Data Manager
l
Tables marked with Pending delete will be deleted.
l
Tables marked with Pending update will be updated with fields that have been added, renamed,
or removed, or the table will be renamed.
l
Tables marked with Pending add will be added.
Do the following:
l
Click Load data to load the changes in the app.
The app data is now updated with changes you made in Data manager.
To apply changes and reload all the data in the selected table from the external data sources:
Do the following:
l
Click the button in the Data manager footer.
3.7 Undo and Redo actions in Data manager
When you are editing in Data manager, you can undo or redo some actions by clicking and , or by using
the keyboard shortcuts Ctrl + Z and Ctrl + Y.
The log of actions is cleared if you:
l
Change view, for example, going from the table overview to Associations.
l
Load data.
l
Close Data manager.
3.8 Viewing table transformation details in Data manager
You can view the operations and transformations performed on a table in Data manager using the Details
dialog. The Details dialog is available in the Associations and Table views.
Details displays the current operations and transformations made to the selected table. This shows you the
source of a table, the current changes that have been made, and the sequence in which the changes have
been applied. Details enables you to more easily understand how a table got into a current state. You can use
Details, for example, to easily see the order in which tables were concatenated.
3.9 Interaction between Data manager and the data load
script
When you add data tables in the Data manager, data load script code is generated. You can view the script
code in the Auto-generated section of the data load editor. You can also choose to unlock and edit the
generated script code, but if you do, the data tables will no longer be managed in the Data manager.
Manage data - Qlik Sense, February 2024 15

3 Loading and managing data with Data Manager
By default, data tables defined in the load script are not managed in Data manager. That is, you can see the
tables in the data overview, but you cannot delete or edit the tables in Data manager, and association
recommendations are not provided for tables loaded with the script. If you synchronize your scripted tables
with Data manager, however, your scripted tables are added as managed scripted tables to Data manager.
If you have synchronized tables, you should not make changes in the data load editor with Data
manager open in another tab.
You can add script sections and develop code that enhances and interacts with the data model created in
Data manager, but there are some areas where you need to be careful. The script code you write can interfere
with the Data manager data model, and create problems in some cases, for example:
l
Renaming or dropping tables added with Data manager in the script.
l
Dropping fields from tables added with Data manager.
l
Concatenation between tables added with Data manager and tables loaded in the script.
l
Using the Qualify statement with fields in tables added with Data manager.
l
Loading tables added with Data manager using Resident in the script.
l
Adding script code after the generated code section. The resulting changes in the data model are not
reflected in Data manager.
3.10 Concatenating tables in Data manager
Concatenation combines two tables into a single table with combined fields. It consolidates content, reducing
the number of separate tables and fields that share content. Tables in Data manager can be automatically or
forcibly concatenated.
Concatenated table in Tables view and Associations view.
3.11 Adding data to the app
You can add data to your app quickly. Open the Data manager and then click . You can also
click Add data in the . You are also prompted to add data when you create a new app. When
you are editing a sheet, you can also click Add in the Fields panel to add data.
Manage data - Qlik Sense, February 2024 16

3 Loading and managing data with Data Manager
The add data options and data sources that are available to you depend on your Qlik Sense
platform and configuration.
Add data view
In-App
Attached files. Deployments: Qlik Sense Enterprise on Windows. Click to attach files to the app, or to view the
files that have been attached to the app. You can load data from these files.
Manual entry. Click to create a table in-app and add the data to the app.
File locations
File locations. Deployments: Qlik Sense Enterprise on Windows. Provides access to folder locations that your
administrator has defined.
My computer. Deployments: Qlik Sense Desktop.
Click to upload a data file, or to add data from a file that has already been uploaded.
Data connections
Deployments: All.
Displays connections that have been created to an external data source. The connection appears after it has
been created under Connect to a new data source.
Click a connection to add data to the app.
Data content
Qlik Catalog Service. Platforms: Qlik Sense Enterprise on Windows.
Manage data - Qlik Sense, February 2024 17

3 Loading and managing data with Data Manager
Provides access to Qlik Catalog Service QVD sources. Only available if your administrator has created a
connection to Qlik Catalog.
Click to add data to the app.
Attach files to this app
Click to attach a file to the app.
Connect to a new data source
Click to create a connection to a new data source.
Add data
Click to add data to an app. The button is enabled after you have created a connection and selected your data
to load. You can add data with profiling enabled or disabled. Data profiling is recommended and enabled by
default. Click to disable data profiling.
Which data sources are available to me?
What data source types are available to you depends on a number of factors:
l
Access settings
Administrator settings determine which types of data sources you can connect to.
l
Installed connectors
Qlik Sense contains built-in support for many data sources. Built-in connectors are installed
automatically by Qlik Sense. To connect to additional data sources you may need to install connectors
separately that are specifically for those data sources. Such separately installed connectors are
supplied by Qlik or a third party.
l
Local file availability
Local files on your desktop computer are only available in Qlik Sense Desktop. They are not available
for use with a server installation of Qlik Sense.
If you have local files that you want to load on a server installation of Qlik Sense, you need to
attach the files to the app, or transfer the files to a folder available to the Qlik Sense server,
preferably a folder that is already defined as a folder data connection.
Adding data from an existing data source
You can add data to your app from connections that have already been defined by you or an
administrator. These can be a database, a folder containing data files, or a connector to an
external data source, such as Salesforce.com.
Do not add a table in Data manager that has already been added as a scripted table with the same
name and same columns in Data load editor.
Manage data - Qlik Sense, February 2024 18

3 Loading and managing data with Data Manager
You can delete connections from Add data by right-clicking the connection and selecting .
If you delete a connection, you must delete any tables from Data manager that used that
connection before you load data.
Do the following:
1. Open your app.
2.
Open the Data manager and then click . You can also click Add data in the .
3. Under Data connections, select an existing connection.
Some connections go directly to their data sources, where you select tables and fields to load. For
example, connections to Salesforce.com or a database go directly to the source for data selection.
4. Select the specific data source you want to add data from if the connection offers a selection.
This differs depending on the type of data source.
l
File-based data sources: Select a file.
l
Databases: Set which database to use.
l
Web files: Enter the URL of the web file.
l
Other data sources: Specified by the connector.
5. Select the tables and fields to load.
6. Optionally, select to apply a data filter if you want to select a subset of the data contained in the fields
you have selected.
If your data source is a file, select Filters. Beside the table to which you want to add a filter, click Add
filter, select a field, select a condition, and then enter a value with which to filter.
Qlik Sense does not support filters on date fields from QVD files.
Note the following:
l
You can apply multiple filters to the same field.
l
You can remove filters in the Associations view of Data manager or from Select data from
source. For the changes to take effect, reload data by clicking the Load data button.
For databases and connectors, when you select Filter data, a text box opens for the filter criteria.
Note the following:
l
Filters are applied to field names from the database. If you rename a field in the Data manager,
you have to apply the filter to the original field name from the database. For example, if a field
is named EMP in your database, and you rename it to EMPLOYEEin the Data manager, you
have to apply the filter EMP = ‘filter_value’ .
l
You can clear data filters in the Associations view of the Data manager. For the changes to
take effect, reload data by clicking the Load data button. You have to split concatenated tables
before clearing filters.
l
Filtering data is not currently available for all connectors, or for attached files.
7. Click Add data to open the data in the Associations view of the data manager. This allows you to
continue to add data sources, transform the data, and associate the tables in Data manager.
Manage data - Qlik Sense, February 2024 19

3 Loading and managing data with Data Manager
Data profiling is enabled by default when you click Add data. Data profiling does the following:
l
Recommends data associations.
l
Auto-qualifies common fields between tables. This adds a unique prefix based on table name.
l
Maps date and time fields to autoCalendar.
Tables are not associated on common field names automatically. You can associate tables in the
Associations view.
If you want to load the data directly into your app, click and then disable data profiling.
This will load the newly selected data from the external data source when you add data.
Tables will be associated on common field names automatically. Date and time fields will not
be created.
For more information, see Managing data associations (page 90).
8. Click Load data when you are done preparing the data. If serious problems are detected, you need to
resolve the problems in Data manager before you can load data into the app.
For more information, see Troubleshooting - Loading data (page 328).
To reload all the data that you have selected from the external source, use the button in the Data
manager footer. This ensures you get all the current data from the source for the selections you have made.
Reloading all the data can take longer than loading only the new data. If the data you loaded previously has
not been changed in the data source, it is not necessary to reload all the data.
Adding data from a new data source
You can add data to your app from a new data source. When you add data from a new data
source, a connection to the data source is created in Data Connections, making it easier to add
more data from the same data source.
Do not add a table in Data manager that has already been added as a scripted table with the same
name and same columns in Data load editor.
You can delete connections from Add data by right-clicking the connection and selecting .
If you delete a connection, you must delete any tables from Data manager that used that
connection before you load data.
Do the following:
1. Open an app.
2.
Open the Data manager and then click . You can also click Add data in the .
3. Under Connect to a new data source, select a source.
4. Enter the connection parameters required by the data source.
Manage data - Qlik Sense, February 2024 20

3 Loading and managing data with Data Manager
For example:
l
File based data sources require that you specify a path to the files and select a file type.
l
Databases such as Oracle and IBMDB2 require database properties and access credentials.
l
Web files require the URL of the web file.
l
ODBC connections require DSN credentials.
5. Select the tables and fields to load.
6. Optionally, select to apply a data filter if you want to select a subset of the data contained in the fields
you have selected.
If your data source is a file, select Filters. Beside the table to which you want to add a filter, click Add
filter, select a field, select a condition, and then enter a value with which to filter.
Qlik Sense does not support filters on date fields from QVD files.
Note the following:
l
You can apply multiple filters to the same field.
l
You can remove filters in the Associations view of Data manager or from Select data from
source. For the changes to take effect, reload data by clicking the Load data button.
For databases and connectors, when you select Filter data, a text box opens for the filter criteria.
Note the following:
l
Filters are applied to field names from the database. If you rename a field in the Data manager,
you have to apply the filter to the original field name from the database. For example, if a field
is named EMP in your database, and you rename it to EMPLOYEEin the Data manager, you
have to apply the filter EMP = ‘filter_value’ .
l
You can clear data filters in the Associations view of the Data manager. For the changes to
take effect, reload data by clicking the Load data button. You have to split concatenated tables
before clearing filters.
l
Filtering data is not currently available for all connectors, or for attached files.
7. Click Add data to open the data in the Associations view of the data manager. This allows you to
continue to add data sources, transform the data, and associate the tables in Data manager.
Data profiling is enabled by default when you click Add data. Data profiling does the following:
l
Recommends data associations.
l
Auto-qualifies common fields between tables. This adds a unique prefix based on table name.
l
Maps date and time fields to autoCalendar.
Tables are not associated on common field names automatically. You can associate tables in the
Associations view.
If you want to load the data directly into your app, click and then disable data profiling.
This will also reload all existing data from data sources when you add the data. Tables will
be associated on common field names automatically. Date and time fields will not be
created.
For more information, see Managing data associations (page 90).
Manage data - Qlik Sense, February 2024 21

3 Loading and managing data with Data Manager
8. Click Load data when you are done preparing the data. If serious problems are detected, you need to
resolve the problems in Data manager before you can load data into the app.
For more information, see Troubleshooting - Loading data (page 328).
Attaching data files and adding the data to the app
You can attach data files to your app, and then use the data in your app.
An attached file is only available in the app that it is attached to. There is no connection to your original data
file, so if you update the original file you need to refresh the attached file.
To avoid exposing restricted data, remove all attached files with section access settings before
publishing the app. Attached files are included when the app is published. If the published app is
copied, the attached files are included in the copy. However, if section access restrictions have been
applied to the attached data files, the section access settings are not retained when the files are
copied, so users of the copied app will be able to see all the data in the attached files.
Limitations
l
The maximum size of a file attached to the app is 50 MB.
l
The maximum total size of files attached to the app, including image files uploaded to the media
library, is 200 MB.
l
It is not possible to attach files in Qlik Sense Desktop.
Attaching several data files quickly
The quickest and in most cases the easiest way to attach and add a set of data files to your app is to just drop
the files in the app.
Do the following:
l
Drop one or more data files in your app.
The files are uploaded and attached to the app, and added to the data model.
When you attach files this way Qlik Sense will try to select the optimal settings for loading the data, for
example, recognizing embedded field names, field delimiters or character set. If a table is added with settings
that are not optimal you can correct the settings by opening the table in the table editor, and clicking Select
data from source.
It is not possible to drop files in the data load editor or in the data model viewer.
Attaching a single data file
You can attach data files one by one. This way you gain more control over file import settings, for example,
embedded field names, field delimiters or character set used.
Manage data - Qlik Sense, February 2024 22

3 Loading and managing data with Data Manager
Do not add a table in Data manager that has already been added as a scripted table with the same
name and same columns in Data load editor.
Do the following:
1. Open an app.
2.
Open the Data manager and then click . You can also click Add data in the .
3. Drop a data file, or click and select a file from your computer to load.
If you try to attach a file with the same name as an already attached file, you get the option to replace
the attached file with the new file.
Each attached file needs to have an unique file name.
4. Select the tables and fields to load.
5. Optionally, select to apply a data filter if you want to select a subset of the data contained in the fields
you have selected.
If your data source is a file, select Filters. Beside the table to which you want to add a filter, click Add
filter, select a field, select a condition, and then enter a value with which to filter.
Qlik Sense does not support filters on date fields from QVD files.
Note the following:
l
You can apply multiple filters to the same field.
l
You can remove filters in the Associations view of Data manager or from Select data from
source. For the changes to take effect, reload data by clicking the Load data button.
6. Click Add data to open the data in the Associations view of the data manager. This allows you to
continue to add data sources, transform the data, and associate the tables in Data manager.
Data profiling is enabled by default when you click Add data. Data profiling does the following:
l
Recommends data associations.
l
Auto-qualifies common fields between tables. This adds a unique prefix based on table name.
l
Maps date and time fields to autoCalendar.
Tables are not associated on common field names automatically. You can associate tables in the
Associations view.
If you want to load the data directly into your app, click and then disable data profiling.
This will also reload all existing data from data sources when you add the data. Tables will
be associated on common field names automatically. Date and time fields will not be
created.
7. Click Load data when you are done preparing the data. If serious problems are detected, you need to
resolve the problems in Data manager before you can load data into the app.
Manage data - Qlik Sense, February 2024 23

3 Loading and managing data with Data Manager
Deleting an attached file
When you delete a table based on an attached file in the data manager, the table is deleted from the data
model, but the attached data file remains in the app. You can delete the data file from the app permanently.
Do the following:
1. Open an app.
2.
Open the Data manager and then click .
3.
Click Attached files.
4. Delete the appropriate file.
The data file is now permanently deleted from the app.
If you delete an attached file that is used in the app, you will not be able to reload the app until you
have removed references to the file in Data manager, or in the load script. You edit load scripts in
Data load editor.
Reload data from an attached file
A file that you upload for an app is attached to the app. It is only available to that app.
There is no connection to your original data file. If you update the original file, you need to refresh the file that
is attached to the app. You can then load the updated data into the app. After reloading the data in Data
manager, click (Refresh data from source) to see the updated data in the table view.
Do not add a table in Data manager that has already been added as a scripted table with the same
name and same columns in Data load editor.
Do the following:
1. Open an app.
2.
Open the Data manager and then click .
3.
Click Attached files.
4. Replace the existing file. The updated file needs to have the same name as the original file. The
content of the data file is refreshed.
5.
Click Add data. Ensure that data profiling is enabled by clicking .
6. In the Associations view or the Tables view, click the table.
7.
Click to update the data.
8. Click Load data to reload the data into the app.
Manage data - Qlik Sense, February 2024 24

3 Loading and managing data with Data Manager
If you have made changes to the field structure of the data file, that is, removed or renamed fields,
this can affect the data model in your app, especially if this involves fields that are used to associate
tables.
Adding data manually
Manual entry in Add data enables you to enter data into an editor in Qlik Sense, and then add
it as a table in Data manager.
Manually entering data is useful if you want to use a limited set of data from another source. For example, if
you only wanted a selection of rows from an Excel spreadsheet or from a table on a webpage to be loaded as
a table into Data manager, you could copy and paste the selected data into Manual entry and then add it as
a table in Data manager. It is also useful if you have a small amount of data that might be faster to add
manually than importing from another data source.
To add data manually, you open Add data, select Manual entry, enter your data into the table, and then add
the table to Data manager. The table editor starts with one row and two columns, but as you add data to the
table, additional empty rows and columns are automatically added to the table.
Manual entry does not automatically save as data is entered. Data entered may be lost if the screen
is refreshed, if the session times out, or if the connection is lost before the data is added to Data
manager.
In addition to typing data, you can copy and paste it from other sources. Manual entry preserves the columns
and rows of data copied from Excel tables.
There are a number of keyboard shortcuts you can use to work effectively and easily in Manual entry.
Shortcuts behavior varies depending if you are selecting cells, rows, or columns, or if you are editing cells in
the table. The following table contains the selecting shortcuts:
Shortcut Description
Arrow keys Navigates between cell selection
Tab Moves the cell selection right. If no cell exists to the right, it moves to the first cell in the next
row.
Shift+Tab Moves the cell selection left. If no cell exists to the left, it moves to the first cell in the
previous row.
Enter Toggles to editing mode
Delete Deletes the current selection
Keyboard shortcuts for selecting
The following table contains the editing shortcuts:
Manage data - Qlik Sense, February 2024 25

3 Loading and managing data with Data Manager
Shortcut Description
Arrow keys Moves the cursors in the cell.
Tab Commits the edit and moves to the next cell to the right
Shift+Tab Commits the edit and moves to the previous cell to the left
Enter Commits the edit and moves to the next cell below
Shift+Enter Commits the edit and moves to the previous cell above
Esc Cancels the edit and toggles to selecting mode
Keyboard shortcuts for editing
Tables created using Manual entry can be edited later to add or remove content. For more information, see
Updating a table from the data source (page 38).
Adding data manually
Do the following:
1. Open an app.
2.
Open the Data manager and then click .
You can also click Add data in the menu.
3. Under In-App, click Manual entry.
4. Type a name for the table.
5. In the table editor, enter your data.
Double-click a cell to start entering data in the cell.
While editing a cell, clicking any other cell in the table commits your edit and selects the other cell.
6. When your data is complete, click Add data.
The table is added to Data manager.
Selecting data fields
You can select which tables and fields to use when you add data, or when you edit a table.
Some data sources, such as a CSV file, contain a single table, while other data sources, such as Microsoft Excel
spreadsheets or databases, can contain several tables.
If a table contains a header row, field names are usually automatically detected, but you may need to change
the Field names setting in some cases. You may also need to change other table options, such as Header size
or Character set, to interpret the data correctly. Table options are different for different types of data sources.
Selecting data from a database
The steps for selecting data from a database depend on how you connect to the database. You can connect to
an ODBC driver as a DSN source, or you can connect directly through a Qlik Database connector that is part of
the Qlik ODBC Connector Package installed with Qlik Sense.
For more information, see ODBC (page 215).
Manage data - Qlik Sense, February 2024 26

3 Loading and managing data with Data Manager
When you add data from a database, the data source can contain several tables.
Do the following:
1. This step is relevant to Databricks only. If your Databricks host supports Unity catalog, the catalog you
specified in the Create new connection dialog will appear in the Catalog field. You can either leave it
unchanged or selected a different catalog from the drop-down list.
While you can select data from multiple databases, all of the databases must belong to the
same catalog.
2. Select a Database from the drop-down list.
Some selection dialogs do not have a Database drop-down list because the database name is entered
when the connection is configured.
3. Select Owner of the database.
The list of Tables is populated with views and tables available in the selected database. Some
databases do not require that owners be specified in the data selection process.
4. Select a table.
5. Select the fields you want to load by checking the box next to each field you want to load.
You can select all fields in the table by checking the box next to the table name.
You can edit the field name by clicking on the existing field name and typing a new name.
This may affect how the table is linked to other tables, as they are joined on common fields
by default.
6. Select additional tables if you want to add data from them.
7. When you are done with your data selection, click Add data to continue with data profiling, and to see
recommendations for table relationships.
If you want to load the data directly into your app, click beside Add data and then disable data
profiling. This will load the selected data as it is, bypassing the data profiling step, and you can start
creating visualizations. Tables will be linked using natural associations, that is, by commonly-named
fields.
Selecting data from a Microsoft Excel spreadsheet
When you add data from a Microsoft Excel spreadsheet, the file can contain several sheets. Each sheet is
loaded as a separate table. An exception is if the sheet has the same field/column structure as another sheet
or loaded table, in which case the tables are concatenated.
Do the following:
Manage data - Qlik Sense, February 2024 27

3 Loading and managing data with Data Manager
1. Make sure you have the appropriate settings for the sheet:
UI item Description
Field
names
Set to specify if the table contains Embedded field names or No field names. Typically
in an Excel spreadsheet, the first row contains the embedded field names. If you select
No field names, fields will be named A,B,C...
Header
size
Set to the number of rows to omit as table header, typically rows that contain general
information that is not in a columnar format.
Settings to assist you with interpreting the table data correctly
Example
My spreadsheet looks like this:
Machine: AEJ12B - -
Date: 2015-10-05 09 - -
Timestamp Order Operator Yield
2015-10-05 09:22 00122344 A 52
2015-10-05 10:31 00153534 A 67
2015-10-05 13:46 00747899 B 86
Spreadsheet example
In this case you probably want to ignore the two first lines, and load a table with the fields Timestamp,
Order, Operator, and Yield. To achieve this, use these settings:
UI item Description
Header
size
2
This means that the first two lines are considered header data and ignored when
loading the file. In this case, the two lines starting with Machine: and Date: are ignored,
as they are not part of the table data.
Field
names
Embedded field names.
This means that the first line that is read is used as field names for the respective
columns. In this case, the first line that will be read is the third line because the two
first lines are header data.
Settings to ignore the two first lines and load the fields
2. Select the first sheet to select data from. You can select all fields in a sheet by checking the box next to
the sheet name.
3. Select the fields you want to load by checking the box next to each field you want to load.
You can edit the field name by clicking on the existing field name and typing a new name.
This may affect how the table is linked to other tables, as they are joined by common fields
by default.
Manage data - Qlik Sense, February 2024 28

3 Loading and managing data with Data Manager
4. When you are done with your data selection, click Add data to continue with data profiling, and to see
recommendations for table relationships.
If you want to load the data directly into your app, click beside Add data and then disable data
profiling. This will load the selected data as it is, bypassing the data profiling step, and you can start
creating visualizations. Tables will be linked using natural associations, that is, by commonly-named
fields.
Selecting data from a table file
You can add data from a large number of data files.
Do the following:
1. Make sure that the appropriate file type is selected in File format.
2. Make sure you have the appropriate settings for the file. File settings are different for different file
types.
3. Select the fields you want to load by checking the box next to each field you want to load. You can also
select all fields in a file by checking the box next to the sheet name.
You can edit the field name by clicking on the existing field name and typing a new name.
This may affect how the table is linked to other tables, as they are joined by common fields
by default.
4.
When you are done with your data selection, click Add data to continue with data profiling, and to see
recommendations for table relationships.
If you want to load the data directly into your app, click beside Add data and then
disable data profiling. This will load the selected data as it is, bypassing the data profiling
step, and you can start creating visualizations. Tables will be linked using natural
associations, that is, by commonly-named fields.
Choosing settings for file types
Delimited table files
These settings are validated for delimited table files, containing a single table where each record is separated
by a line feed, and each field is separated with a delimited character, for example a CSV file.
File format settings
UI item Description
File format for
delimited table files
Set to Delimited or Fixed record.
When you make a selection, the select data dialog will adapt to the file format you
selected.
File format settings for delimited table files
Manage data - Qlik Sense, February 2024 29

3 Loading and managing data with Data Manager
UI item Description
Field names Set to specify if the table contains Embedded field names or No field names.
Delimiter Set the Delimiter character used in your table file.
Quoting Set to specify how to handle quotes:
None = quote characters are not accepted
Standard = standard quoting (quotes can be used as first and last characters of a
field value)
MSQ = modern-style quoting (allowing multi-line content in fields)
Header size Set the number of lines to omit as table header.
Character set Set character set used in the table file.
Comment Data files can contain comments between records, denoted by starting a line with
one or more special characters, for example //.
Specify one or more characters to denote a comment line. Qlik Sense does not load
lines starting with the character(s) specified here.
Ignore EOF Select Ignore EOF if your data contains end-of-file characters as part of the field
value.
Fixed record data files
Fixed record data files contain a single table in which each record (row of data) contains a number of columns
with a fixed field size, usually padded with spaces or tab characters.
Setting field break positions
You can set the field break positions in two different ways:
l
Manually, enter the field break positions separated by commas in Field break positions. Each position
marks the start of a field.
Example: 1,12,24
l
Enable Field breaks to edit field break positions interactively in the field data preview. Field break
positions is updated with the selected positions. You can:
l
Click in the field data preview to insert a field break.
l
Click on a field break to delete it.
l
Drag a field break to move it.
File format settings
UI item Description
Field names Set to specify if the table contains Embedded field names or No field names.
File format settings for fixed record data files
Manage data - Qlik Sense, February 2024 30

3 Loading and managing data with Data Manager
UI item Description
Header size Set Header size to the number of lines to omit as table header.
Character set Set to the character set used in the table file.
Tab size Set to the number of spaces that one tab character represents in the table file.
Record line size Set to the number of lines that one record spans in the table file. Default is 1.
Ignore EOF Select Ignore EOF if your data contains end-of-file characters as part of the field value.
HTML files
HTML files can contain several tables. Qlik Sense interprets all elements with a <TABLE> tag as a table.
File format settings
UI item Description
Field names Set to specify if the table contains Embedded field names or No field names.
Character set Set the character set used in the table file.
File format settings for HTML files
XML files
You can load data that is stored in XML format.
There are no specific file format settings for XML files.
QVD files
You can load data that is stored in QVD format. QVD is a native Qlik format and can only be written to and
read by Qlik Sense or QlikView. The file format is optimized for speed when reading data from a Qlik Sense
script but it is still very compact.
There are no specific file format settings for QVD files.
QVX files
You can load data that is stored in Qlik data eXchange (QVX) format. QVX files are created by custom
connectors developed with the Qlik QVX SDK.
There are no specific file format settings for QVX files.
KML files
You can load map files that are stored in KML format, to use in map visualizations.
There are no specific file format settings for KML files.
Returning to the previous step (Add data)
You can return to the previous step when adding data.
Do the following:
Manage data - Qlik Sense, February 2024 31

3 Loading and managing data with Data Manager
l
Click the back arrow to return to the previous step of Add data.
Filtering data from files
You can create filter conditions when you add data from files. This allows you to select a subset
of data to load. This can be useful when you want to reduce the amount of data loaded, or only
use specific data, such as only sales over $40,000.
The first time that you add data from a file in the Add data step, you can apply filter conditions by clicking
Filters.
Filters button
Subsequently, you can change the conditions by clicking your table in the Data manager, and then clicking
Edit this table. Click Select data from source, and then click Filters.
After you add the data to your app, and apply any filter conditions, you can then load the data into your app.
For more advanced data manipulation, use the Data load editor. See the Scripting for beginners
and Next steps in scripting tutorials to learn more.
The available filter conditions are:
l
=
l
>
l
<
l
>=
l
<=
Consider the following when filtering data. Examples are provided below.
l
You can apply filter conditions to numbers, dates, or text.
l
Wildcard characters are not supported.
l
You can apply multiple conditions. However, conflicting conditions on the same field may result in no
data being returned.
l
Conditions are applied alphabetically to text data. Conditions are case sensitive.
Manage data - Qlik Sense, February 2024 32

3 Loading and managing data with Data Manager
l
You can use more than one letter for text data. For example, >ct will return the word cup, as will >=cu.
Note that >c will also return cup.
l
When you use more than one = condition, all must evaluate to true to return values. However, when
you use more than one = condition on the same field, all values that evaluate to true are returned.
l
The < and > conditions, when combined, must all evaluate to true to return values. If these conditions
are combined with =, all conditions must evaluate to true.
l
The <= and >= conditions, when combined, must all evaluate to true to return values. If these
conditions are combined with =, all conditions must evaluate to true.
l
Filters on date fields from QVD files are not supported.
Examples
These examples use the following values from a single field (one column in a table): cup, fork, and knife.
l
Conditions:
l
=cup
l
=fork
l
=knife
l
Returns: cup, fork, knife
l
The equals condition returns all values that are true.
l
Conditions:
l
>b
l
<d
l
Returns: cup
l
The letter c is both greater than b and lesser than d.
l
Conditions:
l
<b
l
>d
l
Returns: no values
l
There can be no values that are both lesser than b and greater than d.
l
Conditions:
l
=fork
l
>g
l
Returns: no values
l
There can be no values that are both equal to fork and greater than g.
Filtering data from data connectors
Filter data is not available for all connectors.
You enter a data filter expression by selecting Filter data in the Select data to load step. Selecting Filter
data opens a text box where you enter a filter expression. For example:
Manage data - Qlik Sense, February 2024 33

3 Loading and managing data with Data Manager
Sales >= 40000
Filter data selects from individual fields, such as Sales. It operates as an SQL WHERE clause. Most operators
and keywords used in WHERE clauses can be used with Filter data. Valid operators include:
l
=
l
>
l
>=
l
<
l
<=
l
IN
l
BETWEEN
l
LIKE
l
IS NULL
l
IS NOT NULL
Qlik Sense builds a WHERE clause in the data load script from the expression entered in Filter data.
The AND operator can be used to combine operators, such as when you want to filter across more than one
field. For example:
Sales <= 30000 AND RegionID = 45
The OR operator can be used to filter data that matches either condition. For example:
Name = 'Smith' OR Name = 'Jones'
You can get the same results from the INoperator. The INoperator is a shorthand method for using multiple
ORconditions. For example:
Name IN ('Smith', 'Jones')
3.12 Editing a table
You can edit a table that was added to the app in the Data manager overview, to rename the
table, associate the table to other tables, or make field transformations.
To edit a table, select the table in Data manager and click . The table editor is displayed, with a preview of
the data in the table. Each field has a field menu with transformation options. You open the field menu by
clicking . Selecting a field displays the data profiling card pane, which contains a summary of the field’s
data as well as additional transformation options.
If the data contains records with identical data in all fields that are loaded, they are represented by
a single record in the preview table.
Manage data - Qlik Sense, February 2024 34

3 Loading and managing data with Data Manager
Renaming a table
When you add a table in Data manager, the table is assigned a default name, based on the name of the
database table, data file, or Excel worksheet, for example. If the name is non-descriptive or unsuitable, you
can rename it.
Do the following:
1. Click on the table name.
2. Edit the table name.
3. Press Enter or click outside the table name.
The table is now renamed.
Renaming a field
You can rename fields in a table to get a better name that is easier to understand.
Do the following:
1. Click on the field name that you want to rename, or select Rename from the field menu.
2. Type the new name.
Field names must be unique. If you have fields with the same name in several tables, Qlik
Sense will qualify the field names when you add data, that is, add the table name as prefix.
3. Press the Enter key, or click outside the field.
The field is now renamed.
Managing associations to other tables
You can create custom associations to fields in other tables with Associate in the field menu.
Typically, these are the most common cases where you need to create a custom association instead of
following the recommendations:
l
You know which fields to associate the tables with, but the score for this table pair is too low to show
in the list of recommendations.
Create an association based on a single field in each table.
l
The tables contain more than one common field, and they need to be used to form the association.
Create a compound key.
In many cases it is easier to manage to your associations in the Associations view
Changing field type and display format
When data is added, Qlik Sense interprets the field type of each field. The following field types are currently
supported:
Manage data - Qlik Sense, February 2024 35

3 Loading and managing data with Data Manager
l
General
l
Date
l
Timestamp
l
Geo data
If the data was not interpreted correctly, you can adjust the field type. You can also change the input and
display format of a date or timestamp field.
Fields that contain geographical information in the form of names or codes, such as postal areas, cannot be
used for mapping unless they are designated as Geo data fields.
Hiding fields from analysis
You can hide fields so that they are only available in Data manager and Data load editor . You might, for
example, have fields that are only used for calculating another field. You can hide these fields so that they are
not available in the sheets or Insight Advisor assets panel but remain available in Data manager.
For more information, see Hiding fields from analysis (page 55).
Assessing table field data before loading data
You can examine the data in your table for potential quality issues such as null values and outlier values
before you load it using the Summary data profiling card. The Summary card categorizes fields as dimensions
,measures, or temporal fields, providing different data summaries for each and enabling different
transformation options in other data profiling cards. Fields set as measures in the Summary card can be
grouped using the Bucket card. Fields set as dimensions in the Summary card can have a custom order
applied in the Order card. For fields that can be classified in multiple categories, you can switch between each
possible category's summary for the field.
For more information, see Assessing table field data before loading data (page 56).
Replacing field values in a table
You can replace values in a field using the Replace data profiling card. The Replace card enables you to select
one or more values from a field and then replace them with another value. For example, in a data set that
contains country names in both full and abbreviated formats, you could replace them with a single shared
value.
For more information, see Replacing field values in a table (page 58).
Setting field values as null in a table
You can set distinct values from a dimension field to be treated as null values using the Set nulls data
profiling card. The Set nulls card enables you to select values from a table field and then manually set them
as null. For example, if your data set represents nulls using a character such as X, you can use the Set nulls
card to enable Qlik Sense to treat that value as null. The Set nulls card can also be used to clean your data set
by setting unwanted values as nulls.
For more information, see Setting field values as null in a table (page 60).
Manage data - Qlik Sense, February 2024 36

3 Loading and managing data with Data Manager
Setting a custom order for field values
Depending on your data, it may be more meaningful to display dimension values in an order other than
alphabetical or numerical. Fields set as dimensions in the Summary data profiling card may have a custom
order of data applied using the Order data profiling card, enabling you to set the default organization of field
data in visualizations.
For more information, see Customizing the order of dimension values (page 61).
Splitting a field in a table
You can extract information from an existing field into new fields using the Split data profiling card. The Split
card enables you to split content from a field into multiple fields. You could, for example, split a field that
contains an address to extract the zip or postal code. This enables you to quickly create new fields containing
relevant sections of existing data.
For more information, see Splitting a field in a table (page 62).
Grouping measure data into ranges
You can group values in a table measure field into ranges using the Bucket data profiling card. The Bucket
card enables you to group a field’s value in user-defined buckets, creating a new field that is added to the
table. You could, for example, group ages into age ranges to use as a dimensions in your visualizations.
Viewing field transformation details
You can view the current operations and transformations performed on a field and their sequence in the
Details dialog. Details enables you to understand where a field came from, what changes have been made to
it, and the sequence in which the transformations were applied.
For more information, see Viewing table and field transformation details in Data manager (page 79).
Unpivoting crosstab data
If you have loaded data in crosstab format, the best option is usually to unpivot the table, that is, transposing
parts of the table into rows. This will make it easier to work with the data and create associations to your
other data tables.
For more information, see Unpivoting crosstab data in the data manager (page 67).
Manage data - Qlik Sense, February 2024 37

3 Loading and managing data with Data Manager
Updating a table from the data source
You may want to change the selection of fields from the data source. For example, you may need to add a
field that was left out, or the data source may have been updated with added fields. In this case, you can
update the table from the data source. If the table was created with Manual entry, you can add, edit, or
delete table data as well as add new rows and columns. For more information, see Adding data manually
(page 25).
Do the following:
1. Click Select data from source.
The data selection wizard opens with your current selections.
2. Make the required changes in selection.
3. Click Add data with data profiling enabled.
The table is now updated with fields according to the selections you made.
Adding a calculated field
There are many cases where you need to adjust or transform the field data that is loaded. For example, you
may need to concatenate a first name and a last name to a full name, extract part of a product number,
convert the data format or multiply two numbers.
You can add calculated fields to manage many cases like this. A calculated field uses an expression to define
the result of the field. You can use functions, fields and operators in the expression. You can only refer to fields
in the table that you are editing.
Sorting a table
You can sort a table based on a specific field while you are editing the table, to get a better overview of the
data. You can only sort on one field at a time.
Do the following:
l
From the field menu, select Sort.
The table data is now sorted in ascending order according to this field. If you want to sort in descending order,
select Sort again.
The sort order is not maintained in the loaded app data.
Undo and redo actions
You can undo and redo your table edit actions by clicking and .
The undo/redo history is cleared when you close the table editor.
Manage data - Qlik Sense, February 2024 38

3 Loading and managing data with Data Manager
Associating data in the table editor
You can create custom associations to fields in other tables with Associate in the field menu of
the Data manager table editor.
In many cases it is easier to manage to your associations in the Associations view.
Typically, these are the most common cases where you need to create a custom association instead of
following the recommendations:
l
You know which fields to associate the tables with, but the score for this table pair is too low to show
in the list of recommendations.
Create an association based on a single field in each table.
l
The tables contain more than one common field, and they need to be used to form the association.
Create a compound key.
Creating an association using a single field
If the two tables contain related data, but the association does not show up as recommended, you can define
a custom association in the table editor. This creates a key field to associate the tables.
Do the following:
1.
From the data manager overview, click on one of the tables you want to associate.
The table editor opens.
2. Select Associate from the field menu of the field you want to use in the key field.
The Associate tables editor opens, with a preview of the field you selected in the left table. Now you
need to select which field to associate this with in the right hand table.
3. Click Select table and select the table to associate with.
4.
Click and select the field to associate with.
The right hand table will show preview data of the field you selected. Now you can compare the left
table with the right to check that they contain matching data. You can search in the tables with to
compare them more easily.
5. Enter a name for the key field that will be created in Name.
It's not possible to use the same name as an existing field in either of the tables.
6. Click Associate.
The tables are now associated by the two fields you selected, using a key field. This is indicated with . Click
to display options to edit or break the association.
Creating a compound key
If two tables contain more than one common field that would create an association, Qlik Sense creates a
synthetic key to handle the association. The recommended way of fixing this is to create a compound key.
This can be achieved by creating a custom association containing all fields that should be associated.
Do the following:
Manage data - Qlik Sense, February 2024 39

3 Loading and managing data with Data Manager
1.
From the data manager overview, click on one of the tables you want to associate.
The table editor opens.
2. Select Associate from the field menu of one of the fields you want to include in the compound key
field.
The Associate tables editor opens, with a preview of the field you selected in the left table.
3.
Click to add the other fields you want to include in the compound key field.
The preview is updated with the compound key data.
Now you need to select which fields to associate this with in the right hand table.
4. Click Select table and select the fields you want to include in the compound key field.
5.
Click and select the field to associate with. You need to select them in the same order as in the left
hand table.
To make it easier to interpret the data in the key you can also add delimiter characters.
The right hand table will show preview data of the field you selected.
Now you can compare the left table with the right to check that they contain matching data. You can
search in the tables with to compare them more easily.
6. Enter a name for the key field that will be created in Name.
7. Click Associate.
The tables are now associated by the fields you selected, using a compound key field.
Limitations
There are some limitations to the use of compound keys.
l
It is not possible to create a compound key in a concatenated table.
l
If you use a calculated field in a compound key, the calculated field expression is expanded in the
compound key expression. There is no reference to the calculated field, that is, if you edit the
calculated field, the compound key is not updated.
Editing an association
You can edit an association to rename it, or change the associated fields.
Do the following:
1.
Click to show the association menu.
2.
Click to edit the association.
The Associate tables editor opens, and you can rename the association or change the associated fields.
Breaking an association
If you have a created an association between two tables that is not needed, you can break it.
Do the following:
1.
Click to show the association menu.
2.
Click to break the association.
The tables are now not associated anymore.
Manage data - Qlik Sense, February 2024 40

3 Loading and managing data with Data Manager
Using calculated fields
There are many cases where you need to adjust or transform the field data that is loaded. For
example, you may need to concatenate a first name and a last name to a full name, extract part
of a product number, convert the data format or multiply two numbers.
You can add calculated fields to manage many cases like this. A calculated field uses an expression to define
the result of the field. You can use functions, fields and operators in the expression. You can only refer to fields
in the table that you are editing. You can reference another calculated field in your calculated field.
You add and edit calculated fields in the table editor of the data manager.
Adding a calculated field
Do the following:
1. Click Add field and select Calculated field.
The editor for Add calculated field opens.
2. Type the name of the calculated field in Name.
3. Define the expression of the calculated field in Expression. There are two different ways to do this.
l
Use the (Functions), (Fields) and (Operators) lists to select and insert items into the
expression.
The item you select is inserted at the cursor position in Expression.
l
Type the expression for the calculated field in Expression.
As you type, you get assistance with suggested functions and fields, as well as function syntax.
Example results of the calculated field is displayed in Preview.
4. Click Create to create the calculated field and close the calculated field editor.
Editing a calculated field
You can change the name or edit the expression of a calculated field.
Do the following:
1. Select Edit from the drop-down menu next to the field name.
The editor for Update calculated field opens.
2. Edit the name of the calculated field in Name if you want to change it.
3. Edit the expression of the calculated field.
4. Click Update to update the calculated field and close the calculated field editor.
Which functions can I use in a calculated field expression?
You can use the functions listed here when you create a calculated field expression. This is a subset of the
expressions available in the data load script. The expression cannot result in any aggregation of data from
several records, or use inter-record functions to refer to data in other records.
String functions that can be used in a calculated field expression
These functions can be used to modify or extract data in text string format.
Manage data - Qlik Sense, February 2024 41

3 Loading and managing data with Data Manager
Function Description
Capitalize Capitalize() returns the string with all words in initial uppercase letters.
Chr Chr() returns the Unicode character corresponding to the input integer.
FindOneOf FindOneOf() searches a string to find the position of the occurrence of any character
from a set of provided characters. The position of the first occurrence of any
character from the search set is returned unless a third argument (with a value
greater than 1) is supplied. If no match is found, 0 is returned.
Index Index() searches a string to find the starting position of the nth occurrence of a
provided substring. An optional third argument provides the value of n, which is 1 if
omitted. A negative value searches from the end of the string. The positions in the
string are numbered from 1 and up.
KeepChar KeepChar() returns a string consisting of the first string ,'text', less any of the
characters NOT contained in the second string, "keep_chars".
Left Left() returns a string consisting of the first (leftmost) characters of the input string,
where the number of characters is determined by the second argument.
Len Len() returns the length of the input string.
Lower Lower() converts all the characters in the input string to lower case.
LTrim LTrim() returns the input string trimmed of any leading spaces.
Mid Mid() returns the part of the input string starting at the position of the character
defined by the second argument, 'start', and returning the number of characters
defined by the third argument, 'count'. If 'count' is omitted, the rest of the input
string is returned. The first character in the input string is numbered 1.
Ord Ord() returns the Unicode code point number of the first character of the input
string.
PurgeChar PurgeChar() returns a string consisting of the characters contained in the input
string ('text'), excluding any that appear in the second argument ('remove_chars').
Repeat Repeat() forms a string consisting of the input string repeated the number of times
defined by the second argument.
Replace Replace() returns a string after replacing all occurrences of a given substring within
the input string with another substring. The function is non-recursive and works from
left to right.
Right Right() returns a string consisting of the last (rightmost) characters of the input
string, where the number of characters is determined by the second argument.
RTrim RTrim() returns the input string trimmed of any trailing spaces.
SubStringCount SubStringCount() returns the number of occurrences of the specified substring in
the input string text. If there is no match, 0 is returned.
String functions
Manage data - Qlik Sense, February 2024 42

3 Loading and managing data with Data Manager
Function Description
TextBetween TextBetween() returns the text in the input string that occurs between the
characters specified as delimiters.
Trim Trim() returns the input string trimmed of any leading and trailing spaces.
Upper Upper() converts all the characters in the input string to upper case for all text
characters in the expression. Numbers and symbols are ignored.
Date functions that can be used in a calculated field expression
Qlik Sense date and time functions are used to transform and convert date and time values.
Functions are based on a date-time serial number that equals the number of days since December 30, 1899.
The integer value represents the day and the fractional value represents the time of the day.
Qlik Sense uses the numerical value of the argument, so a number is valid as a argument also when it is not
formatted as a date or a time. If the argument does not correspond to a numerical value, for example,
because it is a string, then Qlik Sense attempts to interpret the string according to the date and time
environment variables.
If the date format used in the argument does not correspond to the one set in the DateFormat system
variable, Qlik Sense will not be able to interpret the date correctly. To resolve this, either change the settings
or use an interpretation function.
Function Description
addmonths This function returns the date occurring n months after startdate or, if n is
negative, the date occurring n months before startdate.
addyears This function returns the date occurring n years after startdate or, if n is
negative, the date occurring n years before startdate.
age The age function returns the age at the time of timestamp (in completed years)
of somebody born on date_of_birth.
converttolocaltime Converts a UTC or GMT timestamp to local time as a dual value. The place can
be any of a number of cities, places and time zones around the world.
day This function returns an integer representing the day when the fraction of the
expression is interpreted as a date according to the standard number
interpretation.
dayend This function returns a value corresponding to a timestamp of the final
millisecond of the day contained in time. The default output format will be the
TimestampFormat set in the script.
daylightsaving Converts a UTC or GMT timestamp to local time as a dual value. The place can
be any of a number of cities, places and time zones around the world.
Date functions
Manage data - Qlik Sense, February 2024 43

3 Loading and managing data with Data Manager
Function Description
dayname This function returns a value showing the date with an underlying numeric
value corresponding to a timestamp of the first millisecond of the day
containing time.
daynumberofquarter Converts a UTC or GMT timestamp to local time as a dual value. The place can
be any of a number of cities, places and time zones around the world.
daynumberofyear This function calculates the day number of the year in which a timestamp falls.
The calculation is made from the first millisecond of the first day of the year,
but the first month can be offset.
daystart This function returns a value corresponding to a timestamp with the first
millisecond of the day contained in the time argument. The default output
format will be the TimestampFormat set in the script.
firstworkdate The firstworkdate function returns the latest starting date to achieve no_of_
workdays (Monday-Friday) ending no later than end_date taking into account
any optionally listed holidays. end_date and holiday should be valid dates or
timestamps.
GMT This function returns the current Greenwich Mean Time, as derived from the
regional settings.
hour This function returns an integer representing the hour when the fraction of the
expression is interpreted as a time according to the standard number
interpretation.
inday This function returns True if timestamp lies inside the day containing base_
timestamp.
indaytotime This function returns True if timestamp lies inside the part of day containing
base_timestamp up until and including the exact millisecond of base_
timestamp.
inlunarweek This function determines if timestamp lies inside the lunar week containing
base_date. Lunar weeks in Qlik Sense are defined by counting January 1 as the
first day of the week., Apart from the final week of the year, each week will
contain exactly seven days.
inlunarweektodate This function finds if timestamp lies inside the part of the lunar week up to and
including the last millisecond of base_date. Lunar weeks in Qlik Sense are
defined by counting January 1 as the first day of the week and, apart from the
final week of the year, will contain exactly seven days.
inmonth This function returns True if timestamp lies inside the month containing base_
date.
inmonths This function finds if a timestamp falls within the same month, bi-month,
quarter, four-month period, or half-year as a base date. It is also possible to find
if the timestamp falls within a previous or following time period.
Manage data - Qlik Sense, February 2024 44

3 Loading and managing data with Data Manager
Function Description
inmonthstodate This function finds if a timestamp falls within the part a period of the month, bi-
month, quarter, four-month period, or half-year up to and including the last
millisecond of base_date. It is also possible to find if the timestamp falls within
a previous or following time period.
inmonthtodate Returns True if date lies inside the part of month containing basedate up until
and including the last millisecond of basedate.
inquarter This function returns True if timestamp lies inside the quarter containing base_
date.
inquartertodate This function returns True if timestamp lies inside the part of the quarter
containing base_date up until and including the last millisecond of base_date.
inweek This function returns True if timestamp lies inside the week containing base_
date.
inweektodate This function returns True if timestamp lies inside the part of week containing
base_date up until and including the last millisecond of base_date.
inyear This function returns True if timestamp lies inside the year containing base_
date.
inyeartodate This function returns True if timestamp lies inside the part of year containing
base_date up until and including the last millisecond of base_date.
lastworkdate The lastworkdate function returns the earliest ending date to achieve no_of_
workdays (Monday-Friday) if starting at start_date taking into account any
optionally listed holiday. start_date and holiday should be valid dates or
timestamps.
localtime This function returns a timestamp of the current time for a specified time zone.
lunarweekend This function returns a value corresponding to a timestamp of the last
millisecond of the last day of the lunar week containing date. Lunar weeks in
Qlik Sense are defined by counting January 1 as the first day of the week and,
apart from the final week of the year, will contain exactly seven days.
lunarweekname This function returns a display value showing the year and lunar week number
corresponding to a timestamp of the first millisecond of the first day of the
lunar week containing date. Lunar weeks in Qlik Sense are defined by counting
January 1as the first day of the week and, apart from the final week of the year,
will contain exactly seven days.
lunarweekstart This function returns a value corresponding to a timestamp of the first
millisecond of the first day of the lunar week containing date. Lunar weeks in
Qlik Sense are defined by counting January 1 as the first day of the week and,
apart from the final week of the year, will contain exactly seven days.
makedate This function returns a date calculated from the year YYYY, the month MM and
the day DD.
Manage data - Qlik Sense, February 2024 45

3 Loading and managing data with Data Manager
Function Description
maketime This function returns a time calculated from the hour hh, the minute mm, and
the second ss.
makeweekdate This function returns a date calculated from the year, the week number, and
the day of week .
minute This function returns an integer representing the minute when the fraction of
the expression is interpreted as a time according to the standard number
interpretation.
month This function returns a dual value: a month name as defined in the environment
variable MonthNames and an integer between 1-12. The month is calculated
from the date interpretation of the expression, according to the standard
number interpretation.
monthend This function returns a value corresponding to a timestamp of the last
millisecond of the last day of the month containing date. The default output
format will be the DateFormat set in the script.
monthname This function returns a display value showing the month (formatted according
to the MonthNames script variable) and year with an underlying numeric value
corresponding to a timestamp of the first millisecond of the first day of the
month.
monthsend This function returns a value corresponding to a timestamp of the last
millisecond of the month, bi-month, quarter, four-month period, or half-year
containing a base date. It is also possible to find the timestamp for a previous
or following time period.
monthsname This function returns a display value representing the range of the months of
the period (formatted according to the MonthNames script variable) as well as
the year. The underlying numeric value corresponds to a timestamp of the first
millisecond of the month, bi-month, quarter, four-month period, or half-year
containing a base date.
monthsstart This function returns a value corresponding to the timestamp of the first
millisecond of the month, bi-month, quarter, four-month period, or half-year
containing a base date. It is also possible to find the timestamp for a previous
or following time period.The default output format is the DateFormat set in the
script.
monthstart This function returns a value corresponding to a timestamp of the first
millisecond of the first day of the month containing date. The default output
format will be the DateFormat set in the script.
networkdays The networkdays function returns the number of working days (Monday-
Friday) between and including start_date and end_date taking into account
any optionally listed holiday.
Manage data - Qlik Sense, February 2024 46

3 Loading and managing data with Data Manager
Function Description
now This function returns a timestamp of the current time. The function returns
values in the TimeStamp system variable format. The default timer_mode
value is 1.
quarterend This function returns a value corresponding to a timestamp of the last
millisecond of the quarter containing date. The default output format will be
the DateFormat set in the script.
quartername This function returns a display value showing the months of the quarter
(formatted according to the MonthNames script variable) and year with an
underlying numeric value corresponding to a timestamp of the first millisecond
of the first day of the quarter.
quarterstart This function returns a value corresponding to a timestamp of the first
millisecond of the quarter containing date. The default output format will be
the DateFormat set in the script.
second This function returns an integer representing the second when the fraction of
the expression is interpreted as a time according to the standard number
interpretation.
timezone This function returns the time zone, as defined on the computer where the Qlik
engine is running.
today This function returns the current date. The function returns values in the
DateFormat system variable format.
UTC Returns the current Coordinated Universal Time.
week This function returns an integer representing the week number according to ISO
8601. The week number is calculated from the date interpretation of the
expression, according to the standard number interpretation.
weekday This function returns a dual value with: A day name as defined in the
environment variable DayNames. An integer between 0-6 corresponding to the
nominal day of the week (0-6).
weekend This function returns a value corresponding to a timestamp of the last
millisecond of the last day of the calendar week containing date. The default
output format will be the DateFormat set in the script.
weekname This function returns a value showing the year and week number with an
underlying numeric value corresponding to a timestamp of the first millisecond
of the first day of the week containing date.
weekstart This function returns a value corresponding to a timestamp of the first
millisecond of the first day of the calendar week containing date. The default
output format is the DateFormat set in the script.
Manage data - Qlik Sense, February 2024 47

3 Loading and managing data with Data Manager
Function Description
weekyear This function returns the year to which the week number belongs according to
the environment variables. The week number ranges between 1 and
approximately 52.
year This function returns an integer representing the year when the expression is
interpreted as a date according to the standard number interpretation.
yearend This function returns a value corresponding to a timestamp of the last
millisecond of the last day of the year containing date. The default output
format will be the DateFormat set in the script.
yearname This function returns a four-digit year as display value with an underlying
numeric value corresponding to a timestamp of the first millisecond of the first
day of the year containing date.
yearstart This function returns a timestamp corresponding to the start of the first day of
the year containing date. The default output format will be the DateFormat set
in the script.
yeartodate This function finds if the input timestamp falls within the year of the date the
script was last loaded, and returns True if it does, False if it does not.
Formatting and interpretation functions that can be used in a calculated field expression
The formatting functions use the numeric value of the input expression, and convert this to a text value. In
contrast, the interpretation functions do the opposite: they take string expressions and evaluate them as
numbers, specifying the format of the resulting number. In both cases the output value is dual, with a text
value and a numeric value.
For example, consider the differences in output between the Date and the Date# functions.
Function Output (text) Output (numeric)
Date#('20140831', 'YYYYMMDD')
20140831 41882
Date(41882, 'YYYY.MM.DD')
2014.08.31 41882
Date and the Date# functions
These functions are useful when your data contains date fields that are not interpreted as dates as the format
does not correspond to the date format setting in Qlik Sense. In this case, it can be useful to nest the
functions:
Date(Date#(DateInput, 'YYYYMMDD'),'YYYY.MM.DD')
This will interpret the DateInput field according to the input format, YYYYMMDD, and return it in the format
you want to use, YYYY.MM.DD.
Manage data - Qlik Sense, February 2024 48

3 Loading and managing data with Data Manager
Function Description
Date Date() formats an expression as a date using the format set in the system variables in
the data load script, or the operating system, or a format string, if supplied.
Date# Date# evaluates an expression as a date in the format specified in the second argument,
if supplied.
Dual Dual() combines a number and a string into a single record, such that the number
representation of the record can be used for sorting and calculation purposes, while the
string value can be used for display purposes.
Interval Interval() formats a number as a time interval using the format in the system variables
in the data load script, or the operating system, or a format string, if supplied.
Interval# Interval#() evaluates a text expression as a time interval in the format set in the
operating system, by default, or in the format specified in the second argument, if
supplied.
Money Money() formats an expression numerically as a money value, in the format set in the
system variables set in the data load script, or in the operating system, unless a format
string is supplied, and optional decimal and thousands separators.
Money# Money#() converts a text string to a money value, in the format set in the load script or
the operating system, unless a format string is supplied. Custom decimal and thousand
separator symbols are optional parameters.
Num Num() formats a number, that is it converts the numeric value of the input to display
text using the format specified in the second parameter. If the second parameter is
omitted, it uses the decimal and thousand separators set in the data load script. Custom
decimal and thousand separator symbols are optional parameters.
Num# Num#() interprets a text string as a numerical value, that is it converts the input string to
a number using the format specified in the second parameter. If the second parameter is
omitted, it uses the decimal and thousand separators set in the data load script. Custom
decimal and thousand separator symbols are optional parameters.
Text Text() forces the expression to be treated as text, even if a numeric interpretation is
possible.
Time Time() formats an expression as a time value, in the time format set in the system
variables in the data load script, or in the operating system, unless a format string is
supplied.
Time# Time#() evaluates an expression as a time value, in the time format set in the data load
script or the operating system, unless a format string is supplied.
Timestamp TimeStamp() formats an expression as a date and time value, in the timestamp format
set in the system variables in the data load script, or in the operating system, unless a
format string is supplied.
Formatting and interpretation functions
Manage data - Qlik Sense, February 2024 49

3 Loading and managing data with Data Manager
Function Description
Timestamp# Timestamp#() evaluates an expression as a date and time value, in the timestamp
format set in the data load script or the operating system, unless a format string is
supplied.
Numeric functions that can be used in a calculated field expression
You can use these functions to round numeric values.
Function Description
ceil Ceil() rounds up a number to the nearest multiple of the step shifted by the offset number.
div Div() returns the integer part of the arithmetic division of the first argument by the second
argument. Both parameters are interpreted as real numbers, that is, they do not have to be
integers.
evens Even() returns True (-1), if integer_number is an even integer or zero. It returns False (0), if
integer_number is an odd integer, and NULL if integer_number is not an integer.
fabs Fabs() returns the absolute value of x. The result is a positive number.
fact Fact() returns the factorial of a positive integer x.
floor Floor() rounds down a number to the nearest multiple of the step shifted by the offset
number.
fmod fmod() is a generalized modulo function that returns the remainder part of the integer
division of the first argument (the dividend) by the second argument(the divisor). The result
is a real number. Both arguments are interpreted as real numbers, that is, they do not have
to be integers.
frac Frac() returns the fraction part of x.
mod Mod() is a mathematical modulo function that returns the non-negative remainder of an
integer division. The first argument is the dividend, the second argument is the divisor, Both
arguments must be integer values.
odd Odd() returns True (-1), if integer_number is an odd integer or zero. It returns False (0), if
integer_number is an even integer, and NULL if integer_number is not an integer.
round Round() returns the result of rounding a number up or down to the nearest multiple of step
shifted by the offset number.
sign Sign() returns 1, 0 or -1 depending on whether x is a positive number, 0, or a negative
number.
Numeric functions
Conditional functions that can be used in a calculated field expression
You can use these functions to evaluate a condition and then return different answers depending on the
condition value.
Manage data - Qlik Sense, February 2024 50

3 Loading and managing data with Data Manager
Function Description
alt The alt function returns the first of the parameters that has a valid number representation.
If no such match is found, the last parameter will be returned. Any number of parameters
can be used.
class The class function assigns the first parameter to a class interval. The result is a dual value
with a<=x<b as the textual value, where a and b are the upper and lower limits of the bin,
and the lower bound as numeric value.
if The if function returns a value depending on whether the condition provided with the
function evaluates as True or False.
match The match function compares the first parameter with all the following ones and returns
the numeric location of the expressions that match. The comparison is case sensitive.
mixmatch The mixmatch function compares the first parameter with all the following ones and
returns the numeric location of the expressions that match. The comparison is case
insensitive and insensitive to the Japanese Hiragana and Katakana character systems.
pick The pick function returns the n:th expression in the list.
wildmatch The wildmatch function compares the first parameter with all the following ones and
returns the number of the expression that matches. It permits the use of wildcard
characters ( * and ?) in the comparison strings. * matches any sequence of characters. ?
matches any single character. The comparison is case insensitive and insensitive to the
Japanese Hiragana and Katakana character systems.
Conditional functions
NULL functions that can used in a calculated field expression
You can used these functions to return or detect null values.
Function Description
Null The Null function returns a NULL value.
IsNull The IsNull function tests if the value of an expression is NULL and if so, returns -1 (True),
otherwise 0 (False).
NULL functions
Mathematical functions that can used in a calculated field expression
You can use these functions for mathematical calculations.
Function Description
e The function returns the base of the natural logarithms, e ( 2.71828...).
rand The function returns a random number between 0 and 1. This can be used to create sample
data.
Mathematical functions
Manage data - Qlik Sense, February 2024 51

3 Loading and managing data with Data Manager
Exponential and Logarithmic functions that can used in a calculated field expression
You can use these functions for exponential and logarithmic calculations.
Function Description
exp The natural exponential function, e^x, using the natural logarithm e as base. The result is a
positive number.
log The natural logarithm of x. The function is only defined if x> 0. The result is a number.
log10 The common logarithm (base 10) of x. The function is only defined if x> 0. The result is a
number.
pow Returns x to the power of y. The result is a number.
sqr x squared (x to the power of 2). The result is a number.
sqrt Square root of x. The function is only defined if x >= 0. The result is a positive number.
Exponential and Logarithmic functions
Distribution functions that can used in a calculated field expression
You can use these functions for statistical distribution calculations.
Function Description
CHIDIST ChiDist() returns the one-tailed probability of the chi
2
distribution. The chi
2
distribution
is associated with a chi
2
test.
CHIINV ChiInv() returns the inverse of the one-tailed probability of the chi
2
distribution.
FDIST FDist() returns the accumulated probability of the F distribution.
FINV FInv() returns the inverse of the accumulated probability of the F distribution.
NORMDIST NormDist() returns the cumulative normal distribution for the specified mean and
standard deviation. If mean = 0 and standard_dev = 1, the function returns the standard
normal distribution.
NORMINV NormInv() returns the inverse of the normal cumulative distribution for the specified mean
and standard deviation.
TDIST TDist() returns the probability for the student's t distribution where a numeric value is a
calculated value of t for which the probability is to be computed.
TINV TInv() returns the t value of the student's t distribution as a function of the probability
and the degrees of freedom.
Distribution functions
Geospatial functions that can used in a calculated field expression
You can use this function to handle geospatial data.
Manage data - Qlik Sense, February 2024 52

3 Loading and managing data with Data Manager
Function Description
GeoMakePoint GeoMakePoint() is used in scripts and chart expressions to create and tag a point with
latitude and longitude.
Geospatial functions
Color functions that can used in a calculated field expression
You can use these functions for setting and evaluating color properties.
Function Description
ARGB ARGB() is used in expressions to set or evaluate the color properties of a chart object, where
the color is defined by a red component r, a green component g, and a blue component b,
with an alpha factor (opacity) of alpha.
HSL HSL() is used in expressions to set or evaluate the color properties of a chart object, where
the color is defined by values of hue, saturation, and luminosity between 0 and 1.
RGB RGB() returns an integer corresponding to the color code of the color defined by the three
parameters: the red component r, the green component g, and the blue component b. These
components must have integer values between 0 and 255. The function can be used in
expressions to set or evaluate the color properties of a chart object.
Color functions
Logical functions that can used in a calculated field expression
You can use these functions for handling logical operations.
Function Description
IsNum Returns -1 (True) if the expression can be interpreted as a number, otherwise 0 (False).
IsText Returns -1 (True) if the expression has a text representation, otherwise 0 (False).
Logical functions
System functions that can be used in a calculated field expression
You can use these functions for accerssing system ,device, and Qlik Sense app properties.
Function Description
OSUser This function returns a string containing the name of the user that is currently connected.
It can be used in both the data load script and in a chart expression.
ReloadTime This function returns a timestamp for when the last data load finished. It can be used in
both the data load script and in a chart expression.
System functions
Manage data - Qlik Sense, February 2024 53

3 Loading and managing data with Data Manager
Changing field types
When data is added, Qlik Sense interprets the field type of each field. The following field types
are currently supported:
l
General
l
Date
l
Timestamp
l
Geo data
If the data was not interpreted correctly, you can adjust the field type. You can also change the input and
display format of a data or timestamp field.
To open the table editor, click on the data table you want to edit.
It is not possible to change field type or display format of fields in some cases.
l
The table is the result of concatenating two or more tables.
l
The field is already recognized as a date or a timestamp.
Making sure a date or timestamp field is recognized correctly
If a date or timestamp field is not recognized as a date or a timestamp, that is, it is marked with General,
you can make sure it is interpreted correctly.
Do the following:
1.
Click on above the field heading.
The data format dialog opens.
2. Change Field type to Date or Timestamp.
3. Change the format string in Input format to interpret the date correctly. You can use a prepared
format from the drop down list, or write your own format string.
It is not possible to use a single quote in the format string.
4. If you want to use a display format other than the default format in your app, write or select a format
string in Display format.
If you leave it empty, the app default display format is used.
Changing the display format of a date or timestamp field
Each app has default display formats for date and timestamp fields. You can change the display format for an
individual date or timestamp field.
Do the following:
Manage data - Qlik Sense, February 2024 54

3 Loading and managing data with Data Manager
1.
Click on or above the field heading.
The data format dialog opens.
2. Change the format string in Display format. Either use a prepared format from the drop down list, or
write your own format string..
Changing a field type to geographical data
If a field with values such as city and country names or ISO symbols is not recognized as geographical data,
you can change the field type to Geo data.
Do the following:
1.
Click on above the field heading.
The data format dialog opens.
2. Select Geo data from the Field type drop-down menu.
3. Select the type of geographical data from the Geo data drop-down menu.
The options are City, Country, Country code ISO2, and Country code ISO3. ISO2 and ISO3 are from
ISO 3166, the International Standards Organization's codes for countries. ISO2 contains two-character
codes, and ISO3 contains three-character codes. For example, the codes for Sweden are SE and SWE.
When assigning an ISO code, be sure that the values in the field match the code you assign. If you
assign ISO3 to a field with two-character code values, location coordinates will not be assigned
correctly.
4. For City data, select the related field in the table that contains geographical data for countries.
There may be only one related country field, but it is possible to have multiple fields with geographical
data for countries. For example, one field may have long names such as France and another field that
designates countries by country codes such as ISO2. But the fields appear in the Associated country
list only if they have been designated as Geo data.
If no field has been designated as a Geo data country field, then the Associated country list does not
appear when you designate a field as City.
When a field is assigned the Geo data field type, either by the user or automatically by Qlik Sense, a field
containing geographical coordinates, either point or polygon data, is associated with it. The associated fields
containing the coordinates are visible in the Data model viewer. These coordinates are required for apps that
use Map objects.
Fields that contain geographical information in the form of names or codes, such as postal areas, cannot be
used for mapping unless they are designated as Geo data fields.
The fields assigned the Geo data type continue to hold string values, such as Mexico and MX, but when they
are used in a Map object, the mapping coordinates come from the fields containing the point or polygon data.
Hiding fields from analysis
You can hide data fields that you do not want available when building visualizations in sheet
view or in Insight Advisor.
Manage data - Qlik Sense, February 2024 55

3 Loading and managing data with Data Manager
You might, for example, have fields that are only used for calculating another field. You can hide these fields in
Data manager so that they are not available in the assets panel of sheets or from Insight Advisor but remain
available in Data manager and Data load editor. This can be used to remove information that may be
redundant or unnecessary to your current analysis or insights, including only relevant information and making
it easier to read and analyze.
When hiding a field, all existing relationships the field has, such as associations or use in calculations, will be
maintained. If a field is currently in use, such as in a master item or in an existing chart, it will continue to be
available there, but will not be available for use in new master items or visualizations until it is shown again.
You can view all your hidden fields in Data manager by going into Data load editor and opening
the auto-generated section. All hidden fields will be listed as
TAG FIELD <field name> WITH
'$hidden';
Hiding a field from analysis
Do the following:
1.
Click on above the field heading.
2. Click Hide in Analysis.
The field is now hidden in sheet view and in Insight Advisor. Hidden fields have added above the field
heading.
Showing a hidden field
Do the following:
1.
Click on or above the field heading.
2. Click Show in Analysis.
The field is now available in sheet view and in Insight Advisor. The above the field heading will be
removed.
Assessing table field data before loading data
To examine your data for potential quality issues such as null or outlier before you load it into
Qlik Sense, you view a summary of the data using the Summary data profiling card.
In addition, the Summary card enables you to view different possible data interpretations, such as viewing
the fields data as a dimensionor measure.
You access the Summary card by editing a table in Data manager and selecting a table field. When a field is
selected in the table editor, Qlik Sense examines the data type, metadata, and values present. The field is then
categorized as either a dimension, measure, or temporal field, and an analysis is presented in the Summary
card. Fields whose data can be categorized as either a dimension or measure can switch preview to display
Manage data - Qlik Sense, February 2024 56

3 Loading and managing data with Data Manager
them as a dimension or measure. How a data field is categorized in the Summary card does not affect how
you can use it in Qlik Sense visualizations, but it does determine what transformation options are available for
the data field in other data profiling cards.
A summary of data using the Summary data profiling card.
The Summary card provides the following information:
l
Distinct values: The number of distinct values in the field.
l
Total values:The number of values in the field.
l
Preview of distinct value distribution: In fields with more than 20 distinct values, only the 20 distinct
values with the highest count display. All other values are grouped into a single value on the chart. If
all values are distinct, no bar chart will display.
l
Value Range:(Measure and Temporal only)For a measure field, the Value Range is a chart showing
the Min, Median, Average, and Max values for the field. For a temporal field, the Value Range is the
time period covered by the field's data.
l
Null values: The number of null values in the data. This visualization only displays if there are null
values in the field.
l
Mixed values:The number of text value in a field that contains both text and numeric values. This
visualization only displays if there are mixed values in the field.
Depending on how a field is categorized in the Summary card, it can be modified in other data profiling cards.
Fields set as measures can have grouped values created from the field using the Bucket card. For more
information, see Grouping measure data into ranges (page 64).
Fields set as dimensions can have:
Manage data - Qlik Sense, February 2024 57

3 Loading and managing data with Data Manager
l
Distinct values replaced with other value using the Replace card.
For more information, see Replacing field values in a table (page 58).
l
Distinct values set as null values using the Set nulls card.
For more information, see Setting field values as null in a table (page 60).
l
A custom order applied to the values using the Order card.
For more information, see Customizing the order of dimension values (page 61).
l
Field data split into new table fields using the Split card.
For more information, see Splitting a field in a table (page 62).
Accessing the Summary card
Do the following:
1.
In Data manager, select a table and click .
2. Select a table field.
The Summary card appears.
Changing the data category of a field
Qlik Sense permits changing the data category of a field, provided the data in the field can be categorized in
multiple categories.
Do the following:
l
In the Summary card, click and select a different data category.
Replacing field values in a table
The Replace card enables you to replace different field values in your tables with other values.
In a data set, different terms might be used for the same object or concept. For example, the full name of a
country and its abbreviation might both be found in the same data set. The Replace card enables you to
ensure that these instances are treated as a single distinct value rather than different distinct values. For
example, in a field that contains country data, you could replace U.S, US, and U.S.A with USA. You can also use
the Replace card to change individual values, such as when a name in a data set needs to be changed.
You can set replace values in fields that contain up to a maximum of 5,000 distinct values.
In addition, calculated fields ignore replacement values and will use the original values instead.
The Replace card consists of two sections:Distinct values and Replacement value. Distinct values lists all
distinct values and any replacement values. Replacement value contains a field to enter the replacement
term and a list of values selected to be replaced. You replace field values by selecting distinct values, entering
the replacement value, and applying the replacement. You can also select a replacement value in Distinct
values and edit it to change the values being replaced or the value being used for the replacement. You can
add or edit multiple replacement values before applying the replacements.
Manage data - Qlik Sense, February 2024 58

3 Loading and managing data with Data Manager
Replacing values
Do the following:
1.
In Data manager, select a table and click .
2. Select a dimension field.
3. In the data profiling card, click the Replace tab.
4. Under Distinct values, select the distinct values you want to replace.
5. Under Replacement value, enter the new value for these distinct values.
6. Click Replace.
Editing a replacement value
You can add more distinct values to a replacement value, remove distinct values from a replacement value, or
change the replacement value.
Adding distinct values to a replacement value
Do the following:
1. In the Replace card, under Distinct values, select a replacement value.
2. Under Distinct values, select the distinct values you want to add.
3. Click Replace.
Removing distinct values from a replacement value
Do the following:
1. In the Replace card, under Distinct values, select a replacement value.
2.
After each distinct value you want to remove, click .
3. Click Replace.
Changing a replacement value
Do the following:
1. In the Replace card, under Distinct values, select a replacement value.
2. Under Replacement, enter a new value.
3. Click Replace.
Deleting a replacement value
Replacement values can be deleted by removing all associated distinct values.
Manage data - Qlik Sense, February 2024 59

3 Loading and managing data with Data Manager
Do the following:
1. In the Replace card, under Distinct values, select a replacement value.
2. Click Remove All.
3. Click Replace.
Setting field values as null in a table
In the Set nulls card, you select distinct values from a dimension field to be treated as null
values in Qlik Sense.
For example, if your source data includes representations such as X for nulls, you can use the Set nulls card to
set that value to be treated as a null value in Qlik Sense. If your table contains fields with empty spaces, you
can set these as null values using the Set nulls card. You can also use the Set nulls card to clean your data of
unwanted values by setting these values as null.
If you want to use a specific value as your null value, you can replace the default null value, - (Null), using the
Replace card. For more information, see Replacing field values in a table (page 58).
You can set field values as null in fields that contain up to a maximum of 5,000 distinct values.
The Set nulls card consists of two sections, Distinct values and Manual null values. When you select values
from Distinct values, they are added to Manual null values. When you apply the null values, all instances of
the selected values are set to null in the field's data. You can restore individual or all values set as null.
Setting field values as null
Do the following:
1.
In Data manager, select a table and click .
2. Select a field.
3. In the data profiling card, click the Set nulls card.
4. Under Distinct values, select the values you want set as null.
5. Click Set null values.
Restoring values manually set as null
Do the following:
1.
In Data manager, select a table and click .
2. Select a field.
3. In the data profiling card, click the Set nulls card.
4. In the Set nulls card, under Manual null values, do one of the following:
l
Click after the values you no longer want set as null.
Manage data - Qlik Sense, February 2024 60

3 Loading and managing data with Data Manager
l
Click Remove All to restore all values set as null.
5. Click Set null values.
Customizing the order of dimension values
Custom ordering enables you to set the order of dimension values in visualizations.
While alphabetical or numerical order may work for many visualizations, in some instances, an alternative
order is useful. For example, in a field containing cities, you could set a custom order so that in your charts
cities are listed in order of east to west. You can define custom ordering for fields that meet the following
requirements:
l
Fields must be set as dimensions in the Summary card.
l
Fields must contain up to a maximum of 5,000 distinct values.
It is recommended that your field have up to a maximum of 25 values, but you can choose to use the
Order card with fields containing up to 5,000 distinct values.
The Order card consist of two sections: Current Order and Preview of order. Current Order displays all the
distinct values from the dimension. By default, the distinct values are organized by load order. You set your
custom order by dragging the values in Current Order into the desired order. Preview of order is a bar chart
that displays a count of values in each distinct value, organized by the current order.
A custom order overrides all other sorting options available in Qlik Sense visualizations except for sorting by
load order. If you require alphabetical or numeric ordering for this field, you must remove the custom order by
resetting the order.
Changing the order of values in a dimension field
Do the following:
1.
In Data manager, select a table and click .
2. Select a dimension field.
3. In the data profiling card, click the Order tab.
4. Click and drag the values into the new order.
5. If you want to cancel your current ordering, click Cancel.
Cancel is only available to new custom orders. To cancel your changes if you are changing
the order of values in an existing custom order, select a different field in the table and then
select this field again.
6. Click Reorder.
Resetting the order of values in a dimension field
Do the following:
1.
In Data manager, select a table and click .
2. Select a reordered dimension field.
Manage data - Qlik Sense, February 2024 61

3 Loading and managing data with Data Manager
3. In the data profiling card, click the Order tab.
4. Click Reset.
5. Click OK.
Splitting a field in a table
The Split card enables you to create new fields using data from an existing field.
You could, for example, split a field that contains an address to create a new field that contains only a zip or
postal code. This lets you to quickly create new fields containing segments of existing data. The Split card can
create new fields from table fields that meet the following requirements:
l
Fields must be set as dimensions in the Summary card.
Table fields containing date and time information are automatically split into date fields when their
tables are prepared in Data manager and do not require the Split card.
The Split card consists of an input field containing a template value and a preview of the new fields with their
values. By default, the template value is the first value in numerical order from a field, but you can select
other values from the source field to use as the template. You should select a value that is representative of all
values in the table. Splitting using an outlier value as a template may impact the quality of the new fields.
Fields are split by inserting split markers into the template value where you want to split the field. Split
markers are added by selecting a point in the sample field where you want to add a split marker, adjusting
your selection, and then selecting to split by instance or position. The Split card may automatically add
recommended split markers to your template value.
Instances are occurrences of a selected delimiter, such as the character @ or a space between words.
Positions of instance split markers are relative to either:
l
The start of the value, such as the first instance of @ in a value.
l
Their position to the right of another instance or position split marker, such as the first instance of .
after @.
If you remove the instance to which another instance is relative, the other instance's position adjusts to the
same position relative to the next instance of a different delimiter set as a split marker or the start of the
value. You can split a field on up to 9 delimiters.
The Split card splits values using the characters specified as the split markers. If the data has
variances in how these characters are composed, such as accented characters, those variances will
not be included in the split.
Positions are locations in the field value, such as after the first four characters. Positions are relative to either:
Manage data - Qlik Sense, February 2024 62

3 Loading and managing data with Data Manager
l
The start of the value.
l
Their position to the right of an instance split marker, such as the second character after an instance
split marker.
If you removed an instance that has a position to its right, the position moves to the same position relative to
the start of the value or the first next instance split marker to the left or the start of the value.
The field preview updates as you add split markers , showing the new fields and their data. You can rename
the new fields in the field preview. You can also select to include or exclude split fields from your table before
you apply the split. When you apply a split, the fields you selected in the field preview are added to your table.
A field can be split multiple times.
To split a field into new fields, do the following:
1. Access the Split card.
2. Set split markers in the input field.
3. You can also perform these optional tasks:
l
Remove split markers.
l
Select which new fields you want to be added to the table.
l
Rename the new fields.
4. Create the new fields.
Accessing the Splitting card
Do the following:
1.
In Data manager, select a table and click .
2. Select a dimension field.
3. In the data profiling card, click the Split tab.
Inserting split markers
You insert split markers by clicking positions in the sample value and selecting the kind of split you want to
apply.
You can change the sample value displayed in the input field by clicking and selecting a different
value.
Do the following:
1. In the Split card, click the position in the sample value where you want to add split markers.
Clicking selects all of the template value up to any other split markers.
Double-clicking selects the insert point of your cursor in the template value.
2. Adjust your selection by clicking and dragging the selection tabs or highlighting the section you want
to select.
Manage data - Qlik Sense, February 2024 63

3 Loading and managing data with Data Manager
3. Click the button that corresponds to the kind of split you want applied:
l
This instance: The field splits by the selected instance of the delimiter.
l
All instances: The field splits by all instances of the delimiter.
l
These positions:The field splits on either side of the selection.
l
This position: The field splits at this position.
The split marker is inserted into the template value.
Removing split markers
Do the following:
l
In the Split card, do one of the following:
l
To remove a single split marker, click above the split marker you want to remove.
l
To remove all split marker, click Reset.
Recommended split markers will not be removed and any removed recommended split
markers will be added back to the template. You must remove these individually.
Selecting the fields to add to your table
You can select which fields created by the Split card to include or exclude from your table. By default, all split
fields are included.
Do the following:
l
In the Split card, in the field preview, do one of the following:
l
To include a field, select the field column checkbox.
l
To exclude a field, clear the field column checkbox.
Renaming new fields
Do the following:
l
In the Split card, in a field header in the field preview, enter a new field name.
Creating new fields
Do the following:
l
In the Split card, click Split.
Grouping measure data into ranges
Measures can provide additional insight for analysis when grouped into ranges and used as
dimensions in visualizations.
Manage data - Qlik Sense, February 2024 64

3 Loading and managing data with Data Manager
For example, if a field had customer ages, you could group values into age ranges. The Bucket data profiling
card enables the grouping of field data into ranges, creating a new field with the specified groupings. You
access the Bucket card by editing a table in Data manager and selecting a table field that is set as a measure
in the Summary card.
Requirements
You can group measures into ranges with fields that meet the following requirements:
l
Fields must be classified as a measure in the Summary card
l
Fields must contain at least 10 distinct values.
The Bucket card is not recommended with fields containing a low range of values, but you can choose
to use the Bucket card with non-recommended fields.
l
Values in the field cannot contain more than 20%mixed types.
The Bucket card is not recommended with fields containing mixed types of values, but you can choose
to use the Bucket card with non-recommended fields.
Bucket fields created by the Bucket card are categorized as dimensions in the Summary card.
Bucket fields cannot have a custom order applied to them using the Order card, however. Bucket
fields cannot be used in calculated fields.
Overview
The Bucket card provides a suggested number of groupings, a preview of the groupings, and a slider bar
containing your groupings that enables modifying each bucket's name and value range. You can modify the
suggested number of groupings by entering a new number into the Bucket field. Qlik Sense supports a
maximum of 20 buckets and a minimum of 2 buckets. New buckets are added to the right of your bucket
range while buckets are removed from right to left. If you have not modified any individual buckets, each
bucket's range is adjusted to fit evenly within the value range of the field. If you change the number of buckets
after having modified an individual bucket, new buckets are added to the right of your bucket range and are
given a range of values equal to the size of the second rightmost bucket.
The Preview of data buckets bar chart gives overview of the data in your buckets, with a count of the
number of distinct values in each bucket. The chart is updated as you alter your buckets. If a bucket has no
values in it, it will have no bar in the chart.
The Bucket slider bar enables you to edit your buckets. By clicking a bucket segment, you can set that
bucket's range, change the bucket's name, or remove the bucket entirely. Hovering your cursor over the
bucket brings up the bucket’s name and range of values. By default, buckets are named with the bucket's
value range expressed as an interval notation. Buckets ranges include values between the starting value and
up to but excluding the ending value.
When you adjust a single bucket’s value range, Qlik Sense shifts the values of all buckets, ensuring there are
no gaps and overlaps while respecting the existing quantitative ranges of the other buckets as much as
possible. The leftmost bucket always has no lower boundary and the rightmost bucket has no upper
boundary. This allows them to capture any values that might fall outside the set ranges of all your buckets.
Modifying the lower range of a bucket will alter the ranges of the buckets to the right, modifying the upper
range of a bucket will modify the buckets to the left.
Manage data - Qlik Sense, February 2024 65

3 Loading and managing data with Data Manager
When you create buckets from a field, a new field is generated containing all the buckets assigned to the rows
with their corresponding measure values from the source field. By default, it will be named <field> (Bucketed).
This field can be renamed, associated, sorted, and deleted like other table fields. You can edit the bucketing in
the generated bucket field by selecting the field in the table and modifying the bucketing options. You can
create multiple bucket fields from the same source measure field.
Grouping measures
To group measure values into ranges, do the following:
1. Access the Bucket card.
2. Optionally, change the number of buckets.
3. Optionally, modify individual buckets.
4. Optionally, reset the manual adjustments to buckets to the default settings.
5. Create the bucketed field.
Accessing the Buckets card
Do the following:
1.
In Data manager, select a table and click .
2. If you are creating new groups of value ranges, select a field.
3. If you are editing an existing buckets field, select a buckets field
Changing the number of buckets
Changing the number of buckets adds buckets to or removes buckets from the end of the range.
Do the following:
l
In the Bucket card, enter a new number before Buckets.
Modifying a bucket
You can rename a bucket, adjust a bucket’s value range, or delete a bucket.
If you are modifying buckets, it is recommended to modify buckets in order from the leftmost bucket
segment to the rightmost bucket segment.
Renaming a bucket
Do the following:
1. In the Bucket card, click the bucket segment.
2. In the name field, enter a new name.
3. To apply your changes, click anywhere outside the bucket segment.
Manage data - Qlik Sense, February 2024 66

3 Loading and managing data with Data Manager
Adjusting a bucket's range of values
If you are trying to use decimal values, you must enter them manually in the From and Up To fields.
Do the following:
1. In the Bucket card, click the bucket segment.
2. Do one of the following:
l
After From and Up To, enter new values to set the range of the bucket.
A bucket includes the values between the value in From and up to but excluding the value in
Up To.
l
Adjust the segment's sliders to set the range of the bucket.
3. To apply your changes ,click anywhere outside the bucket segment.
Deleting a bucket
Do the following:
1. In the Bucket card, click the bucket’s segment.
2.
Click .
Resetting a field's buckets
Resetting buckets enables you to restore the bucket card settings to their default state. If this is a measure
field, the default state is the Qlik Sense recommended bucketing. If this is a bucket field, the default state is
the field’s state after the last time Create buckets was clicked.
Do the following:
l
In the Bucket card, click Reset to default.
Creating a bucket field
Do the following:
1. In the Bucket card, click Create buckets.
2. Click OK.
The new field containing your data grouping is added to your table.
Unpivoting crosstab data in the data manager
A crosstab is a common type of table featuring a matrix of values between two orthogonal lists
of header data.
It is usually not the optimal data format if you want to associate the data to other data tables. This topic
describes how you can unpivot data loaded in crosstab format, that is, transpose parts of it into rows using
the data manager.
Unpivot data loaded in crosstab format transpose parts of it into rows.
Manage data - Qlik Sense, February 2024 67

3 Loading and managing data with Data Manager
What's a crosstab?
A crosstab contains a number of qualifying columns, which should be read in a straightforward way, and a
matrix of values. In this case there is one qualifying column, Year, and a matrix of sales data per month.
Year Jan Feb Mar Apr May Jun
2008 45 65 78 12 78 22
2009 11 23 22 22 45 85
2010 65 56 22 79 12 56
2011 45 24 32 78 55 15
2012 45 56 35 78 68 82
Crosstab
If this table is simply loaded into Qlik Sense, the result will be one field for Year and one field for each of the
months. This is generally not what you would like to have. You would probably prefer to have three fields
generated:
l
The qualifying field, in this case Year, marked with green in the table above.
l
The attribute field, in this case represented by the month names Jan - Jun marked with yellow. This
field can suitably be named Month.
l
The data field, marked with blue. In this case they represent sales data, so this can suitably be named
Sales.
This can be achieved by using the Unpivot option in the data manager table editor, and selecting the fields
Jan - Jun. This creates the following table:
Year Month Sales
2008 Jan 45
2008 Feb 65
2008 Mar 78
2008 Apr 12
2008 May 78
Unpivoted table
Manage data - Qlik Sense, February 2024 68

3 Loading and managing data with Data Manager
Year Month Sales
2008 Jun 22
2009 Jan 11
2009 Feb 23
... ... ...
Unpivoting a crosstab table into a flat table
Do the following:
1. Add a data file in crosstab format to your app.
2.
Click on the table in the data manager to open the table editor.
3. Click Unpivot.
4. Select the fields you want to transpose into rows. You need to have at least one qualifying field that is
not unpivoted. There are two ways to make the selections.
l
Click on the field headers of the fields you want to transpose. Do not select the fields you want
to keep as qualifying fields.
l
Click on the field headers of the fields you want to keep as qualifying fields, and then select
Invert selections from the field menu. This is the easiest way to do it if you have a large
number of fields to transpose.
5. Click Apply unpivoting
The selected data is now transposed to rows with two fields, Tablename.Attribute field and
Tablename.Data field.
6. Rename Attribute field to something meaningful, in the example above, Month.
7. Rename Data field to something meaningful, in the example above, Sales.
You have now unpivoted the crosstable to a flat format, which will make it easier when you want to associate
it to other data in the app.
Reverting to the original crosstab table
You can revert to the original crosstab format of your data source by clicking Undo unpivot in the table
editor. If you created any associations to other data in the app, the associations will be deleted.
3.13 Concatenating tables in Data manager
Concatenation combines two tables into a single table with combined fields. It consolidates
content, reducing the number of separate tables and fields that share content. Tables in Data
manager can be automatically or forcibly concatenated.
If you need more granular control over which data is included in combined tables, see Joining tables in Data
manager (page 73) to learn more about Join operations.
Manage data - Qlik Sense, February 2024 69

3 Loading and managing data with Data Manager
Concatenated table in Tables view and Associations view.
Automatically concatenating tables
Tables are automatically concatenated in Data manager when Qlik Sense detects that one or more added
tables have both the same number of fields and identical field names as another table. When this happens,
Qlik Sense automatically concatenates the tables into a single table. Automatically concatenated tables can
be split if they were concatenated erroneously or if you do not want them concatenated. Automatically
concatenated tables can be forcibly concatenated to other tables.
Automatically concatenated tables have the following restrictions:
l
You cannot change field categories.
l
You cannot unpivot an automatically concatenated table.
l
You cannot add or remove data with Select data from source.
Forcing concatenation between tables
Concatenation can be forced between tables in Data manager using the Concatenate or join pane, even if
they do not entirely share the same fields or data. Forced concatenation enables you to control mapping and
exclude fields from the final concatenated table. Forced concatenation supports additional transformations.
Using forced concatenation, you can:
l
Concatenate a concatenated table with another table.
l
Concatenate an unpivoted table with another table. Forcibly concatenated tables can be unpivoted.
l
Concatenate tables with calculated fields. Calculated fields can be concatenated to other fields in a
forced concatenation. Calculated fields can be added to forcibly concatenated tables.
Forcibly concatenated tables have the following restrictions:
l
Forced concatenation requires at least one field from each table be included in the concatenated
table, although they need not be mapped together.
l
Date fields cannot be formatted after concatenation. Date fields must have the same format applied to
them before concatenation. Concatenated date fields use the default time format set with DateFormat
in the Data load editor.
l
You cannot change field categories after concatenation.
l
Calculated fields that refer to a field mapped to another field in a concatenated table will only contain
data for the original field rather than the combined data in the concatenated field. Calculated fields
created after two tables are concatenated that refer to a field in the concatenated table will use all
Manage data - Qlik Sense, February 2024 70

3 Loading and managing data with Data Manager
data in that field.
l
You cannot add or remove data from a concatenated table with Select data from source. You can,
however, remove fields by clicking Add data, selecting the source table, and then excluding the fields.
Null values are added for the removed field’s data.
The Concatenate or join pane is accessed by clicking in Data manager, clicking Concatenate or join, and
selecting two tables. When tables are selected in Concatenate or join, Qlik Sense analyzes the fields and
automatically maps any fields together that match. If there are no clear matches, fields are left unmapped.
When the concatenation is applied, mapped fields are combined in the concatenated table, while unmapped
fields are included as individual fields with null values for the rows where there is no corresponding value.
The first table selected in Concatenate or join is set as the primary table, the table to which the other table is
concatenated. The concatenated table uses the table and field names from the primary table unless these are
manually renamed. You can change which table is the primary table with the button. Concatenate or join
arranges fields in two rows, with the primary table fields in the top row and the secondary table fields on the
bottom row. You can swap the primary and secondary tables with the button.
You can use Edit mappings to change the default mapping and select which fields to map, leave unmapped,
or to exclude from the concatenated table. Edit mappings contains a drag and drop interface for editing
mappings and the Fields pane, which lists all table fields. Fields can be mapped by dragging them beneath a
primary table field. Fields can be added as a new unmapped field by beside the field in the Fields pane or
dragging them into the top row of fields. Unmapped fields are marked with in the Fields pane. Fields
removed from the concatenated table are not included in the table and are not available for use in Qlik Sense
after concatenation is applied to the table.
Once mappings are applied and the tables are concatenated, you cannot edit them, but they can be removed
from the tables by splitting the concatenated table, which restores the tables to their original state.
To forcibly concatenate tables in Data manager, do the following:
1. Select tables for concatenation.
2. Optionally, rename the concatenated table and the field names.
3. Optionally, edit the concatenation mappings.
4. Select the concatenation operator.
5. Concatenate the tables.
Selecting tables for concatenation
Do the following:
1.
In Data manager, click in the bottom row.
2. Click Concatenate or join.
The Concatenate or join pane opens.
3. Select two tables.
The fields of both tables will be mapped or left unmapped in theConcatenate or join pane.
Manage data - Qlik Sense, February 2024 71

3 Loading and managing data with Data Manager
4.
To preview a sample of unique values in each field, click .
5.
To switch the primary and secondary tables, click .
Renaming the table and field names
Do the following:
1. In the Concatenate or join pane, in the table name field, enter a new table name.
2. In a field name field, enter a new field name.
Editing concatenation mappings
Do the following:
1. In the Concatenate or join pane, click Edit mappings.
2. To map two fields, click and drag a table field under a primary table field.
3. To add a new unmapped field, click and drag a table field into the upper row of fields.
4.
To remove a field from the concatenated table, in the field click .
5.
To return a removed field back to the table, click in the Fields pane, click beside the field.
6. Click Edit mappings to close Edit mappings.
Selecting the concatenation operator
Do the following:
1. In the Concatenate or join pane, click Select action.
2. Select Concatenate from the list.
Concatenating tables
Do the following:
l
In the Concatenate or join pane, click Apply.
The tables are now concatenated.
Splitting concatenated tables
In cases where concatenation is no longer needed, such as when Qlik Sense has performed an unwanted
automatic concatenation, you can split the concatenated tables into their source tables.
Splitting a concatenated table will remove any associations the concatenated table had as well as
any associations the primary and secondary tables had with each other. If you want to preserve your
associations while splitting concatenated tables, click to undo the concatenation instead of
splitting the table. You cannot use to undo concatenation after you load data in Data manager.
Manage data - Qlik Sense, February 2024 72

3 Loading and managing data with Data Manager
Splitting an automatically concatenated table
Do the following:
1. Select the concatenated table.
2.
Click .
3. Select the tables to split from the concatenated table.
4. Click Split.
The table is now split into its source tables and all fields in the source tables are qualified. Qualified fields are
renamed with the table name followed by the field name, separated by a period punctuation mark (the
character “.”).
Example:
Table1 and Table2 both contain the fields Field1 and Field2. When you add them in Data manager, they are
concatenated to a table called Table1-Table2 with the same fields, Field1 and Field2.
If you split Table1-Table2, the result is two tables:
l
Table1 with fields Table1.Field1 and Table1.Field2
l
Table2 with fields Table2.Field1 and Table2.Field2
Splitting a forcibly concatenated table
Do the following:
1. Select the concatenated table.
2.
Click .
The table is now split into its source tables. All fields in the source tables and their fields have their pre-
concatenation names. Splitting a concatenated table only splits one level of concatenation, so that any
concatenated tables that were part of the split concatenated table have their own concatenation preserved.
3.14 Joining tables in Data manager
Join is an operation that can be used to manually combine two tables' data, producing varied
results depending on the configuration you select.
This allows more granular control over combined tables than with concatenation.
The Join operation takes two tables and combines them into one, which will be a combination of the fields in
both original tables, based on the overlap of a common value for one or several common fields. There are
multiple operators that can be applied to Join operations: Outer, Inner, Left, and Right.
Manage data - Qlik Sense, February 2024 73

3 Loading and managing data with Data Manager
A joined table still occupies the amount of memory as the tables combined in it. Excessive use of
joined tables may cause Qlik Sense to slow down. The information that is excluded by a join
operation will not be accessible by Qlik Sense until the table is split.
Join operators
There are four join operators: Outer join, Inner join, Left join, and Right join. The selected operator
determines which overlapping fields or values are included or excluded.
When the join operators refer to Left and Right tables, they are referring to the first and second
tables respectively, in order of selection.
Outer join
The Outer join operator contains all possible combinations of values from the two tables, if the overlapping
field values are represented in either one or both tables.
Example:
A B
1 aa
2 cc
3 ee
First table
A C
1 xx
4 yy
Second table
A B C
1 aa xx
2 cc -
3 ee -
4 - yy
Joined table
Manage data - Qlik Sense, February 2024 74

3 Loading and managing data with Data Manager
Inner join
The Inner join operator only contains combinations of values from the two tables, if the overlapping field
values are represented in both tables.
Example:
A B
1 aa
2 cc
3 ee
First table
A C
1 xx
4 yy
Second table
A B C
1 aa xx
Joined table
Left join
The Left join operator contains combinations of values from the two tables, if the overlapping field values are
represented in the first table.
Example:
A B
1 aa
2 cc
3 ee
First table
A C
1 xx
4 yy
Second table
Manage data - Qlik Sense, February 2024 75

3 Loading and managing data with Data Manager
A B C
1 aa xx
2 cc -
3 ee -
Joined table
Right join
The Right join operator contains combinations of values from the two tables, if the overlapping field values
are represented in the second table.
Example:
A B
1 aa
2 cc
3 ee
First table
A C
1 xx
4 yy
Second table
A B C
1 aa xx
4 - yy
Joined table
Joining tables
The Concatenate or join pane is accessed by clicking in Data manager, clicking Concatenate or join, and
selecting two tables. When tables are selected in Concatenate or join tables, Qlik Sense analyzes the fields
and automatically maps any fields together that match. If there are no clear matches, fields are left
unmapped. When the join is applied, mapped fields are combined in the joined table. Unmapped fields are
either included as individual fields with null values for the rows where there is no corresponding value, or
excluded entirely if there are no overlapping instances of the value.
Manage data - Qlik Sense, February 2024 76

3 Loading and managing data with Data Manager
The first table selected in Concatenate or join tables is set as the primary table, the table to which the other
table is joined. The joined table uses the table and field names from the primary table unless these are
manually renamed. You can change which table is the primary table with the button. Concatenate or join
tables arranges fields in two rows, with the primary table fields in the top row and the secondary table fields
on the bottom row. You can swap the primary and secondary tables with the button.
You can use Edit mappings to change the default mapping and select which fields to map, leave unmapped,
or to exclude from the joined table. Edit mappings contains a drag and drop interface for editing mappings
and the Fields pane, which lists all table fields. Fields can be mapped by dragging them beneath a primary
table field. Fields can be added as a new unmapped field by beside the field in the Fields pane or
dragging them into the top row of fields. Unmapped fields are marked with in the Fields pane. Fields
removed from the joined table are not included in the table and are not available for use in Qlik Sense after
joins are applied to the table.
Once mappings are applied and the tables are joined, you cannot edit the mapped fields, but they can be
removed from the tables by splitting the joined table, which restores the tables to their original state.
To join tables in Data manager, do the following:
1. Select tables for joining.
2. Optionally, rename the joined table and the field names.
3. Optionally, edit mappings.
4. Select the join operator.
5. Join the tables.
Selecting tables for joining
Do the following:
1.
In Data manager, click in the bottom row.
2. Click Concatenate or join.
The Concatenate or join pane opens.
3. Select two tables.
The fields of both tables will be mapped or left unmapped in theConcatenate or join tables pane.
4.
To preview a sample of unique values in each field, click .
5.
To switch the primary and secondary tables, click .
Renaming the table and field names
Do the following:
1. In the Concatenate or join pane, in the table name field, enter a new table name.
2. In a field name field, enter a new field name.
Manage data - Qlik Sense, February 2024 77

3 Loading and managing data with Data Manager
Editing mappings
Do the following:
1. In the Concatenate or join pane, click Edit mappings.
2. To map two fields, click and drag a table field under a primary table field.
3. To add a new unmapped field, click and drag a table field into the upper row of fields.
4.
To remove a field from the joined table, in the field click .
5.
To return a removed field back to the table, click in the Fields pane, click beside the field.
6. Click Edit mappings to close Edit mappings.
Selecting the join operator
Do the following:
1. In the Concatenate or join pane, click Select action.
2. Select an operator from the list: Outer join, Inner join, Left join, or Right join.
Joining tables
Do the following:
l
In the Concatenate or join pane, click Apply.
The tables are now joined.
Splitting joined tables
In cases where joining is no longer needed, you can split the joined tables into their source tables.
Splitting a joined table will remove any associations the joined table had as well as any associations
the primary and secondary tables had with each other. If you want to preserve your associations
while splitting joined tables, click to undo the join instead of splitting the table. You cannot use
to undo joins after you load data in Data manager.
Splitting a joined table
Do the following:
1. Select the joined table.
2.
Click .
The table is now split into its source tables. All fields in the source tables and their fields have their pre-join
names. Splitting a joined table only splits one level of joining, so that any joined tables that were part of the
split joined table have their own join preserved.
Manage data - Qlik Sense, February 2024 78

3 Loading and managing data with Data Manager
3.15 Viewing table and field transformation details in Data
manager
You can view the operations and transformations performed on tables and fields in Data
manager using the Details dialog. The Details dialog is available in the Associations and Table
views for tables and in the data table editor for fields.
Details displays the current operations and transformations made to the selected table or field in the order
they are applied in the generated data load script. This enables you to easily see the source of a table or field,
the current changes that have been made, and the sequence in which the changes have been applied. You can
use Details, for example, to easily see which tables were concatenated or if a field was reordered.
The information displayed in Details varies depending if you are viewing a table or field. Table Details
displays:
l
Source tables for the selected table.
l
Transformations used on the table, such as unpivoting and concatenation.
Field Details displays:
l
Source tables and fields for the selected field.
l
Field type changes.
l
Transformations used on the fields, such as from the data profiling card or from concatenation.
Viewing table details
Do the following:
l
In Data manager, select a table, click , and click View details.
The Details dialog opens.
Viewing field details
Do the following:
1.
In Data manager, select a table and click .
2.
Click above a field heading and click View details.
The Details dialog opens.
Manage data - Qlik Sense, February 2024 79

3 Loading and managing data with Data Manager
3.16 Step-by-step - Combining tables using forced
concatenation
This step-by-step walkthrough shows how you can use forced concatenation to combine two
similar data tables.
Forced concatenation can be used to clean up your data before you use it for analysis in a sheet. You can
concatenate two tables into one table. You can also add another table later, for example if you initially add a
table from June, and then later want to add a second table from July.
Concatenation at a glance
l
Tables are automatically concatenated in Data manager when Qlik Sense detects that one or more
added tables have both the same number of fields and identical field names as another table. In this
case, you can split the tables if needed.
l
Two tables can be force concatenated when tables do not entirely share the same fields or data. Only
two tables can be force concatenated. To concatenate three tables, for example, concatenate the first
two tables into one table. Concatenate the third table to that created table.
l
Tables that are not similar enough will not automatically be concatenated. You also will not be able to
forcibly concatenate them. In this case, the fields in the table should instead be associated in the Data
manager.
Walkthrough - Forced concatenation
These are the tasks required to complete the walkthrough:
1. Prepare the data tables
2. Add data tables to an app
3. Concatenate and load data tables into an app
4. A step further - adding a new table and concatenating the data fields
Prerequisites
You should know how to create an app in Qlik Sense.
Prepare the data tables
We have supplied some sample data for you to use to demonstrate forced concatenation. You can also use
your own data, provided the fields and data are mostly the same in your two tables.
For example, here is the header and first row of the data that we supplied below. It has been pasted into two
Excel tables. Note the differences in the fields.
Manage data - Qlik Sense, February 2024 80

3 Loading and managing data with Data Manager
If you want to use the sample data, copy the entire table, including the column headings, into an empty Excel
file on your computer. For this walkthrough, we named the Excel tabs Data Table 1 and DataTable 2. We
named the Excel file Concatenate_Data.xlsx.
Data Table 1
SalesOrder
ID
SalesOrderDeta
ilID
TrackingNum
ber
OrderQt
y
PID
SpecialOffer
ID
UnitPric
e
Modifie
d Date
43659 1 4911-403C-98 1 776 1 1822.494
6
7/1/201
3 0:00
43659 2 4911-403C-98 3 777 1 1822.494
6
7/2/201
3 0:00
43659 3 4911-403C-98 1 778 1 1098.9 7/2/201
3 0:00
43659 4 4911-403C-98 1 771 1 1835.994
6
7/2/201
3 0:00
43659 5 4911-403C-98 1 772 1 1835.994
6
7/3/201
3 0:00
43659 6 4911-403C-98 2 773 1 1835.994
6
7/3/201
3 0:00
43659 7 4911-403C-98 1 774 1 1835.994
6
7/4/201
3 0:00
43659 8 4911-403C-98 3 714 1 25.95636 7/4/201
3 0:00
43659 9 4911-403C-98 1 716 1 25.95636 7/5/201
3 0:00
43659 10 4911-403C-98 6 709 1 5.13 7/5/201
3 0:00
43659 11 4911-403C-98 2 712 1 4.66785 7/6/201
3 0:00
43659 12 4911-403C-98 4 711 1 18.16785 7/6/201
3 0:00
Data Table 1
Manage data - Qlik Sense, February 2024 81

3 Loading and managing data with Data Manager
SalesOrder
ID
SalesOrderDeta
ilID
TrackingNum
ber
OrderQt
y
PID
SpecialOffer
ID
UnitPric
e
Modifie
d Date
43660 13 6431-4D57-83 1 762 1 377.5130
1
7/7/201
3 0:00
43660 14 6431-4D57-83 1 758 1 787.3146 7/7/201
3 0:00
43661 15 4E0A-4F89-AE 1 745 1 728.784 7/7/201
3 0:00
43661 16 4E0A-4F89-AE 1 743 1 643.2338
7
7/8/201
3 0:00
43661 17 4E0A-4F89-AE 2 747 1 643.2338
7
7/8/201
3 0:00
43661 18 4E0A-4F89-AE 4 712 1 4.66785 7/8/201
3 0:00
43661 19 4E0A-4F89-AE 4 715 1 25.95636 7/9/201
3 0:00
DataTable 2
SalesOrderI
D
SalesOrderDetailI
D
TrackingNumbe
r
OrderQty ProductID UnitPrice
Modified
Date
43662 20 2E53-4802-85 3 764 377.51301 7/12/2013
0:00
43662 21 2E53-4802-85 5 770 377.51301 7/12/2013
0:00
43662 22 2E53-4802-85 2 730 165.54438 7/13/2013
0:00
43662 23 2E53-4802-85 4 754 787.3146 7/14/2013
0:00
43662 24 2E53-4802-85 3 725 165.54438 7/14/2013
0:00
43662 25 2E53-4802-85 5 762 377.51301 7/14/2013
0:00
43662 26 2E53-4802-85 3 765 377.51301 7/14/2013
0:00
43662 27 2E53-4802-85 2 768 377.51301 7/15/2013
0:00
Data Table 2
Manage data - Qlik Sense, February 2024 82

3 Loading and managing data with Data Manager
SalesOrderI
D
SalesOrderDetailI
D
TrackingNumbe
r
OrderQty ProductID UnitPrice
Modified
Date
43662 28 2E53-4802-85 1 753 1932.2658 7/15/2013
0:00
43663 29 2E53-4802-85 1 756 787.3146 7/16/2013
0:00
43663 30 2E53-4802-85 3 763 377.51301 7/17/2013
0:00
43664 31 2E53-4802-85 1 732 321.2082 7/18/2013
0:00
43664 32 2E53-4802-85 6 758 787.3146 7/19/2013
0:00
43665 33 2E53-4802-85 1 729 165.54438 7/19/2013
0:00
Add data tables to an app
Do the following:
1. Start Qlik Sense.
2. Click Create new app in your work area. The Create new app window opens.
3. Name your app, and then click Create. The app is created. We named our app ConcatenateExample
4. Click Open app. The app opens and displays a dialog where you can add data.
5. Drag and drop your Excel file into the Add data from files and other sources dialogue. Your tables
are displayed in the Associations view of the Data manager. Click a bubble to see the data for that
table.
If you add data instead from Data manager, you will first be asked to select table fields
before being taken to the Associations view of the Data manager. In this case, select all the
Manage data - Qlik Sense, February 2024 83

3 Loading and managing data with Data Manager
fields for both tables.
Concatenate tables and load data tables into an app
After the data tables have been added to the app, the tables can be concatenated.
Do the following:
1.
In the Associations view of Data manager, select one table by clicking the bubble. Click and then
select Concatenate or join.
Manage data - Qlik Sense, February 2024 84

3 Loading and managing data with Data Manager
2. Click the bubble for the other table, and then click Edit mappings.
3. You can now do the following as required:
Manage data - Qlik Sense, February 2024 85
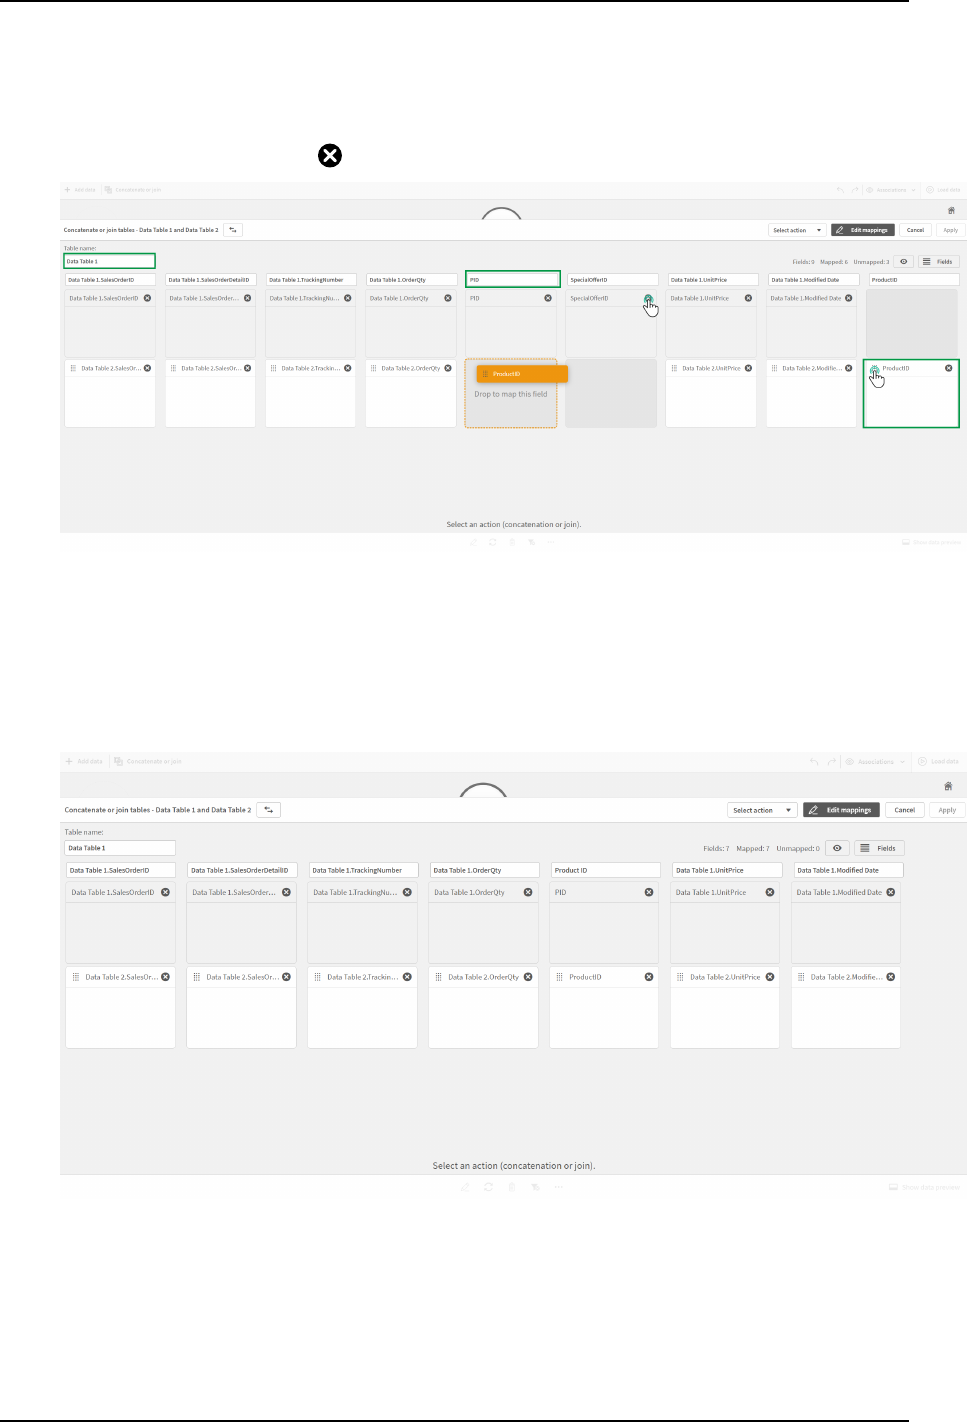
3 Loading and managing data with Data Manager
i. In Table name, rename the table that will be created when you combine the tables.
ii. Combine fields by dragging and dropping field labels.
iii. Rename fields.
iv.
Delete fields by clicking for the field.
In our example, we did the following:
i. Renamed our table to Data Table.
ii. Dragged the ProductID label and field to below the PID field, to combine the fields.
iii. Renamed the PID field to Product ID.
iv. Deleted the SpecialOfferID field.
Our table now looks like this:
4. In the Selection action drop-down, click Concatenate, and then click Apply. The tables are
concatenated on the mapped fields. The * indicates that the data has not yet been loaded into the
app.
Manage data - Qlik Sense, February 2024 86

3 Loading and managing data with Data Manager
5. Click Load data. Amessage is displayed indicating that the data was loaded successfully. Click Edit
sheet to create visualizations using the data.
A step further - adding a new table and concatenating the data fields
The sample data provided above was pasted into two tabs in the same Excel file. However, the tables do not
need to be in same file when you want to concatenate fields. The tables can be in separate files that are
added to the app. Another table can also be added later, for example if you initially add a table from June,
and then later want to add a second table from July.
In this example, we add another table with similar fields to the concatenated table we created above.
Here is the sample data. We named the tab that contains the table DataTable_Newest. We named the data file
Concatenate_Data2.xlsx.
DataTable_Newest
SalesOrderI
D
SalesOrderDetail
ID
TrackingNumb
er
ZIP OrderQty ID UnitPrice
Modified
Date
43666 34 568E-472E-9C 20012 3 764 377.51301 7/12/2013
0:00
43666 34 568E-472E-9C 23220 5 770 377.51301 7/12/2013
0:00
43667 35 AB6C-4FF9-9D 30004 2 730 165.54438 7/13/2013
0:00
43668 36 AB6C-4FF9-9D 11215 4 754 787.3146 7/14/2013
0:00
43668 36 AB6C-4FF9-9D 55401 3 725 165.54438 7/14/2013
0:00
DataTable_Newest
Manage data - Qlik Sense, February 2024 87

3 Loading and managing data with Data Manager
SalesOrderI
D
SalesOrderDetail
ID
TrackingNumb
er
ZIP OrderQty ID UnitPrice
Modified
Date
43668 36 AB6C-4FF9-9D 20003 5 762 377.51301 7/14/2013
0:00
43668 36 AB6C-4FF9-9D 15213 3 765 377.51301 7/14/2013
0:00
43669 37 C618-4998-BE 33125 2 768 377.51301 7/15/2013
0:00
43669 37 C618-4998-BE 11215 1 753 1932.2658 7/15/2013
0:00
Do the following:
1. From the Qlik Sense hub, click the app that you created in the procedures above. The app opens.
2. Select Data manager from the drop-down list in the top toolbar. The Data manager opens and the
table you created in the procedure above is shown.
3.
Click the button to add data.
4. Add the new Excel file to the app by dragging it into the Attach files to this app dialogue.
The Add data window opens.
5. Click Add data to add the data table to the app.
The new table is added to your app.
Manage data - Qlik Sense, February 2024 88

3 Loading and managing data with Data Manager
6. You can now concatenate the tables, edit the mappings, and then load the data.
3.17 Synchronizing scripted tables in Data manager
By default, scripted tables added in the data load editor cannot use the tools available in Data
manager.
For example, you cannot associate scripted tables with other tables in Data manager or transform fields in
scripted tables using the data profiling cards. If you synchronize your scripted tables in Data manager, you
can replace your scripted tables in Data manager with managed scripted tables. These tables have access to
all the same tools as tables added in Data manager, including:
l
Editing tables, such as adding calculated fields.
l
Transforming fields, such as changing the field types or transforming fields with data profiling cards.
l
Transforming tables, such as unpivoting or concatenating tables.
Synchronization and managed scripted tables have the following limitations:
l
Scripted tables must be located before the Auto-generated section in the data load script to be
synchronized as managed scripted tables. Tables after the Auto-generated section in the data load
script will not be synchronized.
l
You cannot use Select data from source to change the selection of fields in a managed scripted table.
Do not synchronize your scripted tables if your data load script contains an Exit statement or
dynamic fields.
To convert your scripted tables into managed scripted tables, synchronize your scripted tables in Data
manager. Synchronization does the following:
l
Replaces all synchronized scripted tables as managed scripted tables.
l
Deletes any managed scripted tables whose scripted tables have been removed in the data load script.
Manage data - Qlik Sense, February 2024 89
3 Loading and managing data with Data Manager
l
Updates any managed scripted tables whose source tables were changed in the data load script.
If you have synchronized tables, you should not make changes in the data load editor with
Data manager open in another tab.
Avoid changing the data load script for tables already synchronized in Data manager. If you
remove or modify fields in data load editor, you must delete or redo any derived fields or
associations in the synchronized table. Derived fields using a removed or modified field such
as a calculated field or fields created by the Split card, display null values.
After synchronization, you can use the managed scripted tables in Data manager like any other table. Data
manager prompts you to synchronize again if it detects differences between a managed scripted table and
the source scripted table.
To change managed scripted tables back into scripted tables, delete them in Data manager. You must repeat
the deletion if you synchronize again.
Synchronizing scripted tables
Do the following:
1.
In Data manager, click .
Alternatively, select a scripted table.
2. Click Synchronize scripted tables.
Managed scripted tables replace all the scripted tables in Data manager.
Removing managed scripted tables
Do the following:
1. In Data manager, select Tables view.
2.
On the managed scripted table you want to remove, click .
3. Click Load data.
The managed scripted table changes back to a scripted table.
3.18 Managing data associations
Qlik Sense can profile your data to help you create associations between tables. You can make
associations by choosing from Qlik Sense Insight Advisor's analysis-based recommendations, or
you can create your own.
Manage data - Qlik Sense, February 2024 90

3 Loading and managing data with Data Manager
If you want to associate your data, we recommend that you use the Add data option with data profiling
enabled. This is the default option. You can verify this setting by clicking beside the Add data button in the
lower right corner of the Add Data page.
In the Associations view of the Data manager, your data is illustrated using bubbles, with each bubble
representing a data table. The size of the bubble represents the amount of data in the table. The links
between the bubbles represent the associations between tables. If there is an association between two tables,
you can click the button in the link to view or edit the association.
Associations view in Data manager
In most cases it is easier to edit table associations in the model view, but you can also edit a single
table's associations using the Associate option in table edit view.
For more information, see Associating data in the table editor (page 39).
Associating tables using the Recommended associations panel
In many cases, Qlik Sense Insight Advisor will recommend associations between data tables. The
Recommended associations panel lets you view and apply these recommendations.
The Recommended associations panel will open by default if any tables are present. It can be closed by and
re-opened by clicking on the .
If the panel is closed and recommendations exist, you will see a badge on top of the showing the number
of recommendations.
Manage data - Qlik Sense, February 2024 91

3 Loading and managing data with Data Manager
Open recommended associations
Do the following:
1.
Click in the upper right corner of the associations view, if the Recommended associations panel is
closed.
The panel appears on the right.
2. You will see the following information:
l
Total tables: the total number of tables.
l
Unassociated tables: the total number of tables that have no associations.
l
Recommendations: the total number of recommended associations.
l
Recommended association details: showing the name of the recommended association, and
then table and field names separated by colons
3. Click on a single recommendation to preview it in dark blue.
4. To accept only some of the recommendations, click the Apply button for the specific recommendation
you need.
5. Click Preview all to see how all the recommended associations will affect your data tables.
Associations being previewed are highlighted.
Manage data - Qlik Sense, February 2024 92
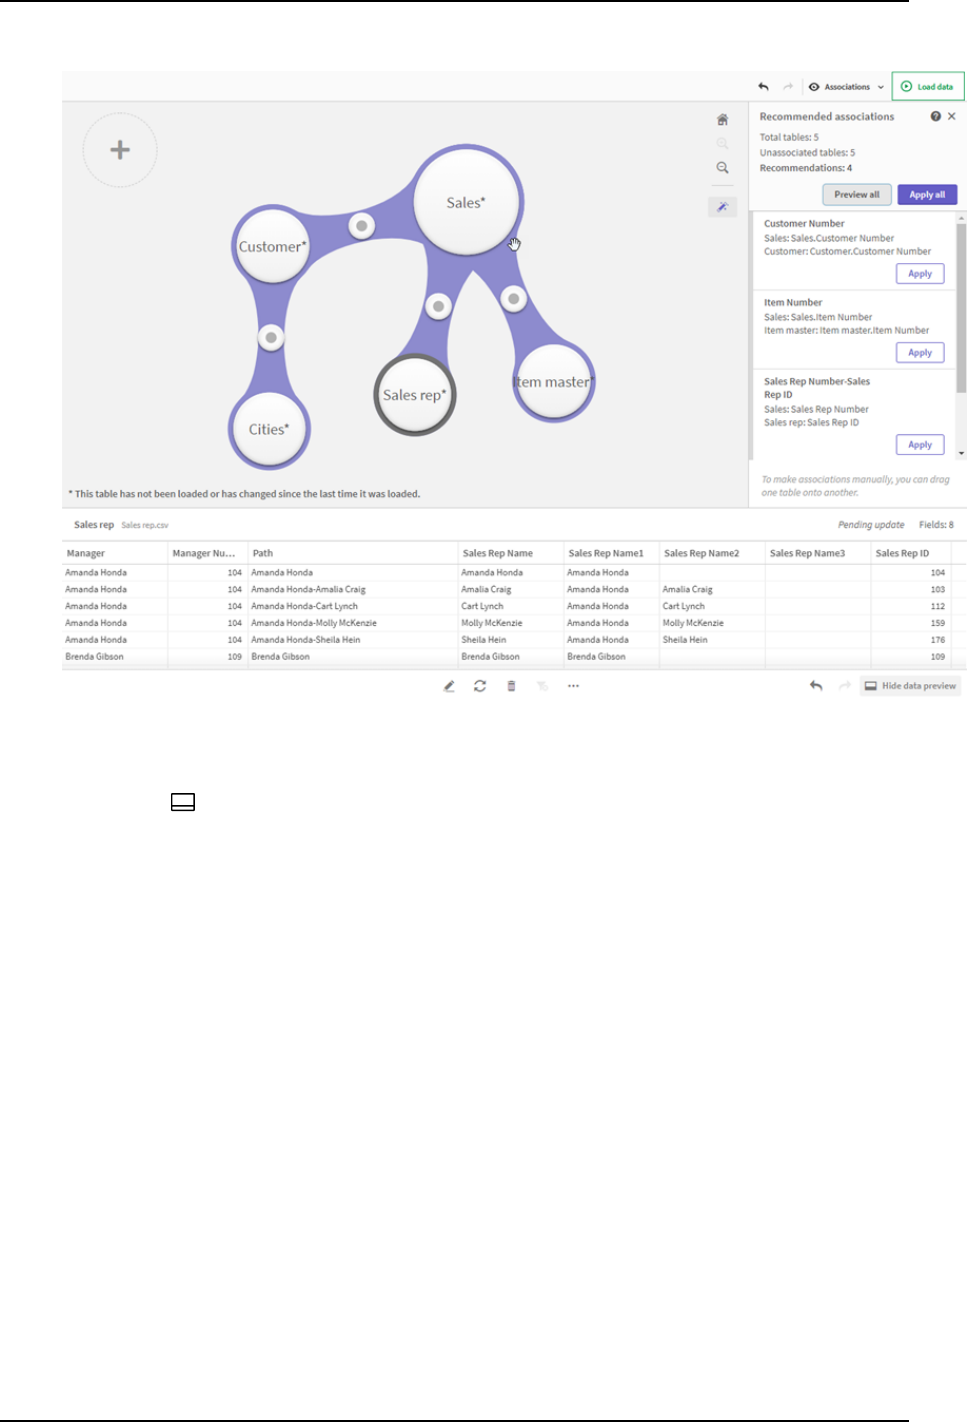
3 Loading and managing data with Data Manager
Recommended associations panel
6. Click Apply all to apply every recommended association. Associations that have been accepted are
highlighted in light grey.
You can click at the bottom of the screen to see how your tables have changed.
You can now start making visualizations with your data.
Associating tables manually
You can associate tables manually, by dragging them together. When you drag table bubbles towards each
other, they will be marked with a green, orange, or red stripe.
l
Green: the Data manager is very confident about which fields to associate. For example, if two tables
have fields labeled "Sales Region", the Data manager assumes they should be associated.
l
Orange: the Data manager is fairly confident that these tables can be associated. For example, if two
different fields have different labels, but contain single digit data, the Data manager will flag them as
orange, because the data types are similar.
l
Red: the Data manager does not know how to associate these tables. You will have to choose which
tables and fields go together in the Associate tables editor.
Manage data - Qlik Sense, February 2024 93

3 Loading and managing data with Data Manager
I want to manually associate tables that are green or orange
Do the following:
1. Drag a table to one of the tables marked with green or orange.
2. The association is automatically applied.
The tables are now associated using the recommended fields.
I want to manually associate a tables that are red
You can associate the tables by creating a custom association.
Do the following:
1. Drag a table to one of the tables marked with red.
The Associate tables editor opens.
2. In the left table, select which fields to use in the association.
You choose a single field or multiple fields. You can also add delimiter characters to make it easier to
interpret the data, or to match a field that already exists. You can see what the association data looks
like in the preview.
3. In the right table, select which fields to use to match the selections you made in the left table.
4. Enter a name for the key field that will be created in Name.
This new field name cannot be the same as an existing field name in either table.
5. Click Associate.
The tables are now associated using your custom association.
Breaking associations
There are two ways of breaking associations that are not a good fit for your data model.
Do the following:
l
Click one of the associated tables, and drag it away from the other table until the association breaks.
Or you can:
l
Click on the link between the two bubbles, and then click the Delete button in the bottom panel.
The two tables are no longer associated.
Editing associations
You can edit an existing association between two tables if you need to adjust the data model.
Do the following:
1. Click the circle between the associated tables to open the data panel.
The panel opens with a preview of data in the associated fields.
Manage data - Qlik Sense, February 2024 94

3 Loading and managing data with Data Manager
2.
Click .
You will see one or more buttons, each marked with green, orange, or red. Green means the Data
manager is very confident in the association, orange means somewhat confident, and red means
unsure. The current association is marked with grey.
3. Click one of the association buttons:
l
Click a recommended association to select it.
l
Click an existing custom association to edit which fields to use in the association.
l
Click Custom association to create a new association.
This button is only available if there is a recommended association for the table pair.
Custom associations can contain a single field or multiple fields.
You have now changed the association between the table pair.
Previewing data
You can preview tables in the associations view to get a better understanding of the data.
Do the following:
1. Select a table.
2.
Click at the bottom of the view.
The preview pane is displayed with the table data.
Synthetic keys
When two or more data tables have two or more fields in common, this suggests a composite key relationship.
Qlik Sense handles this by creating synthetic keys automatically. These keys are anonymous fields that
represent all occurring combinations of the composite key.
For more information, see Synthetic keys (page 129).
If adding a table results in any of the following cases, you can only add data with profiling enabled:
l
A synthetic key containing more than five fields is created.
l
More than ten synthetic keys are created.
l
Nested synthetic keys are created, that is, synthetic keys containing other synthetic keys.
These cases indicate that you need to adjust the data tables to resolve the issues.
Limitations
There are some cases where association recommendations are not provided, due to the structure of the
loaded tables and the data in the tables. In these cases, you need to adjust the associations in the table
editor.
l
Many-to-many relationships.
Manage data - Qlik Sense, February 2024 95

3 Loading and managing data with Data Manager
l
Field pairs with data does not match well in both directions. This may be the case when you have a
small table with a few field values that match a field in a large table 100%, while the match in the other
direction is significantly smaller.
l
Compound key associations.
Additionally, the Data manager will only analyze tables that were added with Add data. Tables added using
the data load script are not included in the association recommendations, unless they have been
synchronized into Data manager.
For more information, see Synchronizing scripted tables in Data manager (page 89).
Applying changes and reloading data
Changes that you have made in the Data manager will not be available in the app until you have reloaded
data. When you reload data, the changes are applied and any new data that you have added is loaded from
the external data sources. Data that you loaded previously is not reloaded.
You can reload all the data from the external data sources by using the button in the Data manager
footer.
The button reloads all the data for the selected table. It does not reload all the data for all the tables in the
app.
If the data in Data manager is out of sync with the app data, the Load data button is green. In the
Associations view, all new or updated tables are indicated with *, and deleted tables are a lighter color of
gray. In the Tables view, all new, updated, or deleted tables are highlighted in blue and display an icon that
shows the status of the table:
l
Tables marked with Pending delete will be deleted.
l
Tables marked with Pending update will be updated with fields that have been added, renamed,
or removed, or the table will be renamed.
l
Tables marked with Pending add will be added.
Applying changes
Do the following:
l
Click Load data to load the changes in the app.
The app data is now updated with changes you made in Data manager.
Manage data - Qlik Sense, February 2024 96

4 Loading and transforming data with scripting
4 Loading and transforming data with scripting
This introduction serves as a brief presentation of how you can load data into Qlik Sense using
data load scripts.
Qlik Sense uses a data load script, which is managed in the Data load editor, to connect to and retrieve data
from various data sources. A data source can be a data file, for example an Excel file or a .csv file. A data
source can also be a database, for example a Google BigQuery or Salesforce database.
You can also load data using the Data manager, but when you want to create, edit and run a data load script
you use the data load editor.
In the script, the fields and tables to load are specified. Scripting is often used to specify what data to load
from your data sources. You can also manipulate the data structure by using script statements.
During the data load, Qlik Sense identifies common fields from different tables (key fields) to associate the
data. The resulting data structure of the data in the app can be monitored in the data model viewer. Changes
to the data structure can be achieved by renaming fields to obtain different associations between tables.
After the data has been loaded into Qlik Sense, it is stored in the app.
Analysis in Qlik Sense always happens while the app is not directly connected to its data sources. So, to
refresh the data, you need to run the script to reload the data.
4.1 Interaction between Data manager and the data load
script
When you add data tables in the Data manager, data load script code is generated. You can view the script
code in the Auto-generated section of the data load editor. You can also choose to unlock and edit the
generated script code, but if you do, the data tables will no longer be managed in the Data manager.
By default, data tables defined in the load script are not managed in Data manager. That is, you can see the
tables in the data overview, but you cannot delete or edit the tables in Data manager, and association
recommendations are not provided for tables loaded with the script. If you synchronize your scripted tables
with Data manager, however, your scripted tables are added as managed scripted tables to Data manager.
If you have synchronized tables, you should not make changes in the data load editor with Data
manager open in another tab.
You can add script sections and develop code that enhances and interacts with the data model created in
Data manager, but there are some areas where you need to be careful. The script code you write can interfere
with the Data manager data model, and create problems in some cases, for example:
l
Renaming or dropping tables added with Data manager in the script.
l
Dropping fields from tables added with Data manager.
l
Concatenation between tables added with Data manager and tables loaded in the script.
Manage data - Qlik Sense, February 2024 97

4 Loading and transforming data with scripting
l
Using the Qualify statement with fields in tables added with Data manager.
l
Loading tables added with Data manager using Resident in the script.
l
Adding script code after the generated code section. The resulting changes in the data model are not
reflected in Data manager.
4.2 Using the data load editor
Create and run data load scripts from the data load editor, and create connections to data
sources. When you have loaded the data it is available to the app for analysis.
Click Data load editor under the Prepare tab in the navigation bar to open the data load editor.
Data load editor
Toolbar
Toolbar with the most frequently used commands for the data load editor.
Data connections
Under Data connections you can save shortcuts to the data sources (databases or remote files) you
commonly use. This is also where you initiate selection of which data to load.
Text editor
You can write and edit the script code in the text editor. Each script line is numbered and the script is color
coded by syntax components. The text editor toolbar contains commands for Search and replace, Help
mode, Undo, and Redo The initial script contains some pre-defined regional variable settings, for example SET
ThousandSep=, that you can optionally edit.
Manage data - Qlik Sense, February 2024 98
4 Loading and transforming data with scripting
Sections
Divide your script into sections to make it easier to read and maintain. The sections are executed from top to
bottom.
If you have added data using Add data, you will have a data load script section named Auto-generated
section that contains the script code required to load the data.
Output
Output displays the autosave status and all messages that are generated during script execution.
Connect to data sources in the data load editor
Data connections in the Data load editor let you save shortcuts to the data sources you
commonly use: databases, local files, or remote files.
Data connections lists the connections you have saved in alphabetical order. You can use the search box to
narrow the list down to connections with a certain name or type.
You can only see data connections that you own, or have been given rights to access. Please contact
your Qlik Sense system administrator to acquire access if required.
Creating a new data connection
Do the following:
1. Click Create new connection.
2. Select the type of data source you want to create from the drop-down list.
The settings dialog, specific for the type of data source you selected, opens.
3. Enter the data source settings and click Create to create the data connection.
The connection name will be appended with your user name and domain to ensure that it is unique.
The data connection is now created with you as the default owner. If you want other users to be able to use
the connection in a server installation, you need to edit the access rights of the connection in the Qlik
Management Console.
The settings of the connection you created will not be automatically updated if the data source
settings are changed. This means you need to be careful about storing user names and passwords,
especially if you change settings between integrated Windows security and database logins in the
DSN.
If Create new connection is not displayed, it means you do not have access rights to add data
connections. Please contact your Qlik Sense system administrator to acquire access if required.
Manage data - Qlik Sense, February 2024 99

4 Loading and transforming data with scripting
Deleting a data connection
Do the following:
1.
Click on the data connection you want to delete.
2. Confirm that you want to delete the connection.
The data connection is now deleted.
If is not displayed, it means you do not have access rights to delete the data connection. Please
contact your Qlik Sense system administrator to acquire access if required.
Editing a data connection
Do the following:
1. Under Data connections, select the space containing the data connection you want to edit.
2.
Click on the data connection you want to edit.
3. Edit the data connection details. Connection details are specific to the type of connection.
You may need to provide the connection's credentials.
The data connection is now updated.
If you edit the name of a data connection, you also need to edit all existing references (lib://) to the
connection in the script, if you want to continue referring to the same connection.
If is not displayed, it means you do not have access rights to update the data connection. Please
contact your Qlik Sense system administrator if required.
Inserting a connect string
Connect strings are required for most connections. Only folder and web file connections do not require
connect strings.
This functionality is not available in Qlik Sense SaaS.
Do the following:
l
Click on the connection for which you want to insert a connect string.
A connect string for the selected data connection is inserted at the current position in the data load editor.
Selecting data from a data connection
If you want to select data from a data connection to load in your app do the following:
Manage data - Qlik Sense, February 2024 100

4 Loading and transforming data with scripting
1. Create new connection linking to the data source (if the data connection does not already exist).
2.
Select data from the connection.
Referring to a data connection in the script
You can use the data connection to refer to data sources in statements and functions in the script, typically
where you want to refer to a file name with a path.
The syntax for referring to a file is 'lib://(connection_name)/(file_name_including_path)'
Example: Loading a file from a DataFiles connection
This example loads the file orders.csv from the location defined in the Folder data connection. This may be, for
example, a folder that your administrator creates on the Qlik Sense server.
LOAD * FROM 'lib://DataSource/orders.csv';
Example: Loading a file from a sub-folder
This example loads the file Customers/cust.txt from the DataSource data connection folder. Customers is a
sub-folder in the location defined in data connection.
LOAD * FROM 'lib://DataSource/Customers/cust.txt';
Example: Loading from a web file
This example loads a table from the PublicData web file data connection, which contains the link to the actual
URL.
LOAD * FROM 'lib://PublicData' (html, table is @1);
Example: Loading from a database
This example loads the table Sales_data from the DataSource database connection.
LIB CONNECT TO 'DataSource';
LOAD *;
SQL SELECT * FROM `Sales_data`;
Where is the data connection stored?
Connections are stored using the Qlik Sense Repository Service.You can manage data connections with the
Qlik Management Console in a Qlik Sense server deployment. The Qlik Management Console allows you to
delete data connections, set access rights and perform other system administration tasks.
In Qlik Sense Desktop, all connections are saved in the app without encryption. This includes possible
details about user name, password, and file path that you have entered when creating the
connection. This means that all these details may be available in plain text if you share the app with
another user. You need to consider this while designing an app for sharing.
Manage data - Qlik Sense, February 2024 101

4 Loading and transforming data with scripting
Select data in the data load editor
You can select which fields to load from files or database tables and which views of the data
source you want by using Select data in the data load editor.
As well as selecting fields, you can also rename fields in the dialog. When you have finished selecting fields,
you can insert the generated script code into your script.
Some data sources, such as a CSV file, contain a single table, while other data sources, such as Microsoft Excel
spreadsheets or databases can contain several tables.
Do not add a table in Data load editor that has already been added as a scripted table with the
same name and same columns in Data manager.
You open Select data by clicking on a data connection in the data load editor.
Selecting data from a database
When selecting data from a database, the data source can contain several tables.
Do the following:
1. Open the Data load editor.
2.
Under Data connections on the left, click on a database connection.
The select data dialog is displayed.
3. This step is relevant to Databricks only. If your Databricks host supports Unity catalog, the catalog you
specified in the Create new connection dialog will appear in the Catalog field. You can either leave it
unchanged or selected a different catalog from the drop-down list.
While you can select data from multiple databases, all of the databases must belong to the
same catalog.
4. Select a Database from the drop-down list.
Some selection dialogs do not have a Database drop-down list because the database name is entered
when the connection is configured.
5. Select Owner of the database.
The list of Tables is populated with views and tables available in the selected database.
Some databases do not require that owners be specified in the data selection process.
6. Select a table.
7. Select the fields you want to load by checking the box next to each field you want to load.
You can select all fields in the table by checking the box next to the table name.
Manage data - Qlik Sense, February 2024 102

4 Loading and transforming data with scripting
You can edit the field name by clicking on the existing field name and typing a new name.
This may affect how the table is linked to other tables, as they are joined on common fields
by default.
8. Select additional tables if you want to add data from them.
You cannot rename fields in the data selection wizard at the same time as you filter for fields
by searching. You have to erase the search string in the text box first.
It is not possible to rename two fields in the same table so that they have identical names.
9. When you have finished your data selection, do the following:
l
Click Insert script.
The data selection window is closed, and the LOAD /SELECT statements are inserted in the
script in accordance with your selections.
Selecting data from a Microsoft Excel spreadsheet
When you select data from a Microsoft Excel spreadsheet, the file can contain several sheets. Each sheet is
loaded as a separate table. An exception is if the sheet has the same field/column structure as another sheet
or loaded table, in which case, the tables are concatenated.
Do the following:
1.
Click on the appropriate folder connection in the data load editor.
The select file dialog is displayed.
2. Select a file from the list of files accessible to this folder connection.
3. Select the first sheet to select data from. You can select all fields in a sheet by checking the box next to
the sheet name.
4. Make sure you have the appropriate settings for the sheet:
UI item Description
Field
names
Set to specify if the table contains Embedded field names or No field names. Typically
in an Excel spreadsheet, the first row contains the embedded field names. If you select
No field names, fields will be named A,B,C...
Header
size
Set to the number of rows to omit as table header, typically rows that contain general
information that is not in a columnar format.
Settings to assist you with interpreting the table data correctly
Example
My spreadsheet looks like this:
Manage data - Qlik Sense, February 2024 103

4 Loading and transforming data with scripting
Machine: AEJ12B - -
Date: 2015-10-05 09 - -
Timestamp Order Operator Yield
2015-10-05 09:22 00122344 A 52
2015-10-05 10:31 00153534 A 67
2015-10-05 13:46 00747899 B 86
Spreadsheet example
In this case you probably want to ignore the two first lines, and load a table with the fields Timestamp,
Order, Operator, and Yield. To achieve this, use these settings:
UI item Description
Header
size
2
This means that the first two lines are considered header data and ignored when
loading the file. In this case, the two lines starting with Machine: and Date: are ignored,
as they are not part of the table data.
Field
names
Embedded field names.
This means that the first line that is read is used as field names for the respective
columns. In this case, the first line that will be read is the third line because the two
first lines are header data.
Settings to ignore the two first lines and load the fields
5. Select the fields you want to load by checking the box next to each field you want to load.
You can edit the field name by clicking on the existing field name and typing a new name.
This may affect how the table is linked to other tables, as they are joined by common fields
by default.
6. When you are done with your data selection, do the following:
l
Click Insert script.
The data selection window is closed, and the LOAD /SELECT statements are inserted in the
script in accordance with your selections.
You can also use a Microsoft Excel file as data source using the ODBC interface. In that case you need
to use an ODBC data connection instead of a All files data connection.
Selecting data from a table file
You can select data from a large number of data files:
l
Text files, where data in fields is separated by delimiters such as commas, tabs or semicolons (comma-
separated variable (CSV) files).
Manage data - Qlik Sense, February 2024 104

4 Loading and transforming data with scripting
l
HTML tables.
l
XML files.
l
KML files.
l
Qlik native QVD and QVX files.
l
Fixed record length files.
l
DIF files (Data Interchange Format).
Do the following:
1.
Click on the appropriate folder connection in the data load editor.
The select file dialog is displayed.
2. Select a file from the list of files accessible to this folder connection.
3. Make sure that the appropriate file type is selected in File format.
4. Make sure you have the appropriate settings for the file. File settings are different for different file
types.
5. Select the fields you want to load by checking the box next to each field you want to load. You can also
select all fields in a file by checking the box next to the sheet name.
You can edit the field name by clicking on the existing field name and typing a new name.
This may affect how the table is linked to other tables, as they are joined by common fields
by default.
6. When you are done with your data selection, click Insert script.
7. The data selection window is closed, and the LOAD /SELECT statements are inserted in the script in
accordance with your selections.
Users with edit permissions in a space can read, write, and load DataFiles in that space.
Other users will not see the DataFiles.
Choosing settings for file types
Delimited table files
These settings are validated for delimited table files, containing a single table where each record is separated
by a line feed, and each field is separated with a delimited character, for example a CSV file.
UI item Description
File format for
delimited table files
Set to Delimited or Fixed record.
When you make a selection, the select data dialog will adapt to the file format you
selected.
Field names Set to specify if the table contains Embedded field names or No field names.
File format settings for delimited table files
Manage data - Qlik Sense, February 2024 105

4 Loading and transforming data with scripting
UI item Description
Delimiter Set the Delimiter character used in your table file.
Quoting Set to specify how to handle quotes:
None = quote characters are not accepted
Standard = standard quoting (quotes can be used as first and last characters of a
field value)
MSQ = modern-style quoting (allowing multi-line content in fields)
Header size Set the number of lines to omit as table header.
Character set Set character set used in the table file.
Comment Data files can contain comments between records, denoted by starting a line with
one or more special characters, for example //.
Specify one or more characters to denote a comment line. Qlik Sense does not load
lines starting with the character(s) specified here.
Ignore EOF Select Ignore EOF if your data contains end-of-file characters as part of the field
value.
Fixed record data files
Fixed record data files contain a single table in which each record (row of data) contains a number of columns
with a fixed field size, usually padded with spaces or tab characters.
You can set the field break positions in two different ways:
l
Manually, enter the field break positions separated by commas in Field break positions. Each position
marks the start of a field.
Example: 1,12,24
l
Enable Field breaks to edit field break positions interactively in the field data preview. Field break
positions is updated with the selected positions. You can:
l
Click in the field data preview to insert a field break.
l
Click on a field break to delete it.
l
Drag a field break to move it.
UI item Description
Field names Set to specify if the table contains Embedded field names or No field names.
Header size Set Header size to the number of lines to omit as table header.
Character set Set to the character set used in the table file.
File format settings for fixed record data files
Manage data - Qlik Sense, February 2024 106

4 Loading and transforming data with scripting
UI item Description
Tab size Set to the number of spaces that one tab character represents in the table file.
Record line size Set to the number of lines that one record spans in the table file. Default is 1.
Ignore EOF Select Ignore EOF if your data contains end-of-file characters as part of the field value.
HTML files
HTML files can contain several tables. Qlik Sense interprets all elements with a <TABLE> tag as a table.
UI item Description
Field names Set to specify if the table contains Embedded field names or No field names.
Character set Set the character set used in the table file.
File format settings for HTML files
XML files
You can load data that is stored in XML format.
There are no specific file format settings for XML files.
QVD files
You can load data that is stored in QVD format. QVD is a native Qlik format and can only be written to and
read by Qlik Sense or QlikView. The file format is optimized for speed when reading data from a Qlik Sense
script but it is still very compact.
There are no specific file format settings for QVD files.
QVX files
You can load data that is stored in Qlik data eXchange (QVX) format. QVX files are created by custom
connectors developed with the Qlik QVX SDK.
There are no specific file format settings for QVX files.
KML files
You can load map files that are stored in KML format, to use in map visualizations.
There are no specific file format settings for KML files.
Previewing scripts
The statements that will be inserted are displayed in the script preview, which you can choose to hide by
clicking Preview script.
Including LOAD statements
If Include LOAD statement is selected, SELECT statements are generated with preceding LOAD statements
using the SELECT statements as input.
Manage data - Qlik Sense, February 2024 107

4 Loading and transforming data with scripting
If you rename fields in a table, a LOAD statement will be inserted automatically regardless of this
setting.
Inline loads
You can load data in the data load editor using an inline load. A basic inline load creates a table, and inserts
the data fields and records. For example:
MyTable:
Load * Inline [
Country, Year, Sales
Argentina, 2014, 66295.03
Argentina, 2015, 140037.89
Austria, 2014, 54166.09
Austria, 2015, 182739.87
];
The following syntax is used for the above inline load:
l
MyTable: creates a table for the data.
l
Load * Inline indicates an inline (in the data load editor)data load.
l
Square brackets enclose the data.
l
The first line of the load statement defines the data fields.
l
Commas separate data fields and records.
l
A semi-colon closes the load statement.
The data is loaded using the Load data button.
The following image shows an inline load in a new script section called Load.
Manage data - Qlik Sense, February 2024 108
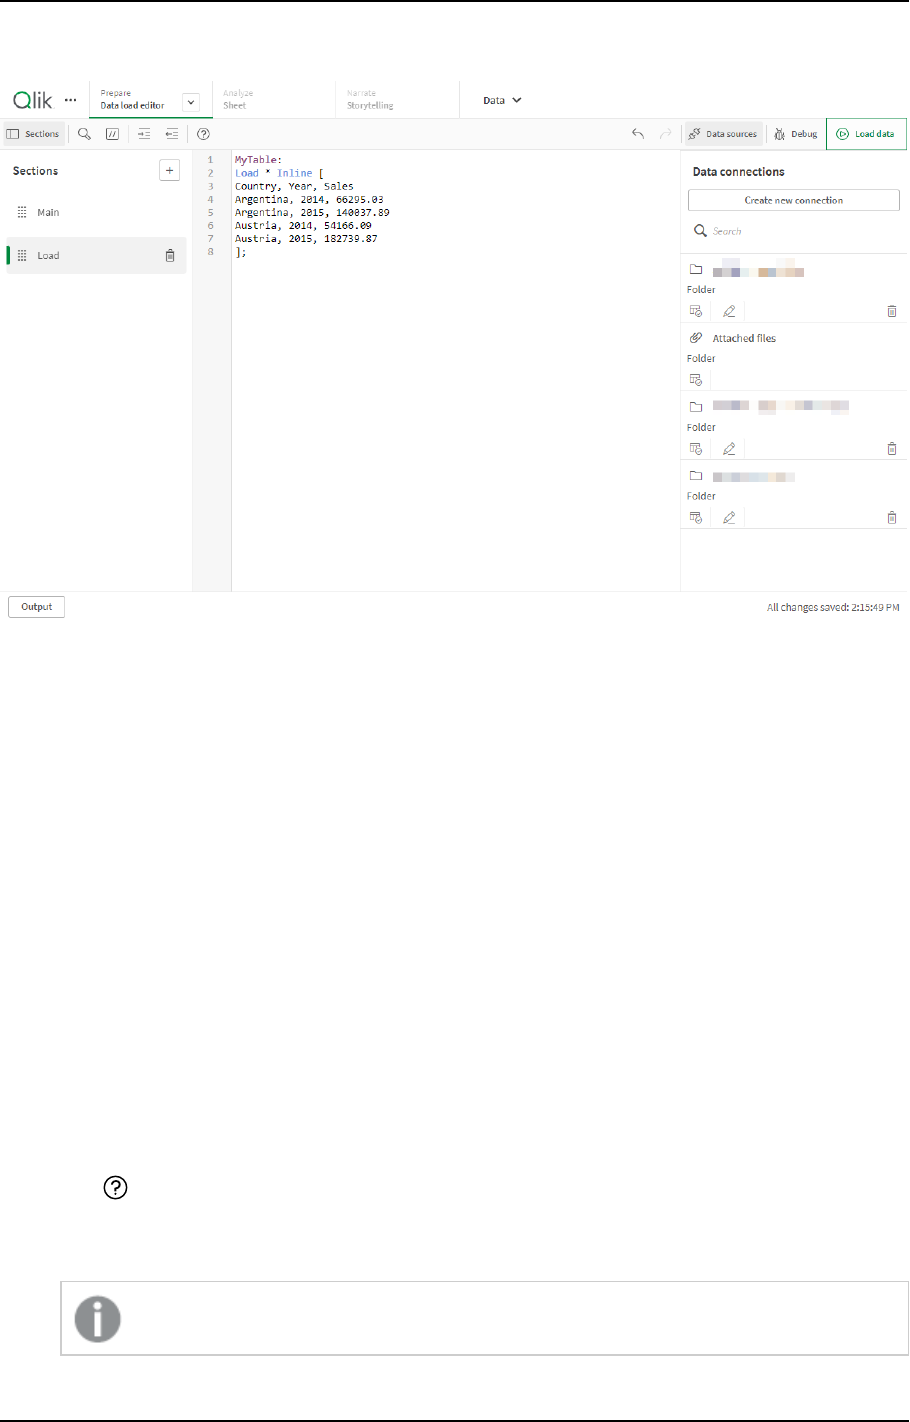
4 Loading and transforming data with scripting
Inline load in data load editor
Edit the data load script
You write the script in the text editor of the Data load editor. Here you can make manual
changes to the LOAD or SELECT statements you have generated when selecting data, and type
new script.
The script, which must be written using the Qlik Sense script syntax, is color coded to make it easy to
distinguish the different elements. Comments are highlighted in green, whereas Qlik Sense syntax keywords
are highlighted in blue. Each script line is numbered.
There are a number of functions available in the editor to assist you in developing the load script, and they are
described in this section.
Accessing syntax help for commands and functions
There are several ways to access syntax help for a Qlik Sense syntax keyword.
Accessing the help portal
You can access detailed help in the help portal in two different ways.
l
Click in the toolbar to enter syntax help mode. In syntax help mode you can click on a syntax
keyword (marked in blue and underlined) to access syntax help.
l
Place the cursor inside or at the end of the keyword and press Ctrl+H.
You cannot edit the script in syntax help mode.
Manage data - Qlik Sense, February 2024 109

4 Loading and transforming data with scripting
Using the auto-complete function
If you start to type a Qlik Sense script keyword, you get an auto-complete list of matching keywords to select
from. The list is narrowed down as you continue to type, and you can select from templates with suggested
syntax and parameters. A tooltip displays the syntax of the function, including parameters and additional
statements, as well as a link to the help portal description of the statement or function.
You can also use the keyboard shortcut Ctrl+Space to show the keyword list, and Ctrl+Shift+Space to
show a tooltip.
Inserting a prepared test script
You can insert a prepared test script that will load a set of inline data fields. You can use this to quickly create
a data set for test purposes.
Do the following:
l
Press Ctrl + 00.
The test script code is inserted into the script.
Indenting code
You can indent the code to increase readability.
Do the following:
1. Select one or several lines to change indentation.
2.
Click to indent the text (increase indentation) or, click to outdent the text (decrease
indentation).
You can also use keyboard shortcuts:
Tab (indent)
Shift+Tab (outdent)
Searching and replacing text
You can search and replace text throughout script sections.
Searching for text
Open the data load editor.Do the following:
1.
Click in the toolbar.
The search drop-down dialog is displayed.
2. In the search box, type the text you want to find.
Manage data - Qlik Sense, February 2024 110
4 Loading and transforming data with scripting
The search results are highlighted in the current section of the script code. Also, the number of text
instances found is indicated next to the section label.
3.
You can browse through the results by clicking and .
4.
Click in the toolbar to close the search dialog.
Also, you can select Search in all sections to search in all script sections. The number of text
instances found is indicated next to each section label. You can select Match case to make case
sensitive searches.
Replacing text
Do the following:
1.
Click in the toolbar.
The search drop-down dialog is displayed.
2. Type the text you want to find in the search box.
3. Type the replacement text in the replace box and click Replace.
4.
Click to find next instance of search text and do one of the following:
l
Click Replace to replace text.
l
Click to find next.
5.
Click in the toolbar to close the search dialog.
You can also click Replace all in section to replace all instances of the search text in the current
script section. The replace function is case sensitive, and replaced text will have the case given in the
replace field. A message is shown with information about how many instances that were replaced.
Commenting in the script
You can insert comments in the script code, or deactivate parts of the script code by using comment marks.
All text on a line that follows to the right of // (two forward slashes) will be considered a comment and will not
be executed when the script is run.
The data load editor toolbar contains a shortcut for commenting or uncommenting code. The function works
as a toggle. That is, if the selected code is commented out it will be commented, and vice versa.
Commenting
Do the following:
1. Select one or more lines of code that are not commented out, or place the cursor at the beginning of a
line.
2.
Click , or press Ctrl + K.
The selected code is now commented out.
Manage data - Qlik Sense, February 2024 111

4 Loading and transforming data with scripting
Uncommenting
Do the following:
1. Select one or more lines of code that are commented out, or place the cursor at the beginning of a
commented line.
2.
Click , or press Ctrl + K.
The selected code will now be executed with the rest of the script.
There are more ways to insert comments in the script code:
l
Using the Rem statement.
l
Enclosing a section of code with /* and */.
Example:
Rem This is a comment ;
/* This is a comment
that spans two lines */
// This is a comment as well
Selecting all code
You can select all code in the current script section.
Do the following:
l
Press Ctrl + A.
All script code in the current section is selected.
Organizing the script code
You can divide your script into sections to organize the structure. The script is executed in the
order of the sections from top to bottom. A script must contain at least one section.
Manage data - Qlik Sense, February 2024 112

4 Loading and transforming data with scripting
Sections Main, Dictionary and Calendar in Data load editor
If you have added data using Add data, you will have a data load script section named Auto-generated
section that contains the script code required to load the data.
Working with script sections
There are several ways to organize scripting sections:
l
Click to insert new script sections to organize your code. The new section is inserted after the
currently selected section.
l
Click next to the section tab to delete it. You need to confirm the deletion.
Deleting a script section cannot be undone.
l
Click on the section name and type to edit the name. Press Enter or click outside the section when you
are finished.
l
Put the cursor on and drag the section to rearrange the order.
Debug the data load script
You can use the debugging utilities in the Data load editor to step through the execution of your
script by using breakpoints, which enable you to inspect variable values and output from the
script execution.
You can select whether you want to view any or all of Output, Variables and Breakpoints.
To show the debug panel, do the following:
l
Click Debug in the data load editor toolbar.
The debug panel is opened at the bottom of the Data load editor.
You cannot create connections, edit connections, select data, save the script or load data while you
are running in debug mode. Debug mode begins with debug execution and continues until the script
is executed or execution has been ended.
Manage data - Qlik Sense, February 2024 113

4 Loading and transforming data with scripting
Debug toolbar
The Data load editor debug panel contains a toolbar with the following options to control the debug
execution:
UI item Description
Limited
load
Enable this to limit how many rows of data to load from each data source. This is useful to
reduce execution time if your data sources are large.
Enter the number of rows you want to load.
This only applies to physical data sources. Automatically generated and Inline loads
will not be limited, for example.
Start or continue execution in debug mode until the next breakpoint is reached.
Step to the next line of code.
End execution here. If you end before all code is executed, the resulting data model will only
contain data up to the line of code where execution ended.
Debug toolbar options
Output
Output displays all messages that are generated during debug execution. You can select to lock the output
from scrolling when new messages are displayed by clicking .
Additionally, the output menu contains the following options:
UI item Description
Clear Click this to delete all output messages.
Select all text Click this to select all output messages.
Scroll to bottom Click this to scroll to the last output message.
Output menu options
Variables
Variables lists all reserved variables, system variables and variables defined in the script, and displays the
current values during script execution.
Setting a variable as favorite
If you want to inspect specific variables during execution, you can set them as favorites. Favorite variables are
displayed at the top of the variable list, marked by a yellow star. To set a variable as favorite, do the following:
Manage data - Qlik Sense, February 2024 114

4 Loading and transforming data with scripting
l
Click on the next to a variable.
The is now yellow, and the variable moved to the top of the variable list.
Filtering variables
You can apply a filter to show only a selected type of variables by using the following options in the variables
menu :
UI item Description
Show all variables Click this to show all types of variables.
Show system variables Click this to show system variables.
System variables are defined by Qlik Sense, but you can change the variable
value in the script.
Show reserved
variables
Click this to show reserved variables.
Reserved variables are defined by Qlik Sense and the value cannot be changed.
Show user defined
variables
Click this to show user defined variables.
User defined variables are variables that you have defined in the script.
Variables menu options
Breakpoints
You can add breakpoints to your script to be able to halt debug execution at certain lines of code and inspect
variable values and output messages at this point. When you have reached a breakpoint, you can choose to
stop execution, continue until the next breakpoint is reached, or step to the next line of code. All breakpoints
in the scripts are listed, with a reference to section and line number.
Adding a breakpoint
To add a breakpoint at a line of code , do one of the following:
l
In the script, click in the area directly to the right of the line number where you want to add a
breakpoint.
A next to the line number will indicate that there is a breakpoint at this line.
You can add breakpoints even when the debug panel is closed.
Deleting breakpoints
You can delete a breakpoint by doing either of the following:
l
In the script, click on a next to the line number.
l
In the list of breakpoints, click next to a breakpoint.
You can also click and select Delete all to delete all breakpoints from the script.
Manage data - Qlik Sense, February 2024 115

4 Loading and transforming data with scripting
Enabling and disabling breakpoints
When you create a breakpoint it is enabled by default, which is indicated by next to the breakpoint in the
list of breakpoints. You can enable and disable individual breakpoints by selecting and deselecting them in the
list of breakpoints.
You also have the following options in the breakpoints menu :
l
Enable all
l
Disable all
Saving the load script
When you save a script the entire app is saved, but data is not automatically reloaded.
When the script is saved, the app will still contain old data from the previous reload, which is indicated in the
toolbar. If you want to update the app with new data, click in the data load editor toolbar. The script is
automatically saved to the app when data is loaded.
Data load editor saves your work automatically as you make changes to your load script. You can force a save
by pressing CTRL+S.
The script is not saved automatically in Qlik Sense Desktop. You need to save the script manually.
When you save a script, it is automatically checked for syntax errors. Syntax errors are highlighted in the code,
and all script sections containing syntax errors are indicated with next to the section label.
Run the script to load data
Click in the toolbar to run the script and reload data in the app. The app is automatically
saved before loading the data.
The Data load progress dialog is displayed, and you can Abort the load. When the data load has completed,
the dialog is updated with status (Finished successfully or Data load failed) and a summary of possible
errors and warnings, such as for synthetic keys. The summary is also displayed in Output, if you want to view
it after the dialog is closed.
If you want the Data load progress dialog to always close automatically after a successful
execution, select Close when successfully finished.
Keyboard shortcuts in the Data load editor
There are a number of keyboard shortcuts you can use to work effectively and easily in the Data
load editor environment.
Manage data - Qlik Sense, February 2024 116

4 Loading and transforming data with scripting
Keyboard shortcuts
Keyboard shortcuts are expressed assuming that you are working in Windows. For macOS use Cmd
instead of Ctrl.
Shortcut Action
Ctrl+0,Ctrl+0 Generates sample data.
Alt+1 Shows the Output panel or hides it if it is visible.
Alt+2 Shows the Variables panel or hides it if it is visible, if the debug tool is on.
Alt+3 Shows the Breakpoints panel or hides it if it is visible, if the debug tool is on.
Alt+F5 Shows the debug tools or hides them if they are visible.
Alt+F6 Runs debugging if the debug tool is on.
Alt+F7 Proceeds to the next step in the debugger if the debug tool is on.
Alt+F8 Stops the debugger if the debug tool is on.
F9 Toggles insertion and removal of a debug breakpoint.
Alt+F10 Shows the right panel or hides it if it is visible.
Ctrl+C Copies the selected item to the clipboard.
Ctrl+F Shows the Find search entry field or hides it if is open.
Ctrl+H Opens online help in the context of the current selected function, while in the
data load editor or the expression editor.
Ctrl+K Toggles insertion and removal of a code comment line.
Ctrl+P Prints the current view or active sheet/story
Ctrl+S Saves changes.
Ctrl+V Pastes the most-recently copied item from the clipboard.
Ctrl+X Cuts the selected item and copies it to the clipboard. When using the Google
Chrome browser: if the cursor is put in front of a row in the data load editor or
in the expression editor, without selecting anything, the entire row is cut.
Ctrl+Z Undo action. Repeat to undo earlier actions.
Alt+Insert Inserts a new section in the script.
Alt+PgUp Navigates to the previous section.
Alt+PgDn Navigates to the next section.
Ctrl+Shift+Enter/Return Reloads data.
Keyboard shortcuts in the Data load editor
Manage data - Qlik Sense, February 2024 117

4 Loading and transforming data with scripting
Shortcut Action
Ctrl+Shift+Space Displays a tooltip. (Not supported in Qlik Sense Desktop)
Ctrl+Space Automatically completes with the auto-text string.
Enter/Return in search
field
Searches for the next instance of the search string.
Enter/Return in replace
field
Replaces the selected instance of the search string.
Esc in search or replace
field
Closes the Find search entry field.
Shift+Tab Outdents a line in the script.
Tab Indents a line in the script.
4.3 Understanding script syntax and data structures
Extract, transform, and load
In general, the way you load data into the app can be explained by the extract, transform and load process:
l
Extract
The first step is to extract data from the data source system. In a script, you use SELECT or LOAD
statements to define this. The differences between these statements are:
o
SELECT is used to select data from an ODBC data source or OLE DB provider. The SELECT SQL
statement is evaluated by the data provider, not by Qlik Sense.
o
LOAD is used to load data from a file, from data defined in the script, from a previously loaded
table, from a web page, from the result of a subsequent SELECT statement or by generating
data automatically.
l
Transform
The transformation stage involves manipulating the data using script functions and rules to derive the
desired data model structure. Typical operations are:
o
Calculating new values
o
Translating coded values
o
Renaming fields
o
Joining tables
o
Aggregating values
o
Pivoting
o
Data validation
l
Load
In the final step, you run the script to load the data model you have defined into the app.
Manage data - Qlik Sense, February 2024 118

4 Loading and transforming data with scripting
Your goal should be to create a data model that enables efficient handling of the data in Qlik Sense. Usually
this means that you should aim for a reasonably normalized star schema or snowflake schema without any
circular references, that is, a model where each entity is kept in a separate table. In other words a typical data
model would look like this:
l
a central fact table containing keys to the dimensions and the numbers used to calculate measures
(such as number of units, sales amounts, and budget amounts).
l
surrounding tables containing the dimensions with all their attributes (such as products, customers,
categories, calendar, and suppliers).
In many cases it is possible to solve a task, for example aggregations, either by building a richer
data model in the load script, or by performing the aggregations in the chart expressions. As a
general rule, you will experience better performance if you keep data transformations in the load
script.
It's good practice to sketch out your data model on paper. This will help you by providing structure
to what data to extract, and which transformations to perform.
Data loading statements
Data is loaded by LOAD or SELECT statements. Each of these statements generates an internal table. A table
can always be seen as a list of data, each record (row) then being a new instance of the object type and each
field (column) being a specific attribute or property of the object.
The differences between these statements are:
l
SELECT is used to select data from an ODBC data source or OLE DB provider. The SELECT SQL
statement is evaluated by the data provider, not by Qlik Sense.
l
LOAD is used to load data from a file, from data defined in the script, from a previously loaded table,
from a web page, from the result of a subsequent SELECT statement or by generating data
automatically.
Rules
The following rules apply when loading data into Qlik Sense:
l
Qlik Sense does not make any difference between tables generated by a LOAD or a SELECT statement.
This means that if several tables are loaded, it does not matter whether the tables are loaded by LOAD
or SELECT statements or by a mix of the two.
l
The order of the fields in the statement or in the original table in the database is arbitrary to the Qlik
Sense logic.
l
Field names are used in the further process to identify fields and making associations. These are case
sensitive, which often makes it necessary to rename fields in the script.
Execution of the script
For a typical LOAD or SELECT statement the order of events is roughly as follows:
Manage data - Qlik Sense, February 2024 119

4 Loading and transforming data with scripting
1. Evaluation of expressions
2. Renaming of fields by as
3. Renaming of fields by alias
4. Qualification of field names
5. Mapping of data if field name matches
6. Storing data in an internal table
Fields
Fields are the primary data-carrying entities in Qlik Sense. A field typically contains a number of values, called
field values. In database terminology we say that the data processed by Qlik Sense comes from data files. A
file is composed of several fields where each data entry is a record. The terms file, field and record are
equivalent to table, column and row respectively. The Qlik Sense AQL logic works only on the fields and their
field values.
Field data is retrieved by script via LOAD, SELECT or Binary statements. The only way of changing data in a
field is by re-executing the script. The actual field values can not be manipulated by the user from the layout
or by means of automation. Once read into Qlik Sense they can only be viewed and used for logical selections
and calculations.
Field values consist of numeric or alphanumeric (text) data. Numeric values actually have dual values, the
numeric value and its current, formatted text representation. Only the latter is displayed in sheetobjects etc.
The content of a field can be represented in a filter pane.
Derived fields
If you have a group of fields that are related, or if fields carry information that can be broken up into smaller
parts that are relevant when creating dimensions or measures, you can create field definitions that can be
used to generate derived fields. One example is a date field, from which you can derive several attributes,
such as year, month, week number, or day name. All these attributes can be calculated in a dimension
expression using Qlik Sense date functions, but an alternative is to create a calendar definition that is
common for all fields of date type. Field definitions are stored in the data load script.
Default calendar field definitions for Qlik Sense are included in autoCalendar for date fields loaded
using Data manager.For more information, see Automatically deriving date fields using
autocalendar (page 121) and Adding data to the app (page 16).
Declare the calendar field definitions
You use the Declare statement to create a definition of the derived fields. This is where you define the
different attributes of the field in this case date related attributes. Each field is described as
<expression> As field_name tagged tag. Setting one or more tags is optional, but it can affect the sort
order of the derived field. Use $1 to reference the data field from which the derived fields should be
generated.
Manage data - Qlik Sense, February 2024 120

4 Loading and transforming data with scripting
Unless you are creating your own autocalendar or working with the auto-configured
[autoCalendar]
created by Data manager, do not use autoCalendar as name for calendar field
definitions. This name is reserved for auto-generated calendar templates. See Automatically deriving
date fields using autocalendar (page 121).
Calendar:
DECLARE FIELD DEFINITION TAGGED '$date'
Parameters
first_month_of_year = 1
Fields
Year($1) As Year Tagged ('$numeric'),
Month($1) as Month Tagged ('$numeric'),
Date($1) as Date Tagged ('$date'),
Week($1) as Week Tagged ('$numeric'),
Weekday($1) as Weekday Tagged ('$numeric'),
DayNumberOfYear($1, first_month_of_year) as DayNumberOfYear Tagged ('$numeric');
Map data fields to the calendar with Derive
The next step is to use the Derive statement to map existing data fields to the calendar. This will create the
derived fields. You can do this in three alternative ways in the data load script:
l
Map specific fields by field name.
DERIVE FIELDS FROM FIELDS OrderDate,ShippingDate USING Calendar;
l
Map all fields with one or more specific field tags.
DERIVE FIELDS FROM EXPLICIT TAGS ('$date') USING Calendar;
l
Map all fields that are tagged with one of the tags of the field definition ($date in the example above).
DERIVE FIELDS FROM IMPLICIT TAG USING Calendar;
In this case, you could use any of the three examples here.
Automatically deriving date fields using autocalendar
If you use Data manager to build your app and load data, a calendar named [autocalendar] is automatically
inserted into the load script to provide default calendar definitions. These are visible in the app's business
logic.
For apps created using scripting which contain date fields, you can insert this [autocalendar] code, shown
below, into your script in a section after you have loaded all applicable date fields. This allows app users to
use all available period-based analysis types, including those which can build smart sheets. Note that the
calendar must be titled [autocalendar] for the calendar periods to be added correctly in business logic.
Modify the [My_Date_Field1] and [My_Date_Field2] field names in the line DERIVE FIELDS FROM FIELDS
[My_Date_Field1], [My_Date_Field2] USING [autoCalendar] ; to link the date field with the autocalendar
calculations generating the new derived date fields. If you only have one date field to link to autocalendar,
remove the [My_Date_Field2].Similarly, add additional date fields if you have more than two date fields to
enable autocalendar for.
[autoCalendar]:
DECLARE FIELD DEFINITION Tagged ('$date')
FIELDS
Manage data - Qlik Sense, February 2024 121

4 Loading and transforming data with scripting
Dual(Year($1), YearStart($1)) AS [Year] Tagged ('$axis', '$year'),
Dual('Q'&Num(Ceil(Num(Month($1))/3)),Num(Ceil(NUM(Month($1))/3),00)) AS [Quarter] Tagged
('$quarter', '$cyclic'),
Dual(Year($1)&'-Q'&Num(Ceil(Num(Month($1))/3)),QuarterStart($1)) AS [YearQuarter] Tagged
('$yearquarter', '$qualified'),
Dual('Q'&Num(Ceil(Num(Month($1))/3)),QuarterStart($1)) AS [_YearQuarter] Tagged
('$yearquarter', '$hidden', '$simplified'),
Month($1) AS [Month] Tagged ('$month', '$cyclic'),
Dual(Year($1)&'-'&Month($1), monthstart($1)) AS [YearMonth] Tagged ('$axis', '$yearmonth',
'$qualified'),
Dual(Month($1), monthstart($1)) AS [_YearMonth] Tagged ('$axis', '$yearmonth',
'$simplified', '$hidden'),
Dual('W'&Num(Week($1),00), Num(Week($1),00)) AS [Week] Tagged ('$weeknumber', '$cyclic'),
Date(Floor($1)) AS [Date] Tagged ('$axis', '$date', '$qualified'),
Date(Floor($1), 'D') AS [_Date] Tagged ('$axis', '$date', '$hidden', '$simplified'),
If (DayNumberOfYear($1) <= DayNumberOfYear(Today()), 1, 0) AS [InYTD] ,
Year(Today())-Year($1) AS [YearsAgo] ,
If (DayNumberOfQuarter($1) <= DayNumberOfQuarter(Today()),1,0) AS [InQTD] ,
4*Year(Today())+Ceil(Month(Today())/3)-4*Year($1)-Ceil(Month($1)/3) AS [QuartersAgo] ,
Ceil(Month(Today())/3)-Ceil(Month($1)/3) AS [QuarterRelNo] ,
If(Day($1)<=Day(Today()),1,0) AS [InMTD] ,
12*Year(Today())+Month(Today())-12*Year($1)-Month($1) AS [MonthsAgo] ,
Month(Today())-Month($1) AS [MonthRelNo] ,
If(WeekDay($1)<=WeekDay(Today()),1,0) AS [InWTD] ,
(WeekStart(Today())-WeekStart($1))/7 AS [WeeksAgo] ,
Week(Today())-Week($1) AS [WeekRelNo] ;
DERIVE FIELDS FROM FIELDS [My_Date_Field1], [My_Date_Field2] USING [autoCalendar] ;
If done correctly, a number of calendar periods will be automatically created in the app's business logic, and
you will be able to use the period-based analysis types in Insight Advisor.
Use the derived date fields in a visualization
Qlik Sense is prepared to recognize derived date fields if you have created a calendar definition and mapped
the fields like in the example here. They are available in the Date & time fields section of the Fields asset
panel. You will also find all derived fields in the expression editor and when you create or edit dimensions.
Field tags
Field tags provide the possibility of adding metadata to the fields in your data model. There are two different
types of field tags:
l
System field tags
System field tags are generated automatically when the script is executed and data is loaded. Some of
the tags can be manipulated in the script. System tags are always preceded by a $ sign.
l
Custom field tags
You can add custom tags to fields in the data load script using the Tag statement. Custom tags may
not use the same name as any system tag.
System field tags
The following system field tags are generated automatically when data is loaded.
Manage data - Qlik Sense, February 2024 122

4 Loading and transforming data with scripting
Tag Description
Can be
manipulated
in the script
$system System field that is generated by Qlik Sense during script
execution.
No
$key Key field providing a link between two or more tables. No
$keypart The field is part of one or more synthetic keys. No
$syn Synthetic key No
$hidden Hidden field, that is, it is not displayed in any field selection list
when creating visualizations, dimensions, or measures. You can
still use hidden fields in expressions, but you need to type the
field name.
You can use the HidePrefix and HideSuffix system variables to
set which fields to hide.
Yes
$numeric All (non-NULL) values in the field are numeric. Yes
$integer All (non-NULL) values in the field are integers. Yes
$text No values in the field are numeric. Yes
$ascii Field values contain only standard ASCII characters. Yes
$date All (non-NULL) values in the field can be interpreted as dates
(integers).
Yes
$timestamp All (non-NULL) values in the field can be interpreted as time
stamps.
Yes
$geoname Field values contain names of geographical locations, related to
a point field ($geopoint) and/or an area field ($geomultipolygon).
Yes
$geopoint Field values contain geometry point data, representing points on
a map in the format [longitude, latitude].
Yes
$geomultipolygon Field values contain geometry polygon data, representing areas
on a map.
Yes
System field tags
Derived field tags
The following tags can be used when you declare derived fields to specify how to use and display the fields on
a contiguous axis in a line chart. You can manipulate the tags in the data load script.
Manage data - Qlik Sense, February 2024 123

4 Loading and transforming data with scripting
Tag Description
$axis The $axis tag is used to specify that the field should generate a tick on the contiguous axis
of the chart.
$qualified
$simplified
You can specify a qualified and a simplified version of an axis label by deriving two
different fields. The qualified field is displayed as label when the axis is zoomed to a
deeper level, to show full context.
For example, you can generate two fields when showing data by the quarter:
A simplified field, with the $simplified tag, showing quarter, like 'Q1 and a qualified field,
with the $qualified tag, showing year and quarter, like '2016-Q1'.
When the time axis is zoomed out, the axis shows labels in two levels, for year (2016) and
quarter (Q1), using the simplified field. When you zoom in, the axis shows labels for quarter
and month, and the qualified field (2016-Q1) is used to provide full year context for the
quarter.
$cyclic The $cyclic tag is used for cyclic fields, for example quarter or month, with a dual data
representation.
Derived field tags
System fields
In addition to the fields extracted from the data source, system fields are also produced by Qlik
Sense. These all begin with "$" and can be displayed like ordinary fields in a visualization, such
as a filter pane or a table. System fields are created automatically when you load data, and are
primarily used as an aid in app design.
Available system fields
The following system fields are available:
System field Description
$Table Contains all tables that are loaded.
$Field Contains all fields in the tables that are loaded.
$Fields Contains the number of fields in each table.
$FieldNo Contains the position of the fields in the tables.
$Rows Contains the number of rows in the tables
Available system fields
None of the system fields can be manipulated in the script.
Using system fields in a visualization
System field data is associated. For example, if you add two filter panes, one with $Table and one with $Field,
if you select a table, the $Field filter pane will show the fields in the selected table as possible values.
Manage data - Qlik Sense, February 2024 124

4 Loading and transforming data with scripting
System fields are not included in field lists in the assets panel. They are included in the expression editor. If
you want to use a system field in the assets panel, you need to reference it by typing it manually.
Example: In a dimension in the assets panel
=$Field
Renaming fields
Sometimes it is necessary to rename fields in order to obtain the desired associations. The three
main reasons for renaming fields are:
l
Two fields are named differently although they denote the same thing:
l
The field ID in the Customers table
l
The field CustomerID in the Orders table
The two fields denote a specific customer identification code and should both be named the same, for
example CustomerID.
l
Two fields are named the same but actually denote different things:
l
The field Date in the Invoices table
l
The field Date in the Orders table
The two fields should preferably be renamed, to for example InvoiceDate and OrderDate.
l
There may be errors such as misspellings in the database or different conventions on upper- and
lowercase letters.
Since fields can be renamed in the script, there is no need to change the original data. There are two different
ways to rename fields as shown in the examples.
Example 1: Using the alias statement
The LOAD or SELECT statement can be preceded by an alias statement.
Alias ID as CustomerID;
LOAD * from Customer.csv;
Example 2: Using the as specifier
The LOAD or SELECT statement can contain the as specifier.
LOAD ID as CustomerID, Name, Address, Zip, City, State from Customer.csv;
Logical tables
Each LOAD or SELECT statement generates a table. Normally, Qlik Sense treats the result of
each one of these as one logical table. However, there are a couple of exceptions from this rule:
l
If two or more statements result in tables with identical field names, the tables are concatenated and
treated as one logical table.
Manage data - Qlik Sense, February 2024 125

4 Loading and transforming data with scripting
l
If a LOAD or SELECT statement is preceded by any of the following qualifiers, data is altered or treated
differently.
Table Description
concatenate This table is concatenated with (added to) another named table or with the last
previously created logical table.
crosstable This table is unpivoted. That is, it is converted from crosstable format to column format.
generic This table is split into several other logical tables.
info This table is not loaded as a logical table, but as an information table containing links to
external information such as files, sounds, URLs, etc.
intervalmatch The table (which must contain exactly two columns) is interpreted as numeric intervals,
which are associated with discrete numbers in a specified field.
join This table is joined by Qlik Sense with another named table or with the last previously
created logical table, over the fields in common.
keep This table is reduced to the fields in common with another named table or with the last
previously created logical table.
mapping This table (which must contain exactly two columns) is read as a mapping table, which
is never associated with other tables.
semantic This table is not loaded as a logical table, but as a semantic table containing
relationships that should not be joined, e.g. predecessor, successor and other
references to other objects of the same type.
Logical tables
When the data has been loaded, the logical tables are associated.
Table names
Qlik Sense tables are named when they are stored in the Qlik Sense database. The table names
can be used, for example, for LOAD statements with a resident clause or with expressions
containing the peek function, and can be seen in the $Table system field in the layout.
Tables are named in accordance with the following rules:
1. If a label immediately precedes a LOAD or SELECT statement the label is used as table name. The label
must be followed by a colon.
Example:
Table1:
LOAD a,b from c.csv;
Manage data - Qlik Sense, February 2024 126

4 Loading and transforming data with scripting
2. If no label is given, the file name or table name immediately following the keyword FROM in the LOAD
or SELECT statement is used. A maximum of 32 characters is used. The extension is skipped if the file
name is used.
3. Tables loaded inline are named INLINExx, where xx is a number. The first inline table will be given the
name INLINE01.
4. Automatically generated tables are named AUTOGENERATExx, where xx is a number. The first
autogenerated table is given the name AUTOGENERATE01.
5. If a table name generated according to the rules above should be in conflict with a previous table
name, the name is extended with -x , where x is a number. The number is increased until no conflict
remains. For example, three tables could be named Budget, Budget-1 and Budget-2.
There are three separate domains for table names: section access, section application and mapping tables.
Table names generated in section access and section application are treated separately. If a table name
referenced is not found within the section, Qlik Sense searches the other section as well. Mapping tables are
treated separately and have no connection whatsoever to the other two domains of table names.
Table labels
A table can be labeled for later reference, for example by a LOAD statement with a resident
clause or with expressions containing the peek function. The label, which can be an arbitrary
string of numbers or characters, should precede the first LOAD or SELECT statement that
creates the table. The label must be followed by a colon ":".
Labels containing blanks must be quoted using single or double quotation marks or square brackets.
Example 1:
Table1:
LOAD a,b from c.csv;
LOAD x,y from d.csv where x=peek('a',y,'Table1');
Example 2: Table label containing a blank
[All Transactions]:
SELECT * from Transtable;
LOAD Month, sum(Sales) resident [All Transactions] group by Month;
Associations between logical tables
A database can have many tables. Each table can be considered as a list of something; each
record in the list represents an instance of an object of some type.
Example:
If two tables are lists of different things, for example if one is a list of customers and the other a list of
invoices, and the two tables have a field such as the customer number in common, this is usually a sign that
there is a relationship between the two tables. In standard SQL query tools the two tables should almost
always be joined.
Manage data - Qlik Sense, February 2024 127

4 Loading and transforming data with scripting
The tables defined in the Qlik Sense script are called logical tables. Qlik Sense makes associations between
the tables based on the field names, and performs the joins when a selection is made, for example selecting a
field value in a filter pane.
This means that an association is almost the same thing as a join. The only difference is that the join is
performed when the script is executed - the logical table is usually the result of the join. The association is
made after the logical table is created - associations are always made between the logical tables.
Four tables: a list of countries, a list of customers, a list of transactions and a list of memberships, which are associated
with each other through the fields Country and CustomerID.
Qlik Sense association compared to SQL natural outer join
A Qlik Sense association resembles a SQL natural outer join. The association is however more general: an
outer join in SQL is usually a one-way projection of one table on another. An association always results in a
full (bidirectional) natural outer join.
Frequency information in associating fields
There are some limitations in the use of most associating fields, that is, fields that are common between two
or more tables. When a field occurs in more than one table, Qlik Sense has a problem knowing which of the
tables it should use for calculating data frequencies.
Qlik Sense analyzes the data to see if there is a non-ambiguous way to identify a main table to count in
(sometimes there is), but in most cases the program can only make a guess. Since an incorrect guess could be
fatal (Qlik Sense would appear to make a calculation error) the program has been designed not to allow
certain operations when the data interpretation is ambiguous for associating fields.
Limitations for associating fields
1. It is not possible to display frequency information in a filter pane showing the field.
2. Statistics boxes for the field show n/a for most statistical entities.
Manage data - Qlik Sense, February 2024 128

4 Loading and transforming data with scripting
3. In charts, it is not possible to create expressions containing functions that depend on frequency
information (such as Sum, Count functions, and Average) on the field, unless the Distinct modifier is
activated. After each reload, Qlik Sense will scan all chart expressions to see if any ambiguities have
occurred as a result of changes in data structures. If ambiguous expressions are found, a warning
dialog will be shown and the expression will be disabled. It will not be possible to enable the
expression until the problem has been corrected. If a log file is enabled, all ambiguous expressions will
be listed in the log.
Workaround
There is a simple way to overcome these limitations. Load the field an extra time under a new name from the
table where frequency counts should be made. Then use the new field for a filter pane with frequency, for a
statistics box or for calculations in the charts.
Synthetic keys
Qlik Sense creates synthetic keys when two or more data tables have two or more fields in
common. These keys are anonymous fields that represent all occurring combinations of the
composite key.
If you receive a warning about synthetic keys when loading data, you should review the data structure in the
data model viewer. You should ask yourself whether the data model is correct or not. Sometimes it is, but
most times the synthetic key is there due to an error in the script.
Multiple synthetic keys are often a symptom of an incorrect data model. However, a sure sign of an incorrect
data model is if you have synthetic keys based on other synthetic keys.
When the number of synthetic keys increases, depending on data amounts, table structure and other
factors, Qlik Sense may or may not handle them gracefully, and may end up using excessive amount
of time and/or memory. In such a case you need to re-work your script by removing all synthetic
keys.
Manage data - Qlik Sense, February 2024 129

4 Loading and transforming data with scripting
Three tables associated with synthetic key $Syn 1.
Handling synthetic keys
If you need to avoid synthetic keys, there are a number of ways of solving this in the data load script.
l
Check that only fields that logically link two tables are used as keys.
l
Fields like “Comment”, “Remark” and “Description” may exist in several tables without being
related, and should therefore not be used as keys.
l
Fields like “Date”, “Company” and “Name” may exist in several tables and have identical
values, but still have different roles (Order Date/Shipping Date, Customer Company/Supplier
Company). In such cases they should not be used as keys.
l
Make sure that redundant fields aren’t used – that only the necessary fields connect. If for example a
date is used as a key, make sure not to load year, month or day_of_month of the same date from more
than one internal table.
l
If necessary, form your own non-composite keys, typically using string concatenation inside an
AutoNumber script function.
Understanding and solving circular references
If there are circular references ("loops") in a data structure, the tables are associated in such a
way that there is more than one path of associations between two fields.
This type of data structure should be avoided as much as possible, since it might lead to ambiguities in the
interpretation of data.
Manage data - Qlik Sense, February 2024 130

4 Loading and transforming data with scripting
Three tables with a circular reference, since there is more than one path of associations between two fields.
Qlik Sense solves the problem of circular references by breaking the loop with a loosely coupled table. When
Qlik Sense finds circular data structures while executing the load script, a warning dialog will be shown and
one or more tables will be set as loosely coupled. Qlik Sense will typically attempt to loosen the longest table
in the loop, as this is often a transaction table, which normally should be the one to loosen. In the data model
viewer, loosely-coupled tables are indicated by the red dotted links to other tables.
Example:
Data is loaded from three tables that include the following:
l
Names of some national soccer teams
l
Soccer clubs in some cities
l
Cities of some European countries
View of the source data tables in Excel.
This data structure is not very good, since the field name Team is used for two different purposes: national
teams and local clubs. The data in the tables creates an impossible logical situation.
Manage data - Qlik Sense, February 2024 131

4 Loading and transforming data with scripting
When loading the tables into Qlik Sense, Qlik Sense determines which of the data connections that is least
important, and loosens this table.
Open the Data model viewer to see how Qlik Sense interprets the relevance of the data connections:
View of the circular references as noted by red dotted lines.
The table with cities and the countries they belong to is now loosely coupled to the table with national teams
of different countries and to the table with local clubs of different cities.
Solving circular references
When circular references occur, you need to edit the data load script by assigning a unique name to one of the
fields with identical names.
Do the following:
1. Open the data load editor.
2. Edit the LOAD statement for one of the duplicate field names.
In this example, the LOAD statement of the table that holds the local teams and their cities would
include with a new name for Team, for example LocalClub. The updated LOAD statement reads:
LOAD City, Team as LocalClub
3.
Click in the toolbar to reload data in the app.
You now have logic that works throughout all the tables. In this example, when Germany is selected, the
national team, the German cities and the local clubs of each city are associated:
Manage data - Qlik Sense, February 2024 132

4 Loading and transforming data with scripting
When you open the Data model viewer, you see that the loosely coupled connections are replaced with
regular connections:
Concatenating tables
Concatenation is an operation that combines two tables into one.
The two tables are merely added to each other. That is, data is not changed and the resulting table contains
the same number of records as the two original tables together. Several concatenate operations can be
performed sequentially, so that the resulting table is concatenated from more than two tables.
Automatic concatenation
If the field names and the number of fields of two or more loaded tables are exactly the same, Qlik Sense will
automatically concatenate the content of the different statements into one table.
Example:
LOAD a, b, c from table1.csv;
LOAD a, c, b from table2.csv;
The resulting internal table has the fields a, b and c. The number of records is the sum of the numbers of
records in table 1 and table 2.
The number and names of the fields must be exactly the same. The order of the two statements is
arbitrary.
Forced concatenation
Even if two or more tables do not have exactly the same set of fields, it is still possible to force Qlik Sense to
concatenate the two tables. This is done with the concatenate prefix in the script, which concatenates a table
with another named table or with the last previously created table.
Example:
LOAD a, b, c from table1.csv;
concatenate LOAD a, c from table2,csv;
The resulting internal table has the fields a, b and c. The number of records in the resulting table is the sum of
the numbers of records in table 1 and table 2. The value of field b in the records coming from table 2 is NULL.
Manage data - Qlik Sense, February 2024 133

4 Loading and transforming data with scripting
Unless a table name of a previously loaded table is specified in the concatenate statement the
concatenate prefix uses the most recently created table. The order of the two statements is thus not
arbitrary.
Preventing concatenation
If the field names and the number of fields in two or more loaded tables are exactly the same, Qlik Sense will
automatically concatenate the content of the different statements into one table. This is possible to prevent
with a noconcatenate statement. The table loaded with the associated LOAD or SELECT statement will then
not be concatenated with the existing table.
Example:
LOAD a, b, c from table1.csv;
noconcatenate LOAD a, b, c from table2.csv;
Loading data from a previously loaded table
There are two ways to load and transform data from a table that already has been loaded.
l
Resident LOAD - where you use the Resident predicate in a subsequent LOAD statement to load a
new table.
l
Preceding load - where you load from the preceding LOAD or SELECT statement without specifying a
source.
Resident or preceding LOAD?
In most cases, the same result can be achieved by using either method. A preceding LOAD is generally the
faster option, but there are some cases where you need to use a Resident LOAD instead:
l
If you want to use the Order_by clause to sort the records before processing the LOAD statement.
l
If you want to use any of the following prefixes, in which cases preceding LOAD is not supported:
l
Crosstable
l
Join
l
Intervalmatch
Resident LOAD
You can use the Resident predicate in a LOAD statement to load data from a previously loaded table. This is
useful when you want to perform calculations on data loaded with a SELECT statement where you do not
have the option to use Qlik Sense functions, such as date or numeric value handling.
Example:
In this example, the date interpretation is performed in the Resident load as it can't be done in the initial
Crosstable LOAD.
PreBudget:
Crosstable (Month, Amount, 1)
LOAD Account,
Jan,
Manage data - Qlik Sense, February 2024 134

4 Loading and transforming data with scripting
Feb,
Mar,
…
From Budget;
Budget:
Noconcatenate
LOAD
Account,
Month(Date#(Month,'MMM')) as Month,
Amount
Resident PreBudget;
Drop Table PreBudget;
A common case for using Resident is where you want to use a temporary table for calculations or
filtering. Once you have achieved the purpose of the temporary table, it should be dropped using the
Drop table statement.
Preceding load
The preceding load feature allows you to load a table in one pass, but still define several successive
transformations. Basically, it is a LOAD statement that loads from the LOAD or SELECT statement below,
without specifying a source qualifier such as From or Resident as you would normally do. You can stack any
number of LOAD statements this way. The statement at the bottom will be evaluated first, then the statement
above, and so on until the top statement has been evaluated.
You can achieve the same result using Resident, but in most cases a preceding LOAD will be faster.
Another advantage of preceding load is that you can keep a calculation in one place, and reuse it in LOAD
statements placed above.
Example 1: Transforming data loaded by a SELECT statement
If you load data from a database using a SELECT statement, you cannot use Qlik Sense functions to interpret
data in the SELECT statement. The solution is to add a LOAD statement, where you perform data
transformation, above the SELECT statement.
In this example we interpret a date stored as a string using the Qlik Sense function Date# in a LOAD
statement, using the previous SELECT statement as source.
LOAD Date#(OrderDate,'YYYYMMDD') as OrderDate;
SQL SELECT OrderDate FROM … ;
Example 2: Simplifying your script by reusing calculations
In this example we use a calculation more than once in the script:
LOAD Age(FromDate + IterNo() – 1, BirthDate ) as Age,
Date(FromDate + IterNo() – 1 ) as ReferenceDate
Resident Policies
While IterNo() <= ToDate - FromDate + 1 ;
By introducing the calculation in a first pass, we can reuse it in the Age function in a preceding LOAD:
Manage data - Qlik Sense, February 2024 135

4 Loading and transforming data with scripting
LOAD ReferenceDate,
Age(ReferenceDate, BirthDate ) as Age;
LOAD *,
Date(FromDate + IterNo() – 1 ) as ReferenceDate
Resident Policies
While IterNo() <= ToDate - FromDate + 1 ;
Limitations of preceding loads
l
The following prefixes cannot be used in conjunction with preceding LOAD: Join, Crosstable and
Intervalmatch.
l
If you are using distinct to load unique records, you need to place distinct in the first load statement,
as distinct only affects the destination table.
Data types
Qlik Sense can handle text strings, numbers, dates, times, timestamps, and currencies correctly. They can be
sorted, displayed in a number of different formats and they can be used in calculations. This means, for
example, that dates, times, and timestamps can be added to or subtracted from each other.
Data representation
In order to understand data interpretation and number formatting in Qlik Sense, it is necessary to know how
data is stored internally by the program. All of the data loaded into Qlik Sense is available in two
representations: as a string and as a number.
1. The string representation is always available and is what is shown in the list boxes and the other sheet
objects. Formatting of data in list boxes (number format) only affects the string representation.
2. The number representation is only available when the data can be interpreted as a valid number. The
number representation is used for all numeric calculations and for numeric sorting.
If several data items read into one field have the same number representation, they will all be treated as the
same value and will all share the first string representation encountered. Example: The numbers 1.0, 1 and
1.000 read in that order will all have the number representation 1 and the initial string representation 1.0.
Number interpretation
When you load data containing numbers, currency, or dates, it will be interpreted differently
depending on whether the data type is defined or not. This section describes how data is
interpreted in the two different cases.
Data with type information
Fields containing numbers with a defined data type in a database loaded using ODBC will be handled by Qlik
Sense according to their respective formats. Their string representation will be the number with an
appropriate formatting applied.
Qlik Sense will remember the original number format of the field even if the number format is changed for a
measure under Number formatting in the properties panel.
The default formats for the different data types are:
Manage data - Qlik Sense, February 2024 136

4 Loading and transforming data with scripting
l
integer, floating point numbers: the default setting for number
l
currency: the default setting for currency
l
time, date, timestamp: ISO standard formatting
The default settings for number and currency are defined using the script number interpretation variables or
the operating system settings (Control Panel).
Data without type information
For data without specific formatting information from the source (for example, data from text files or ODBC
data with a general format) the situation becomes more complicated. The final result will depend on at least
six different factors:
l
The way data is written in the source database
l
The operating system settings for number, time, date and so on. (Control Panel)
l
The use of optional number-interpreting variables in the script
l
The use of optional interpretation functions in the script
l
The use of optional formatting functions in the script
l
The number formatting controls in the document
Qlik Sense tries to interpret input data as a number, date, time, and so on. As long as the system default
settings are used in the data, the interpretation and the display formatting is done automatically by Qlik
Sense, and the user does not need to alter the script or any setting in Qlik Sense.
By default, the following scheme is used until a complete match is found. (The default format is the format
such as the decimal separator, the order between year, month and day, and so on, specified in the operating
system, that is, in the Control Panel, or in some cases from the special number interpretation variables in the
script.
Qlik Sense will interpret the data as:
1. A number in accordance with the default format for numbers.
2. A date according to the default format for date.
3. A timestamp according to the default format for time and date.
4. A time according to the default format for time.
5. A date according to the following format: yyyy-MM-dd.
6. A time-stamp according to the following format: YYYY-MM-DD hh:mm[:ss[.fff]].
7. A time according to the following format: hh:mm[:ss[.fff]].
8. Money according to the default format for currency.
9. A number with '.' as decimal separator and ',' as thousands separator, provided that neither the
decimal separator nor the thousands separator are set to ','.
10. A number with ',' as decimal separator and '.' as thousands separator, provided that neither the
decimal separator nor the thousands separator are set to ‘.'.
11. A text string. This last test never fails: if it is possible to read the data, it is always possible to interpret
it as a string.
Manage data - Qlik Sense, February 2024 137

4 Loading and transforming data with scripting
When loading numbers from text files, some interpretation problems may occur, for example, an incorrect
thousands separator or decimal separator may cause Qlik Sense to interpret the number incorrectly. The first
thing to do is to check that the number-interpretation variables in the script are correctly defined and that the
system settings in the Control Panel are correct.
When Qlik Sense has interpreted data as a date or time, it is possible to change to another date or time format
in the properties panel of the visualization.
Since there is no predefined format for the data, different records may, of course, contain differently
formatted data in the same field. It is possible for example, to find valid dates, integers, and text in one field.
The data will therefore, not be formatted, but shown in its original form.
Date and time interpretation
Qlik Sense stores each date, time, and timestamp found in data as a date serial number. The date serial
number is used for dates, times and timestamps and in arithmetic calculations based on date and time
entities. Dates and times can thus be added and subtracted, intervals can be compared, and so on.
The date serial number is the (real valued) number of days passed since December 30, 1899, that is, the Qlik
Sense format is identical to the 1900 date system used by Microsoft Excel and other programs, in the range
between March 1, 1900 and February 28, 2100. For example, 33857 corresponds to September 10, 1992.
Outside this range, Qlik Sense uses the same date system extended to the Gregorian calendar.
If the field contains dates before January 1, 1980, the field will not contain the $date or $timestamp
system tags. The field should still be recognized as a date field by Qlik Sense, but if you need the
tags you can add them manually in the data load script with the Tag statement.
The serial number for times is a number between 0 and 1. The serial number 0.00000 corresponds to 00:00:00,
whereas 0.99999 corresponds to 23:59:59. Mixed numbers indicate the date and time: the serial number 2.5
represents January 1, 1900 at 12:00 noon.
The data is, however, displayed according to the format of the string. By default, the settings made in the
Control Panel are used. It is also possible to set the format of the data by using the number interpretation
variables in the script or with the help of a formatting function. Lastly, it is also possible to reformat the data
in the properties sheet of the sheet object.
Example 1:
l
1997-08-06 is stored as 35648
l
09:00 is stored as 0.375
l
1997-08-06 09:00 is stored as 35648.375
and the other way around:
l
35648 with number format 'D/M/YY' is shown as 6/8/97
l
0.375 with number format 'hh.mm' is shown as 09.00
Qlik Sense follows a set of rules to try to interpret dates, times, and other data types. The final result,
however, will be affected by a number of factors as described here.
Manage data - Qlik Sense, February 2024 138

4 Loading and transforming data with scripting
Example 2:
These examples assume the following default settings:
l
Number decimal separator:
l
Short date format: YY-MM-DD
l
Time format: hh:mm
The following table shows the different representations when data is read into Qlik Sense without the special
interpretation function in the script:
Source
data
Qlik Sense default
interpretation
'YYYY-MM-DD'
date format
'MM/DD/YYYY'
date format
'hh:mm'
time format
'# ##0.00'
number format
0.375 0.375 1899-12-30 12/30/1899 09:00 0.38
33857 33857 1992-09-10 09/10/1992 00:00 33 857.00
97-08-06 97-08-06 1997-08-06 08/06/1997 00:00 35 648.00
970806 970806 4557-12-21 12/21/4557 00:00 970 806.00
8/6/97 8/6/97 8/6/97 8/6/97 8/6/97 8/6/97
Table when data is read without the special interpretation function in the script
The following table shows the different representations when data is read into Qlik Sense using the date#( A,
'M/D/YY') interpretation function in the script:
Source
data
Qlik Sense default
interpretation
'YYYY-MM-DD'
date format
'MM/DD/YYYY'
date format
'hh:mm'
time format
'# ##0.00'
number format
0.375 0.375 0.375 0.375 0.375 0.375
33857 33857 33857 33857 33857 33857
97-08-06 97-08-06 97-08-06 97-08-06 97-08-06 97-08-06
970806 970806 970806 970806 970806 970806
8/6/97 8/6/97 1997-08-06 08/06/1997 00:00 35 648.00
Table when using the date#( A, 'M/D/YY') interpretation function in the script
Dollar-sign expansions
Dollar-sign expansions are definitions of text replacements used in the script or in expressions.
This process is known as expansion - even if the new text is shorter. The replacement is made
just before the script statement or the expression is evaluated. Technically it is a macro
expansion.
The expansion always begins with '$(' and ends with ')'. For example: $(variablename). The content between
brackets defines how the text replacement will be done.
Manage data - Qlik Sense, February 2024 139

4 Loading and transforming data with scripting
A dollar-sign expansion is limited in how many expansions it can calculate. Any expansion with over
1000 levels of nested expansions will not be calculated.
Dollar-sign expansion using a variable
In the load script or a chart expression, use a variable in a dollar-sign expansion to:
l
Reference text
l
Reference a numeric value
Text variable
When using a variable for text replacement in the script or in an expression, the following syntax is used:
$(variablename)
$(variablename) expands to the value in the variable. If variablename does not exist, the expansion will
result in an empty string.
Examples: Text variable load scripts
Example 1: Load script
Load script
Load the following data as an inline load in the data load editor:
Set x = 'red'; // Assign the value "red" to variable x
Set y = 'blue'; // Assign the value "blue" to variable y
Set z = '$(x) $(y)'; // Expands x and y, returns "red blue" in variable z
// Expand x and y, return "red green blue" in variable MyString
Let MyString='$(x)'&' green '&'$(y)';
// Create table MyTable, load variable values for x, y, z into fields X, Y, Z
// Concatenate with variable MyString into field NewString
MyTable:
Load '$(x)' as X, '$(y)' as Y, '$(z)' as Z, '$(MyString)' as NewString autogenerate 1;
Explanation
This example demonstrates:
l
How to expand a variable in variable assignments.
l
How to expand variables combined with a textual operations.
This is a useful setup for creating dynamic labels and general text strings that combine a variable content with
static strings.
Manage data - Qlik Sense, February 2024 140

4 Loading and transforming data with scripting
Output
Create the following table in Qlik Sense:
X Y Z NewString
red blue red blue red blue green
Table - Output from load script
Example 2: Load script
Load script
Load the following data as an inline load in the data load editor:
Set vFunction = 'upper'; // Assign the string “upper” to variable vFunction
Set vField = 'String'; // Assign the string "String" to variable vField
Let vEvaluate = '$(vFunction)'&'('&'$(vField)'&')';
// The variable vEvaluate returns the value "upper(string)"
MyTable: // Create table called MyTable
Load *, $(vEvaluate) as Upper; // vEvaluate expanded as a dynamic expression
Load *, '$(vEvaluate)' as Expression; // vEvaluate expanded as string
Load * inline [
ID, String
1, abc
2, def
3, ghi
4, jkl ];
Explanation
The Set and Letstatements are used to assign values to variables in the load script. The difference between
the two is that the Setstatement assigns a string to the variable, while the Letstatement evaluates the content
of the string before assigning the resultant value to the variable. The load inline table in this example is
supplemented with two preceding load statements that are used to visualize different evaluations of the
variable vEvaluate both as a text string and as the corresponding expression.
Output
Create the following table in Qlik Sense:
ID String Expression Upper
1 abc upper(String) ABC
2 def upper(String) DEF
Table - Output from load script
Manage data - Qlik Sense, February 2024 141

4 Loading and transforming data with scripting
ID String Expression Upper
3 ghi upper(String) HIJ
4 jkl upper(String) JKL
Example: Text variable chart expression
Example: Load script
Load script
Load the following data as an inline load in the data load editor:
// Create table SalesByCountry
SalesByCountry:
Load * Inline [
Country, Year, Sales
Argentina, 2014, 66295.03
Argentina, 2015, 140037.89
Austria, 2014, 54166.09
Austria, 2015, 182739.87
Belgium, 2014, 182766.87
Belgium, 2015, 178042.33
Brazil, 2014, 174492.67
Brazil, 2015, 2104.22
Canada, 2014, 101801.33
Canada, 2015, 40288.25
Denmark, 2014, 45273.25
Denmark, 2015, 106938.41
Finland, 2014, 107565.55
Finland, 2015, 30583.44
France, 2014, 115644.26
France, 2015, 30696.98
Germany, 2014, 8775.18
Germany, 2015, 77185.68
];
Variables
In a sheet in edit mode, open the Variables dialog from the Assets panel.
Manage data - Qlik Sense, February 2024 142

4 Loading and transforming data with scripting
Open variables dialog
Create the following variables:
Name Definition
vSales Sum(Sales)
vSales2014 Sum({<Year={2014}>}Sales)
vSales2015 Sum({<Year={2015}>} Sales)
vSalesAllYears $(vSales2014) +$(vSales2015)
vSalesDifference $(vSales2015)/$(vSales2014) - 1
Variable to create
Manage data - Qlik Sense, February 2024 143

4 Loading and transforming data with scripting
Variables
Create KPI charts to see the expansions.
Manage data - Qlik Sense, February 2024 144

4 Loading and transforming data with scripting
KPIs using dollar sign expansions
Numeric variable expansion
For numeric variable expansions, the following syntax is used:
(#variablename)
The expansion always yields a valid decimal-point representation of the numeric value of the variable,
possibly with exponential notation (for very large or small numbers). If variablename does not exist or does
not contain a numeric value, it will be expanded to 0 instead of NULL.
Examples: Numeric variable load scripts
Example 1: Load script
Load script
Load the following data as an inline load in the data load editor:
Set DecimalSep = ','; // Set decimal comma as separator for this example.
Let X = 7/2; // Assign the expression 7/2 to variable X.
MyTable: // Create an inline table labeled “MyTable”
Load 1 as ID, * inline [
DecimalComma DecimalPoint
Manage data - Qlik Sense, February 2024 145

4 Loading and transforming data with scripting
$(X) $(#X) ]
(delimiter is '\t');
Explanation
The #vVariable expansion always yields a valid decimal-point representation of the numeric value of the
variable. This is useful when comma, rather than point is used as decimal separator and there is a risk of a
conflict with comma separated lists.
The main reason for expanding these variables in a load-inline table is that no additional quoting of $(X) is
required.
Output
Create the following table in Qlik Sense:
DecimalComma DecimalPoint
3,5 3.5
Table - Output from load script
Example 2: Load script
Load script
Load the following data as an inline load in the data load editor:
// The three Set statements below are required to mimic and initialize
// Format specifiers that are relevant to this particular example
Set ThousandSep=' '; // Set example thousand separator
Set DecimalSep=','; // Set example decimal separator
Set TimestampFormat='YYYY-MM-DD hh:mm:ss'; // Set example date format
Let vRaw = today()-1/1440; // Timestamp minus one minute
Let vFormat = timestamp($(#vRaw)); // Formatted as timestamp
// Create MyTable as an inline table to expand variables as field values
MyTable:
Load * inline [
DecimalComma DecimalPoint FormattedNumber
$(vRaw) $(#vRaw) $(vFormat) ] (delimiter is '\t');
Explanation
The #vVariable expansion always yields a valid decimal-point representation of the numeric value of the
variable. This is useful when comma, rather than point is used as decimal separator and there is a risk of a
conflict with comma separated lists. It is also important to note that the numerical precision will be affected
due to the decimal part being truncated when variables are expanded without correct decimal separator.
Manage data - Qlik Sense, February 2024 146

4 Loading and transforming data with scripting
The main reason for expanding these variables in a load-inline table is that no additional quoting of $(X) is
required.
Output
Create the following table in Qlik Sense:
DecimalComma DecimalPoint FormattedNumber
44 470,00 44469.999305556 2021-09-18 23:59:00
Table - Output from load script
Example 3: Load script
Load script
Load the following data as an inline load in the data load editor:
// The three Set statements below are required to mimic and initialize
// format specifiers that are relevant to this particular example
Set ThousandSep=' '; // Set example thousand separator
Set DecimalSep=','; // Set example decimal separator
Set TimestampFormat='YYYY-MM-DD hh:mm:ss'; // Set example date format
// Assign a numerical value and a valid format specifier to vStart
Let vStart = timestamp#('2021-03-23 12:34:56','$(TimestampFormat)');
// Calculate timestamp (vStart + 3 hours) with valid decimal separator: "."
Let vStop = timestamp($(#vStart)+1/8,'YYYY-MM-DD hh:mm:ss');
// Create MyTable as an inline table to expand variables as field values
MyTable:
Load * inline [
StartTime StopTime
$(vStart) $(vStop) ] (delimiter is '\t');
// This is a tab delimited inline table
// Tab delimited tables are useful for avoiding conflicting list separators
Explanation
The #vVariable expansion always yields a valid decimal-point representation of the numeric value of the
variable. This is useful when comma, rather than point is used as decimal separator and there is a risk of a
conflict with comma separated lists. It is also important to note that the numerical precision will be affected
due to the decimal part being truncated when variables are expanded without correct decimal separator.
Manage data - Qlik Sense, February 2024 147

4 Loading and transforming data with scripting
The main reason for expanding these variables in a load-inline table is that no additional quoting of $(X) is
required.
Output
Create the following table in Qlik Sense:
StartTime StopTime
2021-03-23 12:34:56 2021-03-23 15:34:56
Table - Output from load script
Expanding variables referencing alternate states
The variable has only one value, and this is used in all alternate states. When you expand a variable the value
is also the same, independent of where it is made, and the state of the object.
If the variable is a calculated variable, that is, the definition starts with an equals sign, the calculation is made
in the default state, unless you specify an alternate state in the variable definition.
For example, if you have a state named MyState, and a variable named vMyVar:
vMyvar: =only({MyState}MyField)
The variable definition content, with an explicit reference to the alternate state name, determines in which
state the variable content will be evaluated.
Dollar-sign expansion using parameters
Parameters can be used in dollar-sign expansions. This makes it possible to have a dynamic
evaluation of the variable.
The variable created for use in the expansion must contain formal parameters. A formal parameter is a
placeholder for the input to the evaluation and is written with a dollar sign: $1, $2, $3. The number indicates
the parameter number.
When using the variable, the actual parameters should be stated in a comma separated list.
Examples: Parameters in dollar-sign expansions
If you want to define a multiplication between two numbers, you can write:
Set MUL= $1*$2 ;
This defines that $1 and $2 should be multiplied with each other. When used, this variable must be dollar
expanded with values for $1 and $2 inserted into the expression:
Set X= $( MUL(3,7) ) ;
The values (3 and 7) are the actual parameters that replace $1 and $2 in the expansion. The expansion is made
before the Set statement is parsed and executed, which means that the script parser sees the following:
Set X= 3*7 ;
As a result, the variable X will be assigned the string value: 3*7.
If you use a Let instead of Set statement:
Manage data - Qlik Sense, February 2024 148

4 Loading and transforming data with scripting
Let X= $( MUL(3,7) ) ;
The parser will see the following:
Let X= 3*7 ;
Here an evaluation will be made, and X will be assigned the numeric value 21.
Number of parameters
If the number of formal parameters exceeds the number of actual parameters, only the formal parameters
corresponding to actual parameters will be expanded. If the number of actual parameters exceeds the number
of formal parameters, the superfluous actual parameters will be ignored.
Examples: Formal parameters versus actual parameters
Set MUL= '$1*$2' ;
Set X= $(MUL) ; // returns $1*$2 in X
Set X= $(MUL(10)) ; // returns 10*$2 in X
Let X= $(MUL(5,7,8)) ; // returns 35 in X
The $0 parameter
The parameter $0 returns the number of parameters actually passed by a call.
Example: How to introduce error handling
Set MUL= If($0=2, $1*$2, 'Error') ;
Dollar-sign expansion using an expression
Expressions can be used in dollar-sign expansions.
The content between the brackets must start with an equal sign:
$(=expression)
The expression will be evaluated and the value will be used in the expansion. For example:
// returns a string with the current year
$(=Year(Today()));
// returns the year before the selected one
$(=Only(Year)-1);
Example: Select a measure by referencing the measure in a chart expression
Example: Load script
Load script
Load the following data as an inline load in the data load editor:
// Load string “=MinString(Measure)” into variable VSelectMeasure
Let vSelectMeasure = '=MinString(Measure)';
MyTable1: // Create table and load values for Dim and Sales
Load * inline [
Dim, Sales
A, 150
A, 200
Manage data - Qlik Sense, February 2024 149

4 Loading and transforming data with scripting
B, 240
B, 230
C, 410
C, 330 ];
MyTable2: // Create table and load aggregations as field values for Measure
Load * Inline [
Measure
avg(Sales)
sum(Sales)
count(distinct Dim)];
Explanation
The script allows you to select a measure by referencing the measure in a chart expression. The chart
expression contains the variable expansion $(=MinString(Measure)). MinString() finds string values in the
expression and returns the first text value sorted alphabetically, in this case avg(Sales). This makes it
possible to interactively decide (and select) which expression to use in a visualization without accessing and
manipulating the properties of the object.
Output
Create the following table in Qlik Sense by using:
l
Dimension: Dim
l
Measures:
o
='$(vSelectMeasure)'
o
=$(=MinString(Measure))
o
Avg(Sales)
Dim ='$(vSelectMeasure)' =$(=MinString(Measure)) Avg(Sales)
Totals - 260 260
A avg(Sales) 175 175
B avg(Sales) 235 235
C avg(Sales) 370 370
Table - Dollar-sign expansion using an expression
Example: Calculate the quota between two dimensions
Example: Load script
Load script
Load the following data as an inline load in the data load editor:
Manage data - Qlik Sense, February 2024 150

4 Loading and transforming data with scripting
Let vDivision = '=MinString(Numerator) / MinString(Denominator)';
Load recno() as Numerator autogenerate 100;
Load recno() as Denominator autogenerate 100;
Explanation
This script generates a pair of fields, containing 100 values each, that function as Numerators and
Denominators in a calculation of the quota between the two. The chart measure contains the variable
expansion ='$( vDivision )' , making it possible to interactively decide (and select) which quota to be
calculated.
Output
Create the following table in Qlik Sense by using:
l
Dimensions:
o
Numerator
o
Denominator
l
Measure: ='$(vDivision)
The resultant quota (Totals) is affected by the selected values in the fields. Numerator (=5) and Denominator
(=3) and will be recalculated with each new selection in either field.
Numerator Denominator ='$(vDivision)'
Totals - 1,6666666666667
5 3 1,6666666666667
Table - Dollar-sign expansion as expression
File inclusion
File inclusions are made using dollar-sign expansions. The syntax is:
$(include=filename)
The above text will be replaced by the content of the file specified after the equal sign. This feature is useful
when storing scripts or parts of scripts in text files.
Dollar expansions and alternate states
A dollar expansion is normally not sensitive to alternate states. However, if the dollar expansion has an
expression, this is evaluated in the state relevant to the object where the dollar expansion is made.
For example:
$(=Sum(Amount))
The calculation will return the sum of amount based on the selection in the state of the object.
Using quotation marks in the script
You can use quotation marks in script statements in a number of different ways.
Manage data - Qlik Sense, February 2024 151

4 Loading and transforming data with scripting
Inside LOAD statements
In a LOAD statement the following symbols should be used as quotation marks:
Description Symbol Code point Example
double quotation marks " " 34 "string"
square brackets [ ] 91, 93 [string]
grave accents ` ` 96 `string`
Field names
Description Symbol Code point Example
single quotation marks ' ' 39 'string'
String literals
In SELECT statements
For a SELECT statement interpreted by an ODBC driver, usage may vary. Usually, you should use the straight
double quotation marks (Alt + 0034) for field and table names, and the straight single quotation marks (Alt +
0039) for literals, and avoid using grave accents. However, some ODBC drivers not only accept grave accents
as quotation marks, but also prefer them. In such a case, the generated SELECT statements contain grave
accent quotation marks.
Microsoft Access quotation marks example
Microsoft Access ODBC Driver 3.4 (included in Microsoft Access 7.0) accepts the following quotation marks
when analyzing the SELECT statement:
Field names and table names:
l
[ ]
l
" "
l
` `
String literals:
l
' '
Other databases may have different conventions.
Outside LOAD statements
Outside a LOAD statement, in places where Qlik Sense expects an expression, double quotation marks denote
a variable reference and not a field reference. If you use double quotation marks, the enclosed string will be
interpreted as a variable and the value of the variable will be used.
Manage data - Qlik Sense, February 2024 152

4 Loading and transforming data with scripting
Out-of-context field references and table references
Some script functions refer to fields that have already been created, or are in the output of a LOAD statement,
for example Exists() and Peek(). These field references are called out-of-context field references, as opposed
to source field references that refer to fields that are in context, that is, in the input table of the LOAD
statement.
Out-of-context field references and table references should be regarded as literals and therefore need single
quotation marks.
Difference between names and literals
The difference between names and literals becomes clearer comparing the following examples:
Example:
'Sweden' as Country
When this expression is used as a part of the field list in a LOAD or SELECT statement, the text string
"Sweden" will be loaded as field value into the Qlik Sense field "Country".
Example:
"land" as Country
When this expression is used as a part of the field list in a LOAD or SELECT statement, the content of the
database field or table column named "land" will be loaded as field values into the Qlik Sense field "Country".
This means. that land will be treated as a field reference.
Difference between numbers and string literals
The difference between numbers and string literals becomes clearer comparing the following examples.
Example:
'12/31/96'
When this string is used as a part of an expression, it will in a first step be interpreted as the text string
"12/31/96", which in turn may be interpreted as a date if the date format is 'MM/DD/YY'. In that case it will be
stored as a dual value with both a numeric and a textual representation.
Example:
12/31/96
When this string is used as a part of an expression, it will be interpreted numerically as 12 divided by 31
divided by 96.
Using quotation marks in a string
When a string contains characters that can be used as quotation marks, it is important to clearly indicate
where a string begins and where it ends when quoting the string. If the string is not properly quoted, the script
will fail or it will load data incorrectly.
There are two methods for quoting a string that contains quotation marks.
Manage data - Qlik Sense, February 2024 153

4 Loading and transforming data with scripting
Use a specific quotation mark to quote the string
Choose a quotation mark that is not used inside the string, and use it to quote the entire string. Qlik Sense will
use that specific quotation mark to determine where the string begins and ends.
Any of the following quotation marks can be used to quote the entire string:
l
Double quotation marks " "
l
Square brackets [ ]
l
Grave accents ` `
l
Single quotation marks ' '
Example:
[Table '1 "2"]
Square brackets are used to quote the string. The string loads as : Table '1 "2"
'string `Name1` "Name2'
Single quotation marks are used to quote the string. The string loads as: string `Name1` "Name2
Use escape characters
Escape characters are an additional instance of the quotation mark that is used to quote the string. They must
be added beside every instance of the quotation mark that appears within the string. When all quotation
marks are used inside a string, you need to add escape characters beside the same type of quotation mark
used to quote the string. Escape characters can also be used if you want to use a quotation mark that is
already in use in a string.
Only the following marks can be used as escape characters:
l
Double quotation marks " "
l
Square brackets [ ]
l
Single quotation marks ' '
Example:
"Michael said ""It's a beautiful day""."
If you quote the string using the double quotation marks " ", then you must add an extra double quotation
mark beside every double quotation mark used inside the string.
This string is loaded as Michael said "It's a beautiful day". By using the escape character "", the Qlik Sense
Data load editor understands which double quotation marks are part of the string and which quotation mark
indicates the end of the string. The single quotation mark ' used in the abbreviation It's does not need to be
escaped because it is not the mark used to quote the string.
Example:
'Michael said: "It''s a beautiful day".'
If you quote this string using single quotation marks, then you must add an extra single quotation mark beside
each single quotation mark used inside the string.
Manage data - Qlik Sense, February 2024 154

4 Loading and transforming data with scripting
This string is loaded as Michael said "It's a beautiful day". The double quotation mark " used for quoting what
Michael said does not need to be escaped because it is not the mark used to quote the string.
Example:
[Michael said [It's a "beautiful day]].]
Square brackets [ ] behave differently from the other two quotation marks. If you want to use brackets as an
escape character, you must add an extra bracket beside the right square bracket ] only, and not beside the left
square bracket [.
This string is loaded as Michael said [It's a "beautiful day]. Only the right square bracket ] is escaped. The
single quotation mark ' and the double quotation mark " used in the string do not need to be escaped as they
are not used to quote the string.
Wild cards in the data
You can use wild cards in the data. Two different wild cards exist: the star symbol, interpreted as
all values of this field, and an optional symbol, interpreted as all remaining values of this field.
The star symbol
The star symbol is interpreted as all (listed) values of this field, that is, a value listed elsewhere in this table. If
used in one of the system fields (USERID, PASSWORD, NTNAME or SERIAL) in a table loaded in the access
section of the script, it is interpreted as all (also not listed) possible values of this field.
There is no star symbol available unless explicitly specified.
OtherSymbol
In many cases a way to represent all other values in a table is needed, that is, all values that were not
explicitly found in the loaded data. This is done with a special variable called OtherSymbol. To define the
OtherSymbol to be treated as "all other values", use the following syntax:
SET OTHERSYMBOL=<sym>;
before a LOAD or SELECT statement. <sym> may be any string.
The appearance of the defined symbol in an internal table will cause Qlik Sense to define it as all values not
previously loaded in the field where it is found. Values found in the field after the appearance of the
OtherSymbol will thus be disregarded.
In order to reset this functionality use:
SET OTHERSYMBOL=;
Example:
CustomerID Name
1 ABC Inc.
Table Customers
Manage data - Qlik Sense, February 2024 155

4 Loading and transforming data with scripting
CustomerID Name
2 XYZ Inc.
3 ACME INC
+ Undefined
CustomerID OrderID
1 1234
3 1243
5 1248
7 1299
Table Orders
Insert the following statement in the script before the point where the first table above is loaded:
SET OTHERSYMBOL=+;
Any reference to a CustomerID other than 1, 2 or 3, e.g. as when clicking on OrderID 1299 will result in
Undefined under Name.
OtherSymbol is not intended to be used for creating outer joins between tables.
NULL value handling
When no data can be produced for a certain field as a result of a database query and/or a join between tables,
the result is normally a NULL value.
Overview
The Qlik Sense logic treats the following as real NULL values:
l
NULL values returned from an ODBC connection.
l
NULL values created as a result of a forced concatenation of tables in the data load script.
l
NULL values created as a result of a join made in the data load script
l
NULL values created as a result of the generation of field value combinations to be displayed in a table
It is generally impossible to use these NULL values for associations and selections except when the
NullAsValue statement is being employed.
Text files per definition cannot contain NULL values.
Manage data - Qlik Sense, February 2024 156

4 Loading and transforming data with scripting
Associating/selecting NULL values from ODBC
It is possible to associate and/or select NULL values from an ODBC data source. For this purpose a script
variable has been defined. The following syntax can be used:
SET NULLDISPLAY=<sym>;
The symbol <sym> will substitute all NULL values from the ODBC data source on the lowest level of data input.
<sym> may be any string.
In order to reset this functionality to the default interpretation, use the following syntax:
SET NULLDISPLAY=;
The use of NULLDISPLAY only affects data from an ODBC data source.
If you wish to have the Qlik Sense logic interpret NULL values returned from an ODBC connection as an empty
string, add the following to your script before any SELECT statement:
SET NULLDISPLAY=";
Here '' is actually two single quotation marks without anything in between.
Creating NULL values from text files
It is possible to define a symbol, which when it occurs in a text file or an inline clause will be interpreted as a
real NULL value. Use the following statement:
SET NULLINTERPRET=<sym>;
The symbol <sym> is to be interpreted as NULL. <sym> may be any string.
In order to reset this functionality to the default interpretation, use:
SET NULLINTERPRET=;
The use of NULLINTERPRET only affects data from text files and inline clauses.
Propagation of NULL values in expressions
NULL values will propagate through an expression according to a few logical and quite reasonable rules.
Functions
The general rule is that functions return NULL when the parameters fall outside the range for which the
function is defined.
Expression Result
asin(2) returns NULL
Examples
Manage data - Qlik Sense, February 2024 157

4 Loading and transforming data with scripting
Expression Result
log(-5) returns NULL
round(A,0) returns NULL
As a result of the above follows that functions generally return NULL when any of the parameters necessary
for the evaluation are NULL.
Expression Result
sin(NULL) returns NULL
chr(NULL) returns NULL
if(NULL, A, B) returns B
if(True, NULL, A) returns NULL
if(True, A, NULL) returns A
Examples
The exception to the second rule are logical functions testing for type.
Expression Result
isnull(NULL) returns True (-1)
isnum(NULL) returns False (0)
Examples
Arithmetic and string operators
If NULL is encountered on any side of these operators NULL is returned.
Expression Result
A + NULL returns NULL
A - NULL returns NULL
A / NULL returns NULL
A * NULL returns NULL
NULL / A returns NULL
0 / NULL returns NULL
0 * NULL returns NULL
A & NULL returns A
Examples
Relational operators
If NULL is encountered on any side of relational operators special rules apply.
Manage data - Qlik Sense, February 2024 158

4 Loading and transforming data with scripting
Expression Result
NULL (any relation operator) NULL returns NULL
A <> NULL returns True (-1)
A < NULL returns False (0)
A <= NULL returns False (0)
A = NULL returns False (0)
A >= NULL returns False (0)
A > NULL returns False (0)
Examples
4.4 Guidelines for data and fields
There are certain conventions and limitations you need to be aware of when working with Qlik Sense. For
example: the upper limit for data tables and fields as well as maximum amount of loaded data in Qlik Sense.
Guidelines for amount of loaded data
The amount of data that can be loaded into Qlik Sense is primarily, but not exclusively, limited by the amount
of primary memory of the computer.
Upper limits for data tables and fields
Be aware when building very large apps that a Qlik Sense app cannot have more than 2,147,483,648 distinct
values in one field.
The number of fields and data tables as well as the number of table cells and table rows that can be loaded, is
mainly limited by RAM.
When importing a dataset file into a Qlik Sense app or space with Data manager (drag-and-drop or other
direct uploads), the maximum number of fields that can be loaded is 5000.
Recommended limit for load script sections
The recommended maximum number of characters to be used per load script section is 50,000 characters.
Descriptions for number and time formats
In many interpretation and formatting functions it is possible to set the format for numbers and dates by
using a format code. This topic describes the formats for the number, date, time, and timestamp functions.
These formats apply both to script and chart functions.
Number formats
To denote a specific number of digits, use the symbol "0" for each digit.
To denote a possible digit to the left of the decimal point, use the symbol "#".
Manage data - Qlik Sense, February 2024 159

4 Loading and transforming data with scripting
To mark the position of the thousands separator or the decimal separator, use the applicable thousands
separator and the decimal separator.
The format code is used for defining the positions of the separators. It is not possible to set the separator in
the format code. Use the DecimalSep and ThousandSep variables for this in the script.
It is possible to use the thousand separator to group digits by any number of positions, for example, a format
string of "0000-0000-0000" (thousand separator="-") could be used to display a twelve-digit part number as
"0012-4567-8912".
Examples:
Number
format
Description
# ##0 describes the number as an integer with a thousands separator. In this example " " is used
as a thousands separator.
###0 describes the number as an integer without a thousands separator.
0000 describes the number as an integer with at least four digits. For example, the number 123
will be shown as 0123.
0.000 describes the number with three decimals. In this example "." is used as a decimal
separator.
Example of number formats
Special number formats
Qlik Sense can interpret and format numbers in any radix between 2 and 36 including binary, octal and
hexadecimal. It can also handle roman formats.
Format Description
Binary format To indicate binary format the format code should start with (bin) or (BIN).
Octal format To indicate octal format the format code should start with (oct) or (OCT).
Hexadecimal
format
To indicate hexadecimal format the format code should start with (hex) or (HEX). If the
capitalized version is used A-F will be used for formatting (for example 14FA). The non-
capitalized version will result in formatting with a-f (for example 14fa). Interpretation will
work for both variants regardless of the capitalization of the format code.
Decimal format The use of (dec) or (DEC) to indicate decimal format is permitted but unnecessary.
Special number formats
Manage data - Qlik Sense, February 2024 160

4 Loading and transforming data with scripting
Format Description
Custom radix
format
To indicate a format in any radix between 2 and 36 the format code should start with
(rxx) or (Rxx) where xx is the two-digit number denoting the radix to be used. If the
capitalized R is used letters in radices above 10 will be capitalized when Qlik Sense is
formatting (for example 14FA). The non-capitalized r will result in formatting with non-
capital letters (for example 14fa). Interpretation will work for both variants regardless of
the capitalization of the format code. Note that (r02) is the equivalent of (bin), (R16) is
the equivalent of (HEX), and so on.
Roman format To indicate roman numbers the format code should start with (rom) or (ROM). If the
capitalized version is used capital letters will be used for formatting (for example MMXVI).
The non-capitalized version will result in formatting with lower cap letters (mmxvi).
Interpretation will work for both variants regardless of the capitalization of the format
code. Roman numbers are generalized with minus sign for negative numbers and 0 for
zero. Decimals are ignored with roman formatting.
Examples:
Example Result
num(199, '(bin)') returns 11000111
num(199, '(oct)') returns 307
num(199, '(hex)') returns c7
num(199, '(HEX)' ) returns C7
num(199, '(r02)' ) returns 11000111
num(199, '(r16)') returns c7
num(199, '(R16)' ) returns C7
num(199, '(R36)') returns 5J
num(199, '(rom)') returns cxcix
num(199, '(ROM)' ) returns CXCIX
Examples of special number formats
Dates
You can use the following symbols to format a date. Arbitrary separators can be used.
Symbols Description
D To describe the day, use the symbol "D" for each digit.
Symbols to format a date
Manage data - Qlik Sense, February 2024 161

4 Loading and transforming data with scripting
Symbols Description
M To describe the month number, use the symbol "M".
Use "M" or "MM" for one or two digits.
"MMM" denotes short month name in letters as defined by the operating system or by the
override system variable MonthNames in the script.
"MMMM" denotes long month name in letters as defined by the operating system or by the
override system variable LongMonthNames in the script.
Y To describe the year, use the symbol "Y" for each digit.
W To describe the weekday, use the symbol "W".
"W" will return the number of the day (for example 0 for Monday) as a single digit.
"WW" will return the number with two digits (e.g. 02 for Wednesday).
"WWW" will show the short version of the weekday name (for example Mon) as defined by
the operating system or by the override system variable DayNames in the script.
"WWWW" will show the long version of the weekday name (for example Monday) as defined
by the operating system or by the override system variable LongDayNames in the script.
Examples: (with 31st March 2013 as example date)
Example Result
YY-MM-DD describes the date as 13-03-31.
YYYY-MM-DD describes the date as 2013-03-31.
YYYY-MMM-DD describes the date as 2013-Mar-31.
DD MMMM YYYY describes the date as 31 March 2013.
M/D/YY describes the date as 3/31/13.
W YY-MM-DD describes the date as 6 13-03-31.
WWW YY-MM-DD describes the date as Sat 13-03-31.
WWWW YY-MM-DD describes the date as Saturday 13-03-31.
Examples of date formats
Times
You can use the following symbols to format a time. Arbitrary separators can be used.
Manage data - Qlik Sense, February 2024 162

4 Loading and transforming data with scripting
Symbols Description
h To describe the hours, use the symbol "h" for each digit.
m To describe the minutes, use the symbol "m" for each digit.
s To describe the seconds, use the symbol "s" for each digit.
f To describe the fractions of a second, use the symbol "f" for each digit.
tt To describe the time in AM/PM format, use the symbol "tt" after the time.
Symbols to format a time
Examples: (with 18.30 as example time):
Example Result
hh:mm describes the time as 18:30
hh.mm.ss.ff describes the time as 18.30.00.00
hh:mm:tt describes the time as 06:30:pm
Examples of time formats
Time stamps
The same notation as that of dates and times above is used in time stamps.
Examples: (with 31th March 2013 18.30 as example time stamp):
Example Result
YY-MM-DD hh:mm describes the time stamp as 13-03-31 18:30.
M/D/Y hh.mm.ss.ffff describes the time stamp as 3/31/13 18.30.00.0000.
Examples of time stamp formats
4.5 Working with QVD files
A QVD (QlikView Data) file is a file containing a table of data exported from Qlik Sense. QVD is a
native Qlik format and can only be written to and read by Qlik Sense or QlikView. The file format
is optimized for speed when reading data from a script but it is still very compact. Reading data
from a QVD file is typically 10-100 times faster than reading from other data sources.
QVD files can be read in two modes: standard (fast) and optimized (faster). The selected mode is determined
automatically by the script engine.
There are some limitations regarding optimized loads. It is possible to rename fields, but any of the operations
mentioned here will disable the optimized load and result in a standard load.
Manage data - Qlik Sense, February 2024 163
4 Loading and transforming data with scripting
l
Any transformations on the fields that are loaded.
l
Using a where clause causing Qlik Sense to unpack the records.
l
Using Map on a field that is loaded.
Purpose of QVD files
QVD files can be used for many purposes and more than one may apply in any given situation. At least four
major uses can be easily identified:
l
Increasing load speed
By buffering non-changing or slowly-changing blocks of input data in QVD files, script execution
becomes considerably faster for large data sets.
l
Decreasing load on database servers
The amount of data fetched from external data sources can also be greatly reduced. This reduces the
workload on external databases and network traffic. Furthermore, when several scripts share the same
data, it is only necessary to load it once from the source database into a QVD file. Other apps can make
use of the same data through this QVD file.
l
Consolidating data from multiple apps
With the binary script statement, data can be loaded from a single app into another app, but with QVD
files a script can combine data from any number of apps. This makes it possible for apps to
consolidate similar data from different business units, for example.
l
Incremental
In many common cases, the QVD functionality can be used for incremental load by loading only new
records from a growing database.
To see how the Qlik Community is using Qlik Application Automationto improve QVD load
times, see ≤ How to split QVDs using an automation to improve reloads
Creating QVD files
A QVD file can be created in two ways:
l
Explicit creation and naming using the store command in the script. State in the script that a
previously-read table, or part thereof, is to be exported to an explicitly-named file at a location
of your choice.
l
Automatic creation and maintenance from script. When you precede a LOAD or SELECT
statement with the buffer prefix, Qlik Sense will automatically create a QVD file, which, under
certain conditions, can be used instead of the original data source when reloading data.
There is no difference between the resulting QVD files with regard to reading speed.
Reading data from QVD files
A QVD file can be read or accessed by the following methods:
l
Loading a QVD file as an explicit data source. QVD files can be referenced by a LOAD statement
in the script, just like any other type of text files (csv, fix, dif, biff etc).
Manage data - Qlik Sense, February 2024 164

4 Loading and transforming data with scripting
For example:
l
LOAD * from xyz.qvd (qvd)
l
LOAD Name, RegNo from xyz.qvd (qvd)
l
LOAD Name as a, RegNo as b from xyz.qvd (qvd)
l
Automatic loading of buffered QVD files. When you use the buffer prefix on LOAD or SELECT
statements, no explicit statements for reading are necessary. Qlik Sense will determine the
extent to which it will use data from the QVD file as opposed to acquiring data using the
original LOAD or SELECT statement.
l
Accessing QVD files from the script. A number of script functions (all beginning with qvd) can be
used for retrieving various information on the data found in the XML header of a QVD file.
QVD format
A QVD file holds exactly one data table and consists of three parts:
l
Header.
If the QVD file was generated with QlikView the header is a well-formed XML header
(in UTF-8 char set) describing the fields in the table, the layout of the subsequent
information and other metadata.
l
Symbol tables in a byte-stuffed format.
l
Actual table data in a bit-stuffed format.
4.6 Configuring analytic connections in Qlik Sense Desktop
With analytic connections you are able to integrate external analysis with your business discovery. An analytic
connection extends the expressions you can use in load scripts and charts by calling an external calculation
engine (when you do this, the calculation engine acts as a server-side extension (SSE)). For example, you could
create an analytic connection to R, and use statistical expressions when you load the data.
For Qlik Sense Desktop, the configuration must be done in the Settings.ini file.
Do the following:
1. Open the file Settings.ini.
For Qlik Sense Desktop it is located in C:/Users/<User ID>/Documents/Qlik/Sense/ or in
C:/Users/AppData/Local/Programs/Qlik/Sense/Engine.
For Qlik Sense it is found in: C:/ProgramData/Qlik/Sense/Engine/.
2. Add the following configuration (note the empty line at the end):
[Settings 7]
SSEPlugin=<PluginConfig>[;<PluginConfig>...]
Where <PluginConfig> is a comma-separated list of configuration elements containing the following:
<EngineName>,<Address>[,<PathToCertFile>,<RequestTimeout>,<ReconnectTimeout>]
Manage data - Qlik Sense, February 2024 165

4 Loading and transforming data with scripting
After adding new connections or changing existing connections, a restart of Qlik Sense Desktop is
required for the changes to take effect.
Note that the server-side extension (SSE) plugin server must be running before you start Qlik Sense,
otherwise the connection will not be established.
Qlik open source SSE repositories
The following two Qlik SSE repositories are open source:
l
https://github.com/qlik-oss/server-side-extension
Contains the SSE protocol, general documentation, and examples written in Python and C++.
l
https://github.com/qlik-oss/sse-r-plugin
Contains an R-plugin written in C#, only the source code. You must create the plugin before it can be
used.
Description of the elements
<EngineName>: Mapping/alias to the plugin that will be used from within the expressions in the app using the
plugin functions, for example, SSEPython for a Python plugin.
<Address>: colon-separated list with two elements, and
l
<Host>: DNS name (or IP-adress) of the plugin.
l
<Port>: Port on which the plugin listens, typically 50051.
<PathToCertFile>: File system path to folder containing client certificates required for secure communication
with the plugin. Optional. If omitted, insecure communication will be invoked. This path just points to the
folder where the certificates are located. You have to make sure that they are actually copied to that folder.
The names of the three certificate files must be the following: root_cert.pem, sse_client_cert.pem, sse_client_
key.pem. Only mutual authentication (server and client authentication) is allowed.
<RequestTimeout>: Integer (seconds). Optional. Default value is 0 (infinite). Timeout for message duration.
<ReconnectTimeout>: Integer (seconds). Optional. Default value is 20 (seconds). Time before the client tries to
reconnect to the plugin after the connection to the plugin was lost.
Examples:
l
Example where one SSE plugin server is defined: SSEPlugin=SSEPython,localhost:50051
l
Example where two SSE plugin servers are defined:
SSEPlugin=SSEPython,localhost:50051;R,localhost:50053
l
Example where one SSE plugin server is defined without certificate path but with timeouts set:
SSEPlugin=SSEPython,localhost:50051,,0,20
Manage data - Qlik Sense, February 2024 166

5 Managing data security with Section Access
5 Managing data security with Section Access
Section Access is used to control the security of an application. It is basically a part of the data
load script where you add a security table to define who gets to see what. Qlik Sense uses this
information to reduce data to the appropriate scope when the user opens the application, that
is, some of the data in the app is hidden from the user based on their identity. Section Access is
tightly integrated with the data in the app and relies upon it to control access. This form of
dynamic data reduction can target table rows, columns, or a combination of both. For more
information, see Trust and Security at Qlik.
5.1 Sections in the load script
Data access control is managed through one or more security tables loaded in the same way that data is
normally loaded. This makes it possible to store these tables in a standard database or in a spreadsheet. The
script statements managing the security tables are given within an authorization section, which in the script is
initiated by the statement Section Access.
If an authorization section is defined in the script, the part of the script loading the app data must be put in a
different section, initiated by the statement Section Application.
Example:
Section Access;
Load * INLINE [
ACCESS, USERID, REDUCTION
USER, AD_DOMAIN\ADMIN, *
USER, AD_DOMAIN\A, 1
USER, AD_DOMAIN\B, 2
USER, AD_DOMAIN\C, 3
ADMIN, INTERNAL\SA_SCHEDULER,
];
Section Application;
T1:
Load *,
NUM AS REDUCTION;
LOAD
Chr(RecNo()+ord('A')-1) AS ALPHA,
RecNo() AS NUM
AUTOGENERATE 3;
Note that after making changes to the load script, you must always reload the data for the changes to take
effect.
Section Access system fields
The access levels are assigned to users in one or more security tables loaded within the Section Access part of
the script. These tables must contain, as a minimum, two system fields: ACCESS, which is the field defining the
access level, and USERID or USER.EMAIL . Other optional system fields can be added depending on the use
Manage data - Qlik Sense, February 2024 167

5 Managing data security with Section Access
case. The full set of Section Access system fields is described below.
ACCESS
Defines what access the corresponding user should have.
Access to Qlik Sense apps can be authorized for specified users. In the security table, users can be assigned to
the access levels ADMIN or USER. A user with ADMIN privileges has access to all data in the app unless limited
by the security table. A user with USER privileges can only access data as defined in the security table. If no
valid access level is assigned, the user cannot open the app.
If Section Access is used in a reload scenario, INTERNAL\SA_SCHEDULER, which is the scheduler service user,
needs ADMIN access to perform reloads. For example:
Section Access;
LOAD * inline [
ACCESS, USERID
ADMIN, INTERNAL\SA_SCHEDULER
];
If you do not want to use the INTERNAL\SA_SCHEDULER account, see Using impersonation to reload data
(page 173) for an alternate method.
If Section Access is used in an on-demand app generation (ODAG) scenario in the template app, the
INTERNAL\SA_API user must be included as ADMIN in the Section Access table. For example:
Section Access;
LOAD * inline [
ACCESS, USERID
ADMIN, INTERNAL\SA_API
];
USERID
Contains a string corresponding to a Qlik Sense domain name and user name. Qlik Sense will get the login
information from the proxy service and compare it to the value in this field.
A wildcard character (*) is interpreted as all users, subject to further conditions specified in the security table.
For example, in the following security table, users who are in the Qlik Sense Tenant Admins can see all listed
REDUCTION values.
Section Access;
LOAD * INLINE [
ACCESS, USERID, GROUP, REDUCTION
ADMIN, *, Qlik Sense Tenant Admins, *
USER, QLIK-POC\SOMEOTHERUSER1, *, 1
USER, QLIK-POC\SOMEOTHERUSER2, *, 2
...
];
USERID and the NTNAME both use the same authentication information, so it is not necessary to
check both on the same row in the security table. The difference between the two fields is that
NTNAME checks groups also.
Manage data - Qlik Sense, February 2024 168

5 Managing data security with Section Access
NTNAME
NTNAME is a legacy QlikView field and it is recommended to use USERID if QlikView is not using the
same security table.
A field that should contain a string corresponding to a Windows NT Domain user name or group name. If a
different authentication system is used, it should contain the name of an authenticated user. Qlik Sense will
fetch the login information from the OS and compare it to the value in this field.
GROUP
Contains a string corresponding to a group in Qlik Sense. Qlik Sense will resolve the user supplied by the
proxy service against this group.
SERIAL
SERIALis a legacy QlikView field and is not used if you are only using Qlik Sense.
Contains a string corresponding to the platform. If the field contains the string ‘QLIKSENSE’ or a wildcard ‘*’,
access may be granted, depending on the other fields in the security table.
If the field SERIAL contains a license number the Section Access row will deny access to the
document. This setting is only valid in QlikView.
OMIT
Contains the name of the field that is to be omitted for this specific user. Wildcards may be used and the field
may be empty.
It is recommended that you do not apply OMIT on key fields. Key fields that are omitted are visible in
the data model viewer, but the content is not available, which can be confusing for a user.
Additionally, applying OMIT on fields that are used in a visualization can result in an incomplete
visualization for users that do not have access to the omitted fields.
5.2 Managing user access to an app
Section access, in its simplest form, can be used to restrict specific users from accessing an app. Users are
denied access to an app through exclusion. In other words, if a specific user IDis not listed in the security
table, they will not be able to access the app. The only exception to this rule is if a wildcard (*) is assigned to
the USERID field in one of the rows in the security table. A wildcard, in this case, means that all authenticated
users can access the app. Here is an example of a security table with a list of user IDs:
Section Access;
LOAD * inline [
ACCESS, USERID
Manage data - Qlik Sense, February 2024 169

5 Managing data security with Section Access
ADMIN, AD_DOMAIN\ADMIN
USER, AD_DOMAIN\A
USER, AD_DOMAIN\B
];
Section Application;
5.3 Managing user access to specific data in an app
Dynamic data reduction limits access to rows and columns in the data tables within Qlik Sense apps after a
user has been authorized to access the app itself.
Managing access to row-level data
Restrict access to row-level data by adding a data reduction column to the security table in the access section
of the load script. Specific records (rows) can be hidden from users by linking the Section Access data with the
real data. The selection of data to be shown or excluded is controlled by having one or more reduction fields
with common names in Section Access and Section Application parts of the script. After user login, Qlik Sense
matches the selections in reduction fields in the access section to any fields in the application section with
exactly the same field names (the field names must be written in uppercase). After the selections have been
made, Qlik Sense permanently hides all data excluded by these selections from the user. If a wildcard (*) is
used as a field value in the data reduction column, it is interpreted as allowing the user to access records
associated with all selected reduction fields in the security table.
When Qlik Sense is comparing the reduction field in Section Access to fields in the data model, the following
behaviors are expected:
l
If a field value in the data model matches the reduction field in Section Access, the app will open
showing data associated with the match for the specified user. Other data will be hidden.
l
If the reducing field value does not match any of the values in the data model, the app will not open
for a normal USER. It will, however, open unreduced for a user marked as ADMIN.
Using several reducing fields in Section Access is not recommended, since it will allow other access
combinations than the intended ones.
The wildcard character * in the data reduction column refers only to all values in the security table. If
there are values in Section Application that are not available in the reduction column of the security
table, they will be reduced.
All field names used in the transfer described above and all field values in these fields must be
uppercase because all field names and field values are, by default, converted to uppercase in the
access section.
Manage data - Qlik Sense, February 2024 170

5 Managing data security with Section Access
By default, if you want to enable reload of the script in a Qlik Management Console task, the
INTERNAL\SA_SCHEDULER account user with ADMIN access is required. If you do not want to use the
INTERNAL\SA_SCHEDULER account, see Using impersonation to reload data (page 173) for an
alternate method.
Example: Row-level data reduction based on user identity
Section Access;
Authorization:
LOAD * inline [
ACCESS, USERID, REDUCTION
ADMIN, AD_DOMAIN\ADMIN, *
USER, AD_DOMAIN\A, 1
USER, AD_DOMAIN\B, 2
USER, AD_DOMAIN\C, *
ADMIN, INTERNAL\SA_SCHEDULER, *
];
Section Application;
T1:
LOAD *,
NUM AS REDUCTION;
LOAD
RecNo() AS NUM
AUTOGENERATE 3;
In this example, the field REDUCTION (uppercase) now exists in both Section Access and Section Application
(all field values are also uppercase). The two fields would normally be different and separated, but using
Section Access, these fields are linked and the number of records displayed to the user is reduced.
The result will be:
l
User ADMIN can see all fields and only those records other users can see when REDUCTION = 1 or
REDUCTION =2.
l
User A can see all fields, but only those records associated with REDUCTION=1.
l
User B can see all fields, but only those records associated with REDUCTION=2.
l
User C can see all fields and only those records other users can see when REDUCTION = 1 or
REDUCTION =2.
Managing access to column-level data
Restrict access to column-level data by adding the OMIT system field to the security table in the Section
Access script. The following example builds on the previous example where row data reduction is already in
place.
Example: Column data reduction based on user identity
Section Access;
LOAD * inline [
ACCESS, USERID, REDUCTION, OMIT
ADMIN, AD_DOMAIN\ADMIN, *,
USER, AD_DOMAIN\A, 1,
Manage data - Qlik Sense, February 2024 171

5 Managing data security with Section Access
USER, AD_DOMAIN\B, 2, NUM
USER, AD_DOMAIN\C, 3, ALPHA
ADMIN, INTERNAL\SA_SCHEDULER, *,
];
Section Application;
T1:
LOAD *,
NUM AS REDUCTION;
LOAD
Chr( RecNo()+ord('A')-1) AS ALPHA,
RecNo() AS NUM
AUTOGENERATE 3;
The field OMIT in Section Access defines the fields that should be hidden from the user.
The result will be:
l
User ADMIN can see all fields and only those records other users can see in this example when
REDUCTION is 1, 2, or 3.
l
User A can see all fields, but only those records associated with REDUCTION=1.
l
User B can see all fields except NUM, and only those records associated with REDUCTION=2.
l
User C can see all fields except ALPHA, and only those records associated with REDUCTION=3.
Some visualizations have minimum data requirements that must be met in order to render. As a
result, "Incomplete visualization" might be displayed when a column-level field is omitted from a
user's data view.
Managing access to user groups
Section Access offers you the option to limit the scope of data visible to users through group membership. To
restrict your data using user groups, add the GROUP field name to the security table in the access section and
define values for the GROUPfield.
Example: Data reduction based on user groups
Section Access;
LOAD * inline [
ACCESS, USERID, GROUP, REDUCTION, OMIT
USER, *, ADMIN, *,
USER, *, A, 1,
USER, *, B, 2, NUM
USER, *, C, 3, ALPHA
USER, *, GROUP1, 3,
ADMIN, INTERNAL\SA_SCHEDULER, *, *,
];
section application;
T1:
LOAD *,
NUM AS REDUCTION;
LOAD
Chr( RecNo()+ord('A')-1) AS ALPHA,
Manage data - Qlik Sense, February 2024 172

5 Managing data security with Section Access
RecNo() AS NUM
AUTOGENERATE 3;
The result will be:
l
Users belonging to the ADMIN group are allowed to see all fields and only those records other users
can see in this example when REDUCTION is 1, 2, or 3.
l
Users belonging to the A group are allowed to see data associated with REDUCTION=1 across all fields.
l
Users belonging to the B group are allowed to see data associated with REDUCTION=2, but not in the
NUM field
l
Users belonging to the C group are allowed to see data associated with REDUCTION=3, but not in the
ALPHA field
l
Users belonging to the GROUP1 group are allowed to see data associated with REDUCTION=3 across all
fields
Qlik Sense compares the user with UserID and resolves the user against groups in the table. If the user belongs
to a group that is allowed access, or the user matches, they can access the app.
5.4 Using impersonation to reload data
By default, the internal system account, SA_SCHEDULER, is used to run reload tasks. This account has
elevated privileges and, technically, can use any data source. There is a setting, however, in the QMC that uses
impersonation to run reload tasks with the permissions of the app owner instead of the internal system
account. By configuring this setting, the app owner and not SA_SCHEDULER is used for reloads, meaning that
you do not add SA_SCHEDULER in the Section Access table but instead add the app owner. Within a task
chain, apps can have different owners with permissions to sources dependent on each owner's access rights.
5.5 Managing user access in a multi-cloud environment
A Qlik Sense multi-cloud environment involves a mix of user authentication mechanisms. Typically, with Qlik
Sense Enterprise on Windows, the USERIDin the Section Access security table is verified by the proxy service.
In Qlik Cloud, an Identity Provider assumes that authentication role. Consequently, Section Access that is set
up for an on-premises environment such as Qlik Sense Enterprise on Windows will not work in a cloud
environment.
When using an OIDC identity provider (Qlik IdP or custom IdP) with Qlik Cloud, the subject claim is used
to identify users when logging in. With Section Access, the value of the USERID field in the security table is
compared to the value of the subject claim. When you set up your tenant, make sure that the
SAMaccount name is mapped to the subject claim of your identity provider. So, for example, if your
SAMaccount name is AD_DOMAIN\Dev, set the subject claim to AD_DOMAIN\Dev. If you want to see the
value of the subject claim of the IdP, append /api/v1/diagnose-claims to the tenant URL in the browser,
for example, your-tenant.us.qlikcloud.com/api/v1/diagnose-claims. In the JSONresponse, the subject
claim is called sub.
If you are unable to use the SAM account name, there is an alternate way to authenticate a user. Since e-mail
addresses tend to remain the same in different environments, you can use the USER.EMAIL field instead of
USERID in the security table. Here is an example of what the security table could look like:
Manage data - Qlik Sense, February 2024 173

5 Managing data security with Section Access
ACCESS USERID USER.EMAIL Comment COUNTRY
USER ABC\Joe * Access-on-prem United States
USER ABC\Ursula * Access-on-prem Germany
USER ABC\Stefan * Access-on-prem Sweden
Authorization script:
Section Access;
LOAD * INLINE [
ACCESS, USERID, USER.EMAIL, COUNTRY
USER, ABC\Joe, *, United States
USER, ABC\Ursula, *, Germany
USER, ABC\Stefan, *, Sweden
];
Note that each user has two records: One for on-premises access and one for cloud access. The wildcards
ensure that only the relevant authenticating fields are used. In this example, COUNTRY is used as a data
reduction field.
5.6 Using Section Access and Insight Advisor Chat
To make apps using section access to be available in Insight Advisor Chat, you must ensure the following
service users have admin access in the section access script:
l
INTERNAL/sa_repository: This makes the section access script available with the repository service for
controlling user access.
l
INTERNAL/sa_scheduler:This allows the app to reload using QMC tasks.
If you have sensitive information in app names, field names, or master item names, these may be
exposed by making apps using Section Access available for Insight Advisor Chat. App suggestions for
queries include apps in streams to which users have access. These may include apps to which users
do not have access in an app's Section Access. Selecting these apps will do nothing, however. When
clicking Dimensions or Measures to view the available items from an app using Section Access,
users may see items to which they do not have access. Clicking on these items will not provide any
data to the users, however.
For example:
Section Access;
LOAD * inline [
Manage data - Qlik Sense, February 2024 174

5 Managing data security with Section Access
USERID ,ACCESS
INTERNAL\sa_repository ,ADMIN
INTERNAL\sa_scheduler ,ADMIN
DOMAINNAME\user1 ,ADMIN
DOMAINNAME\user2 ,USER
DOMAINNAME\user3 ,USER
];
Once these users are in the Section Access script, you can make the app available for Insight Advisor Chat.
Once the app is reloaded, the app will be available in Insight Advisor Chat.
5.7 Using QVDs with Section Access
QVD files can be read as a regular load or as an optimized load. An optimized load is when no data
transformations are made during loading and there are no filters in a WHERE clause.
Optimized loads do not work when using QVDs with Section Access. If you want to use a QVD file to load data
into Section Access, you must expand the QVD file. The easiest way to expand the QVD file is to make a
formatting change when loading the data.
In the following example, the QVD file is not expanded as no formatting is done to the data.
Example: Non-working example with no data formatting (optimized load)
section access;
LOAD
ACCESS,
USERID,
PASSWORD,
[GROUP]
FROM SAccess.qvd (qvd);
Instead, you can for example use the upper() function to format the data which will expand the QVD file.
Example: Working example with data formatting
section access;
LOAD
ACCESS,
USERID,
PASSWORD,
upper([GROUP]) as [GROUP]
FROM SAccess.qvd (qvd);
You can also add a Where 1=1 statement to the LOAD statement.
Example: Another working example with data formatting
section access;
LOAD
ACCESS,
USERID,
PASSWORD,
[GROUP]
FROM SAccess.qvd (qvd) where 1=1;
Manage data - Qlik Sense, February 2024 175

5 Managing data security with Section Access
5.8 Guidelines and tips for using Section Access
Here are some important facts and helpful hints to know about Section Access.
l
All the field names and values listed in LOAD or SELECT statements in the access section must be
written in uppercase. Convert any field name containing lowercase letters in the database to
uppercase using the Upper function before reading the field by the LOAD or SELECT statement.
l
You cannot use the Section Access system field names listed as field names in your data model.
l
Apps must be published before Section Access controls will be applied. Reloading the app does not
apply any new or changed Section Access scripts.
l
A snapshot shows data according to the access rights of the user who takes the snapshot, and the
snapshot can then be shared in a story. However, when users return to a visualization from a story to
see the live data in the app, they are restricted by their own access rights.
l
Do not assign colors to master dimension values if you use section access or work with sensitive data,
because the values might be exposed by the color configuration.
l
To avoid exposing restricted data, remove all attached files with section access settings before
publishing the app. Attached files are included when the app is published. If the published app is
copied, the attached files are included in the copy. However, if section access restrictions have been
applied to the attached data files, the section access settings are not retained when the files are
copied, so users of the copied app will be able to see all the data in the attached files.
l
A wildcard (*) is interpreted as all (listed) values of the field in the table. If used in one of the system
fields (USERID, GROUP) in a table loaded in the access section of the script, it is interpreted as all (also
not listed) possible values of this field.
l
Security fields can be put in different tables.
l
When loading data from a QVD file, the Upper function slows down the loading speed.
l
If you have locked yourself out of an app by setting Section Access, you can open the app without
data, and edit the access section in the data load script. This requires that you have access to edit and
reload the data load script.
l
A binary load will cause the access restrictions to be inherited by the new Qlik Sense app.
Manage data - Qlik Sense, February 2024 176

6 Managing big data with on-demand apps
6 Managing big data with on-demand apps
On-demand apps enable you to load and analyze big data sources in Qlik Sense Enterprise.
Trying to analyze an entire big data store at one time is highly inefficient. Nevertheless, to make
representative visualizations, all the data must be discoverable. Qlik Sense on-demand apps
give users aggregate views of big data stores and allow them to identify and load relevant
subsets of the data for detailed analysis.
On-demand apps expand the potential use cases for data discovery, enabling business users to conduct
associative analysis on larger data sources. They allow users to first select data they are interested in
discovering insights about and then interactively generate an on-demand app with which they can analyze the
data with the full Qlik in-memory capabilities.
6.1 On-demand app components
Qlik Sense manages the loading of big data sources with selection apps that provide aggregated views of the
big data and also enable a user to zoom in and analyze finer-grained data. Embedded in each selection app
are on-demand app navigation links to one or more template apps used as the basis for creating on-demand
apps. Properties of the navigation links and template apps enable you to tightly control the shape and volume
of data loaded into on-demand apps.
Apps can be generated repeatedly from the template app to track frequently changing data sets. While the
data is filtered according to selections made in the selection app, the on-demand app content is dynamically
loaded from the underlying data source. The same on-demand app can be generated multiple times to make
fresh analyses of the data as they change.
On-demand app generation is controlled by the On-demand app service. The service is disabled by
default and must be enabled before selection and template apps can be linked and on-demand apps
generated. The On-demand app service is managed in the Qlik Management Console.
Manage data - Qlik Sense, February 2024 177

6 Managing big data with on-demand apps
Relations between on-demand app components.
6.2 Constructing on-demand apps
Because on-demand selection and template apps require special load scripting, they are usually created by
users with experience writing Qlik Sense load scripts. On-demand selection apps, for example, must load data
with a modest level of dimension granularity. On-demand template apps contain load scripts with data
binding expressions used to formulate the queries made on the data sources.
A selection app can be linked to multiple template apps, and a single template app can be linked to by
multiple selection apps. But the template app's data binding expressions must correspond to fields in the
selection apps that link to it. For that reason, selection and template apps tend to be created in conjunction
with one another and often by the same experienced script writer.
There are sample on-demand selection and template apps included in the Qlik Sense Enterprise
installation at ProgramData\Qlik\Examples\OnDemandApp\sample.
Creating navigation links also requires an understanding of the fields in the selection app that have
corresponding bindings in the template app. That is because each navigation link requires an expression that
computes the total number of detail records. That total represents the aggregate records accessible by way of
the selection state in the selection app. To create that expression requires that the user know how to compute
the template app's total record count using fields available in the selection app.
Using selection apps to generate on-demand apps does not require a user to understand the load script. Once
an on-demand app navigation link has been created, a user can drag that navigation link onto the selection
app's App navigation bar to create an app navigation point. On-demand apps are then generated from the
navigation point.
Manage data - Qlik Sense, February 2024 178

6 Managing big data with on-demand apps
Navigation points become available for on-demand app generation when the maximum row calculation from
the expression in the navigation link comes within the required range. At that point, the user can generate an
on-demand app. The user can also make another set of selections and generate additional apps based on
those different selections.
Navigation links have a limit on the number of on-demand apps that can be generated from the link. When the
maximum number of apps has been generated, the user who is generating apps from the navigation point
must delete one of the existing apps before generating a new on-demand app. The maximum number of
generated apps applies to the on-demand app navigation link. If one on-demand app navigation point is
created from the navigation link, then that navigation point would be able to create up to the maximum
number. When multiple navigation points are created from the same navigation link, together those
navigation points are limited to the maximum number set for the navigation link.
Navigation links also set a retention time for generated apps. On-demand apps are automatically deleted
when their retention period expires.
6.3 Publishing on-demand apps
Most users will use on-demand and selection apps after they have been published. When selection apps are
published to a stream, users who have proper permission on that stream can use them to make aggregate
selections and generate on-demand apps from the navigation points included with the selection apps. As with
all published apps, they cannot be changed after they have been published. To add navigation points, for
example, the user would have to make a copy of the selection app.
In many cases, users only use generated on-demand apps. Each generated app can be published separately.
In fact, the app navigation link can specify that apps generated from it be published to a specific stream
automatically. Users would then explore the selected slices of data loaded with those generated on-demand
apps on the stream to which the app was published.
6.4 Advantages of on-demand apps
On-demand apps help business users and IT departments derive value from big data environments in
numerous ways. On-demand apps:
l
Provide users with a "shopping list" experience that enables them to interactively populate their apps
with a subset of data such as time period, customer segment, or geography.
l
Provide full Qlik Sense functionality on a latent subset that is hosted in memory.
In contrast, Direct Discovery, which can also manage large data sources, does not keep all relevant
data in memory. With Direct Discovery, measure data resides at the source until execution.
l
Enable IT to govern how large an app can be and invoke apps based on data volume or dimensional
selections.
l
Provide access to non-SQL data sources such as Teradata Aster, MapR, SAP BEx, and the
PLACEHOLDER function in SAP HANA.
Performing non-SQL queries is in contrast to Direct Discovery, which can only be used with SQL data
sources.
l
Allow customizable SQL and load script generation.
l
Allow section access in all cases.
Manage data - Qlik Sense, February 2024 179

6 Managing big data with on-demand apps
6.5 Limitations
You cannot use Qlik NPrinting with on-demand apps.
6.6 Creating an on-demand selection app
An on-demand selection app provides the means for selecting subsets of large data sets so that the Qlik
associative engine can make associations efficiently and effectively. In very large data volume environments,
we recommend that you have the selection app load only a modest level of dimension granularity. For
example, a selection app whose data is based on sales data aggregated by quarter, region, and product
category could use an SQL SELECT statement such as the following:
SELECT SUM(S.UNIT_COST) AS TOTAL_UNIT_COST,
SUM(S.QUANTITY) AS TOTAL_QUANTITY,
SUM(S.UNIT_PRICE * S.QUANTITY) AS TOTAL_SALE,
SUM( (S.UNIT_PRICE - S.UNIT_COST) * QUANTITY) AS TOTAL_PROFIT,
SUM(1) AS TOTAL_LINE_ITEMS,
S.REGION,
S.YEARQUARTER,
S.PRODCAT,
FROM SALE_DETAIL S
GROUP BY S.REGION, S.YEARQUARTER, S.PRODCAT
The on-demand measure expression property is typically based on a computed aggregate result from an SQL
GROUP BY query used to load the data. Because the selection app uses a GROUP BY query to aggregate the
SALE_DETAIL records, an aggregation function--in this case SUM--must be used on the measure fields of
UNIT_COST, QUANTITY and the computed values for TOTAL_SALE and TOTAL_PROFIT.
The SUM(1) AS TOTAL_LINE_ITEMS provides a way to precisely measure the total number of sale line items
for every distinct combination of region, quarter, and product category. When creating a link used to produce
on-demand apps, a measure expression must be supplied as way to control the number of records loaded into
the on-demand apps. In the SALE_DETAIL example, when a user selects multiple product categories, regions,
and/or quarters, a sum can be computed for TOTAL_LINE_ITEMS to determine whether or not the selection
exceeds the record limit for the on-demand app.
There is a sample on-demand selection app included in the Qlik Sense Enterprise on Windows
installation at ProgramData\Qlik\Examples\OnDemandApp\sample.
Record limits are specified when the selection app is linked to a template app to create an app navigation
link. Each app navigation link has a record limit. Multiple navigation links can be created from the selection
app. Multiple app navigation links are commonly made linking a selection app to different template apps in
order to produce multiple views of data.
Individual on-demand app navigation links can be included in a selection app for publication. Once included
in the selection app, an app navigation link is used to create one or more app navigation points that make it
possible for users of specific sheets to create on-demand apps based on that link’s template app.
Manage data - Qlik Sense, February 2024 180

6 Managing big data with on-demand apps
6.7 Creating an on-demand template app
An on-demand template app is a regular Qlik Sense app with one important difference: its load script contains
data binding expressions used to formulate the queries made on the data sources. These data binding
expressions are used at on-demand app generation time to read values from the selection state of the
selection app and bind them to the template app script so that the generated app is loaded with a user-
controlled subset of the data.
The template app typically connects to the same data source as the selection app. The load script of a
selection app typically loads aggregated data to reduce data volumes while still offering interactive
visualizations of important dimensions and measures. The load script of a template app uses queries that load
a controlled subset of more granular data.
An on-demand template app does not load data directly. The template app connection must be
valid, but to test whether the connection works correctly, you must generate an on-demand app.
When an on-demand app is generated, the load script is modified by the On-demand app service to
load the selection state of the on-demand selection app. If the on-demand app generates without
error, then you know the connection in template app work correctly.
Structure of a template app
A template app is linked to a selection app using an on-demand app navigation link. The app navigation link
includes properties that control the number of records queried when the on-demand app is loaded with data.
The load script of the template app contains data binding expressions that specify which field data from the
selection app is used to formulate the queries issued when loading data into the on-demand app.
There is a sample on-demand template app included in the Qlik Sense Enterprise on Windows
installation at ProgramData\Qlik\Examples\OnDemandApp\sample.
A new syntax for data binding expression was introduced in June 2020. The previous syntax and
prefixes od_, ods_, odo_, odso_, and odb_ behave as before including quantity constraints, _n suffix,
and format specifications. If your app should work on Qlik Sense versions prior to June 2020, use the
old syntax. For the old syntax, see Creating an on-demand template app (old version).
The _n suffix is not supported when using the new prefixes.
Basic data binding expressions have the form:
$(odag_FIELDNAME)
The odag_ prefix is used to bind the selection state of the selection app to the load script of the on-demand
app, which is created by copying the template app. The part of the data binding expression that follows the
odag prefix must be a name that matches a field in the selection app. When the on-demand app is generated,
Manage data - Qlik Sense, February 2024 181

6 Managing big data with on-demand apps
the current selection state of the selection app is used to obtain the desired values to bind for each field. Each
occurrence of a $(odag_FIELDNAME) expression in the load script of the newly created on-demand app is
replaced with the list of values selected for the corresponding field in the selection state of the selection app.
Other prefixes for more specialized data binding are available. To learn more about tailoring for special cases
and optimizing load statements, see Binding expressions in on-demand template apps (page 183).
On-demand bindings can be inserted directly into SELECT and WHERE statements in your load script. When
you add bindings directly into your WHEREstatements, it is easy to combine them with other conditions in
the statement.
You can add a placeholder variable $(odagActive) when making your load script. This enables you to load
sample data into the template app so that master charts for dynamic views can be created without loading all
data.
The following examples illustrate a sample on-demand template load script.
Example: Adding some sample data
This example adds sample values so the app can be loaded even if the bindings are not complete.
IF '$(odagActive)'='' THEN
trace ODAG variables not inserted! Loading sample data.;
SET 'odag_Origin Code' = '''LAX''';
SET 'odag_Destination Code' = '''JFK''';
SET odagn_Year = 2015;
SET odag_Quarter = '''1''';
SET 'odag_Ticket Carrier Code' = '''CA''';
SET 'odag_Fare Class' = '''X''';
END IF;
Example: Loading data in the template app
The following is a sample load script for loading the sample data and filtering it with the generated odag_
FIELDNAME bindings. The odagn_<Field Name> bindings pick the numbers in the duals and uses by default
no quoting.
SQL SELECT *
FROM FlightDB.Flights
WHERE "Origin Code" IN ($(odag_Origin Code))
AND "Destination Code" IN ($(odag_Destination Code))
AND "Year" IN ($(odagn_Year))
AND "Quarter" IN ($(odag_Quarter))
AND "Ticket Carrier Code" IN ($(odag_Ticket Carrier Code))
AND "Fare Class" IN ($(odag_Fare Class));
Single Sign-On (SSO)
On-demand apps can use single sign-on (SSO) with data sources that support SSO. The engine and the data
source must be configured to allow SSO.
Once the engine and data source have been configured for SSO, the template app must enable SSO by adding
the following syntax to the template app script:
Manage data - Qlik Sense, February 2024 182

6 Managing big data with on-demand apps
///!ODAG_SSO
The On-Demand App Service parses the script when an on-demand app is generated and each time it is
reloaded.
When an on-demand app is loaded with SSO, the identity of the end user is sent to the data source. The end
user must have access to the sources used in the template app's data connections. Only data that user has
access to in those sources is loaded, even if a larger set of data is selected.
On-demand apps generated from template apps that use single sign-on (SSO) cannot be published.
Reload nodes for template apps
Administrators can control where on-demand apps are reloaded in a multi-node environment by setting load
balancing rules on template apps. When a load balancing rule is set, all apps generated from links to the
template app will be loaded according to the rule that applies to the template app.
Binding expressions in on-demand template apps
Data bindings in a template app specify which data from a corresponding selection app is used
to formulate the queries issued when loading data into an on-demand app.
The basic form of binding expressions--$(odag_FIELDNAME)--is not the only method available to bind
expressions. Other prefixes can be used to refine selections and to ensure that the template app loads data
correctly.
Template apps originally created using the Qlik Sense extension for On-demand App Generation
should be changed to use the approach illustrated below for binding a large number of selections
from a field.
Available binding prefixes
The general prefix form is odag[s|o][n][cnt] where:
l
s - include only selected values
l
o - include only optional values
l
n - pick the numeric version, by default unquoted
l
cnt - insert the number of values instead of actual values
The following table provides a list of all versions of the binding prefixes available. The examples assume a field
named MyField with 1,2,3 as the selected values (green values) and 4 as an optional selected value (white
value).
Manage data - Qlik Sense, February 2024 183

6 Managing big data with on-demand apps
Prefix Description Example
Replaced
with
odag_ Replaced by the selected (green) and optional (white)
values. Picks the text version of the values.This is the
standard prefix for string values.
$(odag_MyField) '1','2','3','4'
odagcnt_ Replaced by the number of values in the
corresponding odag_ binding.This prefix is used for
optimization of queries.
$(odagcnt_
MyField)
4
odagn_ Replaced by the selected (green) and optional (white)
values. Picks the numeric version of the values.This is
the standard prefix for numeric values.
If the data model is such that there can be
no selected or optional values of the field, a
noValue must be specified in the
expression. For example,
$(odagn_
MyField){"noValue":"-99999"}
.
For more information, see Changing the
value quotation and delimiter characters
(page 187).
$(odagn_
MyField)
1,2,3,4
odagncnt_ Replaced by the number of values in the
corresponding odagn_ binding.This is for optimization
of queries.
$(odagncnt_
MyField)
4
odago_ Replaced by the optional (white) values. Picks the text
version of the values. This is for optimization of
queries.
Optimizing for large database (page 185).
$(odago_
MyField)
'4'
odagocnt_ Replaced by the number of values in the
corresponding odago_ binding.This is for optimization
of queries.
$(odagocnt_
MyField)
1
odagon_ Replaced by the optional (white) values. Picks the
numeric version of the values. This is for optimization
of queries.
Optimizing for large database (page 185).
$(odagon_
MyField)
4
odagoncnt_ Replaced by the number of values in the
corresponding odagon_ binding.This is for
optimization of queries.
$(odagoncnt_
MyField)
1
Binding prefixes
Manage data - Qlik Sense, February 2024 184

6 Managing big data with on-demand apps
Prefix Description Example
Replaced
with
odags_ Replaced by the selected (green) values. Picks the text
version of the values. This is for optimization of
queries.
Optimizing for large database (page 185).
$(odags_
MyField)
'1','2','3'
odagscnt_ Replaced by the number of values in the
corresponding odags_ binding.This is for optimization
of queries.
$(odagscnt_
MyField)
3
odagsn_ Replaced by the selected (green) values. Picks the
numeric version of the values. This is for optimization
of queries.
Optimizing for large database (page 185).
$(odagsn_
MyField)
1,2,3
odagsncnt_ Replaced by the number of values in the
corresponding odagsn_ binding.This is for
optimization of queries.
$(odagsncnt_
MyField)
3
Empty values are filtered away in the text versions. Non numeric and NaN values are filtered away in
the numeric versions.
Optimizing for large database
The odags_ and odagsn_ prefixes are intended for optimization of queries. When there are no selections in the
bound fields, odag_ includes all the values while odags_ includes no values. In some cases, it is more efficient
to use the odags_ and odagscnt_ prefixes. This enables you to test if the set of values are empty. For example,
the following is more efficient when no selections are made in MyField than testing for all values in odag_
MyField:
WHERE ($(odagscnt_MyField)=0 OR MyColumn IN ($(odags_MyField)))
odags_ cannot be used when there is an alternate field to select from in the selection app that is not an on-
demand field. For example, if the user makes selections in CountryName, but the binding expression is on the
associated field CountryCode, odags_ could not be used. In these cases, odago_ can be used instead. If there
are no values in a odago_ binding, it could either mean that either all values should be included or that no
values should be included.
Binding numeric values
When the data to be bound to the on-demand app consists of numbers instead of strings, it is useful to
disable the quote wrapping behavior on the numeric fields. For example, if the sales records include a numeric
DAY_OF_WEEK column and you want the user of the selection app to choose arbitrary combinations of DAY_
OF_WEEK, you would augment the aggregation query used for loading the selection app to include DAY_OF_
Manage data - Qlik Sense, February 2024 185

6 Managing big data with on-demand apps
WEEK in both the SELECT list as well as the GROUP BY list. If quotation marks are wrapped around DAY_OF_
WEEK values when they are selected, a runtime query error could result if the database does not support
automatic type conversion from string to numeric.
To handle this situation, you can use a numeric version of the binding expression suffix. This forces the field
binding to use the numeric values from the selection app rather than string values. The following numeric
version are available:
l
odagn_
l
odagon_
l
odagsn_
By using numeric versions, the values are picked up from the numeric part in the duals that store selected
values and the values are unquoted by default.
Requiring a certain number of selections
In some situations, it may be necessary to require that the on-demand app query contain a specific number or
range of values for a specific field. For example, if the on-demand app's query contains a BETWEEN clause to
obtain all sales between a start and end date, the bind expression for the YEARQUARTER field can have a suffix
syntax of [2] that will require exactly two values be selected for YEARQUARTER, as in:
$(odag_YEARQUARTER)[2]
The on-demand app navigation point on the selection app will remain disabled as long as there are not
exactly two values of YEARQUARTER selected. A message will display to indicate that exactly two values of
YEARQUARTER must be selected.
Selection quantity constraints create a prerequisite linkage between the selection app and the on-demand
app. This is different from bind expressions that do not use quantity constraints. For example, when the
template app's script contains a bind expression without a quantity constraint, as in:
$(odag_MYFIELD)
there is no requirement that the selection app contain a field named MYFIELD nor for there to be any selected
values of that field if it does exist. If the selection app does not contain a field named MYFIELD or if the user
simply neglects to make any selections from it, the on-demand app navigation point can still become enabled
when other selections are made to fulfill the record-limit value condition.
If on the other hand, the bind expression is:
$(odag_MYFIELD)[1+]
there are now two requirements placed on the selection app:
l
The selection app must contain a field named MYFIELD.
l
The user must select at least one value for MYFIELD.
This type of bind expression must be used carefully because it limits which selection apps can be used with
the template app. You should not use this quantity constraint on bindings of a template app unless you are
certain you want to impose that selection quantity requirement on all selection apps that link to that
template app.
Manage data - Qlik Sense, February 2024 186

6 Managing big data with on-demand apps
To perform the data binding process, the On-demand app service uses a string substitution approach that is
insensitive to comments in the script. This means you should not use bind expressions in comments unless
you want those comments to contain the list of bound values following app generation. Any bindings in
comments will also show up in the field list of the On-demand app generation link, which may be undesirable.
Other quantity constraints are possible. The following table summarizes the different combinations of
selection quantity constraints.
Constraint pattern Selection requirement
$(odag_YEARQUARTER)[2] Exactly 2 values of YEARQUARTER must be selected.
$(odag_YEARQUARTER)[2-4] Between 2 and 4 values of YEARQUARTER must be selected.
$(odag_YEARQUARTER)[2+] At least 2 values of YEARQUARTER must be selected.
$(odag_YEARQUARTER)[2-] At most 2 values of YEARQUARTER can be selected.
Different combinations of selection quantity constraints
The check to determine if all the quantity constraints in the template app have been met is
performed during the app generation process. If a quantity constraint is violated, the request to
generate the app will be rejected and an error message will be displayed.
Changing the value quotation and delimiter characters
When a list of values from a field selected in a selection app is inserted into the script of a template app, the
values are surrounded by single quotation marks and separated by commas. These are the default characters
for quotations and delimiters. These values can be changed in syntax appended to binding statement for each
field. For example:
$(odag_ORIGIN){"quote": "|", "delimiter": ";"}
These new values are then used when formulating the list of binding values taken from the selection app. For
example, if the selected values are the first three months of the year, the list would be constructed as:
|January|;|February|;|March|
The default values for the quotation and delimiter characters work for most standard SQL databases. But they
might not work for some SQL databases and do not work for many dynamic data sources such as NoSQL and
REST. For those sources, you need append this binding expression to change the quotation and delimiter
characters.
The following table outlines format parameters for changing quotation and delimiter characters.
Manage data - Qlik Sense, February 2024 187

6 Managing big data with on-demand apps
Parameter
Default
value
Definition
quote ' (single
quote) for
text prefixes
empty for
numeric
prefixes
Will be added before and after each value
delimiter , (comma) Will be added between all values
quoteReplace '' (double
single
quotes)
When the value is not empty and the quotation is not empty, then all
occurrences of the of the quote inside the values will be replaced by the
specified string.
quoteReplace is not supported as a parameter for numeric
prefixes such as odagn_. quoteReplace is ignored by numeric
prefixes.
noValue (empty) When there are no values selected for a field, this value will be used
instead. This parameter is useful when there can be no values of a
particular field in the selection.
The value should be set to a value that does not exist in the source data.
For numeric values, for example, use a negative value if all values in the
database are positive.
For unquoted values, noValue must be specified if selected
values of the field can be an empty set.
Format parameters
The following tables outline the format specification and generated values for odag_ and odagn_. The
generated inserted values are based on the default data values of VAL1, VAL2.
Format
specification
Description
Generated inserted
values
not specified Comma separated list of values, quoted with ' . 'VAL1','VAL2'
{"quote": "",
"delimiter": ""}
Concatenated values VAL1VAL2
{"quote": "X",
"delimiter": "Y"}
Values quoted by X and delimited by Y. XVAL1XYXVAL2X
odag_ example format specifications and generated values
Manage data - Qlik Sense, February 2024 188

6 Managing big data with on-demand apps
Format
specification
Description
Generated inserted
values
{"quote": "XX",
"delimiter": "YY"}
Values quoted by XX and delimited by YY. XXVAL1XXYYXXVAL2XX
{"quote": "X"} Values quoted by X and delimited by , (default). XVAL1X,XVAL2X
{"delimiter": "YY"} Values quoted by ' (default) and delimited by YY 'VAL1'YY'VAL2'
{"quote": ""} Unquoted values delimited by ,. VAL1,VAL2
{"quote": "A",
"quoteReplace":
"\\A"}
Values quoted by A and delimited by comma (default). A
values inside the field will be replaced by \A.
In this example, there needs to be double \
since \ is the escape character in json format.
AV\AL1A,AV\AL2A
Format specification Description
Generated
inserted values
not specified Comma separated list of unquoted values. Note that the
numeric values will be used.
VAL1,VAL2
{"delimiter": "YY"} Unquoted values delimited by YY VAL1YYVAL2
{"quote": "A",
"quoteReplace": "\\A"}
Compared to the odag_ prefix the quoteReplace
parameter will be ignored.
AVAL1A,AVAL2A
odagn_ example format specifications and generated values
Processing individual values
When individual processing of field values is required, you can use an inline method to generate values in the
variable Values and perform arbitrary processing with Replace or another function. In the example below,
Replace is used with placeholder values.
MyTempBindingData:
LOAD * INLINE [VAL
$(odag_MyField){"quote": "", "delimiter": "\n"}
];
_TempTable:
LOAD Concat(chr(39) & Replace(text, from_str, to_str) & chr(39), ',') as CombinedData Resident
MyTempBindingData;
LET Values = Peek('CombinedData',0,'_TempTable');
drop table _TempTable;
drop table MyTempBindingData;
Manage data - Qlik Sense, February 2024 189

6 Managing big data with on-demand apps
6.8 Building an on-demand app
An on-demand app loads a subset of the data that is loaded in aggregate form by a selection
app. An on-demand app is constructed by linking an on-demand selection app to an on-demand
template app. Selection apps and template apps are the fundamental building blocks of on-
demand apps.
To build an on-demand app, selection and template apps that can be linked together must first be created. To
be linked, selection and template apps must have data fields in common that can be bound together.
A selection app can be linked to multiple template apps, and a single template app can be linked to by
multiple selection apps. But the template app's data binding expressions must correspond to fields in the
selection apps that link to it.
An on-demand app navigation link joins a selection app to a template app. On-demand app navigation links
are created in selection apps. Once a navigation link has been defined, it can be added to the selection app's
App navigation bar as an on-demand app navigation point. Each sheet in an app contains its own App
navigation bar. Users then generate on-demand apps from the app navigation point.
Example the On-demand app building view.
Multiple on-demand apps, each containing a different combination of selected data, can be generated from
the same app navigation point.
Pointers to a single app navigation link can be added to multiple sheets in the same selection app. Also,
sheets can have multiple app navigation points, created from multiple app navigation links.
When a selection app is complete with navigation links and navigation points, on-demands can be generated.
Manage data - Qlik Sense, February 2024 190

6 Managing big data with on-demand apps
Do the following:
1. Open an on-demand selection app and select Edit.
2. Select App navigation links from the panel on the left side.
3. Click the Create new button to open the Create new On-demand app navigation link dialog.
4. Name the new on-demand app navigation link.
5. Select an On-demand template app.
Not all the apps in the Template app drop-down list are valid template apps. You must select an app
that has been constructed as a template app and whose data binding expressions correspond to fields
in the selection app you are working with. Otherwise, the on-demand apps generated from the app
navigation link will produce errors.
6. Write an expression that computes the total number of detail records that are represented by the
aggregate records accessible by way of the selection state in the selection app.
The expression usually uses the SUM function to obtain a total of the records selected. The result is
used to determine when the amount of data to load is within the range specified for generating the on-
demand app.
7. Specify the Maximum row count.
The Maximum row count value sets the upper limit on the number of records, computed by the
function in the Expression entry, that the on-demand app can load. As long as the number of records
as computed by the row estimate expression in the selection app is greater than the Maximum row
count value, the on-demand app cannot be generated. The app can only be generated when the
number of records computed by the row estimate expression is at or below the upper limit set by the
Maximum row count value.
To create the expression used for Maximum row count, you must know how the total record count is
computed from fields available in the selection app.
8. Specify the Maximum number of generated apps.
Multiple on-demand apps can be generated from the same on-demand app navigation point on the
selection app's App navigation bar. The reason for generating multiple apps is that each one can
contain a different selection of data. When the maximum number of apps has been generated, the user
who is generating apps from the navigation point must delete one of the existing apps before
generating a new on-demand app.
The maximum number of generated apps applies to the on-demand app navigation link. If one on-
demand app navigation point is created from the navigation link, then that navigation point would be
able to create up to the maximum number. But if multiple navigation points are created from the same
navigation link, then the total number of on-demand apps generated from those navigation points is
limited to the setting for Maximum number of generated apps.
9. Enter a numeric value in the Retention time field for the length of time apps generated from the
navigation link will be retained before they are deleted.
10. In the drop-down menu to the right of the Retention time field, select the unit of time for the
retention period.
The options for retention time are hours, days, or Never expires.
Manage data - Qlik Sense, February 2024 191

6 Managing big data with on-demand apps
All on-demand apps generated from the navigation link will be retained according to this setting. The
age of a generated on-demand app is the difference between the current time and the time of the last
data load. This calculation of an on-demand app's age is the same for published and unpublished
apps. And if an on-demand app is published manually after it has been generated, the age calculation
remains the same: it is based on the last data load of the generated app.
There is also a retention time setting in the On-Demand App Service that applies to apps
generated by anonymous users. That setting does not affect the retention time for users who
are logged in with their own identity. For apps generated by anonymous users, the retention
time is the shorter of the Retention time setting on the navigation link and the On-Demand
App Service setting, which is set in the Qlik Management Console.
11. In the Default view when opened drop-down menu, select the sheet to display first when the apps
generated from the navigation link are opened.
You can select App overview or one of the sheets in the selection app from which the navigation link is
created.
12. Select a stream from the Publish to drop-down menu where apps generated from the navigation link
will be published.
You must have permission to publish on the stream you select. If you do not have Publish privileges on
the selected stream, attempts to generate on-demand apps from the navigation link will fail.
When selecting a stream to publish generated apps to, you must be sure the intended users of the on-
demand app have Read privileges on the stream.
You can also select Not published (saved to workspace) to save the generated apps in the users
workspace without publishing them.
If anonymous users will be allowed to use a published selection app, the on-demand app
navigation links should be configured to publish to a stream that anonymous users can
access. If on-demand apps generated from the navigation link are not published
automatically, anonymous users will get an error message when they try to generate those
apps.
After an app has been generated, it can be published manually.
13. Click Create and the new on-demand app navigation link will appear in the list of App navigation
links.
14. Drag the app navigation link to the App navigation bar on the selection app.
Dragging the app navigation link onto the selection app creates an on-demand app navigation point.
The properties of the new on-demand app navigation point are displayed in the panel on the right
side. You can change the name of the navigation point there if you wish.
15. Click Done in the sheet editor.
The on-demand selection app is now ready to use or publish. Users of the selection app will be able to
generate on-demand apps from the navigation points on the App navigation bar in the selection app.
Manage data - Qlik Sense, February 2024 192

7 Managing data with dynamic views
7 Managing data with dynamic views
Dynamic views offer users the ability to directly control both the analytic sources they want to
explore and when data is refreshed in visualizations.
Dynamic views enable you to query and view relevant subsets of large data sets in charts that can be
dynamically refreshed as selections are made. This enables up-to-date visualizations for high data volume or
fast-changing data scenarios.
7.1 Dynamic views overview
Dynamic views enable you to connect a base app to another app. Master visualizations from that app can then
be used in the base app. This enables app creators to use master visualizations from the template app as
dynamic charts in other apps. There is no limit to the number of dynamic views you can add to your base app.
Sheet view with dynamic view and dynamic charts
Dynamic views are made from three main components:
l
Dynamic views: A mechanism added to base apps that connect to template apps and enable app
creators to add master visualizations from the template app to the base app.
Manage data - Qlik Sense, February 2024 193

7 Managing data with dynamic views
l
Dynamic view template apps:A Qlik Sense app containing connections to data sources, such as cloud
databases.
l
Dynamic charts:Master visualizations in the dynamic view template app that can be added to base
apps and that can be manually refreshed by users.
The template app and the base app do not need to use the same data. If you have a data set covering
customer purchases, you could add a dynamic view to a template app containing weather data to look at any
correlations.
If the data queried from the template app’s source can be filtered using values in your base app, you can use
binding expressions in the template app’s script. This enables the dynamic view to only query a subset of data
specifically related to the selections in the base app from the data sources of the template app. For example,
you could bind the field SalesDate in the base app to the field DailyTemperatureReadingDate in the template
app.
This subset capability is useful if your base app contains aggregated data and the dynamic view data is from
the same source but is more granular than the base app data (e.g. the base app contains sales by month and
product brand while the template app contains sales by day and product name). For more information on
adding binding expressions to template apps, see Binding expressions in on-demand template apps (page 183).
Dynamic views can be used with any kind of data. Dynamic views are particularly useful when dealing with
large volumes of data or fast changing data scenarios, where it is better to perform data aggregations on the
database. This helps avoid latency in data transfers from the data source.
Dynamic views are accessible from the Assets panel. Dynamic views are enabled by administrators in QMC.
For information about enabling dynamic views, see Managing on-demand apps.
Dynamic views are similar to on-demand app generation. Both use template apps to offer on-demand data,
but dynamic views allow you to use individual charts in sheets rather than generating whole on-demand apps.
If you are also using on-demand apps, you can create dynamic views using your on-demand template apps.
For more information about generating on-demand apps, see Managing big data with on-demand apps (page
177).
Dynamic views
When you create a dynamic view, you select a template app and optionally apply a row limit expression to
control how much data the dynamic view will access. Once the dynamic view is created, you can then add
master visualizations from the template app to your sheets.
Multiple dynamic views can use the same template app. Each dynamic view is refreshed individually. If bind
expressions are used in a dynamic view’s template app script, selections made in the base app can control
which data is loaded into each dynamic view that uses that template app. Two dynamic views using the same
template can be used to compare side-by-side charts of two separate subsets of granular data. For example,
you have two dynamic views using the same template app. You could select Jan 1, 2018 from the base app
SaledDate field and refresh one dynamic view. You could then change the selection to Jan 1, 2019, refresh the
other dynamic view, and then compare the dynamic charts.
Manage data - Qlik Sense, February 2024 194

7 Managing data with dynamic views
When a user accesses an app containing a dynamic view, an on-demand app is added to their Work. This app
contains the dynamic view template app with the current data and is used to populate the base app with the
dynamic view. It is replaced by a new version every time the dynamic view refreshes. If the user is not the
owner of the dynamic view template app, the load script will be removed. These apps are deleted 24 hours
after the last refresh.
For information on creating and editing dynamic views, see Managing data with dynamic views (page 193).
For information on using dynamic views, see Using dynamic views and charts (page 198).
Dynamic view template apps
A dynamic view template app is a Qlik Sense app used to supply dynamic views with data and master
visualizations.
Dynamic view templates can have a load script that contains data binding expressions used to formulate
queries made on the data sources based on selections made in the base app. Binding expressions are usually
created by users with experience writing Qlik Sense load scripts. Template apps can have query filter
conditions that are based on input parameters supplied during the activation of dynamic charts.
Once the data model of a dynamic view template app is complete, master visualizations can be added to the
template app. These master visualizations can then be accessed through dynamic views and added as
dynamic charts in other apps.
For information on creating template apps, see Creating an on-demand template app (page 181).
Dynamic charts
Dynamic charts are derived from the master charts of a dynamic view’s template app. Dynamic charts can be
added to the sheets of other apps using dynamic views. Unlike other Qlik Sense charts, users can control
when the source data in a dynamic view is refreshed using a refresh option in the charts. When a dynamic
view’s data is controlled by bind expressions, Qlik Sense tracks the base app selection state. A stale data icon
appears on each chart of a dynamic view whenever the base app's selection state changes so that the new
value sets for and off the dynamic view's bound fields no longer match the values used for the view's last
refresh.
For information about using dynamic charts, see Using dynamic views and charts (page 198).
7.2 Dynamic views limitations
Dynamics views have the following limitations:
l
Dynamic views are not supported with stories. You can add snapshots of dynamic charts to stories, but
cannot use go to source with a dynamic chart.
l
Dynamic views are not supported with Qlik NPrinting.
l
Dynamic views support the Dashboard bundle and Visualization bundle extensions. No other
extensions are supported.
l
Dynamic view ownership does not change with app ownership.
l
Dynamic views cannot be created in apps in a managed space.
Manage data - Qlik Sense, February 2024 195

7 Managing data with dynamic views
l
Dynamic views are not supported in Qlik Sense Desktop.
l
Dynamic charts cannot be placed in a container.
l
Trellis containers and containers are not supported as master charts in dynamic views.
l
Dynamic views are not supported for anonymous users.
7.3 Streams and dynamics views
You can create dynamic views to any app to which you have access. You can make dynamic views to your
published apps in streams and to your unpublished apps in Work. You can also make dynamic views to
published apps owned by other users in streams to which you have access.
Users with access to an app with a dynamic view can use the dynamic view even if they do not have access to
the template app.
Dynamic views cannot be added to published apps. Apps can be duplicated and republished to add new
dynamic views.
7.4 Creating dynamic views and charts
Dynamic views can be added from the Assets panel in sheet view. You can add dynamic charts
from your dynamic views to your sheets.
Dynamic views in the Assets panel of a new sheet
Creating dynamic views
When you create a dynamic view, you can limit how many rows are brought in as a part of the dynamic view.
This can help prevent returning too many rows if your dynamic views are connecting to a very large data set.
Manage data - Qlik Sense, February 2024 196
7 Managing data with dynamic views
Do the following:
1. In the Edit mode of a sheet, click Dynamic views.
2. Click Create new.
3. After Name, enter a name for the view.
4. After Template app, select a template app.
5. After Row limit, optionally select to use a Row limit expression and optionally set a Maximum row
count.
6. Click Create.
Considerations for multi-node environments
To enable dynamic views in multi-node deployments of Qlik Sense, the app developer should specify a stream
to publish to. This can be configured in the dynamic view creation dialog.
Do the following:
1. In the dynamic view creation dialog, under Publish to, specify a stream for publishing.
If you have a single-node deployment of Qlik Sense, select Not published (saved to
workspace). Selecting a stream for a single-node environment might result in significantly
longer processing time.
2. Click Create.
Adding dynamic charts to sheets
Dynamic charts can be added to sheets from the Assets panel.
If you have editing permissions in the template app, you can edit the master chart upon which the dynamic
chart is based.
To edit a dynamic chart, select a dynamic chart while the sheet is in Edit mode and select Edit source app.
Editing dynamic views
You can edit your dynamic views and change your row limits. You cannot change the template app used by a
dynamic view.
Do the following:
1. Select a dynamic view from the dynamic views drop-down.
2.
Click and click .
Manage data - Qlik Sense, February 2024 197

7 Managing data with dynamic views
7.5 Using dynamic views and charts
Dynamic charts can be interacted with like other Qlik Sense visualizations. Users can also
directly control when to refresh data in dynamic views. If a dynamic view’s template app uses
bind expressions in its load script, the query that refreshes the dynamic view’s data will usually
include filter conditions that use values selected in the selection state of the base app. When a
user refreshes a dynamic view, all dynamic charts associated with the view are updated with the
new data.
To access a context menu for chart options, such as for taking snapshots and opening the exploration menu,
right-click on the chart and select Dynamic chart.
You can interact with the dynamic view through the dynamic charts. By right-clicking a dynamic chart and
selecting Dynamic view, you can refresh the charts, view constraints, and view the values of the dynamic
view’s binding fields used on the last refresh of the dynamic view.
Selections in dynamic views
Dynamic charts use the same associative selection model as standard Qlik Sense charts. Selections made in
dynamic charts do not impact the selections in the base app and do not appear in the base app selection bar.
You can clear the selections you have made within a dynamic view by right-clicking a dynamic chart from that
view, selecting Dynamic view and then selecting Clear selections.
If bind expressions are in the dynamic view’s template app, selections made in the base app impact the data
loaded into a dynamic view when it is next refreshed. Qlik Sense keeps track of the selection state that existed
on the last refresh of each dynamic view. The data in the dynamic view is considered stale whenever
selections change the values used by any of the bound fields in the dynamic view from when the dynamic
view was last refreshed. A stale data icon displays on all of the charts of a dynamic view whenever data is
stale. Refreshing a stale chart refreshes all charts from dynamic view using the updated selected value sets for
each of the view’s bound fields. If you want to restore the base app’s selection state to match what it was
when the dynamic view was last refreshed instead of refreshing it, use the context menu on any of the charts
from that dynamic view and select Dynamic View, Show last selections, and click Apply.
Manage data - Qlik Sense, February 2024 198

7 Managing data with dynamic views
Dynamic chart with stale data notification
If any of the constraints have not been met for a dynamic view, such as if the current selections result in a
number of rows that exceeds the maximum row count, no data will be shown for any of that view’s charts. It is
not be possible to refresh the dynamic view until the selection state of the base app changes so that all
constraints are met.
Manage data - Qlik Sense, February 2024 199

7 Managing data with dynamic views
Dynamic chart with selections exceeding the constraints
Viewing dynamic view details
You can view the refresh history, constraints, and selections used with dynamic view in Dynamic view details.
You can access the details by clicking the Dynamic view details icon in the corner of a dynamic chart.
Refresh shows the last time the data in the dynamic view was refreshed.
Manage data - Qlik Sense, February 2024 200

7 Managing data with dynamic views
Refresh details in Dynamic view details
Constraints shows the field and row constraints applied for generating content from the dynamic view.
Manage data - Qlik Sense, February 2024 201

7 Managing data with dynamic views
Current constraints in Dynamic view details
Selections shows the selections that were applied to generate data for this view. If you make new selections
that would change the data in the dynamic view and have not refreshed your dynamic view, you can click
Apply to restore the original selections of the dynamic view.
Manage data - Qlik Sense, February 2024 202

7 Managing data with dynamic views
Current selections in Dynamic view details
Refreshing dynamic views
You can refresh the data in your dynamic view by selecting a dynamic chart from that view and clicking .
Using the refresh option on a dynamic chart will refresh all charts from the same dynamic view. Refreshing
removes any selections you have made within the dynamic charts of the dynamic view.
Manage data - Qlik Sense, February 2024 203

8 Connecting to data sources
8 Connecting to data sources
Qlik Sense lets you to connect to your data, wherever it is stored, with a wide range of Qlik
Connectors and other data connection types.
When you create a data connection it is saved, so you can quickly select and load data from the data sources
that you commonly use. Connect to databases, social media data, local files, remote files, and web files.
8.1 Create a connection
To select data from a data source, you can either create a new data connection or use a saved data
connection. You can create data connections and access your saved connections from:
l
Add data in the data manager.
Add new data to your appquickly and get assistance creating associations.
l
Data connections in the data load editor.
Select data from a new or existing data connection, or use the script editor to load data from a data
connection. You can also edit existing data connections.
You can only see data connections that you own, or have been given access to, for reading or
updating. Please contact your Qlik Sense system administrator to acquire access if required.
8.2 Data connection types
Qlik Sense allows you to access your data wherever it resides. The following data connection types are
available with Qlik Sense. You can download connectors from ≤ Product Downloads to use with Qlik
Sense.
Many of the connectors that access these data sources are built into Qlik Sense, while others can be added.
Each type of data connection has specific settings that you need to configure.
Attached files
Attach data files directly to your app by using drag and drop.
Database connectors
Qlik Sense Enterprise only.
Connect to an ODBC data source with preconfigured ODBC database connectors.
l
Amazon Athena
l
Amazon Redshift
l
Apache Drill
Manage data - Qlik Sense, February 2024 204

8 Connecting to data sources
l
Apache Hive
l
Apache Phoenix
l
Apache Spark
l
Azure SQL
l
Azure Synapse
l
Cloudera Impala
l
Databricks
l
Google BigQuery
l
IBM DB2
l
Microsoft SQL Server
l
MongoDB
l
MySQL Enterprise
l
Oracle
l
PostgreSQL
l
Presto
l
Snowflake
l
Sybase ASE
l
Teradata
Essbase
Connect to an Essbase dataset
Local or network files
Qlik Sense Enterprise only.
Connect to a local or network file to select and load data.
ODBC connections through DSN
Qlik Sense Enterprise only.
Connect to a Database Management System (DBMS)with ODBC. Install an ODBC driver for the DBMS in
question, and create a data source DSN.
Qlik Web Connectors
Connect to social media or web-based data sources. Requires separate installation.
l
Amazon S3
l
AYLIEN News V2
Manage data - Qlik Sense, February 2024 205

8 Connecting to data sources
l
AYLIEN Text Analysis
l
Azure Storage
l
Bitly V2
l
Box
l
Dropbox
l
Facebook Insights
l
GitHub
l
Google Ads
l
Google Ad Manager
l
Google AdWords
l
Google Analytics
l
Google Calendar
l
Google Drive and Spreadsheets
l
Google Search Console
l
Helper Connector
l
JIRA
l
Mailbox IMAP
l
Mailbox POP3
l
MeaningCloud
l
Microsoft Dynamics CRM V2
l
OData
l
Outlook 365
l
Office 365 SharePoint
l
RegEx Connector
l
Repustate
l
Sentiment140
l
SMTP Connector
l
Strava
l
SugarCRM
l
SurveyMonkey
l
Watson Natural Language Understanding
l
Twitter
l
YouTube Analytics
REST
Connect to a RESTdata source. The RESTconnector is not tailored for a specific RESTdata source and can be
use to connect to any data source exposed through the REST API.
Manage data - Qlik Sense, February 2024 206

8 Connecting to data sources
Salesforce
Qlik Sense Enterprise only.
Connect to your Salesforce.com account.
SAP
Qlik Sense Enterprise only.
Load data from SAP NetWeaver.
Web files
Qlik Sense Enterprise only
Connect to a web-based data source on a web URL.
Web Storage Provider Connectors
Connect to your file-based data from web storageproviders.
l
Dropbox
l
Google Drive
Third-party connectors
With third-party connectors, you can connect to data sources that are not directly supported by Qlik Sense.
Third-party connectors are developed using the QVX SDK or supplied by third-party developers. In a standard
Qlik Sense installation you will not have any third-party connectors available.
8.3 Where is the data connection stored?
Connections are stored in the repository database by the Qlik Sense Repository Service. In a Qlik Sense server
deployment, you manage data connections with the Qlik Management Console. The Qlik Management Console
allows you to delete data connections, set access rights, and perform other system administration tasks.
In Qlik Sense Desktop, all connections are saved in the app without encryption.
Because Qlik Sense Desktop connections store any details about user name, password, and the file
path that you entered when creating the connection, these stored details are available in plain text if
you share the app with another user. You need to consider this when you design an app for sharing.
Manage data - Qlik Sense, February 2024 207
8 Connecting to data sources
8.4 Loading data from files
Qlik Sense can read data from a variety of file formats.
File formats
There are several supported data file formats:
l
Text files: Data in fields must be separated by delimiters such as commas, tabs, or semicolons. For
example: comma-separated variable (CSV) files.
l
HTML tables
l
Excel files
You cannot load data from password-protected Excel files, or Excel Binary Workbook files
(.xlsb).
l
XML files
l
Qlik native QVD and QVX files
l
Apache Parquet files
l
Fixed record length files
l
Data Interchange Format (DIF) files: DIF files can only be loaded with the data load editor.
Connection types
You can load files from different data connection types:
l
Local and network file folders: For more information, see Loading files from local and network file
folders (page 209).
l
The Attached files folder: You cannot delete or edit this folder. It contains files that are uploaded and
attached to the app. (Not available in Qlik Sense Desktop). For more information, see Adding data to
the app (page 16).
l
Files on the web: For more information, see Loading files from web resources (page 209).
The file extension of DataFiles connections is case sensitive. For example: .qvd.
How do I load data from files?
There are several ways to load data from files.
Users with edit permissions in a space can read, write, and load DataFiles in that space. Other users
will not see the DataFiles.
Manage data - Qlik Sense, February 2024 208

8 Connecting to data sources
Selecting data from a data connection in the data load editor
You can go to Data Connections, and use the Select data dialog to select data to load.
Loading data from a file by writing script code
Files are loaded using a LOAD statement in the script. LOAD statements can include the full set of script
expressions. To read in data from another Qlik Sense app, you can use a Binary statement.
Loading files from local and network file folders
You can load files from local and network file folders with a folder connection:
UI item Description
Path Path to the folder containing the data files. You can either: Select the folder, type a valid local
path, or type a UNC path.
Example of valid local path: C:\data\DataFiles\
Example of a UNC path: \\myserver\filedir\
You cannot use a mapped network drive in the path.
Name Name of the data connection.
Settings for the data connection
Loading files from web resources
You can load files from web resources, such as FTP, HTTP, or HTTPS, with a web file data connection. The file
can be of any type supported by Qlik Sense:
UI item Description
URL Full URL to the web file you want to connect to, including the protocol identifier.
Example:
http://unstats.un.org/unsd/demographic/products/socind/Dec.%202012/1a.xls
If you connect to an FTP file you may need to use special characters, for example : or @, in
the user name and password part of the URL. In this case you need to replace special
characters with a percent character and the ASCII hexadecimal code of the character. For
example, you should replace : with '%3a', and @ with '%40'.
Name Name of the data connection.
Settings for a web file data connection
The URL set in the web file data connection is static by default, but you can override the URL with the format
specification setting URL is. This is useful if you need to load data from dynamically created URLs.
Manage data - Qlik Sense, February 2024 209

8 Connecting to data sources
Loading data from a dynamically created URL
In this example we want to load forum posts from the first 10 pages of the New to Qlik Sense forum of Qlik
Community. The forum page contains 20 posts on each page, and the final parameter of the URL ,start, sets
which post to show as the first post of the page. In the example URL here, the page will show posts starting
with post number 20, and the following 20 posts.
https://community.qlik.com/community/qlik-sense/new-to-qlik-
sense/content?filterID=contentstatus%5Bpublished%5D~objecttype~objecttype%5Bthread%5D&itemView
=detail&start=20
With the counter i we step through the pages with a step of 20 until 180, which means the For loop executes
10 times.
To load the page, we substitute the start page with $(i) at the end of the URL in the URL is setting,.
For i = 0 to 180 step 20
LOAD
Title1,
"Author",
F6 As Replies,
Views,
"Latest activity"
FROM [lib://x2]
(URL IS [https://community.qlik.com/community/qlik-sense/new-to-qlik-
sense/content?filterID=contentstatus%5Bpublished%5D~objecttype~objecttype%5Bthread%5D&itemView
=detail&start=$(i)], html, utf8, embedded labels, table is @1);
Next i;
This will load the 200 most recent posts of the forum in a table, with title, author, number of replies and views,
and time of latest activity.
Loading data from Microsoft Excel spreadsheets
Qlik Sense can read data from Microsoft Excel spreadsheets. The supported file formats are XLS,
XLSX, XLW and XLSM.
You can either use Add data in data manager, or select data in the data load editor. In both cases you can
select named areas of a sheet, a single sheet, selected sheets, or all sheets from the spreadsheet file. Each
sheets is loaded as a separate table, except if they have the same field structure, in which case they are
concatenated into one table.
When you load a Microsoft Excel spreadsheet, you are using the spreadsheet as a data source for
Qlik Sense apps. That is, Microsoft Excel sheets become tables in Qlik Sense, not sheets in a Qlik
Sense app.
You may find it useful to make some changes in Microsoft Excel before you load the spreadsheet.
Manage data - Qlik Sense, February 2024 210

8 Connecting to data sources
Selecting data from Microsoft Excel sheets
When you select data from Microsoft Excel sheets, there are some settings to assist you with interpreting the
table data correctly:
UI item Description
Field
names
Set to specify if the table contains Embedded field names or No field names. Typically in an
Excel spreadsheet, the first row contains the embedded field names. If you select No field
names, fields will be named A,B,C...
Header
size
Set to the number of rows to omit as table header, typically rows that contain general
information that is not in a columnar format.
Settings to assist you with interpreting the table data correctly
Example
My spreadsheet looks like this:
Machine: AEJ12B - -
Date: 2015-10-05 09 - -
Timestamp Order Operator Yield
2015-10-05 09:22 00122344 A 52
2015-10-05 10:31 00153534 A 67
2015-10-05 13:46 00747899 B 86
Spreadsheet example
In this case you probably want to ignore the two first lines, and load a table with the fields Timestamp, Order,
Operator, and Yield. To achieve this, use these settings:
UI item Description
Header
size
2
This means that the first two lines are considered header data and ignored when loading the
file. In this case, the two lines starting with Machine: and Date: are ignored, as they are not
part of the table data.
Field
names
Embedded field names.
This means that the first line that is read is used as field names for the respective columns. In
this case, the first line that will be read is the third line because the two first lines are header
data.
Settings to ignore the two first lines and load the fields
Manage data - Qlik Sense, February 2024 211

8 Connecting to data sources
Preparing Microsoft Excel spreadsheets for easier loading with Qlik Sense
If you want to load Microsoft Excel spreadsheets into Qlik Sense, there are many functions you can use to
transform and clean your data in the data load script, but it may be more convenient to prepare the source
data directly in the Microsoft Excel spreadsheet file. This section provides a few tips to help you prepare your
spreadsheet for loading it into Qlik Sense with minimal script coding required.
Use column headings
If you use column headings in Microsoft Excel, they will automatically be used as field names if you select
Embedded field names when selecting data in Qlik Sense. It is also recommended that you avoid line breaks
in the labels, and put the header as the first line of the sheet.
Formatting your data
It is easier to load an Microsoft Excel file into Qlik Sense if the content is arranged as raw data in a table. It is
preferable to avoid the following:
l
Aggregates, such as sums or counts. Aggregates can be defined and calculated in Qlik Sense.
l
Duplicate headers.
l
Extra information that is not part of the data, such as comments. The best way is to have a column for
comments, that you can easily skip when loading the file in Qlik Sense.
l
Cross-table data layout. If, for instance, you have one column per month, you should, instead, have a
column called “Month” and write the same data in 12 rows, one row per month. Then you can always
view it in cross-table format in Qlik Sense.
l
Intermediate headers, for example, a line saying “Department A” followed by the lines pertaining to
Department A. Instead, you should create a column called “Department” and fill it with the appropriate
department names.
l
Merged cells. List the cell value in every cell, instead.
l
Blank cells where the value is implied by the previous value above. You need to fill in blanks where
there is a repeated value, to make every cell contain a data value.
Use named areas
If you only want to read a part of a sheet, you can select an area of columns and rows and define it as a
named area in Microsoft Excel. Qlik Sense can load data from named areas, as well as from sheets.
Typically, you can define the raw data as a named area, and keep all extra commentary and legends outside
the named area. This will make it easier to load the data into Qlik Sense.
Remove password protection
Password protected files are not supported by Qlik Sense, so you need to remove password protection from
the spreadsheet before loading it into Qlik Sense.
Loading Excel Binary Workbook files (.xlsb)
It is not possible to load Excel Binary Workbook files (.xlsb) directly into Qlik Sense. The workaround is to use
an ODBC connection.
Manage data - Qlik Sense, February 2024 212

8 Connecting to data sources
Working with Apache Parquet files
Apache Parquet is a columnar storage format, highly efficient for storing and querying large
datasets. In Qlik Sense, you can read data from Parquet files, and store tables as Parquet files.
Parquet allows for efficient querying of specific columns in a table rather than reading the entire table. This
makes it well-suited for use with big data processing. Also, Parquet supports efficient compression and
encoding of data. This can further reduce storage space and improve query performance.
All existing apps created in a Qlik Sense version before August 2023 must be manually updated to
enable Parquet support. This is required both for deployments that are upgraded to August 2023,
and when importing existing apps to a new deployment. For more information about updating the
apps, see Enable Parquet file support for existing apps in Qlik Sense.
Creating Parquet files
You can create Parquet files using the Store command in the script. State in the script that a previously-read
table, or part thereof, is to be exported to an explicitly-named file at a location of your choice.
Reading data from Parquet files
You can read data from a Parquet file just like any other data file supported by Qlik Sense. This includes Data
manager, Data load editor, or when you add data to a new app.
You can also load data from a Parquet file in the data load script with the LOAD command. For example:
LOAD * from xyz.parquet (parquet);
Limitations
l
Nested field types are not supported by Qlik Sense. The fields are loaded but the content will be null.
l
Parquet files that contain an int96 timestamp field may not be loaded correctly.
Int96 is a deprecated data type that contains a timestamp without timezone information. An attempt
will be made to read the field as UTC, but as there are different vendor implementations there is no
guarantee for success.
Verify the loaded data and adjust it to the correct timezone with an offset if required.
8.5 Loading data from databases
You can load data from commercial database systems into Qlik Sense using the following
connectors:
l
Connectors specifically developed to load data directly from databases through licensed ODBC drivers,
without the need for DSN connections. For more information, see Qlik Connectors: Database.
l
Connectors that use the Microsoft ODBC interface or OLE DB. To use Microsoft ODBC, you must install a
driver to support your DBMS, and you must configure the database as an ODBC data source in the
ODBC Data Source Administrator in Windows Control Panel.
Manage data - Qlik Sense, February 2024 213

8 Connecting to data sources
Loading data from an ODBC database
There are two ways to load data from a database.
To connect directly to a database through one of the Qlik-licensed ODBC drivers, see the instructions for
Database connectors on the Qlik Connectors help site.
For more information, see ODBC Connector Package.
Qlik-licensed ODBC drivers support the following databases:
l
Amazon Redshift
l
Apache Drill
l
Apache Hive
l
Apache Phoenix
l
Apache Spark
l
Azure SQL
l
Cloudera Impala
l
Google BigQuery
l
Microsoft SQL Server
l
MongoDB
l
MySQL Enterprise
l
Oracle
l
PostgreSQL
l
Presto
l
Sybase ASE
l
Teradata
To use the Microsoft ODBC interface, do the following:
1. You need to have an ODBC data source for the database you want to access. This is configured in the
ODBC Data Source Administrator in Windows Control Panel. If you do not have one already, you
need to add it and configure it, for example pointing to a Microsoft Access database.
2. Open the data load editor.
3. Create an ODBC data connection, pointing to the ODBC connection mentioned in step 1.
4.
Click on the data connection to open the data selection dialog.
Now you can select data from the database and insert the script code required to load the data.
Manage data - Qlik Sense, February 2024 214

8 Connecting to data sources
ODBC
Loading data from ODBC data sources
l
You can use the Database connectors in the Qlik ODBC Connector Package that supports the most
common ODBC sources. This lets you define the data source in Qlik Sense without the need to use the
Microsoft Windows ODBC Data Source Administrator. To connect directly to a database through one
of the Qlik-licensed ODBC drivers in the ODBC Connector Package, see the instructions for Database
connectors on the Qlik Connectors help site.
l
You can install an ODBC driver for the DBMS in question, and create a data source DSN. This is
described in this section.
You can access a DBMS (Database Management System) via ODBC with Qlik Sense:
The Create new connection (ODBC) dialog displays the User DSN connections that have been
configured. When you are using the Qlik Sense Desktop, the list of DSN connections displays the
ODBC drivers included in the ODBC Connector Package. They are identified by the "Qlik-" attached to
the name (for example, Qlik-db2). These drivers cannot be used to create a new ODBC connection.
They are used exclusively by the database connectors in the ODBC Connector Package. The ODBC
drivers from the ODBC Connector Package are not displayed when you are using Qlik Sense in a
server environment.
The alternative is to export data from the database into a file that is readable to Qlik Sense.
Normally, some ODBC drivers are installed with Microsoft Windows. Additional drivers can be bought from
software retailers, found on the Internet or delivered from the DBMS manufacturer. Some drivers are
redistributed freely.
In a server environment, the Microsoft Access Database driver has limitations. To avoid issues, use
SQL Server Express Edition.
Microsoft Access Database Engine 2016 Redistributable.
The ODBC interface described here is the interface on the client computer. If the plan is to use ODBC to access
a multi-user relational database on a network server, additional DBMS software that allows a client to access
the database on the server might be needed. Contact the DBMS supplier for more information on the software
needed.
Manage data - Qlik Sense, February 2024 215

8 Connecting to data sources
ODBC data connection settings
UI item Description
User DSN
System DSN
Select which type of DSN to connect to.
For User DSN sources you need to specify if a 32-bit driver is used with Use 32-bit
connection.
System DSN connections can be filtered according to 32-bit or 64-bit.
Single Sign-
On
You can enable Single Sign-On (SSO) when connecting to SAP HANA data sources.
If this option is not selected, Engine service user credentials are used, unless you specify
credentials in Username and Password.
If this option is selected, Engine service user or Username / Password credentials are used
to do a Windows logon, followed by a subsequent logon to SAML (SAP HANA) using current
user credentials.
Username User name to connect with, if required by the data source.
Leave this field empty if you want to use Engine service user credentials, or if the data
source does not require credentials.
Password Password to connect with, if required by the data source.
Leave this field empty if you want to use Engine service user credentials, or if the data
source does not require credentials.
Name Name of the data connection.
ODBC data connection settings
Adding ODBC drivers
An ODBC driver for your DBMS (Database Management System) must be installed on for Qlik Sense to be able
to access your database. Best practice is always to install the latest driver. Please refer to the vendor's
documentation for download and installation instructions.
An ODBC driver for your DBMS must be installed for Qlik Sense to be able to access your database. This is
external software. Therefore the instructions below may not match the software of all vendors. For details,
refer to the documentation for the DBMS you are using.
Do the following:
1. Double-click the Administrative Tools icon in the Control Panel.
2. Double-click the ODBC Data Sources (64-bit) icon.
The ODBC Data Source Administrator dialog appears.
3. In the User DSN tab, select the database to use with Qlik Sense.
4. Select the Drivers tab in the Data Sources dialog.
Manage data - Qlik Sense, February 2024 216

8 Connecting to data sources
In the Drivers tab you can see a list of installed ODBC drivers. If your DBMS is not listed you must
install a driver for it. Run the install program delivered with the ODBC driver, for example the Microsoft
ODBC install program.
64-bit and 32-bit versions of ODBC configuration
A 64-bit version of the Microsoft Windows operating system includes the following versions of the Microsoft
Open DataBase Connectivity (ODBC) Data Source Administrator tool (Odbcad32.exe):
l
The 32-bit version of the Odbcad32.exe file is located in the %systemdrive%\Windows\SysWOW64 folder.
l
The 64-bit version of the Odbcad32.exe file is located in the %systemdrive%\Windows\System32 folder.
Creating ODBC data sources
An ODBC data source must be created for the database you want to access. This can be done during the ODBC
installation or at a later stage.
Before you start creating data sources, a decision must be made whether the data sources should be
User DSN or System DSN (recommended). You can only reach user data sources with the correct
user credentials. On a server installation, typically you need to create system data sources to be able
to share the data sources with other users.
Do the following:
1. Open Odbcad32.exe.
2. Go to the tab System DSN to create a system data source.
3. Click Add.
The Create New Data Source dialog appears, showing a list of the ODBC drivers installed.
4. If the correct ODBC driver is listed, select it and click Finish.
A dialog specific to the selected database driver appears.
5. Select Microsoft Access Driver (*.mdb, *.accdb) and click Finish.
If you cannot find this driver in the list you can download it from Microsoft’s downloads
website and install it.
6. Name the data source and set the necessary parameters.
7. Name the data source Scripting tutorial ODBC.
8. Under Database:, click Select....
9. Under Directories, navigate to the location of your Sales.accdb file (a tutorial example file).
10. When the file Sales.accdb is visible in the text box on the left, click on it to make it the database name.
11. Click OK three times to close all the dialogs.
12. Click OK.
Manage data - Qlik Sense, February 2024 217

8 Connecting to data sources
Best practices when using ODBC data connections
Moving apps with ODBC data connections
If you move an app between Qlik Sense sites/Qlik Sense Desktop installations, data connections are included.
If the app contains ODBC data connections, you need to make sure that the related ODBC data sources exist
on the new deployment as well. The ODBC data sources need to be named and configured identically, and
point to the same databases or files.
Security aspects when connecting to file based ODBC data connections
ODBC data connections using file based drivers will expose the path to the connected data file in the
connection string. The path can be exposed when the connection is edited, in the data selection dialog, or in
certain SQL queries.
If this is a concern, it is recommended to connect to the data file using a folder data connection if it is
possible.
Stopping preview of large datasets in tables
If you have large data sets and you do not want to see a data preview while adding ODBCdata sources to
Data manager or Data load editor, hold down the Shift key while selecting your ODBC data connection.
OLE DB
Qlik Sense supports the OLE DB (Object Linking and Embedding, Database) interface for
connections to external data sources. A great number of external databases can be accessed via
OLE DB.
OLE DB data connection settings
UI item Description
Provider Select Provider from the list of available providers. Only available when you create a new
connection.
OLE DB data connection settings
Manage data - Qlik Sense, February 2024 218
8 Connecting to data sources
UI item Description
Data source Type the name of the Data source to connect to. This can be a server name, or in some
cases, the path to a database file. This depends on which OLE DB provider you are using.
Only available when you create a new connection.
Example:
If you selected Microsoft Office 12.0 Access Database Engine OLE DB Provider, enter the
file name of the Access database file, including the full file path:
C:\Users\{user}\Documents\Qlik\Sense\Apps\Tutorial source files\Sales.accdb
If a connection to the data source fails, a warning message is displayed.
Connection
string
The connection string to use when connecting to the data source. This string contains
references to the Provider and the Data source. Only available when you edit a
connection.
Windows
integrated
security
With this option you use the existing Windows credentials of the user running the Qlik
Sense service.
Specific user
name and
password
With this option you need to enter User name and Password for the data source login
credentials.
Username User name to connect with, if required by the data source.
Leave this field empty if you use Windows integrated security or the data source does
not require credentials.
Password Password to connect with, if required by the data source.
Leave this field empty if you use Windows integrated security or the data source does
not require credentials.
Load
Select
database...
If you want to test the connection, click Load and then Select database... to use for
establishing the data connection.
You are still able to use all other available databases of the data source when
selecting data from the data connection.
Name Name of the data connection.
Manage data - Qlik Sense, February 2024 219

8 Connecting to data sources
Security aspects when connecting to file based OLE DB data connections
OLE DB data connections using file based drivers will expose the path to the connected data file in the
connection string. The path can be exposed when the connection is edited, in the data selection dialog, or in
certain SQL queries.
If this is a concern, it is recommended that you connect to the data file using a folder data connection if it is
possible.
Stopping preview of large datasets in tables
If you have large data sets and you do not want to see a data preview while adding OLE DBdata sources to
Data manager or Data load editor, hold down the Shift key while selecting your OLE DB data connection.
Logic in databases
Several tables from a database application can be included simultaneously in the Qlik Sense
logic. When a field exists in more than one table, the tables are logically linked through this key
field.
When a value is selected, all values compatible with the selection(s) are displayed as optional. All other values
are displayed as excluded.
If values from several fields are selected, a logical AND is assumed.
If several values of the same field are selected, a logical OR is assumed.
In some cases, selections within a field can be set to logical AND.
8.6 Accessing large data sets with Direct Discovery
Direct Discovery enables you to load big data sets from certain SQL sources that have simple
star schema structures and combine them with in-memory data.
Selections can be made on in-memory and Direct Discovery data to see associations across the data sets with
the Qlik Sense association colors: green, white, and gray. Certain visualizations can analyze data from both
data sets together, though there are a number of limitations with this approach. It is not designed to be a real-
time solution.
No new development of Direct Discovery will be undertaken to overcome the limitations.
Qlik Sense on-demand apps provide a more flexible approach to loading and analyzing big data sources.
Direct Discovery expands the associative capabilities of the Qlik Sense in-memory data model by providing
access to additional source data through an aggregated query that seamlessly associates larger data sets with
in-memory data. Direct Discovery enhances business users’ ability to conduct associative analysis on big data
Manage data - Qlik Sense, February 2024 220

8 Connecting to data sources
sources without limitations. Selections can be made on in-memory and Direct Discovery data to see
associations across the data sets with the same Qlik Sense association colors - green, white, and gray.
Visualizations can analyze data from both data sets together.
Data is selected for Direct Discovery using a special script syntax, DIRECT QUERY. Once the Direct Discovery
structure is established, Direct Discovery fields can be used along with in-memory data to create Qlik Sense
objects. When a Direct Discovery field is used in a Qlik Sense object, an SQL query is run automatically on the
external data source.
On-demand apps provide another method for accessing large data sets. In contrast to Direct Discovery, on-
demand apps provide full Qlik Sense functionality on a latent subset that is hosted in memory.
Differences between Direct Discovery and in-memory data
In-memory model
In the Qlik Sense in-memory model, all unique values in the fields selected from a table in the load script are
loaded into field structures, and the associative data is simultaneously loaded into the table. The field data
and the associative data is all held in memory.
A second, related table loaded into memory would share a common field, and that table might add new
unique values to the common field, or it might share existing values.
Manage data - Qlik Sense, February 2024 221

8 Connecting to data sources
Direct Discovery
When table fields are loaded with a Direct Discovery LOAD statement (Direct Query), a similar table is created
with only the DIMENSION fields. As with the In-memory fields, the unique values for the DIMENSION fields are
loaded into memory. But the associations between the fields are left in the database.
Manage data - Qlik Sense, February 2024 222

8 Connecting to data sources
MEASURE field values are also left in the database.
Manage data - Qlik Sense, February 2024 223

8 Connecting to data sources
Once the Direct Discovery structure is established, the Direct Discovery fields can be used with certain
visualization objects, and they can be used for associations with in-memory fields. When a Direct Discovery
field is used, Qlik Sense automatically creates the appropriate SQL query to run on the external data. When
selections are made, the associated data values of the Direct Discovery fields are used in the WHERE
conditions of the database queries.
With each selection, the visualizations with Direct Discovery fields are recalculated, with the calculations
taking place in the source database table by executing the SQL query created by Qlik Sense. The calculation
condition feature can be used to specify when visualizations should be recalculated. Until the condition is
met, Qlik Sense does not send queries to recalculate the visualizations.
Performance differences between in-memory fields and Direct Discovery fields
In-memory processing is always faster than processing in source databases. Performance of Direct Discovery
reflects the performance of the system running the database processing the Direct Discovery queries.
It is possible to use standard database and query tuning best practices for Direct Discovery. All of the
performance tuning should be done on the source database. Direct Discovery does not provide support for
query performance tuning from the Qlik Sense app. It is possible, however, to make asynchronous, parallel
calls to the database by using the connection pooling capability. The load script syntax to set up the pooling
capability is:
SET DirectConnectionMax=10;
Manage data - Qlik Sense, February 2024 224

8 Connecting to data sources
Qlik Sense caching also improves the overall user experience. See Caching and Direct Discovery (page 226)
below.
Performance of Direct Discovery with DIMENSION fields can also be improved by detaching some of the fields
from associations. This is done with the DETACH keyword on DIRECT QUERY. While detached fields are not
queried for associations, they are still part of the filters, speeding up selection times.
While Qlik Sense in-memory fields and Direct Discovery DIMENSION fields both hold all their data in memory,
the manner in which they are loaded affects the speed of the loads into memory. Qlik Sense in-memory fields
keep only one copy of a field value when there are multiple instances of the same value. However, all field
data is loaded, and then the duplicate data is sorted out.
DIMENSION fields also store only one copy of a field value, but the duplicate values are sorted out in the
database before they are loaded into memory. When you are dealing with large amounts of data, as you
usually are when using Direct Discovery, the data is loaded much faster as a DIRECT QUERY load than it
would be through the SQL SELECT load used for in-memory fields.
Differences between data in-memory and database data
DIRECT QUERY is case-sensitive when making associations with in-memory data. Direct Discovery selects data
from source databases according to the case-sensitivity of the database fields queried. If the database fields
are not case-sensitive, a Direct Discovery query might return data that an in-memory query would not. For
example, if the following data exists in a database that is not case-sensitive, a Direct Discovery query of the
value "Red" would return all four rows.
ColumnA ColumnB
red one
Red two
rED three
RED four
Example table
An in-memory selection of "Red," on the other hand, would return only:
Red two
Qlik Sense normalizes data to an extent that produces matches on selected data that databases would not
match. As a result, an in-memory query may produce more matching values than a Direct Discovery query. For
example, in the following table, the values for the number "1" vary by the location of spaces around them:
ColumnA ColumnB
' 1' space_before
'1' no_space
Table with different values for
the number "1" because of
different location of spaces
around them
Manage data - Qlik Sense, February 2024 225

8 Connecting to data sources
ColumnA ColumnB
'1 ' space_after
'2' two
If you select "1" in a Filter pane for ColumnA, where the data is in standard Qlik Sense in-memory, the first
three rows are associated:
ColumnA ColumnB
' 1' space_before
'1' no_space
'1 ' space_after
Associated rows
If the Filter pane contains Direct Discovery data, the selection of "1" might associate only "no_space". The
matches returned for Direct Discovery data depend on the database. Some return only "no_space" and some,
like SQL Server, return "no_space" and "space_after".
Caching and Direct Discovery
Qlik Sense caching stores selection states of queries and associated query results in memory. As the same
types of selections are made, Qlik Sense leverages the query from the cache instead of querying the source
data. When a different selection is made, an SQL query is made on the data source. The cached results are
shared across users.
Example:
1. User applies initial selection.
SQL is passed through to the underlying data source.
2. User clears selection and applies same selection as initial selection.
Cache result is returned, SQL is not passed through to the underlying data source.
3. User applies different selection.
SQL is passed through to the underlying data source.
A time limit can be set on caching with the DirectCacheSeconds system variable. Once the time limit is
reached, Qlik Sense clears the cache for the Direct Discovery query results that were generated for the
previous selections. Qlik Sense then queries the source data for the selections and recreates the cache for the
designated time limit.
The default cache time for Direct Discovery query results is 30 minutes unless the DirectCacheSeconds
system variable is used.
Manage data - Qlik Sense, February 2024 226

8 Connecting to data sources
Direct Discovery field types
Within Direct Discovery, there are three types of data fields: DIMENSION, MEASURE, and DETAIL.
The types are set on data fields when the Direct Discovery selection is made using the Direct
Query statement in the load script.
All Direct Discovery fields can be used in combination with in-memory fields. Typically, fields with discrete
values that will be used as dimensions should be loaded with the DIMENSION keyword, whereas numeric data
that will be used in aggregations only should be marked as MEASURE fields.
The following table summarizes the characteristics and usage of the Direct Discovery field types:
Field Type In memory? Forms association? Used in chart expressions?
DIMENSION Yes Yes Yes
MEASURE No No Yes
DETAIL No No No
Direct Discovery field types
DIMENSION fields
DIMENSION fields are loaded in memory and can be used to create associations between in-memory data and
the data in Direct Discovery fields. Direct DiscoveryDIMENSION fields are also used to define dimension values
in charts.
MEASURE fields
MEASURE fields, on the other hand, are recognized on a "meta level." MEASURE fields are not loaded in
memory (they do not appear in the data model viewer).The purpose is to allow aggregations of the data in
MEASURE fields to take place in the database rather than in memory. Nevertheless, MEASURE fields can be
used in expressions without altering the expression syntax. As a result, the use of Direct Discovery fields from
the database is transparent to the end user.
The following aggregation functions can be used with MEASURE fields:
l
Sum
l
Avg
l
Count
l
Min
l
Max
DETAIL fields
DETAIL fields provide information or details that you may want to display but not use in chart expressions.
Fields designated as DETAIL commonly contain data that cannot be aggregated in any meaningful way, like
comments.
Any field can be designated as a DETAIL field.
Manage data - Qlik Sense, February 2024 227

8 Connecting to data sources
Data sources supported in Direct Discovery
Qlik Sense Direct Discovery can be used against the following data sources, both with 32-bit and
64-bit connections:
l
ODBC/OLEDB data sources - All ODBC/OLEDB sources are supported, including SQL Server, Teradata
and Oracle.
l
Connectors that support SQL – SAP SQL Connector, Custom QVX connectors for SQL compliant data
stores.
Both 32-bit and 64-bit connections are supported.
SAP
For SAP, Direct Discovery can be used only with the Qlik SAP SQL Connector, and it requires the following
parameters in SET variables:
SET DirectFieldColumnDelimiter=' ';
SET DirectIdentifierQuoteChar=' ';
SAP uses OpenSQL, which delimits columns with a space rather than a comma, so the above set statements
cause a substitution to accommodate the difference between ANSI SQL and OpenSQL.
Google Big Query
Direct Discovery can be used with Google Big Query and requires the following parameters in the set variables:
SET DirectDistinctSupport=false;
SET DirectIdentifierQuoteChar='[]';
SET DirectIdentifierQuoteStyle='big query'
Google Big Query does not support SELECT DISTINCT or quoted column/table names and has non-ANSI
quoting configuration using '[ ]'.
MySQL and Microsoft Access
Direct discovery can be used in conjunction with MySQL and Microsoft Access but may require the following
parameters in the set variables due to the quoting characters used in these sources:
SET DirectIdentifierQuoteChar='``';
DB2, Oracle and PostgreSQL
Direct discovery can be used in conjunction with DB2, Oracle and PostgreSQL but may require the following
parameter in the set variables due to the quoting characters used in these sources:
SET DirectIdentifierQuoteChar='""';
Sybase and Microsoft SQL Server
Direct discovery can be used in conjunction with Sybase and Sybase and Microsoft SQL Server but may require
the following parameter in the set variables due to the quoting characters used in these sources:
SET DirectIdentifierQuoteChar='[]';
Manage data - Qlik Sense, February 2024 228

8 Connecting to data sources
Apache Hive
Direct discovery can be used in conjunction with Apache Hive but may require the following parameter in the
set variables due to the quoting characters used in these sources:
SET DirectIdentifierQuoteChar='';
Cloudera Impala
Direct discovery can be used in conjunction with Cloudera Impala but may require the following parameter in
the set variables due to the quoting characters used in these sources:
SET DirectIdentifierQuoteChar='[]';
This parameter is required when using the Cloudera Impala Connector in the Qlik ODBC Connector Package. It
may not be required when using ODBC through DSN.
Limitations when using Direct Discovery
No new development of Direct Discovery will be undertaken to overcome the limitations.
Supported data types
Not all data types are supported in Direct Discovery. There may be cases in which specific source data formats
need to be defined in Qlik Sense. You define data formats in the load script by using the "SET Direct...Format"
syntax. The following example demonstrates how to define the date format of the source database that is
used as the source for Direct Discovery:
Example:
SET DirectDateFormat='YYYY-MM-DD';
There are also two script variables for controlling how the Direct Discovery formats currency values in the
generated SQL statements:
SET DirectMoneyFormat (default '#.0000')
SET DirectMoneyDecimalSep (default '.')
The syntax for these two variables is the same as for MoneyFormat and MoneyDecimalSep, but there are two
important differences in usage:
l
This is not a display format, so it should not include currency symbols or thousands separators.
l
The default values are not driven by the locale but are tied to the values. (Locale-specific formats
include the currency symbol.)
Direct Discovery can support the selection of extended Unicode data by using the SQL standard format for
extended character string literals (N'<extended string>') as required by some databases, such as SQL Server.
This syntax can be enabled for Direct Discovery with the script variable DirectUnicodeStrings. Setting this
variable to "true" enables the use of "N" in front of the string literals.
Manage data - Qlik Sense, February 2024 229

8 Connecting to data sources
Security
The following behaviors that could affect security best practice should be taken into consideration when using
Direct Discovery:
l
All of the users using the same app with the Direct Discovery capability use the same connection.
Authentication pass-through and credentials-per-user are not supported.
l
Section Access is supported in server mode only.
l
Section access is not supported with high-cardinality joins.
l
It is possible to execute custom SQL statements in the database with a NATIVE keyword expression, so
the database connection set up in the load script should use an account that has read-only access to
the database.
l
Direct Discovery has no logging capability, but it is possible to use the ODBC tracing capability.
l
It is possible to flood the database with requests from the client.
l
It is possible to get detailed error messages from the server log files.
Qlik Sense functionality that is not supported
Because of the interactive and SQL syntax-specific nature of Direct Discovery, several features are not
supported:
l
Advanced calculations (set analysis, complex expressions)
l
Calculated dimensions
l
Comparative analysis (alternate state) of the objects that use Direct Discovery fields
l
Direct Discovery MEASURE and DETAIL fields are not supported in smart search.
l
Search of Direct Discovery DETAIL fields
l
Binary load from an application that is accessing a Direct Discovery table.
l
Synthetic keys on the Direct Discovery table
l
Table naming in a script does not apply to the Direct Discovery table.
l
The wild card character * after a DIRECT QUERY keyword in the load script
Example: (DIRECT QUERY *)
l
Oracle database tables with LONG data type columns.
l
Big integers in scientific notation, outside the range [-9007199254740990, 9007199254740991]. These
may can cause rounding errors and undefined behavior.
l
Snowflake database schemas
l
Data preparation in the Data manager
l
Qlik Sense Enterprise SaaS
l
Download to Microsoft Excel
l
Offline mobile iOS app
l
Advanced Analytics Integration
l
Extensions
l
Qlik GeoAnalytics
Manage data - Qlik Sense, February 2024 230

8 Connecting to data sources
l
Assigning colors to master dimensions and measures
l
New visualizations included in Qlik Sense Enterprise on Windows June 2017 and later
l
Non-SQL sources and non-SQL statements (for example, the PLACEHOLDER function in SAP HANA).
l
The following connectors are not supported:
l
Qlik Salesforce Connector
l
Qlik REST Connector
l
Qlik Web connectors
l
Qlik Connector for use with SAP NetWeaver
l
Optimizing the SQL generated by the Direct Discovery queries.
l
High-cardinality joins in combination with in-memory tables can produce large IN clauses that may
exceed the SQL buffer limit of the data source.
l
Qlik Visualization and Dashboard bundle objects
l
Insight Advisor
l
Alerting
l
Dynamic Views
l
Custom tooltips
Multi-table support in Direct Discovery
You can use Direct Discovery to load more than one table or view using ANSI SQL join
functionality.
In a single chart, all measures must be derived from the same logical table in Qlik Sense, but this can be a
combination of several tables from source linked via join statements. However, you can use dimensions
sourced from other tables in the same chart.
For example, you can link the tables loaded with Direct Discovery using either a Where clause or a Join
clause.
l
Direct Discovery can be deployed in a single fact/multi-dimension in memory scenario with large
datasets.
l
Direct Discovery can be used with more than one table which match any of the following criteria:
l
The cardinality of the key field in the join is low.
l
The cardinality of the key field in the join is high, DirectEnableSubquery is set to true and all
tables have been joined with Direct Discovery.
l
Direct Discovery is not suitable for deployment in a Third Normal Form scenario with all tables in
Direct Discovery form.
Linking Direct Discovery tables with a Where clause
In this example script, we load data from the database AW2012. The tables Product and ProductSubcategory
are linked with a Where clause using the common ProductSubCategoryID field.
Product_Join:
DIRECT QUERY
DIMENSION
[ProductID],
Manage data - Qlik Sense, February 2024 231

8 Connecting to data sources
[AW2012].[Production].[Product].[Name] as [Product Name],
[AW2012].[Production].[ProductSubcategory].[Name] as [Sub Category Name],
Color,
[AW2012].[Production].[Product].ProductSubcategoryID as [SubcategoryID]
MEASURE
[ListPrice]
FROM [AW2012].[Production].[Product],
[AW2012].[Production].[ProductSubcategory]
WHERE [AW2012].[Production].[Product].ProductSubcategoryID =
[AW2012].[Production].[ProductSubcategory].ProductSubcategoryID ;
Linking Direct Discovery tables with Join On clauses
You can also use Join On clauses to link Direct Discovery tables. In this example statement we join the
SalesOrderHeader table to the SalesOrderDetail table via the SalesOrderID field, and also join the Customer
table to the SalesOrderHeader table via the Customer ID field.
In this example we create measures from the same logical table, which means we can use them in the same
chart. For example, you can create a chart with SubTotal and OrderQty as measures.
Sales_Order_Header_Join:
DIRECT QUERY
DIMENSION
AW2012.Sales.Customer.CustomerID as CustomerID,
AW2012.Sales.SalesOrderHeader.SalesPersonID as SalesPersonID,
AW2012.Sales.SalesOrderHeader.SalesOrderID as SalesOrderID,
ProductID,
AW2012.Sales.Customer.TerritoryID as TerritoryID,
OrderDate,
NATIVE('month([OrderDate])') as OrderMonth,
NATIVE('year([OrderDate])') as OrderYear
MEASURE
SubTotal,
TaxAmt,
TotalDue,
OrderQty
DETAIL
DueDate,
ShipDate,
CreditCardApprovalCode,
PersonID,
StoreID,
AccountNumber,
rowguid,
ModifiedDate
FROM AW2012.Sales.SalesOrderDetail
JOIN AW2012.Sales.SalesOrderHeader
ON (AW2012.Sales.SalesOrderDetail.SalesOrderID =
AW2012.Sales.SalesOrderHeader.SalesOrderID)
JOIN AW2012.Sales.Customer
ON(AW2012.Sales.Customer.CustomerID =
AW2012.Sales.SalesOrderHeader.CustomerID);
Manage data - Qlik Sense, February 2024 232

8 Connecting to data sources
Using subqueries with Direct Discovery
If the cardinality of the key field joining the table is high, that is, it contains a large number of
distinct values, a selection in Qlik Sense may generate a very large SQL statement as the WHERE
key_field IN clause can contain a large number of values. In this case, a possible solution is to
let Qlik Sense create subqueries instead.
To illustrate this, we use an example where a products table (ProductTable) is linked to a sales order table
(SalesOrderDetail) using a product id (ProductID), with both tables used in Direct Discovery mode.
We create a chart with OrderMonth as dimension, and Sum(Subtotal) as measure, and a filter box for selecting
Size.
Manage data - Qlik Sense, February 2024 233

8 Connecting to data sources
Scenario 1: Low cardinality
In this scenario, the product table contains a low number of distinct products, 266. If we make a selection in
Size, Direct Discovery generates a SQL statement to return the data, using a WHERE ProductID IN clause
containing the product IDs matching the selected size, in this case 19 products.
The SQL that is generated looks like this:
SELECT ProductID, month([OrderDate]), SUM(OrderQty), SUM(SubTotal)
FROM SalesTable
WHERE ProductID IN ( 12, 51, 67, 81, 89, 92, 100, 108, 142, 150, 151, 162, 191, 206, 220, 222,
251, 254)
GROUP BY ProductID, month([OrderDate])
Scenario 2: Using subqueries
If the same example contains a high number of distinct products, for example 20.000, selecting a dimension
filter, Size for example, would generate a SQL statement with a WHERE ProductID IN clause containing
thousands of product IDs. The resulting statement could be too large to be handled by the data source due to
limitations or issues with memory or performance.
The solution is to let Qlik Sense create subqueries instead, by setting the DirectEnableSubquery to true. The
generated SQL statement could look like this instead:
SELECT ProductID, month([OrderDate]), SUM(OrderQty), SUM(SubTotal)
FROM SalesTable
Manage data - Qlik Sense, February 2024 234

8 Connecting to data sources
WHERE ProductID IN
( SELECT DISTINCT "AW2012"."dbo"."PRODUCT"."PRODUCTID" WHERE "AW2012"."dbo"."PRODUCT"."SIZE"
IN (3))
GROUP BY ProductID, month([OrderDate])
The WHERE ProductID IN clause size is not dependent on the number of keys resulting from the selection
anymore.
The following limitations apply when using subqueries:
l
Subquery syntax is only invoked when you select data which involves filtering a chart using data from
another table.
l
The amount of data within the keys is the determining factor, not the number of keys.
l
Subqueries are only invoked if all tables involved are in Direct Discovery mode. If you filter the chart
using data from a table included in memory mode, an IN clause will be generated.
Logging Direct Discovery access
Direct DiscoverySQL statements passed to the data source can be recorded in the trace files of
the database connection. For a standard ODBC connection, tracing is started with the ODBC
Data Source Administrator:
The resulting trace file details SQL statements generated through the user selections and interactions.
Manage data - Qlik Sense, February 2024 235

9 Viewing and transforming the data model
9 Viewing and transforming the data model
The data model viewer is an overview of the data structure of an app. You can view detailed
metadata about the tables and fields. You can also create dimensions and measures from the
data fields.
Click Data model viewer under the Prepare tab in the navigation bar to open the data model viewer.
Each data table is represented by a box, with the table name as title and with all fields in the table listed.
Table associations are shown with lines, with a dotted line indicating a circular reference. When you select a
table or a field, the highlighting of associations instantly gives you a picture of how fields and tables are
related. You can search for specific tables and fields by clicking .
The data model displays the data structure of the app.
You can change the zoom level by clicking , or using the slider. Click to restore the zoom level to 1:1.
In the preview pane, you can inspect the contents of a table or field. You can also add dimensions and
measures to the app if you select a field. For more information, see Previewing tables and fields in the data
model viewer (page 240).
9.1 Moving tables
You can move tables by dragging them on the canvas. The table positions will be saved when the app is saved.
Manage data - Qlik Sense, February 2024 236

9 Viewing and transforming the data model
You can lock the table layout (positions and sizes), by clicking in the right part of the canvas. To unlock the
table layout, click .
You can also arrange the layout automatically using the options under in the toolbar:
UI
item
Name Description
Grid layout To arrange the tables in a grid.
Auto layout To arrange the tables to fit in the window.
Restore
layout
To revert to the layout state present when the data model viewer was last
opened.
Options for moving tables
9.2 Resizing tables
You can adjust the display size of a table with the arrow in the bottom right corner of the table. The display
size will not be saved when the app is saved.
You can also use the automatic display size options in the toolbar:
UI
item
Name Description
Collapse all To minimize all tables to show the table name only.
Show linked
fields
To reduce the size of all tables to show the table name and all fields with
associations to other tables.
Expand all To maximize all tables to show all fields in the table.
Options for resizing tables
9.3 Data model performance
These are indicators that can impact data model performance. Each one is a best practice that will improve
app usability.
Action Description
Synthetic keys removed Qlik Sense creates synthetic keys when two
or more data tables have two or more fields
in common. This may mean that there is an
error in the script or the data model.
Data model performance best practices
Manage data - Qlik Sense, February 2024 237

9 Viewing and transforming the data model
Action Description
Circular references removed
from data model
Circular references occur when two fields
have more than one association. Qlik Sense
will attempt to resolve these by changing
the connection to one of the tables.
However, all circular reference warnings
should be resolved.
Appropriate granularity of
data
You should only load data that is necessary.
For example: a group of users only need
data divided by week, month, and year. You
can either load in the aggregated data or
aggregate the data within the load script to
save memory. If a user does need to
visualize data at a lower level of granularity,
you can use ODAG or document chaining.
QVDs used where possible A QVD is a file containing a table of data
exported from Qlik Sense. This file format is
optimized for speed when reading data
from a script, but is still very compact.
Reading data from a QVD file is typically 10-
100 times faster than reading from other
data sources.
QVD files optimized on load QVD files can be read in two modes:
standard (fast) and optimized (faster). The
selected mode is determined automatically
by the script engine.
There are some limitations regarding
optimized loads. It is possible to rename
fields, but any of these operations will result
in a standard load:
l
Any transformations on the fields
that are loaded.
l
Using a where clause causing Qlik
Sense to unpack the records.
l
Using Map on a field that is loaded.
Incremental loads leveraged If your app connects to a large amount of
data from databases that are continuously
updated, reloading the entire data set can
be time consuming. Instead, you should use
incremental load to retrieve new or changed
records from the database.
Manage data - Qlik Sense, February 2024 238

9 Viewing and transforming the data model
Action Description
Snowflake model
consolidated
If you have a snowflake data model, you
may be able to reduce the number of data
tables by joining some of them using the
Join prefix or other mapping. This is
especially important for large fact tables. A
good rule of thumb is to have only one large
table.
Tables that have a small
number of fields are
denormalized
If you have two tables with few fields, it may
improve performance to join them. .
Denormalized lookup (leaf)
tables with mapping loads
You should not use the Join prefix if you
only need to add one field from a table to
another. You should use the ApplyMap
lookup function.
Time stamps removed or
decoupled from date field
Date fields can fill up space when the
timestamp is present as the string
representation is larger, and the number of
distinct values is larger. If the precision is
not necessary for your analysis, you can
round the timestamp to e.g. the nearest
hour using Timestamp(Floor
(YourTimestamp,1/24)) or remove the time
component completely using Date(Floor
(YourTimestamp)).
If you want the timestamp, you can
decouple it from the date itself. You can use
the same Floor() function, and then create a
new field with the extracted time by using
something along the lines of: Time(Frac
(YourTimestamp)).
Unnecessary fields removed
from data model
You should only load necessary fields in
your data model. Avoid using Load * and
SELECT. Make sure you keep:
l
Fields that are necessary for your
analysis.
l
Fields that are actually being used in
the app.
Manage data - Qlik Sense, February 2024 239

9 Viewing and transforming the data model
Action Description
Link tables avoided when
dealing with high data
volumes
You should use link tables where possible.
However, if you are dealing with large data
volumes, concatenated tables can out-
perform link tables.
Concatenated dimensions
broken to new fields
You should break apart concatenated
dimensions into separate fields. This
reduces the number of unique occurrences
of values in your fields. This is similar to
how timestamps can be optimized.
AutoNumber used where
possible
You can create an optimized load by loading
your data from a QVD file first, and then
using the AutoNumber statement to
convert values to symbol keys.
Data islands avoided Data islands can be useful, but they usually
affect performance. If you are creating
islands for selection values, use variables.
QVDs are stored based on
incremental timeframes
You should store QVD in segments, such as
monthly. These smaller monthly QVD can
then support many different apps that
might not need all of the data.
For more best practices, see Best practices for data modeling (page 243).
9.4 Previewing tables and fields in the data model viewer
In the data model viewer, you can preview any data table in the panel at the bottom of the
screen. In the preview, you can quickly inspect the contents of a table or field. You can also add
dimensions and measures to the app if you select a field.
Additionally, metadata for the selected table or field are displayed in the preview panel.
You can show and hide the preview panel in two ways:
l
Click in the toolbar.
l
Click the Preview header.
Direct Discovery data is not displayed in the preview .
Manage data - Qlik Sense, February 2024 240

9 Viewing and transforming the data model
Showing a preview of a table
Do the following:
l
Click a table header in the data model viewer.
The preview panel is displayed with fields and values of the selected table.
Showing a preview of a field
Do the following:
l
Click a table field in the data model viewer.
The preview panel is displayed with the selected field and its values, and metadata for the field. You can also
add the field as a master dimension or measure.
l
Density is the number of records that have non-NULL values in this field, as compared to the total
number of records in the table.
l
Subset ratio is the number of distinct values of the field found in this table, as compared to the total
number of distinct values of this field in other tables in the data model. This is only relevant for key
fields.
l
If the field is marked with [Perfect key], every row contains a key value that is unique.
Manage data - Qlik Sense, February 2024 241

9 Viewing and transforming the data model
9.5 Creating a master dimension from the data model viewer
When you are working with an unpublished app, you can create master dimensions so that they
can be reused. Users of a published app will have access to the master dimensions, but will not
be able to modify them. The data model viewer is not available in a published app.
Do the following:
1. In the data model viewer, select a field and open the Preview panel.
2. Click Add as dimension.
The Create new dimension dialog opens, with the selected field. The name of the selected field is also
used as the default name of the dimension.
3. Change the name if you want to, and optionally add a description, color, and tags.
4. Click Create.
5. Click Done to close the dialog.
The dimension is now saved to the master items tab of the assets panel.
You can quickly add several dimensions as master items by clicking Add dimension after adding
each dimension. Click Done when you have finished.
Direct Discovery tables are indicated by in the data model viewer.
9.6 Creating a master measure from the data model viewer
When you are working with an unpublished app, you can create master measures so that they
can be reused. Users of a published app will have access to the master measures, but will not be
able to modify them.
Do the following:
1. In the data model viewer, select a field and open the Preview panel.
2. Click Add as measure.
The Create new measure dialog opens, with the selected field. The name of the selected field is also
used as the default name of the measure.
3. Enter an expression for the measure.
4. Change the name if you want to, and optionally add a description, color, and tags.
5. Click Create.
The measure is now saved to the master items tab of the assets panel.
Manage data - Qlik Sense, February 2024 242

10 Best practices for data modeling
10 Best practices for data modeling
This section describes a number of different ways you can load your data into a Qlik Sense app,
depending on how the data is structured and which data model you want to achieve.
10.1 Turning data columns into rows
My data probably looks like this, and I want to have the sales figures in a separate field:
Year Q1 Q2 Q3 Q4
2013 34 54 53 52
2014 47 56 65 67
2015 57 56 63 71
Original data table
Proposed action
Use the Crosstable prefix when you load the table.
The result will look like this:
Year Quarter Sales
2013 Q1 34
2013 Q2 54
2013 Q3 53
2013 Q4 52
2014 Q1 47
... ... ...
Table after applying Crosstable prefix
10.2 Turning data rows into fields
I have a generic table with three fields similar to this, and I want to have each attribute as a separate table:
Object Attribute Value
ball color red
ball diameter 25
ball weight 3
Generic table with three fields
Manage data - Qlik Sense, February 2024 243

10 Best practices for data modeling
Object Attribute Value
box color 56
box height 30
box length 20
box width 25
Proposed action
Create a generic data model using the Generic load prefix.
You will get a data model that looks like this:
10.3 Loading data that is organized in hierarchical levels, for
example an organization scheme
My data is stored in an adjacent nodes table that looks like this:
NodeID ParentNodeID Title
1 - General manager
2 1 Country manager
3 2 Region manager
Adjacent nodes table
Proposed action
Load the data with the Hierarchy prefix to create an expanded nodes table:
Manage data - Qlik Sense, February 2024 244

10 Best practices for data modeling
NodeID ParentNodeID Title Level1 Level2 Level3
1 - General
manager
General
manager
- -
2 1 Country
manager
General
manager
Country
manager
-
3 2 Region manager General
manager
Country
manager
Region
manager
Expanded nodes table
10.4 Loading only new or updated records from a large
database
I have a database with a large number of records, and I don't want to reload the entire database to refresh the
data in my app. I only want to load new or updated records, and remove records that are deleted from the
database.
Proposed action
Implement an incremental load solution using QVD files.
10.5 Combining data from two tables with a common field
Qlik Sense will associate tables with a common field automatically, but I want to control how the tables are
combined.
Proposed action : Join / Keep
You can combine two tables into a single internal table with the Join or Keep prefixes.
Proposed action : Mapping
An alternative to joining tables is to use mapping, which automates lookup of associated values in a mapping
table. This can reduce the amount of data to load.
10.6 Matching a discrete value to an interval
I have a table of discrete numeric values (Event), and I want to match it to one or more intervals (Start and
End).
Time Event Comment
00:00 0 Start of shift 1
01:18 1 Line stop
02:23 2 Line restart 50%
Table of discrete numeric values (Event)
Manage data - Qlik Sense, February 2024 245

10 Best practices for data modeling
Time Event Comment
04:15 3 Line speed 100%
08:00 4 Start of shift 2
11:43 5 End or production
Start End Order
01:00 03:35 A
02:30 07:58 B
03:04 10:27 C
07:23 11:43 D
Table with intervals (Start and End)
Proposed action
Use the IntervalMatch prefix to link the Time field with the interval defined by Start and End.
If the interval is not defined explicitly with start and end, only with a change timestamp like in the table
below, you need to create an interval table.
Currency Change Data Rate
EUR - 8.59
EUR 28/01/2013 8.69
EUR 15/02/2013 8.45
USD - 6.50
USD 10/01/2013 6.56
USD 03/02/2013 6.30
Table with a change timestamp
10.7 Handling inconsistent field values
My data contains field values that are not consistently named in different tables. For example, one table
contains the value US in Country while another table contains United States. This situation will prevent
associations.
Country Region
US Maryland
US Idaho
Table 1
Manage data - Qlik Sense, February 2024 246

10 Best practices for data modeling
Country Region
US New York
US California
Country Population
United States 304
Japan 128
Brazil 192
China 1333
Table 2
Proposed action
Perform data cleansing using a mapping table, that will compare field values and enable correct associations.
10.8 Handling inconsistent field value capitalization
My data contains field values that are not consistently formatted in different tables. For example, one table
contains the value single in Type while another table contains Single in the same field. This situation will
prevent associations, as the Type field will contain both single and Single values, capitalization matters.
Type Price
single 23
double 39
Table 1
Type Color
Single Red
Single Blue
Double White
Double Black
Table 2
Proposed action
If you loaded the data with Add data, you can fix this in the data manager.
Do the following:
1. In the data manager, open Table2 in the table editor.
2. Rename the Type field to Table2.Type.
Manage data - Qlik Sense, February 2024 247

10 Best practices for data modeling
If you just added the table with Add data with data profiling enabled, the field may already be named
Table2.Type to prevent automatic association. In this case, this procedure will associate the two
tables.
3. Create a calculated field using the expression Lower(Table2.Type) and name it Type.
4. Click Load data.
Table1 and Table2 should now be associated by the field Type, which only contains values in lowercase, like
single and double.
If you want to use different capitalization, you can also achieve this with similar procedures, but remember
that the tables will associate using the fields with the same name.
l
To get all values capitalized, like Single, create the calculated Type field in Table1 instead, and use the
expression Capitalize(Table1.Type).
l
To get all values in uppercase, like SINGLE, create the calculated Type field in both tables, and use the
expressions Upper(Table1.Type) and Upper(Table2.Type) respectively.
10.9 Loading geospatial data to visualize data with a map
I have data that I want to visualize using a map, for example sales data per country, or per store. To use the
map visualization I need to load area or point data.
Proposed action
You can load area or point data that match your data value locations from a KML file or an Excel file.
Additionally, you need to load the actual map background.
10.10 Loading new and updated records with incremental load
If your app contains a large amount of data from database sources that are continuously
updated, reloading the entire data set can be time consuming. In this case, you want to load
new or changed records from the database. All other data should already be available in the
app. Incremental load using QVD files, makes it possible to achieve this.
The basic process is described below:
1. Load new or updated data from the database source table.
This is a slow process, but only a limited number of records are loaded.
2. Load data that is already available in the app from the QVD file.
Many records are loaded, but this is a much faster process.
3. Create a new QVD file.
This is the file you will use the next time you do an incremental load.
4. Repeat the procedure for every table loaded.
The following examples show cases where incremental load is used. However, a more complex solution might
be necessary, depending on the source database structure and mode of operation.
Manage data - Qlik Sense, February 2024 248

10 Best practices for data modeling
l
Append only (typically used for log files)
l
Insert only (no update or delete)
l
Insert and update (no delete)
l
Insert, update and delete
You can read QVD files in either optimized mode or standard mode. (The method employed is automatically
selected by the Qlik Sense engine depending on the complexity of the operation.) Optimized mode is about 10
times faster than standard mode, or about 100 times faster than loading the database in the ordinary fashion.
Append only
The simplest case is the one of log files; files in which records are only appended and never deleted. The
following conditions apply:
l
The database must be a log file (or some other file in which records are appended and not inserted or
deleted) which is contained in a text file (ODBC, OLE DB or other databases are not supported).
l
Qlik Sense keeps track of the number of records that have been previously read and loads only records
added at the end of the file.
Example:
Buffer (Incremental) Load * From LogFile.txt (ansi, txt, delimiter is '\t', embedded labels);
Insert only (no update or delete)
If the data resides in a database other than a simple log file, the append approach will not work. However, the
problem can still be solved with a minimum amount of extra work. The following conditions apply:
l
The data source can be any database.
l
Qlik Sense loads records inserted in the database after the last script execution.
l
A ModificationTime field (or similar) is required for Qlik Sense to recognize which records are new.
Example:
QV_Table:
SQL SELECT PrimaryKey, X, Y FROM DB_TABLE
WHERE ModificationTime >= #$(LastExecTime)#
AND ModificationTime < #$(BeginningThisExecTime)#;
Concatenate LOAD PrimaryKey, X, Y FROM File.QVD;
STORE QV_Table INTO File.QVD;
The hash signs in the SQL WHERE clause define the beginning and end of a date. Check your database manual
for the correct date syntax for your database.
Insert and update (no delete)
The next case is applicable when data in previously loaded records may have changed between script
executions. The following conditions apply:
Manage data - Qlik Sense, February 2024 249

10 Best practices for data modeling
l
The data source can be any database.
l
Qlik Sense loads records inserted into the database or updated in the database after the last script
execution.
l
A ModificationTime field (or similar) is required for Qlik Sense to recognize which records are new.
l
A primary key field is required for Qlik Sense to sort out updated records from the QVD file.
l
This solution will force the reading of the QVD file to standard mode (rather than optimized), which is
still considerably faster than loading the entire database.
Example:
QV_Table:
SQL SELECT PrimaryKey, X, Y FROM DB_TABLE
WHERE ModificationTime >= #$(LastExecTime)#;
Concatenate LOAD PrimaryKey, X, Y FROM File.QVD
WHERE NOT Exists(PrimaryKey);
STORE QV_Table INTO File.QVD;
Insert, update and delete
The most difficult case to handle is when records are actually deleted from the source database between
script executions. The following conditions apply:
l
The data source can be any database.
l
Qlik Sense loads records inserted into the database or updated in the database after the last script
execution.
l
Qlik Sense removes records deleted from the database after the last script execution.
l
A field ModificationTime (or similar) is required for Qlik Sense to recognize which records are new.
l
A primary key field is required for Qlik Sense to sort out updated records from the QVD file.
l
This solution will force the reading of the QVD file to standard mode (rather than optimized), which is
still considerably faster than loading the entire database.
Example:
Let ThisExecTime = Now( );
QV_Table:
SQL SELECT PrimaryKey, X, Y FROM DB_TABLE
WHERE ModificationTime >= #$(LastExecTime)#
AND ModificationTime < #$(ThisExecTime)#;
Concatenate LOAD PrimaryKey, X, Y FROM File.QVD
WHERE NOT EXISTS(PrimaryKey);
Inner Join SQL SELECT PrimaryKey FROM DB_TABLE;
If ScriptErrorCount = 0 then
STORE QV_Table INTO File.QVD;
Let LastExecTime = ThisExecTime;
End If
Manage data - Qlik Sense, February 2024 250

10 Best practices for data modeling
10.11 Combining tables with Join and Keep
A join is an operation that uses two tables and combines them into one. The records of the resulting table are
combinations of records in the original tables, usually in such a way that the two records contributing to any
given combination in the resulting table have a common value for one or several common fields, a so-called
natural join. In Qlik Sense, joins can be made in the script, producing logical tables.
It is possible to join tables already in the script. The Qlik Sense logic will then not see the separate tables, but
rather the result of the join, which is a single internal table. In some situations this is needed, but there are
disadvantages:
l
The loaded tables often become larger, and Qlik Sense works slower.
l
Some information may be lost: the frequency (number of records) within the original table may no
longer be available.
The Keep functionality, which has the effect of reducing one or both of the two tables to the intersection of
table data before the tables are stored in Qlik Sense, has been designed to reduce the number of cases where
explicit joins need to be used.
In this documentation, the term join is usually used for joins made before the internal tables are
created. The association made after the internal tables are created, is however essentially also a
join.
Joins within a SQL SELECT statement
With some ODBC drivers it is possible to make a join within the SELECT statement. This is almost equivalent
to making a join using the Join prefix.
However, most ODBC drivers are not able to make a full (bidirectional) outer join. They are only able to make
a left or a right outer join. A left (right) outer join only includes combinations where the joining key exists in
the left (right) table. A full outer join includes any combination. Qlik Sense automatically makes a full outer
join.
Further, making joins in SELECT statements is far more complicated than making joins in Qlik Sense.
Example:
SELECT DISTINCTROW
[Order Details].ProductID, [Order Details].
UnitPrice, Orders.OrderID, Orders.OrderDate, Orders.CustomerID
FROM Orders
RIGHT JOIN [Order Details] ON Orders.OrderID = [Order Details].OrderID;
This SELECT statement joins a table containing orders to a fictive company, with a table containing order
details. It is a right outer join, meaning that all the records of OrderDetails are included, also the ones with an
OrderID that does not exist in the table Orders. Orders that exist in Orders but not in OrderDetails are however
not included.
Manage data - Qlik Sense, February 2024 251

10 Best practices for data modeling
Join
The simplest way to make a join is with the Join prefix in the script, which joins the internal table with
another named table or with the last previously created table. The join will be an outer join, creating all
possible combinations of values from the two tables.
Example:
LOAD a, b, c from table1.csv;
join LOAD a, d from table2.csv;
The resulting internal table has the fields a, b, c and d. The number of records differs depending on the field
values of the two tables.
The names of the fields to join over must be exactly the same. The number of fields to join over is
arbitrary. Usually the tables should have one or a few fields in common. No field in common will
render the cartesian product of the tables. All fields in common is also possible, but usually makes
no sense. Unless a table name of a previously loaded table is specified in the Join statement the
Join prefix uses the last previously created table. The order of the two statements is thus not
arbitrary.
Keep
The explicit Join prefix in the data load script performs a full join of the two tables. The result is one table. In
many cases such joins will results in very large tables. One of the main features of Qlik Sense is its ability to
make associations between tables instead of joining them, which reduces space in memory, increases speed
and gives enormous flexibility. The keep functionality has been designed to reduce the number of cases where
explicit joins need to be used.
The Keep prefix between two LOAD or SELECT statements has the effect of reducing one or both of the two
tables to the intersection of table data before they are stored in Qlik Sense. The Keep prefix must always be
preceded by one of the keywords Inner, Left or Right. The selection of records from the tables is made in the
same way as in a corresponding join. However, the two tables are not joined and will be stored in Qlik Sense
as two separately named tables.
Inner
The Join and Keep prefixes in the data load script can be preceded by the prefix Inner.
If used before Join, it specifies that the join between the two tables should be an inner join. The resulting
table contains only combinations between the two tables with a full data set from both sides.
If used before Keep, it specifies that the two tables should be reduced to their common intersection before
being stored in Qlik Sense.
Example:
In these examples we use the source tables Table1 and Table2:
Manage data - Qlik Sense, February 2024 252

10 Best practices for data modeling
A B
1 aa
2 cc
3 ee
Table 1
A C
1 xx
4 yy
Table2
Inner Join
First, we perform an Inner Join on the tables, resulting in VTable, containing only one row, the only record
existing in both tables, with data combined from both tables.
VTable:
SELECT * from Table1;
inner join SELECT * from Table2;
A B C
1 aa xx
VTable
Inner Keep
If we perform an Inner Keep instead, you will still have two tables. The two tables are associated via the
common field A.
VTab1:
SELECT * from Table1;
VTab2:
inner keep SELECT * from Table2;
A B
1 aa
VTab1
A C
1 xx
VTab2
Left
The Join and Keep prefixes in the data load script can be preceded by the prefix left.
Manage data - Qlik Sense, February 2024 253

10 Best practices for data modeling
If used before Join, it specifies that the join between the two tables should be a left join. The resulting table
only contains combinations between the two tables with a full data set from the first table.
If used before Keep, it specifies that the second table should be reduced to its common intersection with the
first table before being stored in Qlik Sense.
Example:
In these examples we use the source tables Table1 and Table2:
A B
1 aa
2 cc
3 ee
Table1
A C
1 xx
4 yy
Table2
First, we perform a Left Join on the tables, resulting in VTable, containing all rows from Table1, combined
with fields from matching rows in Table2.
VTable:
SELECT * from Table1;
left join SELECT * from Table2;
A B C
1 aa xx
2 cc -
3 ee -
VTable
If we perform an Left Keep instead, you will still have two tables. The two tables are associated via the
common field A.
VTab1:
SELECT * from Table1;
VTab2:
left keep SELECT * from Table2;
A B
1 aa
VTab1
Manage data - Qlik Sense, February 2024 254

10 Best practices for data modeling
A B
2 cc
3 ee
A C
1 xx
VTab2
Right
The Join and Keep prefixes in the data load script can be preceded by the prefix right.
If used before Join, it specifies that the join between the two tables should be a right join. The resulting table
only contains combinations between the two tables with a full data set from the second table.
If used before Keep, it specifies that the first table should be reduced to its common intersection with the
second table before being stored in Qlik Sense.
Example:
In these examples we use the source tables Table1 and Table2:
A B
1 aa
2 cc
3 ee
Table1
A C
1 xx
4 yy
Table2
First, we perform a Right Join on the tables, resulting in VTable, containing all rows from Table2, combined
with fields from matching rows in Table1.
VTable:
SELECT * from Table1;
right join SELECT * from Table2;
A B C
1 aa xx
4 - yy
VTable
Manage data - Qlik Sense, February 2024 255

10 Best practices for data modeling
If we perform an Right Keep instead, you will still have two tables. The two tables are associated via the
common field A.
VTab1:
SELECT * from Table1;
VTab2:
right keep SELECT * from Table2;
A B
1 aa
VTab1
A C
1 xx
4 yy
VTab2
10.12 Using mapping as an alternative to joining
The Join prefix in Qlik Sense is a powerful way of combining several data tables in the data
model.
One disadvantage is that the combined tables can become large and create performance problems. An
alternative to Join in situations where you need to look up a single value from another table is to use
mapping instead. This can save you from loading unnecessary data that slows down calculations and
potentially can create calculation errors, as joins can change the number of records in the tables.
A mapping table consists of two columns: a comparison field (input) and a mapping value field (output).
In this example we have a table of orders (Orders), and need to know the countries of the customers, which
are stored in the customer table (Customers).
OrderID OrderDate ShipperID Freight CustomerID
12987 2007-12-01 1 27 3
12988 2007-12-01 1 65 4
12989 2007-12-02 2 32 2
12990 2007-12-03 1 76 3
Orders data table
CustomerID Name Country ...
1 DataSales Spain ...
2 BusinessCorp Italy ...
Customers data table
Manage data - Qlik Sense, February 2024 256

10 Best practices for data modeling
CustomerID Name Country ...
3 TechCo Germany ...
4 Mobecho France ...
In order to look up the country (Country) of a customer, we need a mapping table that looks like this:
CustomerID Country
1 Spain
2 Italy
3 Germany
4 France
Mapping table
The mapping table, which we name MapCustomerIDtoCountry, is defined in the script as follows:
MapCustomerIDtoCountry:
Mapping LOAD CustomerID, Country From Customers ;
The next step is to apply the mapping, by using the ApplyMap function when loading the order table:
Orders:
LOAD *,
ApplyMap('MapCustomerIDtoCountry', CustomerID, null()) as Country
From Orders ;
The third parameter of the ApplyMap function is used to define what to return when avalue is not found in
the mapping table, in this case Null().
The resulting table will look like this:
OrderID OrderDate ShipperID Freight CustomerID Country
12987 2007-12-01 1 27 3 Germany
12988 2007-12-01 1 65 4 France
12989 2007-12-02 2 32 2 Italy
12990 2007-12-03 1 76 3 Germany
Result table
10.13 Working with crosstables in the data load script
A crosstab is a common type of table featuring a matrix of values between two orthogonal lists of header data.
It is usually not the optimal data format if you want to associate the data to other data tables.
This topic describes how you can unpivot a crosstab, that is, transpose parts of it into rows, using the
crosstable prefix to a LOAD statement in the data load script.
Manage data - Qlik Sense, February 2024 257

10 Best practices for data modeling
Unpivoting a crosstab with one qualifying column
A crosstab is often preceded by a number of qualifying columns, which should be read in a straightforward
way. In this case there is one qualifying column, Year, and a matrix of sales data per month.
Year Jan Feb Mar Apr May Jun
2008 45 65 78 12 78 22
2009 11 23 22 22 45 85
2010 65 56 22 79 12 56
2011 45 24 32 78 55 15
2012 45 56 35 78 68 82
Crosstab with one qualifying column
If this table is simply loaded into Qlik Sense, the result will be one field for Year and one field for each of the
months. This is generally not what you would like to have. You would probably prefer to have three fields
generated:
l
The qualifying column, in this case Year, marked with green in the table above.
l
The attribute field, in this case represented by the month names Jan - Jun marked with yellow. This
field can suitably be named Month.
l
The data matrix values, marked with blue. In this case they represent sales data, so this can suitably be
named Sales.
This can be achieved by adding the crosstable prefix to the LOAD or SELECT statement, for example:
crosstable (Month, Sales) LOAD * from ex1.xlsx;
This creates the following table in Qlik Sense:
Year Month Sales
2008 Jan 45
2008 Feb 65
2008 Mar 78
2008 Apr 12
2008 May 78
2008 Jun 22
2009 Jan 11
2009 Feb 23
... ... ...
Table with crosstable prefix added to the LOAD or SELECT statement
Manage data - Qlik Sense, February 2024 258

10 Best practices for data modeling
Unpivoting a crosstab with two qualifying columns
In this case there are two qualifying columns to the left, followed by the matrix columns.
Salesman Year Jan Feb Mar Apr May Jun
A 2008 45 65 78 12 78 22
A 2009 11 23 22 22 45 85
A 2010 65 56 22 79 12 56
A 2011 45 24 32 78 55 15
A 2012 45 56 35 78 68 82
B 2008 57 77 90 24 90 34
B 2009 23 35 34 34 57 97
B 2010 77 68 34 91 24 68
B 2011 57 36 44 90 67 27
B 2012 57 68 47 90 80 94
Crosstab with two qualifying columns
The number of qualifying columns can be stated as a third parameter to the crosstable prefix as follows:
crosstable (Month, Sales, 2) LOAD * from ex2.xlsx;
This creates the following result in Qlik Sense:
Salesman Year Month Sales
A 2008 Jan 45
A 2008 Feb 65
A 2008 Mar 78
A 2008 Apr 12
A 2008 May 78
A 2008 Jun 22
A 2009 Jan 11
A 2009 Feb 23
... ... ... ...
Table with qualifying columns stated as a third parameter to the crosstable prefix
Manage data - Qlik Sense, February 2024 259

10 Best practices for data modeling
10.14 Generic databases
A generic database is a table in which the field names are stored as field values in one column,
while the field values are stored in a second. Generic databases are usually used for attributes of
different objects.
Look at the example GenericTable below. It is a generic database containing two objects, a ball and a box.
Obviously some of the attributes, like color and weight, are common to both the objects, while others, like
diameter, height, length and width are not.
object attribute value
ball color red
ball diameter 10 cm
ball weight 100 g
box color black
box height 16 cm
box length 20 cm
box weight 500 g
box width 10 cm
GenericTable
On one hand it would be awkward to store the data in a way giving each attribute a column of its own, since
many of the attributes are not relevant for a specific object.
On the other hand, it would look messy displaying it in a way that mixes lengths, colors and weights.
If this database is loaded into Qlik Sense using the standard way and the data is displayed in a table, it looks
like this:
Manage data - Qlik Sense, February 2024 260

10 Best practices for data modeling
However, if the table is loaded as a generic database, column two and three will be split up into different
tables, one for each unique value of the second column:
The syntax for doing this is simple, as shown in the following example.
Example
Load script
Add the example script to your app and run it. To see the result, add the fields listed in the results column to a
sheet in your app.
Sheet1:
Generic Load * inline [
object, attribute, value
ball, color, red
ball, diameter, 10 cm
ball, weight, 100 g
box, color, black
box, height, 16 cm
box, length, 20 cm
box, weight, 500 g
box, width, 10 cm ];
Manage data - Qlik Sense, February 2024 261

10 Best practices for data modeling
Result
object color diameter length height width weight
ball red 10 cm - - - 100 g
box black - 20 cm 16 cm 10 cm 500 g
Resulting table
10.15 Matching intervals to discrete data
The intervalmatch prefix to a LOAD or SELECT statement is used to link discrete numeric
values to one or more numeric intervals. This is a very powerful feature which can be used, for
example, in production environments.
Intervalmatch example
Look at the two tables below. The first table shows the start and end of production of different orders. The
second table shows some discrete events. How can we associate the discrete events with the orders, so that
we know, for example, which orders were affected by the disturbances and which orders were processed by
which shifts?
Start End Order
01:00 03:35 A
02:30 07:58 B
03:04 10:27 C
07:23 11:43 D
Table OrderLog
Time Event Comment
00:00 0 Start of shift 1
01:18 1 Line stop
02:23 2 Line restart 50%
04:15 3 Line speed 100%
08:00 4 Start of shift 2
11:43 5 End of production
Table EventLog
First, load the two tables as usual and then link the field Time to the intervals defined by the fields Start and
End:
SELECT * from OrderLog;
SELECT * from EventLog;
Manage data - Qlik Sense, February 2024 262

10 Best practices for data modeling
Intervalmatch (Time) SELECT Start,End from OrderLog;
You can now create a table in Qlik Sense as below:
Time Event Comment Order Start End
0:00 0 Start of shift 1 - - -
1:18 1 Line stop A 1:00 3:35
2:23 2 Line restart 50% A 1:00 3:35
4:15 3 Line speed 100% B 2:30 7:58
4:15 3 Line speed 100% C 3:04 10:....
8:00 4 Start of shift 2 C 3:04 10:....
8:00 4 Start of shift 2 D 7:23 11:....
11:43 5 End of production E 7:23 11:.....
Table with Time field linked to the intervals defined by the Start and End
We can now easily see that mainly order A was affected by the line stop but that the reduced line speed
affected also orders B and C. Only the orders C and D were partly handled by Shift 2.
Note the following points when using intervalmatch:
l
Before the intervalmatch statement, the field containing the discrete data points (Time in the example
above) must already have been read into Qlik Sense. The intervalmatch statement does not read this
field from the database table.
l
The table read in the intervalmatch LOAD or SELECT statement must always contain exactly two
fields (Start and End in the example above). In order to establish a link to other fields you must read
the interval fields together with additional fields in a separate LOAD or SELECT statement (the first
SELECT statement in the example above).
l
The intervals are always closed. That is, the end points are included in the interval. Non-numeric limits
render the interval to be disregarded (undefined) while NULL limits extend the interval indefinitely
(unlimited).
l
The intervals may be overlapping and the discrete values will be linked to all matching intervals.
Using the extended intervalmatch syntax to resolve slowly changing
dimension problems
The extended intervalmatch syntax can be used for handling of the well-known problem of slowly changing
dimensions in source data.
Sample script:
SET NullInterpret='';
IntervalTable:
LOAD Key, ValidFrom, Team
FROM 'lib://dataqv/intervalmatch.xlsx' (ooxml, embedded labels, table is IntervalTable);
Key:
Manage data - Qlik Sense, February 2024 263

10 Best practices for data modeling
LOAD
Key,
ValidFrom as FirstDate,
date(if(Key=previous(Key),
previous(ValidFrom) - 1)) as LastDate,
Team
RESIDENT IntervalTable order by Key, ValidFrom desc;
drop table IntervalTable;
Transact:
LOAD Key, Name, Date, Sales
FROM 'lib://dataqv/intervalmatch.xlsx' (ooxml, embedded labels, table is Transact);
INNER JOIN intervalmatch (Date,Key) LOAD FirstDate, LastDate, Key RESIDENT Key;
The nullinterpret statement is only required when reading data from a table file since missing values are
defined as empty strings instead of NULL values.
Loading the data from IntervalTable would result in the following table:
Key FirstDate Team
000110 2011-01-21 Southwest
000110 - Northwest
000120 - Northwest
000120 2013-03-05 Southwest
000120 2013-03-05 Northwest
000120 2013-03-05 Southwest
Table with data loaded from IntervalTable
The nullasvalue statement allows NULL values to map to the listed fields.
Create Key, FirstDate, LastDate, (attribute fields) by using previous and order by and thereafter the
IntervalTable is dropped having been replaced by this key table.
Loading the data from Transact would result in the following table:
Key Name Date Sales
000110 Spengler Aaron 2009-08-18 100
000110 Spengler Aaron 2009-12-25 200
000110 Spengler Aaron 2011-02-03 300
000110 Spengler Aaron 2011-05-05 400
000120 Ballard John 2011-06-04 500
000120 Ballard John 2013-01-20 600
Table with data loaded from Transact
Manage data - Qlik Sense, February 2024 264

10 Best practices for data modeling
Key Name Date Sales
000120 Ballard John 2013-03-10 700
000120 Ballard John 2013-03-13 800
000120 Ballard John 2013-09-21 900
The intervalmatch statement preceded by the inner join replaces the key above with a synthetic key that
connects to the Transact table resulting in the following table:
Key Team Name FirstDate LastDate Date Sales
000110 Northwest Spengler Aaron - 2011-01-20 2009-08-18 100
000110 Northwest Spengler Aaron - 2011-01-20 2009-12-25 200
000110 Southwest Spengler Aaron 2011-01-21 2011-02-03 300
000110 Southwest Spengler Aaron 2011-01-21 2011-05-05 400
000120 Northwest Ballard John 2013-01-05 2011-06-04 500
000120 Southwest Ballard John 2013-01-06 2013-03-04 2013-01-20 600
000120 Southwest Ballard John 2013-03-05 2013-03-10 700
000120 Southwest Ballard John 2013-03-05 2013-03-13 800
000120 Southwest Ballard John 2013-03-05 2013-09-21 900
Table with the intervalmatch statement preceded by the inner join
10.16 Creating a date interval from a single date
Sometimes time intervals are not stored explicitly with a beginning and an end. Instead they are implied by
only one field – the change timestamp.
It could be as in the table below where you have currency rates for multiple currencies. Each currency rate
change is on its own row; each with a new conversion rate. Also, the table contains rows with empty dates
corresponding to the initial conversion rate, before the first change was made.
Currency Change Date Rate
EUR - 8.59
EUR 28/01/2013 8.69
EUR 15/02/2013 8.45
USD - 6.50
USD 10/01/2013 6.56
USD 03/02/2013 6.30
Currency rates
Manage data - Qlik Sense, February 2024 265

10 Best practices for data modeling
The table above defines a set of non-overlapping intervals, where the begin data is called Change Date and the
end date is defined by the beginning of the following interval. But since the end date isn’t explicitly stored in a
column of its own, we need to create such a column, so that the new table will become a list of intervals.
Do the following:
1. Create a new app and give it a name.
2. Add a new script section in the Data load editor.
3. Add the following inline table. Make sure that the dates in the Change Date column are in the same
format as the local date format.
In_Rates:
LOAD * Inline [
Currency,Change Date,Rate
EUR,,8.59
EUR,28/01/2013,8.69
EUR,15/02/2013,8.45
USD,,6.50
USD,10/01/2013,6.56
USD,03/02/2013,6.30
];
4. Determine which time range you want to work with. The beginning of the range must be before the
first date in the data and the end of the range must be after the last.
Add the following to the top of your script:
Let vBeginTime = Num('1/1/2013');
Let vEndTime = Num('1/3/2013');
Let vEpsilon = Pow(2,-27);
5. Load the source data, but change empty dates to the beginning of the range defined in the previous
bullet. The change date should be loaded as "From Date".
Sort the table first according to Currency, then according to the "From Date" descending so that you
have the latest dates on top.
Add the following after the In_Rates table:
Tmp_Rates:
LOAD Currency, Rate,
Date(If(IsNum([Change Date]), [Change Date], $(#vBeginTime))) as FromDate
Resident In_Rates;
6. Run a second pass through data where you calculate the "To Date". If the current record has a different
currency from the previous record, then it is the first record of a new currency (but its last interval), so
you should use the end of the range defined in step 1. If it is the same Currency, you should take the
"From Date" from the previous record, subtract a small amount of time, and use this value as "To
Date" in the current record.
Add the following after the Tmp_Rates table:
Rates:
LOAD Currency, Rate, FromDate,
Date(If( Currency=Peek('Currency'),
Peek('FromDate') - $(#vEpsilon),
$(#vEndTime)
)) as ToDate
Resident Tmp_Rates
Order By Currency, FromDate Desc;
Manage data - Qlik Sense, February 2024 266

10 Best practices for data modeling
Drop Table Tmp_Rates;
Your script should look like this:
Let vBeginTime = Num('1/1/2013');
Let vEndTime = Num('1/3/2013');
Let vEpsilon = Pow(2,-27);
In_Rates:
LOAD * Inline [
Currency,Change Date,Rate
EUR,,8.59
EUR,28/01/2013,8.69
EUR,15/02/2013,8.45
USD,,6.50
USD,10/01/2013,6.56
USD,03/02/2013,6.30
];
Tmp_Rates:
LOAD Currency, Rate,
Date(If(IsNum([Change Date]), [Change Date], $(#vBeginTime))) as FromDate
Resident In_Rates;
Rates:
LOAD Currency, Rate, FromDate,
Date(If( Currency=Peek('Currency'),
Peek('FromDate') - $(#vEpsilon),
$(#vEndTime)
)) as ToDate
Resident Tmp_Rates
Order By Currency, FromDate Desc;
Drop Table Tmp_Rates;
The script will update the source table in the following manner:
Currency Rate FromDate ToDate
EUR 8.45 15/02/2013 vEndTime
EUR 8.69 28/01/2013 14/02/2013 23:59:59
EUR 8.59 vBeginTime 28/01/2013 23:59:99
USD 6.30 03/02/2013 vEndTime
USD 6.56 10/01/2013 2/02/2013 23:59:59
USD 6.50 vBeginTime 9/01/2013 23:59:59
Updated source table
In your app, the table appears as follows:
Manage data - Qlik Sense, February 2024 267

10 Best practices for data modeling
Currency Rate FromDate ToDate
EUR 8.45 15/02/2013 01/03/2013
EUR 8.69 28/01/2013 14/02/2013
EUR 8.59 01/01/2013 28/01/2013
USD 6.30 03/02/2013 01/03/2013
USD 6.56 10/01/2013 2/02/2013
USD 6.50 01/01/2013 9/01/2013
Preview of data
This table can subsequently be used in a comparison with an existing date using the Intervalmatch method.
10.17 Loading hierarchy data
Unbalanced n-level hierarchies are often used to represent geographical or organizational
dimensions in data, among other things.
These types of hierarchies are usually stored in an adjacent nodes table, which is in a table where each record
corresponds to a node and has a field that contains a reference to the parent node.
NodeID ParentNodeID Title
1 - General manager
2 1 Region manager
3 2 Branch manager
4 3 Department manager
Nodes table
In such a table, the node is stored on one record only but can still have any number of children. The table may
of course contain additional fields describing attributes for the nodes.
An adjacent nodes table is optimal for maintenance, but difficult to use in everyday work. Instead, in queries
and analysis, other representations are used. The expanded nodes table is one common representation,
where each level in the hierarchy is stored in a separate field. The levels in an expanded nodes table can easily
be used e.g. in a tree structure.The hierarchy keyword can be used in the data load script to transform an
adjacent nodes table to an expanded nodes table.
Example:
Hierarchy (NodeID, ParentNodeID, Title, 'Manager') LOAD
NodeID,
ParentNodeID,
Title
FROM 'lib://data/hierarchy.txt' (txt, codepage is 1252, embedded labels, delimiter is ',',
msq);
Manage data - Qlik Sense, February 2024 268

10 Best practices for data modeling
NodeID ParentNodeID Title Title1 Title2 Title4 Title4
1 - General
manager
General
manager
- - -
2 1 Region
manager
General
manager
Region
manager
- -
3 2 Branch
manager
General
manager
Region
manager
Branch
manager
-
4 3 Department
manager
General
manager
Region
manager
Branch
manager
Department
manager
Expanded nodes table
A problem with the expanded nodes table is that it is not easy to use the level fields for searches or selections,
since prior knowledge about which level to search or select in is needed. An ancestors table is a different
representation that solves this problem. This representation is also called a bridge table.
An ancestors table contains one record for every child-ancestor relation found in the data. It contains keys and
names for the children as well as for the ancestors. That is, every record describes which node a specific node
belongs to. The hierarchybelongsto keyword can be used in the data load script to transform an adjacent
nodes table to an ancestors table.
10.18 Loading your own map data
To be able to create a map visualization, you need access to geographical data that connects to
the data in your app
Qlik Sense can use:
l
Name data in fields to place locations in map layers.
l
Fields containing geopoints (latitude and longitude) in WGS-84.
l
Fields containing geopoints, polygons, or lines from a geographic data source such as a KML file.
l
Fields containing geodata in GeoJSON, LineString, or MultiLineString formats.
l
Fields containing non-WGS-84 coordinates (when using a custom map as the base map).
When loading map data in Data manager with data profiling enabled, the data profiling service will identify
country names, city names, and latitude and longitude fields and load the corresponding geometries into new
fields. In Data load editor, you can optionally combine coordinate fields into a single field for convenience.
Supported name data for fields in a map visualization
The map visualization can use name data in fields to place locations in map layers. The following location
types can be used:
l
Continent names
l
Country names
l
ISO alpha 2 country codes
Manage data - Qlik Sense, February 2024 269

10 Best practices for data modeling
l
ISO alpha 3 country codes
l
First-level administrative area names. such as a state or province names
l
Second-level administrative area names
l
Third order administrative area names
l
Fourth order administrative area names
l
City, village, or other populated place names
l
Postal codes or ZIP Codes
l
IATA airport codes
l
ICAO airport codes
Availability of locations may vary by country. If the named location is not available, use coordinate
or area data for the location.
Qlik Sense uses map and location data obtained from recognized field leaders who use accepted
methodologies and best practices in marking borders and naming countries within their mappings.
Qlik Sense provides flexibility to enable users to integrate their own, separate background maps. If
the standard maps do not fit, Qlik Sense offers the option to load customer provided background
maps, borders, and areas.
Loading point and area data from a KML file
You can add data from a KML file into your map in Data manager and Data load editor. By default, all fields
are selected in the data selection dialog, even if they do not contain any data. A KML file could contain, for
example, area data but no point data. When adding data from a KMLfile that contains an empty point or area
field to Qlik Sense, you can exclude the empty field without running the risk of creating map dimensions
without any data.
When adding a field from a KML field to a map layer, if the name field contains meaningful name data, it
should be added as the dimension of the layer. The area or point field should then be added as the Location
field. There will be no difference in how the data is visualized in the layer and the text in the name field will be
shown as a tooltip.
If the KML file does not contain point data, line data, or area data, you cannot load data from that
file. If the KML file is corrupt, an error message is displayed, and you will not be able to load the
data.
Loading map data with data profiling
When you load geographical data using Add data in Data manager with data profiling enabled, Qlik Sense
will try to recognize if your data contains:
l
Country and city names from your data
l
Geopoint data (latitude, longitude) for a single location, such as a city
l
Area data (polygons of geopoints) to represent regions or countries
Manage data - Qlik Sense, February 2024 270

10 Best practices for data modeling
If successful, a new field containing geographical information is created automatically.
When using Add data, data profiling must be enabled. This is the default selection. If you disable
data profiling, the geographical data is not detected and the new field containing geographical
information is not created.
If cities are recognized during data preparation, the new field contains geopoints, and if countries are
recognized the new field contains area polygon data. This field is named <data field>_GeoInfo. For example,
if your data contains a field named Office containing city names, a field with geopoints named Office_
GeoInfo is created.
Qlik Sense analyzes a subset of your data to recognize fields containing cities or countries. If the
matching is less than 75 percent, a field with geographical information will not be created. If a field
is not recognized as geographical data, you can manually change the field type to geographical
data.
For more information, see Changing field types (page 54).
Fields with geographical information do not display the geopoint or polygon data in the Associations preview
panel or in the Tables view. Instead, the data is indicated generically as [GEO DATA]. This improves the speed
with which the Associations and Tables views are displayed. The data is available, however, when you create
visualizations in the Sheet view.
Loading and formatting point data
You can create a map by using point data (coordinates). Two formats are supported:
l
The point data is stored in two fields, one for latitude and one for longitude. You can add the fields to a
point layer in the Latitude and Longitude fields in the point layer. Optionally, you can combine them
into a single field. To combine them into a single field:
l
If you used Add data with data profiled enabled to load the table, the latitude and longitude
fields are recognized, and a geopoint field is created automatically.
l
If you loaded the data using the data load script you can create a single field with point data in
[x, y] format, using the function GeoMakePoint().
For more information, see Example:Loading point data from separate latitude and longitude
columns with the data load script (page 272).
l
The point data is stored in one field. Each point is specified as an array of x and y coordinates: [x, y].
With geospatial coordinates, this would correspond to [longitude, latitude].
When using this format and loading the data in Data load editor, it is recommended that you to tag
the point data field with $geopoint;.
For more information: Example: Loading point data from a single column with the data load script (page
272).
In the following examples we assume that the files contain the same data about the location of a company's
offices, but in two different formats.
Manage data - Qlik Sense, February 2024 271

10 Best practices for data modeling
Example:Loading point data from separate latitude and longitude columns with the data load
script
The Excel file has the following content for each office:
l
Office
l
Latitude
l
Longitude
l
Number of employees
The load script could look as follows:
LOAD
Office,
Latitude,
Longitude,
Employees
FROM 'lib://Maps/Offices.xls'
(biff, embedded labels, table is (Sheet1$));
Combine the data in the fields Latitude and Longitude to define a new field for the points.
Run the script and create a map visualization. Add the point dimension to your map.
You can choose to create the dimension Location in the script by adding the following string above the
LOADcommand:
LOAD *, GeoMakePoint(Latitude, Longitude) as Location;
The function GeoMakePoint() joins the longitude and latitude data together.
It is recommended that you tag the field Office with $geoname so that it is recognized as the name of a
geopoint. Add the following lines after the last string in the LOAD command:
TAG FIELDS Office WITH $geoname;
The complete script then is as follows:
LOAD *, GeoMakePoint(Latitude, Longitude) as Location;
LOAD
Office,
Latitude,
Longitude,
Employees
FROM 'lib://Maps/Offices.xls'
(biff, embedded labels, table is (Sheet1$));
TAG FIELDS Office WITH $geoname;
Run the script and create a map visualization. Add the point dimension to your map.
Example: Loading point data from a single column with the data load script
The Excel file has the following content for each office:
Manage data - Qlik Sense, February 2024 272

10 Best practices for data modeling
l
Office
l
Location
l
Number of employees
The load script could look as follows:
LOAD
Office,
Location,
Employees
FROM 'lib://Maps/Offices.xls'
(biff, embedded labels, table is (Sheet1$));
The field Location contains the point data and it is recommended to tag the field with $geopoint so that it is
recognized as a point data field. It is recommended that you tag the field Office with $geoname so that it is
recognized as the name of a geopoint. Add the following lines after the last string in the LOAD command:
TAG FIELDS Location WITH $geopoint;
TAG FIELDS Office WITH $geoname;
The complete script then looks as follows:
LOAD
Office,
Location,
Employees
FROM 'lib://Maps/Offices.xls'
(biff, embedded labels, table is (Sheet1$));
TAG FIELDS Location WITH $geopoint;
TAG FIELDS Office WITH $geoname;
Run the script and create a map visualization. Add the point dimension to your map.
10.19 Data cleansing
When loading data from different tables, note that field values denoting the same thing are not
always consistently named. Since this lack of consistency is not only annoying, but also hinders
associations, the problem needs to be solved. This can be done in an elegant way by creating a
mapping table for the comparison of field values.
Mapping tables
Tables loaded via mapping load or mapping select are treated differently from other tables. They will be
stored in a separate area of the memory and used only as mapping tables during script execution. After the
script execution they will be automatically dropped.
Manage data - Qlik Sense, February 2024 273

10 Best practices for data modeling
Rules:
l
A mapping table must have two columns, the first one containing the comparison values and the
second the desired mapping values.
l
The two columns must be named, but the names have no relevance in themselves. The column names
have no connection to field names in regular internal tables.
Using a mapping table
When loading several tables listing countries, you may find that one and the same country has several
different names. In this example, the U.S.A. are listed as US, U.S., and United States.
To avoid the occurrence of three different records denoting the United States in the concatenated table,
create a table similar to that shown and load it as a mapping table.
The entire script should have the following appearance:
CountryMap:
Mapping LOAD x,y from MappingTable.txt
(ansi, txt, delimiter is ',', embedded
labels);
Map Country using CountryMap;
LOAD Country,City from CountryA.txt
(ansi, txt, delimiter is ',', embedded labels);
LOAD Country, City from CountryB.txt
(ansi, txt, delimiter is ',', embedded labels);
The mapping statement loads the file MappingTable.txt as a mapping table with the label CountryMap.
The map statement enables mapping of the field Country using the previously loaded mapping table
CountryMap.
The LOAD statements load the tables CountryA and CountryB. These tables, which will be concatenated due to
the factthat they have the same set of fields, include the field Country, whose field values will be compared
with those of the first column of the mapping table. The field values US, U.S., and United States will be found
and replaced by the values of the second column of the mapping table, i.e. USA.
The automatic mapping is done last in the chain of events that leads up to the field being stored in the Qlik
Sense table. For a typical LOAD or SELECT statement the order of events is roughly as follows:
1. Evaluation of expressions
2. Renaming of fields by as
3. Renaming of fields by alias
4. Qualification of table name, if applicable
5. Mapping of data if field name matches
This means that the mapping is not done every time a field name is encountered as part of an expression but
rather when the value is stored under the field name in the Qlik Sense table.
To disable mapping, use the unmap statement.
For mapping on expression level, use the applymap function.
Manage data - Qlik Sense, February 2024 274

10 Best practices for data modeling
For mapping on substring level, use the mapsubstring function.
Manage data - Qlik Sense, February 2024 275

11 Customizing logical models for Insight Advisor
11 Customizing logical models for Insight Advisor
Business logic enables you to customize how Insight Advisor interprets your app data when
generating analysis from queries.
Business logic defines how Insight Advisor interprets your data and handles alternative terms for values in
your data model with:
l
Insight Advisor Search
l
Insight Advisor Analysis Types
l
Insight Advisor Chat
l
Associative insights
Insight Advisor relies on the Qlik cognitive engine and learned precedents to understand the relationships and
uses of fields in your data model. You can optionally customize the logical model used by Insight Advisor for
an app. You can add vocabulary to your business logic that helps Insight Advisor handle alternate terminology
users might use when querying Insight Advisor.
You can customize the following areas of business logic in Qlik Sense:
l
Logical model: Customize the fields and groups used in the model, create packages, define field
hierarchies, and set behavior.
Building logical models for Insight Advisor with Business logic (page 276)
l
Vocabulary:Add terms and associate them to fields and values in your data to enable users to use
alternative terminology when using natural language questions with Insight Advisor.
Creating vocabularies for Insight Advisor (page 296)
Business logic options are available in the Prepare tab.
As of August 2022, Insight Advisor, including business logic, is no longer supported with Qlik Sense Desktop. In
November 2022, Insight Advisor will be upgraded to a new experience. This will only be available on Qlik
Sense Enterprise on Windows. Users who want to continue using Insight Advisor and business logic on Qlik
Sense Desktop should not upgrade to August 2022.
11.1 Building logical models for Insight Advisor with Business
logic
Insight Advisor uses a logical model based on learned precedents to generate analyses based on
your queries. You can define your own logical model for your apps with Business logic.
Manage data - Qlik Sense, February 2024 276

11 Customizing logical models for Insight Advisor
Insight Advisor relies on the Qlik cognitive engine and learned precedents to understand the relationships and
uses of fields in your data model. Optionally, you can customize the logical model to improve Insight Advisor
results. You can customize your logical model in Logical model under Business logic in the Prepare tab.
When business logic is enabled in an app, precedent-based learning is disabled for the app.
Understanding logical models
The logical model of an app is the conceptual model Insight Advisor uses when generating visualizations. It is
built from the underlying data model of an app. Each app has a single logical model. Fields and master items
are the core components of the logical model. They are organized into groups. Groups indicate a conceptual
association or relationship between fields or master items. The logical model also contains information about
possible relationships between groups.
The logical model directly influences how Insight Advisor functions. For example, when a user selects a field to
show a trend analysis, Insight Advisor tries to find a date field that is part of a primary calendar group. If the
field was Sales, Insight Advisor would prioritize a field like Order Date over the field Employee Birth Date.
Business logic also affects how the system chooses between fields in natural language questions. For example,
the fields Product Name and Product Code are grouped as a single group. If 'what are sales by product' is used
as a natural language question, Product Name would be used for 'product' as it is a better choice for that
group.
The default logical model used for business logic is a star schema. Business logic enables you to construct
different modeling for your app if a star schema is not optimal. Business logic can also help constrain
aggregation in logical models containing semi-additive measures or very large measure tables. This improves
the exploration of app data in Insight Advisor.
Manage data - Qlik Sense, February 2024 277

11 Customizing logical models for Insight Advisor
Customizing logical models
Logical model is divided into the following sections for customizing the logical model of an app:
l
Overview: Overview provides a summary of your business logic. Clicking the cards for Fields &
groups, Packages, Hierarchies, or Behaviors opens the corresponding section.
l
Fields &groups:Fields &groups enables you to define the groups to which your fields and master
items belong in the logical model.
l
Packages:Packages enables you to create collections of related groups. This prevents groups from
being used together that are not in the same package.
l
Hierarchies: Hierarchies enables you to define drill-down relationships between groups.
l
Behaviors: Behaviors enables you to specify prefer or deny relationships between fields. Behaviors
can also enforce required selections.
l
Calendar periods: Calendar periods enables you to create default periods of analysis for Insight
Advisor.
To customize a logical model, do the following:
1. Enable the customization of the business logic of your app.
2. Define your fields and groups.
Defining fields and groups (page 279)
3. Optionally, add your groups to packages.
Setting logical model scope with packages (page 284)
4. Optionally, define hierarchies between groups
Creating drill-down analysis with hierarchies (page 285)
5. Optionally, apply behaviors.
Applying behaviors to logical models (page 286)
6. Optionally, create calendar periods.
Defining analysis periods with calendar periods (page 289)
You can reset your logical model to the default. You can also disable business logic temporarily.
Enabling custom business logic
Do the following:
1. In an app, click Prepare and select Logical model.
2. Click Continue.
Custom business logic is now enabled for your app. Precedent-based learning is now disabled.
Manage data - Qlik Sense, February 2024 278

11 Customizing logical models for Insight Advisor
When you activate a custom logical model, recommendations for field visibility and data value
search are automatically applied. This means that certain fields in your data model might not be
visible or searchable in Insight Advisor. You can reconfigure the logical model to revert these
recommendations, or apply other customizations. See Visibility (page 281) and Data value lookup
(page 283).
Resetting business logic
You can reset your logical model to the default model. Resetting disables custom business logic and enables
precedent-based learning in Insight Advisor.
Do the following:
1. In Logical model, click Reset to default.
2. Click Confirm.
Disabling business logic
You can disable custom logical models. Unlike resetting business logic, you can enable your custom business
logic again later. While your business logic is disabled, it will use the default business logic for your app.
Do the following:
1. In Logical model, click Disable logic.
2. Click Confirm.
Defining fields and groups
Field and groups are the primary component of logical models in business logic. By defining the
groups to which your fields and master items belong, you can define how Insight Advisor should
use them.
Manage data - Qlik Sense, February 2024 279

11 Customizing logical models for Insight Advisor
You define how business logic should handle fields and groups in the Fields &groups section of Logical
model. Fields and master items can be grouped together to indicate a relationship in Insight Advisor analysis.
For each item in a group, you can define how Insight Advisor should treat it in analysis.
Groups enable you to organize fields and master items into related conceptual groupings. For example, you
can group all the fields related to customers in a single group, regardless of which tables in the data model
from which they are loaded. Insight Advisor uses this information to determine which fields to show together
in visualizations. Groups can also be used to create packages, which limits scope for Insight Advisor to only
use related groups together. There are three kinds of groups:
l
Dimension: A dimension group commonly consists of fields that are classified as dimensions.
Dimension groups can also contain fields classified as measures or dates.
l
Measure: A measure group consists of related measure fields. Only measures can belong to a measure
group.
l
Calendar: A calendar group contains a time dimension in your logical model. Calendar groups can only
contain dimensions and are expected to have at least one temporal fields (such as date, timestamp, or
year). Calendar groups are useful if you have separate fields defining your calendar, such as year,
month, and day. If you can also group other data-related fields, such as fiscal quarter or fiscal year.
By default, fields and master items are ordered by group. If you disable this, an additional column, In group,
is added to the table.
In addition to defining groups, you can also define the properties of individual fields and master items
belonging to your groups.
Creating groups
Once you create a group, the group type cannot be changed. You can rename the group and add or remove
fields from the group. Groups can also be deleted. Deleting a group ungroups all items in the group.
Manage data - Qlik Sense, February 2024 280

11 Customizing logical models for Insight Advisor
To edit an existing group, click in the group row or after the group name in the In group column.
Do the following:
1. Click Create group.
2. Enter a group name.
3. Select a group type.
4. Add fields to the group from Available fields.
5. Click Create.
Defining fields and master items
Fields & groups consists of a table containing fields and master items from your app, along with the groups
to which they belong. You can edit the properties of your fields and master items by adjusting the column
value in that item's row. For additional options, you can click in the row. You can:
l
Move item: Move the item to a different group.
l
Create behavior:Create a behavior for the group to which the current item belongs.
l
Ungroup:Remove the item from its current group. Ungrouped items are excluded from Insight Advisor.
You can also select multiple rows using the row checkboxes to make the same changes to multiple items.
When selected in this way, properties settings and options are available above the table.
Field and master item properties
The table is divided into the following columns:
l
Name
l
Group
l
Visibility
l
Classification
l
Data value lookup
l
Default aggregation
l
Favorable trend
l
Favorite
l
Overall aggregation
l
Default period grain
Name lists the field names. Group lists the group name to which the field belongs. The following section
outlines the different values and settings of the other fields. You can set which columns display in the table by
clicking .
Visibility
Visibility controls if an item is available in Insight Advisor. There are two possible values:
Manage data - Qlik Sense, February 2024 281

11 Customizing logical models for Insight Advisor
l
Visible: The item is available for use in Insight Advisor.
l
Hidden: The item is not available for use in Insight Advisor. Hidden fields should not be enabled for
data value lookup.
You can hide all hidden items in Field & groups by selecting Show visible only.
Classification
Classification defines the default role that attribute can play in an analysis. The following types can be used to
classify fields and groups:
l
dimension: Afield that is only to be used as a dimension
l
measure: A field that is to only be used as a measure.
l
boolean: A binary dimension.
l
date: Atemporal dimension containing dates.
l
timestamp : Atemporal field containing timestamps.
l
year: Atemporal dimension containing year data.
l
week: A temporal dimension containing week data.
l
quarter:A temporal dimension containing quarter data.
l
month: A temporal dimension containing month data.
l
weekDay: A temporal dimension containing data for the day of the week, either short form (Mon.,
Tues.), long form (Monday, Tuesday), or a number between 1-7.
l
monthDay: Atemporal dimension containing a number between 1-31 indicating the day of the month.
l
yearDay: Atemporal dimension containing a number for the day of the year (between 1-366).
l
hour: Atemporal dimension containing hour data.
l
email:A dimension containing email addresses.
l
address: A dimension containing addresses.
l
country: Adimension containing country names.
l
stateProvince: Adimension representing first-level administrative areas, such as states and provinces.
l
city: A dimension representing cities.
l
geoPoint: A dimension containing geographic point data.
l
geoPolygon: Adimension containing geographic polygon data
l
geographical: A dimension representing a geographic location, such as country or region.
l
postalCode: A dimension containing postal codes.
l
longitude:A dimension containing longitude data.
l
latitude: A dimension containing latitude data.
l
percentage: A measure field representing percentage values such as employment rate or inflation.
l
monetary: A monetary measure such as revenue, cost, or salary.
l
ordinal: A dimension whose values have inherent order.
l
temporal: A time-related dimension.
You may have fields that might be considered a dimension in one question and a measure in another
question. As a best practice, it is recommended to create a second field or master item for the alternate use
case of the field.
Manage data - Qlik Sense, February 2024 282

11 Customizing logical models for Insight Advisor
You may have fields that might be considered a dimension in one query and a measure in another query. As a
best practice, it is recommended to create a second field or master item for the alternate use case of the field.
Data value lookup
Data value lookup controls whether or not Insight Advisor can look up values from fields when a user asks a
natural language question.
Reducing the number of fields that have data value lookup enabled can help you avoid false positive results
and to reduce the time to generate results. For example, you may have three fields containing names in your
data model:First Name, Last Name, and Full Name. If Data value lookup was enabled for all three fields, users
might get confusing results from all three fields if they search for `Drew`.
Data value lookup should be disabled for measures and hidden fields.
Default aggregation
Default aggregation sets the standard aggregation for measures in Insight Advisor. The following aggregations
can be used:
l
sum
l
avg
l
min
l
max
l
count
l
countDistinct
When field has a default aggregation, Insight Advisor always applies that aggregation when using it as a
measure.Users can edit charts to change the aggregation to a different type in Insight Advisor.
Default aggregations cannot be assigned to master items.
Favorable trend
Favorable trend sets whether the desired trend for a measure is to increase or decrease. By default, the
favorable trend for measures is to increase. The following trends can be used:
l
Up
l
Down
The favored trend is used in visualizations created by Insight Advisor to ranking results.
Favorite
Favorite marks a measure as being of particular interest for Insight Advisor. Insight Advisor will use this
measure more often when generating visualizations without user queries or selections, such as with Generate.
Overall aggregation
Overall aggregation indicates to Insight Advisor what aggregation should be used when Insight Advisor cannot
determine for itself what aggregation to use in natural language insights for results involving master
measures. As some master measures use complex expressions, Insight Advisor may not know the aggregation
Manage data - Qlik Sense, February 2024 283

11 Customizing logical models for Insight Advisor
to use when calculating the contribution of the master measure in the narratives. Setting an overall
aggregation allows Insight Advisor to calculate narratives for these complex master measures.
You can only set overall aggregation for master measures.
Default period grain
You can set the default period grain, such as month or year, to be used with a date field in a calendar group
when generating analyses in Insight Advisor. The grains are either derived from the autocalendar or you can
pick a field containing a grain from the same calendar group.
You can use the default calendar setting with the default calendar period behavior. Default calendar
properties set for fields and master items are overruled by default calendar period behaviors set for groups.
Setting logical model scope with packages
Packages enable you to define and limit the scope of insights for specific areas of interest in
your logical model.
A package is a collection of related groups. Insight Advisor only uses groups in the same package together
when generating results. Groups can belong to multiple packages. Logical model packages are created and
managed in Packages.
For example, your data model may contain tables from separate business areas. If there are connections
between the tables, a date field from Sales might be used in an Insight Advisor analysis with a date field from
Support. By putting Sales groups and Support groups into separate packages, you could ensure that analysis
for those business areas only use fields in the associated package.
The use of packages is optional. If you define no packages, then all fields and groups are considered to be in
the same package for analysis.
You can edit or delete packages by clicking and selecting Edit or Delete.
Manage data - Qlik Sense, February 2024 284

11 Customizing logical models for Insight Advisor
Creating packages
Do the following:
1. Click Create package.
2. Enter a package name.
3. Add groups to the package from Available groups
Packages must include at least one measure group.
4. Click Create.
Creating drill-down analysis with hierarchies
Defining which groups in your logical model have a hierarchical relationship enables Insight
Advisor to offer breakdown analysis along specified hierarchies and better detect dependencies
among groups.
Hierarchies enable drill-down breakdowns in recommendations (such as Sales by Product category, Product
sub-category, and Product). Hierarchies also help Insight Advisor avoid mixing geographic items in
recommendations. For example, creating hierarchies for Supplier County withSupplier City and for Customer
Country and Customer City prevents them from being used in erroneous combinations such as SupplierCountry
and Customer City.
Hierarchies are also used in associative insights to detect dependencies when making selections. For example,
selecting Sweden in an Insight Advisor analysis and then having only Swedish city values be selected in
another chart that uses the City field.
Manage data - Qlik Sense, February 2024 285

11 Customizing logical models for Insight Advisor
There two kinds of logical model hierarchies: learned and defined. Learned hierarchies are detected from how
fields are linked and used in the data model. For example, the logical model may see the hierarchical link
between a city field and a country field and treat them as having a hierarchy. Defined hierarchies are user-
created. Defined hierarchies are created and managed in Hierarchies. Hierarchies are optional for business
logic.
You can edit or delete defined hierarchies by clicking and selecting Edit or Delete.
You cannot view or modify learned hierarchies in Hierarchies.
Creating hierarchies
Do the following:
1. Click Create hierarchy
2. Enter a hierarchy name.
3. Add groups to the hierarchy in order from lowest level in the hierarchy to the highest level of the
hierarchy.
4. Click Create.
Applying behaviors to logical models
Behaviors enable you to set prefer or deny relationships between measure groups and other
groups. You can also use behaviors to enforce value selection in Insight Advisor.
Manage data - Qlik Sense, February 2024 286

11 Customizing logical models for Insight Advisor
You may have groups that either should be always used together in analysis or never used together in
analysis. You also maybe have field values that you would prefer always been included as selected when fields
from a group are being used by Insight Advisor. Behaviors enable you to set these preferences on a group by
group basis. Logical model behaviors are created and managed in Behaviors.
The following behaviors are available in logical models:
l
Required selections
l
Prefer relationship
l
Deny relationship
l
Default calendar period
You can edit or delete behaviors by clicking and selecting Edit or Delete.
Required selections
Required selection behavior enables you to specify field values that must be included when using fields from a
group. A behavior can include multiple required selections.
For example, you may have fields for Country, Population, and Year. When generating recommendations in
Insight Advisor, you might get charts that use Country and Population, but include the sum of data for all years
in the charts. You can use required selection behavior to limit Insight Advisor results to use the current year
instead of all time when generating analysis for Population or Country.
Prefer relationships
Prefer relationship behavior guides Insight Advisor into selecting groups that should be used more often
together when generating analysis . When you specify a prefer relationship, Insight Advisor uses the preferred
group when generating results. Prefer relationships are useful when there might be ambiguity .
Prefer relationships does not prevent a group from being used with other groups. It only selects the preferred
group when all group choices are equal in the analysis. In analysis where other groups are more appropriate,
the non-preferred groups may be used instead.
For example, there are four groups:
l
Sales
l
Customer
l
Product
l
Sales Person
Sales has a preferred relationship with Customer. For a breakdown analysis with Sales, Customer is selected
over the other groups as it is preferred. For a trend analysis for Sales, Product might be used in the analysis
instead.
Deny relationships
Deny relationship behavior prevents Insight Advisor from using the selected groups together when generating
insights. This is useful when some groups in the same package may not be useful to use together in analysis.
Deny relationships can also be used to block groups from being used together that could impact app
Manage data - Qlik Sense, February 2024 287

11 Customizing logical models for Insight Advisor
performance. With star schema data models, there may be groups that have one-to-many and many-to-one
relationships that complicate analysis. Deny relationships can prevent association between these groups.
Deny relationships are overruled when a user specifically requests insights from the groups that have a deny
relationship. For example, Sales and Supplier have a deny relationship. If someone searches 'show me sales',
no analysis will be generated that contains Sales and Supplier. If someone searches 'show me sales by
supplier', results including Sales and Supplier are generated.
Default calendar period
Default calendar period behaviors assign calendar periods to be used as the default time period in
visualizations for the selected group. The default calendar period is applied whenever Insight Advisor creates
visualizations for fields from that group. Groups can have single default calendar period. Default calendar
periods behaviors overrule any default period grains set for a date field.
Calendar periods are generally applied to analyses in the following way:
l
Fact and rank analyses use the current or first selected period from the calendar period. The previous
or second selected period from the calendar period is added to the analyses for comparison.
l
Trend analyses and similar analyses only use the aggregated grain from the calendar period.
l
Other analyses use the current or first selected period from the calendar period.
For example, you have the group Client Satisfaction that contains client satisfaction data. By default, many of
your app's users are only interested in seeing data for the current month. By creating a calendar period for the
current month and making it the default calendar period, Insight Advisor visualizations for Client Satisfaction
will only show data from the current month.
Ignoring default calendar periods for select analysis types
You can configure analysis types to ignore parts or all of a default calendar period. This is useful for
controlling how default calendar periods are applied more specifically. For example, you may not want a
comparison in your fact analyses and only want to view the current period.
You can pick analysis types to ignore period 1 (the previous or second selected period), period 2 (the current
or first selected period), or the grain of your calendar period. Ignoring period 1 stops using earlier period in
analyses that would compare two periods so that only period 2 is displayed. Ignoring period 2 or the grain
stops the calendar period from being used by default with that analysis type.
Creating behaviors
Do the following:
1. Click Create behavior.
2. Under Applies to, select a group.
3. Select a behavior type
4. Do one of the following:
l
If configuring a Prefer relationship or a Deny relationship, select the groups to which to apply
that relationship.
Manage data - Qlik Sense, February 2024 288

11 Customizing logical models for Insight Advisor
l
If configuring a Required selection, select if this is a single value. From Require for, select the
fields and their required values.
You can add additional required selections by clicking Add another.
l
If configuring a Default calendar period, select a calendar group and a calendar period from
that group. Optionally, specify which analysis types should have exceptions from the default
calendar period under Ignore Period 1, Ignore Period 2, and Ignore grain.
5. Click Create.
Defining analysis periods with calendar periods
Define calendar periods for your calendar groups to control the time frames that Insight Advisor
uses when creating visualizations.
Calendar periods define time periods of interest for Insight Advisor to use in analysis in the logical model. For
example, a KPI showing total sales for all time may be less useful than a KPI showing total sales for the
current month. You could create a calendar period for the current month and set that as the default period to
use with total sales. Calendar periods for logical model are created and managed in Calendar periods.
Calendar periods define single periods of times or comparisons of relative periods of time. For example, you
can create calendar periods to:
l
Show only the values from this month
l
Compare this month to last month
l
Compare the current quarter to the current quarter last year
Insight Advisor uses calendar periods when creating charts. Calendar periods enable additional analysis types.
You can select and apply calendar periods when editing a chart in Insight Advisor. You can set a default
calendar period to be used with a group when Insight Advisor creates charts for fields and master items in that
group. Default calendar periods are set in Behaviors.
Manage data - Qlik Sense, February 2024 289

11 Customizing logical models for Insight Advisor
Creating calendar periods
Create calendar periods from the calendar groups defined in Fields & groups. You can create calendar
periods with or without fields that use the autoCalendar function in the data load script.
You can use the Use Autocalendar option with a custom calendar if it uses the same declared fields
as
autoCalendar
.
Creating calendar periods using autocalendar
Select the grain for analysis when creating calendar periods using the autocalendar. The grain is for example,
month of year or quarter of year. You can then the choose to use most recent value, or create a comparison.
Do the following:
1. Click Create calendar period.
2. Select a calendar group, and then select Use Autocalendar.
3. Enter a name for the calendar period.
4. Select the calendar period grain.
5. Do one of the following:
l
To use the most recent value in the period grain field, select Use last sorted value.
l
To make a comparative calendar period, do one of the following:
l
In Compare, select the period for comparison. Select Last complete period if Insight
Advisor should use the last complete period instead of the current period.
l
In Custom, select the period for analysis in Offset, and then select the period for
comparison in Compare offset.
Offset and Compare offset use numeric values, with 0 being the current period.
For example, if you used quarter of year as your period grain, 0 would be the current
period and 3 would be three quarters ago.
6. Click Create.
Creating calendar periods using a custom calendar
You can create calendar periods without using the autoCalendar in the load script. For example, you may
have a custom calendar, or you may want to use custom calendar flags that do not exist in the autoCalendar.
To create a calendar period using a custom calendar, select a calendar group and choose a time field to
aggregate. You then the choose to use most recent value or create a comparison. Two comparison methods
are supported:
l
Relative: A relative comparison that uses a field containing the relative number of periods ago. The
relative period field must contain numeric values that define the relative period from the current date
for each value in the aggregated field. You can then select the offset and comparison offset for
analysis.
Manage data - Qlik Sense, February 2024 290

11 Customizing logical models for Insight Advisor
For example, to do a comparison of this month to last month, select Date as your aggregate field. Next,
select MonthsAgo as your relative period field. MonthsAgo uses an expression to evaluate how many
months ago each value in Date is from the current month. If the current month is July, values from July
would be 0, values from June would by 1, values from May would be 2, and so on. You can then select
0 for your offset and 1 for your compare offset.
l
Flag: A flag comparison uses two fields that define two separate flagged periods of time.
For example, first quarter and second quarter could be two periods used for a flag comparison. The
comparison fields must contain binary values indicating which aggregated field values are in the
flagged period.
To compare Quarter 1 to Quarter 2, select Date as the aggregated field. As flag fields, you can then
select InQuarter1 and InQuarter2. These fields use expressions to evaluate if values are or are not in
Quarter 1 or Quarter 2.
Do the following:
1. Click Create calendar period.
2. Select a calendar group, and then clear the Use Autocalendar check box.
3. Enter a name for the calendar period.
4. Select the aggregated date field to use.
5. Do one of the following:
l
To use the most recent value in the period grain field, select Use last sorted value.
l
To make a comparative calendar period, do one of the following:
l
In Relative, for Relative periods ago, select the field defined in your load script
containing the relative time period data for the field selected in Aggregated date. Set
the time period for analysis in Offset, and then set time period for comparison in
Compare offset.
Offset and Compare offset use numeric values, with 0 being the current period.
l
In Flag, select the field containing the flag for the current period, and then select the
field containing the flag for the comparison period.
6. Click Create.
Limitations
Business logic calendar periods have the following limitations:
l
Default calendar periods are not applied to time-based master measures that include specific time
periods in their expression.
Step-by-step – Creating calendar periods using a custom calendar
This step-by-step walkthrough shows you how to create calendar periods using custom calendar
fields and flags.
Calendar periods can be made either by using the autocalendar or by using individual date/time fields from
your data. You can also use fields containing binary data to flag periods of time for comparative analysis.
There are three kinds of calendar periods you can make with custom calendar data:
Manage data - Qlik Sense, February 2024 291

11 Customizing logical models for Insight Advisor
l
Last sorted value: Last sorted value calendar periods show the most recent period in the selected
aggregated field. In Insight Advisor analyses supporting comparisons, such as rank analysis, the last
sorted value shows the previous period as well.
l
Relative comparison: Relative calendar periods use a field containing the relative periods of data from
the current date. It provides a comparison between the current or previous period and an older period.
l
Flag comparison: Flags use boolean classified fields containing binary data to flag two periods of time
for comparative analysis.
To demonstrate relative time period comparisons, the data source for this app contains data for
future dates. The load script loads data from the data source up to the current date. The results in
the images may differ from your results as the time periods shown in the images will have changed.
Getting started
Download the example package and unzip it:
Calendar periods example app
The QVF file contains the following data file:
l
TutorialCustomCalendarData.xlsx
To demonstrate relative comparisons possible through calendar periods,
TutorialCustomCalendarData.xlsx contains data for future dates. The app load script updates the in app
data for the current date when loaded.
Import the QVFfile in Qlik Sense and attach the XLSX file to your app. Once you have imported the app and
attached the data file to the app, load the app data in Data load editor.
Example data
The data is used in this example is loaded with the following load script:
Sales:
LOAD
City,
Country,
Customer,
OrderDate,
Sales,
"Q4-2020",
"Q1-2021",
"Q2-2021",
"Q3-2021",
"Q4-2021",
"Q1-2022",
"Q2-2022",
"Q3-2022",
"Q4-2022",
"Q1-2023",
"Q2-2023",
"Q3-2023",
Month([OrderDate]) AS [Month],
Manage data - Qlik Sense, February 2024 292

11 Customizing logical models for Insight Advisor
Year([OrderDate]) AS [Year],
Day([OrderDate]) AS [Day],
Dual(Year(OrderDate)&'-'&Month(OrderDate), monthstart(OrderDate)) AS [YearMonth],
12*Year(Today())+Month(Today())-12*Year(OrderDate)-Month(OrderDate) AS [MonthsAgo]
FROM [lib://AttachedFiles/TutorialCustomCalendarData.xlsx]
(ooxml, embedded labels, table is Sales) Where OrderDate <= Today(1);
The load script creates separate fields for Year, Month, and Day. These three fields are used to create the
following calculated fields:
l
YearMonth, which has year and month information. This is the primary field for aggregation in the
example.
l
MonthsAgo, which calculates if months are from a specific month relative to the current date.
The data also contains several fields for the different quarters covered in the data. These fields contain binary
data that indicates to which fiscal quarter each value in the Sales table belongs.
Tasks
This walkthrough takes you through creating three different kinds of calendar periods:
l
Create a custom calendar period without autocalendar
l
Create a relative calendar period
l
Creating a flag comparison calendar period
Creating a calendar period using the last sorted value
For the first calendar period, you will create a calendar period for YearMonth using the last sorted value.
Do the following:
1. In the example app, click Prepare.
2. Under Business logic, select Logical model.
3. Click Create calendar period.
4. Select OrderDate.
5. For Calendar period name, enter Last sorted month.
6. For Aggregated date, select YearMonth.
7. Select Use last sorted value.
8. Click Create.
Result
Navigate to Sheet and search for show me sales by customer.
Select the chart sum(Sales) by customer and apply the analysis period Last sorted month. The chart updates to
display a comparison between the current month and the previous month.
Manage data - Qlik Sense, February 2024 293
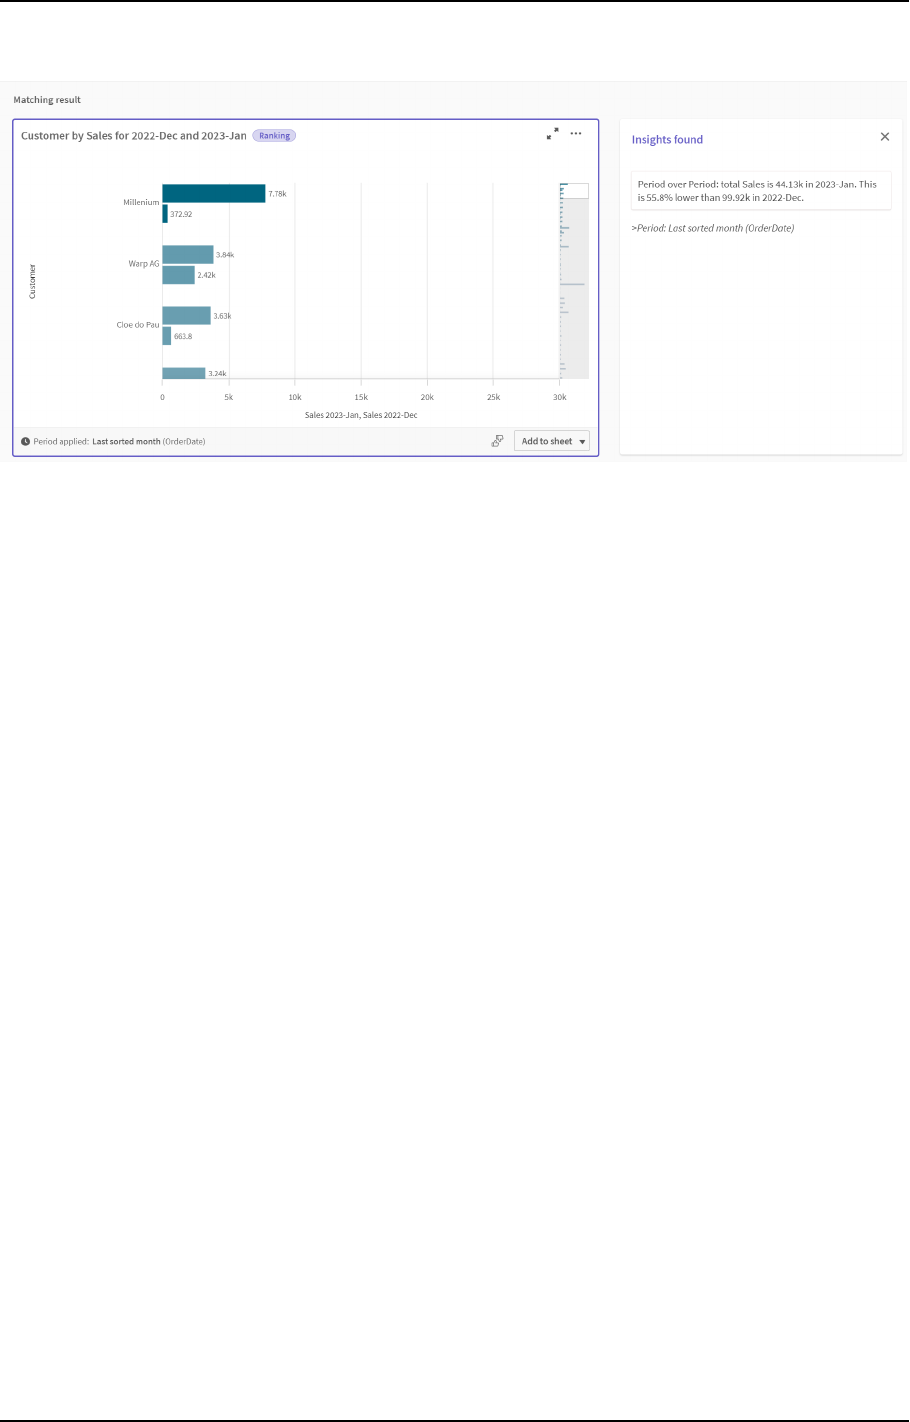
11 Customizing logical models for Insight Advisor
Last sorted month applied to Customer by sum(Sales) between 2022-Dec and 2023-Jan
Creating a relative comparison calendar period
Next, you will make a relative calendar period. A relative calendar period requires:
l
An aggregation field containing a period of time (year, month, quarter, etc).
l
A field containing the relative positions of dates from that field to today's date.
From these fields, you then define the offset. The offset is the relative difference, in the selected period of
time, from the current date for the two periods of comparison. You can compare the current or previous
period (set as 0 or 1 in Offset) to an older period up to 12 periods ago (set as a number from 1 to 12 in
Compare offset).
For this calendar period, we will use YearMonth as the aggregation field and MonthsAgo as the relative periods
field. We want to compare the current month to the same month last year.
Do the following:
1. Click Create calendar period.
2. Select OrderDate.
3. For Calendar period name, enter This month to this month last year.
4. For Aggregated date, select YearMonth.
5. Under Relative periods ago, select MonthsAgo.
6. Under Offset, select 0.
7. Under Compare offset, select 12.
8. Click Create.
Result
Navigate to Sheet and search for show me sales by customer.
Select the chart sum(Sales) by customer and apply the analysis period This month to this month last year. The
chart updates to display a comparison between the current month and the current month last year.
Manage data - Qlik Sense, February 2024 294

11 Customizing logical models for Insight Advisor
Customer by sum(Sales) between 2022-Jan and 2023-Jan
Creating a flag comparison calendar period
Flag comparison calendar periods use two fields to flag two separate periods for analysis from an aggregated
date field.
In the example app data, there are separate fields for the different fiscal quarters. Each field has binary data
indicating if the corresponding dates are or are not in the quarter. You will use these with YearMonth to make
a flag comparison calendar period.
Do the following:
1. Click Create calendar period.
2. Select OrderDate.
3. For Calendar period name, enter Q4 to Q3
4. For Aggregated date, select YearMonth.
5. Click Flags.
6. Under Current period flag, select Q4-2020.
7. Under Compare period flag, select Q3-2020.
8. Click Create.
Result
Navigate to Sheet and search for show me sales by customer.
Select the chart sum(Sales) by customer and apply the analysis period Q4 to Q3. The chart updates to display a
comparison between the fourth fiscal quarter of 2020 and the third fiscal quarter of 2020.
Manage data - Qlik Sense, February 2024 295

11 Customizing logical models for Insight Advisor
Customer by sum(Sales) between Q4 and Q3
11.2 Creating vocabularies for Insight Advisor
You can create vocabularies for Insight Advisor. This allows you to define synonyms for Insight
Advisor and define analyses to be used with specific terms.
You create vocabularies in Vocabulary under Business logic in the Prepare tab. Vocabularies help improve
the success of natural language questions. For example, you can use vocabulary to:
l
Add alternative names for fields, master items, and values.
l
Define names for coded values.
l
Define the Insight Advisor analysis type to be used with certain terms or questions.
l
Provide sample questions for users to ask.
Vocabulary supports the following kinds of vocabulary:
l
Synonyms: Synonyms allow you to add alternate terms.
For more information, see Adding synonyms to Insight Advisor (page 297).
l
Custom analysis:Custom analysis allow you to define what analyses should be used with select terms.
For more information, see Adding custom analyses to Insight Advisor (page 298).
l
Example questions: Add sample questions users can select to help guide analysis of your app.
For more information, see Adding example questions to Insight Advisor (page 303).
Limitations
Vocabularies have the following limitations:
l
Vocabularies are not supported in associative insights.
l
Vocabularies do not support creating terms for fields classified as dates.
l
The following words are reserved for use in Qlik Sense and cannot be used as a vocabulary term:
l
App
l
Application
Manage data - Qlik Sense, February 2024 296

11 Customizing logical models for Insight Advisor
l
Dimensions
l
Dim
l
Measure
l
Msr
l
Insight Advisor does not lemmatize or stem vocabulary terms. For example, if the term is open, a
question using opened or opening will not be treated as having entered open. Similarly, if the term was
opened, open and opening would not be recognized as the term.
l
If a vocabulary term also exists as a field value, and a question includes the field containing that value
and the shared term, Insight Advisor won't use the vocabulary term and will uses the field value
instead when processing the question as the question included the field.
Adding synonyms to Insight Advisor
You can create vocabularies for Insight Advisor. This enables you to define terms and values that
may be used in questions that are not present in your data model.
You can create vocabularies in Vocabulary under Business logic in the Prepare tab. Vocabularies help
improve the success of natural language queries. For example, you can use vocabularies to define:
l
Alternative names or synonyms for fields, master items, and values.
For example, Earnings, Proceeds, and Revenue for the field Income.
l
Names for coded values
For example, names for medical classifications codes.
l
Names for groups of values from a field
For example, defining named age ranges for a field containing ages.
l
Common acronyms and abbreviations not in the data.
For example, yr for year or num for number.
When you create a vocabulary, you define the terms associated to that vocabulary. You then associate the
terms to fields and master items in your app. Optionally, terms can be associated to individual values from the
selected fields and master items. The following conditions are available when defining terms for values from
fields:
l
Greater than
l
Greater than or equal to
l
Less than
l
Less than or equal to
l
In
l
Not in
l
In range
The availability of conditions for fields varies depending on the values in the fields.
Vocabularies are created by language for an app. Each language's vocabulary is separate.
Manage data - Qlik Sense, February 2024 297

11 Customizing logical models for Insight Advisor
Qlik Sense supports English, French, Russian, and Spanish for vocabularies.
Do the following:
1. In an app, click Prepare and select Vocabulary.
2. Select a language from the language drop-down.
3. Click Create terms.
4. Enter terms for the vocabulary.
5. Select the field or master item to which the vocabulary applies.
6. Optionally, select a condition and the values to which the condition applies.
7. Click Create.
Limitations
Synonyms have the following limitations:
l
Master items and temporal fields do not support conditions.
Adding custom analyses to Insight Advisor
You can define specific analyses to be used for certain terms. This helps you control what
analyses users receive in Insight Advisor and create preferred analyses.
With custom analyses, you can define the response for specific terms and control the analyses returned by
Insight Advisor. You can define multiple terms for a custom analysis. You can also define different terms in
different languages for a custom analysis.
In Qlik Sense Client-Managed, vocabularies are only supported in English.
Manage data - Qlik Sense, February 2024 298

11 Customizing logical models for Insight Advisor
Custom analysis
When you create a custom analysis, you add terms to the analysis and then select the analysis type. You can
then specify default dimensions or measures. When no defaults are set, Insight Advisor determines the
appropriate dimensions or measures to use in the analysis based on the user's question.
Optionally, you can set constraints on your analysis type, to limit the scope. For example, you may want only
values that exceed a certain measure value to be included in the analysis.
The availability of conditions for fields varies depending on the values in the fields.
You can optionally choose the chart type to use in your analysis from those available to your analysis type. If
you select a chart type, the custom analysis will always use that chart type unless it determines another chart
is more appropriate for the selected data. You can choose to enforce your chart so that only that chart type
will be used, even if there are more appropriate charts for the question. For example, you can enforce a pie
chart. If a search uses a dimension that contains 200 distinct values, the pie chart will be used even if it is not
the optimal chart for the data.
Some analysis types also let you set sorting options for the chart and optionally apply limits for how many
values are displayed. For example, you could configure a custom analysis with the Ranking analysis type,
sorted by ascending values and with a limit of 20 dimension values shown. The image below shows how this
can be set up.
Manage data - Qlik Sense, February 2024 299
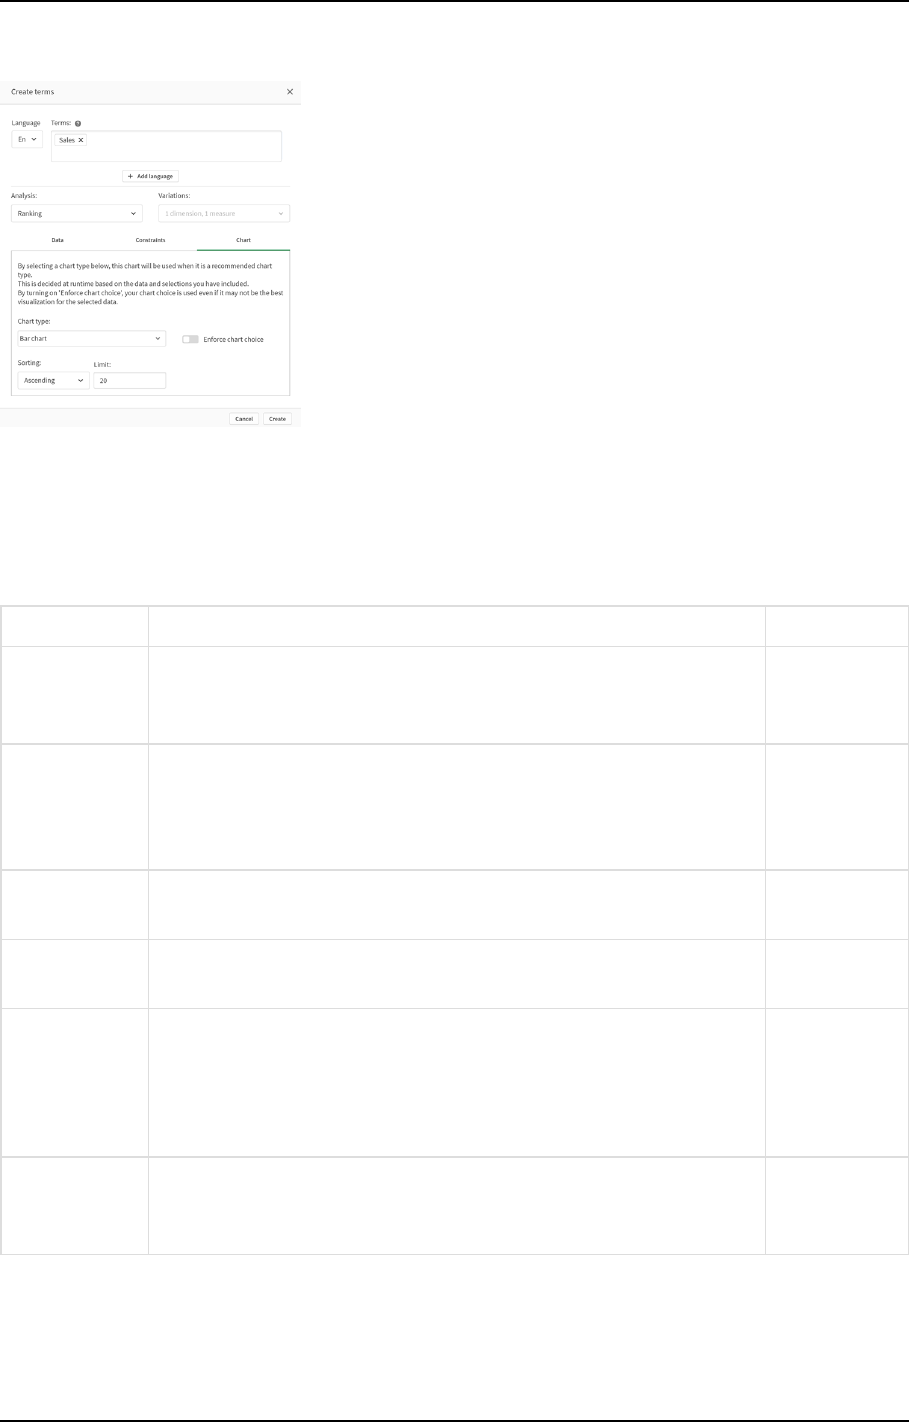
11 Customizing logical models for Insight Advisor
Custom analysis dialog with options for chart sorting
Analysis types
The following table outlines the analysis types available when making custom analyses. Some analyses have
different variations from which to choose. These determine what kind of field are used in the analysis.
Analysis type Use Variations
Breakdown Break down a measure by multiple dimensions. 2-3
dimensions, 1
measure
Breakdown
(geospatial)
Group data by simple and hierarchical geographic divisions. 1-2
geographic
dimensions, 0-
2 measures
Calculated
measure (KPI)
Display aggregated totals. 1 measure
Clustering (k-
means)
Compare 2 measures over a dimension by clustering the results using
the KMeans2D function.
1 dimension, 2
measures
Comparison Compare two to four measures over one or two dimensions. Two
variations are supported:
l
1 dimension, 2-4 measures
l
2 dimensions, 2-3 measures
1 dimension,
2-4 measures
2 dimensions,
2-3 measures
Correlation Show the relative correlation between 2 measures over up to 2 optional
dimensions.
0-2
dimensions, 2
measures
Analysis types
Manage data - Qlik Sense, February 2024 300

11 Customizing logical models for Insight Advisor
Analysis type Use Variations
Mutual
information
Display the statistical dependency between the target and the selected
items.
The dependency indicator ranges between 0% (no dependency) and
100% (strong dependency).
You can select one field (measure or dimension) as the target and then
select 1-10 dimensions or measures as drivers.
Mutual information uses a randomly selected sample of data. Results
for this analysis type for the same fields or selections may vary as a
result.
2-11 fields
Overview Show the overview of a measure with multiple dimensions. 1-2
dimensions, 1
measure
Period over
period
Compare a measure over the current period versus the previous period. 1 measure
Process
control
(mean)
Show an indication of a measure's performance between two calculated
control limits.
1 measure, 1
temporal
dimension
Process
control
(rolling mean)
Show an indication of a measure's performance between two calculated
control limits over the last seven periods.
1 measure, 1
temporal
dimension
Ranking Rank dimension values by a measure, with optional grouping. 1 dimension, 1
measure
Ranking
(grouped)
Show the nested ranking of one or more dimensions against a measure
over time.
3 dimensions,
1 measure
Relative
importance
Create a rank with cumulative contribution (Pareto chart). 1 dimension, 1
measure
Trend over
time
Show the performance of a measure over time, optionally broken down
by a dimension with low cardinality.
Two variations are supported:
l
0-1 dimensions, 1 measure, 1 date/time dimension
l
2-3 measures, 1 date/time dimension
0-1
dimension, 1
measure, 1
temporal
dimension
2-3 measures,
1 temporal
dimension
Year to date Break down a measure (with results from this year and last year) by a
dimension.
1 dimension, 1
measure, 1
temporal
dimension
Manage data - Qlik Sense, February 2024 301

11 Customizing logical models for Insight Advisor
Creating custom analyses
Do the following:
1. In an app, click Prepare and select Vocabulary.
2. Click Custom analysis.
3. Click Create terms.
4. Select a language from the language drop-down and enter the terms for your custom analysis.
5. Optionally, add another language and add the terms for that language.
6. From Analysis type, select your analysis type.
7. If available, select the variation to use.
8. If you want to specify the dimensions and measures for the analysis. in Data, select the default fields
to use.
9. If you want to apply constraints to the analysis, in Constraints, select a field, condition, and value.
10. In Chart, under Chart type, optionally select the primary chart to use with your custom analysis.
To use this chart type even when other charts might be more appropriate, select Enforce chart
choice.
11. If available for your analysis type, set the sorting and limit for the chart.
12. Click Create.
13. If your app is available for Insight Advisor Chat, click the app name in the navigation bar and then
under Use Insight Advisor, turn In hun off then on.
Limitations
Custom analyses have the following limitations:
l
The setting Enforce chart choice is not followed in the following scenarios:
l
When an unsupported number of fields are added to the custom analysis than the selected
chart type supports.
For example, some charts support two dimensions, but not three dimensions. If you create a
breakdown analysis with two dimensions and enforce the mekko chart, that functions as
expected. If you create a breakdown analysis with three dimensions and select the mekko
chart, the mekko chart will not be used as it does not support three dimensions.
l
When a user adds a constraint on a dimension that causes the limit of dimensions to be
exceeded.
For example, you create a breakdown analysis with the dimensions category and product and
select and enforce a mekko chart. This works as expected. If you add a constraint on the
dimension country, there are now three dimensions being used in the chart, so the mekko chart
will not be enforced.
l
When a variance waterfall chart is selected, but there are no calendar periods applied.
l
Constraints are not available with all analysis types.
l
In Insight Advisor Chat, follow-up questions do not work with custom analyses. For example, if you ask
sales summary, a custom analysis, and then ask a follow up question, such as what about profit, Insight
Advisor Chat will treat it as a new question.
Manage data - Qlik Sense, February 2024 302

11 Customizing logical models for Insight Advisor
l
Fields tagged $hidden in the load script will not be available in custom analysis, even if they are set to
visible in the logical model.
Adding example questions to Insight Advisor
You can add example question to Insight Advisor. These help give your app users example
question to help guide or encourage their analysis.
With example questions, you can add a curated list of questions that are available in Insight Advisor Search
and Insight Advisor Chat. These questions can help show your app users what is possible in this app and help
prompt them on how to use your app.
In Insight Advisor Search, the questions are available when the user selects the search box. Selecting a
question asks Insight Advisor that question. In Insight Advisor Chat, users can click Questions to see a list of
questions from apps to which they have access. Selecting the question in Insight Advisor Chat enters the
question in the user's chat box.
Example questions in Insight Advisor Search
When you add an example question, you pick a locale and enter the question. You can add entries for the
same question in other languages. Questions you add are only available in the language you added them in.
Once added, the question is available in Insight Advisor. New example questions become available in Insight
Advisor Chat after the app reloads.
Do the following:
1. In an app, click Prepare and select Vocabulary.
2. Click Example questions.
3. Click Add question.
4. Under Language, select the language for the question.
5. Under Question, enter the question.
6. Optionally, click Add language to add the question in another language.
7. Click Add.
Manage data - Qlik Sense, February 2024 303

11 Customizing logical models for Insight Advisor
11.3 Tutorial – Customizing how Insight Advisor interprets
data
Welcome to this tutorial, which will introduce you to customizing how Insight Advisor interprets
data in Qlik Sense.
After you load your data into an app, you can customize how Insight Advisor interprets your data. Insight
Advisor can learn how to interpret relationships in your data model through precedent-based learning. If you
are familiar with your data model and know how you want fields used, you can instead define a logical model
in business logic for Insight Advisor. This enables you to ensure Insight Advisor offers the most relevant results
to the users of your app.
What you will learn
After completing this tutorial, you should be comfortable using business logic to define your app’s logical
model. You will understand how business logic impacts Insight Advisor results.
Who should complete this tutorial
You should be familiar with Qlik Sense basics. For example, you have loaded data, created apps, and created
visualizations in sheets.
You will need access to the Data manager and should be allowed to load data in Qlik Sense Enterprise on
Windows.
What you need to do before you start
Download this app and upload the QVF file to Qlik Sense:
Insight Advisor and business logic tutorial app
This app contains the data file TutorialData.xlsx. Upload the app Qlik Sense. Open the app and navigate to
Data load editor. Click Load data to load the app data.
To demonstrate relative comparisons possible through calendar periods, TutorialData.xlsx contains
data for future dates. The app load script updates the in app data for the current date when loaded.
Screenshots in this tutorial will differ depending on the date you load data.
Lessons in this tutorial
The topics in this tutorial are designed to be completed in sequence. However, you can step away and return
at any time. The screenshots in this tutorial are taken in Qlik Sense SaaS. This tutorial is focused on Qlik Sense
SaaS, so some differences might occur if you are using Qlik Sense in a different environment.
l
What is Insight Advisor and business logic? (page 305)
l
Enabling a custom logical model (page 308)
Manage data - Qlik Sense, February 2024 304

11 Customizing logical models for Insight Advisor
l
Customizing fields and groups (page 309)
l
Configuring your packages (page 315)
l
Reviewing your hierarchies (page 316)
l
Configuring your calendar periods (page 318)
l
Configuring your behaviors (page 323)
l
Creating vocabularies (page 325)
Further reading and resources
l
≤ Qlik offers a wide variety of resources when you want to learn more.
l
Qlik online help is available.
l
Training, including free online courses, is available in the ≤ Qlik Continuous Classroom.
l
Discussion forums, blogs, and more can be found in ≤ Qlik Community.
What is Insight Advisor and business logic?
Insight Advisor is a suite of Qlik Sense features. Insight Advisor helps you build your data model,
create visualizations, and analyze data. Business logic helps Insight Advisor interpret your data.
Insight Advisor
Insight Advisor comprises the following Qlik Sense features:
l
Insight Advisor Search: Insight Advisor Search is available from Sheet in the Analyze tab of an app.
Insight Advisor Search creates visualizations based on natural language searches or selections of fields
and master items. Insight Advisor Search can also generate charts of potential interest.
l
Insight Advisor Analysis Types: Insight Advisor Analysis Types is available from Sheet in the Analyze
tab of an app. Insight Advisor Analysis Types allows you to select an analysis type and the data to
include. Insight Advisor then generates charts based on your parameters.
l
Insight Advisor Chat: Insight Advisor Chat is a chat-based interface for conversational analytics. Insight
Advisor Chat enables you to make natural language searches from the hub to apps to which you have
access. Insight Advisor Chat then returns relevant visualizations.
l
Associative insights: Associative insights helps you uncover blind spots and reveal relationships you
may have missed. Associative insights compares the contributions of your selections and excluded
values against your measures.
l
Chart suggestions: Chart suggestions enable you to select data fields when editing a sheet and let Qlik
Sense choose the dimensions, measures, and visualization types. The suggested chart adjusts itself
based on your changes. You can customize a suggested visualization with a focused set of properties.
l
Recommended associations: Insight Advisor can recommend associations between your data tables in
the Associations view in Data manager. The Recommended associations panel lets you view and
apply these recommendations.
This tutorial will focus on improving search-based analysis in Insight Advisor Search with business logics.
Manage data - Qlik Sense, February 2024 305

11 Customizing logical models for Insight Advisor
Insight Advisor Search
Insight Advisor Search is available from Sheet in the Analyze tab in an app. You can enter natural language
searches in the search box, such as 'what is profit by employee for 2020'. If you click Insight Advisor, you can
also select specific data assets. Insight Advisor then generates charts or finds matching charts in the app. If
you are creating apps, Insight Advisor Search helps you making apps based on the questions you want
answered. If you are using an app, Insight Advisor helps you find the right visualization to answer your
question, either in the app or by creating it for you.
For example, you are interested in viewing some visualizations that show profit earned by each employee.
Open the tutorial app in Qlik Sense. In Sheet, search for show profit by employee. Insight Advisor generates
results.
Results for show profit by employee
You have one matching result, that shows the sum of Gross Profit by EmployeeID, and some additional results.
You can add these charts to sheets in our app.
While these results matched what we were looking for, the fields selected could be improved. In trying to pick
a field to match employee from the data model, Insight Advisor selected EmployeeID. The field EmployeeName
is more useful in analysis, however. The sum of Gross Profit in the chart is also for all time. While this is not
wrong, you may want to see more recent data by default.
In Analysis properties, you can teach Insight Advisor that you prefer EmployeeName by selecting that
dimensions. These precedents are learned on a user-by-user basis. An app developer, however, can create a
model that shows Insight Advisor exactly how to interpret the data model and use the fields within it. This
logical model is used by Insight Advisor for all users using the app. You can do this using business logic.
Business logic
Business logic is an optional part of data preparation that defines the logical model used by some Insight
Advisor features to interpret your data model. Business logic comprises two main features:
Manage data - Qlik Sense, February 2024 306

11 Customizing logical models for Insight Advisor
l
Logical model: The data model of the app used when generating visualizations.
l
Vocabulary:Alternative terms for natural language questions.
Insight Advisor uses business logic in the following Insight Advisor features:
l
Insight Advisor Analysis Types
l
Insight Advisor Search
l
Insight Advisor Chat
l
Associative insights
Logical model
The logical model is the conceptual model Insight Advisor uses when creating visualizations. It is built from
the data model of an app. Each app has a single logical model. Fields and master items are the core
components of this model. They are organized into groups. Groups indicate a conceptual association or
relationship between fields or master items. Once you define these, you can then specify other relationships
and handling behavior. These include:
l
Packages:Packages enables you to create collections of related groups. This prevents groups from
being used together that are not in the same package.
l
Hierarchies: Hierarchies enables you to define drill-down analytical relationships between groups.
l
Calendar periods: Calendar periods enables you to create default periods of analysis for Insight
Advisor.
l
Behaviors: Behaviors enables you to specify prefer or deny relationships between fields. Behaviors
can also enforce required selections and default calendar periods.
Vocabulary
Business logic vocabulary enables you to improve the success of natural language questions. With vocabulary,
you can define terms and values that may be used in natural language questions that are not present in your
data model. You can also set the analysis types to be used for questions containing specific terms. For
example, you can use vocabulary to:
l
Add alternative names for fields, master items, and values.
For example, Earnings, Proceeds, and Revenue for the field Income.
l
Define names for coded values.
For example, names for medical classifications codes.
l
Common acronyms and abbreviations not in the data.
For example, yr for year or num for number.
l
Define the Insight Advisor analysis type to be used with certain terms or questions.
For example, setting it so the map distribution analysis type is always used by Insight Advisor when a
question includes the term regional view.
l
Add example questions to help guide app users with their analysis.
For example, provide questions such as what are the sales for this quarter compared to last quarter.
Manage data - Qlik Sense, February 2024 307

11 Customizing logical models for Insight Advisor
Enabling a custom logical model
The first step to customizing how Insight Advisor interprets your data is enabling the business
logic logical model.
Once enabled, Qlik Sense creates a logical model for business logic based on your data model. You can then
start customizing this logical model.
You can toggle the logical model on and off by clicking Disable logic/Enable logic. This is useful
when you want to compare results with the model applied to results without the model applied.
Do the following:
1. In the tutorial app, click Prepare.
2. Under Business logic, select Logical model.
3. Click Continue.
Results
Business logic analyzes your data model and automatically creates groups, hierarchies, and behaviors.
Overview provides a look at your new logical model.
The new logical model in Overview
Qlik Sense has hidden 14 fields from analysis, so they are no longer available in Insight Advisor. 9 groups have
been created from the data model, associating related fields together. 2 hierarchies have been defined, linking
groups for drill-down analysis. 3 calendar periods have been defined, providing periods of time for use in
analyses.
Next, you will edit this default logical model, starting by modifying the default fields and groups.
Manage data - Qlik Sense, February 2024 308

11 Customizing logical models for Insight Advisor
Customizing fields and groups
The next step to customizing your logical model is to define your fields and groups. Fields and
groups are the basic level of the logical model. All other logical model elements use these
groups.
When you enable a custom logical model, Qlik Sense automatically creates default groups from your data
model. It also sets the properties of all your fields. Some of these groups and field properties need to be
adjusted. Qlik Sense will make a best interpretation of your data model, but it is not always correct in which
fields should be hidden or which fields are measures, for example.
Fields & groups, with default groups
There are three kinds of groups:
l
Dimension: A dimension group consists of related fields that are classified as dimensions. Dimension
groups can also contain fields classified as measures or dates.
l
Measure: A measure group consists of related measure fields. Only measures can belong to a measure
group.
l
Calendar: A calendar group contains a time dimension in your logical model. Calendar groups can only
contain dimensions and must have at least one temporal fields (such as date, timestamp, or year).
Each group has field with the following properties:
l
Visibility: Defines if a field is visible or not in Insight Advisor. Hidden fields can still be used in analysis,
such as when a user searches for that field.
l
Classification: Defines the default role the field plays in analysis. Classifications can be broad, such as
dimension, or specific, such as city.
Manage data - Qlik Sense, February 2024 309

11 Customizing logical models for Insight Advisor
l
Data value lookup:Controls whether or not users can search for specific values from this field.
Reducing the number of fields that have data value lookup enabled can help you avoid false positive
results and reduce the time to generate results.
l
Default aggregation: Sets the standard aggregation for measures in Insight Advisor. When a field has a
default aggregation, Insight Advisor always applies that aggregation when using it as a measure. Users
can edit Insight Advisor analyses to change the aggregation to a different type in Insight Advisor.
l
Favorable trend: Defines whether the favorable trend is for the measure is to go up or down.
l
Overall aggregation: Defines which aggregation should be used when Insight Advisor cannot
determine for itself what aggregation to use when generating results involving master measures with
complex expressions. You can only set overall aggregation for master measures.
l
Favorite: Defines a measure that should be used more often in analysis when Insight Advisor generates
analyses without a question or field selections, such as with Generate.
l
Default period grain:Sets a default grain to use with a date field in analyses.
You can set which columns display in the table by clicking .
Fields can be ungrouped. Ungrouped fields belong to no group and are excluded from analysis.
Why define fields and groups?
Defining fields and groups enables you to set the defaults of how fields and master items are handled. When
you define fields, you set the preferences on how they are handled by Insight Advisor. For example:
l
Should this field be available for analysis in Insight Advisor?
l
Should this field be used as a dimension or measure? What kind of dimension or measure?
l
Can Insight Advisor look up individual values from the field in searches?
l
What should the default aggregation for the field be when used as a measure?
When you define groups, you show Insight Advisor which fields are closely related and should be used
together in analysis. Groups are used to create other business logic features, such as packages, calendar
periods, and behaviors.
Customizing your fields and groups
You are going to start by cleaning up some of the field properties to change visibility and adjust a few
classifications. You are then going to ungroup some of the fields from the groups. With these fields, you will
make the following new groups:
l
Customer
l
SalesCity
l
SalesCountry
l
SupportCalls
l
SupportDate
Some fields you will leave ungrouped. Ungrouped fields are not used by Insight Advisor in any analysis. This
will remove fields that are not relevant to analysis, such as ID and GeoInfo fields.
Manage data - Qlik Sense, February 2024 310

11 Customizing logical models for Insight Advisor
Customizing field properties
Do the following:
1. Navigate to Fields &groups.
2. In Employees, adjust the following fields:
l
For Extension, set the following properties:
l
Visibility: visible
l
Classification: dimension
l
Data value lookup: No
l
Default aggregation: Not specified
l
For EmployeeName, set the following properties:
l
Visibility: visible
l
Classification: dimension
l
Data value lookup: Yes
l
Default aggregation: Not specified
l
For Hire Date, set the following properties:
l
Visibility: visible
l
For Reports To, set the following properties:
l
Visibility: hidden
l
Classification: dimension
l
Data value lookup: Yes
l
Default aggregation: Not specified
l
For Title, set the following properties:
l
Visibility: visible
l
For Year Salary, set the following properties:
l
Visibility: visible
l
Classification: monetary
l
Data value lookup: No
l
Default aggregation: Sum
Ungrouping fields
Do the following:
1. In Categories, select CatID-CategoryID.
2. In Suppliers, select SupplierID .
3. In SupportCalls, select the following:
l
SupportCalls
l
AverageCallSatisfaction
l
Date
Manage data - Qlik Sense, February 2024 311

11 Customizing logical models for Insight Advisor
4. In Products, select ProductID.
5. In Employees, select EmployeeID.
6. In Sales_ENT, select the following fields:
l
Address
l
City
l
ContactName
l
Country
l
CountryCode
l
Customer
l
CustomerID
l
Latitude
l
Longitude
l
Longitude_Latitude
l
OrderID
l
Phone
l
PostalCode
l
ShipperID
7. Click Ungroup.
Creating Customer group
This group will let you group together dimension fields relating to customer information.
Do the following:
1. Click Create group.
2. For Group name, enter Customer.
3. For Group type, select Dimension.
4. Add the following fields to the group:
l
Address
l
ContactName
l
Customer
l
Phone
l
PostalCode
5. Click Create.
Creating SalesCity group
This group will let you group together dimension fields relating to city information. You will use this later
when making a hierarchy.
Manage data - Qlik Sense, February 2024 312

11 Customizing logical models for Insight Advisor
Do the following:
1. Click Create group.
2. For Group name, enter SalesCity.
3. For Group type, select Dimension.
4. Add the following fields to the group:
l
City
l
Longitude_Latitude
5. Click Create.
Creating SalesCountry group
This group will let you group together dimension fields relating to country information. You will use this later
when making a hierarchy.
Do the following:
1. Click Create group.
2. For Group name, enter SalesCountry.
3. For Group type, select Dimension.
4. Add the followings fields to the group:
l
Country
l
CountryCode
5. Click Create.
Creating SupportCalls group
You removed all fields from the previous SupportCalls group as it was classified as a dimension group. You will
use the fields to make a measure group.
Do the following:
1. Click Create group.
2. For Group name, enter SupportCalls.
3. For Group type, select Measure.
4. Add the following fields to the group:
l
AverageCallSatisfaction
l
SupportCalls
5. Click Create.
CreatingSupportDate group
Finally, you will make a calendar group for the Date field from the support calls data.
Manage data - Qlik Sense, February 2024 313

11 Customizing logical models for Insight Advisor
Do the following:
1. Click Create group.
2. For Group name, enter SupportDate.
3. For Group type, select Calendar.
4. Add the following fields to the group:
l
Date
5. Click Create.
Results
Go to Sheet in the Analyze tab and clickInsight Advisor. Look at the Assets panel. There is a significantly
reduced number of fields in Assets. The ID fields are no longer there, for example.
Fields in Insight Advisor assets panel
Now, search for what is the profit by employee. This time, instead of EmployeeID, Insight Advisor uses
EmployeeName, a more useful field to use as a dimension in visualizations.
Manage data - Qlik Sense, February 2024 314

11 Customizing logical models for Insight Advisor
Results for what is the profit by employee
Configuring your packages
The next step is to start working with the other elements of the logical model, starting with
packages.
Packages are collections of groups that should be used together in analysis. This ensures only relevant fields
are used together by Insight Advisor. Groups can belong to multiple packages. Packages are an optional part
of the logical model.
Why create packages?
Packages define the scope of which groups should be used together in analysis. For example, your logical
model may have groups that cover different areas of an organization. Mixing these may not always be
desirable for your Insight charts.
For example, the tutorial app has data related to the handling of support calls, which is not related to the
sales and supplier data. If you navigate to Sheet and select AverageCallSatisfaction from the Insight Advisor
Assets panel, you get results where the support call data is mixed with sales data fields.
By using packages, you can keep the sales and supplier data together for analysis and keep the support call
data together for analysis, preventing Insight Advisor from trying to use the data together.
Creating packages
You are going to create packages for the sales-related groups and support-related groups. Both will include
the relevant Employees and Offices groups.
Manage data - Qlik Sense, February 2024 315

11 Customizing logical models for Insight Advisor
Creating the Support package
Do the following:
1. Navigate to Packages.
2. Click Create package.
3. For Package name, enter Support.
4. Add the following groups to the package:
l
SupportCalls
l
SupportDate
l
Employees
l
Offices
5. Click Create.
Creating the Sales package
Do the following:
1. Navigate to the Packages section.
2. Click Create package.
3. For Package name, enter Sales.
4. Add the following groups to the package:
l
Categories
l
Customer
l
SalesCity
l
SalesCountry
l
Employees
l
Offices
l
Sales_OrderDate
l
Products
l
Sales
l
Suppliers
5. Click Create.
Results
Navigate to Sheet and click Insight Advisor. In the assets panel, select AverageCallSatisfaction. Now, none of
the generated Insight Advisor analyses use fields from groups that are not part of the Support package.
Reviewing your hierarchies
Next, you will review the hierarchies in your logical model. Hierarchies is an optional business
logic feature. It defines drill-down relationships between groups.
Manage data - Qlik Sense, February 2024 316

11 Customizing logical models for Insight Advisor
When you enable business logic, some hierarchies may be automatically created by Qlik Sense from your data
model. If you navigate to Hierarchies, you can see that business logic has created two hierarchies.
Hierarchies in the logical model
Hierarchies indicate groups that can be used to break each other down in analysis. For example, the two
hierarchies created by Qlik Sense correctly identify two drill-down relationships in our logical model:
l
The data in the Category fields can be broken down into the data in the Products fields.
l
The data in the Suppliers fields can be broken down into the data in the Products fields.
If you navigate to Sheet, click Insight Advisor, and select CategoryName, Insight Advisor includes a treemap
that breaks down CategoryName by ProductName.
Category and products breakdown
Hierarchies do not enable drill-down selections in the generated charts. That requires drill-down
dimension master items. For example, if you want map charts that drill-down from to cities after a
country is selected, you need to create a corresponding drill-down dimension master item.
Manage data - Qlik Sense, February 2024 317

11 Customizing logical models for Insight Advisor
In addition to defined hierarchies, the logical model can contain learned hierarchies. These are learned
automatically from how fields are used and defined in the data model. For example, navigate to Sheet and
click Insight Advisor. From the assets panel, select Country. You now have results that reflect a City-Country
hierarchy, including a treemap that shows sum(Sales) by Country and City. This hierarchy is a learned hierarchy
detected from the data model.
New Insight Advisor results for Country
Configuring your calendar periods
Calendar periods use your calendar groups to create default periods of time for analysis in
Insight Advisor.
Calendar periods are used to define time periods for analysis in Insight Advisor analysis. You create calendar
periods from your calendar groups. Depending on your data, business logic may automatically create calender
periods from your data model. If you navigate to Calendar periods, you can see calendar periods have
already been made. Calendar periods can be relative, covering a period relative to the current date. For
example, you could create a relative period to cover the current month. Calendar periods can also use the last
recorded value in your data. For example, the three calendar periods created when you activated business
logic all use last recorded values to make calendar periods for the last year, month, and quarter. app users
can applly the calendar periods to Insight Advisor analysis in Sheets.
You can also define default calendar periods for groups in behaviors. This ensures that by default, Insight
Advisor uses that calendar period when creating any charts for fields in that group.
Why define calendar periods?
Calendar periods are useful because they create specific periods of analysis for your data. If Insight Advisor is
not given a specified time frame, such as in 2020 or for December, it will use the entirety of the data available.
If you provide calendar periods, app users can more easily view and compare data for specific periods.
Manage data - Qlik Sense, February 2024 318

11 Customizing logical models for Insight Advisor
For example, you want to view sales by product. Navigate to Sheet, and search for show me sales by product.
If you want to view specific periods of sales, such as a data for this month compared to last month or a
comparison of the current quarter to a previous quarter, you would need to enter a new query. By making
calendar periods, you can view these periods for your query without making new queries. Business logic has
already made last recorded value calendar periods for the last month, quarter, and year in the data. It does
not have relative periods, however. You could create a comparison for the current month to the same month
last yea. You could also make a comparison between the current quarter (x) and the quarter two quarters ago
(x-2).
Creating the Month comparison calendar period
This calendar period will display results for the most recent month in the data and compare it to the same
month last year.
Do the following:
1. Click Create calendar period.
2. Select Sales_Order Date.
3. For Calendar period name, enter Month comparison.
4. For Calendar period grain, select Month of year.
5. Under Period comparison, select Year over year.
6. Select Last complete period.
7. Click Create.
Creating the Quarter comparison calendar period
This calendar period will display results for the current quarter (x) and compares it to the quarter two quarters
ago (x-2).
Do the following:
1. Click Create calendar period.
2. Select Sales_Order Date.
3. For Calendar period name, enter Quarter comparison.
4. For Calendar period grain, select Quarter of year.
5. Click Custom.
6. For Offset, select 0.
7. For Compare offset, select 2.
8. Click Create.
Results
Navigate to Sheet and search for show me sales by product. Select the matching result. In Analysis
properties, there is a new property available, Analysis period. Select it and select Month comparison to apply
the period to the chart.
Manage data - Qlik Sense, February 2024 319
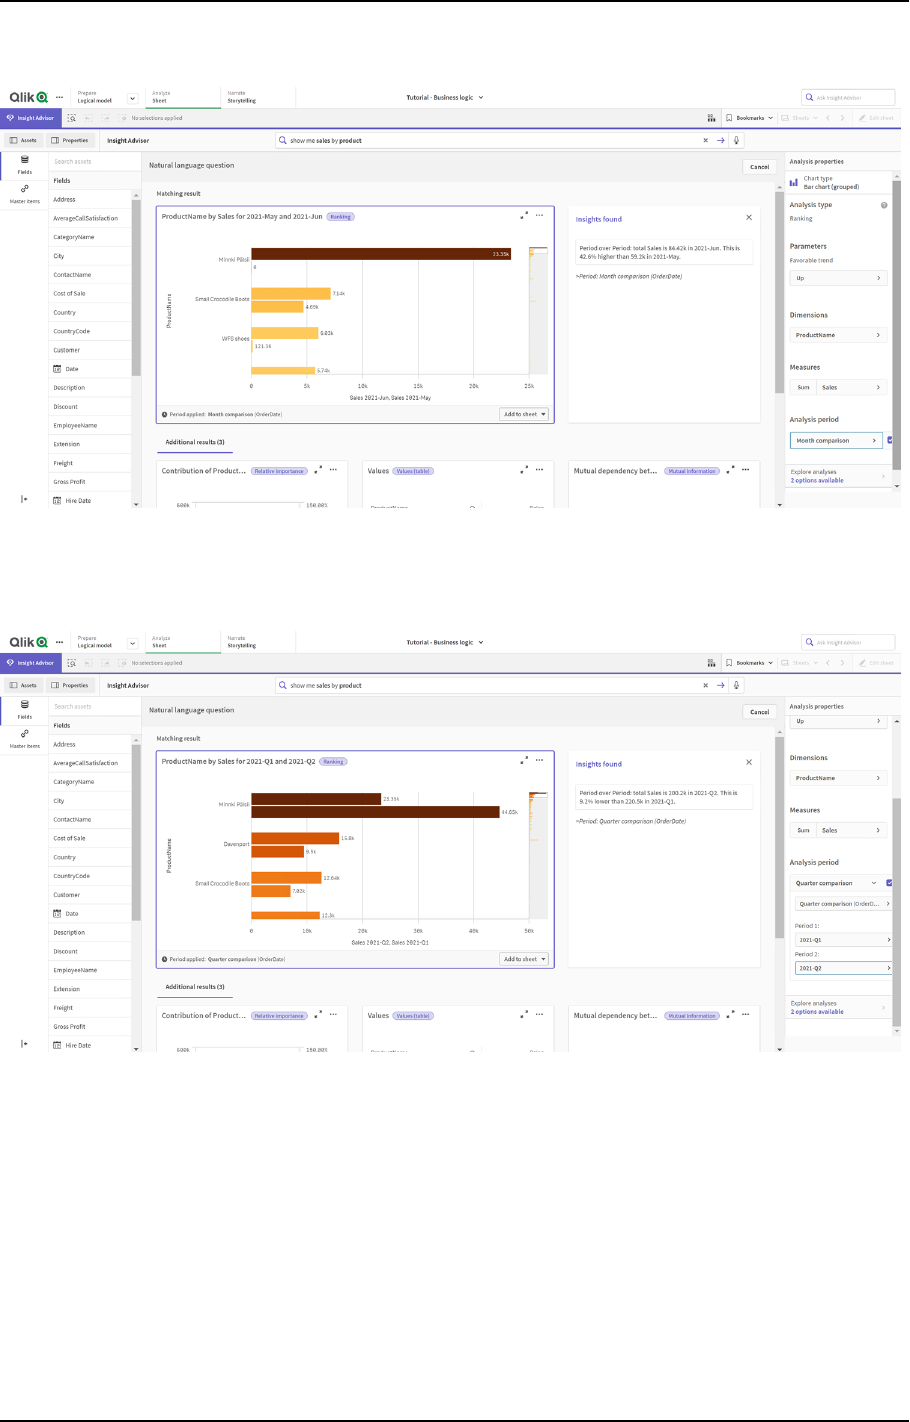
11 Customizing logical models for Insight Advisor
Month comparison calendar period applied to a chart
Next, apply the Quarter comparison calendar period.
Quarter comparison calendar period applied to a chart
You can also adjust the time periods in an analysis period manually for individual charts in Insight Advisor by
changing the values in Period 1 and Period 2. For example, under Period 1, change the value to 2019-Q2. The
chart updates for the newly defined period.
Manage data - Qlik Sense, February 2024 320

11 Customizing logical models for Insight Advisor
Quarter comparison calendar period applied to a chart, now using 2019-Q2 and 2021-Q2
Additional analysis types are available in Insight Advisor when calendar periods are available: period changes,
period changes (detailed), and period over period. These provide a suite of charts for analyzing the period and
its changes.
Click Explore analyses under Analysis period. There are two analyses to select from. First, choose Period
changes. Period changes shows a KPI and bar chart for the changes of the sum(Sales) delta between the two
periods. When there is a small number of dimensions, a variance waterfall chart is displayed instead of a bar
chart.
Period changes analysis
Manage data - Qlik Sense, February 2024 321

11 Customizing logical models for Insight Advisor
Click Close and scroll back to the bar chart. Click Explore analyses and now select Period analysis
(detailed). This provides the period performance against a target. It displays four charts that measure if
targets were met for this period. You can adjust the parameters to define what met, what almost met, and
what did not meet the target in Analysis properties.
Period performance against target analysis
Under Parameters, adjust the limit for missing the target to 100 and the limit for meeting the target to 105.
The detailed period analysis updates for the new targets.
Updated period performance against target analysis
As you can see, calendar periods enable app users to quickly view different periods of interest in Insight
Advisor.
Manage data - Qlik Sense, February 2024 322

11 Customizing logical models for Insight Advisor
Configuring your behaviors
Now you will create a behavior. Behaviors enable you to set custom individual scope for how
measure groups are used.
With behaviors, you can:
l
Enforce required selections of values from a field with a measure group.
l
Set which groups you prefer to be used with a measure group.
l
Set which groups you do not want used with a measure group.
l
Set a calendar period to be used by default with a measure group.
Behaviors are optional.
Why configure behaviors?
Like packages, behaviors help you set the scope for how groups are used together. Behaviors enable you to
set narrow scope for how individual measure groups are used with other groups.
For example, when we search for fields from the Sales group in Sheet measure results for Gross Profits are
aggregated across all time. It would be more useful if you had a more recent period of time applied. You can
create a behavior to use one of your calendar periods by default.
Creating a default calendar period behavior
Do the following:
1. Click Create behaviors.
2. Under Applies to, select Sales.
3. Under Behavior type, select Default calendar period.
4. Under Calendar group, select Sales_OrderDate.
5. Under Period, select Month comparison.
6. Click Create.
Results
Navigate to Sheet and search for what is the average sales by employee. The matching results now displays a
bar chart that compares this month's sales for each employee to the sales from the same month last year. For
charts that do not support comparisons, only the results for the current month are shown.
Manage data - Qlik Sense, February 2024 323

11 Customizing logical models for Insight Advisor
Insight Advisor analysis using the default calendar period
Configure a behavior to use a default calendar period for Period over period analysis
You can also set a default calendar period behavior for a group that is applied to Period over period analysis.
Period over period analysis type uses a line chart to compare a measure over the current period versus the
previous period. It requires a default calendar period set for the group containing the measure in the logical
model.
First, create a Quarter over quarter calendar period.
Do the following:
1. Click Create calendar period.
2. Select Sales_Order Date.
3. For Calendar period name, enter Quarter over quarter.
4. For Calendar period grain, select Quarter of year.
5. Select Use last sorted value.
6. Click Create.
Now in the Behaviors tab, set this calendar period as the default for the group Sales.
Do the following:
1. Click Create behavior.
2. Under Applies to, select Sales.
3. Under Behavior type, select Default calendar period.
4. Under Calendar group, select Sales_OrderDate.
5. Under Period, select Quarter over quarter.
6. Click Create.
Navigate to Discovery and search on show me sales. The first chart that appears below the KPI is a Period
over period analysis. Open this chart (sum (Sales) for 2020-Q4 vs 2020-Q3) and navigate to the property
Analysis period. Select it and note that the default calendar period Quarter over quarter was correctly
Manage data - Qlik Sense, February 2024 324

11 Customizing logical models for Insight Advisor
selected to compare the most recent period to the previous period. In this tutorial those periods are 2020-Q3
(Period 1) and 2020-Q4 (Period 2). These selections can be changed by selecting different quarters from the
drop-downs. A reference line indicates the current day in the current calendar period grain, which in this case
is a quarter.
Period over period analysis applied to a Line chart
You can change this default calendar period in Analysis period.
Creating vocabularies
With vocabularies, you can define synonyms, custom analysis, and example questions. With synonyms, you
can add terms to define values or selections of values from your data model. With custom analyses, you can
define the response from custom questions or partial questions and indicate the specific results returned by
Insight Advisor. Example questions let you add default questions users can select in Insight Advisor Search to
help guide analysis.
With vocabularies, you can define synonyms and custom analysis. With synonyms, you can add terms to
define values or selections of values from your data model. With custom analyses, you can define the response
from custom questions or partial questions and indicate the specific results returned by Insight Advisor.
Why create vocabularies?
Vocabulary is a key tool for preparing your app for natural language questions. Insight Advisor attempts to link
all natural language questions to field names and values in your data. It cannot know all possible search terms
that your app users might enter. Vocabulary lets you fill these terminology gaps, linking terms to fields and
fields values.
For example, in the tutorial app, you have some products that are swimwear. These items are in the category
Beachwear in the data. In Sheet, if you search for swimwear, you will not get any results. Similarly, you cannot
search for footwear and get results for both men's and women's footwear.
Manage data - Qlik Sense, February 2024 325

11 Customizing logical models for Insight Advisor
Custom analyses are useful when you know what analyses you want your app consumers to receive based on
their search terms. For example, you know that your app users have a preference to viewing regional data as
maps. You can use a custom analysis to make sure that maps are offered when users include regional in their
searches.
Example questions can be used to help encourage users in their analysis and help guide them to insights.
Users may not know what is possible in your app. Example questions can help make their analyses and
exploration an easier experience.
Creating beachwear vocabulary
Do the following:
1. From Prepare, click Vocabulary.
2. In Synonyms, click Create terms.
3. In Terms, enter the following terms:
l
swimwear
l
swimsuits
4. Under Applies to, select CategoryName.
5. Under Condition, select In.
6. Under In, select the following values:
l
Beachwear
7. Click Create.
Creating footwear vocabulary
Do the following:
1. In Synonyms, click Create terms.
2. In Terms, enterfootwear.
3. Under Applies to, select CategoryName.
4. Under Condition, select In.
5. Under In, select the following values:
l
men's footwear
l
women's footwear
6. Click Create.
Creating regional custom analysis
For this custom analysis, you will not specify a measure. This will allow Insight Advisor to pick a measure
based on how the someone uses regional in their question.
Manage data - Qlik Sense, February 2024 326

11 Customizing logical models for Insight Advisor
Do the following:
1. Click Custom analysis.
2. Click Create terms.
3. Under Terms, enter regional.
4. Under Analysis, select Breakdown (Geospatial).
5. In Data, under Geographicals, select Country.
6. Click Chart.
7. Under Chart type, select Map.
8. Click Create.
Creating example questions
Do the following:
1. Click Example questions.
2. Click Add question.
3. Under Language, select your language.
4. Under Question, enter Who are the top customers for sales.
5. Click Add.
Results
Navigate to Sheet and open Insight Advisor. Select the search box. Who are the top customers for sales is now
available there. Search for what is the average freight for footwear. You now receive results for both men's and
women's footwear.
Next, search for gross profit for swimwear in 2019. You now get results for beachwear while searching with
swimwear.
Now, search for show me regional sales. You now get a map distribution of the sales by country.
Thank you!
Now you have finished this tutorial, and hopefully you have gained some more knowledge about business
logic and Insight Advisor in Qlik Sense.
Manage data - Qlik Sense, February 2024 327

12 Troubleshooting - Loading data
12 Troubleshooting - Loading data
This section describes problems that can occur when loading and modeling data in Qlik Cloud
Analytics and Qlik Sense.
12.1 Attaching a file by dropping it in Add data does not
work
You are trying to attach a file by dragging and dropping it on the Add data/Attach files dialog, but the file is
not uploaded.
Possible cause
The file is stored in a ZIP archive. It is not possible to attach individual files from a ZIP archive.
Proposed action
Extract the files from the ZIP archive before attaching them.
12.2 Character set problems with non-ANSI encoded
data files
You may experience problems with character encoding in non-ANSI encoded data files when using an ODBC
data connection.
Possible cause
ODBC data connections do not provide full capabilities for character set encoding.
Proposed action
Do the following:
l
If possible, import the data files using a folder data connection, which supports more options for
handling character codes. This is probably the best option if you are loading a Microsoft Excel
spreadsheet or a text data file.
12.3 Circular references warning when loading data
Possible cause
If you have loaded more than two tables, the tables can be associated in such a way that there is more than
one path of associations between two fields, causing a loop in the data structure.
Manage data - Qlik Sense, February 2024 328

12 Troubleshooting - Loading data
Proposed action
12.4 Columns are not lining up as expected when
selecting data from a fixed record file
Possible cause
The file uses tab characters to pad the columns. Typically, you will see that the field headings do not line up
with the expected data if you select Field breaks in the select dialog.
In this case, the tab character is usually equivalent to a number of characters.
Proposed action
Do the following:
1. Select No field names in Field names.
2. Select Field breaks.
3. Increase the setting of Tab size until you see the columns lining up with the header.
4. Insert field breaks by clicking at the appropriate column positions.
5. Select Data preview.
6. Select Embedded field names in Field names.
The columns are now lined up properly, and each field should have the correct field name.
12.5 Connector is not working
You are trying to create a data connection to a separately installed connector in the data load editor, but the
connection fails, or an existing connection is labeled as unknown.
The connector is not properly installed
Possible cause
The connector is not properly installed according to installation instructions. If an app uses a connector on a
multi-node site, the connector needs to be installed on all nodes.
Proposed action
Do the following:
l
Verify that the connector is installed according to instructions on all nodes of the site.
The connector is not adapted for Qlik Sense
Possible cause
QlikView connectors need to be adapted for Qlik Sense if you want to be able to select data.
Manage data - Qlik Sense, February 2024 329

12 Troubleshooting - Loading data
Proposed action (if you developed the connector yourself with the QVX SDK)
Do the following:
l
You need to adapt the connector for Qlik Sense with an interface to select data.
Proposed action (if the connector was supplied to you)
Do the following:
l
Contact the connector supplier to acquire a Qlik Sense adapted connector.
12.6 Data connection stops working after SQL Server is
restarted
Possible cause
If you create a data connection to a SQL Server, and then restart the SQL Server, the data connection may
stop working, and you are not able to select data. Qlik Sense has lost connection to the SQL Server and was
not able to reconnect.
Proposed action
Qlik Sense:
Do the following:
l
Close the app, and open it again from the hub.
Qlik Sense Desktop:
Do the following:
1. Close all apps.
2. Restart Qlik Sense Desktop.
12.7 Data load editor does not display the script
When Data load editor is opened, the content of the editor is blank, and the script cannot be edited.
Possible cause
The script contains very complex constructions, for example, a large number of nested if statements.
Proposed action
Open the data load editor in safe mode by adding /debug/dle_safe_mode to the URL. This will disable syntax
highlighting and auto-complete functions, but you should be able to edit and save the script.
Consider moving the complex parts of the script to a separate text file, and use the include variable
to inject it into the script at runtime.
Manage data - Qlik Sense, February 2024 330

12 Troubleshooting - Loading data
12.8 Data load script is executed without error, but data
is not loaded
The script is executed without syntax or load errors, but data is not loaded as expected. A general
recommendation is to activate debug to step through the script and examine execution results, but here are
some common causes of error.
A statement is not terminated with a semicolon
Possible cause
You have forgotten to terminate a statement with a semicolon.
Proposed action
Do the following:
l
Terminate all statements with a semicolon.
Single quote character inside a string
Possible cause
A string contains a single quote character in, for example, a SET variable statement.
Proposed action
Do the following:
l
If a string contains a single quote character, it needs to be escaped with an extra single quote.
12.9 Data manager does not show tables in app that
contains data
When opening an app created in a Qlik Sense version earlier than 3.0, Data manager shows no tables and a
message is displayed that the app contains no data.
Possible cause
The improved data model in Qlik Sense 3.0 and later requires a data reload to complete data profiling and
preparation.
Proposed action
Click Load data in Data manager. This requires that the app can access the data sources that are used in the
app.
Manage data - Qlik Sense, February 2024 331

12 Troubleshooting - Loading data
12.10 Data manager work flows are broken for all users
creating apps on a server
Users get errors when trying to use Add data or Load data in Data manager, or when refreshing the app in
the browser.
Possible cause
The Data manager uses QVD files to cache loaded data. These files are deleted automatically when they are
no longer used, but if a large number accumulate, or they become corrupted, they can cause errors.
Proposed action
Delete the folder containing the QVD files. On a Qlik Sense server, the cache is located at:
<Qlik Sense shared folder>\Apps\DataPrepAppCache
On a Qlik Sense Desktop, the cache is located at:
C:\Users\<username>\Documents\Qlik\Sense\Apps\DataPrepAppCache
12.11 Data selection problems with an OLE DB data
source
Possible cause
If you are not able to select data from an OLE DB data connection, you need to check how the connection is
configured.
Proposed action
Do the following:
1. Verify that the connection string is correctly designed.
2. Verify that you are using appropriate credentials to log on.
12.12 Date fields are not recognized as date fields in
sheet view
You have fields containing date or timestamp data, but they are not recognized as date fields in sheet view,
that is, they are not indicated with in the assets panel and other field lists.
Data profiling was disabled when the table was added
Possible cause
When you added the tables, you disabled data profiling from beside the Add data button.
Manage data - Qlik Sense, February 2024 332

12 Troubleshooting - Loading data
With this option, date and timestamp fields that are recognized will function correctly, but they are not
indicated with in the assets panel and other field lists, and expanded property fields are not available.
Proposed action
Open Data manager and click Load data.
Now, all date and timestamp fields should be indicated with in the assets panel of sheet view. If they are
still not indicated with , the field data is probably using a format that is not recognized as a date.
Date format was not recognized
Possible cause
The input format of the date field was not recognized when the table was loaded. Usually, Qlik Sense
recognizes date fields automatically, based on locale settings and common date formats, but in some cases
you may need to specify the input format.
Proposed action
Open Data manager and edit the table containing the field that was not recognized as a date. The field is
most likely indicated with as a general field. Change the field type to Date or Timestamp, with an input
format that matches the field data.
12.13 Error message "Invalid path" when attaching a file
Possible cause
The file name is too long. Qlik Sense only supports file names up to 171 characters.
Proposed action
Rename the file to a name that contains less than 172 characters.
12.14 Errors when loading an app converted from a
QlikView document
You may receive errors when reloading an app that was converted from a QlikView document due to
differences between the two products.
Absolute file path references are used in the script
Possible cause
The load script refers to files using absolute paths, which is not supported in Qlik Sense standard mode.
Examples of error messages are "Invalid Path" and "LOAD statement only works with lib:// paths in this script
mode".
Manage data - Qlik Sense, February 2024 333

12 Troubleshooting - Loading data
Proposed action
Do the following:
l
Replace all file references with lib:// references to data connections in Qlik Sense.
Unsupported functions or statements are used in the script
Possible cause
If you get a syntax error when running the script in the data load editor, it may be related to using QlikView
script statements or functions that are not supported in Qlik Sense.
Proposed action
Do the following:
l
Remove the invalid statement or replace it with a valid one.
12.15 Microsoft Excel: Loading data from files in data
manager or data load editor fails
Possible cause
Excel spreadsheet has Freeze Panes or Split screen enabled, and there are empty cells in a table.
Proposed action
Disable Freeze Panes or Split screen, or clean the spreadsheet, and then reload the data.
12.16 Microsoft Excel: Problems connecting to and
loading data from files through ODBC
Possible cause
You may encounter problems when setting up an ODBC data connection to a Microsoft Excel file, or loading
data from from Microsoft Excel files through an ODBC data connection. This is commonly due to issues with
the ODBCDSN configuration in Windows, or problems with the associated ODBC drivers.
Proposed action
Qlik Sense has native support for loading Microsoft Excel files. If possible, replace the ODBC data connection
with a folder data connection that connects to the folder containing the Microsoft Excel files.
12.17 Running out of disk space
There are several reasons why a system may run low on disk space, and the data manager's method of
caching loaded data in QVD files is one possible cause.
Manage data - Qlik Sense, February 2024 334

12 Troubleshooting - Loading data
Proposed action
Delete the folder containing the QVD files. On a Qlik Sense server, the cache is located at:
<Qlik Sense shared folder>\Apps\DataPrepAppCache
On a Qlik Sense Desktop, the cache is located at:
C:\Users\<username>\Documents\Qlik\Sense\Apps\DataPrepAppCache
12.18 Synthetic keys warning when loading data
If you have loaded several files, you may receive a warning that synthetic keys have been created after loading
the data.
Possible cause
If two tables contain more than one common field, Qlik Sense creates a synthetic key to resolve the linking.
Proposed action
In many cases, you do not need to do anything about synthetic keys if the linking is meaningful, but it is a
good idea to review the data structure in the data model viewer.
12.19 Tables with common fields are not automatically
associated by field name
You have added two or more tables using Add data. The tables have fields with a common field name, but
they are not automatically associated.
Possible cause
When you added the tables, you kept the default option to enable data profiling in the Add data dialog. This
option auto-qualifies all field names that are common between tables. For example, if you add table A and
table B with a common field F1 using this option, the field will be named F1 in table A, and B.F1 in table B.
This means that the tables are not automatically associated.
Proposed action
Open Data manager and select the Associations view. Now you can associate the tables based on data
profiling recommendations.
When you have associated the tables, click Load data.
Manage data - Qlik Sense, February 2024 335
