
County
Quicken Accounts
Procedures Manual
REVISED SPRING 2019

1 | Page
TABLE OF CONTENTS
Process Flow Chart ................................................................................................................................. Pg. 2
Operating Guidelines
Acceptable Uses for County Petty Cash Accounts .......................................................................... Pg. 3
Disallowed Transactions ................................................................................................................ Pg. 3
Cash Management ......................................................................................................................... Pg. 4
Cash Receipts ............................................................................................................................... Pg. 4-5
Cash Disbursements ........................................................................................................................ Pg. 5
Travel/Problem Areas .................................................................................................................. Pg. 5-6
Quicken
Quicken Terminology .......................................................................................................................... Pg. 7
Adding New Accounts .................................................................................................................... Pg. 8-12
Adding New Categories ................................................................................................................ Pg. 13-15
Generating The Monthly Reports ................................................................................................ Pg. 32-37
Reconciliation ............................................................................................................................... Pg. 38-42
Backup .......................................................................................................................................... Pg. 43-44
Sales Tax Processing ..................................................................................................................... Pg. 45-54
Quicken End of Month Checklist ....................................................................................................... Pg. 55
Entering Transactions
Entering a Deposit ............................................................................................................................. Pg. 16
Entering a Donation/Gift/Sponsorship ............................................................................................. Pg. 17
Entering a Direct Deposit .................................................................................................................. Pg. 18
Entering a Check .......................................................................................................................... Pg. 19-20
Voiding a Check ............................................................................................................................ Pg. 21-22
Entering Other Transactions ............................................................................................................. Pg. 23
Entering an Insufficient Check .......................................................................................................... Pg. 24
Resolving an Insufficient Check ......................................................................................................... Pg. 25
Entering an Error Correction ............................................................................................................. Pg. 26
Entering the Monthly Transfer..................................................................................................... Pg. 27-29
Entering Transfers between Accounts ......................................................................................... Pg. 30-31

2 | Page
Process
Flow
Chart
Depository
Account
(Deposits)
ARVEST Petty
Cash Bank
Account
(Expenditures)
Deposit Slips
Record in County
Quicken Files
County Support
Staff
Checks
Save Quicken
Report Files
Transmit to
Financial Services
Account Balance
As of Previous
Month Report
Monthly Activity
Detail Report
Outstanding
Check List Report
Reconcile Local
Depository Bank
Account &
Transmit Copy to
Financial Services
Depository Bank
Account
Reconciliation
Financial Services
Load Transactions
into Banner
Reconcile
Depository &
Expenditure Bank
Accounts to
Banner - FS
Transfer Funds
from Depository to
Expenditures
Account - FS
Record Funds
Transfer in
Quicken – County
Support Staff
Notify County
Support Staff of
Transfer Amount -
FS

3 | Page
Operating Guidelines
The county bank account is a University of Arkansas Cooperative Extension Service bank account and all
funds are recognized as the property of the University. The county bank account should only be used for
program related expenses. It must be used for the sole purpose of promoting, supporting, and/or
enhancing legitimate CES educational programs, projects, events, or activities.
See Extension Policy for System Management: Financial Guidelines (C.E.S.P. 15-3 Managing County
Financial Transactions)
Acceptable Uses for County Petty Cash Accounts
Examples may include:
• Time Sensitive Expense-Postage, copies, etc.
• Participation/Registration Fees
• Demonstration Supplies
• Newspaper and Newsletter Subscriptions
• Publication Sales
• Youth Program Activities
• County Extension Council Activities
• Donations and Gifts to CES
• Postage for Plant, Forage, and Water samples
Disallowed Transactions
Examples may include:
• Personal Expenditures
• Advance Payments for Future Expenditures
• Checks signed by Non-Extension Employees
• Blank Checks
• Checks Written for Cash
• Expenditures Paid with Cash
• Payroll and Payroll related transactions
• Disbursements for Entertainment
• Reimbursement from M & O budget to County Petty Cash Account

4 | Page
Cash Management
• Ensure access to checks is restricted to authorized personnel
• Ensure only appropriate personnel have check signing authority
• Ensure bank statements are reconciled in a timely manner by someone other than the
person who writes and/or signs the checks
• Ensure reconciling items are reasonable and clear the bank in a timely manner or that
follow-up procedures are performed for items that do not clear in a reasonable period of
time.
• Ensure the County Financial Report and Quicken data file are submitted to Financial
Services by the 17
th
day of every month.
• The Staff Chair should immediately report all cash discrepancies to Financial Services and
the District Director who will conduct an investigation.
Cash Receipts
• Ensure that all monies due are collected
• Income receipts must be used when collections are received. Receipts should be issued
for all money received, including Poultry Auctions
• All funds must be deposited into the University of Arkansas County Extension Office
Depository Account
• Limit custody of monies to Staff Chair and Administrative Specialist only
• Maintain adequate security with locked and restricted access to monies/checks
• Stamp a restrictive endorsement on incoming checks when mail is opened
• Write pre-numbered UACES receipts for all cash/checks received
White copy goes to individual/entity submitting funds
Yellow copy goes to Financial Services
Pink copy stays in receipt book or files
(Exception - large number of small amounts received for registration, etc.
Write one receipt to person collecting funds and attach a list of participants)
• Write purpose of funds and account on receipt
• Write receipt numbers on deposit tickets
• Ensure that all monies collected are deposited in a timely manner (preferably daily, but
no longer than 3 days and never left in office over weekends or holidays)

5 | Page
Cash Receipts Cont’d
• Ensure that all deposits are properly coded (categorized) in Quicken
• Keep adequate documentation in County files to ensure that all donated funds are spent
within donor’s restrictions (if any)
• Research and resolve NSF checks according to established procedures in a timely manner
Cash Disbursements
• Ensure all checks written are for valid Extension obligations
• Ensure all checks written are authorized
• Ensure all checks written are recorded in a timely manner and in the appropriate amount
• Ensure all expenditures are coded properly: account (program) and expense category
describe the nature of the transaction
• Obtain itemized receipts, invoices, etc.
• Examine receipts for reasonableness
• Write check number on original and all copies of receipt or invoice
• On personal reimbursements, have payee sign and date receipt and indicate activity or
purpose
• Check must be made payable to person/entity who made payment
• Maintain adequate records in files
Travel
• County funds may be used for travel for Extension employees/non-Extension individuals
provided purpose of travel is legitimate Extension activity
• Do not write County checks for travel
• Complete appropriate travel authorization form using Fund #13823 and county org number,
submit for appropriate approvals, and forward to Financial Services
• Funds used for travel will be transferred from the County Depository bank account with the
regular monthly transfer
• The monthly transfer email will reflect the travel payment

6 | Page
Problem Areas
• Inadequate Documentation
• Handwritten Receipts for Expenditures
• Checks Written for Cash
• Expenditures Paid with Cash
• Checks Written for Travel
• Missing Receipts
• Yellow copies of the pre-numbered receipts not attached with the corresponding deposit
slip
• Checks Written for Gifts to Extension Personnel
• Submitting expenditure documentation to Financial Services with the County Financial
Report – Financial Services does not need expenditure documentation
• Failure to submit County Financial Report to Financial Services by the 17th day of each
month
• Entering deposits in Quicken with date on the receipts rather than the actual deposit date
• Failure to enter P-Card charges in Quicken in the month they occur
• Entering donations/gifts/sponsorships without the GIFT notation. Begin each donation
entry in the Payee field with GIFT-then the name of the person/entity
• Submitting Monthly Reconciliation Report (Finance 401) when the adjusted bank balance
and the Quicken adjusted balance are not the same
• Deletion of entries in a previous month in Quicken. NEVER delete or change a transaction in
a previous month – please consult with the Quicken Specialist in Financial Services if
corrections need to be made to an entry in a previous month
• Finance 401 being submitted without both signatures (AOS and Staff Chair)
• Use of Apostrophes (‘) and Quotation Marks (“) in Quicken. Please forget about proper
grammar when making entries in Quicken - Banner will not accept them.
• Adding org numbers or county names to the check number in the Num field. Please do not
add any information to the check number – other information has to be manually deleted
before the information can be loaded in Banner

7 | Page
Quicken
Quicken Terminology
• Depository Account - local county bank account where funds are deposited and the related
expenses may be transferred from
• Account Bar - list of all the sub-accounts within the Depository Account
• Category - used to clarify and track income and expenses
•
Tag - used to track funds for a specific fund or group
• Memo - used to enter more information and/or explanation of the transaction
• Transfers - Financial Services will transfer funds on a monthly basis from the Depository
Account to the Expenditures Account to offset checks that cleared the petty cash bank account
during the previous month. A second transfer may also occur each month if transactions for
your org number appear on the County Petty Cash Account Clearing Account (13823) (i.e.
travel, P-Cards, publications, printing, postage, etc.)
• Saved Reports (electronic and printed)
(1) Account Balance as of Previous Month – “B” Report
(2) Monthly Activity Detail – “D” Report
(3) Outstanding Check List – “OS” Report
(4) Finance 401 Report
(5) Sales Tax Report (if applicable)
(6) Reconciliation Reports (if applicable) – these reports can be customized from the
Monthly Activity Detail “D” Report for a specific group (i.e. Master Gardener, PAT, 4H
Clubs, etc.)
8 | Page
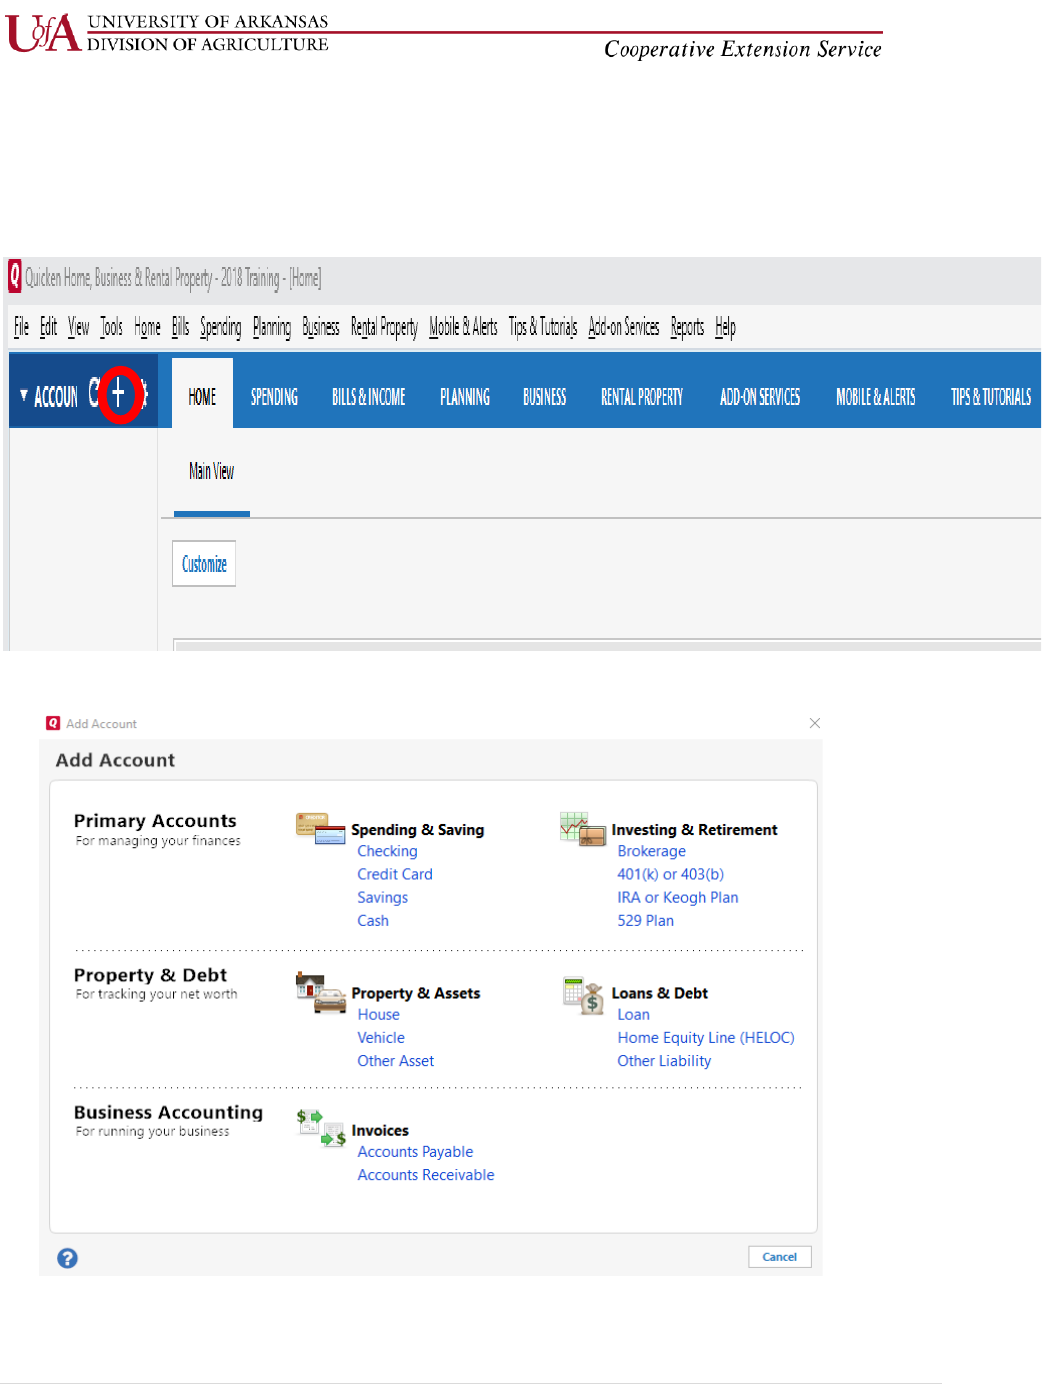
Quicken: Adding New Accounts
• Click on the plus (+) sign in the top left hand corner.
• Make sure that Checking Account is selected in the Account Setup Box, then click Next.

9 | Page
Quicken: Adding New Accounts Cont’d
• Select Advanced Setup, then select I want to enter my transactions manually.

10 | Page
Quicken: Adding New Accounts Cont’d
• Enter the name of the account you wish to add in the Account Name/Nickname box, select
Personal Transactions under “This account is used primarily for”, then click Next.

11 | Page
Quicken: Adding New Accounts Cont’d
• The statement ending date will be the current date of adding the account. The statement ending
balance will be $0.00 until you begin adding transactions.
• Once you see the Account Added, you can add another account or click Finish.

12 | Page
• You will then see your new Account listed under Banking in the Account Bar on the left-hand
side of your screen.

13 | Page
Quicken: Adding New Categories
• Choose the Tools menu at the top of your screen and select Category List from the drop down-
menu.
• Click New at the top right-hand side of your screen.

14 | Page
Quicken: Adding New Categories Cont’d
• Enter a name for your new category, select the proper category group from the drop-down
menu next to the Group box (Income or Expenses), then click Save. If you want to add a
category as a subcategory of another category, select Subcategory of and select the appropriate
category.
• Once you see your new category in the Category List, click Done.

15 | Page

16 | Page
Quicken: Entering a Deposit
• Select (highlight) the Account in the Account Bar where you want to record the deposit. The
account register will appear on the right-hand side of your screen.
• Enter the Date the deposit was made at the bank in the Date field.
• Select or enter DEP in the Check # field.
• Enter the source of the money (contributor’s name or how money was received) In the Paid By
field. It is a NAME of a person or entity. It is not an Event, unless you are creating a deposit for a
group event―then you enter the Name of the Event Participants-list attached (i.e. PAT
Participants-list attached and attach a list of each individual name with amount paid or given,
and form of payment (cash or check).
• Enter the total amount of money deposited in the deposit field.
• Select the appropriate Income Category from the drop-down list.
• For deposits split between accounts―DO NOT USE THE SPLIT BUTTON―make two separate
entries-one in each account for the amount being placed in that account and make an entry in
the Memo field that reflects the total amount of the deposit and the deposit date.
• Select the appropriate Tag fund or group, if applicable.
• Enter more information for explanation of the transaction in the Memo field, if needed.
• Click Save to record the deposit.

17 | Page
Quicken: Entering a Donation/Gift/Sponsorship
• Select (highlight) the Account in the Account Bar where you want to record the deposit. The
account register will appear on the right-hand side of your screen.
• Enter the Date the deposit was made in the Date field.
• If the funds received are a donation, begin the entry in the Payee field with GIFT-then enter
the name of the person/entity, i.e. GIFT-Farm Bureau
• Smaller donations can be grouped together in a deposit, i.e. GIFT-Individual Donors-list
attached and attach a list of the individuals with the amount of each donation and type
(cash/check) of donation.
• If a single donation is $250 or more is received, enter it as a single entry and a copy of all
documentation should be sent to Brian Helms in the Development Office.
• Enter the total amount of money deposited in the deposit field.
• Select the appropriate Income Category from the drop-down list.
• For deposits split between accounts―DO NOT USE THE SPLIT BUTTON―make two
separate entries-one in each account for the amount being placed in that account and
make an entry in the Memo field that reflects the total amount of the deposit and the
deposit date.
• Select the appropriate Tag fund or group, if applicable.
• Enter more information for explanation of the transaction in the Memo field, if needed.
• Click Save to record the deposit.

18 | Page
Quicken: Entering a Direct Deposit
Occasionally, there will be money directly transferred (deposited) into the Depository Account from
UACES and/or other entities. You will have to look at your bank statement and determine the source of
the funds.
• Select (highlight) the Account in the Account Bar where you want to record the deposit. The
account register will appear on the right-hand side of your screen.
• If the funds are received from UACES (i.e. Paper Clover, Citizenship Leadership, Monthly
Clearings, etc.) you will enter TSR in the Num field. You will receive an email from Financial
Services detailing the source of the funds for TSR entries.
• If the funds are received directly from another entity (i.e. United Way, State of Arkansas, etc.)
you will enter DEP in the Num field.
• If the funds are received from UACES, enter the description provided in the email form Financial
Services in the Paid By field.
• Enter the total amount of money deposited in the deposit field.
• Select the appropriate Income Category from the drop-down list.
• For deposits split between accounts―DO NOT USE THE SPLIT BUTTON―make two separate
entries-one in each account for the amount being placed in that account and make an entry in
the Memo field that reflects the total amount of the deposit and the deposit date.
• Select the appropriate Tag fund or group, if applicable.
• Enter more information for explanation of the transaction in the Memo field, if needed.
• Click Save to record the deposit.
Tips for determining the correct entry in the Num field for deposits:
DEP―used when funds are received in the County office and the funds are deposited at the local
Depository Account bank.
DEP― used when funds are directly deposited into the Depository Account by an entity other than
UACES
TXFR― used when funds are received by UACES and transferred into the Depository Account. You will
receive an email from Financial Services detailing the source of the funds. (If you receive notification
from Financial Services, the funds have already been recorded in Banner and do not need to be
recorded as a deposit entry in Banner again.)

19 | Page
Quicken: Entering a Check
• Select (highlight) the Account in the Account Bar where you want to record the deposit. The
account register will appear on the right-hand side of your screen.
• Enter the date the check was written in the Date field.
• Enter the check number in the Num field. Do not add your Org number to the check number.
• Enter the Name to which the check was written in the Payee field.
• Enter the amount of the check in the Payment field.
• Select the appropriate Expense category from the drop down menu in the Category field.
• DO NOT USE THE SPLIT BUTTON―if you have checks which will affect more than one Account,
you will enter two transactions in Quicken. Select the first Account and enter the check as
indicated above. The amount you enter in the Payment field will be the amount of money you
want taken from this Account. Click in the Memo field and make an entry that reflects the total
amount of the check and the check date.
• Then select the second Account and repeat the steps above for the second Account where you
want to record the check, enter the remaining amount of the check and make an entry in the
Memo field that reflects the total amount of the check and the check date. The total of the
amounts entered should equal the total amount of the check that was written.
• Select the appropriate Tag fund or group, if applicable.
• Enter more information for explanation of the transaction in the Memo field, if needed.
• Click Save to record the deposit.
• Be mindful that there is a drop-down menu that will allow you to select Next Check Num

20 | Page
Quicken: Entering a Check Cont’d
When you write a check, please make sure that you perform a proper review of documentation for that
expenditure including the following:
1. Original Invoice/Receipt
2. Allowable Purchases
3. Reasonable Expenditures
4. No State Contract Items
5. Deface all pages of documentation-check # and date
• Check Distribution―AOS and Staff Chair
• Proper Category
• Resolve checks which have not cleared the bank in a reasonable length of time. Contact the
payee and ask them to deposit the check. If they did not receive the check or have lost the
check, void the check in Quicken and reissue a new check.
• You may want to use a check request form such as the example shown below:

21 | Page
Quicken: Voiding a Check-Current Month
• Select (highlight) the Account in the Account Bar where the original check was written.
• Select the More Actions icon next to the Save button.
• Select Void transaction(s) from the drop down menu.
• Click Save to void the check. A (c) is automatically added to the Clr column

22 | Page
Quicken: Voiding a Check Cont’d
• Once the check is voided, the amount of the check is returned to the balance of the
Account. There is no need to make an additional transaction as a deposit as previously done
before.
• Enter more information for explanation of the transaction in the Memo field, if needed.
Quicken: Voiding a Check-Previous Month
If you are voiding a transaction from a previous month you will need to enter a deposit transaction to
offset the previous expense. View the example below on voiding a check from a previous reporting
period.

23 | Page
Quicken: Entering Other Transactions
When the reference of “Other Transactions” is used, this is referring to transactions that are not a check,
deposit, or transfer that may need to be entered in Quicken, i.e. P-cards, Bank Charges, publications,
printing, postage, etc.
• Select (highlight) the Account in the Account Bar where you want to record the transaction.
• In the Check Register on the right-hand side of your screen, enter the Date the transaction
occurred in the Date field. **If the date of the transaction is for a previous month that the
County Financial Reports have already been submitted to Financial Services, use the current
date and refer to the actual date in the Memo field.**
• Select OTH for the Num field.
• Enter a description of the transaction in the Payee field (i.e. if you are entering a P-card expense,
you would enter the name of the company where the item was purchased. If the transaction is
for bank charges, you would enter the Bank name. Enter the amount of the transaction in the
Payment field if it subtracts from your bank balance OR enter the amount of the transaction in
the Deposit field if it adds to your bank balance.
• Select the appropriate Income or Expense category from the category drop-down menu. You
may want to add a P-card category to use for P-card transactions. If you use a Category other
than P-card, you may enter additional information in the Memo field, such as P-card Expense
John Doe for further detail.
• Select the appropriate Tag fund or group, if applicable.
• Enter more information for explanation of the transaction in the Memo field, if needed. For
example, when recording a bank charge for Deposit Slips, you would enter Deposit Slips.
• Click Save to record the transaction.

24 | Page
Quicken: Entering an Insufficient (NSF) Check
• Select (highlight) the Account in the Account Bar where the original deposit was recorded.
• Enter the date the check was charged back to your Depository Account if you have not
already sent your Financial Reports to Financial Services. If you have already sent your files
to Financial Services, use the current date.
• Enter CORR in the Num field.
• Enter a description (Check #XXXX-Name of Person/Entity-Returned NSF) in the Payee field.
• Enter the Amount of the Insufficient Check in the Payment field.
• Select the Category that was used for the original deposit.
• Select the appropriate Tag fund or group, if it was used for the original deposit.
• Enter more information for explanation of the transaction in the Memo field, if needed.
• Click Save to record the transaction.
• You will clear (clr) this transaction in the month that the insufficient check is listed on your
bank statement.

25 | Page
Quicken: Resolving an Insufficient Check
• Resolve the insufficient check as quickly as possible after notification of return is received
from the Depository Bank.
• Record the insufficient check in Quicken as previously outlined.
• Mail the party who submitted the insufficient check a letter (sample copy below)
• If you do not receive a response to the first letter in a timely manner, send a second letter
by registered mail using a return confirmation.
• If you do not receive a response to the second letter, contact the Cash Manager, in Financial
Services for further instructions.
• When you do receive the funds for the insufficient check, the deposit will be recorded as a
new deposit. Keep a copy of the insufficient check and the new check in your files and send
the original insufficient check back to the party who submitted the check, unless that party
requests that you destroy the check.

26 | Page
Quicken: Entering an Error Correction
If you have not already sent your Financial Report for the month to Financial Services, you may
make corrections to the original transaction entry. Go to the original transaction and make the
needed corrections.
• Remember, you must click the enter key to save the changes
If you have already sent your Financial Report to Financial Services for the month in which you
need to make the correction, you will have to record a new transaction in Quicken for the
amount of the error.
• Select (highlight) the Account in the Account Bar where the original transaction was
recorded.
• Enter the current date.
• Enter CORR in the Num field
• Your description should refer back to the original transaction and date.
• Enter the Amount of the correction in the appropriate Payment or Deposit field.
• Select the category that was used for the original deposit.
• Select the appropriate Tag fund or group, if it was used for the original deposit.
• Enter more information for explanation of the transaction in the Memo field, if needed.
• Click Save to record the transaction.

27 | Page
Quicken: Entering the Monthly Transfer
• Each month a transfer will be made from your local Depository Bank account to cover the
amount of the checks written on your Expenditures Account which cleared during the previous
month. A second transfer may also occur each month if transactions for your org number
appear in the County Petty Cash Account Clearing Account (13823), i.e. travel, P-cards,
publications, printing, postage, etc.
• Although these transfers will not affect the balance of any of your Quicken accounts, they are
necessary to provide an audit trail for the transfer transactions in your Depository Account.
• The transfers should always be made in the Transfers Account in the Account bar.
• Financial Services will send an email to inform you of the date the transfers were made, the
month the checks cleared the bank or the clearing account transaction posted to the clearing
account, the total amount of the transfer, and the amount and check numbers of all the checks
or the document number and amount for clearing account transactions.
• Recording a transfer requires two separate entries, a Payment and a Deposit.
• Each time you enter these transfers you will see a prompt asking if you really want to record a
transfer to and from the same account. You will answer Yes at the prompt.
• Be sure to clear (clr) both entries
Monthly Transfer-Payment Entry
• Select the Transfers Account in the Account bar.
• In the register, enter the date the transfer was made (refer to the email)
• Enter TXFR in the Num field.
• Type in the (Month) (Year) Monthly Transfer in the Description field (refer to the email)
• Enter the total amount of the transfer in the Payment field.
• Enter Transfers in the Category field.
• Place a (c) in the Clr column and click Save to record the transaction.

28 | Page
Quicken: Entering the Monthly Transfer Cont’d
Monthly Transfer- Deposit Entry
• Select the Transfers Account in the Account bar
• In the register, enter the ate the transfer was made (refer to the email)
• Enter TXFR in the Num field
• Type in the (Month) (Year) Monthly Transfer in the Description field (refer to the email)
• Enter the total amount of the transfer in the Deposit field.
• Enter Transfers in the Category field.
• Place a (c) in the Clr column and click Save to record the transaction.

29 | Page
Quicken: Entering the Monthly Transfer Cont’d
• Once both sides of the transfer entry have been recorded, the net effect of the transfer in the
Transfer account should be $0.
• Once again, although these transfers will not affect the balance in any of your Quicken accounts,
they are necessary to provide an audit trail for the transfers that are recorded in you Depository
Account.

30 | Page
Quicken: Entering Transfers between Accounts (Interfund Transfers)
• You may transfer funds between Accounts, as needed, if the funds to be transferred were not
restricted by the donor.
• To transfer funds between Accounts, select (highlight) the Account in the Account bar that the
funds are to be transferred FROM.
• From the check register for that Account, enter the current date in the Date field.
• Enter TXFR in the Num field.
• Type in Transfer to XXXX (Account where funds are to be transferred) in the Payee field.
• Enter the amount of the transfer in the Payment field.
• Select the Account where the funds are to be transferred TO in the Category field.
• Place a (c) in the clear column and click Save.
• Quicken will automatically create a deposit entry in the Account that you selected in the
Category field.

31 | Page
Quicken: Entering Transfers between Accounts Cont’d
• Select (highlight) the Account in the Account bar where the funds should have been transferred
TO.
• Quicken will have automatically created a deposit entry in that Account.
• Highlight that entry, click In the Num field, and enter TXFR.
• Click in the Payee field, delete the current description, and type in Transfer from XXXX (Account
where funds were transferred FROM).
• Make sure the Category is the Account the funds were transferred FROM.
• Place a (c) in the clear column and click Save.
• Funds are transferred.

32 | Page
Quicken: Generating the Monthly Reports
Account Balance as of Previous Month (B) Report
• Reflects balance of all accounts as of the end of the previous month.
• Click on the word Reports at the top of your screen.
• Click on Saved Reports and Graphs.
• Click on the Account Balance as of the Previous Month Report
• Make sure that the date range at the top of the report shows the proper month.
• Click on the Print button and print 2 copies of the report on your printer. One copy is for your
files and the second copy will be sent with the monthly report to Financial Services.
• Click on the Print button again―this is the step to save the report in tab-delimited format.
• Click on the Export to: button, click on the drop-down, select tab delimited (Excel compatible)
disk file, then click the Export button.

33 | Page
Quicken: Generating the Monthly Reports Cont’d
Account Balance as of Previous Month (B) Report
• In the Create Disk File dialog box, enter the name for the file using the following naming
convention (nine characters).
• Characters 1-4 should be your county org number.
• Characters 5-6 should be the last two digits of the report year.
• Characters 7-8 should be the two digit report month for the month of the activity you are
sending.
• Character 9 should be B for Balance.
• Make note of the location where the file is being saved so you can find it later. I recommend
setting up a folder called Quicken Files in My Documents or on your Desktop.
• You may also use the Export button at the top right hand corner to save your files in tab
delimited format. (.txt)

34 | Page
Quicken: Generating the Monthly Reports Cont’d
Monthly Activity Detail (D) Report
• Provides a detailed list of all transactions recorded last month in all of your Accounts.
• NOTE: This is the only file that needs to be emailed to Financial Services each month when you
submit your Monthly Reconciliation Report.
• Click on the word Reports at the top of your screen.
• Click on Saved Reports and Graphs.
• Click on the Monthly Activity Detail.
• Make sure the date range at the top of the report shows the proper month.
• Click on the Print button and print 2 copies of the report on your printer. One copy is for your
files and the second copy will be sent with the monthly report to Financial Services.
• Be sure that your date range is Last month, subtotal by is Don’t subtotal and sort by is
Account/Date
• In the Create Disk File dialog box, enter the name for the file using the following naming
convention (nine characters).
• Characters 1-4 should be your county org number.
• Characters 5-6 should be the last two digits of the report year.
• Characters 7-8 should be the two digit report month for the month of the activity you are
sending.
• Character 9 should be D for Detail.
• Make note of the location where the file is being saved so you can find it later. I recommend
setting up a folder called Quicken Files in My Documents or on your Desktop.

35 | Page
Quicken: Generating the Monthly Reports Cont’d
Outstanding Check List (O) Report
• Shows checks which have not cleared the Expenditures bank as of the end of the month being
reconciled.
• This report will be used for reconciliation purposes.
• Click on the word Reports at the top of your screen.
• Click on Saved Reports and Graphs.
• Click on the Outstanding Check List.
• Once the report appears, you will have to change the date range at the top of the report to
reflect the proper period since the report is set up to show the transactions from the earliest to
the current date.
• Click on the down arrow next to the Date Range box, select Custom Date, and then click OK.

36 | Page
Quicken: Generating the Monthly Reports Cont’d
Outstanding Check List (OS) Report
• When the Custom Date box pops up, change the date in the box beside “from” to the date of
your oldest outstanding check and the box beside “to” being the last day of the month being
reconciled, then click on the OK button.
• Make sure that the date range at the top of the report show the proper time period.
• Click on the Print button and print 2 copies of the report on your printer. One copy is for your
files and the second copy will be sent with the monthly report to Financial Services.

37 | Page
Quicken: Generating the Monthly Reports Cont’d
Outstanding Check List (OS) Report
• In the Create Disk File dialog box, enter the name for the file using the following naming
convention (nine characters).
• Characters 1-4 should be your county org number.
• Characters 5-6 should be the last two digits of the report year.
• Characters 7-8 should be the two digit report month for the month of the activity you are
sending.
• Character 9 should be O for Outstanding Check List.
• Make note of the location where the file is being saved so you can find it later. I recommend
setting up a folder called Quicken Files in My Documents or on your Desktop.

38 | Page
Quicken: Reconciliation
• Each month when you receive the monthly transfer email from Financial Services, you must go
into Quicken and mark all checks and other transactions that were included in the email(s) as
cleared.
• From Quicken Home, select your first Account from the Account Bar so that the register for that
Account appears on the right-hand side of your screen.
• It will be easier to mark the transactions if you will sort them by the Check Number.
• Once you have sorted the transactions within an Account, highlight each transaction that needs
to be cleared and click on the Clr column until a “c” appears and click on the Save button to
save the changes.
• Deposits are cleared if they are listed on the Depository Account Bank Statement for the
month being reconciled.
• Checks are cleared when there is a transfer amount on the Depository Account bank statement
for the month being reconciled. You will receive an email from Financial Services listing the
checks that are include in the transfer amount from the Depository Account.
• Clearing account transactions and transfers are also cleared when there is a transfer amount
on the Depository Account bank statement for the month being reconciled. You will receive an
email from Financial Services listing the transactions that are included in the transfer amount
from the Depository Account.
• Remember that transfers that clear the checks and clearing account transactions are one
month in arrears (i.e. the funds for the checks and clearing account transactions that cleared in
February would not ordinarily be transferred from the Depository Account until March)
Therefore, those transactions would not be cleared until the month of March is reconciled.
• Save the Finance 401 form in your Quicken file folder using the month and year being
reconciled in the title.
• Type the county name and org number as well as the month and year being reconciled on the
appropriate lines at the top of the Finance 401 form.
• Type the ending balance from the Depository Account Bank Statement for the period being
reconciled on the line next to Ending Balance per Depository Account Bank Statement in the Per
Bank box at the top of the Finance 401 form.

39 | Page
Quicken: Reconciliation Cont’d
• Any items that are not on both the Monthly Activity Detail Report and the Depository Account
Bank Statement are reconciling items that should be entered on the appropriate lines in the Per
Bank box of the Finance 401.
• Enter any Deposits in Transit (deposits which are on the Quicken Depository Account Activity
Report but are not on the Depository Account bank statement on line 1 and subsequent lines of
the Per Bank box of the Finance 401.
• Enter the Total Outflows from the Quicken Outstanding Check List on line 3 of the second
section of the Per Bank box of the Finance 401 (this will be a negative number).
• Enter any other transactions that appear on the Monthly Activity Detail Report, but not on the
Depository Account bank statement on line 4 and subsequent lines of the Per Bank box of the
Finance 401.
• The Total Additions, Total Reductions, Subtotals, and Adjusted Bank Balance are formulas that
will update automatically.

40 | Page
Quicken: Reconciliation Cont’d
• Enter the Total Assets amount from the Quicken Account Balance as of Previous Month Report
on the line next to the Ending Balance per Quicken Account Balance as of Previous Month in the
Per Books box of the Finance 401 form.
• Enter any bank charges that are on the Depository Account bank statement but have not been
recorded in Quicken on line 5 and subsequent lines of the Per Books box of the Finance 401
form. This should very rarely be used as you are working in the month that you are reconciling,
so you should enter the bank charges in Quicken and run the monthly reports again.
• Enter any other transactions that are on the Depository Account bank statement but have not
been recorded in Quicken on line 6 and subsequent lines of the Per Books box of the Finance
401 form. Once again, this should very rarely be used as you can continue to enter transactions
in Quicken for the month you are reconciling.
41 | Page
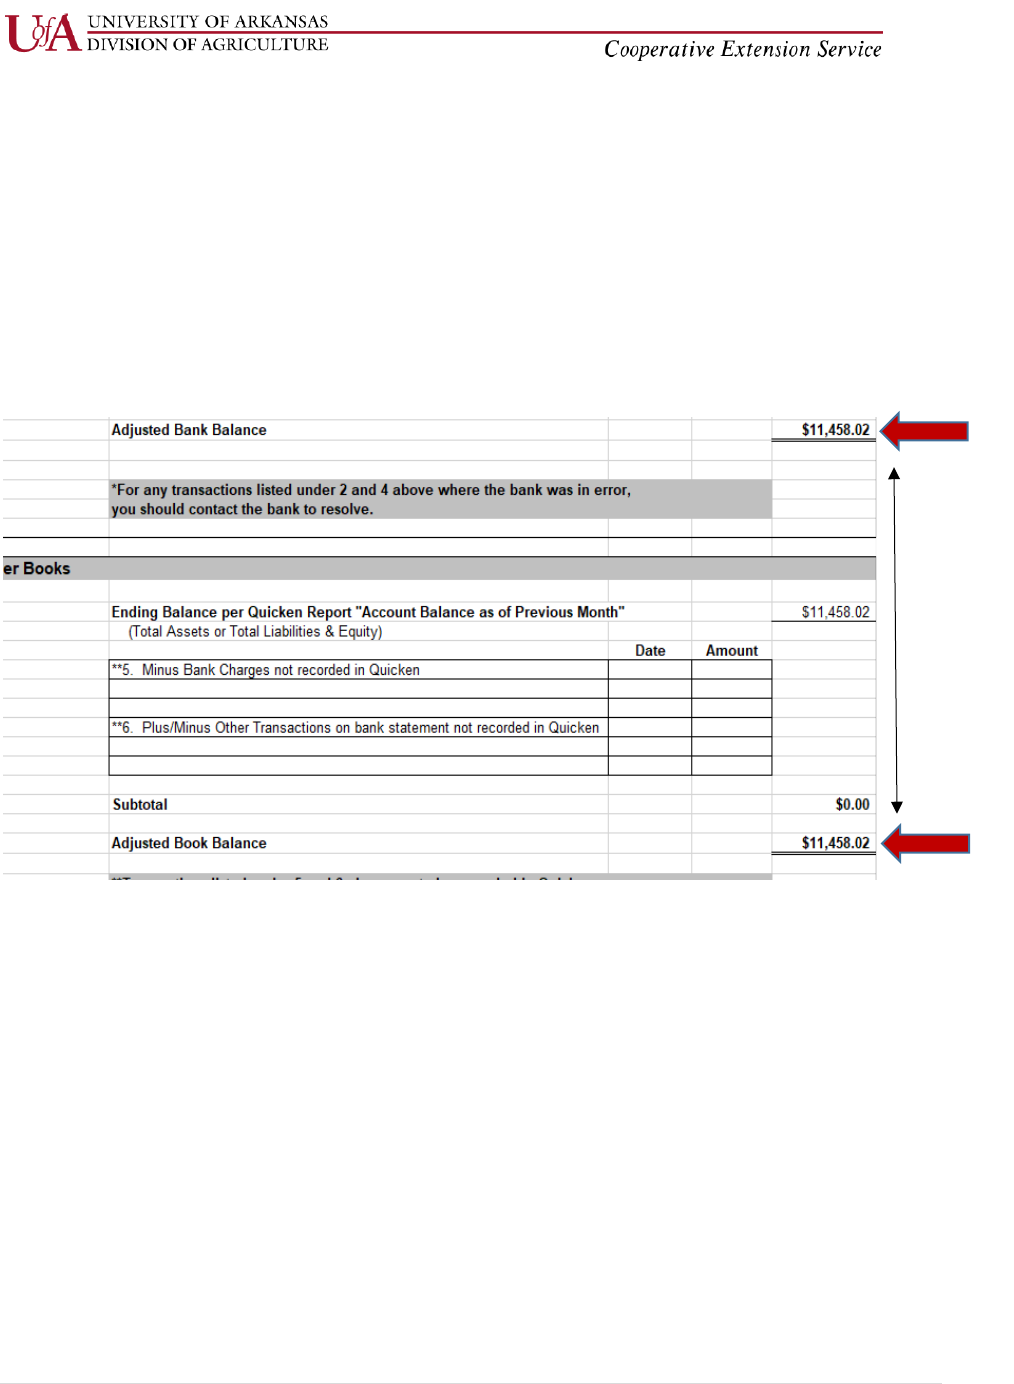
These
should
ALWAYS
match
Quicken: Reconciliation Cont’d
• The Subtotals and Adjusted Book Balance are formulas and will update automatically. The
Adjusted Bank Balance and the Adjusted Book Balance should agree. If they do not, you need
to check your reports and your Finance 401 for errors.
• Any items recorded on lines 5 or 6 or the subsequent lines of the Per Books box of the Finance
401 must be recorded in Quicken using the current date.
• Sign and date the Finance 401 at the bottom and submit the Finance 401 and documentation to
your Staff Chair for review and signature. Once the Finance 401 form has been signed, send the
documentation outlined on the next page to Financial Services.

42 | Page
Quicken: Reconciliation Cont’d
What do I send to Financial Services with my Reconciliation?
The Monthly County Financial Report should be submitted in the following order:
1. Signed Monthly Reconciliation Form (Finance 401) - please include org with county
name
2. Copy of Depository Account Bank Statement (please keep original in your files)
3. Quicken Outstanding Check List (OS) Report
4. Quicken Account Balance as of Previous Month (B) Report
5. Quicken Monthly Activity Detail (D) Report
6. Copy of Monthly Transfer Email(s) from Financial Services
7. Yellow Copy of deposit slip(s) with the corresponding yellow pre-numbered receipts
attached
The Monthly County Financial Report may be delivered to Financial Services either by mail or
scanned and emailed. If emailing files, be sure to include Quicken Reports in the subject line of
your email so that sensitive information can be encrypted.
The Monthly County Financial Report and the electronic
Monthly Activity Detail (D) Report are due in Financial
Services no later than the 17
th
day of each month.
Monthly Checklist
• Make sure all transactions for the month are entered in Quicken.
• Reconcile Depository Account.
• Send the signed Depository Account Reconciliation (Finance 401), a copy of the bank
statement, all three Quicken reports, copy of monthly transfer emails and copy of
deposit slip(s) with the corresponding yellow pre-numbered receipts attached to
Financial Services.
• Email the Monthly Activity Detail “D” Report to the Financial Services Quicken Fiscal
Support Analyst.
• File the originals of all documentation in a folder identified by month and year. You do
not have to send copies of checks written, receipts for money spent, invoices, etc.
(expenditure documentation) to Financial Services; however, this information should be
maintained in your monthly file.
• Follow up on any checks that have not cleared the bank in a reasonable length of time
(A check should not remain outstanding after 3 months)
• Backup your Quicken data files.

43 | Page
Quicken: Backups
• Back up your Quicken files at least on a monthly basis after all transactions have been entered
and the reports generated. You may want to back up more often if you have a lot of activity.
• The Quicken files are to be backed up to 2 USB drives for security reasons.
• The AOS and Staff Chair should retain possession of the USB drives.
• When you back up your files, include the date the file was backed up in the file name.
• Go to File & select Backup and Restore and then select Back up Quicken file…
• Be sure to check the box to Add date to back up file name. This way you will know the last date
in which a backup was done.
• You will select Change in order to locate the folder backup files are normally saved.
• Then select Back up Now and it will tell you when the file has been backed up successfully.

44 | Page

45 | Page
Sales Tax Processing
• If you haven’t done so already, add a new account called “Sales Tax Liability”. Refer to pages 8-
12 for instructions.
Enter Deposit Amount into Account
• Select the appropriate account in the Account Bar list, enter the date of the deposit, enter DEP
in the Num field, enter a transaction description in the Payee column (including the # of items
sold and the amount per item), enter the total amount of the deposit in the Deposit field, select
the appropriate category in the Category field, then click on the Enter button.
Calculate and Transfer Sales Tax Amount to Sales Tax Liability Account
• To calculate the sales tax amount, open an Internet Explorer and type in the URL as follows:
https://arsalestax.uaex.edu/Default.asp
• Determine whether you want to use the pre-tax option or the post-tax option for calculating the
sales taxes and click on the button next to that option.

46 | Page
Sales Tax Processing Cont’d
Pre-Tax Option
The pre-tax option allows you to add sales taxes to the sale price of the item(s). For example, if the sale
price of an item is $10.00, you would add sales tax of $0.90 (assuming the sale took place in Little Rock)
for a total price of $10.90
Post-Tax Option
The post-tax option allows you to set a price that includes or imputes the sales taxes. For example, if
you wanted to charge an even $10.00 so that you did not have to handle change, that $10.00 would
include the sales taxes.
• Enter the sale price of the item in the box next to Amount.

47 | Page
Sales Tax Processing Cont’d
• Click on the drop-down menu that says “Select the county”, and select the county where the
merchandise is being sold.

48 | Page
Sales Tax Processing Cont’d
• Once you have selected the county, the calculator will re-display and ask you to “Select a city
within the XXXXX County.” Click on the arrow next to the box and select either one of the cities
or the unincorporated area, then click on the Go! button.

49 | Page
Sales Tax Processing Cont’d
Pre-Tax Example
Sale Amount $10.00
Total Tax Amount .90
Total Collected $10.90
Post-Tax Example
Total Collected $10.00
Total Tax Amount -.83
Sale Amount $9.17

50 | Page
Sales Tax Processing Cont’d
• Select the account where the original deposit was entered and enter the date of the deposit,
enter TXFR in the Num field, enter the description “XXXX Sales Taxes-XX/XX/XX” with the X’s
being the name of the event and the date, enter the sales tax amount that you calculated in the
Payment column, select the Sales Tax Liability category field, and then click on the Save button.
Create the Sales Tax Report
• Click on the Reports Option in the Menu Options at the top of your screen, scroll down and
select My Saved Reports & Graphs, then select Monthly Activity Detail.
• Once the Monthly Activity Detail report appears, click on the Customize button in the right-hand
corner of your screen.
• Once the Customize Monthly Activity Detail dialog box appears, click on the Display tab, change
the Date range to Last Quarter (or Last Month if submitting sales taxes monthly), change the
title of the report to Sales Tax Report, and make sure that only the Date, Num, Description,
Category, Clr, and Amount options are selected in the Column box.

51 | Page
Sales Tax Processing Cont’d
• Click on the Accounts tab, click on the Clear All button, then scroll down and select the Sales Tax
Liability Account.

52 | Page
Sales Tax Processing Cont’d
• Click on the Categories tab and make sure all categories are selected. Check and make sure that
the Payee: Category contains: and Memo contains: boxes are blank.
• Click on the Payees tab, make sure that all Payees are selected. Check and make sure that the
Category: Payee contains: and Memo contains: boxes are blank.

53 | Page
Sales Tax Processing Cont’d
• Click on the Advanced tab and make sure that the Amounts box shows All, the Transaction types
box shows All transactions, the Transfers tab shows Include all, the Subcategories box shows
Show all, and that only the Not cleared transactions is checked under Status, then click on the
OK button.
• Your report should look similar to this report. You can expand your columns as necessary by
Clicking on the double line next to that column and dragging them. Once you have the report
formatted, click on the Save Report button in the Menu bar.

54 | Page
Sales Tax Processing Cont’d
• Once the Save Report dialog box appears, change the Report name to Sales Tax Report and
make sure the Save in box shows [My Saved Reports], then click the OK button.
• Immediately following the sale, please be sure to submit via email a copy of the form in the link
below for the sales taxes due to the Accounts Payable Manager in Financial Services. The
original along with the check should also be mailed in to Financial Services.
• The check for the sales taxes should be recorded in the Sales Tax Liability Account in Quicken.
Visit https://www.uaex.edu/yard-garden/master-gardeners/resources.aspx
to use the Record of
Sales Report to submit to the Accounts Payable Manager in Financial Services.

55 | Page
• Staff Chairs may use this checklist to ensure all documentation has been reviewed. It’s not
necessary but can be added to monthly reports sent to Financial Services.
