
1
Creating a Profile & Entering
Orders Information
How to: create/update your DPS Profile and enter orders
information
DPS

2
DPS HOMEPAGE
(New User)
From your DPS Homepage:
1. Check the box next to the words “I have
reviewed the…”
2. Click “Create Profile”
Note: If you have never used DPS before, you
will need to acknowledge your branch of
service information. Click the blue words
“United States Navy specific information”
Note: the words will change depending on your
branch of service (i.e. Navy, Air Force, Army,
USMC, USCG) A new window will open with
your branch of service information; once you
have read the information, close the window to
return to your DPS Homepage

3
DPS HOMEPAGE
(Returning User)
NEW USERS
If it has been 30 days or more since you
accessed your DPS account you are
required to review and update your User
Profile.
Click “Review User Profile”

4
Customer Profile
Your Customer Information is auto-filled with
your name, email address, phone number and
branch of service.
Make sure to update any information and
select whether you are a military service
member or civilian employee
TIP: It is strongly recommended that you use
a personal email and phone number.
It's best to use your personal email that
you have access to. Once your HHG/UB
shipments are booked, you will get email
updates to this "primary" email regarding
your shipments.
5
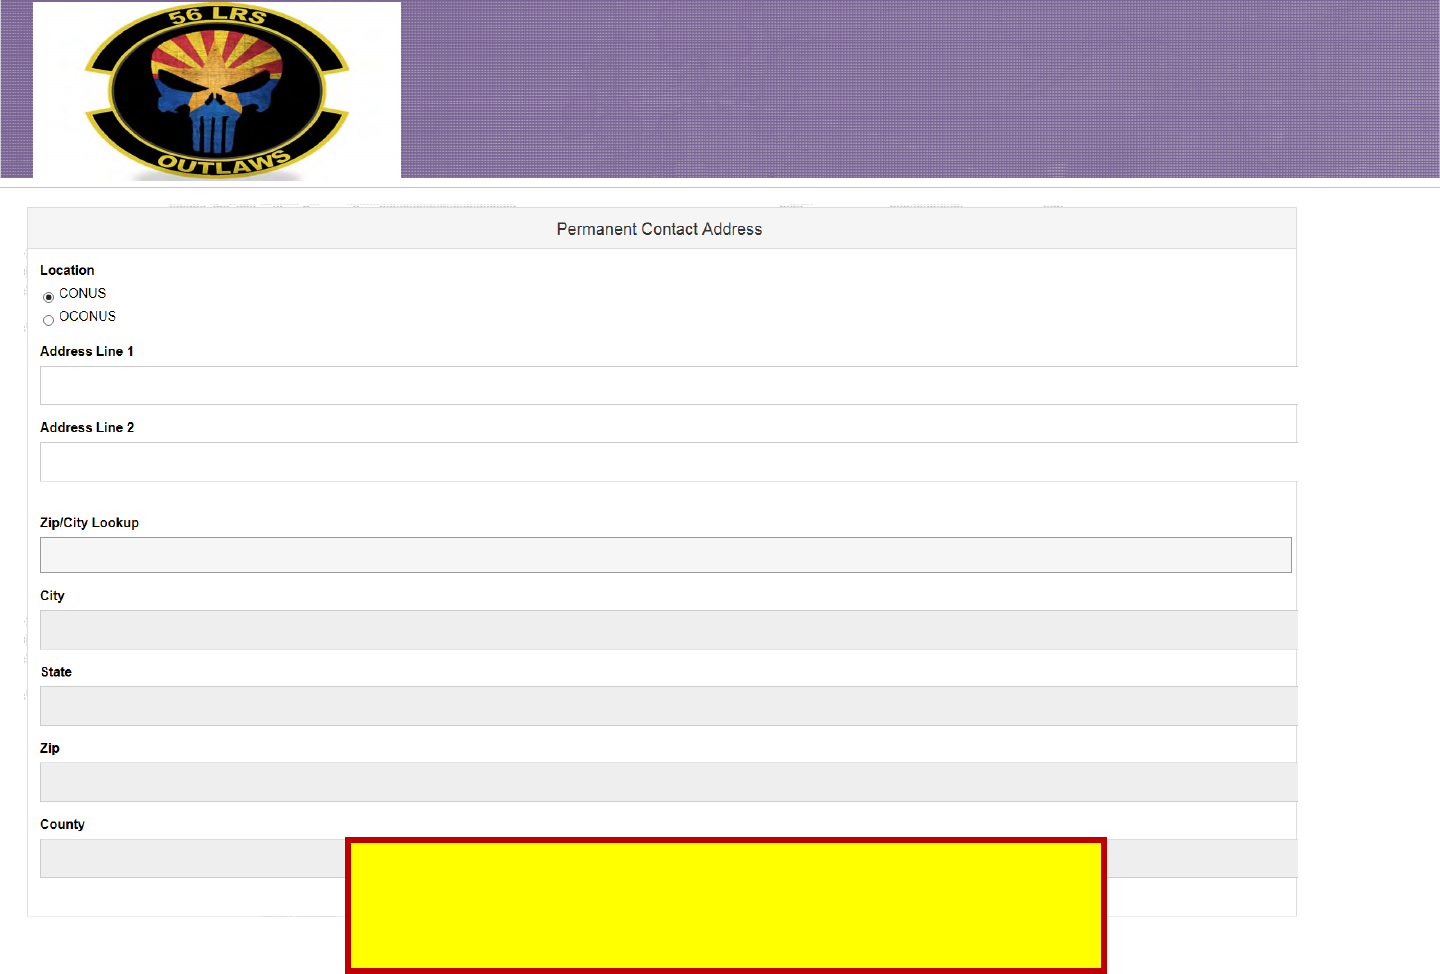
Permanent Contact Address
Permanent Contact Address: A permanent contact address is
required to continue creating your profile. This is an address where
you can receive mail or be reached during the transition to your new
duty station.

6
Permanent Contact Address, cont.
1. Select whether the address is within
the Continental United States
(CONUS) or Outside the Continental
United States (OCONUS or overseas)
2. Enter the Street Address
3. Enter the City Name OR ZIP Code.
DPS will provide a list of cities with
the name or ZIP Code you entered;
select the correct location
IMPORTANT! Do not hit the tab or enter
key when entering the city name/ZIP!

7
Permanent Contact Address, cont.
Once you have selected the correct
ZIP/City in the lookup field, the system
automatically populates the information
in the required City, State, ZIP & County
fields

8
Point of Contact
It is highly recommended that if you are married, you add your
spouse as a Point of Contact. Later on in the application, you will be
asked to indicate whether you have a releasing/and or receiving
agent. If you do not add the information in this section, the list will
not generate when asked for your agent information.
Unless you designate a releasing/receiving agent in your DPS
application, your move information will NOT be shared. You can name
anyone over the age of 18 to act as your agent. If you DO name an
agent, you will need to make them aware that they must be available
on the days of pack, pickup and/or delivery between the hours of
0800 and 1700. If your agent is not available on agreed upon dates
you may be charged an attempted pickup/delivery fee.
To add a contact, click the “Add Contact” button
WHOEVER you
want to act as your
backup during pick-
up or delivery, click
here to add them
as a POC.

9
Adding a Contact, cont
Fields with a red asterisk ( * ) are required items
Enter the name, phone number and email address
of your contact.
You must respond to the Power of Attorney (POA)
and Letter of Authorization (LOA) fields. If your
contact has a POA or LOA, indicate yes; if they do
not have a POA or LOA, indicate no.
Click the “Save” button.

10
Deleting a Contact
If you need to delete a contact, use the drop-down menu in the action column and select ‘Delete’. A new box will
popup that asks you to confirm the delete.
If you need to edit a contact, use the drop-down menu in the action column and select ‘Edit’.
Once you have finished adding, deleting or editing your contacts, click the “Create Profile” button.

11
Customer Profile
Once you have confirmed your customer
information, added a permanent contact
address and any points of contact, you will
receive confirmation that your profile has
been successfully updated.
To add your orders information and create a
shipment request, click the blue “Home”
button at the bottom of the page.

12
Orders Information
The next step in the process is to add your new
orders information.
Click “Start a New Move”
NEW USERS: Skip to slide 14
RETURNING USERS: continue to slide 13

13
Entering Orders Information
(Returning Users)
If you have previously had a move
arranged through the DPS system
returning users will see all current
and past move requests.
Click “Start a New Move”
IMPORTANT! Returning users
should NOT modify orders that have
already been processed (i.e.
anything that appears under the
“Past Moves” header). If you have
entered orders information and
need to create a shipment or add a
new shipment request, you can
click on the blue words “Edit my
order/shipment info” link on the
right side under the ‘Current Move’
header.
NOTE: if you have received an
orders modification you should
enter the new orders information
and create a shipment.

14
Entering Orders Information
(New Users)
The next step in the Self-Counseling Process is to enter your orders information. You must
enter new orders information in order to create a shipment request.
LEAVE BLANK unless your
orders SPECIFICALLY states a
max weight allowance

15
In the ‘Rank & Hard Copy Orders’ section, you will be prompted to identify your rank/pay grade and indicate
whether or not you have hard copy orders or a Homeport Change Certificate.
Orders Details: Rank & Hard Copy
Orders

16
Using the drop down menu,
select Rank/Pay Grade
Indicate whether or not you have
Hard Copy Orders
TIP: say yes to this question even if you do
not have orders in hand. This will allow
you to finish submitting the application.
Please be aware that your application will
not be processed until you provide the
responsible origin counseling office with
your orders and any other supporting
documents.
Indicate whether you have a
Homeport ChangeCertificate
(HPC)
NOTE: A HPC is issued to Navy members
who are stationed on a vessel that is
changing homeports from one location to
another. Entitlement to use a HPC expires
one year from the effective date of the
homeport change. If you say yes to this
question you will be prompted to answer
additional questions regarding your
Homeport Change Certificate.
Orders Details: Rank & Hard Copy
Orders

17
Orders Details: Rank & Hard Copy
Orders
Click here
Once you have entered the required information, click ‘Next’
Reminder: required information is indicated by a red asterisk ( * ); if the field does not have a red asterisk it is not
necessary to enter information.

18
Orders Details: Order Information
The next step is to enter your order number and date.
If you are unsure of your orders number you may use ‘DPS123’ .
Use the Calendar icon to select the date orders were issued. If you are unsure, use the current date.
Once you have entered all of your orders information, click ‘Next’
TIP: the Headquarters Issuing Orders field is NOT required and may be left blank.

19
Orders Details: Duty Stations
The next step in entering your orders information is to provide your current and new duty station locations.
"Duty Station Class" applies to
Navy/Coast Guard, all other
branches will not see this drop
down menu. Just continue to
input your authorized from/to
location. For all branches
other than Navy/Coast Guard,
skip to SLIDE 25.

20
Current Station:
Entering Location
Using the drop down menu, select whether your new duty
station is ‘sea’ or ‘shore’.
To enter the City/State/Country of your current
duty station, click the ‘Enter Location’ button
A new window opens to select your duty station.
Make sure to check the appropriate
CONUS/OCONUS button before typing in your city.
Click OK
TIP: Type in the name of the city BUT DO NOT HIT ENTER!! A
new drop down list will present all of the cities with the same
name. It is only necessary to type in the first four letters of
the city name. Select the correct city/state/ZIP from the
populated list. The relevant information will automatically
appear once you have made your selection.

21
New Duty Station
Using the drop down menu, select whether your current duty
station is ‘sea’ or ‘shore’.
If you selected ‘sea’ as your duty station class, use the drop
down menu and select your ship name.
NOTE: If you are assigned to a vessel which has not yet been
commissioned, please contact SDDC Help Desk and request
assistance for it to be added
TIP: Some Navy members will be assigned to a billet that
counts as sea duty for rotation purposes but is not indicated in
the drop down menu, such as air squadrons. If your command
does not appear in the drop down menu, select your duty
station class as ‘shore’ – this will not affect your entitlement

22
New Duty Station:
Entering Location
To enter the City/State/Country of your new duty
station, click the ‘Enter Location’ button
A new window opens to select your duty station. Make
sure to check the appropriate CONUS/OCONUS button
before typing in your city.
TIP: Type in the name of the city BUT DO NOT HIT ENTER!! A new
drop down list will present all of the cities with the same name. It
is only necessary to type in the first four letters of the city name.
Select the correct city from the populated list. The relevant
information will automatically appear once you have made your
selection.
Technical Tip: Some users are experiencing difficulty with entering duty station locations and pickup/delivery
address. This happens for a variety of reasons and can be solved by increasing your screen magnification

23
Duty Stations
When you have finished entering your current and new duty station information, click ‘Next’.
Click here

24
Orders Selection:
Arduous Duty
Navy members who select
‘sea’ duty as their current or
new duty station will be
prompted to indicate
whether their sea duty is
considered unusually
arduous.
Unusually arduous sea duty is one
in which your command is away
from its homeport for an extended
period of time.
Click ‘Next’

25
Order Selection: Order Type
In this section, you will be prompted to select your Order Type and then select one of the Authorized Order options
from the populated list. You can click on each order type for an explanation and review your choices.
If you are not sure which order type and authorized to select, choose Permanent Change of Station as the Order Type
and Shipment of HHG Permitted as Authorized. Click ‘Next’.
If you need assistance determining which type of orders and authorized shipments to choose, please email a copy of
your orders to householdgoods@navy.mil.
26
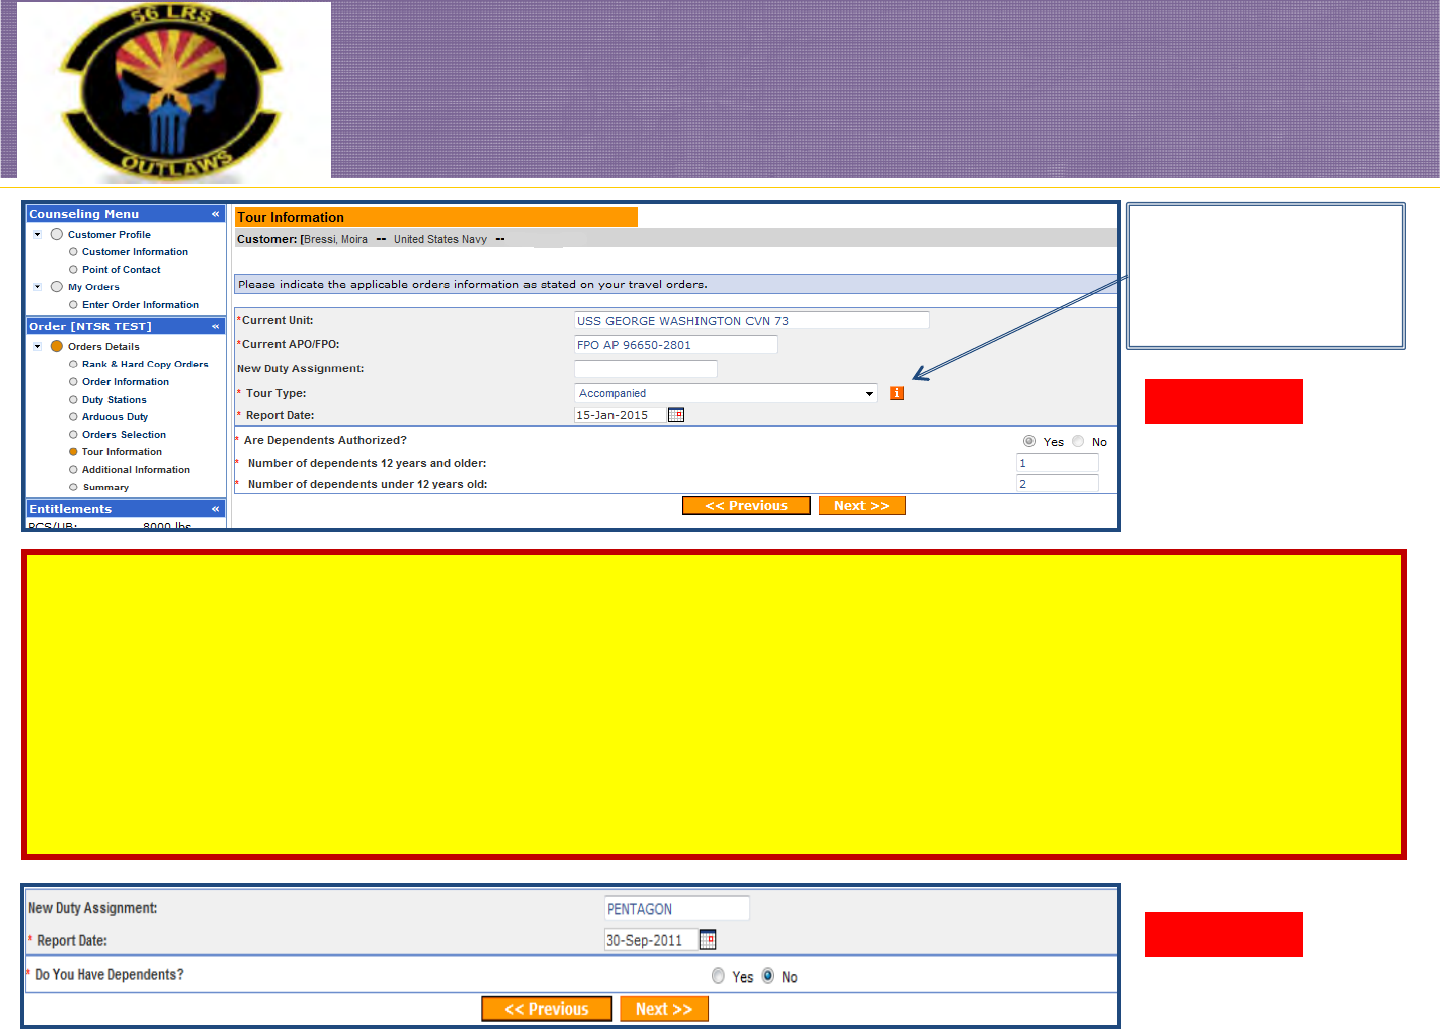
Orders: Tour Information
You will next be asked to identify your tour information. If you indicated that your current or new duty station is Sea
Duty and/or OCONUS (overseas), you will be prompted to provide your current unit and APO/FPO address and
indicate whether your OCONUS tour is accompanied or unaccompanied. If you select accompanied, you will be
prompted to indicate how many dependents you have over the age of 12 and how many are under the age of 12 (don’t
forget to count your spouse as a dependent over 12!).
If you selected a CONUS (within the US) as your current or new duty station, your tour information screen will appear
similar to the lower portion of this slide.
Once you have completed the required entries, click ‘Next’.
OCONUS
CONUS
NOTE: If you select unaccompanied
as Tour Type but have dependents,
make sure to say ‘yes’ to the question
that asks “Are Dependents
Authorized” – this will ensure the
system shows your full weight
entitlements.

27
Orders: Additional Information
On this screen, based on your orders
and the information you have entered
so far, you will be asked additional
information.
As a general rule, members who have
PCS orders within CONUS are not
authorized POV shipment. For more
clarification on this entitlement you
may send a copy of your orders to
householdgoods@navy.mil.
If you plan on shipping a motorcycle,
you will be asked to provide
additional information (i.e. make,
model, etc.) later on in the
application.
Select a response to the questions
regarding shipment of a boat, mobile
home or consumables.
Select yes to the last question if you
have items in Non-Temporary
Storage at gov't expense (long term
or NTS).
Click ‘Next’

28
Entitlement Summary
Once you have entered all of the requested orders information you will be presented with a summary of your entitlements. This
information is subject to change upon validation of your application. For this presentation, we have indicated that our orders
are from a shore command to an arduous sea command within the Continental United States. The summary informs us that we
are entitled to a Household Goods (HHG) shipment.
It is important to review the information provided in your entitlement summary. Once you have read the information, check the
box to verify that you have read the information and it is correct.
Click ‘Next’
TIP – for information on your new duty
station, click the blue words “New Duty
Station Instructions”. This opens a new
window with information relevant to your new
duty station.

29
Now that you have created or updated your profile and entered
your new orders information, you will continue the self-
counseling and create a shipment request.
For additional step-by-step instructions on how to create a
shipment, check out the "How to create a HHG move" and/or
"How to create a DITY move" guides for further instructions.


JTR: https://www.defensetravel.dod.mil/Docs/perdiem/JTR.pdf
DOD Household Goods Portal: http://www.move.mil
POV Locator: http://www.pcsmypov.com/
Shipping a POV: www.transcom.mil/dtr/part-iv/dtr_part_iv_app_k_3.pdf
Storing a POV: www.transcom.mil/dtr/part-iv/dtr_part_iv_app_k_4.pdf
Weight Estimator Form: www.move.mil/documents/dod/weightestimator.xls
It’s Your Move Booklet: https://www.ustranscom.mil/dtr/part-iv/dtr_part_iv_app_k_1.pdf
Links
