User Manual
Please read and understand the manual
English Version-英语
Model
X3 Pro
Screen Size
1.54 inch
Battery
capacity
280mAh
Charging
voltage
5V±0.2V

Charging time
2.5 hours
Battery life
7-10 days
Waterproof
level
5ATM
Standby time
30 days
Operating
temperature
-20℃--45℃
Bluetooth
version
BLE5.0
Screen
material
Glass
Strap width
22mm
Product Introduction
1, Long press the side button and wait for the watch to vibrate to
boot, press and hold the touch area for 2 seconds on the dial interface to
enter the dial switch, slide left and right to select the dial, and click on the
dial preview to switch the dial。

2, Swipe left and right on the dial interface to switch shortcut
functions, including today’s activity data, heart rate measurement,
sleep record, and breathing training。
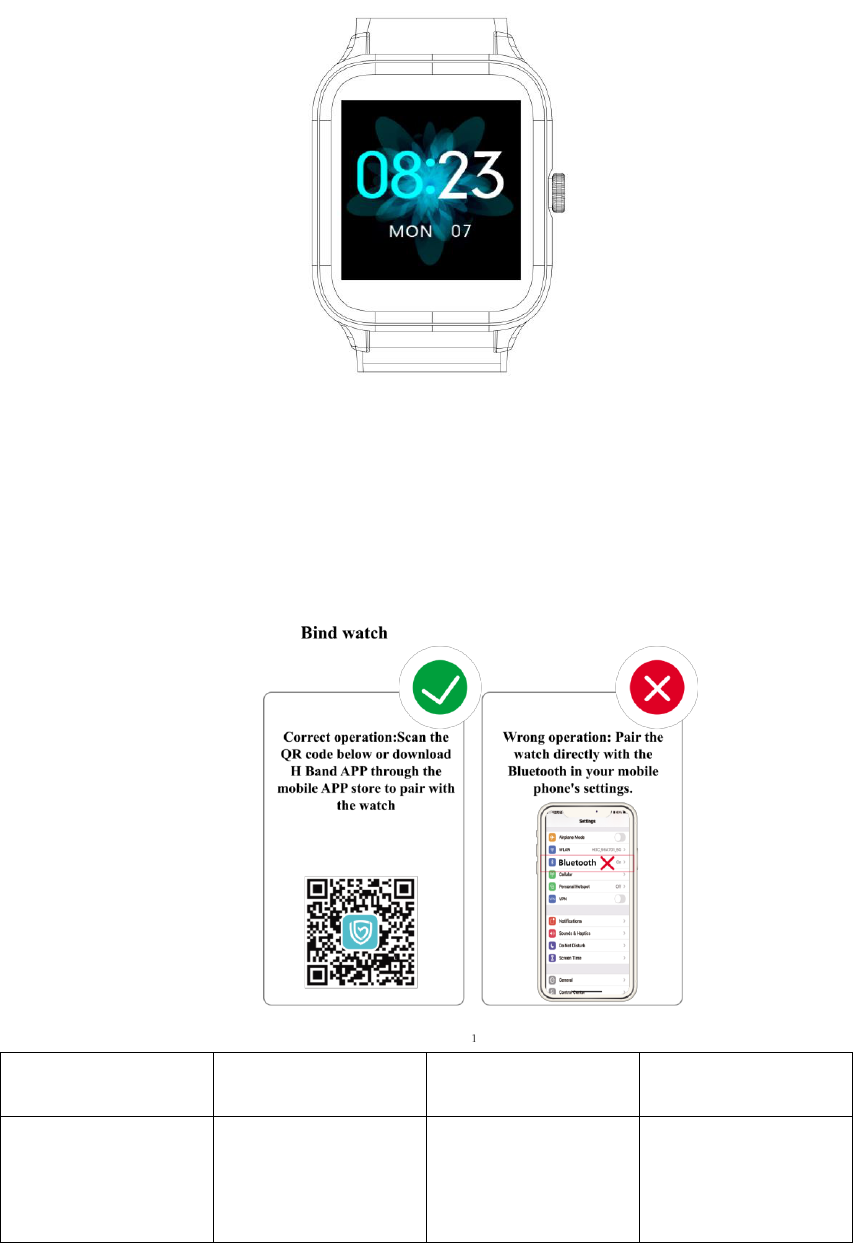
Introduction To the Connection between
Watch and Mobile Phone
1、Download and install mobile APP(GloryFit)
Use the mobile browser program to download by scanning the
QR code on the packaging box or the built-in QR code on the watch
end。 The download process requires the mobile phone to be
connected to the WIFI network or data traffic download。 After the
download is complete, install it。 After the installation is complete,
open GloryFit。 Give this software the corresponding permission, the
permission used is required for Bluetooth connection。 (Note:
GloryFit supports systems above IOS9.0, systems above Android 6.0)
(GloryFit QR code)
2、The way to connect the watch to the phone
Turn on the Bluetooth switch of the mobile phone, and then open
the GloryFit application on the mobile desktop。 You can choose to skip
the login or use the email and other third-party login methods to log in。
Before logging in, you need to agree to the "User Agreement" and
"Privacy Policy"。 After successful login, set the background Run
permissions and personal information settings。
Android system connection method (you must click Allow all the
prompts to ensure the normal operation of the APP): In the select device
interface, give GloryFit location information and Bluetooth usage
permissions, click "select bracelet" to search for the device, and select
the corresponding device (X3 Pro) Connect and bind, and then grant
permissions according to the APP prompts。
ios system setting method: click "select bracelet" on the device selection
interface to search for the device, select the corresponding device (X3
Pro) to connect and bind, wait a few seconds, and then prompt the watch
end and mobile phone Bluetooth pairing request (ios need to pair,
Android does not need ) Please allow "Bluetooth pairing" to complete
the Bluetooth connection between the mobile phone and the device。
Will the system pop up "Allow" X3 Pro" to display the "iphone"
notification on ios 13 and above? Click "Allow"。

Important:
If the Apple mobile phone is not used for a long time (more than 2
hours), in standby or sleep mode (the phone has not been used, it
is in a black screen state), GloryFit may be cleaned up by the Apple
IOS system, and the GloryFit application is disconnected from the
watch。 , The GloryFit application function will not be available。
Open the GloryFit application again and the watch will
automatically reconnect。
After installing the GloryFit software on the Android phone, you
need to open the background application startup permission in the
phone's settings。 Each phone has a difference。 Take Huawei
mobile phone as an example, the steps are as follows:

Settings-Application-Application startup management-GloryFit, find the
APP application, change the automatic management to manual
management, and open all permissions (allow self-start, allow associated
startup, allow background activities)。 This work is only for the GloryFit
application to be able to maintain the Bluetooth connection with the
watch when the phone is in standby (the phone is not on the screen), and
will not be cleaned up by the Android system。
Watch Function Introduction
1、Heart Rate
Swipe the second page from the left on the dial interface to enter
the heart rate measurement interface。 Enter this interface to
automatically start the heart rate test。 After the test duration is 50
seconds, the screen will automatically turn off and stand by。 Please
maintain a sitting posture before the test。 (Note: The watch should not
be worn too tightly or too loosely and keep a finger distance from the
wrist to ensure the accuracy of the data。)
2、Training
Swipe on the dial interface to enter the function menu interface to
find the multi-sport function, click the multi-sport icon to enter the sport
mode。 The watch provides:( Running,Walking,Yoga,Jumping Jack,
Alpinism,Badminton,Treadmill,Spinning bike,Cycling,Basketball,
Swimming,Tennis)12 kinds of exercise modes for users to choose,
exercise history record will save the latest 5 exercise data for viewing。
When the watch and GloryFit are connected, the exercise mode is
turned on in GloryFit, and the watch will start the current exercise
synchronously。 Part of the exercise mode GloryFit requires the use of
mobile phone GPS。
Exercise record storage conditions:
1。 All exercises require more than 60 seconds
2。 The movement distance with steps is greater than 100 meters
3。 Exercise calories without steps are greater than 1kcal
4。 The movement started by GloryFit, the movement with track needs
GPS signal to have data
3、Message
This function can be set to GloryFit→APP reminder setting switch,
when set to "on", the phone receives applications (WeChat, QQ,
lnstagram, YouTube, Messenger, Gmail, Snapchat, Facebook, Twitter,
WhatsGloryFit, Pinterest, Hangouts, LinkedIn, When Skype, Tumblr, Viber,
LINE, Google+, Flickr, VKontakte, Kakaotalk, others, etc。) message is
pushed, the push content can be displayed on the watch (IOS needs to
be paired, Android permissions need to be turned on, and the device can
promptly push normally)。 Store up to 8 messages in the watch
4、Find Phone
Swipe down on the dial interface to enter the shortcut navigation bar,
and click the Find phone icon to find the phone。 If the phone is
connected to the watch, the phone will vibrate and ring。 If it is in the
disconnected state, the click is invalid。(For connection status, please
check the Bluetooth icon in the upper left corner of the shortcut
navigation bar)
5、Music
Swipe to enter the function menu on the dial interface to find the
music function, click Open to enter the music control interface, if the
phone is connected to the watch, click the corresponding play, previous
song, next song, pause, you can enter the phone player to control music
playback 。 If it is in the disconnected state, the Bluetooth icon on the
interface will display disconnected。 (Note: There may be compatibility
issues due to the large number of playback software and Android mobile
phone manufacturers。 It is recommended to open the mobile phone
music player before using it, and then use the music control Features。)
6、Stopwatch
Swipe to enter the function menu on the dial interface to find the
stopwatch function, click to open the stopwatch function, click the start
button in the lower right corner to enter timing, click the button again to
change to pause timing or use a short physical button to start/pause,
click the button in the lower left corner to restore Timing, the stopwatch
will pause when exiting during timing。
7、Timer
Slide into the function menu on the dial interface to find the
countdown function, click to open the countdown function, you can
choose 1min, 5min, 10min to count down。 Or click the "+" in the lower
right corner to customize the countdown。 After setting the time, click
Start and you can return to the function menu。 The countdown will
continue in the background。 When the countdown is completed, the
pop-up window will add a vibration reminder。
8、Breath training
Swipe right on the dial interface to enter the breathing training
interface or slide on the dial interface to enter the function menu to find
breathing training and click to enter。 Breathing training provides 1
minute/2 minutes training duration selection, you can select it according
to your needs and start, and perform breathing training dynamically
according to the interface。
9、Setting
Slide down the dial interface to enter the shortcut navigation bar, click
the setting icon in the lower right corner to enter the setting interface,
the setting function includes dial switching, GloryFit download QR code,
device information, factory reset, shutdown, etc。。
Function introduction
Note: GloryFit automatically synchronizes data every hour, and changes
in the number of steps are synchronized in real time。
1、APP reminder
This function can be set to GloryFit→APP reminder setting switch,
when set to "on", the phone receives applications (WeChat, QQ,
lnstagram, YouTube, Messenger, Gmail, Snapchat, Facebook, Twitter,
WhatsGloryFit, Pinterest, Hangouts, LinkedIn, When Skype, Tumblr, Viber,
LINE, Google+, Flickr, VKontakte, Kakaotalk, others, etc。) message is
pushed, the push content can be displayed on the watch (IOS needs to
be paired, Android permissions need to be turned on, and the device can
promptly push normally)。 Store up to 8 messages in the watch。
2、 Call reminder
Turn on "GloryFit"-->Device-->Incoming call reminder, and turn
on the incoming call reminder。 When the phone receives an
incoming call, it will be pushed to the watch and vibrate。
One-click rejection of incoming calls: After this function is
enabled, when the phone receives an incoming call and is pushed to
the watch, you can click the hang-up icon on the watch push
interface to hang up (Note: This function can only be used when the
call reminder is turned on)
Delayed reminder: When this function is enabled, the phone
receives an incoming call and pushes it to the watch according to the
set delay time。 The default delay reminder time is 3 seconds after
the incoming call or a custom time。 The minimum delay is 1 second
and the maximum delay is 10 seconds。 (Note: This feature can only
be used when the call reminder is turned on)
3、More settings
Open "GloryFit"-->Devices-->More settings
Shake to take a photo: After tapping to take a photo, you will
enter the photo interface。 At this time, shaking the watch will
control the phone to take a photo
Find device: Click Find device and the watch will vibrate。
SMS reminder: The SMS received by the phone with this feature
will be pushed to the watch and vibrate
On-screen duration: You can set the on-screen duration of the
watch, support 5 seconds/10 seconds/15 seconds, this function is
default 5 秒。
Time system: The watch time system can be set, supporting
12-hour system/24-hour system。
Device language: You can set the language displayed on the
watch or follow the phone language。 This function follows the
system by default。
4、Dial settings
Open "GloryFit"-->Device-->Dial Settings, the center of the dial will
provide a variety of different styles of dials for selection, these dials can
be pushed to the watch
Custom watch face: select a photo in the phone album to set it as the
watch face
(Note: Please keep the device and mobile phone connected during the
dial push process)
5、Heart rate monitoring
Open "GloryFit"-->Devices-->Heart Rate Monitoring, turn on this
function, the watch will monitor the heart rate in real time for 24
hours, and the heart rate value will be uploaded every 10 minutes。
6、Raise hand to activate display
Turn on "GloryFit"-->Device-->Raise your wrist to turn on the
screen, turn on this function, when you raise your wrist, the watch will
automatically turn on the screen。
7、Do not disturb mode
Turn on "GloryFit"-->Device-->Do Not Disturb Mode, this
function defaults to 22:00-08:00 or a custom time。 When the Do Not
Disturb mode is in the effective time period, the device vibration will
be turned off, and the screen will turn off when you raise your wrist。
Turn off information push。 Outside the do not disturb time period,
you can set to turn off device vibration and turn off information
reminders separately。
8、Smart alarm clock
Open "GloryFit"-->Device-->Smart alarm clock, click to add an
alarm clock at the bottom of the interface, set the time and period
(statutory working days, daily, custom)-->click "√" in the upper right
corner, and the alarm setting is completed。
9、Sedentary reminder
Open "GloryFit"-->Device-->Sedentary Reminder-->Enable
Sedentary Reminder-->(Set the start time and end time) After setting,
it will be saved automatically。 The default value is 08:00-22:00 pm,
the default reminder is every 60 minutes, or the custom reminder
interval is at least 30 minutes and the maximum is 180 minutes。
When the status is "On", the user can set the sedentary reminder
interval。 At this time, the watch will continue to monitor whether the
user is sedentary。 If the user is in this state for longer than the set
time, the watch will vibrate and display the sedentary reminder
interface。
Frequently Asked Questions
1。Mobile APP search for the watch failed
(1) It is recommended to update ” GloryFit ”to the latest Version。
(2) It is recommended to close all programs,restart the Bluetooth,and then
connect。
(3) Confirm whether the mobile phone system meets Android 6。0 or lOS 9。
0 or above。
2。The watch received no alerts,text messages or phone calls
(1) You need to tum on the smart reminder function and the call reminder
switch in the APP,and synchronize to the watch。
(2) The phone needs to be paired with the watch via Bluetooth。(Please
check the column of "Synchronous Data" for details)
(3) You need to keep your watch connected to Bluetooth。
3。Bluetooth is often disconnected
(1) If the distance between the watch and the mobile phone is too far,the
connection effect of more than 7m bluetooth is obviously weakened。
(2) Whether there is a shield between the watch and the mobile phone,the
human body,wearing metal jewelry,etc,will interfere with the bluetooth
connection signal。
(3) Whether the bluetooth function of the mobile phone is abnormal。
4。About data
The data of the watch is synchronized at least once every to the mobile
phone。
5。How to restart settings
Shutdown operation:watch-->press Watch 's button
6。Do I need to keep my bluetooth on when I wear my watch?
(1) For the three functions,counting steps,sleeping and alarm clock,you do
not need to connect the watch to the mobile phone all the time,You need to
wear a watch when you exercise,Because when you connect the watch,you
can view the data synchronously in your mobile phone after the exercise。
(2) For the functions of call alert。message alert,find the phone,you need to
turn on the mobile phone's bluetooth,and maintain the connection with the
mobile phone。
* More detailed questions can be answered with help and feedback in the
APP Operation steps:GloryFit>My>(IOS)Help/(Android)Common center。
NOTE: This equipment has been tested and found to comply with the limits for a
Class B digital device, pursuant to part 15 of the FCC Rules. These limits are
designed to provide reasonable protection against harmful interference in a
residential installation. This equipment generates uses and can radiate radio
frequency energy and, if not installed and used in accordance with the instructions,
may cause harmful interference to radio communications. However, there is no
guarantee that interference will not occur in a particular installation. If this
equipment does cause harmful interference to radio or television reception, which
can be determined by turning the equipment off and on, the user is encouraged to
try to correct the interference by one or more of the following measures:
- Reorient or relocate the receiving antenna.
- Increase the separation between the equipment and receiver.
-Connect the equipment into an outlet on a circuit different from that to which the
receiver is connected.
-Consult the dealer or an experienced radio/TV technician for help
Changes or modifications not expressly approved by the party responsible for
compliance
could void the user's authority to operate the equipment.
This device complies with Part 15 of the FCC Rules. Operation is subject to the
following
two conditions:
(1) this device may not cause harmful interference, and
(2) this device must accept any interference received, including interference that may
cause undesired operation.
