
EN

SPECIAL MESSAGE SECTION
PRODUCT SAFETY MARKINGS: Yamaha electronic
products may have either labels similar to the graphics
shown below or molded/stamped facsimiles of these graph-
ics on the enclosure. The explanation of these graphics
appears on this page. Please observe all cautions indicated
on this page and those indicated in the safety instruction sec-
tion.
The exclamation point within the equi-
lateral triangle is intended to alert the
user to the presence of important operat-
ing and maintenance (servicing) instruc-
tions in the literature accompanying the
product.
The lightning flash with arrowhead sym-
bol, within the equilateral triangle, is
intended to alert the user to the presence
of uninsulated “dangerous voltage”
within the product’s enclosure that may
be of sufficient magnitude to constitute a
risk of electrical shock.
IMPORTANT NOTICE: All Yamaha electronic products
are tested and approved by an independent safety testing
laboratory in order that you may be sure that when it is prop-
erly installed and used in its normal and customary manner,
all foreseeable risks have been eliminated. DO NOT modify
this unit or commission others to do so unless specifically
authorized by Yamaha. Product performance and/or safety
standards may be diminished. Claims filed under the
expressed warranty may be denied if the unit is/has been
modified. Implied warranties may also be affected.
SPECIFICATIONS SUBJECT TO CHANGE: The
information contained in this manual is believed to be cor-
rect at the time of printing. However, Yamaha reserves the
right to change or modify any of the specifications without
notice or obligation to update existing units.
ENVIRONMENTAL ISSUES: Yamaha strives to produce
products that are both user safe and environmentally
friendly. We sincerely believe that our products and the pro-
duction methods used to produce them, meet these goals. In
keeping with both the letter and the spirit of the law, we
want you to be aware of the following:
Battery Notice: This product MAY contain a small non-
rechargeable battery which (if applicable) is soldered in
place. The average life span of this type of battery is approx-
imately five years. When replacement becomes necessary,
contact a qualified service representative to perform the
replacement.
Warning: Do not attempt to recharge, disassemble, or
incinerate this type of battery. Keep all batteries away from
children. Dispose of used batteries promptly and as regu-
lated by applicable laws. Note: In some areas, the servicer is
required by law to return the defective parts. However, you
do have the option of having the servicer dispose of these
parts for you.
Disposal Notice: Should this product become damaged
beyond repair, or for some reason its useful life is consid-
ered to be at an end, please observe all local, state, and fed-
eral regulations that relate to the disposal of products that
contain lead, batteries, plastics, etc.
NOTICE: Service charges incurred due to lack of knowl-
edge relating to how a function or effect works (when the
unit is operating as designed) are not covered by the manu-
facturer’s warranty, and are therefore the owners responsi-
bility. Please study this manual carefully and consult your
dealer before requesting service.
NAME PLATE LOCATION: The graphic below indicates
the location of the name plate. The model number, serial
number, power requirements, etc., are located on this plate.
You should record the model number, serial number, and the
date of purchase in the spaces provided below and retain this
manual as a permanent record of your purchase.
Model
Serial No.
Purchase Date
CAUTION
RISK OF ELECTRIC SHOCK
DO NOT OPEN
CAUTION: TO REDUCE THE RISK OF ELECTRIC SHOCK.
DO NOT REMOVE COVER (OR BACK).
NO USER-SERVICEABLE PARTS INSIDE.
REFER SERVICING TO QUALIFIED SERVICE PERSONNEL.
92-469- 1 (rear)

CP300 Owner’s Manual
2
The above warning is located on the rear of the unit.
Explanation of Graphical Symbols
The lightning flash with arrowhead symbol
within an equilateral triangle is intended to
alert the user to the presence of uninsulated
“dangerous voltage” within the product’s
enclosure that may be of sufficient
magnitude to constitute a risk of electric
shock to persons.
The exclamation point within an equilateral
triangle is intended to alert the user to the
presence of important operating and
maintenance (servicing) instructions in the
literature accompanying the product.
IMPORTANT SAFETY INSTRUCTIONS
1 Read these instructions.
2 Keep these instructions.
3 Heed all warnings.
4 Follow all instructions.
5 Do not use this apparatus near water.
6 Clean only with dry cloth.
7 Do not block any ventilation openings. Install in
accordance with the manufacturer’s instructions.
8 Do not install near any heat sources such as radiators,
heat registers, stoves, or other apparatus (including
amplifiers) that produce heat.
9 Do not defeat the safety purpose of the polarized or
grounding-type plug. A polarized plug has two blades
with one wider than the other. A grounding type plug
has two blades and a third grounding prong. The wide
blade or the third prong are provided for your safety. If
the provided plug does not fit into your outlet, consult
an electrician for replacement of the obsolete outlet.
10 Protect the power cord from being walked on or
pinched particularly at plugs, convenience receptacles,
and the point where they exit from the apparatus.
11 Only use attachments/accessories specified by the
manufacturer.
12 Use only with the cart, stand,
tripod, bracket, or table specified
by the manufacturer, or sold with
the apparatus. When a cart is
used, use caution when moving
the cart/apparatus combination
to avoid injury from tip-over.
13 Unplug this apparatus during
lightning storms or when unused for long periods of
time.
14 Refer all servicing to qualified service personnel.
Servicing is required when the apparatus has been
damaged in any way, such as power-supply cord or
plug is damaged, liquid has been spilled or objects
have fallen into the apparatus, the apparatus has been
exposed to rain or moisture, does not operate normally,
or has been dropped.
(UL60065_03)
NAME PLATE LOCATION: The graphic below indicates
the location of the name plate. The model number, serial num-
ber, power requirements, etc., are located on this plate. You
should record the model number, serial number, and the date of
purchase in the spaces provided below and retain this manual
as a permanent record of your purchase.
Model
Serial No.
Purchase Date
CAUTION: TO REDUCE THE RISK OF
ELECTRIC SHOCK, DO NOT REMOVE
COVER (OR BACK). NO USER-SERVICEABLE
PARTS INSIDE. REFER SERVICING TO
QUALIFIED SERVICE PERSONNEL.
CAUTION
RISK OF ELECTRIC SHOCK
DO NOT OPEN
WARNING
TO REDUCE THE RISK OF FIRE OR ELECTRIC SHOCK, DO NOT EXPOSE THIS APPARATUS TO RAIN OR MOISTURE.

CP300 Owner’s Manual
3
1. IMPORTANT NOTICE: DO NOT MODIFY THIS UNIT!
This product, when installed as indicated in the instructions con-
tained in this manual, meets FCC requirements. Modifications not
expressly approved by Yamaha may void your authority, granted by
the FCC, to use the product.
2. IMPORTANT: When connecting this product to accessories and/
or another product use only high quality shielded cables. Cable/s
supplied with this product MUST be used. Follow all installation
instructions. Failure to follow instructions could void your FCC
authorization to use this product in the USA.
3. NOTE: This product has been tested and found to comply with the
requirements listed in FCC Regulations, Part 15 for Class “B” digital
devices. Compliance with these requirements provides a reason-
able level of assurance that your use of this product in a residential
environment will not result in harmful interference with other elec-
tronic devices. This equipment generates/uses radio frequencies
and, if not installed and used according to the instructions found in
the users manual, may cause interference harmful to the operation
of other electronic devices. Compliance with FCC regulations does
* This applies only to products distributed by YAMAHA CORPORATION OF AMERICA. (class B)
not guarantee that interference will not occur in all installations. If
this product is found to be the source of interference, which can be
determined by turning the unit “OFF” and “ON”, please try to elimi-
nate the problem by using one of the following measures:
Relocate either this product or the device that is being affected by
the interference.
Utilize power outlets that are on different branch (circuit breaker or
fuse) circuits or install AC line filter/s.
In the case of radio or TV interference, relocate/reorient the
antenna. If the antenna lead-in is 300 ohm ribbon lead, change the
lead-in to co-axial type cable.
If these corrective measures do not produce satisfactory results,
please contact the local retailer authorized to distribute this type of
product. If you can not locate the appropriate retailer, please con-
tact Yamaha Corporation of America, Electronic Service Division,
6600 Orangethorpe Ave, Buena Park, CA90620
The above statements apply ONLY to those products distributed by
Yamaha Corporation of America or its subsidiaries.
FCC INFORMATION (U.S.A.)
IMPORTANT NOTICE FOR THE UNITED KINGDOM
Connecting the Plug and Cord
IMPORTANT. The wires in this mains lead are coloured in accor-
dance with the following code:
BLUE : NEUTRAL
BROWN : LIVE
As the colours of the wires in the mains lead of this apparatus may
not correspond with the coloured makings identifying the terminals
in your plug proceed as follows:
The wire which is coloured BLUE must be connected to the terminal
which is marked with the letter N or coloured BLACK.
The wire which is coloured BROWN must be connected to the termi-
nal which is marked with the letter L or coloured RED.
Making sure that neither core is connected to the earth terminal of
the three pin plug.
• This applies only to products distributed by Yamaha-Kemble Music (U.K.) Ltd. (2 wires)
* This applies only to products distributed by
YAMAHA CORPORATION OF AMERICA.
COMPLIANCE INFORMATION STATEMENT
(DECLARATION OF CONFORMITY PROCEDURE)
Responsible Party : Yamaha Corporation of America
Address : 6600 Orangethorpe Ave.,
Buena Park, Calif. 90620
Telephone : 714-522-9011
Type of Equipment : Stage Piano
Model Name : CP300
This device complies with Part 15 of the FCC Rules.
Operation is subject to the following two conditions:
1) this device may not cause harmful interference, and
2) this device must accept any interference received including inter-
ference that may cause undesired operation.
See user manual instructions if interference to radio reception is sus-
pected.
(FCC DoC)

CP300 Owner’s Manual
4
PRECAUTIONS
PLEASE READ CAREFULLY BEFORE PROCEEDING
Please keep this manual in a safe and handy place for future reference.
WARNING
Always follow the basic precautions listed below to avoid the possibility of serious injury or even death from electrical
shock, short-circuiting, damages, fire or other hazards. These precautions include, but are not limited to, the following:
• Do not place the power cord near heat sources such as heaters or
radiators. Also, do not excessively bend or otherwise damage the
cord, or place heavy objects on it.
• Only use the voltage specified as correct for the instrument. The
required voltage is printed on the name plate of the instrument.
• Use only the supplied power cord/plug.
• Check the electric plug periodically and remove any dirt or dust
which may have accumulated on it.
• This instrument contains no user-serviceable parts. Do not attempt
to disassemble or modify the internal components in any way. If it
should appear to be malfunctioning, discontinue use immediately
and have it inspected by qualified Yamaha service personnel.
• Do not expose the instrument to rain, use it near water or in damp or
wet conditions, place on it any containers (such as vases, bottles or
glasses) containing liquids which might spill into any openings. If
any liquid such as water seeps into the instrument, turn off the
power immediately and unplug the power cord from the AC outlet.
Then have the instrument inspected by qualified Yamaha service
personnel.
• Never insert or remove an electric plug with wet hands.
• Do not put burning items, such as candles, on the unit.
A burning item may fall over and cause a fire.
• When one of the following problems occur, immediately turn off the
power switch and disconnect the electric plug from the outlet. Then
have the device inspected by Yamaha service personnel.
- The power cord or plug becomes frayed or damaged.
- It emits unusual smells or smoke.
- Some object has been dropped into the instrument.
- There is a sudden loss of sound during use of the instrument.
CAUTION
Always follow the basic precautions listed below to avoid the possibility of physical injury to you or others, or damage
to the instrument or other property. These precautions include, but are not limited to, the following:
• Do not connect the instrument to an electrical outlet using a
multiple-connector. Doing so can result in lower sound quality, or
possibly cause overheating in the outlet.
• When removing the electric plug from the instrument or an outlet,
always hold the plug itself and not the cord. Pulling by the cord can
damage it.
• Remove the electric plug from the outlet when the instrument is not
to be used for extended periods of time, or during electrical storms.
• Do not place the instrument in an unstable position where it might
accidentally fall over.
• When transporting or moving the instrument, always use two or
more people. Attempting to lift the instrument by yourself may
damage your back, result in other injury, or cause damage to the
instrument itself.
• Before moving the instrument, remove all connected cables, to
prevent damage to the cables or injury to anyone who might trip
over them.
• When setting up the product, make sure that the AC outlet you are
using is easily accessible. If some trouble or malfunction occurs,
immediately turn off the power switch and disconnect the plug from
the outlet. Even when the power switch is turned off, electricity is
still flowing to the product at the minimum level. When you are not
using the product for a long time, make sure to unplug the power
cord from the wall AC outlet.
Power supply/Power cord
Do not open
Water warning
Fire warning
If you notice any abnormality
Power supply/Power cord
Location
DMI-5 1/2

CP300 Owner’s Manual
5
• Before connecting the instrument to other electronic components,
turn off the power for all components. Before turning the power on
or off for all components, set all volume levels to minimum.
• Be sure to set the volumes of all components at their minimum
levels and gradually raise the volume controls while playing the
instrument to set the desired listening level.
• Do not insert a finger or hand in any gaps on the instrument.
• Never insert or drop paper, metallic, or other objects into the gaps
on the panel. This could cause physical injury to you or others,
damage to the instrument or other property, or operational failure.
• Do not rest your weight on, or place heavy objects on the
instrument, and do not use excessive force on the buttons, switches
or connectors.
• Do not use the instrument/device or headphones for a long period of
time at a high or uncomfortable volume level, since this can cause
permanent hearing loss. If you experience any hearing loss or
ringing in the ears, consult a physician.
Yamaha cannot be held responsible for damage caused by improper use or modifications to the instrument, or data that is lost or destroyed.
Always turn the power off when the instrument is not in use.
NOTICE
To avoid the possibility of malfunction/ damage to the
product, damage to data, or damage to other property, follow
the notices below.
Handling and Maintenance
• Do not use the instrument in the vicinity of a TV, radio,
stereo equipment, mobile phone, or other electric devices.
Otherwise, the instrument, TV, or radio may generate noise.
When you use the instrument along with an application on
your iPad, iPhone or iPod touch, we recommend that you
set “Airplane Mode” to “ON” on that device in order to
avoid noise caused by communication.
• Do not expose the instrument to excessive dust or
vibrations, or extreme cold or heat (such as in direct
sunlight, near a heater, or in a car during the day) to
prevent the possibility of panel disfiguration, damage to
the internal components or unstable operation.
• Do not place vinyl, plastic or rubber objects on the
instrument, since this might discolor the panel or
keyboard.
• When cleaning the instrument, use a soft, dry cloth. Do not
use paint thinners, solvents, cleaning fluids, or chemical-
impregnated wiping cloths.
• During extreme changes in temperature or humidity,
condensation may occur and water may collect on the
surface of the instrument. If water is left, the wooden parts
may absorb the water and be damaged. Make sure to
wipe any water off immediately with a soft cloth.
Saving data
• Current memory data (see page 82) is lost when you turn
off the power to the instrument. Save the data to the
storage memory (see page 82)/external device such as a
computer.
Saved data may be lost due to malfunction or incorrect
operation. Save important data to external device such as
a computer.
Information
About copyrights
• Copying of the commercially available musical data
including but not limited to MIDI data and/or audio data is
strictly prohibited except for your personal use.
• This product incorporates and bundles computer
programs and contents in which Yamaha owns copyrights
or with respect to which it has license to use others'
copyrights. Such copyrighted materials include, without
limitation, all computer software, style files, MIDI files,
WAVE data, musical scores and sound recordings. Any
unauthorized use of such programs and contents outside
of personal use is not permitted under relevant laws. Any
violation of copyright has legal consequences. DON'T
MAKE, DISTRIBUTE OR USE ILLEGAL COPIES.
About functions/data bundled with the
instrument
• This device is capable of using various types/formats of
music data by optimizing them to the proper format music
data for use with the device in advance. As a result, this
device may not play them back precisely as their
producers or composers originally intended.
About this manual
• The illustrations and LCD screens as shown in this manual
are for instructional purposes only, and may appear
somewhat different from those on your instrument.
• Windows is a registered trademark of Microsoft
®
Corporation in the United States and other countries.
• Apple, Mac, Macintosh, iPad, iPhone and iPod touch are
trademarks of Apple Inc., registered in the U.S. and other
countries.
• The company names and product names in this manual
are the trademarks or registered trademarks of their
respective companies.
Connections
Handling caution
DMI-5 2/2

CP300 Owner’s Manual
6
Introduction
Introduction
Thank you for choosing the Yamaha Stage Piano CP300. The CP300 features exceptionally high-quality
sound, comprehensive features and a variety of editing functions—making it suitable for a wide range of
applications, including live performance and recording.
We recommend that you read this manual carefully so that you can fully take advantage of the advanced and
convenient functions of the CP300. We also recommend that you keep this manual in a safe and handy place
for future reference.
About this Owner’s Manual
This manual consists of four main sections: Introduction, Basic Operation, Reference and Appendix.
Introduction (page 6)
Please read this section first.
Basic Operation (page 20)
This section explains the basic functions and how to use them in detail.
Refer to this section while you play the CP300.
Reference (page 53)
This section explains how to make detailed settings for the CP300’s various functions. Refer to this section as
necessary.
Appendix (page 94)
This section contains important reference material, including Voice and Drum Kit lists, and various detailed
charts and tables.
• The illustrations and LCD displays as shown in this Owner’s Manual are for instructional purposes only, and may
appear somewhat different from those on your instrument.
Copying of the commercially available musical data including but not limited to MIDI data and/or audio data is strictly
prohibited except for your personal use. If you wish to use such data for occasions other than personal use, consult a
copyright expert.
This product incorporates and bundles computer programs and contents in which Yamaha owns copyrights or with respect
to which it has license to use others’ copyrights. Such copyrighted materials include, without limitation, all computer
software, style files, MIDI files, WAVE data, musical scores and sound recordings. Any unauthorized use of such programs
and contents outside of personal use is not permitted under relevant laws. Any violation of copyright has legal
consequences. DON’T MAKE, DISTRIBUTE OR USE ILLEGAL COPIES. This device is capable of using various types/
formats of music data by optimizing them to the proper format music data for use with the device in advance. As a result,
this device may not play them back precisely as their producers or composers originally intended.
Trademarks
•Windows is the registered trademark of Microsoft
®
Corporation.
•Apple and Macintosh are trademarks of Apple Computer, Inc.
• The company names and product names in this Owner’s Manual are the trademarks or registered trademarks of their
respective companies.

CP300 Owner’s Manual
7
Introduction
Supplied Accessories
• Power cord
• Foot pedal (FC3)
• Owner’s Manual
Main Features
The CP300 gives you the ultimate acoustic grand piano sound—utilizing three-stage dynamic sampling,
providing the ability to change tone with the sustain pedal, and adding a subtle, authentic release sound when
you lift your fingers from the keys.
Among the advanced features are:
• 88-key “Graded Hammer” keyboard with action that is virtually indistinguishable from an actual acoustic
piano.
•Sophisticated AWM synthesis engine and tone generation system, with a maximum polyphony of 128 notes.
Using AWM, the CP300 has 50 original Voices—including a variety of ultra-realistic piano and other
keyboard Voices, plus a wealth of authentic sounds of virtually every instrument type.
•High-grade five-band Master EQ, which enables you to control the tone intuitively using sliders on the
panel.
•Luscious reverb and chorus effects, plus an enormous variety of other effects that add extraordinary depth
and expression to your sound.
• Comprehensive MIDI functions for use with other devices and in larger music production systems.
•Four pedal connectors for maximum expressive capabilities—especially ideal for live performance—and
built-in high-quality stereo speakers.
•A powerful, versatile Performance function, which lets you store and instantly recall your custom CP300
settings, including Dual/Split configurations, Voice and effect parameters, MIDI transmit/receive channel
values and Master Edit settings.
•Built-in 16-track sequencer for recording and playing back your keyboard performance, as well as for
creating complex multi-instrument arrangements and Songs—up to a maximum 16 parts.
•Master mode, which allows you to independently control up to four external tone generators.
• Comprehensive selection of inputs/outputs and interfaces—including two separate stereo output pairs,
stereo inputs, MIDI terminals, and a USB connector.

CP300 Owner’s Manual
8
Introduction
Introduction . . . . . . . . . . . . . . . . . . . . . . . . . . . . . . . . . . 6
Application Index . . . . . . . . . . . . . . . . . . . . . . . . . . . . . . . . . . . . . . . . . . . . . . . . . . 10
Before Using the CP300 . . . . . . . . . . . . . . . . . . . . . . . . . . . . . . . . . . . . . 11
Power Supply Connections . . . . . . . . . . . . . . . . . . . . . . . . . . . . . . . . . . . . . . . . . . 11
Using the Pedals . . . . . . . . . . . . . . . . . . . . . . . . . . . . . . . . . . . . . . . . . . . . . . . . . . 11
Using Headphones . . . . . . . . . . . . . . . . . . . . . . . . . . . . . . . . . . . . . . . . . . . . . . . . 12
Turning the Power On . . . . . . . . . . . . . . . . . . . . . . . . . . . . . . . . . . . . . . . . . . . . . . 12
Adjusting the Brightness of the Display. . . . . . . . . . . . . . . . . . . . . . . . . . . . . . . . . 13
Setting the Volume . . . . . . . . . . . . . . . . . . . . . . . . . . . . . . . . . . . . . . . . . . . . . . . . . 13
Playing the keyboard . . . . . . . . . . . . . . . . . . . . . . . . . . . . . . . . . . . . . . . 14
Playing the Sounds . . . . . . . . . . . . . . . . . . . . . . . . . . . . . . . . . . . . . . . . . . . . . . . . 14
Basic Operation . . . . . . . . . . . . . . . . . . . . . . . . . . . . . . . . . . . . . . . . . . . 15
Display Settings—Basic Operation . . . . . . . . . . . . . . . . . . . . . . . . . . . . . . . . . . . . 15
Restoring the Factory-programmed Settings of the CP300. . . . . . . . . . . . . . . . . . 16
Basic Instructions. . . . . . . . . . . . . . . . . . . . . . . . . . . . . . . . . . . . . . . . . . 18
Basic Operation . . . . . . . . . . . . . . . . . . . . . . . . . . . . . . 20
Control Names and Functions. . . . . . . . . . . . . . . . . . . . . . . . . . . . . . . . 20
Front Panel . . . . . . . . . . . . . . . . . . . . . . . . . . . . . . . . . . . . . . . . . . . . . . . . . . . . . . . 20
Rear Panel . . . . . . . . . . . . . . . . . . . . . . . . . . . . . . . . . . . . . . . . . . . . . . . . . . . . . . . 22
Quick Guide. . . . . . . . . . . . . . . . . . . . . . . . . . . . . . . . . . . . . . . . . . . . . . . 23
Listening to the Demo Songs. . . . . . . . . . . . . . . . . . . . . . . . . . . . . . . . . . . . . . . . . 23
Playing Voices . . . . . . . . . . . . . . . . . . . . . . . . . . . . . . . . . . . . . . . . . . . . . . . . . . . . 25
Playing Different Voices Simultaneously . . . . . . . . . . . . . . . . . . . . . . . . . . . . . . . . 27
Changing the Volume for Each Part (Zone Control) . . . . . . . . . . . . . . . . . . . . . . . 28
Combining Voices—Dual. . . . . . . . . . . . . . . . . . . . . . . . . . . . . . . . . . . . . . . . . . . . 29
Playing Different Voices with the Left and Right Hands—Split . . . . . . . . . . . . . . . 31
Using the Pedals . . . . . . . . . . . . . . . . . . . . . . . . . . . . . . . . . . . . . . . . . . . . . . . . . . 33
Bending Notes—Pitch Bend Wheel . . . . . . . . . . . . . . . . . . . . . . . . . . . . . . . . . . . . 34
Adding a Vibrato Effect to the Sound—Modulation Wheel . . . . . . . . . . . . . . . . . . 34
Enhancing the Sound with Reverb and Chorus. . . . . . . . . . . . . . . . . . . . . . . . . . . 35
Equalizer (EQ) . . . . . . . . . . . . . . . . . . . . . . . . . . . . . . . . . . . . . . . . . . . . . . . . . . . . 36
Key Transposition—Transpose . . . . . . . . . . . . . . . . . . . . . . . . . . . . . . . . . . . . . . . 37
Using the Click. . . . . . . . . . . . . . . . . . . . . . . . . . . . . . . . . . . . . . . . . . . . . . . . . . . . 38
Using the Master Mode. . . . . . . . . . . . . . . . . . . . . . . . . . . . . . . . . . . . . . 39
Selecting a Performance . . . . . . . . . . . . . . . . . . . . . . . . . . . . . . . . . . . . 40
Recording Your Performance . . . . . . . . . . . . . . . . . . . . . . . . . . . . . . . . 41
Recording Your Performance . . . . . . . . . . . . . . . . . . . . . . . . . . . . . . . . . . . . . . . . 42
Re-recording Parts of a Song . . . . . . . . . . . . . . . . . . . . . . . . . . . . . . . . . . . . . . . . 44
Other Recording Techniques. . . . . . . . . . . . . . . . . . . . . . . . . . . . . . . . . . . . . . . . . 46
Song Playback . . . . . . . . . . . . . . . . . . . . . . . . . . . . . . . . . . . . . . . . . . . . 49
Playing Back a Song . . . . . . . . . . . . . . . . . . . . . . . . . . . . . . . . . . . . . . . . . . . . . . . 49
Convenient Functions . . . . . . . . . . . . . . . . . . . . . . . . . . . . . . . . . . . . . . 51
Panel Lock Function. . . . . . . . . . . . . . . . . . . . . . . . . . . . . . . . . . . . . . . . . . . . . . . . 51
MIDI Transmission On/Off . . . . . . . . . . . . . . . . . . . . . . . . . . . . . . . . . . . . . . . . . . . 51
Contents

CP300 Owner’s Manual
9
Introduction
MIDI Panic Control . . . . . . . . . . . . . . . . . . . . . . . . . . . . . . . . . . . . . . . . . . . . . . . . . 52
Built-in Speakers On/Off . . . . . . . . . . . . . . . . . . . . . . . . . . . . . . . . . . . . . . . . . . . . 52
Reference Section . . . . . . . . . . . . . . . . . . . . . . . . . . . . 53
Master Settings—Master Edit . . . . . . . . . . . . . . . . . . . . . . . . . . . . . . . . 53
Detailed Settings for the Voices—Voice Edit . . . . . . . . . . . . . . . . . . . . 56
Voice Edit—Basic Operation . . . . . . . . . . . . . . . . . . . . . . . . . . . . . . . . . . . . . . . . . 56
Detailed Settings for MIDI Operations—MIDI Settings . . . . . . . . . . . . 63
About MIDI . . . . . . . . . . . . . . . . . . . . . . . . . . . . . . . . . . . . . . . . . . . . . . . . . . . . . . . 63
MIDI Settings—Basic Operation . . . . . . . . . . . . . . . . . . . . . . . . . . . . . . . . . . . . . . 64
Miscellaneous CP300 Settings—Other Settings . . . . . . . . . . . . . . . . . 67
Other Settings—Basic Operation. . . . . . . . . . . . . . . . . . . . . . . . . . . . . . . . . . . . . . 67
Master Equalizer Settings . . . . . . . . . . . . . . . . . . . . . . . . . . . . . . . . . . . 72
Using the Performance Functions . . . . . . . . . . . . . . . . . . . . . . . . . . . . 73
Performance Parameters . . . . . . . . . . . . . . . . . . . . . . . . . . . . . . . . . . . . . . . . . . . . 74
Handling Performance Files . . . . . . . . . . . . . . . . . . . . . . . . . . . . . . . . . 76
Performance File—Basic Operation . . . . . . . . . . . . . . . . . . . . . . . . . . . . . . . . . . . 76
Handling Song Files . . . . . . . . . . . . . . . . . . . . . . . . . . . . . . . . . . . . . . . . 81
Song File—Basic Operation. . . . . . . . . . . . . . . . . . . . . . . . . . . . . . . . . . . . . . . . . . 81
Settings for Song Recording and Playback—Song Settings . . . . . . . 85
Song Settings—Basic Operation . . . . . . . . . . . . . . . . . . . . . . . . . . . . . . . . . . . . . . 85
Connecting to a Computer and Other MIDI Devices . . . . . . . . . . . . . . 88
Connecting to External Audio Equipment . . . . . . . . . . . . . . . . . . . . . . . . . . . . . . . 88
Connecting to External Equipment . . . . . . . . . . . . . . . . . . . . . . . . . . . . . . . . . . . . 89
Connecting to External MIDI Equipment . . . . . . . . . . . . . . . . . . . . . . . . . . . . . . . . 90
Connecting to a Computer. . . . . . . . . . . . . . . . . . . . . . . . . . . . . . . . . . . . . . . . . . . 92
Appendix. . . . . . . . . . . . . . . . . . . . . . . . . . . . . . . . . . . . 94
Message List . . . . . . . . . . . . . . . . . . . . . . . . . . . . . . . . . . . . . . . . . . . . . . 94
Troubleshooting . . . . . . . . . . . . . . . . . . . . . . . . . . . . . . . . . . . . . . . . . . . 98
MIDI Data Compatibility . . . . . . . . . . . . . . . . . . . . . . . . . . . . . . . . . . . . 100
Factory Setting List . . . . . . . . . . . . . . . . . . . . . . . . . . . . . . . . . . . . . . . 101
Voice List . . . . . . . . . . . . . . . . . . . . . . . . . . . . . . . . . . . . . . . . . . . . . . . . 103
Program Change List . . . . . . . . . . . . . . . . . . . . . . . . . . . . . . . . . . . . . . 105
Preset Performance List. . . . . . . . . . . . . . . . . . . . . . . . . . . . . . . . . . . . 106
XG Voice List. . . . . . . . . . . . . . . . . . . . . . . . . . . . . . . . . . . . . . . . . . . . . 108
XG Drum Kit List . . . . . . . . . . . . . . . . . . . . . . . . . . . . . . . . . . . . . . . . . . 112
Effect Type List . . . . . . . . . . . . . . . . . . . . . . . . . . . . . . . . . . . . . . . . . . . 114
Effect Parameter List . . . . . . . . . . . . . . . . . . . . . . . . . . . . . . . . . . . . . . 115
Effect Data Assign Table . . . . . . . . . . . . . . . . . . . . . . . . . . . . . . . . . . . 123
MIDI Data Format . . . . . . . . . . . . . . . . . . . . . . . . . . . . . . . . . . . . . . . . . 125
MIDI Implementation Chart . . . . . . . . . . . . . . . . . . . . . . . . . . . . . . . . . 137
Specifications . . . . . . . . . . . . . . . . . . . . . . . . . . . . . . . . . . . . . . . . . . . . 138
Index. . . . . . . . . . . . . . . . . . . . . . . . . . . . . . . . . . . . . . . . . . . . . . . . . . . . 139

CP300 Owner’s Manual
10
Introduction
Listening
• Listening to Demo Songs with different Voices . . . . . . . . . . . . . .“Listening to the Demo Songs” on page 23
• Listening to your recorded performance . . . . . . . . . . . . . . . . . . . . . . . . . . “Playing Back a Song” on page 49
Playing
• Selecting and playing Voices . . . . . . . . . . . . . . . . . . . . . . . . . . . . . . . . . . . . . . . . “Playing Voices” on page 25
• Selecting and playing Performances . . . . . . . . . . . . . . . . . . . . . . . . . . . “Selecting a Performance” on page 40
• Using different pedals. . . . . . . . . . . . . . . . . . . . . . . . . . . . . . . . . . . . . . . . . . . “Using the Pedals” on page 33
• Using multiple MIDI tone generators . . . . . . . . . . . . . . . . . . . . . . . . . “Using the Master Mode” on page 39
Changing Voices
• Viewing the list of Voices . . . . . . . . . . . . . . . . . . . . . . . . . . . . . . . . . . . . . . . . . . . . “Voice List” on page 103
• Viewing the list of Performances. . . . . . . . . . . . . . . . . . . . . . . . . . . . . “Preset Performance List” on page 106
• Combining Voices . . . . . . . . . . . . . . . . . . . . . . . . . . . . . . . . . . . . . . “Combining Voices—Dual” on page 29
• Playing different sounds with left and right hands
. . . . . . . . . . . . . . . . . . . . . . . . . .“Playing Different Voices with the Left and Right Hands—Split” on page 31
• Adding Variations to the Sound . . . . . . . . . . . . . . . . . . . . “Bending Notes—Pitch Bend Wheel” on page 34
“Adding a Vibrato Effect to the Sound—Modulation Wheel” on page 34
“Enhancing the Sound with Reverb and Chorus” on page 35
“Equalizer (EQ)” on page 36
Recording
• Recording your performance . . . . . . . . . . . . . . . . . . . . . . . . . . . . “Recording Your Performance” on page 42
• Deleting recorded Songs. . . . . . . . . . . . . . . . . . . . . . . . . . . . . . . . . . . . . . “Handling Song Files” on page 81
Settings
• Making detailed settings for Voices. . . . . . . . . . . . “Detailed Settings for the Voices—Voice Edit” on page 56
• Making detailed settings for the entire CP300 “Miscellaneous CP300 Settings—Other Settings” on page 67
• Making settings for Master mode . . . . . . . . . . . . . . . . . . . . . . . . “Master Settings—Master Edit” on page 53
• Making detailed settings for MIDI. . .“Detailed Settings for MIDI Operations—MIDI Settings” on page 63
• Making detailed settings for Master Equalizer . . . . . . . . . . . . . . . . . .“Master Equalizer Settings” on page 72
Saving
• Saving the Voice settings. . . . . . . . . . . . . . . . . . . . . . . . . . . . . . . . .“Handling Performance Files” on page 76
Connecting the CP300 to other devices
• What is MIDI?. . . . . . . . . . . . . . . . . . . . . . . . . . . . . . . . . . . . . . . . . . . . . . . . . . . “About MIDI” on page 63
• Connecting to multiple MIDI devices . . . . . . . . . . “Connecting to External MIDI Equipment” on page 90
• Raising the volume. . . . . . . . . . . . . . . . . . . . . . . . . “Connecting to External Audio Equipment” on page 88
• Connecting to a computer . . . . . . . . . . . . . . . . . . . . . . . . . . . . . . . “Connecting to a Computer” on page 92
Quick solutions
• Returning to the main display . . . . . . . . . . . . . . . . . . . . . . “Display Settings—Basic Operation” on page 15
• Resetting the default settings . . . . . “Restoring the Factory-programmed Settings of the CP300” on page 16
• About the display messages. . . . . . . . . . . . . . . . . . . . . . . . . . . . . . . . . . . . . . . . . . “Message List” on page 94
• Troubleshooting . . . . . . . . . . . . . . . . . . . . . . . . . . . . . . . . . . . . . . . . . . . . . . . “Troubleshooting” on page 98
Application Index

CP300 Owner’s Manual
11
Introduction
Before Using the CP300
1 Make sure that the instrument’s [POWER] switch on the rear panel is at the OFF
position.
2 Connect the supplied power cord to the [AC INLET] jack (page 22) on the
instrument’s rear panel.
3 Connect the other end of the power cord to an AC outlet. Make sure your CP300
meets the voltage requirement for the country or region in which it is being used.
Connect the included pedal (FC3) to the [1 SUSTAIN] jack.
An optional FC3/FC4/FC5 foot switch or FC7 foot controller can alternately be connected to this jack. Also
an optional FC3/FC4/FC5 foot switch or FC7 foot controller can be connected to the [4 AUX] jack, and can
be assigned to control a variety of parameters on the instrument (page 33).
Power Supply Connections
Using the Pedals
POWER
ON
OFF
POWER
OFF!!
AC INLET jack
Power cord (included)
AC INLET
ASSIGNABLE FOOT PEDAL
1
SUSTAIN
4
AUX
3
SOFT
2
SOSTENUTO
MIDI
IN
OUT
THRU
USB
OUTPUT OUTPUT INPUT
RL RL/MONO R L/MONO
ASSIGNABLE FOOT PEDAL
1
SUSTAIN
4
AUX
3
SOFT
2
SOSTENUTO
FC7
FC3/FC4/FC5

Before Using the CP300
CP300 Owner’s Manual
12
Introduction
If you are using a set of headphones, connect them to the [PHONES] jack.
Do not use headphones at a high volume for an extended period of time. Doing so may cause hearing loss.
n If the [SPEAKER] button is lit, this indicates that the built-in speakers sound normally when using the
headphones.
Make sure the volume setting of the CP300 and external devices are turned down to the minimum.
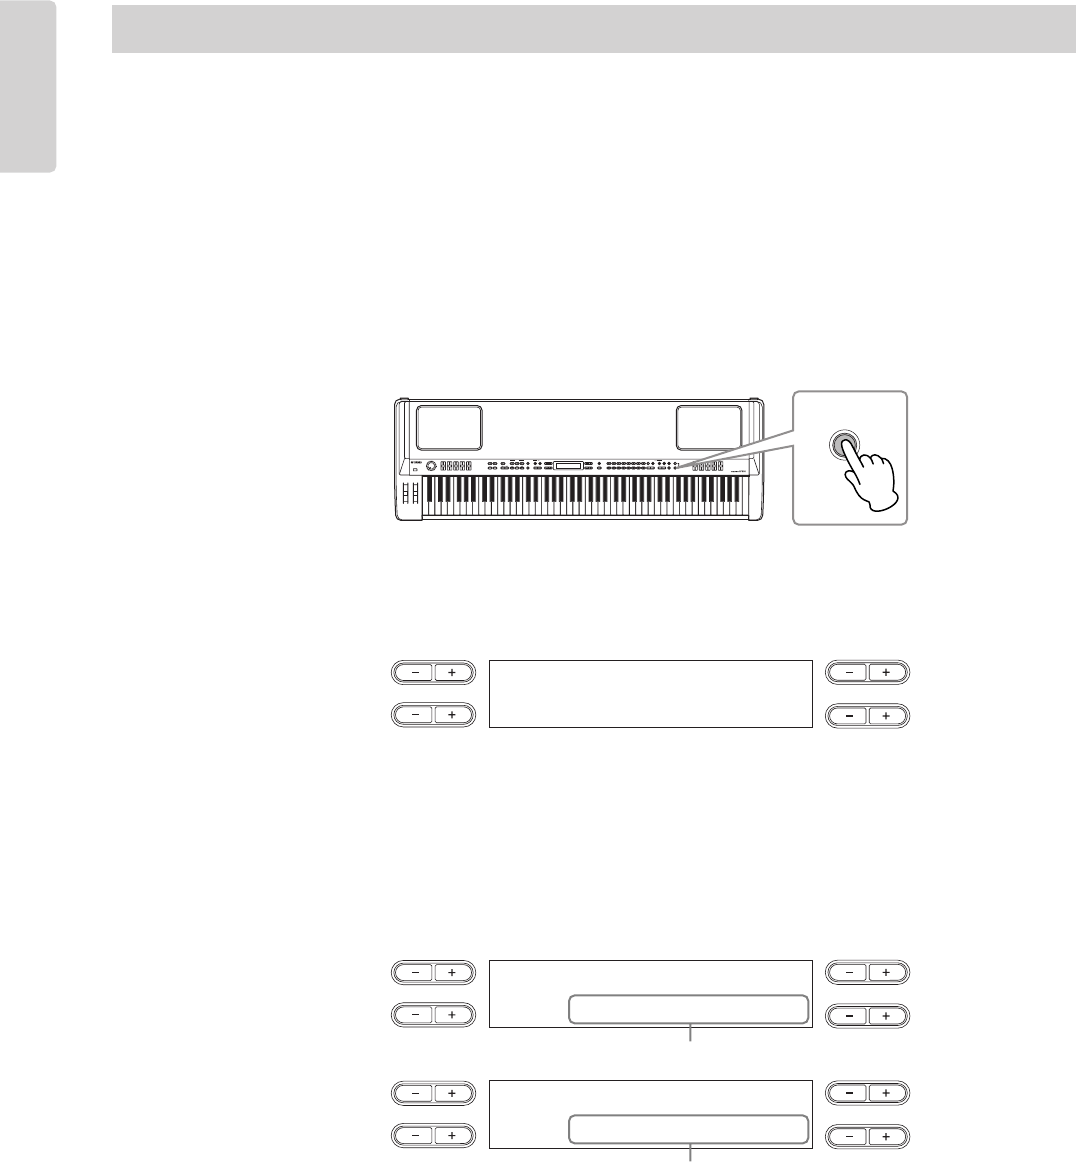
Press the [POWER] switch to turn the power on.
The display located in the center of the front panel lights up.
Press the [POWER] switch again to turn off the power to the CP300.
The display will disappear.
Using Headphones
Tur ning the Power On
PHONES jack
CAUTION
POWER
ON
OFF
MIN MAX
MASTER VOLUME
POWER
ON!
****** PleaseWait ******
****** YAMAHA ******
NO YES
A
B
D
C
Grand Piano 1
NO YES
A
B
D
C

Before Using the CP300
CP300 Owner’s Manual
13
Introduction
You can adjust the contrast of the display by turning the [CONTRAST] knob located to the right of the LCD.
To adjust the volume, use the [MASTER VOLUME] dial located at the left of the panel. When you start
playing, re-adjust the [MASTER VOLUME] dial to the most comfortable listening level.
n The [MASTER VOLUME] dial also controls the volume of the headphones.
Adjusting the Brightness of the Display
Setting the Volume
Terminology
Master Volume: The volume level of the entire keyboard sound.
EXIT
CONTRAST
Grand Piano 1
NO YES
A
B
D
C
MIN MAX
MASTER VOLUME
The level
decreases.
The level
increases.

CP300 Owner’s Manual
14
Introduction
Playing the keyboard
Tr y playing some of the realistic and dynamic CP300 sounds from the keyboard now.
When you turn the power on following the directions in “Power Supply Connections” (pages 11 and 12), the
display below appears.
In this condition, you can play the keyboard and hear the sound of the selected “Grand Piano 1” Voice.
To change the Voice, press any one of the Voice group buttons located at the right of the panel.
Play the keyboard and enjoy the sound.
Playing the Sounds
Grand Piano 1
NO YES
A
B
D
C
GRAND
PIANO 1
GRAND
PIANO 2
MONO
PIANO
E. PIANO 1 E. PIANO 2 E. PIANO 3
CLAVI.
VIBES
ORGAN 1 ORGAN 2 HARPSI. STRINGS CHOIR/PAD
GUITAR
BASS
XG
12345678
910111213141516
VOICE/PERFORMANCE
Voice group buttons

CP300 Owner’s Manual
15
Introduction
Basic Operation
In this section you’ll learn about the fundamental operations of the CP300—the use of the panel buttons and controls and
how to restore the CP300’s memory to the factory default settings.
Each function may have many items or parameters from which you can choose. To select an item or parameter,
press one of the A [–][+] – D [–][+] buttons.
Each parameter in the display corresponds to the A [–][+] – D [–][+] buttons next to it.
Sometimes, after you’ve changed the parameter values or settings, you may want to reset them to their normal
condition. To do this, simply press the [–] button and [+] button simultaneously.
n The TEMPO [DOWN][UP] buttons are the same shape as the A [–][+] – D [–][+] buttons. Parameters
corresponding to button pairs of this shape can all be reset to their default values by pressing both buttons
simultaneously.
To execute the operation, press B [+(YES)] button. To cancel the operation, press the B [– (NO)] button.
In general, when a prompt is shown on the upper right of the display, press the appropriate B [– (NO)]
[+(YES)] buttons to execute or cancel the operation.
Press the [EXIT] button to exit from a function.
Display Settings—Basic Operation
GrandPiano1 Choir
Strings E.Bass
NO YES
A
B
D
C
ClickVolume
100
NO YES
A
B
D
C
SaveToMemory Execute?-->
M-001:NewSong.MID
NO YES
A
B
D
C
NO: Cancel
YES: Execute
NO YES
A
B
D
C
CONTRAST
EXIT
Main Set?-->
Octave 0
Basic Operation
CP300 Owner’s Manual
16
Introduction
The CP300 has a Factory Set function for restoring your CP300’s memory to the factory default settings.
This lets you restore the CP300’s default Voices and Performances, as well as its System and other settings.
Refer to “Factory Setting List” on page 101.
There are two ways you can restore the CP300’s memory to the factory default settings: 1) Set the “Factory Set”
parameter in the Other Settings menu, or 2) Turn the power off and turn the power on again while holding the
C7 key (rightmost key on the keyboard).
Method 1
1 Press the [OTHER SETTING] button to access the Other Settings menu.
2 Press the [OTHER SETTING] button repeatedly or use the A [–][+] buttons to call up
“Factory Set” in the display.
3 Use the D [–][+] buttons to select either “Memory File Excluded” or “Memory File
Included.”
Storage memory selections:
Memory File Excluded.......................Memory files are maintained.
Memory File Included .......................Memory files are erased.
n The “Character Code” parameter in the Song File menu does not change (page 84).
Restoring the Factory-programmed Settings of the CP300
OTHER SETTING
FactorySet Execute?-->
MemoryFileExcluded
NO YES
A
B
D
C
FactorySet Execute?-->
MemoryFileExcluded
NO YES
A
B
D
C
FactorySet Execute?-->
MemoryFileIncluded
NO YES
A
B
D
C
Indicates memory files are maintained.
Indicates memory files are erased.

Basic Operation
CP300 Owner’s Manual
17
Introduction
4 Press the B [+ (YES)] button to execute the job.
After the job has been completed, a “Completed” message appears and operation returns to the original
display.
For Factory Set operations that take longer to process, you will see the message “Executing” during processing.
Do not switch the power off while this message is on the display. Turning the power off in this state may cause the
system to freeze.
Method 2
Simultaneously hold down the white key on the right end of the keyboard (C7), and press the [POWER]
switch to turn on the power to the CP300.
In this case, the Memory files saved in the storage memory are not erased.
If you wish to erase Memory files at this time, simultaneously hold down the rightmost white key (C7) and
black key (Bb6) together and press the [POWER] switch to turn on the power to the CP300.
Terminology
File: A file contains various data in a group. A file includes both Performance data and Song data (pages 73, 81).
Terminology
Storage memory: This memory area enables you to save Performance files and recorded Songs.
CAUTION
POWER
ON
OFF
C7
POWER
ON
OFF
B
b
6
C7

CP300 Owner’s Manual
18
Introduction
ON
OFF
POWER
ON!
GRAND
PIANO 1
GRAND
PIANO 2
MONO
PIANO
E. PIANO 1 E. PIANO 2 E. PIANO 3
CLAVI.
VIBES
ORGAN 1 ORGAN 2 HARPSI. STRINGS CHOIR/PAD
GUITAR
BASS
XG
12345678
910111213141516
M
U
S
IC
P
R
O
D
U
C
T
I
O
N
S
Y
N
T
H
E
S
IZ
E
R
VOICE/PERFORMANCE
Basic Instructions
Turning the Power On
First, turn the power on and set
up the keyboard before playing.
• Before Using the CP300 (pages 11
and 12)
Selecting and Playing a Voice
The CP300 features an exceptionally wide variety of Preset Voices
for playing in virtually any musical style. Try searching through
the Voices to find your favorites.
• Selecting a Voice (page 25)
Terminology
Preset: Refers to data loaded to the internal memory of the CP300
before being shipped from the factory.
Combining Voices and Playing Them on the
Keyboard
The CP300 allows you to play several different Voices together in
a layer, or play one Voice with your left hand while you play a
different Voice (or even two layered Voices!) with your right. Try
out some of the variations and experiment with your own Voice
combinations.
• Playing Different Voices Simultaneously (page 27)
• Combining Voices—Dual (page 29)
• Playing Different Voices with the Left and Right Hands—Split
(page 31)
Create Your Own Original Voices
Once you’ve explored your favorite Voices and feel comfortable
with them, try branching out creatively and use the editing
features to make your own original Voices.
• Detailed Settings for the Voices—Voice Edit (page 56)
Connecting to a Computer and MIDI devices
• Connecting to External Audio Equipment (page 88)
• Connecting to External MIDI Equipment (page 90)
• Connecting to a Computer (page 92)

Basic Instructions
CP300 Owner’s Manual
19
Introduction
REC
STOP
PLAY/PAUSE
SYNCHRO START
12
3-16
TRACK
PERFORMANCE
PERFORM.FILE
ZONE 1 ZONE 2 ZONE 3 ZONE 4
MASTER
MASTER EDIT
GRAND
PIANO 1
GRAND
PIANO 2
MONO
PIANO
E. PIANO 1 E. PIANO 2 E. PIANO 3
CLAVI.
VIBES
ORGAN 1 ORGAN 2 HARPSI. STRINGS CHOIR/PAD
GUITAR
BASS
XG
12345678
910111213141516
Recording Your Performance and Playing It Back
Recording and playing back your performance is exceptionally easy. The
CP-300 allows you to record up to sixteen independent parts, letting you
record the left- and right-hand parts separately—and lets you build up a
complete, multi-instrument Song by recording each part one-by-one.
• Recording Your Performance (page 42)
• Other Recording Techniques (page 46)
• Handling Song Files (page 81)
• Playing Back Songs (page 49)
Terminology
On the CP300, performance data is called a “Song.” This includes
demonstration tunes and piano preset tunes.
Using the Performance Functions
The useful Performance functions enable you to store and recall the entire
CP300 settings all together. These include the Dual/Split settings, Voice
and effect parameters, MIDI transmit/receive channel settings and Master
Edit settings. If you have any original Voices you’ve created, you can save
these to a Performance as well.
• Using the Performance Functions (page 73)
• Selecting a Performance (page 40)
• Performance Parameters (page 74)
• Handling Performance Files (page 76)
Using as a Master Keyboard
The Master mode of the instrument enables you to control up to four external tone
generators (or four separate instrument parts on one multi-timbral tone generator).
This effectively lets you play four different MIDI instruments at one time. Once you’ve
created your custom Master settings, you can save them to a Performance as well.
• Using the Master Mode (page 39)
• Master Settings—Master Edit (page 53)

Control Names and Functions
CP300 Owner’s Manual
20
Basic Operation
Basic Operation
Control Names and Functions
1 Pitch Bend wheel (page 34)
Controls the pitch bend effect.
2 Modulation wheel (page 34)
Controls the modulation effect.
3 [PHONES] jack (page 12)
For connection to a pair of stereo headphones.
4 [POWER] switch (page 12)
For turning the power on or off. The power is turned on if the
button is set to this position: . The power is turned off if
the button is set this way: .
5 [MASTER VOLUME] dial (page 13)
Adjusts the overall volume.
6 [SONG VOLUME] slider (page 47)
Adjusts the volume of the Song playback.
7 [ZONE CONTROL] sliders (pages 28, 39)
These four sliders adjust the output level for each Layer parts
(up to four). Turning on the [MASTER] button switches the
function assigned to the [ZONE CONTROL] sliders.
8 [MASTER] button (page 39)
Turning on the [MASTER] button switches the CP300 to
function as a Master keyboard.
9 [MASTER EDIT] button (page 53)
Enables selection of the settings for the Master mode.
) [PERFORMANCE] button (page 40)
Switches the Performance on/off.
! [PERFORM.FILE] button (page 76)
Enables selection of Performance File settings, such as saving
and deleting Performance data, and making other settings for
Performance files.
Front Panel
POWER
ON
OFF
MIN MAX
MASTER VOLUME
SONG
VOLUME
ZONE CONTROL
ZONE 1 ZONE 2 ZONE 3 ZONE 4
MASTER
PERFORMANCE
MASTER EDIT
PERFORM.FILE
TRANSPOSE
SONG SELECT
NEW SONG
REC
STOP
PLAY/PAUSE
SYNCHRO START
SONG
12
3-16
TRACK
SONG FILE
SONG SETTING
MIDI OUT PANEL LOCK
DOWN UP
TEMPO
A
C
12
3
4
5 6 7 8
9
) @ $ & ( º ™ £
! # % ^ * ¡
PHONES
A-1 B-1 C0 D0 E0 F0 G0 A0 B0 C1 D1 E1 F1 G1 A1 B1 C2 D2 E2 F2 G2 A2 B2 C3 D
3

Control Names and Functions
CP300 Owner’s Manual
21
Basic Operation
@ [TRANSPOSE] button (page 37)
The Transpose function makes it possible to shift the pitch of
the entire keyboard up or down, letting you easily match the
pitch of the keyboard to the range of a singer or other
instruments.
# SONG SELECT [N][O] buttons
(pages 42, 49)
Selects a Preset Song or one of your recorded Songs.
$ TRACK [1], [2], and [3-16] buttons (page 50)
For turning off the specified track as required so you can
practice the corresponding track (the track that is turned off)
on the keyboard.
% SONG [REC] button (page 42)
For recording your keyboard performance.
^ SONG [PLAY/PAUSE], [STOP] buttons
(page 49)
Plays back the Preset Songs or your recorded Songs.
& [SONG FILE] button (page 81)
Saves recorded Songs and makes other settings for Song files.
* [SONG SETTING] button (page 85)
Enables selection of the settings for playback of recorded
Songs.
( [MIDI OUT] button (page 51)
Switches MIDI transmission on/off.
º [PANEL LOCK] button (page 51)
Switches panel lock on/off. Turning on the button disables the
panel operations.
¡ TEMPO [UP]/[DOWN] buttons (page 38)
Adjusts the tempo.
NO YES
EXIT
VOICE/PERFORMANCE
B
D
CONTRAST
GRAND
PIANO 1
GRAND
PIANO 2
MONO
PIANO
E. PIANO 1 E. PIANO 2 E. PIANO 3
CLAVI.
VIBES
ORGAN 1 ORGAN 2 HARPSI. STRINGS CHOIR/PAD
GUITAR
BASS
XG
12345678
910111213141516
VOICE EDIT
SPLIT
VARIATION
REVERB
CHORUS SPEAKER MIDI SETTING
MASTER EQ EDIT
CLICK
OTHER SETTING
DEMO
LOW LO-MID
MID
HI-MID
HIGH
MASTER EQUALIZER
™ ¢ § ¶ • ‚ ¤ › fl
∞ ª ⁄ ‹ fi
D3 E3 F3 G3 A3 B3 C4 D4 E4 F4 G4 A4 B4 C5 D5 E5 F5 G5 A5 B5 C6 D6 E6 F6 G6 A6 B6 C7

Control Names and Functions
CP300 Owner’s Manual
22
Basic Operation
™ A to D [–][+] buttons (page 15)
For selecting parameters and changing values while viewing
the display.
£ Display (page 15)
For showing various messages and certain settings of the
instrument.
¢ [CONTRAST] knob (page 13)
Adjusts the brightness of the display.
∞ [EXIT] button (page 15)
Returns to the initial display (the display that first appears
when the power is turned on).
§ Voice group buttons (pages 25, 40)
These let you select from sixteen groups of Voices, including
grand piano. You can also select a Performance if the
[PERFORMANCE] button is turned on.
¶ [VOICE EDIT] button (page 56)
Enables selection of detailed settings of the sounds and effects.
• [SPLIT] button (page 31)
Allows you to play different Voices on the left- and right-hand
sections of the keyboard.
ª VARIATION [▼][▲] buttons (page 25)
Enables selection of alternate Voices in the selected Voice
group.
‚ [REVERB], [CHORUS] buttons (page 35)
These add ambience (Reverb) and depth (Chorus) to the
sound. You can turn the corresponding effect on or off with a
single touch.
⁄ MASTER EQ EDIT [▼][▲] buttons (page 72)
Enables selection of detailed settings for the Master Equalizer.
¤ [SPEAKER] button (page 52)
Switches the built-in speakers on or off.
‹ [CLICK] button (page 38)
Switches the click function on or off.
› [MIDI SETTING] button (page 64)
Enables selection of detailed MIDI settings.
fi [OTHER SETTING] button (page 67)
This lets you make detailed settings, such as adjusting the
keyboard touch or making fine adjustments to the scale.
fl [MASTER EQUALIZER] sliders (page 36)
These five sliders adjust the tone of each band: LOW (low
band) to HIGH (high band).
1 [AC INLET] jack (page 11)
Connect the supplied AC power cord here. Use only the AC
power cord supplied with the CP300.
2 [ASSIGNABLE FOOT PEDAL] jacks
(pages 11, 33)
For connecting the included pedal (FC3), an optional FC4/5
foot switch, or FC7 foot controller.
3 MIDI [IN][OUT][THRU] connectors (page 90)
For connecting external MIDI devices, allowing the use of
various MIDI functions.
4 [USB] connector (page 92)
For connecting the CP300 and computer.
5 OUTPUT [L][R] jacks (page 88)
These jacks output balanced audio signals, and are for
connection to an external device such as a mixer.
6 OUTPUT [L/MONO][R] jacks (page 88)
These jacks output stereo audio signals (1/4" mono phone
plug). For monophonic output, use just the L/MONO jack.
7 INPUT [L/MONO][R] jacks (page 89)
External audio signals can be input via these phone jacks (1/4"
mono phone plug). The sound of an external instrument can
be reproduced via the CP300’s speakers. Use 1/4" mono
phone plugs. For stereo input from an audio device, connect
to both the L/MONO and R jacks.
Rear Panel
AC INLET
ASSIGNABLE FOOT PEDAL
1
SUSTAIN
4
AUX
3
SOFT
2
SOSTENUTO
MIDI
IN
OUT
THRU
USB
OUTPUT OUTPUT INPUT
RL RL/MONO R L/MONO
1234567

CP300 Owner’s Manual
23
Basic Operation
Quick Guide
The CP300 has a variety of specially recorded Demo Songs that effectively showcase each of the instrument’s
Voice groups. Listen to some of these Demo Songs now and hear the wide-ranging capabilities of the CP300.
n Make sure the CP300 is ready for playback. Details are given in the section “Before Using the CP300” on page 11.
1 Simultaneously press both the [MIDI SETTING] button and the [OTHER SETTING]
button.
The Voice group button indicators will flash in sequence.
The “Voice Demo” message appears in the display.
2 Press one of the Voice group buttons to listen to the Demo Songs.
The corresponding Voice button indicator lights up and playback starts. Demo Songs provided for each
Voice group will play back in sequence until you press the [STOP] button.
Adjusting the Volume
To adjust the volume level of the Demo Songs, use the [MASTER VOLUME] dial or [SONG VOLUME]
slider.
n Make sure that the [SONG VOLUME] slider is set appropriately. If the [SONG VOLUME] slider is set to
minimum, no sound can be heard.
3 Press the button of the Voice group currently being played or the [PLAY/PAUSE]
button to stop the Voice demo.
4 Press the [EXIT] button to exit the Demo selection display.
Listening to the Demo Songs
NO YES
EXIT
MASTER
PERFORMANCE
MASTER EDIT
PERFORM.FILE
TRANSPOSE
SONG SELECT
NEW SONG
REC
STOP
PLAY/PAUSE
SYNCHRO START
SONG VOICE/PERFORMANCE
12
3-16
TRACK
SONG FILE
SONG SETTING
MIDI OUT PANEL LOCK
DOWN UP
TEMPO
A
B
D
C
CONTRAST
GRAND
PIANO 1
GRAND
PIANO 2
MONO
PIANO
E. PIANO 1 E. PIANO 2 E. PIANO 3
CLAVI.
VIBES
ORGAN 1 ORGAN 2 HARPSI. STRINGS CHOIR/PAD
GUITAR
BASS
XG
12345678
910111213141516
VOICE EDIT
SPLIT
VARIATION
REVERB
CHORUS SPEAKER MI DI SETTING
MASTER EQ EDIT
CLICK
OTHER SETTING
DEMO
3 4 12
VoiceDemo
SelectVoiceButton
NO YES
A
B
DC
MIN MAX
MASTER VOLUME
SONG
VOLUME
ZONE CONTROL
ZONE 1 ZONE 2 ZONE 3 ZONE 4

Quick Guide
CP300 Owner’s Manual
24
Basic Operation
Listening to the Piano Demo Songs
1 Simultaneously press both the [MIDI SETTING] button and the [OTHER SETTING]
button.
2 Use the A [–][+] buttons to select the Piano Demo Songs.
The “Piano Demo” message appears in the display.
3 Press one of the Voice group buttons to listen to the corresponding Piano Demo
Song.
The Piano Demo Songs are assigned to the sound buttons as follows.
Voice Name Piano Demo Song Description
1 GRAND PIANO 1 Stereo sampling Song recorded in stereo.
2 GRAND PIANO 2 Mono sampling Song recorded with a mono sampled sound.
3 MONO PIANO Dynamic sampling: mezzopiano Showcases the Dynamic Sampling feature, with
multiple velocity-switched samples to accurately
simulate the timbral response of an acoustic
instrument.
4 E. PIANO 1 Dynamic sampling: mezzoforte
5 E. PIANO 2 Dynamic sampling: forte
6 E. PIANO 3 With Sustain
(with Sustain Sampling)
Showcases the Sustain Sampling feature, which
reproduces the unique resonance of an acoustic
grand piano’s soundboard and strings when the
damper pedal is pressed.
7 CLAVI. No Sustain
(without Sustain Sampling)
8 VIBES With KeyOff
(with Key-off Sampling)
Showcases the Key-off Samples that add the
subtle sound produced when the keys are
released on an acoustic piano.
9 ORGAN 1 No KeyOff
(without Key-off Sampling)
10 ORGAN 2 With String Resonance Showcases the String Resonance feature that
recreates the characteristic resonance of actual
piano strings.
11 HARPSI. No String Resonance
PianoDemo
SelectVoiceButton
NO YES
A
B
DC
GRAND
PIANO 1
GRAND
PIANO 2
MONO
PIANO
E. PIANO 1 E. PIANO 2 E. PIANO 3
CLAVI.
VIBES
ORGAN 1 ORGAN 2 HARPSI. STRINGS CHOIR/PAD
GUITAR
BASS
XG
12345678
910111213141516
VOICE/PERFORMANCE

Quick Guide
CP300 Owner’s Manual
25
Basic Operation
Selecting a Voice
1 Select the desired Voice group button by pressing one of the Voice group buttons.
In this step, press the [GRAND PIANO 1] button.
n Make sure the [PERFORMANCE] button is turned off. For details about Performances, refer to page 73.
n Refer to the “Voice List” on page 103 for more information on the characteristics of each Preset Voice.
2 Select the desired Voice by using the VARIATION [▼][▲] buttons or the A [–][+]
buttons.
The currently selected Voice will sound when you play the keyboard.
Playing Voices
Voice Group Voice Name Voice Group Voice Name
GrandPiano1 Grand Piano 1 Organ1 Jazz Organ
Mellow Piano 1 Theater Organ
Rock Piano Rock Organ
Honky Tonk Piano Draw Organ
GrandPiano2 Grand Piano 2 Organ2 Pipe Organ Principal
Mellow Piano 2 Pipe Organ Tutti
MonoPiano Mono Piano 1 Pipe Organ Flute
Mono Piano 2 Harpsichord Harpsichord 8'
Comp. Piano 1 Harpsichord 8'+4'
Comp. Piano 2 Strings Strings
E.Piano1 Chorus E.Piano Synth Strings
Phaser E.Piano Slow Strings
AutoPan E.Piano Choir/Pad Choir
Standard E.Piano Slow Choir
E.Piano2 DX E.Piano 1 Scat
DX E.Piano 2 Synth Pad 1
Synth Piano Synth Pad 2
E.Piano3 Tremolo Vintage E.P. Guitar Nylon Guitar
Vintage E.Piano Steel Guitar
Amp.Sim.Vintage E.P. Bass Wood Bass
Clavi. Phaser Clavi. Bass&Cymbal
Clavi. 1 Electric Bass
Wah Clavi. Fretless Bass
Clavi. 2 XG XG Voice
Vibraphone Vibraphone
Marimba
Celesta
NO YES
EXIT
MASTER
PERFORMANCE
MASTER EDIT
PERFORM.FILE
TRANSPOSE
SONG SELECT
NEW SONG
REC
STOP
PLAY/PAUSE
SYNCHRO START
SONG VOICE/PERFORMANCE
12
3-16
TRACK
SONG FILE
SONG SETTING
MIDI OUT PANEL LOCK
DOWN UP
TEMPO
A
B
D
C
CONTRAST
GRAND
PIANO 1
GRAND
PIANO 2
MONO
PIANO
E. PIANO 1 E. PIANO 2 E. PIANO 3
CLAVI.
VIBES
ORGAN 1 ORGAN 2 HARPSI. STRINGS CHOIR/PAD
GUITAR
BASS
XG
12345678
910111213141516
VOICE EDIT
SPLIT
VARIATION
REVERB
CHORUS SPEAKER MI DI SETTI NG
MASTER EQ EDIT
CLICK
OTHER SETTING
DEMO
12
2
Voice group buttons
Mellow Piano 1
NO YES
A
B
DC
Indicates the currently selected Voice

Quick Guide
CP300 Owner’s Manual
26
Basic Operation
About XG Voices
The XG Voices are categorized and contained in appropriate folders. Select the XG Voice group first, then
select the desired Voice.
2-1 Press the [XG] button.
2-2 Simultaneously press the [–] [+] buttons located beside the XG Voice name display,
to call up the display for selecting XG Voices.
In this case, press the A [–][+] buttons simultaneously to call up the XG Voice selection display.
The XG Voice selection display can also be called up by pressing both the VARIATION [▼][▲]
buttons simultaneously, after pressing the [XG] button.
2-3 Use the A [–][+] buttons to select a Voice group.
2-4 Use the C [–][+] buttons to select a specific Voice.
3 Play the keyboard.
GRAND
PIANO 1
GRAND
PIANO 2
MONO
PIANO
E. PIANO 1 E. PIANO 2 E. PIANO 3
CLAVI.
VIBES
ORGAN 1 ORGAN 2 HARPSI. STRINGS CHOIR/PAD
GUITAR
BASS
XG
12345678
910111213141516
VOICE/PERFORMANCE
PIANO XG
00:GrandPiano
NO YES
A
B
D
C
Voice group name
Voice name
Indicates that an XG Voice is selected

Quick Guide
CP300 Owner’s Manual
27
Basic Operation
The advanced features of the CP300 allow you to do things and perform in ways that are simply not possible
on an acoustic instrument. For example, you can play several different Voices together in a layer, or play one
Voice (or even two) layered Voices with your left hand while you play a different Voice (or two) layered Voices
with your right.
You can make detailed settings for each Voice and combined Voice in Dual or Split. Refer to the “Detailed
Settings for the Voices—Voice Edit” on page 56.
Keyboard Part Combinations
The CP300 lets you effectively divide the keyboard into four independent parts: Main, Layer, Left and Left
Layer. Moreover, a different Voice can be assigned to each part.
■ Playing a Single Voice (Main part) (page 25)
You can play a single Voice over the entire keyboard range. This is used for normal performance.
■ Playing Two Voices Simultaneously (Dual) (page 29)
This lets you play a unison melody with two different instruments, or combine two similar, complementary
Voices to create a thicker sound.
■ Playing Different Voices with Your Left and Right Hands (Split) (page 31)
This allows you to play different Voices with your left and right hands. For example, you can play a bass
part with your left hand, using the Wood Bass or Electric Bass Voice, and a melody on top with your right
hand.
■ Playing Three Different Voices with Your Left and Right Hands (Split and Dual for the
Main parts) (pages 29, 31)
■ Playing Three Different Voices with Your Left and Right Hands (Split and Dual for the
Left parts) (page 31)
■ Playing Four Different Voices with Your Left and Right Hands (Split and Dual) (page 30)
n The volume level for each Voice part can be adjusted independently. For details, refer to page 28.
Playing Different Voices Simultaneously
Main part
Layer part
Main part
Left part Main part
Left part
Layer part
Main part
Left Layer part
Left part
Main part
Left Layer part
Left part
Layer part
Main part

Quick Guide
CP300 Owner’s Manual
28
Basic Operation
The convenient [ZONE CONTROL] sliders allow you to adjust the volume of each part independently while
you play the keyboard. Moving a slider up increases the volume while pulling the slider down decreases it.
n When you play a single Voice (Main part), you can adjust the volume by moving the [ZONE 1] slider. In this case,
the [ZONE 2], [ZONE 3] and [ZONE 4] sliders have no effect on the volume.
Turning on the [MASTER] button switches the function assigned to the [ZONE CONTROL] sliders. Refer
to the “Using the Master Mode” on page 39.
Changing the Volume for Each Part (Zone Control)
SONG
VOLUME
ZONE CONTROL
ZONE 1 ZONE 2 ZONE 3 ZONE 4
Left Layer part
Left part
Layer part
Main part
ZONE 1: Main part
ZONE 2: Left part
ZONE 3: Layer part
ZONE 4: Left Layer part
MASTER
PERFORMANCE
MASTER EDIT
PERFORM.FILE

Quick Guide
CP300 Owner’s Manual
29
Basic Operation
Using Voices of Different Voice Groups—Dual
n Make sure the [PERFORMANCE] button is turned off. For details about Performances, refer to page 73.
1 Press two Voice group buttons at the same time (or press one Voice group button
while holding down another) to enable Dual.
In this step, press the [GRAND PIANO 1] button and the [CHOIR/PAD] button.
The [GRAND PIANO 1] button and [CHOIR/PAD] button light. The selected Voice name will appear
in the display.
2 Select the particular Voice for each part by using the A [–][+] buttons and B [– (NO)]
[+ (YES)] buttons.
You can also select the Main part Voice by using the VARIATION [▼][▲] buttons.
n XG Voices can also be selected. For more information, refer to “About XG Voices” on page 26.
Select the “Honky Tonk Piano” Voice by using the A [–][+] buttons and select the “Scat” Voice by using
the B [– (NO)][+ (YES)] buttons.
To select three parts—Main, Layer and Left—simultaneously hold down the [SPLIT] button and press
the desired Voice group button.
Combining Voices—Dual
NO YES
EXIT
MASTER
PERFORMANCE
MASTER EDIT
PERFORM.FILE
TRANSPOSE
SONG SELECT
NEW SONG
REC
STOP
PLAY/PAUSE
SYNCHRO START
SONG VOICE/PERFORMANCE
12
3-16
TRACK
SONG FILE
SONG SETTING
MIDI OUT PANEL LOCK
DOWN UP
TEMPO
A
B
D
C
CONTRAST
GRAND
PIANO 1
GRAND
PIANO 2
MONO
PIANO
E. PIANO 1 E. PIANO 2 E. PIANO 3
CLAVI.
VIBES
ORGAN 1 ORGAN 2 HARPSI. STRINGS CHOIR/PAD
GUITAR
BASS
XG
12345678
910111213141516
VOICE EDIT
SPLIT
VARIATION
REVERB
CHORUS SPEAKER MI DI SETTING
MASTER EQ EDIT
CLICK
OTHER SETTING
DEMO
1, 3
2
2
Voice group buttons
GrandPiano1 Choir
NO YES
A
B
DC
Main part Layer part
Dual
HonkyTonkPiano Scat
NO YES
A
B
DC
Main part Layer part
GrandPiano1 Choir
Strings
NO YES
A
B
DC
Main part Layer part
Left part
Split + Dual for the Main parts

Quick Guide
CP300 Owner’s Manual
30
Basic Operation
To select four parts—Main, Layer, Left and Left Layer—simultaneously hold down the [SPLIT] button
and press two Voice group buttons.
You can select other Voices by using the A – D letter buttons (A [–][+] to D [–][+]).
n For details about the Split function, refer to page 31.
3 Press any single Voice group button to exit Dual and return to normal play.
Using Voices in the Same Voice Group—Dual
Dual can also be used to select and play Voices in the same Voice group.
1 Press one of the Voice group buttons.
2 Use the A [–][+] buttons to select the desired Voice.
You can also select the Main part Voice by pressing the VARIATION [▼][▲] buttons.
3 Use the B [– (NO)][+ (YES)] buttons to select another Voice in the same Voice group.
To use identical Voices, press the B [– (NO)][+ (YES)] buttons once.
To use different Voices within the same Voice group, press the B [– (NO)][+ (YES)] buttons repeatedly.
GrandPiano1 Choir
Strings E.Bass
NO YES
A
B
DC
Main part Layer part
Left part
Left Layer part
Split + Dual

Quick Guide
CP300 Owner’s Manual
31
Basic Operation
1 Press the [SPLIT] button to enable Split.
The [SPLIT] button lights.
2 Select a Voice for the right-hand area by pressing one of the Voice group buttons.
In this step, press the [GRAND PIANO 1] button.
Use the A [–][+] buttons to select the “Honky Tonk Piano” Voice.
3 Select a Voice for the left-hand area by simultaneously holding down the [SPLIT]
button and pressing one of the Voice group buttons.
In this step, press the [CHOIR/PAD] button.
Use the C [–][+] buttons to select the “Scat” Voice.
To divide the keyboard into Main, Layer and Left parts, press two Voice group buttons at the same time
(or press one Voice group button while holding down another).
To divide the keyboard into Main, Layer and Left Layer parts, simultaneously hold down the [SPLIT]
button and press two Voice group buttons.
To divide the keyboard into four parts—Main, Layer, Left and Left Layer—perform both the above
operations (last two sentences) in order.
Playing Different Voices with the Left and Right Hands—Split
NO YES
EXIT
MASTER
PERFORMANCE
MASTER EDIT
PERFORM.FILE
TRANSPOSE
SONG SELECT
NEW SONG
REC
STOP
PLAY/PAUSE
SYNCHRO START
SONG VOICE/PERFORMANCE
12
3-16
TRACK
SONG FILE
SONG SETTING
MIDI OUT PANEL LOCK
DOWN UP
TEMPO
A
B
D
C
CONTRAST
GRAND
PIANO 1
GRAND
PIANO 2
MONO
PIANO
E. PIANO 1 E. PIANO 2 E. PIANO 3
CLAVI.
VIBES
ORGAN 1 ORGAN 2 HARPSI. STRINGS CHOIR/PAD
GUITAR
BASS
XG
12345678
910111213141516
VOICE EDIT
SPLIT
VARIATION
REVERB
CHORUS SPEAKER MI DI SETTI NG
MASTER EQ EDIT
CLICK
OTHER SETTING
DEMO
2, 3
2
3
1,4,5
4
[SPLIT] button
HonkyTonkPiano
Scat
NO YES
A
B
DC
Main part
Left part
Split
GrandPiano1 Choir
Strings
NO YES
A
B
DC
Main part Layer part
Left part
Split + Dual for the Main parts
Grand Piano 1
Strings E.Bass
NO YES
A
B
DC
Main part
Left part
Left Layer part
Split + Dual for the Left parts

Quick Guide
CP300 Owner’s Manual
32
Basic Operation
4 Specify the split point (the border between the right- and left-hand range).
The default setting (factory setting) is “F#2.” (If you do not need to change the split point, skip this
step.)
To Change the Split Point Setting
4-1 Simultaneously hold down the [SPLIT] button and use the D [–][+] buttons to specify
the split point.
There is also a quicker, more intuitive way: instead of using the D [–][+] buttons, simultaneously hold
down the [SPLIT] button and press the appropriate key on the keyboard.
n The Main part and Layer part of the split point are specified simultaneously. If you wish to independently change
the split point for each part, you can call up the Other Settings menu and use the “Split Point” parameter to set the
Main part split point and use “Split Point 2” to set that of the Layer part (page 69).
4-2 Release the [SPLIT] button to return to the main display.
5 Press the [SPLIT] button to exit Split and return to normal play.
F
#
2
Center “C” (C3)
SplitPoint
F#2
NO YES
A
B
DC
Split point

Quick Guide
CP300 Owner’s Manual
33
Basic Operation
Make sure that the power is off when connecting or disconnecting any pedal.
n •By connecting a pedal to the [ASSIGNABLE FOOT PEDAL] jack, you can use the pedal to control one of various
assignable functions. Refer to the “Pedal 1/Pedal 2/Pedal 3/Pedal 4” parameter in the Voice Edit menu (pages 61, 62).
•Depending upon the pedal that is connected to the [ASSIGNABLE FOOT PEDAL] connector, the effect produced by
operating the pedal (on/off, dynamics, etc.) might be reversed. Refer to the “Pedal Type” parameter in the Other
Settings menu (page 70).
• The function of the [PLAY/PAUSE] button can be assigned to the pedal connected to the [2 SOSTENUTO]/[3
SOFT]/[4 AUX] jacks. Refer to the “Pedal Play/Pause” parameter in the Other Settings menu (page 70).
The [ASSIGNABLE FOOT PEDAL] jack is set initially for use with the following functions (factory default
setting).
Sustain Pedal (1 SUSTAIN jack)
This jack is for connecting the included FC3 foot pedal. The pedal functions in the same way as a damper pedal on
an acoustic piano. Connect the included pedal (FC3) to this jack and press the pedal to sustain the sound.
When Voices of the GRAND PIANO 1 Voice group and the Mono Piano 1 and Comp. Piano 1 Voices are selected,
pressing the FC3 pedal activates the instrument’s special Sustain Samples, which accurately recreate the unique
resonance of an acoustic grand piano’s soundboard and strings. The FC3 can also be used to control the half pedal
effect on these Voices, recreating the partial damping of strings that is possible on an actual piano. An optional FC4/
FC5 foot switch can also be connected to this jack. However, these foot switches cannot be used to control the half
pedal effect.
n The depth of the effect produced by the Sustain Samples can be adjusted via the “Sustain Sampling Depth”
parameter in the Other Settings menu (page 69).
Sostenuto Pedal (2 SOSTENUTO jack)
This jack is for connecting an included foot pedal FC3 and an optional FC3/FC4/FC5 foot switch.
If you play a note or chord on the keyboard and press the sostenuto pedal while holding the note(s), the notes will
sustain as long as the pedal is held. This makes it possible to sustain a chord, for example, while other notes are
played “staccato.”
n Organ, string and choir Voices will continue to sound for as long as the sostenuto pedal is depressed.
Soft Pedal (3 SOFT jack)
This jack is for connecting an included foot pedal FC3 and an optional FC3/FC4/FC5 foot switch. The soft pedal
reduces the volume and slightly changes the timbre of notes played while the pedal is pressed. The soft pedal will not
affect notes that are already playing.
n The depth of the Soft pedal can be adjusted via the “Soft Pedal Depth” parameter in the Other Settings menu
(page 69).
AUX Pedal (4 AUX jack)
This jack is for connecting an optional FC7 foot controller.
This AUX Pedal can be assigned to control a variety of parameters on the instrument. Refer to the “Pedal 4"
parameter in the Voice Edit menu (page 62).
Using the Pedals
AC INLET
ASSIGNABLE FOOT PEDAL
1
SUSTAIN
4
AUX
3
SOFT
2
SOSTENUTO
MIDI
IN
OUT
THRU
USB
OUTPUT OUTPUT INPUT
RL RL/MONO R L/MONO
ASSIGNABLE FOOT PEDAL
1
SUSTAIN
4
AUX
3
SOFT
2
SOSTENUTO
FC7
FC3/FC4/FC5
CAUTION

Quick Guide
CP300 Owner’s Manual
34
Basic Operation
Use the Pitch Bend wheel to bend notes up (roll the wheel away from you) or down (roll the wheel toward you)
while playing the keyboard. This wheel is self-centering and will automatically return to normal pitch when
released. Try out the Pitch Bend wheel while pressing a note on the keyboard.
n The bend range can be adjusted via the “Pitch Bend Range” parameter in the Other Settings menu (page 70).
The Modulation wheel applies vibrato to the sound. The more you move this wheel up, the greater the effect
that is applied to the sound. Try out the Modulation wheel with various Preset Voices while playing the
keyboard.
n Keep in mind that many of the Preset Voices are not set with a Modulation effect. (This is to ensure the most
natural sound on these acoustic instrument Voices.) However, the Modulation wheel can be effectively used to
control user-programmable effects, as well as alter the sounds of a connected MIDI tone generator.
n Various functions can be assigned to the Modulation Wheel. Refer to the “Modulation” parameter in the Voice
Edit menu (page 62).
n To avoid accidentally applying Modulation or other effects to the current Voice, make sure the Modulation Wheel
is set to minimum before you start playing.
Bending Notes—Pitch Bend Wheel
Adding a Vibrato Effect to the Sound—Modulation Wheel
Raises the pitch
Lowers the pitch
Pitch Bend wheel
Maximum
Minimum
Modulation wheel

Quick Guide
CP300 Owner’s Manual
35
Basic Operation
The effect processing of the CP300 features both System Effects and Insertion Effects.
System Effects—Reverb and Chorus
System Effects are applied to the overall sound, whether it be a Voice, an entire Performance, a Song, etc. Each
part can be given a different amount of System Effect processing.
Reverb
The reverb effects add a warm ambience to the sound, simulating the complex reflections of actual
performance spaces, such as a concert hall or small club.
Refer to “Effect Type List” on page 114 for more information on the preset reverb types.
Pressing the [REVERB] button alternates between On and Off.
The indicator lights if reverb is turned on.
n You can select a reverb type via the “Reverb Type” parameter in the Voice Edit menu, and adjust the reverb depth
for the selected Voice via the “Reverb Send” parameter (page 58).
n Even if the reverb effect is turned off, a “soundboard reverb” effect will be applied for these Voices: GRAND
PIANO 1, GRAND PIANO 2 Voice groups and Mono Piano 1, Mono Piano 2, Marimba and Celesta Voices.
Chorus
The chorus effects use various types of modulation processing, including flanger and phaser, to enhance the
sound in a variety of ways.
Refer to “Effect Type List” on page 114 for more information on the preset chorus types.
Pressing the [CHORUS] button alternates between On and Off.
The indicator lights if chorus is turned on.
You can turn the chorus effect on and off by pressing the [CHORUS] button on the panel and by setting the
“Chorus On Off” parameter in the Voice Edit menu (page 59). The [CHORUS] button setting on the panel is
temporary. That is, if you select another Voice, the chorus setting for the previous Voice is cancelled.
The “Chorus On Off” parameter setting is saved for each Voice. That is, if you select a given Voice, the chorus
setting is automatically turned on or off according to the saved chorus setting.
n You can select a chorus type via the “Chorus Type” parameter in the Voice Edit menu and adjust the chorus depth
for the selected Voice via the “Chorus Send” parameter (page 59). You can also turn chorus on or off via the
“Chorus On Off” parameter (page 59).
Insertion Effects
Insertion effects can be applied individually to each part. Insertion effects are mainly used to directly process a
single part. The CP300 has three separate Insertion Effect blocks, letting you apply different effects on up to
three parts from Main, Layer, Left and Left Layer parts (page 27).
n You can select an Insertion type via the “Ins. Type” parameter in the Voice Edit menu, and adjust the Insertion
effect depth for the selected part via the “Dry/Wet Balance” parameter (pages 59, 60).
The CP300 also has a Variation effect that can be used as either a System effect or Insertion effect. Refer to
“Effect Type List” on page 114 for more information on the types of effects you can use. The Variation effect
can be controlled only by the use of MIDI messages.
Enhancing the Sound with Reverb and Chorus
NO YES
EXIT
MASTER
PERFORMANCE
MASTER EDIT
PERFORM.FILE
TRANSPOSE
SONG SELECT
NEW SONG
REC
STOP
PLAY/PAUSE
SYNCHRO START
SONG VOICE/PERFORMANCE
12
3-16
TRACK
SONG FILE
SONG SETTING
MIDI OUT PANEL LOCK
DOWN UP
TEMPO
A
B
D
C
CONTRAST
GRAND
PIANO 1
GRAND
PIANO 2
MONO
PIANO
E. PIANO 1 E. PIANO 2 E. PIANO 3
CLAVI.
VIBES
ORGAN 1 ORGAN 2 HARPSI. STRINGS CHOIR/PAD
GUITAR
BASS
XG
12345678
910111213141516
VOICE EDIT
SPLIT
VARIATION
REVERB
CHORUS SPEAKER MI DI SETTI NG
MASTER EQ EDIT
CLICK
OTHER SETTING
DEMO
[REVERB] button
[CHORUS] button

Quick Guide
CP300 Owner’s Manual
36
Basic Operation
Usually an equalizer is used to correct the sound output from amps or speakers to match the special character
of the room, or to change the tonal character of the sound. EQ divides the sound into several frequency bands,
and adjustments are made by raising or lowering the level of each band.
By adjusting the sound according to the genre—classical music being more refined, pop music more crisp, and
rock music more dynamic—you can draw out the special characteristics of the music and make your
performance more enjoyable.
Two separate EQ sections are available on the instrument: Part EQ and Master EQ.
Part EQ
The Part EQ is applied to each Voice.
n You can adjust the part’s low and high frequency via the “EQ Low Freq.” and “EQ High Freq.” parameter in the
Voice Edit menu. You can also adjust the part’s low- and high-range gain via the “EQ Low Gain” and “EQ High
Gain” parameters (pages 60, 61).
Master EQ
Master EQ is applied to the final, overall (post-effect) sound of the instrument.
When the corresponding slider is set to center, the equalizer level is set to normal.
n You can adjust the Q (frequency bandwidth) and Frequency parameters via the Master EQ Edit menu (page 72).
However, the last gain setting by the slider or Master EQ Edit menu will remain in effect.
n While the “Equalizer Lock” parameter (page 71) in the Other Settings menu is turned on, the Master Equalizer
values will not be affected by Performance recall, incoming MIDI data and Song playback.
Equalizer (EQ)
Gain
Low Gain
High Gain
Freq.
Low Freq. High Freq.
LOW HIGHHIGHMIDMIDLOWMID
–
+
0
5 bands
Gain
Q (frequency bandwidth)
Freq.

Quick Guide
CP300 Owner’s Manual
37
Basic Operation
The CP300’s Transpose function makes it possible to shift the pitch of the entire keyboard up or down in
semitone intervals to facilitate playing in difficult key signatures, and to let you easily match the pitch of the
keyboard to the range of a singer or other instruments. For example, if you set the transposition amount to
“+5,” playing a C key produces a pitch of F. In this way, you can play a Song as though it were in C major, and
the CP300 will transpose it to the key of F.
Press the [TRANSPOSE] button to transpose the entire keyboard. With just the press of a button, you can
reconfigure the transpose setting. For details about setting the amount of transposition, see below. The
indicator will light when a transpose setting other than “0” is selected.
1 Press the [TRANSPOSE] button.
The amount of transposition in semitone units appears in the display.
2 Press the D [–][+] button to transpose down or up as required.
You can set the range from -12 semitones (down one octave) to 12 semitones (up one octave) in semitone
steps.
Transposing shifts the pitch of the entire keyboard.
The transposition range:
-12: -12 semitones (down one octave), 0: normal pitch, 12: 12 semitones (up one octave)
n You can set the keyboard’s Transpose via the “Transpose” parameter in the Other Settings menu, when the
[TRANSPOSE] button is turned on (page 69).
n The Transpose setting affects transmitted MIDI data.
3 Press the [EXIT] button to exit the Transpose setting.
n The edited Transpose settings will be erased after you turn off the power to the CP300. If you set the Memory
Backup’s Transpose setting to On in the Other Settings menu, the current Transpose setting will remain in effect
when you turn the power off and back on again (page 71).
Key Transposition—Transpose
NO YES
EXIT
MASTER
PERFORMANCE
MASTER EDIT
PERFORM.FILE
TRANSPOSE
SONG SELECT
NEW SONG
REC
STOP
PLAY/PAUSE
SYNCHRO START
SONG VOICE/PERFORMANCE
12
3-16
TRACK
SONG FILE
SONG SETTING
MIDI OUT PANEL LOCK
DOWN UP
TEMPO
A
B
D
C
CONTRAST
GRAND
PIANO 1
GRAND
PIANO 2
MONO
PIANO
E. PIANO 1 E. PIANO 2 E. PIANO 3
CLAVI.
VIBES
ORGAN 1 ORGAN 2 HARPSI. STRINGS CHOIR/PAD
GUITAR
BASS
XG
12345678
910111213141516
VOICE EDIT
SPLIT
VARIATION
REVERB
CHORUS SPEAKER MI DI SETTI NG
MASTER EQ EDIT
CLICK
OTHER SETTING
DEMO
1
2
3
[TRANSPOSE] button
Transpose
Keyboard 0
NO YES
A
B
DC
Amount of transposition
Quick Guide
CP300 Owner’s Manual
38
Basic Operation
Pressing the [CLICK] button turns Click or the metronome sound on and off.
1 Press the [CLICK] button to start the click.
Adjusting the Tempo
1-1 Press the TEMPO [DOWN] or [UP] button.
The “Tempo” parameter will appear in the display.
To adjust the tempo (number of beats per minute: 10-500), use the TEMPO [DOWN][UP] or the
D [–][+] buttons.
To reset the tempo to the default setting, press the TEMPO [DOWN][UP] or the D [–][+] buttons
simultaneously.
Default setting: 120 (If a Song has been selected, the Song tempo is used.)
1-2 Press the [EXIT] button to go back to the Main display.
2 Press the [CLICK] button to stop the click sound.
n You can change the time signature, volume, and bell on/off settings using the Song Setting menu (page 87).
n The click will not start after the Song is stopped. If you wish to start the click, press the [CLICK] button again.
n The click will stop when Song playback is paused.
Using the Click
NO YES
EXIT
MASTER
PERFORMANCE
MASTER EDIT
PERFORM.FILE
TRANSPOSE
SONG SELECT
NEW SONG
REC
STOP
PLAY/PAUSE
SYNCHRO START
SONG VOICE/PERFORMANCE
12
3-16
TRACK
SONG FILE
SONG SETTING
MIDI OUT PANEL LOCK
DOWN UP
TEMPO
A
B
D
C
CONTRAST
GRAND
PIANO 1
GRAND
PIANO 2
MONO
PIANO
E. PIANO 1 E. PIANO 2 E. PIANO 3
CLAVI.
VIBES
ORGAN 1 ORGAN 2 HARPSI. STRINGS CHOIR/PAD
GUITAR
BASS
XG
12345678
910111213141516
VOICE EDIT
SPLIT
VARIATION
REVERB
CHORUS SPEAKER MI DI SETTI NG
MASTER EQ EDIT
CLICK
OTHER SETTING
DEMO
1, 2
TEMPO [DOWN][UP] button
Tempo
120
NO YES
A
B
DC
Tempo
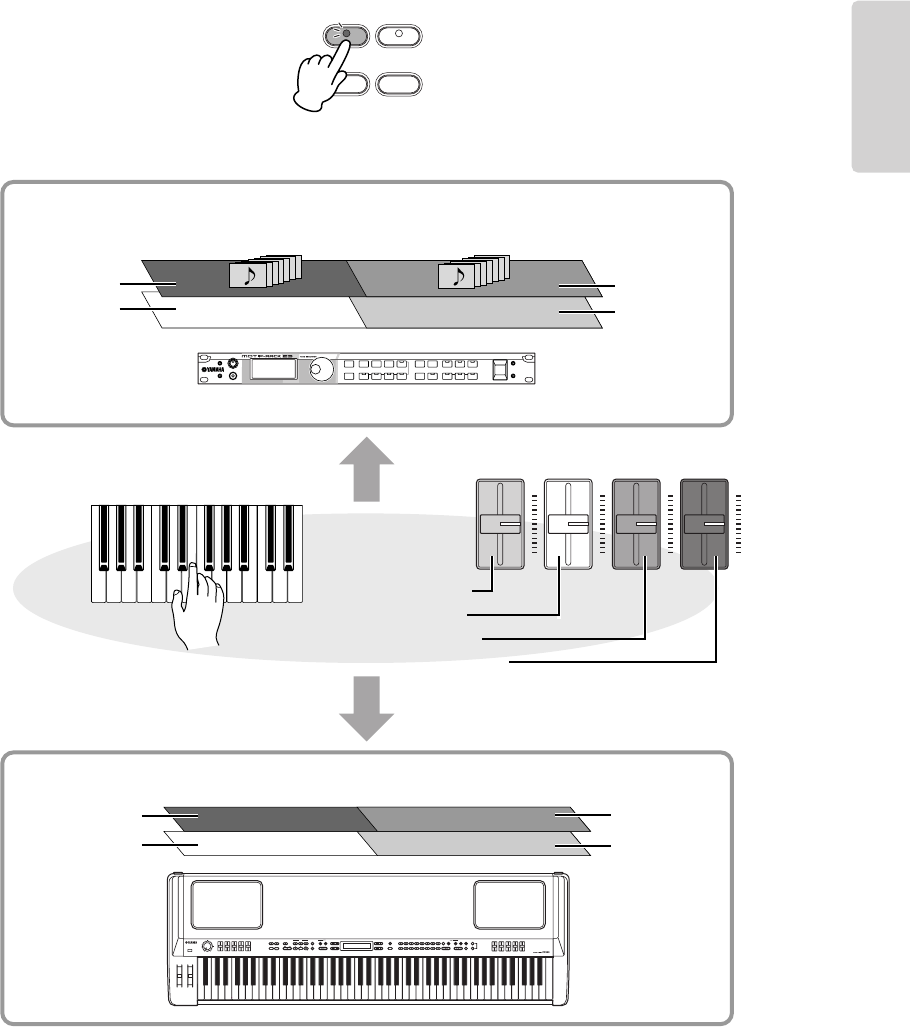
CP300 Owner’s Manual
39
Basic Operation
Using the Master Mode
The Master mode allows you to divide the keyboard into a total of four independent areas (called “Zones”). Each Zone can be
assigned to different MIDI channels and have different Control Slider functions. This makes it possible to control up to four
tone generators simultaneously from a single keyboard, and to control Voices of an external tone generator over several
different channels, in addition to the internal Voices of the CP300 itself.
Press the [MASTER] button to turn the Master mode on.
Turning on the Master mode also enables the “Master Edit” settings for this function.
For details, refer to page 53.
Example: Connecting to external tone generators
n While the Master mode is turned on, the “MIDI Out Channel” parameter in the Master Edit menu will be
enabled for MIDI channel assignments.
n If you turn the power off and on again while the Master mode is on, the function will be turned off.
MASTER
PERFORMANCE
MASTER EDIT
PERFORM.FILE
ZONE CONTROL
ZONE 1 ZONE 2 ZONE 3 ZONE 4
MIDI CH2 MIDI CH1
MIDI CH4 MIDI CH3
External tone generator
Voice
Voice
ZONE 4
ZONE 2
ZONE 3
ZONE 1
External MIDI synthesizer/tone generator
ZONE 1: Main part
ZONE 2: Left part
ZONE 3: Layer part
ZONE 4: Left Layer part
Internal tone generator
Left Layer part
(ZONE 4)
Left part
(ZONE 2)
Layer part
(ZONE 3)
Main part
(ZONE 1)

CP300 Owner’s Manual
40
Basic Operation
Selecting a Performance
All settings of the entire CP300 can be saved together in a group, referred to as a “Performance.” A Performance includes
Dual/Split settings, Voice and effect parameters, MIDI transmit/receive channel settings and Master Edit settings. For details
on Performance settings, refer to page 73.
A total of 64 Preset Performances are supplied with the CP300. The Preset Performances consist of 32 Yamaha original Voices
and 32 default Performances (Grand Piano Voices). Try some of the Preset Performances and listen to the sound.
n Refer to the “Preset Performance List” on page 106 for more information on the characteristics of each Preset Performance.
1 Press the [PERFORMANCE] button to enter the Performance mode.
The [PERFORMANCE] button flashes.
2 Choose a Performance by pressing one of the Voice group buttons.
Playing the keyboard sounds the Performance indicated in the display. The parameters shown in the
Performance Play display are briefly explained below.
3 Press the VARIATION [▼][▲] buttons to select one of the Performance variations,
A to D.
A single Performance can include up to four different Performances (A to D). “A” and “B” features the
Yamaha original Voices. “C” and “D” contains the default Performances (Grand Piano Voices).
4 Play the keyboard.
5 Press the [PERFORMANCE] button to exit the Performance Play mode.
The [PERFORMANCE] button lamp turns off. The Voice selection will return to the Voice selected
before entering the Performance.
You can exit the Performance yet keep the current Voice used in the Performance by simultaneously
holding down the B [– (NO)] button and pressing the [PERFORMANCE] button.
Terminology
Preset Performance file: A single file that includes data of 64 different Preset Performances.
NO YES
EXIT
MASTER
PERFORMANCE
MASTER EDIT
PERFORM.FILE
TRANSPOSE
SONG SELECT
NEW SONG
REC
STOP
PLAY/PAUSE
SYNCHRO START
SONG VOICE/PERFORMANCE
12
3-16
TRACK
SONG FILE
SONG SETTING
MIDI OUT PANEL LOCK
DOWN UP
TEMPO
A
B
D
C
CONTRAST
GRAND
PIANO 1
GRAND
PIANO 2
MONO
PIANO
E. PIANO 1 E. PIANO 2 E. PIANO 3
CLAVI.
VIBES
ORGAN 1 ORGAN 2 HARPSI. STRINGS CHOIR/PAD
GUITAR
BASS
XG
12345678
910111213141516
VOICE EDIT
SPLIT
VARIATION
REVERB
CHORUS SPEAKER MI DI SETTING
MASTER EQ EDIT
CLICK
OTHER SETTING
DEMO
21, 5 2
3
A01.Piano+Pad
GrandPiano1 WarmPad
NO YES
A
B
DC
A01.Piano+Pad
Voice names (Main and Layer only)
Hold this down to view
all Voices of the parts
Hold this down to view
the Performance file name
Number
(Select the number by pressing
one of the Voice group buttons.)
Performance name
A to D
(Select “A” to “D” by pressing the
VARIATION [▼][▲] buttons.)

CP300 Owner’s Manual
41
Basic Operation
Recording Your Performance
This chapter explains how to record your performance using the CP300’s versatile recording features. For example, you can
record just the left-hand part, and then practice the right-hand part while playing back the recorded left-hand part. Since the
CP300 lets you record up to sixteen tracks separately, you can build up a complete, multi-instrument Song by recording each
part one-by-one.
About the Recording Features of the CP300
Unlike conventional audio recording (such as to an MD recorder or cassette tape recorder), the CP300 records
your keyboard playing as performance data. In other words, while an MD records the actual sounds, the
CP300 records the physical “moves” and settings that create the sound—including which notes are played, the
timing they were played with, the Voice(s) used, and the tempo value. This type of recording has the advantage
of allowing you greater editing flexibility and smaller data size.
n If you want to record the sounds of your performance as audio data, you can do so by connecting an MD recorder
or other recording device to the [OUTPUT] connector (page 88).
Song
On the CP300, performance data is called a “Song.” This includes demonstration tunes and preset tunes.
Song (performance data)
Demo Songs Preset Songs
Recorded
Songs

Recording Your Performance
CP300 Owner’s Manual
42
Basic Operation
n The Performance mode is automatically turned off if the CP300 is set to recording or recording standby while
Performance mode is on.
1 Press the SONG SELECT [N] button and [O] button at the same time.
n “P-000: New Song” is a blank Song provided for you to record your performance.
2 Select a Voice (page 25).
In addition to selecting the desired Voice, make sure to set other sound-related parameters, such as reverb
and chorus. When you’ve finished making the settings, press the SONG SELECT [N] or [O] button
to return to the “New Song” display.
Using the Click Sound
You can record data while using the Click sound. Press the [CLICK] button in Step 2.
The Click sound is not recorded.
n Refer to page 48 for more information on recording in Dual/Split mode.
3 Select a recording track.
Recording to Track 1:
Press the TRACK [1] button while holding down the [REC] button.
Recording to Track 2:
Press the TRACK [2] button while holding down the [REC] button.
Recording to Tracks 3 – 16:
Press the B [– (NO)][+ (YES)] button while holding down the [REC] button, then select the desired
recording track, 3 – 16. Keep holding down the [REC] button and press the TRACK [3-16] button.
Recording Your Performance
NO YES
EXIT
MASTER
PERFORMANCE
MASTER EDIT
PERFORM.FILE
TRANSPOSE
SONG SELECT
NEW SONG
REC
STOP
PLAY/PAUSE
SYNCHRO START
SONG VOICE/PERFORMANCE
12
3-16
TRACK
SONG FILE
SONG SETTING
MIDI OUT PANEL LOCK
DOWN UP
TEMPO
A
B
D
C
CONTRAST
GRAND
PIANO 1
GRAND
PIANO 2
MONO
PIANO
E. PIANO 1 E. PIANO 2 E. PIANO 3
CLAVI.
VIBES
ORGAN 1 ORGAN 2 HARPSI. STRINGS CHOIR/PAD
GUITAR
BASS
XG
12345678
910111213141516
VOICE EDIT
SPLIT
VARIATION
REVERB
CHORUS SPEAKER MI DI SETTING
MASTER EQ EDIT
CLICK
OTHER SETTING
DEMO
3 2
1 3 4,65
PresetSong Bar 001
P-000:NewSong
NO YES
A
B
DC
Indicates the current measure.
(The words “bar” and “measure” are used interchangeably.)

Recording Your Performance
CP300 Owner’s Manual
43
Basic Operation
When the recording track has been selected, the indicator for the [REC] button and selected track lights
up in red. (Record Ready mode can be disengaged before recording by pressing the [REC] button again.)
Set the Tempo, if necessary (page 38).
If this Record Standby display does not appear, press one of the SONG SELECT [N][O] buttons
once. If you select “Key On” as the Starting method (page 44), a Tempo setting of 120 will be entered at
the beginning of the Song.
4 Start recording.
You can start recording by pressing the [PLAY/PAUSE] button, or have recording started automatically
for you as soon as you play a note on the keyboard. The current measure number is shown in the display
during recording.
n Song recording can be paused by pressing the [PLAY/PAUSE] button. Recording will begin automatically as soon
as you play a note on the keyboard or press the [PLAY/PAUSE] button again.
5 Press either [STOP] button or [REC] button to stop recording.
Press the [STOP] button to return to the top of the Song.
6 Press the [PLAY/PAUSE] button to play back the recording.
n To erase recorded data from a track, use the “Channel Clear” parameter in the Song Setting menu for Song
playback/recording (page 86).
7 Save the recorded Song
When pressing the SONG SELECT [N][O] button, A [–][+] button or C [–][+] button, a “Song
Changed Save?” message appears in the display. Press the B [+ (YES)] button to save the file. If you want
to cancel the Save operation, press the B [– (NO)] button. For details about saving Song files, refer to
page 82.
SongRecording Bar 001
P-000:NewSong
NO YES
A
B
DC
SongChanged Save?
NO YES
A
B
DC

Recording Your Performance
CP300 Owner’s Manual
44
Basic Operation
This section explains how to record a specific section or part of a Song again.
1 Use the B [– (NO)][+ (YES)] buttons while the playback display is displayed to move
through the measures, or play back the recording and press the [PLAY/PAUSE]
button to locate a point slightly prior to the beginning of the part you wish to re-
record.
If the playback display does not appear, press one of the SONG SELECT [N][O] buttons once.
2 Select a Voice or Voices for recording, if necessary.
Repeat Step 2 on page 42 if you wish to change the previous settings.
3 Press and hold down the [REC] button, and press one of the C [–][+] buttons
repeatedly to specify how the recording should start. Similarly, use the D [–][+]
buttons to specify how the recording should end.
While you are holding down the [REC] button, the following recording method select display appears.
Starting methods:
Norm: All existing data in the Song will be erased after re-recording starts.
Key On: Data that exists prior to the point where you start playing a note will not be erased (when re-
recording part of the Song).
Ending methods:
Replace: Existing data following the point at which you stopped recording will be erased.
Punch Out: Existing data following the point at which you stopped recording will remain.
4 Select a recording track, then start recording.
After this, follow the procedure beginning with Step 3 on page 42.
Re-recording Parts of a Song
PresetSong Bar 012
P-000:NewSong
NO YES
A
B
DC
Indicates the current measure.
(The words “bar” and “measure” are used interchangeably.)
RecMode ExtraTrackCh=3
Start:Norm End:Replace
NO YES
A
B
DC

Recording Your Performance
CP300 Owner’s Manual
45
Basic Operation
Data Recorded to User Songs
Data recorded to individual tracks:
• Notes played
• Voice selection
• Pitch Bend
• Pedal/Modulation wheel ON/OFF
• Reverb depth (Reverb Send)
• Chorus depth (Chorus Send)
• Insertion effect depth (Dry/Wet Balance)
• Sound brightness (Brightness)
• Resonance effect setting (Harmonic Content)
• Equalizer’s low-range frequency setting (EQ Low Freq.)
• Equalizer’s low-range gain setting (EQ Low Gain)
• Equalizer’s high-range frequency setting (EQ High Freq.)
• Equalizer’s high-range gain setting (EQ High Gain)
• Voice octave setting (Octave)
• Voice volume level (Volume)
• Stereo image of each Voice (Pan)
• Fine tuning of the pitch of two Voices in Dual mode (Detune)
• Volume level changes for each Voice with response to the way you play (Touch Sense)
• Voice Transpose (Transpose)
• Scale (Scale)
• Depth of Soft pedal effect (Soft Pedal Depth)
• Depth of string resonance (String Resonance Depth)
• Depth of sustain sampling (Sustain Sampling Depth)
• Volume of the key-off sound (Key-off Sampling Depth)
• Modulation (Modulation)
• Pitch Bend range (Pitch Bend Range)
Data recorded globally to all tracks:
• Tempo
• Time signature (beat)
• Reverb type
• Chorus type
• Insertion effect type
n You can change any of the settings with the exception of note data (including the Octave and Transpose setting)
after recording.
n You can change the time signature at the beginning of the Song, or at a specific position in the Song, by using the
B [– (NO)][+ (YES)] buttons while the Song is stopped.
n When you record in the Dual or Split mode, the CP300 records each Voice onto a separate track. For details, refer
to page 48.

Recording Your Performance
CP300 Owner’s Manual
46
Basic Operation
Adding Data to or Recording Over an Existing Song
The previous section explains how to record your performance from the beginning by selecting a blank Song
(P-000: New Song). You can also add new performance recordings to existing Songs, or overwrite your
previously recorded performances.
1 Press one of the SONG SELECT [N][O] button then use the A [–][+] button to call
up “Memory Song.”
2 Press the C [–][+] button to select the Song you wish to add data to or record over.
You cannot add data to or record over Preset Songs.
To continue recording, follow the procedure described in “Recording Your Performance” on page 42. To add
data to an existing Song, follow the procedure starting with Step 1 in “Re-recording Parts of a Song” on
page 44.
If you record on a track that already has data, the existing data on the track will be lost.
Changing a Voice or Tempo After Recording
You can change the Voice or tempo after recording to change a Song’s feel or to set a more suitable tempo. You
can also change these elements in the middle of a Song.
n Before changing the Voice or tempo, set the starting method to “Norm” (page 44). When the starting method is set
to “Key On,” you cannot change the Voice or tempo.
1 Select a Song you wish to change.
To select a Song, follow the procedure described in “Adding Data to or Recording Over an Existing
Song” above.
2 To change the Voice or tempo in the middle of the Song, specify the measure at which
the change is to be made by using the B [– (NO)][+ (YES)] buttons while the playback
display is appeared, or by pressing the [PLAY/PAUSE] button to locate a point slightly
prior to the beginning of the part you wish to re-record.
If the playback display does not appear, press one of the SONG SELECT [N][O] buttons once.
Other Recording Techniques
MemorySong Bar 001
M-001:NewSong.MID
NO YES
A
B
DC
CAUTION

Recording Your Performance
CP300 Owner’s Manual
47
Basic Operation
3 Change the settings (Voice, reverb, etc.).
For example, if you wish to change the recorded E. Piano 1 Voice to E. Piano 2, use the Voice group
buttons and the A [–][+] buttons to select E. Piano 2.
When you’ve finished making the settings, press one of the SONG SELECT [N][O] button to
return to the Song Select display.
The panel settings made in Step 3 will be saved in memory and you will not be able to restore the previous
settings. Proceed with caution.
4 Simultaneously hold down the [REC] button and select a track to change the value.
The indicator for the selected part lights up in red. Change the tempo setting now, if necessary.
Do not play the keyboard or press the [PLAY/PAUSE] button. Doing so will start recording, erasing the recorded
data.
5 Press the [STOP] or [REC] button to exit the record mode.
When you exit the record mode, the display prompts you whether you want to overwrite the Song or
not. Press the B [+ (YES)] button to overwrite the Song.
n Refer to “Data Recorded to User Songs” on page 45 for information on the settings that can be changed here.
Adjusting the Volume Balance between the Song and the Keyboard
While recording multiple parts one-by-one, you can adjust the volume balance between the playback of the
recorded parts and your current performance by using the [SONG VOLUME] slider.
Turning off the [MASTER] button lets you adjust the volume for the keyboard performance by using the
[ZONE CONTROL] sliders.
CAUTION
CAUTION
SONG
VOLUME
ZONE CONTROL
ZONE 1 ZONE 2 ZONE 3 ZONE 4
Move the sliders to make
adjustments in the sound.

Recording Your Performance
CP300 Owner’s Manual
48
Basic Operation
Recording in Dual or Split Mode
When you record in Dual or Split mode, the CP300 records each Voice onto a separate track. The following
table shows how tracks are assigned to each Voice.
When you record multiple parts into tracks one-by-one, or when you record new data over an existing Song (page 46),
the existing data will be erased. Proceed with caution.
In the following example, Tracks 1, 2, and Extra Track “n” have been selected for recording.
Track n = Track 3 to 16
If “n+1,” “n+2,” and “n+3” exceeds 16, Tracks 1, 2, and 3 are used.
n Changing between Dual and Split mode in the middle of a Song cannot be recorded.
Panel Assigned
recording track
Tra ck 1 Tra ck 2 Extra
Tra ck 3
Extra
Tra ck 4
Extra
Tra ck 5
Extra
Tra ck 6
... Extra
Tra ck 16
Dual
Main part Layer part
Main part Layer part
Main part
(Track n)
Layer part
(Track n+2)
Split
Main part Left part
Main part Left part
Main part
(Track n)
Left part
(Track n+1)
Dual+Split
Main part Left part Main Layer
part
Left Layer
part
Main part Left part Main Layer
part
Left Layer
part
Main part
(Track n)
Left part
(Track n+1)
Main Layer
part
(Track n+2)
Left Layer
part
(Track n+3)
CAUTION
12
3-16
TRACK
12
3-16
TRACK
12
3-16
TRACK
12
3-16
TRACK
12
3-16
TRACK
12
3-16
TRACK
12
3-16
TRACK
12
3-16
TRACK
12
3-16
TRACK

CP300 Owner’s Manual
49
Basic Operation
Song Playback
Songs you’ve recorded using the Record function (page 41) as well as Preset Songs can be played back on the CP300. You can
also play the keyboard along with Song playback.
1 Press one of the SONG SELECT [N][O] buttons to call up the Song Select display.
2 Select “Preset Song” or “Memory Song” by using the A [–][+] buttons.
The indication “Memory Song” can be called up when your Song data exists in internal storage memory.
3 Select the desired Song by using the C [–][+] buttons or SONG SELECT [N][O]
buttons.
Use the D [–][+] buttons to scroll through the Song name, if the name does not fit in the display.
4 Press the [PLAY/PAUSE] button to start playback.
n •Use the “Song Repeat” parameter in the Song Setting menu (page 87) to select repeat playback of all Songs or
repeat playback of a single Song.
•You can use the TEMPO [DOWN][UP] buttons to adjust the playback tempo as required before or during
playback (page 38).
• When the “Character Code” setting is different than that used when you named the Song, the title might be
displayed incorrectly. Change the CP300’s character type (“Character Code”) to that appropriate for the selected
Song (page 84).
5 Stop playback.
When playback is complete, the Song automatically stops and the CP300 returns to the top of the Song.
If you wish to stop playback in the middle of a Song, press the [STOP] button. Song playback can be
paused by pressing the [PLAY/PAUSE] button.
6 Press the [EXIT] button to go back to the Main display.
Playing Back a Song
Terminology
Preset: Preset Song Memory. Several Preset Songs (16 Songs) are built into this instrument.
Memory: Refers to the memory storage location for saving recorded data on this instrument.
NO YES
EXIT
MASTER
PERFORMANCE
MASTER EDIT
PERFORM.FILE
TRANSPOSE
SONG SELECT
NEW SONG
REC
STOP
PLAY/PAUSE
SYNCHRO START
SONG VOICE/PERFORMANCE
12
3-16
TRACK
SONG FILE
SONG SETTING
MIDI OUT PANEL LOCK
DOWN UP
TEMPO
A
B
D
C
CONTRAST
GRAND
PIANO 1
GRAND
PIANO 2
MONO
PIANO
E. PIANO 1 E. PIANO 2 E. PIANO 3
CLAVI.
VIBES
ORGAN 1 ORGAN 2 HARPSI. STRINGS CHOIR/PAD
GUITAR
BASS
XG
12345678
910111213141516
VOICE EDIT
SPLIT
VARIATION
REVERB
CHORUS SPEAKER MI DI SETTING
MASTER EQ EDIT
CLICK
OTHER SETTING
DEMO
2
1, 3 4, 553 6
PresetSong Bar 001
P-000:NewSong
NO YES
A
B
DC

Song Playback
CP300 Owner’s Manual
50
Basic Operation
Fast Forward and Rewind
The following operations can be performed in the Song select display:
•Use the B [– (NO)][+ (YES)] buttons to move back and forth (rewind and fast forward) through the Song
while the Song is played or stopped.
•Press the C [–] button during playback to locate the top of the current Song.
•Press the C [–] button twice (double-click) during playback to start playback from the previous Song.
•Press the C [+] button during playback to start playback from the next Song.
• Press the [STOP] button or simultaneously press the B [– (NO)][+ (YES)] buttons during playback or while
playback is stopped in the middle of the Song to locate the top of the Song.
Resetting the Tempo
Whenever you select a new Preset Song, the tempo is automatically reset to the Song’s original value.
n Performance mode is automatically turned off if you start Song playback while Performance mode is on.
Automatically Starting Song Playback by Playing the Keyboard—
Synchro Start
You can pause playback to begin when you play the keyboard (Synchro Start). Hold down the [STOP] button
and press the [PLAY/PAUSE] button. The [PLAY/PAUSE] indicator will blink, and the CP300 will wait for
Synchro Start.
In this condition, playback begins as soon as you play the keyboard.
n If you press the [STOP] button while waiting, Synchro Start will be cancelled.
Pedal Play/Pause
You can alternately start or pause Song playback by pressing a pedal connected to the CP300’s [ASSIGNABLE
FOOT PEDAL] jack. A pedal connected to the [ASSIGNABLE FOOT PEDAL] jack can be assigned to play
and pause Preset Song playback from the “Pedal Play/Pause” parameter in the Other Settings function
described on page 70.
This is convenient when performing along with previously recorded parts—it lets you stop and start playback
of the recorded backing, while you add parts of your own live.
Turning Part Playback On and Off
While the CP300 is playing or stopped, pressing these track buttons turn off the indicators, and the data on
those parts will not be played. Pressing the part buttons toggles part playback on and off. Turning a playback
part off lets you play that part yourself while the other parts play back.
REC
STOP
PLAY/PAUSE
SYNCHRO START
REC
STOP
PLAY/PAUSE
SYNCHRO START
Synchro Start standby mode
1. Hold down the [STOP] button
2. Press the [PLAY/PAUSE] button
12
3-16
TRACK
Tra ck 1
Tra ck 2
Track 3-16

CP300 Owner’s Manual
51
Basic Operation
Convenient Functions
This section covers various functions that you’ll find come in handy as you play and perform with the instrument.
The panel lock function can temporarily disable the panel operation and prevent unintended operation during
live performance.
1 Double-click the [PANEL LOCK] button (press it quickly twice).
The [PANEL LOCK] button lights. A “PANEL LOCK” message also appears in the display. While the
Panel Lock function is engaged, panel operations will be ignored.
2 To cancel Panel Lock, double-click the [PANEL LOCK] button.
The [PANEL LOCK] button turns off, and the display returns to the previous display.
n The Panel Lock function affects all controls, with the exception of the [MASTER VOLUME] dial, the [SONG
VOLUME] slider, the [ZONE CONTROL] sliders, the [MASTER EQUALIZER] sliders, the Modulation wheel,
the Pitch bend wheel, and the pedals.
This parameter specifies whether the CP300 transmits MIDI data to an external MIDI device (On) or not
(Off).
Pressing the [MIDI OUT] button alternates between On and Off. MIDI messages can be transmitted if the
button lamp is lit. MIDI messages cannot be transmitted if the lamp is off.
n This button is equipped with certain MIDI safeguards and also turns off pedal messages during performance. Even
if you turn MIDI transmission off while holding a key, a key-off message will still be transmitted when you release
the key. Turning MIDI transmission off also sends the following MIDI messages: Sustain Off, Sostenuto Off, Soft
Pedal Off.
n Keep in mind that if you turn MIDI transmission off, MIDI signals will not be transmitted no matter what other
MIDI transmission settings (in Master Edit and MIDI Settings) are made.
Panel Lock Function
MIDI Transmission On/Off
MIDI OUT PANEL LOCK
****** PANEL LOCK ******
Grand Piano 1
NO YES
A
B
DC
MIDI OUT PANEL LOCK MIDI OUT PANEL LOCK
Lit: Enables sending of MIDI messages. Off: Disables sending of MIDI messages.

Convenient Functions
CP300 Owner’s Manual
52
Basic Operation
This function serves as a convenient MIDI “panic” switch during performance when using a connected
external tone generator. If the connected tone generator continues to sound (stuck notes, etc.) even after you’ve
released the keys of the CP-300, using this MIDI Panic control transmits the necessary messages to stop the
tone generator from sounding continuously.
Press the [REVERB] button while holding the [MIDI OUT] button.
A “MIDI PANIC SEND” message appears in the display.
n Keep in mind that MIDI Panic transmission will not function if MIDI transmission is set to Off (page 51).
MIDI Panic messages: All Note Off, All Sound Off, Reset All Controllers, Sustain Off, Sostenuto Off, Modulation
Depth Off, Pitch Bend Center, Channel Pressure Off
This parameter specifies whether the CP300’s built-in speakers produce sound (On) or not (Off).
Pressing the [SPEAKER] button alternates between On and Off. The built-in speakers produce sound if the
lamp is lit, and do not sound if the lamp is off.
n If the [SPEAKER] button is lit, the built-in speakers sound normally even when using the headphones.
MIDI Panic Control
Built-in Speakers On/Off
MIDI OUT PANEL LOCK
REVERB
CHORUS
*** MIDI PANIC SEND ***
NO YES
A
B
DC
SPEAKER MIDI SETTING
CLICK
OTHER SETTING
DEMO
SPEAKER MIDI SETTING
CLICK
OTHER SETTING
DEMO
Lit: Speaker sounds normally. Off: Speakers do not sound.

Master Settings—Master Edit
CP300 Owner’s Manual
53
Reference
Reference Section
Master Settings—Master Edit
The Master mode allows you to divide the keyboard into up to four independent areas (zones) which will be effective when
the [MASTER] button is turned on.
n This setting is retained even after you turn off the power to the CP300. If you set the Memory Backup’s Master Setting to Off in the
Other Settings menu, the Master Settings will return to the default (initial) values when you turn on the power next time (page 71).
1 Press the [MASTER EDIT] button to call up the Master Setting display.
2 Select the desired item by pressing the [MASTER EDIT] button or by using the A [–]
[+] buttons.
For information about the parameters and their values, refer to “Parameters” on page 54.
3 Use the C [–][+] buttons to select a target item.
4 Use the D [–][+] buttons to change the value.
5 Press the [EXIT] button to exit the Master Setting display and return to normal play.
NO YES
EXIT
MASTER
PERFORMANCE
MASTER EDIT
PERFORM.FILE
TRANSPOSE
SONG SELECT
NEW SONG
REC
STOP
PLAY/PAUSE
SYNCHRO START
SONG VOICE/PERFORMANCE
12
3-16
TRACK
SONG FILE
SONG SETTING
MIDI OUT PANEL LOCK
DOWN UP
TEMPO
A
B
D
C
CONTRAST
GRAND
PIANO 1
GRAND
PIANO 2
MONO
PIANO
E. PIANO 1 E. PIANO 2 E. PIANO 3
CLAVI.
VIBES
ORGAN 1 ORGAN 2 HARPSI. STRINGS CHOIR/PAD
GUITAR
BASS
XG
12345678
910111213141516
VOICE EDIT
SPLIT
VARIATION
REVERB
CHORUS SPEAKER MI DI SETTI NG
MASTER EQ EDIT
CLICK
OTHER SETTING
DEMO
2
341, 2 5
Slider
Zone1 Volume
NO YES
A
B
DC

Master Settings—Master Edit
CP300 Owner’s Manual
54
Reference
Parameters
For assigning specific functions to each [ZONE
CONTROL] slider.
Setting targets: Zone 1, Zone 2, Zone 3, Zone 4
Functions/range: Volume, Modulation, Brightness, Harmonic
Content, After Touch, Control numbers 001 – 031, 033 – 095, Off
Default setting: Volume
n If you select After Touch or control numbers 001 – 031,
033 – 095, the slider affects only connected MIDI
instruments and not the CP300 itself.
You can select specific Voices or programs on a connected
MIDI device by specifying a Bank Select MSB value, in
combination with the Bank Select LSB and Program
Change parameters below.
Setting targets: Zone 1, Zone 2, Zone 3, Zone 4
Setting range: 0 – 127
Default setting: 0
The three specified MIDI messages—Bank Select MSB, Bank
Select LSB and Program Change—will be transmitted in the
following conditions:
• When turning on the Master mode.
• When changing any of the values of Bank Select MSB, Bank
Select LSB or Program Change when the Master mode is on.
• When selecting a Performance which was saved with the
Master mode on.
You can select specific Voices or programs on a connected
MIDI device by specifying a Bank Select LSB value, in
combination with the Bank Select MSB parameter (above)
and the Program Change parameter (below).
Setting targets: Zone 1, Zone 2, Zone 3, Zone 4
Setting range: 0 – 127
Default setting: 0
The three specified MIDI messages—Bank Select MSB, Bank
Select LSB and Program Change—will be transmitted in the
following conditions:
• When turning on the Master mode.
• When changing any of the values of Bank Select MSB, Bank
Select LSB or Program Change when the Master mode is on.
• When selecting a Performance which was saved with the
Master mode on.
You can select specific Voices or programs on a connected
MIDI device by specifying a Program Change number, in
combination with the Bank Select MSB and Bank Select
LSB parameters above.
Setting targets: Zone 1, Zone 2, Zone 3, Zone 4
Setting range: 1 – 128
Default setting: 1
The three specified MIDI messages—Bank Select MSB, Bank
Select LSB and Program Change—will be transmitted in the
following conditions:
• When turning on the Master mode.
• When changing any of the values of Bank Select MSB, Bank
Select LSB or Program Change when the Master mode is on.
• When selecting a Performance which was saved with the
Master mode on.
Slider Settings
Bank Select MSB Settings for MIDI
Transmission to an External Tone Generator
Slider
Zone 1 Volume
NO YES
A
B
DC
SendBankMsb
Zone 1 0
NO YES
A
B
DC
Bank Select LSB Settings for MIDI
Transmission to an External Tone Generator
Program Change Number Settings for MIDI
Transmission to an External Tone Generator
SendBankLsb
Zone 1 0
NO YES
A
B
DC
SendPG#
Zone 1 1
NO YES
A
B
DC

Master Settings—Master Edit
CP300 Owner’s Manual
55
Reference
The pitch of a note can be shifted upward or downward in
steps of an octave in each zone. You can adjust the offset up
or down over a maximum range of two octaves.
Setting targets: Zone 1, Zone 2, Zone 3, Zone 4
Setting range: -2 – 0 – +2
-2 (two octaves lower), 0 (no pitch shift), +2 (two octaves higher)
Default setting: 0
The Octave setting is effective when the [MASTER] button is on.
It also affects the following settings:
Internal: [VOICE EDIT] Octave setting for each Voice
MIDI Output: [MASTER EDIT] Octave setting for each zone
When the [MASTER] button is off, Octave affects the following:
Internal and MIDI Output: [VOICE EDIT] Octave setting for each
Voice
Turns the sound from the internal tone generator on or off
for each part.
Setting targets: Zone 1, Zone 2, Zone 3, Zone 4
Settings: On/Off
Default setting: On
Specifies the channels over which the CP300 transmits
MIDI data from each zone.
Setting targets: Zone 1, Zone 2, Zone 3, Zone 4
Setting range: Ch 1 – Ch 16, Off
Default settings:
n When the [MASTER] button is turned off, the “MIDI
Out Channel” setting in the MIDI Settings menu is used
for MIDI channel assignments.
Octave Setting for Connected External Tone
Generator
Internal Tone Generator On/Off Status
Octave
Zone 1 0
NO YES
A
B
DC
InternalTG
Zone 1 On
NO YES
A
B
DC
MIDI Transmission Channel for Master Mode
Zone 1 Ch 1
Zone 2 Ch 2
Zone 3 Ch 3
Zone 4 Ch 4
MidiOutChannel
Zone 1 Ch1
NO YES
A
B
DC
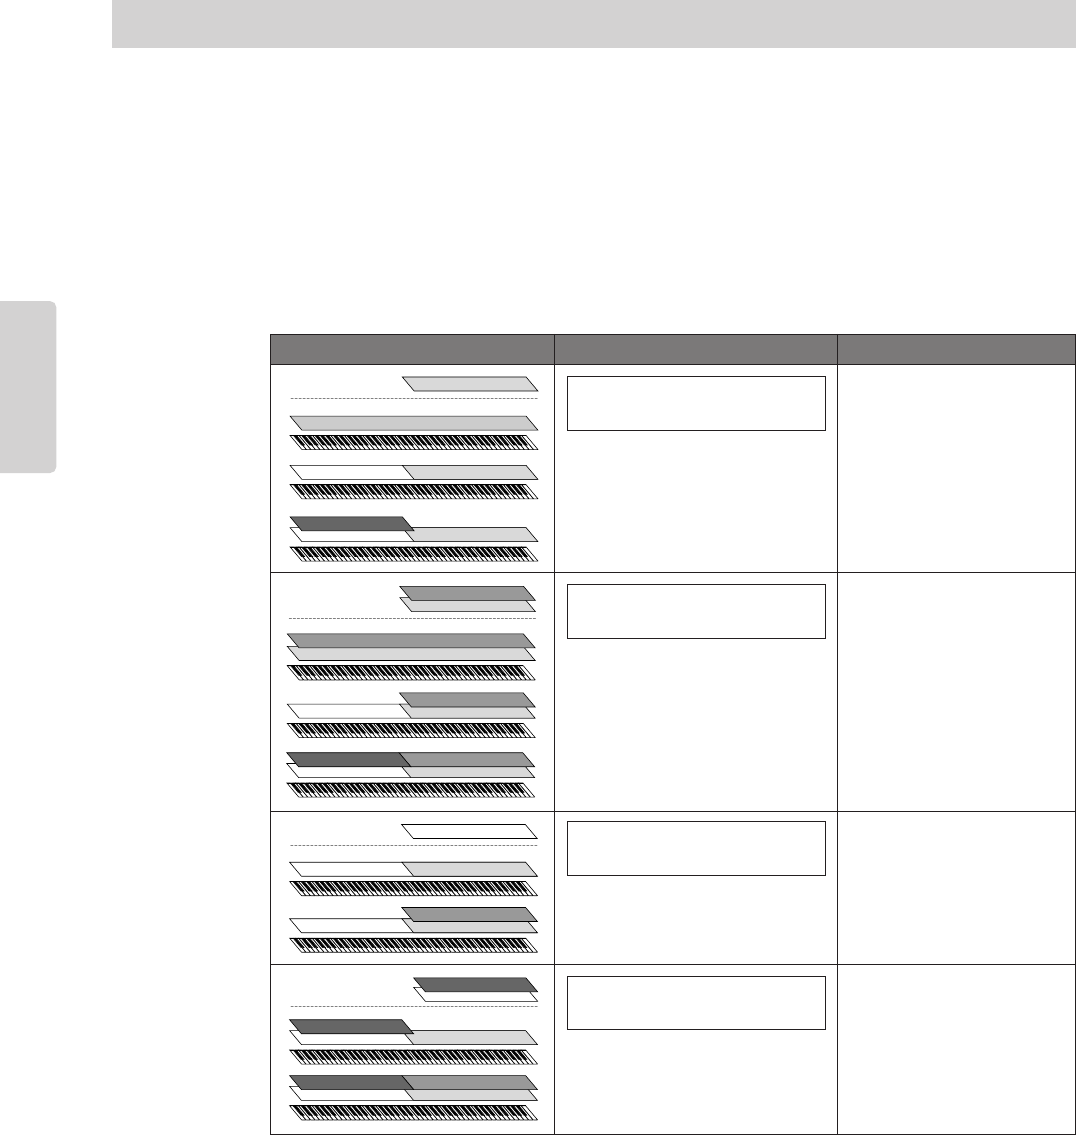
CP300 Owner’s Manual
56
Reference
Detailed Settings for the Voices—Voice Edit
You can make detailed settings for Voice. You can make these settings for each Voice (or each combination of Voices)
individually.
1 Select the desired Voice or combination of Voices.
For instructions on how to select a Voice, see page 25.
2 Press the [VOICE EDIT] button to access the Voice Edit menu.
3 Use the A [–][+] buttons to select the part for which you wish to change the Voice.
The range of the displayed part varies depending on the selected Voice.
n For details about the split point settings between the Main part and Left part, refer to the “To Change the Split
Point Setting” (page 32) or the “Split Point” parameter in the Other Settings menu (page 69). The split point
settings for the Layer part and Left Layer part can be changed via the “Split Point 2” parameter in the Other
Settings menu (page 69).
For information about the parameters and their values, refer to “Parameters” on page 58.
Voice Edit—Basic Operation
Voice Part Display Setup
MAIN Voices (displayed with a single
Voice or in Split mode)
The Main part Voice can be set.
Displayed when the MAIN side is in
Dual mode
The Main part Voice and Layer
part Voice can be set.
Displayed in Split mode
The Left part Voice can be set.
Displayed when the LEFT side is in Dual
mode
The Left part Voice and Left
Layer Voice can be set.
Main
Main Set?-->
Octave 0
Main x Layer
MainXLayer Set?-->
Octave(GrndPno1) 0
Left
Left Set?-->
Octave 0
Left x Left Layer
LeftXLeftLayer Set?-->
Octave(GrndPno1) 0

Detailed Settings for the Voices—Voice Edit
CP300 Owner’s Manual
57
Reference
4 Use the C [–][+] buttons to select a target item.
You can change the Voice for each part when Main x Layer or Left x Left Layer is selected in Step 3 (in
Dual mode). The target Voice name will be displayed in parentheses.
5 Use the D [–][+] buttons to change the value.
Press the [–][+] buttons simultaneously to instantly reset to the default setting.
6 Press the B [+ (YES)] button to execute the job.
To proceed, press the B [+ (YES)] button again. An “Executing” message appears and the data is saved.
When the operation is complete, a “Completed” message appears briefly, then returns to the previous
display.
n This setting will be retained even if you turn off the power to the CP300. The previous settings will be restored
when you turn on the power next time and the same Voice or part you selected before turning the power off will
automatically be selected.
7 Press the [EXIT] button to exit from the Voice Edit settings.
MainXLayer Set?-->
Octave(GrndPno1) 0
NO YES
A
B
DC
Main Set?-->
Octave 0
NO YES
A
B
DC
Main Executing
Octave 0
NO YES
A
B
DC

Detailed Settings for the Voices—Voice Edit
CP300 Owner’s Manual
58
Reference
Parameters
This allows you to shift the pitch of a note upward or
downward in octave steps, over a range of +/- two octaves.
Setting range: -2 – 0 – +2
-2 (two octaves lower), 0 (no pitch shift), +2 (two octaves higher)
This allows you to set the volume level for each Voice part.
Setting range: 0 – 127
This allows you to set the position of the sound in the
stereo field, left or right.
Setting range: L64 (hard left) – C (center) – R63 (hard right)
This allows you to finely tune the pitches of the two Voices
selected in Dual mode away from each other. Used
especially with similar sounding Voices, this creates a
warmer, richer sound.
Setting range: -20 – +20 (Positive (+) settings will raise the
pitch of the Main or Left Voice part’s sound and lower the pitch of
the Layer or Left Layer Voice part’s sound. Negative (-) settings
will do the opposite.)
This determines the types of Reverb effects used for the
Voices of the Main and Main x Layer parts. The Reverb
Type settings here are also used for the Voices of the Left
and Left x Left Layer parts, respectively. (These cannot be
set independently from the Main and Main x Layer Voices.)
Settings:
This allows you to control the depth of the reverb effect for
the Voice.
n The reverb effect is not applied if “Reverb Send” is set to
“0.”
n Reverb Send can be set independently for all Voice
parts—Main, Main x Layer, Left, and Left x Left Layer.
Setting range: 0 – 127
When the Voice part is set to Main x Layer or Left x Left Layer, parameters indicated with an asterisk (*) below are set for
each part’s Voice individually.
Octave*
Volume*
Pan (Stereo position)*
Main Set?-->
Octave 0
NO YES
A
B
DC
Main Set?-->
Volume 115
NO YES
A
B
DC
Main Set?-->
Pan C
NO YES
A
B
DC
Detune (Dual mode only)
Reverb Type
Room Simulates the reverberation of a room.
Hall1 Simulates the reverberation of a concert hall.
Hall2 Reverberation is slightly longer than that of Hall 1.
Stage Reverberation suitable for a solo instrument sound.
Plate Simulates the characteristic sound of a plate reverb.
Reverb Send*
MainxLayer Set?-->
Detune +3
NO YES
A
B
DC
Main Set?-->
ReverbType Hall1
NO YES
A
B
DC
Main Set?-->
ReverbSend 10
NO YES
A
B
DC

Detailed Settings for the Voices—Voice Edit
CP300 Owner’s Manual
59
Reference
This determines the types of Chorus effects used for the
Voices of the Main and Main x Layer parts. The Chorus
Type settings here are also used for the Voices of the Left
and Left x Left Layer parts, respectively. (These cannot be
set independently from the Main and Main x Layer Voices.)
Settings:
This allows you to control the depth of the chorus effect for
the Voice.
n Chorus Send can be set independently for all Voice
parts—Main, Main x Layer, Left, and Left x Left Layer.
Setting range: 0 – 127
This allows you to set the [CHORUS] button on or off for
each Voice. When you select a Voice, the [CHORUS]
button on/off setting for the Voice automatically changes
according to this parameter’s setting.
n Even if this parameter is turned on, the chorus effect is
disabled if “Chorus Send” is set to 0.
Setting range: On/Off
This allows you to select from a variety of effects (other
than reverb and chorus).
Settings:
This applies only to the Vibraphone Voice and allows you
to change the speed of the vibrato effect (controlled by the
Modulation wheel), simulating the electric rotor on an
actual vibraphone.
This is displayed only if “Vibe Rotor” is selected for the
“Ins. Type” parameter.
It enables you to set the speed of vibrato when you select
the Vibraphone Voice and use the Modulation wheel.
Setting range: 1 – 10
Chorus Type
Chorus Makes the sound more rich and spacious.
Celeste Adds warm animation and spaciousness to the
sound.
Flanger Adds a sweeping, metallic sound, similar to a jet
airplane.
Chorus Send*
Chorus On/Off
Main Set?-->
ChorusType Chorus
NO YES
A
B
DC
Main Set?-->
ChorusSend 48
NO YES
A
B
DC
Main Set?-->
ChorusOnOff Off
NO YES
A
B
DC
Insertion Effect Type*
DelayLCR Delay applied at left, center, and right positions.
DelayLR Delay applied at left and right positions.
Echo Echo-like delay
CrossDelay Left and right delays are crossed.
Symphonic Adds a rich and deep acoustic effect.
Rotary Adds the vibrato effect of a rotary speaker.
Tremolo Changes the volume level in rapid cycles.
VibeRotor Produces the vibrato effect of a vibraphone.
AutoPan Automatically pans the sound left to right and
back and forth.
Phaser Changes the phase of the sound periodically,
creating sweeping effects.
AutoWah Changes the center frequency of the wah filter
periodically.
SoundBoard Simulates the reverberation of a piano
soundboard.
AmpSimulator Recreates the distortion effect of a guitar amp.
Compressor This squeezes the dynamic range of a sound,
giving the overall sound greater “punch” and
impact.
Off No effect
Vibe Rotor Speed*
Main Set?-->
Ins.Type SoundBoard
NO YES
A
B
DC
Main Set?-->
VibeRotorSpeed 6
NO YES
A
B
DC

Detailed Settings for the Voices—Voice Edit
CP300 Owner’s Manual
60
Reference
This applies only to the Vibraphone Voice and allows you
to turn the vibrato effect (controlled by the Modulation
wheel) on and off. This is displayed only if “Vibe Rotor” is
selected for the “Ins. Type” parameter. When the
Vibraphone Voice is selected, the Vibe Rotor effect is
automatically set to On.
Setting range: On/Off
This allows you to set the rotation speed of the rotary
speaker effect. This is displayed only if “Rotary” is selected
for the “Ins. Type” parameter.
Setting range: Slow/Fast
This allows you to set the depth of the Insertion effect.
Some “Ins. Type” settings do not allow you to set the “Dry/
Wet Balance.”
Setting range: D63>W – D=W – D<W63
D63>W (outputs only the original sound with almost no effect
applied)
D=W (dry/wet balance is even)
D<W63 (outputs only the sound processed by the effect)
This allows you to set the brightness of the sound.
Setting range: -64 – +63
This allows you to adjust the resonance of the sound.
Setting range: -64 – +63
This allows you to adjust the low-range frequency of the
part EQ.
n For details about EQ or Equalizer, refer to page 36.
Setting range: 32 Hz – 2.0 kHz
This allows you to adjust the low-range gain (amount of
boost/cut of the low frequencies) of the part EQ.
Setting range: -12 dB – +12 dB
Vibe Rotor On/Off*
Rotary Speed*
Dry/Wet Balance*
Main Set?-->
VibeRotorOnOff On
NO YES
A
B
DC
Main Set?-->
RotarySpeed Slow
NO YES
A
B
DC
Main Set?-->
Dry/WetBalance D58>W
NO YES
A
B
DC
Brightness*
Harmonic Content*
EQ Low Frequency*
EQ Low Gain*
Main Set?-->
Brightness 0
NO YES
A
B
DC
Main Set?-->
HarmonicContent 0
NO YES
A
B
DC
Main Set?-->
EQ LowFreq. 80
NO YES
A
B
DC
Main Set?-->
EQ LowGain 0
NO YES
A
B
DC

Detailed Settings for the Voices—Voice Edit
CP300 Owner’s Manual
61
Reference
This allows you to adjust the high-range frequency of the
part EQ.
Setting range: 500 Hz – 16 kHz
This allows you to adjust the high-range gain (amount of
boost/cut of the high frequencies) of the part EQ.
Setting range: -12 dB – +12 dB
This allows you to determine the manner and degree to
which the volume level changes in response to your touch
on the keyboard (how hard you play). Since the volume
level of actual harpsichords and pipe organs does not
change regardless of how you play the keyboard, the normal
setting for these Voices is 127. (See the setting range below.)
Setting range: 0 – 64 – 127
0: Softest level
64: Normal touch response; optimum dynamic range
127: Loudest level; fixed (no change in response to touch)
This allows you to assign a specific function to the pedal
connected to the [1 SUSTAIN] jack.
Settings:
*For best results, use an optional Yamaha FC7 Foot Controller.
This allows you to assign a specific function to the pedal
connected to the [2 SOSTENUTO] jack.
Setting range: same as “Pedal 1” (above)
This allows you to assign a specific function to the pedal
connected to the [3 SOFT] jack.
Setting range: same as “Pedal 1” (above)
EQ High Frequency*
EQ High Gain*
Touch Sensitivity (Touch Sense)*
Main Set?-->
EQ HighFreq. 4.0k
NO YES
A
B
DC
Main Set?-->
EQ HighGain 0
NO YES
A
B
DC
Main Set?-->
TouchSense 64
NO YES
A
B
DC
Assigning the Pedal 1 Function
Sustain On/Off switch-type damper (page 33).
SustainCont Damper function that sustains the sound longer
the further down you press the pedal (page 33)
Sostenuto Sostenuto pedal (page 33)
Soft Soft pedal (page 33)
Expression* Makes the sound softer or louder
Off No function is assigned
Assigning the Pedal 2 Function
Assigning the Pedal 3 Function
Main Set?-->
Pedal 1 SustainCont
NO YES
A
B
DC
Main Set?-->
Pedal 2 Sostenuto
NO YES
A
B
DC
Main Set?-->
Pedal 3 Soft
NO YES
A
B
DC

Detailed Settings for the Voices—Voice Edit
CP300 Owner’s Manual
62
Reference
This allows you to assign a specific function to the pedal
connected to the [4 AUX] jack.
Settings:
This allows you to specify the parameter controlled by the
modulation wheel.
Settings:
Assigning the Pedal 4 Function
Sustain On/Off switch-type damper (page 33)
SustainCont Damper function that sustains the sound longer
the further down you press the pedal (page 33).
Sostenuto Sostenuto (page 33)
Soft Soft (page 33)
Expression Makes the sound softer or louder.
ReverbSend Adds reverb accents to notes being played.
ChorusSend Adds chorus accents to notes being played.
Brightness Adds brightness accents to notes being played.
Harmonic
Content
Adds resonance accents to notes being played.
AfterTouch Adds after-touch accents to notes being played
(MIDI transmit only)
Ctrl #0 – #119 Adds accents by controllers #0 – 119 to notes
being played (MIDI transmit only).
Off No function is assigned.
Main Set?-->
Pedal 4 Expression
NO YES
A
B
DC
Assigning the Modulation Wheel Function
Expression Makes the sound softer or louder.
MainVolume Changes the volume level of notes being played
in the Main part. (Displayed only when Main is in
Dual mode.)
LayerVolume Changes the volume level of notes being played
in the Layer part. (Displayed only when Main is in
Dual mode.)
LeftVolume Changes the volume level of notes being played
in the Left part. (Displayed only when Left is in
Dual mode.)
LeftLayer
Volume
Changes the volume level of notes being played
in the Left Layer part. (Displayed only when Left
is in Dual mode.)
RotarySpeed Changes the rotary speaker effect’s rotation
speed.
VibeRotor Changes the vibraphone’s vibrato speed.
Modulation Adds modulation accents.
ReverbSend Adds reverb accents to notes being played.
ChorusSend Adds chorus accents to notes being played.
Brightness Adds brightness accents to notes being played.
Harmonic Adds resonance accents to notes being played.
AfterTouch Adds after-touch accents to notes being played
(MIDI transmit only).
Ctrl #0 – #119 Adds accents by controllers #0 – 119 to notes
being played (MIDI transmit only).
Off No function is assigned.
Main Set?-->
Modulation Ctrl#001
NO YES
A
B
DC

CP300 Owner’s Manual
63
Reference
Detailed Settings for MIDI Operations—MIDI Settings
Here you can make settings for MIDI applications, such as MIDI receive/transmit channels and other settings necessary when
using the CP300 with other MIDI devices.
n These settings will be retained even if you turn off the power to the CP300. If you set the Memory Backup’s MIDI Setting to Off in
the Other Settings menu, the MIDI Settings will return to the default (initial) values when you turn on the power next time
(page 71).
n While the Master mode is turned on, the “MIDI Out Channel” parameter and “MIDI Out Select” parameter in the MIDI Settings
menu are not effective.
MIDI (Musical Instrument Digital Interface) is a standard format for data transmission/reception. It enables
the transfer of performance data and commands between MIDI devices and personal computers. Using MIDI,
you can control a connected MIDI device from the CP300, or control the CP300 from a connected MIDI
device or computer.
MIDI Channels
MIDI data is transferred over 16 channels numbered from 1 through 16. Using these channels, 1 – 16, the
performance data for sixteen different instrument parts can be simultaneously sent over one MIDI cable.
Think of the MIDI channels as TV channels. Each TV station transmits its broadcasts over a specific channel.
Your home TV set receives many different programs simultaneously from several TV stations and you select the
appropriate channel to watch the desired program.
MIDI operates on the same basic principle. The transmitting instrument sends MIDI data on a specific MIDI
channel (MIDI Transmit Channel) via a single MIDI cable to the receiving instrument. If the receiving
instrument’s MIDI channel (MIDI Receive Channel) matches the Transmit Channel, the receiving instrument
will sound according to the data sent by the transmitting instrument.
For detailed information on how to set the MIDI transmit channel and the MIDI receive channel, refer to
page 65.
About MIDI
1
Weather Report
News
2
2
News
MIDI Transmit channel 2 MIDI Receive channel 2
MIDI
cable

Detailed Settings for MIDI Operations—MIDI Settings
CP300 Owner’s Manual
64
Reference
1 Press the [MIDI SETTING] button to call up the MIDI Settings menu.
2 Select the desired item by pressing the [MIDI SETTING] button or by using the A [–]
[+] buttons.
For information about the parameters and their values, refer to “Parameters” on page 65.
3 Use the C [–][+] buttons to select a target item.
4 Use the D [–][+] buttons to change the value.
Press the [–][+] buttons simultaneously to instantly reset to the default setting.
5 Press the B [+ (YES)] button to execute the job, if a “Start?” message appears.
Press the B [+ (YES)] button to call up the confirmation prompt (“Sure?”). Press the B [+ (YES)] button
once again to actually execute the job. An “Executing” message appears and the data is saved. When the
operation is complete, a “Completed” message appears briefly, then returns to the previous display.
To cancel the operation, press the B [– (NO)] button instead of the B [+ (YES)] button.
6 Press the [EXIT] button to exit the MIDI Settings menu.
MIDI Settings—Basic Operation
NO YES
EXIT
MASTER
PERFORMANCE
MASTER EDIT
PERFORM.FILE
TRANSPOSE
SONG SELECT
NEW SONG
REC
STOP
PLAY/PAUSE
SYNCHRO START
SONG VOICE/PERFORMANCE
12
3-16
TRACK
SONG FILE
SONG SETTING
MIDI OUT PANEL LOCK
DOWN UP
TEMPO
A
B
D
C
CONTRAST
GRAND
PIANO 1
GRAND
PIANO 2
MONO
PIANO
E. PIANO 1 E. PIANO 2 E. PIANO 3
CLAVI.
VIBES
ORGAN 1 ORGAN 2 HARPSI. STRINGS CHOIR/PAD
GUITAR
BASS
XG
12345678
910111213141516
VOICE EDIT
SPLIT
VARIATION
REVERB
CHORUS SPEAKER MI DI SETTI NG
MASTER EQ EDIT
CLICK
OTHER SETTING
DEMO
1, 22 5
346
MidiOutChannel
Main Ch1
NO YES
A
B
DC
InitialSetup Start?-->
NO YES
A
B
DC

Detailed Settings for MIDI Operations—MIDI Settings
CP300 Owner’s Manual
65
Reference
Parameters
This allows you to specify the channel over which the
CP300 transmits MIDI data.
Setting targets: Main, Left, Layer, Left Layer
Setting range: Ch 1 – Ch 16, Off (not transmitted)
Default settings:
n While the Master mode is turned on, “MIDI Out
Channel” parameter in the Master Edit menu will be
enabled for MIDI channel assignments.
This allows you to specify the channel over which the
CP300 receives data from the MIDI [IN] or USB
connectors.
Setting targets: Song, Main, Left, Layer, Left Layer, Keyboard,
Off
Setting range: Ch 1 – Ch 32
Default settings:
“Local Control On” is a state in which the CP300 produces
the sound from its tone generator when you play the
keyboard. In “Local Control Off” state, the keyboard and
the tone generator are cut off from each other. This means
that even if you play the keyboard, the CP300 will not
produce the sound. Instead, the keyboard data can be
transmitted via MIDI to a connected MIDI device, which
can produce the sound. The “Local Control Off” setting is
useful when you wish to play an external sound source
while playing the keys on the CP300, but don’t want the
CP300 to sound. It’s also useful for recording data to a
sequencer/computer and using the sequencer to route the
data to the appropriate tone generator or instrument.
Setting range: On/Off
Default setting: On
This allows you to select whether your performance data or
Song playback data is sent via MIDI.
Settings:
Default setting: Keyboard
n While the Master mode is turned on, keyboard
performance data is transmitted no matter what setting is
made here.
MIDI Transmit Channel Selection
Main Ch 1
Left Ch 2
Layer Ch 3
Left Layer Ch 4
MIDI Receive Channel Selection
Ch 1 – Ch 16 Song
Ch 17 Keyboard
Ch 18 Main
Ch 19 Left
Ch 20 Layer
Ch 21 Left Layer
Ch 22 – Ch 32 Off
MidiOutChannel
Main Ch1
NO YES
A
B
DC
Selects the Voice part
Specifies the channel
MidiInChannel
Ch1 Song
NO YES
A
B
DC
Selects the MIDI receive partSelects the channel
Local Control On/Off
MIDI Out Select
Keyboard Performance data played on the keyboard
Song Song playback data
MIDI IN
(Ch 1 – Ch 16)
USB
(Ch 1 – Ch 32)
Ch 1 – Ch 16
Song
Ch 17 – Ch 32
Song
Keyboard
Internal Voices
LocalControl
On
NO YES
A
B
DC
MidiOutSelect
Keyboard
NO YES
A
B
DC

Detailed Settings for MIDI Operations—MIDI Settings
CP300 Owner’s Manual
66
Reference
This allows you to specify which types of MIDI data the
CP300 will receive and respond to.
Type of data: Note, Control, Program, AfterTouch, PitchBend,
SysEx (System Exclusive)
Setting range: On/Off
Default setting: On for all types of data
This allows you to specify which types of MIDI data the
CP300 will transmit.
Type of data: Note, Control, Program, AfterTouch, PitchBend,
SystemRealTime, SysEx (System Exclusive)
Setting range: On/Off
Default setting: On for all types of data
This allows you to transmit initial panel setup data, such as
Voice selection and other settings, to a connected
sequencer. This is useful when you record performance data
to a sequencer, since it lets you take a “snapshot” of the
CP300 settings you want to use at the beginning of a
recorded Song and have those settings automatically called
up for you when you play back the Song.
You can transmit each setting data as the MIDI setting bulk
data.
Type of data:
Default setting: Current
Bulk data cannot be transmitted in the following situations:
• Song record/playback
• Song recording standby
• When selecting recording tracks
• Demo Song playback
Bulk data cannot be received in the following situations:
• Song record/playback
• Song recording standby
• When selecting recording tracks
• Demo Song playback
• When transmitting bulk data
• When the message “Receiving bulk data has failed” appears
If the Performance file has 56 files, or the Song file has 112
Songs (1.4 MB), the data transfer will take at least 3 minutes if
you are using the USB connection, or 21 minutes if you are using
the MIDI connection.
n If you’ve changed the “Character Code” setting (page 84)
since naming a Song and the Song name does not display
correctly, bulk data cannot be transmitted.
n Press the B [– (NO)] button or [EXIT] button to cancel
the transmission.
Never attempt to turn off the power while bulk data is being
transmitted. Turning the power off in this state results in loss of
all user data.
MIDI Receive Parameter
MIDI Transmit Parameter
Transmitting the Default Settings on the Panel
ReceiveParameter
Note On
NO YES
A
B
DC
Selects the type of data Turns reception on or off
TransmitParameter
Note On
NO YES
A
B
DC
Selects the type of data Turns transmission
on or off
InitialSetup Start?-->
NO YES
A
B
DC
Bulk Dump
Current The data is set on the panel
Performance The data saved to the Performance
Voice The Voice data saved using Voice Edit
MemorySong/
Perf.File
The Performance file, the data saved to the
Song file.
ALL Send each bulk in sequence.
BulkDump Start?-->
Voice
NO YES
A
B
DC
CAUTION

CP300 Owner’s Manual
67
Reference
Miscellaneous CP300 Settings—Other Settings
The Other Setting(s) menu provides a variety of settings, generally related to the overall sound and operation of the CP300.
These include detailed settings for touch response, tuning, pedal operation, and more.
n The edited Other Settings will be erased after you turn off the power to the CP300. If you set the Memory Backup’s Other Setting
to On in the Other Settings menu, the current Other Settings’ values will remain in effect when you turn the power off and back on
again (page 71).
1 Press the [OTHER SETTING] button to call up the Other Settings menu.
2 Select the desired item by pressing the [OTHER SETTING] button or by using the
A [–][+] buttons.
For information about the parameters and their values, refer to “Parameters” on page 68.
3 Use the C [–][+] buttons to select a target item.
4 Use the D [–][+] buttons to change the value.
Press the [–][+] buttons simultaneously to instantly reset to the default setting.
5 Press the B [+ (YES)] button to execute the job (if an “Execute?” message appears).
Pressing the B [+ (YES)] button calls up a confirmation prompt (“Sure?”). Press the B [+ (YES)] button
again to execute the job. An “Executing” message appears and the data is saved. When the operation is
complete, a “Completed” message appears briefly, then returns to the previous display.
To cancel the operation, press the B [– (NO)] button instead of the B [+ (YES)] button.
6 Press the [EXIT] button to exit from the Other Settings menu.
Other Settings—Basic Operation
NO YES
EXIT
MASTER
PERFORMANCE
MASTER EDIT
PERFORM.FILE
TRANSPOSE
SONG SELECT
NEW SONG
REC
STOP
PLAY/PAUSE
SYNCHRO START
SONG VOICE/PERFORMANCE
12
3-16
TRACK
SONG FILE
SONG SETTING
MIDI OUT PANEL LOCK
DOWN UP
TEMPO
A
B
D
C
CONTRAST
GRAND
PIANO 1
GRAND
PIANO 2
MONO
PIANO
E. PIANO 1 E. PIANO 2 E. PIANO 3
CLAVI.
VIBES
ORGAN 1 ORGAN 2 HARPSI. STRINGS CHOIR/PAD
GUITAR
BASS
XG
12345678
910111213141516
VOICE EDIT
SPLIT
VARIATION
REVERB
CHORUS SPEAKER MI DI SETTING
MASTER EQ EDIT
CLICK
OTHER SETTING
DEMO
1, 2
2
5
346
Transpose
Song 0
NO YES
A
B
DC
FactorySet Sure?-->
MemoryFileExcluded
NO YES
A
B
DC

Miscellaneous CP300 Settings—Other Settings
CP300 Owner’s Manual
68
Reference
Parameters
This allows you to specify the touch response of the
CP300’s keyboard, or change how the sound responds to
the way you play the keys.
Settings:
Default setting: Medium
This allows you to finely tune the pitch of the entire
instrument—a useful feature when playing the CP300
along with other instruments or CD music.
Setting range: A3 = 427.0 Hz – 453.0 Hz (0.1 Hz steps)
Default setting: A3 = 440.0 Hz
This allows you to specify a tuning curve, Stretch or Flat,
for the Piano Voices groups (Grand Piano 1, Grand Piano 2
and Mono Piano). Actual piano tuners often employ stretch
tuning, extending the upper octaves of the piano slightly to
compensate for the perception of the human ear in the
higher range. The Flat setting is an acoustically perfect
tuning, to be used if the stretch-tuned piano Voice sounds
out of tune with other instrument Voices.
Settings:
Default setting: Stretch
This allows you to select different scales or tuning systems
for the instrument. Equal Temperament is the most
common contemporary piano tuning scale. However,
history has known numerous other scales, many of which
serve as the basis for certain genres of music. You can
experience these tunings with the CP300.
Settings:
Setting range: C, C#, D, Eb, E, F, F#, G, Ab, A, Bb, B
For scales other than Equal, a root note must be specified using
the B [– (NO)]/[+ (YES)] buttons.
Default setting: Equal
Touch Response
Light A soft playing touch results in a relatively loud sound.
The volume level tends to be consistent.
Medium Standard touch response.
Heavy The keys must be played very strongly to generate
loud volume. This setting is best for a wide dynamic
range and optimum expressive control of the sound,
from pianissimo to fortissimo.
Fixed No touch response. The volume level will be the same
regardless of how strongly you play the keys. Use the
B [– (NO)][+ (YES)] buttons to set the fixed volume
level. Setting range of the fixed volume level:
1 – 127
Tune
Piano Tuning Curve
TouchResponse Vel= 64
Fixed
NO YES
A
B
DC
Tune
A3=440.0Hz
NO YES
A
B
DC
PianoTuningCurve
Stretch
NO YES
A
B
DC
Stretch Tuning curve particularly for pianos, with higher
octaves slightly “stretched.”
Flat Tuning curve in which the frequency relationships are
precisely duplicated in all octaves.
Scale
Equal The pitch range of each octave is divided equally
into twelve parts, with each half-step evenly
spaced in pitch. This is the most commonly used
tuning in music today.
PureMajor These tunings preserve the pure mathematical
intervals of each scale, especially for triad chords
(root, third, fifth). You can hear this best in actual
vocal harmonies—such as choirs and a cappella
singing.
PureMinor
Pythagorean This scale was devised by the famous Greek
philosopher and is created from a series of
perfect fifths, which are collapsed into a single
octave. The 3rd in this tuning are slightly
unstable, but the 4th and 5th are beautiful and
suitable for some leads.
MeanTone This scale was created as an improvement on the
Pythagorean scale, by making the major third
interval more “in tune.” It was especially popular
from the 16th century to the 18th century. Handel,
among others, used this scale.
Werckmeister The Werckmeister and Kirnberger scales were
improvements on the mean-tone and
Pythagorean scales. The main feature of these
scales is that each key has its own unique
character. The scales were used extensively
during the time of Bach and Beethoven, and
even now are often used when performing period
music on the harpsichord.
Kirnberger
Scale BaseNote=C
PureMajor
NO YES
A
B
DC

Miscellaneous CP300 Settings—Other Settings
CP300 Owner’s Manual
69
Reference
This allows you to specify the split point (the boundary on
the keyboard separating the Main part and Left part).
Setting range: A-1 – C7
Default setting: F#2
This allows you to specify the secondary split point (the
boundary on the keyboard separating the Layer part and
Left Layer part).
Setting range: A-1 – C7
Default setting: F#2
The CP300’s Transpose function makes it possible to shift
the pitch of the entire keyboard up or down in semitone
intervals to facilitate playing in difficult key signatures, and
to let you easily match the pitch of the keyboard to the
range of a singer or other instruments.
Setting targets:
Setting range: -12 – 0 – +12
-12 (-1 octave) – 0 (normal pitch) – +12 (+1 octave)
Default setting: Keyboard = 0, Song = 0
n The Keyboard settings can only be made when the
[TRANSPOSE] button is turned on (page 37).
n You can also change the keyboard Transpose setting by
using the [TRANSPOSE] button. Whichever method
you use, the most recently made settings will be effective.
n The Transpose setting affects transmitted MIDI data.
This allows you to specify the depth of the soft pedal effect.
Setting range: 1 – 10
Default setting: 5
This parameter sets the amount or depth of the String
Resonance sound and is effective on certain Voice, such as
Grand Piano 1.
Setting range: Off, 1 – 10
Default setting: 5
This parameter sets the amount or depth of the Sustain
Sampling sound and is effective on the Mono Piano 1 and
Comp. Piano 1 Voices, as well as on the Grand Piano 1
Voice group.
Setting range: Off, 1 – 10
Default setting: 5
Split Point
Split Point 2
Transpose
Keyboard The sound you play with the keys
Song The sound of Song playback
SplitPoint(Main)
F#2
NO YES
A
B
DC
SplitPoint(Layer)
F#2
NO YES
A
B
DC
Transpose
Keyboard 0
NO YES
A
B
DC
Soft Pedal Depth
String Resonance Depth
Sustain Sampling Depth
SoftPedalDepth
5
NO YES
A
B
DC
StringResonanceDepth
5
NO YES
A
B
DC
SustainSamplingDepth
5
NO YES
A
B
DC
Miscellaneous CP300 Settings—Other Settings
CP300 Owner’s Manual
70
Reference
This allows you to adjust the volume of the key-off sound
(the subtle sound that occurs when you release a key). This
parameter is effective on the Grand Piano 1, Mono Piano 1
and Comp. Piano 1 Voices, as well as on the E. Piano 1,
Clavi. and Harpsi Voice groups.
Setting range: Off, 1 – 10
Default setting: 5
This parameter affects only the Vibraphone Voice, and
enables you to select whether the Vibraphone sound is
sustained while you press the keys on the keyboard (“Piano
Like”) or the sound is sustained only while you press and
hold down the sustain pedal, like when playing an actual
vibraphone (“Normal”).
Setting range: PianoLike, Normal
Default setting: PianoLike
This allows you to assign the Song Play/Pause function to
the pedal, letting you start or pause Song playback with
your foot. In this setting, the selected pedal (2 – 4)
functions in the same manner as the [PLAY/PAUSE]
button on the panel.
n If you assign the Play/Pause function to a pedal and turn
the function On, the pedal function assigned to the pedal
in the Voice Edit menu (pages 61 and 62) is disabled.
Setting for: Pedal 2, Pedal 3, Pedal 4
Setting range: On/Off
Default setting: Off for all pedals
This allows you to select the type or polarity of the pedals
you use, connected to the [SUSTAIN] pedal jack,
[SOSTENUTO] pedal jack, [SOFT] pedal jack and [AUX]
pedal jack. If you are using a Yamaha-recommended pedal
(such as the FC4 or FC5), the Pedal Type need not be
changed. However, if you are using a pedal of a different
manufacturer, the polarity may be opposite and the effect
produced by operating the pedal (on/off, dynamics, etc.)
might be reversed. If this happens, you can use this setting
to correct the pedal operation.
Setting for: Pedal 1, Pedal 2, Pedal 3, Pedal 4
Setting range: Make, Break
Default settings: Pedal 1, Pedal 2, Pedal 3: Make; Pedal 4:
Break
This allows you to set the point at which the damper pedal
starts to affect the sound. In other words, you can change
the point at which the assigned effect begins to be applied,
as you press the pedal down. If the effect is a simple on/off
type effect, this setting specifies the point at which the
effect will be switched on/off (with the exception of the
Expression function).
Refer to the section on assigning the pedal function in the
Voice Edit settings (page 61).
Setting range: -2 (effective with the shallowest press) – 0 – +2
(effective with the deepest press)
Default setting: 0
This allows you to specify the amount of pitch change
produced by moving the Pitch bend wheel. This parameter
applies only to the manually played sound (not to a
connected MIDI device). The value can be set in semitone
steps.
Setting range: 0 – 12 semitones (moving the wheel will raise/
lower the pitch by a maximum of 12 semitones or 1 octave)
Default setting: 2
Key-off Sampling Depth
Vibraphone Pedal Mode
Pedal Play/Pause
KeyoffSamplingDepth
5
NO YES
A
B
DC
VibraphonePedalMode
PianoLike
NO YES
A
B
DC
PedalPlay/Pause
Pedal 2 Off
NO YES
A
B
DC
Selects the pedal to which
the function will be assigned
Selects on or off
Pedal Type
Half Pedal Point
Pitch Bend Range
PedalType
Pedal 1 Make
NO YES
A
B
DC
HalfPedalPoint
0
NO YES
A
B
DC
PitchBendRange
2
NO YES
A
B
DC

Miscellaneous CP300 Settings—Other Settings
CP300 Owner’s Manual
71
Reference
This allows you to lock the Master Equalizer settings and
prevent them from being changed when selecting a
Performance, or by Song playback and incoming MIDI
data.
However, if bulk data (of the Current type) is received, the
Master Equalizer settings will be changed, no matter
whether the "Equalizer Lock" is turned on or off. (See Bulk
Dump in the MIDI Settings on page 66.)
Setting range: On/Off
Default setting: On
This allows you to select specific items and parameters, such
as Voice selection and reverb type, to be automatically saved
upon shutdown, ensuring that they will not be lost when
you turn off the power to the CP300.
If the backup function is turned on for an item, the settings
for that item when power is turned off will be in effect the
next time power is turned on. If the backup function is
turned off for an item, the settings in memory are erased
when you turn off the power. In this case, when you turn
on the power to the unit, the default settings (the initial
settings) will be used. Refer to the “Factory Setting List” on
page 101.
Keep in mind that the backup settings themselves, the files
of the storage memory, and Character Code setting
(page 84) are always saved upon shutdown.
Setting for:
Default setting: The Transpose, Main/LeftVoice and
OtherSetting parameters are set to Off. Other parameters are set
to On.
This allows you to reset the CP300 to its default settings.
• The “Character Code” parameter setting does not change
(page 84).
• The “Memory Backup” parameter setting (On/Off) is
reset to the default setting (left column).
•You can specify whether the files in the storage memory
are erased or kept.
Never attempt to turn off the power during factory set. Doing so
could result in damage to the data.
Selecting for storage memory:
Equalizer Lock
Memory Backup
Master Master settings (page 53)
Transpose Transpose settings (page 69)
Equalizer Master Equalizer settings (page 72)
ReverbOnOff Reverb on or off (page 35)
SplitPoint Split Point settings (page 69)
Main/LeftVoice Voice, Keyboard part combinations
(page 27)
SongSetting Settings for Song recording and playback
(page 85)
MidiSetting MIDI Settings (page 63)
OtherSetting Other Settings (page 67)
EqualizerLock
Off
NO YES
A
B
DC
MemoryBackUp
Transpose Off
NO YES
A
B
DC
Selects the desired item
Selects on or off
Factory Set
MemoryFileExcluded Memory Songs are kept.
MemoryFileIncluded Memory Songs are erased.
CAUTION
FactorySet Execute?-->
MemoryFileExcluded
NO YES
A
B
DC
Resets the CP300
Selects whether the memory files
are erased or kept

CP300 Owner’s Manual
72
Reference
Master Equalizer Settings
This section explains how to set the Master Equalizer using the Master EQ Edit menu.
n This setting is retained even after you turn off the power to the CP300. If you set the Memory Backup’s Equalizer setting to Off in
the Other Settings menu, the Master Equalizer settings will return to the default (initial) values when you turn on the power the
next time (page 71).
1 Use the MASTER EQ EDIT [▼][▲] buttons to show the Master EQ Edit display.
2 Set the Master Equalizer type by using the MASTER EQ EDIT [▼][▲] buttons or the
B [– (NO)][+ (YES)] buttons.
Setting range: Mellow 1 – 3, Normal, Bright 1 – 3, Edit
Default setting: Edit
3 Use the C [–][+] buttons to select the parameter item.
4 Use the D [–][+] buttons to change the value.
The contents of the EQ parameters are briefly explained below.
*1 You can also set the EQ Gain by moving the [MASTER EQUALIZER] slider. Keep in mind that the most recently made
settings will be effective.
*2 You can specify the range of the gain from -12 dB to +12 dB on MIDI Input. The display will also indicate from -12 dB
to +12 dB.
n If the “Equalizer Lock” parameter (page 71) in the Other Settings menu is turned on, the Master Equalizer settings
will not be affected by selecting a Performance, or by Song playback and incoming MIDI data.
Parameter name Contents Data Range
Low Gain EQ low-range gain
*1
-9 dB – +9 dB
*2
Low Freq. EQ low-range frequency 32 Hz – 2.0 kHz
Low Q EQ low-range resonance 0.1 – 12.0
LowMid Gain EQ low-middle range gain
*1
-9 dB – +9 dB
*2
LowMid Freq. EQ low-middle frequency 100 Hz – 10.0 kHz
LowMid Q EQ low-middle resonance 0.1 – 12.0
Mid Gain EQ middle range gain
*1
-9 dB – +9 dB
*2
Mid Freq. EQ middle frequency 100 Hz – 10.0 kHz
Mid Q EQ middle resonance 0.1 – 12.0
HighMid Gain EQ high-middle range gain
*1
-9 dB – +9 dB
*2
HighMid Freq. EQ high-middle frequency 100 Hz – 10.0 kHz
HighMid Q EQ high-middle resonance 0.1 – 12.0
High Gain EQ high range gain
*1
-9 dB – +9 dB
*2
High Freq. EQ high frequency 500 Hz – 16.0 kHz
High Q EQ high resonance 0.1 – 12.0
NO YES
EXIT
MASTER
PERFORMANCE
MASTER EDIT
PERFORM.FILE
TRANSPOSE
SONG SELECT
NEW SONG
REC
STOP
PLAY/PAUSE
SYNCHRO START
SONG VOICE/PERFORMANCE
12
3-16
TRACK
SONG FILE
SONG SETTING
MIDI OUT PANEL LOCK
DOWN UP
TEMPO
A
B
D
C
CONTRAST
GRAND
PIANO 1
GRAND
PIANO 2
MONO
PIANO
E. PIANO 1 E. PIANO 2 E. PIANO 3
CLAVI.
VIBES
ORGAN 1 ORGAN 2 HARPSI. STRINGS CHOIR/PAD
GUITAR
BASS
XG
12345678
910111213141516
VOICE EDIT
SPLIT
VARIATION
REVERB
CHORUS SPEAKER MI DI SETTING
MASTER EQ EDIT
CLICK
OTHER SETTING
DEMO
Specifies the type
Specifies the item
Specifies the value
MASTER EQ EDIT
[▼][▲] buttons
Equalizer Edit
LowGain 0dB
NO YES
A
B
DC
Master Equalizer type
Parameter name Parameter value
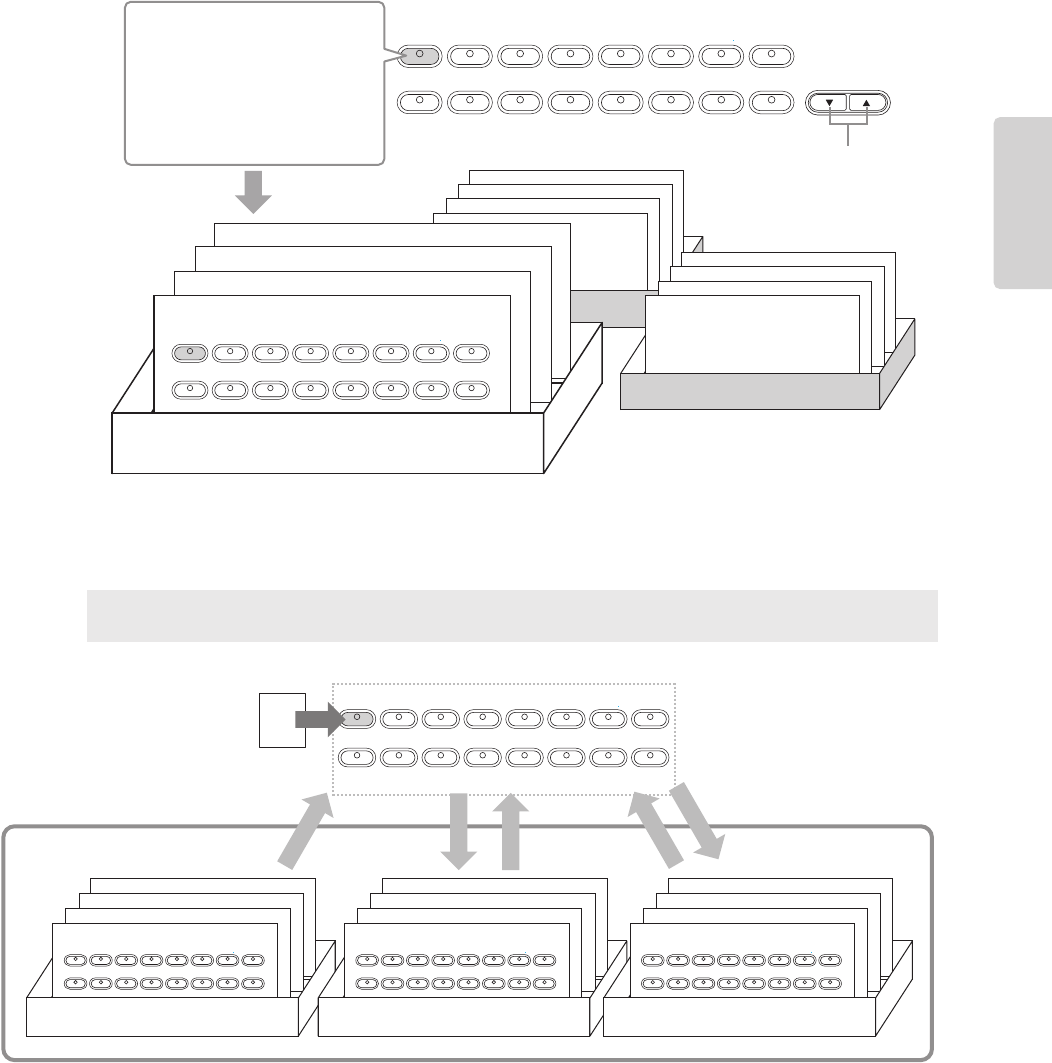
CP300 Owner’s Manual
73
Reference
Using the Performance Functions
The Performance functions allow you to store edited Voices, including Dual/Split settings, Voice and effect parameters, MIDI
transmit/receive channel settings and Master Edit settings, to the VOICE/PERFORMANCE [1] – [16] buttons. Once they
have been saved, the Performances can instantly be recalled from the panel. Refer to the section “Handling Performance Files”
on page 76.
You can save up to a total of 64 Performances to the VOICE/PERFORMANCE [1] – [16] buttons. A single button can
contain four different Performances, A – D.
To select the desired Performance (A – D), use the VARIATION [▼][▲] buttons.
Performance file
A Performance file is a single file that includes the data of 64 Performances.
The current Performance, along with data of 64 Performances, is saved to the storage memory. For details
about recalling a Performance file from storage memory, refer to page 79.
Terminology
Storage memory: This memory area enables you to save Performance files and recorded Songs.
GRAND
PIANO 1
GRAND
PIANO 2
MONO
PIANO
E. PIANO 1 E. PIANO 2 E. PIANO 3
CLAVI.
VIBES
ORGAN 1 ORGAN 2 HARPSI. STRINGS CHOIR/PAD
GUITAR
BASS
XG
12345678
910111213141516
VARIATION
GRAND
PIANO 1
GRAND
PIANO 2
MONO
PIANO
E. PIANO 1 E. PIANO 2 E. PIANO 3
CLAVI.
VIBES
ORGAN 1 ORGAN 2 HARPSI. STRINGS CHOIR/PAD
GUITAR
BASS
XG
12345678
910111213141516
VOICE/PERFORMANCE
Performance
• Dual/Split settings
•Voice and effect parameters
• MIDI transmit/receive channel
settings
• Master Edit settings
Switch the Performance
(A – D)
Performance file = 64 Performances
Performance D (16 Performances)
Performance C (16 Performances)
Performance B (16 Performances)
Performance A (16 Performances)
GRAND
PIANO 1
GRAND
PIANO 2
MONO
PIANO
E. PIANO 1 E. PIANO 2 E. PIANO 3
CLAVI.
VIBES
ORGAN 1 ORGAN 2 HARPSI. STRINGS CHOIR/PAD
GUITAR
BASS
XG
12345678
910111213141516
A01
GRAND
PIANO 1
GRAND
PIANO 2
MONO
PIANO
E. PIANO 1 E. PIANO 2 E. PIANO 3
CLAVI.
VIBES
ORGAN 1 ORGAN 2 HARPSI. STRINGS CHOIR/PAD
GUITAR
BASS
XG
12345678
910111213141516
Performance A
Performance B
Performance C
Performance D
GRAND
PIANO 1
GRAND
PIANO 2
MONO
PIANO
E. PIANO 1 E. PIANO 2 E. PIANO 3
CLAVI.
VIBES
ORGAN 1 ORGAN 2 HARPSI. STRINGS CHOIR/PAD
GUITAR
BASS
XG
12345678
910111213141516
Performance A
Performance B
Performance C
Performance D
GRAND
PIANO 1
GRAND
PIANO 2
MONO
PIANO
E. PIANO 1 E. PIANO 2 E. PIANO 3
CLAVI.
VIBES
ORGAN 1 ORGAN 2 HARPSI. STRINGS CHOIR/PAD
GUITAR
BASS
XG
12345678
910111213141516
Performance A
Performance B
Performance C
Performance D
VOICE/PERFORMANCE
Select the button
to save
Performance
Recalling a Performance file
from storage memory
Storage memory
Preset Performance file
= 64 Performances
Performance file
= 64 Performances
Performance file
= 64 Performances

Using the Performance Functions
CP300 Owner’s Manual
74
Reference
The useful Performance function enables you to store and recall all settings of the entire CP300 together,
including Dual/Split settings, Voice and effect parameters, MIDI transmit/receive channel settings and Master
Edit settings. Settings that can be edited and stored to a Performance are called “Performance parameters.”
Performance Parameters
Parameter menu Contents Parameter name Page
VOICE/
PERFORMANCE
Selecting a Voice
*1
–25
Setting Dual – 29
SPLIT Setting Split – 31
REVERB Turning the Reverb on/off – 35
MASTER Turning the Master mode on/off – 39
TRANSPOSE Turning the Transpose on/off – 37
VOICE EDIT Setting the octave
*1
Octave 58
Setting the volume level
*1
Volume 58
Setting the position of right and left channels
*1
Pan 58
Make fine adjustments to the pitch (only in Dual mode)
*1
Detune 58
Selecting the Reverb type
*1
ReverbType 58
Setting the Reverb send
*1
ReverbSend 58
Setting the Chorus type
*1
ChorusType 59
Setting the Chorus send
*1
ChorusSend 59
Turning the Chorus on/off
*1
ChorusOnOff 59
Selecting the Insertion effect type
*1
Ins.Type 59
Setting the speed of the Vibraphone vibrato effect
*1
VibeRotorSpeed 59
Turning the Vibraphone vibrato effect on/off
*1
VibeRotorOnOff 60
Setting the rotation speed of the rotary speed
*1
RotarySpeed 60
Adjusting the Insertion effect depth
*1
Dry/WetBalance 60
Adjusting the Brightness of the sound
*1
Brightness 60
Adjusting the Resonance effect
*1
HarmonicContent 60
Adjusting the low-range frequency of the Part equalizer
*1
EQLowFreq. 60
Adjusting the high frequency of the Part equalizer
*1
EQHighFreq. 61
Adjusting the low-range gain of the Part equalizer
*1
EQLowGain 60
Adjusting the high range gain of the Part equalizer
*1
EQHighGain 61
Setting the Touch Sensitivity
*1
TouchSense 61
Setting the Pedal 1 function
*2
Pedal1 61
Setting the Pedal 2 function
*2
Pedal2 61
Setting the Pedal 3 function
*2
Pedal3 61
Setting the Pedal 4 function
*2
Pedal4 62
Setting the Modulation wheel function
*2
Modulation 62
MASTER EQ EDIT Selecting the Master equalizer type
*3
Edit or Master EQ type
name
72
Adjusting the low-range gain of the Master equalizer
*3
LowGain
Adjusting the low-middle range gain of the Master equalizer
*3
LowMidGain
Adjusting the middle range gain of the Master equalizer
*3
MidGain
Adjusting the high-middle range gain of the Master equalizer
*3
HighMidGain
Adjusting the high range gain of the Master equalizer
*3
HighGain
Adjusting the low-range frequency of the Master equalizer
*3
LowFreq.
Adjusting the low-middle frequency of the Master equalizer
*3
LowMidFreq.
Adjusting the middle frequency of the Master equalizer
*3
MidFreq.
Adjusting the high-middle frequency of the Master equalizer
*3
HighMidFreq.
Adjusting the high frequency of the Master equalizer
*3
HighFreq.

Using the Performance Functions
CP300 Owner’s Manual
75
Reference
*1 The value of the parameter varies depending on the Dual (page 29) and Split (page 31) settings.
*2 The value of the parameter varies depending on the Split settings (page 31).
*3 If the Equalizer Lock parameter in the Other Settings menu is turned on, recalling a Performance from the panel will
not update the parameter settings (page 71).
MASTER EQ EDIT Adjusting the low-range resonance of the Master equalizer
*3
LowQ 72
Adjusting the low-middle resonance of the Master equalizer
*3
LowMidQ
Adjusting the middle resonance of the Master equalizer
*3
MidQ
Adjusting the high-middle resonance of the Master equalizer
*3
HighMidQ
Adjusting the high resonance of the Master equalizer
*3
HighQ
MIDI SETTING Setting the MIDI transmit channel MidiOutChannel 65
Setting the MIDI receive channel MidiInChannel 65
Turning Local Control on/off LocalControl 65
Selecting Performance from the keyboard or Song data for
MIDI transmission
MidiOutSelect 65
OTHER SETTING Selecting the Touch Response TouchResponse 68
Selecting a tuning curve for a Piano Voice PianoTuningCurve 68
Selecting a scale Scale 68
Specifying the Split Point (Main) SplitPoint (Main) 69
Specifying the Split Point 2 (Layer) SplitPoint2 (Layer) 69
Changing the key Transpose 69
Adjusting the depth of the Soft pedal SoftPedalDepth 69
Setting the depth of String Resonance StringResonanceDepth 69
Setting the depth of Sustain Sampling for the Sustain pedal SustainSamplingDepth 69
Specifying the volume of the Key-off sound KeyOffSamplingDepth 70
Selecting a pedal function for Vibraphone Voice VibraphonePedalMode 70
Assigning the SONG [PLAY/PAUSE] function to the pedal PedalPlay/Pause 70
Setting the point at which the Sustain pedal starts to affect the
sound
HalfPedalPoint 70
Setting the Pitch bend range PitchBendRange 70
MASTER EDIT Assigning a function to the [ZONE CONTROL] slider Slider 54
Setting the MSB of the Send Bank Select message SendBankMsb 54
Setting the LSB of the Send Bank Select message SendBankLsb 54
Setting the Program Change message SendPG# 54
Setting the octave of the external tone generator Octave 55
Turning the internal tone generator on/off InterITG 55
Setting the MIDI transmit channel when the Master mode is
turned on
MidiOutChannel 55
Parameter menu Contents Parameter name Page

CP300 Owner’s Manual
76
Reference
Handling Performance Files
File displays (accessed via the [PERFORM.FILE] button) enable you to handle and organize files (e.g., save, delete and
rename Performance files) from the display.
A message (information or confirmation prompt) sometimes appears on the display to facilitate operation.
Refer to the “Message List” on page 94 for an explanation of each message, along with the appropriate actions
to take.
1 Prepare the file(s) for handling.
When using the Performance or Save As parameters:
Select the edited Voice or Performance file you want to save.
When using the Perf. Name, Rename File, Load From Mem. and Delete File parameters:
No operations necessary; go on to Step 2 below.
2 Press the [PERFORM.FILE] button to enter the Performance File settings.
3 Select the desired item by pressing the [PERFORM.FILE] button or by using the A [–]
[+] buttons.
To close the Performance File menu, press the [EXIT] button once or twice.
4 Use the B [– (NO)][+ (YES)] to D [–][+] buttons to change the value.
For details about each operation, refer to pages 77 – 80.
5 Press the [EXIT] button to exit from the Performance File settings.
Setting Parameter name Page
Saving a Performance Performance 77
Renaming a Performance Perf.Name 78
Saving as a Performance file SaveAs 79
Recalling the Performance file from the storage memory LoadFromMem. 79
Deleting a Performance file DeleteFile 80
Renaming a Performance file RenameFile 80
Performance File—Basic Operation
NO YES
EXIT
MASTER
PERFORMANCE
MASTER EDIT
PERFORM.FILE
TRANSPOSE
SONG SELECT
NEW SONG
REC
STOP
PLAY/PAUSE
SYNCHRO START
SONG VOICE/PERFORMANCE
12
3-16
TRACK
SONG FILE
SONG SETTING
MIDI OUT PANEL LOCK
DOWN UP
TEMPO
A
B
D
C
CONTRAST
GRAND
PIANO 1
GRAND
PIANO 2
MONO
PIANO
E. PIANO 1 E. PIANO 2 E. PIANO 3
CLAVI.
VIBES
ORGAN 1 ORGAN 2 HARPSI. STRINGS CHOIR/PAD
GUITAR
BASS
XG
12345678
910111213141516
VOICE EDIT
SPLIT
VARIATION
REVERB
CHORUS SPEAKER MI DI SETTI NG
MASTER EQ EDIT
CLICK
OTHER SETTING
DEMO
3
2, 3
4
544
Performance Set?-->
A01.Piano+Pad
NO YES
A
B
DC

Handling Performance Files
CP300 Owner’s Manual
77
Reference
Saving a Performance—Performance
You can save the edited Performance to one of the VOICE/PERFORMANCE [1] – [16] buttons. For details
about the parameters you can store to a Performance and their contents, refer to the “Performance Parameters”
list (page 74). The Performance data is stored to storage memory as a Performance file. For instructions on
recalling a Performance file from storage memory, refer to page 79.
If you create a Performance by editing an existing Preset Performance file, a new Performance file named
“PresetPerformance.PER” will be made. The Preset Performance file is not overwritten; however, the edited
Performance can be overwritten without any warning. To avoid overwriting the data, save it as another Performance file
with the Save As operation or rename the Performance file with Rename File.
For basic operation instructions, refer to page 76.
The following steps are detailed instructions for Step 4 (in the Basic Operation above).
4-1 Select the desired Performance by using the VARIATION [▼][▲] buttons or the C [–]
[+] buttons.
The location for saving the Performance can be specified from A01 to D16.
4-2 Press the B [+ (YES)] button to execute the job.
An “Executing” message appears and the data is saved. When the operation is complete, a “Completed”
message appears briefly, then returns to the previous display.
Never attempt to turn the [POWER] switch OFF while the “Executing” message is shown in the display. Turning
the power off in this state may cause the Performance file to be deleted.
CAUTION
Performance Set?-->
A01.Piano+Pad
NO YES
A
B
DC
GRAND
PIANO 1
GRAND
PIANO 2
MONO
PIANO
E. PIANO 1 E. PIANO 2 E. PIANO 3
CLAVI.
VIBES
ORGAN 1 ORGAN 2 HARPSI. STRINGS CHOIR/PAD
GUITAR
BASS
XG
12345678
910111213141516
A01
Performance file = 64 Performances
Performance D (16 Performances)
Performance C (16 Performances)
Performance B (16 Performances)
Performance A (16 Performances)
Save
CAUTION

Handling Performance Files
CP300 Owner’s Manual
78
Reference
Renaming a Performance—Perf. Name
This allows you to rename the Performance.
For basic operation instructions, refer to page 76.
The following steps are detailed instructions for Step 4 (in the Basic Operation above).
4-1 Renaming a Performance.
To move the cursor (small underline), use the C [–][+] buttons.
To insert a space, press the C [–][+] buttons simultaneously.
To select a character on the cursor, use the D [–][+] buttons.
To delete a character, press the D [–][+] buttons simultaneously.
You can use up to 20 characters for a Performance name.
You can change the type of characters on the display using the “Character Code” parameter in the Song
File menu.
4-2 Press the B [+ (YES)] button to execute the job.
An “Executing” message appears and the data is saved. When the operation is complete, a “Completed”
message appears briefly, then returns to the previous display.
Never attempt to turn the [POWER] switch OFF while the “Executing” message is shown in the display. Turning
the power off in this state may cause the Performance file to be deleted.
Perf.Name Set?-->
A01.Piano+Pad
NO YES
A
B
DC
CAUTION

Handling Performance Files
CP300 Owner’s Manual
79
Reference
Saving as a Performance File—Save As
This allows you to save the Performance file as another file, under another file name.
For basic operation instructions, refer to page 76.
The following steps are detailed instructions for Step 4 (in the Basic Operation above).
4-1 Name the Performance as described in the “Perf.Name” section (page 78).
4-2 Press the B [+ (YES)] button to execute the job.
Press the B [+ (YES)] button to display the confirmation prompt (“Sure?”).
To proceed, press the B [+ (YES)] button again. An “Executing” message appears and the data is saved.
When the operation is complete, a “Completed” message appears briefly, then returns to the previous
display.
To cancel the operation, press the B [– (NO)] button instead of the B [+ (YES)] button.
If storage memory contains one or more Performance files, and you save a Performance file, the CP300
automatically sorts the Songs alphabetically and renumbers them.
Never attempt to turn the [POWER] switch OFF while the “Executing” message is shown in the display. Turning
the power off in this state may cause the Performance file to be deleted.
Recalling the Performance File from the Storage Memory—Load From Memory
This allows you to recall the Performance file from storage memory. A single Performance file consists of 64
separate Performances. The Performance file in the current memory will be replaced with the selected
Performance file in the storage memory.
For basic operation instructions, refer to page 76.
The following steps are detailed instructions for Step 4 (in the Basic Operation above).
4-1 Use the C [–][+] buttons to select the desired Performance file to be loaded.
4-2 Press the B [+ (YES)] button to execute the job.
Press the B [+ (YES)] button to display the confirmation prompt (“Sure?”).
To proceed, press the B [+ (YES)] button again. An “Executing” message appears and the data is saved.
When the operation is complete, a “Completed” message appears briefly, then returns to the previous
display.
To cancel the operation, press the B [– (NO)] button instead of the B [+ (YES)] button.
Never attempt to turn the [POWER] switch OFF while the “Executing” message is shown in the display. Turning
the power off in this state may cause the Performance file to be deleted.
n The Performance file loaded from the storage memory is effective after restarting the CP300.
SaveAs Execute?-->
001.PresetPerformance
NO YES
A
B
DC
CAUTION
LoadFromMem. Execute?-->
001.PresetPerformance
NO YES
A
B
DC
CAUTION

Handling Performance Files
CP300 Owner’s Manual
80
Reference
Deleting a Performance File—Delete File
This allows you to delete a Performance file from the CP300’s storage memory. It is not possible to delete a
Preset Performance file and current Performance file.
For basic operation instructions, refer to page 76.
The following steps are detailed instructions for Step 4 (in the Basic Operation above).
4-1 Use the C [–][+] buttons to select the Performance file to be deleted.
4-2 Press the B [+ (YES)] button to execute the job.
Press the B [+ (YES)] button to display the confirmation prompt (“Sure?”).
To proceed, press the B [+ (YES)] button again. An “Executing” message appears and the data is saved.
When the operation is complete, a “Completed” message appears briefly, then returns to the previous
display.
To cancel the operation, press the B [– (NO)] button instead of the B [+ (YES)] button.
Never attempt to turn the [POWER] switch OFF while the “Executing” message is shown in the display. Turning
the power off in this state may damage the data of the Performance.
n The Performance file in the current memory cannot be deleted. After you delete a Performance file, the CP300
automatically updates the Performance file numbers.
Renaming a Performance File—Rename File
You can rename a Performance file in the storage memory. You cannot change the Preset Performance file.
For basic operation instructions, refer to page 76.
The following steps are detailed instructions for Step 4 (in the Basic Operation above).
4-1 Name the Performance file as described in the “Perf.Name” section (page 78).
4-2 Press the B [+ (YES)] button to execute the job.
After you rename a Performance, the CP300 sorts Performance files alphabetically and renumbers them.
Never attempt to turn the [POWER] switch OFF while the “Executing” message is shown in the display. Turning
the power off in this state may cause the Performance file to be deleted.
DeleteFile Execute?-->
001.MyPerformance.PER
NO YES
A
B
DC
CAUTION
RenameFile Execute?-->
001.MyPerformance.PER
NO YES
A
B
DC
CAUTION

CP300 Owner’s Manual
81
Reference
Handling Song Files
File displays (accessed via the [SONG FILE] button) enable you to handle and organize files (e.g., save, delete and rename
Song files) and change characters from the display.
A message (information or confirmation prompt) sometimes appears on the display to facilitate operation.
Refer to the “Message List” on page 94 for an explanation of each message, along with troubleshooting
information and the appropriate actions to take.
1 Prepare the file(s) for handling.
When using the Save To Memory, Rename Song and Delete Song parameters:
Use the SONG SELECT [N] [O] buttons to select the target Song.
When using the Character Code parameter:
No operations necessary; go on to Step 2 below.
2 Press the [SONG FILE] button to access the Song File settings.
3 Select the desired item by pressing the [SONG FILE] button or by using the A [–][+]
buttons.
To close the Song File menu, press the [EXIT] button once or twice.
4 Press the B [– (NO)][+ (YES)] to D [–][+] button to execute the job or change the value.
For details about each operation, refer to pages 82 – 84.
5 Press the [EXIT] button to exit the Song File settings.
Setting Parameter name Page
Saving recorded Songs to the CP300’s storage memory SaveToMemory 82
Deleting a Song from the CP300’s storage memory DeleteSong 83
Renaming Song files RenameSongs 83
Changing the type of characters in display CharacterCode 84
Terminology
Song file: On the CP300, a Song file includes both Song data and a Song number.
Song File—Basic Operation
NO YES
EXIT
MASTER
PERFORMANCE
MASTER EDIT
PERFORM.FILE
TRANSPOSE
SONG SELECT
NEW SONG
REC
STOP
PLAY/PAUSE
SYNCHRO START
SONG VOICE/PERFORMANCE
12
3-16
TRACK
SONG FILE
SONG SETTING
MIDI OUT PANEL LOCK
DOWN UP
TEMPO
A
B
D
C
CONTRAST
GRAND
PIANO 1
GRAND
PIANO 2
MONO
PIANO
E. PIANO 1 E. PIANO 2 E. PIANO 3
CLAVI.
VIBES
ORGAN 1 ORGAN 2 HARPSI. STRINGS CHOIR/PAD
GUITAR
BASS
XG
12345678
910111213141516
VOICE EDIT
SPLIT
VARIATION
REVERB
CHORUS SPEAKER MI DI SETTI NG
MASTER EQ EDIT
CLICK
OTHER SETTING
DEMO
2, 3 3
1 4
4
45
RenameSong Execute?-->
M-001:NewSong.MID
NO YES
A
B
DC

Handling Song Files
CP300 Owner’s Manual
82
Reference
Saving Recorded Songs to the CP300’s Storage Memory—Save To Memory
This allows you to save recorded Songs to the CP300’s storage memory. Keep in mind that when you turn off
the power to the CP300, your recorded Song data will be lost. To permanently save the recorded Song, you
must save it to the CP300’s storage memory.
The Save To Memory operation is not available for Preset Songs.
For basic operation instructions, refer to page 81.
The following steps are detailed instructions for Step 4 (in the Basic Operation above).
4-1 Name the Song.
To move the cursor (small underline), use the C [–][+] buttons.
To insert a space, press the C [–][+] buttons simultaneously.
To select a character on the cursor, use the D [–][+] buttons.
To delete a character, press the D [–][+] buttons simultaneously.
You can use up to 58 characters for a Song name. If the name is longer than the display, use the C [–][+]
buttons to move the cursor and scroll through the name.
You can change the type of characters on the display using the “Character Code” parameter (page 84).
4-2 Press the B [– (NO)][+ (YES)] button to execute the job.
Press the B [+ (YES)] button to display the confirmation prompt (“Sure?”).
To proceed, press the B [+ (YES)] button again. An “Executing” message appears and the data is saved.
When the operation is complete, a “Completed” message appears briefly, then returns to the previous
display.
To cancel the operation, press the B [– (NO)] button instead of the B [+ (YES)] button.
Never attempt to turn the [POWER] switch OFF while the “Executing” message is shown in the display. Turning
the power off in this state may cause the recorded Song to be deleted.
The Song is automatically numbered as “Mxx,” where “M” stands for “Memory” and “xx” is a number.
If storage memory contains one or more Songs, and you save a new Song, the CP300 automatically sorts the
Songs alphabetically and renumbers them.
SaveToMemory Execute?-->
M-001:NewSong.MID
NO YES
A
B
DC
Current memory
This is a temporary memory area
where you can temporarily place
and edit the currently selected
Song before playback or recording.
A recorded
Song
Storage memory
This is a memory area that provides space for saving
recorded Songs that would normally be lost when
you turn off the power.
Memory
Song
Preset
Song
Save
CAUTION

Handling Song Files
CP300 Owner’s Manual
83
Reference
Deleting a Song from the CP300’s Storage Memory—Delete Song
This allows you to delete a Song from the CP300’s storage memory. It is not possible to delete a Preset Song.
For basic operation instructions, refer to page 85.
The following steps are detailed instructions for Step 4 (in the Basic Operation above).
4-1 Use the C [–][+] buttons to select a Song to delete.
4-2 Press the B [+ (YES)] button to execute the job.
Press the B [+ (YES)] button to display the confirmation prompt (“Sure?”).
To proceed, press the B [+ (YES)] button again. An “Executing” message appears and the data is saved.
When the operation is complete, a “Completed” message appears briefly, then returns to the previous
display.
Never attempt to turn the [POWER] switch OFF while the “Executing” message is shown in the display. Turning
the power off in this state may damage the data of the recorded Song.
n After you delete a Song, the CP300 automatically updates the Song numbers.
Renaming Song Files—Rename Song
This allows you to rename Song files. The titles of any Songs can be changed, with the exception of the Preset
Songs and “P-000:NewSong.”
For basic operation instructions, refer to page 81.
The following steps are detailed instructions for Step 4 (in the Basic Operation above).
4-1 Name the Song as described in the Save To Memory operation (page 82).
4-2 Press the B [+ (YES)] button to execute the job.
After you rename a Song, the CP300 sorts all Songs alphabetically and renumbers them.
Never attempt to turn the [POWER] switch OFF while the “Executing” message is shown in the display. Turning
the power off in this state may cause the recorded Song to be deleted.
DeleteSong Execute?-->
M-001:NewSong.MID
NO YES
A
B
DC
CAUTION
RenameSong Execute?-->
M-001:NewSong.MID
NO YES
A
B
DC
CAUTION

Handling Song Files
CP300 Owner’s Manual
84
Reference
Changing the Type of Characters in Display—Character Code
This allows you to change the type of characters that appear on display. The instructions below correspond to
Step 4 in the Basic Operation on page 81.
4 Use the D [–][+] buttons to select “International” or “Japanese.”
Settings: International, Japanese
Character List
Japanese
International
n File names using the characters shown in gray above will not display correctly if the Character Code setting has
been changed.
n The Character Code setting is also reflected in the display for the Performance and Performance file names.
CharacterCode
International
NO YES
A
B
DC

CP300 Owner’s Manual
85
Reference
Settings for Song Recording and Playback—
Song Settings
From this menu, you can make detailed settings for the selected Song. First, select the desired Song (page 49).
1 Press the [SONG SETTING] button to access the Song Settings menu.
2 Select the desired item by pressing the [SONG SETTING] button or by using the
A [–][+] buttons.
3 Use the B [– (NO)][+ (YES)] to D [–][+] buttons to execute the job or change the value.
Press the [–][+] buttons simultaneously to instantly reset to the default setting.
4 Press the B [+ (YES)] button to execute the job, if an “Execute?” or “Start?” prompt
appears.
Press the B [+ (YES)] button to display the confirmation prompt (“Sure?”).
To proceed, press the B [+ (YES)] button again. An “Executing” message appears and the data is saved.
When the operation is complete, a “Completed” message appears briefly, then returns to the previous
display.
To cancel the operation, press the B [– (NO)] button instead of the B [+ (YES)] button.
5 Press the [EXIT] button to exit from the Song Settings menu.
n Save the edited Song data by using the “Save To Memory” operation in the Song File menu.
Song Settings—Basic Operation
NO YES
EXIT
MASTER
PERFORMANCE
MASTER EDIT
PERFORM.FILE
TRANSPOSE
SONG SELECT
NEW SONG
REC
STOP
PLAY/PAUSE
SYNCHRO START
SONG VOICE/PERFORMANCE
12
3-16
TRACK
SONG FILE
SONG SETTING
MIDI OUT PANEL LOCK
DOWN UP
TEMPO
A
B
D
C
CONTRAST
GRAND
PIANO 1
GRAND
PIANO 2
MONO
PIANO
E. PIANO 1 E. PIANO 2 E. PIANO 3
CLAVI.
VIBES
ORGAN 1 ORGAN 2 HARPSI. STRINGS CHOIR/PAD
GUITAR
BASS
XG
12345678
910111213141516
VOICE EDIT
SPLIT
VARIATION
REVERB
CHORUS SPEAKER MI DI SETTING
MASTER EQ EDIT
CLICK
OTHER SETTING
DEMO
2
1, 2 3
3, 4
35
Quantize Execute?-->
Off
NO YES
A
B
DC

Settings for Song Recording and Playback—Song Settings
CP300 Owner’s Manual
86
Reference
Parameters
This allows you to correct the timing of notes you’ve
recorded. For example, if the timing of your performance
was slightly off in places, you can adjust the notes to precise
eighth or sixteenth notes. Changes made in Quantize affect
the entire Song.
Quantize timing settings (according to note value):
Off
If you select “1/8” or “1/16” for correction, the Swing Rate
parameter is shown (as a percentage value). Changing the
Swing Rate will make the Song sound more lively and give it
more of a swing or jazzy feel.
Setting range: 0% – 100%
If you select “1/8” for correction:
Default setting: Off
This allows you to specify whether a Song that starts at a
point other than the first beat of the first measure should be
played from the first actual note or from the beginning of
the Song. (Some Songs are recorded with initial settings and
non-note data at the very beginning of the Song; this
parameter allows you to skip those settings and play the
Song from the first note. It also allows you to skip over rests
that naturally occur before the pickup note in a Song.)
Settings:
Default setting: On
This allows you to select and audition the recorded contents
of a single channel. Playback starts from the first note.
Setting range: Ch 1 – Ch 16
Default setting: Ch 1
n Song data consists of 16 channels. Each instrument part is
assigned to a specific channel, so for this instrument, the
words “channel” and “track” have the same meaning.
n Channels that do not contain any data are not displayed.
However, for some Songs, all channels (including the
channels that contain no data) may be displayed.
This allows you to delete data of a single specified channel,
or of all 16 channels at once.
Setting range: Ch 1 – Ch 16, ALL (all channels)
Default setting: Ch 1
n Song data consists of 16 channels. Each instrument part is
assigned to a specific channel, so for this instrument, the
words “channel” and “track” have the same meaning.
Quantize
Quantize Execute?-->
SwingRate= 50% 1/8
NO YES
A
B
DC
Changes the swing rate Selects the notes for which
you can adjust the timing
1/4 .............
1/8 .............
1/12 ...........
1/16 ...........
1/24 ...........
Quarter note
Eighth note
Eighth note triplets
Sixteenth note
Sixteenth note triplets
Your keyboard performance
Swing rate = 50%: No swing; straight
Swing rate = 75% (51% or higher): The timing of even beat
notes is slightly delayed.
Swing rate = 25% (49% or lower): The timing of even beat notes
is slightly early.
Swing rate = 67%: The timing of even beat notes is moved to
the third beat of the triplets.
Quick Play
On Playback from the first note
Off Playback from the start of the Song (including a rest
or blank measure)
Channel Listen
Channel Clear
QuickPlay
On
NO YES
A
B
DC
ChannelListen Start?-->
Ch1
NO YES
A
B
DC
ChannelClear Execute?-->
Ch1
NO YES
A
B
DC

Settings for Song Recording and Playback—Song Settings
CP300 Owner’s Manual
87
Reference
n Channels that do not contain any data are not displayed.
However, for some Songs, all channels (including the
channels that contain no data) may be displayed.
n When you clear all channels using the “ALL” parameter,
you can overwrite the Song. In this case, an empty Song
file having no channel data is saved.
This allows you to specify a section within a Song and play
it back repeatedly. The section can be specified freely (in
measures/beats), and playback repeats after it reaches the
point just prior to the beat specified as the end point.
If you start playing back a Song with “Repeat On” selected,
a lead-in count starts, followed by the repeated playback of
the specified part until you press the [STOP] button. If you
select “Repeat Off,” normal playback starts.
Settings: RepeatOn, RepeatOff
Default setting: RepeatOff
If you select “Repeat On,” use the C [–][+] and D [–][+] buttons
to specify the range to be repeated during Song playback.
n When you select another Song, the specified range is
automatically cancelled and the Repeat function is turned
off.
This allows you to repeatedly play back all Songs or a single
Song selected from storage memory.
When you start playback, the CP300 plays the Song you
selected from the front panel, then starts repeat playback of
the specified Songs until you press the [STOP] button.
Press the [STOP] button to return to the top of the Song.
Settings:
Default setting: PresetSongs
This allows you to set the time signature of the click.
Specify the numerator of the time signature by using the
C [–][+] buttons and specify the denominator by using the
D [–][+] buttons. For example, to specify 3/4 time, use the
C [–][+] buttons to select “3” and the D [–][+] buttons to
select “4.”
Setting range for the numerator: 1 – 16
Setting options for the denominator: 2, 4, 8
Default setting: 4/4
This allows you to set volume of the click sound.
Setting range: 0 – 127
Default setting: 100
This allows you to select whether the click sound has a bell
accent, or plays only a click sound.
Setting range:
Default setting: BellOff
From/To Repeat
Song Repeat
PresetSongs All Preset Songs
All All Memory Songs and Preset Songs
OneSong One Song selected from the front panel
MemorySongs All recorded Songs
FromToRepeat RepeatOff
From 001:001 To 002:001
NO YES
A
B
DC
SongRepeat Off
PresetSongs
NO YES
A
B
DC
Time Signature
Click Volume
Click Type
BellOff Click (standard click sound)
BellOn Click and bell
TimeSignature
4/ 4
NO YES
A
B
DC
ClickVolume
100
NO YES
A
B
DC
ClickType
BellOff
NO YES
A
B
DC

CP300 Owner’s Manual
88
Reference
Connecting to a Computer and Other MIDI Devices
The CP300 has built-in speakers. You can also monitor the sound of the instrument by using external
equipment. Connect a set of headphones, powered speakers, or other playback equipment as required.
There are several methods of connecting to external audio equipment, as described in the following
illustrations. The following illustrations show various connection examples; use the one most similar to your
intended setup.
Connecting Stereo Powered Speakers
For optimum, accurate reproduction of the instrument’s rich sounds, effects and full stereo image, use a pair of
powered speakers. Connect the powered speakers to the OUTPUT L/MONO and R jacks on the rear panel.
n When using just one powered speaker, connect it to the OUTPUT L/MONO jack on the rear panel.
n If you are connecting only to the L/MONO jack and want to use a Piano Voice, we recommend that you use the
Mono Piano 1 or Mono Piano 2 Voice for best results.
First, make sure that all volume settings are turned down all the way to the minimum. Then turn on the every
device in your setup in the order of MIDI master (controllers), MIDI slaves (receivers), then audio equipment
(mixers, amplifiers, speakers, etc.).
When powering down the setup, first turn down the volume for each audio devices, then switch off each device in
the reverse order (first audio devices, then MIDI).
Connecting to External Audio Equipment
CAUTION
MUSIC PRODUCTION SYNTHESIZER
1 2 3
POWER
ON!!
MIDI master CP300 Audio equipment (first mixer,
then amplifier)
CP300
Powered speaker (Left)
Powered speaker (Right)
Headphones
OUTPUT L/MONO jack OUTPUT R jack
PHONES
jack

Connecting to a Computer and Other MIDI Devices
CP300 Owner’s Manual
89
Reference
Connecting to a Mixer
These are extra audio outputs in addition to the main OUTPUT L/R jacks.
The CP300 also features professional-use balanced XLR connectors for the OUTPUT L/R jacks. This type of
connector is used in professional studio equipment and installations.
n • Connecting a pair of headphones does not affect audio output from the OUTPUT L/R and OUTPUT L/
MONO, R jacks. You can adjust the volume of the external audio equipment, built-in speakers or headphones
with the [MASTER VOLUME] dial.
• The sound monitored through the headphones is identical to the sound of the OUTPUT L/R and OUTPUT L/
MONO, R jacks.
The CP300 also features a set of INPUT jacks. The stereo outputs from another instrument can be connected
to these jacks, allowing you to play the sound of an external instrument through the CP300’s speakers.
Connect the outputs from the other instrument to the INPUT L/MONO and R jacks on the rear panel.
The sound of an instrument connected to these INPUT jacks cannot be adjusted from the CP300. Any level
adjustments must be done from the instrument itself.
About the OUTPUT L/R jacks
These XLR connectors carry a balanced signal output, and are intended for use in professional studios
and installations. If the corresponding circuitry is designed properly, however, XLR-type connectors will
also handle unbalanced signals with no problem. Microphone cables usually have this type of connector,
as do the inputs and outputs of most professional audio gear.
Connecting to External Equipment
OUTPUT L
OUTPUT R
CP300
Powered
speaker
(Left)
Powered
speaker
(Right)
Headphones
OUTPUT L jack OUTPUT R jack
PHONES
jack
Mixer
Amplifier
MUSIC PRODUCTION SYNTHESIZER
CP300
External MIDI synthesizer/tone generator
OUTPUT L/MONO jack OUTPUT R jack
INPUT L/MONO jack INPUT R jack

Connecting to a Computer and Other MIDI Devices
CP300 Owner’s Manual
90
Reference
Using a standard MIDI cable (available separately), you can connect an external MIDI device, and control it
from the CP300. Likewise, you can use an external MIDI device (such as a keyboard or sequencer) to control
the sounds on the CP300. Below are several different MIDI connection examples; use the one most similar to
your intended setup.
n The CP300 cannot receive or transmit MIDI start (FAh), Continue (FBh), or Stop (FCh) messages.
Controlling from an External MIDI Keyboard
Use an external keyboard or synthesizer (such as the MOTIF ES) to remotely select and play the Voices of the
CP300.
n The CP300 can playback commercially available Song data or Song data created for other instruments or on a
computer. For details about MIDI data compatibility, refer to page 100.
n In order to have an external MIDI device control separate parts of the CP300’s internal tone generator, you’ll need
to change the “MIDI In Channel” parameter in the MIDI Setting menu. For details, refer to page 65.
Connecting to External MIDI Equipment
MIDI Transmit Channel and Receive Channel
Make sure to match the MIDI Transmit Channel of the external MIDI instrument with the MIDI
Receive Channel of the CP300. For details on setting the MIDI Transmit Channel of the external MIDI
instrument, refer to the Owner’s Manual of the MIDI instrument.
When setting the MIDI Receive Channel of the CP300, confirm the MIDI Receive Channel for each
part and change the settings of the desired parts, if necessary, to match the MIDI Transmit Channel
settings on the external MIDI instrument. (Refer to page 65.)
MUSIC PRODUCTION SYNTHESIZER
CP300
External MIDI synthesizer such as MOTIF ES
MIDI IN
MIDI OUT

Connecting to a Computer and Other MIDI Devices
CP300 Owner’s Manual
91
Reference
Controlling an External MIDI Keyboard
This connection lets you play the sounds of an external MIDI tone generator (synthesizer, tone generator
module, etc.) from the keyboard of the CP300. Use this connection to play the sounds of the connected
instrument in a layer with the CP300, or use the sophisticated Zone functions (page 39) to set up splits in the
sounds.
Controlling Another MIDI Device via MIDI THRU
MIDI THRU simply re-transmits the MIDI messages received via MIDI IN. In the example below, the MIDI
messages generated by playing an external keyboard are transmitted to an external tone generator via the MIDI
THRU connector on the CP300. The MIDI data of your performance on the CP300 are transmitted to an
external device via the MIDI OUT connector on the CP300.
Splitting the Sound between the CP300 and an External Tone Generator by MIDI
Channel
Using the connection example shown above, you can play both instruments and have them separately
sound different parts. To use this feature, you must set the CP300’s output channel and the external tone
generator’s receive channel to the same channel number. Set the MIDI Transmit Channel via the “MIDI
Out Channel” parameter in the MIDI Settings menu while turning on the power (page 65). While the
Master mode is turned on, set the MIDI Transmit Channel via the “MIDI Out Channel” parameter in
the Master Edit menu (page 55).
CP300
External MIDI keyboard or synthesizer,
such as the S/SY/EX series
MIDI IN
MIDI OUT
C
MUSIC PRODUCTION SYNTHESIZER
CP300
MIDI OUT
MIDI OUT
MIDI IN
MIDI IN
MIDI IN MIDI THRU
External MIDI keyboard
External MIDI tone
generator
External MIDI synthesizer

Connecting to a Computer and Other MIDI Devices
CP300 Owner’s Manual
92
Reference
Connecting this instrument to a computer via MIDI opens up a whole world of musical possibilities—such as
using sequencer software to record and play back compositions with the CP300 sounds.
Using a USB Cable
MIDI messages can be transferred between the sequencer software and CP300 using the USB cable. However,
audio data cannot be transmitted or received via USB on the CP300.
When the USB connector is connected, the MIDI connectors cannot be used.
Connecting to a Computer
In order to use the instrument with a computer via a USB connection, you will need to install an
appropriate USB-MIDI driver. You can download the proper driver from our website:
http://download.yamaha.com
• Information on system requirements can also be found on the above web page
• The USB-MIDI driver may be revised and updated without prior notice. Before installing, visit the above web page
to confirm the latest related information and ensure that you have the most up-to-date version.
Precautions when using the USB connector
When connecting the computer to the USB connector, make sure to observe the following points. Failing
to do so risks freezing the computer and corrupting or even losing the data. If the computer or the
instrument freezes, turn the power to the instrument off or restart the computer.
• Before connecting the computer to the USB connector, exit from any power-saving mode (such as suspended, sleep, standby)
of the computer.
• Before turning on the power to the instrument, connect the computer to the USB connector.
• Execute the following before turning the power to the instrument on/off or plugging/unplugging the USB cable to/from the
USB connector.
- Quit any open applications (such as Voice Editor, Multi Part Editor, and sequencer software).
- Make sure that data is not being transmitted from the instrument. (Data is transmitted only by playing notes on the
keyboard or playing back a song.)
• While a USB device is connected to the instrument, you should wait for six seconds or more between these operations: (1)
when turning the power of the instrument off then on again, or (2) when alternately connecting/disconnecting the USB cable.
• Use a USB cable less than 3 meters in length.
Selecting Voices from a Computer
You can select Voices on this instrument from your computer software by specifying the following MIDI
messages.
• Bank Select MSB
• Bank Select LSB
• Program Change
For details on what values are assigned to the Voice Bank/Number of this synthesizer, refer to the
“Program Change List” on page 105.
CP300
USB connector
USB cable
Computer with a USB interface
CAUTION

Connecting to a Computer and Other MIDI Devices
CP300 Owner’s Manual
93
Reference
Using Local On/Off when connected to a computer
When connecting the CP300 to a computer, the keyboard performance data is generally sent to the computer,
and then returned from the computer to play the tone generator block on the CP300. If the Local Control
parameter in the MIDI Settings menu is set to “on,” a “double” sound may result, since the CP300 tone
generator is receiving performance data from both the keyboard directly and the computer.
Use the setting suggestions below as a guideline; specific instructions may differ depending on your computer
and the software used.
When MIDI Echo (MIDI Thru) is enabled on the software/computer:
n When transmitting or receiving System Exclusive data (such as with the Bulk Dump function), use the setting
example below, making sure that MIDI Echo on the computer software is set to “off.”
When MIDI Echo (MIDI Thru) is disabled on the software/computer:
* MIDI Echo is a function on sequencers that takes any data received via the MIDI IN and “echoes” it (or sends it as is) through the MIDI
OUT. In some software, this function is also called “MIDI Thru.”
n For details about MIDI Echo, refer to the owner’s manual of your particular software.
CP300
[MIDI SETTING] Local Control = Off Echo back = on
Computer (SQ01, etc.)
USB connector
In
Out
Tone generator Keyboard
In
Out
Local off
CP300
[MIDI SETTING] Local Control = On Echo back = on
USB connector
Out
Tone generator Keyboard
In
Local on
Computer (SQ01, etc.)

Message List
CP300 Owner’s Manual
94
Appendix
Appendix
Message List
The messages are listed in alphabetical order.
Message Description
Bulk data reception has been completed.
This is shown following the “Bulk Data Receiving Voice” message. This indicates that the
instrument finished receiving bulk data, and that you can go on to the next step.
Bulk data reception has failed.
Check that the cable connection is secure and try again.
The instrument is receiving bulk data while this message is displayed.
Wait until the message closes, then go on to the next step.
The instrument failed to transmit the bulk data.
If this message appears, make sure that the power of your computer has not been turned
off, that the cable is connected correctly, and that the driver on your computer is functioning
correctly. Then try transmitting the data once again.
This is shown when the operation has been canceled.
The operation is completed.
This is shown following the “Executing” message. The instrument’s internal processing is
complete. You can go on to the next step.
The file format is invalid.
This message appears when the Performance file selected via “Load From Mem.” (page 79)
is invalid and cannot be called up.
The Song name or Performance name is duplicated.
You tried to save a Song file after changing its name using the “Rename Song” (page 83), or
a Performance file after changing its name using the “Rename File” (page 80) parameter,
but a Song or Performance with the same name already exists in memory. The instrument
returns to the previous display after three seconds. Rename the Song correctly.
Do you wish to execute the operation?
This message prompts you to execute a file-related operation. Press the B [+ (YES)] button
to save the settings. Press the B [– (NO)] or [EXIT] button to cancel.
The instrument is processing the data internally.
Wait until the message closes, then proceed to the next step.
The factory default settings, excepting files stored to storage memory (refer to
“Factory Set” on page 71), have been restored.
This message also appears if you press and hold down the C7 key and turn on the power to
the instrument (page 17).
The factory default settings, including files stored to storage memory (refer to
“Factory Set” on page 71), have been restored.
This message also appears if you press and hold down the C7 and Bb6 keys and turn on the
power to the instrument (page 17).
BulkDataReceiving
Completed
BulkDataReceiving
Error
BulkDataReceiving
BulkDump Error
Canceled
Completed
DataFmtErr
DuplicatedName
Execute?-->
Executing
FactorySet Completed
MemoryFileExcluded
FactorySet Completed
MemoryFileIncluded

Message List
CP300 Owner’s Manual
95
Appendix
The instrument’s flash memory (storage memory) has expired.
Consult your Yamaha dealer. If this message appears, the instrument will not be able to back
up the Songs, Performance files and settings in memory. Press the [EXIT] button to return to
the original display.
There is a problem with the USB connector.
The power to the computer is turned off, the cables are connected incorrectly, or the driver
or MIDI application on the computer is working incorrectly. In this situation, turn the power off
to both the instrument and the computer, and check the cable connection. Then, turn on the
power to the computer and the instrument in this order and check to see if the driver and
MIDI application on the computer work properly.
This message is also shown if the USB cable is connected to the instrument without being
connected to your computer. When you wish to use the instrument alone, turn off the power
of the instrument, disconnect the USB cable from the instrument, then turn the power on
again. If the cable is left connected in this condition, the instrument may not function
properly.
The power was incorrectly turned off the previous time. The instrument is
checking the internal memory.
You turned off the power to the instrument while it was writing data to storage memory. This
message appears next time you turn on the power. The internal memory is being checked
while this message is displayed. If it has been confirmed that any files in the storage
memory are corrupted, all the files will be deleted.
Some files in the storage memory have been restored.
This message appears following the message “Last Power Off Illegal / Memory File
Checking,” indicating that the instrument recovered as much data in the storage memory as
possible.
Files on the storage memory have been deleted.
This message appears following the message “Last Power Off Illegal / Memory File
Checking,” indicating that the instrument could not recover data in the storage memory and
that all memory files were deleted.
A memory problem has occurred.
While a Song or a Performance file was being loaded, the instrument detected defects in
memory. Reset the instrument to its normal (factory default) settings with “Memory File
Included” (page 71) after you back up all Song data.
There may be a memory problem.
1. This message indicates that there may be a problem with the memory when selecting a
Song or Performance file. If the message appears repeatedly when you continue using
the instrument, back up the Song data, then restore the default setting by using “Memory
File Included” in “Factory Set” (page 71).
2. This message will appear if a different “Character Code” (page 84) is selected than was
when you assigned the Performance file name. In this case, switch the “Character
Code,” re-select the Performance file.
There is no more available space in storage memory.
There is not enough memory space left and you cannot save any more Songs or
Performance files. Delete some Songs or Performance files in the storage memory (pages
80, 83), then save the new data to memory.
There is no Song to be saved.
This message will appear if there is no Song for the “Save To Memory” (page 82) operation
to save. In this case, no Song will be saved.
There is no file to be deleted.
You tried to delete a file that does not exist in the storage memory. You cannot delete the file.
There is no Song to be deleted.
You tried to delete a Song that does not exist in the storage memory. The Song cannot be
deleted.
Message Description
FlashMemoryLifeTime
Exit-->
HostError
LastPowerOffIllegal
MemoryFileChecking
LastPowerOffIllegal
MemoryFileErrorRecovered
LastPowerOffIllegal
MemoryFileErased
MemoryError
MemoryError
MemoryFull
NoSong
NoFileToDelete
NoSongToDelete

Message List
CP300 Owner’s Manual
96
Appendix
Do you want to overwrite the data?
This message prompts you to select whether you wish to overwrite the existing data with
new data. Press the B [+ (YES)] button to allow overwriting. Press the B [– (NO)] button to
cancel.
Please wait.
You tried to start playing a Song or perform another operation right after selecting the Song.
Wait until the message closes.
This is a protected file.
You tried to copy or delete data in internally-protected files (such as commercially available
music data). You cannot write to, copy, or delete such files.
This is a protected Song.
This message appears when you try to change the name of an internally-protected Song
(Preset Song). You cannot change the name of such Songs.
Is the setting maintained?
This message prompts you to select whether you wish to save the edited settings or not.
Press the B [+ (YES)] button to save the settings. Press the [EXIT] button to cancel.
The Song has been changed. Do you wish to save the Song?
You tried to perform another operation before saving the recorded Song to storage memory.
If you continue the operation, the recorded Song will be lost. To delete the new recording,
press the B [– (NO)] button. To keep the recording, press the B [+ (YES)] button. The “Save
To Memory” (page 82) parameter is shown in the display. Save the Song then try the
operation again.
An error has been found in the Song data.
1. The instrument has found some defects in the selected (or playing) Song. Select the
Song and play it again. If you still see this message, the Song data may be damaged.
2. This message will appear if a different “Character Code” (page 84) is selected than was
when you assigned the Song name. In this case, switch the “Character Code,” re-select
the Song, and play it back.
The Song data is too large.
1. The Current memory space has become full during recording. Recording stops
automatically. The data recorded up to that point remains. This message also appears
when you try to enter recording mode to perform additional recording but the Song data
has already filled the current memory. In this case, you cannot perform additional
recording. Use the “Channel Clear” parameter (page 86) to delete unnecessary tracks (if
any) to make more room in memory.
2. The size of the selected Song is larger than the current memory. The instrument cannot
load/play the selected Song. Select another Song.
3. This message is shown when you edit a Song if that Song is larger than the capacity of
the current memory. This Song cannot be edited on the instrument.
Do you wish to start the operation?
This message prompts you to start the operation. To start, press the B [+ (YES)] button.
Press the [EXIT] button to cancel the operation.
Are you sure?
This message prompts you to confirm the execution. Press the B [+ (YES)] button to
continue. Press the B [– (NO)] button to cancel.
MIDI bulk data is being transmitted.
This message appears when the instrument receives a bulk request from a computer. This
message appears while the bulk data is being transmitted. Wait until the message closes,
then go on to the next step. Please wait.
Bulk data transmission has been completed.
This is shown following the “Transmitting” message. It is displayed when the transmission of
the bulk data has been completed. You can go on to the next step.
Message Description
OverWrite?
PleaseWait
ProtectedFile
ProtectedSong
Set?-->
SongChanged Save?
SongError
SongError
SongTooBig
SongTooBig
Start?-->
Sure?-->
Transmitting
Transmitting
Completed

Message List
CP300 Owner’s Manual
97
Appendix
MIDI Bulk data is being transmitted.
This message appears when the instrument receives a bulk request from a computer. The
instrument has failed to transmit Voice bulk data.
Check the cable connection and repeat the procedure from the beginning.
The Song name or Performance file name is not appropriate.
1. This message appears when you have used a period or space at the beginning of a
Song name/Performance file (while handling a Song/Performance file), or you have tried
to change a Song name by including a character (or characters) not supported by the
instrument. The instrument returns to previous display after three seconds. Make sure to
enter a valid name.
2. This message will appear if a different “Character Code” (page 84) is selected than was
when you assigned the Song name or Performance file name. In this case, switch the
“Character Code,” re-select the Song or Performance file.
Message Description
Transmitting
Error
WrongName

CP300 Owner’s Manual
98
Appendix
Troubleshooting
Problem Possible causes Solution
The power of the instrument does
not turn on.
The instrument has not been plugged in
properly.
Securely insert the female plug into the
socket on the instrument, and the male plug
into a proper AC outlet (page 11).
A click or pop is heard when the
power is turned on or off.
This is normal when electrical current is
being applied to the instrument.
This is normal.
Noise is heard from the instrument's
speakers.
The noise may be due to interference
caused by the use of a mobile phone in
close proximity to the instrument.
Turn off the mobile phone, or use it further
away from the instrument. Using a mobile
phone in close proximity to the instrument
may produce interference.
The overall volume is too low, or
there is no sound at all.
The [MASTER VOLUME] (page 13) may be
set too low.
Raise the [MASTER VOLUME] level.
The [ZONE CONTROL] (page 28) may be
set too low.
Raise the [ZONE CONTROL] slider.
Speaker setting may be off. Turn on the [SPEAKER] button (page 52).
“Local Control” (page 65) may be set to off. Set “Local Control” to on.
“Internal TG” (page 55) may be set to off. Set “Internal TG” to on.
The pedal or the Modulation wheel is set to
minimum, when “Expression” is assigned to
the foot controller or Modulation wheel.
Change the position of the pedal or
Modulation wheel.
“Expression” may have been assigned to
one of the connected footswitches.
Assign any function other than “Expression”
to the footswitch.
The gain setting of the Master EQ (page 36)
may be low.
Raise the gain of the Master EQ.
The gain of the Part EQ (page 36) may be
low.
Raise the gain of the Part EQ.
“Volume” may have been assigned to the
[ZONE CONTROL] slider while the Master
mode is turned on, the [ZONE CONTROL]
may be set too low.
Raise the [ZONE CONTROL] slider.
The keyboard volume is low. The volume level for the keyboard
Performance may be set too low.
Raise any of the [ZONE CONTROL] slider.
The Song playback volume is low. The volume of the Song playback may be
set too low.
Raise the [SONG VOLUME] slider.
The speakers do not switch off when
a pair of headphones is connected.
Speaker setting may be On. Set the Speaker setting to Off.
The pitch and/or tone of the Piano
Voices in certain ranges do not
sound right.
The Piano Voices attempt to precisely
simulate actual piano sounds. However, as
a result of sampling algorithms, overtones in
some ranges may sound exaggerated,
producing a somewhat different pitch or
tone.
This is normal.
Mechanical noise is heard during
Performance.
The keyboard mechanism of this instrument
simulates the keyboard mechanism of an
actual piano. Mechanical noise is also heard
on a piano.
This is normal.
The buttons do not respond. While you are using a function, some
buttons not used for the function are
disabled.
If a Song is playing or recording, stop
playback or recording. Otherwise, press the
[EXIT] button to return to the main display,
and then perform the desired operation.
The Panel Lock function is effective. Rapidly press the [PANEL LOCK] button
twice to cancel the Panel Lock.

Troubleshooting
CP300 Owner’s Manual
99
Appendix
The sound sustains and does not
decay while pressing the pedal to
which the sostenuto function is
assigned.
For Voices in the ORGAN, STRINGS,
CHOIR, PAD, and XG groups, the sound
continues sustaining while you are holding
down the sostenuto pedal.
This is normal.
Higher or lower notes do not sound
correctly when the transpose or
octave setting is made.
The setting range for the transposition and
octave setting is C-2 – G8. (With the normal
setting, the 88 keys of this instrument cover
the range of A-1 – C7.) If the lowest key is
set to a note lower than C-2, it will produce a
sound one octave higher. If the highest key
is set to a note higher than G8, it will
produce a sound one octave lower.
This is normal.
The tempo does not change even
though the Song was recorded with
tempo changes.
Depending on the timing of tempo changes,
the tempo change may not have been
recorded. In this case, the recording will be
played back at the original tempo. Make
tempo changes when the recording track is
selected and a red track indicator is
flashing. The same method applies to
editing the tempo after recording.
This is normal. Check the location of the
tempo change.
Performance in Dual or Split mode
is not recorded, and one or more
tracks have been unexpectedly
deleted.
For Dual or Split mode recording, the
recording track for the Layer part Voice or
the Left part Voice is automatically assigned
(page 48). Therefore, if the track already has
data, the data will be overwritten during
recording. Also, the actual process of
switching to Dual mode or Split mode in the
middle of the Song is not recorded.
Therefore, the notes you played with the
Layer part Voice or the Left part Voice are
not recorded.
This is normal.
Cannot change the time signature in
the Song after recording.
The time signature cannot be changed in
the middle of the measure.
Press the [STOP] button to locate the top of
the Song, use the B [– (NO)][+ (YES)]
buttons to locate the measure in which you
wish to change the time signature, and then
change it.
The Song title is not correct. The “Character Code” setting may be
different than that used when you named the
Song.
Use the “Character Code” parameter
(page 84) in the [SONG FILE] button to
change the setting.
The Performance title is not correct. The “Character Code” parameter setting
(page 84) has been changed from the one
set when naming the Performance file.
Make sure that the “Character Code”
parameter is set to the same one as set
when the Performance file was named.
Problem Possible causes Solution

CP300 Owner’s Manual
100
Appendix
MIDI Data Compatibility
The data and the MIDI device must match in regards to the items below.
Voice allocation format
With MIDI, Voices are assigned to specific numbers, called “program numbers.” The numbering standard
(order of Voice allocation) is referred to as the “Voice allocation format.” Voices may not play back as expected
unless the Voice allocation format of the Song data matches that of the compatible MIDI device used for
playback.
GM System Level 1
This is one of the most common Voice allocation formats. Many MIDI devices are compatible with GM
System Level 1. Most commercially available music data is created as Format 0 “GM System Level 1.”
XG
XG is a major enhancement of the GM System Level 1 format, and was developed by Yamaha specifically
to provide more Voices and variations, as well as greater expressive control over Voices and effects, and to
ensure compatibility of data well into the future. Song data recorded on the instrument using Voices in
the XG category is XG-compatible.

CP300 Owner’s Manual
101
Appendix
Factory Setting List
Voice settings [VOICE EDIT]
All the Voice settings differ depending on the current Voice.
MIDI settings [MIDI SETTING]
Other settings [OTHER SETTING]
Parameter name Settings Value Page
MidiOutChannel Setting the MIDI transmit channel Main: Ch 1
Left: Ch 2
Layer: Ch 3
Left Layer: Ch 4
65
MidiInChannel Setting the MIDI receive channel Ch 1 – 16: Song
Ch 17: Keyboard
Ch 18: Main
Ch 19: Left
Ch 20: Layer
Ch 21: Left Layer
Ch 22 – 32: Off
65
LocalControl Turning local control on/off On 65
MidiOutSelect Selecting performance from the keyboard or Song data for
MIDI transmission
Keyboard 65
ReceiveParameter Selecting the types of data received via MIDI All data: On 66
TransmitParameter Selecting the types of data transmitted via MIDI All data: On 66
IntialSetup Transmitting the initial settings on the panel — 66
BulkDump Executing Voice data bulk dump Current 66
Parameter name Settings Value Page
TouchResponse Selecting the touch response Medium 68
Tune Fine tuning the pitch A3 = 440.0 Hz 68
PianoTuningCurve Selecting a tuning curve for a Piano Voice Stretch 68
Scale Selecting a scale Equal 68
SplitPoint Specifying the Split Point (Main) F#269
SplitPoint2 Specifying the Split Point 2 (Layer) F#269
Transpose Changing the key Keyboard = 0
Song = 0
69
SoftPedalDepth Adjusting the depth of the Soft pedal 5 69
StringResonanceDepth Setting the depth of String Resonance 5 69
SustainSamplingDepth Setting the depth of Sustain Sampling for the Sustain pedal 5 69
KeyOffSamplingDepth Specifying the volume of the Key-off sound 5 70
VibraphonePedalMode Selecting a pedal function for Vibraphone Voice PianoLike 70
PedalPlay/Pause Assigning the SONG [PLAY/PAUSE] function to the pedal All pedals: Off 70
PedalType Selecting a pedal type Pedal 1, Pedal 2, Pedal
3: Make; Pedal 4: Break
70

Factory Setting List
CP300 Owner’s Manual
102
Appendix
Master settings [MASTER EDIT]
Settings for Song recording and playback [SONG SETTING]
HalfPedalPoint Setting the point at which the sustain pedal starts to affect
the sound
070
PitchBendRange Setting the Pitch Bend range 2 70
EqualizerLock Locking the Master Equalizer settings On 71
MemoryBackUp Selecting items saved at shutdown Transpose,
Main/Left Layer,
OtherSetting: Off,
Others: On
71
FactorySet Restoring the default settings MemoryFileExcluded 71
Parameter name Settings Value Page
Slider Assigning a function to the [ZONE CONTROL] slider VOLUME 54
SendBankMsb Setting the MSB of the Send Bank Select message 0 54
SendBankLsb Setting the LSB of the Send Bank Select message 0 54
SendPG# Setting the Program Change message 1 54
Octave Setting the octave of the external tone generator 0 55
InterITG Turning the internal tone generator on/off On 55
MidiOutChannel Setting the MIDI transmit channel when the Master mode is
turned on
Zone 1: Ch 1,
Zone 2: Ch 2,
Zone 3: Ch 3,
Zone 4: Ch 4
55
Parameter name Settings Value Page
Quantize Correcting note timing.
Determining how strongly the notes will be quantized.
Off 86
SwingRate 50%
QuickPlay Specifying whether playback starts immediately along with
the first voicing
On 86
ChannelListen Auditioning the channels Ch 1 86
ChannelClear Deleting data from each channel Ch 1 86
FromToRepeat Specifying the range and playing back repeatedly RepeatOff 87
SongRepeat Playing back a Song/all Songs repeatedly PresetSongs 87
TimeSignature Setting the Click time signature 4/4 87
ClickVolume Setting the Click volume level 100 87
ClickType Setting the Click bell sound BellOff 87
Parameter name Settings Value Page

CP300 Owner’s Manual
103
Appendix
Voice List
Voice group Voice name Stereo
sampling
Touch
Sense
Dynamic
sampling
Key-off
samples
String
resonance
Voice description
GrandPiano1 Grand Piano 1 ØØØ Ø ØThis sound was sampled from a full concert
grand piano. Three stages of dynamics were
sampled, and no effort has been spared in
making the sound virtually identical to that of an
acoustic piano. Even the tonal changes
produced by the damper pedal and the subtle
sounds of releasing a key are reproduced. The
sympathetic vibration (string resonance) that
occurs between the strings of an acoustic piano
has also been simulated. Suitable not only for
classical compositions but also for piano pieces
of any style.
Mellow Piano 1 ØØØ Ø ØA warm and mellow piano sound. Ideal for
classical music.
Rock Piano ØØØ Ø ØA bright-sounding piano. Ideal for rock styles.
HonkyTonk Piano ØØØ Ø ØA honky-tonk style piano. Enjoy a tonal
character that is quite different than a grand
piano.
GrandPiano2 Grand Piano 2 ØØ– – –A spacious and clear piano sound with a bright
resonance. Ideal for popular music.
Mellow Piano 2 ØØ – – –A mellow piano sound with a different character
than Mellow Piano 1.
Mono Piano Mono Piano 1 –ØØ – –The sound of a mono piano. Good for ensemble
performance.
Mono Piano 2 –Ø– – –A mono piano sound with a different character
than Mono Piano 1.
Comp. Piano 1 –ØØ – –A mono piano sound with compression effect.
Comp. Piano 2 –Ø– – –A mono piano sound with a different character
than Comp. Piano 1.
E.Piano1 Chorus E.Piano –ØØØ –The sound of an electric piano that generates
sound by striking metal tines with a hammer.
Softly played notes will have a mellow character,
and strongly played notes will sound more
forceful. A chorus effect is applied to create
warmth.
Phaser E.Piano –ØØØ –A distinctive phaser effect makes this ideal for
fusion styles.
AutoPan E.Piano –ØØØ –An electric piano with a characteristic panning
effect.
Standard E.Piano –ØØØ –A straightforward electric piano sound with
reverb as the only effect.
E.Piano2 DX E.Piano 1 ØØØ – –The sound of an electronic piano as simulated
by an FM synthesizer such as the DX7.
Differences in playing dynamics will affect the
tone. Ideal for popular songs.
DX E.Piano 2 –Ø– – –An FM synthesizer electronic piano sound using
a different algorithm than DX E.Piano 1, with a
bright sounding character.
Synth Piano –Ø– – –This Voice simulates the electric piano sound
produced by synthesizers in popular music. It
also goes well with the acoustic piano sound.
E.Piano3 Tremolo Vintage
E.P.
–ØØ – –The sound of an electric piano of a different type
than E.Piano 1, often used in rock and popular
music.
Vintage E.Piano –ØØ – –An electric piano sound with a vintage
character, and reverb as the only effect.
Amp.Sim. Vintage
E.P.
–ØØ – –The sound of an electric piano distorted by an
amp simulator effect. Ideal for rock music.

Voice List
CP300 Owner’s Manual
104
Appendix
Clavi. Phaser Clavi. –Ø– Ø –This is the Voice of a keyboard that produces
sound by striking the strings with magnetic
pickups. This funky sound is popular in
contemporary soul and R&B music. Because of
its unique structure, the instrument produces a
peculiar sound when you release the keys.
Clavi. 1 –Ø– Ø –A struck-string keyboard instrument with
electromagnetic pickups. A straightforward
sound with only reverb applied.
Wah Clavi. –Ø– Ø –Includes a distinctive wah effect.
Clavi. 2 –Ø– Ø –A different type of Clavi. 1 sound.
Vibraphone Vibraphone ØØØ – –Vibraphone played with relatively soft mallets.
The tone becomes more metallic the harder you
play.
Marimba ØØ – – –A marimba sound, sampled in stereo for
spaciousness and realism.
Celesta ØØØ – –The sound of a celesta—a percussion
instrument in which hammers strike metallic
bars to produce sound.
Organ1 Jazz Organ ––– – –The sound of a “tonewheel” type electric organ.
Often heard in jazz and rock idioms.
Theater Organ ––– – –A bright electric organ sound.
Rock Organ ––– – –An aggressive electric organ sound, ideal for
rock.
Draw Organ ––– – –A standard electric organ sound.
Organ2 Pipe Organ
Principal
Ø–– – –This Voice features the combination of pipes
(8'+4'+2') of a principal (brass instrument)
organ. It is suitable for Baroque church music.
Pipe Organ Tutti Ø– – – –This Voice features a full coupler of a pipe
organ, famous for the sound used in Toccata
and Fugue in D Minor by Bach.
Pipe Organ Flute Ø–– – –A pipe organ sound that combines flute-type
(woodwind type) stops of different pitches
(8'+4'). This is a gentle sound that is ideal for
accompanying hymns.
Harpsichord Harpsichord 8 Ø–– Ø –The sound of the instrument frequently used in
baroque music. Variations in playing touch will
not affect the volume, and a characteristic
sound will be heard when you release the key.
Harpsichord 8'+4 Ø–– Ø –A harpsichord with an added upper octave.
Produces a more brilliant sound.
Strings Strings ØØ – – –Stereo-sampled, large-scale strings ensemble
with realistic reverb. Try combining this Voice
with piano in the Dual mode.
Synth Strings ØØ – – –A bright and spacious strings sound. Suitable
for sustained parts in the background of an
ensemble.
Slow Strings ØØ– – –The sound of a string ensemble, with a slow
attack. Suitable for use in Dual mode with
GRAND PIANO or E.PIANO.
Choir/Pad. Choir –Ø– – –A big, spacious choir Voice. Perfect for creating
rich harmonies in slow pieces.
Slow Choir –Ø– – –The sound of a choir with a slow attack. Suitable
for use in Dual mode with GRAND PIANO or
E.PIANO.
Scat –ØØ – –You can enjoy jazz “scatting” with this Voice.
Depending on how hard and what note range
you play, different sounds will be produced.
Synth Pad 1 –Ø– – –A warm, mellow, and spacious synth sound.
Ideal for sustained parts in the background of
an ensemble.
Voice group Voice name Stereo
sampling
Touch
Sense
Dynamic
sampling
Key-off
samples
String
resonance
Voice description

CP300 Owner’s Manual
105
Appendix
Program Change List
P.C.# = Program Change number (1-128)
When you specify a program change as a number in the range of 0-127, specify a number that is one less than the program number listed
below. For example, to specify program number 128, you would actually enter program change 127.
For details about XG Voices, refer to the XG Voice List (page 108).
Choir/Pad. Synth Pad 2 –Ø– – –A clear and spacious synth sound. Ideal for
sustained parts in the background of an
ensemble.
Guitar Nylon Guitar ØØØ – –A warm and natural nylon-string guitar sound.
Enjoy the atmosphere it adds to a quiet song.
Steel Guitar –Ø– – –A bright steel guitar sound. Ideal for popular
music.
Bass Wood Bass –Ø– – –The sound of a finger-plucked upright bass.
Frequently used in jazz and Latin music.
Bass&Cymbal –Ø– – –The sound of a cymbal has been layered onto
the bass. Effective when used for jazz walking-
bass lines.
Electric Bass –Ø– – –The sound of an electric bass. Frequently used
in jazz, rock, and popular music.
Fretless Bass –Ø– – –The sound of a fretless bass. Suitable for styles
such as jazz and fusion.
Voice group Voice name Bank
MSB
Bank
LSB
P.C.# Voice group Voice name Bank
MSB
Bank
LSB
P.C.#
GrandPiano1
Grand Piano 1 0 122 1
Organ1
Jazz Organ 0 122 17
Mellow Piano 1 0 123 1 Theater Organ 0 124 17
Rock Piano 0 122 3 Rock Organ 0 122 19
HonkyTonk Piano 0 122 4 Draw Organ 0 125 17
GrandPiano2
Grand Piano 2 0 112 1
Organ2
Pipe Organ Principal 0 123 20
Mellow Piano 2 0 114 1 Pipe Organ Tutti 0 122 20
Mono Piano
Mono Piano 1 0 123 2 Pipe Organ Flute 0 124 20
Mono Piano 2 0 114 2
Harpsichord
Harpsichord 8' 0 122 7
Comp. Piano 1 0 124 2 Harpsichord 8'+4' 0 123 7
Comp. Piano 2 0 116 2
Strings
Strings 0 122 49
E.Piano1
Chorus E.Piano 0 122 5 Synth Strings 0 122 51
Phaser E.Piano 0 124 5 Slow Strings 0 122 50
AutoPan E.Piano 0 125 5
Choir/Pad.
Choir 0 122 53
Standard E.Piano 0 126 5 Slow Choir 0 123 53
E.Piano2
DX E.Piano 1 0 122 6 Scat 0 122 54
DX E.Piano 2 0 123 6 Synth Pad 1 0 122 90
Synth Piano 0 122 89 Synth Pad 2 0 122 92
E.Piano3
Tremolo Vintage E.P. 0 123 5
Guitar
Nylon Guitar 0 122 25
Vintage E.Piano 0 121 5 Steel Guitar 0 122 26
Amp.Sim.Vintage E.P. 0 120 5
Bass
Wood Bass 0 122 33
Clavi.
Phaser Clavi. 0 124 8 Bass&Cymbal 0 124 33
Clavi. 1 0 122 8 Electric Bass 0 122 34
Wah Clavi. 0 123 8 Fretless Bass 0 122 36
Clavi. 2 0 125 8 XG 480 Voices – – –
Vibraphone
Vibraphone 0 122 12
Marimba 0 122 13
Celesta 0 122 9
Voice group Voice name Stereo
sampling
Touch
Sense
Dynamic
sampling
Key-off
samples
String
resonance
Voice description

CP300 Owner’s Manual
106
Appendix
Preset Performance List
Number Performance name Type Voices used Performance discription
Main Layer Left Left Layer
A01 Piano+Pad Dual GrandPiano1 WarmPad Grand piano layered with a
warm-sounding pad. Usable in
a variety of situations from rapid
passages to ballads.
A02 Piano+E.Piano Dual GrandPiano1 ChorusE.P. Widely-used layered sound with
piano and electric piano. Ideal
for 80’s pop.
A03 Piano+DX E.P.1 Dual GrandPiano1 DX E.Piano1 Widely-used layered sound with
piano and DX electric piano.
Enjoy harmonies with the
sparkling electric piano.
A04 Piano+DX E.P.2 Dual GrandPiano2 DX E.Piano2 Another type of layered piano
and DX electric piano.
A05 Piano+SoftStr Dual GrandPiano2 S.SlwStr Piano layered with soft strings.
A06 HonkyTonkPiano Dual GrandPiano1 GrandPiano1 Honky-tonk piano that simulates
slight detuning.
A07 E.Piano+Pad Dual AutoPanE.P. SynthPad1 Auto-panned electric piano
layered with a soft pad.
Beautifully spacious stereo
spread.
A08 E.Piano+DX E.P. Dual StandardE.P DX E.Piano1 Layered electric piano and DX
electric piano.
A09 E.Piano+SlowStr Dual ChorusE.P. SlowStrings Chorused electric piano layered
with slow attack strings.
A10 E.Piano+
Vintage E.P.
Dual StandardE.P VintageE.P. Standard electric piano layered
with vintagetype electric piano.
A11 DX E.P.+SoftStr Dual DX E.Piano2 S.SlwStr DX electric piano layered with
soft strings.
A12 DX E.P.+
SynthPiano
Dual DX E.Paino2 SynthPiano DX electric piano layered with
synth piano.
A13 PipeOrgan+Choir Dual PipeOrganTu Choir Magnificent layered sound with
pipe organ and chorus.
A14 Strings+Choir Dual Strings Choir Classical layered sound with
strings and chorus.
A15 Orchestral Harp Dual NylnHarp Harp Beautiful layered sound of two
harps, slightly delayed.
A16 PolySynthPad Dual PolySyPd NewAgePd Dense and rich motion pad.
Key-on modifies the sound.
B01 WoodBass/
GrandPiano
Split GrandPiano1 Wood Bass Standard wood bass split with
piano. Ideal for playing jazz by
yourself.
B02 WoodBass/
NylonGuitar
Split Nylon Guitar Wood Bass Nylon-string guitar split with
wood bass.
B03 WoodBass/
VibraPhone
Split Vibraphone Wood Bass Standard wood bass split with
vibraphone.
B04 Bass+Cym/
JazzOrgan
Split JazzOrgan
Bass & Cymbal
Play rhythm with bass and
cymbal in the left hand, and
solo organ in the right hand.
B05 E.Bass/PhaserE.P. Split Phaser E.Piano Electric Bass Electric piano with phaser
(typical of 70’s fusion), split with
electric bass.
B06 Bass+Cym/Scat Split Scat
Bass & Cymbal
Play scat in the right hand, and
bass and cymbal in the left.
Scat sounds are velocity-
switched.

Preset Performance List
CP300 Owner’s Manual
107
Appendix
The 32 Performances in variations C, D use the Grand Piano 1 Voice.
B07 Organ Upper/Lower Dual+Split JazzOrgan SoloSine Jazz Organ Simulates a dual-manual organ.
Play chords in the left hand, and
solo with the right.
B08 E.Piano/GrandPiano Split GrandPiano1 Phaser E.Piano Play chords in the left hand on
an electric piano with phaser
applied, and piano solo in the
right.
B09 JazzOrg/GrandPiano Split GrandPiano1 Jazz Organ Play organ backing in the left
hand, and piano solo in the
right.
B10 SynBass/SynBrass Dual+Split SynBrss1 SynBrss1
SynBass1Dark
Play synth bass in the left hand,
and bright synth brass in the
right.
B11 Delay E.Piano Single
Standard
E.Piano
Electric piano with delay
applied to create a sense of
space.
B12 Room Piano Single GrandPiano1 Piano that sounds as if heard at
a distance in a spacious room.
B13 Old piano Single GrandPiano2 Simulation of a piano sound
heard on an old record. Distorts
slightly as you play harder.
B14 Baroque Ensemble Dual+Split Hc8'+4' PipeOrganP Strings Choir Play strings and chorus in the
left hand, and harpsichord and
pipe organ in the right.
B15 AOR Split Dual+Split GrandPiano2 SynthPad1 E.Bass MuteGtr Rich sound that lets you play
muted guitar and bass in the left
hand, and piano and pad in the
right.
B16 Drum Kit Drm StandardKit1 The CP300 provides high-
quality drum sounds as well as
piano sounds. Try out your
drumming skills!
Number Performance name Type Voices used Performance discription
Main Layer Left Left Layer

CP300 Owner’s Manual
108
Appendix
XG Voice List
Bank Select MSB=00
KSP Stereo Single Slow Fast Decay Double Attack Bright Dark Resonant Attack
Instrument
Group
Pgm#
Bank 0
Bank Select LSB=00
Bank 0 E Bank 1 E Bank 3 E Bank 6 E Bank 8 E Bank 12 E Bank 14 E Bank 16 E Bank 17 E Bank 18 E Bank 19 E Bank 20 E Bank 24 E
Piano 1 Acoustic Grand Piano GrandPno 2 GrndPnoK 1 MelloGrP 2
2 Bright Acoustic Piano BritePno 2 BritPnoK 1
3 Electric Grand Piano El.Grand 2 ElGrPnoK 2
4 Honky-tonk Piano HnkyTonk 2 HnkyTnkK 2
5 Electric Piano 1 E.Piano1 2 El.Pno1K 1 MelloEP1 2
6 Electric Piano 2 E.Piano2 2 El.Pno2K 1
7 Harpsichord Harpsi. 1 Harpsi.K 1
8 Clavi Clavi. 2 Clavi K 1
Chromatic
Percussion
9 Celesta Celesta 1
10 Glockenspiel Glocken 1
11 Music Box MusicBox 2
12 Vibraphone Vibes 1 Vibes K 1
13 Marimba Marimba 1 MarimbaK 1
14 Xylophone Xylophon 1
15 Tubular Bells TubulBel 1
16 Dulcimer Dulcimer 1
Organ 17 Drawbar Organ 1 DrawOrgn 1
18 Percussive Organ PercOrgn 1 70sPcOr1 2
19 Rock Organ RockOrgn 2
20 Church Organ 1 ChrchOrg 2
21 Reed Organ ReedOrgn 1
22 Accordion Acordion 2
23 Hamonica Harmnica 1
24 Tango Accordion TangoAcd 2
Guitar 25 Acoustic Guitar (nylon) 1 NylonGtr 1 NylonGt2 1
26 Acoustic Guitar (steel) SteelGtr 1 SteelGt2 1
27 Electric Guitar (jazz) Jazz Gtr 1 MelloGtr 1
28 Electric Guitar (clean) CleanGtr 1
29 Electric Guitar (muted) Mute.Gtr 1
30 Overdriven Guitar Ovrdrive 1
31 Distortion Guitar Dist.Gtr 1
32 Guitar Harmonics GtrHarmo 1
Bass 33 Acoustic Bass Aco.Bass 1
34 Electric Bass (finger) FngrBass 1 FingrDrk 2
35 Electric Bass (pick) PickBass 1
36 Fretless Bass Fretless 1
37 Slap Bass 1 SlapBas1 1
38 Slap Bass 2 SlapBas2 1
39 Synth Bass 1 SynBass1 1 SynBa1Dk 1 FastResB 1 AcidBass 1
40 Synth Bass 2 SynBass2 2 MelloSBa 1 Seq Bass 2 ClkSynBa 2 SynBa2Dk 1
Strings 41 Violin Violin 1 Slow Vln 1
42 Viola Viola 1
43 Cello Cello 1
44 Contrabass Contrabs 1
45 Tremolo Strings Trem.Str 1 SlwTrStr 1
46 Pizzicato Strings Pizz.Str 1
47 Orchestral Harp Harp 1
48 Timpani Timpani 1
Ensemble 49 String Ensemble 1 Strings1 1 S.Strngs 2 Slow Str 1 Arco Str 2
50 String Ensemble 2 Strings2 1 S.SlwStr 2 LegatoSt 2
51 Synth Strings 1 Syn.Str1 2
52 Synth Strings 2 Syn.Str2 2
53 Choir Aahs ChoirAah 1 S.Choir 2 Ch.Aahs2 2
54 Voice Oohs VoiceOoh 1
55 Synth Voice SynVoice 1
56 Orchestra Hit Orch.Hit 2
Brass 57 Trumpet Trumpet 1 Trumpet2 1 BriteTrp 2
58 Trombone Trombone 1 Trmbone2 2
59 Tuba Tuba 1 Tuba 2 1
60 Muted Trumpet Mute.Trp 1
61 French Horn Fr. Horn 2 FrHrSolo 1
62 Brass Section 1 BrasSect 1
63 Synth Brass 1 SynBrss1 2 Quack Br 2 RezSynBr 2 PolyBrss 2
64 Synth Brass 2 SynBrss2 1 Soft Brs 2
Reed 65 Soprano Sax SprnoSax 1
66 Alto Sax Alto Sax 1
67 Tenor Sax TenorSax 1
68 Baritone Sax Bari.Sax 1
69 Oboe Oboe 2
70 English Horn Eng.Horn 1
71 Bassoon Bassoon 1
72 Clarinet Clarinet 1
Pipe 73 Piccolo Piccolo 1
74 Flute Flute 1
75 Recorder Recorder 1
76 Pan Flute PanFlute 1
77 Blown Bottle Bottle 2
78 Shakuhachi Shakhchi 2
79 Whistle Whistle 1
80 Ocarina Ocarina 1
Synth Lead 81 Lead 1 (square) SquareLd 2 SquarLd2 1 LMSquare 2 Hollow 1 Shroud 2
82 Lead 2 (sawtooth) Saw Ld 2 Saw Ld 2 1 ThickSaw 2 Dyna Saw 1 Digi Saw 2 Big Lead 2 HeavySyn 2
83 Lead 3 (calliope) CaliopLd 2
84 Lead 4 (chiff) Chiff Ld 2
85 Lead 5 (charang) CharanLd 2
86 Lead 6 (voice) Voice Ld 2 SynthAah 2
87 Lead 7 (fifths) Fifth Ld 2
88 Lead 8 (bass+lead) Bass&Ld 2 Big&Low 2
Synth Pad 89 Pad 1 (new age) NewAgePd 2
90 Pad 2 (warm) Warm Pad 2 ThickPad 2 Soft Pad 2 Sine Pad 2
91 Pad 3 (polysynth) PolySyPd 2
92 Pad 4 (choir) ChoirPad 2
93 Pad 5 (bowed) BowedPad 2
94 Pad 6 (metallic) MetalPad 2
95 Pad 7 (halo) Halo Pad 2
96 Pad 8 (sweep) SweepPad 2 Shwimmer 2
Synth Effects 97 FX 1 (rain) Rain 2
98 FX 2 (soundtrack) SoundTrk 2
99 FX 3 (crystal) Crystal 2 SynDrCmp 2 Popcorn 2 TinyBell 2
100 FX 4 (atmosphere) Atmosphr 2 WarmAtms 2 HollwRls 2
101 FX 5 (brightness) Bright 2
102 FX 6 (goblins) Goblins 2
103 FX 7 (echoes) Echoes 2 Echoes 2 2 Echo Pan 2
104 FX 8 (sci-fi) Sci-Fi 2
Ethnic 105 Sitar Sitar 1
106 Banjo Banjo 1
107 Shamisen Shamisen 1
108 Koto Koto 1
109 Kalimba Kalimba 1
110 Bagpipe Bagpipe 2
111 Fiddle Fiddle 1
112 Shanai Shanai 1
Percussive 113 Tinkle Bell TnklBell 2
114 Agogo Agogo 2
115 Steel Drums SteelDrm 2
116 Woodblock Woodblok 1
117 Taiko Drum TaikoDrm 1
118 Melodic Tom 1 MelodTom 2
119 Synth Drum Syn Drum 1
120 Reverse Cymbal RevCymbl 1
Sound Effects 121 Guitar Fret Noise FretNoiz 2
122 Breath Noise BrthNoiz 2
123 Seashore Seashore 2
124 Bird Tweet Tweet 2
125 Telephone Ring Telphone 1
126 Helicopter Helicptr 1
127 Applause Applause 1
128 Gunshot Gunshot 1
: Same as Bank 0 : No sound E: Element number

XG Voice List
CP300 Owner’s Manual
109
Appendix
Release Rezo Sweep Muted Detune 1 Detune 2 Detune 3 Octave 1 Octave 2 5th 1 5th 2 Bend Tutti
Instrument
Group
Pgm#
Bank 0
Bank Select LSB=00
Bank 0 E Bank 25 E Bank 27 E Bank 28 E Bank 32 E Bank 33 E Bank 34 E Bank 35 E Bank 36 E Bank 37 E Bank 38 E Bank 39 E Bank 40 E
Piano 1 Acoustic Grand Piano GrandPno 2 PianoStr 2
2 Bright Acoustic Piano BritePno 2
3 Electric Grand Piano El.Grand 2 Det.CP80 2 LayerCP1 2
4 Honky-tonk Piano HnkyTonk 2
5 Electric Piano 1 E.Piano1 2 Chor.EP1 2 HardEl.P 2
6 Electric Piano 2 E.Piano2 2 Chor.EP2 2 DX Hard 2 DXLegend 2 DX Phase 2
7 Harpsichord Harpsi. 1 Harpsi.2 2 Harpsi.3 2
8 Clavi Clavi. 2 ClaviWah 2
Chromatic
Percussion
9 Celesta Celesta 1
10 Glockenspiel Glocken 1
11 Music Box MusicBox 2
12 Vibraphone Vibes 1
13 Marimba Marimba 1
14 Xylophone Xylophon 1
15 Tubular Bells TubulBel 1
16 Dulcimer Dulcimer 1 Dulcimr2 2
Organ 17 Drawbar Organ 1 DrawOrgn 1 DetDrwOr 2 60sDrOr1 2 60sDrOr2 2 70sDrOr1 2 DrawOrg2 2 60sDrOr3 2 Even Bar 2 16+2"2/3 2
18 Percussive Organ PercOrgn 1
DetPrcOr 2 Lite Org 2 PercOrg2 2
19 Rock Organ RockOrgn 2
20 Church Organ 1 ChrchOrg 2 ChurOrg3 2 ChurOrg2 2 NotreDam 2
21 Reed Organ ReedOrgn 1
Puff Org 2
22 Accordion Acordion 2 AccordIt 2
23 Hamonica Harmnica 1 Harmo. 2 2
24 Tango Accordion TangoAcd 2
Guitar 25 Acoustic Guitar (nylon) 1 NylonGtr 1 NylonGt3 2
26 Acoustic Guitar (steel) SteelGtr 1 12StrGtr 2 Nyln&Stl 2
27 Electric Guitar (jazz) Jazz Gtr 1
Jazz Amp 2
28 Electric Guitar (clean) CleanGtr 1 ChorusGt 2
29 Electric Guitar (muted) Mute.Gtr 1 FunkGtr1 2
30 Overdriven Guitar Ovrdrive 1
31 Distortion Guitar Dist.Gtr 1 FeedbkGt 2
32 Guitar Harmonics GtrHarmo 1
Bass 33 Acoustic Bass Aco.Bass 1 JazzRthm 2
34 Electric Bass (finger) FngrBass 1
FlangeBa 2 Ba&DstEG 2
35 Electric Bass (pick) PickBass 1 MutePkBa 1
36 Fretless Bass Fretless 1 Fretles2 2 Fretles3 2 Fretles4 2
37 Slap Bass 1 SlapBas1 1 ResoSlap 1 PunchThm 2
38 Slap Bass 2 SlapBas2 1
39 Synth Bass 1 SynBass1 1 Clv Bass 2 TechnoBa 2
40 Synth Bass 2 SynBass2 2 SmthSynB 2 ModulrBa 2
Strings 41 Violin Violin 1
42 Viola Viola 1
43 Cello Cello 1
44 Contrabass Contrabs 1
45 Tremolo Strings Trem.Str 1 Susp.Str 2
46 Pizzicato Strings Pizz.Str 1
47 Orchestral Harp Harp 1 YangChin 2
48 Timpani Timpani 1
Ensemble 49 String Ensemble 1 Strings1 1 60sStrng 2 Orchestr 2
50 String Ensemble 2 Strings2 1 Warm Str 2
51 Synth Strings 1 Syn.Str1 2 Reso Str 2
52 Synth Strings 2 Syn.Str2 2
53 Choir Aahs ChoirAah 1 MelChoir 2 ChoirStr 2
54 Voice Oohs VoiceOoh 1
55 Synth Voice SynVoice 1 SyVoice2 2
56 Orchestra Hit Orch.Hit 2 OrchHit2 2
Brass 57 Trumpet Trumpet 1 Warm Trp 2
58 Trombone Trombone 1
59 Tuba Tuba 1
60 Muted Trumpet Mute.Trp 1
61 French Horn Fr. Horn 2 FrHorn 2 1 HornOrch 2
62 Brass Section 1 BrasSect 1 Tp&TbSec 2 BrssSec2 2
63 Synth Brass 1 SynBrss1 2 SynBrss3 2 JumpBrss 2
64 Synth Brass 2 SynBrss2 1 SynBrss4 2
Reed 65 Soprano Sax SprnoSax 1
66 Alto Sax Alto Sax 1 Sax Sect 2
67 Tenor Sax TenorSax 1 BrthTnSx 2
68 Baritone Sax Bari.Sax 1
69 Oboe Oboe 2
70 English Horn Eng.Horn 1
71 Bassoon Bassoon 1
72 Clarinet Clarinet 1
Pipe 73 Piccolo Piccolo 1
74 Flute Flute 1
75 Recorder Recorder 1
76 Pan Flute PanFlute 1
77 Blown Bottle Bottle 2
78 Shakuhachi Shakhchi 2
79 Whistle Whistle 1
80 Ocarina Ocarina 1
Synth Lead 81 Lead 1 (square) SquareLd 2
82 Lead 2 (sawtooth) Saw Ld 2 WaspySyn 2 PulseSaw 2
83 Lead 3 (calliope) CaliopLd 2
84 Lead 4 (chiff) Chiff Ld 2
85 Lead 5 (charang) CharanLd 2
86 Lead 6 (voice) Voice Ld 2
87 Lead 7 (fifths) Fifth Ld 2 Big Five 2
88 Lead 8 (bass+lead) Bass&Ld 2
Synth Pad 89 Pad 1 (new age) NewAgePd 2
90 Pad 2 (warm) Warm Pad 2
91 Pad 3 (polysynth) PolySyPd 2
92 Pad 4 (choir) ChoirPad 2
93 Pad 5 (bowed) BowedPad 2
94 Pad 6 (metallic) MetalPad 2
95 Pad 7 (halo) Halo Pad 2
96 Pad 8 (sweep) SweepPad 2 Converge 2
Synth Effects 97 FX 1 (rain) Rain 2
98 FX 2 (soundtrack) SoundTrk 2 Prologue 2
99 FX 3 (crystal) Crystal 2 RndGlock 2 GlockChi 2
100 FX 4 (atmosphere) Atmosphr 2 Nylon EP 2
101 FX 5 (brightness) Bright 2
102 FX 6 (goblins) Goblins 2
103 FX 7 (echoes) Echoes 2
104 FX 8 (sci-fi) Sci-Fi 2
Ethnic 105 Sitar Sitar 1 DetSitar 2 Sitar 2 2
106 Banjo Banjo 1 MuteBnjo 1
107 Shamisen Shamisen 1
108 Koto Koto 1
109 Kalimba Kalimba 1
110 Bagpipe Bagpipe 2
111 Fiddle Fiddle 1
112 Shanai Shanai 1
Percussive 113 Tinkle Bell TnklBell 2
114 Agogo Agogo 2
115 Steel Drums SteelDrm 2
116 Woodblock Woodblok 1
117 Taiko Drum TaikoDrm 1
118 Melodic Tom 1 MelodTom 2
119 Synth Drum Syn Drum 1
120 Reverse Cymbal RevCymbl 1
Sound Effects 121 Guitar Fret Noise FretNoiz 2
122 Breath Noise BrthNoiz 2
123 Seashore Seashore 2
124 Bird Tweet Tweet 2
125 Telephone Ring Telphone 1
126 Helicopter Helicptr 1
127 Applause Applause 1
128 Gunshot Gunshot 1
: Same as Bank 0 : No sound E: Element number

XG Voice List
CP300 Owner’s Manual
110
Appendix
Velo-Switch Velo-Xfade other wave
Instrument
Group
Pgm#
Bank 0
Bank Select LSB=00
Bank 0 E Bank 41 E Bank 42 E Bank 43 E Bank 45 E Bank 64 E Bank 65 E Bank 66 E Bank 67 E Bank 68 E Bank 69 E Bank 70 E Bank 71 E
Piano 1 Acoustic Grand Piano GrandPno 2 Dream 2
2 Bright Acoustic Piano BritePno 2
3 Electric Grand Piano El.Grand 2 LayerCP2 2
4 Honky-tonk Piano HnkyTonk 2
5 Electric Piano 1 E.Piano1 2 VX El.P1 2 60sEl.P1 1
6 Electric Piano 2 E.Piano2 2 DX+Analg 2 DXKotoEP 2 VX El.P2 2
7 Harpsichord Harpsi. 1
8 Clavi Clavi. 2 PulseClv 1 PierceCl 2
Chromatic
Percussion
9 Celesta Celesta 1
10 Glockenspiel Glocken 1
11 Music Box MusicBox 2 Orgel 2
12 Vibraphone Vibes 1 HardVibe 2
13 Marimba Marimba 1 SineMrmb 2
14 Xylophone Xylophon 1
15 Tubular Bells TubulBel 1
16 Dulcimer Dulcimer 1
Organ 17 Drawbar Organ 1 DrawOrgn 1 Organ Ba 1 70sDrOr2 2 CheezOrg 2 DrawOrg3 2
18 Percussive Organ PercOrgn 1
19 Rock Organ RockOrgn 2 RotaryOr 2 SloRotar 2 FstRotar 2
20 Church Organ 1 ChrchOrg 2 OrgFlute 2 TrmOrgFl 2
21 Reed Organ ReedOrgn 1
22 Accordion Acordion 2
23 Hamonica Harmnica 1
24 Tango Accordion TangoAcd 2 TngoAcd2 2
Guitar 25 Acoustic Guitar (nylon) 1 NylonGtr 1 VelGtHrm 2
26 Acoustic Guitar (steel) SteelGtr 1 Stl&Body 2
27 Electric Guitar (jazz) Jazz Gtr 1
28 Electric Guitar (clean) CleanGtr 1
29 Electric Guitar (muted) Mute.Gtr 1 MuteStlG 2 FunkGtr2 2 Jazz Man 1
30 Overdriven Guitar Ovrdrive 1 Gt.Pinch 2
31 Distortion Guitar Dist.Gtr 1 FeedbkG2 2
32 Guitar Harmonics GtrHarmo 1 GtFeedbk 1 GtrHrmo2 1
Bass 33 Acoustic Bass Aco.Bass 1 VXUprght 2
34 Electric Bass (finger) FngrBass 1 FngrSlap 2 FngBass2 2 Mod.Bass 2
35 Electric Bass (pick) PickBass 1
36 Fretless Bass Fretless 1
37 Slap Bass 1 SlapBas1 1
38 Slap Bass 2 SlapBas2 1 VeloSlap 2
39 Synth Bass 1 SynBass1 1 Orbiter 2 Sqr.Bass 1 RubberBa 2
40 Synth Bass 2 SynBass2 2 DX Bass 2 X WireBa 2
Strings 41 Violin Violin 1
42 Viola Viola 1
43 Cello Cello 1
44 Contrabass Contrabs 1
45 Tremolo Strings Trem.Str 1
46 Pizzicato Strings Pizz.Str 1
47 Orchestral Harp Harp 1
48 Timpani Timpani 1
Ensemble 49 String Ensemble 1 Strings1 1 Orchstr2 2 TremOrch 2 Velo.Str 2
50 String Ensemble 2 Strings2 1 Kingdom 2 70s Str 1 Strings3 1
51 Synth Strings 1 Syn.Str1 2 Syn Str4 2 Syn Str5 2
52 Synth Strings 2 Syn.Str2 2
53 Choir Aahs ChoirAah 1
54 Voice Oohs VoiceOoh 1
55 Synth Voice SynVoice 1 Choral 2 AnaVoice 1
56 Orchestra Hit Orch.Hit 2 Impact 2
Brass 57 Trumpet Trumpet 1
58 Trombone Trombone 1
59 Tuba Tuba 1
60 Muted Trumpet Mute.Trp 1
61 French Horn Fr. Horn 2
62 Brass Section 1 BrasSect 1 Hi Brass 2 MelloBrs 2
63 Synth Brass 1 SynBrss1 2 AnVelBr1 2 AnaBrss1 2
64 Synth Brass 2 SynBrss2 1 ChoirBrs 2 AnVelBr2 2 AnaBrss2 2
Reed 65 Soprano Sax SprnoSax 1
66 Alto Sax Alto Sax 1 HyprAlto 2
67 Tenor Sax TenorSax 1 SoftTenr 2 TnrSax 2 1
68 Baritone Sax Bari.Sax 1
69 Oboe Oboe 2
70 English Horn Eng.Horn 1
71 Bassoon Bassoon 1
72 Clarinet Clarinet 1
Pipe 73 Piccolo Piccolo 1
74 Flute Flute 1
75 Recorder Recorder 1
76 Pan Flute PanFlute 1
77 Blown Bottle Bottle 2
78 Shakuhachi Shakhchi 2
79 Whistle Whistle 1
80 Ocarina Ocarina 1
Synth Lead 81 Lead 1 (square) SquareLd 2 Mellow 2 SoloSine 2 SineLead 1
82 Lead 2 (sawtooth) Saw Ld 2 Dr. Lead 2 VeloLead 2
83 Lead 3 (calliope) CaliopLd 2 PureLead 2
84 Lead 4 (chiff) Chiff Ld 2 Rubby 2
85 Lead 5 (charang) CharanLd 2 DistLead 2 WireLead 2
86 Lead 6 (voice) Voice Ld 2 Vox Lead 2
87 Lead 7 (fifths) Fifth Ld 2
88 Lead 8 (bass+lead) Bass&Ld 2 Fat&Prky 2 Soft Wrl 2
Synth Pad 89 Pad 1 (new age) NewAgePd 2 Fantasy 2
90 Pad 2 (warm) Warm Pad 2 Horn Pad 2 RotarStr 2
91 Pad 3 (polysynth) PolySyPd 2 PolyPd80 2 ClickPad 2 Ana. Pad 2 SquarPad 2
92 Pad 4 (choir) ChoirPad 2 Heaven 2 Itopia 2 CC Pad 2
93 Pad 5 (bowed) BowedPad 2 Glacier 2 GlassPad 2
94 Pad 6 (metallic) MetalPad 2 Tine Pad 2 Pan Pad 2
95 Pad 7 (halo) Halo Pad 2
96 Pad 8 (sweep) SweepPad 2 PolarPad 2 Celstial 2
Synth Effects 97 FX 1 (rain) Rain 2 ClaviPad 2 HrmoRain 2 AfrcnWnd 2 Carib 2
98 FX 2 (soundtrack) SoundTrk 2 Ancestrl 2
99 FX 3 (crystal) Crystal 2 ClearBel 2 ChorBell 2 SynMalet 1 SftCryst 2 LoudGlok 2 ChrstBel 2 VibeBell 2 DigiBell 2 AirBells 2 BellHarp 2
100 FX 4 (atmosphere) Atmosphr 2 NylnHarp 2 Harp Vox 2 AtmosPad 2 Planet 2
101 FX 5 (brightness) Bright 2 FantaBel 2
102 FX 6 (goblins) Goblins 2 GobSynth 2 Creeper 2 Ring Pad 2 Ritual 2 ToHeaven 2 Night 2 Glisten 2
103 FX 7 (echoes) Echoes 2 EchoBell 2 Big Pan 2 SynPiano 2 Creation 2 StarDust 2 Reso&Pan 2
104 FX 8 (sci-fi) Sci-Fi 2 Starz 2
Ethnic 105 Sitar Sitar 1
106 Banjo Banjo 1
107 Shamisen Shamisen 1
108 Koto Koto 1
109 Kalimba Kalimba 1
110 Bagpipe Bagpipe 2
111 Fiddle Fiddle 1
112 Shanai Shanai 1 Shanai 2 1
Percussive 113 Tinkle Bell TnklBell 2
114 Agogo Agogo 2
115 Steel Drums SteelDrm 2
116 Woodblock Woodblok 1
117 Taiko Drum TaikoDrm 1
118 Melodic Tom 1 MelodTom 2 Mel Tom2 1 Real Tom 2 Rock Tom 2
119 Synth Drum Syn Drum 1 Ana Tom 1 ElecPerc 2
120 Reverse Cymbal RevCymbl 1
Sound Effects 121 Guitar Fret Noise FretNoiz 2
122 Breath Noise BrthNoiz 2
123 Seashore Seashore 2
124 Bird Tweet Tweet 2
125 Telephone Ring Telphone 1
126 Helicopter Helicptr 1
127 Applause Applause 1
128 Gunshot Gunshot 1
: Same as Bank 0 : No sound E: Element number

XG Voice List
CP300 Owner’s Manual
111
Appendix
Instrument
Group
Pgm#
Bank 0
Bank Select LSB=00
Bank 0 E Bank 72 E Bank 96 E Bank 97 E Bank 98 E Bank 99 E Bank 100 E Bank 101 E
Piano 1 Acoustic Grand Piano GrandPno 2
2 Bright Acoustic Piano BritePno 2
3 Electric Grand Piano El.Grand 2
4 Honky-tonk Piano HnkyTonk 2
5 Electric Piano 1 E.Piano1 2
6 Electric Piano 2 E.Piano2 2
7 Harpsichord Harpsi. 1
8 Clavi Clavi. 2
Chromatic 9 Celesta Celesta 1
Percussion 10 Glockenspiel Glocken 1
11 Music Box MusicBox 2
12 Vibraphone Vibes 1
13 Marimba Marimba 1 Balimba 2 Log Drum 2
14 Xylophone Xylophon 1
15 Tubular Bells TubulBel 1 ChrchBel 2 Carillon 2
16 Dulcimer Dulcimer 1 Cimbalom 2 Santur 2
Organ 17 Drawbar Organ 1 DrawOrgn 1
18 Percussive Organ PercOrgn 1
19 Rock Organ RockOrgn 2
20 Church Organ 1 ChrchOrg 2
21 Reed Organ ReedOrgn 1
22 Accordion Acordion 2
23 Hamonica Harmnica 1
24 Tango Accordion TangoAcd 2
Guitar 25 Acoustic Guitar (nylon) 1 NylonGtr 1 Ukulele 1
26 Acoustic Guitar (steel) SteelGtr 1 Mandolin 2
27 Electric Guitar (jazz) Jazz Gtr 1
28 Electric Guitar (clean) CleanGtr 1
29 Electric Guitar (muted) Mute.Gtr 1
30 Overdriven Guitar Ovrdrive 1
31 Distortion Guitar Dist.Gtr 1
32 Guitar Harmonics GtrHarmo 1
Bass 33 Acoustic Bass Aco.Bass 1
34 Electric Bass (finger) FngrBass 1
35 Electric Bass (pick) PickBass 1
36 Fretless Bass Fretless 1 SynFretl 2 SmthFrtl 2
37 Slap Bass 1 SlapBas1 1
38 Slap Bass 2 SlapBas2 1
39 Synth Bass 1 SynBass1 1 Hammer 2
40 Synth Bass 2 SynBass2 2
Strings 41 Violin Violin 1
42 Viola Viola 1
43 Cello Cello 1
44 Contrabass Contrabs 1
45 Tremolo Strings Trem.Str 1
46 Pizzicato Strings Pizz.Str 1
47 Orchestral Harp Harp 1
48 Timpani Timpani 1
Ensemble 49 String Ensemble 1 Strings1 1
50 String Ensemble 2 Strings2 1
51 Synth Strings 1 Syn.Str1 2
52 Synth Strings 2 Syn.Str2 2
53 Choir Aahs ChoirAah 1
54 Voice Oohs VoiceOoh 1
55 Synth Voice SynVoice 1
56 Orchestra Hit Orch.Hit 2
Brass 57 Trumpet Trumpet 1
58 Trombone Trombone 1
59 Tuba Tuba 1
60 Muted Trumpet Mute.Trp 1
61 French Horn Fr. Horn 2
62 Brass Section 1 BrasSect 1
63 Synth Brass 1 SynBrss1 2
64 Synth Brass 2 SynBrss2 1
Reed 65 Soprano Sax SprnoSax 1
66 Alto Sax Alto Sax 1
67 Tenor Sax TenorSax 1
68 Baritone Sax Bari.Sax 1
69 Oboe Oboe 2
70 English Horn Eng.Horn 1
71 Bassoon Bassoon 1
72 Clarinet Clarinet 1
Pipe 73 Piccolo Piccolo 1
74 Flute Flute 1
75 Recorder Recorder 1
76 Pan Flute PanFlute 1
77 Blown Bottle Bottle 2
78 Shakuhachi Shakhchi 2
79 Whistle Whistle 1
80 Ocarina Ocarina 1
Synth Lead 81 Lead 1 (square) SquareLd 2
82 Lead 2 (sawtooth) Saw Ld 2 Seq Ana. 2
83 Lead 3 (calliope) CaliopLd 2
84 Lead 4 (chiff) Chiff Ld 2
85 Lead 5 (charang) CharanLd 2
86 Lead 6 (voice) Voice Ld 2
87 Lead 7 (fifths) Fifth Ld 2
88 Lead 8 (bass+lead) Bass&Ld 2
Synth Pad 89 Pad 1 (new age) NewAgePd 2
90 Pad 2 (warm) Warm Pad 2
91 Pad 3 (polysynth) PolySyPd 2
92 Pad 4 (choir) ChoirPad 2
93 Pad 5 (bowed) BowedPad 2
94 Pad 6 (metallic) MetalPad 2
95 Pad 7 (halo) Halo Pad 2
96 Pad 8 (sweep) SweepPad 2
Synth Effects 97 FX 1 (rain) Rain 2
98 FX 2 (soundtrack) SoundTrk 2
99 FX 3 (crystal) Crystal 2 Gamelmba 2
100 FX 4 (atmosphere) Atmosphr 2
101 FX 5 (brightness) Bright 2 Smokey 2
102 FX 6 (goblins) Goblins 2 BelChoir 2
103 FX 7 (echoes) Echoes 2
104 FX 8 (sci-fi) Sci-Fi 2
Ethnic 105 Sitar Sitar 1 Tambra 2 Tamboura 2
106 Banjo Banjo 1 Rabab 2 Gopichnt 2 Oud 2
107 Shamisen Shamisen 1
108 Koto Koto 1 Taisho-k 2 Kanoon 2
109 Kalimba Kalimba 1
110 Bagpipe Bagpipe 2
111 Fiddle Fiddle 1
112 Shanai Shanai 1 Pungi 1 Hichriki 2
Percussive 113 Tinkle Bell TnklBell 2 Bonang 2 Altair 2 Gamelan 2 S.Gamlan 2 Rama Cym 2 AsianBel 2
114 Agogo Agogo 2
115 Steel Drums SteelDrm 2 GlasPerc 2 ThaiBell 2
116 Woodblock Woodblok 1 Castanet 1
117 Taiko Drum TaikoDrm 1 Gr.Cassa 1
118 Melodic Tom 1 MelodTom 2
119 Synth Drum Syn Drum 1
120 Reverse Cymbal RevCymbl 1
Sound Effects 121 Guitar Fret Noise FretNoiz 2
122 Breath Noise BrthNoiz 2
123 Seashore Seashore 2
124 Bird Tweet Tweet 2
125 Telephone Ring Telphone 1
126 Helicopter Helicptr 1
127 Applause Applause 1
128 Gunshot Gunshot 1
Bank Select MSB=64
SFX
Pgm# Bank 0 E
1 CuttngNz 1
2 CttngNz2 2
3
4 Str Slap 1
5
6
7
8
9
10
11
12
13
14
15
16
17 Fl.KClik 1
18
19
20
21
22
23
24
25
26
27
28
29
30
31
32
33 Shower 1
34 Thunder 1
35 Wind 1
36 Stream 2
37 Bubble 2
38 Feed 2
39
40
41
42
43
44
45
46
47
48
49 Dog 1
50 Horse 1
51 Tweet 2 1
52
53
54
55 Ghost 2
56 Maou 2
57
58
59
60
61
62
63
64
65 PhonCall 1
66 DoorSqek 1
67 Door Slam 1
68 ScratchC 1
69 ScratchS 2
70 WindChim 1
71 Telphon2 1
72
73
74
75
76
77
78
79
80
81 CarEIgnt 1
82 CarTSqel 1
83 Car Pass 1
84 CarCrash 1
85 Siren 2
86 Train 1
87 JetPlane 2
88 Starship 2
89 Burst 2
90 Coaster 2
91 Submarin 2
92
93
94
95
96
97 Laugh 1
98 Scream 1
99 Punch 1
100 Heart 1
101 Footstep 1
102
103
104
105
106
107
108
109
110
111
112
113 MchinGun 1
114 LaserGun 2
115 Xplosion 2
116 Firework 2
117
118
119
120
121
122
123
124
125
126
127
128
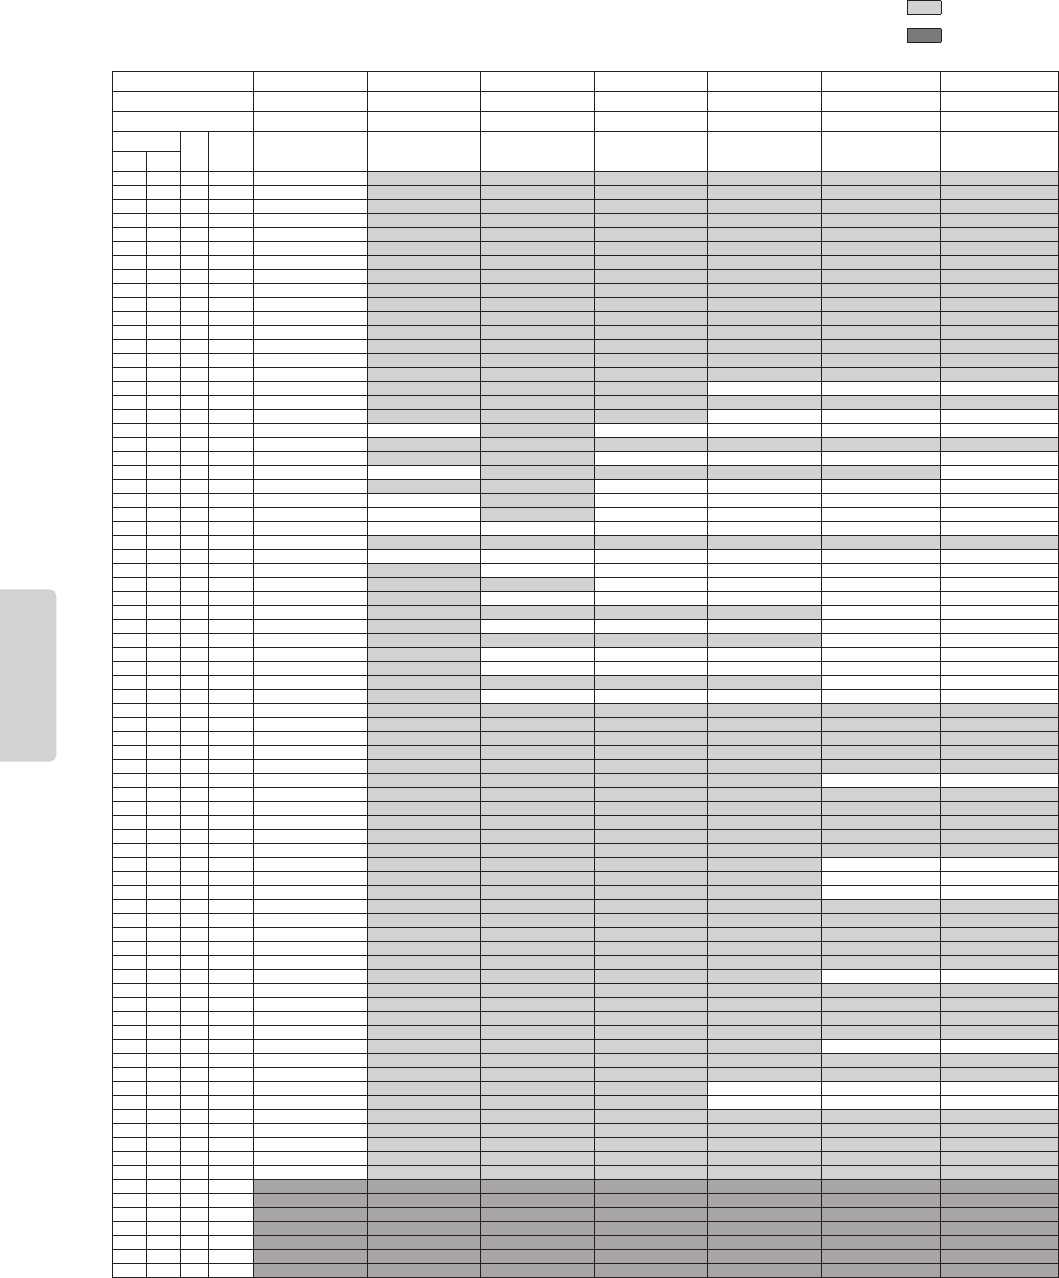
CP300 Owner’s Manual
112
Appendix
XG Drum Kit List
• Key-off: Keys marked “O” stop sounding the instant they are released.
• Alternate Group: Playing any instrument within a numbered group will immediately stop the sound of any other
instrument in the same group of the same number
Bank Select MSB (0-127)
127 127 127 127 127 127 127
Bank Select LSB (0-127)
00000 0 0
Program Change (1-128)
12917252628
MIDI
Key
Off
Alternate
Group
Standard Kit1 Standard Kit2 Room Kit Rock Kit Electro Kit Analog Kit Dance Kit
Note# Note
13 C#-1 3 Surdo Mute
14 D-1 3 Surdo Open
15 D#-1 Hi Q
16 E-1 Whip Slap
17 F-1 4 Scratch H
18 F#-1 4 Scratch L
19 G-1 Finger Snap
20 G#-1 Click Noise
21 A-1 Metronome Click
22 A#-1 Metronome Bell
23 B-1 Seq Click L
24 C0 Seq Click H
25 C#0 Brush Tap
26 D0 O Brush Swirl
27 D#0 Brush Slap
28 E0 O Brush Tap Swirl Reverse Cymbal Reverse Cymbal Reverse Cymbal
29 F0 O Snare Roll
30 F#0 Castanet Hi Q 2 Hi Q 2 Hi Q 2
31 G0 Snare Soft Snare Soft 2 Snare Noisy Snare Snappy Electro Snare Noisy 4 Snare Techno
32 G#0 Sticks
33 A0 Kick Soft Kick 3 Kick 3 Kick Techno Q
34 A#0 Open Rim Shot Open Rim Shot H Short Rim Gate
35 B0 Kick Tight Kick 2 Kick Gate Kick Analog Short Kick Techno L
36 C1 Kick Kick Short Kick Gate Kick Gate Heavy Kick Analog Kick Techno
37 C#1 Side Stick Side Stick Light Side Stick Analog Side Stick Analog
38 D1 Snare Snare Short Snare Snappy Snare Rock Snare Noisy 2 Snare Analog Snare Clap
39 D#1 Hand Clap
40 E1 Snare Tight Snare Tight H Snare Tight Snappy Snare Rock Tight Snare Noisy 3 Snare Analog 2 Snare Dry
41 F1 Floor Tom L Tom Room 1 Tom Rock 1 Tom Electro 1 Tom Analog 1 Tom Analog 1
42 F#1 1 Hi-Hat Closed Hi-Hat Closed Analog Hi-Hat Closed 3
43 G1 Floor Tom H Tom Room 2 Tom Rock 2 Tom Electro 2 Tom Analog 2 Tom Analog 2
44 G#1 1 Hi-Hat Pedal Hi-Hat Closed Analog 2 Hi-Hat Closed Analog 3
45 A1 Low Tom Tom Room 3 Tom Rock 3 Tom Electro 3 Tom Analog 3 Tom Analog 3
46 A#1 1 Hi-Hat Open Hi-Hat Open Analog Hi-Hat Open 3
47 B1 Mid Tom L Tom Room 4 Tom Rock 4 Tom Electro 4 Tom Analog 4 Tom Analog 4
48 C2 Mid Tom H Tom Room 5 Tom Rock 5 Tom Electro 5 Tom Analog 5 Tom Analog 5
49 C#2 Crash Cymbal 1 Crash Analog Crash Analog
50 D2 High Tom Tom Room 6 Tom Rock 6 Tom Electro 6 Tom Analog 6 Tom Analog 6
51 D#2 Ride Cymbal 1
52 E2 Chinese Cymbal
53 F2 Ride Cymbal Cup
54 F#2 Tambourine
55 G2 Splash Cymbal
56 G#2 Cowbell Cowbell Analog Cowbell Analog
57 A2 Crash Cymbal 2
58 A#2 Vibraslap
59 B2 Ride Cymbal 2
60 C3 Bongo H
61 C#3 Bongo L
62 D3 Conga H Mute Conga Analog H Conga Analog H
63 D#3 Conga H Open Conga Analog M Conga Analog M
64 E3 Conga L Conga Analog L Conga Analog L
65 F3 Timbale H
66 F#3 Timbale L
67 G3 Agogo H
68 G#3 Agogo L
69 A3 Cabasa
70 A#3 Maracas Maracas 2 Maracas 2
71 B3 O Samba Whistle H
72 C4 O Samba Whistle L
73 C#4 Guiro Short
74 D4 O Guiro Long
75 D#4 Claves Claves 2 Claves 2
76 E4 Wood Block H
77 F4 Wood Block L
78 F#4 Cuica Mute Scratch H 2 Scratch H 2 Scratch H 2
79 G4 Cuica Open
Scratch L 2 Scratch L 2 Scratch L 2
80 G#4 2 Triangle Mute
81 A4 2 Triangle Open
82 A#4 Shaker
83 B4 Jingle Bells
84 C5 Bell Tree
85 C#5
86 D5
87 D#5
88 E5
89 F5
90 F#5
91 G5
Same as Standard Kit 1
No Sound

XG Drum Kit List
CP300 Owner’s Manual
113
Appendix
Bank Select MSB (0-127)
127 127 127 126 126
Bank Select LSB (0-127)
00000
Program Change (1-128)
33 41 49 1 2
MIDI
Key
Off
Alternate
Group
Jazz Kit Brush Kit Symphony Kit SFX Kit1 SFX Kit2
Note# Note
13 C#-1 3
14 D-1 3
15 D#-1
16 E-1
17 F-1 4
18 F#-1 4
19 G-1
20 G#-1
21 A-1
22 A#-1
23 B-1
24 C0
25 C#0
26 D0 O
27 D#0
28 E0 O
29 F0 O
30 F#0
31 G0 Snare Jazz H Brush Slap 2
32 G#0
33 A0 Kick Soft 2
34 A#0 Open Rim Shot Light
35 B0 Gran Cassa
36 C1 Kick Jazz Kick Jazz Gran Cassa Mute Cutting Noise Phone Call
37 C#1 Side Stick Light Side Stick Light Cutting Noise 2 Door Squeak
38 D1 Snare Jazz L Brush Slap 3 Band Snare Door Slam
39 D#1 String Slap Scratch Cut
40 E1 Snare Jazz M Brush Tap 2 Band Snare 2 Scratch H 3
41 F1 Tom Brush 1 Wind Chime
42 F#1 1 Telephone Ring 2
43 G1 Tom Brush 2
44 G#1 1
45 A1 Tom Brush 3
46 A#1 1
47 B1 Tom Brush 4
48 C2 Tom Brush 5
49 C#2 Hand Cymbal
50 D2 Tom Brush 6
51 D#2 Hand Cymbal Short
52 E2 Flute Key Click Car Engine Ignition
53 F2 Car Tires Squeal
54 F#2 Car Passing
55 G2 Car Crash
56 G#2 Siren
57 A2 Hand Cymbal 2 Train
58 A#2 Jet Plane
59 B2 Hand Cymbal 2 Short Starship
60 C3 Burst
61 C#3 Roller Coaster
62 D3 Submarine
63 D#3
64 E3
65 F3
66 F#3
67 G3
68 G#3 Shower Laugh
69 A3 Thunder Scream
70 A#3 Wind Punch
71 B3 O Stream Heart Beat
72 C4 O
Bubble Foot Steps
73 C#4
Feed
74 D4 O
75 D#4
76 E4
77 F4
78 F#4
79 G4
80 G#4 2
81 A4 2
82 A#4
83 B4
84 C5 Dog Machine Gun
85 C#5
Horse Laser Gun
86 D5
Bird Tweet 2 Explosion
87 D#5 Firework
88 E5
89 F5
90 F#5 Ghost
91 G5 Maou

CP300 Owner’s Manual
114
Appendix
Effect Type List
■ Reverb
Reverb types that can be selected by
panel operation
All reverb types
■ Chorus
Chorus types that can be selected by
panel operation
All chorus types
■ Variation/Insertion
Variation/insertion types that can be
selected by panel operation
All variation/insertion effects
Type MSB Type LSB Effect Name Display
217Room 4 Room
119Hall 4 Hall 1
117Hall 3 Hall 2
317Stage 3 Stage
416Plate 2 Plate
Type MSB Type LSB Effect Name
00No Effect
10Hall 1
11Hall 2
16Hall M
17Hall L
117Hall 3
119Hall 4
20Room 1
21Room 2
22Room 3
25Room S
26Room M
27Room L
217Room 4
30Stage 1
31Stage 2
317Stage 3
318Sound Board
40Plate 1
47GM Plate
416Plate 2
16 0 White Room
17 0 Tunnel
18 0 Canyon
19 0 Basement
Type MSB Type LSB Effect Name Display
65 8 Chorus 4 Chorus
66 8 Celeste 4 Celeste
67 1 Flanger 2 Flanger
Type MSB Type LSB Effect Name
00No Effect
65 0 Chorus 1
65 1 Chorus 2
65 2 Chorus 3
65 3 GM Chorus 1
65 4 GM Chorus 2
65 5 GM Chorus 3
65 6 GM Chorus 4
65 7 FB Chorus
65 8 Chorus 4
66 0 Celeste 1
66 1 Celeste 2
66 2 Celeste 3
66 8 Celeste 4
66 18 Rotary Speaker 1
67 0 Flanger 1
67 1 Flanger 2
67 7 GM Flanger
67 8 Flanger 3
68 0 Symphonic 1
68 16 Symphonic 2
72 0 Phaser 1
72 8 Phaser 2
72 20 Phaser 3
87 0 Ens Detune
Type MSB Type LSB Effect Name Display
516DelayL,C,R 2 Delay L,C,R
60Delay L,R Delay L,R
70Echo Echo
80Cross Delay Cross Delay
68 16 Symphonic 2 Symphonic
66 18
RotarySpeaker1
Rotary Speaker
70 22 Tremolo 3 Tremolo
119 0 VibeRotor VibeRotor
71 27 Auto Pan 3 Auto Pan
72 20 Phaser 3 Phaser
78 21 Auto Wah 2 Auto Wah
318Sound Board Sound Board
75 26 AmpSimulator2 Amp Simulator
83 16 Compressor 2 Compressor
Type MSB Type LSB Effect Name
00No Effect
10Hall 1
11Hall 2
16Hall M
17Hall L
20Room 1
21Room 2
22Room 3
25Room S
26Room M
27Room L
30Stage 1
31Stage 2
318Sound Board
40Plate
47GM Plate
50Delay L,C,R 1
516Delay L,C,R 2
60Delay L,R
70Echo
80Cross Delay
90ER1
91ER2
10 0 Gate Reverb
11 0 Reverse Gate
16 0 White Room
17 0 Tunnel
18 0 Canyon
19 0 Basement
20 0 Karaoke 1
20 1 Karaoke 2
20 2 Karaoke 3
21 0 Tempo Delay
21 8 Tempo Echo
22 0 Tempo Cross
64 0 Thru
65 0 Chorus1
65 1 Chorus2
65 2 Chorus3
65 3 GM Chorus 1
65 4 GM Chorus 2
65 5 GM Chorus 3
65 6 GM Chorus 4
65 7 FB Chorus
65 8 Chorus 4
66 0 Celeste 1
66 1 Celeste 2
66 2 Celeste 3
66 8 Celeste 4
66 18 Rotary Speaker 1
67 0 Flanger 1
67 1 Flanger 2
67 7 GM Flanger
67 8 Flanger 3
68 0 Symphonic 1
68 16 Symphonic 2
69 0 Rotary Speaker 2
69 1 Dist + Rot Sp
69 2 OD + Rot Sp
69 3 Amp Sin + Rot Sp
70 0 Tremolo 1
70 19 Tremolo 2
70 22 Tremolo 3
71 0 AutoPan 1
71 26 AutoPan 2
71 27 AutoPan 3
72 0 Phaser 1
72 8 Phaser 2
72 20 Phaser 3
73 0 Distortion
73 1 Comp Dist
73 8 Stereo Dist
74 0 Over Drive
74 8 Stereo OD
75 0 Amp Simulator 1
75 8 Stereo Amp Sim
75 26 Amp Simulator 2
76 0 3 Band EQ
77 0 2 Band EQ
78 0 Auto Wah 1
78 1 Auto Wah + Dist
78 2 Auto Wah + OD
78 21 Auto Wah 2
80 0 Pitch Change 1
80 1 Pitch Change 2
81 0 Hrm ENH
82 0 Touch Wah 1
82 1 Touch Wah + Dist
82 2 Touch Wah + OD
82 8 Touch Wah 2
83 0 Compressor 1
83 16 Compressor 2
84 0 Noise Gate
85 0 Voice Cancel
86 0 2 Way Rot Sp
86 1 Dist + 2 Rot Sp
86 2 OD + 2 Rot Sp
86 3 Amp Sim + 2 Rot Sp
87 0 Ens Detune
88 0 Ambience
93 0 Talk Mod
94 0 Lo-Fi
95 0 Dist + Delay
95 1 OD + Delay
96 0 Cmp + Dist + Dly
96 1 Cmp + OD + Dly
97 0 Wah + Dist + Dly
97 1 Wah + OD + Dly
98 0 V Dist Hard
98 1 V Dist H + Dly
98 2 V Dist Soft
98 3 V Dist S + Dly
99 0 Dual Rot Sp 1
99 1 Dual Rot Sp 2
100 0 Dist + Tmp Delay
100 1 OD + Tmp Delay
101 0 Cmp + Dist + TDly
101 1 Cmp + OD + TDly
102 0 Wah + Dist + TDly
102 1 Wah + OD + TDly
103 0 V Dist H + TDly
103 1 V Dist S + TDly
119 0 Vibe Rotor
Type MSB Type LSB Effect Name

CP300 Owner’s Manual
115
Appendix
Effect Parameter List
Items with a dot indicator (●) in the Control column are parameters that can be controlled via assignable controllers.
Note that this is applicable to the Variation effects (while Insertion is selected) and to the Insertion effects.
HALL 1, HALL 2, HALL M, HALL L
ROOM 1, ROOM 2, ROOM 3, ROOM S, ROOM M, ROOM L
STAGE 1, STAGE 2
PLATE (Reverb, Variation, Insertion block)
HALL 3
HALL 4
ROOM 4
STAGE 3
PLATE 2 (Reverb)
DELAY L, C, R 1
DELAY L, C, R 2 (Variation, Insertion block)
DELAY L, R (Variation, Insertion block)
ECHO (Variation, Insertion block)
CROSS DELAY (Variation, Insertion block)
EARLY REF 1, EARLY REF 2 (Variation, Insertion block)
No. Parameter Display Value See Table Control
1 Reverb Time 0.3 – 30.0s 0 – 69 table #4
2 Diffusion 0 – 10 0 – 10
3 Initial Delay 0.1mS – 200.0mS (Rev)
0.1mS – 99.3mS (Var/Ins)
0 – 127
0 – 63
table #5
4 HPF Cutoff Thru – 8.0kHz 0 – 52 table #3
5 LPF Cutoff 1.0k – Thru 34 – 60 table #3
6
7
8
9
10 Dry/Wet D63>W – D=W – D<W63 1 – 127 (table #15) ●
11 Rev Delay 0.1mS – 200.0mS (Rev)
0.1mS – 99.3mS (Var/Ins)
0 – 127
0 – 63
table #5
12 Density 0 – 4 0 – 4
13 Er/Rev Balance E63>R – E=R – E<R63 1 – 127
14 High Damp 0.1 – 1.0 1 – 10
15 Feedback Level -63 – +63 1 – 127 (table #16)
16
No. Parameter Display Value See Table Control
1 Reverb Time 0.3 – 30.0s 0 – 69 table #4
2 Diffusion 0 – 10 0 – 10
3 Initial Delay 0.1mS – 99.3mS 0 – 63 table #5
4 HPF Cutoff Thru – 8.0kHz 0 – 52 table #3
5 LPF Cutoff 1.0k – Thru 34 – 60 table #3
6
7
8
9
10 Dry/Wet D63>W – D=W – D<W63 1 – 127 (table #15) ●
11
12
13
14 High Damp 0.1 – 1.0 1 – 10
15
16
No. Parameter Display Value See Table Control
1 Lch Delay 0.1 – 1638.3ms 1 – 16383
2 Rch Delay 0.1 – 1638.3ms 1 – 16383
3 Cch Delay 0.1 – 1638.3ms 1 – 16383
4 Feedback Delay 0.1 – 1638.3ms 1 – 16383
5 Feedback Level -63 – +63 1 – 127
6 Cch Level 0 – 127 0 – 127
7 High Damp 0.1 – 1.0 1 – 10
8
9
10 Dry/Wet D63>W – D=W – D<W63 1 – 127 ●
11
12
13 EQ Low Frequency 32Hz – 2.0kHz 4 – 40 table #3
14 EQ Low Gain -12 – +12dB 52 – 76
15 EQ High Frequency 500Hz – 16.0kHz 28 – 58 table #3
16 EQ High Gain -12 – +12dB 52 – 76
No. Parameter Display Value See Table Control
1 Lch Delay 0.1 – 1638.3ms 1 – 16383
2 Rch Delay 0.1 – 1638.3ms 1 – 16383
3 Feedback Delay 1 0.1 – 1638.3ms 1 – 16383
4 Feedback Delay 2 0.1 – 1638.3ms 1 – 16383
5 Feedback Level -63 – +63 1 – 127
6 High Damp 0.1 – 1.0 1 – 10
7
8
9
10 Dry/Wet D63>W – D=W – D<W63 1 – 127 ●
11
12
13 EQ Low Frequency 32Hz – 2.0kHz 4 – 40 table #3
14 EQ Low Gain -12 – +12dB 52 – 76
15 EQ High Frequency 500Hz – 16.0kHz 28 – 58 table #3
16 EQ High Gain -12 – +12dB 52 – 76
No. Parameter Display Value See Table Control
1 Lch Delay1 0.1 – 1486.0ms 1 – 14860
2 Lch Feedback Level -63 – +63 1 – 127
3 Rch Delay1 0.1 – 1486.0ms 1 – 14860
4 Rch Feedback Level -63 – +63 1 – 127
5 High Damp 0.1 – 1.0 1 – 10
6 Lch Delay2 0.1 – 1486.0ms 1 – 14860
7 Rch Delay2 0.1 – 1486.0ms 1 – 14860
8 Delay2 Level 0 – 127 0 – 127
9
10 Dry/Wet D63>W – D=W – D<W63 1 – 127 ●
11
12
13 EQ Low Frequency 32Hz – 2.0kHz 4 – 40 table #3
14 EQ Low Gain -12 – +12dB 52 – 76
15 EQ High Frequency 500Hz – 16.0kHz 28 – 58 table #3
16 EQ High Gain -12 – +12dB 52 – 76
No. Parameter Display Value See Table Control
1L –>R Delay 0.1 – 1486.0ms 1 – 14860
2R –>L Delay 0.1 – 1486.0ms 1 – 14860
3 Feedback Level -63 – +63 1 – 127
4 Input Select L, R, L&R 0 – 2
5 High Damp 0.1 – 1.0 1 – 10
6
7
8
9
10 Dry/Wet D63>W – D=W – D<W63 1 – 127 ●
11
12
13 EQ Low Frequency 32Hz – 2.0kHz 4 – 40 table #3
14 EQ Low Gain -12 – +12dB 52 – 76
15 EQ High Frequency 500Hz – 16.0kHz 28 – 58 table #3
16 EQ High Gain -12 – +12dB 52 – 76
No. Parameter Display Value See Table Control
1Type S-H, L-H, Rdm, Rvs, Plt, Spr 0 – 5
2 Room Size 0.1 – 7.0 0 – 44 table #6
3 Diffusion 0 – 10 0 – 10
4 Initial Delay 0.1ms – 200.0ms 0 – 127 table #5
5 Feedback Level -63 – +63 1 – 127
6 HPF Cutoff Thru – 8.0kHz 0 – 52 table #3
7 LPF Cutoff 1.0k – Thru 34 – 60 table #3
8
9
10 Dry/Wet D63>W – D=W – D<W63 1 – 127 ●
11 Liveness 0 – 10 0 – 10
12 Density 0 – 3 0 – 3
13 High Damp 0.1 – 1.0 1 – 10
14
15
16

Effect Parameter List
CP300 Owner’s Manual
116
Appendix
GATE REVERB
REVERSE GATE (Variation, Insertion block)
WHITE ROOM
TUNNEL
CANYON
BASEMENT (Reverb, Variation, Insertion block)
KARAOKE 1, 2, 3 (Variation, Insertion block)
TEMPO DELAY
TEMPO ECHO (Variation, Insertion block)
TEMPO CROSS (Variation, Insertion block)
CHORUS 1, 2, 3, 4
CELESTE 1, 2, 3, 4
GM CHORUS 1, 2, 3, 4
FB CHORUS
ROTARY SPEAKER 1 (Chorus, Variation, Insertion block)
FLANGER 1, 2, 3
GM FLANGER (Chorus, Variation, Insertion block)
No. Parameter Display Value See Table Control
1Type Type A, Type B 0 – 1
2 Room Size 0.1 – 7.0 0 – 44 table #6
3 Diffusion 0 – 10 0 – 10
4 Initial Delay 0.1ms – 200.0ms 0 – 127 table #5
5 Feedback Level -63 – +63 1 – 127
6 HPF Cutoff Thru – 8.0kHz 0 – 52 table #3
7 LPF Cutoff 1.0k – Thru 34 – 60 table #3
8
9
10 Dry/Wet D63>W – D=W – D<W63 1 – 127 ●
11 Liveness 0 – 10 0 – 10
12 Density 0 – 3 0 – 3
13 High Damp 0.1 – 1.0 1 – 10
14
15
16
No. Parameter Display Value See Table Control
1 Reverb Time 0.3 – 30.0s 0 – 69 table #4
2 Diffusion 0 – 10 0 – 10
3 Initial Delay 0.1ms – 99.3ms 0 – 63 table #5
4 HPF Cutoff Thru – 8.0kHz 0 – 52 table #3
5 LPF Cutoff 1.0k – Thru 34 – 60 table #3
6Width 0.5 – 10.2m 0 – 37 table #11
7 Height 0.5 – 20.2m 0 – 73 table #11
8 Depth 0.5 – 30.2m 0 – 104 table #11
9Wall Vary 0 – 30 0 – 30
10 Dry/Wet D63>W – D=W – D<W63 1 – 127 ●
11 Rev Delay 0.1ms – 99.3ms 0 – 63 table #5
12 Density 0 – 4 0 – 4
13 Er/Rev Balance E63>R – E=R – E<R63 1 – 127
14 High Damp 0.1 – 1.0 1 – 10
15 Feedback Level -63 – +63 1 – 127
16
No. Parameter Display Value See Table Control
1 Delay Time 0.1ms – 400.0ms 0 – 127 table #7
2 Feedback Level -63 – +63 1 – 127
3 HPF Cutoff Thru – 8.0kHz 0 – 52 table #3
4 LPF Cutoff 1.0k – Thru 34 – 60 table #3
5
6
7
8
9
10 Dry/Wet D63>W – D=W – D<W63 1 – 127 ●
11 Density 0 – 3 0 – 3
12
13
14
15
16
No. Parameter Display Value See Table Control
1 Delay Time 64th/3 – 4thx6 0 – 19 table #14
2 Feedback Level -63 – +63 1 – 127
3 Feedback High
Dump
0 – 1.0 0 – 10
4 L/R Diffusion 1 (-63ms) – 64 (0ms) –
127 (63ms)
1 – 127
5 Lag 1 (-63ms) – 64 (0ms) –
127 (63ms)
1 – 127
6
7
8
9
10 Dry/Wet D63>W – D=W – D<W63 1 – 127 ●
11
12
13 EQ Low Frequency 32Hz – 2.0kHz 4 – 40
14 EQ Low Gain -12 – +12dB 52 – 76
15 EQ High Frequency 500Hz – 16.0kHz 28 – 58
16 EQ High Gain -12 – +12dB 52 – 76
No. Parameter Display Value See Table Control
1 Delay Time L>R 64th/3 – 4thx6 0 – 19 table #14
2 Delay Time R>L 64th/3 – 4thx6 0 – 19 table #14
3 Feedback Level -63 – +63 1 – 127
4 Input Select L, R, L&R 0 – 2
5 Feedback High
Dump
0 – 1.0 0 – 10
6 Lag 1 (-63ms) – 64 (0ms) –
127 (63ms)
1 – 127
7
8
9
10 Dry/Wet D63>W – D=W – D<W63 1 – 127 ●
11
12
13 EQ Low Frequency 32Hz – 2.0kHz 4 – 40
14 EQ Low Gain -12 – +12dB 52 – 76
15 EQ High Frequency 500 – 16.0kHz 28 – 58
16 EQ High Gain -12 – +12dB 52 – 76
No. Parameter Display Value See Table Control
1 LFO Frequency 0.00Hz – 39.7Hz 0 – 127 table #1
2 LFO Depth 0 – 127 0 – 127
3 Feedback Level -63 – +63 1 – 127
4 Delay Offset 0.0mS – 50mS 0 – 127 table #2
5
6 EQ Low Frequency 32Hz – 2.0kHz 4 – 40 table #3
7 EQ Low Gain -12 – +12dB 52 – 76
8 EQ High Frequency 500Hz – 16.0kHz 28 – 58 table #3
9 EQ High Gain -12 – +12dB 52 – 76
10 Dry/Wet D63>W – D=W – D<W63 1 – 127 ●
11 EQ Mid Frequency
(variation block)
100Hz – 10.0kHz 14 – 54 table #3
12 EQ Mid Gain
(variation block)
-12 – +12dB 52 – 76
13 EQ Mid Width
(variation block)
1.0 – 12.0 10 – 120
14
15 Input Mode mono/stereo 0 – 1
16
No. Parameter Display Value See Table Control
1 LFO Frequency 0.00Hz – 39.7Hz 0 – 127 table #1
2 LFO Depth 0 – 127 0 – 127
3 Feedback Level -63 – +63 1 – 127
4 Delay Offset 0.0ms – 50ms 0 – 127 table #2
5
6 EQ Low Frequency 32Hz – 2.0kHz 4 – 40 table #3
7 EQ Low Gain -12 – +12dB 52 – 76
8 EQ High Frequency 500Hz – 16.0kHz 28 – 58 table #3
9 EQ High Gain -12 – +12dB 52 – 76
10 Dry/Wet D63>W – D=W – D<W63 1 – 127 ●
11 EQ Mid Frequency
(variation block)
100Hz – 10.0kHz 14 – 54 table #3
12 EQ Mid Gain
(variation block)
-12 – +12dB 52 – 76
13 EQ Mid Width
(variation block)
1.0 – 12.0 10 – 120
14 LFO Phase
Difference
-180 – +180deg
(resolution=3deg.)
4 – 124
15
16

Effect Parameter List
CP300 Owner’s Manual
117
Appendix
SYMPHONIC 1, 2 (Chorus, Variation, Insertion block)
ROTARY SPEAKER 2 (Variation, Insertion block)
DISTORTION+ROTARY SPEAKER
OVERDRIVE+ROTARY SPEAKER (Variation, Insertion block)
AMP SIM.+ROTARY SPEAKER (Variation, Insertion block)
TREMOLO 1, 2, 3 (Variation, Insertion block)
AUTO PAN 1, 2, 3 (Variation, Insertion block)
PHASER 1, 3 (Chorus, Variation, Insertion block)
PHASER 2 (Chorus, Variation, Insertion block)
No. Parameter Display Value See Table Control
1 LFO Frequency 0.00Hz – 39.7Hz 0 – 127 table #1
2 LFO Depth 0 – 127 0 – 127
3 Delay Offset 0.0ms – 50ms 0 – 127 table #2
4
5
6 EQ Low Frequency 32Hz – 2.0kHz 4 – 40 table #3
7 EQ Low Gain -12 – +12dB 52 – 76
8 EQ High Frequency 500Hz – 16.0kHz 28 – 58 table #3
9 EQ High Gain -12 – +12dB 52 – 76
10 Dry/Wet D63>W – D=W – D<W63 1 – 127 ●
11 EQ Mid Frequency
(variation block)
100Hz – 10.0kHz 14 – 54 table #3
12 EQ Mid Gain
(variation block)
-12 – +12dB 52 – 76
13 EQ Mid Width
(variation block)
1.0 – 12.0 10 – 120
14
15
16
No. Parameter Display Value See Table Control
1 LFO Frequency 0.00Hz – 39.7Hz 0 – 127 table #1 ●
2 LFO Depth 0 – 127 0 – 127
3
4
5
6 EQ Low Frequency 32Hz – 2.0kHz 4 – 40 table #3
7 EQ Low Gain -12 – +12dB 52 – 76
8 EQ High Frequency 500Hz – 16.0kHz 28 – 58 table #3
9 EQ High Gain -12 – +12dB 52 – 76
10 Dry/Wet D63>W – D=W – D<W63 1 – 127
11 EQ Mid Frequency
(variation block)
100Hz – 10.0kHz 14 – 54 table #3
12 EQ Mid Gain
(variation block)
-12 – +12dB 52 – 76
13 EQ Mid Width
(variation block)
1.0 – 12.0 10 – 120
14
15
16
No. Parameter Display Value See Table Control
1 LFO Frequency 0.00Hz – 39.7Hz 0 – 127 ●
2 LFO Depth 0 – 127 0 – 127
3
4
5
6 EQ Low Frequency 32Hz – 2.0kHz 4 – 40
7 EQ Low Gain -12 – +12dB 52 – 76
8 EQ High Frequency 500 – 16.0kHz 28 – 58
9 EQ High Gain -12 – +12dB 52 – 76
10 Dry/Wet D63>W – D=W – D<W63 1 – 127
11
12
13
14 Drive 0 – 127 0 – 127
15 LPF Cuttoff 1kHz – Thru 34 – 60
16 Output Level 0 – 127 0 – 127
No. Parameter Display Value See Table Control
1 LFO Frequency 0.00Hz – 39.7Hz 0 – 127 ●
2 LFO Depth 0 – 127 0 – 127
3AMP Type Off, Stack, Combo, Tube 0 – 3
4
5
6 EQ Low Frequency 32Hz – 2.0kHz 4 – 40
7 EQ Low Gain -12 – +12dB 52 – 76
8 EQ High Frequency 500Hz – 16.0kHz 28 – 58
9 EQ High Gain -12 – +12dB 52 – 76
10 Dry/Wet D63>W – D=W – D<W63 1 – 127
11
12
13
14 Drive 0 – 127 0 – 127
15 LPF Cuttoff 1kHz – Thru 34 – 60
16 Output Level 0 – 127 0 – 127
No. Parameter Display Value See Table Control
1 LFO Frequency 0.00Hz – 39.7Hz 0 – 127 table #1 ●
2AM Depth 0 – 127 0 – 127
3 PM Depth 0 – 127 0 – 127
4
5
6 EQ Low Frequency 32Hz – 2.0kHz 4 – 40 table #3
7 EQ Low Gain -12 – +12dB 52 – 76
8 EQ High Frequency 500Hz – 16.0kHz 28 – 58 table #3
9 EQ High Gain -12 – +12dB 52 – 76
10
11 EQ Mid Frequency
(variation block)
100Hz – 10.0kHz 14 – 54 table #3
12 EQ Mid Gain
(variation block)
-12 – +12dB 52 – 76
13 EQ Mid Width
(variation block)
1.0 – 12.0 10 – 120
14 LFO Phase
Difference
-180 – +180deg
(resolution=3deg.)
4 – 124
15 Input Mode mono/stereo 0 – 1
16
No. Parameter Display Value See Table Control
1 LFO Frequency 0.00Hz – 39.7Hz 0 – 127 table #1 ●
2 L/R Depth 0 – 127 0 – 127
3 F/R Depth 0 – 127 0 – 127
4PAN Direction L <–> R, L –> R, L <– R,
Lturn, Rturn, L/R
0 – 5
5
6 EQ Low Frequency 32Hz – 2.0kHz 4 – 40 table #3
7 EQ Low Gain -12 – +12dB 52 – 76
8 EQ High Frequency 500Hz – 16.0kHz 28 – 58 table #3
9 EQ High Gain -12 – +12dB 52 – 76
10
11 EQ Mid Frequency
(variation block)
100Hz – 10.0kHz 14 – 54 table #3
12 EQ Mid Gain
(variation block)
-12 – +12dB 52 – 76
13 EQ Mid Width
(variation block)
1.0 – 12.0 10 – 120
14
15
16
No. Parameter Display Value See Table Control
1 LFO Frequency 0.00Hz – 39.7Hz 0 – 127 table #1
2 LFO Depth 0 – 127 0 – 127
3 Phase Shift Offset 0 – 127 0 – 127
4 Feedback Level -63 – +63 1 – 127
5
6 EQ Low Frequency 32Hz – 2.0kHz 4 – 40 table #3
7 EQ Low Gain -12 – +12dB 52 – 76
8 EQ High Frequency 500Hz – 16.0kHz 28 – 58 table #3
9 EQ High Gain -12 – +12dB 52 – 76
10 Dry/Wet D63>W – D=W – D<W63 1 – 127 ●
11 Stage 4 – 22 (chorus, variation
block)
4 – 22
4 – 12 (insertion block) 4 – 12
12 Diffusion mono/stereo 0 – 1
13
14
15
16
No. Parameter Display Value See Table Control
1 LFO Frequency 0.00Hz – 39.7Hz 0 – 127 table #1
2 LFO Depth 0 – 127 0 – 127
3 Phase Shift Offset 0 – 127 0 – 127
4 Feedback Level -63 – +63 1 – 127
5
6 EQ Low Frequency 32Hz – 2.0kHz 4 – 40 table #3
7 EQ Low Gain -12 – +12dB 52 – 76
8 EQ High Frequency 500Hz – 16.0kHz 28 – 58 table #3
9 EQ High Gain -12 – +12dB 52 – 76
10 Dry/Wet D63>W – D=W – D<W63 1 – 127 ●
11 Stage 3 – 11 3 – 6
12
13 LFO Phase
Difference
-180deg – +180deg
(resolution=3deg.)
4 – 124
14
15
16

Effect Parameter List
CP300 Owner’s Manual
118
Appendix
DISTORTION
OVERDRIVE (Variation, Insertion block)
COMP+DIST (Variation, Insertion block)
STEREO DISTORTION
STEREO OVER DRIVE (Variation, Insertion block)
AMP SIMULATOR (Variation, Insertion block)
STEREO AMP SIMULATOR (Variation, Insertion block)
3BAND EQ (Variation, Insertion block)
2BAND EQ (Variation, Insertion block)
AUTO WAH 1, 2 (Variation, Insertion block)
No. Parameter Display Value See Table Control
1 Drive 0 – 127 0 – 127 ●
2 EQ Low Frequency 32Hz – 2.0kHz 4 – 40 table #3
3 EQ Low Gain -12 – +12dB 52 – 76
4 LPF Cutoff 1.0k – Thru 34 – 60 table #3
5 Output Level 0 – 127 0 – 127
6
7 EQ Mid Frequency 100Hz – 10.0kHz 14 – 54 table #3
8 EQ Mid Gain -12 – +12dB 52 – 76
9 EQ Mid Width 1.0 – 12.0 10 – 120
10 Dry/Wet D63>W – D=W – D<W63 1 – 127
11 Edge (Clip Curve) 0 – 127 0 – 127 mild – sharp
12
13
14
15
16
No. Parameter Display Value See Table Control
1 Drive 0 – 127 0 – 127 ●
2 EQ Low Frequency 32Hz – 2.0kHz 4 – 40 table #3
3 EQ Low Gain -12 – +12dB 52 – 76
4 LPF Cutoff 1.0k – Thru 34 – 60 table #3
5 Output Level 0 – 127 0 – 127
6
7 EQ Mid Frequency 100Hz – 10.0kHz 14 – 54 table #3
8 EQ Mid Gain -12 – +12dB 52 – 76
9 EQ Mid Width 1.0 – 12.0 10 – 120
10 Dry/Wet D63>W – D=W – D<W63 1 – 127
11 Edge (Clip Curve) 0 – 127 0 – 127 mild – sharp
12 Attack 1ms – 40ms 0 – 19 table #8
13 Release 10ms – 680ms 0 – 15 table #9
14 Threshold -48dB – -6dB 79 – 121
15 Ratio 1.0 – 20.0 0 – 7 table #10
16
No. Parameter Display Value See Table Control
1 Drive 0 – 127 0 – 127 ●
2 EQ Low Frequency 32Hz – 2.0kHz 4 – 40 table #3
3 EQ Low Gain -12 – +12dB 52 – 76
4 LPF Cuttoff 1kHz – Thru 34 – 60
5 Output Level 0 – 127
6
7 EQ Mid Frequency 100Hz – 10.0kHz 14 – 54 table #3
8 EQ Mid Gain -12 – +12dB 52 – 76
9 EQ Mid Width 1 – 12 10 – 120
10 Dry/Wet D63>W – D=W – D<W63 1 – 127
11 Edge (Clip Curve) 0 – 127 0 – 127
12
13
14
15
16
No. Parameter Display Value See Table Control
1 Drive 0 – 127 0 – 127 ●
2AMP Type Off, Stack, Combo, Tube 0 – 3
3 LPF Cutoff 1.0k – Thru 34 – 60 table #3
4 Output Level 0 – 127 0 – 127
5
6
7
8
9
10 Dry/Wet D63>W – D=W – D<W63 1 – 127
11 Edge (Clip Curve) 0 – 127 0 – 127 mild – sharp
12
13
14
15
16
No. Parameter Display Value See Table Control
1 Drive 0 – 127 0 – 127 ●
2AMP Type Off, Stack, Combo, Tube 0 – 3
3 LPF Cuttoff 1kHz – Thru 34 – 60
4 Output Level 0 – 127 0 – 127
5
6
7
8
9
10 Dry/Wet D63>W – D=W – D<W63 1 – 127
11 Edge (Clip Curve) 0 – 127 0 – 127
12
13
14
15
16
No. Parameter Display Value See Table Control
1 EQ Low Gain -12 – +12dB 52 – 76
2 EQ Mid Frequency 100Hz – 10.0kHz 14 – 54 table #3
3 EQ Mid Gain -12 – +12dB 52 – 76
4 EQ Mid Width 1.0 – 12.0 10 – 120
5 EQ High Gain -12 – +12dB 52 – 76
6 EQ Low Frequency 50Hz – 2.0kHz 8 – 40 table #3
7 EQ High Frequency 500Hz – 16.0kHz 28 – 58 table #3
8
9
10
11
12
13
14
15 Input Mode mono/stereo 0 – 1
16
No. Parameter Display Value See Table Control
1 EQ Low Frequency 32Hz – 2.0kHz 4 – 40 table #3
2 EQ Low Gain -12 – +12dB 52 – 76
3 EQ High Frequency 500Hz – 16.0kHz 28 – 58 table #3
4 EQ High Gain -12 – +12dB 52 – 76
5
6
7
8
9
10
11
12
13
14
15
16
No. Parameter Display Value See Table Control
1 LFO Frequency 0.00Hz – 39.7Hz 0 – 127 table #1
2 LFO Depth 0 – 127 0 – 127
3 Cutoff Frequency
Offset
0 – 127 0 – 127 ●
4 Resonance 1.0 – 12.0 10 – 120
5
6 EQ Low Frequency 32Hz – 2.0kHz 4 – 40 table #3
7 EQ Low Gain -12 – +12dB 52 – 76
8 EQ High Frequency 500Hz – 16.0kHz 28 – 58 table #3
9 EQ High Gain -12 – +12dB 52 – 76
10 Dry/Wet D63>W – D=W – D<W63 1 – 127
11
Drive (variation block)
0 – 127 0 – 127
12
13
14
15
16

Effect Parameter List
CP300 Owner’s Manual
119
Appendix
AUTO WAH+DIST
AUTO WHA+ODRV (Variation, Insertion block)
PITCH CHANGE 1 (Variation, Insertion block)
PITCH CHANGE 2 (Variation, Insertion block)
HARMONIC ENHANCER (Variation, Insertion block)
TOUCH WAH 1
TOUCH WAH+DIST (Variation, Insertion block)
TOUCH WAH 2
TOUCH WAH+ODRV (Variation, Insertion block)
COMPRESSOR 1, 2 (Variation, Insertion block)
NOISE GATE (Variation, Insertion block)
No. Parameter Display Value See Table Control
1 LFO Frequency 0.00Hz – 39.7Hz 0 – 127 table #1
2 LFO Depth 0 – 127 0 – 127
3 Cutoff Frequency
Offset
0 – 127 0 – 127 ●
4 Resonance 1.0 – 12.0 10 – 120
5
6 EQ Low Frequency 32Hz – 2.0kHz 4 – 40 table #3
7 EQ Low Gain -12 – +12dB 52 – 76
8 EQ High Frequency 500Hz – 16.0kHz 28 – 58 table #3
9 EQ High Gain -12 – +12dB 52 – 76
10 Dry/Wet D63>W – D=W – D<W63 1 – 127
11 Drive 0 – 127 0 – 127
12 EQ Low Gain
(distortion)
-12 – +12dB 52 – 76
13 EQ Mid Gain
(distortion)
-12 – +12dB 52 – 76
14 LPF Cutoff 1.0kHz – thru 34 – 60 table #3
15 Output Level 0 – 127 0 – 127
16
No. Parameter Display Value See Table Control
1 Pitch -24 – +24 40 – 88
2 Initial Delay 0.1ms – 400.0ms 0 – 127 table #7
3 Fine 1 -50 – +50 14 – 114
4 Fine 2 -50 – +50 14 – 114
5 Feedback Level -63 – +63 1 – 127
6
7
8
9
10 Dry/Wet D63>W – D=W – D<W63 1 – 127 ●
11 Pan 1 L63 – R63 1 – 127
12 Output Level 1 0 – 127 0 – 127
13 Pan 2 L63 – R63 1 – 127
14 Output Level 2 0 – 127 0 – 127
15
16
No. Parameter Display Value See Table Control
1 Pitch -24 – +24 40 – 88
2 Initial Delay 0.1ms – 400.0ms 0 – 127 table #7
3 Fine 1 -50 – +50cent 14 – 114
4 Fine 2 -50 – +50cent 14 – 114
5 Feedback Level -63 – +63 1 – 127
6
7
8
9
10 Dry/Wet D63>W – D=W – D<W63 1 – 127 ●
11 Pan 1 L63 – R63 1 – 127
12 Output Level 1 0 – 127 0 – 127
13 Pan 2 L63 – R63 1 – 127
14 Output Level 2 0 – 127 0 – 127
15
16
No. Parameter Display Value See Table Control
1 HPF Cutoff 500Hz – 16.0kHz 28 – 58
2 Drive 0 – 127 0 – 127
3Mix Level 0 – 127 0 – 127
4
5
6
7
8
9
10
11
12
13
14
15
16
No. Parameter Display Value See Table Control
1 Sensitive 0 – 127 0 – 127
2 Cutoff Frequency
Offset
0 – 127 0 – 127 ●
3 Resonance 1.0 – 12.0 10 – 120
4
5
6 EQ Low Frequency 32Hz – 2.0kHz 4 – 40 table #3
7 EQ Low Gain -12 – +12dB 52 – 76
8 EQ High Frequency 500Hz – 16.0kHz 28 – 58 table #3
9 EQ High Gain -12 – +12dB 52 – 76
10 Dry/Wet D63>W – D=W – D<W63 1 – 127
11
Drive (variation block)
0 – 127 0 – 127
12
13
14
15
16
No. Parameter Display Value See Table Control
1 Sensitive 0 – 127 0 – 127
2 Cutoff Frequency
Offset
0 – 127 0 – 127 ●
3 Resonance 1.0 – 12.0 10 – 120
4
5
6 EQ Low Frequency 32Hz – 2.0kHz 4 – 40 table #3
7 EQ Low Gain -12 – +12dB 52 – 76
8 EQ High Frequency 500Hz – 16.0kHz 28 – 58 table #3
9 EQ High Gain -12 – +12dB 52 – 76
10 Dry/Wet D63>W – D=W – D<W63 1 – 127
11
Drive (variation block)
0 – 127 0 – 127
12 EQ Low Gain
(variation block)
(distortion)
-12 – +12dB 52 – 76
13 EQ Mid Gain
(variation block)
(distortion)
-12 – +12dB 52 – 76
14 LPF Cutoff (variation
block)
1.0kHz – thru 34 – 60 table #3
15 Output Level
(variation block)
0 – 127 0 – 127
16 Release (variation
block)
10 – 680ms 52 – 67 table #12
No. Parameter Display Value See Table Control
1 Attack 1 – 40ms 0 – 19 table #8
2 Release 10 – 680ms 0 – 15 table #9
3 Threshold -48 – -6dB 79 – 121
4 Ratio 1.0 – 20.0 0 – 7 table #10
5 Output Level 0 – 127 0 – 127
6
7
8
9
10
11
12
13
14
15
16
No. Parameter Display Value See Table Control
1 Attack 1 – 40ms 0 – 19 table #8
2 Release 10 – 680ms 0 – 15 table #9
3 Threshold -72 – -30dB 55 – 97
4 Output Level 0 – 127 0 – 127
5
6
7
8
9
10
11
12
13
14
15
16

Effect Parameter List
CP300 Owner’s Manual
120
Appendix
VOICE CANCEL (Variation, Insertion block)
2WAY ROTARY SPEAKER (Variation, Insertion block)
DIST+2WAY ROTARY SPEAKER
OD+2WAY ROTARY SPEAKER (Variation, Insertion block)
AMP SIM.+2WAY ROTARY SP (Variation, Insertion block)
ENSEMBLE DETUNE (Chorus, Variation, Insertion block)
AMBIENCE (Variation, Insertion block)
TALKING MODULATION (Variation, Insertion block)
LO-FI (Variation, Insertion block)
No. Parameter Display Value See Table Control
1
2
3
4
5
6
7
8
9
10
11 Low Adjust 0 – 26 0 – 26
12 High Adjust 0 – 26 0 – 26
13
14
15
16
No. Parameter Display Value See Table Control
1 Rotor Speed 0.0Hz – 39.7Hz 0 – 127 table #1 ●
2 Drive Low 0 – 127 0 – 127
3 Drive High 0 – 127 0 – 127
4 Low/High L63>H – L=H – L<H63 1 – 127
5
6 EQ Low Frequency 32Hz – 2.0kHz 4 – 40 table #3
7 EQ Low Gain -12 – +12dB 52 – 76
8 EQ High Frequency 500Hz – 16.0kHz 28 – 58 table #3
9 EQ High Gain -12 – +12dB 52 – 76
10
11 Crossover Frequency 100Hz – 10.0kHz 14 – 54 table #3
12 Mic L – R Angle 0deg – 180deg
(resolution=3deg.)
0 – 60
13
14
15
16
No. Parameter Display Value See Table Control
1 Rotor Speed 0.0 – 39.7Hz 0 – 127 ●
2 Drive Low 0 – 127 0 – 127
3 Drive High 0 – 127 0 – 127
4 Low/High Balance L63>H – L=H – L<H63 1 – 127
5
6 EQ Low Frequency 32 – 2.0kHz 4 – 40
7 EQ Low Gain -12 – +12dB 52 – 76
8 EQ High Frequency 500Hz – 16.0kHz 28 – 58
9 EQ High Gain -12 – +12dB 52 – 76
10
11 Crossover Frequency 100Hz – 10.0kHz 14 – 54
12 Mic L – R Angle 0 – 180deg 0 – 60
13
14 Drive 0 – 127
15 LPF Cuttoff 1kHz – Thru 34 – 60
16 Output Level 0 – 127
No. Parameter Display Value See Table Control
1 Rotor Speed 0.0 – 39.7Hz 0 – 127 ●
2 Drive Low 0 – 127 0 – 127
3 Drive High 0 – 127 0 – 127
4 Low/High Balance L63>H – L=H – L<H63 1 – 127
5
6 EQ Low Frequency 32Hz – 2.0kHz 4 – 40
7 EQ Low Gain -12 – +12dB 52 – 76
8 EQ High Frequency 500Hz – 16.0kHz 28 – 58
9 EQ High Gain -12 – +12dB 52 – 76
10
11 Crossover Frequency 100Hz – 10.0kHz 14 – 54
12 Mic L – R Angle 0 – 180deg 0 – 60
13 AMP Type Off, Stack, Combo,
Tube (AMPSIM only)
0 – 3
14 Drive 0 – 127
15 LPF Cuttoff 1kHz – Thru 34 – 60
16 Output Level 0 – 127
No. Parameter Display Value See Table Control
1 Detune -50 – +50cent 14 – 114
2 Lch Init Delay 0.0mS – 50mS 0 – 127 table #2
3 Rch Init Delay 0.0mS – 50mS 0 – 127 table #2
4
5
6
7
8
9
10 Dry/Wet D63>W – D=W – D<W63 1 – 127 ●
11 EQ Low Frequency 32Hz – 2.0kHz 4 – 40 table #3
12 EQ Low Gain -12 – +12dB 52 – 76
13 EQ High Frequency 500Hz – 16.0kHz 28 – 58 table #3
14 EQ High Gain -12 – +12dB 52 – 76
15
16
No. Parameter Display Value See Table Control
1 Delay Time 0.0mS – 50mS 0 – 127 table #2
2 Output Phase normal/inverse 0 – 1
3
4
5
6 EQ Low Frequency 32Hz – 2.0kHz 4 – 40 table #3
7 EQ Low Gain -12 – +12dB 52 – 76
8 EQ High Frequency 500Hz – 16.0kHz 28 – 58 table #3
9 EQ High Gain -12 – +12dB 52 – 76
10 Dry/Wet D63>W – D=W – D<W63 1 – 127 ●
11
12
13
14
15
16
No. Parameter Display Value See Table Control
1Vowel a, i, u, e, o 0 – 4 ●
2 Move speed 1 – 62 1 – 62
3 Drive 0 – 127 0 – 127
4 Output Level 0 – 127 0 – 127
5
6
7
8
9
10
11
12
13
14
15
16
No. Parameter Display Value See Table Control
1 Sampling Freq
Control
44.1kHz – 345Hz 0 – 127 table #13
2Word Length 1 – 127 1 – 127
3 Output Gain -6 – +12dB 0 – 18
4 LPF Cutoff 63Hz – Thru 10 – 60 table #3
5 Filter Type Thru, PowerBass, Radio,
Tel, Clean, Low
0 – 5
6 LPF Resonance 1.0 – 12.0 10 – 120
7 Bit Assign 0 – 6 0 – 6
8 Emphasis Off/On 0 – 1
9
10 Dry/Wet D63>W – D=W – D<W63 1 – 127 ●
11
12
13
14
15 Input Mode mono/stereo
16

Effect Parameter List
CP300 Owner’s Manual
121
Appendix
DIST+DELAY
OVERDRIVE+DELAY (Variation, Insertion block)
COMP+DIST+DELAY
COMP+OVERDRIVE+DELAY (Variation, Insertion block)
WAH+DIST+DELAY
WAH+OVERDRIVE+DELAY (Variation, Insertion block)
V DISTORTION HARD
V DISTORTION SOFT (Variation, Insertion block)
V DISTORTION HARD+DELAY
V DISTORTION SOFT+DELAY (Variation, Insertion block)
DUAL ROTOR SPEAKER1, 2 (Variation, Insertion block)
DIST+TEMPO DELAY
OVERDRIVE+TEMPO DELAY (Variation, Insertion block)
COMP+DIST+TEMPO DELAY
COMP+OD+TEMPO DELAY (Variation, Insertion block)
No. Parameter Display Value See Table Control
1 Lch Delay Time 0.1 – 1638.3ms 1 – 16383
2 Rch Delay Time 0.1 – 1638.3ms 1 – 16383
3 Delay Feedback
Time
0.1 – 1638.3ms 1 – 16383
4 Delay Feedback
Level
-63 – +63 1 – 127
5 Delay Mix 0 – 127 0 – 127
6 Dist Drive 0 – 127 0 – 127
7 Dist Output Level 0 – 127 0 – 127
8 Dist EQ Low Gain -12 – +12dB 52 – 76
9 Dist EQ Mid Gain -12 – +12dB 52 – 76
10 Dry/Wet D63>W – D=W – D<W63 1 – 127 ●
11
12
13
14
15
16
No. Parameter Display Value See Table Control
1 Delay Time 0.1 – 1638.3ms 1 – 16383
2 Delay Feedback
Level
-63 – +63 1 – 127
3 Delay Mix 0 – 127 0 – 127
4 Dist Drive 0 – 127 0 – 127
5 Dist Output Level 0 – 127 0 – 127
6 Dist EQ Low Gain -12 – +12dB 52 – 76
7 Dist EQ Mid Gain -12 – +12dB 52 – 76
8
9
10 Dry/Wet D63>W – D=W – D<W63 1 – 127 ●
11 Comp. Attack 1ms – 40ms 0 – 19 table #8
12 Comp. Release 10ms – 680ms 0 – 15 table #9
13 Comp. Threshold -48dB – -6dB 79 – 121
14 Comp. Ratio 1.0 – 20.0 0 – 7 table #10
15
16
No. Parameter Display Value See Table Control
1 Delay Time 0.1 – 1638.3ms 1 – 16383
2 Delay Feedback
Level
-63 – +63 1 – 127
3 Delay Mix 0 – 127 0 – 127
4 Dist Drive 0 – 127 0 – 127
5 Dist Output Level 0 – 127 0 – 127
6 Dist EQ Low Gain -12 – +12dB 52 – 76
7 Dist EQ Mid Gain -12 – +12dB 52 – 76
8
9
10 Dry/Wet D63>W – D=W – D<W63 1 – 127 ●
11 Wah Sensitive 0 – 127 0 – 127
12 Wah Cutoff Freq
Offset
0 – 127 0 – 127
13 Wah Resonance 1.0 – 12.0 10 – 120
14 Wah Release 10 – 680ms 52 – 67 table #12
15
16
No. Parameter Display Value See Table Control
1 Overdrive 0 – 100% 0 – 100
2 Device Transistor/Vintage Tube/
Dist1/Dist2/Fuzz
0 – 4
3 Speaker Flat/Stack/Combo/Twin/
Radio/Megaphone
0 – 5
4Presence 0 – 20 0 – 20
5 Output Level 0 – 100% 0 – 100
6
7
8
9
10 Dry/Wet Balance D63>W – D=W – D<W63 1 – 127 ●
11
12
13
14
15
16
No. Parameter Display Value See Table Control
1 Overdrive 0 – 100% 0 – 100
2 Device Transistor/Vintage Tube/
Dist1/Dist2/Fuzz
0 – 4
3 Speaker Flat/Stack/Combo/Twin/
Radio/Megaphone
0 – 5
4Presence 0 – 20 0 – 20
5 Output Level 0 – 100% 0 – 100
6 Delay Time L 0.1ms – 1486.0ms 1 – 14860
7 Delay Time R 0.1ms – 1486.0ms 1 – 14860
8 Delay Feedback
Time
0.1ms – 1486.0ms 1 – 14860
9 Delay Feedback
Level
-63 – +63 1 – 127
10 Dry/Wet Balance D63>W – D=W – D<W63 1 – 127 ●
11 Delay Mix 0 – 127 0 – 127
12
13
14
15
16
No. Parameter Display Value See Table Control
1 Rotor Speed Slow 0.0 – 2.65Hz 0 – 63 table #1
2 Horn Speed Slow 0.0 – 2.65Hz 0 – 63 table #1
3 Rotor Speed Fast 2.69 – 39.7Hz 64 – 127 table #1
4 Horn Speed Fast 2.69 – 39.7Hz 64 – 127 table #1
5 Slow-Fast Time of R 0 – 127 0 – 127
6 Slow-Fast Time of H 0 – 127 0 – 127
7 Drive Low 0 – 127 0 – 127
8 Drive High 0 – 127 0 – 127
9 Low/High Balance L63>H – L=H – L<H=63 1 – 127
10
11 EQ Low Frequency 32Hz – 2.0kHz 4 – 40 table #3
12 EQ Low Gain -12 – +12dB 52 – 76
13 EQ High Frequency 500Hz – 16.0kHz 28 – 58 table #3
14 EQ High Gain -12 – +12dB 52 – 76
15 Mic L-R Angle 0 – 180deg 0 – 60
16 Speed Control Slow/Fast 0/1 ●
No. Parameter Display Value See Table Control
1 Delay Time 64th/3 – 4thx6 0 – 19 table #14
2 Delay Feedback
Level
-63 – +63 1 – 127
3 Delay Mix 0 – 127 0 – 127
4 Dist Drive 0 – 127 0 – 127
5 Dist Output Level 0 – 127 0 – 127
6 Dist EQ Low Gain -12 – +12dB 52 – 76
7 Dist EQ High Gain -12 – +12dB 52 – 76
8 L/R Diffusion 1 (-63ms) – 64 (0ms) –
127 (63ms)
1 – 127
9 Lag 1 (-63ms) – 64 (0ms) –
127 (63ms)
1 – 127
10 Dry/Wet D63>W – D=W – D<W63 1 – 127 ●
11
12
13
14
15
16
No. Parameter Display Value See Table Control
1 Delay Time 64th/3 – 4thx6 0 – 19 table #14
2 Delay Feedback
Level
-63 – +63 1 – 127
3 Delay Mix 0 – 127 0 – 127
4 Dist Drive 0 – 127 0 – 127
5 Dist Output Level 0 – 127 0 – 127
6 Dist EQ Low Gain -12 – +12dB 52 – 76
7 Dist EQ High Gain -12 – +12dB 52 – 76
8 L/R Diffusion 1 (-63ms) – 64 (0ms) –
127 (63ms)
1 – 127
9 Lag 1 (-63ms) – 64 (0ms) –
127 (63ms)
1 – 127
10 Dry/Wet D63>W – D=W – D<W63 1 – 127 ●
11 Comp. Attack 1ms – 40ms 0 – 19
12 Comp. Release 10ms – 680ms 0 – 15
13 Comp. Threshold -48dB – -6dB 79 – 121
14 Comp. Ratio 1.0 – 20.0 0 – 7
15
16

Effect Parameter List
CP300 Owner’s Manual
122
Appendix
WAH+DIST+TEMPO DELAY
WAH+OD+TEMPO DELAY (Variation, Insertion block)
V DIST HARD+TEMPO DELAY
V DIST SOFT+TEMPO DELAY (Variation, Insertion block)
VIBE ROTOR (Variation, Insertion block)
NO EFFECT (Reverb, Chorus, Variation)
THRU (Insertion block)
* Parameter 10 Dry/Wet only affects insertion type effects.
No. Parameter Display Value See Table Control
1 Delay Time 64th/3 – 4thx6 0 – 19 table #14
2 Delay Feedback
Level
-63 – +63 1 – 127
3 Delay Mix 0 – 127 0 – 127
4 Dist Drive 0 – 127 0 – 127
5 Dist Output Level 0 – 127 0 – 127
6 Dist EQ Low Gain -12 – +12dB 52 – 76
7 Dist EQ High Gain -12 – +12dB 52 – 76
8 L/R Diffusion 1 (-63ms) – 64 (0ms) –
127 (63ms)
1 – 127
9 Lag 1 (-63ms) – 64 (0ms) –
127 (63ms)
1 – 127
10 Dry/Wet D63>W – D=W – D<W63 1 – 127 ●
11 Wah Sensitive 0 – 127 0 – 127
12 Wah Cutoff Freq
Offset
0 – 127 0 – 127
13 Wah Resonance 1.0 – 12.0 10 – 120
14 Wah Release 10 – 680mS 52 – 67
15
16
No. Parameter Display Value See Table Control
1 Overdrive 0 – 100% 0 – 100
2 Device Transistor/Vintage Tube/
Dist1/Dist2/Fuzz
0 – 4
3 Speaker Flat/Stack/Combo/Twin/
Radio/Megaphone
0 – 5
4Presence 0 – 20 0 – 20
5 Output Level 0 – 100% 0 – 100
6 Delay Time 64th/3 – 4thx6 0 – 19 table #14
7 Delay Feedback
Level
-63 – +63 1 – 127
8 L/R Diffusion 1 (-63ms) – 64 (0ms) –
127 (63ms)
1 – 127
9 Lag 1 (-63ms) – 64 (0ms) –
127(63ms)
1 – 127
10 Dry/Wet Balance D63>W – D=W – D<W63 1 – 127 ●
11 Delay Mix 0 – 127 0 – 127
12
13
14
15
16
No. Parameter Display Value See Table Control
1Vibrate Speed 0.00Hz – 39.7Hz 0 – 127 table #1
2Vibrate Depth (AM) 0 – 127 0 – 127
3Vibrate Depth (PM) 0 – 127 0 – 127
4
5
6 EQ Low Frequency 32Hz – 2.0kHz 4 – 40 table #3
7 EQ Low Gain -12 – +12dB 52 – 76
8 EQ High Frequency 500Hz – 16.0kHz 28 – 58 table #3
9 EQ High Gain -12 – +12dB 52 – 76
10 Dry/Wet Balance D63>W – D=W – D<W63 1 – 127
11
12
13
14 LFO Phase
Difference
-180 – +180deg
(resolution=3deg.)
4 – 124
15 Input Mode mono/stereo 0 – 1
16 Vibrate SW OFF, ON 0 – 1 ●
No. Parameter Display Value See Table Control
1
2
3
4
5
6
7
8
9
10
11
12
13
14
15
16

CP300 Owner’s Manual
123
Appendix
Effect Data Assign Table
Table #1
LFO Frequency
Table #2
Modulation Delay Offset
Table #3
EQ Frequency
Table #4
Reverb Time
Table #5
Delay Time (200.0ms)
Data Value Data Value
0 0.00 64 2.69
1 0.04 65 2.78
2 0.08 66 2.86
3 0.13 67 2.94
4 0.17 68 3.03
5 0.21 69 3.11
6 0.25 70 3.20
7 0.29 71 3.28
8 0.34 72 3.37
9 0.38 73 3.45
10 0.42 74 3.53
11 0.46 75 3.62
12 0.51 76 3.70
13 0.55 77 3.87
14 0.59 78 4.04
15 0.63 79 4.21
16 0.67 80 4.37
17 0.72 81 4.54
18 0.76 82 4.71
19 0.80 83 4.88
20 0.84 84 5.05
21 0.88 85 5.22
22 0.93 86 5.38
23 0.97 87 5.55
24 1.01 88 5.72
25 1.05 89 6.06
26 1.09 90 6.39
27 1.14 91 6.73
28 1.18 92 7.07
29 1.22 93 7.40
30 1.26 94 7.74
31 1.30 95 8.08
32 1.35 96 8.41
33 1.39 97 8.75
34 1.43 98 9.08
35 1.47 99 9.42
36 1.51 100 9.76
37 1.56 101 10.1
38 1.60 102 10.8
39 1.64 103 11.4
40 1.68 104 12.1
41 1.72 105 12.8
42 1.77 106 13.5
43 1.81 107 14.1
44 1.85 108 14.8
45 1.89 109 15.5
46 1.94 110 16.2
47 1.98 111 16.8
48 2.02 112 17.5
49 2.06 113 18.2
50 2.10 114 19.5
51 2.15 115 20.9
52 2.19 116 22.2
53 2.23 117 23.6
54 2.27 118 24.9
55 2.31 119 26.2
56 2.36 120 27.6
57 2.40 121 28.9
58 2.44 122 30.3
59 2.48 123 31.6
60 2.52 124 33.0
61 2.57 125 34.3
62 2.61 126 37.0
63 2.65 127 39.7
Data Value Data Value
0 0.0 64 6.4
1 0.1 65 6.5
2 0.2 66 6.6
3 0.3 67 6.7
4 0.4 68 6.8
5 0.5 69 6.9
6 0.6 70 7.0
7 0.7 71 7.1
8 0.8 72 7.2
9 0.9 73 7.3
10 1.0 74 7.4
11 1.1 75 7.5
12 1.2 76 7.6
13 1.3 77 7.7
14 1.4 78 7.8
15 1.5 79 7.9
16 1.6 80 8.0
17 1.7 81 8.1
18 1.8 82 8.2
19 1.9 83 8.3
20 2.0 84 8.4
21 2.1 85 8.5
22 2.2 86 8.6
23 2.3 87 8.7
24 2.4 88 8.8
25 2.5 89 8.9
26 2.6 90 9.0
27 2.7 91 9.1
28 2.8 92 9.2
29 2.9 93 9.3
30 3.0 94 9.4
31 3.1 95 9.5
32 3.2 96 9.6
33 3.3 97 9.7
34 3.4 98 9.8
35 3.5 99 9.9
36 3.6 100 10.0
37 3.7 101 11.1
38 3.8 102 12.2
39 3.9 103 13.3
40 4.0 104 14.4
41 4.1 105 15.5
42 4.2 106 17.1
43 4.3 107 18.6
44 4.4 108 20.2
45 4.5 109 21.8
46 4.6 110 23.3
47 4.7 111 24.9
48 4.8 112 26.5
49 4.9 113 28.0
50 5.0 114 29.6
51 5.1 115 31.2
52 5.2 116 32.8
53 5.3 117 34.3
54 5.4 118 35.9
55 5.5 119 37.5
56 5.6 120 39.0
57 5.7 121 40.6
58 5.8 122 42.2
59 5.9 123 43.7
60 6.0 124 45.3
61 6.1 125 46.9
62 6.2 126 48.4
63 6.3 127 50.0
Data Value
0 THRU (0)
122
225
328
432
536
640
745
850
956
10 63
11 70
12 80
13 90
14 100
15 110
16 125
17 140
18 160
19 180
20 200
21 225
22 250
23 280
24 315
25 355
26 400
27 450
28 500
29 560
30 630
31 700
32 800
33 900
34 1.0k
35 1.1k
36 1.2k
37 1.4k
38 1.6k
39 1.8k
40 2.0k
41 2.2k
42 2.5k
43 2.8k
44 3.2k
45 3.6k
46 4.0k
47 4.5k
48 5.0k
49 5.6k
50 6.3k
51 7.0k
52 8.0k
53 9.0k
54 10.0k
55 11.0k
56 12.0k
57 14.0k
58 16.0k
59 18.0k
60 THRU (20.0k)
Data Value Data Value
0 0.3 64 17.0
1 0.4 65 18.0
2 0.5 66 19.0
3 0.6 67 20.0
4 0.7 68 25.0
5 0.8 69 30.0
6 0.9
7 1.0
8 1.1
9 1.2
10 1.3
11 1.4
12 1.5
13 1.6
14 1.7
15 1.8
16 1.9
17 2.0
18 2.1
19 2.2
20 2.3
21 2.4
22 2.5
23 2.6
24 2.7
25 2.8
26 2.9
27 3.0
28 3.1
29 3.2
30 3.3
31 3.4
32 3.5
33 3.6
34 3.7
35 3.8
36 3.9
37 4.0
38 4.1
39 4.2
40 4.3
41 4.4
42 4.5
43 4.6
44 4.7
45 4.8
46 4.9
47 5.0
48 5.5
49 6.0
50 6.5
51 7.0
52 7.5
53 8.0
54 8.5
55 9.0
56 9.5
57 10.0
58 11.0
59 12.0
60 13.0
61 14.0
62 15.0
63 16.0
Data Value Data Value
0 0.1 64 100.8
1 1.7 65 102.4
2 3.2 66 104.0
3 4.8 67 105.6
4 6.4 68 107.1
5 8.0 69 108.7
6 9.5 70 110.3
7 11.1 71 111.9
8 12.7 72 113.4
9 14.3 73 115.0
10 15.8 74 116.6
11 17.4 75 118.2
12 19.0 76 119.7
13 20.6 77 121.3
14 22.1 78 122.9
15 23.7 79 124.4
16 25.3 80 126.0
17 26.9 81 127.6
18 28.4 82 129.2
19 30.0 83 130.7
20 31.6 84 132.3
21 33.2 85 133.9
22 34.7 86 135.5
23 36.3 87 137.0
24 37.9 88 138.6
25 39.5 89 140.2
26 41.0 90 141.8
27 42.6 91 143.3
28 44.2 92 144.9
29 45.7 93 146.5
30 47.3 94 148.1
31 48.9 95 149.6
32 50.5 96 151.2
33 52.0 97 152.8
34 53.6 98 154.4
35 55.2 99 155.9
36 56.8 100 157.5
37 58.3 101 159.1
38 59.9 102 160.6
39 61.5 103 162.2
40 63.1 104 163.8
41 64.6 105 165.4
42 66.2 106 166.9
43 67.8 107 168.5
44 69.4 108 170.1
45 70.9 109 171.7
46 72.5 110 173.2
47 74.1 111 174.8
48 75.7 112 176.4
49 77.2 113 178.0
50 78.8 114 179.5
51 80.4 115 181.1
52 81.9 116 182.7
53 83.5 117 184.3
54 85.1 118 185.8
55 86.7 119 187.4
56 88.2 120 189.0
57 89.8 121 190.6
58 91.4 122 192.1
59 93.0 123 193.7
60 94.5 124 195.3
61 96.1 125 196.9
62 97.7 126 198.4
63 99.3 127 200.0

Effect Data Assign Table
CP300 Owner’s Manual
124
Appendix
Table #6
Room Size
Table #7
Delay Time (400.0ms)
Table #8
Compressor Attack Time
Table #9
Compressor Release Time
Table #10
Compressor Ratio
Table #11
Reverb Width; Depth; Height
Table #12
Wah Release Time
Table #13
Sampling Freq Control
Table #14
Tempo Delay
Data Value Data Value
0 0.1 64 10.1
1 0.3 65 10.3
2 0.4 66 10.4
3 0.6 67 10.6
4 0.7 68 10.8
5 0.9 69 10.9
6 1.0 70 11.1
7 1.2 71 11.2
8 1.4 72 11.4
9 1.5 73 11.5
10 1.7 74 11.7
11 1.8 75 11.9
12 2.0 76 12.0
13 2.1 77 12.2
14 2.3 78 12.3
15 2.5 79 12.5
16 2.6 80 12.6
17 2.8 81 12.8
18 2.9 82 12.9
19 3.1 83 13.1
20 3.2 84 13.3
21 3.4 85 13.4
22 3.5 86 13.6
23 3.7 87 13.7
24 3.9 88 13.9
25 4.0 89 14.0
26 4.2 90 14.2
27 4.3 91 14.4
28 4.5 92 14.5
29 4.6 93 14.7
30 4.8 94 14.8
31 5.0 95 15.0
32 5.1 96 15.1
33 5.3 97 15.3
34 5.4 98 15.5
35 5.6 99 15.6
36 5.7 100 15.8
37 5.9 101 15.9
38 6.1 102 16.1
39 6.2 103 16.2
40 6.4 104 16.4
41 6.5 105 16.6
42 6.7 106 16.7
43 6.8 107 16.9
44 7.0 108 17.0
45 7.2 109 17.2
46 7.3 110 17.3
47 7.5 111 17.5
48 7.6 112 17.6
49 7.8 113 17.8
50 7.9 114 18.0
51 8.1 115 18.1
52 8.2 116 18.3
53 8.4 117 18.4
54 8.6 118 18.6
55 8.7 119 18.7
56 8.9 120 18.9
57 9.0 121 19.1
58 9.2 122 19.2
59 9.3 123 19.4
60 9.5 124 19.5
61 9.7 125 19.7
62 9.8 126 19.8
63 10.0 127 20.0
Data Value Data Value
0 0.1 64 201.6
1 3.2 65 204.8
2 6.4 66 207.9
3 9.5 67 211.1
4 12.7 68 214.2
5 15.8 69 217.4
6 19.0 70 220.5
7 22.1 71 223.7
8 25.3 72 226.8
9 28.4 73 230.0
10 31.6 74 233.1
11 34.7 75 236.3
12 37.9 76 239.4
13 41.0 77 242.6
14 44.2 78 245.7
15 47.3 79 248.9
16 50.5 80 252.0
17 53.6 81 255.2
18 56.8 82 258.3
19 59.9 83 261.5
20 63.1 84 264.6
21 66.2 85 267.7
22 69.4 86 270.9
23 72.5 87 274.0
24 75.7 88 277.2
25 78.8 89 280.3
26 82.0 90 283.5
27 85.1 91 286.6
28 88.3 92 289.8
29 91.4 93 292.9
30 94.6 94 296.1
31 97.7 95 299.2
32 100.9 96 302.4
33 104.0 97 305.5
34 107.2 98 308.7
35 110.3 99 311.8
36 113.5 100 315.0
37 116.6 101 318.1
38 119.8 102 321.3
39 122.9 103 324.4
40 126.1 104 327.6
41 129.2 105 330.7
42 132.4 106 333.9
43 135.5 107 337.0
44 138.6 108 340.2
45 141.8 109 343.3
46 144.9 110 346.5
47 148.1 111 349.6
48 151.2 112 352.8
49 154.4 113 355.9
50 157.5 114 359.1
51 160.7 115 362.2
52 163.8 116 365.4
53 167.0 117 368.5
54 170.1 118 371.7
55 173.3 119 374.8
56 176.4 120 378.0
57 179.6 121 381.1
58 182.7 122 384.3
59 185.9 123 387.4
60 189.0 124 390.6
61 192.2 125 393.7
62 195.3 126 396.9
63 198.5 127 400.0
Data Value Data Value
011012
121114
231216
341318
451420
561523
671626
781730
891835
9101940
Data Value Data Value
010885
1159100
22510115
33511140
44512170
55513230
66514340
77515680
Data Value Data Value
0 1.0 4 5.0
1 1.5 5 7.0
2 2.0 6 10.0
3 3.0 7 20.0
Data Value Data Value
0 0.5 64 17.6
1 0.8 65 17.9
2 1.0 66 18.2
3 1.3 67 18.5
4 1.5 68 18.8
5 1.8 69 19.1
6 2.0 70 19.4
7 2.3 71 19.7
8 2.6 72 20.0
9 2.8 73 20.2
10 3.1 74 20.5
11 3.3 75 20.8
12 3.6 76 21.1
13 3.9 77 21.4
14 4.1 78 21.7
15 4.4 79 22.0
16 4.6 80 22.4
17 4.9 81 22.7
18 5.2 82 23.0
19 5.4 83 23.3
20 5.7 84 23.6
21 5.9 85 23.9
22 6.2 86 24.2
23 6.5 87 24.5
24 6.7 88 24.9
25 7.0 89 25.2
26 7.2 90 25.5
27 7.5 91 25.8
28 7.8 92 26.1
29 8.0 93 26.5
30 8.3 94 26.8
31 8.6 95 27.1
32 8.8 96 27.5
33 9.1 97 27.8
34 9.4 98 28.1
35 9.6 99 28.5
36 9.9 100 28.8
37 10.2 101 29.2
38 10.4 102 29.5
39 10.7 103 29.9
40 11.0 104 30.2
41 11.2
42 11.5
43 11.8
44 12.1
45 12.3
46 12.6
47 12.9
48 13.1
49 13.4
50 13.7
51 14.0
52 14.2
53 14.5
54 14.8
55 15.1
56 15.4
57 15.6
58 15.9
59 16.2
60 16.5
61 16.8
62 17.1
63 17.3
Data Value
52 10.0
53 15.0
54 25.0
55 35.0
56 45.0
57 55.0
58 65.0
59 75.0
60 85.0
61 100.0
62 115.0
63 140.0
64 170.0
65 230.0
66 340.0
67 680.0
Data Value Data Value
0 44.1K 64 678.0
1 22.1K 65 668.0
2 14.7K 66 658.0
3 11.0K 67 649.0
4 8.8K 68 639.0
5 7.4K 69 630.0
6 6.3K 70 621.0
7 5.5K 71 613.0
8 4.9K 72 604.0
9 4.5K 73 596.0
10 4.0K 74 588.0
11 3.7K 75 580.0
12 3.4K 76 573.0
13 3.2K 77 565.0
14 2.9K 78 558.0
15 2.8K 79 551.0
16 2.6K 80 544.0
17 2.5K 81 538.0
18 2.3K 82 531.0
19 2.2K 83 525.0
20 2.1K 84 519.0
21 2.0K 85 513.0
22 1.92K 86 507.0
23 1.84K 87 501.0
24 1.76K 88 496.0
25 1.70K 89 490.0
26 1.63K 90 485.0
27 1.58K 91 479.0
28 1.52K 92 474.0
29 1.47K 93 469.0
30 1.42K 94 464.0
31 1.38K 95 459.0
32 1.34K 96 455.0
33 1.30K 97 450.0
34 1.26K 98 445.0
35 1.23K 99 441.0
36 1.19K 100 437.0
37 1.16K 101 432.0
38 1.13K 102 428.0
39 1.10K 103 424.0
40 1.08K 104 420.0
41 1.05K 105 416.0
42 1.03K 106 412.0
43 1.00K 107 408.0
44 980.0 108 405.0
45 959.0 109 401.0
46 938.0 110 397.0
47 919.0 111 394.0
48 900.0 112 390.0
49 882.0 113 387.0
50 865.0 114 383.0
51 848.0 115 380.0
52 832.0 116 377.0
53 817.0 117 374.0
54 802.0 118 371.0
55 788.0 119 368.0
56 774.0 120 364.0
57 760.0 121 361.0
58 747.0 122 359.0
59 735.0 123 356.0
60 723.0 124 353.0
61 711.0 125 350.0
62 700.0 126 347.0
63 689.0 127 345.0
Data Value Data Value
0 64th/3 64 4thX51
1 64th. 65 4thX52
2 32th 66 4thX53
3 32th/3 67 4thX54
4 32th. 68 4thX55
5 16th 69 4thX56
6 16th/3 70 4thX57
7 16th. 71 4thX58
8 8th 72 4thX59
9 8th/3 73 4thX60
10 8th. 74 4thX61
11 4th 75 4thX62
12 4th/3 76 4thX63
13 4th. 77 4thX64
14 2nd
15 2nd/3
16 2nd.
17 4thX4
18 4thX5
19 4thX6
20 4thX7
21 4thX8
22 4thX9
23 4thX10
24 4thX11
25 4thX12
26 4thX13
27 4thX14
28 4thX15
29 4thX16
30 4thX17
31 4thX18
32 4thX19
33 4thX20
34 4thX21
35 4thX22
36 4thX23
37 4thX24
38 4thX25
39 4thX26
40 4thX27
41 4thX28
42 4thX29
43 4thX30
44 4thX31
45 4thX32
46 4thX33
47 4thX34
48 4thX35
49 4thX36
50 4thX37
51 4thX38
52 4thX39
53 4thX40
54 4thX41
55 4thX42
56 4thX43
57 4thX44
58 4thX45
59 4thX46
60 4thX47
61 4thX48
62 4thX49
63 4thX50

CP300 Owner’s Manual
125
Appendix
MIDI Data Format
Many MIDI messages listed in the MIDI Data Format are expressed in decimal numbers, binary numbers and hexadecimal numbers.
Hexadecimal numbers may include the letter “H” as a suffix.
Also, "n" can freely be defined as any whole number. To enter data/values, refer to the table below.
• Except the table above, for example 144-159 (decimal)/9nH/1001 0000-1001 1111 (binary) denotes the Note On Message for each channel
(1-16). 176-191/BnH/1011 0000-1011 1111 denotes the Control Change Message for each channel (1-16). 192-207/CnH/1100 0000-1100
1111 denotes the Program Change Message for each channel (1-16). 240/FOH/1111 0000 denotes the start of a System Exclusive Message.
247/F7H/1111 0111 denotes the end of a System Exclusive Message.
• aaH (hexidecimal)/0aaaaaaa (binary) denotes the data address. The address contains High, Mid, and Low.
• bbH/0bbbbbbb denotes the byte count.
• ccH/0ccccccc denotes the check sum.
• ddH/0ddddddd denotes the data/value.
Decimal Hexa-
decimal
Binary Decimal Hexa-
decimal
Binary Decimal Hexa-
decimal
Binary Decimal Hexa-
decimal
Binary
0000000 0000 32 20 0010 0000 64 40 0100 0000 96 60 0110 0000
1010000 0001 33 21 0010 0001 65 41 0100 0001 97 61 0110 0001
2020000 0010 34 22 0010 0010 66 42 0100 0010 98 62 0110 0010
3030000 0011 35 23 0010 0011 67 43 0100 0011 99 63 0110 0011
4040000 0100 36 24 0010 0100 68 44 0100 0100 100 64 0110 0100
5050000 0101 37 25 0010 0101 69 45 0100 0101 101 65 0110 0101
6060000 0110 38 26 0010 0110 70 46 0100 0110 102 66 0110 0110
7070000 0111 39 27 0010 0111 71 47 0100 0111 103 67 0110 0111
8080000 1000 40 28 0010 1000 72 48 0100 1000 104 68 0110 1000
9090000 1001 41 29 0010 1001 73 49 0100 1001 105 69 0110 1001
10 0A 0000 1010 42 2A 0010 1010 74 4A 0100 1010 106 6A 0110 1010
11 0B 0000 1011 43 2B 0010 1011 75 4B 0100 1011 107 6B 0110 1011
12 0C 0000 1100 44 2C 0010 1100 76 4C 0100 1100 108 6C 0110 1100
13 0D 0000 1101 45 2D 0010 1101 77 4D 0100 1101 109 6D 0110 1101
14 0E 0000 1110 46 2E 0010 1110 78 4E 0100 1110 110 6E 0110 1110
15 0F 0000 1111 47 2F 0010 1111 79 4F 0100 1111 111 6F 0110 1111
16 10 0001 0000 48 30 0011 0000 80 50 0101 0000 112 70 0111 0000
17 11 0001 0001 49 31 0011 0001 81 51 0101 0001 113 71 0111 0001
18 12 0001 0010 50 32 0011 0010 82 52 0101 0010 114 72 0111 0010
19 13 0001 0011 51 33 0011 0011 83 53 0101 0011 115 73 0111 0011
20 14 0001 0100 52 34 0011 0100 84 54 0101 0100 116 74 0111 0100
21 15 0001 0101 53 35 0011 0101 85 55 0101 0101 117 75 0111 0101
22 16 0001 0110 54 36 0011 0110 86 56 0101 0110 118 76 0111 0110
23 17 0001 0111 55 37 0011 0111 87 57 0101 0111 119 77 0111 0111
24 18 0001 1000 56 38 0011 1000 88 58 0101 1000 120 78 0111 1000
25 19 0001 1001 57 39 0011 1001 89 59 0101 1001 121 79 0111 1001
26 1A 0001 1010 58 3A 0011 1010 90 5A 0101 1010 122 7A 0111 1010
27 1B 0001 1011 59 3B 0011 1011 91 5B 0101 1011 123 7B 0111 1011
28 1C 0001 1100 60 3C 0011 1100 92 5C 0101 1100 124 7C 0111 1100
29 1D 0001 1101 61 3D 0011 1101 93 5D 0101 1101 125 7D 0111 1101
30 1E 0001 1110 62 3E 0011 1110 94 5E 0101 1110 126 7E 0111 1110
31 1F 0001 1111 63 3F 0011 1111 95 5F 0101 1111 127 7F 0111 1111

MIDI Data Format
CP300 Owner’s Manual
126
Appendix
MIDI CHANNEL MESSAGE (1)
MIDI Events
Status byte 1st Data byte 2nd Data byte MIDI Reception (respond/ignore)
MIDI Transmission (generated data)
REC
Status Data (HEX) Parameter Data (HEX) Parameter Song
Main
Layer
Left
Left Layer
Keyboard
Panel
(main generation
method)
Song Midi
Recorded
from
panel
Key Off 8nH
(n: Channel
Number)
kk Key no. (0 – 127) vv Velocity (0 – 127) Ø Ø Ø ˛ Ø ˛ ˛
Key On 9nH
(n: Channel
Number)
kk Key no. (0 – 127) vv
Key On:
vv=1 – 127
Key Off: vv=0
ØØ Ø
Ø
(Keyboard)
Ø˛ Ø
Control
Change
BnH
0 (00H) Bank Select MSB
0
64
126
127
(00H)
(40H)
(7EH)
(7FH)
Normal
SFX Voice
SFX kit
Drum kit
ØØ ˛
Ø
(Voice)
Ø˛ Ø
1 (01H) Modulation 0 – 127
(00H...
7FH)
Data Ø Ø
Ø
(All manually
played parts)
Ø
(Modulation Wheel)
Ø˛ Ø
5 (05H) Portamento Time 0 – 127
(00H...
7FH)
Data Ø Ø
Ø
(All manually
played parts)
˛Ø˛˛
6 (06H) Data Entry MSB 0 – 127
(00H...
7FH)
Data Ø Ø
Ø
(All manually
played parts)
Ø
(VOICE EDIT)
Ø˛ Ø
7 (07H) Main Volume 0 – 127
(00H...
7FH)
Data Ø Ø
Ø
(All manually
played parts)
Ø
(VOICE EDIT)
Ø˛ Ø
10 (0AH) Panpot 0 – 127
(00H...
7FH)
L64 Ø Ø
Ø
(All manually
played parts)
Ø
(VOICE EDIT)
Ø˛ Ø
11 (0BH) Expression 0 – 127
(00H...
7FH)
Data Ø Ø
Ø
(All manually
played parts)
Ø
(Pedal1 – 4,
Modulation Wheel)
Ø˛ Ø
32 (20H) Bank Select LSB 0 – 127
(00H...
7FH)
Data Ø Ø ˛
Ø
(Voice)
Ø˛ Ø
38 (26H) Data Entry LSB 0 – 127
(00H...
7FH)
Data Ø Ø
Ø
(All manually
played parts)
Ø
(VOICE EDIT)
Ø˛ Ø
64 (40H) Sustain (Damper) 0 – 127
(00H...
7FH)
Data Ø Ø
Ø
(All manually
played parts)
Ø
(Pedal1 – 4)
Ø˛ Ø
65 (41H) Portamento 0 – 127
(00H...
7FH)
0...63, 64...127
(OFF, ON)
ØØ
Ø
(All manually
played parts)
˛Ø˛˛
66 (42H) Sostenuto 0 – 127
(00H...
7FH)
0...63, 64...127
(OFF, ON)
ØØ
Ø
(All manually
played parts)
Ø
(Pedal1 – 4)
Ø˛ Ø
67 (43H) Soft Pedal 0 – 127
(00H...
7FH)
0...63, 64...127
(OFF, ON)
ØØ
Ø
(All manually
played parts)
Ø
(Pedal1 – 4)
Ø˛ Ø
71 (47H) Harmonic Content 0 – 127
(00H...
7FH)
-64...0...+63 Ø Ø
Ø
(All manually
played parts)
Ø
(Pedal4, Modulation
Wheel, VOICE EDIT)
Ø˛ Ø
72 (48H) Release Time 0 – 127
(00H...
7FH)
-64...0...+63 Ø Ø
Ø
(All manually
played parts)
˛Ø˛˛
73 (49H) Attack Time 0 – 127
(00H...
7FH)
-64...0...+63 Ø Ø
Ø
(All manually
played parts)
˛Ø˛˛
74 (4AH) Brightness 0 – 127
(00H...
7FH)
-64...0...+63 Ø Ø
Ø
(All manually
played parts)
Ø
(Pedal4, Modulation
Wheel, VOICE EDIT)
Ø˛ Ø
84 (54H) Portamento Control 0 – 127
(00H...
7FH)
Key no. (0 – 127) Ø Ø ˛ ˛ Ø ˛ ˛
91 (5BH)
Effect1 Depth
(Reverb Send Level)
0 – 127
(00H...
7FH)
Data Ø Ø
Ø
(All manually
played parts)
Ø
(Pedal4, Modulation
Wheel, VOICE EDIT)
Ø˛ Ø
93 (5DH)
Effect3 Depth
(Chorus Send Level)
0 – 127
(00H...
7FH)
Data Ø Ø
Ø
(All manually
played parts)
Ø
(Pedal4, Modulation
Wheel, VOICE EDIT)
Ø˛ Ø
94 (5EH)
Effect4 Depth
(Variation Send Level)
0 – 127
(00H...
7FH)
Data Ø ˛ ˛ ˛ Ø ˛ ˛
96 (60H) RPN Increment – –
The data byte is
ignored.
ØØ ˛ ˛ Ø˛˛
97 (61H) RPN Decrement – –
The data byte is
ignored.
ØØ ˛ ˛ Ø˛˛
98 (62H) NRPN LSB 0 – 127
(00H...
7FH)
Data Ø Ø ˛ ˛ Ø ˛ ˛
99 (63H) NRPN MSB 0 – 127
(00H...
7FH)
Data Ø Ø ˛ ˛ Ø ˛ ˛
100 (64H) RPN LSB 0 – 127
(00H...
7FH)
Data Ø Ø
Ø
(All manually
played parts)
Ø
(VOICE EDIT)
Ø˛ Ø
101 (65H) RPN MSB 0 – 127
(00H...
7FH)
Data Ø Ø
Ø
(All manually
played parts)
Ø
(VOICE EDIT)
Ø˛ Ø
0 – 119
(00H...77H)
(Assignable)
0 – 127
(00H...7FH)
Data ˛ ˛ ˛
Ø
(Pedal4, Modulation
Wheel)
˛˛ ˛
Mode
Message
BnH
(n: Channel
Number)
120 (78H) All Sound Off 0 (00H) Data Ø Ø
Ø
(All manually
played parts)
˛Ø˛˛
121 (79H) Reset All Controllers 0 (00H) Data Ø ˛ ˛ ˛ Ø ˛ ˛
123 (7BH) All Note Off 0 (00H) Data Ø Ø
Ø
(All manually
played parts)
˛Ø˛˛
124 (7CH) Omni Off 0 (00H) Data Ø ˛ ˛ ˛ ˛ ˛ ˛
125 (7DH) Omni On 0 (00H) Data Ø ˛ ˛ ˛ ˛ ˛ ˛
126 (7EH) Mono 0 – 16
(00H...
10H)
Data Ø ˛ ˛ ˛ Ø ˛ ˛
127 (7FH) Poly 0 (00H) Data Ø ˛ ˛ ˛ Ø ˛ ˛
Program
Change
CnH
(n: Channel
Number)
pp
(00H...
7FH)
Voice number
(0 – 127)
–– – ØØ ˛
Ø
(Voice)
Ø˛ Ø

MIDI Data Format
CP300 Owner’s Manual
127
Appendix
MIDI CHANNEL MESSAGE (2)
Parameters controlled by NRPN (Non-Registered Parameter Numbers)
NRPN MSB: 14H-1FH (for drums) message is accepted as long as the channel is set with a drum Voice.
Data Entry LSB: Ignored.
Parameters controlled by RPN (Registered Parameter Numbers)
Channel After
Touch
DnH
(n: Channel
Number)
vv
(00H...
7FH)
Data – – – Ø Ø
Ø
(All manually
played parts)
Ø
(Pedal4, Modulation
Wheel)
Ø˛ ˛
Polyphonic
After Touch
AnH
(n: Channel
Number)
kk
(00H...
7FH)
Key no. (0 – 127) vv
(00H...
7FH)
Data Ø ˛ ˛ ˛ Ø ˛ ˛
Pitch Bend
Change
EnH
(n: Channel
Number)
cc
(00H...
7FH)
LSB dd
(00H...
7FH)
MSB Ø Ø
Ø
(All manually
played parts)
Ø
(Pitch Bend Wheel)
Ø˛ Ø
Realtime
Message
F8H MIDI Clock – – – – ˛ ˛ Ø ˛ ˛
FAH Start – – – – ˛ ˛ ˛
FBH Continue – – – – ˛ ˛ ˛
FCH Stop – – – – ˛ ˛ ˛
FEH
Active
Sense
–––– Ø Ø˛
FFH
System
Reset
–––– ˛ ˛˛
NRPN Data Entry
Parameter Data Range
MIDI Reception (respond/ignore)
MIDI Transmission (generated data)
REC
MSB LSB MSB LSB Song
Main
Layer
Left
Left Layer
Keyboard
Panel
(main generation
method)
Song Midi
Recorded
from
panel
01H 08H mmH – Vibrato Rate mm: 00H-40H-7FH (-64...0...+63) Ø Ø ˛ ˛ Ø ˛ ˛
01H 09H mmH – Vibrato Depth mm: 00H-40H-7FH (-64...0...+63) Ø Ø ˛ ˛ Ø ˛ ˛
01H 0AH mmH – Vibrato Delay mm: 00H-40H-7FH (-64...0...+63) Ø Ø ˛ ˛ Ø ˛ ˛
01H 20H mmH –
Low Pass Filter Cutoff
Frequency
mm: 00H-40H-7FH (-64...0...+63) Ø ˛ ˛ ˛ Ø ˛ ˛
01H 21H mmH – Low Pass Filter Resonance mm: 00H-40H-7FH (-64...0...+63) Ø ˛ ˛ ˛ Ø ˛ ˛
01H 30H mmH – EQ BASS mm: 00H-40H-7FH (-64...0...+63) Ø ˛ ˛ ˛ Ø ˛ ˛
01H 31H mmH – EQ TREBLE mm: 00H-40H-7FH (-64...0...+63) Ø ˛ ˛ ˛ Ø ˛ ˛
01H 34H mmH – EQ BASS Frequency mm: 04H-28H (32...2.0k[Hz]) Ø ˛ ˛ ˛ Ø ˛ ˛
01H 35H mmH – EQ TREBLE Frequency mm: 1CH-3AH (500...16.0k[Hz]) Ø ˛ ˛ ˛ Ø ˛ ˛
01H 63H mmH – EG Attack Time mm: 00H-40H-7FH (-64...0...+63) Ø ˛ ˛ ˛ Ø ˛ ˛
01H 64H mmH – EG Decay Time mm: 00H-40H-7FH (-64...0...+63) Ø Ø ˛ ˛ Ø ˛ ˛
01H 66H mmH – EG Release mm: 00H-40H-7FH (-64...0...+63) Ø ˛ ˛ ˛ Ø ˛ ˛
14H rrH mmH –
Drum Low Pass Filter Cutoff
Frequency
rr: drum instrument note number
mm: 00H-40H-7FH (-64...0...+63)
Ø˛ ˛ ˛ Ø˛˛
15H rrH mmH –
Drum Low Pass Filter
Resonance
rr: drum instrument note number
mm: 00H-40H-7FH (-64...0...+63)
Ø˛ ˛ ˛ Ø˛˛
16H rrH mmH – Drum EG Attack Rate
rr: drum instrument note number
mm: 00H-40H-7FH (-64...0...+63)
Ø˛ ˛ ˛ Ø˛˛
17H rrH mmH – Drum EG Decay Rate
rr: drum instrument note number
mm: 00H-40H-7FH (-64...0...+63)
Ø˛ ˛ ˛ Ø˛˛
18H rrH mmH – Drum Pitch Coarse
rr: drum instrument note number
mm: 00H-40H-7FH (-64...0...+63)
Ø˛ ˛ ˛ Ø˛˛
19H rrH mmH – Drum Pitch Fine
rr: drum instrument note number
mm: 00H-40H-7FH (-64...0...+63)
Ø˛ ˛ ˛ Ø˛˛
1AH rrH mmH – Drum Level
rr: drum instrument note number
mm: 00H-7FH (0...127)
Ø˛ ˛ ˛ Ø˛˛
1CH rrH mmH – Drum Pan
rr: drum instrument note number
mm: 00H, 01H-40H-7FH (RND, L63...C...R63)
Ø˛ ˛ ˛ Ø˛˛
1DH rrH mmH – Drum Reverb Send Level
rr: drum instrument note number
mm: 00H-7FH (0...127)
Ø˛ ˛ ˛ Ø˛˛
1EH rrH mmH – Drum Chorus Send Level
rr: drum instrument note number
mm: 00H-7FH (0...127)
Ø˛ ˛ ˛ Ø˛˛
1FH rrH mmH – Drum Variation Send Level
rr: drum instrument note number
mm: 00H-7FH (0...127)
(Variation Connection = SYSTEM)
mm: 00H, 01H-7FH (OFF, ON)
(Variation Connection = INSERTION)
Ø˛ ˛ ˛ Ø˛˛
RPN Data Entry
Parameter Data Range
MIDI Reception (respond/ignore)
MIDI Transmission (generated data)
REC
MSB LSB MSB LSB Song
Main
Layer
Left
Left Layer
Keyboard
Panel
(main generation
method)
Song Midi
Recorded
from
panel
00H 00H mmH – Pitch Bend Sensitivity mm: 00H-18H (0...+24[semitones]) Ø Ø
Ø
(All manually
played parts)
Ø
(Other Setting)
Ø˛ Ø
00H 01H mmH llH Fine Tune
mm l: 00H 00H -100 [cent]
...
mm ll: 40H 00H 0 [cent]
...
mm ll: 7FH 7FH 100 [cent]
ØØ
Ø
(All manually
played parts)
Ø
(VOICE EDIT)
Ø˛ Ø
00H 02H mmH – Coarse Tune mm: 28H-40H-58H (-24...0...+24 [semitones]) Ø Ø
Ø
(All manually
played parts)
˛Ø˛˛
7FH 7FH – – Null – Ø Ø
Ø
(All manually
played parts)
˛Ø˛˛
MIDI Events
Status byte 1st Data byte 2nd Data byte MIDI Reception (respond/ignore)
MIDI Transmission (generated data)
REC
Status Data (HEX) Parameter Data (HEX) Parameter Song
Main
Layer
Left
Left Layer
Keyboard
Panel
(main generation
method)
Song Midi
Recorded
from
panel

MIDI Data Format
CP300 Owner’s Manual
128
Appendix
MIDI PARAMETER CHANGE TABLE
*Not Received when Receive Parameter SysEx is set to off.
*Not transmitted when Transmit Parameter SysEx is set to off.
MIDI Parameter Change table (XG SYSTEM)
TOTAL SIZE 07
MIDI Parameter Change table (SYSTEM INFORMATION)
TOTAL SIZE 10
Transmitted in response to Dump Request. Not received.
MIDI Parameter Change table (EFFECT1)
TOTAL SIZE 0E
TOTAL SIZE 06
Address
(H)
Size
(H)
Data
(H)
Parameter Description
XG Default
(H)
MIDI Reception (respond/ignore) MIDI Transmission (generated data)
REC
Song
Main
Layer
Left
Left Layer
Keyboard
Panel
(main generation
method)
Song Midi
Recorded
from
panel
00 00
00
01
02
03
4
00-0F
00-0F
00-0F
00-0F
MASTER TUNE
-102.4...0...+102.3 [cent]
1st bit 3-0 → bit 15-12
2nd bit 3-0 → bit 11-8
3rd bit 3-0 → bit 7-4
4th bit 3-0 → bit 3-0
*Panel setting
value
Ø˛Ø˛˛
04 1 00-7F MASTER VOLUME 0...127 7F Ø ˛ ˛ ˛ Ø ˛ ˛
05 1 00-7F MASTER ATTENUATOR 0...127 00 ˛ ˛ ˛ ˛ ˛ ˛ ˛
06 1 28-58 TRANSPOSE -24...0...+24 [semitones] 40 Ø ˛ ˛ ˛ Ø ˛ ˛
7D 1 N DRUM SETUP RESET N: Drum setup number – Ø ˛ ˛ ˛ Ø ˛ ˛
7E 1 00 XG SYSTEM ON 00=XG system ON – Ø ˛ ˛ ˛ Ø ˛ Ø
7F 1 00 ALL PARAMETER RESET 00=ON – Ø ˛ ˛ ˛ Ø ˛ ˛
Address
(H)
Size
(H)
Data
(H)
Parameter Description
MIDI Reception (respond/ignore) MIDI Transmission (generated data)
REC
Song
Main
Layer
Left
Left Layer
Keyboard
Panel
(main generation
method)
Song Midi
Recorded
from
panel
01 00
00
...
0D
E
20-7F
...
20-7F
Model Name 1
...
Model Name 14
32...127 (ASCII CHARACTER)
...
32...127 (ASCII CHARACTER)
–– – ˛ ˛Ø˛
0E 1 NOT USED
0F 1 NOT USED
Address
(H)
Size
(H)
Data
(H)
Parameter Description
XG Default
(H)
MIDI Reception (respond/ignore) MIDI Transmission (generated data)
REC
Song
Main
Layer
Left
Left Layer
Keyboard
Panel
(main generation
method)
Song Midi
Recorded
from
panel
02 01 00 2
00-7F
00-7F
REVERB TYPE MSB
REVERB TYPE LSB
Refer to Effect Parameter List
:
01 (=HALL1)
00
Ø
Ø
(VOICE EDIT)
Ø˛ Ø
02 1 00-7F REVERB PARAMETER 1 :
Depends on
Reverb type
Ø
(*Depends on Reverb type)
˛Ø˛˛
03 1 00-7F REVERB PARAMETER 2 :
Depends on
Reverb type
Ø
(*Depends on Reverb type)
˛Ø˛˛
04 1 00-7F REVERB PARAMETER 3 :
Depends on
Reverb type
Ø
(*Depends on Reverb type)
˛Ø˛˛
05 1 00-7F REVERB PARAMETER 4 :
Depends on
Reverb type
Ø
(*Depends on Reverb type)
˛Ø˛˛
06 1 00-7F REVERB PARAMETER 5 :
Depends on
Reverb type
Ø
(*Depends on Reverb type)
˛Ø˛˛
07 1 00-7F REVERB PARAMETER 6 :
Depends on
Reverb type
Ø
(*Depends on Reverb type)
˛Ø˛˛
08 1 00-7F REVERB PARAMETER 7 :
Depends on
Reverb type
Ø
(*Depends on Reverb type)
˛Ø˛˛
09 1 00-7F REVERB PARAMETER 8 :
Depends on
Reverb type
Ø
(*Depends on Reverb type)
˛Ø˛˛
0A 1 00-7F REVERB PARAMETER 9 :
Depends on
Reverb type
Ø
(*Depends on Reverb type)
˛Ø˛˛
0B 1 00-7F REVERB PARAMETER 10 :
Depends on
Reverb type
Ø
(*Depends on Reverb type)
˛Ø˛˛
0C 1 00-7F REVERB RETURN -∞dB...0dB...+6dB (0...64...127) 40 Ø ˛ Ø ˛ ˛
0D 1 01-7F REVERB PAN L63...C...R63 40 Ø ˛ Ø ˛ ˛
02 01 10 1 00-7F REVERB PARAMETER 11 Refer to Effect Parameter List
Depends on
Reverb type
Ø
(*Depends on Reverb type)
˛Ø˛˛
11 1 00-7F REVERB PARAMETER 12 :
Depends on
Reverb type
Ø
(*Depends on Reverb type)
˛Ø˛˛
12 1 00-7F REVERB PARAMETER 13 :
Depends on
Reverb type
Ø
(*Depends on Reverb type)
˛Ø˛˛
13 1 00-7F REVERB PARAMETER 14 :
Depends on
Reverb type
Ø
(*Depends on Reverb type)
˛Ø˛˛
14 1 00-7F REVERB PARAMETER 15 :
Depends on
Reverb type
Ø
(*Depends on Reverb type)
˛Ø˛˛
15 1 00-7F REVERB PARAMETER 16 :
Depends on
Reverb type
Ø
(*Depends on Reverb type)
˛Ø˛˛

MIDI Data Format
CP300 Owner’s Manual
129
Appendix
TOTAL SIZE 0F
TOTAL SIZE 06
TOTAL SIZE 21
TOTAL SIZE 06
Address
(H)
Size
(H)
Data
(H)
Parameter Description
XG Default
(H)
MIDI Reception (respond/ignore) MIDI Transmission (generated data)
REC
Song
Main
Layer
Left
Left Layer
Keyboard
Panel
(main generation
method)
Song Midi
Recorded
from
panel
02 01 20 2
00-7F
00-7F
CHORUS TYPE MSB
CHORUS TYPE LSB
Refer to Effect Parameter List
:
41 (=CHORUS1)
00
Ø
Ø
(VOICE EDIT)
Ø˛ Ø
22 1 00-7F CHORUS PARAMETER 1 :
Depends on
Chorus Type
Ø
(*Depends on Chorus Type)
˛Ø˛˛
23 1 00-7F CHORUS PARAMETER 2 :
Depends on
Chorus Type
Ø
(*Depends on Chorus Type)
˛Ø˛˛
24 1 00-7F CHORUS PARAMETER 3 :
Depends on
Chorus Type
Ø
(*Depends on Chorus Type)
˛Ø˛˛
25 1 00-7F CHORUS PARAMETER 4 :
Depends on
Chorus Type
Ø
(*Depends on Chorus Type)
˛Ø˛˛
26 1 00-7F CHORUS PARAMETER 5 :
Depends on
Chorus Type
Ø
(*Depends on Chorus Type)
˛Ø˛˛
27 1 00-7F CHORUS PARAMETER 6 :
Depends on
Chorus Type
Ø
(*Depends on Chorus Type)
˛Ø˛˛
28 1 00-7F CHORUS PARAMETER 7 :
Depends on
Chorus Type
Ø
(*Depends on Chorus Type)
˛Ø˛˛
29 1 00-7F CHORUS PARAMETER 8 :
Depends on
Chorus Type
Ø
(*Depends on Chorus Type)
˛Ø˛˛
2A 1 00-7F CHORUS PARAMETER 9 :
Depends on
Chorus Type
Ø
(*Depends on Chorus Type)
˛Ø˛˛
2B 1 00-7F CHORUS PARAMETER 10 :
Depends on
Chorus Type
Ø
(*Depends on Chorus Type)
˛Ø˛˛
2C 1 00-7F CHORUS RETURN -∞dB...0dB...+6dB (0...64...127) 40 Ø ˛ Ø ˛ ˛
2D 1 01-7F CHORUS PAN L63...C...R63 40 Ø ˛ Ø ˛ ˛
2E 1 00-7F
SEND CHORUS TO REVERB
-∞dB...0dB...+6dB (0...64...127) 00 Ø ˛ Ø ˛ ˛
02 01 30 1 00-7F CHORUS PARAMETER 11 Refer to Effect Parameter List
Depends on
Chorus Type
Ø
(*Depends on Chorus Type)
˛Ø˛˛
31 1 00-7F CHORUS PARAMETER 12 :
Depends on
Chorus Type
Ø
(*Depends on Chorus Type)
˛Ø˛˛
32 1 00-7F CHORUS PARAMETER 13 :
Depends on
Chorus Type
Ø
(*Depends on Chorus Type)
˛Ø˛˛
33 1 00-7F CHORUS PARAMETER 14 :
Depends on
Chorus Type
Ø
(*Depends on Chorus Type)
˛Ø˛˛
34 1 00-7F CHORUS PARAMETER 15 :
Depends on
Chorus Type
Ø
(*Depends on Chorus Type)
˛Ø˛˛
35 1 00-7F CHORUS PARAMETER 16 :
Depends on
Chorus Type
Ø
(*Depends on Chorus Type)
˛Ø˛˛
Address
(H)
Size
(H)
Data
(H)
Parameter Description
XG Default
(H)
MIDI Reception
(respond/ignore)
MIDI Transmission
(generated data)
REC
Song
Main
Layer
Left
Left Layer
Keyboard
Panel (main
generation
method)
Song Midi
Recorded
from
panel
02 01 40 2 00-7F VARIATION TYPE MSB Refer to Effect Parameter List
05 (=DELAY L,
C, R)
Ø˛Ø˛˛
00-7F VARIATION TYPE LSB : 00
42 2
00-7F
00-7F
VARIATION PARAMETER 1 MSB
VARIATION PARAMETER 1 LSB
:
:
Depends on
Variation Type
Ø
(*Depends on Variation Type)
˛Ø˛˛
44 2
00-7F
00-7F
VARIATION PARAMETER 2 MSB
VARIATION PARAMETER 2 LSB
:
:
Depends on
Variation Type
Ø
(*Depends on Variation Type)
˛Ø˛˛
46 2
00-7F
00-7F
VARIATION PARAMETER 3 MSB
VARIATION PARAMETER 3 LSB
:
:
Depends on
Variation Type
Ø
(*Depends on Variation Type)
˛Ø˛˛
48 2
00-7F
00-7F
VARIATION PARAMETER 4 MSB
VARIATION PARAMETER 4 LSB
:
:
Depends on
Variation Type
Ø
(*Depends on Variation Type)
˛Ø˛˛
4A 2
00-7F
00-7F
VARIATION PARAMETER 5 MSB
VARIATION PARAMETER 5 LSB
:
:
Depends on
Variation Type
Ø
(*Depends on Variation Type)
˛Ø˛˛
4C 2
00-7F
00-7F
VARIATION PARAMETER 6 MSB
VARIATION PARAMETER 6 LSB
:
:
Depends on
Variation Type
Ø
(*Depends on Variation Type)
˛Ø˛˛
4E 2
00-7F
00-7F
VARIATION PARAMETER 7 MSB
VARIATION PARAMETER 7 LSB
:
:
Depends on
Variation Type
Ø
(*Depends on Variation Type)
˛Ø˛˛
50 2
00-7F
00-7F
VARIATION PARAMETER 8 MSB
VARIATION PARAMETER 8 LSB
:
:
Depends on
Variation Type
Ø
(*Depends on Variation Type)
˛Ø˛˛
52 2
00-7F
00-7F
VARIATION PARAMETER 9 MSB
VARIATION PARAMETER 9 LSB
:
:
Depends on
Variation Type
Ø
(*Depends on Variation Type)
˛Ø˛˛
54 2
00-7F
00-7F
VARIATION PARAMETER 10 MSB
VARIATION PARAMETER 10 LSB
:
:
Depends on
Variation Type
Ø
(*Depends on Variation Type)
˛Ø˛˛
56 1 00-7F VARIATION RETURN -∞dB...0dB...+6dB (0...64...127) 40 Ø ˛ Ø ˛ ˛
57 1 01-7F VARIATION PAN L63...C...R63 40 Ø ˛ Ø ˛ ˛
58 1 00-7F SEND VARIATION TO REVERB -∞dB...0dB...+6dB (0...64...127) 00 Ø ˛ Ø ˛ ˛
59 1 00-7F SEND VARIATION TO CHORUS -∞dB...0dB...+6dB (0...64...127) 00 Ø ˛ Ø ˛ ˛
5A 1 00-01 VARIATION CONNECTION INSERTION, SYSTEM 00 Ø ˛ Ø ˛ ˛
5B 1 00-7F VARIATION PART NUMBER
Reception: Part1...16 (0...15)
Transmission:
Part1...16 (0...15)
OFF (127)
7F Ø ˛ Ø ˛ ˛
5C 1 00-7F MW VARIATION CONTROL DEPTH -64...0...+63 40 Ø ˛ Ø ˛ ˛
5D 1 00-7F BEND VARIATION CONTROL DEPTH -64...0...+63 40 Ø ˛ Ø ˛ ˛
5E 1 00-7F CAT VARIATION CONTROL DEPTH -64...0...+63 40 Ø ˛ Ø ˛ ˛
5F 1 00-7F AC1 VARIATION CONTROL DEPTH -64...0...+63 40 Ø ˛ Ø ˛ ˛
60 1 00-7F AC2 VARIATION CONTROL DEPTH -64...0...+63 40 Ø ˛ Ø ˛ ˛
02 01 70 1 00-7F VARIATION PARAMETER 11 Refer to Effect Parameter List
Depends on
Variation Type
Ø
(*Depends on Variation Type)
˛Ø˛˛
71 1 00-7F VARIATION PARAMETER 12 :
Depends on
Variation Type
Ø
(*Depends on Variation Type)
˛Ø˛˛
72 1 00-7F VARIATION PARAMETER 13 :
Depends on
Variation Type
Ø
(*Depends on Variation Type)
˛Ø˛˛
73 1 00-7F VARIATION PARAMETER 14 :
Depends on
Variation Type
Ø
(*Depends on Variation Type)
˛Ø˛˛
74 1 00-7F VARIATION PARAMETER 15 :
Depends on
Variation Type
Ø
(*Depends on Variation Type)
˛Ø˛˛
75 1 00-7F VARIATION PARAMETER 16 :
Depends on
Variation Type
Ø
(*Depends on Variation Type)
˛Ø˛˛

MIDI Data Format
CP300 Owner’s Manual
130
Appendix
MIDI Parameter Change table (MULTI EQ)
TOTAL SIZE 15
MIDI Parameter Change table (EFFECT2)
TOTAL SIZE 12
TOTAL SIZE 6
Address
(H)
Size
(H)
Data
(H)
Parameter Description
MIDI Reception (respond/ignore) MIDI Transmission (generated data)
REC
Song
Main
Layer
Left
Left Layer
Keyboard
Panel
(main generation
method)
Song Midi
Recorded
from
panel
02 40 00 1 00-04 EQ TYPE flat, jazz, pops, rock, classic
*MULTI EQ is
not reset by the
XG System On.
Ø˛˛˛˛
01 1 34-4C EQ GAIN 1 -12...0...+12 [dB] Ø ˛ ˛ ˛ ˛
02 1 04-28 EQ FREQUENCY 1 32...2.0k [Hz] Ø ˛ ˛ ˛ ˛
03 1 01-78 EQ Q 1 0.1...12.0 Ø ˛ ˛ ˛ ˛
04 1 00-01 EQ SHAPE 1 shelving, peaking Ø ˛ ˛ ˛ ˛
05 1 34-4C EQ GAIN 2 -12...0...+12 [dB] Ø ˛ ˛ ˛ ˛
06 1 0E-36 EQ FREQUENCY 2 100...10.0k [Hz] Ø ˛ ˛ ˛ ˛
07 1 01-78 EQ Q 2 0.1...12.0 Ø ˛ ˛ ˛ ˛
08 1 NOT USED –––––
09 1 34-4C EQ GAIN 3 -12...0...+12 [dB] Ø ˛ ˛ ˛ ˛
0A 1 0E-36 EQ FREQUENCY 3 100...10.0k [Hz] Ø ˛ ˛ ˛ ˛
0B 1 01-78 EQ Q 3 0.1...12.0 Ø ˛ ˛ ˛ ˛
0C 1 NOT USED –––––
0D 1 34-4C EQ GAIN4 -12...0...+12 [dB] Ø ˛ ˛ ˛ ˛
0E 1 0E-36 EQ FREQUENCY 4 100...10.0k [Hz] Ø ˛ ˛ ˛ ˛
0F 1 01-78 EQ Q 4 0.1...12.0 Ø ˛ ˛ ˛ ˛
10 1 NOT USED –––––
11 1 34-4C EQ GAIN 5 -12...0...+12 [dB] Ø ˛ ˛ ˛ ˛
12 1 1C-3A EQ FREQUENCY 5 0.5k...16.0k [Hz] Ø ˛ ˛ ˛ ˛
13 1 01-78 EQ Q 5 0.1...12.0 Ø ˛ ˛ ˛ ˛
14 1 00-01 EQ SHAPE 5 shelving, peaking Ø ˛ ˛ ˛ ˛
Address
(H)
Size
(H)
Data
(H)
Parameter Description
MIDI Reception (respond/ignore) MIDI Transmission (generated data)
REC
Song
Main
Layer
Left
Left Layer
Keyboard
Panel
(main generation
method)
Song Midi
Recorded
from
panel
03 n 00 2
00-7F
00-7F
INSERTION EFFECT TYPE MSB
INSERTION EFFECT TYPE LSB
Refer to Effect Parameter List
:
Ø
Ø
(VOICE EDIT)
Ø˛ Ø
02 1 00-7F INSERTION EFFECT PARAMETER 1 :
Ø
(*Depends on Insertion Type)
Ø
(VOICE EDIT)
Ø˛ Ø
03 1 00-7F INSERTION EFFECT PARAMETER 2 :
Ø
(*Depends on Insertion Type)
˛Ø˛˛
04 1 00-7F INSERTION EFFECT PARAMETER 3 :
Ø
(*Depends on Insertion Type)
Ø
(VOICE EDIT)
Ø˛ Ø
05 1 00-7F INSERTION EFFECT PARAMETER 4 :
Ø
(*Depends on Insertion Type)
˛Ø˛˛
06 1 00-7F INSERTION EFFECT PARAMETER 5 :
Ø
(*Depends on Insertion Type)
˛Ø˛˛
07 1 00-7F INSERTION EFFECT PARAMETER 6 :
Ø
(*Depends on Insertion Type)
˛Ø˛˛
08 1 00-7F INSERTION EFFECT PARAMETER 7 :
Ø
(*Depends on Insertion Type)
˛Ø˛˛
09 1 00-7F INSERTION EFFECT PARAMETER 8 :
Ø
(*Depends on Insertion Type)
˛Ø˛˛
0A 1 00-7F INSERTION EFFECT PARAMETER 9 :
Ø
(*Depends on Insertion Type)
˛Ø˛˛
0B 1 00-7F INSERTION EFFECT PARAMETER 10 :
Ø
(*Depends on Insertion Type)
Ø
(VOICE EDIT)
Ø˛ Ø
0C 1 00-7F INSERTION EFFECT PART NUMBER
Reception: Part1...16 (0...15)
Transmission: Part1...16 (0...15)
OFF (127)
Ø
Ø
(Voice)
Ø˛ Ø
0D 1 00-7F MW INSERTION CONTROL DEPTH -64...0...+63 Ø ˛ Ø ˛ ˛
0E 1 00-7F BEND INSERTION CONTROL DEPTH -64...0...+63 Ø ˛ Ø ˛ ˛
0F 1 00-7F CAT INSERTION CONTROL DEPTH -64...0...+63 Ø ˛ Ø ˛ ˛
10 1 00-7F AC1 INSERTION CONTROL DEPTH -64...0...+63 Ø ˛ Ø ˛ ˛
11 1 00-7F AC2 INSERTION CONTROL DEPTH -64...0...+63 Ø ˛ Ø ˛ ˛
20 1 00-7F INSERTION EFFECT PARAMETER 11 Refer to Effect Parameter List
Ø
(*Depends on Insertion Type)
˛Ø˛˛
21 1 00-7F INSERTION EFFECT PARAMETER 12 :
Ø
(*Depends on Insertion Type)
˛Ø˛˛
22 1 00-7F INSERTION EFFECT PARAMETER 13 :
Ø
(*Depends on Insertion Type)
˛Ø˛˛
23 1 00-7F INSERTION EFFECT PARAMETER 14 :
Ø
(*Depends on Insertion Type)
˛Ø˛˛
24 1 00-7F INSERTION EFFECT PARAMETER 15 :
Ø
(*Depends on Insertion Type)
˛Ø˛˛
25 1 00-7F INSERTION EFFECT PARAMETER 16 :
Ø
(*Depends on Insertion Type)
Ø
(VOICE EDIT)
Ø˛ Ø
30 2
00-7F
00-7F
INSERTION EFFECT PARAMETER 1 MSB
INSERTION EFFECT PARAMETER 1 LSB
Refer to Effect Parameter List
:
Ø
(*Depends on Insertion Type)
˛Ø˛˛
32 2
00-7F
00-7F
INSERTION EFFECT PARAMETER 2 MSB
INSERTION EFFECT PARAMETER 2 LSB
:
:
Ø
(*Depends on Insertion Type)
˛Ø˛˛
34 2
00-7F
00-7F
INSERTION EFFECT PARAMETER 3 MSB
INSERTION EFFECT PARAMETER 3 LSB
:
:
Ø
(*Depends on Insertion Type)
˛Ø˛˛
36 2
00-7F
00-7F
INSERTION EFFECT PARAMETER 4 MSB
INSERTION EFFECT PARAMETER 4 LSB
:
:
Ø
(*Depends on Insertion Type)
˛Ø˛˛
38 2
00-7F
00-7F
INSERTION EFFECT PARAMETER 5 MSB
INSERTION EFFECT PARAMETER 5 LSB
:
:
Ø
(*Depends on Insertion Type)
˛Ø˛˛
3A 2
00-7F
00-7F
INSERTION EFFECT PARAMETER 6 MSB
INSERTION EFFECT PARAMETER 6 LSB
:
:
Ø
(*Depends on Insertion Type)
˛Ø˛˛
3C 2
00-7F
00-7F
INSERTION EFFECT PARAMETER 7 MSB
INSERTION EFFECT PARAMETER 7 LSB
:
:
Ø
(*Depends on Insertion Type)
˛Ø˛˛
3E 2
00-7F
00-7F
INSERTION EFFECT PARAMETER 8 MSB
INSERTION EFFECT PARAMETER 8 LSB
:
:
Ø
(*Depends on Insertion Type)
˛Ø˛˛

MIDI Data Format
CP300 Owner’s Manual
131
Appendix
TOTAL SIZE 14
The EFFECT2 Parameter cannot be reset to its factory setting with XG SYSTEM ON.
The second byte of the address is considered as an Insertion effect number.
n: insertion effect number (n = 0 – 2)
For effect types that do not require MSB, the Parameters for Address 02 – 0B will be received and the Parameters for Address 30 – 42 will not be received.
For effect types that require MSB, the Parameters for Address 30 – 42 will be received and the Parameters for Address 02 – 0B will not be received.
When Bulk Dumps that include Effect Type data are transmitted, the Parameters for Address 02-0B will always be transmitted. But, effects that require MSB, when the bulk dump is received the
Parameters for Address 02 – 0B will not be received.
MIDI Parameter Change table (MULTI PART)
TOTAL SIZE 29
40 2
00-7F
00-7F
INSERTION EFFECT PARAMETER 9 MSB
INSERTION EFFECT PARAMETER 9 LSB
:
:
Ø
(*Depends on Insertion Type)
˛Ø˛˛
42 2
00-7F
00-7F
INSERTION EFFECT PARAMETER 10 MSB
INSERTION EFFECT PARAMETER 10 LSB
:
:
Ø
(*Depends on Insertion Type)
Ø
(VOICE EDIT)
Ø˛ Ø
Address
(H)
Size
(H)
Data
(H)
Parameter Description
XG Default
(H)
MIDI Reception (respond/ignore) MIDI Transmission (generated data)
REC
Song
Main
Layer
Left
Left Layer
Keyboard
Panel
(main generation
method)
Song Midi
Recorded
from
panel
08 nn 00 1 00-20 NOT USED ˛˛ ˛ ˛ ˛˛˛
01 1 00-7F BANK SELECT MSB 0...127
part10=7F,
other parts=00
ØØ ˛ ˛ Ø˛˛
02 1 00-7F BANK SELECT LSB 0...127 00 Ø Ø ˛ ˛ Ø ˛ ˛
03 1 00-7F PROGRAM NUMBER 1...128 00 Ø Ø ˛ ˛ Ø ˛ ˛
04 1
00-0F,
7F
Rcv CHANNEL 1...16, OFF Part No. Ø ˛ ˛ ˛ Ø ˛ ˛
05 1 00-01 MONO/POLY MODE MONO, POLY 01 Ø ˛ ˛ ˛ Ø ˛ ˛
06 1 00-02
SAME NOTE NUMBER KEY ON
ASSIGN
SINGLE, MULTI, INST
(for Drum)
01 Ø ˛ ˛ ˛ Ø ˛ ˛
07 1 00-03 PART MODE
NORMAL, DRUM,
DRUMS1...2
part10=02,
other parts=00
Ø˛ ˛
Ø
(Drum Voice)
Ø˛ Ø
08 1 28-58 NOTE SHIFT -24...0...+24 [semitones] 40 Ø Ø ˛ ˛ Ø ˛ ˛
09
0A
2
00-0F
00-0F
DETUNE
-12.8...0...+12.7 [Hz]
1st bit3-0 → bit7-4
2nd bit3-0 → bit3-0
08 00 Ø Ø ˛ ˛ Ø ˛ ˛
0B 1 00-7F VOLUME 0...127 64 Ø Ø ˛ ˛ Ø ˛ ˛
0C 1 00-7F VELOCITY SENSE DEPTH 0...127 40 Ø Ø ˛
Ø
(VOICE EDIT)
Ø˛ Ø
0D 1 00-7F VELOCITY SENSE OFFSET 0...127 40 Ø Ø ˛
Ø
(VOICE EDIT)
Ø˛ Ø
0E 1 00-7F PAN RND, L63...C...R63 40 Ø Ø ˛ ˛ Ø ˛ ˛
0F 1 00-7F NOTE LIMIT LOW C-2...G8 00 Ø Ø ˛ ˛ Ø ˛ ˛
10 1 00-7F NOTE LIMIT HIGH C-2...G8 7F Ø Ø ˛ ˛ Ø ˛ ˛
11 1 00-7F DRY LEVEL 0...127 7F Ø Ø ˛ ˛ Ø ˛ ˛
12 1 00-7F CHORUS SEND 0...127 00 Ø Ø ˛ ˛ Ø ˛ ˛
13 1 00-7F REVERB SEND 0...127 28 Ø Ø ˛ ˛ Ø ˛ ˛
14 1 00-7F VARIATION SEND 0...127 00 Ø Ø ˛ ˛ Ø ˛ ˛
15 1 00-7F VIBRATO RATE -64...0...+63 40 Ø Ø ˛ ˛ Ø ˛ ˛
16 1 00-7F VIBRATO DEPTH -64...0...+63 40 Ø Ø ˛ ˛ Ø ˛ ˛
17 1 00-7F VIBRATO DELAY -64...0...+63 40 Ø Ø ˛ ˛ Ø ˛ ˛
18 1 00-7F FILTER CUTOFF FREQUENCY -64...0...+63 40 Ø Ø ˛ ˛ Ø ˛ ˛
19 1 00-7F FILTER RESONANCE -64...0...+63 40 Ø Ø ˛ ˛ Ø ˛ ˛
1A 1 00-7F EG ATTACK TIME -64...0...+63 40 Ø Ø ˛ ˛ Ø ˛ ˛
1B 1 00-7F EG DECAY TIME -64...0...+63 40 Ø Ø ˛ ˛ Ø ˛ ˛
1C 1 00-7F EG RELEASE TIME -64...0...+63 40 Ø Ø ˛ ˛ Ø ˛ ˛
1D 1 28-58 MW PITCH CONTROL -24...0...+24 [semitones] 40 Ø Ø ˛ ˛ Ø ˛ ˛
1E 1 00-7F MW LOW PASS FILTER CONTROL -9600...0...+9450 [cent] 40 Ø Ø ˛ ˛ Ø ˛ ˛
1F 1 00-7F MW AMPLITUDE CONTROL -100...0...+100 [%] 40 Ø Ø ˛ ˛ Ø ˛ ˛
20 1 00-7F MW LFO PMOD DEPTH 0...127 0A Ø Ø ˛ ˛ Ø ˛ ˛
21 1 00-7F MW LFO FMOD DEPTH 0...127 00 Ø Ø ˛ ˛ Ø ˛ ˛
22 1 00-7F MW LFO AMOD DEPTH 0...127 00 Ø Ø ˛ ˛ Ø ˛ ˛
23 1 28-58 BEND PITCH CONTROL -24...0...+24 [semitones] 42 Ø Ø ˛ ˛ Ø ˛ ˛
24 1 00-7F BEND LOW PASS FILTER CONTROL -9600...0...+9450 [cent] 40 Ø Ø ˛ ˛ Ø ˛ ˛
25 1 00-7F BEND AMPLITUDE CONTROL -100...0...+100 [%] 40 Ø Ø ˛ ˛ Ø ˛ ˛
26 1 00-7F BEND LFO PMOD DEPTH 0...127 00 Ø Ø ˛ ˛ Ø ˛ ˛
27 1 00-7F BEND LFO FMOD DEPTH 0...127 00 Ø Ø ˛ ˛ Ø ˛ ˛
28 1 00-7F BEND LFO AMOD DEPTH 0...127 00 Ø Ø ˛ ˛ Ø ˛ ˛
Address
(H)
Size
(H)
Data
(H)
Parameter Description
XG Default
(H)
MIDI Reception (respond/ignore) MIDI Transmission (generated data)
REC
Song
Main
Layer
Left
Left Layer
Keyboard
Panel
(main generation
method)
Song Midi
Recorded
from
panel
30 1 00-01 Rcv PITCH BEND OFF, ON 01 Ø ˛ ˛ ˛ Ø ˛ ˛
31 1 00-01 Rcv CH AFTER TOUCH (CAT) OFF, ON 01 Ø ˛ ˛ ˛ Ø ˛ ˛
32 1 00-01 Rcv PROGRAM CHANGE OFF, ON 01 Ø ˛ ˛ ˛ Ø ˛ ˛
33 1 00-01 Rcv CONTROL CHANGE OFF, ON 01 Ø ˛ ˛ ˛ Ø ˛ ˛
34 1 00-01 Rcv POLY AFTER TOUCH (PAT) OFF, ON 01 Ø ˛ ˛ ˛ Ø ˛ ˛
35 1 00-01 Rcv NOTE MESSAGE OFF, ON 01 Ø ˛ ˛ ˛ Ø ˛ ˛
36 1 00-01 Rcv RPN OFF, ON 01 Ø ˛ ˛ ˛ Ø ˛ ˛
37 1 00-01 Rcv NRPN OFF, ON
XGmode=01,
GMmode=00
Ø˛ ˛ ˛ Ø˛˛
38 1 00-01 Rcv MODULATION OFF, ON 01 Ø ˛ ˛ ˛ Ø ˛ ˛
39 1 00-01 Rcv VOLUME OFF, ON 01 Ø ˛ ˛ ˛ Ø ˛ ˛
3A 1 00-01 Rcv PAN OFF, ON 01 Ø ˛ ˛ ˛ Ø ˛ ˛
3B 1 00-01 Rcv EXPRESSION OFF, ON 01 Ø ˛ ˛ ˛ Ø ˛ ˛
3C 1 00-01 Rcv HOLD1 OFF, ON 01 Ø ˛ ˛ ˛ Ø ˛ ˛
3D 1 00-01 Rcv PORTAMENTO OFF, ON 01 Ø ˛ ˛ ˛ Ø ˛ ˛
3E 1 00-01 Rcv SOSTENUTO OFF, ON 01 Ø ˛ ˛ ˛ Ø ˛ ˛
3F 1 00-01 Rcv SOFT PEDAL OFF, ON 01 Ø ˛ ˛ ˛ Ø ˛ ˛
40 1 00-01 Rcv BANK SELECT OFF, ON 01 Ø ˛ ˛ ˛ Ø ˛ ˛
41 1 00-7F SCALE TUNING C -63...0...+63 [cent] 40 Ø Ø ˛
Ø
(Other Setting)
Ø˛ Ø

MIDI Data Format
CP300 Owner’s Manual
132
Appendix
TOTAL SIZE 3F
TOTAL SIZE 04
TOTAL SIZE 0C
nn = PART NUMBER
If there is a Drum Voice assigned to the part, the following parameters are ineffective.
• BANK SELECT LSB
• MONO/POLY MODE
• SCALE TUNING
• PORTAMENTO
• PITCH EG
• FILTER MODULATION DEPTH (FMOD DEPTH)
• AMPLITUDE MODULATION DEPTH (AMOD DEPTH)
42 1 00-7F SCALE TUNING C# -63...0...+63 [cent] 40 Ø Ø ˛
Ø
(Other Setting)
Ø˛ Ø
43 1 00-7F SCALE TUNING D -63...0...+63 [cent] 40 Ø Ø ˛
Ø
(Other Setting)
Ø˛ Ø
44 1 00-7F SCALE TUNING D# -63...0...+63 [cent] 40 Ø Ø ˛
Ø
(Other Setting)
Ø˛ Ø
45 1 00-7F SCALE TUNING E -63...0...+63 [cent] 40 Ø Ø ˛
Ø
(Other Setting)
Ø˛ Ø
46 1 00-7F SCALE TUNING F -63...0...+63 [cent] 40 Ø Ø ˛
Ø
(Other Setting)
Ø˛ Ø
47 1 00-7F SCALE TUNING F# -63...0...+63 [cent] 40 Ø Ø ˛
Ø
(Other Setting)
Ø˛ Ø
48 1 00-7F SCALE TUNING G -63...0...+63 [cent] 40 Ø Ø ˛
Ø
(Other Setting)
Ø˛ Ø
49 1 00-7F SCALE TUNING G# -63...0...+63 [cent] 40 Ø Ø ˛
Ø
(Other Setting)
Ø˛ Ø
4A 1 00-7F SCALE TUNING A -63...0...+63 [cent] 40 Ø Ø ˛
Ø
(Other Setting)
Ø˛ Ø
4B 1 00-7F SCALE TUNING A# -63...0...+63 [cent] 40 Ø Ø ˛
Ø
(Other Setting)
Ø˛ Ø
4C 1 00-7F SCALE TUNING B -63...0...+63 [cent] 40 Ø Ø ˛
Ø
(Other Setting)
Ø˛ Ø
4D 1 28-58 CAT PITCH CONTROL -24...0...+24 [semitones] 40 Ø Ø ˛ ˛ Ø ˛ ˛
4E 1 00-7F CAT LOW PASS FILTER CONTROL -9600...0...+9450 [cent] 40 Ø Ø ˛ ˛ Ø ˛ ˛
4F 1 00-7F CAT AMPLITUDE CONTROL -100...0...+100 [%] 40 Ø Ø ˛ ˛ Ø ˛ ˛
50 1 00-7F CAT LFO PMOD DEPTH 0...127 00 Ø Ø ˛ ˛ Ø ˛ ˛
51 1 00-7F CAT LFO FMOD DEPTH 0...127 00 Ø Ø ˛ ˛ Ø ˛ ˛
52 1 00-7F CAT LFO AMOD DEPTH 0...127 00 Ø Ø ˛ ˛ Ø ˛ ˛
53 1 28-58 PAT PITCH CONTROL -24...0...+24 [semitones] 40 Ø ˛ ˛ ˛ Ø ˛ ˛
54 1 00-7F PAT LOW PASS FILTER CONTROL -9600...0...+9450 [cent] 40 Ø ˛ ˛ ˛ Ø ˛ ˛
55 1 00-7F PAT AMPLITUDE CONTROL -100...0...+100 [%] 40 Ø ˛ ˛ ˛ Ø ˛ ˛
56 1 00-7F PAT LFO PMOD DEPTH 0...127 00 Ø ˛ ˛ ˛ Ø ˛ ˛
57 1 00-7F PAT LFO FMOD DEPTH 0...127 00 Ø ˛ ˛ ˛ Ø ˛ ˛
58 1 00-7F PAT LFO AMOD DEPTH 0...127 00 Ø ˛ ˛ ˛ Ø ˛ ˛
59 1 00-5F AC1 CONTROLLER NUMBER 0...95 10 Ø ˛ ˛ ˛ Ø ˛ ˛
5A 1 28-58 AC1 PITCH CONTROL -24...0...+24 [semitones] 40 Ø ˛ ˛ ˛ Ø ˛ ˛
5B 1 00-7F AC1 LOW PASS FILTER CONTROL -9600...0...+9450 [cent] 40 Ø ˛ ˛ ˛ Ø ˛ ˛
5C 1 00-7F AC1 AMPLITUDE CONTROL -100...0...+100 [%] 40 Ø ˛ ˛ ˛ Ø ˛ ˛
5D 1 00-7F AC1 LFO PMOD DEPTH 0...127 00 Ø ˛ ˛ ˛ Ø ˛ ˛
5E 1 00-7F AC1 LFO FMOD DEPTH 0...127 00 Ø ˛ ˛ ˛ Ø ˛ ˛
5F 1 00-7F AC1 LFO AMOD DEPTH 0...127 00 Ø ˛ ˛ ˛ Ø ˛ ˛
60 1 00-5F AC2 CONTROLLER NUMBER 0...95 11 Ø ˛ ˛ ˛ Ø ˛ ˛
61 1 28-58 AC2 PITCH CONTROL -24...0...+24 [semitones] 40 Ø ˛ ˛ ˛ Ø ˛ ˛
62 1 00-7F AC2 LOW PASS FILTER CONTROL -9600...0...+9450 [cent] 40 Ø ˛ ˛ ˛ Ø ˛ ˛
63 1 00-7F AC2 AMPLITUDE CONTROL -100...0...+100 [%] 40 Ø ˛ ˛ ˛ Ø ˛ ˛
64 1 00-7F AC2 LFO PMOD DEPTH 0...127 00 Ø ˛ ˛ ˛ Ø ˛ ˛
65 1 00-7F AC2 LFO FMOD DEPTH 0...127 00 Ø ˛ ˛ ˛ Ø ˛ ˛
66 1 00-7F AC2 LFO AMOD DEPTH 0...127 00 Ø ˛ ˛ ˛ Ø ˛ ˛
67 1 00-01 PORTAMENTO SWITCH OFF, ON 00 Ø Ø ˛ ˛ Ø ˛ ˛
68 1 00-7F PORTAMENTO TIME 0...127 00 Ø Ø ˛ ˛ Ø ˛ ˛
69 1 00-7F PITCH EG INITIAL LEVEL -64...0...+63 40 Ø ˛ ˛ ˛ Ø ˛ ˛
6A 1 00-7F PITCH EG ATTACK TIME -64...0...+63 40 Ø ˛ ˛ ˛ Ø ˛ ˛
6B 1 00-7F PITCH EG RELEASE LEVEL -64...0...+63 40 Ø ˛ ˛ ˛ Ø ˛ ˛
6C 1 00-7F PITCH EG RELEASE TIME -64...0...+63 40 Ø ˛ ˛ ˛ Ø ˛ ˛
6D 1 01-7F VELOCITY LIMIT LOW 1...127 01 Ø ˛ ˛ ˛ Ø ˛ ˛
6E 1 01-7F VELOCITY LIMIT HIGH 1...127 7F Ø ˛ ˛ ˛ Ø ˛ ˛
70 1 NOT USED – – – – – – – –
71 1 NOT USED – – – – – – – –
72 1 00-7F EQ BASS GAIN -12dB...+12dB 40 Ø Ø ˛
Ø
(VOICE EDIT)
Ø˛ Ø
73 1 00-7F EQ TREBLE GAIN -12dB...+12dB 40 Ø Ø ˛
Ø
(VOICE EDIT)
Ø˛ Ø
74 1 NOT USED – – – – – – – –
75 1 NOT USED – – – – – – – –
76 1 04-28 EQ BASS FREQUENCY 32...2.0k[Hz] 0C Ø Ø ˛
Ø
(VOICE EDIT)
Ø˛ Ø
77 1 1C-3A EQ TREBLE FREQUENCY 500...16.0k[Hz] 36 Ø Ø ˛
Ø
(VOICE EDIT)
Ø˛ Ø
78 1 NOT USED – – – – – – – –
79 1 NOT USED – – – – – – – –
7A 1 NOT USED – – – – – – – –
7B 1 NOT USED – – – – – – – –
7C 1 NOT USED – – – – – – – –
7D 1 NOT USED – – – – – – – –
7E 1 NOT USED – – – – – – – –
7F 1 NOT USED – – – – – – – –
Address
(H)
Size
(H)
Data
(H)
Parameter Description
XG Default
(H)
MIDI Reception (respond/ignore) MIDI Transmission (generated data)
REC
Song
Main
Layer
Left
Left Layer
Keyboard
Panel
(main generation
method)
Song Midi
Recorded
from
panel

MIDI Data Format
CP300 Owner’s Manual
133
Appendix
MIDI Parameter Change table (DRUM SETUP)
TOTAL SIZE 10
TOTAL SIZE 0E
n: Drum Setup Number (0-1)
rr: note number (0D-5B)
In the following cases, the PF-500 will initialize all Drum Setups.
XG SYSTEM ON received
GM SYSTEM ON received
DRUM SETUP RESET received (only when in XG mode)
When a part to which a Drum Setup is assigned receives a program change, the assigned Drum Setup will be initialized.
If the same Drum Setup is assigned to two or more parts, changes in Drum Setup parameters (including program changes) will apply to all parts to which it is assigned.
System Exclusive Messages (1)
*Not Received when Receive Parameter SysEx is set to off.
*Not transmitted when Transmit Parameter SysEx is set to off.
System Exclusive Messages (Universal Realtime messages)
System Exclusive Messages (Universal Non Realtime messages)
Address
(H)
Size
(H)
Data
(H)
Parameter Description
XG Default
(H)
MIDI Reception (respond/ignore) MIDI Transmission (generated data)
REC
Song
Main
Layer
Left
Left Layer
Keyboard
Panel
(main generation
method)
Song Midi
Recorded
from
panel
3n rr 00 1 00-7F PITCH COARSE -64...0...+63 40 Ø ˛ ˛ ˛ Ø ˛ ˛
01 1 00-7F PITCH FINE -64...0...+63 [cent] 40 Ø ˛ ˛ ˛ Ø ˛ ˛
02 1 00-7F LEVEL 0...127
Depends on the
note
Ø˛ ˛ ˛ Ø˛˛
03 1 00-7F ALTERNATE GROUP OFF, 1...127
Depends on the
note
Ø˛ ˛ ˛ Ø˛˛
04 1 00-7F PAN RND, L63...C...R63
Depends on the
note
Ø˛ ˛ ˛ Ø˛˛
05 1 00-7F REVERB SEND 0...127
Depends on the
note
Ø˛ ˛ ˛ Ø˛˛
06 1 00-7F CHORUS SEND 0...127
Depends on the
note
Ø˛ ˛ ˛ Ø˛˛
07 1 00-7F VARIATION SEND 0...127 7F Ø ˛ ˛ ˛ Ø ˛ ˛
08 1 00-01 KEY ASSIGN SINGLE, MULTI 00 Ø ˛ ˛ ˛ Ø ˛ ˛
09 1 00-01 Rcv NOTE OFF OFF, ON
Depends on the
note
Ø˛ ˛ ˛ Ø˛˛
0A 1 00-01 Rcv NOTE ON OFF, ON 01 Ø ˛ ˛ ˛ Ø ˛ ˛
0B 1 00-7F
LOW PASS FILTER CUTOFF
FREQUENCY
-64...0...+63 40 Ø ˛ ˛ ˛ Ø ˛ ˛
0C 1 00-7F LOW PASS FILTER RESONANCE -64...0...+63 40 Ø ˛ ˛ ˛ Ø ˛ ˛
0D 1 00-7F EG ATTACK RATE -64...0...+63 40 Ø ˛ ˛ ˛ Ø ˛ ˛
0E 1 00-7F EG DECAY1 RATE -64...0...+63 40 Ø ˛ ˛ ˛ Ø ˛ ˛
0F 1 00-7F EG DECAY2 RATE -64...0...+63 40 Ø ˛ ˛ ˛ Ø ˛ ˛
20 1 00-7F EQ BASS GAIN -12...+12 [dB] 40 Ø ˛ ˛ ˛ Ø ˛ ˛
21 1 00-7F EQ TREBLE GAIN -12...+12 [dB] 40 Ø ˛ ˛ ˛ Ø ˛ ˛
22 1 NOT USED – – – – – – – –
23 1 NOT USED – – – – – – – –
24 1 04-28 EQ BASS FREQUENCY 32...2.0k [Hz] 0C Ø ˛ ˛ ˛ Ø ˛ ˛
25 1 1C-3A EQ TREBLE FREQUENCY 500...16.0k [Hz] 36 Ø ˛ ˛ ˛ Ø ˛ ˛
26 1 NOT USED – – – – – – – –
27 1 NOT USED – – – – – – – –
28 1 NOT USED – – – – – – – –
29 1 NOT USED – – – – – – – –
2A 1 NOT USED – – – – – – – –
2B 1 NOT USED – – – – – – – –
2C 1 NOT USED – – – – – – – –
2D 1 NOT USED – – – – – – – –
MIDI Event Data Format
MIDI Reception
(effective or not for each part)
MIDI Reception
(affecting the
panel)
MIDI Transmission
(generated data)
REC
Song
Main
Layer
Left
Left Layer
Keyboard
Panel (main
generation
method)
Song Midi
Recorded
from
panel
Master
Volume
F0 7F XN 04 01 SS TT F7
Ø˛ ˛ ˛ ˛
˛
(Output as XG
Master Volume)
˛˛
11110000 F0
= Exclusive status
01111111 7F
= Universal Real Time
0xxxnnnn XN
= When N is received N = 0-F, whichever is
received. X = ignored
00000100 04
= Sub-ID #1 = Device Control Message
00000001 01
= Sub-ID #2 = Master Volume
0sssssss SS
= Volume LSB
0ttttttt TT
= Volume MSB
11110111 F7
= End of Exclusive
MIDI Event Data Format
MIDI Reception
(effective or not for each part)
MIDI Reception
(affecting the
panel)
MIDI Transmission
(generated data)
REC
Song
Main
Layer
Left
Left Layer
Keyboard
Panel (main
generation
method)
Song Midi
Recorded
from
panel
GM1
System On
F0 7E XN 09 01 F7
Ø˛ ˛
Ø
(VOICE EDIT
Reverb Type
Chorus Type)
˛Ø˛Ø
11110000 F0
= Exclusive status
01111110 7E
= Universal Non-Real Time
0xxxnnnn XN
= When N is received N = 0-F, whichever is
received. X = ignored
00001001 09
= Sub-ID #1 = General MIDI Message
00000001 01
= Sub-ID #2 = General MIDI On
11110111 F7
= End of Exclusive
Ø: Available

MIDI Data Format
CP300 Owner’s Manual
134
Appendix
System Exclusive Messages (2)
*Not received when the Receive Parameter SysEx is set to off.
*Not transmitted when the Transmit Parameter SysEx is set to off.
System Exclusive Messages (XG)
MIDI Event Data Format
MIDI Reception
(effective or not for each part)
MIDI Reception
(affecting the
panel)
MIDI Transmission
(generated data)
Song
Main
Layer
Left
Left Layer
Keyboard
Panel (main
generation
method)
Song Midi
XG Parameter
Change
F0 43 1n 4C hh mm ll dd ... F7
Ø
*Refer to Parameter Change
Table
–
Ø
*Refer to Parameter
Change Table
˛
11110000 F0
= Exclusive status
01000011 43
= YAMAHA ID
0001nnnn 1n
= Device Number n = always 0 (when transmit),
n = 0-F (when receive)
01001100 4C
= Model ID
0hhhhhhh hh
= Address High
0mmmmmmm mm
= Address Mid
0lllllll ll
= Address Low
0ddddddd dd
= Data
:
:
11110111 F7
= End of Exclusive
XG Bulk Dump
F0 43 0n 4C aa bb hh mm ll dd ... dd cc F7
Ø
*Refer to Parameter Change
Table
–
Ø
*Refer to Parameter
Change Table
˛
11110000 F0
= Exclusive status
01000011 43
= YAMAHA ID
0000nnnn 0n
= Device Number n = always 0 (when transmit),
n = 0-F (when receive)
01001100 4C
= Model ID
0aaaaaaa aa
= Byte Count MSB
0bbbbbbb bb
= Byte Count LSB
0hhhhhhh hh
= Address High
0mmmmmmm mm
= Address Mid
0lllllll ll
= Address Low
0ddddddd dd
= Data
:
:
0ddddddd dd
= Data
0ccccccc cc
= Checksum
11110111 F7
= End of Exclusive
XG Parameter
Request
F0 43 3n 4C hh mm ll F7
Ø
*Refer to Parameter Change
Table
–˛
11110000 F0
= Exclusive status
01000011 43
= YAMAHA ID
0011nnnn 3n
= Device Number n = always 0 (when transmit),
n = 0-F (when receive)
01001100 4C
= Model ID
0hhhhhhh hh
= Address High
0mmmmmmm mm
= Address Mid
0lllllll ll
= Address Low
11110111 F7
= End of Exclusive
XG Dump
Request
F0 43 2n 4C hh mm ll dd F7
Ø
*Refer to Parameter Change
Table
–˛
11110000 F0
= Exclusive status
01000011 43
= YAMAHA ID
0010nnnn 2n
= Device Number n = always 0 (when transmit),
n = 0-F (when receive)
01001100 4C
= Model ID
0hhhhhhh hh
= Address High
0mmmmmmm mm
= Address Mid
0lllllll ll
= Address Low
11110111 F7
= End of Exclusive
MIDI Data Format
CP300 Owner’s Manual
135
Appendix
System Exclusive Message (Preset Voice)
*For each Depth value, the reset value is 40H = Voice parameter.
System Exclusive Message (Other)
MIDI Event Data Format
MIDI Reception
(effective or not for each part)
MIDI Reception
(affecting the
panel)
MIDI Transmission
(generated data)
Song
Main
Layer
Left
Left Layer
Keyboard
Panel (main
generation
method)
Song Midi
String
Resonance
Depth
F0 43 73 01 50 11 0n 02 dd F7
ØØ ˛
Ø
(Other Setting)
Ø
(Other Setting)
Ø˛
11110000 F0
= Exclusive status
01000011 43
= YAMAHA ID
01110011 73
= Clavinova ID
00000001 01
= Model ID (Clavinova common ID)
01010000 50
= Sub ID
00010001 11
= Sub ID
0000nnnn 0n
= Channel (00 – 0F)
00000010 02
= Sub ID (String Resonance Depth)
0ddddddd dd
= Depth (00 – 48)
11110111 F7
= End of Exclusive
Sustain
Sampling
Depth
F0 43 73 01 50 11 0n 03 dd F7
ØØ ˛
Ø
(Other Setting)
Ø
(Other Setting)
Ø˛
11110000 F0
= Exclusive status
01000011 43
= YAMAHA ID
01110011 73
= Clavinova ID
00000001 01
= Model ID (Clavinova common ID)
01010000 50
= Sub ID
00010001 11
= Sub ID
0000nnnn 0n
= Channel (00 – 0F)
00000011 03
= Sub ID (Sustain Sampling Depth)
0ddddddd dd
= Depth (00 – 48)
11110111 F7
= End of Exclusive
Key-off
Sampling
Depth
F0 43 73 01 50 11 0n 04 dd F7
ØØ ˛
Ø
(Other Setting)
Ø
(Other Setting)
Ø˛
11110000 F0
= Exclusive status
01000011 43
= YAMAHA ID
01110011 73
= Clavinova ID
00000001 01
= Model ID (Clavinova common ID)
01010000 50
= Sub ID
00010001 11
= Sub ID
0000nnnn 0n
= Channel (00 – 0F)
00000100 04
= Sub ID (Key-off Sampling Depth)
0ddddddd dd
= Depth (00 – 50)
11110111 F7
= End of Exclusive
Soft Pedal
Depth
F0 43 73 01 50 11 0n 05 dd F7
ØØ ˛
Ø
(Other Setting)
Ø
(Other Setting)
Ø˛
11110000 F0
= Exclusive status
01000011 43
= YAMAHA ID
01110011 73
= Clavinova ID
00000001 01
= Model ID (Clavinova common ID)
01010000 50
= Sub ID
00010001 11
= Sub ID
0000nnnn 0n
= Channel (00 – 0F)
00000101 05
= Sub ID (Soft Pedal Depth)
0ddddddd dd
= Depth (00 – 7F)
11110111 F7
= End of Exclusive
MIDI Event Data Format
MIDI Reception
(effective or not for each part)
MIDI Reception
(affecting the
panel)
MIDI Transmission
(generated data)
Song
Main
Layer
Left
Left Layer
Keyboard
Panel (main
generation
method)
Song Midi
MIDI Master
Tuning
F0 43 1n 27 30 00 00 Om Ol cc F7
Ø
Ø
(Other Setting)
˛Ø˛
11110000 F0
= Exclusive status
01000011 43
= YAMAHA ID
0001nnnn 1n
n = always 0 (when transmit), n = 0-F (when receive)
00100111 27
= Model ID of TG100
00110000 30
= Address High
00000000 00
= Address Mid
00000000 00
= Address Low
0000mmmm 0m
= Master Tune MSB
0000llll 0l
= Master Tune LSB
0ccccccc cc
= irrelevant
11110111 F7
= End of Exclusive

MIDI Data Format
CP300 Owner’s Manual
136
Appendix
System Exclusive Message (Data Bulk )
MIDI Event Data Format
MIDI Reception
(effective or not for each part)
MIDI Reception
(affecting the panel)
MIDI Transmission
(generated data)
Song
Main
Layer
Left
Left Layer
Keyboard
Panel (main
generation
method)
Song Midi
Data Bulk
Dump
F0 43 0n xx yy zz aa bb cc dd hh mm ll dd ... dd sum F7
11110000 F0
= Exclusive status
01000011 43
= YAMAHA ID
0000nnnn 0n
= Device Number n = always 0
0xxxxxxx 7F
= Model ID High
0zzzzzzz 04
= Model ID Low
0aaaaaaa aa
= Byte Count MSB
0bbbbbbb bb
= Byte Count LSB
0ccccccc cc
= The number of available MSB
0ddddddd dd
= The number of available LSB
0hhhhhhh hh
= Address High
0mmmmmmm mm
= Address Mid
0lllllll ll
= Address Low
0ddddddd dd
= Data
:
:
0ddddddd dd
= Data
0ccccccc cc
= Checksum
Data Bulk
Dump Request
F0 43 2n xx yy zz hh mm ll F7
11110000 F0
= Exclusive status
01000011 43
= YAMAHA ID
0000nnnn 2n
= Device Number n = always 0
0xxxxxxx 7F
= Model ID High
0zzzzzzz 04
= Model ID Low
0hhhhhhh hh
= Address High
0mmmmmmm mm
= Address Mid
0lllllll ll
= Address Low
Function Address High Address Mid Address Low
Bulk Header 10 00 00
Current
(End)
20 00
7F
00
7F
Performance
(End)
30 00
00
7F
00
:
7F
Voice Setting
(End)
40 00
00
7F
00
:
7F
Bulk Footer 11 00 00
–
–
–
–
–
–
Ø
–
–
–
–
Ø
–
–
–
–
Ø
(Other than the Data Bulk)
Ø
(Performance)
–
(Voice Setting)
–
Ø
(Bulk)
Ø
(Bulk Current)
Ø
(Bulk
Performance)
Ø
(Bulk Voice)
Ø
(Bulk)
˛
˛
˛
˛
˛
Ø
(Bulk Request)
Ø
(Bulk Request)
Ø
(Bulk Request)
Ø
(Bulk Request)
Ø
(Bulk Request)
Function Address High Address Mid Address Low
Current,
Performance,
Voice Setting
00 00 00
–
– –
–
˛
˛
˛

CP300 Owner’s Manual
137
Appendix
TransmittedFunction... Recognized Remarks
Basic
Channel
Note
Number : True voice
Velocity
After
Touch
Pitch Bend
Control
Change
Prog
Change : True #
System Exclusive
Common : Song Pos.
: Song Sel.
: Tune
System : Clock
Real Time : Commands
: All Sound Off
Aux :
Reset
All
Cntrls
: Local ON/OFF
Mes- : All Notes OFF
sages: Active Sense
: Reset
Note :
Mode
Default
Changed
Note ON
Note OFF
Key's
Ch's
0,32
1
5
7,10,11
6,38
64,66,67
65
71,74
72,73
84,94
91,93
96-97
98-99
100-101
1-119
1 - 16
1 - 16
Ø 9nH,v=1-127
˛ 9nH,v=0
˛
˛
Ø
Ø
˛
Ø
Ø
Ø
˛
Ø
˛
˛
Ø
˛
˛
Ø
Ø (Assignable)
Ø
Ø
Ø
Ø
Ø
Ø
Ø
Ø
Ø
Ø
Ø
Ø
Ø
Ø
˛
Ø
0 - 127
**************
˛
˛
˛
Ø
Ø
˛
˛
˛
˛
Ø
˛
3
˛
**************
0 - 127
**************
Ø
Mode 1 : OMNI ON , POLY Mode 2 : OMNI ON ,MONO
Mode 3 : OMNI OFF, POLY Mode 4 : OMNI OFF,MONO
Ø Ø 0 - 24 semi
1 - 16
1 - 16
Ø 9nH,v=1-127
˛
Ø
Ø
˛
˛
˛
˛
Ø
Ø (120,126,127)
Ø (121)
˛ (122)
Ø (123-125)
Ø
˛
3
˛
˛
0 - 127
0 - 127
Ø
Ø : Yes
˛ : No
Default
Messages
Altered
YAMAHA [ Stage Piano ] Date :1-NOV-2005
CP300 MIDI Implementation Chart
Version : 1.0
Bank Select
Modulation
Portamento Time
Data Entry
Portamento
Sound Controller
Sound Controller
RPN Inc,Dec
NRPN LSB,MSB
RPN LSB,MSB
*1
Ø 0 - 127
*1= Transmission only
MIDI Implementation Chart

CP300 Owner’s Manual
138
Appendix
Specifications
*: Refer to the Effect Type List on page 114.
Specifications and descriptions in this owner’s manual are for information purposes only. Yamaha Corp. reserves the right to change or modify
products or specifications at any time without prior notice. Since specifications, equipment or options may not be the same in every locale,
please check with your Yamaha dealer.
Item CP300
Keyboard GH keyboard 88 keys (A-1 – C7)
Sound Source AWM Dynamic Stereo Sampling
Polyphony (max.) 128
Voice Selection Presets: 50 Voices
XG Voices: 480 Voices + 12 Drum kits
Performance 64 Performamces x 56 files (max.)
Effect* Reverb*, Chorus*, Master Equalizer, Variation effect*, Insertion effect* x 3
Controller Master Volume Dial, Pitch Bend Wheel, Modulation Wheel, Master Equalizer Slider, Zone Control
Slider, Song Volume Slider
Display 24 characters x 2 lines, LCD with back-light
Recording/Playback 16-track recording/playback, Tempo adjustment, max. capacity: 1.4 MB, 140,000 notes
Jacks/Connectors MIDI (IN/OUT/THRU), PHONES, INPUT (L/MONO, R), OUTPUT (L/MONO, R), OUTPUT (L/R),
ASSIGNABLE FOOT PEDAL (SUSTAIN/SOSTENUTO/SOFT/AUX), USB TO HOST, AC INLET
Main Amplifiers 30 W x 2
Speakers 13 cm x 2
Dimensions (W x D x H) 1391 x 460 x 170mm (54-3/4" x 18-1/8" x 6-15/16")
Weight 32.5 kg (71 lbs., 10 oz)
Accessories AC Power Cord, Foot Pedal FC3, Owner’s Manual

CP300 Owner’s Manual
139
Appendix
Index
Numerics
[1] – [16] buttons .......................................................... 73
A
A [–][+] buttons ............................................................ 15
[AC INLET] jack ............................................................ 11
Application Index .......................................................... 10
[ASSIGNABLE FOOT PEDAL] jacks ............................. 11
[AUX] jack ..................................................................... 33
AUX pedal ....................................................................33
B
B [– (NO)][+(YES)] buttons ........................................... 15
Bar ................................................................................ 42
Basic operation ............................................................. 15
Bulk Dump .................................................................... 66
C
C [–][+] button .............................................................. 15
Character Code ............................................................ 84
Chorus .......................................................................... 35
[CHORUS] button ......................................................... 35
Click .............................................................................. 38
[CLICK] button .............................................................. 38
Connections
computer ................................................................ 92
external audio equipment ...................................... 88
external instrument ................................................89
external MIDI keyboard ......................................... 90
[CONTRAST] knob ....................................................... 13
Current memory ............................................................ 82
D
D [–][+] buttons ............................................................ 15
Delete
Performance file ..................................................... 80
Song file ................................................................. 83
Demo Songs ................................................................. 23
Display
adjust the brightness ............................................. 13
settings .................................................................. 15
Dual .............................................................................. 29
E
Effect Data Assign Table ............................................ 123
Effect Parameter List ..................................................115
Effect Type List ........................................................... 114
Equalizer (EQ) .............................................................. 36
[EXIT] button ................................................................. 15
F
Factory Set .............................................................. 16, 71
Factory Setting List .....................................................101
Factory-programmed settings ......................................16
Fast Forward ................................................................. 50
Fast Rewind ..................................................................50
File ................................................................................17
G
GM System Level 1 .....................................................100
H
Headphones .................................................................12
I
INPUT [L/MONO][R] jack .............................................. 89
Insertion effect ..............................................................35
K
Keyboard part combinations ........................................27
L
Layer part ......................................................................27
Left Layer part ...............................................................27
Left part .........................................................................27
List
Effect Parameter List ............................................115
Effect Type List .................................................... 114
Factory Setting List .............................................. 101
Master Settings ....................................................102
Message List ..........................................................94
MIDI Settings ........................................................101
Other Settings ......................................................101
Preset Performance List .......................................106
Program Change List ........................................... 105
Song Settings .......................................................102
Voice List ..............................................................103
XG Drum Kit List ................................................... 112
XG Voice List ........................................................108
Load From Memory ....................................................... 79
M
Main part .......................................................................27
[MASTER] button ..........................................................39
[MASTER EDIT] button ................................................. 53
Master EQ ..................................................................... 36
MASTER EQ EDIT [▼][▲] buttons ................................72
Master Equalizer settings ............................................. 72
[MASTER EQUALIZER] sliders ..................................... 36
Master mode .................................................................39
Master settings ............................................................. 53
Master Volume .............................................................. 13
[MASTER VOLUME] dial ...............................................13
Memory .........................................................................49
Memory Backup ............................................................71

Index
CP300 Owner’s Manual
140
Appendix
Message List ................................................................94
MIDI [IN][OUT][THRU] connectors .............................. 90
MIDI channel ................................................................63
MIDI data compatibility ............................................... 100
MIDI Data Format .......................................................125
MIDI Implementation Chart ......................................... 137
[MIDI OUT] button ........................................................ 51
MIDI Panic .................................................................... 52
[MIDI SETTING] button ................................................. 64
MIDI Settings ................................................................ 63
Modulation wheel .......................................................... 34
O
[OTHER SETTING] button ............................................ 67
Other Settings ............................................................... 67
OUTPUT [L/MONO][R] jacks ........................................ 88
OUTPUT [L][R] jacks .................................................... 89
P
Panel Lock .................................................................... 51
[PANEL LOCK] button .................................................. 51
Parameter
Master Edit ............................................................. 54
MIDI Settings .........................................................65
Other Settings ........................................................ 68
Song Settings ......................................................... 86
Voice Edit ............................................................... 58
Part EQ .........................................................................36
Pedal ............................................................................. 33
Pedal functions ....................................................... 61, 62
Perf. Name .................................................................... 78
[PERFORM.FILE] button ............................................... 76
Performance ................................................................. 77
rename ................................................................... 78
save to a button ..................................................... 77
[PERFORMANCE] button ............................................. 40
Performance file
basic operation ...................................................... 76
defined ................................................................... 73
delete ..................................................................... 80
recall from the storage memory ............................. 79
rename ................................................................... 80
save as ................................................................... 79
Performance functions .................................................. 73
Performance parameters .............................................. 74
[PHONES] jack ............................................................. 12
Pitch Bend wheel .......................................................... 34
[POWER] switch ..................................................... 11, 12
Precautions ..................................................................... 4
Preset ...................................................................... 18, 49
Preset Performance file ................................................ 40
Preset Performance List .............................................106
Program Change List .................................................. 105
Q
Quantize ....................................................................... 86
R
[REC] button .................................................................42
Recording
Dual mode ..............................................................48
live performance ..............................................41, 42
Split mode .............................................................. 48
Recording Techniques
adding data ............................................................46
changing Tempo after recording ........................... 46
changing Voice after recording .............................46
overwriting ..............................................................46
re-recording parts .................................................. 44
Recording track ............................................................42
Rename
Performance ...........................................................78
Performance file ..................................................... 80
Song file .................................................................83
Rename File .................................................................. 80
Rename Song ...............................................................83
Reverb ..........................................................................35
[REVERB] button ........................................................... 35
S
Save
Performance ...........................................................77
Performance file ..................................................... 79
Recorded Song ......................................................82
Save As .........................................................................79
Save To Memory ........................................................... 82
Scale .............................................................................68
[SOFT] jack ................................................................... 33
Soft pedal ......................................................................33
Song ..............................................................................41
Song file
basic operation ......................................................81
defined ...................................................................81
delete .....................................................................83
rename ...................................................................83
save to memory ......................................................82
Song playback ..............................................................49
Song Repeat ................................................................. 87
SONG SELECT [N][O] buttons .........................42, 49
Song Settings ................................................................85
[SONG VOLUME] slider ................................................ 47
[SOSTENUTO] jack ....................................................... 33
Sostenuto pedal ............................................................33
[SPEAKER] button ........................................................ 52
Speakers (built-in) On/Off ............................................. 52
Specifications .............................................................138
Split ...............................................................................31
[SPLIT] button ............................................................... 31
Split Point ................................................................ 32, 69
Storage memory ............................................... 17, 73, 82
[SUSTAIN] jack ............................................................. 33
Sustain pedal ................................................................ 33
Synchro Start ................................................................ 50
System effect ................................................................35

Index
CP300 Owner’s Manual
141
Appendix
T
Tempo ........................................................................... 38
TEMPO [DOWN] [UP] buttons ...................................... 38
Time Signature .............................................................. 87
Touch ...................................................................... 61, 68
TRACK [1][2][3-16] buttons .................................... 42, 50
Transpose ..................................................................... 37
[TRANSPOSE] button ................................................... 37
Troubleshooting ............................................................ 98
Tune .............................................................................. 68
U
[USB] connector ........................................................... 92
V
VARIATION [▼][▲] buttons .......................................... 25
Voice ............................................................................. 25
Voice Edit ...................................................................... 56
[VOICE EDIT] button ..................................................... 56
Voice List .................................................................... 103
[VOICE/PERFORMANCE] button ...................... 25, 40, 73
Volume
adjusting each part ................................................ 28
adjusting Master Volume ................................. 13, 23
adjusting Song Volume .................................... 23, 47
X
XG ............................................................................... 100
XG Drum Kit List ......................................................... 112
XG Voice ....................................................................... 26
XG Voice List .............................................................. 108
Z
Zone Control ........................................................... 28, 39
[ZONE CONTROL] sliders ...................................... 28, 39

LIMITED 3-YEAR WARRANTY ON
DIGITAL PIANOS
(P, CP, YDP, DGX640, DGX650)
Thank you for selecting a YAMAHA product. YAMAHA products are designed and manufactured to provide a high level of defect-free
performance. Yamaha Corporation of America (“YAMAHA”) is proud of the experience and craftsmanship that goes into each and
every YAMAHA product. YAMAHA sells its products through a network of reputable, specially authorized dealers and is pleased to offer
you, the Original Owner, the following Limited Warranty, which applies only to products that have been (1) directly purchased from
YAMAHA’s authorized dealers in the fifty states of the USA and District of Columbia (the “Warranted Area) and (2) used exclusively in the
Warranted Area. YAMAHA suggests that you read the Limited Warranty thoroughly, and invites you to contact your authorized YAMAHA
dealer or YAMAHA Customer Service if you have any questions.
Coverage: YAMAHA will, at its option, repair or replace the product covered by this warranty if it becomes defective, malfunctions or
otherwise fails to conform with this warranty under normal use and service during the term of this warranty, without charge for labor or
materials. Repairs may be performed using new or refurbished parts that meet or exceed YAMAHA specifications for new parts. If
YAMAHA elects to replace the product, the replacement may be a reconditioned unit. You will be responsible for any installation or
removal charges and for any initial shipping charges if the product(s) must be shipped for warranty service. However, YAMAHA will pay
the return shipping charges to any destination within the USA if the repairs are covered by the warranty. This warranty does not cover
(a) damage, deterioration or malfunction resulting from accident, negligence, misuse, abuse, improper installation or operation or failure
to follow instructions according to the Owner’s Manual for this product; any shipment of the product (claims must be presented to the
carrier); repair or attempted repair by anyone other than YAMAHA or an authorized YAMAHA Service Center; (b) any unit which has
been altered or on which the serial number has been defaced, modified or removed; (c) normal wear and any periodic maintenance; (d)
deterioration due to perspiration, corrosive atmosphere or other external causes such as extremes in temperature or humidity; (e)
damages attributable to power line surge or related electrical abnormalities, lightning damage or acts of God; or (f) RFI/EMI
(Interference/noise) caused by improper grounding or the improper use of either certified or uncertified equipment, if applicable. Any
evidence of alteration, erasing or forgery of proof-of-purchase documents will cause this warranty to be void. This warranty covers only
the Original Owner and is not transferable.
In Order to Obtain Warranty Service: Warranty service will only be provided for defective products within the Warranted Area.
Contact your local authorized YAMAHA dealer who will advise you of the procedures to be followed. If this is not successful, contact
YAMAHA at the address, telephone number or website shown below. YAMAHA may request that you send the defective product to a
local authorized YAMAHA Servicer or authorize return of the defective product to YAMAHA for repair. If you are uncertain as to whether
a dealer has been authorized by YAMAHA, please contact YAMAHA’s Service Department at the number shown below, or check
Yamaha’s website at www.usa.yamaha.com. Product(s) shipped for service should be packed securely and must be accompanied by
a detailed explanation of the problem(s) requiring service, together with the original or a machine reproduction of the bill of sale or other
dated, proof-of-purchase document describing the product, as evidence of warranty coverage. Should any product submitted for
warranty service be found ineligible therefore, an estimate of repair cost will be furnished and the repair will be accomplished only if
requested by you and upon receipt of payment or acceptable arrangement for payment.
Limitation of Implied Warranties and Exclusion of Damages: ANY IMPLIED WARRANTIES, INCLUDING WARRANTIES OF
MERCHANTABILITY AND FITNESS FOR A PARTICULAR PURPOSE SHALL BE LIMITED IN DURATION TO THE APPLICABLE PERIOD
OF TIME SET FORTH ABOVE. YAMAHA SHALL NOT BE RESPONSIBLE FOR INCIDENTAL OR CONSEQUENTIAL DAMAGES OR FOR
DAMAGES BASED UPON INCONVENIENCE, LOSS OF USE, DAMAGE TO ANY OTHER EQUIPMENT OR OTHER ITEMS AT THE SITE
OF USE OR INTERRUPTION OF PERFORMANCES OR ANY CONSEQUENCES THEREOF. YAMAHA’S LIABILITY FOR ANY DEFECTIVE
PRODUCT IS LIMITED TO REPAIR OR REPLACEMENT OF THE PRODUCT, AT YAMAHA’S OPTION. SOME STATES DO NOT ALLOW
LIMITATIONS ON HOW LONG AN IMPLIED WARRANTY LASTS OR THE EXCLUSION OR LIMITATION OF INCIDENTAL OR
CONSEQUENTIAL DAMAGES, SO THE ABOVE LIMITATION OR EXCLUSION MAY NOT APPLY TO YOU. This Warranty gives you
specific legal rights, and you may also have other rights which vary from state to state. This is the only express warranty applicable to
the Product specified herein; Yamaha neither assumes nor authorizes anyone to assume for it any other express warranty.
If you have any questions about service received or if you need assistance in locating an authorized YAMAHA Servicer, please contact:
CUSTOMER SERVICE
Yamaha Corporation of America
6600 Orangethorpe Avenue, Buena Park, California 90620-1373
Telephone: 800-854-1569
www.usa.yamaha.com
Do not return any product to the above address without a written Return Authorization issued by YAMAHA.
© 2013 Yamaha Corporation of America.
02/15/13
DPWARPAD


C.S.G., Digital Musical Instruments Division
© 2006 - 2014 Yamaha Corporation
404MWCP*.*-01C0
Printed in Japan
WG78300
Yamaha Web Site (English only)
http:// ww w.yamahasynth.com/
Yamaha Downloads
http://download.yamaha.com/
