
Ivanti Secure Access Client Administration
Guide
22.2R1 - 22.7R3

Copyright Notice
This document is provided strictly as a guide. No guarantees can be provided or expected. This
document contains the confidential information and/or proprietary property of Ivanti, Inc. and its
affiliates (referred to collectively as “Ivanti”) and may not be disclosed or copied without prior written
consent of Ivanti.
Ivanti retains the right to make changes to this document or related product specifications and
descriptions, at any time, without notice. Ivanti makes no warranty for the use of this document and
assumes no responsibility for any errors that can appear in the document nor does it make a
commitment to update the information contained herein. For the most current product information,
please visit www.Ivanti.com.
Copyright © 2024, Ivanti, Inc. All rights reserved.
Protected by patents, see https://www.ivanti.com/patents.
Copyright © 2024, Ivanti, Inc. All Rights Reserved. Privacy and Legal.
Page 2 of 151

Contents
Revision History 5
Preface 6
Document conventions 6
Requesting Technical Support 8
Deploying Ivanti Secure Access Client 10
Ivanti Secure Access Client Installation Overview 10
Adding a Configuration to a New Ivanti Secure Access Client Installation 13
Installing Ivanti Secure Access Client from the Web 16
Launching Ivanti Secure Access Client from the Ivanti server Web Portal 17
Launching Ivanti Secure Access Client using URL 18
Installing Ivanti Secure Access Client on Windows Endpoints Using a Preconfiguration File 25
Installing Ivanti Secure Access Client on OS X Endpoints Using a Preconfiguration File 29
Ivanti Secure Access Client Command-line Launcher 31
Using jamCommand to Import Ivanti Connections 35
Using jamCommand to change DNS Cache settings 36
jamCommand Reference 37
Managing Server Certificate Authorities 39
Chromium Embedded Framework (CEF) Support 42
Using Ivanti Secure Access Client Interface 46
Ivanti Secure Access Client for Windows 60
Ivanti Secure Access Client for macOS 68
Ivanti Secure Access Client for Linux 69
User Experience 70
Ivanti Secure Access Client Configuration Overview 84
Ivanti Secure Access Client Status Icons 86
Installation Requirements 86
Ivanti Secure Access Client Error Messages Overview 87
Uninstalling Ivanti Secure Access Client 88
Uninstall Ivanti Secure Access Client from Windows 88
Uninstall Ivanti Secure Access Client from macOS 88
Uninstall Ivanti Secure Access Client using Intune 88
Ivanti Secure Access Client Deep Clean procedure 88
Rollback Ivanti Secure Access Client 91
Handling ISAC Upgrade failure 92
Accessing Ivanti Secure Access Client Error Messages on macOS Endpoints 92
Ivanti Secure Access Client Log Files 93
Deleting Ivanti Secure Access Client Log Files 97
Uploading Ivanti Secure Access Client Log Files 97
Predictable Ivanti Server Hostname Resolution with IPv6 100
Session Migration 101
Understanding Session Migration 101
Task Summary: Configuring Session Migration 104
Copyright © 2024, Ivanti, Inc. All Rights Reserved. Privacy and Legal.
Page 3 of 151

Configuring Session Migration for Ivanti Secure Access Client 105
Configuring an IF-MAP Federated Network for Session Migration 106
Customizing Ivanti Secure Access Client 109
Customizing Ivanti Secure Access Client Overview 109
Brand Packager Workflow 111
Setting Up the Ivanti Secure Access Client Customization Environment 112
Initializing the Ivanti Secure Access Client Customization Environment 112
Importing an Existing Customized Ivanti Secure Access Client Package 114
Editing Ivanti Secure Access Client User Interface Labels 115
Editing Ivanti Secure Access Client Messages 118
Adding Custom Graphics to Ivanti Secure Access Client 120
Customizing Ivanti Secure Access Client for Apple OS X Online Help 122
Validating Customizations to Ivanti Secure Access Client 123
Building the New Ivanti Secure Access Client Package 123
Testing the Ivanti Secure Access Client Package 124
Installing or Upgrading Ivanti Secure Access Client for Windows with a Branding Package 124
Installing or Upgrading Ivanti Secure Access Client for Apple OS X with a Branding Package 125
Installing a Branding Package Only 126
Ivanti Secure Access ClientAuthentication Types 128
RSA Authentication 128
Google Authentication 129
Certificate Authentication Support 131
YubiKey Authentication Support 137
Using Ivanti Secure Access Client with nZTA 144
nZTA Overview 144
On-Demand and Simultaneous Connection Handling 144
Disabling the nZTA Connection 145
Dynamic Policy Update and CARTA 148
Enrolling a User Device 149
Copyright © 2024, Ivanti, Inc. All Rights Reserved. Privacy and Legal.
Page 4 of 151

Revision History
The following table lists the revision history for this document:
Revision Date Feature Add/Update/Remove
22.7R3 July 2024 • Disable Secure DNS for
Embedded Edge Browser
• Uninstalling ISAC
• jamCommands for Admin
Mode only
• Updated section Using
jamCommand to
change DNS Cache
settings.
• Added Section
Uninstalling ISAC.
• Updated section Using
jamCommand to
Import Ivanti
Connections
22.7R2 June 2024 Removal of unsupported client
information
Removed Client Software
Feature Comparison
22.7R2 May 2024 Using jamCommand to change
DNS Cache settings
Added a section Using
jamCommand to change DNS
Cache settings.
22.7R1 January
2024
Ivanti Secure Access Client
Command-line Launcher
Updated the format to include
session Selection.
22.6R1 October
2023
None Typos and small error fixes.
22.3R1 January
2023
None Typos and small error fixes.
22.2R1 July 2022 Initial release as Ivanti Secure
Access Client; Previously Pulse
Client.
Complete rebranding to Ivanti
Secure Access Client.
Copyright © 2024, Ivanti. All Rights Reserved. Privacy and Legal.
Ivanti Secure Access Client Administration Guide 22.1R1 - 22.7R3

Preface
Document conventions
The document conventions describe text formatting conventions, command syntax conventions, and
important notice formats used in Ivanti technical documentation.
Text formatting conventions
Text formatting conventions such as boldface, italic, or Courier font may be used in the flow of the text
to highlight specific words or phrases.
Format Description
bold text Identifies command names
Identifies keywords and operands
Identifies the names of user-manipulated GUI elements
Identifies text to enter at the GUI
italic text Identifies emphasis
Identifies variables
Identifies document titles
Courier Font Identifies command output
Identifies command syntax examples
Command syntax conventions
Bold and italic text identify command syntax components. Delimiters and operators define groupings of
parameters and their logical relationships.
Convention Description
bold text Identifies command names, keywords, and command options.
Copyright © 2024, Ivanti, Inc. All Rights Reserved. Privacy and Legal.
Page 6 of 151
Preface

Convention Description
italic text Identifies a variable.
[ ] Syntax components displayed within square brackets are optional.
Default responses to system prompts are enclosed in square
brackets.
{ x | y | z } A choice of required parameters is enclosed in curly brackets
separated by vertical bars. You must select one of the options.
x | y A vertical bar separates mutually exclusive elements.
< > Non-printing characters, for example, passwords, are enclosed in
angle brackets.
... Repeat the previous element, for example, member[member...].
\ Indicates a “soft” line break in command examples. If a backslash
separates two lines of a command input, enter the entire command
at the prompt without the backslash.
bold text Identifies command names, keywords, and command options.
Notes and Warnings
Note, Attention, and Caution statements might be used in this document.
A Note provides a tip, guidance, or advice, emphasizes important information, or provides a
reference to related information.
ATTENTION
An Attention statement indicates a stronger note, for example, to alert you when traffic might be
interrupted or the device might reboot.
CAUTION
A Caution statement alerts you to situations that can be potentially hazardous to you or cause damage
to hardware, firmware, software, or data.
Copyright © 2024, Ivanti, Inc. All Rights Reserved. Privacy and Legal.
Page 7 of 151
Preface

Requesting Technical Support
Technical product support is available through the Ivanti Global Support Center (PSGSC). If you have a
support contract, file a ticket with PSGSC.
• Product warranties—For product warranty information, visit
https://forums.ivanti.com/s/contactsupport/product-service-policies/
Self-Help Online Tools and Resources
For quick and easy problem resolution, Ivanti provides an online self-service portal called the Customer
Support Center (CSC) that provides you with the following features:
• Find CSC offerings: https://forums.ivanti.com/s/contactsupport
• Search for known bugs: https://forums.ivanti.com/s/contactsupport
• Find product documentation: https://www.ivanti.com/support/product-documentation
• Download the latest versions of software and review release notes:
https://forums.ivanti.com/s/contactsupport
• Open a case online in the CSC Case Management tool:
https://forums.ivanti.com/s/contactsupport
• To verify service entitlement by product serial number, use our Serial Number Entitlement (SNE)
Tool:
https://forums.ivanti.com/s/contactsupport
For important product notices, technical articles, and to ask advice:
• Search the Ivanti Knowledge Center for technical bulletins and security advisories:
https://forums.ivanti.com/s/searchallcontent
Opening a Case with PSGSC
You can open a case with PSGSC on the Web or by telephone.
• Use the Case Management tool in the PSGSC at https://forums.ivanti.com/s/contactsupport.
• Call 1-844 751 7629 (Toll Free, US).
Copyright © 2024, Ivanti, Inc. All Rights Reserved. Privacy and Legal.
Page 8 of 151
Preface


Deploying Ivanti Secure Access Client
Ivanti Secure Access Client Installation Overview
This section describes how to deploy Ivanti Secure Access Client for Windows and Ivanti Secure Access
Client for macOS client software from Ivanti Policy Secure and Ivanti Connect Secure platforms.
Ivanti Policy Secure and Ivanti Connect Secure include a default connection set and a default
component set. These defaults enable you to deploy Ivanti Secure Access Client to users without
creating new connection sets or component sets. The default settings for the client permit dynamic
connections, install only the components required for the connection, and permit an automatic
connection to Ivanti Connect Secure or Ivanti Policy Secure to which the endpoint connects.
For detailed configuration of the Ivanti Secure Access Client on Ivanti Connect Secure, refer to Ivanti
Secure Access Client Configuration on Ivanti Connect Secure.
In all deployment scenarios, you must have already configured authentication settings, realms, and
roles.
You can deploy Ivanti Secure Access Client to endpoints from Ivanti Connect Secure and Ivanti Policy
Secure in the following ways:
• Web install: With a Web install (also called a server-based installation), users log in to the Ivanti
server's Web portal and are assigned to a role that supports a Ivanti Secure Access Client
installation. When a user clicks the link to run Ivanti Secure Access Client, the default installation
program adds Ivanti Secure Access Client to the endpoint and adds the default component set
and the default connection set. If you do not make any changes to the defaults, the endpoint
receives a Ivanti Secure Access Client installation in which a connection to the Ivanti server is set
to connect automatically. You can edit the default connection set to add connections of other
Ivanti servers and change the default options.
Copyright © 2024, Ivanti, Inc. All Rights Reserved. Privacy and Legal.
Page 10 of 151
Deploying Ivanti Secure Access Client

Note:The exact mechanism used to launch and install a particular Ivanti Secure Access Client
from a web browser depends on a number of factors, including:
- The Ivanti Secure Access Client (Windows/Mac desktop client, Host Checker, WSAM,
Windows Terminal Services) being launched/installed.
- The endpoint operating system type and version.
- The web browser type and version.
- The security settings of the endpoint operating system and browser.
For a particular client/OS/browser combination, you may need to enable the appropriate
technology on the endpoint device. For example, to launch the Ivanti Secure Access Client from
Firefox on Windows, you will need to ensure that Java is enabled in Firefox on the end user's
endpoint device. For more information, consult the "Adaptive Delivery" section of the Ivanti
Secure Access Client Supported Platforms Guide.
A Web install is not compatible with the Ivanti rebranding tool, BrandPackager.
• Preconfigured installer: Create the connections that an endpoint needs for connectivity and
services, download the settings file (.pulsepreconfig), and download default Ivanti Secure
Access Client installation program. For Windows endpoints you run the Ivanti Secure Access
Client installation program by using an msiexec command with the settings file as an option.
For OS X endpoints, you run the default installer and then import the .pulsepreconfig file using
a separate command.
Download the Ivanti Secure Access Client from Software Download Portal. You need to have the login
credentials to access the portal.
• Default installer: You can download the default Ivanti Secure Access Client installation
program and distribute it to endpoints using your local organization's standard software
distribution method (such as Microsoft SMS/SCCM). Ivanti Secure Access Client software is
installed with all components and no connections. After users install a default Ivanti Secure
Access Client installation, they can add new connections manually through Ivanti Secure Access
Client user interface or by using a browser to access a Ivanti server's Web portal. For the latter,
the Ivanti server's dynamic connection is downloaded automatically and the new connection is
added to Ivanti Secure Access Client's connections list when the user starts Ivanti Secure Access
Client by using the Ivanti server's Web portal interface. Dynamic connections are created as
manual rather than automatic connections, which means that they are run only when the user
initiates the connection or the user browses to a Ivanti server and launches Ivanti Secure Access
Client from the server's Web interface.
Copyright © 2024, Ivanti, Inc. All Rights Reserved. Privacy and Legal.
Page 11 of 151
Deploying Ivanti Secure Access Client

If the Windows endpoints in your environment do not have admin privileges, you can use the Ivanti
Secure Access Client Installer program, which is available on the admin console System Maintenance
Installers page. The Ivanti Secure Access Client Installer allows users to download, install, upgrade, and
run client applications without administrator privileges. In order to perform tasks that require
administrator privileges, the Ivanti Secure Access Client Installer runs under the client's Local System
account (a powerful account with full access to the system) and registers itself with Windows' Service
Control Manager (SCM). An Active-X control or a Java applet running inside the user's Web browser
communicates the details of the installation processes to be performed through a secure channel
between the Ivanti server and the client system.
• Installing the Ivanti Secure Access Client Installer MSI package requires administrator rights to
install onto your client systems. If you plan to use the EXE version, administrator rights are not
needed as long as a previous version of the access service component (deployed through, for
example, JIS, Ivanti Secure Access Client, and so forth) is already present. If policies are defined
for your client with the group policy "Run only Allowed Windows Application", the following
files must be allowed to run in the group policy. If not, client applications might not install.
• dsmmf.exe
• PulseCompMgrInstaller.exe
• PulseSetupClient.exe
• PulseSetupClientOCX.exe
• PulseSetupXP.exe
• uninstall.exe
• x86_Microsoft.*.exe
• You should ensure that the Microsoft Windows Installer exists on the client system prior to
installing the Ivanti Secure Access Client Installer.
• Your end-users' client systems must contain either a valid and enabled Java Runtime Engine
(JRE) or a current Ivanti Connect Secure ActiveX control. If the client systems do not contain
either of these software components, the users will be unable to connect to the gateway. If
there is no JRE on your end-users' client systems, you should download an appropriate installer
package from Maintenance > System > Installers. The service appears in the Windows
Services (Local) list as Neoteris Setup Service. The service starts automatically on install and
during client system start up.
Copyright © 2024, Ivanti, Inc. All Rights Reserved. Privacy and Legal.
Page 12 of 151
Deploying Ivanti Secure Access Client

Adding a Configuration to a New Ivanti Secure Access
Client Installation
When you install Ivanti Secure Access Client for Windows or Ivanti Secure Access Client for macOS client
on an endpoint using the default Ivanti Secure Access Client installation program, the endpoint has all
the Ivanti Secure Access Client components it needs to connect to Ivanti servers. However, Ivanti Secure
Access Client needs a configuration that identifies the Ivanti servers it can connect to, that is, the
connections. Connection properties also define how the connections are to be started, manually,
automatically, or according to location awareness rules, and how Ivanti Secure Access Client
connections receive updates. These connection set properties are also called machine settings. Figure
95 shows the default Ivanti Secure Access Client connection set properties (machine settings) that are
passed to Ivanti Secure Access Client as its configuration. Figure 96 shows the connection set properties
as they appear in a Ivanti Secure Access Client preconfiguration file, which you can use to add the Ivanti
Secure Access Client configuration when you install Ivanti Secure Access Client. The preconfiguration
file also includes Ivanti Secure Access Client connections.
There are two methods for installing an initial configuration on a new Ivanti Secure Access Client:
Copyright © 2024, Ivanti, Inc. All Rights Reserved. Privacy and Legal.
Page 13 of 151
Deploying Ivanti Secure Access Client

• Use a Ivanti Secure Access Client preconfiguration file (.pulsepreconfig) when you install Ivanti
Secure Access Client on endpoints using the default Ivanti Secure Access Client installer.
• Instruct users to open a browser and login to the Ivanti server Web portal where the Ivanti
Secure Access Client configuration has been defined. After successful login, the user should
start Ivanti Secure Access Client from the Web page. Or you can enable Auto-launch as a role
option to have the Ivanti Secure Access Client installation begin automatically after login.
The first time Ivanti Secure Access Client connects to a server that offers a Ivanti Secure Access Client
configuration, the configuration settings are installed on the client, and the client is bound to that
server, which means that only that server can update the client's configuration. Any Ivanti server can
update the Ivanti Secure Access Client software version if that feature is enabled, and any Ivanti server
can add a connection to an existing Ivanti Secure Access Client configuration if the Dynamic
connections option is enabled as part of the connection set on the binding server. Only the binding
server can update Ivanti Secure Access Client's configuration.
If the Ivanti Secure Access Client configuration has Dynamic connections enabled, then connections
from other Ivanti servers are automatically added to Ivanti Secure Access Client's connections list when
the user connects to the other Ivanti server through that server's Web portal, and the user starts Ivanti
Secure Access Client using the Ivanti server's Web portal interface. For example, a user has a Ivanti
Secure Access Client configuration from IvantiServerA (the binding server) and the Ivanti Secure Access
Client configuration allows dynamic connections. If the user browses to IvantiServerB and successfully
authenticates through that server's Web portal and clicks the Ivanti Secure Access Client button, the
server adds a IvantiServerB connection to the Ivanti Secure Access Client configuration, and it appears
in Ivanti Secure Access Client's connection list. This new connection is set to start manually so that it
does not attempt to connect when the endpoint is restarted or conflict with the connections from the
binding server. A dynamic connection is added to Ivanti Secure Access Client's connections list.
However, the connection's target URL is Ivanti Web server URL; it does not use the URL that is defined
for the connection in the server's Ivanti Secure Access Client connection properties. In most cases, these
URLs will be the same.
You can see a Ivanti Secure Access Client configuration by creating and viewing a pulsepreconfig file.
(To create the file, go to the Ivanti Secure Access Client Component screen, select a component set, and
then click the Download Installer Configuration button.) The .pulsepreconfig file contains a section
that defines the machine settings and separate sections for each Ivanti Secure Access Client connection
deployed to the client, as shown in figure.
Copyright © 2024, Ivanti, Inc. All Rights Reserved. Privacy and Legal.
Page 14 of 151
Deploying Ivanti Secure Access Client

The machine settings and each centrally configured connection include the server ID (server-id) of the
binding server. When a user browses to a Ivanti server, the server can offer a new configuration, (that is,
updates to the machine settings). If the server-id under machine settings matches, Ivanti Secure Access
Client accepts the configuration update. If the server-id does not match, Ivanti Secure Access Client
ignores the update.
Configuration files have a version number as well. When Ivanti Secure Access Client connects to its
binding server, Ivanti Secure Access Client compares the version of its existing configuration to the
version on the server. If the server version is later than the existing client version, the client
configuration is updated. The update might add, change, or remove connections and change machine
settings.
If you have several Ivanti servers and you want to provision the same Ivanti Secure Access Client
configuration from all of the servers, the server ID of the Ivanti Secure Access Client configuration must
be the same across all of the servers. To accomplish this, you create the configuration on one server,
and then use the "push config" feature of the Ivanti server to push the configuration to the other Ivanti
servers. This method ensures that the server ID of the configuration file is the same across all of the
Ivanti servers so that clients can receive a configuration update from any of the Ivanti servers.
Copyright © 2024, Ivanti, Inc. All Rights Reserved. Privacy and Legal.
Page 15 of 151
Deploying Ivanti Secure Access Client

Installing Ivanti Secure Access Client from the Web
For a Web install, you direct users to the Web interface of the Ivanti server. After a successful login, a
user is assigned to a role that includes an automatic download and installation of Ivanti Secure Access
Client software.
In order to install the Ivanti Secure Access Client from a web browser, you may need to enable
certain browser plugins or other technologies on the endpoint device. For example, Java must
be enabled on the endpoint device to install Ivanti Secure Access Client from Firefox, and either
ActiveX or Java must be enabled to install Ivanti Secure Access Client from Microsoft Edge.
Ivanti Connect Secure and Ivanti Policy Secure introduced a new web-installation option called "Pulse
Secure Application Launcher” (PSAL). PSAL leverages “URL handler” functionality by invoking a custom
URL in a manner that instructs the web browser to execute a program that launches/installs the
appropriate Ivanti Secure Access Client. PSAL was created to address both the restrictions placed on
Java on macOS and the deprecation of Java (and Active X) plug-ins in Google Chrome version 45 and
the Microsoft Edge browser. To read more about PSAL, see the Ivanti Knowledge Center article
“KB40102” (https://forums.ivanti.com/s/searchallcontent).
For a full discussion of this subject, see the “Adaptive Delivery” section of the Ivanti Secure Access Client
Supported Platforms Guide.
The default Ivanti Secure Access Client installation settings includes minimal components, which
includes the Host Checker component, and a connection to the Ivanti server. If you want a Web install
that has customized settings, you can do any of the following:
• Edit the default connection set and add new connections. The default installer uses the default
component set which includes the default connection set.
• Create a new connection set and edit the default component set to include the new connection
set.
• Edit the role to specify a component set that includes the connections you want for the default
installation.
Copyright © 2024, Ivanti, Inc. All Rights Reserved. Privacy and Legal.
Page 16 of 151
Deploying Ivanti Secure Access Client

A Ivanti Secure Access Client installation causes a restart of active network connections on a
Windows endpoint. When a user initiates a Ivanti Secure Access Client installation through a
WAN connection to the Web interface of a Ivanti server, the user might need to log in to their
service provider again to reestablish network connectivity. Users need to be aware of this issue
before they begin the installation.
Launching Ivanti Secure Access Client from the Ivanti server
Web Portal
One typical method of establishing a VPN connection is for users to browse to the Ivanti server's Web
portal, login, and then launch Ivanti Secure Access Client from the Web page.
The following items describe the Ivanti Secure Access Client connection behaviors:
• Ivanti Secure Access Client has been installed on the endpoint by using the default Ivanti Secure
Access Client installer. The installed Ivanti Secure Access Client does not yet have any
connections. The user browses to the Ivanti server, logs into the server, and then clicks the
Ivanti Secure Access Client button on the Web portal page. The following action occurs:
• The default Ivanti Secure Access Client connection set is automatically deployed to the
client.
• The connection that has a URL that matches the server URL is launched.
• Ivanti Secure Access Client has been installed on the endpoint and it has a connection from the
Ivanti server. The user browses to the Ivanti server, logs into the server, and then clicks the
Ivanti Secure Access Client button on the Web portal page. The following action occurs:
• The connection that has a URL that matches the server URL is launched.
• Ivanti Secure Access Client has been installed on the endpoint and it has a connection from two
different Ivanti servers. The user browses to one of these Ivanti servers, logs into the server, and
then clicks the Ivanti Secure Access Client button on the Web portal page. The following action
occurs:
• Only the connection that has a URL that matches the server URL is launched.
• Ivanti Secure Access Client has been installed on the endpoint. It has a connection for one Ivanti
server but the user browses to a different Ivanti server, logs into the server, and then clicks the
Ivanti Secure Access Client button on the Web portal page. The following action occurs:
Copyright © 2024, Ivanti, Inc. All Rights Reserved. Privacy and Legal.
Page 17 of 151
Deploying Ivanti Secure Access Client

• A new dynamic connection is created on Ivanti Secure Access Client for this Ivanti server.
(Note that the default connection on the server must be configured as a dynamic
connection.) This new connection is a manual connection, that is, it does not start
automatically when Ivanti Secure Access Client starts.
• The new connection for this Ivanti server is started based on matching URLs.
Usage Notes
The Web browser method of launching Ivanti Secure Access Client is affected by the following
configuration issues:
• The Ivanti Secure Access Client connection URL and the server URL must be an exact match.
Ivanti Secure Access Client does not perform reverse DNS lookup to find a match.
• Connections that have the connection property Allow user to override connection policy
disabled cannot be launched from the browser even if URLs match.
Launching Ivanti Secure Access Client using URL
Launching Ivanti Secure Access Client using URL feature enables the user to launch the Ivanti Secure
Access Client using the admin prescribed URL. This feature is supported for Windows only.
Administrator creates a web URL (in a prescribed format), and provides it to the user in the following
ways:
• URL is placed in a web page in the form of a link and the address of the link is provided to the
user.
• URL itself is provided to the user.
User clicks on the link or types the URL in the browser. Ivanti Secure Access Client gets launched and the
connection is redirected to the gateway mentioned in the URL.
User receives a link or a URL which has been crafted by an administrator. Following is the format of the
URL:
pulsesecureclient://
connect?name=NAME&server=SERVERURL&userrealm=REALM&username=USER&stor
e=TRUE
Table lists the parameter and their description mentioned in URL:
Copyright © 2024, Ivanti, Inc. All Rights Reserved. Privacy and Legal.
Page 18 of 151
Deploying Ivanti Secure Access Client

Parameter Mandatory/Optional Action
pulsesecureclient Mandatory // URI scheme for URL launching.
connect Mandatory This parameter is an action item and
establishes the connection.
name Mandatory This parameter is an unique parameter, which
defines the name of the connection. This
connection name is used to identify a specific
connection.
Connection name will be suffixed by (Auto
Launch) for Ivanti Secure Access Client
connection established through
URL.Connection name will be displayed as
Name(Auto Launch).
name parameter is case sensitive.
For example, a connection named as
Connection1 will be different from a
connection named as connection1.
server Mandatory This parameter defines the sign-in URL, to
which Ivanti Secure Access Client should get
connected. It can be any one of the following:
FQDN
IP address (IPv6 and IPv4)
A Sign-in URL
userrealm Optional This parameter defines the user realm.
userrealm parameter is case sensitive.
username Optional This parameter defines the username.
username parameter is case sensitive.
store Optional If store value is "True", then the connection
information gets saved in the connection store.
Copyright © 2024, Ivanti, Inc. All Rights Reserved. Privacy and Legal.
Page 19 of 151
Deploying Ivanti Secure Access Client

Parameter Mandatory/Optional Action
If store value is "False", then the connection
information will not be saved in the connection
store.
It provides the flexibility for the user to save
the connection information for future
purposes.
Following is the scenario to understand the behaviour of this feature:
In this scenario, the user establishes a Auto Launch connection to the Ivanti Connect Secure server with
userrelam as "Users" and username as "test_user". Also, user wants to store the connection in Ivanti
Secure Access Client for future references.
Administrator will craft the URL with the values mentioned in below table:
Parameter Values
name Test Connection
server https://pcssamlpcs.psecure.net/
userrealm Users
username test_user
store true
1. User receives a link or the below mentioned URL which has been crafted by an administrator.
pulsesecureclient://connect?name=Test
Connection&server=https://pcssamlpcs.psecure.net/&userrealm=Users&use
rname=test_user&store=true
Copyright © 2024, Ivanti, Inc. All Rights Reserved. Privacy and Legal.
Page 20 of 151
Deploying Ivanti Secure Access Client
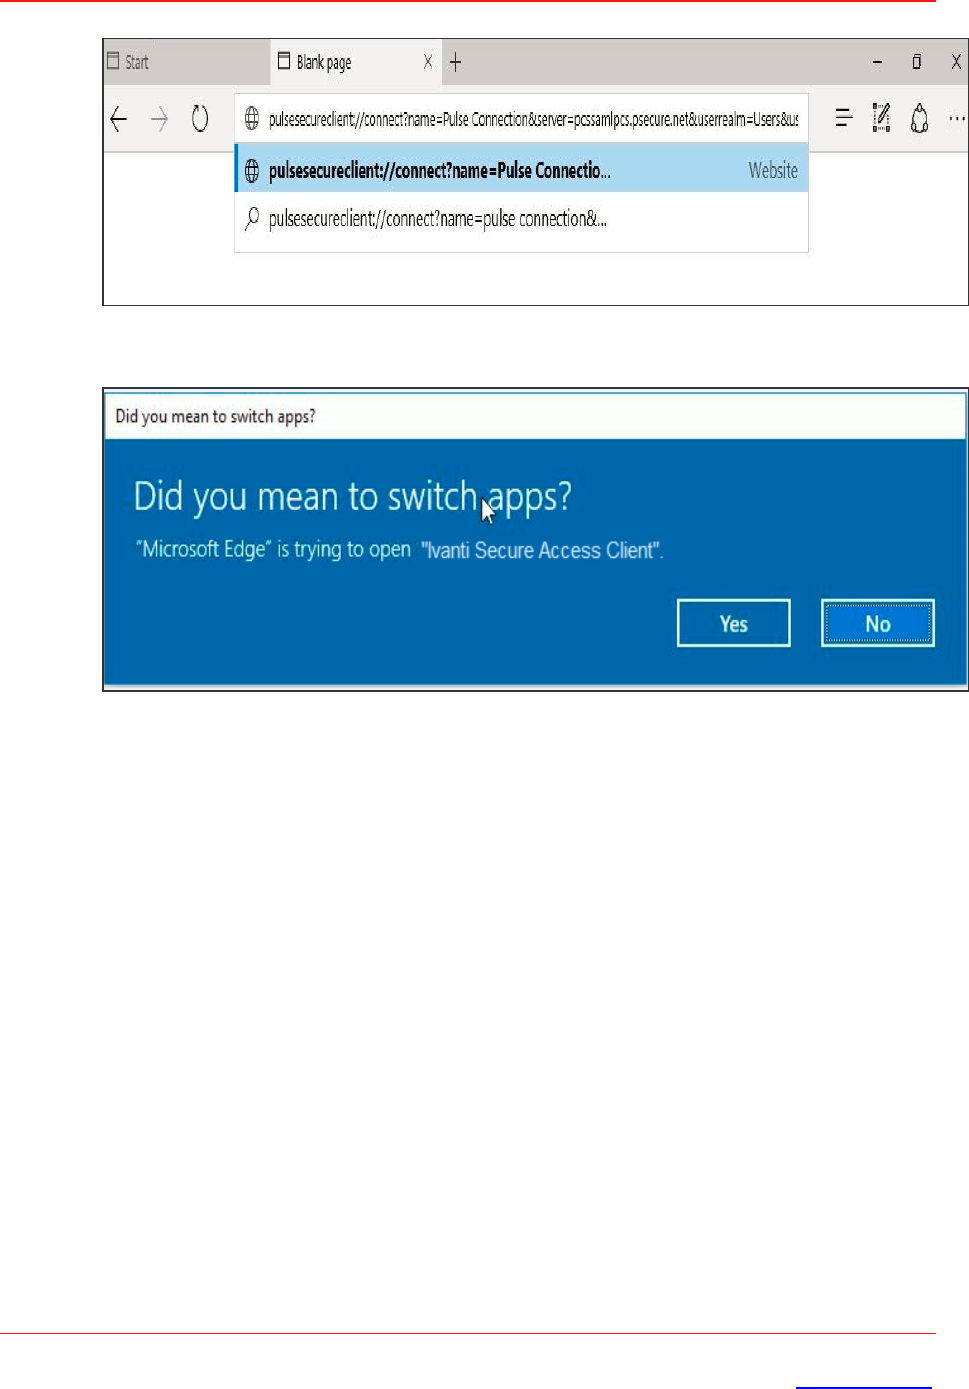
2. Once the user opens the URL (in Edge browser), following screen appears:
A permission dialog box appears to get the confirmation from the user to launch Ivanti Secure
Access Client application via URL.
3. User clicks Yes button and Ivanti Secure Access Client gets launched.
A connection with the name specified in the URL is added in the Ivanti Secure Access Client and
following screen appears:
Copyright © 2024, Ivanti, Inc. All Rights Reserved. Privacy and Legal.
Page 21 of 151
Deploying Ivanti Secure Access Client

Connection name will be suffixed by (Auto Launch) for Ivanti Secure Access Client connection
established through URL.
4. User enters the password and clicks the Connect button.
Now, connection <Connection Name>(Auto Launch) with provided values as mentioned in the
table is established. The full connection name can be viewed in Edit window as shown in the
following screen.
Copyright © 2024, Ivanti, Inc. All Rights Reserved. Privacy and Legal.
Page 22 of 151
Deploying Ivanti Secure Access Client

After this, Ivanti Secure Access Client is launched, and a connection named Test Connection
(Auto Launch) is established. This connection is then established with username as test_user.
After successful connection establishment, if a user decides to disconnect the Auto Launch
connection, click Disconnect button. Auto Launch connection gets disconnected and
connection details gets stored in the Ivanti Secure Access Client for future references, as store
parameter is set to true in this scenario.
Otherwise, if store parameter is set to false, then the connection details of Auto Launch
connection is not be stored after disconnection. Also, next launch of the Ivanti Secure Access
Client with same URL will create a new connection.
If the user tries to connect the connection with same connection name but with different server
URL, following error message appears:
Benefits
Following are the benefits of this feature:
• Fast Connection: As URL will handle the Ivanti Secure Access Client launch, user needs not to
login through Ivanti Connect Secure, which reduces number of logins, hence time saving and
fast connection.
• Enhancing User Experience: When ICS (IP or FQDN based), username and realm are prefilled,
user just needs to enter the password to login.
• With the help of Store parameter in launch URL format, it will be possible to have temporary
client entries. This ensures that each connection need not to be stored in the PDC and PDC
does not get filled up with a pile of entries.
• Scriptability: Programmatically driven launch of Ivanti Secure Access Client lessens the burden
of the Administrator.
Copyright © 2024, Ivanti, Inc. All Rights Reserved. Privacy and Legal.
Page 23 of 151
Deploying Ivanti Secure Access Client

Following is the scenario to understand the scriptability behaviour of this feature:
• User enters the URL in command Prompt as shown below:
A permission dialog box appears to get the confirmation from the user to launch Ivanti Secure
Access Client application.
• User clicks Allow button, following authentication screen appears for user to authenticate:
Copyright © 2024, Ivanti, Inc. All Rights Reserved. Privacy and Legal.
Page 24 of 151
Deploying Ivanti Secure Access Client

• Click Connect. Following screen appears:
Connection named Test Connection(Auto Launch) with provided values in table is established.
Installing Ivanti Secure Access Client on Windows Endpoints
Using a Preconfiguration File
The following procedures apply to Windows installations only.
Copyright © 2024, Ivanti, Inc. All Rights Reserved. Privacy and Legal.
Page 25 of 151
Deploying Ivanti Secure Access Client

After you create client connection sets and specify the connections to include within a client component
set, you can create a preconfiguration file with all of the connections you want to distribute with Ivanti
Secure Access Client. You specify the preconfiguration file as an option when you run the Ivanti Secure
Access Client MSI installer program using an msiexec (windows\system32\msiexec.exe) command.
Download the Ivanti Secure Access Client from Software Download Portal. You need to have the login
credentials to access the portal.
To create a preconfigured Ivanti Secure Access Client installer for distribution to Windows endpoints:
1. Select Users > Ivanti > Connections and create a connection set with the connections that
you want to distribute.
2. Select Users > Ivanti > Components.
3. If necessary, create a new component set with the connection sets you want to distribute.
It does not matter which component option you select, All components or No components. The
Ivanti Secure Access Client installer installs all components.
4. Select the check boxes next to the component sets that you want to distribute.
5. Click Download Installer Configuration.
You are prompted to save the preconfiguration. You can also specify the name of the target
Ivanti server for the connections, which enables you to create configuration files that are the
same except for the target server.
The default filename of the .pulsepreconfig file is the name of the selected component set.
Make note of the filename and location where you put the file. The preconfiguration file must
be available to the clients either through a network share or distributed along with the Ivanti
Secure Access Client installation file.
6. Select Maintenance > System > Installers.
If necessary for your environment, download and install the Ivanti Secure Access Client Installer.
To install Ivanti Secure Access Client, users must have appropriate privileges. The Ivanti Secure
Access Client Installer allows you to bypass privilege restrictions and allow users with limited
privileges to install Ivanti Secure Access Client.
7. Download the appropriate Ivanti Secure Access Client installer for your Windows environment:
• Ivanti Secure Access Client installer (32-bit)
• Ivanti Secure Access Client installer (64-bit)
Copyright © 2024, Ivanti, Inc. All Rights Reserved. Privacy and Legal.
Page 26 of 151
Deploying Ivanti Secure Access Client

For a Windows installation (.msi) that uses an automated distribution mechanism and where
the users do not have administrator privileges, you should ensure that the installation is run in
the proper context, typically the USER context. To install in USER context, first advertise the .msi
while in the SYSTEM context. For example, to advertise the 64-bit Windows installation to all
users, use the following msiexec command:
msiexec /jm \PulseSecure.x64.msi
The advertisement allows the installation to be run in USER context even if the user is a
restricted (non-admin) user. The location where the advertisement is run and where the actual
installation is run must be the same. If the installation is an upgrade, you must advertise the
upgrade version before running it. (Note that it is much easier to upgrade Ivanti Secure Access
Client by not disabling the automatic upgrade feature on the Ivanti server.) After the
installation is run by the user, Ivanti Secure Access Client will use the correct user certificate and
context.
Installing Ivanti Secure Access Client Using Advanced Command-
Line Options
The Ivanti Secure Access Client installer includes Ivanti Secure Access Client and all the software
components for all related services. The preconfiguration file contains the definitions of the Ivanti
Secure Access Client connections that provide client access to specific Ivanti servers and services.
Usage Notes:
• The preconfigured installer installs all Ivanti Secure Access Client components.
• When you run msiexec, you should append /qn or /qb (msiexec options) to the command line
to suppress the installation program user interface.The /qn option specifies a silent install, so
no user interface appears. The /qb option also hides the user interface but it displays a progress
bar.
• The procedures in this topic are valid with Windows installations only. For information about
installing Ivanti Secure Access Client on OS X endpoints, see "Installing Ivanti Secure Access
Client on OS X Endpoints Using a Preconfiguration File" on page29.
You run the Ivanti Secure Access Client preconfigured installer program with msiexec (the command
line for launching .msi programs on Windows platforms) and specify the following options.
Copyright © 2024, Ivanti, Inc. All Rights Reserved. Privacy and Legal.
Page 27 of 151
Deploying Ivanti Secure Access Client

Command-line options CONFIGFILE is case sensitive and must be all caps.
If the path to the pulsepreconfig file includes spaces, be sure to use quotes around the path.
• CONFIGFILE: This property specifies a configuration file to be imported into Ivanti Secure
Access Client during installation. The property must include the full path to the configuration
file. For example:
msiexec /i PulseSecure.x86.msi CONFIGFILE="c:\temp\my
configuration..pulsepreconfig "
Examples
To install Ivanti Secure Access Client on a 32-bit Windows endpoint using a configuration file:
msiexec /i PulseSecure.x86.msi
CONFIGFILE=c:\temp\myconfiguration.pulsepreconfig /qb
To install Ivanti Secure Access Client on a 64-bit Windows endpoint using a configuration file:
msiexec /i PulseSecure.x64.msi
CONFIGFILE=c:\temp\myconfiguration.pulsepreconfig /qb
Repairing a Ivanti Secure Access Client Installation on a Windows
Endpoint
Ivanti Secure Access Client uses an MSI installer, which supports a repair function. If problems with
Ivanti Secure Access Client on a Windows endpoint indicate missing or damaged files or registry
settings, the user can easily run the installation repair program. The repair program performs a
reinstallation and replaces any missing files. The repair program does not install any files that were not
part of the original installation. For example, if the file that holds Ivanti Secure Access Client connection
configurations is damaged, the file installed by the repair program does not replace any Ivanti Secure
Access Client connections that were created by the user or deployed to the endpoint after the original
Ivanti Secure Access Client installation.
To repair a Ivanti Secure Access Client installation on a Windows endpoint:
Copyright © 2024, Ivanti, Inc. All Rights Reserved. Privacy and Legal.
Page 28 of 151
Deploying Ivanti Secure Access Client

1. On the Windows endpoint where Ivanti Secure Access Client is installed, click Start > Programs
> Ivanti > Repair Ivanti.
2. Follow the prompts for the installation wizard.
When the program is finished, you might be prompted to reboot the system.
Installing Ivanti Secure Access Client on OS X Endpoints
Using a Preconfiguration File
The following procedures apply to OS X installations only.
After you create client connection sets and specify the connections to include within a client component
set, you can create a preconfiguration file with all the connections you want to distribute with Ivanti
Secure Access Client. After you run the Ivanti Secure Access Client installer on the endpoint, you run a
special command that imports the settings from the preconfiguration file into Ivanti Secure Access
Client.
To create a preconfigured Ivanti Secure Access Client installer for distribution to OS X endpoints:
1. Select Users > Ivanti Secure Access Client> Connections and create a connection set with
the connections that you want to distribute.
2. Select Users > Ivanti Secure Access Client> Components.
3. If necessary, create a new component set with the connection sets you want to distribute.
The All components or No components options apply to Web-based installations only. The
Ivanti Secure Access Client installation program for OS X always installs all components.
4. Select the check boxes next to the component sets that you want to distribute.
5. Click Download Installer Configuration.
You are prompted to save the pre-configuration. You can also specify the name of the target
Ivanti server for the connections, which enables you to quickly create multiple configuration
files that are the same except for the target server.
The default filename of the ".pulsepreconfig" file is the name of the selected component set.
Make note of the filename and location where you put the file. The preconfiguration file must
be available to the clients either through a network share or distributed along with the Ivanti
Secure Access Client installer file.
Copyright © 2024, Ivanti, Inc. All Rights Reserved. Privacy and Legal.
Page 29 of 151
Deploying Ivanti Secure Access Client

6. Select Maintenance > System > Installers.
7. Download the Ivanti Secure Access Client installer, "Ivanti Secure Access Client installer
(Macintosh)".
Installing Ivanti Secure Access Client on OS X Endpoints Using
Command-Line Options
The Ivanti Secure Access Client installer includes Ivanti Secure Access Client and all of the software
components for all of the Ivanti Secure Access Client services. The preconfiguration (.pulsepreconfig)
file contains the definitions of the Ivanti Secure Access Client connections that provide client access to
specific Ivanti servers and services. After you distribute the Ivanti Secure Access Client installation
package, you must first run the installer, and then run a separate program called jamCommand, which
imports the settings from the .pulsepreconfig file. The jamCommand program is part of the Ivanti
Secure Access Client installation.
The Ivanti Secure Access Client file you download from the Ivanti server is in compressed (.dmg) format.
You must unpack the file before you run the Ivanti Secure Access Client installation program.
The following steps include sample commands to install Ivanti Secure Access Client on an OS X
endpoint and then import Ivanti Secure Access Client connections from a .pulsepreconfig file.
1. Run the Ivanti Secure Access Client installation program:
sudo /usr/sbin/installer -pkg <full-path-to-the-pulse-install-
package> -target /
2. Import the settings from the .pulsepreconfig file:
/Applications/Ivanti\ Secure\
Access.app/Contents/Plugins/JamUI/./jamCommand -importfile
/Users/<user profile>/<pre-config file location on local
disk>/<preconfig file name>
Installing Ivanti Secure Access Client on Linux Using Command-Line
Options
The nss3-tools and net-tools are dependency packages required to successfully install the Ivanti Secure
Access Client. Use the following commands to install these dependency tools manually.
Fedora: yum install <dependency tool name>
Copyright © 2024, Ivanti, Inc. All Rights Reserved. Privacy and Legal.
Page 30 of 151
Deploying Ivanti Secure Access Client

Ubuntu and Debian: apt-get install < dependency tool name >
The Installation Command:
Debian – based installation
dpkg -i <package name>
RPM – based installation
rpm -ivh <package name>
The Uninstallation Command:
Debian – based installation
dpkg -r <package name>
RPM – based installation
rpm -e <package name>
The upgrade from old Pulse client to new Ivanti Secure Access Client is not supported.
Ivanti Secure Access Client Command-line Launcher
The Ivanti Secure Access Client Launcher (pulselauncher.exe) is a standalone client-side command-line
program that allows you to launch Ivanti Secure Access Client and connect to or disconnect from a
Ivanti server (Ivanti Connect Secure or Ivanti Policy Secure) without displaying the Ivanti Secure Access
Client graphical user interface.
Ivanti Secure Access Client Launcher Usage Notes:
• Ivanti Secure Access Client Launcher runs on Windows 32-bit and 64-bit endpoints.
• The Ivanti Secure Access Client Launcher program, pulselauncher.exe, is installed as part of a
Ivanti Secure Access Client installation in Program Files\Common Files\Ivanti\Integration or
Program Files (x86)\Common Files\Pulse Secure\Integration.
• Ivanti Secure Access Client Launcher works only for the Connect Secure or Policy Secure (L3)
connection type. Ivanti Secure Access Client Launcher does not support Policy Secure (802.1X)
connection types.
Copyright © 2024, Ivanti, Inc. All Rights Reserved. Privacy and Legal.
Page 31 of 151
Deploying Ivanti Secure Access Client

• The Ivanti Secure Access Client Launcher program does not support the role mapping option
that prompts a user to select from a list of assigned roles. If you use the Ivanti Secure Access
Client Launcher and more than one role can be assigned to a user, you must configure the role
mapping settings for the realm to merge settings for all assigned roles. If the realm settings
require the user to select a role, the Ivanti Secure Access Client Launcher command fails and
exits with return code 2.
• Ivanti Secure Access Client Launcher does not support secondary authentication.
To use Ivanti Secure Access Client Launcher:
1. Write a script, batch file, or application.
2. Include a call to the Ivanti Secure Access Client Launcher executable, pulselauncher.exe.
3. Include logic in your script, batch file, or application to handle the possible return codes.
Table lists the Ivanti Secure Access Client Launcher arguments.
The following command shows the complete pulselauncher.exe command syntax:
pulselauncher [-version|-help|-stop|-loglevel] [-sessionselection
<connect|cancel>] [-url <url> -u <username> -p <password> -r <realm>]
[-d <DSID> -url <url>] [-cert <client certificate> -url <url> -r
<realm>] [-signout|-suspend|-resume -url <url>] [-t timeout)]]
Argument Action
-version Display the Ivanti Secure Access Client Launcher version information, then
exit.
--sessionselection Allows to terminate the first session when a new session is attempted on
reaching maximum number of concurrent sessions
This option restricts the user interference and allows the scripts to run
automatically.
-help Display available arguments information.
-stop Stop Ivanti Secure Access Client and disconnect all active connections.
-L loglevel Specify the log level to show in logs.
3: Normal - Log Critical, Error, Warning and Info messages (default)
5: Detailed - Log All messages
Copyright © 2024, Ivanti, Inc. All Rights Reserved. Privacy and Legal.
Page 32 of 151
Deploying Ivanti Secure Access Client

Argument Action
-url <url> Specify the Ivanti server URL.
-u <user> Specify the username.
-p <password> Specify the password for authentication.
-r <realm> Specify the realm on the Ivanti server.
-d <DSID> Passes a cookie to Ivanti Secure Access Client Launcher for a specified Ivanti
server from another authentication mechanism when Ivanti Secure Access
Client Launcher starts. When you use the -d argument, you must also
specify the -url argument to specify the Ivanti server.
-cert <client
certificate>
Specify the certificate to use for user authentication. For <client certificate>
use the string specified in the Issued To field of the certificate. When using
the -cert argument, you must also specify the -url and -r <realm>
arguments.
To use certificate authentication with the Ivanti Secure Access Client
Launcher program, you must first configure the Ivanti server to allow the
user to sign in via user certificate authentication. You must also configure a
trusted client CA on the Ivanti server and install the corresponding client-
side certificate in the Web browsers of end-users before running the Ivanti
Secure Access Client Launcher.
If the certificate is invalid, the Ivanti Secure Access Client Launcher displays
an error message on the command line and logs a message in the log file.
If Ivanti Secure Access Client is launched through a browser, the
browser handles certificate verification. If Ivanti Secure Access
Client is launched through an application on Windows, the
application handles certificate verification. If Ivanti Secure Access
Client is launched through the Ivanti Secure Access Client Launcher
on Windows, Ivanti Secure Access Client Launcher handles the
expired or revoked client certificates.
Copyright © 2024, Ivanti, Inc. All Rights Reserved. Privacy and Legal.
Page 33 of 151
Deploying Ivanti Secure Access Client

Argument Action
-signout <url> Signout disconnects and signs out from a specific server. Suspend puts an
active connection in the suspend state without removing the session
information from the server. Resume restores a suspended connection.
Ivanti Secure Access Client can have multiple simultaneous connections so
the -url argument is required when you use -signout, -suspend, or -resume.
-suspend <url>
-resume <url>
-t <timeout in
seconds>
The amount of time allowed for the connection to take place before the
attempt fails. Min = 45 (default), Max = 600.
Code Description
-1 Ivanti Secure Access Client is not running.
0 Success.
1 A parameter is invalid.
2 Connection has failed or Ivanti Secure Access Client is unable to connect to
the specified gateway.
3 Connection established with error.
4 Connection does not exist. Example: the command attempts to sign out from
a server that has not been added on the Ivanti Secure Access Client UI.
5 User cancelled connection.
6 Client certificate error.
7 Timeout error.
8 No user connection allowed from Ivanti Secure Access Client UI.
9 No policy override from Ivanti Secure Access Client UI.
25 Invalid action for current connection state. This error code would occur if you
tried to suspend or resume a connection that was disconnected.
100 General error.
Copyright © 2024, Ivanti, Inc. All Rights Reserved. Privacy and Legal.
Page 34 of 151
Deploying Ivanti Secure Access Client

The return codes specified in Table10 refer to the executable's return codes. On Windows, you
can display the last error level with "echo %errorlevel%" (without quotes). On OSX, the
command is "echo $?" (without quotes).
Examples
The following command is a simple login application that captures the credentials the user enters, and
passes the credentials as arguments to pulselauncher.exe:
pulselauncher.exe -u JDoe -p my$Pass84 -url https://int-
company.portal.com/usr -r Users
pulselauncher return code: 0
The following Ivanti Secure Access Client Launcher example shows a certificate authentication:
pulselauncher.exe -url https://int-company.portal.com/usr -cert
MyCert -url https://int-company.portal.com/usr -r Users
pulselauncher return code: 0
The following example shows a command to use Ivanti Secure Access Client Launcher to specify a
cookie (-d) for a specific Ivanti server (-url):
pulselauncher.exe -d 12adf234nasu234 -url https://int-
company.portal.com/usr
pulselauncher return code: 0
Using jamCommand to Import Ivanti Connections
The jamCommand.exe program is a command line program that imports a .pulsepreconfig file into
Ivanti Secure Access Client. The jamCommand program is available for Windows (Vista, Windows 8.1,
and later) and macOS.
From Release 22.7R3, jamCommands for user mode are not supported. However for admin
mode, there are no changes.
A .pulsepreconfig file includes Ivanti Secure Access Client connection parameters. You can create a
.pulsepreconfig file on the Ivanti server, and then use it as part of a Ivanti Secure Access Client
installation to ensure that Ivanti Secure Access Client users have one or more Ivanti Secure Access Client
connections when they start Ivanti Secure Access Client for the first time.
Copyright © 2024, Ivanti, Inc. All Rights Reserved. Privacy and Legal.
Page 35 of 151
Deploying Ivanti Secure Access Client

One typical use case for jamCommand on a Windows endpoint is to first run jamCommand to
import one or more Ivanti Secure Access Client connections from a .pulsepreconfig file, and
then run pulselauncher.exe to start Ivanti Secure Access Client.
To install Ivanti Secure Access Client connections using jamCommand:
1. Create a .pulsepreconfig file on the Ivanti server.
In the Ivanti server admin console, click Users > Ivanti Secure Access Client > Components.
2. Select the component sets you want, and then click Download Installer Configuration.
3. Distribute the .pulsepreconfig file to the Ivanti Secure Access Client endpoints.
4. Run jamCommand with the .pulsepreconfig file as an option. For example:
On Windows:
\Program Files\Common Files\Pulse Secure\JamUI\jamCommand -importfile
myfile.pulsepreconfig
On macOS:
/Applications/Ivanti\ Secure\
Access.app/Contents/Plugins/JamUI/./jamCommand -importfile
/Users/<user profile>/<pre-config file location on local
disk>/<preconfig file name>
On Linux
/opt/pulsesecure/bin/jamCommand /ImportFile
~/Downloads/pulsepreconfig
If Ivanti Secure Access Client is running when you run jamCommand, the new Ivanti Secure Access
Client connection or connections appear immediately. The connection name appears as it was defined
when you created the connection in the Ivanti server admin console.
Using jamCommand to change DNS Cache settings
The ISAC installer supports enabling DNS caching at the system level and removing the setting upon
uninstallation. End users can use jamcommand.exe to enable, disable, or remove the DNS caching
configuration at the user level.
Copyright © 2024, Ivanti, Inc. All Rights Reserved. Privacy and Legal.
Page 36 of 151
Deploying Ivanti Secure Access Client

By default, when a client upgrades or installs to version 22.7R2 or the later, DNS caching is Enabled at
the global level under the following registry path:
HKEY_LOCAL_MACHINE\SOFTWARE\WOW6432Node\Pulse Secure\Pulse
Use the following commands to change the DNS caching settings:
Action Command
Enable DNS caching jamcommand.exe /enableGWDNSCaching 1
Disable DNS caching jamcommand.exe /enableGWDNSCaching 0
Remove DNS caching jamcommand.exe /enableGWDNSCaching 2
To disable secure DNS for Embedded Edge Browser then end user machine needs full control
permission for the following registry keys:-
HKEY_LOCAL_MACHINE\SOFTWARE\Policies\Microsoft\ → system context need full control
permission
HKEY_CURRENT_USER\SOFTWARE\Policies\Microsoft\ → user context need full control
permission
jamCommand Reference
Syntax
jamCommand [-import [script]] [-tray] [-log
[level]]
/import
/importFile <script>
/tray
/log <level>
/stop
Copyright © 2024, Ivanti, Inc. All Rights Reserved. Privacy and Legal.
Page 37 of 151
Deploying Ivanti Secure Access Client

/suspend <GUIDS>
/resume <GUIDS>
/resume
/brand <brandfile>
/unbrand
/norestart
Release Information Introduced with Ivanti Secure Access Client R1.0.
Ivanti Secure Access Client R3.1 introduced the suspend and resume
options.
Ivanti Secure Access Client R4.0.3 introduced new options to
support Ivanti Secure Access Client Customization tool.
Description The jamCommand.exe program is a command line program that
imports a .pulsepreconfig or a "Branding.PulseBrandingPackage" file
into Ivanti Secure Access Client. The jamCommand program is
available for Windows and macOS.
Options import: Import script from the default memory-mapped file.
importFile <script>: Import script from the specified file.
tray: Launch the tray notify application.
log: Set the global log level.
stop: Stop the Ivanti Secure Access Client UI.
suspend <GUIDS>: Suspend the Ivanti Secure Access Client UI.
resume <GUIDS>: Resume a suspended Ivanti Secure Access Client
UI.
brand <brandfile>: Install the Ivanti Secure Access Client UI
changes defined in the Ivanti Secure Access Client branding file.
unbrand: Remove the changes applied by the Ivanti Secure Access
Client branding file.
norestart: Do not restart Ivanti Secure Access Client after applying
the Ivanti Secure Access Client branding file.
Required Privilege Level administrator
Copyright © 2024, Ivanti, Inc. All Rights Reserved. Privacy and Legal.
Page 38 of 151
Deploying Ivanti Secure Access Client

Managing Server Certificate Authorities
Ivanti Secure Access Client verifies server certificate with trusted Certificate Authorities (CA) store in the
system. Follow the instructions to add issuing CA certificate to store.
CA certificates are stored in PEM format in trusted CA store. Following command is used to
convert CA certificates to PEM format from DER format.
openssl x509 -in cert.crt -inform der -outform pem -out cert.pem
Linux (Ubuntu, Debian)
To Add CA certificate into system store:
1. Install the ca-certificate package
sudo apt-get install ca-certificates
2. Copy the CA certificate which has been used to sign the device certificate, to
/usr/local/share/ca-certificates directory:
sudo cp device-ca.crt /usr/local/share/ca-certificates/device-ca.crt
3. Copy the CA certificate which has been used to sign the certificate of Identity Provider (IdP) (in
case of SAML authentication), to /usr/local/share/ca-certificates directory:
sudo cp idp-ca.crt /usr/local/share/ca-certificates/idp-ca.crt
4. Update the CA store:
sudo update-ca-certificates
Linux (Fedora)
To add CA certificate into system store:
1. Become Super User of the machine using the following command:
su-
2. Install the ca-certificates package:
yum install ca-certificates
Copyright © 2024, Ivanti, Inc. All Rights Reserved. Privacy and Legal.
Page 39 of 151
Deploying Ivanti Secure Access Client

3. Copy the CA certificate which has been used to sign the device certificate, to
/usr/local/share/ca-certificates directory:
sudo cp device-ca.crt /etc/pki/ca-trust/source/anchors/
4. Enable the dynamic CA configuration feature:
update-ca-trust force-enable
5. Copy the CA certificate which has been used to sign the certificate of Identity Provider (IdP) (in
case of SAML authentication), to /usr/local/share/ca-certificates directory:
sudo cp idp-ca.crt /usr/local/share/ca-certificates/idp-ca.crt
6. Use command:
update-ca-trust extract
If the user connects to servers which have certificates not trusted by the machine the following error
message displays:
If connecting to untrusted sites through Embedded browser, the following error displays:
Copyright © 2024, Ivanti, Inc. All Rights Reserved. Privacy and Legal.
Page 40 of 151
Deploying Ivanti Secure Access Client


Chromium Embedded Framework (CEF) Support
Chromium Embedded Framework (CEF) is used as the embedded browser for custom sign-in, SAML
Authentication, on all the platform to work with FIDO U2F.
CEF installation on UI
To install CEF browser using Pulse UI, use the following procedure.
1. Launch Ivanti Secure Access Client application and select a connection and click Connect.
2. An authentication confirmation window appears. Click OK to continue.
Copyright © 2024, Ivanti, Inc. All Rights Reserved. Privacy and Legal.
Page 42 of 151
Deploying Ivanti Secure Access Client

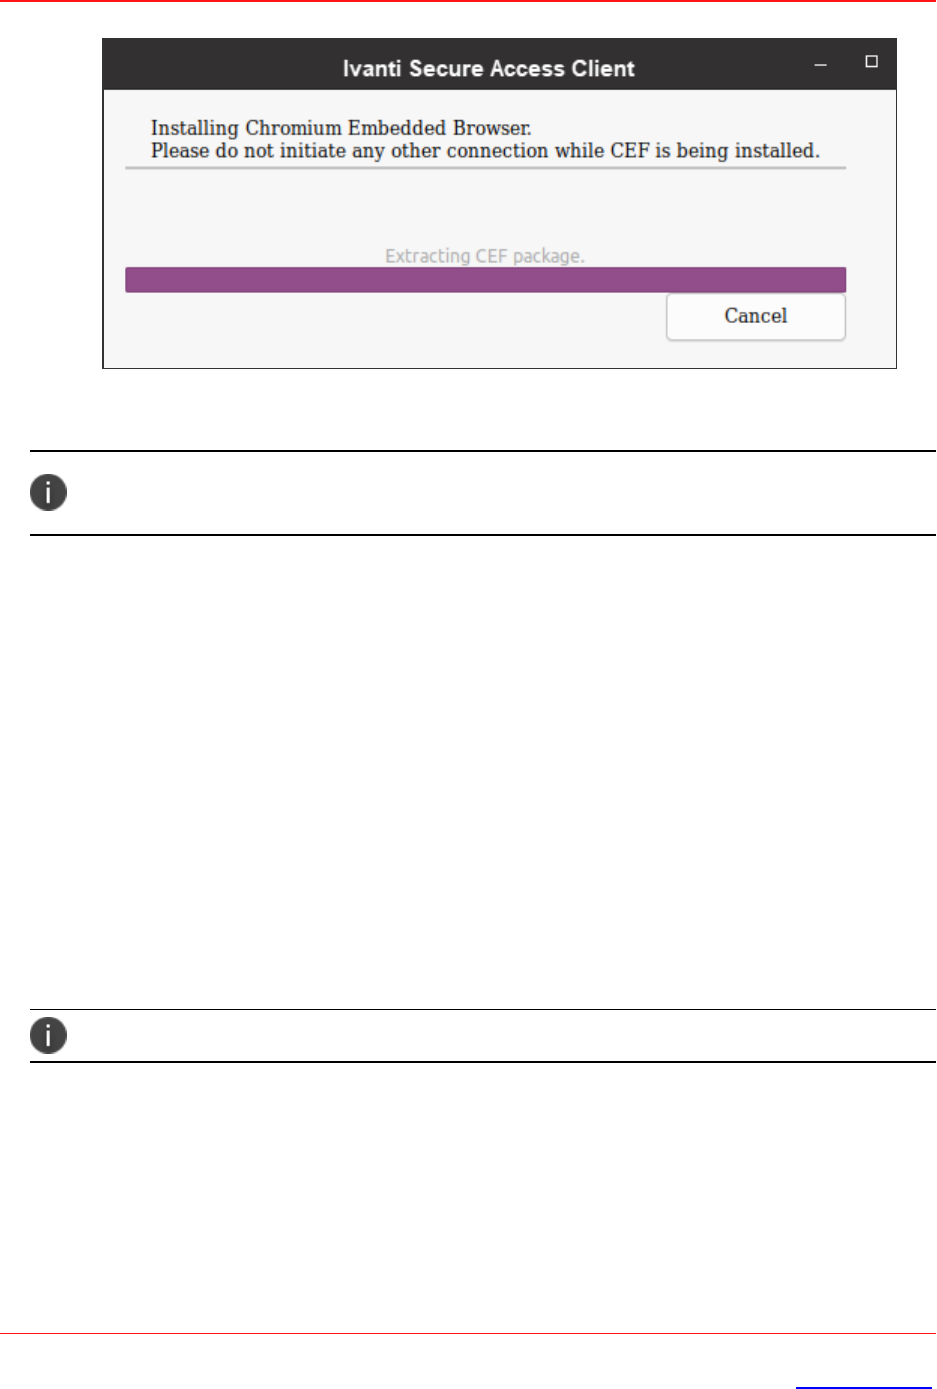
3. A CEF download confirmation window appears, click OK to download and install CEF browser.
The installation progress and status displays. Ensure not to initiate any other connection when
CEF installation is in progress.
Copyright © 2024, Ivanti, Inc. All Rights Reserved. Privacy and Legal.
Page 43 of 151
Deploying Ivanti Secure Access Client
User is prompted for authentication and the Connection proceeds.
If Ivanti Secure Access Client is not closed, and opened again, the client authenticates the user
without prompting for credentials after the first successful authentication.
CEF Installation Using scripts
Use the following util scripts “setup_cef.sh” to manage CEF using the scripts.
/opt/pulsesecure/bin$./setup_cef.sh <install|reinstall|uninstall >
[-tmpDirPath <Path>]
The CEF package downloads and extracts to a temporary directory -tmpDirPath This directory is cleared
upon installation.
• install: installs CEF only if not already installed.
• reinstall: removes and reinstalls CEF.
• Uninstall: removes the CEF.
CEF reinstall is supported only using scripts.
• The install option runs only with root privileges.
• Installation requires 1276 MB of free space in the tmpDirPath. This space is used only
during installation and freed upon installation.
• 1063 MB of free space is needed in the /opt
Copyright © 2024, Ivanti, Inc. All Rights Reserved. Privacy and Legal.
Page 44 of 151
Deploying Ivanti Secure Access Client

To check if CEF is installed
/opt/pulsesecure/bin$./setup_cef.sh check_installed
Uninstalling Ivanti Secure Access Client does not remove CEF library or the client certificates
used for Certificate Authentication.
Copyright © 2024, Ivanti, Inc. All Rights Reserved. Privacy and Legal.
Page 45 of 151
Deploying Ivanti Secure Access Client

Using Ivanti Secure Access Client Interface
To launch Ivanti Secure Access Client from Desktop
Pulse Secure Client is re-branded as Ivanti Secure Access Client. The release numbering is
updated to 22.RX. Complete UX rebranding and the UI upgrade is implemented. There is also
an option to switch between the Classic UI and New-UI to maintain user experience. The Pulse
Secure client icon is replaced by Ivanti Secure Access Client icon . For more information
refer KB45301.
To enable the New-UX installation, sideloading of Windows Apps must be enabled on the
system.
Launch Ivanti Secure Access Client by searching for Ivanti Secure Access Client Icon under Applications
List.
Copyright © 2024, Ivanti, Inc. All Rights Reserved. Privacy and Legal.
Page 46 of 151
Using Ivanti Secure Access Client Interface

To launch Ivanti Secure Access Client from the Terminal
Launch the UI by executing the below command
/opt/pulsesecure/bin/pulseUI
Adding VPN Connections
To create a Ivanti VPN connection on a device:
Classic UI
Copyright © 2024, Ivanti, Inc. All Rights Reserved. Privacy and Legal.
Page 47 of 151
Using Ivanti Secure Access Client Interface

New-UX
Click Add icon on the top-right-hand corner of the main Ivanti Secure Access Client screen.
1. In the Name field, specify the name for the Ivanti Connect Secure gateway.
2. In the Server URL field, specify the URL for the Ivanti Connect Secure gateway.
You can identify the server using the server IP address, the hostname, or a URL that optionally
specifies the port the connection uses and the specific sign-in page. To specify an URL, use the
following format: https://hostname[:port][/][sign-in page]
The brackets indicate options. If you specify a specific sign-in page, make sure that the name
you specify matches what is defined on the Ivanti Connect Secure gateway. (Authentication >
Signing in > Sign-in pages.)
3. Click Add. The new VPN connection appears in the VPN list.
Click Connect to initiate a VPN connection. The VPN connection state is indicated in the VPN
dropdown menu on the VPN list.
Use “JamCommand” tool to import connections to client store using CLI.
/opt/pulsesecure/bin/jamCommand /ImportFile
~/Downloads/pulsepreconfig
Copyright © 2024, Ivanti, Inc. All Rights Reserved. Privacy and Legal.
Page 48 of 151
Using Ivanti Secure Access Client Interface


New-UX
1. Select the VPN connection and click the edit icon on the top-right-hand corner of the main
Ivanti Secure Access Client screen.
2. In the Name field, specify the name for the Ivanti Connect Secure gateway.
3. In the Server URL field, specify the URL for the Ivanti Connect Secure gateway.
You can identify the server using the server IP address, the hostname, or a URL that optionally
specifies the port the connection uses and the specific sign-in page. To specify an URL, use the
following format: https://hostname[:port][/][sign-in page]
The brackets indicate options. If you specify a specific sign-in page, make sure that the name
you specify matches what is defined on the Ivanti Connect Secure gateway. (Authentication >
Signing in > Sign-in pages.)
4. Click Save, modified VPN connection appears in the VPN list.
Tap Connect to initiate a VPN connection. The VPN connection state is indicated in the VPN
dropdown menu on the VPN list.
Copyright © 2024, Ivanti, Inc. All Rights Reserved. Privacy and Legal.
Page 50 of 151
Using Ivanti Secure Access Client Interface

New-UX
1. Select the VPN connection and click on the delete icon on the top-right-hand corner of the
main Ivanti Secure Access Client screen.
2. VPN connection is removed from the VPN list after user click the OK button on the above
screen.
Initiating VPN Connection
To initiate a Ivanti VPN connection on a device:
Classic UI
Copyright © 2024, Ivanti, Inc. All Rights Reserved. Privacy and Legal.
Page 52 of 151
Using Ivanti Secure Access Client Interface

New-UX
1. Select the VPN connection and click Connect on the main screen.
2. New window opens to continue authentication process based on the authentication method
configured for the realm.
Terminating VPN Connection
To terminate a Ivanti VPN connection on a device:
Copyright © 2024, Ivanti, Inc. All Rights Reserved. Privacy and Legal.
Page 53 of 151
Using Ivanti Secure Access Client Interface


New-UX
On Classic UI, select the VPN connection and click Disconnect on the main screen.
On New-UX, select the VPN connection and click and select Disconnect.
Ivanti Secure Access Client automatically attempts to reconnect in case of an interrupted
connection, such as temporarily losing the Wi-Fi link.
Advanced Connection Details
Advanced connection details page shows the status of the selected VPN connection from the list.
To view advanced connection details on classic UI, navigate to File > Connections > Advanced Status
Details.
Copyright © 2024, Ivanti, Inc. All Rights Reserved. Privacy and Legal.
Page 55 of 151
Using Ivanti Secure Access Client Interface

To view advanced connection details on New-UX, click and select Connection Details.
To upload logs to the VPN server, the user needs to be authenticated with an active session.
Copyright © 2024, Ivanti, Inc. All Rights Reserved. Privacy and Legal.
Page 56 of 151
Using Ivanti Secure Access Client Interface

Switching UI modes
The Ivanti Secure Access Client allows to navigate from the New-UX to Classic UI and vice versa.
On New-UX, select and UI mode to switch between the modes.
On Classic UI, click File > UI Mode to switch between the modes.
Copyright © 2024, Ivanti, Inc. All Rights Reserved. Privacy and Legal.
Page 57 of 151
Using Ivanti Secure Access Client Interface

Select Admin Setting to change the mode as per the server settings. Confirm the switch on the display
message to reset to UI interface as set on the server.
About Ivanti Secure Access Client
To view Ivanti Secure Access Client details:
1.
Click Help>About on classic UI or > About on New-UX.
Copyright © 2024, Ivanti, Inc. All Rights Reserved. Privacy and Legal.
Page 58 of 151
Using Ivanti Secure Access Client Interface

Classic UI
New-UX
Uninstall Ivanti Secure Access Client
Search for Ivanti Secure Access Client Icon under Applications List. Uninstall "Ivanti Secure Access
Client" form the list under Add/Remove programs.
Copyright © 2024, Ivanti, Inc. All Rights Reserved. Privacy and Legal.
Page 59 of 151
Using Ivanti Secure Access Client Interface

Ivanti Secure Access Client for Windows
The Ivanti Secure Access Client for Windows user interface (see figure) lists the deployed Ivanti Secure
Access Client connections. Each connection is a set of properties that enables network access through a
specific Ivanti server. The user can expand a connection to see more details about the connection.
Download the Ivanti Secure Access Client from Software Download Portal. You need to have the login
credentials to access the portal.
Ivanti Secure Access Client connects to the server through proxy at the first attempt and then
try connecting directly upon failure.
VPN Connections
To view the VPN connection details dialog:
1. Select the VPN connection from the list of connection items.
2. Click File --> Connections --> Advanced Connection Details, or Right click the selected
connection to get the context menu, refer to the following figure.
Copyright © 2024, Ivanti, Inc. All Rights Reserved. Privacy and Legal.
Page 60 of 151
Using Ivanti Secure Access Client Interface

The Advanced Connection Detail information window will not update automatically. For example, the
session time remaining shows how much time remains when you open the dialog. To update advanced
detail information, click Refresh or click the check box labeled automatically refresh.
Copyright © 2024, Ivanti, Inc. All Rights Reserved. Privacy and Legal.
Page 61 of 151
Using Ivanti Secure Access Client Interface

The Advanced Connection Details window gives the following information
Field Name Description
Session time
remaining
The duration that the current VPN session will remain active before
credentials must be re-entered or the session manually extended.
Session Duration The duration elapsed for the session.
Tunnel type This describes that the connection is a VPN tunnel.
VPN type The protocol used to create the tunnel (SSL or ESP).
Assigned IPv4 The IPv4 address assigned to the virtual adapter.
Bytes in Number of bytes received through the tunnel.
Bytes out Number of bytes sent through the tunnel.
Connection Source This describes how the Ivanti Secure Access Client received the connection
entry:
If the value is Preconfigured, then the connection entry came from a
Connection Set that was downloaded from a gateway.
Copyright © 2024, Ivanti, Inc. All Rights Reserved. Privacy and Legal.
Page 62 of 151
Using Ivanti Secure Access Client Interface
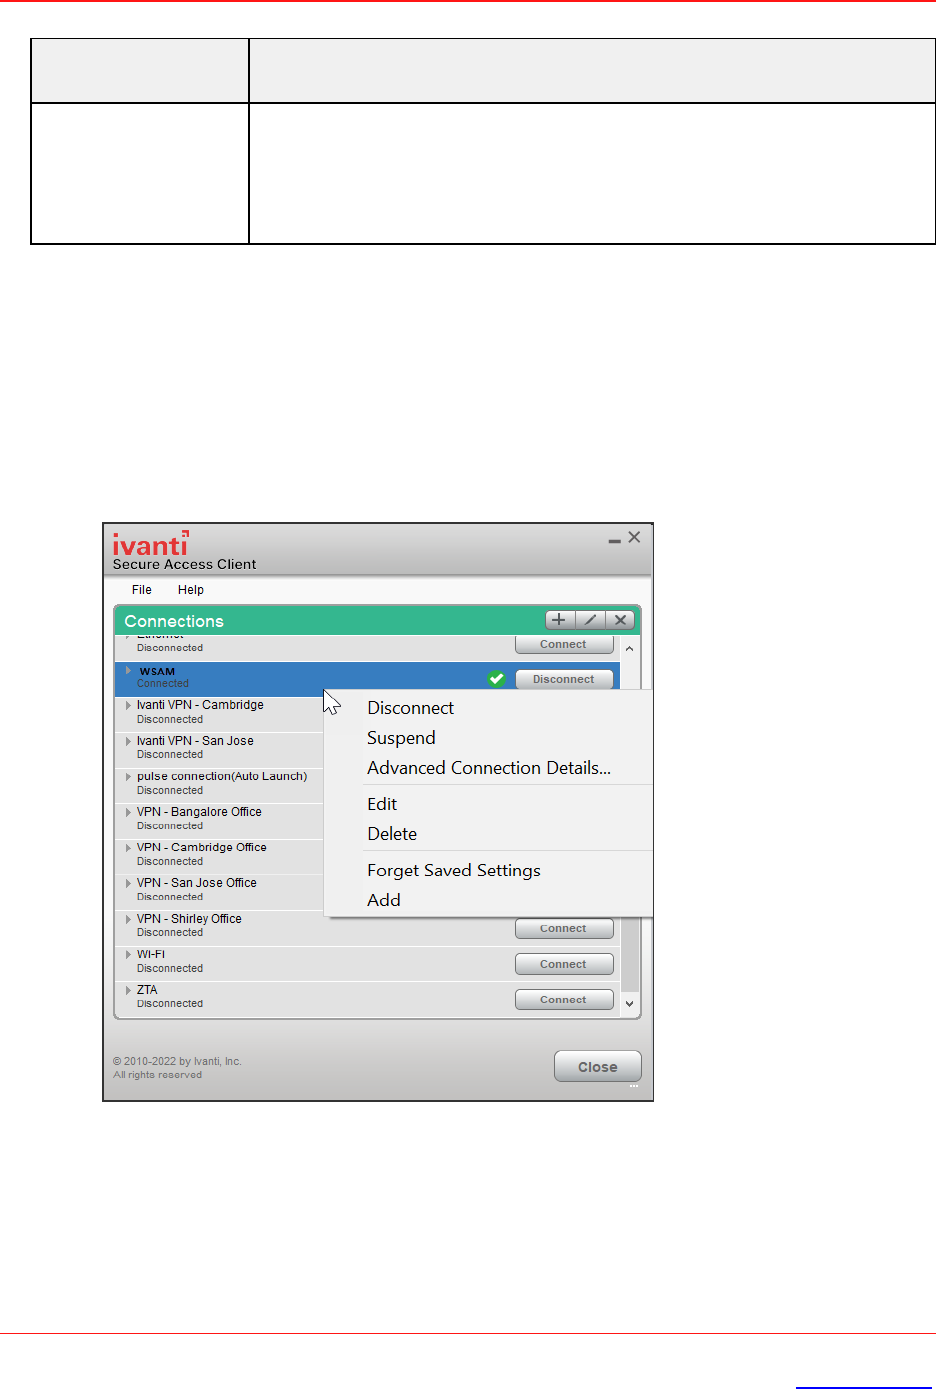
Field Name Description
And if the value is Dynamic, then it means that the connection entry was
resulted from launching the Ivanti Secure Access Client by connecting a
web browser to an Ivanti gateway and pressing the "Start" button on the
web page
PSAM Connection Details
To view the PSAM Advanced Connection Details dialog:
1. Select the PSAM connection from the list of connection items.
2. Click File --> Connections --> Advanced Connection Details, or right click the selected
connection to get the context menu, refer to the following figure.
Copyright © 2024, Ivanti, Inc. All Rights Reserved. Privacy and Legal.
Page 63 of 151
Using Ivanti Secure Access Client Interface

The Advanced Connection Detail information will not update automatically. For example, the session
time remaining shows how much time remains when you open the dialog. To update advanced detail
information, click Refresh or click the check box labeled automatically refresh.
The Advanced Connection Details window gives the following information:
Field Name Description
Session time
remaining
The duration that the current VPN session will remain active before
credentials must be re-entered or the session manually extended.
Session Duration The duration elapsed for the session.
Tunnel type This describes that the connection is a port/application mapping through
SAM (Secure Access Manager).
VPN type The protocol used to create the tunnel (SSL or ESP).
Bytes in Number of bytes received through the tunnel.
Bytes out Number of bytes sent through the tunnel.
PSAM Application Details
1. Select the PSAM connection from the list of connection items.
Copyright © 2024, Ivanti, Inc. All Rights Reserved. Privacy and Legal.
Page 64 of 151
Using Ivanti Secure Access Client Interface

2. Click File --> Connections --> Application Details, or right click on the selected connection
to get the context menu, refer to the following figure.
PSAM Session Details
To view the PSAM Session Details dialog:
1. Select the PSAM connection from the list of connection items.
2. Click File --> Connections --> SAM Session Details, or right click the selected connection to
get the context menu, refer to the following figure.
Copyright © 2024, Ivanti, Inc. All Rights Reserved. Privacy and Legal.
Page 65 of 151
Using Ivanti Secure Access Client Interface

The PSAM Session Details window gives the following information:
Field Name Description
Application The name of the application running in the active session.
Status The status of the application in the session.
Protocol The protocol used for the session.
Sent Number of bytes sent in the established session.
Received Number of bytes received in the established session.
Destination The target used by the application.
Ivanti Secure Access Client also displays a system tray icon that provides connection status, and can
allow the user to connect and disconnect and enables quick access to the program interface. One tray
icon provides status for all active connections.
Typically, the network administrator defines and deploys the Ivanti Secure Access Client connections
but you can also enable users to define, edit, and remove their own connections.
New-UX
Indicator
Classic
UIIndicator
Description
Connected.
Connecting.
Copyright © 2024, Ivanti, Inc. All Rights Reserved. Privacy and Legal.
Page 66 of 151
Using Ivanti Secure Access Client Interface

New-UX
Indicator
Classic
UIIndicator
Description
Connected with limitations
Connection attempt failed.
Connection suspended.
Connected to the local network but no Internet access
available. Public WiFi locations often deploy a captive portal
that requires the user to enter authentication information or to
accept terms of service before network access is granted. Ivanti
Secure Access Client detects the presence of captive portals
and does not initiate a connection to a Ivanti server until
Internet access is granted.
Ivanti Secure Access Client supports the Federal Information Processing Standard (FIPS), which defines
secure communication practices for the U.S. government. If FIPS is enabled on the endpoint, "FIPS On"
appears near the bottom the Ivanti Secure Access Client window.
A single system tray icon indicates the status of all active Ivanti Secure Access Client connections. You
can right-click the system tray icon to control Ivanti Secure Access Client connections, to open the Ivanti
Secure Access Client interface, or to exit from Ivanti Secure Access Client. The following table shows the
connection status indicated by the system tray icon.
Tray Icon
Indicator
Description
No connection
Connecting. A connection stays in this state until it fails or succeeds.
Suspended
Connected with issues
Copyright © 2024, Ivanti, Inc. All Rights Reserved. Privacy and Legal.
Page 67 of 151
Using Ivanti Secure Access Client Interface

Tray Icon
Indicator
Description
Connection failed
Connected
Connected to the local network but no Internet access available. Public WiFi
locations often deploy a captive portal that requires the user to enter
authentication information or to accept terms of service before network access is
granted. Ivanti Secure Access Client detects the presence of captive portals and
does not initiate a connection to a Ivanti server until Internet access is granted.
Ivanti Secure Access Client for macOS
Ivanti Secure Access Client supports Apple computers running macOS. You deploy Ivanti Secure Access
Client to Mac endpoints the same way you deploy the Windows client.
Download the Ivanti Secure Access Client from Software Download Portal. You need to have the login
credentials to access the portal.
Ivanti Secure Access Client for Mac endpoints supports the following features:
• Connections to Ivanti Policy Secure
• Connections to Ivanti Connect Secure
Ivanti Secure Access Clients connect to the Ivanti Connect Secure in SSL fallback mode.
• PSAM on macOS
• Host Checker
• Host Checker for macOS supports the following rules and remediation actions:
• Port
• Process
• File
• Custom IMC
Copyright © 2024, Ivanti, Inc. All Rights Reserved. Privacy and Legal.
Page 68 of 151
Using Ivanti Secure Access Client Interface

• Enable Custom Instructions
• Kill Processes
• Delete Files
• Send reason strings
Ivanti Secure Access Client for Linux
Ivanti Secure Access Client for Linux provides secure connectivity between a device running Linux and
Ivanti Connect Secure. After installing the Ivanti Secure Access Client VPN package on a Linux device,
the user can configure a connection and establish Layer 3 VPN communications.
Download the Ivanti Secure Access Client from Software Download Portal. You need to have the login
credentials to access the portal.
The following features are supported by the Ivanti Secure Access Client for Linux:
• Ivanti Secure Access Client Usability Improvements
• VPN (SSL) connections to a Ivanti Secure Access Client SSL/VPN server.
• IPV6 mixed modes like IPv4 connections in IPV6 tunnels and vice versa
• Source IP enforcement through Ivanti Policy Secure
• SAML and Custom Sign-in support for Linux
• 64-bit Operating Systems Support
• Multi-Factor Authentication (MFA) Support
• Host Checker
• Command Line Support
• RPM/DEB Package Support
• Pre- and post-authentication sign-in notification messages
• Client Certificate Authentication Support
• VPN tunneling connections for IPv4 and IPv6 resource access
• IP based split tunneling and route monitoring
Copyright © 2024, Ivanti, Inc. All Rights Reserved. Privacy and Legal.
Page 69 of 151
Using Ivanti Secure Access Client Interface

User Experience
From the user perspective, Ivanti Secure Access Client presents a clean, uncomplicated interface. The
user can enter credentials, select a realm, save settings, and accept or reject the server certificate. When
you configure the Ivanti Secure Access Client, you can specify whether to permit end users to modify
settings, such as by adding connections.
Security Assertion Markup Language (SAML) Authentication
Ivanti Secure Access Client facilitates SAML authentication for Single Sign-on (SSO) in the following two
ways:
• The Ivanti Secure Access Client user sees an embedded browser (see figure) - if Enable
embedded browser for authentication is enabled.
Ivanti Secure Access Client will close the embedded browser, once the SAML authentication is done.
If user resizes the Embedded browser window, size will remain same even if user reconnects to
Ivanti Secure Access Client. Embedded browser window size will remain as pre-selected size
which was set by the user for the first time, until user resizes it again.
Copyright © 2024, Ivanti, Inc. All Rights Reserved. Privacy and Legal.
Page 70 of 151
Using Ivanti Secure Access Client Interface

• The Ivanti Secure Access Client user sees an external browser (see figure). if Enable embedded
browser for authentication is disabled.
Single Logout
Single logout is a mechanism provided by SAML for logging out a particular user from all the sessions
created by the identity provider.
Ivanti Secure Access Client supports Single Logout only when embedded browser is enabled.
Select this option if the system must receive and send a single logout request for the peer SAML
identity provider. If you use the metadata option, the Single Logout Service URL setting can be
completed by selecting the SLO service URL from the list. The list is populated by the identity provider
entities defined in metadata files added to the System > Configuration > SAML page. The system
sends Single Logout requests to this URL. In addition, if you use the metadata option, the Single Logout
Response URL setting is completed based on your selection for Single Logout Service URL.
Copyright © 2024, Ivanti, Inc. All Rights Reserved. Privacy and Legal.
Page 71 of 151
Using Ivanti Secure Access Client Interface

If the identity provider has left this setting empty in its metadata file, the system sends the Single
Logout response to the SLO service URL. If you complete these settings manually, ask the SAML identity
provider administrator for guidance. The Support Single Logout service for the identity provider must
present a valid certificate.
Custom Sign-in Page in Embedded browser
To upload a custom sign-In page in Ivanti Secure Access Client, admin needs to perform the following
steps:
1. Log into Ivanti Connect Secure/Ivanti Policy Secure as admin.
2. Go to Authentication > Signing-In > Sign-In Pages > Upload Custom Sign-In Pages.
3. Select the option Use Custom Page for the Pulse Desktop Client Logon.
Copyright © 2024, Ivanti, Inc. All Rights Reserved. Privacy and Legal.
Page 72 of 151
Using Ivanti Secure Access Client Interface

4. Click Browse and select the custom sign-in page file and click Upload Custom Pages.
5. Go to Signing In > Sign-In Policies > New Sign-In Policy to create the new Sign-In policy.
6. Under Sign-In page, select the uploaded custom page from the drop-down box to associate
custom Sign-In page with the Sign-In Policy.
Copyright © 2024, Ivanti, Inc. All Rights Reserved. Privacy and Legal.
Page 73 of 151
Using Ivanti Secure Access Client Interface

Ivanti Secure Access Client can open a custom sign-In page in the following two ways:
• A Ivanti Secure Access Client user sees an embedded browser (see figure) if Enable embedded
browser for authentication is enabled.
Ivanti Secure Access Client closes the embedded browser once the authentication is done.
Whenever user logs into the custom sign-in URL from Ivanti Secure Access Client, embedded browser
will be launched with custom sign-in pages uploaded into it.
Copyright © 2024, Ivanti, Inc. All Rights Reserved. Privacy and Legal.
Page 74 of 151
Using Ivanti Secure Access Client Interface

L3 and PSAM Coexistence
L3 and PSAM coexistence (supported on Windows only) enables the user to establish Layer 3
connection to Ivanti Connect Secure and PSAM connection simultaneously (refer to ). This feature is
available from 9.0R3 onwards.
To achieve, L3 and PSAM coexistence, Ivanti Secure Access Client should have minimum two Ivanti
Connect Secure connections, each for L3 and PSAM. Also, maximum three active user connections are
allowed at once.
Limitation for L3 and PSAM coexistence:
• At any given point, for any user only one L3 and one L4 is supported.
With L3 and PSAM coexistence, the way the packet is tunneled, depends on how the L3 and PSAM
tunnel are configured. It can be done in following two ways:
Following are the 2 scenarios, where L3 and PSAM coexistence is supported.
Scenario-1: PSAM is behind L3
ICS1 has L3 tunnel configuration and ICS2 is behind ICS1.
Copyright © 2024, Ivanti, Inc. All Rights Reserved. Privacy and Legal.
Page 75 of 151
Using Ivanti Secure Access Client Interface

Scenario-2: L3 and PSAM are independent
ICS1 has L3 tunnel configuration and ICS2 has PSAM configuration.
L3 Connection for Ivanti Connect Secure is established, split tunneling should be enabled and exclude
the ICS2 IP from the spilt tunneling networks.
If single user needs to access two different set of resources available on ICS1 and ICS2, then one specific
set of resources is under ICS1 and another set of resources is under ICS2.
As ICS1 and ICS2 are at different locations and user can not establish two L3 connections to access both
set of resources on ICS1 and ICS2, so PSAM can provide the secure access to set of resources on ICS2.
L3 based FQDN Split Tunneling feature with PSAM coexistence is not supported.
HVCI Compatibility
Ivanti Secure Access Client for Windows is compatible with Microsoft Windows 10 HVCI settings.
Windows 10 HVCI settings are part of Windows Device Guard security features for mitigating
cybersecurity threats. When HVCI is enabled, Windows OS performs code integrity checks and allows
only secured applications. Ivanti Secure Access Client for Windows is compatible with these settings
which would help customers adopt the latest security features of Windows.
PSAM IPv6 Support
PSAM IPv6 support is available for Windows 8.1 and later.
Internet Protocol Version 6 (IPv6) is the protocol designed to succeed Internet Protocol Version 4 (IPv4).
From 9.1R1 release onwards, PSAM (PSAM) will support IPv6 PSAM tunneling along with IPv4 PSAM
tunneling with the help of new option for internet traffic filtering, Windows Filtering Platform (WFP)
driver.
WFP driver supports both IPv6 and IPv4, however TDI driver supports only IPv4. WFP driver allows the
user to provide a deeper inspection and control of packets by modifying or examining TCP/IP traffic at
any TCP/IP stack layer.
Administrator can switch from WFP driver (supporting both IPv6 and IPv4) to classic TDI driver
(supporting IPv4 only) with fallback mechanism, in case of any issue due to WFP driver installation.
Following are the steps to switch from WFP to TDI:
1. Go to Users > User Role.
Copyright © 2024, Ivanti, Inc. All Rights Reserved. Privacy and Legal.
Page 76 of 151
Using Ivanti Secure Access Client Interface

2. Select the role.
3. Go to SAM > Options. The screen in figure appears.
4. Select Enable fail-over to TDI for PSAM connection.
Benefits
Following are the benefits of this feature:
• PSAM will be able to filter the traffic from Windows 10 and Windows 8.1 Metro Mode
Applications.
• PSAM will be able to filter the traffic from Microsoft Edgewith Enhanced Protected mode.
• PSAM will support Dual Stack (both IPv6 and IPv4).
Deployment Scenarios
The following table summarizes the IPv6 in IPv6, IPv4 in IPv6 and IPv6 in IPv4 scenarios:
Copyright © 2024, Ivanti, Inc. All Rights Reserved. Privacy and Legal.
Page 77 of 151
Using Ivanti Secure Access Client Interface

Client Endpoint
ICS External
Interface
ICS Internal
Interface
Tunnel
Description of
the Connection
Dual
Stack or
IPv6 only
Dual Stack
(IPv6 and
IPv4) or IPv6
only
IPv6 Dual Stack or
IPv6 only
IPv6-in-IPv6 IPv6 resource on
IPv6 PSAM
session.
Dual
Stack or
IPv6 only
Dual Stack
(IPv6 and
IPv4) or IPv6
only
IPv6 IPv4 IPv4-in-IPv6 IPv4 resource on
IPv6 PSAM
session.
Dual
Stack or
IPv4 only
Dual Stack
(IPv6 and
IPv4) or IPv6
only
IPv4 Dual Stack or
IPv4
IPv6-in-IPv4 IPv6 resource on
IPv4 PSAM
session.
Ivanti Secure Access Client 9.0R1 PSAM connection fails with Ivanti Connect Secure 9.1R1
version. For more details, refer to 9.1R1 Ivanti Secure Access Client Release Notes.
For PSAM (L4) connections, endpoints having IPV4 only cannot access IPV6 resources, or
endpoints having IPV6 only cannot access IPV4 resources.
Location Awareness
The location awareness feature enables you to define connections that are activated automatically
based on the location of the endpoint. Ivanti Secure Access Client determines the location of the
endpoint by evaluating rules that you define. For example, you can define rules to enable Ivanti Secure
Access Client to automatically establish a secure tunnel to the corporate network through Ivanti
Connect Secure when the user is at home, and to establish a Ivanti Policy Secure connection when the
user is in the office and connected to the corporate network over the LAN. Ivanti Secure Access Client
does not re-establish a VPN tunnel when the endpoint re-enters the trusted/corporate network.
Location awareness rules are based on the client's IP address and network interface information.
Copyright © 2024, Ivanti, Inc. All Rights Reserved. Privacy and Legal.
Page 78 of 151
Using Ivanti Secure Access Client Interface

Centralized Ivanti Secure Access Client Configuration Management
Centralized configuration management is a key feature of Ivanti Secure Access Client. Ivanti Secure
Access Client connection sets (the configurations that define how and when a Ivanti Secure Access
Client connects), are bound to a particular Ivanti server. The binding server is the one that provides the
initial configuration to the Ivanti Secure Access Client. For example, if you create a Ivanti Secure Access
Client connection set on Server A, and then distribute those connections to endpoints, those clients are
bound to Server A.
A bound client is managed by its particular Ivanti server. The Ivanti administrator defines Ivanti Secure
Access Client connections and software components that are installed on the endpoint. When Ivanti
Secure Access Client connects to the Ivanti server that is managing it, the server automatically
provisions configuration and software component updates. The administrator can permit the user to
add, remove, and modify connections. The administrator can also allow dynamic connections
(connections that are added by Ivanti servers when the user logs into the server using a browser). A
dynamic connection enables a bound client to add connections from Ivanti servers other than the one
the client is bound to. Dynamic connections are created as manual rather than automatic connections,
which means that they are run only when the user initiates the connection or the user browses to a
Ivanti server and launches Ivanti Secure Access Client from the server's Web interface. Dynamic
connections create the connection with the minimum configuration required to make the connection,
which means that the URL used to install or launch Ivanti Secure Access Client from the Ivanti server's
Web interface is used as the Connection URL and connection name. Binding Ivanti Secure Access Clients
to a particular server ensures that the client does not receive different configurations when it accesses
other Ivanti servers. A bound endpoint receives connection set options and connections from its
binding server, but it can have its Ivanti Secure Access Client software upgraded from any Ivanti server
that has the automatic upgrade option enabled.
Ivanti Secure Access Client can be bound to only one Ivanti server connection set at a time.
Ivanti Secure Access Client can receive updates and changes to that bound connection set from
other Ivanti servers only if the connection set is exported from the Ivanti server and then
imported to another Ivanti server.
Ivanti Secure Access Client does not need to be bound to a Ivanti server. An unbound client is managed
by its user. If Ivanti Secure Access Client software is installed without any connections, the user must
add connections manually. Dynamic connections can be added by visiting the Web portals of Ivanti
servers. An unbound client does not accept configuration updates from any Ivanti server.
Copyright © 2024, Ivanti, Inc. All Rights Reserved. Privacy and Legal.
Page 79 of 151
Using Ivanti Secure Access Client Interface

Session Migration
If you configure your access environment to support the Ivanti Secure Access Client session migration
feature, users can log in once through a Ivanti server on the network, and then securely access
additional Ivanti servers without needing re-authentication. For example, a user can connect from home
through Ivanti Connect Secure, and then arrive at work and connect through Ivanti Policy Secure
without having to log in again. Session migration also enables users to access different resources within
the network without repeatedly providing credentials. IF-MAP Federation is required to enable session
migration for users.
Smart Connections - List of URLs
Each Ivanti Secure Access Client connection that connects to Ivanti Policy Secure or Ivanti Connect
Secure can be configured with a list of Ivanti servers. Ivanti Secure Access Client attempts to connect to
each of the servers in the URL list until it succeeds. You can choose different modes to control the
behavior of a Ivanti Secure Access Client connection that is starting from a disconnected state, start at
the top of the list, start with the most recently connected URL, or choose randomly. The random option
helps distribute the connection load across different Ivanti servers. If a Ivanti Secure Access Client
connection that is already established gets disconnected, for example, the wireless connection is
interrupted, Ivanti Secure Access Client always tries to connect to the most recently connected URL. If
that connection fails, Ivanti Secure Access Client uses the server list. The Ivanti Secure Access Client user
can also choose a connection from the list as shown in figure.
Copyright © 2024, Ivanti, Inc. All Rights Reserved. Privacy and Legal.
Page 80 of 151
Using Ivanti Secure Access Client Interface

Security Certificates
Users cannot add CA servers or manage the server list. Ivanti Secure Access Client handles certificates in
the same way that a browser handles certificates. If the Ivanti Secure Access Client dynamic certificate
trust option is enabled for a connection, the user can accept or reject the certificate that is presented if
it is not from a CA that is defined in the endpoint's certificate store.
Compliance and Remediation
Ivanti Secure Access Client supports the Host Checker application to assess endpoint health and update
critical software. You configure rules in Host Checker policies for Ivanti Connect Secure and Ivanti Policy
Secure to specify the minimum criteria for the security compliance of endpoints that are allowed to
enter the network. Endpoints that fail can be connected through a remediation role that provides
limited access.
Host Checker can be deployed from a Ivanti server to Ivanti Secure Access Clients on Windows and
macOS endpoints. It will be downloaded and run when a browser is used on a Windows or macOS
endpoint to connect to the Ivanti server Web portal. You can use Host Checker policies at the realm or
role level.
Copyright © 2024, Ivanti, Inc. All Rights Reserved. Privacy and Legal.
Page 81 of 151
Using Ivanti Secure Access Client Interface

Host Checker is not supported in the use case where the user employs a browser on the mobile
device to connect to the Ivanti server Web portal.
For Windows and OS X clients, you can use Host Checker to perform the following:
• Virus signature monitoring
You can configure Host Checker to monitor and verify that the virus signatures, operating
systems, and software versions installed on client computers are up to date. You can configure
automatic remediation for those endpoints that do not meet the specified criteria.
• Patch management information monitoring and patch deployment
You can configure Host Checker policies that check for Windows endpoints' operating system
service pack, software version, or desktop application patch version compliance.
• Patch verification remediation options
Ivanti Secure Access Client and Host Checker support endpoint remediation through Microsoft
System Management Server or Microsoft System Center Configuration Manager (SMS/SCCM).
With SMS/SCCM, Ivanti Secure Access Client triggers a preinstalled SMS/SCCM client to get
patches from a pre-configured server.
• Endpoint configuration
You can configure custom rules to allow Host Checker to check for third-party applications,
files, process, ports, registry keys, and custom DLLs.
Ivanti Secure Access Client supports a set of Host Checker functions that vary from one OS to the next.
For complete information on Host Checker for mobile clients.
Two Factor Authentication
Ivanti Secure Access Client supports RSA SecurID authentication through soft token, hard token, and
smart card authenticators. The SecurID software (RSA client 4.1 and later) must already be installed on
the client machine.
Copyright © 2024, Ivanti, Inc. All Rights Reserved. Privacy and Legal.
Page 82 of 151
Using Ivanti Secure Access Client Interface

Captive Portal Detection
Public WiFi locations often deploy a captive portal that requires the user to enter authentication
information or to accept terms of service before network access is granted. Ivanti Secure Access Client
detects the presence of captive portals and does not initiate a connection to a Ivanti Connect Secure or
Policy Secure server until internet access is granted. Ivanti Secure Access Client displays appropriate
status information to enable the user to establish the portal and network connections.
Captive portal detection notes:
• Captive portal detection is supported on Ivanti Secure Access Client for both Windows and
Mac. Captive portal detection is not supported on Windows In-Box Ivanti Secure Access Client
or Ivanti Secure Access Client.
• If Ivanti Secure Access Client connects through a proxy in Captive Portal scenario, the captive
portal detection algorithm is disabled and Ivanti Secure Access Client tries connecting directly
to ICS.
Sign In Notifications
The notifications feature on Ivanti Connect Secure and Ivanti Policy Secure allows the network
administrator to display notifications to Ivanti Secure Access Client users prior to the user logging in
and after the user has already logged in. For example, you could display a legal statement or a message
stating who is allowed to connect to the server before you display the Ivanti Secure Access Client
credentials dialog. After the user has connected, you could display a message that notifies the user of
scheduled network or server maintenance.
Automatic Software Updates
After you deploy Ivanti Secure Access Client software to endpoints, software updates occur
automatically. If you upgrade the Ivanti Secure Access Client configuration on the server, updated
software components are pushed to a client the next time it connects. You can disable this automatic
upgrade feature.
The automatic update feature is supported on Ivanti Connect Secure and Ivanti Policy Secure
servers only.
Copyright © 2024, Ivanti, Inc. All Rights Reserved. Privacy and Legal.
Page 83 of 151
Using Ivanti Secure Access Client Interface
If you configure Ivanti Secure Access Client to make 802.1X-based connections, a reboot might
be required on Windows endpoints.
Ivanti Secure Access Client Customization and Rebranding
The Ivanti Secure Access Client customization tool (BrandPackager) enables you to customize the
appearance of Ivanti Secure Access Client for Windows and Ivanti Secure Access Client for Apple OS X.
You can add your own identity graphic to the Ivanti Secure Access Client splash screen, to the program
interface, and to Windows credential provider tiles. "User Experience" on page70 shows graphic
customizations applied to the Ivanti Secure Access Client for Windows. You can also customize error
and informational message text, the text that appears in dialog boxes and on buttons, and make limited
changes to Ivanti Secure Access Client online Help. For example, you might want to add your help desk
phone number to Ivanti Secure Access Client error messages and the Ivanti Secure Access Client online
Help.
BrandPackager is available for download from the Ivanti website (www.ivanti.com).
Ivanti Secure Access Client Configuration Overview
You configure Ivanti Secure Access Client settings on the Ivanti server so that when users request
authentication, they are assigned a role based on the role mappings and optional security profile that
you create. Access to specific resources is permitted only for users and devices that provide the proper
credentials for the realm, that are associated with the appropriate roles, and whose endpoints meet
security restrictions. If a user attempts to connect to the network from an endpoint that does not
comply with the security restrictions you have defined, the user cannot access the realm or role.
Copyright © 2024, Ivanti, Inc. All Rights Reserved. Privacy and Legal.
Page 84 of 151
Using Ivanti Secure Access Client Interface

As you plan your Ivanti Secure Access Client configuration, be sure you know how you want to deploy
Ivanti Secure Access Client. You can use one or more of the following Ivanti Secure Access Client
deployment options:
• Use the defaults or make changes to the Ivanti Secure Access Client default component set and
default connection set, and then download and distribute Ivanti Secure Access Client by having
users log in to the gateway's user Web portal and be assigned to a role. After the installation is
complete, users have all the connections they need to access network resources.
• Create connections that an endpoint needs for connectivity and services, download the Ivanti
Secure Access Client settings file (.pulsepreconfig), download default Ivanti Secure Access
Client .msi installation program, and then run the .msi installation program by using an msiexec
command with the settings file as an option. You can use the msiexec command to deploy
Ivanti Secure Access Client using a standard software distribution process, such as SMS/SCCM.
• Distribute Ivanti Secure Access Client with no preconfiguration. You can download the default
Ivanti Secure Access Client installation file (Mac or Win) from the device, and then distribute the
file to endpoints using your organization's standard software distribution methods. Because the
installer does not contain preconfigured connections, users must define network connections
manually. Or you can create dynamic connections on each access gateway. These connections
are automatically downloaded to the installed Ivanti Secure Access Client when users provide
their login credentials to the gateway's user Web portal.
The following tasks summarize how to configure Ivanti Secure Access Client on the device:
• Create and assign user roles to control who can access different resources and applications on
the network. If you are converting your access environment from agentless or a VPN Tunneling
environment, you should create new roles that are specific for Ivanti Secure Access Client.
• Define security restrictions for endpoints with Host Checker policies.
• Define user realms to establish authentication domains. If you are converting your access
environment from agentless or a NC environment, typically you can use your existing realms.
• Associate the roles with appropriate realms to define your access control hierarchy using role
mapping.
• Define Ivanti Secure Access Client component sets, connection sets, and connections.
• Deploy Ivanti Secure Access Client to endpoints.
Copyright © 2024, Ivanti, Inc. All Rights Reserved. Privacy and Legal.
Page 85 of 151
Using Ivanti Secure Access Client Interface

Ivanti Secure Access Client Status Icons
The Ivanti Secure Access Client interface (Windows and OS X) displays a system tray icon (Windows) or a
menu bar icon (OS X) that indicates connection status, provides access to menu items that let the user
connect and disconnect from networks and meetings, and enables quick access to the program
interface. Only one icon is visible even when there are multiple connections. One icon provides the
status for all connections by indicating the most important connection state information.
New-UX
Indicator
Classic
UIIndicator
Description
Connected.
Connecting.
Connected with limitations
Connection attempt failed.
Connection suspended.
Connected to the local network but no Internet access
available. Public WiFi locations often deploy a captive portal
that requires the user to enter authentication information or to
accept terms of service before network access is granted. Ivanti
Secure Access Client detects the presence of captive portals
and does not initiate a connection to a Ivanti server until
Internet access is granted.
Installation Requirements
For detailed information about supported platforms and installation requirements, see the Ivanti Secure
Access Client Supported Platforms Guide, available from the Ivanti website (www.ivanti.com).
Copyright © 2024, Ivanti, Inc. All Rights Reserved. Privacy and Legal.
Page 86 of 151
Using Ivanti Secure Access Client Interface

Ivanti Secure Access Client Error Messages Overview
Ivanti Secure Access Client error and warning messages reside in message catalog files on the endpoint.
Each message includes a short description that states the problem and a long description that provides
more details and suggests actions the user can take to resolve the issue.
You can edit Ivanti Secure Access Client messages by using the optional Ivanti Secure Access Client
branding tool, BrandPackager. See "Editing Ivanti Secure Access Client Messages" on page118 for more
information.
All message catalog files are localized. The filename indicates the language. For example,
MessageCatalogConnMgr_EN.txt is the English-language version of the file. The following filename
conventions indicate the language:
• DE-German
• EN-English
• ES-Spanish
• FR-French
• IT-Italian
• JA-Japanese
• KO-Korean
• PL-Polish
• ZH-Chinese (Traditional)
• ZH-CN-Chinese (Simplified)
Copyright © 2024, Ivanti, Inc. All Rights Reserved. Privacy and Legal.
Page 87 of 151
Using Ivanti Secure Access Client Interface

Uninstalling Ivanti Secure Access Client
Ivanti Secure Access Client can be uninstalled from the endpoints in the following ways:
• Remove the current version ISAC application: Remove only the current version of ISAC
application but retain the associated components for further use when ISAC is upgraded.
• Remove ISAC application along with the components: Remove ISAC application and all
associated components from the endpoint.
• Deep cleaning: After removing the ISAC application, few files and registry settings may still
exist. To completely remove all changes pertaining to ISAC application, refer to ISAC deep clean
procedure.
Uninstall Ivanti Secure Access Client from Windows
Search for Ivanti Secure Access Client Icon under Applications List. Uninstall "Ivanti Secure Access
Client" form the list under Add/Remove programs. On the prompt, choose an option to remove only
the application or all associated components along with the application.
Uninstall Ivanti Secure Access Client from macOS
Using Finder, move the Ivanti Secure Access Client found in /Applications/Pulse Secure.app to the
Trash/Bin. On the prompt, choose an option to remove only the application or all associated
components along with the application.
Uninstall Ivanti Secure Access Client using Intune
The ISAC is uninstalled from devices in the selected groups if Intune has previously installed the
application onto the device through an "Available for enrolled devices" or "Required" assignment using
the same deployment. For more information, refer Application Assignment.
Ivanti Secure Access Client Deep Clean procedure
Deep Clean Process for Windows
Ivanti reccomends to use the PowerShell script for deep clean process on WindowsOS endpoints.
To remove Ivanti Secure Access Client components manually for deep cleaning on Windows system:
Copyright © 2024, Ivanti, Inc. All Rights Reserved. Privacy and Legal.
Page 88 of 151
Uninstalling Ivanti Secure Access Client

1. Uninstall "Ivanti Secure Access Client" from the list under Add/Remove programs. On the
prompt, choose the option to remove only the application or all associated components along
with the application.
2. Remove Juniper/Pulse secure folder from the following locations:
• C:\Program Files
• C:\ProgramData
• C:\Users\CurrentUser\AppData\Roaming
• C:\Users\CurrentUser\AppData\Local
• C:\Users\Public
3. Navigate to C:\Users\CurrentUser\AppData\Local\Temp and remove all the temp files.
4. Remove the following files from Windows/System32 folder:
• C:\Windows\System32\DRVSTORE\jnprns_
260C6334D987C71B41EC39304CE4AE75D6794E54
• C:\Windows\System32\drivers\jnprns.sys
• C:\Windows\System32\drivers\jnprTdi_821_227.sys
• C:\Windows\System32\drivers\jnprva.sys
• C:\Windows\System32\drivers\jnprvamgr.sys
5. Remove the Juniper/Pulse Secure adapter under Control Panel/Device Manager/Network
adapters. Uninstall all the Ivanti Secure and third-party adapters if any.
6. Open the registry and delete Juniper/Pulse Secure folders from the below location:
• On 32-bit machines:
• HKEY_LOCAL_MACHINE\SOFTWARE\Juniper Networks\
• HKEY_LOCAL_MACHINE\SOFTWARE\Pulse Secure\
• On 64-bit machines:
• HKEY_LOCAL_MACHINE\SOFTWARE\Wow6432Node\Juniper Networks\
• HKEY_LOCAL_MACHINE\SOFTWARE\Wow6432Node\Pulse Secure\
Copyright © 2024, Ivanti, Inc. All Rights Reserved. Privacy and Legal.
Page 89 of 151
Uninstalling Ivanti Secure Access Client

• HKEY_CURRENT_USER\Software\Juniper Networks
• HKEY_CURRENT_USER\Software\Pulse Secure\
• HKLM\SYSTEM\CurrentControlSet\Services\JnpRTDI*
• HKLM\SYSTEM\CurrentControlSet\Services\Jnprva
• HKLM\SYSTEM\CurrentControlSet\Services\Jnprvamgr
7. Remove all files from the location C:\Windows\Downloaded Program Files.
8. Refer to Fix problems that block programs from being installed or removed for more
troubleshooting to remove the ISAC application.
Alternatively, you can use the PowerShell script for deep clean process on WindowsOS endpoints.
Deep Clean Steps for macOS
1. Using Finder, move the Ivanti Secure Access Client found in /Applications/Pulse Secure.app to
the Trash/Bin. On the prompt, choose an option to remove only the application or all
associated components along with the application.
2. Execute the following commands from the terminal window
• defaults write com.apple.Finder AppleShowAllFiles true
• Killall Finder
• sudo rm -rf ~/Library/Application\ Support/Juniper\ Networks/SetupClient
• sudo rm -rf ~/Library/Application\ Support/Juniper\ Networks/HostChecker.app
• sudo rm -rf ~/Library/Application\ Support/Pulse\ Secure/SetupClient
• sudo rm -rf ~/Library/Application\ Support/Pulse\ Secure/HostChecker.app
• rm -rf ~/Library/Logs/Juniper\ Networks
• rm -rf ~/Library/Logs/Pulse\ Secure
• sudo rm -rf /Applications/Network\ Connect.app
• sudo rm -rf /Applications/Pulse\ Secure.app
• sudo /usr/local/juniper/nc/install/uninstall_nc.sh
Copyright © 2024, Ivanti, Inc. All Rights Reserved. Privacy and Legal.
Page 90 of 151
Uninstalling Ivanti Secure Access Client

• sudo rm -rf ~/Library/Application\ Support/Pulse\ Secure
• rm -rf ~/Library/Logs/Pulse\ Secure
• sudo rm -rf /Applications/Ivanti\ Secure\ Access.app
3. Navigate to Finder on the following location and drag the Juniper/Pulse Secure Folders to the
Trash.
4. From the User profile, remove:
• ~/Library/Application Support/Juniper Networks
• ~/Library/Application Support/Pulse Secure
5. At the same location, from the root i.e Macintosh HD
• /Library/Application Support/Juniper Networks
• /Library/Application Support/Pulse Secure
6. Execute the following commands:
• /Library/LaunchDaemons/net.juniper.UninstallPulse.plist.org<http://net.juniper.UninstallPu
lse.plist.org>
• /Library/LaunchDaemons/net.pulse.UninstallPulse.plist.org<http://net.pulse.UninstallPulse.
plist.org>
• /Library/LaunchAgents/net.juniper.UninstallPulse.plist.org<http://net.juniper.UninstallPulse
.plist.org>
• /Library/LaunchAgents/net.pulse.UninstallPulse.plist.org<http://net.pulse.UninstallPulse.pli
st.org>
Try navigating through Finder and verify if all the files are removed.
Rollback Ivanti Secure Access Client
Currently, in-place rollback of Ivanti Secure Access Client to lower versions is not supported.
If a lower version of Ivanti Secure Access Client is required, perform a deep clean of the existing version
and perform a fresh installation of the required version.
Copyright © 2024, Ivanti, Inc. All Rights Reserved. Privacy and Legal.
Page 91 of 151
Uninstalling Ivanti Secure Access Client

Handling ISAC Upgrade failure
For failed upgrades of Ivanti Secure Access Client, during auto-upgrade through Ivanti Connect Secure
on managed or unmanaged endpoints, perform a deep clean for the existing version and install the
client using the URL provided by the administrator (browser-based installation).
If upgrade failure persists and cause cannot be determined, contact Ivanti support.
Accessing Ivanti Secure Access Client Error Messages on
macOS Endpoints
Ivanti Secure Access Client error and warning messages reside in message catalog files on the OS X
endpoint. Each message includes a short description that states the problem and a long description that
provides more details and suggests actions to resolve the issue.
You can edit Ivanti Secure Access Client messages by using the optional Ivanti Secure Access Client
branding tool, BrandPackager. See "Editing Ivanti Secure Access Client Messages" on page118 for more
information.
All message catalog files are localized. The filename indicates the language. For example,
MessageCatalogPulseUI_EN.txt is the English-language version of the file. The following filename
conventions indicate the language:
• DE-German
• EN-English
• ES-Spanish
• FR-French
• IT-Italian
• JA-Japanese
• KO-Korean
• PL-Polish
• ZH-Chinese (Traditional)
• ZH-CN-Chinese (Simplified)
Copyright © 2024, Ivanti, Inc. All Rights Reserved. Privacy and Legal.
Page 92 of 151
Uninstalling Ivanti Secure Access Client

To view Ivanti Secure Access Client catalog files on macOS endpoint, use Finder to display the package
contents of the Ivanti Secure Access Client application.
Ivanti Secure Access Client Log Files
Ivanti Secure Access Client writes information to log files on Windows and Apple OS X endpoints. If you
need to investigate a problem with connectivity on a Ivanti Secure Access Client endpoint, you can
instruct the user to save the client logs and e-mail them to you.
The user saves logging information by opening Ivanti Secure Access Client and then clicking File >
Logs > Save As. All relevant log files are added to a single file, LogsAndDiagnostics.zip. The user saves
the .zip file and then makes it available to you.
Ivanti Secure Access Client maintains its own log files on all supported platforms. On Windows, Ivanti
Secure Access Client also logs its major operational events into Windows Event Log. Network
administrators can review the Ivanti Secure Access Client event log to help troubleshoot problems.
"Ivanti Secure Access Client Log Files" above lists the Ivanti Secure Access Client messages that can
appear in the Windows event log.
To view the Ivanti Secure Access Client messages:
1. Open the Windows Event Viewer.
2. Click Applications and Services > Ivanti > Operational.
ID Level Message Description
600 error The connection <ID> failed
authentication: Error <ID>.
802.1X EAP authentication failure.
601 informational User has canceled
authentication of the
connection <ID>.
The user canceled 802.1X EAP
authentication.
602 error Failure writing wireless LAN
profile for connection <ID>
Error <ID>: Reason <ID>:
Profile: <ID>.
A failure occurred while a wireless
LAN profile was being created or
modified.
603 error Failure writing wireless LAN
profile for connection <ID>
Error <ID>.
A failure occurred while a wireless
LAN profile was being deleted.
Copyright © 2024, Ivanti, Inc. All Rights Reserved. Privacy and Legal.
Page 93 of 151
Uninstalling Ivanti Secure Access Client

ID Level Message Description
604 error Failure writing wired LAN
profile for connection <ID>
Error <ID>: Profile: <ID>.
A failure occurred while a wired LAN
profile was being created or
modified.
605 error Failure writing wired LAN
profile for connection <ID>
Error <ID>.
A failure while a wired LAN profile
was being deleted.
500 informational Pulse servicing has completed
successfully. All components
are up to date.
Ivanti Secure Access Client servicing
was successful.
501 informational Pulse servicing has completed
successfully. All components
are up to date.
Servicing was requested but all
components were up to date.
502 error Pulse servicing has failed.
Failure summary:
Ivanti Secure Access Client servicing
failed.
100 informational User requested connection
<ID> to start.
The user initiated a connect request.
101 informational User requested connection
<ID> to stop.
The user initiated a disconnect
request.
102 informational Connection <ID> is starting
because its policy
requirements have been met.
Connection Policy: <ID>.
A connection was started because
of a policy evaluation.
103 informational Connection <ID>) is stopping
because of its policy
requirements. Connection
Policy: <ID>.
A connection was stopped because
of a policy evaluation.
104 informational Connection <ID> is stopping
because of transition to
context <ID>.
The machine-to-user connection
was disconnected to transition to
another identity.
Copyright © 2024, Ivanti, Inc. All Rights Reserved. Privacy and Legal.
Page 94 of 151
Uninstalling Ivanti Secure Access Client

ID Level Message Description
105 informational Connection <ID> is starting
because of transition to
context <ID>.
The machine-to-user connection
was connected as part of the
transition to another identity.
106 informational Connection <ID> is
disconnected due to
computer suspend.
The connection to Ivanti Connect
Secure was disconnected because
the computer is being suspended.
107 informational Connection <ID> is
disconnected due to login
error.
A credential provider connection
was disconnected because of a
login error.
108 informational Connection <ID> is
disconnected because it was
modified.
A connection was disconnected
because it was modified.
109 informational User requested connection
<ID> to suspend.
The user initiated a suspend
request.
110 informational User requested connection
<ID> to resume.
The user initiated a resume request.
1 informational The Ivanti service version
<ID> has successfully started.
The Ivanti Secure Access Client
service started.
2 informational The Ivanti service has stopped. The Ivanti Secure Access Client
service stopped.
200 error No connections matching URL
<ID> were found in Pulse
database. Request to start a
connection from the browser
has failed.
Ivanti Secure Access Client failed to
resume a connection from the
browser.
400 error The host check for connection
<ID> has failed. Failed
policies: <ID>.
Host Checker failed one or more
policies.
Copyright © 2024, Ivanti, Inc. All Rights Reserved. Privacy and Legal.
Page 95 of 151
Uninstalling Ivanti Secure Access Client

ID Level Message Description
300 informational The connection <ID> was
established successfully
through web-proxy <ID>.
Ivanti Secure Access Client
established a connection to Ivanti
Connect Secure or Ivanti Policy
Secure through a Web proxy.
301 informational The connection <ID> was
established successfully to
address <ID>.
Ivanti Secure Access Client
established a direct (nonproxy)
connection to Ivanti Connect Secure
or Ivanti Policy Secure.
302 informational The connection <ID> was
disconnected.
The Ivanti Secure Access Client
connection was disconnected from
the Ivanti server.
303 error The connection <ID>
encountered an error: <ID>
Peer address: <ID>.
A connection encountered an error.
304 error The connection <ID> was
disconnected due to change
in routing table. Interface
address changed from <ID>
to <ID>.
Ivanti Secure Access Client detected
a change in the route to the Ivanti
server.
305 informational VPN tunnel transport for
connection <ID> switched
from ESP to SSL mode due to
missing ESP heartbeat.
ESP to SSL fallback occurred
because of missing ESP heartbeats.
306 informational VPN tunnel for connection
<ID> is switched to ESP mode.
Tunnel transport switched to ESP
mode.
307 error The connection <ID>
encountered an error: System
error: <ID> Peer address:
<ID>.
The Ivanti Secure Access Client
connection failed because of a
system error.
308 error The server disconnected
connection <ID> Reason
<ID>: Peer address: <ID>.
The server disconnected a
connection.
Copyright © 2024, Ivanti, Inc. All Rights Reserved. Privacy and Legal.
Page 96 of 151
Uninstalling Ivanti Secure Access Client

Deleting Ivanti Secure Access Client Log Files
Ivanti recommends that you do not delete Ivanti Secure Access Client log files.
Ivanti Secure Access Client controls log file size automatically. When a current log file reaches 10MB, a
new one is created and the oldest log file is deleted. If you need to delete Ivanti Secure Access Client
log files, do not delete the file without first moving it to the Recycle Bin or renaming it.
To safely delete Ivanti Secure Access Client log files on a Windows endpoint:
1. Use a command line or Windows Explorer to locate and delete debuglog.log and, optionally,
debuglog.log.old. When prompted if you want to move the file to the Recycle Bin, answer Yes.
Do not press Shift+Delete, which permanently deletes a file without moving it to the Recycle
bin.
The file location varies depending on which version of Windows the endpoint is running. For
example, the following path is valid for a Windows 8.1Enterprise 64-bit endpoint:
C:\ProgramData\Ivanti\Logging.
2. Empty the Recycle Bin.
Alternatively, you could first rename debuglog.log and then delete it. After you delete the log
file, Ivanti Secure Access Client creates a new one. However, that operation might take some
time depending on the activities of Ivanti Secure Access Client.
Uploading Ivanti Secure Access Client Log Files
The Ivanti Secure Access Client for Windows makes it easy to transmit diagnostic log bundles to ICS
gateways for analysis by system administrators. To send a log bundle to the Ivanti Connect Secure,
when a VPN connection is active, run the following from the desktop client user interface: File > Logs >
Upload.
Copyright © 2024, Ivanti, Inc. All Rights Reserved. Privacy and Legal.
Page 97 of 151
Uninstalling Ivanti Secure Access Client


New-UX
The user must select the server to send the logs to. A dialog will appear that shows the progress of the
upload.
Note that a system administrator must enable this feature on the server side before an end user can
upload log files to the Ivanti gateway. To do this, the system administrator must launch the Ivanti server
administrative console and navigate to Users > Roles > General > Session Options > Enable Upload
Logs.
The admin must check the "Enable Upload Logs" checkbox, as shown below:
Copyright © 2024, Ivanti, Inc. All Rights Reserved. Privacy and Legal.
Page 99 of 151
Uninstalling Ivanti Secure Access Client

The admin must also enable which clients can send log files by traversing the following menus in the
admin console and clicking on Ivanti Secure Access Client: System > Log/Monitoring > Client-Side
Log > Settings
Once this work is done, the system administrator can view uploaded logs in the administrative console
here: System > Log/Monitoring > Client-Side Log > Uploaded Logs
Predictable Ivanti Server Hostname Resolution with IPv6
When connecting to a Ivanti server, Ivanti Secure Access Client uses the services of the endpoint
operating system to resolve the hostname to an IP address. If a Ivanti server hostname resolves to both
IPv4 and IPv6 addresses, an IPv4 or an IPv6 address is presented to Ivanti Secure Access Client as the
preferred IP address. The behavior depends on the operating system and how it is configured. For
example, Windows 8.1adheres to IETF standards that define how to establish the default address
selection for IPv6. macOS 10.6 does not support that standard. Additionally, Windows 8.1 default
settings can be changed by netsh commands, so RFC compliance can be modified on the endpoint. For
these and other reasons, it is difficult to predict which Ivanti server IP address would get resolved to on
a given client machine.
For predictable hostname resolution, we recommend that you use different Ivanti server hostnames for
IPv6 and IPv4 addresses. For example, configure myserver1.mycompany.com for IPv4 addresses and
myserver1-v6.mycompany.com for IPv6 addresses. The Ivanti server administrator can publish
myserver1-v6.mycompany.com to the Ivanti Secure Access Client users who are expected to connect
over IPv6, and others will continue using myserver1.mycompany.com.
Copyright © 2024, Ivanti, Inc. All Rights Reserved. Privacy and Legal.
Page 100 of 151
Uninstalling Ivanti Secure Access Client

Session Migration
Understanding Session Migration
This topic describes the session migration feature.
Session Migration Overview
When you enable session migration on two or more Ivanti servers, a Ivanti Secure Access Client (Ivanti
Secure Access Client) endpoint can be moved from one location to another and connect to a different
Ivanti server without providing additional authentication. For example, a user can be connected from
home through Ivanti Connect Secure, and then arrive at work and connect to Ivanti Policy Secure
without being reauthenticated. If session migration is not enabled, Ivanti Secure Access Client users
must be reauthenticated each time they attempt to access the network through a different Ivanti server.
Sessions can be migrated between Ivanti Policy Secure and Ivanti Connect Secure servers that are in the
same IF-MAP federated network: using either the same IF-MAP server, or using IF-MAP servers that are
replicas of one another.
The servers must be in the same authentication group. Authentication groups are configured through
authentication realms. An authentication group is a string that you define for common usage. You can
use authentication groups to group together realms with similar authentication methods. Such as, one
authentication group for SecurID authentication, another authentication group for AD. A single gateway
can belong to more than one authentication group, with a different authentication group per realm.
The Ivanti server to which a user authenticates publishes session information to the IF-MAP server.
Other IF-MAP clients in the federated network can use the information to permit access without
additional authentication to users.
When a user session is migrated to another Ivanti server, the new session information is pushed to the
IF-MAP server. The IF-MAP server notifies the authenticating server, and information about the session
that existed on the original server is removed leaving only session information about the current
authenticating server on the IF-MAP server. The authenticating server removes information about the
session from its local session table.
Copyright © 2024, Ivanti, Inc. All Rights Reserved. Privacy and Legal.
Page 101 of 151
Session Migration

When a session is migrated, realm role-mapping rules determine user access capabilities. You can
import user attributes when a session is migrated, or you can configure a dedicated directory server to
look up attributes for migrated user sessions. To ensure that session migration retains user sessions,
configure a limited access remediation role that does not require a Host Checker policy. This role is
necessary because the Host Checker timeout can be exceeded if an endpoint is in hibernation or asleep.
With the new remediation role, the user's session is maintained.
If additional Host Checker policies are configured on a role or realm to which a migrated session
applies, the policies are performed before allowing the user to access the role or realm. Administrators
of different Ivanti servers should ensure that Host Checker policies are appropriately configured for
endpoint compatibility.
Figure illustrates the task flow for enabling session migration for Ivanti Secure Access Client.
Session Migration and Session Timeout
Session timeout on the authenticating server does not apply to a migrated session. Instead, session
start time is applicable. The inbound server evaluates session timeout using the start time of the original
session on the original server.
Copyright © 2024, Ivanti, Inc. All Rights Reserved. Privacy and Legal.
Page 102 of 151
Session Migration

When a user reboots an endpoint for which session migration is enabled, the session is retained for a
short time on the server. For sessions on the Ivanti Policy Secure, sessions are retained until the
heartbeat timeout expires. For Ivanti Connect Secure sessions, the idle timeout determines how long
the session is retained.
If an endpoint that is connected to a Ivanti Policy Secure or Ivanti Connect Secure is rebooted and the
user does not sign out, when the endpoint is restarted and the user attempts to connect to the same
access gateway, Ivanti Secure Access Client resumes the previous session without requesting user
credentials if the previous session is still active.
How Session Migration Works
Session migration uses IF-MAP Federation to coordinate between servers.
When a session is established, the authenticating gateway publishes the session information, including
a session identifier, to the IF-MAP server. The session identifier is also communicated to the Ivanti
Secure Access Client.
When Ivanti Secure Access Client connects to a migrating gateway in the same authentication group,
Ivanti Secure Access Client sends the session identifier to the migrating gateway. The migrating
gateway uses the session identifier to look up the session information in the IF-MAP server. If the
session information is valid, the migrating gateway uses the session identifier to establish a local session
for the endpoint that Ivanti Secure Access Client is running on.
The IF-MAP server notifies the authenticating gateway that the user session has migrated, and the
authenticating gateway deletes the session information from the IF-MAP server.
Session Migration and Session Lifetime
Session migration is designed to give users maximum flexibility and mobility. Users are no longer tied
to the office. The workplace can travel with the user, and electronic chores such as online banking can
come to work. Because of this flexibility, users might be away from their machines for long periods of
time, allowing their active session to expire. Session migration requires users to have an active session
on Ivanti Policy Secure or Ivanti Connect Secure.
You can adjust session lifetime to ensure that sessions do not time out while users are away from their
machines. You adjust session lifetime on the gateway by selecting Users > User Roles > [Role Name]
> General > Session Options in the admin console.
Copyright © 2024, Ivanti, Inc. All Rights Reserved. Privacy and Legal.
Page 103 of 151
Session Migration

Session Migration and Load Balancers
A Ivanti Secure Access Client that connects to a Ivanti server that is behind a load balancer will attempt
to migrate the network connection if the connected server fails. The Ivanti servers must be federated
and configured for session migration. For example, a load balancer that balances to 2 Ivanti servers
(non-clustered) balances to Server1. If Server1 fails, the load balancer then balances to Server2. A Ivanti
Secure Access Client that is connected to Server1 is migrated to Server2 without re-authentication.
Authentication Server Support
The behavior of session migration depends to some extent on the authentication server on the inbound
side.
The following list provides a summary of authentication server support:
• Local authentication server: Migration succeeds if the username is valid on the local
authentication server.
• LDAP server: Migration succeeds if the LDAP authentication server can resolve the username
to a distinguished name (DN).
• ACE server: Migration always succeeds.
• RADIUS server: Migration always succeeds. If you select Lookup Attributes using Directory
Server, no attributes are present in the user context data.
• Active Directory: Migration always succeeds. The Lookup Attributes using Directory Server
option might not work, depending on your configuration.
• Certificate: No support for migrating sessions because sessions are authenticated using
certificates.
• SAML: No support for migrating sessions because SAML SSO is used instead.
For local and LDAP authentication servers, the inbound username must reflect an existing
account.
Task Summary: Configuring Session Migration
To permit session migration for users with the Ivanti Secure Access Client, perform the following tasks:
Copyright © 2024, Ivanti, Inc. All Rights Reserved. Privacy and Legal.
Page 104 of 151
Session Migration

1. Configure location awareness rules within a Ivanti Secure Access Client connection set to
specify locations included in the scope of session migration for users. For example, configure
location awareness rules for a corporate Ivanti Policy Secure server connection and a Ivanti
Connect Secure server connection.
2. Configure an IF-MAP federated network, with the applicable Ivanti servers as IF-MAP
Federation clients of the same IF-MAP Federation server.
3. Ensure that user entries are configured on the authentication server for each gateway.
4. Ensure that user roles are configured for all users on each gateway.
5. Define a remediation role with no Host Checker policies to allow user sessions to be maintained
when an endpoint is sleeping or hibernating.
6. Configure role-mapping rules that permit users to access resources on each gateway.
7. Enable and configure session migration from the User Realms page of the admin console.
8. Distribute Ivanti Secure Access Client to users.
Configuring Session Migration for Ivanti Secure Access
Client
Ensure that all of the Ivanti Policy Secure servers and Ivanti Connect Secure servers for which
you want to enable session migration are IF-MAP Federation clients of the same IF-MAP
Federation server. Additionally, make sure that each gateway is configured according to the
procedures outlined in this section.
To configure session migration:
1. In the admin console, select Users > User Realms.
2. Select an existing realm, or create a new realm.
3. On the General page, select the Session Migration check box. Additional options appear.
4. In the Authentication Group box, enter a string that is common to all of the gateways that
provision session migration for users. The authentication group is used as an identifier.
5. Select for either the Use Attributes from IF-MAP option button or the Lookup Attributes
using Directory Server option.
Copyright © 2024, Ivanti, Inc. All Rights Reserved. Privacy and Legal.
Page 105 of 151
Session Migration

Select Lookup Attributes using Directory Server only if you are using an LDAP server. Attributes
are served faster with an LDAP server.
Configuring an IF-MAP Federated Network for Session
Migration
To successfully deploy session migration, you configure a Ivanti Policy Secure IF-MAP server, and you
configure all of the connected Ivanti servers that users access as IF-MAP clients. A Ivanti Connect Secure
server cannot be an IF-MAP server.
To add clients, you must specify the IP address and the security mechanism and credentials for the
client.
An IF-MAP server certificate must be installed on the IF-MAP server. The client verifies the server
certificate when it connects to the server. The server certificate must be signed by a Certificate Authority
(CA), the client must be configured to trust certificates signed by that CA, and the hostname in the
server certificate must match the hostname in the IF-MAP URL on the client.
You must identify the IF-MAP server to each Ivanti server IF-MAP client. To add the server, you specify
the IF-MAP URL of the server and how to authenticate to the server. Match the URL and security
settings to equal those on the IF-MAP server to which the IF-MAP clients will connect.
To configure IF-MAP server settings on the Ivanti Policy Secure server:
1. From the admin console select System > IF-MAP Federation > Overview.
2. Under Choose whether this Ivanti Policy Secure server runs an IF-MAP Server, an IF-MAP client,
or no IF-MAP, select the IF-MAP Server option button.
3. Click Save Changes.
4. From the admin console select System > IF-MAP Federation > This Server > Clients.
5. Under IF-MAP Client, enter a Name and an optional Description for this client.
For example, enter the name CS-access1.corporate.com and the description Connect Secure 1.
Copyright © 2024, Ivanti, Inc. All Rights Reserved. Privacy and Legal.
Page 106 of 151
Session Migration

6. Type one or more IP addresses of the client. If the client is multi-homed, for best results list all
of its physical network interfaces. If the client is a Ivanti Policy Secure server or Ivanti Connect
Secure cluster, list the internal and external network interfaces of all nodes. You must enter all
of the IP addresses for all of the interfaces because equipment failures might cause traffic
between the IF-MAP client and the IF-MAP server to be re-routed through a different network
interface. Listing all of the IP addresses maximizes the probability that IF-MAP Federation still
works in the event of a failure.
For example, enter 172.16.100.105.
7. Under Authentication, select the Client Authentication Method: Basic or Certificate.
• If you select Basic, enter a Username and Password. The same information should be
added to the IF-MAP server.
• If you select Certificate, choose which Certificate Authority (CA) to use to verify the
certificate for this client. Optionally, specify certificate attributes or restrictions to require
values for certain client certificate attributes.
8. Click Save Changes to save the IF-MAP Client instance on the IF-MAP server.
To configure IF-MAP client settings on the Ivanti server clients:
1. From the admin console select System > IF-MAP Federation > Overview.
2. In a Policy Secure server, under Choose whether this server runs an IF-MAP Server, an IF-MAP
client, or no IF-MAP, select the IF-MAP Client option button. On a Ivanti Connect Secure
server, select Enable IF-MAP Client check box.
3. Type the server URL for IF-MAP Web service on the IF-MAP server. Append the server URL with
/dana-ws/soap/dsifmap for all Ivanti IF-MAP servers.
For example, https://access2.corporate.com/dana-ws/soap/dsifmap.
4. Select the client authentication method: Basic or Certificate.
5. If you select Basic, enter a username and password. This is the same as the information that
was entered on the IF-MAP server.
6. If you select Certificate, select the device certificate to use.
Ensure that the certificate of the CA that signed the IF-MAP server certificate is added from the
System > Configuration > Certificates > Trusted Server CA page.
Copyright © 2024, Ivanti, Inc. All Rights Reserved. Privacy and Legal.
Page 107 of 151
Session Migration

The IF-MAP client validates the IF-MAP server certificate: if validation fails, the connection fails.
Ensure that the hostname in the IF-MAP URL on the client machine matches the hostname of
the server certificate on the IF-MAP server, and that the CA that signed the server certificate is
configured as a trusted server CA on the IF-MAP client.
7. Click Save Changes.
Copyright © 2024, Ivanti, Inc. All Rights Reserved. Privacy and Legal.
Page 108 of 151
Session Migration

Customizing Ivanti Secure Access Client
Customizing Ivanti Secure Access Client Overview
The Ivanti Secure Access Client (Ivanti Secure Access Client) customization tool BrandPackager enables
you to customize the appearance of the Ivanti Secure Access Client for Windows and Apple OS X. You
can add your own identity graphic to the Ivanti Secure Access Client splash screen, to the program
interface, and to Windows credential provider tiles. Figure 107 shows graphic customizations applied to
the Ivanti Secure Access Client for Windows. You can also customize error and informational message
text, the text that appears in dialog boxes and on buttons, and make limited changes to Ivanti Secure
Access Client online Help. For example, you might want to add your help desk phone number to Ivanti
Secure Access Client error messages and the Ivanti Secure Access Client online Help.
BrandPackager is available for download along with client packages at:
https://forums.ivanti.com/s/product-downloads.
BrandPackager runs on Windows only, but you use it to create the package files for Ivanti Secure Access
Client for Windows and Ivanti Secure Access Client for OS X. A package file contains your edits to Ivanti
Secure Access Client resource files. The edited resource files are installed into a special folder on the
client. When Ivanti Secure Access Client needs to access a particular file, it checks this special folder first
and uses the file if it is present. If Ivanti Secure Access Client does not find the file there, it uses the file
that resides in the normal Ivanti Secure Access Client resource file location.
For Windows, you deploy the package to endpoints and use an MSIEXEC command-line installation
option to instruct the installation program to apply your package file on the endpoint. For OS X, you
copy the package file, the Ivanti Secure Access Client installation program, and a script file from the
BrandPackager file set to an OS X computer, and then use them to add the package file to the Ivanti
Secure Access Client installation file.
You can apply your changes to new or upgrade installations. You can also apply your customizations to
an existing Ivanti Secure Access Client installation without installing or upgrading Ivanti Secure Access
Client. Your changes to the Ivanti Secure Access Client user interface, message text, and online Help
persist through normal client software upgrades.
Copyright © 2024, Ivanti, Inc. All Rights Reserved. Privacy and Legal.
Page 109 of 151
Customizing Ivanti Secure Access Client

BrandPackager Usage Notes:
• BrandPackager supports Ivanti Secure Access Client for Windows and Ivanti Secure Access
Client for macOS.
• BrandPackager is compatible with Ivanti Secure Access Client R5.0 or later.
• Ivanti Secure Access Client customizations cannot be installed through Ivanti Web portal
(server) installations.
• When you edit Ivanti Secure Access Client resource files, you must preserve the UTF-8
encoding. UTF-8 files include 3 bytes {0xEF, 0xBB, 0xBF}, the Byte Order Mark (BOM), at the
beginning of the file.
• The Ivanti Secure Access Client interface and the online Help include separate resource files for
each of the supported languages. If you make a change in the English file, you should make the
same change in the files for the other languages that you support in your environment. If you
do not do so, then the edited English version is always used.
• Ivanti Secure Access Client online Help can include new information with each new release. If
you edit a Help topic, your changes are retained during a Ivanti Secure Access Client upgrade.
However, if Ivanti changes that topic in the new release, that new information will not be
available, because your edited topic will be used instead. For this reason we recommend that
you make only limited changes to the online Help. For example, you can change the topic that
describes how to contact customer support to direct users to contact your own help desk.
Copyright © 2024, Ivanti, Inc. All Rights Reserved. Privacy and Legal.
Page 110 of 151
Customizing Ivanti Secure Access Client

Brand Packager Workflow
To create a rebranded Ivanti Secure Access Client, you use the BrandPackager tool. The following
procedure summarizes the steps from tool installation to client deployment. See the related
documentation list for links to detailed information about the steps that are summarized here.
1. Download PulseBrandingTools.zip from the Ivanti website (www.ivanti.com). Create a folder on
a Windows 8 or later version for PulseBrandingTools.zip, and then unzip it. Make sure that the
host computer has Ivanti Secure Access Client installed, and that the version of Ivanti Secure
Access Client is the one that you want to customize and distribute to users.
Set up the customization environment by installing 7Zip, a free open-source archive file
program, and by running the BrandPackager initialization command to copy Ivanti Secure
Access Client resource files to local work folders. To edit an existing package file, first import
the file as part of the initialization process.
2. Edit the Ivanti Secure Access Client user interface files as needed.
3. Edit the Ivanti Secure Access Client message text files as needed.
4. Add your customization graphics.
5. Optionally, edit the Ivanti Secure Access Client online Help. There are separate procedures for
the Windows and OS X online Help systems.
6. Run the BrandPackager script file to verify the structure of your changes and to create your
package files.
7. Test your packages. The BrandPackager tool set provides a script to quickly activate your
changes on the local machine for testing.
8. Deploying the package file is different depending on the platform:
• For a Windows deployment, you install the package file by using an MSIEXEC command
option when you run the Ivanti Secure Access Client installer.
• For an OS X deployment, you copy the branding package, the default Ivanti Secure Access
Client for OS X installation file (PulseSecure.dmg), and ConfigureInstaller to the Mac, and
then run ConfigureInstaller. ConfigureInstaller is a Python script that adds the package file
to the Ivanti Secure Access Client installation program. You can then run the Ivanti Secure
Access Client for OS X installation.
Copyright © 2024, Ivanti, Inc. All Rights Reserved. Privacy and Legal.
Page 111 of 151
Customizing Ivanti Secure Access Client

Setting Up the Ivanti Secure Access Client Customization
Environment
The Ivanti Secure Access Client BrandPackager customization tool must be run on a windows 8.1 or later
version computer that has Ivanti Secure Access Client 5.0 or later installed. Make sure that the Ivanti
Secure Access Client installation includes all Ivanti Secure Access Client components to ensure that you
have access to all of the Ivanti Secure Access Client resource files. BrandPackager creates the package
files for Ivanti Secure Access Client for Windows and Ivanti Secure Access Client for OS X. A package file
contains your edits to Ivanti Secure Access Client resource files.
To create the Ivanti Secure Access Client customization environment:
1. If you have not already done so, download PulseBrandingTools.zip from the Ivanti website
(www.ivanti.com). Create a folder for PulseBrandingTools.zip, and then unzip it. Make sure that
the host computer has Ivanti Secure Access Client installed, and that the version of Ivanti Secure
Access Client is the one that you want to customize and distribute to users.
2. Install 7Zip.
7Zip is a free open-source archive file program. It is used during the process of creating the
Ivanti Secure Access Client customization package. You can download 7Zip from http://7-
zip.org/.
3. If you have not already done so, install Ivanti Secure Access Client 5.0 or later on the endpoint
where you will do the Ivanti Secure Access Client customization work.
Initializing the Ivanti Secure Access Client Customization
Environment
The message text and user interface strings that appear in Ivanti Secure Access Client reside in text files
that reside in different Ivanti Secure Access Client installation directories. After you install the
BrandPackager tool, you run an initialization command that copies all the strings from the Ivanti Secure
Access Client installation directories to two language-specific files in a reference directory called
StringReference. The Ivanti Secure Access Client resource files are identical on Windows and OS X
installations so the files from your Ivanti Secure Access Client for Windows installation can be used for
both Windows and OS X customizations.
During initiation, the Ivanti Secure Access Client customization tool creates the PulseBranding directory
and copies Ivanti Secure Access Client strings from an active Ivanti Secure Access Client installation to
the StringReference directory area for customization.
Copyright © 2024, Ivanti, Inc. All Rights Reserved. Privacy and Legal.
Page 112 of 151
Customizing Ivanti Secure Access Client

BrandPackager copies files from the local Ivanti Secure Access Client installation, so make sure that you
have the Ivanti Secure Access Client version installed that you want to customize and distribute.
Make sure that the Ivanti Secure Access Client installation includes all Ivanti Secure Access Client
components. You can download the Ivanti Secure Access Client installation program from a Ivanti Policy
Secure server or from a Ivanti Connect Secure server. You can configure and include Ivanti Secure
Access Client connections in the installation before you edit Ivanti Secure Access Client files.
To initialize the Ivanti Secure Access Client customization environment:
1. Run the following command:
BrandPackager -init
The -init option does not overwrite files. If there is already a PulseBranding directory, only
missing files are written to it.
By default, Ivanti Secure Access Client online Help files are not included. To include the Help
files, specify the -help option:
BrandPackager -init -help
The online Help files are different between Windows and OS X. BrandPackager uses the Windows files
from the local Ivanti Secure Access Client installation. The OS X files are included as part of the
BrandPackager file set. The -help option creates two directories. The help directory holds the Windows
files. The PulseSecureHelp.Help directory holds the OS X online Help files.
You can run BrandPackager -init -help if you have already run the -init option and want to just add the
Help files.
Localized files in the StringReference directory are identified by a language identifier:
• DE - German
• EN - English
• ES - Spanish
• FR - French
• IT - Italian
• JA - Japanese
• KO - Korean
Copyright © 2024, Ivanti, Inc. All Rights Reserved. Privacy and Legal.
Page 113 of 151
Customizing Ivanti Secure Access Client

• PL - Polish
• ZH-CN - Chinese (Simplified)
• ZH - Chinese (Traditional)
Importing an Existing Customized Ivanti Secure Access
Client Package
If you already have a customized BrandPackager package, you can import it and make further changes
to it without starting over. Also, changes to Ivanti Secure Access Client Help are not retained during a
Ivanti Secure Access Client software upgrade operation. You should import the old package that has the
Help file changes, create a new package, and then include that with the upgrade.
If you are upgrading to a new major release of Ivanti Secure Access Client, make sure you have
the latest version of BrandPackager before you create a new BrandPackager package.
To import an existing customized BrandPackager package into the PulseBranding directory:
1. Open a Command Prompt window and make the PulseBranding directory your working
directory.
2. Run the following commands:
BrandPackager -init
BrandPackager -import <filename>
The -import option must include the filename of your existing BrandPackager package file. For
example:
BrandPackager -import C:/Staging/PulseWin.PulseBranding
If your original BrandPackager package included changes to the online Help, run the optional -
help option:
BrandPackager -init -help
BrandPackager -import <filename>
The -import option overwrites any files in the PulseBranding directory. The program prompts
you for confirmation before it makes any changes.
Copyright © 2024, Ivanti, Inc. All Rights Reserved. Privacy and Legal.
Page 114 of 151
Customizing Ivanti Secure Access Client

Editing Ivanti Secure Access Client User Interface Labels
You can modify any text string that appears in the Ivanti Secure Access Client user interface. Ivanti
Secure Access Client user interface strings reside in the StringReference\PulseResource_XX.txt file. Your
modified strings must reside in the PulseBranding\BrandingResourceCatalog_XX.txt file. (XX indicates
the language.)
If your Ivanti Secure Access Client environment uses Security Assertion Markup Language
(SAML) for a Single Sign-on (SSO) authentication environment, the Ivanti Secure Access Client
user sees a credential dialog box that is served from the Ivanti server instead of the local Ivanti
Secure Access Client credential dialog box. The sign-in page is defined as part of the sign-in
policy on the Ivanti server and Ivanti Secure Access Client embeds the sign-in page within a
Ivanti Secure Access Client dialog box. To change the appearance of the SAML credential
dialog, you must edit or create a new sign-in page on the Ivanti server.
The BrandingResourceCatalog files hold only the strings you modify. The default strings in their normal
files are used for all strings that you do not modify.
The following procedure describes the workflow for modifying user interface strings using the English
language version of the Ivanti Secure Access Client Edit Connection dialog box as an example:
1. Start Ivanti Secure Access Client and then display the Ivanti Secure Access Client string that you
want to modify. For example, in the Ivanti Secure Access Client main window, select a
connection and then click File > Connection > Edit. Press the Alt key to show shortcut
characters.
2. Take a screen shot of the screen that you want to modify.
Copyright © 2024, Ivanti, Inc. All Rights Reserved. Privacy and Legal.
Page 115 of 151
Customizing Ivanti Secure Access Client

The screen shot is not required but it can help you maintain or create a new shortcut character
when you edit the string in the catalog file. It is good practice to keep track of what you change
so you can verify your changes later.
3. Find the string that you want to modify.
Search StringReference\PulseResource_EN.txt for the string. The string might appear
more than once. For example, the string "Server URL" appears twice as a value in
PulseResource_EN.txt because that string appears in two different dialog boxes. In
general, the resource ID indicates where the value is used.
Many strings use an ampersand (&) to designate a keyboard shortcut key. The ampersand
causes the character that follows it to appear as an underlined character in the user interface.
The presence of the ampersand can affect your results when you use the editor's search
function.
4. Open PulseBranding\BrandingResourceCatalog_EN.txt with a text editor.
5. Copy the string that you want to edit from PulseResource_EN.txt to BrandingResourceCatalog_
EN.txt. Be sure to copy/paste the entire entry. For example:
;IDS_CONNECTION_DLG_ST_URL [184] Value = &Server URL:
6. Modify the string in BrandingResourceCatalog_EN.txt. For example:
;IDS_CONNECTION_DLG_ST_URL [184] Value = &Server URL:
Modify only the value. Do not change the string identifiers, ;IDS_CONNECTION_DLG_ST_URL
and [184].
Copyright © 2024, Ivanti, Inc. All Rights Reserved. Privacy and Legal.
Page 116 of 151
Customizing Ivanti Secure Access Client

We suggest that you keep the same letter for the shortcut to avoid a conflict with other strings
on the screen. If the shortcut key letter does not appear in the new string, you can include it by
putting it in parentheses. For example, the following entries show how to change Close to Exit
and retain the "C" as a shortcut key:
;IDS_MAIN_DLG_BTN_CANCEL
[188]
Value = &Close
;IDS_MAIN_DLG_BTN_CANCEL
[188]
Value = Exit(&C)
You should change the shortcut letter only if you are certain that the new letter is not used
elsewhere in that dialog box.
Each shortcut key on a screen must be unique. You can eliminate the shortcut by deleting the
ampersand. However, shortcut keys are a part of good user interface design.
7. Edit that same resource ID in each of the language files that your organization supports.
The Ivanti Secure Access Client interface includes separate files for each of the 10 supported
languages. If you make a change in the English file, you should make the same change for the
other languages that you support in your environment. If you do not do so, then the edited
English version is always used.
After initialization, there are two files for each language in the StringReference directory:
PulseCombinedMessages_XX.txt
Message catalog files hold the text that appears in the Ivanti Secure Access Client program interface
and dialog boxes.
PulseResource_XX.txt
Resource catalog files hold the text that appears in Ivanti Secure Access Client message boxes.
Copyright © 2024, Ivanti, Inc. All Rights Reserved. Privacy and Legal.
Page 117 of 151
Customizing Ivanti Secure Access Client

To customize a particular string, you find the string you want to customize in PulseCombinedMessages_
XX.txt or PulseResource_XX.txt, and then copy and paste that entire string and its resource ID to a
corresponding resource or message file in the PulseBranding directory, where you edit it. This directory
holds all of the files that make up your customization package.
You must use a text editor, such as Visual Studio IDE or Notepad++ that retains the byte order
mark (BOM) in the resource files. (Notepad++ is free open source software available at
http://notepad-plus-plus.org/).
See the Sample directory for an example of a customized Ivanti Secure Access Client file set.
Editing Ivanti Secure Access Client Messages
Ivanti Secure Access Client message strings reside in the
StringReference\PulseCombinedMessages_XX.txt file. Modified message strings must reside
in the PulseBranding\BrandingMessageCatalog_XX.txt file. (XX indicates the language.)
The BrandingMessageCatalog files hold only the strings that you modify. The default strings in the
installed resource files are used for all strings that you do not modify.
Copyright © 2024, Ivanti, Inc. All Rights Reserved. Privacy and Legal.
Page 118 of 151
Customizing Ivanti Secure Access Client

It is not always possible to set up the conditions that cause a particular message to appear in Ivanti
Secure Access Client. Browsing the contents of BrandingMessageCatalog_XX.txt is the easiest
way to identify the strings you might want to change.
You can use HTML tags within the BrandingMessageCatalog entries. For example, you can use <b> and
</b> tags to make text appear in bold type. You can use <A href=> tags to include a link to other
HTML text you want. Make sure that your link displays the text in a new window. For example:
<A HREF="Http://www.myserver/my-messsge.html" target="_blank">
Keep in mind that Ivanti Secure Access Client might not be connected to the Internet when the error
occurs.
Each message includes a short description and a long description. The short description is shown as a
title to the longer description. There are no limits to the number of characters that you can include as
the long description. However, the long description must be on one line in the message catalog file. Use
HTML <br> and </br> tags to insert line breaks when the message is displayed.
To modify a message:
1. Find the string that you want to modify.
Search PulseCombinedMessages_XX.txt for the string. In general, the resource ID
indicates where the value is used.
2. Open PulseBranding\BrandingMessageCatalog_XX.txt with a text editor.
3. Copy the string that you want to edit from StringReference\PulseCombinedMessages_
XX.txt to BrandingMessageCatalog_XX.txt. Be sure to copy/paste the entire entry. For
example:
[1731] ;kMsgCommonCertTrustPulseAuthServerIdentityNotFoundShort-desc
= Authentication server not trusted. Long-desc = Authentication
server identity not found in client's "Trusted Server List". Contact
your network administrator.
4. Modify the string in BrandingMessageCatalog_XX.txt. For example:
[1731] ;kMsgCommonCertTrustPulseAuthServerIdentityNotFoundShort-desc
= Authentication server not trusted. Long-desc = Authentication
server identity not found in client's "Trusted Server List". Contact
the Help Desk at Ext.50123.
5. Edit that same resource ID in each of the language files that your organization supports.
Copyright © 2024, Ivanti, Inc. All Rights Reserved. Privacy and Legal.
Page 119 of 151
Customizing Ivanti Secure Access Client

The Ivanti Secure Access Client interface includes separate files for each of the 10 supported languages.
If you make a change in the English file, you should make the same change for the other languages you
support in your environment. If you do not do so, then the edited English version is always used.
Adding Custom Graphics to Ivanti Secure Access Client
The PulseBranding directory also includes default graphics. To add your custom graphics to the Ivanti
Secure Access Client interface, simply replace the default graphics with your custom graphics.
You can add a graphic to the following areas:
• Next to the Ivanti logo on the main screen
• In dialog boxes
• On the About screen
• On the Ivanti Secure Access Client splash screen
The Ivanti Secure Access Client connection set properties, which you define on the Ivanti server,
include an option to suppress the Ivanti Secure Access Client splash screen.
The PulseBranding directory includes two graphics:
• BrandingLogo.png: Appears on the Ivanti Secure Access Client splash screen and program
interface. The default BrandingLogo.png file is an empty file with a transparent background. For
best results, your graphic image should have a transparent background. The file must be a PNG
file.
The default BrandingLogo.png file is 19 by 52 pixels. The maximum height is 37 pixels, which
corresponds to the size of the Ivanti logo. Maximum width is 100 pixels. A graphic larger than
the recommended size might be clipped or it could obscure other graphic elements.
• BrandingCredProv.png: Appears as the image on credential provider tiles.
To add a custom graphic:
1. Replace PulseBranding\BrandingLogo.png with your graphic.
2. Replace PulseBranding\BrandingCredProv.png with your graphic.
If you do not want to include a custom graphic, you should delete default graphics from
PulseBranding.
Copyright © 2024, Ivanti, Inc. All Rights Reserved. Privacy and Legal.
Page 120 of 151
Customizing Ivanti Secure Access Client

The Ivanti Secure Access Client online Help provides reference and procedural information for
users. Ivanti Secure Access Client users can access the Help by clicking the Help button in the
Ivanti Secure Access Client program interface. Ivanti Secure Access Client online Help is a
collection of standard HTML files with CSS formatting and javascript navigation. Updating the
Help requires knowledge of basic HTML coding. To edit the online Help, you must include the
Help when you initialize the Ivanti Secure Access Client customization environment.
If you edit a Help topic, your edited topic is used instead of the original topic. Your edited topic
is retained during an upgrade. Ivanti Secure Access Client online Help can include new
information with each new release. If Ivanti changes a topic in the new release, that new
information will not be available because your edited topic is used instead. To avoid this
problem, we recommend that you make only the Help topic changes described in this guide.
You might want to edit that topic and substitute your own help desk contact information. Use an HTML
editor to make your changes. Do not change the filename or any of the javascript code within the topic.
Ivanti Secure Access Client Help includes the following language versions:
• DE - German
• EN - English
• ES - Spanish
• FR - French
• IT - Italian
• JA - Japanese
• KO - Korean
• PL - Polish
• ZH-CN - Chinese (Simplified)
• CN - Chinese (Traditional)
Be sure to edit the same topics for all the languages that you support.
The Ivanti Secure Access Client Help viewer includes a menu item labeled Feedback, which links to a
documentation comments page on www.ivanti.com.
To change the Feedback destination URL or to remove the menu item:
Copyright © 2024, Ivanti, Inc. All Rights Reserved. Privacy and Legal.
Page 121 of 151
Customizing Ivanti Secure Access Client

1. Open j_header.html with an HTML editor.
2. Search for the following string:
https://forums.ivanti.com/s/contactsupport
3. Either edit or remove the link.
Customizing Ivanti Secure Access Client for Apple OS X
Online Help
The Ivanti Secure Access Client online Help provides reference and procedural information for users.
Ivanti Secure Access Client users can access the Help by clicking the Help button in the Apple menu bar.
Ivanti Secure Access Client online Help is a collection of standard HTML files with CSS formatting. Apple
Help application acceleration includes special metadata in the header of each topic and a particular
directory structure to properly interact with OS X. Updating the Help requires knowledge of basic HTML
coding. To edit the online Help, you must include the Help when you initialize the Ivanti Secure Access
Client customization environment.
If you edit a Help topic, your edited topic is used instead of the original topic. Your edited topic
is retained during an upgrade. Ivanti Secure Access Client online Help can include new
information with each new release. If Ivanti changes a topic in the new release, that new
information will not be available because your edited topic is used instead. To avoid this
problem, we recommend that you make only the Help topic changes described in this guide.
You might want to edit that topic and substitute your own help desk contact information. The file
resides in PulseSecureHelp.Help\Contents\Resources\<language>.lproj\pages.
Filenames in OS X are case-sensitive.
Ivanti Secure Access Client for OS X online Help includes the following language versions:
l
DE.lproj - German
l
English.lproj - English
l
ES.lproj - Spanish
l
FR.lproj - French
l
IT.lproj - Italian
l
JA.lproj - Japanese
Copyright © 2024, Ivanti, Inc. All Rights Reserved. Privacy and Legal.
Page 122 of 151
Customizing Ivanti Secure Access Client

l
KO.lproj - Korean
l
PL.lproj - Polish
l
TW.lproj - Chinese (Traditional)
l
CN.lproj - Chinese (Simplified)
Be sure to edit the same topics for all the languages that you support.
Validating Customizations to Ivanti Secure Access Client
The validation process examines the files in the PulseBranding directory to ensure that they can be
added to the Ivanti Secure Access Client installation package.
To validate your changes before building the BrandPackager package, run the following command:
BrandPackager -validate
Validation is a basic level of checking. After you build the new Ivanti Secure Access Client installation
package, you should test the package before you deploy it.
Building the New Ivanti Secure Access Client Package
The packaging process creates two package files, one for Windows and one for OS X, that include your
changes. It does not include the Ivanti Secure Access Client installation files. You include a package
when you install Ivanti Secure Access Client. Or you can apply your changes to a Ivanti Secure Access
Client without installing or upgrading Ivanti Secure Access Client.
To create a package, run the following command:
BrandPackager -package
When the command finishes, it creates two package files, PulseWin.PulseBranding and
PulseMac.PulseBranding. To apply your changes on a Ivanti Secure Access Client endpoint, you include
a package file when you install or upgrade Ivanti Secure Access Client.
Copyright © 2024, Ivanti, Inc. All Rights Reserved. Privacy and Legal.
Page 123 of 151
Customizing Ivanti Secure Access Client

Testing the Ivanti Secure Access Client Package
Before you deploy the new Ivanti Secure Access Client installation package, you should verify that your
changes work correctly. BrandInstaller.bat installs the BrandPackager package on the local
machine. BrandInstaller.bat employs jamCommand.exe, which is a program that resides in the
Ivanti Secure Access Client program directory.
You must be an administrator to run BrandInstaller.
To install your BrandPackager package on the machine where you created it, run the following
command:
BrandInstaller -brand
You can now view your changes on the local Ivanti Secure Access Client to make sure that you have
made all the modifications correctly. Verify Ivanti Secure Access Client by checking the following:
• View the main dialog and the About screen to make sure that the branding logo appears as you
want.
• View the screens that contain any of the user interface strings that you changed.
• If you have updated the Ivanti Secure Access Client for Windows Help, invoke the Help to make
sure your changes are correct.
If you are satisfied, you can install the package on endpoints.
Installing or Upgrading Ivanti Secure Access Client for
Windows with a Branding Package
You install or upgrade Ivanti Secure Access Client and apply the changes in PulseWin.PulseBranding to
Ivanti Secure Access Client for Windows by using Microsoft Exec (msiexec) and setting the
BRANDINGFILE attribute to point to the branding file. This installation requires administrative
privileges.
The following example shows the msiexec command to install or upgrade Ivanti Secure Access Client
and to apply the customizations in PulseWin.PulseBranding:
msiexec /i c:\staging\PulseSecure.x64.msi
BRANDINGFILE=c:\staging\PulseWin.PulseBranding
Copyright © 2024, Ivanti, Inc. All Rights Reserved. Privacy and Legal.
Page 124 of 151
Customizing Ivanti Secure Access Client

Installing or Upgrading Ivanti Secure Access Client for
Apple OS X with a Branding Package
To apply the branding package changes to an Apple OS X endpoint, you must copy the necessary files
to an OS X endpoint and use them to update the Ivanti Secure Access Client installation program. You
can also use this process to add Ivanti Secure Access Client configurations (a .pulsepreconfig file) to the
Ivanti Secure Access Client installation program. You can then use that Ivanti Secure Access Client
installation program to install or update Ivanti Secure Access Client on OS X endpoints. If the specified
branding package is present in the Ivanti Secure Access Client installation program, the installation
process creates the following directory:
/Library/Application Support/Ivanti/PulseBranding
The PulseBranding directory holds the changes you made to Ivanti Secure Access Client resource
files and graphics. When Ivanti Secure Access Client must access a resource file, it checks this directory
first.
To add PulseMac.PulseBranding to PulseSecure.dmg, perform the following steps on an OS X
endpoint:
1. Create a directory on an OS X endpoint and copy the following files to it:
• PulseMac.PulseBranding: The file created for OS X by BrandPackager that contains all of
your client customizations. After you edit the resource files and run BrandPackager,
PulseMac.PulseBranding is available in the same directory as BrandPackager.
• PulseSecure.dmg: The Ivanti Secure Access Client installation program. You can download
PulseSecure.dmg from the Downloads page of Ivanti Connect Secure or Ivanti Policy
Secure.
• ConfigureInstaller: A Python script that adds the package file to PulseSecure.dmg.
ConfigureInstaller is available in the same directory as BrandPackager. Python is part of OS
X 10.2 and greater and is included in the system PATH.
2. Open a terminal window and make the directory that holds ConfigureInstaller your current
directory.
3. Run ConfigureInstaller. You can run ConfigureInstaller with no options to see the command
summary:
python ./ConfigureInstaller
Copyright © 2024, Ivanti, Inc. All Rights Reserved. Privacy and Legal.
Page 125 of 151
Customizing Ivanti Secure Access Client

usage -s <source dmg> -b <brandingfile> -c <configfile> -t <target
dmg>
usage -s <source dmg> -b <brandingfile> -t <target dmg>
usage -s <source dmg> -c <configfile> -t <target dmg>
The following example shows a command for adding a branding file and a Ivanti Secure Access Client
config file to the Ivanti Secure Access Client installation program:
python ./ConfigureInstaller -s PulseSecure.dmg -b
~/Staging/PulseMac.PulseBranding -c ~/Staging/myfile.pulsepreconfig-t
PulseSecure-new.dmg
When the operation completes successfully, the new Ivanti Secure Access Client installation program is
ready for use.
Installing a Branding Package Only
You can add or remove the contents of a Ivanti Secure Access Client branding package on a client
machine by using jamCommand. The jamCommand program is part of every Ivanti Secure Access Client
installation. On Windows endpoints, jamCommand is located in the 32-bit program files directory:
Program Files (x86)\Common Files\Ivanti\JamUI\jamCommand.exe
On OS X endpoints, jamCommand is located in the Applications folder:
/Applications/Ivanti\ Secure\
Access.app/Contents/Plugins/JamUI/./jamCommand
The jamCommand program must be run with administrator privileges.
To apply the customizations in PulseWin.PulseBranding (Windows) or PulseMac.PulseBranding (OS X):
1. Run the following command:
jamCommand -brand
To remove your customized Ivanti Secure Access Client user interface from the endpoint and allow
Ivanti Secure Access Client to use default strings:
2. Run the following command:
jamCommand -unbrand
jamCommand Usage Notes:
Copyright © 2024, Ivanti, Inc. All Rights Reserved. Privacy and Legal.
Page 126 of 151
Customizing Ivanti Secure Access Client

• Running jamCommand with the -brand or -unbrand option causes Ivanti Secure Access Client
to restart. Connections are maintained and should be active after the restart. A restart is
required to allow Ivanti Secure Access Client to access the customized settings. If you will be
rebooting the system manually, or if there is no logged in user, then you can use the -norestart
option. To avoid a restart when you run jamCommand, use the following option:
jamCommand -norestart
• jamCommand reports its results using the following numeric error codes:
0 - Success.
1 - General branding error.
2 - Error deleting branding files. This error can also occur when you install new files because the
first action -brand performs is to remove the old files.
3 - Error branding Ivanti Secure Access Client. The new branding files cannot be written.
• The Ivanti Secure Access Client version must be R5.0 or later. To verify your current version of
Ivanti Secure Access Client, run jamCommand with no parameters. If the result (displayed in a
window) shows the branding options (-brand, -unbrand, -norestart), then branding is
supported.
The jamCommand errors are not written to the console. To see jamCommand errors, include a script
that checks error codes. Additional error message information is written to the Ivanti Secure Access
Client log files.
Copyright © 2024, Ivanti, Inc. All Rights Reserved. Privacy and Legal.
Page 127 of 151
Customizing Ivanti Secure Access Client

Ivanti Secure Access ClientAuthentication
Types
RSA Authentication
RSA Authentication Manager (formerly known as ACE/Server) is an authentication and authorization
server that allows user authentication based on credentials from the RSA SecurID® product from RSA
Security Inc.
When you use RSA Authentication Manager as the authentication and authorization service for your
Ivanti access management framework, users can sign into IPS using the same username and password
stored in the backend server.
Method Action
Using a hardwaretokenand the
standard system sign-in page
The user browses to the standard system sign-in page, and
then enters the username and password (consisting of the
concatenation of the PIN and the RSA SecurID
hardwaretoken’s current value). The system then forwards the
user’s credentials to the authentication server.
Using a softwaretokenand the
custom SoftID system sign-in
page
The user browses to the SoftID custom sign-in page. Then,
using the SoftID plug-in, the user enters the username and PIN.
The SoftID plug-in generates a passphrase by concatenating
the user’s PIN andtokenand passes the passphrase to the
authentication server.
If the RSA Authentication Manager positively authenticates the user, the user gains access to the
system. Otherwise, the RSA Authentication Manager:
• Denies the user access to the system.
• Prompts the user to generate a new PIN (New PIN mode) if the user is signing into the system
for the first time. Users see different prompts depending on the method they use to sign in.
• If the user signs in using the SoftID plug-in, then the RSA prompts the user to create a new pin;
otherwise IPS prompts the user to create a new PIN.
Copyright © 2024, Ivanti, Inc. All Rights Reserved. Privacy and Legal.
Page 128 of 151
Ivanti Secure Access ClientAuthentication Types

• Prompts the user to enter the next token (Next Token mode) if the token entered by the user is
out of sync with the token expected by RSA Authentication Manager. Next Token mode is
transparent to users signing in using a SoftID token. The RSA SecurID software passes the token
through the system to RSA Authentication Manager without user interaction.
• ·Redirects the user to the standard system sign-in page (SoftID only) if the user tries to sign-in
to the RSA SecurID Authentication page on a computer that does not have the SecurID
software installed.
Google Authentication
The admin can associate an end-user to a realm that has a secondary authentication server configured
as TOTP authentication server.
For first time registration through web, perform the following steps:
For example: Admin associates an end-user User1 to a user-realm that has the TOTP authentication-
server configured as the secondary authentication-server.
When User1 for the first time, performs a login to the above configured user-realm:
1. After successful authentication with primary authentication-server, User1 is shown the TOTP
registration page.
2. User1 is given a TOTP registration key in text form/QR image form and 10 backup codes. User
saves 10 backup codes in a safe place for using it later during authentication when end-user
device (where Google Authenticator app is installed) is not available (in emergency).
3. Now, User1 opens the device where Google Authenticator app is installed, then either scans the
QR image (or) manually adds a new user (for example: GA-User1) by entering the above given
secret registration key.
4. The Google-Authentication app (for GA-User1) generates a new 6-digit number called as a
token once in every 30 seconds.
5. Enter the current token in the registration page. Click on Sign In. On successful authentication
with that token, User1 will be taken to his/her home page.
Copyright © 2024, Ivanti, Inc. All Rights Reserved. Privacy and Legal.
Page 129 of 151
Ivanti Secure Access ClientAuthentication Types

For already registered user, perform the following steps:
1. The already-registered user (For example: User1), whose realm was associated with secondary
authentication server configured as TOTP authentication server, accesses IPS URL via web
(User1 has already registered TOTP user in Google Authenticator app.)
2. After successful authentication with primary authentication server, user1 is shown TOTP Token
entry page as seen in Figure 29
3. User1 opens Google Authentication app that was installed in mobile (or PC), enters the current
token to the
4. Authentication Code. If mobile is not available, user can enter any of the unused backup codes.
5. On successful authentication with the token, User1 can enter any of the unused backup codes.
6. A backup code can be used only once to successfully authenticate with the TOTP authentication
server. Once used, the same backup code cannot be reused.
Copyright © 2024, Ivanti, Inc. All Rights Reserved. Privacy and Legal.
Page 130 of 151
Ivanti Secure Access ClientAuthentication Types

Certificate Authentication Support
This feature enables users to login to the client using their certificates. The supported scenario is
“certificate-based login only" the Ivanti Secure Access Client setup is now switched to this
authentication method. In a typical enterprise environment, each user will be provided with certificate
which can be used for VPN login. This mechanism can be used only as a primary authentication
mechanism.
Configuring Client Certificate in Ivanti Connect Secure
To configure trusted client CA certificate:
1. Select System > Configuration > Certificates > Trusted Client CAs.
Copyright © 2024, Ivanti, Inc. All Rights Reserved. Privacy and Legal.
Page 131 of 151
Ivanti Secure Access ClientAuthentication Types

2. Click Import CA Certificate to display the configuration page.
3. Browse to the certificate file and select it.
4. Click Import Certificate to complete the import operation.
5. Click the link for the Trusted Client CA to configure.
Copyright © 2024, Ivanti, Inc. All Rights Reserved. Privacy and Legal.
Page 132 of 151
Ivanti Secure Access ClientAuthentication Types

Configuring Authentication with the Certificate Server
To configure authentication with the certificate server, follow the steps below:
1. Select Authentication > Auth Servers.
2. Select Certificate Server and Click New Server to display the configuration page.
Copyright © 2024, Ivanti, Inc. All Rights Reserved. Privacy and Legal.
Page 133 of 151
Ivanti Secure Access ClientAuthentication Types

3. Complete the configuration as described in following table:
Settings Guidelines
Name Specify a name to identify the server within the system
User Name Template Specify a username template. Specify how the system should construct a
username. You may use any combination of certificate variables contained
in angle brackets and plain text.
NOTE: This value populates the <USER> and <USERNAME> session
variables for use throughout the rest of the system configuration.
User Record
Synchronization
This applies only to Connect Secure.
Enable User Record
Synchronization
Select this option to retain the bookmarks and individual preferences
regardless of which system you log in to.
Logical Auth Server
Name
Specify a logical authentication server name.
Copyright © 2024, Ivanti, Inc. All Rights Reserved. Privacy and Legal.
Page 134 of 151
Ivanti Secure Access ClientAuthentication Types

4. Save the configuration.
Client Certificate Installation
The installation of the certificates can be facilitated through a script. Client certificates can be installed
using util script “certificate_installer.sh”. Use the following commands to install or delete the
certificates:
• To install the certificate:
/opt/pulsesecure/bin/certificate_installer.sh install_certificates [-
inpfx < PFX /P12 file >] [-inpriv <private file> -inpub <public
file>]
Password is required to install private and public keys separately.
• To list the certificates on the certificate store
/opt/pulsesecure/bin/certificate_installer.sh list_installed_
certificates
Copyright © 2024, Ivanti, Inc. All Rights Reserved. Privacy and Legal.
Page 135 of 151
Ivanti Secure Access ClientAuthentication Types

• To delete the Certificate from certificate store
/opt/pulsesecure/bin/certificate_installer.sh delete_certificates -
certName <certificate name>
To delete certificates from CEF certificate store:
/usr/bin/certutil -d sql:/ /$HOME/.pki/nssdb -D -n <Nickname>
where, 'Nickname' is available in list of installed certificates
Public Certificates
Extensions Certificate Formats
der, cer DER
pem, crt, key, pub PEM
Private Keys
Extensions Certificate Formats
der, cer DER
pem, crt, key PEM
PFX file (Contains both Private Key and Public Keys)
Extensions Certificate Formats
Pfx, p12 PFX
Default Certificate Selection
If multiple certificates are available for a connection, the certificates list allows the user to select the
certificate and authenticate to establish the connection.
Copyright © 2024, Ivanti, Inc. All Rights Reserved. Privacy and Legal.
Page 136 of 151
Ivanti Secure Access ClientAuthentication Types

Client certificate authentication through smart cards is not supported.
YubiKey Authentication Support
YubiKey is a hardware token for Multifactor Authentication that supports OTP, with plans to adopt
modern authentication approaches such as FIDO U2F with single security key.
• On Linux systems, Chromium Embedded Framework (CEF) is used as the embedded browser for
custom sign-in, SAML Authentication to work with FIDO U2F. On Ivanti Connect Secure, enable
“Enable embedded browser for authentication” option in Connections settings for Ivanti Secure
Access Client to launch CEF for sign in.
• On macOS systems, Chromium Embedded Framework (CEF) is used as the embedded browser
SAML Authentication to work with FIDO U2F. On Ivanti Connect Secure, enable “Enable FIDO2
U2F for SAML authentication” option on the connection set.
• On windows, Ivanti Secure Access Client uses Microsoft Edge WebView2 based Embedded
browser, for Captive portal, SAML, Custom sign-in, and SAML Single Logout (SLO). The
embedded browser also supports FIDO2 passwordless Authentication.
Ivanti recommends to download the Evergreen Bootstrapper softwarefrom the Microsoft
software download site and run it on the endpoints. If WebView2 runtime is not installed on the
machine, Ivanti client attempts to install it
Ivanti Secure Access Client integrates YubiKey for MFA with CEF to redirect to the IDP such as Azure AD
and Okta.
To set up YubiKey for authentication and install CEF browser, use the following procedure.
1. Launch Ivanti Secure Access Client application and select a connection and click Connect.
Copyright © 2024, Ivanti, Inc. All Rights Reserved. Privacy and Legal.
Page 137 of 151
Ivanti Secure Access ClientAuthentication Types


The CEF downloads automatically. The installation progress and status displays. Ensure not to
initiate any other connection when CEF installation is in progress.
4. On successful installation of CEF Browser, YubiKey authentication window appears.
Enter Username and Password to Sign In if already registered. If not registered, registration
page displays.
Copyright © 2024, Ivanti, Inc. All Rights Reserved. Privacy and Legal.
Page 139 of 151
Ivanti Secure Access ClientAuthentication Types


Using Ivanti Secure Access Client with nZTA
nZTA Overview
Ivanti provides a nZTA-ready version of the Ivanti Secure Access Client software required for end-user
devices to be able to connect to your secure applications and resources.
Ivanti Secure Access Client connects to nZTA services, by default, through an on-demand connection
basis and can handle multiple simultaneous nZTA and non-nZTA connections. To learn more, see On-
Demand and Simultaneous Connection Handling.
Ivanti Secure Access Client maintains communication with the nZTA Controller to continuously-enable
synchronization of policy and configuration updates. Through this mechanism, user requests to access
resources and applications are subject to continuous assessment for risk and authorization. For more
details, see Dynamic Policy Update and CARTA.
To learn more about enrolling user devices for use with nZTA, see Enrolling a User Device.
On-Demand and Simultaneous Connection Handling
While active, Ivanti Secure Access Client maintains two connection channels for nZTA services, a control
channel to the nZTA Controller, and a data channel to your nZTA Gateways. For more details on
networking considerations when deploying Gateways, see Working with Gateways.
The control channel connection to the nZTA Controller is activated when Ivanti Secure Access Client is
started up and remains in an always-on state, silently in the background. If Ivanti Secure Access Client is
able to locate a valid session cookie from an earlier session, the connection is re-established
automatically. If no valid cookie is present, Ivanti Secure Access Client requests re-authentication from
the user. The nZTA Controller connection is terminated when Ivanti Secure Access Client is shut down.
Ivanti Secure Access Client creates data channel connections to nZTA Gateways as an on-demand
service. That is, connections to resources and applications controlled by nZTA Gateways become active
only when required, and the connection is suspended after a period of inactivity. The user remains
unaware of the connection state, unless re-authentication becomes necessary. As a user makes a
request for a resource, Ivanti Secure Access Client transitions automatically from disconnected to
connected. The connection remains in this state for the duration of the session, or until one of the
following events occurs:
• An idle time-out occurs (after 5 minutes)
• The connection is actively placed in a disconnected state
Copyright © 2024, Ivanti, Inc. All Rights Reserved. Privacy and Legal.
Page 144 of 151
Using Ivanti Secure Access Client with nZTA

• Ivanti Secure Access Client is shut down
To avoid the data channel being reconnected unnecessarily, non-nZTA DNS traffic is redirected to the
device’s physical network adapter.
Applicable Ivanti Secure Access Client versions can manage simultaneous connections with the nZTA
Controller, and with other Ivanti services such as Ivanti Connect Secure (ICS). While ICS connections
must be activated and deactivated by the user, connections to nZTA are provided on-demand, as
mentioned. Therefore, a nZTA connection in the Ivanti Secure Access Client does not provide the same
Connect and Disconnect controls. Instead, nZTA connections include only a ZTA button to provide
access to the nZTA Applications page. If this button is active, the connection to the Controller has been
established. If the button is inactive, the connection to the Controller has not yet been established, or a
communication problem has occurred. In this case, access to your applications is prevented.
When running active connections to both nZTA and ICS simultaneously, note that the following ICS
features are not supported:
• Route Monitoring
• Traffic Enforcement
• Stealth Mode
• Always on VPN/LockDown
• Location awareness
• IPv6 support
Disabling the nZTA Connection
Ivanti Secure Access Client additionally provides the ability to actively disable the on-demand
connection feature. Use of this facility disables the nZTA connection, avoiding the scenario where Ivanti
Secure Access Client attempts to repeatedly request authentication even after the user might be unable
to authenticate due to too many failed attempts, or where the user just does not require access to any
PZTA-controlled resources during that session.
If a user attempts to request a PZTA-controlled resource during the period a nZTA connection is
disabled, the request fails. Other Ivanti Secure Access Client connections are unaffected.
For Ivanti Secure Access Client on macOS and Windows, click Disconnect in the Ivanti Secure Access
Client connection list context menu. Right-click a nZTA connection profile to see the available options.
Copyright © 2024, Ivanti, Inc. All Rights Reserved. Privacy and Legal.
Page 145 of 151
Using Ivanti Secure Access Client with nZTA

For Ivanti Secure Access Client on macOS and Windows, click Disconnect from the System Tray icon.
View the sub-menu for the nZTA connection you want to disconnect.
For Ivanti Secure Access Client on macOS and Windows, click Disconnect through the Ivanti Secure
Access Client application menu. Open Ivanti Secure Access Client and select the nZTA connection
profile. Then click File > Connections > Disconnect.
Copyright © 2024, Ivanti, Inc. All Rights Reserved. Privacy and Legal.
Page 146 of 151
Using Ivanti Secure Access Client with nZTA
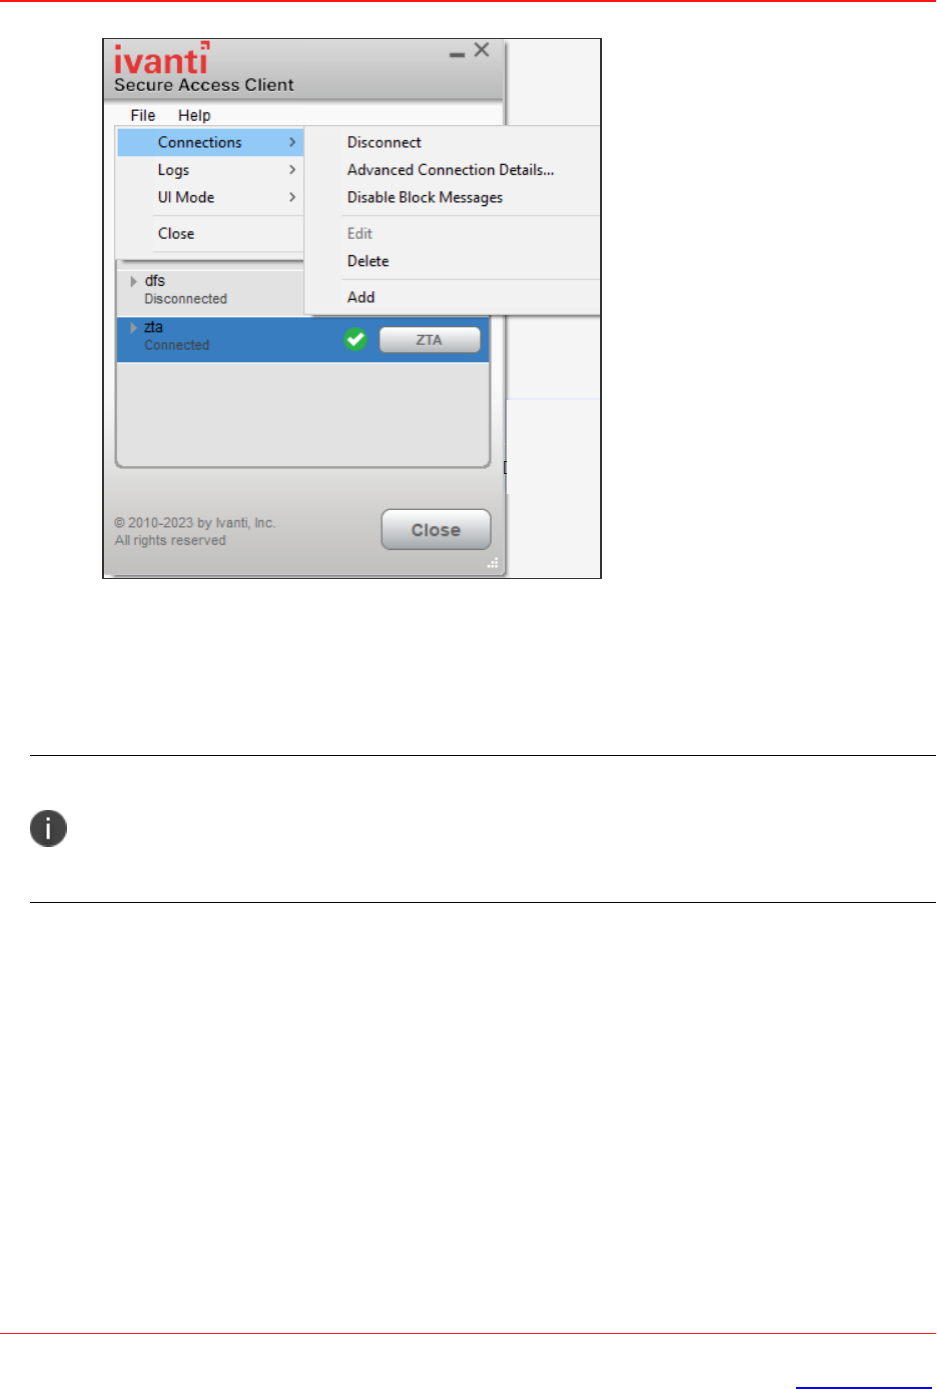
By setting the nZTA connection to be disconnected, Ivanti Secure Access Client suspends both the
control channel and the data channel (where either are active). If the control channel was previously
logged-in to the nZTA Controller, this remains the case to facilitate session resumption through a
subsequent reconnect.
The disconnect feature is not activated by clicking or tapping Cancel in the nZTA authentication
dialog. Canceling an authentication request triggers a timeout interval, after which Ivanti
Secure Access Client re-displays the authentication dialog. The disconnect feature instead
disables the authentication request process until the user manually reinstates it.
To reinstate the nZTA connection on macOS and Windows devices, use the Launch ZTA option in the
Ivanti Secure Access Client system tray menu or tap the ZTA button in the nZTA connection profile in
the Ivanti Secure Access Client application.
If the existing session cookie is still valid, the control channel is re-established. If the session is now
invalid, Ivanti Secure Access Client prompts the user for their nZTA credentials as normal. On successful
re-establishment of the nZTA session, the user is presented with the nZTA End User Portal in the default
browser.
When restarting Ivanti Secure Access Client, nZTA connections default to being on-demand services.
That is, a previously disabled nZTA connection is re-enabled when Ivanti Secure Access Client starts.
Copyright © 2024, Ivanti, Inc. All Rights Reserved. Privacy and Legal.
Page 147 of 151
Using Ivanti Secure Access Client with nZTA

Dynamic Policy Update and CARTA
To complement the zero-trust approach, nZTA supports dynamic policy updates and CARTA
(Continuous Adaptive Risk and Trust Assessment) for your end user devices. This framework establishes
an approach of continuous assessment and updating of secure access policies on the Ivanti Secure
Access Client, without the requirement to disconnect and reconnect to establish an updated
authorization posture.
As your policies, applications, and authentication configuration are updated by the administrator on the
nZTA Controller, changes are synchronized out to Ivanti Secure Access Client devices dynamically and
take effect immediately. Ivanti Secure Access Client ensures that any application updates are applied
and any new authentication requirements are met before continuing the session, providing the end
user with a seamlessly-updated experience. This method ensures that Ivanti Secure Access Client is
always updated at the point of change, and not just when establishing a connection to a nZTA Gateway
to access an affected resource.
The CARTA implementation in Ivanti Secure Access Client means that the security posture of the end
user is continuously assessed in conjunction with policies configured in the Controller, with allow or
deny decisions enforced through dynamic assessment and updating of the current policy set. Where
application access is denied or restricted, Ivanti Secure Access Client informs the user of any access
restrictions or policy contravention at the point of use. For example, the Ivanti Secure Access Client
Home page updates to provide visual cues with applicable error messages whenever a specific
application becomes unavailable:
Copyright © 2024, Ivanti, Inc. All Rights Reserved. Privacy and Legal.
Page 148 of 151
Using Ivanti Secure Access Client with nZTA

By hovering your pointer over the warning symbol in the inactive application, nZTA provides an
explanatory message.
Furthermore, user attempts to access a restricted web resource in a browser trigger a CARTA response
with Ivanti Secure Access Client presenting a pop-up resource blocked message:
Ivanti Secure Access Client implements a no-repeat interval for resource blocked messages of 2
minutes, to avoid a user repeatedly seeing the same pop-up message for every browser request for the
same restricted resource. While the resource remains blocked to further access attempts, no further
messages are displayed by Ivanti Secure Access Client until after 2 minutes has elapsed. You can force
Ivanti Secure Access Client to continue hiding blocked resource messages indefinitely by right-clicking
the connection in the Ivanti Secure Access Client dialog and selecting Disable Block Messages. To re-
enable showing blocked resource messages, select Enable Block Messages.
Enrolling a User Device
To use nZTA, end users must first enroll their devices with the nZTA Controller. This process installs the
Ivanti Secure Access Client software and establishes a connection to the Controller in order to obtain
policies and details for a user’s authorized resources.
Copyright © 2024, Ivanti, Inc. All Rights Reserved. Privacy and Legal.
Page 149 of 151
Using Ivanti Secure Access Client with nZTA

Ivanti Secure Access Client uses this configuration to establish a secure connection to the nZTA
Gateways you deploy to control access to your applications. Through this process, the user is provided a
seamless connection to the resources they need and is never aware of the location or extent of the
organization’s application infrastructure.
A new user might arrive at this scenario from one of the following routes:
• An existing Ivanti Secure Access Client user, with a previous Ivanti Secure Access Client
connection to Ivanti Connect Secure (ICS) or similar, see Existing Ivanti Secure Access Client
Users.
• A first time nZTA user, with no previous Ivanti Secure Access Client software installed, see
"Enrolling First Time Users" on the next page.
• An existing nZTA user enrolling a new device, or upgrading a previous version of Ivanti Secure
Access Client, see "Enrolling Existing nZTA Users" on the next page.
Existing Ivanti Secure Access Client Users
Your users might have a previous version of Ivanti Secure Access Client installed if, for example, they are
existing ICS users.
To enroll existing ICS users into nZTA, a ICS administrator must first push out the nZTA-ready edition of
the Ivanti Secure Access Client software to the user base. An admin uploads the new Ivanti Secure
Access Client software to the ICS server and activates the nZTA-ready version of Ivanti Secure Access
Client from the ICS management console in the same way as any other version. This process ensures
that when your users next activate a Ivanti Secure Access Client connection to the server, their device is
prompted to download and install the new version.
For more details on this process, see the Ivanti Connect Secure documentation at
https://www.ivanti.com/support/product-documentation.
After the new nZTA-ready version of Ivanti Secure Access Client is installed, the user can configure a
nZTA connection using the same process used for other, existing, connections. To create a nZTA
connection, compatible Ivanti Secure Access Client versions offer a specific connection type: “Zero Trust
Access”.
The tenant administrator must then supply the nZTA enrollment URL to their users to create the new
nZTA connection.
Copyright © 2024, Ivanti, Inc. All Rights Reserved. Privacy and Legal.
Page 150 of 151
Using Ivanti Secure Access Client with nZTA

Enrolling First Time Users
When enrolling a new device, an authorized user contacts the nZTA Controller to activate an initial first-
time enrollment of their Ivanti Secure Access Client device. The Controller responds to a valid
enrollment request by activating a download of Ivanti Secure Access Client along with a suitable client
certificate.
After Ivanti Secure Access Client is installed, a secure connection request is attempted with the
Controller. The request is validated against the designated authentication policy applicable to that
combination of user and device and, where successful, a connection profile is downloaded to the Ivanti
Secure Access Client. This profile enables Ivanti Secure Access Client to set up a secure tunnel directly to
the nZTA Gateway serving the resource set the Ivanti Secure Access Client is authorized to view.
Enrolling Existing nZTA Users
After you have enrolled the new device, Ivanti Secure Access Client is installed and configured with the
policies and settings relevant to the device type. Your application and resource access rights should be
duplicated to the new device.
If a user device is currently using a Beta version of the nZTA-ready Ivanti Secure Access Client,
Ivanti advises to remove the nZTA connection from Ivanti Secure Access Client and to re-
perform the enrollment procedure through a web browser. For more details, see your support
representative.
Copyright © 2024, Ivanti, Inc. All Rights Reserved. Privacy and Legal.
Page 151 of 151
Using Ivanti Secure Access Client with nZTA
