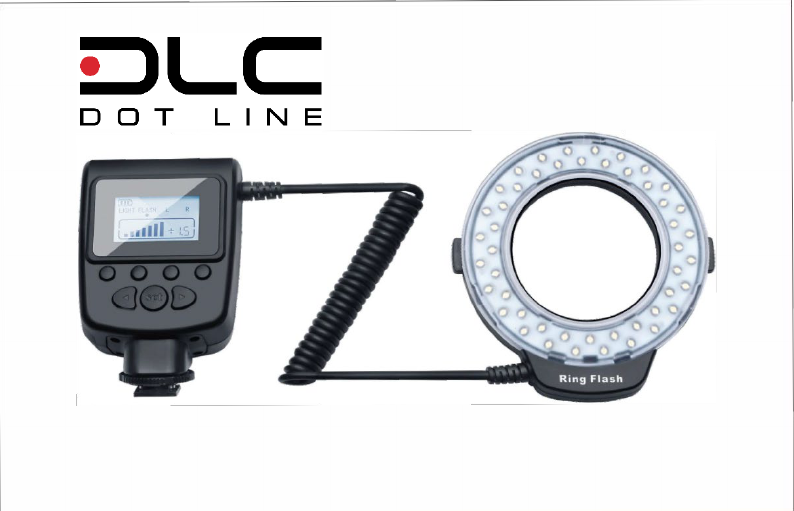
DL-RLF90
LED
Ring Light / Flash

Part Descriptions:
1.
Ring Flash LED Light
2.
Control Module
3.
Connecting cable
4.
Translucent diffuser ( or Warming filter)
5.
Squeeze Lock buttons
6.
Battery cover
7.
Hot Shoe Locking Ring
8.
Hot Shoe
9.
Test button (PILOT)
10.
Mode switch button (MODE)
11.
Constant LED light button (LIGHT)
12.
Power switch (ON/OFF)
13.
Output power adjustment button(Left/Decrease)
14.
Set button
15.
Output power adjustment button (Right/Increase)
16.
LCD display screen
-1-

-2-
LCD Panel Description
:
1.
Power level indication.
2.
Mode indication.
3.
Output power indicator.
Main Features:
• High CRI of 95 for accurate color rendition
• Flash or Constant light capabilities for use in a wide variety of applications
• Adjustable power
• LCD Display to allow full and accurate control of unit
• 8 adapter rings included to allow use on a wide variety of lenses
Warnings
1.
Review manual before using product
2.
Do not disassemble any part of the ring flash. If service is needed, return unit to DLC
3.
Do not use if unit or cord shows sign of wear or damage
4.
Do not flash near eyes
5.
If the ring flash is not used for more than two weeks, take out all batteries to prevent battery leakage.
6.
When replacing batteries, replace the full set of four batteries together.
7.
Keep the ring flash dry.
8.
Store the ring flash in a dry and cool place and away from high temperature and direct exposure to sunlight.
9.
Use a soft cloth to clean the flash unit – Do not use any thinner, gasoline, or other solvents.

-3-
Installing and Removing the Flash Diffuser.
1.
Rotate the diffuser according to the direction indicated by the arrow to open it.
2.
Connect the diffuser to the main body according to the indication on the diffuser.
3.
Rotate the diffuser according to the direction indicated by the arrow to tighten it.
Note: There are two types of diffusers: warming and diffusion.
Installing the Batteries.
1.
Slide the battery storehouse cover according to the direction indicated by the arrow to open it.
2.
Install the batteries based on the indication on the battery cover and ensure that the positive and negative poles are
c
onnected correctly.
3.
Slide the battery storehouse cover according to the direction indicated by the arrow to close it.
Note: Use four standard AA batteries only. Do not use batteries with shell damage to prevent short circuits or leakage.

Installing and Removing the Control Unit from Camera.
1.
Push the Power Control's hot shoe base fully into the camera hot shoe.
2.
Rotate the Hot Shoe Locking Ring to tighten it according to the direction indicated by the arrow. Do not over-tighten.
3.
To remove the Power Control, loosen the Hot Shoe Locking Ring and slide the Power Control off of the camera hot shoe.
Note: If the camera's built-in flash is in pop-up state, tum off the flash and then install the power control onto the camera.
When installing or removing the power control, hold the flash power control bottom to prevent damage to hot shoe bases
of the camera and power control.
-4-

-5-
Compatible Devices
With the new hot shoe base technology, the DL-RLF90 Ring Flash will fit a variety of camera models:
including most Nikon / Canon / Panasonic/ Olympus brand DSLR and Mirrorless models.
Installing the Ring Flash on the Camera lens
Included are adapter rings to fit lens diameters of 46mm, 52mm, 55mm, 58mm, 62mm, 67mm,
72mm and 77mm. Other diameter lenses can be used with step-up rings (not included).
1.
Choose and install adapter rings according to the diameter of camera lenses. Use care to not cross thread or
overtighten adapter ring.
2.
Squeeze the Lock Buttons on the sides of the Ring Flash, move it to the lens, and release the buttons. Make sure the Ring Flash is
fully mounted and secure on the lens.

-6-
Basic Functions
Buttons operation
Button Name
Operation
Power switch (ON/OFF)
Long press the button 3 to 5 seconds to turn on or turn off the ring flash power.
Mode switch button (MODE)
Press button to switch between the FLASH, Land R modes.
Output Power adjustment button
(Right/lncrease)/(Left/Decrease)
Press button to adjust the flash output power.
LED light steady on button (LIGHT)
Press button to make ring flash light constant on for video shooting and
special macro photography.
Test button (PILOT)
Press button to test the flash output brightness.
Turn On and Off the Power
Long press the power switch (ON/OFF) 3 to 5 seconds to turn on or turn off the ring flash power. It is also recommended to press this
button to turn off the ring flash power before removing the batteries.
Press the test button (PILOT) to check whether the flash is operating normally.
LIGHT Mode
Press the Constant LED button (LIGHT) on for video shooting and special macro photography.
FLASH Mode
Press the (mode switch button) to access the flash mode.
Land R Mode
Press the (mode switch button) to access L mode (the left half of the ring flash) and R mode (the right half of the ring flash) to use one
side of the unit or the other only. Ring Flash unit can also be rotated so that this feature can be used as top or bottom half of Ring Flash
separately as well.
Brightness adjustment
Press the Output Power adjustment button (Right/Increase)/(Left/Decrease) to adjust the ring flash brightness.

-7-
LCD suspend mode and Startup Status
The backlight will be automatically turned off if there is no operation (button pressing or flashing) after 20 seconds but will be
automatically turned on when an operation is performed.
The ring flash is automatically powered off and enters power-conservation mode if no operation (button pressing or flashing) is
performed after 30 minutes. In this mode, the ring flash can work only after you press the power button on again for 3 to 5 seconds.
LCD Display Description
Power level indication
LCD display status
Power level
70-100%
40-70%
10-40%
0-10%
Note: 1. When switching to LIGHT mode, the power level drops to a low level quickly due to battery features. When switching to
FLASH mode, the power level rises quickly. This is a normal operation.
2. When the power level is between 0-10%, it is recommended to replace the batteries with four new batteries.

-8-
Mode Display
Output power control display
-9-
Q&A
1.
Q: What if underexposure or overexposure occurs?
A: Check the related settings flashing such as the shutter, aperture, ISO, exposure compensation and exposure bracketing.
2.
Q: What if the four corners of the photo are dark or have shadows?
A: Adjust the camera focal distance to 50mm or higher.
3.
Q: What if the ring flash does not work
?
A: •
Check the battery. If the battery is out of power, replace it with a new set of batteries
•
Check the battery polarity connection. If batteries are reversed, reinstall the batteries correctly.
•
Check the metal contacts of the ring flash or camera. If there is grime on the metal contacts of the ring flash of camera, clean it
with a soft fiber cloth and reinstall Control unit.
4.
Q: What if the ring flash state is abnormal ?
A:
Turn off the power of the ring flash and camera, install a ring flash on the camera hot shoe, and turn on the power of the ring
flash and camera. If the problem still occurs, replace the batteries with new batteries.
Technical Specifications
Flash GN: 15 Effective
Distance: 2"-79" (5cm-2.0m)
Color
temperatur:e
3000-15000K
Exposure time: 1/100s
Power: 4xAA batteries
Weight: Approx. 7oz (200g)
