

2
Workshop description
In this course, participants will learn how to create quizzes using a variety of
questioning techniques including: true/false, multiple choice, rank order,
short-answer, fill-in-the-blank, and matching. Advanced options for each type
of question will be discussed including timers, feedback, subjective questions,
allowing for partial credit, using a word bank, randomizing choices, using
audio/video prompts, and allowing students to submit audio or video
answers. Participants will also learn how to adjust quiz settings such as time
limits, the number of attempts a student is permitted, how the a quiz is graded
by Schoology, randomizing the order of questions, and allowing students to
review their answers and/or resume a quiz at a later time. The instructor will
also discuss how to create a “question bank” from which to pull questions
later. Finally, the instructor will show teachers how to setup and use Casper
Focus to insure academic honesty when students take a quiz. Pre-requisite:
successful completion of an introductory workshop on Schoology or basic
knowledge of the program. Teachers MUST bring an iPad to this
workshop!
3
Table of Contents
Creating a Quiz .............................................................................................................. 4
Advanced Quiz Options .......................................................................................................... 5
The “Quiz” menu ........................................................................................................................ 5
Types of Questions ................................................................................................................... 6
Adding Questions to a Quiz ................................................................................................... 7
True/False Questions .......................................................................................................... 8
Multiple Choice Questions .............................................................................................. 11
Rank Order Questions ...................................................................................................... 13
Short-Answer/Essay Questions ................................................................................... 15
Fill in the Blank Questions .............................................................................................. 17
Matching Questions ........................................................................................................... 19
Editing Questions ....................................................................................................... 22
Quiz Settings ................................................................................................................ 23
Previewing a quiz ....................................................................................................... 27
Viewing the Results of a Quiz ................................................................................. 28
Adding Comments to a Quiz .................................................................................... 34
Adding Questions to a Question Bank ................................................................. 35
Adding Questions From a Question Bank .......................................................... 37
Formative vs. Summative Quizzes ........................................................................ 39
Casper Focus ................................................................................................................ 41
Setting Up Casper Focus ...................................................................................................... 42
Using Casper Focus ............................................................................................................... 45
An Additional Professional Development Opportunity ................................ 49

4
Creating a Quiz
1. From within a course, click on “Add Materials”
(OR from your “Resources”, choose “Add
Resources”).
2. Click on “Add Test/Quiz”. The “Create
Test/Quiz” dialog box will appear.
3. Give the quiz a name. (Remember the
importance of naming your quiz so that you
can easily find it a year from now. It is
suggested that you use a naming convention
that includes the name of the class, the unit,
and the topic of the quiz. For example:
“IBEnglish – Unit 4 – Death of a Salesman”.)
4. Enter a due date by clicking on the calendar and selecting a date by
which the quiz must be finished. (You can also specify the time on
that date by which the quiz must be finished.)
5. The default point value of a quiz or test is 100. You can change this
number by replacing it with your own point value.

5
6. Select a grading category, which will most likely be “Quizzes”. (In
order for the quiz grade to appear in your grade book, you must
select a grading category.)
7. The default scale is numeric. If you prefer to use a different scale, pull
down the menu and choose another one.
Advanced Quiz Options
The same advanced options exist for quizzes as they do for normal
assignments.
1. You can assign a quiz to an individual student.
2. You can make the quiz visible to or hidden from students.
3. You can enable or disable “Grade Statistics”
The “Quiz” menu
Below is the quiz menu consisting of five tabs (Questions, Settings, Preview,
Results, and Comments), three buttons (View Stats, View Grade Info, and
Edit), and an “Add Question” button.
6
Types of Questions
The different types of questions include:
1. True/false
2. Multiple choice
3. Ordering
4. Short-Answer/Essay
5. Fill in the Blank
6. Matching

7
Adding Questions to a Quiz
1. Pull down the “Add Question” menu to
reveal the options.
2. Choose the type of question you would like
to add.
(Rank order)

8
True/False Questions
For True/False questions, you will be presented with the following menu.
Note: There is a formatting bar similar to the one we've seen for
assignments, which allows you to change the formatting of the text as
you would in Microsoft Word.)
Note: There is a microphone icon in the lower left-hand corner of the
question box. Clicking this will allow you to record an audio question.)

9
1. In the question box, enter your true/false statement.
2. Choose which text you would like to appear for true and false. The
default values are “True” and “False”, however teachers can use their
own values (foreign language teachers can change the text that students
will see to the words “true” and “false” in the target language).
3. Enter the correct answer for this question (either true or false) so that
the computer knows how to grade the quiz and give feedback to the
student.
4. Enter the point value (default is 10). You can change this to whatever
point value you wish. Questions that are given a point value of zero are
not counted for or against the final score of the student, but are included
in the quiz.
5. Click on the “Create Question” button.
10
Advanced Options for True/False Questions
Require a correction if false - when this box is checked, if a student indicates
a statement is false, the computer will prompt the student to correct the
underlined or bolded portion of the sentence.
Show Feedback - clicking on this option affords the teacher the ability to give
feedback for both a correct and an incorrect response. For instance, correct
response feedback might include some type of praise or encouragement.
Incorrect response feedback might include an explanation as to the correct
response. To use this option, simply type in the feedback you would like to
give for correct and incorrect responses.
Subjective question - while not very useful for true or false questions,
Schoology does offer a "subjective question" checkbox. Clicking this box will
result in the computer not correcting the answer for this specific question.
Instead, the student’s response will be presented to the teacher for feedback
prior to the final grade being calculated.
Timed question – Schoology allows all questions to be timed (in minutes).
With this option selected, students will see a timer that counts down as soon
as the question appears. When 10 seconds remain, the timer will turn red. If a
student fails to give an answer to a timed question within the time limit,
he/she receives no points for that question and the computer proceeds to the
next question automatically.

11
Multiple Choice Questions
1. In the question box, enter your question, formatting it as you like.
2. Now enter at least two (and up to 15) possible choices in the boxes
marked “Choice 1”, “Choice 2”, etc...
a. The default value for the number of choices is four.
12
b. To add additional choices, click on the pull-down menu where it
says “Add more choices” and then click on the “Add” button.
Additional choice boxes will appear.
c. To remove blank choice boxes, click on the “Remove Blanks”
button.
3. Click on the “Create Question” button.
Advanced Options for Multiple Choice Questions
Randomize Choices – clicking this option will randomize the choices for this
question for each user. This is an excellent way to promote academic honesty.
Allow partial credit – if multiple correct answers exist, the student will
receive a proportional point value for each correct answer.
Timed question – see section on timed questions under the “True/False
Questions” heading.

13
Rank Order Questions
In this type of question, students are presented with a list of items and must
move the items up and down until they are in the correct vertical order.
1. In the question box, enter your question, formatting it as you like. It is
important to tell students how they should rank order the answers, for
instance, from oldest to youngest or from biggest the smallest.
14
2. Now enter at least two (and up to 20) possible items.
a. Although you can move the items to put them in the correct order
after entering them, it is more efficient to enter them in the
correct order to start with.
b. The default value for the number of choices is four.
c. To add additional choices, click on the pull-down menu where it
says “Add more choices” and then click on the “Add” button.
Additional choice boxes will appear.
d. To remove blank choice boxes, click on the “Remove Blanks”
button.
3. Click on the “Create Question” button.
Advanced Options for Rank Order Questions
Allow partial credit – if multiple correct answers exist, the student will
receive a proportional point value for each correct answer.
Timed question – see section on timed questions under the “True/False
Questions” heading.

15
Short-Answer/Essay Questions
1. In the question box, enter your question, formatting it as you like.
2. Click on the “Create Question” button.
16
Advanced Options for Short-Answer/Essay Questions
Character limit - to limit the number of characters that students can enter for
this type of question, enter a number up to 400 characters.
Allow rich-text answers for students - checking this box will allow students
to use a simple version of the rich text editor when creating their responses.
Allow video or audio answers for students - checking this box will enable
students to submit a recorded audio or video answer for the question instead
of a written answer.
Timed question – see section on timed questions under the “True/False
Questions” heading.

17
Fill in the Blank Questions
1. In the question box, enter your question, formatting it as you like.
a. In place of the missing word, enter a single underscore. For
example, if the complete sentence is “The cow jumped over the
moon" and the teacher wants the word “cow” to be the missing
word, the sentence that would be entered in the question box
would be “The _ jumped over the moon.”
b. Entering more than one underscore means that there is more than
one missing word.
2. When you have finished typing the question, Schoology will create a box
underneath the question for you to enter in the correct answer. This will
be the case for every underscore you create in the question. You can
18
add additional answers for each missing word if you would like there to
be two or more correct answers.
3. Click on the “Create Question” button.
Advanced Options for Fill in the Blank Questions
Allow partial credit – if the sentence has more than one missing word
(meaning more than one underscore was used in the sentence), by clicking
this option, the student will receive a proportional point value for each correct
answer.
Word bank - checking this box will prompt the teacher to enter filler words,
that is, words that you would like to be displayed in the word bank (in
addition to the correct answer) but that are not the actual answers. Type each
word on its own separate line.
Case sensitive - when this box is checked, the computer will only indicate an
answer is correct if it exactly matches the correct answer provided by the
teacher including capitalization.
Timed question – see section on timed questions under the “True/False
Questions” heading.

19
Matching Questions
20
1. In the question box, enter your instructions for how to match the items.
(Note that Schoology uses some confusing language here: the first
column of items to be matched are called “questions” and the second
column of items that match the original column are called “answers”.)
2. Enter your matching pairs by typing the first item in the first question
box and the answer that matches it in the answer box.
3. Continue entering at least two (and up to 15) possible matched sets.
a. The default value for the number of choices is four.
b. To add additional choices, click on the pull-down menu where it
says “Add more choices” and then click on the “Add” button.
Additional choice boxes will appear.
c. To remove blank choice boxes, click on the “Remove Blanks”
button.
4. Schoology will automatically mix up the answers.
5. To add difficulty to this type of question, the teacher can add “filler
words”, which are additional answers that will appear in the possible
list of answers but which will not have a match. Click on the “Add
another” button to add an additional filler word.
6. Click on the “Create Question” button.
21
Advanced Options for Matching Questions
Allow partial credit – by clicking this option, the student will receive a
proportional point value for each correct match.
Subjective question –clicking this box will result in the computer not
correcting the answer for this specific question. Instead, the student’s
response will be presented to the teacher for feedback prior to the final grade
being calculated.
Timed question – see section on timed questions under the “True/False
Questions” heading.

22
Editing Questions
1. To edit individual questions, click on the “gear” button along the right
margin.
2. Under the “Options” button, you can add text (for instance a short
passage) and page breaks for longer quizzes.
3. To reorder the questions, pull down the “Options” menu and select
“Reorder”. Double-headed, blue arrows will appear to the left of each
question. Clicking and dragging any of these arrows will allow you to re-
order the questions.
4. Click on the “Save changes” button.

23
Quiz Settings
1. From within a quiz, click on the “Settings” tab.
2. Enter instructions for the quiz in the text box provided, formatting it as
you would like.
3. Along the bottom margin of the text box, there are four icons which
allow you to attach various media to be used for this quiz. You can
attach files to a quiz in the same way you would attach them to an
assignment.
a. Files
b. Links
c. Resources
d. Audio or video recording
4. Availability - The most important step to remember after creating
a quiz is to specify when the quiz should be made available to
students. This is done using the “Availability” pull-down menu. (Note
that simply indicating when quiz is due does not make it automatically
available.) Your options are:
a. Available now

24
b. Available until a certain date
c. Available from one date to a second date
d. Hide now
5. Time Limit - If you wish, set a time limit in minutes by which the
students must finish the quiz by entering a number in the “Minutes” box.
(Note that a timed quiz may not contain any timed questions. That is, if
you have set specific times for individual questions, you will not be able
to additionally set an overall time limit for the quiz.)
6. Attempt Limit - If you wish, set an attempt limit, or the number of
times that a student may complete the quiz.
a. The default value for this is one, however the teacher can set the
number of attempts at any number between one and 20 or may
allow the student an unlimited number of attempts.
25
b. To change the number of attempts allowed, use the pull-down
menu to select the desired number of attempts.
c. If the number of attempts is set at more than one, a “Grade by”
box appears allowing the teacher to determine how the grade for
the quiz will be calculated. The options from the pull-down menu
include:
i. taking the highest of the grades from all attempts;
ii. taking the average of the grades from all attempts;
iii. taking only the grade of the last attempt.
7. Randomize order - by clicking this box, questions will be randomized
for each student, thus promoting academic honesty.
8. Pagination - teachers may elect to use page breaks or to have each
question appear on its own separate page.
9. Keyboard Language - teachers can select from “None”, which is the
default value of the standard English keyboard, or Spanish. If selected,
the Spanish keyboard will show specialized characters with accents.
10. Question review – this feature allows students to review and change
their answers prior to submitting their quiz for grading.
11. Resumable – this feature allows students to take the quiz, save it, and
come to it later before submitting it.
12. View submissions - the default value for this section is “No”, that is
students are not able to view the results of their quiz.
a. Pull down this menu to select “Yes” so as to allow students to view
the results of their quiz.
b. Select “Yes with correct answers” to not only allow students to
view the results of their quiz, but also to see all of the correct
answers. (Obviously, if you were to choose this last option, you
would most likely not allow multiple attempts as students would
be able to see the correct answer and then attempt the quiz
again.)

26
13. Hide point values - clicking this box will hide the point values for each
question from the students.

27
Previewing a quiz
1. Click on the “Preview” tab in order to see what students will see when
they attempt a quiz.
2. Click on “Begin Test/Quiz”.
3. You will be able to preview the entire quiz, although since you are in
"preview mode", your answers will not be saved.

28
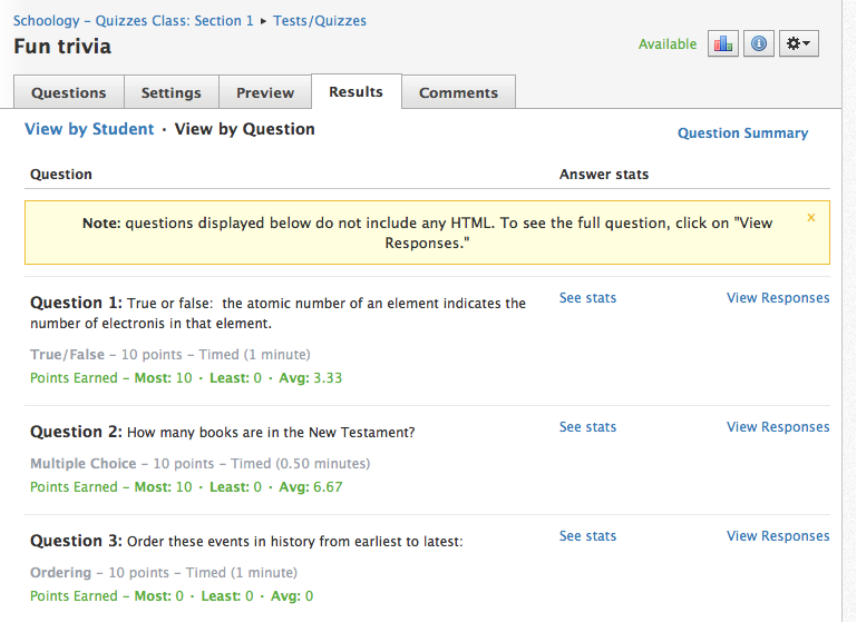
Viewing the Results of a Quiz
Schoology provides a great deal of information for quiz results, from the
overall student scores, to how many attempts were made, to the individual
answers of individual students.
1. Navigate to a particular quiz for which you would like to see the results.
2. Click on the “Results” tab to see the overall results listed alphabetically
by student.

29
a. Each student entry includes:
i. the number of submissions or attempts,
ii. the date and time of the most recent attempt,
iii. and the final score that was entered into the gradebook for
the student.
b. If a student did not give an answer to a timed question, a little
clock will appear next to the number of attempts. Hovering over
this clock will tell you the number of questions on which the
student timed out.
3. Click on a student’s score to override it and type in the desired score.
(Make sure to “Save changes” before leaving the page.)
4. To see an individual student’s attempts, click on the “View Attempts”
link on the student’s line.

30
5. You will see all attempts, when each was started and completed, the
amount of time it took the student to complete each attempt (including
the number of questions on which the student timed out) and the score
for each attempt.
6. From this screen, click on the “gear” icon along the right margin of any
attempt, to view/edit the submission, to “unsubmit” it, or to delete it.
31
7. To view a student’s attempt and the answers he/she gave, click on the
“View by Question” link in blue immediately below the “Results” tab
itself.
a. This screen displays the actual question, the type of question, the
point value, the amount of time allocated to the question (if a
timed question) as well as the most, least, and average points
earned by the student on this question.
b. Click on the “See stats” link to display more information about
how the student answered (for instance, the percentage of times
he or she answered “True”).

32
c. Click on “View Responses” to see how the student actually
answered each of their submissions.

33
d. Statistics for each quiz can also be viewed by clicking on the icon
that looks like a column chart in the upper right-hand corner.
e. These statistics can be exported and the quiz can be copied to a
particular course using the gear button in the upper right-hand
corner.

34
Adding Comments to a Quiz
1. Navigate to a quiz.
2. Click on the “Comments” tab.
3. Click in the “Write a comment” box and type in your comment.
4. Click the “Post” button.

35
Adding Questions to a Question Bank
Each time you make a quiz, it is possible for you to add some or all of the
questions that you create into a question bank for future use. You may add all
of the questions of a quiz at once, choose multiple questions from a single
quiz, or add a single question to the bank.
1. From the “Question” tab of a quiz, pull down the “Options” menu and
choose “Add questions to bank”.
2. You can choose to add
all of the questions
from a quiz or only
those you want by
checking the boxes
next to the desired
questions.

36
3. Click “Next” and the computer will ask you to specify a bank to which to
add your questions. If you have not already set up a question bank in
your resources, select “New Question Bank”.
4. Tell the computer what you
want to name your new
question bank. (You may
wish to consider ahead of
time the topics on which you
would like to build question
banks.)
5. Select the “Collection”
(usually a course) within
your “Resources” to which to
save the new question bank
and if you wish to save it under a particular folder within that collection,
select the folder from the pull-down menu.
6. Click on “Add Questions”.
7. You can also add individual questions directly from the question itself
by navigating to a question within a quiz and clicking on the gear icon.
a. Choose “Add to Bank”.
b. Follow the prompts to add the question.

37
Adding Questions From a Question Bank
1. From within a quiz, pull down the “Add question” menu and select
“From Question Banks”.
2. Choose “Individual Questions” and navigate to the appropriate
resource/collection/folder.
3. You can choose to select all questions, to auto-select questions (telling
the computer how many questions to select), and to set new point
values for the questions.
4. Click on “Add questions”.
5. Alternatively, you can tell the computer to select a certain number of
random questions from a particular test bank. Using this feature, each
student taking the quiz will receive that number of randomly selected
questions, meaning that student 1’s quiz will contain different questions
than student 2’s (although depending on the number of questions
selected and the number of total available questions, there may be some
overlap).

38
What quizzes might look like using the “random questions” feature
Test bank: Algebra I – Binary Operations
Total number of available questions in bank: 20
Desired quiz length: 5 questions
Student 1 Quiz
Student 2 Quiz
Student 3 Quiz
1
st
question
1
2
4
2
nd
question
3
6
5
3
rd
question
7
9
11
4
th
question
15
13
16
5
th
question
19
17
20
Although the students have different questions on their quizzes, they are all
being assessed on the same topic (Binary Operations). The teacher must
ensure that all of the available questions are approximately similar in length
and difficulty level so that one student does not get a short and easy quiz,
while another gets a lengthy and difficult quiz.

39
Formative vs. Summative Quizzes
Formative assessment
The goal of formative assessment is to monitor student learning to provide
ongoing feedback that can be used by instructors to improve their teaching
and by students to improve their learning. More specifically, formative
assessments:
help students identify their strengths and weaknesses and target areas
that need work;
help faculty recognize where students are struggling and address
problems immediately.
Formative assessments are generally low stakes, which means that they have
low or no point value. Examples of formative assessments include asking
students to:
draw a concept map in class to represent their understanding of a topic;
submit one or two sentences identifying the main point of a lecture;
turn in a research proposal for early feedback.
Summative assessment
The goal of summative assessment is to evaluate student learning at the end of
an instructional unit by comparing it against some standard or benchmark.
Summative assessments are often high stakes, which means that they have a
high point value. Examples of summative assessments include:
a midterm exam,
a final project,
a paper,
or a senior recital.
40
Information from summative assessments can be used formatively when
students or faculty use it to guide their efforts and activities in subsequent
courses.
Source: http://www.cmu.edu/teaching/assessment/basics/formative-
summative.html
When designing a quiz on Schoology, whether it will be used as a formative or
summative assessment will guide the types of questions and the quiz settings
that you choose. In formative assessments, you may encourage students to
work cooperatively and therefore you may not wish to use some of the
restrictive settings that promote academic honesty. Although summative
assessments can be given to small groups, they are generally taken by a single
student and because the assessment is high stakes, precautions to ensure
academic honesty should be taken. These settings include:
1. Availability – specify a time window during which to take the quiz.
2. Time limit – specify a reasonable, but not overly generous time limit.
3. Attempt limit – limit the quiz to a single attempt.
4. Question review – turn this feature off so that students must complete
and submit a question before moving on to the next one without being
able to review and change their answers prior to submitting their quiz
for grading.
5. Resumable – turn this feature off so that students may NOT resume an
incomplete quiz submission at a later time.
6. View submissions – make sure this value is set to “No” (the default
value) so that students are not able to view the results of the quiz.
7. Use Casper Focus to limit the students’ use of iPads to only Schoology.
(See next section.)
41
Casper Focus
One of the primary drawbacks of using the iPad for quizzes that a teacher
wishes to grade is that students have access to all of the information on their
iPad as well as from the Internet, thus potentially compromising the quiz
results.
Casper Focus provides a solution to this by limiting student access to only one
application, in this case, Schoology. The process is:
1. Set up your classes in Casper Focus;
2. Create a quiz on Schoology;
3. Focus the students’ iPads in class on the day of the quiz;
4. When students have finished the quiz or when the allotted time for the
quiz has expired, unfocus the students’ iPads. (Note: This last step is
VERY IMPORTANT so that the students can use other apps in their
next classes.)

42
Setting Up Casper Focus
At the beginning of the year/semester, teachers must set up their courses in
Casper Focus (one-time event). It is also important to update Casper Focus
when a students adds or drops your class during the year. This must be done
from a desktop computer, not your iPad.
1. Open an Internet browser.
2. In the address bar, type in: https://eastiron-casper1.monroe.edu:8443
(this displays the login screen).
3. Login by typing your network username and password in the boxes
provided. Click “Enter”.
4. From the top menu, click “Mobile Devices”.

43
5. Click on “Classes” from the upper left.
6. Click on the “+” button to the left of the word “New”.
7. Fill out the following form:

44
a. Display Name = the name of your course. PLEASE follow the
following naming convention:
Building abbreviation – Teacher last name – Course
For example: EHS – Black – IB French 1
b. Teacher Usernames = your network username (for example,
cblack). If you co-teach the course with another teacher, you may
wish to add his/her username – separate usernames by a line
break or a comma space.
c. Method = Assign Usernames
d. Student Usernames = students’ network usernames
i. Just as teacher usernames follow a pattern (first initial+last
name or “cblack”), student usernames follow their own
pattern.
First initial+last name+2-digit graduation year
For example, Charles Oberst (class of 2017) would be:
Coberst17
ii. There are exceptions for students with multiple or
hyphenated last names as well as for students with the
same first initials, last names and graduation years – you
can looks these up/confirm them on the Student
Server (HSStudents (\\BESPIN\Homes) (I:) for the high
school) or ask the students.
e. Click “Save”.
f. Click “Done”.
g. Verify your class appears on the list of classes (alphabetized list).
45
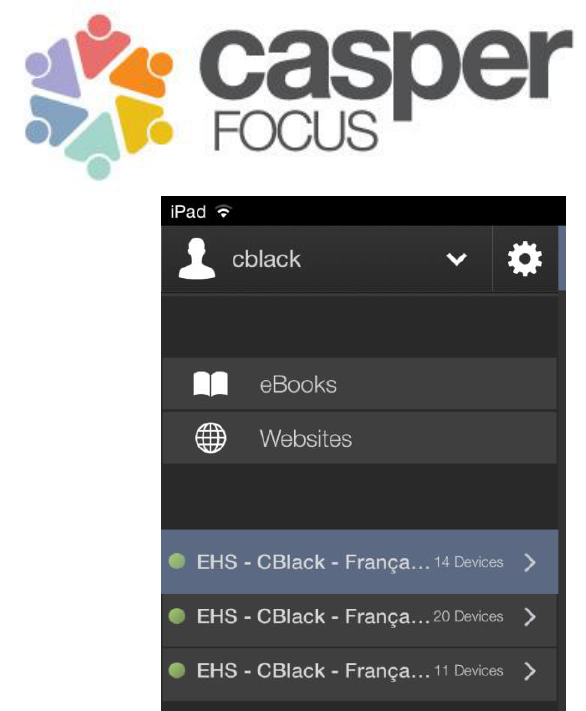
Using Casper Focus
1. FROM YOUR IPAD, open the
Casper Focus app. (If you have not
already downloaded the app, go to the
App Store, type “Casper Focus” into the
search bar, and download the app.)
2. The classes you have entered via your
desktop computer will be located along
the left margin by name. (If it appears that
your iPad is already in a class (as Casper
Focus sometimes defaults to the last
view), simply tap the three horizontal bars
in the upper left-hand corner to return to
the main menu.)
3. Tap the class you wish to focus from the
list along the left margin.
4. An icon will appear for each student in this class representing their iPad.
(See next page.) In addition to the name of the iPad, you will be able to
see what type of iPad the student has as well as whether their battery is
low or completely drained.
a. There are two possible “views” to choose from using the eye icon
in the upper right:
i. “View by Device Name” – this arranges the student iPads by
whatever name the student has given it. Some students
choose crazy names that don’t identify them and therefore
the device name view is limited.
ii. “View by Username” – this arranges the student iPads by
the students’ actual first and last names plus the graduation
years (for example: Allison Farnung16). It is recommended
you use this view.

46

47
5. If another teacher is currently
focusing one of your student’s iPads,
you will be able to see the app on
which they are focused from this
screen.
6. Now select the app from the list on which you wish to focus students.
The list of apps is quite long, so you may wish to use the search function
to type in the first few letters of the app name to find the it quickly.

48
7. Once you have selected the app on which to focus student iPads, tap
“Done” and Casper Focus will then limit students’ access to that singular
app. It is at this point that you would instruct students to take the
Schoology quiz.
IMPORTANT – MAKE SURE YOU UNDERSTAND THE NEXT
STEP BEFORE YOU FOCUS ANY STUDENTS’ IPADS!!!
8. Once your students are done taking the quiz and absolutely before the
end of your class, it is imperative that you remove the focus so that
students can use their iPads in other classes, otherwise it will remain
focused only on Schoology (or whatever app you have chosen). To
remove the focus:
a. On your iPad, with Casper Focus open to the class taking the quiz,
click on “Update Focus”, then “Remove Focus”, then “Done”.
b. If you do not do this last step, the students’ iPads will remain
focused on the one app and they will not be able to use other apps
after leaving your class until you unfocus them.

49
An Additional Professional Development Opportunity
Please consider expanding your knowledge of the instructional uses of
Schoology by checking out the other workshops available this summer and
during the school year on www.mylearningplan.com:
Schoology 5 – Digital Portfolio for Students
Workshop length: 2.5 hours
Monday, November 2
nd
& Wednesday, November 4
th
2:45-4:00 p.m.
In this course, participants will learn how to use digital portfolios for students
to store and manage their own customizable, portable digital profiles,
attaching research papers, certificates, endorsements, test results and other
learning projects. Portfolios in Schoology will act as an extension of a user’s
profile, highlighting a user’s academic and extracurricular achievements, and
following them throughout their educational career. Users will choose which
content--including, but not limited to graded items, research, certificates and
endorsements--and how to display it on their personal profile. Portfolios will
be portable and can be private or public and sharable with peers, faculty and
potential employers.
